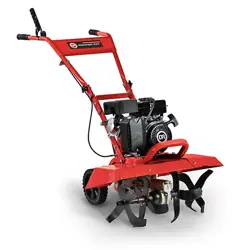
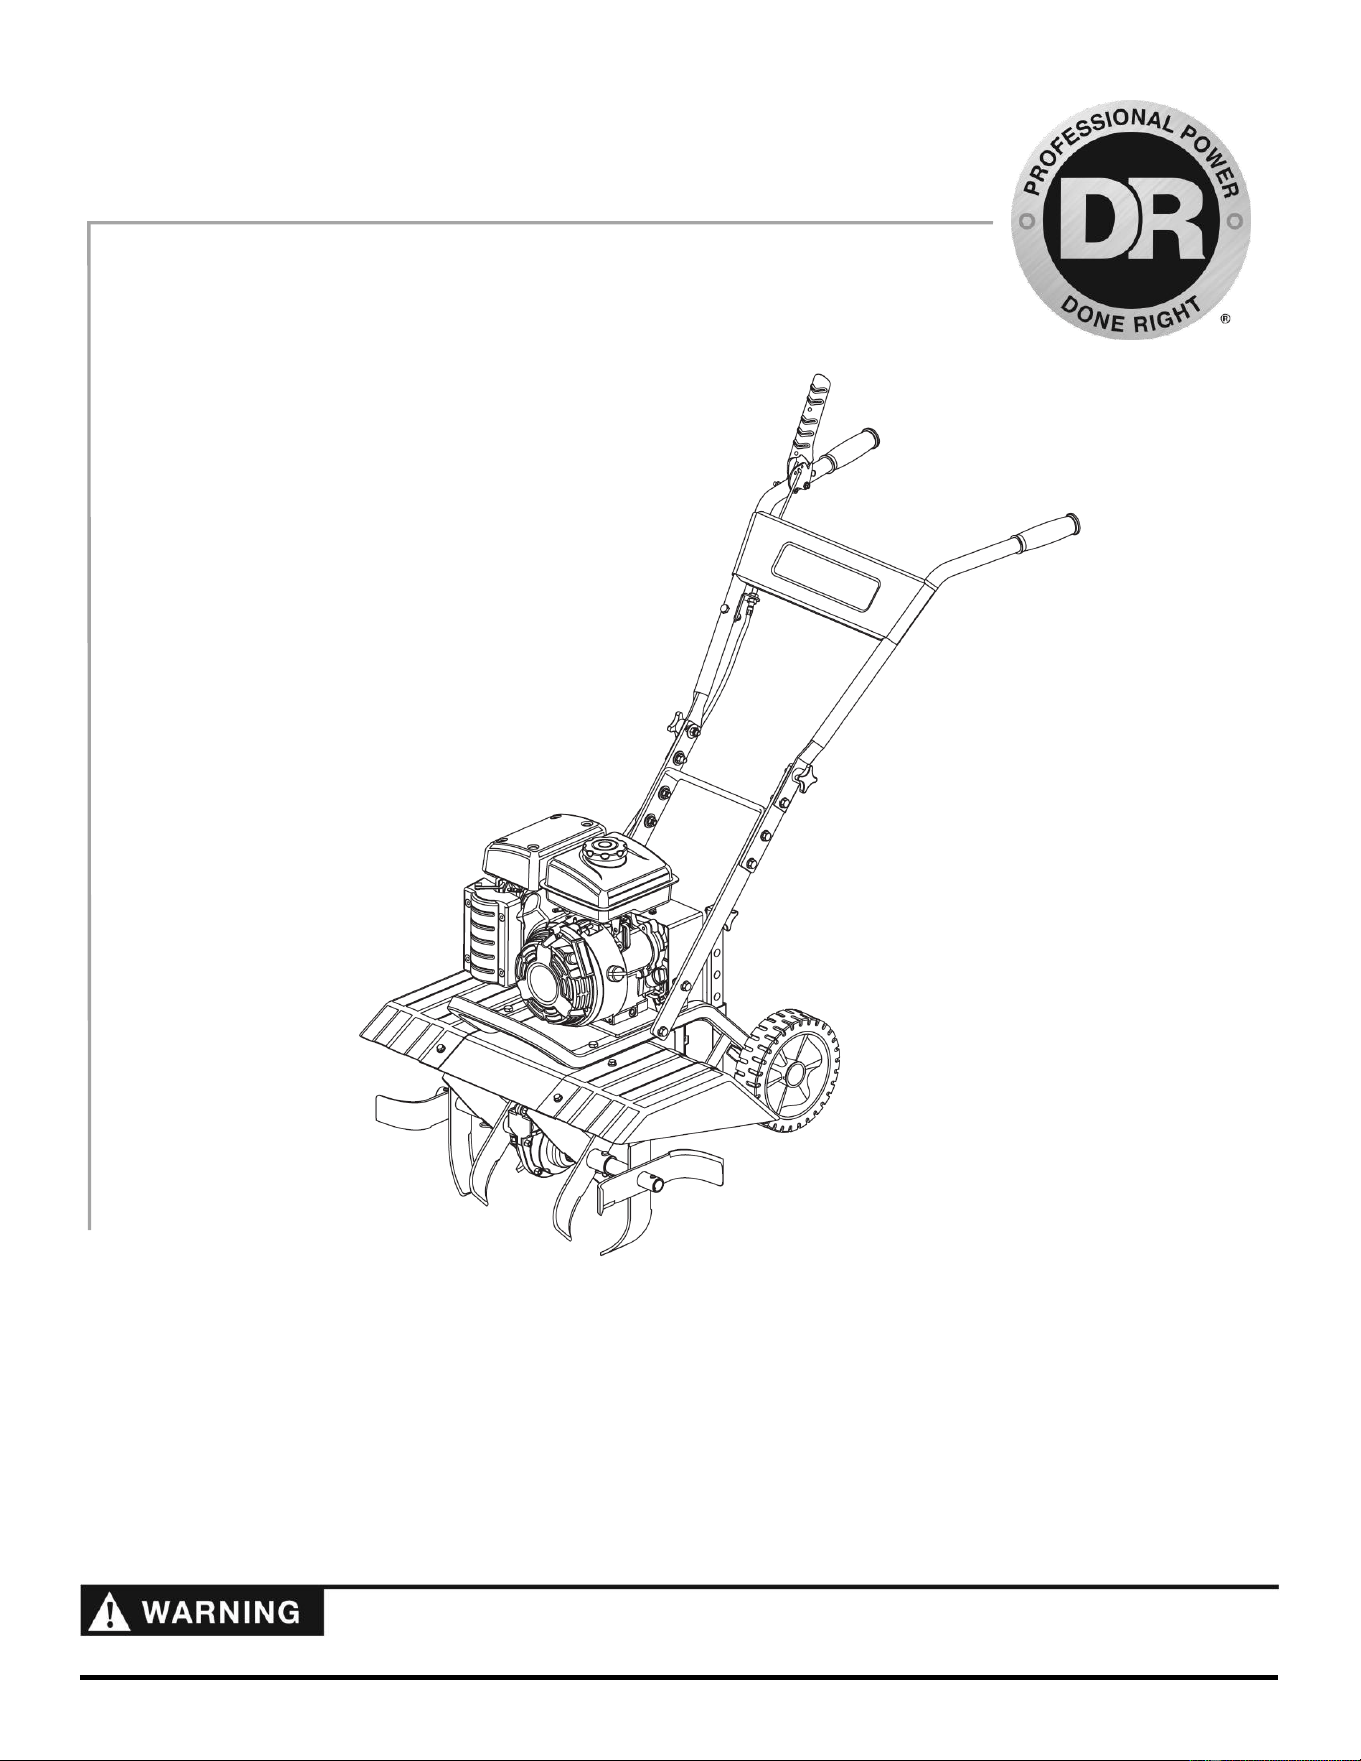
Read and understand this manual and all instructions before operating this DR FRONT TINE ROTOTILLER.
Serial No. ________________
Order No. ________________
DR
®
Power Equipment
Toll-free phone: 1-800-DR-OWNER (376-9637)
Web site: www.DRpower.com
DR
®
FRONT TINE ROTOTILLER
SAFETY & OPERATING INSTRUCTIONS
Model:
Premier FRT
2 DR
®
FRONT TINE ROTOTILLER
This indicates a hazardous situation, which, if not avoided, could result in death or serious injury.
Table of Contents
Chapter 1: General Safety Rules ................................................................................................................................................................. 3
Chapter 2: Setting Up Your DR FRONT TINE ROTOTILLER .................................................................................................................... 7
Chapter 3: Operating Your DR FRONT TINE TILLER ............................................................................................................................. 12
Chapter 4: Maintaining Your DR FRONT TINE TILLER .......................................................................................................................... 14
Chapter 5: Troubleshooting ..................................................................................................................................................................... 18
Chapter 6: Parts Lists, Schematic Diagrams and Warranty .................................................................................................................... 20
Conventions used in this manual
Serial Number and Order Number
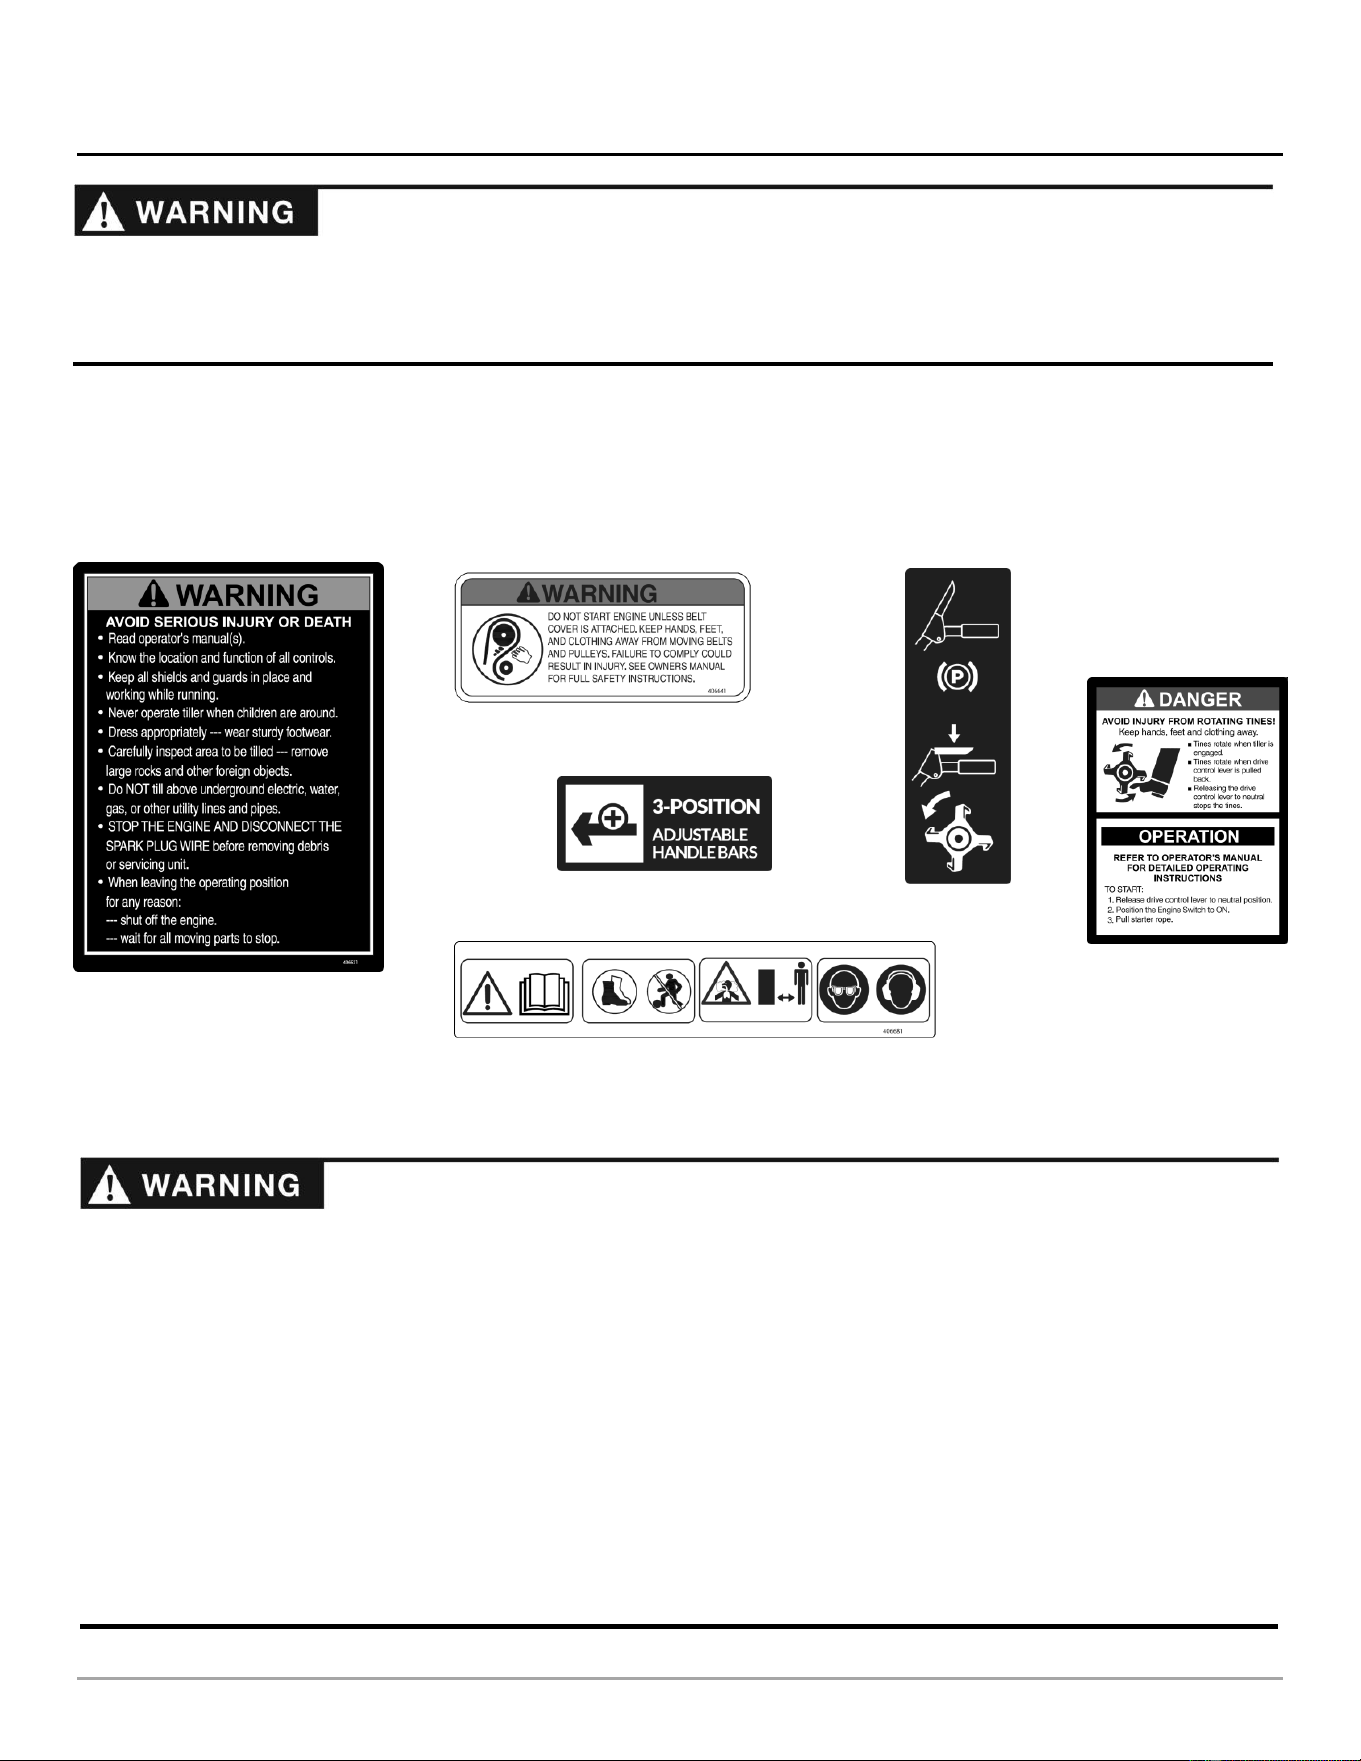
A Serial Number is used to identify your machine. The number is located on the
Serial Number Label attached to the chassis of your machine (Figure 1). For
your convenience and ready reference, enter the Identification number in the
space provided on the front cover of this manual. An Order Number is used to
check and maintain your order history. The number is located on your packing
slip. For your convenience and ready reference, enter the order number in the
space provided on the front cover of this manual.
Additional Information and Potential Changes
DR Power Equipment reserves the right to discontinue, change, and improve its
products at any time without notice or obligation to the purchaser. The
descriptions and specifications contained in this manual were in effect at
printing. Equipment described within this manual may be optional. Some
illustrations may not be applicable to your machine.
California Proposition 65
This information is important in the proper use of your machine. Failure to follow this instruction could result in damage to
your machine or property.
This indicates a hazardous situation, which, if not avoided, could result in minor or moderate injury.
Figure 1
CONTACT US AT www.DRpower.com 3
Read this safety & operating Instructions manual before you use the DR FRONT TINE ROTOTILLER. Become familiar with the
operation and service recommendations to ensure the best performance from your machine. If you have any questions or need
assistance, please contact us at www.DRpower.com or call toll-free 1-800-DR-OWNER (376-9637) and one of our Technical
Support Representatives will be happy to help you.
The DR FRONT TINE ROTOTILLER is a high-powered machine with fast moving parts operating at high speeds. You must
operate this machine safely. Unsafe operation can create hazards for you, as well as anyone else in the work area. Use proper
clothing and safety gear when operating this machine to prevent or minimize the risk of severe injury. Always take the following
precautions when operating the DR FRONT TINE ROTOTILLER:
Always wear protective goggles or safety glasses with side shields to protect your eyes from possible objects thrown from the
machine.
We recommend wearing safety shoes when using this machine. Wear shoes with non-slip treads to improve footing on
slippery surfaces. Do not use the machine wearing open sandals or while barefoot.
Do not wear loose clothing or jewelry, which can catch on the machine’s moving parts.
We recommend wearing long pants and gloves while using this machine. Be sure the gloves fit properly and do not have
loose cuffs or drawstrings.
We recommend the use of ear protectors or ear plugs rated for at least 20 dba to protect your hearing.
Allow only responsible individuals who are familiar with these general safety rules and operating instructions to use your DR
FRONT TINE ROTOTILLER. Never allow people who are unfamiliar with these rules and instructions to use your machine.
Chapter 1: General Safety Rules
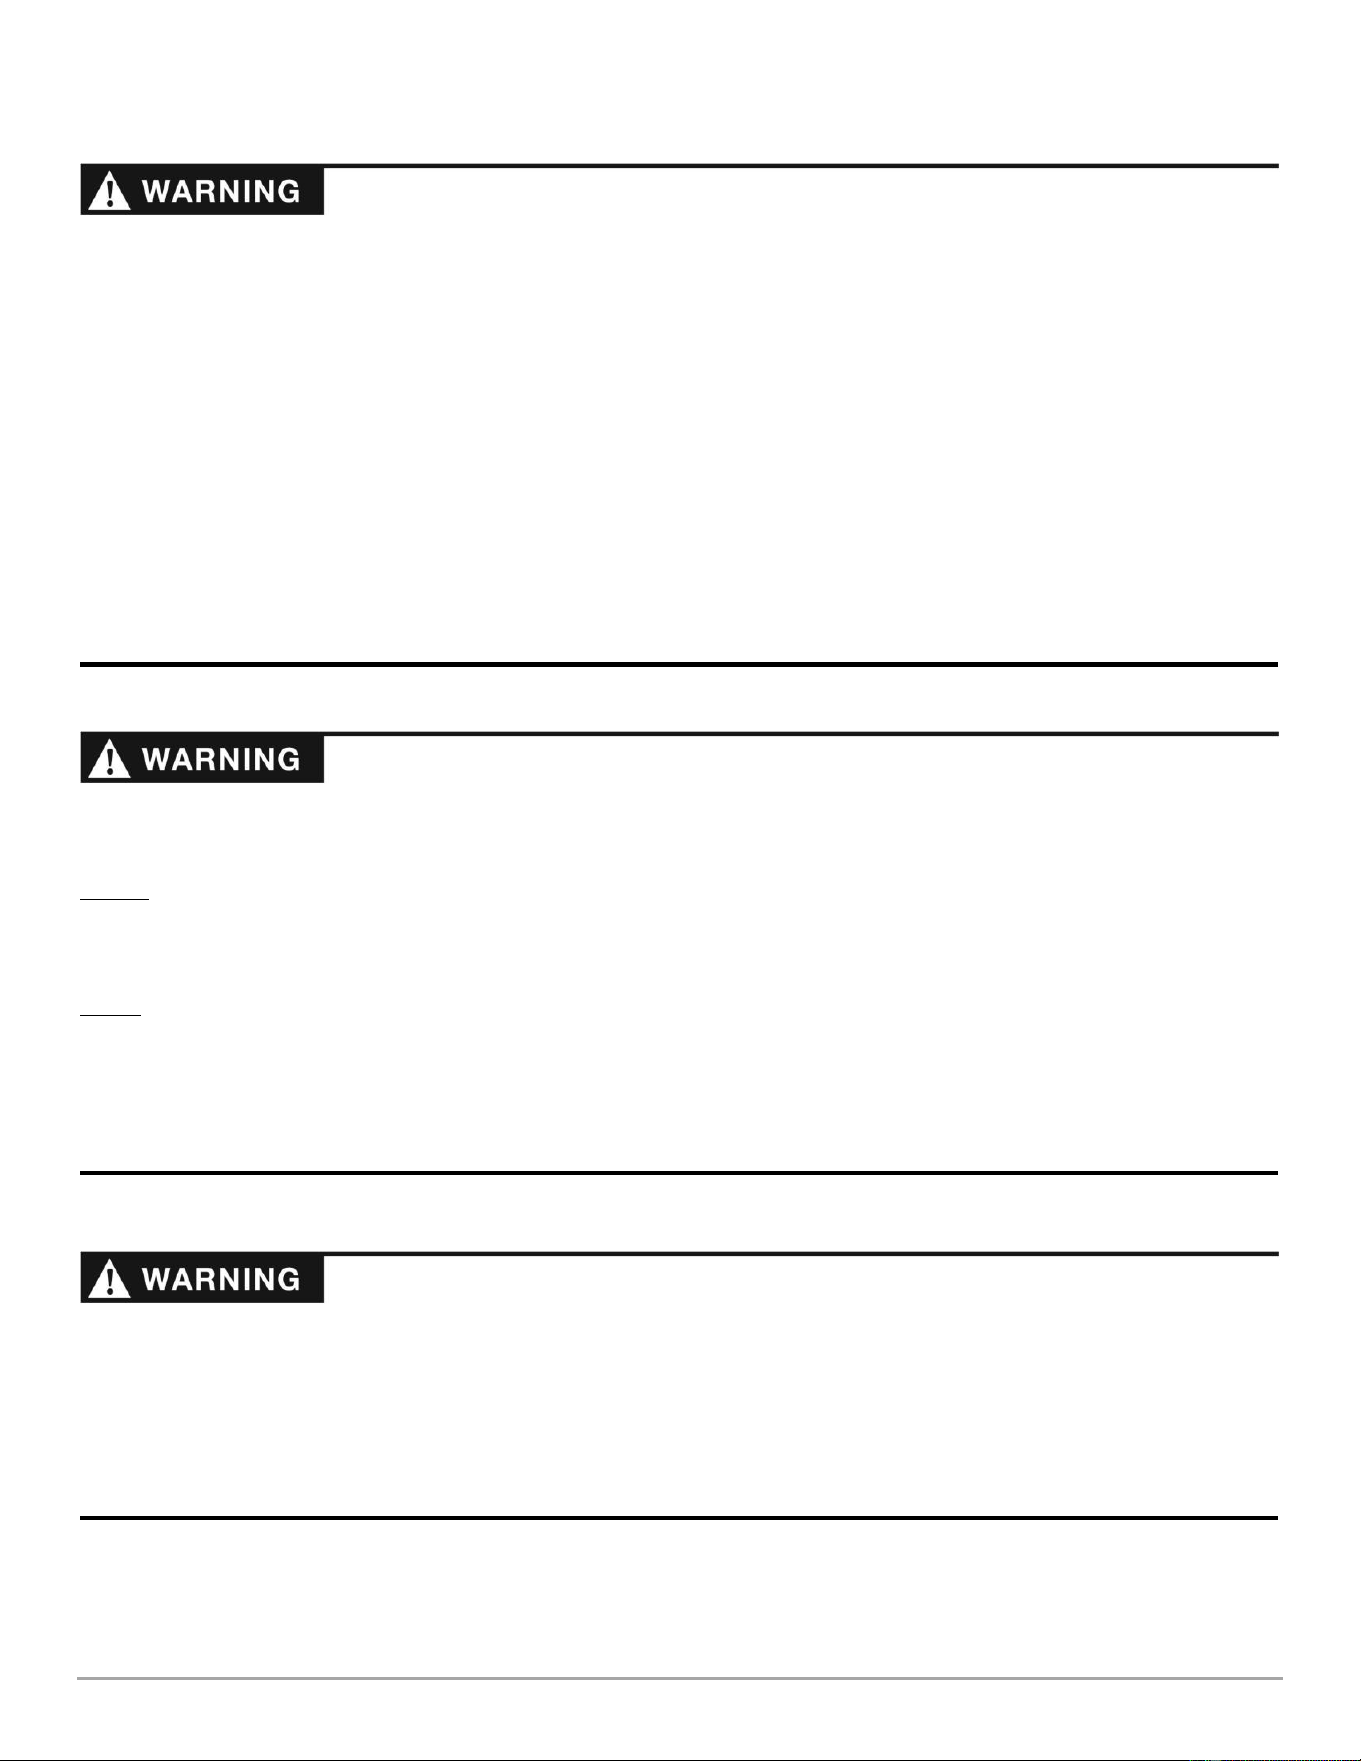
Labels
Your DR FRONT TINE ROTOTILLER carries prominent labels as reminders for its proper and safe use. Shown below are copies of
the Safety and Information Labels that appear on the equipment. Take a moment to study them and make a note of their location
on your DR FRONT TINE ROTOTILLER as you assemble and before you operate the machine. Replace damaged or missing safety
and information labels immediately.
Protecting Yourself and Those Around You
#406621
#406641
#406681
#A0000986520
#A0001327658
#A0001327660
4 DR
®
FRONT TINE ROTOTILLER
Protecting Yourself and Those Around You (continued)
Slope Operation
Safety for Children
Tragic accidents can occur if the operator is not alert to the presence of children. Children can be attracted to the DR FRONT
TINE ROTOTILLER and the tilling activity. Never assume that children will remain where you last saw them.
Keep children out of the work area and under the watchful care of a responsible adult.
Be alert and always turn off your Tiller Engine if children enter the work area.
Before, and while moving backwards, look behind, and down for small children.
Never allow children to operate the DR FRONT TINE ROTOTILLER.
Use extra care when approaching blind corners, shrubs, trees, or other objects that may obscure your vision.
Use of machinery on slopes is a major factor related to accidents, which can result in severe personal injury. Use of machinery on
slopes requires caution. If you feel uneasy using the DR FRONT TINE ROTOTILLER on a slope, do not operate it. Always take the
following precautions when using this machine on slopes:
Always:
Exercise extreme caution when changing direction on slopes.
Watch for holes, ruts, and bumps on the ground.
Operate machine across slopes, never up and down the slope.
Never:
Never operate near drop-offs, ditches, or embankments; you could lose control of your Tow Vehicle and/or the DR FRONT
TINE ROTOTILLER.
Never operate on slopes greater than 15 degrees, or on any excessively steep slope.
Never operate on wet, or slippery slopes. Reduced traction could result in tipping over your Tow Vehicle and/or the DR FRONT
TINE ROTOTILLER.
Never place your hands, feet, or any part of your body near or under any moving part while the DR FRONT TINE ROTOTILLER
Engine is running.
Keep bystanders away from your work area at all times. To be safe, do not operate the DR FRONT TINE ROTOTILLER near
children or pets, and never allow children to operate the machine. Stop the DR FRONT TINE ROTOTILLER Engine when
another person or pet approaches.
Do not touch the Muffler and Engine when the machine is in use as they become very hot and can cause severe burns.
Clear the work area of objects that might jam or wrap around the tines such as glass, large sticks, stones, metal objects, wire,
rope, and string-like materials. Use on these objects could damage the DR FRONT TINE ROTOTILLER and/or cause injury.
Do not use this machine around large roots and surface rocks that you cannot remove.
Do not use this machine around underground pipes and wiring.
Never engage the Tines when they are in the ground. If the DR FRONT TINE ROTOTILLER Engine should stall, raise the
Tines out of the soil and disengage them.
Never, under any conditions, remove, bend, cut, fit, weld, or otherwise alter standard parts on the DR FRONT TINE
ROTOTILLER. This includes all shields and guards. Modifications to your machine could cause personal injuries and
property damage and will void your warranty.

CONTACT US AT www.DRpower.com 5
Safety with Gasoline-Powered Machines
Gasoline is a highly flammable liquid. Gasoline also gives off flammable vapor that can be easily ignited and cause a fire or
explosion. Never overlook the hazards of gasoline and always follow these precautions:
Never run the DR FRONT TINE ROTOTILLER Engine in an enclosed area or without proper ventilation as the exhaust from the
Engine contains carbon monoxide, which is an odorless, tasteless, and deadly poisonous gas.
Store all fuel and oil in containers specifically designed and approved for this purpose and keep away from heat, open flame,
and out of the reach of children.
Fill the gasoline tank outdoors with the Engine off and allow the Engine to cool completely. Do not handle gasoline if you or
anyone nearby is smoking, or if you are near anything that could cause it to ignite or explode. Replace the Fuel Tank and Fuel
Container Caps securely.
If you spill gasoline, do not attempt to start the Engine. Move the machine away from the area of the spill and avoid creating
any source of ignition until the gas vapors have dissipated. Wipe up any spilled fuel to prevent a fire hazard and properly
dispose of the waste.
Allow the DR FRONT TINE ROTOTILLER Engine to cool completely before storing in any enclosure. Never store the machine
with gas in the Tank or with gas in a Fuel Container near an open flame or spark such as a water heater.
Never make adjustments or repairs with the Engine running. Before making an adjustment or repair, shut off the DR FRONT
TINE ROTOTILLER Engine, wait five minutes to cool, then disconnect the Spark Plug Wire and keep the Wire away from the
Spark Plug to prevent accidental starting.
Never check for an ignition spark with the Spark Plug or Spark Plug Wire removed. Always use an approved Spark Tester.
Never tamper with safety devices. Regularly check their proper operation.
Never change the Engine Governor settings or modify the Engine speed. Modifications will void your warranty.
To reduce fire hazard, keep the Engine and Muffler area free of debris build-up such as leaves, grass, oil, grease, or any other
combustible material. Clean the Engine area after each use.
Never operate the Engine without the Muffler. Inspect the Muffler periodically and replace if necessary. If the Engine is
equipped with a Muffler Deflector, inspect it periodically and replace if necessary.
Never operate the Engine with the Air Cleaner or Cover over the Carburetor Air Intake removed, except for adjustment.
Removal of such parts could create a fire hazard. Do not use flammable solutions to clean the Air Filter.
Always check Fuel Lines and Fittings frequently for cracks or leaks, replace if necessary.
Replace rubber Fuel Lines and Grommets when worn or damaged, but do not use over five years.

6 DR
®
FRONT TINE ROTOTILLER
General Safety
A Note to All Users
No list of warnings and cautions can be all-inclusive. If situations occur that are not covered by this manual, the operator must
apply common sense and operate the DR FRONT TINE ROTOTILLER in a safe manner. Visit our website at www.DRpower.com
or call 1-800-DR-OWNER (376-9637) for assistance.
Under California law, and the laws of some other states, you are not permitted to operate an internal combustion Engine using
hydrocarbon fuels without an Engine Spark Arrester. This also applies to operation on US Forest Lands. All DR FRONT TINE
ROTOTILLERs shipped to California and Washington State are provided with Spark Arresters. Failure of the owner/operator to
maintain this equipment in compliance with state regulations is a misdemeanor under California law and may be in violation of
other state and/or federal regulations. Contact your local Fire Marshal, Forest Service, State Park Association, or the appropriate
state organization for specific information in your area.
Safe operation of the DR FRONT TINE ROTOTILLER is necessary to prevent or minimize the risk of death or serious injury.
Unsafe operation can create a number of hazards for you. Always take the following precautions when operating this machine:
The DR FRONT TINE ROTOTILLER is a powerful tool and not a plaything. When using this machine, exercise extreme caution
at all times. The design of this machine is to till soil. Do not use it for any other purpose.
The operator or user of the DR FRONT TINE ROTOTILLER is responsible for accidents or hazards occurring to other people,
their property, and themselves.
Know how to quickly stop the DR FRONT TINE ROTOTILLER. See page 12.
Never allow people or pets to ride on this machine.
If the machine should make an unusual noise or vibration, shut off the Tow Vehicle and the DR FRONT TINE ROTOTILLER
Engines. Vibration is generally a warning of trouble. Wait five (5) minutes for the DR FRONT TINE ROTOTILLER Engine to
cool. Disconnect the Spark Plug Wire and then inspect the machine for clogging, damaged Tines, or loose Engine mounting
Bolts. Clear any obstructions and repair and/or replace damaged parts.
Always keep the machine in good safe operating condition. Always make certain Nuts and Bolts are tight and always use the
supplied self-locking hardware. DO NOT USE SUBSTITUTE HARDWARE.
Always shut off the Tow Vehicle and DR FRONT TINE ROTOTILLER Engine, wait five (5) minutes to cool, and disconnect the
Spark Plug Wire before attempting to clear any obstructions.
Use the DR FRONT TINE ROTOTILLER only in daylight and give complete and undivided attention to the job at hand.
Do not hurry or take things for granted when using the DR FRONT TINE ROTOTILLER. When in doubt about the machine or
your surroundings; stop the machine and take time to look things over.
Exercise extreme caution when on or crossing drives, walks, or roads. Stay alert for hidden hazards or traffic.
Never leave the DR FRONT TINE ROTOTILLER unattended with the Engine running. If leaving the machine, shift the Tow
Vehicle into neutral, set the Vehicle Parking Brake, turn off the Vehicle Engine and remove Key; raise the Tines of the Tiller and
disengage the Tine Drive then turn off the Tiller Engine.
Prior to transportation to and from the work area, disengage the Tiller Tine Drive, stop the Tiller Engine, and raise the Tines.
Do not operate the machine when under the influence of alcohol, drugs, or medication.
See manufacturer’s instructions for proper operation and installation of accessories. Only use accessories approved by DR
Power Equipment.
CONTACT US AT www.DRpower.com 7
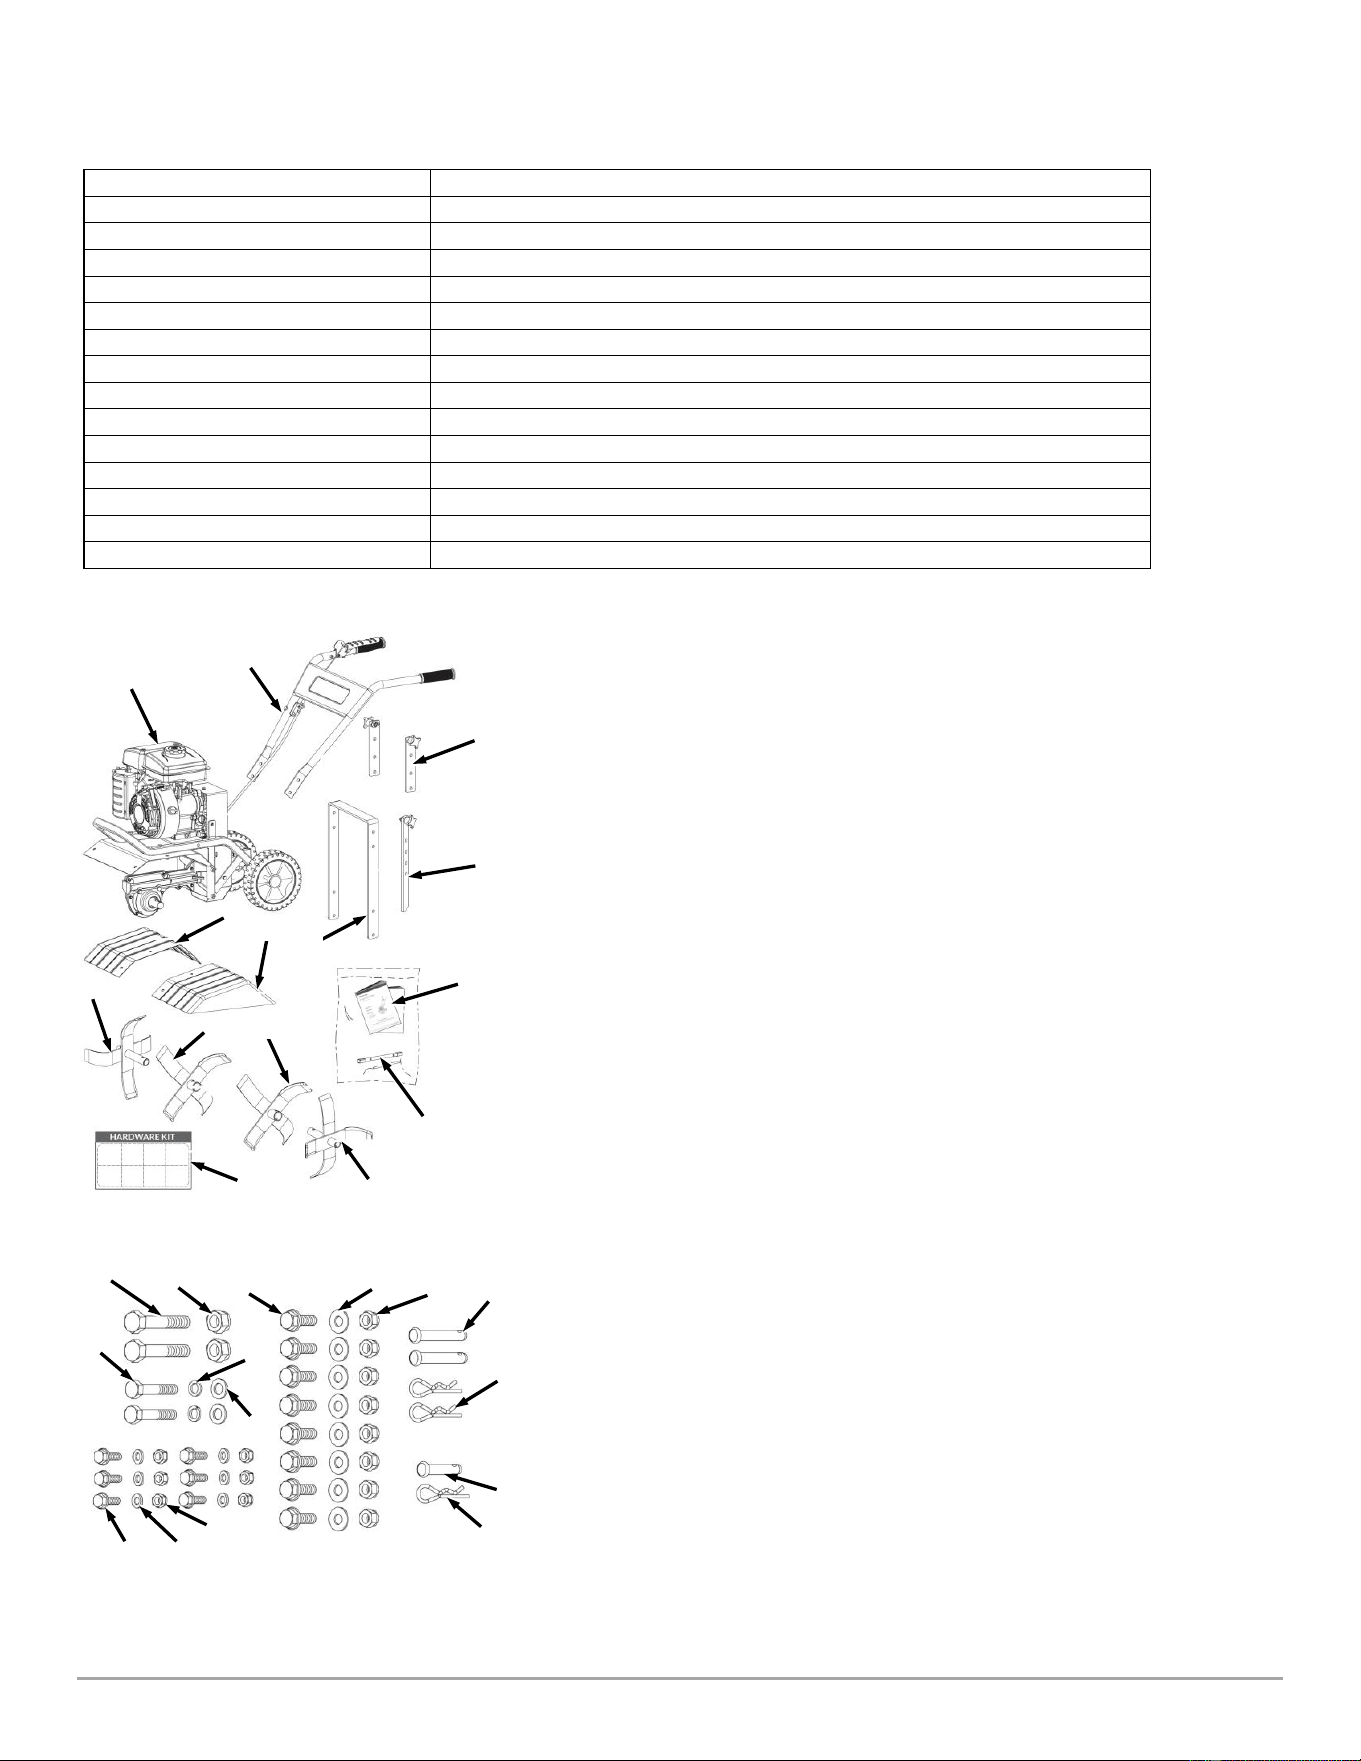
Drive Control Lever
Upper Handlebar
Gas Tank
Muffler
Air Filter
Depth Stake
Transport Wheel
Tine Shield
Inner Tine
Outer Tine
Choke Control
Throttle Control
Recoil Starter Handle
Engine On/Off Switch
Oil Fill/Dipstick
Transmission
Chapter 2: Setting Up Your DR FRONT TINE ROTOTILLER
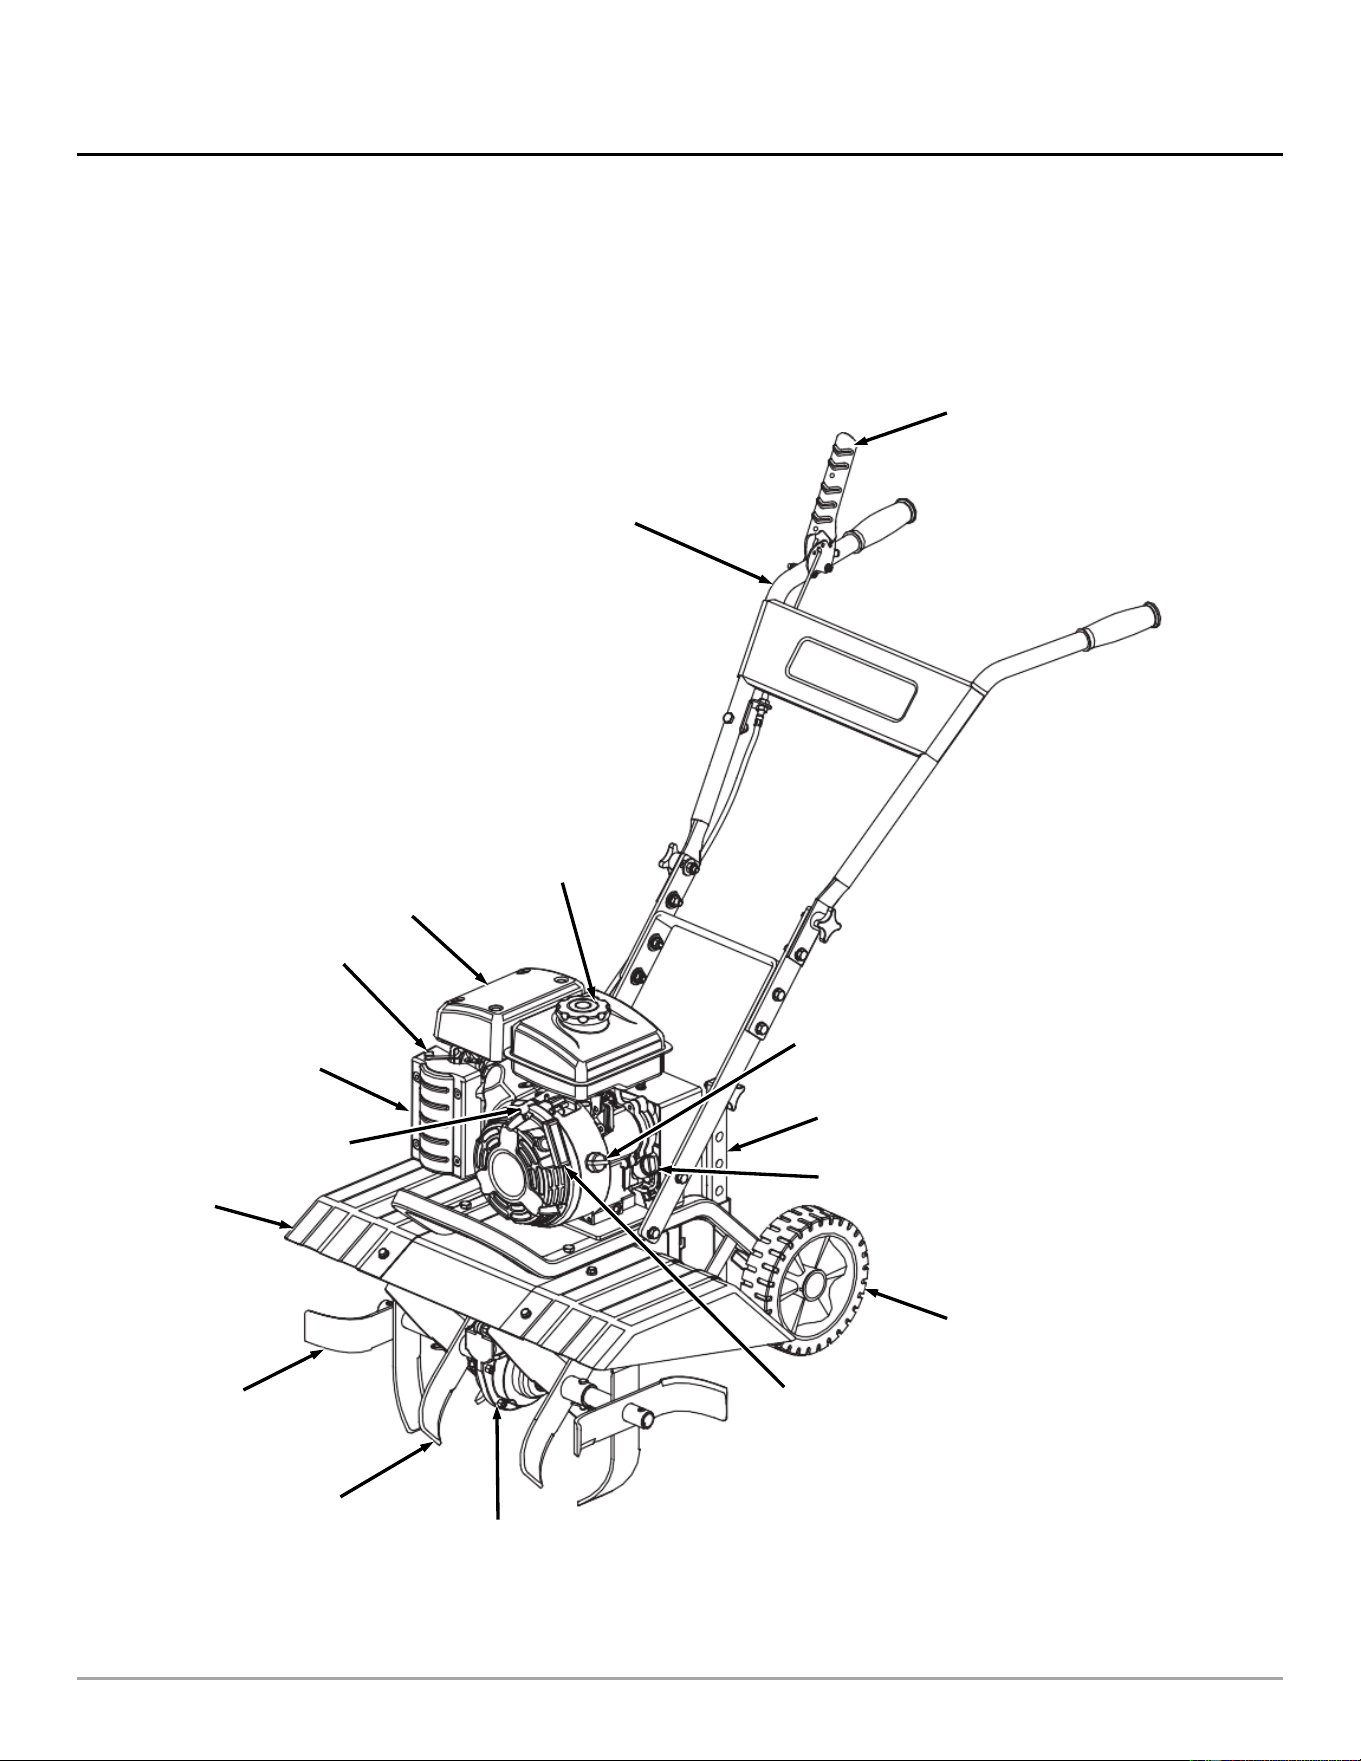
It may be helpful to familiarize yourself with the Controls and Features on your new machine by reviewing Figure 2 before
beginning the steps outlined in this chapter. For technical assistance, please visit our website at www.DRpower.com.
DR FRONT TINE ROTOTILLER Controls and Features
Note: The model shown in Figure 2 may look slightly different from your machine.
Figure 2
8 DR
®
FRONT TINE ROTOTILLER
DR FRONT TINE ROTOTILLER Specification Sheet
Shipping Contents
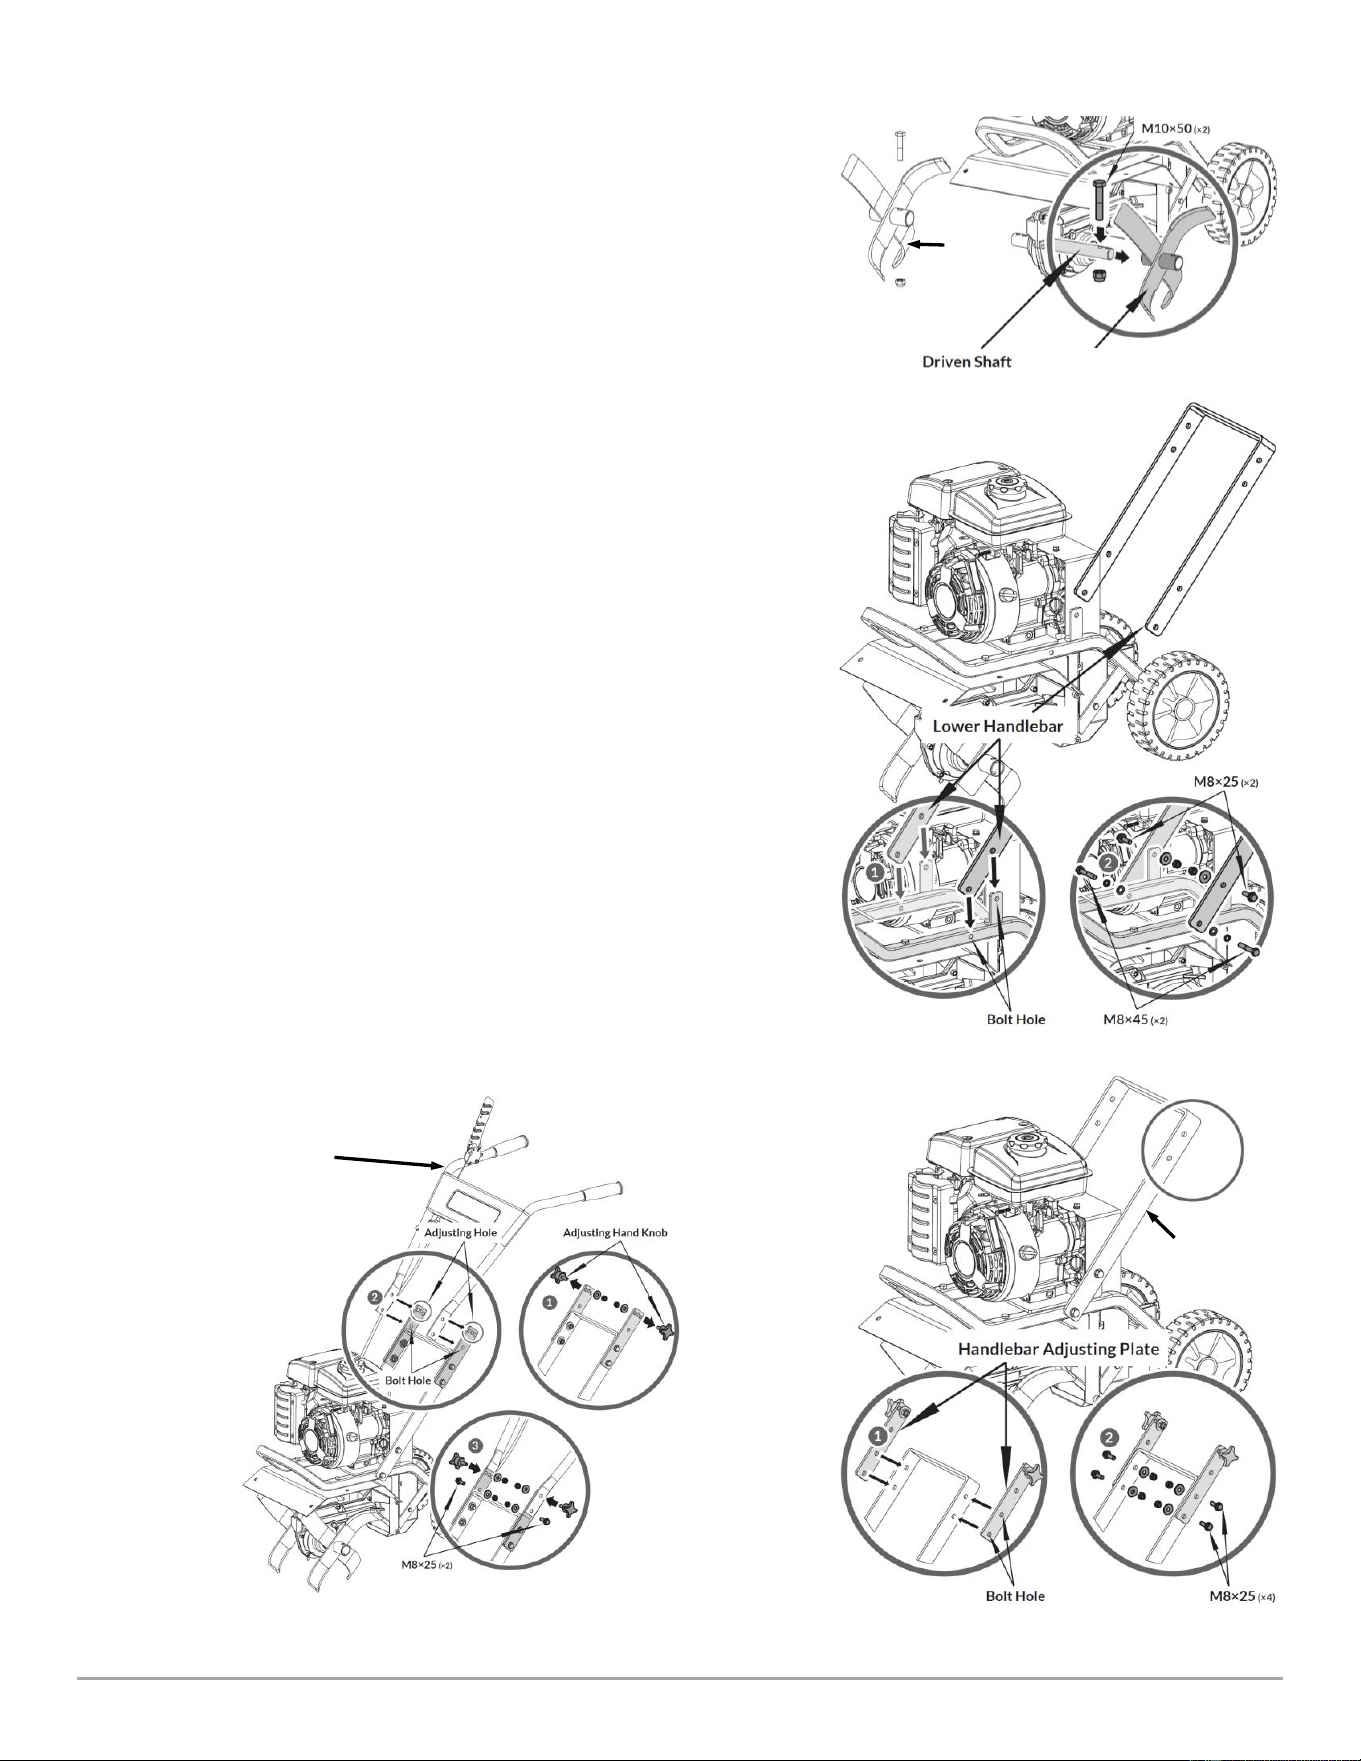
Main Parts (Figure 3):
1 Upper Handlebar
2 Main Machine
3 Outer Tine - Right
4 Inner Tine - Right
5 Inner Tine - Left
6 Outer Tine - Left
7 Lower Handlebar
8 Tine Shield - Right
9 Tine Shield - Left
10 Handlebar Adjusting Plates (1 pair)
11 Depth Stake
12 Operator's Manual & Engine Manual
13 Tools for Spark Plug Assembly
14 Hardware Kit (Figure 4 and list below)
Parts Supplied in Hardware Kit (Figure 4):
Item# Part# Description Qty
1 ........... 371321 ................... Hex Bolt-M10 X 50 .......................................... 2
2 ........... A0000953197 ......... Nut-M10 Nylon Lock ...................................... 2
3 ........... A0000947585 ......... Hex Bolt-M8 X 25 Flange ................................ 8
4 ........... 302471 ................... Washer-M8 ...................................................... 8
5 ........... 333421 ................... Nut-Nylon Lock Flanged M8-1.25 Cl8 Zp ...... 8
6 ........... A0000953216 ......... Pin-8 X 45 ........................................................ 2
7 ........... A0000953211 ......... Cotter Pin-2.5mm Dia X 45 ............................ 3
8 ........... A0000953210 ......... Pin-8 X 32 ....................................................... 1
9 ........... A0000947584 ......... Nut-Nylon Lock M6 ....................................... 6
10 ......... A0000940904 ......... Washer-M6 Flat .............................................. 6
11 ......... A0000953209 ......... Hex Bolt-M6 X 16 ........................................... 6
12 ......... A0000947682 ......... Washer-M8 Flat .............................................. 2
13 ......... A0000940903 ......... Washer-M8 Split Lock .................................... 2
14 ......... A0000947598 ......... Hex Bolt-M8 X 45 ........................................... 2
Engine
DR 4-Cycle OHV
Displacement
98 cc
Engine Speed
3,600 rpm
Torque
3.33 ft-lbs (4.5Nm)
Fuel Type and Capacity
Unleaded Gasoline, 1.69 qt (1.6L)
Oil Capacity
12 oz (350mL)
Spark Plug Type
Torch E6TC/E6RTC, Champion RN9YC, NGK BPR6ES, Bosh WR6DC
Frame and Handlebars
Powder Coated Steel
Tine rpm
180
Transmission
Worm Gear and Belt
Tire Size
8" (20.3cm)
Tilling Width
11" – 21" (28cm-53cm)
Tilling Depth
2" – 11" (5cm-28cm)
Dimensions (L × W × H)
48" × 24" × 40" (122cm x 61cm x 102cm)
Machine Weight
95 lbs (43.1kg)
1
2
6
7
8
7
9
10
11
4
5
3
12
13
14
Figure 4
1
Figure 3
2
3
4
6
5
7
8
9
10
11
12
13
14
CONTACT US AT www.DRpower.com 9
Figure 8
Upper
Handlebar
Figure 5
Inner
Tine
(right)
Inner Tine (left)
Figure 6
Figure 7
Lower
Handlebar
Assembling the Machine
Tools Needed:
Two 16mm Wrenches
Two 13mm Wrenches
Two 10mm Wrenches
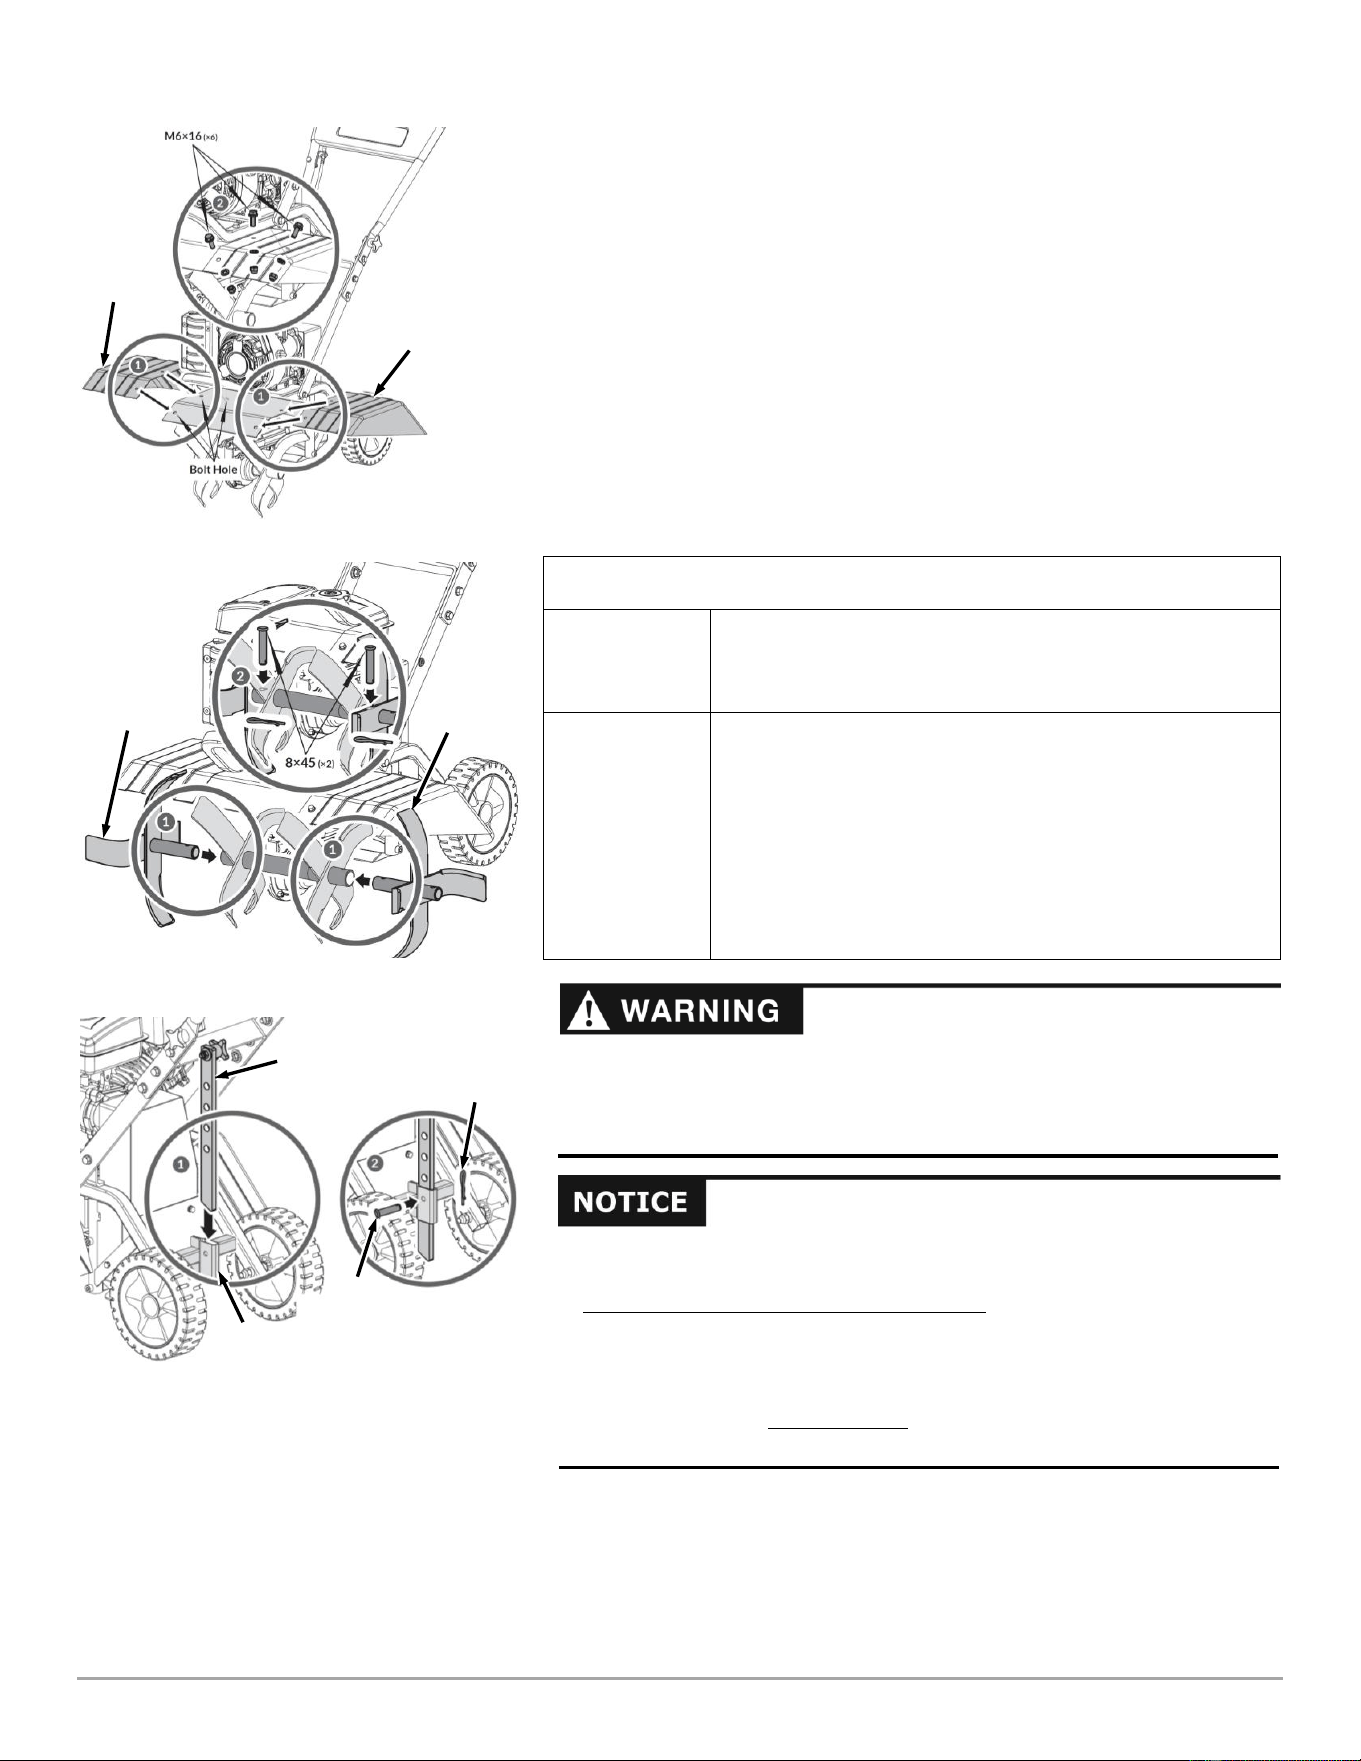
1. Install the two Inner Tines onto the Gearbox Shafts with two M10×50 Hex
Bolts and M10 Nylon Lock Nuts using two 16mm Wrenches (Figure 5).
2. Secure the Lower Handlebar (use lower holes) to the Support Bracket with
M8×45 Hex Bolts, M8 Spring Washers, and M8 Flat Washers using a 13mm
Wrench (Figure 6).
3. Secure the Lower Handlebar (next set of holes) to the Support Bracket with
M8×25 Bolts, M8 Flat Washers, and M8 Lock Nuts using two 13mm
Wrenches.
4. Install the two Handlebar Adjusting Plates to the Lower Handlebar with
four M8×25 Bolts, M8 Washers, and M8 Nuts using two 13mm Wrenches
(Figure 7).
5. Remove the two Adjusting Hand Knobs, Flat Washers and Nuts from the
Handlebar Adjusting Plates (Figure 8).
6. Secure the lower holes of the Upper Handlebar to the Handlebar Adjusting
Plates (only hand tight) with two M8×25 Bolts, M8 Washers, and M8 Nuts.
7. Reinstall the Adjusting Hand Knobs into one of three upper holes and
secure with M8 Washer and M8 Nuts using a 13mm Wrench.
8. Tighten the lower two M8 nuts installed in step 6 using two 13mm
Wrenches.
Note: The handlebars can be adjusted to adapt to the user and working conditions.
The procedure is explained in the Operation section.
10 DR
®
FRONT TINE ROTOTILLER
Figure 10
Outer
Tine
(left)
Outer
Tine
(right)
Figure 9
Tine
Shield
(right)
Tine Shield
(left)
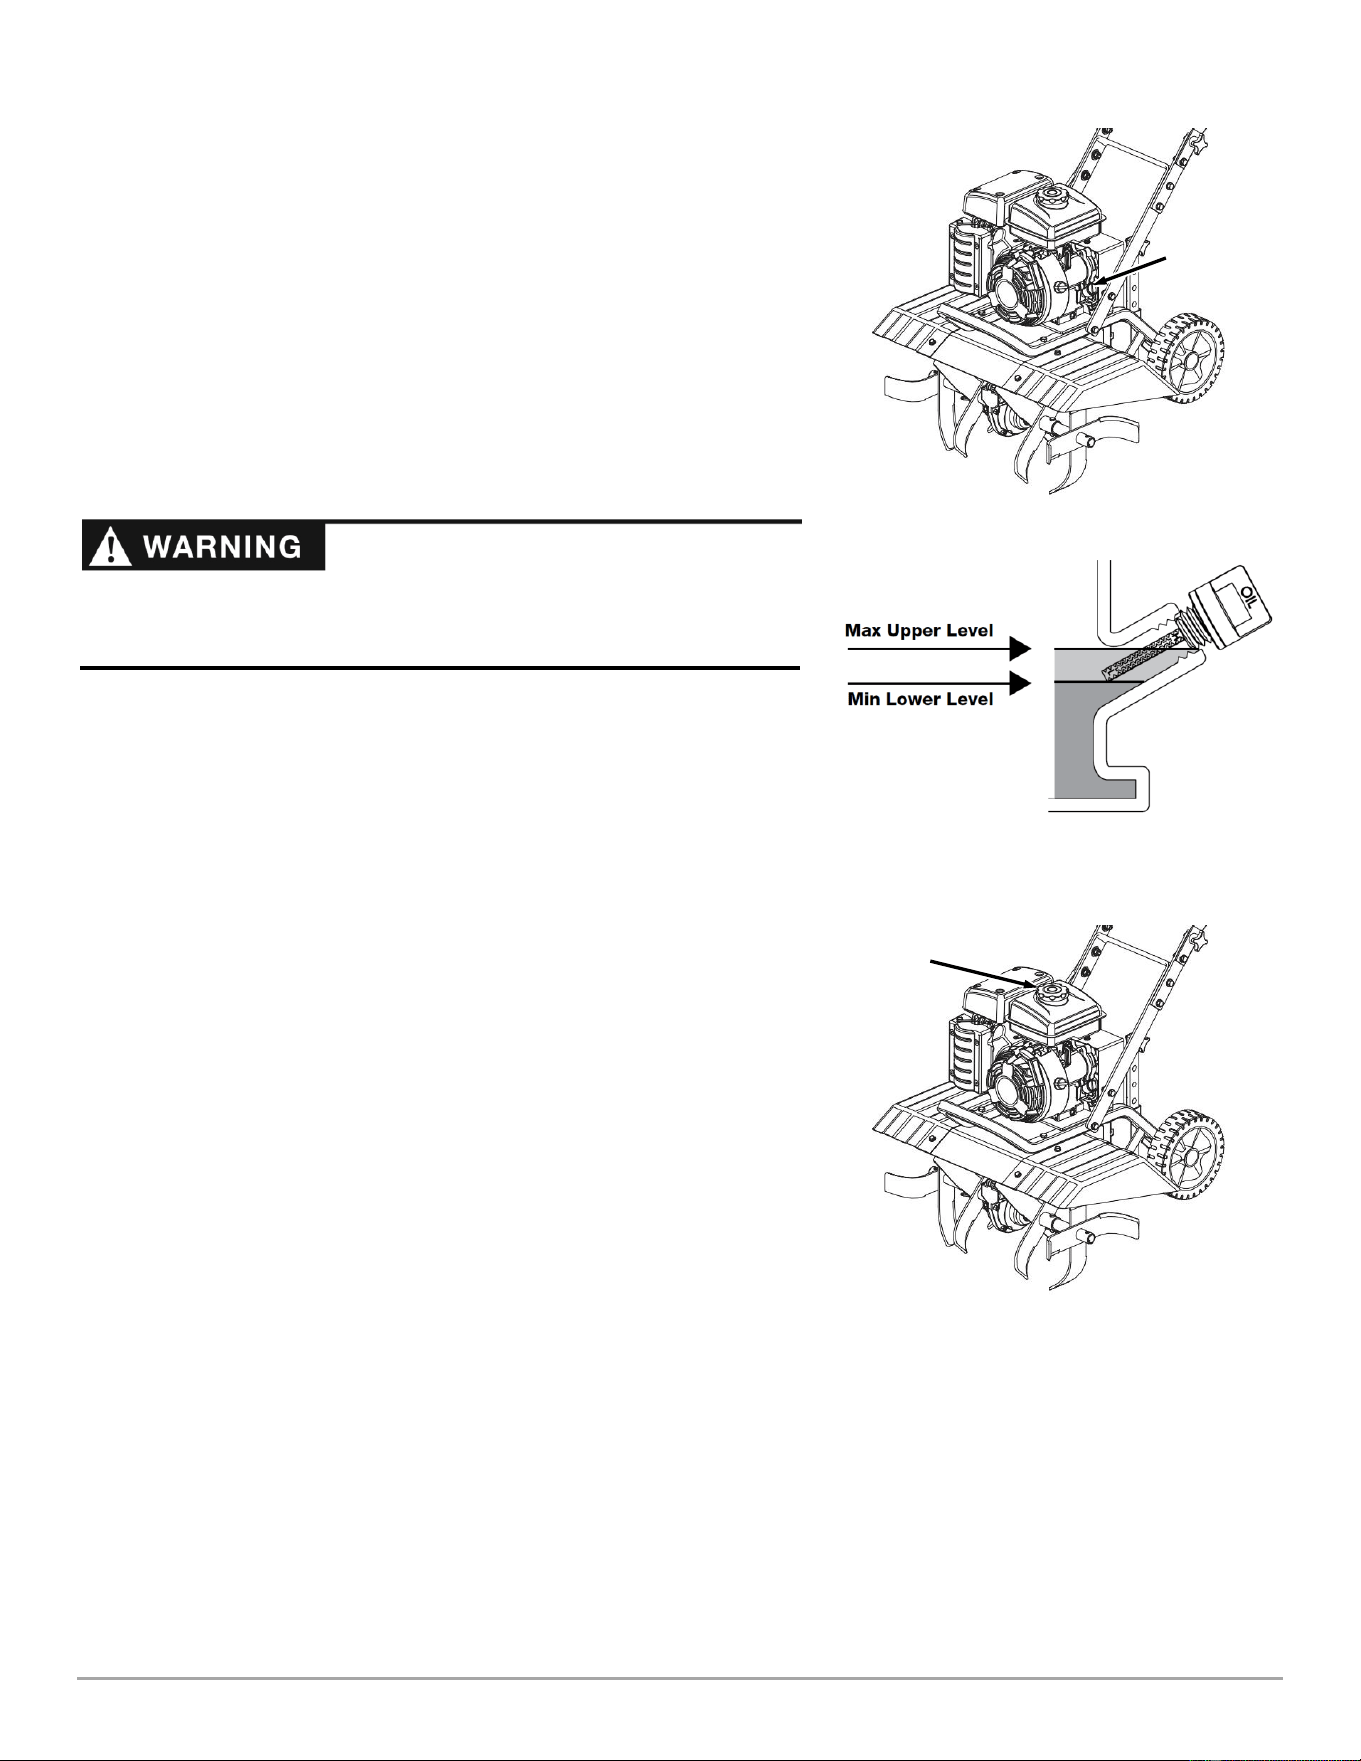
9. Install the Tine Shields with six M6×16 Bolts, Flat Washers, and M6 Lock
Nuts using two 10mm Wrenches (Figure 9).
10. Position the two Outer Tines into the Inner Tines and align the holes
(Figure 10).
11. Secure the Outer Tines to the Inner Tines with the 8 X 45 Pins and 2.5mm
Dia X 45 Cotter Pins.
Drag Stake
1. Insert the Drag Stake into the Drag Stake Holder Tube. And secure it at the
lowest Depth Stake hole location with 8×32 Pin and Cotter Pin (Figure 11).
Note: The Depth Stake can be adjusted to control tilling depth as needed. The
procedure is explained in the Operation section.
Adding the Engine Oil and Gasoline
Engine Fluid Requirements
Engine Oil
12oz. (350ml)
0-100 °F (-17-38°C); SAE 10W-30
50-100 °F (10-38 °C); SAE 30
For Service SF, SG, SH, SJ or higher
Gasoline Tank
1.69qt. (1.6L)
Unleaded Gas (87 Octane minimum)
Up to 10% ethanol (gasohol) is acceptable
Non-ethanol premium fuel recommended
DO NOT USE E85
DO NOT use gas oil mixture
DO NOT modify engine to run on alternate fuels
Add Stabilizer to fuel prior to storage
Tools and Supplies needed:
Small Funnel
Clean Rags
1. Place the machine on a level surface and clean the Oil and Fuel fill areas.
Drag
Stake
Figure 11
Clevis
Pin
Cotter
Pin
Drag Stake
Holder
SKIN IRRITATION: Avoid prolonged or repeated contact with motor oil
(especially used motor oil). Used motor oil has been shown to cause skin
cancer in laboratory animals. Thoroughly wash exposed areas with soap and
water.
You must add Oil before starting the Engine. This machine is shipped
without Oil. Traces of Oil may be in the reservoir from factory testing, but
you must add Oil before starting the Engine. Fill the reservoir slowly,
checking the level frequently, to avoid overfilling.
To get an accurate reading when checking the oil level:
- The machine should be on a level surface.
- The dipstick SHOULD NOT be screwed down to ensure an
accurate oil level reading.
CONTACT US AT www.DRpower.com 11
Figure 13
2. Remove the Oil Fill/Dipstick and wipe the Oil off with a clean rag (Figure
12).
3. Initially add 10 oz. (.29L) of SAE 30 High Detergent oil, recommended by the
Engine Manufacturer, and wait one minute for the oil to settle.
2. Install the Dipstick but DO NOT screw it in (Figure 13). Remove the Dipstick
and check the Oil level. Continue adding Oil as needed, until the Oil reaches
the full mark (Max Upper Level). Be careful not to overfill.
3. Install and screw in the Dipstick when finished.
4. Fill the Gas Tank with fresh, unleaded gas (with a minimum of 87 Octane),
to approximately 1" below the top of the Fill Neck to allow for Fuel expansion
(Figure 14). Be careful not to overfill and reinstall the Cap before starting the
Engine. See your Engine Owner’s Manual for more information.
Note: To refill the Gas Tank, turn the Engine OFF, and let the Engine cool at least
five minutes before removing the Gas Fill Cap.
Figure 12
Oil
Fill/Dipstick
Gas Fill
Figure 14
FIRE AND EXPLOSION RISK: Keep spark and flame away from liquid and
vapor. Do not smoke while using. Doing so could result in death, serious
injury, or equipment damage.
12 DR
®
FRONT TINE ROTOTILLER
Chapter 3: Operating Your DR FRONT TINE TILLER
Before Starting the Engine
1. Check the Engine Oil level every time before you use the machine (Figure 12
and 13 on page 11).
2. Check the gas level (Figure 14 on page 12).
Starting the Engine
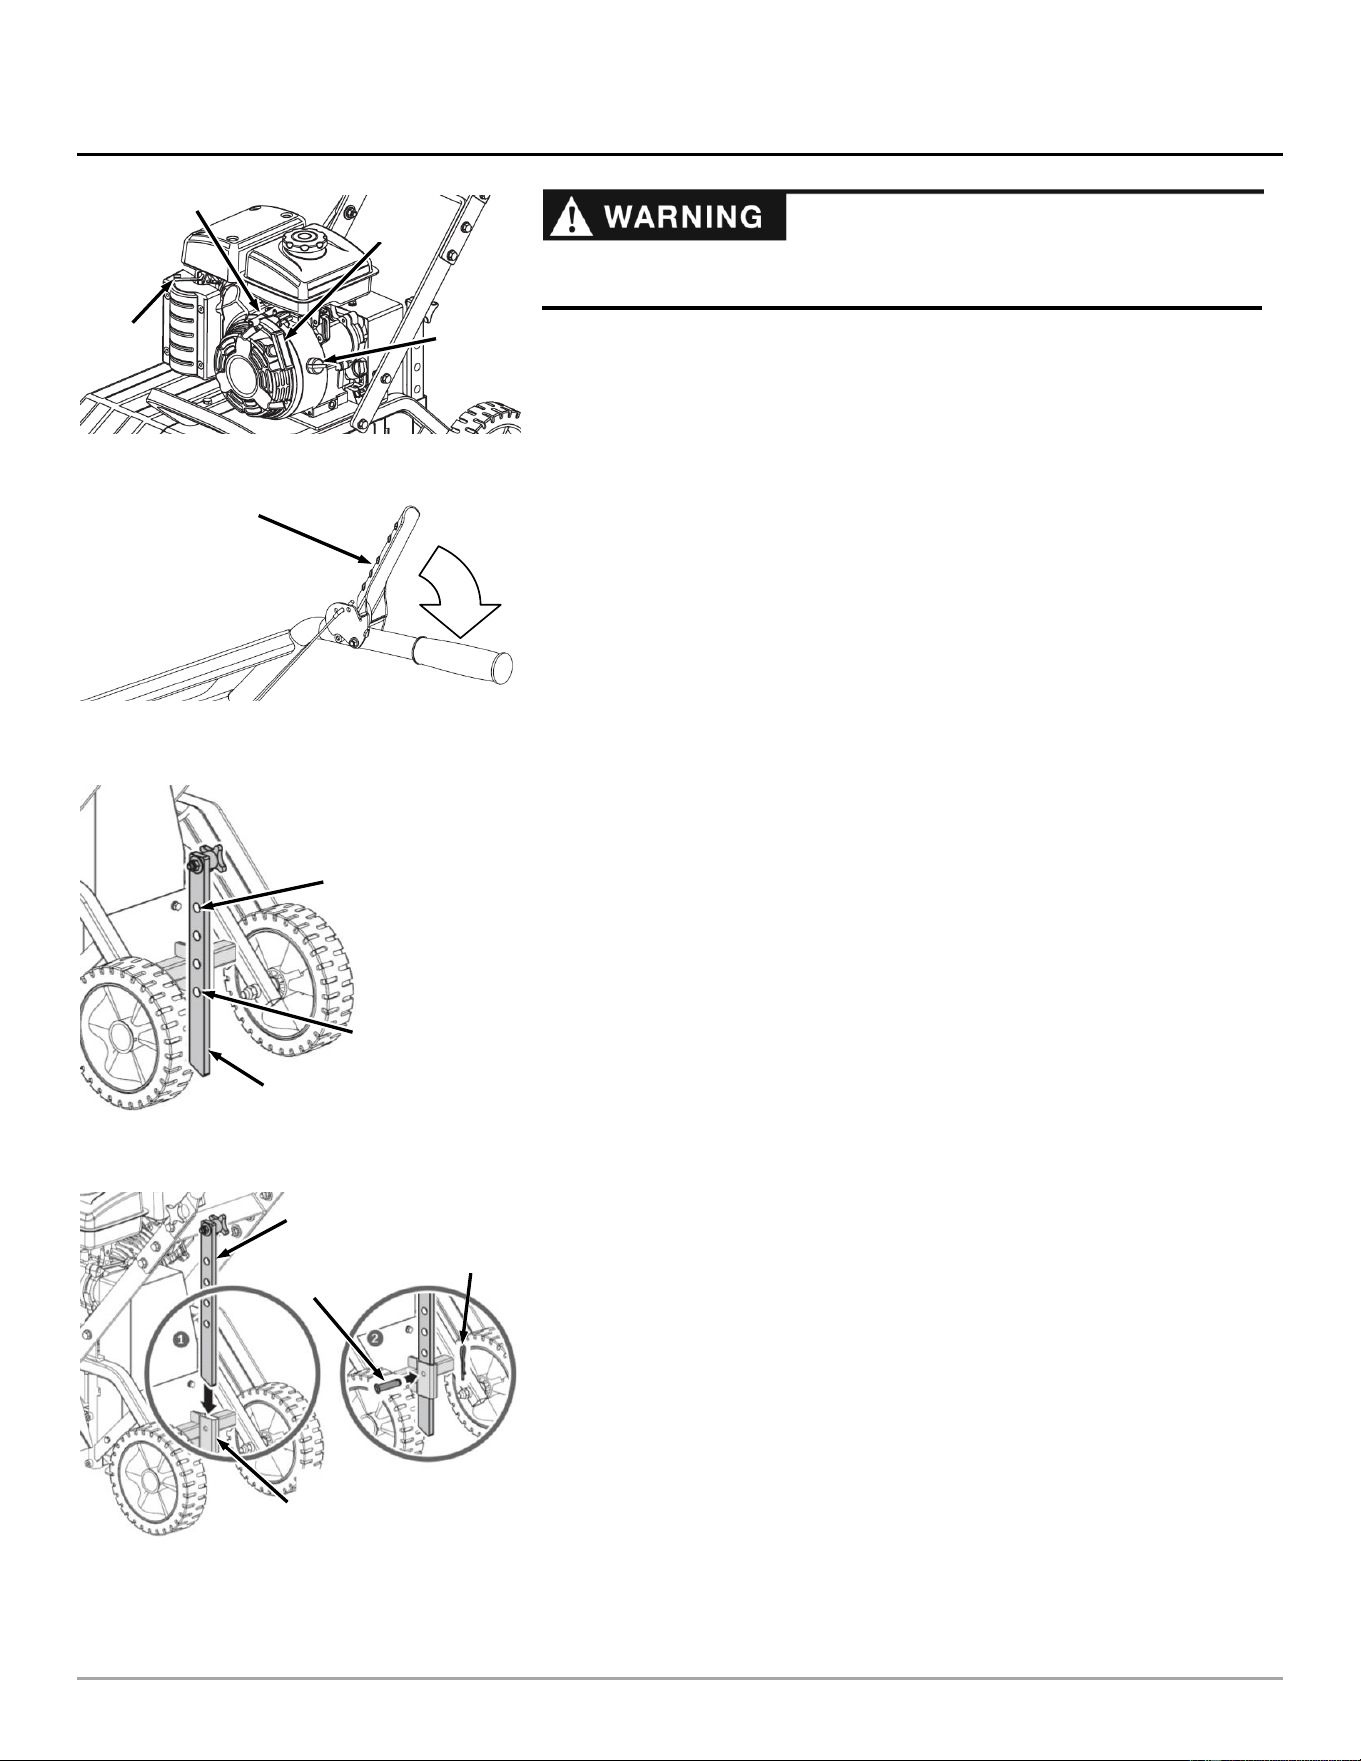
1. Move the engine On/Off switch to the "ON" position (Figure 15).
2. Move the choke lever to the "CHOKE" position (leave the Choke "RUN"
position if the Engine is already warm)
3. Move the Throttle from the "STOP" position to about 1/4 of the way to the
fast (Rabbit) position.
4. Grasp the Recoil Starter Handle and slowly pull until you feel resistance.
Let the Cord retract a little bit, and then pull the Cord rapidly to start the
Engine.
5. When the Engine starts, move the Throttle to the Fast (Rabbit) position.
Stopping the Engine
To stop the engine in an emergency, simply turn the engine switch to the "OFF"
position. Under normal conditions, use the following procedure:
1. Move the throttle lever to the slow (Turtle) position (Figure 15).
2. Let the engine idle for one or two minutes.
3. Turn the engine On/Off switch to the "OFF" position.
4. Turn the fuel valve lever to the "OFF" position.
Tine Operation
1. Pull the drive control lever against the Handlebar to engage the tines
(Figure 16).
2. Release the drive control lever to disengage the tines.
Drag Stake
The Drag Stake can be raised or lowered to four different settings allowing more
versatile tilling and cultivating, or to more easily transport your tiller (Figure 17).
1. Remove the Cotter Pin and Clevis Pin (Figure 18).
2. Align the holes in the Drag Stake and Drag Stake Holder as desired and
reinstall the Clevis Pin and Cotter Pin.
The highest hole location is for deepest tilling.
The lowest hole location is for shallowest tilling and transport.
Figure 17
Deepest Tilling
Shallowest
Tilling/Transport
Drag Stake
Drive Control
Lever
Figure 16
Choke
Lever
Figure 15
On/Off
Switch
Throttle Lever
Recoil
Starter
Drag Stake
Figure 18
Clevis Pin
Cotter
Pin
Drag Stake
Holder
Read all information and Warnings in Chapter 1 before operating the DR
Front Tine Rototiller.
CONTACT US AT www.DRpower.com 13
Figure 19
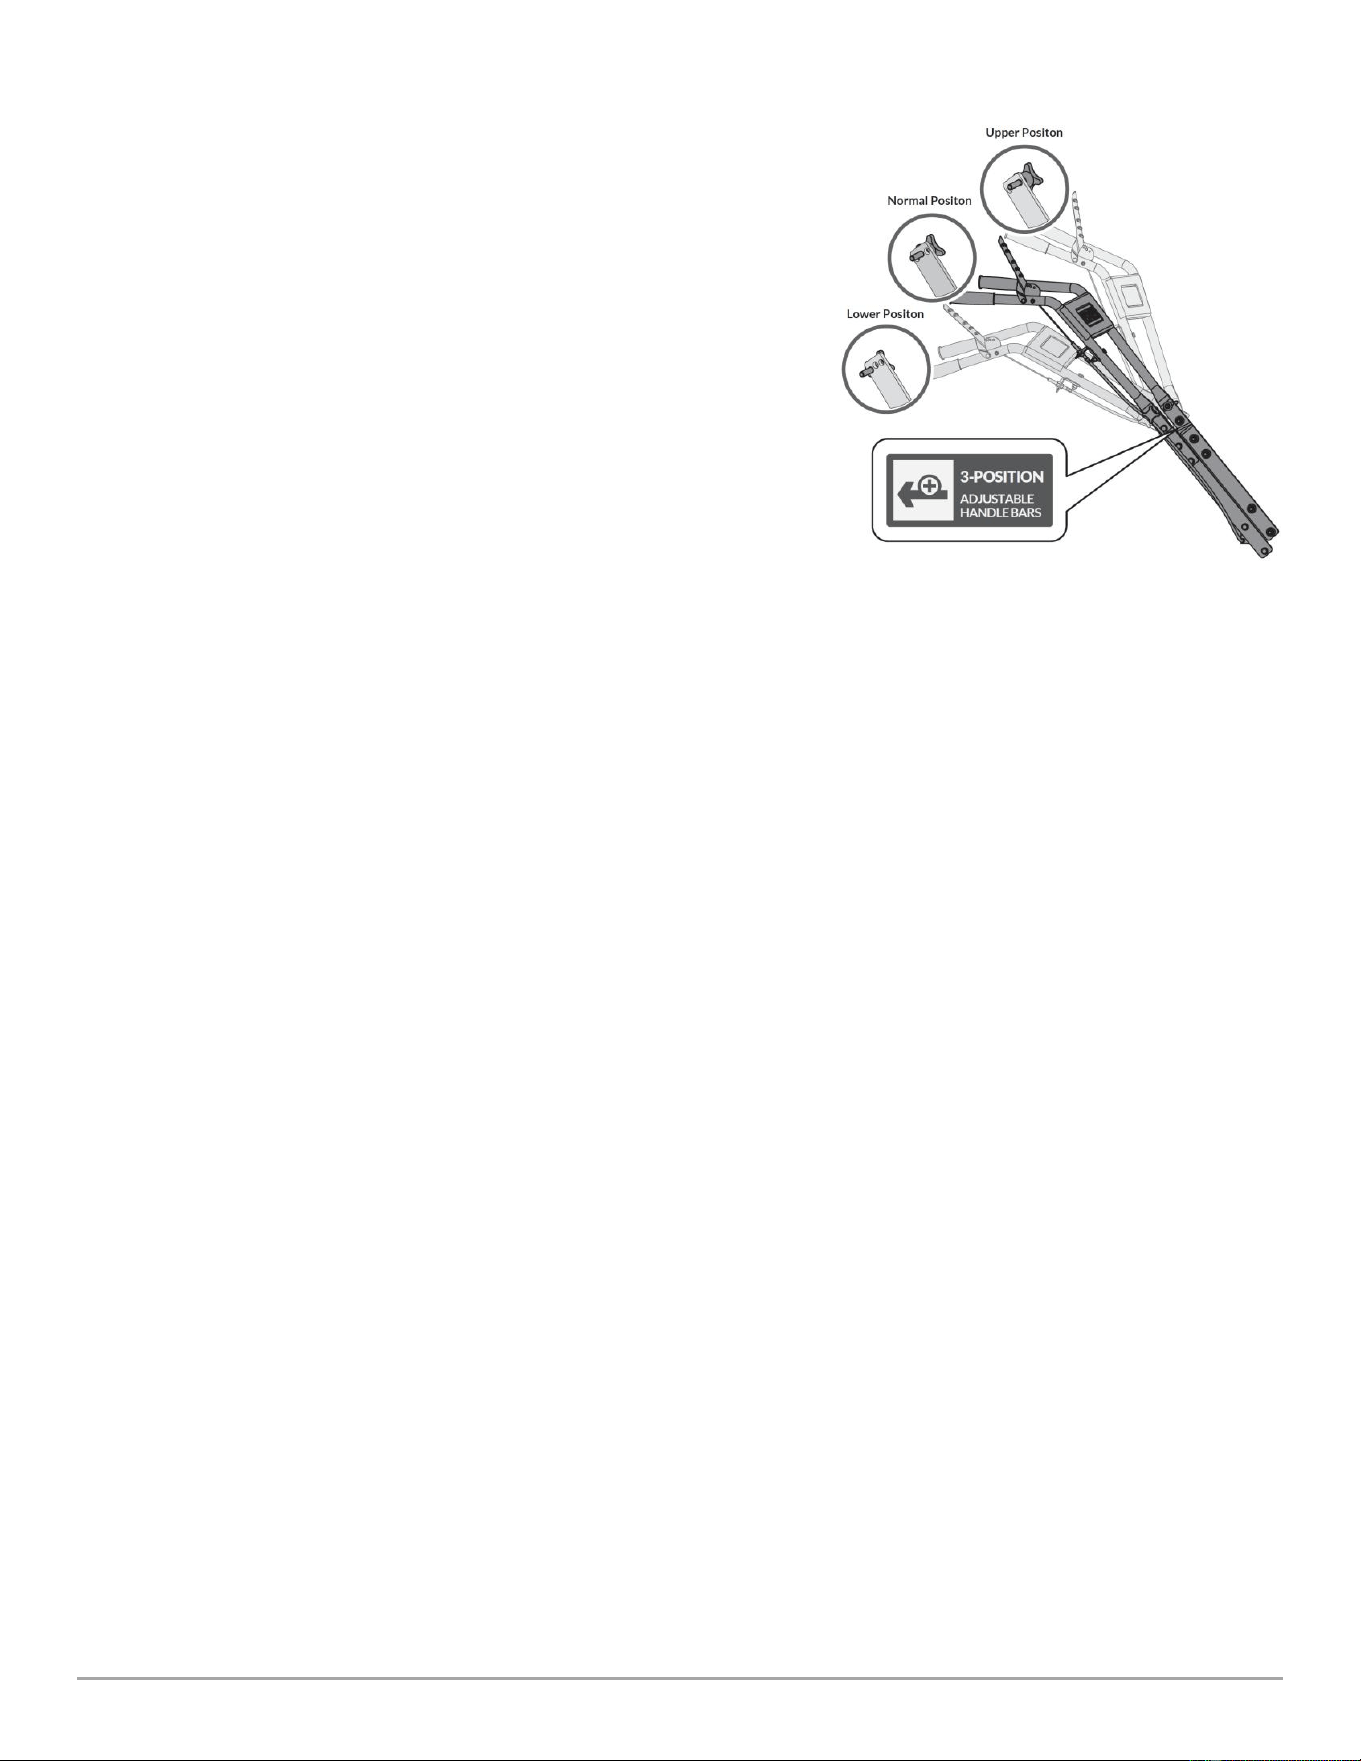
Handlebar Height Adjustment
Tools needed:
Two 13mm Wrenches
1. Loosen the two bottom Bolts of the Upper Handlebar using two 13mm
Wrenches (Figure 19).
2. Remove the Locknuts, Flat washers, and Hand Knobs from the top holes of
the Upper Handlebar using a 13mm Wrench.
Operating Speed
For normal tilling, set the throttle control lever to “FAST” for best tiller action.
The throttle should be set to control forward movement to a slow walking
speed for cultivating.
Set the throttle control lever to “LOW” to reduce stress on the engine when
tilling is not being performed.
Besides depth stake setting, variation of pressure on the handles also helps
further control of tilling depth and travel speed.
A downward pressure on the handles will reduce the tilling depth and
increase the forward speed.
An upward pressure on the handles will increase the working depth and
reduce the forward speed.
Tilling
Tilling is digging in, turning over and breaking up garden soil to prepare a seedbed for planting. Best tilling depth is 4" (100mm)
to 6" (150mm). A tiller will also clear the soil of unwanted vegetation. The decomposition of this vegetation matter enriches the
soil.
Avoid tilling soil that is too dry as it will pulverize and produce a dust that will not hold water. Water the area to be tilled a few days
before tilling. Also, tilling soil that is too wet will produce unsatisfactory clods. Wait a day or two after heavy rain for the soil to dry.
Better growth will be obtained if an area is tilled properly and used soon after tilling to preserve the moisture content.
The type of soil and working conditions will determine the actual setting of the tilling depth. In some soils, the desired depth is
reached first pass over garden. In other soils, the desired depth is obtained by going over the garden two or three times. In later
case, the Drag Stake should be lowered before each succeeding pass over the garden. Passes should be made across the length
and width of the garden alternately. Do not try to dig too deeply in the first pass. If the machine jumps or bucks, adjust the Drag
Stake to allow the unit to move forward at a slightly faster rate.
If the tiller stops forward motion and tries to dig in one spot, rock the handles from side to side to start it moving forward again.
Rocks which are turned up should be removed from the garden area.
Cultivating
Cultivating is loosening or digging around growing plants to disrupt weeds and aerate soil. Less than 2” (50mm) depth is always
desirable.
Idle Speed
1. Set the throttle control lever to the SLOW position to reduce stress on the engine when work is not being performed.
Lowering the engine speed will help extend the life of the engine, and will help conserve fuel and reduce noise level.
14 DR
®
FRONT TINE ROTOTILLER
Never use a “pressure washer” to clean your unit. Water can penetrate tight areas of the machine and its transmission case and
cause damage to spindles, gears, bearings, or the engine. The use of pressure washers will result in shortened life and reduce
serviceability.
Chapter 4: Maintaining Your DR FRONT TINE TILLER
This chapter covers regular maintenance procedures that will ensure the best performance and long life of your DR FRONT TINE
TILLER. For Engine maintenance, please refer to the Engine Owner’s Manual that came with your machine. Service intervals
listed in the checklist below supersede those listed in the Engine Owner’s Manual. Maintenance Kits and accessories are available
through our website at www.DRpower.com.
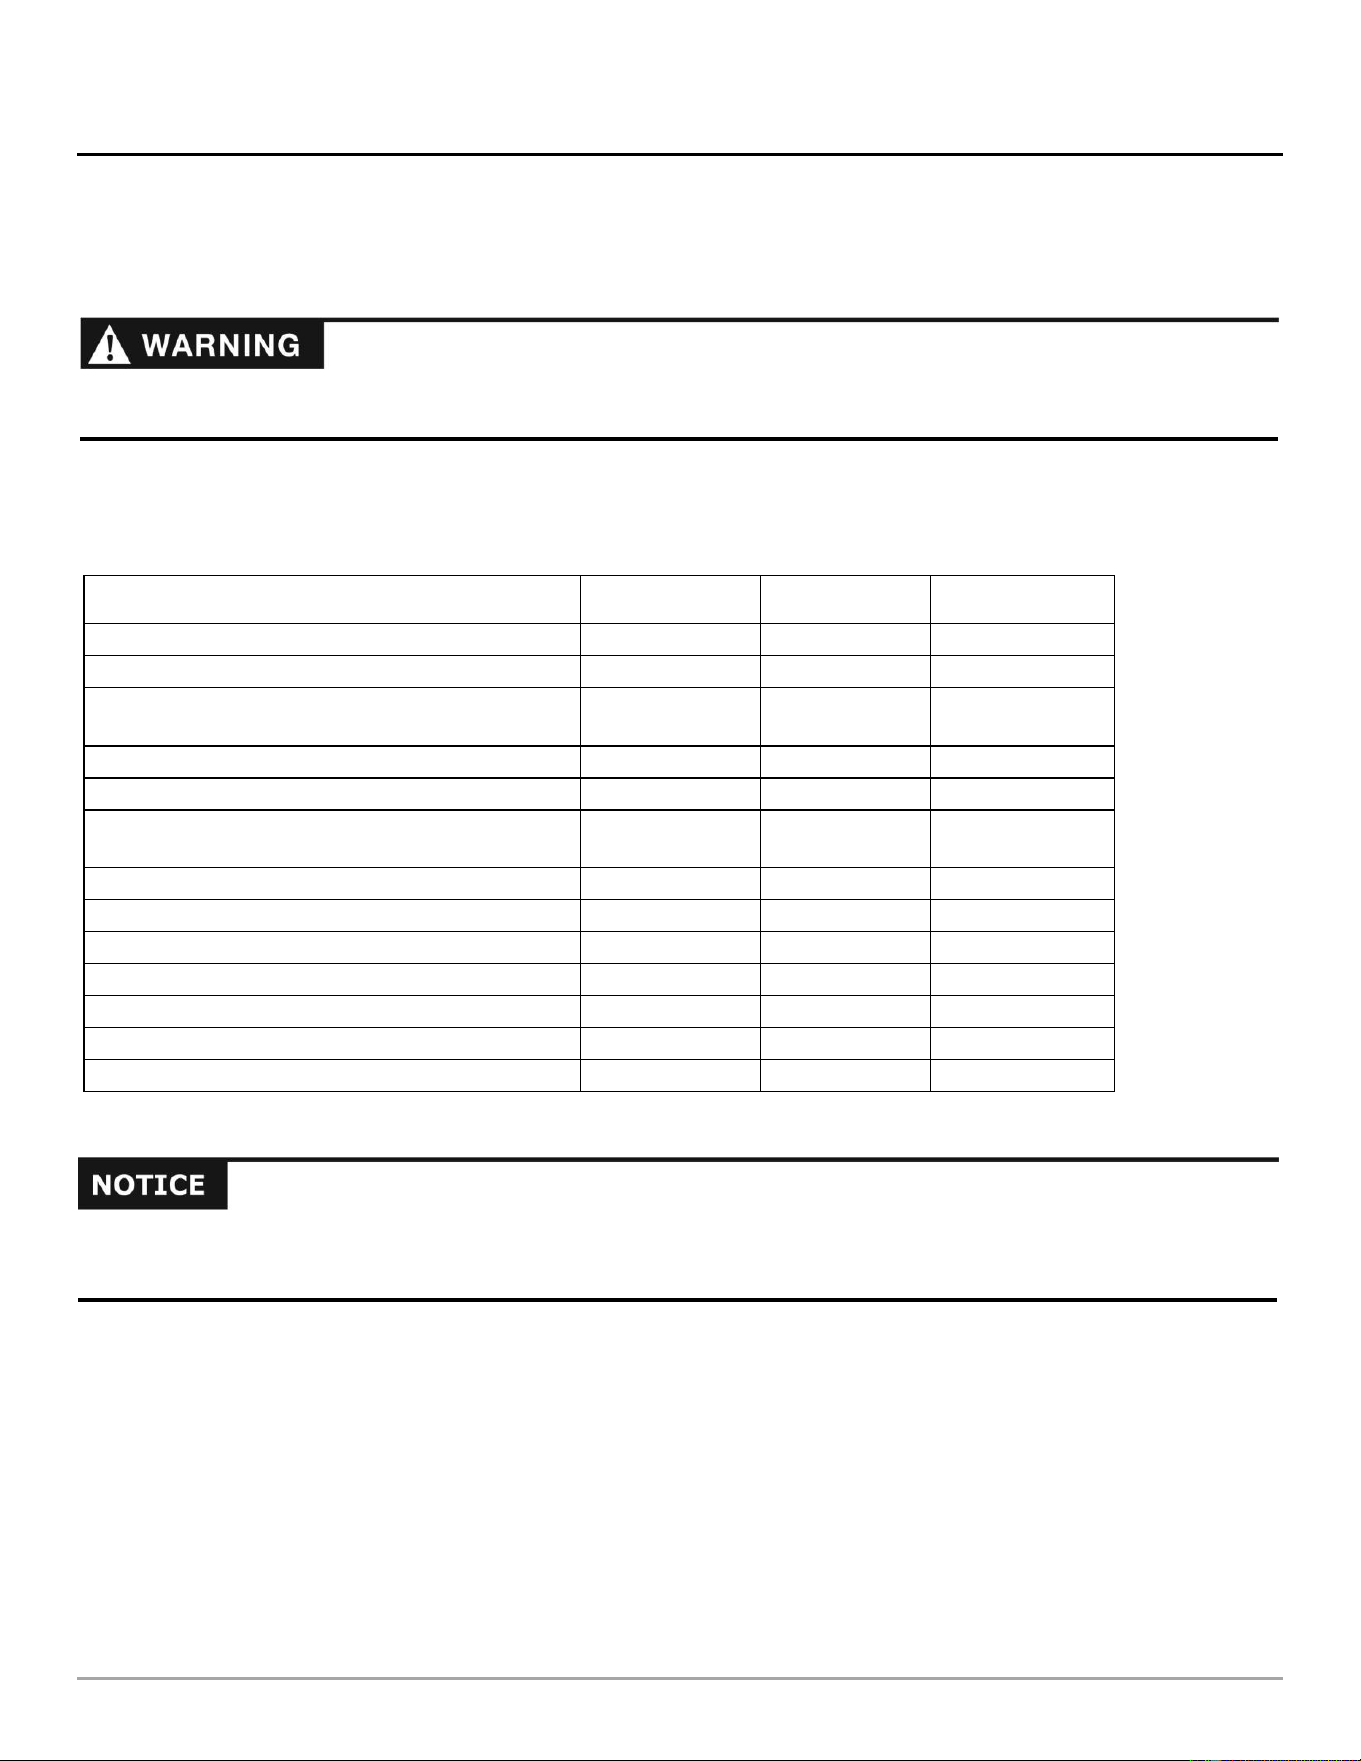
Regular Maintenance Checklist
Note: Consider that the service intervals shown are the maximum under normal operating conditions. Increase frequencies under
extremely dirty or dusty conditions.
PROCEDURE
BEFORE EACH USE
EVERY 25 HOURS
EVERY 100 HOURS
Check the Engine Oil Level
▲
Clean the Tines and Debris Shield*
After each use
Check the general condition of the machine, e.g.
nuts, bolts, welds, etc.
▲
Clean Engine Exterior & Cooling Fins
▲
Check the Tine Shear Pins for damage
▲
Inspect the Tine Drive Belt for wear or damage
(replace as needed)
▲
Check Tines for Wear or damage
▲
Clean and Grease the Tines Shaft
▲
Check/add Transmission Grease
▲
Check/Clean Air Filter
▲
Change Engine Oil
1st Time 5 hrs
▲
Replace Air Filter and Pre-cleaner
▲
Replace Spark Plug
▲
* Cover the Engine Muffler, Carburetor, and Air Filter before using a hose to clean the Tines and Debris Shield.
When performing any inspection or maintenance, you must first shut off the Engine; wait five minutes to allow parts to cool and
disconnect the Spark Plug Wire, keeping it away from the Spark Plug.
Key
Switch
Wheel
Clutch
Blade
Clutch
Operator
Presence
Control
CONTACT US AT www.DRpower.com 15
Figure 23
Changing the Engine Oil
Tools and Supplies needed:
10mm Wrench
14mm Wrench
Approved Oil Drain Container
1. Position an approved Container under the Oil Drain Tube.
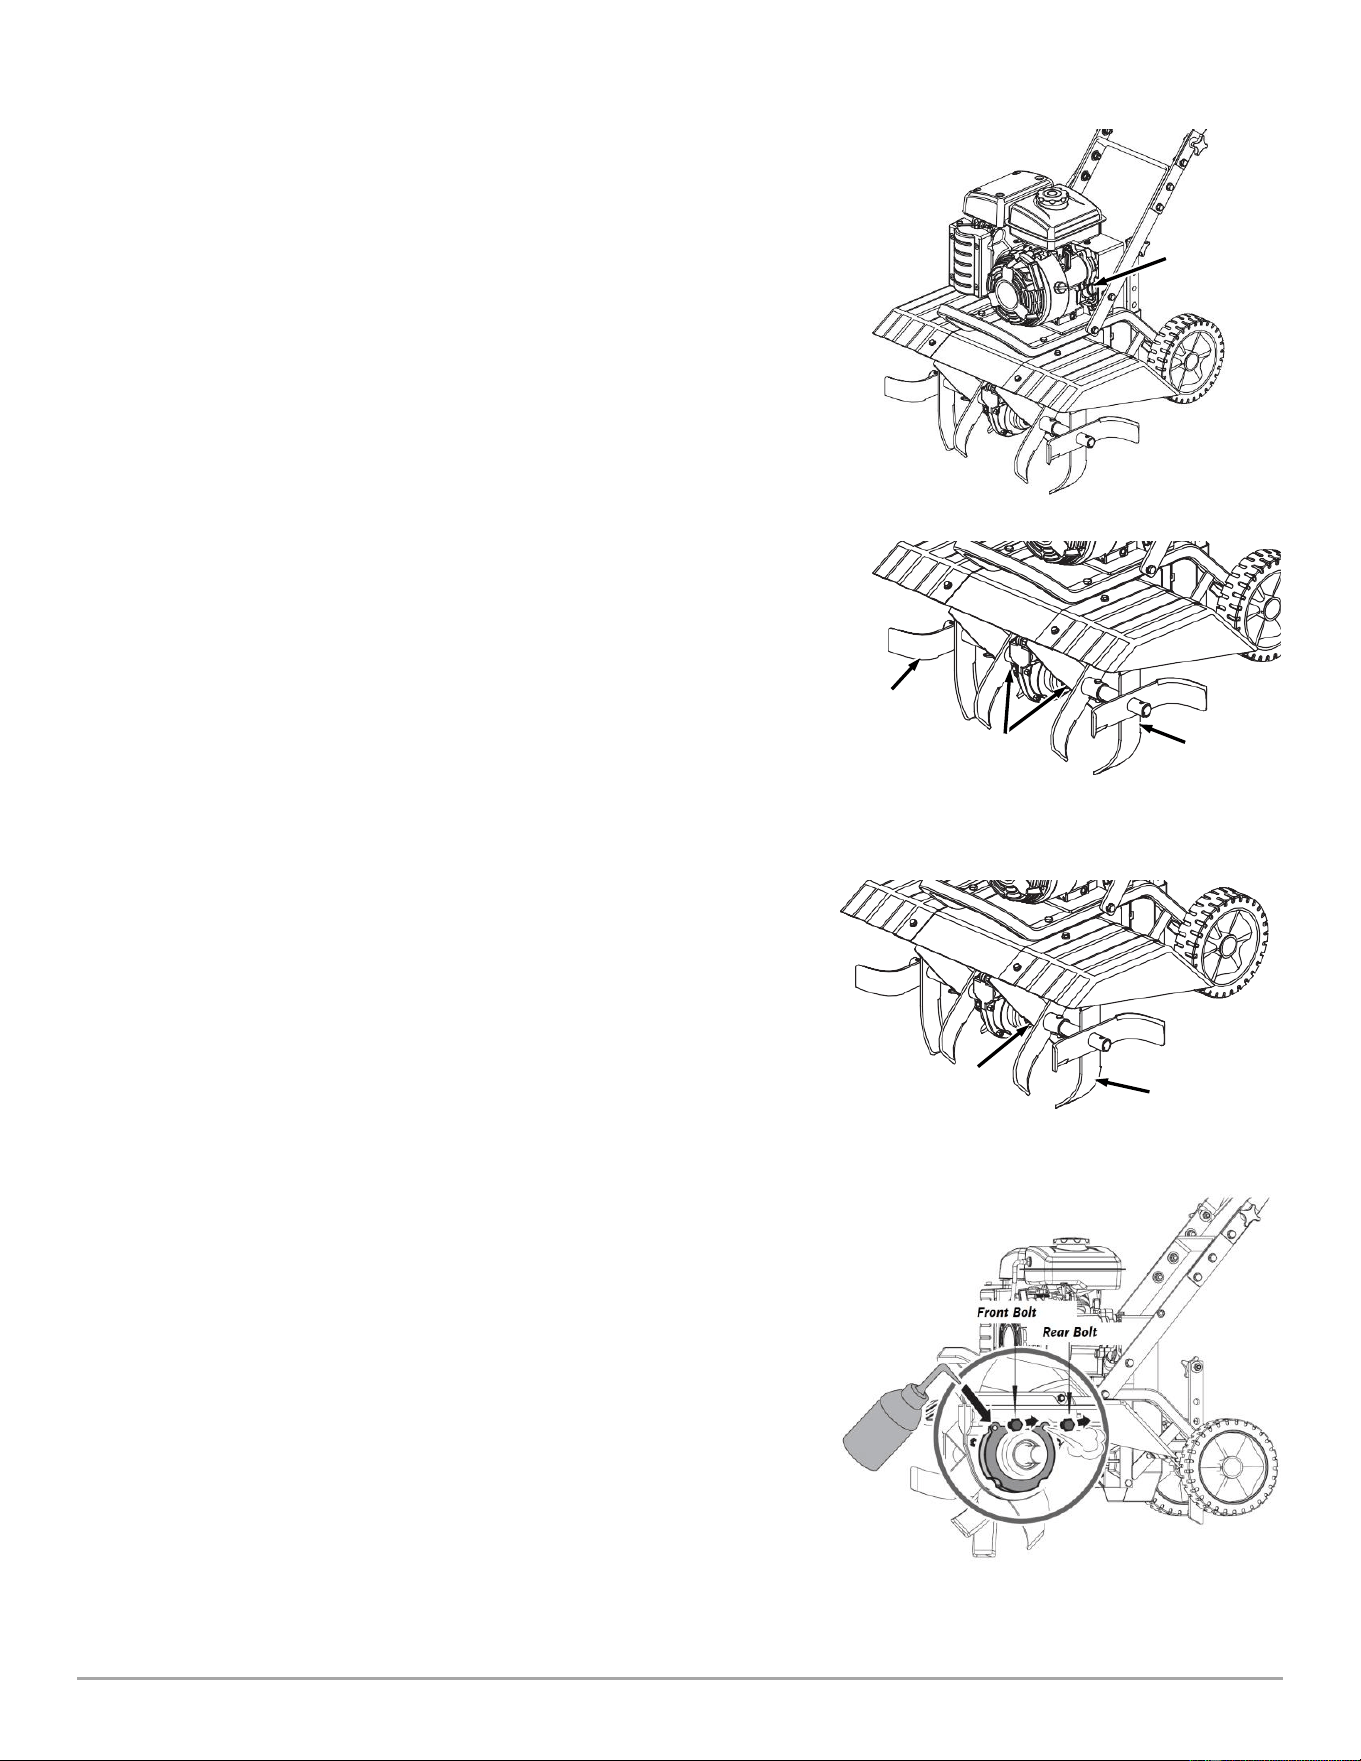
2. Remove the Oil Fill Cap/Dipstick on the left side of the Engine (Figure 20).
3. On the right side of the Engine, hold the Oil Drain Tube to prevent it from
turning with a 14mm Wrench as you remove the Oil Drain Plug using a
10mm Wrench to drain the oil into the Container.
4. Replace the Oil Drain Plug and Oil Fill Cap/Dipstick.
5. Add Oil the Engine as described in the "Adding the Engine Oil and
Gasoline" section in Chapter 2.
Tine Shaft Lubrication
Lubricate the Tine Shafts at least once every season.
Tools and Supplies needed:
Two 16mm Wrenches
General Purpose Grease
1. Remove the Bolt and Locknut securing the Tine Assemblies to the Shafts on
both sides using two 16mm Wrenches (Figure 21).
2. Apply Grease to the Shafts and reinstall the Tine Assemblies.
Transmission Lubrication
The Transmission is lubricated and sealed at the factory. At the beginning of
each season, make sure enough lubricant inside the Transmission.
Tools and Supplies needed:
Two 16mm Wrenches
13mm Wrench
Portable tool lithium #0 grease such as Lubricate 6300AA , Lubricate GR-132,
or Multifak EP-0
1. Place the Tiller on level surface. Allow the Transmission to cool before
filling with Grease.
2. Remove the Bolt and Locknut securing the left side Tine Assembly to the
Shaft using two 16mm Wrenches (Figure 22).
3. Remove the two Bolts above the Shaft using a 13mm Wrench (Figure 23).
4. Fill the Transmission through the front hole until the grease begins to come
out from the rear hole.
5. Reinstall the two Bolts and reinstall the Tine Assembly.
Figure 22
Left Tine
Assembly
Bolt and
Locknut
Bolt and
Locknut
Figure 21
Left Tine
Assembly
Right Tine
Assembly
Figure 20
Oil
Fill/Dipstick
16 DR
®
FRONT TINE ROTOTILLER
Figure 24
Figure 27
Figure 25
Figure 26
Adjusting the Drive Cable
Tools needed:
Two 12mm Wrenches
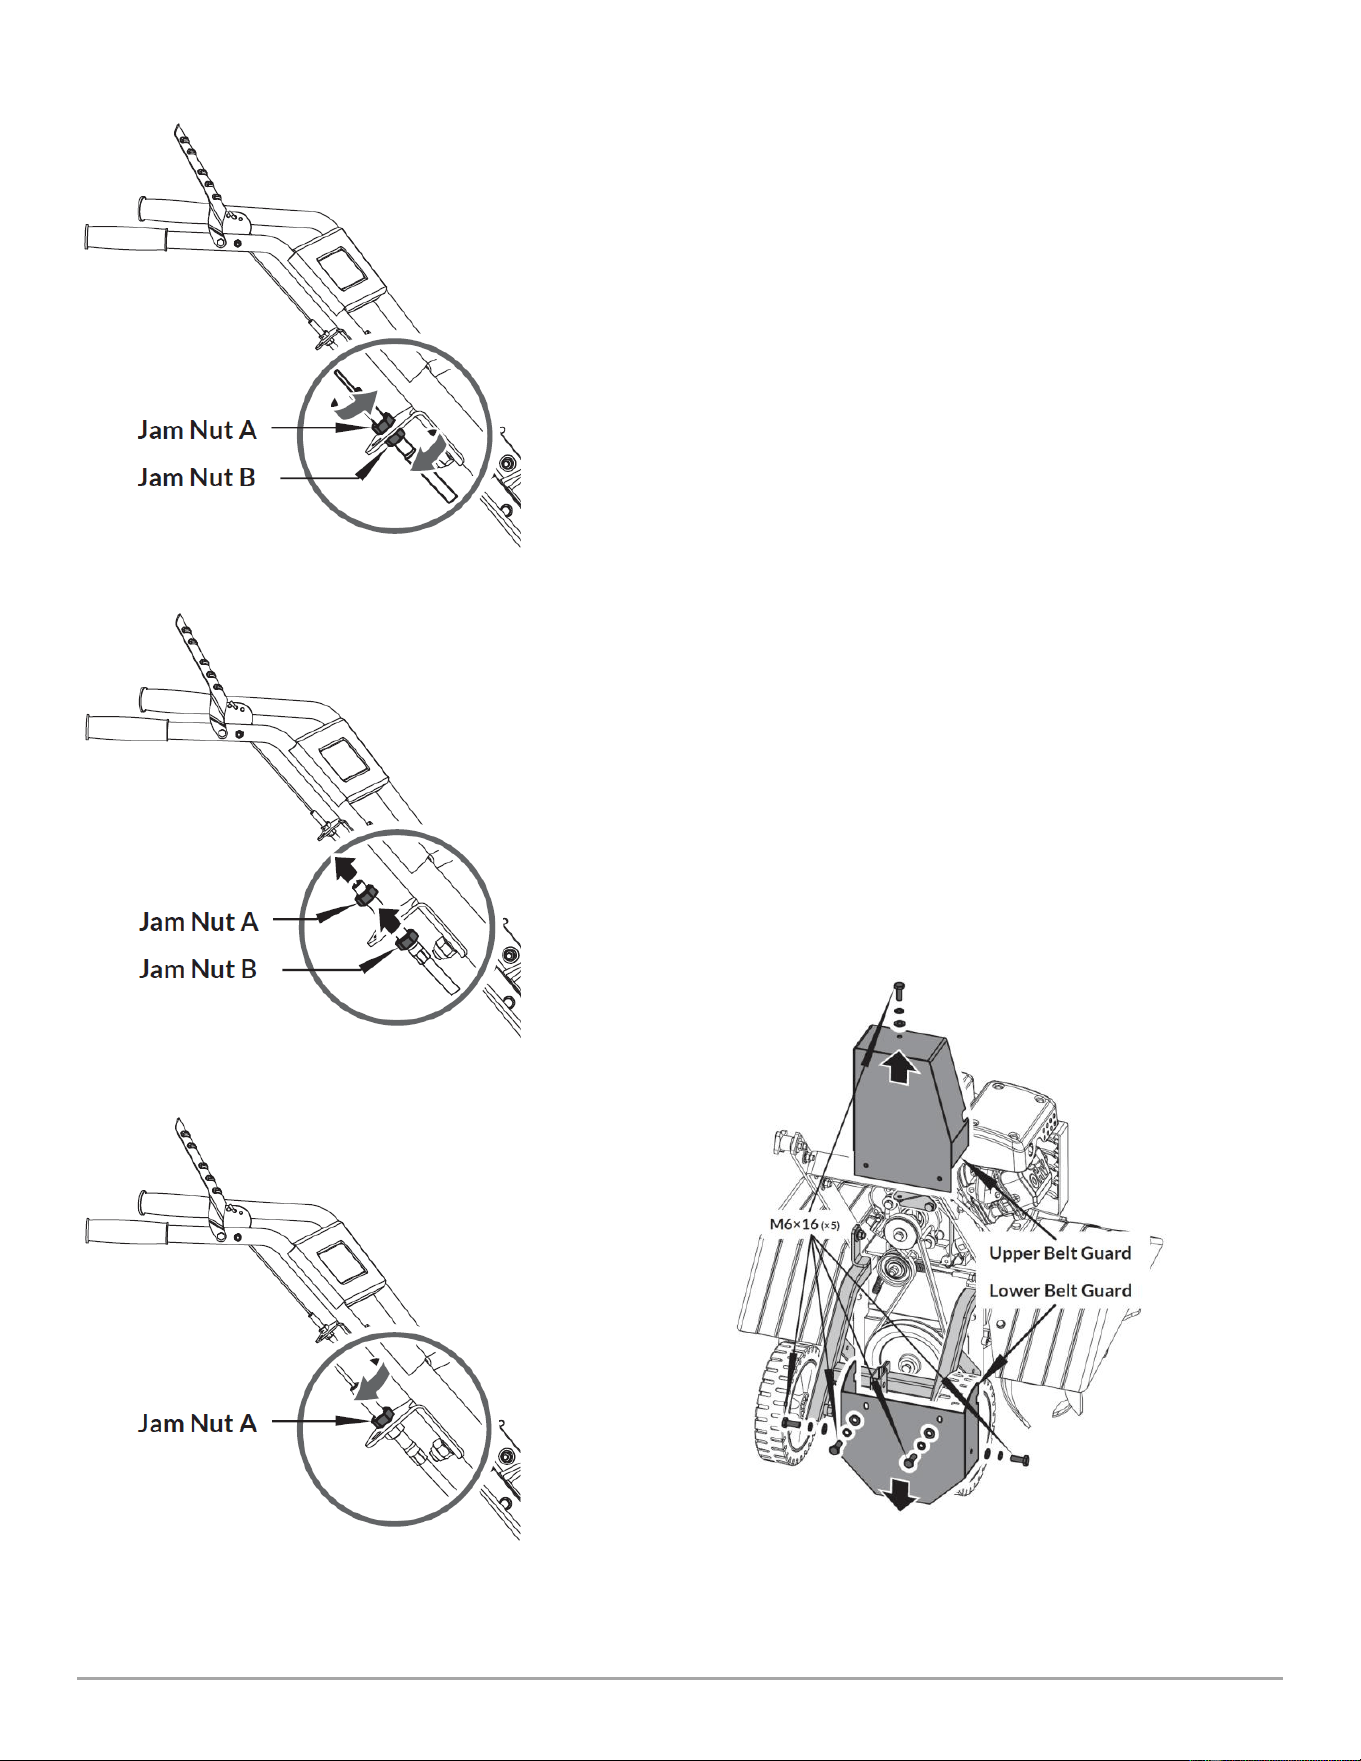
1. Loosen Jam Nut "A" and "B" with two 12mm wrenches (Figure 24)
2. Rotate jam nut "A" enough so the jam nut "B" can be rotated up. Rotate
jam nut "B" up against the Bracket until desired cable tightness is reached
(Figure 25).
3. Hold Jam Nut "B" in position against the Bracket with the Wrench as you
tighten Jam Nut "A" down against the Bracket to lock the Cable in place
(Figure 26).
Replacing the Drive Belt
Tools needed:
10mm Wrench
13mm Wrench
1. Adjust the Drag Stake down to lift the Wheels off the ground.
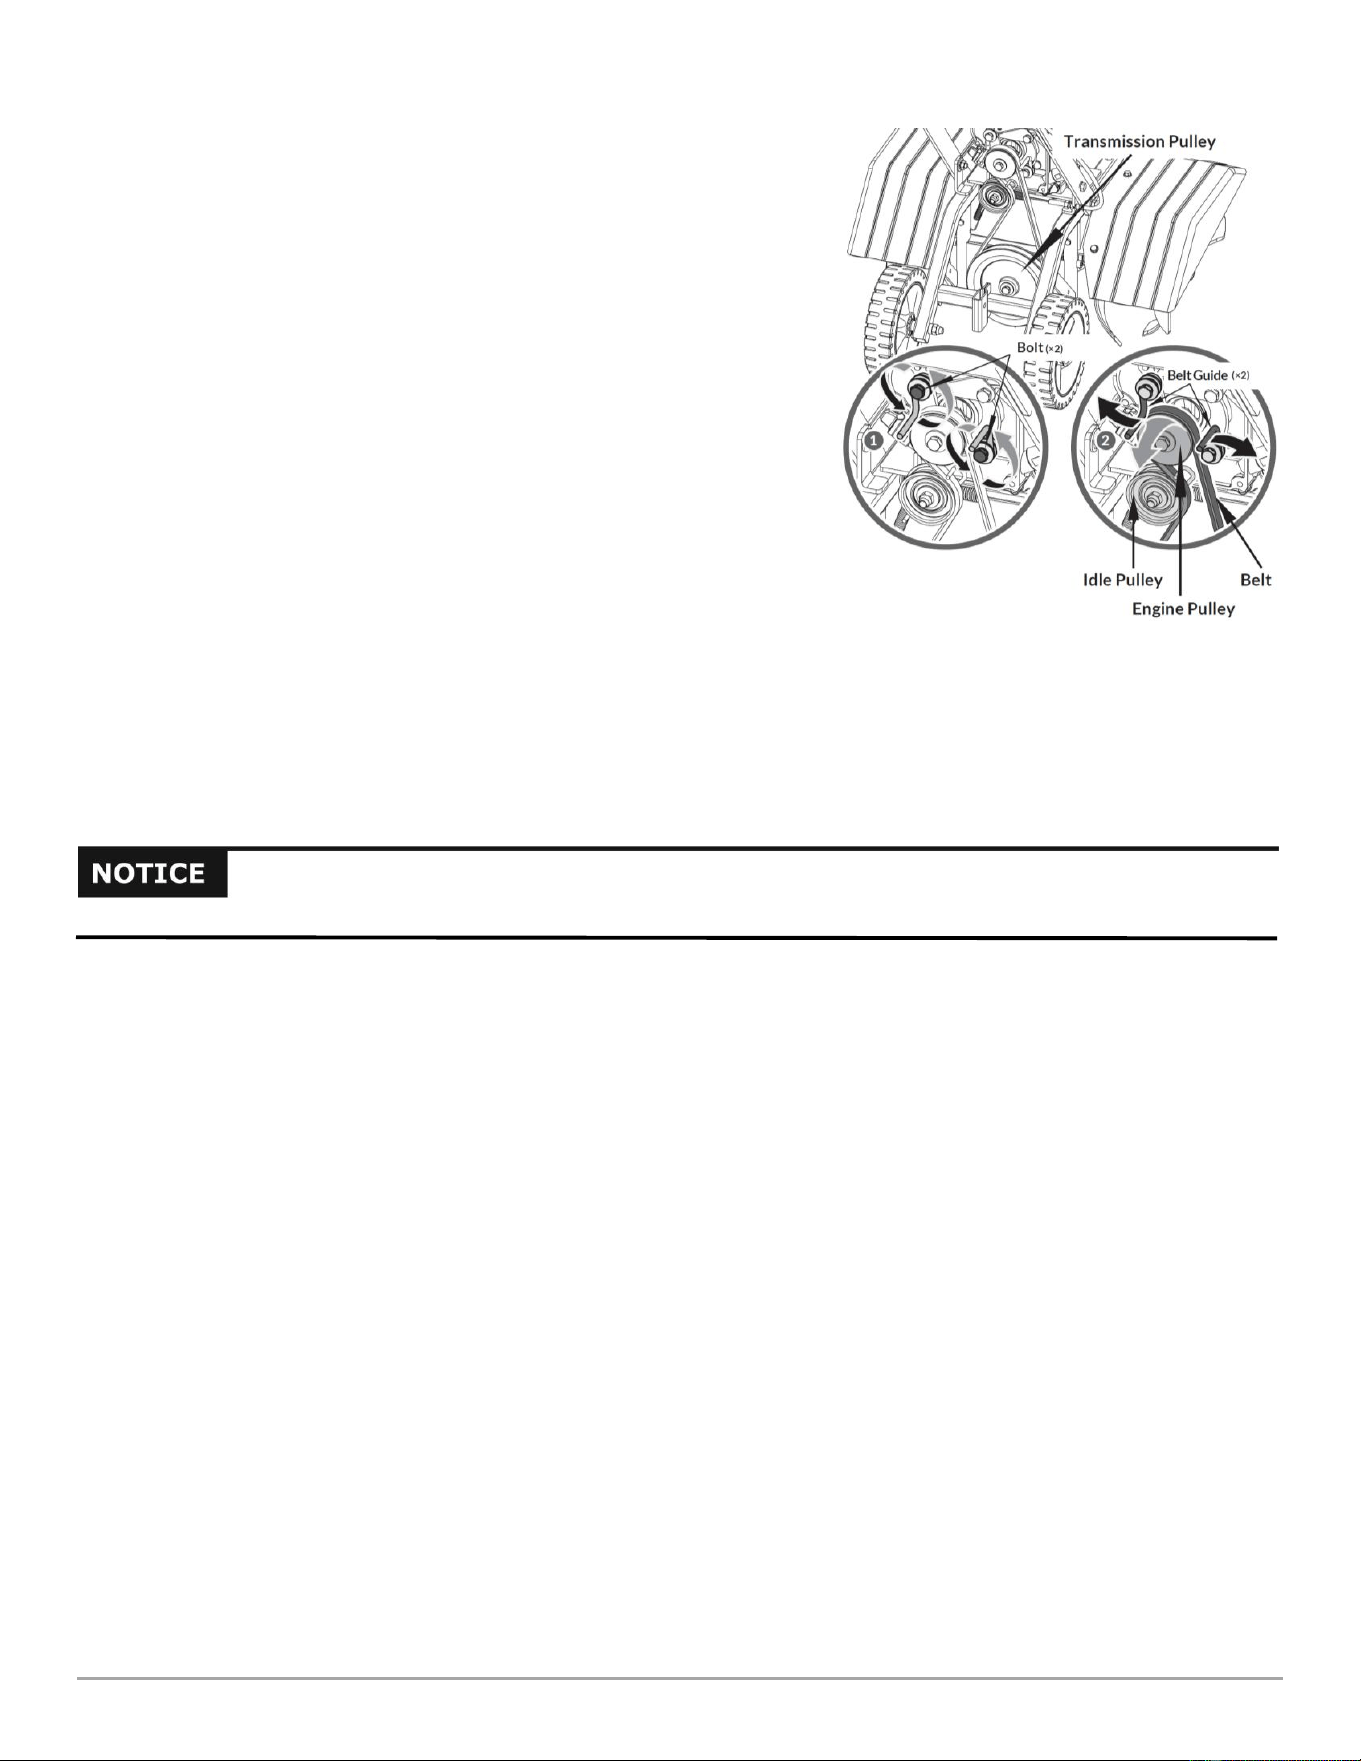
2. Remove the four Bolts, Flat Washers and Lock Washers in the Lower Belt
Guard using a 10mm Wrench and remove the Guard (Figure 27).
3. Remove the Bolt, Flat Washer and Lock Washer in the Upper Belt Guard
using a 10mm Wrench and remove the Guard.
CONTACT US AT www.DRpower.com 17
Figure 28
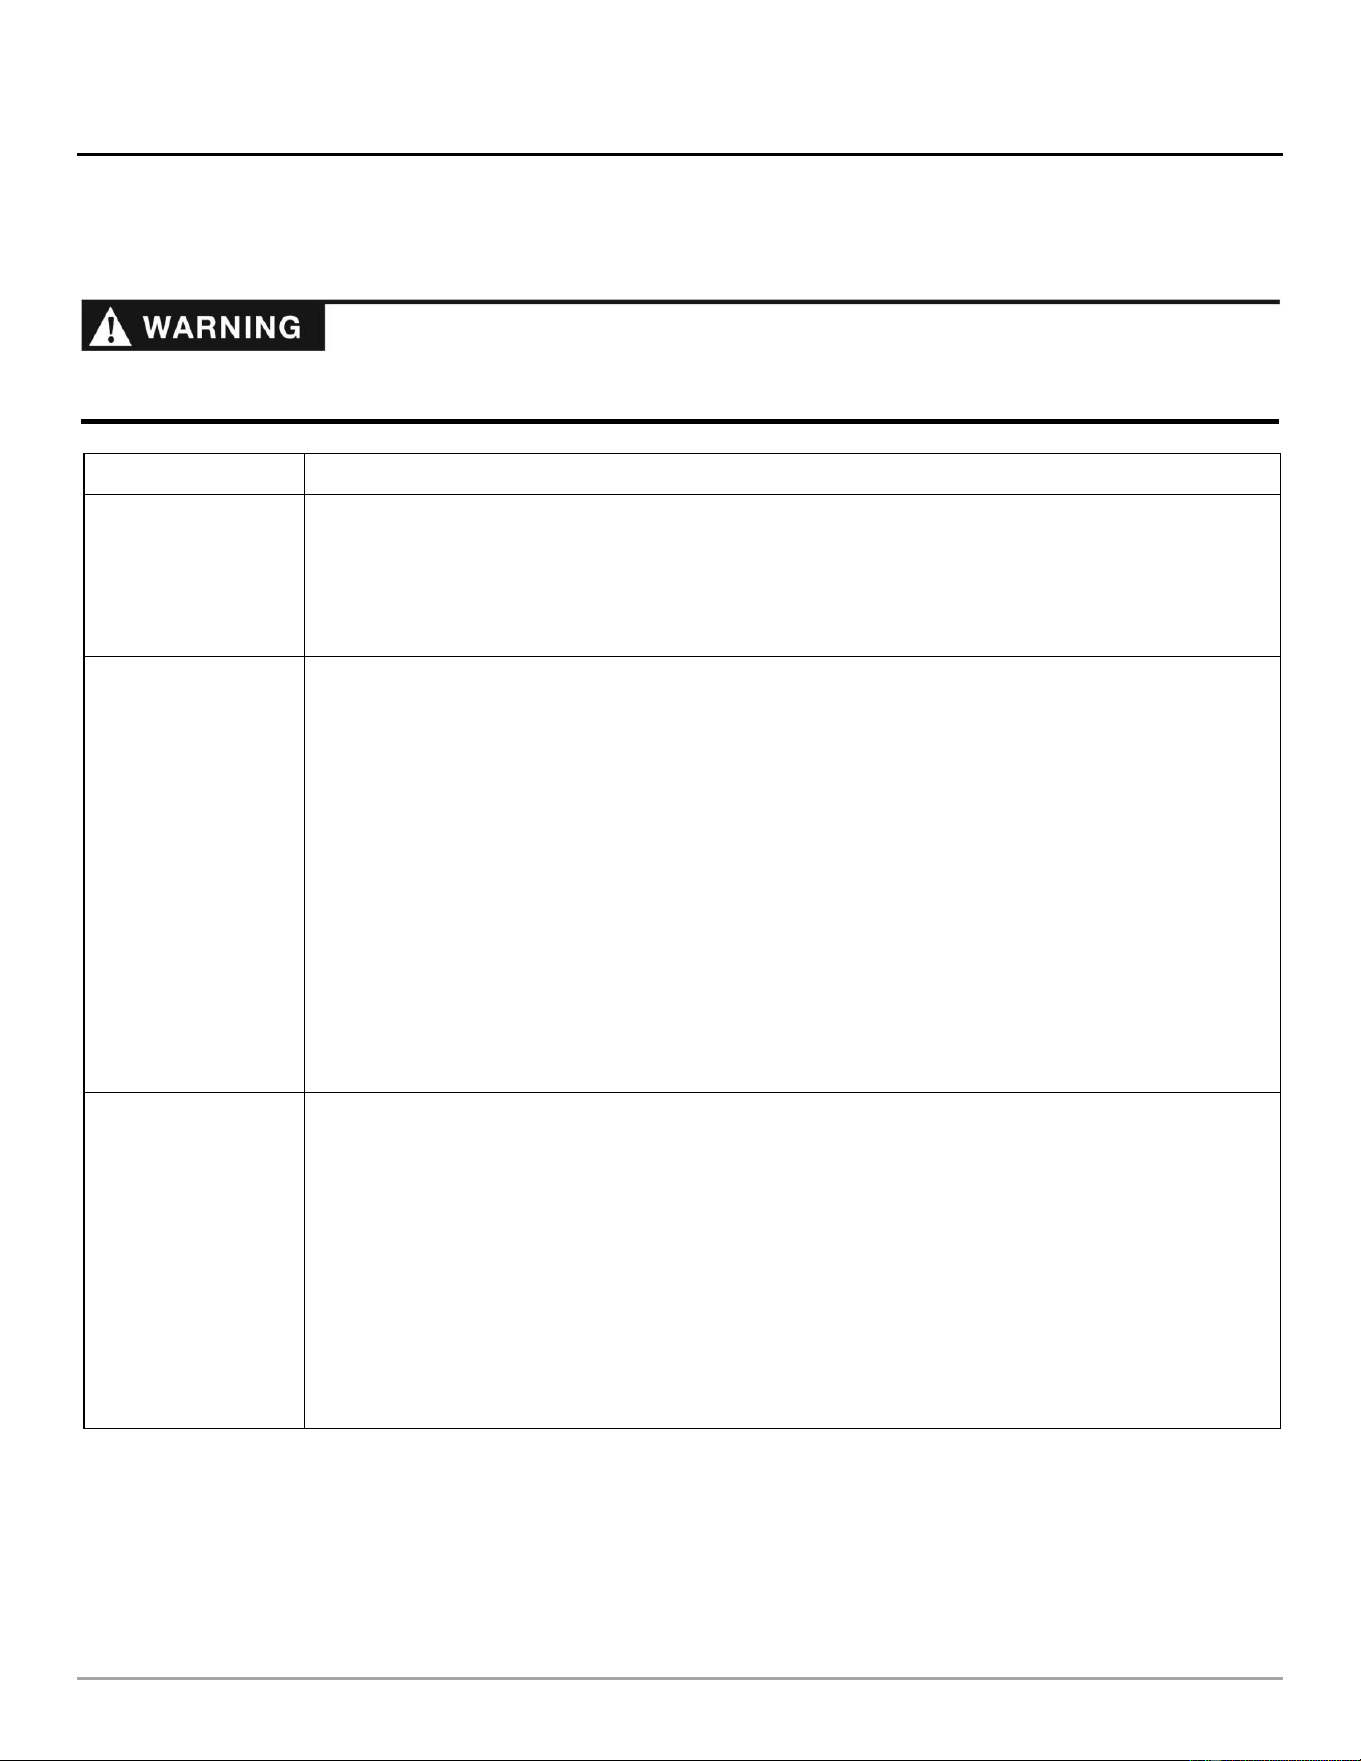
Note: Observe the location and space of the Belt Guides in reference to the Belt and
Engine Pulley before the next step.
4. Loosen the Bolts that secure the two Belt Guides to the Engine using a
13mm Wrench and leave the Guides in place (Figure 28).
5. Remove the Belt from around the Engine Pulley, Idler Pulley, and
Transmission Pulley.
6. Install the new Belt around the Engine and Transmission Pulleys and inside
the Idler Pulley.
7. Position the Belt Guides on the outside of the Belt with about 1/8" between
the Guides and Engine Pulley as you tighten the Bolts. When the Guide
Bolts are tight, ensure the Guide is approximately 1/8" away from the Pulley
and not touching the Belt.
8. Reposition the Upper Belt Guide and secure at the top with the Bolt, Lock
washer and Flat Washer.
9. Reposition the Lower Belt Guide and secure with the four Bolts, Lock
Washers and Flat Washers.
10. Readjust the Drag Stake to the transport position.
Tine Shear Pins
The DR FRONT TINE TILLER drive components are protected from damage by Shear Pins in the Tine Assemblies. The Shear Pins
hold the Tine Assemblies in the proper location on the Drive Axles. Should a Tine Assembly strike or pick up a large object and
jam, the Shear Pin holding the Tine Assembly to the drive shaft will shear, protecting the drive components of the DR FRONT
TINE TILLER from major damage. Replace Damaged or missing Shear Pins.
Engine Maintenance
For information on engine maintenance, refer to the Engine Manual included with your machine. Your engine manual provides
detailed information and a maintenance schedule for performing maintenance tasks.
NEVER attempt to use a Shear Pin that is larger or harder than the original grade of Shear Pin.
18 DR
®
FRONT TINE ROTOTILLER
Chapter 5: Troubleshooting
Most problems are easy to fix. Consult the Troubleshooting Table for common problems and their solutions. If you continue to
experience problems, visit our website at www.DRpower.com or call: 1-800-DR-OWNER (376-9637) for support.
Troubleshooting Table
SYMPTOM
POSSIBLE CAUSE
Recoil will not pull out
or is difficult to pull.
Check the Engine Oil level; the Engine may be seized.
There may be an Oil compression lock in the Cylinder. Take out the Spark Plug; hold a rag over the
Spark Plug Hole and pull the Recoil Cord several times to blow out any Oil in the Cylinder. Wipe off
the Spark Plug and reinstall it.
The Recoil may be broken or jammed. Visit our website at www.DRpower.com.
The Engine will not
start.
(Please refer to the
Engine Owner’s
Manual for Engine-
specific procedures.)
Check that the Spark Plug Wire is attached.
Check the Oil and Gas level.
The Gas may be old; change it if necessary. Use a fuel stabilizer if you keep Gas longer than one
month.
The Fuel Tank may be clogged. Remove it and clean it out.
Check the Throttle and Choke settings, adjustment and travel.
The Engine is "Choked" improperly, flooding the Engine. Move the Choke to the RUN position,
move the Throttle to the FAST position and pull the Recoil Starter several times to clear out Gas.
The Spark Plug may be dirty or cracked; change it if necessary. If it’s oily, leave it out, hold a rag
over the Plug Hole and pull the Recoil Cord several times to blow out any Oil in the Cylinder, then
wipe off the Plug and reinsert it.
The Air Filter may be dirty; change it following the procedure in the Engine Owner’s Manual.
If your Engine still won’t start, visit our website at www.DRpower.com.
The Engine lacks
power or is not
running smoothly.
(Please refer to the
Engine Owner’s
Manual for engine-
specific procedures.)
The Engine is overloaded. Set Depth Stake and Wheels for shallower tilling.
Check the Throttle; it should be set in the FAST position.
The Air Filter may be dirty; change it following the procedure in the Engine Owner’s Manual.
The Spark Plug may be dirty or cracked; change it if necessary. If it’s oily, leave it out, hold a rag
over the Plug hole and pull the Recoil Cord several times to blow out any Oil in the Cylinder, then
wipe off the Plug, check the gap and reinsert it.
The Gas may be old; change it if necessary. Use a fuel stabilizer if you keep Gas longer than one
month.
The Engine Oil may be dirty. Change it if necessary.
If your Engine still lacks power, visit our website at www.DRpower.com.
When performing any maintenance, you must first shut off the Engine; wait five minutes to allow parts to cool and disconnect the
Spark Plug Wire, keeping it away from the Spark Plug.
CONTACT US AT www.DRpower.com 19
SYMPTOM
POSSIBLE CAUSE
Engine smokes and
overheats.
Check the Oil level and adjust as needed.
The Air Filter may be dirty; change it following the procedure in the Engine Owner’s Manual.
You may be using the wrong Oil. Refer to your Engine Owner’s Manual for detailed information.
Clean the Engine cooling fins and the Carburetor Housing if they are dirty.
If the Engine still smokes, visit our website at www.DRpower.com.
The Engine runs well
but the Tines won’t
move.
Shear Pins damaged.
The Tine Drive Lever is not engaged.
The Tine Drive V-Belt is off the pulleys or broken.
The Engine runs well
but labors when
tilling.
Operator is being too aggressive; raise the Tines.
The tilling is too deep. Adjust the Depth Stake.
Be sure the Engine Throttle is set on the Fast (RABBIT) position.
Excessive bounce and
difficult handling.
The area you are tilling may be too dry and hard. Moisten the ground or wait for conditions that are
more favorable.
Be sure the Engine Throttle is set on the Fast (RABBIT) position.
The Drag Stake are incorrectly adjusted. Readjust Drag Stake.
If your DR FRONT TINE ROTOTILLER still bounces, visit our website at www.DRpower.com.
The tilled soil balls up
or clumps.
The ground that you are trying to till is too moist.
Tiller surges forward.
Drag Stake is set too high. Lower the Drag Stake to slow the machines forward motion.
The Tines are engaged while on the ground or in the soil. Ensure the Tines are raised and are not
in contact with anything before engaging.
Tilling in an area with large roots, surface rocks or other debris. Remove obstacles if possible. If
obstacles cannot be removed, do not use the Tiller in that area.
The rotating Tines are lowered too fast. Lower the Tines slowly into area to be tilled to prevent
overload; especially in untilled sod.
When performing any maintenance, you must first shut off the Engine; wait five (5) minutes to allow parts to cool and disconnect
the Spark Plug Wire, keeping it away from the Spark Plug.

20 DR
®
FRONT TINE ROTOTILLER
Chapter 6: Parts Lists, Schematic Diagrams and Warranty
Parts List - Main Assembly
Note: Part numbers listed are available through DR Power Equipment.
Ref# Part# Description
1 A0000946500 Grip-Handlebar
2 A0001316953 Handlebar-Upper
3 A0000946502 Handlebar Knob-M8 X 25
4 A0000946503 Cable-Tensioning Pulley
5 A0000947567 Cap Screw-M6 X 35
6 A0000947568 Nut-M5 Flange Nylon Lock
7 A0001316958 Lever-Drive Control
8 A0000947569 Hex Bolt-M5 X 40
9 A0000947584 Nut-M6 Nylon Lock
10 A0000947585 Hex Bolt-M8 X 25 Flange
11 A0001316960 Bracket-Handlebar Adjust
12 302471 Washer-M8
13 333421 Nut-Nylon Lock Flanged M8-1.25 Cl8
Zp
14 A0001316961 Handlebar-Lower
15 A0000947598 Hex Bolt-M8 X 45
16 A0000946508 Drag Stake
17 A0000946510 Cap-Wheel
18 A0000946511 Belt-4lxp85
19 402911 Hex Bolt-M6 X 20
20 A0000941125 Washer-M6 Split Lock
21 A0000940904 Washer-M6 Flat
22 A0000946513 Pulley-Small
23 A0000946515 Flat Key-Pulley 5 X 5 X 30
24 A0000946516 Pulley-Tensioning
25 A0000938005 Hex Bolt-M8 X 30
26 303611 Washer-M16 Flat
27 A0000940903 Washer-M8 Split Lock
28 A0000946517 Lock Ring-Drive Pulley
29 A0000946518 Bushing-Bearing
30 A0000946519 Belt Guide-Upper
31 A0000946521 Belt Guide-Lower
32 A0000947524 Return Spring-
33 A0000947525 Bushing-Slide
34 A0000947526 Bracket-Tensioning Pulley
35 A0001316965 Guard-Upper Belt
36 A0000947666 Hex Bolt-M10 X 100
37 A0000947667 Hex Bolt-M8 X 235
38 A0000947668 Hex Bolt-M6 X 16 Flange
39 A0000940904 Washer-M6 Flat
40 A0000947672 Hex Bolt-M6 X 40
41 337031 Hex Bolt-M8 X 25
42 324001 Hex BOLT-M8 X 20
Ref# Part# Description
43 A0000947682 Washer-M8 Flat
44 A0000947528 Bracket-Belt Guard Mount
45 A0001316841 Engine-Dr 98cc
46 A0000953186 Hex Bolt-M8 X 40
47 A0001316967 Frame Weldment-
48 A0000953197 Nut-M10 Nylon Lock
49 A0000953202 Washer-M10 Flat
50 A0001316970 Tine Shield-Left
51 A0000947531 Bushing-Wheel
52 A0000947532 Wheel-
53 A0000947584 Nut-M6 Nylon Lock
54 A0001316971 Tine Shield-Middle
55 A0001316973 Tine Shield-Right
56 A0000953209 Hex Bolt-M6 X 16
57 A0000953210 Pin-8 X 32
58 A0000953211 Cotter Pin-2.5mm Dia X 45
59 A0000947535 Bracket-Cable
60 371321 Hex Bolt-M10 X 50
61 A0000947536 Inner Tine-Right
62 A0000953216 Pin-8 X 45
63 A0000947537 Outer Tine -Right
64 A0000947538 Case-Transmission
65 A0001316974 Guard-Lower Belt
66 A0000947540 Inner Tine-Left
67 A0000947541 Outer Tine-Left
68 A0000947542 Cover-Bearing
69 A0000941175 Cap Screw-M6 X 25
70 A0000947544 Oil Seal-Fb25 X 40 X 8
71 A0000947545 Transmission Case-Right
72 A0000947546 Snap Ring-25
73 A0000947547 Bearing-6005 - 2z(Hch)
74 A0000947549 Bushing-Worm Gear
75 A0000947550 Bearing-30204(Hch)
76 A0000947551 Axle-Worm Gear
77 A0000947552 Worm-
78 A0000947553 Flat Key-Worm Gear A6 X 28
79 A0000947554 Worm Gear-
80 A0000947555 Bearing-6004 - 2rs
81 A0000947556 Flat Key-Worm Pulley 5 X 5 X 20
82 A0000947557 Pulley-Worm
83 A0000947558 Transmission Case-Left
84 A0000947736 Hex Bolt-M8 X 12
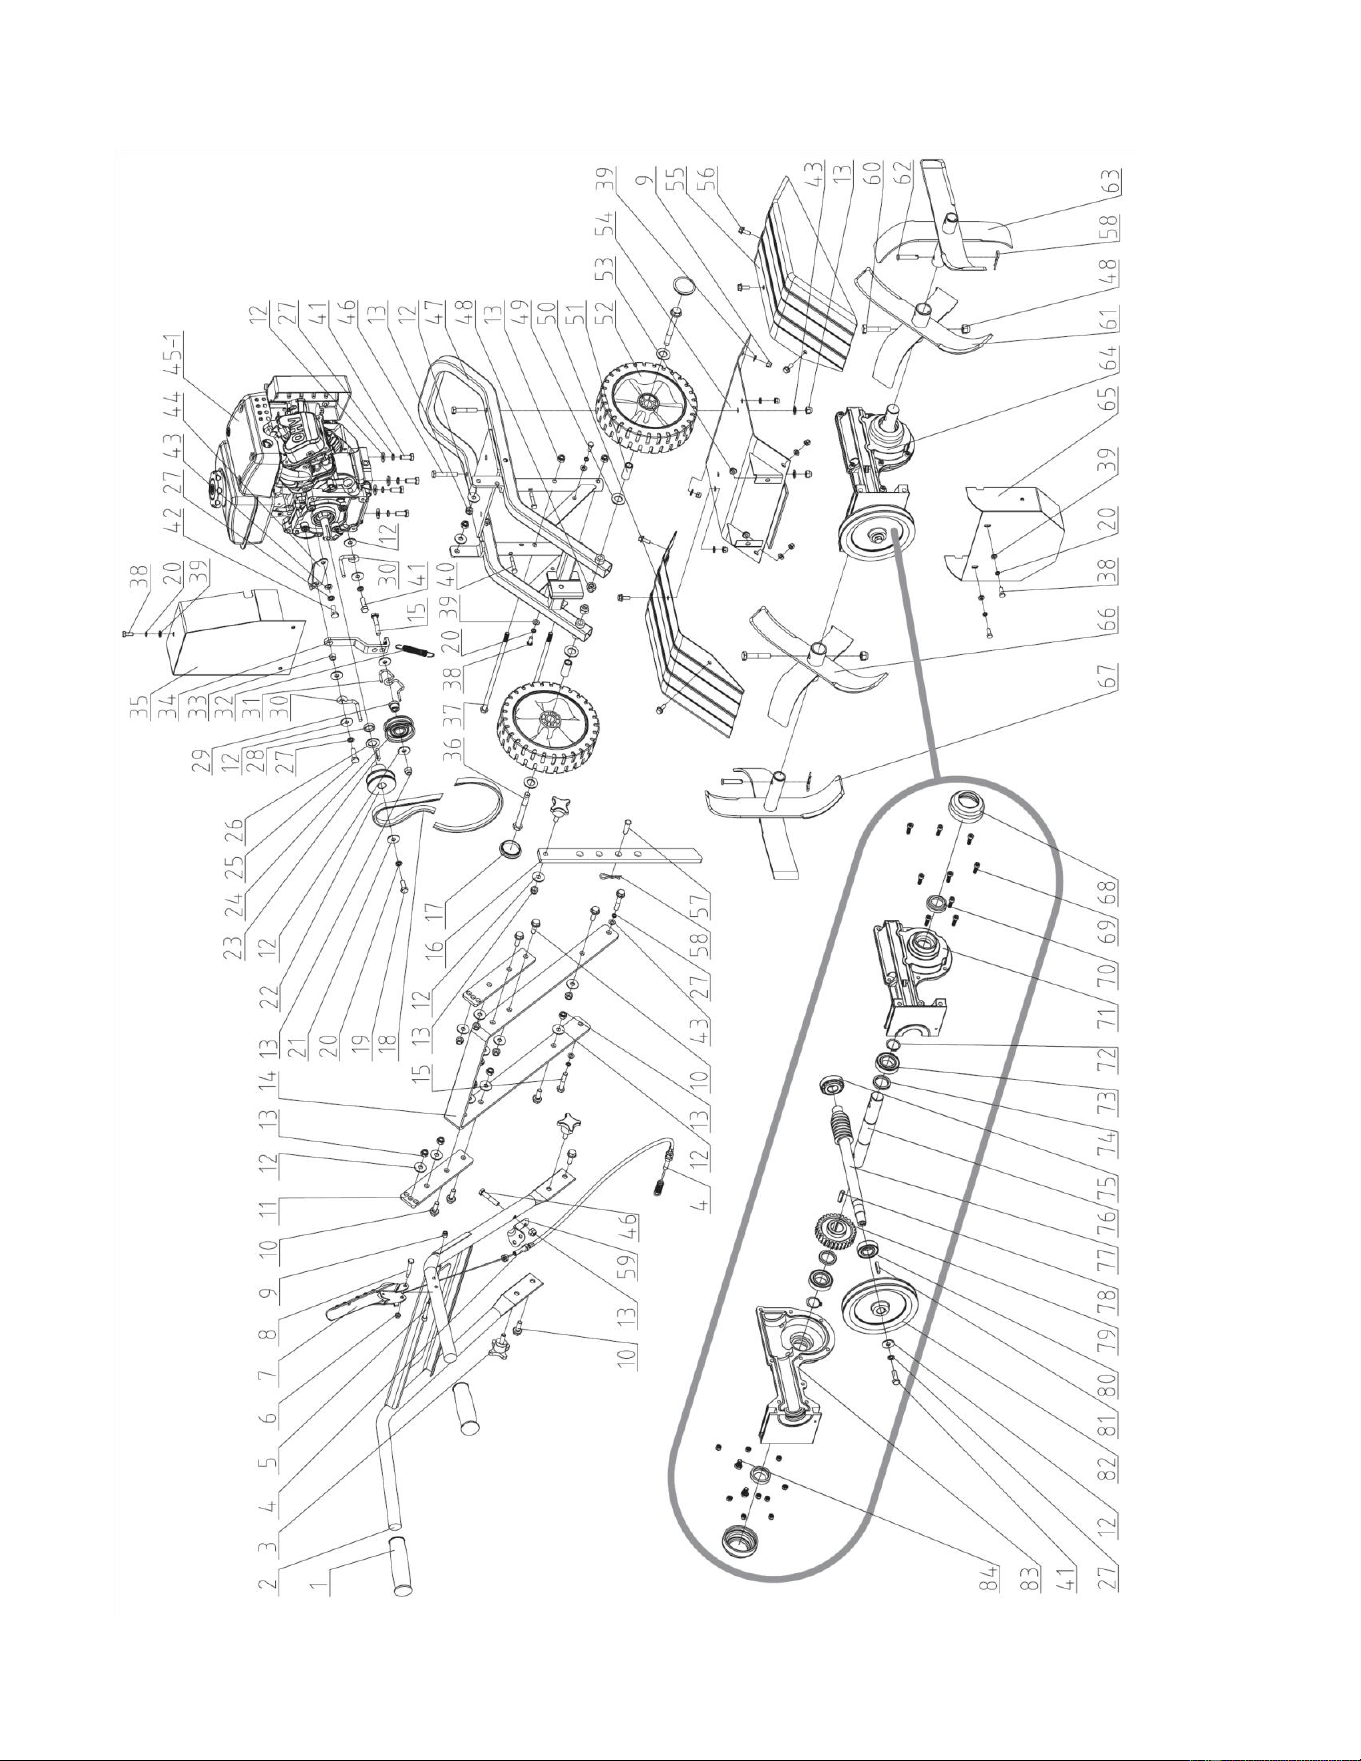
Schematic Diagram - Main Assembly

22 DR
®
FRONT TINE ROTOTILLER
Notes:
Contact us at www.DRpower.com 23
2-Year Limited Warranty
Terms and Conditions
The DR
FRONT TINE ROTOTILLER is warranted for two (2) years against defects in materials or workmanship
when put to ordinary and normal consumer use; ninety (90) days for any other use. The Engine Manufacturer
warrants the Engine separately.
For the purposes of all the above warranties, “ordinary and normal consumer use” refers to non-commercial
residential use and does not include misuse, accidents, or damage due to inadequate maintenance.
DR
Power Equipment certifies that the DR
FRONT TINE ROTOTILLER is fit for ordinary purposes for which a
product of this type is used. DR
Power Equipment however, limits the implied warranties of merchantability and
fitness in duration to a period of two (2) years in consumer use, ninety (90) days for any other use.
The 2-Year Limited Warranty on the DR
FRONT TINE ROTOTILLER starts on the date the machine ships from our
factory. The 2-Year Limited Warranty is applicable only to the original owner.
The warranty holder is responsible for the performance of the required maintenance as defined by the
manufacturer's owner manuals. The warranty holder is responsible for replacement of normally wearing parts such
as the Drive Belt, Tines, Tires, Shear Pins, Spark Plug and Air Filter. Attachments and accessories to the machine
are not covered by this warranty.
During the warranty period, the warranty holder is responsible for the machine transportation charges, if required.
During the warranty period, warranty parts will ship by standard method at no charge to the warranty holder.
Expedited shipping of warranty parts is the responsibility of the warranty holder.
SOME STATES DO NOT ALLOW LIMITATIONS ON THE LENGTH OF IMPLIED WARRANTIES, SO THE ABOVE
LIMITATIONS MAY NOT APPLY TO YOU.
DR
Power Equipment shall not be liable under any circumstances for any incidental or consequential damages or
expenses of any kind, including, but not limited to, cost of equipment rentals, loss of profit, or cost of hiring services
to perform tasks normally performed by the DR
FRONT TINE ROTOTILLER.
SOME STATES DO NOT ALLOW THE EXCLUSION OR LIMITATION OF INCIDENTAL OR CONSEQUENTIAL
DAMAGES, SO THE ABOVE LIMITATIONS MAY NOT APPLY TO YOU.
THIS WARRANTY GIVES YOU SPECIFIC LEGAL RIGHTS, AND YOU HAVE OTHER RIGHTS, WHICH VARY FROM
STATE TO STATE.
DR
®
FRONT TINE ROTOTILLER
8 0 0 H I N E S B U R G R O A D , S O U T H B U R L I N G T O N , V E R M O N T 0 5 4 0 3
©2021 DR Power Equipment. All rights reserved A0001323763_A
Daily Checklist for the DR FRONT TINE ROTOTILLER
To help maintain your DR FRONT TINE ROTOTILLER for optimum performance, we recommend you follow this checklist each
time you use your machine.
[ ] Check the engine oil level.
[ ] Check the gas Level
[ ] Check the general condition of the Tiller, e.g.; nuts, bolts, welds, etc.
[ ] Check belt for wear, damage or stretching.
[ ] ENGINE: It is very important to keep the Engine clean. Remove dirt and other debris from the Engine Cooling Fins. A dirty
Engine retains heat and can cause damage to internal Engine components.
[ ] HARDWARE: Check all nuts and bolts to be sure that the components are secure.
[ ] FRAME: Check all welds to be sure that the Frame is intact and secure.
[ ] TINES: Make sure that the Tine Assemblies and Debris Shield are free of accumulated debris.
End of Season and Storage
NOTE: Please refer to the Engine Owner’s Manual for Engine-specific procedures.
Change the Engine oil.
If your DR FRONT TINE ROTOTILLER will be idle for more than 30 days, we recommend using a gas stabilizer. This will
prevent sediment from gumming up the Carburetor. If there is dirt or moisture in the Gas or Tank, remove it by draining the
Tank. Completely fill the Tank with fresh, unleaded Gas and add the appropriate amount of stabilizer or gasoline additive. Run
the Engine for a short time to allow the additive to circulate.
Remove the Spark Plug and pour about 1 ounce of motor oil into the cylinder hole. Replace the Plug and pull the Recoil Starter
Rope until you feel strong resistance. This will coat the Piston and seat the Valves to prevent moisture buildup.
Clean or replace the Engine Air Filter. Reference the Engine Owner’s Manual.
Clean dirt and debris from the Engine Cylinder Head Cooling Fins, Debris Screen, and Muffler.
Clean out residual debris from the under the Debris Shield and Tine Assemblies.
Lubricate the Tine Assemblies and Wheels.
Touch up all rusted or chipped painted surfaces. Sand them lightly before painting.
Be sure all Nuts, Bolts, and Screws are securely fastened.
Inspect moving parts and the Tine Drive Belt for damage and wear; replace if necessary.
If possible, store your DR FRONT TINE ROTOTILLER inside, but not near an open flame or spark such as found in a water
heater.
After the DR FRONT TINE ROTOTILLER has cooled, cover the machine with a suitable protective cover that does not retain
moisture. Do not use plastic, as this material cannot breathe; it also allows condensation to form, which will cause your
machine to rust.
When performing any maintenance, you must first shut off the Engine; wait five (5) minutes to allow parts to cool and disconnect
the Spark Plug Wire, keeping it away from the Spark Plug.
When performing any maintenance, you must first shut off the Engine; wait five (5) minutes to allow parts to cool and disconnect
the Spark Plug Wire, keeping it away from the Spark Plug.