VIVALNK
Medical Wearable Platform
Only
INSTRUCTIONS FOR USE LBL 75-06-132 Rev 01


Contents
Medical Wearable Platform Description
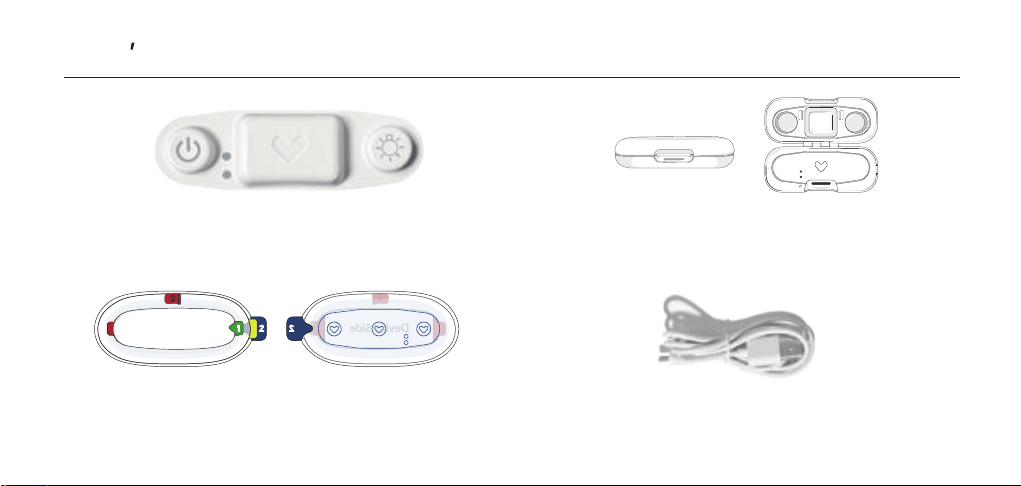
What's Included
Intended Use & Precautions
Instructions for Use
Charging, Storage & Maintenance
Instructions for Authorized Persons
Troubleshooting
Certification & Disclaimer
Electromagnetic Compatibility (EMC) Tables
Wireless Technology
Technical Specifications
Definition of Symbols
1
3
4
7
25
27
30
31
33
35
36
39
01/40

This document provides instructions for the Medical Wearable Platform. The Medical Wearable Platform is an end-to-end solution for
multi-parameter monitoring, including continuous recording, display, and analysis of multiple physiologic parameters by healthcare professionals
in a home or healthcare setting.
The Platform consists of the following:
1) a Multi Vital Sensor (aka. the Recorder), rechargeable or single-use.
2) single use, disposable Hydrogel Adhesive Patch.
3) a Charging Case and USB cable.
4) Software Library for Authorized Persons to build their own app.
5) a Mobile App, built upon the Software Library (4) as an option for end-users.
6) Cloud Data Services.
7) Web Portal.
The platform does not make any independent diagnosis or determinations; it provides data, preliminary analyses, and data visualizations to
healthcare professionals for interpretation.
The Medical Wearable Platform‘s Software Library is developed as an Application Programming Interface (API), intended to be used as a
programming platform to allow Authorized Persons (i.e. health care services providers) to develop applications enabling target users (i.e.
physicians, caregivers, patients) to view or access collected vital information.
The device provides operational alarms, shown as an audible chime and a text notification, for lead on/off status detection, battery monitoring.
Over the Air (OTA) updates, real time clock, and power management. The operational alarms are intended to notify users of any interruption in
data and of the overall operation status of the device. The device does not provide any alarms based on physiological data setting.
Medical Wearable Platform Description
02/40
i
What s Included
Multi Vital Sensor
x1
Charger
x1
Adhesive
x4
USB Charging Cable
x1
Device Side
Device Side
Liner #3 only available on part of adhesive models
03/40

i
Intended Use and Precautions
Intended Use
Precautions
The Medical Wearable Platform is a wireless monitoring system intended
for use by healthcare professionals for recording and displaying
multi-parameter physiological data within healthcare settings or at home.
This includes electrocardiogram (ECG), accelerometer and gyroscope
data (activity), heart rate, respiratory rate, and skin temperature. Data is
transmitted wirelessly to a separate location (such as mobile phones and
web applications) for storage and display.
The Medical Wearable Platform can be configured by Authorized
Persons developing their own applications utilizing the software library
and application programming interfaces provided.
The Medical Wearable Platform is not intended to be used on critical care
patients and is intended to supplement vital sign monitoring by healthcare
professionals, not to replace current standards of care. The Medical
Wearable Platform is an ambulatory, continuous recording system
intended for use on general care patients and on patients who are 18
years of age or older.
1. Any form of modification to this device is forbidden.
2. The Multi Vital Sensor is to be worn on chest. Do not use this
device if it cannot stay in contact with the skin and do not use on
wounded or irritated skin.
3. This device is non-sterile.
4. Do not submerge the device in water. The device may be
removed and re-applied after showering or bathing with a new
adhesive.
5. Pacemakers and implantable cardioverter defibrillator (ICD)
are allowed to use with the Multi Vital Sensor. However, do not
use the Multi Vital Sensor with other defibrillators, or other
implanted electronic devices. The Multi Vital Sensor is
contraindicated for use during defibrillation.
6. Do not wear or use the device during a magnetic resonance
imaging (MRI), or electro-cautery procedures. The Multi Vital
Sensor is MR Unsafe.
04/40

i
Intended Use and Precautions
05/40
7. Exposure of the wireless communications features of the device, or
its accessories, may be interfered with by other devices that operate on
the same frequencies.
8. Excessive body tissue, hair, or dry skin may affect the signal quality.
9. Do not excessively bend or twist the device.
10. In case of skin discomfort, remove the device immediately.
11. User may only charge the device via USB cable with the provided
charger. No user serviceable part is provided for this product.
12. The performance of the device may be degraded if one or more of
the following occur: a) operation outside the manufacturer's stated
temperature, humidity and pressure range; b) storage outside the
manufacturer's stated temperature, humidity and pressure range; c)
mechanical shock (for example, being dropped).
13. Please contact customer service at [email protected] if you
have any questions.
14. For best results, the Multi Vital Sensor must be used with the
provided adhesives.
15. No servicing/maintainance required while the device is in use.
16. Not for use in an oxygen rich enviroment.
17. Before every use, check the device. Do not use the device if it is
damaged. The continuous use of a damaged unit may cause improper
results.
18. If the device is not charging or the device is not working, please
contact the authorized maintenance personnel.
19.Be careful to potential allergic reactions to Silicone and Hydrogel that
are primary materials of the Multi Vital Sensor and adhesive.
20.The device should be used only with the components
recommended for use by the manufacturer.
21. When not in use, store the device in a dry room and protect it
against extreme moisture, heat, lint, dust and direct sunlight.
22. Never place any heavy objects on the storage case.
23. The device is not intended for measuring and/or analyzing ST
segments.

i
Intended Use and Precautions
24. The device does not analyze the ECG tracing or detect the
presence of any arrhythmias. lt is simply an Recorder.
25. In case of interference from other RF emitters in the vicinity, follow
Troubleshooting steps listed below.
26.When the device battery is fully discharged, charge it first then
reconnect to the Mobile app via Bluetooth before re-attaching to the
body to get Clock Synchronization.
27. Caution: Federal law restricts this device to sale by or on the order
of a physician.
28. Do not remove the adhesives by pulling on the dome circles on top
of the electrodes or by peeling the edge of the device. Doing so may
break the device, and render it nonfunctional.
29. lmmediately after each use, gently wipe the device with alcohol
until all adhesives residue are removed. Excessive cleaning or strong
scrub or using non-recommended solvents may damage the
electrodes and render the device unfunctional.
30. Properly and carefully insert the provided USB type-C cable into
the charging case and connect it to a USB power source to charge the
device.
31. Using strong insertion force or different USB cable will damage the
charging port and make the case no longer charging the device.
32. VivaLNK's email for complaint: [email protected].
YBER SECURITY:
1. Device pairing: ensure LOT#/SN returned to the Mobile app from
Multi Vital Sensor matches with the LOT#/SN printed on back of the
device. Do not connect the Mobile app to any unknow devices.
2. Do not attempt to connect any unknown devices to Multi Vital
Sensor or Authorized Persons
3. AlI Multi Vital Sensor data is encrypted for security purposes. The
Software Library needs a decryption key to decrypt the data, and then
send the data to Mobile app to display.
4. The Multi Vital Sensor will not connect or transfer data to any
devices that does not use VivaLNK provided Software Library
package. The Bluetooth protocol of Multi Vital Sensor firmware and
Software Library is proprietary to VivaLNK and cannot be intercepted
by other unknown devices.
.
06/40
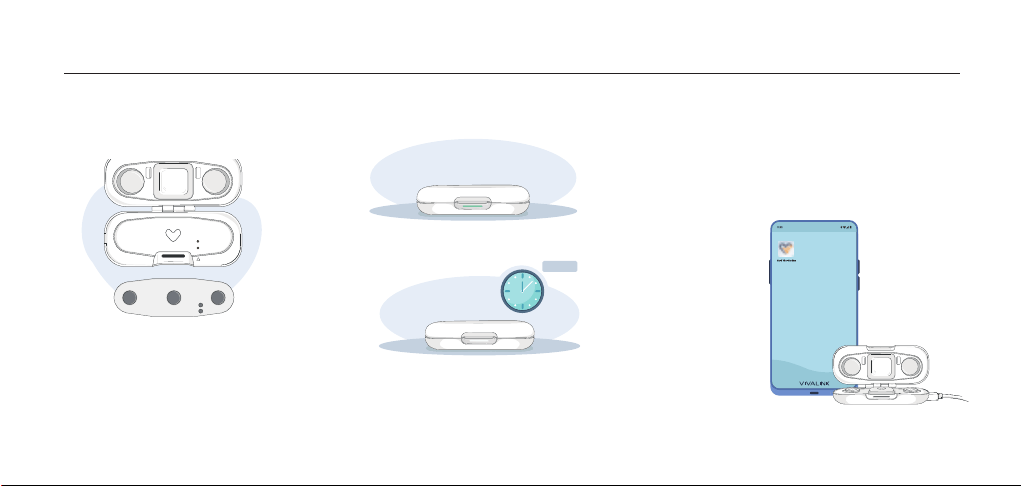
1. Place the Recorder in the
2. Fully charge the
Recorder before use
charger to recharge
i
Instructions for Use - Charging the Recorder
Note: For the charger, just clean with a dry cloth, if needed.
1-3 hours
Note: Charging can start when the provided USB type-C cable is properly and carefully inserted into
the charging case and connected to a USB power source. Using strong insertion force or different
USB cable will damage the charging port and make the case no longer charging the Recorder.
Solid White Light Indicates Charging
Solid Green Light Indicates Fully Charged
Align the two dots on the Recorder
with the two pins on the charger to
properly charge the Recorder.
3. Once charged, please pair the Recorder
to your mobile app first for synchronous
clock, then follow the instructions for
"Applying the Recorder"
07/40
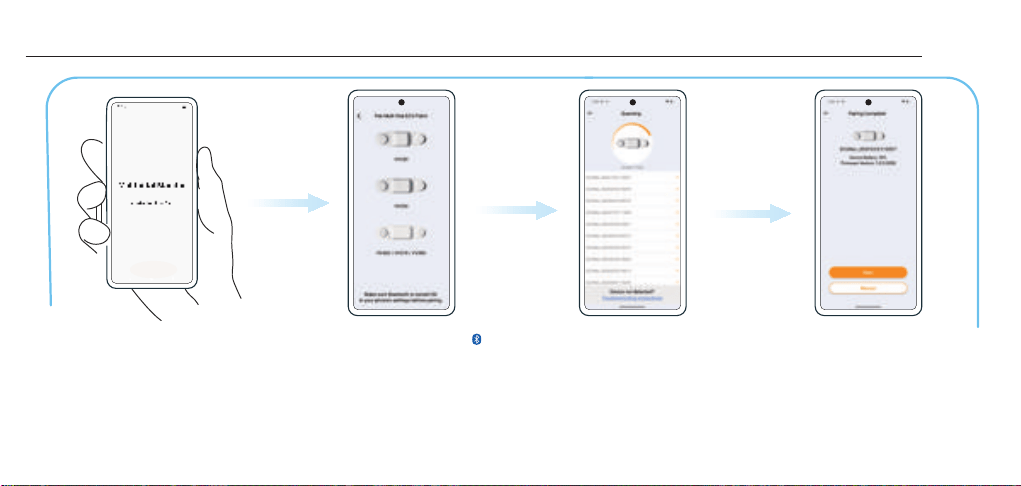
Instructions for Use - Download the Mobile App and Pairing via Bluetooth
1) Contact [email protected],
download and install the Multi Vital
Monitor App (aka. MVM App, v4.0.0)
from link provided or app stores and
follow instructions to create an
account and set up your profile.
2) Make sure Bluetooth
is turned ON in your
phone settings and then
click the product image
to “Start Pairing”.
3) Select the Recorder SN that
matches with the SN listed on the
packaging or back of your Recorder.
If device not found, select
“Troubleshoot” and follow the
instructions.
4) Once pairing is successful, you
should see the Recorder battery and
the firmware version. The Recorder
is now connected to the MVM App
and you are set to view your ECG
and other vital signs.
08/40
Note: refer to the separate Instruction for Use for more clear procedures on Mobile App operation, the
file ID is LBL 75-06-114. Please contact VivaLNK Customer Service to obtain if need.
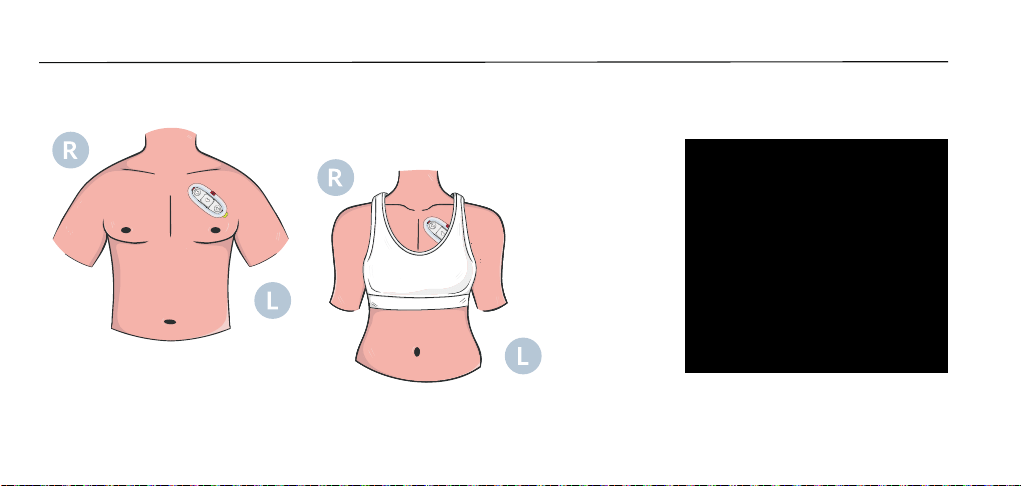
Position #1 Position #2
Instructions For Use - Device Wear Positions
Applicable Adhesive Models: A13, A34, A35, A50, A60
Applying Procedures: Refer to Pages 10-16
Applicable Adhesive Model: A51
Applying Procedures: Refer to Pages 17-23
09/40
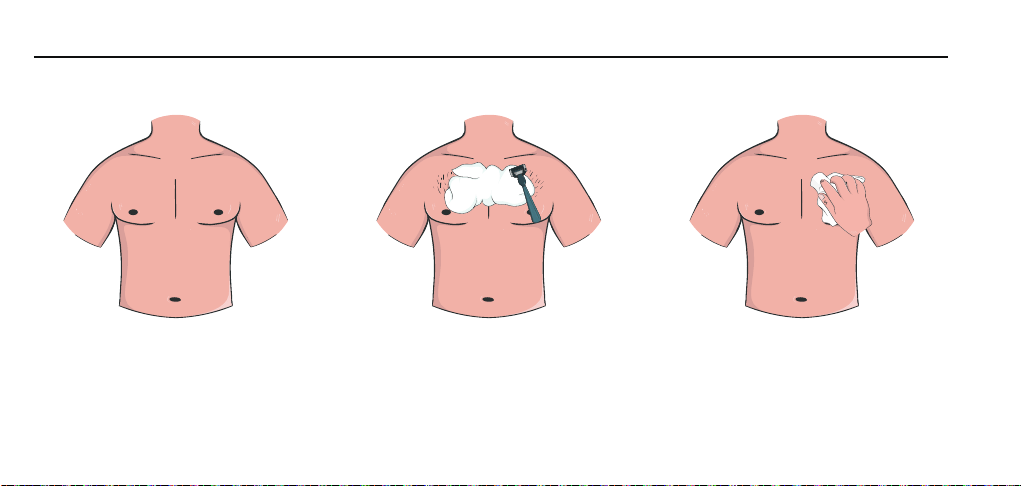
Instructions For Use - Skin Preparation (Position #1)
2. Shave application area
Shave the area on the sternum or middle of your
chest, as shown in the pictures. Chest hair can
interfere with the contact between the hydrogel and
your skin, affecting the Recorder's performance.
Avoid Open Wounds:
Do not apply the Recorder on open wounds
or broken skin.
3. Clean your skin
Clean the designated area on your chest
with a 70% isopropanol wipe and let it
dry for one to two minutes.
This removes any lotion or oil, ensuring
better Recorder performance and
reducing skin irritation.
1. Remove clothing
Remove your shirt and bra so your
upper chest is exposed.
10/40
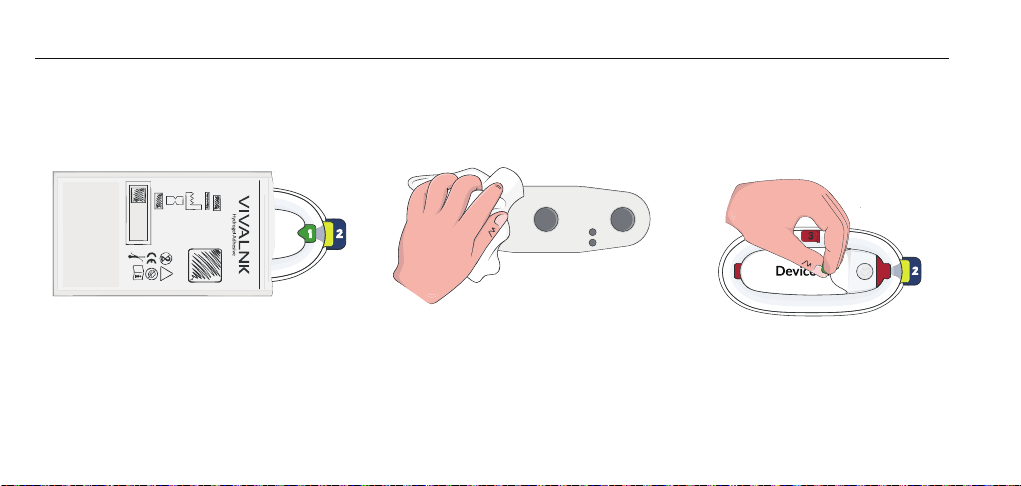
3. Remove liner 1
( Green Tab )
On a clean, flat surface, peel off the liner strip
(Green Tab) from the top of the adhesive.
2. Clean the Recorder
Use a 70% isopropanol wipe to clean the
Recorder before and after each use.
1. Prepare the adhesive
Open a bag of adhesives for the
Recorder and remove the adhesive.
Instructions for Use - Applying Adhesive (Position #1)
11/40
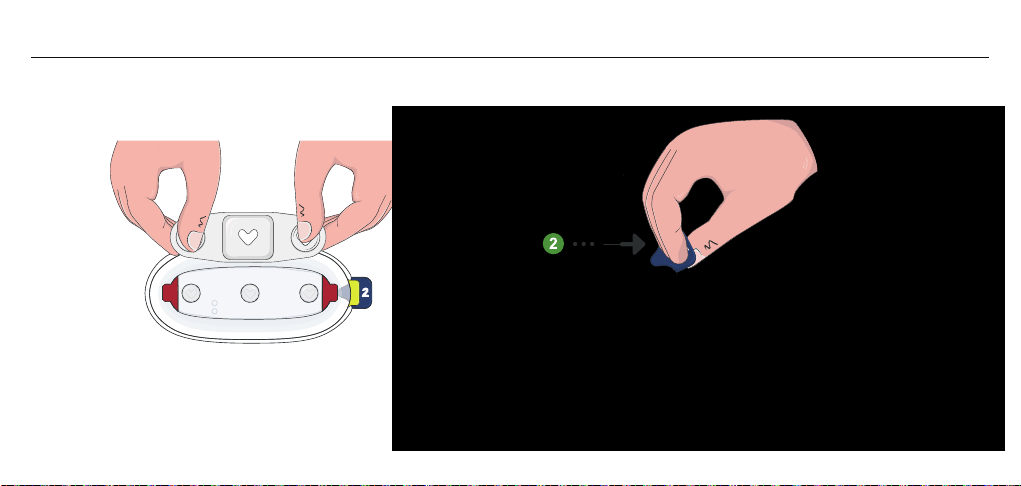
Instructions for Use - Applying Adhesive (Position #1)
5. Remove liner 2 ( Blue Tab )
On a clean, flat surface, peel off the liner strip
(Blue Tab) from the top of the adhesive.
4. Place the Recorder on the adhesive
Place the Recorder onto the exposed adhesive surface,
aligning the hearts on the device and the adhesive.
When positioned correctly, the heart symbols should face upward.
Press down firmly to attach it securely.
12/40
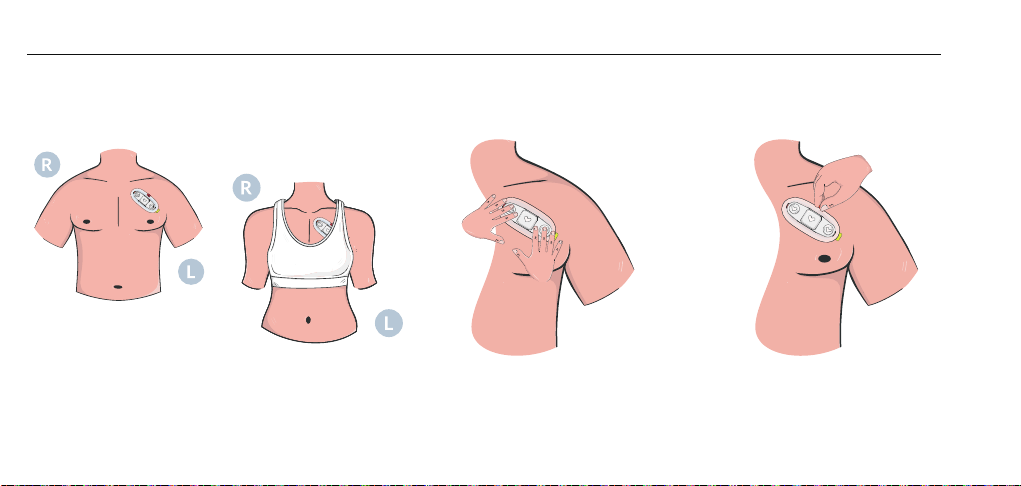
Instructions for Use - Applying the Recorder (Position #1)
1. Position Recorder
Apply it 2 to 3 finger widths below the left collar
bone (over your heart on your upper left chest)
2. Secure the Recorder
Press down on the Recorder firmly and trace
the edge of the adhesive with your finger
to ensure a firm hold.
3. Remove liner 3
( Red Tab )
A60: Peel off the liner strip
(Red Tab) from the edge of the adhesive.
* For optimal adhesion, stretch chest outward (moving shoulders back with a full inhalation), to ensure the skin is at maximum stretch.
13/40
View
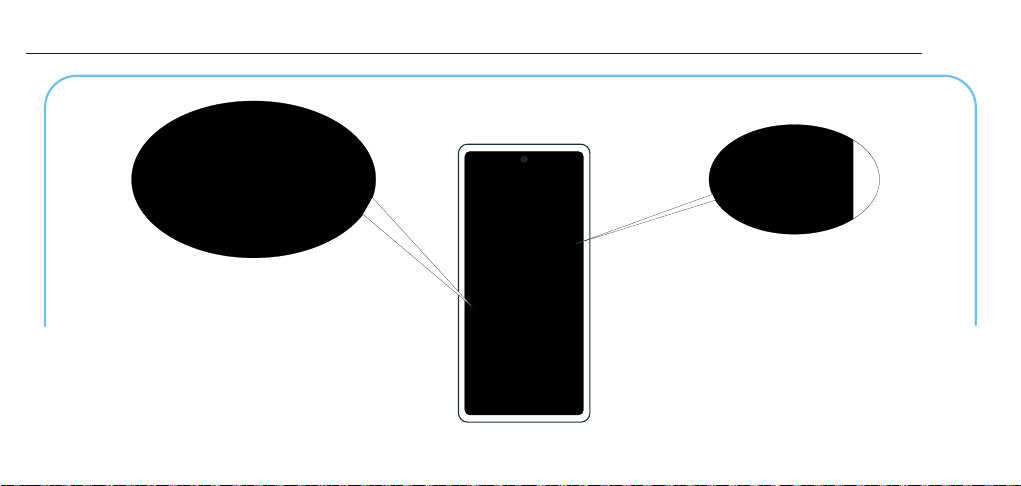
Instructions for Use - View Live ECG on MVM App
14/40
Note: refer to the separate Instruction for Use for more
clear procedures on Mobile App operation, the file ID is
LBL 75-06-114. Please contact VivaLNK Customer
Service to obtain if need.
View your live ECG and the current vital signs on the
home page after the Recorder is paired.
BATTERY section provides information
about the Recorder's battery or if the
Recorder is connected.
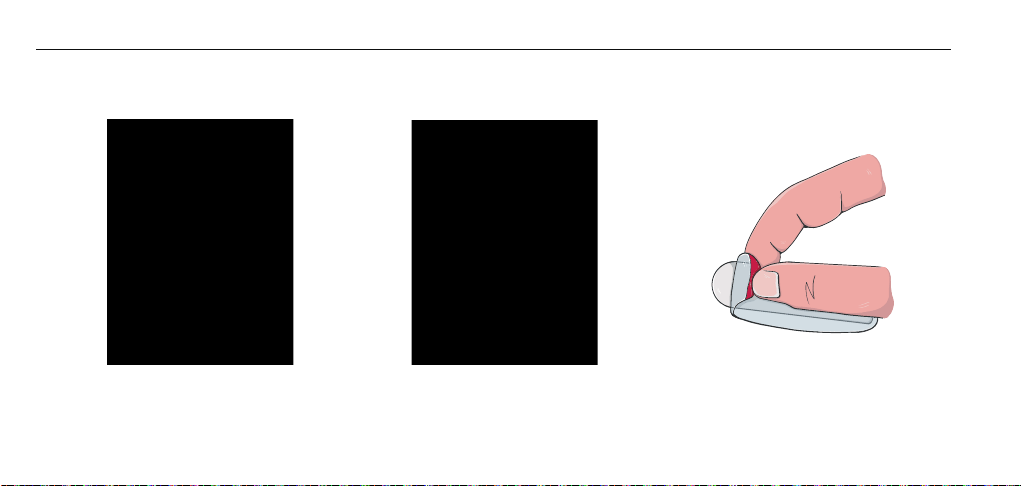
3. Remove the adhesive
from the Recorder
Peel the adhesive from the Recorder starting
from the edge or red tab. Removing the
adhesive on a flat surface may be easier. Not
to bend the Recorder.
2. Slowly remove
the Recorder
Slowly peel the yellow tab of the
adhesive to remove the Recorder
from your chest.
Note: Do not use the adhesive remover on cuts or scrapes.
Note: Do not remove the adhesives by pulling on the dome circles on top of the electrodes or
by peeling the edge of the device. Doing so may break the device, and render it unfunctional.
1. Applying adhesive
remover
Use the Uni Solve Adhesive Remover wipe.
Hold the wipe at the edge of the adhesive
tape and squeeze gently so the fluid flows
between the skin and the adhesive.
Instructions for Use - Remove Your Recorder (Position #1)
15/40
6. Cleaning your skin
Wash the skin where the Recorder was applied
using soap and water.
Rinse and pat dry.
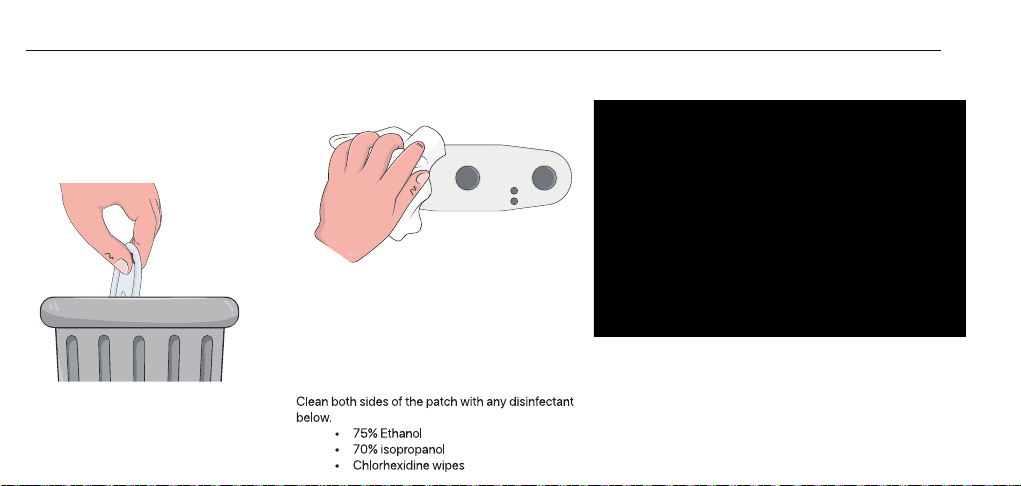
4. Discard the
used adhesive
Instructions for Use - Cleaning (Position #1)
5. Cleaning the Recorder
After discarding the adhesive, use a 70% isopropanol
wipe to remove any adhesive residue from the Recorder.
Clean the Recorder with a 70% isopropanol wipe before
and after each use. If adhesive residue has dried on
the Recorder, apply 70% isopropyl alcohol to soften
it. Then, gently wipe it off using a paper towel.
16/40
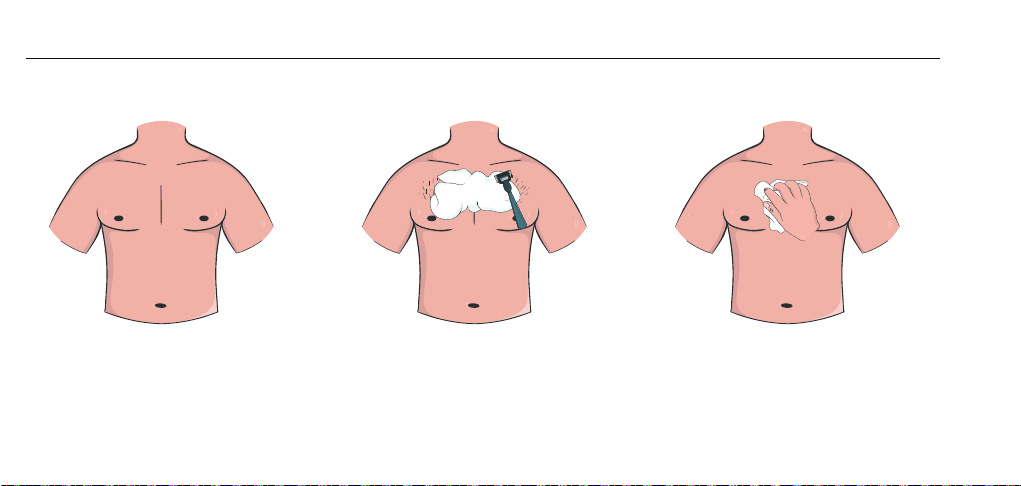
Instructions For Use - Skin Preparation (Position #2)
2. Shave application area
Shave the area on the sternum or middle of your
chest, as shown in the pictures. Chest hair can
interfere with the contact between the hydrogel and
your skin, affecting the Recorder's performance.
Avoid Open Wounds:
Do not apply the Recorder on open wounds
or broken skin.
3. Clean your skin
Clean the designated area on your chest
with a 70% isopropanol wipe and let it
dry for one to two minutes.
This removes any lotion or oil, ensuring
better Recorder performance and
reducing skin irritation.
1. Remove clothing
Remove your shirt and bra so your
upper chest is exposed.
17/40
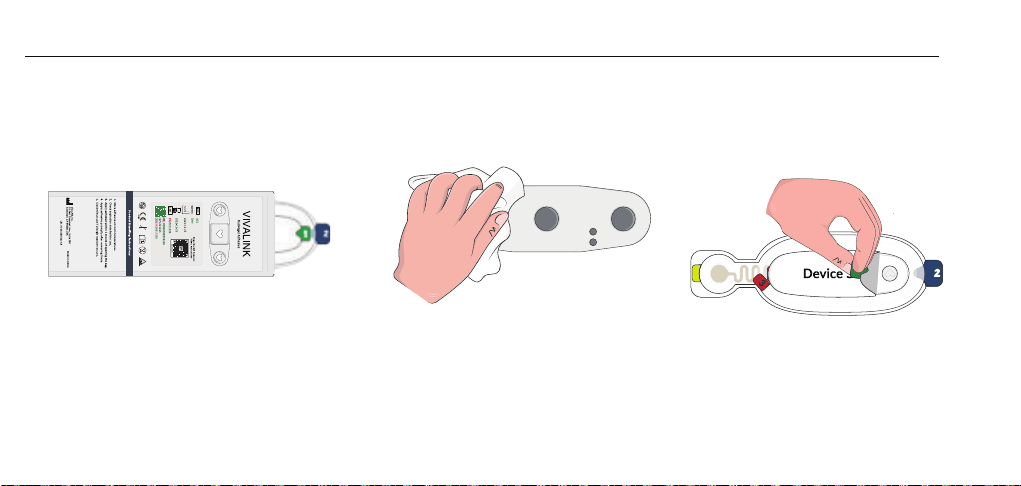
3. Remove liner 1
( Green Tab )
On a clean, flat surface, peel off the liner strip
(Green Tab) from the top of the adhesive.
2. Clean the Recorder
Use a 70% isopropanol wipe to clean the
Recorder before and after each use.
1. Prepare the adhesive
Open a bag of adhesives for the
Recorder and remove the adhesive.
Instructions for Use - Applying Adhesive (Position #2)
18/40
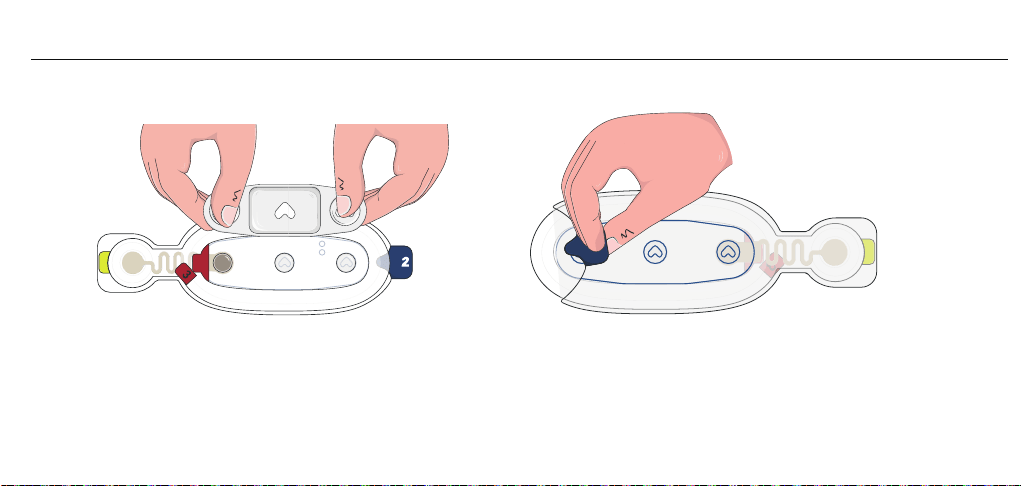
5. Remove liner 2 ( Blue Tab )
Lift the combined Recorder and peel off the backing
(Blue Tab) from the adhesive.
4. Place the Recorder on the adhesive
Place the Recorder onto the exposed adhesive surface, aligning
the hearts on the device and the adhesive.
When positioned correctly, the heart symbols should face
upward, and the adhesive tail should point to the right.
Press down firmly to attach it securely.
Instructions for Use - Applying Adhesive (Position #2)
19/40

Instructions for Use - Applying The Recorder (Position #2)
Peel off the liner strip 3 (Red Tab)
from the edge of the adhesive.
3. Remove liner 3
( Red Tab )
2. Secure the Recorder
First press the device side of the Recorder
onto your skin, then press down the adhesive
tail, making sure it points downward.
Press down on the Recorder firmly and
trace the edge of the adhesive with your
finger to ensure a firm hold.
1. Position Recorder
Position the Recorder two to three
finger-widths below your jugular notch.
* For optimal adhesion, stretch chest outward (moving shoulders back with a full inhalation), to ensure the skin is at maximum stretch.
20/40
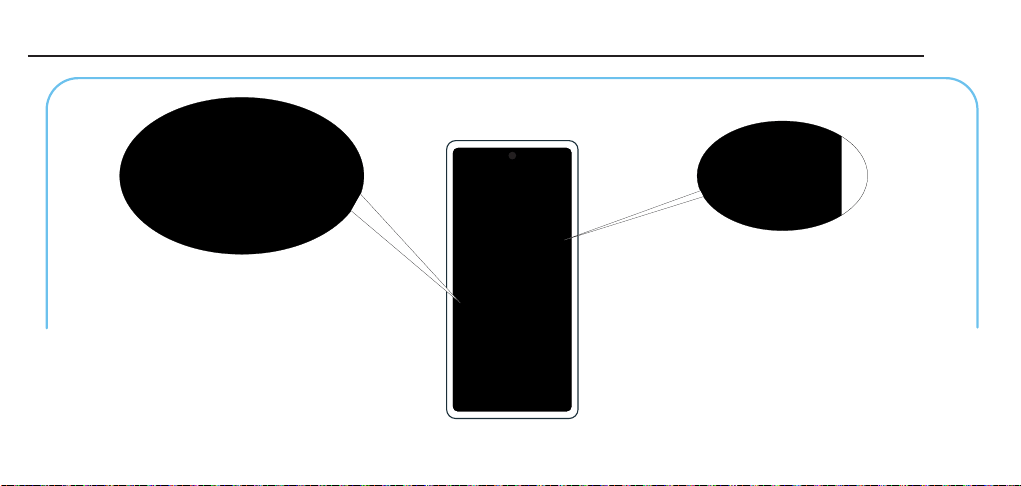
Instructions for Use - View Live ECG on MVM App
21/40
Note: refer to the separate Instruction for Use for more
clear procedures on Mobile App operation, the file ID is
LBL 75-06-114. Please contact VivaLNK Customer
Service to obtain if need.
BATTERY section provides information
about the Recorder's battery or if the
Recorder is connected.
View your live ECG and the current vital signs on the
home page after the Recorder is paired.
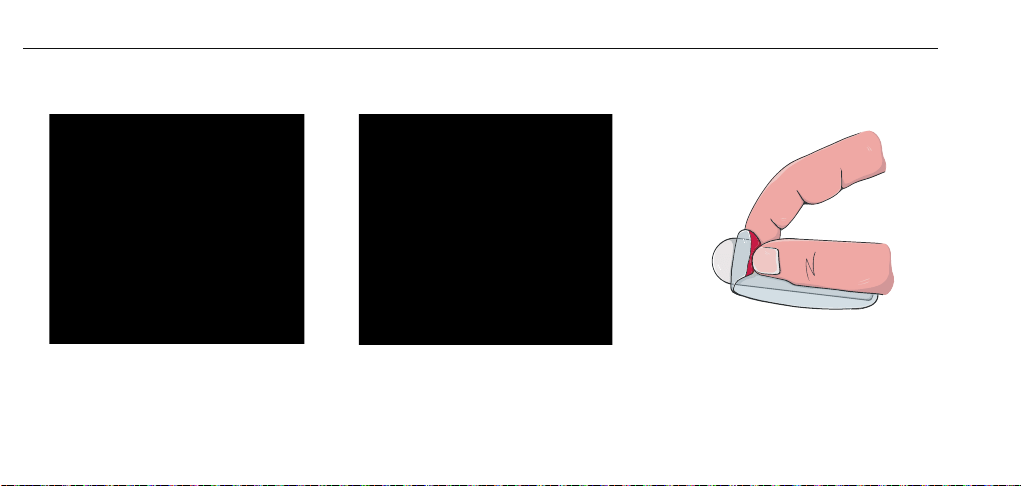
Note: Do not use the adhesive remover on cuts or scrapes.
Note: Do not remove the adhesives by pulling on the dome circles on top of the electrodes or
by peeling the edge of the device. Doing so may break the device, and render it unfunctional.
3. Remove the adhesive
from the Recorder
Peel the adhesive from the Recorder
starting from the edge or red tab.
Removing the adhesive on a flat surface
may be easier.
Not to bend the Recorder.
2. Slowly remove
the Recorder
Slowly peel the yellow tab of the
adhesive to remove the Recorder from
your chest. Use the adhesive remover
to remove any remaining adhesive.
1. Applying adhesive
remover
Use the Uni Solve Adhesive Remover wipe.
Hold the wipe at the edge of the adhesive
tape and squeeze gently so the fluid flows
between the skin and the adhesive.
Instructions for Use - Remove Your Recorder (Position #2)
22/40
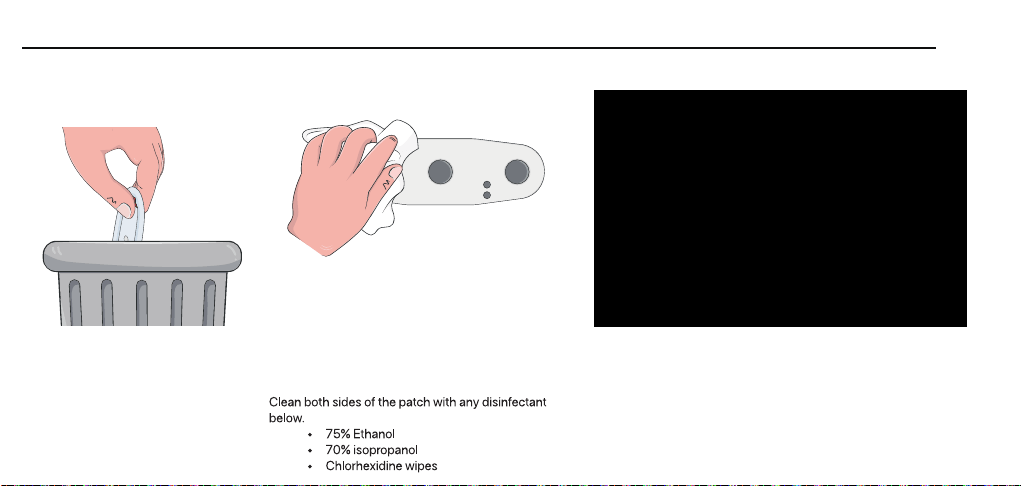
5. Cleaning the Recorder
After discarding the adhesive, use a 70% isopropanol
wipe to remove any adhesive residue from the Recorder.
Clean the Recorder with a 70% isopropanol wipe before
and after each use. If adhesive residue has dried on
the Recorder, apply 70% isopropyl alcohol to soften
it. Then, gently wipe it off using a paper towel.
6. Cleaning your skin
Wash the skin where the Recorder was applied
using soap and water.
Rinse and pat dry.
4. Discard the
used adhesive
Instructions for Use - Cleaning (Position #2)
23/40
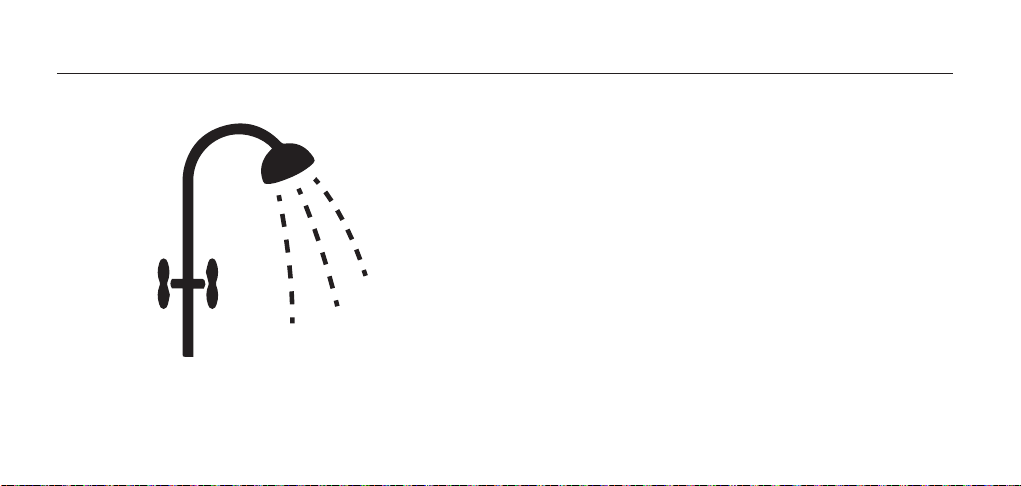
Instructions for Use - Tips before Showering
Note: While the Recorder is water resistant,
avoid excessive exposure to water as it can
affect the adhesive and device.
1. Avoid prolonged or hot showers.
2. Avoid soap or rubbing around the Recorder.
3. Dry Recorder with towel.
4. If the Recorder dislodges after a shower, or you
notice a problem with the sensor signals, see
instructions for “Removing and Cleaning the Recorder”.
24/40

Charging, Storage & Maintenance
Adhesives
Traveling
Cleaning
Each Recorder comes with 4 medical grade, disposable adhesives.
Adhesives can be used up to 14 days (please contact VivaLNK for the latest
adhesive options), but some users may want to change adhesives more
often depending on skin type and comfortability. Additional adhesives can
be purchased separately as needed. After each use, discard the used
adhesive.
The actual wear duration may vary based on real-world conditions
and may need to be replaced more frequently depending on:
• Skin type and oiliness
• Level of physical activity or sweating
• Showering or water exposure
• Skin preparation and placement
Note: After adhesive bag is open, use within one month. Otherwise, the water
evaporation of the adhesive tape may affect performance.
Charging and Battery Handling
To prevent patient cross infection, it is recommended to use a new
adhesive before each use. Before applying a new adhesive, gently
clean both sides of the Recorder with any disinfectant below:
- 75% Ethanol
- 70% isopropanol
- chlorhexidine wipes
Note: Excessive cleaning or strong scrub or using non-recommended
solvents may damage the electrodes and render the device unfunctional.
The device will not work until the battery has enough power.
Storage
It is recommended to store the Recorder inside the charger when
not in use for better cleanliness.
When passing through the airport security, if wearing the device, take
it off from your body and allow TSA officers to screen the device. To
charge the device in other countries, make sure to use a standard USB
(Universal Serial Bus) outlet.
25/40

Charging, Storage & Maintenance
• When the Recorder needs charging, please connect the Recorder to a power source.
• Charging can start when the provided USB type-C cable is properly and carefully inserted into the charging case and connected to a USB power
source. Using strong insertion force or different USB cable will damage the charging port and make the case no longer charging the Recorder.
• You should charge the battery when the battery is less than 10% charged.
• When in charging mode, the charging status will be displayed on the charger box. See the table below for details.
The charger box’s WHITE light will remain solidly lit.
The charger box’s GREEN light will remain solidly lit.
The light is OFF when the Recorder is not placed in
charger, or the charger is not plugged in via USB cable.
Notification from mobile app if connected via BLE.
Battery low
Status Indicator
Charging
Recorder Status
Fully charged
Not in charging
Disassemble and replace the battery is not allowed. If the battery can no longer be
charged, please contact Customer Service.
!
!
Overcharging the battery may reduce its lifetime.
Over discharging the battery may reduce its lifetime.
!
The battery will enter over-discharge state when the Recorder is not used for more
than 8 months. When charging an over-discharged battery, the charger box’s white
and green LED lights will be alternately flashing during the first one minute of charging.
!
Do not plug or unplug the charging cable into the AC charger adapter, or the AC charger
adapter’s power cord into the electrical outlet with wet hands. If the AC adapter is
abnormal, please change the adapter.
!
The battery has limited charge cycles. Battery life and charge cycles vary by use
and settings.
!
Do not use the Recorder while charging.
!
26/40
Instructions for Authorized Persons
• Authorized Persons (i.e. healthcare services providers) must sign the Developer License agreement with VivaLNK to be able to use the Software
Library to create their own application, which provides any user interface functionality along with any fault alarms.
• Authorized Persons must adhere to the Application Programming Interface (API) in the Software Library while developing their applications, and
provide their Instruction for Use accordingly based on the information below.
• Authorized Persons are required to maintain compliance with the intended use of the Medical Wearable Platform.
• Should the Authorized Persons choose to expand the intended use of the device in any way, such as any of the following in their application, the
Authorized Persons are responsible to comply with the healthcare rules, applicable FDA regulations, local regulations and safety compliance
requirements of their target country.
o Introduction of additional data analysis or data generation intended for any diagnostic purpose.
o Use of the Platform as a part of a larger system having more functions and features with a different Intended Use.
o Generation of their own Instructions for Use due to changes above.
• Authorized Persons are allowed to modify the following if desired:
o the view or the display of physiological data in the app without any altering of such data.
o the removal or combination or cosmetic look of the alerts provided in the Software library.
• Authorized Persons are not allowed to modify the Recorder, the Charger, and the physical content of this Platform in anyway.
27/40

Instructions for Authorized Persons - continued
• Authorized Persons must follow applicable FDA regulations below to determine if a new submission is needed or if the modification is acceptable.
o “Deciding When to Submit a 510(k) for a Change to an Existing Device” issued on October 25th 2017, which is available at
https://www.fda.gov/media/99812/download,
o “Deciding When to Submit a 510(k) for a Software Change to an Existing Device” issued on October 25th 2017, which is available at
https://www.fda.gov/media/99785/download,
o “The 510(k) Program: Evaluating Substantial Equivalence in Premarket Notifications [510(k)]” issued on July 28th 2014, which is available at
https://www.fda.gov/media/82395/download,
o “General/Specific Intended Use” issued on November 4th 1998, which is available at https://www.fda.gov/media/71966/download.
• The device provides operational alarms, shown as an audible chime and a text notification, for lead on/off status detection, battery monitoring, Over the Air
(OTA) updates, real time clock, and power management. The operational alarms are intended to notify users of any interruption in data and of the overall
operation status of the Recorder. The device does not provide any alarms based on physiological data setting.
• Authorized Persons are allowed to modify or merge or ignore any of these operational alerts, but Authorized Persons are not allowed to set new alerts by
configuring the physiological data without considering a new 510(k) submission.
28/40

Instructions for Authorized Persons - continued
1. Join the VivaLNK Developer Program (https://www.vivalnk.com/developer/) by signing the Developer License / Terms and Conditions
2. A VivaLNK representative will send you an invitation to the Box.com folders (https://vivalnk.account.box.com/login) with the Software
Development Kit (SDK).
3. Accept the invitation to Box.com (create a free account if you don't have one already), and Download the SDK. The SDK includes:
• Software Library
• Developer Guide and API Specification, SAS 73-01-04 for Android and SAS 73-01-12 for iOS
• Demo app
4. Integrate the Library into your application according to the Developer Guide and API Specification.
5. Prepare and provide end-user with instructions specific to your use case.
29/40
i
Troubleshooting
1. This device might be damaged.
2. This device might not be worn correctly.
3. The operation temperature is too high or too low.
4. Improper or no skin preparation.
5. Incorrect attachment of adhesive.
1. Contact your device provider.
2. Recheck device‘s location or contact with skin.
3. Use this device under instructed operation temperature.
4. Prepare the skin before application.
5. Follow the instructions to attach the adhesive.
1. Bluetooth turned off in the Mobile app-installed
device.
2. The device was paired with another Mobile
app-installed device.
3. Mobile (Android or iOS) OS error.
4. Out of wireless connection range.
5. Interference from other RF emitters, such as RFID
metal detectors, medical equipment etc., in the
vicinity.
1. Enable Bluetooth.
2. To charge the Recorder via charger box for 5 seconds, to
activate it.
3. To check the possible pairing between current Recorder
and other Mobile app-installed devices.
4. Typically, disabling and re-enabling the Bluetooth on the Mobile
app-installed device or restarting the device resolves the issue.
5. The Recorder battery is low and charge it.
6. Move the Recorder close to the Mobile app-installed device.
7. Move the Recorder far away from any electronic equipment or
change rooms or move to an open space.
No BLE signal can be
scanned out, or
continuous pairing
failure.
No data or
intermittent data
received by Mobile
App, or data
transmission latency.
Unusual Data
Symptom
Solutions
Possible Causes
30/40

Certification & Disclaimer
31/40
Notes:
This device has been tested and found to comply with the limits for a
Class B digital device, pursuant to part 15 of the FCC Rules. These limits
are designed to provide reasonable protection against harmful
interference in a residential installation. This equipment generates, uses,
and can radiate radio frequency energy and, if not installed and used in
accordance with the instructions, may cause harmful interference to
radio communications. However, there is no guarantee that interference
will not occur in a particular installation. If this device does cause harmful
interference to radio or television reception, the user is encouraged to try
to correct the interference by one or more of the following measures.
1. Increase the separation between the Recorder and the other devices.
2. Connect the equipment into an outlet on a circuit different from
that to which the receiver is connected.
3. Consult an experienced radio / TV technician for help.
4. Reorient or relocate the receiving antenna.
This device complies with Part 15 of the FCC Rules. Operation is subject
to the following two conditions: (1) this device may not cause harmful
interference, and (2) this device must accept any interference received,
including interference that may cause undesired operation.
Changes or modifications not expressly approved by your device
provider could void the user's authority to operate the equipment.
This device contains licence-exempt transmitter(s)/receiver(s) that
comply with Innovation, Science and Economic Development Canada’s
licence-exempt RSS(s). Operation is subject to the following two
conditions:
(1) This device may not cause interference.
(2) This device must accept any interference, including interference that
may cause undesired operation of the device.
l'appareil contient des émetteurs/récepteurs exempts de licence qui sont
conformes aux CNR exempts de licence d’Innovation, Sciences et
Développement économique Canada. L’exploitation est soumise aux
deux conditions suivantes :
(1) l'appareil ne doit pas produire de brouillage,
(2) l'utilisateur de l'appareil doit accepter tout brouillage radioélectrique
subi, même si le brouillage est susceptible d'en compromettre le
fonctionnement.

i
Certification & Disclaimer
For private households: Information on Disposal for Users of
WEEE
Disposing of this product correctly will help save valuable
resources and prevent any potential negative effects on human
health and the environment, which could otherwise arise from
inappropriate waste handling. Please contact your local authority
for further details of your nearest designated collection point.
Penalties may be applicable for incorrect disposal of this waste, in
accordance with your national legislation.
This symbol on the product(s) and / or accompanying
documents means that used electrical and electronic equipment
(WEEE) should not be mixed with general household waste. For
proper treatment, recovery and recycling, please take this
product(s) to designated collection points where it will be
accepted free of charge.
Alternatively, in some countries, you may be able to return your
products to your local retailer upon purchase of an equivalent new
product.
Battery Removal
The Recorder contains a lithium battery. Refer to proper disposal
instructions below:
1. To remove the battery, cut the Recorder. The battery is located
in the center of the Recorder. .
2. All batteries / accumulators should be disposed separately from
the municipal waste stream via designated collection facilities
appointed by the government or the local authorities. The correct
disposal of your old batteries/accumulators will help to prevent
potential negative consequences for the environment, animal, and
human health.
32/40
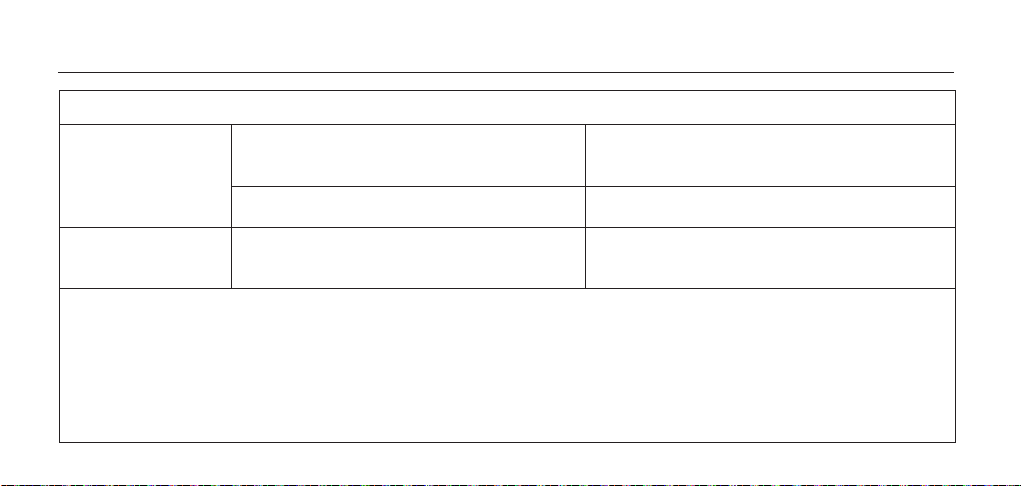
Electromagnetic Compatibility (EMC) Tables Table 1
Conducted and
radiated RF EMISSION
Phenomenon
Emission Test Levels
IEC 60601 Test Level
Professional Healthcare Facility Environment
(E.g. physician offices, dental offices, clinics etc.)
Home Healthcare Environment
(E.g. restaurants, cafes, shops, etc.)
IEC 60601 Test Level
CISPR 11 CISPR 11
a) b)
33/40
The Multi Vital Sensor used in aircraft shall meet the RF EMISSIONS reguirements of RTCA DO-160G: 2010 and EUROCAE
ED-14G: 2011. Therefore, use of Section 21 (and category M) of a more recent edition, e.g. [39] or [40], should be
considered. The conducted FR EMlSSlONS test is also applicable to The Multi Vital Sensor stored in charger connected to
aircraft power.
In other intended modes or in EM ENVIRONMENTS of transportation, applicable standards shall apply. Examples of standards
that might be applicable include CISPR 25 and lS0 7637-2.
a)
b)
Electromagnetic Compatibility (EMC) Tables Table 2
This test level assumes a minimum distance between the Multi Vital Sensor and power source with magnetic field of at
least 15 cm. If the RISK ANALYSIS shows that the Multi Vital Sensor will be used closer than 15 cm to power source with
magnetic field, the IMMUNITY TEST LEVEL shall be adjusted as appropriate for the minimum expected distance.
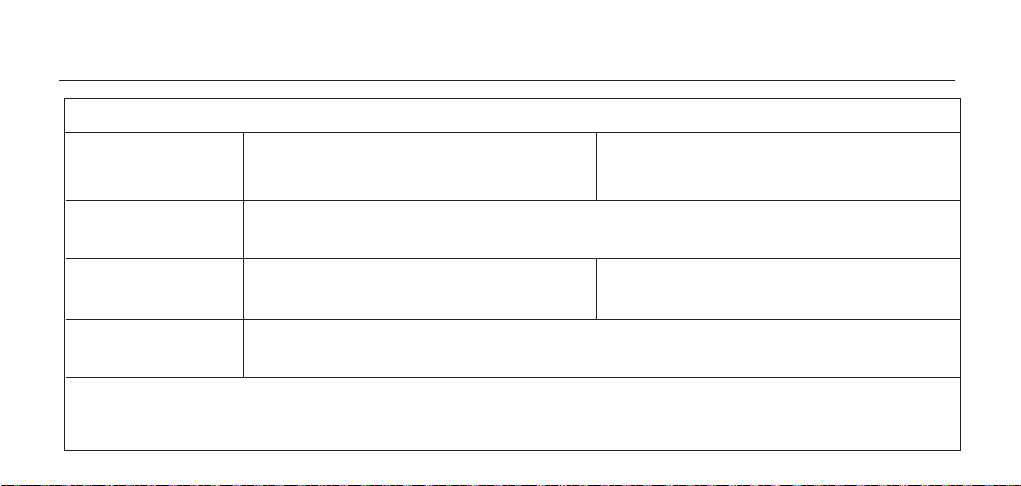
Immunity Test Levels
Phenomenon and
Basic EMC standard
or test method
Electrostatic discharge
IEC 61000-4-2
± 8 kV contact
± 2 kV , ± 4 kV, ±8 kV, 15 kV air
30 A/m
50Hz or 60Hz
Radiated RF EM fields
IEC 61000-4-3
Rated power frequency
magnetic fields
IEC 61000-4-8
3 V/m
80 MHz - 2.7 GHz
8% AM at 1kHz
10 V/m
80 MHz - 2.7 GHz
8% AM at 1kHz
Professional Healthcare Facility Environment
(E.g. physician offices, dental offices, clinics etc.)
Home Healthcare Environment
(E.g. restaurants, cafes, shops, etc.)
c)
c)
34/40

Wireless Technology
VivaLNK Multi Vital Sensor (the Recorder) uses Bluetooth Low Energy (LE) wireless technology (IEEE 802.15.1, managed by Bluetooth Special
Interest Group now) to transfer data between the Recorder firmware and the Mobile app, including ECG, RRI, HR, ACC data, and device
information, which complies with the BLE 5.0 and above.
Security Measures:
Low-power Bluetooth wireless communication between the Recorder firmware and Mobile app, in line with Bluetooth 4.0+ low-power Bluetooth
protocol, works in the 2.4GHZ ISM radio frequency band, and belongs to general information technology equipment. Through security mechanism
in wireless Bluetooth communication protocol stack ensured by Bluetooth Special Interest Group, both the Recorder firmware and Mobile app are
required to execute these secure controls during data/information exchange. Additionally, AES128 encryption algorithm is added to encrypte the
data in the air during BLE transmission.
35/40

Technical Specifications
Catalog/Model:
Recorder Size:
90mm x 28mm
11 mm
17 g
Duration of continuous recording use: up to 30 days
Operating Conditions:
Temperature Range:
Humidity Range: 10% - 95%
Pressure Range: 70 - 106 kPa
Storage Conditions:
Temperature Range:
Humidity Range: 10% - 95%
Pressure Range: 70 - 106 kPa
Charger Power Source:
Note: The above duration of continuous recording use is including battery lifetime and onboard memory
data storage size during no wireless transmission..
Recorder Thickness:
Recorder Weight:
Recorder Battery: rechargeable
Hardware Product Name: Multi Vital Sensor
36/40
VV360/VV370/VV380
To recognize the hardware version of the Recorder, the below ICON
will be printed on the surface of the device.
- VV360 Rev 01 will be marked F3
- VV370 Rev 01 will be marked G3
- VV380 Rev 01 will be marked H3
41℉ - 113℉(5℃ - 45℃)
-4℉ - 131℉(-20℃ - 55℃)
IP67 for the Recorder,
IP21 for Charging Case
USB type C Charging Case
Dust and Water Resistance:
This device complies with Part 15 of the FCC Rules
Accelerometer Range: +/- 16g
Gyroscope Angular Rate: +/- 250dps
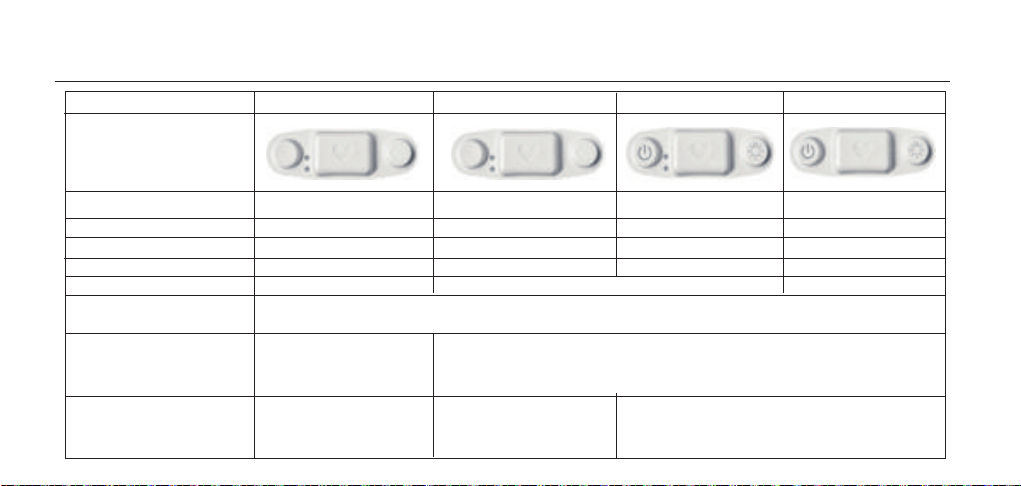
37/40
Regulation
LED Light
Physical Button
40 BPM - 300 BPM / ±5%
US FDA
No
No
CE, Health Canada
No
No
Global
Yes
Yes
Global
Yes
Yes
5 BrPM – 35 BrPM / ±3BrPM
86℉-109.4℉(30℃– 43℃)/
±32.18℉(±0.1℃)
Respiratory Rate
Detection Range
/Accuracy
Skin Temperature
Detection Range /
Accuracy
No
Heart Rate Detection
Range /Accuracy
No
No
Rechargeable?
Single-use?
Yes
Yes Yes No
Yes
No
No
No
VV360
VV360
VV370 VV380Product Model
Product Label
Technical Specifications
i
Technical Specifications
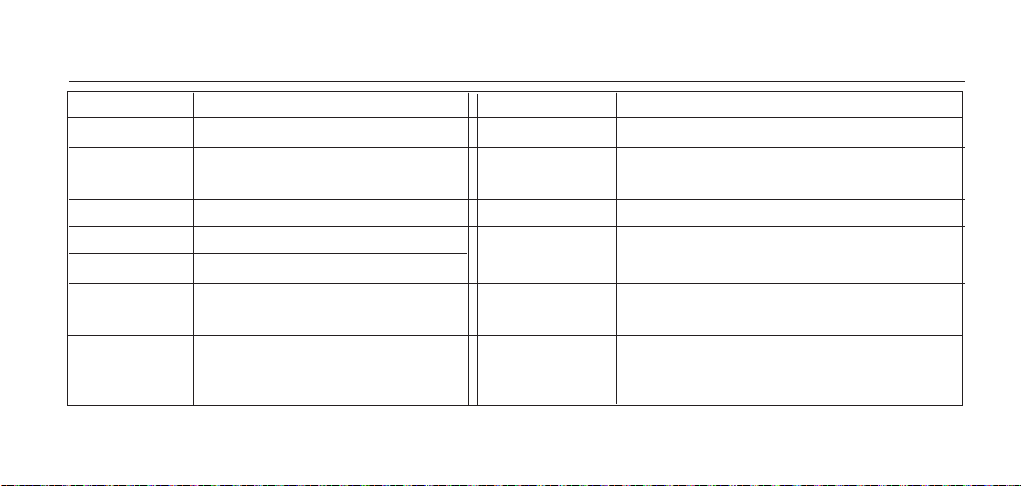
Frequency Band 2.4GHz ISM Band (2.402 – 2.480 GHz Utilized)
Channels 40 channels with 2 MHz spacing (3 advertising
channels/37 data channels)
Security 128-bit AES with Counter Mode CBC-MAC and
application layer user defined
Modulation GFSK
Data Rate LE 1M PHY: 1 Mb/s, 2 Mb/s
Max Tx Power
1.32mW (1.19dBm), between Class 2 to 1.
Network Topologies
Point-to-Point (including piconet)
Broadcast
Power Consumption ~0.01x to 0.5x of reference (depending on use case)
Channel Usage Frequency-Hopping Spread Spectrum (FHSS)
Application throughput 0.27-1.37 Mbit/s
Latency (from a non-
connected state)
6 ms
Robustness
Adaptive frequency hopping, Lazy Acknowledgement, 24-bit
CRC, 32-bit Message Integrity Check
Minimum total time to
send data
(det. battery life)
3 ms
Specification Multi Vital Sensor Specification Multi Vital Sensor
38/40
Regulation
LED Light
Physical Button
US FDA
No
No
CE, Health Canada
No
No
Global
Yes
Yes
Global
Yes
Yes
Definition of Symbols
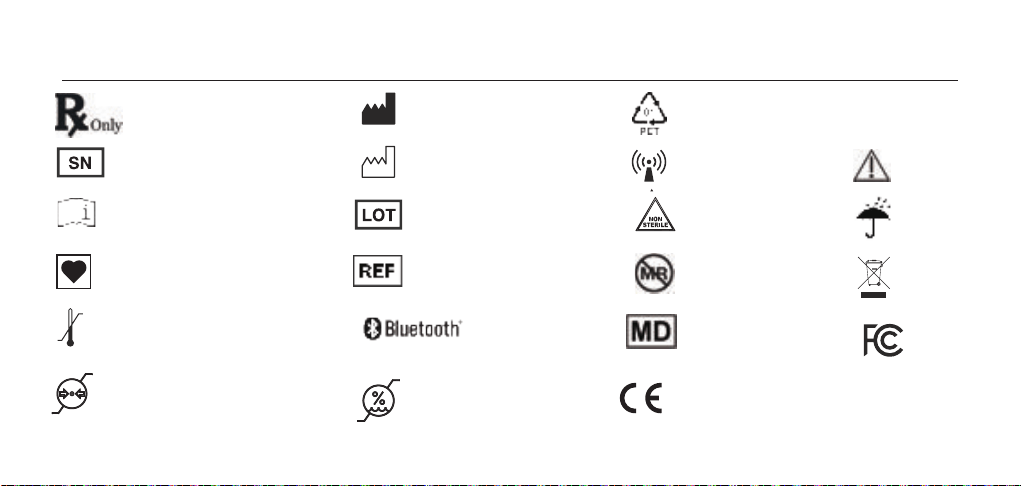
FCC icon
Manufacturer
Polyethylene terephthalate
Date of Manufacture
Radio emission
Serial Number
Lot/batch Number
Catalog Number
WEEE icon
Consult Instructions
For Use
Bluetooth
Non Sterile
Humidity Limitation
Atmospheric Pressure
Limitation
MR Unsafe
Keep Dry
Caution
Prescription Use Only
Medical device
Type-CF applied part
39/40
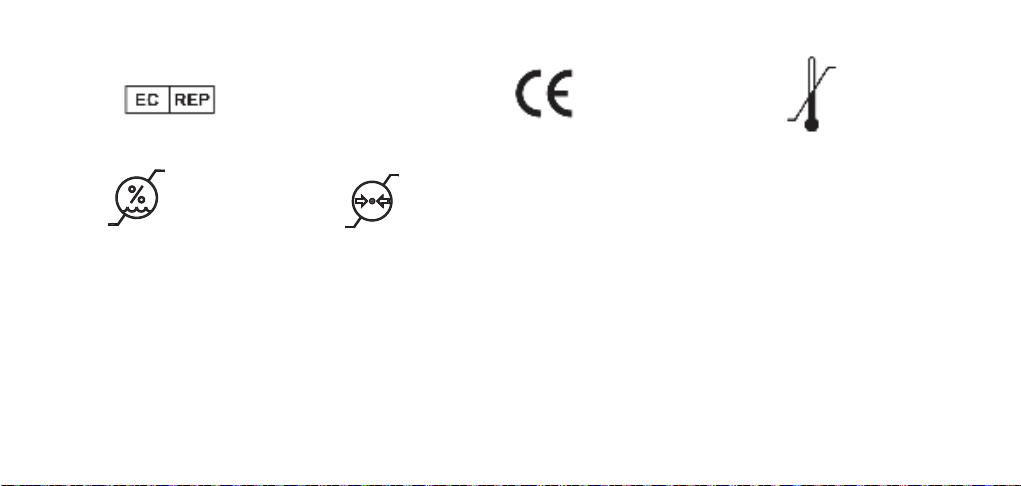
2797
CE mark and notified
body number
Temperature Limitation
LBL 75-06-132
Instruction for Use (IFU)
40/40
Emergo Europe B.V.
Westervoortsedijk 60
6827 AT Arnhem
The Netherlands
2797
-20℃
-4 ℉
55℃
131℉
10%
95%
70 kPa
106 kPa


Manufactured by VivaLNK, Inc.
51 East Campbell Avenue, Suite #160
Campbell CA, 95008 USA
+1 (888) 861-3241
THANK YOU