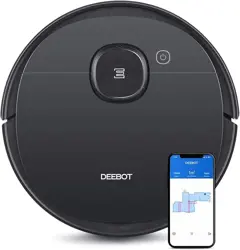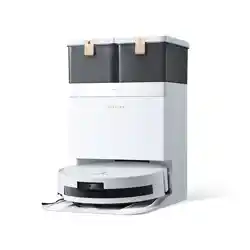

Instruction Manual
Family

2EN
1. The Appliance is not intended for use by
persons(including children)with reduced
physical, sensory or mental capabilities, or
lack of experience and knowledge, unless they
have been given supervision or instruction
concerning use of the Appliance by a person
responsible for their safety.
2. Clear the area to be cleaned. Remove power
cords and small objects from the oor that
could entangle the Appliance. Tuck rug fringe
under the rug base, and lift items such as
curtains and tablecloths off the oor.
3. If there is a drop off in the cleaning area due
to a step or stairs, you should operate the
Appliance to ensure that it can detect the step
without falling over the edge. It may become
necessary to place a physical barrier at the
edge to keep the unit from falling. Make sure
the physical barrier is not a trip hazard.
4. Only use as described in this manual. Only
use attachments recommended or sold by the
manufacturer.
5. For INDOOR household use ONLY. Do not
use the Appliance in outdoor, commercial, or
industrial environments.
6. Do not use without dust bin and/or lters in place.
7. Do not operate the Appliance in an area
where there are lit candles or fragile objects.
8. Keep hair, loose clothing, ngers, and all parts of
body away from any openings and moving parts.
9. Do not operate the Appliance in a room where
an infant or child is sleeping.
10. Do not use and store in extremely hot or
cold environments (below -5˚C /23˚F or
above 40˚C/104˚F). Please charge the robot
in temperature above 0°C/32°F and below
40°C/104°F.
11. Do not use Appliance on wet surfaces or
surfaces with standing water.
12. Do not allow the Appliance to pick up large
IMPORTANT SAFETY INSTRUCTIONS
IMPORTANT SAFETY INSTRUCTIONS
When using an electrical Appliance, basic
precautions should always be followed,
including the following:
READ ALL INSTRUCTIONS BEFORE
USING THIS APPLIANCE
SAVE THESE INSTRUCTIONS

3 EN
objects like stones, large pieces of paper, or
any item that may clog the Appliance.
13. Do not use Appliance to pick up ammable
or combustible materials such as gasoline,
printer or copier toner, or use in areas where
they may be present.
14. Do not use Appliance to pick up anything that
is burning or smoking, such as cigarettes,
matches, hot ashes, or anything that could
cause a re.
15. Do not put objects into the suction intake. Do
not use if the suction intake is blocked. Keep
the intake clear of dust, lint, hair, or anything
that may reduce air ow.
16. If the power cord is damaged, it must be
replaced by the manufacturer or its service
agent in order to avoid a hazard.
17. Turn OFF the power switch before cleaning or
maintaining the Appliance.
18. The lithium battery type suitable for CH2453I is
Max. 8 cells, max. nominal voltage DC 14.4V,
rated capacity 5,800mAh.The battery must be
removed and discarded according to local laws
and regulations before disposal of the Appliance.
19. Please dispose of used batteries according to
local laws and regulations.
20. Do not incinerate the Appliance even if it is
severely damaged. The batteries can explode
in a re.
21. The Appliance must be used in accordance
with the directions in this Instruction Manual.
Ecovacs Home Service Robotics cannot be
held liable or responsible for any damages or
injuries caused by improper use.
22. The robot contains batteries that are only
replaceable by skilled persons. To replace the
robot’s battery, please contact Customer Service.
23. Please make sure your power supply source
voltage matches the power voltage marked
on the OMNI Station.
24. Use only the original rechargeable battery and
OMNI Station provided with the Appliance
from the manufacturer. Non-rechargeable
batteries are prohibited.
25. Take care not to damage the power cord. Do
not pull on or carry the Appliance or OMNI
Station by the power cord, use the power cord
as a handle, close a door on the power cord, or
pull power cord around sharp edges or corners.
Do not run Appliance over the power cord.

4EN
Keep power cord away from hot surfaces.
26. Do not use the OMNI Station if it is damaged.
The power supply is not to be repaired and
not to be used any longer if it is damaged or
defective.
27. Do not use with a damaged power cord or
receptacle. Do not use the Appliance or OMNI
Station if it is not working properly, has been
dropped, damaged, left outdoors, or come in
contact with water. It must be repaired by the
manufacturer or its service agent in order to
avoid hazards.
28. The plug must be removed from the
receptacle before cleaning or maintaining the
OMNI Station.
29. Remove the Appliance from the OMNI
Station, and turn OFF the power switch to
the Appliance before removing the battery for
disposal of the Appliance.
30. When not using the OMNI Station for a long
period of time, please unplug it.
31. If the robot will not be used for a long time,
power OFF the robot for storage and unplug
the OMNI Station.
32. WARNING-Add clean water into the clean
tank only.
33. WARNING: For the purposes of recharging
the battery, only use the detachable supply
unit CH2453I provided with the Appliance.
To satisfy RF exposure requirements, a separation
distance of 20 cm or more should be maintained
between this device and persons during device
operation.
To ensure compliance, operations at closer than
this distance is not recommended. The antenna
used for this transmitter must not be co-located in
conjunction with any other antenna or transmitter.
Device Update
Typically, some devices are updated bi-monthly,
but not always so specic.
Some devices, especially those that went on sale
more than three years ago, will only be updated if
a critical vulnerability is found and xed.
5 EN
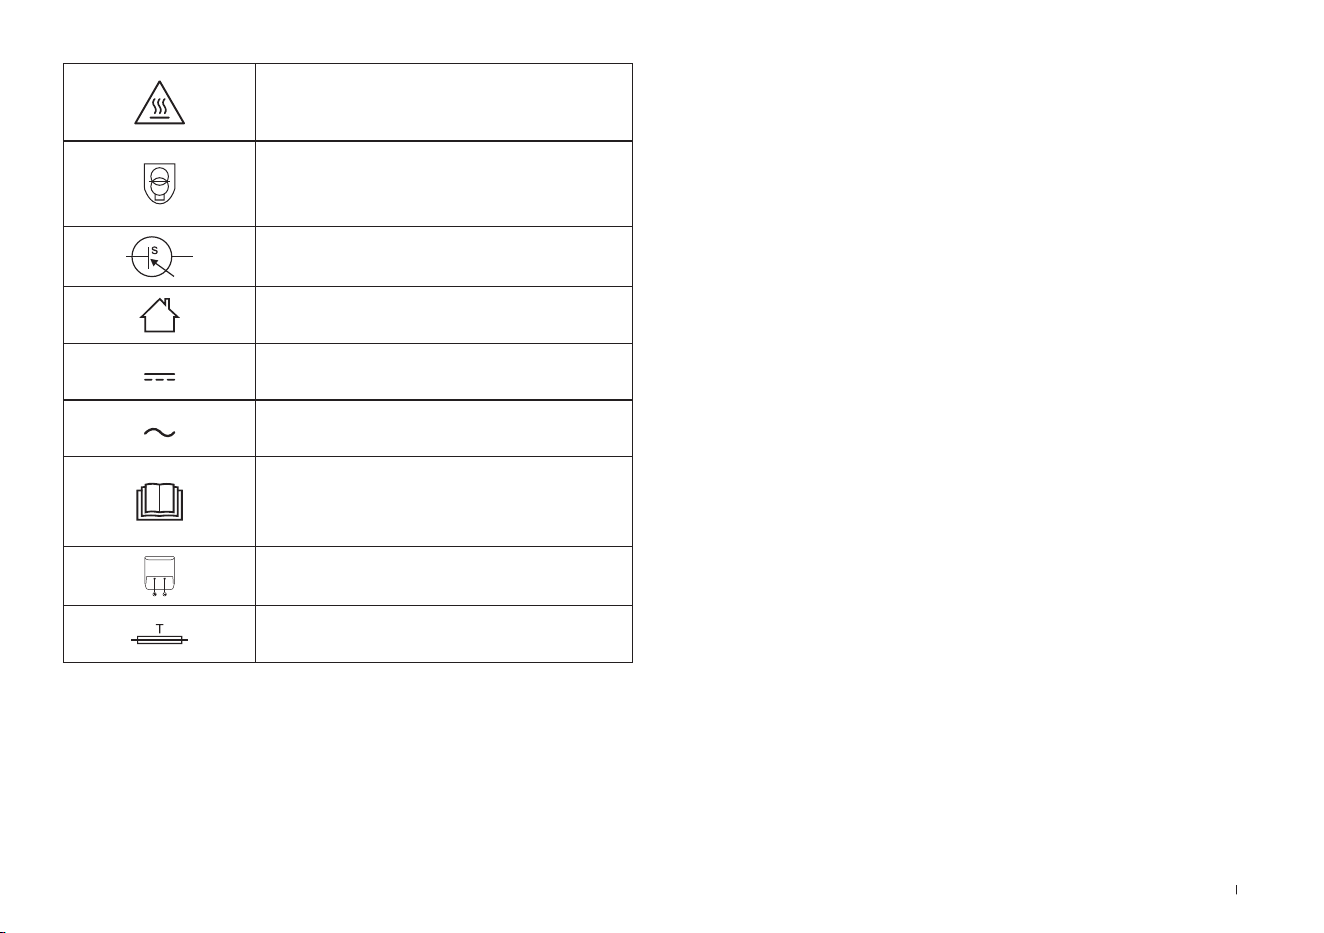
Caution: hot surface
Short-circuit-proof safety isolating
transformer
Switch mode power supply
For indoor use only
Direct current
Alternating current
Before charging, read the
instructions.
Polarity of the charging port
Time-lag miniature fuse-link
The remote surveillance is for the absolute private
use of non-public, private owned places for the pure
self-protection and single control intended only.
Please be aware of the local data protection based
legal obligations in case of use. No surveillance of
public places, especially with clandestine intent
and/or on the part of the employer without justied
reasons. Such not justied use is in the risk and
responsibility of the user only.
6EN
European Union Compliance Statement
Information on Disposal for Users of used
batteries
Information on Disposal for Users of Waste
Electrical & Electronic Equipment
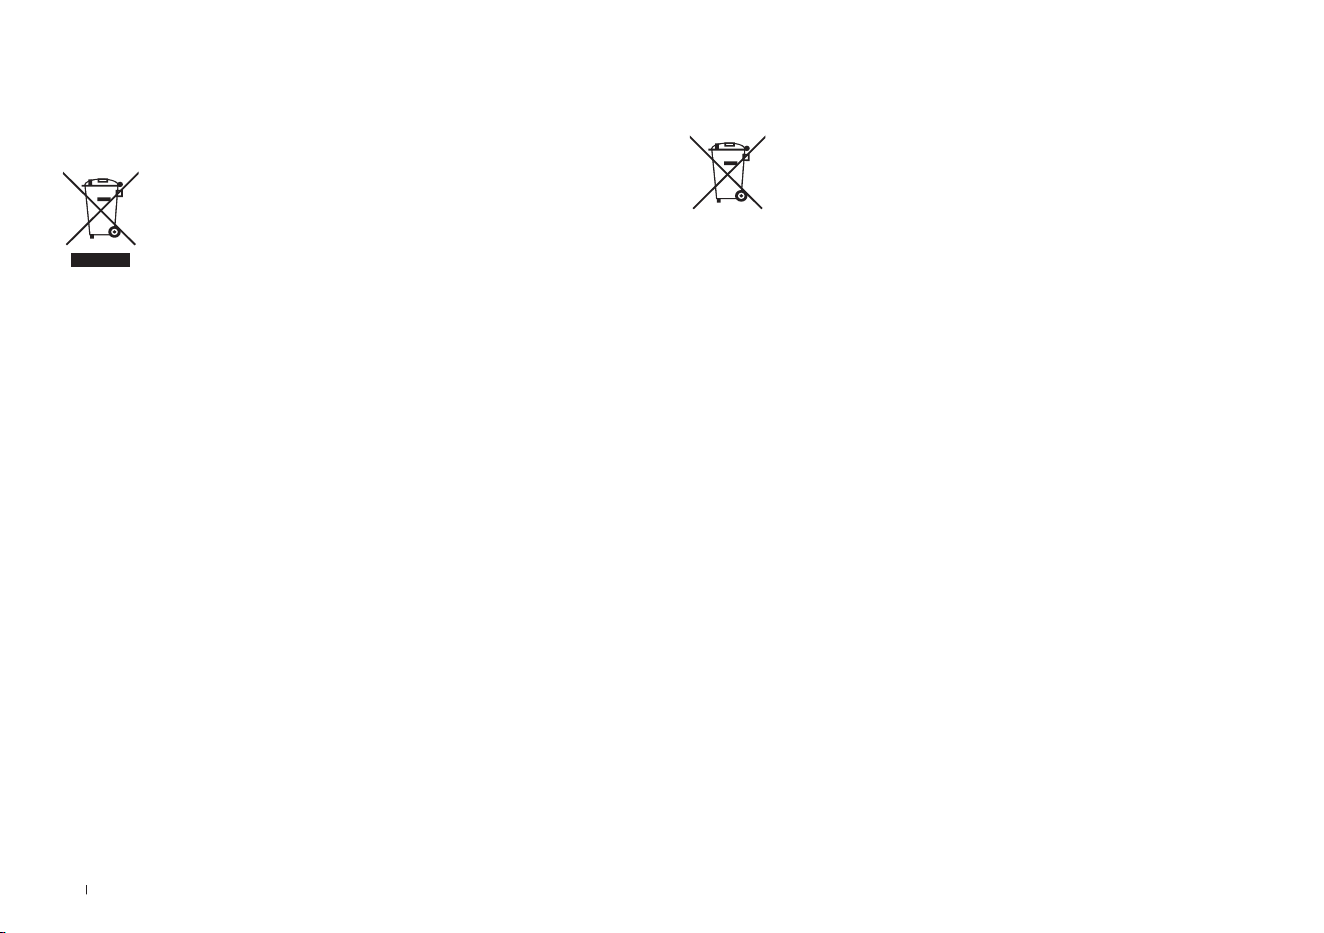
This symbol on the product or on its packaging
indicates that used electrical and electronic products
should not be mixed with unsorted municipal waste.
For proper treatment, it is your responsibility to
dispose of your waste equipment by arranging to
return it to designated collection points.
Disposing of this product correctly will help save
valuable resources and prevent any potential negative
effects on human health and the environment, which
could otherwise arise from inappropriate waste
handling.
To return your used device, please use the return
and collection systems or contact the retailer where
the product was purchased, which is free of charge,
please contact your local authority for further details
of your nearest designated collection point.
Penalties may be applicable for incorrect disposal
of this waste, in accordance with your national
legislation.
This symbol means that batteries and accumulators,
at their end-of-life, should not be mixed with unsorted
municipal waste. Your participation is an important
part of the effort to minimize the impact of batteries
and accumulators on the environment and on human
health. For proper recycling you can return this product
or the batteries or accumulators it contains to your
supplier or to a designated collection point, which is
free of charge.
Disposing of this product correctly will help save
valuable resources and prevent any potential negative
effects on human health and the environment, which
could otherwise arise from inappropriate waste
handling.
Penalties may be applicable for incorrect disposal of
this waste, in accordance with your national legislation.
there are separate collection systems for used batteries
and accumulators.
Please, dispose of batteries and accumulators correctly
at your local community waste collection/recycling
center.

7 EN
Restriction of the use of certain hazardous
substances (RoHS) Directive
Radio Equipment Directive
Europe Authorised Representative:
Ecovacs Home Service Robotics Co., Ltd. hereby
declares the whole product including parts (cables,
cords, and so on) meets the requirements of RoHS
Directive 2011/65/EU and amendment Commission
Delegated Directive (EU) 2015/863 on the restriction
of the use of certain hazardous substances in
electrical and electronic equipment ("RoHS recast"
or "RoHS 2.0").
Ecovacs Home Service Robotics Co., Ltd. hereby
declares that the product listed in this section
comply with the essential requirements and other
relevant provisions of the Radio Equipment Directive
2014/53/EU.
Ecovacs Home Service Robotics Co., Ltd. hereby
declares that the product comply with the essential
requirements and other relevant provisions of
the RoHS Directive 2011/65/EU and amendment
Commission Delegated Directive (EU) 2015/863,
the Radio Equipment Directive 2014/53/EU.
The declaration of conformity can be viewed at the
following address:
https://www.ecovacs.com/global/compliance.
ECOVACS Europe GmbH
Holzstrasse 2 | D-40221 Düsseldorf | Germany
8EN
3D Structure Light
Sensor
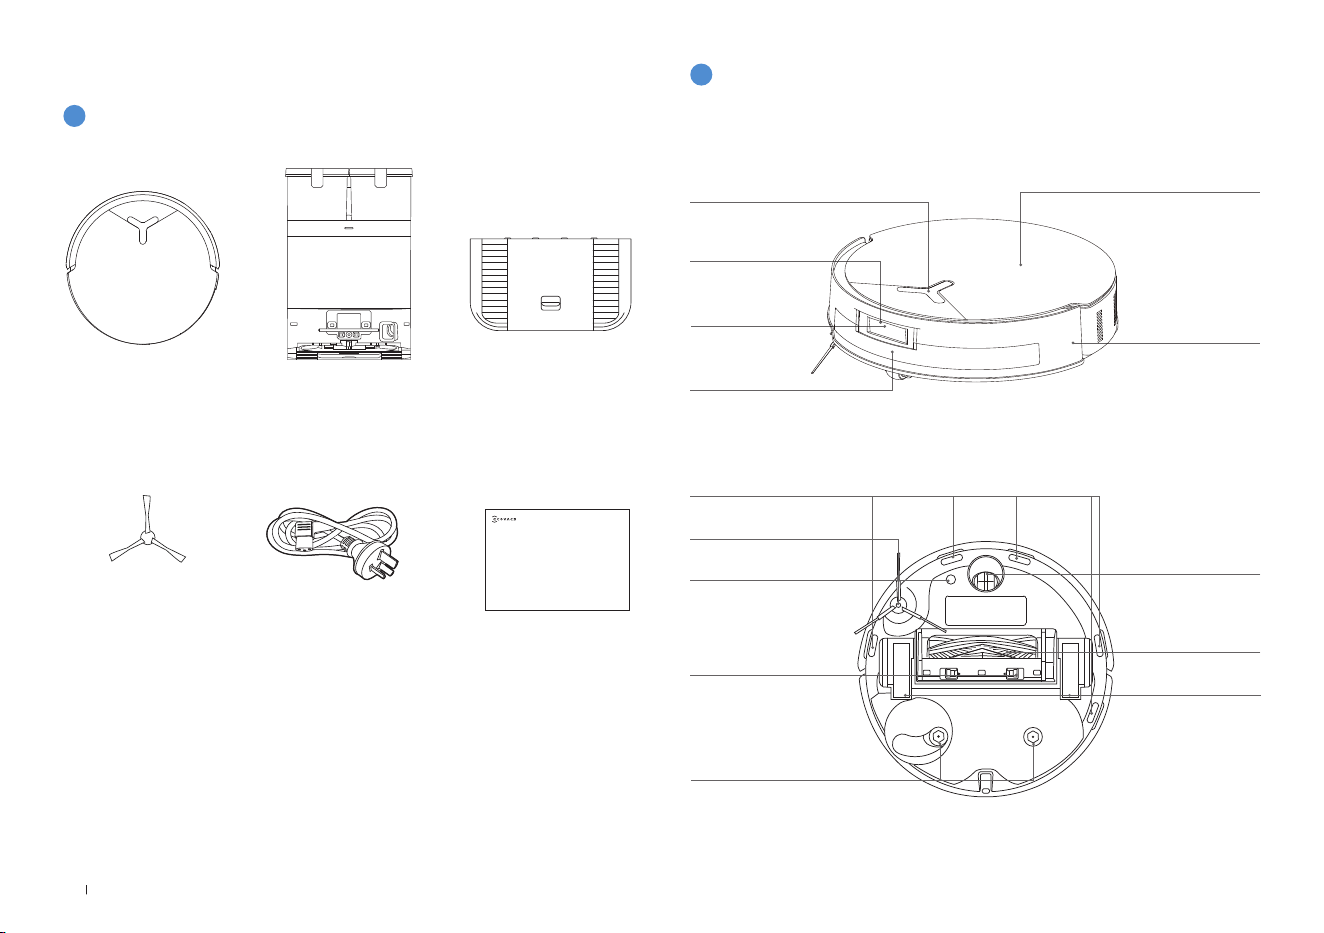
1. Robot Front View
Top Cover
Button on DEEBOT
Press: Start/Pause
Press and hold for 3s:
Return to charge
Bumper
2
PRODUCT DIAGRAM
d-ToF Laser Module
2. Bottom Back View
Driving Wheels
Universal Wheel
Side Brush
Carpet Detection Sensor
Roller Brush
Anti-drop Sensors
Brush Release Button
AI Camera
Mounting Slots for
Mopping Pad Assembly
Package Components
Robot OMNI Station Base
Instruction Manual
Side Brush Power Cord
1
PACKAGE CONTENTS
Instruction Manual
Note: Figures and illustrations are for reference only and may differ from actual product appearance.
Product design and specications are subject to changes without notice.
9 EN
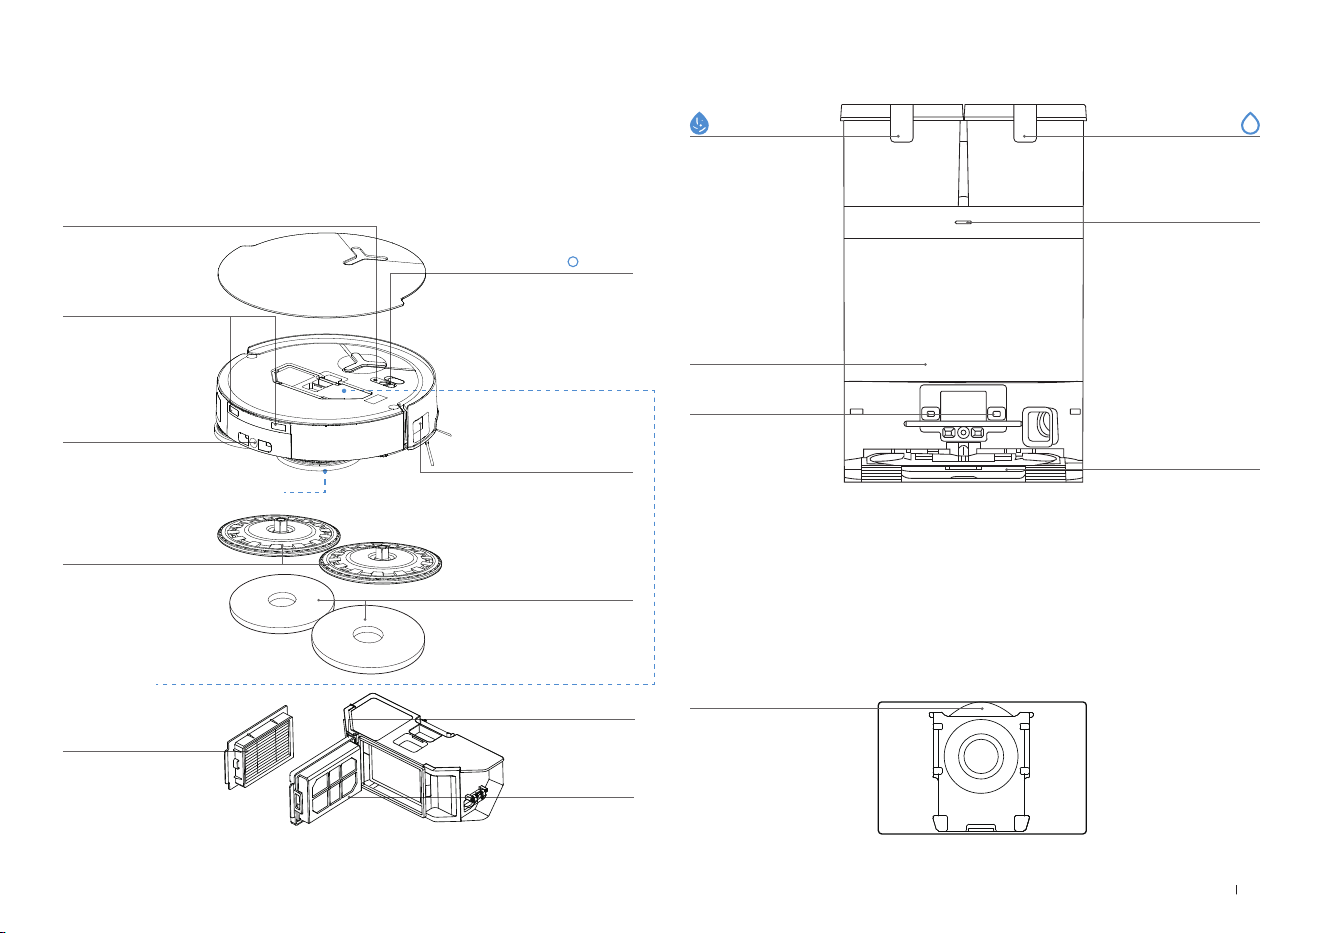
3. Inside the Robot
Power Switch
"I" = ON
"
" = OFF
RESET Button
Network Setup: Press the RESET Button and follow the voice prompt to set up
the network.
Restore to default settings: Press and hold the RESET button for 5 seconds, and
you will hear a prompt sound. After that, the startup music will play, and the robot
will be restored to default settings.
Wi-Fi Status Indicator/
RESET Button
5. Dust Bin
Water Filling Port
Edge Sensor
Charging Contacts
6. Station Front View
Dirty Water Tank
Dust
Collection Cabin
Note:
7. Dust Bag
Indicator
Mop Washing Tray
Clean Water Tank
Charging
Contacts on Station
• If the Indicator ashes red, go to the ECOVACS HOME App for details about the
malfunction.
• If the robot cannot charge, wipe the corresponding charging contacts on the
OMNI station with a dry cloth.
Dust Bag Handle
4. Mopping Pad Assembly
Mopping Pad Plates
Washable Mops
Filter
Dust Disposal Port
Release Button
10EN
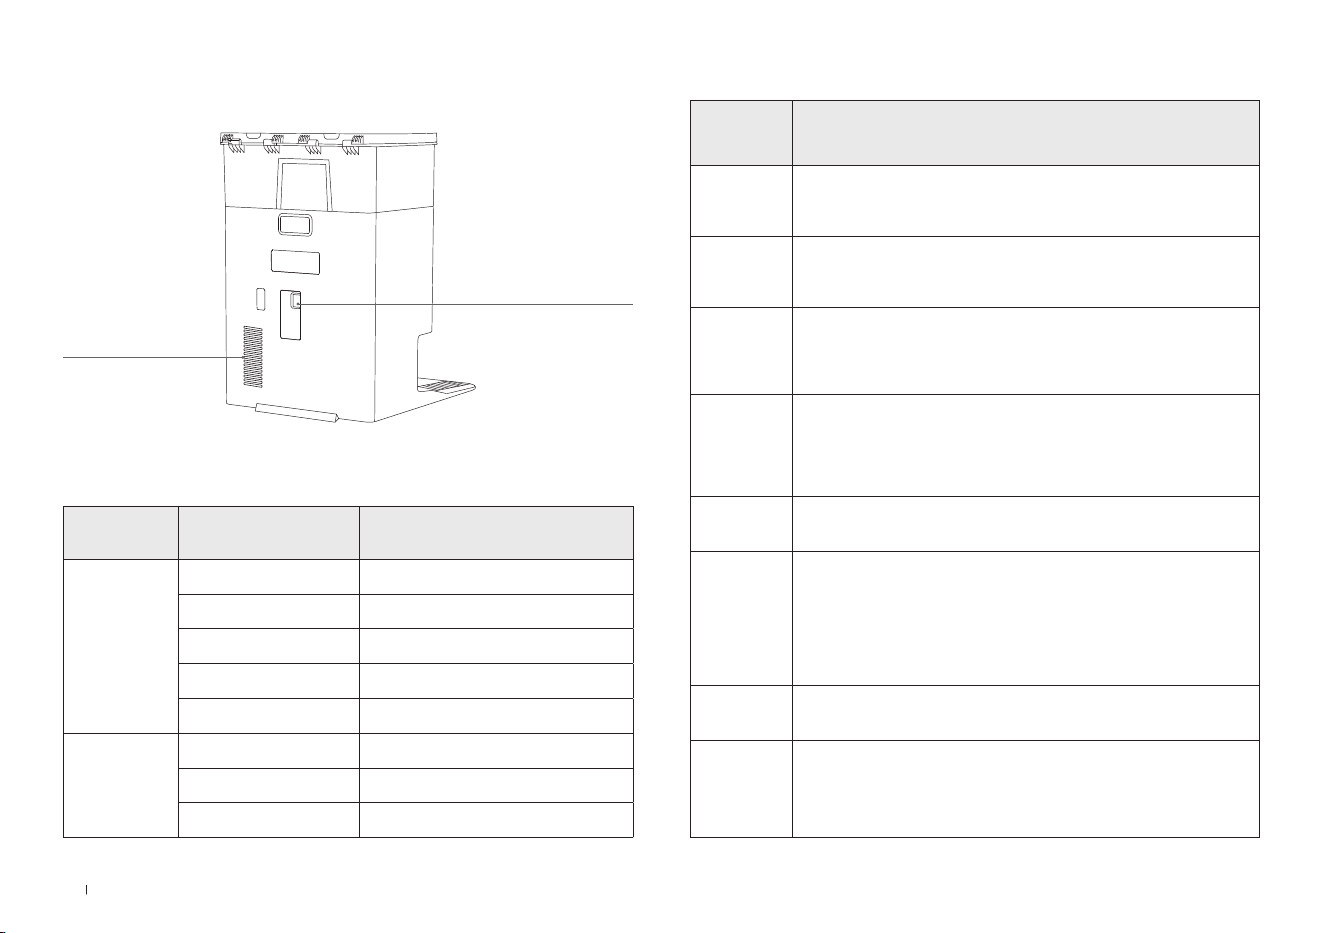
8. Station Back View
9. Indicator Light
Air Vent
Power Socket
Indicator Light Effect State
Robot
Breathing White Charging
Solid White Fully Charged/Running
Solid Red Low Battery
Flashing Red Alarm
Solid Yellow Voice Assistant Mute
Station
Solid White Standby/Running
Flashing Red Malfunction
Goes Out Power Outage/ Deep Sleep Mode
10. Sensors Overview
Name
Functional
Description
Functional Description
d-ToF
Laser
Module
Laser Ranging is applied to measure the distance between the robot
and surrounding objects based on the time difference of reection,
allowing the module to map against the objects around while the
robot is moving. The detection range is 10 m.
3D Structure
Light Sensor
Infrared ranging and similar triangles are applied to measure the
distance between the surrounding objects and the robot. When the
sensor detects an object nearby, the robot will automatically take a
turn to avoid bumping into the object. The detection range is 0.4 m.
Anti-drop
Sensors
Infrared ranging is applied by the sensor at the bottom of the robot to
measure the height between the bottom of the robot and the ground.
When there is a height difference, for example, a height above 55 mm
on white-colored ground or a height above 30 mm on black-colored
ground, the robot will stop advancing, fullling the feature of Anti-drop.
Carpet
Detection
Sensor
The ultrasound probe can emit ultrasonic waves with a frequency
of 300KHZ. The energy of the ultrasonic waves can be absorbed by
carpets. If the reected energy is below the threshold, the robot will
recognize the presence of a carpet. According to ECOVACS lab tests,
currently, over 50 types of carpets available on the market can be
identied.
Anti-collision
Sensor
When the transmitted signal is blocked by an object, the signal
receiver will not be able to receive it. With this principle, the robot will
avoid obstacles when encountering them.
Edge Sensor
With Infrared Ranging, the robot can detect the distance
between itself and objects on its right side. When there is a
wall or an obstacle on the right side, the robot will do edge
cleaning to avoid missed spots or collisions. (for model DDX 45)
With ToF distance measurement, the robot can detect the distance
between itself and objects on its right side. When there is a wall or
obstacle on the right side, the robot will perform edge cleaning to
avoid missing spots or collisions. (for model DEX 54)
AI Camera
Use AI Camera to collect images of the surroundings for video
recording, allowing distant video call via the microphone. FOV: Vertical
Span of 77°, Horizontal Span of 97°
Microphone
Human voices cause vibrations in the diaphragm of the microphone
through air. As a result, the microphone utilizes the collection and
algorithms of sound models to achieve sound recording and voice
control of the robot to complete specic tasks. The effective wake-up
distance is 5 m.
11 EN
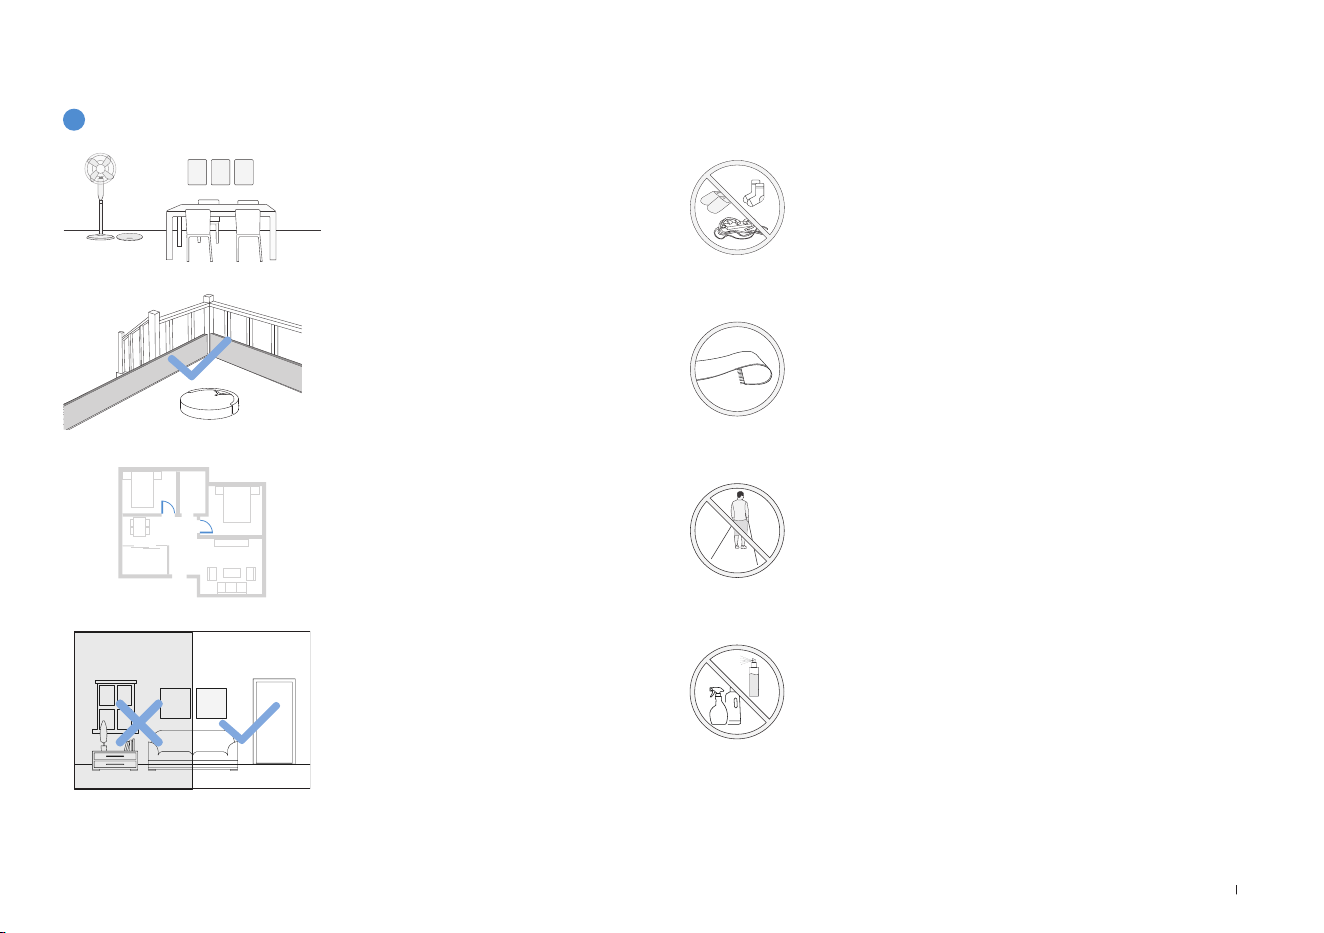
NOTES BEFORE CLEANING
Tidy up the area by arranging furniture
like chairs and storing low-lying items to
maximize cleaning space.
During the rst use, keep all doors open
to help the robot explore and map the
area.
Prepare the Area
Keep Doors Open to Rooms to be
Cleaned
If working near stairs or edges, place a
barrier to prevent falls.
Set up Protective Barriers
1
Before Cleaning
Ensure areas are well-lit to optimize the
robot's obstacle avoidance.
Provide Sufcient Lighting
Tidy up the area by arranging furniture like chairs and storing
low-lying items to maximize cleaning space.
For rugs with tassels, tuck them under the rug.
Avoid blocking narrow spaces like doorways to ensure the robot
can detect all areas.
Keep the camera lens clean with a soft cloth, avoiding cleaning
agents.
12EN
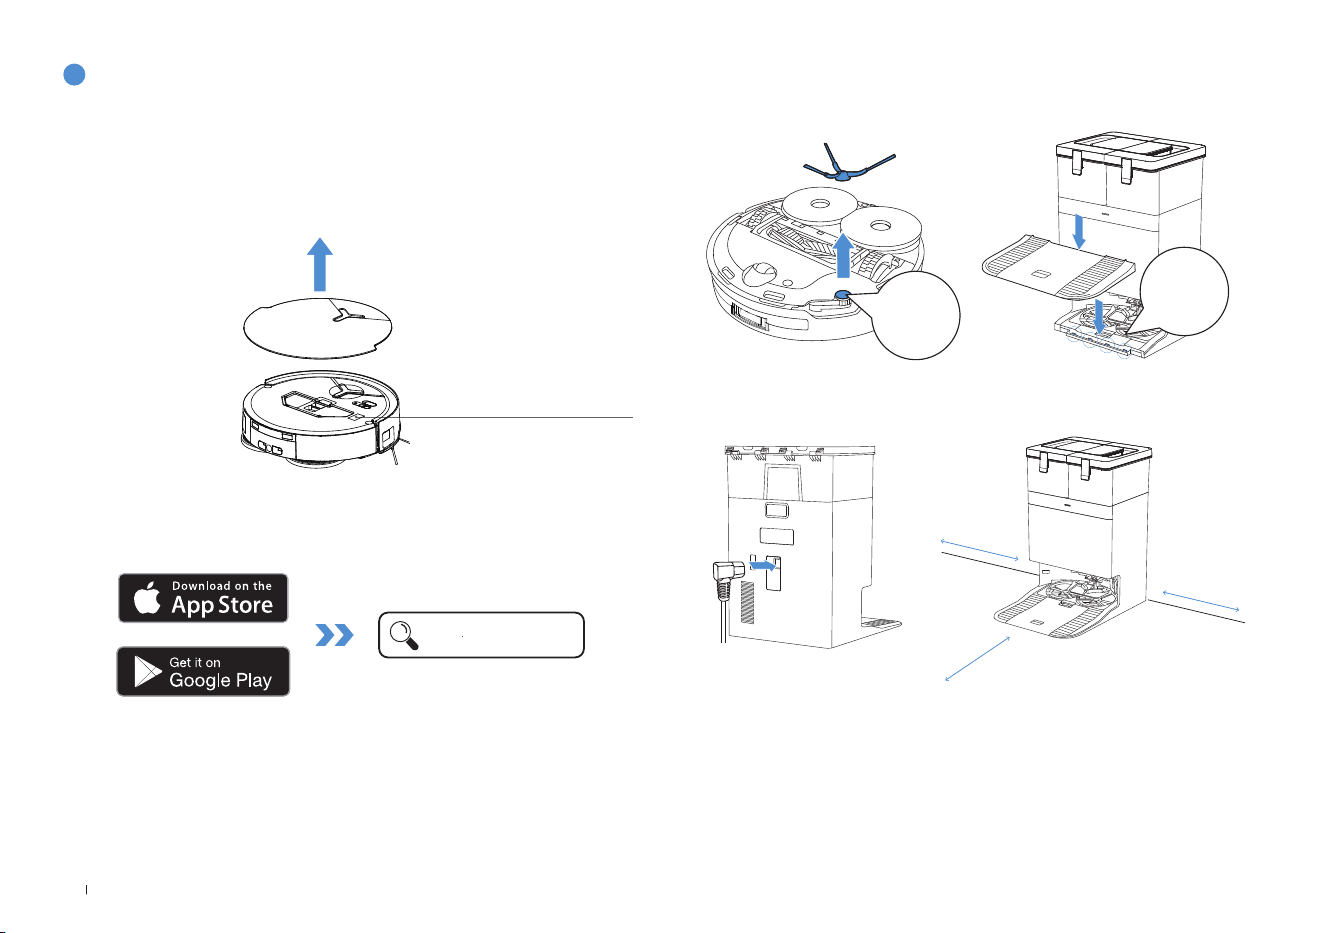
Note: Follow the guide of the App to register, log in, and connect the product with the App.
You may scan the QR Code on the robot to download the App.
Download ECOVACS HOME App to enjoy more features.
1. Download ECOVACS HOME App
Under the Top Cover
Or search for the ECOVACS HOME in your mobile app store to download the App.
ECOVACS HOME
2. Install Robot and Station
Before using, please remove all protective materials from the robot and OMNI
station.
The sound of Click indicates proper installation.
3. Place Station and Connect Power Cord
Note:
• If there are reective objects, such as mirrors, or reective skirting lines near the
station, cover them from the ground up to a height of 14 cm.
• Do not place the Station under direct sunlight.
• Place the Station in a location with a strong Wi-Fi signal.
Place the station against a wall on a level, hard ground. Ensure there are no
objects within 0.05 m on either side or 0.8 m in front of it.
≥
0.05m (0.16’)
≥
0.05m (0.16’)
≥
0.8m (2.62’)
2
Quick Start
click
click
13 EN
Note:
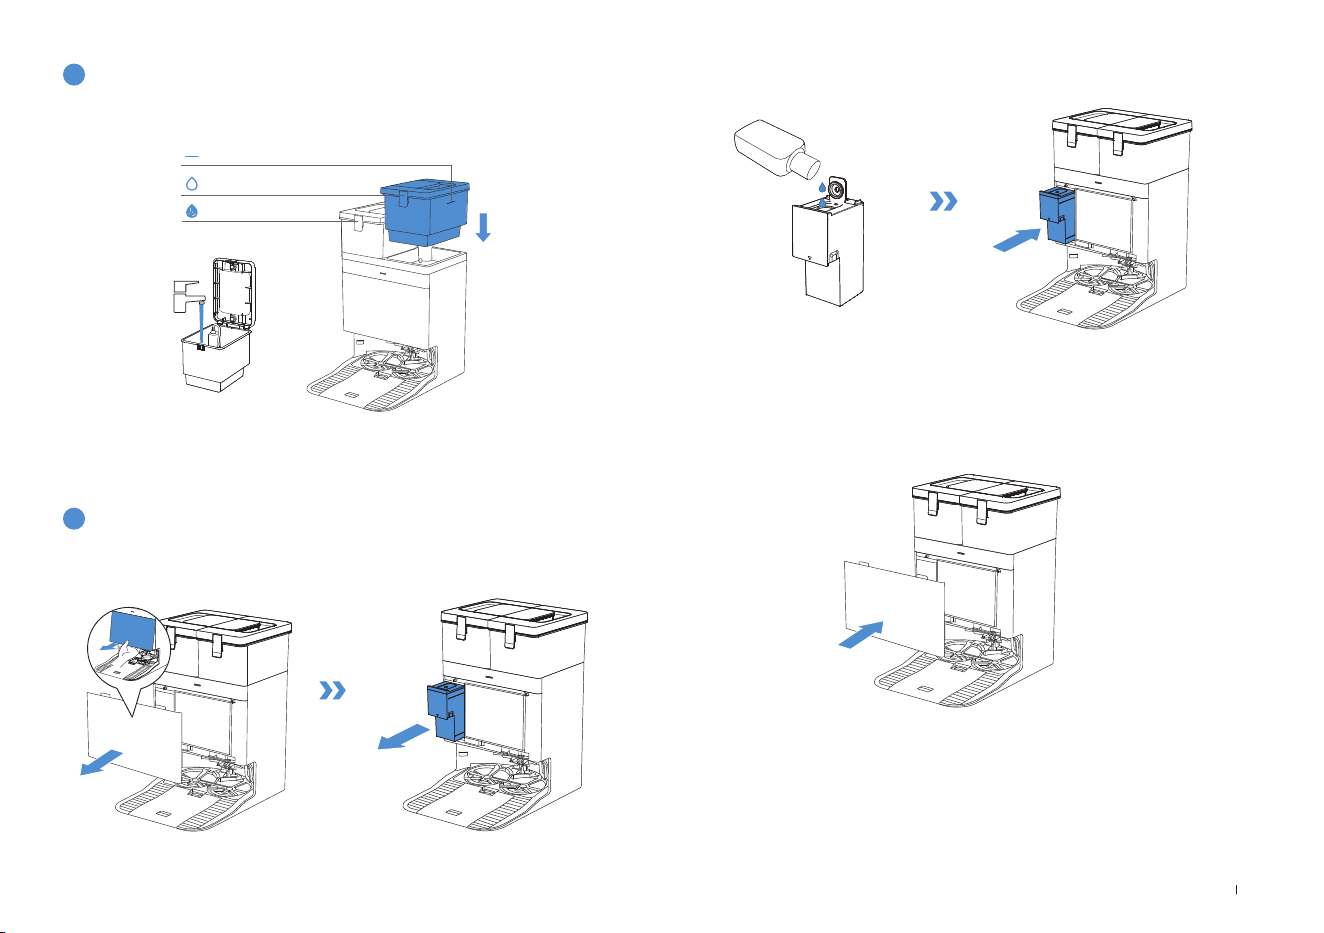
• Use a clean, dry cloth to wipe off any water on the surface of the tank before placing it in position.
• Make sure to lock the top covers of both water tanks securely before use.
• Any water marks in the water tanks are from function testing. Please use it with condence.
Take out the clean water tank and ll it up to the max water level. After lling the
tank, lock its cover and put it back to the station.
1. Take off the dust collection cabin cover, pull out the cleaning solution unit, and
place it on a level, hard surface.
3
Fill Clean Water Tank
4
Add Cleaning Solution (sold separately)
Dirty Water Tank
Clean Water Tank
Max Water Level
2. Unlid the cleaning solution unit and ll it with ECOVACS cleaning solution (sold
separately). Put the lid on and the unit back to the station.
3. Place the t joints at the upper edge of the dust cabin cover and press the lower
part of it to install it properly.
Note:
• Cleaning Solution is pumped automatically from the cleaning solution unit. Do not add
Cleaning Solution to the water tanks.
• For better performance and longer lifespan of the product, please use ECOVACS DEEBOT
Cleaning Solution (sold separately).
• Please make sure that no foreign objects fall into the cleaning solution unit.
14EN
Please note that to access smart features such as remote startup, voice interaction,
2D/3D map display and control settings, and personalized cleaning (features may
vary depending on the product), you'll need to download and use the ECOVACS
HOME App, which receives constant updates. You must agree to our Privacy Policy
and User Agreement before we can process some of your basic and necessary
information and enable you to operate the product via the ECOVACS HOME App.
Without your agreement, some of the aforementioned smart features cannot be
accessed through the ECOVACS HOME App. Nevertheless, you can still use the
product's basic functions for manual operation.
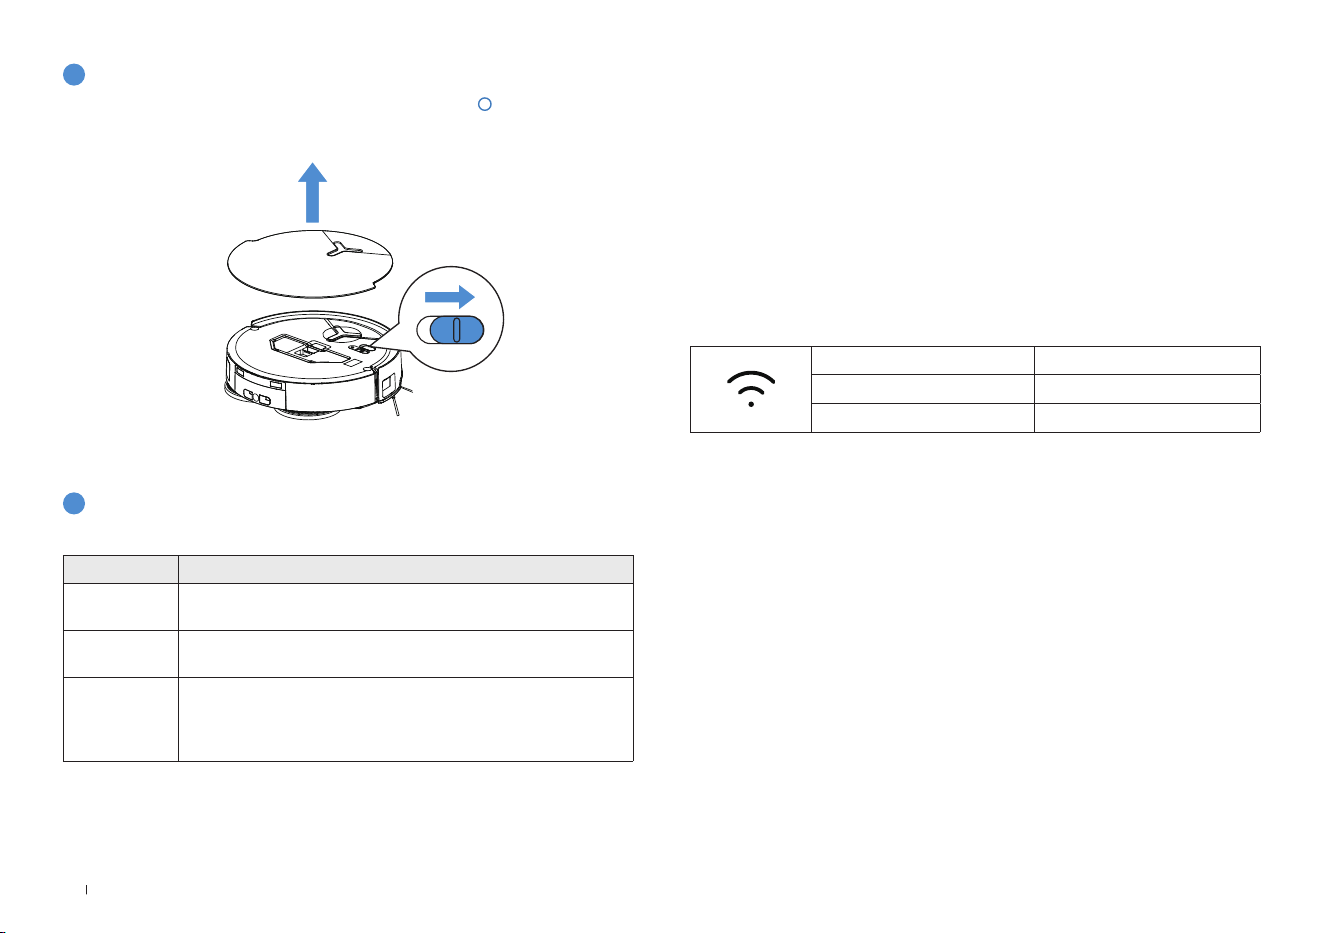
Wi-Fi Indicator Light
Network Interface Information
Slow Flashing White Disconnected from Wi-Fi
Quick Flashing White Connecting
Solid White Connected to Wi-Fi
6
Connect Robot to App
Wi-Fi Network Requirements:
• You are using a 2.4GHz or 2.4/5 GHz mixed network.
• Your router supports 802.11b/g/n and IPv4 protocol.
• Do not use a VPN (Virtual Private Network) or Proxy Server.
• Do not use a hidden network.
• WPA and WPA2 using TKIP, PSK, AES/CCMP encryption.
• WEP EAP (Enterprise Authentication Protocol) is not supported.
• Use Wi-Fi channels 1-11 in North America and channels 1-13 outside North
America (refer to local regulatory agency).
• If you are using a network extender/repeater, the network name (SSID) and
password are the same as that of your primary network.
• Please enable the WPA2 on your router.
Turn on the power switch under the robot cover ("I" = ON, "
"= OFF), and place
the robot in front of the Station that is connected to power supply.
5
Power on Robot
Name Description
Bluetooth
Enable Bluetooth to connect the robot to the network during
the network setup process.
WI-FI*
Facilitate data transfer between the app and the robot, enabling
control of the robot through the app.
ECOVACS
HOME App
ECOVACS products offer smart functions such as network
setup, mapping, and cleaning mode selection (specic to each
product). To utilize these features, users need to download and
use the ofcial ECOVACS Home App.
*Note: The Deebot series robotic vacuums are designed for domestic cleaning scenarios. A
home Wi-Fi network is required for operation, and anti-DDOS protection can be congured by
users through route settings.
15 EN
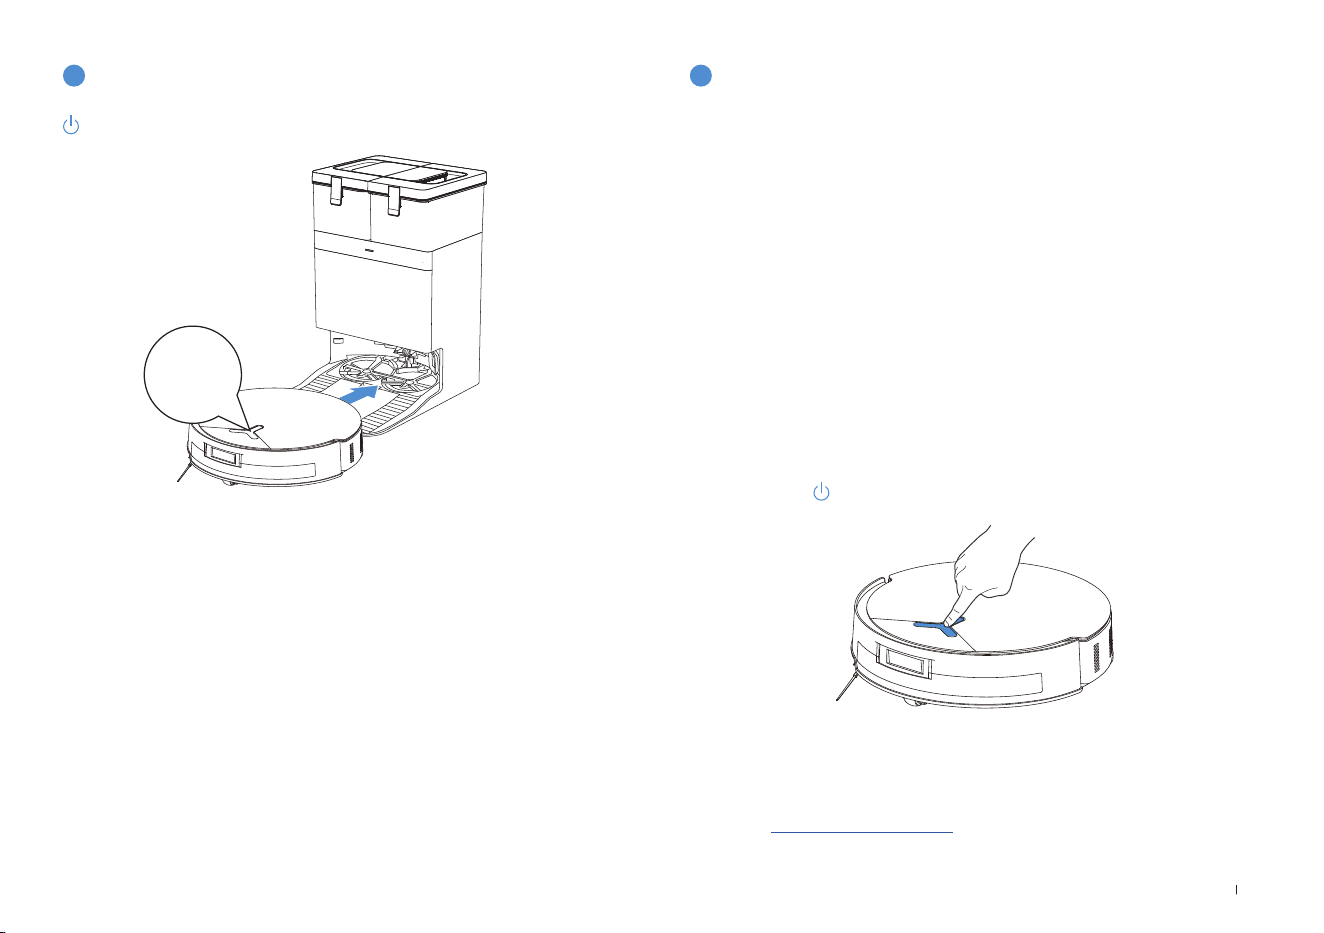
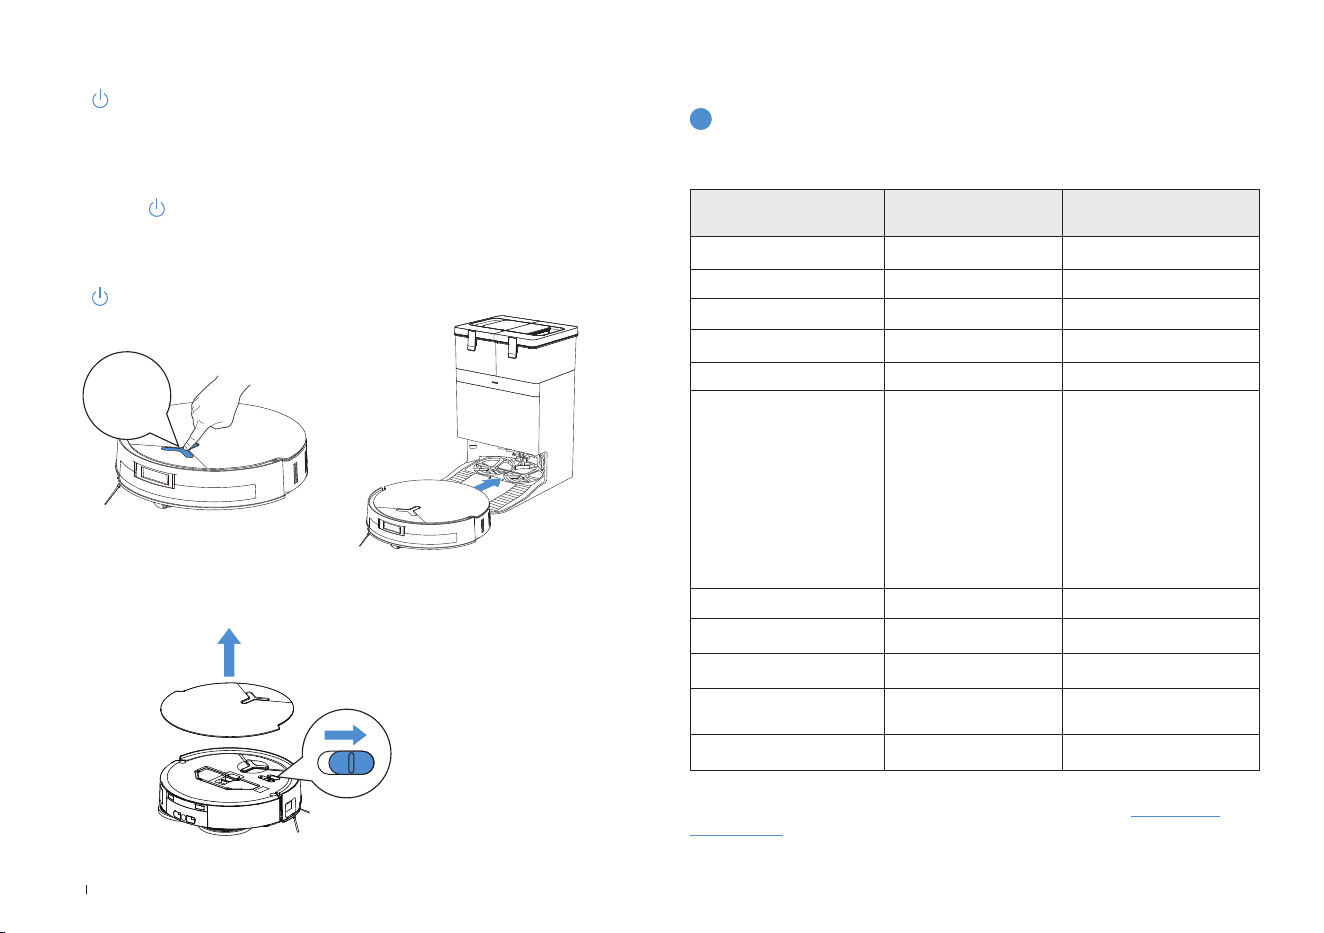
Before cleaning for the rst time, please make sure the robot is in the Station and
fully charged. Tap
on the robot to start. You can also use the ECOVACS HOME
App or Voice Control to start.
2. Start Cleaning
1. Start Mapping
When creating a map for the rst time, please follow the robot to help resolve some
minor issues.
For instance, if the robot gets stuck in a narrow space under furniture, you may refer
to the following solutions:
①
Raise the furniture to create a passage for the robot if feasible.
②
Cover the bottom of the furniture to prevent the robot from trying to enter.
③
Set up Virtual Boundary in the App to prevent the robot from entering.
8
Operate Robot
• The robot's water tank is automatically relled through the Station. Manual relling
is not needed.
• When mopping, the robot will recognize oor types and is able to lift mops
automatically when encountering carpets. Please do not use the robot on shaggy
rugs or carpets with bres longer than 10 mm. It is recommended to fold up the
shaggy rugs with bres longer than 10 mm during the cleaning process, or set
the shaggy carpeted area as a no-entry zone by setting virtual boundary in the
ECOVACS HOME App.
Note:
•
Do not frequently remove washable mopping pads.
•
Do not use a rag or any other object to scratch the Moping Pad Plates.
•
When the ECOVACS HOME App prompts that the mops need to be replaced,
please replace them in time. Explore more accessories on ECOVACS HOME
App or at https://www.ecovacs.com.
7
Charge Robot
Use the ECOVACS HOME App or voice control to recall the robot, or press and hold
the robot for 3 seconds, to allow the robot to dock for charging.
Note:
• The robot cannot be charged when the power is turned off.
• When the robot is not working, it is recommended to keep it powered ON and
charging.
• It is recommended that the robot start cleaning from the Station. Do not move the
Station while cleaning.
3 s
16EN
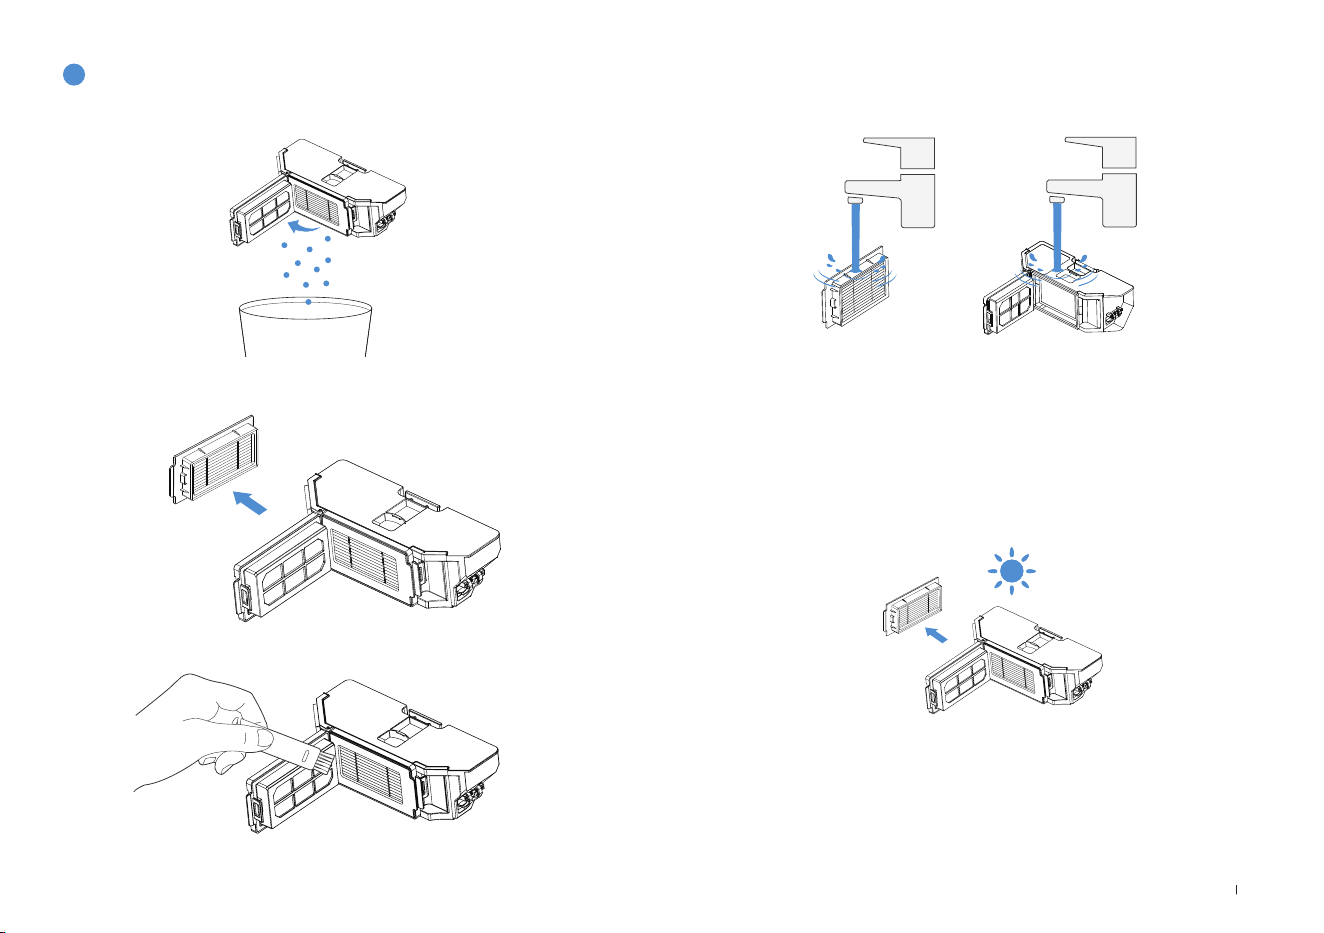
Regular Maintenance
To ensure optimal performance, maintain and replace parts at the following frequencies:
Part
Maintenance
Frequency
Replacement
Frequency
Washable Mops / Every 1-2 months
Dust Bag / When App prompts
Side Brush Every 2 weeks Every 3-6 months
Roller Brush Every week Every 6-12 months
Filter Every week Every 3-6 months
3D structure light sensor
Universal Wheel
Anti-drop Sensors
Bumper
Charging Contacts on the
robot
Charging Contacts on the
Station
d-ToF Laser Module
AI Camera
Approx. every month /
Clean Water Tank Every 3 months /
Dirty Water Tank Every month /
Dust Collection Cabin Every month /
Body and Bottom of the
Station
Every month /
Cleaning Solution Unit Every month /
1
Maintenance Frequency
Note: Explore more accessories at ECOVACS HOME App or at https://www.
ecovacs.com.
Tap on the robot to pause it while it is working. You can also use the ECOVACS
HOME App or Voice Control to pause the robot.
3. Pause
After pausing for a while, all indicator lights on the robot will go out. To wake up the
robot, press
.
4. Wake up
Use the ECOVACS HOME App or Voice Control to recall the robot, or press and hold
the
button on the robot for 3 seconds, to allow the robot to dock for charging.
5. Return to Station
3 s
The robot will enter deep sleep mode to protect the battery if it stays outside the
Station for about 10 h. Please switch OFF and ON to wake up the robot.
6. Deep Sleep Mode
17 EN
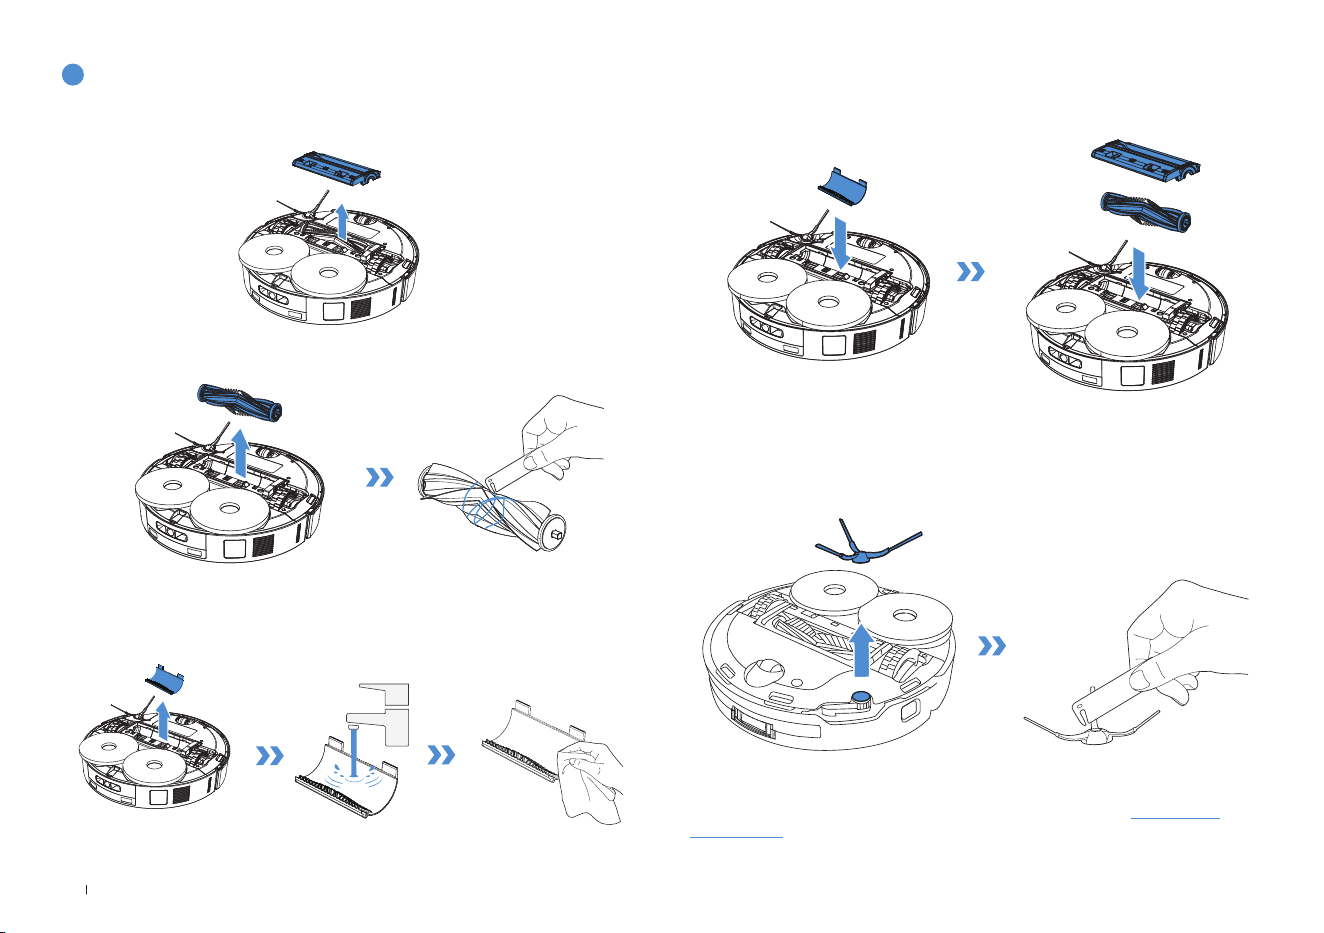
2
Dust Bin Maintenance
2. Take out the lter.
1. Open the cover and empty the bin.
3. Clean the dust bin.
Note:
• Please rinse the lter with water.
• Do not use ngers or brushes to clean the lter.
5. Dry by airing.
4. You may wash the dust bin and the lter with running water.
Shake off the remaining water from the parts.
Note: Make sure to dry the lter completely before use.
18EN
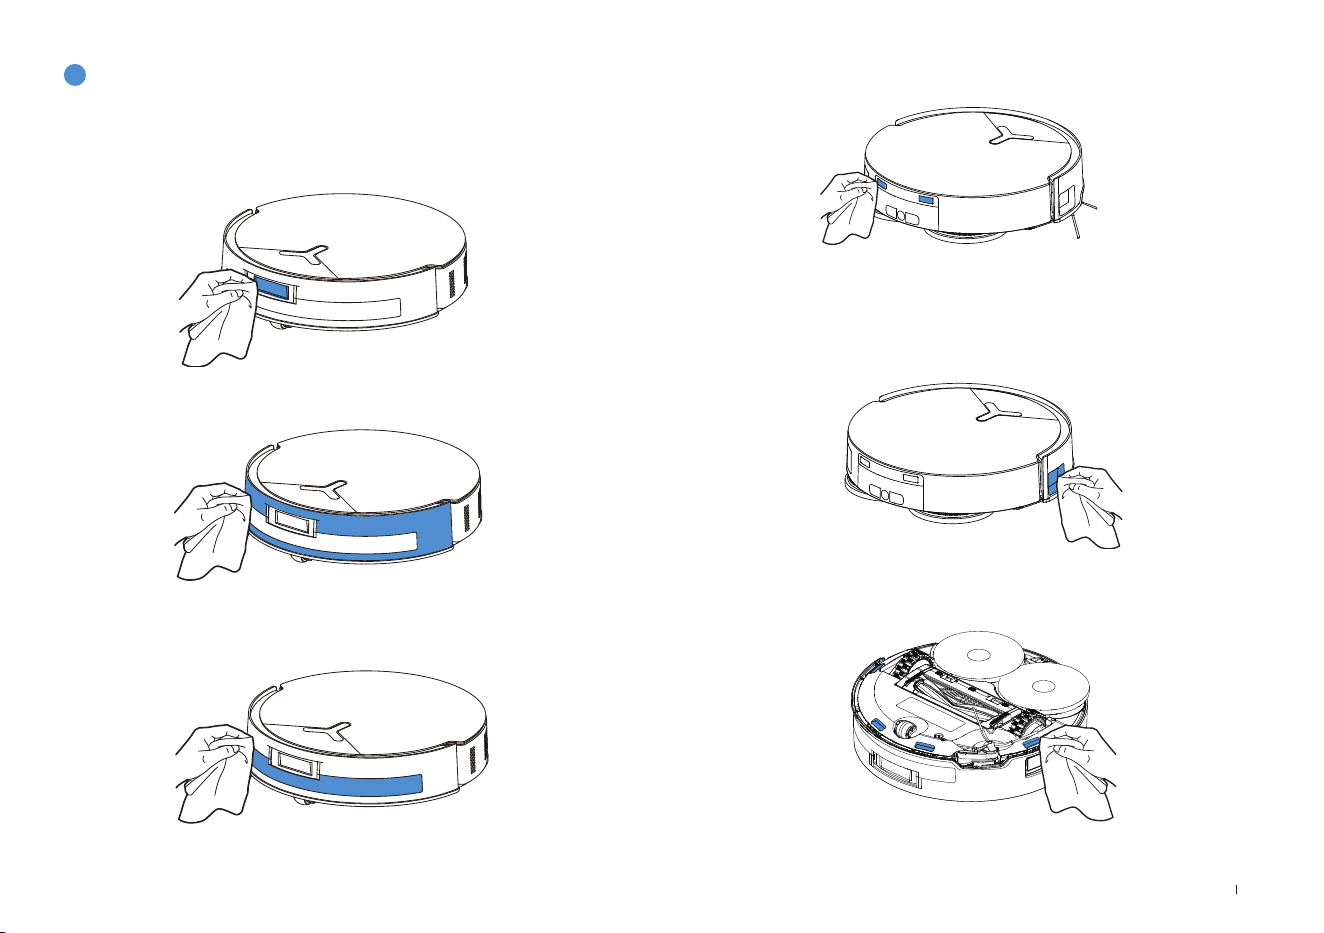
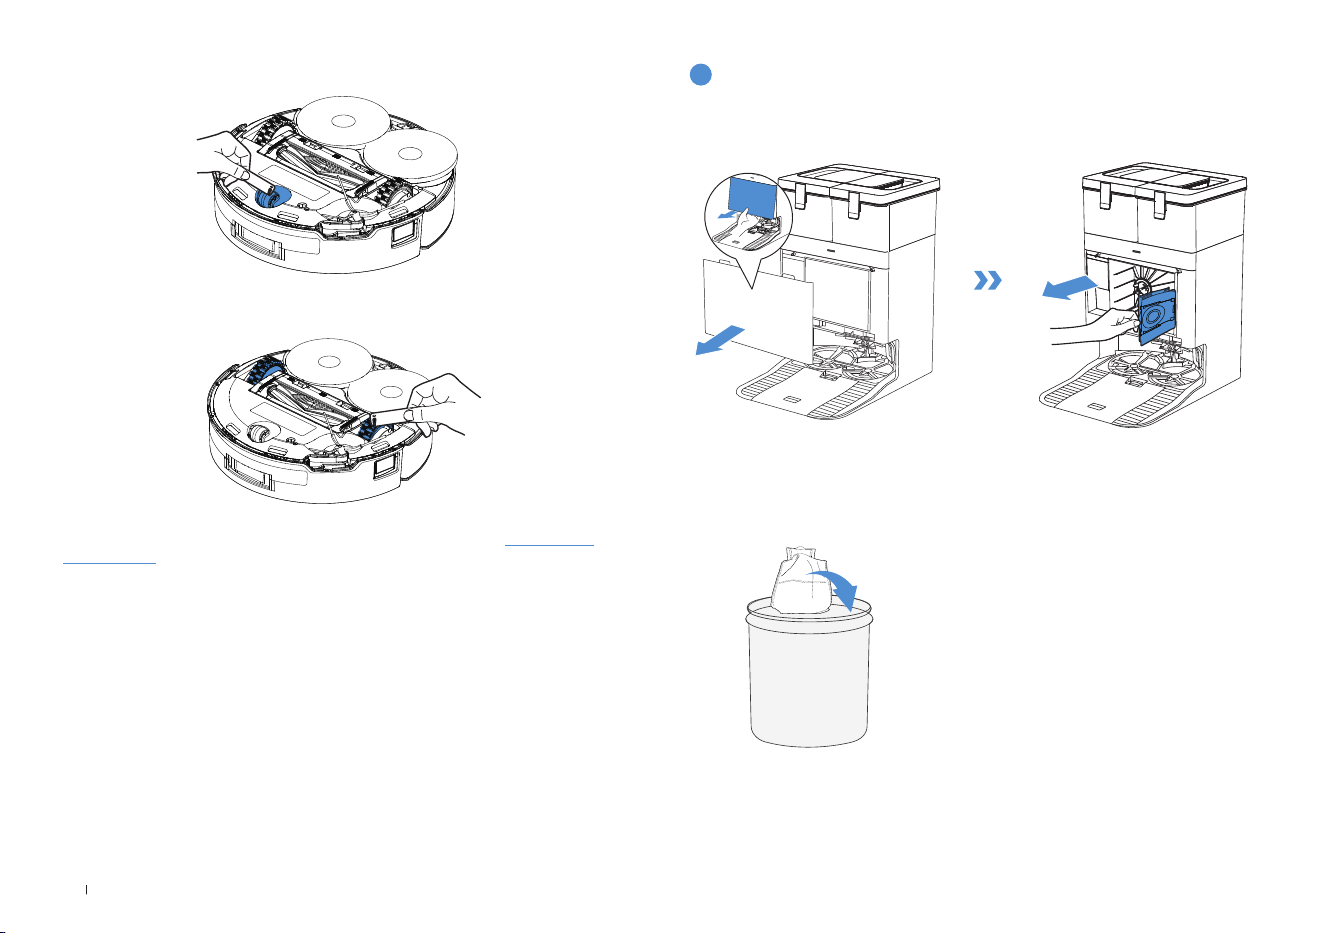
4. Install the brush comb, the roller brush and the roller brush cover.
Clean the Side Brush
Remove and clean the side brush.
Note: Explore more accessories at ECOVACS HOME App or at https://www.
ecovacs.com
Clean the Roller Brush
1. Remove the cover on the roller brush.
2. Remove and clean the roller brush.
3. Remove, clean and dry the brush comb.
3
Roller and Side Brush Maintenance
19 EN
1. Clean the Sensor Lens
4
Maintain Other Components
2. Clean the Bumper
Note: Do not use wet cloth when cleaning the following parts to prevent water
damage.
3. Clean the d-ToF Laser Module
4. Clean the Charging Contacts
6. Clean the Anti-drop Sensors
5. Clean the Edge Sensor
20EN
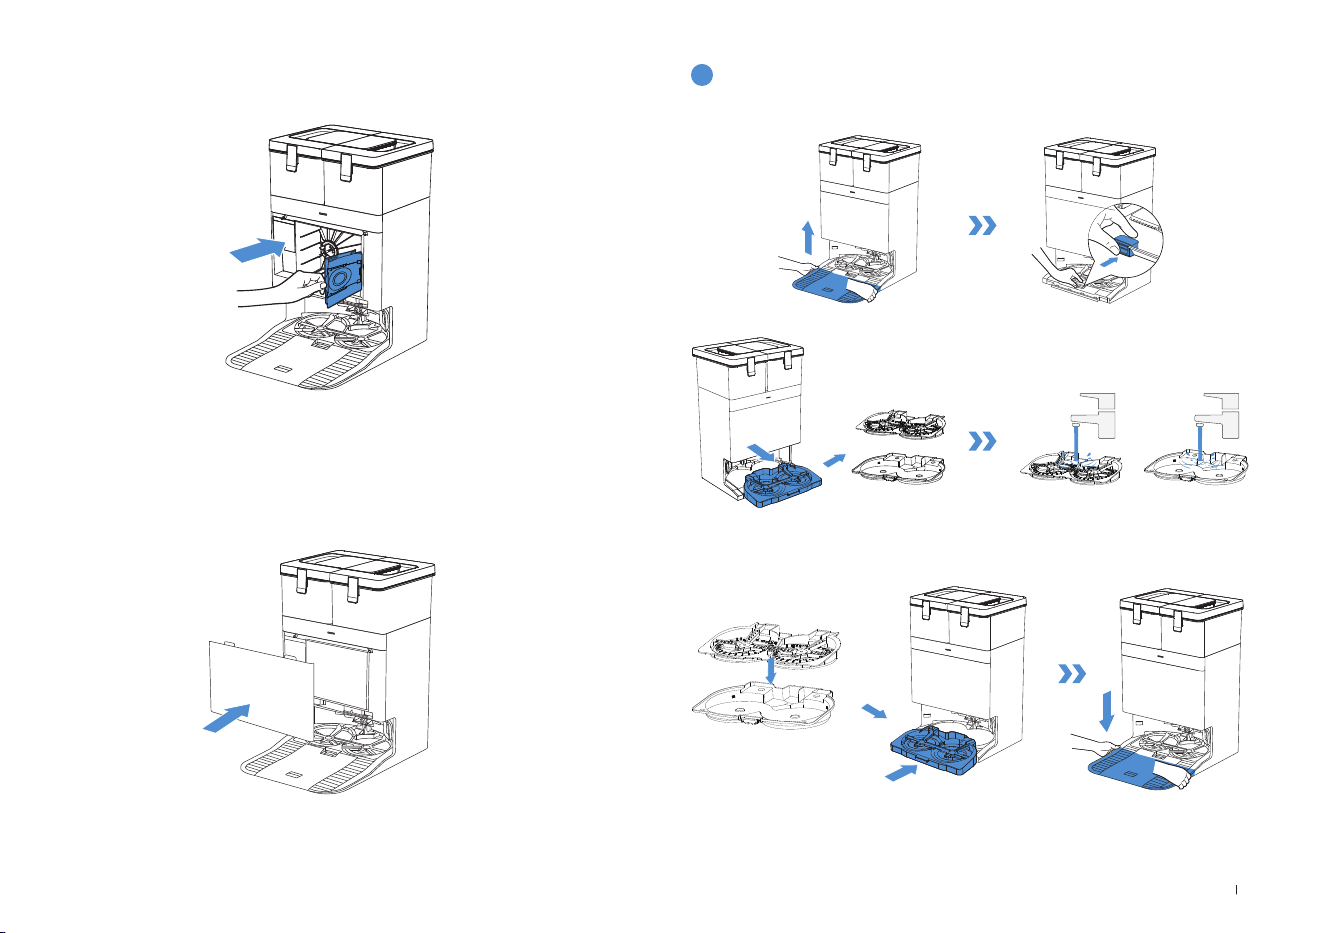
1. Discard the used dust bag.
Hold the handle to lift out the dust
bag, which can effectively prevent
dust leakage.
5
Dust Bag
8. Clean the Driving Wheels
7. Clean the Universal Wheel
Note: Explore more accessories at ECOVACS HOME App or at https://www.
ecovacs.com
21 EN
2. Wipe the dust collection cabin with a dry cloth and insert a new
dust bag.
3. Place the t joints at the upper edge of the dust cabin cover and
press the lower part of it to install it properly.
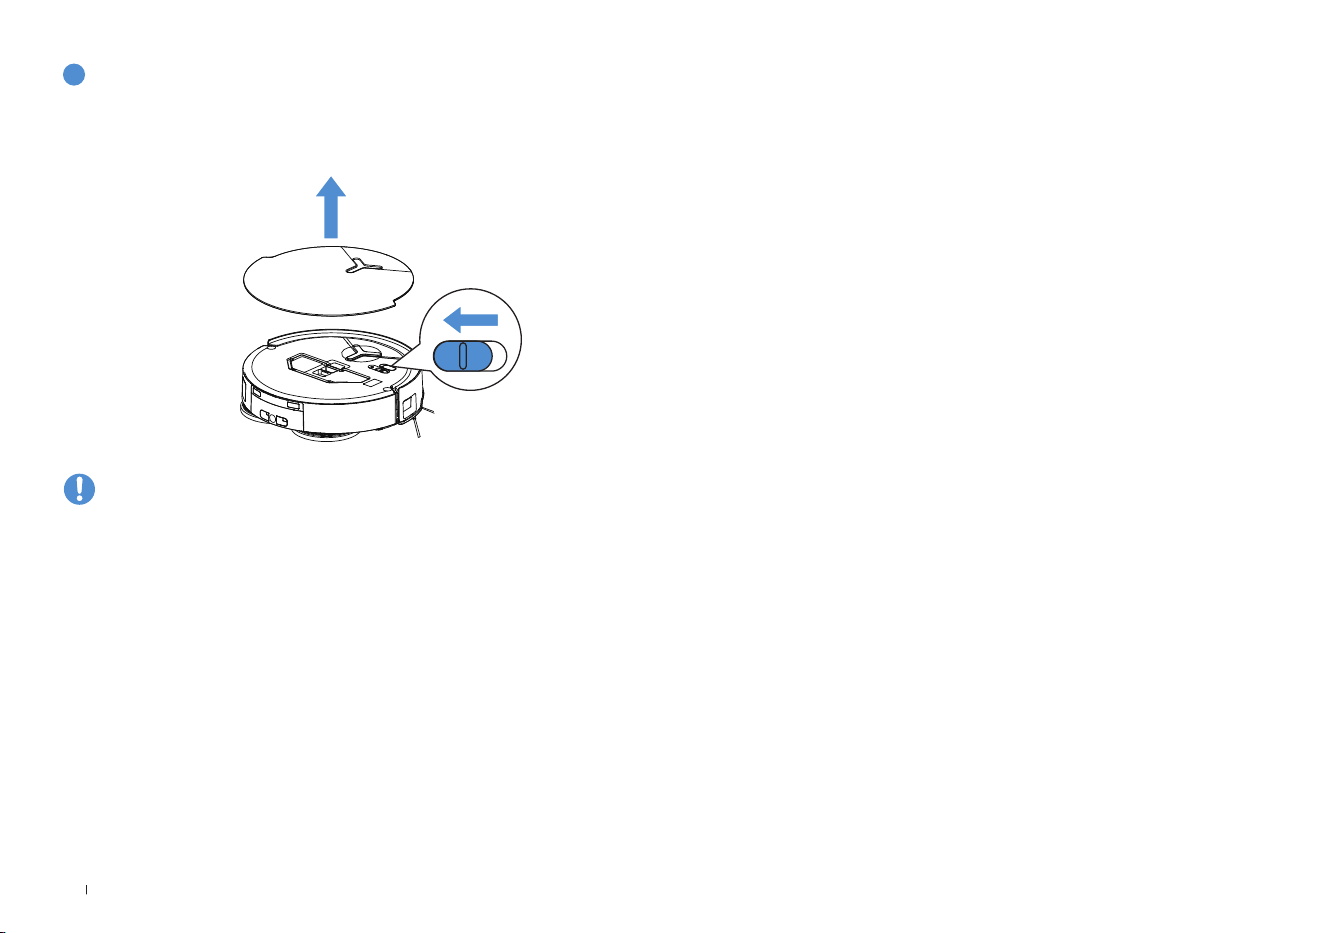
2. Install the cleaned base and mop washing tray.
1. Remove the base and mop washing tray, and clean them.
6
Mop Washing Tray
Note: Please install the Mop Washing Tray properly for smooth operation.
22EN
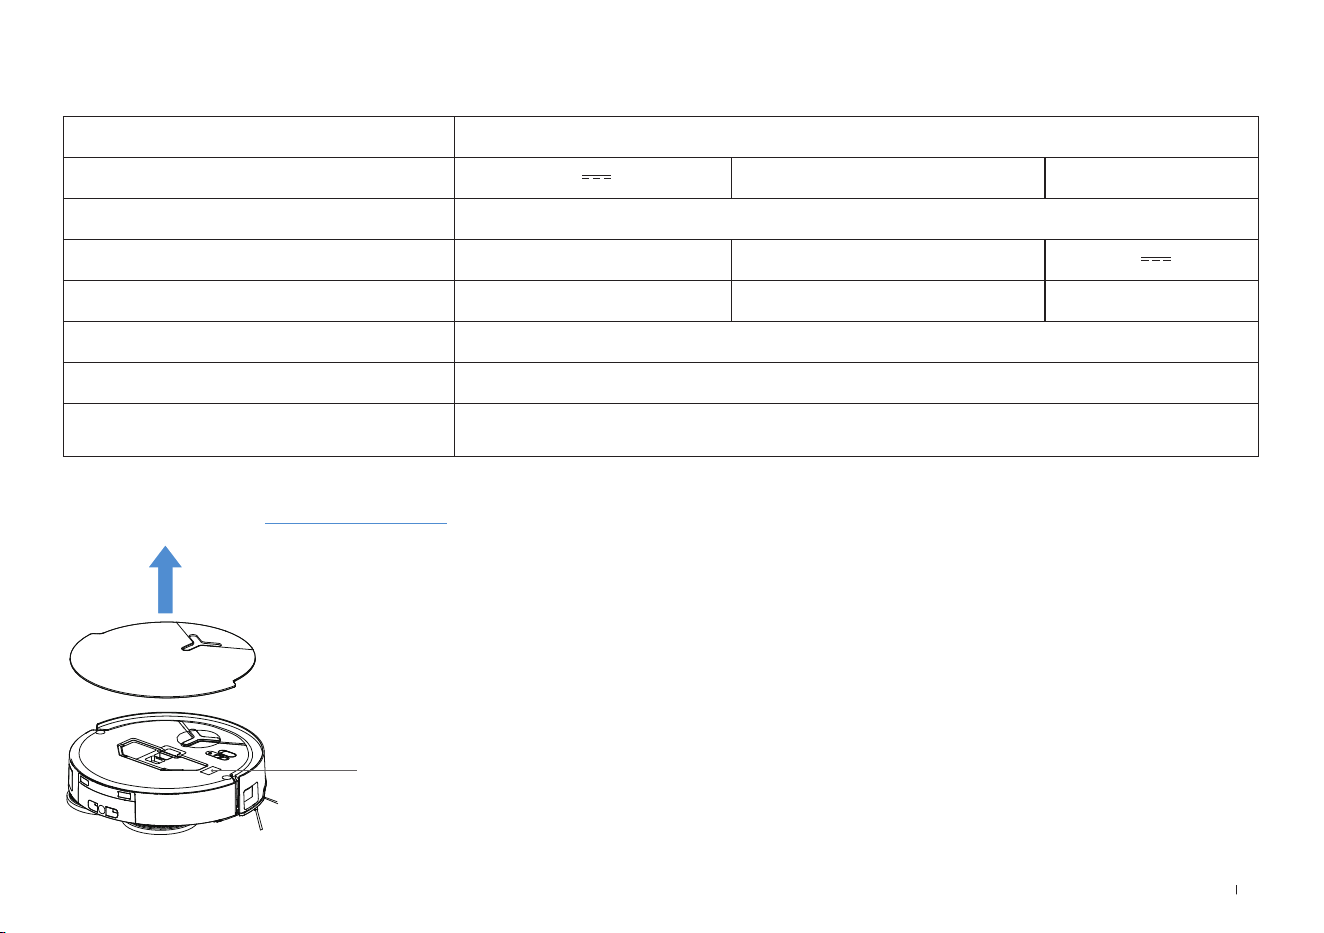
Please note that the robot cannot charge when powered OFF.
Please fully charge and switch OFF the robot before storage. Please recharge it
every 1.5 months to prevent the battery from over-discharging.
• When the robot is not working, it is recommended to keep it powered ON and
charging.
• If the battery is over-discharged or not used for a long time, the robot may not
be able to be charged. Please contact ECOVACS for help. Do not disassemble
the battery by yourself.
7
Storage

23 EN
For any issues encountered, refer to the corresponding solutions below. If the problem persists, please contact customer service for further assistance.
No. Malfunction Possible Cause Solution
1
The robot is not able to
connect to the ECOVACS
HOME App.
Incorrect Wi-Fi username or password entered. Enter the correct Wi-Fi username and password.
The robot is not within range of your home Wi-Fi signal.
Make sure the robot is within range of your home Wi-Fi signal. Try to
stay as close to the router as possible.
The robot is not in the conguration state.
Press the RESET button and try to connect again. In case of failure,
follow the App to reset the connection.
There is no home Wi-Fi on the Wi-Fi list.
1. Check if the Wi-Fi name contains special characters. Please do not
use special characters like ! @#& ¥%/\.
2. Do not use a 5 Ghz network.
Incorrect App installed. Please download and install the ECOVACS HOME App.
2 The map is lost.
The map might be lost if you move the robot while
cleaning.
Move the robot back to the Station to retrieve the map.
Find the saved map in Map Management on the ECOVACS HOME App
and tap “Use This Map” to retrieve it.
If this issue persists, please restart mapping.
3
Unable to create the furniture
map in the App.
Moving the robot when cleaning might cause the map to
be lost.
During cleaning, do not move the robot.
Auto cleaning is not nished.
Make sure that the robot automatically returns to the station after
cleaning.
4
The Side Brush drops out of
place during use.
The side brush is not properly installed. Make sure the side brush clicks into place.
5
No signal found. Unable to
return to the station.
The Station is incorrectly placed.
Please place the station correctly according to the instructions in the
[Quick Start] section.
The station is out of power or moved.
Check whether the station is connected to the power supply.
Do not move the station.
The robot does not start cleaning from the OMNI station. It is recommended that the robot starts cleaning from the OMNI station.
The docking route is blocked. For example, the door is
closed to the room where the station is placed.
Keep the route clear.
TROUBLESHOOTING

24EN
No. Malfunction Possible Cause Solution
6
The robot returns to the
station before it has nished
cleaning.
The room is so large that the robot needs to return to recharge.
Please enable auto resume. For more details, please follow the App
instructions.
In highly complex home layouts, cleaning efciency may
decrease, possibly resulting in incomplete cleaning.
Simplify your home layout.
7 The robot is unable to charge.
The robot is not switched ON. Switch ON the robot.
The robot’s charging contacts are not fully in contact with the
station's.
Make sure that the robot’s charging contacts have connected to
the station's charging contacts and
ashes. Check whether the
robot’s and OMNI station's charging contacts are dirty. Please
clean these parts according to the instructions in the [Regular
Maintenance] section.
The station is not connected to power supply. Make sure the OMNI station is connected to power supply.
The base of the station is not installed properly. Refer to the [Quick Start] section for correct installation.
8
The robot is very loud during
cleaning.
The roller brush/side brush is tangled, or the dust bin/lter is
blocked.
It is recommended to clean the roller brush, side brush, dust bin,
lter, etc. regularly.
The robot is in Strong Mode. Switch to Standard Mode.
9
The robot gets stuck while
working and stops.
The robot is tangled with objects on the oor (electrical wires,
curtains, carpet fringing, etc.).
The robot will try various ways to free itself. If its attempts fail,
manually remove the obstacles and restart.
The robot might be stuck under furniture with an entrance of
similar height.
Please raise the furniture, set a physical barrier, or set a virtual
boundary via the ECOVACS HOME App.
The robot is stuck in a narrow area.
Tidy up your home, set a physical barrier, or set a virtual boundary
via the ECOVACS HOME App.
10
During cleaning, the robot
may encounter issues like
a disorderly route, biased
movement, repeated cleaning
over the same spots, and
missing small areas. (If there
is a large area that has not
been cleaned temporarily, the
robot will automatically clean
the missed area. Sometimes
the robot will re-enter a
cleaned room, which may not
be repeated cleaning, but the
robot nds any missed area.)
Objects such as wires and slippers placed on the ground block
the robot.
Before cleaning, please tidy up scattered wires, slippers, and other
objects on the ground as possibly can. If there is any area missed
during cleaning, the robot will correct it automatically. Please refrain
from interfering (such as moving the robot or blocking its route).
The Driving Wheels may slip on the ground when the robot climbs
steps, thresholds, and door bars, which can affect its judgement
of the entire home environment.
It is recommended to close the door of the affected area and clean
it separately. After cleaning, the robot will return to its starting
location.
On freshly waxed or polished oors, as well as smooth tiles, there
may be less friction between the driving wheels and the oor.
Please wait for the wax to dry before cleaning.
Due to variations in home layouts, some areas cannot be entered
by the robot.
Tidy up your home to ensure that the robot can enter the areas to
be cleaned.

25 EN
No. Malfunction Possible Cause Solution
11 Delay in remote control.
The Wi-Fi signal is poor, causing the video loading to
be slow.
Use the robot in areas with good Wi-Fi signal.
12
After returning to the OMNI station,
the robot does not empty its dust
bin.
The Auto-Empty function has not been turned on in the
ECOVACS HOME App.
Turn on the auto-empty function in the ECOVACS HOME App.
Dust Bag is not installed in the station. Install the dust bag, and close the dust collection cabin.
Manually moving the robot back to the station may not
trigger the auto-empty function.
It is recommended to allow the robot return to the OMNI station on
its own. Please do not manually move it.
In Do Not Disturb mode, the robot will not empty the
dust after returning back to the OMNI station.
Turn off Do Not Disturb in the ECOVACS HOME App or manually
start dust-emptying.
If the above possible causes have been ruled out,
components of the station may be abnormal.
Please contact customer service for assistance.
13 Auto-empty unsuccessful.
The station detects a decrease in empty efciency.
Replace the dust bag according to the [Regular Maintenance]
section and close the dust collection cabin. If the dust bag is not
full when prompted by the App, you can put it back again.
The outlet of the dust bin is blocked by foreign objects. Remove the dust bin and clear the foreign objects on the outlet.
14
The inner side of the dust
collection cabin is dirty.
Fine particles pass through the dust bag and
accumulate on the inner side of the dust collection
cabin.
Clean the inner side of the dust collection cabin.
The dust bag is broken. Check and replace the dust bag.
15
Dust leakage occurs while the
robot is working.
The outlet of the dust bin is blocked by foreign objects. Remove the dust bin and clear the foreign objects on the outlet.
16 Mopping pad plates will not rotate.
The mopping pad plates are not correctly installed.
Please install the mopping pad plates correctly. The sound of click
indicates proper installation.
The mopping pad plates are blocked by foreign
objects.
Clear the foreign objects.
17
The robot does not respond to the
station's instructions.
The robot is not in the station. Please make sure the robot is in the station.

26EN
No. Malfunction Possible Cause Solution
18 The driving wheel is stuck.
The driving wheel is entangled or stuck due to foreign
objects.
Rotate and press the driving wheel to check for any wrapping or
obstruction by foreign objects. If any foreign objects are found,
please clean them promptly. If this issue persists, please contact
customer service for assistance.
19
The mop washing tray is
full of water and can't be
emptied. A voice prompt
is broadcasted to alert you
about this.
The dirty water tank is not properly installed. Tap down on the dirty water tank to ensure it is properly installed.
The sealing plugs in the Dirty Water Tank are not installed
properly.
Make sure that the two sealing plugs are properly installed.
The station cannot drain water normally.
Follow the App instructions to see if the station can drain properly.
If draining attempts fail, please check for possible foreign objects
between the dirty water tank and the Station.
The suction port of the mop washing tray is blocked by
foreign objects.
Ensure that there is no foreign object in the suction port of the mop
washing tray.
The mop washing tray is dirty. Cleaning the mop washing tray with running water.
Check if the oating ball gets stuck when there is no water
in the mop washing tray base.
Take out the mop washing tray to put the oating ball back in
place.
The voice alert persists after all the above solutions are
tried.
Power off and on the station. If this issue persists, please contact
customer service for assistance.
Please contact our customer service for assistance if the problem persists despite the recommended solutions.
27 EN
Please use the mobile camera to scan the QR code and obtain the user guide.
TECHNICAL SPECIFICATIONS
Output power of the wireless module is less than 100mW.
Note: Technical and design specications may be changed for continuous product improvement.
Explore more accessories at https://www.ecovacs.com.
Model DEX 54
Rated Input 20V
2A Charging Time About 3.5 h
Station Model CH2453I
Rated Input 220-240V
~
50-60Hz Rated Output 20V
2A
Rated Input Current(Charging) 0.5A Power(Emptying) 650W
Power(Hot Water Washing Mop) 1650W
Robot Dimensions (L*W*H mm) 353*350*98mm
Station Dimensions (L*W*H mm)
350*477*533mm (with base)
350*294*533mm (without base)

451-2441-0803
Ecovacs Home Service Robotics Co., Ltd.
No.518 Songwei Road, Wusongjiang Industry Park, Guoxiang Street,
Wuzhong District, Suzhou, Jiangsu, China.