
SapphireAppliances.com | 1.866.754.6672
Sapphire Series 3
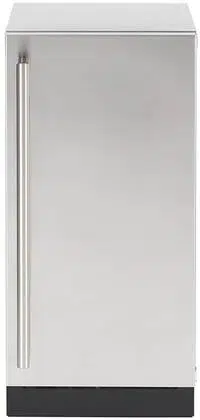
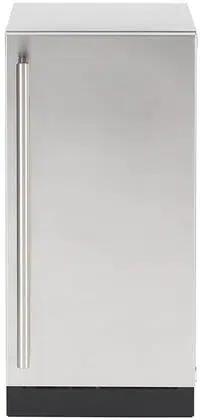
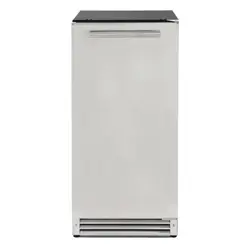
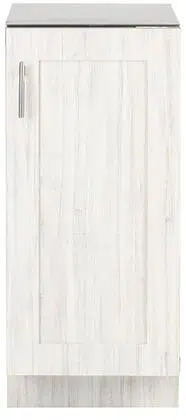
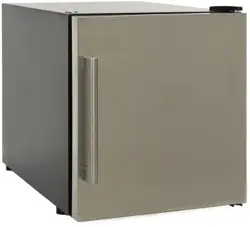
15'' Crescent Ice Maker
Operator’s Manual
SCIM153SS Indoor&Outdoor Model
SCIM153SSPR Indoor&Outdoor Model
SCIMCTSS Indoor Counter-top Model
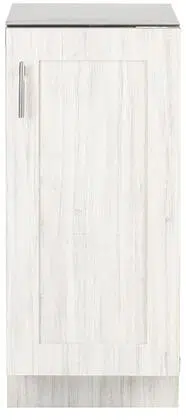
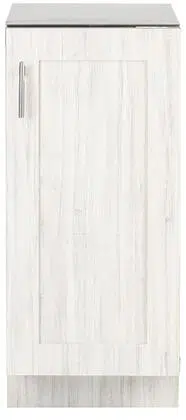
Adapting to Your Environment
Ice Maker
•
Wine Cellar
•
Refrigerator
•
Beverage Center •
Drawer Refrigerator

SAPPHIRE Ice Maker Operator’s Manual
© 2025 SAPPHIRE
TABLE OF CONTENTS
INTRO / GENERAL INFORMATION ............................................................................................2
SAFETY INSTRUCTIONS..............................................................................................................3
DEFINITIONS – DANGER - WARNING – CAUTION......................................................................3
DISPOSAL...................................................................................................................................3
SAFETY PRECAUTIONS ..............................................................................................................4
SPECIFICATION .........................................................................................................................5
CRESCENT BUILT-IN SCIM153SS/SCIM153SSPR....................................................................5
INSTALLATION ...........................................................................................................................7
CONNECTING THE WATER SUPPLY ............................................................................................9
ELECTRICAL CONNECTION..........................................................................................................9
FILTER INSTALL & REPLACEMENT.............................................................................................10
LEVELING THE UNIT..................................................................................................................11
ANTI-TIP INSTALL......................................................................................................................11
REVERSING THE DOOR.............................................................................................................12
SCIM153SS...........................................................................................................................12
SCIM153SSPR ......................................................................................................................13
SCIMCTSS.............................................................................................................................14
CUSTOM DOOR PANELS ...........................................................................................................15
INSTALLING DOOR PANEL .......................................................................................................15
RECESSED INSTALLATION...........................................................................................................8
OPERATING THE UNIT...............................................................................................................18
CARE AND MAINTENANCE.......................................................................................................21
TROUBLESHOOTING ................................................................................................................23
WARRANTY ..............................................................................................................................25
CRESCENT COUNTERTOP SCIMCTSS......................................................................................6
EXTENDED PERIODS OF NON-USE ..........................................................................................21
1

© 2025 SAPPHIRE
SAPPHIRE Ice Maker Operator’s Manual
2
THANK YOU FOR CHOOSING SAPPHIRE
SAPPHIRE products were created using commercial equipment
manufacturing and design expertise to forge premium residential
products that target the affordable luxury market with Series 3 products,
the premium market with Series 5 products, and the luxury market with
Series 7 products.
All Sapphire products are designed for household and similar applications.
Series 5 and 7 Products are also rated and certified for Commercial and Food Service
applications.
For Authorized Parts or Technical Service
Please contact Sapphire: +1(866) 754-6672 option 2 or email
General Inquiries
The Legacy Companies
Sapphire Division
3355 Enterprise Avenue, Suite 160
Weston, FL 33331 USA
T: +1 (954) 202-7419
Connect With US
www.thelegacycompanies.com
SAPPHIRE Ice Maker Operator’s Manual
IMPORTANT SAFETY INSTRUCTIONS
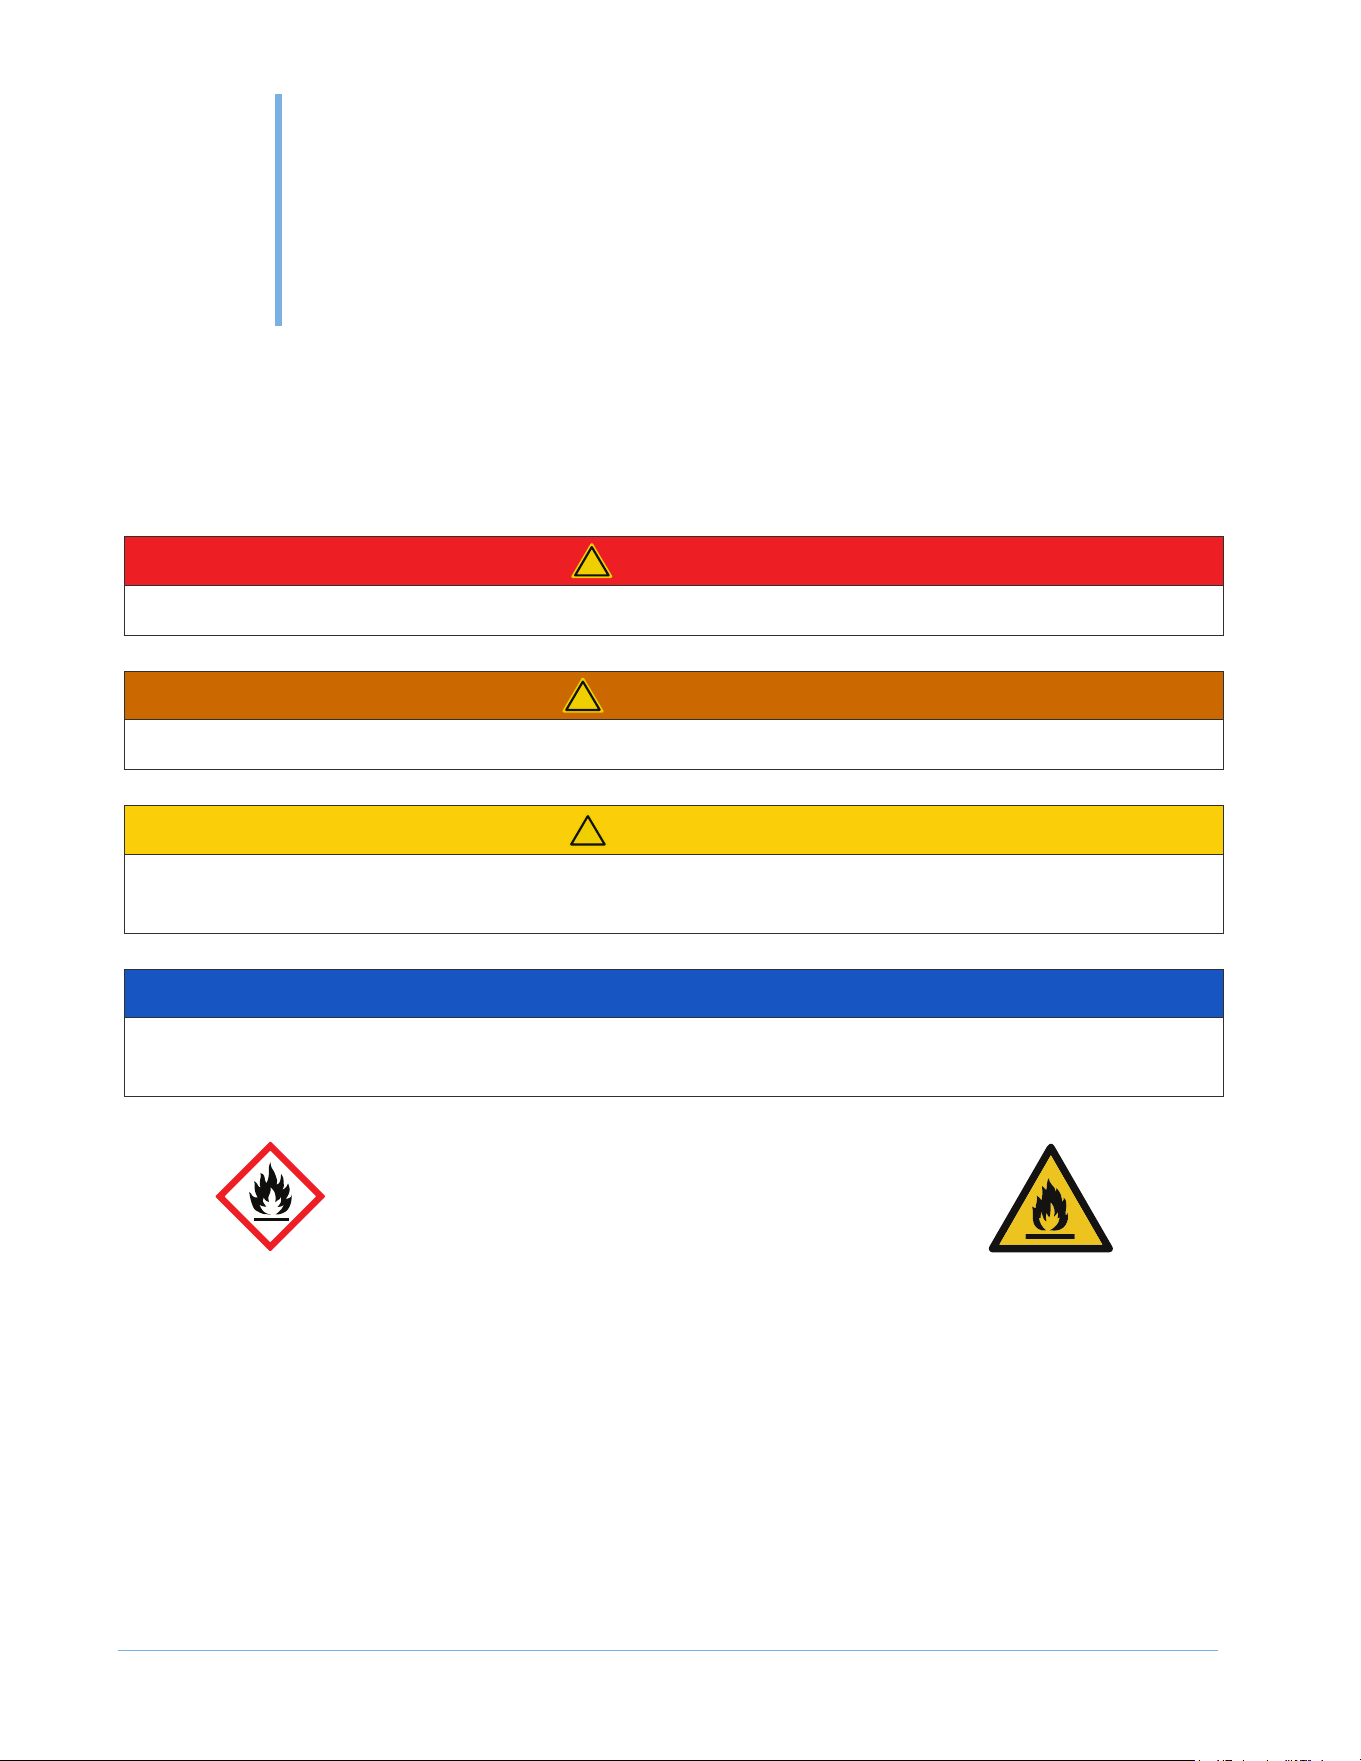
SAFETY DEFINITIONS
The words DANGER, WARNING, CAUTION and NOTICE are used throughout this manual to
highlight important information. Be certain that the meanings of these alerts are known to all who
operate and install the appliance.
DANGER – Risk of Fire or Explosion. FLAMMABLE REFRIGERANT Used.
Do not use mechanical devices to defrost.
Do not puncture refrigerant tubing.
To be repaired only by trained service personnel.
DISPOSAL
The appliance cannot be treated as normal domestic trash but must be handed in at a collection point
for recycling electric and electronic appliances. Your
contribution to the correct disposal of this
product protects the environment. Further information about the recycling of this product can be
obtained from your local municipal authority.
!
DANGER
Indicates a hazardous situation that, if not avoided, will result in death or serious injury.
!
WARNING
Indicates a hazardous situation that, if not avoided, could result in death or serious injury.
!
CAUTION
Indicates a hazardous situation that, if not avoided, could result in minor or moderate
injury.
NOTICE
Indicates a situation that can cause damage to the appliance and/or the environment, or cause the
appliance to operate improperly.
SAFETY
1
3
© 2025 SAPPHIRE

© 2025 SAPPHIRE
SAPPHIRE Ice Maker Operator’s Manual
SAFETY PRECAUTIONS
POWER CORD PRECAUTIONS
• Do not use the appliance if the power cord is damaged. If the power cord is damaged, have a
qualified electrician replace the power cord.
• Never lift, carry, or drag the appliance by the power cord.
• Do not connect or disconnect the electric plug when your hands are wet.
• Never unplug by pulling on the power cord. Always grip the plug firmly and pull straight out from
the outlet.
INSTALLING PRECAUTION
• Connect to potable water supply only.
• To ensure proper ventilation for the appliance, keep obstructions away from the front of the unit.
• Keep fingers out of the “pinch point” areas. Clearance between the door and cabinet are
necessarily small. Be careful closing the door when children are in the area.
• Do not touch the evaporator with your hand when the appliance is operating.
• Do not attempt to repair or replace any part of your appliance unless this manual specifically
recommends it. Have a qualified technician perform all other service on the unit.
• Children 8 years of age and older and people with reduced physical, sensory or mental
capabilities or lack of experience and knowledge can use this appliance if they have been given
supervision or instruction concerning use of the appliance in a safe way and they understand the
hazards involved.
• Never allow children to operate, play with or crawl inside the appliance.
• Never allow children to clean and maintain the machine without supervision.
• Do not use the appliance other than for its intended purpose.
• Do not touch the condenser surfaces. They are sharp and can be easily damaged.
• Never clean the appliance parts with flammable fluids. Do not store or use gasoline or
other flammable vapors and liquids in the vicinity of this appliance or any other appliances. The
fumes can create a fire hazard or explosion.
• Do not use solvent-based cleaning agents or abrasives on the interior. These cleaners may
transmit taste to the ice cubes, or damage or discolor the interior.
• If the appliance will not be used for a long time, thoroughly clean it before the next use.
Carefully follow any instructions provided for cleaning or the use of sanitizing solution. Do
not leave any solution inside the appliance after cleaning.
SAFETY
4
MOVING PRECAUTIONS
• When moving the appliance, do not turn it upside-down and do not unlevel it more than 45
degrees.
• Do not move the appliance without emptying it and securing the door in the closed position.
OTHER PRECAUTIONS
CLEANING AND MAINTENANCE PRECAUTIONS
© 2025 SAPPHIRE
SAPPHIRE Ice Maker Operator’s Manual
SSPPEECCIIFFIICCAATTIIOONNSS
2
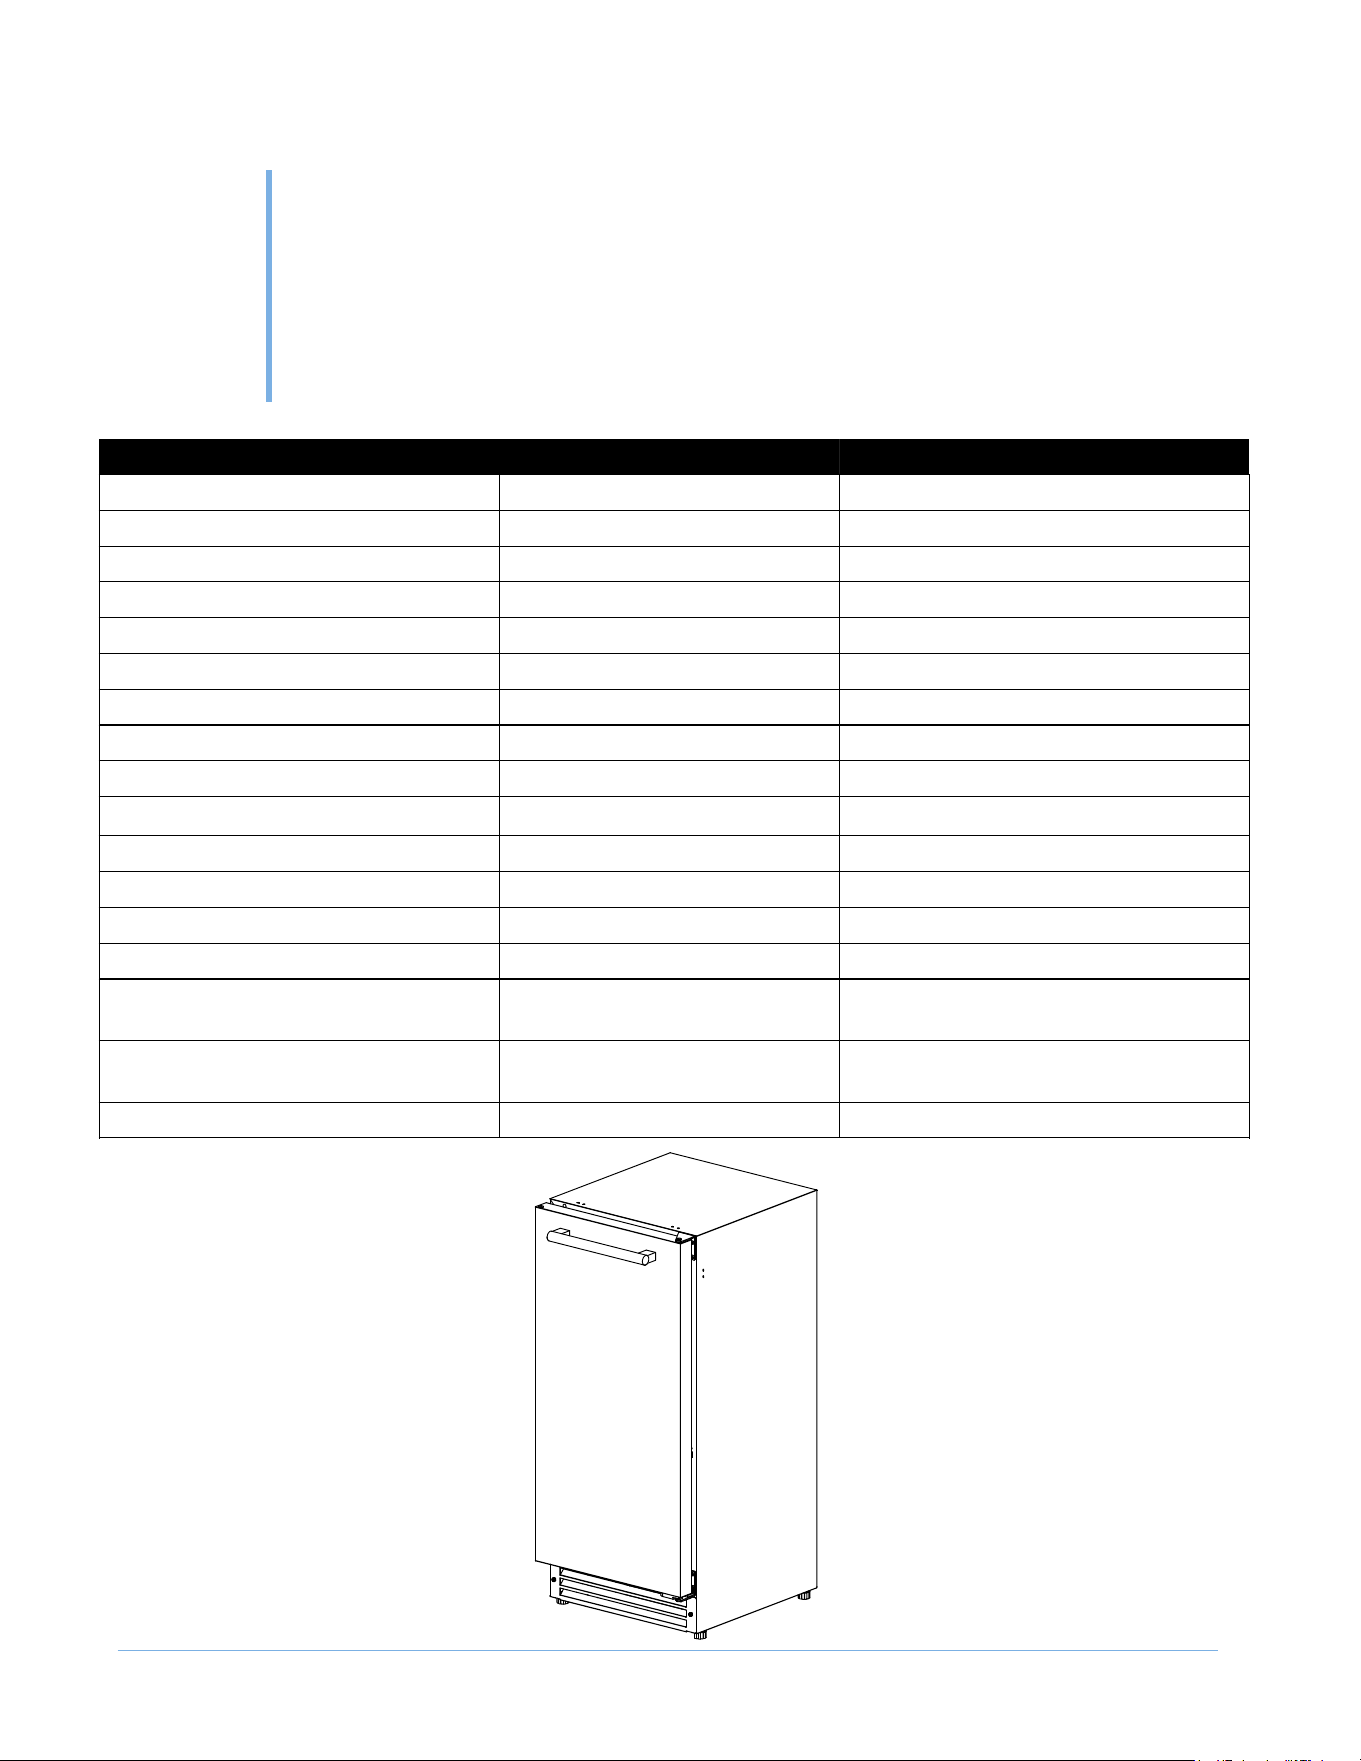
FEATURES SCIM153SSPR SCIM153SS
Electrical Requirements 115V/60Hz 115V/60Hz
Maximum Amp Fuse 15 amps 15 amps
Indoor/Outdoor
Indoor/Outdoor*
Indoor/Outdoor*
IP Rating IPX4 IPX4
Ambient Operating Range 50~110°F(10°C~43°C) 50~110°F (10°C~43°C)
Water Operating Range 41~90°F (5°C~32°C) 41~90°F (5°C~32°C)
Water Pressure Operating Range 20~80psi (0.138MPa~0.55MPa) 20~80psi (0.138MPa~0.55MPa)
Water Inlet Adapter 1/4" OD compression fitting 1/4" OD compression fitting
Ice Shape Crescent Cube Crescent Cube
Ice Production Capacity (70°F/50°F )
25lbs
** 25lbs **
Ice Storage Capacity 22bs 22lbs
Ice Size (L×D×H) 2-3/8"x1/2"x3/4" 2-3/8"x1/2"x3/4"
Ice Weight about 0.4oz about 0.4oz
Ice quantity per cycle 12 12
Unit Dimensions (W×D×H)
14-7/8"×18-7/8"×33-5/8"
378×480×855(mm)
14-7/8"×18-3/4"×33-5/8"
378×475×855(mm)
Cut-Out Dimensions (W×D×H)
15-3/5"×21-5/8"×34-3/16'' to 35''
390×550×868 to 889(mm)
15-3/5"×21-5/8"×34-3/16'' to 35''
390×550×868 to 889(mm)
Net Weight
65lbs(29.5kg) 62lbs(28kg)
5
© 2025 SAPPHIRE
SAPPHIRE Ice Maker Operator’s Manual
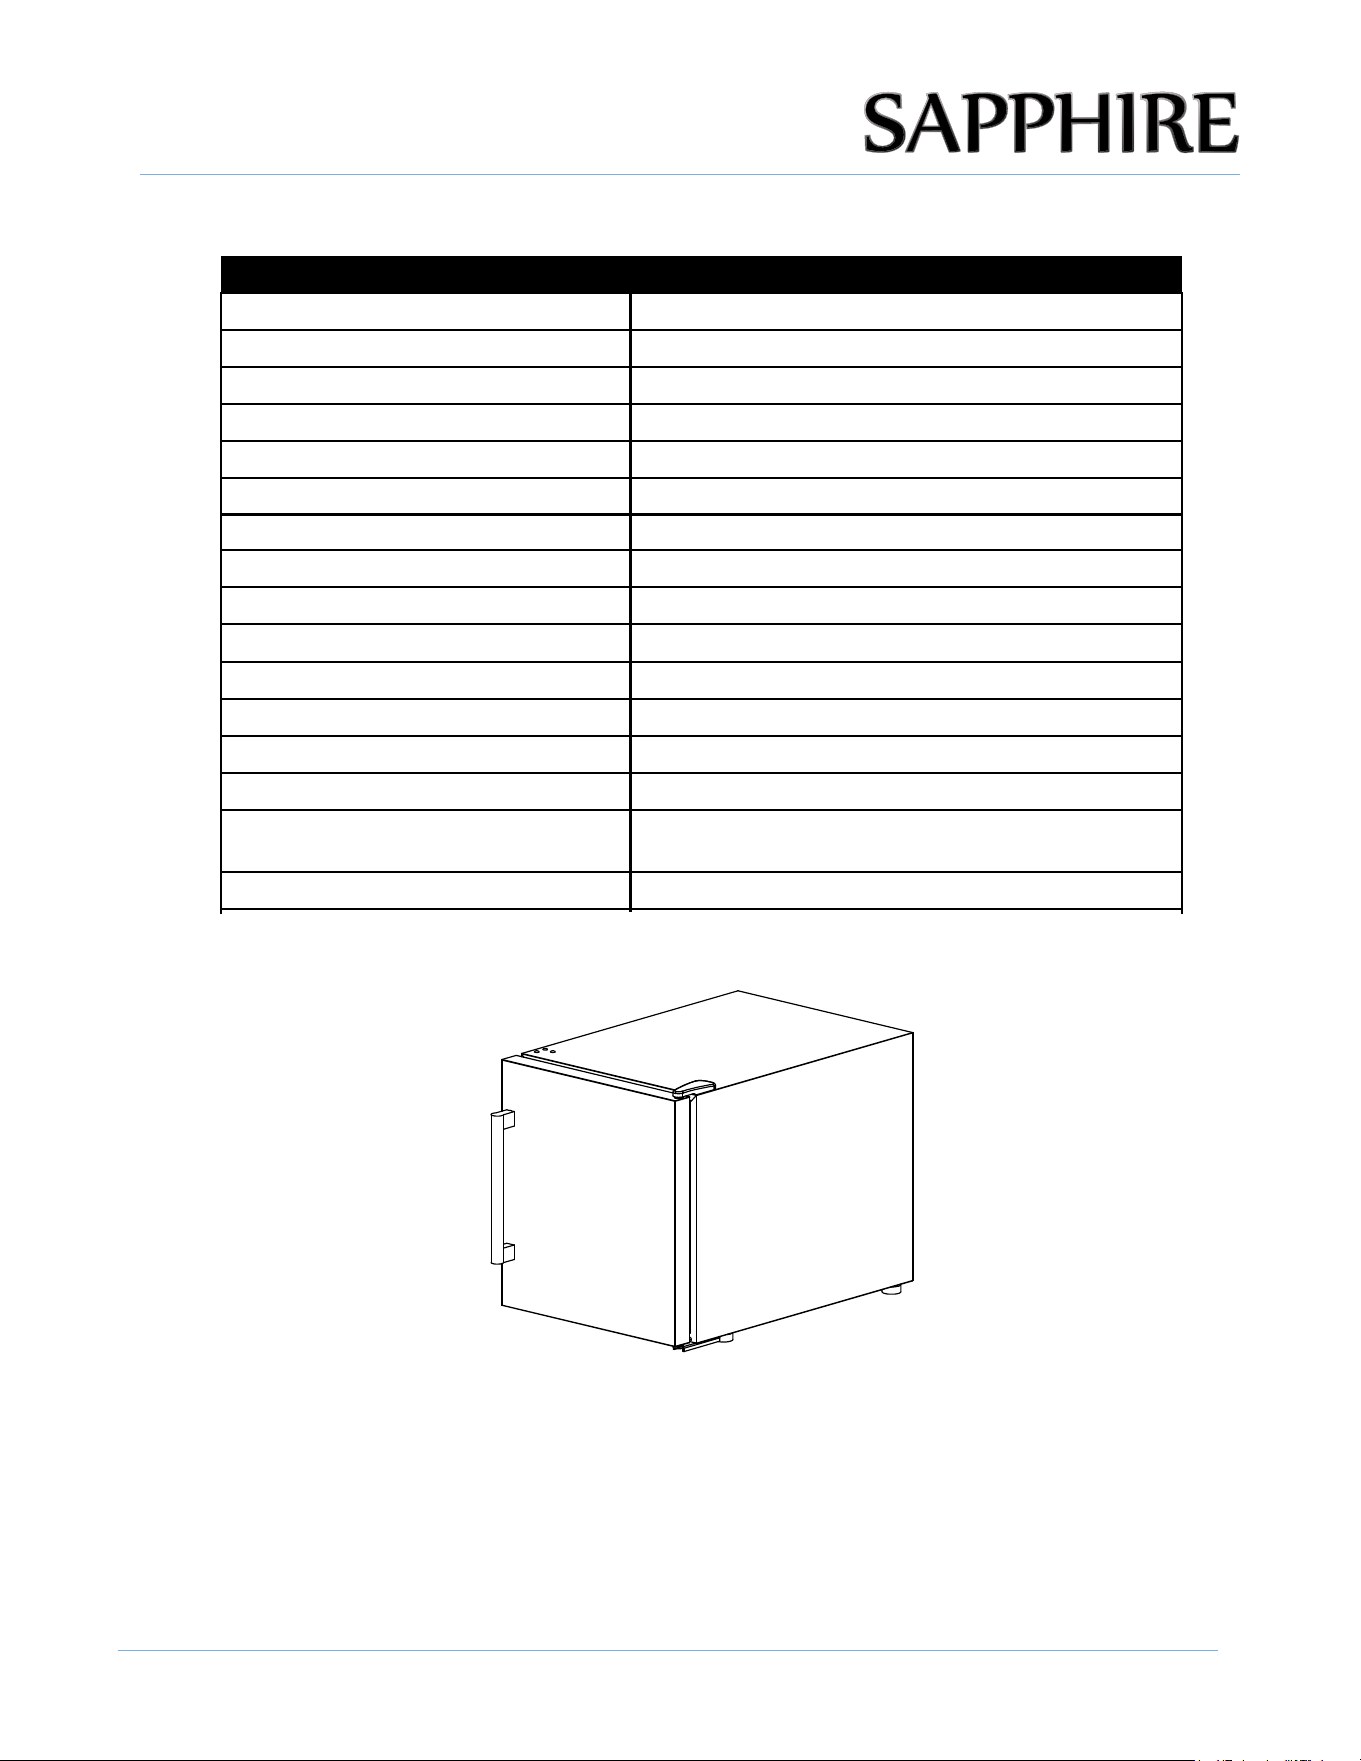
FEATURES SCIMCTSS
Electrical Requirements 115V/60Hz
Maximum Amp Fuse 15 amps
Indoor/Outdoor Indoor
IP Rating N/A
Ambient Operating Range 50~100°F (10°C~38°C)
Water Operating Range 41~90°F (5°C~32°C)
Water Pressure Operating Range 20~80psi (0.138MPa~0.55MPa)
Water Inlet Adapter 1/4" OD compression fitting
Ice Shape Crescent Cube
Ice Production Capacity (70°F/50 °F)
15lbs **
Ice Storage Capacity 12lbs
Ice Size (L×D×H) 2-3/8"x1/2"x3/4"
Ice Weight about 0.4oz
Ice quantity per cycle 12
Unit Dimensions (W×D×H)
14-7/8"×23-7/8"×17-1/4"
378×606×438(mm)
Net Weight 44lbs (20Kg)
* In outdoor use, the unit must be installed under an awning or canopy and must not be exposed directly to
rain.
** The actual quantity of ice produced per day will vary with ambient and water conditions.
Note: Technical data and performance information are provided for reference only and subject to change.
SPECIFICATIONS
6

© 2025 SAPPHIRE
SAPPHIRE Ice Maker Operator’s Manual
BEFORE USING YOUR ICE MAKER
Check to be sure you have all the following parts:
• 1 Clear Ice Bin & Scoop (All)
• 1 Set of Anti-Tip Brackets with Screws (SCIM153SS & SSPR)
• 1 Package of Custom Wood Panel Attachment Screws (SCIM153SSPR)
• 1 Water Filter (All)
• 1 User Manual (All)
PLUMBING AND ELECTRICAL TIPS
• A licensed plumber must install this appliance.
• This appliance must be installed with all electrical and water connections in accordance with state
and local codes.
• This unit requires a standard electrical supply properly grounded in accordance with National
Electrical Code and local codes and ordinances. The fuse (or circuit breaker) size should be 15
amperes for 115V.
• The manufacturer recommends that you provide a separate circuit that services only your
appliance. Use receptacles that cannot be turned off by a switch or pull chain.
• Plug the appliance into a grounded three-prong outlet. Do not remove the grounding prong, do
not use an adapter, and do not use an extension cord.
• Do not kink, pinch, or damage the power supply cord between the ice machine and wall or
cabinet.
• Before connecting the ice machine to the power source, let it stand upright for approximately 4
hours. Following this step will reduce the possibility of a malfunction in the cooling system
brought on by handling during transportation.
• Make sure to install on level surface and ensure drain line and waterline are not kinked.
• Use two or more people to move and install the appliance. Failure to do so can result in back or
other injury.
• Remove the packing materials and clean the appliance before using it.
WATER SUPPLY TIPS
• Check for leaks after connecting the water line.
• The ice machine requires a continuous water supply with a minimum pressure of 20 psi (0.138
MPa) and a static pressure not to exceed 80 psi (0.55 MPa).
• The manufacturer recommends filtering the water. A water filter helps remove taste, odors and
INSTALLING
THE UNIT
3
7
TIPS ON MOVING AND SETTING UP THE UNIT
INSTALLATION
© 2025 SAPPHIRE
SAPPHIRE Ice Maker Operator’s Manual
RECESSED INSTALLATION
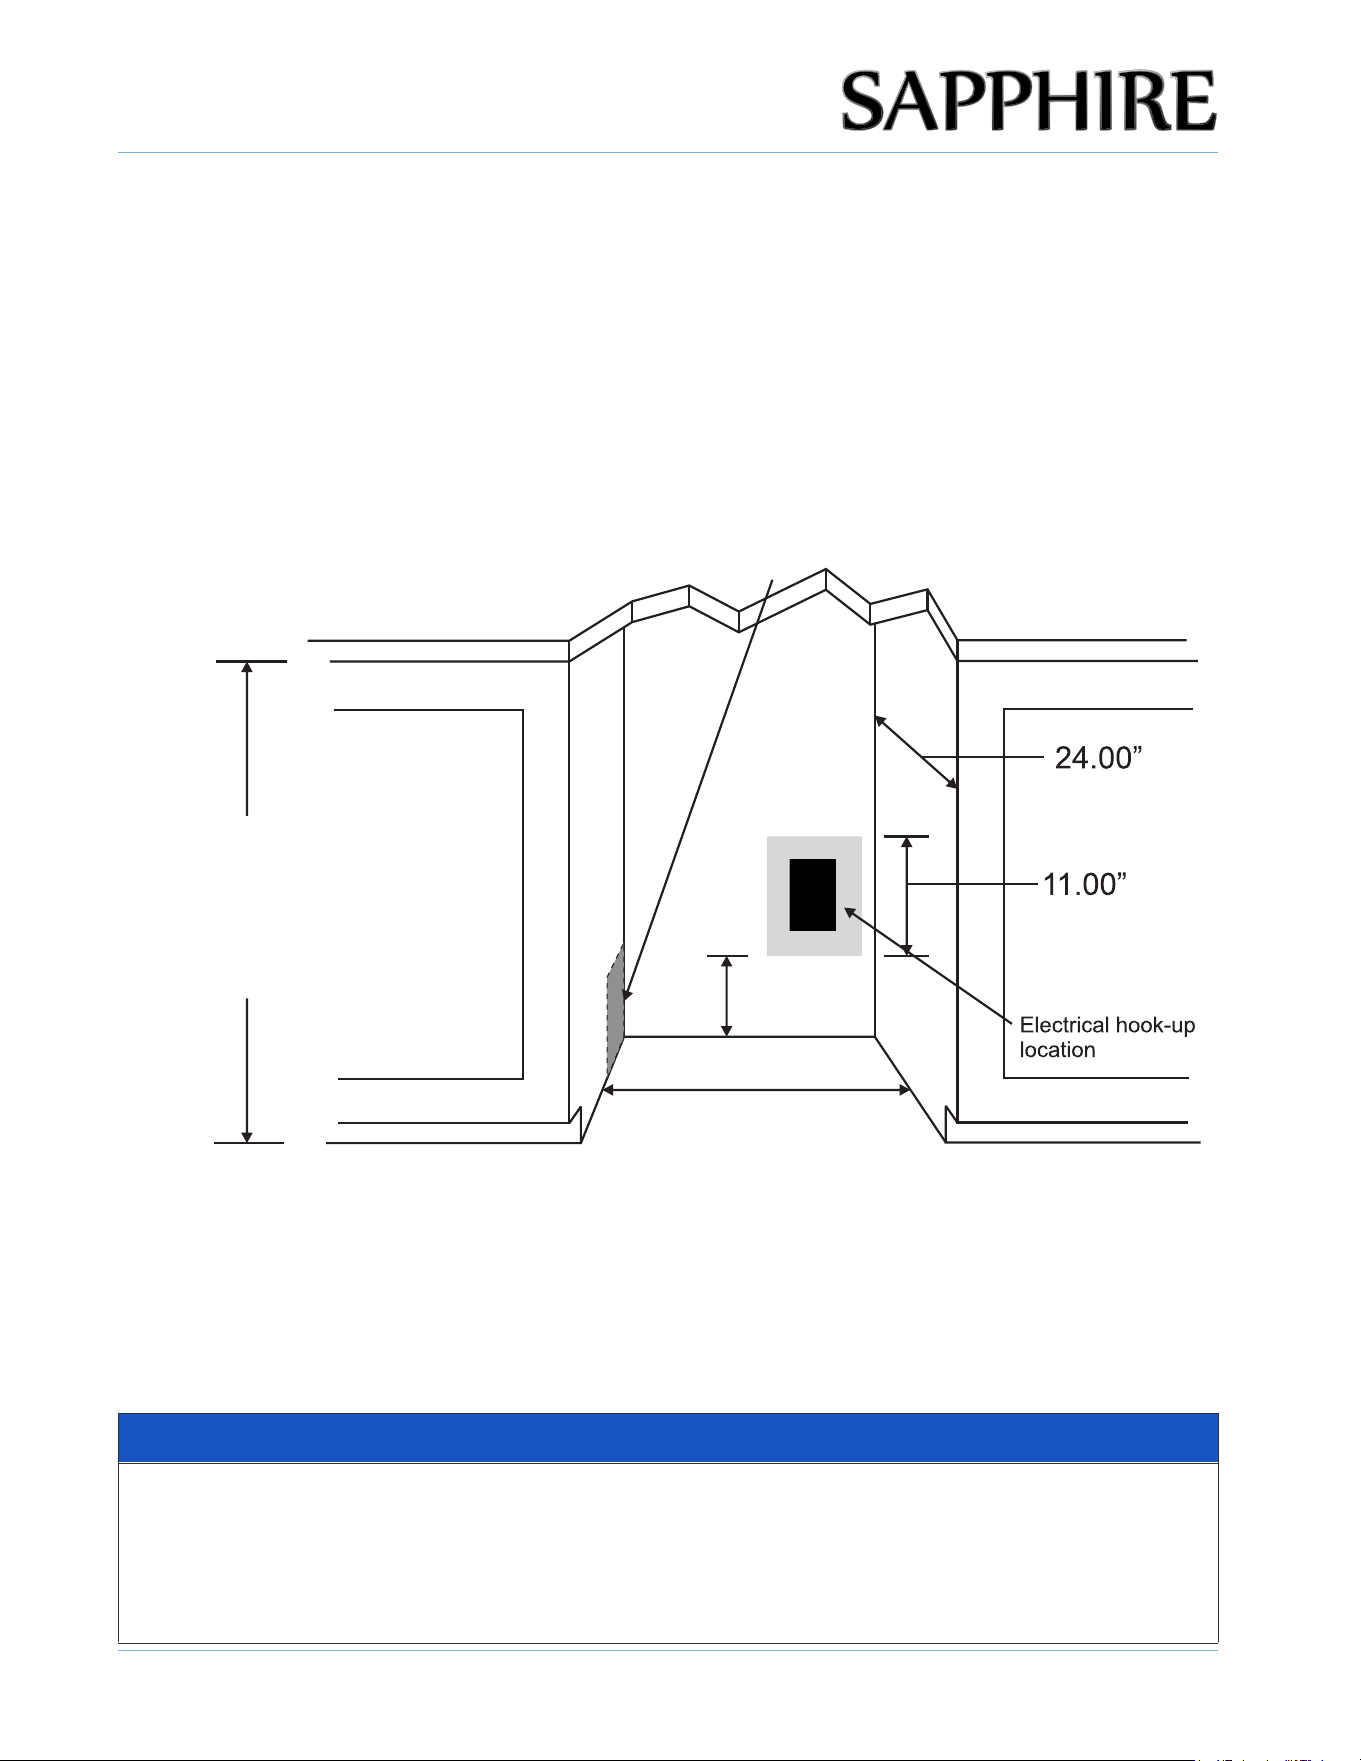
A built-in installation will allow you to install the ice machine under a counter or in a kitchen
cabinet if you respect the required clearance space around the clear ice machine. The appliance
must be located to allow clearance for water and electrical connections in the rear of the unit.
BUILT-IN CABINET DIMENSIONS
A built-in installation requires for a water line and plug clearance for proper operation. A
built-in unit is designed for zero clearance at the top and each side of the unit. The unit uses fan-
forced condenser cooling, which requires air circulation through the lower section of the unit.
To ensure proper service access and ventilation, the unit should not have the grill openings
covered. There are no additional requirements for venting at the top, side, or rear of the unit.
Recommended location for waterline and
electrical connection in either adjacent cabinet.
7.00"
NOTICE
• Ensure that the air path for the grill remains unrestricted. Any restriction of flair flow through
the grill will disrupt normal operation of the unit, resulting in damage to components, and
voids warranty.
• ŽŶŶĞĐƚƚŚĞƵŶŝƚƚŽĂƉŽƚĂďůĞǁĂƚĞƌƐƵƉƉůLJŽŶůLJ
particles. Using softened water may result in white, mushy cubes that stick together. Avoid using
deionized water.
• Using a RO system may cause the water pressure to be lower than the minimum the ice machine
requires.
• Ensure that the water supply hose is not pinched, kinked, or damaged during installation.
15-3/5"
34-3/16''
to
35''
8

INSTALLATION
© 2025 SAPPHIRE
SAPPHIRE Ice Maker Operator’s Manual
WARNING
Electrical Shock Hazard
Always disconnect power at the source before working on the unit. Failure to
unplug the clear ice machine could result in electrical shock or personal injury.
• Do not touch the power plug when your hands are wet.
• Never unplug the unit by pulling on the cord. Grasp the plug and pull out firmly.
CONNECTING THE WATER SUPPLY
1. Turn off the main water supply. Turn on the nearest faucet long enough to clear the line of water.
2. Locate a 1/2" to 3/4" vertical cold-water pipe near the installation location. The distance should
be less than 9 feet.
3. Install a shut-off valve to the main water supply. If the water pipe has a plain piece of copper
tubing, attach a 1/4" O.D. compression union to the tubing and remove the nut.
4. Thread the nuts of the supplied water supply hose to the tap and water inlet valve. Access to the
water inlet valve is through the opening in the rear panel. Tighten firmly by hand, then one-half
turn with a wrench.
5. Turn on the main water supply and tap. Check for leaks in the water supply connection.
Tighten all connections.
ELECTRICALCONNECTION
Do not, under any circumstances, cut or remove the third (ground) prong from the power cord.
For personal safety, you must properly ground this appliance. The power cord of this appliance
features a three-prong grounding plug that mates with a standard three-prong grounding wall
outlet to minimize the possibility of electric shock hazard from the appliance. Have a qualified
electrician check the wall outlet and circuit to make sure the outlet is properly grounded. It is your
responsibility and obligation to have a standard two-prong wall outlet replaced with a properly
grounded three-prong wall outlet.
Always plug the appliance into its own individual electrical outlet. The voltage rating of the outlet
must match the rating label on the appliance. This match provides the best performance and
prevents overloading the electrical circuits, which could cause a fire hazard from overheated wires.
Never unplug your appliance by pulling on the power cord. Always grip the plug firmly and pull
straight out from the outlet.
Repair or replace immediately all power cords that have become frayed or damaged. Do not use a
cord that shows cracks or abrasion damage along its length or at either end.
When moving the appliance, take care not to damage the power cord.
If the power supply cord suffers damage, have the manufacturer, its service agent, or similarly
qualified persons replace the supply cord to avoid a hazard.
AVOIDINGUSEOFEXTENSIONCORDS
Because of potential safety hazards under certain conditions, the manufacturer strongly
recommends that you do not use an extension cord with this appliance.
9
INSTALLATION
© 2025 SAPPHIRE
SAPPHIRE Ice Maker Operator’s Manual
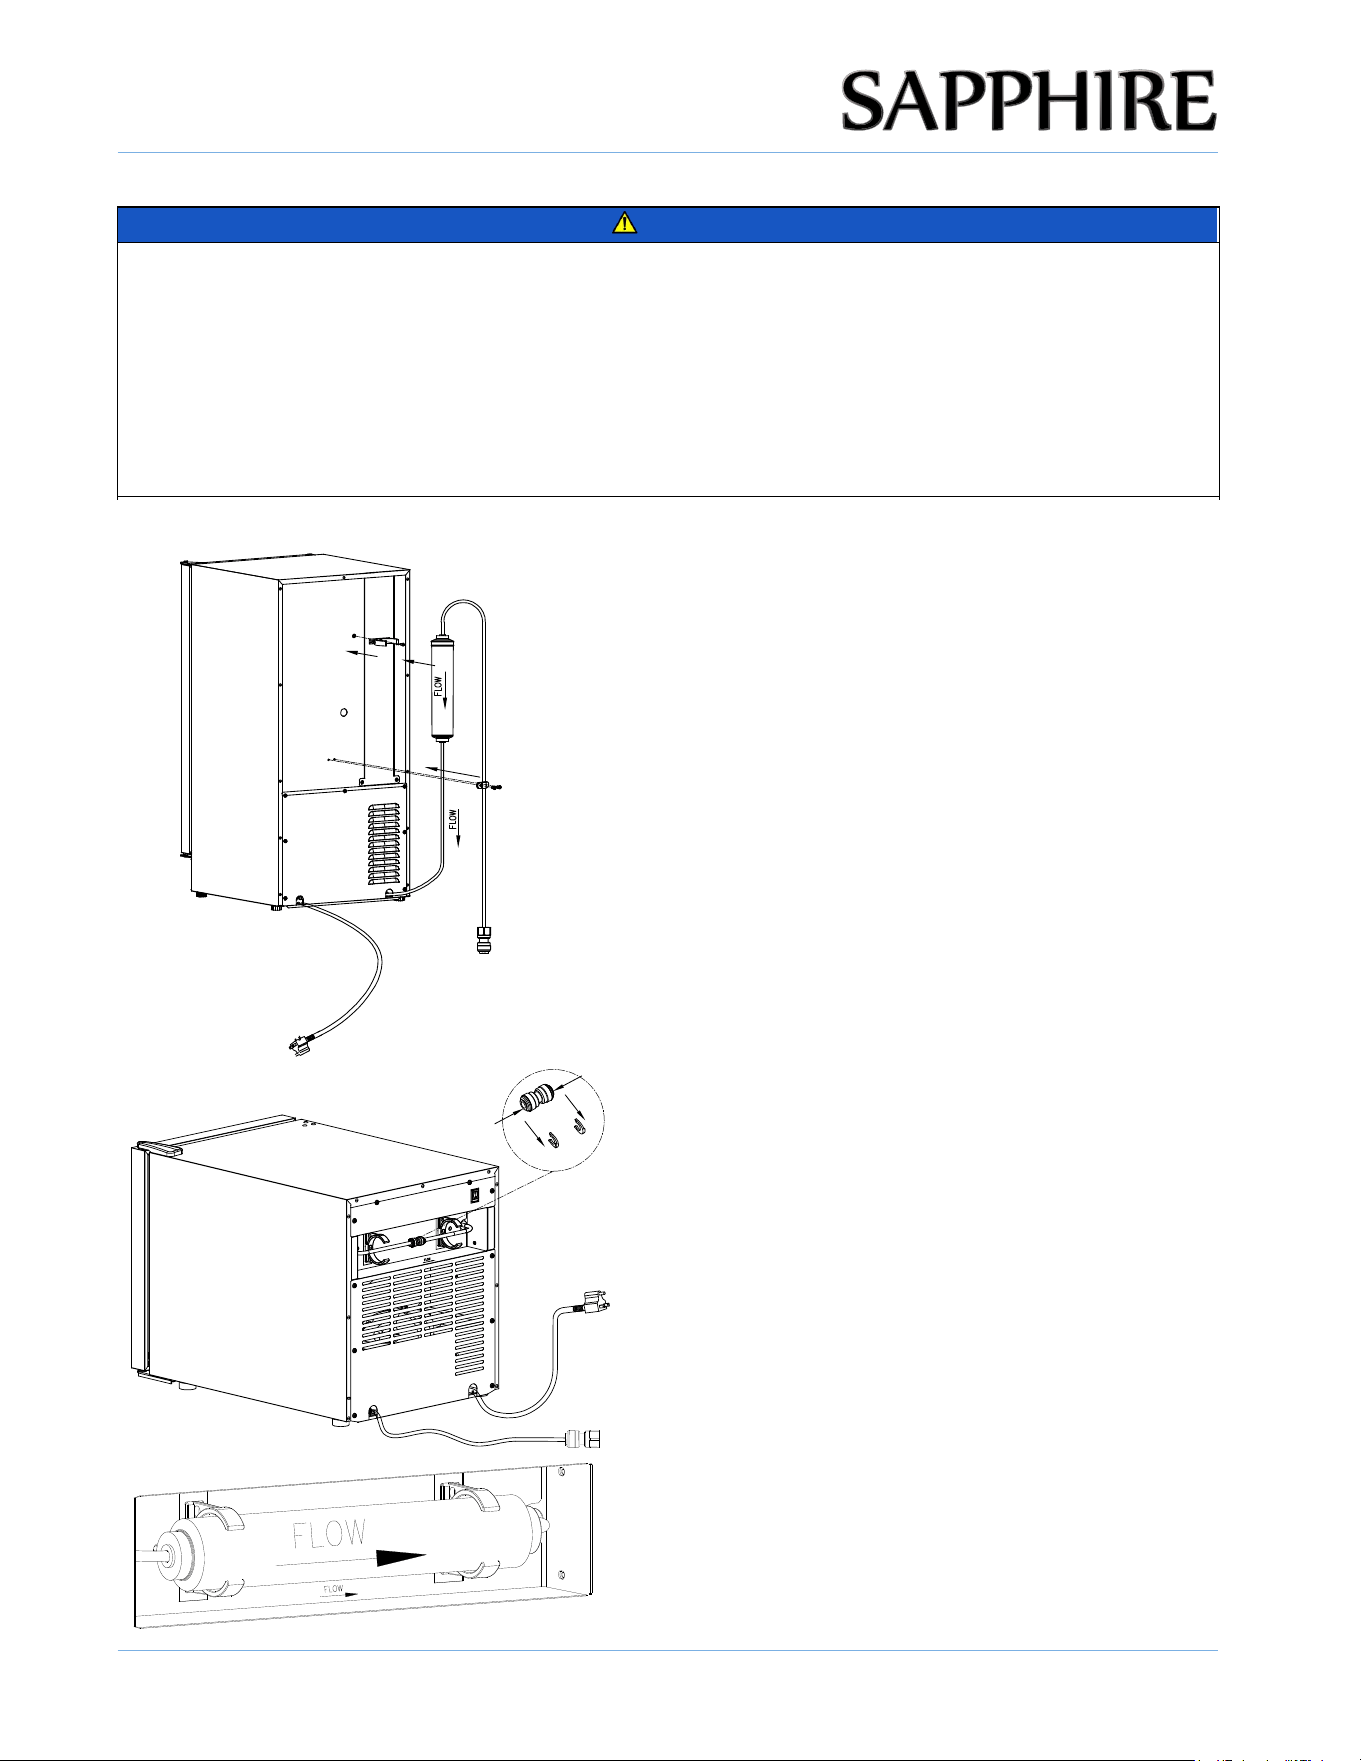
FILTER INSTALLATION / REPLACEMENT
NOTICE
1. The filter must be replaced after noticeable reduction in water flow or change in quality of ice.
2. Before Installing or Replacing, always connect the filter to water supply separately first. Run
water for at least 5 minutes to purge the filter of debris or air. Thewater should run clear and
with full pressure.
3. Insert the water line into the end of the built-in quick-connectors and always check for
leaks before fixing the filter to the clips on the unit.
For SCIM153SS/SSPR
For SCIMCTSS
1.Purge
Connect the filter to portable water supply by insert the water
supply tube to the inlet end of the filter, run water for 5
minutes to purge the system and check for leaks. This is a
MUST.
2.Ice Maker Connection
Cut off the water hose to proper length. Insert the water supply
hose of the ice maker to the filter’s built-in 1/4’’ quick
connectors, till the tube reach the bottom (approx 1/2’’), run
water to check leakage.
3.Fixing the filter
Use a screwdriver to install the filter clip on the back of the unit
and fix the filter to the clip. install the water line clip on lower
back of the unit to fix the water tube.
1.Purge
Connect the filter to portable water supply by insert
the water supply tube to the inlet end of the filter, run
water for 5 minutes to purge the system and check for
leaks. This is a MUST.
2.Ice Maker Connection
Located the the joint connector on rear of the ice
machine that connecting water tubes. Take away the
two clips on both ends of the joint connector, pull the
tubes out from it, and then insert the tubes to the
filter’s built-in 1/4’’ quick connectors, till the tube
reach the bottom (approx 1/2’’).
3.Fixing the filter
Turn on the water supply to check for leaks before
fixing the filter to Clips.
BEWARE THE FLOW DIRECTION ARROW OF THE ICE
MACHINE AND THE FILTER, MAKE SURE THEY MATCH!
10
INSTALLATION
© 2025 SAPPHIRE
SAPPHIRE Ice Maker Operator’s Manual
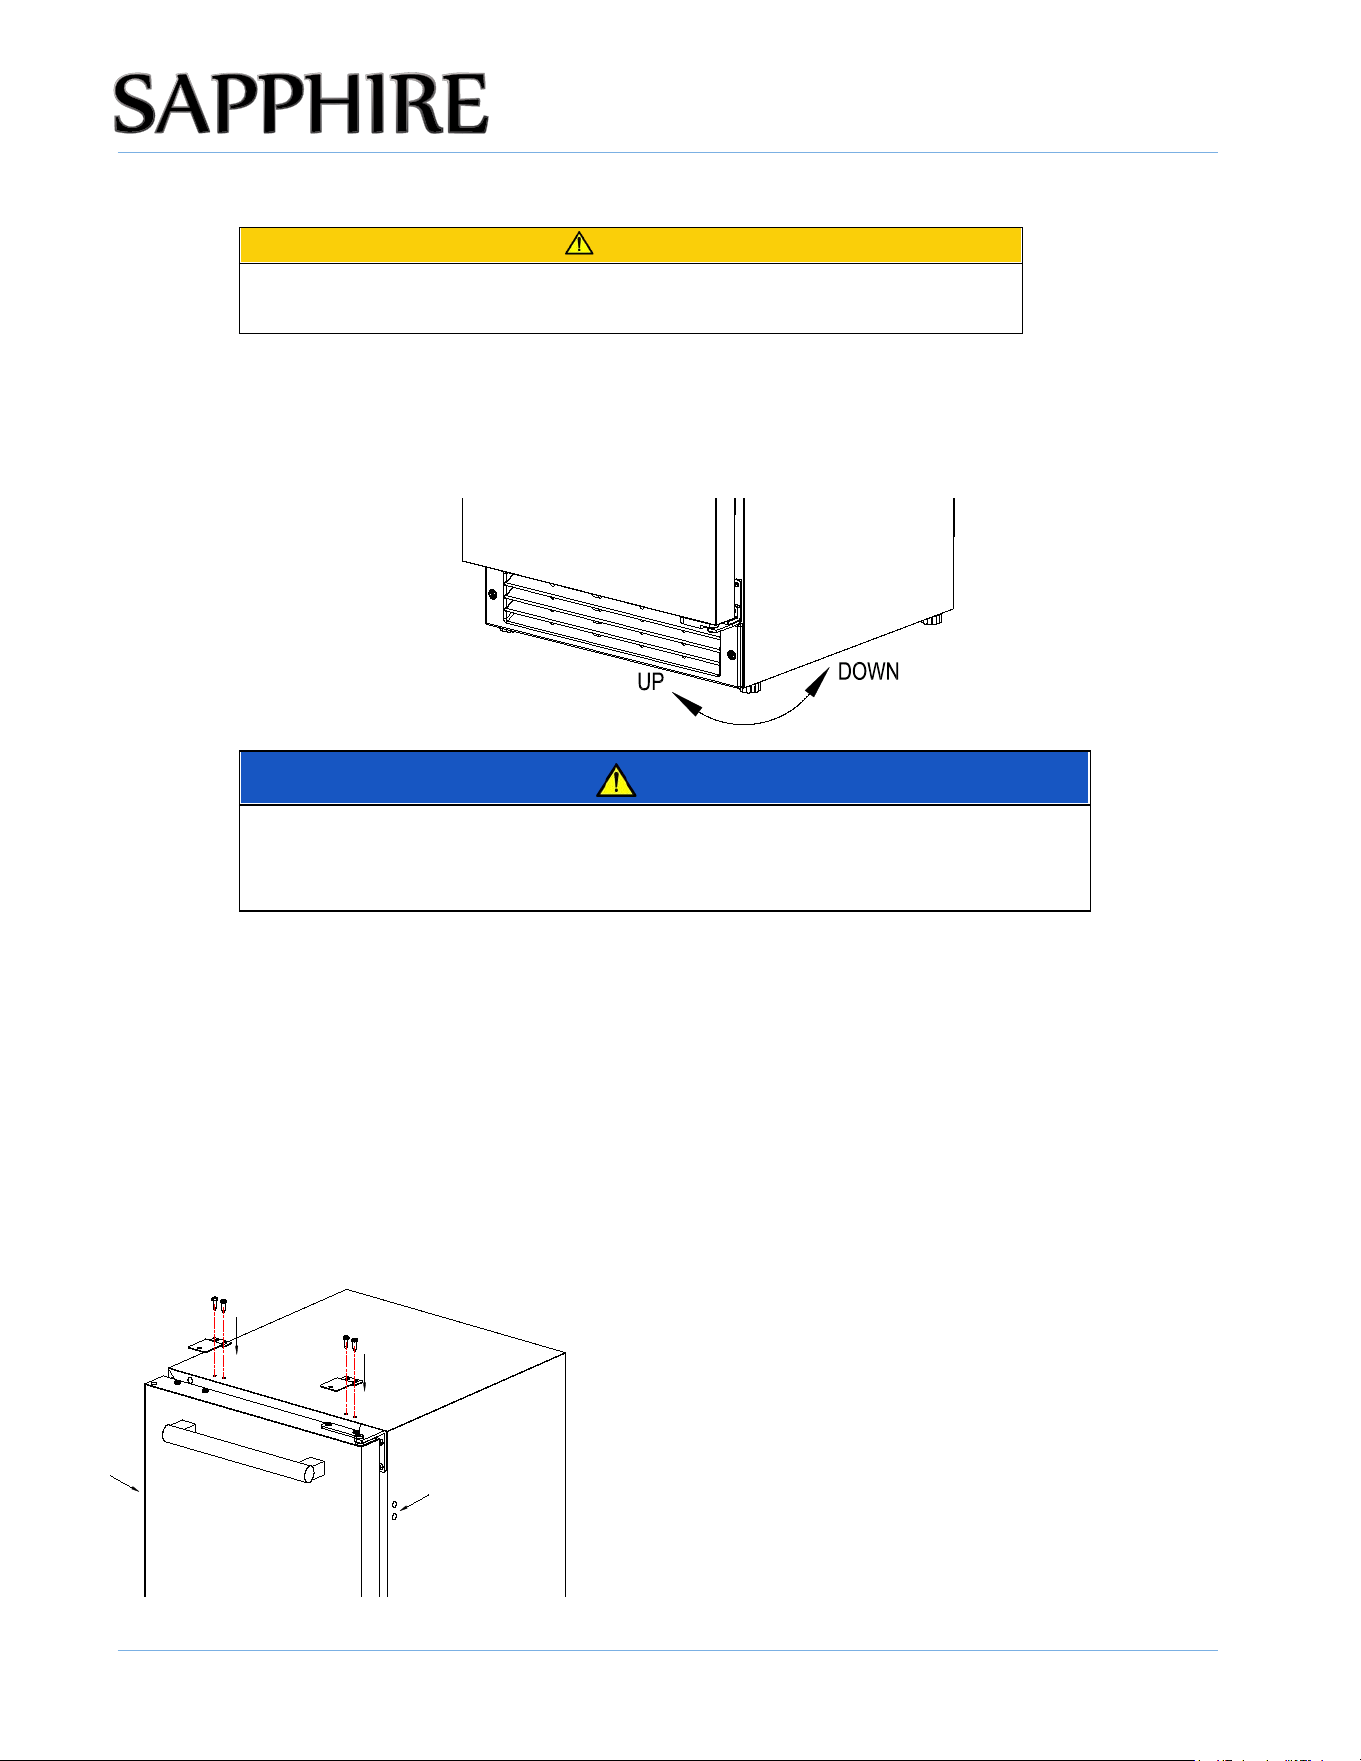
LEVELING THE UNIT
CAUTION
The unit will be significantly heavier once it is operational and fully
loaded.
Place your ice machine on a level surface that is strong enough to support the ice maker when it is fully
loaded. Level your ice maker by adjusting the legs at the front of the ice machine. If necessary, raise or
lower the unit by turning the four leveling feet on the bottom.
NOTICE
It is extremely important that the ice machine is level. If it is not level,
production of uneven ice will occur.
Adjust all four leveling feet evenly so that the top of the appliance is at the desired installation height
and is perfectly level, front to back and side to side. Adjust the height of the feet by turning the feet
to the right to lower that side and to the left to rise that side.
ANTI-TIP SYSTEM FOR SCIM153SS/SSPR
To reduce the risk of tipping the unit by abnormal usage or improper loading, the appliance must be
secured by properly installing the anti-tip device packed with the appliance.
Once the appliance is in place and leveled, secure the two
Anti-tip brackets underneath the countertop using the two
Provided screws.
If the brackets for the anti-tip system cannot be secured
Above the appliance, relocate the anti-tip brackets to the
Side of the appliance for securing into an adjacent cabinet.
11
INSTALLATION
© 2025 SAPPHIRE
SAPPHIRE Ice Maker Operator’s Manual
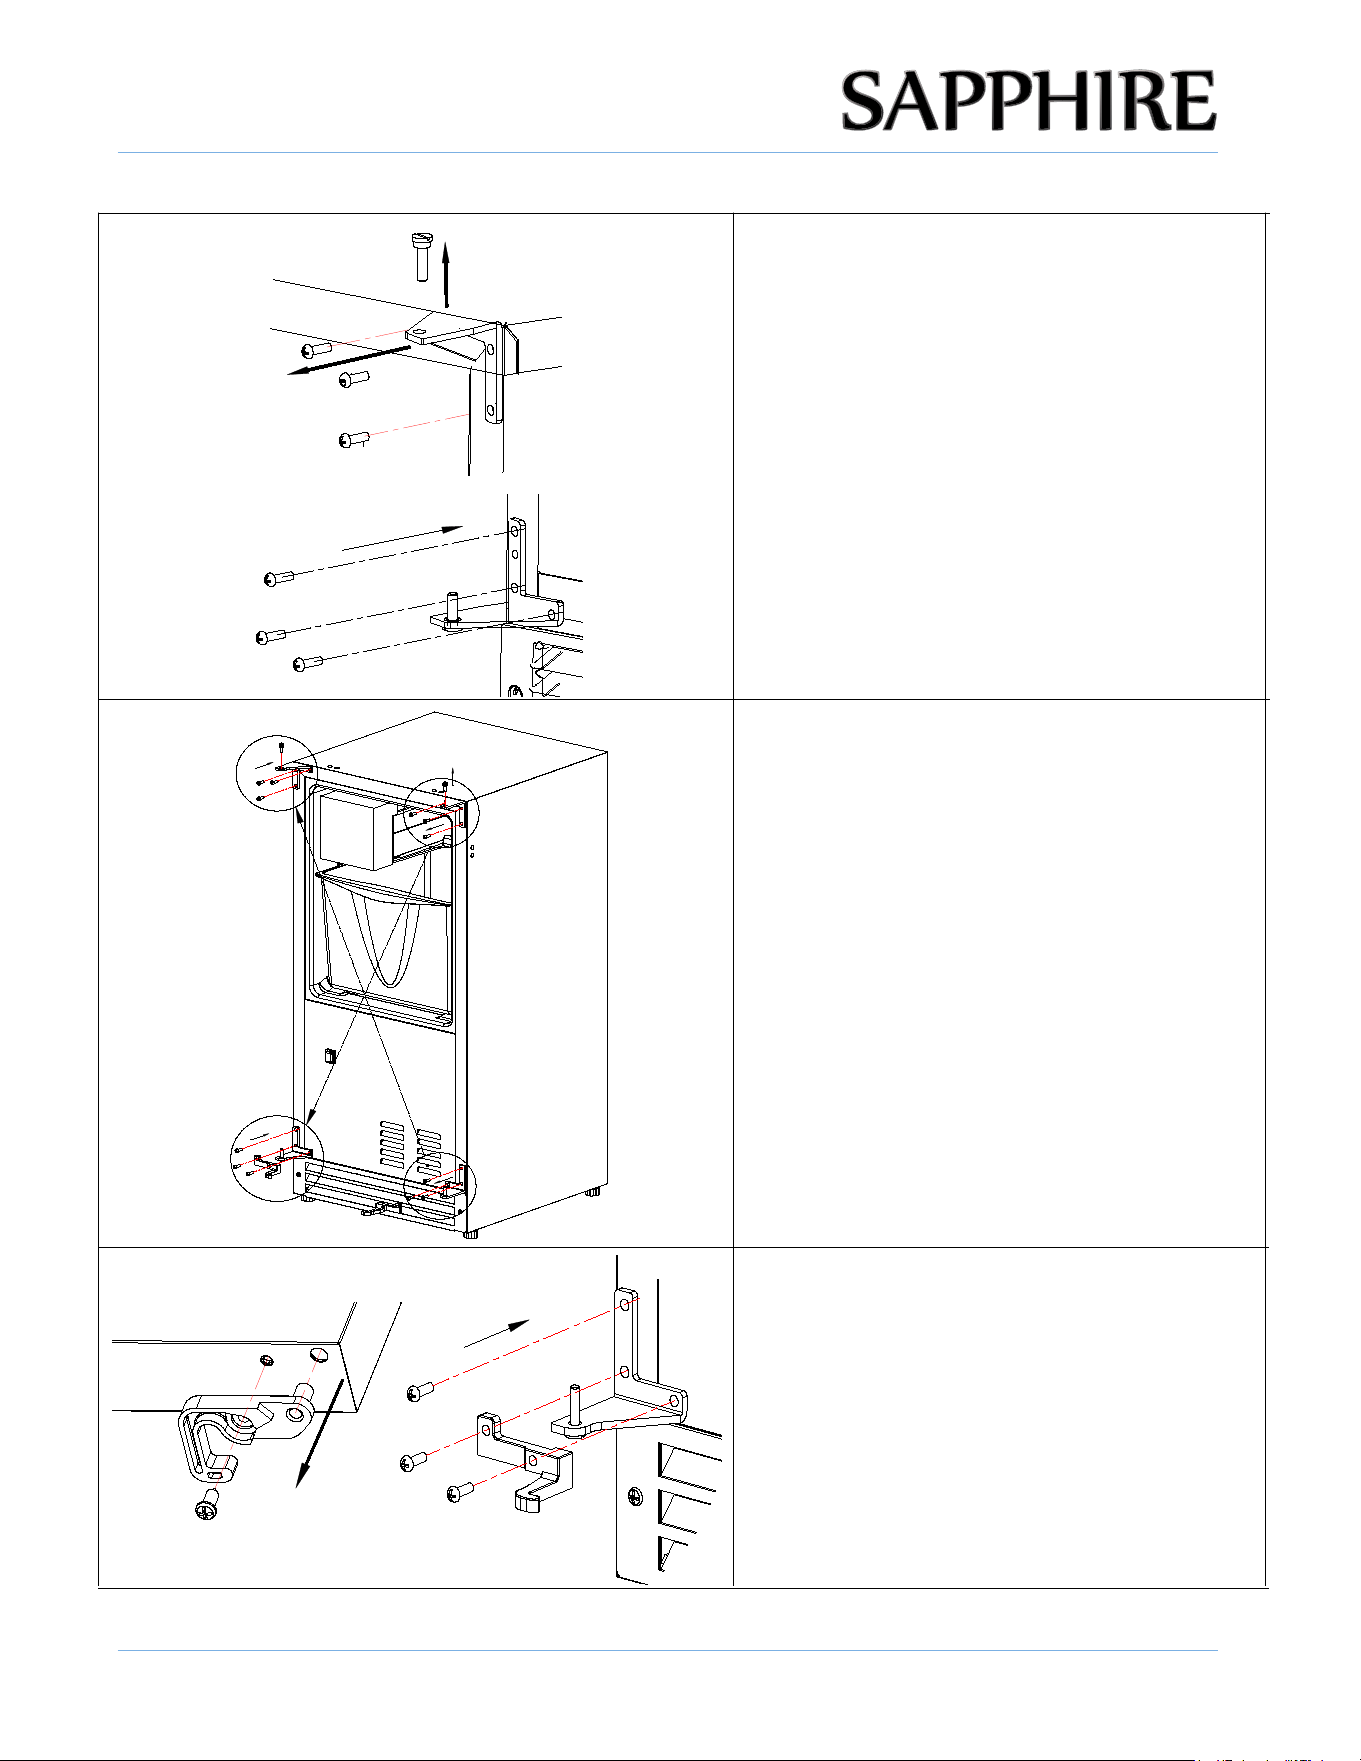
REVERSING THE DOOR: FOR MODEL SCIM153SS/SSPR
1. Remove the door
Use the flathead screwdriver to unscrew
the hinge pin from the top hinge, put it
aside, then hold the door and lift to
remove the door from the bottom hinge.
2. Swap the hinge locations
Use a Phillips screwdriver to unscrew the
screws fixing the top and bottom hinges
to uninstall them both.
Install the bottom right hinge to the left top of
the cabinet and the top right hinge to the left
bottom of the cabinet. Cover the right
mounting holes by the plugs just
disassembled from the left.
Note: unscrew the hinge pin from the left
top hinge for later door installation.
3.1 For SCIM153SS, Change the latch
mechanism and installed on the left.
Use a Phillips screwdriver to unscrew and
remove the right latch hook from the
bottom of the door and right latch from
the previous right bottom hinge. find the
left latch mechanism set in the accessory
bag and install them to the left bottom of the
door and left bottom hinge accordingly.
12
INSTALLATION
© 2025 SAPPHIRE
SAPPHIRE Ice Maker Operator’s Manual
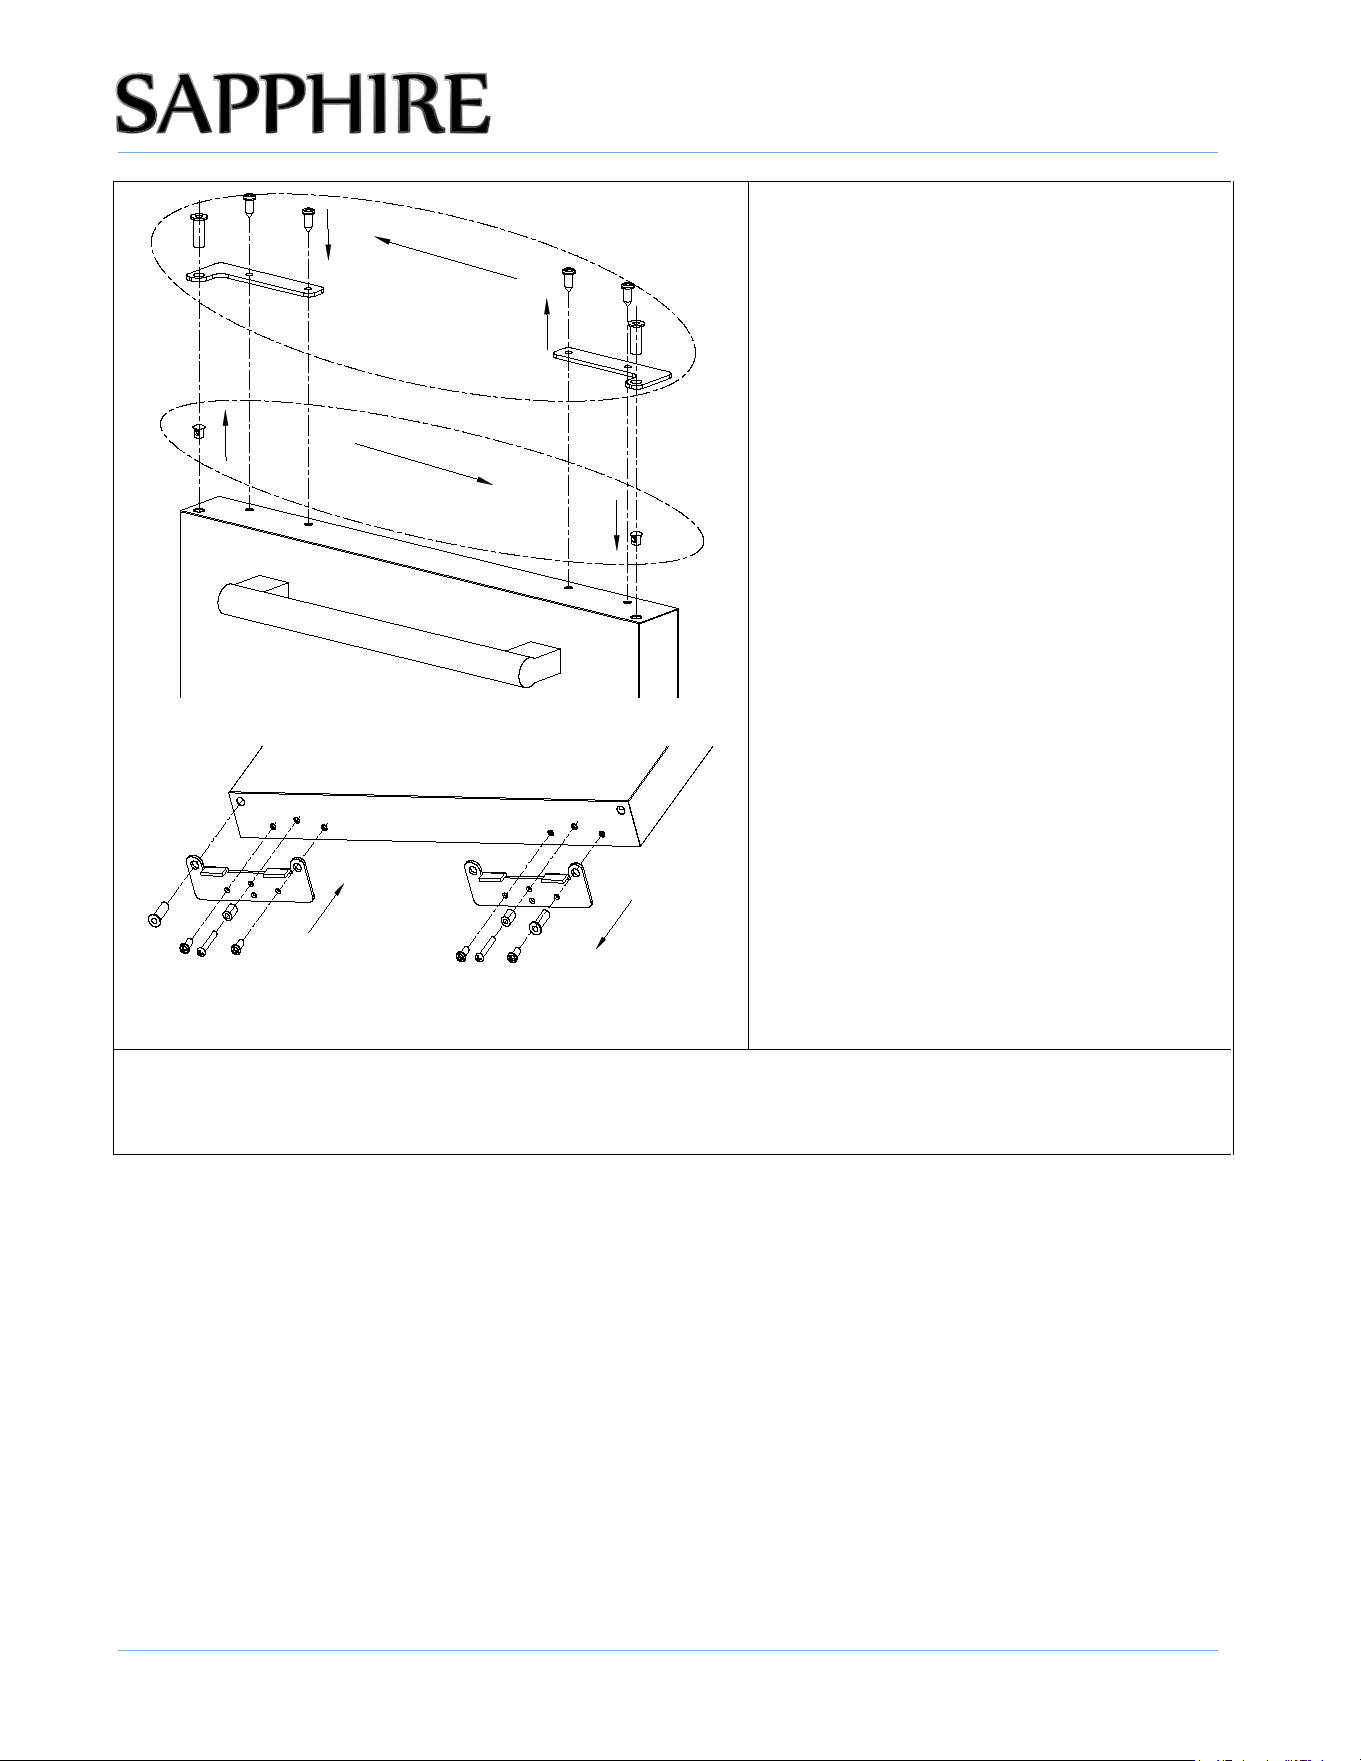
3.2 For SCIM153SSPR, Swap the shaft
reinforcement mechanism location Move
their positions from right to left of the
door top&bottom before inserting the
door to hinges. Use a Phillips screwdriver
to disassemble and reinstall it accordingly.
4. Install the door
Align the left latch block to the bottom hinge pin, insert the door. Align the pin sleeve on the top of
the door to the top hinge and install the hinge pin, tighten firmly. The door reversing is complete.
13
INSTALLATION
© 2025 SAPPHIRE
SAPPHIRE Ice Maker Operator’s Manual
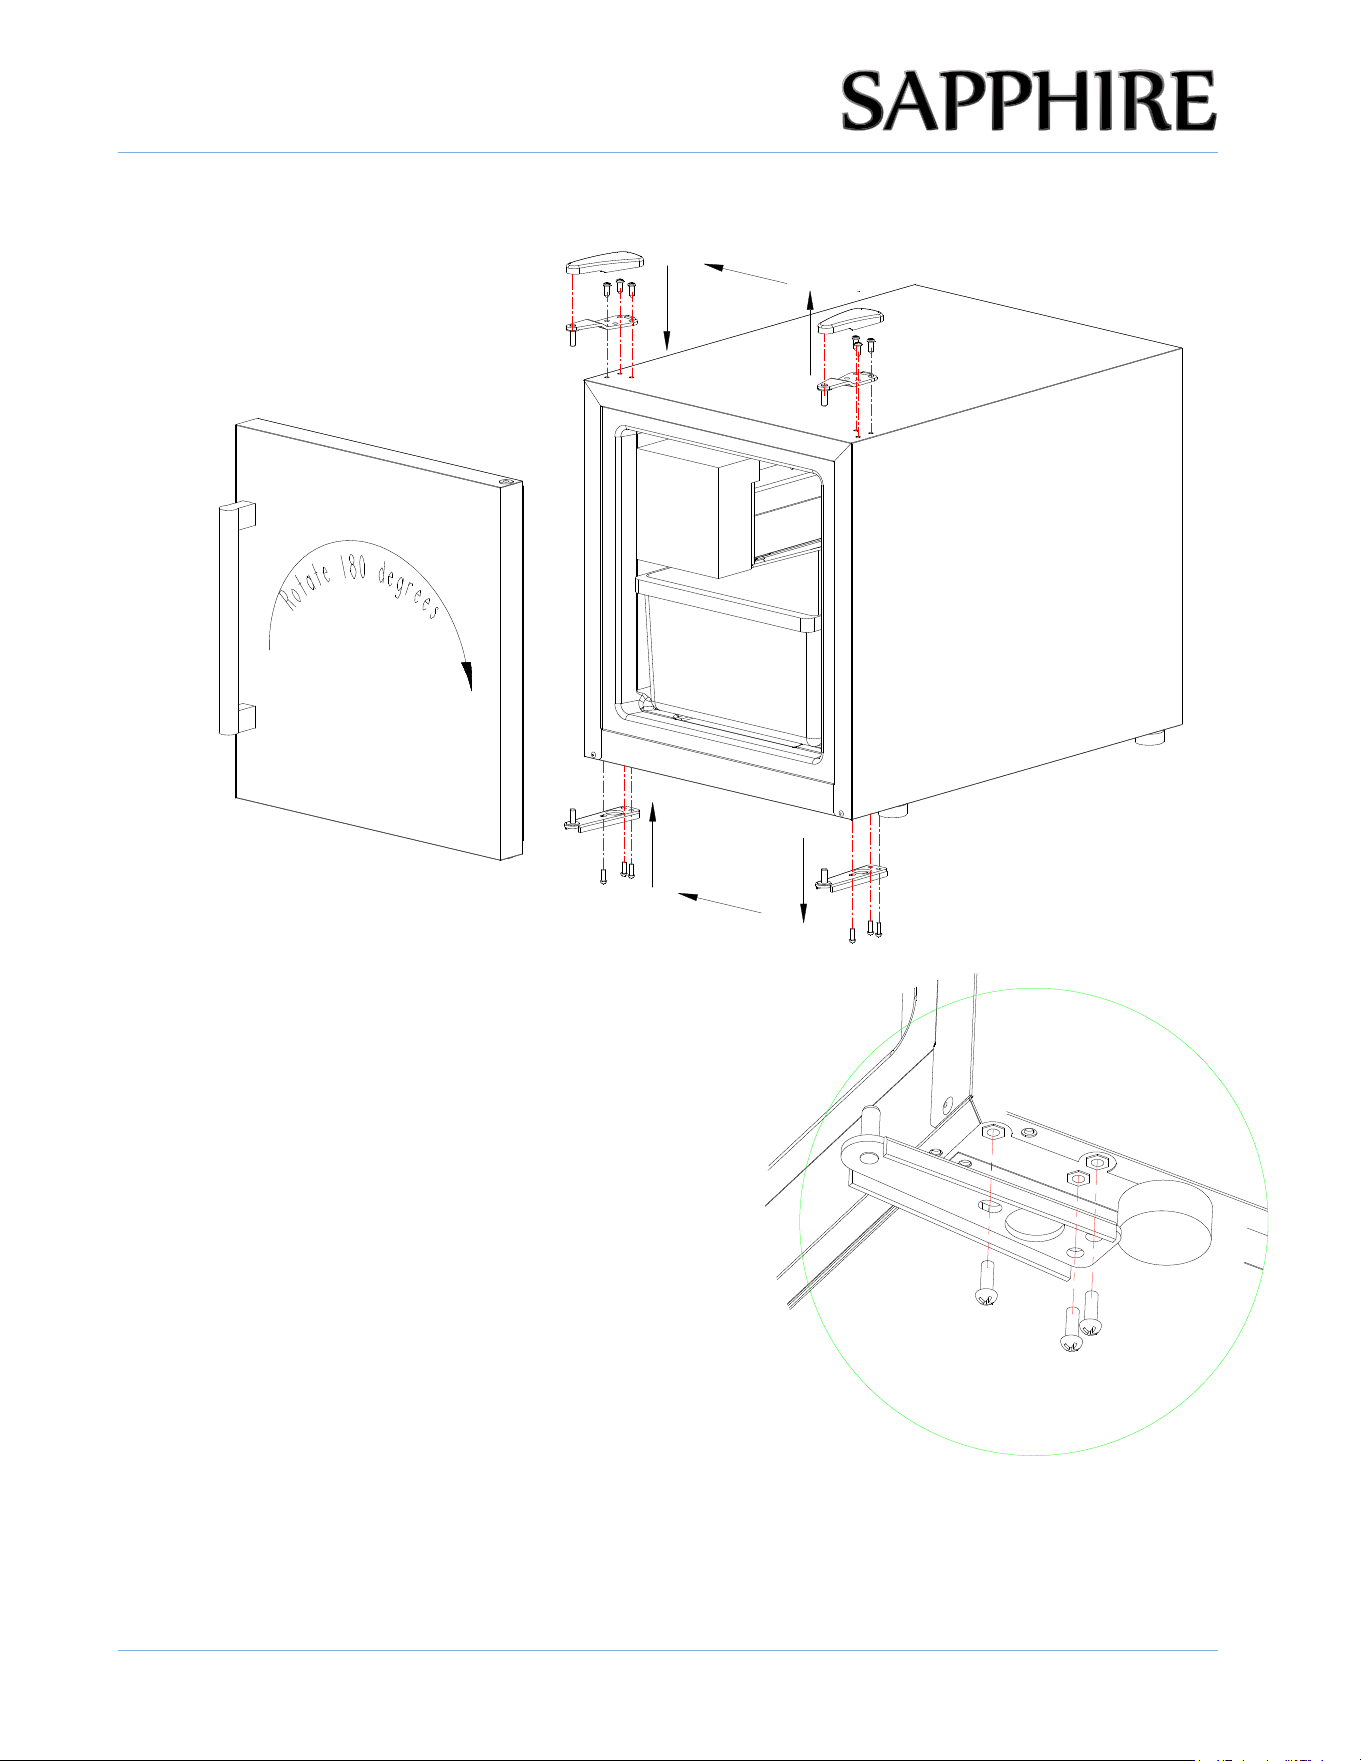
For Model SCIMCTSS
1. Open the screw cap on the top hinge and unscrew
the three (3) bolts to take away the top hinge and
then lift out the door.
2. Take out the plugs on the top left and insert to the
top right to cover the hinge mounting holes.
3. Lift the unit form the front, unscrew the three
bolts from the bottom to take away the bottom
hinge and then reinstall it on the bottom left.
4. Rotate the door 180 degrees and Install on the
bottom hinge, and then install the top hinge on the
left. Tighten firmly.
5. Put the screw cap back to the top hinge.
14
INSTALLATION
© 2025 SAPPHIRE
SAPPHIRE Ice Maker Operator’s Manual
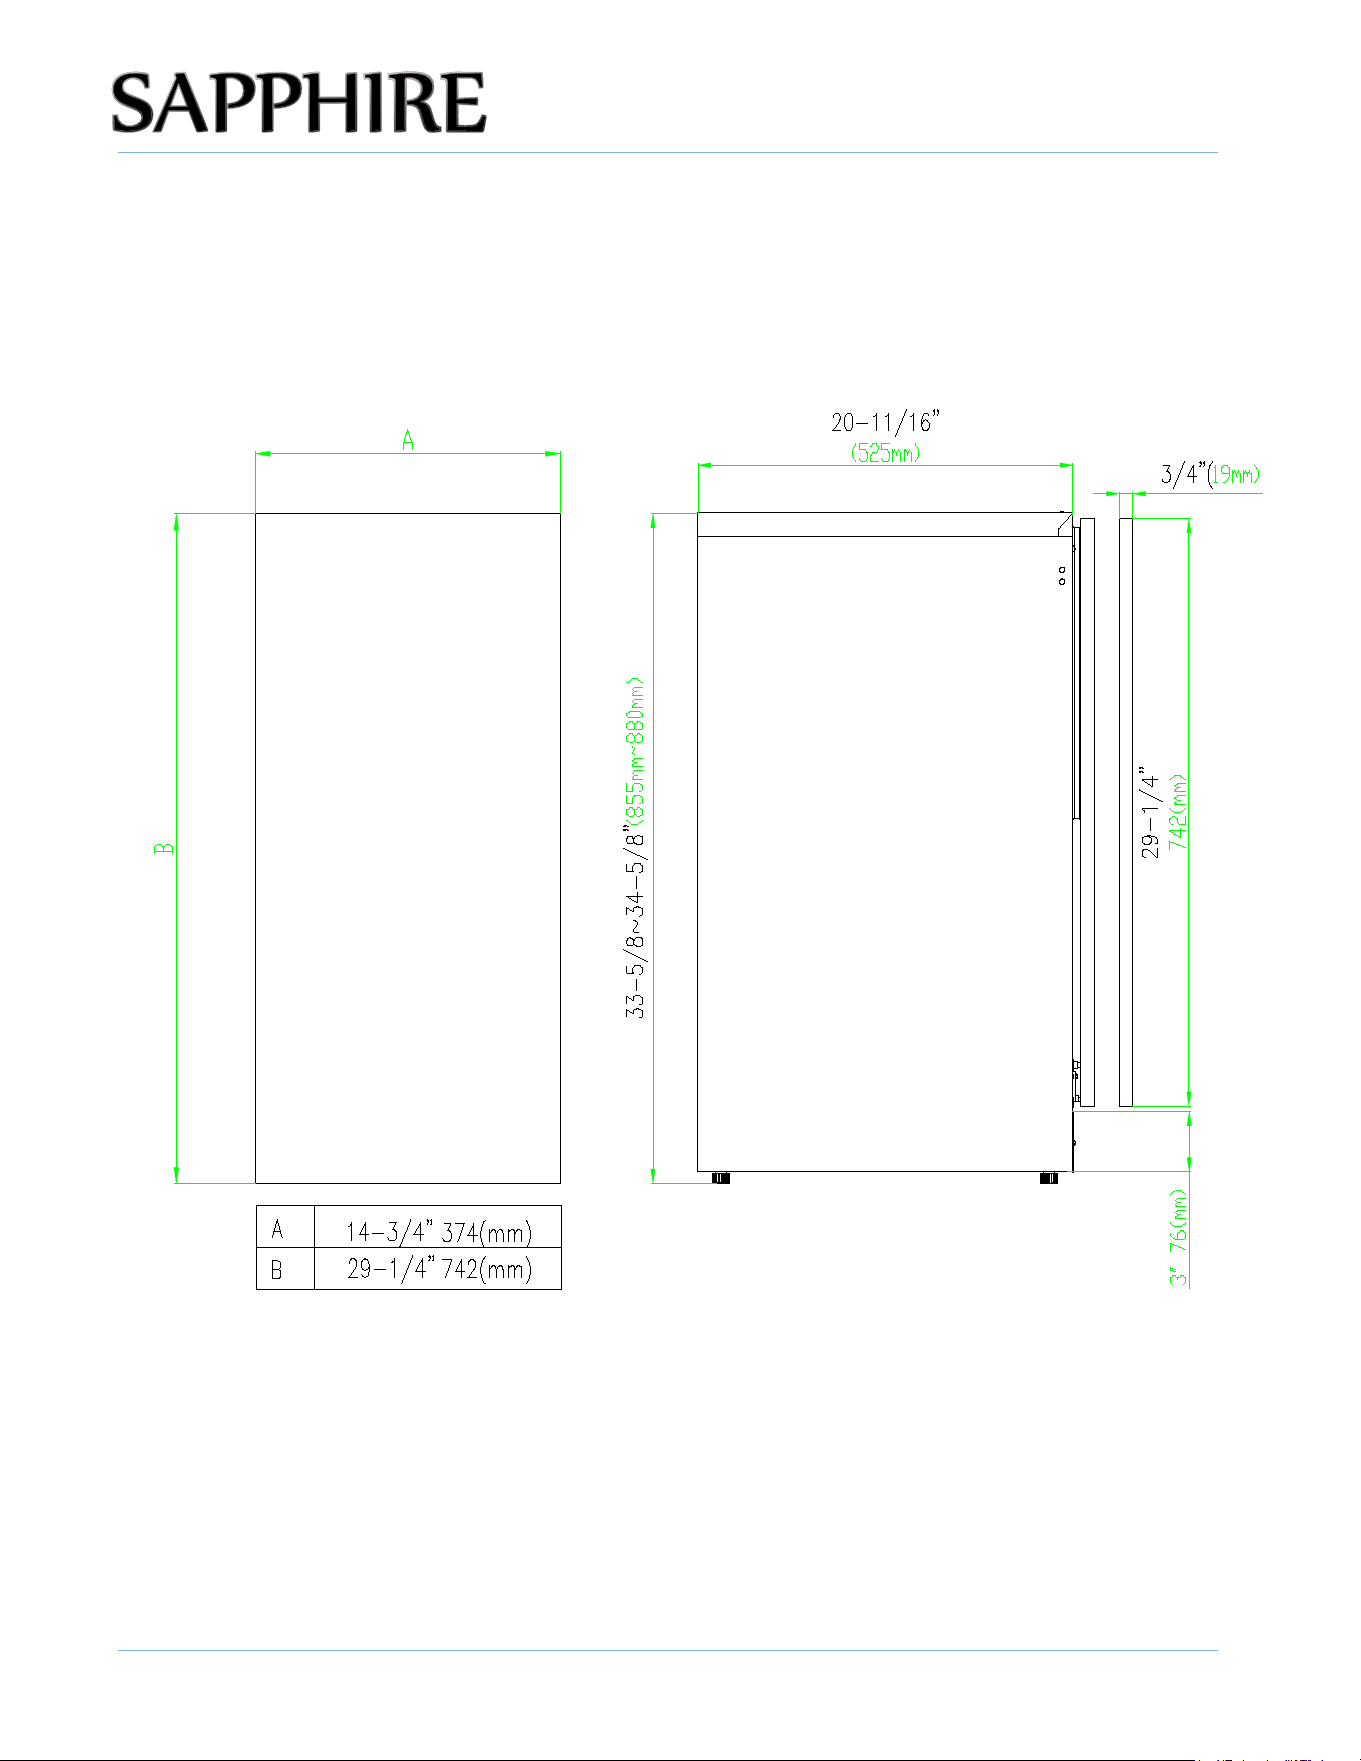
CUSTOM DOOR PANEL DIMENSIONS – SCIM153SSPR
A custom door panel can be fabricated for the appliance. Handle hardware must also be provided,
if needed. Finish all sides of the custom panel. They may be visible when the door is open.
Integrated Overlay Panel
Maximum Panel Weight = 25 lbs.
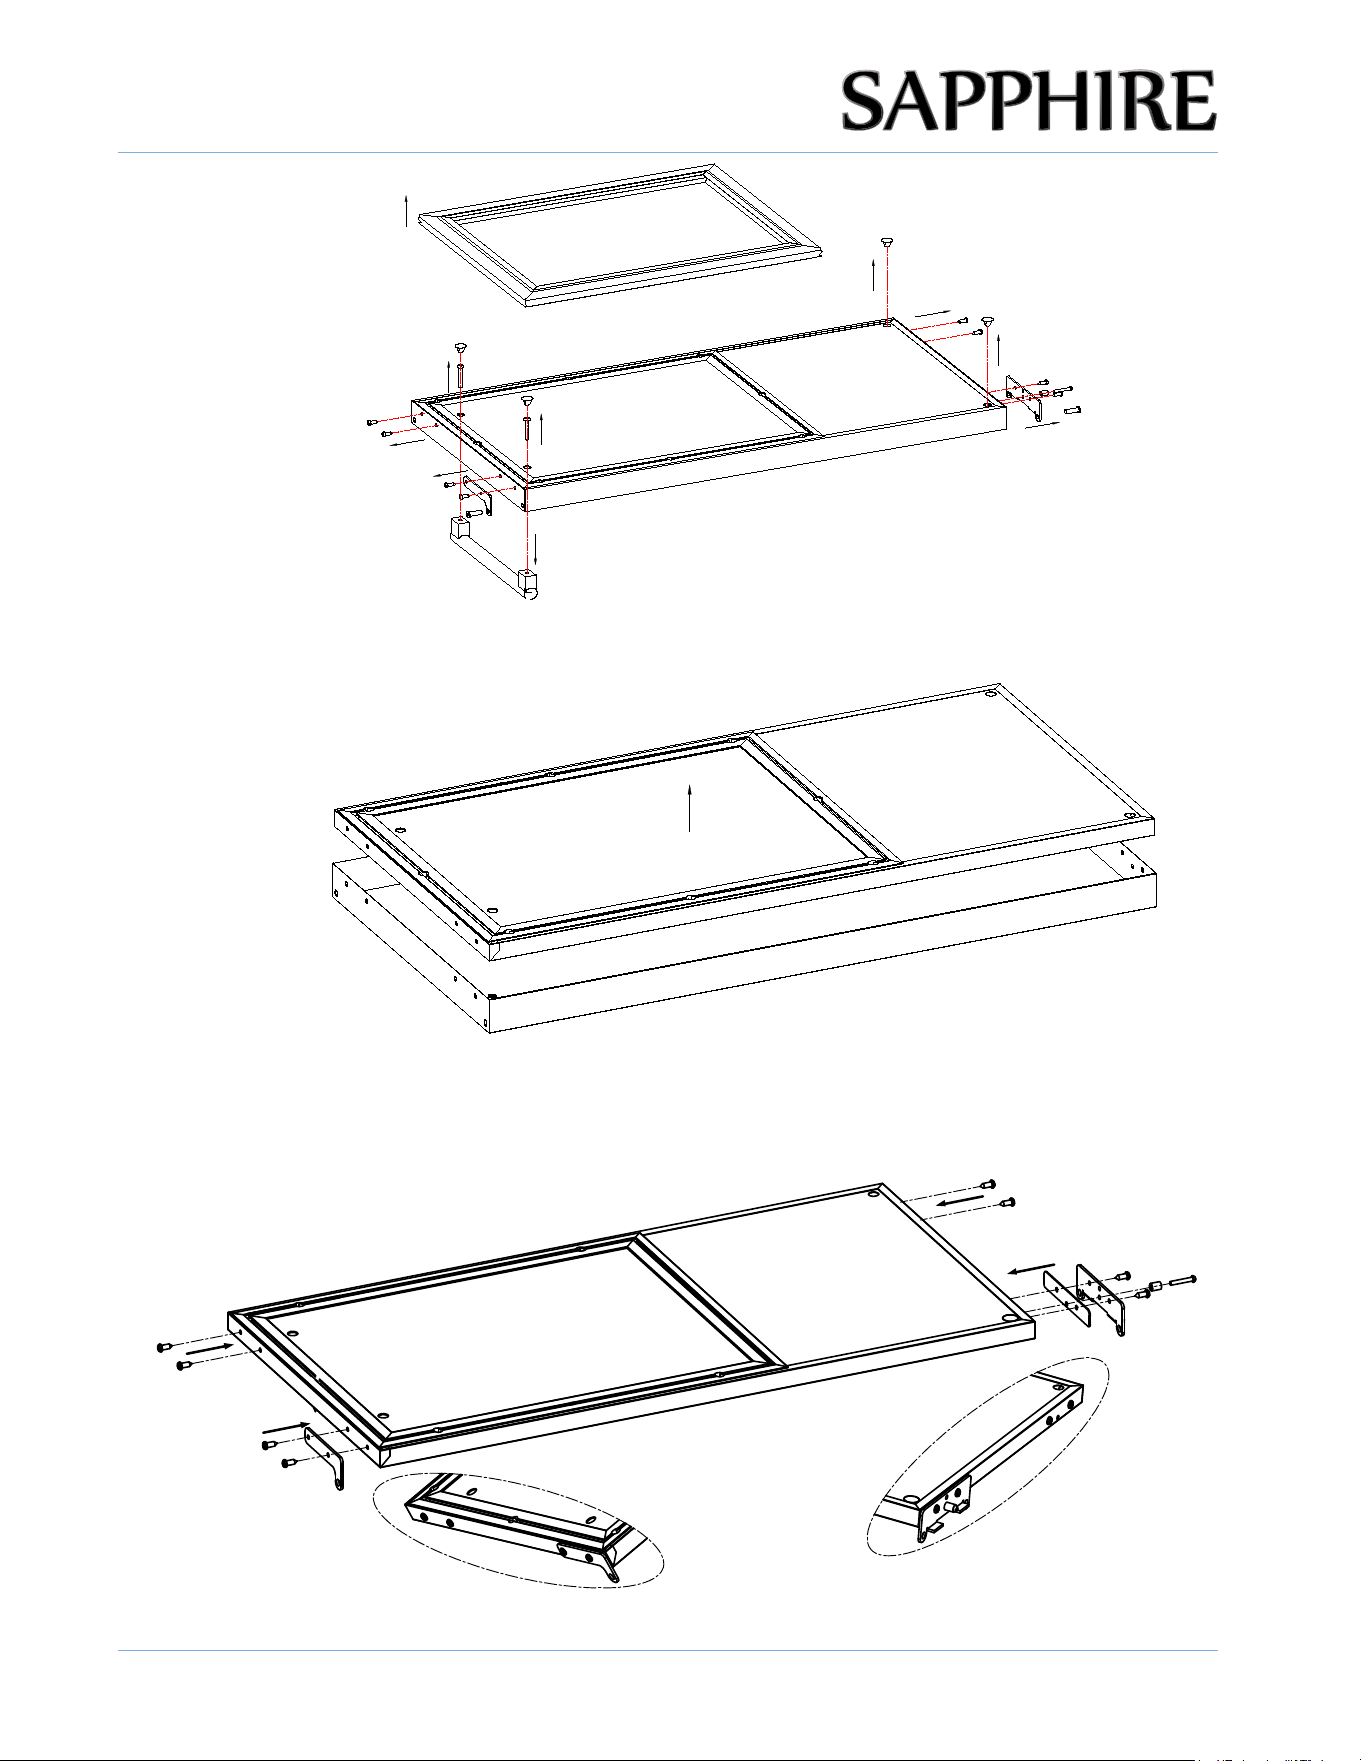
INSTALLING YOUR CUSTOM DOOR PANEL
1. Disassembly the door
First remove the door from the unit, then properly disassemble the shaft reinforce mechanism and
decorative plugs on the other side of the door, the door handle mounting hole plugs and door
handle, peel off the door gasket to gain access to the custom door panel mounting holes.
15
INSTALLATION
© 2025 SAPPHIRE
SAPPHIRE Ice Maker Operator’s Manual
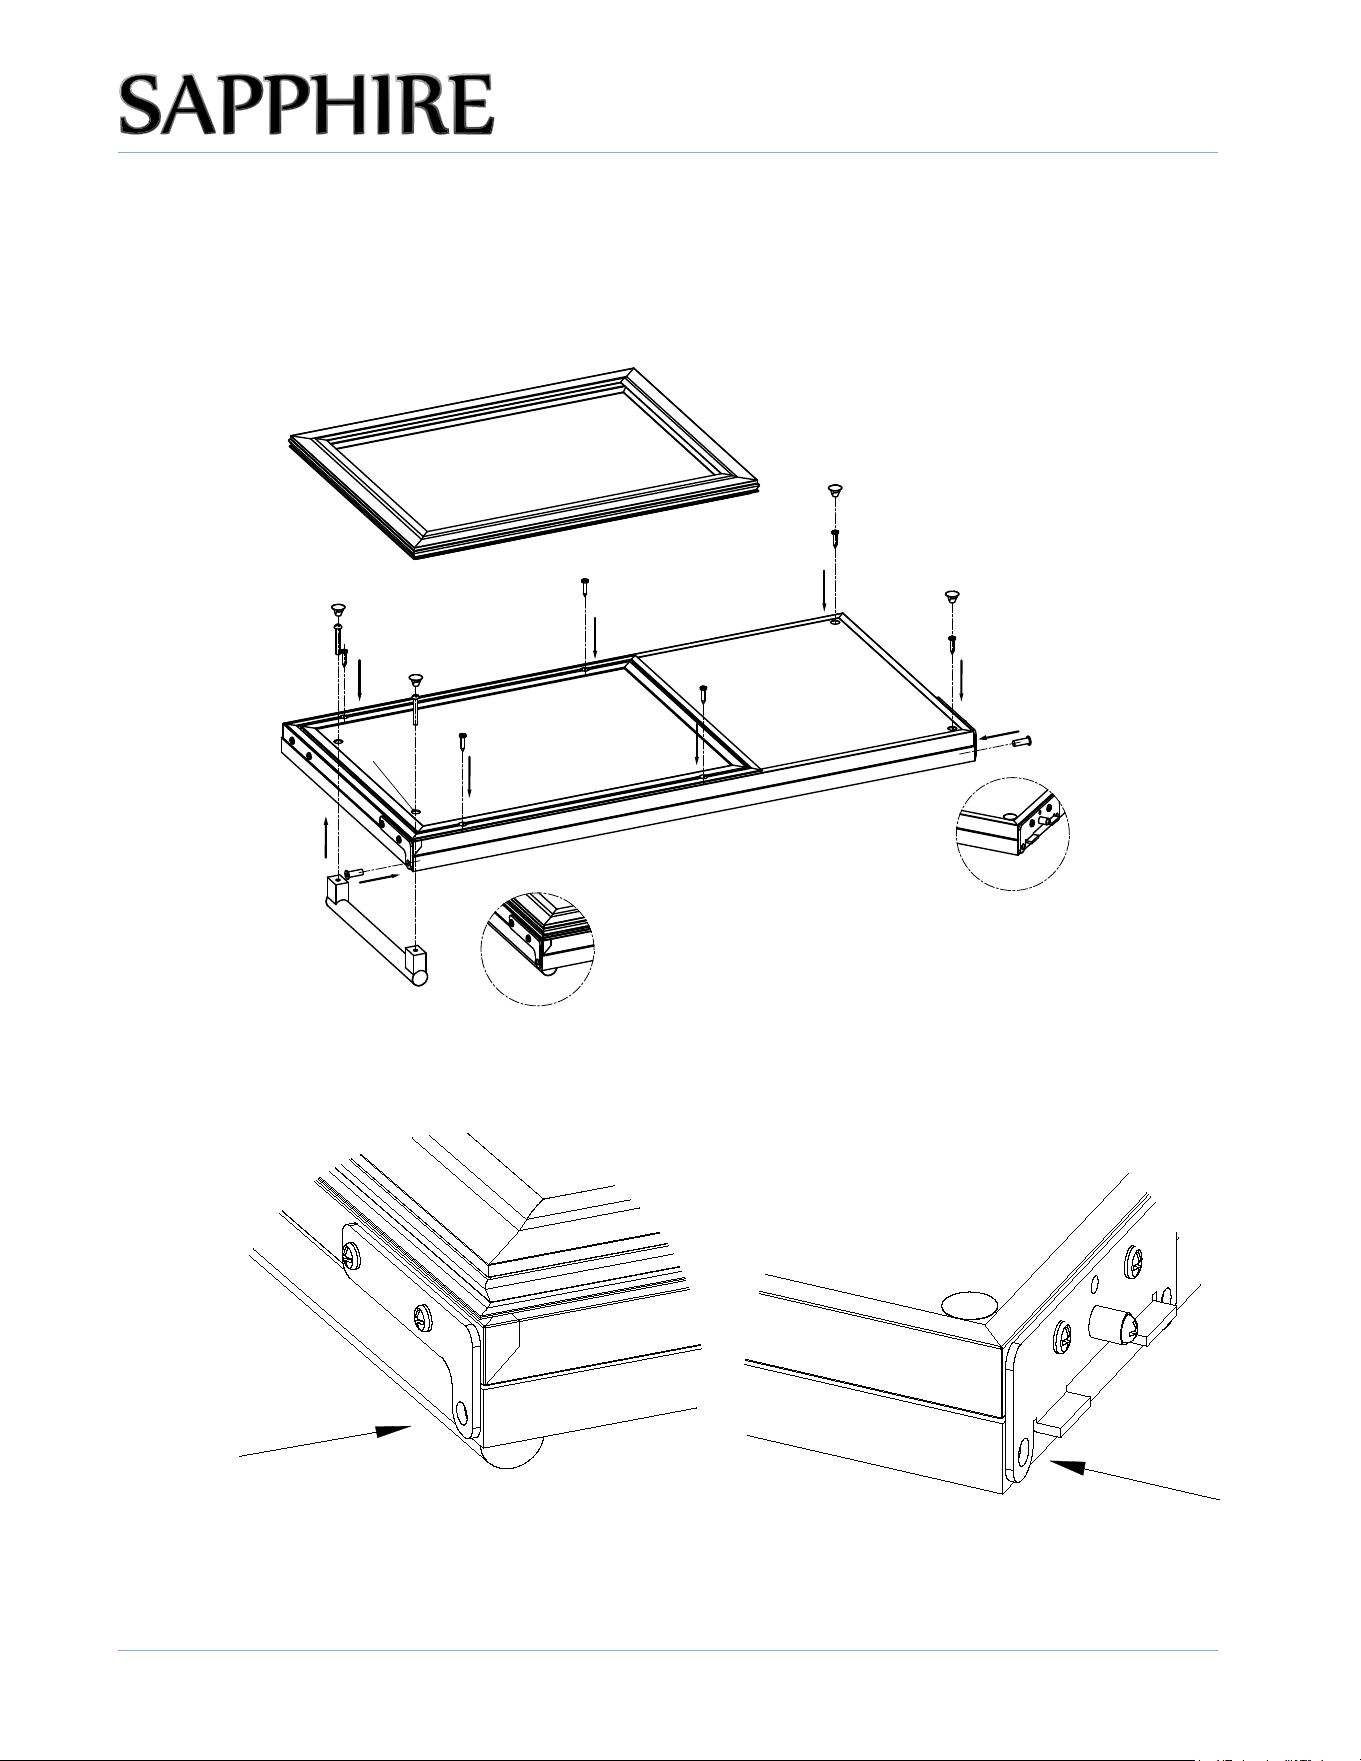
2. Stripping the outer door shell
Flap the front panel to let the inner door separate from the stainless outer shell and draw it out.
3. Re-install the shaft reinforce mechanism
Install the shaft reinforce mechanism and the decorative plugs back to where they belong.
16
INSTALLATION
© 2025 SAPPHIRE
SAPPHIRE Ice Maker Operator’s Manual
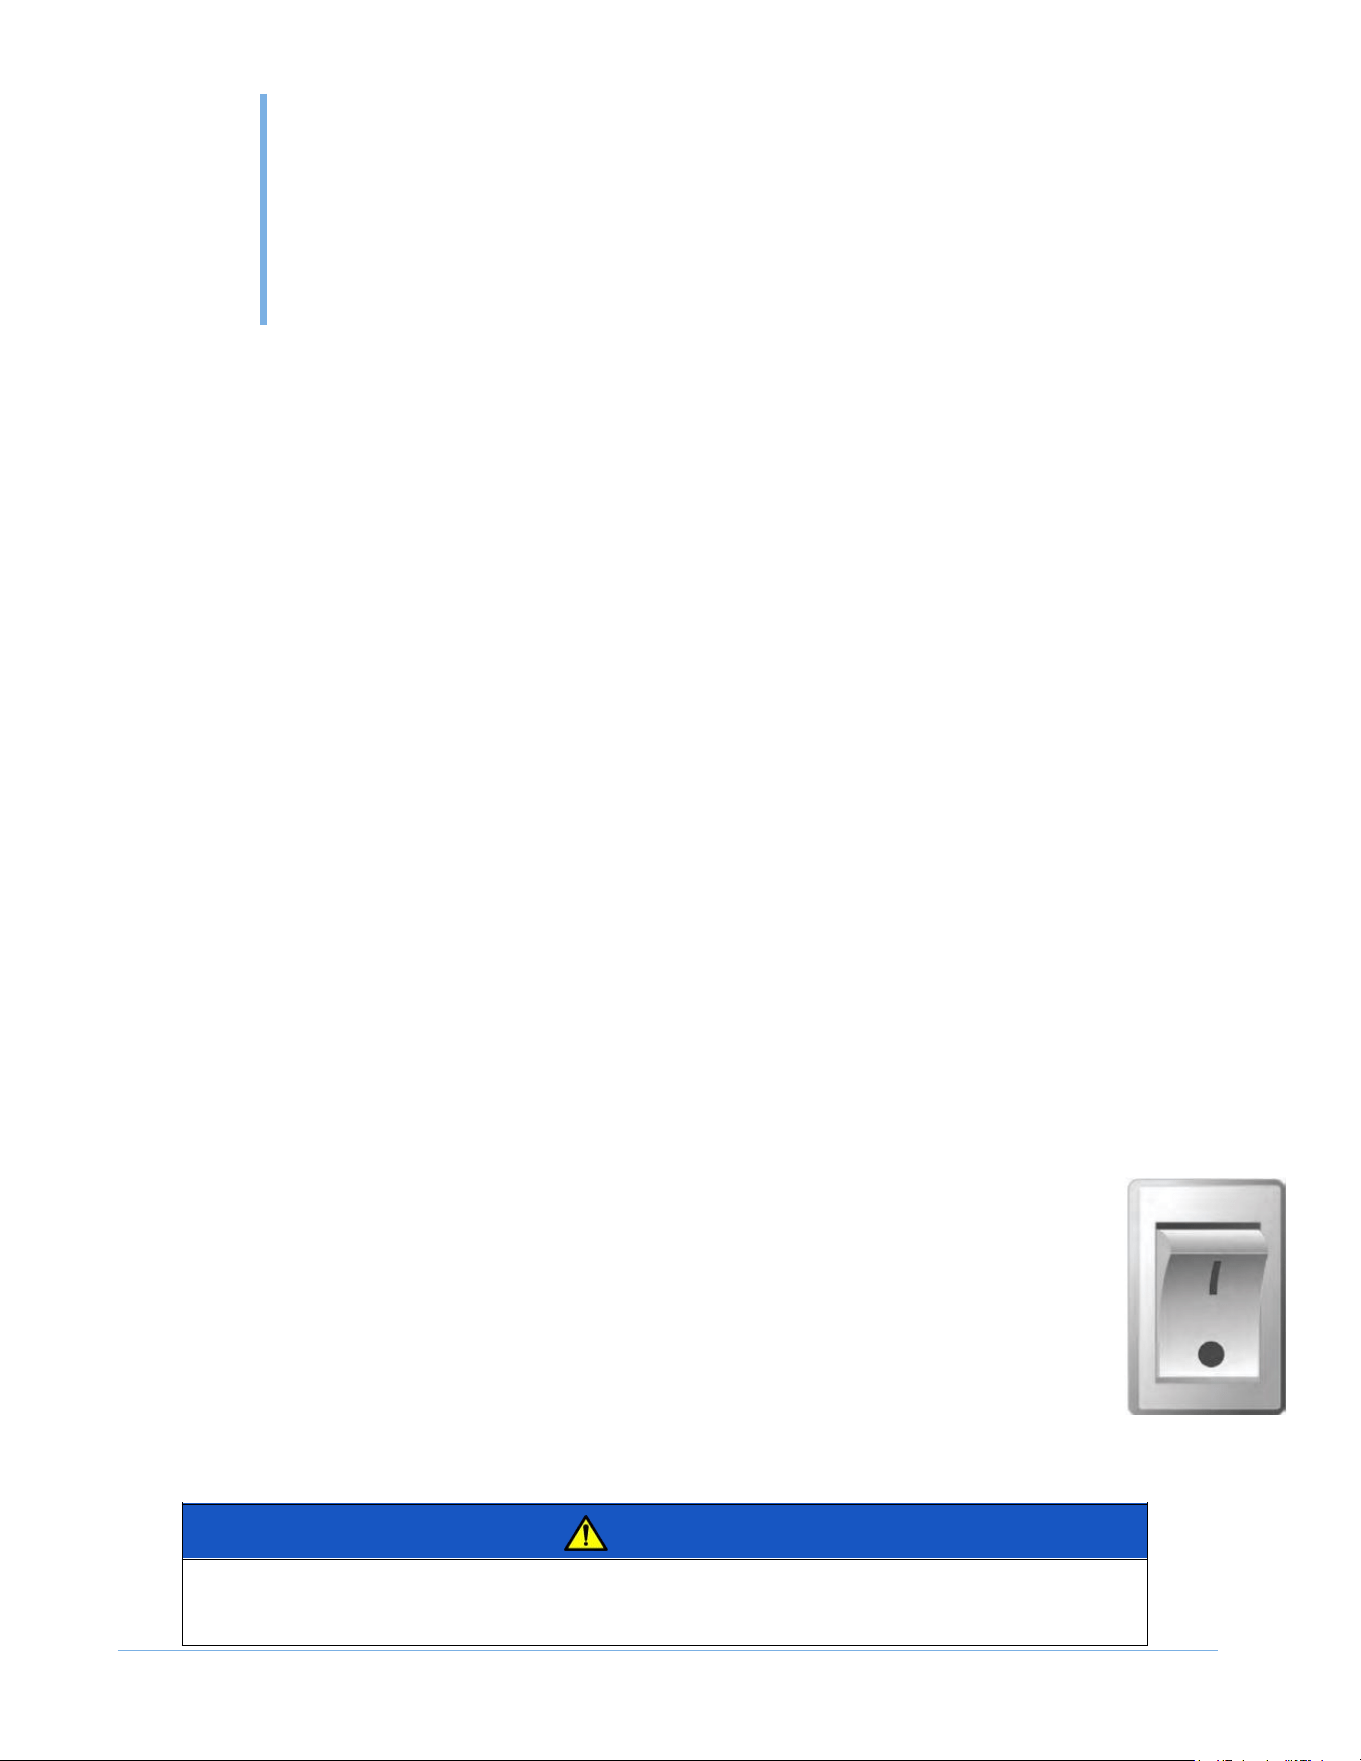
4. Install the custom door panel
Align the top of the custom door pane flush with the top of the door and adjust the overlap of the
custom door panel so it is equal on both sides of the door. Secure the custom door panel to the door
using wood screws (provided). then put the door gasket back. If you prefer the default handle, clamp
you panel to the base door and drill mounting holes to install the handle back.
5. Drill the hinge holes
After the custom door panel fixed, drill the hinge holes through the shaft reinforce mechanism holes,
(depth approx 7/8’’ ) and put the shaft sleeves back.
6. Re-install the door back to the unit, same as the door reversing.
17
© 2025 SAPPHIRE
SAPPHIRE Ice Maker Operator’s Manual
IMPORTANT: ENSURING ICE FRESHNESS AND QUALITY
• Although the unit has been tested and cleaned at the factory, discard the first few batches of
ice cubes due to long-term transit and storage.
• If you do not use the ice maker for long periods of time we recommend emptying the ice bin
periodically to ensure ice freshness.
• This unit is a manual defrost freezer and will store the ice for long term but over time the ice
will get old.
OTHER OPERATING TIPS
ICE MACHINE PRODUCTION
Crescent cube ice makers SCIM153SS, SCIM153SSPR or SCIMCTSS produce ice in a mold. With 12
ice cubes forming per cycle. The ice maker will continue to produce ice until ice in the bin is full and
the arm is raised on the ice maker. Once the ice is removed the arm can be lower and the unit will
continue to produce ice.
INITIAL START-UP OPERATION
• Plug in appliance into a 115/120v polarized and grounded wall electric outlet
• Place the on-off switch in the “|” (On) Position
• Make sure the water supply is on. As soon as the inner mechanism reaches the proper
temperature, the icemaker mechanism will fill the mold with water to start the ice
making process.
• The first cubes may be small because of air in the water line. Later cubes will be of
standard crescent type size.
• Approximate time for the first cycle is between 30-40 minutes.
• Each cycle will take approximately 5ozs of water. You should have a full bin in less than a days’ time.
NOTICE
Dispose of all ice from first 3 hours of operation.
• Keep the air intake and exhaust free of dust and lint to allow free air flow. With hard
water, cleaning may have to be more frequent.
• Never touch the evaporator when the unit is running.
• Keep the door closed to reduce ice melting and to promote proper ice formation. Open the
door only when taking ice from the appliance.
• Turn on the water supply tap before switching on the ice machine. Never turn the water
supply tap off when the ice machine is working.
OPERATING
THE UNIT
4
18
OPERATING THE UNIT
© 2025 SAPPHIRE
SAPPHIRE Ice Maker Operator’s Manual
NORMAL OPERATION
• When the ice bucket is full, the ice will push the metal arm up turning off the ice production. To
start production again the arm must be lowered manually.
• Ice production can be interrupted by raising the metal arm manually into the upright position.
• If the Ice Maker is not used regularly, it is recommended that the ice bucket be emptied
periodically to ensure the ice stays fresh.
• Sometimes the cubes may appear cloudy. This is due to the rapid freezing of the ice cubes. This
is the result usually of trapped air in the water and does not affect the taste and quality of the
ice.
• The front grille should be kept free of dust and lint to allow free airflow – clean periodically
• This appliance is a manual defrost freezer, frost will build up on the walls and inside of the door
depending on the environment it is installed in and the humidity levels. Frost will need to be
removed once the frost build up excess ¼” thickness, which may take around 4-6 weeks in
normal humidity locations.
• To Defrost turn the unit off, remove bin of cubes, leave door open at least two (2) inches. Frost
will melt and puddle up on base of unit. Wipe out water with a soft towel. Replace bin, turn unit
back on, and close the door. The ice maker will start to make ice again.
NOTICE
Do not store anything but ice in this unit.
CAUTION
Do not store explosive substances such as aerosol cans with a flammable
propellant in this appliance.
19
© 2025 SAPPHIRE
SAPPHIRE Ice Maker Operator’s Manual
OPERATING THE UNIT
Your new ice machine may make sounds that are not familiar to you. Hard surfaces like the floor and
walls can make the sounds seem louder than they actually are. The following describes the kinds of
sounds that might be new to you and the source of those sounds:
• The high-efficiency compressor may make a pulsating or high-pitched sound.
• Water running from the evaporator to the water reservoir may make a splashing sound.
• As each cycle ends, you may hear a gurgling sound due to the refrigerant flowing in your ice
machine.
• Rattling noises may come from the flow of the refrigerant, the water line or items store on top of
the ice maker.
• You may hear the sound of the condenser fan forcing air over the condenser.
• During the harvest cycle, you may hear the sound of ice cubes falling into the ice bin.
DEALING WITH POWER FAILURE
Most power failures are corrected within a few hours and should not affect the temperature of
your ice machine if you minimize the number of times you open the ice machine door. If the power is
going to be off for a longer period of time, take the proper steps to disconnect your appliance.
Note: When the ice machine is operating, the evaporator is the only component that is cold to
make ice. A power failure will only impact the machine from making ice and keeping it frozen. The
ice in the bin as well as the frost build-upwill slowly melt. Be sure to removed pooled water from in
and under the bin when power is restored to avoid melted water re-freezing.
WARNING
Failure to unplug the ice maker could result in electrical shock or
personal injury.
20
EXPECTING NORMAL SOUNDS

© 2025 SAPPHIRE
SAPPHIRE Ice Maker Operator’s Manual
5
CLEANING AND MAINTAINING THE UNIT
Perform periodic cleaning and proper maintenance to ensure efficiency, top performance, and long
life. The maintenance intervals listed in this manual are based on normal conditions. You may want to
shorten the intervals if you have pets or if you have other special considerations.
• Periodically vacuum dust and dirt from the condenser, which is located behind the grill at the
bottom front of the unit.
• Regularly inspect plumbing connections to ensure that no leaks exist.
• Disconnect the water supply line if the ice machine will not be used for a long period of time.
• Never keep anything in the ice storage bin that is not ice. Objects such as wine and beer bottles
are not sanitary and could damage the interior.
CLEANING THE UNIT’S EXTERIOR
Clean the door and cabinet with a mild detergent and warm-water solution, such as 1oz. (28 g)
of dish-washing liquid mixed with 2 gallons of warm water. Do not use solvent-based or abrasive
cleaners. Use a soft sponge and rinse the unit with clean water. Wipe the unit with a soft, clean towel
to prevent water spotting.
Clean stainless steel with a mild detergent, a warm-water solution, and a damp cloth. Never use an
abrasive cleaning agent.
CLEANING THE UNIT’S INTERIOR
When necessary, defrost and thoroughly clean the inside of the unit with mild soap and water. Do not
use electrical heating devices or sharp or pointed tools when defrosting the unit.
When defrosting or leaving the unit turned off, leave the door propped open. Leaving the door open
allows air to dry the inside of the cabinet, reducing the chance for mildew and damage to mold
mechanism’s components.
EXTENDED PERIODS OF NON-USE (Winterize)
WARNING
Electrical Shock Hazard
Always disconnect power at the source before working on the unit.
Note: Do not winterize this unit with ANY type of anti-freeze; damage to the mold coating will occur,
invalidating product’s Limited Warranty and creating potential health hazard.
21
CARE AND
MAINTENANCE

CARE AND MAINTENANCE
© 2025 SAPPHIRE
SAPPHIRE Ice Maker Operator’s Manual
1. Turn off the water at the main water supply.
2. Disconnect the water supply line from the water inlet of the ice machine and dispose of filter.
3. Allow the unit to run for a few hours until all remaining ice cubes have been ejected and
all water has cycled through the system and has been made into ice cubes.
4. Turn off the electrical supply at the main power source. Remove the power cord from
the electrical outlet.
5. Remove any remaining ice from the storage bin.
6. Press the on/off toggle switch button to the on position.
7. Dry out excess water from the ice maker assembly
8. Leave the water supply line disconnected and the power cord unplugged until ready for use.
9. Remove the front toe grille and use a brush and vacuum to clean dirt and debris from
beneath the unit. Thoroughly clean the toe grille and re-install on the unit.
10. Remove the rear access cover and use a brush and vacuum to clean dirt and debris from
the machine compartment. Thoroughly clean the rear access cover and re-install on the unit.
11. Clean the exterior and interior of the ice maker thoroughly. Wipe down and dry the ice
machine with rags or paper towels after it has been cleaned. Ensure all water has been
removed from the unit.
12. Leave the door open to prevent formation of mold and mildew. Open door a minimum of
2” to provide the necessary ventilation.
13. Do not cover the unit with anything but a synthetic cover, any other type could trap
condensation.
RECOMMISSIONING OR START UP AFTER LONG TERM STORAGE
1. If stored outside, it is recommended that the unit again be thoroughly inspected per storage
instructions to address any dirt or debris from the weather and/or animals or insects.
2. Connect the water supply. It is recommended you install a new water filter at this
time. It is also recommended to clean your ice maker after long-term storage by following
the instructions on pages 21 and 22.
3. Turn on the water, check for leaks.
4. Plug in the power cord to the wall outlet and turn the ice maker on.
5. Follow initial startup from page 18
MOVING YOUR ICE MAKER
1. Securely tape down all loose items inside your ice maker.
2. Turn the leveling feet up to the base (their shortest length possible) to avoid damage
3. Tape Door Shut
4. Make sure the ice maker stays in the upright position during transportation.
22

© 2025 SAPPHIRE
SAPPHIRE Ice Maker Operator’s Manual
Before Calling for Service:
If the unit appears to be malfunctioning, read through the “Operating the unit” section of this manual
first. If the issue persists, check the Troubleshooting Guide below. Some of the problems mentioned
in the Troubleshooting Guide can be solved easily without a service call.
PROBLEM POSSIBLE CAUSES SOLUTIONS
The machine won't
operate.
The ice machine is unplugged.
The power switch is OFF.
The ice storage bin is full of ice.
Plug the ice machine in. Turn
on power switch Remove some
ice and lower metal arm.
The compressor works
abnormally with a
buzzing noise.
The voltage is lower than
recommended.
Stop the ice maker and do not
restart until the voltage is
normal.
The water doesn't feed in
after the ice machine
starts.
The water supply is turned off.
The water supply pipe is not
properly connected.
The water filter is not installed or
not installed correctly
Turn on the water supply tap.
Reconnect the water supply
pipe.
Check that the water filter is
installed correctly.
TROUBLESHOOTING
6
Machine makes ice, but
bin does not fill up with
ice.
The condenser may be dirty. The
air flow to the ice
machine may
be obstructed.
The ambient temperature and
water temperature are high, or it
is near with some heat source.
Clean the condenser.
Check the installation to ensure
the air flow to the ice maker is
not blocked.
Run the unit for a longer time
Noise during operation.
The feet are not leveled. Certain
sounds are normal.
Level the feet. See “Leveling the
Unit”.
See “Expecting Normal Sounds”.
Water is leaking out of
the unit.
A few water droplets are on the
door.
The water supply connection is
leaking.
Under some conditions,
humidity may condense on the
door. Tighten water supply hose
fitting.
23

TABLE OF CONTENTS
© 2025 SAPPHIRE
SAPPHIRE Ice Maker Operator’s Manual
PROBLEM POSSIBLE CAUSES SOLUTIONS
Cubes are partially
formed
There is not enough water
getting to the ice maker.
Check if the water supply pressure
has dropped below 20PSI. Check
the water supply for leaks
The ice machine stops
suddenly while making
ice.
The electricity is off.
The room temperature is out of
the stated range.
Reconnect the power supply line.
Cut off the electricity and let the
ice
machine stop working until the
temperature returns within the
stated range.
The body of the ice
machine is electrified.
The ground line is not in the
sockets.
Use the correct plug and outlet.
24

© 2025 SAPPHIRE
WARRANTY
LIMITED WARRANTY COVERAGE
The Legacy Companies, warrants to the original purchaser of its Sapphire products that they will be
free from defects in materials and workmanship for the following time periods from the date of
purchase shown on the sales receipt:
WARRANTY EXCLUSIONS
NO CONSEQUENTIAL DAMAGES: SAPPHIRE and The Legacy Companies are not responsible for any
economic loss or special, indirect or consequential damages including without limitation; loss of
revenue and loss or damage arising from food or product spoilage claims.
WARRANTY IS NOT TRANSFERABLE: This warranty is not transferable or assignable and applies only
to the original verified purchaser.
NO IMPLIED WARRANTY OF MERCHANTABILITY OR FITNESS FOR PARTICULAR SERVICE:
There are no other warranties statutory, express, or implied. This Limited Warranty is the exclusive
warranty and made in lieu of all other warranties including any implied warranties or any warranties
of merchantability or fitness for a particular purpose.
FILING WARRANTY CLAIMS: All warranty claims for SAPPHIRE products must be made directly
through The Legacy Company’s Technical Service Department. All claims should include model and
serial number, proof of purchase, date of installation, location purchased, and all pertinent
information supporting the existence of the claim.
IMPROPER ELECTRICAL AND WATER CONNECTIONS: SAPPHIRE and The Legacy Companies are not
responsible for the repair or replacement of any failed or damaged components resulting from
electrical power failure, the use of extension cords, low voltage or voltage spikes to the unit.
Likewise, repair or replacement attributable to low water pressure, high water pressure or
contaminated water are not covered by this Limited Warranty.
Two (2) year parts & on-site labor
+ Three (3) additional years, parts only on the compressor
SAPPHIRE Ice Maker Operator’s Manual
25

WARRANTY
© 2025 SAPPHIRE
SAPPHIRE Ice Maker Operator’s Manual
IMPROPER USAGE: Neither SAPPHIRE nor The Legacy Companies assumes liability for parts or
labor coverage for component failure or other damages resulting from improper usage or
installation or failure to clean and/or maintain the product as set forth in the owner’s manual
provided.
ADJUSTMENTS & CALIBRATIONS: Adjustments including calibrations, leveling, tightening of
fasteners, or utility connections normally associated with the original installation are the
responsibility of the reseller, installer or the end user and not the responsibility of SAPPHIRE or
The Legacy Companies and will not be considered warranty issues for this Limited Warranty.
CONSEQUENTIAL DAMAGES: This warranty does not cover any defect due to, or resulting from,
ordinary wear and tear, handling, abuse, misuse, or harsh chemical action, nor shall it extend to
any product from which the serial number has been removed or altered, or modifications made
by unauthorized service personnel or damage by flood, fire, earthquake or other Acts of God.
OUTSIDE U.S. & CANADA: This warranty does not apply to, and SAPPHIRE and The Legacy
Companies are not responsible for any warranty claims made on products sold or used outside of
the United States and Canada or any territories of the United States of America.
ALL REPAIRS AND SERVICE MUST BE MADE BY A SAPPHIRE AUTHORIZED TECHNICIAN
Customer Service: 1.866.754.6672
SAPPHIRE Appliances | The Legacy Companies
3355 Enterprise Avenue, Suite 160, Weston, FL 33331
[email protected] | SapphireAppliances.com
26
PN:1866836203

SapphireAppliances.com | 1.866.754.6672
SAPPHIRE Appliances | The Legacy Companies
3355 Enterprise Avenue, Suite 160, Weston, FL 33331
The Beautiful & Adaptable
Sapphire-bellied Hummingbird
Lepidopyga lilliae
© 2025
P/N 14IM 10-25
“Sapphire”
Rev 3 101425