
Read all instructions before you
operate
your grill.
Save these instructions!
MODEL NO: SUNPLT40
Fuel input rating: 1.7LBS/hr
Electrical Rate: 120Vac, 60Hz, 485W – 4.4 AMPS
Refer to Intertek’s Directory of Building Products
for detailed information.
Minimum clearance from side and back of unit to
combustible construction: 24” (609.6mm) from
sides and 24” (609.6mm) from back.
3174816
Certified to:
UL SUBJECT 2728A
ULC/ORD-C2728
www.sunstonemp.com
40" PELLET GRILL W/COLD SMOKER

Welcome & Congratulations
Congratulations on your purchase of a new Sunstone Pellet Grill! We are very proud of our product, and we
are
comple
tely committed to providing you
with
the best service possible.
ATTENTION: Please read this entire manual before installation and use of the pelletized, all natural,
wood fuel-burning appliance. Failure to follow these instructions could result in property damage, bodily
injury or even death.
Contact local building or fire officials about restrictions and installation inspection
requirements in your area.
BODILY INJURY: Improper Use Can Cause Uncontrolled Fire. To Reduce Fire Risk This Appliance Is
Intended to Burn (pelletized, all natural, wood) Fuel Only. Where (pelletized, all natural, wood) Is the Fuel.
Manufacturer’s Name or Fuel Trade Name and Distinctive Model Designation. Operate Only Per
Manufacturer’s Instructions. Never Use Gasoline or Lighter Fluid. Always Store Wood Pellets Away from
Heat-Producing Appliances and Other Fuel Containers.
ATTENTION: If Fire Occurs: Call Fire Department. Do Not: Try to Move Appliance, Try To Smother
Fire, Or Put Water On The Fire. Keep The Appliance Clean – See Instruction Manual for Cleaning And Proper
Operation. Always Operate Appliance With Doors Of Room Open (For Appliances That Are Intended For
Indoor Use)
SUNSTONE METAL PRODUCTS LLC.
16004 Central Commerce Dr, Pflugerville Texas 78660.
Save these instructions.
How to Obtain Service
Before you call
Please make sure you have the following information:
MODEL NUMBER | DATE OF PURCHASE| INVOICE NUMBER.
To installer or person assembling grill:
Leave this manual with grill for future reference.
To consumer:
Keep this manual for future reference.
For warranty service, contact SUNSTONE Customer Service Department at (888)-934-9449 and
complete the warranty form here: https://sunstonemp.com/product-warranty/
Business Hours.
Mon. to Thur. 9:00AM to 4:30PM
Closed Fri/Sat/Sun
Tel: 512-487-5116
Toll Free: 888-934-9449
Fax: 512-487-7016
www.sunstonemp.com
ENGLISH
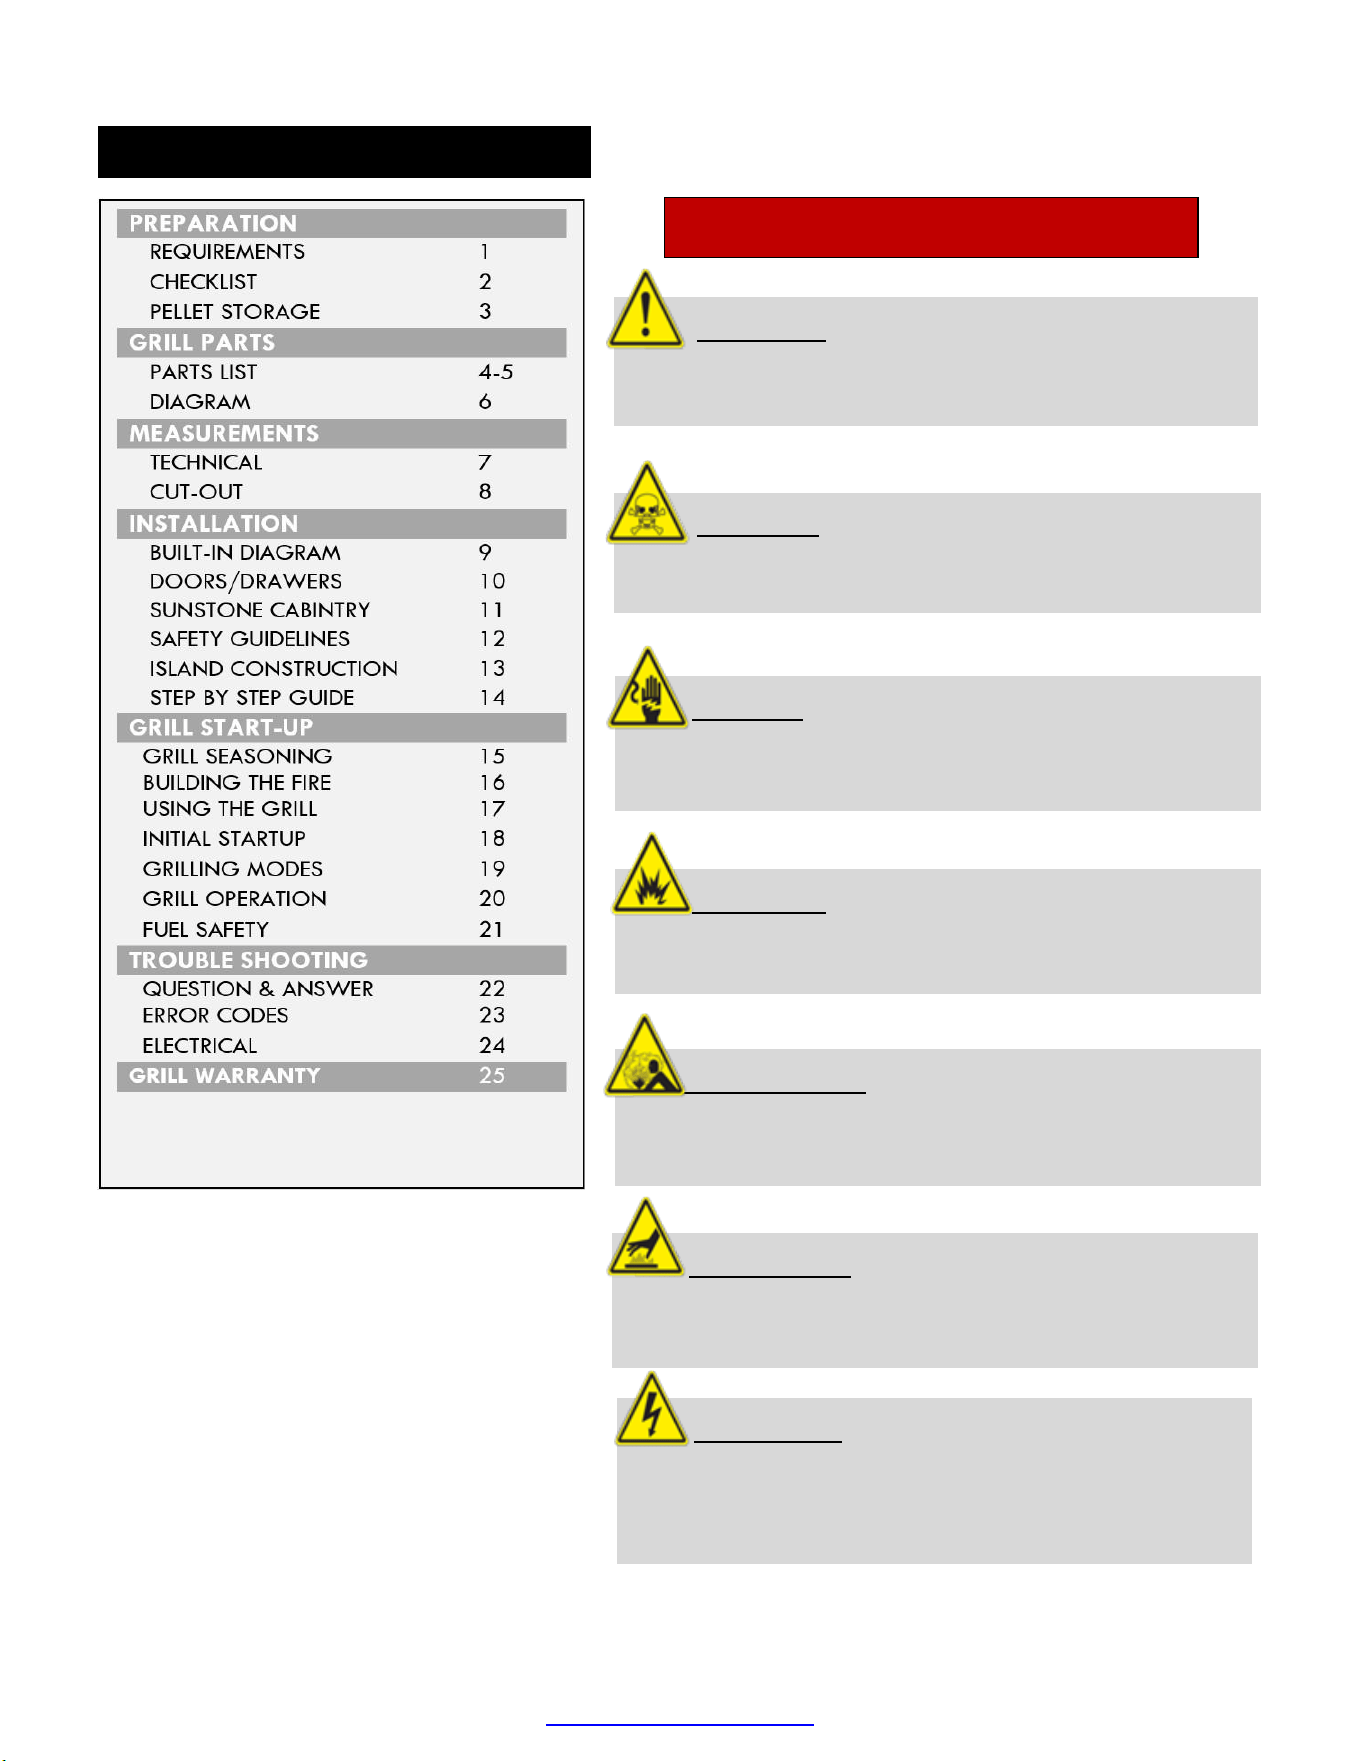
LIVE CIRCUIT:
Indicates a potentially hazard from
Live electrical current that if extreme caution is not
used, may result in minor or moderate personal injury,
or property damage.
HOT SURFACE:
Indicates an imminently hazardous
hot
surface which, if not avoided, will result in
serious
burn or injury.
BODILY INJURY:
Indicates a potentially hazardous
situation which, if not avoided, may result in minor or
moderate personal injury, or property damage.
EXPLOSION:
Indicates an imminently hazardous
situation which, if not avoided, will result in possible
explosion and cause death or severe injury.
VOLTAGE:
Indicates a potentially hazardous
situation which, if not avoided, may result in minor or
moderate electrical shock.
ATTENTION: Indicates a potentially hazardous
situation which, if not avoided, may result in minor or
moderate personal injury, or property damage.
WARNING:
Indicates an imminently hazardous
situation which, if not avoided, will result in death or
serious injury.
INDEX DIRECTORY
HAZARDS & WARNING SIGNS
Copyright 2024. All rights reserved. No part
of this manual may be copied, transmitted,
transcribed, stored in a retrieval system, in
any form or by any means without
expressed written permission.
www.sunstonemp.com

ATTENTION: Do not use spirit, petrol, gasoline, lighter-fluid or kerosene for
lighting or refreshing a fire in your grill. Keep all such liquids well away from the
appliance when in use.
ATTENTION: A MAJOR CAUSE OF FIRES IS FAILURE TO MAINTAIN
REQUIRED CLEARANCES (AIR SPACES) TO COMBUSTIBLE MATERIALS. IT IS
OF UTMOST IMPORTANCE THAT THIS PRODUCT BE INSTALLED ONLY IN
ACCORDANCE WITH THESE INSTRUCTIONS.
STARTUP
–
PELLET STORAGE
PAGE 1
Countertop support: The countertop should be able to support the weight of the pellet grill
and any other items that will be placed on it. It's important to ensure that the countertop is
strong and stable enough to support the weight of the grill, as well as any movement or
vibration caused by the operation of the grill.
Adequate clearance: The area beneath the pellet grill should be clear and free of any
obstructions or combustible materials that could be damaged by heat or sparks. Ensure
that there is adequate clearance of at least 6” behind the grill for air flow and to allow the
hood to open without any obstruction.
Ventilation: The grill should be in an area that allows for proper ventilation, with sufficient
space around the grill to prevent any heat buildup or damage to the countertop. It's
important to maintain a clearance of 24” Minimum between the grill and any nearby
Combustible Materials, and Never build your island using combustible materials to prevent
any safety hazards, risk of fire or injury.
Power source: The Pellet Grill is 120Vac, 60HZ, 485W – 4.4 AMPS and requires an electrical
outlet that can deliver 120 volts of alternating current (Vac) at 60 hertz (Hz), with a
minimum of 4.4 amps of current. Ensure that the electrical outlet is properly grounded and
in good condition to prevent any safety hazards.
Safety precautions: Follow all safety precautions and guidelines provided in this Manual
during the installation and operation of the pellet grill. Never leave the grill unattended,
always use the grill in a safe and responsible manner, and follow all local codes and
regulations related to the installation and operation of outdoor cooking equipment.
PREPERATION - REQUIREMENTS
www.sunstonemp.com
Page 1

Pre
-
Startup Checklist: Ensuring Safe and Delicious Grilling
Safety First:
1. Packaging Removal: Before using the grill, double-check that all packaging materials
have been removed from the interior.
2. Component Check: Confirm that all parts and components are properly installed
and functioning correctly.
Optimizing Your Grill:
3. Electrical Connection: Verify that the transformer electrical plug is securely
installed. Remember to keep all electrical cords away from hot surfaces on the grill.
4. Clearance from Flammables: Maintain a minimum of 24 inches between the grill
and any combustible materials like wood, siding, or decorations.
5. Approved Fuel Only: This grill is designed to burn only pelletized, all-natural wood
fuel. Using other fuel types voids the warranty and safety certification.
6. Weather Considerations: Avoid operating the grill in wet conditions or near water
sources for safety reasons.
7. Power Down Before Maintenance: Always disconnect the power cord from the
8. Moisture Protection: If storing the grill outdoors during rainy seasons or periods of
high humidity, take extra precautions to prevent water from entering the hopper.
9. Cleaning After Storage: If the grill has been unused or stored for a while, inspect the
burn grate for any obstructions and the hopper for air blockage. Clean both areas
thoroughly before use.
By completing this checklist, you'll ensure your pellet grill is ready for safe and delicious
grilling adventures! Remember, safety is paramount. Always prioritize safe practices and
follow the manufacturer's instructions for setup and operation.
outlet before performing any cleaning or maintenance on the grill.
www.sunstonemp.com
PREPERATION – CHECKLIST
Page 2

Proper Pellet Storage: Ensuring Optimal Performance and Longevity
For the best grilling experience, proper storage of your wood pellets is essential. Here are
some key guidelines to follow:
1. Maintain a Dry Environment: Moisture is the enemy of wood pellets, causing them to
degrade and potentially mold. Store your pellets in a protected location, such as a garage
or shed, to keep them dry and free from the elements.
2. Avoid Heat Sources: Pellets can be damaged by heat. Choose a cool storage area away
from direct sunlight or appliances that generate heat.
3. Utilize Airtight Containers: Freshness is key! Airtight containers prevent moisture
absorption and maintain pellet quality until you're ready to use them.
4. Deter Pests: Pellets can attract unwanted critters. Store them in containers with tight-
fitting lids to keep out any pests.
5. Practice Stock Rotation: For optimal performance and consistent grilling results, use a
"first-in, first-out" approach with your pellets. Prioritize using older pellets before adding
new ones to your supply.
By following these simple yet effective storage methods, you'll ensure your wood pellets
are always ready to deliver peak performance on your pellet grill. Proper storage extends
the lifespan and quality of your pellets, allowing you to enjoy delicious grilling for years to
come. Additionally, optimal pellet storage contributes to your grill's efficiency and overall
performance, guaranteeing a consistently excellent grilling experience.
PREPERATION
–
PELLET STORAGE
www.sunstonemp.com
Page 3
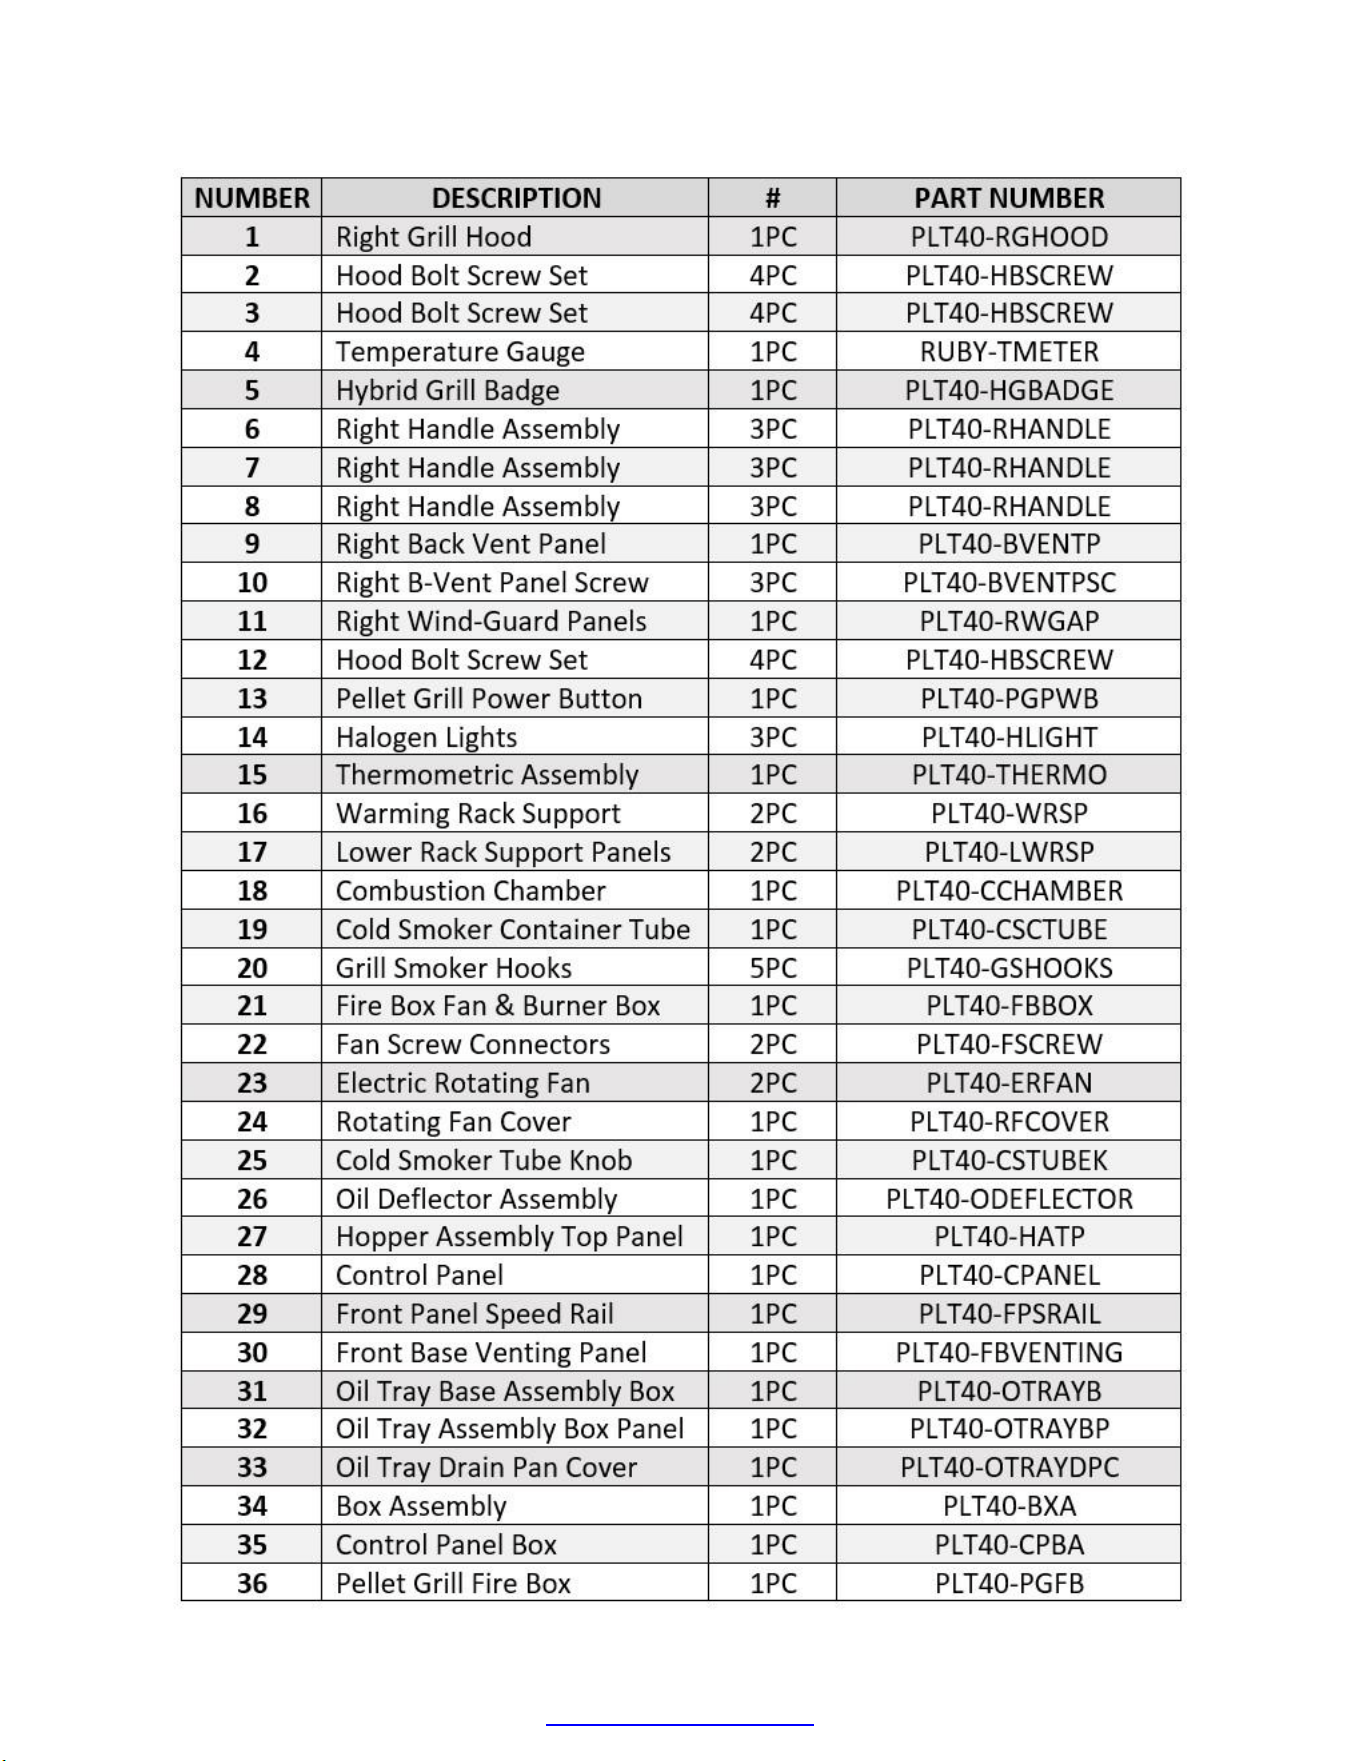
www.sunstonemp.com
GRILL PARTS – PARTS LIST
Page 4
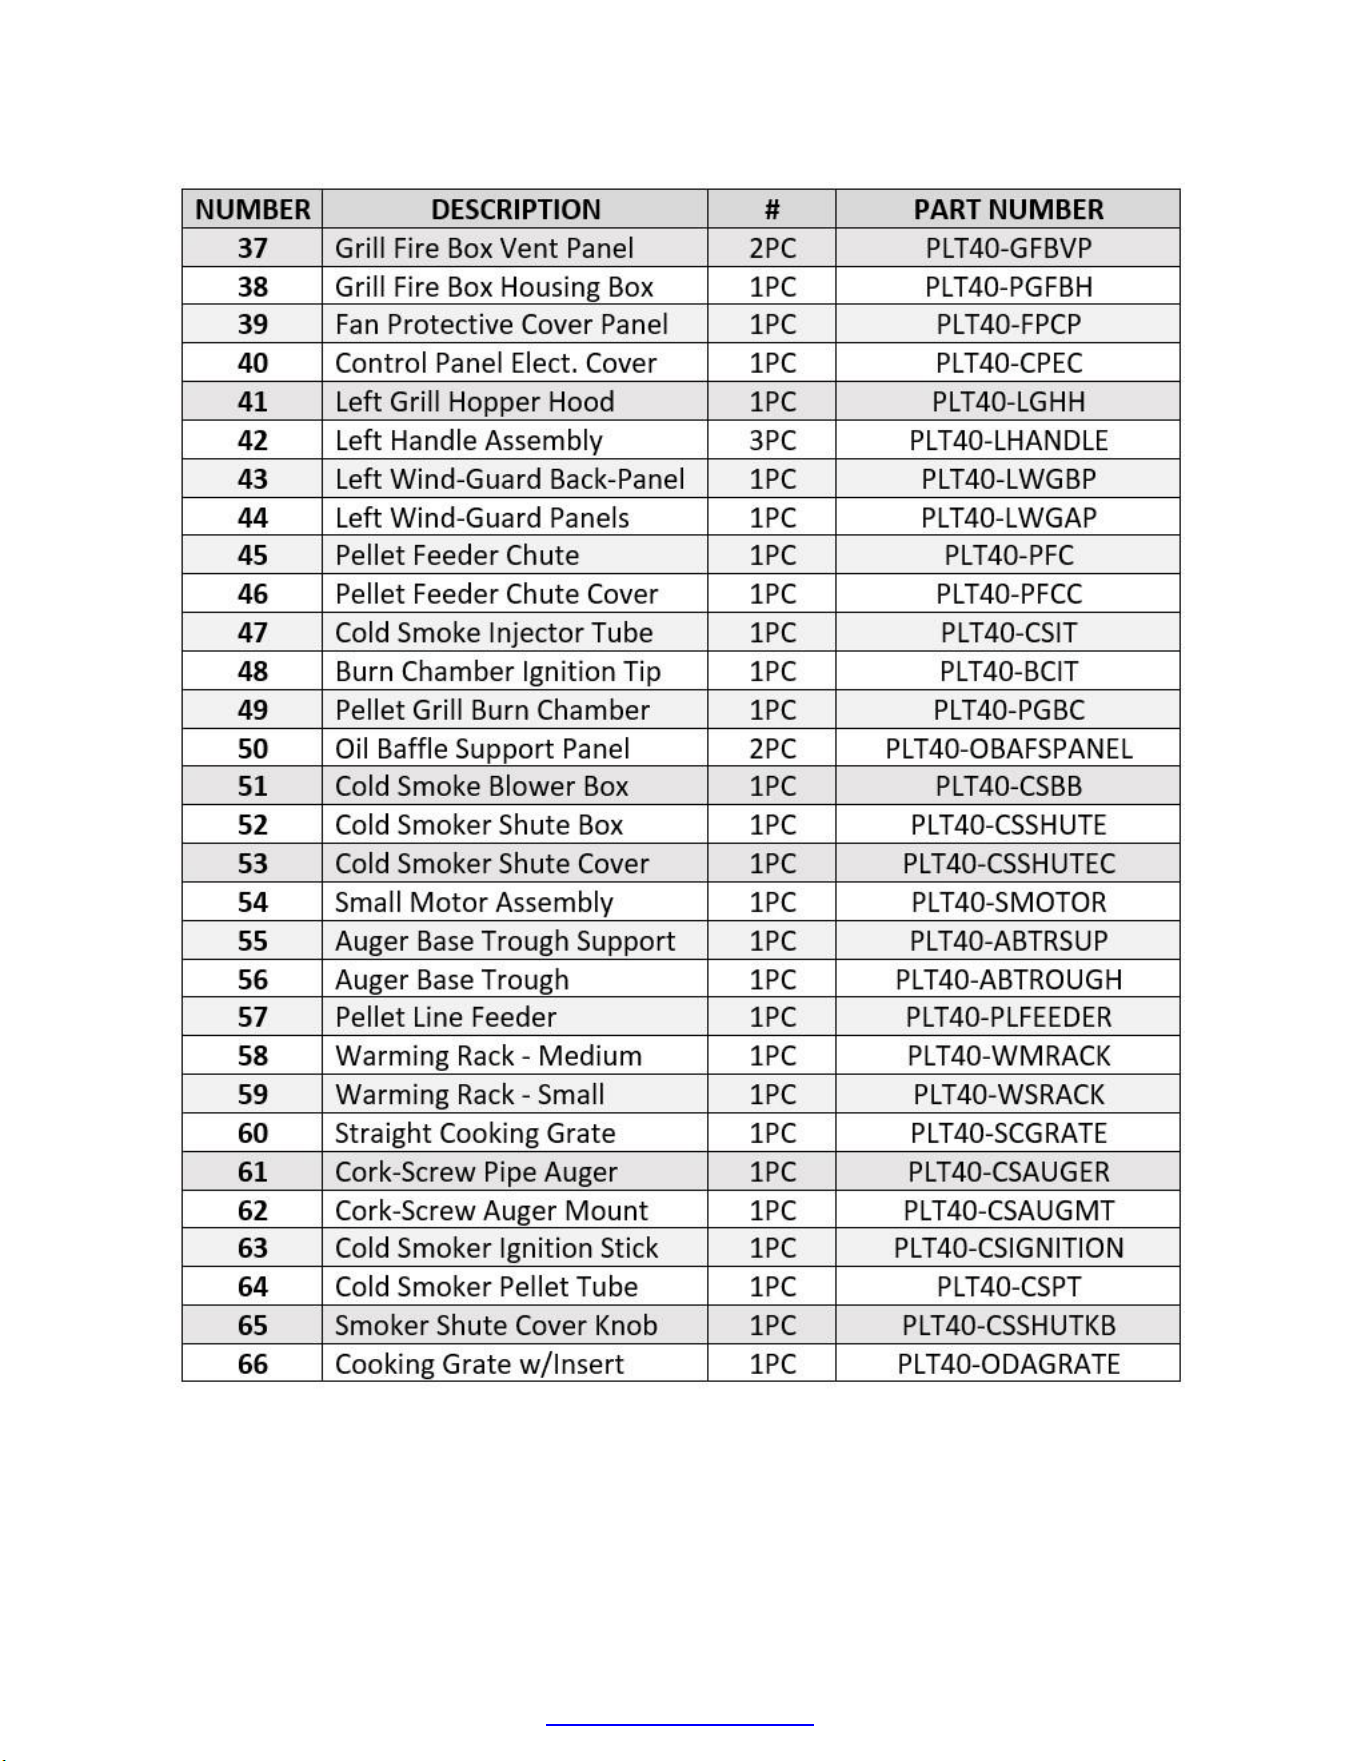
www.sunstonemp.com
GRILL PARTS – PARTS LIST
Page 5
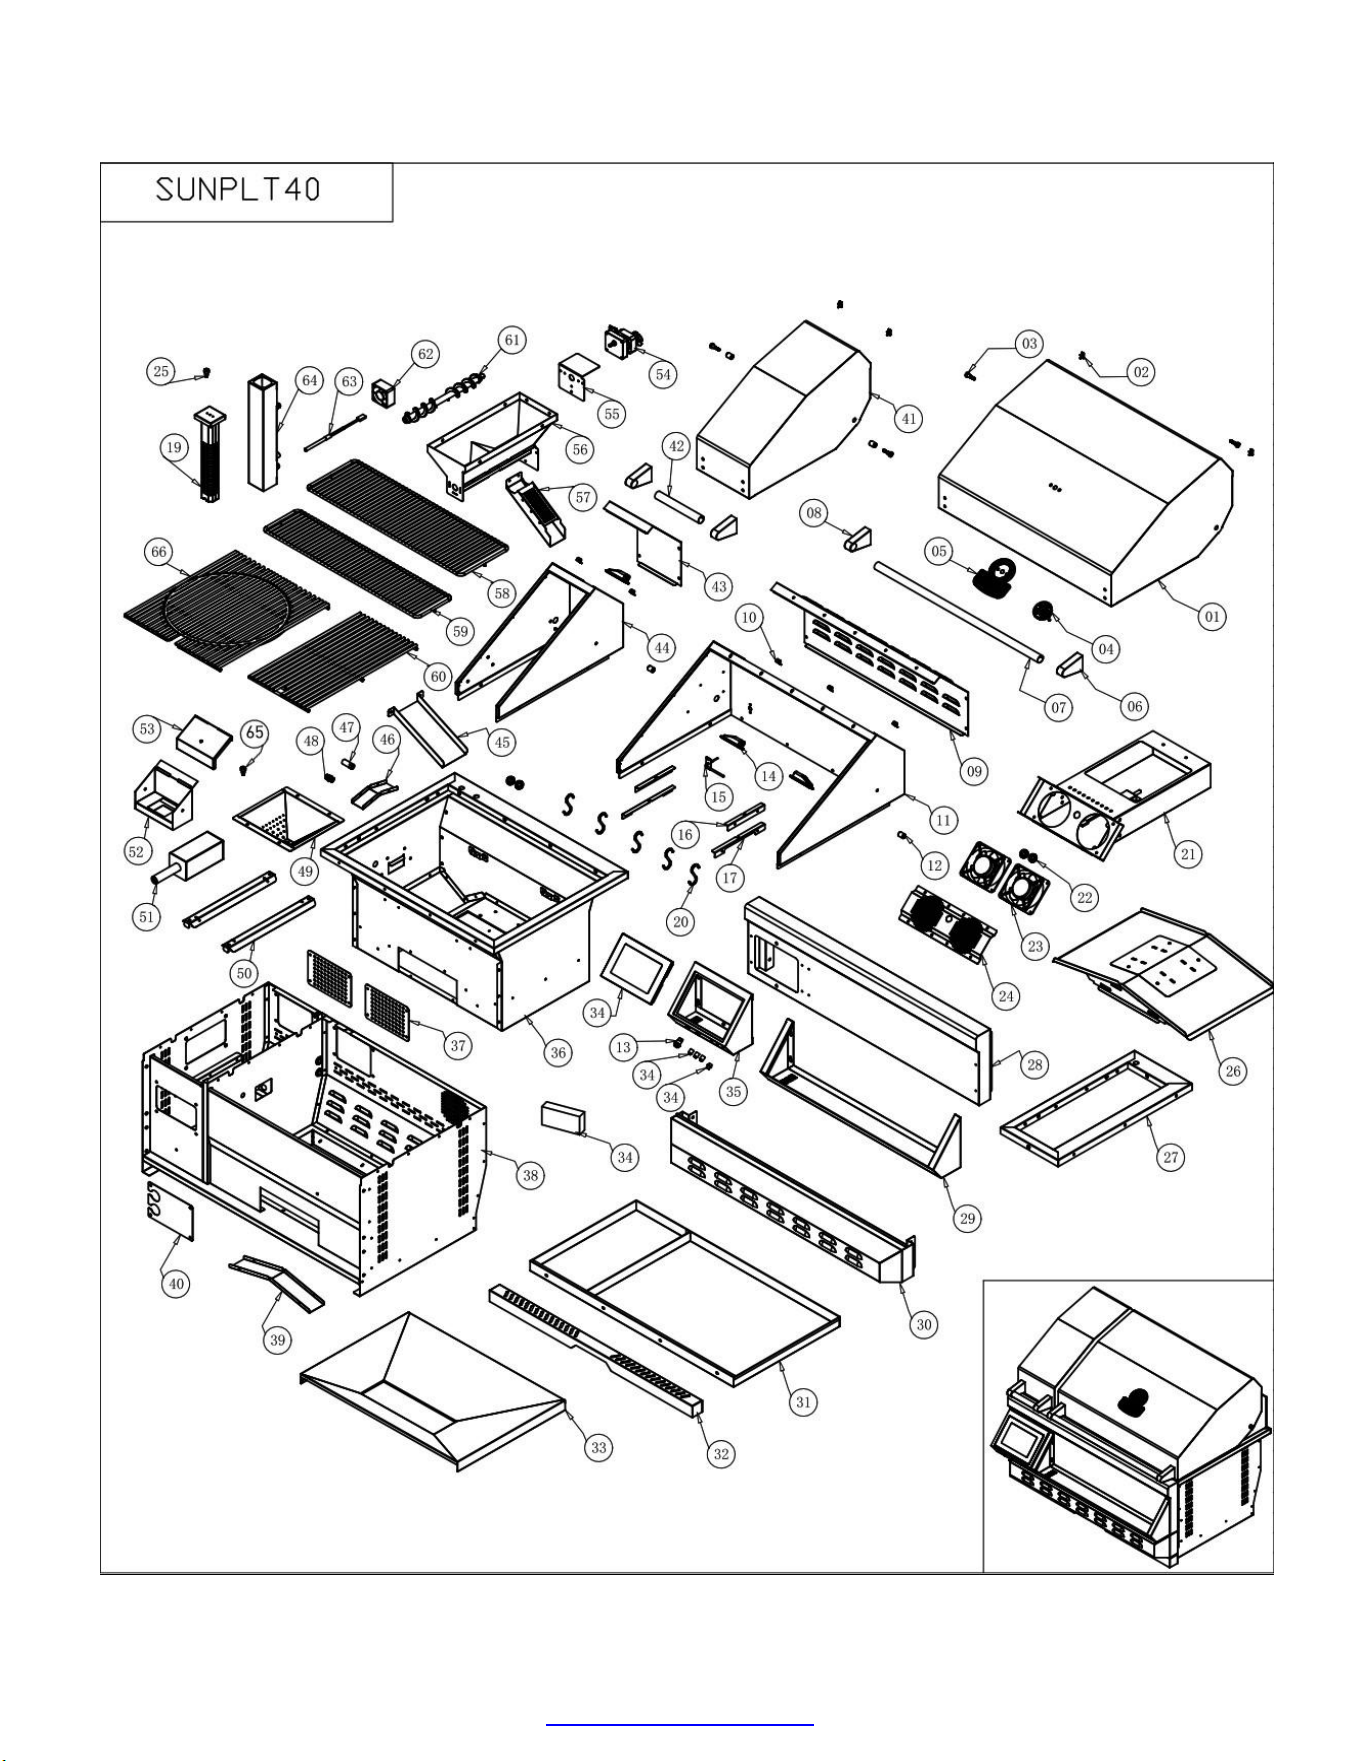
Refer to page 4-5 Parts List
www.sunstonemp.com
GRILL PARTS – DIAGRAM
Page 6
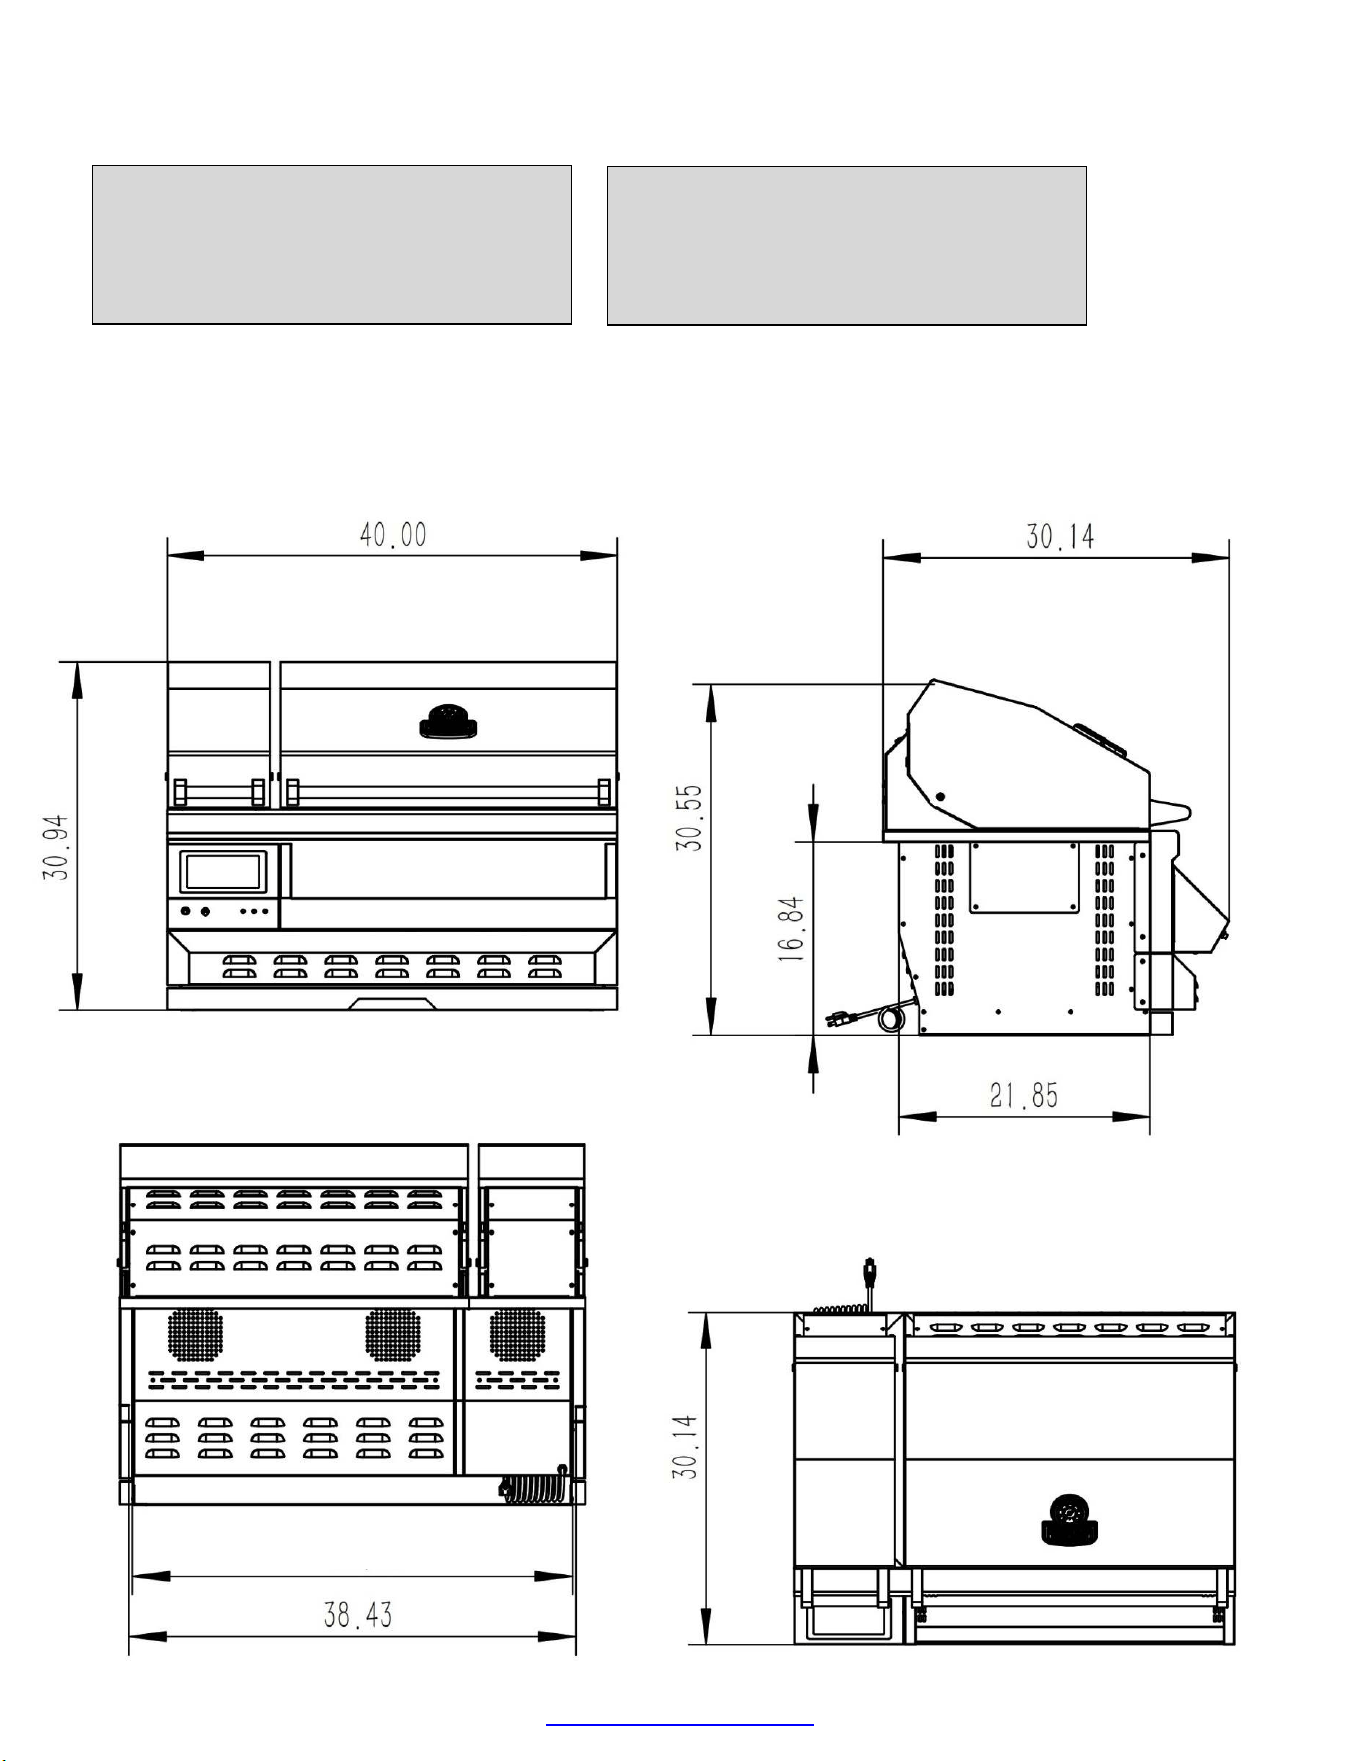
Product Size
Overall Width-------------------- 40"
Overall Height------------------- 30.94"
Overall Depth-------------------- 30.14"
Firebox Size
Box Width ---------------------- 38.43"
Box Height---------------------- 1 6 . 8 4 "
Box Depth----------------------- 21.85"
MEASURMENTS
–
TECHNICAL
FRONT VIEW
SIDE VIEW
BACK VIEW
TOP VIEW
www.sunstonemp.com
Page 7
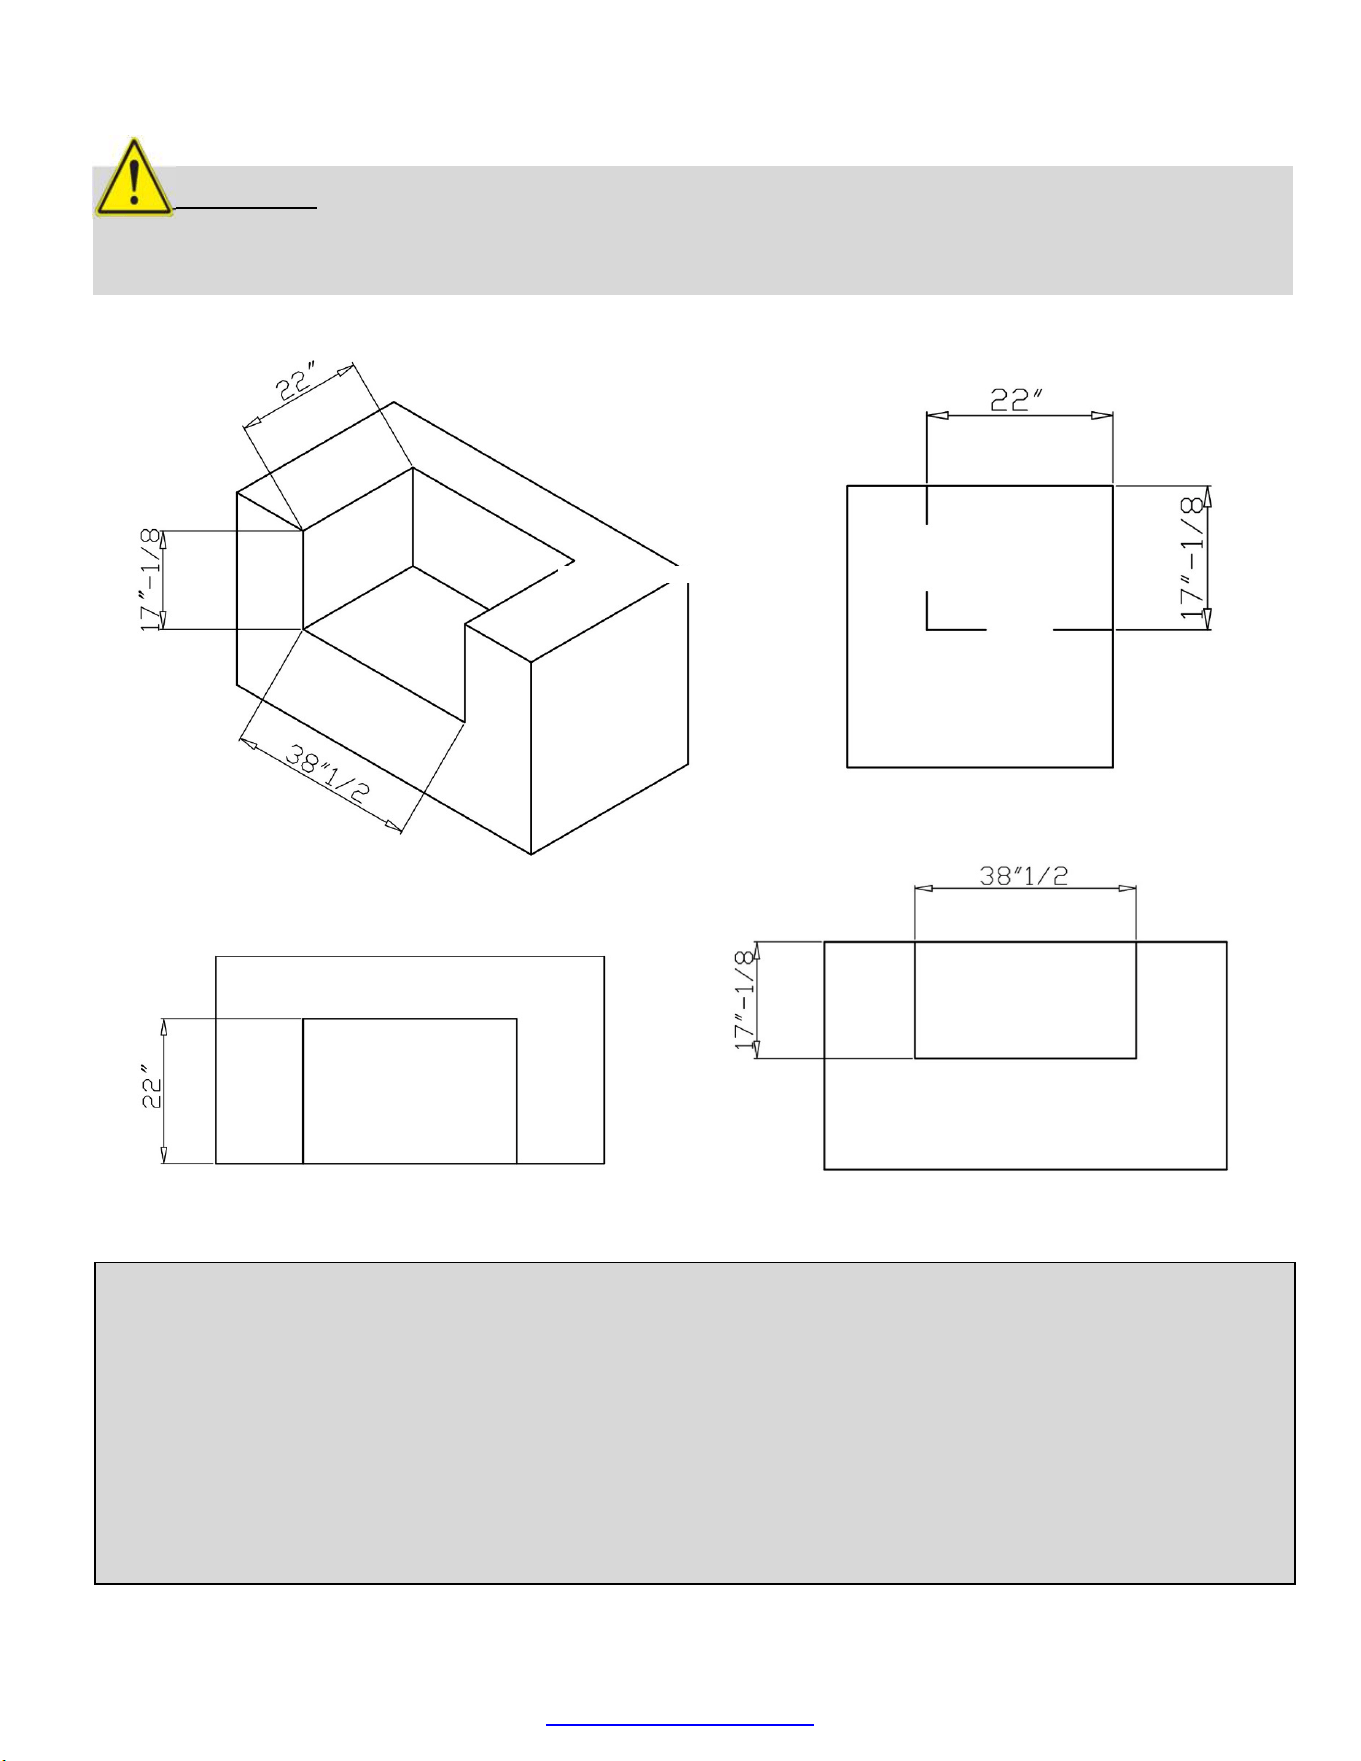
ATTENTION
: Never build an enclosure under the Grill or partition side walls, the Grill
must be Free Hanging supported by the countertop only! Must have clear access to
underside of Grill within reach of at least Two Vents.
Countertop Slide-in Installation
Grill Cut-out Depth -------------------------------------------------------------
-----
22 Inch Depth
Grill Cut-out Height (Allow ¾” Air-Flow Gap Below Drip Pan) -------
-----
17-1/8 Inch Height
Grill Cut-out Width--------------------------------------------------------------
-----
38-1/2 Inch Width
Make 1-3/4” W x1”D Notch Cut-Out on both sides of cut-out counter edge, to allow grill to
slide flush against the island finish wall.
Leave Minimum ¾” Gap below Drip Pan for Air/Gas Ventilation
Must have TWO Vents in HIGH position for Air Circulation
TOP VIEW
FRONT VIEW
SIDE VIEW ISO VIEW
www.sunstonemp.com
MEASUREMENTS - CUT-OUT
Page 8
INSTALLATION
–
BUILT
-
IN DIAGRAM
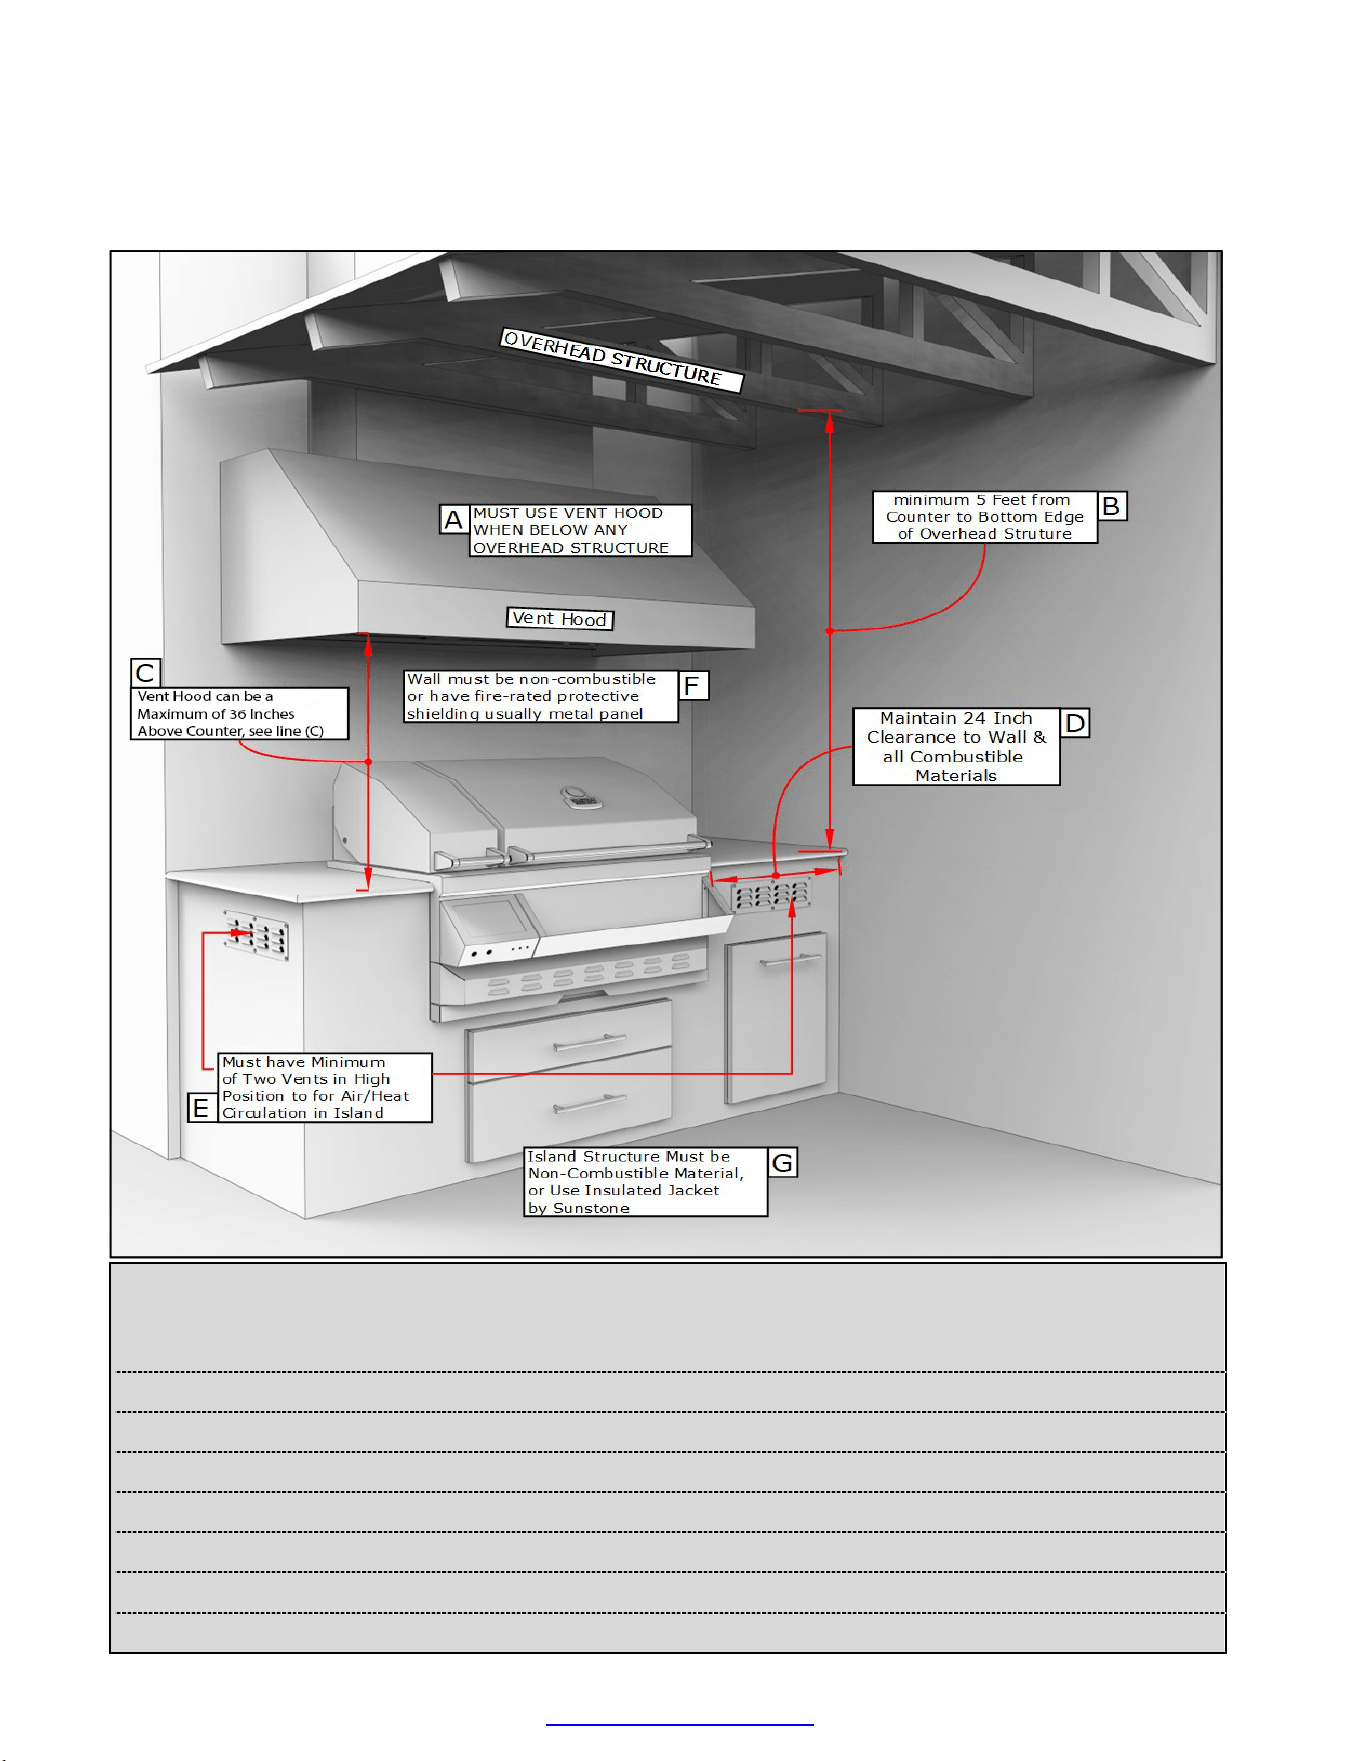
Enclosed Installation Definition:
Structure built above Appliance that is attached to the home’s exterior outside wall, roof or is inside a
separate structure like outdoor room and there is a Minimum of “One” Side open with outside exposure.
Minimum Distances to Combustible Materials or other
Appliances ONLY, Non-Combustible materials do not apply!
Clearance
(C) Vent Hood can be a Maximum of 36 Inches above Countertop , unless otherwise stated by Manufacturer
(D) Minimum 24 Inch clearance from all combustible materials
(E) Must have TWO Vents in HIGH position for Ventilation
(F) Install Non-Combustible Barrier Shielding, Stainless Steel Sheet is recommended.
(G) Island Structure must be Non-Combustible otherwise must use grill jacket or metal cabinet.
A) Must Use Vent Hood when Covered by Overhead Structure or local building code requires.
(B) Minimum 5 Feet distance from counter to overhead structure
www.sunstonemp.com
Page 9

Access and Storage Solutions for Your Pellet Grill
Planning Your Outdoor Kitchen
The decision to include access doors hinges on the layout of your outdoor kitchen and the
appliances you'll be using. Carefully consider the placement of your pellet grill and other
equipment to determine if access doors are necessary.
Investing in Quality
When incorporating access doors into your outdoor kitchen design, prioritize high-quality
construction materials. Our access doors are built from robust 304 stainless steel, ensuring
long-lasting durability and resistance to the elements.
Recommended Storage Solutions
For optimal compatibility with your built-in pellet grill, all recommended components
(including drawers) fit within a 14-inch clearance space, allowing for structural framing
within your outdoor kitchen island.
Classic Series Signature Series Designer Series
C-SD12 BA-SD12 DE-SD30
C-VSDL/R12 BA-VSDL/R12 DE-MD30
DH140 BA-DH1420 DE-DPCF13
A-DH1420 BA-VDHR1420 DE-DD13
B-SD6 BA-SD6
B-DD12 BA-DD12
www.sunstonemp.com
INSTALLATION – DOORS/DRAWERS
Installing access doors can be challenging due to the significant depth of the grill below the
countertop (over 17 inches). Alternative storage solutions, such as our 30-inch Designer
Series Drawers (Item No. DE-MD30 or DE-SD30), offer optimal functionality. These drawers
provide ample storage for grilling accessories and are conveniently accessible, even with
the grill's lower profile. Additionally, for easier access to the outlet the grill is plugged into,
we recommend using the DE-DVL15 or DE-DVR15, which facilitate plug-in and removal
during installation and repairs.
Optimizing Functionality with Drawers
Electrical Pellet Grill Advantage
A significant advantage of electric pellet grills is the elimination of the need for access doors
beneath the unit. Unlike gas grills, there's no requirement for accessing gas lines or
propane tanks. However, if your outdoor kitchen incorporates a gas grill or side burner,
access doors are recommended for easy maintenance.
Page 10

Unmatched Quality and Durability:
Crafted from premium 304 stainless steel, the cabinet boasts exceptional resistance to the
harshest weather conditions. This ensures long-lasting performance and a sleek, modern
aesthetic that complements any outdoor setting.
Ample and Functional Storage:
Two spacious drawers provide ample storage for both your main hopper and built-in cold
smoker pellets. This convenient design eliminates the need for constant refilling and allows
for effortless switching between smoking and grilling techniques.
Enhanced Flavor Experience:
Expand your culinary horizons with the integrated cold smoker. Infuse your favorite
meats, fish, and cheeses with rich, authentic wood-smoked flavor, taking your grilling
creations to the next level.
Safety by Design:
Sunstone prioritizes safety in every detail. The cabinet features a built-in venting system
with a bottom vent that promotes proper airflow, preventing the accumulation of harmful
gases. Moreover, the construction utilizes non-combustible materials, minimizing fire
hazards.
The Perfect Choice for Every Griller:
Whether you're a seasoned chef or a backyard grilling enthusiast, Sunstone cabinets are
designed to meet your culinary needs. Our commitment to innovative technology and high-
quality materials guarantees unparalleled performance.
Unleash Your Customization Potential:
Sunstone cabinets offer exceptional flexibility, allowing you to personalize your outdoor
kitchen to reflect your unique style. Easy installation and a variety of storage options
empower you to create a space that perfectly suits your grilling preferences.
Ready to Elevate Your Grilling Experience?
Contact our knowledgeable Sales and Technical Support team today at 888-934-9449 and
let us help you achieve your dream outdoor kitchen!
INSTALLATION
–
SUNSTONE CABINTRY
Elevate Your Outdoor Kitchen with the
Sunstone Pellet Grill Cabinet
Effortless Pellet Grilling Integration:
Transform your outdoor space into a grilling
haven with the Sunstone Pellet Grill
Cabinet! Designed for seamless compatibility
with the Sunstone Pellet Grill (Item
No. SAC44GPTD), this cabinet offers a simple
installation process, allowing you to quickly
elevate your outdoor kitchen.
Item No.
SAC44GPTD
www.sunstonemp.com
Page 11

ATTENTION: Major causes of appliance fires are a result of poor maintenance and a
failure to maintain required clearance to combustible materials. Always keep a Minimum of
24 Inch Clearance from ALL Combustible Materials.
ATTENTION: You must contact your local home association, building or fire officials, or
authority having jurisdiction, to obtain the necessary permits, mission, or information on
any installation restrictions, such as any grill being installed on a combustible surface,
inspection requirements or even ability to use, in your area.
Clearances to Combustible Construction:
Minimum of 24” from the sides and rear of grill must be maintained to adjacent vertical combustible
construction above the countertop level. You should take in account that there is a large volume of heat,
and smoke will exhaust from the rear of the grill. This may discolor or damage unprotected areas, do not
install under unprotected combustible construction without using a fire safe ventilation system. A 24”
minimum clearance must be maintained under the countertop to combustible construction. The clearance
can be modified by a use of an insulated jacket.
DEFINITION OF COMBUSTIBLE MATERIAL -
Any
materials of a building structure or decorative structure
made of wood, compressed paper, plant fibers, vinyl/plastic or other materials that are capable of transferring heat
or being ignited and burned. Such material shall be considered combustible even though flame-proofed, fire-
retardant treated or surface-painted, or plastered.
INSTALLATION
–
SAFETY GUIDELINES
Combustible Floor Materials:
When installing a pellet grill, it is important to avoid installation on combustible floors, such as wooden or
carpeted floors, to prevent the risk of fire. The Pellet Grill should be installed on non-combustible floors or
floors that are protected with non-combustible surfaces. The protective surface should be approved for use
by the authority having jurisdiction, which may include local building codes or other regulatory bodies.
Examples of noncombustible surfaces that may be suitable for protecting floors during pellet grill
installation include concrete, brick, or tile. These surfaces are less likely to ignite if exposed to heat or
sparks from the grill and can help to prevent the spread of fire in the event of an accident.
Combustible Ceiling or Overhang:
Installing a pellet grill under a combustible ceiling or overhang increases the risk of fire, as heat and sparks
from the grill can ignite nearby materials. Therefore, it is strongly recommended to avoid installing a pellet
grill under a combustible ceiling or overhang. If installation in such an area is necessary, a minimum
clearance of 5 feet must be maintained between the counter and the overhead ceiling or structure. This will
help to minimize the risk of fire and ensure a safe and enjoyable outdoor cooking experience.
Furthermore, all installations under a ceiling or overhang which are above the grill installation must have a
vent hood installed at a minimum of 36 inches from the countertop to the bottom edge of the vent hood.
This will help to ensure proper ventilation and prevent any heat buildup or smoke damage to the overhead
structure.
www.sunstonemp.com
Page 12

BODILY INJURY: Failure to maintain minimum 24” clearances from combustible
materials may create a fire hazard that may result in property damage or serious personal
injury.
Island Safety & Construction
Constructing an outdoor kitchen island is a great way to enhance your outdoor living space
and entertain guests while enjoying delicious grilled meals. However, it is important to
ensure that your outdoor kitchen island is constructed with proper air-circulation to prevent
the build-up of heat and provide safety for your family and property.
When using the Sunstone Pellet Grill, it is essential to have a minimum of two vents set in a
high position to allow high heat to escape and provide proper air-circulation. This is
especially important when any gas appliances are in use. If you're using Natural Gas, then
two vents in a high position are recommended. If you're using Liquid Propane, then two
vents - one in a high position and one in a low position - are essential.
This is a safety essential, as more homes burn down every year simply because the
homeowner did not properly construct the outdoor kitchen island and have proper air-
circulation. Any gas grill or pellet grill holds the heat below the counter surface, unlike an
indoor cooktop where the flame is above the counter surface, so a much larger volume of
heat can build-up within the island construction.
By providing proper air-circulation and ventilation, you can reduce the risk of fire and
ensure that your outdoor kitchen is a safe and enjoyable space to cook and entertain. In
addition to proper ventilation, it's also important to follow all safety guidelines for outdoor
cooking, including keeping flammable materials away from the grill and keeping a fire
extinguisher nearby.
Proper air-circulation is essential when constructing an outdoor kitchen island with a
Sunstone Pellet Grill.
It is important to have a minimum of two vents set in a high position to allow high
heat to escape and provide proper air-circulation.
For Natural Gas, it is recommended to have two vents set in a high position. For
Liquid Propane, it is essential to have two vents in low positions.
This is a safety essential to prevent the build-up of heat and reduce the risk of fire.
Any gas grill or pellet grill holds the heat below the counter surface, so a much larger
volume of heat can build-up within the island construction.
INSTALLATION
–
ISLAND
CONSTRUCTION
www.sunstonemp.com
Page 13

1. Slide Grill in Place
Begin by sliding the grill into place, ensuring it aligns properly with the cut-out. The grill is
designed with an internal built-in hanger lip located on the right, left, and back sides. This
allows the grill to hang by the three supported edges, while the front control panel hangs
down the front of the cut-out.
2. Electrical Connection
Connect the electrical supply to the grill. This outdoor cooking appliance is equipped with a
three-prong (grounding) plug for protection against shock hazard and should be plugged
directly into properly grounded three-prong outlets. The electrical connection to the grill is
located behind the back left side corner. Double-check that the plug is tightly pushed into
the plug sockets at the back of the grill. Lift any loose wire and attach it to the back wall,
keeping it away from any potential water collection on the floor of the island interior.
3. Allow for Ventilation
Proper ventilation is critical to the safe and efficient operation of the grill. Ensure there is a
minimum of 6 inches of clearance behind the grill to allow for proper airflow. The grill is
engineered with special vents on the back of the unit, which allow for proper airflow out of
the back of the grill. Push the grill all the way into the cut-out, so that there are no gaps
present between the grill and the inside of the island frame. Ensure that the grill control
panel is flush against the island wall. Be sure to additionally have a minimum of Two-Vents
placed in a High Position on the island wall, as to allow High-Heat Air-Circulation for within
the island construction.
4. Familiarize Yourself with the Grill
Read all the instruction manual guides and information to familiarize yourself with the grill.
Turn the pellet grill on by pressing the round button just below the control panel on the left-
hand side. Get to know the digital control panel, see the three modes, SMOKE, GRILL and
SEAR. The temperature gauge is in the center top, while the desired temperature is in the
center bottom. On the right side are the three prongs with individual temperature readouts,
connect the prongs at the bottom of control panel, with the three adjacent plugholes.
Familiarizing yourself with the grill will help you to understand how to properly operate the
grill and ensure that you get the most out of your outdoor cooking experience.
5. Add Pellets
Fill the hopper with wood pellets of your choice. Make sure to use only high-quality pellets
designed for use in pellet grills, as lower quality pellets can cause issues with the grill's
performance. We recommend B&B Wood Pellets – see www.bbcharcoal.com.
INSTALLATION
–
STEP BY STEP GUIDE
www.sunstonemp.com
Page 14

1. Grill Preparation
Proper Grill Maintenance needs to be part of your regular care of the Pellet Grill, the
following solutions help ensure your grill will last for your lifetime and beyond. First, make
sure that your grill is off, and the grates are cold. Wash all surfaces of Pellet Grill
Before using the grill, wash all surfaces with warm soapy water and a wet sponge. This helps
to remove debris off the surface which may otherwise cause rust staining. Dry with a soft
towel.
2. Seasoning your Grill
You'll need spray bottles of high-heat cooking oil, such as vegetable oil, canola oil, or peanut
oil. Any cooking oil with a high smoke point will work well for grilling.
The first thing you want to do is spray the inside of your grill, paying special attention to any
stainless-steel grates and emitter plates. You'll also want to put a thin layer of oil on all
inside surfaces of your grill. Remove the inside parts of the grill to make sure you can get to
all the surfaces. You can use any of high-heat cooking oil, such as vegetable oil, canola oil, or
peanut oil for this.
3. Turn on the Grill – See Grill Startup Page 18
Next, turn up the heat to high and let the grill get hot. Let it burn and smoke and work its
high heat magic for a good 30 to 40 minutes. The oil will seep into the pores of the steel and
bake in and harden. This creates a smooth nonstick coating.
Seasoning your grill has three benefits: Easier cooking / cleaning, better flavor, and
extended grill life. The oil used during seasoning process protects the grates from rust. This
creates a non-stick surface, making cleaning easier. The juices and fats from food vaporize
during grilling, creating a signature flavor that improves over time. Seasoning helps prevent
rust-staining giving you years of non-stick, easy-care grilling. It's recommended to season
your new grill right after install, and a minimum of once a year depending on use.
www.sunstonemp.com
GRILL START-UP – GRILL SEASONING
Page 15

BODILY INJURY: Never use gasoline, gasoline-type lantern fuel, kerosene, charcoal
lighter fluid, or similar liquids to start or “freshen up” a fire in this appliance. Keep all such
liquids well away from the appliance when in use.
1. Use high-quality, all-natural wood pellets that are designed for use in pellet grills.
Avoid using fuel with additives or other materials that can damage the grill or affect
the flavor of your food. We recommend B&B Wood Pellets – see www.bbcharcoal.com.
2. Follow all instructions for loading the hopper with pellets, and avoid overfilling the
hopper, which can cause the pellets to jam and prevent proper combustion.
3. Start the grill according to the Grill Startup Guide in the Manual and allow it to heat
up to the desired temperature before adding food.
4. Monitor the temperature of the grill closely and make any necessary adjustments to
maintain a consistent heat. Avoid over-Heating the grill, as this can cause damage to
the grill and affect the quality of your food.
5. Regularly clean the burn grate and hopper to remove any debris or blockages that
could affect the performance of the grill.
6. It is important to follow these recommendations carefully to ensure the safe and
effective operation of your built-in electric pellet grill. Over-firing the grill, or exposing
it to excessively high temperatures, can cause damage to the grill and increase the
risk of fire.
By following these recommendations and warnings, you can help to ensure a safe and
enjoyable cooking experience with your built-in Pellet Grill. Never make any modifications
to the grill. This could affect its performance, make the unit unsafe to operate and void all
warranties
GRILL START
-
UP
–
BUILDING THE FIRE
Building and maintaining the fire in a built-in Pellet Grill requires careful attention to
the following recommendations:
www.sunstonemp.com
Page 16

ATTENTION: Use Only Wood Pellet Fuel Specified by The Manufacturer – B&B
Wood Pellets. Do Not Use Pellet Fuel Labeled as Having Additives. Using pellet fuel labeled
as having additives or other materials can damage the grill or affect the flavor of your food
and should be avoided.
Operation of the Grill:
Operating and using electrical assemblies for a built-in pellet grill requires careful attention
to the following technical guidelines:
Ensure that the electrical supply to the grill is properly installed and grounded
according to local electrical codes and manufacturer's instructions. Always use a
properly grounded electrical outlet and avoid using extension cords or other devices
that may cause power fluctuations or electrical hazards.
Familiarize yourself with the control panel and user interface of the grill. The control
panel should allow you to adjust the temperature, set cooking times, and monitor the
status of the grill. Follow the manufacturer's instructions carefully when using the
control panel and make any necessary adjustments to maintain the desired
temperature and cooking conditions.
Pellet Name & Grade Requirement
The grade designation for wood pellets used in pellet grills can vary depending on the
manufacturer, but the most common grades are "Premium" or "Food-Grade". These
designations indicate that the pellets are made from high-quality, food-safe materials that
are free from chemicals, additives, or other contaminants that could potentially harm the
food being cooked on the grill. We recommend B&B Wood Pellets –
see www.bbcharcoal.com.
GRILL START
-
UP
–
USING THE GRILL
Mean Pellet Heating Value
The average heating value of wood pellets used in pellet grills can vary based on the type
and quality of the pellets. Typically, wood pellets have a heating value of approximately
8000 to 8500 BTU (British Thermal Units) per pound. This means each pound of wood
pellets can generate about 8000 to 8500 BTUs of heat energy when burned. It's important
to note that factors such as moisture content, density, and ash content can influence the
heating value, so using high-quality pellets specifically designed for pellet grills is crucial to
ensure optimal performance and heat output.
www.sunstonemp.com
Page 17
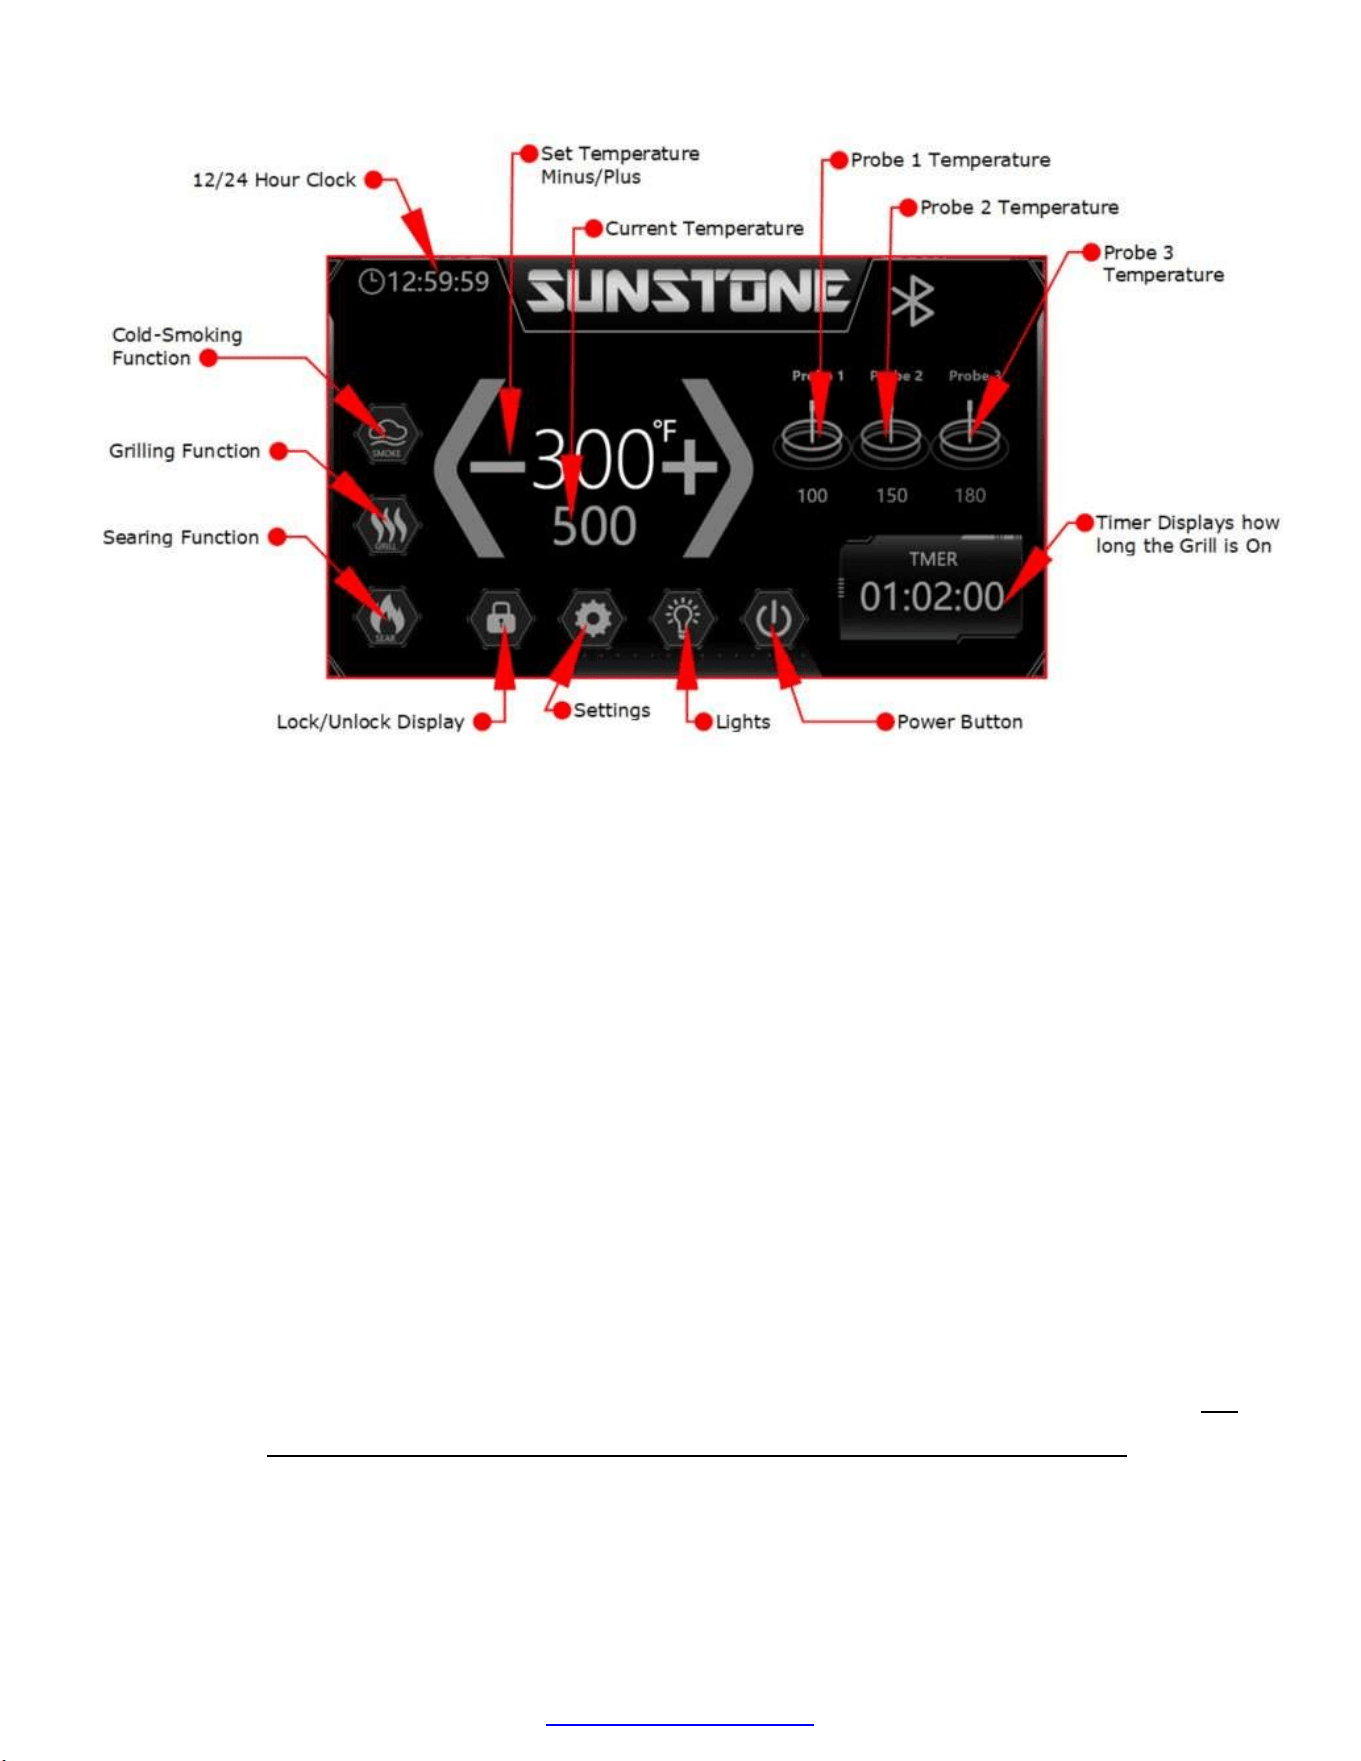
1. Plug the power cord into a Grounded power source (120 Volt Required). Initial
set up of your pellet grill. PRESS the setting icon to set time, temperature C° or
F°, and Bluetooth. Then select "save" for the new settings. Lock / Unlock
Setting, Push lock icon, on the display. Red=Locked, Green=Unlock. See Page
23 for Image (Bluetooth connectivity is in development)
2. Open the Main Hood. Check the burner pot grate ensuring there is no
obstruction for proper ignition. Open the left hopper lid. Ensure there are no
foreign objects in the hopper or auger feed system. Fill the hopper with dry, all
natural barbecue hardwood pellets.
3. With the Hood Closed, turn the unit on by pressing the Power Button located at
the base of the control box, display with will activate within 5 seconds.
4. Turn on power button on display panel, chose either Smoke, Grill or Sear. Do
Not use the Smoke function in conjunction with either Grill or Sear. You can
manually adjust temperature by pushing Arrow button on target. Pellet loader
will start feeding grill pellets, the main ignition system will start working, it
takes around 3 minute to ignite, green lights show in working mode.
www.sunstonemp.com
GRILL START-UP – INTIAL STARTUP
Page 18
BODILY INJURY: Should a grease fire occur, turn the grill off and leave the lid closed
until the fire is out. Do not unplug the power cord. Do not throw water on the unit. Do not
try to smother the fire. Highly recommend the use of a fire extinguisher to keep on site. If
an uncontrolled fire does occur, call the Fire Department.
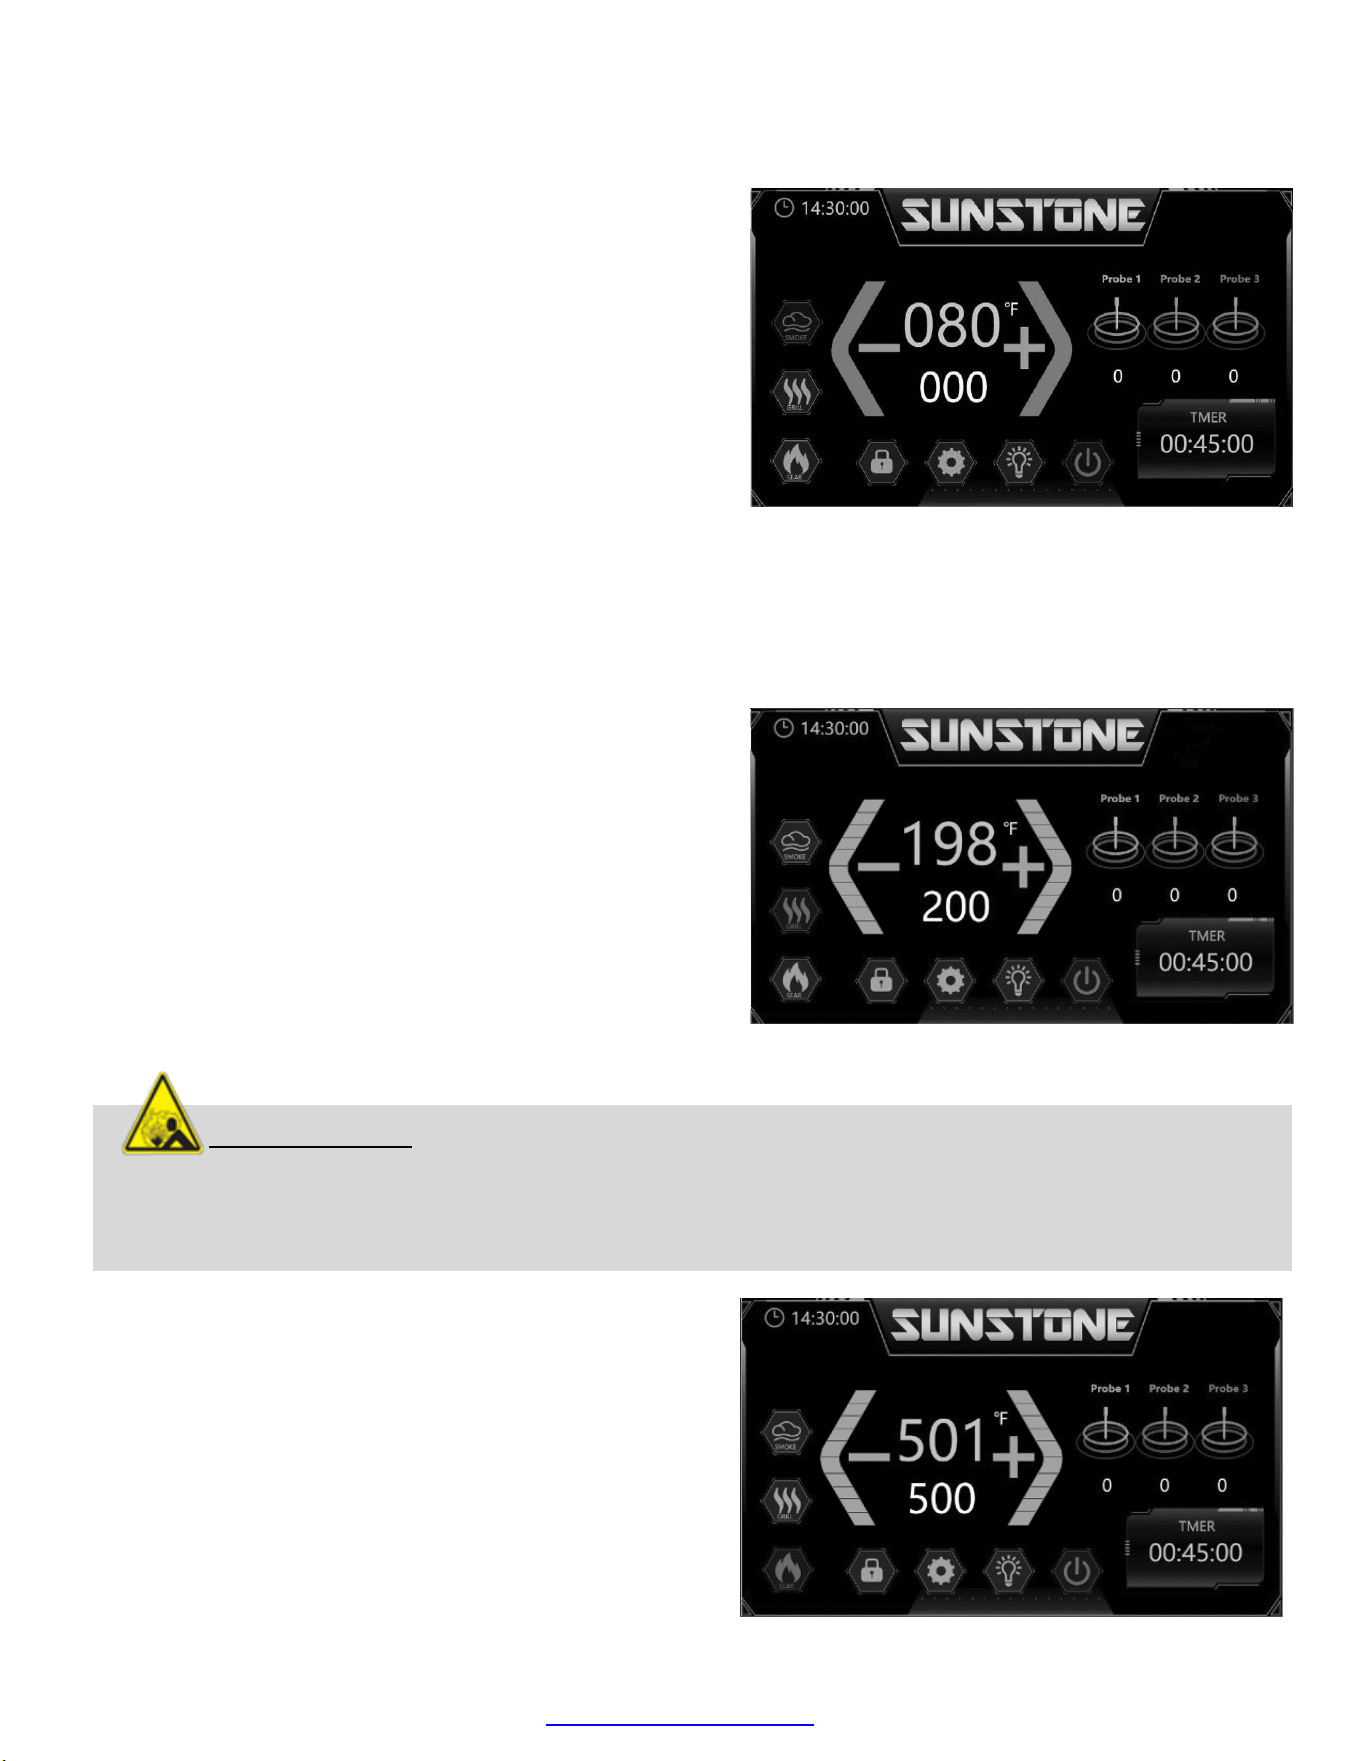
GRILL - Grilling
The Grilling function is the most common
function to use, with temperature ranges
between 200 to 500 degrees. With the grilling
function you can cook most all variations and
you can smoke with the heated flame. You can
even use two types of natural hardwood
pellets, one for the Cold Smoker and one for
the Grilling.
SEAR - Searing
Sear sets the grill to very high temperatures to
sear the outside of your food sealing in the all
the flavor while quickening the grilling. The
searing function allows between 500-700
degrees, excellent searing temperature.
SMOKE - Cold Smoking
Do not use the Smoke function in conjunction
with either Grill or Sear. Do not use the
Cold-Smoking function in more than 1-Hour
increments.
To cold smoke, follow these steps:
1.
Open the small cover to expose the cold
smoker box at the front.
2. Pull the feeder tube out, add pellets, then
slide the tube back into the compartment and
close the cold smoker box cover.
3. Turn on the display panel and choose the
SMOKE setting.
With this setting, the temperature will not rise
because the pellets are burned in a separate
internal compartment. As smoke develops, it is
pushed up and through a pipe where it is
cooled with a fan blower.
www.sunstonemp.com
GRILL START-UP – GRILLING MODES
Page 19

HOT SURFACE: If the grill is set to a high heat setting and the hood is closed, wind
can prevent the hot air from being expelled through the rear vent – forcing heat to the front
of the grill. This heat can make the hood handle and front panel extremely hot. In some
cases, this heat can damage important components.
ATTENTION: Ashes should be placed in a metal container with a tight-fitting lid. The
closed container of ashes should be placed on a noncombustible floor or on the ground,
well away from all combustible materials, pending final disposal. If the ashes are disposed
of by burial in soil or otherwise locally dispersed, they should be retained in the closed
container until all cinders have thoroughly cooled.
Direct Cooking
Direct cooking is the process of cooking your food directly over hot coals. This method is
also called Searing or Grilling. Direct cooking is recommended for most grilling applications,
and the best place to perform Direct Cooking is in the place where the cooking surface is
the hottest. This type of cooking locks in flavor and juices while allowing the outer surface
to absorb smoke and food aroma that is produced as grease and drippings are vaporized by
the coals. The result is a crisp, flavorful outside with a tender, juicy inside.
GRILL START
-
UP
–
GRILL OPERATION
Grill Operation
Your Wood Fired Pellet Grill and Smoker have been designed and engineered to produce
smoke that infuses your food with a smoky flavor. The firepot requires air for efficient
combustion. This fresh air is pulled through a vent in the front of your grill and the intense
hot air and smoke produced by the pellets is expelled through a vent in the rear. If you are
using your grill in windy conditions, the wind can disrupt this important airflow.
Ash Collection Tray
Never use the grill if the Ash Collection Tray is not installed or fully closed. Remove and
discard ash from the collection tray when the ash is cold to the touch and no danger of hot
embers exist. If they are hot and you have to remove them, they should be placed in a
metal container with a tight-fitting lid. The container must be placed on a non-combustible
surface well away from all other combustible materials. Ashes are to remain in the
container until fully cooled, then disposed of properly. It is recommended to clean the
pellet burning chamber periodically.
www.sunstonemp.com
Page 20

Health hazards: Using non-compatible accessories may also pose health hazards. For
example, if you use a chemical cleaner on a grill, it may contaminate the food and
harm your health.
Poison Prevention
Follow these guidelines to prevent this colorless, odorless gas from poisoning you, your
family, or others.
Know the symptoms of carbon monoxide poisoning: headache, dizziness, weakness,
nausea, vomiting, sleepiness, and confusion. Carbon monoxide reduces the blood’s
ability to carry oxygen. Low blood oxygen levels can result in loss of consciousness
and death.
See a doctor if you or others develop cold or flu-like symptoms while cooking or in
the vicinity of this appliance. Carbon monoxide poisoning, which can easily be
mistaken for a cold or flu, is often detected too late.
Alcohol consumption and drug use increase the effects of carbon monoxide
poisoning.
Carbon monoxide is especially toxic to pregnant women, infants, the elderly, smokers, and
people with blood or circulatory system problems. (such as anemia, or heart disease).
Fire hazard: Using incompatible accessories can result in fire hazards. For example, if
you use a non-pellet grill rated griddle, it may not be able to withstand the high
temperatures generated by the pellet grill, which could result in a fire.
Damage to the grill: Using the wrong accessories can also damage the grill. For
instance, using a metal scraper or brush can scratch and damage the stainless-steel
brushed finish.
www.sunstonemp.com
Use only Specified Accessories
Do not use accessories not specified for use with this appliance. Using pellet grill accessories
that are not specified for use with the pellet grill can be dangerous and may result in several
potential hazards. Some of the dangers of using incompatible pellet grill accessories include:
GRILL START-UP – FUEL SAFETY
Invalidating warranties: Using incompatible accessories can also void the warranty
of the pellet grill. If the grill is damaged because of using the wrong accessories, this
may Void the manufactures warranty.
Page 21

TROUBLE SHOOTING
–
Q & A
A: The temperature range varies depending on the function:
Cold Smoking: Ambient temperature
Grilling: 200°F to 500°F
Searing: 500°F to 700°F
Troubleshooting Grill Lights:
Symptom: One or both halogen lights are out.
Solution: A single burned-out light suggests a normal lifespan expiration. If both lights fail
simultaneously, investigate a potential connection issue.
Symptom: All lights are inoperative.
Solution: Verify the power cord is plugged in. If plugged in, a malfunctioning transformer
might be the culprit.
Replacing Halogen Lights (For Technical Audience):
1. Locate the single screw on the left side of each light cover. Unscrew for removal.
2. Detach the entire light box, revealing two small black wires with hardwired connections
at the back of the light.
3. Utilize pliers to carefully remove these wires from the light box.
4. Replace the light box with a new unit.
5. Reconnect the wires using pliers, ensuring a secure fit in each socket of the new light box.
6. Test the functionality of the new light before reinstalling it into the designated opening.
7. Re-secure the light cover by tightening the screw on the left side.
Cold Smoking: A Flavorful Technique
Q: What is cold smoking?
A: Cold smoking is a method that infuses food with rich, smoky flavor using cool smoke. It's
suitable for a variety of ingredients, though not all.
Key Considerations:
Proper Equipment: Ensure you have the appropriate tools for cold smoking.
Purpose and Goal: Clearly define your desired outcome for the smoked food.
Important Note:
1. Avoid using the smoke function while grilling or searing.
2. Limit cold smoking sessions to a maximum of 1 hour at a time.
Cold Smoking vs. Hot Smoking: Understanding the Difference
Q: What differentiates cold smoking from hot smoking?
A: The primary distinction lies in the temperature of the grill. Cold smoking utilizes
temperatures of 150°F or lower, while traditional hot smoking typically ranges from 200°F
and above.
Hopper Capacity and Temperature Range:
Q: How much can the hopper hold?
A: The hopper has a capacity of approximately 20 pounds of natural barbecue wood pellets.
Q: What is the temperature range of the grill?
www.sunstonemp.com
Page 22

Error Code Guide:
If the grill detects an issue, an error code will appear on the display instead of the usual
temperature reading. These codes begin with "E" followed by a number.
This guide can help diagnose basic issues. For further assistance, contact our technical
support team at 888-934-9449.
Important Note:
Upon encountering an error, the grill automatically shuts down as a safety precaution. All
functions cease until the error is resolved.
Error Code Breakdown:
E01: Unable to Light
This code indicates the grill cannot ignite the pellets. It will attempt ignition up to 6 times if
the temperature remains below 160°F. If unsuccessful after these attempts, turn the grill off
and back on using the main power button.
E02: Unable to Read Temperature
This code signifies a high-temperature error, where the grill detects a temperature
exceeding 700°F.
E03: Temperature Probe Not Working
This code indicates a short circuit in the grill's temperature sensor assembly.
E04: Broken Temperature Probe
This code warns of a malfunctioning temperature probe. After ignition mode, the grills
temperature fails to reach at least 135°F, triggering this error.
Remember:
Error codes E01 to E04 prevent grill operation due to safety concerns. They cannot be
overridden by the user. Once the error is cleared and the alarm dismissed, the grill will
automatically restart.
Understanding Grill Settings:
The Settings menu (gear icon)
allows you to: Set the clock time
(hour, minute, second). Choose
between Celsius and Fahrenheit
temperature display. Enable or
disable Bluetooth functionality.
Remember to save your settings
before exiting the menu.
www.sunstonemp.com
TROUBLE SHOOTING - ERROR CODES
Page 23
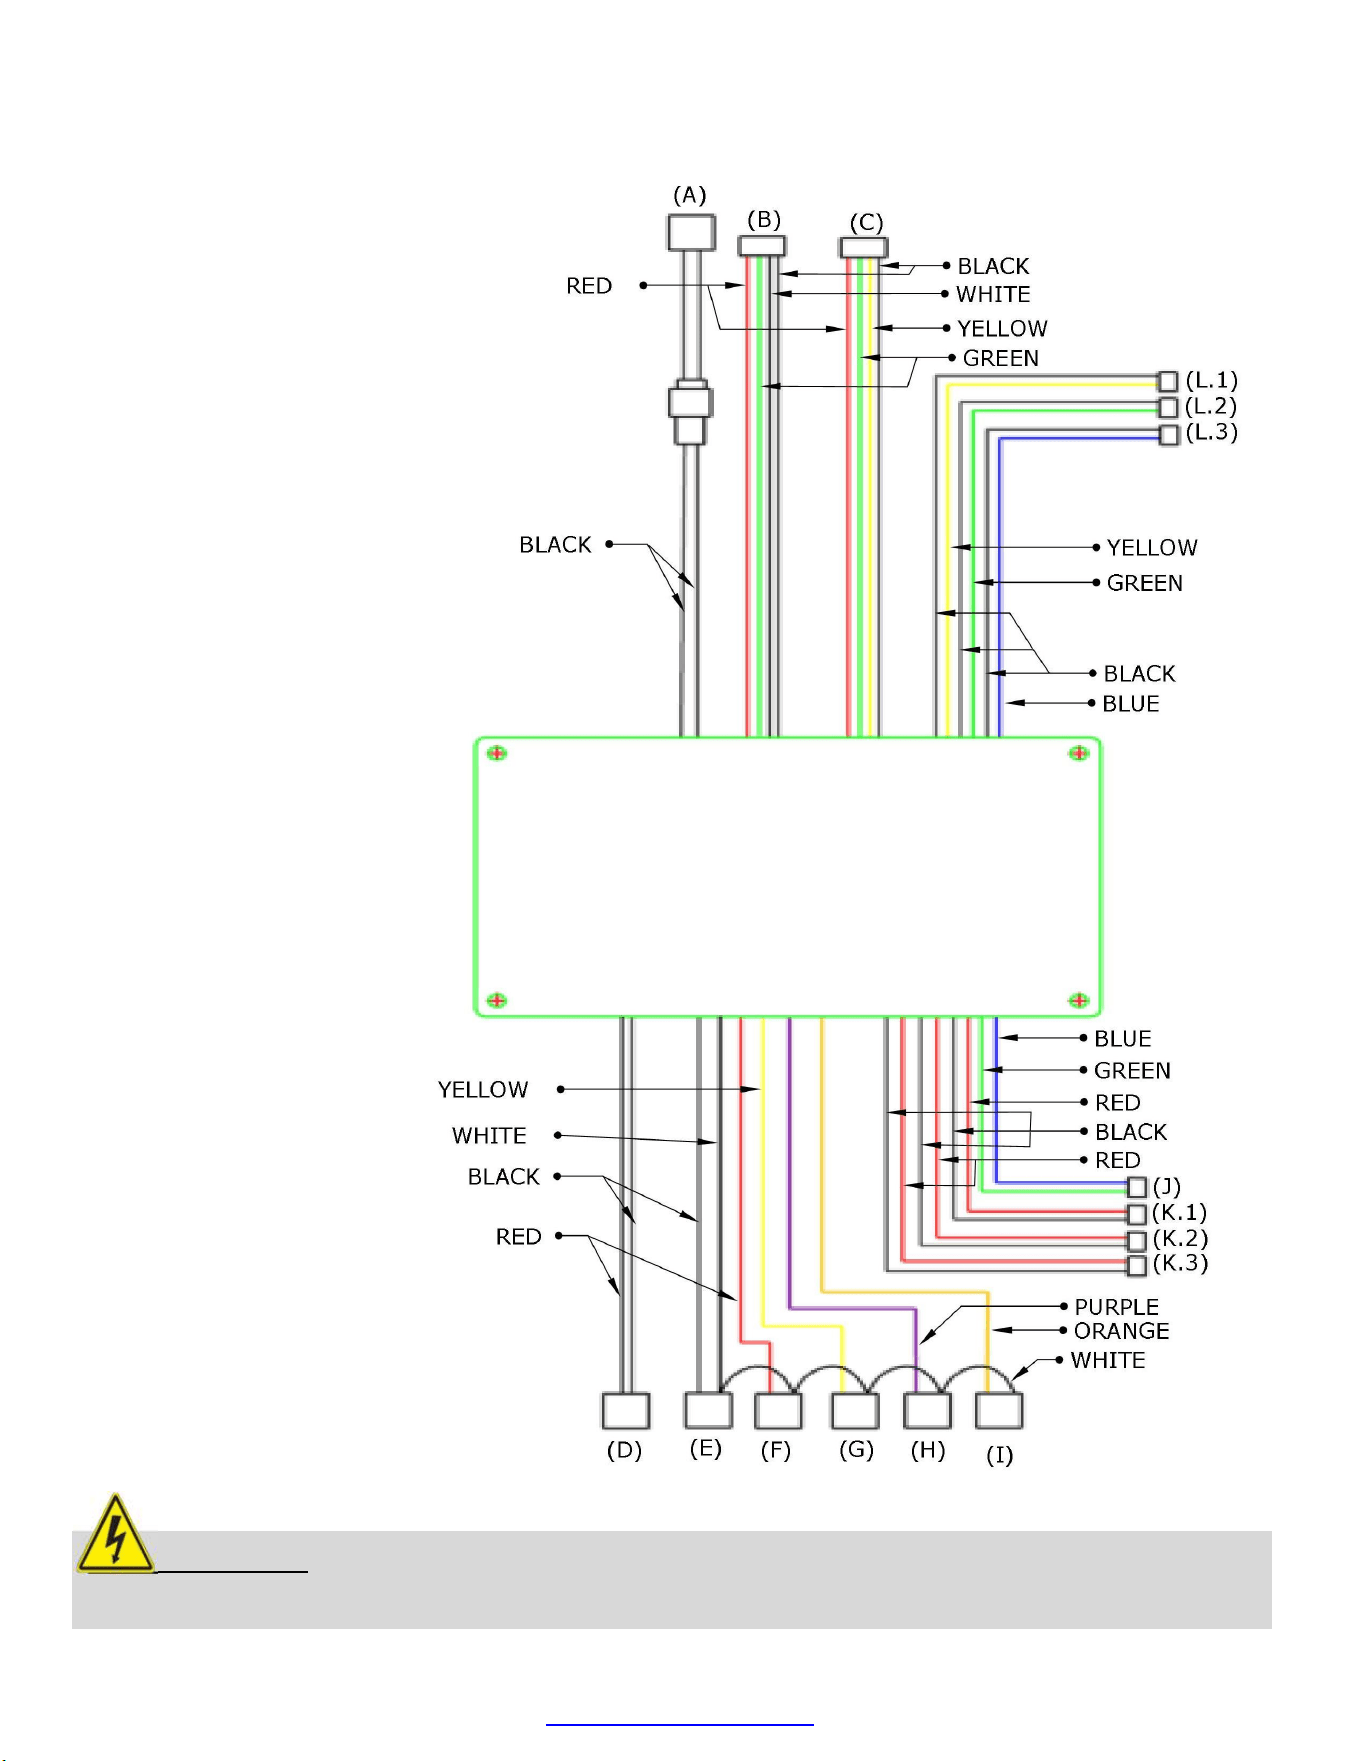
TROUBLE SHOOTING
-
ELECTRICAL
LIVE CIRCUIT
: Use only with a Ground-Fault Circuit Interrupter - GFCI protected Outlet
with this grill.
(A) Fuse (Black,Black)
(B) Connect Screen (Red, Green, White, Black)
(C) Connect Switch (Red, Green, Yellow, Black)
(D) Connect Oven Temp. (Red, Black)
(E) Connect Power Supply (Black, White)
(F) Connect Motor (Red, White)
(G) Connect Fan (Yellow, White)
(H) Connect Ignition Rod (Purple, White)
(I) Connect Smoke Ignition Rod (Orange, White)
(J) Connect DC Fan (Green, Blue)
(K.1) Connect Oven Light (Red, Black)
(K.2) Connect Oven Light (Red, Black)
(K.3) Connect Oven Light (Red, Black)
(L.1) Meat Temp. Sensor (Yellow, Black)
(L.2) Meat Temp. Sensor (Green, Black)
(L.3) Meat Temp. Sensor (Blue, Black)
www.sunstonemp.com
Page 24

ATTENTION
:
The Pellet Grill must be installed according to the product manual. If your grill
installation does not meet the Basic Setup Instructions ALL WARRANTIES MAY BE VOID.
GRILL WARRANTY
LIMITED LIFETIME WARRANTY
Sunstone Stainless Rod Cooking Grids and Stainless-Steel Housings (including liners, frames, firebox and hood and all exterior grill
faces) are warranted for as long as you own the Sunstone Barbecue Grill against all factory defects. This warranty does not cover
against consumer usage wear and tear from using the grill as all grilling methods will erode the 304 Stainless Steel Materials.
Owner must pay for any shipping and handling charges.
LIMITED THREE-YEAR WARRANTY: Sunstone warrants the stainless-steel cooking grates, burner pot and drip pans to be free
from defects in materials and workmanship under normal residential use for a period of five years from the original date of
purchase.
LIMITED ONE-YEAR WARRANTY: Sunstone warrants all electrical parts and components to be free from defects in materials and
workmanship under normal residential use for a period of one year from the original date of purchase. Including the Main Control
Panel, Lights, gear motors, Starter Ignitions and any other related part.
For all the above warranties, the actual parts will be repaired or replaced, free of charge, with the owner paying for all other
costs including labor, shipping, and handling.
NINETY (90) DAY RESIDENTIAL PLUS WARRANTY: This warranty applies to applications where use of the product ex-tends
beyond normal residential use such as bed and breakfast inn and private clubs or apartment complexes. The actual part will be
repaired or replaced, free of charge, with the owner paying for all other costs including service tech labor, shipping, and handling.
This warranty excludes all commercial locations such as restaurants and food service locations.
LIMITATIONS & EXCLUSIONS
1. SUNSTONE warranty applies only to the original purchaser and may not be transferred.
2. SUNSTONE warranty is in lieu of all other warranties expressed or implied and all other obligations or liabilities related to the sale or
use of its grill products.
3. SUNSTONE warranty shall not apply, and SUNSTONE is not responsible for damage resulting from misuse, abuse, alteration of or
tampering with the appliance, accident, hostile environment, flare-up fires, improper installation, or installation not in accordance
with the instructions contained in the User Manual, or the local codes.
4. SUNSTONE is not responsible for warping of component parts due to overheating or using in a way not in line with the product
manual.
5. SUNSTONE shall not be liable for incidental, consequential, special, or contingent damages resulting from its breach of this written
warranty or any implied warranty.
6. Some states do not allow limitations on how long an implied warranty lasts, or the exclusions of or limitations on Consequential
damages. This warranty gives you specific legal rights and you may have other rights, which vary from state to state.
7. No one has the authority to add to or vary SUNSTONE warranty, or to create for SUNSTONE any other obligation or liability in
connection with the sale or use of its products.
8. SUNSTONE DOES NOT COVER FOR WARPING OF STEEL DRAWER, GRATES, OR ANY OTHER COMPONENT FROM THE RESULT OF
MISUSE OR OVERHEATING OF COMPONETS.
WHAT IS NOT COVERED. & INTERNET PURCHASE DISCLAIMER
SUNSTONE shall not be responsible for and shall not pay for the following Installation or start-up.
1. Service by an unauthorized service provider and the cost of a service tech of any warrantied parts.
2. Damage or repair due to service by an unauthorized service provider or use of unauthorized parts.
3. Damage caused by accidents, abuse, alteration, misuse, installation that is not in accordance with the instructions contained in the
User Manual, or local codes.
4. Shipping and handling costs, export duties, or installation cost.
5. The cost-of-service calls to diagnose trouble, or Removal or re-installation cost.
This warranty applies to the original purchaser with invoice or proof of purchase and covers Sunstone products intended for personal, family or household usage
only. It does not apply to surface rust, corrosion, oxidation, or discoloration, which may occur due to moisture or overheating, unless the affected component
becomes inoperable. This warranty does not cover parts becoming defective by misuse, accidental damage, improper handling and/or installation. It does not
cover labor or labor related charges. It specifically excludes liability for indirect, incidental, or consequential damages. Some states do not allow the exclusion or
limitation of incidental or consequential damages, so the above exclusion or limitation may not apply to you. This warranty gives you specified legal rights, and
you may have other rights which may vary from state to state. For additional information regarding this warranty, or information on how to place a warranty
claim, contact your authorized Sunstone dealer.
SUNSTONE SERIES 40” PELLET GRILL WARRANTY
***All Warranties Start from the Date of Purchase and Non-Transferable***
www.sunstonemp.com
Page 25