

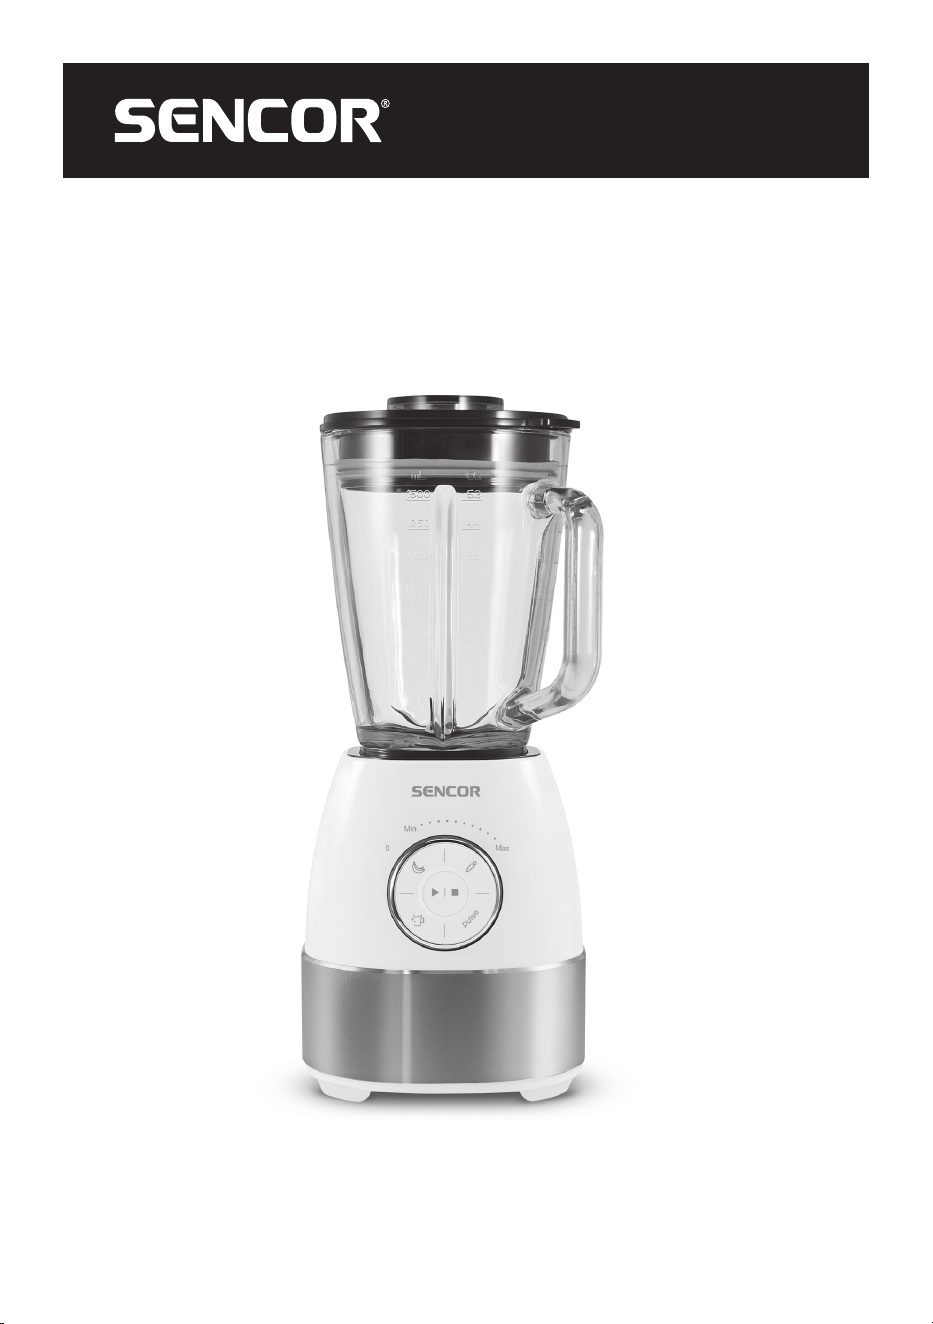
SBL 5870GD
EN
MULTIFUNCTIONAL TABLE BLENDER
Translation of the original manual
SBL 5870GD
A
1
2
3
5
6
7
4
8
9
10
B
1
2
3
4
5
6
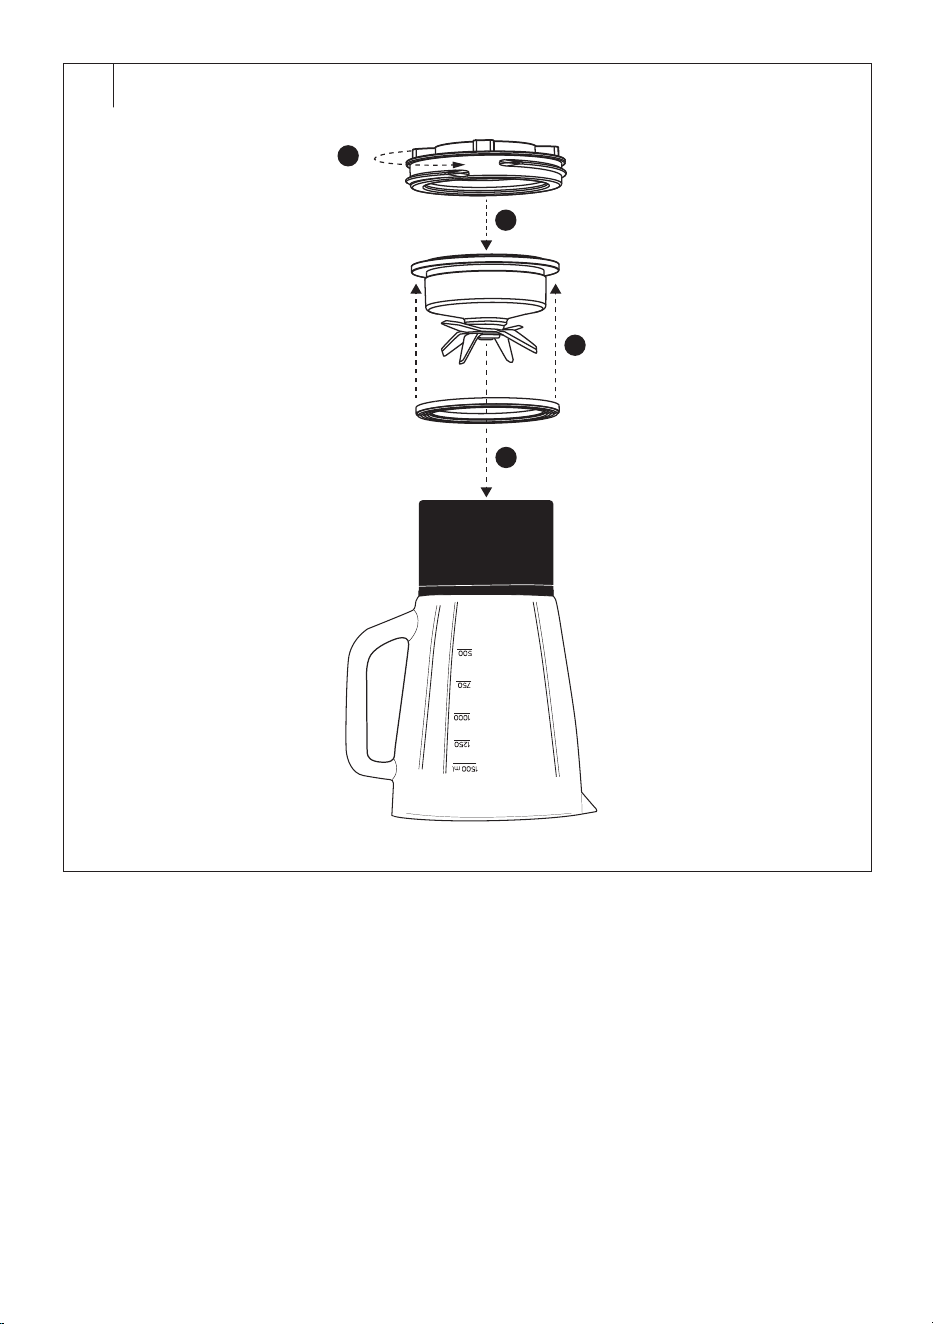
C
3
1
2
4
D
D
EN Blender not in operation
CZ Provoz mixéru zastaven
SK Prevádzka mixéra zastavená
HU Aturmixgép működése leállt
PL Praca blendera zatrzymana
RU Работа блендера остановлена
HR Rad blendera je zaustavljen
GR Διακοπή λειτουργίας του μπλέντερ
E

– 1 –
08/2024
2024, .
EN Multifunctional Table Blender
Important Safety Instructions
READ CAREFULLY AND STORE FOR FUTURE USE.
General Warnings
• Persons with reduced physical, sensory, or mental
capabilities or with alack of experience and knowledge
may use this appliance only if they are supervised or have
been instructed on how to use the appliance safely and
understand the potential hazards.
• This appliance is not to be used by children. Keep the
appliance and its power cord out of the reach of children.
• Children must not play with the appliance.
• This appliance is designed for domestic use and similar
premises, such as:
– kitchenettes in shops, offices and other work
environments;
– agricultural farms;
– inhotels, motels andother residential environments
(inthese facilities the appliance is intended for use by
guests);
– bed and breakfast establishments.
• This appliance is not intended for commercial use.
– 2 –
08/2024
2024, .
Caution:
To avoid danger due to sudden resetting of the
thermal fuse, this appliance must not be powered
via an external switching device such as atime
switch, or connected to acircuit whose characteristic
is that it switches on and off periodically.
• If the power cord is damaged, have it replaced in
aprofessional service centre in order to prevent
adangerous situation. It is forbidden to use the appliance
with the power cable damaged.
• To avoid injury from the chopping blades, take extra care
when handling the blade unit, especially when assembling
the appliance, emptying the container, removing the blade
unit from the container and during cleaning.
• Take special care if you pour hot liquid into the blender
container, as it may splash out of the appliance due to
sudden evaporation.
Warning:
Improper or unintended use can lead to injury.
WARNING:
Always operate the blender with the lid in place, as
described inthis user'smanual.
• Never place your hand in the blender container when
placed on the motor unit.
• If you need to press down the food in the container, use
asuitable kitchen utensil such as akitchen spatula.

– 3 –
08/2024
2024, .
• The maximum operating time is 1.5 minutes. Allow the
appliance to cool for at least 5 minutes before using
it again. Do not exceed the maximum operating time
andobserve the cooling time of the appliance.
• Food processing times and speed settings are listed
in thechapter QUICK GUIDE TO PROCESSING
INGREDIENTS.
• Before replacing the accessories or accessible movable
parts, please turn the appliance off and disconnect it from
the power supply.
• Always disconnect the appliance from the power socket
if you are leaving it unattended and before assembly,
disassembly or cleaning.
• Clean the food contact surfaces of the appliance and its
accessories according to the instructions in the chapter
CLEANING AND MAINTENANCE.
Additional Important Safety Instructions forUse of the Appliance
• Use the appliance and its accessories in accordance with the instructions in this manual.
• The appliance is designed for mixing food and liquids. Never use the appliance for purposes other than those for which it was designed.
• The appliance is designed for indoor use. Do not use the appliance in an industrial environment or outdoors.
• It is forbidden to modify the surface of the appliance in any way, e.g. using self-adhesive foil, etc.
• Do not expose the appliance or its accessories to the outdoor environment, extreme temperatures, rapid temperature changes, direct sunlight or
excessive dust.
• Always place the appliance on aclean, flat, dry and stable surface. Do not place it on the edge of the table to prevent it from falling.
• Do not place the appliance and its accessories on or near an electric or gas hob. Keep it at asufficient distance from open fire, heating elements
andother sources of heat. Do not place it or any part of it into the freezer.
• Before connecting this appliance to apower socket, make sure the rated voltage stated on the product'srating label corresponds to the voltage in
your power socket.
• Do not place heavy objects on the power cord. Make sure the power cord does not hang over the edge of atable or that it does not touch ahot
surface.
• The use of an extension cable is not recommended.
• Only use the appliance with original accessories from the manufacturer.
Warning:
The use of non-original accessories can lead to adangerous situation.
• Before use, always make sure that no part of the appliance is damaged. Do not use the appliance if the motor unit, container, lid, blade unit or screw
nut is damaged in any way.
• Do not overfill the blender container. The maximum capacity of the blender container is indicated by the 1,500 ml mark.
• To avoid adangerous situation, never use the blender to process hard ingredients such as nutshells, bones, hard pits of apricots, peaches, mangoes,
etc.
• This appliance is not intended for preparing dough or mashed potatoes, whipping egg whites or grinding raw meat, etc.
• Do not use the appliance to mix ingredients such as sparkling water, baking soda, baking powder, yeast, etc.
• Take extra care when handling hot liquids and food. Hot steam or splashes of hot liquids or food can cause scalding.
– 4 –
08/2024
2024, .
• The blender container is temperature resistant up to 70°C. Never put food into it or pour liquids at higher temperatures. There is arisk of scalding
due to the container bursting. Placing hot food or pouring hot liquids into the blender container causes the surface to heat up. Avoid contact with hot
surfaces. For added safety, allow hot liquids and foods to cool to room temperature before placing in the blender container.
• Use the handle for carrying the blender container. Move the blender container in avertical position.
• Never mix hot foods or liquids. Allow them to cool down to room temperature before blending.
• Prior to connecting the appliance to apower socket, make sure that the appliance is properly assembled according to the instructions in this
user'smanual.
• The appliance is equipped with asafety lock that will not allow it to start if the container is not properly fitted to the motor unit.
Caution:
Do not use the appliance without the sealing ring of the blade unit or the screw nut that attaches the blade unit to the blender
container.
Never run the blender without the lid properly attached to the blender container.
Warning:
Avoid contact with rotating parts of the appliance.
To avoid the risk of serious injury or damage to the appliance, never insert your hands, fingers, kitchen utensils or other objects into
the blender container when it is attached to themotor unit.
• The appliance may vibrate during operation.
• Do not turn on the appliance when it is empty. Incorrect use may negatively affect the appliance’slifetime.
• If you are using the manual speed setting, always run the blender on the lowest speed first and then set the desired speed.
• While blending, hold the lid of the container with one hand from above.
• The lid must be properly secured to the container for the entire time of operation. After removing the inner lid, the ingredients can be added to the
blender container through the lid opening. Stop the blender before adding the ingredients. Add ingredients slowly insmall doses. Do not add hot
liquids or food. Do not go over the maximum mark. After adding food or liquids, return the inner lid back to its place.
• If food sticks to the blade unit or blender container, switch off the appliance and unplug it from the power socket. Make sure that the blade unit has
stopped rotating. Carefully remove the container from themotor unit. Open the lid and use aspatula to clean the blade unit andthe inside of the
container. Check that only the ingredients intended for processing are in the container and close the lid properly again. Attach the container back to
themotor unit. Connect the power cord to thepower socket andcontinueblending.
• When making nut butters or processing other high-fat or thick foods, do not leave the appliance running for more than one minute after the blended
mixture begins to circulate in the container. During prolonged operation, the appliance may overheat.
• If the appliance is overloaded or overheated, the motor will stop automatically. Set the speed dial to position 0, disconnect the appliance from the
power socket andallow it to cool down for 30−60minutes. The appliance can be used again once it has cooled down. Divide larger batches of food
into several smaller batches or use food cut into smaller pieces.
• After use, set the speed dial to position 0, switch off the appliance and disconnect the power cord from the power socket. Wait for the rotating parts to
stop before removing the container from the motor unit.
• Unplug the appliance from the power socket by pulling the plug. Do not pull the power cord. Otherwise, damage to the power cable or the socket
may occur.
• Do not connect or disconnect the power cord plug to or from the power socket with wet hands.
• None of the components of this appliance are intended for use inamicrowave or electric oven, etc.
• The blender container is not designed forstoring food.
• To avoid the risk of electric shock, do not immerse the motor unit, power cord or power cord plug in water or any other liquid, or wash these parts
under running water.
• Do not use the appliance if it is not working properly, if the motor unit has been immersed in water or if it shows any signs of damage. Take it to an
authorised service centre for inspection or repair.
• Do not make any adjustments to the appliance. Do not disassemble the motor unit.
• Do not repair the appliance yourself. All repairs should be carried out by an authorised service centre. Tampering with the appliance during the
warranty period may void the warranty.
• Store the appliance in adry and clean environment out of the reach of children and animals.
– 5 –
08/2024
2024, .
• Thank you for purchasing our SENCOR product; we hope it will serve
to your satisfaction.
• Prior to using this appliance, please read the user manual thoroughly,
even in cases when you are already familiar with the use of similar
types of appliances. Use the appliance only as described in this
user manual. Keep the manual for future reference. If you pass the
appliance on to another person, ensure that this user manual is
included.
• Carefully unpack the appliance and make sure not to discard any part
of the packaging material until you have found all its components. It
is recommended to keep the original packaging, packing material,
receipt and confirmation of the extent of the seller'sliability or warranty
certificate at least for the duration of the legal right of defective
performance or quality guarantee. When transporting the appliance,
we recommend packaging it again in the original box provided by the
manufacturer.
. . . . . . . . . . . . . . . . . . . . . . . . . . . . . . . . . . . . . . . . . . . . . . . . . . . . . . . . . . . . . . . . . . . .
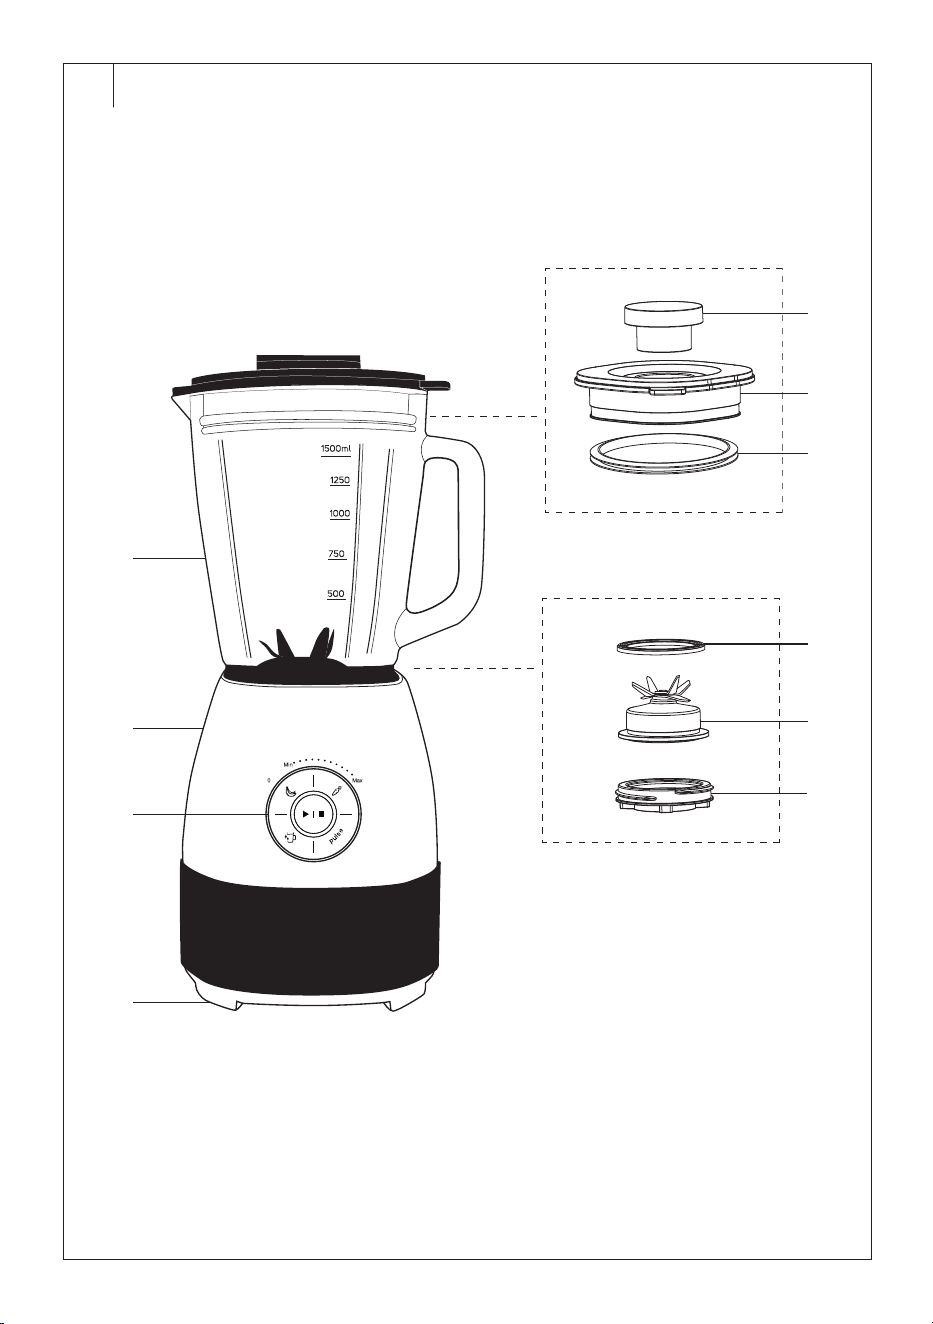
DESCRIPTION OF THE TABLE BLENDER AND ITS ACCESSORIES (Fig. A)
A1 Inner lid
A2 Perimeter lid
A3 Lid seal
A4 Glass container with handle,
max. filling capacity 1.5 l
A5 Blade unit seal
A6 Blade unit with 6 chopping
blades
A7 Screw nut
for fixing the A6 blade unit to
the A4 container
A8 Motor unit
A9 Motor unit control
A10 Anti-slip feet
. . . . . . . . . . . . . . . . . . . . . . . . . . . . . . . . . . . . . . . . . . . . . . . . . . . . . . . . . . . . . . . . . . . .
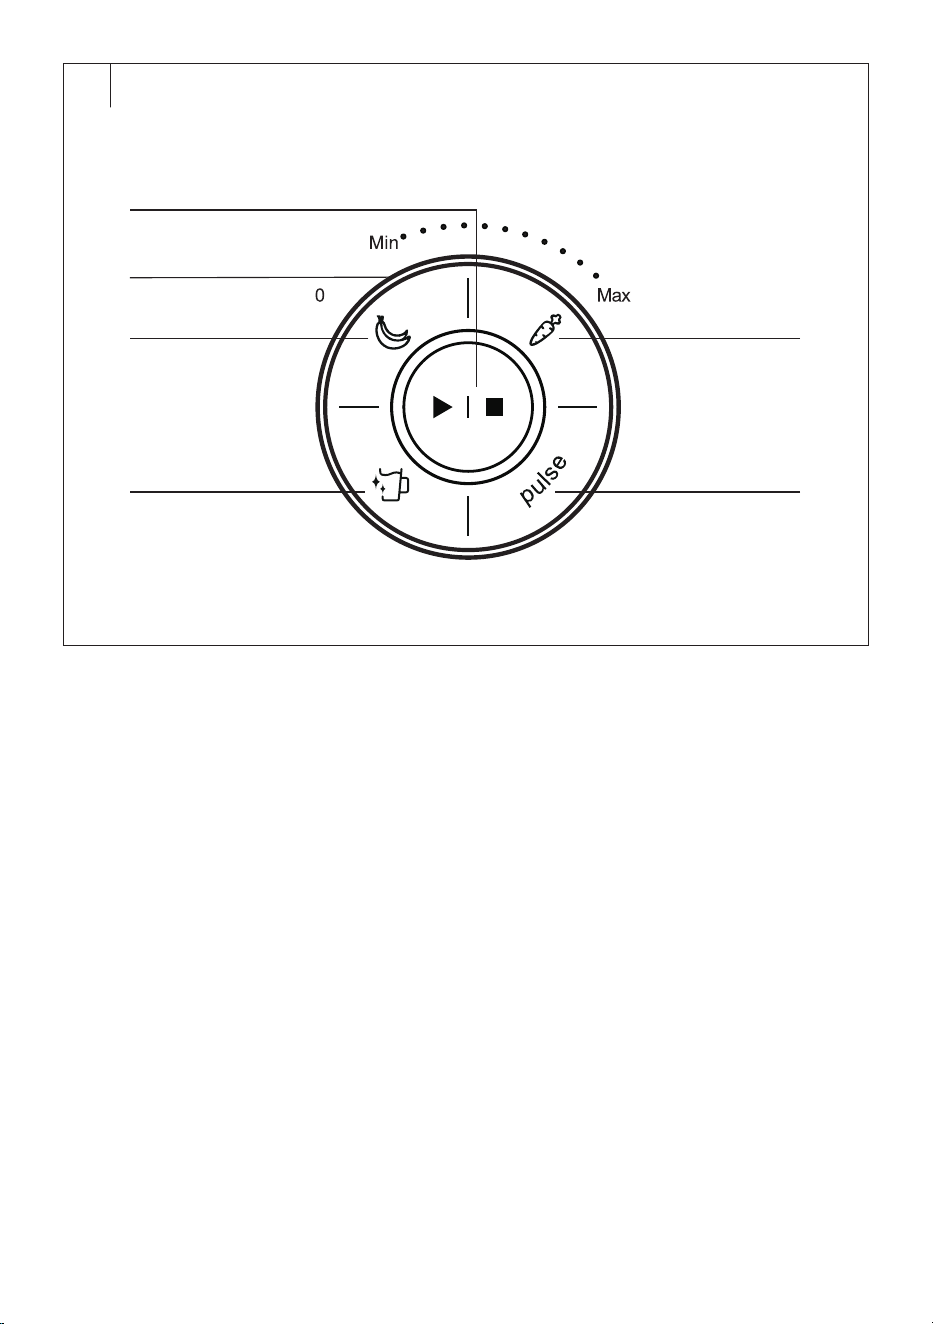
DESCRIPTION OF MOTOR UNIT CONTROL (fig. B)
B1 Button for turning the motor
unit
withLED lighting on/off
B2 Speed dial
0 – stopping the appliance
operation
Min to Max – lowest to
highest gear
B3 Touch button
with LED lighting
− used to start/stop the
preset soft food mixing
programme
B4 Touch button
with LED lightning
− used to start/stop the preset
programme for automatic
cleaning of the blender
container
B5 Touch button
with LED lightning
− used to start/stop the
preset hard food mixing
programme
B6 PULSE touch button withLED
lighting
− used to briefly start the
blender at maximum speed
. . . . . . . . . . . . . . . . . . . . . . . . . . . . . . . . . . . . . . . . . . . . . . . . . . . . . . . . . . . . . . . . . . . .
SOFT START FUNCTION
• This blender is equipped with aSoft Start function, which ensures
asmooth start-up of the motor during start-up, thus saving the internal
components of the product andextending its service life.
. . . . . . . . . . . . . . . . . . . . . . . . . . . . . . . . . . . . . . . . . . . . . . . . . . . . . . . . . . . . . . . . . . . .
THE PURPOSE OF USING THE TABLE BLENDER
• This blender can be used toprepare smoothies,milkshakes, blending
spreads, sauces, soups or baby food, making nut butters, crushing
ice, etc.
. . . . . . . . . . . . . . . . . . . . . . . . . . . . . . . . . . . . . . . . . . . . . . . . . . . . . . . . . . . . . . . . . . . .
BEFORE FIRST USE
• Take the appliance and its accessories out of the packaging materials.
• Remove the A2 perimeter lid from the neck of the container. Remove
the A1 inner lid from the A2 perimeter lid.
• Turn the A4 blender container upside down andplace it carefully
on an even, dry andstable surface. Unscrew the A7 screw nut in
the clockwise direction and remove the A6 blade unit from the A4
container.
• Wash the A4 blender container, the A2 perimeter lid, the A1 inner lid
and the A6 blade unit thoroughly with warm water using afew drops
of hand dishwashing detergent. Then thoroughly rinse everything
under running water to remove any dishwashing detergent residue
andwipe dry with akitchen towel.
Caution:
When handling and cleaning the A6 blade unit, take
extra care not to cut yourself on the chopping blades.
Do not touch the chopping blades.
Warning:
To avoid the risk of electric shock, do not immerse
the A8 motor unit, power cord or power cord plug in
water or any other liquid, or wash these parts under
running water.
. . . . . . . . . . . . . . . . . . . . . . . . . . . . . . . . . . . . . . . . . . . . . . . . . . . . . . . . . . . . . . . . . . . .
ATTACHING THE BLADE UNIT TO THE CONTAINER (Fig. C)
• Turn the A4 blender container upside down andplace it carefully on
an even, dry andstable surface. Place the A6 blade unit in the A4
container with the blades facing inwards. Place the A7 screw nut
threaded down on the A6 blade unit. Turn the A7 screw nut counter-
clockwise to attach the A6 blade unit to the A4 blender container.
Tighten the A7 nut with areasonably large force. Pull the A7 screw
nut upwards to verify that the A6 blade unit is properly attached to
thecontainer. Turn the A4 blender container upside down.
Caution:
When handling the A6 blade unit, take extra care
not to injure yourself on the chopping blades. Do not
touch the chopping blades.
Do not use the A6 blade unit without the A5 seal or
the A7 screw nut.
. . . . . . . . . . . . . . . . . . . . . . . . . . . . . . . . . . . . . . . . . . . . . . . . . . . . . . . . . . . . . . . . . . . .
FOOD PREPARATION
• Remove the peel from citrus fruits and fruits with inedible or too hard
skin, such as pineapple, mango, etc. Remove the central part of the
pineapple in addition to the peel.
• Fruit with hard seeds or stones, such as apricots, peaches, mangoes,
etc., should be stripped of their stones or seeds. Remove the cores and
stems from fruits such as apples, pears, etc. Remove the stems and
leaves from the strawberries. Remove the nuts from the shells.
• Cut the food into evenly sized pieces of approximately 2 cm.
• The size of frozen ingredients (ice cubes, banana, strawberries,
mangoes, etc.) should also be around 2 cm.
• Ice cubes should be processed immediately after taking them out of
thefreezer.
• The blender is not intended for blending dried foods such as beans,
pepper, coffee beans, dry corn kernels, etc., or other hard foods that
cannot be cut with aknife.
. . . . . . . . . . . . . . . . . . . . . . . . . . . . . . . . . . . . . . . . . . . . . . . . . . . . . . . . . . . . . . . . . . . .
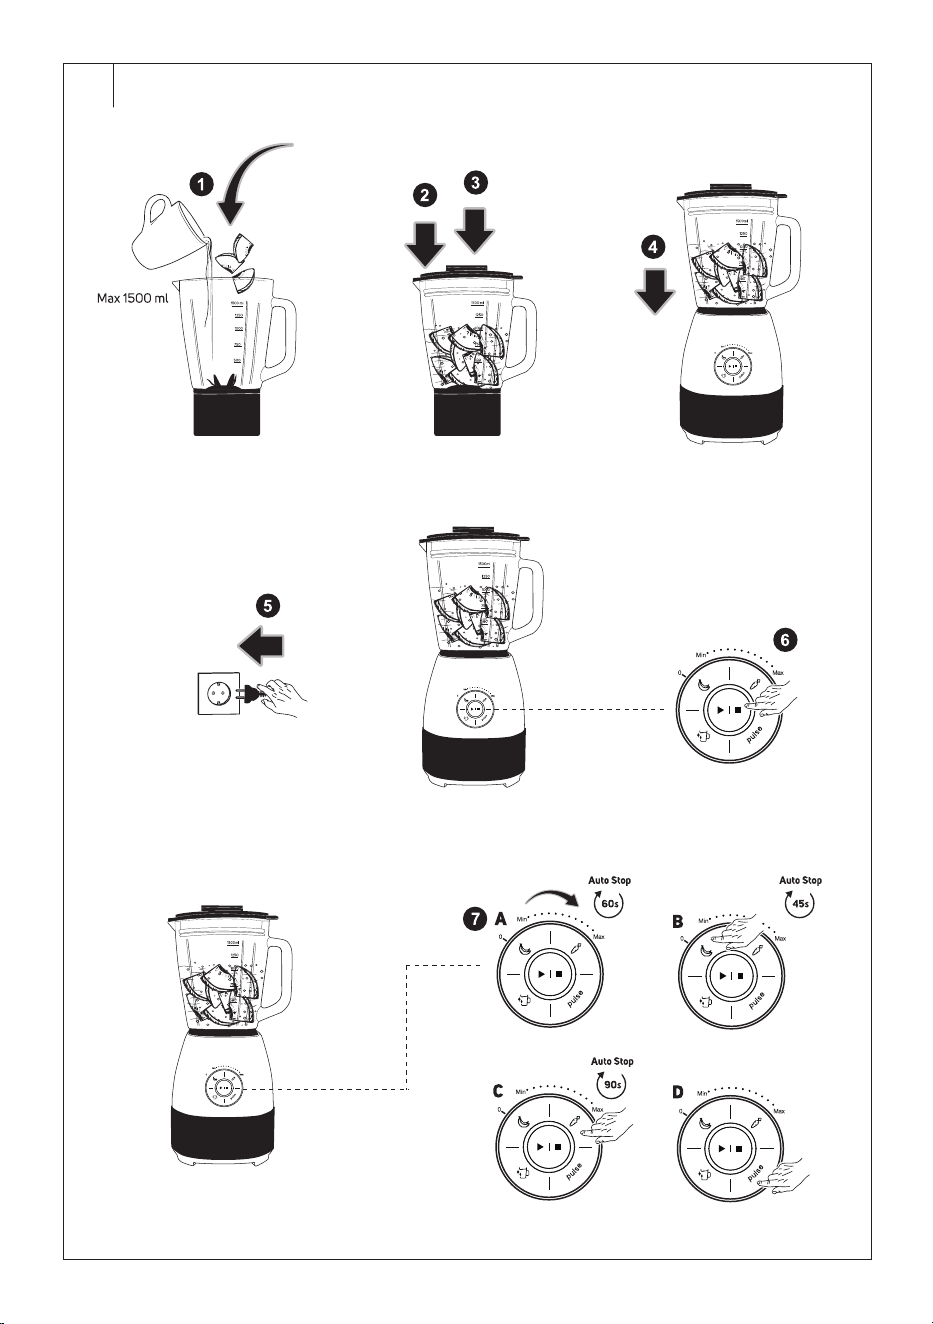
USING THE TABLE BLENDER (Fig. D)
• Fill the A4 blender container with prepared food andliquids. Do not
overfill the A4 container above the 1,500ml mark, otherwise the A2
lid could be loosened during operation and the ingredients could be
splashed out of the A4 container. If you are processing ingredients
that gain volume duringthe course of blending (milk, etc.), fill the A4
EN
Multifunctional Table Blender
User Manual
– 6 –
08/2024
2024, .
container up to amaximum of 1,000ml. Separate larger amounts of
ingredients into several smaller batches andprocess it gradually.
• Place the A2 lid on the A4 blender container. With one hand hold the
A4 container by the handle and with the other hand press the A2 lid
evenly down so that it adheres to the neck of the A4 container around
its entire circumference. Insert the A1 inner lid into the A2 perimeter lid
andpress it down to engage the A2 perimeter lid.
Caution:
Always use the A2 perimeter lid with the A3 seal
properly fitted.
• Ensure that the A8 motor unit is disconnected from the power socket
and the B2 speed dial is set to 0. Make sure that the outer surface
of the A4 blender container is clean anddry. Place the assembled
andfilled container on the A8 motor unit.
Note:
The safety lock will not allow the blender to start if the A4
container is not properly fitted to the A8 motor unit.
• Connect the power cord plug to apower socket. Ashort beep will be
heard when the A8 motor unit is connected to the power socket.
• To turn on the A8 motor unit, press the B1 button. You will hear ashort
beep. The lights of the B1 button and the B3−B6 touch buttons light
up. Now the A8 motor unit is ready foruse. If the B2 speed dial is not
set to 0, the illumination of B1 button will flash. Inthis case, set the B2
speed dial to position 0.
• Please follow the instructions below to operate the A8 motor unit.
Recommended speed settings and processing times are given in the
chapter QUICK GUIDE TO PROCESSING INGREDIENTS.
Caution:
The maximum operating time is 1.5 minutes. Allow
the appliance to cool for 5 minutes before using it
again. Do not exceed the maximum operating time
andobserve the cooling time of the appliance.
Manual Speed Setting
• Set the desired speed using the B2 speed dial. Set the speed to put
the blender into operation. During operation, the light of the button
B1 is on and the touch buttons B3−B6 are off. This means that
after setting the speed with the B2 speed dial, neither the preset
programmes nor the Pulse mode are available.
• Turn the B2 speed dial to the right to increase the speed. By turning
to the opposite side, the speed decreases. Start with the lowest speed
setting, so that the ingredients are mixed first, andthen gradually
increase the speed to the desired level.
• Turn the B2 speed dial back to position 0 to stop running. After setting
the B2 speed dial to position 0, the B3−B6 touch buttons light up.
• The blender is equipped with an automatic stop function after
60seconds of operation. If the blender stops automatically after
60seconds of operation, the light of B1 button will flash. Return the B2
speed dial to position 0.
Preset Blending Programmes
• The B2 rotary speed dial must be set inposition 0. Press the B3, B4
or B5 touch-button to start the desired programme. During operation,
the illumination of the B1 button and the touch button of the selected
programme are lit. The other touch buttons are off. The speed andtime
of operation are preset automatically.
Note:
If you want to cancel the programme you have selected,
press the button again.
• Thetable provides an overview of the programmes:
Preset program Touch
button
Progress of the programme
For blending soft foods
B3
During operation, the speed
changes in order toproperly
process all the ingredients
in thecontainer.
Duration of the programme:
45 s
To clean the A4
container
B4
During operation, the speed
is changed to loosen the
dirt from the walls of the A4
container.
Duration of the programme:
40 s
For blending hard foods
B5
During operation, the speed
changes in order toproperly
process all the ingredients
in thecontainer.
Duration of the programme:
90 s
• At the end of the preset programme, abeep will sound 10 times and
the lights of all touch buttons will turn on.
PULSE Touch Button
• The B6 PULSE touch button is used to briefly and repeatedly start the
blender at the highest speed, e.g. when crushing ice.
• To start the blender at the highest speed, press the B6 PULSE touch
button. When the B6 touch button is pressed, the illumination of
the remaining B3−B5 touch buttons turns off. When the B6 button
is released, the blender will automatically stop running and the
illumination of the B3−B5 touch buttons lights up.
• Always keep the B6 touch button pressed only atshort intervals
of afew seconds. The maximum operating time of the blender in
PULSE mode is 60 seconds. After 60 seconds, the blender stops
automatically.
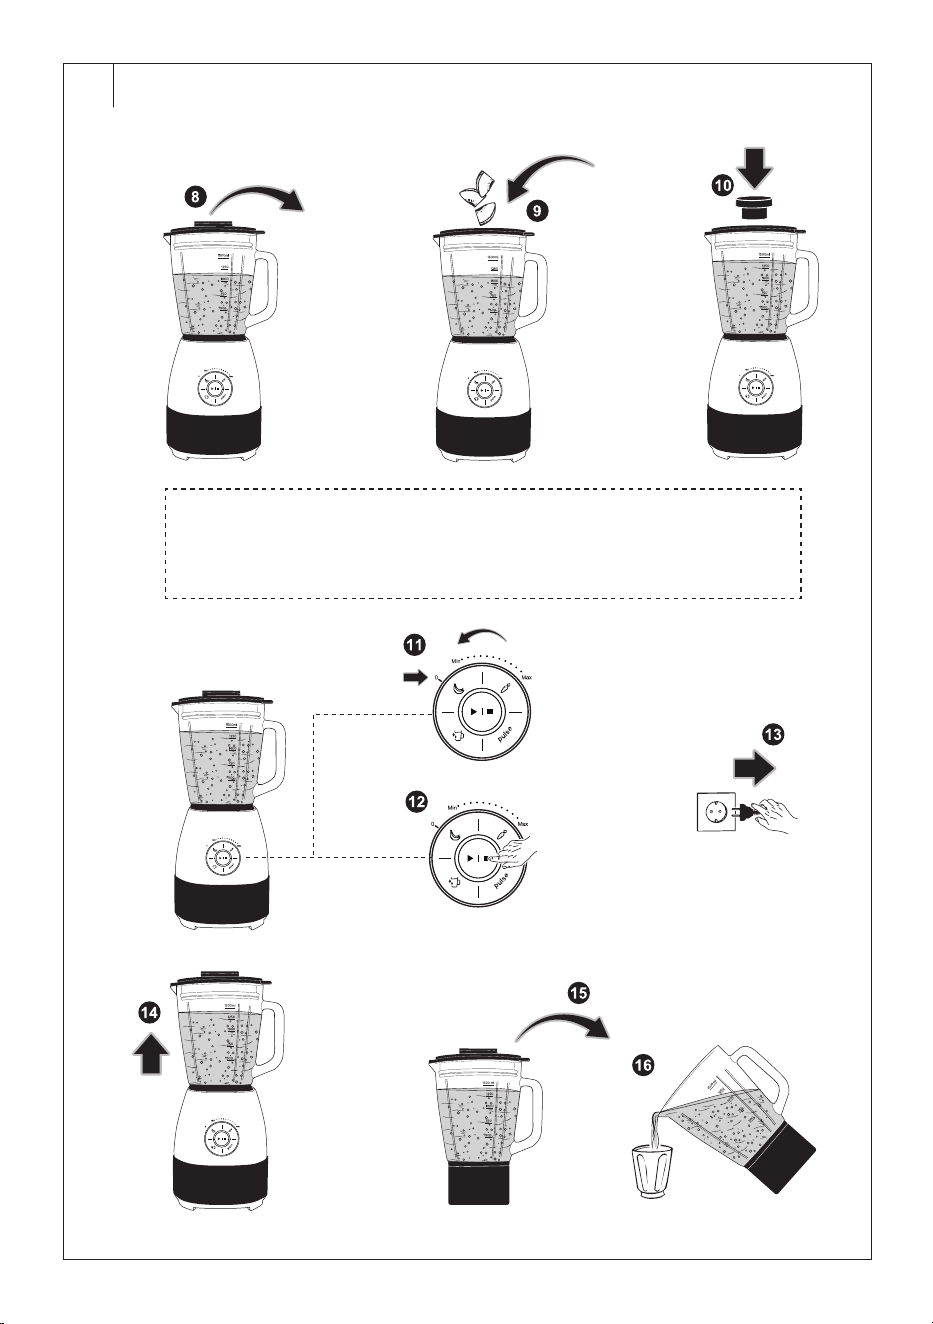
• During operation, hold the A2 lid from above with one hand.
• After removing the A1 inner lid, the ingredients can be added to the
A4 blender container through the opening in the A2 perimeter lid.
Stop the blender before adding the ingredients. To stop the blender in
the preset blending programme mode, it is necessary to cancel the
program. Remove the A1 inner lid and slowly add the ingredients to
the A4 container through the opening in the perimeter lid A2. Do not
exceed the 1,500 ml mark. Do not add hot food or liquids to the A4
container. Replace the A1 inner lid andcontinue by resetting the speed
or selecting the preset programme.
• After use, check that the B2 rotary speed dial is set to 0 and turn off
the A8 motor unit by pressing the B1 button. Ashort beep will sound
and the light of B1 button andall B3−B6 touch buttons will turn off.
Disconnect the power cord from the mains socket.
• Wait until the rotating parts stop rotating and remove the assembled
container from the A8 motor unit.
• Remove the A2 lid andempty the contents of the A4 container.
• After each use, properly clean the parts that have come into contact
with food according to the instructions in the chapter CLEANING AND
MAINTENANCE.
. . . . . . . . . . . . . . . . . . . . . . . . . . . . . . . . . . . . . . . . . . . . . . . . . . . . . . . . . . . . . . . . . . . .
– 7 –
08/2024
2024, .
QUICK GUIDE TO PROCESSING INGREDIENTS
Ingredients | dishes | drinks Quantity Selecting speed | preset programme Recommended blending time inmanual
speed setting mode
Smoothies andcocktails* 750 ml High speed |
mode
or according to the ingredients
used
30−40 s
Children'smixed dishes 250 g Medium speed 15−20 s
Spreads 250 g Low to medium speed 10−15 s
Dressings 250 ml Medium speed 15−20 s
Soups and sauces 750 ml Medium to high speed |
mode
30−40 s
Peanut butter 250 g Low speed 5x 30 s**
Hard pastry for breadcrumbs 2 rolls (approx.
90 g)
PULSE mode 5x 3s
Ice cubes 12 pcs PULSE mode 4−5x 3s
* Use PULSE mode when mixing drinks withfrozen fruit or ice cubes.
** Between each 30-second cycle, wipe the walls of the A4 container with aspatula. Before cleaning the walls of the A4 container, set the B2 speed
dial to position 0. Turn off the A8 motor unit by pressing the B1 button. Disconnect the power cord from the power socket and wait for the rotating
parts to stop. Remove the container from the A8 motor unit andonly then, after removing the A2 lid, clean the walls of the A4 container. After the
first cycle, add atablespoon of peanut oil. Allow the blender to cool down for 5minutes after the first 3 cycles.
Note:
The above table serves only as arecommendation.
. . . . . . . . . . . . . . . . . . . . . . . . . . . . . . . . . . . . . . . . . . . . . . . . . . . . . . . . . . . . . . . . . . . . . . . . . . . . . . . . . . . . . . . . . . . . . . . . . . . . . . . . . . . . . . . . . . . . . . . . . . . . . . . . . . . . . . . . . . . .
of 1 to 2drops of hand dishwashing detergent. This will release most
of the food remains. Then turn off the blender and disconnect it from
the power socket. After stopping the rotating parts, remove the A4
container from theA8 motor unit. Remove the A2 lid andempty
the contents of the A4 container. Disassemble the container into its
individual parts. Rinse the A4 glass container, the A2 perimeter lid, the
A1 inner lid and the A6 blade unit thoroughly under running water to
remove any residual dirt anddishwashing detergent andwipe dry with
akitchen towel.
• Always check that the A3 lid seal and the A5 blade unit seal are clean.
Residual dirt can cause the seal not to perform its purpose properly.
• The A7 screw nut can be washed with water and hand dishwashing
detergent. After washing, wipe the A7 nut dry.
• Use aslightly damp cloth to remove dirt from the A8 motor unit. Wipe
the cleaned surface of the A8 motor unit dry with asoft cloth.
. . . . . . . . . . . . . . . . . . . . . . . . . . . . . . . . . . . . . . . . . . . . . . . . . . . . . . . . . . . . . . . . . . . .
STORAGE
• Clean the blender and its accessories according to the instructions
in the chapter CLEANING AND MAINTENANCE. Before storing, the
blender andits accessories must be clean anddry.
• Store the blender and its accessories in aclean, dry place out of the
reach of children and pets.
. . . . . . . . . . . . . . . . . . . . . . . . . . . . . . . . . . . . . . . . . . . . . . . . . . . . . . . . . . . . . . . . . . . .
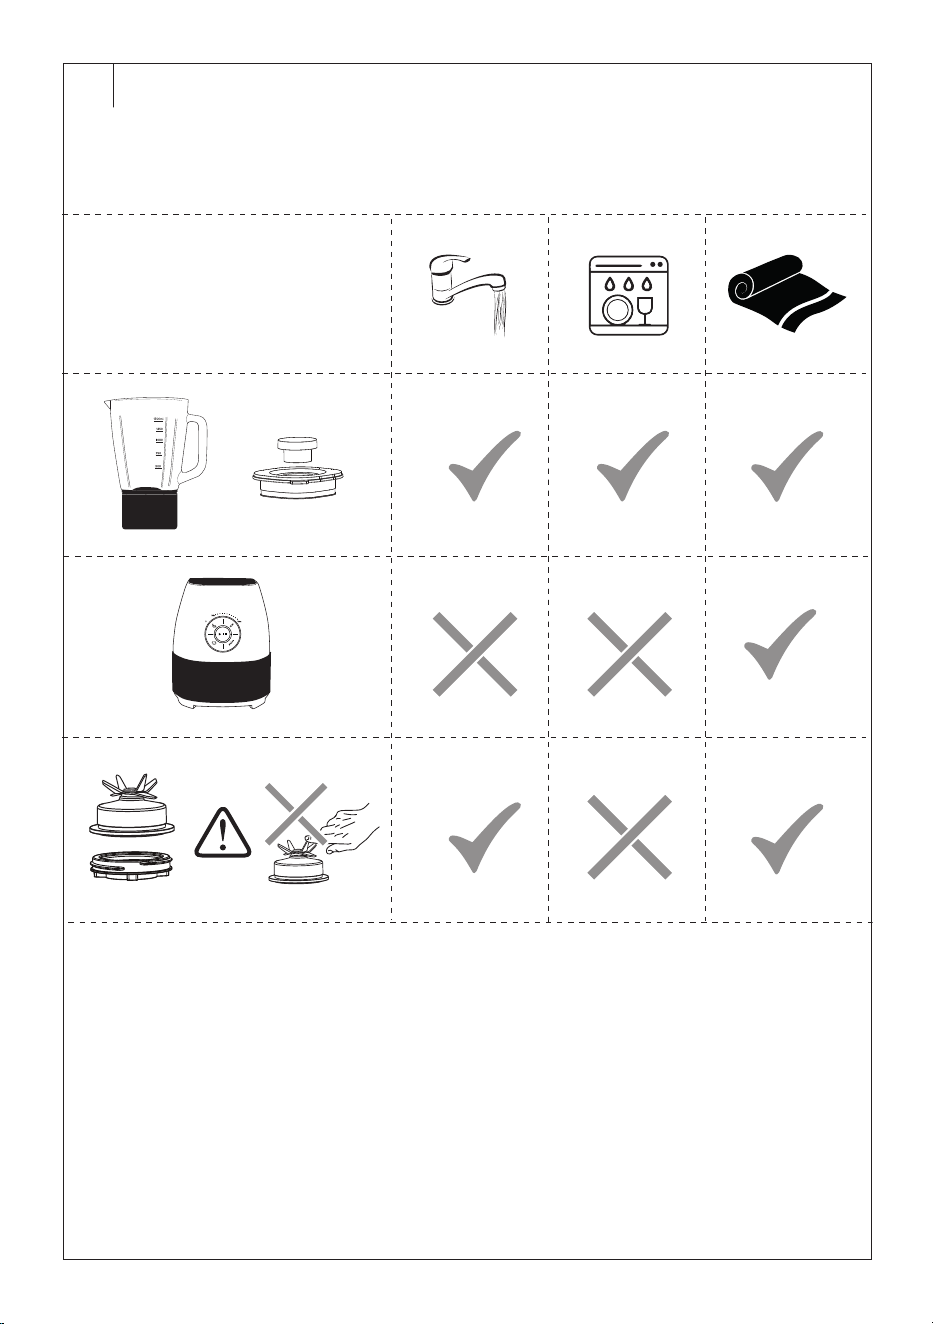
CLEANING AND MAINTENANCE (Fig. E)
• Before any cleaning or maintenance, set the B2 speed dial to position
0, switch off the A8 motor unit with B1 button and disconnect the
power cord from the power socket. After stopping the rotating parts,
remove the container from theA8 motor unit.
• Never use thinners, metal or other dishwashers or abrasive cleaners
for cleaning. The finish of the appliance and its accessories could be
damaged.
Warning:
To avoid the risk of electric shock, do not immerse
the A8 motor unit, power cord or power cord plug in
water or any other liquid, or wash these parts under
running water.
Caution:
When handling and cleaning the A6 blade unit, take
extra care not to cut yourself on the chopping blades.
Do not touch the chopping blades.
• Clean the appliance immediately after use. Do not store food in the A4
blender container or allow food remains to dry init. Dried food remains
are more difficult to remove andmay make it more difficult to remove
the A6 blade unit from theA4 container.
• Remove the A2 perimeter lid with the A1 inner lid from the container.
After emptying the A4 container, carefully remove the A6 blade unit.
• Wash the A4 glass container, the A2 perimeter lid, the A1 inner lid and
the A6 blade unit thoroughly with warm water using afew drops of
hand dishwashing detergent. Then thoroughly rinse everything under
running water to remove any dishwashing detergent residue andwipe
dry with akitchen towel.
• A1 inner lid, A2 perimeter lid and A4 blender container (without A6
blade unit) are suitable for washing in adishwasher. Leave the A1 inner
lid and the A2 perimeter lid to be washed inthe dishwasher'supper
basket. You can leave the A4 blender container to be washed in the
lower dishwasher basket.
• The A4 blender container can also be cleaned by running the blender
in the preset programme for cleaning the container according to the
instructions in the chapter USING THE TABLE BLENDER with the
A4 container filled with about 0.5l of clean water with the addition

– 8 –
08/2024
2024, .
TROUBLESHOOTING
Problem Possible Cause Solution
The blender cannot be turned on by pressing
the B1 button. The power cord is connected to
the power socket.
The A4 blender container is not properly
attached to the A8 motor unit.
Disconnect the power cord from the power
socket. Attach the assembled container to
theA8 motor unit properly. Connect the power
cord to the power socket and press the B1
button to turn on the A8 motor unit.
When the A8 motor unit is switched on, the
light of the B1 button flashes and the blender
cannot be started.
The B2 speed dial is not set inposition 0. Set the B2 speed dial first to position 0 andonly
then select the desired speed or programme.
There is afaint smell when first used. This is anormal occurrence. If the smell persistsafter several uses, please
contact an authorised service centre.
The blender suddenly stopped. Overheating or overload protection has been
activated.
Set the B2 speed dial to position 0. Disconnect
the power cord from the power socket. Let
the blender cool for 30–60 minutes. Divide
alarger batch of ingredients into several smaller
batches andblend them inablender gradually.
If the blender fails to start after cooling down,
contact an authorised service centre.
The A4 blender container is leaking. The A4 blender container is cracked. Stop using the cracked A4 container
andreplace it with anew container of the
original type.
The A6 blade unit is not properly attached to
the A4 blender container.
Empty the contents of the A4 container and
properly attach the A6 blade unit to the A4
blender container with the A7 screw nut.
The A5 sealing ring does not extend around the
perimeter to the A6 blade unit or is not fitted at
all to the A6 blade unit.
Empty the contents of the A4 container and
unscrew A7 nut. Remove the A6 blade unit
from the A4 blender container. Align the A5
sealing ring so that it adheres to the A6 blade
unit along the entire circumference or place it on
the A6 blade unit andmake sure that it adheres
toit along the entire circumference. Attach the
A6 blade unit to the A4 blender container with
the A7 screw nut and tighten the A7 nut with
areasonably large force.
An unusual sound or an abnormal vibration can
be heard during operation.
The A6 blade unit is not properly attached to
the A4 blender container.
Set the B2 speed dial to position 0. Turn off
the A8 motor unit by pressing the B1 button.
Disconnect the power cord from the power
socket. Wait until the rotating parts stop rotating
and remove the assembled container from the
A8 motor unit. Empty the contents of the A4
blender container and tighten the A7 screw
nut properly.
There are too many ingredients in the A4
blender container.
Set the B2 speed dial to position 0. Turn off
the A8 motor unit by pressing the B1 button.
Disconnect the power cord from the power
socket. Wait until the rotating parts stop rotating
and remove the assembled container from the
A8 motor unit. Remove the A2 lid and remove
some of the ingredients from the A4 container.
The A6 blade unit is jamming. There are too many ingredients in the A4
blender container or the ingredients are cut into
too large pieces.
Set the B2 speed dial to position 0. Turn off
the A8 motor unit by pressing the B1 button.
Disconnect the power cord from the power
socket. Wait until the rotating parts stop rotating
and remove the assembled container from the
A8 motor unit. Remove the A2 lid and remove
part of the ingredients from the A4 container or
use ingredients cut into smaller pieces.
. . . . . . . . . . . . . . . . . . . . . . . . . . . . . . . . . . . . . . . . . . . . . . . . . . . . . . . . . . . . . . . . . . . . . . . . . . . . . . . . . . . . . . . . . . . . . . . . . . . . . . . . . . . . . . . . . . . . . . . . . . . . . . . . . . . . . . . . . . . .
– 9 –
08/2024
2024, .
TECHNICAL SPECIFICATIONS
Rated voltage range ................................................................................220−240 V
Rated frequency ..........................................................................................50–60 Hz
Rated input ......................................................................................................... 1800 W
Safety class (for electric shock protection) ............................................................II
Noise level ....................................................................................................... 85 dB(A)
Blender container capacity ....................................................................................1.5 l
Operating cycle ..................................................................................................1.5 min
Cooling time ............................................................................................................5 min
The declared noise emission level of the appliance is 85 dB(A), which
represents alevel Aof acoustic power with respect to areference acoustic
power of 1 pW.
Glossary of technical terms
Safety Class for Electric Shock Protection:
Class II – Electric shock protection is provided by double or heavy-duty
insulation.
. . . . . . . . . . . . . . . . . . . . . . . . . . . . . . . . . . . . . . . . . . . . . . . . . . . . . . . . . . . . . . . . . . . .
EXPLANATION OF SYMBOLS PLACED ON THE PRODUCT OR INTHE
ACCOMPANYING DOCUMENTATION
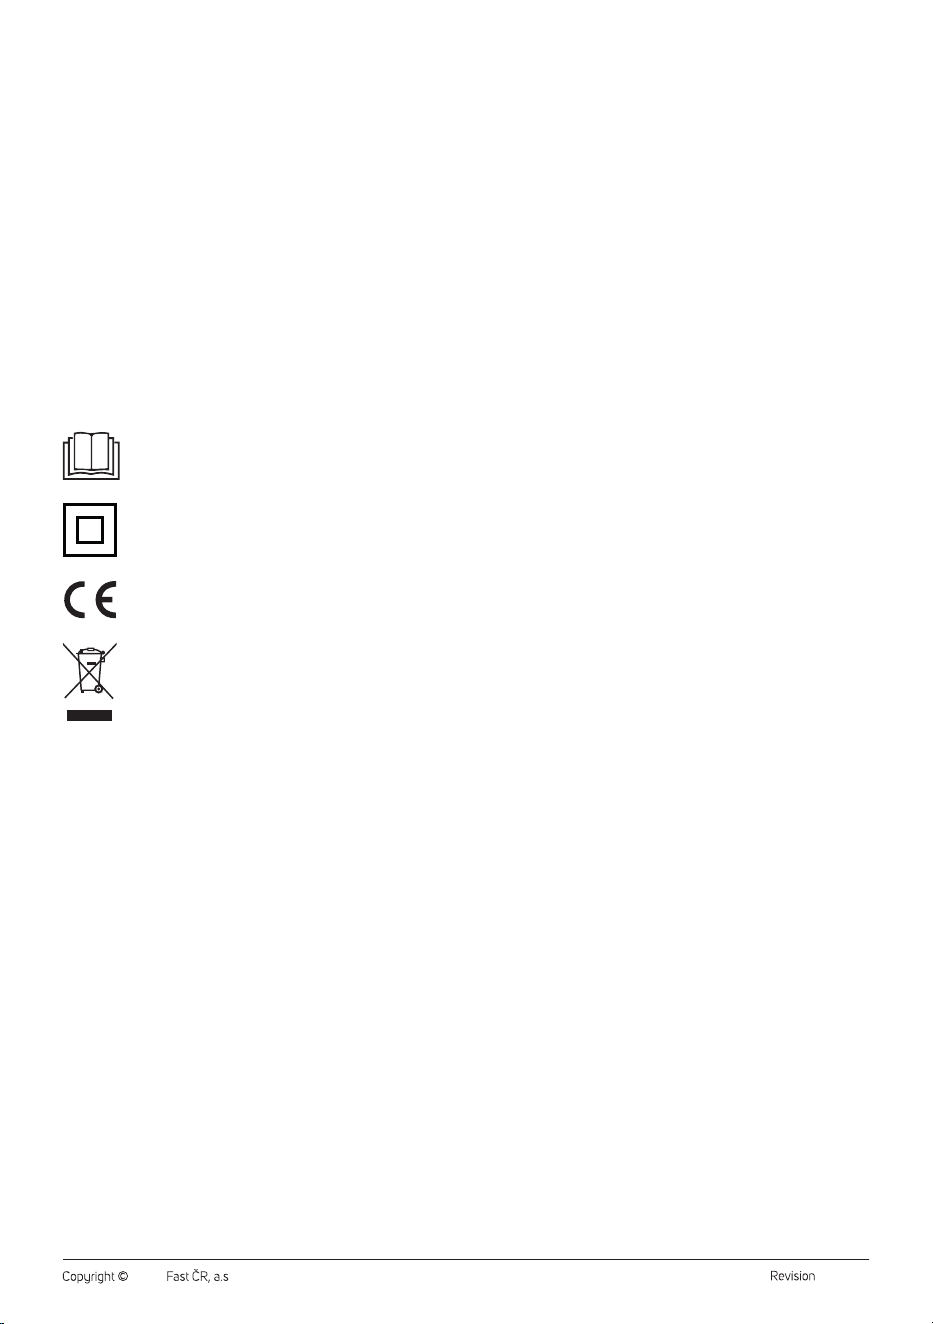
Read the user'smanual.
Product with protection class II
The product meets all the basic requirements of the
applicable EU directives.
This symbol on products or original documents means that
used electric or electronic products must not be added to
ordinary municipal waste.
. . . . . . . . . . . . . . . . . . . . . . . . . . . . . . . . . . . . . . . . . . . . . . . . . . . . . . . . . . . . . . . . . . . .
INSTRUCTIONS AND INFORMATION ON DISPOSAL OF USED
PACKAGING MATERIAL
Dispose of used packaging material at the location designated by the
municipality for waste disposal.
DISPOSAL OF USED ELECTRICAL AND ELECTRONIC EQUIPMENT
Used electrical andelectronic products must not be added to ordinary
municipal waste. For proper disposal and recycling of these products,
deliver them to designated collection points. Alternatively, in some
European Union states or other European countries the products can be
returned to the local retailer when buying an equivalent new product. By
properly disposing of this product, you help preserve valuable natural
resources and contribute to preventing potential negative impacts on the
environment and human health resulting from improper waste disposal.
For further details, contact your local authorities or the nearest collection
point. Fines may be imposed for improper disposal of this type of waste in
accordance with national regulations.
For Business Entities in European Union States
To dispose of electric or electronic equipment, request necessary
information from your retailer or supplier.
Disposal in Other Countries Outside the European Union
This symbol is valid in the European Union. If you wish to dispose of this
product, request the necessary information about the correct disposal
method from the local council or from your retailer.
. . . . . . . . . . . . . . . . . . . . . . . . . . . . . . . . . . . . . . . . . . . . . . . . . . . . . . . . . . . . . . . . . . . .
Changes to text and technical parameters are reserved.