54488
EN
Original Instructions
Version 1
VERTICAL
DRILL
STAND
1.1 Product Reference
User Manual for: Vertical Drill Stand
Stock No: 54488
Part No: DS1
1.2 Revisions
Version 1: February 2024
First release
As our manuals are continually updated, always ensure
that the latest version is used.
Please visit drapertools.com/manuals for the latest
version of this manual and the associated parts list, if
applicable.
1.3 Understanding the Safety Content of
This Manual
WARNING!
– Situations or actions that may result
in personal injury or death.
CAUTION! – Situations or actions that may result
in damage to the product or surroundings.
Important: – Information or instructions of particular
importance.
1.4 Copyright © Notice
Copyright © Draper Tools Limited.
Permission is granted to reproduce this manual for
personal and educational use ONLY. Commercial
copying, redistribution, hiring or lending is strictly
prohibited.
No part of this manual may be stored in a retrieval system
or transmitted in any other form or means without written
permission from Draper Tools Limited.
In all cases, this copyright notice must remain intact.
1. Preface
– 2 –
These are the original product instructions. This
document is part of the product; retain it for the life
of the product, passing it on to subsequent holders.
Read this manual in full before attempting to
assemble, operate or maintain this product.
This Draper Tools manual describes the purpose
of the product and contains all the necessary
information to ensure its correct and safe use.
Following all the instructions and guidance in
this manual will ensure the safety of both the
product and the operator and increase the
lifespan of the product.
All photographs and drawings within this manual are
supplied by Draper Tools to help illustrate correct
operation of the product.
Every eort has been made to ensure the
information contained in this manual is accurate.
However, Draper Tools reserves the right to amend
this document without prior warning. Always use the
latest version of the product manual.
EN

2. Contents
– 3 –
EN
1. Preface 2
1.1 Product Reference 2
1.2 Revisions 2
1.3 Understanding the Safety Content of This
Manual 2
1.4 Copyright © Notice 2
2. Contents 3
3. Product Introduction 4
3.1 Intended Use 4
3.2 Specication 4
4. Health and Safety Information 5
4.1 General Health and Safety Precautions 5
4.2 Residual Risk 5
4.3 Explanation of Symbols 5
5. Identication and Unpacking 6-7
5.1 Product Overview 6
5.2 What’s in the Box? 7
5.3 Packaging 7
6. Preparation Instructions 8
6.1 Assembly 8
7. Using the Drill Stand 9
7.1 Fitting a Drill 9
7.2 Setting the depth 9
7.3 Using the drill 9
8. Maintenance 10
9. Spares, Returns and Disposal 10
10. Warranty 10

3. Product Introduction
Stock No. 54488
Part No. DS1
Net Weight 6.2kg
Cast Iron Base Dimensions 170 X 240mm
Height 540mm
Drill Collar Diameter 38 – 43mm
Leverage Ratio 5:1
Depth of Feed 0 – 63mm
– 4 –
EN
3.2 Specication
3.1 Intended Use
This vertical stand is designed for use with handheld
electric drills with collar diameters of 43mm or 38mm to
support while drilling.
Any other application beyond the conditions established
for use will be considered misuse. Draper Tools accepts
no responsibility for improper use of this product.
Read this manual in full before attempting to assemble,
operate or maintain the product and retain it for later use.
4. Health and Safety Information
Important: Read all the Health and Safety instructions
before attempting to operate, maintain or repair this
product. Failure to follow these instructions may result in
injury or damage to the user, the product or the tool
being used.
4.1 General Health and Safety
Precautions
CAUTION! NEVER USE WITH A DRILL IN
‘HAMMER’ MODE.
• ONLY use the stand on a at level, unobstructed
surface.
• The stand MUST be xed to a surface capable of
supporting the weight of the stand, drill and
workpiece.
• ALWAYS ensure that you understand the application,
limitations and potential hazards relating to the tool
you are using. Read and familiarise yourself with all
operating instructions.
• ALWAYS wear eye protection and protective gloves
when drilling.
• DO NOT wear loose clothing or jewellery. ALWAYS
take care to keep your hands, hair and clothing away
from the chuck of the drill and any other moving
parts.
• Before each use check for damage and ensure that
the stand and tool will operate correctly. DO NOT use
if any parts are damaged or missing.
• Any repairs or replacement of damaged parts must be
carried out by a qualied repair person using spare
parts recommended by Draper Tools.
• ALWAYS ensure that the working area is well lit and
free from obstructions.
• Keep children and bystanders away from the work
area when operating the power tool – distractions can
cause a loss of control and accidents.
• Care must be taken when handling and lifting−
dropping the stand may result in damage to the
product or personal injury.
4.2 Residual Risk
• The safety instructions in this manual cannot account
for all possible conditions and situations that may
occur. Exercise common sense and caution when
using this product and protect against any additional
conceivable risks.
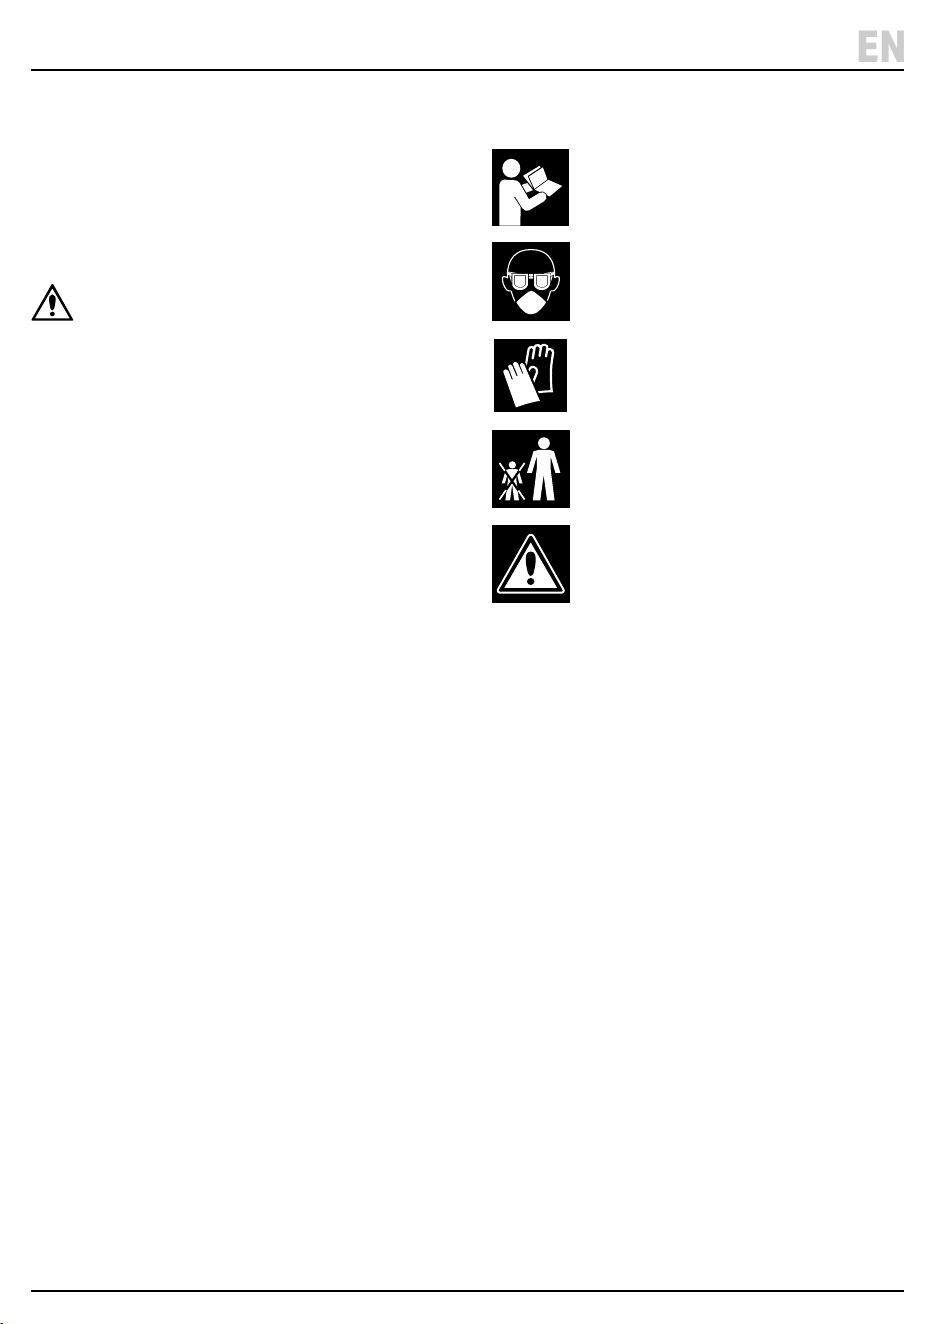
4.2 Explanation of Symbols
– 5 –
EN
Read the instruction manual
Wear face mask and safety glasses
Wear protective gloves
Keep out of the reach of children
Warning!
5. Identication and Unpacking
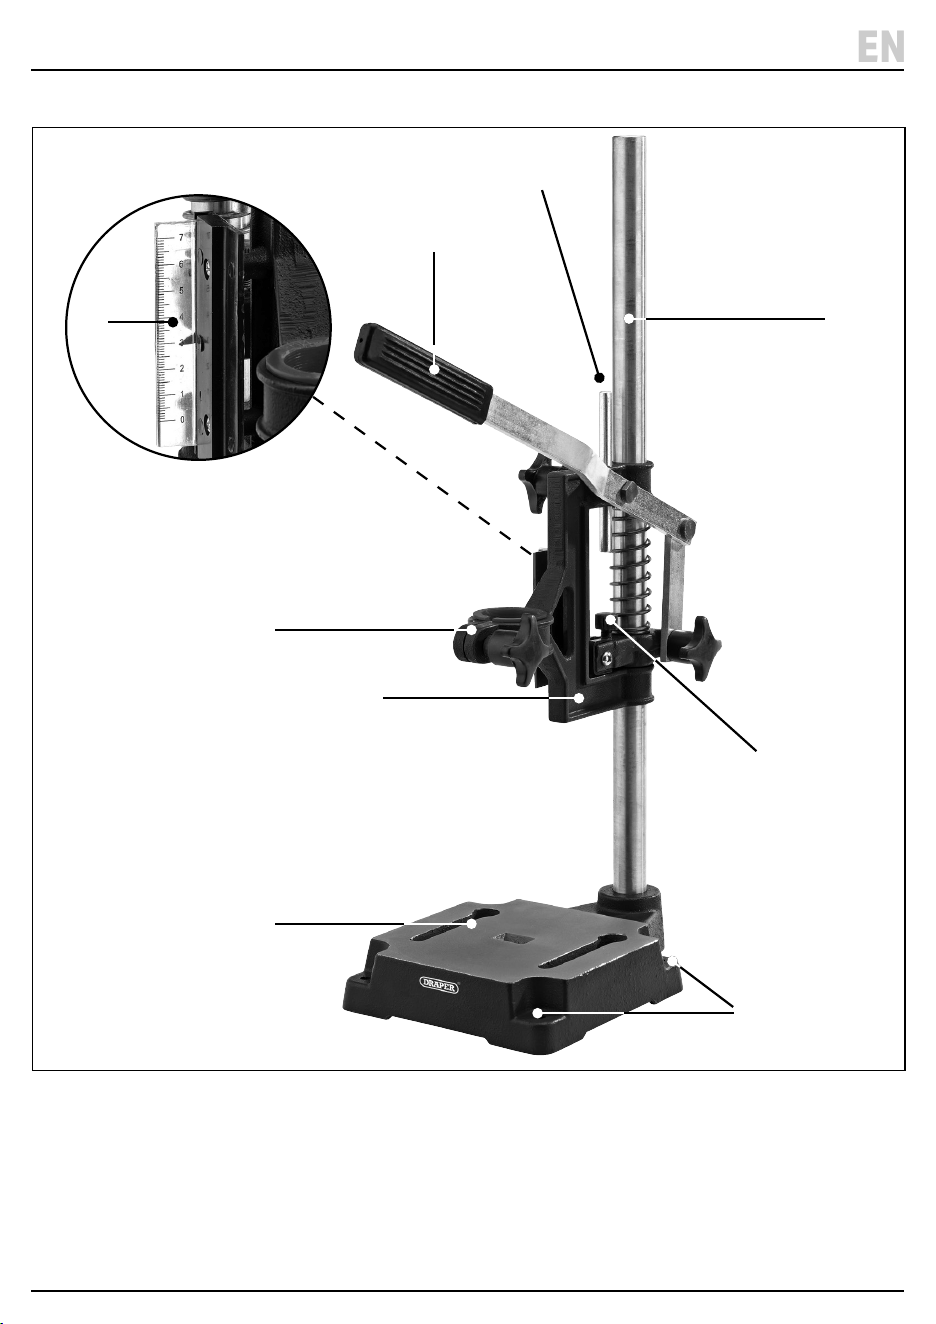
5.1 Product Overview
(1) Base
(2) Head assembly
(3) Drill collar
(4) Depth scale ruler
(5) Handle
(6) Solid bar column
(7) Depth stop
(8) Mounting holes X 4
(9) Depth stop rod
– 6 –
EN
(1)
(8)
(5)
(7)
(6)
(4)
(3)
(2)
(4)
(9)
5. Identication and Unpacking
5.3 Packaging
Keep the product packaging for the duration of the
warranty period for reference should the product need to
be returned for repair.
WARNING! Keep packaging materials out of reach of
children. Dispose of packaging correctly and
responsibly and in accordance with local regulations.
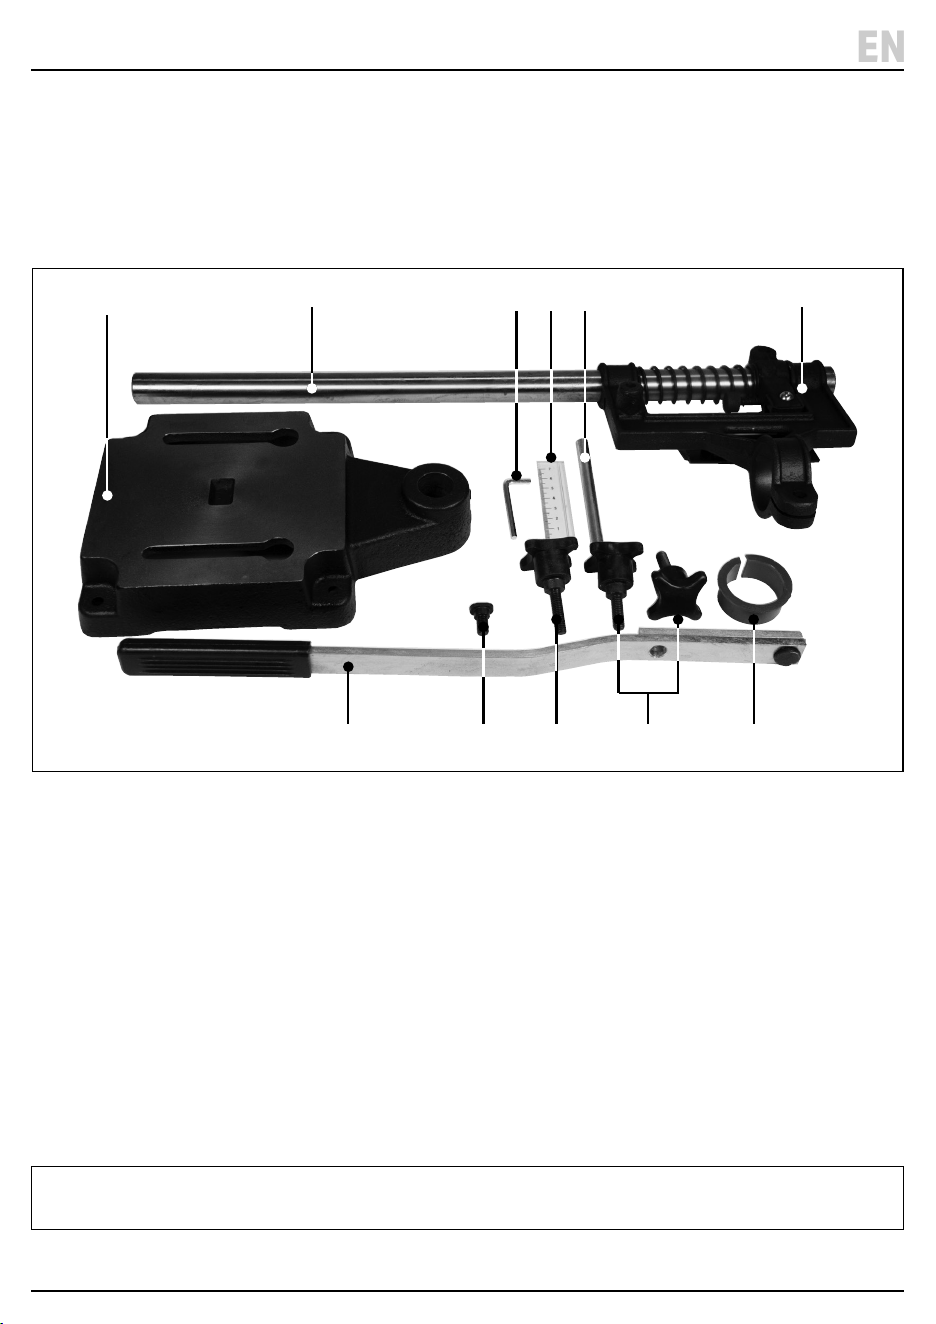
(A) 1 x Base
(B) 1 x Column
(C) 1 X Head assembly
(D) 1 X Hex key
(E) 1 X Depth scale ruler
(F) 1 X Depth stop rod
(G) 1 X bolt
(H) 1 X Handle Knob (longer screw thread)
(I) 2 X knobs
(I1) Knob (depth adjustment)
(I2) Knob (drill collar)
(J) 38mm collar reducer
(K) Handle
Please visit drapertools.com for our full range of accessories and consumables.
– 7 –
EN
5.2 What’s in the Box?
Carefully remove the product from the packaging and
examine it for any signs of damage that may have
occurred during shipment.
Before assembling the product, lay the contents out and
check them against the parts shown below. If any part is
damaged or missing, do not attempt to use the product.
Please contact the Draper Helpline; contact details can
be found at the back of this manual.
(A)
(B) (D) (E) (F) (C)
(J)(I)(H)(G)(K)
6. Preparation Instructions
Important: Before preparing or adjusting this product,
read and understand all the safety instructions listed in
this manual.
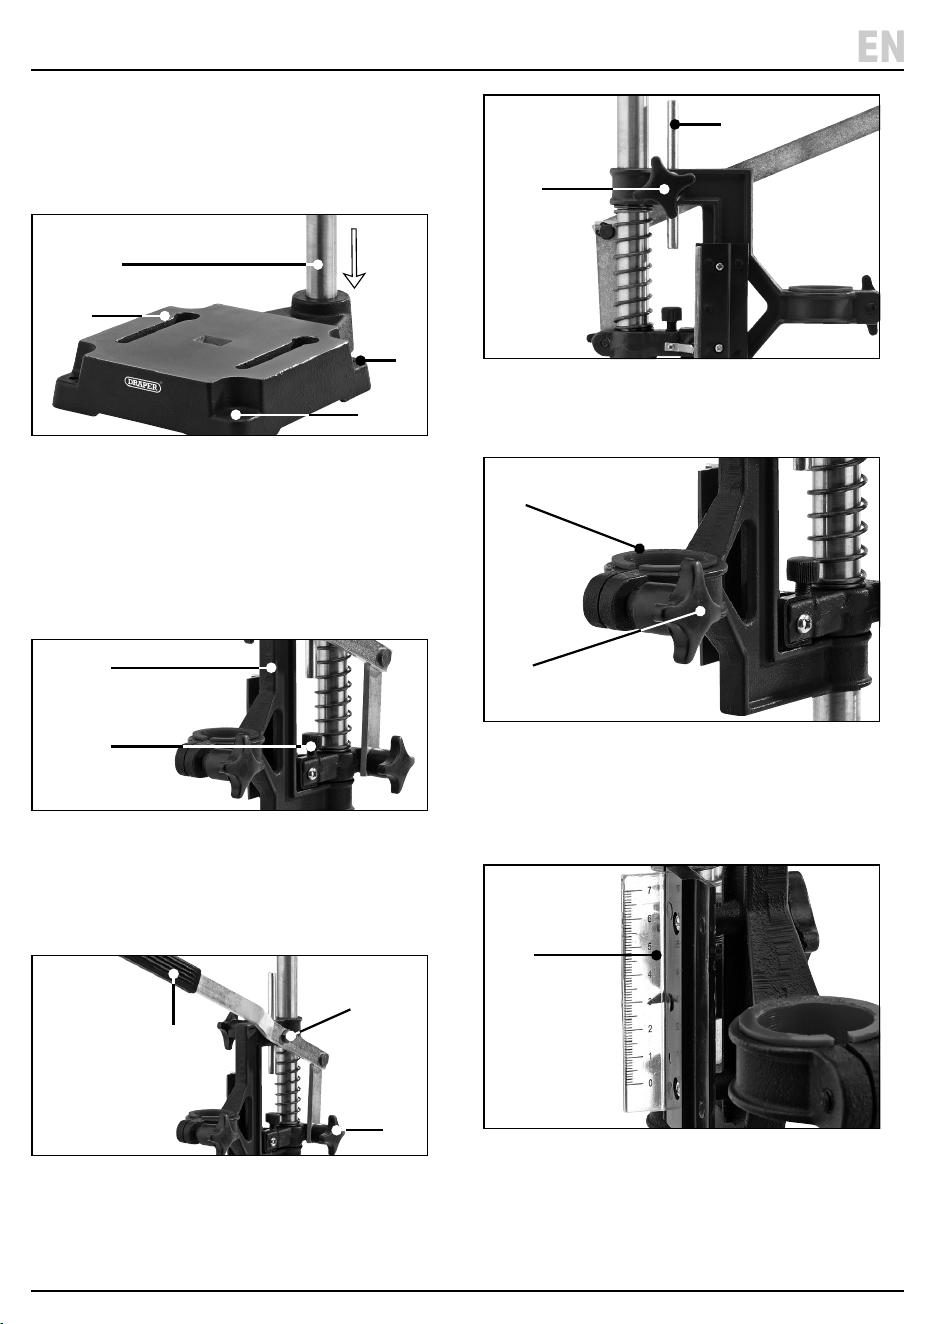
6.1 Assembly
1 Fig.
1. Insert the solid bar column (B) into the base (A) –
tighten the two grub screws (L) on the base with the
hex key (D) supplied. (Fig.1)
• Important: Ensure that the stand is xed to the
worksurface with suitable bolts (not supplied) using
the four mounting holes (8) in the base.
2 Fig.
2. Ensure that the head assembly ( C ) is attached to the
column bar the correct way round – the depth stop (7)
should be positioned at the bottom of the head
assembly. (Fig.2)
3 Fig.
3. Attach and secure the leverage handle (K) with the
bolt (G) and the handle knob (H). (Fig 3)
4 Fig.
4. Insert the depth rod (F) and secure in position with
knob (I1). (Fig.4)
5 Fig.
5. Attach the drill knob (I2) and turn to lock in place.
Once tightened this will hold the drill in place during
operation. Fit the collar reducer (J) into the drill collar
(3) if required. (Fig. 5)
6 Fig.
6. Slide the depth scale ruler ( E ) into the slot. (Fig.6)
7. The drill stand is now ready to use.
– 8 –
EN
(B)
(L)
(H)
(F)
(G)
(K)
(8)
(C)
(I1)
(E)
(J)
(I2)
(7)
(A)
(3)
7. Using the Drill Stand
Important: Before operating this product, read and
understand all the safety instructions listed in this
manual and refer to the drill manufacturer’s safety and
usage instructions. Ensure that the product is fully
assembled and correctly prepared for use (Refer to
section 6.1).
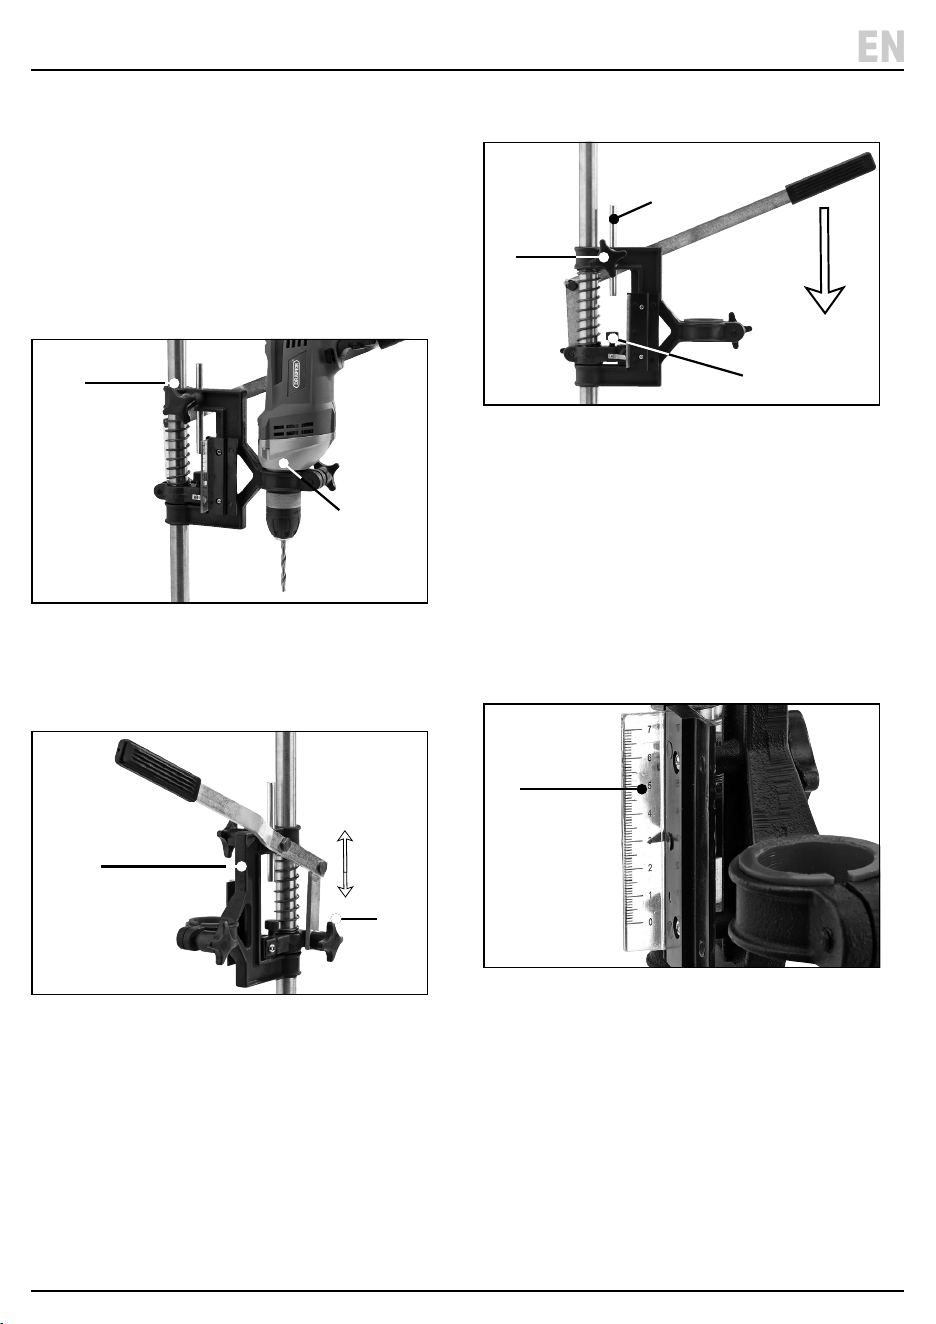
7.1 Fitting a Drill
• The drill stand is suitable for use with 38mm and
43mm diameter drills.
7 Fig.
1. Insert you drill into the collar (3) and tighten knob (I2)
to secure the drill in place. Use the collar reducer (J)
for 38mm diameter drills. (Fig.7)
8
Fig.
2. To adjust the height, loosen the handle knob (H) and
move the head assembly (2) up or down to the correct
drill height and retighten the knob. (Fig.8)
7.2 Setting the Depth
9 Fig.
1. With the drill tted in the collar, unlock the depth
adjustment knob (I1) and pull the handle (5) down.
(Fig.9)
2. Check the depth ruler scale ( E) and lower the handle
until the required depth is set. (Fig.10)
3. Retighten the knob and the depth rod (F) will be set to
the required depth.
• The depth stop (7) can be rotated up or down to ne
tune the depth setting.
10 Fig.
7.3 Using the drill
1. Ensure the drill is tted securely in the collar and the
required depth is set.
2. Switch on the drill and use the handle to lower the
drill bit until it just touches the workpiece.
• The depth of the hole will be restricted by the depth
stop height.
3. Switch o the drill as soon as drilling is nished.
– 9 –
EN
(I2)
(2)
(H)
(7)
(F)
(I1)
(E)

For spare parts, servicing, and repair and replacement
options, please contact the Draper Tools Product
Helpline for details of your nearest authorised agent.
Draper Tools will endeavour to hold any spare parts, if
applicable, for seven years from the date that it sells the
nal matching stock item.
Any servicing or repairs carried out by unauthorised
personnel or installation of spare parts not supplied by
Draper Tools will invalidate your warranty.
At the end of its working life, dispose of the product
responsibly and in line with local regulations. Recycle
where possible.
9. Spares, Returns and Disposal
8. Maintenance
8.1 General Maintenance
• Keep the stand clean and wipe over with a mild cleaner and damp cloth.
• Lubricate the column and screw threads with a light oil.
• Store the product in a clean and dry location, out of the reach of children.
– 10 –
EN
10. Warranty
Draper Tools products are carefully tested and inspected
before shipment and are guaranteed to be free from
defective materials and workmanship.
Should the tool develop a fault, return the complete tool
to your nearest distributor or contact Draper Tools
directly. Contact information can be found at the back of
this manual.
Proof of purchase must be provided.
If, upon inspection, it is found that the fault occurring is
due to defective materials or workmanship, repairs will
be carried out free of charge. This warranty period covers
parts and labour for 12 months from the date of
purchase.
This warranty does not apply to any consumable parts,
batteries or normal wear and tear, nor does it cover any
damage caused by misuse, careless or unsafe handling,
alterations, accidents, or repairs attempted or made by
any personnel other than the authorised Draper Tools
repair agent.
Please note that this warranty is an additional benet
and does not aect your statutory rights.
Draper Tools Limited

Notes
– 11 –
EN
– 11 –
EN

© Published by Draper Tools Limited© Published by Draper Tools Limited
Delta International
Delta International BV
Oude Graaf 8
6002 NL
Weert
Netherlands
Contact Details
Draper Tools
Draper Tools Limited
Hursley Road
Chandler’s Ford
Eastleigh
Hampshire
SO53 1YF
UK
Website: drapertools.com
Email: [email protected]
Product Helpline: +44 (0) 23 8049 4344
Telephone Sales Desk: +44 (0) 23 8049 4333
General Enquiries: +44 (0) 23 8026 6355
General Fax: +44 (0) 23 8026 0784
Please contact the Draper Tools Product Helpline for repair and servicing enquiries.
