User Manual
Dishwasher
CP 6E51LW-80
CP 6E51LS-80

Thank you for purchasing a Haier product
Please read these instructions carefully before using this appliance. The
instructions contain important information which will help you get the best out of the
appliance and ensure safe and proper installation, use and maintenance.
Keep this manual in a convenient place so you can always refer to it for the safe
and proper use of the appliance.
If you sell the appliance, give it away, or leave it behind when you move house,
make sure you also pass on this manual so that the new owner can become
familiar with the appliance and safety warnings.
Safety and warnings ......................................................................................
Installation instructions ..................................................................................
Product description ................................. ......................................................
Content
1
4
Overview of programmes...............................................................................
13
Using rinse aid
Caring for your tableware..............................................................................
17
Loading tableware .........................................................................................
18
How to make savings.....................................................................................
19
Adding detergent............................................................................................
Preference settings.................................. ......................................................
20
22
Daily use........................................................................................................
Care and cleaning.....................................
.....................................................
Troubleshoot
ing.............................................................................................
Standards test ...............................................................................................
24
26
28
...............................................................................................
21
32
12
Water softening system ..............................................................................
15

1
Your dishwasher has been carefully designed to operate safely during normal
dishwashing procedures. Please keep the following instructions in mind when you
are using your dishwasher.
Read all instructions before using the dishwasher.
The information in this manual must be followed to minimise the risk of fire or
explosion or to prevent property damage, personal injury or loss of life.
Use the dishwasher only for its intended function as described in this user guide.
This appliance is intended to be used in household and similar applications such
as:
– staff kitchen areas in shops, offices and other working environments;
– farm houses;
– by clients in hotels, motels and other residential type environments;
– bed and breakfast type environments.
Electrical shock hazard
Cut Hazard
When using your dishwasher, follow basic
precautions, including the following:
Safety and warnings
WARNING
WARNING
WARNING
Before installing the dishwasher, remove the house fuse or open the circuit breaker.
This appliance must be earthed. In the event of a malfunction or breakdown,
earthing will reduce the risk of electric shock by providing a path of least resistance
for electric current. This appliance is equipped with a cord having an equipment-
earthing conductor and an earthing plug. The plug must be plugged into an
appropriate outlet that is installed and earthed in accordance with all local codes
and ordinances.
WARNING - Improper connection of the equipment-earthing conductor can result in
a risk of electric shock. Check with a qualifi
ed electrician or service representative
if you are in doubt as to whether the appliance is properly earthed.
Do not modify the power supply plug provided with the appliance - if it will not fit
the outlet, have a proper outlet installed by a qualified electrician. Do not use an
extension cord, adapter plug or multiple outlet box.
Failure to follow this advice may result in electrical shock or death.
Take care - panel edges are sharp.
Failure to use caution could result in injury or cuts.

Use only detergents or rinse aid recommended for use in a domestic dishwasher
and keep them out of reach of children.
Check that the detergent dispenser is empty after the completion of each wash
programme.
When loading items to be washed, locate sharp items so that they are not likely
to damage the dishwasher and load sharp knives with the handle up to reduce the
risk of cut-type injuries.
Do not touch the filter plate (the metal disc in the dishwasher base) during or
immediately after use, as it may be hot from the heater plate underneath.
Do not tamper with the controls.
Do not abuse, sit in, stand on the door or dish rack of the dishwasher.
Do not lean on the adjustable racks or use them to support your body weight.
To reduce the risk of injury, do not allow children to play in or on the dishwasher.
Under certain conditions, hydrogen gas may be produced in a hot water heater
system that
has not been used for two weeks or more. Hydrogen gas is explosive.
If the hot water system has not been used for such a period, before using the
dishwasher, turn on all hot water taps and let the water flow from each for several
minutes. This will release any accumulated hydrogen gas. As the gas is flammable,
do not smoke or use an open flame during this time.
Remove the door to the washing compartment when removing an old dishwasher
from service or discarding it.
Some dishwasher detergents are strongly alkaline. They can be extremely
dangerous if swallowed. Avoid contact with the skin and eyes and keep children
away from the dishwasher when the door is open. Check that the detergent
receptacle is empty after completion of the wash cycle.
Certified residential dishwashers are not intended for licensed food
establishments.
Maintenance safety instructions
Disconnect the appliance from the power supply before any cleaning or
maintenance.
When disconnecting the appliance, pull the plug rather than the power supply
cord or junction of cord to avoid damage.
Do not repair or replace any part of the appliance or attempt any servicing unless
specifically recommended in this user guide.
Keep the floor around your appliance clean and dry to reduce the possibility of
slipping.
Safety and warnings
2

3
Keep the area around/underneath your appliance free from the accumulation of
combustible materials, such as lint, paper, rags and chemicals.
Operational safety instructions
Open the door very carefully if the dishwasher is in operation. There is a risk of
being sprayed with hot water. Do not open the door fully until the spray arms have
stopped rotating.
The door should not be left in the open position as this could present a tripping
hazard.
The water inside the dishwasher is not suitable for drinking.
The dishwasher must be used with the filter plate, drain filter and spray arm(s) in
place. To identify what these parts are, see drawings in section ‘‘Care and Cleaning’’
of this user guide.
Do not operate this dishwasher if it is damaged, malfunctioning, partially
disassembled or has missing or broken parts, including a damaged power supply
cord or plug.
Household appliances are not intended to be played with by children. Children of
less than 8 years old must be kept away from the appliance unless continuously
supervised. This appliance can be used by children aged from 8 years and
above, and persons with reduced physical, sensory or mental capabilities or lack
of experience and knowledge, if they have been
given supervision or instruction
concerning the use of the appliance in a safe way and they understand the hazards
involved.
Cleaning and user maintenance shall not be done by children without supervision.
Do not allow children to play inside, on or with this appliance or any discarded
appliance.
If a dishwasher cleaner is used, we would strongly recommend a wash program
with detergent should be run immediately afterward, to prevent any damage to the
dishwasher.
The dishwasher is designed for washing normal household utensils. Items that
are contaminated by petrol, paint, steel or iron debris, corrosive, acidic or alkaline
chemicals are not to be washed in the dishwasher.
If the dishwasher is not being used for long periods of time, turn the electricity
and water supply to the dishwasher off.
Safety and wainings
4
Installation instructions
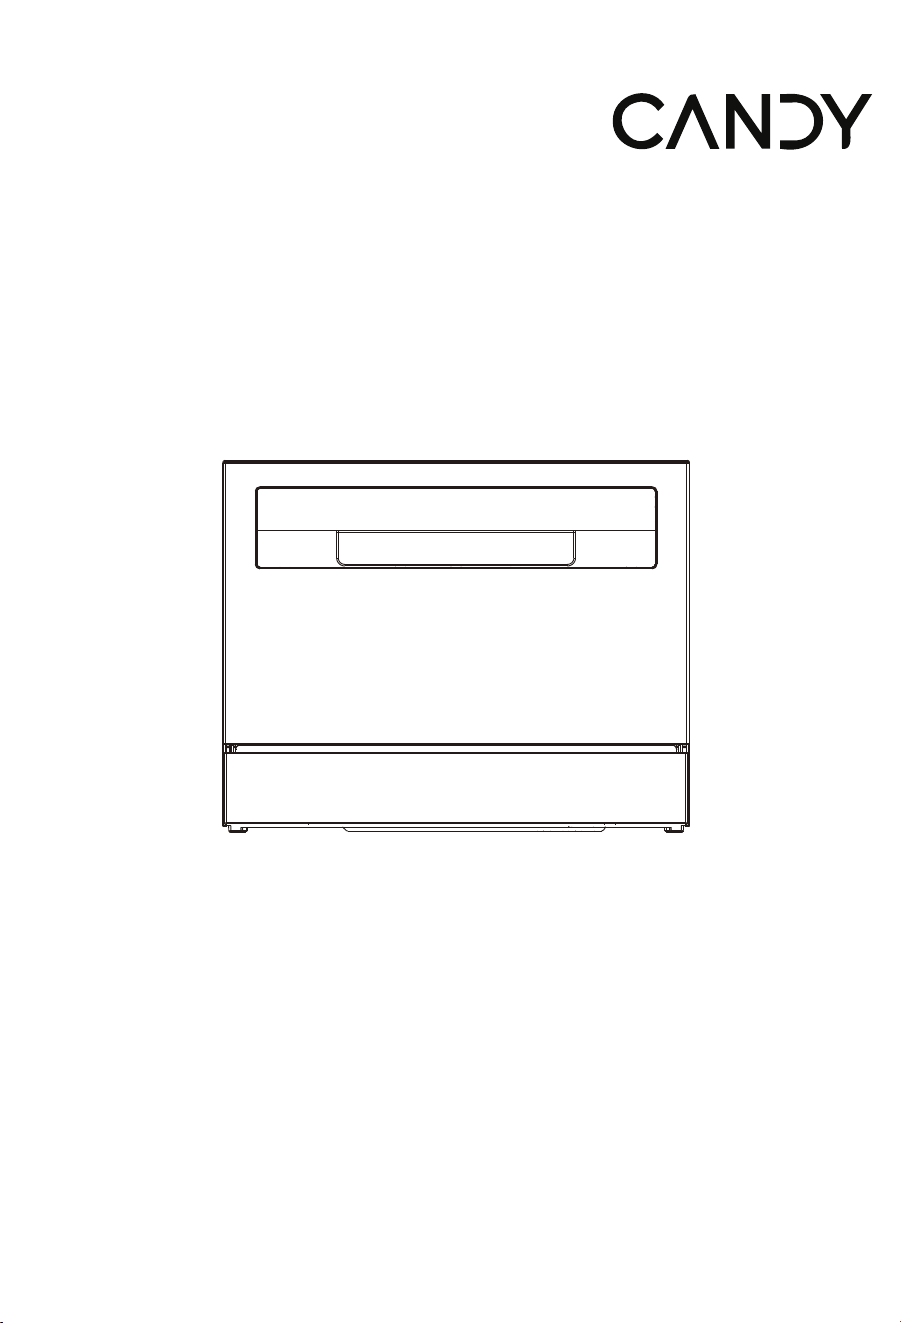
Parts supplied
Prior to installation
Unpacking and handling
Connections and services
Check packaging and dishwasher for signs of transport damage. If the
dishwasher is in any way damaged, do not install it. Contact the dealer the
dishwasher was purchased from.
Disposal of packaging: some of the packaging is recyclable. Check the symbols
and labels and recycle if possible.
Never lift the dishwasher from the door handle or the top panel. Doing so may
cause damage.
Always be careful with the hoses and power cord at the back of the dishwasher.
Careful handling will prevent damage and malfunction from squashing, kinking or
cuts.
While installing the dishwasher, check the drain hose is not restricted or kinked.
Check that the power cord is long enough to reach the outlet. If it isn’t, it must be
replaced by a haier authorised technician. Extension cords or multi-outlet power
boards should not be used to connect the dishwasher to the power supply.
Check that the hoses are long enough to reach the services. If a hose needs
extending, ensure that the extension hose is new and of equal quality and diameter
The dishwasher should not
to the one already fitted.
be connected to a water system where the
temperature exceeds 60
o
C.
The dishwasher must not be connected to an undersink high-pressure “push-
through” type hot water system, as damage to the system will result.
water inlet hose Warranty card
User Manual
Energy label
cup shelf x2
10 years warranty
card
General safety
rules
Energy label
5
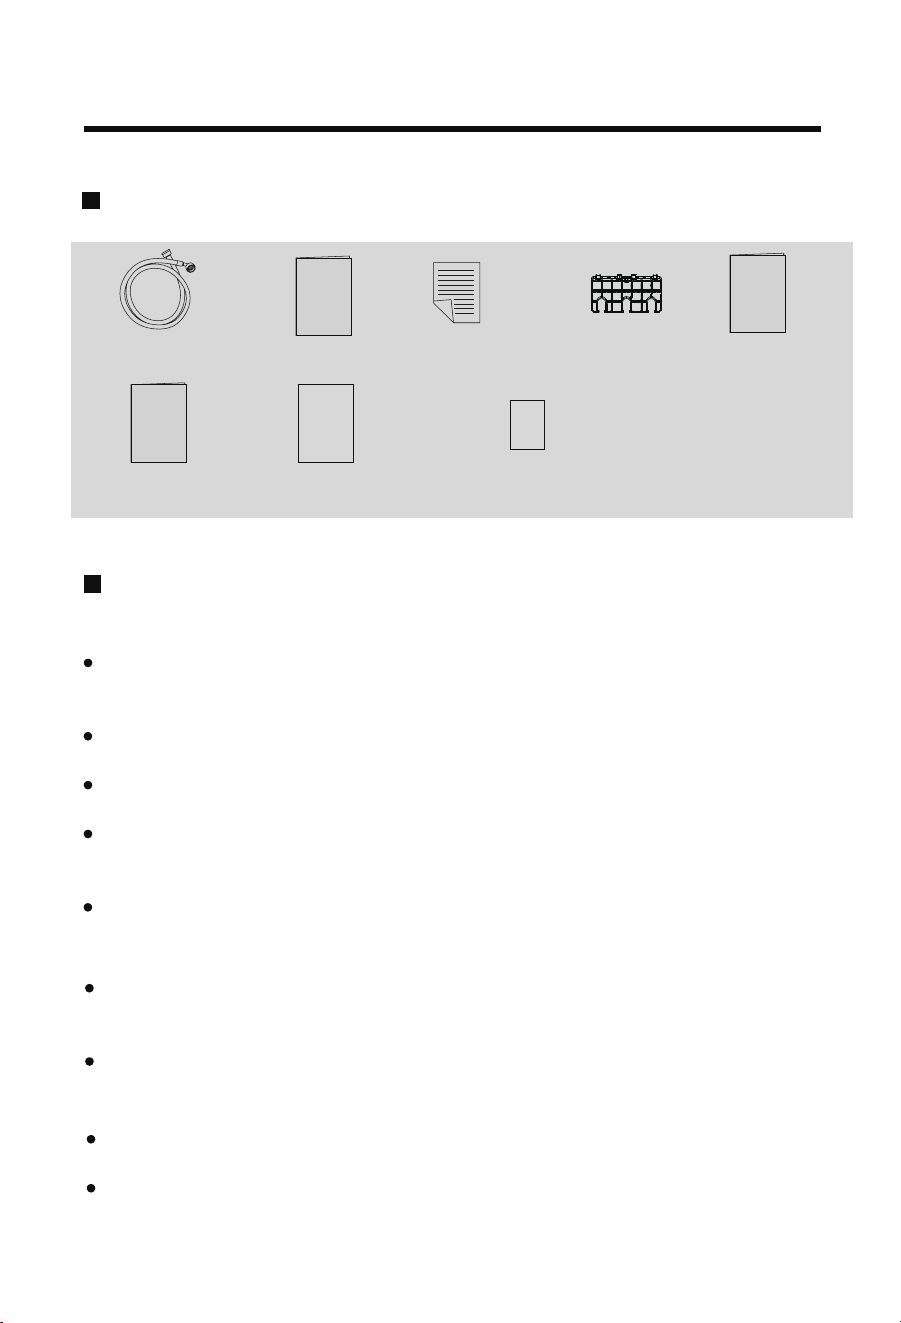
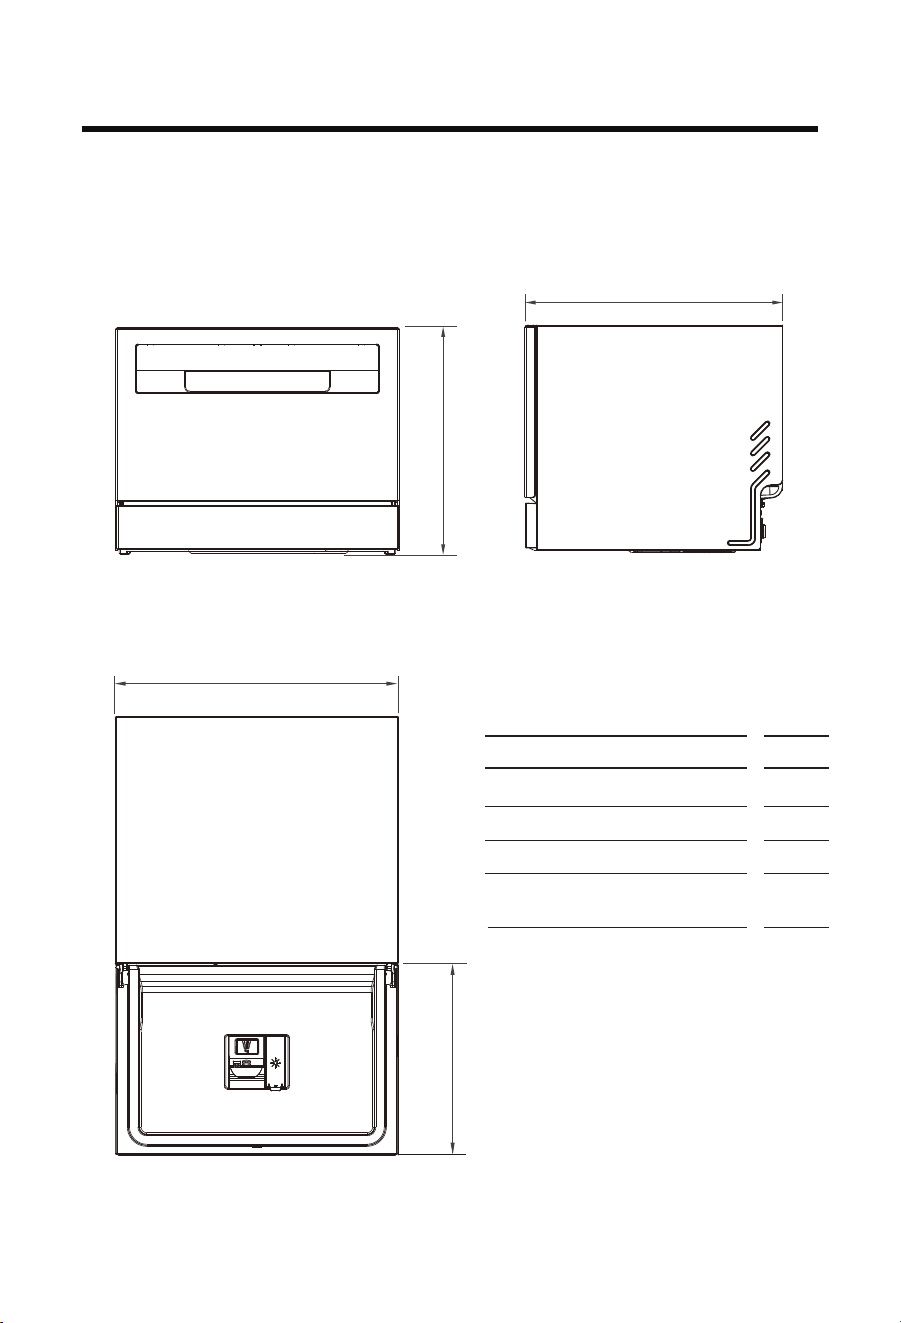
Product dimensions
Installation instructions
B
C
A
D
MM SNOISNEMID TCUDORP
A
Overall height of product
B
550
443
tcudorp fo htdiw llarevO
C
501tcudorp fo htped llarevO
D
Depth of open door
(measured from front of kickstrip)
338
TOP
FRONT PROFILE
Dia. 60mm
The appliance is in the open door state. Do not allow children to pull the door body,
otherwise the device may tip over
Installation instructions
6
WARNING
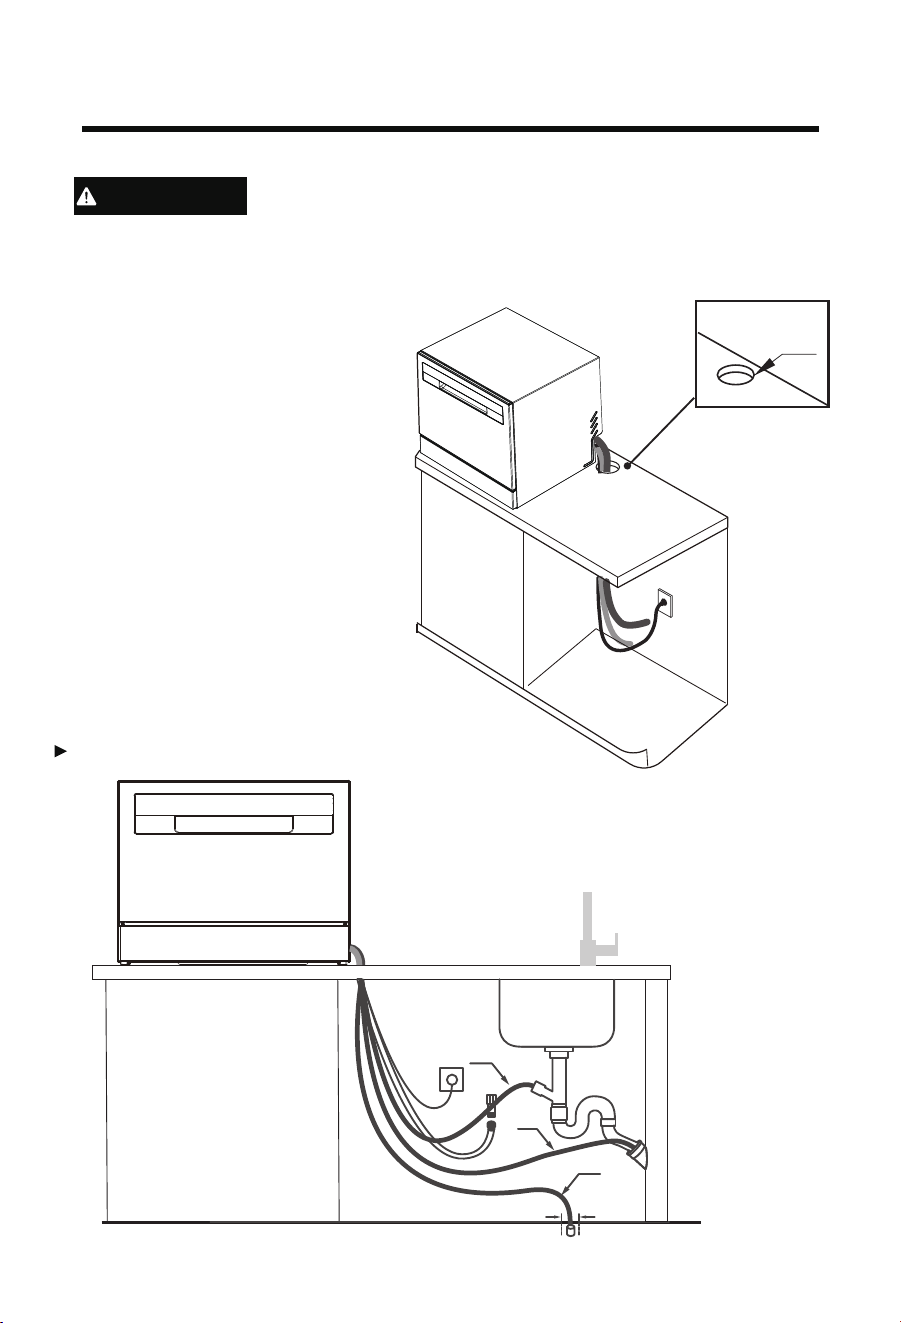
IMPORTANT!
The power outlet must be located
in a cabinet adjacent to the
dishwasher cavity
IMPORTANT!
Do not connect the drain hoses
to a Waste Disposal Unit, as this
type of connection may lead to a
blockage in the drain hoses.
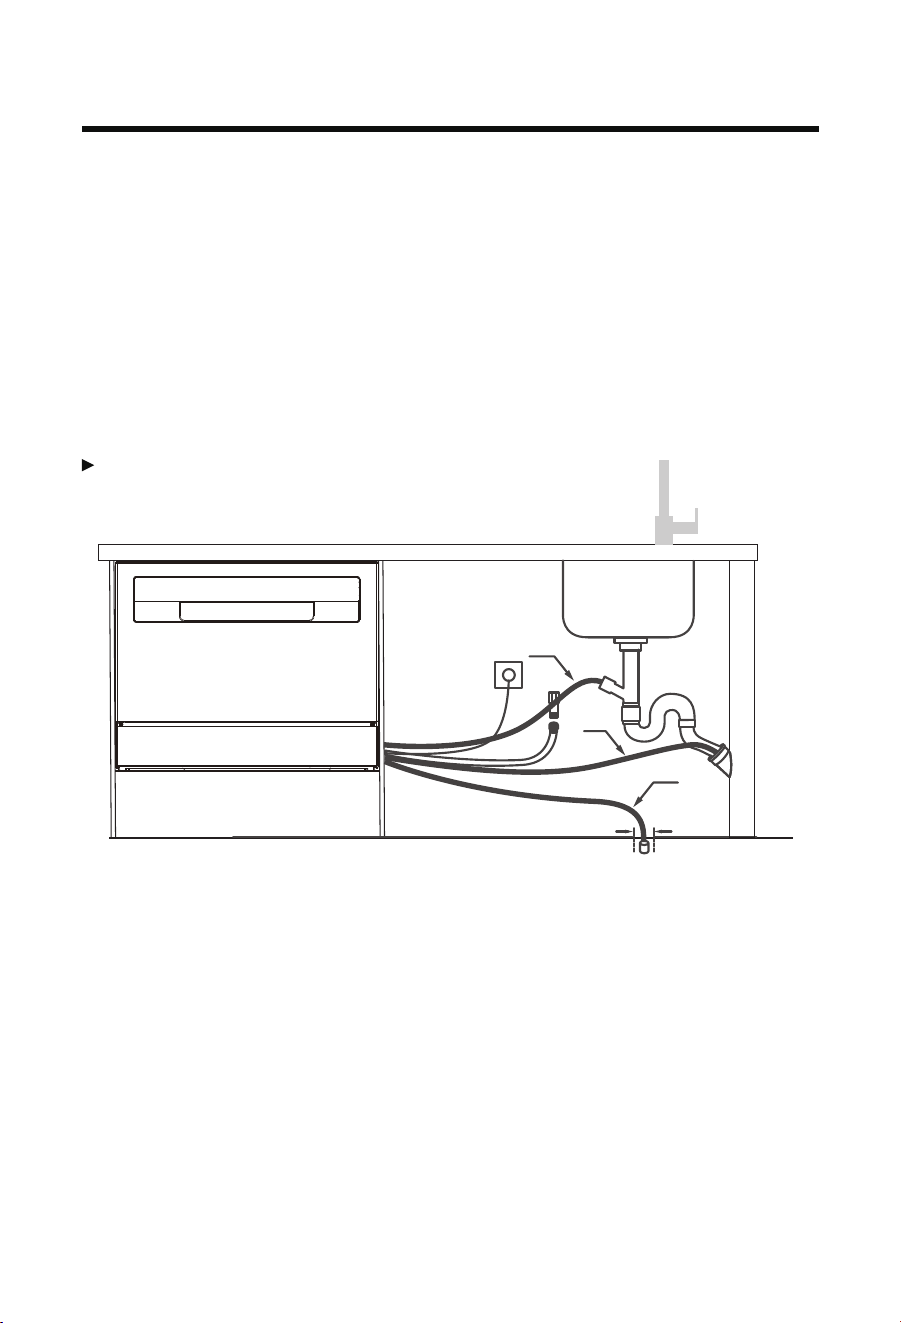
Installation method 1
Drain pipe connection method
Φ4 0 m m
B
C
A
min
Installation instructions
7
555
448
520
To prevent possible steam damage to the cabinetry,ensure that any bare wood
surrounding the dishwasher is sealed with an oil-based paint or moisture-proof
polyurethane.
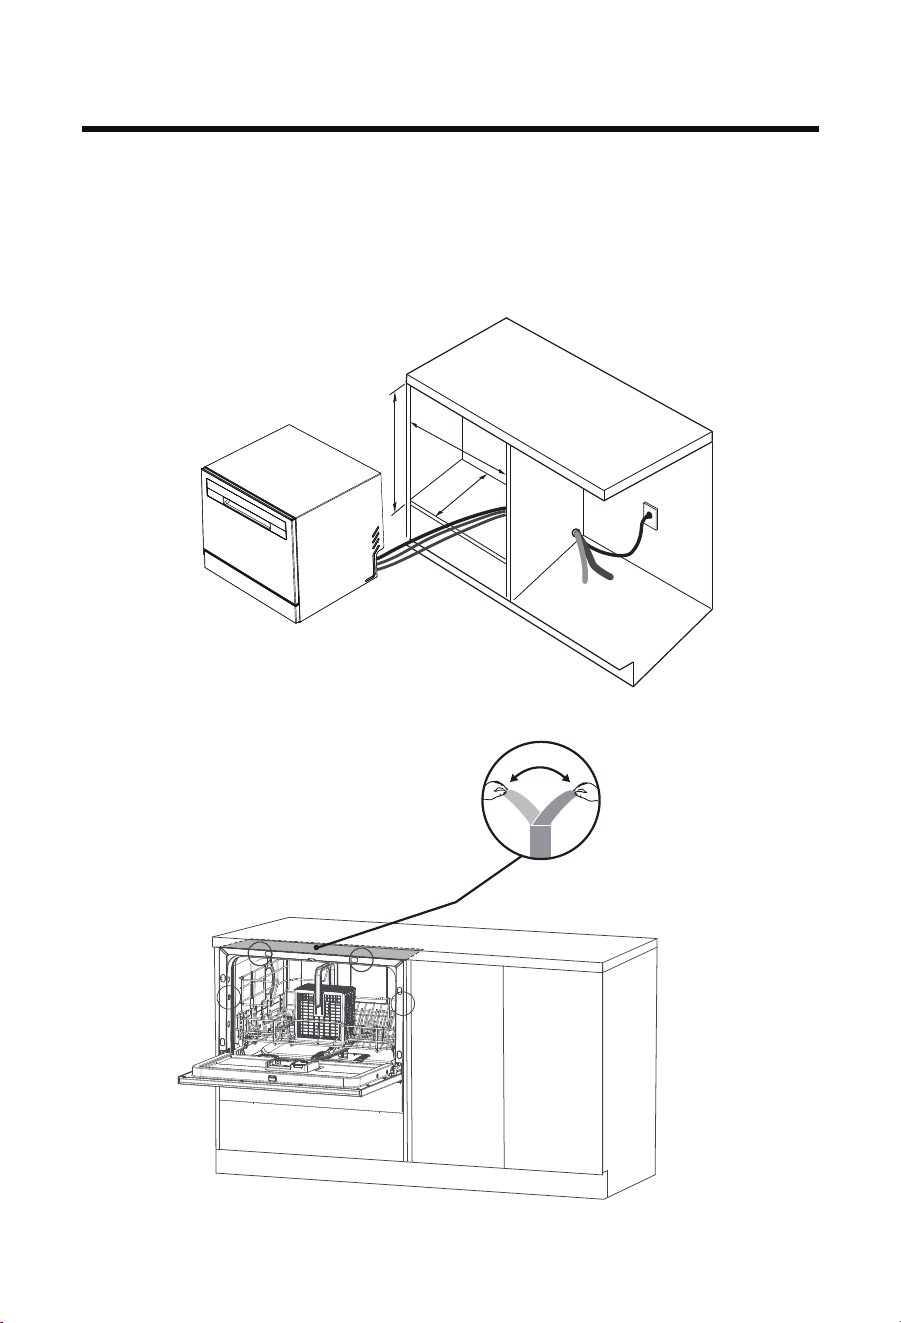
Installation method 2
Fixed dishwasher
A
B
C
D
Installation instructions
8
Drain pipe connection method
2.Move the dishwasher into the cabinet.
IMPORTANT!
Before fixing, it is necessary to confirm that the dishwasher is level. Maintain
a consistent left and right gap between the dishwasher and the cabinet.
Otherwise, it may cause abnormalities in the door body
1.Stick the sater-proof sticker on bottom of the countertop.
Φ4 0 m m
B
C
A
min
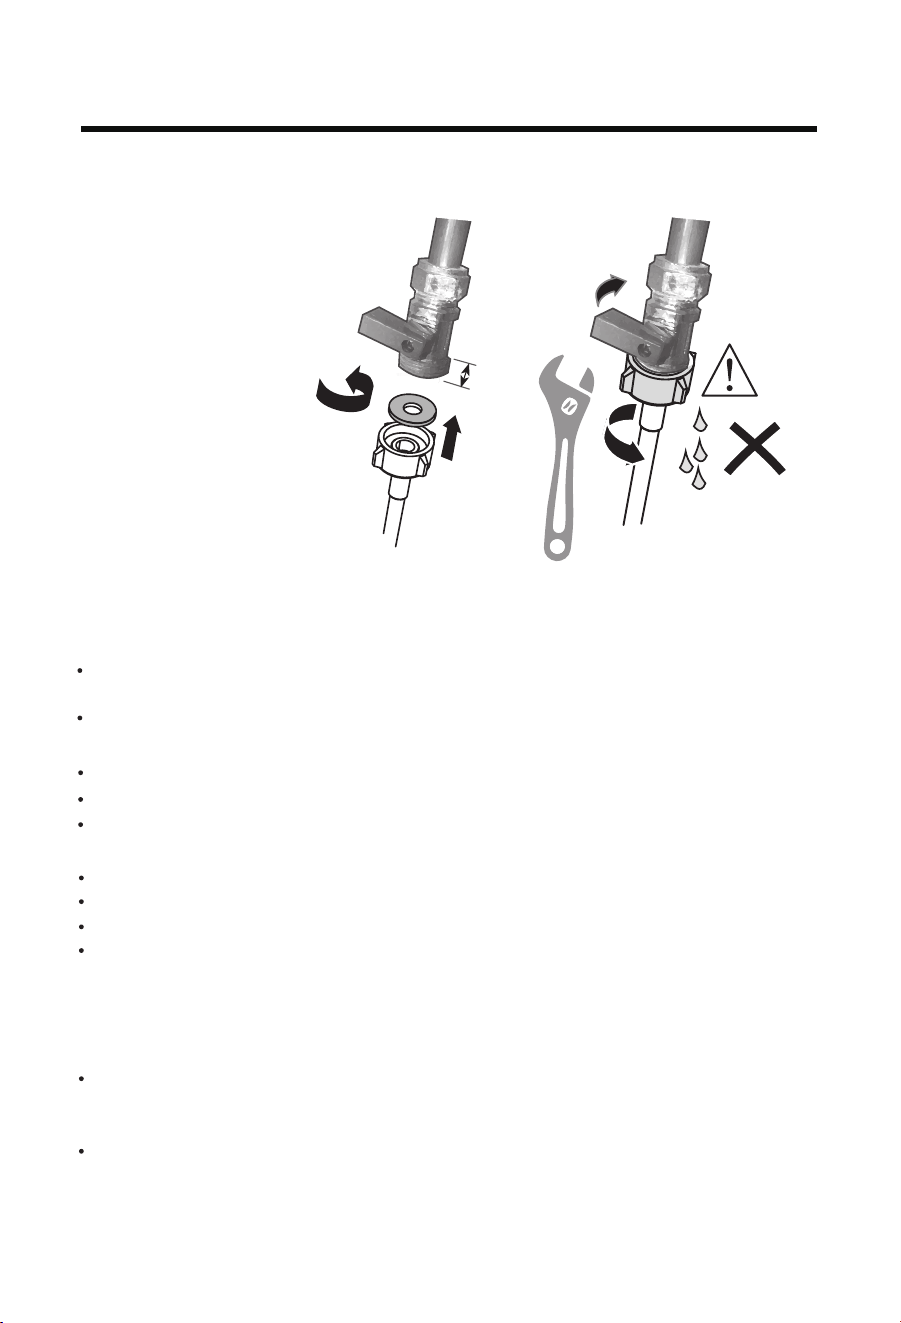
Ensure the supplied rubber
washer is fitted inside the
coupling.
Tighten coupling
with spanner.
180
o
No leaks!
1
2
Plumbing -- Water inlet connection
IMPORTANT!
The appliance should be connected to the water main using the new water
inlet hose supplied. Old hoses should not be used.
Do not shorten the inlet hose.
1.Take note of water connection requirements.
The dishwasher has a single valve water connection.
We recommend a cold water connection for best performance and energy efficiency.
The incoming water temperature should not exceed 60
o
C.
2.Take note of the permitted water pressure extremes.
Lowest: 0.4 bar = 4 N/cm = 40kPa
Where pressure is below 1 bar, contact a qualified plumber.
Highest: 10 bar = 100 N/cm = 1MPa
Where pressure is above 10 bar, a pressure reduction valve must be installed.
Contact a qualified plumber.
3.Connect the water inlet hose to an accessible water tap with a “3/4” BSP connector.
Ensure that there is no kink in the inlet hose that could restrict the flow of water. A
90
o
bend requires a minimum height of 200 mm for a kink-free curve.
Ensure incoming water is clear. If the water pipes have not been used for a long
period of time, let the water run to make sure it is clear with no impurities. Not
doing so may result in the water inlet hose g
etting blocked and damaging the appliance.
If required, use a filter insert to filter out deposits from the piping. The filter insert is
available from your Authorised Service Centre or Customer Care.
4.Tighten the hose coupling a further half turn after seal contact.
5.Check that the connection does not leak.
min.
10mm
“3/4” BSP connector
Connect inlet hose to cold water
2
2
Installation instructions
9
5
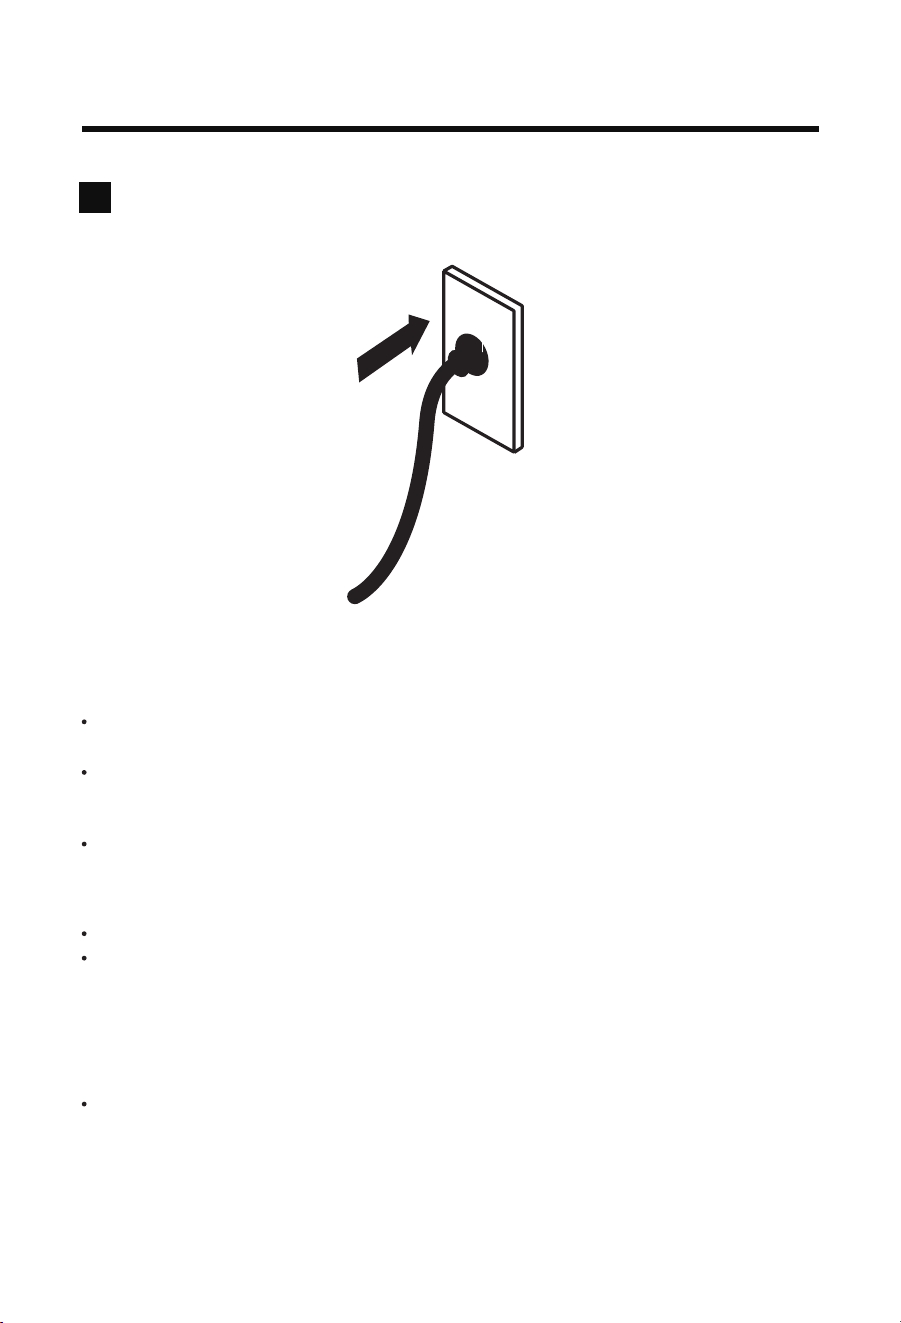
Plug product in
Electrical connection
The dishwasher must not be connected to the electrical supply while installation is
being carried out. Ensure all domestic wiring is properly earthed.
Check the rating label (located on the left-hand side of the dishwasher’s stainless
steel inner door) and ensure that the voltage and frequency values for the current
in the house correspond to those on the rating label.
Insert the plug into a properly earthed power outlet that has a disconnection switch.
IMPORTANT!
The earthing of the appliance is a safety requirement mandated by law.
If the power cord is not long enough to reach the outlet or the outlet to which the
appliance must be connected is not appropriate for the plug, the entire dishwasher
power cord must be replaced. This should only be done by a Haier authorised technician.
Do not modify or cut the plug. D
o not use an adaptor, extension cord, or multi-outlet
power board to connect the dishwasher to the power supply, as these could cause
overheating and create a fire hazard.
The outlet into which the dishwasher is plugged must remain easily accessible(e.g.
in an adjacent cabinet) even when the appliance is installed. This is to ensure that the
dishwasher can be disconnected from the power supply for safe cleaning and
maintenance.
Installation instructions
10

11
Final checklist
To be completed by the installer
Check all parts are installed.
Ensure that all panels and parts thereof are secure and final electrical tests have
been conducted in accordance with local electrical regulations.
Check that the dishwasher is level. If necessary, adjust the levelling feet slightly.
To ensure optimum performance, the dishwasher should not be inclined more than
1
o
. Check with a spirit level.
Ensure inlet hose to water supply has supplied rubber washer fitted, and that it’s
tightened a further half turn after seal contact.
Ensure any knockouts or plugs in drain connection have been drilled out and drain
connection has been made.
The drain hose joiner must not support the weight of excess hose material. Keep
drain hose as fully extended as possible to prevent sagging. Any excess length of
drain hose should be kept on the dishwasher side of the highloop.
If connecting the drain hose to the sink trap, ensure the highloop is a minimum
150mm higher than the drain hose joiner.
Ensure any packaging or tape securing the racks is removed from the dishwasher.
Check that the door opens and closes freely without resistance to adjacent cabinetry.
Check that the electrical outlet is accessible and located in an adjacent cupboard.
Check the operation of the dishwasher:
If a fault code appears, see the ‘Fault codes’ section of the User guide for advice.
Installation instructions
12
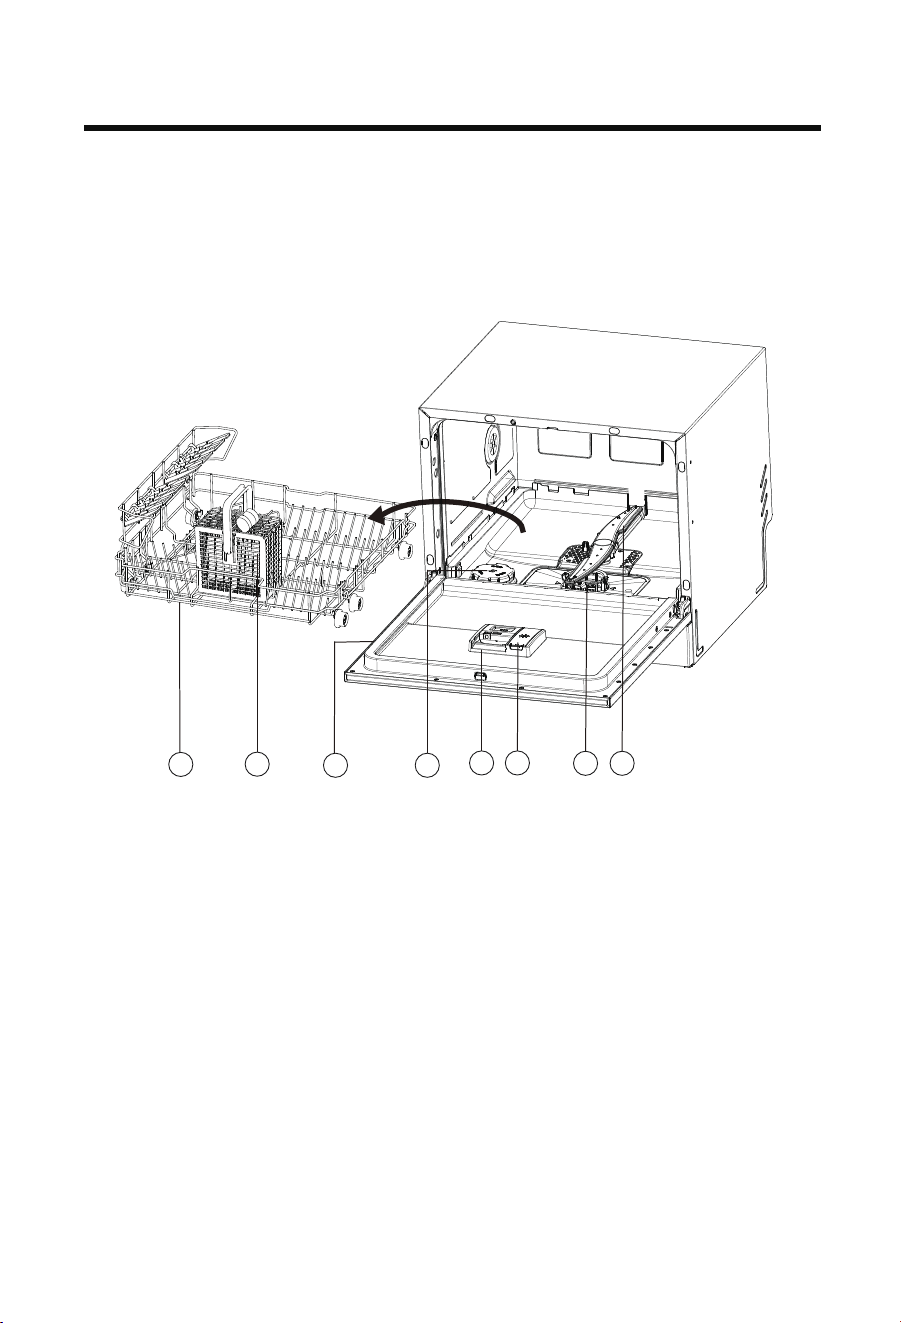
Product Description
6. Rinse Aid Dispenser
7. Filters
8. Spray Arm
1. Basket
2. Cutlery Basket
3. Rating Label
4. Salt container
2
1
3
5 6
7
8
5. Detergent Dispenser
4

13
Overview of programmes
1. ON / OFF
3. PROGRAM / CHILD LOCK
5. DELAY / SET
4. HALF LOAD / Rinse Aid RESET
6. START/ PAUSE/ RESET
2. SALT indicator / SALT RESET
Child Lock: To activate or cancel Child lock, press button 3 for 5 seconds.(only on FS and Half-Integrated)
P1. RAPID 35' (W&D)
P2. UNIVERSAL
P3. ECO
P5. GLASS
P4. INTENSIVE
1 2 3 4 5 6
Delay: Appointment for 3, 6, and 9 hours

14
Overview of programmes
Programmes
Type of food residue
RAPID 35'
(W&D)
Fresh soil:
Coffee,cake,milk,cold drink,
salad,sausage
Light soil:
Coffee,cake,milk,cold drink,
salad,sausage
Normal soil:
Soups,eggs,sauce,potatoes,
pasta,rice,roasted or fried food
Non-delicate:
Dinnerware,cutlery,
glassware
Non-delicate:
Dinnerware,cutlery,
glassware
Type of load
Programmes
Heavy soil:
Casseroles,sauces,potatoes
pasta,rice,roasted or fried food
ECO
GLASS
UNIVERSAL
INTENSIVE
Non-delicate:
Dinnerware,cutlery,
glassware
All:
Glassware,dinnerware,
pots and pans
All:
Glassware,dinnerware,
pots and pans
Normal soil:
Soups,eggs,sauce,potatoes,
pasta,rice,roasted or fried food

15
To ensure good washing results,the dishwasher requires soft water.Hard water can
be detrimental to the performance of your dishwasher. Over time,glassware washed
in hard water will become opaque and dishes will become spotted or covered in a
white film. Using very hard water can cause dishwasher parts to fail over time.Salt
can improve the situation.
The amount of salt dispensed can be set in H- and H8 stages,depending on the
hardness of your water.
1.Find out about the hardness value of your tap water.Your water utility company
will help you with this.
2.Setting can be found in the water hardness table.
Adjusting the water softening system
Identify the local water hardness
Water softening system
* Remark
1) The water softener is factory set to H5. H- gear, water softener not working.
2) When the water softener is working, you may hear a strange sound, which is normal.
3) To adjust the gear, refer to the "User Preference Settings" section.
4) If scale still appears inside the dishwasher and shelf after the gear is adjusted to H8,
it indicates that the hardness of local tap water is too high, please use white vinegar
to clean it.
Water hardness
Water softener
adjustment
German
degrees
(°dH)
French
degrees
(°fH)
Mmol/l Clark
degrees
electronic
0-1.10
H-
1.11-1.45
1.46-1.75
1.76-2.15
2.16-2.85
-
-
-
1) *
2) *
3) *
-
H1
H2
H3
H4
H5
H6
H7
H8
2.86-3.75
3.76-5.35
5.36-8.92
0-6.1
6.2-8.1
8.2-9.8
9.9-12
12.1-16
21.1-30
16.1-21
30.1-50
0-11
11.1-14.5
14.6-17.5
17.6-21.5
21.6-28.5
28.6-37.5
37.6-53.5
53.6-89.2
0-7.7
7.8-10.2
10.3-12.3
12.4-15.1
15.2-20
20.1-26.3
26.4-37.5
37.6-62.6
16
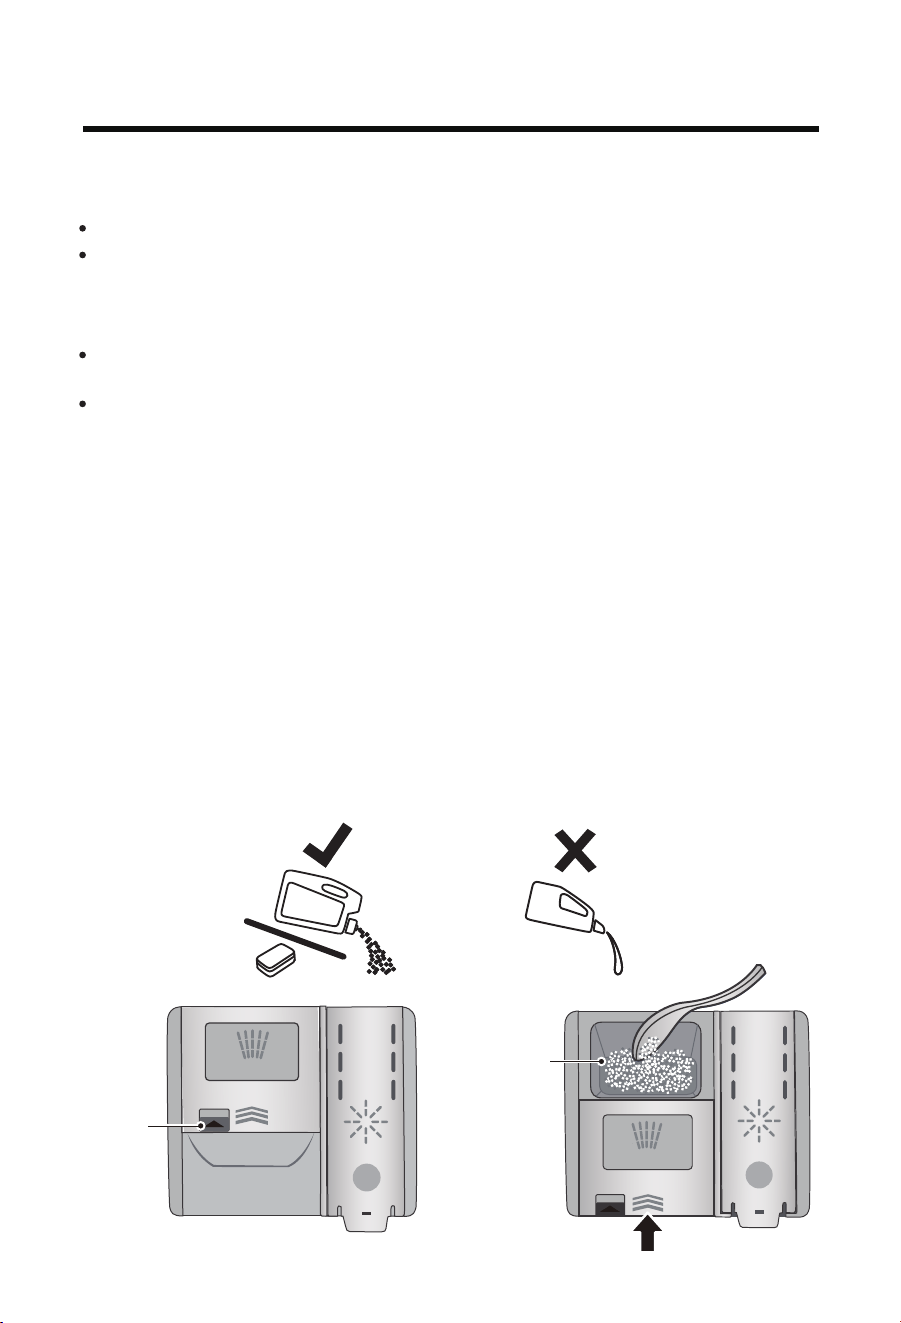
As soon as the low salt indicator is lit on the control panel ,salt should be topped
up.Always refill with special salt immediately before switching on the appliance.This
ensures that overrun special salt solution is immediately washed out and does not
corrode the rinsing tank.
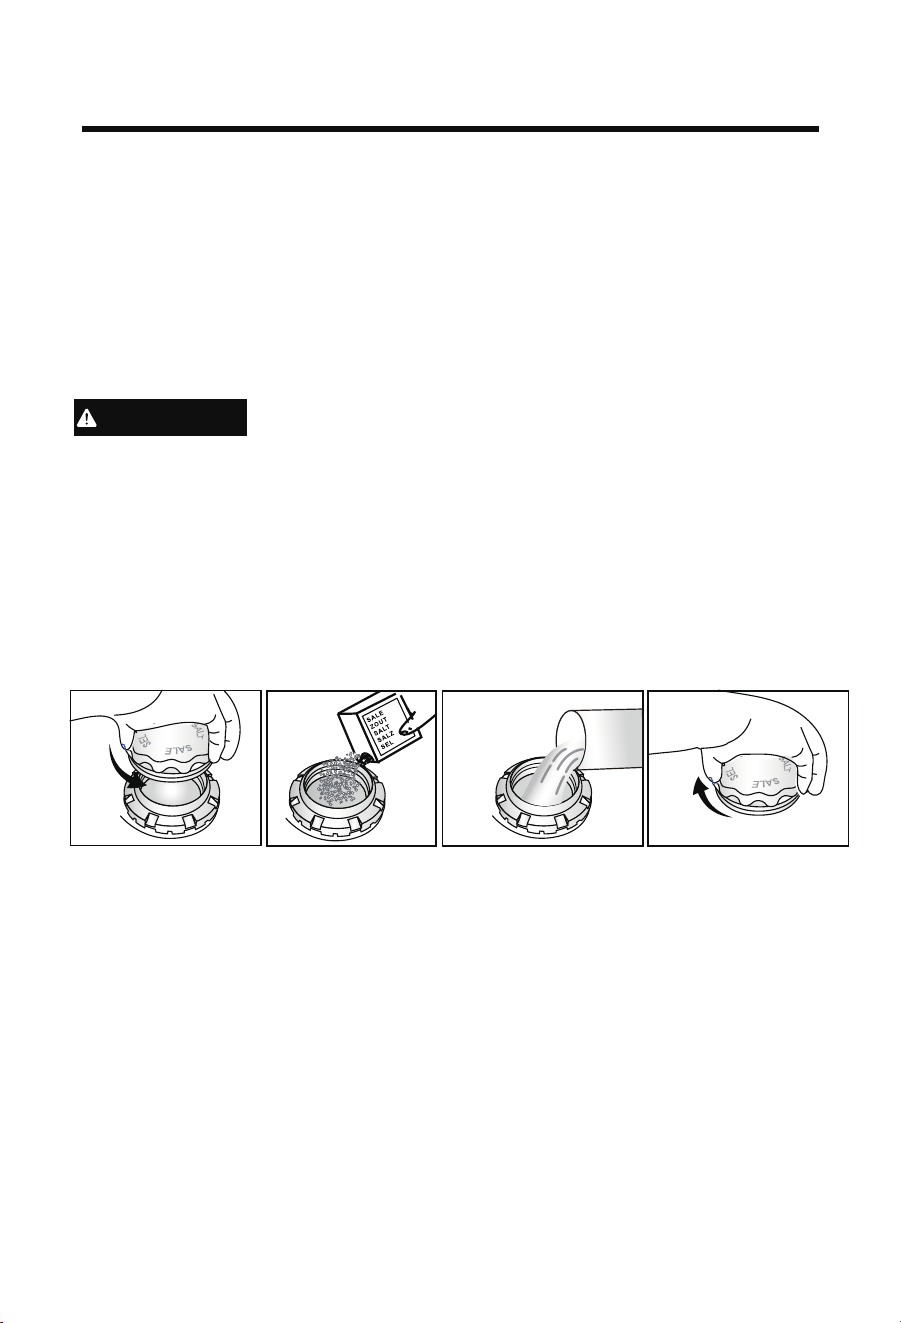
Using special salt
Top up the salt as follows:
Water softening system
Only use dishwasher salt. Other products can cause damage to the appliance!
Any spilled salt causes corrosion.Run a programme after each refill.
CAUTION
Add about 300g special salt to the water softener, add once, can be used many times
(Note: the first time to use the dishwasher, first add about 300g special salt to the water
softener, and then add 300ml water; When the salt shortage indicator lights up again,
only special salt is added, no water is needed). The consumption of special salt depends
on the water hardness (the higher the water hardness, the greater the consumption).
If the special salt indicator light is still not extinguished after salt is added, it may be
related to the amount of salt added and the temperature of the water, and will be
automatically extinguished after the salt is fully melted.
1.Turn the cap counter-clockwise to open the salt container.
2.Add 300 grams of salt to the water softener.
3.Add 300ml water (add water for first use only).
4.Turn the cap clockwise to close the salt container.

17
Caring for your tableware
Never put highly absorbent materials, such as sponges and towels in your
dishwasher. Do not put dishes or cutlery that have been soiled by tobacco
ash, wax, lubricating grease or paint in your dishwasher.
IMPORTANT!
Cutlery and silverware
All cutlery and silverware should be rinsed immediately after use to prevent tarnishing
caused by some foods. Silver items should not come into contact with stainless steel,
e.g. other cutlery. Mixing these items can cause staining. Remove silver cutlery from
the dishwasher and hand dry immediately after the programme has finished.
Aluminium
Aluminium can be dulled by dishwasher detergent. The degree of change depends on
the quality of the item.
Other metals
Iron and cast iron objects can rust and stain other items. Copper, pewter and brass
tend to stain. Wash these items by hand.
Woodware
Wooden items are generally sensitive to heat and water. Regular use in the
dishwasher may cause deterioration over time. If in doubt, wash by hand.
Glassware
Most everyday glassware is dishwasher safe. Crystal, very fine and antique
glassware may etch that is, become opaque. You may prefer to wash these items by
hand.
Pl
astic
Some plastic may change shape or colour with hot water. Check the manufacturer’s
instructions about washing plastic items. Washable plastic items should be weighted
down so they do not flip over and fill with water or fall through the basket during the
wash.
Decorated items
Most modern china patterns are dishwasher safe. Antique items, those with a pattern
painted over the glaze, gold rims or hand-painted china may be more sensitive to
machine washing. If in doubt, wash by hand.
Glued items
Certain adhesives are softened or dissolved in machine washing. If in doubt, wash by
hand.
18
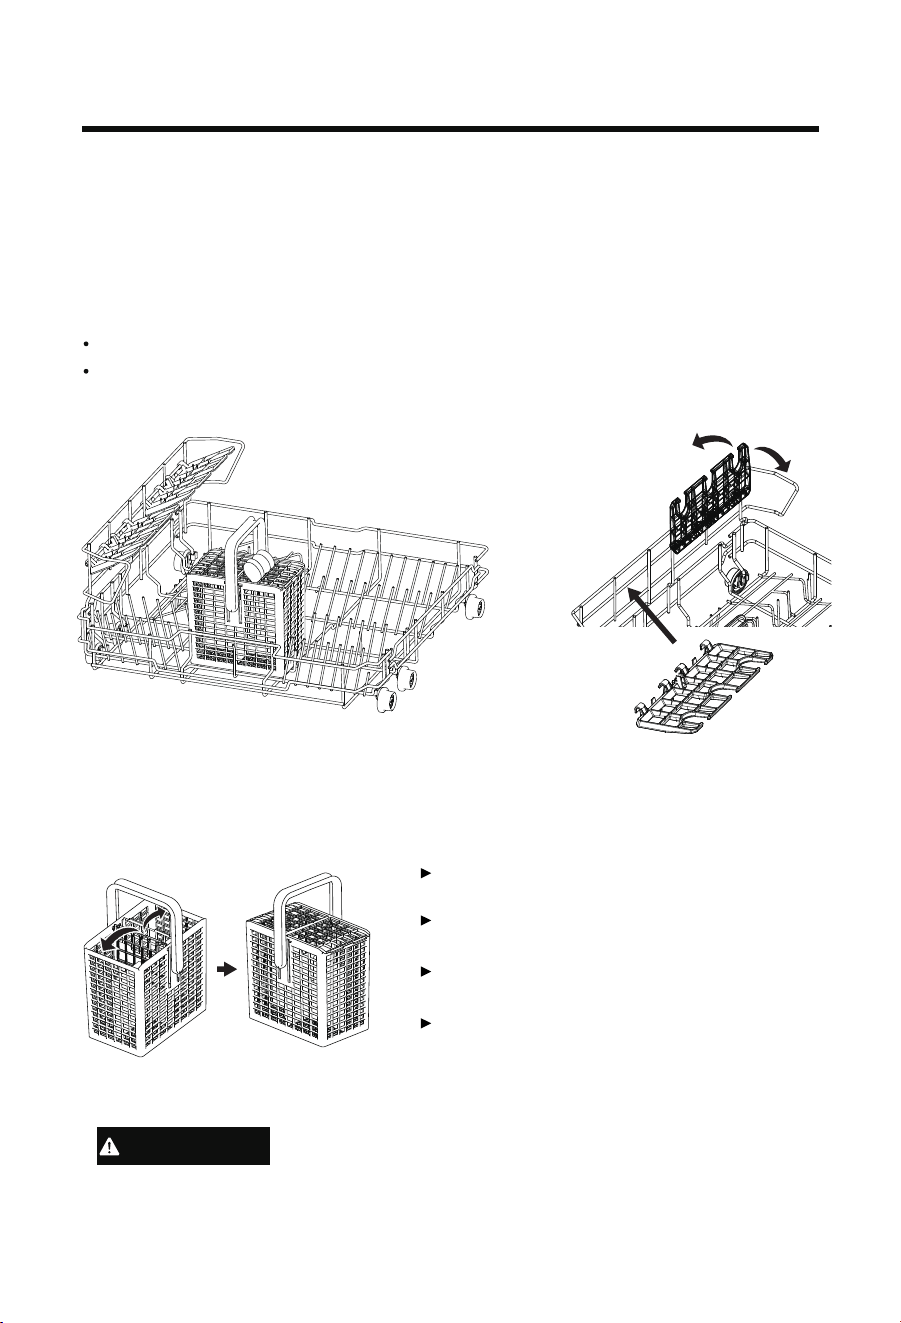
Loading tableware
Remove any large food particles before placing dishes in the dishwasher. It is not
necessary to prerinse tableware under running water.
Place the largest items here: pots,
pans, lids, serving dishes and bowls.
Fold down the tines to place pots and pans flat on the bottom.
Basket
Cutlery basket
Put sharp and pointed items with the blade pointing downward to keep them out of
harms way.
Mix spoons with other cutlery to prevent
them to bond together.
Use the grid element in order to separate
the cutlery.
If long items may block the spray arms find
The lid of the cutlery basket can be filpped
up and down.
a horizontal positioning in the upper basket.
CAUTION

How to make savings
• Tips on how to save money and not damage the environment, when using your
• Achieve the best use of energy, water, detergent and time by using the
recommended maximum load size. Save up to 50% energy by washing a full load
instead of 2 half loads.
• Scrape food particles from load items rather than pre-rinse to save water.
• For normally soiled dishes select an ECO programme for most efficient water and
energy consumption.
appliance.
19
Adding detergent
IMPORTANT!
Only use detergents recommended for automatic dishwashers.
Dishwasher detergents are strongly alkaline. They can be extremely dangerous if
swallowed. Avoid contact with the skin and eyes and keep children and infirm
persons away from the dishwasher when it is open. Check that the detergent
dispenser is empty after completion of each wash programme.
Never sprinkle or pour detergent directly onto any item in the dishwasher. Detergent
and dishwasher tablets should not be in direct contact with dishes or cutlery.
Do not use hand washing liquids, soap, laundry detergents or disinfectants, as
these will damage the dishwasher.
Filling the detergent dispenser
1.Press the button on the left of the dispenser.
IMPORTANT!
Approach the dispenser from the left-hand side to prevent the cover from snapping
open on your hand.
2.Add detergent into the appropriate compartment(s). The ‘15’ and ‘25’
markings in the
main wash compartment correspond to grams of powdered detergent.
IMPORTANT!
Tablets should only be placed in the main wash (larger) compartment.
3.Remove any excess detergent from the edges of the dispenser.
4.Close the cover and press down until it clicks shut. The detergent will automatically
be released into the dishwasher during the wash programme.
Open the
cover here
wash
compartment
6g
6g
20
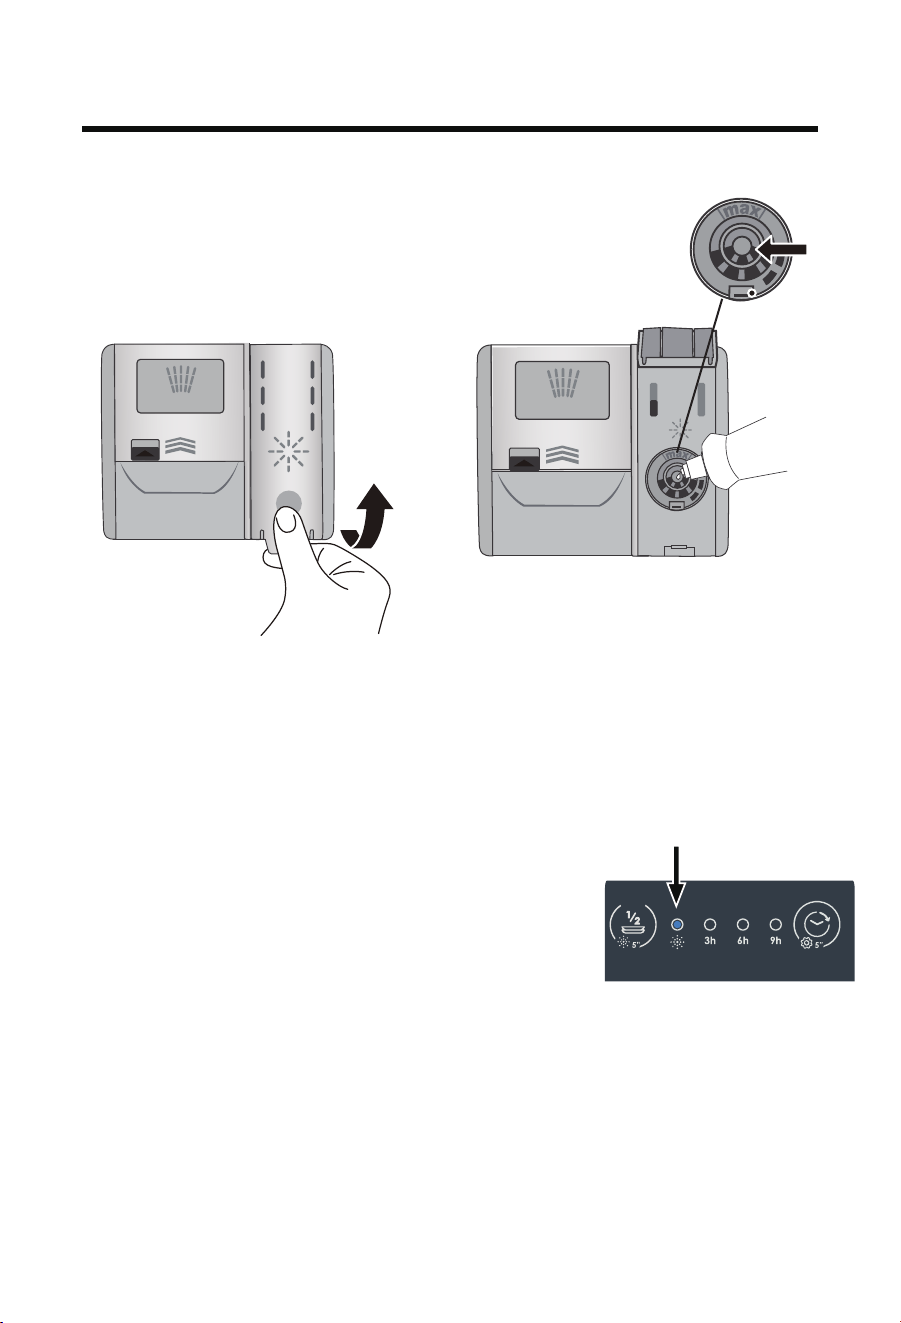
Filling the rinse aid dispenser
1.Pull the upper end of the dispenser cover to snap it open.
2.Pour rinse aid into the circular opening, making sure not to fill beyond the MAX
marking.
IMPORTANT!
Take care not to spill rinse aid into the dishwasher. Any spills must be wiped up
to prevnet excess foaming. Failure to do so may result in a service call, which
will not be covered by warranty.
3.Close the cover, making sure it clicks shut.
Add Entry
When to refill the rinse aid dispenser
When rinse aid level becomes low, the Rinse aid
indicator will flash to remind you to refill the dispenser.
Then press and hold the Rinse aid reset button
for 5 sec after each refill to reset rinse aid indicator
Using rinse aid
6g
6g
We highly recommend using liquid rinse aid regularly to ger the best drying results.
Rinse aid gives a streak-free, sparkling clean look to glass and chinaware. In addition,
it prevents metal from tarnishing
21

Preference Settings
How to Adjust User Preference Settings
Users can set Water softener grade,Buzzer setting, MEMO mode, Rinse Aid setting
according to preferences
The LED displays as right table:
L1 L2 L3 L4
L6 L7
L8 L9
L10
L11
L5
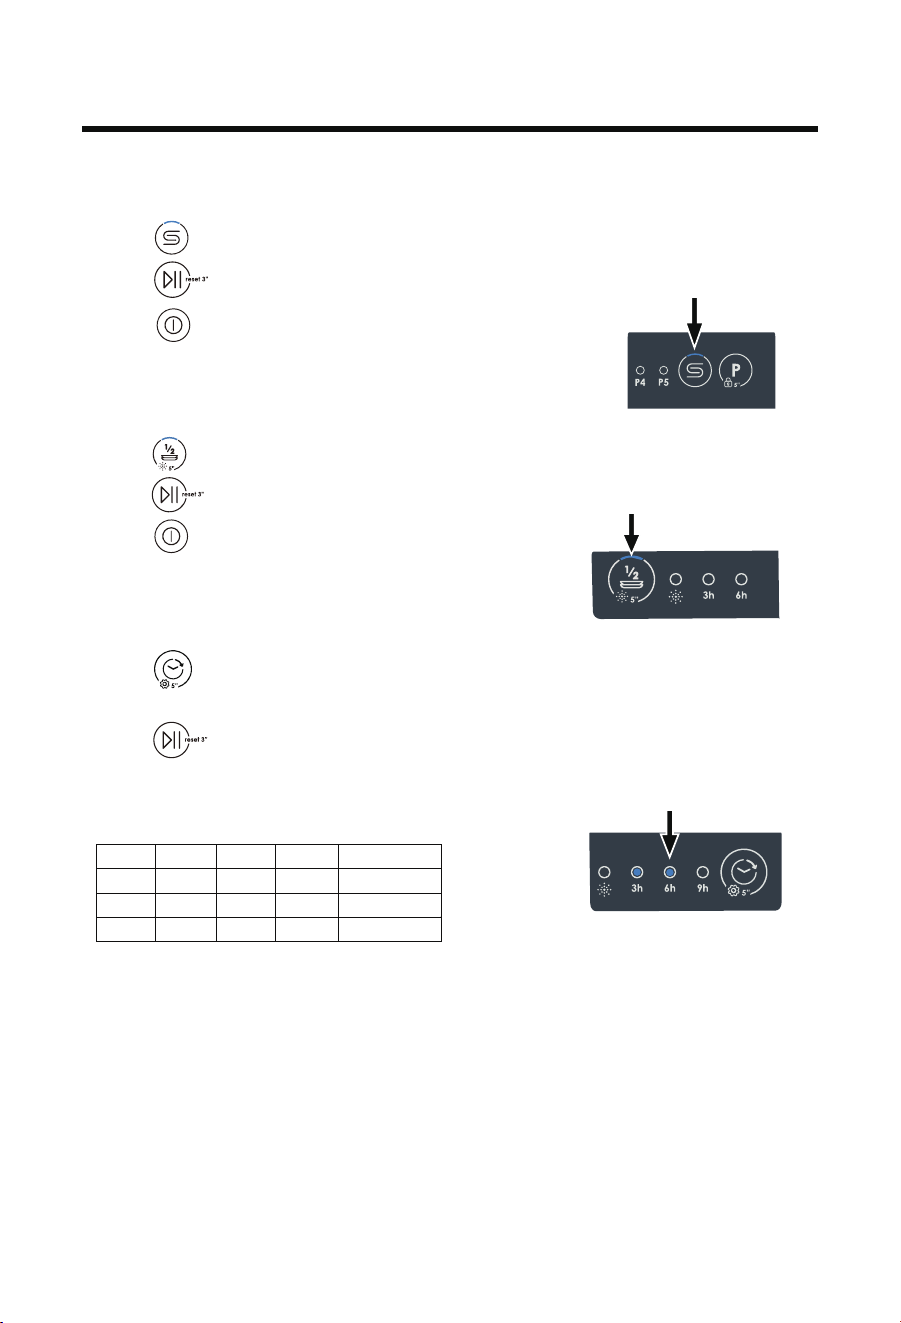
1.Water softener gear setting
Press to change the water softener dosage level from S0-S5.The default gear
During the selection of programmes. Press and hold for about 5 seconds to
enter the user preference setting. The screen indicator light flashes three times
(LED1-LED5+LED6+LED7+LED9+LED10)
is S3.
Press to cancel changes and exit.
Press to save the settings and exit.
The buzzer sounds once.
1
2
3
4
5
6
-
0-15
16-22
23-29
30-54
55-89
-
0-8
9-12
13-16
17-30
31-50
S0
22
S3
S2
S1
S4
S5
Remark:
1) Find out about the hardness value of your tap water.Your water utility company
will help you with this.
2) Setting can be found in the water hardness table.
22
Preference Settings
2.MEMO mode
Press to switch on/off. The default is off
The LED displays as follows:
R0
R1 3h
3h 6h
6h3h 9h
R2
6ml
Press to cancel changes and exit.
MEMO mode is ON/OFF, LED6 is ON/OFF.
Press to save the settings and exit. The buzzer sounds once.
Press to cancel changes and exit without buzzer.
Press to save the settings and exit. The buzzer sounds once.
3.Buzzer setting
4.Rinse Aid setting
Press to switch on/off. The default is on
Press to change the setting in steps between R0 ( minimum dispense)
Buzzer is ON/OFF, LED7 is ON/OFF.
to R3 ( maximum dispense).
Empty
3ml
5ml default
R3
Press to save the setting and exit the setting mode.
The default is R2(5ml)
23
Daily use
1. Press the ON/OFF button to turn the dishwasher on.
3. Press to start the programme.
Start a Programme
Set a start time by the following procedure in order to delay a programme start:
1.Set a programme.
2.Press the Start Delay button to seclect the required delay time.(3/6/9hrs).
3.Press the START/PAUSE button and close the door.
4.Countdown begins: 6 hrs < countdown time -------LED 9h light(L11)
Start a Programme with Delay
Pause and restart a wash programme
1. Press to pause the programme and open the door carefully. The current
washing programme indicator and running stage indicator will flash while the
dishwasher is paused.
NOTICE
There is a risk of being sprayed with hot water,do not fully open the door until
the spray arms have stopped rotating.
2.Load, remove, or rearrange any dishes if needed.
3.After closing the door, press button to continue the program. Otherwise, the
program will not run
2. Press to select the program you want on the dishwasher control panel.
4.If you want to reselect the program.Press and hold for 3s.Clear all select
option and delay setting,then back to selection(Avaliable with door open and closed)
3 hrs < countdown time < 6 hrs -------LED 6h light(L10)
3 hrs > countdown time -------LED 3h light(L9)
countdown is completed, the program starts and
the light goes out
1. Press the button for 3s, the start delay is cancelled.
2. Start a new programme and a delayed start if desired.
Cancel Start Delay / Programme
24
Daily Use
If a programme will be aborted in the process of washing dishes, the residue of
detergent remains on the dishes. These can cause damage to health! Make sure to
rinse off the detergent residues completely before using these dishes again.
If the door will be opened immediately after the end of programme, hot steam can
escape. Danger of scalding! Open the door carefully!
When the programme is completed, an accoustic signal is heard(if it is not switched
off).
1.Press to switch off the appliance or the appliance switches into standby mode
automatically after 1 min.
2. Open the door.
3. Remove dishes:
Open the door slightly and leave it ajar (about 100 mm) to help the drying
process.
Let the dishes become cold before removing them from the appliance. Hot
dishes damage more easily.
Then remove the items from the basket.
CAUTION
CAUTION
End of Programme
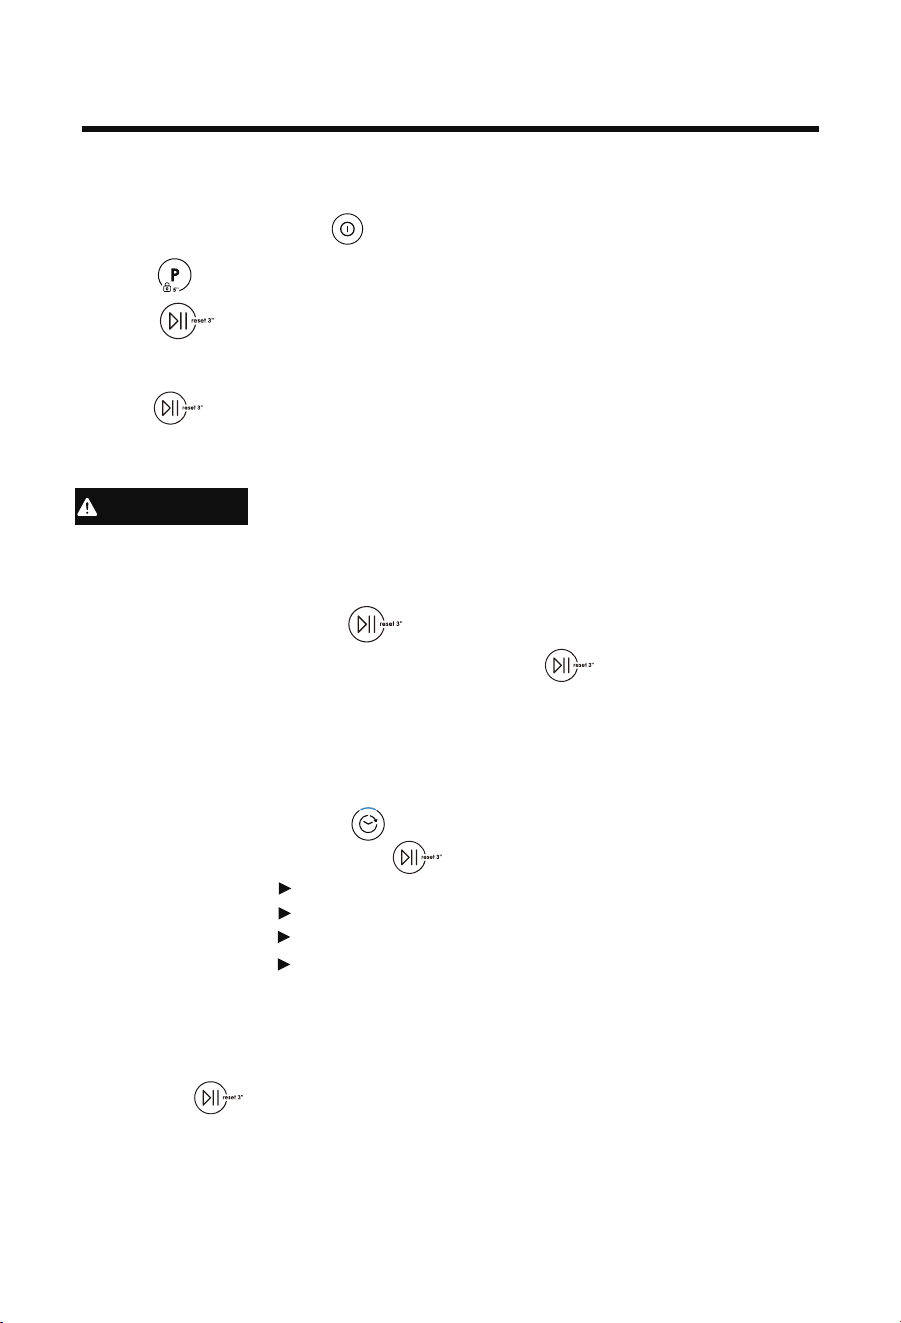
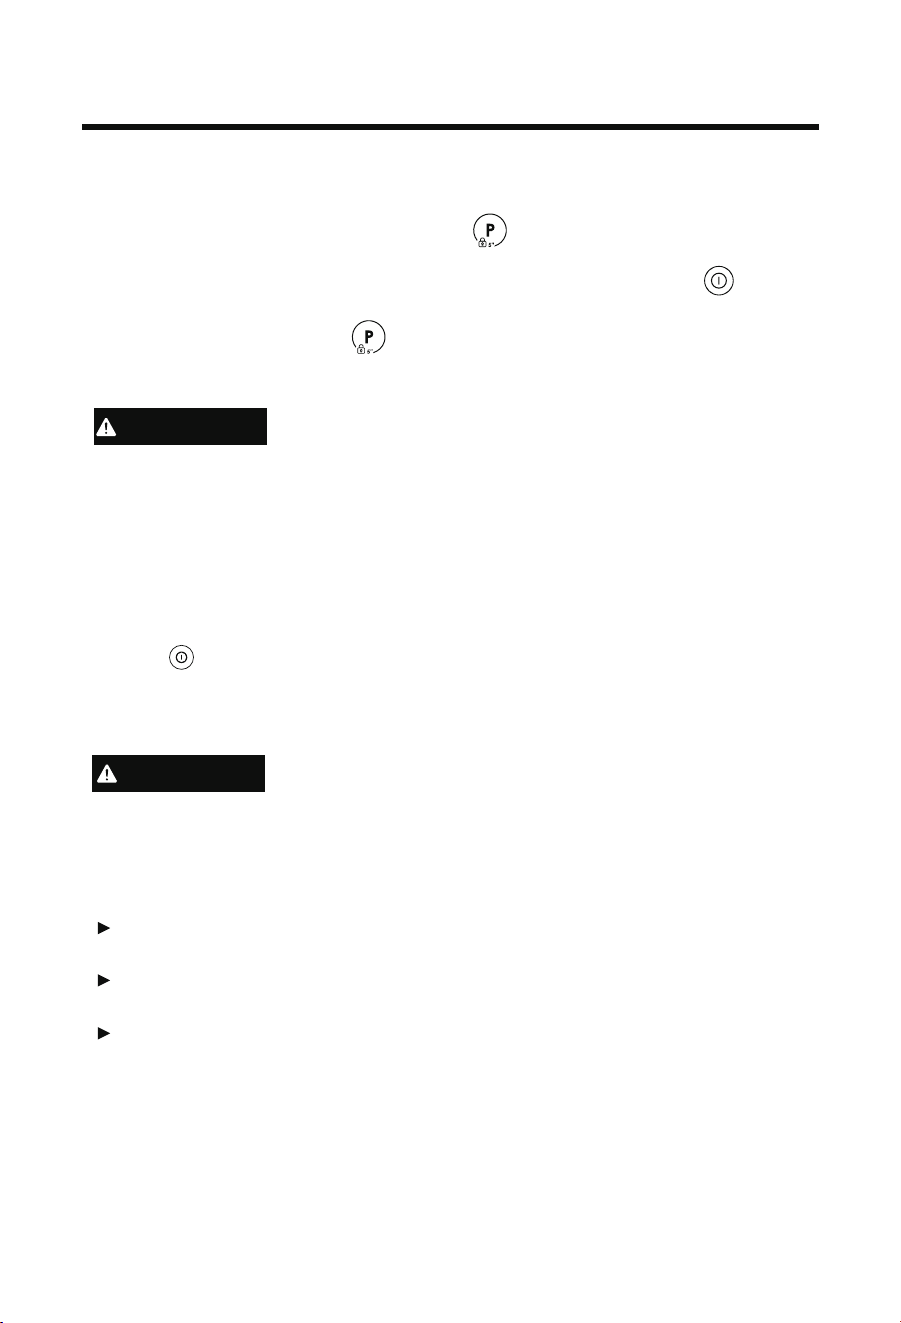
1. In the power on state, press the button for 5s to activate the child lock
function. (only on FS and Half-Integrated).
2. In the locked state,Only the Power button is avaliable.By pressing for
500ms the DW switches off but child lock remains activated.
Child lock
3. In the locked state, Press for 5s to deactivate.
25

Care and cleaning
Over time, food residue or limescale deposits may accumulate inside your
dishwasher.These may reduce efficiency, and food residue may produce a bad
odour. Inspect and clean your dishwasher regularly.
To clean exterior surfaces of the dishwasher, wipe with a clean, soft damp cloth
and dry with a clean, lint-free cloth.
For non-flush surfaces wipe along or around the surface. For example, to wipe
down the exterior control buttons, use a circular wiping motion around the button.
Take care not to cause excessive wetting of the control panel area.
Note: before cleaning the control panel, it is useful to disable the buttons by
activating child lock.
Clean thoroughly with warm water on a soft, lint-free cloth. If the interior is heavily
soiled, use a dishwasher cleaner/descaler following the manufacturer’s instructions.
The filters prevent larger food particles in the wash water from reaching the pump.
These particles may occasionally block the filters. We recommend cleaning the
filters whenever there is evidence of food particles.
Cleaning the dishwasher exterior
Cleaning the door seal and dishwasher interior
IMPORTANT !
Before any cleaning or maintenance, always disconnect the dishwasher from the
power supply, turn off the water supply, and wait until all parts of the dishwasher
have cooled.
Do not use the following cleaning aids, as they may damage the surfaces:
-plastic or stainless steel scouring pads
-abrasive, solvent, household cleaners
-acid or alkaline cleaners
-laundry detergents or disinfectants
-stainless steel cleaners or polishes
-hand-washing liquids or soap
Where there is broken crockery or glass in the dishwasher, it must be carefully
removed to prevent personal injury or damage to the appliance.
After cleaning, always check that the spray arms and filters are all correctly in
place.
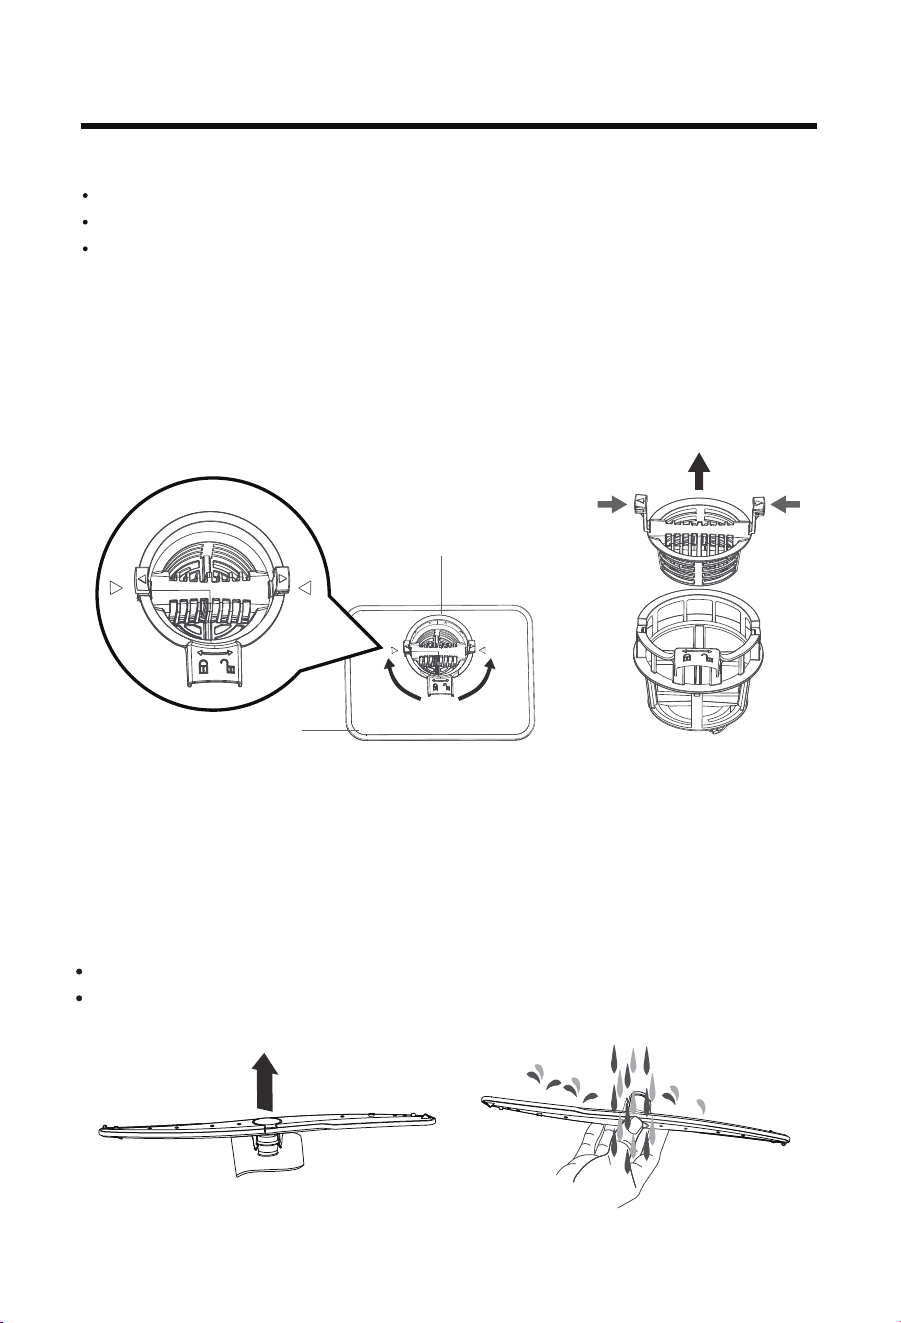
Cleaning the filters
26
Care and cleaning
To remove the drain filter, turn the filter anti-clockwise to release, then lift out.
Once the drain filter has been removed you can lift the filter plate out.
Rinse them thoroughly under running water and then replace.
Replace the filters correctly after cleaning, making sure the filter plate is flush with
the
dishwasher base.
IMPORTANT !
When cleaning the underside of the filter plate, take care handling its sharp outer
edge.
Cleaning the spray arms
Limescale and food particles in the wash water can block the holes in the spary
arms and the arm mountings. Clean these parts about once a month, or more often
should the need arise.
Drain filter
Filter plate
openclose
1 2
To remove the lower spray arm, simply lift the spray arm off its mounting.
Rinse the spray arm thoroughly under running water, then refit it on its mounting.
27

Troubleshooting
Before maintenance, deactivate the appliance and disconnect the mains plug from
the mains socket.
Electrical equipment should be serviced only by qualified electrical experts,
because improper repairs can cause considerable consequential damages.
Many occuring problems could be solved by yourself without specific expertise. In
case of a problem please check all shown possibilities and follow below instructions
before you contact an after sales service.
CAUTION
The appliance does not start, or it stops during operation or Indicator is lighted.
Problem Possible cause Possible solution
The programme
does not start.
Appliance door is open. Close the appliance door.
Delay start is set. Refer to 3h 6h 9h.
Mains plug is not connected
in the mains socket.
Connect the mains plug.
Fuse in the house circuit is
damaged.
Replace the fuse.
Rinse Aid Indicator
is lighted.
Rinse aid dispenser is empty.
Refill Rinse aid until full and
reset indicator.
Refill of rinse aid was not
confirmed
Press button for 5 sec
after each refill.
Fault codes
Error codes on the display
E10
Alarm code Alarm lightFlicker number
E30
E40
E50
Flicker 1 time P5
P3
P3、P5
P4、P5
Flicker 3 time
Flicker 4 time
Flicker 5 time
28

Troubleshooting
Problem Possible cause Possible solution
Acoustic alarm,
LED flash at interval
(1 time / 1 sec).
The alarm code is
E10.
The appliance does
not fill with water.
Water tap is closed.
Open the water tap.
Water inlet hose has a kink or
a bend.
Make sure that the position of
the hose is correct.
In case of aqua-stop system:
water protection is triggered;
the marker (C) is red.
The hose must be replaced.
Filter in the water inlet hose
is clogged.
Clean the filter at the inlet
hose connections at tap and
the rear of the appliance.
Water inlet is clogged. Check water flow from tap.
Water pressure is too low.
Contact your local water
authority.
Acoustic alarm,
LED flash at interval
(3 times / 1 sec)
Leak:
The drain
pump runs permanently!
Anti- flood device is on:
There are water leakages in
the appliance.
The water inlet valve is
open and blocked.
The drainage is blocked.
1.Close the water tap.
2.Disconnect appliance from
power supply.
2.Contact Service.
2.Contact Service.
Error codes on the display
All other Alarmcodes:
1. Note Alarmcode
2. Contact Service ; refer to CUSTOMER SERVICE
Note: Whenever Error is solved
switch off the appliance and
restart the programm.
The alarm code is
E30.
29
E40
Flowmeter alarm
1.Long press the power
button to shut down or
unplug the power cord
1.Long press the power
button to shut down or
unplug the power cord
E50
Display board
communication alarm

Troubleshooting
Problem Possible cause Possible solution
The dishes are not
clean.
Filters are clogged. Clean the filters.
assembled and installed.
Make sure that the filters
are correctly assembled and
installed.
Spray arms are clogged.
Rem o v e r ema i n i n g f o o d
remnants with a thin pointed
object.
applicable for the type of load
and food remnants.
programme is applicable for
the type of load and food
remnants.
Incorrect position of the items
in the baskets. Water could
not wash all items.
Make sure that the position
of the items in the baskets is
correct and that the water can
easily wash all items.
Spray arms could not turn
freely.
Make sure that the position
of the items in the baskets is
correct and does not cause
the blockage of t
he spray
arms.
No detergent or insufficient
quantity of detergent in the
detergent dispenser.
Make sure that you add the
correct quantity detergent in
the dispenser before you start
a programme.
interrupted by a long break.
Do not open the door or cut
power supply during the wash
cycle.
Whitish streaks,
Released Decrease the released
quantity of rinse aid
quantity of rinse aid
is too much.
Quantity of detergent was too
much.
Make sure that you add the
correct quantity of detergent
in the dispenser before you
start a programme.
Washing Results are not satisfactory
Filters are not correctly
Programme was not
Make sure that the
stains or bluish layers
on glasses and
dishes.
The wash cycle was
30
Troubleshooting
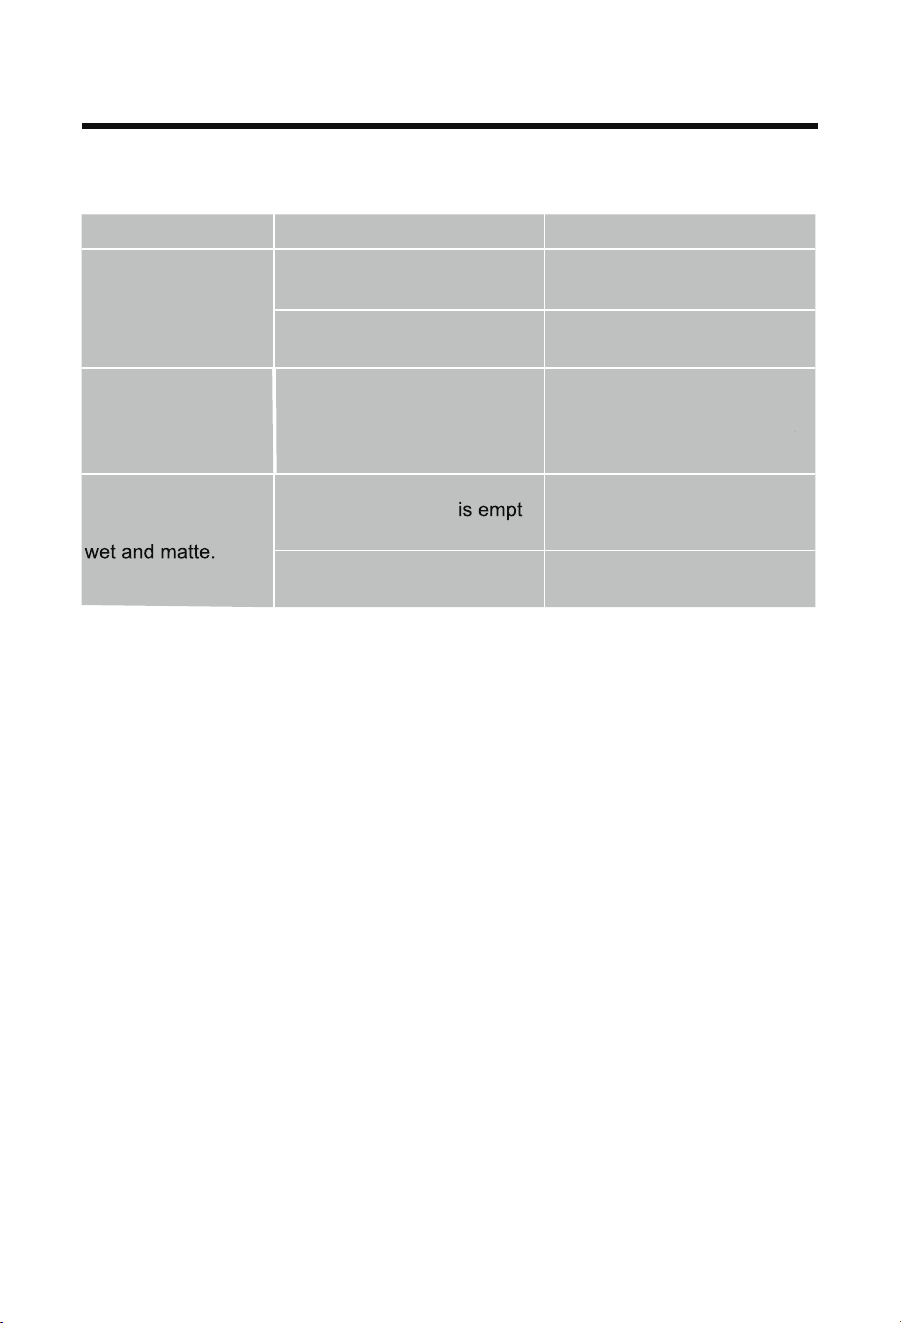
Problem Possible cause Possible solution
Dry water drop
stains on glasses
and dishes.
Rinse aid dosage is too low.
Multitab stains on glasses
The dishes are wet.
The dishes are
Rinse aid dispenser y.
the
dispenser and reset the rinse
aid indicator.
Quality of rinse aid or Multitab.
Quality of rinse aid or
Refill rinse aid into
Cleaning product too old;
change the product.
Cleaning product too old;
change the product.
Open the door slightly and
to help the drying process.
Increase the released quantity
of rinse aid.
leave it ajar(about 100mm)
Programme had no drying
phase.
Programme had a low
temperature drying phase.
31

Standards Test
Wash programme
Powdered detergent quantities
Rinse aid dosage level
Maximum number of place settings
Eco
R2
6
14g
Recommended loading patterns
32
