www.klarstein.com
AURORA 60/90
SMART
Dunstabzugshaube
Range Hood
Campana extractora
Hotte aspirante
Cappa aspirante
10040234 10040235 10040236
10040237


3
DE
Sehr geehrter Kunde,
wir gratulieren Ihnen zum Erwerb Ihres Gerätes. Lesen Sie
die folgenden Hinweise sorgfältig durch und befolgen Sie
diese, um möglichen Schäden vorzubeugen. Für Schäden,
die durch Missachtung der Hinweise und unsachgemäßen
Gebrauch entstehen, übernehmen wir keine Haftung. Scannen
Sie den folgenden QR-Code, um Zugriff auf die aktuellste
Bedienungsanleitung und weitere Informationen rund um das
Produkt zu erhalten:
INHALTSVERZEICHNIS
Sicherheitshinweise4
Installation6
Bedienfeld9
Tastenfunktionen9
Gerätesteuerung per Smartphone11
Birnen und Lampen austauschen13
Fehlersuche und Fehlerbehebung14
Produktdatenblatt15
Hinweise zum Umweltschutz17
Spezielle Entsorgungshinweise für Verbraucher in Deutschland18
Hinweise zur Entsorgung20
Konformitätserklärung20
TECHNISCHE DATEN
Artikelnummer
10040234, 10040235, 10040236,
10040237
Stromversorgung 220-240 V ~ 50/60 Hz
WiFi-Standard
802.11 b/g/n
WiFi-Frequenz
2,4 GHz
WiFi-Sendeleistung (max.)
< 20 dBm
English 21
Español 37
Français 53
Italiano 69
Nederlands

4
DE
SICHERHEITSHINWEISE
• Lesen Sie sich alle Hinweise vor der Benutzung sorgfältig durch und bewahren Sie
die Bedienungsanleitung zum späteren Nachschlagen gut auf.
• Die Montagearbeiten dürfen nur von einer Elektrofachkraft oder einer qualizierten
Person durchgeführt werden. Bevor Sie die Dunstabzugshaube verwenden, stellen
Sie sicher, dass die Spannung (V) und die auf der Dunstabzugshaube angegebene
Frequenz (Hz) der Spannung und Frequenz der Stromversorgung in Ihrem Haushalt
entsprechen.
• Für Schäden, die durch unsachgemäßen Gebrauch und unsachgemäße Installation
entstehen, übernehmen wir keine Haftung.
• Kinder unter 8 Jahren dürfen die Dunstabzugshaube nicht benutzen.
• Das Gerät ist nicht für den kommerziellen Gebrauch, sondern nur für den Gebrauch
im Haushalt und in ähnlichen Umgebungen vorgesehen.
• Reinigen Sie das Gerät und den Filter regelmäßig, damit das Gerät immer efzient
arbeitet.
• Ziehen Sie vor der Reinigung immer den Stecker aus der Steckdose.
• Reinigen Sie das Gerät genau wie in der Bedienungsanleitung angegeben.
• Verwenden Sie unter der Abzugshaube kein offenes Feuer.
• Falls das Gerät nicht normal funktioniert, wenden Sie sich an den Hersteller oder
einen Fachbetrieb.
• Kinder ab 8 Jahren, psychisch, sensorisch und körperlich eingeschränkte Menschen
dürfen das Gerät nur benutzen, wenn sie vorher von einer für sie verantwortlichen
Aufsichtsperson ausführlich mit den Funktionen und den Sicherheitsvorkehrungen
vertraut gemacht wurden und die damit verbundenen Risiken verstehen.
• Falls das Netzkabel oder der Stecker beschädigt sind, müssen sie vom Hersteller,
einem autorisierten Fachbetrieb oder einer ähnlich qualizierten Person ersetzt
werden.
• Wenn die Dunstabzugshaube mit Herden verwendet wird, die Gas oder andere
Brennstoffe verbrennen, muss eine ausreichende Belüftung des Raumes vorhanden
sein.
• Flambieren Sie nicht unter der Abzugshaube.
• Achtung: Die Geräteoberäche kann während des Betriebs heiß werden.
Wichtige Hinweise zur Installation
• Die Luft darf nicht in einen Abzug abgeleitet werden, der zum Absaugen von
Rauchgasen von Gas- oder anderen Brennstoffen verwendet wird (gilt nicht für
Geräte, die nur die Luft in den Raum zurückführen).
• Beachten Sie alle regionalen Vorschriften zum Einbau von Entlüftungsanlagen.

5
DE
Wichtige Hinweise zum Abluftbetrieb
WARNUNG
Vergiftungsgefahr durch zurückgesaugte Abgase! Betreiben Sie das
Gerät nicht im Abluftbetrieb, wenn es zusammen mit einer
raumluftabhängigen Feuerstätte betrieben wird und keine
ausreichende Luftzirkulation garantiert wird.
Raumluftabhängige Feuerstätten wie Gas-, Öl-, Holz- oder Kohleheizungen, Boiler oder
Durchlauferhitzer beziehen die Luft aus dem Raum und führen sie durch ein Abluftrohr
oder einen Kamin ins Freie. Im Abluftbetrieb wird der Küche und den benachbarten
Räumen Luft entzogen. Ohne ausreichende Zuluft entsteht ein Unterdruck. Giftige
Gase aus dem Kamin oder Abluftrohr können dabei in die Wohnräume zurückgesaugt
werden.
• Achten Sie darauf, dass ausreichend Frischluftzufuhr garantiert ist und die Luft
zirkulieren kann.
• Ein Zuluft-/Abluftmauerkasten reicht nicht aus, um die Einhaltung des Grenzwertes
sicherzustellen.
Ein gefahrloser Betrieb ist nur dann möglich, wenn der Unterdruck am Standort der
Feuerstätte 4 Pa (0,04 mbar) nicht überschreitet. Das erreichen Sie, wenn durch nicht-
verschließbare Öffnungen in Türen und Fenstern in Verbindung mit einem Zuluft-/
Abluftmauerkasten die zur Verbrennung benötigte Luft nachströmen kann. Lassen
Sie sich in jedem Fall von einem Schornsteinfegermeister beraten und den gesamten
Lüftungsverbund des Hauses beurteilen. Er kann ihnen gegebenenfalls die nötigen
Maßnahme zur Belüftung nennen.
Wird die Dunstabzugshaube ausschließlich im Umluftbetrieb eingesetzt, ist der Betrieb
ohne Einschränkung möglich.
Wichtige Hinweis zur Demontage des Geräts
• Die Demontage gleicht der Installation/Montage in umgekehrter Reihenfolge.
• Nehmen Sie sich bei der Demontage eine zweite Person zu Hilfe, um Verletzungen
zu vermeiden.

6
DE
INSTALLATION
Vorbereitung
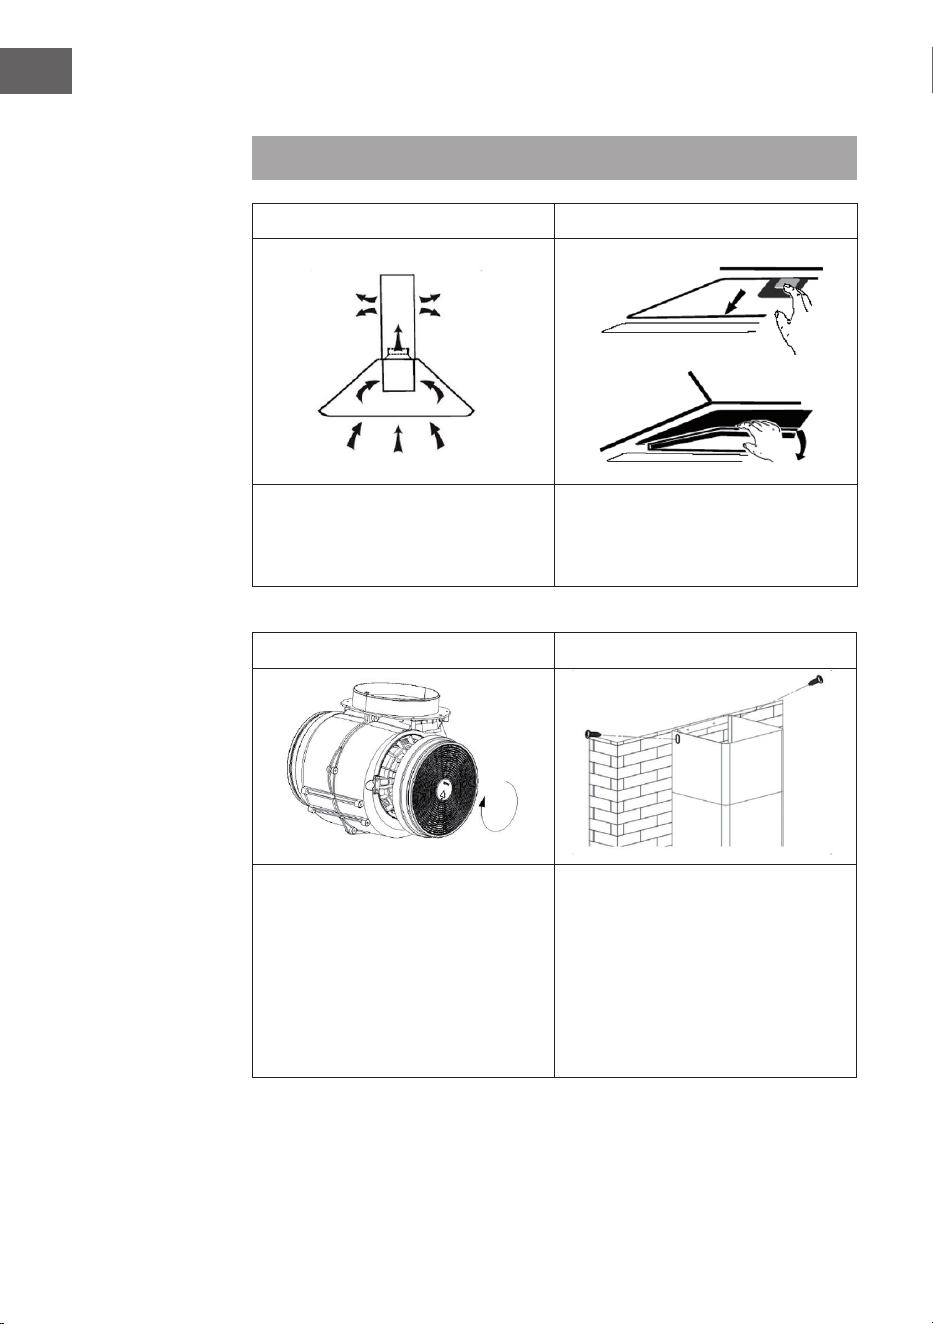
Falls Sie über einen Abzug nach außen verfügen, können
Sie die Abzugshaube wie auf dem Bild rechts installieren.
Der Abzugskanal sollte einen Durchmesser von mindestens
150 mm haben und aus Emaille, Aluminium oder einem
exiblen, hitzebeständigen Rohr bestehen.
• Schalten Sie das Gerät vor der Installation aus und
ziehen Sie den Stecker.
• Die Abzugshaube sollte in einer Höhe von 65-75 cm
über dem Kochfeld angebracht werden.
Installation mit Außenentlüftung
Hinweis: Beachten Sie die Sicherheitshinweise zur Bedienung des Gerätes, wenn die
Luft nach außen abgeführt wird. Wenn die Dunstabzugshaube gleichzeitig mit einem
Gerät in Betrieb ist, das seine Energie aus einer anderen Quelle als Strom bezieht,
darf der Unterdruck im Raum 4 Pa nicht übersteigen (4 x 10
-5
Bar).
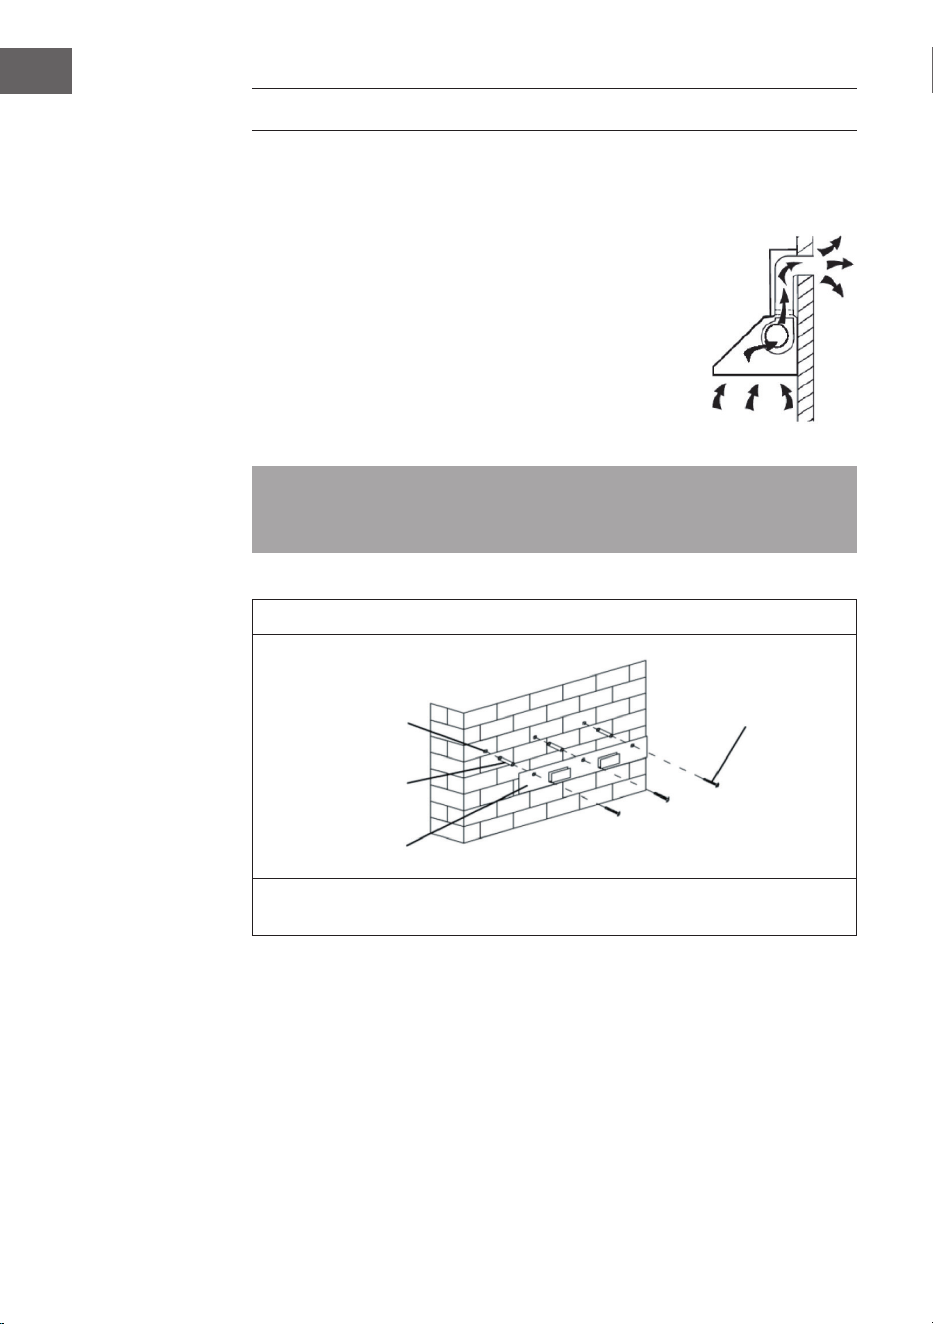
1
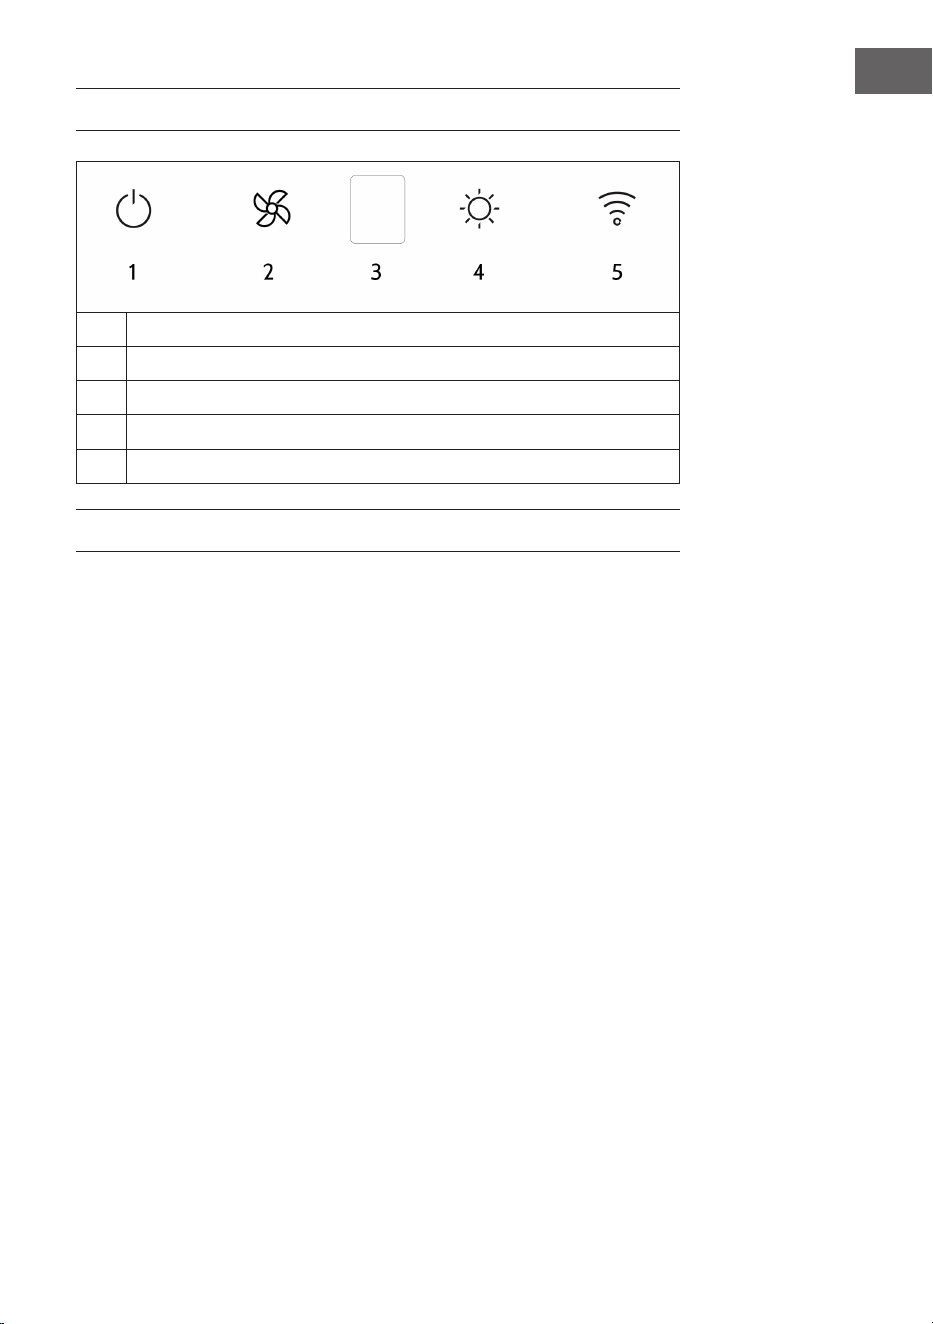
Bohren Sie 3 x 8 mm Löcher für die Halterung. Befestigen Sie die Halterung mit den
mitgelieferten Dübeln und Schrauben an der Wand.
Bohrloch
Dübel
Halterung
Schrauben
(4 mm x 30mm)
7
DE
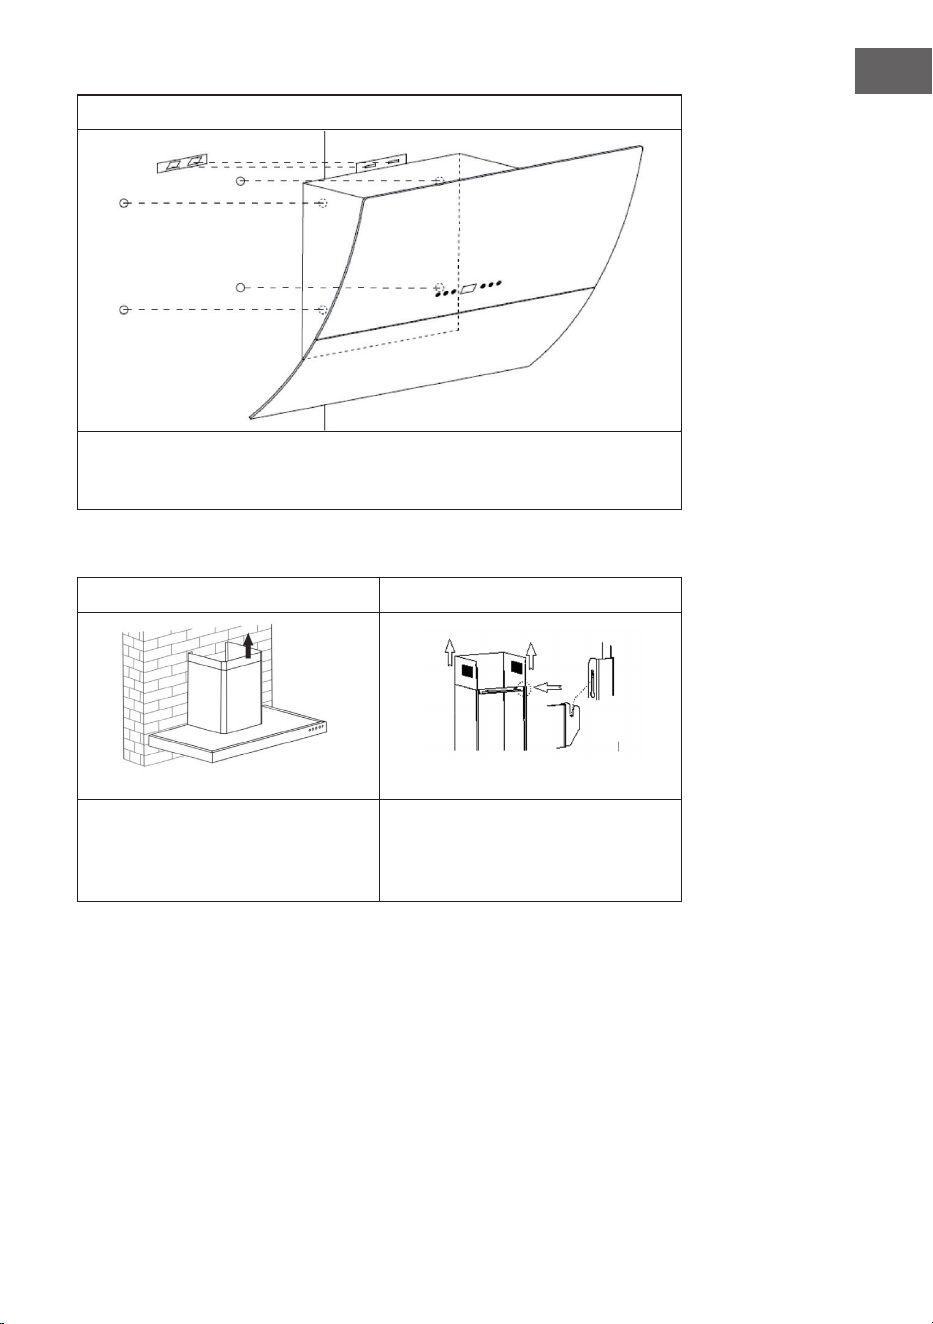
2
Für Modelle mit schräger Ausführung müssen Sie vor der Montage vier zusätzliche
Löcher (8 mm) bohren. Setzen Sie Dübel und Schrauben ein, bevor Sie die
Dunabzugshaube an der Wand aufhängen.
Kamininstallation
1 2
Stecken Sie den oberen Kamin in den
unteren Kamin. Ziehen Sie dann den
oberen Kamin bis zur erforderlichen
Höhe heraus.
Sobald der Kamin die richtige Höhe hat,
hängen Sie die Befestigungsbohrung in
die Haltekrallen ein.
Installation mit Innenentlüftung
Falls Sie nicht über einen Außenabzug verfügen, benötigen Sie kein Abluftrohr. Die
Installation entspricht der Installation mit Außenentlüftung.

8
DE
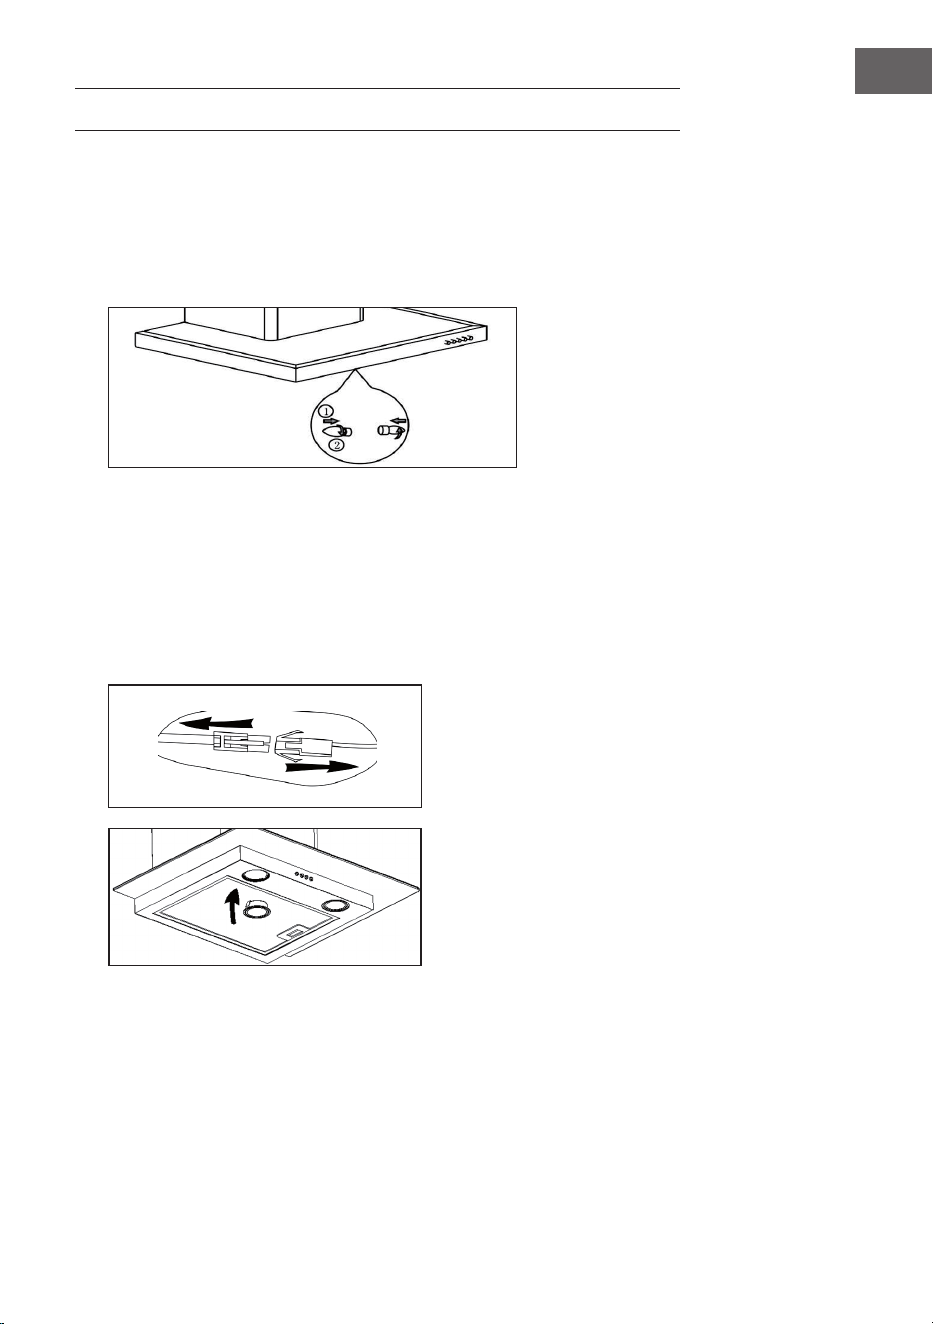
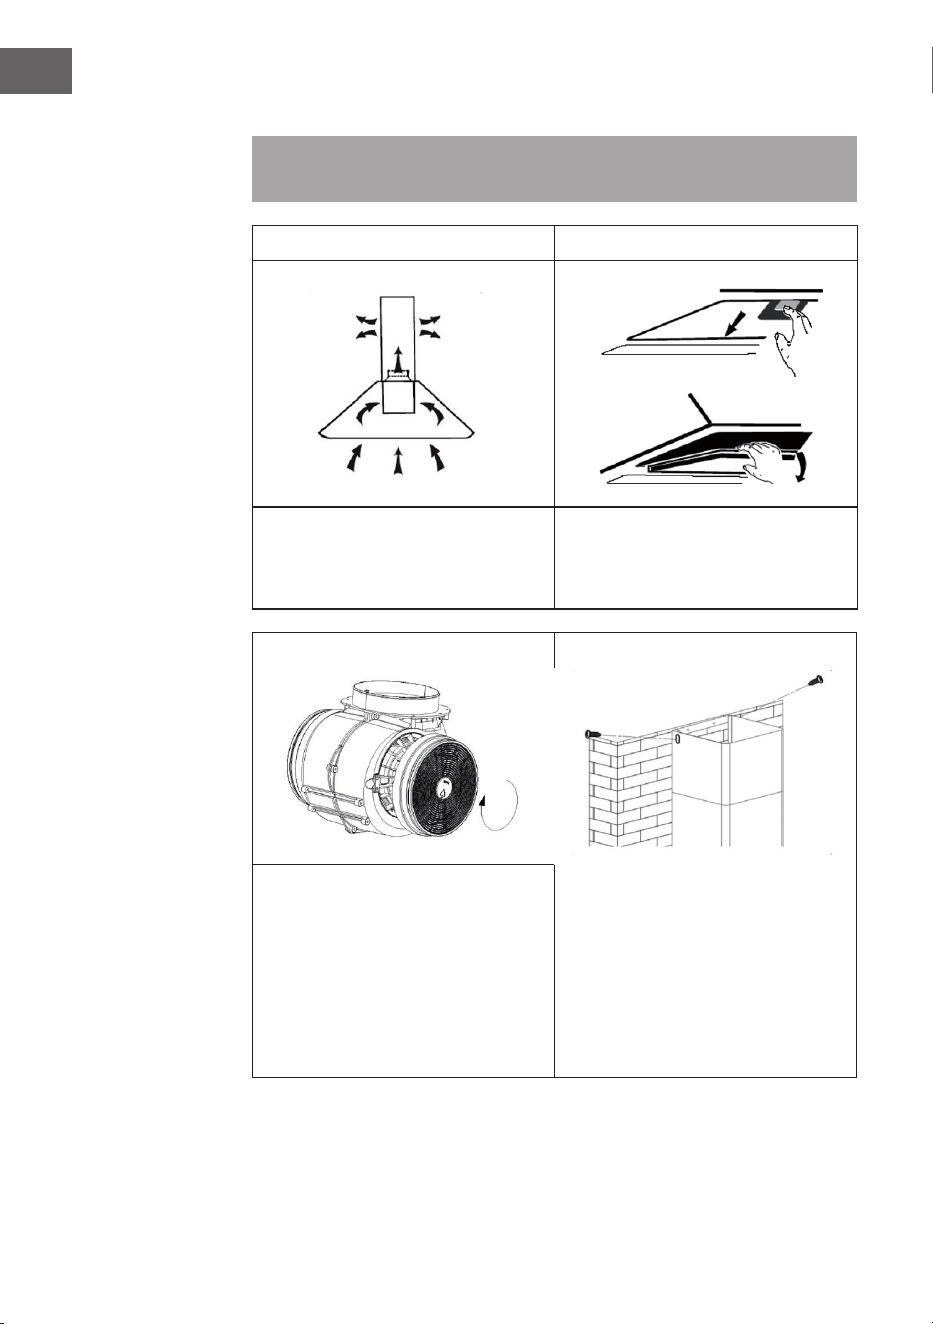
Aktivkohlelter einbauen
Hinweis: Ein Aktivkohlelter gehört nicht zum Lieferumfang. Sie können ihn aber zur
Abzugshaube dazukaufen.
1 2
Mit einem Aktivkohlelter lassen sich
bei innenentlüfteten Abzugshauben
unangenehme Essensgerüche aus der
Luft ltern.
Um den Filter installieren zu können,
müssen sie zuerst den Fettlter entfernen.
Drücken Sie auf den Verschluss und
ziehen Sie ihn herunter.
3 4
Stecken Sie den Aktivkohlelter auf
den Lüfter und drehen Sie ihn im
Uhrzeigersinn fest. Wiederholen
die Prozedur auf der anderen Seite.
Versichern Sie sich, dass der Filter fest
sitzt, andernfalls könnte er sich lösen
und eine Gefahr darstellen. Hinweis: Bei
installiertem Aktivkohlelter nimmt die
Absaugleistung etwas ab.
Setzen Sie den Lüfter wieder ein und
befestigen Sie den Fettlter. Befestigen
Sie den oberen Kamin und entfernen sie
zum Schluss noch die blaue Schutzfolie
vom Kamin und der Abzugshaube.

9
DE
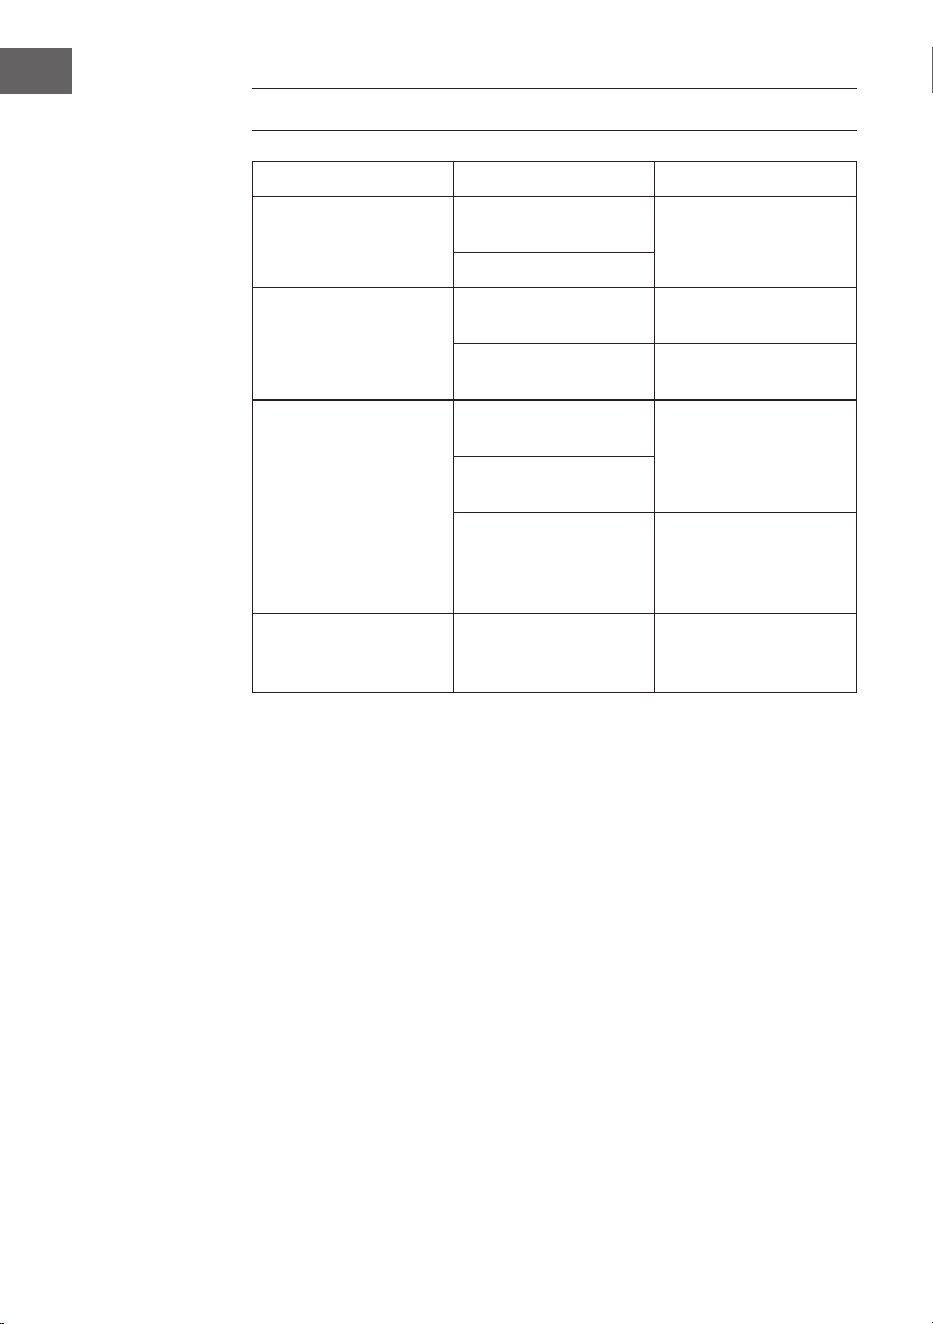
BEDIENFELD
1 POWER-Taste (Gerät einschalten/ausschalten)
2 Geschwindigkeit
3 Display
4 Licht (ein/aus)
5 WiFi (WLAN-Symbol)
TASTENFUNKTIONEN
Ein/aus
Drücken Sie kurz auf die Taste EIN/AUS, um die Dunstabzugshaube einzuschalten.
Wenn Sie das Gerät zum ersten Mal einschalten, läuft der Lüfter auf Stufe1. Wenn Sie
das Gerät ausschalten, merkt es sich die zuletzt eingestellte Geschwindigkeit.
Geschwindigkeit einstellen
Drücken Sie mehrmals kurz auf die Taste GESCHWINDIGKEIT, um die gewünschte
Geschwindigkeit einzustellen: Stufe 1 (niedrig) > Stufe 2 (mittel) > Stufe 3 (hoch).
Drücken Sie einmal lang auf die Taste GESCHWINDIGKEIT, um die höchste
Geschwindigkeit einzustellen. Im Display blinkt [b] für die Booster-Funktion. Nach
5Minuten wechselt die Geschwindigkeit automatisch auf Stufe 3.
Ausschalt-Verzögerung einstellen
Wenn sich das Gerät im Standby-Modus bendet, halten Sie die Tasten
GESCHWINDIGKEIT + LICHT gleichzeitig gedrückt, um einzustellen, dass der
Ventilator mit einer Verzögerung von 5Minuten ausgeht. Im Display blinkt die aktuelle
Geschwindigkeit und die Zeit wird heruntergezählt. Nachdem die Zeit abgelaufen
ist, werden alle Tasten heruntergedimmt, während das Display weiter blinkt und ein
Signal ertönt. Drücken Sie eine beliebige Taste oder warten sie 5 Sekunden, um in den
Standby-Modus zu wechseln. Um die Verzögerung abzubrechen, halten Sie während
des Countdowns die Tasten GESCHWINDIGKEIT + LICHT gleichzeitig gedrückt.

10
DE
Licht ein/aus
Drücken Sie kurz auf die Taste LICHT, um das Licht einzuschalten. Drücken Sie die Taste
erneut, um das Licht wieder auszuschalten.
Lichtfarbe einstellen
Drücken Sie lang auf die Taste LICHT, um die Lichtfarbe einzustellen. Das Display zeigt
[0] an. Drücken Sie nun mehrmals kurz auf die Taste GESCHWINDIGKEIT, um die
Lichtfarbe von [L1] bis [L9] anzupassen:
L1 = weiß L2 = rot L3 = grün
L4 = blau L5 = gelb L6 = lila
L7 = orange L8 = türkis L9 = grün-gelb
Nachdem Sie die gewünschte Farbe eingestellt haben, halten Sie die Taste LICHT erneut
lang gedrückt, um die Einstellung abzuschließen.
WiFi aktivieren
Drücken Sie im Standby-Modus lang auf die Taste WiFi, um die WiFi-Funktion zu
aktivieren. Das WiFi-Symbol beginnt zu blinken. Richten Sie die Verbindung ein, wie
im Kapitel „Gerätesteuerung per Smartphone“ beschrieben. Sobald die Verbindung
erfolgreich steht, leuchtet das WiFi-Symbol durchgängig. Falls innerhalb von 3 Minuten
keine Verbindung zustande kommt, hört das WiFi-Symbol auf zu blinken und das Gerät
wechselt automatisch in den Standby-Modus.
11
DE
GERÄTESTEUERUNG PER SMARTPHONE
Wenn Sie Ihr Klarstein-Gerät in Ihr heimisches WLAN einbinden, können Sie es ganz
bequem über die dazugehörige Klarstein-App bedienen. Die App ermöglicht es Ihnen,
nicht nur das Gerät über Ihr Smartphone fernzusteuern, sondern bietet Ihnen zudem
Zugang zu Rezepten und weiterführenden Informationen.
Gehen Sie folgendermaßen vor, um Ihr Smartphone mit Ihrem Klarstein-Gerät zu
verbinden:
1 Laden Sie zuerst die Klarstein-App herunter, indem Sie mit Ihrem Smartphone den
QR-Code scannen (siehe unten) oder laden Sie diese direkt aus dem App Store
oder bei Google Play herunter.
2 Versichern Sie sich, dass Ihr Smartphone mit demselben WLAN-Netzwerk
verbunden ist, mit dem Ihr Klarstein-Gerät verbunden werden soll.
3 Öffnen Sie die Klarstein-App.
4 Melden Sie sich mit Ihrem Konto an. Wenn Sie noch keinen Account haben,
registrieren Sie sich in der Klarstein-App.
5 Folgen Sie den Anweisungen der App.
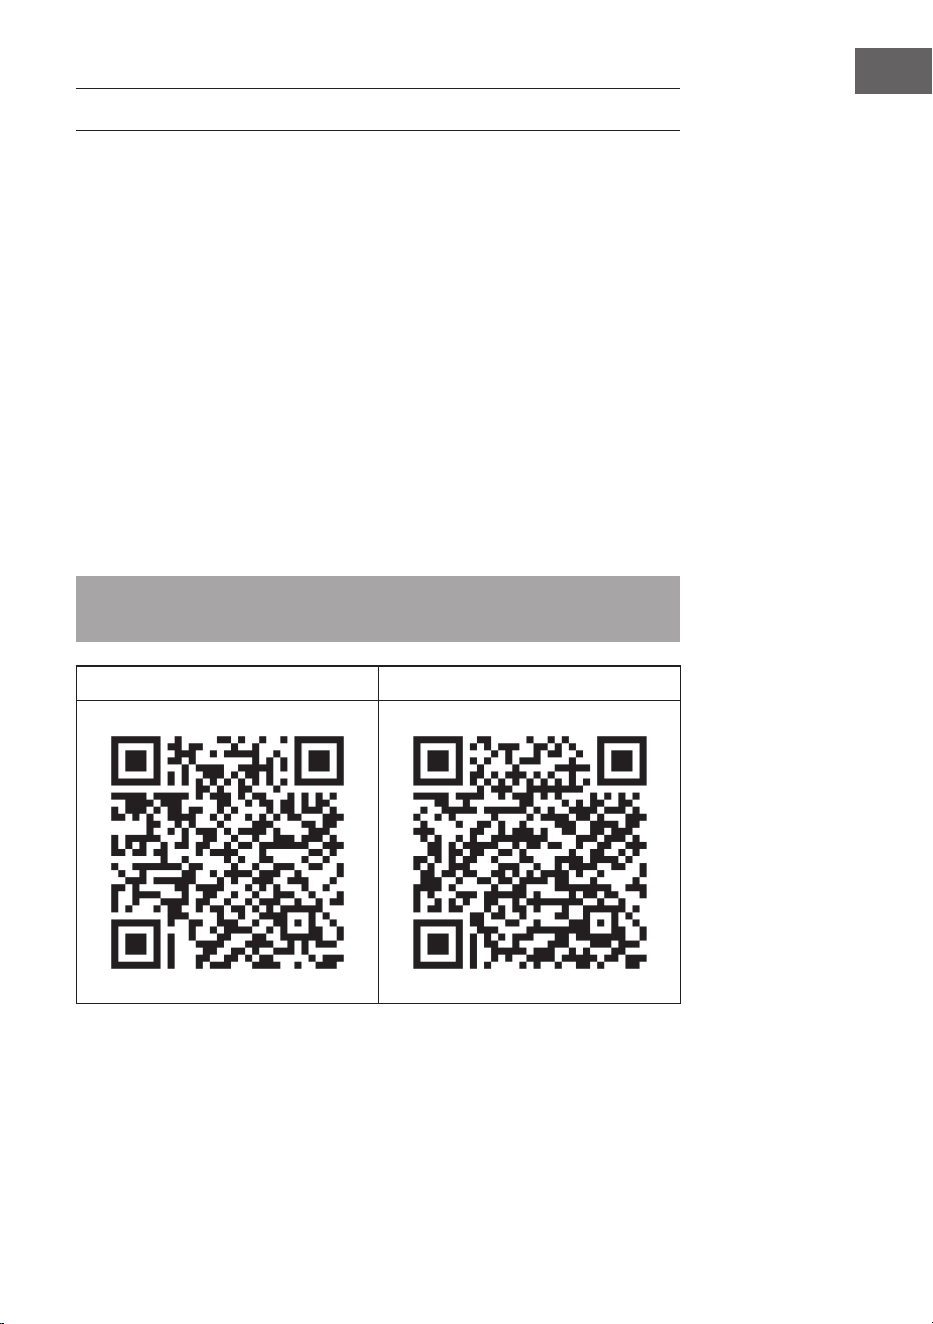
App-Download
Verwenden Sie die Scan-Funktion Ihres Handys, um den QR-Code zu scannen, und
speichern Sie die App auf Ihrem Smartphone.
Hinweis: Weitere Hinweise zur Bedienung der App und Hilfestellungen zur
Herstellung der Verbindung mit Ihrem Gerät liefert Ihnen die App, sobald Sie sie das
erste Mal öffnen.
iOS Android

12
DE
Fehlerbehebung bei Verbindungsproblemen
Wenn Ihr Klarstein-Gerät im WLAN nicht gefunden werden kann, überprüfen Sie
Folgendes:
1 Das Gerät ist nicht eingesteckt. Stellen Sie sicher, dass Ihr Gerät an eine Steckdose
angeschlossen ist.
2 Das Gerät bendet sich nicht im Kopplungsmodus. Stellen Sie sicher, dass die WiFi-
Anzeige (LED) auf dem Bedienfeld des Smart-Geräts blinkt, wie in der Anweisung
„WiFi-Einstellungen zurücksetzen“ Ihres Smart-Geräts beschrieben (Anweisungen
nden Sie in der Regel unter Geräteanschluss).
3 Der WiFi-Zugangspunkt arbeitet nicht auf 2,4 GHz. Vergewissern Sie sich, dass Ihr
Zugangspunkt auf dem 2,4-GHz-Band arbeitet und Sie eine eigene SSID auf dem
2,4-GHz-Band haben. Wenn Sie sich über das Betriebsband Ihres Access Points
unsicher sind, wenden Sie sich bitte an Ihren Internet-Provider.
Wichtig: Bitte beachten Sie, dass, wenn Ihr WiFi-Router über ein Dualband verfügt -
also sowohl im 2,4-GHz- als auch im 5-GHz-Band arbeitet - Sie die SSIDs für jedes
Band trennen und die 2,4-GHz-SSID für die Verbindung verwenden müssen.
4 Überprüfen Sie die Firewall-Einstellungen Ihres WiFi-Netzwerks. Die Firewall-
Einstellung Ihres WiFi-Netzwerks erlaubt der Klarstein-App möglicherweise
nicht, die WiFi-Einstellungen auf Ihrem Smart-Gerät zu kongurieren. Bitte stellen
Sie sicher, dass Sie kein öffentliches WiFi-Netzwerk nutzen, z. B. Flughäfen,
Wohnheime, Firmen, etc.
5 Unterschiedliche Anmeldedaten im Smartphone und in der App. Stellen Sie sicher,
dass die in der Klarstein-App eingegebenen WiFi-Anmeldedaten mit denen
übereinstimmen, mit denen Ihr Smartphone verbunden ist.
Wenn Sie die oben genannten Punkte befolgt haben und Ihr Smartphone sich immer
noch nicht mit der App verbinden kann, wenden Sie sich bitte per E-Mail an uns, um
Unterstützung zu erhalten: [email protected]
13
DE
BIRNEN UND LAMPEN AUSTAUSCHEN
Birne austauschen
1 Schalten Sie das Gerät aus und ziehen Sie den Stecker aus der Steckdose.
2 Schrauben Sie die 2 Schrauben der Lampenabdeckung heraus und nehmen Sie sie ab.
3 Schrauben Sie die Birne heraus und ersetzen Sie sie durch eine desselben Typs:
LED-Lampen austauschen
• Trennen Sie die Lichtverkabelung, die sich innerhalb der Haube hinter dem Fettlter
bendet.
• Entfernen Sie die Birnenfassungen und die Kabel mithilfe eines Schraubenziehers
aus der Abzugshaube und ersetzen Sie die Lampe durch eine desselben Typs:
LED-Lampe: max. 1,5 W
14
DE
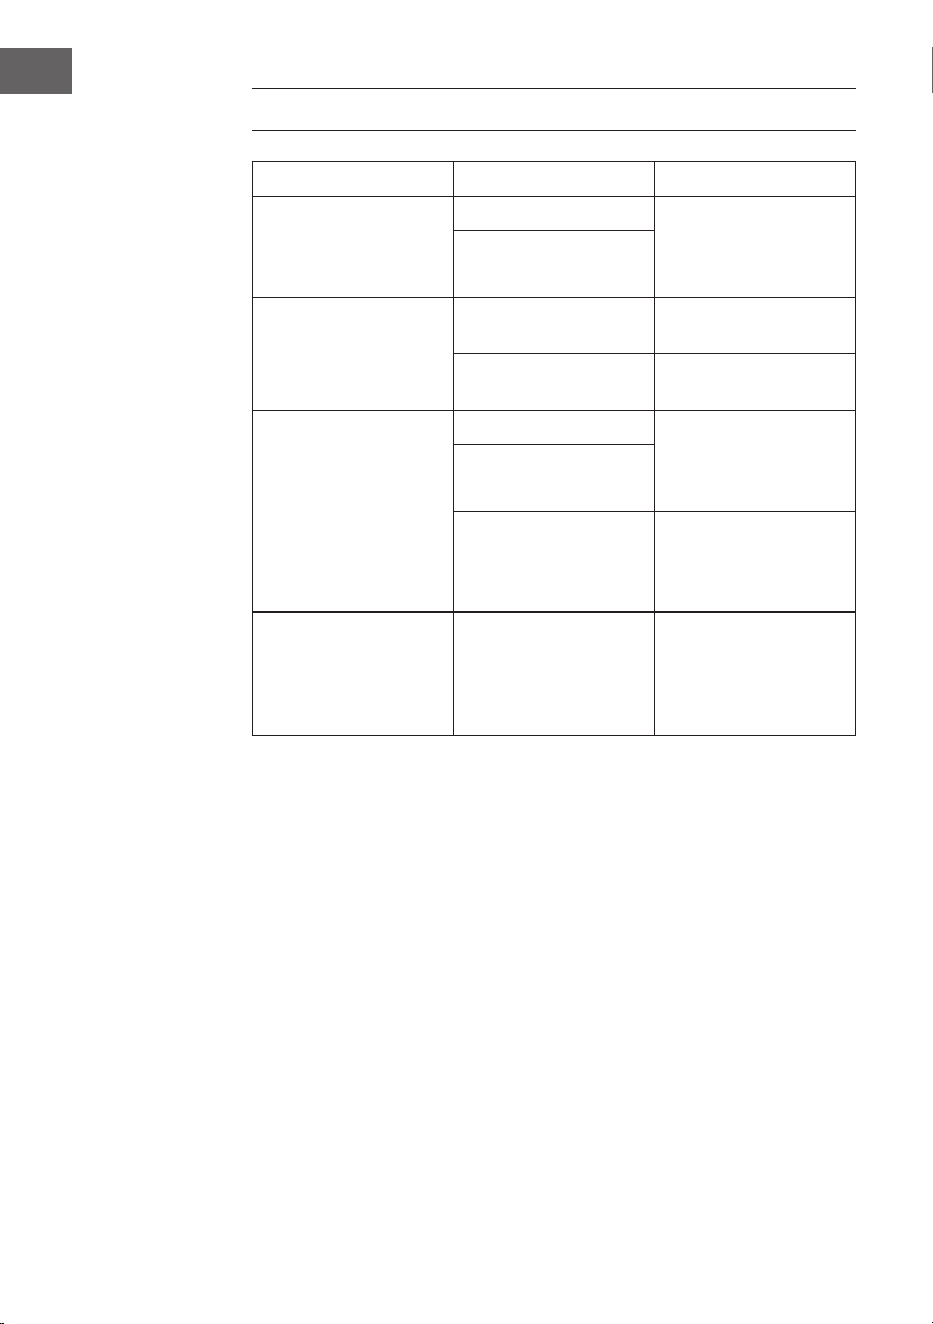
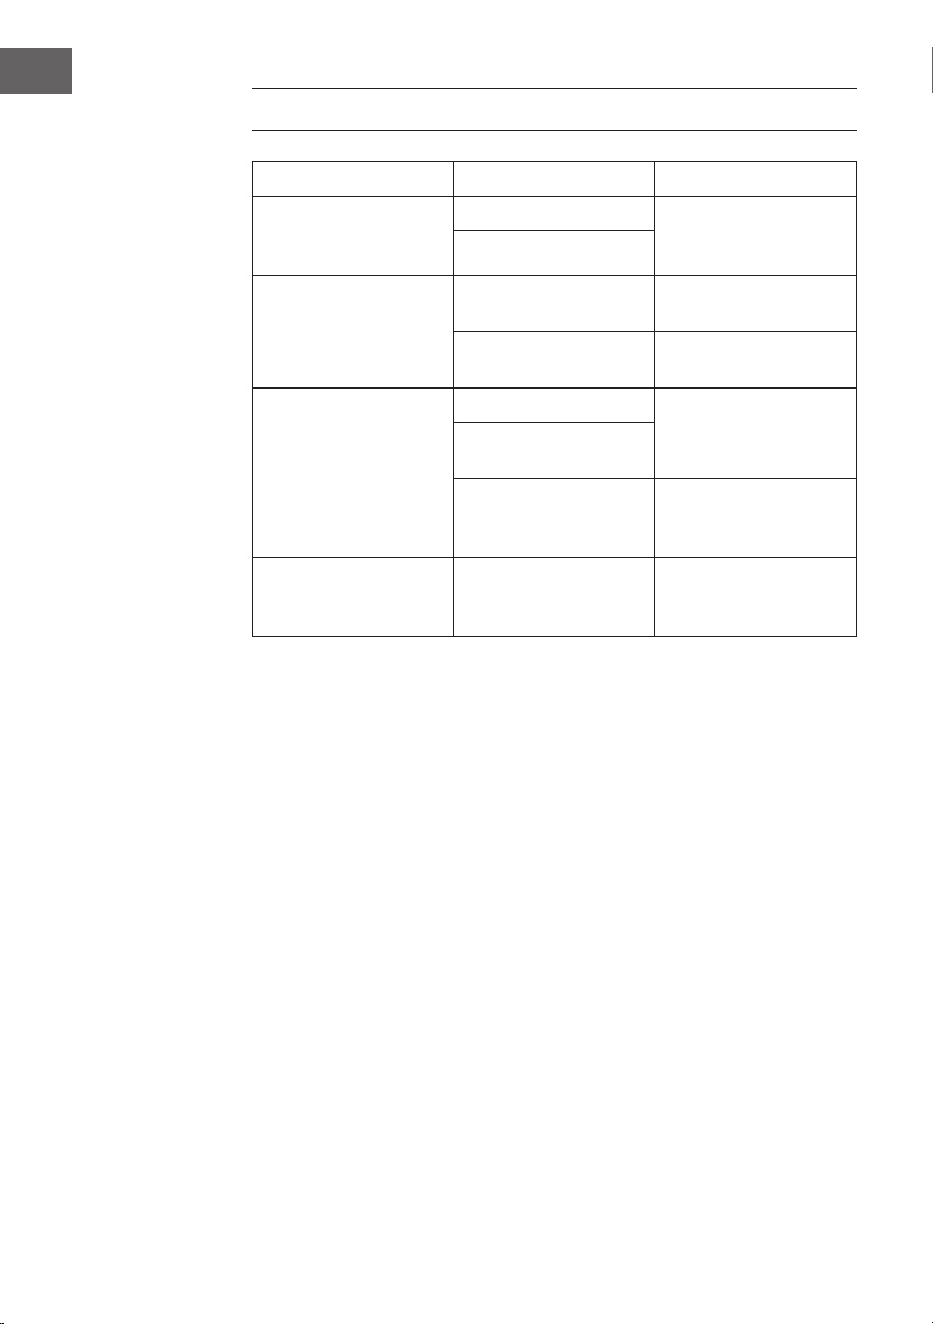
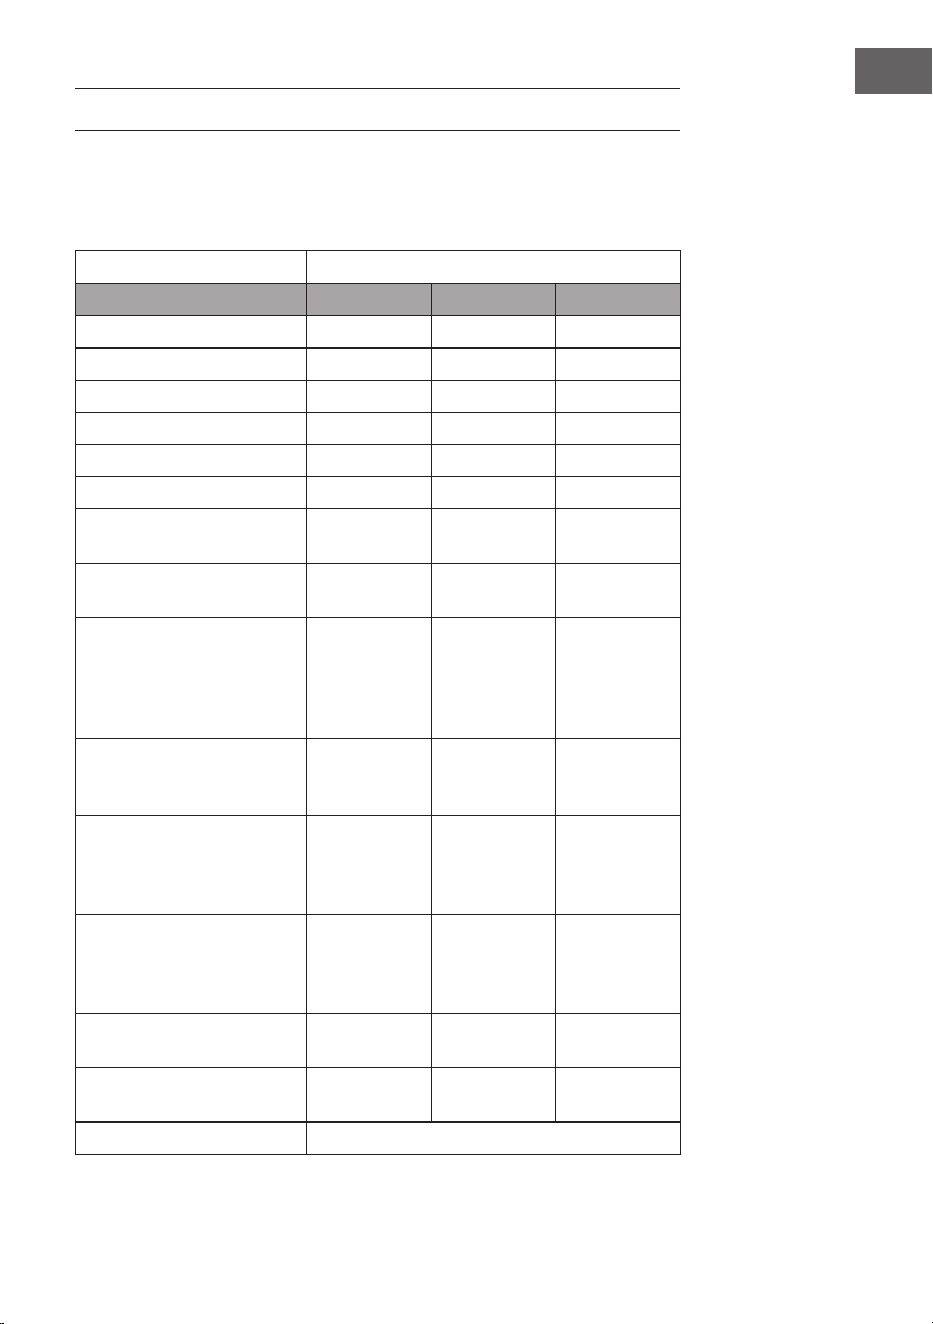
FEHLERSUCHE UND FEHLERBEHEBUNG
Fehler Mögliche Ursache Lösung
Das Licht geht an, aber
der Lüfter arbeitet nicht.
Das Lüfterblatt ist kaputt. Schalten Sie das Gerät
aus und lassen Sie es
von einem Fachbetrieb
untersuchen.
Der Motor ist beschädigt.
Das Licht und der Lüfter
funktionieren nicht.
Die Birne ist
durchgebrannt.
Ersetzen Sie die Birne
durch eine gleichwertige.
Stecker nicht eingesteckt. Stecken Sie den Stecker
ein.
Das Gerät vibriert stark. Das Lüfterblatt ist kaputt. Schalten Sie das Gerät
aus und lassen Sie es
von einem Fachbetrieb
untersuchen.
Motor nicht richtig
angebracht.
Das Gerät hängt nicht
sicher an der Wand.
Nehmen Sie das Gerät ab
und versichern Sie sich,
dass die Aufhängung gut
sitzt.
Die Absaugleistung ist
schlecht.
Zu großer Abstand
zwischen Abzugshaube
und Herd.
Hängen Sie die
Abzugshaube so auf, dass
der Abstand zwischen
Herd und Abzug 65-
75cm beträgt.

15
DE
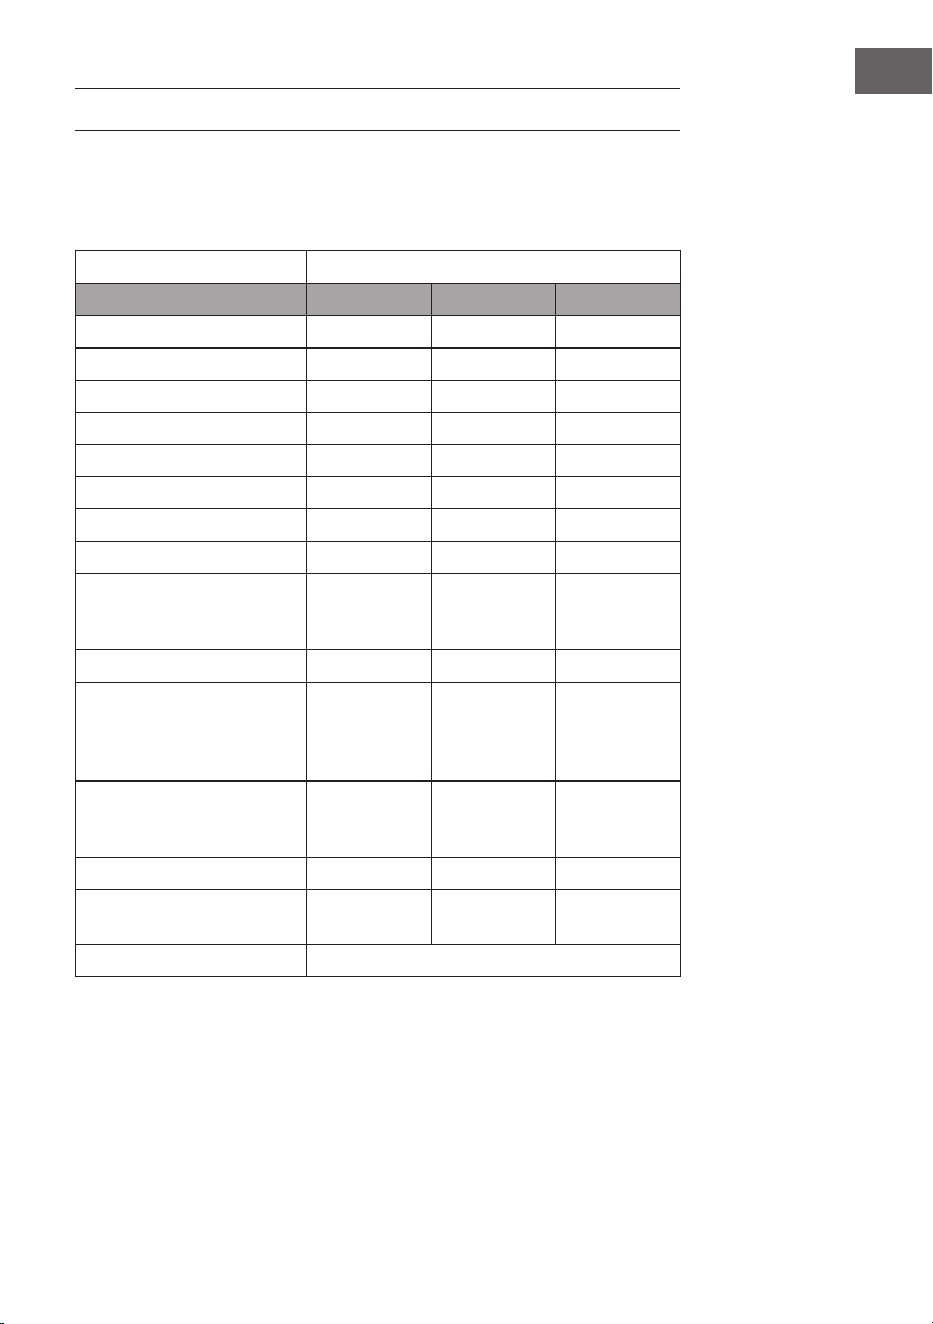
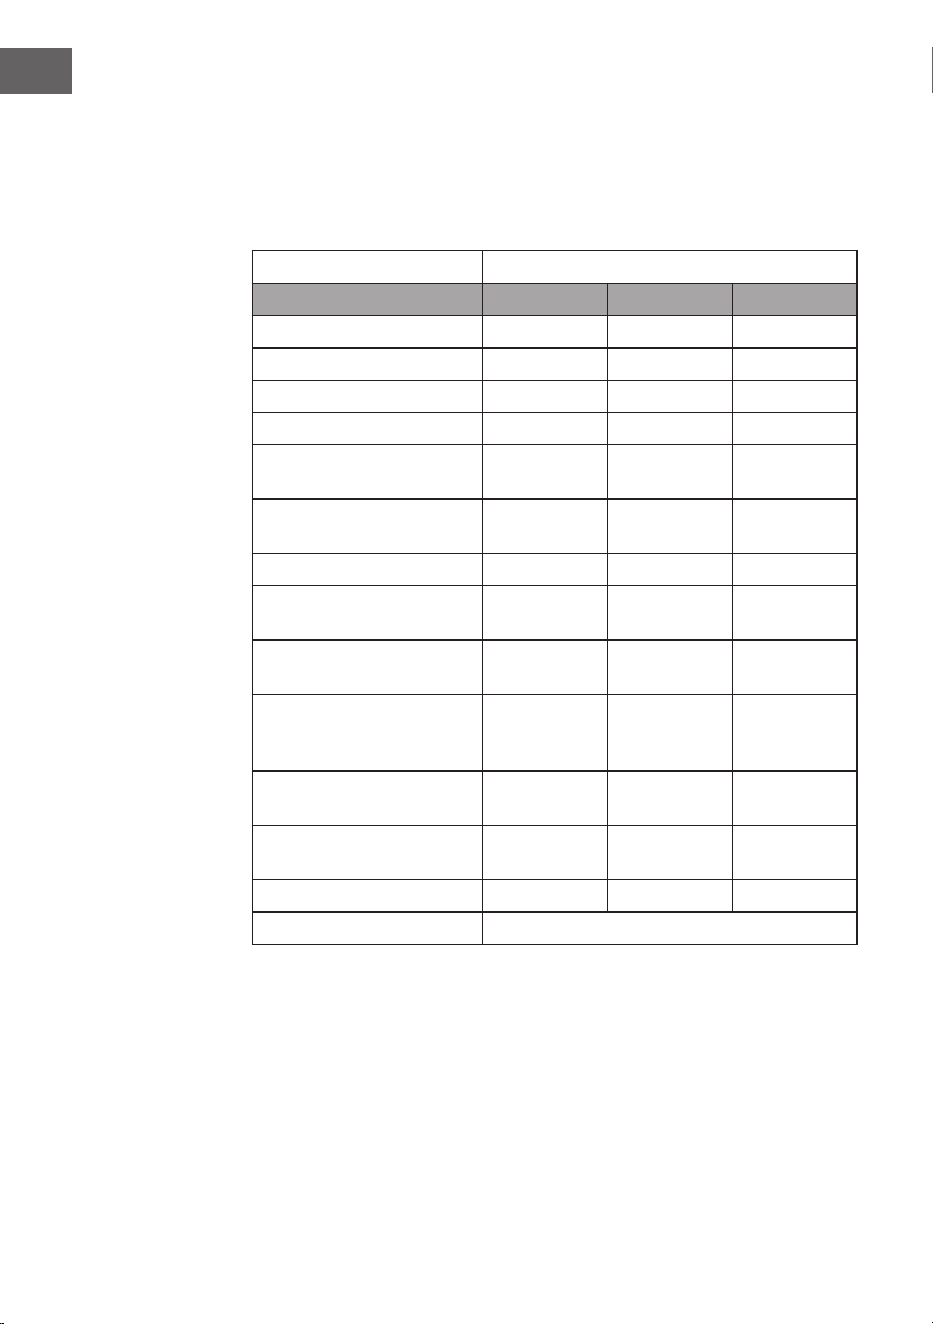
PRODUKTDATENBLATT
Angaben nach Verordnung (EU) Nr. 65/2014
Mess- und Berechnungsmethoden nach EN 61591:1997+A1:2006+A2:2011+A11:201
4+A12:2015
Artikelnummer
10040234, 10040235, 10040236, 10040237
Bezeichnung Symbol Wert Einheit
Jährlicher Energieverbrauch AEC
hood
12,1 kWh/Jahr
Energieefzienzklasse A++
uiddynamische Efzienz FDE
hood
31, 7
Klasse für die uiddynamische
Efzienz
A
Beleuchtungsefzienz LE
hood
34 Lux/W
Beleuchtungsefzienzklasse A
Fettabscheidegrad GFE
hood
57,1 %
Klasse für den Fettabscheidegrad E
Luftstrom bei minimaler und bei
maximaler Geschwindigkeit im
Normalbetrieb, ausgenommen den
Betrieb auf der Intensivstufe oder
Schnelllaufstufe
320.9 / 514,9 m³/h
Luftstrom im Betrieb auf der
Intensivstufe oder Schnelllaufstufe
552,6 m³/h
A-bewertete Luftschallemissionen
bei minimaler und maximaler
verfügbarer Geschwindigkeit im
Normalbetrieb
48 / 59 dB
A-bewertete Luftschallemissionen
im Betrieb auf der Intensivstufe
oder Schnelllaufstufe
60 dB
Leistungsaufnahme im Aus-Zustand P
o
0,44 W
Leistungsaufnahme im
Bereitschaftszustand
P
s
- W
Kontaktangaben Chal-Tec GmbH, Wallstraße 16, 10179, Berlin,
Deutschland

16
DE
Angaben nach Verordnung (EU) Nr. 66/2014
Mess- und Berechnungsmethoden nach EN 61591:1997+A1:2006+A2:2011+A11:201
4+A12:2015
Artikelnummer
10040234, 10040235, 10040236, 10040237
Bezeichnung Symbol Wert Einheit
Jährlicher Energieverbrauch AEC
hood
12,1 kWh/Jahr
Zeitverlängerungsfaktor f 0,9
Fluiddynamische Efzienz FDE
hood
31, 7
Energieefzienzindex EEI
hood
36
Gemessener Luftvolumenstrom im
Bestpunkt
Q
BEP
205,4 m³/h
Gemessener Luftdruck im Bestpunkt P
BEP
168 Pa
Maximaler Luftstrom Q
max
514,9 m³/h
Gemessene elektrische
Eingangsleistung im Bestpunkt
W
BEP
30,2 W
Nennleistung des
Beleuchtungssystems
W
L
3 W
Durchschnittliche
Beleuchtungsstärke des
Beleuchtungssystems auf der
Kochoberäche
E
middle
101 Lux
Gemessene Leistungsaufnahme im
Bereitschaftszustand
P
o
- W
Gemessene Leistungsaufnahme im
Aus-Zustand
P
s
0,44 W
Schallleistungspegel L
WA
59 dB
Kontaktangaben Chal-Tec GmbH, Wallstraße 16, 10179, Berlin,
Deutschland

17
DE
HINWEISE ZUM UMWELTSCHUTZ
• Achten Sie während des Kochens auf eine ausreichende Luftzufuhr, damit die
Dunstabzugshaube efzient und mit einem geringen Betriebsgeräusch arbeiten kann.
• Passen Sie die Gebläsedrehzahl an die beim Kochen entstehende Dampfmenge
an. Verwenden Sie den Intensivmodus nur bei Bedarf. Je niedriger die
Gebläsedrehzahl ist, desto weniger Energie wird verbraucht.
• Wenn beim Garen große Mengen Dampf entstehen, wählen Sie rechtzeitig eine
höhere Gebläsedrehzahl. Wenn sich der Kochdampf bereits in der Küche verteilt
hat, muss die Dunstabzugshaube länger betrieben werden.
• Schalten Sie die Dunstabzugshaube aus, wenn Sie sie nicht mehr benötigen.
• Schalten Sie die Beleuchtung aus, wenn Sie diese nicht mehr benötigen.
• Reinigen Sie den Filter in regelmäßigen Abständen und tauschen Sie ihn ggf. aus,
um die Effektivität des Lüftungssystems zu erhöhen und Brandgefahr zu vermeiden.
• Setzen Sie beim Kochen immer den Deckel auf, um Kochdampf und Kondenswasser
zu reduzieren.
18
DE
SPEZIELLE ENTSORGUNGSHINWEISE FÜR
VERBRAUCHER IN DEUTSCHLAND
Entsorgen Sie Ihre Altgeräte fachgerecht. Dadurch wird gewährleistet, dass die
Altgeräte umweltgerecht verwertet und negative Auswirkungen auf die Umwelt und
menschliche Gesundheit vermieden werden. Bei der Entsorgung sind folgende Regeln
zu beachten:
• Jeder Verbraucher ist gesetzlich verpichtet, Elektro- und Elektro-
nikaltgeräte (Altgeräte) sowie Batterien und Akkus getrennt vom
Hausmüll zu entsorgen. Sie erkennen die entsprechenden Altgeräte
durch folgendes Symbol der durchgestrichene Mülltonne (WEEE
Symbol).
• Sie haben Altbatterien und Altakkumulatoren, die nicht vom Altgerät umschlossen
sind, sowie Lampen, die zerstörungsfrei aus dem Altgerät entnommen werden
können, vor der Abgabe an einer Entsorgungsstelle vom Altgerät zerstörungsfrei zu
trennen.
• Bestimmte Lampen und Leuchtmittel fallen ebenso unter das Elektro- und
Elektronikgesetz und sind dementsprechend wie Altgeräte zu behandeln.
Ausgenommen sind Glühbirnen und Halogenlampen. Entsorgen Sie Glühbirnen
und Halogenlampen bitte über den Hausmüll, sofern Sie nicht das WEEE Symbol
tragen.
• Jeder Verbraucher ist für das Löschen von personenbezogenen Daten auf dem
Elektro- bzw. Elektronikgerät selbst verantwortlich.
Rücknahmepicht der Vertreiber
Vertreiber mit einer Verkaufsäche für Elektro- und Elektronikgeräte von mindestens 400
Quadratmetern sowie Vertreiber von Lebensmitteln mit einer Gesamtverkaufäche von
mindestens 800 Quadratmetern, die mehrmals im Kalenderjahr oder dauerhaft Elektro-
und Elektronikgeräte anbieten und auf dem Markt bereitstellen, sind verpichtet,
1 bei der Abgabe eines neuen Elektro- oder Elektronikgerätes an einen Endnutzer ein
Altgerät des Endnutzers der gleichen Geräteart, das im Wesentlichen die gleichen
Funktionen wie das neue Gerät erfüllt, am Ort der Abgabe oder in unmittelbarer
Nähe hierzu unentgeltlich zurückzunehmen und
2 auf Verlangen des Endnutzers Altgeräte, die in keiner äußeren Abmessung größer
als 25 Zentimeter sind, im Einzelhandelsgeschäft oder in unmittelbarer Nähe hierzu
unentgeltlich zurückzunehmen; die Rücknahme darf nicht an den Kauf eines Elektro-
oder Elektronikgerätes geknüpft werden und ist auf drei Altgeräte pro Geräteart
beschränkt.

19
DE
• Bei einem Vertrieb unter Verwendung von Fernkommunikationsmitteln ist die
unentgeltliche Abholung am Ort der Abgabe auf Elektro- und Elektronikgeräte der
Kategorien 1, 2 und 4 gemäß § 2 Abs. 1 ElektroG, nämlich „Wärmeüberträger“,
„Bildschirmgeräte“ (Oberäche von mehr als 100 cm²) oder „Großgeräte“
(letztere mit mindestens einer äußeren Abmessung über 50Zentimeter)
beschränkt. Für andere Elektro- und Elektronikgeräte (Kategorien 3, 5, 6) ist eine
Rückgabemöglichkeit in zumutbarer Entfernung zum jeweiligen Endnutzer zu
gewährleisten.
• Altgeräte dürfen kostenlos auf dem lokalen Wertstoffhof oder in folgenden
Sammelstellen in Ihrer Nähe abgegeben werden:
www.take-e-back.de
• Für Elektro- und Elektronikgeräte der Kategorien 1, 2 und 4 an bieten wir auch die
Möglichkeit einer unentgeltlichen Abholung am Ort der Abgabe. Beim Kauf eines
Neugeräts haben sie die Möglichkeit eine Altgerätabholung über die Webseite
auszuwählen.
• Batterien können überall dort kostenfrei zurückgegeben werden, wo sie verkauft
werden (z. B. Super-, Bau-, Drogeriemarkt). Auch Wertstoff- und Recyclinghöfe
nehmen Batterien zurück. Sie können Batterien auch per Post an uns zurücksenden.
Altbatterien in haushaltsüblichen Mengen können Sie direkt bei uns von Montag bis
Freitag zwischen 07:30 und 15:30 Uhr unter der folgenden Adresse unentgeltlich
zurückgeben:
Chal-Tec GmbH
Member of Berlin Brands Group
Handwerkerstr. 11
15366 Dahlwitz-Hoppegarten
Deutschland
• Wichtig zu beachten ist, dass Lithiumbatterien aus Sicherheitsgründen vor der
Rückgabe gegen Kurzschluss gesichert werden müssen (z. B. durch Abkleben der
Pole).
• Finden sich unter der durchgestrichenen Mülltonne auf der Batterie zusätzlich die
Zeichen Cd, Hg oder Pb ist das ein Hinweis darauf, dass die Batterie gefährliche
Schadstoffe enthält. (»Cd« steht für Cadmium, »Pb« für Blei und »Hg« für
Quecksilber).
Hinweis zur Abfallvermeidung
Indem Sie die Lebensdauer Ihrer Altgeräte verlängern, tragen Sie dazu bei, Ressourcen
efzient zu nutzen und zusätzlichen Müll zu vermeiden. Die Lebensdauer Ihrer Altgeräte
können Sie verlängern indem Sie defekte Altgeräte reparieren lassen. Wenn sich
Ihr Altgerät in gutem Zustand bendet, könnten Sie es spenden, verschenken oder
verkaufen.

20
DE
HINWEISE ZUR ENTSORGUNG
Wenn es in Ihrem Land eine gesetzliche Regelung zur
Entsorgung von elektrischen und elektronischen Geräten
gibt, weist dieses Symbol auf dem Produkt oder auf der
Verpackung darauf hin, dass dieses Produkt nicht im
Hausmüll entsorgt werden darf. Stattdessen muss es zu
einer Sammelstelle für das Recycling von elektrischen
und elektronischen Geräten gebracht werden. Durch
regelkonforme Entsorgung schützen Sie die Umwelt und die
Gesundheit Ihrer Mitmenschen vor negativen Konsequenzen.
Informationen zum Recycling und zur Entsorgung dieses
Produkts, erhalten Sie von Ihrer örtlichen Verwaltung oder
Ihrem Hausmüllentsorgungsdienst.
KONFORMITÄTSERKLÄRUNG
Hersteller:
Chal-Tec GmbH, Wallstraße 16, 10179 Berlin, Deutschland.
Importeur für Großbritannien:
Berlin Brands Group UK Ltd
PO Box 1145
Oxford, OX1 9UW
United Kingdom
Hiermit erklärt Chal-Tec GmbH, dass der Funkanlagentyp
Aurora Smart der Richtlinie 2014/53/EU entspricht. Der
vollständige Text der EU-Konformitätserklärung ist unter der
folgenden Internetadresse verfügbar: use.berlin/10040234

21
EN
Dear Customer,
Congratulations on purchasing this device. Please read the
following instructions carefully and follow them to prevent
possible damages. We assume no liability for damage caused
by disregard of the instructions and improper use. Scan the QR
code to get access to the latest user manual and more product
information.
CONTENTS
Safety Instructions22
Installation24
Control Panel27
Key Functions27
Device Control by Smartphone29
Bulb and Lamp Replacement31
Troubleshooting32
Product Data Sheet33
Notes on Environmental Protection35
Disposal Considerations36
Declaration of Conformity36
TECHNICAL DATA
Item number
10040234, 10040235, 10040236,
10040237
Power supply 220-240 V ~ 50/60 Hz
WiFi standard
802.11 b/g/n
WiFi frequency
2,4 GHz
WiFi radio-frequency power (max.)
< 20 dBm

22
EN
SAFETY INSTRUCTIONS
• Thank you for purchasing this cooker hood. Please read the instruction manual
carefully before you use the cooker hood, and keep it in a safe place.
• The installation work must be carried out by a qualied electrician or competent
person. Before you use the cooker hood, make sure that the voltage (V) and the
frequency (Hz) indicated on the cooker hood are exactly the same as the voltage
and the frequency in your home.
• The manufacturer and the agent will not bear any responsibility for the damage
caused by inappropriate installation and usage.
• Children under the age of 8 must not use the cooker hood.
• The appliance is not intended for commercial use, but only for household and
similar environments.
• The cooker hood and its lter mesh should be cleaned regularly in order to keep it
in good working order.
• Before cleaning, switch the power off at the main supply.
• Clean the cooker hood according to the instruction manual and keep the cooker
hood from the danger of burning.
• Prohibit putting the cooker hood by re.
• If the appliance does not function normally, contact the manufacturer or a specialist
company.
• This device may be only used by children 8 years old or older and persons with
limited physical, sensory and mental capabilities and / or lack of experience
and knowledge, provided that they have been instructed in use of the device by a
responsible person who understands the associated risks.
• If the supply cord is damaged, it must be replaced by the manufacturer, its service
agent or similarly qualied persons in order to avoid a hazard.
• If the range hood is used at the same time as appliances burning gas or other fuels,
the room must be adequately ventilated.
• Do not ambé under the range hood. Accessible parts may become hot when used
with cooking appliances.
Important hints on installation
• The air must not be discharged into a ue that is used for exhausting fumes from
appliances burning gas or other fuels (not applicable to appliances that only
discharge the air back into the room).
• Regulations concerning the discharge of air have to be fullled.
23
EN
Important notes about the extraction mode
WARNING
Risk of poisoning from exhaust gases sucked back. Never operate
the device in extraction mode simultaneously with an open flue
appliance when there is not adequate airflow guaranteed.
Open ue combustion equipment (for example, gas, oil, wood or coal- red heaters,
tankless water heaters, water heaters) pulls combustion air from the room and runs
it through an exhaust pipe or chimney to the outside. In the extraction mode, indoor
air is removed from the kitchen and the adjacent rooms - without suf cient air intake
this creates a vacuum. Toxic gases from the chimney or extraction ue can thereby be
sucked back into the living spaces.
• Always ensure that a suf cient supply of fresh air is guaranteed and that the air can
circulate.
• An air supply / extractor box alone does not ensure compliance with the limit
value.
Safe operation is only possible when the negative pressure in the room where the
appliance is located does not exceed 4 Pa (0.04 mbar). This can be achieved when
the air required for combustion can ow through openings that are not closable, for
example in doors, windows, in conjunction with an air supply / extractor box or
through other technical measures. In any case, consult a quali ed chimney sweep who
can assess the entire ventilation of your house and propose appropriate measures for
adequate ventilation.
If the hood is used exclusively in the recirculation mode, unrestricted operation is
possible.
Important note on disassembly of the device
• Disassembly is similar to installation/assembly in reverse order.
• Take a second person to help you during disassembly to avoid injuries.
24
EN
INSTALLATION
Preparation
If you have an outlet to the outside, your cooker hood can
be connected as below picture by means of an extraction
duct (enamel, aluminium, exible pipe or inammable
material with an interior diameter of 150mm)
• Before installation, turn the unit off and unplug it from
the outlet.
• The cooker hood should be placed at a distance of
65~75cm above the cooking plane for best effect.
Installation (Vent outside)
Note: When the range hood and appliance supplied with energy other than
electricity are simultaneously in operation, the negative pressure in the room must be
not exceed 4 Pa (4 x 10
-5
Bar).
1
Drill 3 x 8 mm holes to accommodate the bracket. Screw and tighten the bracket
onto the wall with the screws & screw plugs provided.
Holes
Screw plugs
Wall bracket
Screws
(4 mm x 30mm)

25
EN
2
For inclined panel model, you need to drill 4 x 8 mm extra holes an use screw plugs
and screws befor installation.
Chimney Installation
1 2
Put the upper chimney into lower
chimney .Then pulling out the upper
chimney upwards. Adjust to reach the
height required.
Sliding the chimney to adjust the
chimney height. When the height you
required is reached, then hang the xing
hole to the xing screws as showed in
picture.
Installation (Vent inside)
If you do not have an outlet to the outside, exhaust pipe is not required and the
installation is similar to the one show in section “Installation (Vent outside)”.

26
EN
Installing the Carbon Filter
Note: Carbon Filter is not standard accessory, these can be purchased as an
accessory.
1 2
Activated carbon lter can be used to
trap odours.
In order to install the activated carbon
lter, the grease lter should be
detached rst. Press the lock and pull it
downward.
3 4
Plug the activated carbon lter into the
unit and turn it in clockwise direction.
Repeat the same on the other side.
Make sure the lter is securely locked.
Otherwise, it would loosen and cause
dangerous. When activated carbon
lter attached, the suction power will
be lower.
Remove all blue protective lm on
chimney and cooker hood, the
installation is now nished.

27
EN
CONTROL PANEL
1 POWER button (switch on/off the device)
2 Speed
3 Display
4 Light (on /off)
5 WiFi (WLAN icon)
KEY FUNCTIONS
On/Off
Press the ON/OFF button briey to switch on the cooker hood. When you switch on the
unit for the rst time, the fan runs at speed 1. When you switch off the unit, it remembers
the last speed set.
Setting the speed
Briey press the SPEED button several times to set the desired speed: Level 1 (low) >
Level 2 (medium) > Level 3 (high).
Press the SPEED key once for a long time to set the highest speed. In the display, [b]
ashes for the Booster function. After 5 minutes, the speed automatically changes to
level 3.
Setting the switch-off delay
When the unit is in standby mode, press and hold the SPEED + LIGHT keys
simultaneously to set the fan to turn off with a 5 minute delay. The current speed ashes
in the display and the time is counted down. After the time has elapsed, all keys will dim
down while the display continues to ash and a signal sounds. Press any key or wait 5
seconds to switch to standby mode. To cancel the delay, press and hold the SPEED +
LIGHT keys simultaneously during the countdown.

28
EN
Light on/off
Briey press the LIGHT key to switch the light on. Press the key again to switch the light
off.
Setting the light color
Press and hold the light key to set the light color. The display shows [0]. Now briey
press the speed key several times to adjust the light color from [L1] to [L9]:
L1 = white L2 = red L3 = green
L4 = blue L5 = yellow L6 = purple
L7 = orange L8 = cyan L9 = green-yellow
After setting the desired color, long press the LIGHT button again to complete the setting.
Enable WiFi
In standby mode, long press the WiFi button to activate the WiFi function. The WiFi icon
will start ashing. Set up the connection as described in the chapter “Device Control
by Smartphone“. As soon as the connection is successful, the WiFi symbol lights up
continuously. If no connection is established within 3 minutes, the WiFi icon stops
ashing and the device automatically switches to standby mode.
29
EN
DEVICE CONTROL BY SMARTPHONE
If you integrate the device into your home WiFi, you can conveniently operate it via the
associated Klarstein app. The app not only allows you to remotely control the device via
your smartphone, but also gives you access to recipes and additional information.
Follow these steps to connect your smartphone to your Klarstein device:
1 Download the Klarstein app rst by scanning the QR code with your smartphone
(see below), or download it directly from App Store or Google Play.
2 Make sure your smartphone is connected to the same WiFi network that your
Klarstein device is to be connected to.
3 Open the Klarstein app.
4 Sign in to your account. If you do not have an account, sign up in the Klarstein app.
5 Follow the instructions from the app.
App Download
Use the scan function of your smartphone to scan the QR code and save the app on
your smartphone.
Note: The app provides further information on how to use the app and help on how
to connect to your device as soon as you open it for the rst time.
iOS Android

30
EN
Troubleshooting connection problems
If your Klarstein device cannot be found in the WLAN, check the following:
1 The device is not plugged in. Make sure that your device is plugged into an electric
socket.
2 The device is not in pairing mode. Make sure that the WiFi indicator (LED) on the
smart device control panel is blinking as described in the ‘Reset WiFi settings‘
instruction of your smart device (instructions are usually available on device
connection process).
3 The WiFi access point does not operate on 2.4 GHz. Make sure that your access
point operates on 2.4 GHz band and you have a separate SSID on 2.4 GHz
band. If you are not sure about the operating band of your access point, please
contact your internet provider company.
Important: please note that if your WiFi router is dual band - operating on both 2.4
GHz and 5 GHz band - you need to separate the SSIDs for each band and use the
2.4 GHz SSID for connection.
4 Firewall settings of your WiFi network; the rewall setting of your WiFi network
may not allow the Klarstein app to congure the WiFi settings on your smart device.
Please make sure that you are not using a public WiFi network, e.g. airports,
dormitories, companies, etc.
5 Different credentials used in smartphone and the app. Make sure that the WiFi
credentials entered in the Klarstein app are the same as the ones that your
smartphone is connected to.
Following the above mentioned points, if your smart device still fails to connect to the
app, please contact us via email for support:

31
EN
BULB AND LAMP REPLACEMENT
Replacing Bulbs
• Switch the unit off and unplug the appliance. Remove the lamp cover by unscrewing
the 2 screws.
• Unscrew the incandescent bulb. Replace with the same type and rated bulb:
Replacing LED Lamps
• Disconnect the light wiring point which is located within the hood, (behind the
grease ler).
• Then use a screw driver remove the bulb holders and wiring from the hood. Replace
with the same type and rated lamp:
LED Lamp: max 1.5 W
32
EN
TROUBLESHOOTING
Fault Cause Solution
Light on, but fan does not
work
The fan blade is jammed. Switch of the unit and
repair by qualied service
personnel only.
The motor is damaged.
Both light and fan do not
work
light bulb burn. Replace the bulb with
correct rating.
Power cord looses. Plug in to the power
supply again.
Serious Vibra-tion of the
unit
The fan blade is damaged. Switch of the unit and
repair by qualied service
personnel only.
The fan motor is not xed
tightly.
The unit is not hung
properly on the bracket.
Take down the unit and
check whether the bracket
is in proper location.
Suction per-formance not
good
Too long distance
between the unit and the
cooking plane
Readjust the distance to
65-75cm
33
EN
PRODUCT DATA SHEET
Information according to Regulation (EU) No. 65/2014
Measurement and calculation methods according to EN 61591:1997+A1:2006+A2:20
11+A11:2014+A12:2015
Item number
10040234, 10040235, 10040236, 10040237
Description Symbol Value Unit
Annual Energy Consumption AEC
hood
12.1 kWh/Year
Energy Efciency class A++
Fluid Dynamic Efciency FDE
hood
31. 7
Fluid Dynamic Efciency class A
Lighting Efciency LE
hood
34 Lux/W
Lighting Efciency class A
Grease Filtering Efciency GFE
hood
57.1 %
Grease Filtering Efciency class E
air ow at minimum and maximum
speed in normal use, intensive or
boost excluded
320.9 / 514.9 m³/h
air ow at intensive or boost setting 552.6 m³/h
airborne acoustical A-weighted
sound power emissions at minimum
and maximum speed available in
normal use
48 / 59 dB
airborne acoustical A-weighted
sound power emissions at intensive
or boost setting
60 dB
power consumption in off mode P
o
0.44 W
power consumption in standby
mode
P
s
- W
Contact details Chal-Tec GmbH, Wallstraße 16, 10179, Berlin, Germany

34
EN
Information according to Regulation (EU) No. 66/2014
Measurement and calculation methods according to EN 61591:1997+A1:2006+A2:20
11+A11:2014+A12:2015
Item number
10040234, 10040235, 10040236, 10040237
Description Symbol Value Unit
Annual Energy Consumption AEC
hood
12.1 kWh/Year
Time increase factor f 0.9
Fluid Dynamic Efciency FDE
hood
31. 7
Energy Efciency Index EEI
hood
36
Measured air ow rate at best
efciency point
Q
BEP
205.4 m³/h
Measured air pressure at best
efciency point
P
BEP
168 Pa
Maximum air ow Q
max
514.9 m³/h
Measured electric power input at
best efciency point
W
BEP
30.2 W
Nominal power of the lighting
system
W
L
3 W
Average illumination of the lighting
system on the cooking surface
E
middle
101 Lux
Measured power consumption in
standby mode
P
o
- W
Measured power consumption
off mode
P
s
0.44 W
Sound power level L
WA
59 dB
Contact details Chal-Tec GmbH, Wallstraße 16, 10179, Berlin, Germany

35
EN
NOTES ON ENVIRONMENTAL PROTECTION
• During cooking, make sure that there is sufcient air supply so that the cooker hood
can operate efciently and with low operating noise.
• Adjust the fan speed to the amount of steam produced during cooking. Use the
intensive mode only when necessary. The lower the fan speed, the less energy is
consumed.
• If large amounts of steam are produced during cooking, select a higher fan speed
in good time. If the cooking steam has already dispersed in the kitchen, the cooker
hood must be operated longer.
• Switch off the cooker hood when you no longer need it.
• Switch off the lighting when you no longer need it.
• Clean the lter at regular intervals and replace it if necessary to increase the
effectiveness of the ventilation system and prevent re hazards.
• Always put the lid on when cooking to reduce cooking steam and condensation.
36
EN
DISPOSAL CONSIDERATIONS
If there is a legal regulation for the disposal of electrical and
electronic devices in your country, this symbol on the product
or on the packaging indicates that this product must not be
disposed of with household waste. Instead, it must be taken to
a collection point for the recycling of electrical and electronic
equipment. By disposing of it in accordance with the rules, you
are protecting the environment and the health of your fellow
human beings from negative consequences. For information
about the recycling and disposal of this product, please contact
your local authority or your household waste disposal service.
DECLARATION OF CONFORMITY
Manufacturer:
Chal-Tec GmbH, Wallstrasse 16, 10179 Berlin, Germany.
Importer for Great Britain:
Berlin Brands Group UK Ltd
PO Box 1145
Oxford, OX1 9UW
United Kingdom
Hereby, Chal-Tec GmbH declares that the radio equipment type
Aurora Smart is in compliance with Directive 2014/53/EU. The full
text of the EU declaration of conformity is available at the following
internet address: use.berlin/10040234
For Great Britain: Hereby, Chal-Tec GmbH declares that the
radio equipment type Aurora Smart is in compliance with the
relevant statutory requirements. The full text of the declaration of
conformity is available at the following internet address: use.
berlin/10040234
37
ES
Estimado cliente:
Le felicitamos por la adquisición de este producto. Lea
atentamente las siguientes instrucciones y sígalas para evitar
posibles daños. No asumimos ninguna responsabilidad por los
daños causados por el incumplimiento de las instrucciones y el
uso inadecuado. Escanee el siguiente código QR para obtener
acceso a la última guía del usuario y más información sobre el
producto.
ÍNDICE
Indicaciones de seguridad38
Instalación40
Panel de control43
Funciones de las teclas43
Control del dispositivo por smartphone45
Sustituir las bombillas y lámparas47
Detección y resolución de problemas48
Ficha técnica del producto49
Notas para cuidar del medio ambiente51
Retirada del aparato52
Declaración de conformidad52
DATOS TÉCNICOS
Número de artículo
10040234, 10040235, 10040236,
10040237
Fuente de alimentación 220-240 V ~ 50/60 Hz
WiFi estándar
802.11 b/g/n
WiFi frecuencia
2,4 GHz
WiFi potencia de radiofrecuencia (max.)
< 20 dBm

38
ES
INDICACIONES DE SEGURIDAD
• Lea atentamente todas las indicaciones y conserve este manual para consultas
posteriores.
• Los trabajos de montaje deben ser realizados solamente por un electricista u otro
profesional. Antes de utilizar la campana extractora, asegúrese de que la tensión
(V) y la frecuencia indicada en la campana extractora (Hz) coinciden con la
tensión (V) y frecuencia (Hz) de su suministro eléctrico.
• La empresa no se responsabiliza de los daños ocasionados por un uso o
instalación indebida del producto.
• Los niños menores de 8 años no deben utilizar la campana extractora.
• Este aparato no ha sido concebido para un uso comercial, sino doméstico o para
entornos similares.
• Limpie el aparato y el ltro con regularidad para que el aparato funcione siempre
de manera eciente. Desconecte el enchufe antes de limpiar el aparato.
• Limpie el aparato solamente según se describe en estas instrucciones.
• No utilice fuentes de ignición bajo la campana extractora.
• Si el aparato no funciona correctamente, contacte inmediatamente con el
fabricante.
• Este aparato puede ser utilizado por niños mayores de 8 años y personas con
discapacidades físicas, sensoriales y mentales y/o con falta de experiencia y
conocimientos, siempre y cuando hayan sido instruidos sobre el uso del aparato y
comprendan los peligros y riesgos asociados.
• Si el cable de alimentación o el enchufe están dañados, deberán ser sustituidos por
el fabricante, un servicio técnico autorizado o una persona igualmente cualicada.
• Si utiliza la campana extractora con hornillos y entren en combustión el gas u otras
sustancias combustibles, deberá garantizar una buena ventilación de la sala.
• No amee nada bajo la campana extractora.
• Advertencia: La supercie del aparato puede alcanzar temperaturas muy elevadas
durante el funcionamiento.
Indicaciones importantes de instalación
• El aire no puede desviarse a un tiro de salida que se emplee para evacuar humos
de gases u otras sustancias inamables (no se aplica para aparatos que solo
desvíen el aire a la sala).
• Siga todas las disposiciones locales para montar las instalaciones de ventilación.
39
ES
Notas importantes acerca del modo de extracción
ADVERTENCIA
Peligro de muerte, riesgo de intoxicación provocado por gases en
combustión aspirados. Nunca ponga en funcionamiento la función
de extracción simultáneamente con un dispositivo que genere calor
en una estancia estanca si no se ha garantizado una ventilación
su ciente.
Los dispositivos no estancos que generan calor (por ejemplo, radiadores que funcionan
con gas, aceite, madera o carbón, calentadores, calentadores de agua) extraen el aire
de combustión de la estancia correspondiente y canalizan el aire de salida por medio
de un tiro (por ejemplo una chimenea) hacia el exterior. Al encender simultáneamente
una campana extractora, el aire de la cocina y de las estancias colindantes se extrae
y sin su ciente aire adicional se produce el fenómeno de presión hipoatmosférica. Los
gases nocivos de la chimenea o del ori cio de salida retornan a la estancia.
• Siempre debe proveer de su ciente aire adicional a la estancia.
• Un conducto de ventilación y evacuación no garantiza en su totalidad que se
cumpla el valor límite.
Solo se garantizará un funcionamiento sin riesgos cuando presión hipoatmosférica en la
estancia del dispositivo generador de calor no supere los 4 Pa (0,04 mbar). Esto podrá
conseguirse cuando el aire necesario para la combustión pueda circular por ori cios
sin cierre, como puertas o ventanas, junto con un conducto de ventilación o evacuación
o a través de otros medios técnicos. En cualquier caso, siga el consejo del constructor
de chimeneas autorizado que pueda evaluar la conexión de ventilación general de su
hogar y tomar las medidas necesarias.
Si pone en funcionamiento la campana extractora en modo circulación de aire, puede
utilizarla sin ninguna limitación.
Nota importante sobre el desmontaje del aparato
• El desmontaje es igual que el montaje pero en orden inverso.
• Al desmontar el aparato, pida ayuda a una segunda persona para evitar lesiones.

40
ES
INSTALACIÓN
Preparación
Si cuenta con una salida de aire al exterior, puede instalar
la campana tal y como indica la ilustración de la derecha. El
tiro de aire debe contar con un diámetro mínimo de 150 mm
y el conducto deberá estar fabricado en esmalte, aluminio o
un material exible y resistente al calor.
• Apague el aparato antes de la instalación y desconecte
el enchufe.
• La campana extractora debe instalarse a 65-75 cm por
encima de la supercie de cocción.
Instalación con ventilación exterior
Advertencia: consulte las indicaciones de seguridad para utilizar el aparato
si el aire se conduce hacia el exterior. Si la campana extractora se pone en
funcionamiento al mismo tiempo que otro dispositivo desde la misma fuente de
energía, la presión de la estancia no debe superar los 4 Pa (4 x 10
-5
Bar).
1
Perfore dos agujeros de 3 x 8 mm para instalar los soportes. Fije el soporte a la
pared con los tacos y los tornillos incluidos.
Agujero en la
pared
Clavijas
Fijación
Tornillos
(4 mm x 30mm)

41
ES
2
En el caso de los modelos oblicuos, es necesario taladrar cuatro oricios adicionales
(8 mm) antes del montaje. Inserte los tacos y tornillos antes de colgar la campana de
la pared.
Instalación de la chimenea
1 2
Encaje la chimenea superior en la
inferior. Deslice entonces la chimenea
superior hasta la conseguir la altura
deseada.
Cuando haya conseguido la altura
necesaria para la chimenea, cuelgue la
pieza de los soportes por medio de las
ranuras de esta.
Instalación con ventilación inferior
Si no dispone de una salida de aire al exterior, no necesita un conducto de salida. La
instalación es idéntica a la descrita anteriormente.
42
ES
Montaje del ltro de carbón activo
Advertencia: el ltro de carbón activo no está incluido, debe adquirirlo por separado.
1 2
Con el ltro de carbón activo podrá
ltrar los olores producidos por la
cocina que se quedan impregnados en
la campana.
Para instalar el ltro, debe retirar
primero los ltros antigrasa. Presione en
el cierre y tire de ellos hacia abajo.
3 4
Encaje el ltro de carbón activo sobre el
ventilador y gírelo en el sentido de las
agujas del reloj. Repita el proceso en el
otro extremo. Asegúrese de que el ltro
está bien colocado; de lo contrario,
podría soltarse y suponer un peligro.
Indicación: tras la instalación del ltro
de carbón activo, la potencia de
extracción se reduce ligeramente.
Vuelva a montar el ventilador y coloque
los ltros antigrasa. Fije la chimenea
superior y retire el plástico protector de
la chimenea y de la campana.
43
ES
PANEL DE CONTROL
1 Botón POWER (encender/apagar la unidad)
2 Velocidad
3 Mostrar
4 Luz (encendido/apagado)
5 WiFi (símbolo WLAN)
FUNCIONES DE LAS TECLAS
ON/OFF
Pulse la tecla ON/OFF para encender la campana extractora. Si enciende el aparato
por primera vez, el ventilador funciona al nivel 1. Si apaga el aparato, memorizará la
última velocidad seleccionada.
Ajustar la velocidad
Pulse varias veces la tecla VELOCIDAD para seleccionar la velocidad deseada: Nivel 1
(bajo) > Nivel 2 (medio) > Nivel 3 (alto).
Pulse una vez la tecla VELOCIDAD para seleccionar la velocidad más elevada. En
el display aparece [b] para la función Booster. Tras 5 minutos, la velocidad cambia
automáticamente al nivel 3.
Seleccionar apagado con retardo
Cuando el aparato se encuentre en modo de espera, mantenga pulsadas las teclas
VELOCIDAD + LUZ al mismo tiempo para elegir que el ventilador se apague con un
retraso de 5 minutos. En la pantalla, la velocidad actual parpadea y se realiza una
cuenta atrás del tiempo. Cuando haya transcurrido el tiempo, todas las teclas se
atenúan mientras el display continúa parpadeando y suena una señal. Pulse cualquier
tecla o espere 5 segundos para pasar al modo de espera. Para cancelar el retraso,
mantenga pulsadas las teclas VELOCIDAD + LUZ simultáneamente durante la cuenta
atrás.

44
ES
Luz on/off
Puse la tecla LUZ para encender la luz. Pulse de nuevo la tecla para volver a apagar
la luz.
Seleccionar el color de la luz
Mantenga pulsada la tecla LUZ para seleccionar el color de la luz. El display muestra
[0]. Pulse varias veces la tecla VELOCIDAD, para seleccionar el color de la luz desde
[1] a [9]:
L1 = blanco L2 = rojo L3 = verde
L4 = azul L5 = amarillo L6 = violeta
L7 = naranja L8 = turquesa L9 = verde-amarillo
Después de haber seleccionado el color deseado, mantenga pulsada la tecla LUZ para
nalizar la selección.
Activar el WIFI
Pulse la tecla WIFI en modo de espera para activar la función de wi. El símbolo wi
empieza a parpadear. Congure la conexión como se describe en el capítulo „Control
del aparato por smartphone“. En cuanto se establezca la conexión, el símbolo WIFI
se ilumina permanentemente. Si no se establece ninguna conexión en 3 minutos, el
símbolo WIFI deja de parpadear y el aparato pasa automáticamente al modo de
espera.

45
ES
CONTROL DEL DISPOSITIVO POR SMARTPHONE
Si conecta el aparato a su red WLAN doméstica, podrá controlarlo cómodamente
mediante la App correspondiente de Klarstein. La App le permite no solo controlar el
aparato mediante su smartphone, sino que también le ofrece acceso a recetas y otra
información adicional.
Proceda del siguiente modo para conectar su smartphone al dispositivo Klarstein.
1 Descargue primero la App de Klarstein escaneando el código QR con su
smartphone (véase más abajo) o descárguelo directamente de la App Store o de
Google Play.
2 Asegúrese de que su smartphone esté conectado a la misma red WiFi a la que
debe conectarse su dispositivo Klarstein.
3 Abra la App de Klarstein.
4 Inicie sesión con su cuenta. Si aún no tiene una cuenta, regístrese en la aplicación
Klarstein.
5 Siga las instrucciones que aparecerán en la app.
Descarga la aplicación
Utilice la función de escaneado de su teléfono para escanear el código QR y guarde
la app en su smartphone.
Nota: La aplicación proporciona más información sobre cómo usar la aplicación y
ayuda sobre cómo conectarse al dispositivo tan pronto como se abre por primera
vez.
iOS Android

46
ES
Solución de problemas de conexión
Si su dispositivo Klarstein no se puede encontra en la WLAN, verique lo siguiente:
1. El aparato no está enchufado. Asegúrese de que su dispositivo esté conectado a
un enchufe.
2. El aparato no se encuentra en modo sincronización. Asegúrese de que el indicador
de WiFi (LED) parpadea en el panel de control del dispositivo inteligente, tal y
como se describe en las instrucciones „Restablecer la conguración de WiFi“ de
su dispositivo inteligente (las instrucciones en general se encuentran en el apartado
„Conexión del dispositivo“).
3. El punto de acceso WiFi no funciona en 2,4 GHz. Asegúrese de que su punto de
acceso funcione en la banda de 2,4 GHz y que tenga su propio SSID en la banda
de 2,4 GHz. Si no está seguro de la banda operativa de su punto de acceso,
comuníquese con su proveedor de Internet.
Importante: tenga en cuenta que si su enrutador WiFi tiene una banda dual, es
decir, si funciona tanto en la banda de 2,4 GHz como en la de 5 GHz, separe los
SSID para cada banda y use el SSID de 2,4 GHz para conectarse.
4. Supervise los ajustes Firewall de su red WiFi. Es posible que la conguración del
Firewall de su red WiFi no permita que la aplicación Klarstein congure los ajustes
de WiFi en su dispositivo inteligente. Asegúrese de que no está usando ninguna
red WiFi pública, como por ejemplo de aeropuertos, otros hogares, empresas, etc.
5. Los diferentes datos de inicio de sesión en el teléfono inteligente y en la aplicación
le aseguran de que los datos de inicio de sesión WiFi de la aplicación de Klarstein
coincidan con los que está conectado su teléfono inteligente.
Si ha seguido todos los pasos anteriores y su teléfono inteligente aún no puede
conectarse a la aplicación, envíenos un correo electrónico para obtener ayuda:

47
ES
SUSTITUIR LAS BOMBILLAS Y LÁMPARAS
Sustituir las bombillas
• Apague el aparato y desconéctelo de la toma de corriente.
• Desatornille los dos tornillos de la cubierta de la lámpara y retire esta última.
• Desenrosque la bombilla y sustitúyala por otra del mismo modelo.
Sustituir lámparas LED
• Desconecte el cableado de la luz situado dentro de la campana, detrás del ltro
antigrasa.
• Retire el soporte de la bombilla y el cable con ayuda de un destornillador y
sustituya la lámpara por otra del mismo modelo:
Lámpara LED: máx. 1,5 W
48
ES
DETECCIÓN Y RESOLUCIÓN DE PROBLEMAS
Problema Posible causa Solución
La luz se enciende pero el
ventilador no funciona.
La hoja del ventilador está
averiada.
Apague el aparato y
contacte con un servicio
técnico.
El motor está averiado.
La luz y el ventilador no
funcionan.
La bombilla está fundida. Sustituya la bombilla por
otra del mismo modelo.
El aparato no está
enchufado.
Conecte el aparato.
El aparato emite fuertes
vibraciones.
La hoja del ventilador está
averiada.
Apague el aparato y
contacte con un servicio
técnico.
El motor no se ha
instalado correctamente.
El aparato no se ha
instalado correctamente
en la pared.
Descuelgue el aparato
y asegúrese de que está
colocado correctamente
sobre el soporte.
La potencia extractora es
insuciente.
Demasiada distancia entre
la campana y la cocina.
Cuelgue la campana entre
65-75 cm por encima de
la supercie de cocción.
49
ES
FICHA TÉCNICA DEL PRODUCTO
Información según el Reglamento (UE) nº 65/2014
Métodos de medición y cálculo según EN 61591:1997+A1:2006+A2:2011+A11:2014
+A12:2015
Número de artículo
10040234, 10040235, 10040236, 10040237
Descripción Símbolo Valor Unidad
Consumo anual de energía AEC
hood
12,1 kWh/Año
Clase de eciencia energética A++
eciencia uidodinámica FDE
hood
31, 7
Clase de eciencia uidodinámica A
Eciencia de la iluminación LE
hood
34 Lux/W
Clase de eciencia lumínica A
Ecacia de la separación de la
grasa
GFE
hood
57,1 %
Clase de eciencia de separación
de grasas
E
Flujo de aire al mínimo y
a la máxima velocidad en
funcionamiento normal, excepto
para el funcionamiento en el nivel
de velocidad intensivo o rápido
320.9 / 514,9 m³/h
Flujo de aire durante el
funcionamiento en el nivel de
velocidad intensivo o rápido
552,6 m³/h
Emisiones de ruido aéreo con
ponderación A a la velocidad
mínima y máxima disponible
durante el funcionamiento normal
48 / 59 dB
Emisiones de ruido aéreo
ponderadas A durante el
funcionamiento en la fase intensiva
o de alta velocidad
60 dB
Consumo de energía en modo
apagado
P
o
0,44 W
Consumo de energía en modo de
espera
P
s
- W
Datos de contacto Chal-Tec GmbH, Wallstraße 16, 10179, Berlin, Alemania
50
ES
Datos según el Reglamento (UE) nº 66/2014
Métodos de medición y cálculo según EN 61591:1997+A1:2006+A2:2011+A11:2014
+A12:2015
Número de artículo
10040234, 10040235, 10040236, 10040237
Descripción Símbolo Valor Unidad
Consumo anual de energía AEC
hood
12,1 kWh/Año
Factor de extensión temporal f 0,9
eciencia uidodinámica FDE
hood
31, 7
Índice de eciencia energética EEI
hood
36
Caudal de aire medido en el punto
óptimo
Q
BEP
205,4 m³/h
Presión de aire medida en el mejor
punto
P
BEP
168 Pa
Flujo de aire máximo Q
max
514,9 m³/h
Potencia eléctrica de entrada
medida en el mejor punto
W
BEP
30,2 W
Potencia nominal del sistema de
iluminación
W
L
3 W
Iluminación media del sistema de
iluminación en la supercie de
cocción
E
middle
101 Lux
Consumo de energía medido en
modo de espera
P
o
- W
Consumo de energía medido en
estado apagado
P
s
0,44 W
Nivel de potencia sonora L
WA
59 dB
Datos de contacto Chal-Tec GmbH, Wallstraße 16, 10179, Berlin, Alemania

51
ES
NOTAS PARA CUIDAR DEL MEDIO AMBIENTE
• Durante la cocción, asegúrese de que haya un ujo de aire suciente para que la
campana extractora funcione ecazmente y con poco ruido de funcionamiento.
• Ajuste la velocidad del ventilador a la cantidad de vapor producida durante la
cocción. Utilice el modo intensivo sólo cuando sea necesario. Cuanto menor sea la
velocidad del ventilador, menos energía consume.
• Si se producen grandes cantidades de vapor durante la cocción, seleccione una
velocidad de ventilador más alta. Si el vapor de la cocción ya se ha extendido por
toda la cocina, la campana extractora debe funcionar durante más tiempo.
• Apague la campana extractora cuando ya no la necesite.
• Apaga la iluminación cuando ya no la necesites.
• Limpie el ltro a intervalos regulares y sustitúyalo si es necesario, para aumentar la
ecacia del sistema de ventilación y prevenir los riesgos de incendio.
• Ponga siempre la tapa cuando cocine para reducir el vapor de la cocción y la
condensación.

52
ES
RETIRADA DEL APARATO
Si en su país existe una disposición legal relativa a la
eliminación de aparatos eléctricos y electrónicos, este
símbolo estampado en el producto o en el embalaje
advierte que no debe eliminarse como residuo doméstico.
En lugar de ello, debe depositarse en un punto de recogida
de reciclaje de aparatos eléctricos y electrónicos. Una
gestión adecuada de estos residuos previene consecuencias
potencialmente negativas para el medio ambiente y la salud
de las personas. Puede consultar más información sobre el
reciclaje y la eliminación de este producto contactando con
su administración local o con su servicio de recogida de
residuos.
DECLARACIÓN DE CONFORMIDAD
Fabricante:
Chal-Tec GmbH, Wallstraße 16, 10179 Berlín, Alemania.
Importador para Gran Bretaña:
Berlin Brands Group UK Ltd
PO Box 1145
Oxford, OX1 9UW
United Kingdom
Por la presente, Chal-Tec GmbH declara que el tipo de
equipo radioeléctrico Aurora Smart es conforme con la
Directiva 2014/53/UE. El texto completo de la declaración
UE de conformidad está disponible en la dirección Internet
siguiente: use.berlin/10040234

53
FR
Chère cliente, cher client,
Toutes nos félicitations pour l’acquisition de ce nouvel appareil.
Veuillez lire attentivement et respecter les instructions de ce mode
d’emploi an d’éviter d’éventuels dommages. Nous ne saurions
être tenus pour responsables des dommages dus au non-respect
des consignes et à la mauvaise utilisation de l’appareil. Scannez
le QR-Code pour obtenir la dernière version du mode d‘emploi et
des informations supplémentaires concernant le produit.
SOMMAIRE
Consignes de sécurité54
Installation56
Panneau de commande59
Fonctions des touches59
Contrôle de l‘appareil par smartphone61
Remplacement des ampoules et des lampes63
Résolution des problèmes64
Fiche de données produit65
Informations sur la protection de l‘environnement67
Conseils pour le recyclage68
Déclaration de conformité68
FICHE TECHNIQUE
Numéro d'article
10040234, 10040235, 10040236,
10040237
Alimentation 220-240 V ~ 50/60 Hz
WiFi standard
802.11 b/g/n
WiFi fréquence
2,4 GHz
WiFi puissance de radiofréquence (max.)
< 20 dBm

54
FR
CONSIGNES DE SÉCURITÉ
• Lisez attentivement toutes les consignes avant d’utiliser l’appareil et conservez ce
mode d’emploi pour vous y référer ultérieurement.
• Les travaux de montage doivent être effectués uniquement par électricien
professionnel ou un spécialiste. Avant d‘utiliser la hotte aspirante, assurez-vous que
la tension (V) et la fréquence indiquée sur la hotte aspirante (Hz) correspondent à
la tension (V) et à la fréquence (Hz) de votre alimentation.
• Le fabricant ne saurait être tenu responsable des dégâts occasionnés par le non-
respect des consignes d‘utilisation et d‘installation.
• Les enfants de moins de 8 ne doivent pas utiliser la hotte aspirante.
• L’appareil n’est pas destiné à une utilisation commerciale mais au cadre domestique
et dans des conditions similaires.
• Nettoyez l‘appareil et le ltre régulièrement pour que l‘appareil fonctionne toujours
de manière efcace.
• Avant le nettoyage, débranche toujours la che de la prise.
• Nettoyez l‘appareil exactement comme il est indiqué dans le mode d‘emploi.
• N‘utilisez aucune amme libre sous la hotte aspirante.
• Si l‘appareil ne fonctionne pas normalement, adressez-vous au fabricant ou à un
spécialiste.
• Cet appareil peut être utilisé par des enfants de 8 ans ou plus et des personnes
ayant des capacités physiques, sensorielles et mentales limitées et / ou
dénuées d‘expérience et de connaissances, à condition d‘avoir été instruits au
fonctionnement de l‘appareil par une personne responsable et d‘en comprendre les
risques associés.
• Si le câble secteur ou la che sont endommagés, faites-les remplacer par le
fabricant un service professionnel agréé ou une personne de qualication
équivalente.
• Si la hotte aspirante est utilisée avec une cuisinière à gaz ou utilisant d‘autres
combustibles, une ventilation sufsante de la pièce doit être assurée.
• Ne faites pas de ambée sous la hotte aspirante.
• Attention : la surface de l‘appareil peu devenir très chaude pendant le
fonctionnement.
Conseils importants pour l‘installation
• L‘air ne doit pas être dirigé vers une conduite déjà utilisée pour aspirer les gaz de
combustion provenant d‘une cuisinière à gaz ou utilisant d‘autres combustibles
(valable même pour les appareils qui ne renvoient pas l‘air dans la pièce).
• Respectez les règlementations locales concernant l‘installation de dispositifs
d‘extraction d‘air.

55
FR
Remarques importantes concernant le mode d‘extraction
MISE EN GARDE
Danger de mort, risques d‘intoxication ! Par la ré-aspiration de gaz
de combustion. Ne jamais utiliser la fonction d’aspiration de l’appareil
en même temps qu’un foyer dépendant de l’air ambiant si l’air frais
est insuf sant.
Les foyers dépendants de l’air ambiant (par ex. les systèmes de chauffage au gaz, au
fuel, au bois ou au charbon, les chauffe-eaux électriques, les chaudières) extraient
l’air de combustion de la pièce où l’appareil est installé et rejettent les gaz résiduaires
à l’extérieur en les faisant passer par un conduit d’évacuation des gaz (par ex. une
cheminée). Lorsque la hotte aspirante est en marche, la cuisine et les pièces adjacentes
extraient l’air ambiant – une dépressurisation se produit si le volume d’air frais n’est pas
suf sant. Les gaz toxiques d’une cheminée ou d’un foyer seront ré-aspirés dans la pièce
d’habitation.
• Ainsi, il est toujours nécessaire de veiller à ce qu’il y ait une quantité suf sante d’air frais.
• Un caisson mural d’aspiration/d’évacuation ne peut pas garantir à lui seul le
respect des valeurs limites.
Un fonctionnement sans risque est uniquement possible si la dépressurisation de la pièce
où est installé le foyer ne dépasse pas 4 Pa (0,04 mbar). Ceci n’est possible que si l’air
nécessaire à la combustion peut circuler par des ouvertures permanentes, par ex. dans
des portes, fenêtres associées à un caisson mural d’aspiration/d’évacuation ou par
d’autres dispositifs techniques. Dans tous les cas, demander conseil auprès du ramoneur
responsable de la circulation de l’air pour l’ensemble du bâtiment, il sera à même de
proposer les mesures à prendre pour une aération appropriée.
Si la hotte aspirante est utilisée exclusivement en mode ventilation tournante, son
fonctionnement n’est soumis à aucune restriction.
Remarques importantes pour le démontage de l’appareil
• Pour le démontage, suivez les mêmes étapes que l’installation / montage dans
l’ordre inverse.
• Faites-vous aider par une deuxième personne lors du démontage pour éviter les
blessures.

56
FR
INSTALLATION
Préparation
Si l’espace dispose d’une bouche d’aération dirigée vers
l’extérieur, il est possible d’installer la hotte comme sur
l’image de droite. Le conduit d’aspiration doit avoir un
diamètre d’au moins 150 mm et doit être composé d’émail,
d’aluminium ou d’un tuyau exible et thermorésistant.
• Éteindre l’appareil avant de l’installer et débrancher la
prise.
• La hotte aspirante doit être montée 65 à 75 cm au-
dessus de la surface de cuisson.
Installation avec évacuation extérieure de l’air
Attention: respecter les consignes de sécurité pour l’utilisation de l’appareil avec
évacuation extérieure de l’air. Si la hotte aspirante est utilisée simultanément avec un
autre appareil qui tire son énergie d’une source autre qu’électrique, la dépression de
la pièce ne doit pas excéder 4 Pa (4 x 10
-5
Bar).
1
Percer des trous de 3 x 8 mm pour le support de xation. Fixer le support au mur
avec les chevilles et les vis fournies.
Puits de
forage
Goujons
Fixation
Vis
(4 mm x 30mm)

57
FR
2
Pour les modèles obliques, vous devez percer quatre trous supplémentaires (8 mm)
avant le montage. Insérez les chevilles et les vis avant d‘accrocher le capot au mur.
Installation de la cheminée
1 2
Introduire la partie supérieure de la
cheminée dans la partie inférieure. Puis
tirer sur la partie supérieure jusqu’à
atteindre la hauteur nécessaire.
Une fois que la cheminée a la hauteur
exacte, xer les vis de xation aux
crans d’arrêt.
Installation avec évacuation intérieure de l’air
Si l’espace ne dispose pas d’une bouche d’aération dirigée vers l’extérieur, un tuyau
d’évacuation de l’air n’est pas nécessaire. L’installation est semblable à l’installation
avec évacuation extérieure.
58
FR
Installer le ltre à charbon actif
Remarque : le ltre à charbon actif ne fait pas partie du contenu de l’emballage. Il est
toutefois possible de s’en acheter un qui soit adapté à la hotte aspirante.
1 2
Le ltre à charbon actif permet de ltrer
les odeurs de nourriture désagréables
dans le cas d’une évacuation intérieure
de l’air.
Pour installer le ltre, il faut tout d’abord
retirer le ltre à graisse. Débloquer le
verrou et détacher le ltre en le tirant
vers le bas.
3 4
Introduire le ltre à charbon actif dans
le ventilateur et le faire tourner dans le
sens des aiguilles d’une montre. Répéter
l’opération de l’autre côté. S’assurer
que le ltre est bien xé, faute de quoi
il pourrait se désolidariser et provoquer
un accident. Remarque : la capacité
d’aspiration est légèrement plus faible si
un ltre à charbon actif est installé.
Remettre le ventilateur en place et
rexer le ltre à graisse. Fixer la partie
supérieure de la cheminée puis retirer
enn le lm bleu de protection de la
cheminée et de la hotte.

59
FR
PANNEAU DE COMMANDE
1 Bouton POWER (allumer/éteindre l'appareil)
2 Vitesse
3 Écran
4 Lumière (allumé / éteint)
5 WiFi (icône WLAN)
FONCTIONS DES TOUCHES
Marche /arrêt
Appuyez brièvement sur MARCHE / ARRÊT pour allumer la hotte aspirante. Lorsque
vous allumez l‘appareil pour la première fois, le ventilateur fonctionne au niveau 1.
Lorsque vous éteignez l‘appareil, il se souvient de la dernière vitesse réglée.
Réglage de la vitesse
Appuyez brièvement sur VITESSE plusieurs fois pour régler la vitesse souhaitée : Niveau
1 (faible) > Niveau 2 (moyen) > Niveau 3 (élevé).
Appuyez longuement sur VITESSE une fois pour régler la vitesse la plus élevée.
[B] pour la fonction booster clignote à l‘écran. Après 5 minutes, la vitesse passe
automatiquement au niveau 3.
Réglage d‘un arrêt différé
Si l‘appareil est en mode veille, maintenez les touches VITESSE + ÉCLAIRAGE
simultanément pour éteindre le ventilateur avec un délai de 5 minutes. La vitesse actuelle
clignote à l‘écran et le temps est décompté. Une fois le délai écoulé, toutes les touches
sont atténuées tandis que l‘écran continue de clignoter et qu‘un signal retentit. Appuyez
sur n‘importe quelle touche ou attendez 5 secondes pour passer en mode veille. Pour
annuler le délai, appuyez simultanément sur VITESSE + ÉCLAIRAGE et maintenez-les
pendant le compte à rebours.
60
FR
Éclairage marche / arrêt
Appuyez brièvement sur Éclairage pour allumer la lumière. Appuyez à nouveau pour
éteindre la lumière.
Réglage de la couleur de l‘éclairage
Appuyez longuement sur le bouton d‘éclairage pour dénir la couleur de la lumière.
L‘écran afche [0]. Maintenant, appuyez brièvement sur VITESSE plusieurs fois pour
régler LA COULEUR DE LA LUMIÈRE DE [L1] à [L9] :
L1 = blanc L2 = rouge L3 = vert
L4 = bleu L5 = jaune L6 = violet
L7 = orange L8 = turquoise L9 = vert-jaune
Après avoir réglé la couleur souhaitée, appuyez de nouveau longuement sur
ÉCLAIRAGE pour terminer le réglage.
Activation du WIFI
En mode veille, appuyez longuement sur le bouton WIFI pour activer la fonction WIFI.
Le symbole WIFI commence à clignoter. Congurez la connexion comme décrit au
chapitre „Commande de l‘appareil par smartphone“. Dès que la connexion est établie,
le symbole WIFI s‘allume en continu. S‘il n‘y a pas de connexion dans les 3 minutes, le
symbole WIFI cesse de clignoter et l‘appareil passe automatiquement en mode veille.
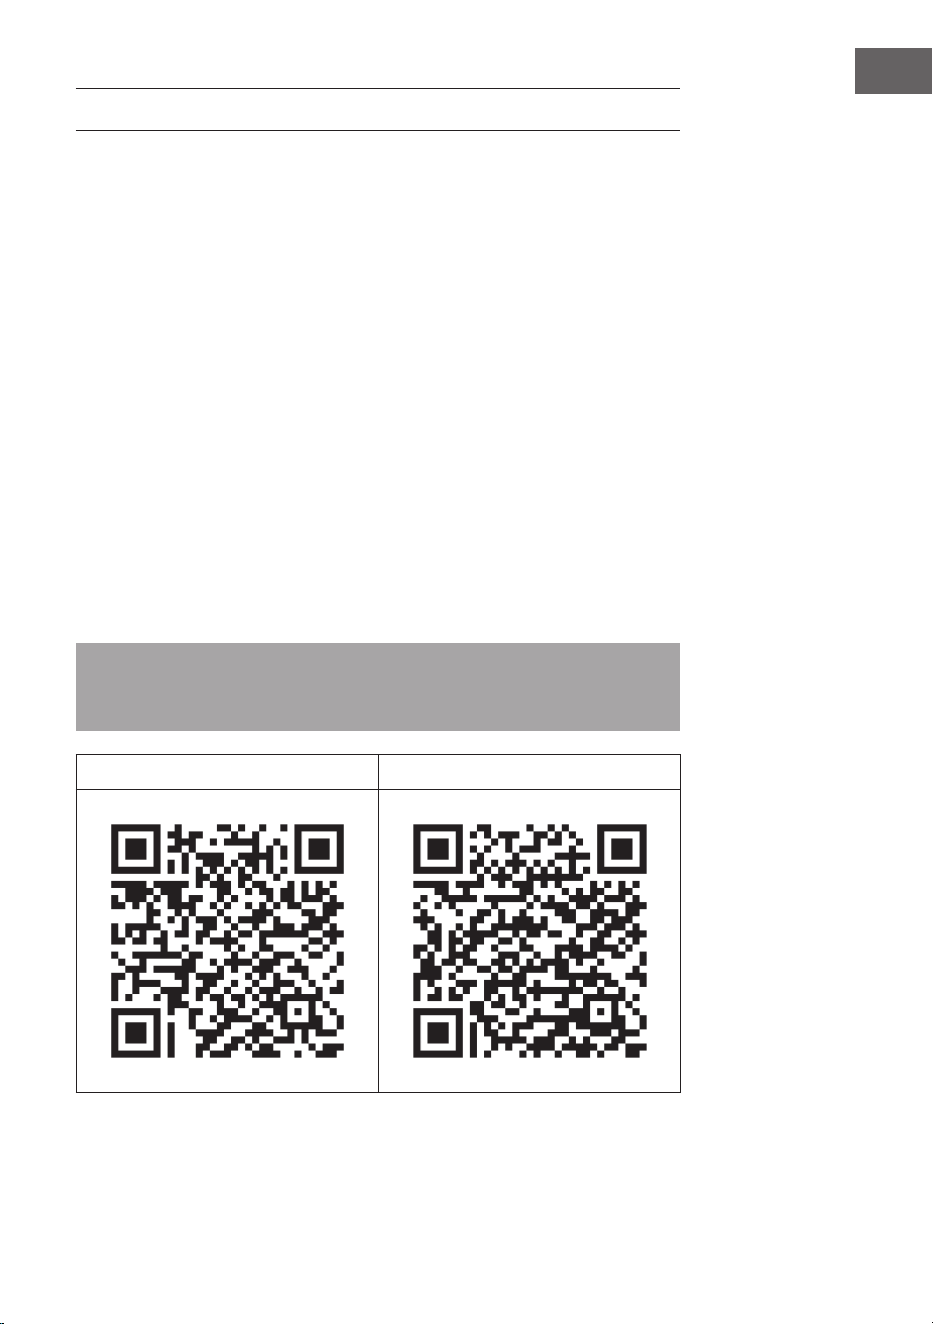
61
FR
CONTRÔLE DE L‘APPAREIL PAR SMARTPHONE
Si vous connectez l‘appareil à votre réseau Wi-Fi domestique, vous pouvez l‘utiliser
facilement via l‘application Klarstein associée. L‘application vous permet non seulement
de contrôler à distance l‘appareil via votre smartphone, mais vous donne également
accès à des recettes et à des informations supplémentaires.
Procédez comme suit pour connecter votre smartphone avec votre appareil Klarstein :
1 Téléchargez d‘abord l‘application Klarstein en scannant le code QR avec votre
smartphone (voir ci-dessous) ou téléchargez-le directement depuis l‘App Store ou
Google Play.
2 Assurez-vous que votre smartphone est connecté au même réseau WiFi que votre
appareil Klarstein.
3 Ouvrez l‘application Klarstein.
4 Connectez-vous avec votre compte. Si vous n‘avez pas encore de compte,
inscrivez-vous dans l‘application Klarstein.
5 Suivez les indications de l‘application.
Téléchargement de l‘application
Utilisez la fonction de scan de votre téléphone portable pour scanner le QR Code et
télécharger l‘application sur votre smartphone.
Remarque : L‘application fournit des informations supplémentaires sur la façon
d‘utiliser l‘application et de l‘aide sur la façon de se connecter à votre appareil dès
que vous l‘ouvrez pour la première fois.
iOS Android

62
FR
Résolution des problèmes de connexion
Si votre appareil Klarstein est introuvable dans le Wi, vériez les points suivants :
1. L‘appareil n‘est pas branché. Vériez que votre appareil est branché à une prise.
2. L‘appareil ne se trouve pas en mode d‘appairage. Vériez que le voyant WiFi
(LED) du panneau de commande de l‘appareil intelligent clignote comme décrit
dans les instructions „Réinitialiser les paramètres WiFi“ pour votre appareil
intelligent (les instructions se trouvent généralement sous Connexion de l‘appareil).
3. Le point d‘accès WiFi ne fonctionne pas sur 2,4 GHz. Assurez-vous que votre point
d‘accès fonctionne sur la bande 2,4 GHz et que vous disposez de votre propre
SSID sur la bande 2,4 GHz. Si vous n‘êtes pas sûr de la bande de fonctionnement
de votre point d‘accès, veuillez contacter votre fournisseur d‘accès Internet.
Important : veuillez noter que si votre routeur WiFi a une double bande - c‘est-
à-dire qu‘il fonctionne à la fois dans les bandes 2,4 GHz et 5 GHz - vous devez
séparez les SSID pour chaque bande et les 2,4 GHz Utilisez le SSID GHz pour vous
connecter.
4. Vériez les paramètres du pare-feu de votre réseau WiFi. Le paramétrage de
pare-feu de votre réseau Wi-Fi peut ne pas permettre à l‘application Klarstein
de congurer les paramètres Wi-Fi sur votre appareil connecté. Veuillez vous
assurer que vous n‘utilisez pas un réseau WiFi public, par ex. aéroports, dortoirs,
entreprises, etc.
5. Différentes données de connexion dans le smartphone et dans l‘application.
Vériez que les données de connexion WiFi saisies dans l‘application Klarstein
correspondent à celles de votre smartphone.
Si vous avez suivi les instructions ci-dessus et que votre smartphone ne parvient
toujours pas à se connecter à l‘application, veuillez nous envoyer un e-mail pour
obtenir de l‘aide : [email protected]
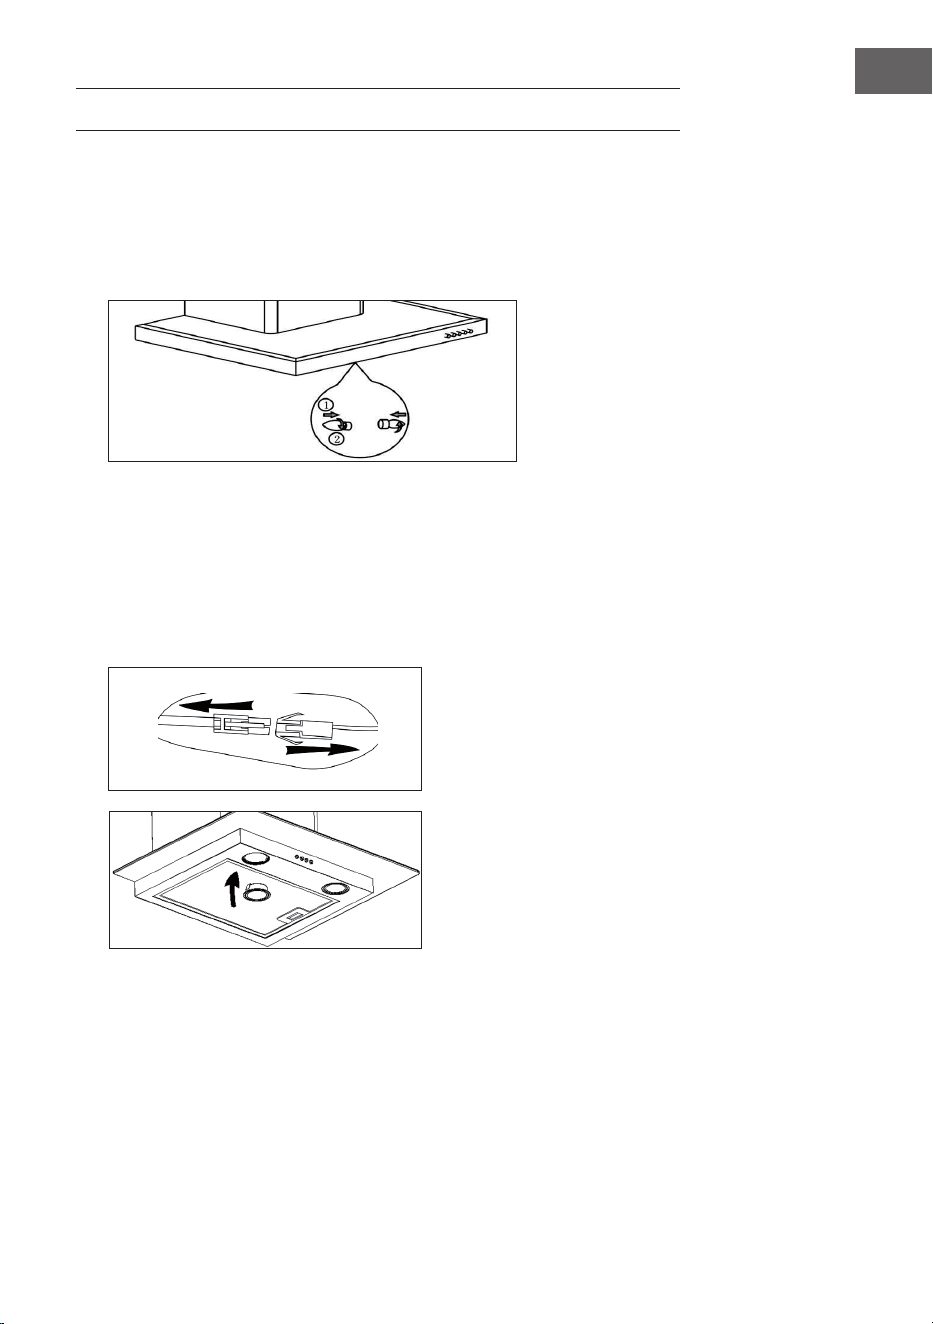
63
FR
REMPLACEMENT DES AMPOULES ET DES LAMPES
Remplacement des ampoules
• Éteindre l’appareil et le débrancher.
• Dévisser les 2 vis de la grille de protection des lampes et retirer celle-ci.
• Dévisser l’ampoule et la remplacer par une autre de même type.
Remplacement des ampoules LED
• Dissocier les câbles pour l’éclairage qui se situent à l’intérieur de la hotte derrière le
ltre de graisse.
• Sortir les douilles et les câbles de la hotte à l’aide d’un tournevis et remplacer
l’ampoule par une autre de même type.
Ampoule LED : max. 1,5 W
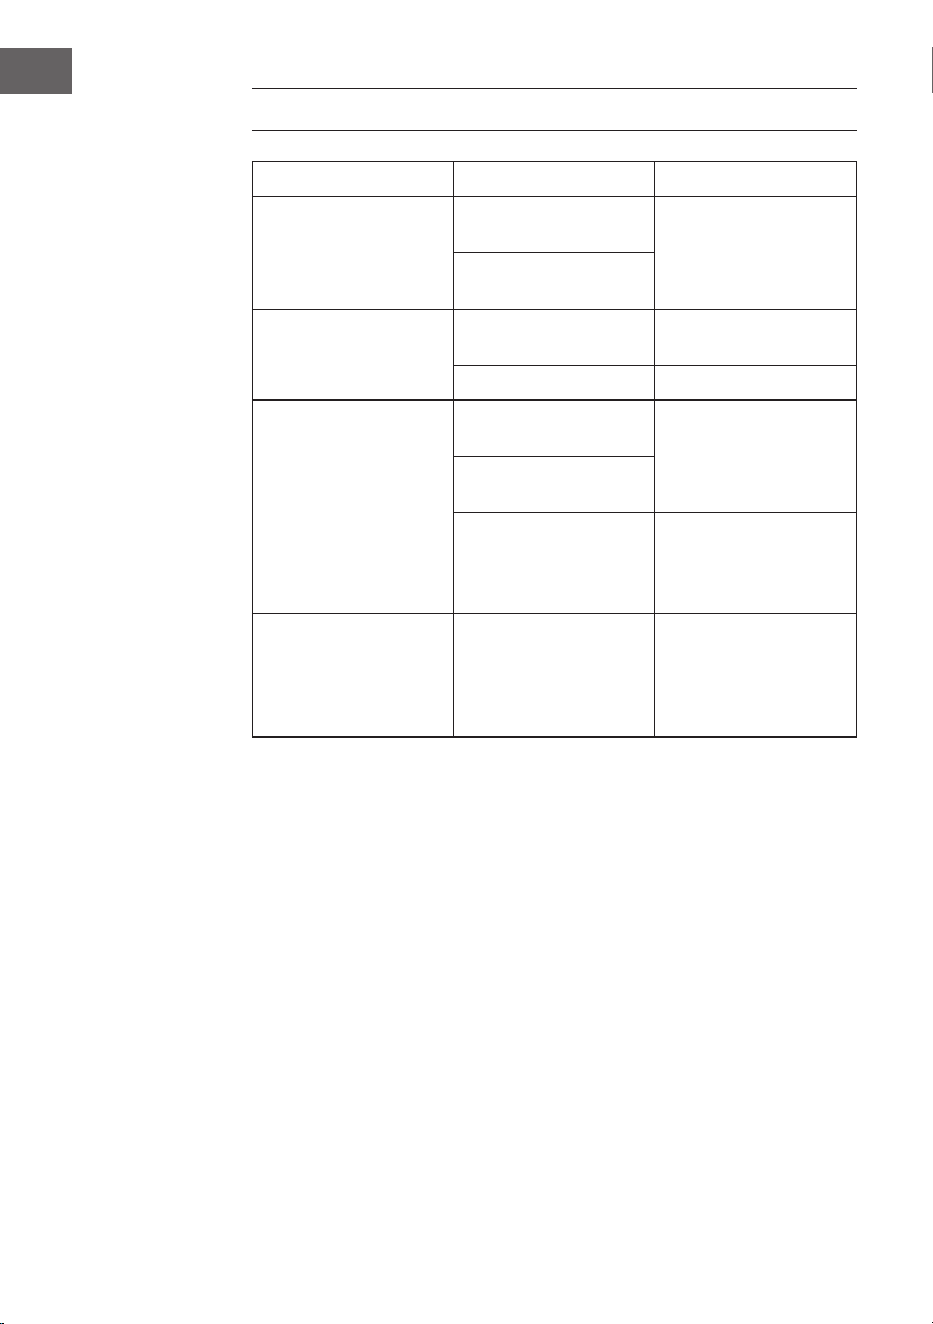
64
FR
RÉSOLUTION DES PROBLÈMES
Problème Cause possible Solution
L’éclairage s’allume
mais le ventilateur ne
fonctionne pas.
Les pales de ventilation
sont cassées.
Éteindre l’appareil et
le faire réviser par une
entreprise spécialisée.
Le moteur est
endommagé.
L’éclairage et le ventilateur
ne fonctionnent pas.
L’ampoule est usagée. Remplacer l’ampoule par
une autre équivalente.
L’appareil est débranché. Brancher l’appareil.
L’appareil produit de fortes
vibrations.
Les pales de ventilation
sont cassées.
Éteindre l’appareil et
le faire réviser par une
entreprise spécialisée.
Ne moteur n’est pas bien
positionné
L’appareil n’est pas bien
xé au mur.
Décrocher l’appareil et
s’assurer que les xations
sont correctement
installées.
L’aspiration est mauvaise. Écart trop important entre
la hotte et la cuisinière.
Monter la hotte aspirante
de telle manière à ce que
l’écart avec la cuisinière
soit compris entre 65 et
75 cm.
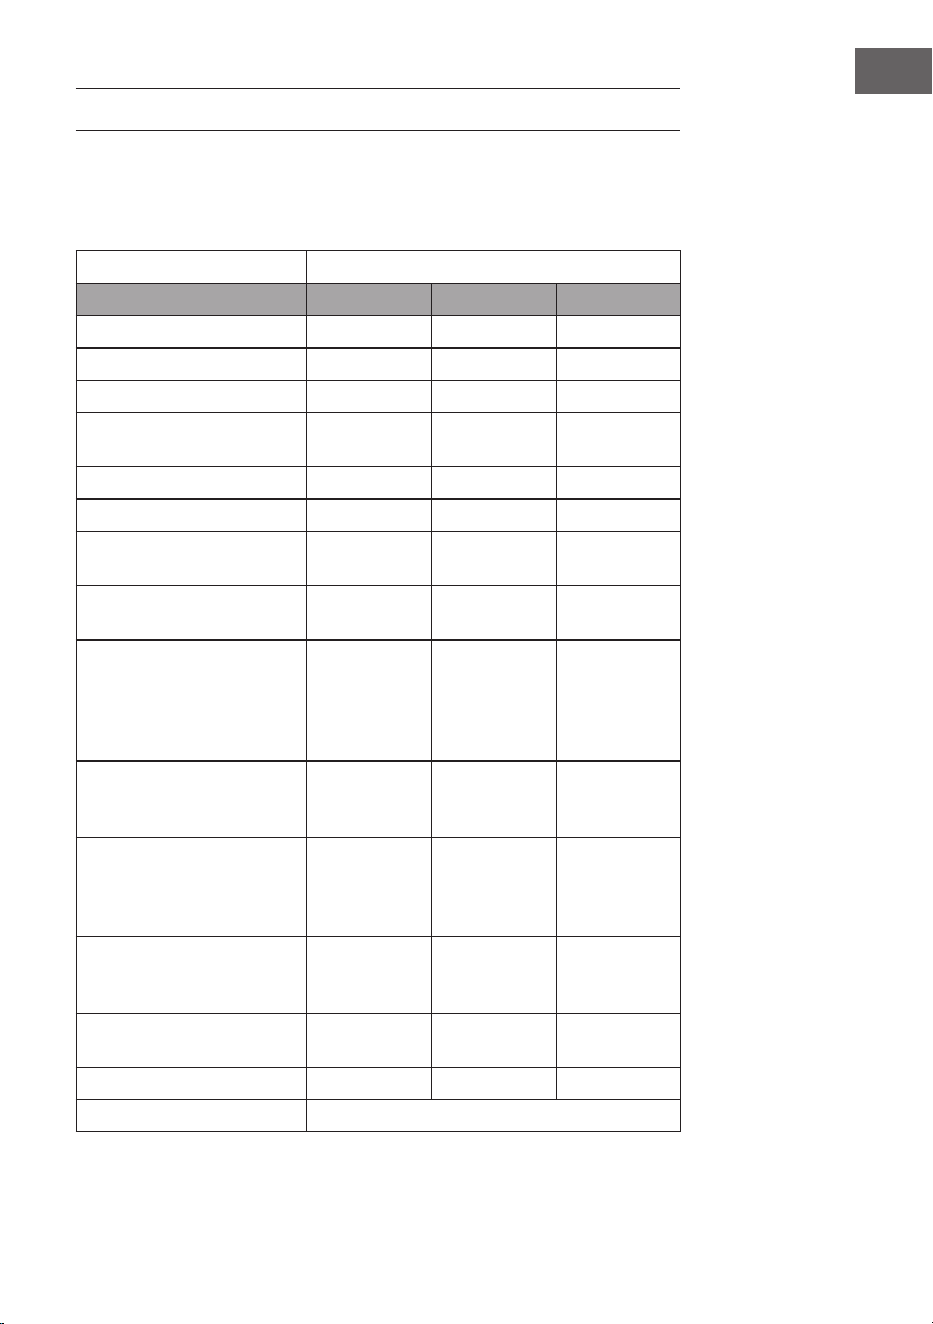
65
FR
FICHE DE DONNÉES PRODUIT
Informations selon le règlement (UE) n ° 65/2014
Méthodes de mesure et de calcul selon EN 61591:1997+A1:2006+A2:2011+A11:201
4+A12:2015
Numéro d‘article
10040234, 10040235, 10040236, 10040237
Description Symbole Valeur Unité
Consommation annuelle d'énergie AEC
hood
12,1 kWh/Année
Classe d'efcacité énergétique A++
Efcacité dynamique des uides FDE
hood
31, 7
Classe d'efcacité dynamique des
uides
A
Efcacité lumineuse LE
hood
34 Lux/W
Classe d'efcacité lumineuse A
Efcacité de séparation des
graisses
GFE
hood
57,1 %
Clase d'efcacité de capture des
graisses
E
Débit d'air à vitesse minimale
et maximale en fonctionnement
normal, à l'exception du
fonctionnement au niveau intensif
ou au niveau haute vitesse
320.9 / 514,9 m³/h
Flux d'air pendant le
fonctionnement au niveau intensif
ou au niveau haute vitesse
552,6 m³/h
Niveau sonore de classe A aux
vitesses minimale et maximale
disponibles en fonctionnement
normal
48 / 59 dB
Niveau sonore de classe A en
fonctionnement au niveau intensif
ou au niveau haute vitesse
60 dB
Consommation d'énergie appareil
éteint
P
o
0,44 W
Consommation électrique en veille P
s
- W
Coordonnées de contact Chal-Tec GmbH, Wallstraße 16, 10179, Berlin, Allemagne
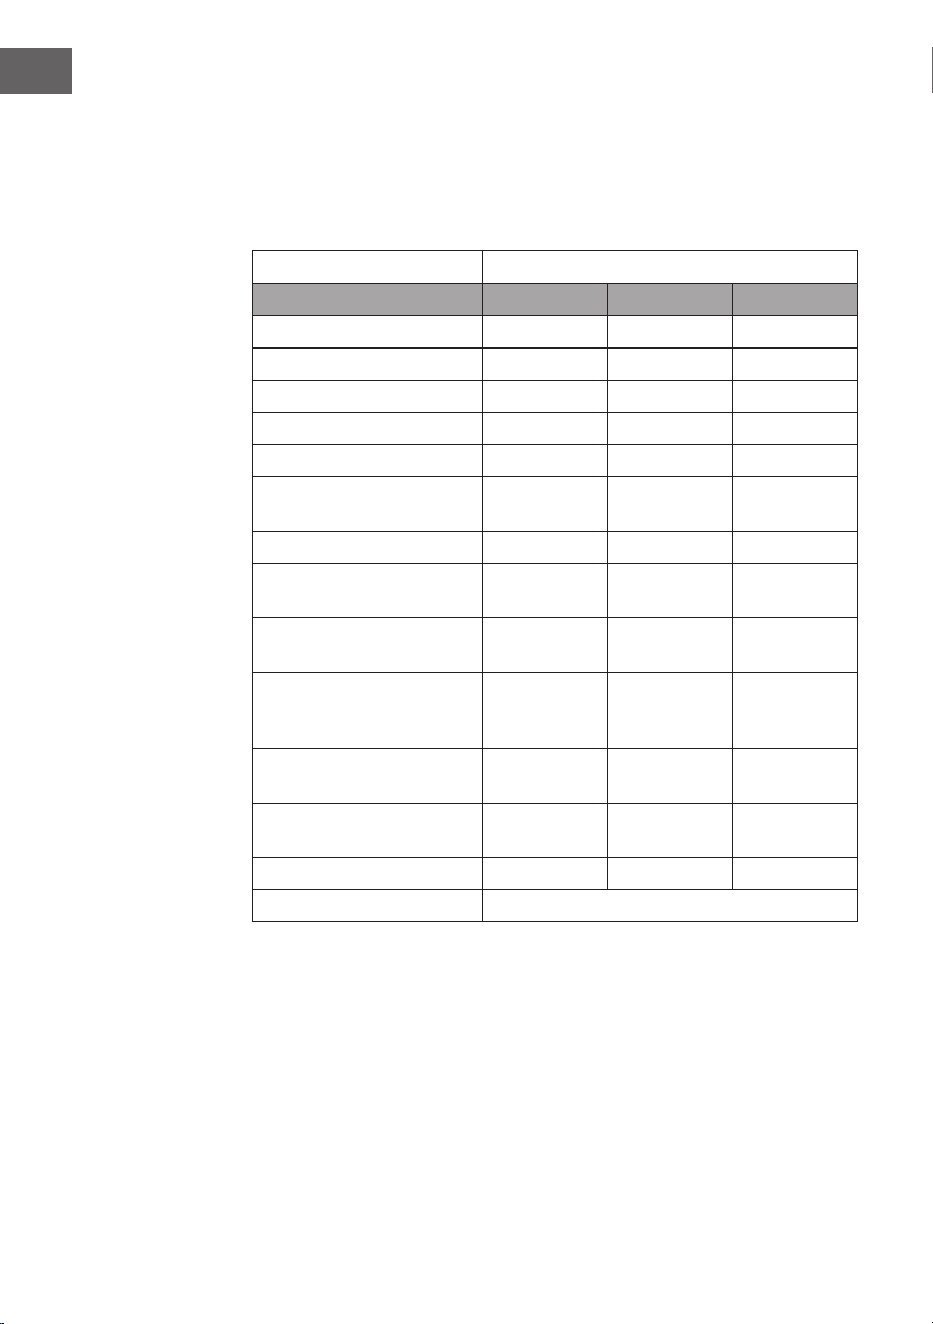
66
FR
Informations selon le règlement (UE) n ° 66/2014
Méthodes de mesure et de calcul selon EN 61591:1997+A1:2006+A2:2011+A11:201
4+A12:2015
Numéro d‘article
10040234, 10040235, 10040236, 10040237
Description Symbole Valeur Unité
Consommation annuelle d'énergie AEC
hood
12,1 kWh/Année
Facteur d'extension de temps f 0,9
Efcacité dynamique des uides FDE
hood
31, 7
Indice d'efcacité énergétique EEI
hood
36
Débit d'air mesuré au meilleur point Q
BEP
205,4 m³/h
Pression d'air mesurée au meilleur
point
P
BEP
168 Pa
Débit d'air maximal Q
max
514,9 m³/h
Puissance électrique d'entrée
mesurée au meilleur point
W
BEP
30,2 W
Puissance nominale du système
d'éclairage
W
L
3 W
Puissance moyenne du système
d'éclairage sur la surface de
cuisson
E
middle
101 Lux
Consommation électrique mesurée
en mode veille
P
o
- W
Consommation d'énergie mesurée
appareil éteint
P
s
0,44 W
Niveau sonore L
WA
59 dB
Coordonnées de contact Chal-Tec GmbH, Wallstraße 16, 10179, Berlin, Allemagne

67
FR
INFORMATIONS SUR LA PROTECTION DE
L‘ENVIRONNEMENT
• Assurez-vous qu‘il y a une ventilation sufsante pendant la cuisson pour que la
hotte aspirante puisse fonctionner efcacement et avec un faible niveau sonore.
• Ajustez la vitesse du ventilateur à la quantité de vapeur produite pendant la
cuisson. Utilisez le mode intensif uniquement lorsque cela est nécessaire. Plus la
vitesse du ventilateur est basse, moins la consommation d‘énergie est réduite.
• Si de grandes quantités de vapeur sont produites pendant la cuisson, sélectionnez
une vitesse de ventilation plus élevée en temps utile. Si la vapeur de cuisson est
déjà répartie dans la cuisine, la hotte aspirante devra fonctionner plus longtemps.
• Éteignez la hotte aspirante lorsque vous n‘en avez plus besoin.
• Éteignez l‘éclairage lorsque vous n‘en avez plus besoin.
• Nettoyez le ltre à intervalles réguliers et remplacez-le si nécessaire an
d‘augmenter l‘efcacité du système de ventilation et d‘éviter les risques d‘incendie.
• Mettez toujours le couvercle pendant la cuisson pour réduire la vapeur et la condensation.
68
FR
CONSEILS POUR LE RECYCLAGE
S‘il existe une réglementation pour l‘élimination ou le
recyclage des appareils électriques et électroniques dans
votre pays, ce symbole sur le produit ou sur l‘emballage
indique que cet appareil ne doit pas être jeté avec les
ordures ménagères. Vous devez le déposer dans un point
de collecte pour le recyclage des équipements électriques
et électroniques. La mise au rebut conforme aux règles
protège l‘environnement et la santé de vos semblables des
conséquences négatives. Pour plus d‘informations sur le
recyclage et l‘élimination de ce produit, veuillez contacter
votre autorité locale ou votre service de recyclage des
déchets ménagers.
DÉCLARATION DE CONFORMITÉ
Fabricant :
Chal-Tec GmbH, Wallstraße 16, 10179 Berlin, Allemagne.
Importateur pour la Grande Bretagne :
Berlin Brands Group UK Ltd
PO Box 1145
Oxford, OX1 9UW
United Kingdom
Le soussigné, Chal-Tec GmbH, déclare que l’équipement
radioélectrique du type Aurora Smart est conforme à la
directive 2014/53/UE. Le texte complet de la déclaration UE
de conformité est disponible à l’adresse internet suivante : use.
berlin/10040234
69
IT
Gentile cliente,
La ringraziamo per aver acquistato il dispositivo. La preghiamo
di leggere attentamente le seguenti istruzioni per l’uso e di
seguirle per evitare possibili danni. Non ci assumiamo alcuna
responsabilità per danni scaturiti da una mancata osservazione
delle avvertenze di sicurezza e da un uso improprio del
dispositivo. Scansionare il codice QR seguente, per accedere
al manuale d’uso più attuale e per ricevere informazioni sul
prodotto.
INDICE
Avvertenze di sicurezza70
Installazione72
Pannello di controllo75
Tasti funzione75
Gestione tramite smartphone77
Sostituire le lampadine e le lampade79
Ricerca e risoluzione dei problemi80
Scheda dati del prodotto81
Indicazioni per la tutela dell’ambiente83
Smaltimento84
Dichiarazione di conformità84
DATI TECNICI
Numero articolo
10040234, 10040235, 10040236,
10040237
Alimentazione 220-240 V ~ 50/60 Hz
WiFi standard
802.11 b/g/n
WiFi frequenza
2,4 GHz
WiFi potenza a radiofrequenza (max.)
< 20 dBm

70
IT
AVVERTENZE DI SICUREZZA
• Leggere attentamente tutte le istruzioni prima dell´uso e conservare il manuale per
consultazioni future.
• Il montaggio può essere eseguito solo da un tecnico qualicato. Prima di utilizzare
la cappa aspirante, accertarsi che la tensione (V) e la frequenza (Hz) indicate
corrispondano alla tensione (V) e alla frequenza (Hz) domestiche.
• Si declina ogni responsabilità per danni derivati da un utilizzo improprio e da
un´installazione errata della cappa aspirante.
• I bambini minori di 8 anni non possono utilizzare la cappa aspirante.
• La cappa aspirante non è per un uso commerciale bensì domestico e in ambienti
simili.
• Pulire regolarmente la cappa aspirante e il ltro per un corretto funzionamento.
• Staccare la spina dalla presa prima di eseguire la pulizia.
• Pulire la cappa aspirante come indicato nel manuale di istruzioni. Non utilizzare
amme vive sotto la cappa aspirante.
• Se la cappa aspirante non funziona correttamente, rivolgersi al produttore o ad un
tecnico competente.
• Questo dispositivo può essere utilizzato da bambini a partire da 8 anni e da
persone con limitate capacità siche e psichiche o con conoscenza ed esperienza
limitate, solo se sono stati istruiti sulle modalità d’uso e comprendono i rischi e i
pericoli connessi.
• Se il cavo di alimentazione o la spina sono danneggiati, farli sostituire dal
produttore o da un tecnico qualicato.
• Se la cappa aspirante viene utilizzata insieme ad apparecchi che bruciano gas o
combustibili, è necessario che la stanza sia ben ventilata.
• Non cucinare alimenti alla amma (ambé) sotto la cappa aspirante.
• Attenzione: le superci della cappa aspirante possono diventare molto calde
durante l´uso.
Note importanti per l´installazione
• L´aria non deve essere condotta in uno scarico utilizzato per aspirare gas di
combustione o altri combustibili (ciò non si applica per dispositivi che emettono
solo aria nella stanza).
• Osservare tutte le disposizioni regionali relative all´incasso di dispositivi di
ventilazione.
71
IT
Note importanti circa la modalità di estrazione
AVVERTENZA
Pericolo di morte, pericolo di intossicazione da gas di scarico! Non
azionare l´apparecchio con funzione di scarico mentre è attivo un
impianto di riscaldamento che utilizza l´aria ambiente, se
l´areazione non è suf ciente.
Gli impianti di riscaldamento che sfruttano l´aria ambiente (ad es. stufe a gas, ad
gasolio, a legna o a carbone, scalda-acqua istantanei, scaldabagno), usano l´aria
ambiente per la combustione ed espellono all´esterno i gas di scarico attraverso un
sistema di scarico (ad es. camino). Con la cappa aspirante accesa viene sottratta
aria dalla cucina e dalle stanze adiacenti. Se l´areazione è insuf ciente si forma una
depressione. I gas tossici del camino vengono riaspirati negli ambienti domestici.
• Pertanto è necessario che ci sia sempre un´areazione suf ciente.
• La cassetta a muro per areazione o s ato da sola non garantisce un´areazione
suf ciente.
Un utilizzo sicuro è possibile solo se la depressione nella stanza dove è installato
l´impianto di riscaldamento non supera i 4 Pa (0,04 mbar). Ciò è possibile solo se
l´aria necessaria per la combustione può af uire nella stanza attraverso aperture
permanenti come porte, nestre, in combinazione con una cassetta a muro per
areazione o s ato o con altre misure tecniche. In ogni caso rivolgersi ad un esperto di
impianti di areazione il quale fornirà indicazioni sulle misure da intraprendere per una
corretta areazione.
Se la cappa aspirante viene impiegata esclusivamente con funzione di ricircolo
dell´aria, l´utilizzo è possibile senza limiti.
Informazioni importanti per smontare il dispositivo
• Lo smontaggio avviene seguendo i passaggi relativi a installazione/montaggio in
ordine inverso.
• Chiedere l’aiuto di una seconda persona per smontare il dispositivo, in modo da
evitare lesioni.
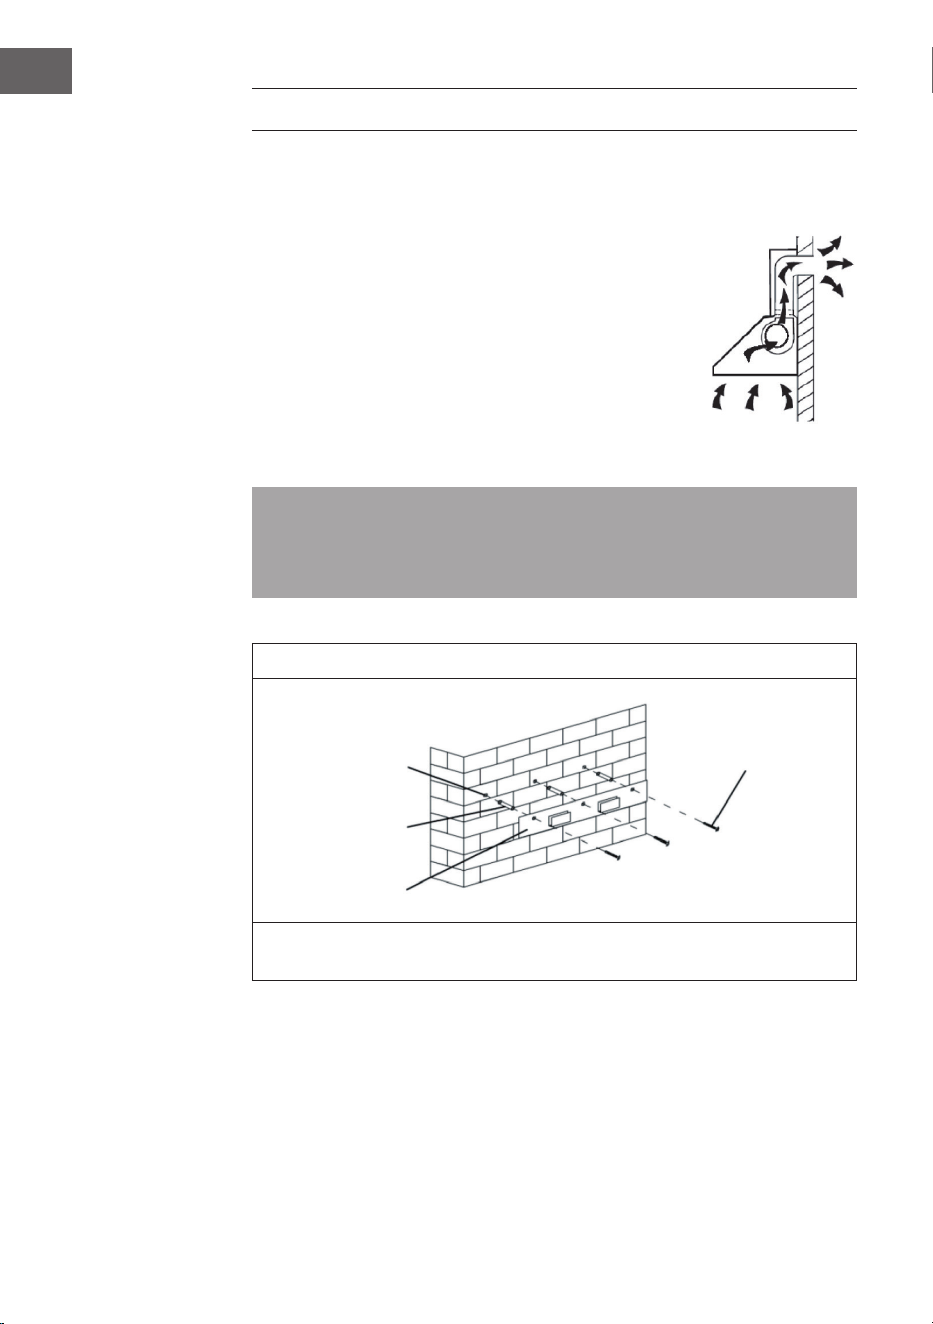
72
IT
INSTALLAZIONE
Preparazione
Se si possiede uno scarico verso l‘esterno, è possibile
installare la cappa come mostrato nell‘immagine a destra. Il
condotto di scarico deve avere un diametro minimo di 150
mm ed essere composto da smalto, alluminio, da un tubo
essibile, resistente al calore.
• Prima di procedere con l’installazione, spegnere il
dispositivo e staccare la spina.
• Installare la cappa aspirante sopra il piano di cottura
ad un‘altezza di 65-75 cm.
Installazione con scarico all’esterno
Attenzione: prestare attenzione alle avvertenze di sicurezza se si utilizza lo scarico
all’esterno. Se la cappa aspirante è in funzione contemporaneamente con un altro
dispositivi che trae energia da un’altra fonte di corrente, la depressione nella stanza
non deve superare i 4 Pa (4 x 10
-5
bar).
1
Eseguire i fori (3 x 8 mm) per la staffa di montaggio. Fissare la staffa di montaggio
alla parete utilizzando i tasselli e le viti incluse nella consegna.
Benoro
Spine
Montatura
Bulloneria
(4 mm x 30mm)
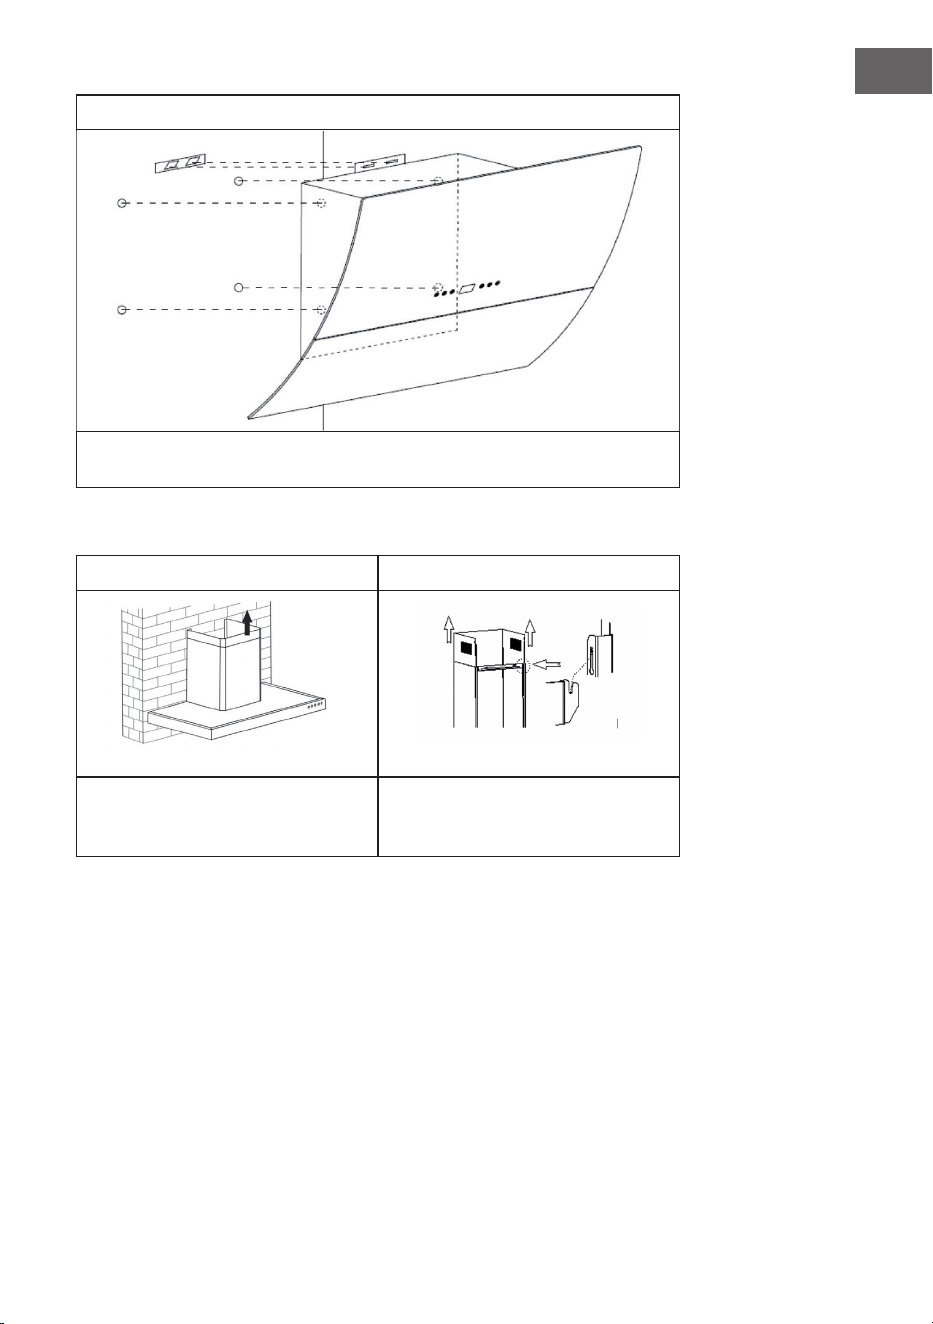
73
IT
2
Per i modelli obliqui, è necessario praticare quattro fori aggiuntivi (8 mm) prima del
montaggio. Inserire i tasselli e le viti prima di appendere il cappuccio alla parete.
Installazione del camino
1 2
Inserire il camino superiore in quello
inferiore. Tirare verso l’alto il camino
superiore e regolare la sua altezza.
Una volta che il camino è installato alla
giusta altezza, agganciare il foro di
ssaggio alle viti di ssaggio.
Installazione con scarico interno
Se non si dispone di uno scarico esterno, occorre un tubo di scarico. L‘installazione è
simile all’installazione con scarico esterno.
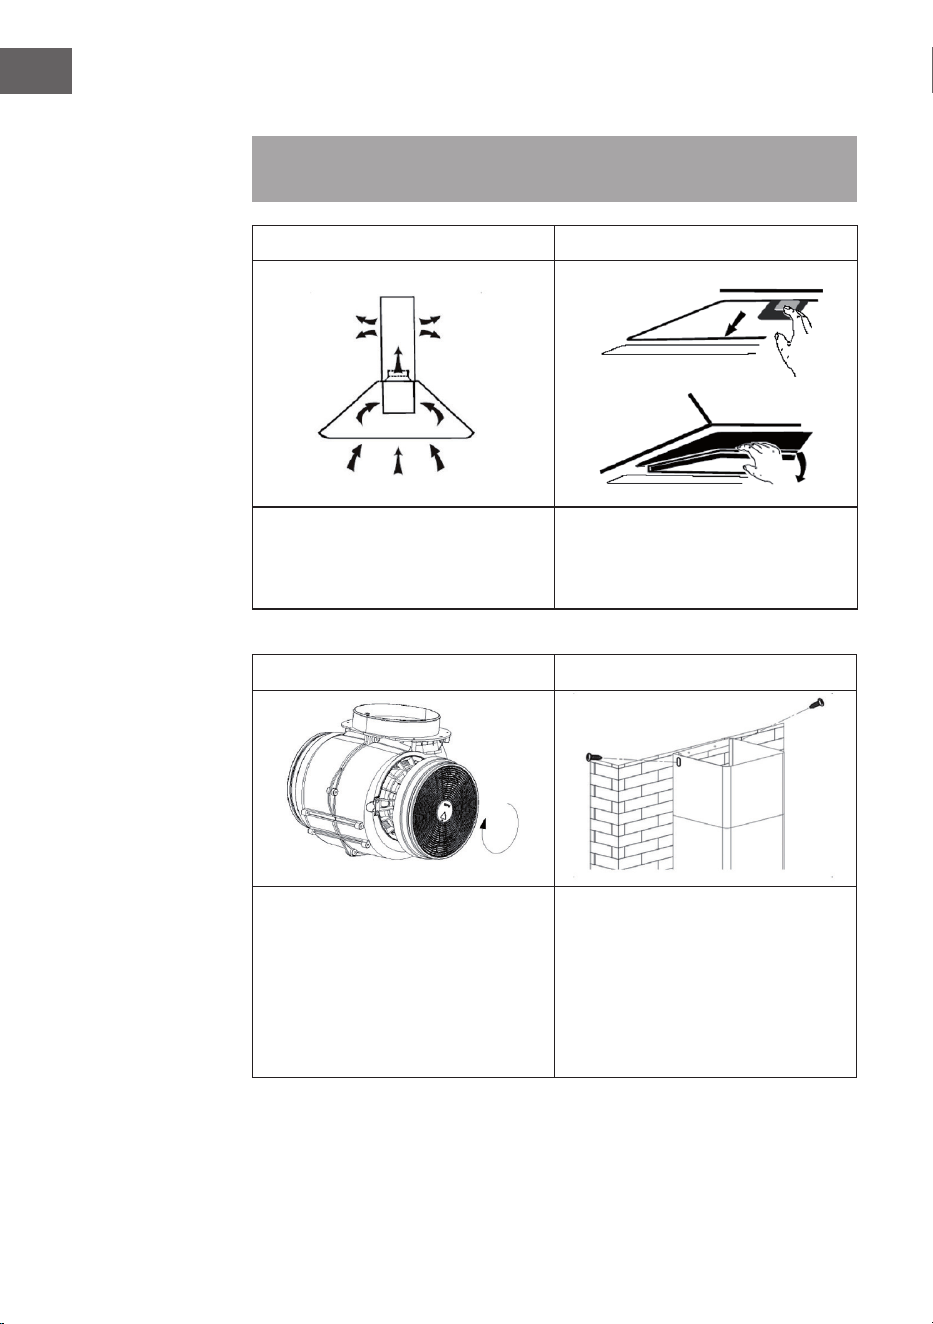
74
IT
Installare il ltro a carbone attivo
Nota: il ltro a carbone attivo non è incluso nella consegna. Questo può essere
acquistato come accessorio.
1 2
Grazie al ltro a carboni attivi è
possibile ltrare gli odori se non si ha
uno scarico esterno.
Per poter installare il ltro, è necessario
rimuovere per prima cosa il ltro
antigrasso. Premere e tirare verso il
basso lo sportello.
3 4
Inserire il ltro a carbone attivo sulla
ventola e ruotarlo in senso orario.
Ripetere la procedura per l’altro lato.
Assicurarsi che il ltro sia inserito
correttamente, altrimenti potrebbe
allentarsi e causare danni. Nota: con
il ltro a carbone attivo installato la
potenza aspirante è ridotta.
Inserire di nuovo la ventola e ssare
il ltro antigrasso. Fissare il camino
superiore e inne rimuovere la pellicola
protettiva blu dal camino e dalla cappa
aspirante.

75
IT
PANNELLO DI CONTROLLO
1 Pulsante POWER (accendere / spegnere l'unità)
2 Velocità
3 Visualizza
4 Luce (on / off)
5 WiFi (simbolo WLAN)
TASTI FUNZIONE
On/off
Premere brevemente ON/OFF per accendere la cappa aspirante. Quando si accende
il dispositivo per la prima volta, la ventola funziona al livello di velocità 1. Se si spegne
il dispositivo, viene salvata l’ultimo livello di velocità utilizzato.
Impostare la velocità
Premere più volte brevemente VELOCITÀ per impostare il livello desiderato: livello 1
(basso) > livello 2 (medio) > livello 3 (alto).
Premere una volta VELOCITÀ a lungo per impostare la velocità massima. Sul display
lampeggia [b] per indicare la funzione Booster. Dopo 5 minuti, la velocità passa
automaticamente al livello 3.
Impostare lo spegnimento ritardato
Se il dispositivo si trova in standby, tenere premuti contemporaneamente
VELOCITÀ+LUCE per impostare lo spegnimento ritardato di 5 minuti della ventola. Sul
display lampeggia la velocità attuale e inizia il conto alla rovescia. Una volta scaduto il
tempo, la luminosità di tutti i tasti viene ridotta, mentre il display continua a lampeggiare
e viene emesso un segnale acustico. Premere un tasto a piacere o attendere 5
secondi per passare in standby. Per interrompere lo spegnimento ritardato, premere
contemporaneamente VELOCITÀ+LUCE durante il conto alla rovescia.

76
IT
Accendere/spegnere la luce
Premere brevemente LUCE per accendere la luce. Premere di nuovo il tasto per
spegnere la luce.
Impostare il colore della luce
Premere a lungo LUCE per impostare il colore desiderato. Il display mostra [0]. Premere
più volte brevemente VELOCITÀ per regolare il colore della luce da [L1] a [L9].
L1 = bianco L2 = rosso L3 = verde
L4 = blu L5 = giallo L6 = viola
L7 = arancione L6 = azzurro L9 = verde-giallo
Dopo aver impostato il colore desiderato, tenere premuto a lungo LUCE per concludere
l’impostazione.
Attivare il Wi-Fi
In modalità standby, premere a lungo WI-FI per attivare la relativa funzione. Il simbolo
del Wi-Fi inizia a lampeggiare. Stabilire il collegamento seguendo le indicazioni
del capitolo “Controllo del dispositivo tramite smartphone”. Una volta stabilito il
collegamento, il simbolo del Wi-Fi rimane acceso costantemente. Se non viene stabilito
alcun collegamento entro 3 minuti, il simbolo del Wi-Fi smette di lampeggiare e il
dispositivo passa automaticamente in standby.
77
IT
GESTIONE TRAMITE SMARTPHONE
Se si collega l‘apparecchio al WiFi, è possibile gestirlo comodamente con la relativa
applicazione Klarstein. L‘app non solo consente di controllare l´apparecchio da
remoto dal proprio smartphone, ma consente anche di accedere a ricette e ad altre
informazioni.
Per collegare il telefono al dispositivo Klarstein, procedere come segue:
1 Per prima cosa scaricare l‘app Klarstein scansionando il codice QR con lo
smartphone (vedere sotto) o scaricarla direttamente dall‘App Store o da Google
Play.
2 Accertarsi che lo smartphone sia connesso alla stessa rete WiFi a cui deve
collegarsi il dispositivo Klarstein.
3 Aprire l‘applicazione Klarstein.
4 Accedere con il proprio account. Se non si possiede ancora un account, registrarsi
nell‘app Klarstein.
5 Seguire le istruzioni contenute nell‘App.
App-Download
Utilizzare la funzione di scansione del telefono per eseguire la scansione del codice
QR e salvare l‘applicazione sullo smartphone.
Nota: L‘applicazione fornisce ulteriori informazioni su come utilizzarla e su come
connettersi al dispositivo non appena viene aperta per la prima volta.
iOS Android

78
IT
Correzione degli errori in caso di problemi di connessione
Se non è possibile trovare il dispositivo Klarstein nella rete Wi-Fi, controllare i seguenti
punti:
1. La spina non è collegata. Assicurarsi che il dispositivo sia collegato a una presa
elettrica.
2. Il dispositivo non si trova in modalità di accoppiamento. Assicurarsi che
l‘indicazione Wi-Fi (LED) sul pannello di controllo del dispositivo smart lampeggi
come descritto alla voce „Resettare le impostazioni Wi-Fi“ del dispositivo smart in
questione (indicazioni a riguardo possono essere normalmente trovate alla voce
„Connessione dei dispositivi“).
3. Il punto di accesso Wi-Fi non opera sulla banda da 2,4 GHz. Assicurarsi che il
punto di accesso utilizzato operi sulla banda da 2,4 GHz e che sia disponibile un
SSID personale sulla banda da 2,4 GHz. Se non si è sicuri del tipo di banda del
punto di accesso, rivolgersi al fornitore di Internet.
Importante: tenere presente che se il router Wi-Fi è dotato di dualband e opera
dunque sia sulla banda da 2,4 GHz che su quella da 5 GHz, è necessario dividere
gli SSID per ogni banda e utilizzare per il collegamento l‘SSID della banda da 2,4
GHz.
4. Controllare le impostazioni del rewall della rete Wi-Fi. L‘impostazione del rewall
della rete Wi-Fi potrebbe non permettere alla app Klarstein di congurare le
impostazioni Wi-Fi sul dispositivo smart. Assicurarsi di non utilizzare reti Wi-Fi
pubbliche, come ad es. presso aeroporti, hotel, aziende, ecc.
5. Diversi dati di registrazione su smartphone e app. Assicurarsi che i dati di
registrazione Wi-Fi inseriti nella app Klarstein corrispondano a quelli con cui è
collegato lo smartphone.
Se sono stati rispettati i punti citati in precedenza e lo smartphone continua a non
connettersi alla app, si prega di inviare un‘email al seguente indirizzo per ricevere
supporto: appsuppor[email protected].
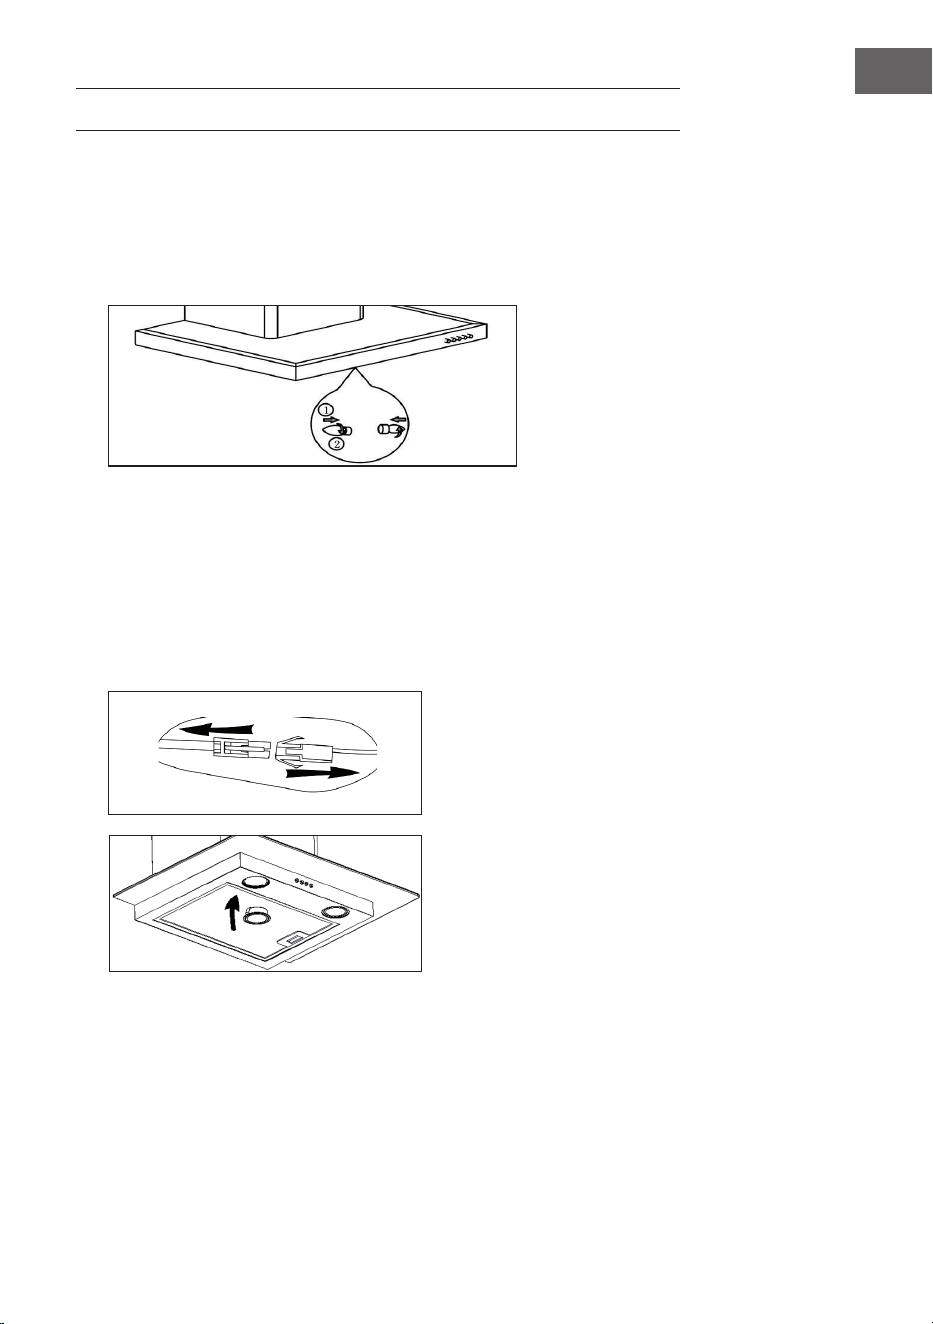
79
IT
SOSTITUIRE LE LAMPADINE E LE LAMPADE
Sostituire le lampadine
• Spegnere il dispositivo e disinserire la spina dalla presa.
• Allentare le 2 viti del coperchio della lampada e rimuoverle.
• Sostituire la lampadina con una dello stesso tipo:
Sostituire le lampade LED
• Scollegare il cablaggio della luce, posto all’interno della cappa dietro il ltro
antigrasso.
• Rimuovere i porta lampadine e il cavo con un cacciavite e sostituire la lampada
con una dello stesso tipo:
Lampada a LED: max. 1,5 W
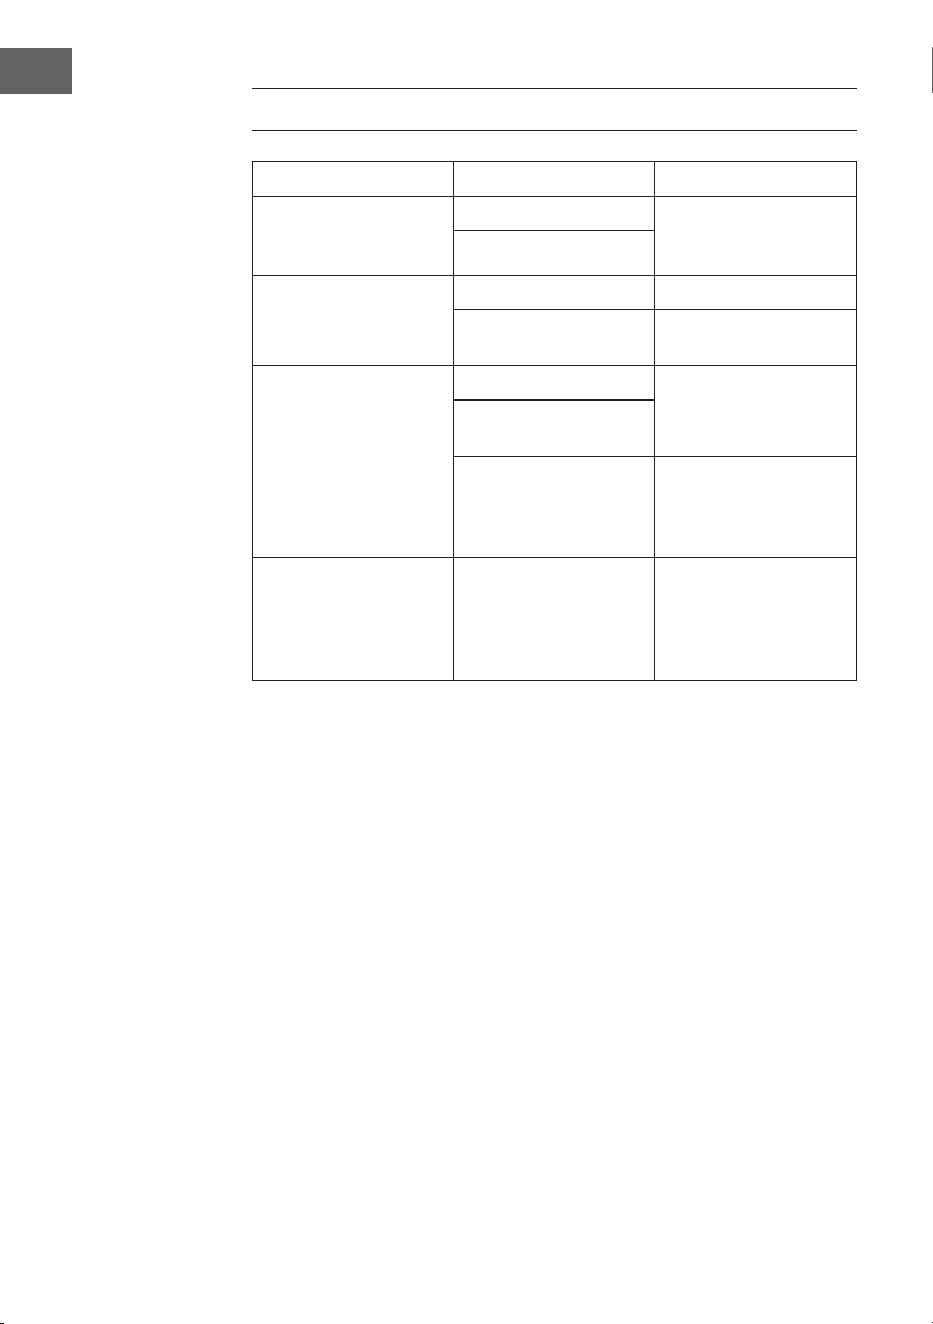
80
IT
RICERCA E RISOLUZIONE DEI PROBLEMI
Problema Causa possibile Soluzione
La luce si accende ma la
ventola non si aziona.
La ventola è rotta. Spegnere il dispositivo e
farlo riparare da un centro
assistenza specializzato.
La ventola è danneggiata.
La luce e la ventola non
funzionano.
La lampadina è bruciata. Sostituire la lampadina.
Non è stata inserita la
spina nella presa.
Inserire la spina nella
presa.
Forti vibrazioni. La ventola è rotta. Spegnere il dispositivo e
farlo riparare da un centro
assistenza specializzato.
La ventola non è installata
correttamente.
Il dispositivo non è
installato correttamente
alla parete.
Rimuovere il dispositivo
e assicurarsi che la staffa
di montaggio sia ssata
correttamente.
La potenza aspirante è
ridotta.
Troppa distanza tra la
cappa e il fornello.
Installare la cappa in
modo tale che la distanza
tra il fornello e la cappa
sia compresa tra i 65 e i
75 cm.
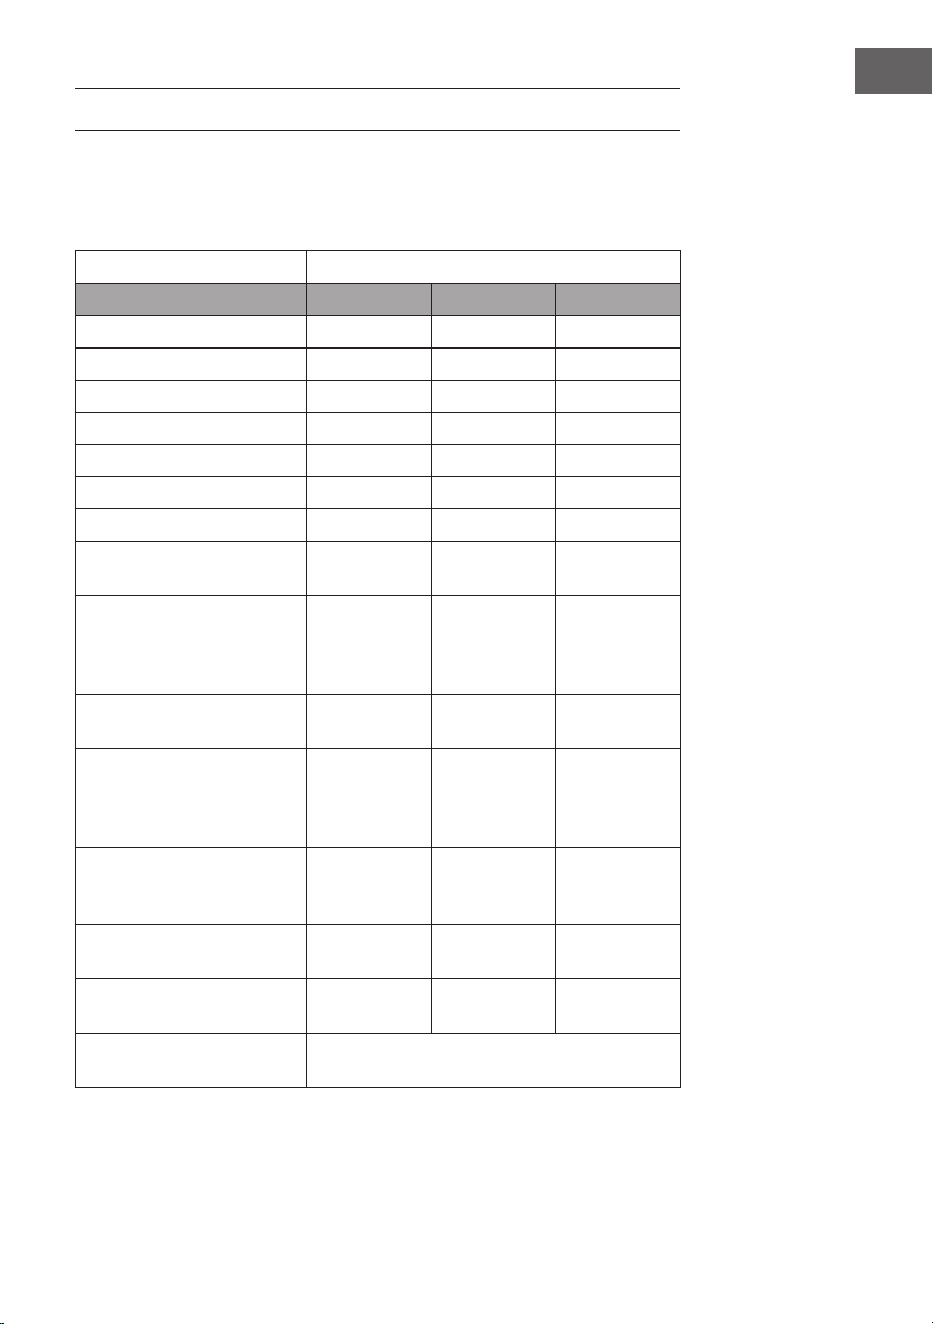
81
IT
SCHEDA DATI DEL PRODOTTO
Indicazioni conformi alla direttiva (UE) N° 65/2014
Metodi di misurazione e calcolo conformi a EN 61591:1997+A1:2006+A2:2011+A11:
2014+A12:2015
Numero articolo
10040234, 10040235, 10040236, 10040237
Denizione Simbolo Valore Unità
Consumo energetico annuale AEC
hood
12,1 kWh/Anno
Classe di efcienza energetica A++
Efcienza uidodinamica FDE
hood
31, 7
Classe di efcienza uidodinamica A
Efcienza luminosa LE
hood
34 Lux/W
Classe di efcienza luminosa A
Grado di separazione del grasso GFE
hood
57,1 %
Classe relativa al grado di
separazione del grasso
E
Flusso d’aria a velocità minima in
funzionamento normale, escluso il
funzionamento a livello intenso o
ad alta velocità.
320.9 / 514,9 m³/h
Flusso d’aria in funzionamento
intenso o ad alta velocità.
552,6 m³/h
Livello di emissioni sonore
ponderato A, nelle velocità
massima e minima disponibili in
funzionamento normale.
48 / 59 dB
Livello di emissioni sonore
ponderato A, in funzionamento
intenso o ad alta velocità.
60 dB
Potenza assorbita a dispositivo
spento
P
o
0,44 W
Potenza assorbita a dispositivo in
standby
P
s
- W
Informazioni di contatto Chal-Tec GmbH, Wallstraße 16, 10179, Berlino,
Germania
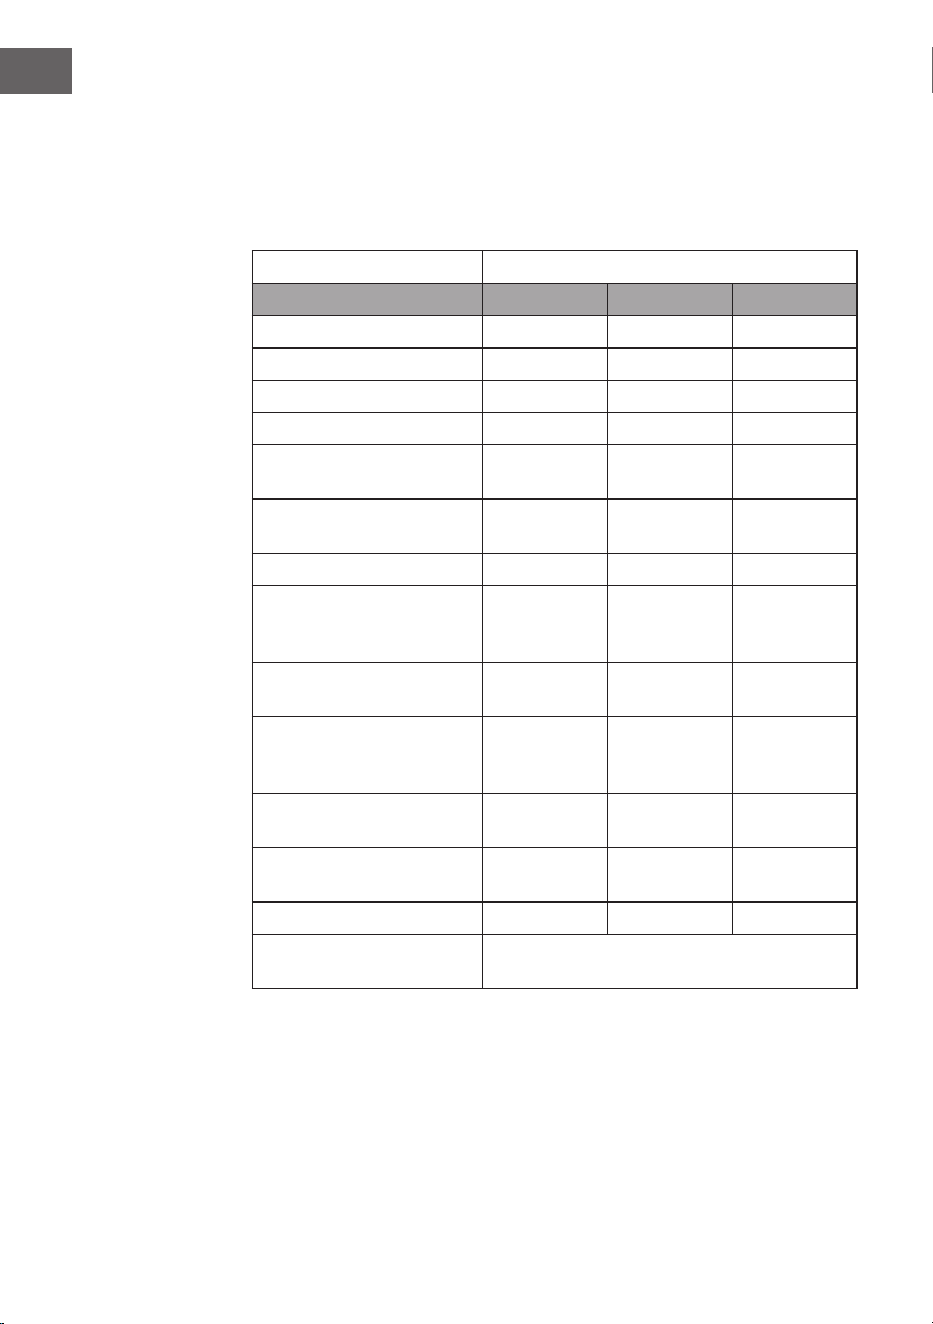
82
IT
Indicazioni conformi alla direttiva (UE) N° 66/2014
Metodi di misurazione e calcolo conformi a EN 61591:1997+A1:2006+A2:2011+A11:
2014+A12:2015
Numero articolo
10040234, 10040235, 10040236, 10040237
Denizione Simbolo Valore Unità
Consumo energetico annuale AEC
hood
12,1 kWh/Anno
Fattore di incremento nel tempo f 0,9
Efcienza uidodinamica FDE
hood
31, 7
Indice di efcienza energetica EEI
hood
36
Volume del usso d’aria misurato
nel punto di massima efcienza
Q
BEP
205,4 m³/h
Pressione dell’aria misurata nel
punto di massima efcienza
P
BEP
168 Pa
Flusso d’aria massimo Q
max
514,9 m³/h
Potenza elettrica in entrata
misurata nel punto di massima
efcienza
W
BEP
30,2 W
Potenza nominale del sistema di
illuminazione
W
L
3 W
Intensità luminosa media del
sistema di illuminazione sul piano
cottura
E
middle
101 Lux
Potenza assorbita misurata a
dispositivo in standby
P
o
- W
Potenza assorbita misurata a
dispositivo spento
P
s
0,44 W
Livello di rumorosità L
WA
59 dB
Informazioni di contatto Chal-Tec GmbH, Wallstraße 16, 10179, Berlino,
Germania

83
IT
INDICAZIONI PER LA TUTELA DELL’AMBIENTE
• Mentre si cucina, assicurare un sufciente usso d’aria, in modo che la cappa
aspirante possa funzionare in modo efciente e con bassa rumorosità operativa.
• Regolare la velocità della ventola in base alla quantità di vapore generato durante
la cottura. Utilizzare la modalità di funzionamento intenso solo se necessario.
Minore la velocità della ventola, minori i consumi energetici.
• Se durante la preparazione di grandi quantità di alimenti si forma molto vapore,
selezionare per tempo una velocità maggiore della ventola. Se il vapore si è già
diffuso nella cucina, sarà necessario lasciare in funzione più a lungo la cappa
aspirante.
• Spegnere la cappa quando non è più necessaria.
• Spegnere la luce quando non è più necessaria.
• Pulire il ltro a intervalli regolari e sostituirlo secondo necessità, in modo da
incrementare l’efcacia del sistema di ventilazione e da evitare il rischio di incendi.
• Mettere sempre il coperchio sulle pentole quando si cucina, per ridurre vapore e
condensa.
84
IT
SMALTIMENTO
Se nel proprio paese si applicano le regolamentazioni
inerenti lo smaltimento di dispositivi elettrici ed elettronici,
questo simbolo sul prodotto o sulla confezione segnala che
questi prodotti non possono essere smaltiti con i ri uti normali
e devono essere portati a un punto di raccolta di dispositivi
elettrici ed elettronici. Grazie al corretto smaltimento dei
vecchi dispositivi si tutela il pianeta e la salute delle persone
da possibili conseguenze negative. Informazioni riguardanti il
riciclo e lo smaltimento di questi prodotti si ottengono presso
l’amministrazione locale oppure il servizio di gestione dei
ri uti domestici.
DICHIARAZIONE DI CONFORMITÀ
Produttore:
Chal-Tec GmbH, Wallstraße 16, 10179 Berlino, Germania.
Importatore per la Gran Bretagna:
Berlin Brands Group UK Ltd
PO Box 1145
Oxford, OX1 9UW
United Kingdom
Il fabbricante, Chal-Tec GmbH, dichiara che il tipo di
apparecchiatura radio Aurora Smart è conforme alla direttiva
2014/53/UE. Il testo completo della dichiarazione di
conformità UE è disponibile al seguente indirizzo Internet:
use.berlin/10040234