08/2024
Read these instructions carefully before using your appliance, and keep it carefully.
If you follow the instructions, your appliance will provide you with many years of good service.
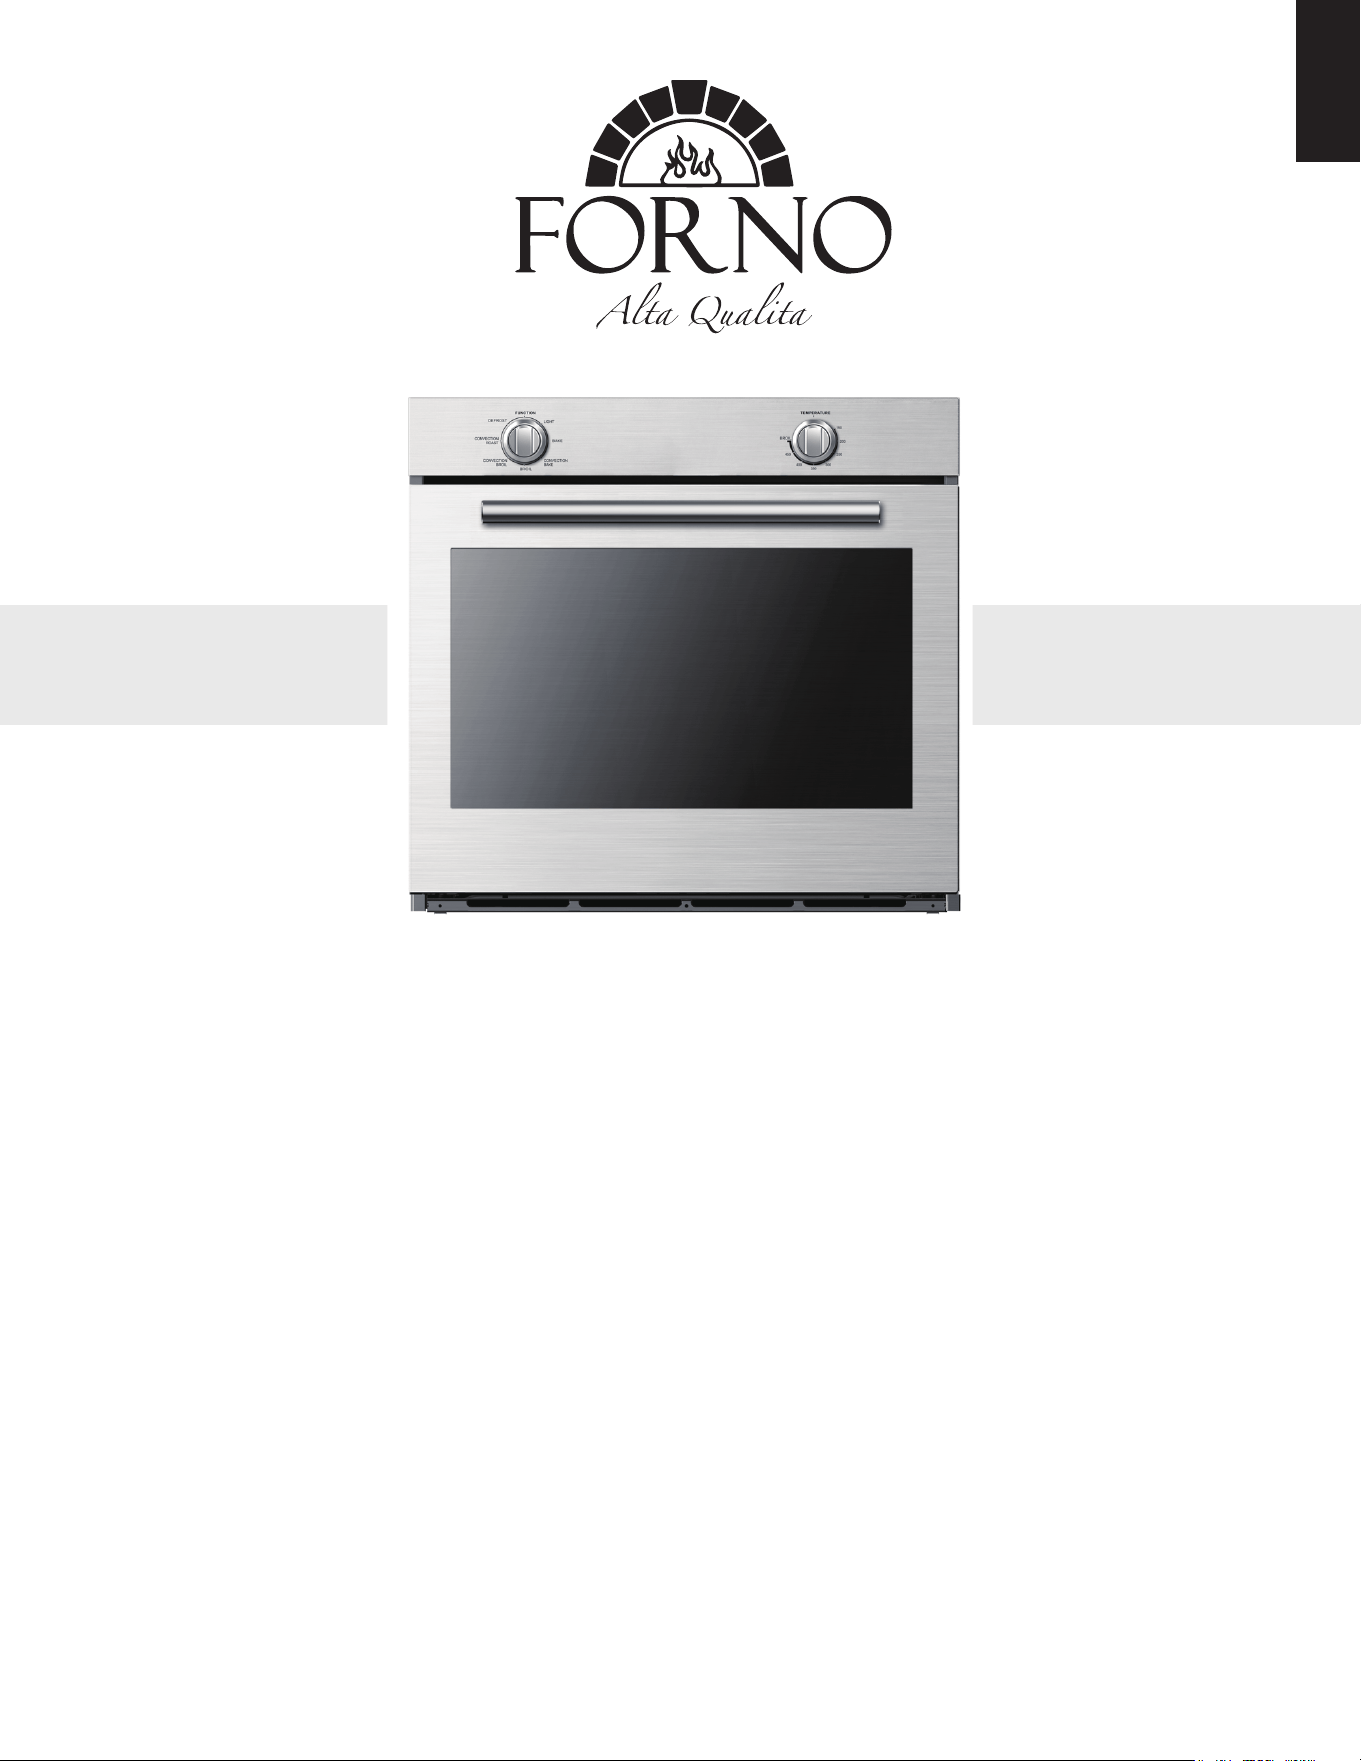
INSTRUCTION MANUAL
ENGLISH
®
30" Sigle Wall Oven-Mechanical Control
MODEL NUMBER SERIES
FBOEL1370-30

TABLE OF CONTENTS
Customer Care 4
Warning 5
Important Safety 7
PARTS AND FEATURES 9
The Handle Installation 10
Operating Instructions 11
OVEN USE 12
2
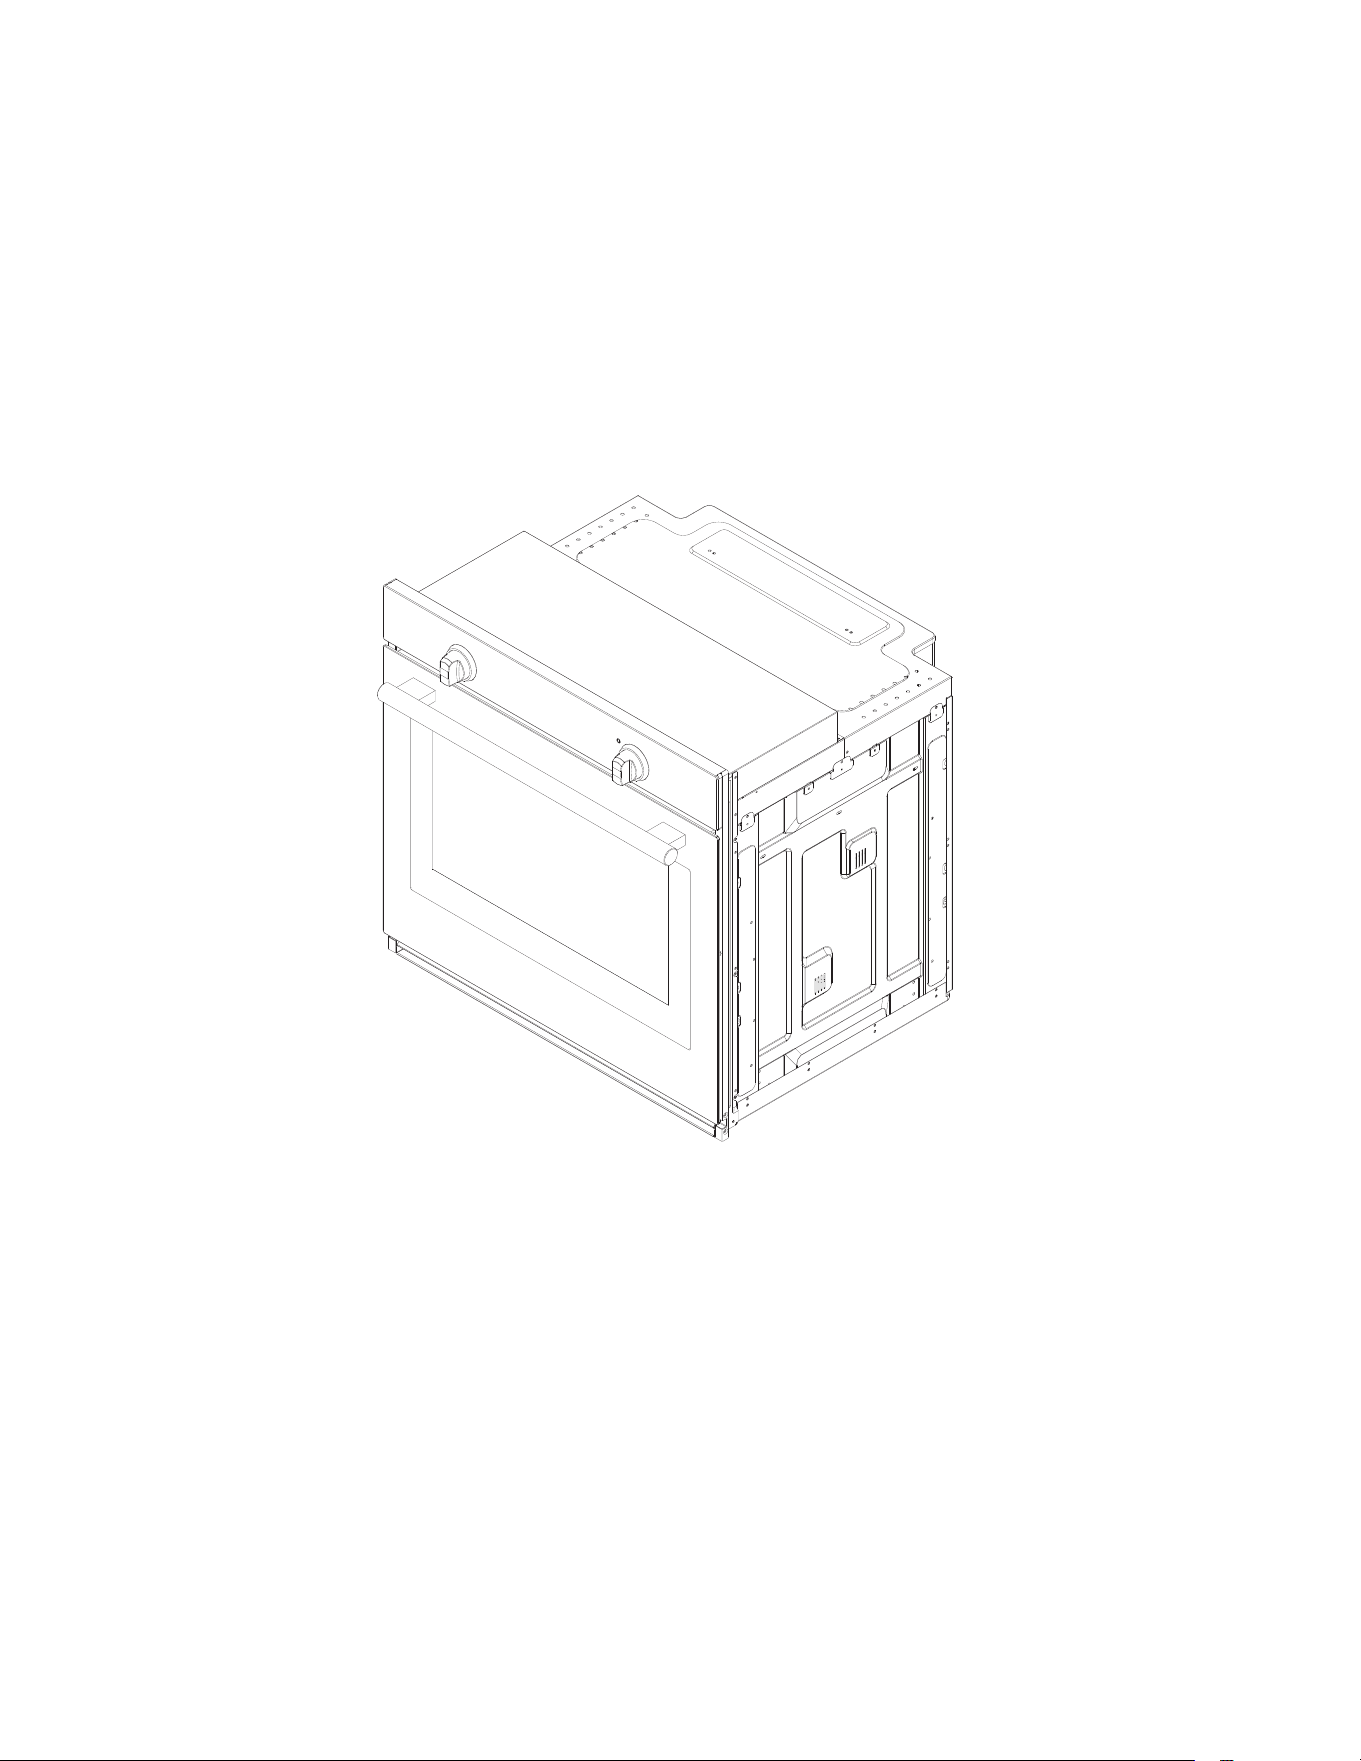
FBOEL1370-30
30" Sigle Wall Oven-Mechanical Control
3
Thank you for purchasing a Forno product. Please read the entire instruction manual before operating your new appliance
practices, features, operation and care recommendations of your appliance.
Both the model and serial number are listed inside the product. For warranty purposes, you will also need the date of
purchase .
Record this information below for future reference.
Services in Canada and Untied States
Keep the instruction manual handy to answer your questions. If you don’t understand something or need more assistance,
please visit our website for fast support. Please provide us your name, number, address,serial number of the product that
troubleshooting, proof of purchase, and a short description of the issue. A customer service representative will contact you
providers are carefully selected and rigorously trained by us.
Product Information Service Information
Model Number : _________________________________________
Use these numbers in any
correspondence or services calls
concerning your product.
If you received a damaged product,
immediately contact Forno.
To save time and money, before
you call for serviced, check the
troubleshooting guide. It listed the
causes of minor operation problems
that you can correct yourself.
Serial Number :
Date of Purchase :________________________________________
Purchase Address And Phone : _____________________________
_______________________________________________________
_______________________________________________________
Customer Care
“Need some quick help? Simply scan the qr code and get access
to our fast support form. We’re always here to assist you with any
questions or concerns you may have. So, don’t hesitate to reach out!”
4
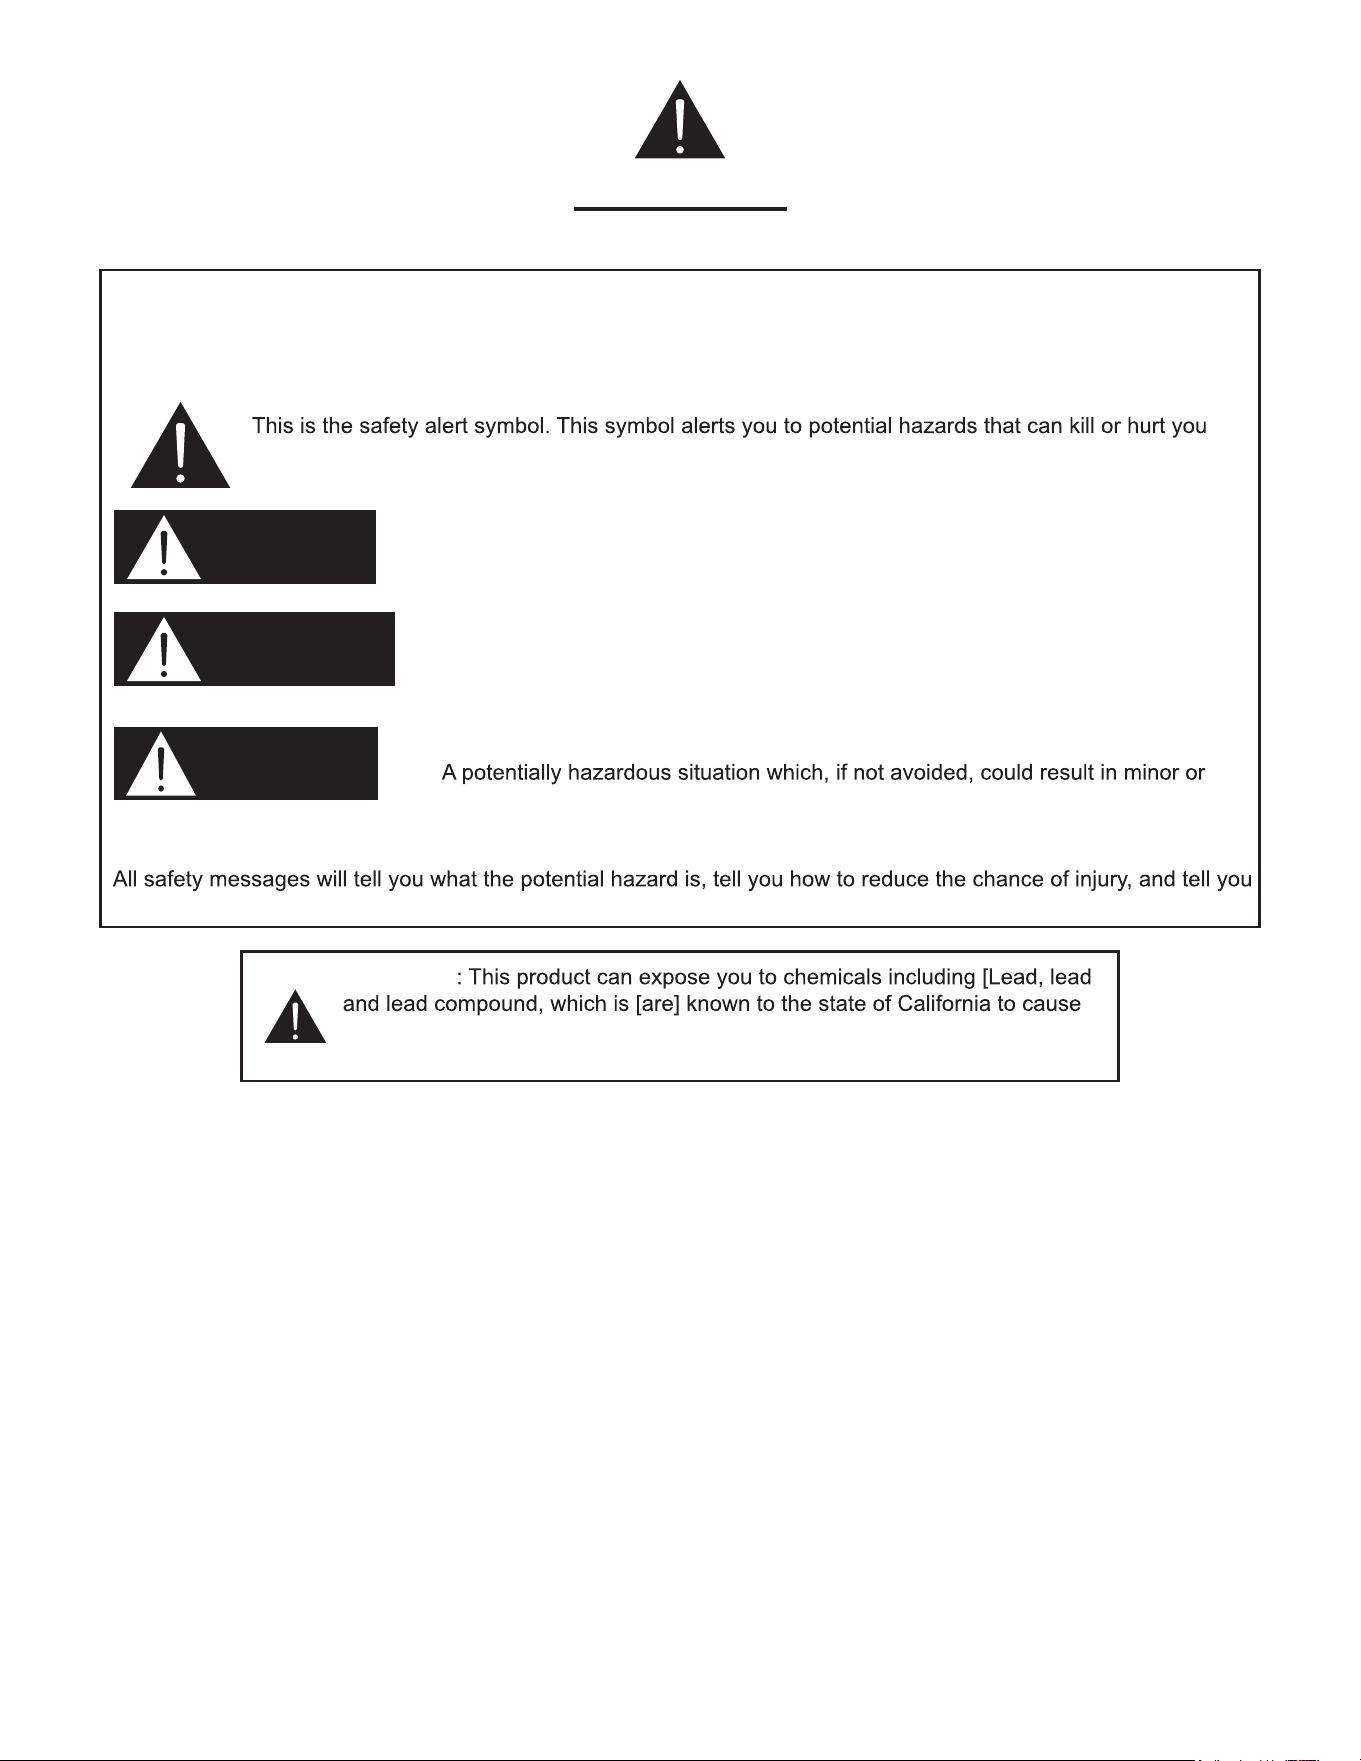
WARNING
FOR YOUR SAFETY
Your safety and the safety of others are very important.
We have provided many important safety messages in this manual and on your appliance. Always read and obey all
safety messages.
and others. Al l safety messages will follow the safety alert symbol and either the word “DANGER,”
“WARNING” or “CAUTION.” These words mean:
• You can be killed or seriously injured if you don’t immediately follow instructions.
• You can be killed or seriously injured if you don’t follow instructions.
•
moderate injury.
what can happen if the instructions are not followed.
DANGER
WARNING
CAUTION
WARNING
cancer and birth defects or other reproductive harm. For more information go
to www.P65Warning.ca.gov.
5
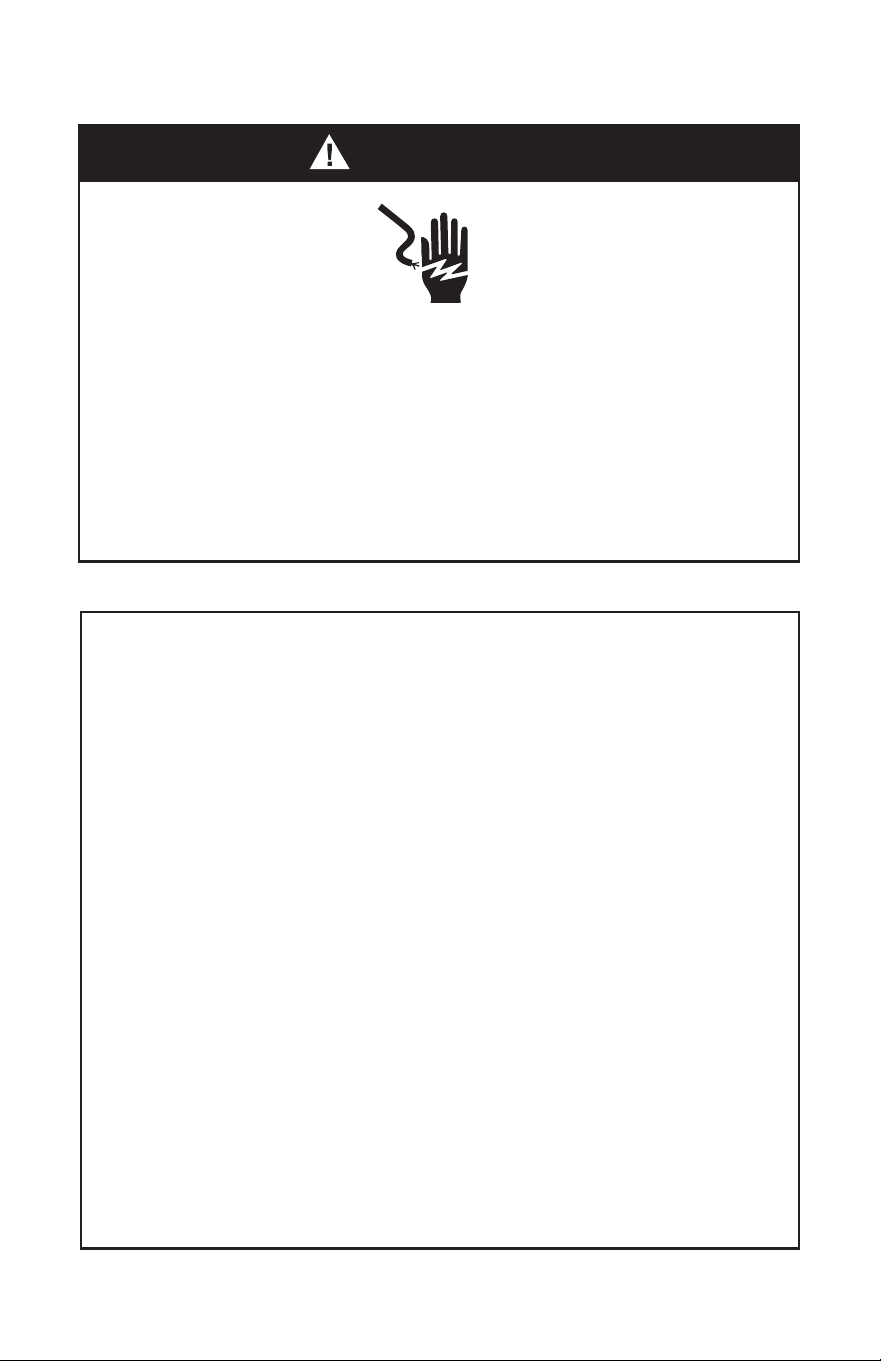
WARNINGS FOR ELECTRIC INSTALLATION
WARNING
Electrical Shock Hazard
Installation and service must be performed by a qualified installer or
service agency.
The models may be powered at 240V or 208V.
Always disconnect the power before servicing this unit.
This appliance must be properly grounded.
Failure to do so could result in death or serious injury.
IMPORTANT SAFETY
INSTRUCTIONS
WARNING: To reduce the risk of re, elecrical shock, injury to persons,
or damage when using the oven, follow basic precautions, including the
following:
Proper Installation
•
This appliance must be
properly installed and
electrically grounded by a
qualied technician. Connect
only to properly grounded
outlet. See “Grounding
Instructions” found in the
Installation Instructions.
•
This appliance should
be serviced only by a
qualied service technician.
Contact the nearest
authorized service center
for examination, repair or
adjustment.
•
Do not repair or replace
any part of the oven unless
specically recommended.
Refer service to an authorized
servicer.
•
Do not operate this appliance
if it is not working properly or
if it has been damaged, until
an authorized servicer has
examined it.
•
Install or locate this appliance
only in accordance with the
Installation Instructions.
•
Use this oven only as intended
by the manufacturer. If you
have any questions, contact
the manufacturer.
6

IMPORTANT SAFETY
INSTRUCTIONS
•
Do not cover or block any
openings on this appliance.
•
Use this appliance only for
its intended use as described
in this manual. Do not use
corrosive chemicals, vapors,
or nonfood products in this
appliance. This type of oven is
specically designed to heat
or cook. It is not designed
for industrial or laboratory
use. The use of corrosive
chemicals in heating or
cleaning will damage the
appliance.
To reduce the risk of re in the
oven cavity:
•
Do not store ammable
materials in or near the oven.
•
Do not use water on a grease
re. Smother re or use a
dry chemical or foam-type
extinguisher.
•
It is highly recommended that
a re extinguisher be readily
available and highly visible
next to any cooking appliance.
•
Do not overcook food.
Carefully attend oven if paper,
plastic or other combustible
materials are placed inside
the oven.
•
Do not use the cavity for
storage purposes. Do not
leave paper products, cooking
utensils or food in the cavity
when not being used.
•
If materials inside the oven
should ignite, keep oven door
closed. Turn oven o and
disconnect the circuit at the
circuit breaker box.
•
Be sure the blower fan runs
whenever the oven is in
operation. If the fan does not
operate, do not use the oven.
Call an authorized service
center.
•
Never use the oven to warm
or heat a room.
Personal Safety
•
Do not allow children to use
this appliance unless closely
supervised by an adult.
Children and pets should not
be left alone or unattended in
the area where the appliance
is in use. Never allow children
to sit or stand on any part of
the oven.
•
Do not store items of interest
to children above the oven.
If children should climb onto
the appliance to reach these
items, they could be seriously
injured.
•
For personal safety, wear
proper clothing. Loose tting
or garments with hanging
sleeves should never be worn
while using this appliance.
•
Tie long hair so that it doesn’t
hang loose.
•
Do not touch heating
elements or interior surfaces
of oven.
•
The heating elements may be
hot even though they are dark
in color. Interior surfaces of
an oven become hot enough
to cause burns.
7
IMPORTANT SAFETY
INSTRUCTIONS
•
During and after use, do not
touch or let clothing or other
the heating elements or the
interior surfaces of the oven
time to cool.
•
The trim on the top and sides
of the oven door may become
hot enough to cause burns.
•
Use care when opening the
door. Open the door slightly
to let hot air or steam escape
before removing or replacing
food.
•
Do not heat unopened
food containers. Build-up
of pressure may cause the
container to burst and cause
injury.
•
Always place oven racks in
desired location while oven is
cool. If a rack must be moved
while oven is hot, do not let
potholder contact the hot
heating elements.
•
Use only dry potholders.
Moist or damp potholders
on hot surfaces may result in
burns from steam. Do not let
potholder touch hot heating
elements. Do not use a towel
or other bulky cloth.
READ AND SAVE THESE
INSTRUCTIONS
8
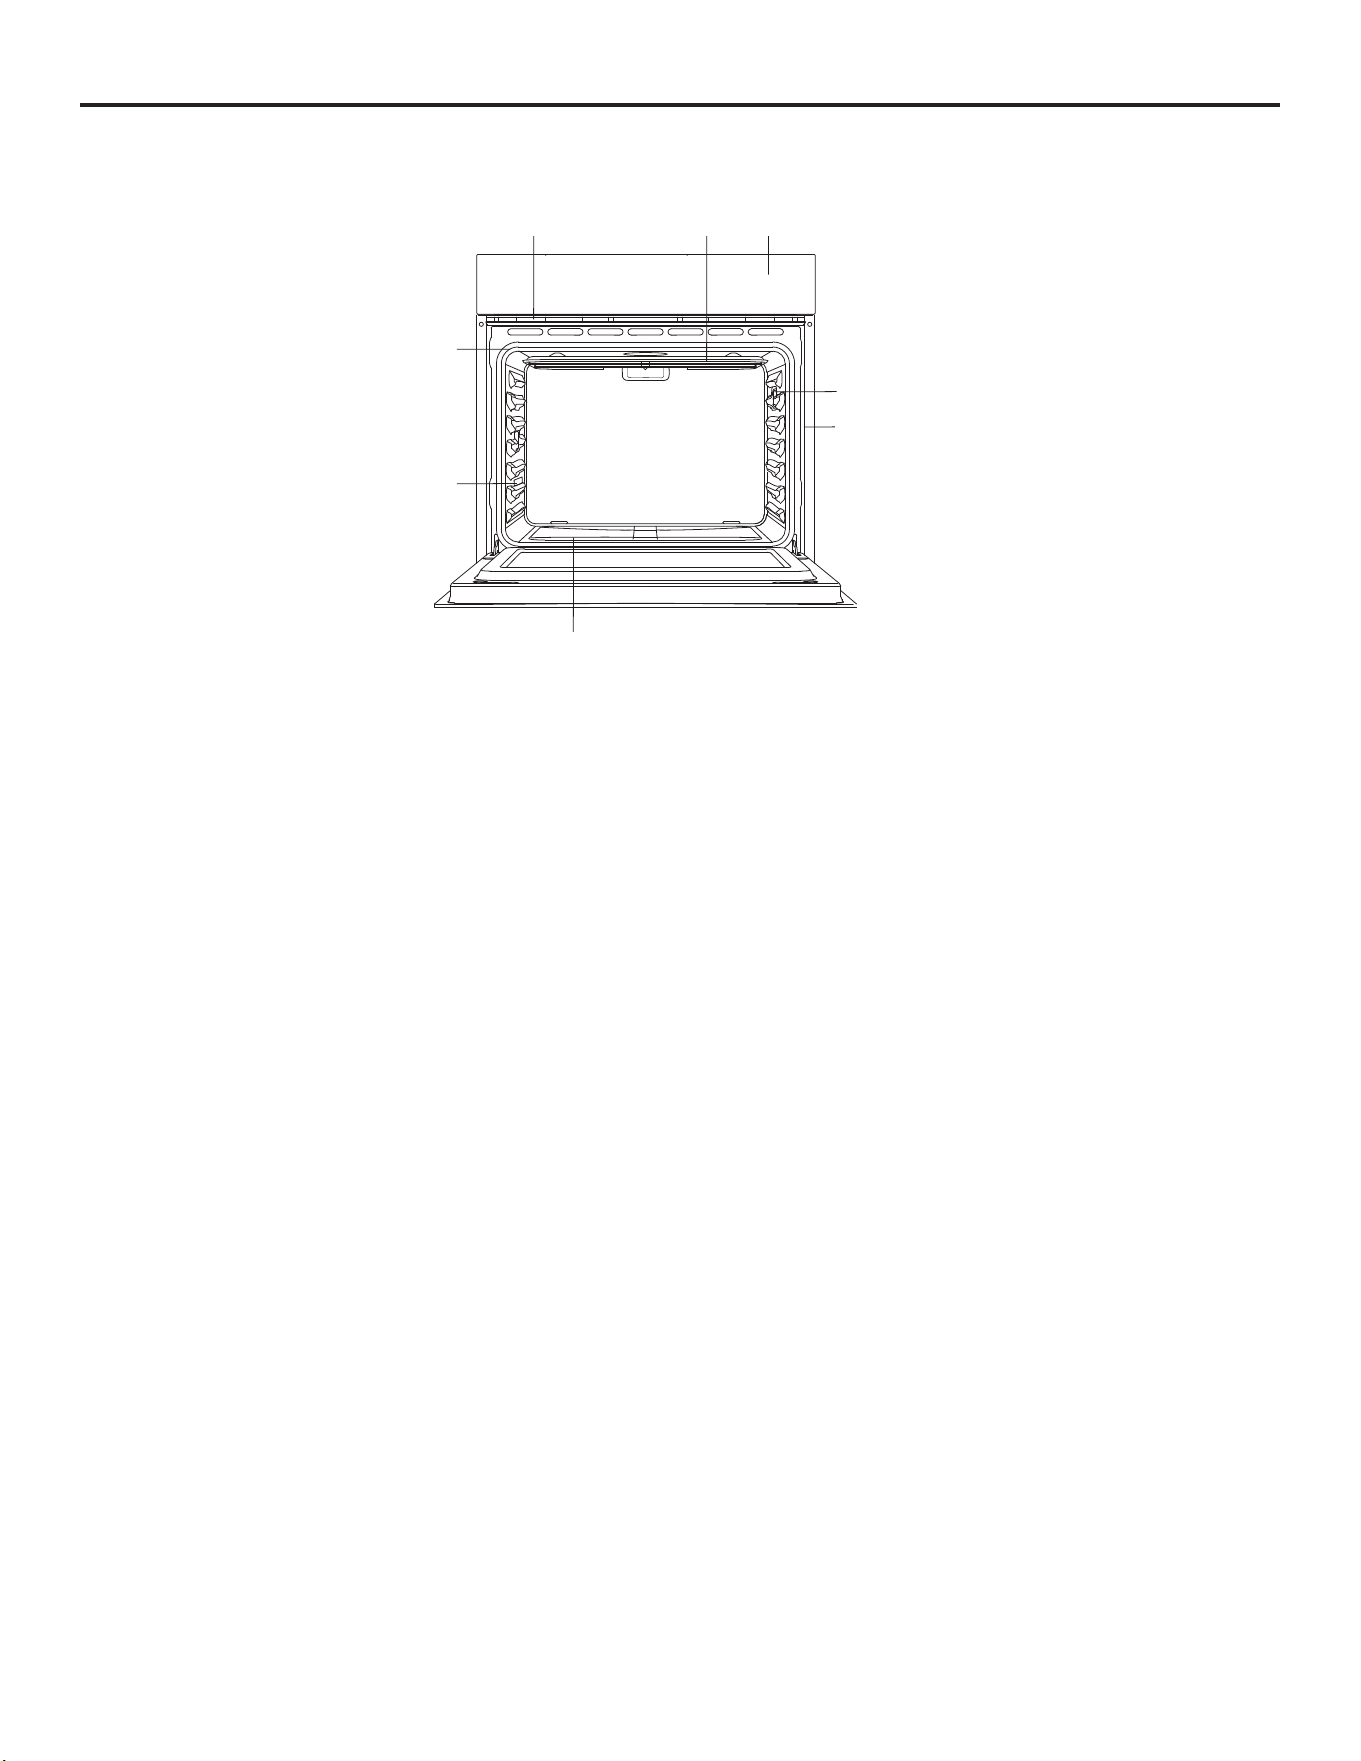
PARTS AND FEATURES
G
D
D
F
A
B C
E
A Oven Vent
B Broil Element
C Control Panel
D Halogen Light
E Bottom Element (not visible)
F Model and Serial # Plate
G Door Gasket
9
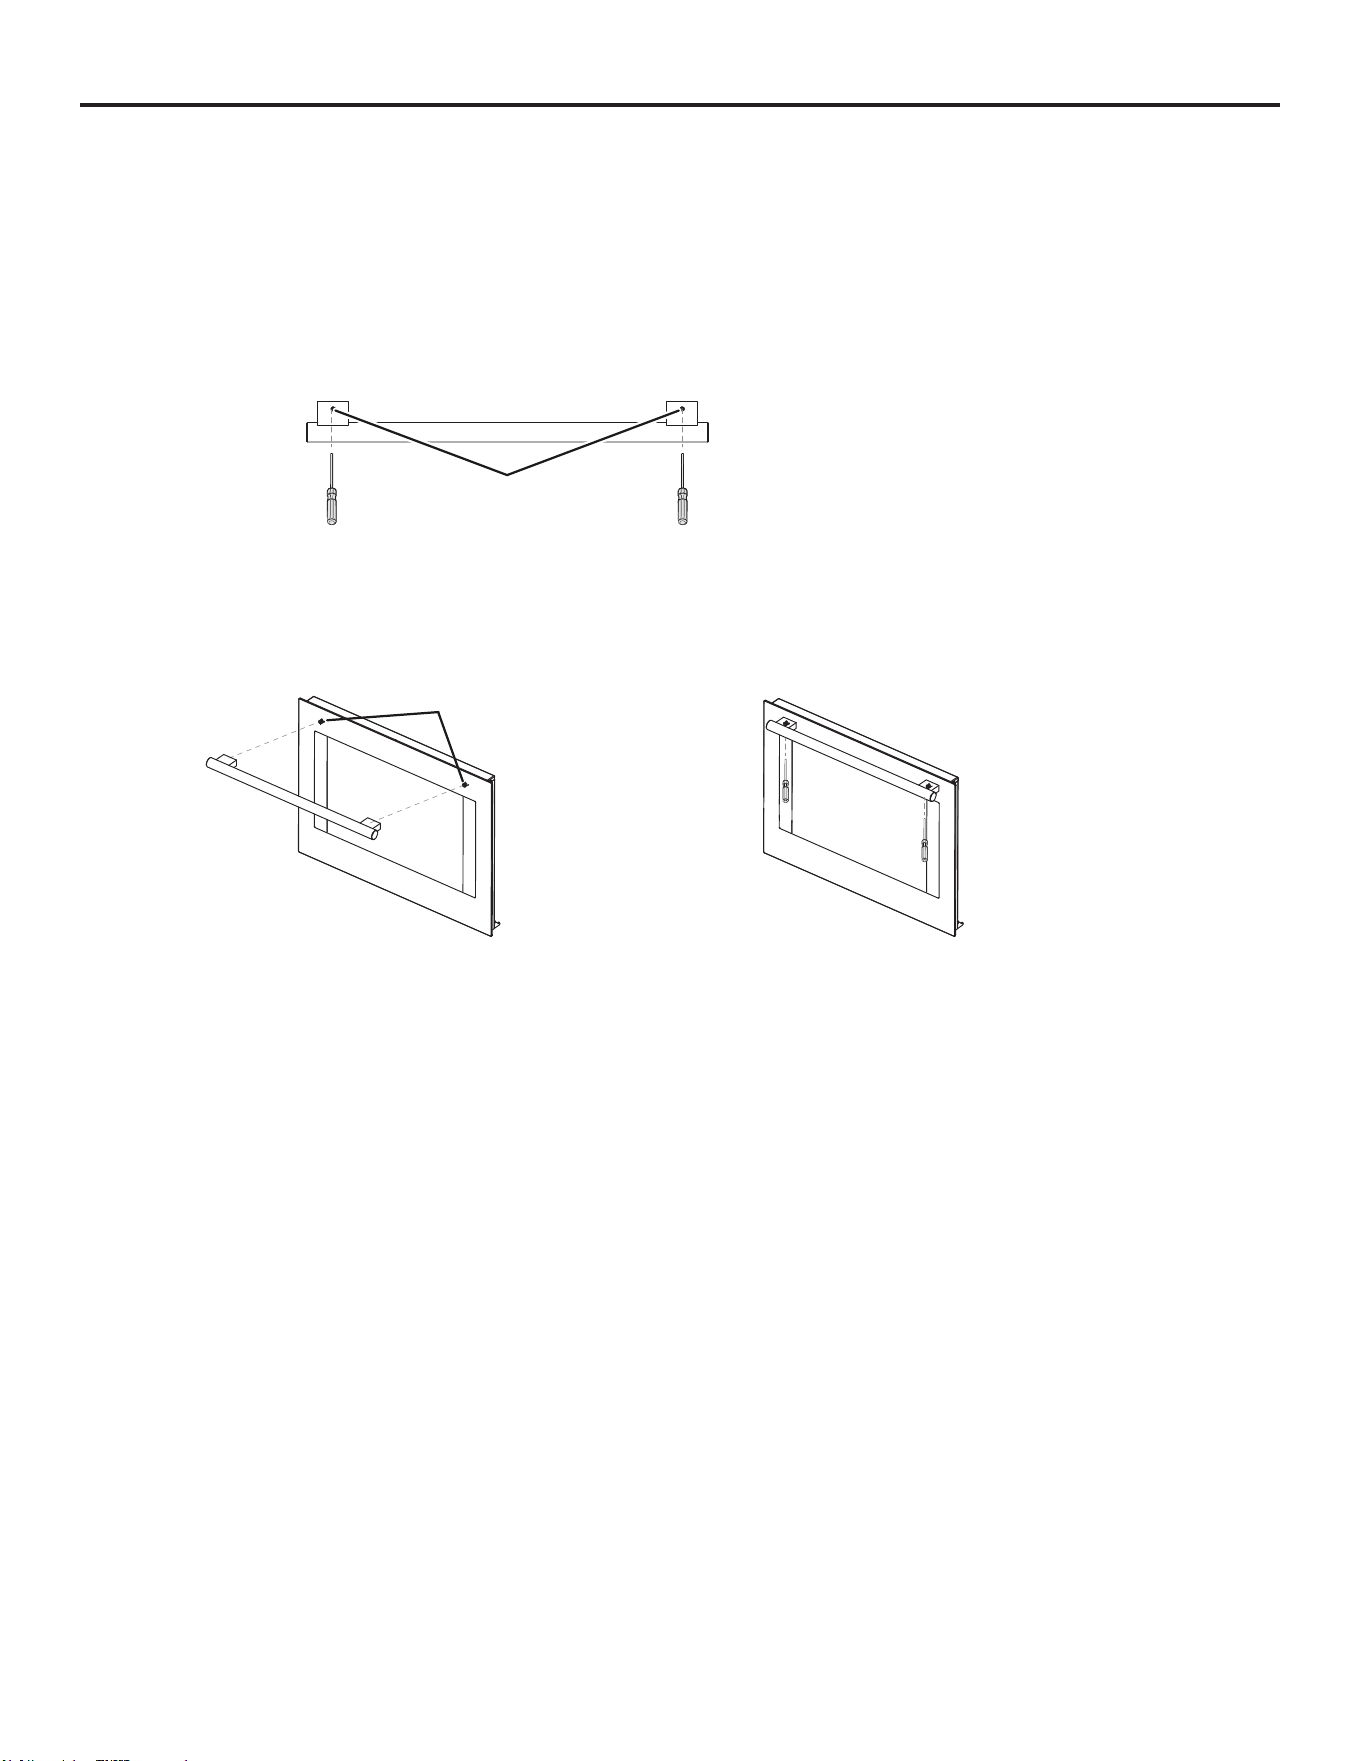
The Handle Installation
Be very careful not to scratch the surface of the unit. The appearance of the handle may vary from what is shown in the
manual.
Tool Needed
Assembling Handle
• Hex screwdriver(provided)
1. Partially loosen the set screws installed in both ends of the handle with the Hex screwdriver.
2. Place the handle on the door by fitting the handle footprints over the mounting fasteners and tightening the set screws
with the Hex screwdriver
Install Oven Door Handle
Set screw
(pre-installed)
Mounting fastener
10
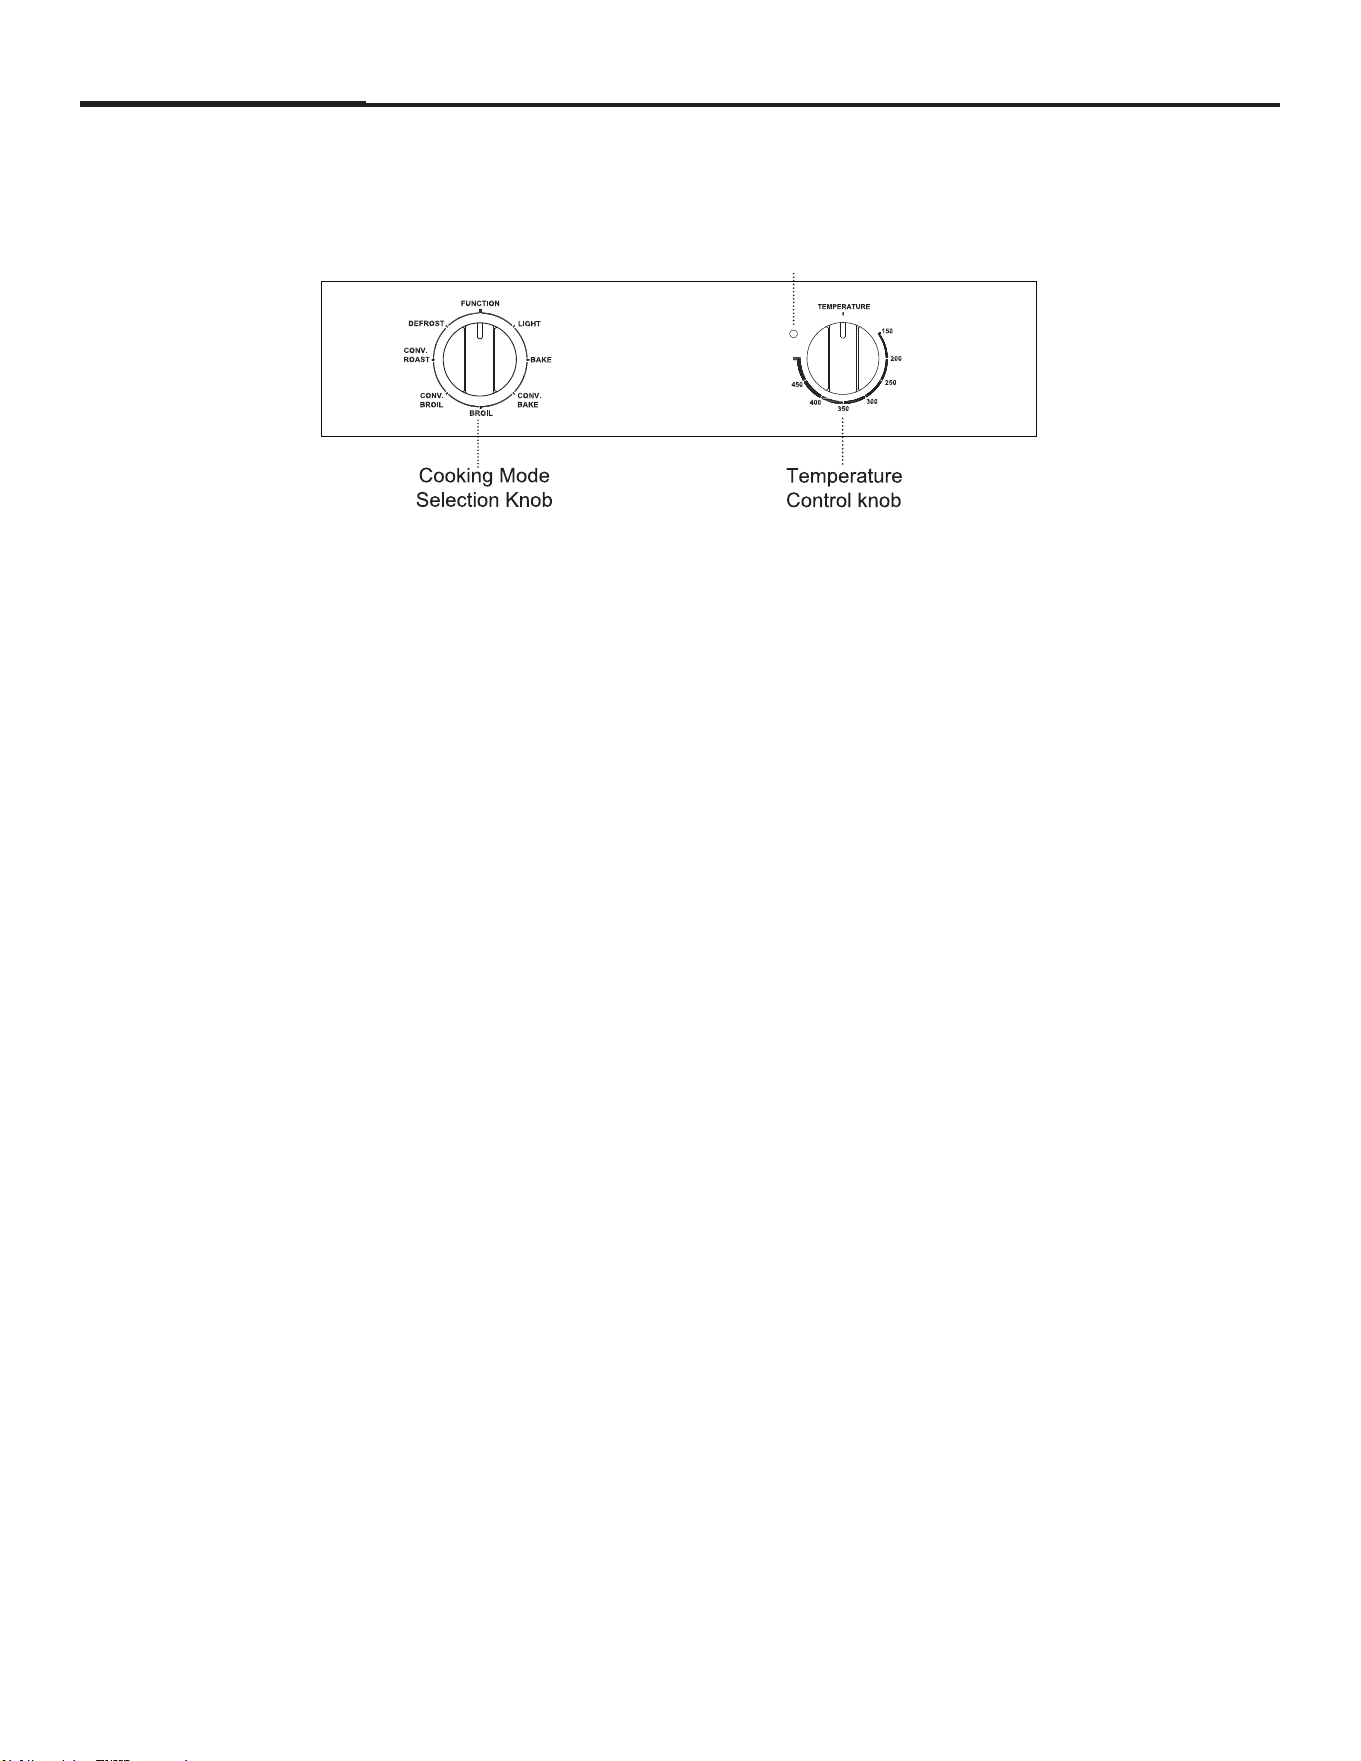
Operating Instructions
• Light: Turns the oven light on when turn to Light. (When select other cooking modes, the light will keep on during working).
• Bake: Top heating element and bottom heating element work.
• Conv Bake: Top heating element, bottom heating element and convection fan work.
• Boril: Top heating element works.
• Conv Broil: Top heating element and convection fan work.
• Conv Roast: Bottom heating element and convection fan work.
• Defrost: Convection fan works.
• The adjustable temperature range of each working mode is from 150°F to MAX(around 500°F).
• The indicator light can indicate when the temperature has reached. It will turn off when the set temperature has reached.
CONTROL PANEL:
Cooking Mode:
Temperature Control:
Indicator light:
MAX
Indicator light
11

BEFORE USING THE OVEN
GENERAL
PREHEATING THE OVEN
OPERATIONAL SUGGESTIONS
NOTE:
IMPORTANT:
1. Turn the Cooking Mode Selection control knob to Roast mode.
1. Place bake ware with food on the shel provided with the oven.
• Preheat the oven when using the oven except Broil and Conv Broil modes.
• Preheating is necessary for good results when baking cakes, cookies, pastry and breads.
• Preheating will help to sear roasts and seal in meat juices.
• Place oven racks in their proper position before preheating.
• The indicator light will turn off when the set temperature has r eached.
• Do not set pans on the open oven door.
• View the food through the oven door window rather than opening the door frequently.
2. Turn the Temperature Control knob to the highest setting.
2. Turn the Oven Mode konb to the desired oven function.
3. Turn the Temperature Control knob to the desired temperature.
4. Oven will start working.
3. Allow the oven to operate for 30 minutes with the door closed and no food in the cavity.
4. Turn off the oven, and allow the oven to cool.
Do not place anything, including dishes, foil and oven trays, on the bottom of the oven when it is in
operation to avoid damaging the enamel.
Any odor that may be detected during this initial use is due to the evaporation of substances used to protect the
oven during storage.
OVEN USE
12
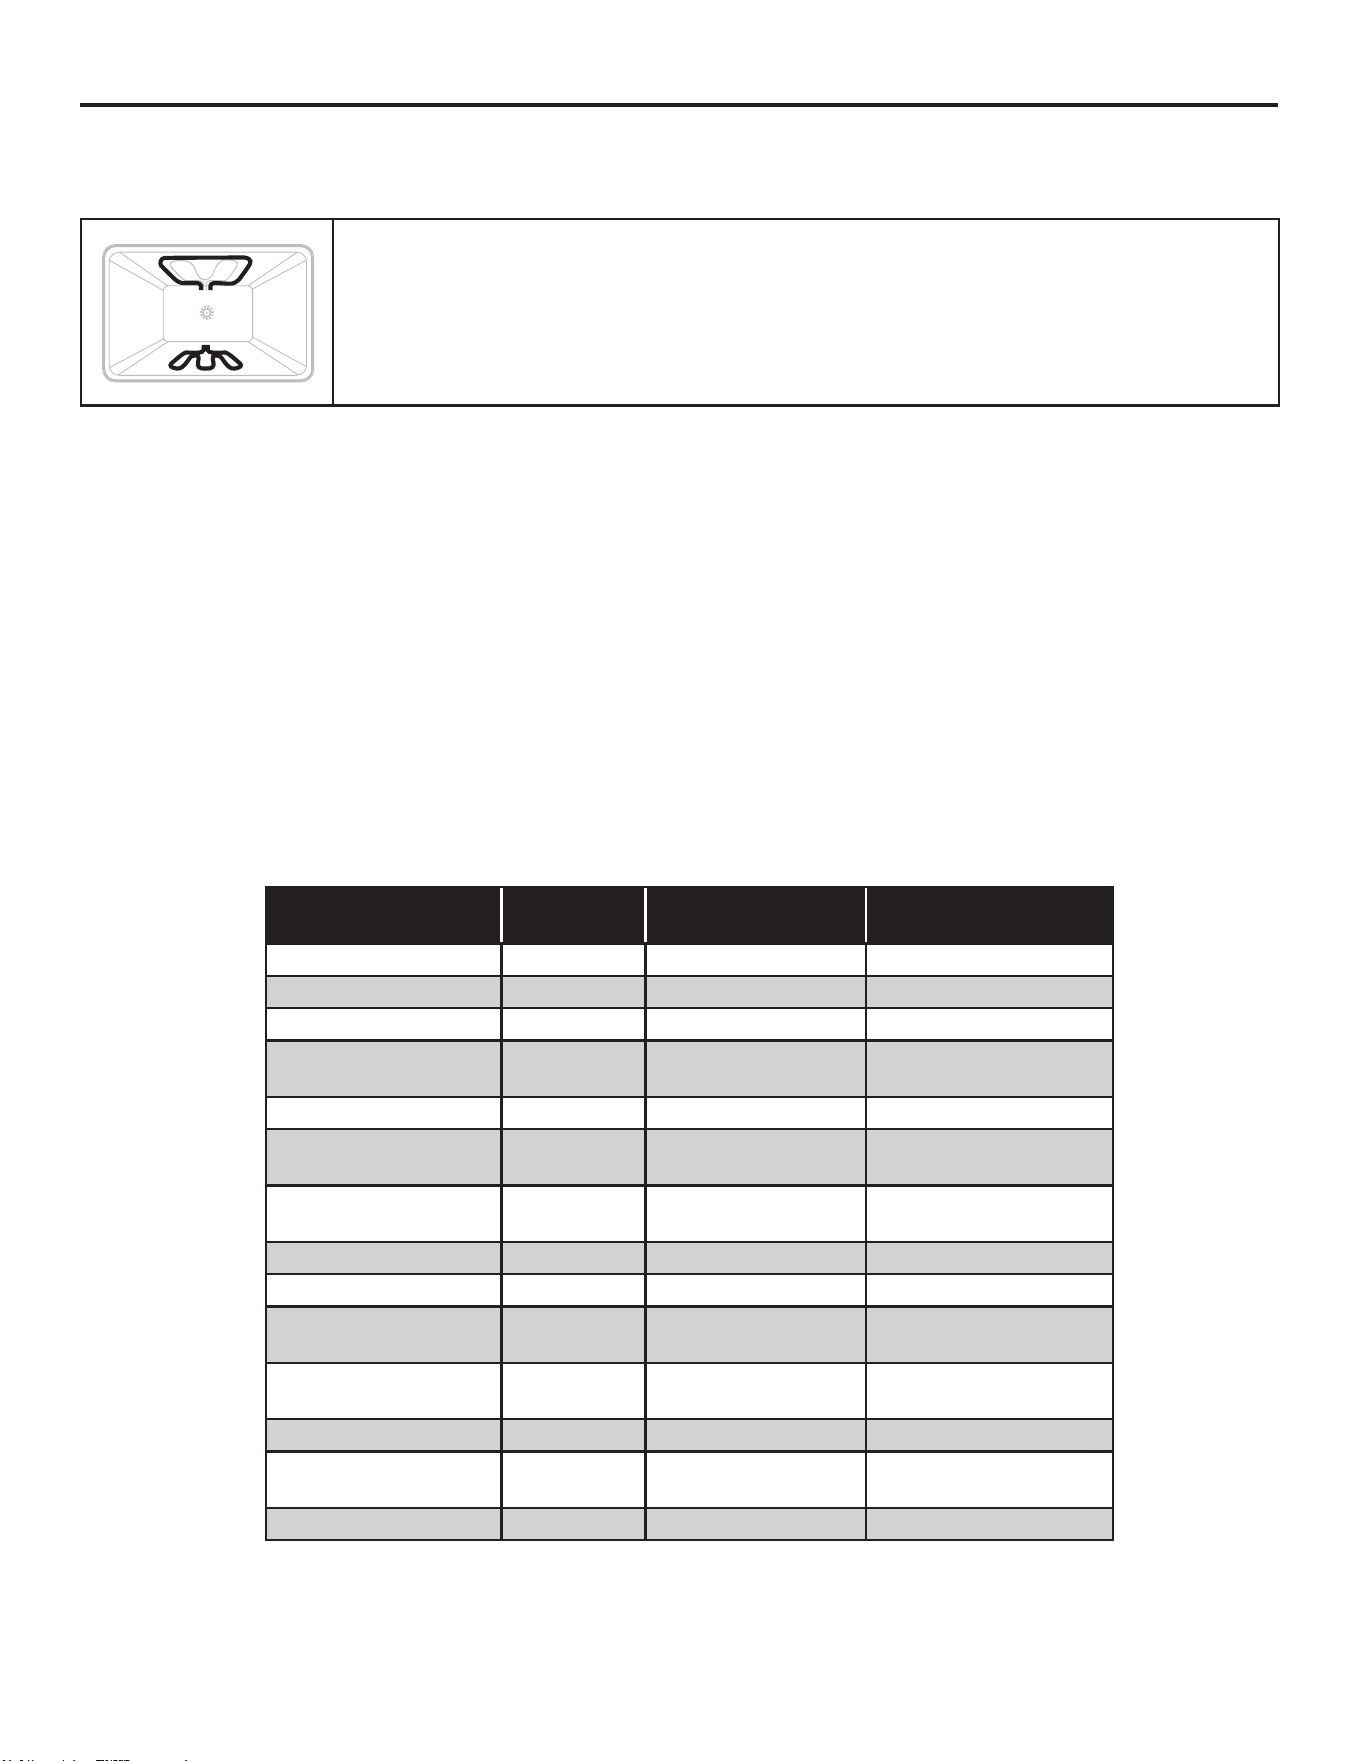
12
OVEN SETTINGS
1. Bake
• Use one rack when selecting the bake mode.
• On occasion, check the oven to see if your food is done.
• Use metal bakeware (with or without a non-stick nish), heatproof glass, glass ceramic, pottery, or other utensils suitable
for the oven.
•For best results, bake food on a single rack with at least 1” - 1½” (2.5 - 4 cm) space between bakeware and oven walls.
• When using heatproof glass, reduce temperature by 25°F (15°C) from recommended temperature. Use baking sheets
with or without sides or jelly roll pans.
• Dark metal pans or nonstick coatings will cook faster with more browning. Insulated bakeware will slightly lengthen the
cooking time for most foods.
• Do not use aluminum foil or disposable aluminum trays to line any part of the oven. Foil is an excellent heat insulator and
heat will be trapped beneath it. This will alter the cooking performance and can damage the nish of the oven. You can
line a baking tray with foil and use this on the bottom shelf.
• Avoid using the opened door as a shelf to place pans.
• See Troubleshooting for tips on solving baking and roasting problems.
Oven (continued)
Baking is cooking with heated air. Both upper and lower elements in the oven are used, but
the fan is used only during preheating. Follow the recipe or convenience food directions for
baking temperature, time, and rack position. Baking time will vary with the temperature of
ingredients and the size, shape, and nish of the baking utensil.. The temperature can be set
from 170°F (77°C) to 500°F (260°C).
Food Item Rack Position
Temp. °F (°C)
(Preheated Oven)
Time (Min)
Cupcakes 2 350(175) 19-22
Bunt Cake 1 350(175) 40-45
Angel Food 1 350(175) 35-39
Pie 2 crust, fresh, 9” 2
375-400
(190-205)
45-50
2 crust, frozen fruit, 9” 2 375(190) 68-78
Cookies Sugar 2
350-375
(175-190)
8-10
Chocolate Chip cookies 2
350-375
(175-190)
8-13
Brownies 2 350(175) 29-36
Yeast bread loaf 9 x 5 2 375(190) 18-22
Yeast rolls 2
375-400
(190-205)
12-15
Biscuits 2
375-400
(190-205)
7-9
Muns 2 425 (220) 15-19
Frozen Pizza 2
400-450
(205-235)
23-26
Fresh Pizza 2 425 (246) 15-18
Bake chart Oven Function:
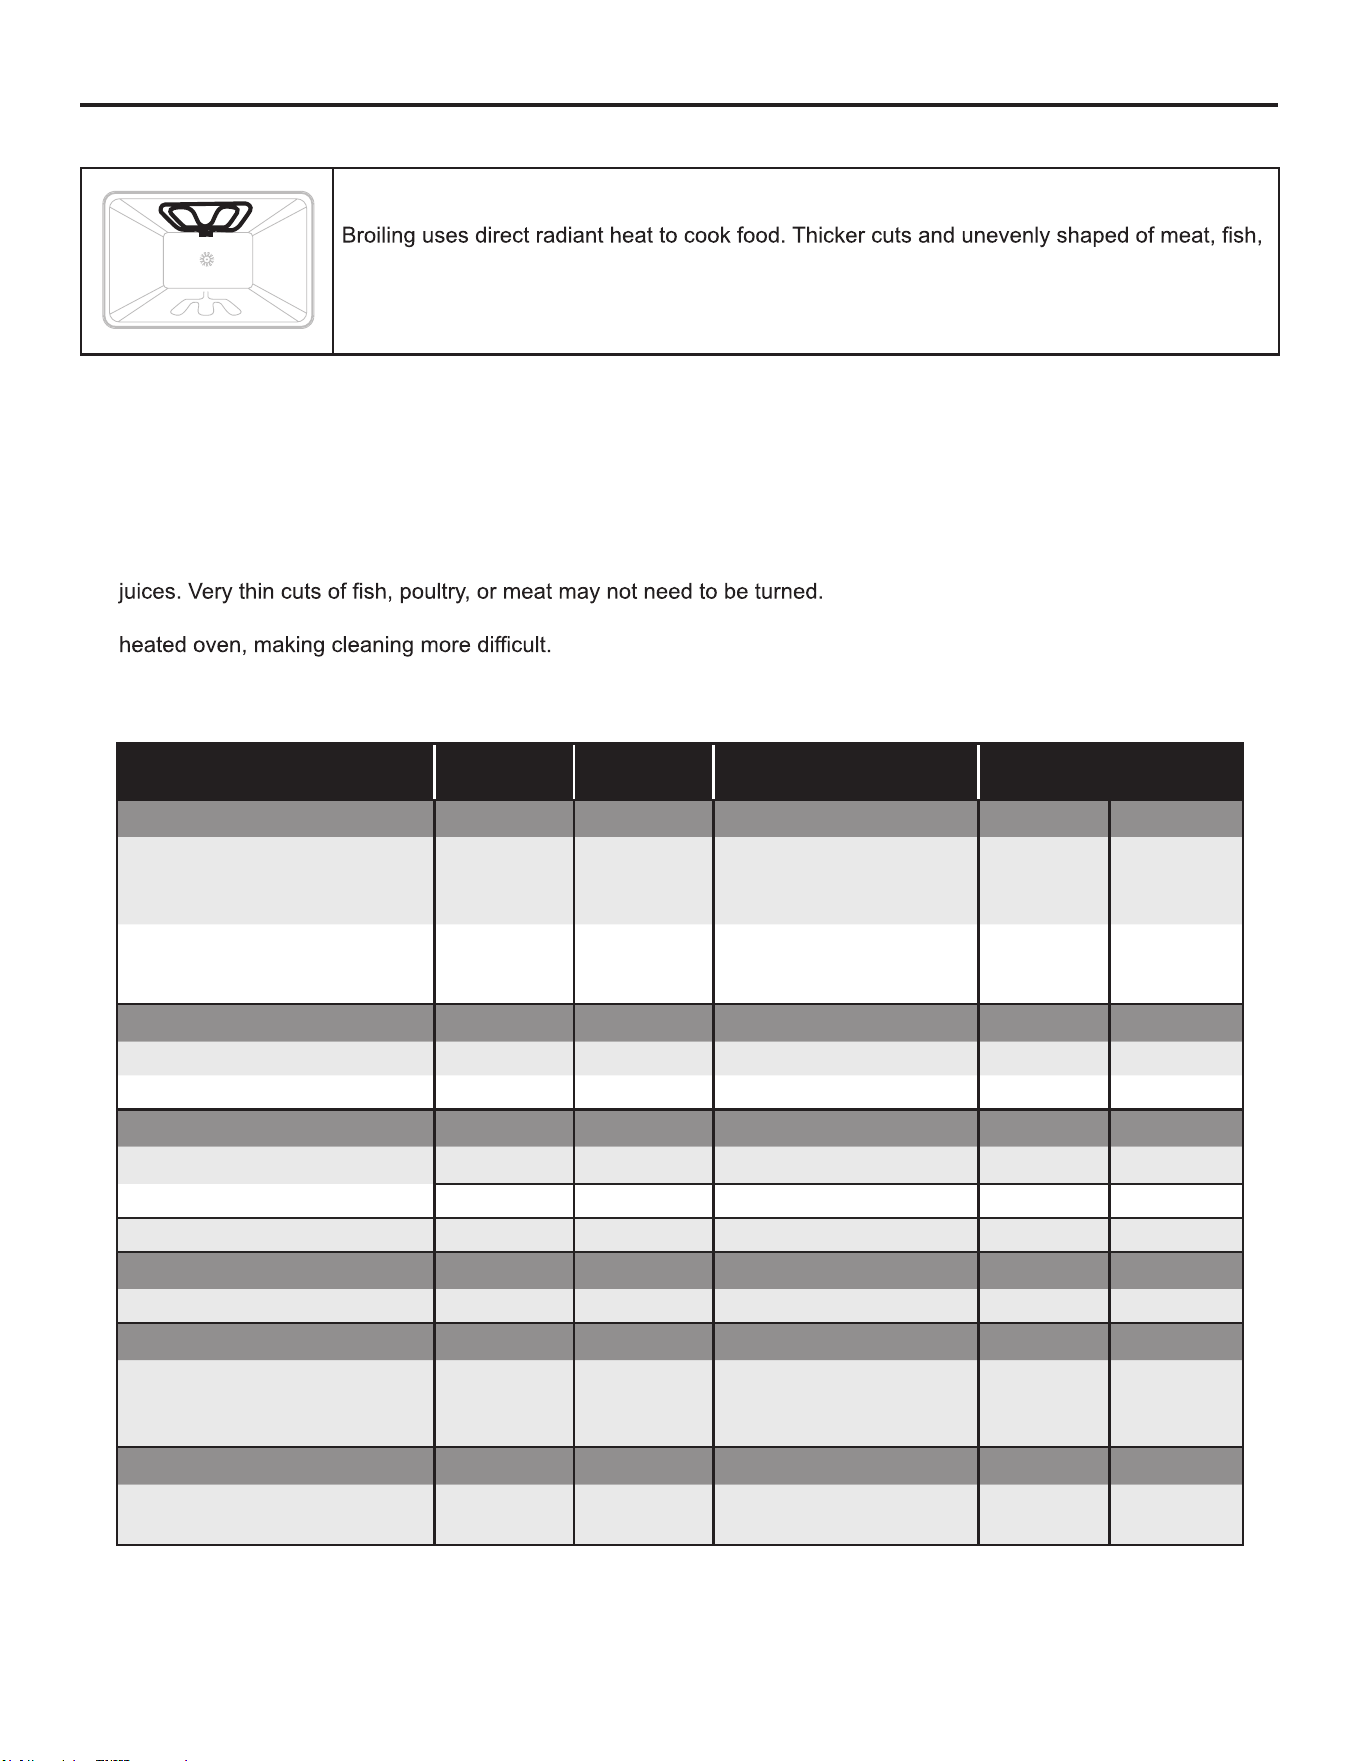
13
2. Broil
NOTES: Before broiling, position the rack to your needs
• For best results, use a two-piece broiler pan with a grid (not provided). It is designed to drain juices which helps to
avoid spills and splatters.
• For proper draining, do not cover the grid with foil. The bottom of the pan may be lined with aluminum foil for easier
cleaning.
• Trim excess fat to reduce spattering. Slit the remaining fat on the edges to avoid curling.
• Pull out the oven rack to stop position before turning or removing food. Use tongs to turn food to avoid the loss of
• After broiling, remove the pan from the oven when removing the food. Drippings will bake on the pan if left in the
• Position food on the grid in the broiler pan, then place it in the center of the oven rack. Close the oven door and set
the control.
Oven (continued)
and poultry may cook better at lower broiling temperatures. Tips: The oven door remains closed during
broil. When inspecting the food, open the oven door no more than two inches.).
Food And Thickness
Rack
Position
Broil Setting.
°F (°C)
Level of
Doneness
SIDE 1
Time (Min)
SIDE 2
Time (Min)
BEEF
Steak (3/4"-1) 5 MAX
-Medium Rare
-Medium
-Well Done
- (5 - 7)
- (6 - 8)
- (8 - 10)
- (4 - 6)
- (5 - 7)
- (7 - 0)
Hamburgers (3/4"-1") 4 MAX
-Medium
-Well Done
- (8 - 11)
- (10-13)
- (6 - 9)
- (8 - 10)
POULTRY
Breast (bone-in) 4 450 (235) Well Done (10 - 12) (8 - 10)
Thigh (very well done) 4 MAX Well Done (28 - 30) (13 - 15)
PORK
Pork Chops (1") 5 MAX Well Done (7- 9) (5 - 7)
Sausage - fresh 5 MAX Well Done (5 - 7) (3 - 5)
Ham Slice (½") 5 MAX Well Done (4 - 6) (3 - 5)
SEAFOOD
Fish Filets, 1" Buttered 4 450 (235) Well Done (10 - 14) Do not turn
LAMB
Chops (1") 5 MAX
-Medium Rare
-Medium
-Well Done
- (5 - 7)
- (6 - 8)
- (7 - 9)
- (4 - 6)
- (4 - 6)
- (5 - 7)
BREAD
Garlic Bread, 1" slices
4
3
MAX
- (2 - 2:30)
- (4 - 6)
14
Oven (continued)
CONVECTION SETTINGS
During convection cooking, the fan provides hot air circulation throughout the oven. The movement of heated air around
the food can help to speed up cooking by penetrating the cooler outer surfaces. The food cooks more evenly, browning
and crisping outer surfaces while sealing moisture inside. When the oven is set to the Convection function, the bake and
broil elements, and the fan operate to heat the oven cavity. *The convection fan operates during any convection function.
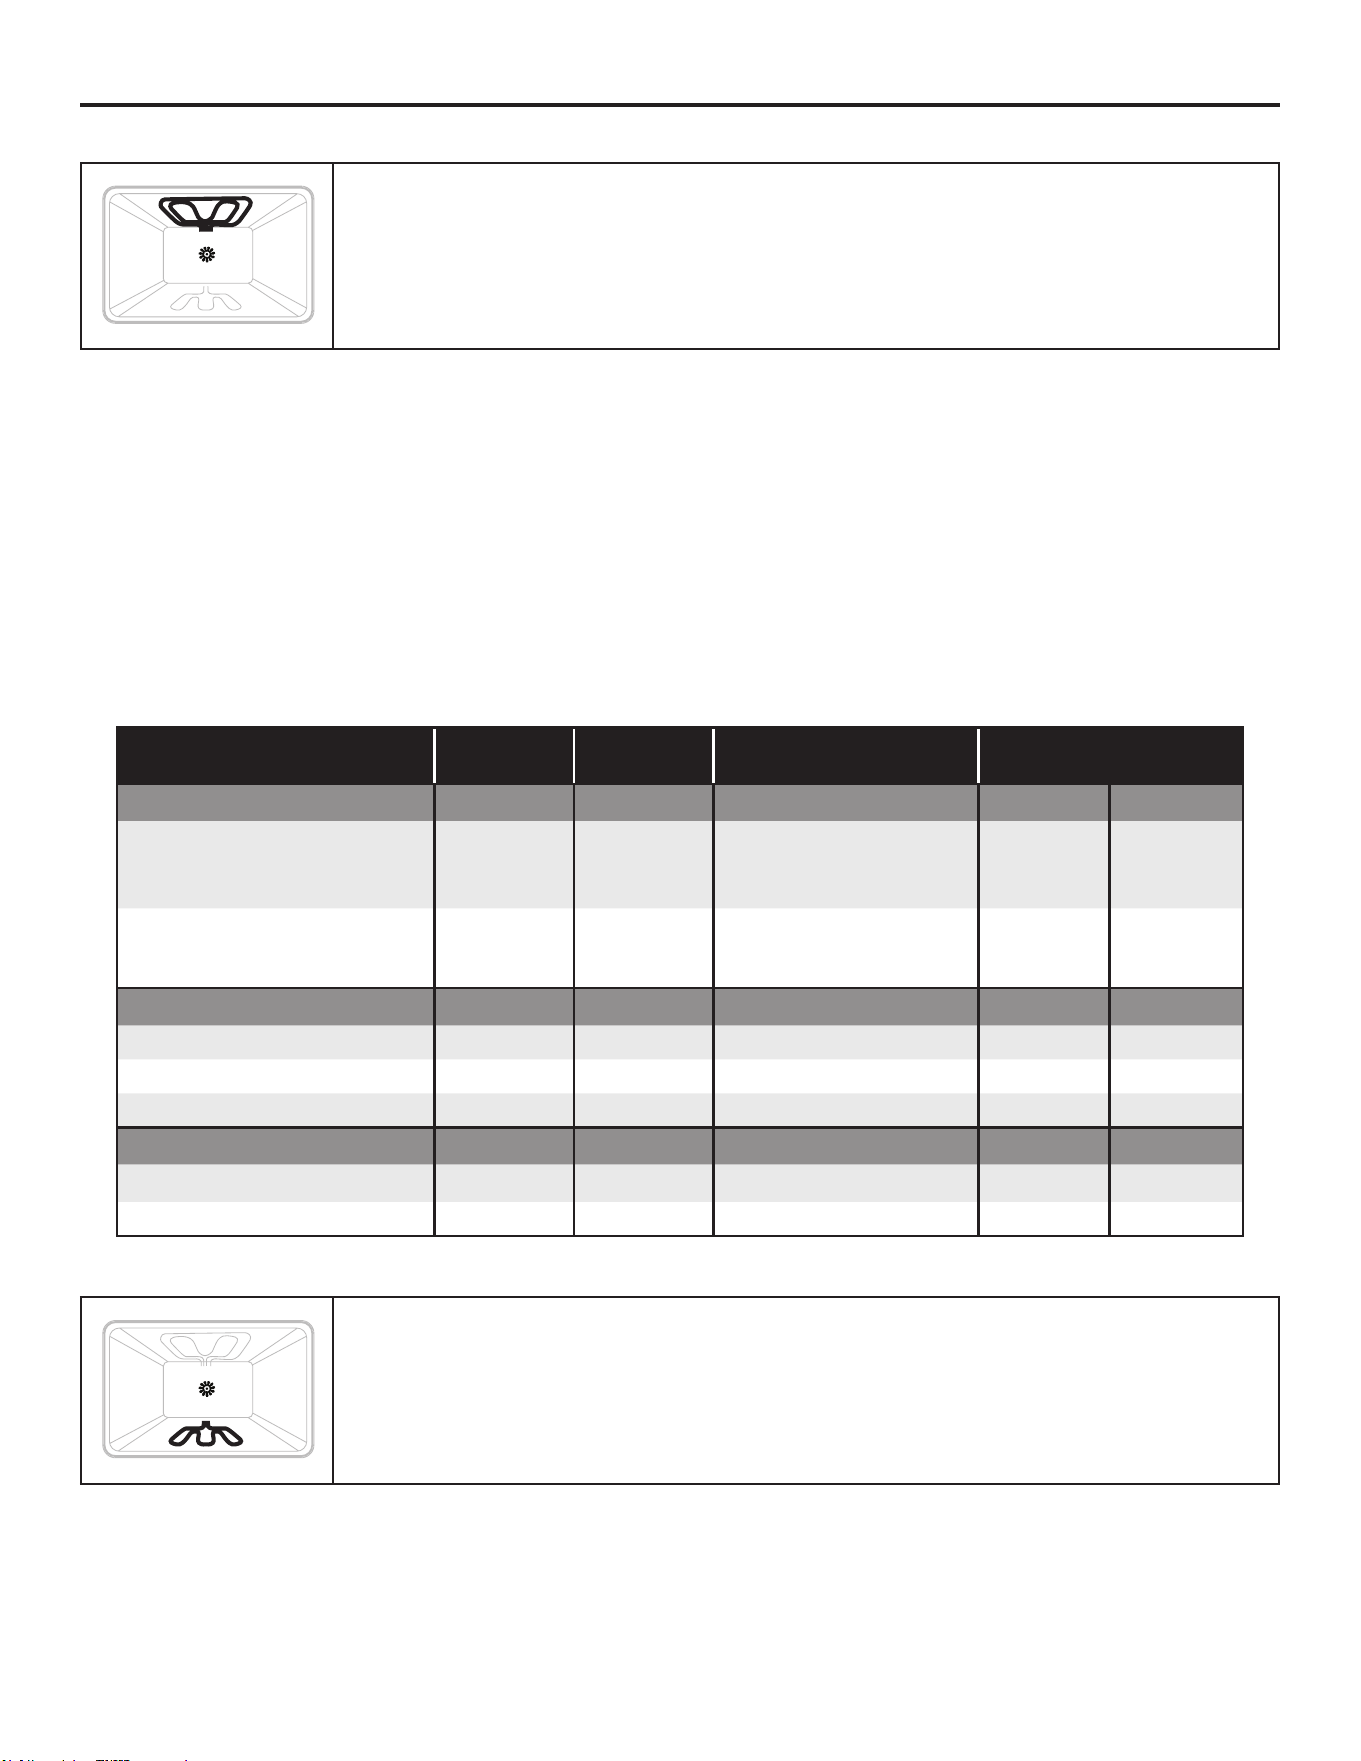
1. Convection Bake:
• Use Convection Bake for single or multiple-rack baking. Reduce standard recipe baking temperature by 25°F (15°C).
• For best results, foods should be cooked uncovered, in low-sided pans to take advantage of the forced air circulation.
Use shiny aluminum pans for best results unless otherwise specied.
• Heatproof glass or ceramic can be used. Reduce the temperature by another 25°F (15°C) when using heatproof glass
dishes for a total reduction of 50°F (30°C).
• Dark metal pans may be used. Note that food may brown faster when using dark metal bakeware.
• The number of racks used is determined by the height of the food to be cooked.
• Baked items, for the most part, cook extremely well in convection. Don’t try to convert recipes such as custards,
quiches, pumpkin pie, or cheesecakes, which do not benet from the convection-heating process. Use the regular
Bake mode for these foods.
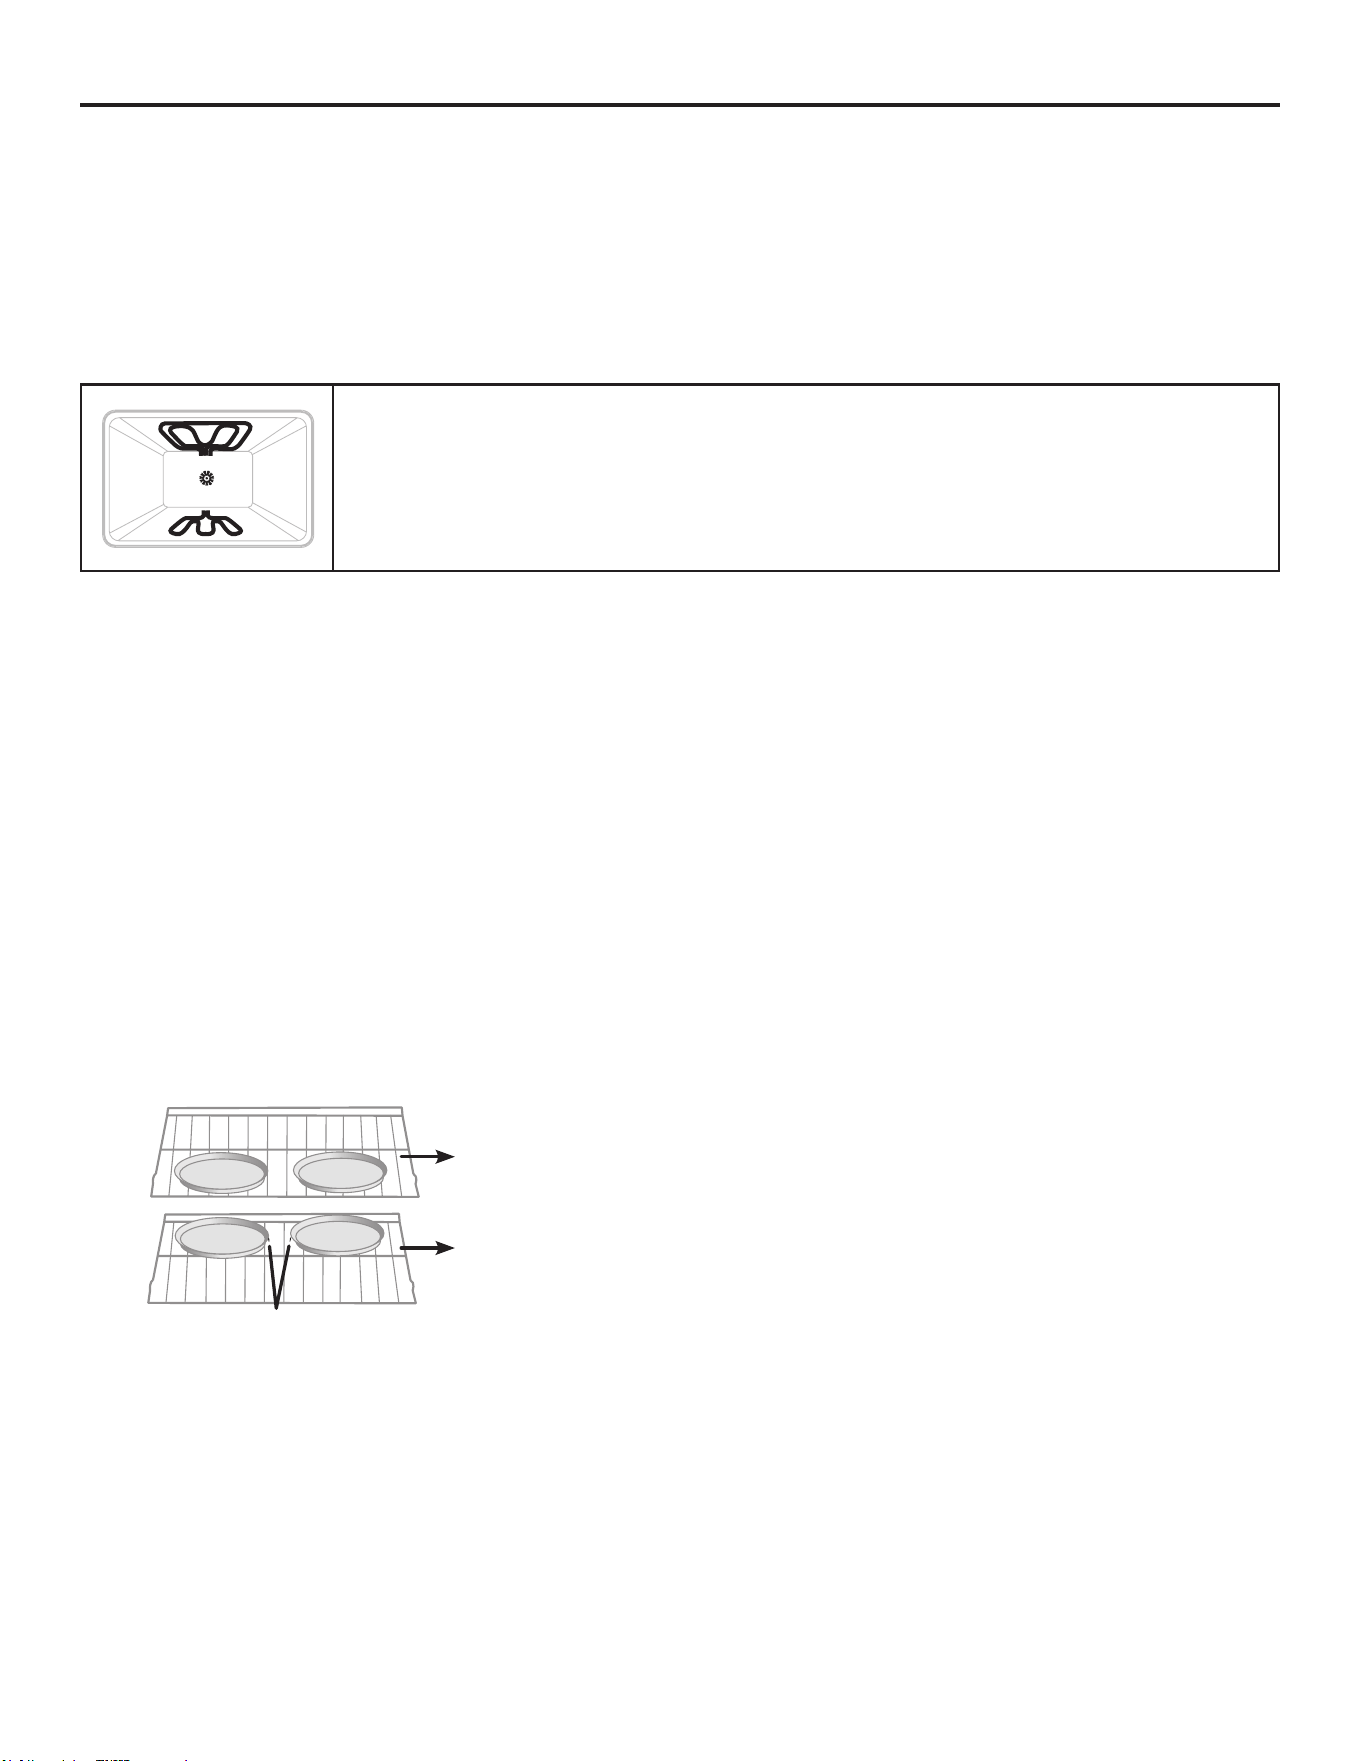
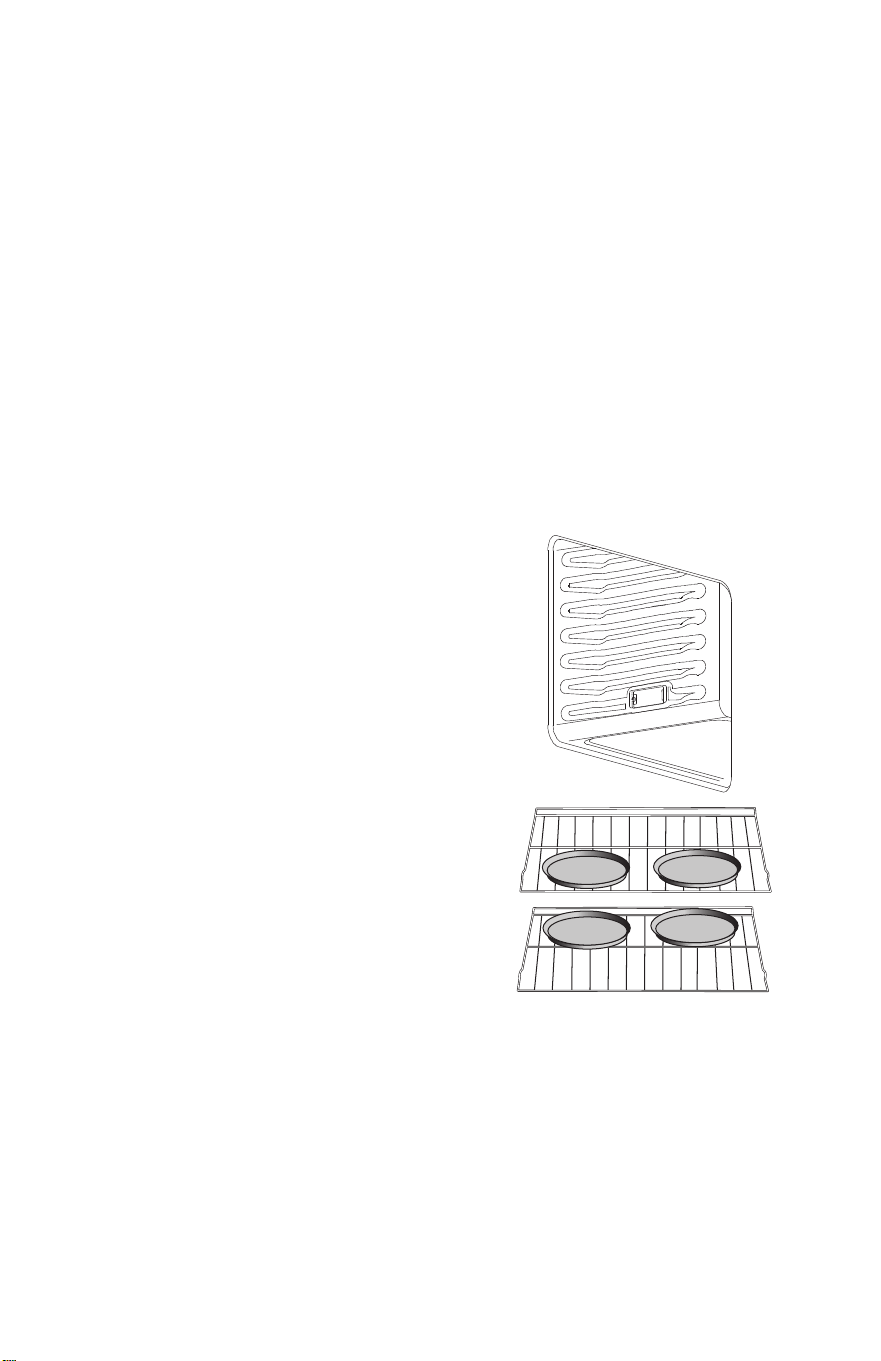
• When baking four cake layers at the same time, stagger pans so that one pan is not directly above another. For best
results, place cakes on front of upper rack and back of lower rack. Allow 1” - 1½” (2.5 - 4 cm) air space around pans.
1. Turn the cooking functions knob to the convection bake.
2. Rotate the dial to the temperature you wish to use.
3. You can open the door and place food in the oven.
2 at the front
2 at the rear
1¹⁄2”
Compared to BAKE setting, Convection Bake adds the use of convection fan(s) to circulate
heated air. So both the temperature and the cooking time may be slightly reduced.
Tips: When convection baking, reduce your recipe baking temperature by 25°F.
15
2. Convection Broil
1. Turn the cooking functions knob to the convection BROIL.
2. Rotate the dial to the temperature you wish to use.
3. The oven will begin preheating. Do not open the door while the oven is preheating. When the oven had reached the
set temperature, the indicator light on the control panel will turn on.
4. You can open the door and place food in the oven.
Guidelines:
•Place rack in the required position needed before turning on the oven.
•Use Convection Broil mode with the oven door closed. •When convection broiling, enter your normal broiling temperature.
•Do not preheat oven.
•Use the 2-piece broil pan.
•Turn meats once halfway through the cooking time. See the Convection Broil chart.
•Thicker cuts and unevenly shaped pieces of meat, sh and poultry may cook better at lower broiling temperatures.
Oven (continued)
3. Convection Roast:
1. Turn the cooking functions knob to the convection roast.
2. Rotate the dial to the temperature you wish to use.
3. You can open the door and place food in the oven.
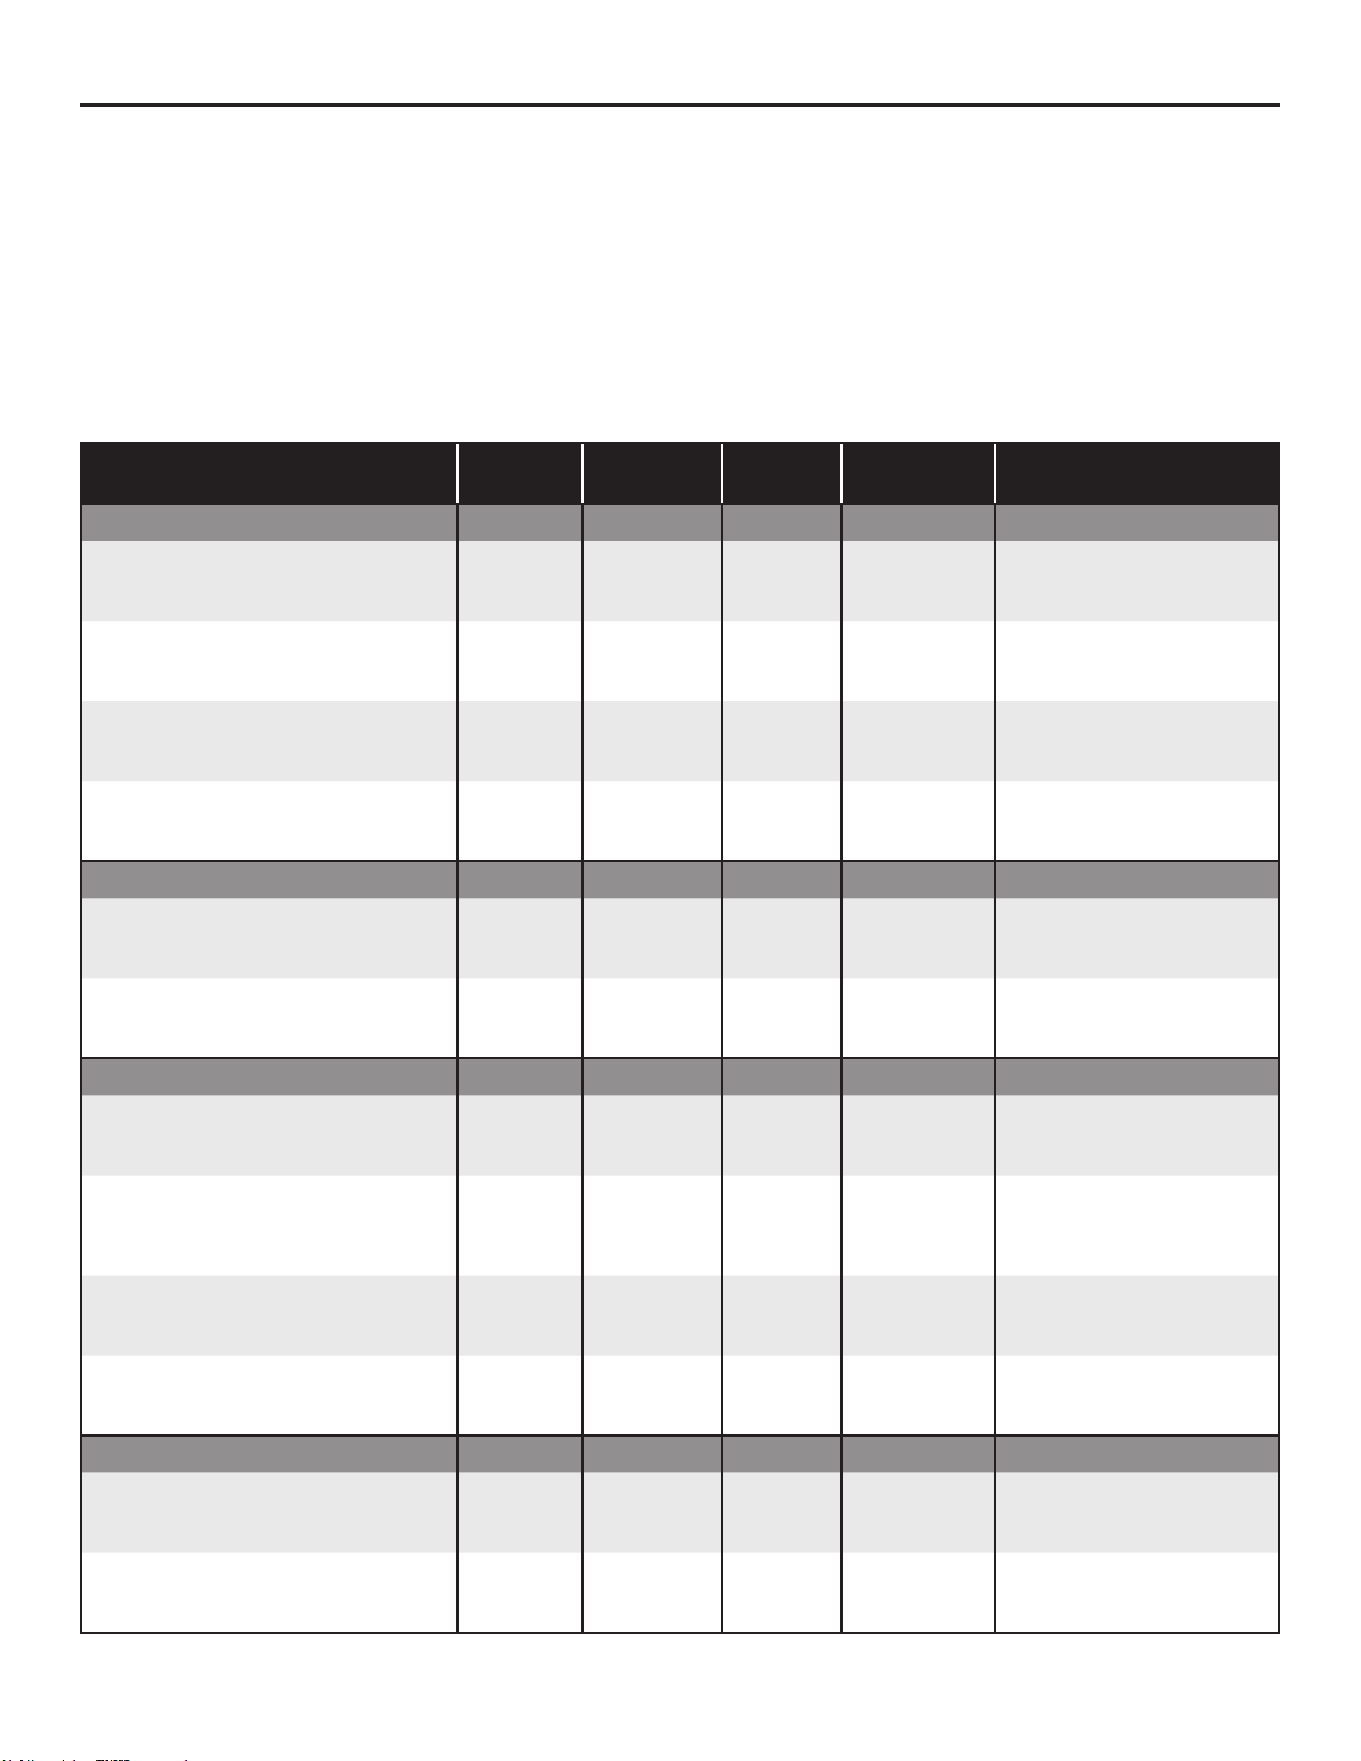
Convection Broil adds the use of convection fan(s) to circulate heated air. Bring the rack to the
middle of the cavity to provide evening cooking.
Food And Thickness
Rack
Position
Broil Setting.
°F (°C)
Level of
Doneness
SIDE 1
Time (Min)
SIDE 2
Time (Min)
BEEF
Steak (1½” or more) 4 450 (235)
-Medium Rare
-Medium
-Well Done
- (9 - 12)
- (11 - 13)
- (18 - 20)
- (8 - 10)
- (10 - 12)
- (16 - 17)
Hamburgers (more than 1") 4 550 (290)
-Medium
-Well Done
- (8 - 11)
- (11-13)
- (5 - 7)
- (8 - 10)
POULTRY
Chicken Quarters 4 450 (235) Well Done (16 - 18) (10 - 13)
Chicken Halves 3 450 (235) Well Done (25 - 27) (15 - 18)
Chicken Breasts 4 450 (235) Well Done (13 - 15) (9 - 13)
PORK
Pork Chops (1¼" or more) 4 450 (235) Well Done (12 - 14) (11 - 13)
Sausage - fresh 4 450 (235) Well Done (4 - 6) (3 - 5)
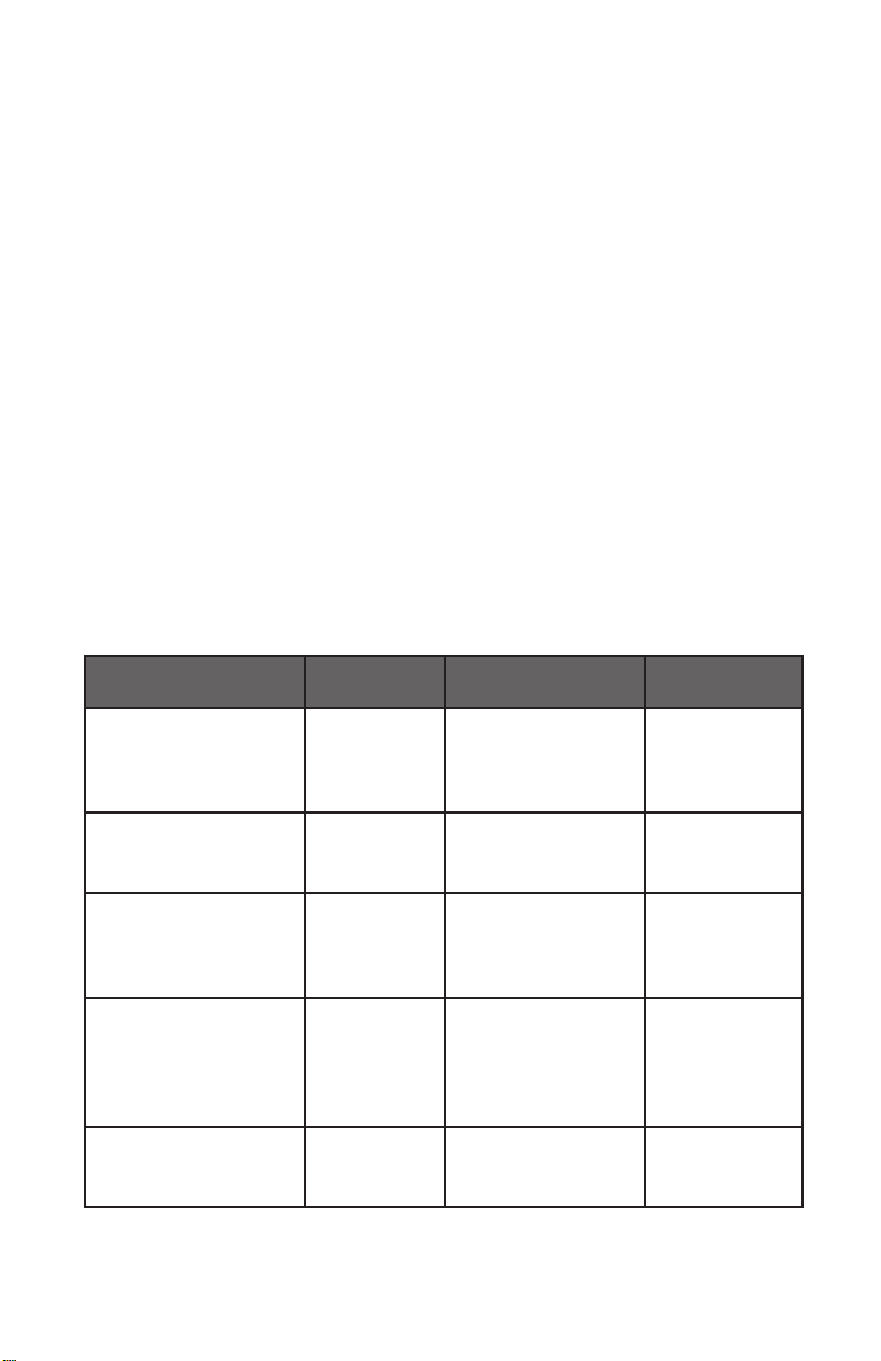
When convection roasting, turn to your normal roasting temperature. The roasting time should
be 15-30% less than in conventional cooking. It is not necessary to preheat the oven for
Convection Roast.
16
Oven (continued)
Food And Thickness
Weight
(Lb)
Oven Temp.
°F (°C)
Rack
Position
Time
(Min. Per Lb)
Internal
Temp. °F (°C)
BEEF
Rib Roast - 4 - 6 325 (160) 2
16-20
18-22
-145 (63) Medium Rare
-160 (71) medium
Rib Eye Roast (boneless) - 4 - 6 325 (160) 2
16-20
18-22
-145 (63) Medium Rare
-160 (71) medium
Rump, Eye, Tip, Sirloin (boneless) - 3 - 6 325 (160) 2
16-20
18-22
-145 (63) Medium Rare
-160 (71) medium
Tenderloin Roast - 2 - 3 400 (205) 2 15-20 145 (63) Medium Rare
PORK
Loin Roast (boneless or bone-in) - 5 - 8 350 (205) 2 16-20 160 (71) medium
Shoulder - 3 - 6 400 (205) 2 20-25 160 (71) medium
POULTRY
Chicken whole- 3 - 4 375 (190) 2 18-21 180 (82)
Turkey, not stued -
12 - 15
16 - 20
21 - 25
325 (160)
325 (160)
325 (160)
1
1
1
10-14
9-11
6 - 11
-180 (82)
-180 (82)
-180 (82)
Turkey Breast - 3 - 8 325 (160) 1 15-20 170 (77)
Comish Hen - 1 - 1 ¹⁄2 350 (205) 2
45-75
total
180 (82)
LAMB
Half Leg - 3 - 4 325 (160) 2
22 - 27
28 - 33
-160 (71) medium
-170 (77) well
Whole Leg - 6 - 8 325 (160) 1
22 - 27
28 - 33
-160 (71) medium
-170 (77) well
Guidelines:
• Do not preheat for Convection Roast.
• Roast in a low-sided, uncovered pan.
• When roasting whole chickens or turkey, tuck wings behind back and loosely tie legs with kitchen string.
• Use the 2-piece broil pan for roasting uncovered.
• Double-check the internal temperature of meat or poultry by inserting meat thermometer into another position.
• Large poultry may need to be covered with foil (and pan roasted) during a portion of the roasting time to prevent over-
browning.
• The minimum safe temperature for stung in poultry is 165ºF (75ºC).
• After removing the food from the oven, cover loosely with foil for 10 to 15 minutes before carving if necessary to
increase the nal foodstu temperature by 5° to 10°F (3° to 6° C).
BAKE TIPS
•
For best results, bake food on a single rack with at least 1" - 1½" (2.5 - 3 cm)
space between utensils and oven walls.
•
Use one rack when selecting the bake mode.
•
Check for doneness at the minimum time.
•
Use metal bake ware (with or without a non stick njQLVKKHDWSURRIJODVVJODVV
ceramic, pottery or other utensils suitable for the oven.
•
When using heatproof glass, reduce temperature by 25°F (15°C) from
recommended temperature.
•
8VHEDNLQJVKHHWVZLWKRUZLWKRXWVLGHVRUMHOO\UROOSDQV
•
Dark metal pans or nonstick coatings will cook faster with more browning.
Insulated bake ware will slightly lengthen the cooking time for most foods.
•
Do not use aluminum foil or disposable aluminum trays to line any part of the
oven. Foil is an excellent heat insulator and heat will be trapped beneath it. This
ZLOODOWHUWKHFRRNLQJSHUIRUPDQFHDQGFDQGDPDJHWKHnjQLVKRIWKHRYHQ
•
Avoid using the opened door as a shelf to place pans.
•
See Troubleshooting for tips for Baking and Roasting problems.
27
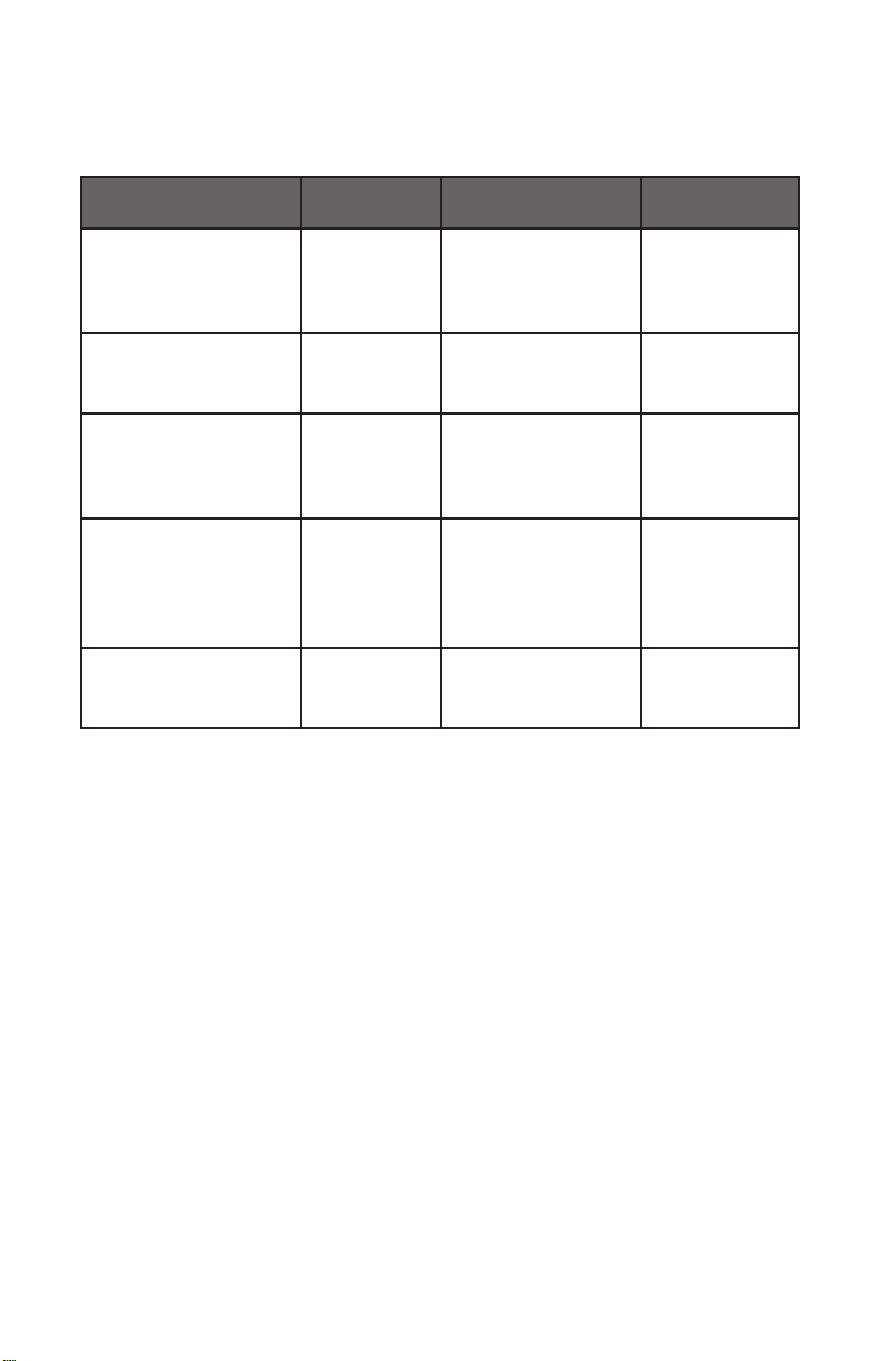
BAKE CHART
FOOD ITEM
RACK
POSITION
TEMP. °F (°C)
(PREHEATED OVEN)
TIME (MIN)
Cake
Cupcakes
Bundt Cake
Angel Food
2
1
1
350 (175)
350 (175)
350 (175)
19-22
40-45
35-39
Pie
2 crust, fresh, 9"
2 crust, frozen fruit, 9"
2
2
375-400 (190-205)
375 (190)
45-50
68-78
Cookies
Sugar
Chocolate Chip
Brownies
2
2
2
350-375 (175-190)
350-375 (175-190)
350 (175)
8-10
8-13
29-36
Breads
Yeast bread loaf, 9x5
Yeast rolls
Biscuits
0XǎQV
2
2
2
2
375 (190)
375-400 (190-205)
375-400 (190-205)
425 (220)
18-22
12-15
7-9
15-19
Pizza
Frozen
Fresh
2
2
400-450 (205-235)
475 (246)
23-26
15-18
CONVECTION BAKE TIPS
Reduce recipe baking temperatures by 25°F (15°C).
•
For best results, foods should be cooked uncovered, in low-sided pans to take
advantage of the forced air circulation. Use shiny aluminum pans for best results
XQOHVVRWKHUZLVHVSHFLnjHG
•
Heatproof glass or ceramic can be used. Reduce temperature by another 25°F
(15°C) when using heatproof glass dishes for a total reduction of 50°F (30°C).
•
Dark metal pans may be used. Note that food may brown faster when using dark
metal bake ware.
•
The number of racks used is determined by the height of the food to be cooked.
•
Baked items, for the most part, cook extremely well in convection. Don’t try to
convert recipes such as custards, quiches, pumpkin pie , or cheesecakes, which
GRQRWEHQHnjWIURPWKHFRQYHFWLRQKHDWLQJSURFHVV8VHWKHUHJXODU%DNHPRGH
for these foods.
28
•
Multiple rack cooking for oven meals is
done on rack positions 1, 2, 3 , 4 and 5. All
six racks can be used for cookies, biscuits
and appetizers.
- 2 Rack baking: Use positions 1 and 3.
- When baking four cake layers at the same
time, stagger pans so that one pan is not
directly above another. For best results,
place cakes on front of upper rack and
back of lower rack (See graphic at right).
Allow 1" - 1 ½" (2.5 - 3 cm) air space
around pans.
•
Converting your own recipe can be easy.
Choose a recipe that will work well in
convection.
•
Reduce the temperature and cooking
time if necessary. It may take some trial
and error to achieve a perfect result. Keep
track of your technique for the next time
you want to prepare the recipe using
convection.
4
6
5
3
2
1
•
See Troubleshooting for tips for Baking and Roasting problems.
FOODS RECOMMENDED FOR CONVECTION BAKE MODE:
$SSHWL]HUV%LVFXLWV&RNjHH&DNHV
Cookies (2 to 4 racks), Yeast Breads
&UHDP3XNjV3RSRYHUV
&DVVHUROHVDQG2QH'LVK(QWUH«V
Oven Meals (rack positions 1, 2, 3)
$LU/HDYHQHG)RRGV6RXǏ«V0HULQJXH0HULQJXH7RSSHG'HVVHUWV$QJHO)RRG
&DNHV&KLNjRQ&DNHV
CONVECTION BAKE CHART
Reduce standard recipe temperature by 25 ºF (15 °C) for Convection Bake.
Temperatures have been reduced in this chart.
FOOD ITEM
RACK
POSITION
TEMP. °F (°C)
(PREHEATED OVEN)
TIME (MIN)
Cake
Cupcakes
Bundt Cake
Angel Food
2
1
1
325 (160)
325 (160)
325 (160)
20-22
43-50
43-47
Pie
2 crust, fresh, 9"
2 crust, frozen fruit, 9"
2
2
350-400 (175-205)
350 (175)
40-52
68-78
Cookies
Sugar
Chocolate Chip
Brownies
2
2
2
325-350 (160-175)
325-350 (160-175)
325 (160)
9-12
8-13
29-36
Breads
Yeast bread loaf, 9x5
Yeast rolls
Biscuits
0XǎQV
2
2
2
2
350 (175)
350-375 (175-190)
375 (190)
400 (205)
18-22
12-15
8-10
17-21
Pizza
Frozen
Fresh
2
2
375-425 (190-220)
450 (232)
23-26
15-18
30
CONVECTION ROAST TIPS
•
Do not preheat for Convection Roast.
•
Roast in a low-sided, uncovered pan.
•
When roasting whole chickens or turkey, tuck wings behind back and loosely tie
legs with kitchen string.
•
Use the 2-piece broil pan for roasting uncovered.
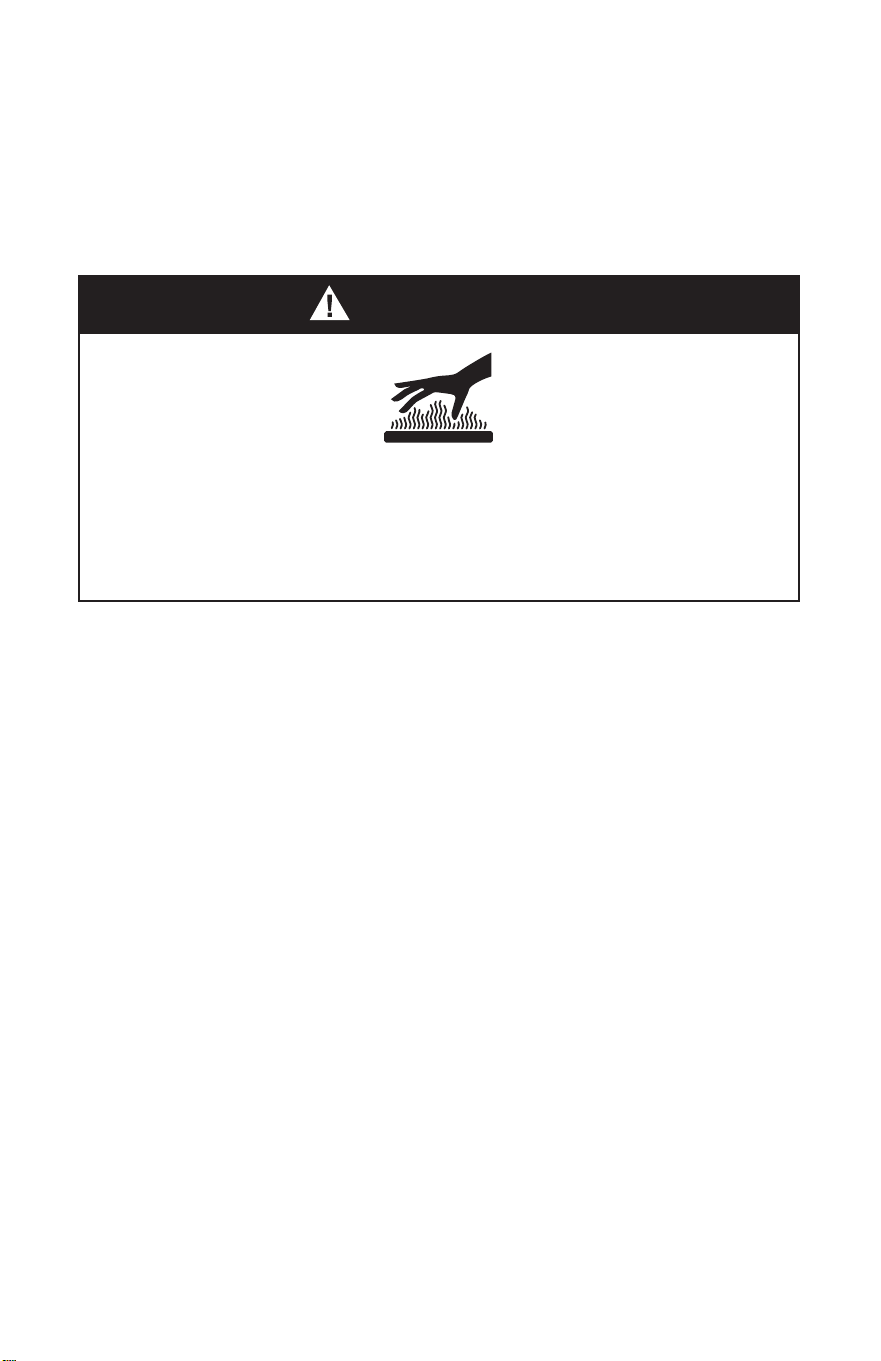
WARNING
Burn Hazard
Use an oven mitt to remove temperature probe.
Do not touch broil element.
Failure to do so can result in burns.
•
Use the probe or a meat thermometer to determine the internal doneness on
“END” temperature (see cooking chart).
•
Double-check the internal temperature of meat or poultry by inserting meat
thermometer into another position.
•
Large birds may also need to be covered with foil (and pan roasted) during a
portion of the roasting time to prevent over-browning.
•
7KHPLQLPXPVDIHWHPSHUDWXUHIRUVWXǎQJLQSRXOWU\LV|)|&
•
After removing the item from the oven, cover loosely with foil for 10 to
bPLQXWHVEHIRUHFDUYLQJLIQHFHVVDU\WRLQFUHDVHWKHnjQDOIRRGVWXNj
temperature by 5° to 10°F (3° to 6° C).
31
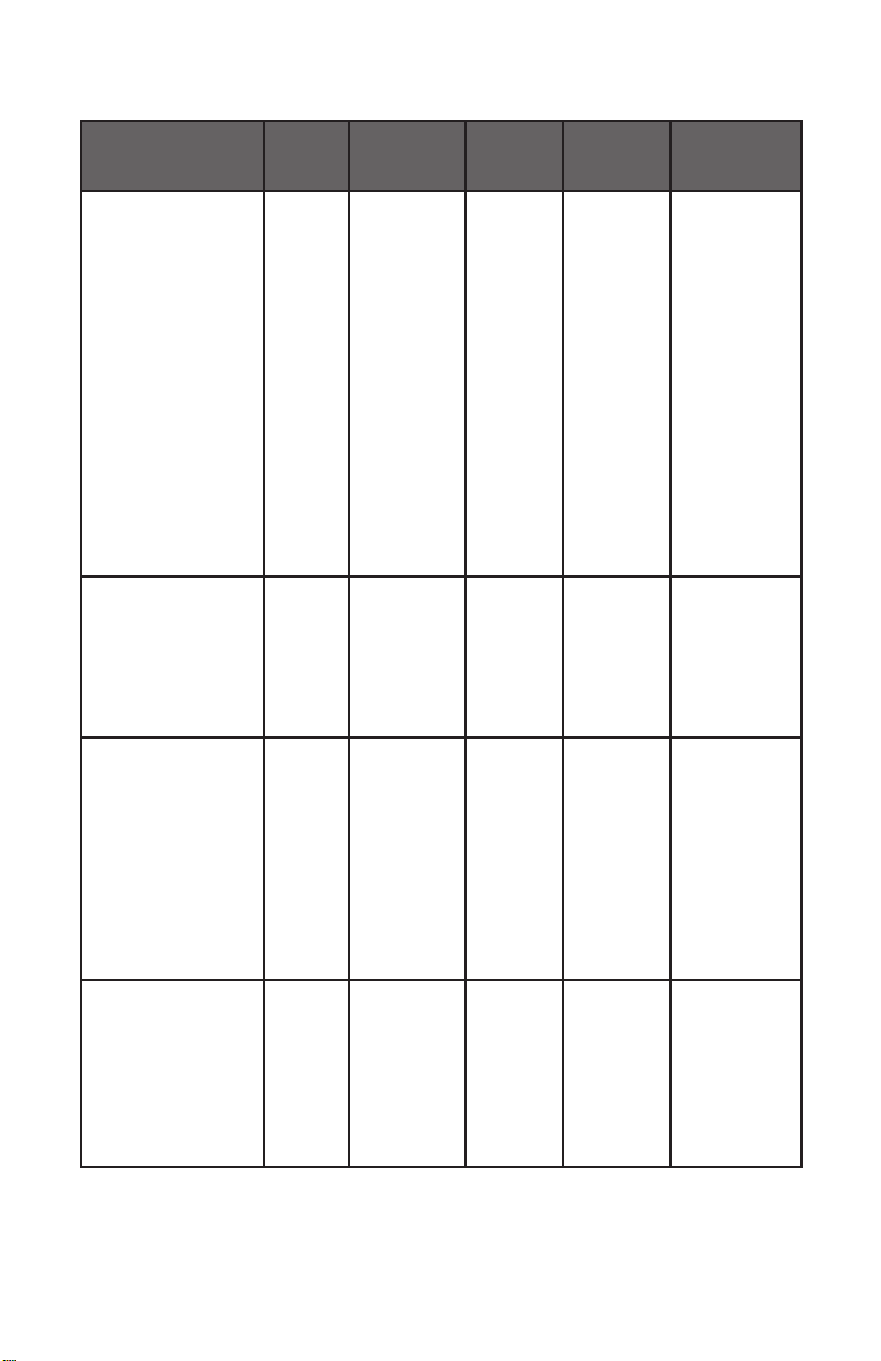
CONVECTION ROAST CHART
MEATS
WEIGHT
(lb)
OVEN TEMP.
°F (°C)
RACK
POSITION
TIME
(min. per
lb)
INTERNAL
TEMP. °F (°C)
Beef
Rib Roast 4-6 325 (160) 2 16-20
18-22
145 (63)
medium rare
160 (71)
medium
Rib Eye Roast,
(boneless)
4-6 325 (160) 2 16-20
18-22
145 (63)
medium rare
160 (71)
medium
Rump, Eye, Tip,
Sirloin (boneless)
3-6 325 (160) 2 16-20
18-22
145 (63)
medium rare
160 (71)
medium
Tenderloin Roast 2-3 400 (205) 2 15-20 145 (63)
medium rare
Pork
Loin Roast
(boneless or bone-
in)
5-8 350 (175) 2 16-20 160 (71)
medium
Shoulder 3-6 350 (175) 2 20-25 160 (71)
medium
Poultry
Chicken whole 3-4 375 (190) 2 18-21 180 (82)
7XUNH\QRWVWXNjHG 12-15 325 (160) 1 10-14 180 (82)
7XUNH\QRWVWXNjHG 16-20 325 (160) 1 9-11 180 (82)
7XUNH\QRWVWXNjHG 21-25 325 (160) 1 6-10 180 (82)
Turkey Breast 3-8 325 (160) 1 15-20 170 (77)
Comish Hen 1-1 ½ 350 (175) 2 45-75
total
180 (82)
Lamb
Half Leg 3-4 325 (160) 2 22-27
28-33
160 (71)
medium
170 (77) well
Whole Leg 6-8 325 (160) 1 22-27
28-33
160 (71)
medium
170 (77) well
32
CONVECTION BROIL TIPS
•
Place rack in the required position needed before turning on the oven.
•
Use Convection Broil mode with the oven door closed.
•
Do not preheat oven.
•
Use the 2-piece broil pan.
•
Turn meats once halfway through the cooking time (see convection broil chart).
CONVECTION BROIL CHART
FOOD AND THICKNESS
RACK
POSITION
BROIL
SETTING
°F (°C)
INTERNAL
TEMP. °F
(°C)
TIME
SIDE 1
(MIN.)*
TIME
SIDE 2
(MIN.)*
Beef
Steak (1½" or more)
Medium rare 4 450 (235) 145 (65) 9-12 8-10
Medium 4 450 (235) 160 (71) 11-13 10-12
Well 4 450 (235) 170 (77) 18-20 16-17
Hamburgers (more than 1")
Medium 4 550 (290) 160 (71) 8-11 5-7
Well 4 550 (290) 170 (77) 11-13 8-10
Poultry
Chicken Quarters 4 450 (235) 180 (82) 16-18 10-13
Chicken Halves 3 450 (235) 180 (82) 25-27 15-18
Chicken Breasts 4 450 (235) 170 (77) 13-15 9-13
Pork
Pork Chops (1¼" or more) 4 450 (235) 160 (71) 12-14 11-13
Sausage - fresh 4 450 (235) 160 (71) 4-6 3-5
33
DEHYDRATE TIPS
The circulating heated air at a lower temperature slowly removes the moisture for
food preservation.
•
Oven temperature for dehydrating is between 120ºF (50ºC) to 160ºF (70ºC).
•
Multiple racks can be used simultaneously.
•
Some foods require as much as 14-15 hours of time to fully dehydrate.
•
&RQVXOWDIRRGSUHVHUYDWLRQERRNIRUVSHFLnjFWLPHVDQGWKHKDQGOLQJRIYDULRXV
foods.
•
This mode is suitable for a variety of fruits, vegetables, herbs and meat strips.
•
Drying screens can be purchased at specialty kitchen shops.
•
By using paper towels, some food moisture can be absorbed before dehydrating
begins (such as with sliced tomatoes or sliced peaches).
DEHYDRATE CHART
FOOD PREPARATION
APPROXIMATE
DRYING TIME*
(hrs)
TEST FOR DONENESS
Fruit
Apples Dipped in ¼ cup lemon
MXLFHDQGFXSVZDWHU
¼ slices
11-15 Slightly pliable
Bananas Dipped in ¼ cup lemon
MXLFHDQGFXSVZDWHU
¼ slices
11-15 Slightly pliable
Cherries Wash and towel dry.
For fresh cherries,
remove pits
10-15 Pliable, leathery,
chewy
Oranges Peels
and slices
~VOLFHVRIRUDQJH
orange part of skin
thinly peeled from
oranges
Peels 2-4
Slices: 12-16
Orange peel: dry
and brittle
Orange slices:
skins are dry and
brittle, fruit is
slightly moist
Pineapple rings Towel dried Canned: 9-13
Fresh: 8-12
Soft and pliable
Strawberries Wash and towel dry.
Sliced ½" thick,
skin (outside) down on
rack
12-17 Dry, brittle
Vegetable
Peppers Wash and towel dry.
Remove membrane
of pepper,
coarsely chopped about
1" pieces
16-20 Leathery with no
moisture inside
34
FOOD PREPARATION
APPROXIMATE
DRYING TIME*
(hrs)
TEST FOR DONENESS
Mushrooms Wash and towel dry.
Cut of stem end. Cut
LQWRƌVOLFHV
7-12 Tough and leathery,
dry
Tomatoes Wash and towel dry.
&XWWKLVVOLFHVƌWKLFN
dry well
16-23 Dry, brick red color
Herbs
Oregano, sage
parsley and
thyme, and fennel
Rinse and dry with
paper towel
Dry at 120°F
(60°C) 3-5 hrs
Crisp and brittle
Basil Use basil leaves 3 to 4
inches from top. Spray
ZLWKZDWHUVKDNHRNj
moisture and pat dry
Dry at 120°F
(60°C) 3-5 hrs
Crisp and brittle
BROIL TIPS
•
Place rack in the required position needed before turning on the oven.
•
Use Broil mode with the oven door closed.
•
Preheat oven for 5 minutes before use.
•
Use the 2-piece broil pan.
•
Turn meats once halfway through the cooking time (see convection broil chart).
BROIL CHART
FOOD AND THICKNESS
RACK
POSITION
BROIL
SETTING
°F (°C)
INTERNAL TEMP.
°F (°C)
TIME
SIDE 1
(MIN.)*
TIME
SIDE 2
(MIN.)*
Beef
Steak (¾"-1)
Medium rare 5 5 145 (65) 5-7 4-6
Medium 5 5 160 (71) 6-8 5-7
Well 5 5 170 (77) 8-10 7-9
Hamburgers (¾"-1")
Medium 4 5 160 (71) 8-11 6-9
Well 4 5 170 (77) 10-13 8-10
Poultry
Breast (bone-in) 4 4 170 (77) 10-12 8-10
Thigh (very well done) 4 3 180 (82) 28-30 13-15
Pork
Pork Chops (1") 5 5 160 (71) 7-9 5-7
35
FOOD AND THICKNESS
RACK
POSITION
BROIL
SETTING
°F (°C)
INTERNAL TEMP.
°F (°C)
TIME
SIDE 1
(MIN.)*
TIME
SIDE 2
(MIN.)*
Sausage - fresh 5 5 160 (71) 5-7 3-5
Ham Slice (½") 5 5 160 (71) 4-6 3-5
Seafood
Fish Filets, 1"
Buttered
4 4 Cook until
RSDTXHǍDNHV
easily with fork
10-14 Do not
turn
Lamb
Chops (1")
Medium Rare 5 5 145 (63) 5-7 4-6
Medium 5 5 160 (71) 6-8 4-6
Well 5 5 170 (77) 7-9 5-7
Bread
Garlic Bread, 1" slices 4 5 2-2,30
Garlic Bread, 1" slices 3 5 4-6
* Broiling and convection broiling times are approximate and may vary slightly
Cooking times are indicative and also depend on the thickness and the starting temperature of
the meat before cooking .
36

OVEN RACKS
IMPORTANT: To avoid permanent damage to the porcelain finish, place food or
bakeware on an oven rack. Do not place food or bakeware directly onto the
oven door or oven bottom.
•
The oven racks can be placed in any of the six height positions with the oven.
•
Position racks before turning on the oven.
•
Make sure the oven racks are level.
•
Oven racks have a stop to keep them from being unintentionally withdrawn fully.
To Remove Oven Racks:
•
Pull rack out to the stop position, raise the front edge, and then lift out.
To Replace Oven Racks:
•
Place oven rack on the wire supports along the sides of the oven. Tilt the front
edge up slightly, and slide rack to the rear until it clears the stop position. Lower
the front and slide the rack into the oven.
OVEN DOOR
To avoid oven door glass breakage:
•
Do not close the oven door if the racks are not fully inserted into the oven cavity
or if bakeware extends past the front edge of an oven rack.
•
Do not set objects on the glass surface of the oven door.
•
Do not hit glass surfaces with bakeware or other objects.
•
Do not wipe down glass surfaces until the oven has completely cooled.
OVEN VENTS
Blocking or covering the oven vents will cause poor air circulation, aecting cooking,
cleaning and cooling results.
•
Both the upper and lower oven vent(s) allow fresh air to enter the cooling
system.
•
The lower oven vent also allows hot air to be expelled from the cooling system.
13
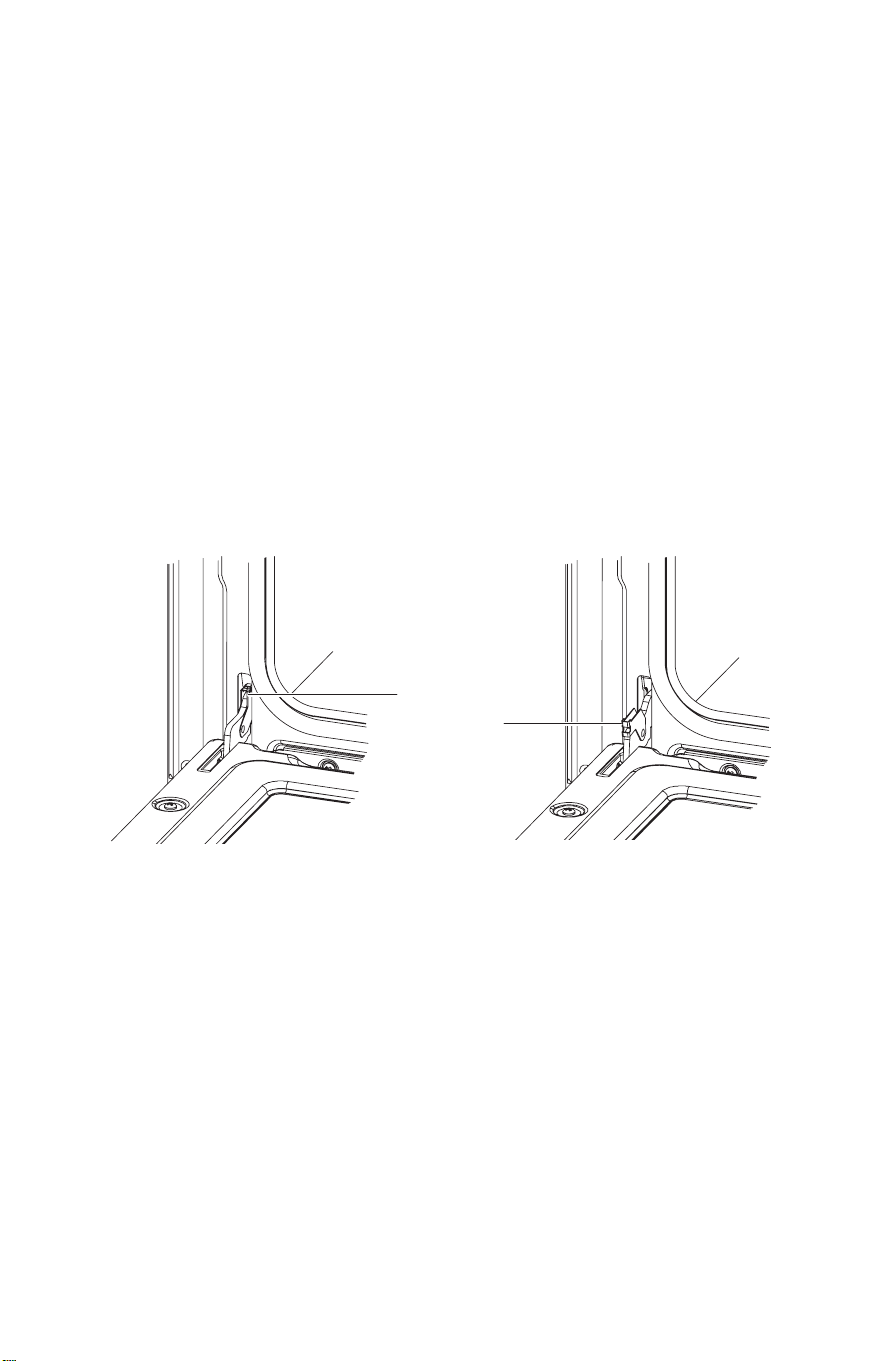
OVEN DOOR REMOVAL
For normal oven use, there is no need to remove the oven door. However, should it
become necessary to remove the door, follow the instructions in this section.
IMPORTANT:
•
Make sure oven is cool and that power to the oven has been turned o before
removing the door.
•
The oven door is heavy and fragile, and the door front is glass. To avoid oven
door glass breakage, use both hands, and grasp only the sides of the oven door
to remove. Do not grasp the handle.
•
Be sure both levers are securely in place before removing the door.
•
Do not force door open or closed.
To Remove the Oven Door:
1. Open the door completely.
2. Flip up the hinge latch on each side.
a
a
a Hinge Bracket
3. Holding the door rmly, close the oven door completely.
4. Grasping both sides lift up on the oven door while pushing it closed, and then
pull it away from the door frame.
5. Place the door in a protected location.
14
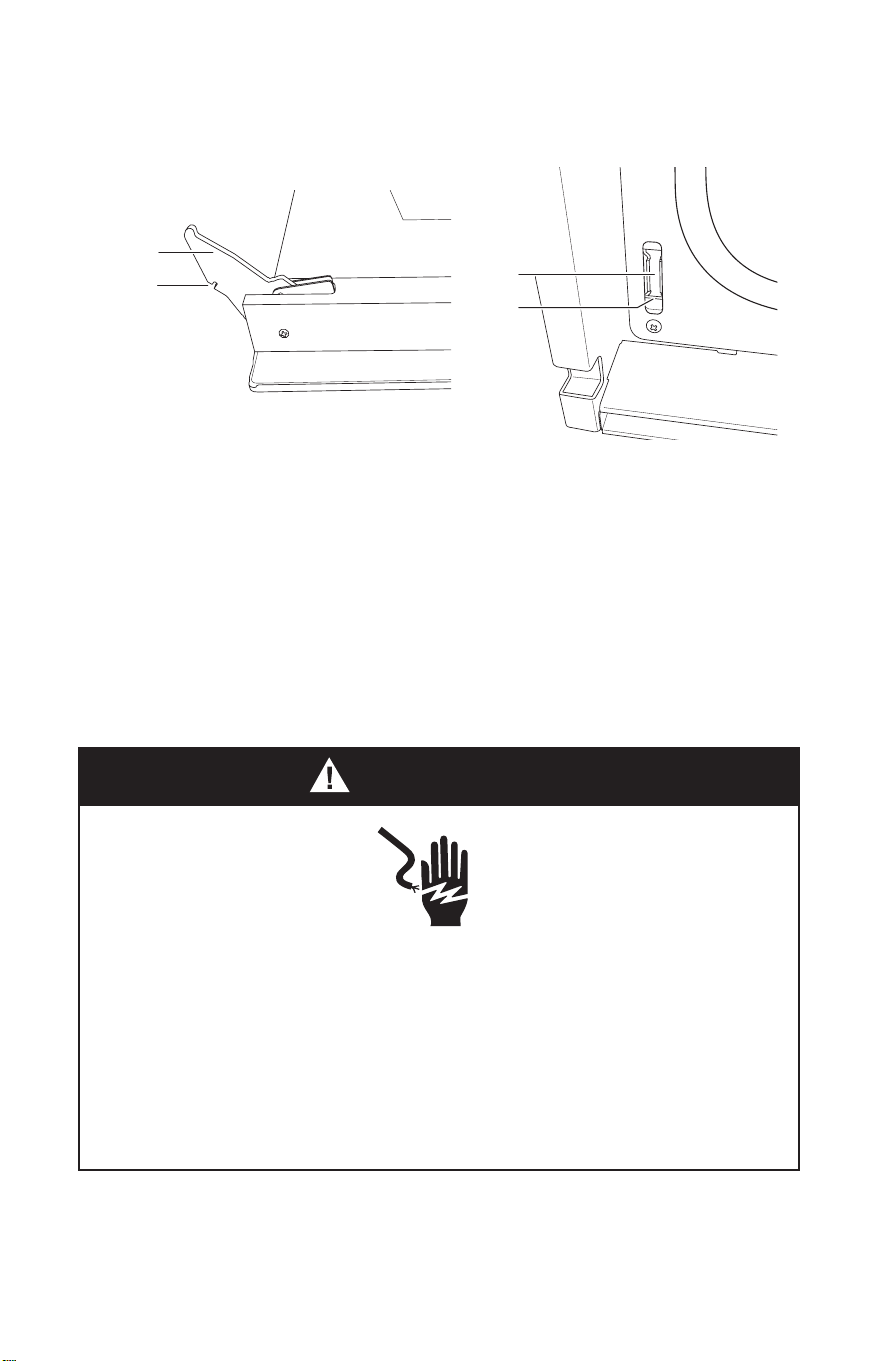
To Replace the Oven Door:
1. Holding the door rmly, insert the upper arms of both hinges into the slots. The
recesses must hook on the lips.
a
b
c
d
a Upper Arm
b Recess
c Slots
d Lip
2. Open the oven door.
NOTE: You should hear a “click” sound when the door is correctly in place.
3. Move the hinge latch on each side back into the locked position.
4. Open and close the door to test that it operates freely. If it does not, repeat the
door removal and replacement process.
5. Close and open the door slowly to assure that it is correctly and securely in place.
REPLACING AN OVEN LIGHT
WARNING
Electrical Shock Hazard
Make sure the oven and lights are cool and power to the oven has been
turned off before replacing the light bulb(s).
The lenses must be in place when using the oven. The lenses serve to
protect the light bulb from breaking.
The lenses are made of glass. Handle carefully to avoid breakage.
Failure to do so could result in death, electric shock, cuts or burns.
The oven light is a standard 25 watt (G9) appliance bulb.
IMPORTANT: Before replacing the bulb, make sure the oven is cool and the controls
are turned o.
15
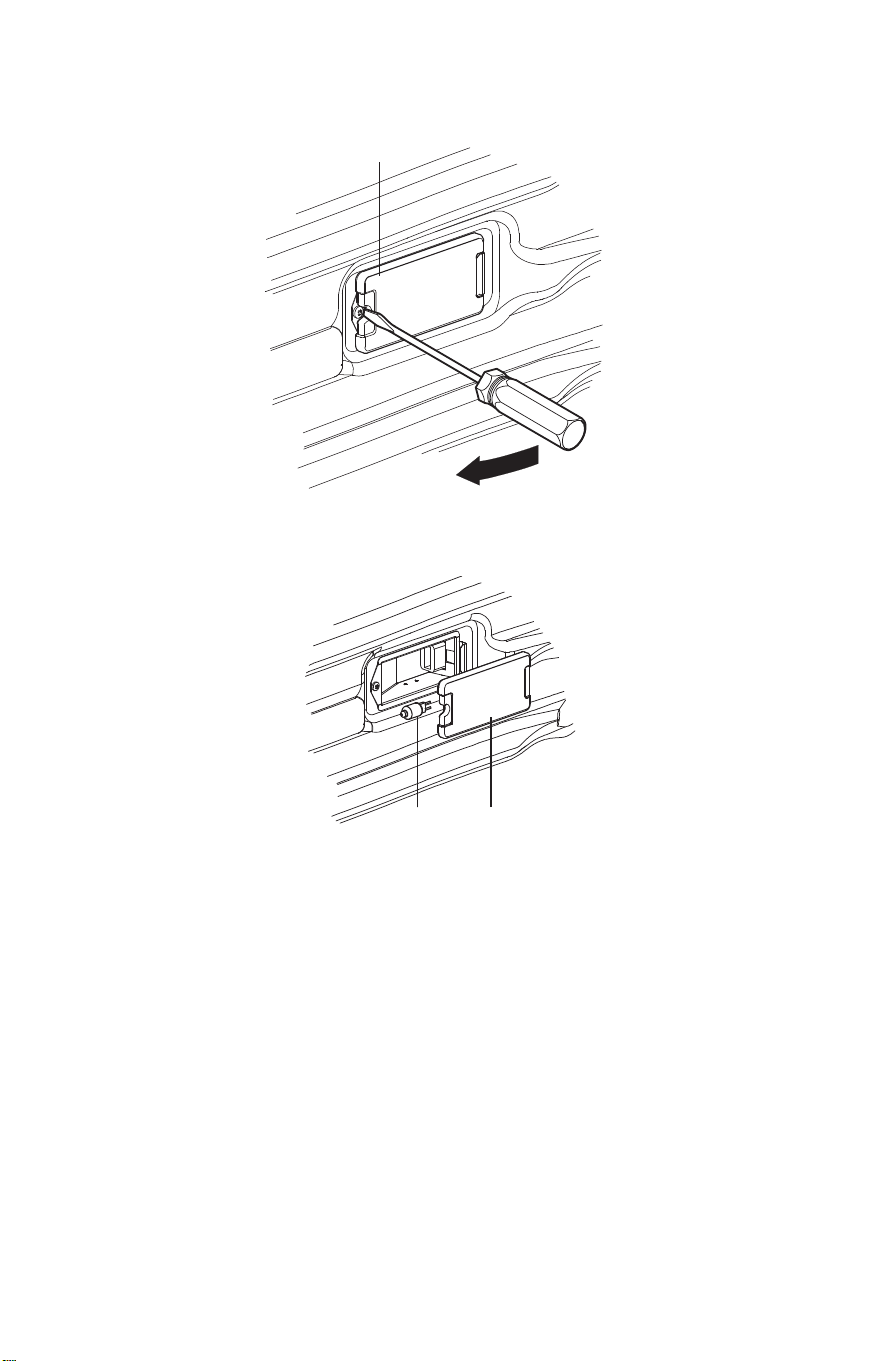
1. Disconnect power at the main power supply (fuse or breaker box).
2. Using a Phillips-head screwdriver, remove the screw, and then remove the cover.
a
a Light Cover
3. Remove the burned out bulb from the socket.
a b
a Light Bulb
b Light Cover
NOTE: To avoid damage or decreasing the life of the new bulb, do not touch bulb
with bare ngers. Wear cotton gloves or use a tissue when replacing the light bulb.
4. Replace the bulb, and then replace the bulb cover.
5. Reconnect power at the main power supply (fuse or breaker box).
16
20
Troubleshooting
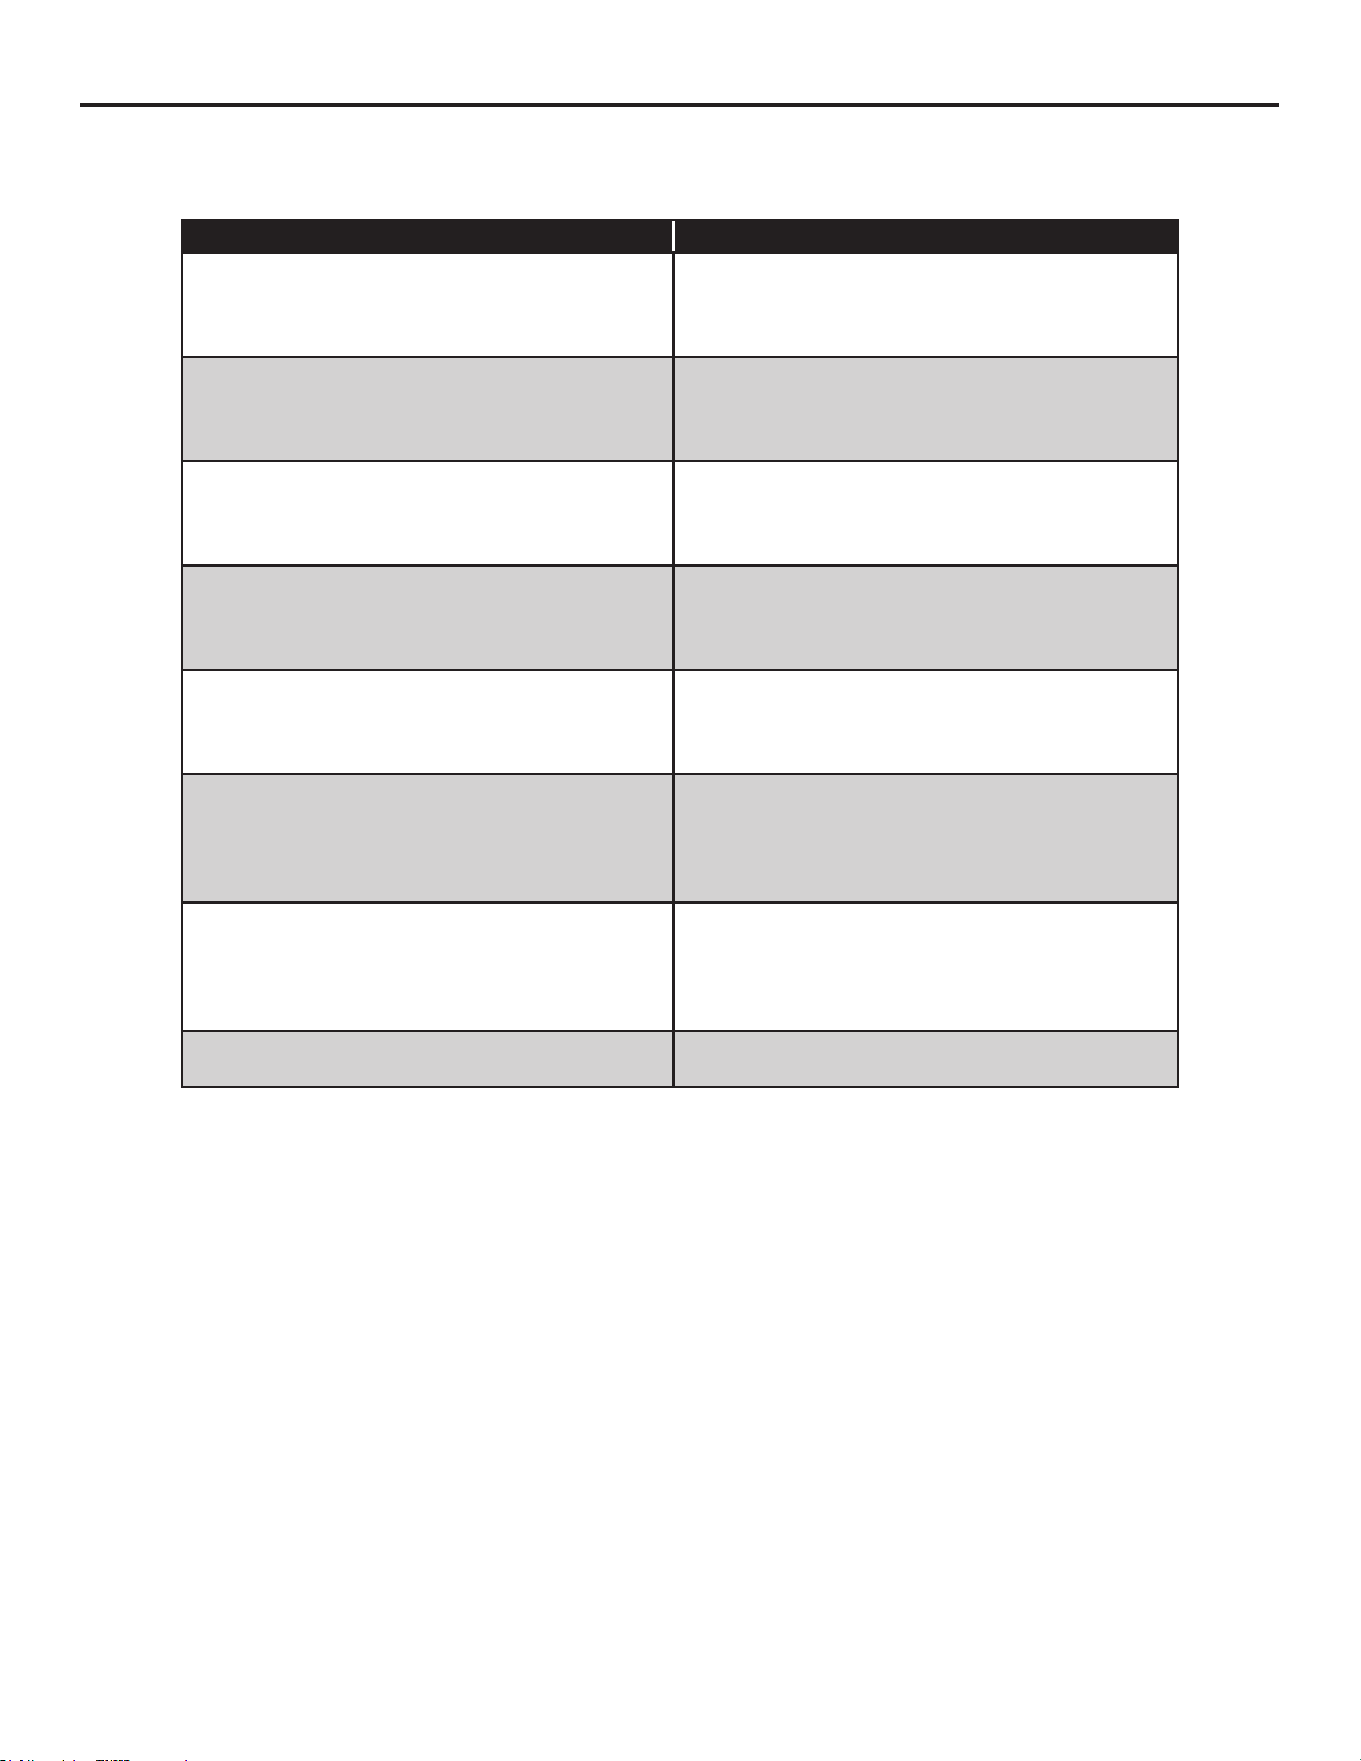
• BAKING AND ROASTING PROBLEMS
Before contacting Forno customer service, please check the chart below for cases that may apply to you. It can be simple
misuse of material, shapes, and sizes of bakeware that causes poor results.
Baking Issues Causes
Food browns unevenly • Oven not preheated
• Aluminum foil on oven rack or oven bottom
• Baking utensil too large for recipe
• Pans touching each other or oven walls
Food too brown on bottom • Oven not preheated
• Using glass, dull or darkened metal pans
• Incorrect rack position
• Pans touching each other or oven walls
Food is dry or has shrunk excessively • Oven not preheated
• Using glass, dull or darkened metal pans
• Incorrect rack position
• Pans touching each other or oven walls
Food is baking or roasting too slowly • Oven temperature too high
• Baking time too long
• Oven door opened frequently
• Pan size too large
Piecrusts do not brown on bottom or crust is soggy • Baking time not long enough
• Using shiny steel pans
• Incorrect rack position
• Oven temperature is too low
Cakes pale, at and may not be done inside • Oven temperature too low
• Incorrect baking time
• Cake tested too soon
• Oven door opened too often
• Pan size may be too large
Cakes high in middle with crack on top • Oven temperature too high
• Baking time too long
• Pans touching each other or oven walls
• Incorrect rack position
• Pan size too small
Piecrust edges too brown • Oven temperature too high
• Edges of crust too thin