Read these instructions carefully before using your appliance, and keep it carefully.
If you follow the instructions, your appliance will provide you with many years of good service.
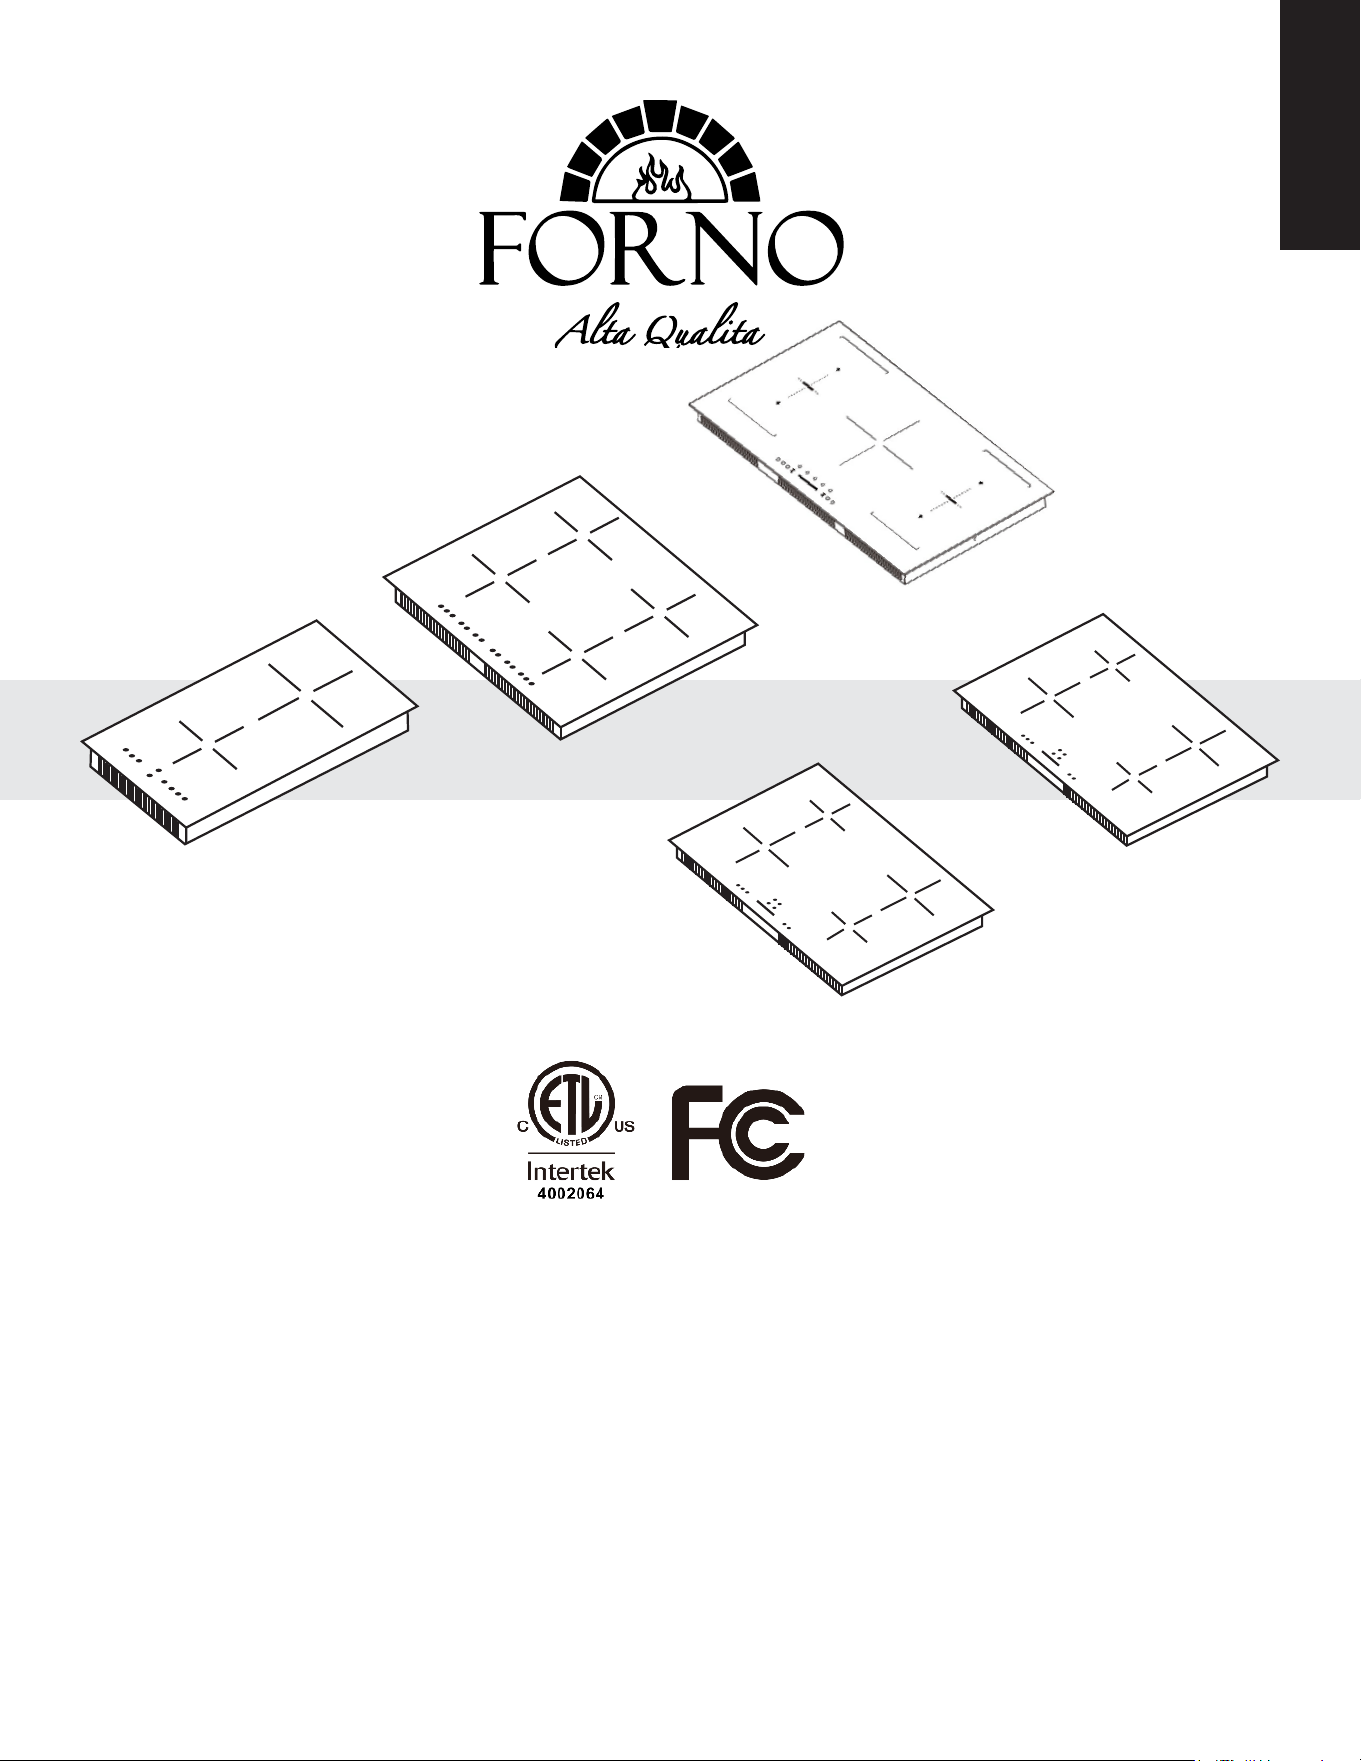
MODEL NUMBER SERIES
FCTIN0583-12 | FCTIN0583-24 | FCTIN0583-30 | FCTIN0583-36 | FCTIN0569-36
INSTRUCTION MANUAL &
INSTALLATION GUIDE
BUILT- IN INDUCTION COOKTOP
FCTIN0583-12
FCTIN0583-24
FCTIN0583-30
FCTIN0583-36
ENGLISH
FCTIN0569-36

Contents
Customer Care 3
Safety Warnings 4
Operation and maintenance 4
Installation 6
Product Overview 9
Before using your new induction cooktop 11
Using the Touch Controls 11
Choose the right Cookware 11
Using your Induction Cooktop 12
Using Booster Function-Induction Hob 13
Flexible Areas-Induction Hob 14
Child Lock Safety Control 14
Stop & Go function 15
Using the Timer 15
Timer overview 15
Detection of Pan and Small Articles 17
Residual Heat Warning 17
Auto Shutdo
wn 17
Over-heat Protection 17
Over-flow Protection 17
Heat Settings 17
Cleaning and Maintenance 18
Hints and Tips 19
Failure Inspection for induction hob 19
Electronic Diagram 20
Warranty 21
2
Customer Care
Thank you for purchasing a Frono product. Please read the entire instruction manual before operating your
new appliance for the first time. Whether you are an occasional user or an expert, it will be beneficial to
familiarize yourself with the safety practices, features, operation and care recommendations of your
appliance.
Both the model
and serial number are listed inside the product. For warranty purposes, you will also need the
date of purchase .
Product Information Service Information
Use these numbers in any
Model Number :
Serial Number :
Date of Purchase :
Purchase Address and Phone :
correspondence or services calls
concerning your product.
If you receive a damaged
product, immediately contact
Forno.
To save time and
money, before
you call for serviced, check the
troubleshooting guide. It listed
the causes of minor operation
problems that you can correct
yourself.
Services
in Canada and Untied States
Keep the instruction manual handy to answer your questions. If you don’t understand something or need
more assistance, please visit our website for fast support. Please provide us with your name, number,
address, serial number of the product that troubleshooting, proof of purchase, and a short description of the
issue. A customer service representative will contact you as soon as possible. All warranty work needs to be
authorized by FORNO
customer service. All our authorized service providers are carefully selected and
rigorously trained by us.
“Need some quick help? Simply scan the qr code and get access
to our fast support form. We’re always here to assist you with any
questions or concerns you may have. So, don’t hesitate to reach
out!”
3

4
Safety Warnings
Your safety is important to us. Please read the information below carefully before installing or using your new
product.
Safety Warnings: Installation
Electrical Shock Hazard
•
Disconnect the appliance from the mains electricity supply before carrying out any work or maintenance on
it.
•
Connection to a good earth wiring system is essential and mandatory.
•
Alterations to the domestic wiring system must only be made by a qualified electrician.
•
Failure to follow this advice may result in electrical shock or death.
Cut Hazard
•
Take care - panel edges are sharp.
•
Failure to use caution could result in injury or cuts.
Important safety instructions
•
Read these instructions carefully before installing or using this appliance.
•
No combustible material or products should be placed on this appliance at any time.
•
Please make this information available to the person responsible for installing the cooktop as it could reduce
your installation costs.
•
To avoid a hazard, this appliance must be placed according to these instructions for installation.
•
This appliance is to be properly installed and earthed only by a suitably qualified person.
•
This appliance should be connected to a circuit which incorporates an isolating switch providing full
disconnection from the power supply.
•
Failure to install the appliance correctly could invalidate any warranty or liability claims.
Operation and maintenance
Electrical Shock Hazard
•
Do not cook on a broken or cracked hob. If the hob surface should break or crack, switch the appliance off
immediately at the mains power supply (wall switch) and contact a qualified technician.
•
Switch the hob off at the wall before cleaning or maintenance.
•
Failure to follow this advice may result in electrical shock or death.
Health Hazard
•
This appliance complies with electromagnetic safety standards.
•
However, persons with cardiac pacemakers or other electrical implants (such as insulin pumps) must
consult with their doctor or implant manufacturer before using this appliance to make sure that their
implants will not be affected by the electromagnetic field.
•
Failure to follow this advice may result in death.
Hot Surface Hazard
•
During use, accessible parts of this appliance will become hot enough to cause burns.
•
Do not let your body, clothing, or any item other than suitable cookware contact the ceramic glass until the
surface is cool.
•
Beware: Metallic objects such as knives, forks, spoons, and lids should not be placed on the hob surface
since they can get hot.
•
Keep children away.
•
Handles of saucepans may be hot to touch. Check saucepan handles do not overhang other cooking zones
that are on. Keep handles out of reach of children.
•
Failure to follow this advice could result in burns and scalds.

5
Cut Hazard
•
The razor-sharp blade of a hob scraper is exposed when the safety cover is retracted. Use it with extreme
care and always store safely and out of reach of children.
•
Failure to use caution could result in injury or cuts.
Important safety instructions
•
Never leave the appliance unattended when in use. Boil-over causes smoking and greasy spillovers that
may ignite.
•
Never use your appliance as a work or storage surface.
•
Never leave any objects or utensils on the appliance.
•
Do not place or leave any magnetizable objects (e.g. credit cards, memory cards) or electronic devices (e.g.
computers, MP3 players) near the appliance, as they may be affected by its electromagnetic field.
•
Never use your appliance for warming or heating the room.
•
After use, always turn off the cooking zones and the hob as described in this manual. Do not rely on the pan
detection feature to turn off the cooking zones when you remove the pans.
•
Do not allow children to play with the appliance or sit, stand, or climb on it.
•
Do not store items of interest to children in cabinets above the hob. Children climbing on the hob could be
seriously injured.
•
Do not leave children alone or unattended in the area where the appliance is in use.
•
Children or a person with a disability which limits their ability to use the appliance should have a responsible
and competent person to instruct them in its use. The instructor should be satisfied that they can use the
appliance without danger to themselves or their surroundings.
•
Do not repair or replace any part of the appliance unless specifically recommended in the manual. All other
servicing should be done by a qualified technician
.
•
Do not use steam cleaner to clean the surface of the product.
•
Do not place or drop heavy objects on the product.
•
Do not stand on your hob.
•
Do not use pans with jagged edges or drag pans across the ceramic glass surface as this can scratch the
glass.
•
Do not use scourers or any other harsh abrasive cleaning agents to clean your hob, as these can scratch
the ceramic glass.
•
If the power supply cable is damaged, it must only be replaced by a qualified technician.
•
This appliance is intended to be used in household and similar applications such as: -staff kitchen areas in
shops, offices, and other working environments; -farm houses; -by clients in hotels, motels, and other
residential type environments; -bed and breakfast type environments.
•
This appliance can be used by children aged from 8 years and above and persons with reduced physical,
sensory, or mental capabilities or lack of experience and knowledge if they have
been given supervision or
instruction concerning use of the appliance in a safe way and understand the hazards involved. Children
shall not play with the appliance. Cleaning and user maintenance shall not be done by children without
supervision.
WARNING: Unattended cooking on a hob with fat or oil can be dangerous and may result in fire. NEVER try
to extinguish a fire with water but switch off the appliance and then cover it with a flame e.g. with a lid or a fire
blanket.
WARNING: This product can expose you to chemicals including [Lead & Lead Compounds],
which is [are] known to the State of California to cause cancer, birth defects and / or reproductive
harm. To minimize exposure to these substances. Always operate this unit according to the Owner’s
Manual, and ensure that you provide proper ventilation. For more information go to
www.P65Warnings.ca.gov
6
Installation
Installation Instructions
The appliance must be installed and connected in accordance with current regulations.
After unpacking the appliance, ensure there is no visible damage. If it has been damaged
during transit, DO NOT USE THE PRODUCT, and contact Forno Customer Care immediately.
Selection of installation equipment
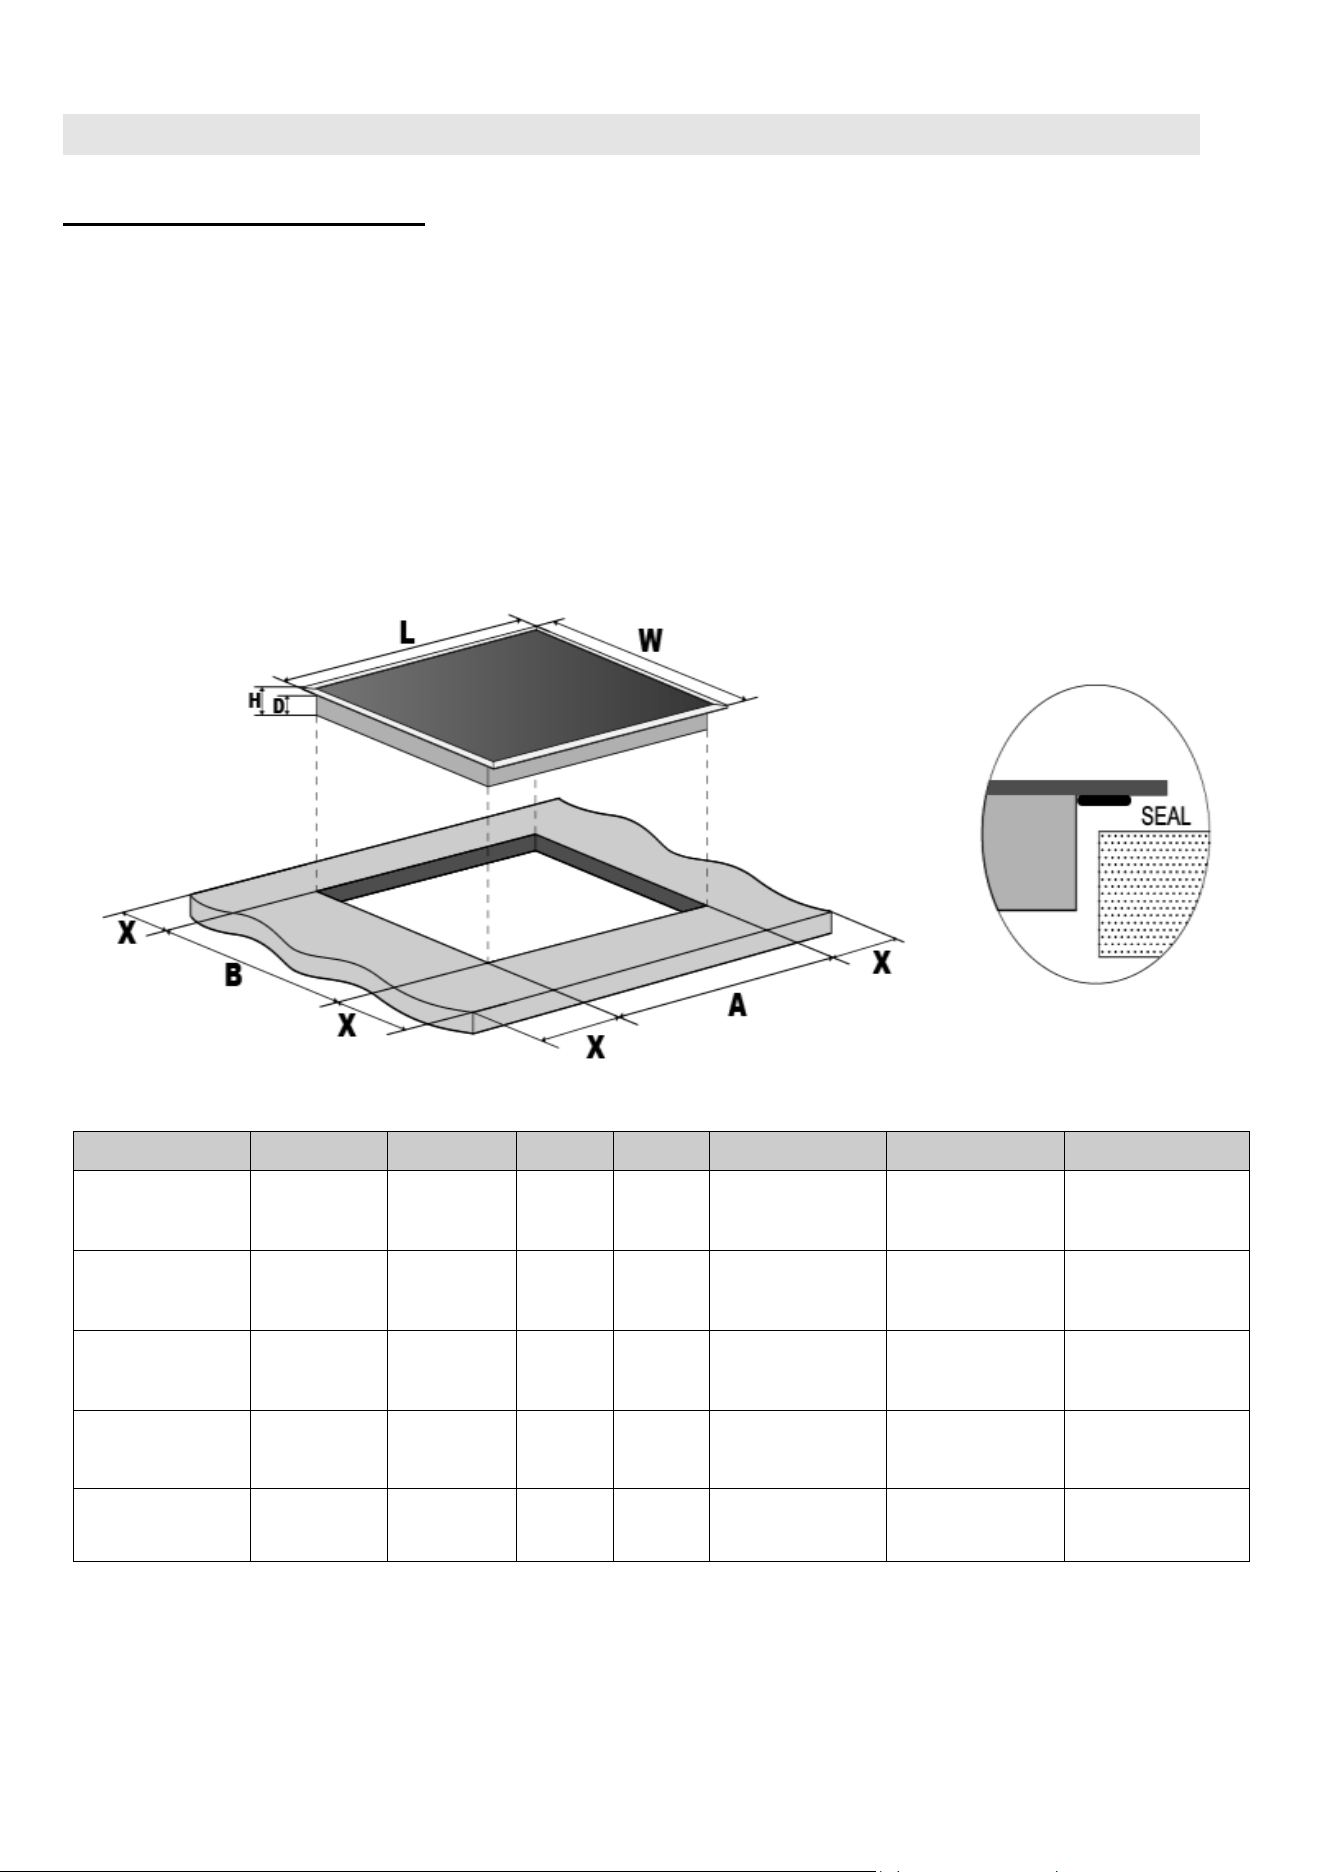
- Cut out the work surface according to the sizes shown in the drawing.
- For the installation, a minimum of 2” (50mm) space shall be preserved around the hole. (Labeled as ‘X’ in
next drawing & table).
- Be sure the thickness of the work surface is at least 1
3
/
16
” (30mm). Please select heat-resistant work
surface material to avoid larger deformation caused by the heat radiation from the hotplate. As shown
below :
Model
L
W
H
D
A
B
X
FCTIN0583-12
11
11
/
32
”
288mm
20
15
/
32
”
520mm
2
7
/
32
”
56mm
2
1
/
16
”
52mm
10
7
/
16
” +
3
/
16
”
265mm+5
19
1
/
2
”+
3
/
16
”
495mm+5
2” min
50mm min
FCTIN0583-24
23
7
/
32
”
590mm
20
15
/
32
”
520mm
2
7
/
32
”
56mm
2
1
/
16
”
52mm
21
27
/
32
” +
3
/
16
”
555mm+5
19
1
/
2
”+
3
/
16
”
495mm+5
2” min
50mm min
FCTIN0583-30
30
5
/
16
”
770mm
20
15
/
32
”
520mm
2
7
/
32
”
56mm
2
1
/
16
”
52mm
29
11
/
32
”+
3
/
16
”
745mm+5
19
1
/
2
”+
3
/
16
”
495mm+5
2” min
50mm min
FCTIN0583-36
35
7
/
16
”
900mm
20
15
/
32
”
520mm
2
7
/
32
”
56mm
2
1
/
16
”
52mm
34
7
/
16
”+
3
/
16
”
875mm+5
19
1
/
2
”+
3
/
16
”
495mm+5
2” min
50mm min
FCTIN0569-36
35
7
/
16
”
900mm
20
15
/
32
”
520mm
2
7
/
32
”
56mm
2
1
/
16
”
52mm
34
7
/
16
”+
3
/
16
”
875mm+5
19
1
/
2
”+
3
/
16
”
495mm+5
2” min
50mm min
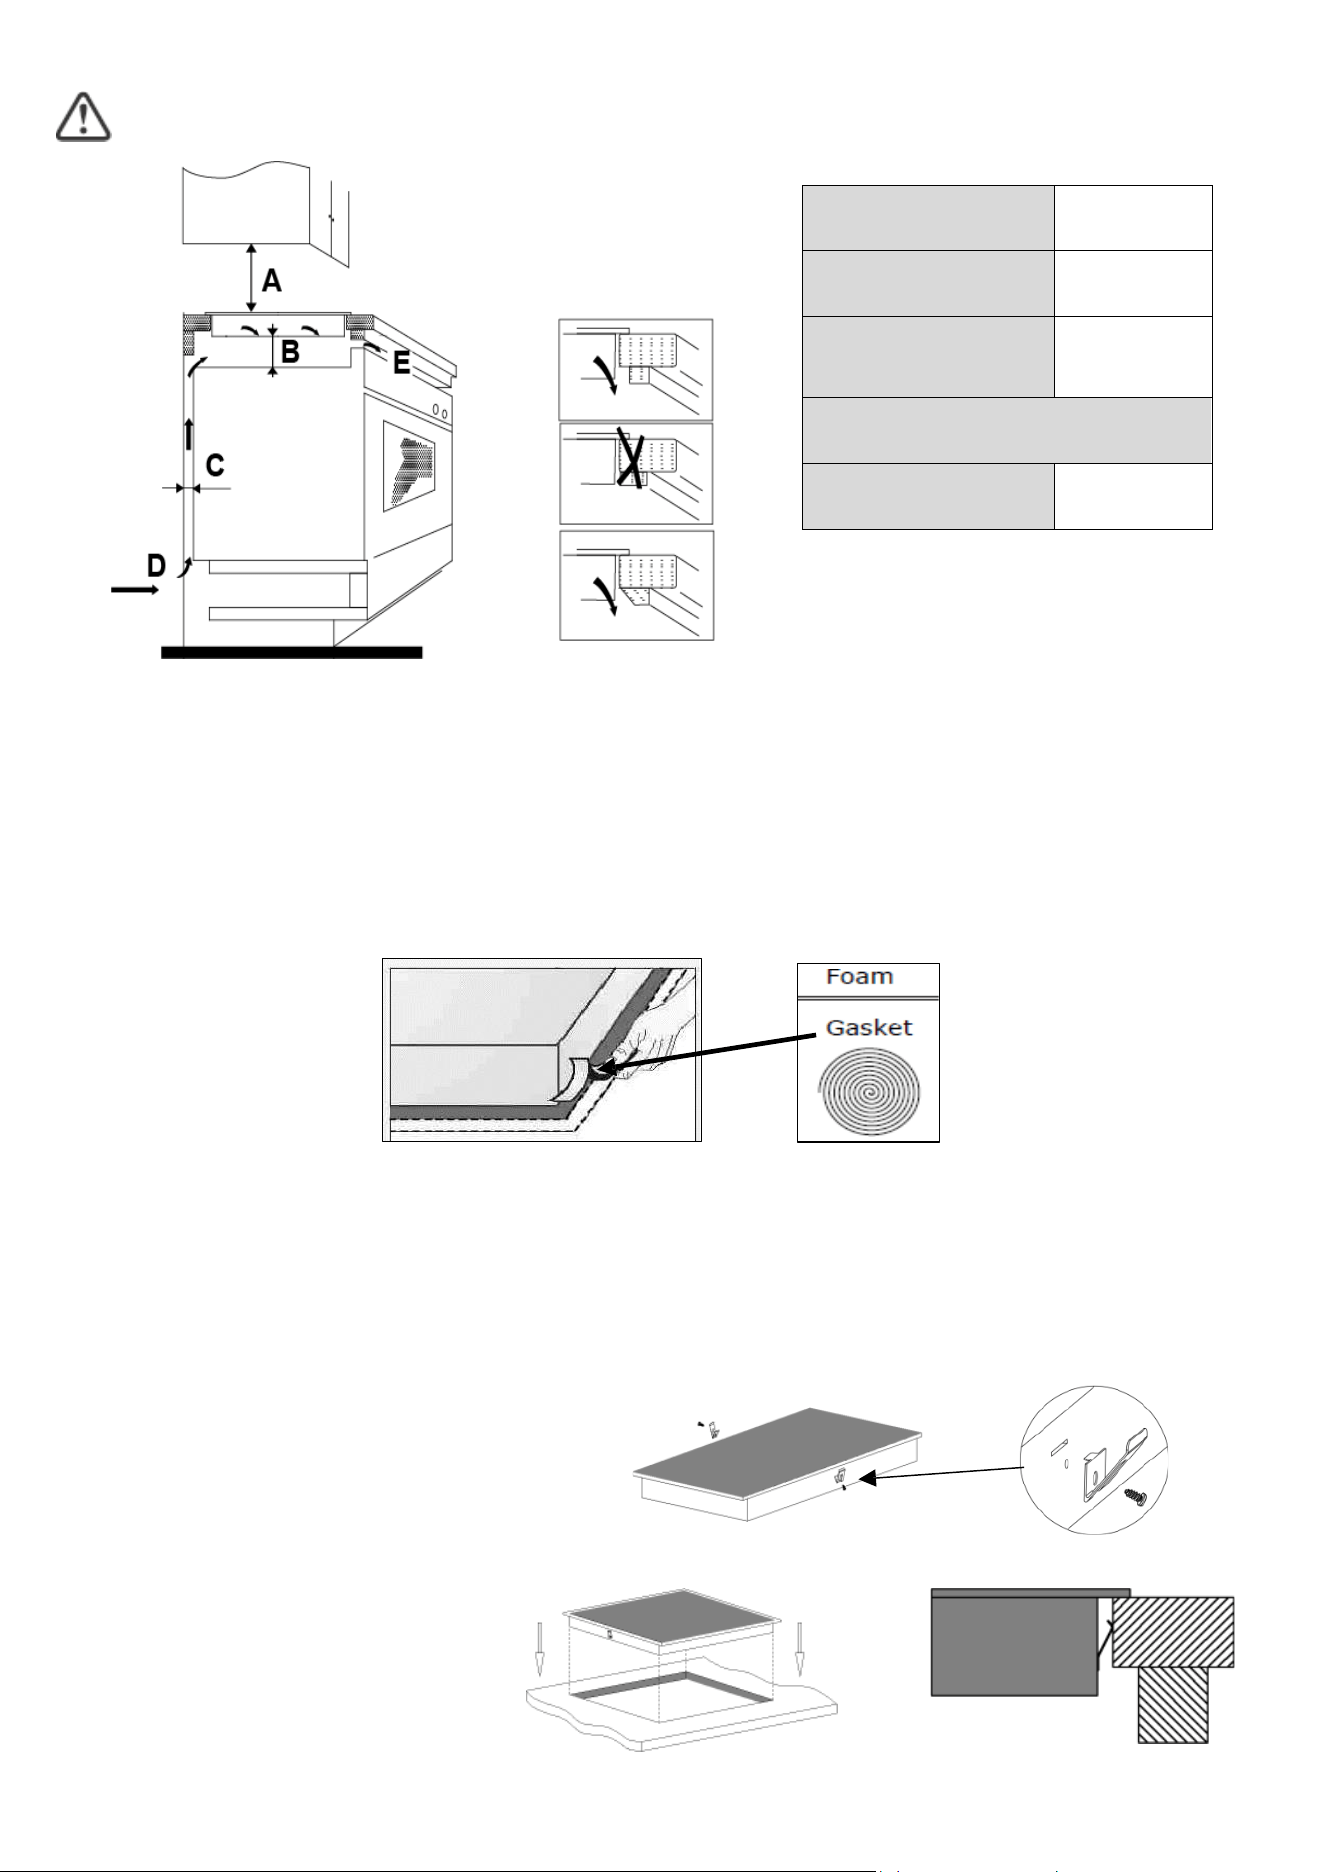
Under any circumstances, make sure the electric hob is well ventilated and the air inlet and outlet are not
blocked. Ensure the electric hob is in good working state. As shown below:
7
Note: The safety distance between the induction cooktop surface and the cupboard above the hotplate
should be at least 30” (760mm)
.
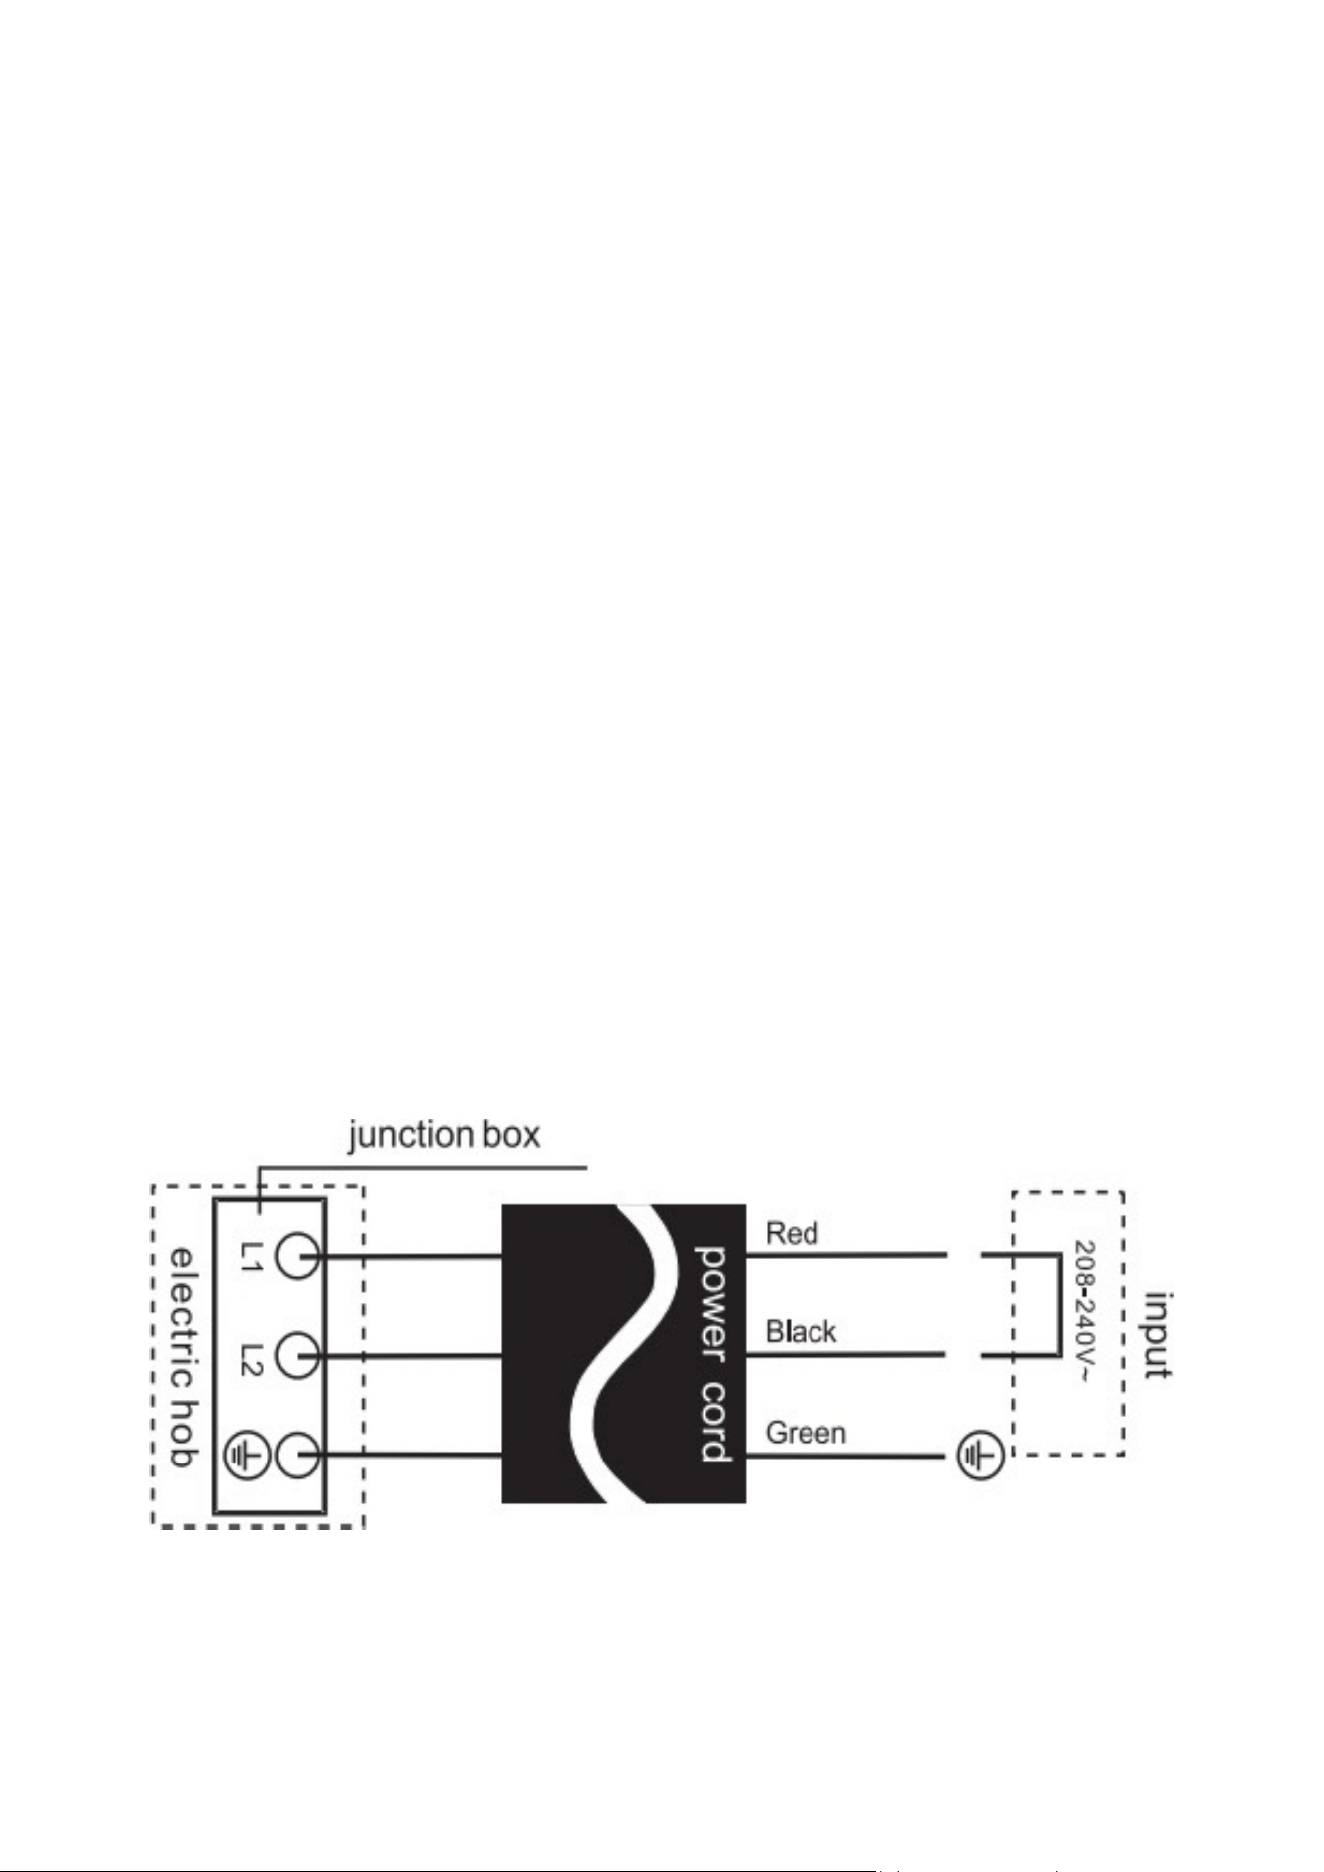
Installing the foam gasket
Before inserting the hob into the opening in
the kitchen worktop, the supplied foam gasket
(in a plastic bag) must be attached to the
lower side of the ceramic glass.
DO NOT INSTALL THE HOB WITHOUT THE FOAM GASKET!
The gasket should be attached to the cooktop by following the next method:
•
Remove the protective film from the gasket.
•
Attach the gasket to the lower side of the glass, right next to the edge.
•
The gasket must be attached along the entire length of the glass edge and should not overlap any of the
corners.
•
When installing the gasket, make sure that the glass does not come into contact with any sharp objects.
Before locating the fixing brackets
The unit should be placed on a stable, smooth surface (use the packaging). Do not apply force onto the
controls protruding from the hob.
Easy Fit kits
There is one easy fit kits package for each hob, including fixing clips and screws. Find the ea
sy fit kit package
first.
Fix clips to hob: Insert the fixing clips into fixing holes reserved on 2 sides of housing, fix clip to housing with
screw, then insert hob into cabinet/work surface.
Fix hob to cabinet: Insert the hob into the cabinet/work surface as below diagrams, the mounted clips on the
sides can secure your hob sturdily.
A
Minimum height to cabinet
29
29
/
32
"
760mm
B
Minimum spacing under unit
2”
50mm
C
Minimum back spacing for
ventilation
25
/
32
”
20mm
D
Air intake for ventilation
E
Air exit/exhaust
3
/
16
”
5mm
8
Connecting the hob to the mains power supply
The power supply should be connected in compliance with the relevant standard, or a single-pole circuit
breaker. The appliance has a large power rating and must be connected to electricity by a Qualified
Electrician.
Notes:
1. If the cable is damaged or needs replacing, this should be done by an after-sales technician using the
proper tools, to avoid any accidents.
2. If the appliance is being connected directly to the mains s
upply, an omni polar circuit breaker must be
installed with a minimum gap of 3mm between the contacts.
3. The installer must ensure that the correct electrical connection has been made and that it complies with
safety regulations.
4. The cable must not be bent or compressed.
5. The cable must be checked regularly and only replaced by a qualified technician.
Cautions
1. The hob must be installed by qualified personnel or technicians. Please ne
ver conduct the operation
by yourself.
2. The electric hob shall not be mounted to cooling equipment, dishwashers, and rotary dryers.
3. The electric hob shall be installed such that better heat radiation can be ensured to enhance its reliability.
4. The wall and induced heating zone above the work surface shall withstand heat.
5. To avoid any damage, the sandwich layer and adhesive must be heat resistant.
6. A steam cleaner is not to be used.
7. This electric hob
can be connected only to a supply with system impedance no more than 0.427 ohm. In
case necessary, please consult your supply authority for system impedance information.
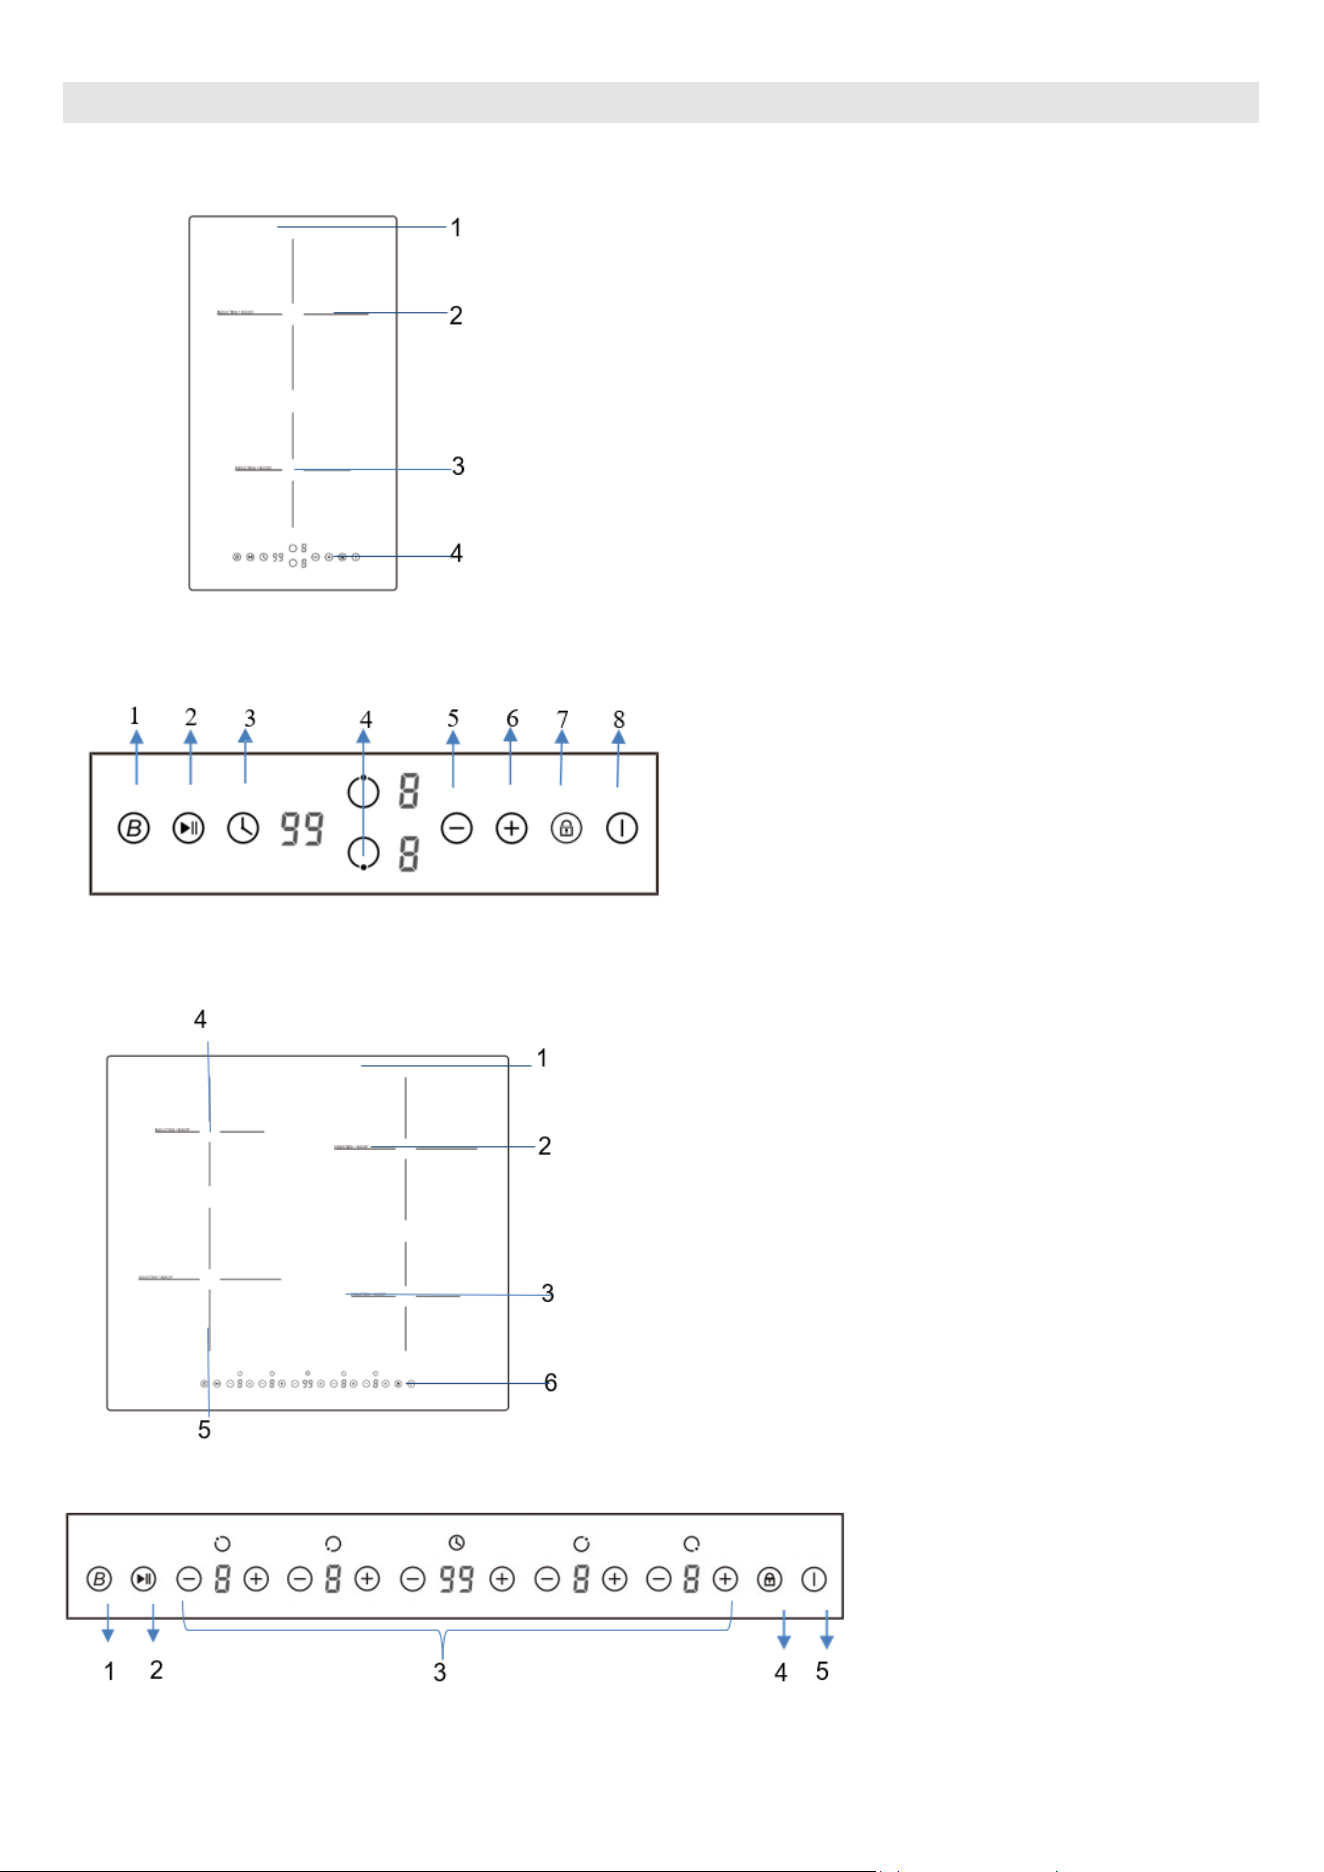
Note: For some of the models, the power cord might come with the plug. If so, you can directly
plug in into the power outlet. Please keep the power cord plug out after use.
For the models where the power cord comes without the plug, the method of connections is
shown below
.
9
Product Overview
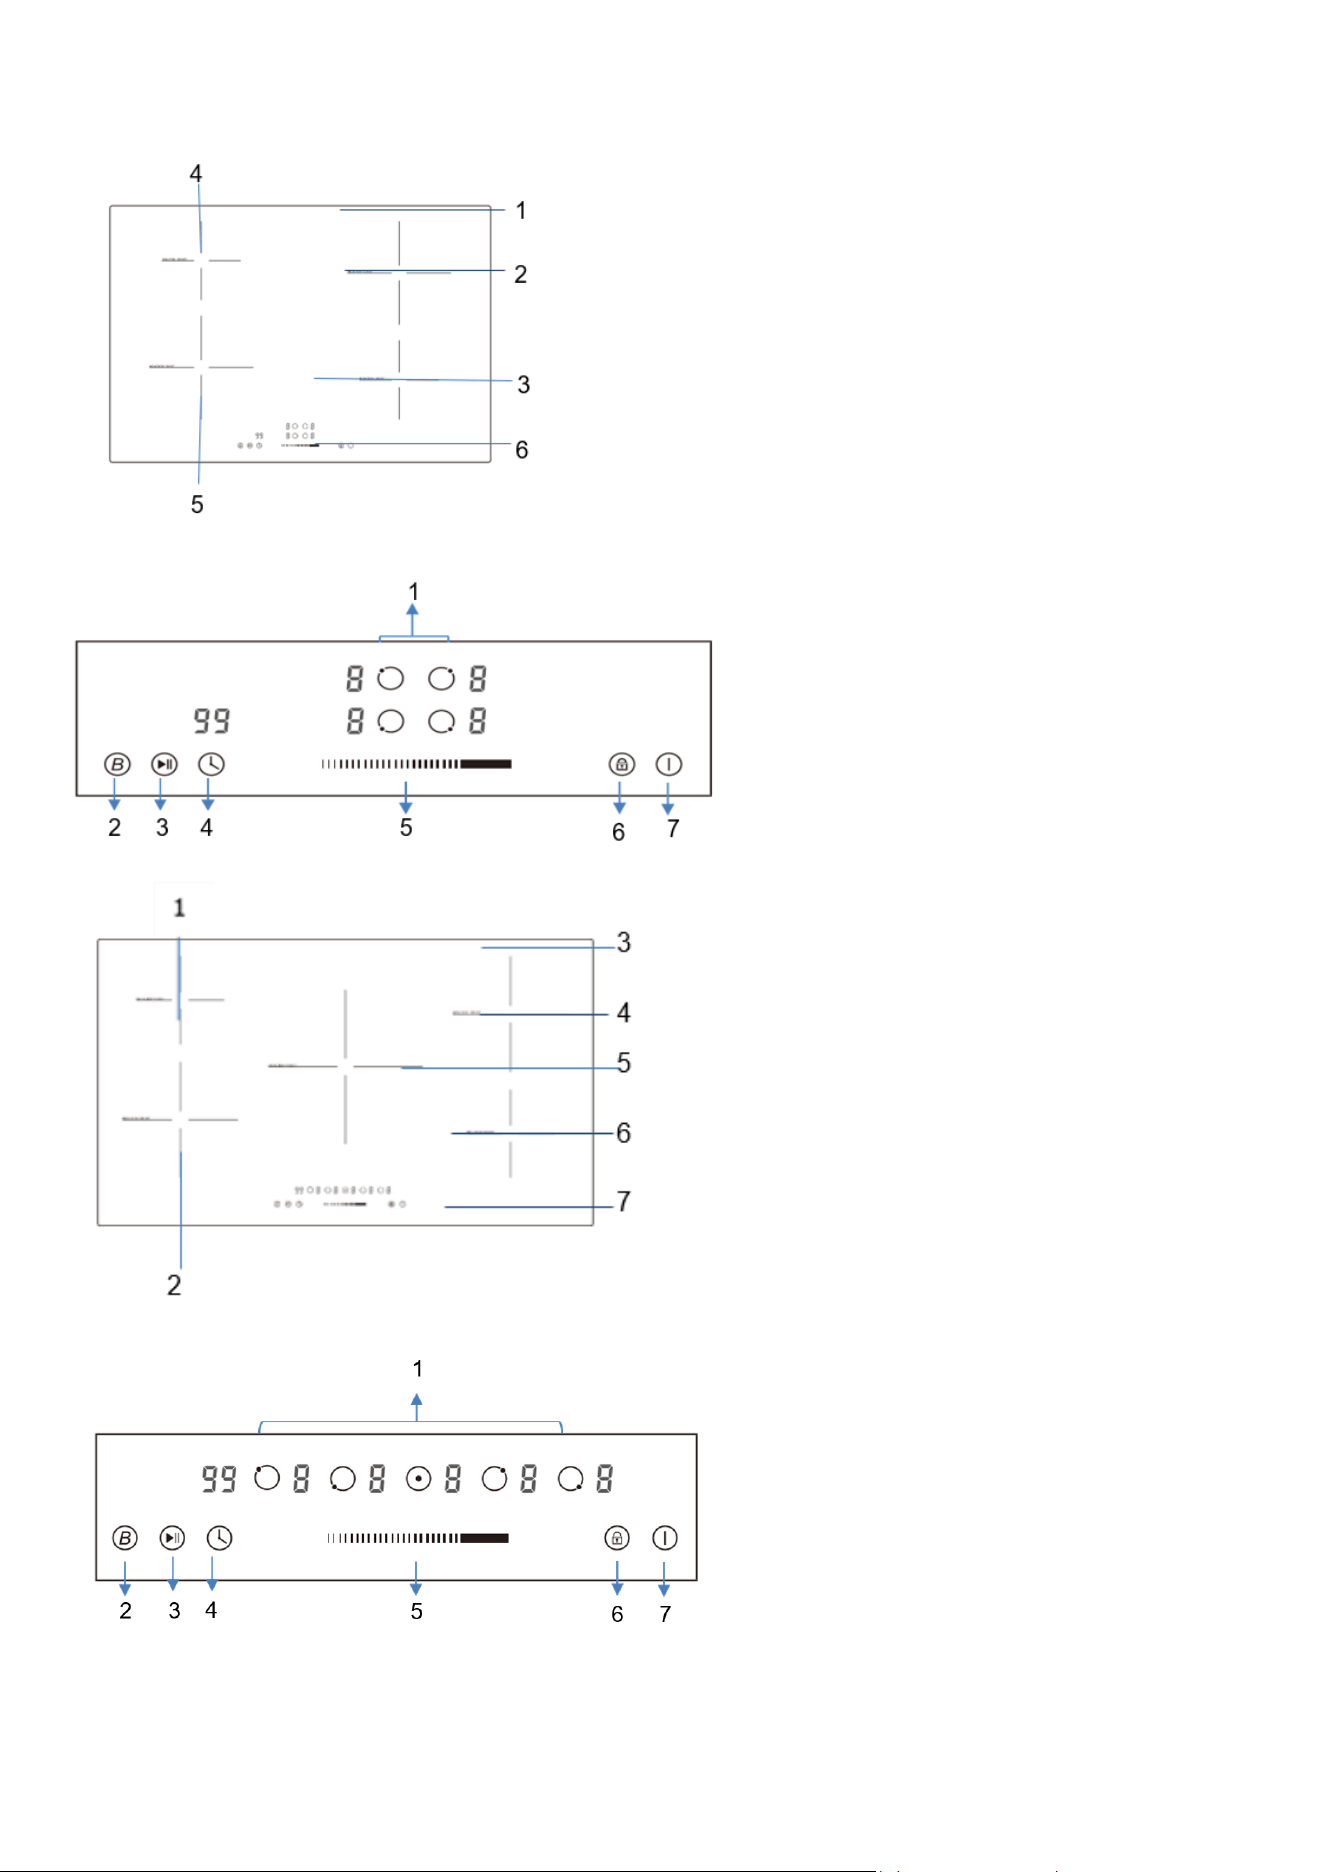
Model: FCTIN0583-12
1
. Ceramic glass surface
2. 2000W Cooking Zone (Boost 2600W)
3. 1300W Cooking Zone (Boost 1500W)
4. Control panel
3
4
Con
trol Panel
1. Boo
ster function control button
2. Stop & Go control button
3. Timer selection button
4. Cooking zone selection button
5. Timer/ Heating level “-“ button
6. Timer/ Heating level “+“ button
7. Child Lock control button
8. On/Off control button
Model: FCTIN0583-24
1
. Ceramic glass surface
2. 2000W Cooking Zone (Boost 3000W)
3. 1500W Cooking Zone (Boost 2000W)
4. 1500W Cooking Zone (Boost 2000W)
5. 2000W Cooking Zone (Boost 3000W)
6. Control panel
Con
trol Panel
1. Boo
ster function control button
2. Stop & Go control button
3. Heating level/Timer “-”/ “+”
button
4. Child Lock control button
5. ON/OFF button
10
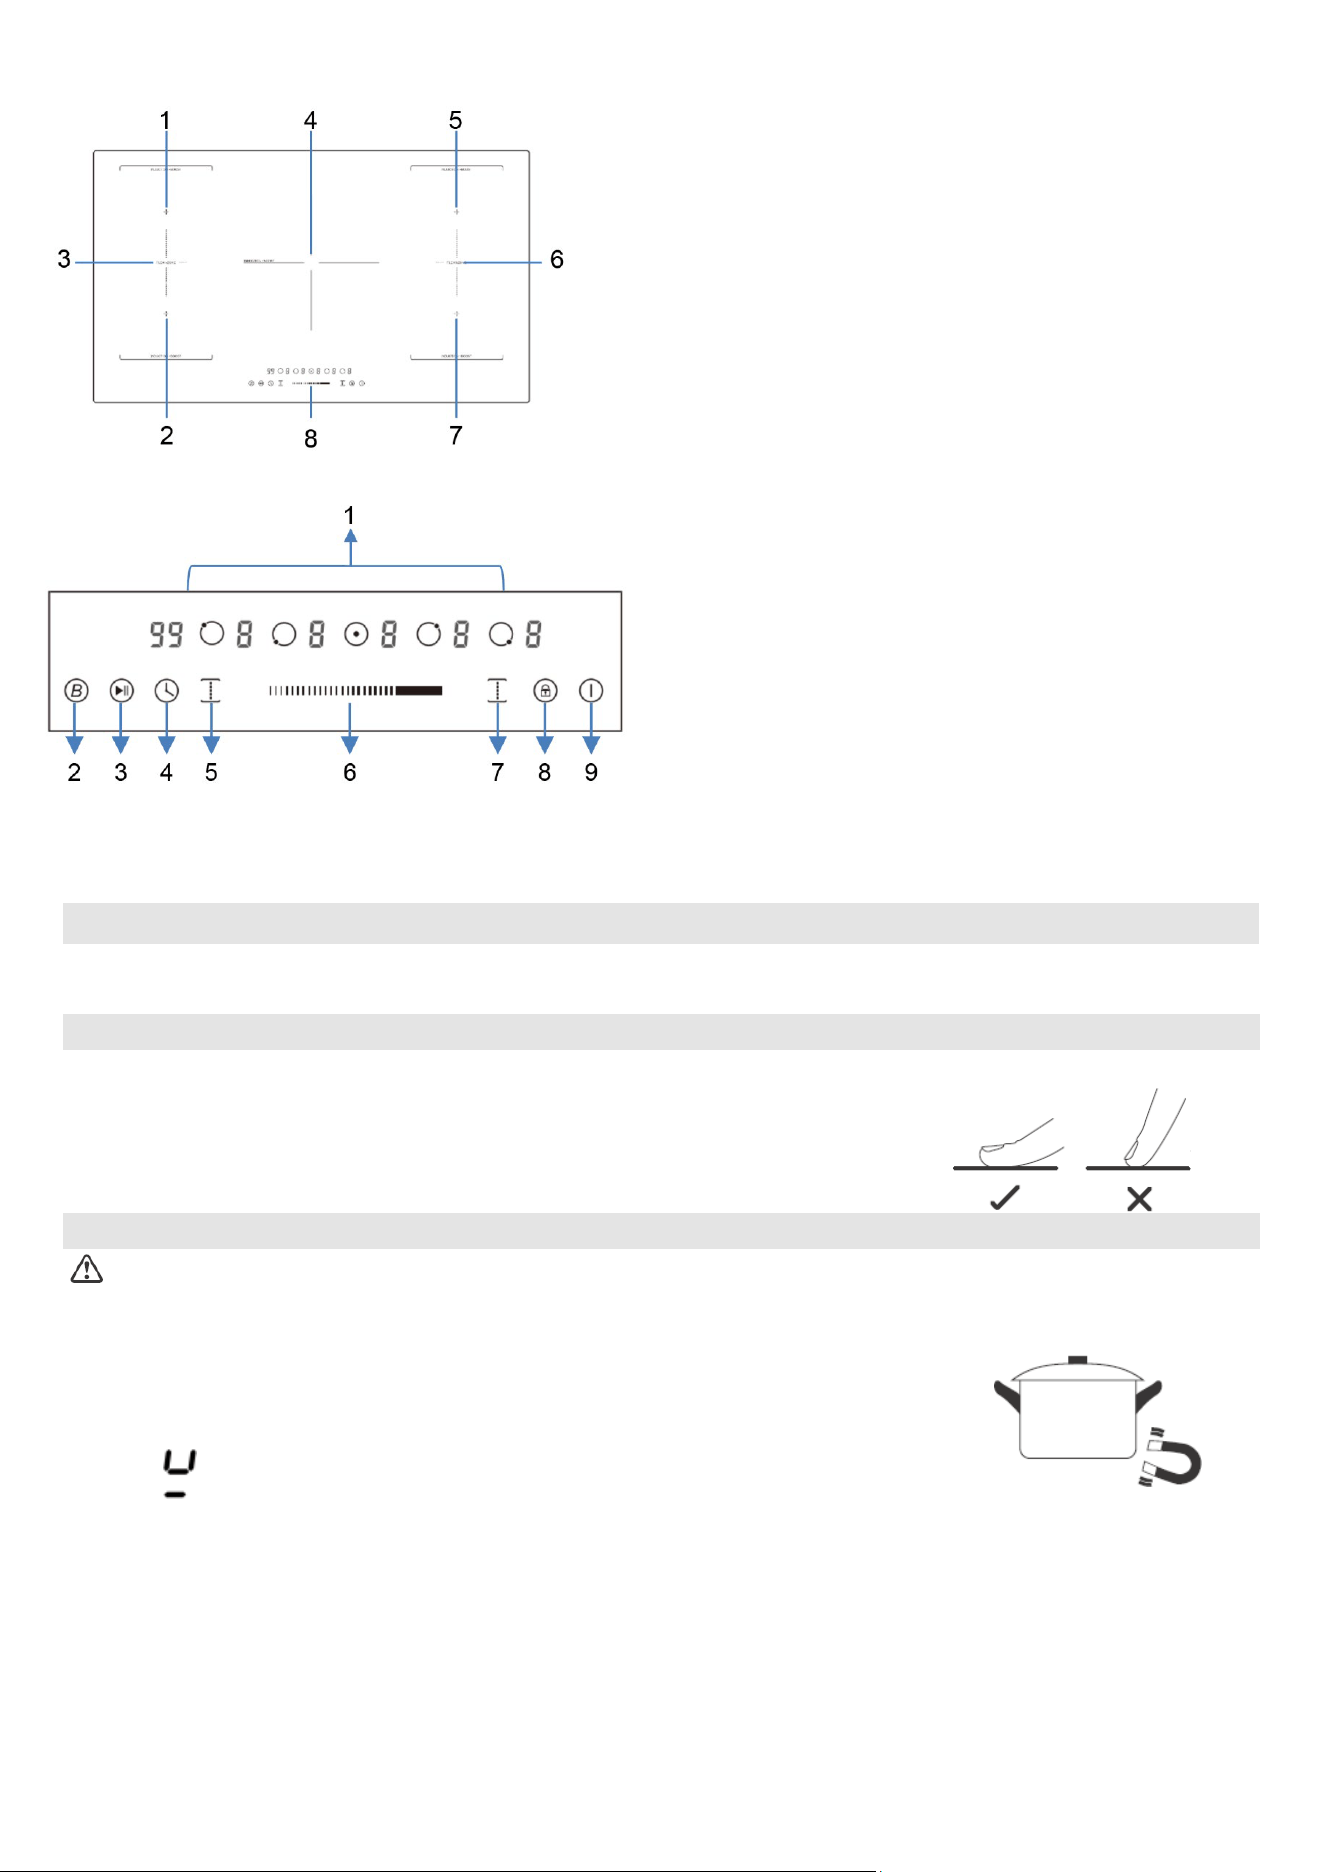
Model: FCTIN0583-30
1. Ceramic glass surface
2. 2000W Cooking Zone (Boost 3000W)
3. 1500W Cooking Zone (Boost 2000W)
4. 1500W Cooking Zone (Boost 2000W)
5. 2000W Cooking Zone (Boost 3000W)
6. Control panel
Con
trol Panel
1. Cooking zone selection button
2. Booster Control button
3. Stop & Go control button
4. Timer selection button
5. Timer/Heating level slider control
6. Child Lock control button
7. On/Off control button
Model: FCTIN0583-36
1. 1500W Cooking Zone (Boost 2000W)
2. 2000W Cooking Zone (Boost 3000W)
3. Ceramic glass surface
4. 2000W Cooking Zone (Boost 3000W)
5. 2300W Cooking Zone (Boost 3000W)
6. 1500W Cooking Zone (Boost 2000W)
7. Control panel
Con
trol Panel
1. Cooking zone selection button
2. Booster function control button
3. Stop & Go control button
4. Timer control button
5. Heating level /Timer slider control
6. Child Lock control button
7. On/Off control button
11
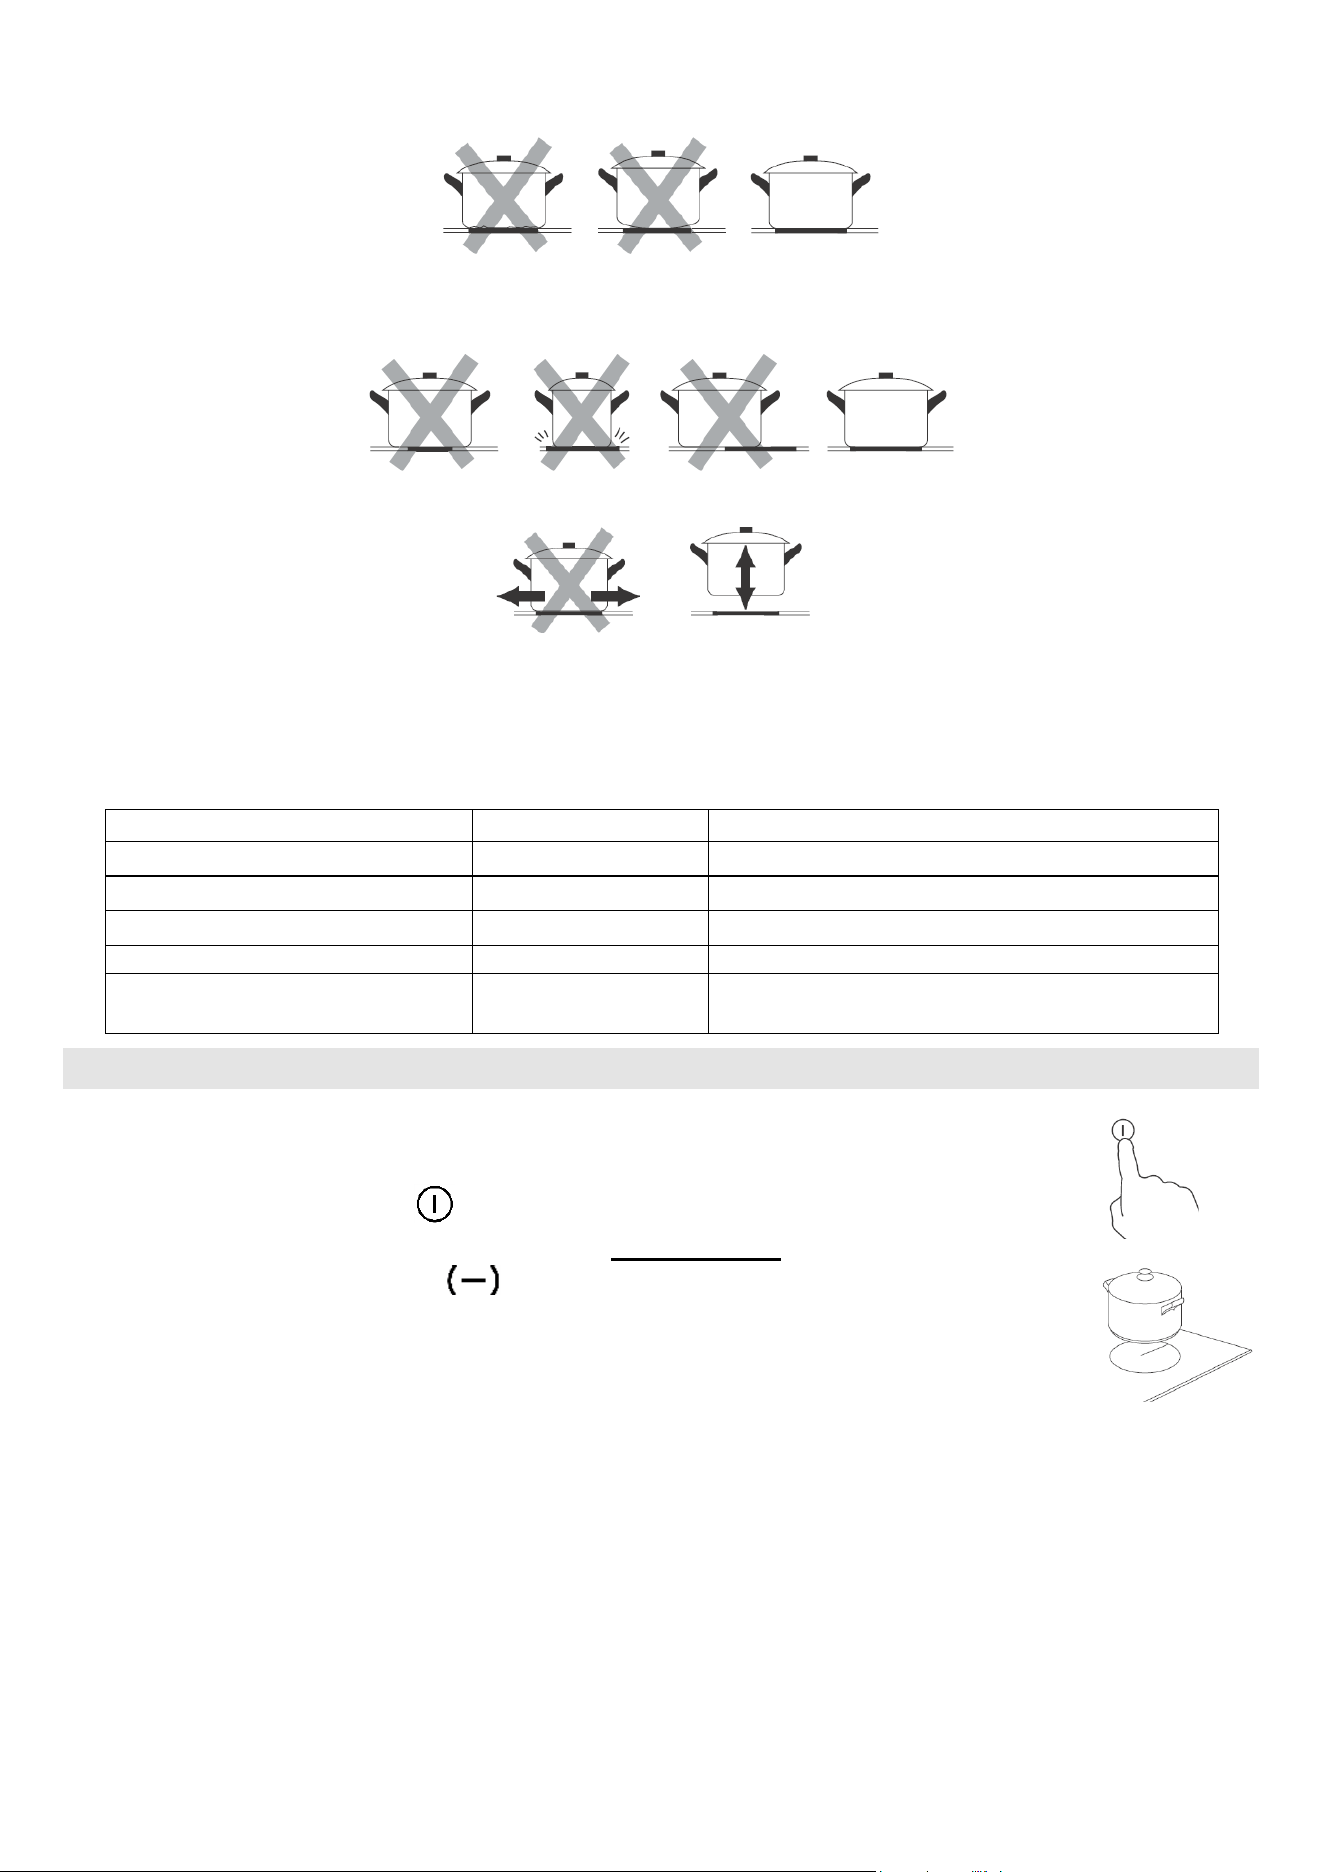
Model: FCTIN0569-36
1
. 1500W Cooking Zone (Boost 2000W)
2. 2000W Cooking Zone (Boost 2600W)
3. 3000W Flexi-Zone (Boost 3600W)
4. 2300W Cooking Zone (Boost 3000W)
5. 2000W Cooking Zone (Boost 2600W)
6. 3000W Flexi-Zone (Boost 3600W)
7. 1500W Cooking Zone (Boost 2000W)
8. Control Panel
Control Panel
1. Cooking zone selection button
2. Booster function control button
3. Stop & Go control button
4. Timer control button
5. Flexi function control button
6. Heating level /Timer slider contro
l
7. Flexi function control button
8. Child lock control button
9. On/Off control button
Notes
: Product diagrams in the manual for reference only, there might be slightly difference due to
continually product improvement
Before using your new induction cooktop
•
Read this guide, taking special note of the ‘Safety Warnings’ section.
•
Remove any protective film that may still be on your new electric hob.
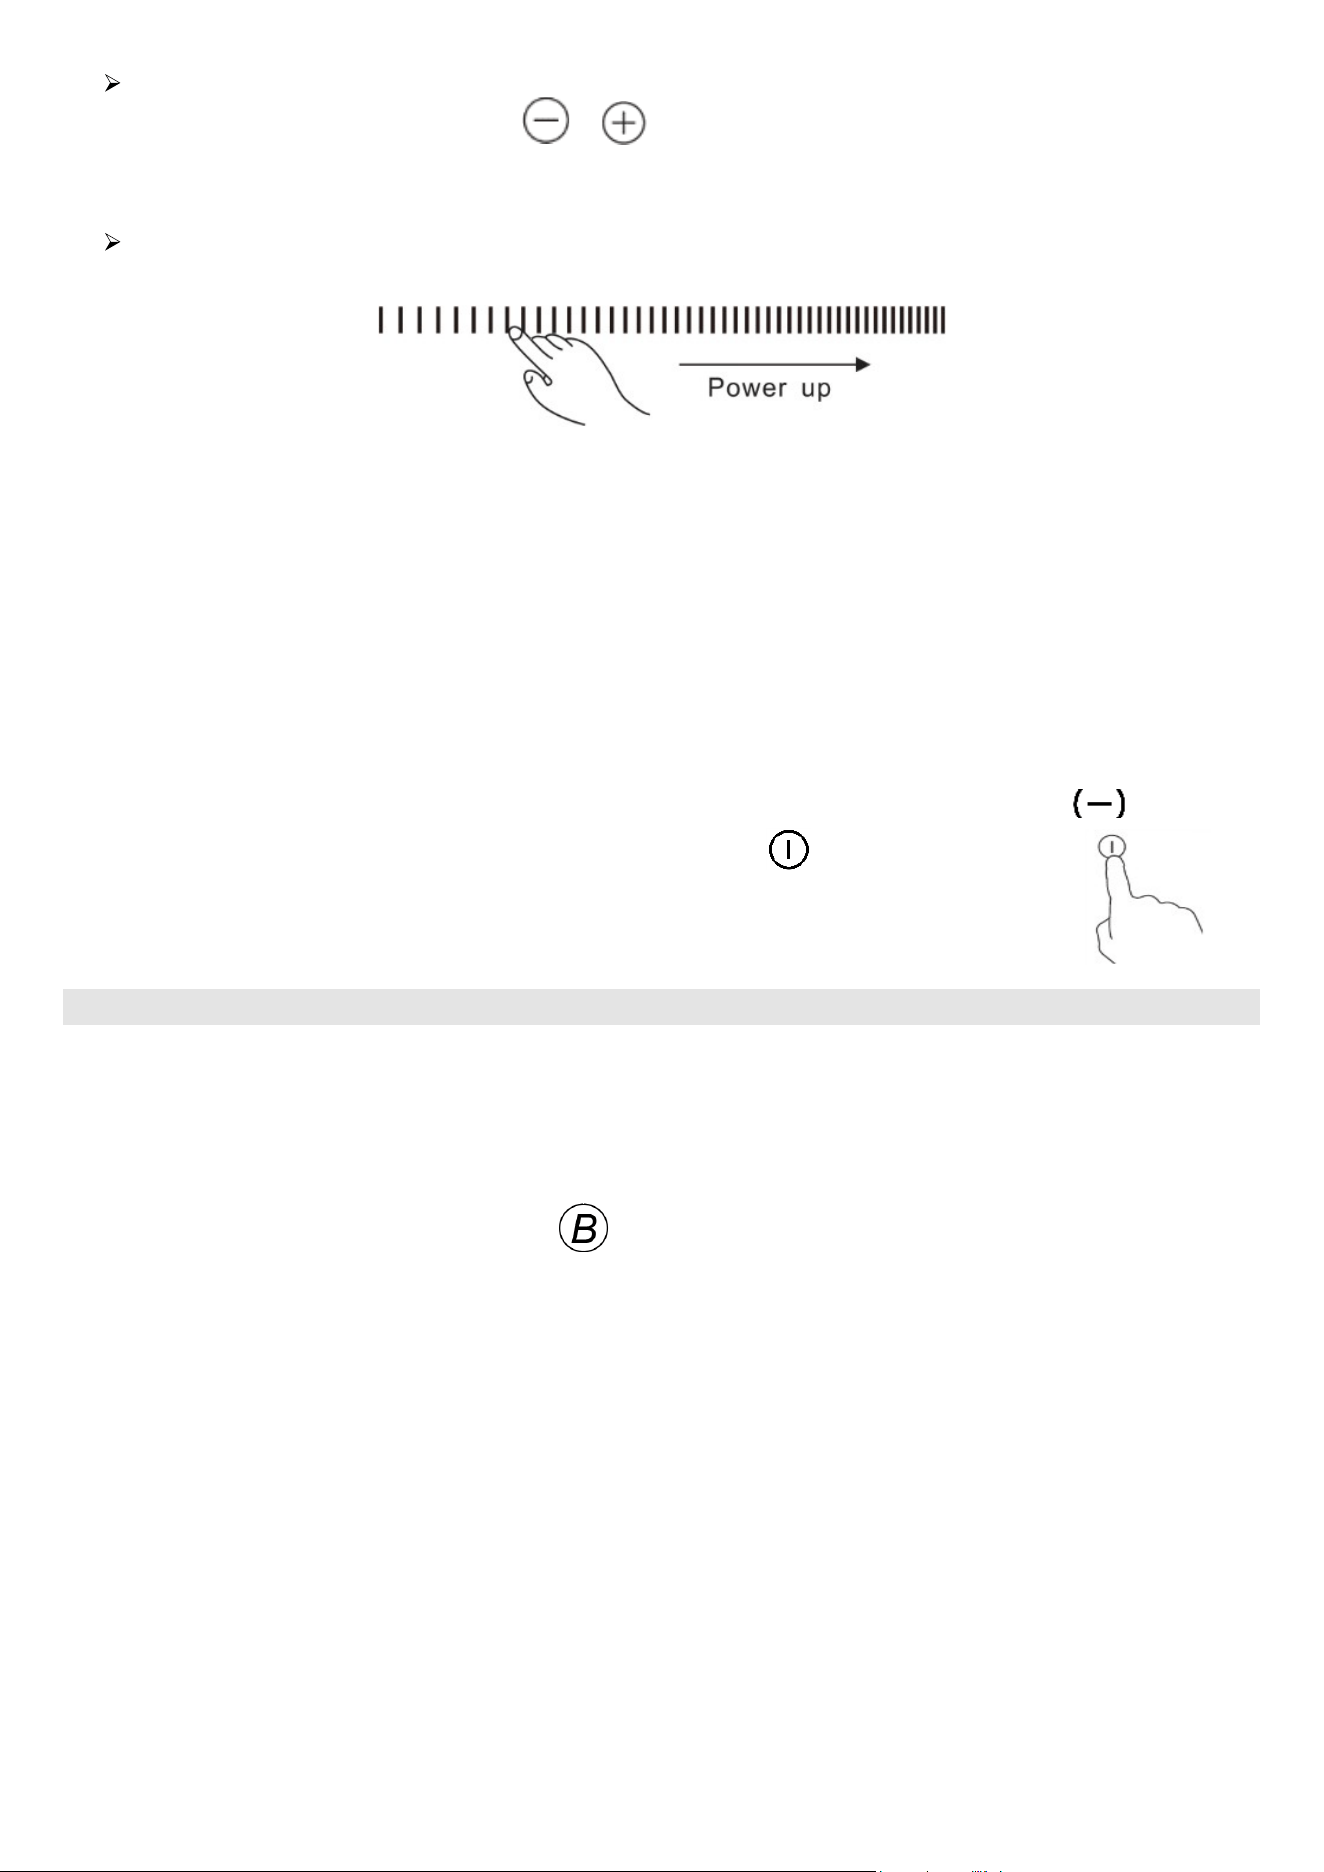
Using the Touch Controls
•
The controls respond to touch, so you don’t need to apply any pressure.
•
Use the ball of your finger, not its tip.
•
You will hear a beep each time a touch is registered.
•
Make sure the controls are always clean, dry, and that there is no object (e.g. a utensil or a cloth) covering
them. Even a thin film of water may make the controls difficult to operate
.
Choose the right Cookware
Only use cookware with a base suitable for induction cooking. Look for the induction symbol on the
packaging or on the bottom of the pan.
•
You can check whether your cookware is suitable by carrying out a magnet test. Move a magnet towards the
base of the pan. If it is attracted, the pan is suitable for induction hob.
•
If you do not have a magnet:
1. Put some water in the pan you want to check.
2. If does not flash in the display and
water is heating, the pan is suitable.
•
Cookware made from the following materials is not suitable for an induction hob: pure stainless steel,
aluminum or copper without a magnetic base, glass, wood, porcelain, ceramic, and earthenware.
•
Induction cooktops are made from smooth, ceramic glass, the heat comes from a magnetic induction coil
which heats the cookware but not the cooking surface. The heat from the cookware is transferr
ed to the
food.
•
It’s important that you use only metal pans specifically designed and/or approved for use on induction hobs.
Never allow melamine or plastic containers to come in contact with the heat zones.
12
•
A pan which diameter less than 140mm may not be detected by the induction hob. Do not use cookware
with jagged edges or a curved base.
Make sure that the base of your pan is smooth, sits flat against the glass, and is the same size as the cooking
zone. If you use smaller pot efficiency could be less than expected. Always center your pan on the cooking
zone.
Always lift pans off the hob – do not slide, or they may scratch the glass.
Notes: You can use any kind of pot or pan for Induction Hob
.
Suggested pan dimensions for induction hob
The cooking zones are, up to a limit, automatically adapted to the diameter of the pan. However, the bottom of
this pan is suggested to have a minimum diameter according to the corresponding cooking zone. To obtain the
best efficiency of your hob, please place the pan in the center of the cooking zone. Base diameter of the pots:
Cooking zone
Minimum
Maximum
6
5
/
16
” (160mm)
5
1
/
2
" (140mm)
6
5
/
16
” (160mm)
7
3
/
32
” (180mm)
5
1
/
2
" (140mm)
7
3
/
32
” (180mm)
8
9
/
32
” (210mm)
6
5
/
16
” (160mm)
8
9
/
32
” (210mm)
11” (280mm)
9
1
/
16
” (230mm)
11” (280mm)
Flexible zones (Only
FCTIN0569-36)
7
7
/
8
” (200mm) 15
3
/
4
"x 7
15
/
32
” (400mm x 190mm)
Using your Induction Cooktop
To start cooking
1. After the hob be connected to electricity and power on.
Press and hold the ON/OFF control button for about 3 seconds till you hear a
“beep” to turn the hob on. Now the hob enters Standby mode, all heat setting indicators
and Timer setting indicators shows
2. Place a suitable pan on the cooking zone you wish to use.
• Make sure the bottom of the pan and the surface of the cooking zone are clean and dry.
3. Set the power/heat level of cooking zone.
Before adjusting the power/hea
t level, you need to select/touch the cooking zone button to activate the
cooking zone you wish to use. The heat setting indicator of the selected zone will flash when active,
then you can adjust the powe
r/heat level by following the next step:
13
FCTIN0583-12 / FCTIN0583-24: Touch control
• Set heat setting by touching the or button.
• If one of the two buttons is pressed and held, the value will adjust down or up rapidly, from 0 to 9 in
circle
.
FCTIN0583-30 / FCTIN0583-36 / FCTIN0569-36: Slider Touch control model:
• Adjust heat setting by sliding the slider control.
Notes
:
1. After connecting to electricity, when the power is on, the buzzer of hob beeps once, all indicators light up
for 1 second then go out.
2. When the hob is in Standby mode, if there is no practice within 1 minute, the electric hob will auto turn off,
with buzzer beeps once.
3. To turn on hob, press the ON/OFF control button and hold on for about
3 seconds; To turn it off, just need
to press ON/OFF button again.
4. The power level can be adjusted from 0 to 9.
5. The heat setting indicator of the selected zone flashes when adjusting. After adjusting, the number flashes
for 5 seconds then stop flashing, then the setting is confirmed and set.
To turn off hob
1. You can turn the cooking zone off by adjust heat setting to level 0, which indicator shows .
2. You can also turn the whole hob off by touching the ON/OFF control button.
Note: If there is power cut off during cooking, all settings will be cancelled.
Note: The cooling fan of the induction hob will remain on for about 1 minute
after the hob is turned off.
Using Booster Function-Induction Hob
Some of the models might have one or several cooking zones which have Booster function. You can use the
“Booster” function to boost power of relevant cooking zone for a maximum power rating for 5 minutes. This
function could reduce the cooking time, which is convenient for cooking when in hurry!
To use booster function when hob is working, follows below:
1. Touch the cooking zone selection button to activate the cooking zone you want
to use Boost function.
2. Touch the Booster function control button to activate the Booster function, the heating zone indicator
will show “b” and flash for 5 seconds then stop flashing, then Booster function be activated.
Note: After the booster is finished, the cooking zone will return to its original setting.
Cancel the Booster function
- Follow above steps on how to activate the Booster function one more time when Booster is working to
cancel the Booster function.
14
Flexible Areas-Induction Hob (Only for FCTIN0569-36)
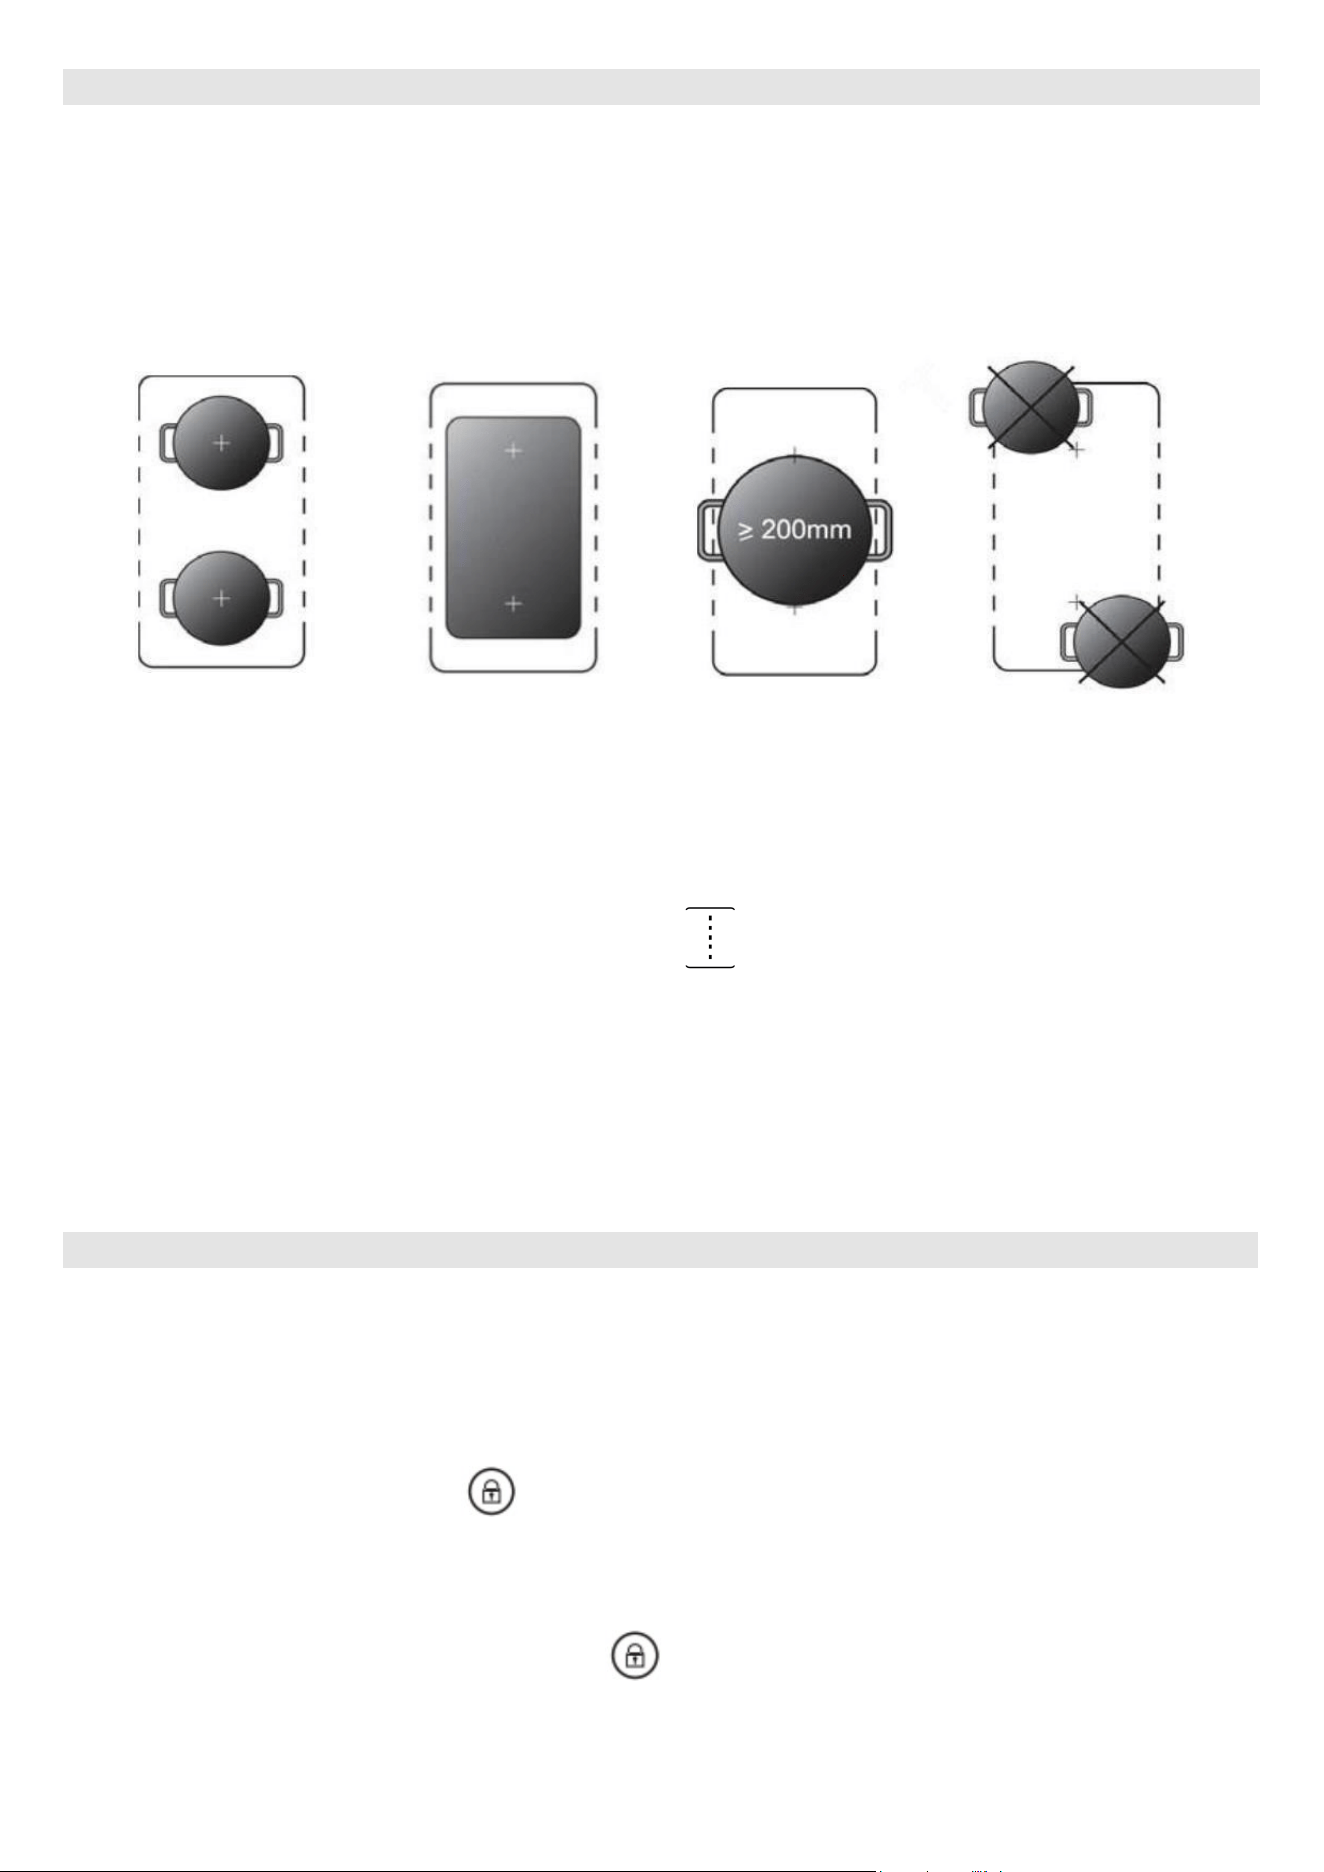
The model FCTIN0569-36 has two Flexible cooking areas. These Flexible cooking areas can each be used as
a single zone or as two independent zones, accordingly to the cooking needs anytime.
Flexible areas are each made of two independent inductors that can be controlled separately. When working
as a single zone, a cookware is moved from one zone to the other one within the flexible area keeping the
same power level of the zone whe
re the cookware originally was placed, and the part that is not covered by
cookware is automatically switched off.
Important: Make sure to place the cookware centered on the single cooking zone. In the case of big pot,
oval, rectangular and elongated pans make sure to place the pans centered on the cooking zone covering
both cross.
Active the flexible induction area
To activate a flexible area as a single big zone, first press either of the
two-heating level slider control of this
flexible area, then press the flexible area control button . When flexible area works, the indicator above
corresponding flexible area control button lighting, the power level indicator flashing, you can adjust power
level of the flexible area by slide the slider.
Inactive the flexible induction area
To deactivate the flexible area when it works, press either of the two-he
ating level slider control of this flexible
area, when power level indicator flashing, press the flexible control button again. The indicator will off after
inactivity.
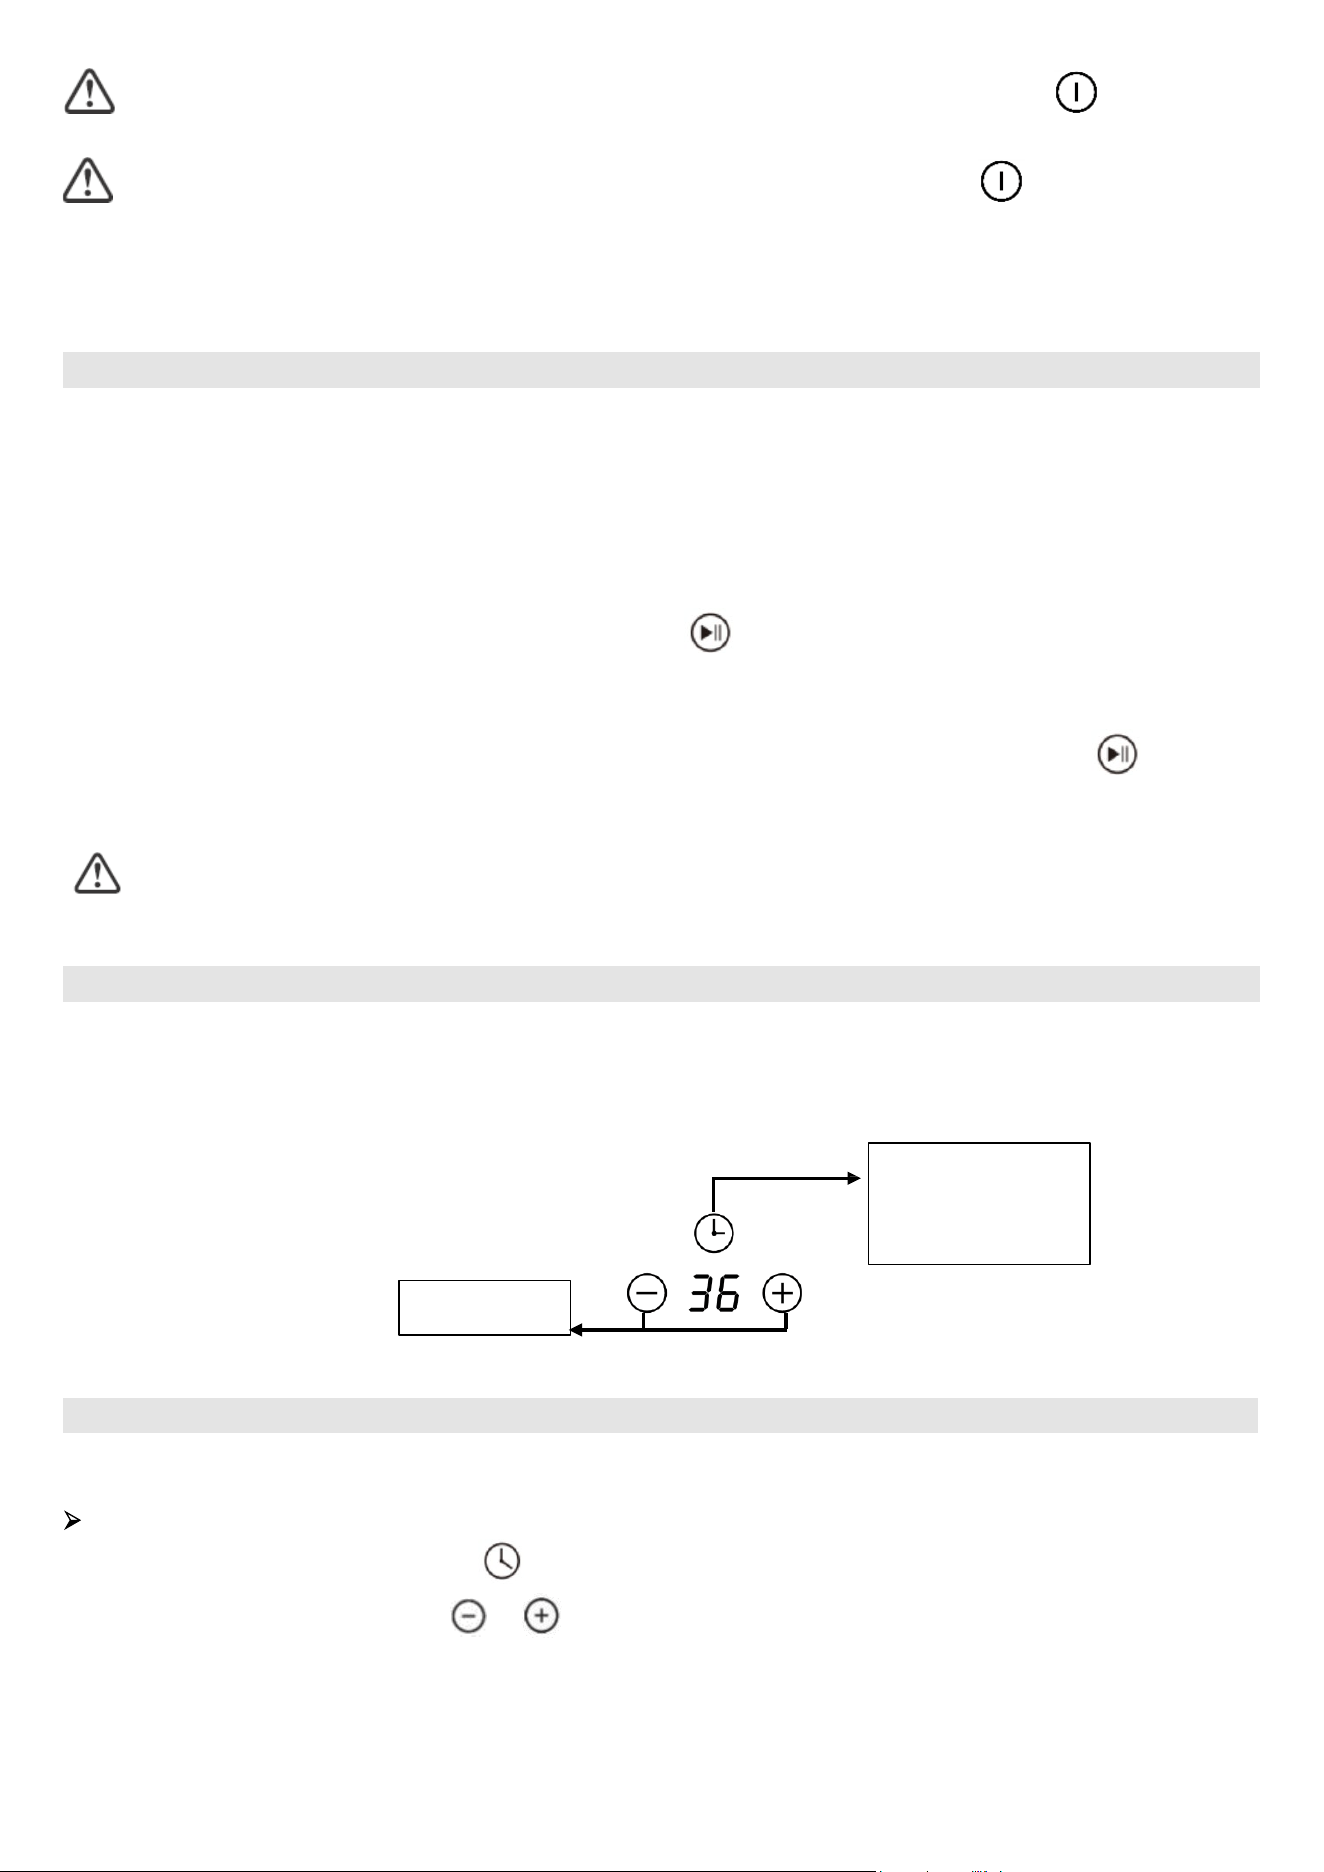
Child Lock Safety Control
• You can lock the controls to prevent unintended use (for example children accidentally turning the cooking
zones on) by active Child Lock function.
• When the controls are locked, except the ON/OFF control button and Child Lock control button, all other
touch control buttons are disabled.
To lock the controls
Touch the Child Lock control button around three seconds. The timer indicator will show “Lo”, and Child
Lock function be
active.
To unlock the controls
1. Make sure the electric hob is turned on.
2. Touch and hold the Child Lock control button for around 3 seconds, the buzzer beeps once and “Lo”
disappears in timer indicator, the Child Lock be inactive.
3. You can now start using your electric hob.
15
Timer control
While in child lock mode, all control buttons are disabled except the ON/OFF button and child lock
button.
In case of an emergency, you can always turn off the hob using the ON/OFF control.
However, for
subsequent operations, you will need to unlock the hob first.
Note: Under the Child Lock function, if the hob is turned off without deactivating the Child Lock, upon later
activation, the Child Lock function will remain in effect.
Stop & Go function
• Cook effortlessly! Interruptions like doorbells, phone calls, or kids yelling from another room can disrupt
your cooking. Stepping out of the kitchen may lead to a burnt dinner or a longer preparation time if you
switch off everything.
• The Stop & Go function conveniently deactivates all zones. Upon your return, a single touch of the button
restarts the hob exactly where it left off, allowing you to seamlessly continue cooking.
1. Active Stop & Go functi
on
To activate the Stop & Go function, press the button once. All programmed settings are retained, the
hob stops heating, and all heat setting indicators display "P".
2. Inactive Stop & Go function
To deactivate the Stop & Go function upon your return, press the Stop & Go button again. All
programmed settings will revert to their original state, and the Stop & Go indicator "P" will disappear from all
indicators.
While the Stop & Go function is active, all
control buttons, except the ON/OFF and Stop & Go button,
are disabled.
Note: The hob will auto turn off, if Stop & Go function lasts more than 10 minutes.
Using the Timer
When the hob is turned on, you can use the timer in two different ways:
• You can use it as a minute minder. In this case, the timer will not turn any cooking zone off when the set time
is up.
• You can set it to turn either or more than one cooking zones off.
• You can set the minute minder/timer for up to 99 minutes.
Timer overview
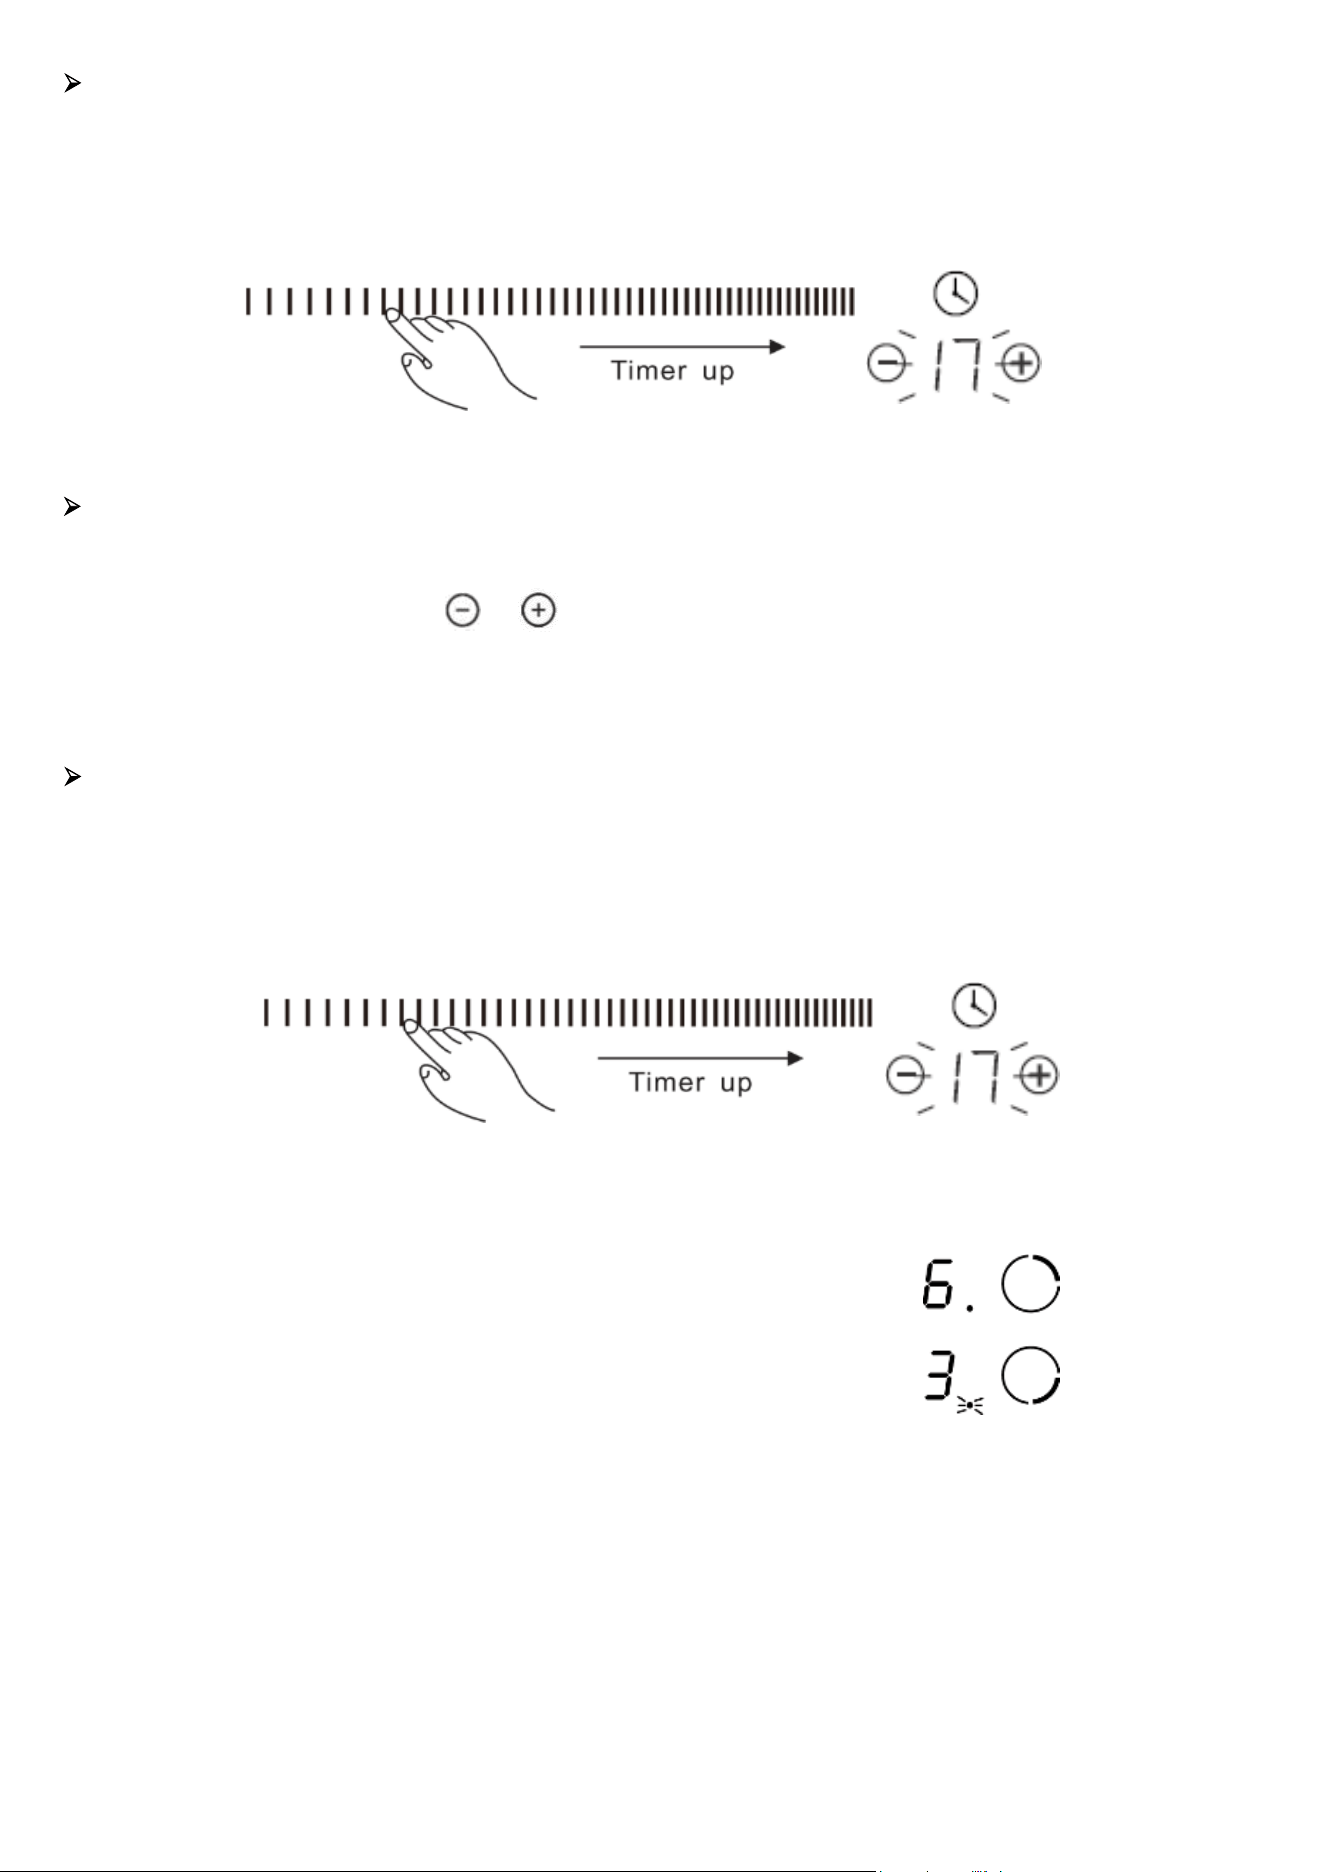
Using the Timer as a Minute Minder - If you have not selected any cooking zones
FCTIN0583-12 / FCTIN0583-24: Touch control
• Touch the timer control button once .
• Set timer setting by touching the or button.
• If press and hold either of the two buttons, the value will adjust down or up rapidly in circle.
Note: When the timer indicator is flashing, touching the timer control button again allows for a quick
confirmation of the timer setting.
Minute display shows
the number of
minutes.
16
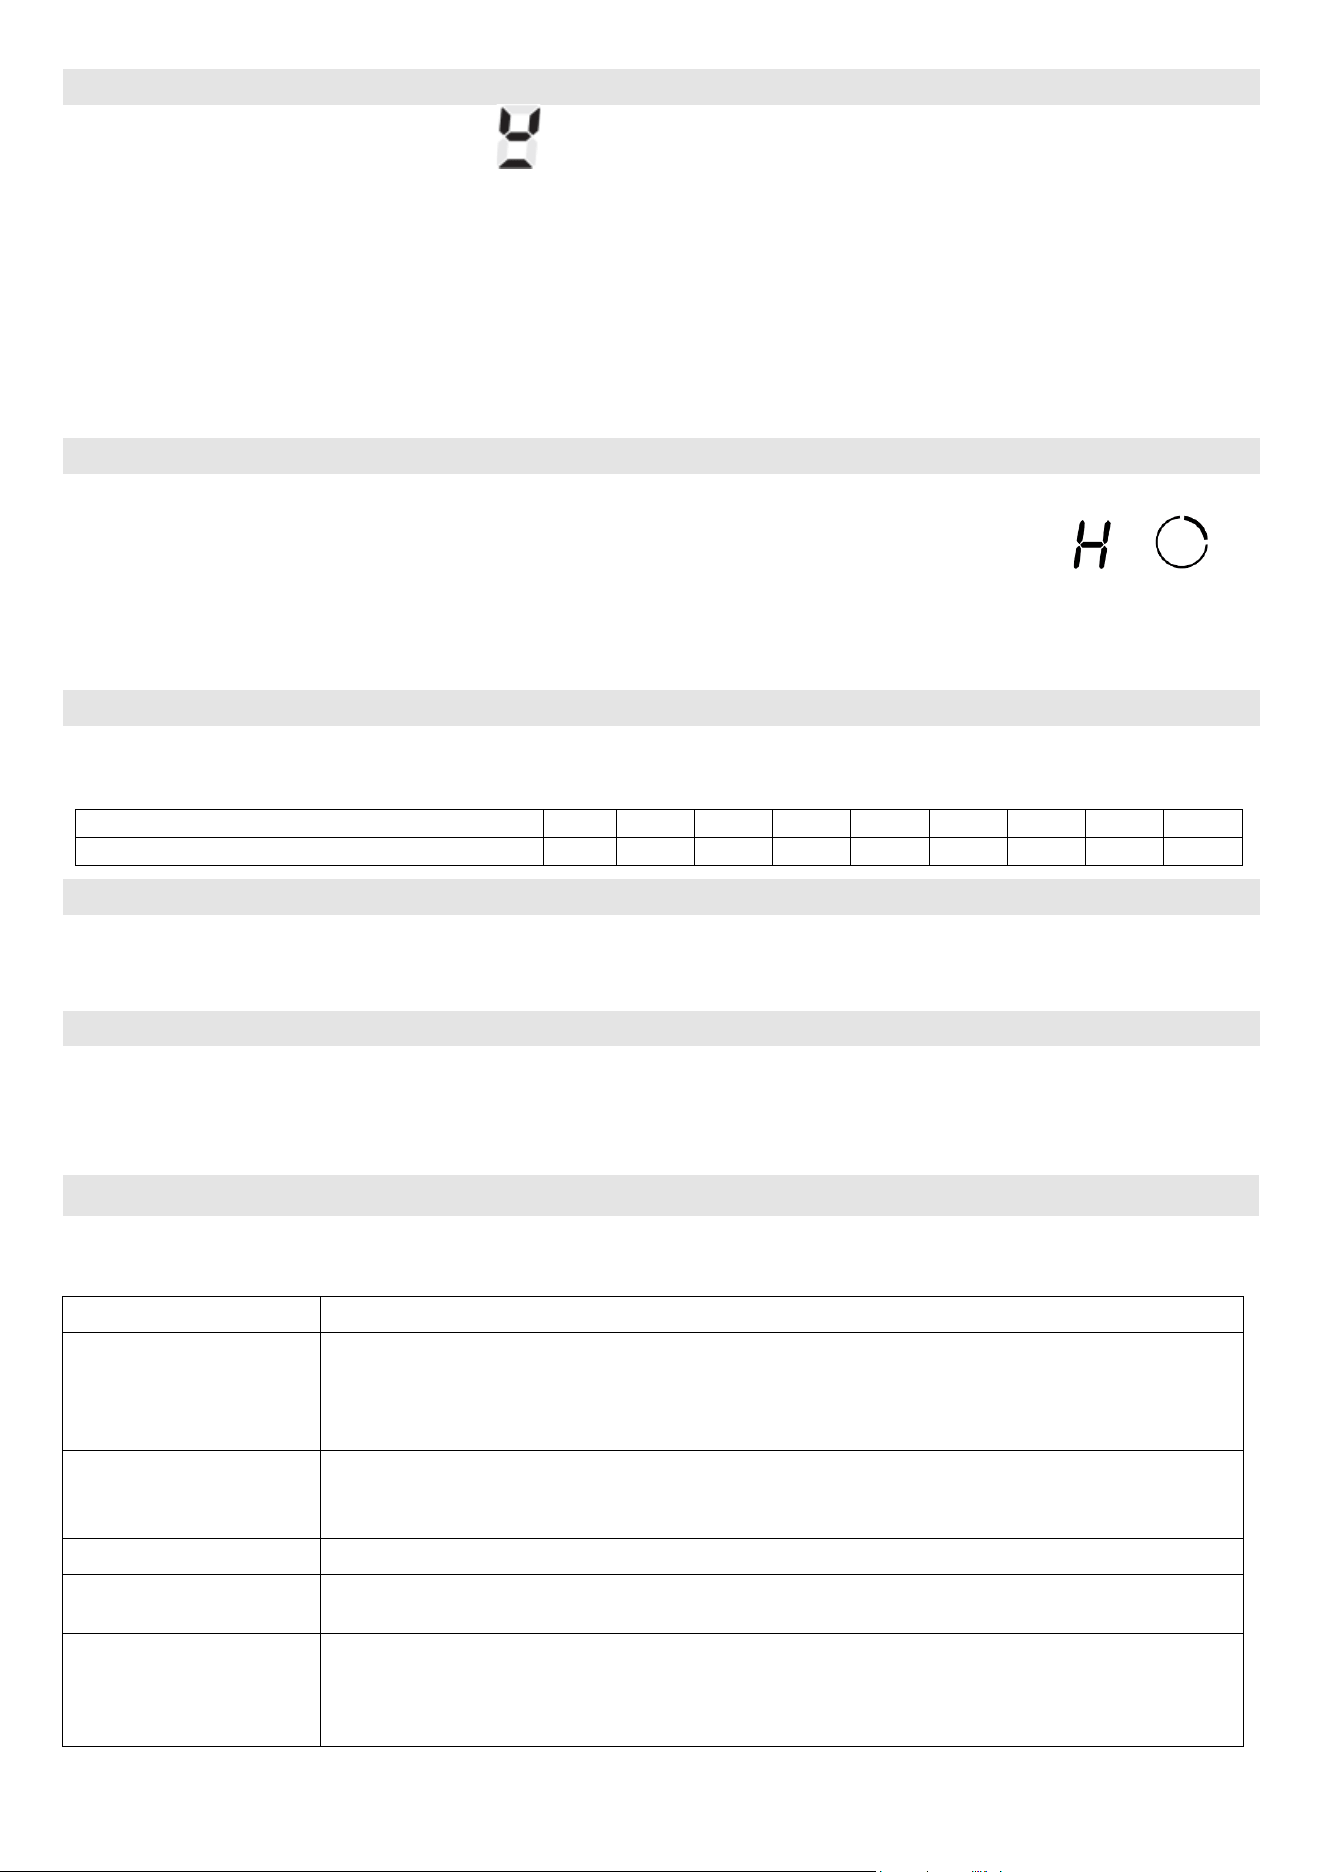
FCTIN0583-30/ FCTIN0583-36 / FCTIN0569-36: Slider Touch control
• Touch the timer control button once, the number of single digits in timer indicator flashing, then adjust
single
digit of minute minder setting by sliding the slider control.
• Press the timer control button again, the number of ten digit in timer indicator flashing, then adjust tens
digit of minute minder setting by sliding the slider control.
Setting the timer to turn cooking zone off
FCTIN0583-12/ FCTIN0583-24: Touch control
• Touch the cooking zone selection button to activate the cooking zone you wish to use.
• Touch the timer control button once.
• Set timer setting by touching the or button.
• If press and hold either of the two buttons, the value will adjust down or up rapidly in circle.
Note: When the timer indicator flashes, touch the timer control button another time, and can quickly confirm the
timer setting.
FCTIN0583-30/ FCTIN0583-36 / FCTIN0569-36: Slider Touch control
• Touch the cooking zone selection button to activate the cooking zone you wish to use.
• Touch the timer control button once, the number of single digits in timer indicator flashing, then adjust single
digit of minute minder setting by sliding the slider control.
• Press the timer control button again, the number of tens digit in timer indicator flashing, then adjust tens digit of
minute
minder setting by sliding the slider control.
NOTE: The red dot next to power level indicator will illuminate for those zones be set with timer. You can
check the timer setting of different cooking zones which set with timer, by active this cooking zone.
NOTE: If more than one heating zone has a timer setting, the timer indicator will show the lowest time. The
red dot next to the power level indicator will flash.
When the cooking timer expires, the corre
sponding cooking zone will be
switched off automatically.
Note: The default setting of minute reminder and timer is 30 minutes.
Note: After adjusting, the setting in timer indicator will flash for 5 seconds and then stop flashing, then the
setting be confirmed.
Note: The minute reminder and timer can be used at same time, timer indicator shows the lowest time setting.
If the lowest setting is minute reminder, the red dot next to timer indicator will
flash. If the lowest setting is timer
setting, the red dot of corresponding cooking zone power level indicator will flash.
Note: If indicator shows timer setting of cooking zone. To check minute reminder setting, touch the heating
level slider control, the indicator will show minute reminder setting.
17
Detection of Pan and Small Articles
For induction hob, if display flashes” “ alternately with heat setting, THIS MEANS:
• You have not placed a pan on the correct cooking zone or,
• The pan you’re using is not suitable for induction cooking or,
• The pan is too small or not properly centered on the cooking zone.
Notes:
1. No heating takes place unless there is a suitable pan in the cooking zone.
2. The display will auto turn off after 2 minutes i
f no suitable pan is placed on it.
3. When an unsuitable size or non-magnetic pan (e.g. aluminum), or some other small item (e.g. knife, fork,
key) has been left on the hob, the corresponding cooking zone will automatically turn off in 1 minute.
Residual Heat Warning
Beware of hot surfaces
When the hob has been operating for some time, there will be some residual heat. The letter “ ”
appears in power setting indicator to warn you to keep away from it.
It can also be used as an energy saving function:
If you want to heat further pans, use the hotplate that is still hot.
Auto Shutdown
Another safety feature of the hob is auto shutdown. This occurs whenever you forget to switch off the cooking
zone. The default shutdown times as below table:
Power level
1
2
3
4
5
6
7
8
9
Default working timer (hour)
8
8
8
4
4
4
2
2
2
Over-heat Protection
A temperature sensor equipped can monitor the temperature inside the hob. When an excessive temperature
is monitored, the hob will auto stop operation.
Over-flow Protection
For your safety, the programmer will auto shut off the power if liquid boiling or wet cloth over touch control
panel. All control buttons became invalid except ON/OFF and Child Lock button unless you wipe the touch
control area dry.
Heat Settings
The settings below are guidelines only. The exact setting will depend on factors including your cookware and
the amount you are cooking. Experiment with the hob to find the settings that best suit you.
Heat setting
Suitability
1 - 2
• Delicate warming for small amounts of food
• Melting chocolate, butter, and foods that burn quickly.
• Gentle simmering
• Slow warming
3 - 4
• Reheating
• Rapid simmering
• Cooking rice
5 - 6
• Pancakes
7 - 8
• Sautéi
• Cooking pasta
9
• Stir-frying
• Searing
• Bringing soup to the boil
• Boiling water

18
Cleaning and Maintenance
Important: Before any maintenance or cleaning work is carried out, DISCONNECT the appliance from
ELECTRICITY supply and ensure the appliances are completely cool.
Cleaning the Hob Surface
Clean spillages from the hob surface as soon as possible after use. Always ensure the surface is cool enough
before cleaning.
Use a soft cloth or kitchen paper to clean the surface. If the spillage has dried on the surface, you may need to
use a speci
alist vitro-ceramic glass cleaner, which is available for most supermarkets.
Do not use other abrasive cleaners and/or wire wool etc.., as it may scratch the ceramic glass surface of your
hob.
Damage from Sugary Spills and Melted Plastic
Special care should be taken when removing hot substances to avoid permanent damage to the glass
surface.
Sugary spillovers (such as jellies, fudge, candy, syrups) or melted plastics can cause pitting of the surface of
you
r cooktop (not covered by the warranty) unless the spill is removed while still hot. Special care should be
taken when removing hot substances.
Maintenance of the Hob
If you find something goes wrong for your hob, before contact the service or where you purchased it,
please check whether below:
1. There is no power to the appliance:
- Check whether there is a power cut of your department;
- Check whether the appliance be connected to electricity properly;
- Has the timer setting elapsed;
- Whether it reaches the longest cooking time setting and auto shut off;
- Whether there is liquid boiling over touch control panel and overflow protection devices auto shut off;
2. The touch control panel buttons can’t be active:
- Whether it’s under “Child Lock”, which there is “Lo” shows in timer displayer;
- Whether liquid/wet cloth over touch control panel active overflow protection;
3. After cooking there is “H” shows on display:
- This is normal. The hob has Residual Heat Warning safety features. It will remain on until the surface is cool
enough to touch.
4. After turn off, the fan of induction hob remains working for a while:
-This is normal, this is to help appliances completely cool down.
5. Some pans make crackling or clicking noises during use of induction hob:
-This is normal, it’s the sound of induction coils during working, and for different cons
truction of your cookware,
the clicking might be slightly different.
6. The glass is being scratched:
-Check whether you use unsuitable cookware, like rough-edged cookware.
-Check whether unsuitable, abrasive scourer or cleaning products being used.
7. The heating element of ceramic hob turns on and off alternately when working:
-This is a normal and natural feature for ceramic hob. Programmer of ceramic hob, together with the
thermostat or thermocouple in heating
element, could control the hob work at set power level and avoid
overheating by heating element work on/off alternately.
-If working at highest power level, the heating element will continue turn on for a certain time then on/off alternately.
-If working at other lower power level, heating element will on/off alternately at certain frequency since
beginning based on power setting of the cooking zone.
19
Hints and Tips
What?
How?
Important!
Everyday soiling on
glass (fingerprints,
marks, stains left by
food or non-sugary
spillovers on the glass)
1. Switch off the power supply.
2. Apply a vitro-ceramic glass
cleaner while the glass is still
warm (but not hot!)
3. Rinse and wipe dry with a clean cloth
or paper towel.
4. Switch on the power supply to
the hob.
• When turn off the power supply of
hob, there will be no ‘hot surface’
indication, but the cooking zone may
still be hot! Take extreme care.
• Heavy-duty scourers, some nylon
scourers and harsh/abrasive
cleaning agents may scratch the
glass. Always read the label to check
if your cleaner or
scourer is suitabl
e.
• Never leave cleaning residue on the
hob glass surface: the glass may
become stained.
Boil over, melts, and
hot sugary spills on the
glass
Remove these immediately with a fish
slice, palette knife or razor blade scrape
r
suitable for ceramic glass of hob, bu
t
beware of hot cooking zone surfaces:
1
. Switch off the power supply.
2
. Hold the blade or utensil at a 30° angl
e
and scrape the soiling or spill to a coo
l
area of the hob.
3
. Clean the soiling or spill it up with
a
dish cloth or paper towel.
4. Follow steps 2 to 4 for ‘Everyda
y
soiling on glass’ above.
• Remove stains left by melts and
sugary food or spillovers as soon as
possible. If left to cool on the glass,
they may be difficult to remove or
even permanently damage the glass
surface.
• Cut hazard: when the safety cover is
retracted, the blade in a scraper is
razor-sharp. Use with extreme care
and always store safely and out of
reach of children.
Spillovers on the
touch controls
1. Switch off the power supply.
2. Soak up the spill
3. Wipe the touch control area with a
clean damp sponge or cloth.
4. Wipe the area completely dry with a
paper towel.
5. Switch on the power supply to
the hob.
• The hob may beep and turn
itself off, and the touch controls may
not function while there is liquid on
them. Make sure you wipe the touch
control area dry before turning the
hob back on.
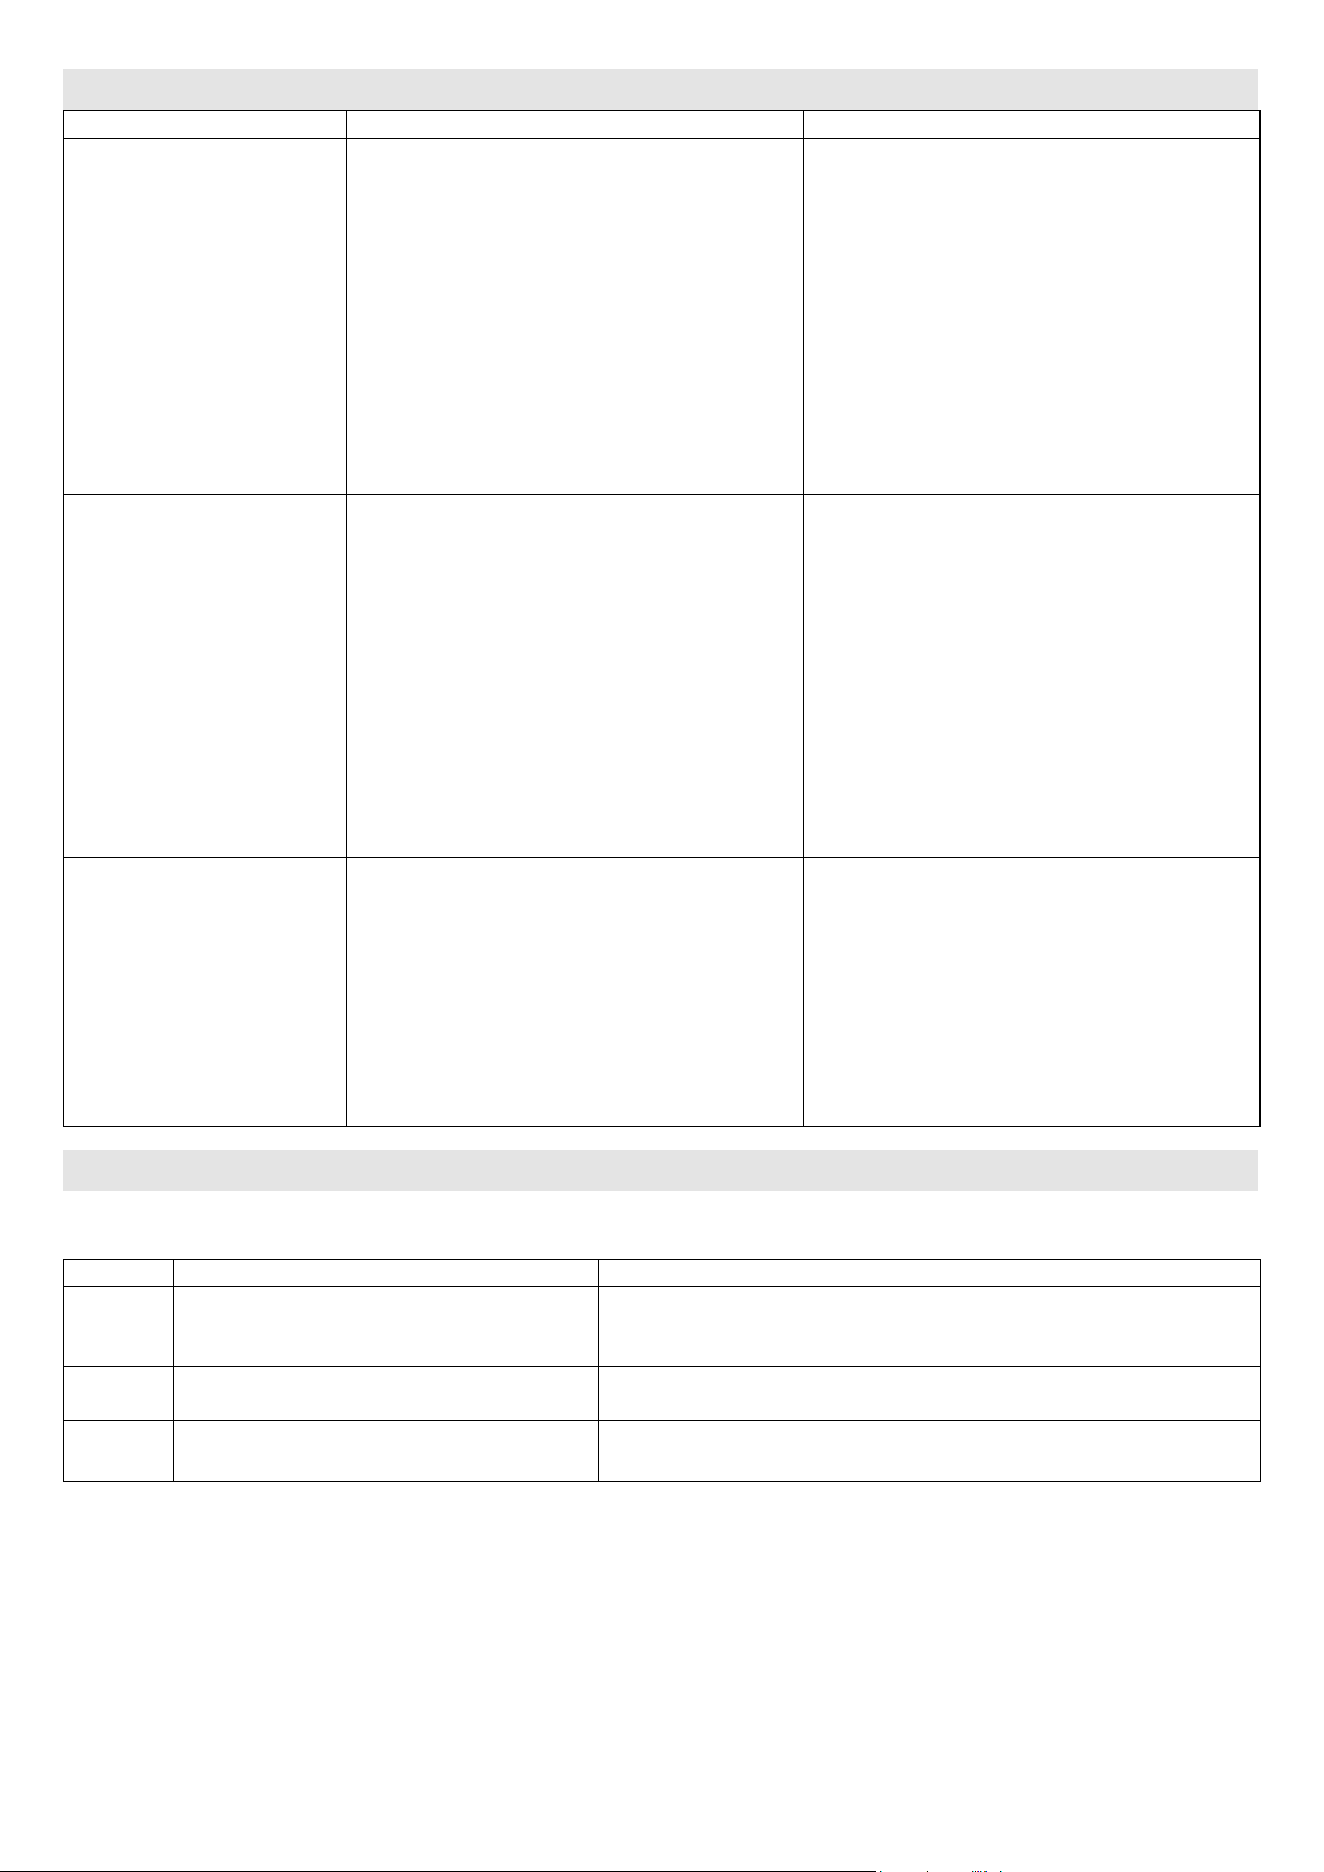
Failure Inspection for induction hob
If an abnormality comes up, the induction hob will enter the protective state automatically and display
corresponding protective codes:
Problem
Possible causes
What to do
E1/E2
Abnormal supply voltage
Please check whether power supply is normal, Power on after the
power supply is normal.
E3
High temperature of the pan sensor
Check whether no liquid in pan, fill with liquid then restart.
E5
High temperature of the IGBT
temperature sensor
Please restart after the induction hob cools down.
For all other error codes, switch off and contact Forno Customer Care.
20
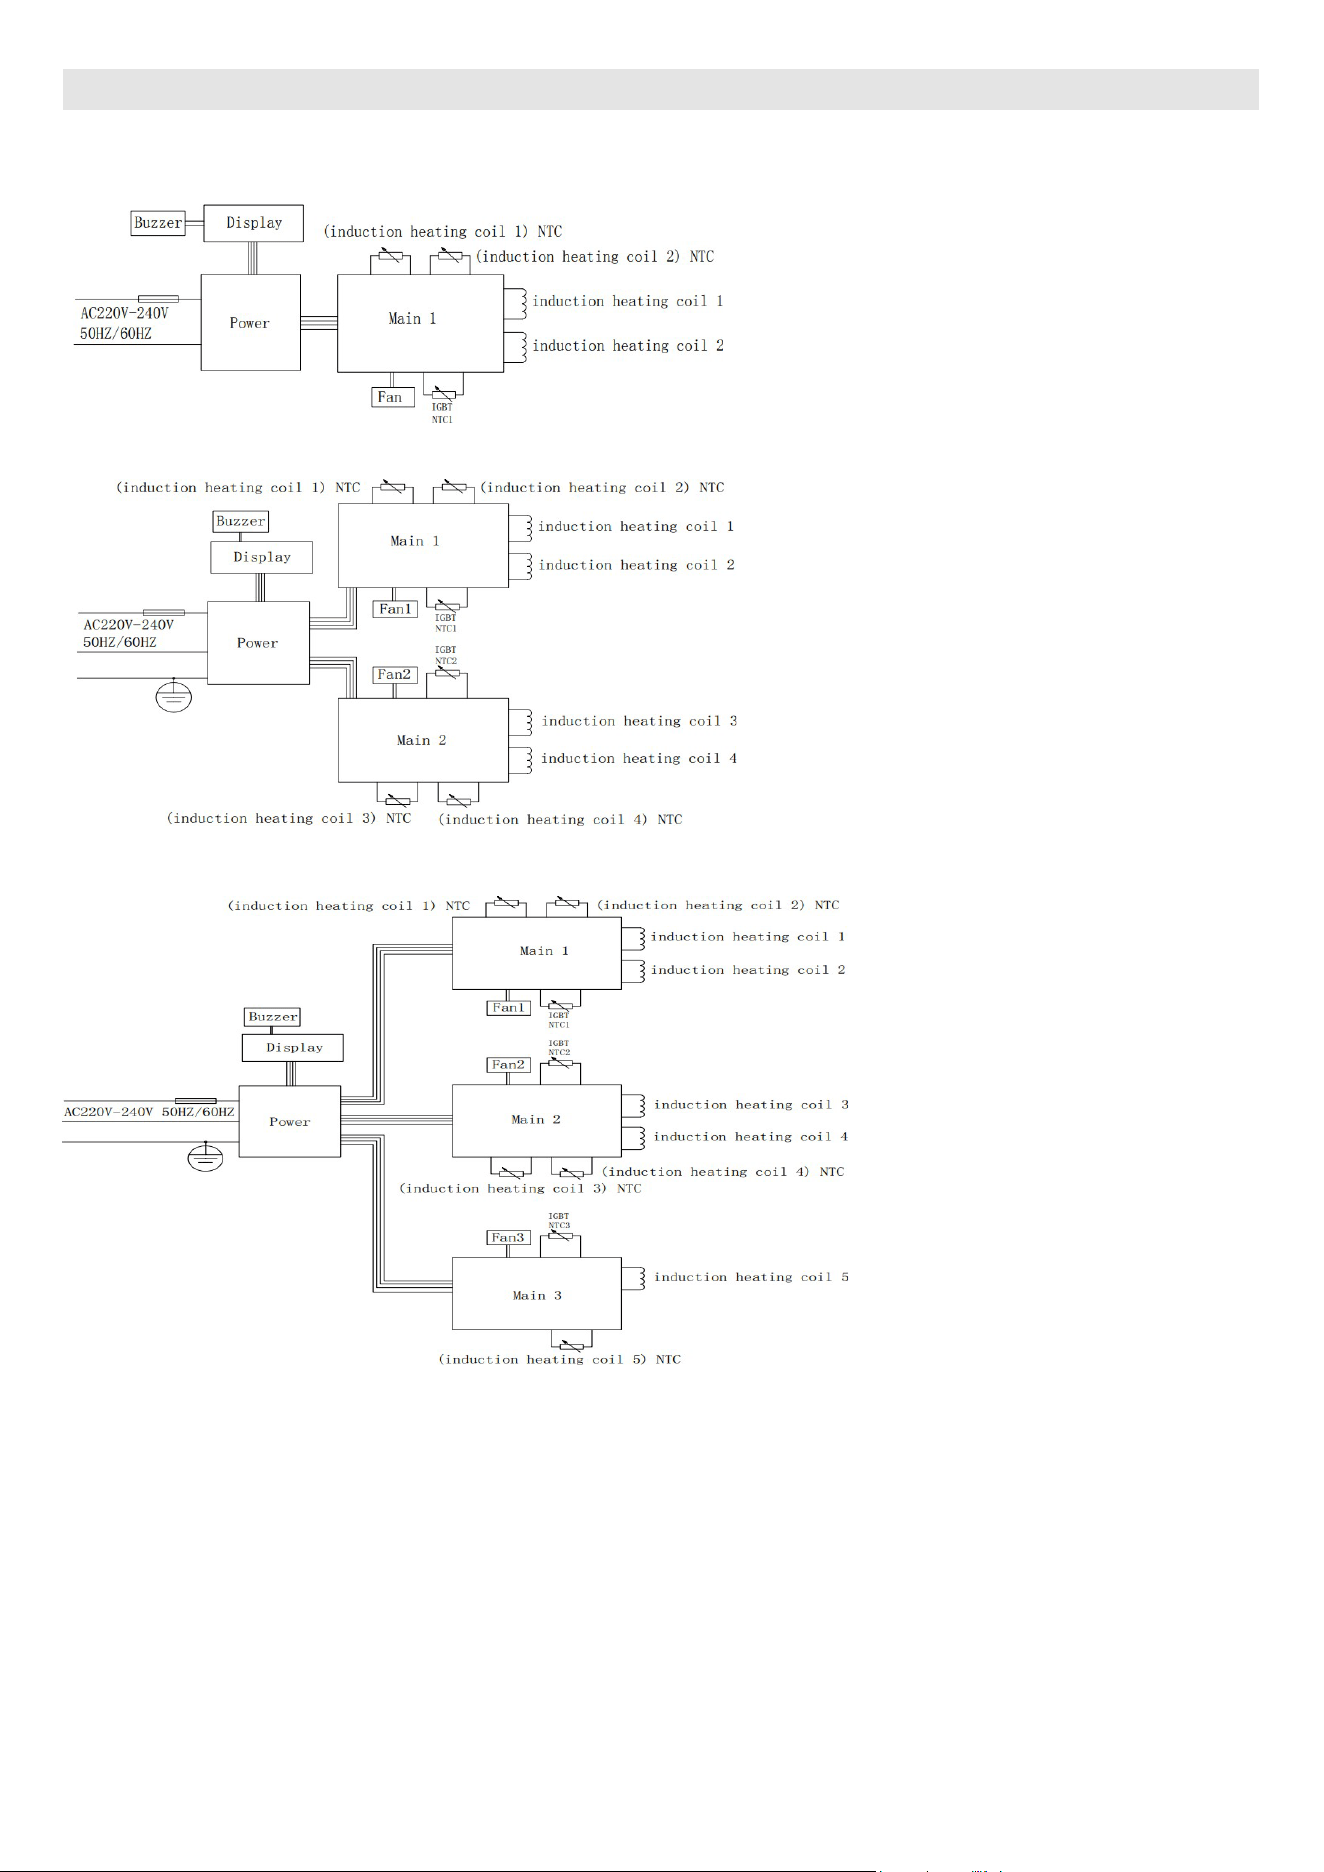
Electronic Diagram
FCTIN0583-12
FCTIN0583-24/ FCTIN0583-30
FCTIN0583-36 / FCTIN0569-36
FRANÇAIS

What this limited warranty covers:
The Warranty coverage provided by Forno Appliances in
this statement applies exclusively to the original Forno
appliance (“Product”) sold to the consumer (“Purchaser”) by
an authorized Forno dealer/distributor/retailer, purchased and
installed in the United States or Canada, and which has always
remained within the original country of purchase (the United
States or Canada). Warranty coverage is activated on the date
of the Product’s original retail purchase and has a duration of
two (2) years.
Warranty coverage is non-transferable. In the event of
replacement of parts or of the entire product, the replacement
Product (or parts) shall assume the remaining original
Warranty activated with the original retail purchase document.
This Warranty shall not be extended with respect to such
replacement. Forno Appliances will repair or replace any
component/part which fails or proves defective due to materials
and/or workmanship within 2 years of the date of the original
retail purchase and under conditions of ordinary residential,
non-commercial use. Repair or replacement will be free
of charge, including labor at standard rates and shipping
expenses. Purchaser is responsible for making the Product
reasonably accessible for service. Repair service must be
performed by a Forno Authorized Service company during
normal working hours.
Important
Retain proof of original purchase to establish warranty period.
Forno’s liability on any claim of any kind, with respect to the
goods and/or services provided, shall in no event exceed the
value of the goods or service or part there of which has given
rise to the claim.
30-Day Cosmetic Warranty
The Purchaser must inspect the product at the time of delivery.
Forno warrants that the Product is free from manufacturing
defects in materials and workmanship for a period of thirty (30)
days from date of the original retail purchase of the Product.
This coverage includes:
• Paint blemishes
• Chips
• Macroscopic finish defects
Cosmetic warranty does NOT cover:
• Issues resulting from incorrect transport, handling and/
or installation (e.g.: dents, broken, warped or deformed
structures or components, cracked or otherwise damaged
glass components);
• Slight color variations on painted/enameled components;
• Differences caused by natural or artificial lighting, location
or other analogous factors; > stains/corrosion/discoloration
caused by external substances and/or environmental
factors; > labor costs, display, floor, B-stock, out- of-
box,“as is” appliances and demo units.
How to receive service
To receive warranty services, the Purchaser must contact the
Forno Support department in order to determine the problem
and the required service procedures. Troubleshooting with
a customer service representative will be necessary before
moving forward with the service. Model number, serial number
and date of original retail purchase will be requested.
Warranty Exclusions: What Is Not Covered.
• Use of the Product in any non-residential, commercial
application.
• Use of the Product for anything other than its intended
purpose.
• Repair services provided by anyone other than a Forno
Authorized Service agency.
• Damages or repair services to correct services provided
by unauthorized parties or the use of unauthorized parts.
• Installation not in accordance with local/state/city/county
fire codes, electrical codes, gas codes, plumbing codes,
building codes, laws or regulations.
• Defects or damage due to improper storage of the
Product.
• Defects, damage or missing parts on products sold out of
the original factory packaging or from displays. > Service
calls or repairs to correct an incorrect installation of the
Product and/or related accessories.
• Replacement of parts/service calls to connect, convert
or otherwise repair the electrical wiring and/or gas line in
order to properly use the product.
• Replacement of parts/service calls to provide instructions
and information on the use of the Product.
• Replacement of parts/service calls to correct issues arising
from the product being used in a manner other than what
is normal and customary for residential use.
• Replacement of parts/service calls due to wear and tear of
components such as seals, knobs, pan supports, shelving,
cutlery baskets, buttons, touch displays, scratched or
broken ceramic-glass tops.
• Replacement of parts/service calls for lack of/improper
maintenance, including but not limited to: build up of
residues, stains, scratches, discoloration, corrosion.
• Defects and damages arising from accidents, alteration,
misuse, abuse or improper installation.
• Defects and damages arising from Product transport,
logistics and handling. Inspection of the product must be
made at time of delivery. Following receipt and inspection,
the selling dealer/delivery company must be notified of any
issues arising from handling, transport and logistics.
• Defects and damages arising from external forces beyond
the control of Forno Appliances, including but not limited
to wind, rain, sand, fires, floods, mudslides, freezing
temperatures, excessive moisture or extended exposure
to humidity, power surges,
• Lightning, structural failures surrounding the appliance and
other acts of God.
• Products whose serial number has been altered/damaged/
tampered with. In no case shall Forno be held liable
or responsible for damage to surrounding property,
including furniture, cabinetry, flooring, panels, and other
structures surrounding the Product. Forno is neither
liable nor responsible for the Product if it is located in a
remote area or an area where certified trained technicians
are not reasonably available. Purchaser must bear any
transportation and delivery costs of the Product to the
nearest Authorized Service Center or the additional travel
expenses of a certified trained technician
20
21

THERE ARE NO EXPRESS WARRANTIES OTHER THAN THOSE LISTED AND DESCRIBED ABOVE, AND NO WARRANTIES, EITHER EXPRESS OR IMPLIED,
INCLUDING, BUT NOT LIMITED TO, ANY IMPLIED WARRANTIES OF MERCHANTABILITY OR FITNESS FOR A PARTICULAR PURPOSE THAT SHALL APPLY
AFTER THE EXPRESS WARRANTY PERIODS STATED ABOVE, AND NO OTHER EXPRESS WARRANTY OR GUARANTEE GIVEN BY ANY PERSON, FIRM
OR CORPORATION WITH RESPECT TO THIS PRODUCT SHALL BE BINDING ON FORNO. FORNO SHALL NOT BE LIABLE FOR LOSS OF REVENUE OR
PROFITS, FAILURE TO REALIZE SAVINGS OR OTHER BENEFITS, TIME AWAY FROM WORK, MEALS, LOSS OF FOOD OR BEVERAGES, TRAVELING OR
HOTEL EXPENSES, EXPENSES TO RENT OR PURCHASE APPLIANCES, REMODELING/CONSTRUCTION EXPENSES IN EXCESS OF DIRECT DAMAGES
WHICH ARE UNDENIABLY CAUSED EXCLUSIVELY BY FORNO OR ANY OTHER SPECIAL, INCIDENTAL OR CONSEQUENTIAL DAMAGES CAUSED BY THE
USE, MISUSE OR INABILITY TO USE THIS PRODUCT, REGARDLESS OF THE LEGAL THEORY ON WHICH THE CLAIM IS BASED, AND EVEN IF FORNO
HAS BEEN ADVISED OF THE POSSIBILITY OF SUCH DAMAGES. NOR SHALL RECOVERY OF ANY KIND AGAINST FORNO BE GREATER IN AMOUNT
THAN THE PURCHASE PRICE OF THE PRODUCT SOLD BY FORNO AND CAUSING THE ALLEGED DAMAGE. WITHOUT PREJUDICE TO THE FOREGOING,
PURCHASER ASSUMES ALL RISK AND LIABILITY FOR LOSS, DAMAGE OR INJURY TO PURCHASER AND PURCHASER’S PROPERTY AND TO OTHERS
AND THEIR PROPERTY ARISING FROM THE USE, MISUSE, OR INABILITY TO USE THIS PRODUCT SOLD BY FORNO THAT IS NOT A DIRECT RESULT OF
NEGLIGENCE ON THE PART OF FORNO THIS LIMITED WARRANTY SHALL NOT EXTEND TO ANYONE OTHER THAN THE ORIGINAL PURCHASER OF THIS
PRODUCT, IS NON-TRANSFERABLE, AND STATES YOUR EXCLUSIVE REMEDY.
Warranty (continued)
2
2

2
3
www.forno.ca