Shule
OWNER’S MANUAL
This manual contains safety, assembly, use and maintenance
instrucons. Read these instrucons carefully before use and keep
them for future reference. Your child’s safety may be aected if
you do not follow these instrucons. The Schwinn Bicycle Trailer
must be assembled by an adult who has read and understands the
instrucons in this manual. Keep the packaging away from children
and dispose of all packaging before use.
TWO SEAT BICYCLE TRAILER
Do not return to store.
Call toll free 1-800-626-2811 for assistance and replacement parts.
Keep instrucons for future reference.

ii
Congratulaons
on your new bicycle trailer! Proper assembly and operaon of
your bicycle trailer is important for your safety and enjoyment.
Our customer service department is dedicated to your
sasfacon with Pacic Cycle and its products. If you have
quesons or need advice regarding assembly, parts,
performance, or returns, please contact the experts at
Pacic Cycle. Enjoy the ride!
Toll free: 1-800-626-2811
Customer Service hours: Monday - Friday 8 AM- 5 PM Central
Standard Time (CST)
You may also reach us at:
Web: www.pacic-cycle.com
Email: customerservice@pacic-cycle.com
Mail: 4902 Hammersley Rd.
Madison, WI 53711
Do not return this item to the store. Please call Pacic Cycle
customer service if you need assistance.

Contents
1 SAFETY . . . . . . . . . . . . . . . . . . . . . . . . . . . . . . . . . . . . . . . . . . . . . 1
Assembly Warnings ....................................1
Child Warnings . . . . . . . . . . . . . . . . . . . . . . . . . . . . . . . . . . . . . . . .1
Trailer Use Warnings ...................................2
Safe Riding Warnings . . . . . . . . . . . . . . . . . . . . . . . . . . . . . . . . . .2
Recommendaons ....................................3
Care.................................................3
2 PARTS AND FEATURES . . . . . . . . . . . . . . . . . . . . . . . . . . . . . . . . 4
3 ASSEMBLY ..........................................5
Unfolding the Frame ...................................5
Aaching The Canopy And Flag Pole . . . . . . . . . . . . . . . . . . . . . .8
Extending and Securing the Tow Bar ......................9
Aaching the Wheels . . . . . . . . . . . . . . . . . . . . . . . . . . . . . . . . 10
4 TRAILER ATTACHMENT . . . . . . . . . . . . . . . . . . . . . . . . . . . . . . 11
Aaching to a Bicycle with Quick Release Axles ............14
5 USING THE SAFETY HARNESS .........................16
Using the Safety Harness with Two Children . . . . . . . . . . . . . . .16
Using the Safety Harness with One Child ..................17
6 DISASSEMBLY AND STORAGE.........................18
Remove the Tow Bar From the Bicycle .................. 18
7 WARRANTY . . . . . . . . . . . . . . . . . . . . . . . . . . . . . . . . . . . . . . . . 21
iii
1 Safety
FAILURE TO FOLLOW THE SAFETY INSTRUCTIONS LISTED BELOW
MAY RESULT IN SERIOUS INJURY OR DEATH. Always read and
understand the informaon and warnings in this manual before
using the Bicycle Trailer.
If you are unsure of any informaon in this manual or have a
queson regarding assembly or use please call customer service.
Always keep this manual for reference and include it with resale of
the Bicycle Trailer.
ASSEMBLY WARNINGS
• An adult who has read and understands the informaon and
warnings in the manual must assemble this product according
to manufacturer’s instrucons.
• Do not use the product if there are any missing or damaged
parts. Do not return the product to the store. Please contact
customer service at 1-800-242-6110 for assistance and
replacement parts.
• Dispose of all plasc bags and wrapping material immediately.
• Check the assembly (i.e.: crossbar locked, screws ght) before
using the product.
• Use cauon to avoid pinch points when folding or unfolding
the trailer.
• Never allow children to assemble, fold, or disassemble
the trailer.
CHILD WARNINGS
• The maximum weight for each child is 40 lbs. The total weight
(children and cargo) in the trailer cannot exceed 92 lbs.
• The child should not exceed the weight limitaons as it
increases the risk of pping the trailer.
• This trailer is intended for a child that is at least 12 months old
and weighing up to 40 lbs.
• Avoid serious injury from falling or sliding out. Always use the
safety harness.
• Never leave children unaended in or around the trailer.
• Never have more than two children in the trailer at one me.
• When using the double trailer with one child, seat the child in
the center.
• Never use with children that cannot support their own head.
• Never use the trailer with children who cannot sit unaided.
• Check the trailer (pram) body or seat unit aachment devices
are correctly engaged before use.
• Always use the crotch strap in combinaon with the waist belt.
WARNING!
1
• Do not allow any of the child’s body, clothing, shoe laces, or
toys to come into contact with a moving trailer.
• Take proper steps (clothing, venlaon, hydraon) to protect
the child from exposure hazards such as wind chill and heat
exhauson. These hazards will have a greater impact on the
less acve passenger.
TRAILER USE WARNINGS
• Failure to comply with the manufacturer’s instrucons can
lead to serious injury or death of the passenger/rider.
• Do not install a car seat or any other seang device into the
trailer.
• Before each ride, ensure the aached trailer does not interfere
with braking, pedaling, or steering of the bicycle.
• Do not add a seat pad (maress) thicker than 2.5” (63.5 mm).
• Parcels or accessories placed on the trailer may cause the
trailer to become unstable.
• Do not place items on the trailer. Hazardous condions may
exist if package carrying accessories are added to the product.
WARNING
This product can expose you to chemicals including lead,
which is known to the State of California to cause cancer and
birth defects or other reproducve harm. For more
informaon go to www.P65Warnings.ca.gov.
• Check the trailer for damage. Do not use if damaged.
• Be sure the fasteners are ght. Tighten if necessary.
• Inspect res for damage and/or tread wear before each ride.
Do not use the trailer if the res are damaged or worn out.
• The safety ag and reectors must be in place. Do not use the
trailer without the safety ag and reector in place.
• Always have the canopy in place.
• Do not make any modicaons to the trailer as it increases the
risk of failure.
• Accessories not approved by the manufacturer must not
be used.
SAFE RIDING WARNINGS
• Children should always wear a properly ed helmet that
complies with US Consumer Product Safety Commission
(CPSC) standard 16CFR 1203.
• Be sure the brakes work properly. Braking distance is
increased when pulling a trailer.
• Avoid braking suddenly.
• Always maintain a safe speed. The trailer is not intended for
use at high speeds. Do not exceed 10 MPH.
• The trailer requires a wide turning radius. Do not turn sharply.
Sharp changes in direcon may cause a p over.
WARNING!
2
• Use cauon when turning on loose or uneven surfaces and
when going downhill.
• Allow extra clearance for the trailer when near curbs, parked
cars, and other obstacles.
• Do not ride over curbs, bumps or holes.
• Do not use the trailer in hazardous weather.
• Do not pull or push the trailer with a vehicle.
• This product is not suitable for running or skang.
• Red reectors must be visible on the rear of the trailer.
• Never ride a bicycle at night without adequate lighng.
Obey all local legal requirements for lighng.
• A load added to the bicycle will alter the stability and riding
characteriscs of the bicycle.
RECOMMENDATIONS
• The bicycle to be used with the trailer should undergo a safety
check with a qualied bicycle mechanic before aaching the
trailer.
• The maximum weight that can be carried in the cabin pockets is
1 lb. each. The maximum weight that can be carried in the rear
storage area is 10 lbs.
• Aach a rearview mirror on the bicycle to check on the (child/
children) in the trailer.
WARNING!
CARE
• To clean the trailer: use only mild soap and water. Do not use
cleaning solvents.
• Rounely check that all fasteners and equipment (wheels,
reectors, ag, etc) are ght and properly assembled.
• Have a qualied bicycle mechanic perform roune safety
checks on your bicycle before using with the trailer.
• Roune bicycle maintenance is recommended to be performed
every year.
• Do not leave trailer outside aer use. Inclement weather and
harsh elements may stress the fabric on the trailer.
3
4
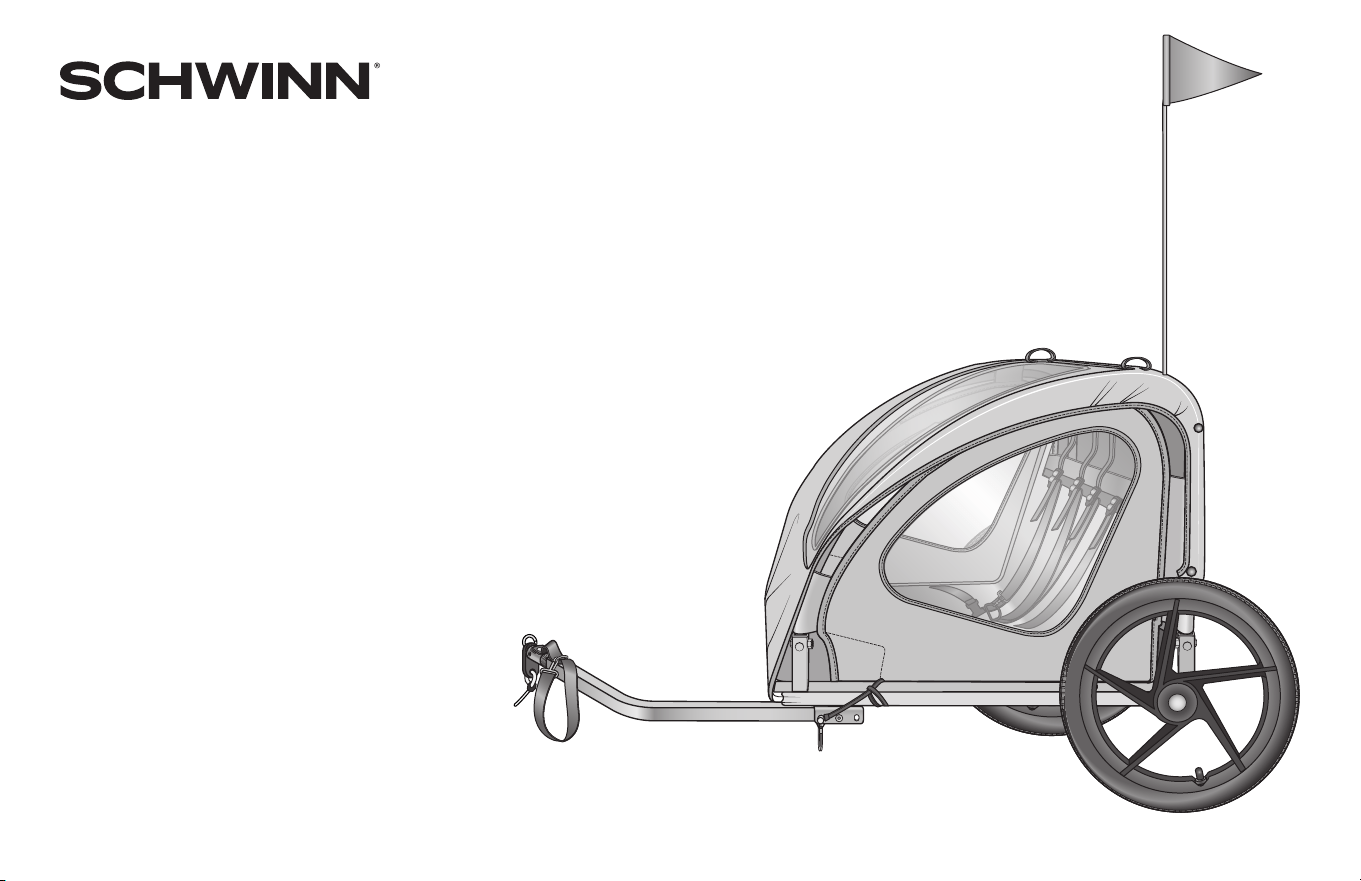
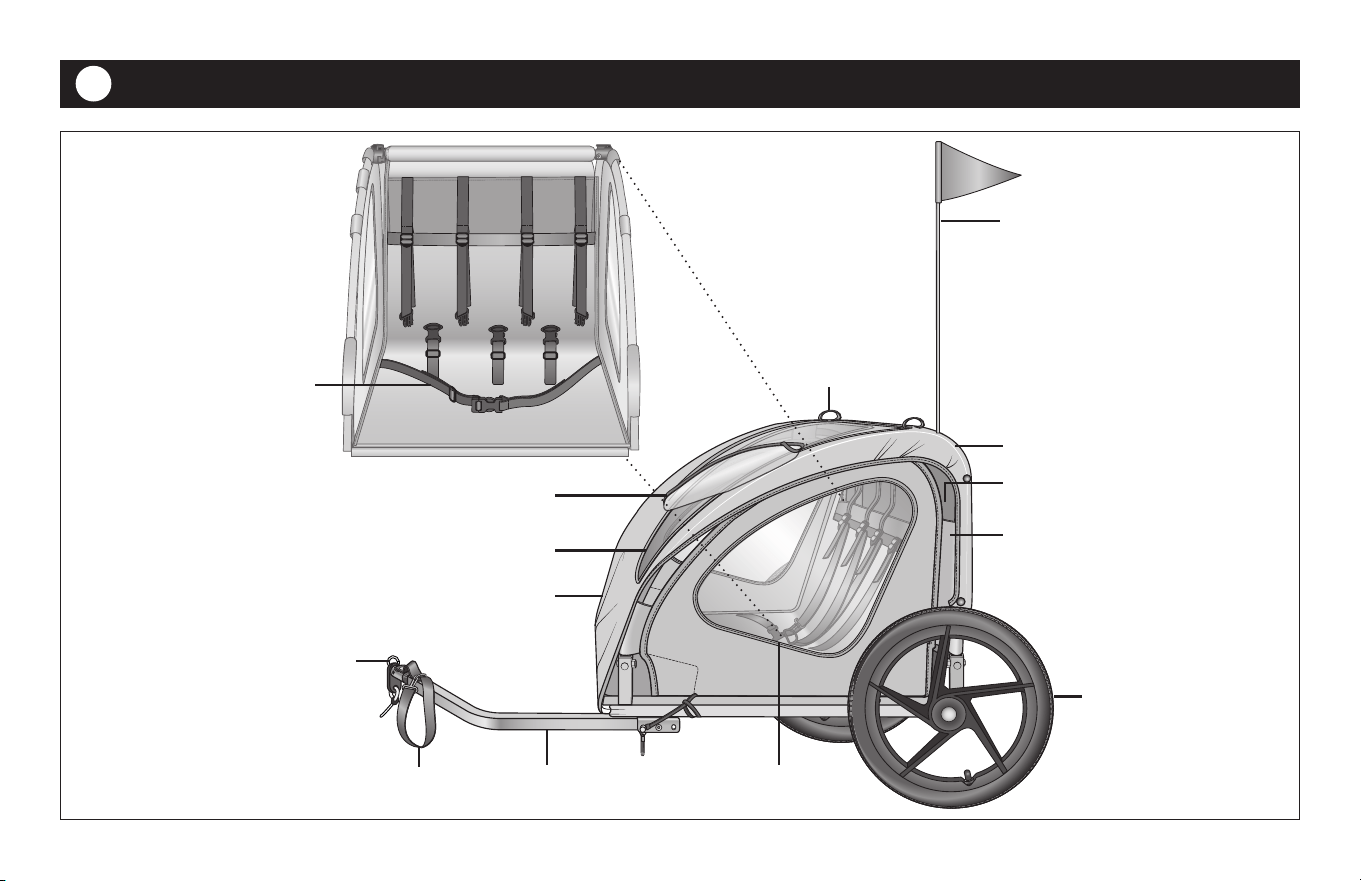
2 Parts and Features
Weather shield(rolls up and fastens in elasc bands)
Wheels (2)
Safety ag with pole
Clear plasc windows
Front panel
Canopy
Back panel
Tow bar
Bicycle coupler
Safety strap
Zip-in/zip-out bug screen
Safety harness system
Elasc bands for
weather shield
Storage area
5
• There are pinch points between the sidewalls and the frame
of the trailer that may cause injury. Fold or unfold the trailer
slowly using cauon.
• Keep children clear when folding or unfolding the trailer.
• Ensure that all locking devices are engaged before use.
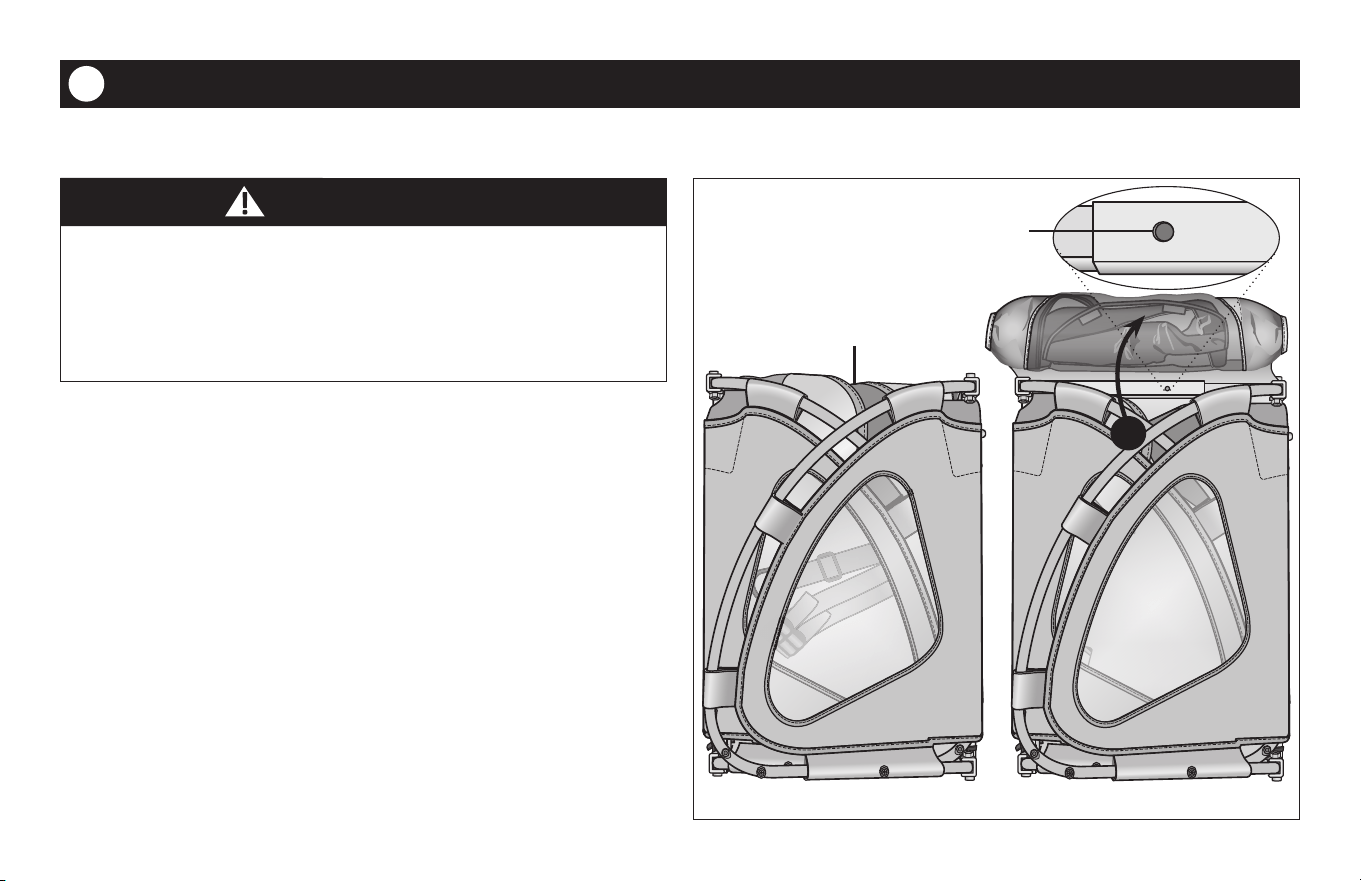
Note: The trailer comes with the frame and the side walls folded
down. The front and back panels are turned under the side walls.
❶ Unsnap the front panel from the side wall and pull the front
panel out from under the side walls to expose the front of the
frame. Notice the locking spring pin holes on front and rear
ends of the frame. Figure 3.1
3 Assembly
UNFOLDING THE FRAME
WARNING!
Figure 3.1
1
Locking spring pin hole
Front panel
6
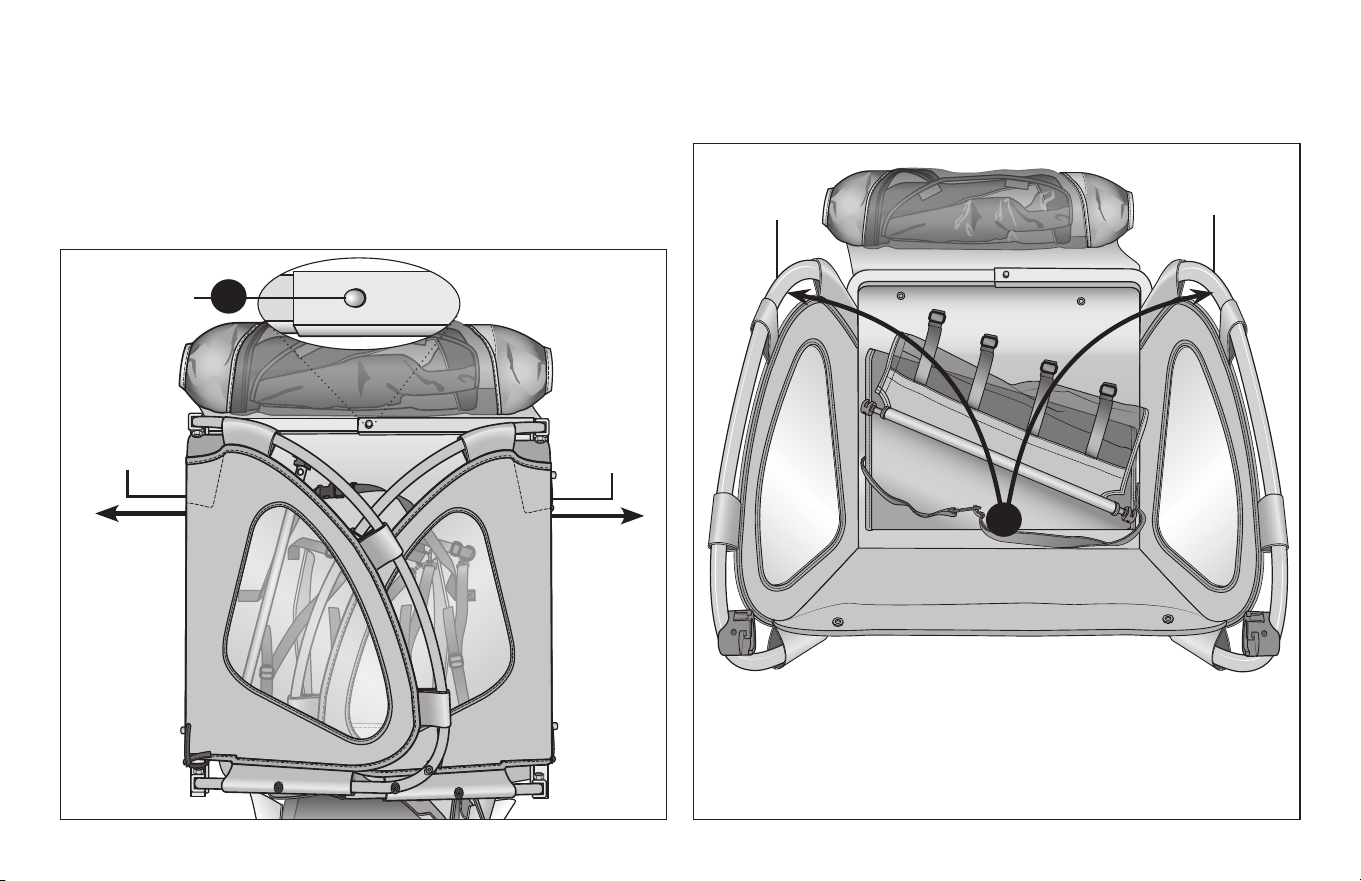
❷ IMPORTANT! Expand the frame out by pulling on the side rails
unl the locking spring pins insert into the holes on both ends
of the frame. Check to ensure the frame is securely locked
together. Figure 3.2
Tip! It may be easier to place the frame on its side. With one foot
on the boom side rail, pull up on the top side rail unl the
locking spring pin is fully inserted into the pin hole.
❸ Li the le side wall up into a vercal posion, then li the
right side wall up unl both sides are completely up into the
vercal posion. Figure 3.3
Figure 3.2 Figure 3.3
Side rail
Side rail
Right wall
Le wall
3
Locking spring
pin in hole
2
7
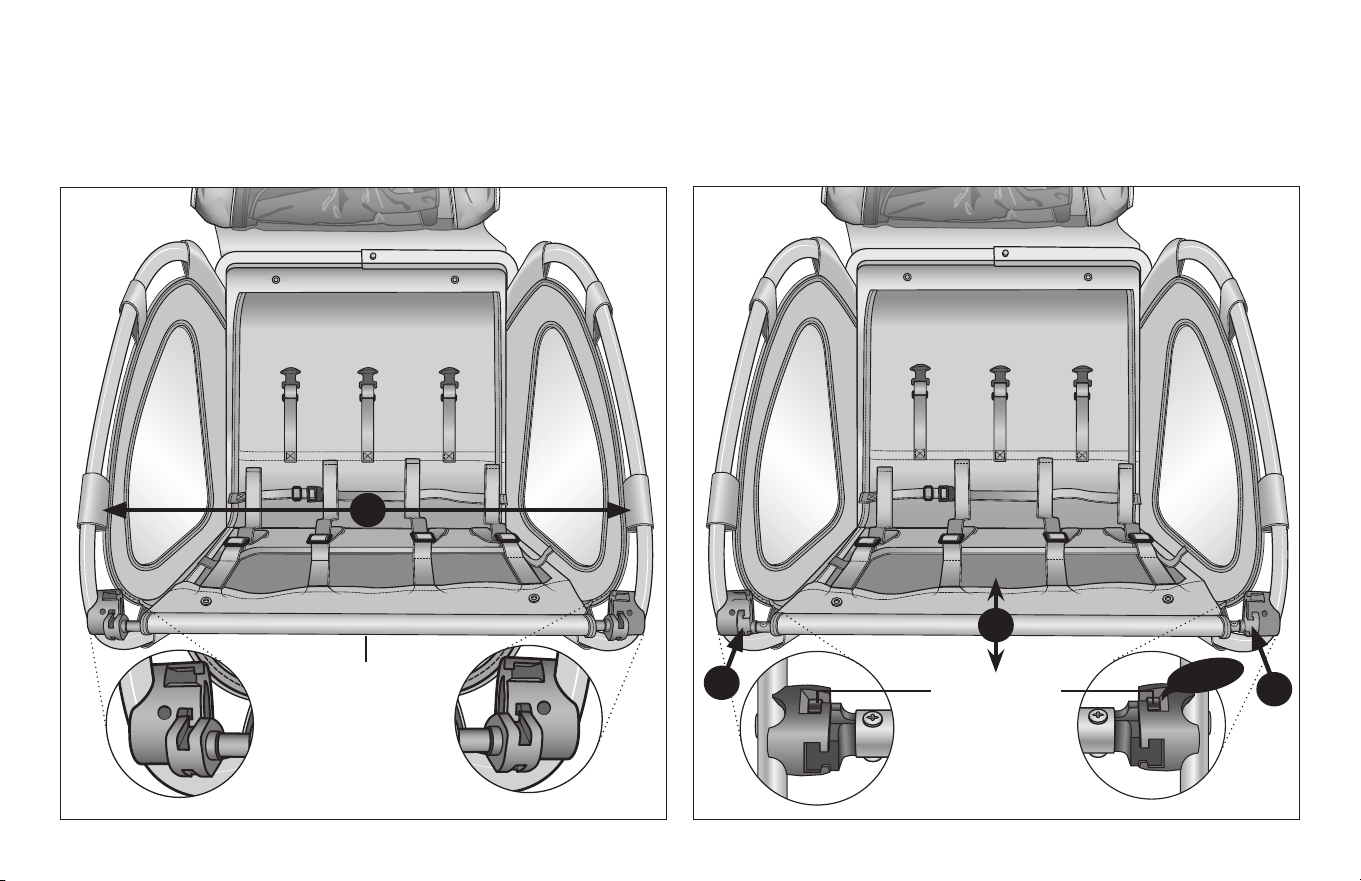
❹ IMPORTANT Ensure the crossbar is completely inserted
through the crossbar sleeve.
While pulling the side walls apart as far as you can, rest each
end of the crossbars into the crossbar latches. Figure 3.4
❺ Press the crossbar completely down into the crossbar latch
unl both latches are fully engaged.
❻ Ensure the crossbar is locked into place by pulling up and
down on it. Figure 3.5
Figure 3.4
Crossbar sleeve
Lock
Figure 3.5
4
5
5
6
Release buon
8
ATTACHING THE CANOPY AND FLAG POLE
Important! The safety ag is an important safety feature that
warns others that a trailer is present and on the bicycle. Always
have the safety ag on the trailer when in use.
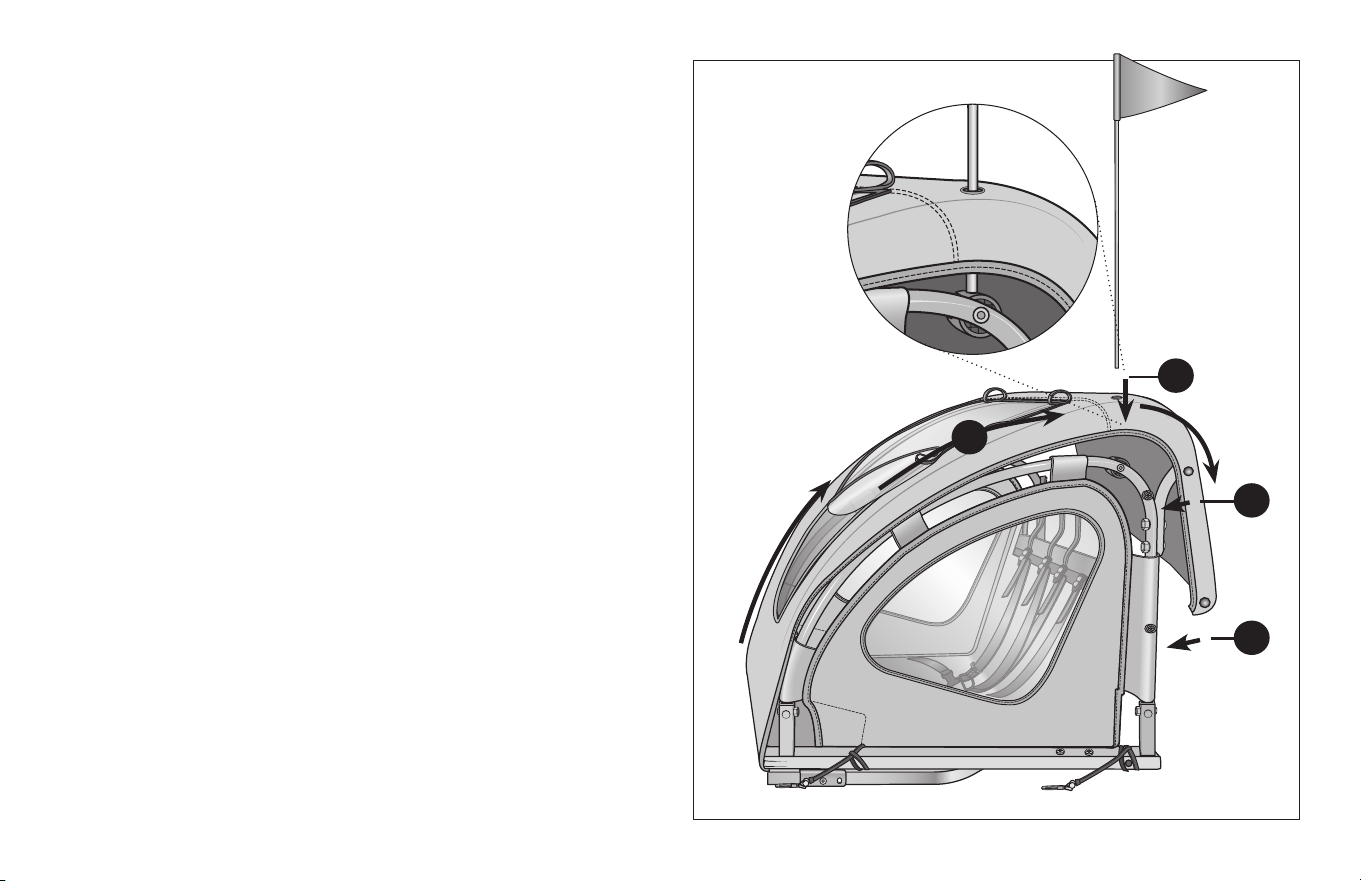
❶ While pulling the canopy up and over the top of the frame,
insert the flag pole through the flag pole slot on the canopy
and into the flag pole attachment hole located on crossbar
latch. Figure 3.6
❷ Snap the first set of snaps at the top of the frame.
❸ Snap the second set of snaps located at the back of the frame
and ensure the flag pole is completely inserted into the flag
pole attachment hole.
❹ Roll the weather shield up into the bands at the top of the
canopy if you are not using it.
Figure 3.6
2
3
1
4
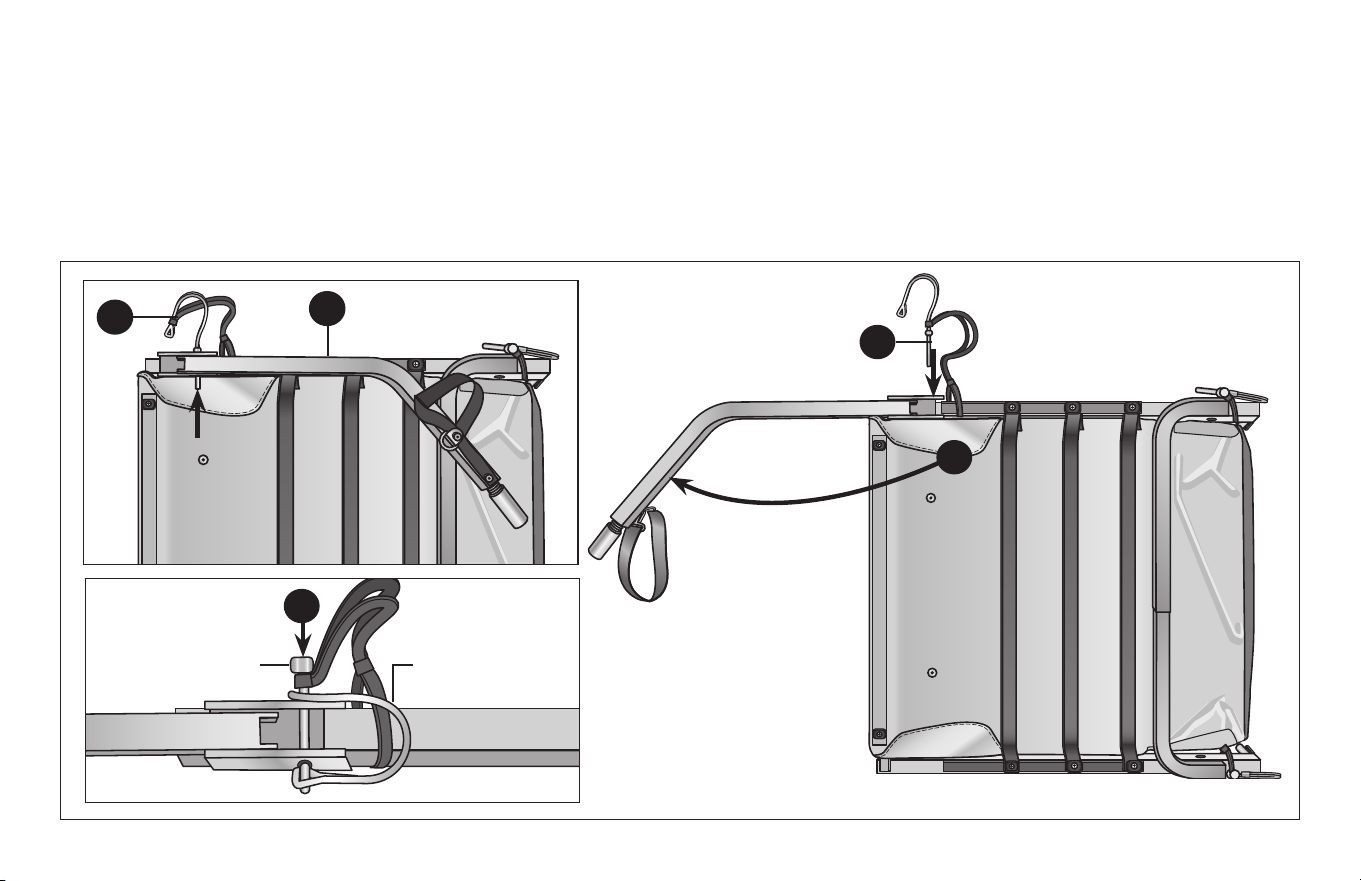
EXTENDING AND SECURING THE TOW BAR
9
❹ Insert the locking pin completely through the hole in the end
of the tow bar and bracket.
❺ Slide the end of the metal safety loop over the end of the
locking pin. Ensure the locking pin is securely in place.
Figure 3.7
❶ Place the trailer on its side with the tow bar facing up.
❷ Remove the locking pin from the tow bar bracket.
❸ Rotate the tow bar out and away from the trailer. The tow bar
should be resng on the front of the frame.
Figure 3.7
2
1
Locking pin
Safety loop
3
4
5
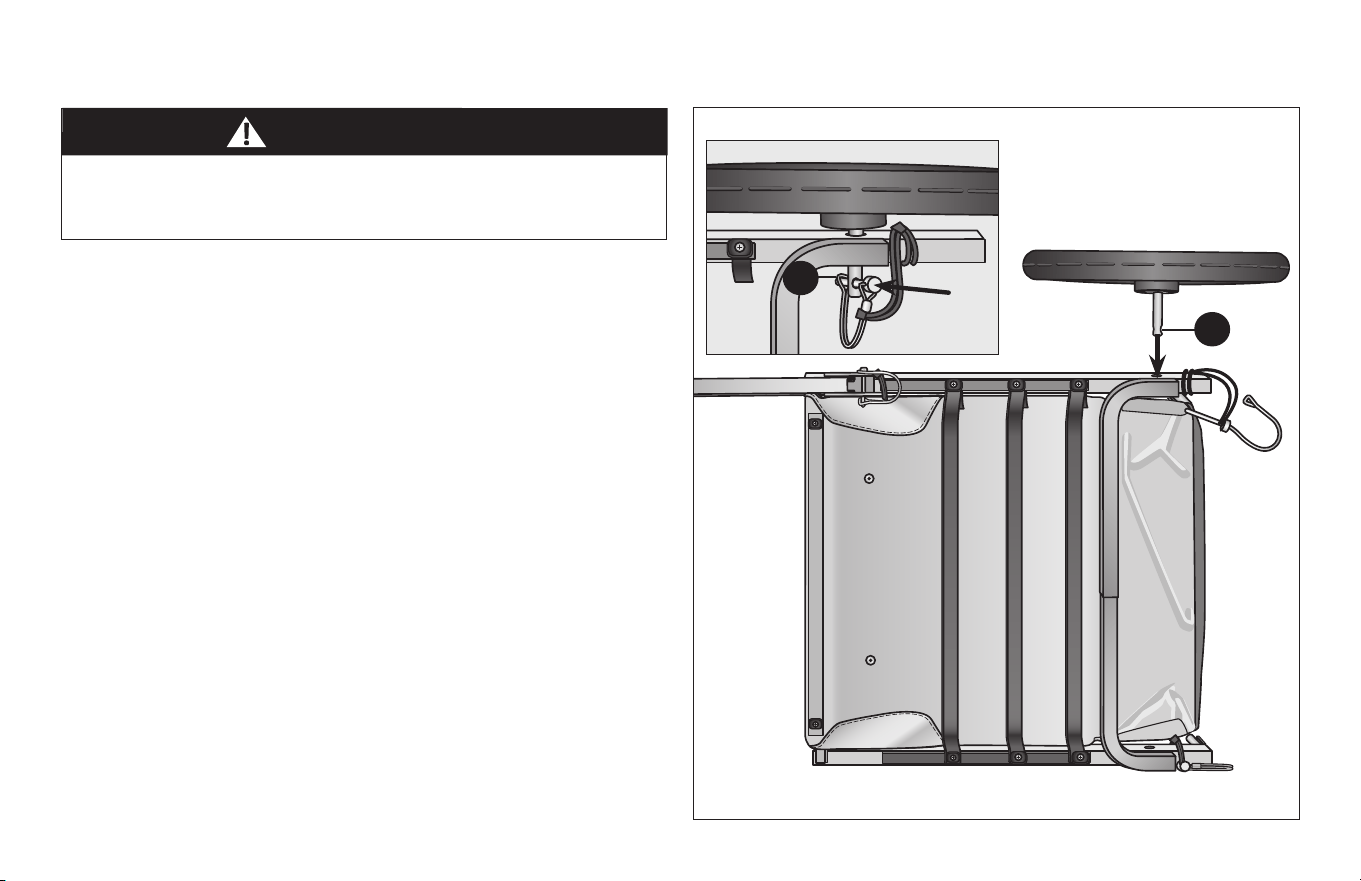
WARNING!
10
ATTACHING THE WHEELS
❶ Insert the axle of the wheel into the wheel hole located
towards the rear of the trailer. Figure 3.8
❷ Insert the locking pin into the axle and slide the end of the
safety loop over the end of the locking pin. Ensure the locking
pin is securely in place.
Wheels that are not securely locked in place may fall o the
trailer and cause serious injury or death. Always ensure the
wheels are securely locked in place before use.
Figure 3.8
1
2
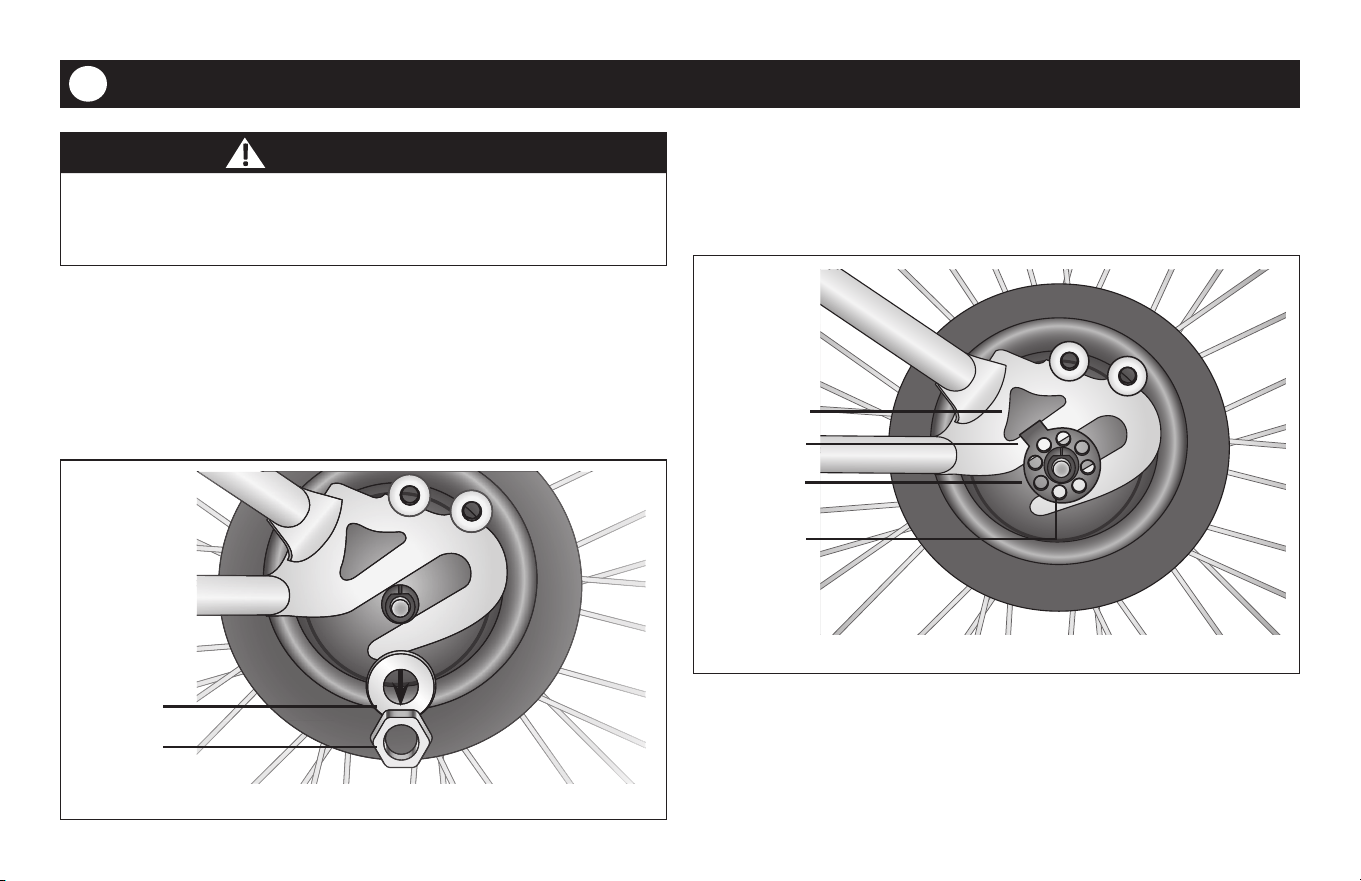
4 Trailer Aachment
11
Use of the trailer without the safety strap aached to the
bicycle may result in serious injury or death. Always aach the
safety strap to the bicycle when using the trailer.
The following secon provides instrucons for aaching the trailer
to a bicycle with rear hub nuts or quick release.
Note: Remove the coupler plate and tab washer from the end of
the tow bar before proceeding.
❷ Place the tab washer on the axle. Fit the tab into the slot on
the bicycle frame dropout. Note: If your bicycle frame doesn’t
have a slot in the drop out, rotate the tab to t into the axle
slot. Figure 4.2
❶ Using a wrench, remove the hub nut and washer from the
bicycle’s back wheel. Figure 4.1
Washer
Hub nut
WARNING!
Slot
Tab
Axle slot
Tab washer
Figure 4.1
Figure 4.2
12
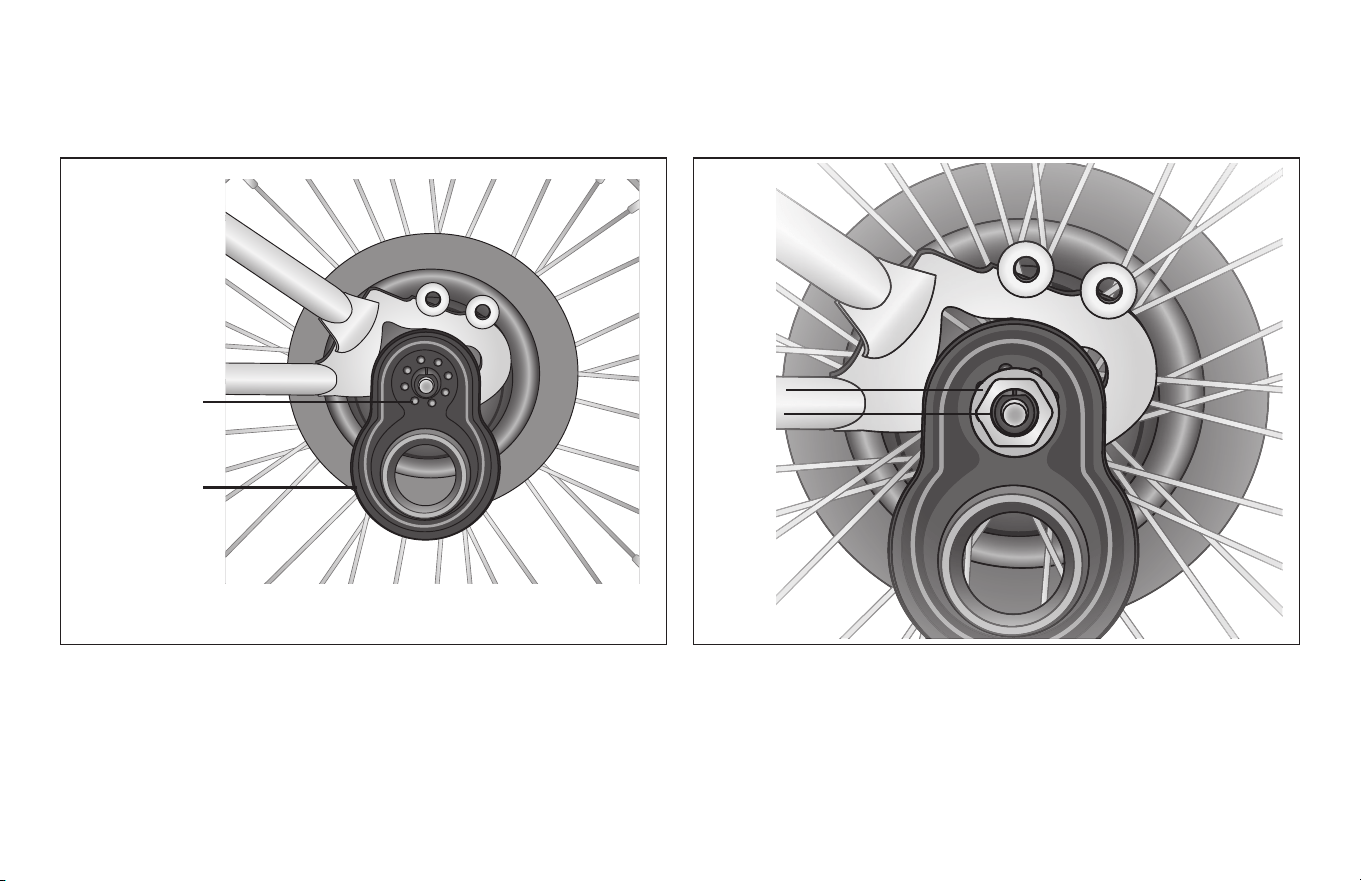
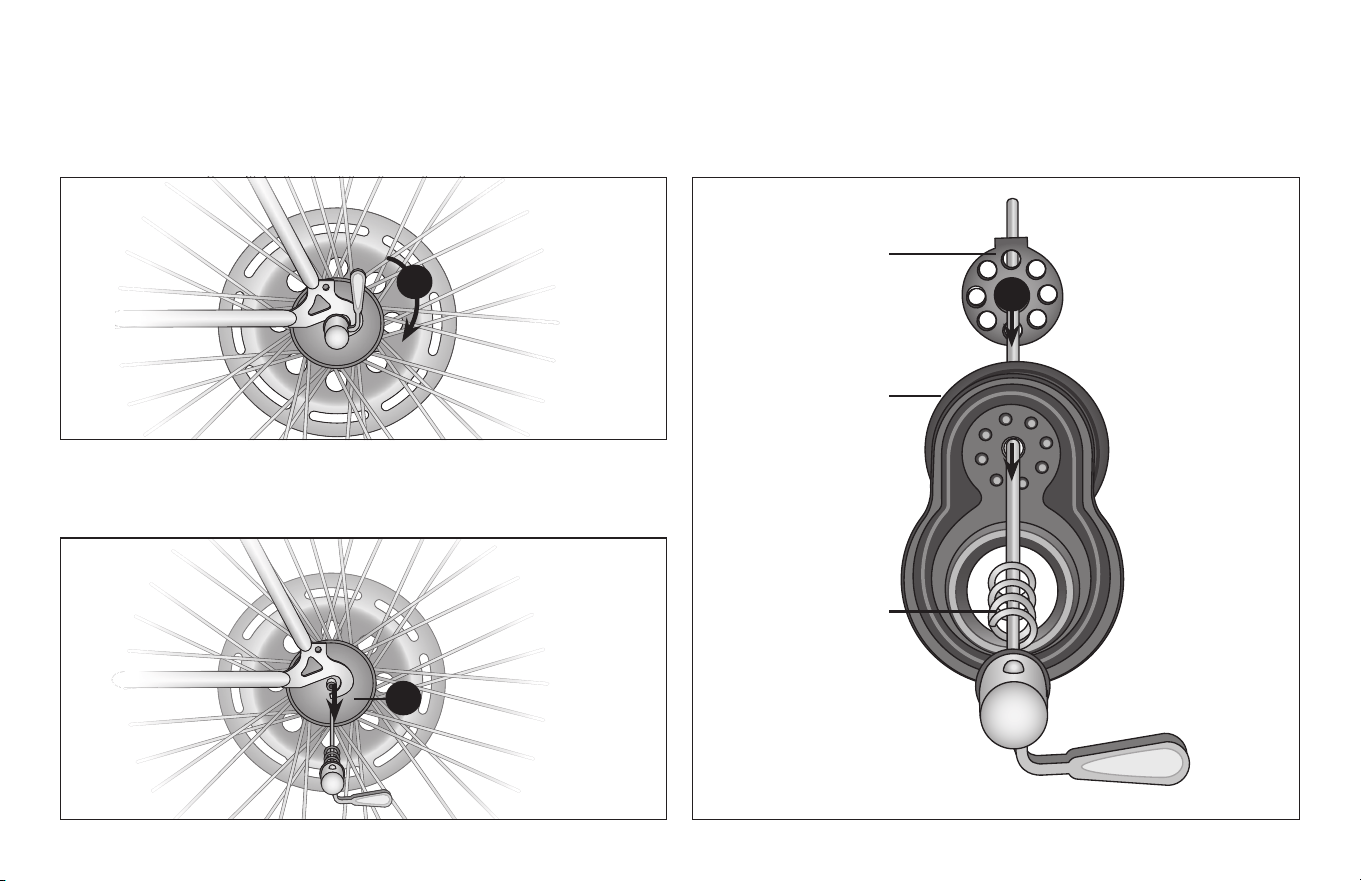
❸ Place the coupler plate on the axle, in a vercal posion with
the large hole down. Align the pegs on the back of
the plate with the holes in the tab washer. Figure 4.3
❹ Place the hub nut and washer back on the axle and ghten.
Figure 4.4
Coupler pegs
Coupler plate
large hole
Washer
Hub nut
Figure 4.3 Figure 4.4
13
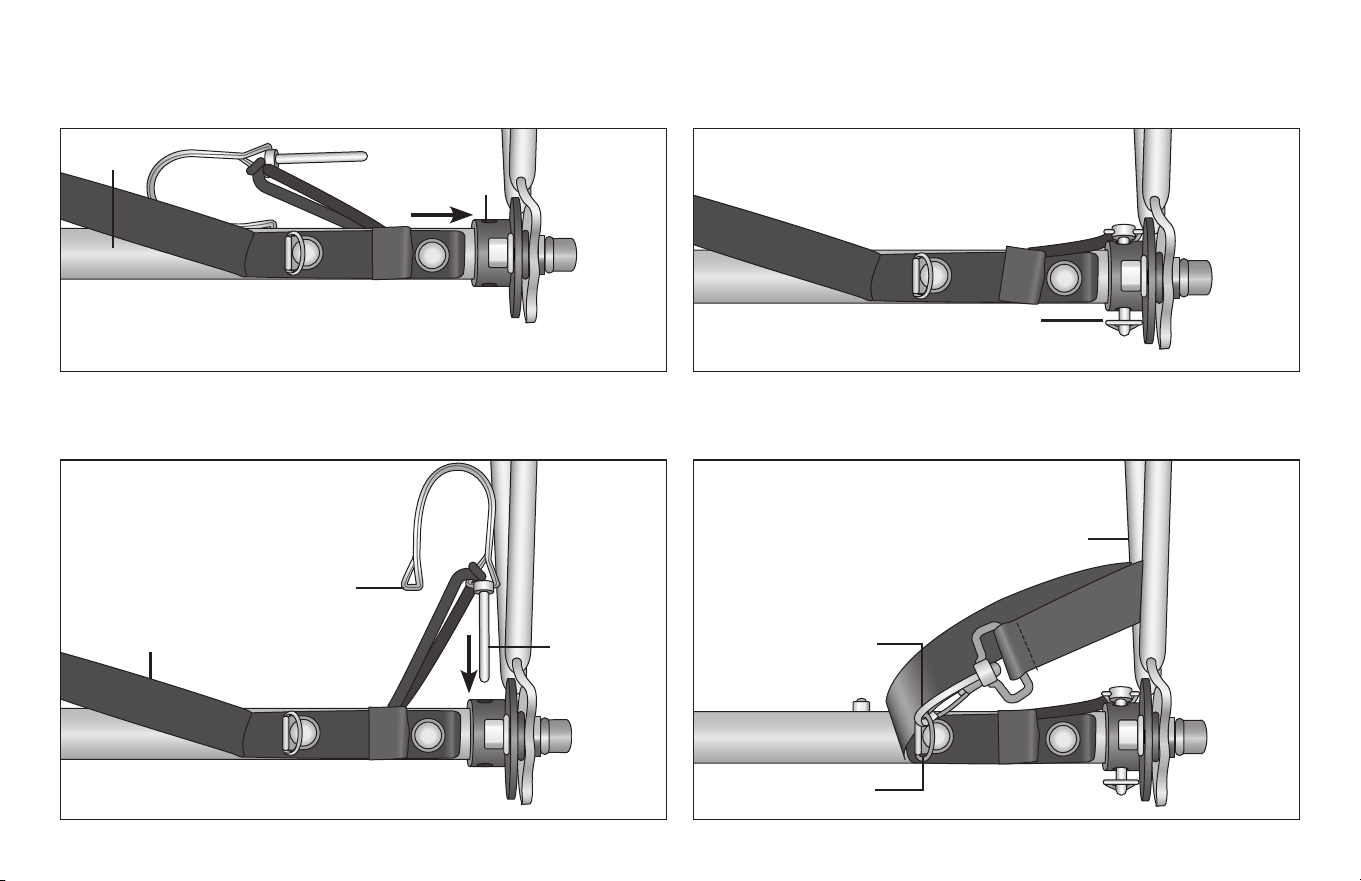
❺ Insert the tow bar into the large hole on the coupler plate.
Figure 4.5
❻ Insert the locking pin through the coupler plate and tow bar.
Figure 4.6
❼ Slide the metal safety loop onto the locking pin. Check that it is
securely in place. Figure 4.7
❽ Wrap the tow bar safety strap around the bicycle frame and
clip it to the ring on the end of the tow bar. Figure 4.8
Coupler plate
Tow bar
Locking pin
Safety loop
Safety loop
secured to pin
Note: Figures 4.5 - 4.8 are top views
looking down on the tow bar.
Figure 4.5 Figure 4.6
Figure 4.7
Bicycle frame
Safety strap clip
Tow bar ring
Figure 4.8
Safety strap
14
ATTACHING TO A BICYCLE WITH QUICK RELEASE AXLES
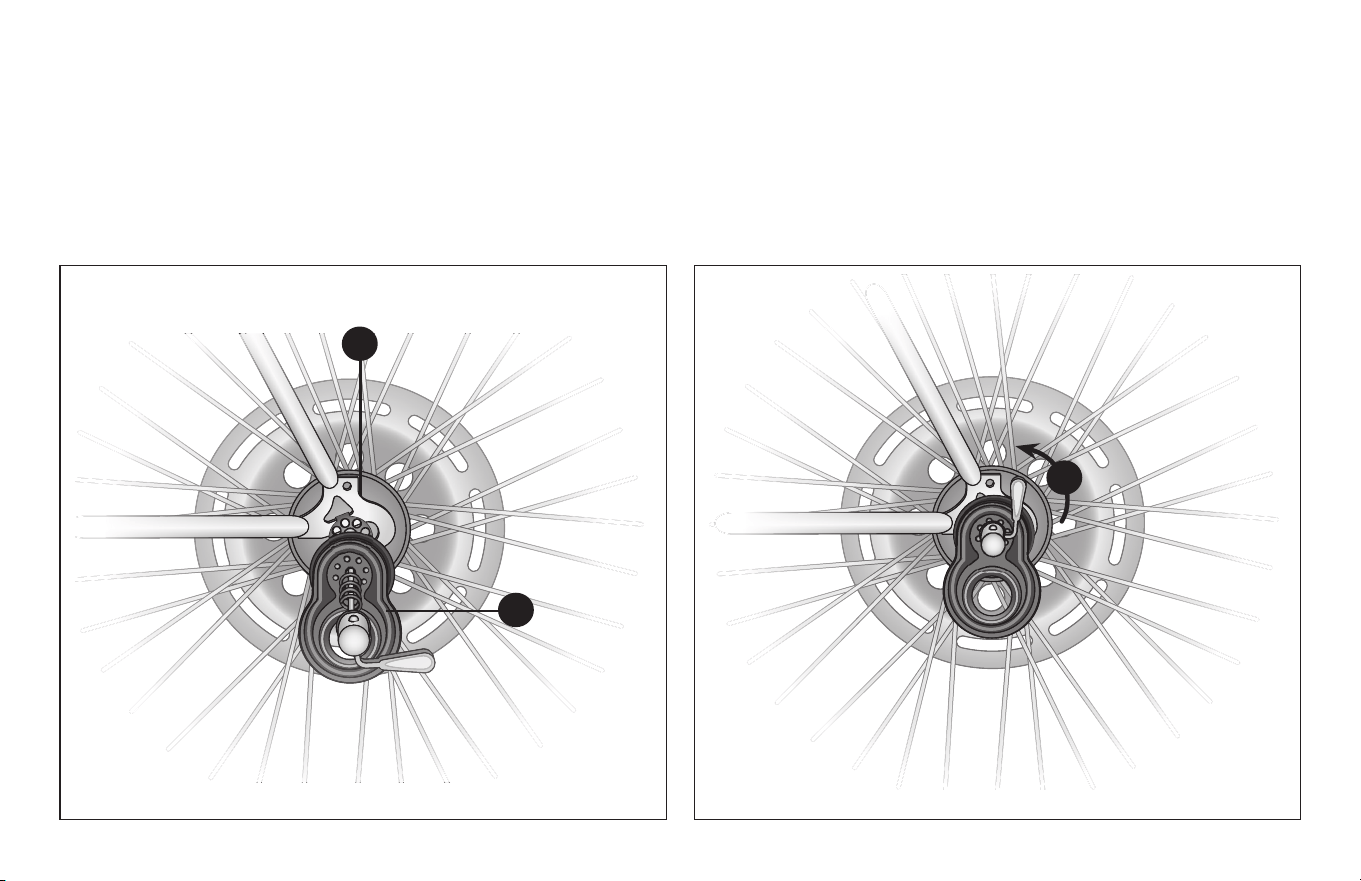
❶ Flip the quick release lever and remove the nut and spring
from the opposite side. Figure 4.9
❷ Remove the axle skewer and spring. Leave the wheel in place.
Figure 4.10
❸ Slide the axle skewer through the coupler plate and tab
washer. Figure 4.11
The hook on the tab
washer must face
towards the wheel hub
The bell of the
coupler plate must
face out
The wide end of the
spring must face out,
touching the lever
1
2
Figure 4.9
Figure 4.10 Figure 4.11
3
15
❹ Insert the axle skewer tab washer, coupler plate and spring
through the wheel, with the parts oriented as described in
step 3. Figure 4.12
❺ Replace the spring and nut that were removed in step 1 on the
axle skewer and ghten.
Fit the tab on the tab washer into the slot on
the bicycle frame dropout
❻ Rotate the quick release lever up and close fully and ghtly.
Ensure the coupler pegs are inserted into holes on tab washer.
When properly tightened, the quick release lever should leave
an imprint in your hand. The pressure should be firm but not
excessive. Figure 4.13
❼ Follow step 5 - 8 on page 13. Figures 4.5 - 4.8
4
5
6
Figure 4.12 Figure 4.13
5 Using the Safety Harness
WARNING!
16
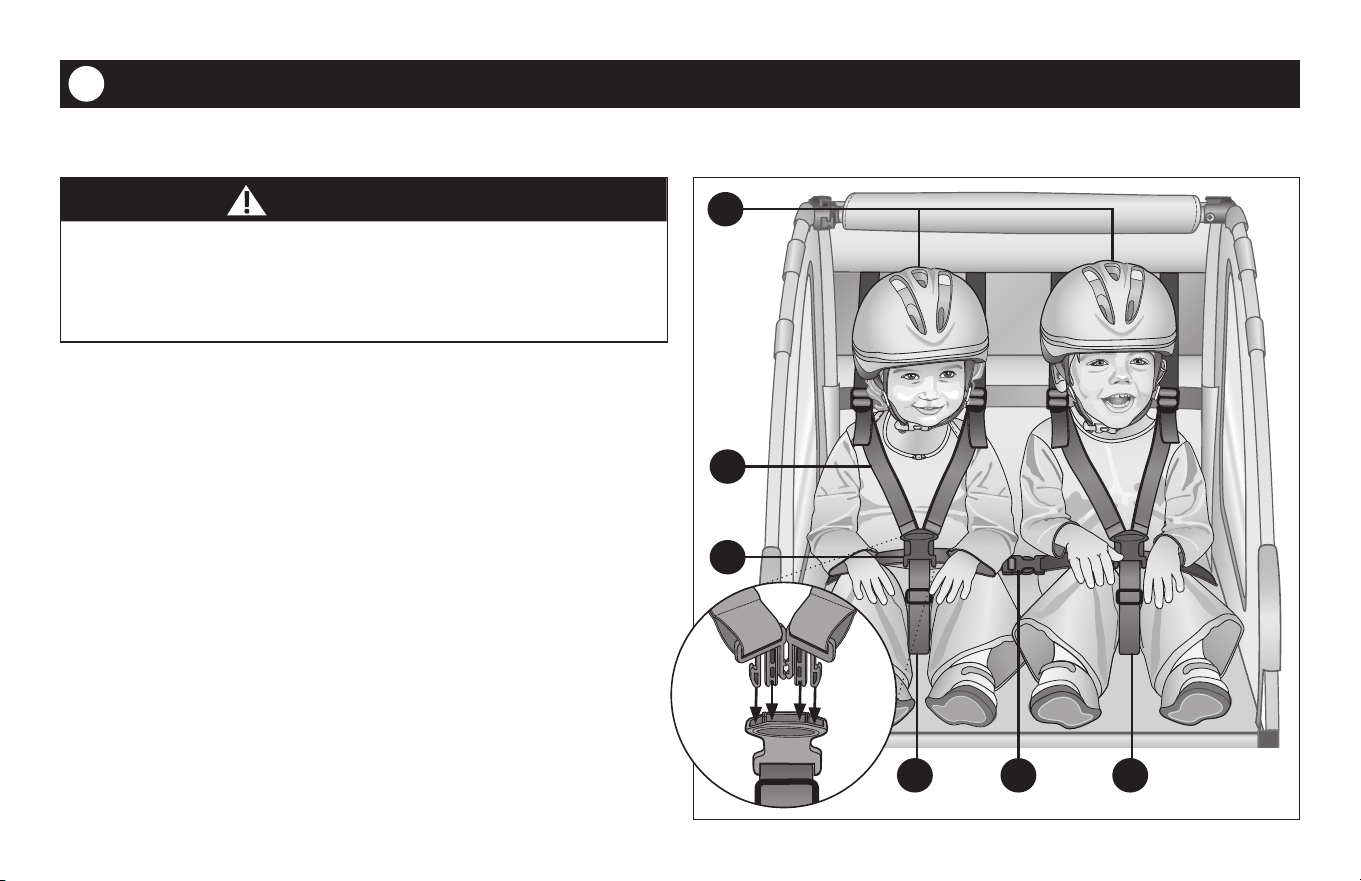
• Avoid serious injury from falling or sliding out. Always properly
secure the passenger(s) with the safety harness.
• Never leave your child unaended in or near the bicycle
trailer.
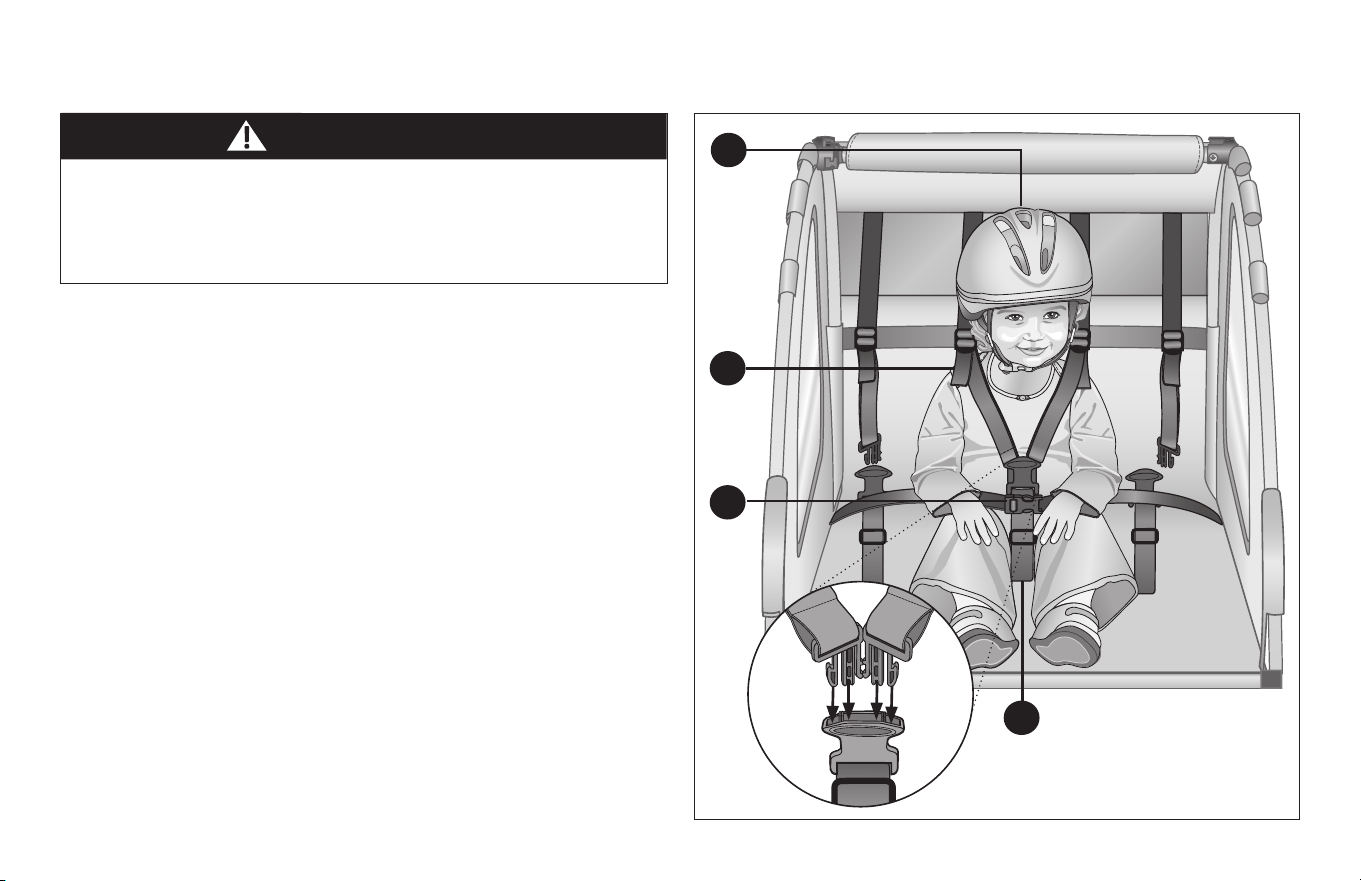
❶ Unbuckle the shoulder straps from the center straps.
❷ Seat each child in the center of each passenger compartment.
❸ Place the center strap between the child’s legs.
❹ Place the shoulder straps over each child’s shoulders and
fasten the center strap buckle.
Important! Adjust the straps so the buckle meets at the child’s
stomach.
❺ Bring the waste strap across both children’s hips, and fasten
the buckle in between the two children. Tighten as needed.
Figure 5.1
To properly remove the children, reverse above steps 1-5, and
take the children out.
USING THE SAFETY HARNESS WITH TWO CHILDREN
1
3
4
2
3 5
Figure 5.1
17
USING THE SAFETY HARNESS WITH ONE CHILD
❶ Seat the child in the center of the passenger compartment.
❷ Place the center strap between the child’s legs.
❸ Place the shoulder straps over each child’s shoulders and
fasten the center strap buckle.
Important! Adjust the straps so the buckle meets at the child’s
stomach.
❹ Bring the waste strap across the children’s hips, and fasten the
buckle. Tighten as needed. Figure 5.4
• Avoid serious injury from falling or sliding out. Always properly
secure the passenger(s) with the safety harness.
• It may be dangerous to leave your child unaended. Never
leave your child unaended in or near the bicycle trailer.
3
4
1
2
WARNING!
Figure 5.4
18
WARNING!
• There are pinch points between the sidewalls and the frame
of the trailer that may cause injury.
• Always fold or unfold the trailer slowly and with cauon.
• Keep children clear when folding or unfolding the trailer.
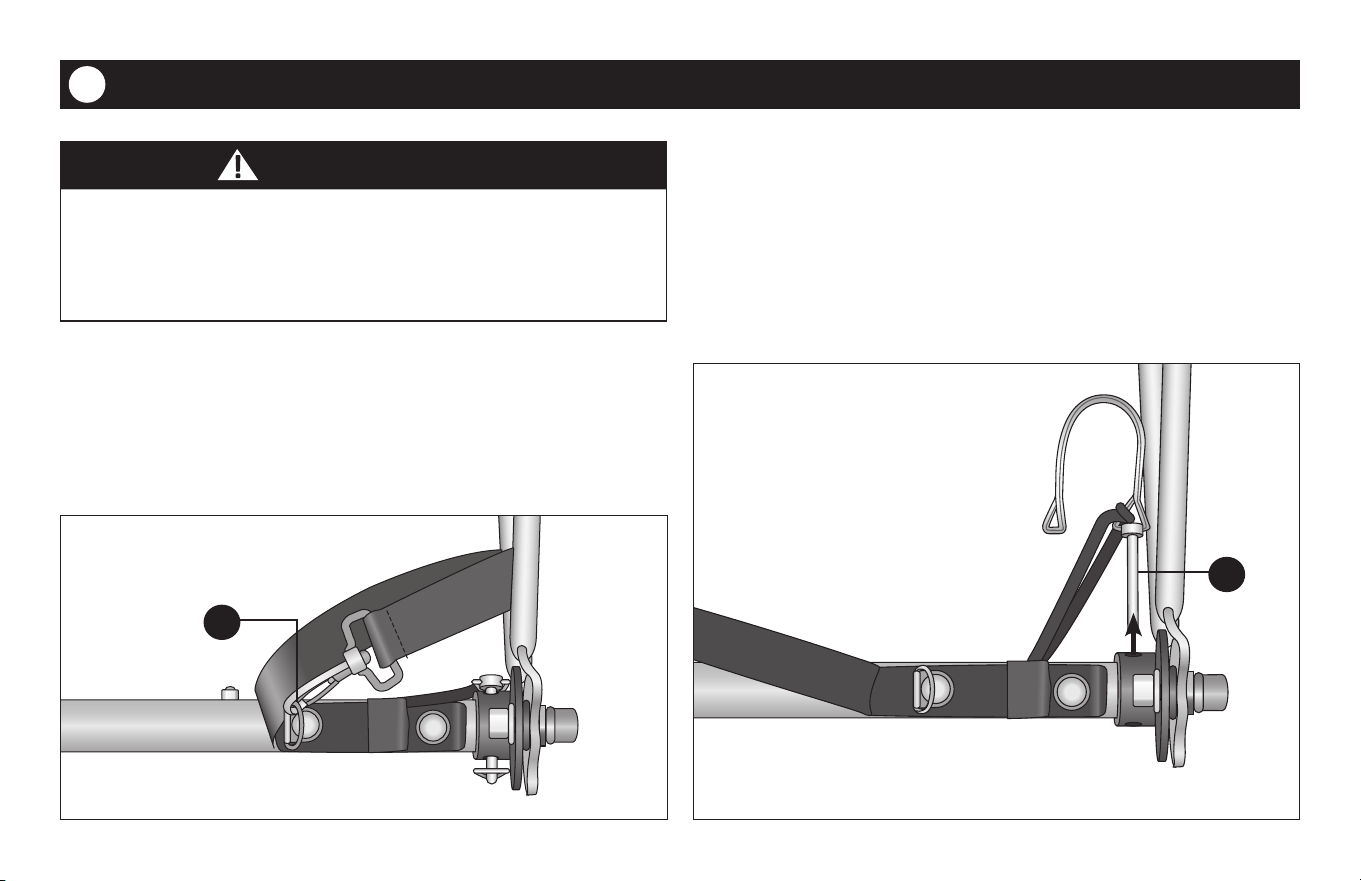
REMOVE THE TOW BAR FROM THE BICYCLE
❶ Remove the child from the passenger compartment
❷ Unfasten the clip on the safety strap from the tow bar ring,
and unwrap it from the bicycle frame. Clip the strap back onto
the D-ring of the tow bar. Figure 6.1
Figure 6.1
❸ Remove the locking pin from the tow bar coupler. Figure 6.2
❹ Remove the tow bar from the coupler.
❺ Insert the locking pin through the end of the tow bar and
secure it with the safety loop.
❻ If desired, leave the coupler on the bicycle wheel hub for
future use. It is not necessary to remove when storing.
3
6 Disassembly and Storage
Figure 6.2
2
19
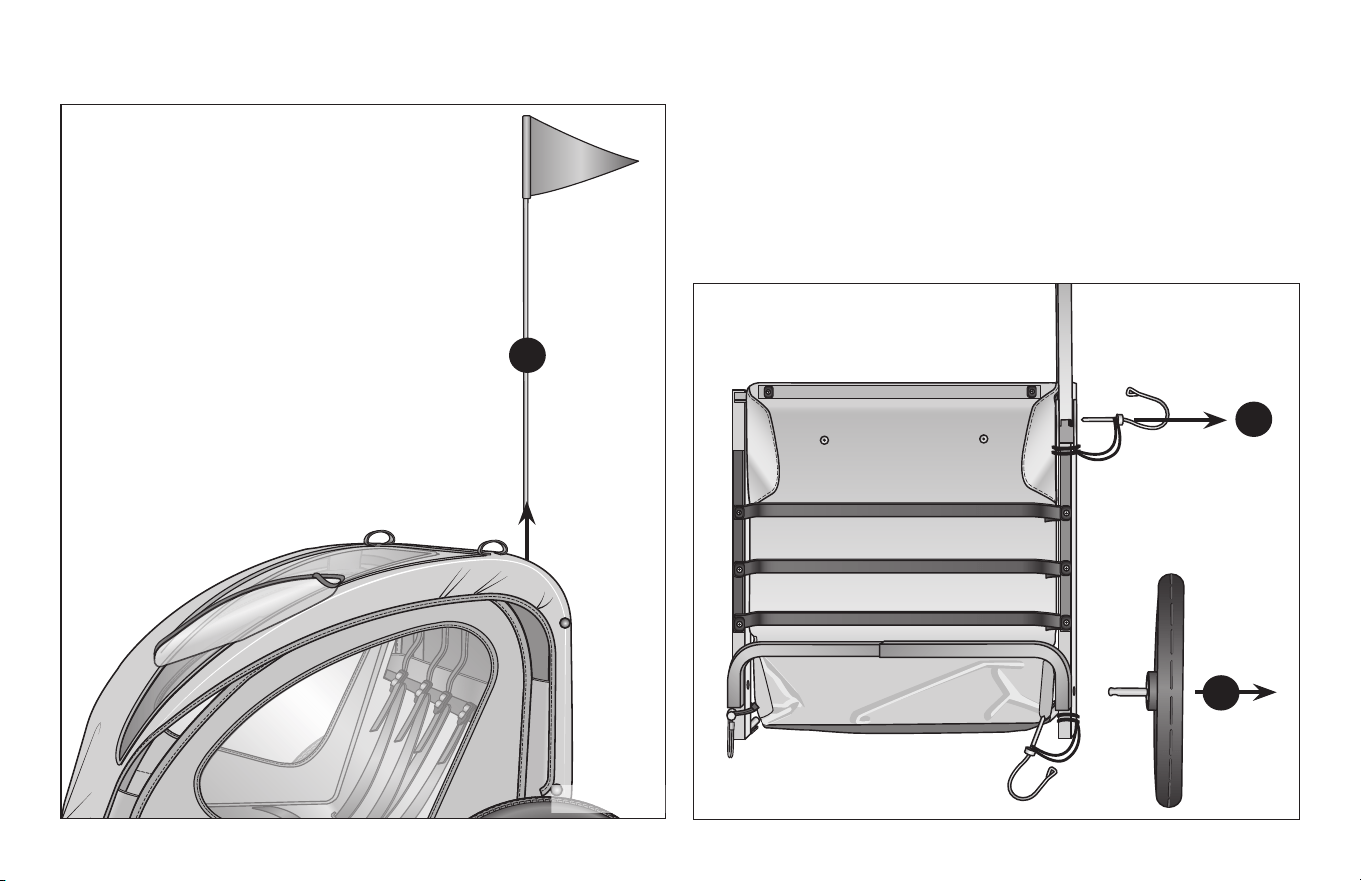
❷ Remove the wheels by:
a. Sliding the safety loop from the end of the locking pin.
b. Remove the locking pin from the axle, and pull the
wheel out of the hole in the frame bracket.
c. Slide the locking pin back into the frame hole
❸ Remove the locking pin from the tow bar bracket. Figure 6.4
❶ Remove the ag pole. Figure 6.3
Figure 6.3
2
3
Figure 6.4
1
Release buon
20
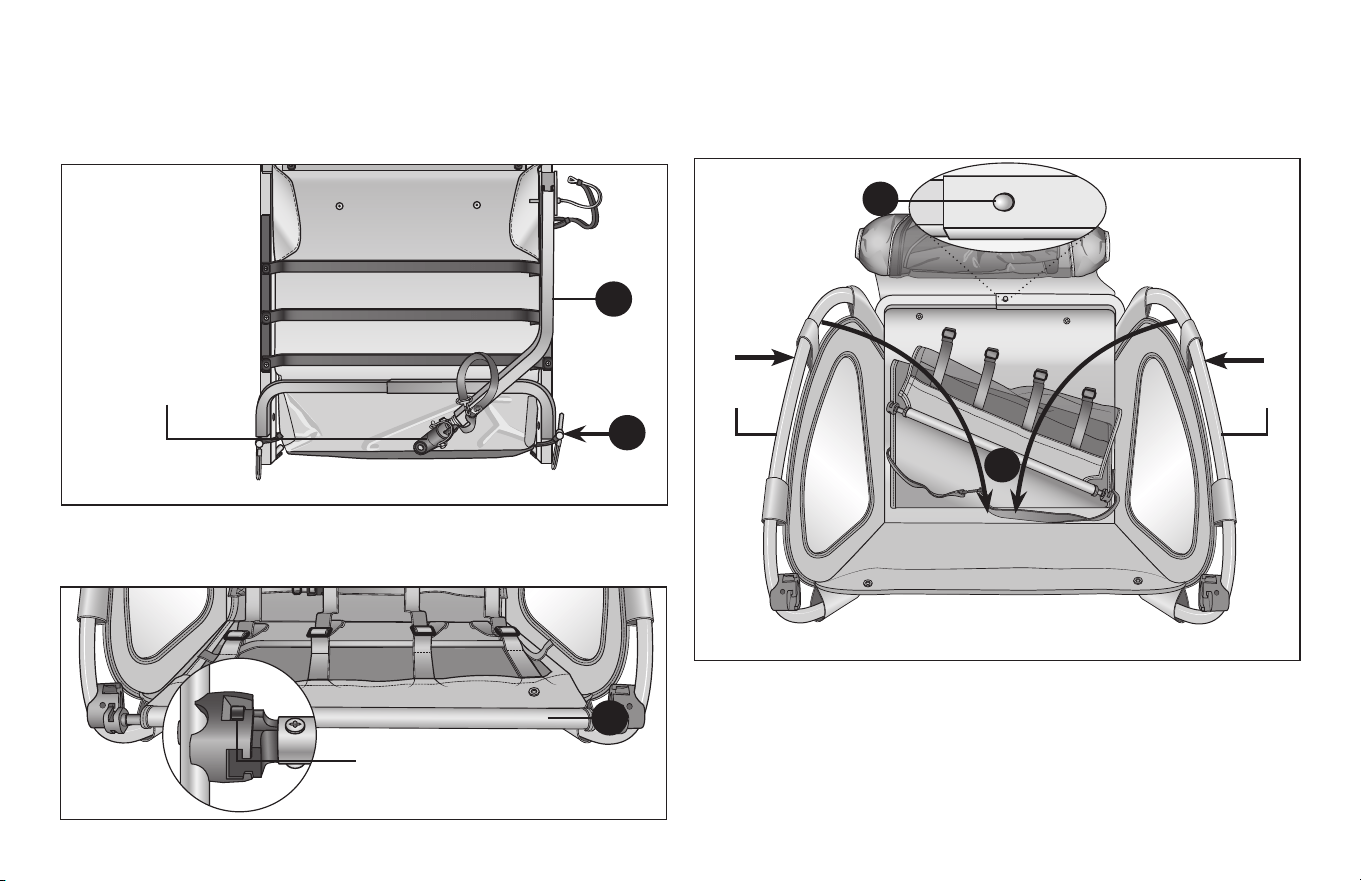
❼ Carefully fold the trailer side walls down. Figure 6.7
❽ Press the locking spring pins down and push the side rails in.
Figure 6.7
Note: Coupler
plate will remain
assembled to bike
99% of the me
❹ Fold the tow bar underneath the trailer. Figure 6.5
❺ Place the locking pin back through the tow bar and bracket
Figure 6.5
❻ Press the crossbar release buttons and remove the crossbar
from the crossbar latches. Figure 6.6
❾ Place any loose items such as the canopy and wheels inside the
passenger compartment.
❿ Store in a dry place. Important! If the storage area is hot then
release the some air from the res. This will help prevent
excessive expansion or popping.
5
4
6
Figure 6.5
Figure 6.6
Figure 6.7
7
8
Side rail Side rail
Locking spring pin

21
Pacic Cycle warrants this product to be free of defecve materials and workmanship for 1 year from the date of original purchase.
THIS LIMITED WARRANTY IS THE ONLY WARRANTY APPLICABLE
TO THIS PRODUCT, AND IS EXPRESSLY IN LIEU OF ANY OTHER WARRANTY.
This limited warranty give you specic legal rights and you may also have other rights which may vary from state to state.
This warranty is extended only to the original consumer purchaser for non-commercial use and does not cover res or tubes, grips,
brake pads, or other wear parts, ordinary wear and tear, abuse, misuse, neglect, the, or damage due to accident.
PACIFIC CYCLE IS NOT RESPONSIBLE FOR INCIDENTAL OR CONSEQUENTIAL DAMAGES. THIS LIMITED WARRANTY DOES NOT COVER ANY
PERSONAL INJURIES, DAMAGE TO, OR, FAILURE OF THE PRODUCT OR ANY OTHER LOSSES DUE TO ACCIDENT, ABUSE, MISUSE,
ALTERATION, NEGLECT, NORMAL WEAR AND TEAR, IMPROPER ASSEMBLY, IMPROPER FIT, IMPROPER MAINTENANCE OR USE OF
UNAUTHORIZED REPLACEMENT PARTS NOT DESIGNED FOR THE PRODUCT.
To make a claim under warranty, nocaon of such defect must be given to Pacic Cycle, Inc. the address stated on the previous page.
You will be instructed on how the product or part needing replacement should be shipped postpaid to Pacic Cycle, Inc.
7 Warranty
schwinnbikes.com
©2025 Pacic Cycle, Inc. Schwinn® is a registered trademark of Pacic Cycle, Inc.
4902 Hammersley Road
Madison, WI 53711
Made in China
A01557 021425