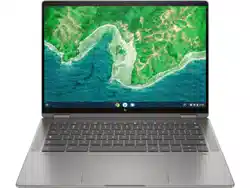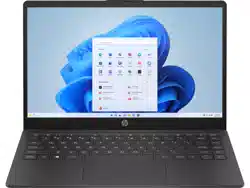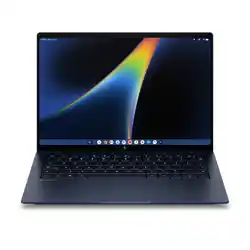

User Guide
SUMMARY
This guide provides basic information for using and upgrading this product, including topics such as components,
features, networks, and HP resources.

Legal information
© Copyright 2026 HP Development
Company, L.P.
Google, Googlebook, Google Drive, and
Chrome are trademarks of Google LLC.
Windows is either a registered trademark or
trademark of Microsoft Corporation in the
United States and/or countries. USB Type-
C, USB-C and the 10 Gbps port logos are
registered trademarks of USB Implementers
Forum.
Second Edition: September 2026
First Edition: August 2026
Document Part Number: Q25464-002
Product notice
This guide describes features that are
common to most models. Some features may
not be available on your computer.
Software terms
By installing, copying, downloading, or
otherwise using any software product
preinstalled on this computer, you agree
to be bound by the terms of the HP End
User License Agreement (EULA). If you do
not accept these license terms, your sole
remedy is to return the entire unused product
(hardware and software) within 14 days for a
full refund subject to the refund policy of your
seller.
For any further information or to request a full
refund of the price of the computer, please
contact your seller.

Safety warning notice
Reduce the possibility of heat-related injuries or of overheating the computer by following the practices
described.
WARNING! To reduce the possibility of heat-related injuries or of overheating the computer, do not
place the computer directly on your lap or obstruct the computer air vents. Use the computer only on a
hard, at surface. Do not allow another hard surface, such as an adjoining optional printer, or a soft
surface, such as pillows, rugs or clothing, to block airow. Also, do not allow the AC adapter to come into
contact with the skin or a soft surface, such as pillows, rugs or clothing, during operation. The computer
and the AC adapter provided by HP comply with the user-accessible surface temperature limits dened
by applicable safety standards.
iii

Table of contents
1 About this guide.................................................................................................................................................................................... 1
2 Components........................................................................................................................................................................................... 2
Right...................................................................................................................................................................................................................................................................2
Left......................................................................................................................................................................................................................................................................2
Display .............................................................................................................................................................................................................................................................3
Keyboard area............................................................................................................................................................................................................................................4
Touchpad............................................................................................................................................................................................................................................4
Special keys.....................................................................................................................................................................................................................................5
Action keys........................................................................................................................................................................................................................................6
Top.......................................................................................................................................................................................................................................................................7
Bottom .............................................................................................................................................................................................................................................................7
Labels ...............................................................................................................................................................................................................................................................8
3 Navigating the screen ......................................................................................................................................................................11
Using touchpad and touch screen gestures .................................................................................................................................................................11
Tap .......................................................................................................................................................................................................................................................11
Scrolling (touchpad only) ...................................................................................................................................................................................................11
One-nger scrolling (touch screen only) ..............................................................................................................................................................12
One-nger swipe (touch screen only) .....................................................................................................................................................................12
Two-nger pinch zoom.........................................................................................................................................................................................................13
4 Power and battery..............................................................................................................................................................................14
Factory-sealed battery...................................................................................................................................................................................................................14
Charging the battery.............................................................................................................................................................................................................14
5 Printing ...................................................................................................................................................................................................15
6 Backing up, resetting, and recovering........................................................................................................................................16
Backing up ................................................................................................................................................................................................................................................16
Resetting....................................................................................................................................................................................................................................................16
Recovering................................................................................................................................................................................................................................................16
Installing the Chromebook Recovery Utility........................................................................................................................................................17
Creating recovery media...................................................................................................................................................................................................17
Recovering the Googlebook operating system with recovery media............................................................................................18
Setting up your computer after a reset or recovery................................................................................................................................................18
Erasing and reformatting the recovery media .............................................................................................................................................................18
7 More HP resources ............................................................................................................................................................................19
8 Specications .....................................................................................................................................................................................20
Input power...............................................................................................................................................................................................................................................20
iv

Operating environment ..................................................................................................................................................................................................................20
9 Electrostatic discharge ...................................................................................................................................................................22
10 Accessibility ......................................................................................................................................................................................23
HP and accessibility..........................................................................................................................................................................................................................23
Finding the technology tools you need...................................................................................................................................................................23
The HP commitment..............................................................................................................................................................................................................23
International Association of Accessibility Professionals (IAAP).........................................................................................................24
Finding the best assistive technology.....................................................................................................................................................................24
Assessing your needs..............................................................................................................................................................................................24
Accessibility for HP products.............................................................................................................................................................................24
Standards and legislation.............................................................................................................................................................................................................25
Standards......................................................................................................................................................................................................................................25
Mandate 376 – EN 301 549...............................................................................................................................................................................25
Web Content Accessibility Guidelines (WCAG)....................................................................................................................................25
Legislation and regulations .............................................................................................................................................................................................25
Useful accessibility resources and links...........................................................................................................................................................................26
Organizations.............................................................................................................................................................................................................................26
Educational institutions......................................................................................................................................................................................................26
Other disability resources................................................................................................................................................................................................27
HP links.............................................................................................................................................................................................................................................27
Contacting support ...........................................................................................................................................................................................................................27
Index ............................................................................................................................................................................................................28
v

About this guide1
This guide provides basic information for using and upgrading this product.
WARNING! Indicates a hazardous situation that, if not avoided, could result in serious injury or death.
CAUTION: Indicates a hazardous situation that, if not avoided, could result in minor or moderate injury.
IMPORTANT: Indicates information considered important but not hazard-related (for example,
messages related to property damage). Warns the user that failure to follow a procedure exactly as
described could result in loss of data or in damage to hardware or software. Also contains essential
information to explain a concept or to complete a task.
NOTE: Contains additional information to emphasize or supplement important points of the main text.
TIP: Provides helpful hints for completing a task.
About this guide
1
Components2
Your computer features top-rated components. This chapter provides details about your components,
where they are located, and how they work.
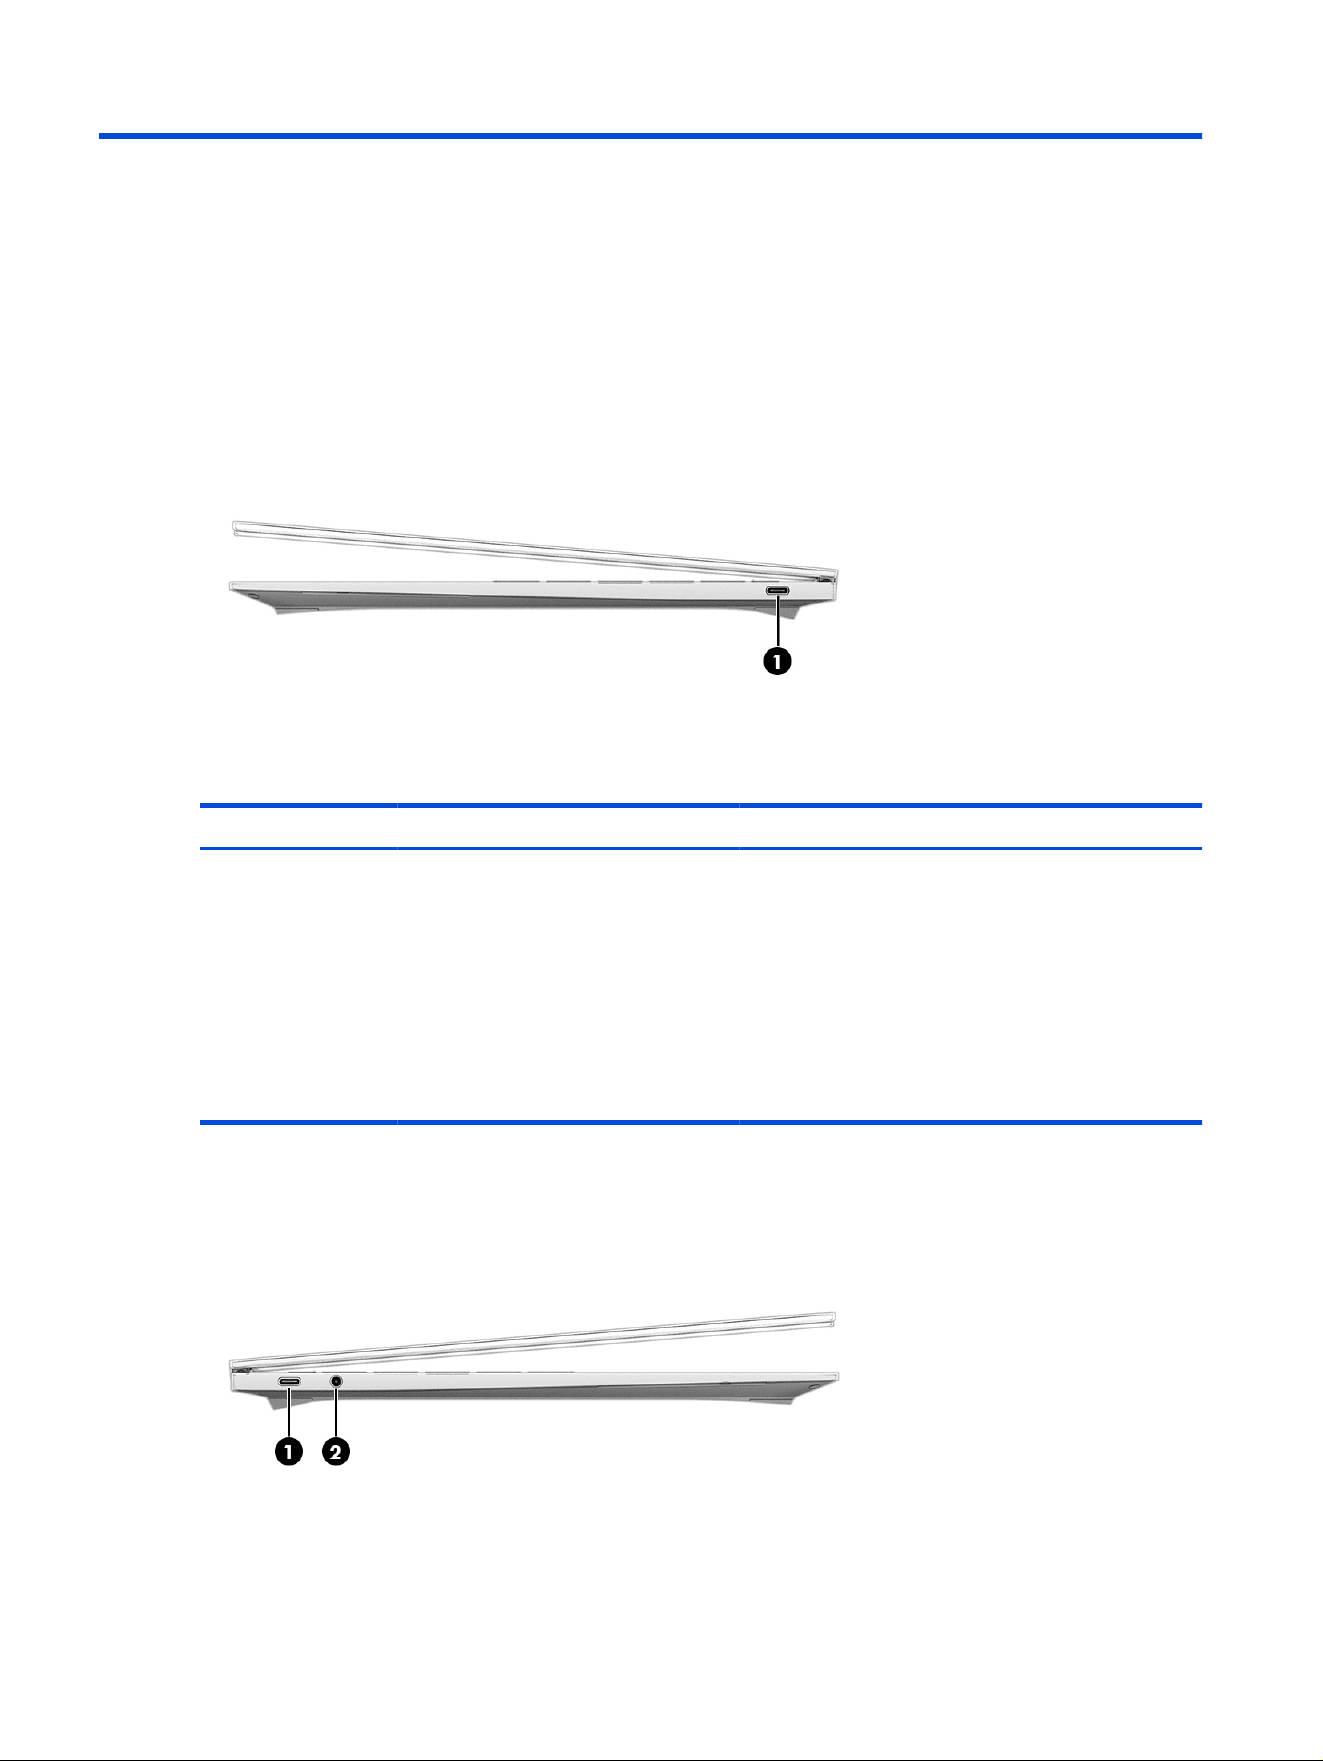
Right
Use the illustration and table to identify the component on the right side of the computer.
Table 2-1 Right-side component and description
Component Description
(1) USB Type-C® 10 Gbps port with HP Sleep
and Charge
Connects a USB device, provides high-speed data transfer,
and charges small devices (such as a smartphone), even
when the computer is off.
NOTE: Use a standard USB Type-C charging cable or
cable adapter (purchased separately) when charging a
small external device.
– and –
Connects a display device that has a USB Type-C
connector, providing DisplayPort output.
Left
Use the illustration and table to identify the components on the left side of the computer.
2
Chapter 2 Components
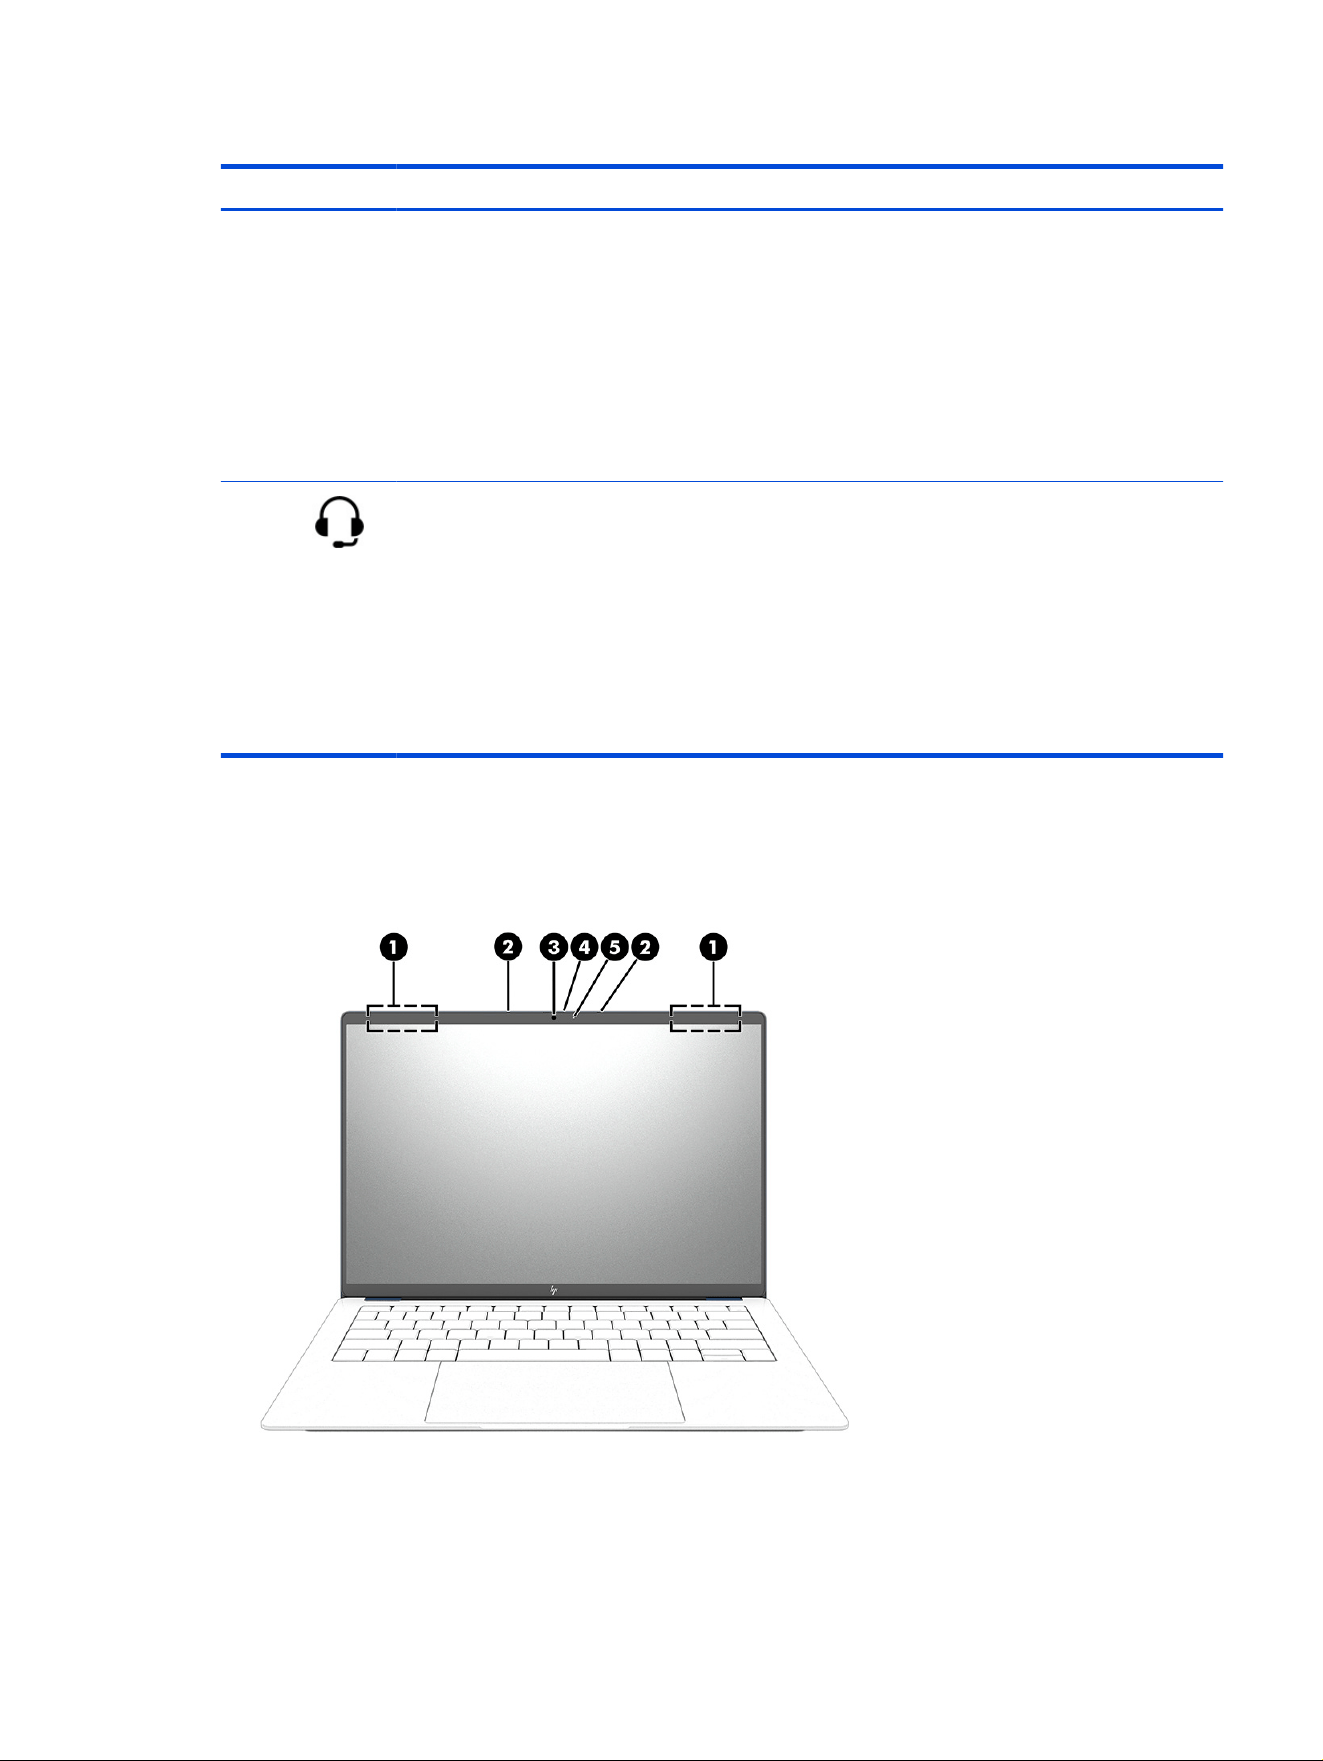
Table 2-2 Left-side components and their descriptions
Component Description
(1) USB Type-C 10 Gbps port with HP Sleep and
Charge
Connects a USB device, provides high-speed data transfer,
and charges small devices (such as a smartphone), even
when the computer is off.
NOTE: Use a standard USB Type-C charging cable or
cable adapter (purchased separately) when charging a
small external device.
– and –
Connects a display device that has a USB Type-C
connector, providing DisplayPort output.
(2) Audio-out (headphone)/Audio-in
(microphone) combo jack
Connects optional powered stereo speakers, headphones,
earbuds, a headset, or a television audio cable. Also
connects an optional headset microphone. This jack does
not support optional standalone microphones.
WARNING! To reduce the risk of personal injury, adjust
the volume before putting on headphones, earbuds, or a
headset. For additional safety information, see the
Regulatory, Safety, and Environmental Notices.
NOTE: When a device is connected to the jack, the
computer speakers are disabled.
Display
Use the illustration and table to identify the components on the display.
Display
3
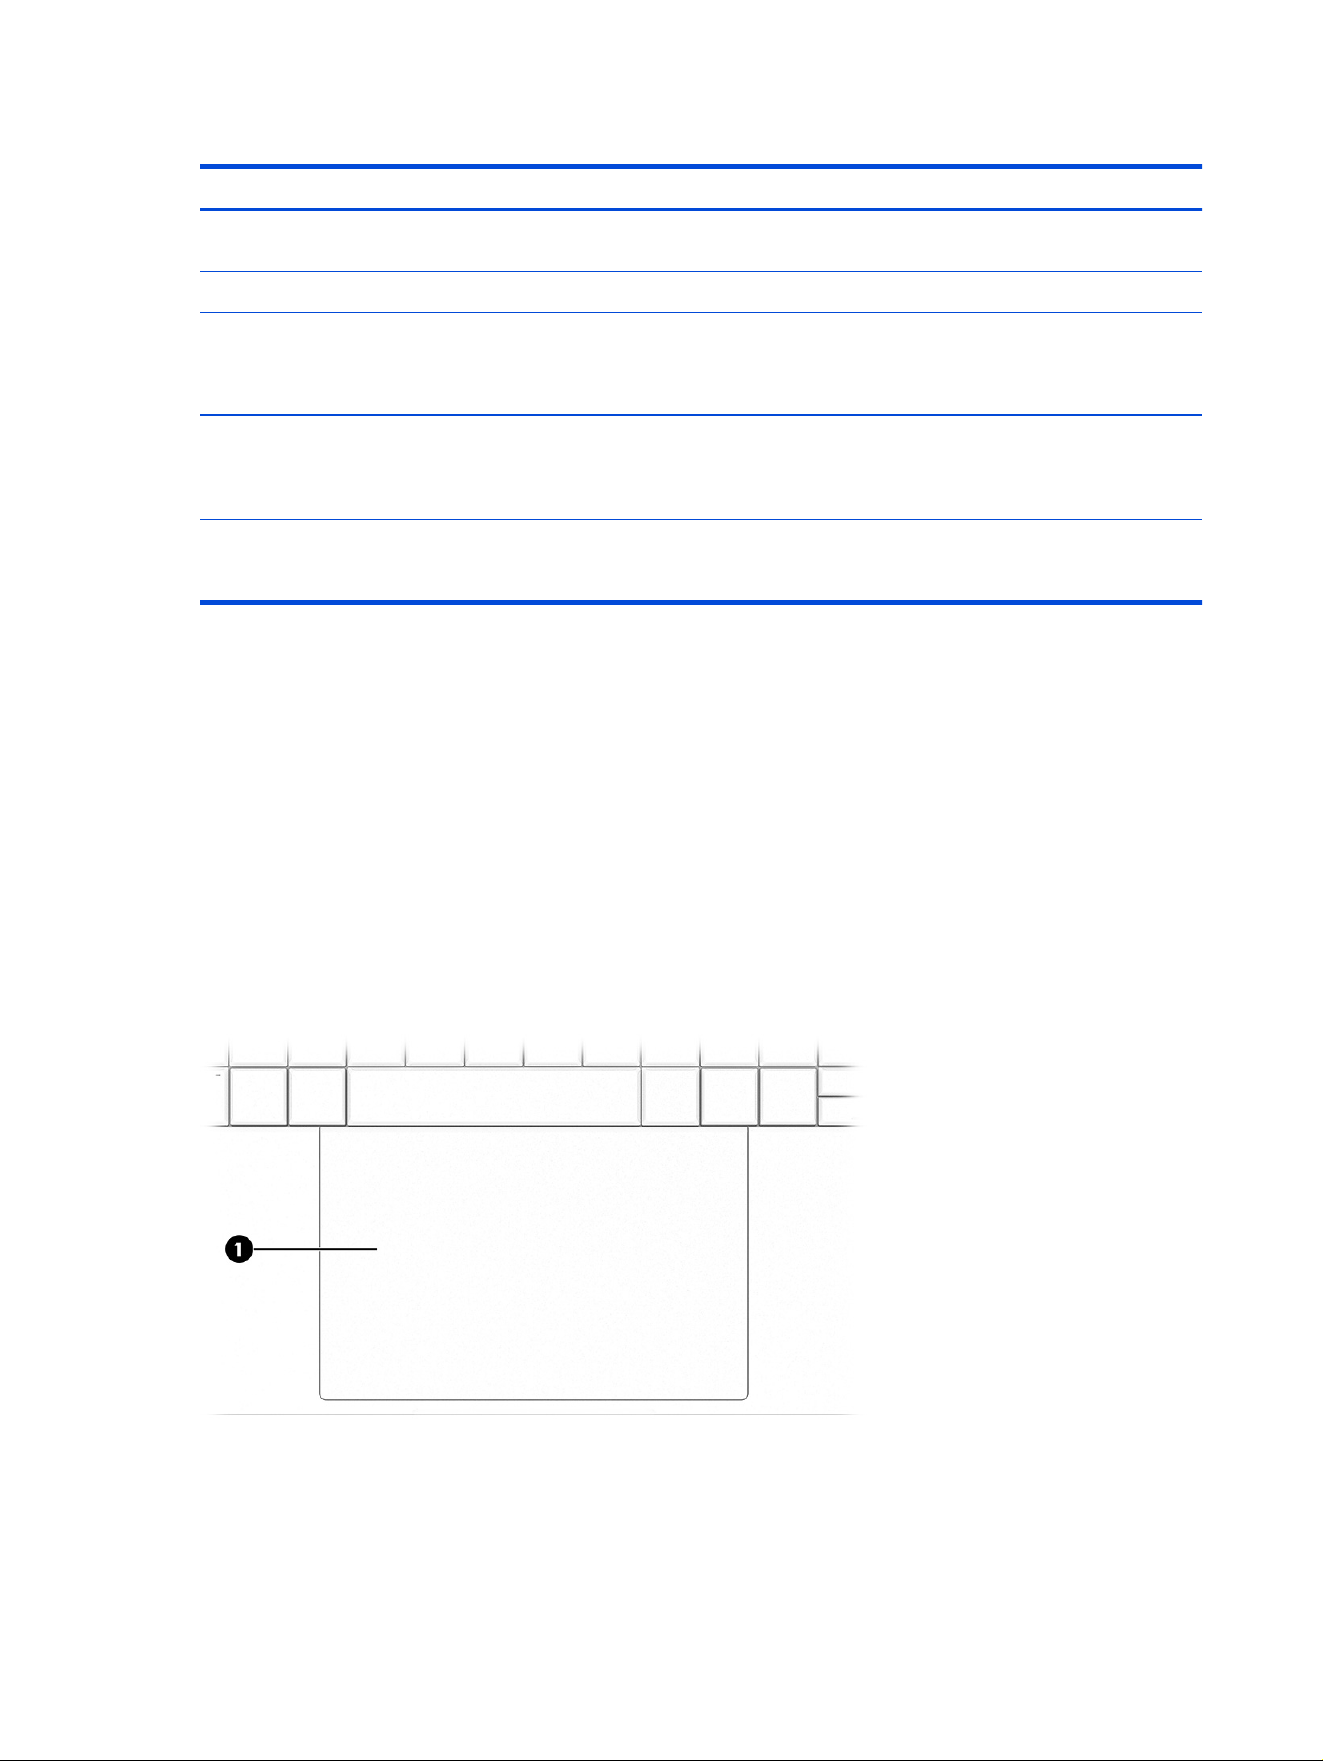
Table 2-3 Display components and their descriptions
Component Description
(1) WLAN antennas* Send and receive wireless signals to communicate with wireless
local area networks (WLANs).
(2) Internal microphones (2) Record sound.
(3) Camera Allows you to video chat, record video, and record still images.
NOTE: Camera functions vary depending on the camera
hardware and software installed on your product.
(4) Camera privacy cover By default, the camera lens is uncovered, but you can slide the
camera privacy cover to block the cameraʼs view. To use the
camera, slide the camera privacy cover in the opposite direction
to reveal the lens.
(5) Camera light On (white): The camera is in use.
Off: The camera is turned off by the software.
*The antennas are not visible from the outside of the computer. For optimal transmission, keep the areas
immediately around the antennas free from obstructions.
For wireless regulatory notices, see the section of the Regulatory, Safety, and Environmental Notices that
applies to your country or region.
Keyboard area
Keyboards can vary by language.
Touchpad
The touchpad setting and component ia described here.
4
Chapter 2 Components
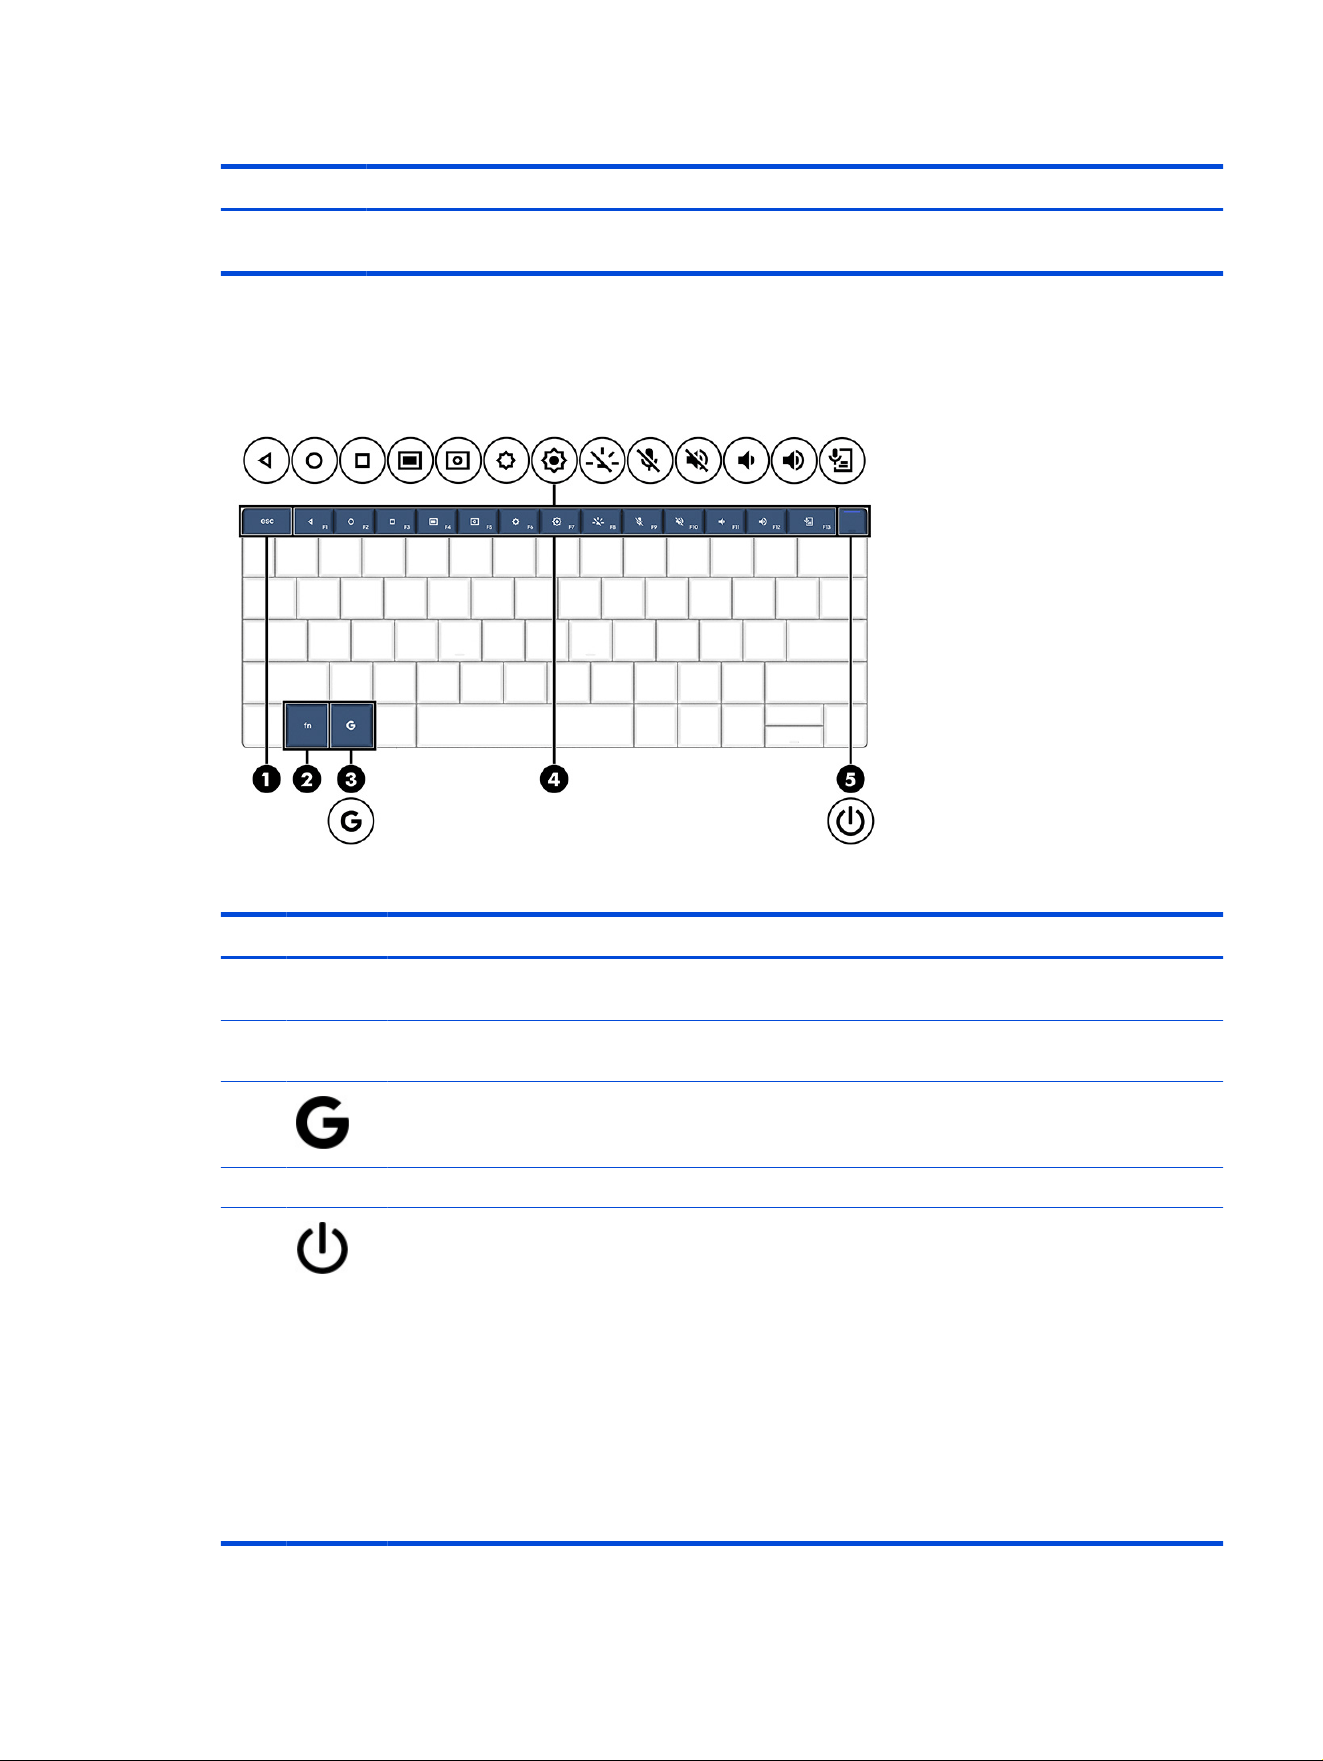
Table 2-4 Touchpad component and its description
Component Description
(1) Touchpad zone Reads your nger gestures to move the pointer or activate
items on the screen.
Special keys
Use the illustration and table to locate the special keys.
Table 2-5 Special keys and their descriptions
Component Description
(1) esc key Activates certain computer functions when pressed in combination
with other keys, such as tab or shift.
(2) fn key Executes frequently used system functions when pressed in
combination with another key.
(3) Google™ key Opens the All apps menu and a combined web and system search
box.
(4) Action keys Execute frequently used system functions.
(5) Power key and ngerprint reader Press the ngerprint reader to unlock the computer screen or to
resume computer operations.
● When the computer is off, press the key briey to turn on the
computer.
● When the computer is in the sleep state, press the key briey
to exit sleep (select products only).
IMPORTANT: Pressing and holding down the power key results in
the loss of unsaved information.
If the computer has stopped responding and shutdown procedures
are ineffective, press and hold the power key for at least 10 seconds
to turn off the computer.
Special keys 5
Action keys
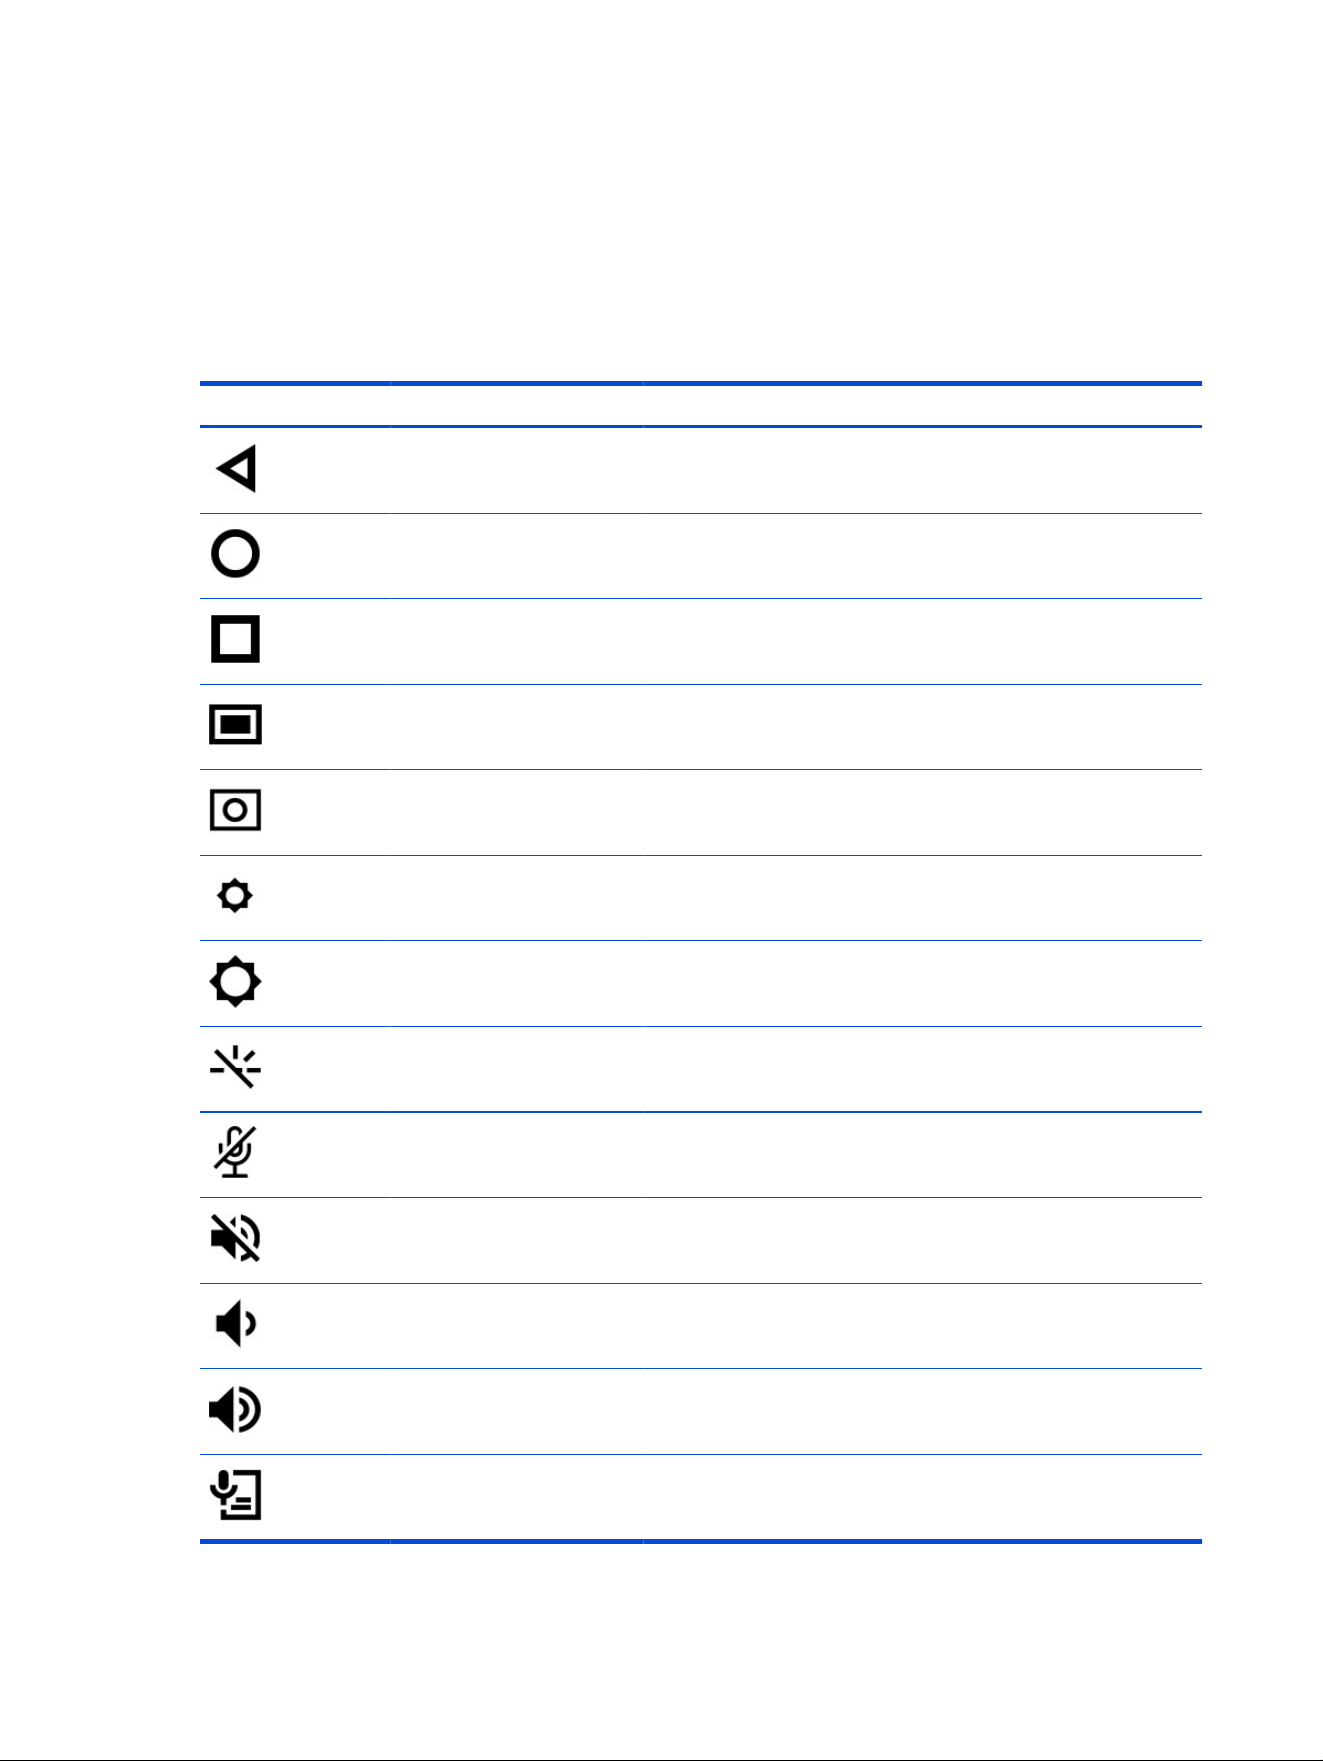
Action keys perform specic functions and vary by computer. To determine which keys are on your
computer, look at the icons on your keyboard and match them to the descriptions in this table.
■
To use an action key, press and hold the key.
Select your language at the bottom of the page.
Table 2-6 Action keys and their descriptions
Icon Key Description
Back Displays the previous page in your browser history.
Home Closes the active window.
Overview Displays all open windows.
Full screen Display the current window at full-screen size.
Screenshot Opens the screenshot tool to capture on-screen images or videos.
Brightness down Press with the Google key to decrease keyboard backlight brightness.
Brightness up Press with the Google key to increase keyboard backlight brightness.
Keyboard backlight Enables or disables the keyboard backlight.
Mute microphone Enables or disables the microphone.
Mute Mutes speaker sound.
Volume down Decreases speaker volume incrementally while you hold down the key.
Volume up Increases speaker volume incrementally while you hold down the key.
Dictation key Enables or disables dictation or “speak to type” mode.
6 Chapter 2 Components

Top
Use the illustration and table to identify the top component.
Table 2-7 Top component and description
Components Description
Glowbar Indicates battery charge status.
● Green: The battery is charged to between 60% and 94% of the
batteryʼs maximum charge.
● Yellow: The battery is charged to between 20% and 59% of the
batteryʼs maximum charge.
● Red: The battery is charged to between 0% and 19% of the
batteryʼs maximum charge.
IMPORTANT: Charge your computer regularly to prevent
accidental data loss.
Bottom
Use the illustration and table to identify the bottom components.
Top
7
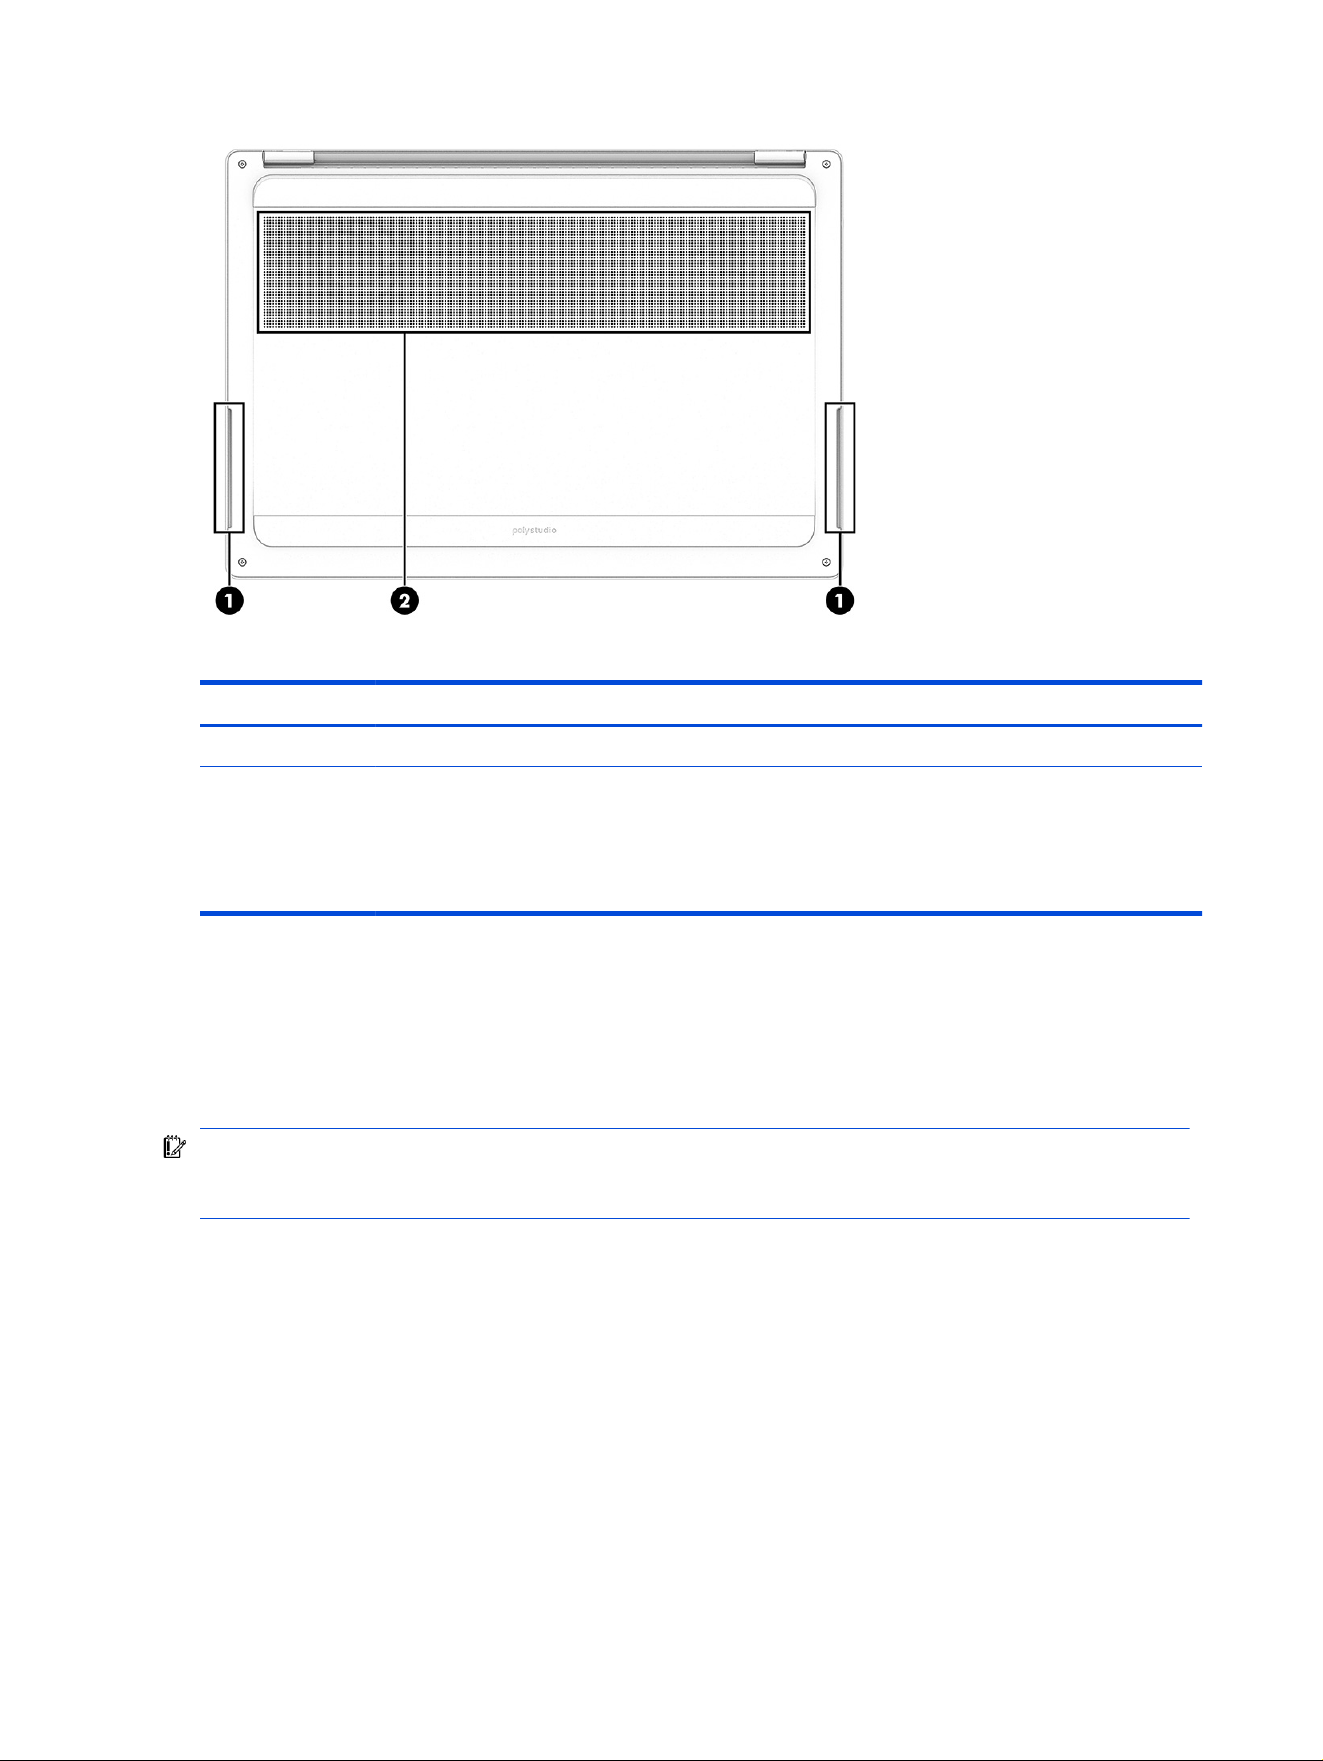
Table 2-8 Bottom components and descriptions
Component Description
(1) Speakers Produce sound.
(2) Vent Enables airow to cool internal components.
NOTE: The computer fan starts automatically to cool
internal components and prevent overheating. It is normal
for the internal fan to cycle on and off during routine
operation.
Labels
The labels afxed to the computer provide information you might need when you troubleshoot system
problems or travel internationally with the computer. Labels might be in paper form or imprinted on the
product.
IMPORTANT: Check the following locations for the labels described in this section: the bottom of the
computer, inside the battery bay, under the service door, on the back of the display, or on the bottom of a
tablet kickstand.
● Service label—Provides important information to identify your computer. When contacting support,
you might be asked for the serial number, the product number, or the model number. Locate this
information before you contact support.
Your service label will resemble one of the following examples. Refer to the illustration that most
closely matches the service label on your computer.
8
Chapter 2 Components
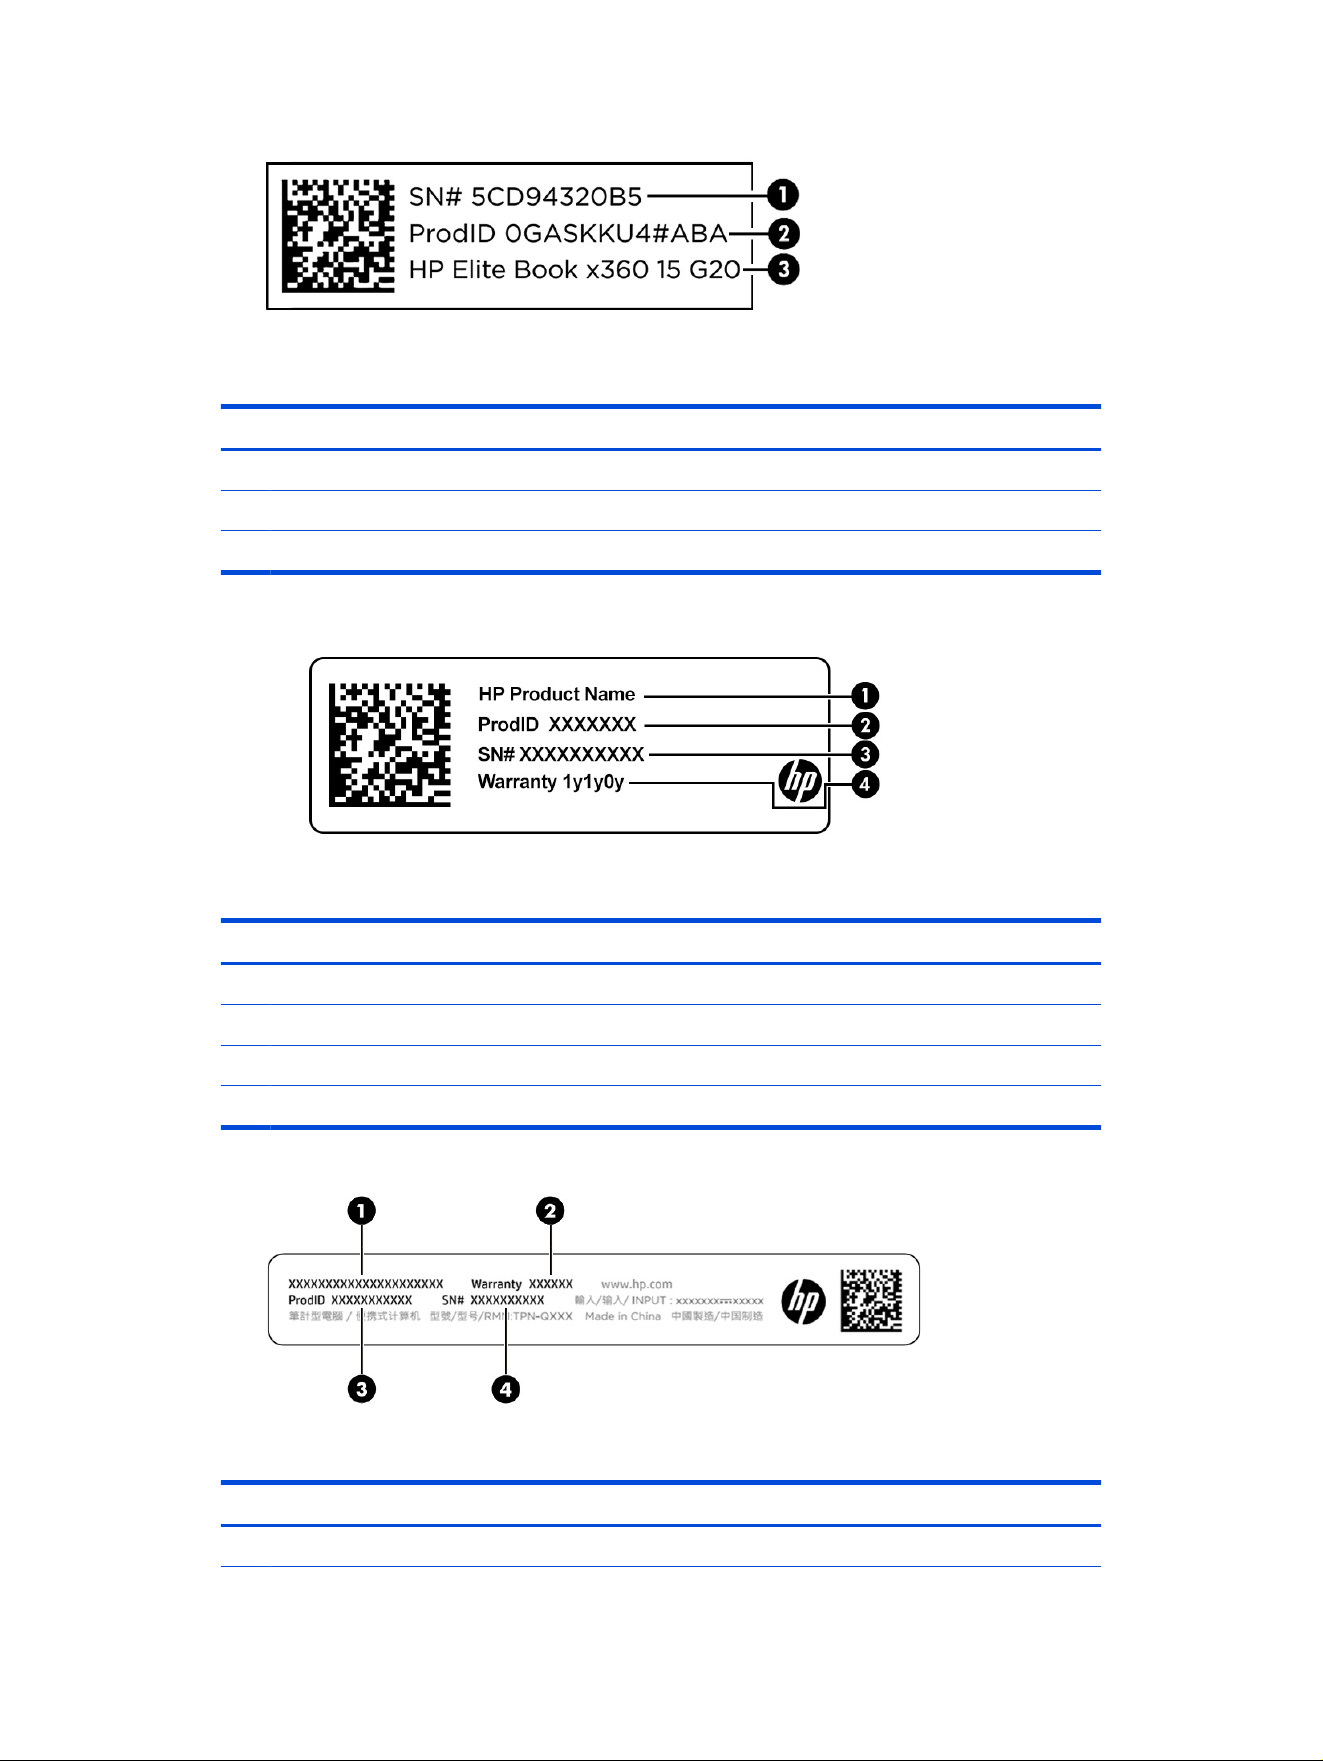
Table 2-9 Service label components
Component
(1) Serial number
(2) Product ID
(3) HP product name
Table 2-10 Service label components
Component
(1) HP product name
(2) Product ID
(3) Serial number
(4) Warranty period
Table 2-11 Service label components
Component
(1) HP product name
Labels 9

Table 2-11 Service label components (continued)
Component
(2) Warranty period
(3) Product ID
(4) Serial number
● Regulatory labels—Provide regulatory information about the computer.
● Wireless certication labels—Provide information about optional wireless devices and the approval
markings for the countries or regions where the devices have been approved for use.
10 Chapter 2 Components
Navigating the screen3
Depending on your computer model, you can navigate the computer screen using one or more methods.
● Use touch gestures directly on the computer screen.
● Use touch gestures on the touchpad.
Using touchpad and touch screen gestures
The touchpad helps you navigate the computer screen and control the pointer using simple touch
gestures. To navigate a touch screen (select products only), touch the screen directly using gestures
described in this chapter.
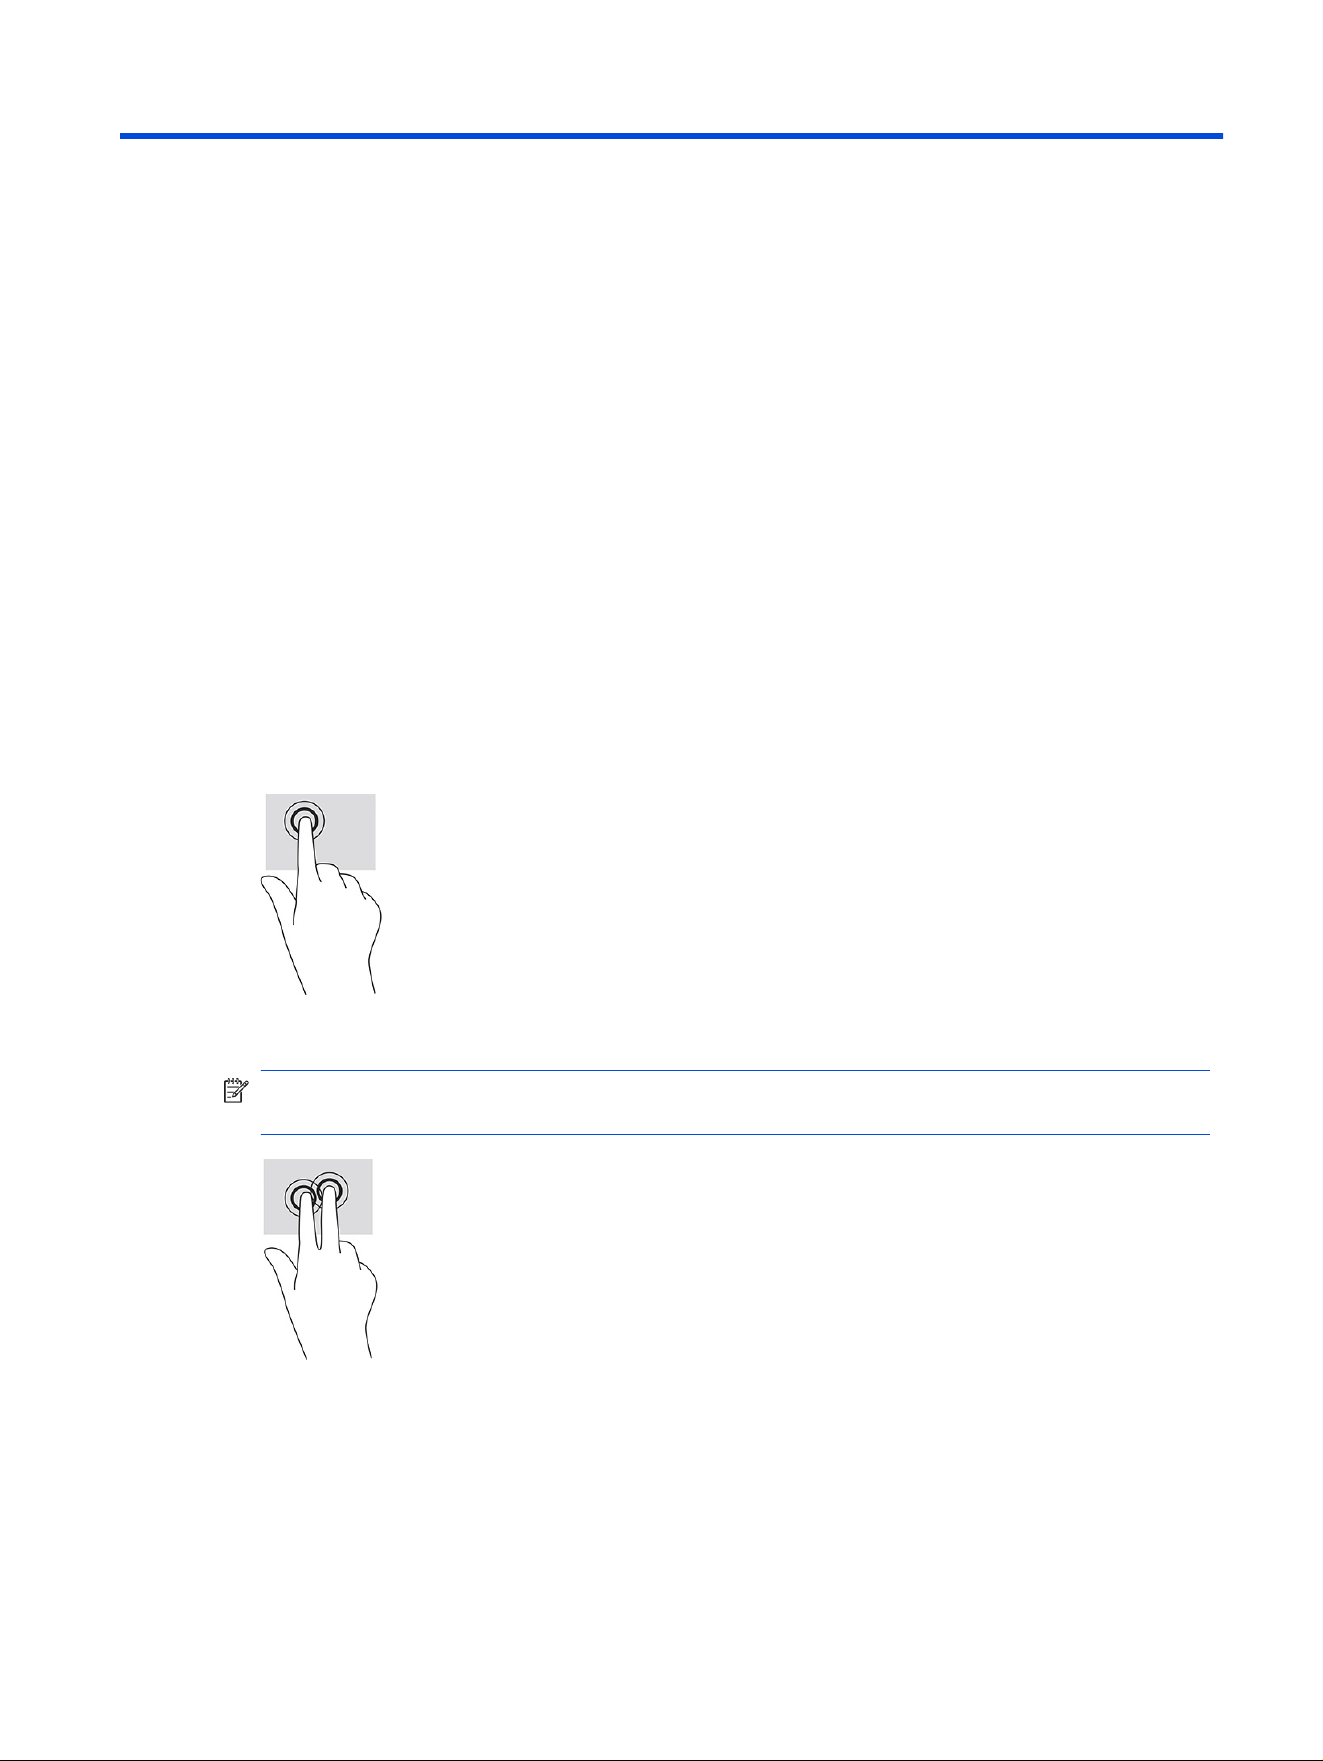
Tap
Use the tap or double-tap gesture to select or open an item on the screen.
● Point to an item on the screen, and then tap one nger on the touchpad zone or touch screen to select
the item. Double-tap to open it.
● Tap two ngers on the touchpad zone to bring up a context-sensitive menu.
NOTE: To open the context-sensitive menu on the touchscreen, use a long press with a single
nger.
Scrolling (touchpad only)
Scrolling is useful for moving up, down, or sideways on a page or image. Scrolling to the left or the right with
two ngers scrolls the screen, if there is more content viewable to either side, or moves back and forth
through web browser history.
Navigating the screen
11
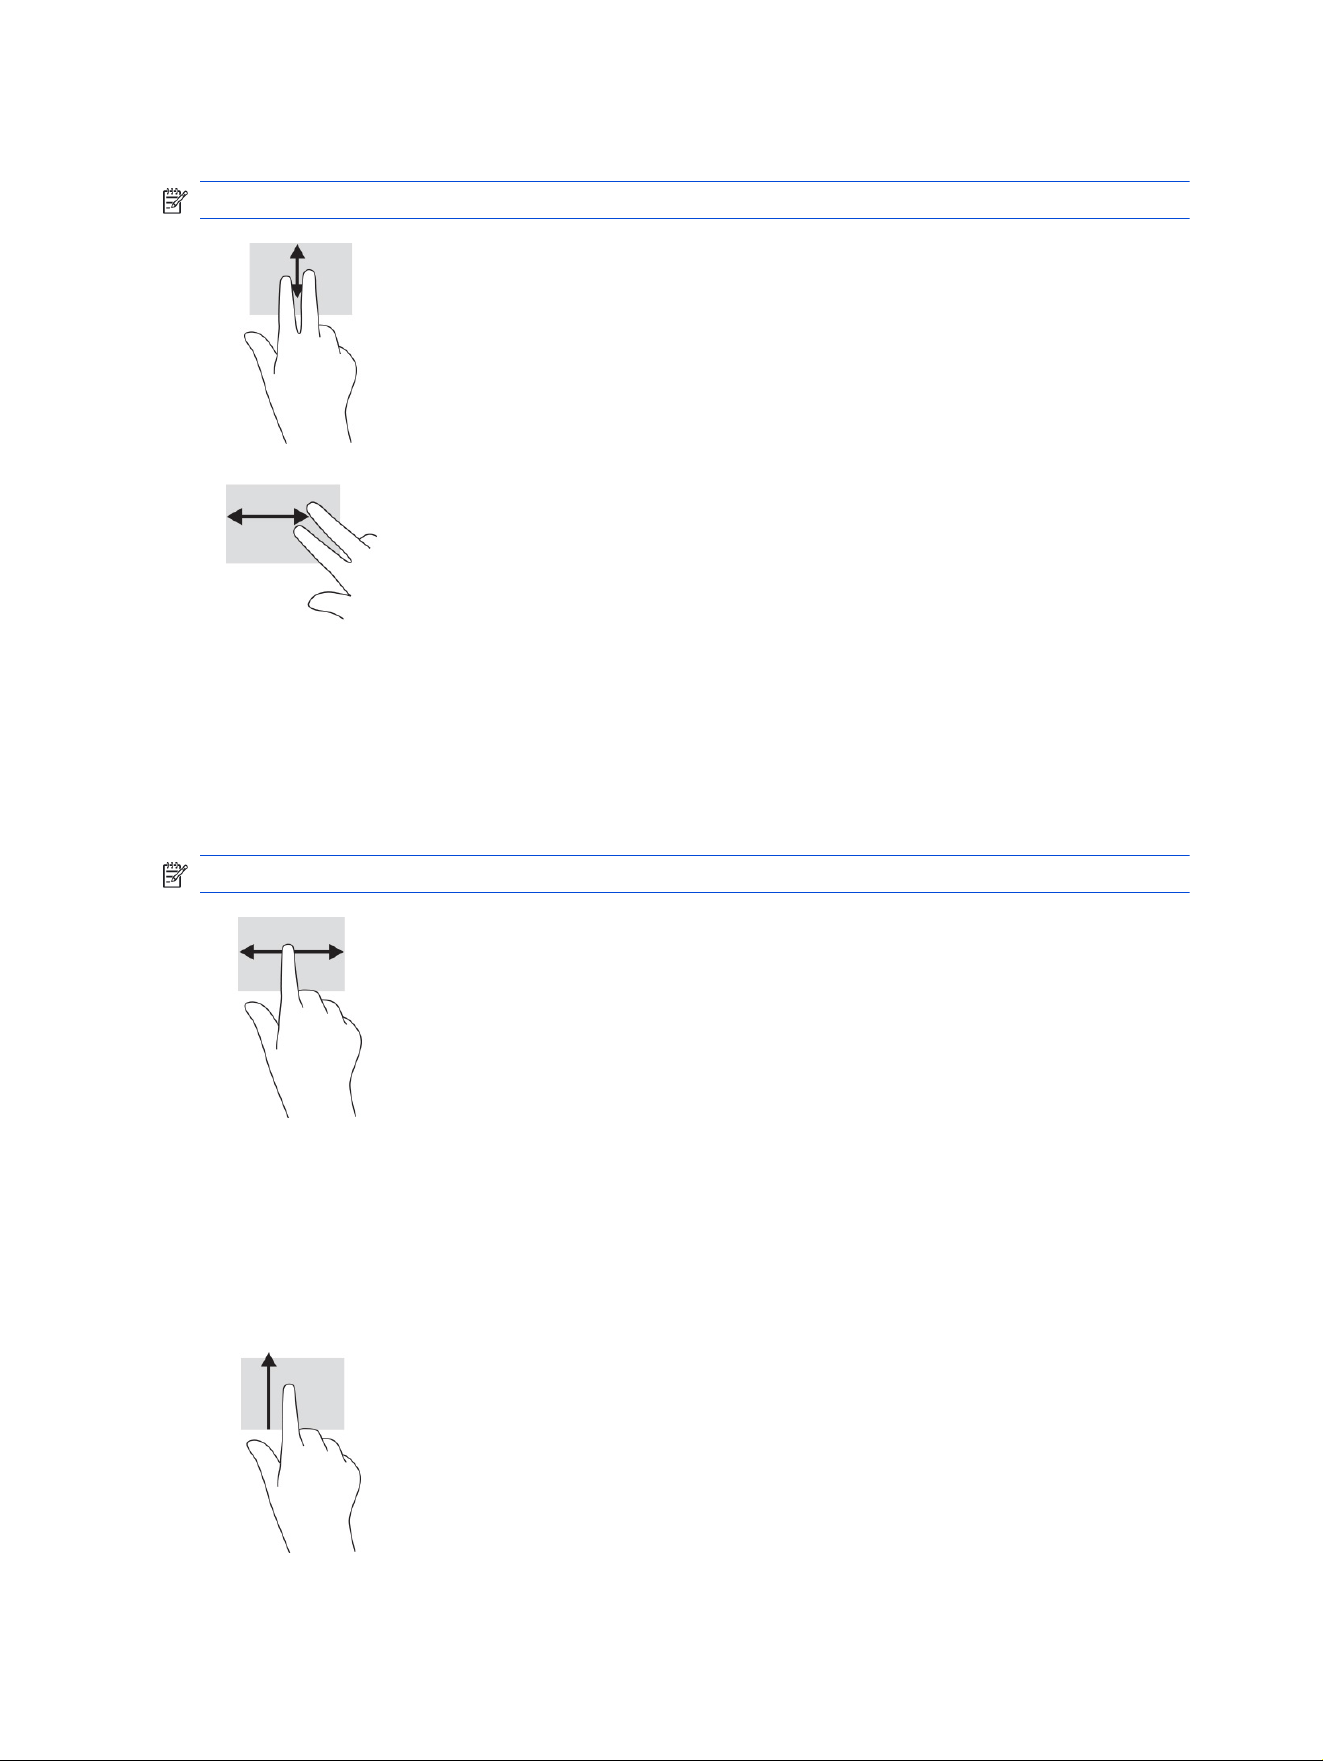
● Place two ngers slightly apart on the touchpad zone, and then drag them up, down, left, or right.
NOTE: Scrolling speed is controlled by nger speed.
One-nger scrolling (touch screen only)
Scrolling to the left or the right with one nger moves back and forth through web browser history.
● Place one nger on the touch screen, and then drag it across the touch screen in a left or right motion.
NOTE: Scrolling speed is controlled by nger speed.
One-nger
swipe (touch screen only)
Swiping one nger up from the bottom of the screen displays the Home screen. Swiping up from the
bottom and then holding briey displays an overview of recently-used apps.
● Place your nger on the bottom of the screen, quickly slide your nger up a short distance, and then lift
it.
12
Chapter 3 Navigating the screen

Two-nger pinch zoom
Use the two-nger pinch zoom to zoom out or in on images or text.
● Zoom out by placing two ngers apart on the touch screen and then moving your ngers together.
● Zoom in by placing two ngers together on the touch screen and then moving your ngers apart.
Two-nger pinch zoom 13

Power and battery4
Your computer can operate on either battery power or external power. When the computer is running
on battery power and an external power source is not available to charge the battery, it is important to
monitor and conserve the battery charge.
Factory-sealed battery
You cannot easily replace the battery in this product. Removing or replacing the battery could affect your
warranty coverage. If a battery is no longer holding a charge, contact support.
When a battery reaches the end of its useful life, do not dispose of the battery in general household waste.
Follow the local laws and regulations in your area for battery disposal.
Charging the battery
When you connect the computer to external power, the battery begins to charge, and the Glowbar
changes appearance.
1. Connect the AC adapter to the computer.
2. Verify that the battery is charging by checking the AC adapter and Glowbar light indicator located on
the lid of the Googlebook™.
3. While the battery is charging, keep the AC adapter connected until the Glowbar indicator turns green.
14
Chapter 4 Power and battery

Printing5
You have several ways to print from your computer.
● Print with the built-in solution.
● Print using the HP Print app.
For more information, refer to the Googlebook support website.
Printing
15

Backing up, resetting, and recovering6
This chapter provides information about the standard procedures of backing up your personal data,
resetting your computer to original factory conditions, and recovering your operating system.
Backing up
You can back up your data to an optional USB ash drive or SD memory card or through Google Drive™.
For detailed information about creating a backup, go to http://www.support.google.com.
Resetting
A factory reset erases the information on your computer hard drive, including les in the Downloads folder.
Before you reset, back up your les to an optional USB ash drive, to an SD memory card, or through
Google Drive. The factory reset will not delete your les at these locations.
You might want to reset your computer in the following circumstances:
● You see an error message asking you to reset your device.
● You are having problems with your user prole or settings.
● You restarted your computer, and it still doesn’t work properly.
● You want to change the owner of your computer.
To reset your computer:
1. Under the Settings menu, select System, and then select Reset Options.
2. In the Reset Options section, select Erase all data (factory reset).
3. Conrm factory reset by selecting Erase all data.
4. After you complete the reset, you will be returned to the beginning of the setup experience.
NOTE: The account you sign in with after you reset your computer is recognized as the owner
account.
Recovering
When your Googlebook doesn’t work properly, you can perform a recovery.
16
Chapter 6 Backing up, resetting, and recovering

A recovery reinstalls the operating system, software programs, and original factory settings. It deletes
locally saved les and saved networks for all accounts. A system recovery does not affect Google
accounts or data synced to Google Drive.
IMPORTANT: Recovery permanently erases everything on your computer hard drive, including your
downloaded les. If possible, back up your les before you recover your computer.
NOTE: For more information about performing a system recovery on your computer, go to the
Googlebook support site.
Before you begin the recovery process, you need the following prerequisites:
● A USB ash drive or SD memory card with a capacity of 32 GB or greater. All data is erased from this
storage device when the recovery media is created, so back up all les from the device before you
begin.
● A separate computer with internet access. You must also have administrative rights to the computer.
● A computer AC adapter. The computer must be plugged into AC power during recovery.
● You see an error message asking you to Start the recovery process. If this message is not already
displayed:
– Turn on the computer, press and hold the esc+f3 keys, and then press the power button. The
computer restarts, and the screen shows the “Start the recovery process” screen.
Installing the Chromebook Recovery Utility
The Chromebook™ Recovery Utility recovers the original operating system and software programs that
were installed at the factory. You can install this utility from the Chrome™ Web Store on any other computer
using a USB ash drive.
NOTE: Use this option if you do not have Internet access on your computer.
To install the Chromebook Recovery Utility:
■
Open the Chrome Web Store, search for Chromebook Recovery Utility, select Chromebook
Recovery Utility from the Apps list, and follow the on-screen instructions.
Creating recovery media
You can use recovery media to recover the original operating system and software programs that were
installed at the factory.
To create recovery media:
1. Turn on a computer that has internet access.
NOTE: You must have administrative rights to the computer.
2. Open the Chrome browser and select the Extensions menu.
3. In the menu, select Device Recovery Utility.
4. Follow the on-screen instructions to create the recovery media.
NOTE: All data and partitions on your recovery media will be deleted. Do not remove the USB ash
drive or SD memory card until the process is complete.
Installing the Chromebook Recovery Utility
17

Recovering the Googlebook operating system with recovery media
Use these instructions to recover the Googlebook operating system on your computer using the recovery
media that you created.
1. Disconnect any external devices connected to your computer, plug in the power cord, and then turn
on the computer.
2. To enter recovery mode, press and hold esc+f3, and then press the power button. When the Start
the recovery process screen appears, insert the recovery media into your computer. The recovery
process begins immediately.
3. Wait while the integrity of the recovery media is veried.
NOTE: Do not disrupt the system recovery process after the verication step is complete.
NOTE: If an error message is displayed, you might need to run the Chrome Recovery Utility again or
use a different USB ash drive or SD memory card.
4. When the “System Recovery is complete” message appears, remove the recovery media.
The computer restarts with the operating system reinstalled.
Setting up your computer after a reset or recovery
After a reset or recovery is complete, perform the initial setup process.
For details about setting up the computer, go to http://www.support.google.com.
Erasing and reformatting the recovery media
When you create recovery media, the USB ash drive or SD memory card is formatted as a recovery tool.
After recovery, you must erase the recovery media to reuse your storage device. Follow these steps to use
the Chromebook Recovery Utility to erase the recovery media.
1. Open the Chrome browser and select the Extensions menu.
2. Select Device Recovery Utility.
3. Select the Settings icon, and then select Erase recovery media.
4. Select the USB ash drive or SD memory card that you inserted, select Continue, and then select
Erase now.
5. After the recovery media is erased, select Done to close the Chromebook Recovery Utility, and then
remove the USB ash drive or SD memory card.
The media is ready to be formatted using a formatting tool provided by your operating system.
18
Chapter 6 Backing up, resetting, and recovering

More HP resources7
To locate resources that provide product details, how-to information, and more, use this table.
Table 7-1 Additional information
Resource Contents
Setup Instructions ● How to set up the computer
● Help to identify computer components
HP Support Assistant app (select products only)
Install HP Support Assistant to get access to HP tools
and troubleshooting for printers and peripherals. Go
to the Chrome Web Store and install the HP Support
Assistant app.
● Optimizes computer performance and resolves problems using
the latest software updates, diagnostic tools, and guided
assistance
HP website
To access the latest user guide, go to http://www.hp.com/
support, and follow the instructions to nd your product.
Then select Setup & User Guides.
● Support information
● Ordering parts and nding additional help
● Accessories available for the device
Worldwide support
To get support in your language, go to http://www.hp.com/
support, and select your country.
● Online chat with an HP technician
● Support telephone numbers
● HP service center locations
Safety & Comfort Guide
Go to http://www.hp.com/ergo.
● Proper workstation setup
● Guidelines for posture and work habits that increase comfort and
decrease risk of injury
● Electrical and mechanical safety information
Regulatory, Safety, and Environmental Notices
This guide is provided in the box.
● Regulatory and safety information
● Battery disposal information
Limited Warranty*
Go to http://www.hp.com/go/orderdocuments.
● Warranty information
*You can nd your HP Limited Warranty located with the user guides on your product and/or on the CD
or DVD provided in the box. In some countries or regions, HP may provide a printed warranty in the box.
For countries or regions where the warranty is not provided in printed format, you can request a copy
from http://www.hp.com/go/orderdocuments. For products purchased in Asia Pacic, you can write to HP
at POD, PO Box 161, Kitchener Road Post Ofce, Singapore 912006. Include your product name, and your
name, phone number, and postal address.
More HP resources
19

Specications8
When you travel with or store your computer, the input power ratings and operating specications provide
helpful information.
Input power
The power information in this section might be helpful if you plan to travel internationally with the
computer.
The computer operates on DC power, which can be supplied by an AC or a DC power source. The AC
power source must be rated at 100 V to 240 V, 50 Hz to 60 Hz. Although the computer can be powered
from a standalone DC power source, it should be powered only with an AC adapter or a DC power source
supplied and approved by HP for use with this computer.
The computer can operate on DC power within one or more of the following specications. The voltage
and current for your computer is located on the regulatory label.
Table 8-1 DC power specications
Input Power Rating
Operating voltage and current 5 V DC @ 3 A / 9 V DC @ 3 A / 12 V DC @ 5 A / 15 V DC @ 5 A /
20 V DC @ 5 A – 100 W USB-C®
5 V DC @ 3 A / 9 V DC @ 3 A / 12 V DC @ 5 A / 15 V DC @ 4.33
A / 20 V DC @ 3.25 A – 65 W USB-C
5 V DC @ 3 A / 9 V DC @ 3 A / 10 V DC @ 5 A / 12 V DC @ 5 A /
15 V DC @ 4.33 A / 20 V DC @ 3.25 A – 65 W USB-C
5 V DC @ 3 A / 9 V DC @ 3 A / 10 V DC @ 5 A / 12 V DC @ 5 A /
15 V DC @ 5 A / 20 V DC @ 4.5 A – 90 W USB-C
5 V DC @ 3 A / 9 V DC @ 3 A / 12 V DC @ 5 A / 15 V DC @ 5 A /
20 V DC @ 5 A / 5 V DC USB-A port @ 2 A – 100 W USB-C + 10
W USB-A
5 V DC @ 3 A / 9 V DC @ 3 A / 12 V DC @ 5 A / 15 V DC @ 5 A /
20 V DC @ 5 A / 28 V DC @ 5 A – 140 W USB-C
NOTE: This product is designed for IT power systems in Norway with phase-to-phase voltage not
exceeding 240 V rms.
Operating environment
Use the operating
specications for helpful information when you travel with or store your computer.
Table 8-2
Operating environment specications
Factor Metric U.S.
Temperature
20 Chapter 8 Specications

Table 8-2 Operating environment specications (continued)
Factor Metric U.S.
Operating 5°C to 35°C 41°F to 95°F
Nonoperating –20°C to 60°C –4°F to 140°F
Relative humidity (noncondensing)
Operating 10% to 90% 10% to 90%
Nonoperating 5% to 95% 5% to 95%
Maximum altitude (unpressurized)
Operating –15 m to 3,048 m –50 ft to 10,000 ft
Nonoperating –15 m to 12,192 m –50 ft to 40,000 ft
Operating environment 21

Electrostatic discharge9
Electrostatic discharge is the release of static electricity when two objects come into contact—for
example, the shock you receive when you walk across the carpet and touch a metal door knob.
A discharge of static electricity from ngers or other electrostatic conductors can damage electronic
components.
IMPORTANT: To prevent damage to the computer, damage to a drive, or loss of information, observe
these precautions:
● If removal or installation instructions direct you to unplug the computer, rst be sure that it is properly
grounded.
● Keep components in their electrostatic-safe containers until you are ready to install them.
● Avoid touching pins, leads, and circuitry. Handle electronic components as little as possible.
● Use nonmagnetic tools.
● Before handling components, discharge static electricity by touching an unpainted metal surface.
● If you remove a component, place it in an electrostatic-safe container.
22
Chapter 9 Electrostatic discharge

Accessibility10
HP’s goal is to design, produce, and market products, services, and information that everyone everywhere
can use, either on a standalone basis or with appropriate third-party assistive technology (AT) devices or
applications.
HP and accessibility
Because HP works to weave diversity, inclusion, and work/life into the fabric of the company, it is reected
in everything HP does. HP strives to create an inclusive environment focused on connecting people to the
power of technology throughout the world.
Finding the technology tools you need
Technology can unleash your human potential. AT removes barriers and helps you create independence at
home, at work, and in the community. AT helps increase, maintain, and improve the functional capabilities
of electronic and information technology.
For more information, see Finding the best assistive technology on page 24.
The HP commitment
HP is committed to providing products and services that are accessible for people with disabilities.
This commitment supports the company’s diversity objectives and helps ensure that the benets of
technology are available to all.
The HP accessibility goal is to design, produce, and market products and services that can be effectively
used by everyone, including people with disabilities, either on a standalone basis or with appropriate
assistive devices.
To achieve that goal, this Accessibility Policy establishes seven key objectives to guide HP actions. All
HP managers and employees are expected to support these objectives and their implementation in
accordance with their roles and responsibilities:
● Raise the level of awareness of accessibility issues within HP, and provide employees with the training
they need to design, produce, market, and deliver accessible products and services.
● Develop accessibility guidelines for products and services, and hold product development groups
accountable for implementing these guidelines where competitively, technically, and economically
feasible.
● Involve people with disabilities in the development of accessibility guidelines, and in the design and
testing of products and services.
● Document accessibility features, and make information about HP products and services publicly
available in an accessible form.
● Establish relationships with leading AT and solution providers.
● Support internal and external research and development that improves AT relevant to HP products
and services.
● Support and contribute to industry standards and guidelines for accessibility.
Accessibility
23

International Association of Accessibility Professionals (IAAP)
IAAP is a not-for-prot association focused on advancing the accessibility profession through networking,
education, and certication. The objective is to help accessibility professionals develop and advance their
careers and to better enable organizations to integrate accessibility into their products and infrastructure.
As a founding member, HP joined to participate with other organizations to advance the eld of
accessibility. This commitment supports HP’s accessibility goal of designing, producing, and marketing
products and services that people with disabilities can effectively use.
IAAP will make the profession strong by globally connecting individuals, students, and organizations to
learn from one another. If you are interested in learning more, go to http://www.accessibilityassociation.org
to join the online community, sign up for newsletters, and learn about membership options.
Finding the best assistive technology
Everyone, including people with disabilities or age-related limitations, should be able to communicate,
express themselves, and connect with the world using technology. HP is committed to increasing
accessibility awareness within HP and with our customers and partners.
Whether it’s large fonts that are easy on the eyes, voice recognition that lets you give your hands a rest, or
any other AT to help with your specic situation—a variety of ATs make HP products easier to use. How do
you choose?
Assessing your needs
Technology can unleash your potential. AT removes barriers and helps you create independence at home,
at work, and in the community. AT helps increase, maintain, and improve the functional capabilities of
electronic and information technology.
You can choose from many AT products. Your AT assessment should allow you to evaluate several
products, answer your questions, and facilitate your selection of the best solution for your situation.
You will nd that professionals qualied to do AT assessments come from many elds, including those
licensed or certied in physical therapy, occupational therapy, speech/language pathology, and other
areas of expertise. Others, while not certied or licensed, can also provide evaluation information. You will
want to ask about the individual’s experience, expertise, and fees to determine if they are appropriate for
your needs.
Accessibility for HP products
These links provide information about accessibility features and AT, if applicable and available in your
country or region, that are included in various HP products. These resources will help you select the
specic AT features and products most appropriate for your situation.
● HP Aging & Accessibility: Go to http://www.hp.com, type Accessibility in the search box. Select
Ofce of Accessibility at HP.
● HP computers: For Windows products, go to http://www.hp.com/support, type Windows
Accessibility Options in the Search our knowledge library search box. Select the
appropriate operating system in the results.
● HP Shopping, peripherals for HP products: Go to http://store.hp.com, select Shop, and then select
Monitors or Accessories.
If you need additional support with the accessibility features on your HP product, see Contacting support
on page 27.
Additional links to external partners and suppliers that may provide additional assistance:
24
Chapter 10 Accessibility

● Microsoft Accessibility information (Windows and Microsoft Ofce)
● Google Products accessibility information (Android, Chrome, Google Apps)
Standards and legislation
Countries worldwide are enacting regulations to improve access to products and services for persons
with disabilities. These regulations are historically applicable to telecommunications products and
services, PCs and printers with certain communications and video playback features, their associated
user documentation, and their customer support.
Standards
The US Access Board created Section 508 of the Federal Acquisition Regulation (FAR) standards to
address access to information and communication technology (ICT) for people with physical, sensory, or
cognitive disabilities.
The standards contain technical criteria specic to various types of technologies, as well as performance-
based requirements which focus on functional capabilities of covered products. Specic criteria cover
software applications and operating systems, web-based information and applications, computers,
telecommunications products, video and multimedia, and self-contained closed products.
Mandate 376 – EN 301 549
The European Union created the EN 301 549 standard within Mandate 376 as an online toolkit for public
procurement of ICT products. The standard species the accessibility requirements applicable to ICT
products and services, with a description of the test procedures and evaluation methodology for each
requirement.
Web Content Accessibility Guidelines (WCAG)
Web Content Accessibility Guidelines (WCAG) from the W3C’s Web Accessibility Initiative (WAI) helps
web designers and developers create sites that better meet the needs of people with disabilities or
age-related limitations.
WCAG advances accessibility across the full range of web content (text, images, audio, and video)
and web applications. WCAG can be precisely tested, is easy to understand and use, and allows web
developers exibility for innovation. WCAG 2.2 has also been approved as ISO/IEC 40500:2012.
WCAG specically addresses barriers to accessing the web experienced by people with visual, auditory,
physical, cognitive, and neurological disabilities, and by older web users with accessibility needs. WCAG
2.2 provides characteristics of accessible content:
● Perceivable (for instance, by addressing text alternatives for images, captions for audio, adaptability
of presentation, and color contrast)
● Operable (by addressing keyboard access, color contrast, timing of input, seizure avoidance, and
navigability)
● Understandable (by addressing readability, predictability, and input assistance)
● Robust (for instance, by addressing compatibility with ATs)
Legislation and regulations
Accessibility of IT and information has become an area of increasing legislative importance.
Standards and legislation
25

The HP policy landscape website provides information about key legislation, regulations, and standards in
the following locations:
● United States
● Canada
● Europe
● Australia
Useful accessibility resources and links
These organizations, institutions, and resources might be good sources of information about disabilities
and age-related limitations.
NOTE: This is not an exhaustive list. These organizations are provided for informational purposes only.
HP assumes no responsibility for information or contacts you encounter on the internet. Listing on this
page does not imply endorsement by HP.
Organizations
These organizations are a few of the many that provide information about disabilities and age-related
limitations.
● American Association of People with Disabilities (AAPD)
● The Association of Assistive Technology Act Programs (ATAP)
● Hearing Loss Association of America (HLAA)
● Information Technology Technical Assistance and Training Center (ITTATC)
● Lighthouse International
● National Association of the Deaf
● National Federation of the Blind
● Rehabilitation Engineering & Assistive Technology Society of North America (RESNA)
● Telecommunications for the Deaf and Hard of Hearing, Inc. (TDI)
● W3C Web Accessibility Initiative (WAI)
Educational institutions
Many educational institutions, including these examples, provide information about disabilities and age-
related limitations.
● California State University, Northridge, Center on Disabilities (CSUN)
● University of Wisconsin - Madison, Trace Center
● University of Minnesota computer accommodations program
26
Chapter 10 Accessibility

Other disability resources
Many resources, including these examples, provide information about disabilities and age-related
limitations.
● ADA (Americans with Disabilities Act) Technical Assistance Program
● ILO Global Business and Disability network
● EnableMart
● European Disability Forum
● Job Accommodation Network
● Microsoft Enable
HP links
These HP-specic links provide information that relates to disabilities and age-related limitations.
HP comfort and safety guide
Accessibility at HP
Contacting support
HP offers technical support and assistance with accessibility options for customers with disabilities.
NOTE: Support is in English only.
● Customers who are deaf or hard of hearing who have questions about technical support or
accessibility of HP products:
– Use TRS/VRS/WebCapTel to call (877) 656-7058 Monday through Friday, 6 a.m. to 9 p.m. Mountain
Time.
– Visit Accessibility at HP.
● Customers with other disabilities or age-related limitations who have questions about technical
support or accessibility of HP products:
– Call (888) 259-5707 Monday through Friday, 6 a.m. to 9 p.m. Mountain Time.
Other disability resources
27

Index
A
accessibility 23-25, 27
accessibility needs
assessment 24
action keys 6
back 6
brightness down 6
brightness up 6
dictation key 6
full screen 6
home 6
identifying 5
keyboard backlight 6
mute 6
mute microphone 6
overview 6
screenshot 6
volume down 6
volume up 6
assistive technology (AT)
nding 24
purpose 23
AT (assistive technology)
nding 24
purpose 23
audio-in (microphone) jack,
identifying 3
audio-out (headphone) jack,
identifying 3
B
back action key 6
backing up 16
battery
charging 14
factory sealed 14
Bluetooth label 8
brightness down action key 6
brightness up action key 6
C
camera 4
identifying 4
camera light, identifying 4
camera privacy cover,
identifying 4
Chromebook Recovery Utility,
installing 17
components
bottom 7
display 3
keyboard area 4
left side 2
right side 2
top 7
customer support,
accessibility 27
E
electrostatic discharge 22
esc key, identifying 5
F
ngerprint reader 5
ngerprint reader, identifying 5
fn key, identifying 5
full screen action key 6
G
glowbar, identifying 7
Google key, identifying 5
H
headphone (audio-out) jack 3
home action key 6
HP Assistive Policy 23
HPSA, identifying 19
I
input power 20
internal microphones,
identifying 4
International Association of
Accessibility Professionals 24
J
jacks
audio-in (microphone) 3
audio-out (headphone) 3
K
keyboard backlight action key 6
keys
esc 5
fn 5
Google 5
power 5
L
labels
Bluetooth 8
regulatory 8
serial number 8
service 8
wireless certication 8
WLAN 8
lights
camera 4
M
microphone (audio-in) jack,
identifying 3
mute action key 6
mute microphone action key 6
O
operating environment 20
overview action key 6
P
ports
USB Type-C Plus with HP Sleep
and Charge 2, 3
power key, identifying 5
printing 15
product name and number,
computer 8
R
recovery media
creating 17
erase 18
recovery, performing 16
regulatory information
regulatory label 8
wireless certication labels 8
28
Index

resetting 16
resources, accessibility 26
S
screenshot action key 6
scrolling touch screen gesture 12
scrolling touchpad gesture 11
Section 508 accessibility
standards 25
serial number, computer 8
service labels, locating 8
speakers, identifying 8
specications 20
standards and legislation,
accessibility 25
support 19
swiping touch screen gesture 12
system recovery
Chrome operating system 18
Chromebook Recovery
Utility 17
recovery media 17
T
tap gestures 11
touch screen gestures
one-nger scrolling 12
one-nger swipe 12
two-nger pinch zoom 13
Touchpad and touch screen
gestures, tap 11
touchpad gestures, scrolling 11
touchpad zone, identifying 4, 5
traveling with the computer 8
two-nger pinch zoom touch
screen gesture 13
U
USB Type-C port with HP Sleep and
Charge, identifying 2, 3
V
vent, identifying 8
volume down action key 6
volume up action key 6
W
wireless certication label 8
WLAN antennas, identifying 4
WLAN device 8
WLAN label 8
Index
29