
INSTANT
®
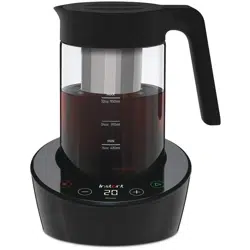
COLD BREWER
USER MANUAL

Welcome to your new Instant™ Cold Brewer!
Make your morning a little more amazing. Be your own barista and create
café-quality drinks.
We hope you fall in love with your Cold Brewer, and enjoy it in your kitchen
for years to come.
Download the
Instant Brands
®
Connect app
to access 1000+
recipe ideas.

CONTENTS
Important safeguards 2
What’s in the box 5
Before you brew 6
Your Instant
®
Cold Brewer 7
Cold brewing 8
Troubleshooting 10
Care, cleaning, storage 11
Learn more 12
Warranty 14

2
User Manual
3
User Manual
READ ALL INSTRUCTIONS
Placement
DO operate the appliance on a stable, noncombustible, level surface.
DO NOT place the appliance on or near a hot gas or electric burner,
or in a heated oven.
General Use
DO NOT use this cold brewer outdoors.
DO NOT let the cold brewer operate without water.
DO NOT use the appliance for anything other than its intended use.
Not for commercial use.
DO regularly inspect the appliance and power cord.
DO NOT leave the appliance exposed to sun, wind, and/or snow.
DO operate and store the appliance above 0°C.
DO NOT allow children to operate or play with appliance; this
appliance is not intended for use by children or persons with
reduced physical, sensory, or mental capabilities. Close supervision is
necessary when any appliance is used near children.
Glass Pitcher Use
DO NOT use the pitcher if it is cracked or chipped.
DO NOT use the pitcher if the handle is loose or weakened.
IMPORTANT
SAFEGUARDS

2
User Manual
3
User Manual
DO NOT expose the pitcher to extreme temperature changes, such
as adding hot water to the pitcher when it is cold. Doing so may
cause the glass to crack.
DO make sure the lid is secure on the pitcher before pouring cold
brew.
DO NOT clean the pitcher with harsh cleansers, steel wool pads or
other abrasive materials; doing so can scratch the surface.
Care and Storage
DO turn the appliance OFF, then unplug from the outlet when not in
use, before assembling or disassembling parts and before cleaning.
DO NOT store any materials in the brewing chamber or glass pitcher
when not in use.
Power Cord
This appliance has an earthed plug. To reduce the risk of electric
shock: DO NOT attempt to modify the plug.
Electrical Warning
The unit contains electrical components that are an electrical shock
hazard. Failure to follow these instructions may result in electric
shock. To protect against electrical shock:
DO NOT use with power converters or adapters, timer switches or
separate remote-control systems.
DO disconnect the appliance by first pressing the Start/Cancel
button, and then grasping the plug and pulling from the outlet. Never
pull from the power cord.
DO keep appliance and cord away from children.
To reduce the risk of fire or electric shock, DO NOT remove the
bottom cover. No user-serviceable parts inside. Repair should be

4
User Manual
5
User Manual
done by authorised service personnel only.
DO
regularly inspect the appliance and power cord.
DO NOT operate the appliance if the power cord or plug is
damaged, or after the appliance malfunctions or is dropped or
damaged in any manner. For assistance, contact Customer Care
by email at [email protected] or by phone at 0393 655 100.
DO NOT attempt to repair, replace or modify components of the
appliance, as this may cause electric shock, fire or injury, and will
void the warranty.
DO NOT tamper with any of the safety mechanisms, as this may
result in injury or property damage.
To protect against electrical shock DO NOT immerse power cord,
plug or the appliance the appliance in water or other liquid.
DO plug this appliance into an earthed outlet ONLY.
DO NOT use the appliance in electrical systems other than
220-240V ~ 50-60Hz.
If a long detachable power-supply cord or extension cord is used:
- The marked electrical rating of the detachable power-supply cord
or extension cord should be at least as great as the electrical rating
of the appliance.
- The longer cord should be arranged so that it will not drape over
the countertop or tabletop where it can be pulled on by children or
tripped over.
SAVE THESE
INSTRUCTIONS
4
User Manual
5
User Manual
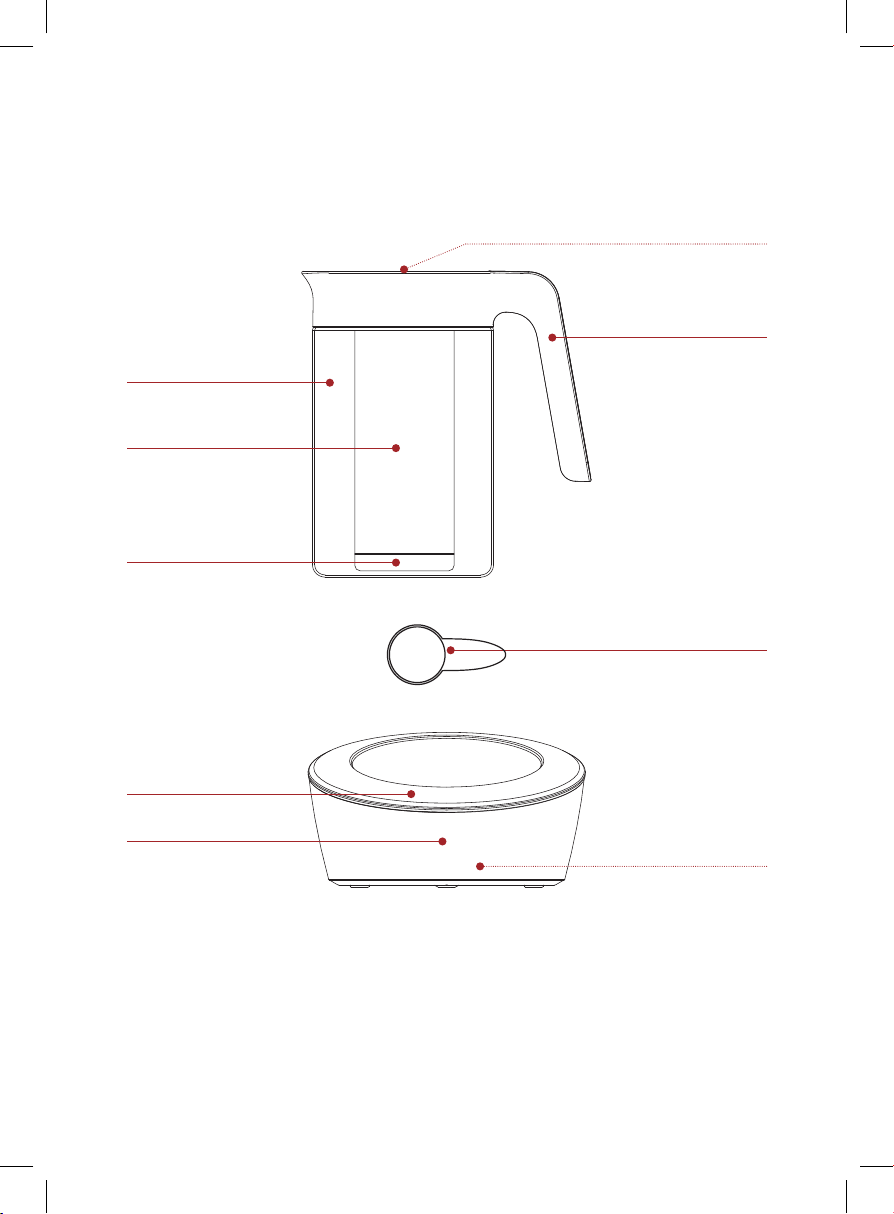
WHAT’S IN THE BOX
Instant
®
Cold Brewer
Illustrations are for reference only and may differ from the actual product.
Remember to recycle!
We designed this packaging with sustainability in mind. Please recycle
everything that can be recycled where you live. Be sure to keep this
User Manual for reference.
Glass pitcher
Brew basket
Brew basket bottom cap
Control panel
Power base
Handle
Coffee scoop
Power switch (rear)
Lid

6
User Manual
7
User Manual
BEFORE YOU BREW
Initial setup
1. Remove the Instant
®
Cold Brewer from the box.
2. Discard excess packaging materials.
3. Ensure the brew basket’s bottom cap is securely fastened to
the basket.
You can unscrew the bottom cap to dispose of grounds and prior to cleaning.
4. Remove the pitcher lid.
5. Place brew basket through the handle housing, into the
glass pitcher.
6. Place the Instant Cold Brewer power base on a dry, stable surface.
7. Place glass pitcher with brew basket onto power base.
Clean before use
The glass pitcher and handle, lid and brew basket are all dishwasher
safe. You can also handwash these pieces using soap and rinsing with
warm water.
1. Remove lid from glass pitcher.
2. Use the brew basket handle to lift the brew basket from glass pitcher.
3. Unscrew the bottom cap of the brew basket.
4. Wash the pieces by hand or placing them onto the top rack of
a dishwasher.
5. Ensure all pieces are sufficiently dried prior to reassembly
and brewing.
6. While unplugged, use a damp cloth to wipe down the power base
and control panel.
DO NOT place power base into dishwasher or submerge power base
in water.
6
User Manual
7
User Manual
YOUR INSTANT
®
COLD BREWER
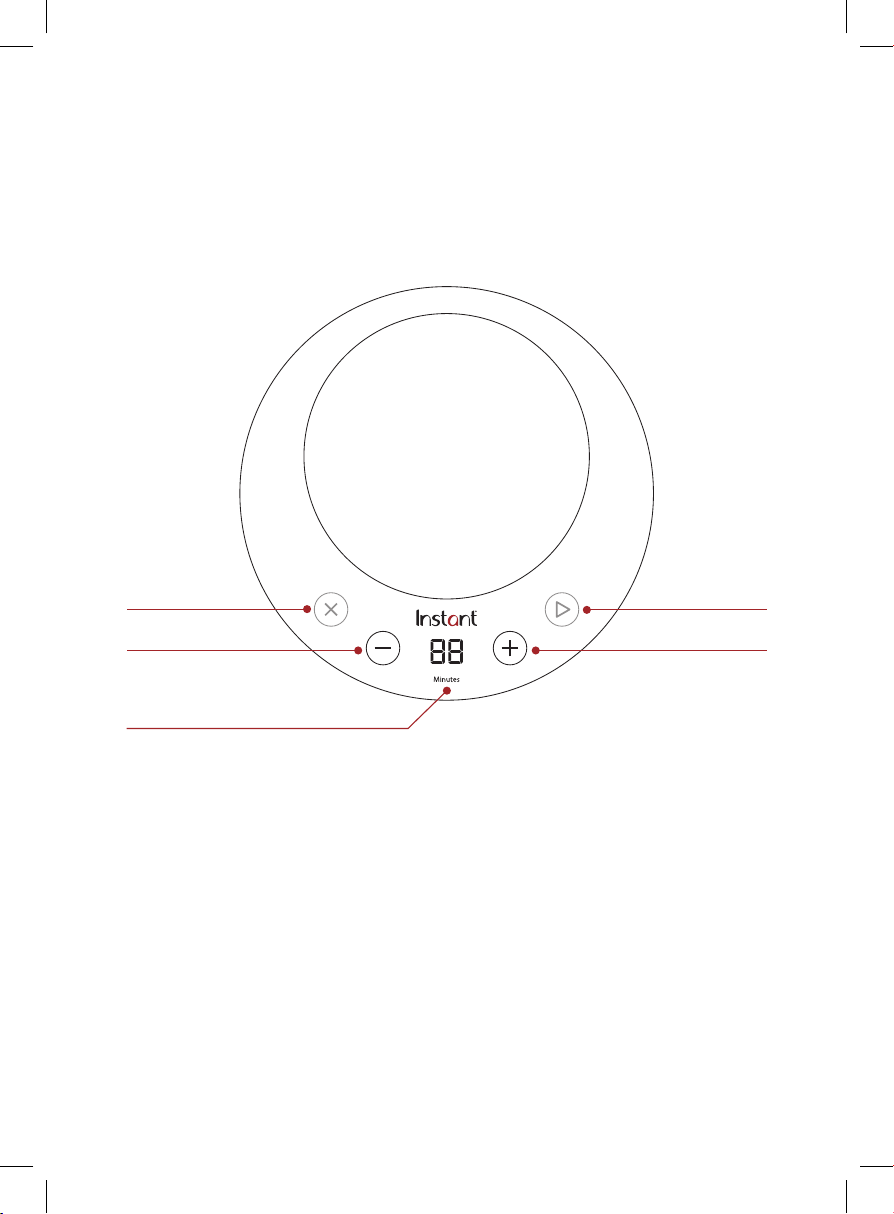
Control panel
The control panel uses flat-touch buttons. To operate, touch lightly
without pressing too hard.
Plugging in your Instant Cold Brewer
Once you’ve followed the Initial Setup instructions on page 6, plug the
power base into an outlet. The Cold Brewer should power up. If the
display does not power on, flip the switch at the back of the power base.
After 2 minutes of inactivity, the display will dim.
Cancel
Time display
Decrease time
Start
Increase time

8
User Manual
9
User Manual
COLD BREWING
True cold brew
Traditional cold brewing takes up to 24 hours. The Instant Cold Brewer’s
FlashExtract
™
technology delivers delicious, never-heated, café-quality
cold brew or iced tea in under 30 minutes.
Recommended brewing for coffee
We recommend using medium-ground coffee and a 14:1 water-to-coffee
ratio. Depending on the size of the grind, the brew basket can hold
up to 70 grams of coffee. Adjust coffee to water ratio as well grind
consistency to taste. Scoop measurements are for the included scoop.
DO NOT use fine grind coffee grounds.
Servings Coffee Water Time
2 3.5 scoops/18 tsp/34 grams 475ml 15 minutes
4 7 scoops/36 tsp/67 grams 950ml 20 minutes
For delicious coffee
By brewing combining FlashExtract
™
technology with overnight brewing
delivers delicious cold brew. After the initial brew on the power base,
store the pitcher with brew basket inserted into the fridge.
Servings Coffee Water Time
4 7 scoops/36 tsp/67 grams 950ml 5 minutes on power base
12-16 hours in fridge
For bolder cold brew
The Instant
®
Cold Brewer allows for a maximum brew time of 30 minutes.
Increase the amount of ground coffee and brew time to create a bolder
cup of coffee.
Brewing iced tea
The Instant Cold Brewer can brew iced tea using loose tea leaves
(not tea in bags). The brew basket can hold up to 6 teaspoons (2
tablespoons) of loose tea leaves.
DO NOT use tea bags or loose teas containing large leaves, stems or dried fruits.

8
User Manual
9
User Manual
Servings Loose tea Water Time
2 1/2 scoop/2-3 tsp/5g 475ml 20 minutes
4 1 scoop/5-6 tsp/10g 950ml 20 minutes
For stronger iced tea
The Instant
®
Cold Brewer allows for a maximum brew time of 30 minutes.
Increase the amount of brew time to create stronger iced tea. Some tea
varietals take more time to brew than others; green tea and chamomile
are likely to take longer to brew.
How to cold brew
Prep
1. Plug in and turn on the Instant Cold Brewer.
2. Fill glass pitcher with water. Place glass pitcher onto power base.
3. Fill brew basket with coffee grounds or tea leaves.
DO NOT overfill the brew basket. Ensure bottom cap is fastened to brew
basket before filling and brewing.
Brew
1. Place the loaded brew basket into the glass pitcher, through the
handle housing.
2. Place lid onto the glass pitcher.
Turn the lid to the closed position, ensuring pour spout is closed.
3. Use the + and – button on the Flat-Touch panel to set brewing time.
You can press and hold the ‘+’ button to add time in 5 minute increments.
For stronger coffee, you can increase brew time at any time.
4. Press the Start button to begin brewing.
Cancel brewing anytime by pressing the X on the Flat-Touch control panel.
5. When the timer reaches 00, brewing is complete.
6. Remove lid and the brewing basket.
7. Unscrew brew basket bottom to discard coffee grounds or tea leaves.
8. Place lid back onto glass pitcher. Turn lid to open pour spout to serve.

10
User Manual
11
User Manual
TROUBLESHOOTING
Problem Cause Solution
Display shows E1 Agitator at bottom
of brew basket is
jammed; this can be
caused by overfilling
with coffee grounds or
loose tea, tea leaves
that are too large, or
tea ingredients such
as stems or dried fruit.
• Remove brew basket from
pitcher, then remove coffee
grounds or loose tea leaves,
refill and do not overfill
brew basket
Loud noise
when brewing
Brew basket is not
properly in place
• Cancel brewing program,
remove lid and lift the brew
basket. Reseat basket through
lid, centering the brew basket
over the power base
Less water than
initially used
Water trapped in brew
basket
• Remove and slightly tilt
the brew basket to drain
trapped water
Brewer stops
after a few
seconds
Pitcher not placed
on power base or
brew basket not fully
assembled
• Ensure bottom cap of brew
basket is fully assembled, brew
basket is fully seated through
the lid, and the pitcher is
properly placed on power base

10
User Manual
11
User Manual
CARE, CLEANING, STORAGE
Clean your Instant
®
Cold Brewer regularly to ensure the best possible
flavor and to prevent mineral deposits from building up in the unit.
Always unplug the power base before cleaning. Never use metal
scouring pads, abrasive powders, or harsh chemical detergents on any
of the cold brewer’s parts.
Let all parts dry thoroughly before use, and before storage.
Part/Accessory Cleaning methods and instructions
Glass pitcher • Handwash or place on top rack of dishwasher.
Lid
• Handwash or place on top rack of dishwasher.
Brew basket
• Handwash or place on top rack of dishwasher.
Coffee Scoop
• Handwash or place on top rack of dishwasher.
Flat-Touch control panel
and power base
• While unplugged, use a damp cloth to wipe
down control panel.
Power cord
• DO NOT fold power cord when storing.
Be careful: The power base contains electrical components.
To avoid fire, electric shock, personal injury, and/or property damage:
• DO NOT rinse or immerse the power base, power cord, or the plug
into water or other liquids.
• Any other servicing should be performed by a qualified
service technician.

12
User Manual
13
User Manual
LEARN MORE
There’s a whole world of Instant
®
Cold Brewer information and help just
waiting for you. Here are some of the most helpful resources.
Register your product
https://www.instantpot.com.au/pages/product-registration
Contact Consumer Care
[w] www.instantpot.com.au
[ph] 0393 655 100
Instant Brands Connect App with 1000+ recipes
iOS and Android app stores
Join the community

12
User Manual
13
User Manual
Product specifications
Model Volume Wattage Power Weight Dimensions
CBCM-
1000
946 mL glass
pitcher
15 W 220-
240V ~
50/60Hz
1.13 kg cm: 17 L x 20 W x 24.9 H

14
User Manual
15
User Manual
WARRANTY
one (1) year limited replacement warranty
statement.
If your product becomes defective due to faulty material or workmanship
within a period of 1 year from the date of purchase, we warrant to do the
following:
For New Zealand Consumers: We will replace the product with a new product, free of charge, or
repair the product at our cost, at our discretion.
For Australian Consumers: Our goods come with guarantees that cannot be excluded under the
Australian Consumer Law. You are entitled to a replacement or refund for a major failure and for
compensation for any other reasonably foreseeable loss or damage. You are also entitled to have
the goods repaired or replaced if the goods fail to be of acceptable quality and the failure does not
amount to a major failure.
YOUR WARRANTY IS SUBJECT TO THE FOLLOWING CONDITIONS:
• DO NOT
operate the appliance with a damaged plug or cord, or if the unit has been dropped,
damaged or dropped in water. To avoid the risk of electric shock, do not disassemble or
attempt to repair the appliance on your own. If the supply cord is damaged, it must be replaced
by a qualified electrician in order to avoid a hazard. Incorrect reassembly or repair can cause a
risk of electric shock or injury to persons when the appliance is used.
• The item has not been misused, abused, neglected, altered, modified or repaired by anyone.
• The item has been subjected to fair wear and tear.
• The item has not been used for trade, professional or hire purposes.
• The item has not sustained damage through foreign objects, substances or accident.

14
User Manual
WARRANTY
YOUR WARRANTY DOES NOT COVER:
• Components that are subject to natural wear and tear caused by normal use in
accordance with operating instructions.
• Unauthorised/improper maintenance/handling or overload is excluded from this
warranty.
• For guarantee claims, you will need to submit a proof of purchase in the form of a
valid receipt that displays date and place of purchase.
This warranty does not replace but is in addition to your statutory rights.
This warranty does not apply to accessories supplied with the item.
This warranty applies only to the original purchaser and may not be transferred.
Replacement items will be covered by the limited warranty for the balance of the
warranty period from the date of the original purchase.
PLEASE NOTE:
Only the defective product or parts returned to place of purchase will be
replaced under this warranty.