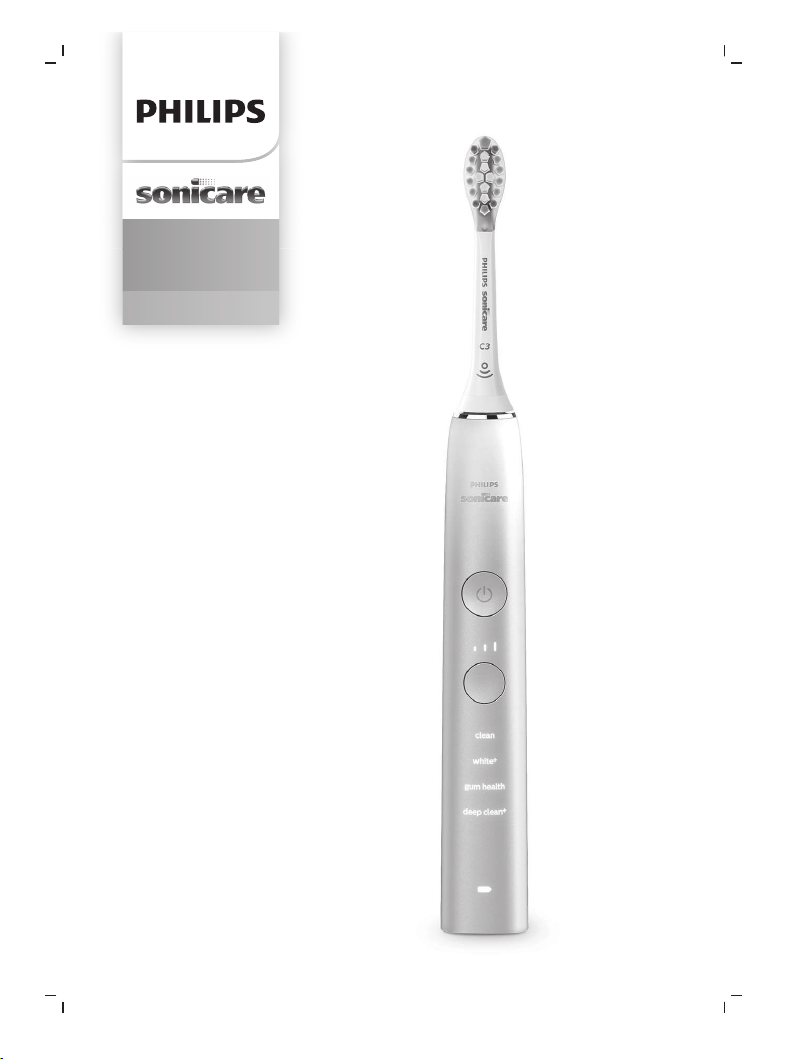
9000 Series
9000
DiamondClean
2
1
3
4
6
16
15
14
12
11
13
10
5
7
8
9

empty page before TOC


English
6
English
Introduction
Welcome to the Philips Sonicare family!
This toothbrush enables you to obtain superior plaque
removal, whiter teeth and healthier gums. Using
Sonicare’s combination of gentle sonic technology and
clinically developed and proven features, you can be
confident that you’re getting the very best clean, every
time.
Further support and product registration are available to
you at: www.philips.com/support
Important safety information
Only use the product for its intended purpose. Read this
important information carefully before you use the
product and its batteries and accessories, and save it for
future reference. Misuse can lead to hazards or serious
injuries.
Any serious incident that has occurred in relation to this
device should be reported to Philips
(www.philips.com/support) and to the competent
authority of the member state in which the user and / or
patient is established.
Warnings
- Only use original Philips accessories or consumables. If
supplied, only use the original USB cable and USB
power supply unit.
- This appliance contains no user-serviceable parts. If
the appliance is damaged, stop using it and contact
the Consumer Care Center in your country.
- If the USB cable or USB power supply unit is damaged,
stop using it.
- Keep adapters, chargers, and charging travel case
away from water.
- After cleaning, make sure the adapters, chargers and
charging travel case are completely dry before you
connect these.

7
English
- This appliance can be used by children and persons
with reduced physical, sensory or mental capabilities
or lack of experience and knowledge if they have
been given supervision or instruction concerning use
of the appliance in a safe way and understand the
hazards involved. Cleaning and user maintenance
shall not be made by children without supervision.
- Children should be supervised to ensure that they do
not play with the product.
- Do not clean any part of the product in the
dishwasher.
- Do not use the adapters, chargers and charging travel
case outdoors or near heated surfaces.
- This appliance has only been designed for cleaning
teeth, gums and tongue.
- Rinse the handle, especially the brush head
connection. Gently clean around the rubber seal.
- Make sure brush head and toothbrush are dry before
storing in travel case.
- Stop using a brush head with crushed or bent bristles.
Replace the brush head every 3 months or sooner if
signs of wear appear.
- Avoid direct contact with products that contain
essential oils or coconut oil. Contact may result in
bristles dislodging.
Medical warnings
- This appliance is a personal care device and is not
intended for use on multiple persons.
- Stop using the appliance and consult your
dentist/doctor if excessive bleeding occurs after use, if
bleeding continues to occur after 1 week of use or if
you experience discomfort or pain.
- If you have a pacemaker or other implanted device,
contact your doctor or the manufacturer of the
implanted device prior to use. (
https://pubmed.ncbi.nlm.nih.gov/25637210/ )
Battery safety instructions
- This appliance contains batteries that are only
removable by skilled persons.

8
English
- Only use the product for its intended purpose. Read
this information carefully before you use the product
and its batteries and accessories, and save it for future
reference. Misuse can lead to hazards or serious
injuries. Accessories supplied may vary for different
products.
- Only use original Philips accessories and consumables.
Only use detachable supply unit CBAxxxx, TCAxxxx, or
WAAxxxx.
- Charge only with Philips compatible chargers:
- CBAxxxx (input ratings: 100 - 240V~; 50/60Hz;
1.3W),
- TCAxxxx (input ratings: 100 - 240V~; 50/60Hz;
1.5W),
- WAAxxxx (input ratings: 100 - 240V~; 50/60Hz;
3.5W).
- Keep product and batteries away from fire and do not
expose them to direct sunlight or high temperatures.
- If the product becomes abnormally hot or smelly,
changes color or if charging takes longer than usual,
stop using and charging the product and contact
Philips.
- Do not place products and their batteries in
microwave ovens or on induction cookers.
- Do not open, modify, pierce, damage or dismantle the
product or battery to prevent batteries from heating
up or releasing toxic or hazardous substances. Do not
short-circuit, overcharge or reverse charge batteries.
- This appliance contains batteries that are non-
replaceable. When the battery is at end of life, the
appliance shall be properly disposed of, see section on
Recycling.
- Charge and use the product at a temperature
between 0 °C and 40 °C (32°F and 104 °F).
- If batteries are damaged or leaking, avoid contact
with the skin or eyes. If this occurs, immediately rinse
well with water and seek medical care.
Storage and transportation conditions
Temperature -10°C to +60°C (14 °F to 140 °F).

9
English
Electromagnetic fields (EMF)
This Philips appliance complies with all applicable
standards and regulations regarding exposure to
electromagnetic fields.
Radio Equipment Directive
Hereby, Philips declares that electric toothbrushes
equipped with a radio frequency interface (Bluetooth or
BrushSync) are in compliance with Directive 2014/53/EU.
- Bluetooth radio frequency: 2.4 GHz
- Maximum Bluetooth radio frequency power: 3 dBm
- NFC radio frequency: 13.56 MHz
- Maximum NFC radio frequency power: -26 dBm
The full text of the EU declaration of conformity is
available at the following internet address:
www.philips.com/support
Intended use
Sonicare DiamondClean 9000 power toothbrushes are
intended to remove adherent plaque and food debris
from the teeth to reduce tooth decay and improve and
maintain oral health. Sonicare DiamondClean 9000
power toothbrushes are intended for personal use. Use
by children should be with adult supervision.
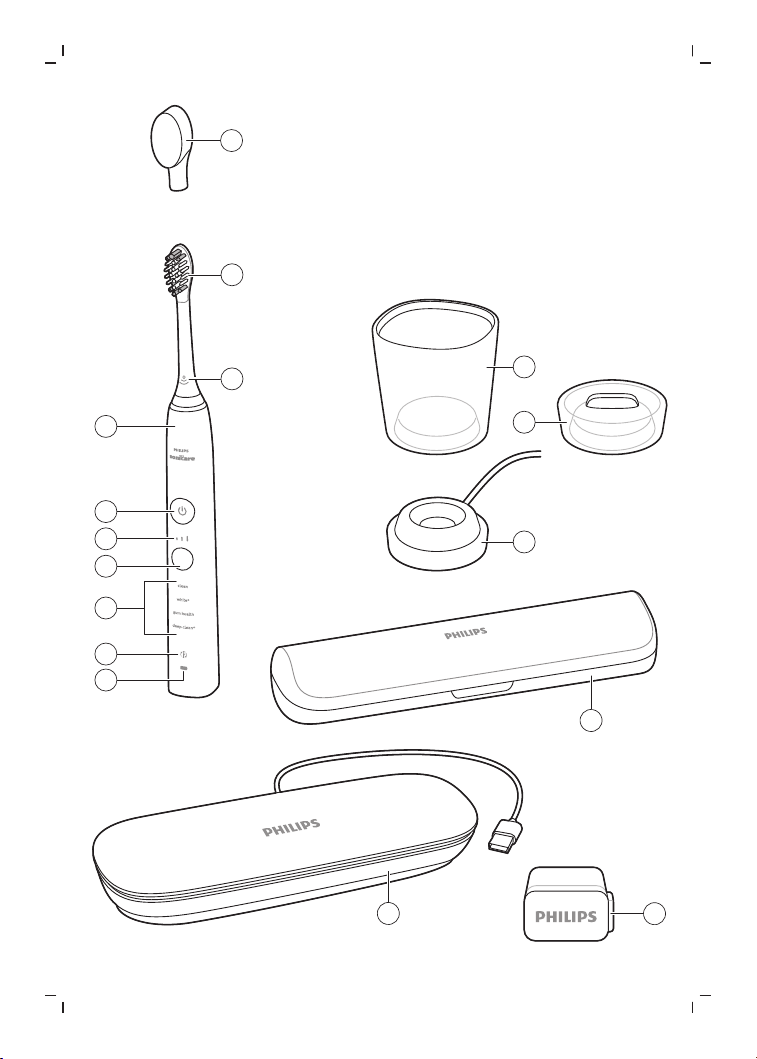
Your Philips Sonicare (Fig 1.)
1 Handle
2 Power on/off button
3 Intensity indicator
4 Mode/intensity button
5 Mode indicator
6 Brush head replacement reminder light
7 Battery indicator
Accessories:
8 Brush head cap
9 Smart brush heads
10 BrushSync symbol
11 Charging glass
12 Charging stand
13 Charging base
14 Travel case
10
English
15 Charging travel case
16 USB(-A) wall adapter
Note: Accessories included may vary based on the
model purchased.
The following symbols may appear on the product:
Read Operator’s Manual.
Detachable Power Supply Part:The "xxxxxx" indicates the
model number of the approved chargers to be used.
Sonicare app - Getting started
The Sonicare app pairs with your toothbrush to provide
you a connected experience. The app is compatible with
a wide range of iPhone and Android™ smartphones.
To start using the Sonicare app:
1
Download the Sonicare app to your phone.
2
Ensure your phone's Bluetooth is turned on.
3
Pick up your toothbrush to ensure it is active (lights
on).
4
Open the app and follow the steps.
5
Pair your toothbrush with the app.
6
Create your account via the app. Complete firmware
update, if prompted, to access the latest
improvements and features.
7
Brush regularly with your toothbrush connected to
the app. When you regularly sync the toothbrush with
the app, you will receive updates to help improve your
oral healthcare.
8
Sync regularly.
11
English
9
Keep your phone close to your toothbrush for optimal
data transfer.
To sync manually: Pair/connect your toothbrush with
the app every two weeks to benefit from the app
features/capabilities.
To sync automatically: Allow location permission while
setting up the app. By allowing location permission, your
phone knows when it is in the connection range of your
toothbrush and can refresh your brushing data in the app
to provide the latest insights and recommendations.
Note: Make sure your phone's Bluetooth is switched on
when using the app so that your toothbrush can transfer
and update your brushing data in the app. If you have
questions about why your brushing data is collected, be
sure to review the Sonicare Privacy Statement, available
throughout the app setup process.
App features
Your Sonicare power toothbrush is equipped with smart
sensors to provide you with feedback about your
brushing habits, including:
- Daily brushing sessions
- Time spent during each brushing session
- Applied brushing pressure
- Brush head replacement reminder (based on actual
use)
The Sonicare app collects the data provided by the smart
sensors and tracks your brushing habits over time.
Getting started
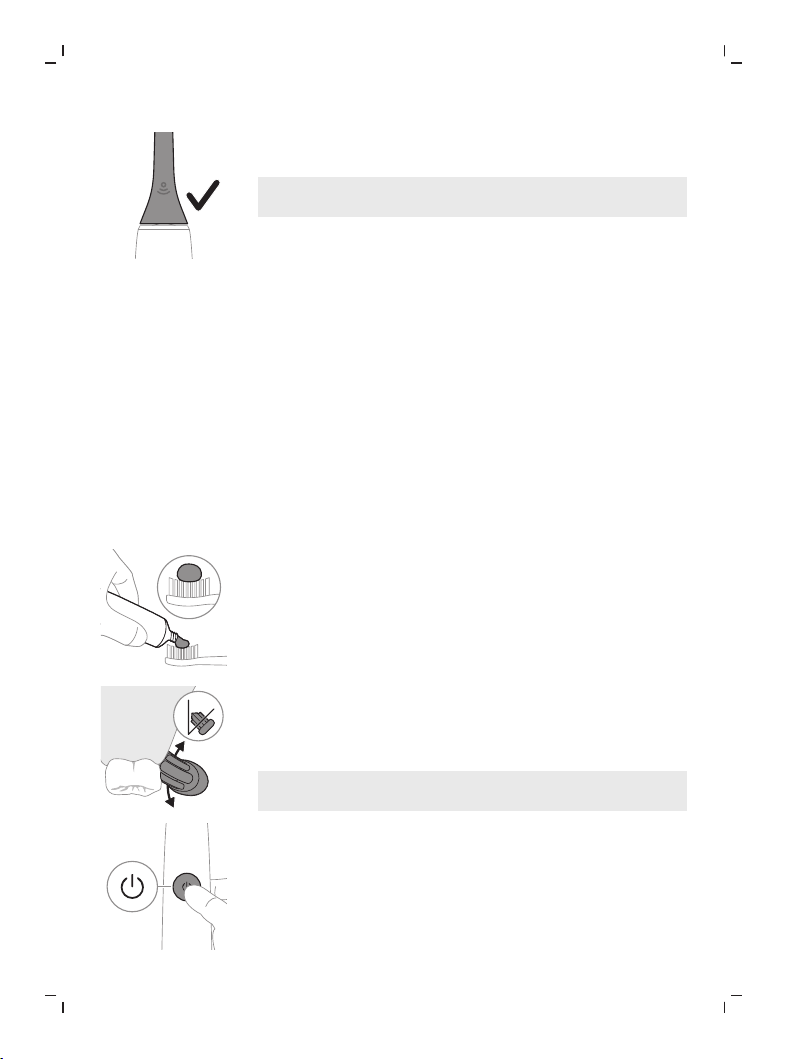
1
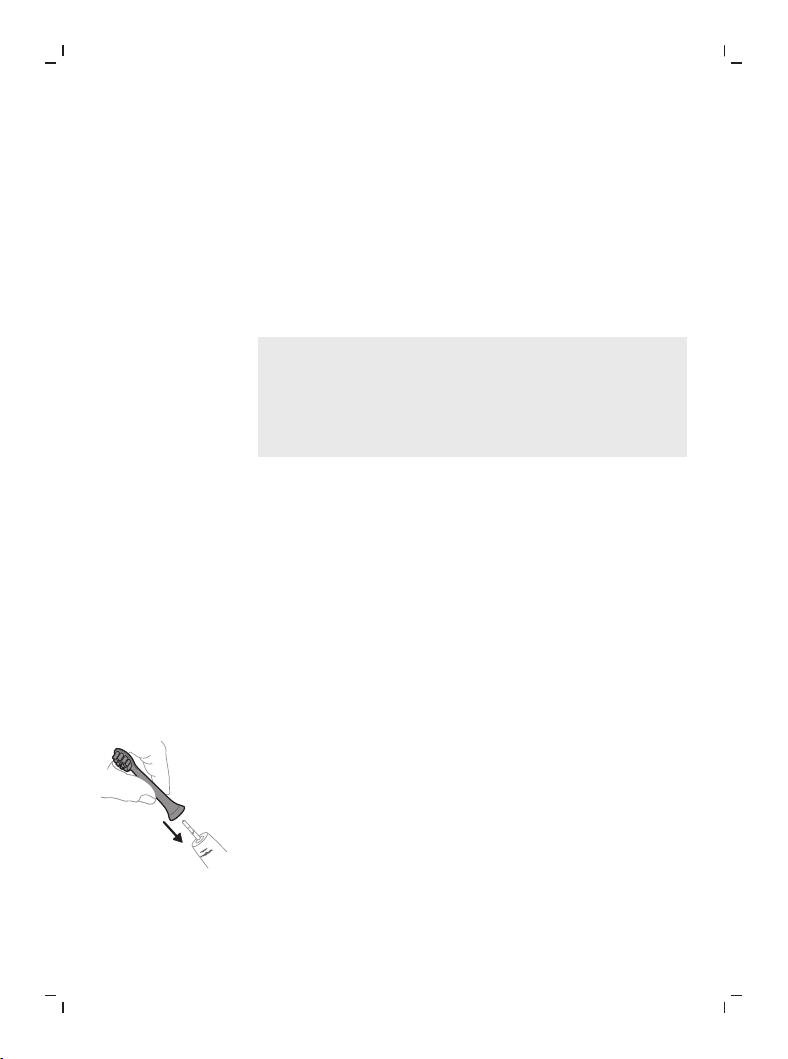
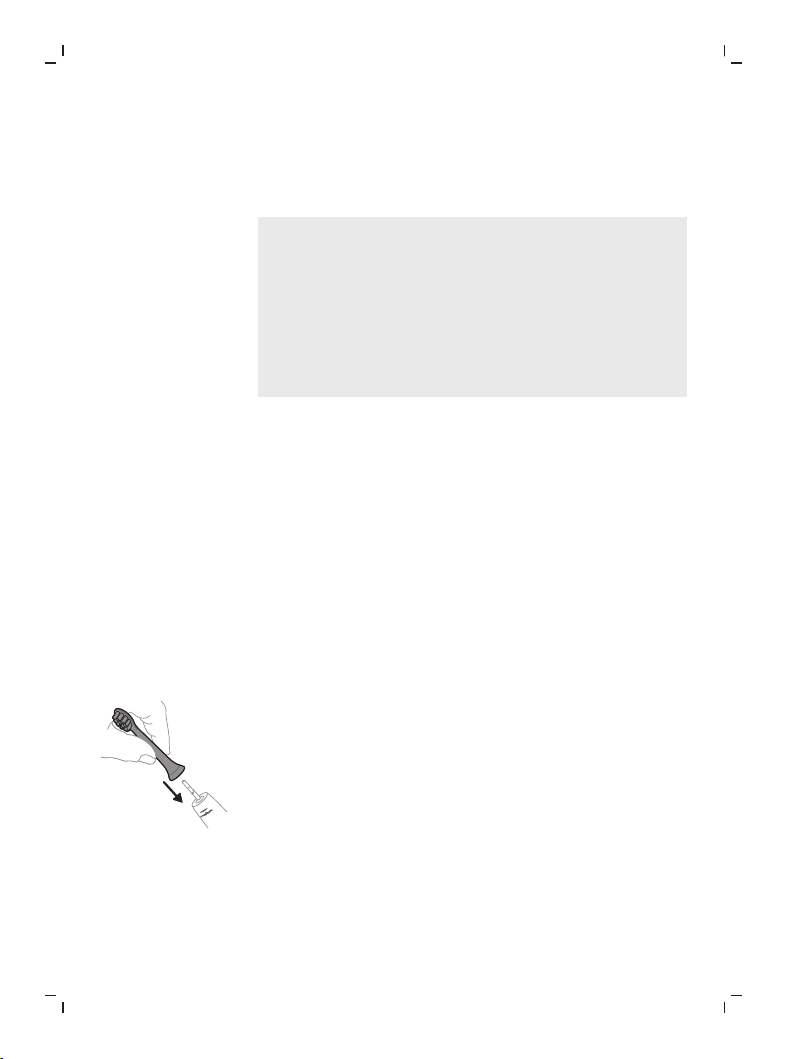
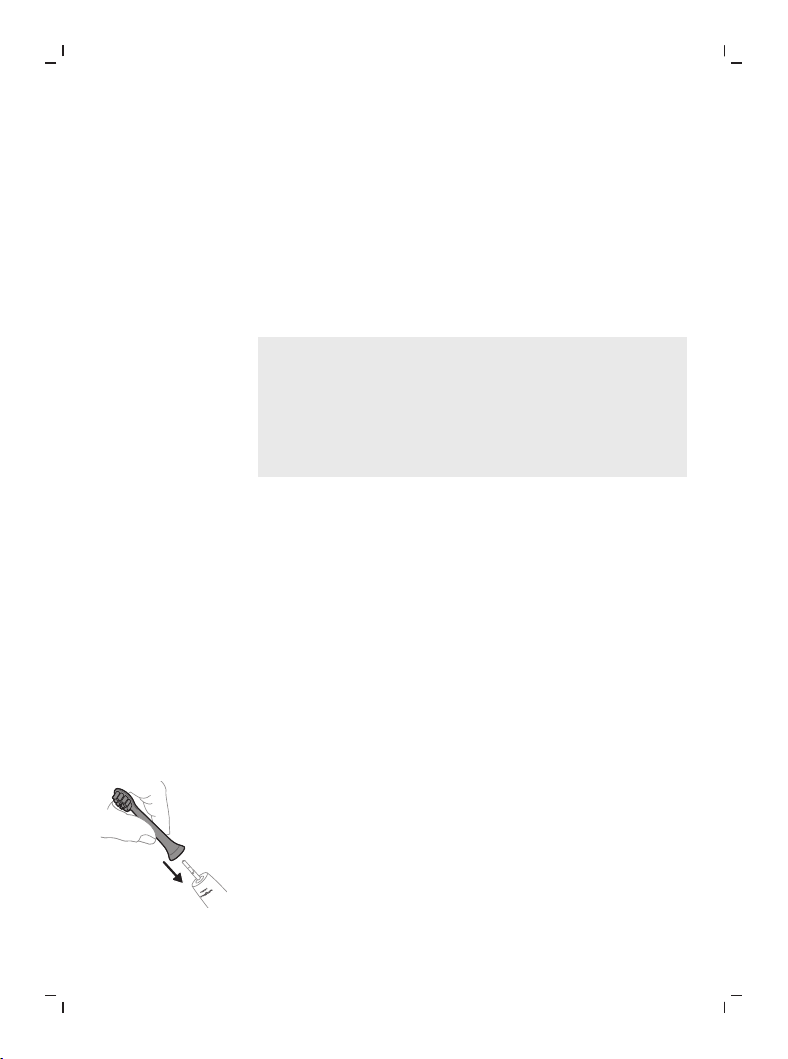
Align the brush head so the bristles point in the same
direction as the front of the handle.
12
English
2
Firmly press the brush head down onto the metal
shaft until it will not go any further.
Note: It is normal to see a slight gap between the
brush head and the handle.
Using your Philips Sonicare toothbrush
If you are using your Sonicare toothbrush for the first
time, it is normal to feel more vibration than when using
a non-electric toothbrush. It is common for first-time
users to apply too much pressure. Only apply gentle
pressure and let the toothbrush do the brushing for you.
Please follow the brushing instructions below for the best
experience.
To help you transition to your new Sonicare power
toothbrush, use a lower setting for the first 1-2 weeks
then transition to a higher setting.
Brushing instructions
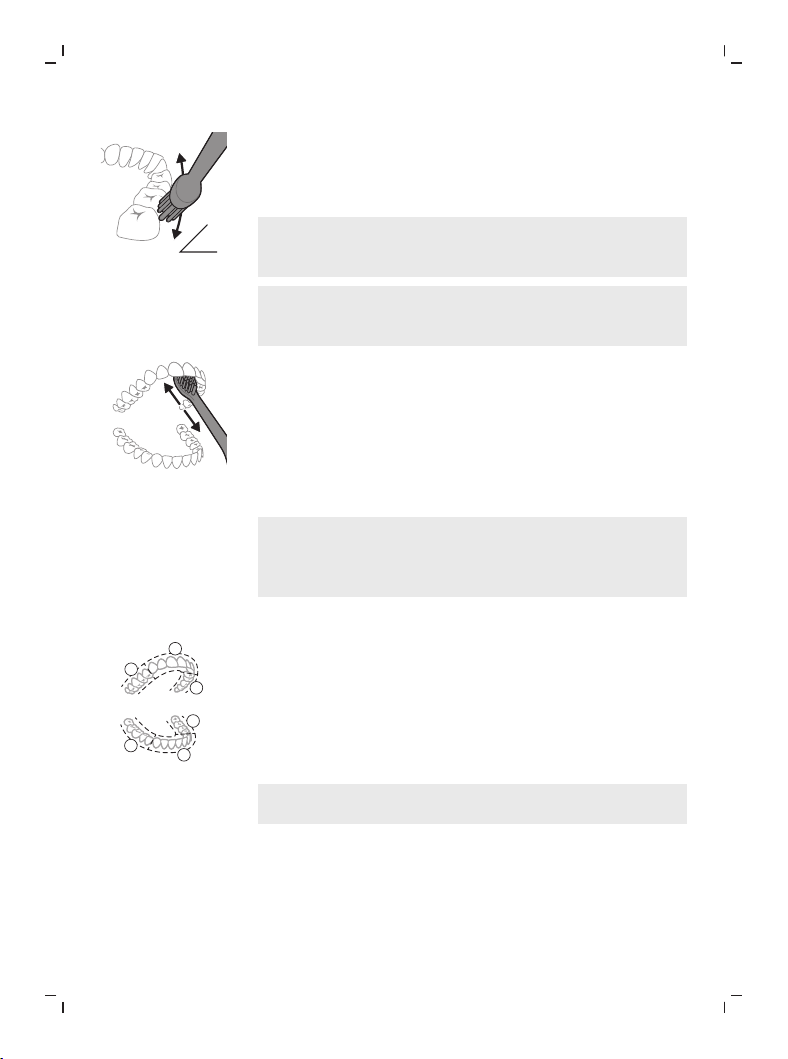
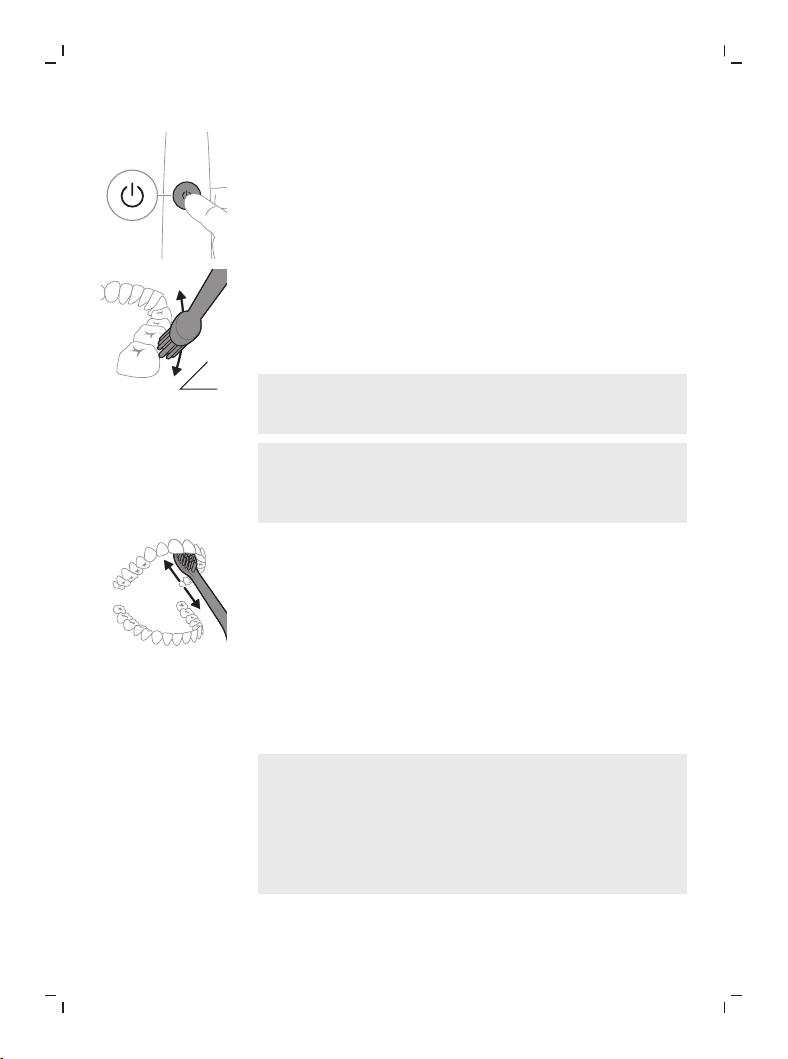
1
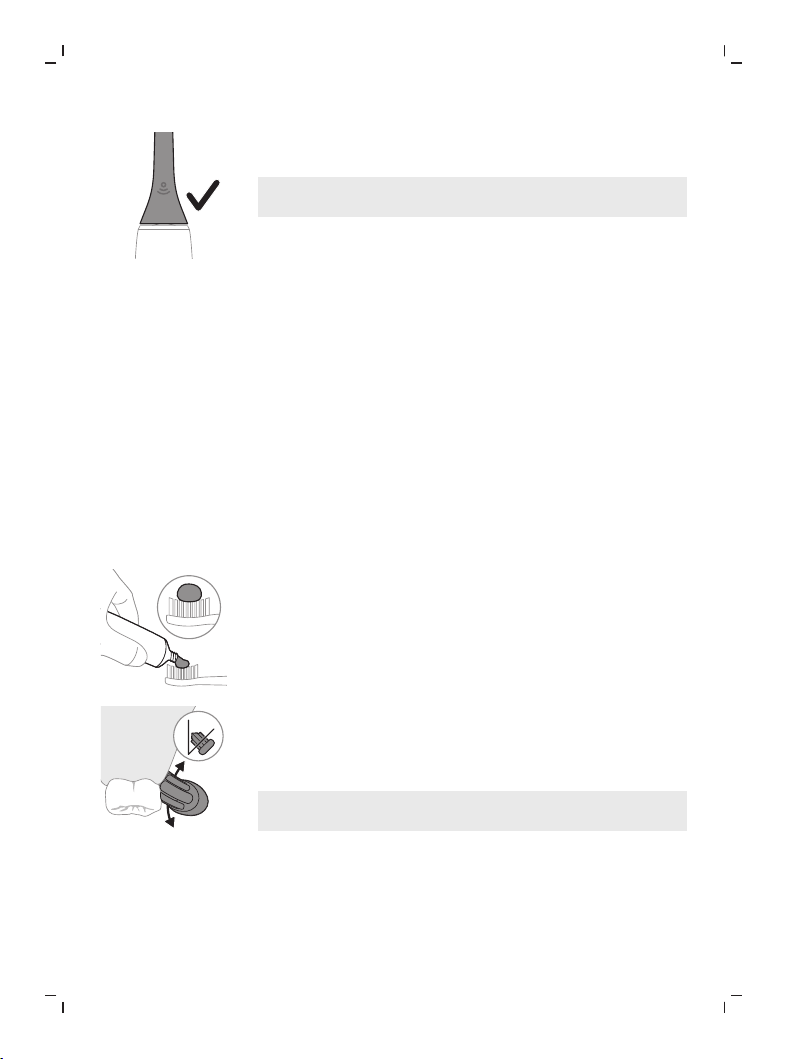
Wet the bristles and apply a small amount of
toothpaste.
45°
2
Place the toothbrush bristles against the teeth at a
slight angle (45 degrees). Pressing firmly to make the
bristles reach the gumline or slightly beneath the
gumline.
Note: Keep the center of the brush in contact with the
teeth at all times.
3
Press the power on/off button to switch on the Philips
Sonicare.
13
English
45°
4
Gently keep the bristles placed on the teeth and in the
gumline. Brush your teeth with small back and forth
motion so the bristles reach between the teeth.
Continue this motion throughout your brushing cycle.
Note: The bristles should slightly flare. It is not
recommended to scrub as you would with a manual
toothbrush.
Note: If you apply too much pressure, you will be
alerted by a change in vibration of the handle and the
brush head replacement reminder flashing amber.
5
To clean the inside surfaces of the front teeth, tilt the
brush handle semi-upright and make several vertical
overlapping brushing strokes on each tooth.
6
After you have completed the brushing cycle, you can
spend additional time brushing the chewing surfaces
of your teeth and areas where staining occurs. You
can also brush your tongue, with the toothbrush
switched on or off, as you prefer.
Note: Your Philips Sonicare toothbrush is safe to use on
braces (brush heads wear out sooner when used on
braces) and dental restorations (fillings, crowns, veneers)
if they are properly adhered and not compromised.
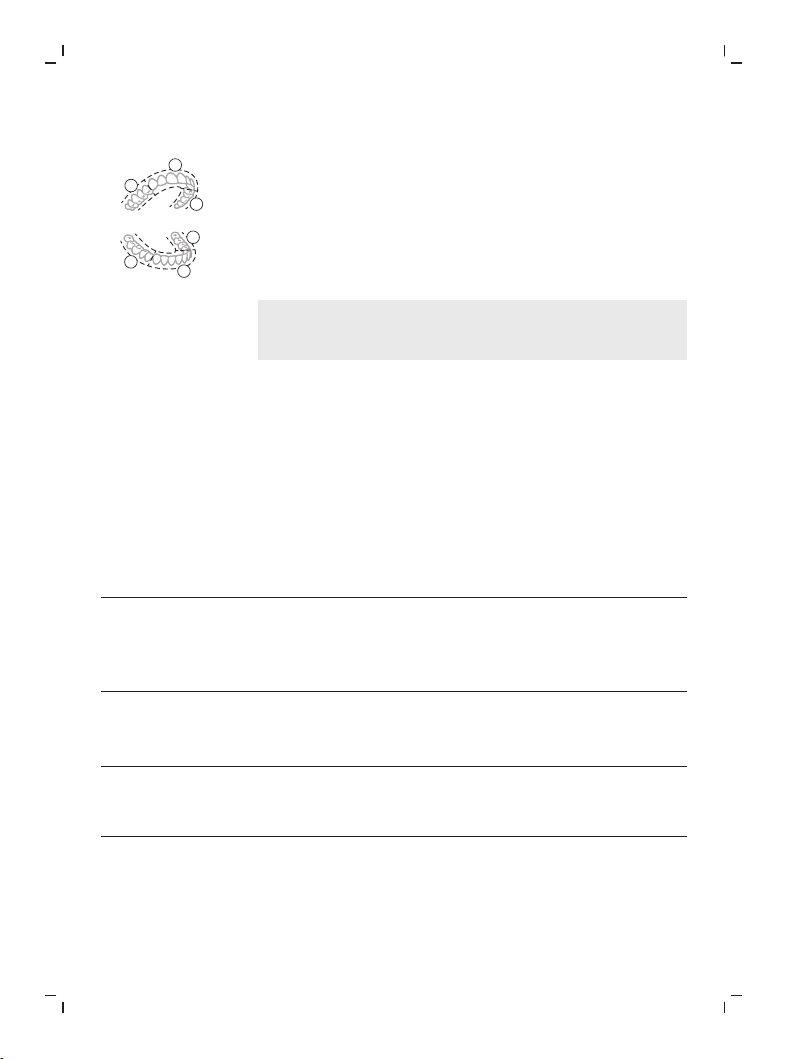
BrushPacer
1
2
3
4
5
6
To make sure you brush evenly throughout the mouth,
divide your mouth into 6 sections using the BrushPacer
feature. The BrushPacer divides the brushing time into 6
equal segments and indicates when you should move to
the next area. The segments are indicated with a brief
pause in vibration. The toothbrush automatically stops at
the end of the brushing session.
Note: Additional segments may be added when you use
the White+ or Gum Health Modes.
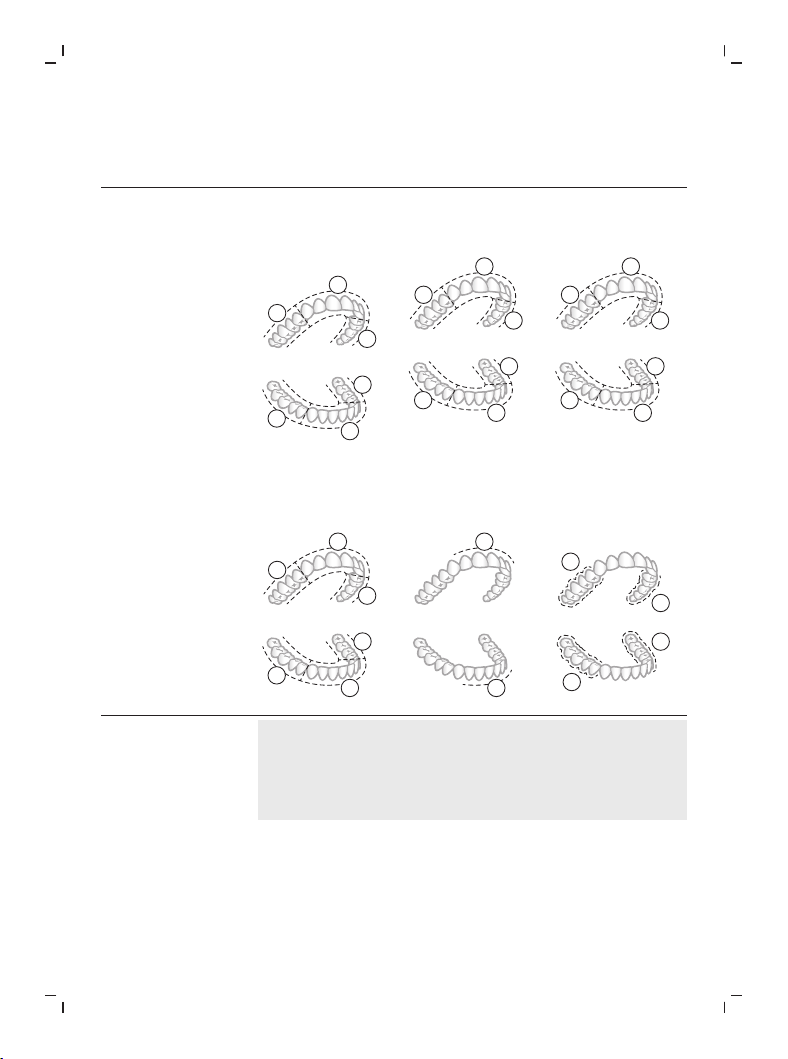
Modes
Your power toothbrush is equipped with 4 different
modes: Clean, White+, Gum Health and Deep Clean+.
Based on the smart brush head you use, the optimal
mode and intensity will be selected automatically by the
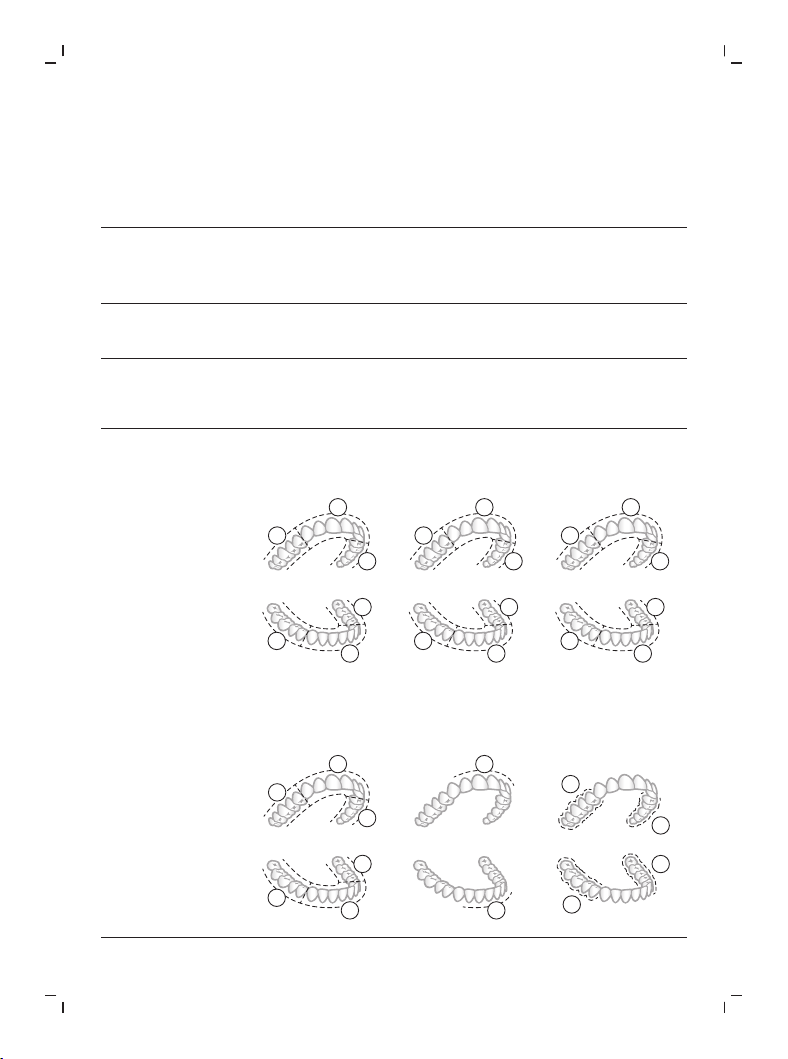
14
English
BrushSync technology. To change modes, press the
mode/intensity button while the handle is turned off.
Clean and Deep
Clean+
White+ Gum health
Benefit
Plaque removal Plaque and
surface stains
removal
Plaque removal
and gum
massage
Recommended
intensity level
High High High
Total brushing
time
Clean: 2 minutes
Deep Clean+: 3
minutes
2 minutes and 40
seconds
3 minutes and 20
seconds
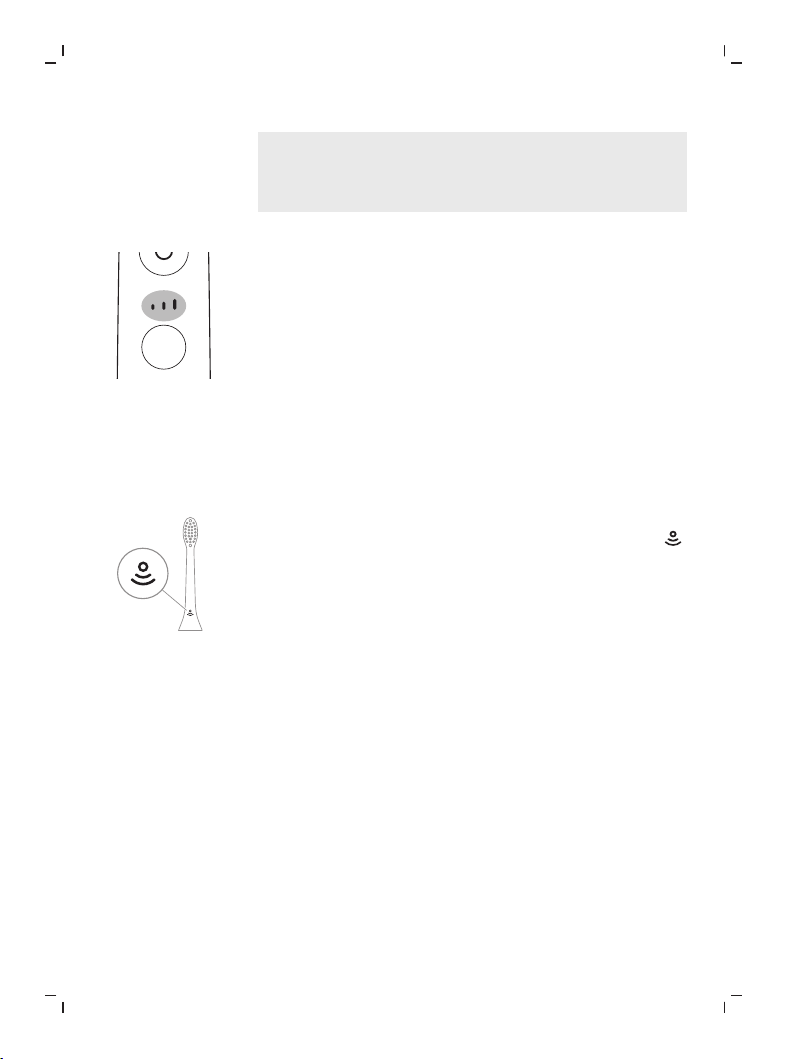
How to brush
Clean: Brush each
segment for 20
seconds
1
2
3
4
5
6
Deep Clean+:
Brush each
segment for 30
seconds*
1
2
3
4
5
6
Brush each
segment for 20
seconds,
1
2
3
4
5
6
then brush
segments 7 and 8
for 20 seconds
each
7
8
Brush each
segment for 20
seconds,
1
2
3
4
5
6
then brush
segments 7, 8, 9
and 10 for 20
seconds each
7
8
10
9
15
English
Note: When brushing with the Philips Sonicare app in
'Deep Clean+' mode, the brushing time will be 2 minutes
when connected to the app and 3 minutes when not
connected to the app.
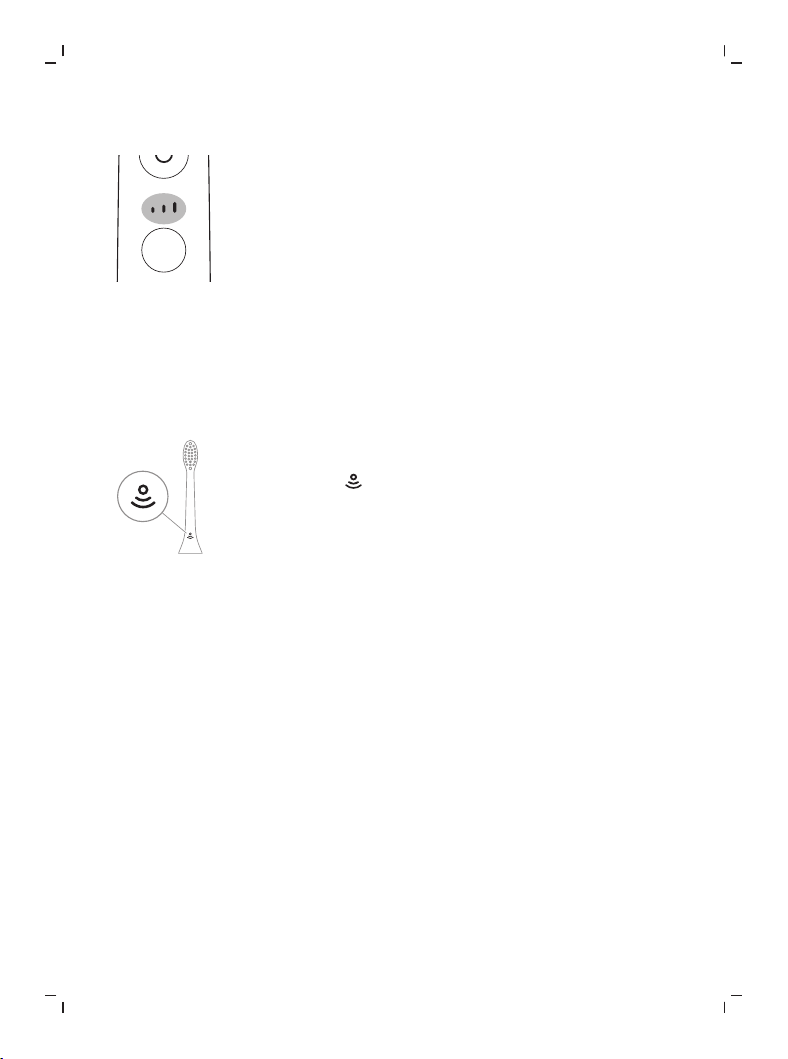
Intensities
Your power toothbrush comes with 3 different intensity
settings:
- low intensity (one bar)
- medium intensity (two bars)
- high intensity (three bars)
When attached to the handle, the smart brush head will
automatically select the recommended intensity. If you
wish to change to a different intensity, you can do so by
pressing the mode/intensity button while brushing.
The intensity cannot be changed as long as the handle is
powered off or paused.
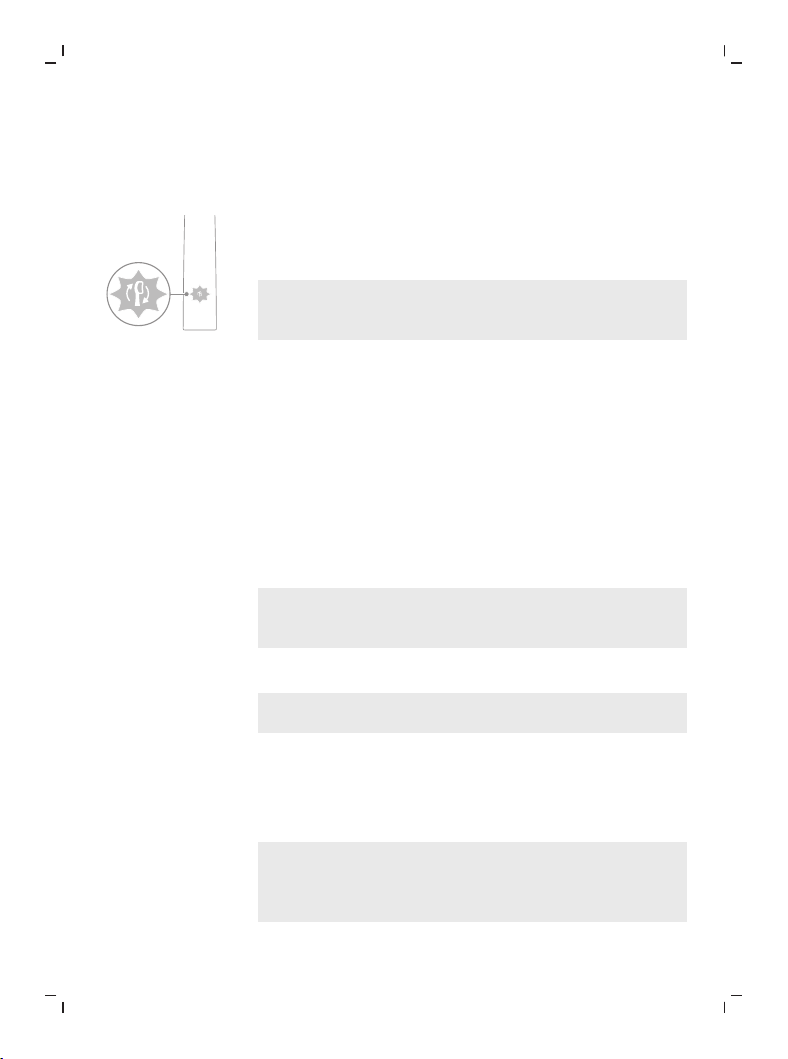
BrushSync technology
BrushSync technology enables your brush head to
communicate with your handle using a microchip. The
symbol at the bottom of the brush head indicates that
the brush head is equipped with this technology.
BrushSync technology enables:
- Brush head replacement reminder
- BrushSync mode and intensity pairing
Philips Sonicare offers a wide range of smart brush heads,
equipped with BrushSync technology. To explore our full
range of toothbrush brush heads, and find the brush
head that is best for you, go to
www.philips.com/toothbrush-heads for more
information.
Features
- Pressure Sensor Feedback
- BrushPacer
- SmarTimer
- EasyStart
- Brush Head Replacement Reminder
- Brush Head Mode Pairing
16
English
Pressure Sensor Feedback
Your Sonicare toothbrush measures the pressure you
apply while brushing, to protect your gums and teeth
from damage.
If you apply excess pressure, the handle changes its
vibration and the brush head replacement reminder icon
flashes amber until you reduce the pressure.
Note: Your product comes with the Pressure Sensor
activated. To deactivate this feature (see 'Activating or
deactivating features').
BrushPacer
The BrushPacer is an interval timer that helps you to
brush evenly through the mouth by dividing your mouth
into 6 sections. (see 'Brushing instructions')
SmarTimer
The SmarTimer indicates that your brushing cycle is
complete by automatically switching off the toothbrush
at the end of the brushing cycle.
Dental professionals recommend brushing no less than 2
minutes twice a day.
Note: If you press the power on/off button after you
started the brushing cycle, the toothbrush pauses. After a
pause of 30 seconds, the SmarTimer resets.
EasyStart
Note: To activate EasyStart. (see 'Activating or
deactivating features')
This Philips Sonicare model comes with the EasyStart
feature deactivated. The EasyStart feature gently
increases the power over the first 14 brushings to help
you get used to brushing with the Philips Sonicare.
The EasyStart feature works with all modes.
Disclaimer
When the Philips Sonicare toothbrush is used in clinical
studies, it must be used at high intensity with the handle
fully charged and the EasyStart feature deactivated.
17
English
Brush Head Replacement Reminder
Your Philips Sonicare is equipped with BrushSync
technology that tracks the wear of your brush head.
Note: This feature only works with Philips Sonicare smart
brush heads with BrushSync technology.
1
When you attach a new smart brush head for the first
time, the handle recognizes that you have a Philips
brush head with BrushSync technology and begins
tracking brush head wear.
2
Over time, based on the pressure you apply and the
total time the brush head has been used, the handle
tracks brush head wear in order to determine the
optimal time to replace your brush head. This feature
guarantees the best cleaning and care of your teeth.
3
When the Brush Head Replacement Reminder
indicator lights up amber, you should replace your
brush head.
Note: All smart brush heads come with the brush head
replacement reminder feature activated. To deactivate
the brush head replacement reminder see 'Activating or
deactivating features'.
Brush Head Mode Pairing
Brush heads with BrushSync technology are equipped
with a microchip which communicates with the handle
and automatically pairs it with the recommended mode
and intensity.
Note: If you change modes/intensity, the brush head will
remember the last used setting.
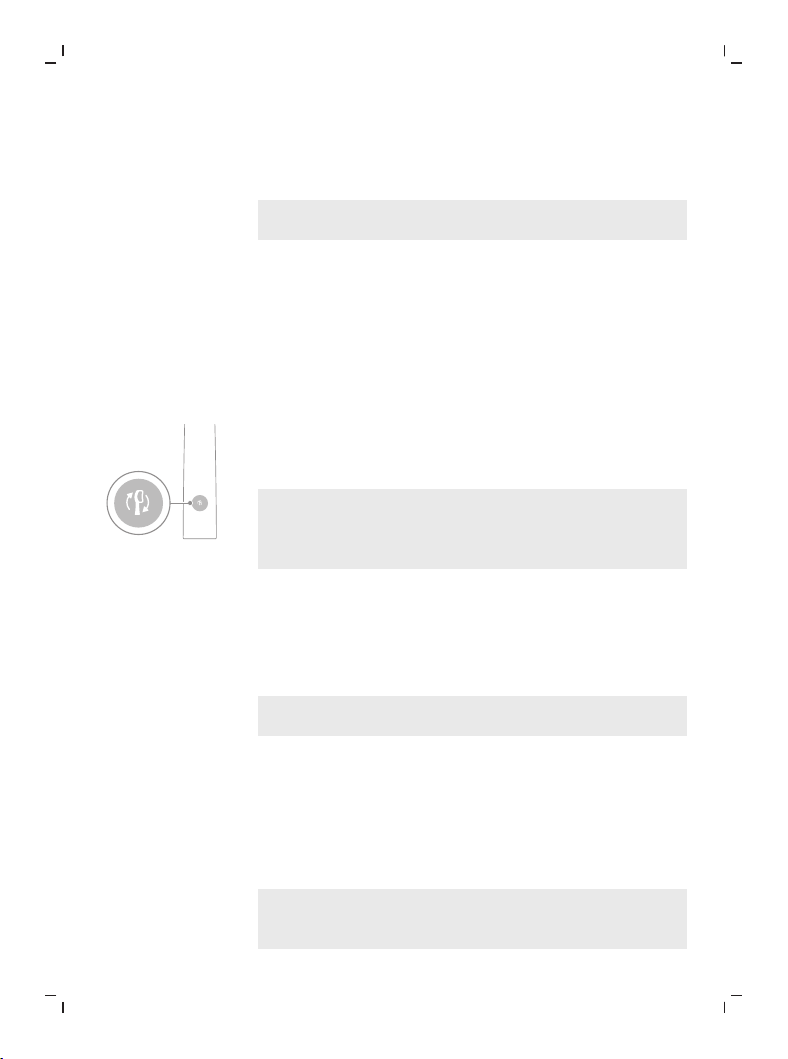
Activating or deactivating features
You can activate or deactivate the following features of
your toothbrush:
- EasyStart
- Brush Head Replacement Reminder
- Pressure Sensor Feedback
Note: You can only activate or deactivate the Brush Head
Replacement Reminder when a smart brush head is on
the handle.
18
English
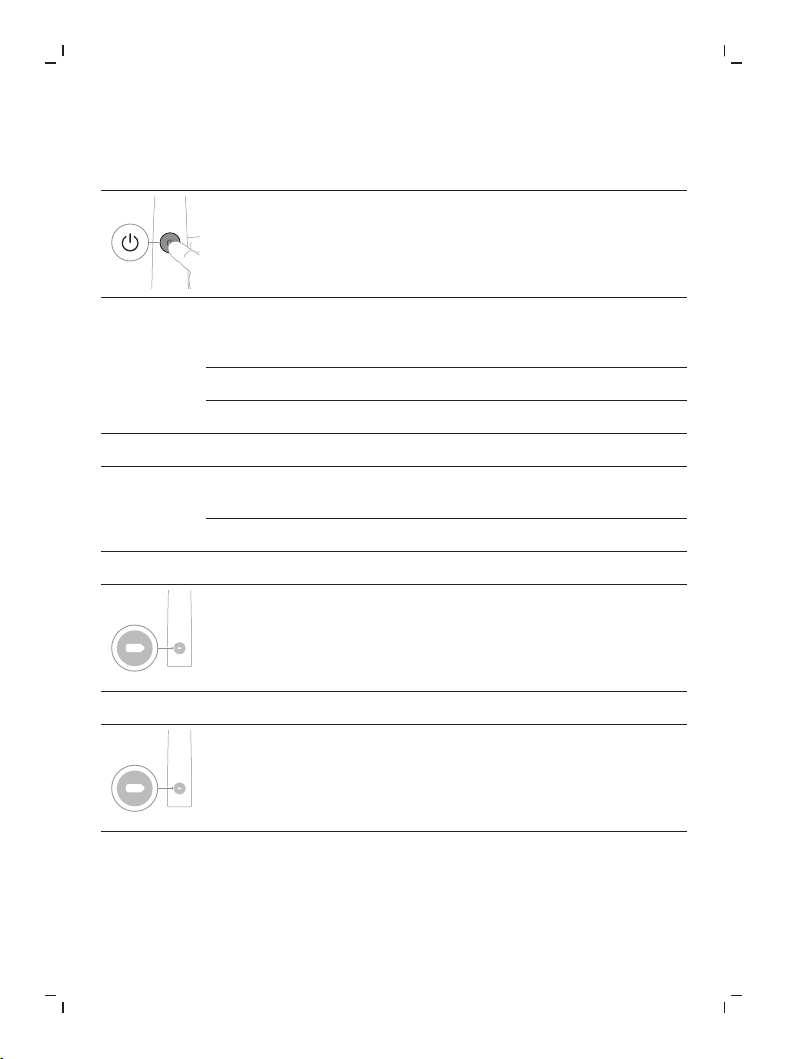
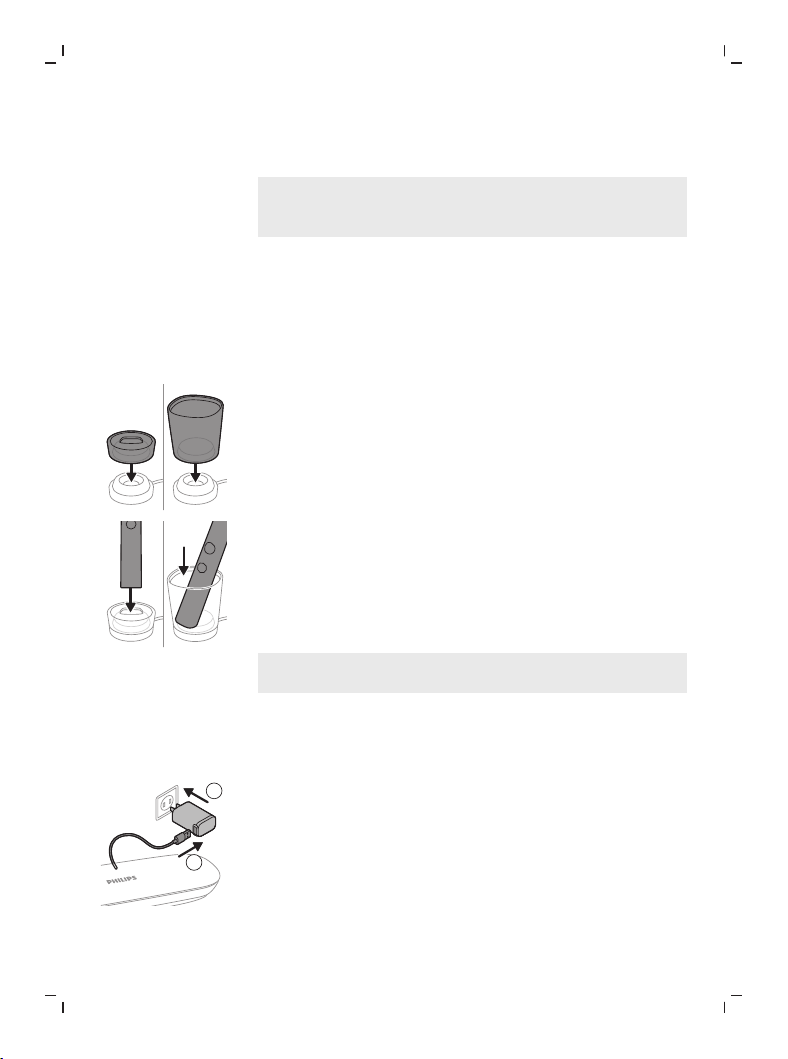
Step 1: Place the handle on the charging stand or in the
charging glass.
Step 2: Press and hold power on/off button for:
Easy start Brush Head
Replacement
Reminder
Pressure Sensor
Feedback
3 seconds Up to 5 seconds Up to 7 seconds
¯ ¯ ¯
Step 3: Let go of the power on/off button when you hear:
1 beep 1 beep and then
2 beeps
1 beep, 2 beeps and
then 3 beeps
¯ ¯ ¯
Together with:
If you see the battery indicator flash 2 times and hear 3 tones
from low to high, then the feature has been activated.
OR
If you see battery indicator flash amber 1 time and hear 3
tones high to low, then the feature has been deactivated.
Charging and battery status
This Philips Sonicare toothbrush is designed to provide at
least 28 brushing sessions, each session lasting 2 minutes
(14 days if used twice per day) on a fully charged battery.
The battery indicator shows the battery status when you
19
English
complete the 2-minute brushing session, when you pause
the toothbrush, or while it is charging.
Note: It can take up to 24 hours to fully charge the
battery before first use, but you can use the Philips
Sonicare toothbrush before it is fully charged.
Charging
Charging on charging base
1
Plug the cord of the charging base into an electrical
outlet.
2
Place the charging stand or the charging glass on the
charging base.
3
Place the handle on the charging stand or in the
charging glass.
- The battery indicator lights up and the handle
beeps twice. This indicates the toothbrush is
charging.
4
The charger will charge your toothbrush until it is fully
charged.
The handle is charging when the battery indicator is
flashing. When the handle is fully charged, the battery
indicator lights up for 30 seconds and then switches off.
Charging with the travel case
Note: Accessories included may vary based on the model
purchased.
1
Take the USB cable from the bottom of the charging
travel case.
2
Connect the charging travel case via the USB cable to
5V DC input power either from:
2
1
- The USB adapter provided
- a UL-listed or certified to ANSI/UL 60950-1
personal computer's standard USB connector or,
- a UL-listed or certified to ANSI/UL 60950-1 LPS
power supply with USB output port or,
- a UL-listed or certified 1310 Class 2 power supply.
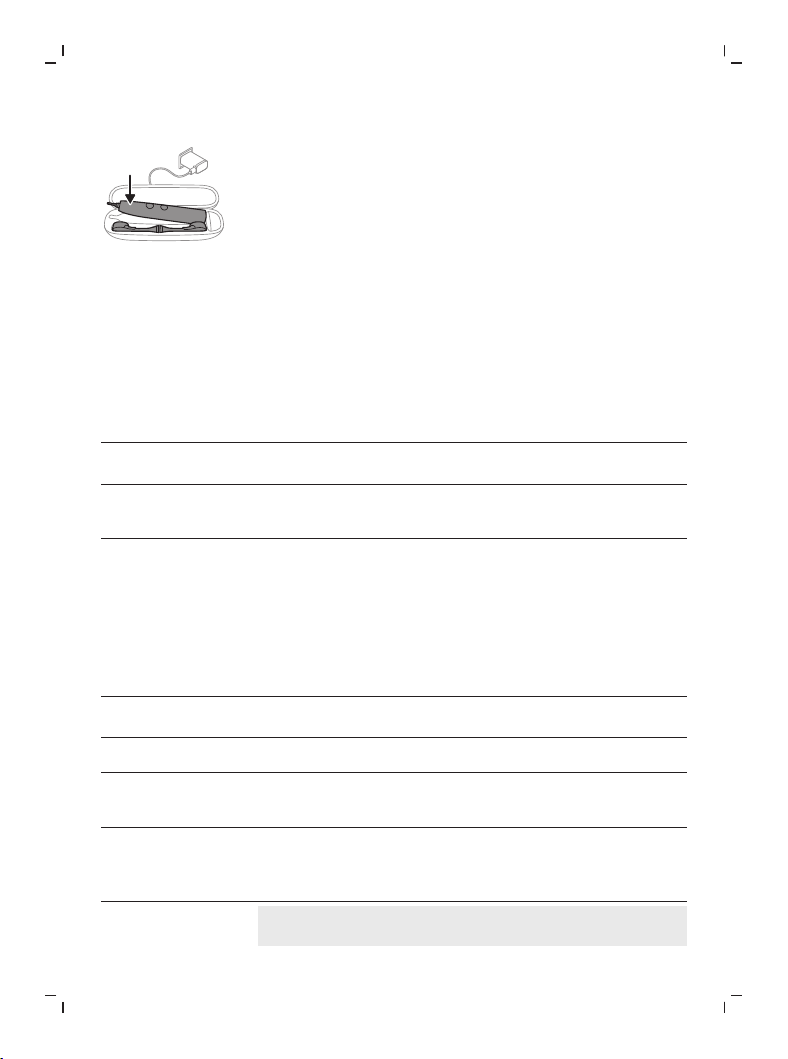
20
English
3
Place the handle in the travel case. The travel case
charges your toothbrush until your toothbrush is fully
charged.
Battery status
Battery status (handle on plugged in charger or in
charging travel case)
When the handle is placed on the charger or in the
charging travel case, the battery indicator shows the
battery level.
Battery status Battery indicator
Charging Flashes
Full Lights up for 30 seconds and then
switches off
Battery status (when handle is not placed on
charger or in charging travel case)
When the toothbrush is awake, the battery indicator at
the bottom of the handle shows the battery level.
Battery status Battery indicator Sound
Full Lights up -
Partially full Flashes -
Low Flashes amber The handle emits 3
beeps after brushing
Empty Flashes amber The handle emits 2 sets
of 5 beeps after
brushing
Note: To save energy, the battery indicator will switch off
when not in use.
21
English
Note: When the battery is completely empty, the
toothbrush switches off. Place the toothbrush on the
charger to charge it.
Note: To keep the battery fully charged at all times, you
may keep your toothbrush on the charger when not in
use.
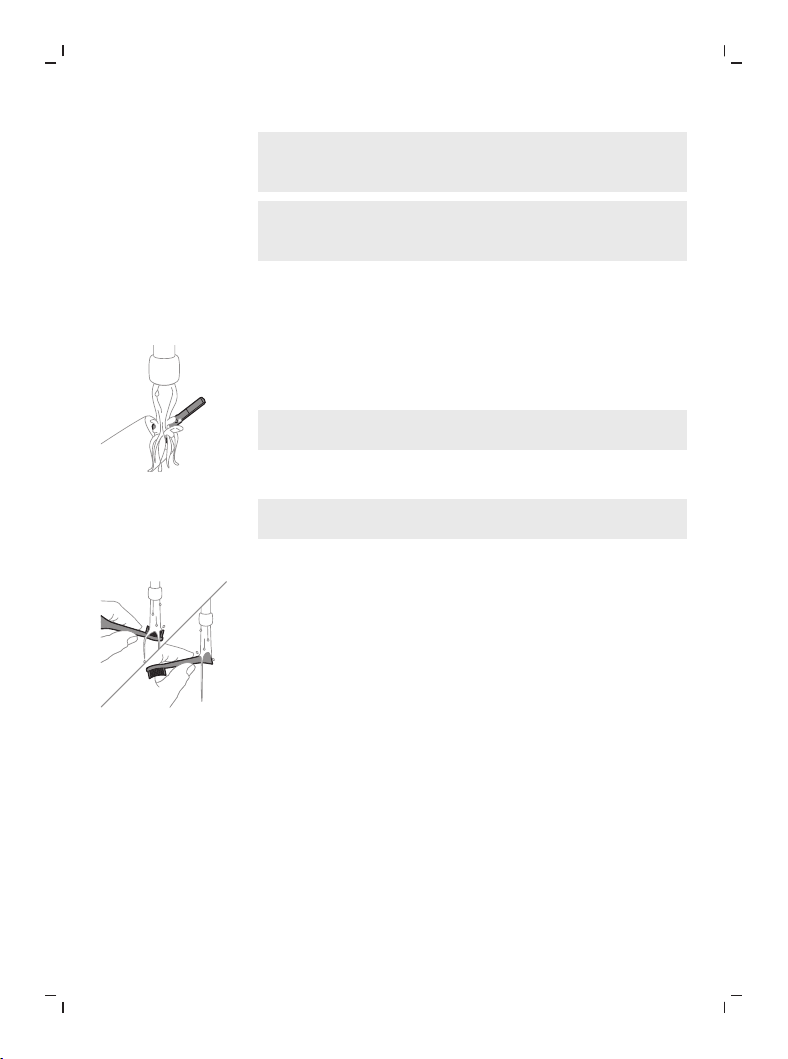
Cleaning
Toothbrush handle
1
Remove the brush head and rinse the metal shaft area
with warm water. Make sure you remove any residual
toothpaste.
Caution: Do not push on the rubber seal on the metal
shaft with sharp objects, as this may cause damage.
2
Wipe the entire surface of the handle with a damp
cloth.
Note: Do not tap the handle on the sink to remove excess
water.
Brush head
1
Rinse the brush head and bristles after each use.
2
Remove the brush head from the handle and rinse the
brush head connection with warm water at least once
a week. Rinse the travel cap as often as needed.
Charger
1
Unplug the charger before you clean it.
2
Wipe the surface of the charger with a damp cloth.
Travel case
Rinse with warm water and use a damp cloth to clean
inside of travel case.
Charging travel case
1
Unplug the charging travel case before cleaning.
2
Use damp cloth to wipe the surface of the travel case.
22
English
Storage
If you are not going to use the product for an extended
period of time, unplug it from the electrical outlet, clean
it and store it in a cool and dry place away from direct
sunlight.
Replacement
Replace Philips Sonicare brush heads every 3 months to
achieve optimal results. Use only Philips Sonicare
replacement brush heads.
Troubleshooting
This chapter summarizes the most common problems
you could encounter with the appliance. If you are
unable to solve the problem with the information below,
visit www.philips.com/support for a list of frequently
asked questions or contact the Consumer Care Center in
your country.
Problem Possible cause Solution
I cannot fully attach the
brush head. There is a
gap between the brush
head and handle.
This is normal. A small
gap is necessary to
allow movement in
order to deliver the
vibrations needed to
clean your teeth.
My Philips Sonicare
toothbrush vibration is
less powerful than
before.
The brush head is too
close to the body of the
handle.
Remove the brush head
from the handle and re-
set it on the metal shaft
leaving small gap.
(1-2mm)
The battery is low. Charge the toothbrush
handle on the charger.
I have charged my
toothbrush, but it only
works for a short time.
The toothbrush handle
is not placed vertically
on the charger,
resulting in no charge.
Place handle vertically
on charger base and
make sure the charger is
plugged in.
The toothbrush stops
working.
The battery is empty. Charge the toothbrush
handle on the charger.
23
English
Locating the model number
Look on the bottom of the Philips Sonicare toothbrush
handle for the model number (HX99XX).
Warranty and support
If you need information or support, please visit
www.philips.com/support or read the international
warranty leaflet.
WARRANTY EXCLUSIONS
What is not covered under warranty:
- In mouth attachments including brush heads and
nozzles.
- Damage caused by use of unauthorized replacement
parts or unauthorized brush heads.
- Damage caused by misuse, abuse, neglect, alterations
or unauthorized repair.
- Normal wear and tear, including chips, scratches,
abrasions, discoloration or fading.
Recycling
- This symbol means that electrical products and
batteries shall not be disposed of with normal
household waste.
- Follow your country’s rules for the separate collection
of electrical products and batteries.
Removal of built-in rechargeable battery
CONTAINS LITHIUM ION RECHARGEABLE CELL. MUST
BE RECYCLED OR DISPOSED OF PROPERLY.
The built-in rechargeable battery must be removed by a
qualified professional when the product is discarded.
Before removing the battery, make sure that the battery
is completely empty.
Take any necessary safety precautions when you
handle tools to open the appliance and when you
dispose of the rechargeable battery. Be sure to
24
English
protect your eyes, hands, fingers, and the surface
on which you work.
When you handle batteries, make sure that your
hands, the product and the batteries are dry.
To avoid accidental short-circuiting of batteries
after removal, do not let battery terminals come
into contact with metal objects (e.g. coins,
hairpins, rings). Do not wrap batteries in
aluminum foil. Tape battery terminals or put
batteries in a plastic bag before you discard them.
To remove the rechargeable battery, you need a towel or
cloth, a hammer and a flat-head (standard) screwdriver.
Observe basic safety precautions when you follow the
procedure outlined below.
1
To deplete the rechargeable battery of any charge,
remove the handle from the charger, turn on the
toothbrush and let it run until it stops. Repeat this
step until you can no longer turn on the toothbrush.
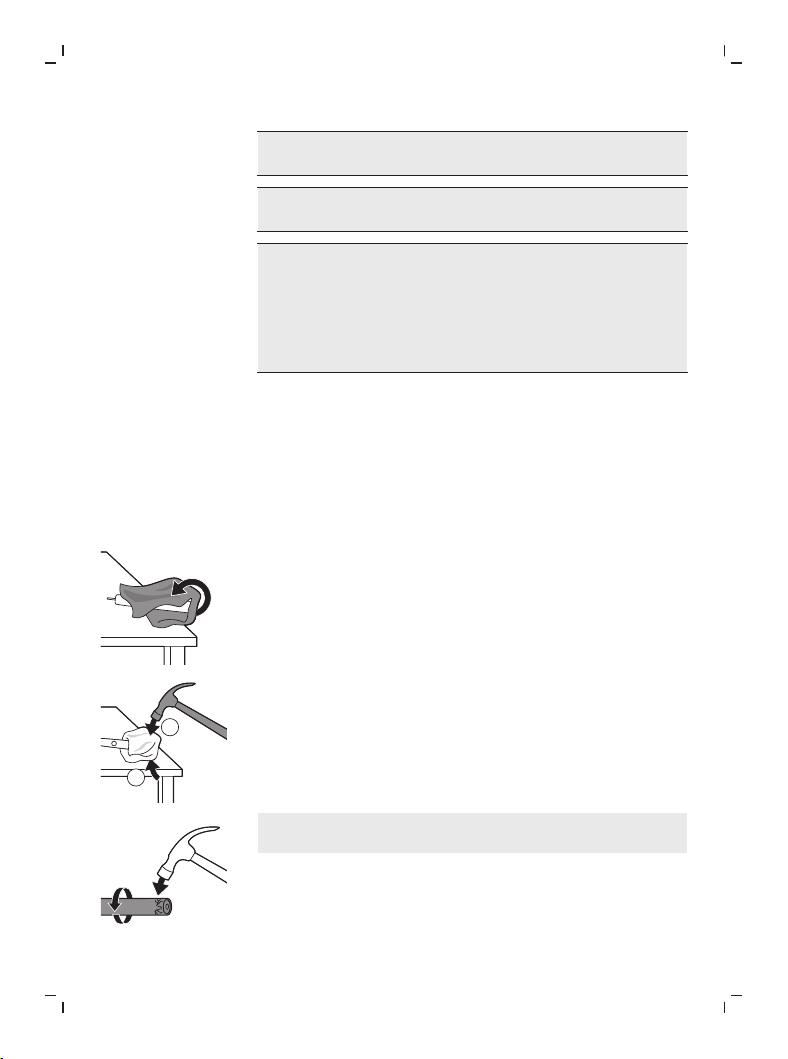
2
Remove and discard the brush head. Cover the entire
handle with a towel or cloth.
1
2
3
Hold the top of the handle with one hand and strike
the handle housing 0.5 inch above the bottom end.
Strike firmly with a hammer on all 4 sides to eject the
end cap.
Note: You may have to hit on the end several times to
break the internal snap connections.
25
English
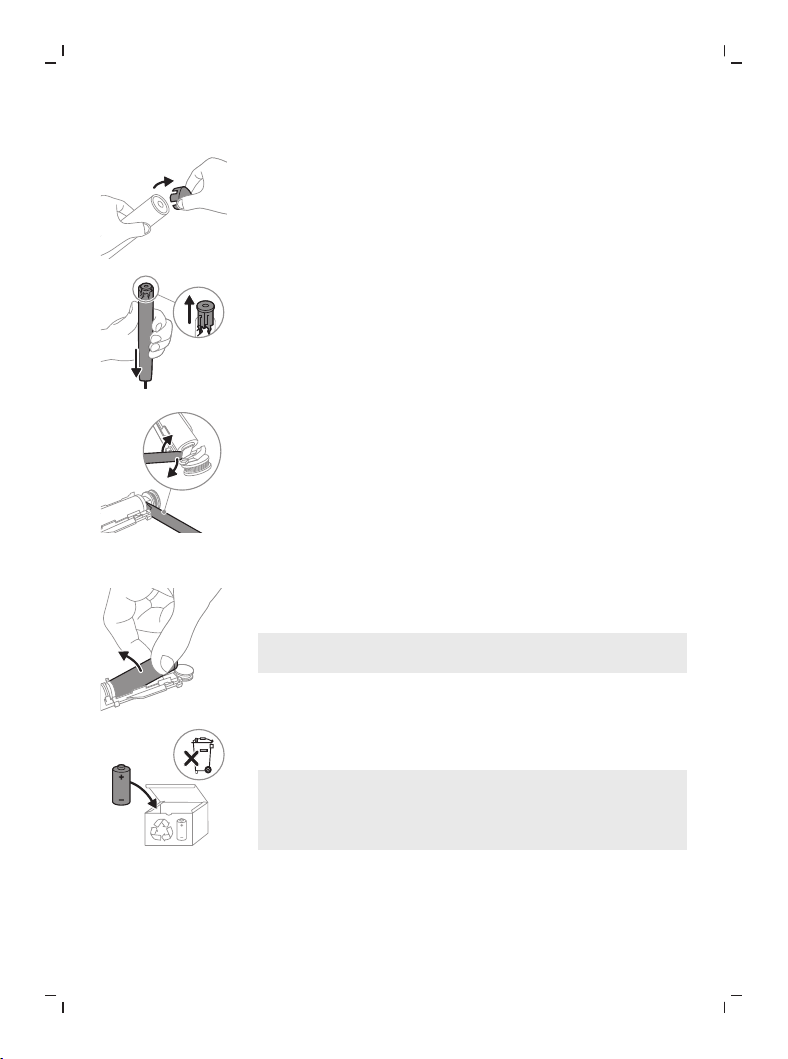
4
Remove the end cap from the toothbrush handle. If
the end cap does not release easily from the housing,
repeat step 3 until the end cap is released.
5
Holding the handle upside down, press the shaft
down on a hard surface. If the internal components
do not easily release from the housing, repeat step 3
until the internal components are released.
6
Wedge the screwdriver between the battery and the
black frame at the bottom of the internal
components. Then pry the screwdriver away from the
battery to break the bottom of the black frame.
7
Insert the screwdriver between the bottom of the
battery and the black frame to break the metal tab
connecting the battery to the green printed circuit
board. This will release the bottom end of the battery
from the frame.
8
Grab the battery and pull it away from the internal
components to break the second metal battery tab.
Caution: Be aware of the sharp edges of the
battery tabs so as to avoid injury to your fingers.
9
Cover the battery contacts with tape to prevent any
electrical short from residual battery charge.
The rechargeable battery can now be recycled and
the rest of the product discarded appropriately.
Note: Do not throw away the appliance with the normal
household waste at the end of its life, but hand it in at an
official collection point for recycling. By doing this, you
help to preserve the environment.

Français
26
Français
Introduction
Bienvenue dans l’univers Philips Sonicare.
Cette brosse à dents offre une meilleure élimination de la
plaque dentaire, des dents plus blanches et des gencives
plus saines. La brosse à dents Philips Sonicare combine la
technologie sonique et des fonctions à l’efficacité testée
en laboratoire pour un nettoyage tout en douceur. Elle
vous garantit à chaque fois le meilleur des brossages.
Pour enregistrer votre produit et obtenir une aide
supplémentaire, connectez-vous à l’adresse:
www.philips.fr/support
Informations de sécurité importantes
N’utilisez le produit que pour l’usage auquel il est
destiné. Lisez attentivement ces informations
importantes avant d’utiliser le produit, les batteries ainsi
que les accessoires et conservez-les pour un usage
ultérieur. Une mauvaise utilisation peut être dangereuse
ou entraîner des blessures graves.
Tout incident grave en lien avec ce dispositif doit être
signalé à Philips (www.philips.com/support) ainsi qu’aux
autorités compétentes de l’État membre dans lequel
l’utilisateur et/ou le patient est établi.
Avertissements
- Utilisez exclusivement des accessoires ou des
consommables de la marque Philips. Utilisez
uniquement le câbleUSB et le bloc
d’alimentationUSB d’origine (s’ils sont fournis).
- Cet appareil ne contient aucune pièce réparable par
l’utilisateur. Si l’appareil est endommagé, cessez de
l’utiliser et contactez le Service Consommateurs de
votre pays.
- Si le câble USB ou le bloc d’alimentationUSB est
endommagé, cessez de l’utiliser.
- Évitez tout contact des adaptateurs, des chargeurs et
du coffret de voyage avec de l’eau.
- Après les avoir nettoyés, assurez-vous que les
adaptateurs, les chargeurs et le coffret de voyage sont
complètement secs avant de les brancher.

27
Français
- Cet appareil peut être utilisé par des enfants, des
personnes dont les capacités physiques, sensorielles
ou intellectuelles sont réduites ou des personnes
manquant d'expérience et de connaissances, à
condition que ces enfants ou personnes soient sous
surveillance ou qu'ils aient reçu des instructions quant
à l'utilisation sécurisée de l'appareil et qu'ils aient pris
connaissance des dangers encourus. Le nettoyage et
l'entretien ne doivent pas être effectués par des
enfants sans surveillance.
- Les enfants doivent être surveillés pour s'assurer qu'ils
ne s'amusent pas avec le produit.
- Ne nettoyez aucune pièce du produit au lave-vaisselle.
- N’utilisez pas les adaptateurs, les chargeurs ni le
coffret de voyage à l’extérieur ou près de surfaces
chauffantes.
- Cet appareil a été conçu uniquement pour le brossage
des dents, des gencives et de la langue.
- Rincez le manche, en particulier la connexion de la
tête de brosse. Nettoyez délicatement autour de
l’anneau.
- Assurez-vous que la tête de brosse et la brosse à dents
sont sèches avant de les ranger dans le coffret de
voyage.
- Cessez d’utiliser une tête de brosse dont les brins sont
écrasés ou tordus. Remplacez la tête de brosse tous
les 3mois ou plus tôt si vous constatez des signes
d’usure.
- Evitez tout contact direct avec des produits qui
contiennent des huiles essentielles ou de l'huile de
coprah. Ce contact peut déloger les brins de la brosse
à dents.
Mises en garde d’ordre médical
- Cet appareil de soins est personnel et n’est pas
destiné à être utilisé sur plusieurs personnes.
- Cessez d’utiliser l’appareil et consultez votre
dentiste/médecin en cas de saignement excessif après
utilisation, si le saignement persiste après une
semaine d’utilisation ou si vous ressentez une gêne ou
une douleur.

28
Français
- Si vous portez un stimulateur cardiaque ou tout autre
dispositif implanté, consultez votre médecin ou le
fabricant de votre dispositif avant d’utiliser cet
appareil. (
https://pubmed.ncbi.nlm.nih.gov/25637210/ )
Consignes de sécurité sur la batterie
- Cet appareil contient une batterie qui ne peut être
remplacée que par des personnes qualifiées.
- N’utilisez le produit que pour l’usage auquel il est
destiné. Lisez attentivement ces renseignements
avant d’utiliser le produit, sa batterie et ses
accessoires, et conservez-les pour un usage ultérieur.
Une mauvaise utilisation peut être dangereuse ou
entraîner des blessures graves. Les accessoires fournis
peuvent varier selon le produit.
- N’utilisez que des accessoires et des consommables
Philips d’origine. Utilisez uniquement le bloc
d’alimentation amovible CBAxxxx, TCAxxxx ou
WAAxxxx.
- Chargez votre appareil uniquement avec des
chargeurs Philips compatibles:
- CBAxxxx (valeurs nominales d’entrée: 100 -
240V~; 50/60Hz; 1,3W),
- TCAxxxx (valeurs nominales d’entrée: 100 -
240V~; 50/60Hz; 1,5W),
- WAAxxxx (valeurs nominales d’entrée: 100 -
240V~; 50/60Hz; 3,5W).
- Tenez le produit et les piles à l’abri du feu et ne les
exposez pas directement aux rayons du soleil ou à des
températures élevées.
- Si le produit devient anormalement chaud, dégage
une odeur, change de couleur ou si la charge prend
plus de temps que d’habitude, cessez d’utiliser et de
charger le produit et contactez Philips.
- Ne placez pas les produits et leurs piles dans un four à
micro-ondes ou sur une table de cuisson à induction.

29
Français
- Afin d’éviter que les piles ne surchauffent ou ne
dégagent des substances toxiques ou dangereuses, le
produit et les piles ne doivent pas être ouverts,
modifiés, percés, endommagés ou démontés. Les piles
ne doivent pas être court-circuitées ou surchargées et
leur polarité ne doit pas être inversée.
- Cet appareil contient une batterie non remplaçable.
Lorsque la batterie est en fin de vie, l’appareil doit
être mis au rebut de manière adéquate (voir la section
sur le recyclage).
- Chargez et utilisez le produit à une température
comprise entre 0°C et 40°C.
- Si les piles sont endommagées ou fuient, évitez tout
contact avec les yeux ou la peau. Si cela se produit,
laver immédiatement et abondamment avec de l'eau
et consulter un médecin.
Conditions de stockage et de transport:
Température: de -10°C à +60°C.
Champs électromagnétiques (CEM)
Cet appareil Philips est conforme à toutes les normes et à
tous les règlements applicables relatifs à l'exposition aux
champs électromagnétiques.
Directive sur l'équipement radio
Par la présente, Philips déclare que les brosses à dents
électriques équipées d’une interface radiofréquence
(Bluetooth ou BrushSync) sont conformes à la
directive2014/53/UE.
- Radiofréquence Bluetooth: 2,4GHz
- Puissance de radiofréquence Bluetooth maximale:
3dBm
- RadiofréquenceNFC: 13,56MHz
- Puissance de radiofréquence NFC maximale: -26dBm
Le texte intégral de la déclaration de conformité aux
directives de l’Union européenne est disponible à
l’adresse suivante: www.philips.fr/support
Usage prévu
Les brosses à dents électriques Sonicare
DiamondClean9000 éliminent la plaque dentaire et les
30
Français
résidus alimentaires entre et sur les dents pour prévenir
les caries, mais aussi améliorer et maintenir la santé
bucco-dentaire. Les brosses à dents électriques Sonicare
DiamondClean9000 sont conçues pour un usage
personnel. Leur utilisation par les enfants doit être faite
sous la supervision d'un adulte.
Votre PhilipsSonicare (Fig.1)
1 Manche
2 Bouton marche/arrêt
3 Indicateur d’intensité
4 Bouton d'intensité et de mode
5 Voyant de mode
6 Voyant de rappel de remplacement de tête de brosse
7 Indicateur de batterie
Accessoires:
8 Capuchon de tête de brosse
9 Têtes de brosse intelligentes
10 Symbole BrushSync
11 Verre de charge
12 Socle de charge
13 Socle de charge
14 Étui de voyage
15 Coffret de voyageUSB
16 Adaptateur mural USB(-A)
Remarque: Les accessoires inclus peuvent varier selon
le modèle acheté.
Les symboles suivants peuvent figurer sur le produit:
Lire le mode d’emploi.
31
Français
Bloc d’alimentation amovible: Le «xxxxxx» indique la
référence des chargeurs agréés à utiliser.
Application Sonicare– Premiers pas
L’application Sonicare se connecte à votre brosse à dents
pour vous offrir une expérience connectée. L’application
est compatible avec une vaste gamme de smartphones
iPhone et Android™.
Pour commencer à utiliser l’application Sonicare:
1
Téléchargez l’application Sonicare sur votre
téléphone.
2
Assurez-vous que la fonction Bluetooth est activée sur
votre téléphone.
3
Vérifiez que votre brosse à dents est active (voyants
allumés).
4
Ouvrez l’application et suivez les étapes.
5
Associez votre brosse à dents et l’application.
6
Créez votre compte via l’application. Effectuez la mise
à jour du micrologiciel, si vous y êtes invité, afin
d’accéder aux dernières améliorations et
fonctionnalités.
7
Brossez-vous régulièrement les dents avec votre
brosse à dents connectée à l'application. Lorsque vous
synchronisez régulièrement votre brosse à dents avec
l’application, vous recevez des mises à jour destinées à
améliorer votre santé bucco-dentaire.
8
Synchronisez régulièrement votre brosse à dents.
9
Pour un transfert optimal des données, laissez votre
téléphone à proximité de votre brosse à dents.
Synchronisation manuelle: Associez/connectez votre
brosse à dents avec l’application toutes les deuxsemaines
pour bénéficier des fonctionnalités/capacités de
l’application.
Synchronisation automatique: Activez la localisation
lors de la configuration de l’application. En autorisant la
localisation, votre téléphone sait quand il se trouve dans
32
Français
la plage de connexion de votre brosse à dents et peut
rafraîchir les données de brossage dans l’application pour
vous permettre de recevoir les dernières informations et
recommandations.
Remarque: Assurez-vous que la fonction Bluetooth de
votre téléphone est activée lorsque vous utilisez
l’application afin que votre brosse à dents puisse
transférer vos dernières données de brossage à
l’application et les mettre à jour. Si vous avez des
questions sur les raisons pour lesquelles vos données de
brossage sont recueillies, consultez la déclaration de
confidentialité de Sonicare, disponible tout au long du
processus d’installation de l’application.
Fonctionnalités de l'application
Votre brosse à dents Sonicare est dotée de capteurs
intelligents pour vous fournir des informations sur vos
habitudes de brossage, notamment:
- Sessions de brossage quotidiennes
- Temps consacré à chaque session de brossage
- Pression de brossage exercée
- Rappel de remplacement de la tête de brosse (en
fonction de l’utilisation réelle)
L’application Sonicare recueille les données fournies par
les capteurs intelligents et suit vos habitudes de brossage
au fil du temps.
Préparation
1
Alignez la tête de brosse afin que les poils soient dans
le même axe que l’avant du manche.
33
Français
2
Appuyez fermement la tête de brosse sur la tige de
métal du manche jusqu’à ce qu’elle s’arrête.
Remarque: Le léger interstice existant entre la tête de
brosse et le manche est normal.
Utilisation de votre brosse à dents Philips Sonicare
Si vous utilisez votre brosse à dents Sonicare pour la
première fois, il est normal de ressentir plus de vibrations
qu’avec une brosse à dents manuelle. Il est fréquent
d’exercer une trop grande pression au début. N’exercez
qu'une pression légère et laissez faire la brosse à dents.
Pour une expérience optimale, suivez les instructions de
brossage ci-dessous.
Pour vous aider dans votre transition vers la nouvelle
brosse à dents électrique Sonicare, utilisez un réglage
plus bas pendant 1 à 2semaines, puis passez à un
réglage plus élevé.
Instructions de brossage
1
Humidifiez les brins de la tête de brosse et appliquez
une petite quantité de dentifrice.
45°
2
Placez les brins de la tête de brosse sur les dents,
légèrement en biais (45degrés). Appliquez
fermement pour que les brins soient légèrement sous
les gencives ou à ras de celles-ci.
Remarque: Maintenez le centre de la brosse en
contact avec les dents en tout temps.
34
Français
3
Allumez la brosse à dents Philips Sonicare en
appuyant sur le bouton marche/arrêt.
45°
4
Maintenez les brins sur les dents et dans le sillon
gingival. Brossez-vous les dents en faisant un léger
mouvement de va-et-vient, de sorte que les brins
atteignent les espaces interdentaires. Continuez ce
mouvement pendant tout le cycle de brossage.
Remarque: Les brins doivent légèrement s’évaser. Il
n’est pas recommandé de frotter fort comme avec
une brosse à dents manuelle.
Remarque: Si vous exercez une pression trop forte, le
manche change de vibration et le voyant de rappel de
remplacement de la tête de brosse clignote en
orange.
5
Pour nettoyer la surface intérieure des dents avant,
inclinez le manche de la brosse à dents en position
intermédiaire et effectuez plusieurs mouvements de
brosse verticaux sur chaque dent en prenant soin de
les faire se chevaucher.
6
Une fois le cycle de brossage terminé, vous pouvez
consacrer du temps supplémentaire au brossage des
surfaces de mastication des dents et insister sur les
zones propices aux taches. Vous pouvez également
brosser votre langue avec la brosse à dents en marche
ou arrêtée.
Remarque: Votre brosse à dents Philips Sonicare peut
être utilisée en toute sécurité sur des appareils
orthodontiques (les têtes de brosse s’usent plus
rapidement lorsqu’elles sont utilisées sur ce type
d’appareil) et des restaurations dentaires (amalgames,
couronnes, facettes) si celles-ci sont correctement collées
et non fragilisées.
35
Français
BrushPacer
1
2
3
4
5
6
Pour garantir un brossage uniforme, divisez votre bouche
en 6sections à l'aide de la fonctionBrushPacer. La
fonctionBrushPacer divise le temps de brossage en
6segments égaux et indique quand vous devez passer à
la zone suivante. Les segments sont indiqués par un bref
arrêt de la vibration. La brosse à dents s’arrête
automatiquement à la fin du brossage.
Remarque: Des segments supplémentaires peuvent être
ajoutés lorsque vous utilisez les modes White+ ou Gum
Health.
Modes
Votre brosse à dents électrique est équipée de
quatremodes différents: Clean, White+, Gum Health et
Deep Clean+. Selon la tête de brosse intelligente que
vous utilisez, le mode et l'intensité optimaux sont
automatiquement sélectionnés par la technologie
BrushSync. Pour changer de mode, appuyez sur le bouton
mode/intensité lorsque le manche est éteint.
Clean et Deep
Clean+
White+ Gum Health
Avantage
Élimination de la
plaque dentaire
Élimination de la
plaque dentaire
et des taches en
surface
Élimination de la
plaque dentaire
et massage des
gencives
Recommandé
Niveau
d'intensité
Élevée Élevée Élevée
Temps total de
brossage
Clean: 2minutes
Deep Clean+:
3minutes
2minutes et
40secondes
3minutes et
20secondes
36
Français
Clean et Deep
Clean+
White+ Gum Health
Brossage
Clean: Brossez
chaque segment
pendant
20secondes.
1
2
3
4
5
6
Deep Clean+:
Brossez chaque
segment pendant
30secondes*.
1
2
3
4
5
6
Brossez chaque
segment pendant
20secondes,
1
2
3
4
5
6
puis, brossez les
segments7 et8
pendant
20secondes
chacun
7
8
Brossez chaque
segment pendant
20secondes,
1
2
3
4
5
6
puis, brossez les
segments7, 8, 9
et 10 pendant
20secondes
chacun
7
8
10
9
Remarque: Lorsque vous vous brossez les dents avec
l'application Philips Sonicare en mode «Deep Clean+», le
temps de brossage est de 2minutes lorsque vous êtes
connecté(e) à l'application et de 3minutes lorsque vous
n'y êtes pas connecté(e).
37
Français
Intensités
Votre brosse à dents permet troisréglages d’intensité
différents:
- intensité faible (une barre)
- Intensité moyenne (deuxbarres)
- intensité élevée (trois barres)
Lorsqu’elle est fixée au manche, la tête de brosse
intelligente sélectionne automatiquement l’intensité
recommandée. Si vous souhaitez passer à une intensité
différente, vous pouvez le faire en appuyant sur le
bouton mode/intensité pendant le brossage.
L'intensité ne peut pas être modifiée lorsque le manche
est mis hors tension ou en pause.
Technologie BrushSync
La technologie BrushSync permet à votre tête de brosse
de communiquer avec votre manche à l’aide d’une puce.
Le symbole au bas de la tête de brosse indique que
celle-ci est équipée de la technologie BrushSync.
La technologie BrushSync offre les fonctionnalités
suivantes:
- Rappel de remplacement de la tête de brosse
- Sélection automatique du mode BrushSync et de
l'intensité
Philips Sonicare propose une vaste gamme de têtes de
brosse intelligentes, équipées de la technologie
BrushSync. Pour découvrir notre gamme complète de
têtes de brosse à dents et trouver la tête de brosse qui
vous convient, rendez-vous sur
www.philips.fr/toothbrush-heads.
Caractéristiques
- Analyse de la pression
- BrushPacer
- SmarTimer
- FonctionEasyStart
- Rappel de remplacement de la tête de brosse
- Mode d’appariement de la tête de brosse
38
Français
Analyse de la pression
Votre brosse à dents Sonicare mesure la pression que
vous exercez lors du brossage afin de protéger vos dents
et vos gencives.
Si vous exercez une pression excessive, le manche change
de vibration et l'icône de rappel de remplacement de la
tête de brosse clignote en orange jusqu’à ce que vous
réduisiez la pression.
Remarque: Le capteur de pression est activé lorsque vous
recevez votre produit. Pour désactiver cette fonction (voir
«Activation ou désactivation de fonctionnalités»).
BrushPacer
Le BrushPacer est un minuteur qui vous aide à brosser
toutes les dents de manière uniforme en divisant votre
bouche en 6sections.
SmarTimer
La fonctionSmarTimer indique que le cycle de brossage
est terminé en arrêtant automatiquement la brosse à
dents à la fin du cycle.
Les professionnels de la santé bucco-dentaire
recommandent un brossage d’au moins 2minutes
deuxfois par jour.
Remarque: Si vous appuyez sur le bouton marche/arrêt
après avoir lancé le cycle de brossage, la brosse à dents se
met en pause. Après une pause de 30secondes, la
fonctionSmarTimer se réinitialise.
FonctionEasyStart
Remarque: Pour activer la fonction EasyStart. (voir
«Activation ou désactivation de fonctionnalités»)
La fonctionEasyStart est désactivée par défaut sur la
brosse à dents Philips Sonicare. La fonctionEasyStart
augmente progressivement la puissance lors des
14premiers brossages pour vous permettre de vous
habituer à la brosse à dents PhilipsSonicare.
La fonctionEasyStart est compatible avec tous les modes.
Avertissement
Lorsque la brosse à dents Philips Sonicare est utilisée dans
39
Français
le cadre d'études cliniques, elle doit être utilisée à haute
intensité avec le manche complètement chargé et la
fonction EasyStart désactivée.
Rappel de remplacement de la tête de brosse
Votre PhilipsSonicare est équipée de la technologie
BrushSync, qui vérifie l'usure de votre tête de brosse.
Remarque: Cette fonctionnalité est compatible
uniquement avec les têtes de brosse intelligentes Philips
Sonicare équipées de la technologie BrushSync.
1
Lorsque vous fixez une nouvelle tête de brosse
intelligente pour la première fois, le manche reconnaît
que vous avez une tête de brosse Philipséquipée de la
technologie BrushSync et commence à mesurer
l'usure de la tête de brosse.
2
Le manche vérifie l'usure de votre tête de brosse au fil
du temps en fonction de la pression appliquée et de la
durée totale d'utilisation, afin de déterminer sa date
de remplacement optimale. Cette fonctionnalité vous
garantit les meilleurs résultats en matière de soins
bucco-dentaires.
3
Lorsque l'indicateur lumineux de remplacement de la
tête de brosse s'allume en orange, vous devez
remplacer votre tête de brosse.
Remarque: La fonctionde rappel de remplacement de la
tête de brosse est activée sur toutes les nouvelles têtes de
brosse intelligentes. Pour désactiver le rappel de
remplacement de tête de brosse, reportez-vous à la
section «Activation ou désactivation de fonctionnalités».
Mode d’appariement de la tête de brosse
Les têtes de brosse dotées de la technologie BrushSync
sont équipées d’une puce qui communique avec le
manche et sélectionne automatiquement le mode et
l’intensité recommandés.
Remarque: Remarque: si vous modifiez le mode ou
l'intensité, la tête de brosse mémorise le dernier réglage
utilisé.

40
Français
Activation ou désactivation de fonctionnalités
Vous pouvez activer ou désactiver les fonctionnalités
suivantes de votre brosse à dents:
- FonctionEasyStart
- Rappel de remplacement de la tête de brosse
- Analyse de la pression
Remarque: Vous ne pouvez activer ou désactiver le
rappel de remplacement de la tête de brosse que
lorsqu'une tête de brosse intelligente est sur le manche.
41
Français
Étape1: Placez le manche sur le support ou le socle de charge.
Étape2: Maintenez le bouton marche/arrêt enfoncé pendant
les durées suivantes:
FonctionEasyS
tart
Rappel de
remplacement
de la tête de
brosse
Analyse de la pression
3secondes Jusqu’à
5secondes
Jusqu’à 7secondes
¯ ¯ ¯
Étape3: Relâchez le bouton marche/arrêt lorsque vous
entendez:
1signal sonore 1signal sonore,
puis 2signaux
sonores
1signal sonore,
2signaux sonores, puis
3signaux sonores
¯ ¯ ¯
Ensemble:
Si le voyant de charge clignote 2fois et si vous entendez
3signaux sonores de tonalité croissante, la fonction est
activée.
OU
Si le voyant de charge clignote 1fois en orange et vous
entendez 3signaux sonores de tonalité décroissante, la
fonction est désactivée.
Charge et niveau de la batterie
Cette brosse à dents Philips Sonicare est conçue pour
proposer 28sessions de brossage minimum, chaque
42
Français
session durant 2minutes (14jours si utilisée deuxfois par
jour) lorsque la batterie est complètement chargée. Le
voyant de niveau de charge indique l'état de la batterie
lorsque vous terminez la séance de brossage de
2minutes, lorsque vous mettez la brosse à dents en
pause ou lorsqu'elle est en charge.
Remarque: Une charge complète peut prendre jusqu'à
24heures avant la première utilisation, mais vous pouvez
utiliser la brosse à dents Philips Sonicare avant qu'elle soit
complètement chargée.
Charge
Charge sur le socle de charge
1
Branchez le cordon du socle de charge sur une prise
électrique.
2
Placez le support de charge ou le verre de charge sur
le socle de charge.
3
Placez le manche sur le support ou le socle de charge.
- Le voyant de charge de la batterie clignote et le
manche émet deuxbips. Cela signifie que la brosse
à dents est en charge.
4
Le chargeur charge entièrement votre brosse à dents.
Le manche se charge lorsque l’indicateur de batterie
clignote. Lorsque le manche est entièrement chargé, le
voyant de charge de la batterie s’allume pendant
30secondes, puis s’éteint.
Charge avec le coffret de voyage
Remarque: Les accessoires inclus peuvent varier selon le
modèle acheté.
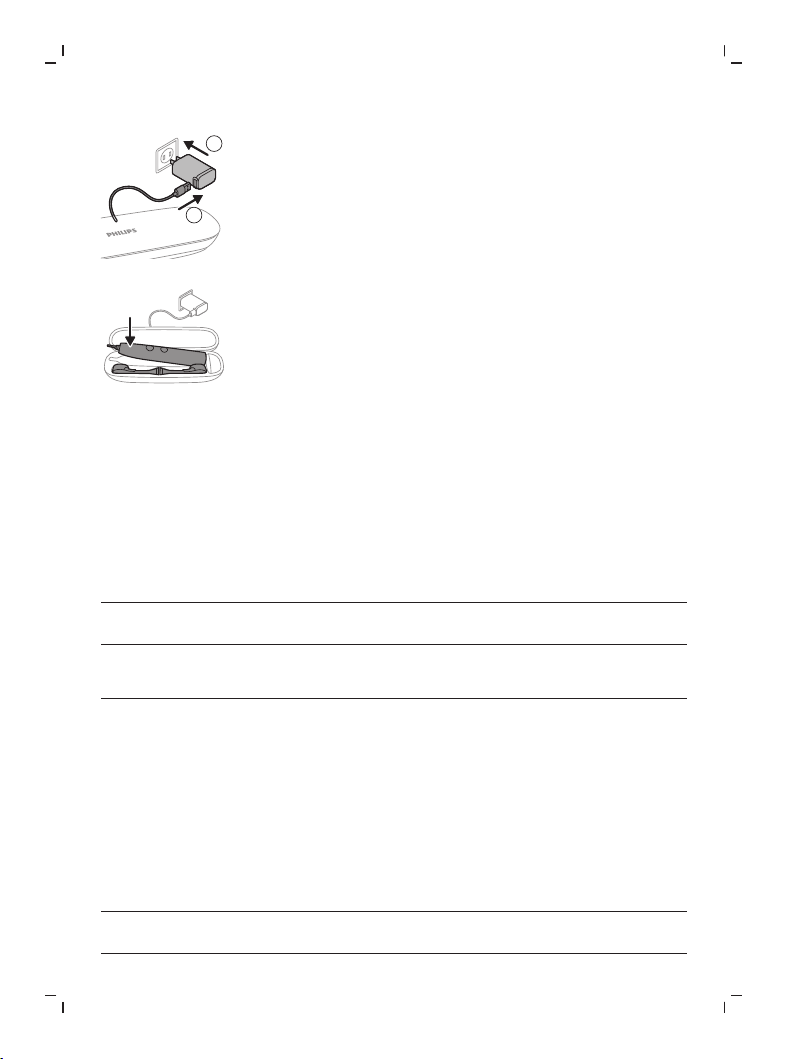
1
Retirez le câble USB du bas du coffret de voyage USB.
2
Connectez le coffret de voyage via le câble USB à une
prise d'une puissance d'entrée de 5V CC avec:
43
Français
2
1
- L'adaptateur USB fourni
- un port USB standard de PC homologué UL ou
certifié ANSI/UL 60950-1, ou
- une alimentation homologuée UL ou certifiée
ANSI/UL 60950-1 avec port de sortie USB, ou
- une alimentation homologuée UL ou certifiée
1310 de classe2.
3
Placez le manche dans le coffret de voyage. Le coffret
de voyage charge entièrement votre brosse à dents.
État de la batterie
Niveau de charge de la batterie (manche placé sur
le chargeur branché ou dans le coffret de voyage
USB)
Lorsque le manche est placé sur le chargeur ou dans le
coffret de voyage, le voyant de la batterie indique le
niveau de charge de la batterie.
État de la batterie Indicateur de batterie
En charge Clignote
Pleine S’allume pendant 30secondes, puis
s’éteint.
Niveau de charge de la batterie (manche non placé
sur le chargeur branché ou dans le coffret de
voyage USB)
Lorsque la brosse à dents est allumée, le voyant de
charge de la batterie situé au bas du manche indique le
niveau de charge de la batterie.
État de la batterie Indicateur de
batterie
Son
Pleine Voyant -
44
Français
État de la batterie Indicateur de
batterie
Son
Partiellement pleine Clignote -
Faible Clignote en orange Le manche émet
3signaux sonores après
le brossage.
Vide Clignote en orange Le manche émet 2séries
de 5signaux sonores
après le brossage
Remarque: Pour économiser de l'énergie, le voyant de
charge de la batterie s'éteint lorsque vous ne l'utilisez
pas.
Remarque: Lorsque la batterie est complètement vide, la
brosse à dents s’éteint. Placez la brosse à dents sur le
chargeur pour la charger.
Remarque: Pour que la batterie reste chargée en
permanence, vous pouvez laisser votre brosse à dents sur
le chargeur lorsque vous ne l'utilisez pas.
Nettoyage
Manche de la brosse à dents
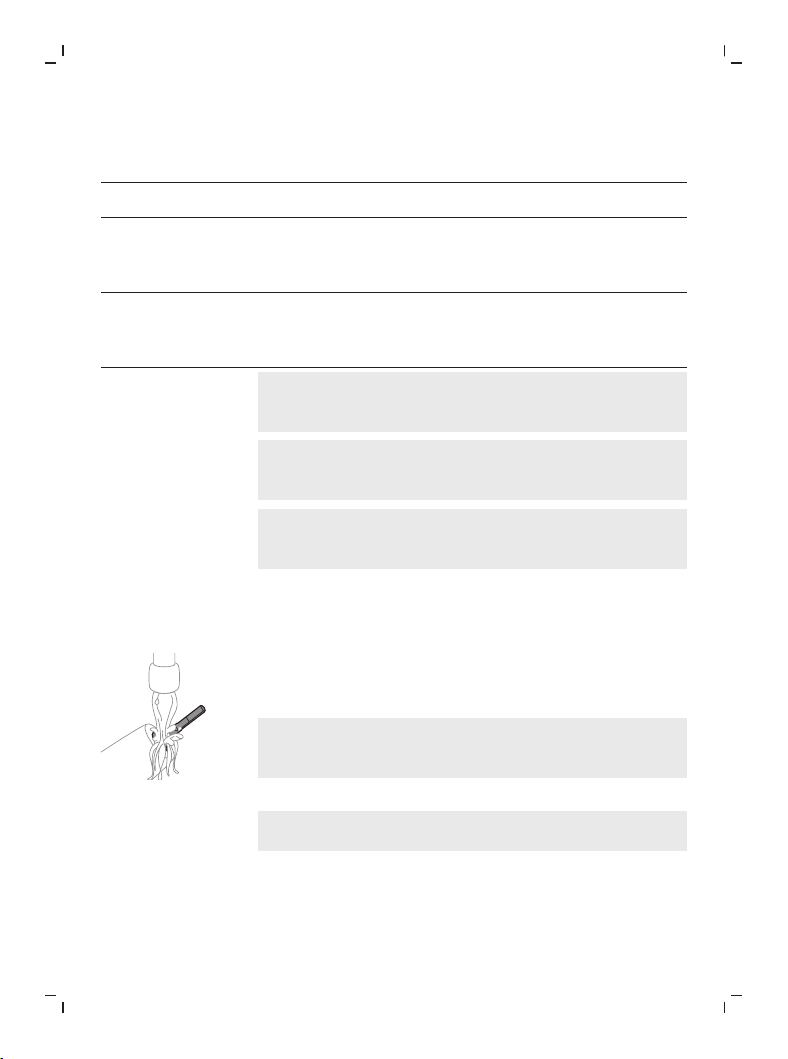
1
Retirez la tête de brosse et rincez à l’eau tiède la zone
de l'axe en métal. Veillez à éliminer tous les résidus de
dentifrice.
Attention: Ne poussez pas sur le joint d'étanchéité en
caoutchouc de la tige en métal avec un objet pointu,
car vous pourriez l'endommager.
2
Nettoyez tout le manche à l'aide d'un chiffon humide.
Remarque: Ne tapez pas le manche sur l'évier pour
retirer l'excédent d'eau.
45
Français
Tête de brosse
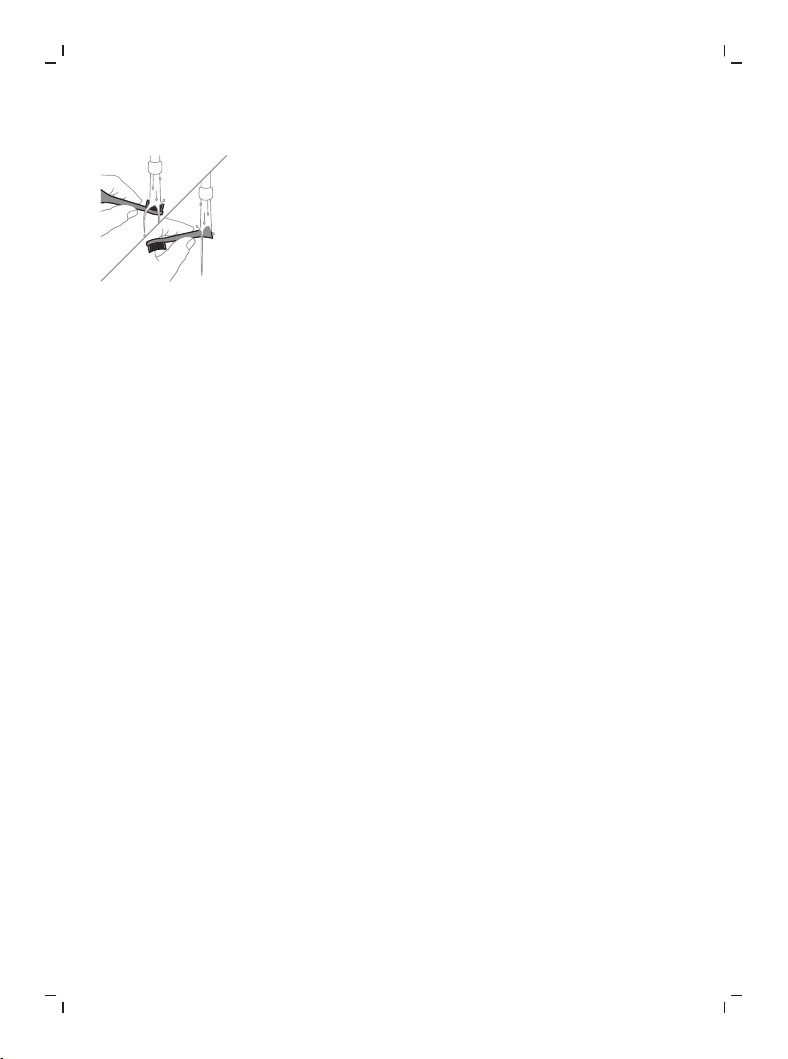
1
Rincez la tête de brosse et les poils après chaque
utilisation.
2
Retirez la tête de brosse du manche et rincez la base
de la tête de brosse à l'eau chaude au moins une fois
par semaine. Rincez le capuchon de protection aussi
souvent que nécessaire.
Chargeur
1
Débranchez le chargeur avant de le nettoyer.
2
Nettoyez la surface du chargeur à l'aide d'un chiffon
humide.
Étui de voyage
Rincez à l'eau chaude et utilisez un chiffon humide pour
nettoyer l'intérieur du coffret de voyage.
Coffret de voyageUSB
1
Débranchez le chargeur et le coffret de voyage USB
avant de les nettoyer.
2
Essuyez la surface du coffret de voyage à l’aide d’un
chiffon humide.
Rangement
Si vous ne comptez pas utiliser l’appareil pendant une
période prolongée, débranchez-le de la prise électrique,
nettoyez-le et rangez-le dans un endroit frais et sec, à
l’abri de la lumière.
Remplacement
Pour obtenir des résultats optimaux, remplacez les têtes
de brosse Philips Sonicare au moins tous les 3mois.
Utilisez uniquement des têtes de brosse de rechange
PhilipsSonicare.
Dépannage
Cette rubrique récapitule les problèmes les plus courants
que vous pouvez rencontrer avec l’appareil. Si vous ne
parvenez pas à résoudre le problème à l’aide des
informations ci-dessous, rendez-vous sur le site
46
Français
www.philips.com/support et consultez la liste de
questions fréquemment posées ou contactez le
ServiceConsommateursPhilips de votre pays.
Problème Cause possible Solution
Je n’arrive pas à fixer
totalement la tête de
brosse. Le léger
interstice entre la tête
de brosse et le manche
est normal.
C’est normal. Un petit
espace est nécessaire
pour permettre le
mouvement et émettre
les vibrations
nécessaires au
nettoyage de vos dents.
Les vibrations de ma
brosse à dents
PhilipsSonicare sont
moins puissantes
qu’auparavant.
La tête de brosse est
trop proche du corps du
manche.
Retirez la tête de brosse
du manche et replacez-
la sur la tige métallique
en laissant un petit
espace. (1 à 2mm)
La batterie est presque
déchargée.
Chargez le manche de
la brosse à dents sur le
chargeur.
J'ai chargé ma brosse à
dents, mais elle ne
fonctionne qu'un court
laps de temps.
Le manche de la brosse
à dents n'est pas placé
verticalement sur le
chargeur, ce qui
empêche toute charge.
Placez le manche
verticalement sur le
chargeur et assurez-
vous que le chargeur est
branché.
La brosse à dents ne
fonctionne plus.
La batterie est
déchargée.
Chargez le manche de
la brosse à dents sur le
chargeur.
Localisation du numéro de modèle
Examinez la partie inférieure du manche de la brosse à
dents Philips Sonicare pour déterminer le numéro de
modèle (HX99XX).
Garantie et assistance
Si vous avez besoin d'une assistance ou d'informations
supplémentaires, consultez le site Web
www.philips.com/support ou lisez le dépliant sur la
garantie internationale.
47
Français
EXCLUSIONS DE GARANTIE
Ce qui n'est pas couvert par la garantie:
- Accessoires buccaux, y compris têtes de brosse et
canules.
- Les dommages causés par l'utilisation de pièces de
rechange ou les têtes de brosse non autorisées;
- Les dommages causés par une mauvaise utilisation,
un usage abusif, de la négligence ou encore des
modifications ou réparations non autorisées.
- L’usure normale, incluant les ébréchures, les
égratignures, les abrasions, la décoloration ou
l’affadissement des couleurs.
Recyclage
- Ce symbole signifie que les produits électriques et les
piles ne doivent pas être jetées avec les ordures
ménagères.
- Respectez la réglementation de votre pays concernant
la collecte sélective des produits électriques et des
piles.
Retrait de la batterie rechargeable intégrée
CONTIENT UNE BATTERIE RECHARGEABLE AU
LITHIUM-ION. DOIT ÊTRE RECYCLÉE OU JETÉE
CORRECTEMENT.
La batterie rechargeable intégrée doit être retirée par un
professionnel qualifié lors de la mise au rebut du produit.
Avant de retirer la batterie, assurez-vous qu’elle est
complètement vide.
Respectez toutes les mesures de sécurité
nécessaires lorsque vous utilisez des outils pour
ouvrir l'appareil ou retirer la batterie
rechargeable. Veillez à protéger vos yeux, vos
mains et vos doigts, ainsi que la surface sur
laquelle vous travaillez.
Lorsque vous manipulez des piles, assurez-vous de
bien sécher vos mains, le produit et les piles.
48
Français
Pour éviter tout court-circuit accidentel des piles
après leur retrait, ne laissez pas les bornes des
piles entrer en contact avec des objets métalliques
(pièces de monnaie, épingles à cheveux, bagues,
etc.). Ne les emballez pas dans du papier
d’aluminium. Collez les bornes de la batterie avec
du ruban adhésif ou placez la batterie dans un sac
en plastique avant de la mettre au rebut.
Retrait de la batterie rechargeable
Pour retirer la batterie rechargeable, munissez-vous
d'une serviette ou d'un tissu, d'un marteau et d'un
tournevis à tête plate (standard). Respectez les mesures
de sécurité élémentaires lorsque vous suivez la procédure
ci-dessous.
1
Pour décharger la batterie rechargeable, retirez le
manche du chargeur, allumez la brosse à dents, et
laissez-la fonctionner jusqu’à ce qu’elle s’éteigne.
Répétez cette opération jusqu’à ce que la brosse à
dents ne s’allume plus.
2
Retirez et jetez la tête de brosse. Recouvrez
l'ensemble du manche avec une serviette ou un tissu.
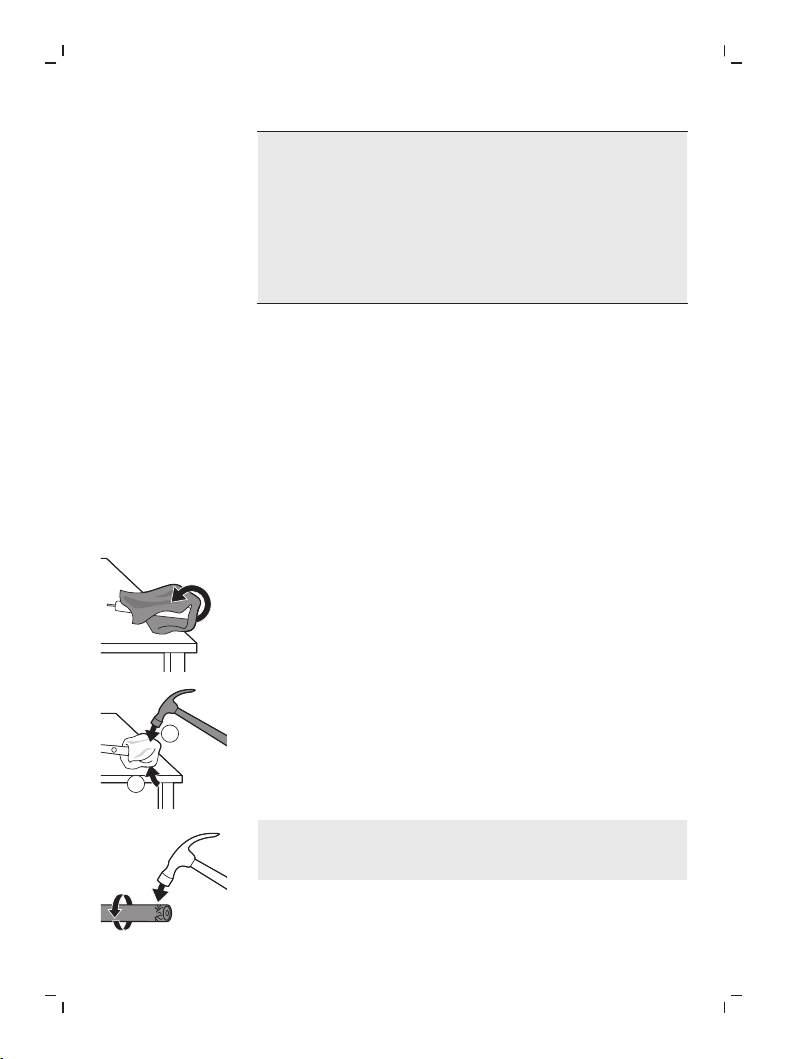
1
2
3
Tenez le haut du manche d'unemain et frappez le
boîtier du manche 1cm au-dessus de l'extrémité
basse. Frappez fermement avec un marteau sur les
4côtés pour éjecter le capuchon.
Remarque: il sera peut-être nécessaire de frapper la
partie inférieure à plusieurs reprises pour libérer les
fermoirs internes.
49
Français
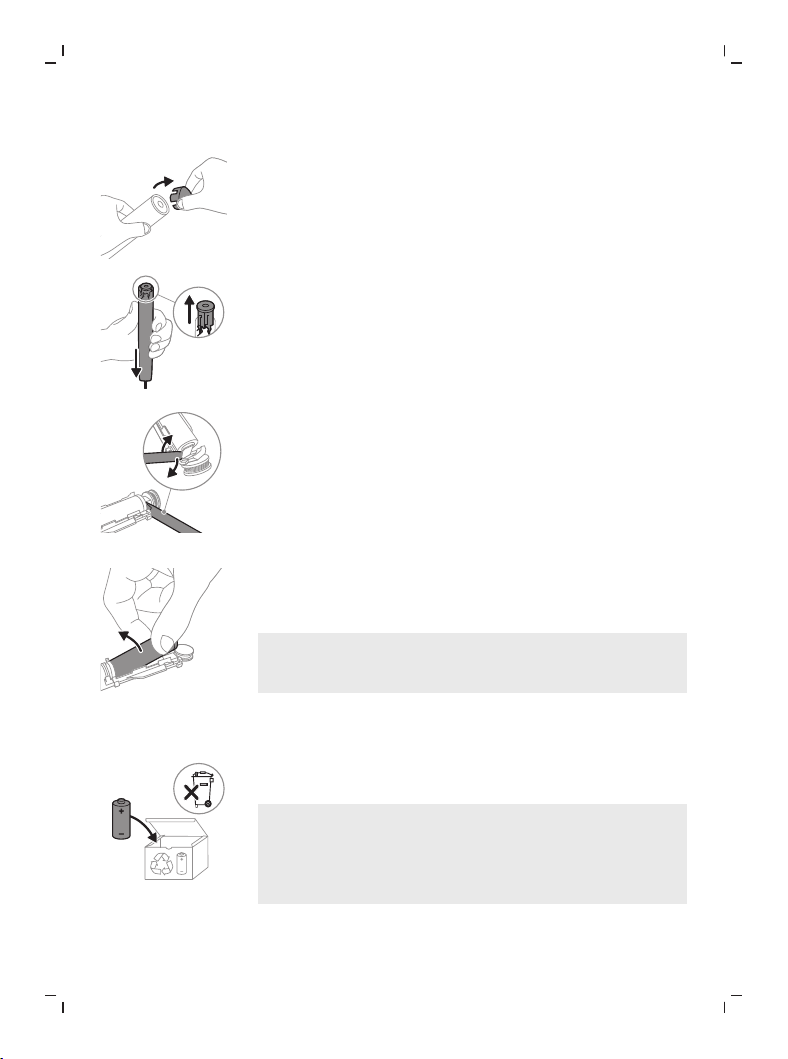
4
Retirez le capuchon du manche de la brosse à dents.
Si le capuchon ne se détache pas facilement du
boîtier, répétez l'étape3 jusqu'à ce que le capuchon
soit libéré.
5
En tenant le manche à l'envers, appuyez l'axe contre
une surface rigide. Si les composants internes ne se
détachent pas facilement du boîtier, répétez l'étape3
jusqu'à ce qu'ils soient libérés.
6
Insérez le tournevis entre la batterie et le cadre noir
en bas des composants internes. Puis, faites levier sous
la batterie avec le tournevis pour retirer le dessus du
cadre noir.
7
Insérez le tournevis entre l'extrémité inférieure de la
batterie et le cadre noir pour rompre la languette
métallique reliant la batterie au circuit imprimé. Ceci
libérera du cadre l'extrémité inférieure de la batterie.
8
Saisissez la batterie et retirez-la des composants
internes pour rompre la deuxième languette
métallique de la batterie.
Attention: prenez garde de ne pas vous blesser les
doigts avec les bords tranchants des languettes de
la batterie.
9
Couvrez les contacts de la batterie avec du ruban
adhésif pour éviter tout court-circuit électrique par la
charge résiduelle de la batterie.
La batterie rechargeable peut maintenant être
recyclée et le reste du produit peut être mis au rebut.
Remarque: Lorsqu'il ne fonctionnera plus, ne jetez pas
l'appareil avec les ordures ménagères mais déposez-le
dans un endroit prévu à cet effet, où il pourra être
recyclé. Vous contribuerez ainsi à la protection de
l’environnement.

Türkçe
50
Türkçe
Giriş
Philips Sonicare ailesine hoş geldiniz!
Bu diş fırçası; üstün diş plağı çıkarma, daha beyaz dişler ve
daha sağlıklı diş etleri elde etmenizi sağlar. Sonicare'in
hassas sonik teknolojisi ile klinik olarak geliştirilmiş ve
kanıtlanmış özelliklerinin birleşimi sayesinde her
fırçalamada iyi temizliği elde edebileceğinizden emin
olabilirsiniz.
Ek destek ve ürün kaydı için şu adresi ziyaret edebilirsiniz:
www.philips.com/support
Önemli güvenlik bilgileri
Ürünü sadece kullanım amacına göre kullanın. Ürünü,
pillerini ve aksesuarlarını kullanmadan önce bu önemli
bilgileri dikkatlice okuyun ve gelecekte başvurmak üzere
saklayın. Yanlış kullanım, tehlikelere veya ciddi
yaralanmalara yol açabilir.
Bu ürünün kullanımıyla ilgili olarak karşılaşılan ciddi
olumsuz durumlar, Philips'e (www.philips.com/support
sayfasından) ve kullanıcı ve/veya hastanın bulunduğu üye
devletin yetkili resmi makamlarına bildirilmelidir.
Uyarılar
- Yalnızca Philips tarafından üretilmiş aksesuar ve sarf
malzemeleri kullanın. Varsa, sadece orijinal USB
kablosunu ve USB güç kaynağı ünitesini kullanın.
- Bu cihaz kullanıcı tarafından onarılabilecek hiçbir
parça içermemektedir. Cihaz hasar görürse,
ülkenizdeki Müşteri Hizmetleri Merkezi ile iletişim
kurun.
- USB kablosu veya USB güç kaynağı ünitesi hasarlıysa
kullanmayı bırakın.
- Adaptörleri, şarj cihazlarını ve şarjlı seyahat çantasını
sudan uzak tutun.
- Temizleme işlemi sonrası adaptörleri, şarj cihazlarını
ve şarjlı seyahat çantasını bağlamadan önce tamamen
kuru olduklarından emin olun.

51
Türkçe
- Bu cihazın çocuklar ve fiziksel, motor ya da zihinsel
becerileri gelişmemiş veya bilgi ve tecrübe açısından
eksik kişiler tarafından kullanımı, sadece bu kişilerin
nezaretinden sorumlu kişilerin bulunması veya güvenli
kullanım talimatlarının bu kişilere sağlaması ve olası
tehlikelerin anlatılması durumunda mümkündür.
Temizlik ve kullanıcı bakımı gözetim olmadan çocuklar
tarafından yapılmamalıdır.
- Küçük çocukların ürünle oynamaları engellenmelidir.
- Ürünün hiçbir parçasını bulaşık makinesinde
temizlemeyin.
- Adaptörleri, şarj cihazlarını ve şarjlı seyahat çantasını
açık havada veya sıcak yüzeylerin yakınında
kullanmayın.
- Bu cihaz sadece diş, diş eti ve dil temizliği için
tasarlanmıştır.
- Sapı, özellikle fırça başlığı bağlantı yerini durulayın.
Sızdırmazlık lastiğinin çevresini nazikçe temizleyin.
- Seyahat çantasına koymadan önce fırça başlığının ve
diş fırçasının kuru olduğundan emin olun.
- Tüyleri kırılan veya bükülen fırça başlığını kullanmayı
bırakın. Fırça başlığını her 3 ayda bir veya yıpranma
belirtileri oluşmuşsa, daha erken değiştirin.
- Uçucu yağlar veya hindistancevizi yağı içeren ürünlerle
doğrudan temastan kaçının. Temas, fırça kıllarının
yerinden çıkmasına neden olabilir.
Tıbbi uyarılar
- Bu cihaz, bir kişisel bakım cihazıdır ve birden fazla kişi
üzerinde kullanılmak üzere tasarlanmamıştır.
- Kullanımdan sonra kanama meydana gelirse, bir
haftalık kullanımdan sonra kanama devam ederse ya
da rahatsızlık veya acı hissederseniz ürünü kullanmayı
bırakıp diş hekiminize veya doktorunuza başvurun.
- Kalp pili ya da ameliyatla takılan başka bir cihaz
kullanıyorsanız, ağız duşunu kullanmadan önce
doktorunuza ya da üreticiye danışın. (
https://pubmed.ncbi.nlm.nih.gov/25637210/ )
Pil güvenlik talimatları
- Bu cihaz, yalnızca vasıflı kişilerce çıkarılabilen piller
içerir.

52
Türkçe
- Ürünü sadece kullanım amacına göre kullanın. Ürünü,
pillerini ve aksesuarlarını kullanmadan önce bu
bilgileri dikkatlice okuyun ve gelecekte başvurmak
üzere saklayın. Yanlış kullanım, tehlikelere veya ciddi
yaralanmalara yol açabilir. Cihazla birlikte verilen
aksesuarlar ürünlere göre farklılık gösterebilir.
- Yalnızca Philips tarafından üretilmiş aksesuar ve sarf
malzemeleri kullanın. Yalnızca çıkarılabilir CBAxxxx,
TCAxxxx veya WAAxxxx besleme ünitelerini kullanın.
- Yalnızca Philips uyumlu şarj cihazlarıyla şarj edin:
- CBAxxxx (giriş değerleri: 100-240 V~; 50/60 Hz; 1,3
W),
- TCAxxxx (giriş değerleri: 100-240 V~; 50/60 Hz; 1,5
W),
- WAAxxxx (giriş değerleri: 100-240 V~; 50/60 Hz;
3,5 W).
- Ürün ve pilleri ateşten uzak tutun, doğrudan güneş
ışığına veya yüksek sıcaklığa maruz bırakmayın.
- Ürün aşırı ısınırsa veya üründen koku gelirse, renk
değiştirirse ya da şarj işlemi her zamankinden daha
uzun sürerse ürünü kullanmayı ve şarj etmeyi bırakıp
Philips ile iletişime geçin.
- Ürünleri ve pillerini mikrodalga fırına ya da
endüksiyonlu pişiricilerin üstüne koymayın.
- Pillerin ısınmasını veya zehirli ya da tehlikeli madde
açığa çıkarmasını önlemek için ürünü veya pili
açmayın, delmeyin, sökmeyin, değişiklik yapmayın
veya hasar görmemesini sağlayın. Pillere kısa devre,
aşırı yükleme veya tersine yükleme yapmayın.
- Bu cihaz değiştirilebilir olmayan piller içermektedir. Pil
kullanım ömrünün sonuna geldiğinde, cihaz uygun
şekilde atılmalıdır; Geri Dönüşüm ile ilgili bölüme
bakın.
- Cihazı 0 °C ila 40 °C arasındaki sıcaklıklarda şarj edin
ve kullanın.
- Hasarlı veya sızdıran pillerin cilde ya da gözlere temas
etmemesine dikkat edin. Bu durumda, hiç vakit
kaybetmeden temas yerini suyla iyice yıkayın ve bir
doktora başvurun.
Saklama ve taşıma koşulları
Sıcaklık -10 °C ila +60 °C (14 °F ila 140 °F).

53
Türkçe
Elektromanyetik alanlar (EMF)
Bu Philips cihaz, elektromanyetik alanlara maruz kalmaya
ilişkin geçerli tüm standartlara ve düzenlemelere
uygundur.
Radyo Ekipman Direktifi
Philips, işbu belge ile radyo frekansı arayüzüne (Bluetooth
veya BrushSync) sahip elektrikli diş fırçalarının
2014/53/EU sayılı Direktif'e uygun olduğunu beyan eder.
- Bluetooth radyo frekansı: 2,4 GHz
- Maksimum Bluetooth radyo frekans gücü: 3 dBm
- NFC radyo frekansı: 13,56 MHz
- Maksimum NFC radyo frekans gücü: -26 dBm
AB uygunluk beyanının tam metnine şu internet
adresinden ulaşabilirsiniz: www.philips.com/support
Kullanım amacı
Sonicare DiamondClean 9000 elektrikli diş fırçaları, diş
çürümelerini azaltmak ve ağız sağlığını iyileştirmek ve
korumak için dişlerdeki yapışkan plak ve gıda kalıntılarını
temizlemek üzere tasarlanmıştır. Sonicare DiamondClean
9000 elektrikli diş fırçaları, kişisel kullanım için
tasarlanmıştır. Çocuklar tarafından kullanımı yetişkin
gözetiminde olmalıdır.
Philips Sonicare cihazınız (Şek. 1.)
1 Fırça gövdesi
2 Açma/kapama düğmesi
3 Yoğunluk göstergesi
4 Mod/yoğunluk düğmesi
5 Mod göstergesi
6 Fırça başlığı değiştirme hatırlatma ışığı
7 Pil göstergesi
Aksesuarlar:
8 Fırça başlığı kapağı
9 Akıllı fırça başlıkları
10 BrushSync simgesi
11 Şarj bardağı
12 Şarj standı
13 Şarj tabanı
14 Seyahat çantası
54
Türkçe
15 Şarj seyahat çantası
16 USB(-A) duvar adaptörü
Not: Dâhil olan aksesuarlar satın alınan modele göre
değişiklik gösterebilir.
Ürün üzerinde aşağıdaki simgeler bulunabilir:
Kullanım Kılavuzunu okuyun.
Sökülebilir Güç Besleme Ünitesi Parçası:"xxxxxx" ifadesi,
kullanılabilecek onaylanmış şarj cihazlarının model
numarasını belirtir.
Sonicare uygulaması: Başlangıç
Sonicare uygulaması, diş fırçanızla eşleşerek bağlantılı bir
deneyim yaşamanızı sağlar. Uygulama, geniş bir iPhone
ve Android™ akıllı telefon yelpazesi ile uyumludur.
Sonicare uygulamasını kullanmaya başlamak için:
1
Sonicare uygulamasını telefonunuza indirin.
2
Telefonunuzda Bluetooth'un etkin olduğundan emin
olun.
3
Etkin olduğunu (ışıklarının açık olduğunu)
doğrulamak için diş fırçanızı elinize alın.
4
Uygulamayı açıp adımları izleyin.
5
Diş fırçanızı uygulamayla eşleştirin.
6
Uygulamada hesabınızı oluşturun. İstenirse, en güncel
iyileştirme ve özelliklere erişebilmek için ürün yazılımı
güncellemesini tamamlayın.
7
Uygulamaya bağlı diş fırçanızla düzenli olarak
fırçalayın. Diş fırçası ile uygulamayı düzenli olarak
eşitlerseniz genel ağız sağlığınızı artırmaya yardımcı
olacak güncellemeler alırsınız.
8
Eşitleme işlemini düzenli olarak yapın.
55
Türkçe
9
Optimum veri aktarımı için telefonunuzu diş fırçanıza
yakın tutun.
Manuel eşitleme için: Uygulamanın özellik ve
avantajlarından yararlanabilmek için diş fırçası ile
uygulamayı her iki haftada bir eşleştirin veya bağlayın.
Otomatik eşitleme için: Uygulamayı kurarken konum
izni verin. Konum izni verdiğinizde telefonunuz, diş
fırçanızın bağlantı menzilinde olduğunu anlayabilir ve en
yeni analiz ve önerileri sunmak amacıyla fırçalama
verilerinizi uygulamaya gönderir.
Not: Diş fırçanızın fırçalama verilerinizi uygulamaya
aktarabilmesi ve güncelleyebilmesi için uygulamayı
kullanırken telefonunuzun Bluetooth özelliğinin açık
olduğundan emin olun. Fırçalama verilerinizin toplanma
nedeniyle ilgili sorularınız varsa uygulama kurulumu
sürecinde sunulan Sonicare Gizlilik Bildirimini
inceleyebilirsiniz.
Uygulama özellikleri
Sonicare elektrikli diş fırçanızda aşağıdaki diş fırçalama
alışkanlıklarınız hakkında bilgi toplamanıza olanak
tanıyan akıllı sensörler bulunur:
- Günlük fırçalama seansları
- Her fırçalama seansında harcanan süre
- Uygulanan fırçalama kuvveti
- Fırça başlığı değiştirme hatırlatma (gerçekleşen
kullanıma uygun olarak)
Sonicare uygulaması, akıllı sensörler tarafından sağlanan
verileri toplar ve zamanla geliştirdiğiniz fırçalama
alışkanlıklarınızı takip eder.
Başlangıç
1
Fırça başlığını, fırça kıllarını sapın ön kısmı ile aynı yöne
bakacak şekilde hizalayın.
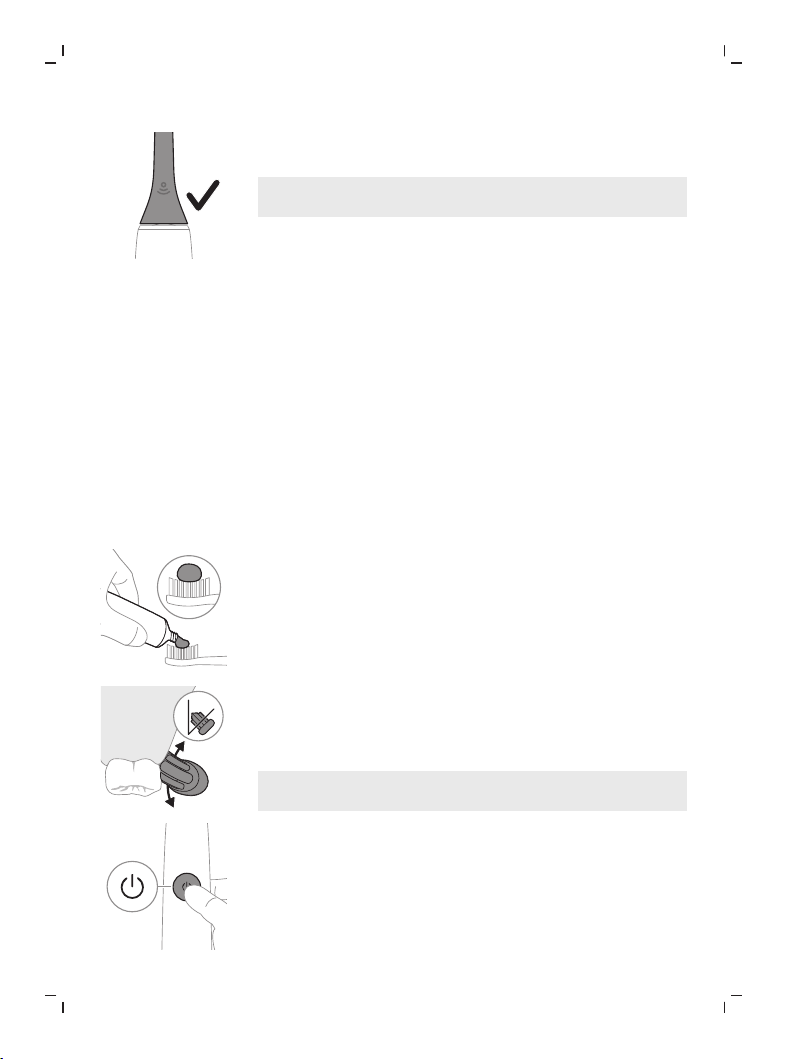
56
Türkçe
2
Fırça başlığını gidebildiği yere kadar metal çubuğun
üzerine sertçe bastırın.
Not: Fırça başlığı ile fırça gövdesi arasında küçük bir
boşluk olması normaldir.
Philips Sonicare diş fırçanızın kullanımı
Sonicare diş fırçanızı ilk kez kullanıyorsanız elektrikli
olmayan bir diş fırçasına kıyasla daha fazla titreşim
hissetmeniz normaldir. İlk kez kullanan kişilerin çok fazla
kuvvet uygulamaları sık rastlanan bir durumdur. Yalnızca
hafif bir şekilde bastırın ve fırçalama işini diş fırçasına
bırakın. En iyi deneyim için aşağıdaki fırçalama
talimatlarını lütfen uygulayın.
Yeni Sonicare elektrikli diş fırçanıza geçiş sürecinde size
yardımcı olması için ilk 1-2 hafta daha düşük bir ayar
kullanın, ardından daha yüksek bir ayara geçin.
Diş fırçalama talimatları
1
Fırçayı ıslatın ve az miktarda diş macunu sürün.
45°
2
Diş fırçası kıllarını dişinizle arasında dar bir açıyla (45
derece) yerleştirin. Fırça kıllarının diş eti çizgisine veya
diş eti çizgisinin biraz altına erişebilmesi için yeterince
bastırın.
Not: Fırçanın orta kısmının daima dişlerle temas
halinde olmasını sağlayın.
3
Philips Sonicare cihazınızı açmak için açma/kapama
düğmesine basın.
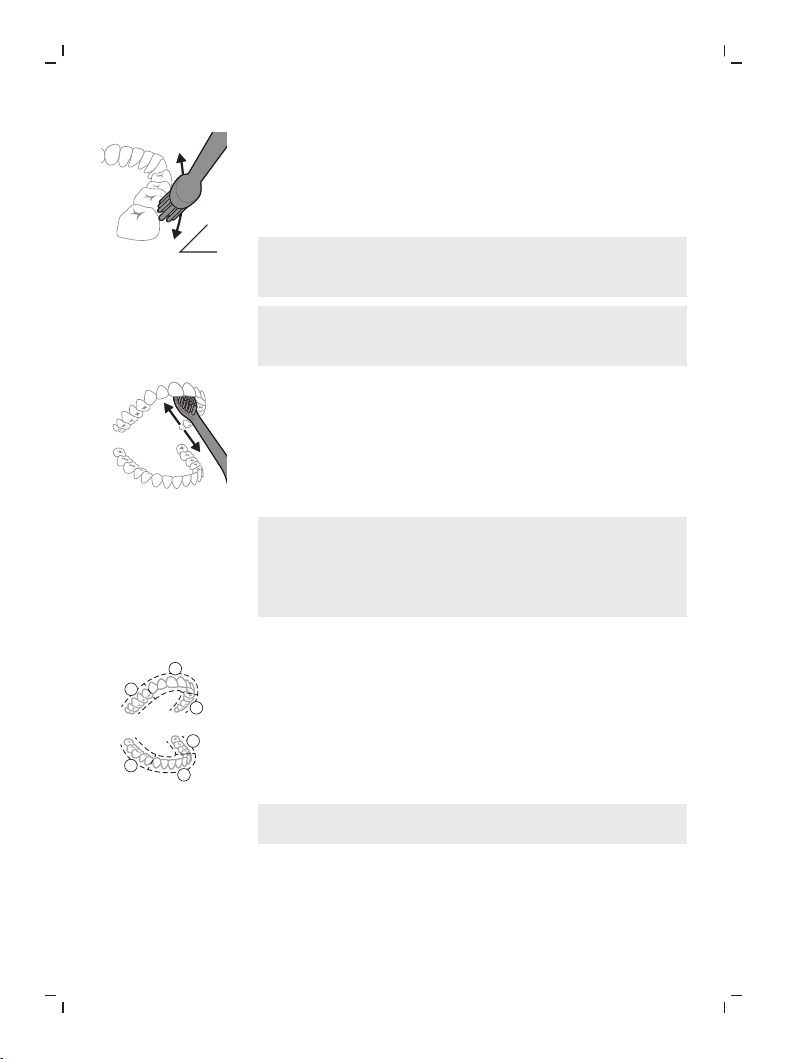
57
Türkçe
45°
4
Fırçayı hafifçe dişlerin üzerine ve diş eti çizgine
yerleştirin. Dişlerinizi küçük ileri ve geri hareketlerle
fırçalayarak fırça kıllarının dişlerin arasındaki bölgeler
ulaşmasını sağlayın. Fırçalama döngünüz boyunca bu
harekete devam edin.
Not: Fırça kılları sadece hafifçe bükülmelidir. Manuel
bir diş fırçasında olduğu gibi fırçalama hareketi
yapmanız önerilmez.
Not: Çok fazla basınç uygularsanız sapın titreşiminde
bir değişiklik ve sarı renkte yanıp sönen fırça başlığı
değiştirme hatırlatıcısı ile uyarılırsınız.
5
Ön dişlerin iç yüzeyini temizlemek için fırça sapını yarı
dik bir şekilde yatırın ve her dişe birkaç dikey fırçalama
darbesi uygulayın.
6
Diş fırçalama döngüsünü bitirdikten sonra, dişlerinizin
çiğneme yüzeyleri ile lekelenmiş kısımlarını bir süre
daha fırçalayabilirsiniz. Dilerseniz dilinizi de diş fırçası
açık veya kapalıyken fırçalayabilirsiniz.
Not: Philips Sonicare diş fırçanızı uygun şekilde
yapıldığından ve tehlikeye atılmadığından emin
olduğunuz diş tellerinde (telde kullanıldığında fırça
başlıkları daha erken yıpranır) ve diş restorasyonlarında
(dolgu, diş kronu, kaplama) kullanabilirsiniz.
BrushPacer
1
2
3
4
5
6
Ağzınızın her bölgesinde eşit fırçalama sağlamak için
BrushPacer özelliğini kullanarak ağzınızı 6 bölüme ayırın.
BrushPacer, fırçalama süresini 6 eşit segmente bölerek bir
sonraki alana ne zaman geçmeniz gerektiğini bildirir.
Segmentleri belirtmek için titreşimde kısa bir duraklama
yaşanır. Fırçalama seansının sonunda diş fırçası otomatik
olarak durur.
Not: White+ veya Gum Health Modlarını kullandığınızda
ek segment eklenebilir.
Modlar
Elektrikli diş fırçanızda 4 farklı mod bulunur: Clean,
White+, Gum Health ve Deep Clean+. Kullandığınız akıllı
fırça başlığına bağlı olarak, en uygun mod ve yoğunluk
BrushSync teknolojisi tarafından otomatik olarak seçilir.
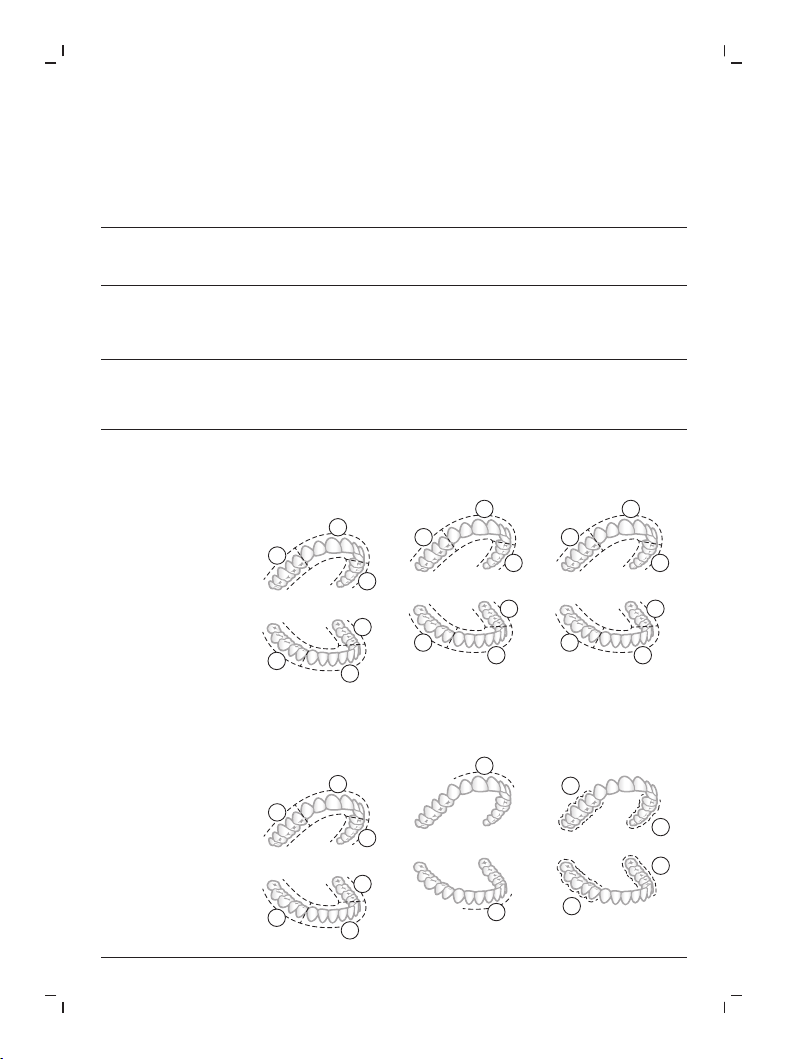
58
Türkçe
Modları değiştirmek için sap kapalıyken mod/yoğunluk
düğmesine basın.
Clean ve Deep
Clean+
White+ Gum Health
İşlev
Plak çıkarma Plak ve yüzey
lekesi çıkarma
Plak çıkarma ve
diş eti masajı
Önerilen
yoğunluk
seviyesi
Yüksek Yüksek Yüksek
Toplam
fırçalama süresi
Clean: 2 dakika
Deep Clean+: 3
dakika
2 dakika 40
saniye
3 dakika 20
saniye
Nasıl
fırçalanmalı
Clean: Her
segmenti 20
saniye süreyle
fırçalayın
1
2
3
4
5
6
Deep Clean+: Her
segmenti 30
saniye süreyle
fırçalayın*
1
2
3
4
5
6
Her segmenti 20
saniye süreyle
fırçalayın,
1
2
3
4
5
6
ardından 7. ve 8.
segmentin her
birini 20 saniye
fırçalayın
7
8
Her segmenti 20
saniye süreyle
fırçalayın,
1
2
3
4
5
6
ardından 7., 8., 9.
ve 10. segmentin
her birini 20
saniye fırçalayın
7
8
10
9
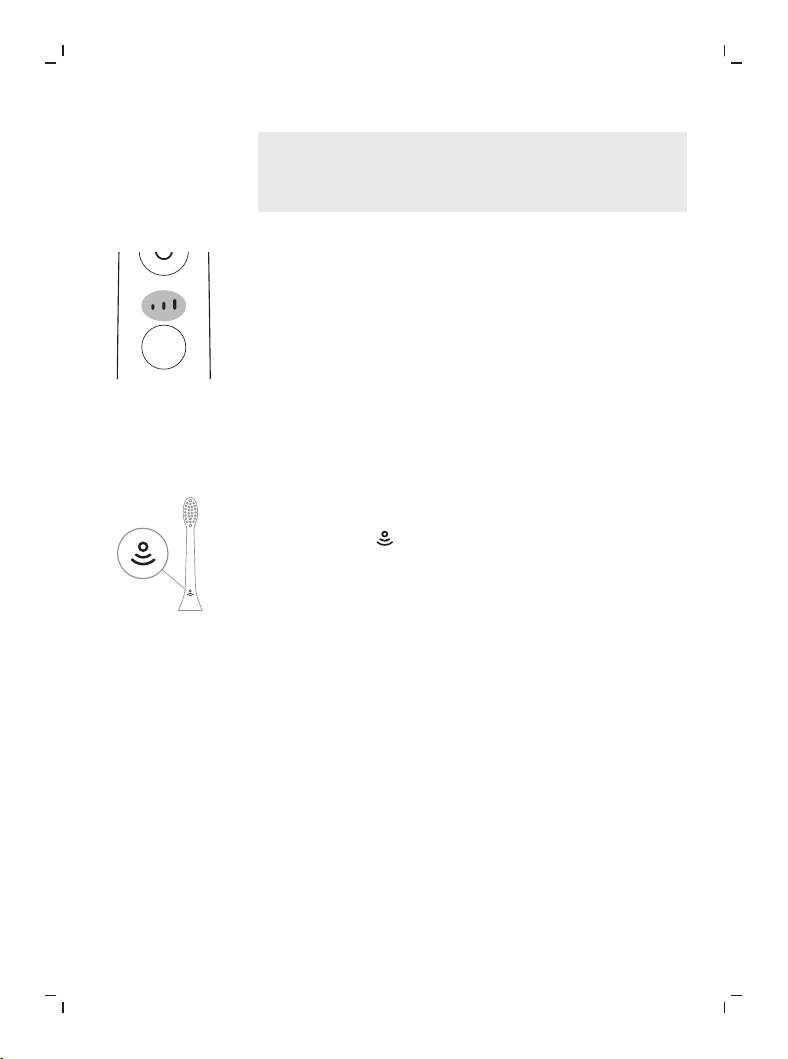
59
Türkçe
Not: Philips Sonicare uygulaması ile "Deep Clean+"
modunda fırçalama yaparken fırçalama süresi,
uygulamaya bağlıyken 2 dakika, uygulamaya bağlı
değilken 3 dakika olur.
Yoğunluklar
Elektrikli diş fırçanız 3 farklı yoğunluk ayarına sahiptir:
- düşük yoğunluk (tek çubuk)
- orta yoğunluk (iki çubuk)
- yüksek yoğunluk (üç çubuk)
Sapa takılan akıllı fırça başlığı, önerilen yoğunluk ayarını
otomatik olarak seçer. Farklı bir yoğunluğa geçmek
isterseniz fırçalama sırasında mod/yoğunluk düğmesine
basarak bunu yapabilirsiniz.
Sap kapalıyken veya duraklatılmışken yoğunluk
değiştirilemez.
BrushSync teknolojisi
BrushSync teknolojisi, fırça başlığının sapla bir mikroçip
sayesinde iletişim kurabilmesini sağlar. Fırça başlığının
altında yer alan simgesi, fırça başlığının bu teknolojiye
sahip olduğunu gösterir.
BrushSync teknolojisi şunları sağlar:
- Fırça başlığı değiştirme hatırlatıcısı
- BrushSync modu ve yoğunluk eşleştirmesi
Philips Sonicare, BrushSync teknolojisi ile donatılmış çok
çeşitli akıllı fırça başlıkları sunar. Tüm diş fırçası başlığı
yelpazemizi keşfetmek ve size en uygun fırça başlığını
bulmak için www.philips.com/toothbrush-heads
adresine giderek daha fazla bilgi alabilirsiniz.
Özellikler
- Basınç Sensörü Geri Bildirimi
- BrushPacer
- SmarTimer
- EasyStart
- Fırça Başlığı Değiştirme Hatırlatıcısı
- Fırça Başlığı Modu Eşleme
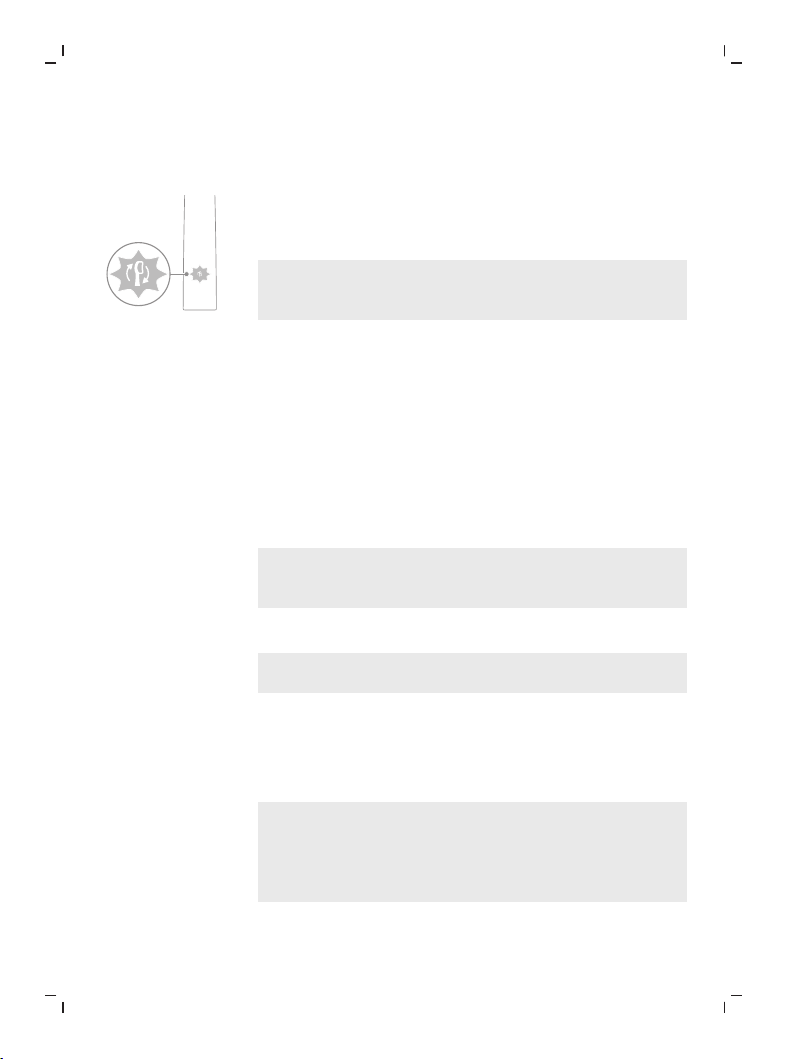
60
Türkçe
Basınç Sensörü Geri Bildirimi
Sonicare diş fırçanız, diş etlerinizi ve dişlerinizi hasardan
korumak için uyguladığınız basıncın miktarını ölçer.
Aşırı basınç uygularsanız sap, titreşimini değiştirir ve fırça
başlığı değiştirme hatırlatma simgesi siz basıncı azaltana
kadar sarı renkte yanıp söner.
Not: Ürününüz Basınç Sensörü etkin şekilde gelir. Bu
özelliği devre dışı bırakmak için (bkz. “Özellikleri
etkinleştirme veya devre dışı bırakma”):
BrushPacer
BrushPacer, ağzınızı 6 bölüme ayırarak eşit şekilde
fırçalamanıza yardımcı olan bir bölüm zamanlayıcısıdır.
SmarTimer
SmarTimer, fırçalama döngüsünün sonunda diş fırçasını
otomatik olarak kapatarak fırçalama döngünüzün
bittiğini gösterir.
Diş hekimleri günde iki kez ve en az 2 dakika boyunca
fırçalamayı önermektedir.
Not: Fırçalama döngüsünü başlattıktan sonra
açma/kapama düğmesine basarsanız diş fırçası duraklar.
30 saniyelik bir duraklamadan sonra, SmarTimer sıfırlanır.
EasyStart
Not: EasyStart özelliğini etkinleştirmek için: (bkz.
“Özellikleri etkinleştirme veya devre dışı bırakma”)
Bu Philips Sonicare modeli, EasyStart özelliği devre dışı
bırakılmış olarak gelir. EasyStart özelliği, ilk 14
fırçalamada gücü biraz arttırarak Philips Sonicare ile
fırçalamaya alışmanıza yardımcı olur.
EasyStart özelliği tüm modlarda çalışır.
Yasal Uyarı
Philips Sonicare diş fırçası klinik çalışmalarda
kullanıldığında sap, tamamen şarj edilmiş ve EasyStart
özelliği devre dışı bırakılmış olarak yüksek yoğunlukta
kullanılmalıdır.
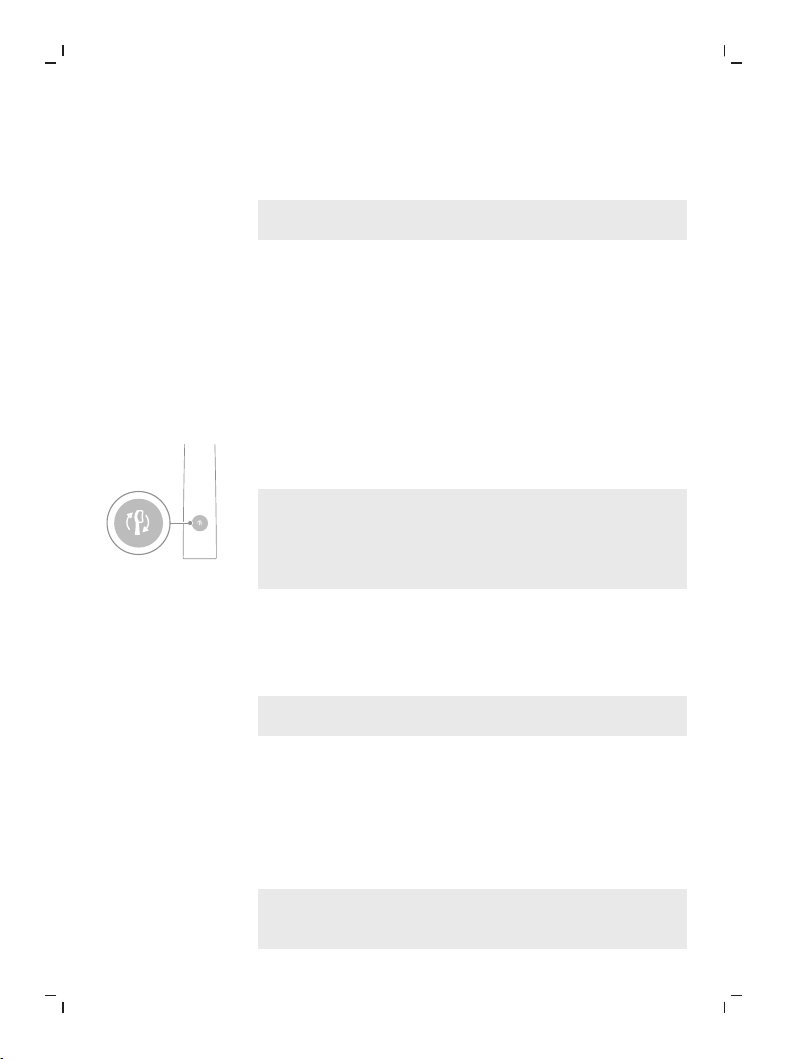
61
Türkçe
Fırça Başlığı Değiştirme Hatırlatıcısı
Philips Sonicare ürününüz, fırça başlığının aşınma
seviyesini izleyen BrushSync teknolojisine sahiptir.
Not: Bu özellik yalnızca BrushSync teknolojisine sahip
Philips Sonicare akıllı fırça başlıklarında mevcuttur.
1
Yeni bir akıllı fırça başlığını ilk kez taktığınızda sap,
BrushSync teknolojisine sahip bir Philips fırça başlığı
takıldığını algılayarak fırça başlığının yıpranmasını
izlemeye başlar.
2
Zaman içinde uyguladığınız basınca ve fırça başlığının
kullanıldığı toplam süreye bağlı olarak sap, fırça
başlığınızı değiştirmek için en uygun zamanı
belirlemek amacıyla fırça başlığı yıpranma düzeyini
izler. Bu özellik, dişlerinizin en iyi şekilde
temizlenmesini ve en iyi diş bakımını garanti eder.
3
Fırça Başlığı Değiştirme Hatırlatıcısı Işığı sarı
yandığında fırça başlığınızı değiştirmeniz gerekir.
Not: Tüm akıllı fırça başlıkları, kutudan çıkardığınızda fırça
başlığını değiştirme hatırlatıcısı özelliği etkin konumdadır.
Fırça başlığı değiştirme hatırlatıcısını devre dışı bırakmak
için "Özellikleri açma veya devre dışı bırakma" bölümünü
inceleyin.
Fırça Başlığı Modu Eşleme
BrushSync teknolojisine sahip fırça başlıklarında yer alan
mikroçip, sapla iletişim kurarak önerilen mod ve
yoğunlukla eşleşmeyi otomatik olarak sağlar.
Not: Mod/yoğunluk değiştirildiğinde fırça başlığı son
kullanılan ayarı hatırlar.
Özellikleri etkinleştirme veya devre dışı bırakma
Diş fırçanızda yer alan şu özellikleri etkinleştirebilir veya
devre dışı bırakabilirsiniz:
- EasyStart
- Fırça Başlığı Değiştirme Hatırlatıcısı
- Basınç Sensörü Geri Bildirimi
Not: Fırça Başlığı Değiştirme Hatırlatıcısı'nı etkinleştirme
veya devre dışı bırakma işlemlerini yalnızca sapta akıllı
fırça başlığı takılıyken yapabilirsiniz.
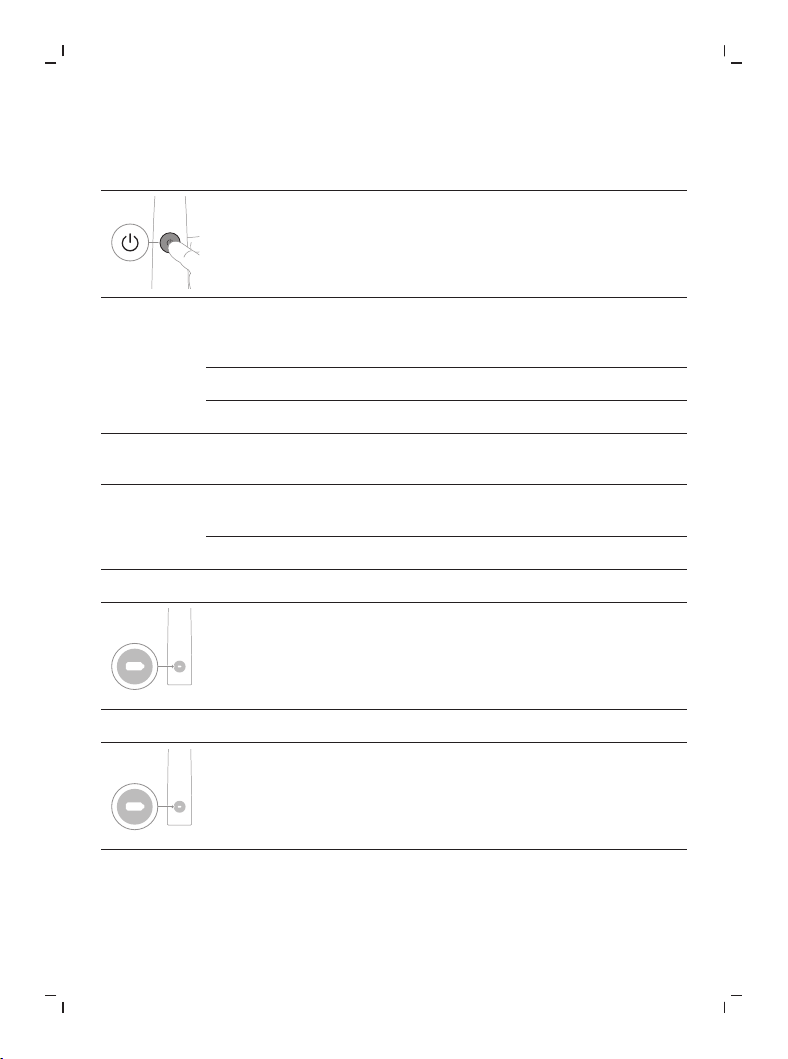
62
Türkçe
1. Adım: Sapı, şarj standının üzerine veya şarj bardağının içine
yerleştirin.
2. Adım: Açma/kapama düğmesini ilgili seçenek için gereken
süre boyunca basılı tutun:
EasyStart Fırça Başlığı
Değiştirme
Hatırlatıcısı
Basınç Sensörü Geri
Bildirimi
3 saniye 5 saniyeye kadar 7 saniyeye kadar
¯ ¯ ¯
3. Adım: Bip sesini duyduğunuzda açma/kapama düğmesini
bırakın:
1 bip 1 bip, ardından 2
bip
1 bip, 2 bip, ardından 3
bip
¯ ¯ ¯
Birlikte:
Pil göstergesinin 2 kez yanıp söndüğünü görüp düşükten
yükseğe 3 ses tonu duyduğunuzda özellik etkinleştirilmiştir.
YA DA
Pil göstergesinin 1 kez sarı renkte yanıp söndüğünü görüp
yüksekten düşüğe 3 ses tonu duyduğunuzda özellik devre dışı
bırakılmıştır.
Şarj ve pil durumu
Philips Sonicare diş fırçası, tam dolu bir pille her seansı 2
dakika süren en az 28 fırçalama seansı (günde iki kez
kullanılırsa 14 gün boyunca) sağlayacak şekilde
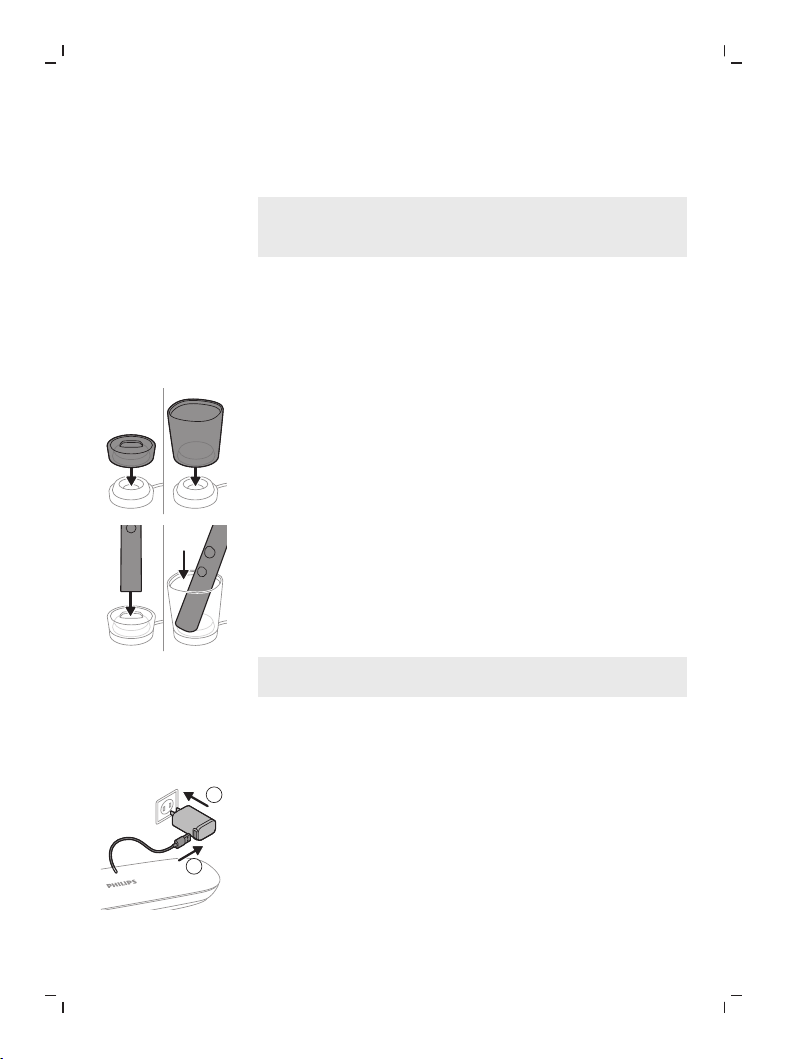
63
Türkçe
tasarlanmıştır. Pil göstergesi, 2 dakikalık fırçalama
seansını tamamladığınızda, diş fırçasını duraklattığınızda
ve şarj olurken pil durumunu gösterir.
Not: İlk kullanımdan önce pilin tamamen şarj olması 24
saate kadar sürebilse de Philips Sonicare diş fırçanızı tam
olarak şarj olmadan da kullanabilirsiniz.
Şarj oluyor
Şarj standında şarj etme
1
Şarj kaidesinin fişini bir elektrik prizine takın.
2
Şarj standını veya şarj bardağını şarj kaidesinin üzerine
yerleştirin.
3
Sapı, şarj standının üzerine veya şarj bardağının içine
yerleştirin.
- Pil göstergesi yanar ve sap iki kez bip sesi çıkarır.
Bu, diş fırçasının şarj olduğunu gösterir.
4
Şarj cihazı diş fırçanızı tamamen şarj olana kadar
doldurur.
Pil göstergesinin yanıp sönmesi sapın şarj edilmekte
olduğunu gösterir. Sap tamamen şarj edildiğinde pil
göstergesi 30 saniye süreyle yanar ve ardından söner.
Seyahat çantasıyla şarj etme
Not: Dâhil olan aksesuarlar satın alınan modele göre
değişiklik gösterebilir.
1
USB kablosunu şarjlı seyahat çantasının alt tarafından
dışarı çıkarın.
2
Şarjlı seyahat çantasını USB kablosu aracılığıyla 5 V DC
giriş gücüne bağlamak için şunları kullanabilirsiniz:
2
1
- Birlikte verilen USB adaptörü
- UL onaylı veya ANSI/UL 60950-1 uyumlu standart
kişisel bilgisayar USB konektörü veya
- UL onaylı veya ANSI/UL 60950-1 uyumlu USB çıkış
bağlantı noktası olan bir LPS güç kaynağı veya
- UL onaylı veya 1310 Class 2 uyumlu güç kaynağı.
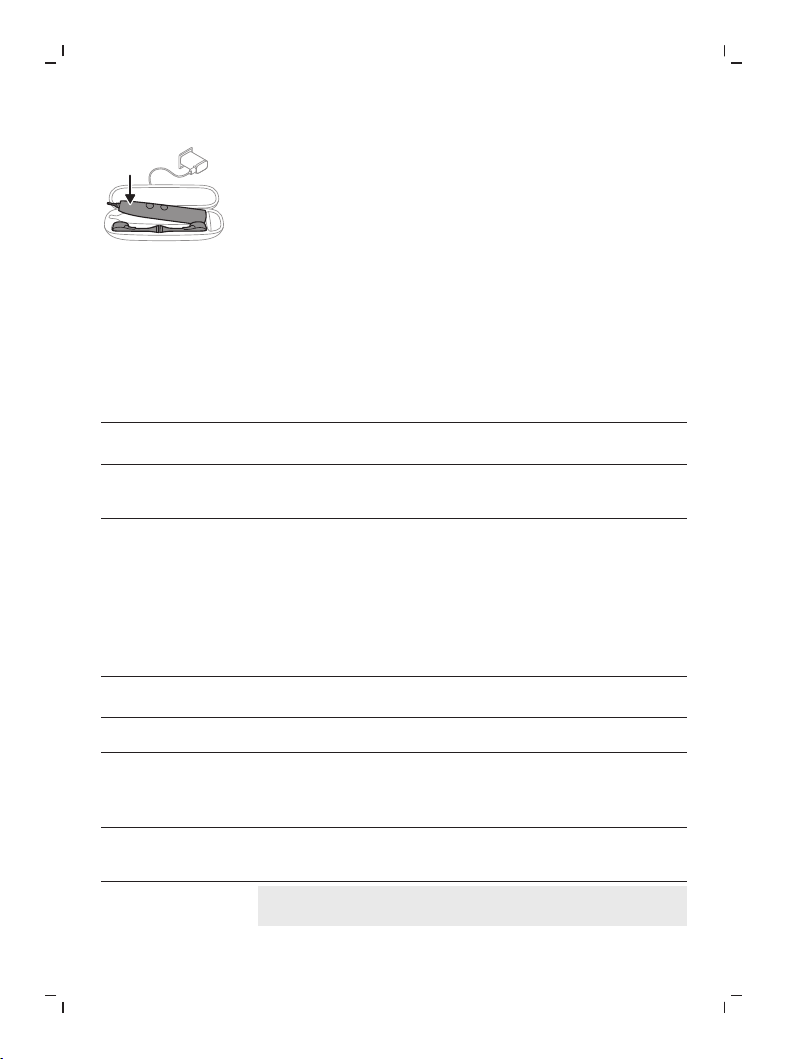
64
Türkçe
3
Sapı seyahat çantasına yerleştirin. Seyahat çantası
tamamen şarj olana kadar diş fırçanızı şarj eder.
Pil durumu
Pil durumu (sap, şarj cihazına takılı veya şarjlı
seyahat çantasında)
Sapı şarj cihazına veya şarjlı seyahat çantasına
yerleştirdiğinizde pil göstergesi pil seviyesini gösterir.
Pil durumu Pil göstergesi
Şarj oluyor Yanıp sönüyor
Dolu 30 saniye boyunca yanar ve ardından
söner
Pil durumu (sap, şarj cihazına veya şarjlı seyahat
çantasına yerleştirilmediğinde)
Diş fırçası uyanık durumdayken sapın altındaki pil
göstergesi pil seviyesini gösterir.
Pil durumu Pil göstergesi Ses
Dolu Işığın yanması -
Kısmen dolu Yanıp sönüyor -
Düşük Sarı renkte yanıp
sönüyor
Fırça gövdesi,
fırçalamadan sonra 3
bip sesi çıkarır
Boş Sarı renkte yanıp
sönüyor
Sap, fırçalamadan sonra
2 kez 5 bip sesi çıkarır
Not: Pil göstergesi, cihaz kullanılmadığında tasarruf
sağlamak için söner.
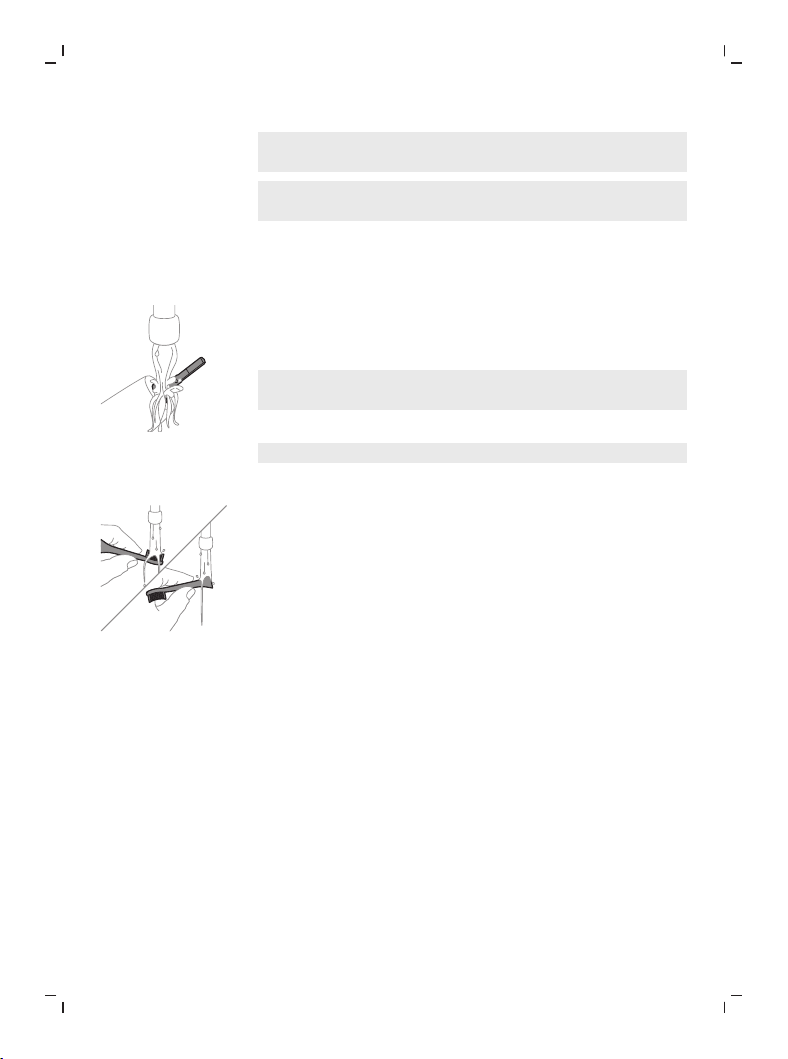
65
Türkçe
Not: Pil tamamen bittiğinde diş fırçası kapanır. Şarj etmek
için diş fırçasını şarj cihazına yerleştirin.
Not: Pili her zaman tam şarjlı tutmak için diş fırçanızı
kullanılmadığı zamanlarda şarj cihazında bırakabilirsiniz.
Temizleme
Diş fırçası gövdesi
1
Fırça başlığını çıkarın ve metal çubuk bölümünü ılık
suyla yıkayın. Kalan diş macununu temizlediğinizden
emin olun.
Dikkat: Hasar görebileceğinden, metal çubuğun
üzerindeki contaya keskin cisimlerle bastırmayın.
2
Sapın tüm yüzeyini nemli bir bez ile temizleyin.
Not: Fazla suyu almak için sapı lavaboya hafifçe vurmayın.
Fırça başlığı
1
Her kullanımdan sonra fırça başlığını ve tüylerini
yıkayın.
2
Haftada en az bir defa fırça başlığını saptan çıkarın ve
fırça başlığı bağlantısını ılık suyla yıkayın. Seyahat
başlığını gerektiği ölçüde sık durulayın.
Şarj Cihazı
1
Şarj cihazını temizlemeye başlamadan önce fişini
çekin.
2
Şarj cihazının yüzeyini nemli bir bezle silin.
Seyahat çantası
Seyahat çantasını ılık suyla durulayın ve içini temizlemek
için nemli bir bez kullanın.
Şarj seyahat çantası
1
Temizlemeden önce şarjlı seyahat çantasının fişini
çekin.
2
Seyahat çantasının yüzeyini hafif nemli bir bezle silin.
66
Türkçe
Saklama
Ürünü uzun bir süre kullanmayacaksanız prizden çıkarın,
temizleyin ve doğrudan güneş ışığı görmeyen, serin ve
kuru bir yerde saklayın.
Değişim
En iyi sonuçlar için Philips Sonicare fırça başlıklarını3 ayda
bir değiştirin. Sadece Philips Sonicare yedek fırça
başlıklarını kullanın.
Sorun giderme
Bu bölümde, cihazla ilgili en sık karşılaşabileceğiniz
sorunlar özetlenmektedir. Sorunu aşağıda verilen bilgileri
kullanarak çözemiyorsanız, sık sorulan sorular listesi için
www.philips.com/support adresini ziyaret edin veya
ülkenizdeki Müşteri Destek Merkezi ile iletişim kurun.
Sorun Olası neden Çözüm
Fırça başlığını tamamen
takamıyorum. Fırça
başlığı ile sap arasında
boşluk vardır.
Bu durum normaldir.
Dişlerin
temizlenmesinde
gerekli titreşimlerin
sağlanabilmesi için
gereken hareket alanını
bu küçük boşluk
sağlamaktadır.
Philips Sonicare diş
fırçamın titreşimi eskisi
kadar güçlü değil.
Fırça başlığı sapın
gövdesine çok yakındır.
Fırça başlığını sapından
çıkarın ve küçük bir
boşluk bırakarak metal
çubuk üzerine yeniden
yerleştirin. (1-2 mm)
Pil seviyesi düşüktür. Diş fırçası sapını şarj
cihazına takın.
Diş fırçamı şarj ettim
ama sadece kısa bir süre
çalışıyor.
Diş fırçası sapı şarj
cihazına dikey olarak
yerleştirilmediğinden
şarj olmuyordur.
Sapı, şarj cihazı
tabanına dikey olarak
yerleştirin ve şarj
cihazının prize takılı
olduğundan emin olun.
67
Türkçe
Sorun Olası neden Çözüm
Diş fırçası çalışmıyor. Pil bitmiştir. Diş fırçası sapını şarj
cihazına takın.
Model numarasını öğrenme
Model numarasını Philips Sonicare diş fırçası gövdesinin
altında bulabilirsiniz (HX99XX).
Garanti ve destek
Bilgi veya desteğe ihtiyaç duyarsanız, lütfen
www.philips.com/support adresini ziyaret edin veya
uluslararası garanti kitapçığını okuyun.
GARANTİ İSTİSNALARI
Garanti kapsamı dışında kalan uygulamalar:
- Fırça başlıkları ve diş arası temizleyici yedek başlıkları
dâhil olmak üzere ağız içi aparatları.
- Onaylanmamış yedek parça veya fırça başlığı kullanımı
nedeniyle oluşan hasarlar.
- Yanlış kullanım, amaç dışı kullanım, modifikasyon veya
yetkisiz kişilerce yapılan onarımdan kaynaklanan
hasarlar.
- Normal yıpranma, çentikler, çizikler, aşınma, renk
değiştirme veya solma.
Geri dönüşüm
- Bu simge, elektrikli ürün ve pillerin normal ev
atıklarıyla birlikte atılmaması gerektiğini belirtir.
- Ülkenizde elektrikli ürün ve pillerin ayrı olarak
toplanmasına ilişkin yürürlükte olan yönetmelikleri
izleyin.
Dâhilî şarj edilebilir pili çıkarma
LİTYUM İYON ŞARJ EDİLEBİLİR PİL İÇERİR. UYGUN
ŞEKİLDE GERİ DÖNÜŞTÜRÜLMELİ VEYA ATILMALIDIR.
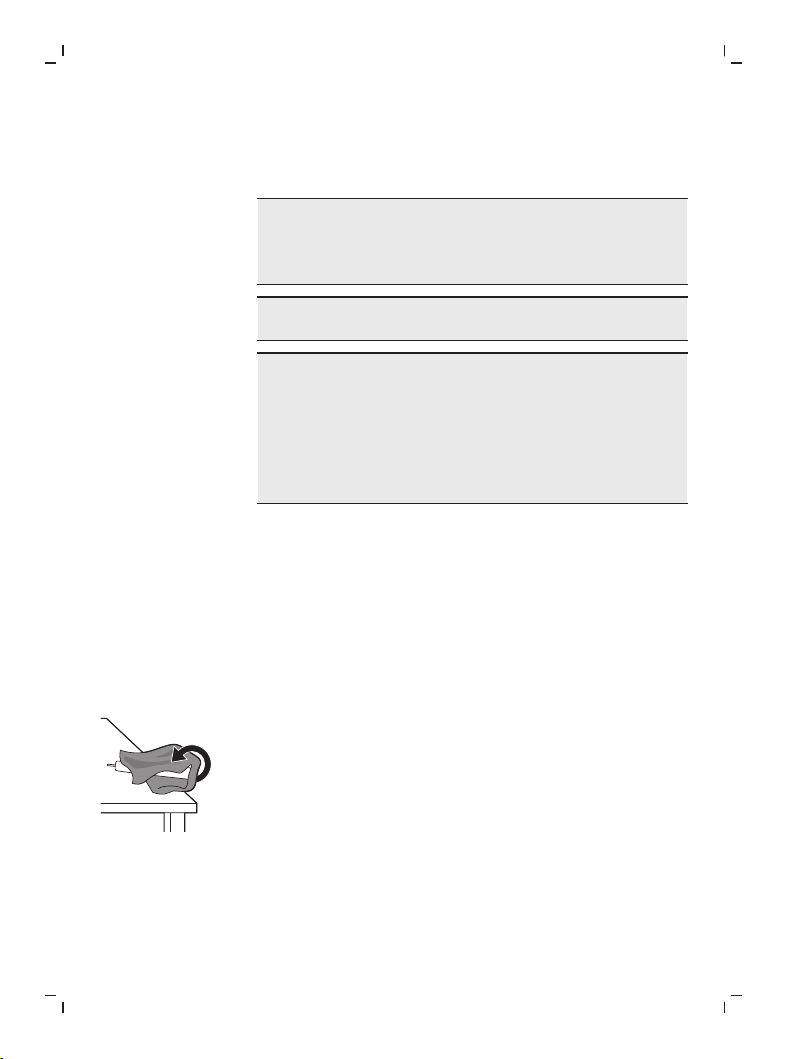
68
Türkçe
Ürün atıldığında, dahili şarj edilebilir pilin bir uzman
tarafından çıkarılması gerekir. Pili çıkarmadan önce pilin
tamamen boş olduğundan emin olun.
Cihazı açmak için alet kullanırken ve şarj edilebilir
pili çöpe atarken gerekli tüm güvenlik önlemlerini
alın. Gözlerinizi, ellerinizi, parmaklarınızı ve
üzerinde çalıştığınız yüzeyi mutlaka koruyun.
Pillere dokunurken ellerinizin, ürünün ve pillerin
kuru olmasına dikkat edin.
Çıkarıldıktan sonra pillerin kazara kısa devre
yapmasını önlemek için pil üzerindeki
terminallerin metal nesnelere (bozuk para, toka,
yüzük vb.) temas etmemesine çok dikkat edin.
Pilleri alüminyum folyoya sarmayın. Pilleri
atmadan önce pil terminallerini bantla kapatın
veya pilleri bir plastik torbaya koyun.
Şarj edilebilir pili çıkarma
Şarj edilebilir pili çıkarmak için havlu veya bez, çekiç ve
düz uçlu (standart) bir tornavida kullanmanız gerekir.
Aşağıdaki prosedürü uygularken temel güvenlik
önlemlerine dikkat edin.
1
Şarj edilebilir pilin tüm şarjını bitirmek içinsapı şarj
cihazından çıkarın, diş fırçanızı açın ve
duranakadarçalıştırın. Diş fırçası artık açılamaz hale
gelene kadar bu işlemi tekrarlayın.
2
Fırça başlığını çıkarın ve atın. Sapın tamamını bir havlu
ya da bez ile kapatın.
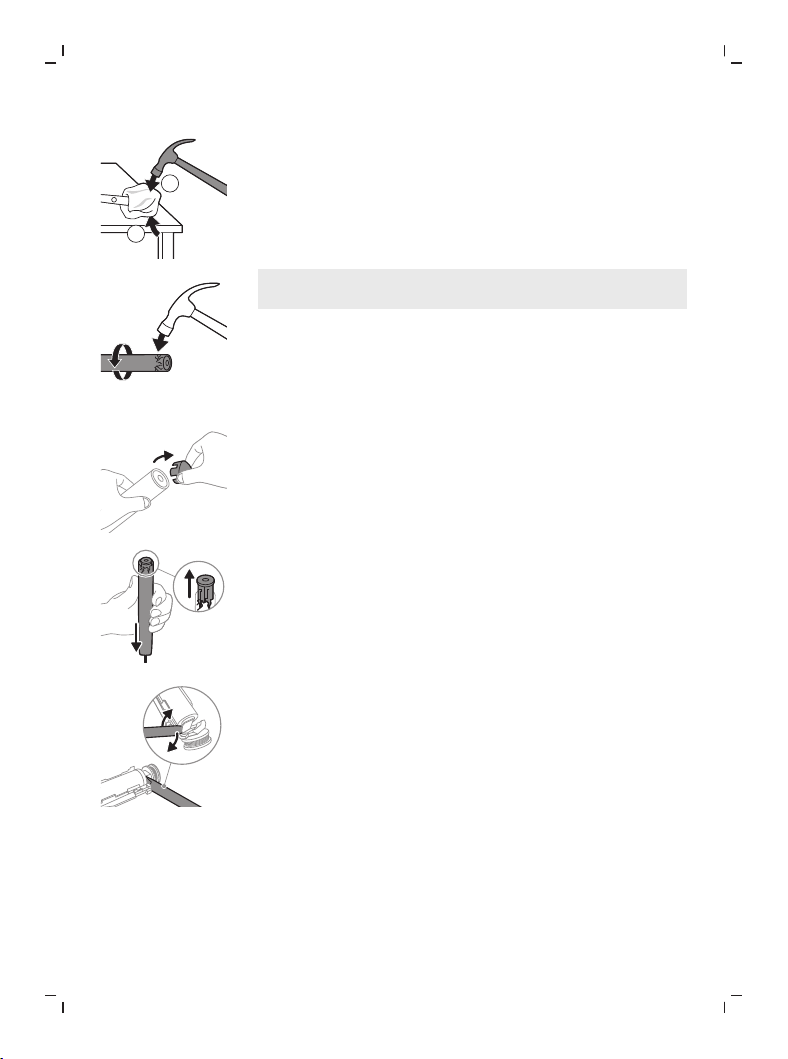
69
Türkçe
1
2
3
Sapı tek elinizle üst kısmından tutun ve sap
muhafazasına alt kısmın 1,2 cm üstünden vurun. Uç
kapağı çıkartmak için 4 taraftan da çekiçle sertçe
vurun.
Not: İç kısımdaki geçmeli bağlantıları koparmak için uç
kısmına birkaç kez vurmanız gerekebilir.
4
Uç kapağı diş fırçası sapından çıkarın. Uç kapak
muhafazadan kolayca ayrılmazsa, uç kapak ayrılana
kadar 3. adımı tekrarlayın.
5
Sapı ters tutarak çubuğu sert bir yüzeye bastırın. İç
kısımdaki parçalar muhafazadan kolayca ayrılmazsa,
bu parçalar ayrılana kadar 3. adımı tekrarlayın.
6
Tornavidayı iç kısımdaki parçaların alt tarafında
bulunan pil ve siyah çerçeve arasına yerleştirin.
Ardından siyah çerçevenin alt kısmını kırmak için
tornavidayı pilden çıkarın.
7
Pili yeşil baskılı devre plakasına bağlayan metal tırnağı
kırmak için tornavidayı pilin alt kısmı ile ve siyah
çerçeve arasına takın. Bu işlem, pilin alt kısmının
çerçeveden ayrılmasını sağlar.
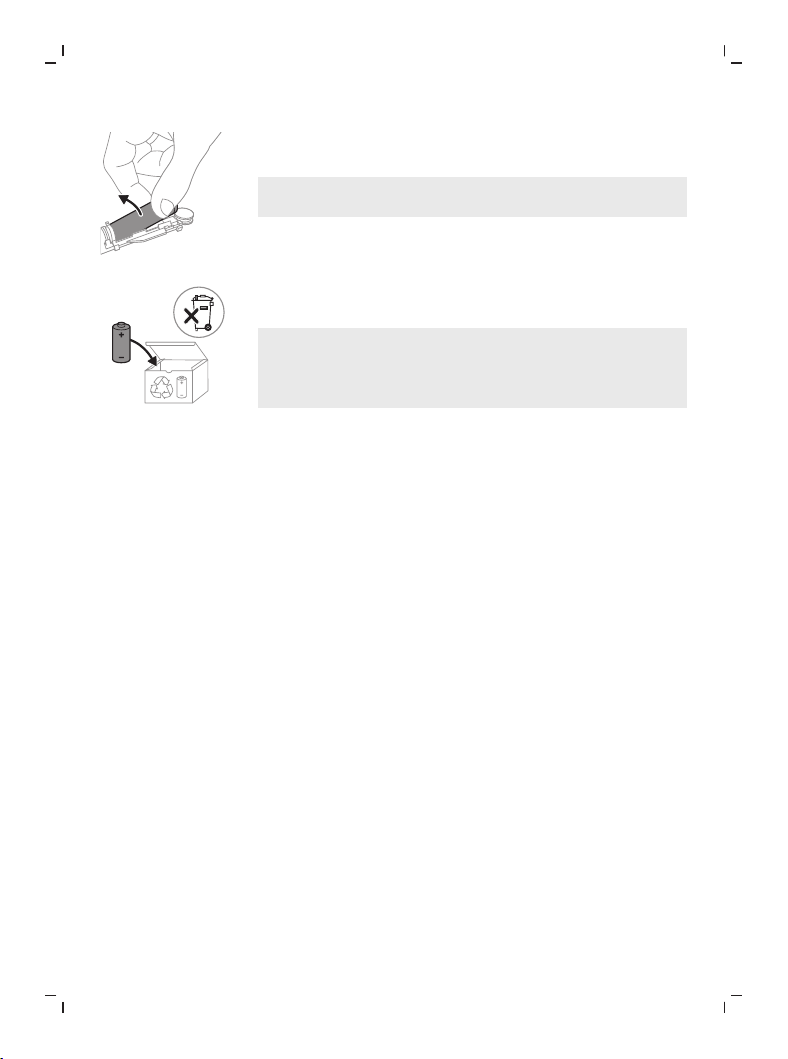
70
Türkçe
8
İkinci metal pil tırnağını kırmak için pili tutarak iç
kısımdaki parçalardan çekerek çıkarın.
Dikkat: Parmaklarınıza zarar vermemek için pil
tırnaklarının sivri uçlarına dikkat edin.
9
Kalan pil şarjından oluşabilecek elektrik kısa
devrelerini önlemek için pil bağlantılarını bantla
kaplayın.
Şarj edilebilir pil geri dönüştürülebilir; ürünün geri
kalan parçaları da uygun bir şekilde atılmalıdır.
Not: Kullanım ömrü sonunda cihazı normal evsel
atıklarınızla birlikte atmayın; geri dönüşüm için resmi
toplama noktalarına teslim edin. Böyle yaparak çevreyi
korumaya yardımcı olursunuz.
AEEE Yönetmeliğine Uygundur

العربية
71
ﺔﻴﺑﺮﻌﻟﺍ
ﺔﻣﺪﻘﻣ
!Philips Sonicare ﺔﻠﺋﺎﻋ ﻲﻓ ﻚﺑ ﺎﹱﺒﺣﺮﻣ
ﻥﺎﻨﺳﺃﻭ ﺕﺎﺒﺳﺮﺘﻠﻟ ﺔﻘﺋﺎﻓ ﺔﻟﺍﺯﺇ ﻰﻠﻋ ﻝﻮﺼﺤﻟﺍ ﻦﻣ ﻩﺬﻫ ﻥﺎﻨﺳﻷﺍ ﺓﺎﺷﺮﻓ ﻚﻨﹽﻜﻤﺗ
ﺔﻴﺗﻮﺼﻟﺍ ﺎﻴﺟﻮﻟﻮﻨﻜﺘﻟﺍ ﻦﻣ Sonicare ﺞﻳﺰﻣ ﻡﺍﺪﺨﺘﺳﺎﺑ .ﺔﺤﺻ ﺮﺜﻛﺃ ﺔﺜﻟﻭ ﺎﹱﺿﺎﻴﺑ ﺮﺜﻛﺃ
ﻰﻠﻋ ﻞﺼﺤﺗ ﻚﻧﺃ ﻲﻓ ﻕﻮﺛﻮﻟﺍ ﻚﻨﻜﻤﻳ ،ﺎﹱﻳﺮﻳﺮﺳ ﺔﺘﺒﺜﻤﻟﺍﻭ ﺓﺭﻮﻄﻤﻟﺍ ﺕﺍﺰﻴﻤﻟﺍﻭ ﺔﻔﻴﻄﻠﻟﺍ
.ﺓﺮﻣ ﻞﻛ ﻲﻓ ﻒﻴﻈﻨﺗ ﻞﻀﻓﺃ
:ﻰﻠﻋ ﺞﺘﻨﻤﻟﺍ ﻞﻴﺠﺴﺗﻭ ﻢﻋﺪﻟﺍ ﻦﻣ ﺪﻳﺰﻣ ﻚﻟ ﺮﻓﻮﺘﻳ
www.philips.com/support
ﺔﻣﻼﺴﻟﺍ ﻝﻮﺣ ﺔﻤﻬﻣ ﺕﺎﻣﻮﻠﻌﻣ
ﻞﺒﻗ ﺔﻳﺎﻨﻌﺑ ﺔﻤﻬﻤﻟﺍ ﺕﺎﻣﻮﻠﻌﻤﻟﺍ ﻩﺬﻫ ﺃﺮﻗﺍ .ﻂﻘﻓ ﺩﻮﺼﻘﻤﻟﺍ ﺽﺮﻐﻠﻟ ﺞﺘﻨﻤﻟﺍ ﻡﺪﺨﺘﺳﺍ
ﻲﻓ ﺎﻬﻴﻟﺇ ﻉﻮﺟﺮﻠﻟ ﺎﻬﻈﻔﺣﺍﻭ ،ﻪﺑ ﺔﺻﺎﺨﻟﺍ ﺕﺎﻘﺤﻠﻤﻟﺍﻭ ﺕﺎﻳﺭﺎﻄﺒﻟﺍﻭ ﺞﺘﻨﻤﻟﺍ ﻡﺍﺪﺨﺘﺳﺍ
ﺕﺎﺑﺎﺻﺇ ﺙﻭﺪﺣ ﻭﺃ ﺮﻃﺎﺨﻣ ﻰﻟﺇ ﻡﺍﺪﺨﺘﺳﻻﺍ ءﻮﺳ ﻱﺩﺆﻳ ﻥﺃ ﻦﻜﻤﻳ .ﻞﺒﻘﺘﺴﻤﻟﺍ
.ﺓﺮﻴﻄﺧ
ﺔﻬﺠﻟﺍﻭ (www.philips.com/support ﻝﻼﺧ ﻦﻣ) Philips ﻍﻼﺑﺇ ﺐﺠﻳ
ﺙﺩﺎﺣ ﻱﺄﺑ ﺾﻳﺮﻤﻟﺍ ﻭﺃ/ﻭ ﻡﺪﺨﺘﺴﻤﻟﺍ ﺎﻬﺑ ﺪﺟﺍﻮﺘﻤﻟﺍ ﻮﻀﻌﻟﺍ ﺔﻟﻭﺪﻟﺍ ﻲﻓ ﺔﺼﺘﺨﻤﻟﺍ
.ﺯﺎﻬﺠﻟﺍ ﺍﺬﻬﺑ ﻖﻠﻌﺘﻳ ﺎﻤﻴﻓ ﻊﻗﻭ ﺮﻴﻄﺧ
ﺕﺍﺮﻳﺬﺤﺗ
-ﻢﺗ ﺍﺫﺇ .ﺔﻴﻛﻼﻬﺘﺳﻻﺍ ﺩﺍﻮﻤﻟﺍ ﻭﺃ ﺔﻴﻠﺻﻷﺍ Philips ﺕﺎﻘﺤﻠﻣ ﻂﻘﻓ ﻡﺪﺨﺘﺳﺍ
ﺔﻗﺎﻃ ﺩﺍﺪﻣﺇ ﺓﺪﺣﻭﻭ ﻲﻠﺻﻷﺍ USB ﻞﺒﻛ ﻂﻘﻓ ﻡﺪﺨﺘﺳﺍ ،ﺞﺘﻨﻤﻟﺍ ﻊﻣ ﻩﺮﻴﻓﻮﺗ
.USB
-ﻒﻠﺗ ﺔﻟﺎﺣ ﻲﻓ .ﺎﻬﺘﻧﺎﻴﺻ ﻡﺪﺨﺘﺴﻤﻠﻟ ﻦﻜﻤﻳ ءﺍﺰﺟﺃ ﻰﻠﻋ ﺯﺎﻬﺠﻟﺍ ﺍﺬﻫ ﻱﻮﺘﺤﻳ ﻻ
.ﻚﺘﻟﻭﺩ ﻲﻓ ﻚﻠﻬﺘﺴﻤﻟﺍ ﺔﻳﺎﻋﺭ ﺰﻛﺮﻤﺑ ﻞﺼﺗﺍﻭ ﻪﻣﺍﺪﺨﺘﺳﺍ ﻦﻋ ﻒﻗﻮﺗ ،ﺯﺎﻬﺠﻟﺍ
-ﻦﻋ ﻒﻗﻮﺗ ،USB ﺔﻗﺎﻃ ﺩﺍﺪﻣﺇ ﺓﺪﺣﻭ ﻭﺃ USB ﻞﺒﻛ ﻒﻠﺗ ﺔﻟﺎﺣ ﻲﻓ
.ﻪﻣﺍﺪﺨﺘﺳﺍ
-ﺍﹰﺪﻴﻌﺑ ﺮﻔﺴﻠﻟ ﺔﺼﺼﺨﻤﻟﺍ ﻦﺤﺸﻟﺍ ﺔﺒﻠﻋﻭ ﻦﺤﺸﻟﺍ ﺓﺰﻬﺟﺃﻭ ﺕﻻﻮﺤﻤﻟﺎﺑ ﻆﻔﺘﺣﺍ
.ءﺎﻤﻟﺍ ﻦﻋ
-ﻦﺤﺸﻟﺍ ﺔﺒﻠﻋﻭ ﻦﺤﺸﻟﺍ ﺓﺰﻬﺟﺃﻭ ﺕﻻﻮﺤﻤﻟﺍ ﻑﺎﻔﺟ ﻦﻣ ﺪﻛﺄﺗ ،ﻒﻴﻈﻨﺘﻟﺍ ﺪﻌﺑ
.ﺎﻬﻠﻴﺻﻮﺗ ﻞﺒﻗ ﺎﹱﻣﺎﻤﺗ ﺮﻔﺴﻠﻟ ﺔﺼﺼﺨﻤﻟﺍ
-ﺕﺍﺭﺪﻘﻟﺍ ﻱﻭﺫ ﺹﺎﺨﺷﻷﺍﻭ ﻝﺎﻔﻃﻷﺍ ﺔﻄﺳﺍﻮﺑ ﺯﺎﻬﺠﻟﺍ ﺍﺬﻫ ﻡﺍﺪﺨﺘﺳﺍ ﻦﻜﻤﻳ
ﻑﺍﺮﺷﻹﺍ ﻁﺮﺸﺑ ﺔﻓﺮﻌﻤﻟﺍﻭ ﺓﺮﺒﺨﻟﺍ ﺺﻘﻧ ﻭﺃ ،ﺔﻴﻠﻘﻌﻟﺍ ﻭﺃ ﺔﻴﺴﺤﻟﺍ ﻭﺃ ﺔﻴﻧﺪﺒﻟﺍ
ﺔﻨﻣﺁ ﺔﻘﻳﺮﻄﺑ ﺯﺎﻬﺠﻟﺍ ﻡﺍﺪﺨﺘﺳﺍ ﻥﺄﺸﺑ ﺔﻣﺯﻼﻟﺍ ﺕﺎﻤﻴﻠﻌﺘﻟﺎﺑ ﻢﻫﺪﻳﻭﺰﺗ ﻭﺃ ﻢﻬﻴﻠﻋ
ﺔﻧﺎﻴﺻﻭ ﻒﻴﻈﻨﺘﻟﺍ ﺕﺎﻴﻠﻤﻋ ءﺍﺮﺟﺇ ﺯﻮﺠﻳ ﻻﻭ .ﺎﻬﻴﻠﻋ ﻱﻮﻄﻨﻳ ﻲﺘﻟﺍ ﺮﻃﺎﺨﻤﻟﺍ ﻢﻬﻓﻭ
.ﻑﺍﺮﺷﻹﺍ ﺖﺤﺗ ﻥﺎﻛ ﺍﺫﺇ ﻻﺇ ﻝﺎﻔﻃﻷﺍ ﺔﻄﺳﺍﻮﺑ ﻡﺪﺨﺘﺴﻤﻟﺍ
-.ﺞﺘﻨﻤﻟﺎﺑ ﻥﻮﺜﺒﻌﻳ ﻻ ﻢﻬﻧﺃ ﻦﻣ ﺪﻛﺄﺘﻠﻟ ﻝﺎﻔﻃﻷﺍ ﻰﻠﻋ ﻑﺍﺮﺷﻹﺍ ﺐﺠﻳ
-.ﻕﺎﺒﻃﻷﺍ ﺔﻟﺎﺴﻏ ﻲﻓ ﺞﺘﻨﻤﻟﺍ ﻦﻣ ءﺰﺟ ﻱﺃ ﻒﻈﻨﺗ ﻻ

72
ﺔﻴﺑﺮﻌﻟﺍ
-ﻲﻓ ﺮﻔﺴﻠﻟ ﺔﺼﺼﺨﻤﻟﺍ ﻦﺤﺸﻟﺍ ﺔﺒﻠﻋﻭ ﻦﺤﺸﻟﺍ ﺓﺰﻬﺟﺃﻭ ﺕﻻﻮﺤﻤﻟﺍ ﻡﺪﺨﺘﺴﺗ ﻻ
.ﺔﻨﺧﺎﺴﻟﺍ ﺢﻄﺳﻷﺍ ﻦﻣ ﺏﺮﻘﻟﺎﺑ ﻭﺃ ﻖﻠﻄﻟﺍ ءﺍﻮﻬﻟﺍ
- .ﻂﻘﻓ ﻥﺎﺴﻠﻟﺍﻭ ﺔﺜﻠﻟﺍﻭ ﻥﺎﻨﺳﻷﺍ ﻒﻴﻈﻨﺘﻟ ﺯﺎﻬﺠﻟﺍ ﺍﺬﻫ ﻢﻴﻤﺼﺗ ﻢﺗ
-ﺓﺩﺍﺪﺴﻟﺍ ﻝﻮﺣ ﻖﻓﺮﺑ ﻒﻈﻧ .ﺓﺎﺷﺮﻔﻟﺍ ﺱﺃﺭ ﺔﻠﺻﻭ ﺔﺻﺎﺧ ،ﺾﺒﻘﻤﻟﺍ ﻒﻄﺷﺍ
.ﺔﻴﻃﺎﻄﻤﻟﺍ
-ﺔﺒﻠﻋ ﻲﻓ ﺎﻤﻬﻨﻳﺰﺨﺗ ﻞﺒﻗ ﻥﺎﻨﺳﻷﺍ ﺓﺎﺷﺮﻓﻭ ﺓﺎﺷﺮﻔﻟﺍ ﺱﺃﺭ ﻑﺎﻔﺟ ﻦﻣ ﺪﻛﺄﺗ
.ﺮﻔﺴﻟﺍ
-ﻭﺃ ﺔﻗﻮﺤﺴﻣ ﺕﺍﺮﻴﻌﺷ ﻰﻠﻋ ﻱﻮﺘﺤﺗ ﻲﺘﻟﺍ ﺓﺎﺷﺮﻔﻟﺍ ﺱﺃﺭ ﻡﺍﺪﺨﺘﺳﺍ ﻦﻋ ﻒﻗﻮﺗ
.ﻰﻠﺒﻟﺍ ﺕﺎﻣﻼﻋ ﺕﺮﻬﻇ ﺍﺫﺇ ﻞﻗﺃ ﻭﺃ ﺮﻬﺷﺃ 3 ﻞﻛ ﺓﺎﺷﺮﻔﻟﺍ ﺱﺃﺭ ﻝﺪﺒﺘﺳﺍ .ﺔﻴﻨﺤﻨﻣ
-ﺖﻳﺯ ﻭﺃ ﺔﻳﺮﻄﻋ ﺕﻮﻳﺯ ﻰﻠﻋ ﻱﻮﺘﺤﺗ ﻲﺘﻟﺍ ﺕﺎﺠﺘﻨﻤﻟﺍ ﻊﻣ ﺮﺷﺎﺒﻤﻟﺍ ﺲﻣﻼﺘﻟﺍ ﺐﻨﺠﺗ
.ﺕﺍﺮﻴﻌﺸﻟﺍ ﺔﺣﺍﺯﺇ ﻰﻟﺇ ﺲﻣﻼﺘﻟﺍ ﻱﺩﺆﻳ ﻥﺃ ﻦﻜﻤﻳ .ﺪﻨﻬﻟﺍ ﺯﻮﺟ
ﺔﻴﺒﻄﻟﺍ ﺕﺍﺮﻳﺬﺤﺘﻟﺍ
-ﺔﻄﺳﺍﻮﺑ ﻡﺍﺪﺨﺘﺳﻼﻟ ﺺﺼﺨﻣ ﺮﻴﻏﻭ ﺔﻴﺼﺨﺸﻟﺍ ﺔﻳﺎﻨﻌﻠﻟ ﺯﺎﻬﺟ ﻮﻫ ﺯﺎﻬﺠﻟﺍ ﺍﺬﻫ
.ﺹﺎﺨﺷﺃ ﺓﺪﻋ
-ﺙﺪﺣ ﺍﺫﺇ ﻚﻳﺪﻟ ﺐﻴﺒﻄﻟﺍ/ﻥﺎﻨﺳﻷﺍ ﺐﻴﺒﻃ ﺮﺸﺘﺳﺍﻭ ﺯﺎﻬﺠﻟﺍ ﻡﺍﺪﺨﺘﺳﺍ ﻦﻋ ﻒﻗﻮﺗ
،ﻡﺍﺪﺨﺘﺳﻻﺍ ﻦﻣ ﻉﻮﺒﺳﺃ ﺪﻌﺑ ﻒﻳﺰﻨﻟﺍ ﺮﻤﺘﺳﺍ ﺍﺫﺇ ﻭﺃ ،ﻡﺍﺪﺨﺘﺳﻻﺍ ﺪﻌﺑ ﺩﺎﺣ ﻒﻳﺰﻧ
.ﻢﻟﻷﺍ ﻭﺃ ﺔﺣﺍﺮﻟﺍ ﻡﺪﻌﺑ ﺕﺮﻌﺷ ﺍﺫﺇ ﻭﺃ
-ﻞﺼﺗﺎﻓ ،ﻉﻭﺭﺰﻣ ﺮﺧﺁ ﺯﺎﻬﺟ ﻱﺃ ﻭﺃ ﺐﻠﻘﻟﺍ ﺕﺎﺑﺮﺿ ﻢﻴﻈﻨﺗ ﺯﺎﻬﺟ ﻚﻳﺪﻟ ﻥﺎﻛ ﺍﺫﺇ
) .ﻡﺍﺪﺨﺘﺳﻻﺍ ﻞﺒﻗ ﻉﻭﺭﺰﻤﻟﺍ ﺯﺎﻬﺠﻠﻟ ﺔﻌﻨﺼﻤﻟﺍ ﺔﻛﺮﺸﻟﺍ ﻭﺃ ﻚﺒﻴﺒﻄﺑ
( /https://pubmed.ncbi.nlm.nih.gov/25637210
ﺔﻳﺭﺎﻄﺒﻟﺍ ﺔﻣﻼﺳ ﺕﺎﻤﻴﻠﻌﺗ
-ﺹﺎﺨﺷﻷﺍ ﺔﻄﺳﺍﻮﺑ ﻻﺇ ﺎﻬﺘﻟﺍﺯﺇ ﻦﻜﻤﻳ ﻻ ﺕﺎﻳﺭﺎﻄﺑ ﻰﻠﻋ ﺯﺎﻬﺠﻟﺍ ﺍﺬﻫ ﻱﻮﺘﺤﻳ
.ﺓﺮﻬﻤﻟﺍ
-ﻞﺒﻗ ﺔﻳﺎﻨﻌﺑ ﺕﺎﻣﻮﻠﻌﻤﻟﺍ ﻩﺬﻫ ﺃﺮﻗﺍ .ﻂﻘﻓ ﺩﻮﺼﻘﻤﻟﺍ ﺽﺮﻐﻠﻟ ﺞﺘﻨﻤﻟﺍ ﻡﺪﺨﺘﺳﺍ
ﺎﻬﻴﻟﺇ ﻉﻮﺟﺮﻠﻟ ﺎﻬﻈﻔﺣﺍﻭ ،ﻪﺑ ﺔﺻﺎﺨﻟﺍ ﺕﺎﻘﺤﻠﻤﻟﺍﻭ ﺕﺎﻳﺭﺎﻄﺒﻟﺍﻭ ﺞﺘﻨﻤﻟﺍ ﻡﺍﺪﺨﺘﺳﺍ
ﺙﻭﺪﺣ ﻭﺃ ﺮﻃﺎﺨﻣ ﻰﻟﺇ ﻡﺍﺪﺨﺘﺳﻻﺍ ءﻮﺳ ﻱﺩﺆﻳ ﻥﺃ ﻦﻜﻤﻳ .ﻞﺒﻘﺘﺴﻤﻟﺍ ﻲﻓ
.ﺔﻔﻠﺘﺨﻣ ﺕﺎﺠﺘﻨﻤﻟ ﺓﺮﻓﻮﺘﻤﻟﺍ ﺕﺎﻘﺤﻠﻤﻟﺍ ﻒﻠﺘﺨﺗ ﺪﻗ .ﺓﺮﻴﻄﺧ ﺕﺎﺑﺎﺻﺇ
-.Philips ﻦﻣ ﺔﻴﻛﻼﻬﺘﺳﻻﺍ ﺩﺍﻮﻤﻟﺍﻭ ﺔﻴﻠﺻﻷﺍ ﺕﺎﻘﺤﻠﻤﻟﺍ ﻂﻘﻓ ﻡﺪﺨﺘﺳﺍ
ﻭﺃ TCAxxxx ﻭﺃ CBAxxxx ﻞﺼﻔﻠﻟ ﺔﻠﺑﺎﻘﻟﺍ ﺩﺍﺪﻣﻹﺍ ﺓﺪﺣﻭ ﻂﻘﻓ ﻡﺪﺨﺘﺳﺍ
.WAAxxxx
-:ﺔﻘﻓﺍﻮﺘﻤﻟﺍ Philips ﻦﺣﺍﻮﺷ ﻡﺍﺪﺨﺘﺳﺎﺑ ﻻﺇ ﻦﺤﺸﺗ ﻻ
-1.3 ؛ﺰﺗﺮﻫ 60/50 ؛~ ﺖﻟﻮﻓ 240 - 100 :ﻝﺎﺧﺩﻹﺍ ﺕﺎﻤﻴﻴﻘﺗ) CBAxxxx
،(ﻁﺍﻭ
-1.5 ؛ﺰﺗﺮﻫ 50/60 ؛~ ﺖﻟﻮﻓ 240 - 100 :ﻝﺎﺧﺩﻹﺍ ﺕﺎﻤﻴﻴﻘﺗ) TCAxxxx
،(ﻁﺍﻭ

73
ﺔﻴﺑﺮﻌﻟﺍ
-3.5 ؛ﺰﺗﺮﻫ 50/60 ؛~ ﺖﻟﻮﻓ 240 - 100 :ﻝﺎﺧﺩﻹﺍ ﺕﺎﻤﻴﻴﻘﺗ) WAAxxxx
.(ﻁﺍﻭ
-ﺲﻤﺸﻟﺍ ﺔﻌﺷﻷ ﺎﻬﺿﺮﻌﺗ ﻻﻭ ﺭﺎﻨﻟﺍ ﻦﻋ ﺍﹰﺪﻴﻌﺑ ﺕﺎﻳﺭﺎﻄﺒﻟﺍﻭ ﺞﺘﻨﻤﻟﺎﺑ ﻆﻔﺘﺣﺍ
.ﺔﻌﻔﺗﺮﻤﻟﺍ ﺓﺭﺍﺮﺤﻟﺍ ﺕﺎﺟﺭﺩ ﻭﺃ ﺓﺮﺷﺎﺒﻤﻟﺍ
-ﻦﺤﺸﻟﺍ ﻕﺮﻐﺘﺳﺍ ﺍﺫﺇ ﻭﺃ ﻪﻧﻮﻟ ﺮﻴﻐﺗ ﻭﺃ ﺔﺤﺋﺍﺮﻟﺍ ﻪﻳﺮﻛ ﻭﺃ ﺎﹱﻨﺧﺎﺳ ﺞﺘﻨﻤﻟﺍ ﺢﺒﺻﺃ ﺍﺫﺇ
ﻞﺼﺗﺍﻭ ﻪﻨﺤﺷﻭ ﺞﺘﻨﻤﻟﺍ ﻡﺍﺪﺨﺘﺳﺍ ﻦﻋ ﻒﻗﻮﺘﻓ ،ﺩﺎﺘﻌﻤﻟﺍ ﻦﻣ ﻝﻮﻃﺃ ﺎﹱﺘﻗﻭ
.Philips ﺔﻛﺮﺸﺑ
-ﺯﺎﺠﺗﻮﺒﻟﺍ ﻰﻠﻋ ﻭﺃ ﻒﻳﻭﻭﺮﻜﻴﻤﻟﺍ ﻥﺍﺮﻓﺃ ﻲﻓ ﺎﻬﺗﺎﻳﺭﺎﻄﺑﻭ ﺕﺎﺠﺘﻨﻤﻟﺍ ﻊﻀﺗ ﻻ
.ﺢﻄﺴﻤﻟﺍ
-ﺎﻤﻬﻜﻜﻔﺗ ﻭﺃ ،ﺎﻤﻬﻔﻠﺘﺗ ﻭﺃ ،ﺎﻤﻬﺒﻘﺜﺗ ﻭﺃ ،ﺎﻤﻬﻟﹼﺪﻌﺗ ﻭﺃ ،ﺔﻳﺭﺎﻄﺒﻟﺍ ﻻﻭ ﺞﺘﻨﻤﻟﺍ ﺢﺘﻔﺗ ﻻ
ﺓﺮﻄﺨﻟﺍ ﻭﺃ ﺔﻤﻤﺴﻤﻟﺍ ﺩﺍﻮﻤﻟﺍ ﺙﺎﻌﺒﻧﺍ ﻭﺃ ﺔﻧﻮﺨﺴﻠﻟ ﺕﺎﻳﺭﺎﻄﺒﻟﺍ ﺽﹼﺮﻌﺗ ﻊﻨﻤﻟ
ﻭﺃ ،ﺎﻬﻨﺤﺷ ﻲﻓ ﻎﻟﺎﺒﺗ ﻭﺃ ،ﺕﺎﻳﺭﺎﻄﺒﻠﻟ ﺔﻴﺋﺎﺑﺮﻬﻜﻟﺍ ﺓﺮﺋﺍﺪﻟﺍ ﺮﻴﺼﻘﺗ ﺐﻨﺠﺗ .ﺎﻬﻨﻣ
.ﺎﹱﻴﺴﻜﻋ ﺎﻬﻨﺤﺸﺗ
-ﺔﻳﺭﺎﻄﺒﻟﺍ ﻞﺼﺗ ﺎﻣﺪﻨﻋ .ﻝﺍﺪﺒﺘﺳﻼﻟ ﺔﻠﺑﺎﻗ ﺮﻴﻏ ﺕﺎﻳﺭﺎﻄﺑ ﻰﻠﻋ ﺯﺎﻬﺠﻟﺍ ﺍﺬﻫ ﻱﻮﺘﺤﻳ
ﻊﺟﺍﺭ ،ﺢﻴﺤﺻ ﻞﻜﺸﺑ ﺯﺎﻬﺠﻟﺍ ﻦﻣ ﺺﻠﺨﺘﻟﺍ ﺐﺠﻳ ،ﻲﺿﺍﺮﺘﻓﻻﺍ ﺎﻫﺮﻤﻋ ﺔﻳﺎﻬﻧ ﻰﻟﺇ
.ﺮﻳﻭﺪﺘﻟﺍ ﺓﺩﺎﻋﺈﺑ ﺹﺎﺨﻟﺍ ﻢﺴﻘﻟﺍ
-40ﻭ ﺔﻳﻮﺌﻣ ﺔﺟﺭﺩ 0 ﻦﻴﺑ ﺡﻭﺍﺮﺘﺗ ﺓﺭﺍﺮﺣ ﺔﺟﺭﺩ ﻲﻓ ﻪﻣﺪﺨﺘﺳﺍﻭ ﺞﺘﻨﻤﻟﺍ ﻦﺤﺷﺍ
.ﺔﻳﻮﺌﻣ ﺔﺟﺭﺩ
-ﻭﺃ ﺪﻠﺠﻠﻟ ﺎﻬﺘﺴﻣﻼﻣ ﺐﻨﺠﺘﻓ ،ﺎﻬﺑ ﺏﺮﺴﺗ ﺩﻮﺟﻭ ﻭﺃ ﺕﺎﻳﺭﺎﻄﺒﻟﺍ ﻒﻠﺗ ﺔﻟﺎﺣ ﻲﻓ
.ﺔﻴﺒﻄﻟﺍ ﺔﻳﺎﻋﺮﻟﺍ ﺐﻠﻃﻭ ءﺎﻤﻟﺎﺑ ﺍﹰﺪﻴﺟ ﻒﻄﺸﻟﺍ ﻚﻴﻠﻌﻓ ،ﺍﺬﻫ ﺙﺪﺣ ﺍﺫﺇﻭ .ﻦﻴﻨﻴﻌﻟﺍ
ﻞﻘﻨﻟﺍﻭ ﻦﻳﺰﺨﺘﻟﺍ ﻑﻭﺮﻇ
ﺔﺟﺭﺩ 14) ﺔﻳﻮﺌﻣ ﺔﺟﺭﺩ 60+ﻭ ﺔﻳﻮﺌﻣ ﺕﺎﺟﺭﺩ 10- ﻦﻴﺑ ﺓﺭﺍﺮﺤﻟﺍ ﺔﺟﺭﺩ ﺡﻭﺍﺮﺘﺗ
.(ﺖﻳﺎﻬﻧﺮﻬﻓ ﺔﺟﺭﺩ 140ﻭ ﺖﻳﺎﻬﻧﺮﻬﻓ
(EMF) ﺔﻴﺴﻴﻃﺎﻨﻐﻣﻭﺮﻬﻜﻟﺍ ﺕﻻﺎﺠﻤﻟﺍ
ﻝﻮﻤﻌﻤﻟﺍ ﺢﺋﺍﻮﻠﻟﺍﻭ ﺮﻴﻳﺎﻌﻤﻟﺍ ﻊﻴﻤﺟ ﻊﻣ ﻖﻓﺍﻮﺘﻳ Philips ﻪﻣﺪﻘﺗ ﻱﺬﻟﺍ ﺯﺎﻬﺠﻟﺍ ﺍﺬﻫ
.ﺔﻴﺴﻴﻃﺎﻨﻐﻣﻭﺮﻬﻜﻟﺍ ﺕﻻﺎﺠﻤﻠﻟ ﺽﺮﻌﺘﻟﺎﺑ ﻖﻠﻌﺘﻳ ﺎﻤﻴﻓ ﺎﻬﺑ
ﻮﻳﺩﺍﺮﻟﺍ ﺯﺎﻬﺟ ﺕﺎﻬﻴﺟﻮﺗ
ﺩﺩﺮﺗ ﺔﻬﺟﺍﻮﺑ ﺓﺩﻭﺰﻤﻟﺍ ﺔﻴﺋﺎﺑﺮﻬﻜﻟﺍ ﻥﺎﻨﺳﻷﺍ ﺵﺮﻓ ﻥﺃ Philips ﻦﻠﻌﺗ ،ﺍﺬﻫ ﺐﺟﻮﻤﺑ
.EU/53/2014 ﻪﻴﺟﻮﺘﻟﺍ ﻊﻣ ﺔﻘﻓﺍﻮﺘﻣ (BrushSync ﻭﺃ Bluetooth) ﻲﻜﻠﺳﻻ
-ﺰﺗﺮﻫ ﺎﺠﻴﺟ Bluetooth: 2.4 ﻮﻳﺩﺍﺭ ﺩﺩﺮﺗ
-ﻁﺍﻭ ﻲﻠﻴﻣ ﻞﺒﻴﺴﻳﺩ Bluetooth: 3 ﻮﻳﺩﺍﺭ ﺩﺩﺮﺗ ﺓﻮﻘﻟ ﻰﺼﻗﻷﺍ ﺪﺤﻟﺍ
-ﺰﺗﺮﻫ ﺎﺠﻴﻣ NFC: 13.56 ﻮﻳﺩﺍﺮﻟﺍ ﺩﺩﺮﺗ
-ﻁﺍﻭ ﻲﻠﻴﻣ ﻞﺒﻴﺴﻳﺩ NFC: -26 ﻮﻳﺩﺍﺮﻟﺍ ﺩﺩﺮﺗ ﺓﻮﻘﻟ ﻰﺼﻗﻷﺍ ﺪﺤﻟﺍ
:ﻲﻟﺎﺘﻟﺍ ﺖﻧﺮﺘﻧﻹﺍ ﻥﺍﻮﻨﻋ ﻰﻠﻋ ﺡﺎﺘﻣ ﻲﺑﻭﺭﻭﻷﺍ ﺩﺎﺤﺗﻼﻟ ﺔﻘﺑﺎﻄﻤﻟﺍ ﻥﻼﻋﻹ ﻞﻣﺎﻜﻟﺍ ﺺﻨﻟﺍ
www.philips.com/support
74
ﺔﻴﺑﺮﻌﻟﺍ
ﺯﺎﻬﺠﻟﺍ ﻪﻟ ﻢﻤﺼﻤﻟﺍ ﻝﺎﻤﻌﺘﺳﻻﺍ
Sonicare DiamondClean 9000 ﺔﻴﺋﺎﺑﺮﻬﻜﻟﺍ ﻥﺎﻨﺳﻷﺍ ﺓﺎﺷﺮﻓ ﻢﻴﻤﺼﺗ ﻢﺗ
ﻥﺎﻨﺳﻷﺍ ﺱﻮﺴﺗ ﻞﻴﻠﻘﺘﻟ ﻥﺎﻨﺳﻷﺍ ﻦﻣ ﻡﺎﻌﻄﻟﺍ ﺎﻳﺎﻘﺑﻭ ﺔﻘﺼﺘﻠﻤﻟﺍ ﻊﻘﺒﻟﺍ ﺔﻟﺍﺯﻹ
ﻥﺎﻨﺳﺃ ﺓﺎﺷﺮﻓ ﻥﺃ ﻰﻟﺇ ﺓﺭﺎﺷﻹﺍ ﺭﺪﺠﺗﻭ .ﺎﻬﻴﻠﻋ ﻅﺎﻔﺤﻟﺍﻭ ﻢﻔﻟﺍ ﺔﺤﺻ ﻦﻴﺴﺤﺗﻭ
ﺐﺠﻳﻭ .ﻲﺼﺨﺸﻟﺍ ﻡﺍﺪﺨﺘﺳﻼﻟ ﺔﺼﺼﺨﻣ Sonicare DiamondClean 9000
.ﻎﻟﺎﺑ ﺺﺨﺷ ﻑﺍﺮﺷﺇ ﺖﺤﺗ ﺓﺎﺷﺮﻔﻠﻟ ﻝﺎﻔﻃﻷﺍ ﻡﺍﺪﺨﺘﺳﺍ ﻥﻮﻜﻳ ﻥﺃ
(1 ﻞﻜﺸﻟﺍ) ﻚﺑ ﺔﺻﺎﺨﻟﺍ Philips Sonicare ﺓﺎﺷﺮﻓ
1ﺾﺒﻘﻤﻟﺍ
2ﻑﺎﻘﻳﻹﺍ/ﻞﻴﻐﺸﺘﻟﺍ ﺭﺯ
3ﺓﺪﺸﻟﺍ ﺮﺷﺆﻣ
4ﺓﺪﺸﻟﺍ/ﻊﺿﻮﻟﺍ ﺭﺯ
5ﻊﺿﻮﻟﺍ ﺮﺷﺆﻣ
6ﺓﺎﺷﺮﻔﻟﺍ ﺱﺃﺭ ﻝﺍﺪﺒﺘﺳﺍ ﺮﻴﻛﺬﺗ ءﻮﺿ
7ﺔﻳﺭﺎﻄﺒﻟﺍ ﺮﺷﺆﻣ
:ﺕﺎﻘﺤﻠﻤﻟﺍ
8ﺓﺎﺷﺮﻔﻟﺍ ﺱﺃﺭ ءﺎﻄﻏ
9ﺔﻴﻛﺬﻟﺍ ﺓﺎﺷﺮﻔﻟﺍ ﺱﻭﺅﺭ
10BrushSync ﺰﻣﺭ
11ﻦﺤﺸﻟﺍ ﺏﻮﻛ
12ﻦﺤﺷ ﻞﻣﺎﺣ
13ﻦﺤﺸﻟﺍ ﺓﺪﻋﺎﻗ
14ﺮﻔﺴﻟﺍ ﺔﺒﻴﻘﺣ
15ﺮﻔﺴﻠﻟ ﺔﺼﺼﺨﻤﻟﺍ ﻦﺤﺸﻟﺍ ﺔﺒﻠﻋ
16ﻲﻄﺋﺎﺤﻟﺍ (A-)USB ﺊﻳﺎﻬﻣ
.ﻩﺅﺍﺮﺷ ﻢﺗ ﻱﺬﻟﺍ ﺯﺍﺮﻄﻟﺍ ﻑﻼﺘﺧﺎﺑ ﺔﻨﻤﻀﻤﻟﺍ ﺕﺎﻘﺤﻠﻤﻟﺍ ﻒﻠﺘﺨﺗ ﺪﻗ :ﺔﻈﺣﻼﻣ
:ﺞﺘﻨﻤﻟﺍ ﻰﻠﻋ ﺔﻴﻟﺎﺘﻟﺍ ﺯﻮﻣﺮﻟﺍ ﺮﻬﻈﺗ ﺪﻗ
.ﻞﻐﺸﻤﻟﺍ ﻞﻴﻟﺩ ﺃﺮﻗﺍ
75
ﺔﻴﺑﺮﻌﻟﺍ
ﺓﺰﻬﺟﺃ ﻞﻳﺩﻮﻣ ﻢﻗﺭ ﻰﻟﺇ "xxxxxx" ﺮﻴﺸﻳ:ﻞﺼﻔﻠﻟ ﻞﺑﺎﻘﻟﺍ ﺔﻗﺎﻄﻟﺎﺑ ﺩﺍﺪﻣﻹﺍءﺰﺟ
.ﺎﻬﻣﺍﺪﺨﺘﺳﺍ ﺏﻮﻠﻄﻤﻟﺍ ﺓﺪﻤﺘﻌﻤﻟﺍ ﻦﺤﺸﻟﺍ
ﻞﻴﻐﺸﺘﻟﺍ ءﺪﺑ - Sonicare ﻖﻴﺒﻄﺗ
.ﺓﺎﺷﺮﻔﻟﺎﺑ ﻞﻴﺻﻮﺘﻟﺍ ﺔﺑﺮﺠﺗ ﻚﻟ ﺮﻓﻮﻴﻟ ﻚﻧﺎﻨﺳﺃ ﺓﺎﺷﺮﻔﺑ Sonicare ﻖﻴﺒﻄﺗ ﻥﺮﺘﻘﻳ
Android™ﻭ iPhone ﻒﺗﺍﻮﻫ ﻦﻣ ﺔﻌﺳﺍﻭ ﺔﻋﻮﻤﺠﻣ ﻊﻣ ﻖﻓﺍﻮﺘﻣ ﻖﻴﺒﻄﺘﻟﺍ
.ﺔﻴﻛﺬﻟﺍ
:Sonicare ﻖﻴﺒﻄﺗ ﻡﺍﺪﺨﺘﺳﺍ ءﺪﺒﻟ
1
.ﻚﻔﺗﺎﻫ ﻰﻠﻋ Sonicare ﻖﻴﺒﻄﺗ ﻞﻳﺰﻨﺘﺑ ﻢﻗ
2
.ﻚﻔﺗﺎﻫ ﻲﻓ Bluetooth ﻞﻴﻐﺸﺗ ﻦﻣ ﺪﻛﺄﺗ
3
.(ﻞﻴﻐﺸﺘﻟﺍ ﺪﻴﻗ ءﺍﻮﺿﻷﺍ) ﺔﻄﺸﻧ ﺎﻬﻧﺃ ﻦﻣ ﺪﻛﺄﺘﻠﻟ ﻚﻧﺎﻨﺳﺃ ﺓﺎﺷﺮﻓ ﻂﻘﺘﻟﺍ
4
.ﺕﺍﻮﻄﺨﻟﺍ ﻊﺒﺗﺍﻭ ﻖﻴﺒﻄﺘﻟﺍ ﺢﺘﻓﺍ
5
.ﻖﻴﺒﻄﺘﻟﺎﺑ ﻚﻧﺎﻨﺳﺃ ﺓﺎﺷﺮﻓ ﻥﺍﺮﻗﺈﺑ ﻢﻗ
6
ﺍﺫﺇ ،ﺔﺘﺑﺎﺜﻟﺍ ﺞﻣﺍﺮﺒﻟﺍ ﺚﻳﺪﺤﺗ ﻝﺎﻤﻜﺘﺳﺎﺑ ﻢﻗ .ﻖﻴﺒﻄﺘﻟﺍ ﺮﺒﻋ ﻚﺑﺎﺴﺣ ءﺎﺸﻧﺈﺑ ﻢﻗ
.ﺕﺍﺰﻴﻤﻟﺍﻭ ﺕﺎﻨﻴﺴﺤﺘﻟﺍ ﺙﺪﺣﺃ ﻰﻟﺇ ﻝﻮﺻﻮﻠﻟ ،ﻚﻟﺫ ﻚﻨﻣ ﺐﻠﹹﻃ
7
ﺔﻠﺼﺘﻤﻟﺍ ﻚﻧﺎﻨﺳﺃ ﺓﺎﺷﺮﻓ ﻡﺍﺪﺨﺘﺳﺎﺑ ﻡﺎﻈﺘﻧﺎﺑ ﺓﺎﺷﺮﻔﻟﺎﺑ ﻚﻧﺎﻨﺳﺃ ﻞﺴﻏﺍ
ﻰﻘﻠﺘﺘﺳ ،ﻡﺎﻈﺘﻧﺎﺑ ﻖﻴﺒﻄﺘﻟﺍ ﻊﻣ ﻥﺎﻨﺳﻷﺍ ﺓﺎﺷﺮﻓ ﺔﻨﻣﺍﺰﻤﺑ ﻡﻮﻘﺗ ﺎﻣﺪﻨﻋ .ﻖﻴﺒﻄﺘﻟﺎﺑ
.ﻚﻤﻓ ﺔﺤﺼﺑ ﺔﻳﺎﻨﻌﻟﺍ ﻦﻴﺴﺤﺗ ﻲﻓ ﻚﺗﺪﻋﺎﺴﻤﻟ ﺕﺎﺜﻳﺪﺤﺗ
8
.ﻡﺎﻈﺘﻧﺎﺑ ﺔﻨﻣﺍﺰﻤﻟﺎﺑ ﻢﻗ
9
.ﻲﻟﺎﺜﻣ ﻞﻜﺸﺑ ﺕﺎﻧﺎﻴﺒﻟﺍ ﻞﻘﻨﻟ ﻚﻧﺎﻨﺳﺃ ﺓﺎﺷﺮﻓ ﻦﻣ ﺏﺮﻘﻟﺎﺑ ﻚﻔﺗﺎﻬﺑ ﻆﻔﺘﺣﺍ
ﻦﻴﻋﻮﺒﺳﺃ ﻞﻛ ﻖﻴﺒﻄﺘﻟﺎﺑ ﻚﻧﺎﻨﺳﺃ ﺓﺎﺷﺮﻓ ﻞﻴﺻﻮﺗ/ﻥﺍﺮﻗﺈﺑ ﻢﻗ :ﺎﹱﻳﻭﺪﻳ ﺔﻨﻣﺍﺰﻤﻠﻟ
.ﻖﻴﺒﻄﺘﻟﺍ ﺕﺎﻧﺎﻜﻣﺇ/ﺕﺍﺰﻴﻣ ﻦﻣ ﺓﺩﺎﻔﺘﺳﻼﻟ
ﻝﻼﺧ ﻦﻣ .ﻖﻴﺒﻄﺘﻟﺍ ﺩﺍﺪﻋﺇ ءﺎﻨﺛﺃ ﻊﻗﻮﻤﻟﺍ ﻥﺫﺈﺑ ﺡﺎﻤﺴﻟﺎﺑ ﻢﻗ :ﺎﹱﻴﺋﺎﻘﻠﺗ ﺔﻨﻣﺍﺰﻤﻠﻟ
ﻚﻧﺎﻨﺳﺃ ﺓﺎﺷﺮﻓ ﻝﺎﺼﺗﺍ ﻕﺎﻄﻧ ﻲﻓ ﻥﻮﻜﻳ ﻰﺘﻣ ﻚﻔﺗﺎﻫ ﻑﺮﻌﻳ ،ﻊﻗﻮﻤﻟﺍ ﻥﺫﺈﺑ ﺡﺎﻤﺴﻟﺍ
ﺙﺪﺣﺃ ﻢﻳﺪﻘﺘﻟ ﻖﻴﺒﻄﺘﻟﺍ ﻰﻠﻋ ﻚﺑ ﺔﺻﺎﺨﻟﺍ ﻥﺎﻨﺳﻷﺍ ﻒﻴﻈﻨﺗ ﺕﺎﻧﺎﻴﺑ ﺚﻳﺪﺤﺗ ﻪﻨﻜﻤﻳﻭ
.ﺕﺎﻴﺻﻮﺘﻟﺍﻭ ﺭﺎﻜﻓﻷﺍ
ﻰﺘﺣ ﻖﻴﺒﻄﺘﻟﺍ ﻡﺍﺪﺨﺘﺳﺍ ﺪﻨﻋ ﻚﻔﺗﺎﻫ ﻲﻓ Bluetooth ﻞﻴﻐﺸﺗ ﻦﻣ ﺪﻛﺄﺗ :ﺔﻈﺣﻼﻣ
ﺍﺫﺇ .ﻖﻴﺒﻄﺘﻟﺍ ﻲﻓ ﺎﻬﺜﻳﺪﺤﺗﻭ ﻥﺎﻨﺳﻷﺍ ﻒﻴﻈﻨﺗ ﺕﺎﻧﺎﻴﺑ ﻞﻘﻧ ﻦﻣ ﻚﻧﺎﻨﺳﺃ ﺓﺎﺷﺮﻓ ﻦﻜﻤﺘﺗ
ﺔﻌﺟﺍﺮﻣ ﻦﻣ ﺪﻛﺄﺘﻓ ،ﺓﺎﺷﺮﻔﻟﺎﺑ ﻒﻴﻈﻨﺘﻟﺍ ﺕﺎﻧﺎﻴﺑ ﻊﻤﺟ ﺐﺒﺳ ﻝﻮﺣ ﺔﻠﺌﺳﺃ ﻚﻳﺪﻟ ﺖﻧﺎﻛ
.ﻖﻴﺒﻄﺘﻟﺍ ﺩﺍﺪﻋﺇ ﺔﻴﻠﻤﻋ ﻝﺍﻮﻃ ﺮﻓﻮﺘﻤﻟﺍ ،Sonicare ﺔﻴﺻﻮﺼﺧ ﻥﺎﻴﺑ
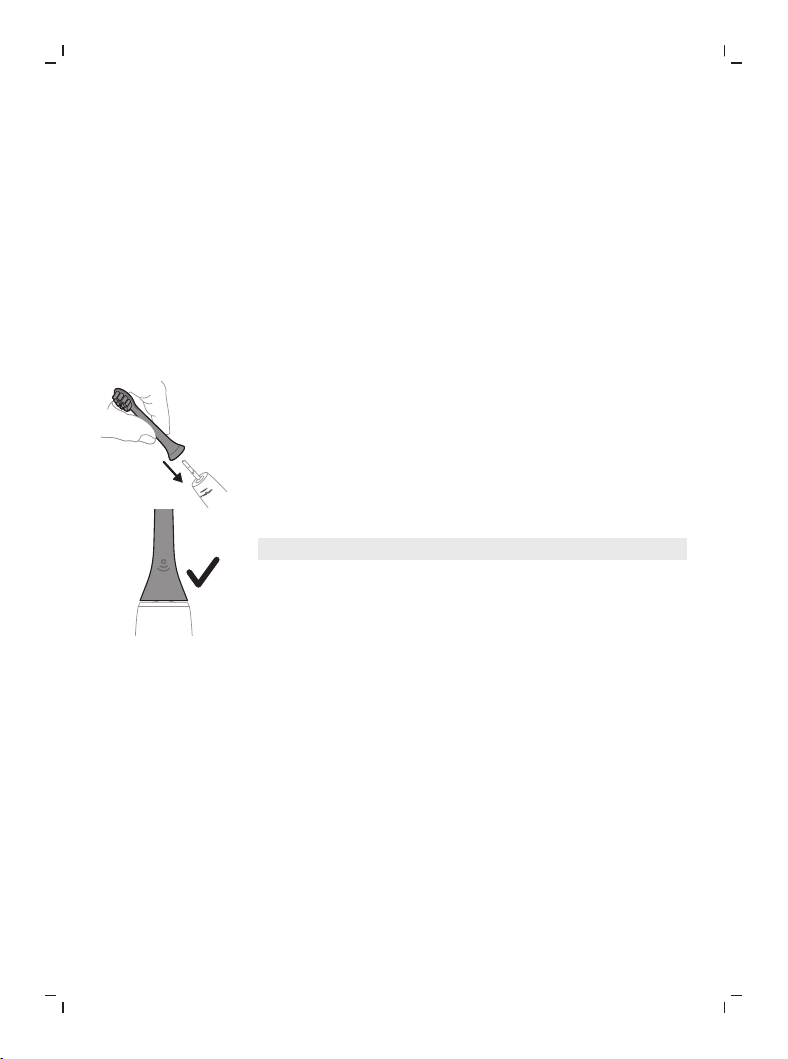
76
ﺔﻴﺑﺮﻌﻟﺍ
ﻖﻴﺒﻄﺘﻟﺍ ﺕﺍﺰﻴﻣ
ﻙﺪﻳﻭﺰﺘﻟ ﺔﻴﻛﺫ ﺭﺎﻌﺸﺘﺳﺍ ﺓﺰﻬﺟﺄﺑ ﺔﻴﺋﺎﺑﺮﻬﻜﻟﺍ Sonicare ﻥﺎﻨﺳﺃ ﺓﺎﺷﺮﻓ ﺪﻳﻭﺰﺗ ﻢﺗ
:ﻚﻟﺫ ﻲﻓ ﺎﻤﺑ ،ﻚﺑ ﺔﺻﺎﺨﻟﺍ ﻒﻴﻈﻨﺘﻟﺍ ﺕﺍﺩﺎﻋ ﻝﻮﺣ ﺕﺎﻈﺣﻼﻤﺑ
-ﺔﻴﻣﻮﻴﻟﺍ ﺓﺄﺷﺮﻔﻟﺎﺑ ﻒﻴﻈﻨﺘﻟﺍ ﺕﺎﺴﻠﺟ
-ﺓﺄﺷﺮﻔﻟﺎﺑ ﻒﻴﻈﻨﺗ ﺔﺴﻠﺟ ﻞﻛ ﻲﻓ ﻪﻴﻀﻘﺗ ﻱﺬﻟﺍ ﺖﻗﻮﻟﺍ
-ﻪﻘﻴﺒﻄﺗ ﻢﺗ ﻱﺬﻟﺍ ﺓﺄﺷﺮﻔﻟﺎﺑ ﻂﻐﻀﻟﺍ
-(ﻲﻠﻌﻔﻟﺍ ﻡﺍﺪﺨﺘﺳﻻﺍ ﻰﻠﻋ ﹰءﺎﻨﺑ) ﺓﺎﺷﺮﻔﻟﺍ ﺱﺃﺭ ﻝﺍﺪﺒﺘﺳﺎﺑ ﺮﻴﻛﺬﺗ
ﻊﺒﺘﺘﻳﻭ ﺔﻴﻛﺬﻟﺍ ﺭﺎﻌﺸﺘﺳﻻﺍ ﺓﺰﻬﺟﺃ ﺎﻫﺮﻓﻮﺗ ﻲﺘﻟﺍ ﺕﺎﻧﺎﻴﺒﻟﺍ Sonicare ﻖﻴﺒﻄﺗ ﻊﻤﺠﻳ
.ﺖﻗﻮﻟﺍ ﺭﻭﺮﻣ ﻊﻣ ﻚﻳﺪﻟ ﺓﺎﺷﺮﻔﻟﺎﺑ ﻒﻴﻈﻨﺘﻟﺍ ﺕﺍﺩﺎﻋ
ﻡﺍﺪﺨﺘﺳﻻﺍ ءﺪﺑ
1
ﻩﺎﺠﺗﺍ ﺲﻔﻧ ﻲﻓ ﺕﺍﺮﻴﻌﺸﻟﺍ ﺔﻄﻘﻧ ﻥﻮﻜﺗ ﺚﻴﺤﺑ ﺓﺎﺷﺮﻔﻟﺍ ﺱﺃﺭ ﺓﺍﺫﺎﺤﻤﺑ ﻢﻗ
.ﺾﺒﻘﻤﻟﺍ ﻦﻣ ﻲﻣﺎﻣﻷﺍ ءﺰﺠﻟﺍ
2
.ﻒﻗﻮﺘﺗ ﻰﺘﺣ ﻲﻧﺪﻌﻤﻟﺍ ﺩﻮﻤﻌﻟﺍ ﻰﻠﻋ ﻞﻔﺳﻷ ﺓﺎﺷﺮﻔﻟﺍ ﺱﺃﺭ ﻰﻠﻋ ﺓﻮﻘﺑ ﻂﻐﺿﺍ
.ﺾﺒﻘﻤﻟﺍﻭ ﺓﺎﺷﺮﻔﻟﺍ ﺱﺃﺭ ﻦﻴﺑ ﺓﺮﻴﻐﺻ ﺓﻮﺠﻓ ﻯﺮﺗ ﻥﺃ ﻲﻌﻴﺒﻄﻟﺍ ﻦﻣ :ﺔﻈﺣﻼﻣ
Philips Sonicare ﻥﺎﻨﺳﺃ ﺓﺎﺷﺮﻓ ﻡﺍﺪﺨﺘﺳﺍ
ﻥﺃ ﻲﻌﻴﺒﻄﻟﺍ ﻦﻤﻓ ،ﻰﻟﻭﻷﺍ ﺓﺮﻤﻠﻟ Sonicare ﻥﺎﻨﺳﻷﺍ ﺓﺎﺷﺮﻓ ﻡﺪﺨﺘﺴﺗ ﺖﻨﻛ ﺍﺫﺇ
ﻥﺃ ﻊﺋﺎﺸﻟﺍ ﻦﻣ .ﺔﻴﺋﺎﺑﺮﻬﻜﻟﺍ ﺮﻴﻏ ﻥﺎﻨﺳﻷﺍ ﺓﺎﺷﺮﻓ ﻡﺍﺪﺨﺘﺳﺍ ﻦﻣ ﺮﺜﻛﺃ ﺯﺍﺰﺘﻫﺎﺑ ﺮﻌﺸﺗ
ﺓﺎﺷﺮﻓ ﻉﺩﻭ ﻖﻓﺮﺑ ﻂﻐﻀﻟﺎﺑ ﻢﻗ ﻂﻘﻓ .ﺍﹰﺮﻴﺜﻛ ﻂﻐﻀﻟﺎﺑ ﻰﻟﻭﻷﺍ ﺓﺮﻤﻟﺍ ﻮﻣﺪﺨﺘﺴﻣ ﻡﻮﻘﻳ
ﻩﺎﻧﺩﺃ ﺓﺎﺷﺮﻔﻟﺎﺑ ﻒﻴﻈﻨﺘﻟﺍ ﺕﺎﻤﻴﻠﻌﺗ ﻉﺎﺒﺗﺍ ﻰﺟﺮﹹﻳ .ﻒﻴﻈﻨﺘﻟﺎﺑ ﻚﻟ ﻡﻮﻘﺗ ﻥﺎﻨﺳﻷﺍ
.ﺔﺑﺮﺠﺗ ﻞﻀﻓﺃ ﻰﻠﻋ ﻝﻮﺼﺤﻠﻟ
،Sonicare ﺓﺪﻳﺪﺠﻟﺍ ﺔﻴﺋﺎﺑﺮﻬﻜﻟﺍ ﻥﺎﻨﺳﻷﺍ ﺓﺎﺷﺮﻓ ﻰﻟﺇ ﻝﺎﻘﺘﻧﻻﺍ ﻲﻓ ﻚﺗﺪﻋﺎﺴﻤﻟ
.ﻰﻠﻋﺃ ﺩﺍﺪﻋﺇ ﻰﻟﺇ ﻞﻘﺘﻧﺍ ﻢﺛ ﻦﻴﻋﻮﺒﺳﺃ ﻰﻟﺇ ﻉﻮﺒﺳﺃ ﻝﻭﻷ ﺎﹱﻀﻔﺨﻨﻣ ﺍﹰﺩﺍﺪﻋﺇ ﻡﺪﺨﺘﺳﺍ
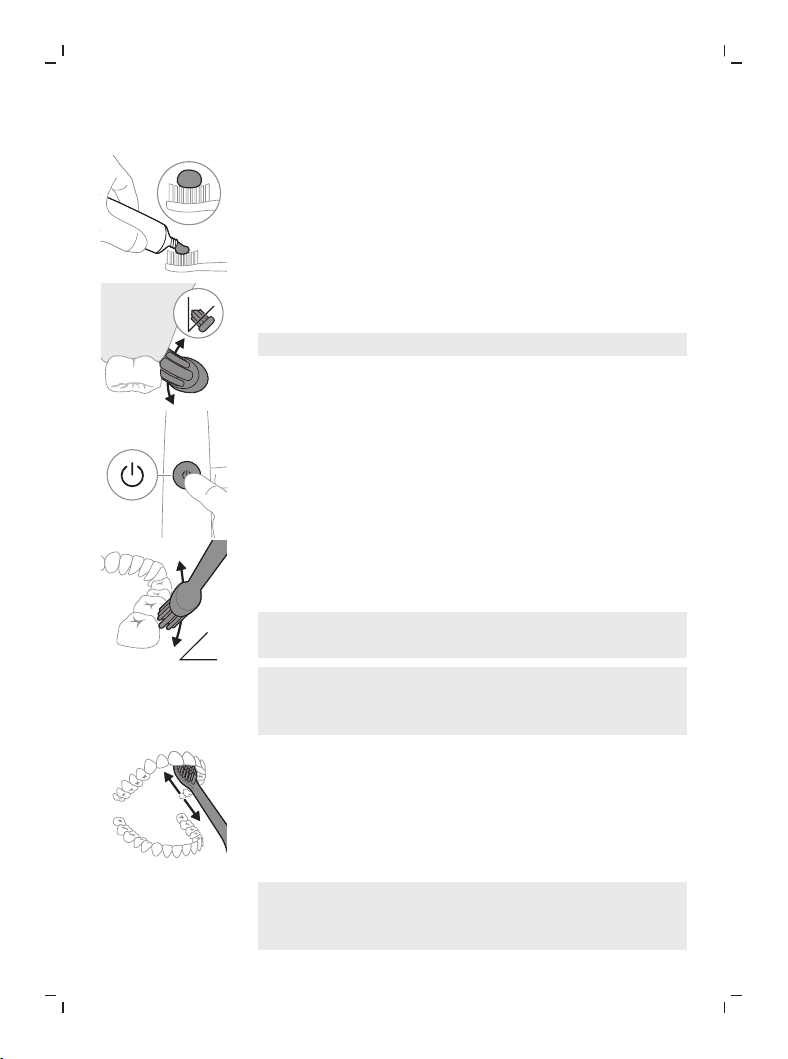
77
ﺔﻴﺑﺮﻌﻟﺍ
ﺶﻳﺮﻔﺘﻟﺍ ﺕﺎﻤﻴﻠﻌﺗ
1
.ﻥﺎﻨﺳﻷﺍ ﻥﻮﺠﻌﻣ ﻦﻣ ﺓﺮﻴﻐﺻ ﺔﻴﻤﻛ ﻊﺿﻭ ﺕﺍﺮﻴﻌﺸﻟﺍ ﻞﻠﺑ
45°
2
.(ﺔﺟﺭﺩ 45) ﺔﻔﻴﻔﻃ ﺔﻳﻭﺍﺰﺑ ﻥﺎﻨﺳﻷﺍ ﻰﻠﻋ ﻥﺎﻨﺳﻷﺍ ﺓﺎﺷﺮﻓ ﺕﺍﺮﻴﻌﺷ ﻊﺿ
.ﹰﻼﻴﻠﻗ ﺔﺜﻠﻟﺍ ﻂﺧ ﻞﻔﺳﺃ ﻭﺃ ﺔﺜﻠﻟﺍ ﻂﺧ ﻰﻟﺇ ﻞﺼﺗ ﺕﺍﺮﻴﻌﺸﻟﺍ ﻞﻌﺠﻟ ﺓﻮﻘﺑ ﻂﻐﻀﻟﺍ
.ﺖﻗﻮﻟﺍ ﻝﺍﻮﻃ ﻥﺎﻨﺳﻷﺎﺑ ﹰﻼﺼﺘﻣ ﺓﺎﺷﺮﻔﻟﺍ ﺰﻛﺮﻣ ﻰﻠﻋ ﻆﻓﺎﺣ :ﺔﻈﺣﻼﻣ
3
Philips ﻥﺎﻨﺳﺃ ﺓﺎﺷﺮﻓ ﻞﻴﻐﺸﺘﻟ ﻞﻴﻐﺸﺘﻟﺍ ﻑﺎﻘﻳﺇ/ﻞﻴﻐﺸﺘﻟﺍ ﺭﺯ ﻰﻠﻋ ﻂﻐﺿﺍ
.Sonicare
45°
4
ﻚﻧﺎﻨﺳﺃ ﺶﻳﺮﻔﺘﺑ ﻢﻗ .ﻒﻄﻠﺑ ﺔﺜﻠﻟﺍﻭ ﻥﺎﻨﺳﻷﺍ ﻰﻠﻋ ﺕﺍﺮﻴﻌﺸﻟﺍ ﻊﺿﻭ ﻰﻠﻋ ﻆﻓﺎﺣ
ﺎﻤﻟ ﺕﺍﺮﻴﻌﺸﻟﺍ ﻞﺼﺗ ﻰﺘﺣ ﺎﹱﺑﺎﻳﺇﻭ ﺎﹱﺑﺎﻫﺫ ﺓﺮﻴﻐﺻ ﺔﻛﺮﺤﺑ ﻚﻳﺮﺤﺘﻟﺍ ﻖﻳﺮﻃ ﻦﻋ
.ﺶﻳﺮﻔﺘﻟﺍ ﺓﺭﻭﺩ ﻝﺍﻮﻃ ﺔﻛﺮﺤﻟﺍ ﻩﺬﻫ ﺬﻴﻔﻨﺗ ﻲﻓ ﺮﻤﺘﺳﺍ .ﻥﺎﻨﺳﻷﺍ ﻦﻴﺑ
ﻞﻌﻔﺗ ﺎﻤﻛ ﻙﺮﻔﻟﺎﺑ ﺢﺼﻨﻳ ﻻ .ﹰﻼﻴﻠﻗ ﺕﺍﺮﻴﻌﺸﻟﺍ ﺞﻫﻮﺘﺗ ﻥﺃ ﺐﺠﻳ :ﺔﻈﺣﻼﻣ
.ﺔﻳﻭﺪﻴﻟﺍ ﻥﺎﻨﺳﻷﺍ ﺓﺎﺷﺮﻔﺑ
ﻝﻼﺧ ﻦﻣ ﻚﻬﻴﺒﻨﺗ ﻢﺘﻴﺴﻓ ،ﻡﺯﻼﻟﺍ ﻦﻣ ﺮﺜﻛﺃ ﺓﺎﺷﺮﻔﻟﺍ ﻰﻠﻋ ﻂﻐﺿ ﺍﺫﺇ :ﺔﻈﺣﻼﻣ
ﻥﻮﻠﻟﺎﺑ ﺓﺎﺷﺮﻔﻟﺍ ﺱﺃﺭ ﻝﺍﺪﺒﺘﺳﺍ ﺮﻴﻛﺬﺗ ﺾﻴﻣﻭﻭ ﺾﺒﻘﻤﻟﺍ ﺯﺍﺰﺘﻫﺍ ﻲﻓ ﺮﻴﻴﻐﺗ
.ﻲﻧﺎﻣﺮﻬﻜﻟﺍ
5
ﺓﺎﺷﺮﻔﻟﺍ ﺾﺒﻘﻣ ﺔﻟﺎﻣﺈﺑ ﻢﻗ ،ﺔﻴﻣﺎﻣﻷﺍ ﻥﺎﻨﺳﻸﻟ ﺔﻴﻠﺧﺍﺪﻟﺍ ﺢﻄﺳﻷﺍ ﻒﻴﻈﻨﺘﻟ
.ﹼﻦﹻﺳ ﻞﻛ ﻕﻮﻓ ﺕﺍﺮﻣ ﺓﺪﻋ ﺎﹱﻳﺩﻮﻤﻋ ﻚﻳﺮﺤﺘﻟﺎﺑ ﻢﻗﻭ ﻱﺩﻮﻤﻋ ﻪﺒﺷ ﻞﻜﺸﺑ
6
ﻲﻓ ﻲﻓﺎﺿﺇ ﺖﻗﻭ ءﺎﻀﻗ ﻚﻨﻜﻤﻳ ،ﺓﺎﺷﺮﻔﻟﺎﺑ ﻒﻴﻈﻨﺘﻟﺍ ﺓﺭﻭﺩ ﻦﻣ ءﺎﻬﺘﻧﻻﺍ ﺪﻌﺑ
ﻚﻨﻜﻤﻳ .ﻥﻮﻠﺗ ﺎﻬﻴﻓ ﺙﺪﺤﻳ ﻲﺘﻟﺍ ﻖﻃﺎﻨﻤﻟﺍﻭ ﻚﻧﺎﻨﺳﻷ ﻎﻀﻤﻟﺍ ﺢﻄﺳﺃ ﻒﻴﻈﻨﺗ
،ﺔﻔﻗﻮﺘﻣ ﻭﺃ ﻞﻴﻐﺸﺘﻟﺍ ﺪﻴﻗ ﻥﺎﻨﺳﻷﺍ ﺓﺎﺷﺮﻓ ﺖﻧﺎﻛ ءﺍﻮﺳ ،ﻚﻧﺎﺴﻟ ﺶﻳﺮﻔﺗ ﺎﹱﻀﻳﺃ
.ﻞﻀﻔﹹﺗ ﺎﻤﻛ
ﺔﻨﻣﺁ ﻚﺑ ﺔﺻﺎﺨﻟﺍ Philips Sonicare ﻥﺎﻨﺳﺃ ﺓﺎﺷﺮﻓ ﻥﻮﻜﺗ ﻥﺃ ﺐﺠﻳ :ﺔﻈﺣﻼﻣ
ﺎﻬﻣﺍﺪﺨﺘﺳﺍ ﺪﻨﻋ ﺍﹰﺮﻜﺒﻣ ﺓﺎﺷﺮﻔﻟﺍ ﺱﻭﺅﺭ ﻞﻛﺂﺘﺗ) ﻥﺎﻨﺳﻷﺍ ﻢﻳﻮﻘﺗ ﻰﻠﻋ ﻡﺍﺪﺨﺘﺳﻼﻟ
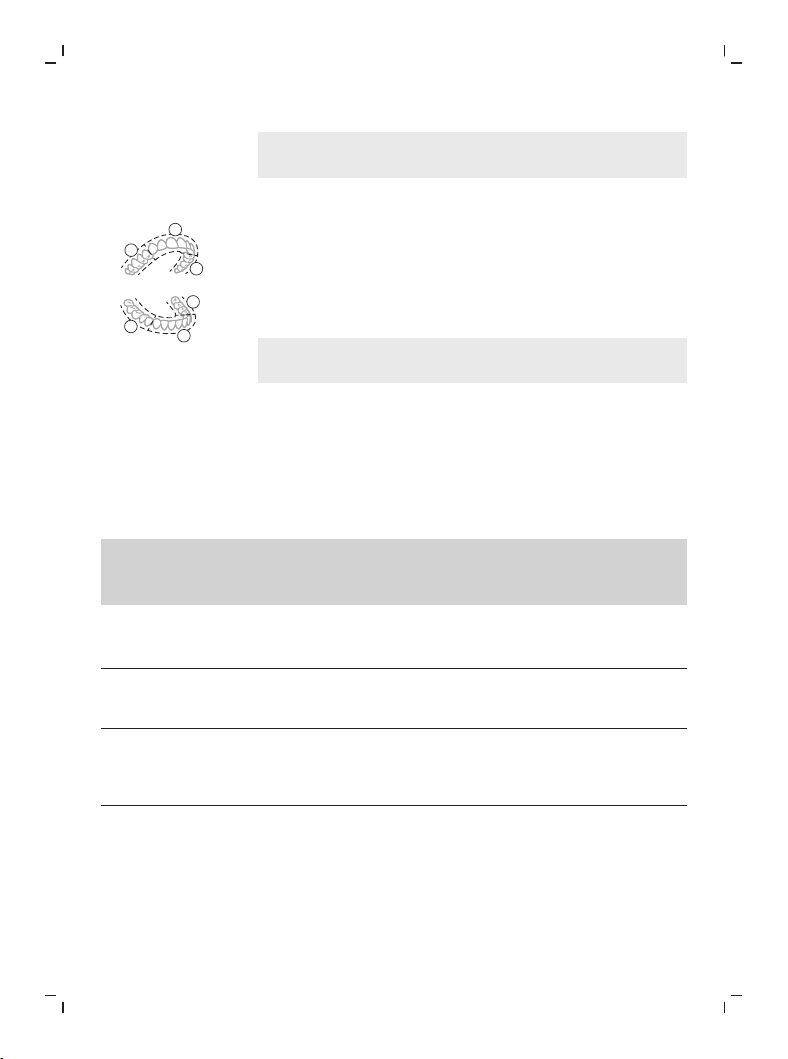
78
ﺔﻴﺑﺮﻌﻟﺍ
ﻢﺗ ﺍﺫﺇ (ﺕﺎﺴﻴﺒﻠﺘﻟﺍﻭ ،ﻥﺎﺠﻴﺘﻟﺍﻭ ،ﻁﺍﻮﺸﺤﻟﺍ) ﻥﺎﻨﺳﻷﺍ ﻢﻴﻣﺮﺗﻭ (ﻥﺎﻨﺳﻷﺍ ﻢﻳﻮﻘﺗ ﻰﻠﻋ
.ﻲﻠﺒﻠﻟ ﺽﺮﻌﺘﺗ ﻢﻟﻭ ﺢﻴﺤﺻ ﻞﻜﺸﺑ ﺎﻬﺘﻴﺒﺜﺗ
BrushPacer
1
2
3
4
5
6
6 ﻰﻟﺇ ﻚﻤﻓ ﻢﹽﺴﻗ ،ﻢﻔﻟﺍ ءﺎﺤﻧﺃ ﻊﻴﻤﺟ ﻲﻓ ﻱﻭﺎﺴﺘﻟﺎﺑ ﻚﻧﺎﻨﺳﺃ ﺶﻳﺮﻔﺗ ﻦﻣ ﺪﻛﺄﺘﻠﻟ
ﻒﻴﻈﻨﺘﻟﺍ ﺖﻗﻭ BrushPacer ﻢﺴﻘﻳ .BrushPacer ﺓﺰﻴﻣ ﻡﺍﺪﺨﺘﺳﺎﺑ ﻡﺎﺴﻗﺃ
ﻰﻟﺇ ﻪﻴﻓ ﻞﻘﺘﻨﺗ ﻥﺃ ﺐﺠﻳ ﻱﺬﻟﺍ ﺖﻗﻮﻟﺍ ﻰﻟﺇ ﺮﻴﺸﻳﻭ ﺔﻳﻭﺎﺴﺘﻣ ءﺍﺰﺟﺃ 6 ﻰﻟﺇ ﺓﺎﺷﺮﻔﻟﺎﺑ
ﺓﺎﺷﺮﻓ ﻒﻗﻮﺘﺗ .ﺯﺍﺰﺘﻫﻻﺍ ﻲﻓ ﺮﻴﺼﻗ ﻒﻗﻮﺘﺑ ءﺍﺰﺟﻷﺍ ﻰﻟﺇ ﺭﺎﺸﹹﻳ .ﺔﻴﻟﺎﺘﻟﺍ ﺔﻘﻄﻨﻤﻟﺍ
.ﺓﺎﺷﺮﻔﻟﺎﺑ ﻒﻴﻈﻨﺘﻟﺍ ﺔﺴﻠﺟ ﺔﻳﺎﻬﻧ ﻲﻓ ﺎﹱﻴﺋﺎﻘﻠﺗ ﻥﺎﻨﺳﻷﺍ
ﻊﺿﻭ ﻭﺃ White+ ﻊﺿﻮﻟﺍ ﻡﺍﺪﺨﺘﺳﺍ ﺪﻨﻋ ﺔﻴﻓﺎﺿﺇ ءﺍﺰﺟﺃ ﺔﻓﺎﺿﺇ ﻦﻜﻤﻳ :ﺔﻈﺣﻼﻣ
.Gum Health
ﻉﺎﺿﻭﻷﺍ
White+ﻭ Clean :ﺔﻔﻠﺘﺨﻣ ﻉﺎﺿﻭﺃ ﺔﻌﺑﺭﺄﺑ ﺓﺩﻭﺰﻣ ﺔﻴﺋﺎﺑﺮﻬﻜﻟﺍ ﻥﺎﻨﺳﻷﺍ ﺓﺎﺷﺮﻓ
ﻱﺬﻟﺍ ﻲﻛﺬﻟﺍ ﺓﺎﺷﺮﻔﻟﺍ ﺱﺃﺭ ﻰﻠﻋ ﹰءﺎﻨﺑ .Deep Clean+ﻭ Gum Healthﻭ
ﺔﻴﻨﻘﺗ ﺔﻄﺳﺍﻮﺑ ﺎﹱﻴﺋﺎﻘﻠﺗ ﻞﺜﻣﻷﺍ ﻮﺤﻨﻟﺍ ﻰﻠﻋ ﺓﺪﺸﻟﺍﻭ ﻊﺿﻮﻟﺍ ﺪﻳﺪﺤﺗ ﻢﺘﻴﺳ ،ﻪﻣﺪﺨﺘﺴﺗ
ﻞﻴﻐﺸﺗ ﻑﺎﻘﻳﺇ ءﺎﻨﺛﺃ ﺓﺪﺸﻟﺍ/ﻊﺿﻮﻟﺍ ﺭﺯ ﻰﻠﻋ ﻂﻐﺿﺍ ،ﻉﺎﺿﻭﻷﺍ ﺮﻴﻴﻐﺘﻟ .BrushSync
.ﺾﺒﻘﻤﻟﺍ
Gum health White+ Deep ﻭ Clean
Clean+
ﻚﻴﻟﺪﺗﻭ ﺕﺎﺒﺳﺮﺘﻟﺍ ﺔﻟﺍﺯﺇ
ﺔﺜﻠﻟﺍ
ﻊﻘﺒﻟﺍﻭ ﺕﺎﺒﺳﺮﺘﻟﺍ ﺔﻟﺍﺯﺇ
ﺔﻴﺤﻄﺴﻟﺍ
ﺕﺎﺒﺳﺮﺘﻟﺍ ﺔﻟﺍﺯﺇ
ﺎﻳﺍﺰﻤﻟﺍ
ﺔﻌﻔﺗﺮﻣ ﺔﻌﻔﺗﺮﻣ ﺔﻌﻔﺗﺮﻣ
ﺕﺎﻴﺻﻮﺘﻟﺍ
ﺓﺪﺸﻟﺍ ﻯﻮﺘﺴﻣ
ﺔﻴﻧﺎﺛ 20ﻭ ﻖﺋﺎﻗﺩ 3 ﺔﻴﻧﺎﺛ 40ﻭ ﻥﺎﺘﻘﻴﻗﺩ ﻥﺎﺘﻘﻴﻗﺩ :ﻒﻴﻈﻨﺘﻟﺍ
Deep Clean+: 3
ﻖﺋﺎﻗﺩ
ﻒﻴﻈﻨﺘﻟﺍ ﺖﻗﻭ ﻲﻟﺎﻤﺟﺇ
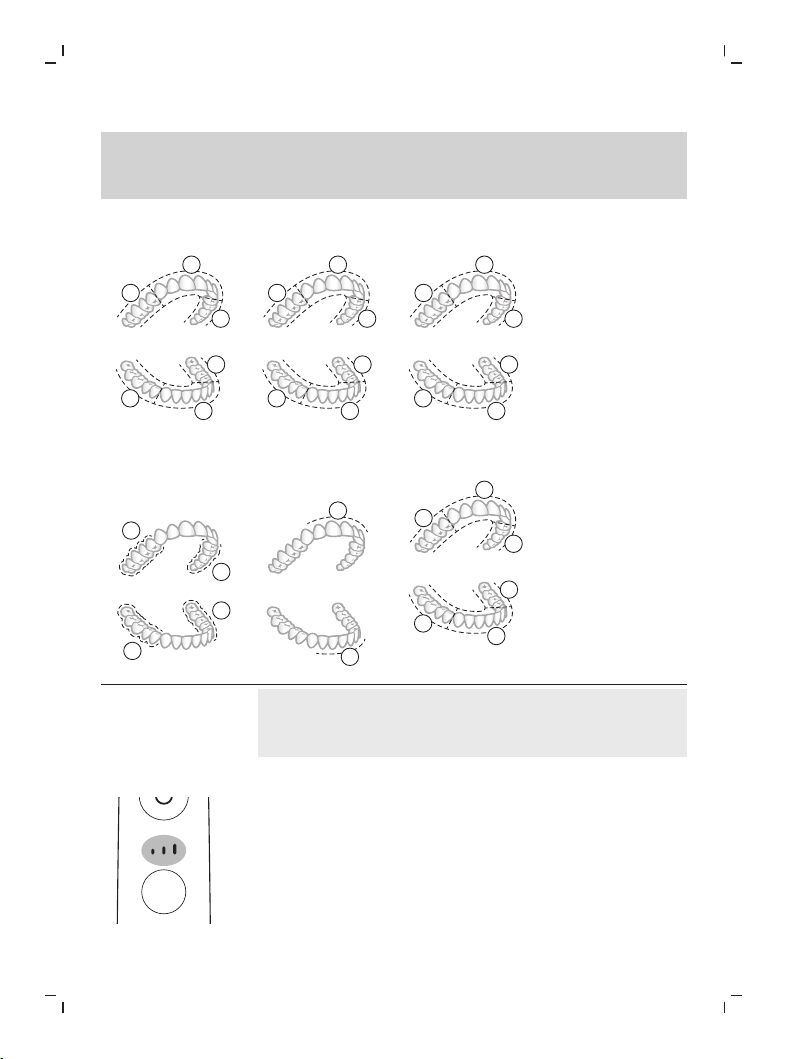
79
ﺔﻴﺑﺮﻌﻟﺍ
Gum health White+ Deep ﻭ Clean
Clean+
20 ﺓﺪﻤﻟ ءﺰﺟ ﻞﻛ ﻒﻴﻈﻨﺗ
،ﺔﻴﻧﺎﺛ
1
2
3
4
5
6
8ﻭ 7 ءﺰﺠﻟﺍ ﻒﻴﻈﻨﺗ ﻢﺛ
ﺔﻴﻧﺎﺛ 20 ﺓﺪﻤﻟ 10ﻭ 9ﻭ
ﻢﻬﻨﻣ ﹴﻞﻜﻟ
7
8
10
9
20 ﺓﺪﻤﻟ ءﺰﺟ ﻞﻛ ﻒﻴﻈﻨﺗ
،ﺔﻴﻧﺎﺛ
1
2
3
4
5
6
8ﻭ 7 ءﺰﺠﻟﺍ ﻒﻴﻈﻨﺗ ﻢﺛ
ﹴﻞﻜﻟ ﺔﻴﻧﺎﺛ 20 ﺓﺪﻤﻟ
ﺎﻤﻬﻨﻣ
7
8
ﻞﻛ ﻒﻴﻈﻨﺗ :ﻒﻴﻈﻨﺘﻟﺍ
ﺔﻴﻧﺎﺛ 20 ﺓﺪﻤﻟ ءﺰﺟ
1
2
3
4
5
6
ﻒﻴﻈﻨﺗ :Deep Clean+
*ﺔﻴﻧﺎﺛ 30 ﺓﺪﻤﻟ ءﺰﺟ ﻞﻛ
1
2
3
4
5
6
ﻒﻴﻈﻨﺘﻟﺍ ﺔﻴﻔﻴﻛ
Deep" ﻊﺿﻭ ﻲﻓ Philips Sonicare ﻖﻴﺒﻄﺘﺑ ﻥﺎﻨﺳﻷﺍ ﻒﻴﻈﻨﺗ ﺪﻨﻋ :ﺔﻈﺣﻼﻣ
ﺪﻨﻋ ﻖﺋﺎﻗﺩ 3ﻭ ﻖﻴﺒﻄﺘﻟﺎﺑ ﻝﺎﺼﺗﻻﺍ ﺪﻨﻋ ﻦﻴﺘﻘﻴﻗﺩ ﻒﻴﻈﻨﺘﻟﺍ ﺖﻗﻭ ﻥﻮﻜﻴﺳ ،"Clean+
.ﻖﻴﺒﻄﺘﻟﺎﺑ ﻝﺎﺼﺗﻻﺍ ﻡﺪﻋ
ﺓﺪﺸﻟﺍ ﺕﺎﺟﺭﺩ
:ﺓﺪﺸﻠﻟ ﺔﻔﻠﺘﺨﻣ ﺕﺍﺩﺍﺪﻋﺇ ﺔﺛﻼﺜﺑ ﻚﺑ ﺔﺻﺎﺨﻟﺍ ﺔﻴﺋﺎﺑﺮﻬﻜﻟﺍ ﻥﺎﻨﺳﻷﺍ ﺓﺎﺷﺮﻓ ﻲﺗﺄﺗ
-(ﺪﺣﺍﻭ ﻂﻳﺮﺷ) ﺔﻀﻔﺨﻨﻣ ﺓﺪﺷ
-(ﻥﺎﻄﻳﺮﺷ) ﺔﻄﺳﻮﺘﻣ ﺓﺪﺷ
-(ﺔﻃﺮﺷﺃ ﺔﺛﻼﺛ) ﺔﻴﻟﺎﻋ ﺓﺪﺷ
.ﺎﹱﻴﺋﺎﻘﻠﺗ ﺎﻬﺑ ﻰﺻﻮﻤﻟﺍ ﺓﺪﺸﻟﺍ ﺔﻴﻛﺬﻟﺍ ﺓﺎﺷﺮﻔﻟﺍ ﺱﺃﺭ ﺩﺪﺤﺗ ،ﺾﺒﻘﻤﻟﺎﺑ ﺎﻬﻠﻴﺻﻮﺗ ﺪﻨﻋ
ﻂﻐﻀﻟﺎﺑ ﻚﻟﺬﺑ ﻡﺎﻴﻘﻟﺍ ﻚﻨﻜﻤﻳ ،ﻒﻠﺘﺨﻣ ﻯﻮﺘﺴﻤﻟ ﺓﺪﺸﻟﺍ ﺮﻴﻴﻐﺗ ﻲﻓ ﺐﻏﺮﺗ ﺖﻨﻛ ﺍﺫﺇ
.ﺶﻳﺮﻔﺘﻟﺍ ءﺎﻨﺛﺃ ﺓﺪﺸﻟﺍ/ﻊﺿﻮﻟﺍ ﺭﺎﻴﺘﺧﺍ ﺭﺯ ﻰﻠﻋ
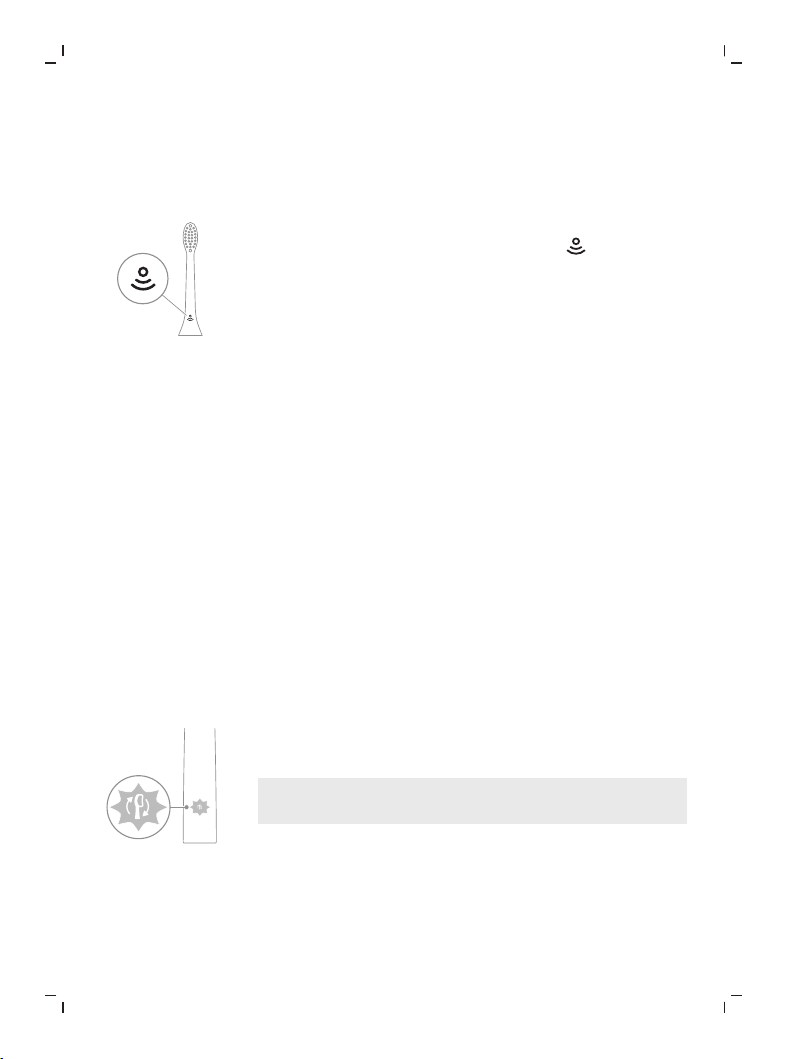
80
ﺔﻴﺑﺮﻌﻟﺍ
ﻦﻋ ﻒﻗﻮﺘﻣ ﻭﺃ ﻞﻴﻐﺸﺘﻟﺍ ﻑﺎﻘﻳﺇ ﻊﺿﻭ ﻲﻓ ﺾﺒﻘﻤﻟﺍ ﻥﺃ ﺎﻤﻟﺎﻃ ﺓﺪﺸﻟﺍ ﺮﻴﻴﻐﺗ ﻦﻜﻤﻳ ﻻ
.ﹰﺎﺘﻗﺆﻣ ﻞﻴﻐﺸﺘﻟﺍ
BrushSync ﺔﻴﻨﻘﺗ
ﺔﻗﺎﻗﺭ ﻡﺍﺪﺨﺘﺳﺎﺑ ﻚﻀﺒﻘﻤﺑ ﻝﺎﺼﺗﻻﺍ ﺓﺎﺷﺮﻔﻟﺍ ﺱﺃﺮﻟ BrushSync ﺔﻴﻨﻘﺗ ﺢﻴﺘﺗ
ﺩﻭﺰﻣ ﺓﺎﺷﺮﻔﻟﺍ ﺱﺃﺭ ﻥﺃ ﻰﻟﺇ ﺓﺎﺷﺮﻔﻟﺍ ﺱﺃﺭ ﻞﻔﺳﺃ ﺩﻮﺟﻮﻤﻟﺍ ﺰﻣﺮﻟﺍ ﺮﻴﺸﻳ .ﺔﻘﻴﻗﺩ
.ﺔﻴﻨﻘﺘﻟﺍ ﻩﺬﻬﺑ
:BrushSync ﺔﻴﻨﻘﺗ ﺢﻴﺘﺗ
-ﺓﺎﺷﺮﻔﻟﺍ ﺱﺃﺭ ﻝﺍﺪﺒﺘﺳﺎﺑ ﺮﻴﻛﺬﺗ
-BrushSync ﻊﺿﻭ ﺓﺪﺸﻟﺍ ﻥﺍﺮﻗﺇ
ﺓﺩﹼﻭﺰﻤﻟﺍ ﺔﻴﻛﺬﻟﺍ ﺓﺎﺷﺮﻔﻟﺍ ﺱﻭﺅﺭ ﻦﻣ ﺓﺮﻴﺒﻛ ﺔﻋﻮﻤﺠﻣ Philips Sonicare ﻡﹼﺪﻘﺗ
،ﻥﺎﻨﺳﻷﺍ ﺓﺎﺷﺮﻓ ﺱﻭﺅﺭ ﻦﻣ ﺔﻠﻣﺎﻜﻟﺍ ﺎﻨﺘﻋﻮﻤﺠﻣ ﻑﺎﺸﻜﺘﺳﻻ .BrushSync ﺔﻴﻨﻘﺘﺑ
ﻰﻟﺇ ﻞﻘﺘﻧﺍ ،ﻚﻟ ﻞﻀﻓﻷﺍ ﺓﺎﺷﺮﻔﻟﺍ ﺱﺃﺭ ﻰﻠﻋ ﺭﻮﺜﻌﻟﺍﻭ
ﻦﻣ ﺪﻳﺰﻣ ﻰﻠﻋ ﻝﻮﺼﺤﻠﻟ www.philips.com/toothbrush-heads
.ﺕﺎﻣﻮﻠﻌﻤﻟﺍ
ﺕﺍﺰﻴﻤﻟﺍ
-ﻂﻐﻀﻟﺍ ﺮﻌﺸﺘﺴﻤﻟ ﺔﺑﺎﺠﺘﺳﻻﺍ
-BrushPacer
-SmarTimer
-EasyStart
-ﺓﺎﺷﺮﻔﻟﺍ ﺱﺃﺭ ﻝﺍﺪﺒﺘﺳﺍ ﺮﻴﻛﺬﺗ
-ﺓﺎﺷﺮﻔﻟﺍ ﺱﺃﺭ ﻊﺿﻭ ﻥﺍﺮﺘﻗﺍ
ﻂﻐﻀﻟﺍ ﺮﻌﺸﺘﺴﻤﻟ ﺔﺑﺎﺠﺘﺳﻻﺍ
ﺔﻳﺎﻤﺤﻟ ،ﻒﻴﻈﻨﺘﻟﺍ ءﺎﻨﺛﺃ ﻪﻘﺒﻄﺗ ﻱﺬﻟﺍ ﻂﻐﻀﻟﺍ Sonicare ﻥﺎﻨﺳﺃ ﺓﺎﺷﺮﻓ ﺲﻴﻘﺗ
.ﻒﻠﺘﻟﺍ ﻦﻣ ﻚﻧﺎﻨﺳﺃﻭ ﻚﺘﺜﻟ
ﺔﻧﻮﻘﻳﺃ ﺾﻣﻮﺗﻭ ﻩﺯﺍﺰﺘﻫﺍ ﺮﹽﻴﻐﻳ ﺾﺒﻘﻤﻟﺍ ﻥﺈﻓ ،ﺪﺋﺍﺯ ﻞﻜﺸﺑ ﻂﻐﻀﻟﺎﺑ ﺖﻤﻗ ﺍﺫﺇ
.ﻂﻐﻀﻟﺍ ﻒﻴﻔﺨﺘﺑ ﻡﻮﻘﺗ ﻰﺘﺣ ﻲﻧﺎﻣﺮﻬﻜﻟﺍ ﻥﻮﻠﻟﺎﺑ ﺓﺎﺷﺮﻔﻟﺍ ﺱﺃﺭ ﻝﺍﺪﺒﺘﺳﺎﺑ ﺮﻴﻛﺬﺘﻟﺍ
ﺓﺰﻴﻤﻟﺍ ﻩﺬﻫ ﻞﻴﻄﻌﺘﻟ .ﺎﹱﻄﹽﺸﻨﻣ ﻂﻐﺿ ﺮﻌﺸﺘﺴﻤﺑ ﺍﹰﺩﻭﺰﻣ ﻚﺠﺘﻨﻣ ﻲﺗﺄﻳ :ﺔﻈﺣﻼﻣ
.('ﺕﺍﺰﻴﻤﻟﺍ ﻂﻴﺸﻨﺗ ءﺎﻐﻟﺃ ﻭﺃ ﻂﻴﺸﻨﺗ' ﺮﻈﻧﺍ)
BrushPacer
ﻢﻔﻟﺍ ﻒﻴﻈﻨﺗ ﻰﻠﻋ ﻙﺪﻋﺎﺴﻳ ﻲﻨﻣﺯ ﺖﻗﺆﻣ ﻦﻋ ﺓﺭﺎﺒﻋ ﻲﻫ BrushPacer ﺓﺰﻴﻣ
.ﻡﺎﺴﻗﺃ 6 ﻰﻟﺇ ﻢﻔﻟﺍ ﻢﻴﺴﻘﺗ ﻖﻳﺮﻃ ﻦﻋ ﻱﻭﺎﺴﺘﻟﺎﺑ

81
ﺔﻴﺑﺮﻌﻟﺍ
SmarTimer
ﻑﺎﻘﻳﺇ ﻖﻳﺮﻃ ﻦﻋ ﺖﻠﻤﺘﻛﺍ ﺪﻗ ﺓﺎﺷﺮﻔﻟﺎﺑ ﻒﻴﻈﻨﺘﻟﺍ ﺓﺭﻭﺩ ﻥﺃ ﻰﻟﺇ SmarTimer ﺮﻴﺸﻳ
.ﺓﺎﺷﺮﻔﻟﺎﺑ ﻒﻴﻈﻨﺘﻟﺍ ﺓﺭﻭﺩ ﺔﻳﺎﻬﻧ ﻲﻓ ﺎﹱﻴﺋﺎﻘﻠﺗ ﻥﺎﻨﺳﻷﺍ ﺓﺎﺷﺮﻓ ﻞﻴﻐﺸﺗ
ﻦﻴﺘﻘﻴﻗﺩ ﻦﻋ ﻞﻘﺗ ﻻ ﺓﺪﻤﻟ ﺓﺎﺷﺮﻔﻟﺎﺑ ﻥﺎﻨﺳﻷﺍ ﻒﻴﻈﻨﺘﺑ ﻥﺎﻨﺳﻷﺍ ﻮﻴﺋﺎﺼﺧﺃ ﺢﺼﻨﻳ
.ﻡﻮﻴﻟﺍ ﻲﻓ ﻦﻴﺗﺮﻣ
،ﺓﺎﺷﺮﻔﻟﺎﺑ ﻒﻴﻈﻨﺘﻟﺍ ﺓﺭﻭﺩ ءﺪﺑ ﺪﻌﺑ ﻑﺎﻘﻳﻹﺍ/ﻞﻴﻐﺸﺘﻟﺍ ﺭﺯ ﻰﻠﻋ ﺖﻄﻐﺿ ﺍﺫﺇ :ﺔﻈﺣﻼﻣ
ﻂﺒﺿ ﺓﺩﺎﻋﺇ ﻢﺘﺗ ،ﺔﻴﻧﺎﺛ 30 ﺓﺪﻤﻟ ﺖﻗﺆﻣ ﻒﻗﻮﺗ ﺪﻌﺑ .ﺎﹱﺘﻗﺆﻣ ﻥﺎﻨﺳﻷﺍ ﺓﺎﺷﺮﻓ ﻒﻗﻮﺘﺗ
.SmarTimer
EasyStart
('ﺕﺍﺰﻴﻤﻟﺍ ﻂﻴﺸﻨﺗ ءﺎﻐﻟﺃ ﻭﺃ ﻂﻴﺸﻨﺗ' ﺮﻈﻧﺍ) .EasyStart ﻂﻴﺸﻨﺘﻟ :ﺔﻈﺣﻼﻣ
.EasyStart ﺓﺰﻴﻣ ﻂﻴﺸﻨﺗ ءﺎﻐﻟﺇ ﻊﻣ Philips Sonicare ﻦﻣ ﺯﺍﺮﻄﻟﺍ ﺍﺬﻫ ﻲﺗﺄﻳ
ﻚﺗﺪﻋﺎﺴﻤﻟ ﺓﺎﺷﺮﻓ 14 ﻝﻭﺃ ﻰﻠﻋ ﻒﻄﻠﺑ ﺔﻗﺎﻄﻟﺍ ﺓﺩﺎﻳﺯ ﻰﻠﻋ EasyStart ﺓﺰﻴﻣ ﻞﻤﻌﺗ
.Philips Sonicare ﻡﺍﺪﺨﺘﺳﺎﺑ ﻥﺎﻨﺳﻷﺍ ﻒﻴﻈﻨﺗ ﻰﻠﻋ ﺩﻮﻌﺘﻟﺍ ﻰﻠﻋ
.ﺯﺮﻄﻟﺍ ﻊﻴﻤﺟ ﻊﻣ EasyStart ﺓﺰﻴﻣ ﻞﻤﻌﺗ
ﺔﻴﻟﻭﺆﺴﻤﻟﺍ ءﻼﺧﺇ
ﺐﺠﻳ ،ﺔﻳﺮﻳﺮﺴﻟﺍ ﺕﺎﺳﺍﺭﺪﻟﺍ ﻲﻓ Philips Sonicare ﻥﺎﻨﺳﺃ ﺓﺎﺷﺮﻓ ﻡﺍﺪﺨﺘﺳﺍ ﺪﻨﻋ
ءﺎﻐﻟﺇ ﻢﺘﻳﻭ ﻞﻣﺎﻜﻟﺎﺑ ﺎﹱﻧﻮﺤﺸﻣ ﺾﺒﻘﻤﻟﺍ ﻥﻮﻜﻳ ﻥﺃﻭ ﺔﻴﻟﺎﻋ ﺓﺪﺸﺑ ﺎﻬﻣﺍﺪﺨﺘﺳﺍ ﻢﺘﻳ
.EasyStart ﺓﺰﻴﻣ ﻂﻴﺸﻨﺗ
ﺓﺎﺷﺮﻔﻟﺍ ﺱﺃﺭ ﻝﺍﺪﺒﺘﺳﺍ ﺮﻴﻛﺬﺗ
ﺱﺃﺭ ﻒﻠﺗ ﺐﻘﻌﺘﺗ ﻲﺘﻟﺍ BrushSync ﺔﻴﻨﻘﺘﺑ Philips Sonicare ﺰﻴﻬﺠﺗ ﻢﺗ
.ﺓﺎﺷﺮﻔﻟﺍ
Philips ﻦﻣ ﺔﻴﻛﺬﻟﺍ ﺓﺎﺷﺮﻔﻟﺍ ﺱﻭﺅﺭ ﻊﻣ ﻂﻘﻓ ﺓﺰﻴﻤﻟﺍ ﻩﺬﻫ ﻞﻤﻌﺗ :ﺔﻈﺣﻼﻣ
.BrushSync ﺔﻴﻨﻘﺘﺑ ﺓﺩﻭﺰﻤﻟﺍ Sonicare
1
ﺱﺃﺭ ﻚﻳﺪﻟ ﻥﺃ ﺾﺒﻘﻤﻟﺍ ﻙﺭﺪﻳ ،ﺓﺮﻣ ﻝﻭﻷ ﺪﻳﺪﺟ ﻲﻛﺫ ﺓﺎﺷﺮﻓ ﺱﺃﺭ ﻕﺎﻓﺭﺇ ﺪﻨﻋ
ﺱﺃﺭ ﻞﻛﺂﺗ ﻊﺒﺘﺗ ﻲﻓ ﺃﺪﺒﻳﻭ BrushSync ﺔﻴﻨﻘﺘﺑ Philips ﻦﻣ ﺓﺎﺷﺮﻓ
.ﺓﺎﺷﺮﻔﻟﺍ
2
ﻪﻴﻓ ﻢﺗ ﻱﺬﻟﺍ ﻲﻟﺎﻤﺟﻹﺍ ﺖﻗﻮﻟﺍﻭ ﻪﺳﺭﺎﻤﺗ ﻱﺬﻟﺍ ﻂﻐﻀﻟﺍ ﻰﻠﻋ ﹰءﺎﻨﺑﻭ ،ﺖﻗﻮﻟﺍ ﺭﻭﺮﻤﺑ
ﺖﻗﻮﻟﺍ ﺪﻳﺪﺤﺘﻟ ﺓﺎﺷﺮﻔﻟﺍ ﺱﺃﺭ ﻞﻛﺂﺗ ﺾﺒﻘﻤﻟﺍ ﻊﺒﺘﺘﻳ ،ﺓﺎﺷﺮﻔﻟﺍ ﺱﺃﺭ ﻡﺍﺪﺨﺘﺳﺍ
ﺔﻳﺎﻋﺭﻭ ﻒﻴﻈﻨﺗ ﻞﻀﻓﺃ ﺓﺰﻴﻤﻟﺍ ﻩﺬﻫ ﻦﻤﻀﺗ .ﺓﺎﺷﺮﻔﻟﺍ ﺱﺃﺭ ﻝﺍﺪﺒﺘﺳﻻ ﻞﺜﻣﻷﺍ
.ﻚﻧﺎﻨﺳﻷ
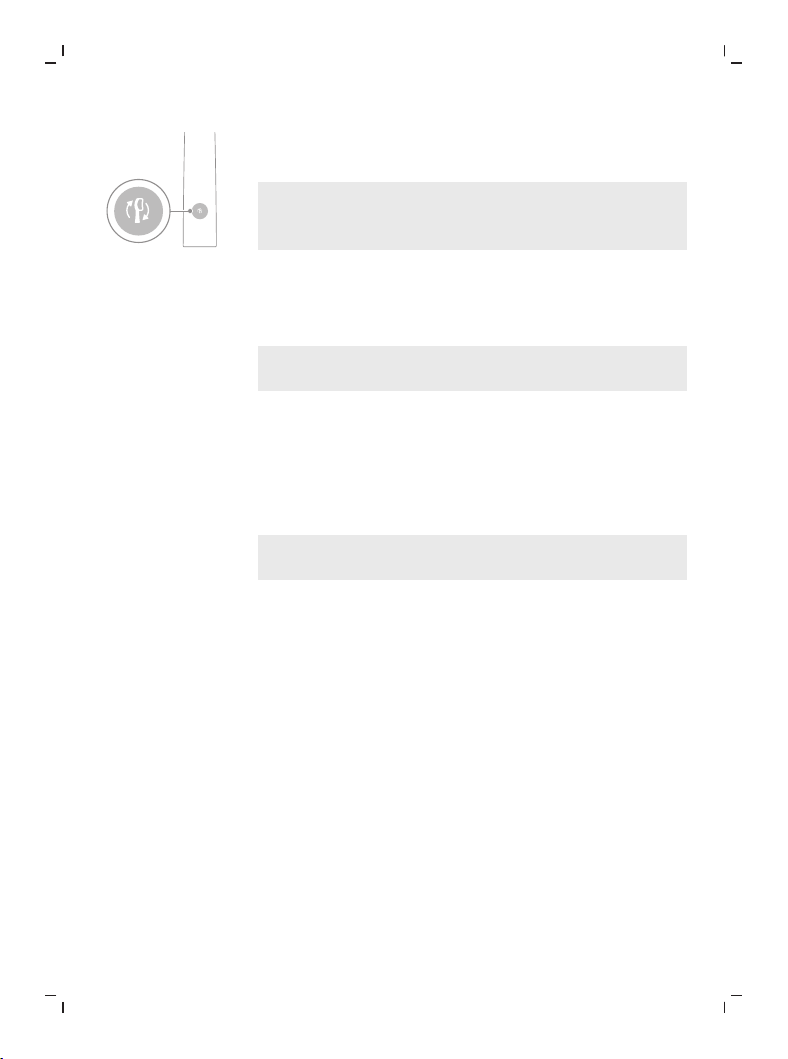
82
ﺔﻴﺑﺮﻌﻟﺍ
3
ﺐﺠﻳ ،ﻲﻧﺎﻣﺮﻬﻜﻟﺍ ﻥﻮﻠﻟﺎﺑ ﺓﺎﺷﺮﻔﻟﺍ ﺱﺃﺭ ﻝﺍﺪﺒﺘﺳﺎﺑ ﺮﻴﻛﺬﺘﻟﺍ ﺮﺷﺆﻣ ءﻲﻀﻳ ﺎﻣﺪﻨﻋ
.ﺓﺎﺷﺮﻔﻟﺍ ﺱﺃﺭ ﻝﺍﺪﺒﺘﺳﺍ ﻚﻴﻠﻋ
ﻝﺍﺪﺒﺘﺳﺎﺑ ﺮﹽﻛﺬﹲﻤﻟﺍ ﻞﻳﺪﺒﺗ ﺓﺰﻴﻣ ﻊﻣ ﺔﻴﻛﺬﻟﺍ ﺓﺎﺷﺮﻔﻟﺍ ﺱﻭﺅﺭ ﻊﻴﻤﺟ ﻲﺗﺄﺗ :ﺔﻈﺣﻼﻣ
ﻂﻴﺸﻨﺗ" ﺮﻈﻧﺍ ،ﺓﺎﺷﺮﻔﻟﺍ ﺱﺃﺭ ﻝﺍﺪﺒﺘﺳﺎﺑ ﺮﻴﻛﺬﺘﻟﺍ ﻂﻴﺸﻨﺗ ءﺎﻐﻟﻹ .ﺓﺎﺷﺮﻔﻟﺍ ﺱﺃﺭ
."ﺎﻬﻄﻴﺸﻨﺗ ءﺎﻐﻟﺇ ﻭﺃ ﺕﺍﺰﻴﻤﻟﺍ
ﺓﺎﺷﺮﻔﻟﺍ ﺱﺃﺭ ﻊﺿﻭ ﻥﺍﺮﺘﻗﺍ
ﺔﻘﻴﻗﺩ ﺔﻴﻧﻭﺮﺘﻜﻟﺇ ﺔﻗﺎﻗﺮﺑ ﺓﺩﻭﺰﻣ BrushSync ﺔﻴﻨﻘﺘﺑ ﺓﺩﻭﺰﻤﻟﺍ ﺓﺎﺷﺮﻔﻟﺍ ﺱﻭﺅﺭ
.ﺓﺪﺸﻟﺍﻭ ﻪﺑ ﻰﺻﻮﻤﻟﺍ ﻊﺿﻮﻟﺍ ﻊﻣ ﺎﹱﻴﺋﺎﻘﻠﺗ ﻥﺮﺘﻘﺗﻭ ﺾﺒﻘﻤﻟﺎﺑ ﻞﺼﺘﺗ
ﺩﺍﺪﻋﺇ ﺮﺧﺁ ﻰﻠﻋ ﺓﺎﺷﺮﻔﻟﺍ ﺱﺃﺭ ﻞﻈﺘﺴﻓ ،ﺓﺪﺸﻟﺍ/ﻉﺎﺿﻭﻷﺍ ﺮﻴﻴﻐﺘﺑ ﺖﻤﻗ ﺍﺫﺇ :ﺔﻈﺣﻼﻣ
.ﻡﺪﺨﺘﺴﻣ
ﺕﺍﺰﻴﻤﻟﺍ ﻂﻴﺸﻨﺗ ءﺎﻐﻟﺃ ﻭﺃ ﻂﻴﺸﻨﺗ
:ﺎﻬﻄﻴﺸﻨﺗ ءﺎﻐﻟﺇ ﻭﺃ ﻚﻧﺎﻨﺳﺃ ﺓﺎﺷﺮﻔﻟ ﺔﻴﻟﺎﺘﻟﺍ ﺕﺍﺰﻴﻤﻟﺍ ﻂﻴﺸﻨﺗ ﻚﻨﻜﻤﻳ
-EasyStart
-ﺓﺎﺷﺮﻔﻟﺍ ﺱﺃﺭ ﻝﺍﺪﺒﺘﺳﺍ ﺮﻴﻛﺬﺗ
-ﻂﻐﻀﻟﺍ ﺮﻌﺸﺘﺴﻤﻟ ﺔﺑﺎﺠﺘﺳﻻﺍ
ﺓﺎﺷﺮﻔﻟﺍ ﺱﺃﺭ ﻝﺍﺪﺒﺘﺳﺎﺑ ﺮﻴﻛﺬﺘﻟﺍ ﻂﻴﺸﻨﺗ ءﺎﻐﻟﺇ ﻭﺃ ﻂﻴﺸﻨﺗ ﻂﻘﻓ ﻚﻨﻜﻤﻳ :ﺔﻈﺣﻼﻣ
.ﺾﺒﻘﻤﻟﺍ ﻰﻠﻋ ﻲﻛﺬﻟﺍ ﺓﺎﺷﺮﻔﻟﺍ ﺱﺃﺭ ﻥﻮﻜﻳ ﺎﻣﺪﻨﻋ
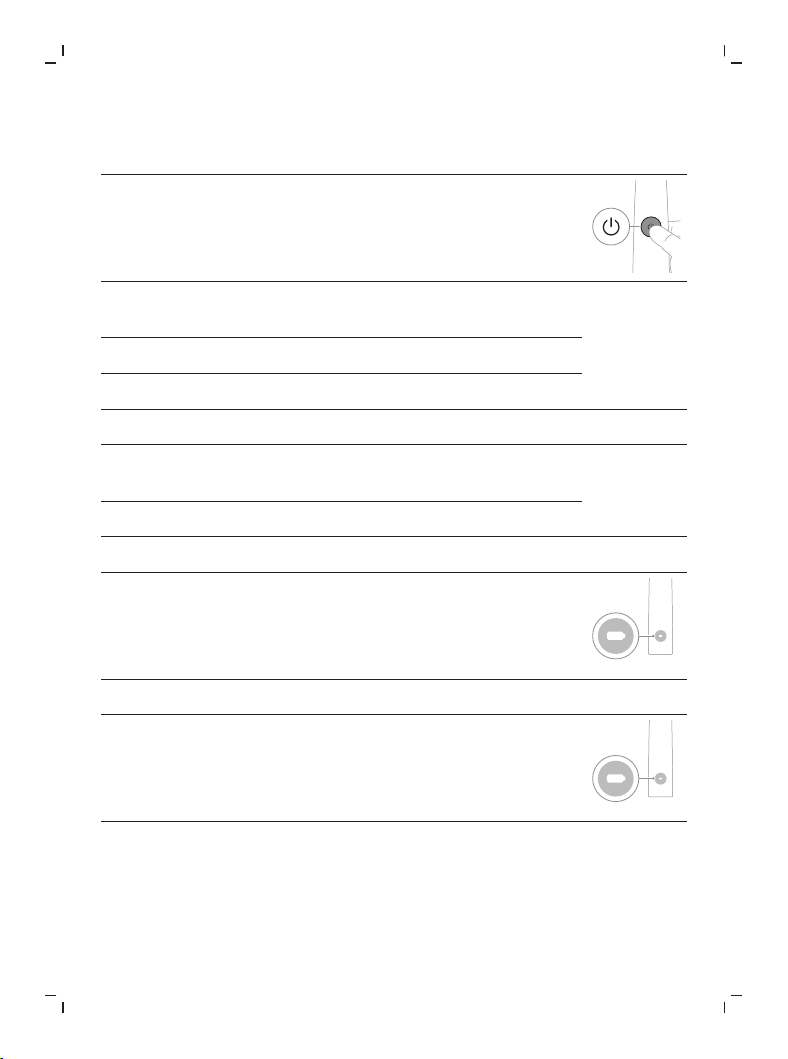
83
ﺔﻴﺑﺮﻌﻟﺍ
.ﻦﺤﺸﻟﺍ ﺏﻮﻛ ﻲﻓ ﻭﺃ ﻦﺤﺸﻟﺍ ﻞﻣﺎﺣ ﻰﻠﻋ ﺾﺒﻘﻤﻟﺍ ﻊﺿ :1 ﺓﻮﻄﺨﻟﺍ
:ﻞﺟﺃ ﻦﻣ ﻞﻴﻐﺸﺗ ﻑﺎﻘﻳﺇ/ﻞﻴﻐﺸﺗ ﺭﺯ ﻰﻠﻋ ﺭﺍﺮﻤﺘﺳﻻﺍ ﻊﻣ ﻂﻐﺿﺍ :2 ﺓﻮﻄﺨﻟﺍ
ﻂﻐﻀﻟﺍ ﺮﻌﺸﺘﺴﻤﻟ ﺔﺑﺎﺠﺘﺳﻻﺍ ﺱﺃﺭ ﻝﺍﺪﺒﺘﺳﺍ ﺮﻴﻛﺬﺗ
ﺓﺎﺷﺮﻔﻟﺍ
ﻂﻴﺴﺒﻟﺍ ءﺪﺒﻟﺍ
ﻥﺍﻮﺛ 7 ﻰﺘﺣ ﻥﺍﻮﺛ 5 ﻰﺘﺣ ﹴﻥﺍﻮﺛ 3
¯ ¯ ¯
:ﻊﻤﺴﺗ ﺎﻣﺪﻨﻋ ﻞﻴﻐﺸﺗ ﻑﺎﻘﻳﺇ/ﻞﻴﻐﺸﺗ ﺭﺯ ﻙﺮﺗﺍ :3 ﺓﻮﻄﺨﻟﺍ
ﺙﻼﺛ ﻢﺛ ﻥﺎﺗﺭﺎﻔﺻﻭ ﺓﺪﺣﺍﻭ ﺓﺭﺎﻔﺻ
ﺕﺍﺭﺎﻔﺻ
ﻢﺛ ﺓﺪﺣﺍﻭ ﺓﺭﺎﻔﺻ
ﻥﺎﺗﺭﺎﻔﺻ
ﺓﺪﺣﺍﻭ ﺓﺭﺎﻔﺻ
¯ ¯ ¯
:ﻊﻣ
ﻢﺗ ﺪﻘﻓ ،ﺔﻌﻔﺗﺮﻣ ﻰﻟﺇ ﺔﻀﻔﺨﻨﻣ ﺕﺍﻮﺻﺃ 3 ﺖﻌﻤﺳﻭ ﻦﻴﺗﺮﻣ ﺾﻣﻮﻳ ﺔﻳﺭﺎﻄﺒﻟﺍ ﺮﺷﺆﻣ ﺖﻳﺃﺭ ﺍﺫﺇ
.ﺓﺰﻴﻤﻟﺍ ﻂﻴﺸﻨﺗ
ﻭﺃ
ﺔﻌﻔﺗﺮﻣ ﺕﺍﻮﺻﺃ 3 ﺖﻌﻤﺳﻭ ﺓﺪﺣﺍﻭ ﺓﺮﻣ ﻲﻧﺎﻣﺮﻬﻜﻟﺍ ﻥﻮﻠﻟﺎﺑ ﺾﻣﻮﻳ ﺔﻳﺭﺎﻄﺒﻟﺍ ﺮﺷﺆﻣ ﺖﻳﺃﺭ ﺍﺫﺇ
.ﺓﺰﻴﻤﻟﺍ ﻂﻴﺸﻨﺗ ءﺎﻐﻟﺇ ﻢﺗ ﻪﻧﺃ ﻲﻨﻌﻳ ﺍﺬﻬﻓ ،ﺔﻀﻔﺨﻨﻣ ﻰﻟﺇ
ﺔﻳﺭﺎﻄﺒﻟﺍ ﺔﻟﺎﺣﻭ ﻦﺤﺸﻟﺍ
ﺔﺴﻠﺟ 28 ﻦﻋ ﻞﻘﻳ ﻻ ﺎﻣ ﺮﻓﻮﺘﻟ Philips Sonicare ﻥﺎﻨﺳﻷﺍ ﺓﺎﺷﺮﻓ ﻢﻴﻤﺼﺗ ﻢﺗ
ﻰﻠﻋ (ﺎﹱﻴﻣﻮﻳ ﻦﻴﺗﺮﻣ ﺎﻬﻣﺍﺪﺨﺘﺳﺍ ﻢﺗ ﺍﺫﺇ ﺎﹱﻣﻮﻳ 14) ﻦﻴﺘﻘﻴﻗﺩ ﺔﺴﻠﺟ ﻞﻛ ﻡﻭﺪﺗ ،ﻒﻴﻈﻨﺗ
ﺔﺴﻠﺟ ﻡﺎﻤﺗﺇ ﺪﻨﻋ ﺔﻳﺭﺎﻄﺒﻟﺍ ﺔﻟﺎﺣ ﺔﻳﺭﺎﻄﺒﻟﺍ ﺮﺷﺆﻣ ﺮﻬﻈﹹﻳ .ﻞﻣﺎﻜﻟﺎﺑ ﺔﻧﻮﺤﺸﻣ ﺔﻳﺭﺎﻄﺑ
.ﻦﺤﺸﻟﺍ ءﺎﻨﺛﺃ ﻭﺃ ،ﺎﹱﺘﻗﺆﻣ ﻥﺎﻨﺳﻷﺍ ﺓﺎﺷﺮﻓ ﻑﺎﻘﻳﺇ ﺪﻨﻋ ﻭﺃ ،ﻦﻴﺘﻘﻴﻗﺩ ﺓﺪﻤﻟ ﻒﻴﻈﻨﺘﻟﺍ
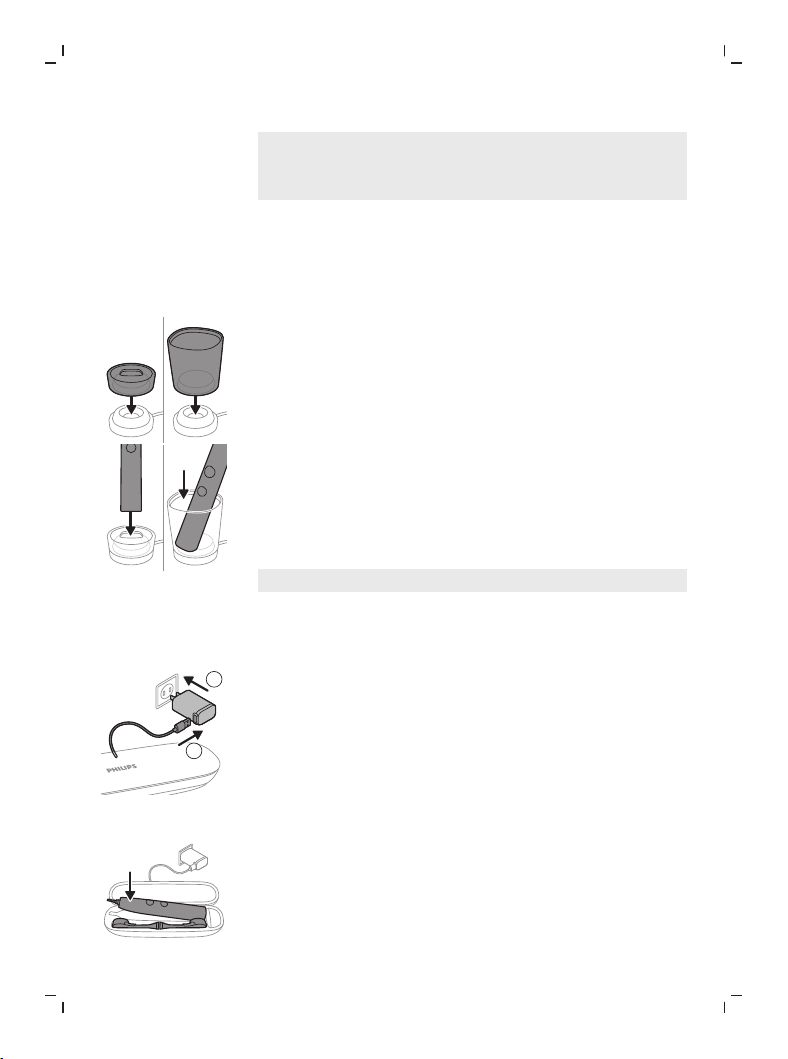
84
ﺔﻴﺑﺮﻌﻟﺍ
ﻝﻭﺃ ﻞﺒﻗ ﺔﻋﺎﺳ 24 ﻰﻟﺇ ﻞﺼﺗ ﺓﺪﻣ ﻞﻣﺎﻜﻟﺎﺑ ﺔﻳﺭﺎﻄﺒﻟﺍ ﻦﺤﺷ ﻕﺮﻐﺘﺴﻳ ﺪﻗ :ﺔﻈﺣﻼﻣ
ﻞﺒﻗ Philips Sonicare ﻥﺎﻨﺳﺃ ﺓﺎﺷﺮﻓ ﻡﺍﺪﺨﺘﺳﺍ ﻚﻨﻜﻤﻳ ﻦﻜﻟﻭ ،ﻡﺍﺪﺨﺘﺳﺍ
.ﻞﻣﺎﻜﻟﺎﺑ ﺎﻬﻨﺤﺷ
ﻦﺤﺸﻟﺍ
ﻦﺤﺸﻟﺍ ﺓﺪﻋﺎﻗ ﻰﻠﻋ ﻦﺤﺸﻟﺍ
1
.ﻲﺋﺎﺑﺮﻬﻛ ﺬﺧﺄﻤﺑ ﻦﺤﺸﻟﺍ ﺓﺪﻋﺎﻗ ﻚﻠﺳ ﻞﻴﺻﻮﺘﺑ ﻢﻗ
2
.ﻦﺤﺸﻟﺍ ﺓﺪﻋﺎﻗ ﻰﻠﻋ ﻦﺤﺸﻟﺍ ﺏﻮﻛ ﻭﺃ ﻦﺤﺸﻟﺍ ﻞﻣﺎﺣ ﻊﺿ
3
.ﻦﺤﺸﻟﺍ ﺏﻮﻛ ﻲﻓ ﻭﺃ ﻦﺤﺸﻟﺍ ﻞﻣﺎﺣ ﻰﻠﻋ ﺾﺒﻘﻤﻟﺍ ﻊﺿ
-ﻰﻟﺇ ﺍﺬﻫ ﺮﻴﺸﻳ .ﻦﻴﺗﺮﻣ ﺍﹰﺮﻴﻔﺻ ﺾﺒﻘﻤﻟﺍ ﺭﺪﺼﻳﻭ ﺔﻳﺭﺎﻄﺒﻟﺍ ﺮﺷﺆﻣ ﺾﻣﻮﻳ
.ﻦﺤﺸﻟﺍ ﺪﻴﻗ ﻥﺎﻨﺳﻷﺍ ﺓﺎﺷﺮﻓ ﻥﺃ
4
.ﻞﻣﺎﻜﻟﺎﺑ ﺎﻬﻨﺤﺷ ﻢﺘﻳ ﻰﺘﺣ ﻥﺎﻨﺳﻷﺍ ﺓﺎﺷﺮﻓ ﻦﺤﺷ ﻰﻠﻋ ﻦﺣﺎﺸﻟﺍ ﻞﻤﻌﻴﺳ
ﺪﻗ ﺾﺒﻘﻤﻟﺍ ﻥﻮﻜﻳ ﺎﻣﺪﻨﻋ .ﺔﻳﺭﺎﻄﺒﻟﺍ ﺮﺷﺆﻣ ﺾﻣﻮﻳ ﺎﻣﺪﻨﻋ ﺾﺒﻘﻤﻟﺍ ﻦﺤﺷ ﻢﺘﻳ
ﹼﻢﺛ ﻦﻣﻭ ﺔﻴﻧﺎﺛ 30 ﺓﺪﻤﻟ ﺾﻣﻮﻳ ﺔﻳﺭﺎﻄﺒﻟﺍ ﺡﺎﺒﺼﻣ ﺮﺷﺆﻣ ﹼﻥﺈﻓ ،ﻞﻣﺎﻜﻟﺎﺑ ﻦﹻﺤﹹﺷ
.ﺊﻔﻄﻨﻳ
ﺮﻔﺴﻟﺍ ﺔﺒﻠﻋ ﻡﺍﺪﺨﺘﺳﺎﺑ ﻦﺤﺸﻟﺍ
.ﻩﺅﺍﺮﺷ ﻢﺗ ﻱﺬﻟﺍ ﺯﺍﺮﻄﻟﺍ ﻑﻼﺘﺧﺎﺑ ﺔﻨﻤﻀﻤﻟﺍ ﺕﺎﻘﺤﻠﻤﻟﺍ ﻒﻠﺘﺨﺗ ﺪﻗ :ﺔﻈﺣﻼﻣ
1
.ﻦﺤﺸﻠﻟ ﺮﻔﺴﻟﺍ ﺔﺒﻴﻘﺣ ﻦﻣ ﻲﻠﻔﺴﻟﺍ ءﺰﺠﻟﺍ ﻦﻣ USB ﻞﺒﻛ ﺬﺧ
2
ﺭﺎﻴﺗ ﺔﻗﺎﻃ ﻞﺧﺪﻤﺑ USB ﻞﺒﻛ ﻡﺍﺪﺨﺘﺳﺎﺑ ﻦﺤﺸﻠﻟ ﺮﻔﺴﻟﺍ ﺔﺒﻴﻘﺣ ﻞﻴﺻﻮﺘﺑ ﻢﻗ
:ﻦﻣ ﺖﻟﻮﻓ 5 ﺮﺷﺎﺒﻣ
2
1
-ﻡﺪﻘﻤﻟﺍ USB ﻝﻮﺤﻣ
-ﺔﻣﻼﺴﻟﺍ ﺔﻤﻈﻨﻣ ﻦﻣ ﺝﺭﺪﻣ ﻲﺼﺨﺸﻟﺍ ﺮﺗﻮﻴﺒﻤﻜﻠﻟ ﻲﺳﺎﻴﻗ USB ﻞﺻﻮﻣ
،ﻭﺃ ،ANSI/UL 60950-1 ـﻟ ﺪﻤﺘﻌﻣ ﻭﺃ
-ﻦﻣ ﺝﺭﺪﻣ USB ﺝﺮﺨﻣ ﺬﻔﻨﻣ ﻪﺑ ﺩﻭﺪﺤﻣ ﺔﻗﺎﻃ ﺭﺪﺼﻣ ﻦﻣ ﺔﻗﺎﻃ ﺩﻭﺰﻣ
،ﻭﺃ ،ANSI/UL 60950-1 ـﻟ ﺪﻤﺘﻌﻣ ﻭﺃ ﺔﻣﻼﺴﻟﺍ ﺔﻤﻈﻨﻣ
-ـﻟ ﺪﻤﺘﻌﻣ ﻭﺃ ﺔﻣﻼﺴﻟﺍ ﺔﻤﻈﻨﻣ ﻦﻣ ﺝﺭﺪﻣ ﺔﻴﻧﺎﺜﻟﺍ ﺔﺌﻔﻟﺍ ﻦﻣ ﺔﻗﺎﻃ ﺩﻭﺰﻣ
.1310
3
ﻰﺘﺣ ﻥﺎﻨﺳﻷﺍ ﺓﺎﺷﺮﻓ ﺮﻔﺴﻟﺍ ﺔﺒﻴﻘﺣ ﻦﺤﺸﺗ .ﺮﻔﺴﻟﺍ ﺔﺒﻴﻘﺣ ﻲﻓ ﺾﺒﻘﻤﻟﺍ ﻊﺿ
.ﺎﹱﻣﺎﻤﺗ ﺎﻬﻨﺤﺷ ﻞﻤﺘﻜﻳ
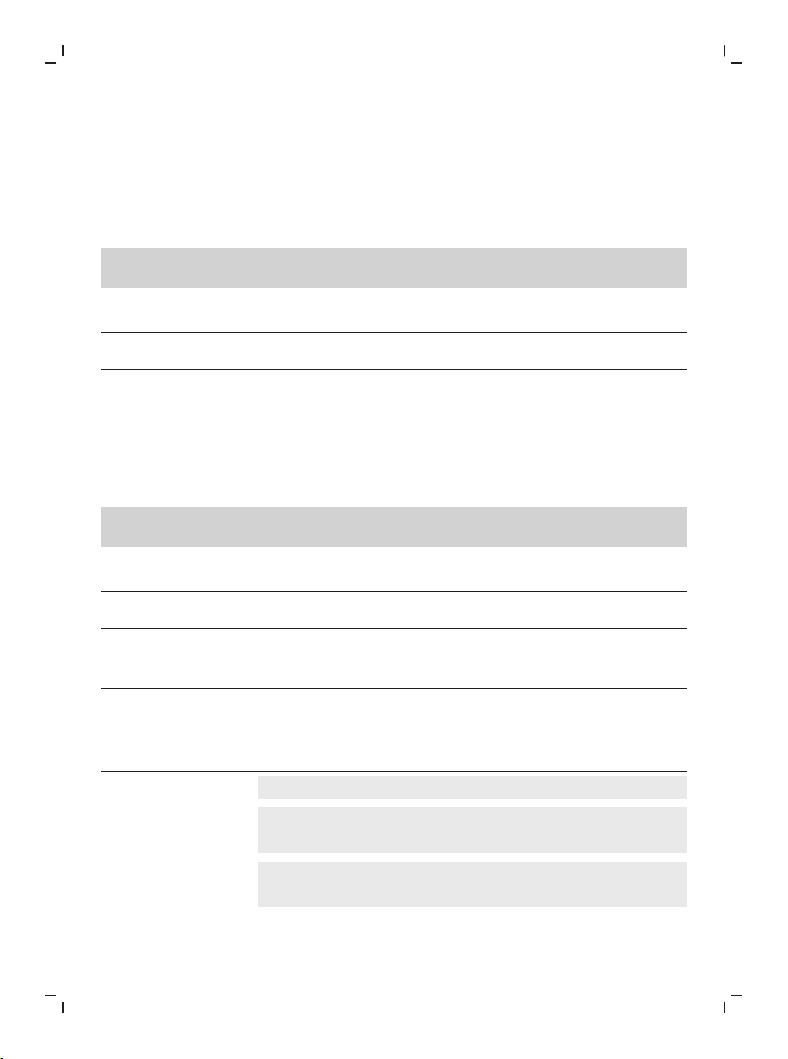
85
ﺔﻴﺑﺮﻌﻟﺍ
ﺔﻳﺭﺎﻄﺒﻟﺍ ﺔﻟﺎﺣ
ﻦﺤﺸﻟﺍ ﺔﺒﻠﻋ ﻲﻓ ﻭﺃ ءﺎﺑﺮﻬﻜﻟﺎﺑ ﻞﺼﺘﻤﻟﺍ ﻦﺣﺎﺸﻟﺍ ﻰﻠﻋ ﺾﺒﻘﻤﻟﺍ) ﺔﻳﺭﺎﻄﺒﻟﺍ ﺔﻟﺎﺣ
(ﺮﻔﺴﻠﻟ ﺔﺼﺼﺨﻤﻟﺍ
،ﺮﻔﺴﻠﻟ ﺔﺼﺼﺨﻤﻟﺍ ﻦﺤﺸﻟﺍ ﺔﺒﻠﻋ ﻲﻓ ﻭﺃ ﻦﺣﺎﺸﻟﺍ ﻰﻠﻋ ﺾﺒﻘﻤﻟﺍ ﻊﺿﻭ ﻢﺘﻳ ﺎﻣﺪﻨﻋ
.ﺔﻳﺭﺎﻄﺒﻟﺍ ﻯﻮﺘﺴﻣ ﺢﺿﻮﻳ ﺔﻳﺭﺎﻄﺒﻟﺍ ﺮﺷﺆﻣ ﻥﺈﻓ
ﺔﻳﺭﺎﻄﺒﻟﺍ ﺮﺷﺆﻣ ﺔﻳﺭﺎﻄﺒﻟﺍ ﺔﻟﺎﺣ
ﺾﻣﻮﻳ ﻦﺤﺸﻟﺍ
ﺊﻔﻄﻨﻳ ﻢﺛ ﺔﻴﻧﺎﺛ 30 ﺓﺪﻤﻟ ءﻲﻀﻳ ءﻰﻠﺘﻤﻣ
ﻦﺤﺸﻟﺍ ﺔﺒﻠﻋ ﻲﻓ ﻭﺃ ﻦﺣﺎﺸﻟﺍ ﻰﻠﻋ ﺾﺒﻘﻤﻟﺍ ﻊﺿﻭ ﻢﺘﻳ ﻻ ﺎﻣﺪﻨﻋ) ﺔﻳﺭﺎﻄﺒﻟﺍ ﺔﻟﺎﺣ
(ﺮﻔﺴﻠﻟ ﺔﺼﺼﺨﻤﻟﺍ
ﻦﻣ ﻲﻠﻔﺴﻟﺍ ءﺰﺠﻟﺍ ﻲﻓ ﺔﻳﺭﺎﻄﺒﻟﺍ ﺮﺷﺆﻣ ﺮﻬﻈﹹﻳ ،ﺔﻄﺸﻧ ﻥﺎﻨﺳﻷﺍ ﺓﺎﺷﺮﻓ ﻥﻮﻜﺗ ﺎﻣﺪﻨﻋ
.ﺔﻳﺭﺎﻄﺒﻟﺍ ﻯﻮﺘﺴﻣ ﺾﺒﻘﻤﻟﺍ
ﺕﻮﺼﻟﺍ ﺔﻳﺭﺎﻄﺒﻟﺍ ﺮﺷﺆﻣ ﺔﻳﺭﺎﻄﺒﻟﺍ ﺔﻟﺎﺣ
- ءﻲﻀﻳ ءﻰﻠﺘﻤﻣ
- ﺾﻣﻮﻳ ﺎﹱﻴﺋﺰﺟ ﺔﺌﻠﺘﻤﻣ
ﻪﻴﺒﻨﺗ ﻁﺍﻮﺻﺃ 3 ﺾﺒﻘﻤﻟﺍ ﺭﺪﺼﻳ
ﺓﺎﺷﺮﻔﻟﺎﺑ ﻥﺎﻨﺳﻷﺍ ﻒﻴﻈﻨﺗ ﺪﻌﺑ
ﻲﻧﺎﻣﺮﻬﻜﻟﺍ ﻥﻮﻠﻟﺎﺑ ﺾﻣﻮﻳ ﺔﻀﻔﺨﻨﻣ
5 ﻦﻣ ﻦﻴﺘﻋﻮﻤﺠﻣ ﺾﺒﻘﻤﻟﺍ ﺭﺪﺼﻳ
ﻒﻴﻈﻨﺗ ﺪﻌﺑ ﺔﻴﺗﻮﺻ ﺕﺍﺭﺎﺷﺇ
ﺓﺎﺷﺮﻔﻟﺎﺑ ﻥﺎﻨﺳﻷﺍ
ﻲﻧﺎﻣﺮﻬﻜﻟﺍ ﻥﻮﻠﻟﺎﺑ ﺾﻣﻮﻳ ﺔﻏﺭﺎﻓ
.ﻡﺍﺪﺨﺘﺳﻻﺍ ﺪﻴﻗ ﻥﻮﻜﻳ ﻻ ﺎﻣﺪﻨﻋ ﺔﻳﺭﺎﻄﺒﻟﺍ ﺮﺷﺆﻣ ﺊﻔﻄﻨﻴﺳ ،ﺔﻗﺎﻄﻟﺍ ﺮﻴﻓﻮﺘﻟ :ﺔﻈﺣﻼﻣ
ﻊﺿ .ﻥﺎﻨﺳﻷﺍ ﺓﺎﺷﺮﻓ ﻞﻴﻐﺸﺗ ﻑﺎﻘﻳﺇ ﻢﺘﻳ ،ﺎﹱﻣﺎﻤﺗ ﺔﻳﺭﺎﻄﺒﻟﺍ ﺩﺎﻔﻧ ﺪﻨﻋ :ﺔﻈﺣﻼﻣ
.ﺎﻬﻨﺤﺸﻟ ﻦﺣﺎﺸﻟﺍ ﻲﻓ ﻥﺎﻨﺳﻷﺍ ﺓﺎﺷﺮﻓ
ﻚﻨﻜﻤﻳ ،ﺕﺎﻗﻭﻷﺍ ﻊﻴﻤﺟ ﻲﻓ ﻞﻣﺎﻜﻟﺎﺑ ﺔﻳﺭﺎﻄﺒﻟﺍ ﻦﺤﺷ ﻰﻠﻋ ﻅﺎﻔﺤﻠﻟ :ﺔﻈﺣﻼﻣ
.ﻡﺍﺪﺨﺘﺳﻻﺍ ﺪﻴﻗ ﻥﻮﻜﺗ ﻻ ﺎﻣﺪﻨﻋ ﻦﺣﺎﺸﻟﺍ ﻰﻠﻋ ﻥﺎﻨﺳﻷﺍ ﺓﺎﺷﺮﻔﺑ ﻅﺎﻔﺘﺣﻻﺍ
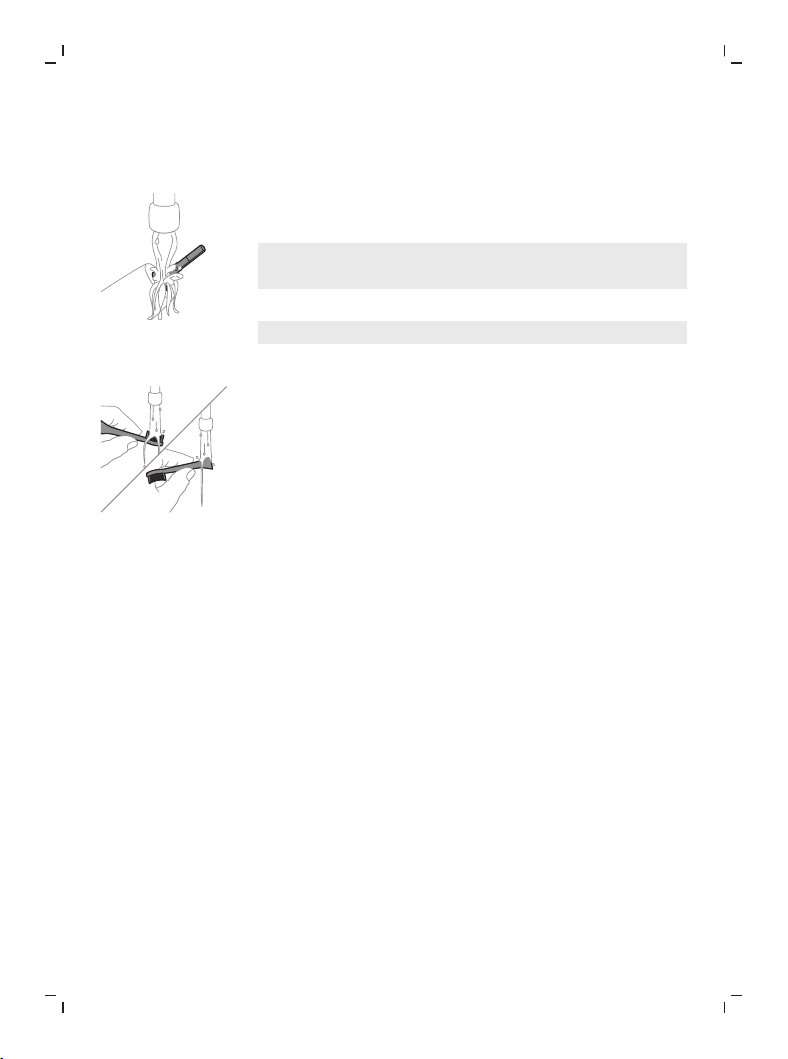
86
ﺔﻴﺑﺮﻌﻟﺍ
ﻒﻴﻈﻨﺘﻟﺍ
ﻥﺎﻨﺳﻷﺍ ﺓﺎﺷﺮﻓ ﺾﺒﻘﻣ
1
ﺪﻛﺄﺗ .ﺊﻓﺍﺩ ءﺎﻤﺑ ﻲﻧﺪﻌﻤﻟﺍ ﺩﻮﻤﻌﻟﺍ ﺔﻘﻄﻨﻣ ﻒﻄﺷﻭ ﺓﺎﺷﺮﻔﻟﺍ ﺱﺃﺭ ﺔﻟﺍﺯﺈﺑ ﻢﻗ
.ﻥﺎﻨﺳﻷﺍ ﻥﻮﺠﻌﻣ ﻦﻣ ﺎﻳﺎﻘﺑ ﻱﺃ ﺔﻟﺍﺯﺇ ﻦﻣ
ﻡﺎﺴﺟﺃ ﻡﺍﺪﺨﺘﺳﺎﺑ ﻲﻧﺪﻌﻤﻟﺍ ﺩﻮﻤﻌﻟﺎﺑ ﺩﻮﺟﻮﻤﻟﺍ ﻲﻃﺎﻄﻤﻟﺍ ءﺎﻄﻐﻟﺍ ﻊﻓﺪﺗ ﻻ :ﻪﻴﺒﻨﺗ
.ﻒﻠﺘﻟﺍ ﺐﺒﺴﻳ ﺪﻗ ﻚﻟﺫ ﻥﻷ ،ﺓﺩﺎﺣ
2
.ﺔﻠﻠﺒﻣ ﺵﺎﻤﻗ ﺔﻌﻄﻗ ﻡﺍﺪﺨﺘﺳﺎﺑ ﻞﻣﺎﻜﻟﺎﺑ ﺾﺒﻘﻤﻟﺍ ﺢﻄﺳ ﺢﺴﻣﺍ
.ﺪﺋﺍﺰﻟﺍ ءﺎﻤﻟﺍ ﺔﻟﺍﺯﻹ ﺲﻄﻐﻤﻟﺍ ﻰﻠﻋ ﺪﻴﻟﺍ ﺮﻘﻨﺗ ﻻ :ﺔﻈﺣﻼﻣ
ﺓﺎﺷﺮﻔﻟﺍ ﺱﺃﺭ
1
.ﻡﺍﺪﺨﺘﺳﺍ ﻞﻛ ﺪﻌﺑ ﺕﺍﺮﻴﻌﺸﻟﺍﻭ ﺓﺎﺷﺮﻔﻟﺍ ﺱﺃﺭ ﻒﻄﺷﺍ
2
ءﺎﻤﺑ ﺓﺎﺷﺮﻔﻟﺍ ﺱﺃﺭ ﺔﻠﺻﻭ ﻒﻄﺷﺍﻭ ﺾﺒﻘﻤﻟﺍ ﻦﻋ ﺓﺎﺷﺮﻔﻟﺍ ﺱﺃﺭ ﺔﻟﺍﺯﺈﺑ ﻢﻗ
.ﺔﺟﺎﺤﻟﺍ ﺪﻨﻋ ﻞﻘﻨﻟﺍ ءﺎﻄﻏ ﻒﻄﺷﺍ .ﻞﻗﻷﺍ ﻰﻠﻋ ﺎﹱﻴﻋﻮﺒﺳﺃ ﺓﺮﻣ ﺊﻓﺍﺩ
ﻦﺣﺎﺸﻟﺍ
1
.ﺎﻬﻔﻴﻈﻨﺗ ﻞﺒﻗ ﻦﺣﺎﺸﻟﺍ ﻞﺼﻓﺍ
2
.ﺔﻠﻠﺒﻣ ﺵﺎﻤﻗ ﺔﻌﻄﻗ ﻡﺍﺪﺨﺘﺳﺎﺑ ﻦﺣﺎﺸﻟﺍ ﺢﻄﺳ ﺢﺴﻣﺍ
ﺮﻔﺴﻟﺍ ﺔﺒﻴﻘﺣ
ﻦﻣ ﺮﻔﺴﻟﺍ ﺔﺒﻴﻘﺣ ﻒﻴﻈﻨﺘﻟ ﺔﻠﻠﺒﻣ ﺵﺎﻤﻗ ﺔﻌﻄﻗ ﻡﺪﺨﺘﺳﺍﻭ ﺊﻓﺍﺪﻟﺍ ءﺎﻤﻟﺎﺑ ﺎﻬﻔﻄﺷﺍ
.ﻞﺧﺍﺪﻟﺍ
ﺮﻔﺴﻠﻟ ﺔﺼﺼﺨﻤﻟﺍ ﻦﺤﺸﻟﺍ ﺔﺒﻠﻋ
1
.ﻒﻴﻈﻨﺘﻟﺍ ﻞﺒﻗ ﺮﻔﺴﻠﻟ ﺔﺼﺼﺨﻤﻟﺍ ﻦﺤﺸﻟﺍ ﺔﺒﻠﻋ ﻞﺼﻓﺍ
2
.ﺮﻔﺴﻟﺍ ﺔﺒﻠﻋ ﺢﻄﺳ ﺢﺴﻤﻟ ﺔﻠﻠﺒﻣ ﺵﺎﻤﻗ ﺔﻌﻄﻗ ﻡﺪﺨﺘﺳﺍ
ﻦﻳﺰﺨﺘﻟﺍ
،ﻲﺋﺎﺑﺮﻬﻜﻟﺍ ﺭﺎﻴﺘﻟﺍ ﺬﺧﺄﻣ ﻦﻋ ﻪﻠﺼﻔﺑ ﻢﻘﻓ ،ﺔﻠﻳﻮﻃ ﺓﺮﺘﻔﻟ ﺞﺘﻨﻤﻟﺍ ﻡﺍﺪﺨﺘﺳﺍ ﻱﻮﻨﺗ ﻢﻟ ﺍﺫﺇ
.ﺓﺮﺷﺎﺒﻤﻟﺍ ﺲﻤﺸﻟﺍ ﺔﻌﺷﺃ ﻦﻋ ﺍﹰﺪﻴﻌﺑ ﻑﺎﺟﻭ ﺩﺭﺎﺑ ﻥﺎﻜﻣ ﻲﻓ ﻪﻨﻳﺰﺨﺗﻭ ﻪﻔﻴﻈﻨﺗﻭ
ﻝﺍﺪﺒﺘﺳﻻﺍ
ﻞﻀﻓﺃ ﻖﻴﻘﺤﺘﻟ ﺮﻬﺷﺃ 3 ﻞﻛ Philips ﻦﻣ Sonicare ﺓﺎﺷﺮﻓ ﺱﻭﺅﺭ ﻝﺍﺪﺒﺘﺳﺎﺑ ﻢﻗ
.ﻝﺍﺪﺒﺘﺳﻻﺍ ﺪﻨﻋ Philips Sonicare ﺓﺎﺷﺮﻓ ﺱﻭﺅﺭ ﻯﻮﺳ ﻡﺪﺨﺘﺴﺗ ﻻ .ﺞﺋﺎﺘﻨﻟﺍ
87
ﺔﻴﺑﺮﻌﻟﺍ
ﺎﻬﺣﻼﺻﺇﻭ ءﺎﻄﺧﻷﺍ ﻑﺎﺸﻜﺘﺳﺍ
ﺍﺫﺇ .ﺯﺎﻬﺠﻟﺍ ﻊﻣ ﺎﻬﻬﺟﺍﻮﺗ ﺪﻗ ﻲﺘﻟﺍ ﺎﹱﻋﻮﻴﺷ ﺮﺜﻛﻷﺍ ﺕﻼﻜﺸﻤﻟﺍ ﻞﺼﻔﻟﺍ ﺍﺬﻫ ﺺﺨﻠﻳ
ﻊﻗﻮﻤﻟﺍ ﺓﺭﺎﻳﺰﺑ ﻢﻘﻓ ،ﻩﺎﻧﺩﺃ ﺓﺩﺭﺍﻮﻟﺍ ﺕﺎﻣﻮﻠﻌﻤﻟﺍ ﻡﺍﺪﺨﺘﺳﺎﺑ ﺔﻠﻜﺸﻤﻟﺍ ﻞﺣ ﻚﻴﻠﻋ ﺭﺬﻌﺗ
ﻭﺃ ﺔﻟﻭﺍﺪﺘﻤﻟﺍ ﺔﻠﺌﺳﻷﺎﺑ ﺔﻤﺋﺎﻗ ﻰﻠﻋ ﻝﻮﺼﺤﻠﻟ www.philips.com/support
.ﻙﺪﻠﺒﻟ ﻊﺑﺎﺘﻟﺍ ﻚﻠﻬﺘﺴﻤﻟﺍ ﺔﻳﺎﻋﺭ ﺰﻛﺮﻤﺑ ﻞﺼﺗﺍ
ﻞﺤﻟﺍ ﻞﻤﺘﺤﻤﻟﺍ ﺐﺒﺴﻟﺍ ﺔﻠﻜﺸﻤﻟﺍ
ﺓﻮﺠﻓ ﺩﻮﺟﻭ ﻡﺰﻠﻳ .ﻲﻌﻴﺒﻃ ﺮﻣﺃ ﺍﺬﻫ
ﻞﺟﺃ ﻦﻣ ﺔﻛﺮﺤﻟﺎﺑ ﺡﺎﻤﺴﻠﻟ ﺓﺮﻴﻐﺻ
ﻒﻴﻈﻨﺘﻟ ﺔﻣﺯﻼﻟﺍ ﺕﺍﺯﺍﺰﺘﻫﻻﺍ ﻞﻴﺻﻮﺗ
.ﻚﻧﺎﻨﺳﺃ
ﺓﺎﺷﺮﻔﻟﺍ ﺱﺃﺭ ﻕﺎﻓﺭﺇ ﻲﻨﻨﻜﻤﻳ ﻻ
ﺱﺃﺭ ﻦﻴﺑ ﺓﻮﺠﻓ ﺪﺟﻮﺗ .ﻞﻣﺎﻜﻟﺎﺑ
.ﺾﺒﻘﻤﻟﺍﻭ ﺓﺎﺷﺮﻔﻟﺍ
ﻦﻣ ﺓﺎﺷﺮﻔﻟﺍ ﺱﺃﺭ ﺔﻟﺍﺯﺈﺑ ﻢﻗ
ﺩﻮﻤﻌﻟﺍ ﻰﻠﻋ ﻪﻄﺒﺿ ﺪﻋﺃﻭ ﺾﺒﻘﻤﻟﺍ
.ﺓﺮﻴﻐﺻ ﺓﻮﺠﻓ ﻙﺮﺗ ﻊﻣ ﻲﻧﺪﻌﻤﻟﺍ
(ﻢﻣ 1-2)
ﻦﻣ ﺍﹰﺪﺟ ﺐﻳﺮﻗ ﺓﺎﺷﺮﻔﻟﺍ ﺱﺃﺭ
.ﺾﺒﻘﻤﻟﺍ ﻢﺴﺟ
Sonicare ﻥﺎﻨﺳﻷﺍ ﺓﺎﺷﺮﻓ ﺯﺍﺰﺘﻫﺍ
ﻱﺫ ﻦﻣ ﺓﻮﻗ ﻞﻗﺃ Philips ﻦﻣ
.ﻞﺒﻗ
ﻥﺎﻨﺳﻷﺍ ﺓﺎﺷﺮﻓ ﺾﺒﻘﻣ ﻦﺤﺷﺍ
.ﻦﺣﺎﺸﻟﺍ ﻰﻠﻋ
.ﺔﻀﻔﺨﻨﻣ ﺔﻳﺭﺎﻄﺒﻟﺍ
ﺓﺪﻋﺎﻗ ﻰﻠﻋ ﺎﹱﻳﺩﻮﻤﻋ ﺾﺒﻘﻤﻟﺍ ﻊﺿ
ﻞﻴﺻﻮﺗ ﻦﻣ ﺪﻛﺄﺗﻭ ﻦﺣﺎﺸﻟﺍ
.ءﺎﺑﺮﻬﻜﻟﺎﺑ ﻦﺣﺎﺸﻟﺍ
ﺓﺎﺷﺮﻓ ﺾﺒﻘﻣ ﻊﺿﻭ ﻢﺘﻳ ﻻ
ﻰﻠﻋ ﻱﺩﻮﻤﻋ ﻞﻜﺸﺑ ﻥﺎﻨﺳﻷﺍ
ﻡﺪﻋ ﻰﻟﺇ ﻱﺩﺆﻳ ﺎﻤﻣ ،ﻦﺣﺎﺸﻟﺍ
.ﻦﺤﺸﻟﺍ
،ﻲﻧﺎﻨﺳﺃ ﺓﺎﺷﺮﻓ ﻦﺤﺸﺑ ﺖﻤﻗ ﺪﻘﻟ
.ﻂﻘﻓ ﺓﺮﻴﺼﻗ ﺓﺮﺘﻔﻟ ﻞﻤﻌﺗ ﺎﻬﻨﻜﻟﻭ
ﻥﺎﻨﺳﻷﺍ ﺓﺎﺷﺮﻓ ﺾﺒﻘﻣ ﻦﺤﺷﺍ
.ﻦﺣﺎﺸﻟﺍ ﻰﻠﻋ
.ﺔﻏﺭﺎﻓ ﺔﻳﺭﺎﻄﺒﻟﺍ .ﻞﻤﻌﻟﺍ ﻦﻋ ﻥﺎﻨﺳﻷﺍ ﺓﺎﺷﺮﻓ ﻒﻗﻮﺘﺗ
ﻞﻳﺩﻮﻤﻟﺍ ﻢﻗﺭ ﺪﻳﺪﺤﺗ
ﺔﻓﺮﻌﻤﻟ Philips Sonicare ﻥﺎﻨﺳﺃ ﺓﺎﺷﺮﻓ ﺾﺒﻘﻣ ﻦﻣ ﻲﻠﻔﺴﻟﺍ ءﺰﺠﻟﺍ ﻰﻟﺇ ﺮﻈﻧﺍ
.(HX99XX) ﻞﻳﺩﻮﻤﻟﺍ ﻢﻗﺭ
ﻢﻋﺪﻟﺍﻭ ﻥﺎﻤﻀﻟﺍ
ﺓﺭﺎﻳﺯ ﻲﺟﺮﹹﻳ ،ﻢﻋﺩ ﻭﺃ ﺕﺎﻣﻮﻠﻌﻣ ﻰﻟﺇ ﺔﺟﺎﺤﺑ ﺖﻨﻛ ﺍﺫﺇ
.ﻲﻤﻟﺎﻌﻟﺍ ﻥﺎﻤﻀﻟﺍ ﺐﻴﺘﻛ ﺓءﺍﺮﻗ ﻭﺃwww.philips.com/support
ﻥﺎﻤﻀﻟﺍ ﺕﺍءﺎﻨﺜﺘﺳﺍ
:ﻥﺎﻤﻀﻟﺍ ﻪﻴﻄﻐﻳ ﻻ ﺎﻣ
-.ﺕﺎﻫﻮﻔﻟﺍﻭ ﺓﺎﺷﺮﻔﻟﺍ ﺱﻭﺅﺭ ﻚﻟﺫ ﻲﻓ ﺎﻤﺑ ﻢﻔﻟﺍ ﻲﻓ ﺕﺎﻘﻓﺮﻤﻟﺍ
88
ﺔﻴﺑﺮﻌﻟﺍ
-ﺮﻴﻏ ﻲﺷﺍﺮﻓ ﺱﻭﺅﺭ ﻭﺃ ﺎﻬﺑ ﺡﺮﺼﻣ ﺮﻴﻏ ﺭﺎﻴﻏ ﻊﻄﻗ ﻡﺍﺪﺨﺘﺳﺍ ﻦﻋ ﺞﺗﺎﻨﻟﺍ ﻒﻠﺘﻟﺍ
.ﺎﻬﺑ ﺡﺮﺼﻣ
-ﻭﺃ ﻞﻳﺪﻌﺘﻟﺍ ﻭﺃ ﻝﺎﻤﻫﻹﺍ ﻭﺃ ﺓءﺎﺳﻹﺍ ﻭﺃ ﻡﺍﺪﺨﺘﺳﻻﺍ ءﻮﺳ ﻦﻋ ﻢﺟﺎﻨﻟﺍ ﻒﻠﺘﻟﺍ
.ﻪﺑ ﺡﺮﺼﻤﻟﺍ ﺮﻴﻏ ﺡﻼﺻﻹﺍ
-ﺮﻴﻐﺗ ﻭﺃ ﻁﻮﺸﻜﻟﺍ ﻭﺃ ﺵﻭﺪﺨﻟﺍ ﻭﺃ ﻩﻮﺸﺘﻟﺍ ﻚﻟﺫ ﻲﻓ ﺎﻤﺑ ،ﻱﺩﺎﻌﻟﺍ ﻕﺰﻤﺘﻟﺍﻭ ﻞﻛﺂﺘﻟﺍ
.ﻪﻴﺷﻼﺗ ﻭﺃ ﻥﻮﻠﻟﺍ
ﺮﻳﻭﺪﺘﻟﺍ ﺓﺩﺎﻋﺇ
-ﻊﻣ ﺕﺎﻳﺭﺎﻄﺒﻟﺍﻭ ﺔﻴﺋﺎﺑﺮﻬﻜﻟﺍ ﺕﺎﺠﺘﻨﻤﻟﺍ ﻦﻣ ﺺﻠﺨﺘﻟﺍ ﺯﻮﺠﻳ ﻻ ﻪﻧﺃ ﺰﻣﺮﻟﺍ ﺍﺬﻫ ﻲﻨﻌﻳ
.ﺔﻳﺩﺎﻌﻟﺍ ﺔﻴﻟﺰﻨﻤﻟﺍ ﺕﺎﻳﺎﻔﻨﻟﺍ
-ﺔﻴﺋﺎﺑﺮﻬﻜﻟﺍ ﺕﺎﺠﺘﻨﻤﻠﻟ ﻞﺼﻔﻨﻤﻟﺍ ﻊﻴﻤﺠﺘﻟﺎﺑ ﺔﺻﺎﺨﻟﺍ ﻙﺪﻠﺑ ﺪﻋﺍﻮﻗ ﻊﺒﺗﺍ
.ﺕﺎﻳﺭﺎﻄﺒﻟﺍﻭ
ﻦﺤﺸﻟﺍ ﺓﺩﺎﻋﻹ ﺔﻠﺑﺎﻘﻟﺍ ﺔﺠﻣﺪﻤﻟﺍ ﺔﻳﺭﺎﻄﺒﻟﺍ ﺔﻟﺍﺯﺇ
ﻭﺃ ﺎﻫﺮﻳﻭﺪﺗ ﺓﺩﺎﻋﺇ ﺐﺠﻳ .ﻦﺤﺸﻟﺍ ﺓﺩﺎﻋﻹ ﺔﻠﺑﺎﻗ ﻥﻮﻳﺃ ﻡﻮﻴﺜﻴﻟ ﺔﻴﻠﺧ ﻰﻠﻋ ﻱﻮﺘﺤﺗ
.ﺢﻴﺤﺻ ﻞﻜﺸﺑ ﺎﻬﻨﻣ ﺺﻠﺨﺘﻟﺍ
ﻞﻫﺆﻣ ﺺﺼﺨﺘﻣ ﺔﻄﺳﺍﻮﺑ ﻦﺤﺸﻟﺍ ﺓﺩﺎﻋﻹ ﺔﻠﺑﺎﻘﻟﺍ ﺔﺠﻣﺪﻤﻟﺍ ﺔﻳﺭﺎﻄﺒﻟﺍ ﺔﻟﺍﺯﺇ ﺐﺠﻳ
.ﺎﹱﻣﺎﻤﺗ ﺔﻏﺭﺎﻓ ﺔﻳﺭﺎﻄﺒﻟﺍ ﻥﺃ ﻦﻣ ﺪﻛﺄﺗ ،ﺔﻳﺭﺎﻄﺒﻟﺍ ﻉﺰﻧ ﻞﺒﻗ .ﺞﺘﻨﻤﻟﺍ ﻦﻣ ﺺﻠﺨﺘﻟﺍ ﺪﻨﻋ
ﺢﺘﻔﻟ ﺔﻣﺯﻼﻟﺍ ﺕﺍﻭﺩﻷﺍ ﻊﻣ ﻞﻣﺎﻌﺘﻟﺍ ﺪﻨﻋ ﺔﻳﺭﻭﺮﺿ ﺔﻣﻼﺳ ﺕﺎﻃﺎﻴﺘﺣﺍ ﻱﺃ ﺬﺨﺗﺍ
ﺔﻳﺎﻤﺣ ﻦﻣ ﺪﻛﺄﺗ .ﻦﺤﺸﻟﺍ ﺓﺩﺎﻋﻹ ﺔﻠﺑﺎﻘﻟﺍ ﺔﻳﺭﺎﻄﺒﻟﺍ ﻦﻣ ﺺﻠﺨﺘﻟﺍ ﺪﻨﻋﻭ ﺯﺎﻬﺠﻟﺍ
.ﻪﻴﻠﻋ ﻞﻤﻌﺗ ﻱﺬﻟﺍ ﺢﻄﺴﻟﺍﻭ ﻚﻌﺑﺎﺻﺃﻭ ﻚﻳﺪﻳﻭ ﻚﻴﻨﻴﻋ
.ﺔﻓﺎﺟ ﺕﺎﻳﺭﺎﻄﺒﻟﺍﻭ ﺞﺘﻨﻤﻟﺍﻭ ﻚﻳﺪﻳ ﻥﺃ ﻦﻣ ﺪﻛﺄﺗ ،ﺕﺎﻳﺭﺎﻄﺒﻟﺍ ﻊﻣ ﻞﻣﺎﻌﺘﻟﺍ ﺪﻨﻋ
ﻉﺪﺗ ﻻ ،ﺔﻟﺍﺯﻹﺍ ﺪﻌﺑ ﺔﻴﺋﺎﺑﺮﻬﻜﻟﺍ ﺓﺭﺍﺪﻟﺍ ﻲﻓ ﺮﺼﻘﻟ ﺕﺎﻳﺭﺎﻄﺒﻟﺍ ﺾﻳﺮﻌﺗ ﺐﻨﺠﺘﻟ
،ﺔﻴﻧﺪﻌﻤﻟﺍ ﺕﻼﻤﻌﻟﺍ ﻞﺜﻣ) ﺔﻴﻧﺪﻌﻣ ﻡﺎﺴﺟﺃ ﻊﻣ ﺲﻣﻼﺘﺗ ﺕﺎﻳﺭﺎﻄﺒﻟﺍ ﻑﺍﺮﻃﺃ
.ﻡﻮﻴﻨﻣﻮﻟﻷﺍ ﻕﺭﻭ ﻲﻓ ﺕﺎﻳﺭﺎﻄﺒﻟﺍ ﻒﻴﻠﻐﺘﺑ ﻢﻘﺗ ﻻ .(ﻢﺗﺍﻮﺨﻟﺍﻭ ،ﺮﻌﺸﻟﺍ ﺲﻴﺑﺎﺑﺩﻭ
ﻚﻴﺘﺳﻼﺒﻟﺍ ﻦﻣ ﺲﻴﻛ ﻲﻓ ﺕﺎﻳﺭﺎﻄﺒﻟﺍ ﻊﺿ ﻭﺃ ﺔﻳﺭﺎﻄﺒﻟﺍ ﻑﺍﺮﻃﺃ ﻰﻠﻋ ﺎﹱﻄﻳﺮﺷ ﻊﺿ
.ﺎﻬﻨﻣ ﺺﻠﺨﺘﻟﺍ ﻞﺒﻗ
ﻦﺤﺸﻟﺍ ﺓﺩﺎﻋﻹ ﺔﻠﺑﺎﻘﻟﺍ ﺔﻳﺭﺎﻄﺒﻟﺍ ﺔﻟﺍﺯﺇ
ﺵﺎﻤﻗ ﺔﻌﻄﻗ ﻭﺃ ﺔﻔﺸﻨﻣ ﻰﻟﺇ ﺝﺎﺘﺤﺗ ،ﻦﺤﺸﻟﺍ ﺓﺩﺎﻋﻹ ﺔﻠﺑﺎﻘﻟﺍ ﺔﻳﺭﺎﻄﺒﻟﺍ ﺔﻟﺍﺯﻹ
ﺔﻣﻼﺴﻟﺍ ﺕﺎﻃﺎﻴﺘﺣﺍ ﺓﺎﻋﺍﺮﻣ ﺐﺠﻳ .ﺢﻄﺴﻣ ﺱﺃﺮﺑ (ﻲﺳﺎﻴﻗ) ﻲﻏﺍﺮﺑ ﻚﻔﻣﻭ ﺔﻗﺮﻄﻣﻭ
.ﻩﺎﻧﺩﺃ ﺔﺤﺿﻮﻤﻟﺍ ﺕﺍءﺍﺮﺟﻹﺍ ﻉﺎﺒﺗﺍ ﺪﻨﻋ ﺔﻴﺳﺎﺳﻷﺍ
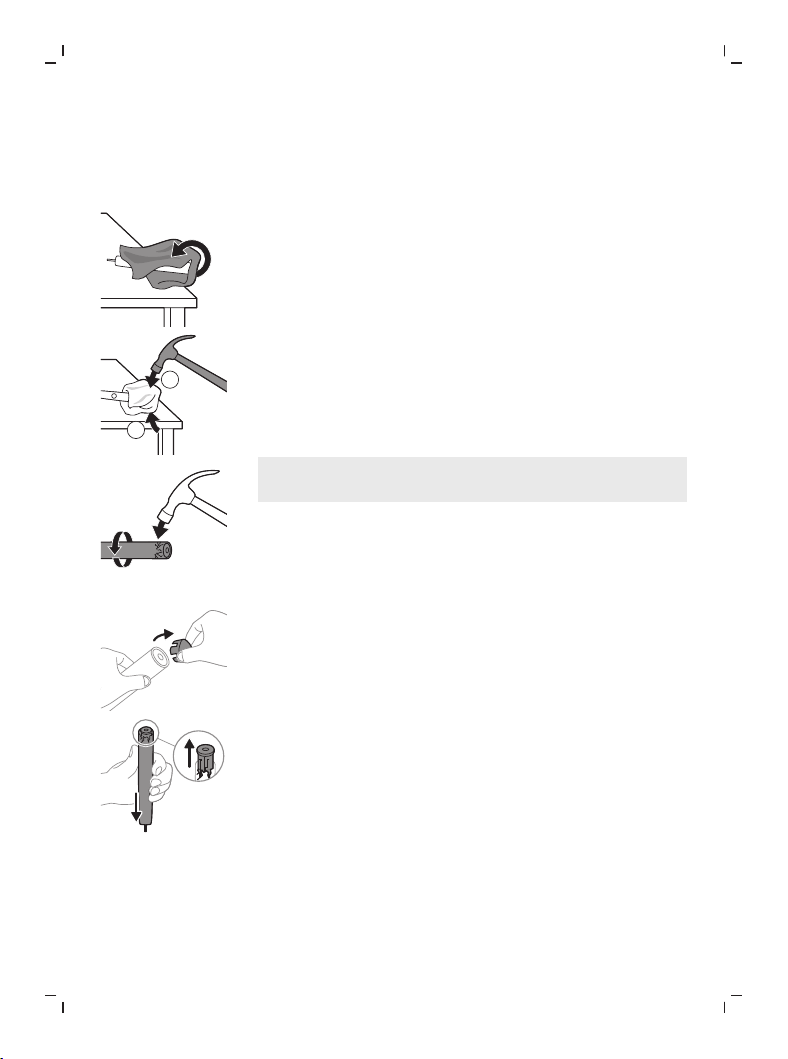
89
ﺔﻴﺑﺮﻌﻟﺍ
1
ﺾﺒﻘﻤﻟﺍ ﺔﻟﺍﺯﺈﺑ ﻢﻗ ،ﺕﺎﻨﺤﺷ ﻱﺃ ﻦﻣ ﻦﺤﺸﻟﺍ ﺓﺩﺎﻋﻹ ﺔﻠﺑﺎﻘﻟﺍ ﺔﻳﺭﺎﻄﺒﻟﺍ ﻎﻳﺮﻔﺘﻟ
ﻰﺘﺣ ﻞﻴﻐﺸﺘﻟﺍ ﺪﻴﻗ ﺎﻬﻋﺩﻭ ﻥﺎﻨﺳﻷﺍ ﺓﺎﺷﺮﻓ ﻞﻴﻐﺸﺘﺑ ﻢﻗﻭ ﻦﺣﺎﺸﻟﺍ ﻦﻣ
.ﻥﺎﻨﺳﻷﺍ ﺓﺎﺷﺮﻓ ﻞﻴﻐﺸﺗ ﻰﻠﻋ ﺍﹰﺭﺩﺎﻗ ﺪﻌﺗ ﻻ ﻰﺘﺣ ﺓﻮﻄﺨﻟﺍ ﻩﺬﻫ ﺭﺮﻛ .ﻒﻗﻮﺘﺗ
2
ﻞﻣﺎﻜﻟﺎﺑ ﺾﺒﻘﻤﻟﺍ ﺔﻴﻄﻐﺘﺑ ﻢﻗ .ﻪﻨﻣ ﺺﻠﺨﺘﻟﺍﻭ ﺓﺎﺷﺮﻔﻟﺍ ﺱﺃﺭ ﺔﻟﺍﺯﺈﺑ ﻢﻗ
.ﺵﺎﻤﻗ ﺔﻌﻄﻗ ﻭﺃ ﺔﻔﺸﻨﻣ ﻡﺍﺪﺨﺘﺳﺎﺑ
1
2
3
ﺱﺎﻘﻣ ﺖﻴﺒﻤﻟﺍ ﺏﺮﺿﺍﻭ ﻦﻳﺪﻴﻟﺍ ﻯﺪﺣﺈﺑ ﺾﺒﻘﻤﻟﺍ ﻦﻣ ﻱﻮﻠﻌﻟﺍ ءﺰﺠﻟﺍ ﻚﺴﻣﺃ
ﻡﺍﺪﺨﺘﺳﺎﺑ ﺓﻮﻘﺑ ﺏﺮﺿﺍ .ﻲﻠﻔﺴﻟﺍ ءﺰﺠﻟﺍ ﺔﻳﺎﻬﻧ ﻰﻠﻋﺃ ﺩﻮﺟﻮﻤﻟﺍ ﺔﺻﻮﺑ 0.5
.ءﺎﻄﻐﻟﺍ ﻑﺮﻃ ﺝﺍﺮﺧﻹ ﺔﻌﺑﺭﻷﺍ ﻑﺍﺮﻃﻷﺍ ﻊﻴﻤﺟ ﻰﻠﻋ ﺔﻗﺮﻄﻣ
ﺓﺍﺩﻷﺍ ﺕﻼﺻﻭ ﻚﻔﻟ ﺕﺍﺮﻣ ﺓﺪﻋ ﻑﺮﻄﻟﺍ ﻰﻠﻋ ﺏﺮﻀﺗ ﻥﺃ ﻰﻟﺇ ﺝﺎﺘﺤﺗ ﺪﻗ :ﺔﻈﺣﻼﻣ
.ﺔﻴﻠﺧﺍﺪﻟﺍ
4
ﺮﻳﺮﺤﺗ ﻢﺘﻳ ﻢﻟ ﺍﺫﺇ .ﻥﺎﻨﺳﻷﺍ ﺓﺎﺷﺮﻓ ﺾﺒﻘﻣ ﻦﻣ ﻲﻓﺮﻄﻟﺍ ءﺎﻄﻐﻟﺍ ﺔﻟﺍﺯﺈﺑ ﻢﻗ
ءﺎﻄﻐﻟﺍ ﺮﻳﺮﺤﺗ ﻢﺘﻳ ﻰﺘﺣ 3 ﺓﻮﻄﺨﻟﺍ ﺭﺮﻜﻓ ،ﺖﻴﺒﻤﻟﺍ ﻦﻣ ﺔﻟﻮﻬﺴﺑ ﻲﻓﺮﻄﻟﺍ ءﺎﻄﻐﻟﺍ
.ﻲﻓﺮﻄﻟﺍ
5
ﺢﻄﺳ ﻰﻠﻋ ﻞﻔﺳﻷ ﺩﻮﻤﻌﻟﺍ ﻰﻠﻋ ﻂﻐﺿﺍﻭ ،ﺏﻮﻠﻘﻣ ﻞﻜﺸﺑ ﺾﺒﻘﻤﻟﺍ ﻚﺴﻣﺃ
ﺭﺮﻜﻓ ،ﺖﻴﺒﻤﻟﺍ ﻦﻣ ﺔﻟﻮﻬﺴﺑ ﺔﻴﻠﺧﺍﺪﻟﺍ ﺕﺎﻧﻮﻜﻤﻟﺍ ﺮﻳﺮﺤﺗ ﻢﺘﻳ ﻢﻟ ﺍﺫﺇ .ﺐﻠﺻ
.ﺔﻴﻠﺧﺍﺪﻟﺍ ﺕﺎﻧﻮﻜﻤﻟﺍ ﺮﻳﺮﺤﺗ ﻢﺘﻳ ﻰﺘﺣ 3 ﺓﻮﻄﺨﻟﺍ
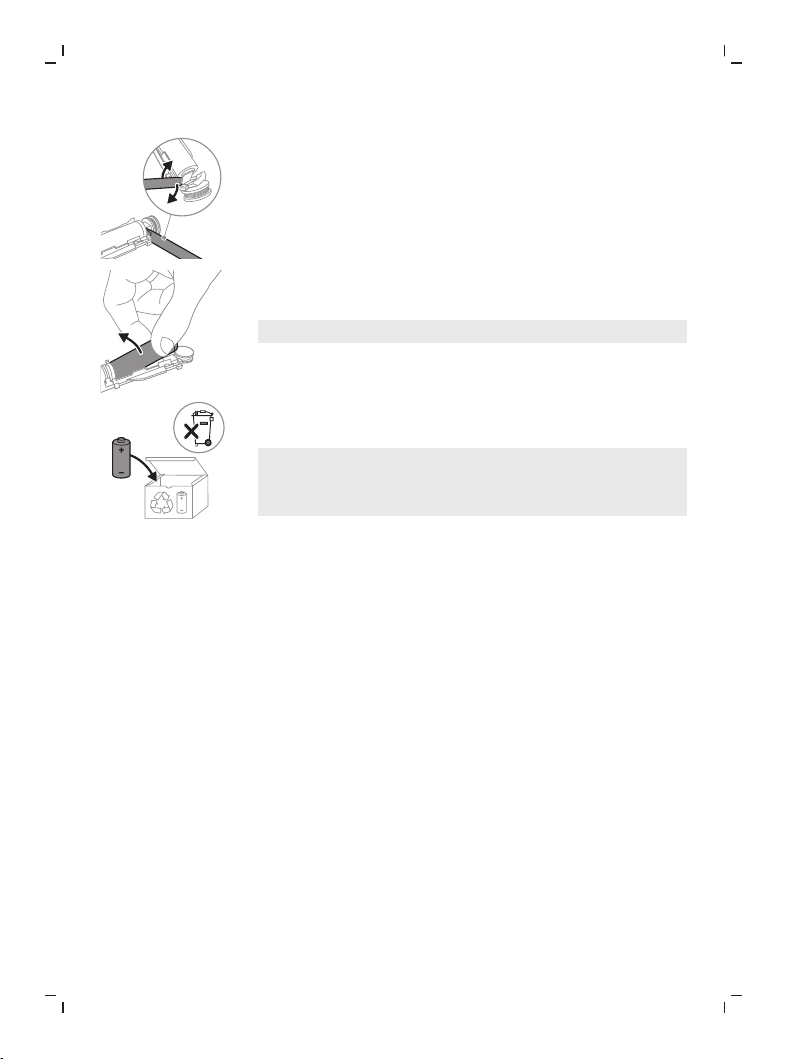
90
ﺔﻴﺑﺮﻌﻟﺍ
6
ﻦﻣ ﻲﻠﻔﺴﻟﺍ ءﺰﺠﻟﺍ ﻲﻓ ﺩﻮﺳﻷﺍ ﺭﺎﻃﻹﺍﻭ ﺔﻳﺭﺎﻄﺒﻟﺍ ﻦﻴﺑ ﻲﻏﺍﺮﺒﻟﺍ ﻚﻔﻣ ﻢﺤﻗﺃ
ءﺰﺠﻟﺍ ﻞﺼﻔﻟ ﺔﻳﺭﺎﻄﺒﻟﺍ ﻦﻋ ﺍﹰﺪﻴﻌﺑ ﻢﺤﻘﹹﻤﻟﺍ ﻚﻔﻤﻟﺍ ﻞﻣﹶﺃ ﻢﺛ .ﺔﻴﻠﺧﺍﺪﻟﺍ ﺕﺎﻧﻮﻜﻤﻟﺍ
.ﺩﻮﺳﻷﺍ ﺭﺎﻃﻹﺍ ﻦﻣ ﻲﻠﻔﺴﻟﺍ
7
ﻞﺼﻔﻟ ﺩﻮﺳﻷﺍ ﺭﺎﻃﻹﺍﻭ ﺔﻳﺭﺎﻄﺒﻟﺍ ﻦﻣ ﻲﻠﻔﺴﻟﺍ ءﺰﺠﻟﺍ ﻦﻴﺑ ﻲﻏﺍﺮﺒﻟﺍ ﻚﻔﻣ ﻞﺧﺩﺃ
ﺔﻋﻮﺒﻄﻤﻟﺍ ﺔﻴﺋﺎﺑﺮﻬﻜﻟﺍ ﺓﺮﺋﺍﺪﻟﺍ ﺔﺣﻮﻠﺑ ﺔﻳﺭﺎﻄﺒﻟﺍ ﻂﺑﺮﻳ ﻱﺬﻟﺍ ﻲﻧﺪﻌﻤﻟﺍ ﻥﺎﺴﻠﻟﺍ
.ﺭﺎﻃﻹﺍ ﻦﻣ ﺔﻳﺭﺎﻄﺒﻠﻟ ﻲﻠﻔﺴﻟﺍ ﻑﺮﻄﻟﺍ ﺮﻳﺮﺤﺗ ﻰﻟﺇ ﺍﺬﻫ ﻱﺩﺆﻴﺳ .ﺮﻀﺧﻷﺍ ﻥﻮﻠﻟﺎﺑ
8
ﺔﻳﺭﺎﻄﺒﻟﺍ ﻥﺎﺴﻟ ﻞﺼﻔﻟ ﺔﻴﻠﺧﺍﺪﻟﺍ ﺕﺎﻧﻮﻜﻤﻟﺍ ﻦﻋ ﺍﹰﺪﻴﻌﺑ ﺎﻬﺒﺤﺳﺍﻭ ﺔﻳﺭﺎﻄﺒﻟﺍ ﻚﺴﻣﺃ
.ﻲﻧﺎﺜﻟﺍ ﻲﻧﺪﻌﻤﻟﺍ
.ﻚﻌﺑﺎﺻﺃ ﺔﺑﺎﺻﺇ ﺐﻨﺠﺘﻟ ﺔﻳﺭﺎﻄﺒﻟﺍ ﺔﻨﺴﻟﻷ ﺓﺩﺎﺤﻟﺍ ﻑﺍﻮﺤﻟﺍ ﻦﻣ ﻪﺒﺘﻧﺍ :ﻪﻴﺒﻨﺗ
9
ﺮﺼﻗ ﺙﻭﺪﺣ ﺐﻨﺠﺘﻟ ﻖﺻﻻ ﻂﻳﺮﺸﺑ ﺔﻳﺭﺎﻄﺒﻟﺍ ﺲﻣﻼﺗ ﻑﺍﺮﻃﺃ ﺔﻴﻄﻐﺘﺑ ﻢﻗ
.ﺔﻴﻘﺒﺘﻤﻟﺍ ﺔﻳﺭﺎﻄﺒﻟﺍ ﺕﺎﻨﺤﺷ ﻦﻣ ﻲﺋﺎﺑﺮﻬﻛ
ﻦﻣ ﺺﻠﺨﺘﻟﺍ ﻦﻜﻤﻳﻭ ﻦﺤﺸﻟﺍ ﺓﺩﺎﻋﻹ ﺔﻠﺑﺎﻘﻟﺍ ﺔﻳﺭﺎﻄﺒﻟﺍ ﺮﻳﻭﺪﺗ ﺓﺩﺎﻋﺇ ﻥﻵﺍ ﻦﻜﻤﻳ
.ﺐﺳﺎﻨﻣ ﻞﻜﺸﺑ ﺞﺘﻨﻤﻟﺍ ﻲﻗﺎﺑ
،ﻪﺘﻴﺣﻼﺻ ﺓﺮﺘﻓ ﺔﻳﺎﻬﻧ ﻲﻓ ﺓﺩﺎﺘﻌﻤﻟﺍ ﺔﻴﻟﺰﻨﻤﻟﺍ ﺕﺎﻳﺎﻔﻨﻟﺍ ﻊﻣ ﺯﺎﻬﺠﻟﺍ ﻖﻠﺗ ﻻ :ﺔﻈﺣﻼﻣ
ﻚﻣﺎﻴﻘﺑ .ﻩﺮﻳﻭﺪﺗ ﺓﺩﺎﻋﺇ ﻞﺟﺃ ﻦﻣ ﺔﻴﻤﺳﺭ ﻊﻴﻤﺠﺗ ﺔﻄﻘﻧ ﻰﻟﺇ ﻪﻤﻴﻠﺴﺘﺑ ﻢﻗ ﻦﻜﻟﻭ
.ﺔﺌﻴﺒﻟﺍ ﻰﻠﻋ ﺔﻈﻓﺎﺤﻤﻟﺍ ﻲﻓ ﺪﻋﺎﺴﺗ ﺖﻧﺄﻓ ﻚﻟﺬﺑ



Empty page before back cover

US
Philips Oral Healthcare, LLC.
22100 Bothell Everett Highway
Bothell, WA 98021 USA
EU
Philips Consumer Lifestyle BV
Tussendiepen 4
9206 AD Drachten, The Netherlands
www.philips.com/Sonicare
© 2024 Koninklijke Philips N.V. (KPNV). All rights reserved. Philips and the Philips
shield are trademarks of KPNV. Sonicare and the Sonicare logo are trademarks of
Philips Oral Healthcare, LLC and/or KPNV.
300012943751 2024-10-24
ﻲﺳ لا لا ،رﯾﻛﺛﻠﯾھ لاروأ سﺑﯾﻠﯾﻓ
ﻊﯾرﺳﻟا
تﯾرﻔﯾإ لﯾﺛوﺑ ﻖﯾرط ۲۲۱۰۰
،۹۸۰۲۱ نطﻧﺷاو ،لﯾﺛوﺑ
ﺔﯾﻛﯾرﻣﻷا ةدﺣﺗﻣﻟا تﺎﯾﻻوﻟا
،نﺗﺷارد AD ۹۲۰٦ ،٤ نﺑﯾﯾدﻧﺎﺳوﺗ - .ﻲﻓ.ﻲﺑ لﯾﺎﺗﺳﻔﯾﻻ رﻣوﯾﺳﻧوﻛ سﺑﯾﻠﯾﻓ
ادﻧﻟوھ
ﺔﯾﻛﯾرﻣﻷا ةدﺣﺗﻣﻟا تﺎﯾﻻوﻟا
ﺎﺑوروأ

