sharkninja.com
IMPORTANT SAFETY INSTRUCTIONS
PLEASE READ ALL INSTRUCTIONS BEFORE USE • FOR HOUSEHOLD USE ONLY
Read and review instructions for operation and use.
Indicates the presence of a hazard that can cause personal injury, death, or substantial property damage if
the warning included with this symbol is ignored.
For indoor and household use only.
When using electrical appliances, basic safety precautions should always be followed, including the following:
CREAMI®
NC351 Series | Owner’s Guide
1 Read all instructions prior to using the appliance and its accessories.
2 Carefully observe and follow all warnings and instructions. This unit contains electrical connections
and moving parts that potentially present risk to the user.
3 Take inventory of all contents to ensure you have all parts needed to properly and safely operate
your appliance.
4 Turn the appliance OFF, then unplug the appliance from the outlet when not in use, before
assembling or disassembling parts, and before cleaning. To unplug, grasp the plug by the body and
pull from the outlet. NEVER unplug by grasping and pulling the flexible cord.
5 Before use, wash all parts that may contact food. Follow washing instructions covered in the
instruction manual.
6 Before each use, inspect Creamerizer™ Paddle for damage. If paddle is bent or damage is suspected,
contact SharkNinja to arrange for replacement.
7 DO NOT use this appliance outdoors. It is designed for indoor household use only.
8 This appliance has a polarized plug (one prong is wider than the other). To reduce the risk of electric
shock, this plug will fit in a polarized outlet only one way. If the plug does not fit fully in the outlet,
reverse the plug. If it still does not fit, contact a qualified electrician. DO NOT modify the plug in any
way.
9 DO NOT operate any appliance with a damaged cord or plug, or after the appliance malfunctions
or is dropped or damaged in any manner. This appliance has no user-serviceable parts. If damaged,
contact SharkNinja for servicing.
10 This appliance has important markings on the plug. The entire supply cord is not suitable for
replacement. If damaged, please contact SharkNinja for service.
11 Extension cords should NOT be used with this appliance.
12 To protect against the risk of electric shock, DO NOT submerge the appliance or allow the power
cord to contact any form of liquid.
13 DO NOT allow the cord to hang over the edges of tables or counters. The cord may become snagged
and pull the appliance o the work surface.
14 DO NOT allow the unit or the cord to contact hot surfaces, including stoves and other heating
appliances.
15 ALWAYS use the appliance on a dry and level surface.
WARNING: To reduce the risk of injury, fire, electrical shock or property damage, basic safety
precautions must always be followed, including the following numbered warnings and subsequent
instructions. Do not use appliance for other than intended use.
sharkninja.com
sharkninja.com
IMPORTANT SAFETY INSTRUCTIONS
PLEASE READ ALL INSTRUCTIONS BEFORE USE • FOR HOUSEHOLD USE ONLY
16 DO NOT allow children to operate this appliance or use as a toy. Close supervision is necessary when
any appliance is used near children.
17 This appliance is NOT intended to be used by people with reduced physical, sensory, or mental
capabilities, or lack of experience and knowledge, unless they have been given supervision or
instruction concerning use of the appliance by a person responsible for their safety.
18 ONLY use attachments and accessories that are provided with the product or are recommended by
SharkNinja. The use of attachments not recommended or sold by SharkNinja may cause fire, electric
shock, or injury.
19 NEVER place the Creamerizer™ Paddle on the motor base without it first being attached to the outer
bowl lid and the lid being attached to the outer bowl.
20 Keep hands, hair, and clothing out of the container when loading and operating.
21 During operation and handling of the appliance, avoid contact with moving parts.
22 DO NOT fill containers past the MAX FILL lines.
23 DO NOT operate the appliance with an empty container.
24 DO NOT microwave the containers or accessories provided with the appliance, except the Creami®
Pint. The pint can be microwaved.
25 DO NOT microwave the pint for more than 8 minutes at a time. Wait until cooled before
microwaving again.
26 NEVER leave the appliance unattended while in use.
27 DO NOT mix hot liquids. Doing so may result in pressure buildup and steam exposure that can pose a
risk of the user being burned.
28 DO NOT process dry ingredients without adding liquid to the pint. It is not intended for dry blending.
29 DO NOT perform grinding operations.
30 NEVER operate the appliance without lids in place. DO NOT attempt to defeat the interlock
mechanism. Ensure the container and lid are properly installed before operation.
31 Before operation, ensure all utensils are removed from containers. Failure to remove utensils can
cause containers to shatter and potentially result in personal injury and property damage.
32 Keep hands and utensils out of containers while mixing to reduce the risk of severe personal injury or
damage to the unit. A scraper may be used ONLY when the processor is not running.
33 DO NOT carry the unit by the handle of the outer bowl. Hold the unit by grasping both sides of the
unit under the head.
34 DO NOT process hard, loose ingredients or ice. This appliance is not intended to process loose frozen
fruit, a block of solid ice, or ice cubes.
35 DO NOT freeze the pint at an angle. Pints must be placed on a level surface in the freezer. Pints
frozen at an angle should NOT be processed.
SAVE THESE INSTRUCTIONS
DID YOU KNOW?
You can use the outer bowl to carry the Creami Pint after removing it from the freezer.
1 Remove all packaging materials from the unit.
2 Wash containers, lids, and paddle in warm, soapy water. Use a dishwashing utensil with a handle to
clean the paddle.
3 Thoroughly rinse and air-dry all parts.
4 Wipe control panel with a soft cloth.
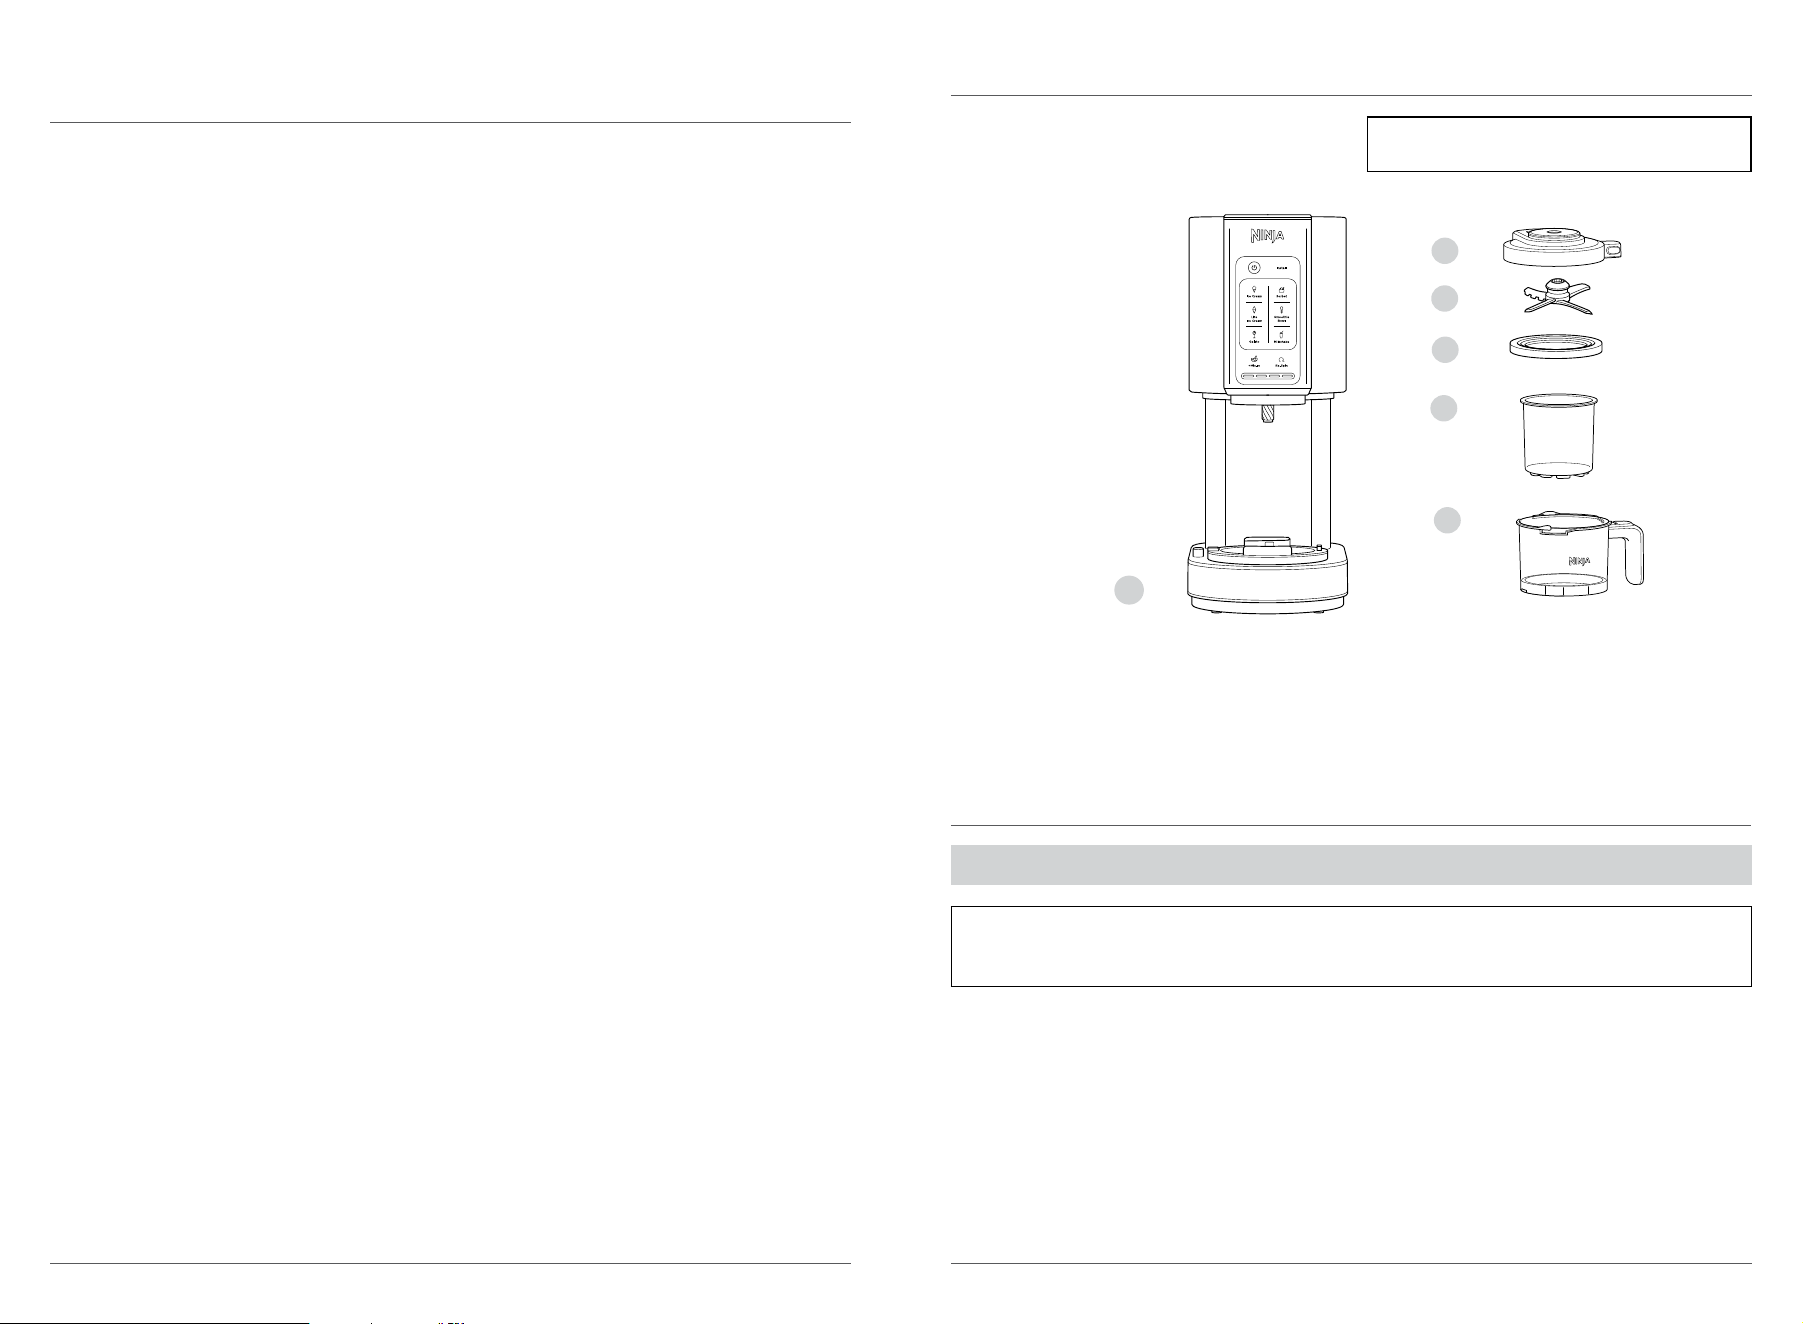
PARTS
A Motor Base
(attached power cord not shown)
B Outer Bowl Lid
C Creamerizer™ Paddle
D Creami® Pint Lid
E 16 oz. Creami Pint
F Outer Bowl
NOTE: Unit color, programs, and number of
pints and lids may vary by model.
IMPORTANT: Review all warnings at the beginning of this Owner’s Guide before proceeding.
NOTE: All attachments are BPA free. Accessories are top-rack dishwasher safe and should NOT be
cleaned with a heated dry cycle and dishwasher safe (top rack only). Ensure the paddle, pint, outer bowl,
and lids are all separated before placing in the dishwasher.
BEFORE FIRST USE
A
F
E
D
B
C
sharkninja.com
sharkninja.com
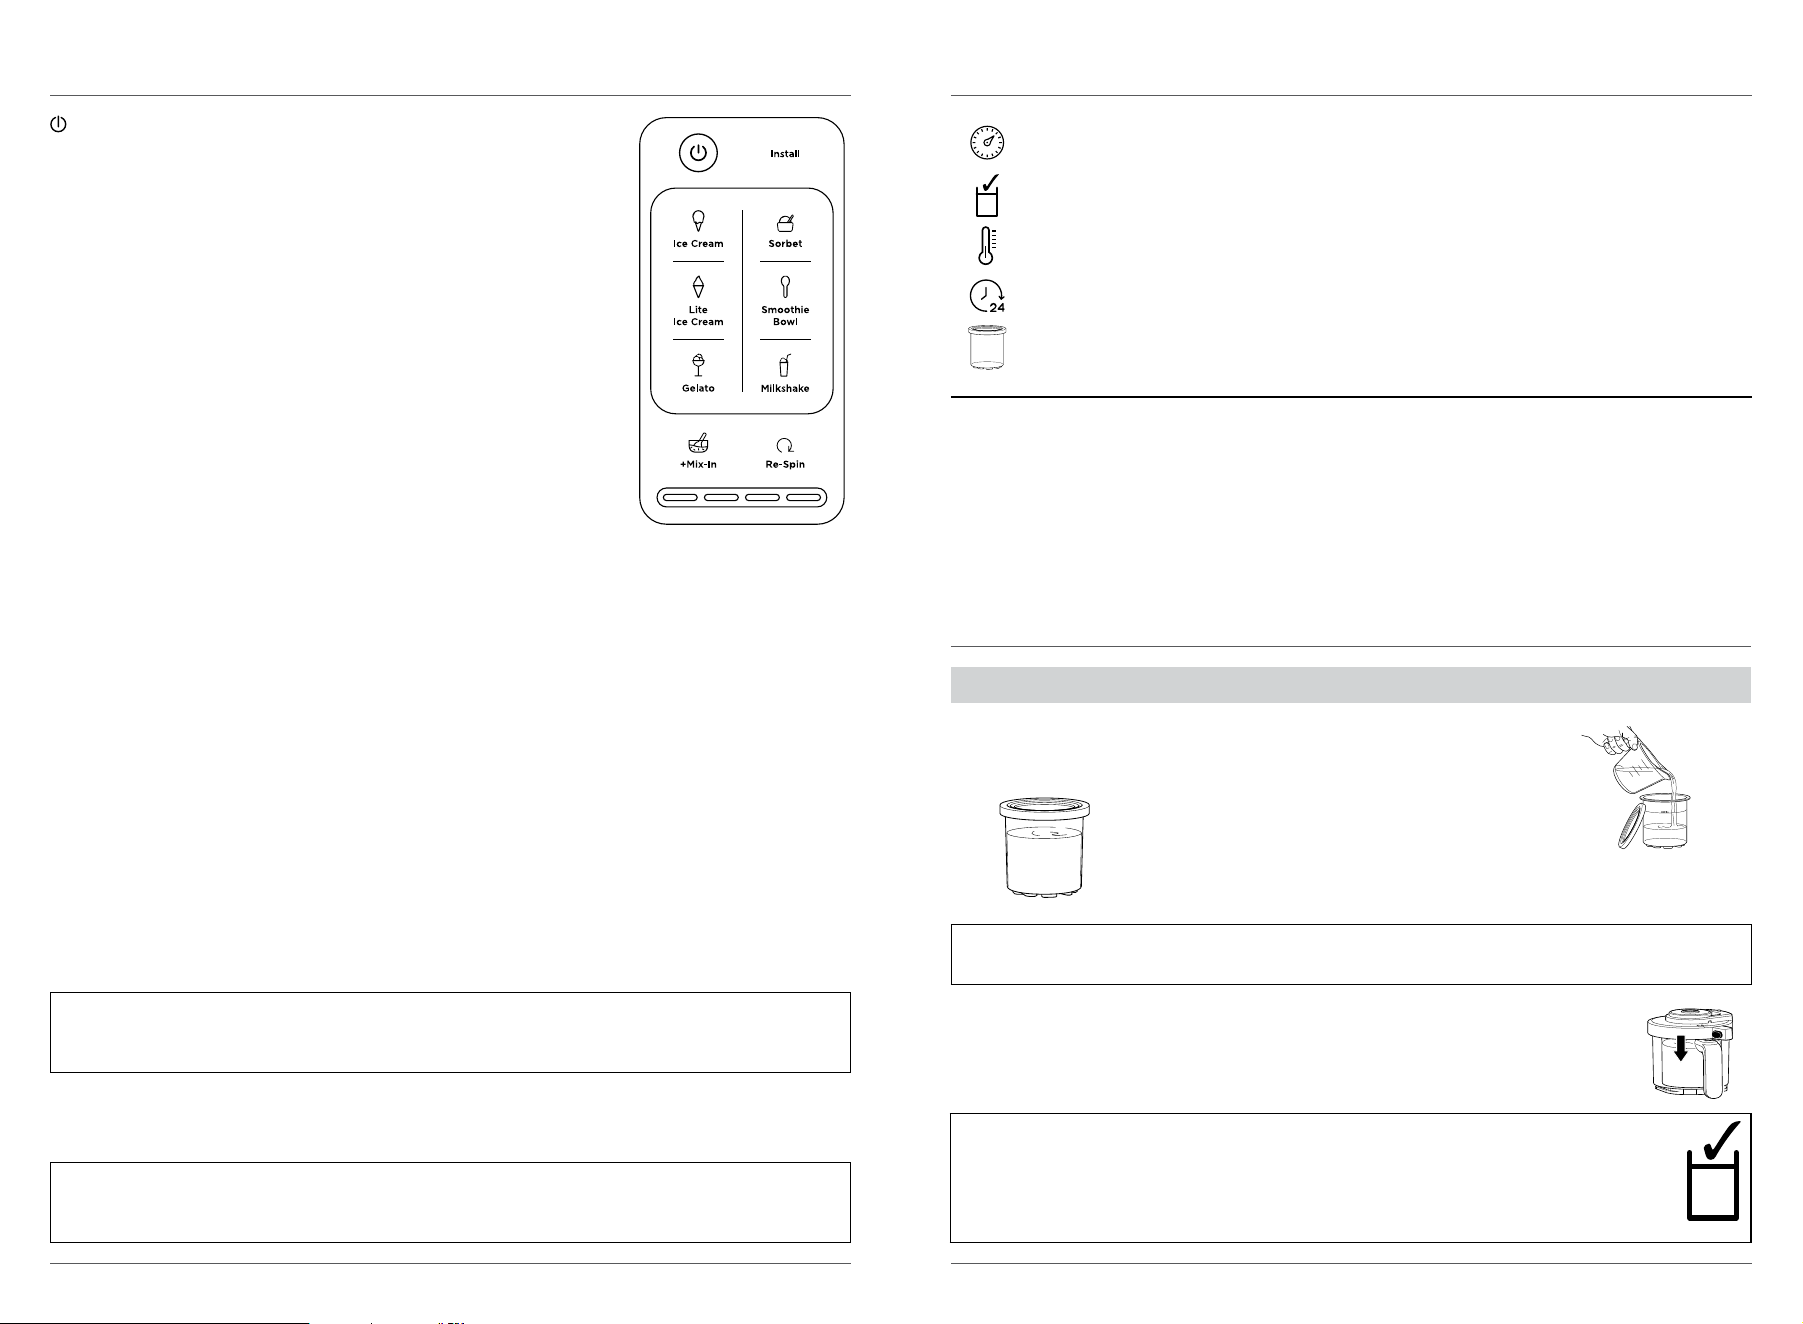
USING THE CONTROL PANEL FREEZING TIPS
Use the Power button to turn the unit on or o.
ICE CREAM
Designed for traditionally indulgent recipes. Great for turning dairy and dairy-alternative recipes into
thick, creamy, and scoopable ice creams.
LITE ICE CREAM
Designed for health-conscious consumers to make ice creams that are low in sugar or fat or use sugar
substitutes. Choose when processing keto or paleo recipes.
SORBET
Designed to transform fruit-based recipes with high water and sugar content into creamy delights.
MILKSHAKE
Designed to create quick and thick milkshakes. Simply combine your favorite ice cream (store-bought or
homemade), milk, and mix-ins and select MILKSHAKE.
GELATO
Transforms cooked bases into rich, dense, Italian-style ice cream.
SMOOTHIE BOWL
Designed for recipes that are made from fruit and/or vegetables frozen together with dairy, dairy
alternatives, or juice.
MIX-IN
Designed to fold in pieces of candies, cookies, nuts, cereal, or frozen fruit to customize a just-processed
base or store-bought treat.
Don’t want to wait 24 hours? Customize store-bought ice cream with mix-ins or make a milkshake.
To customize store-bought ice cream, scoop the ice cream into a pint and skip to step 11a.
THIS IS NOT A BLENDER.
DO NOT process a solid block of ice or ice cubes.
DO NOT make a smoothie or process hard, loose ingredients.
Fruit must be crushed to release its juice or combined with other ingredients and frozen before processing.
INSTALL LIGHT
The install light will illuminate when the unit is not fully assembled for
use. If the light is blinking, make sure the bowl is properly installed. If
the light is solid, check that the paddle is installed.
PROGRESS BAR
The progress bar indicates the progress of the One-Touch Program.
All 4 progress bar LEDs will flash twice and then turn o when the
program is complete.
ONE-TOUCH PROGRAMS: 1–2
1
/2 MINUTES
Each One-Touch Program is intelligently designed to whip up
delicious creations in 1–2
1
/2 minutes. Programs vary in length and
speed depending on the optimal settings to get perfectly creamy
results for that type of recipe.
NOTE: Mix-ins work best if they are added in the middle of the Creami Pint. After processing the pint,
use a spoon to create a 1
1
/2-inch wide hole that reaches the bottom of the pint. Add chopped or
broken mix-ins to the hole in the pint and process again using the MIX-IN program.
NOTE:
• Do not RE-SPIN before using the MIX-IN program.
• To stop an active program, simply press the program button that is illuminated.
RE-SPIN
Designed to ensure a smooth texture after running one of the preset programs. RE-SPIN is often needed
when the base is very cold (below -7°F) and the texture is crumbly rather than creamy.
For best results, set your freezer between 9°F and -7°F. The Creami® is designed to
process bases within this range. If your freezer is within this range, the pint should reach the
appropriate temperature.
For best results, do not freeze the pint at angle. Place the pint on a level surface in the freezer.
Upright freezers work best. We do not recommend using a chest freezer, as they tend to reach
extremely cold temperatures.
Freeze the base for at least 24 hours. While it may be frozen, the base needs to reach an even
colder temperature before it can be processed.
Make the most of your time by prepping several pints at once. Keep these pints in your freezer
to Creamify™ on demand whenever the craving strikes.
RESETTING THE MOTOR
1 Add ingredients to the Creami Pint. DO NOT add ingredients past the
MAX FILL line on the pint. To find ingredients, you can choose from
hundreds of recipes at ninjacreami.com.
2 If the recipe requires the ingredients to be frozen, snap the lid on the pint
and freeze for at least 24 hours.
3 Plug in the unit and place on a clean, dry, level surface such as a countertop
or table.
NOTE: For best results, do not process the pint if ingredients have been frozen at an angle or
if the pint has been scooped out of and then refrozen unevenly.
Always smooth-out the surface of a processed treat before re-freezing in the pint. If the pint
is frozen unevenly, put the pint in the fridge to allow the ingredients to melt. Then whisk to
make sure the ingredients are combined. Refreeze, making sure to place the pint on a level
surface in the freezer.
NOTE: The unit must be plugged in before assembly. The unit will not run if the outer bowl is installed
before the unit is plugged in.
IMPORTANT: Review all warnings before proceeding.
sharkninja.com
sharkninja.com
USING THE CREAMI® – CONT
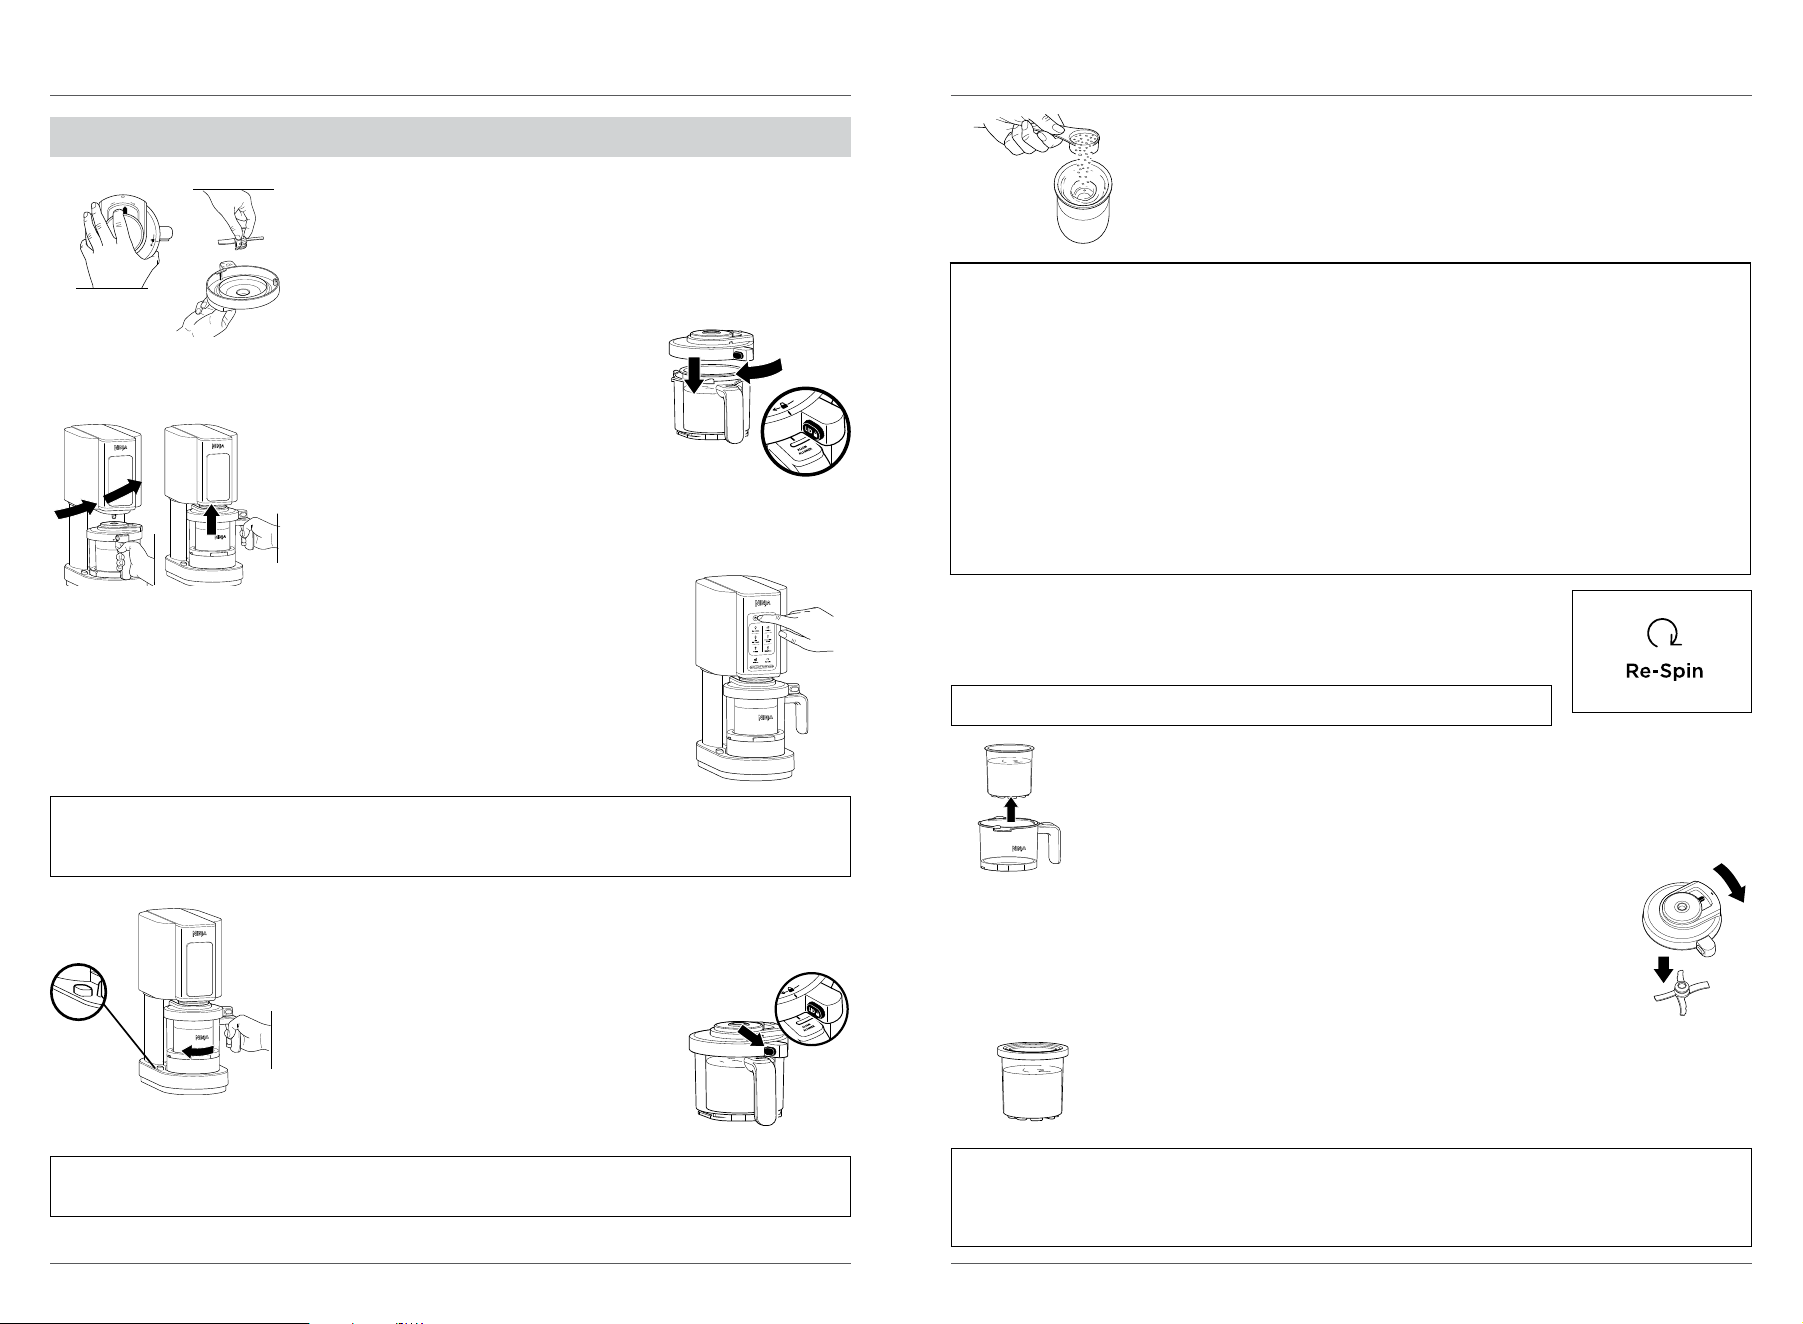
4 When the base is prepped or frozen, remove the pint lid and place
the pint in the outer bowl.
5 Press and hold the paddle latch on the top of the outer bowl lid,
then insert the Creamerizer™ Paddle in the bottom of the lid.
Release the latch to secure the paddle. When fully installed, the
latch will be centered and the paddle will be slightly loose.
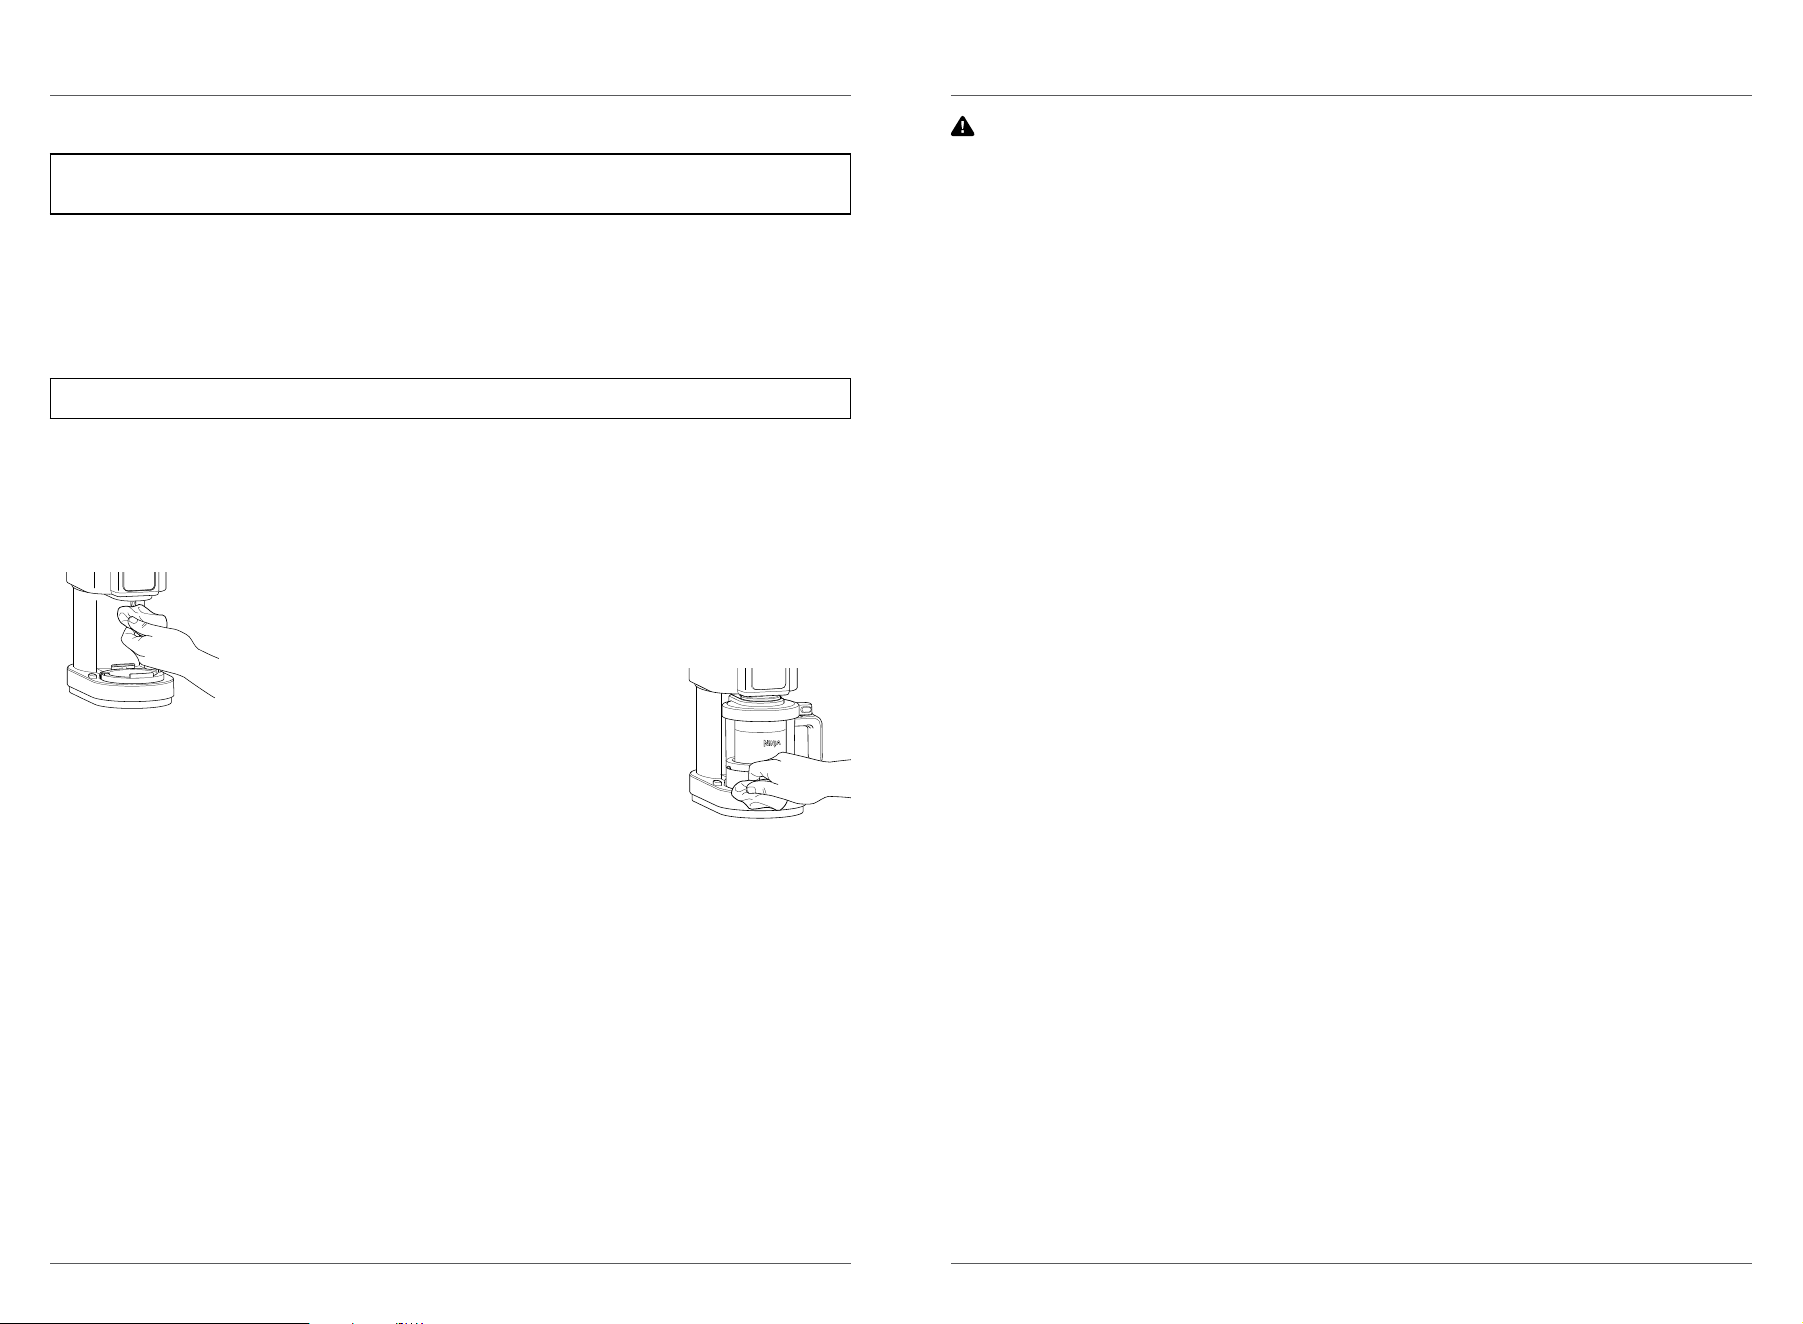
11a If adding mix-ins, use a spoon to create a 1 1/2-inch wide hole that reaches
the bottom of the pint. Add chopped or broken mix-ins to the hole in the
pint and repeat steps 6–10 to process again using the MIX-IN program.
NOTE: If the install light is illuminated, the unit is not fully assembled for use. If the light is blinking,
make sure the bowl is properly installed. If the light is solid, check that the paddle is installed. Make
sure to plug the unit in before installing the bowl.
NOTE: Do not RE-SPIN before using the MIX-IN program.
MIX-IN TIPS
We recommend adding
1
/4 cup of your favorite crushed candies, frozen fruits, chopped nuts,
chocolate pieces, and more. When adding several dierent types of mix-ins, we recommend not
exceeding
1
/4 cup in total. Feel free to adjust the quantity of mix-ins to your taste but make sure
that the outer bowl lid can still comfortably close over the pint.
Hard mix-ins will remain intact.
Mix-ins like chocolate, candy, and nuts will not be broken down during the MIX-IN program. We
recommend using mini chocolate chips and candies or pre-chopped ingredients.
Soft mix-ins will get broken down. Mix-ins like cereal, cookies, and frozen fruit will end up smaller
after the MIX-IN program. We recommend using bigger pieces of soft ingredients.
For ice cream and gelato, we do not recommend fresh fruit, sauces, and spreads as mix-ins.
Adding fresh fruit, fudge, and caramel sauces will water down your treat. Chocolate hazelnut
spread and nut butters also do not mix well. We recommend using frozen fruit or chocolate/
caramel shell toppings.
NOTE: The unit does not allow One-Touch Programs to be run back to back. Between programs,
lower the bowl and check the results before proceeding.
NOTE:
• Leftovers can be stored in other containers. However, we recommend storing leftovers in a pint so
that it can be processed again if necessary.
• If your treat contains mix-ins, processing again will further crush your mix-ins and create a new flavor.
IMPORTANT: Review all warnings before proceeding.
6 Position the tab of the lid just slightly to the right of the outer bowl handle
so the lines on the lid and handle align. Rotate the lid clockwise to lock.
11b If not adding mix-ins, RE-SPIN can be used on a crumbly or powdery pint
to make it more creamy. RE-SPIN is often needed for very cold bases. If
the treat is smooth and scoopable, go to step 12. If the base is crumbly or
powdery, repeat steps 6–10 to process again using the RE-SPIN program.
7 After plugging in the unit, slide outer bowl onto base with handle
pointing toward you. Turn handle counterclockwise to raise platform
until it clicks into place.
12 Lift the pint out of the outer bowl. Enjoy your treat!
8 Press the power button to turn on the unit. If the outer bowl is properly
installed, the One-Touch Programs will illuminate and the unit will be
ready for use. Select the program that best suits your recipe. The
program will automatically stop when complete.
13 Rinse the outer bowl lid to remove any sticky residue or pieces wedged in the
Creamerizer Paddle. Then detach the paddle by pressing the latch on the top
of the outer bowl lid. For easy cleanup, release paddle directly into the sink.
14 Turn the unit o by pressing the power button. Unplug the unit when finished.
Refer to the Care & Maintenance section for cleaning and storage instructions.
9 When the program is complete, remove the outer bowl by holding the
bowl release button on the left side of the motor base and twisting the
handle back to the center. As the handle is twisted, the platform will
lower the bowl. Lift bowl to remove.
15 Didn’t finish your pint? Flatten the top of your frozen treat with a spoon
or spatula before refreezing. If the treat is hard after re-freezing, process it
again on the program you used to make it. If it’s soft, just scoop and enjoy it.
10 To remove the lid, press the lid unlock button and twist the lid counterclockwise.
P
A
D
D
L
E
L
A
T
C
H
sharkninja.com
sharkninja.com
TROUBLESHOOTING GUIDETROUBLESHOOTING GUIDE
WARNING: To reduce the risk of shock and unintended operation, turn power o and unplug
unit before troubleshooting.
Unit moves on counter while processing.
• Make sure the countertop and the feet of the unit are clean and dry.
Frozen treat is liquid, not solid, after processing.
• If a base is soft after processing, put the Creami® Pint back in the freezer for several hours or until
desired consistency is reached.
• For best results, freeze base for at least 24 hours and process immediately after removing from the
freezer. If the processed base is still not firm, try setting your freezer to a colder temperature. The unit
is designed to process bases between 9°F and -7°F.
• The proportion of fat or sugar may be too high in your recipe. Consult the inspiration guide and use
the included recipes as a guide for best results.
Frozen treat looks crumbly or powdery after processing.
• When bases are frozen in very cold freezers, they may come out crumbly. After running a One-Touch
Program, use the RE-SPIN program to make your frozen treat smoother and creamier.
• The proportion of fat or sugar may be too low in your recipe. Consult the inspiration guide and use the
included recipes as a guide for best results.
One-Touch Programs will not illuminate.
• Ensure the unit is plugged into a working outlet before installing the outer bowl. Then press the power
button to select a program.
• Make sure the unit is fully assembled for use. If the unit is powered on and the outer bowl is not
installed correctly, the install light will flash. If the paddle is not installed correctly, the install light will
illuminate. All One-Touch Programs will illuminate when the unit is fully assembled.
• The unit does not allow you to run programs back to back. Between programs, lower the bowl and
check the results before raising the bowl and running another program.
Install light is flashing.
• The outer bowl is not installed or is not installed correctly. Make sure to install the paddle into the
outer bowl lid and the lid onto the outer bowl. Then place the outer bowl onto the motor base with the
handle centered below the control panel. Twist the handle to the right to raise the platform and lock
the bowl in place.
Install light is steadily illuminated.
• The outer bowl is correctly installed, but the paddle is missing or has been incorrectly installed. Lower
the platform by pressing and holding the bowl release button on the left of the motor base while
twisting the outer bowl handle toward the center. Be sure the paddle is installed in the lid.
One progress bar light as well as all program lights are flashing.
• The motor has overloaded and needs to be reset. Unplug the unit, remove the bowl, and allow the
motor base to cool for approximately 15 minutes before running again.
• Remove the outer bowl lid and paddle. Ensure no ingredients are jamming the lid assembly.
• The ingredients you are trying to process might be too dense. Make sure you are using ingredients
with sugar or fat. Follow the recipes in the inspiration guide for best results.
• Your freezer might be very cold. The unit is designed to process bases between 9°F and -7°F. Change
the setting of your freezer, move the pint to the front of your freezer, or leave the pint out on the
counter for a few minutes before processing.
• DO NOT process a solid block of ice, ice cubes, or hard, loose ingredients.
Middle two segments of the progress bar are flashing.
• There was an error and the program did not successfully complete. Check that the paddle is installed
properly and try running the program again.
• Pint froze at an angle in the freezer.
• For best results, do not process a pint that has been frozen at an angle or scooped out of and then
refrozen unevenly.
• Always smooth-out the surface of your ice cream before re-freezing. If the pint is frozen unevenly, put
the pint in the fridge to allow the ingredients to melt. Then whisk to make sure the ingredients are
combined. Refreeze, making sure to place the pint on a level surface in your freezer.
CLEANING
NOTE: Before cleaning, make sure to remove the Creamerizer™ Paddle from the outer bowl lid by
rinsing the lid and then pressing the paddle latch.
NOTE: For best results, use a dishwasher to remove stuck-on ingredients.
• Hand-Washing
Wash containers, lids, and paddle in warm, soapy water. Use a dishwashing utensil with a handle to
clean the paddle. Thoroughly rinse and air-dry all parts.
• Dishwasher
Accessories are top-rack dishwasher safe and should NOT be cleaned with a heated dry cycle.
Ensure the paddle, pint, outer bowl, and lids are all separated before placing them in the dishwasher.
• Outer Bowl Lid
Remove the paddle before cleaning the outer bowl lid as ingredients may be stuck under the paddle.
Then run warm water through the paddle release lever and out the drain holes on either side. Position
the lid with the lever side down to fully drain the lid.
Remove the dark grey rubber lip seal wrapped around the middle of the underside of the outer bowl
lid. Then hand wash the lid and seal with warm, soapy water or place in the dishwasher.
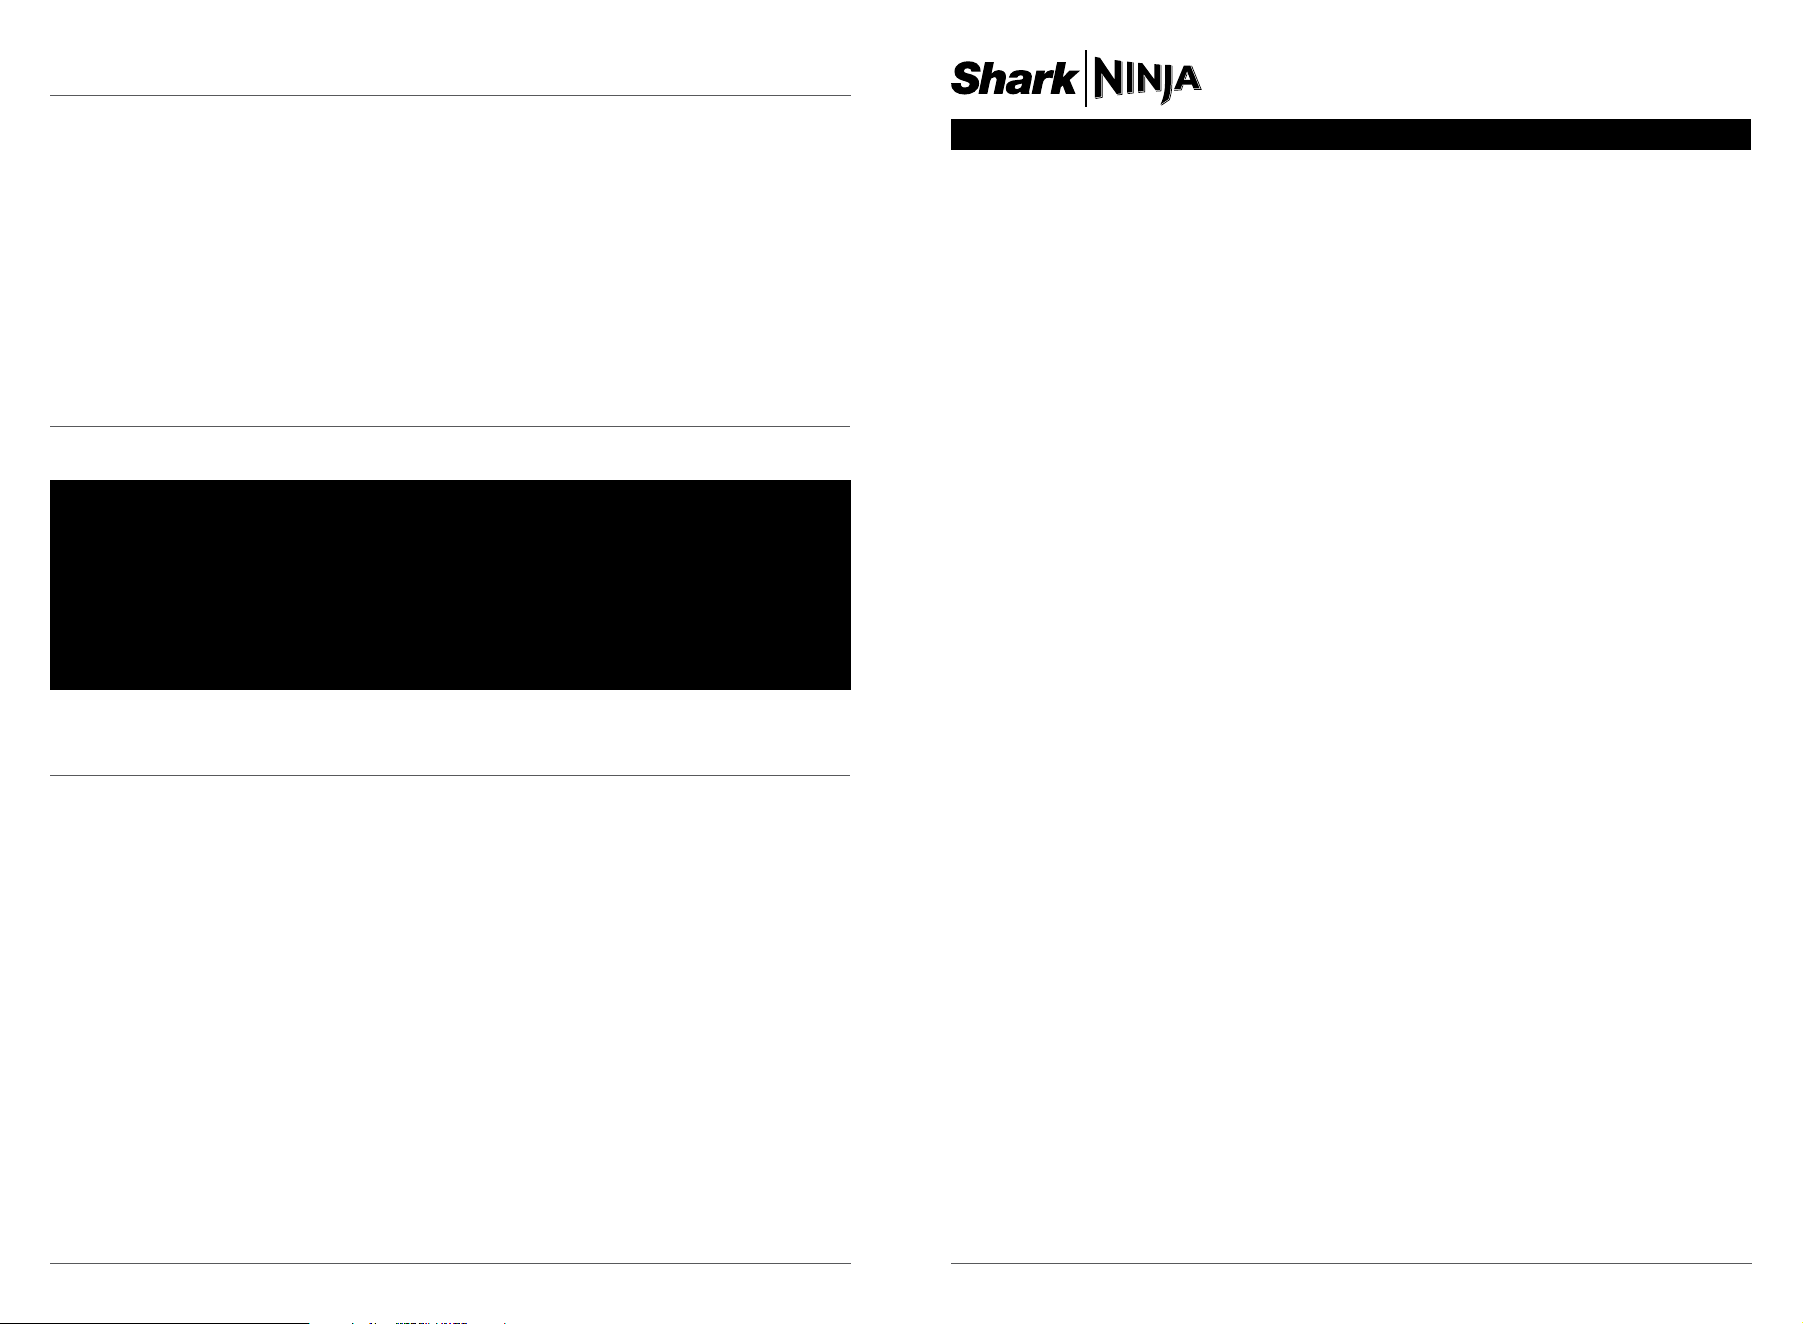
• Motor Base
Unplug the motor base before cleaning. Wipe motor base with a clean, damp
cloth. Do not use abrasive cloths, pads, or brushes to clean the base.
Using a damp cloth, wipe the spindle below the control panel after each use.
If liquid is trapped between the motor base and the platform, raise the platform
to clean. Place the outer bowl onto the motor base with the handle centered
below the control panel. Twist the handle to the right to raise the platform. Then
use a damp cloth to clean the area between the base and the raised platform.
STORING
For cord storage, wrap the cord with the hook-and-loop fastener near the back of the motor base.
DO NOT wrap the cord around the bottom of the base for storage.
Do store any remaining attachments alongside the unit or in a cabinet where they will not be damaged
or create a hazard.
RESETTING THE MOTOR
This unit features a unique safety system that prevents damage to the motor and drive system should
you inadvertently overload it. If the unit is overloaded, the motor will be temporarily disabled. Should this
occur, follow the reset procedure below.
1 Unplug the unit from the electrical outlet.
2 Allow the unit to cool for approximately 15 minutes.
3 Remove the outer bowl lid and paddle. Ensure no ingredients are jamming the lid assembly.
IMPORTANT: Ensure that maximum capacities are not exceeded. This is the most typical cause of
appliance overload.
DO NOT process a solid block of ice or ice cubes. DO NOT make a smoothie or process hard, loose
ingredients. Fruit must be crushed to release its juice or combined with other ingredients and frozen
before processing.
sharkninja.com
sharkninja.com
The One (1) Year Limited Warranty applies to purchases made from authorized retailers of
SharkNinja Operating LLC. Warranty coverage applies to the original owner and to the original product
only and is not transferable.
SharkNinja warrants that the unit shall be free from defects in material and workmanship for a period
of one (1) year from the date of purchase when it is used under normal household conditions and
maintained according to the requirements outlined in the Owner’s Guide, subject to the following
conditions and exclusions:
What is covered by this warranty?
1. The original unit and/or non-wearable parts deemed defective, in SharkNinja’s sole discretion,
will be repaired or replaced up to one (1) year from the original purchase date.
2. In the event a replacement unit is issued, the warranty coverage ends six (6) months following the
receipt date of the replacement unit or the remainder of the existing warranty, whichever is later.
SharkNinja reserves the right to replace the unit with one of equal or greater value.
California Residents Only: The One (1) Year Limited Warranty period begins on the original date of
delivery or pickup.
What is not covered by this warranty?
1. Normal wear and tear of wearable parts (such as blending vessels, lids, cups, blades, blender
bases, removable pots, racks, pans, etc.), which require regular maintenance and/or replacement
to ensure the proper functioning of your unit, are not covered by this warranty. Replacement parts
are available for purchase at ninjaaccessories.com.
2. Any unit that has been tampered with or used for commercial purposes.
3. Damage caused by misuse, abuse, negligent handling, failure to perform required maintenance
(e.g., failure to keep the well of the motor base clear of food spills and other debris), or damage
due to mishandling in transit.
4. Consequential and incidental damages.
5. Defects caused by repair persons not authorized by SharkNinja. These defects include damages
caused in the process of shipping, altering, or repairing the SharkNinja product (or any of its parts)
when the repair is performed by a repair person not authorized by SharkNinja.
6. Products purchased, used, or operated outside North America.
How to get service
If your appliance fails to operate properly while in use under normal household conditions within the
warranty period, visit ninjakitchen.com/support for product care and maintenance self-help. Our
Customer Service Specialists are also available at 1-877-646-5288 to assist with product support and
warranty service options, including the possibility of upgrading to our VIP warranty service options
for select product categories. So we may better assist you, please register your product online at
registeryourninja.com and have the product on hand when you call.
SharkNinja will cover the cost for the customer to send in the unit to us for repair or replacement. A fee
of $20.95 (subject to change) will be charged when SharkNinja ships the repaired or replacement unit.
How to initiate a warranty claim
You must call 1-877-646-5288 to initiate a warranty claim. You will need the receipt as proof of purchase.
We also ask that you register your product online at registeryourninja.com and have the product on
hand when you call, so we may better assist you. A Customer Service Specialist will provide you with
return and packing instruction information.
How state law applies
This warranty gives you specifi c legal rights, and you also may have other rights that vary from state
to state. Some states do not permit the exclusion or limitation of incidental or consequential damages,
so the above may not apply to you.
ONE (1) YEAR LIMITED WARRANTY
NJA_1_YR_IB_LMTD_WRNTY_US_ENG
TROUBLESHOOTING GUIDE – CONT.
Outer bowl will not release from motor base after processing.
• Wait approximately 2 minutes, then try to remove the outer bowl again. Hold the release button on the
left side of the motor base and twist bowl handle clockwise to remove. This may take some force.
• To prevent the outer bowl from getting stuck on the motor base, make sure the cavity on top of the
paddle is fully dry before processing. Also, when processing dierent bases consecutively, make sure
to rinse and dry the paddle after processing each base. With some recipes, water may freeze between
the paddle and motor base causing them to stick together; drying the paddle between runs will
prevent this.
Inside of Creami® Pint is scratched.
• Light scratching of the pint is normal after regular use. To keep the pint from scratching, prep
ingredients in a separate bowl and avoid aggressive use of metal utensils in the pint. Clean with soft,
non-abrasive cloths.
To order additional parts and attachments, visit ninjaaccessories.com.
Visit registeryourninja.com to register your new Ninja® product within ten (10) days of purchase. You will be
asked to provide the store name, date of purchase, and model number along with your name and address.
The registration will enable us to contact you in the unlikely event of a product safety notification. By
registering, you acknowledge you have read and understood the instructions for use and warnings set forth
in the accompanying instructions.
ORDERING REPLACEMENT PARTS
PRODUCT REGISTRATION
GET HELP RIGHT NOW!
DON’T RETURN TO THE STORE.
Questions or Problems?
CALL US: 1-877-646-5288
Toll-free customer support line
REGISTER YOUR PURCHASE
registeryourninja.com
Scan QR code using mobile device
SharkNinja Operating LLC
US: Needham, MA 02494
1-877-646-5288
sharkninja.com
Illustrations may dier from actual product. We are constantly striving to improve our products;
therefore the specifications contained herein are subject to change withoutnotice.
CREAMI and NINJA are registered trademarks of SharkNinja Operating LLC.
CREAMERIZER and CREAMIFY are trademarks of SharkNinja Operating LLC.
This product may be covered by one or more U.S. patents.
See sharkninja.com/patents for more information.
© 2026 SharkNinja Operating LLC
NC351Series_IB_MP_Mv1
TECHNICAL SPECIFICATIONS
Voltage: 120V~, 60Hz
Power: 800 Watts
RECORD THIS INFORMATION
Model Number: _________________________
Serial Number: __________________________
Date of Purchase: ________________________
(Keep receipt)
Store of Purchase: _______________________
@ninjakitchen

