www.klarstein.com
WONDERWALL AIR
ART INFINITY
Infrarotheizung
Infrared Heater
Radiador infrarrojo
Radiateur Infrarouge
Riscaldatore a infrarossi
Infrarood verwarming
Hinweis: Das Gerät eignet sich nicht zur Nutzung als
primäre Heizquelle.
Note: The device is not suitable for use as a primary
heat source.
Remarque : l‘appareil ne convient pas en tant que
source principale de chauage.
Nota: il dispositivo non è idoneo ad essere utilizzato
come fonte di riscaldamento primaria.
Advertencia: el aparato no es apto para utilizar como
fuente de calefacción primaria.
Let op! Dit apparaat is niet geschikt voor gebruik als
primaire bron van verwarming.
10035168 10035169 10035170 10035171
10035172 10035173


3
DE
English 21
Français 37
Italiano 53
Español 69
Nederlands 85
Sehr geehrte Kundin, sehr geehrter Kunde,
wir gratulieren Ihnen zum Erwerb Ihres Gerätes. Lesen Sie
die folgenden Hinweise sorgfältig durch und befolgen Sie
diese, um möglichen Schäden vorzubeugen. Für Schäden,
die durch Missachtung der Hinweise und unsachgemäßen
Gebrauch entstehen, übernehmen wir keine Haftung.
Scannen Sie den QR-Code, um Zugriff auf die aktuellste
Bedienungsanleitung und weitere Informationen rund um
das Produkt zu erhalten.
INHALT
TECHNISCHE DATEN
Artikelnummer Ein/Aus
Stromversor-
gung
Abmessungen
10035168
10035171
300 W (±10 %)
220–240 V ~ 50 Hz
505x595x16 mm
10035169
10035172
580 W (±10 %) 595x900x16 mm
10035170
10035173
720 W (±10 %) 595x1195x16 mm
Technische Daten 3
Produktdatenblatt 4
Sicherheitshinweise 7
Wandinstallation 8
Displayanzeigen der Fernbedienung 9
Bedienung und Funktionen 9
Schnellstart 11
Spezielle Entsorgungshinweise für Verbraucher in Deutschland 17
Hinweise zur Entsorgung 19
Hersteller 19
4
DE
PRODUKTDATENBLATT
Modellkennung(en): 10035168, 10035171
Artikel Sym-
bol
Wert Einheit Artikel Einheit
Wärmeleistung Art der Wärmezufuhr, nur bei elektrischen
Speicherheizgeräte
Nennwärmeleistung P
nom
0,3 kW Manuelle Regelung der Wärmeabgabe
mit integriertem Thermostat
nein
Minimale Heizleistung
(indikativ)
P
min
0,0 kW Manuelle Regelung der Wärmeabgabe
mit Raum- und/oder Außentemperatur-
rückführung
nein
Maximale kontinuierli-
che Wärmeleistung
P
max,c
0,3 kW Elektronische Regelung der Wärmeab-
gabe mit Raum- und/oder Außentem-
peraturrückführung
nein
Zusätzlicher Stromverbrauch Gebläseunterstützte Heizleistung nein
Bei Nennwärmeleistung
(Ventilator-Motor)
el
max
0,300 kW Art der Wärmeleistung/Raumtemperaturkon-
trolle
Bei Mindestwärmeleis-
tung
(Ventilator-Motor)
el
min
0,000 kW Einstuge Wärmeleistung und keine
Raumtemperaturkontrolle
nein
Im Standby-Modus el
SB
0,000 W Zwei oder mehr manuelle Stufen, keine
Raumtemperaturkontrolle
nein
Raumtemperaturkontrolle mit mecha-
nischem Thermostat
nein
Mit elektronischer Raumtemperatur-
kontrolle
nein
Mit elektronischer Raumtemperatur-
kontrolle und Tages-Zeitschaltuhr
nein
Mit elektronischer Raumtemperatur-
kontrolle und Wochen-Zeitschaltuhr
ja
Weitere Kontrollmöglichkeiten (Mehrfachaus-
wahl möglich)
Raumtemperaturkontrolle mit Präsen-
zerkennung
nein
Raumtemperaturkontrolle mit Erken-
nung offener Fenster
ja
Mit Fernbedienungsoption nein
Mit adaptiver Startsteuerung nein
Mit Arbeitszeitbegrenzung nein
Mit Schwarzkugelsensor nein
Kontaktangaben Chal-Tec GmbH, Mühlenstraße 25, 10243 Berlin, Deutschland.
5
DE
Modellkennung(en): 10035169, 10035172
Artikel Sym-
bol
Wert Einheit Artikel Einheit
Wärmeleistung Art der Wärmezufuhr, nur bei elektrischen
Speicherheizgeräte
Nennwärmeleistung P
nom
0,58 kW Manuelle Regelung der Wärmeabgabe
mit integriertem Thermostat
nein
Minimale Heizleistung
(indikativ)
P
min
0,0 kW Manuelle Regelung der Wärmeabgabe
mit Raum- und/oder Außentemperatur-
rückführung
nein
Maximale kontinuierli-
che Wärmeleistung
P
max,c
0,58 kW Elektronische Regelung der Wärmeab-
gabe mit Raum- und/oder Außentem-
peraturrückführung
nein
Zusätzlicher Stromverbrauch Gebläseunterstützte Heizleistung nein
Bei Nennwärmeleistung
(Ventilator-Motor)
el
max
0,580 kW Art der Wärmeleistung/Raumtemperaturkon-
trolle
Bei Mindestwärmeleis-
tung
(Ventilator-Motor)
el
min
0,000 kW Einstuge Wärmeleistung und keine
Raumtemperaturkontrolle
nein
Im Standby-Modus el
SB
0,000 W Zwei oder mehr manuelle Stufen, keine
Raumtemperaturkontrolle
nein
Raumtemperaturkontrolle mit mecha-
nischem Thermostat
nein
Mit elektronischer Raumtemperatur-
kontrolle
nein
Mit elektronischer Raumtemperatur-
kontrolle und Tages-Zeitschaltuhr
nein
Mit elektronischer Raumtemperatur-
kontrolle und Wochen-Zeitschaltuhr
ja
Weitere Kontrollmöglichkeiten (Mehrfachaus-
wahl möglich)
Raumtemperaturkontrolle mit Präsen-
zerkennung
nein
Raumtemperaturkontrolle mit Erken-
nung offener Fenster
ja
Mit Fernbedienungsoption nein
Mit adaptiver Startsteuerung nein
Mit Arbeitszeitbegrenzung nein
Mit Schwarzkugelsensor nein
Kontaktangaben Chal-Tec GmbH, Mühlenstraße 25, 10243 Berlin, Deutschland.
6
DE
Modellkennung(en): 10035170, 10035173
Artikel Sym-
bol
Wert Einheit Artikel Einheit
Wärmeleistung Art der Wärmezufuhr, nur bei elektrischen
Speicherheizgeräte
Nennwärmeleistung P
nom
0,72 kW Manuelle Regelung der Wärmeabgabe
mit integriertem Thermostat
nein
Minimale Heizleistung
(indikativ)
P
min
0,0 kW Manuelle Regelung der Wärmeabgabe
mit Raum- und/oder Außentemperatur-
rückführung
nein
Maximale kontinuierli-
che Wärmeleistung
P
max,c
0,72 kW Elektronische Regelung der Wärmeab-
gabe mit Raum- und/oder Außentem-
peraturrückführung
nein
Zusätzlicher Stromverbrauch Gebläseunterstützte Heizleistung nein
Bei Nennwärmeleistung
(Ventilator-Motor)
el
max
0,720 kW Art der Wärmeleistung/Raumtemperaturkon-
trolle
Bei Mindestwärmeleis-
tung
(Ventilator-Motor)
el
min
0,000 kW Einstuge Wärmeleistung und keine
Raumtemperaturkontrolle
nein
Im Standby-Modus el
SB
0,000 W Zwei oder mehr manuelle Stufen, keine
Raumtemperaturkontrolle
nein
Raumtemperaturkontrolle mit mecha-
nischem Thermostat
nein
Mit elektronischer Raumtemperatur-
kontrolle
nein
Mit elektronischer Raumtemperatur-
kontrolle und Tages-Zeitschaltuhr
nein
Mit elektronischer Raumtemperatur-
kontrolle und Wochen-Zeitschaltuhr
ja
Weitere Kontrollmöglichkeiten (Mehrfachaus-
wahl möglich)
Raumtemperaturkontrolle mit Präsen-
zerkennung
nein
Raumtemperaturkontrolle mit Erken-
nung offener Fenster
ja
Mit Fernbedienungsoption nein
Mit adaptiver Startsteuerung nein
Mit Arbeitszeitbegrenzung nein
Mit Schwarzkugelsensor nein
Kontaktangaben Chal-Tec GmbH, Mühlenstraße 25, 10243 Berlin, Deutschland.
7
DE
SICHERHEITSHINWEISE
• Benutzen Sie das Gerät nicht, bevor es nicht wie in dieser Anleitung beschrieben sicher befestigt ist.
• Vergewissern Sie sich, dass die auf dem Typenschild angegebene Spannung mit der Spannung des
örtlichen Netzes übereinstimmt, bevor Sie das Gerät an das Stromnetz anschließen.
• Wenn das Netzkabel beschädigt ist, muss es von einem qualizierten Techniker ausgetauscht werden,
um eine Gefährdung zu vermeiden.
• Das Kaminheizgerät darf nicht unmittelbar unter einer Steckdose aufgestellt werden.
• Möbel, Vorhänge und anderes brennbares Material müssen mindestens 1 Meter vom Gerät entfernt
sein.
• Lassen Sie das Gerät während des Gebrauchs nicht unbeaufsichtigt.
• Lassen Sie das Gerät nicht unbeaufsichtigt, wenn es an das Stromnetz angeschlossen ist.
• Bewahren Sie das Gerät außerhalb der Reichweite von Kindern auf und erlauben Sie ihnen nicht, das
Gerät zu bedienen.
• Dieses Gerät ist nur für den Hausgebrauch bestimmt und sollte nicht für industrielle Zwecke
verwendet werden.
• Nehmen Sie das Gerät nicht in Betrieb, wenn eine Fehlfunktion vorliegt oder es in irgendeiner Weise
beschädigt wurde.
• Reparaturen an elektrischen Geräten sollten nur von qualiziertem Fachpersonal durchgeführt werden.
• Unsachgemäße Reparaturen können den Benutzer in ernste Gefahr bringen.
• Verlegen Sie das Netzkabel nicht unter Teppichen, Läufern usw.
• Achten Sie darauf, dass das Netzkabel nicht über scharfe Kanten hängt oder mit heißen Oberächen in
Berührung kommt.
• Um eine Überhitzung zu vermeiden, darf das Heizgerät nicht abgedeckt werden.
• Verwenden Sie dieses Heizgerät nicht mit einem Programmierer, einer Zeitschaltuhr, einem
separaten Fernbedienungssystem oder einem anderen Gerät, das das Gerät automatisch einschaltet,
da Brandgefahr besteht, wenn das Gerät abgedeckt oder falsch positioniert ist.
• Tauchen Sie das Gerät niemals in Wasser oder eine andere Flüssigkeit, egal aus welchem Grund.
• Verwenden Sie dieses Heizgerät nicht in unmittelbarer Nähe einer Badewanne, einer Dusche oder
eines Schwimmbeckens.
• Verwenden Sie das Gerät nicht im Freien.
• Nicht mit nassen Händen verwenden.
• Benutzen Sie das Gerät niemals auf oder in der Nähe heißer Oberächen.
• Verwenden Sie das Gerät nicht mit einem beschädigten Kabel.
• Vergewissern Sie sich vor der Reinigung des Geräts, dass es vom Stromnetz getrennt und vollständig
abgekühlt ist.
• Reinigen Sie das Gerät nicht mit Scheuermitteln.
• Verwenden Sie niemals Zubehör, das nicht vom Hersteller empfohlen oder geliefert wird. Es könnte
eine Gefahr für den Benutzer darstellen oder zur Beschädigung des Geräts führen.
• Dieses Gerät ist nicht für die Verwendung von Personen (einschließlich Kindern) mit eingeschränkten
körperlichen, sensorischen oder geistigen Fähigkeiten oder einem Mangel an Erfahrung und Wissen
bestimmt, es sei denn, diese Personen werden von einer für ihre Sicherheit verantwortlichen Person
beaufsichtigt oder in die Verwendung des Geräts eingewiesen.
• Kinder sollten beaufsichtigt werden, um sicherzustellen, dass sie nicht mit dem Gerät spielen.
VORSICHT
Verbrennungsgefahr! Einige Teile dieses Produktes können sehr heiß werden und
Verbrennungen verursachen. Besondere Vorsicht ist geboten, wenn Kinder und
schutzbedürftige Personen anwesend sind.

8
DE
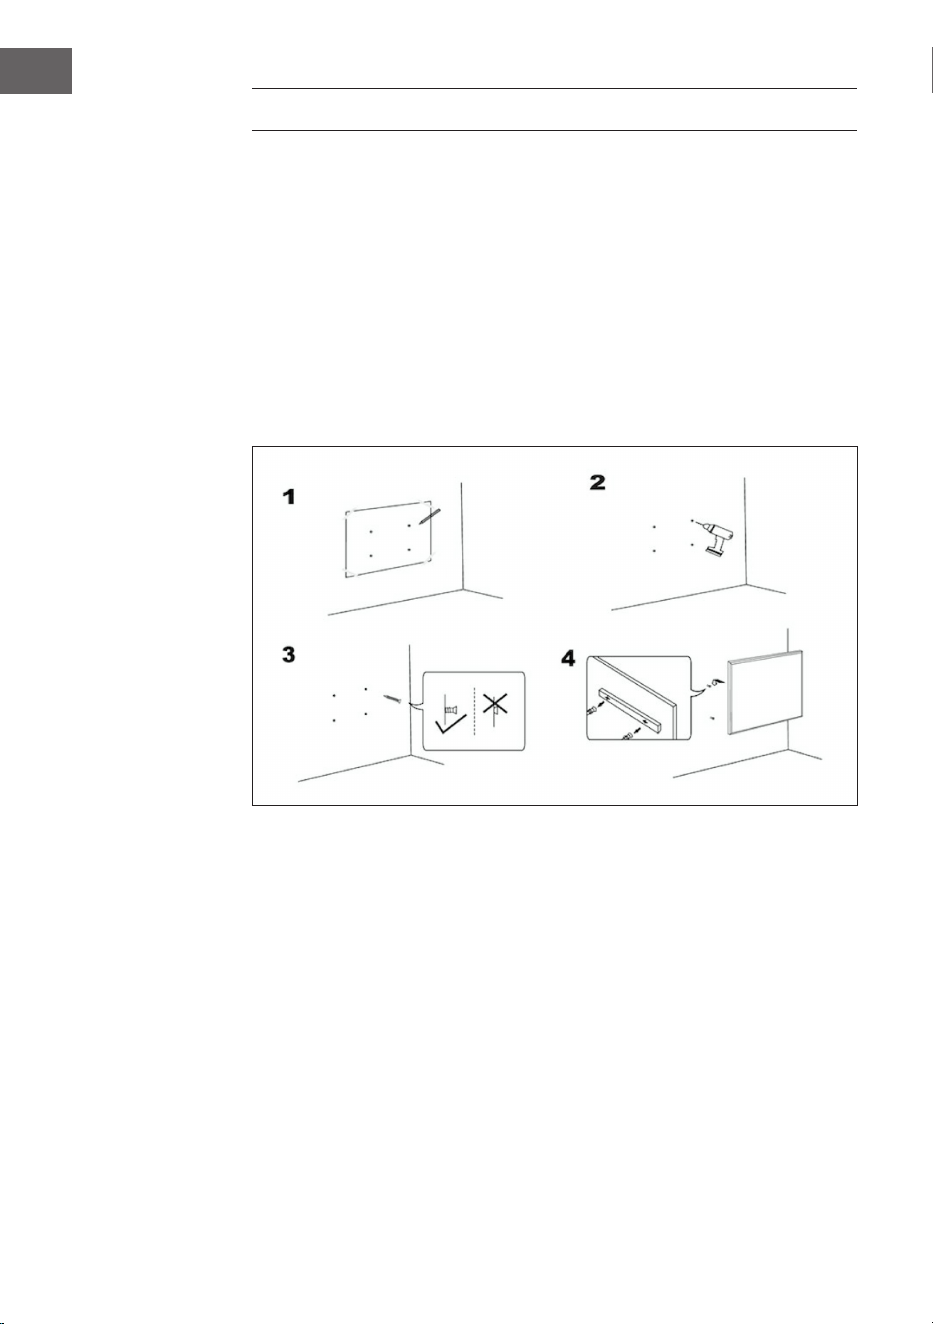
WANDINSTALLATION
Wichtige Installationshinweise
• Der ununterbrochene Betrieb verkürzt die Nutzungsdauer der Heizgeräte.
Wenn möglich, sollte das Gerät alle 12 Stunden ausgeschaltet werden.
• Verwenden Sie das Gerät nicht, wenn die Umgebungstemperatur über 20 °C
liegt, da hohe Temperaturen die Leistung beeinträchtigen.
• Die Steckdose sollte sich mindestens 20 cm über dem Boden benden.
• Halten Sie das Gerät von brennbaren oder explosiven Materialien fern.
• Lassen Sie vor, über und hinter dem Gerät einen Sicherheitsabstand von
30 cm. Lassen Sie einen Sicherheitsabstand von 10 cm auf der linken und
rechten Seite des Geräts.
• In den ersten ein bis zwei Tagen können neue Heizgeräte Gerüche abgeben,
die für Menschen unbedenklich sind.

9
DE
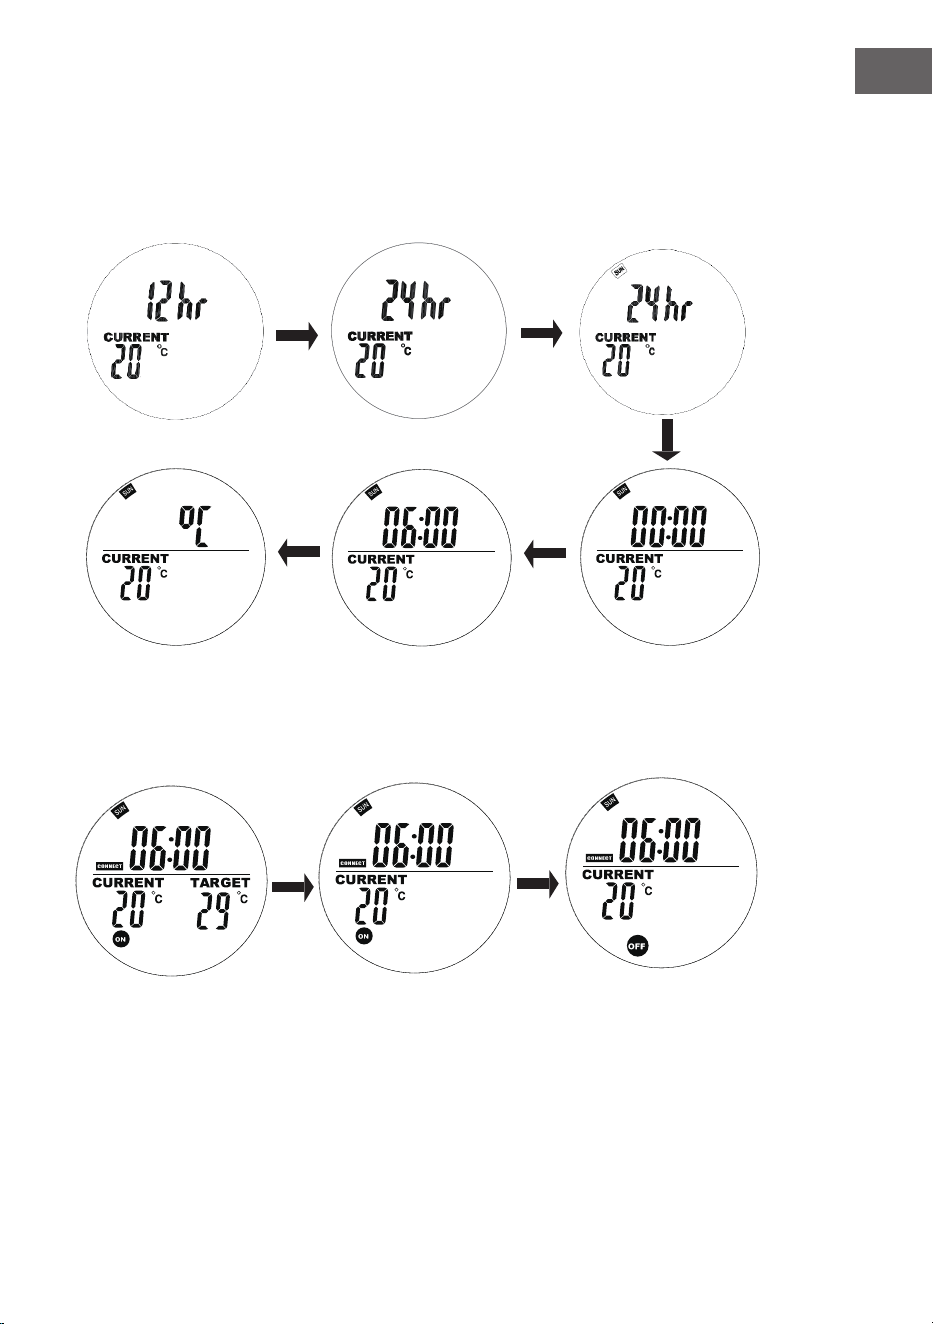
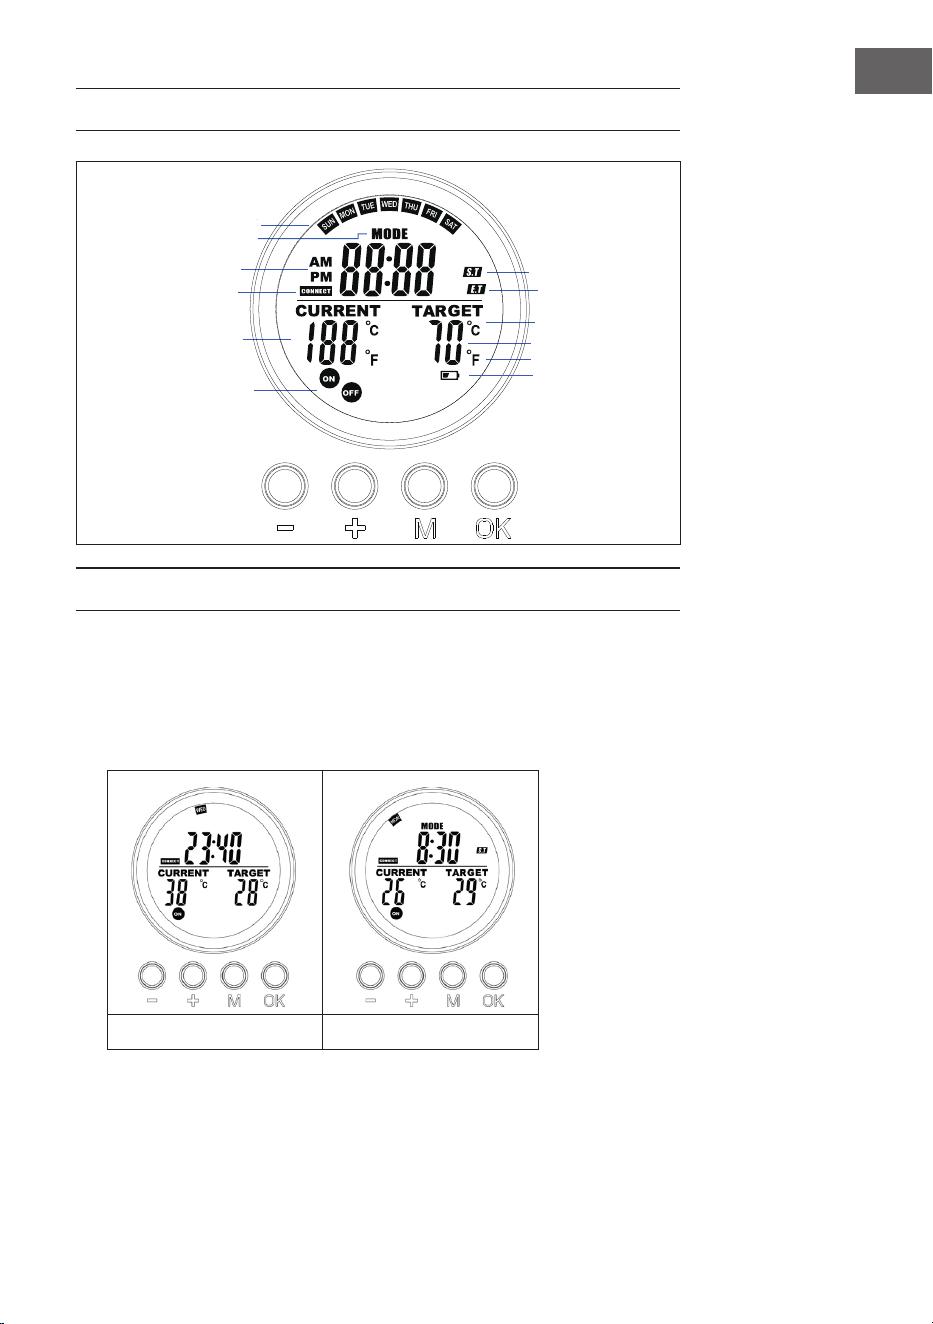
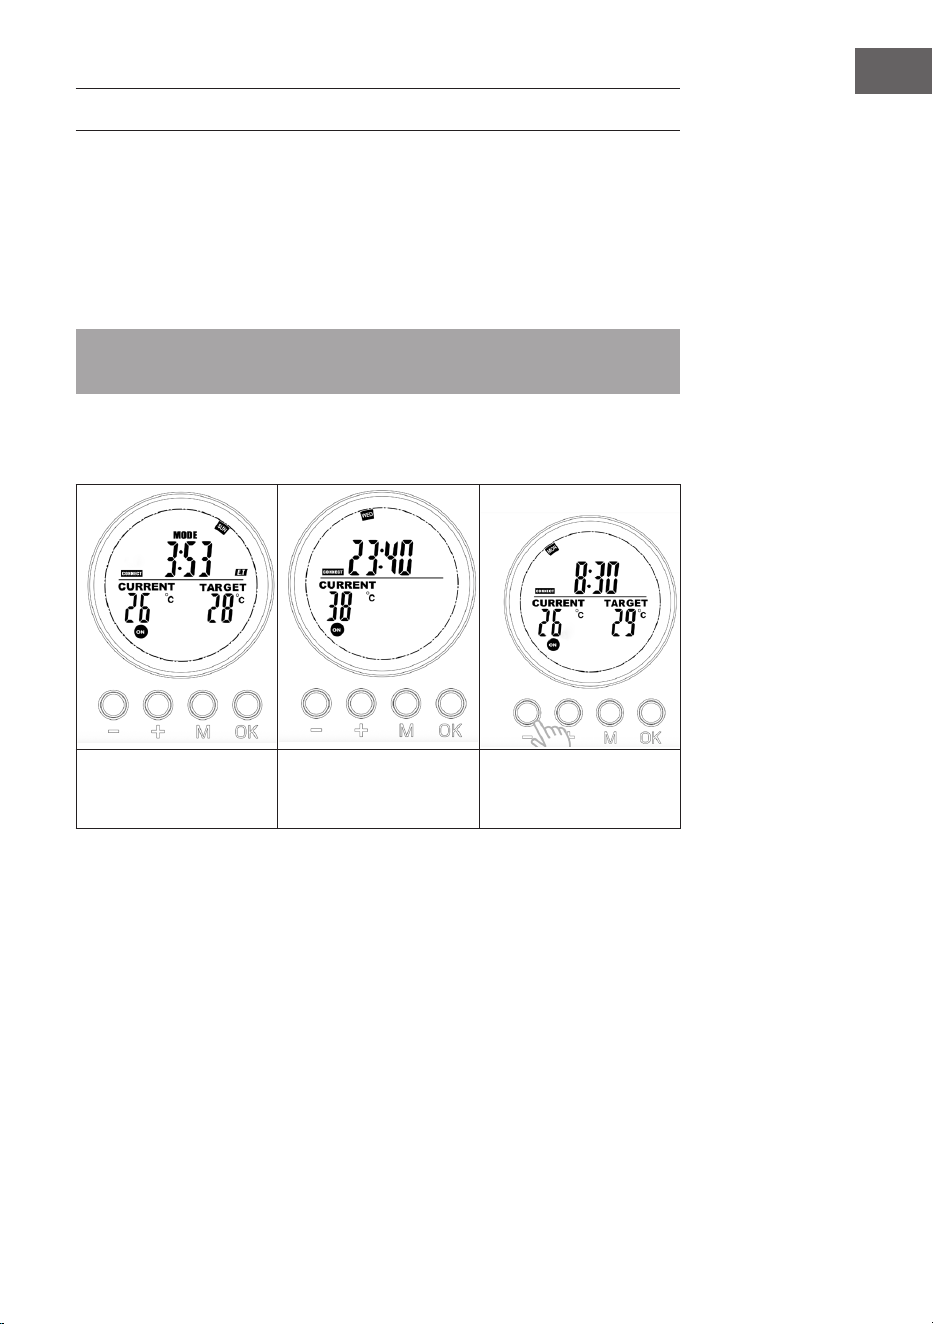
DISPLAYANZEIGEN DER FERNBEDIENUNG
BEDIENUNG UND FUNKTIONEN
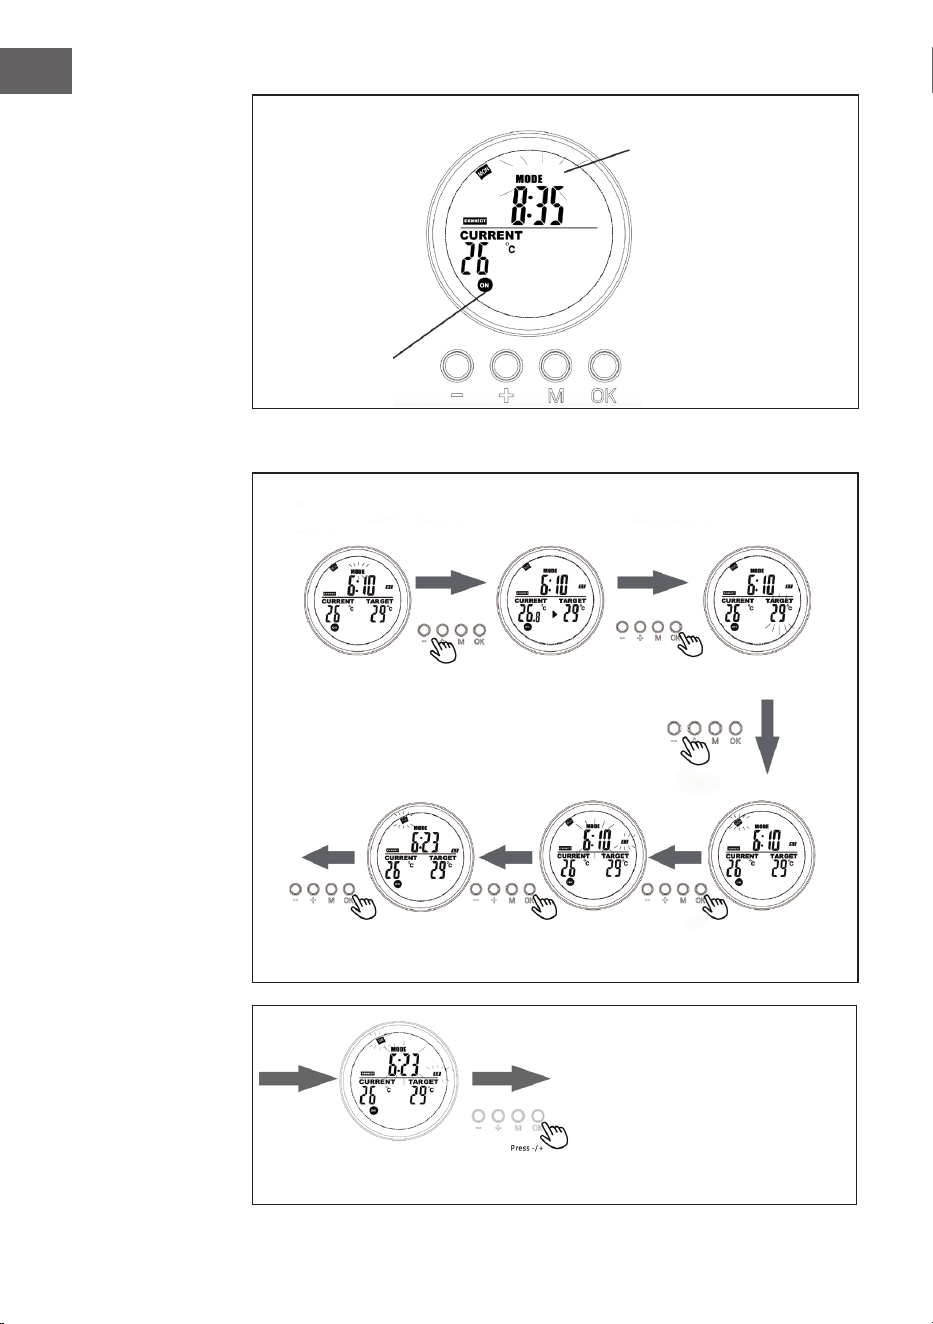
Taste [M]
• Drücken Sie die Taste [M], um zwischen Systemzeit und Thermostat zu
wechseln
• Wenn Sie sich in einem Programmplatz benden, halten Sie die Taste [M]
gedrückt, um ihn zu programmieren.
System Thermostat
Tag
Programmtyp
AM/PM (früh/spät)
Verbindungsstatus
Aktuelle Temperatur
Gerätestatus
Zieltemperatur
Grad Celsius
Grad Fahrenheit
Batterie-Warnung
Programm-Startzeit
Programm-Endzeit
10
DE
Taste [OK]
• Drücken Sie [OK],
• um den Programmplatz 1, 2, 3, 4 zu wählen. Drücken Sie [OK], um den Platz
ein-/auszuschalten.
• Wenn Sie sich im Programmier- oder Einstellungsmodus benden, drücken
Sie die Taste OK, um die Eingabe zu bestätigen und zum nächsten Schritt zu
wechseln.
Taste [+] und [-]
• Wählen Sie den Programmplatz.
• Drücken Sie die Taste [+] oder [-], um den Wert in der Programmierung und
in der Einstellung zu erhöhen/verringern. Halten Sie die Tasten gedrückt, um
den Wert schneller zu erhöhen/verringern.
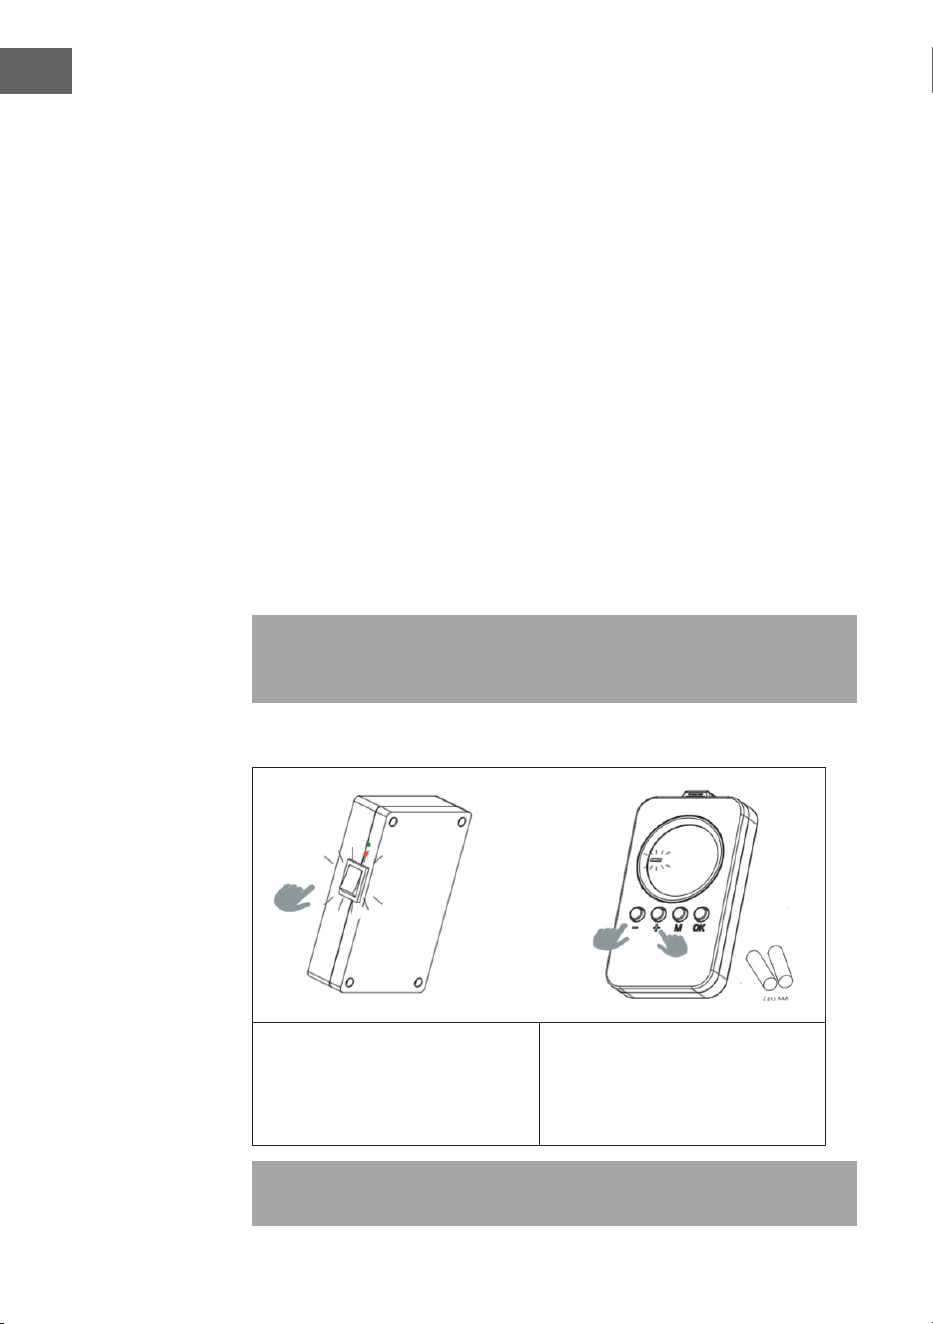
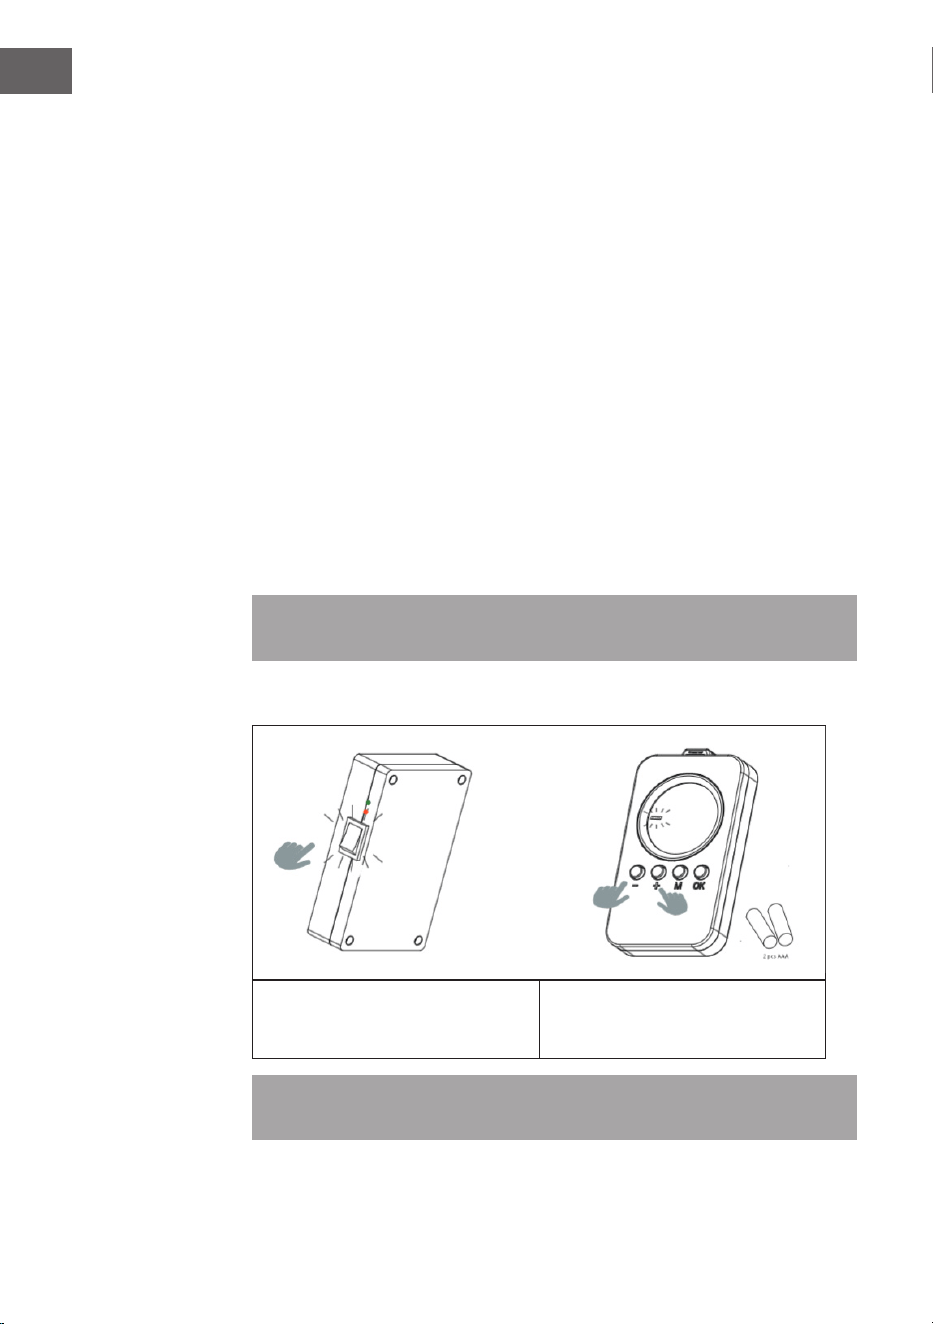
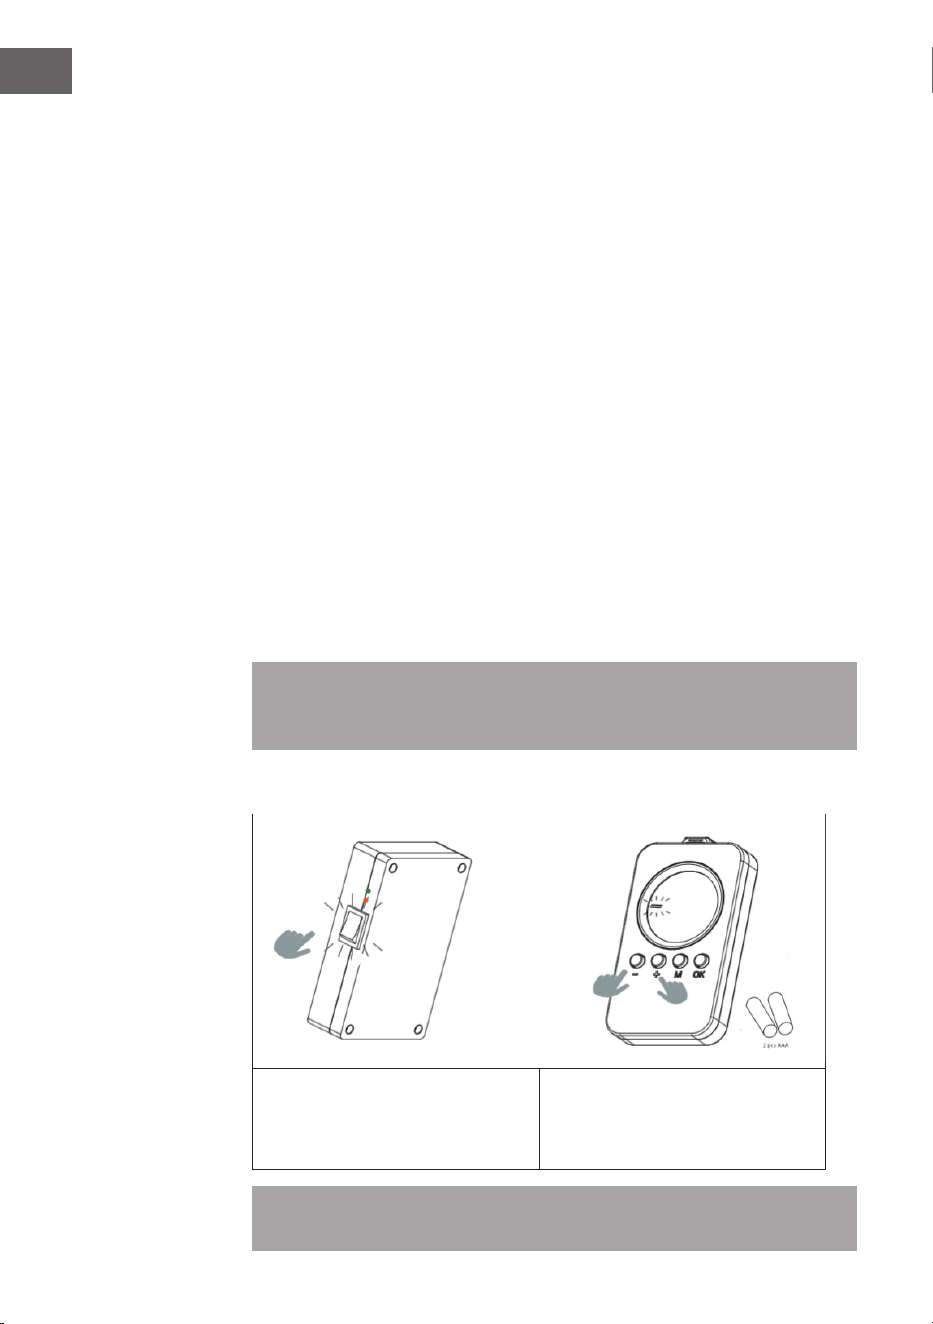
Fernbedienung mit dem Gerät koppeln
1. Halten Sie [+] und [-] gleichzeitig gedrückt, um die Kopplung zu starten. Das
blinkende Symbol CONNECT auf dem Display zeigt an, dass die Fernbedienung
versucht, eine Verbindung mit dem Gerät herzustellen.
2. Schalten Sie die Heizung am seitlichen Schalter ein. Das Gerät bendet sich
nun 60 Sekunden lang im Kopplungsmodus.
3. Warten Sie, bis das Symbol CONNECT nicht mehr blinkt, sondern dauerhaft im
Display leuchtet. Die Fernbedienung ist nun mit dem Heizgerät verbunden.
Hinweis: Die Fernbedienung funktioniert nur innerhalb eines Radius von
10 Metern um das Gerät. Der Aufbau der Verbindung dauert in der Regel 5
Sekunden.
Fernbedienung mit dem Gerät koppeln
1. Schalten Sie das Heizgerät mit dem
Schalter auf der Rückseite ein.
2. Richten Sie die Bedienung auf das
Heizgerät und halten Sie gleichzeitig
"+" und "-" gedrückt. Zwei Pieptöne
zeigen an, dass die Kopplung
erfolgreich war.
Hinweis: Die Fernbedienung funktioniert nur innerhalb eines Radius von 10 Metern um das
Gerät. Der Aufbau der Verbindung dauert in der Regel 5 Sekunden.
11
DE
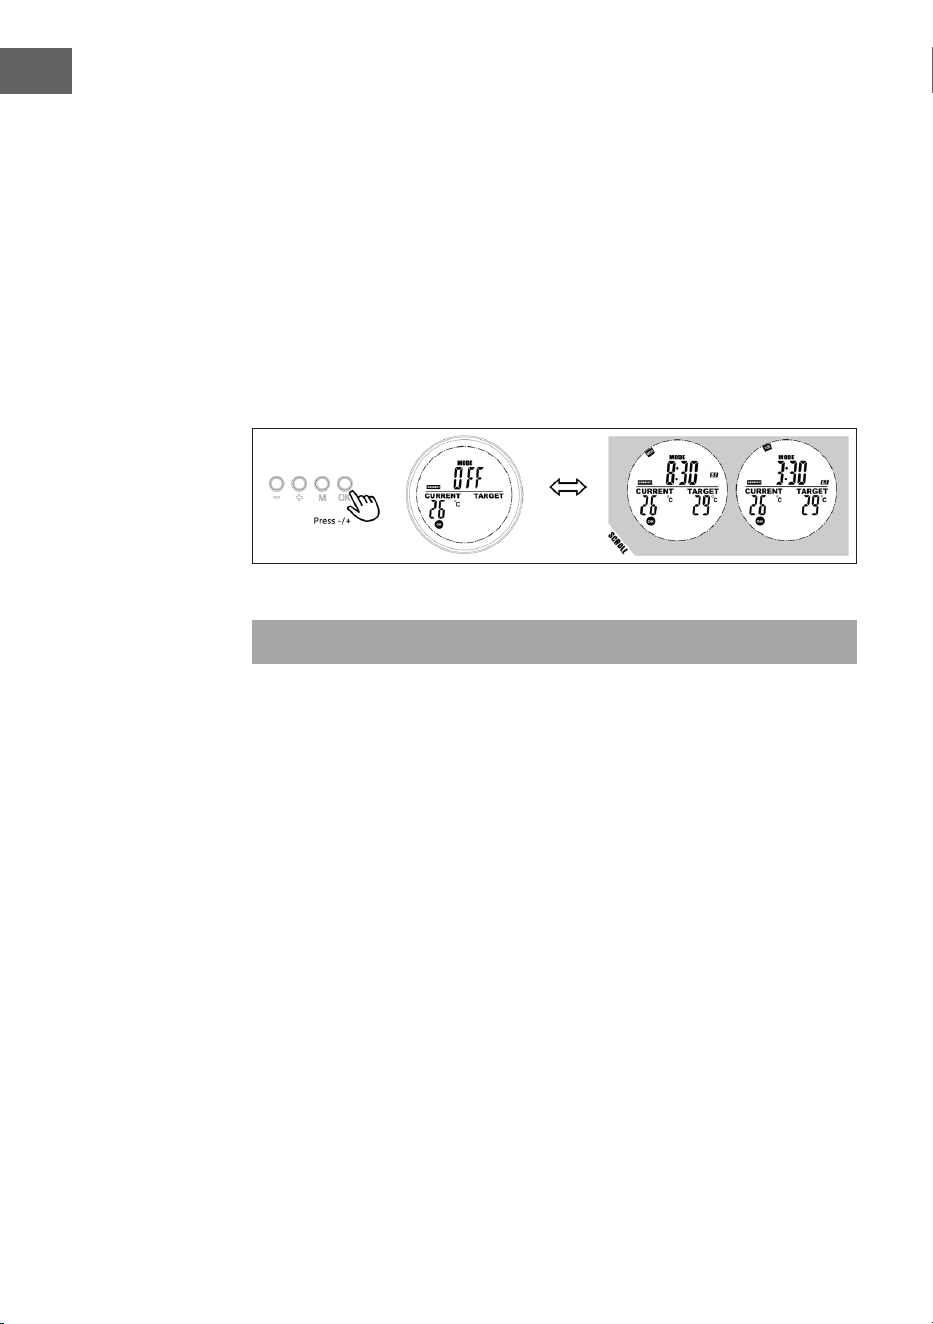
SCHNELLSTART
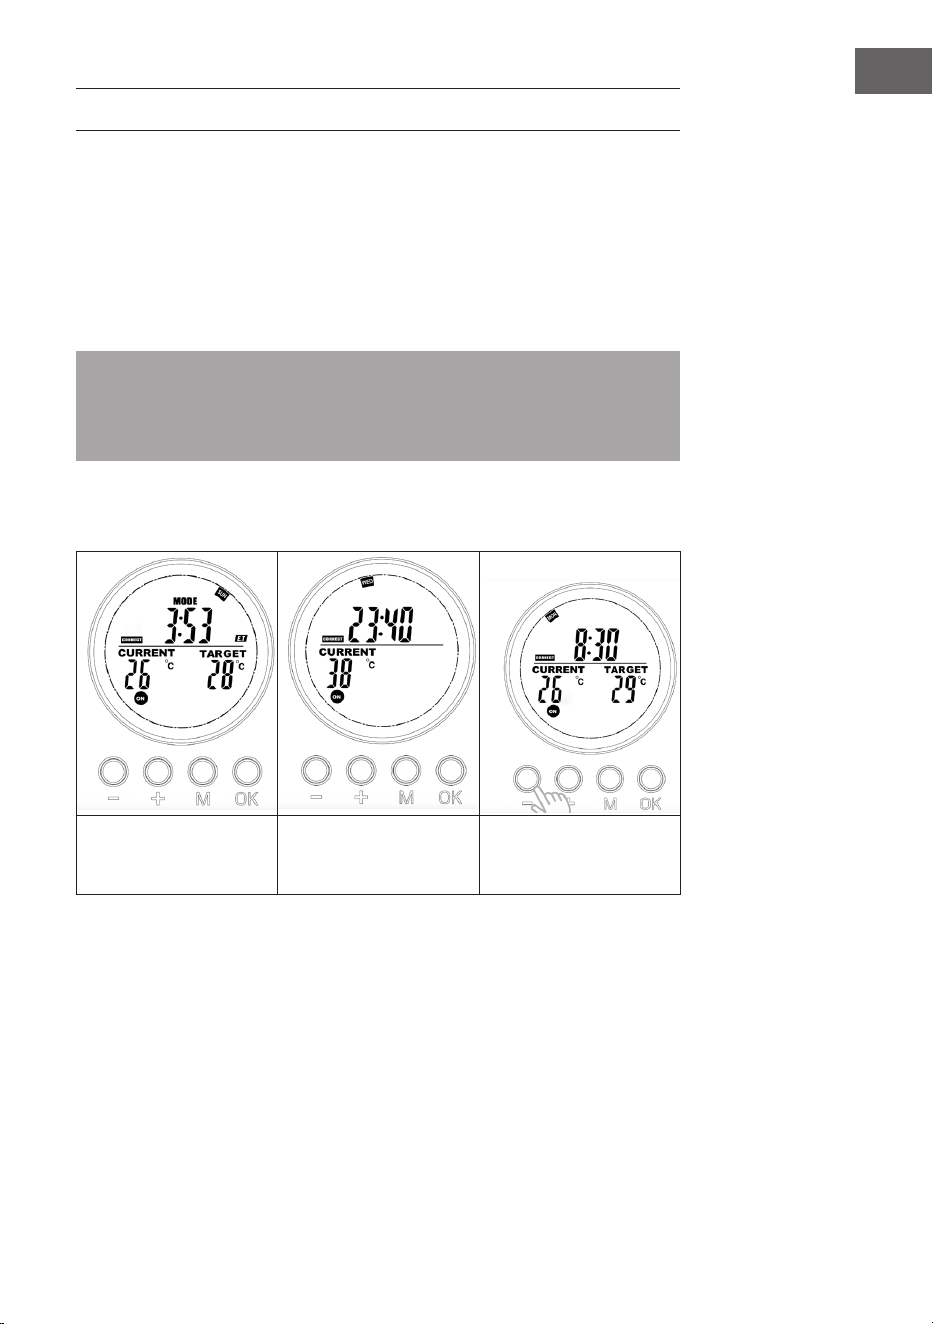
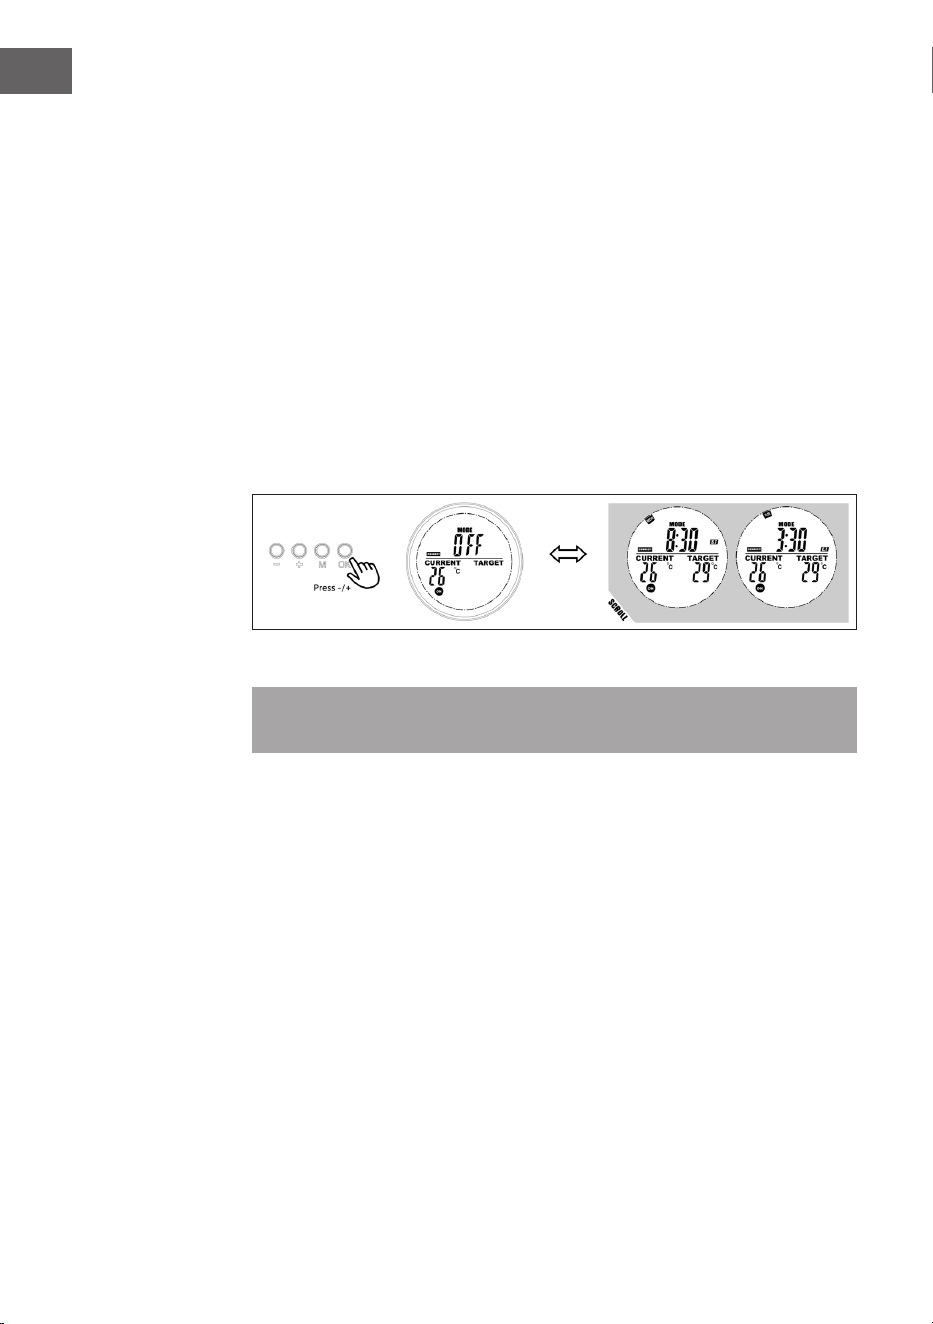
Manuelles Überschreiben
Drücken Sie mehrmals auf die Taste [OK], um zwischen folgenden Funktionen
auszuwählen:
• Manuelle Temperatureinstellung
• OFF – AUS
• ON – AN
Hinweis: Die manuelle Einstellung überschreibt alle Programme, die in den
Programmplätzen gespeichert sind und setzt alle Programmplätze auf OFF.
Umgekehrt löscht das Einschalten der Programme auf den Programmplätzen
die manuellen Einstellungen.
Sind manuellen Einstellung aktiv, leuchten die Symbole On/OFF durchgängig. Sind
Programme auf den Programmplätzen aktiv, blinken die Symbole ON/OFF.
Manuelles Ausschalten
des Systems (das Symbol
leuchtet durchgängig)
Manuelles Einschalten
des Systems (das Symbol
leuchtet durchgängig)
Manuelles Einstellen der
Temperatur (das Symbol
leuchtet durchgängig)
Voreingestellte Programme
Aktivieren Sie einen der Programmplätze, um die manuellen Einstellungen zu
überschreiben und das voreingestellte Programm für diesen Programmplatz zu
starten.
12
DE
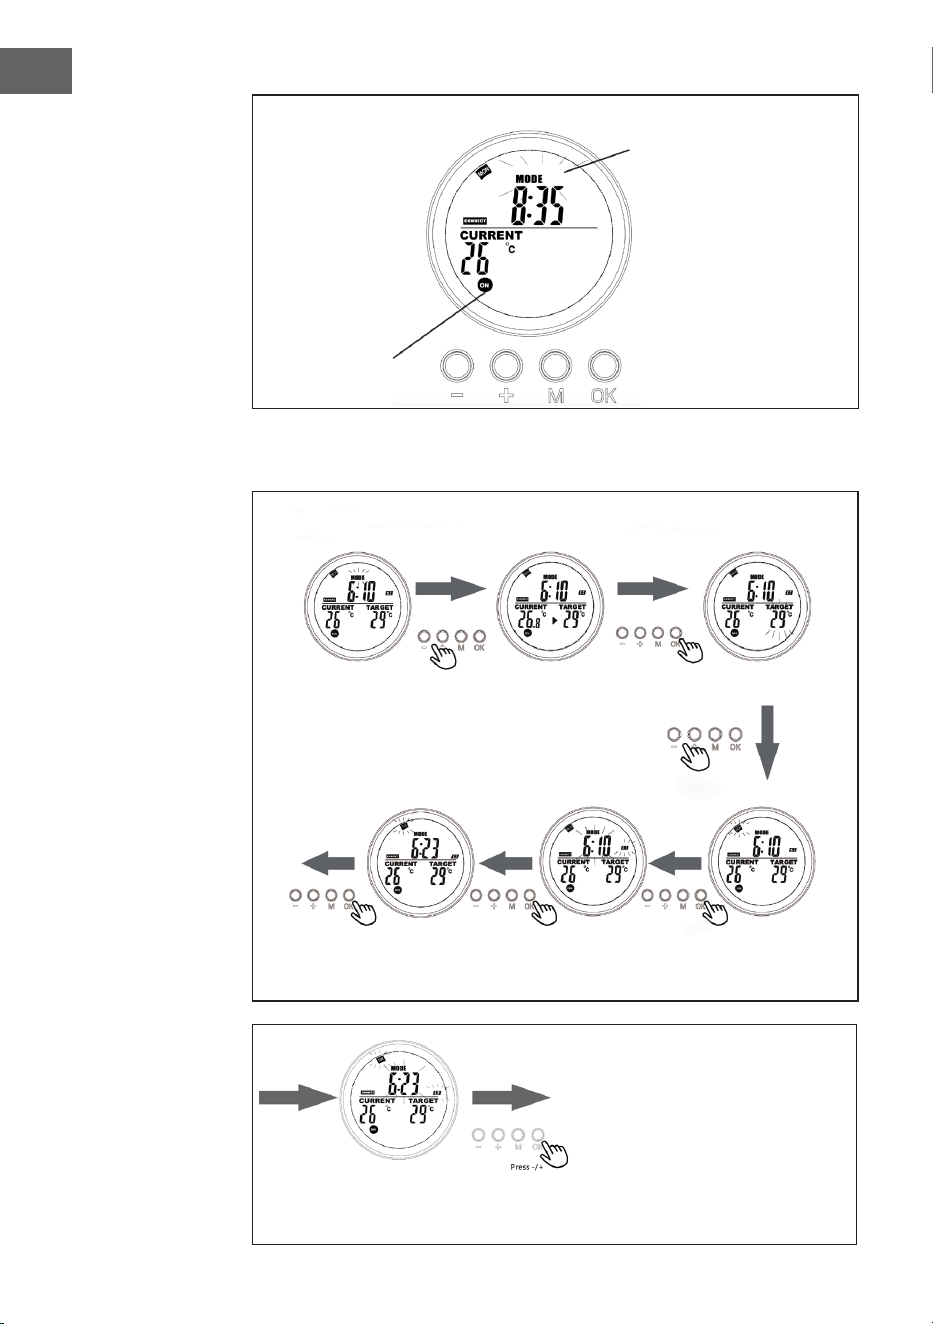
Stellen Sie die genaue Endzeit (Stunde/Minute) mit +/- ein und bestätigen Sie mit
[OK]. Die Programmierung ist nun abgeschlossen.
Anzeige auf der Systemseite, wenn das ein voreingestelltes Programm ausge-
führt wird
Das blinkende Symbol
MODE zeigt, dass das
voreingestellte Programm
für Programmplatz 3
momentan aktiv ist.
Das blinkenden
Symbol ON/OFF
zeigt, dass das Ge-
rät momentan von
einem Programm
gesteuert wird
Wochen-
programmieren
Programmplatz
programmieren
Drücken Sie im
Thermostatmo-
dus [+] oder [-].
Stellen Sie den
Wochentag für die
Startzeit (ST) mit
+/- ein.
Stellen Sie die genaue
Startzeit (Stunde/Mi-
nute) mit +/- ein.
Stellen Sie den Wochen-
tag für die Endzeit (ET)
mit +/- ein.
Wählen Sie den zu
programmierenden
Programmplatz und be-
stätigen Sie mit [OK].
Drücken Sie [+] oder [-] und
bestätigen Sie die Zieltem-
peratur mit [OK].
13
DE
Aktuelle Einstellungen von Wochentag und Uhrzeit
Halten Sie "M" gedrückt, um die Schnittstelle zur Einstellung der aktuellen Uhrzeit
und des Wochentags aufzurufen. Drücken Sie "+" und "-" zur Auswahl. Drücken
Sie "OK" zum Bestätigen.
1. Drücken Sie "+" oder "-", um 24h
oder 12h auszuwählen, und drücken
Sie zur Bestätigung die Taste "OK".
2. Drücken Sie "+" oder
"-", um den Wochentag
auszuwählen
3. Drücken Sie "+" oder
"-", um die Stunden
einzustellen und
bestätigen Sie mit "OK".
4. Drücken Sie "+" oder
"-", um die Minuten
einzustellen und
bestätigen Sie mit "OK".
5. Drücken Sie "+" oder "-",
um Celsius oder Fahrenheit
auszuwählen, und drücken Sie
zur Bestätigung die Taste "OK".
14
DE
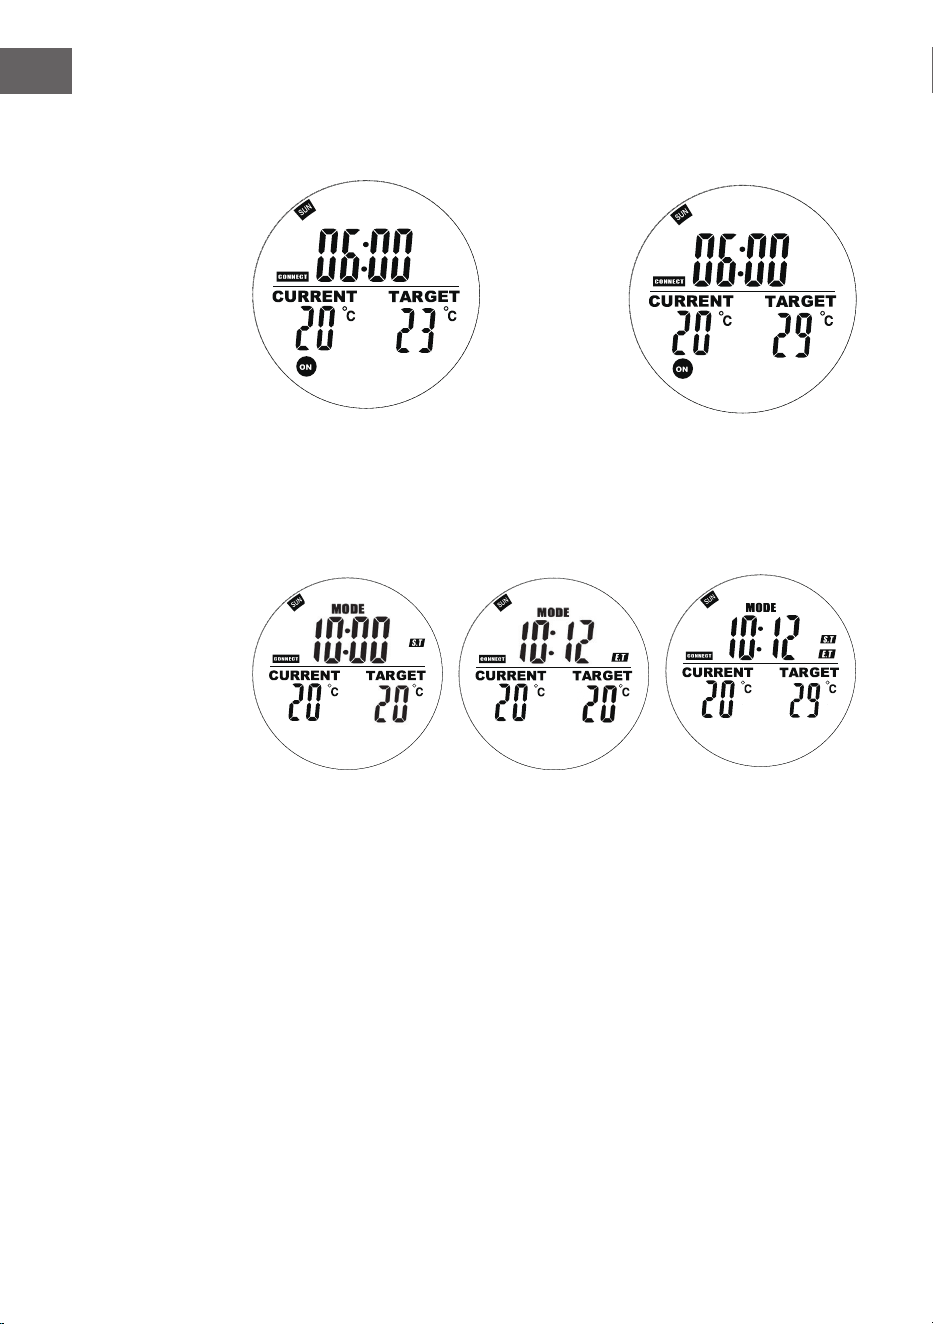
Drücken Sie im Automatikmodus die Tasten "+" oder "-", um die Zieltemperatur auf die gewünschte
Einstellung zu bringen.
Wochenprogrammierung
Drücken Sie kurz die Taste "M", um die Schnittstelle für die Einstellung der Wochenprogrammierung
zu öffnen.
Auf der linken Seit blinkt "00"
und "ST" wird angezeigt.
Drücken Sie + oder -, um die
Startzeit einzustellen. Drücken
Sie zur Bestätigung die Taste
OK.
Rechts blinkt "00" und es wird
"ET" angezeigt.
Drücken Sie + oder -, um die
Endzeit einzustellen. Drücken
Sie zur Bestätigung die Taste
OK.
Drücken Sie die Taste +
oder - um die Zieltem-
peratur einzustellen.
Drücken Sie die Taste
M, um die Einstellung
für den nächsten Tag
vorzunehmen.

15
DE
Hinweise zu Programmen
• Die Fernbedienung sollte sich im selben Raum wie das Heizgerät benden.
• Wenn ein Batteriesymbol auf dem Bildschirm der Fernbedienung angezeigt
wird, bedeutet dies, dass die Batterie fast leer ist. Eine schwache Batterie kann
dazu führen, dass die Fernbedienung nicht mehr funktioniert. Bitte tauschen
Sie die Batterie rechtzeitig aus, um Unterbrechungen zu vermeiden.
• Achten Sie darauf, dass der Abstand in gerader Linie zwischen Fernbedienung
und Gerät nicht mehr als 5 Meter beträgt, um eine ordnungsgemäße
Kommunikation zu gewährleisten.
• Rotes Licht leuchtet: Das System ist eingeschaltet und die Hauptplatine
funktioniert normal.
Grünes Licht leuchtet: Das Heizgerät heizt gerade.
Wochenprogrammierung
• Bevor Sie einen Wochenplan erstellen, überprüfen Sie bitte, dass Sie den
richtigen Tag und die richtige Uhrzeit eingestellt haben, sonst funktioniert die
Wochenprogrammierung nicht richtig.
• Wählen Sie für jeden Tag die Stunde, zu der das Gerät eingeschaltet werden
soll, und die Stunde, zu der es ausgeschaltet werden soll. Beispiel: Einschalten
um 10:00 Uhr, Ausschalten um 17:00 Uhr.
• Die Wochenprogrammierung wird nicht aktiviert, wenn die Einschaltzeit gleich
oder später als die Ausschaltzeit ist. Wenn Sie zum Beispiel die Heizung so
einstellen, dass sie um 10:00 Uhr ein- und um 8:00 Uhr ausgeschaltet wird,
ignoriert das System den Zeitplan für diesen Tag. Damit die Heizung an einem
bestimmten Tag nicht heizt, stellen Sie einfach die Einschaltzeit so ein, dass sie
gleich oder später als die Ausschaltzeit ist.
• Das System verwendet standardmäßig ein 24-Stunden-Format. Wenn Sie ein
12-Stunden-Format eingeben, wandelt das System dieses automatisch um,
eine manuelle Anpassung ist nicht erforderlich.
• Das Heizgerät läuft nur, wenn sowohl die Zeit- als auch die
Temperatureinstellungen vorgenommen wurden.
Beispiel
• EIN-Zeit: 10:00 Uhr
• AUS-Zeit: 12:00 Uhr
• Eingestellte Temperatur: 25 °C
• Das Heizen beginnt, wenn die Temperatur auf 22 °C oder darunter sinkt
(aktuelle Umgebungstemperatur 3 Grad weniger als die eingestellte
Temperatur).
• Das Heizen stoppt, wenn die Temperatur auf über 25 °C steigt (aktuelle
Umgebungstemperatur 1 Grad höher als die eingestellte Temperatur).
• Außerhalb der geplanten Zeit schaltet sich die Heizung nicht ein, auch wenn
die Temperatur niedrig ist.
16
DE
Wenn Sie einen bestimmten Tag in einer Woche als Startzeit ST wählen, können Sie
einen beliebigen Tag als Endzeit ET wählen. Das Gerät wird am Tag und zur Uhrzeit
auf Grundlage der spezischen Startzeit und Endzeit ein- und ausgeschaltet. Das
Programm wird jede Woche wiederholt.
Informationen zum Programmplatz anzeigen
Der Benutzer kann die programmierte Zeit oder Temperatur einsehen, indem er
den Programmplatz im Programm-Modus auswählt. Programmplätze lassen sich
auf diese Weise auch einfach auf ON oder OFF stellen.
1. Gehen Sie zum Programm-Modus.
2. Wählen Sie den Programmplatz aus, dessen Einstellungen Sie einsehen
möchten. Die Anzeige der Startzeit und die Endzeit wechselt im
Sekundentakt und auch alle anderen Einstellungen werden angezeigt.
3. Drücken Sie die OK-Taste, um diesen Programmplatz auszuschalten, und
drücken Sie sie erneut, um den Programmplatz wiederherzustellen.
Modus zur Erkennung offener Fenster
Hinweis: Wenn der Modus zur Erkennung offener Fenster aktiv ist, werden alle
anderen Modi deaktiviert.
• Falls Die Temperatur im Raum innerhalb von 20 Minuten um mehr als 6 °C
sinkt, wird das vom Gerät als offenes Fenster interpretiert und die Heizung
geht automatisch aus.
• Solange der Modus aktiv ist, blinkt OPEN auf dem Display.
• Drücken Sie eine beliebige Taste auf der Fernbedienung, um in den manuellen
Einstellungsmodus zurückzukehren.
Batteriewechsel
• Entfernen Sie den Deckel des Batteriefachs.
• Ersetzen Sie die alten Batterien durch 2 neue AA-Batterien und schließen Sie
das Batteriefach wieder.
17
DE
SPEZIELLE ENTSORGUNGSHINWEISE FÜR
VERBRAUCHER IN DEUTSCHLAND
Entsorgen Sie Ihre Altgeräte fachgerecht. Dadurch wird gewährleistet, dass die
Altgeräte umweltgerecht verwertet und negative Auswirkungen auf die Umwelt
und menschliche Gesundheit vermieden werden. Bei der Entsorgung sind
folgende Regeln zu beachten:
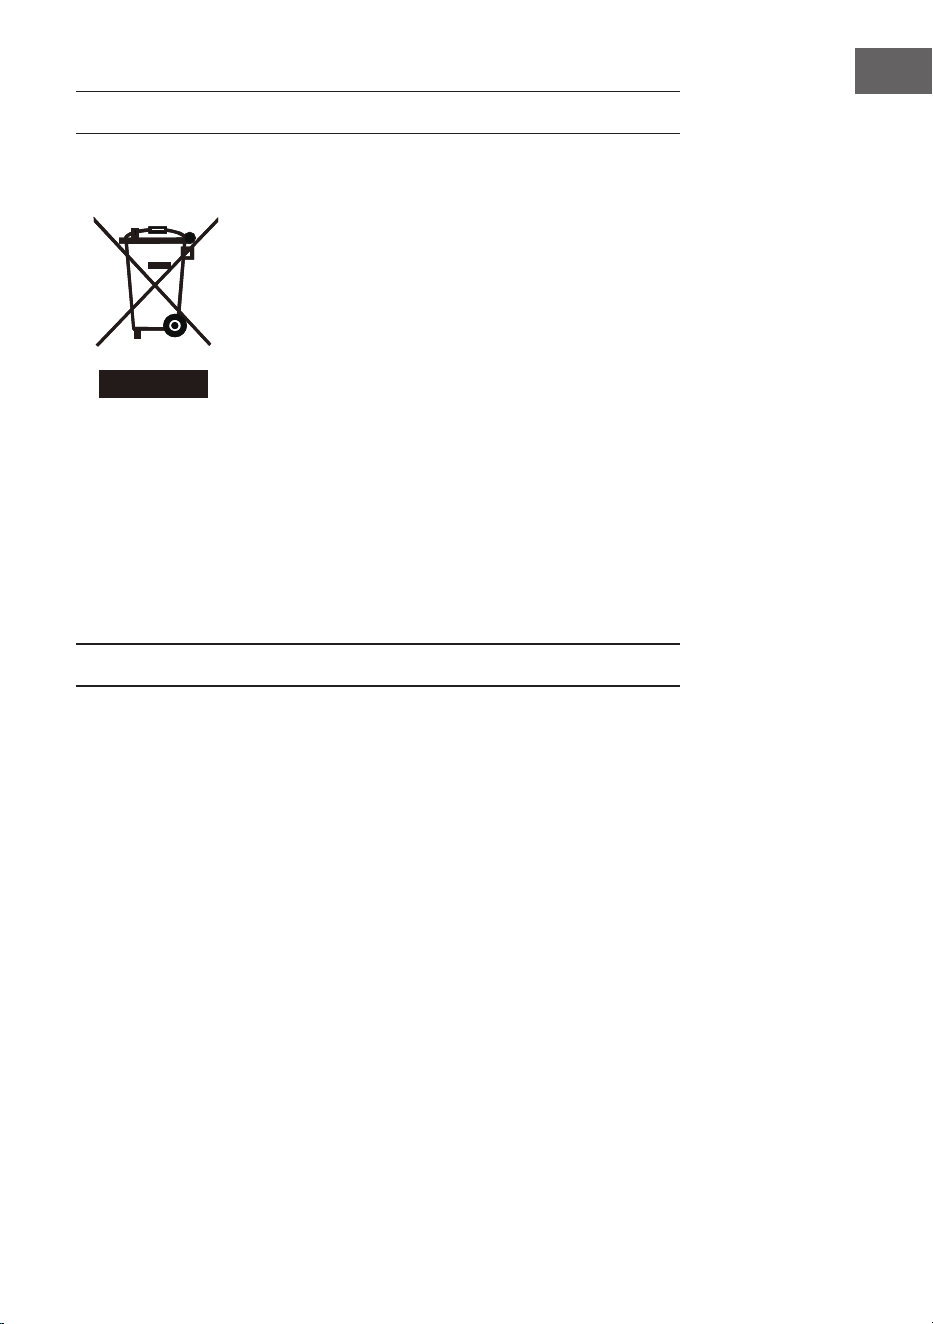
• Jeder Verbraucher ist gesetzlich verpichtet, Elektro- und
Elektronikaltgeräte (Altgeräte) sowie Batterien und Akkus
getrennt vom Hausmüll zu entsorgen. Sie erkennen die
entsprechenden Altgeräte durch folgendes Symbol der
durchgestrichenen Mülltonne (WEEE-Symbol).
• Sie haben Altbatterien und Altakkumulatoren, die nicht vom Altgerät
umschlossen sind, sowie Lampen, die zerstörungsfrei aus dem Altgerät
entnommen werden können, vor der Abgabe an einer Entsorgungsstelle vom
Altgerät zerstörungsfrei zu trennen.
• Bestimmte Lampen und Leuchtmittel fallen ebenso unter das Elektro- und
Elektronikgesetz und sind dementsprechend wie Altgeräte zu behandeln.
Ausgenommen sind Glühbirnen und Halogenlampen. Entsorgen Sie
Glühbirnen und Halogenlampen bitte über den Hausmüll, sofern sie nicht das
WEEE-Symbol tragen.
• Jeder Verbraucher ist für das Löschen von personenbezogenen Daten auf dem
Elektro- bzw. Elektronikgerät selbst verantwortlich.
Rücknahmepicht der Vertreiber
Vertreiber mit einer Verkaufsäche für Elektro- und Elektronikgeräte von
mindestens 400 Quadratmetern sowie Vertreiber von Lebensmitteln mit einer
Gesamtverkaufsäche von mindestens 800 Quadratmetern, die mehrmals im
Kalenderjahr oder dauerhaft Elektro- und Elektronikgeräte anbieten und auf dem
Markt bereitstellen, sind verpichtet,
1 bei der Abgabe eines neuen Elektro- oder Elektronikgerätes an einen Endnutzer
ein Altgerät des Endnutzers der gleichen Geräteart, das im Wesentlichen die
gleichen Funktionen wie das neue Gerät erfüllt, am Ort der Abgabe oder in
unmittelbarer Nähe hierzu unentgeltlich zurückzunehmen und
2 auf Verlangen des Endnutzers Altgeräte, die in keiner äußeren Abmessung
größer als 25 Zentimeter sind, im Einzelhandelsgeschäft oder in unmittelbarer
Nähe hierzu unentgeltlich zurückzunehmen; die Rücknahme darf nicht an den
Kauf eines Elektro- oder Elektronikgerätes geknüpft werden und ist auf drei
Altgeräte pro Geräteart beschränkt.

18
DE
• Bei einem Vertrieb unter Verwendung von Fernkommunikationsmitteln
ist die unentgeltliche Abholung am Ort der Abgabe auf Elektro- und
Elektronikgeräte der Kategorien 1, 2 und 4 gemäß § 2 Abs. 1 ElektroG, nämlich
„Wärmeüberträger“, „Bildschirmgeräte“ (Oberäche von mehr als 100 cm²)
oder „Großgeräte“ (letztere mit mindestens einer äußeren Abmessung
über 50 Zentimeter) beschränkt. Für andere Elektro- und Elektronikgeräte
(Kategorien 3, 5, 6) ist eine Rückgabemöglichkeit in zumutbarer Entfernung
zum jeweiligen Endnutzer zu gewährleisten.
• Altgeräte dürfen kostenlos auf dem lokalen Wertstoffhof oder in folgenden
Sammelstellen in Ihrer Nähe abgegeben werden: www.take-e-back.de
• Für Elektro- und Elektronikgeräte der Kategorien 1, 2 und 4 bieten wir auch die
Möglichkeit einer unentgeltlichen Abholung am Ort der Abgabe. Beim Kauf
eines Neugeräts haben Sie die Möglichkeit, eine Altgerätabholung über die
Webseite auszuwählen.
• Batterien können überall dort kostenfrei zurückgegeben werden, wo sie
verkauft werden (z. B. Super-, Bau-, Drogeriemarkt). Auch Wertstoff- und
Recyclinghöfe nehmen Batterien zurück. Sie können Batterien auch per Post
an uns zurücksenden. Altbatterien in haushaltsüblichen Mengen können Sie
direkt bei uns von Montag bis Freitag zwischen 08:00 und 16:00 Uhr unter der
folgenden Adresse unentgeltlich zurückgeben:
Chal-Tec Fulllment GmbH
Norddeutschlandstr. 3
47475 Kamp-Lintfort
• Wichtig zu beachten ist, dass Lithiumbatterien aus Sicherheitsgründen vor der
Rückgabe gegen Kurzschluss gesichert werden müssen (z. B. durch Abkleben
der Pole).
• Finden sich unter der durchgestrichenen Mülltonne auf der Batterie zusätzlich
die Zeichen Cd, Hg oder Pb ist das ein Hinweis darauf, dass die Batterie
gefährliche Schadstoffe enthält (»Cd« steht für Cadmium, »Pb« für Blei und
»Hg« für Quecksilber).
Hinweis zur Abfallvermeidung
Indem Sie die Lebensdauer Ihrer Altgeräte verlängern, tragen Sie dazu bei,
Ressourcen ezient zu nutzen und zusätzlichen Müll zu vermeiden. Die
Lebensdauer Ihrer Altgeräte können Sie verlängern, indem Sie defekte Altgeräte
reparieren lassen. Wenn sich Ihr Altgerät in gutem Zustand bendet, könnten Sie
es spenden, verschenken oder verkaufen.
19
DE
HINWEISE ZUR ENTSORGUNG
Wenn es in Ihrem Land eine gesetzliche Regelung
zur Entsorgung von elektrischen und elektronischen
Geräten gibt, weist dieses Symbol auf dem Produkt oder
auf der Verpackung darauf hin, dass dieses Produkt
nicht im Hausmüll entsorgt werden darf. Stattdessen
muss es zu einer Sammelstelle für das Recycling von
elektrischen und elektronischen Geräten gebracht
werden. Durch regelkonforme Entsorgung schützen
Sie die Umwelt und die Gesundheit Ihrer Mitmenschen
vor negativen Konsequenzen. Informationen zum
Recycling und zur Entsorgung dieses Produkts,
erhalten Sie von Ihrer örtlichen Verwaltung oder Ihrem
Hausmüllentsorgungsdienst.
Dieses Produkt enthält Batterien. Wenn es in Ihrem
Land eine gesetzliche Regelung zur Entsorgung von
Batterien gibt, dürfen die Batterien nicht im Hausmüll
entsorgt werden. Informieren Sie sich über die örtlichen
Bestimmungen zur Entsorgung von Batterien. Durch
regelkonforme Entsorgung schützen Sie die Umwelt
und die Gesundheit Ihrer Mitmenschen vor negativen
Konsequenzen.
HERSTELLER
Chal-Tec GmbH, Mühlenstraße 25, 10243 Berlin, Deutschland.
Kontakt: [email protected]

21
EN
Dear Customer,
Congratulations on purchasing this equipment. Please
read this manual carefully and take care of the following
hints to avoid damages. Any failure caused by ignoring the
mentioned items and cautions mentioned in the instruction
manual are not covered by our warranty and any liability.
Scan the QR code to get access to the latest user manual
and other information about the product.
CONTENTS
TECHNICAL DATA
Item numer Power Power supply Dimensions
10035168
10035171
300 W (±10%)
220-240 V
~ 50 Hz
505x595x16 mm
10035169
10035172
580 W (±10%) 595x900x16 mm
10035170
10035173
720 W (±10%) 595x1195x16 mm
Technical Data 21
Product Data Sheet 22
Safety Instructions 25
Wall Installation 26
Remote Control Display Indicators 27
Operation and Functions 27
Quick Start 29
Disposal Considerations 35
Manufacturer & Importer (UK) 35
22
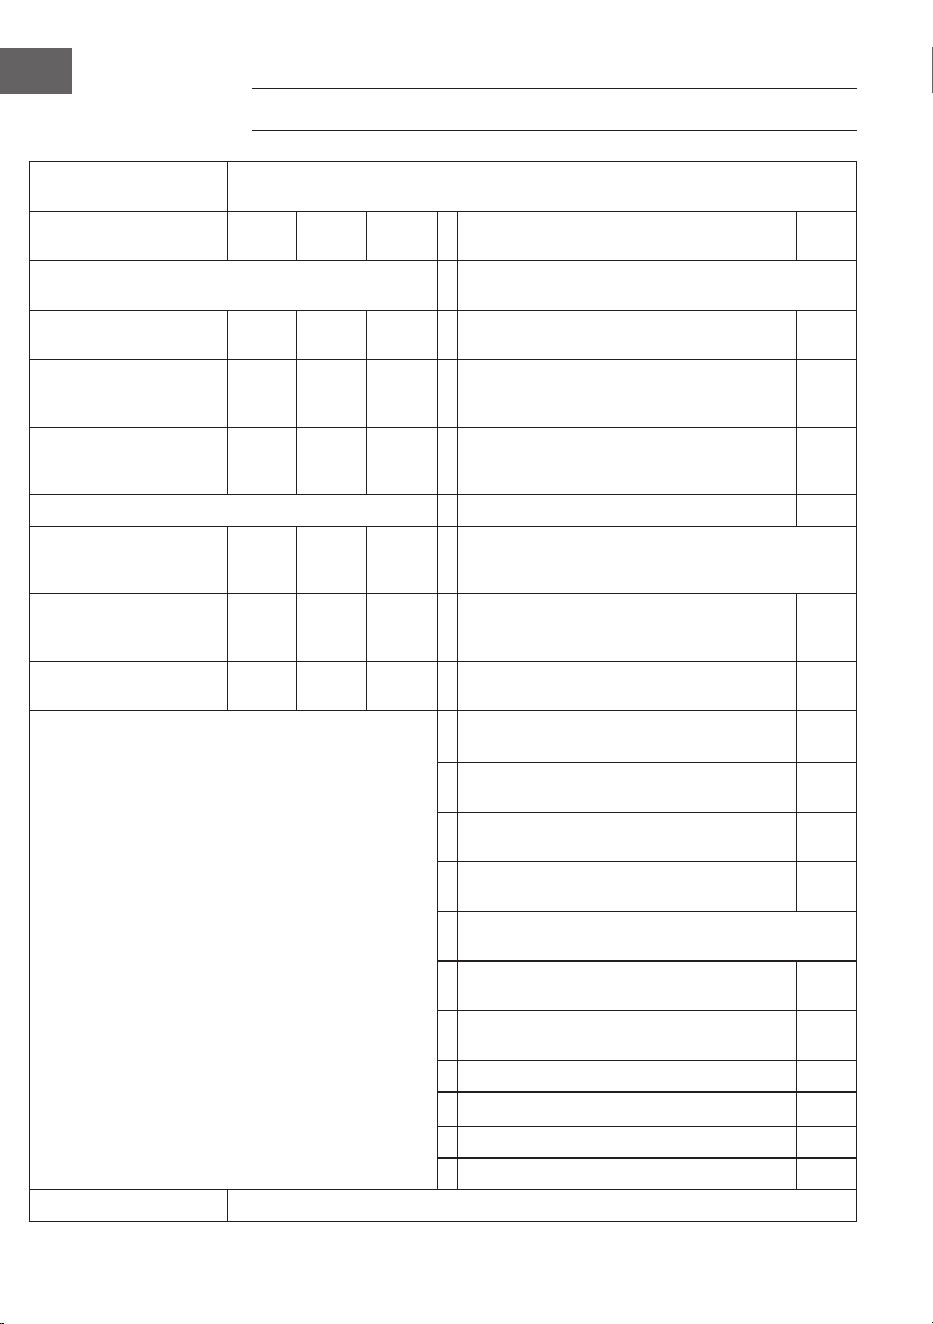
EN
PRODUCT DATA SHEET
Model identier(s): 10035168, 10035171
Item Sym-
bol
Value Unit Item Unit
Heat output Type of heat input, for electric storage local
space heaters only
Nominal heat output P
nom
0.3 kW manual heat charge control, with inte-
grated thermostat
no
Minimum heat output
(indicative)
P
min
0.0 kW manual heat charge control with room
and/or outdoor temperature feedback
no
Maximum continuous
heat output
P
max,c
0.3 kW electronic heat charge control with
room and/or outdoor temperature
feedback
no
Auxiliary electricity consumption fan assisted heat output no
At nominal heat output
(fan motor)
el
max
0.300 kW Type of heat output/room temperature control
At minimum heat
output
(fan motor)
el
min
0.000 kW single stage heat output and no room
temperature control
no
In standby mode el
SB
0.000 W Two or more manual stages, no room
temperature control
no
with mechanic thermostat room tem-
perature control
no
with electronic room temperature
control
no
electronic room temperature control
plus day timer
no
electronic room temperature control
plus week timer
yes
Other control options (multiple selections
possible)
room temperature control, with pres-
ence detection
no
room temperature control, with open
window detection
yes
with distance control option no
with adaptive start control no
with working time limitation no
with black bulb sensor no
Contact details Chal-Tec GmbH, Wallstraße 16, 10179, Berlin, Germany

23
EN
Model identier(s): 10035169, 10035172
Item Sym-
bol
Value Unit Item Unit
Heat output Type of heat input, for electric storage local
space heaters only
Nominal heat output P
nom
0,58 kW manual heat charge control, with inte-
grated thermostat
no
Minimum heat output
(indicative)
P
min
0,0 kW manual heat charge control with room
and/or outdoor temperature feedback
no
Maximum continuous
heat output
P
max,c
0,58 kW electronic heat charge control with
room and/or outdoor temperature
feedback
no
Auxiliary electricity consumption fan assisted heat output no
At nominal heat output
(fan motor)
el
max
0.580 kW Type of heat output/room temperature control
At minimum heat
output
(fan motor)
el
min
0.000 kW single stage heat output and no room
temperature control
no
In standby mode el
SB
0.000 W Two or more manual stages, no room
temperature control
no
with mechanic thermostat room tem-
perature control
no
with electronic room temperature
control
no
electronic room temperature control
plus day timer
no
electronic room temperature control
plus week timer
yes
Other control options (multiple selections
possible)
room temperature control, with pres-
ence detection
no
room temperature control, with open
window detection
yes
with distance control option no
with adaptive start control no
with working time limitation no
with black bulb sensor no
Contact details Chal-Tec GmbH, Wallstraße 16, 10179, Berlin, Germany
24
EN
Model identier(s): 10035170, 10035173
Item Sym-
bol
Value Unit Item Unit
Heat output Type of heat input, for electric storage local
space heaters only
Nominal heat output P
nom
0.72 kW manual heat charge control, with inte-
grated thermostat
no
Minimum heat output
(indicative)
P
min
0.0 kW manual heat charge control with room
and/or outdoor temperature feedback
no
Maximum continuous
heat output
P
max,c
0.72 kW electronic heat charge control with
room and/or outdoor temperature
feedback
no
Auxiliary electricity consumption fan assisted heat output no
At nominal heat output
(fan motor)
el
max
0.720 kW Type of heat output/room temperature control
At minimum heat
output
(fan motor)
el
min
0.000 kW single stage heat output and no room
temperature control
no
In standby mode el
SB
0.000 W Two or more manual stages, no room
temperature control
no
with mechanic thermostat room tem-
perature control
no
with electronic room temperature
control
no
electronic room temperature control
plus day timer
no
electronic room temperature control
plus week timer
yes
Other control options (multiple selections
possible)
room temperature control, with pres-
ence detection
no
room temperature control, with open
window detection
yes
with distance control option no
with adaptive start control no
with working time limitation no
with black bulb sensor no
Contact details Chal-Tec GmbH, Wallstraße 16, 10179, Berlin, Germany
25
EN
SAFETY INSTRUCTIONS
• Do not use the appliance until it is securely xed as described in this manual.
• Check that the voltage indicates on the data plate corresponds with that of the
local network before connecting the appliance to the mains power supply.
• If the supply cord is damaged, it must be replaced by a qualied engineer in
order to avoid a hazard.
• The replace heater must not be positioned directly under the power socket.
• Keep furniture, curtains and other ammable material at least 1 meter away
from the appliance.
• Do not leave the appliance unattended during use.
• Do not leave the appliance unattended whilst connected to the mains supply.
• Keep out of reach of children and do not allow them to operate this appliance.
• This appliance is intended for household use only and should not be used for
industrial purposes.
• Do not operate this appliance after a malfunction or after being damaged in any
way.
• Repairs to electrical appliances should only be performed by a qualied
electrician.
• Improper repairs may place user at serious risk.
• Do not run the mains cable under carpets, rugs, etc.
• Do not allow the mains cable to hang over sharp edges or come in contact with hot
surfaces.
• In order to avoid overheating, do not cover the heater.
• Do not use this heater with a programmer, timer, separate remote control
system or any other device that switches the heater on automatically, since a
re risk exists if the heater is covered or positioned incorrectly.
• Never immerse the product in water or any other liquid for any reasons.
• Do not use this heater in the immediate surroundings of a bath, a shower or a
swimming pool.
• Do not use the appliance outdoors.
• Do not use if you have wet hands.
• Never use the appliance on or near hot surfaces.
• Do not operate with a damaged cord.
• Before cleaning the appliance, make sure it is unplugged from the power and that
it is completely cooled.
• Do not clean the appliance with abrasive chemicals.
• Never use accessories that are not recommended or supplied by the
manufacturer. It could cause danger to the user or damage to the appliance.
• This appliance is not intended for use by persons (including children) with
reduced Physical, sensory or mental capabilities, or lack of experience and
knowledge unless they have been given supervision or instruction concerning
use of the appliance by a person responsible for their safety.
• Children should be supervised to ensure that they do not play with the
appliance.
CAUTION
Risk of burns! Some parts of this product can become very hot and
cause burns. Particular attention has to be given where children
and vulnerable people are present.
26
EN
WALL INSTALLATION
Important installation instructions
• Continuous operation shortens the service life of the heaters. If possible, the
appliance should be paused every 12 hours.
• Do not use the unit when the ambient temperature is above 20 °C, as high
temperatures will affect performance.
• The outlet should be at least 20 cm above the ground.
• Keep the unit away from ammable and explosive materials.
• Leave a safety distance of 30 cm around the unit to the front, top and rear.
Leave a safety distance of 10 cm to the right and left around the unit.
• During the rst one or two days, new heaters may emit odours that are
harmless to humans.
27
EN
REMOTE CONTROL DISPLAY INDICATORS
OPERATION AND FUNCTIONS
Button [M]
• Press the [M] button switch between System time/Thermostat
• Press and hold the [M] button under certain program slot to initiate a
programming into the slot.
System Thermostat
Day
Program type
AM/PM
RF Connection status
Current temperature
Socket status
Target temperature
Degree Celius
Degree Fahrenheit
Battery low warning
Program start time
Program end time
28
EN
Button [OK]
• Press [OK].
• Choose the 1,2,3,4 slot. Press [OK] to turn on/off the slot.
• Under programming or setting status, press the OK button to conrm and
proceed to next step.
Button [+] and [-]
• Choose the program slots.
• Press button increase or decrease, the digit in programming and setting
mode, press and hold [-] or [+] to fast increase/decrease.
Pair to control box
1. Press and hold [+] and [-] simultaneously to start pairing. The CONNECT icon
will blink on the display to indicate that the remote is attempting to connect to
the unit.
2. Turn on the heater at the side switch. The unit will now be in pairing mode for
60 seconds.
3. Wait until the CONNECT symbol stops ashing and lights up permanently in
the display. The remote control is now connected to the heater.
Note: The remote control only works within a radius of 10 meters from the unit.
Establishing the connection usually takes 5 seconds.
Pair to control box
1. Turn on the heating panel using the
swich on the back.
2. Point to the heating panel and press
and hold "+" and "-" simultaneously.
Two beeps indicate successful pairing.
Note: The remote control only works within a radius of 10 meters from the unit. Establishing the
connection usually takes 5 seconds.
29
EN
QUICK START
Manual Override
Press the [OK] button repeatedly to select one of the following functions:
• Manual temperatur setting
• OFF
• ON
Note: Manual operation override all slot programs, and set all running slots into
OFF status. Vice verse, turning on slots program will erase all manual setting.
Manual operation will features in the switch ON/OFF icons stay on while slot
program will feature in the ON/OFF icons ashing.
Manual switch-off of
the system (the symbol
lights up continuously)
Switching on the system
manually (the symbol
lights up continuously)
Manual setting of the
temperature (the symbol
lights up continuously)
Program on-the-run
Activate either of the slots program will erase the manual setting, and execute the
slot program instead.

30
EN
Set the exact end time (hour and minutes) with +/- and
conrm with [OK]. Programming is now complete.
Display on System page when program is on-the-run
The ashing MODE symbol
indicates that the preset
program for slot 3 is
currently active.
The ashing
ON/OFF symbol
indicates that the
heater is currently
controlled by a
program.
Weekly
program
Slot
program
In thermostat
mode, press [+]
or [-].
Set the day of the
week for the start
time (ST) with +/-.
Set the exact start
time (hour and min-
utes) with +/-.
Set the day of the
week for the end
time (ET) to +/-.
Select the programme
position to be pro-
grammed and conrm
with [OK].
Press [+] or [-] and conrm
the target temperature
with [OK].

31
EN
Current day of week and time settings
Press and hold „M“to enter the interface of setting the current time and day of the
week. Press „+“ and „-“ to select. Press „OK“ to conrm.
1. Press “+” or “-” to select
24h or 12h, press “OK”
button to conrm.
2. Pass „+“ or „-“ to select
the day of the week
3. Press “+” or “-” to set
the hourly time, press
“OK” button to conrm.
4. Press “+” or “-” to set
the minutely time, press
“OK” button to conrm..
5. Press “+” or “-” to select
Celsius or Fahrenheit, press
“OK” button to conrm.

32
EN
In Automatic Mode, press the „+“ or „−“ buttons to adjust the target temperature to your desired
setting.
Weekly programming setting
Short press the „M“ button to enter the interface of setting weekly programming.
"00" on the left ashes and "ST"
is displayed. Press + or - to set
the start heating time. Press the
OK button to conrm.
„00“ on the right ashes and
„ET“ is diplayed.
Press + or - to set the end
heating time. Press the OK
button to conrm.
Press the + or - buttons
to set your target
temperature. Press the
M button to the next
day setting.

33
EN
Notes about programs
• Place the remote control and the heating panel in the same room.
• If a battery icon stays on the remote's screen, it means the battery is running
low. A low battery may cause the remote to malfunction or stop working.
Please replace the battery promptly to avoid interruptions.
• Make sure the straight-line distance between them is no more than 5 meters
for proper communication.
• Red light ON: The system is powered and the main board is working normally.
Green light ON: The heating panel is currently heating.
Weekly programming settings
• Before setting a schedule, please ensure to set the correct day and time rst.
Without this, weekly programming will not function correctly.
• Choose the hour to turn ON and the hour to turn OFF each day. Example: Turn
ON at 10:00 AM, turn OFF at 5:00 PM.
• Weekly programming will not activate if the turn ON time is the same as or
later than the turn OFF time. For example, if you set the heater to turn ON at
10:00 and OFF at 8:00, the system will ignore the schedule for that day. To skip
heating on a specic day, simply set the turn ON time to be the same as or
later than the turn OFF time.
• The system uses a 24-hour format by default. If you enter a 12-hour time
format, the system will automatically convert it—no need to adjust manually.
• The heater runs only when both time and temperature settings are met.
Example
• ON time: 10:00 AM
• OFF time: 12:00 PM
• Set temperature: 25°C
• Heating will start if the temperature drops to 22 °C or lower (current ambient
temperature 3 degree lower than the set temperature).
• Heating will stop if the temperature rises to above 25 °C (current ambient
temperature 1 degree higher than the set temperature).
• Outside the scheduled time, the heater will not turn on, even if the
temperature is low.
34
EN
If you choose a specic day in a week as ST, then you can choose any day as ET.
the switch will be turned ON/OFF base on the specic ST day and time to ET. day
and time in a range of one week, and the program will repeat every week.
Display slot info
Users can view their programmed time or temperature by selecting the slot in
program mode, user are allow to close or open the slot easily.
1. Go the programme mode.
2. Select the target slot you want to view, the programmed start time and end
time will scroll in 1 second and repeat, all other information is displayed as
well.
3. Press the OK button to turn off this slot, press again to recover the slot.
Open-window mode
Note: Open-window mode when running overrides all modes.
• If the temperature in the room drops by more than 6 °C within 20 minutes,
the device interprets this as an open window and the heating switches off
automatically.
• As long as the mode is active, OPEN ashes in the display.
• Press any button on the remote control to return to the manual setting mode.
Battery change
• Remove the cover of the battery compartment.
• Replace the old batteries with 2 new AA batteries and close the battery
compartment again.

35
EN
DISPOSAL CONSIDERATIONS
If there is a legal regulation for the disposal of electrical
and electronic devices in your country, this symbol on the
product or on the packaging indicates that this product
must not be disposed of with household waste. Instead,
it must be taken to a collection point for the recycling
of electrical and electronic equipment. By disposing of
it in accordance with the rules, you are protecting the
environment and the health of your fellow human beings
from negative consequences. For information about the
recycling and disposal of this product, please contact your
local authority or your household waste disposal service.
This product contains batteries. If there is a legal
regulation for the disposal of batteries in your country,
the batteries must not be disposed of with household
waste. Find out about local regulations for disposing
of batteries. By disposing of them in accordance with
the rules, you are protecting the environment and the
health of your fellow human beings from negative
consequences.
MANUFACTURER & IMPORTER (UK)
Chal-Tec GmbH, Mühlenstrasse 25, 10243 Berlin, Germany.
Contact: [email protected]

37
FR
Chère cliente, cher client,
Félicitation pour acquisition de ce nouvel appareil. Veuillez
lire attentivement ce manuel et tenir compte des conseils
suivants an d'éviter tout dommage. Toute défaillance
causée par le non-respect des mentions et des précautions
mentionnées dans le manuel d'instructions n'est pas
couverte par notre garantie et notre responsabilité. Scannez
le code QR pour accéder au dernier manuel d'utilisation et à
d'autres informations sur le produit.
SOMMAIRE
FICHE TECHNIQUE
Numéro d'article Alimentation
Alimentation
électrique
Dimensions
10035168
10035171
300 W (±10%)
220-240 V~
50 Hz
505 x 595 x 16
mm
10035169
10035172
580 W (±10%)
595 x 900 x 16
mm
10035170
10035173
720 W (±10%)
595 x 1195 x 16
mm
Fiche technique 37
Fiche technique du produit 38
Consignes de sécurité 41
Installation murale 42
Voyants de la télécommande 43
Utilisation et fonctions 43
Démarrage rapide 45
Informations sur le recyclage 51
Fabricant 51
38
FR
FICHE TECHNIQUE DU PRODUIT
Identiant(s) du
modèle :
10035168, 10035171
Article Symbole Valeur Unité Article
Puissance calorique Type d'apport de chaleur, pour les chauffages
locaux électriques à accumulation
Puissance calorique
nominale
P
nom
0,3 kW Contrôle manuel de la charge de chaleur,
avec thermostat intégré
non
Puissance calorique
minimale (indicative)
P
min
0,0 kW Contrôle manuel de la charge thermique
avec retour d'informations sur la tempéra-
ture ambiante et/ou extérieure
non
Puissance calorique
maximale continue
P
max,c
0,3 kW Contrôle électronique de la charge ther-
mique avec retour d'informations sur la
température ambiante et/ou extérieure
non
Consommation d'électricité auxiliaire Production de chaleur assistée par venti-
lateur
non
À puissance calorique
nominale
(moteur du ventilateur)
el
max
0,300 kW Type de chauffage/régulation de la température
ambiante
Au débit calorique
minimum
(moteur du ventilateur)
el
min
0,000 kW production de chaleur en une seule étape
et pas de contrôle de la température
ambiante
non
En mode veille el
SB
0,000 l Deux étapes manuelles ou plus, pas de
contrôle de la température ambiante
non
avec thermostat mécanique régulation de
la température ambiante
non
avec contrôle électronique de la tempéra-
ture ambiante
non
Avec contrôle électronique de la tempéra-
ture ambiante et minuterie quotidienne
non
Avec contrôle électronique de la tempéra-
ture ambiante et minuterie hebdomadaire
oui
Autres options de contrôle (plusieurs sélections
possibles)
contrôle de la température ambiante, avec
détection de présence
non
Contrôle de la température ambiante, avec
détection de fenêtre ouverte
oui
avec option de contrôle de la distance non
avec contrôle adaptatif du démarrage non
avec limitation du temps de fonctionne-
ment
non
avec capteur à ampoule noire non
Coordonnées de
contact
Chal-Tec GmbH, Mühlenstraße 25, 10243 Berlin, Allemagne.
39
FR
Identiant(s) du
modèle :
10035169, 10035172
Article Symbole Valeur Unité Article
Puissance calorique Type d'apport de chaleur, pour les chauffages
locaux électriques à accumulation
Puissance calorique
nominale
P
nom
0,58 kW Contrôle manuel de la charge de chaleur,
avec thermostat intégré
non
Puissance calorique
minimale (indicative)
P
min
0,0 kW Contrôle manuel de la charge thermique
avec retour d'informations sur la tempé-
rature ambiante et/ou extérieure
non
Puissance calorique
maximale continue
P
max,c
0,58 kW Contrôle électronique de la charge ther-
mique avec retour d'informations sur la
température ambiante et/ou extérieure
non
Consommation d'électricité auxiliaire Production de chaleur assistée par
ventilateur
non
À puissance calorique
nominale
(moteur du ventilateur)
el
max
0,580 kW Type de chauffage/régulation de la tempéra-
ture ambiante
Au débit calorique
minimum
(moteur du ventilateur)
el
min
0,000 kW production de chaleur en une seule étape
et pas de contrôle de la température
ambiante
non
En mode veille el
SB
0,000 l Deux étapes manuelles ou plus, pas de
contrôle de la température ambiante
non
avec thermostat mécanique régulation de
la température ambiante
non
avec contrôle électronique de la tempéra-
ture ambiante
non
Avec contrôle électronique de la tempéra-
ture ambiante et minuterie quotidienne
non
Avec contrôle électronique de la tempé-
rature ambiante et minuterie hebdoma-
daire
oui
Autres options de contrôle (plusieurs sélections
possibles)
contrôle de la température ambiante,
avec détection de présence
non
Contrôle de la température ambiante,
avec détection de fenêtre ouverte
oui
avec option de contrôle de la distance non
avec contrôle adaptatif du démarrage non
avec limitation du temps de fonctionne-
ment
non
avec capteur à ampoule noire non
Coordonnées de
contact
Chal-Tec GmbH, Mühlenstraße 25, 10243 Berlin, Allemagne.
40
FR
Identiant(s) du
modèle :
10035170, 10035173
Article Sym-
bole
Unité Appa-
reil
Article
Puissance calorique Type d'apport de chaleur, pour les chauffages
locaux électriques à accumulation
Puissance calorique
nominale
P
nom
0,72 kW Contrôle manuel de la charge de chaleur,
avec thermostat intégré
non
Puissance calorique
minimale (indicative)
P
min
0,0 kW Contrôle manuel de la charge thermique
avec retour d'informations sur la tempéra-
ture ambiante et/ou extérieure
non
Puissance calorique
maximale continue
P
max,c
0,72 kW Contrôle électronique de la charge ther-
mique avec retour d'informations sur la
température ambiante et/ou extérieure
non
Consommation d'électricité auxiliaire Production de chaleur assistée par venti-
lateur
non
À puissance calorique
nominale
(moteur du ventilateur)
el
max
0,720 kW Type de chauffage/régulation de la tempéra-
ture ambiante
Au débit calorique
minimum
(moteur du ventilateur)
el
min
0,000 kW production de chaleur en une seule étape
et pas de contrôle de la température
ambiante
non
En mode veille el
SB
0,000 l Deux étapes manuelles ou plus, pas de
contrôle de la température ambiante
non
avec thermostat mécanique régulation de
la température ambiante
non
avec contrôle électronique de la tempéra-
ture ambiante
non
Avec contrôle électronique de la tempéra-
ture ambiante et minuterie quotidienne
non
Avec contrôle électronique de la tempéra-
ture ambiante et minuterie hebdomadaire
oui
Autres options de contrôle (plusieurs sélec-
tions possibles)
contrôle de la température ambiante, avec
détection de présence
non
Contrôle de la température ambiante, avec
détection de fenêtre ouverte
oui
avec option de contrôle de la distance non
avec contrôle adaptatif du démarrage non
avec limitation du temps de fonctionne-
ment
non
avec capteur à ampoule noire non
Coordonnées de
contact
Chal-Tec GmbH, Mühlenstraße 25, 10243 Berlin, Allemagne.
41
FR
CONSIGNES DE SÉCURITÉ
• N'utilisez pas l'appareil tant qu'il n'est pas solidement xé comme indiqué dans le présent manuel.
• Vérier que la tension indiquée sur la plaque signalétique correspond à celle du réseau local avant de
brancher l'appareil sur le réseau électrique.
• Si le cordon d'alimentation est endommagé, il doit être remplacé par un ingénieur qualié an
d'éviter tout danger.
• Le poêle-cheminée ne doit pas être placé directement sous la prise de courant.
• Les meubles, rideaux et autres matériaux inammables doivent être éloignés d'au moins 1 mètre de
l'appareil.
• Ne laissez pas l'appareil en fonctionnement sans surveillance.
• Ne laissez pas l'appareil sans surveillance lorsqu'il est branché sur le secteur.
• Tenez l'appareil hors de portée des enfants et ne les laissez pas l'utiliser.
• Cet appareil est destiné à un usage domestique uniquement et ne doit pas être utilisé à des ns
industrielles.
• N'utilisez pas cet appareil après un dysfonctionnement ou après qu'il ait été endommagé de quelque
manière que ce soit.
• Les réparations des appareils électriques ne doivent être effectuées que par un électricien qualié.
• Des réparations inadéquates peuvent mettre l'utilisateur en danger.
• Ne pas faire passer le câble d'alimentation sous les tapis, les moquettes, etc.
• Ne laissez pas le câble d'alimentation pendre sur des arêtes vives ou entrer en contact avec des surfaces
chaudes.
• An d'éviter toute surchauffe, ne couvrez pas l'appareil.
• N'utilisez pas ce poêle avec un programmateur, une minuterie, un système de commande à distance
séparé ou tout autre dispositif qui allume le poêle automatiquement, car il existe un risque d'incendie
si le poêle est couvert ou positionné de manière incorrecte.
• Ne jamais immerger le produit dans l'eau ou tout autre liquide pour quelque raison que ce soit.
• N'utilisez pas ce chauffage à proximité immédiate d'un bain, d'une douche ou d'une piscine.
• Ne pas utiliser l'appareil à l'extérieur.
• Ne pas utiliser si vous avez les mains mouillées.
• Ne jamais utiliser l'appareil sur ou à proximité de surfaces chaudes.
• Ne pas faire fonctionner l'appareil avec un cordon endommagé.
• Avant de nettoyer l'appareil, assurez-vous qu'il est débranché et qu'il est complètement refroidi.
• Ne pas nettoyer l'appareil avec des produits chimiques abrasifs.
• N'utilisez jamais d'accessoires qui ne sont pas recommandés ou fournis par le fabricant. Cela pourrait
mettre en danger l'utilisateur ou endommager l'appareil.
• Cet appareil n'est pas destiné à être utilisé par des personnes (y compris des enfants) dont les
capacités physiques, sensorielles ou mentales sont réduites, ou qui manquent d'expérience et de
connaissances, à moins qu'elles n'aient pu bénécier d'une surveillance ou d'instructions concernant
l'utilisation de l'appareil de la part d'une personne responsable de leur sécurité.
• Les enfants doivent être surveillés pour s'assurer qu'ils ne jouent pas avec l'appareil.
ATTENTION
Risque de brûlures ! Certaines parties de ce produit peuvent devenir très chaudes et
provoquer des brûlures. Une attention particulière doit être accordée en présence
d'enfants et de personnes vulnérables.
42
FR
INSTALLATION MURALE
Instructions importantes pour l'installation
• Un fonctionnement continu réduit la durée de vie des appareils de chauffage.
Dans la mesure du possible, l'appareil doit être mis en pause toutes les 12
heures.
• N'utilisez pas l'appareil lorsque la température ambiante est supérieure à 20
°C, car les températures élevées affectent les performances.
• La sortie doit être située à au moins 20 cm au-dessus du sol.
• Tenez l'appareil à l'écart du feu et des objets inammables ou explosifs.
• Laissez une distance de sécurité de 30 cm autour de l'appareil à l'avant, en
haut et à l'arrière. Laissez une distance de sécurité de 10 cm à droite et à
gauche autour de l'appareil.
• Les premiers jours, les nouveaux appareils de chauffage peuvent dégager des
odeurs inoffensives pour l'homme.

43
FR
VOYANTS DE LA TÉLÉCOMMANDE
UTILISATION ET FONCTIONS
Bouton [M]
• Appuyez sur le bouton [M] pour passer de l'heure du système à l'heure du
thermostat
• Appuyez et maintenez le bouton [M] sous un emplacement donné de
programme pour lancer une programmation dans l'emplacement.
Système thermostat
Jour
Type de programme
AM/PM
État de la connexion
RF
Température actuelle
État de la prise
Température de consigne
Degré Celsius
Degré Fahrenheit
Avertissement de batterie faible
Heure de début du programme
Heure de n du programme
44
FR
Bouton [OK]
• Appuyez sur [OK].
• Choisissez le créneau 1,2,3,4. Appuyez sur [OK] pour activer/désactiver le
créneau.
• En mode programmation ou réglage, appuyez sur la touche OK pour
conrmer et passer à l'étape suivante.
Boutons [+] et [-]
• Choisissez les créneaux horaires du programme.
• Appuyez sur le bouton pour augmenter ou diminuer le chiffre en mode de
programmation et de réglage, appuyez sur [-] ou [+] et maintenez-le enfoncé
pour augmenter/diminuer rapidement le chiffre.
Appairer le boîtier de contrôle
1. Appuyez simultanément sur les touches [+] et [-] et maintenez-les pour
lancer l'appairage. L'icône CONNECT clignote à l'écran pour indiquer que la
télécommande tente de se connecter à l'appareil.
2. Allumez le chauffage à l'aide de l'interrupteur latéral. L'appareil est alors en
mode d'appairage pendant 60 secondes.
3. Attendez que le symbole CONNECT cesse de clignoter et reste allumé en
permanence sur l'écran. La télécommande est maintenant connectée au
radiateur.
Remarque : La télécommande ne fonctionne que dans un rayon de 10 mètres
autour de l'appareil. L'établissement de la connexion prend généralement 5
secondes.
Appairer le boîtier de contrôle
1. Allumez le panneau chauffant à
l'aide du commutateur situé à l'arrière.
2. Pointez le panneau de chauffage et
appuyez simultanément sur les touches
+ et - et maintenez-les. Deux bips
indiquent que l'appairage a réussi.
Remarque : La télécommande ne fonctionne que dans un rayon de 10 mètres autour de
l'appareil. L'établissement de la connexion prend généralement 5 secondes.

45
FR
DÉMARRAGE RAPIDE
Commande manuelle
Appuyez plusieurs fois sur le bouton [OK] pour sélectionner l'une des fonctions
suivantes :
• Réglage manuel de la température
• OFF
• ON
Remarque : L'opération manuelle annule tous les programmes de créneaux
et met tous les créneaux en cours d'exécution en position OFF. A l'inverse,
l'activation de la programmation des créneaux effacera tous les réglages
manuels.
En mode manuel, les icônes ON/OFF de l'interrupteur restent allumées, tandis
qu'en mode programmation, les icônes ON/OFF clignotent.
Arrêt manuel du système
(le symbole s'allume en
continu)
Activation manuelle du
système (le symbole
s'allume en continu)
Réglage manuel de la
température (le symbole
s'allume en continu)
Programme en cours
L'activation de l'un ou l'autre des programmes de créneaux effacera le réglage
manuel et exécutera le programme de créneaux à la place.
46
FR
Réglez l'heure de n exacte (heure et minutes) avec +/- et conrmez avec [OK].
La programmation est maintenant terminée.
Achage sur la page Système lorsque le programme est en cours d'exécution
Le symbole MODE
clignotant indique que le
programme de préréglage
de l'emplacement 3 est
actuellement actif.
Le symbole
clignotant ON/
OFF indique que
le chauffage est
actuellement
contrôlé par un
programme.
Hebdomadaire
Programme
Créneau
Programme
En mode ther-
mostat, appuyez
sur [+] ou [-].
Réglez le jour de la
semaine pour l'heure de
début (ST) avec +/-.
Réglez l'heure de
début exacte (heure et
minutes) avec +/-.
Régler le jour de la se-
maine pour l'heure de n
(ET) à +/-.
Sélectionnez la position
de programme à pro-
grammer et conrmez
avec [OK].
Appuyez sur [+] ou [-] et
conrmez la température
de consigne avec [OK].

47
FR
Réglage du jour de la semaine et de l'heure
Appuyez sur M et maintenez-le enfoncé pour accéder à l'interface de réglage de
l'heure et du jour de la semaine. Appuyez sur + et - pour sélectionner. Appuyez sur
OK pour conrmer.
1. Appuyez sur + ou - pour sélectionner
24h ou 12h puis appuyez sur le bouton
OK pour conrmer.
2. Appuyez sur + ou - pour
sélectionner le jour de la
semaine
3. Appuyez sur + ou - pour
régler les heures, appuyez
sur le bouton OK pour
conrmer.
4. Appuyez sur + ou -
pour régler les minutes,
appuyez sur le bouton OK
pour conrmer.
5. Appuyez sur + ou - pour
sélectionner Celsius ou
Fahrenheit, puis appuyez sur
le bouton OK pour conrmer.

48
FR
En mode automatique, appuyez sur les boutons + ou - pour ajuster la température cible au réglage
souhaité.
Programmation hebdomadaire
Appuyez brièvement sur le bouton M pour accéder à l'interface de réglage de la programmation
hebdomadaire.
le chiffre 00 à gauche clignote
et ST s'afche. Appuyez sur +
ou - pour régler l'heure de dé-
but du chauffage. Appuyez sur
le bouton OK pour conrmer.
le chiffre 00 à droite clignote
et ET s'afche.
Appuyez sur + ou - pour
régler l'heure de début du
chauffage. Appuyez sur le
bouton OK pour conrmer.
Appuyez sur les
boutons + ou - pour
régler la température
souhaitée. Appuyez
sur le bouton M pour
passer au réglage du
jour suivant.

49
FR
Remarques sur les programmes
• Placez la télécommande et le panneau chauffant dans la même pièce.
• Si une icône de pile reste achée sur l'écran de la télécommande, cela signie
que la pile est faible. Une pile faible peut entraîner un dysfonctionnement
ou un arrêt de la télécommande. Veuillez remplacer la pile rapidement pour
éviter les interruptions.
• Veillez à ce que la distance en ligne droite entre les deux ne dépasse pas 5
mètres pour assurer une bonne communication.
• Voyant rouge allumé : Le système est sous tension et la carte principale
fonctionne normalement.
Voyant vert ON : Le panneau chauffant est en train de chauffer.
Programmation hebdomadaire
• Avant de programmer un horaire, veillez à régler d'abord le jour et l'heure
corrects. Sans cela, la programmation hebdomadaire ne fonctionnera pas
correctement.
• Choisissez l'heure de mise en marche et l'heure de mise à l'arrêt chaque jour.
Exemple : Allumer à 10h00, éteindre à 17h00.
• La programmation hebdomadaire n'est pas activée si l'heure de mise en
marche est identique ou postérieure à l'heure de mise à l'arrêt. Par exemple,
si vous réglez le chauffage pour qu'il s'allume à 10 heures et s'éteigne à 8
heures, le système ignorera l'horaire de ce jour. Pour ne pas chauffer un jour
donné, il sut de régler l'heure de mise en marche sur une heure identique
ou postérieure à l'heure de mise à l'arrêt.
• Le système utilise par défaut un format de 24 heures. Si vous entrez un format
horaire de 12 heures, le système le convertira automatiquement, sans qu'il
soit nécessaire de procéder à un ajustement manuel.
• Le chauffage ne fonctionne que lorsque les paramètres de temps et de
température sont respectés.
Exemple
• Heure de mise en service : 10:00 AM
• Heure d'arrêt : 12:00 PM
• Réglage de la température : 25 °C
• Le chauffage démarre si la température descend à 22 °C ou moins
(température ambiante actuelle inférieure de 3 degrés à la température
programmée).
• Le chauffage s'arrête si la température dépasse 25 °C ou moins (température
ambiante actuelle supérieure de 1 degré à la température programmée).
• En dehors de l'heure programmée, le chauffage ne s'allume pas, même si la
température est basse.

50
FR
Si vous choisissez un jour spécique dans une semaine comme ST, vous pouvez
choisir n'importe quel jour comme ET. L'interrupteur sera activé/désactivé en
fonction du jour et de l'heure ST spécique à ET. Le programme se répétera
chaque semaine.
Acher les informations sur les créneaux horaires
Les utilisateurs peuvent visualiser la durée ou la température programmée en
sélectionnant l'emplacement en mode programme, l'utilisateur est autorisé à
fermer ou ouvrir l'emplacement facilement.
1. Accéder au mode programme.
2. Sélectionnez le créneau cible que vous souhaitez visualiser, l'heure de début
et l'heure de n programmées délent en 1 seconde et se répètent, toutes
les autres informations sont également achées.
3. Appuyez sur le bouton OK pour désactiver ce créneau, appuyez à nouveau sur
ce bouton pour récupérer le créneau.
Mode fenêtre ouverte
Remarque : le mode fenêtre ouverte en cours d'exécution est prioritaire sur
tous les autres modes.
• Si la température de la pièce baisse de plus de 6 °C en l'espace de 20 minutes,
l'appareil interprète cela comme une fenêtre ouverte et le chauffage s'éteint
automatiquement.
• Tant que le mode est actif, OPEN clignote à l'écran.
• Appuyez sur n'importe quelle touche de la télécommande pour revenir au
mode de réglage manuel.
Remplacement des piles
• Retirez le couvercle du compartiment des piles.
• Remplacez les piles usagées par 2 nouvelles piles AA et refermez le
compartiment à piles.
51
FR
INFORMATIONS SUR LE RECYCLAGE
S‘il existe une réglementation pour l‘élimination ou le
recyclage des appareils électriques et électroniques dans
votre pays, ce symbole sur le produit ou sur l‘emballage
indique que cet appareil ne doit pas être jeté avec les
ordures ménagères. Vous devez le déposer dans un point
de collecte pour le recyclage des équipements électriques
et électroniques. La mise au rebut conforme aux règles
protège l‘environnement et la santé de vos semblables
des conséquences négatives. Pour plus d‘informations
sur le recyclage et l‘élimination de ce produit, veuillez
contacter votre autorité locale ou votre service de
recyclage des déchets ménagers.
Ce produit contient des piles. S‘il existe une
réglementation pour l‘élimination ou le recyclage des
piles dans votre pays, vous ne devez pas les jeter avec les
ordures ménagères. Renseignez-vous sur les dispositions
locales relatives à la collecte des piles usagées. La mise au
rebut conforme aux règles protège l‘environnement et la
santé de vos semblables des conséquences négatives.
FABRICANT
Chal-Tec GmbH, Mühlenstraße 25, 10243 Berlin, Allemagne.
Contact : [email protected]


53
IT
Gentile cliente,
grazie per aver acquistato questo dispositivo. Leggere
attentamente il manuale e rispettare le seguenti indicazioni
per evitare danni. Malfunzionamenti causati dalla mancata
osservanza delle indicazioni e delle avvertenze contenute
nel manuale d'uso non sono coperti dalla garanzia.
Scansionare il codice QR per accedere al manuale d'uso più
recente e ottenere ulteriori informazioni sul prodotto.
INDICE
DATI TECNICI
Numero
dell'articolo
Potenza Alimentazione Dimensioni
10035168
10035171
300 W (±10%)
220-240 V
~ 50 Hz
505x595x16 mm
10035169
10035172
580 W (±10%) 595x900x16 mm
10035170
10035173
720 W (±10%) 595x1195x16 mm
Dati tecnici 53
Scheda dei dati del prodotto 54
Avvertenze di sicurezza 57
Installazione a parete 58
Indicazioni del display del telecomando 59
Utilizzo e funzioni 59
Avvio rapido 61
Avviso di smaltimento 67
Produttore 67
54
IT
SCHEDA DEI DATI DEL PRODOTTO
Identicatore/-i del
modello:
10035168, 10035171
Articolo Sim-
bolo
Valore Unità Articolo Unità
Potenza termica Tipo di apporto di calore, solo per stufe locali ad
accumulo elettrico
Potenza termica no-
minale
P
nom
0,3 kW Controllo manuale della carica termica, con
termostato integrato
no
Potenza termica minima
(indicativa)
P
min
0,0 kW Controllo manuale della carica termica con
feedback della temperatura ambiente e/o
esterna
no
Potenza termica massi-
ma continua
P
max,c
0,3 kW Controllo elettronico della carica termica
con feedback della temperatura ambiente
e/o esterna
no
Consumo di elettricità ausiliaria Potenza termica assistita da una ventola no
Alla potenza termica
nominale
(motore della ventola)
el
max
0,300 kW Tipo di potenza termica/controllo della tempera-
tura ambiente
Alla potenza termica
minima
(motore della ventola)
el
min
0,000 kW Potenza termica a singolo stadio e nessun
controllo della temperatura ambiente
no
In modalità standby el
SB
0,000 Lar-
ghezza
Due o più fasi manuali, senza controllo
della temperatura ambiente
no
Con termostato meccanico per il controllo
della temperatura ambiente
no
Con controllo elettronico della temperatura
ambiente
no
Controllo elettronico della temperatura
ambiente con timer giornaliero
no
Controllo elettronico della temperatura
ambiente con timer settimanale
sì
Altre opzioni di controllo (è possibile effettuare
più selezioni)
Controllo della temperatura ambiente, con
rilevamento di presenza
no
Controllo della temperatura ambiente, con
rilevamento di nestre aperte
sì
Con opzione di controllo della distanza no
Con controllo adattativo dell'avviamento no
Con limitazione della durata operativa no
Con sensore a bulbo nero no
Dettagli di contatto Chal-Tec GmbH, Mühlenstraße 25, 10243 Berlino, Germania.
55
IT
Identicatore/-i del
modello:
10035169, 10035172
Articolo Sim-
bolo
Valore Unità Articolo Unità
Potenza termica Tipo di apporto di calore, solo per stufe locali
ad accumulo elettrico
Potenza termica no-
minale
P
nom
0,58 kW Controllo manuale della carica termica,
con termostato integrato
no
Potenza termica minima
(indicativa)
P
min
0,0 kW Controllo manuale della carica termica
con feedback della temperatura am-
biente e/o esterna
no
Potenza termica massi-
ma continua
P
max,c
0,58 kW Controllo elettronico della carica ter-
mica con feedback della temperatura
ambiente e/o esterna
no
Consumo di elettricità ausiliaria Potenza termica assistita da una
ventola
no
Alla potenza termica
nominale
(motore della ventola)
el
max
0,580 kW Tipo di potenza termica/controllo della tempe-
ratura ambiente
Alla potenza termica
minima
(motore della ventola)
el
min
0,000 kW Potenza termica a singolo stadio e
nessun controllo della temperatura
ambiente
no
In modalità standby el
SB
0,000 Lar-
ghezza
Due o più fasi manuali, senza controllo
della temperatura ambiente
no
Con termostato meccanico per il con-
trollo della temperatura ambiente
no
Con controllo elettronico della tempera-
tura ambiente
no
Controllo elettronico della temperatura
ambiente con timer giornaliero
no
Controllo elettronico della temperatura
ambiente con timer settimanale
sì
Altre opzioni di controllo (è possibile effettuare
più selezioni)
Controllo della temperatura ambiente,
con rilevamento di presenza
no
Controllo della temperatura ambiente,
con rilevamento di nestre aperte
sì
Con opzione di controllo della distanza no
Con controllo adattativo dell'avvia-
mento
no
Con limitazione della durata operativa no
Con sensore a bulbo nero no
Dettagli di contatto Chal-Tec GmbH, Mühlenstraße 25, 10243 Berlino, Germania.
56
IT
Identicatore/-i del
modello:
10035170, 10035173
Articolo Sim-
bolo
Valore Unità Articolo Unità
Potenza termica Tipo di apporto di calore, solo per stufe locali
ad accumulo elettrico
Potenza termica no-
minale
P
nom
0,72 kW Controllo manuale della carica termica,
con termostato integrato
no
Potenza termica minima
(indicativa)
P
min
0,0 kW Controllo manuale della carica termica
con feedback della temperatura am-
biente e/o esterna
no
Potenza termica massi-
ma continua
P
max,c
0,72 kW Controllo elettronico della carica ter-
mica con feedback della temperatura
ambiente e/o esterna
no
Consumo di elettricità ausiliaria Potenza termica assistita da una
ventola
no
Alla potenza termica
nominale
(motore della ventola)
el
max
0,720 kW Tipo di potenza termica/controllo della tempe-
ratura ambiente
Alla potenza termica
minima
(motore della ventola)
el
min
0,000 kW Potenza termica a singolo stadio e
nessun controllo della temperatura
ambiente
no
In modalità standby el
SB
0,000 Lar-
ghezza
Due o più fasi manuali, senza controllo
della temperatura ambiente
no
Con termostato meccanico per il con-
trollo della temperatura ambiente
no
Con controllo elettronico della tempera-
tura ambiente
no
Controllo elettronico della temperatura
ambiente con timer giornaliero
no
Controllo elettronico della temperatura
ambiente con timer settimanale
sì
Altre opzioni di controllo (è possibile effettuare
più selezioni)
Controllo della temperatura ambiente,
con rilevamento di presenza
no
Controllo della temperatura ambiente,
con rilevamento di nestre aperte
sì
Con opzione di controllo della distanza no
Con controllo adattativo dell'avvia-
mento
no
Con limitazione della durata operativa no
Con sensore a bulbo nero no
Dettagli di contatto Chal-Tec GmbH, Mühlenstraße 25, 10243 Berlino, Germania.
57
IT
AVVERTENZE DI SICUREZZA
• Non utilizzare il dispositivo nché non è stato ssato saldamente come descritto in questo manuale.
• Prima di collegare il dispositivo alla rete elettrica, vericare che la tensione indicata sulla targhetta
corrisponda a quella della rete locale.
• Se il cavo di alimentazione è danneggiato, deve essere sostituito da un tecnico qualicato per evitare
rischi.
• Il dispositivo non deve essere posizionato direttamente sotto la presa di corrente.
• Tenere mobili, tende e altri materiali inammabili ad almeno 1 metro di distanza dal dispositivo.
• Non lasciare il dispositivo incustodito durante l'uso.
• Non lasciare il dispositivo incustodito mentre è collegato alla rete elettrica.
• Tenere fuori dalla portata dei bambini e non permettere loro di utilizzare questo dispositivo.
• Questo dispositivo è destinato esclusivamente all'uso domestico e non deve essere utilizzato per
scopi industriali.
• Non mettere in funzione il dispositivo dopo un malfunzionamento o dopo che è stato danneggiato in
qualsiasi modo.
• Le riparazioni dei dispositivi elettrici devono essere eseguite esclusivamente da un elettricista
qualicato.
• Riparazioni improprie possono mettere in serio pericolo l'utente.
• Non far passare il cavo di alimentazione sotto tappeti, moquette, ecc.
• Non lasciare che il cavo di alimentazione penzoli da spigoli taglienti o venga a contatto con superci calde.
• Per evitare il surriscaldamento, non coprire la stufa.
• Non utilizzare questa stufa con un programmatore, un timer, un sistema di controllo a distanza
separato o qualsiasi altro dispositivo che la accenda automaticamente, poiché si corre il rischio di
incendio se la stufa viene coperta o posizionata in modo errato.
• Non immergere mai il prodotto in acqua o in altri liquidi per nessun motivo.
• Non utilizzare questa stufa nelle immediate vicinanze di un bagno, di una doccia o di una piscina.
• Non utilizzare il dispositivo all'aperto.
• Non utilizzarlo se si hanno le mani bagnate.
• Non utilizzare mai il dispositivo sopra o vicino a superci calde.
• Non utilizzare il dispositivo se il cavo è danneggiato.
• Prima di pulire il dispositivo, assicurarsi che sia scollegato dalla corrente e che si sia completamente
raffreddato.
• Non pulire il dispositivo con prodotti chimici abrasivi.
• Non utilizzare mai accessori non raccomandati o forniti dal produttore. Potrebbe essere pericoloso
per l'utente o danneggiare il dispositivo.
• Questo dispositivo non è destinato all'uso da parte di persone (compresi i bambini) con ridotte
capacità siche, sensoriali o mentali, o con mancanza di esperienza e conoscenza, salvo che non
siano supervisionate o abbiano ricevuto istruzioni sull'uso del dispositivo da parte di una persona
responsabile della loro sicurezza.
• I bambini devono essere sorvegliati per evitare che giochino con il dispositivo.
ATTENZIONE
Rischio di ustioni! Alcune parti di questo prodotto possono diventare molto calde e
causare ustioni. Prestare particolare attenzione in presenza di bambini e persone
vulnerabili.

58
IT
INSTALLAZIONE A PARETE
Istruzioni importanti per l'installazione
• Il funzionamento continuo riduce la vita utile delle stufe. Se possibile, il
dispositivo dovrebbe essere messo in pausa ogni 12 ore.
• Non utilizzare il dispositivo quando la temperatura ambiente è superiore a 20
°C, poiché le temperature elevate ne compromettono le prestazioni.
• L'uscita deve trovarsi ad almeno 20 cm dal suolo.
• Tenere il dispositivo lontano da oggetti inammabili o esplosivi.
• Lasciare una distanza di sicurezza di 30 cm intorno al dispositivo, davanti,
sopra e dietro. Lasciare una distanza di sicurezza di 10 cm sui lati destro e
sinistro del dispositivo.
• Durante i primi uno o due giorni, le nuove stufe possono emettere odori
innocui.

59
IT
INDICAZIONI DEL DISPLAY DEL TELECOMANDO
UTILIZZO E FUNZIONI
Tasto [M]
• Premere il tasto [M] per cambiare tra Orario del sistema/Termostato
• Tenere premuto il tasto [M] in un determinato intervallo di programmazione
per avviare la programmazione di tale intervallo.
Sistema Termostato
Giorno
Tipo di programma
AM/PM
Stato del
collegamento RF
Temperatura attuale
Stato della presa
Temperatura da raggiungere
Gradi Celsius
Gradi Fahrenheit
Avviso di batteria
scarica
Orario di inizio del programma
Orario di conclusione del programma
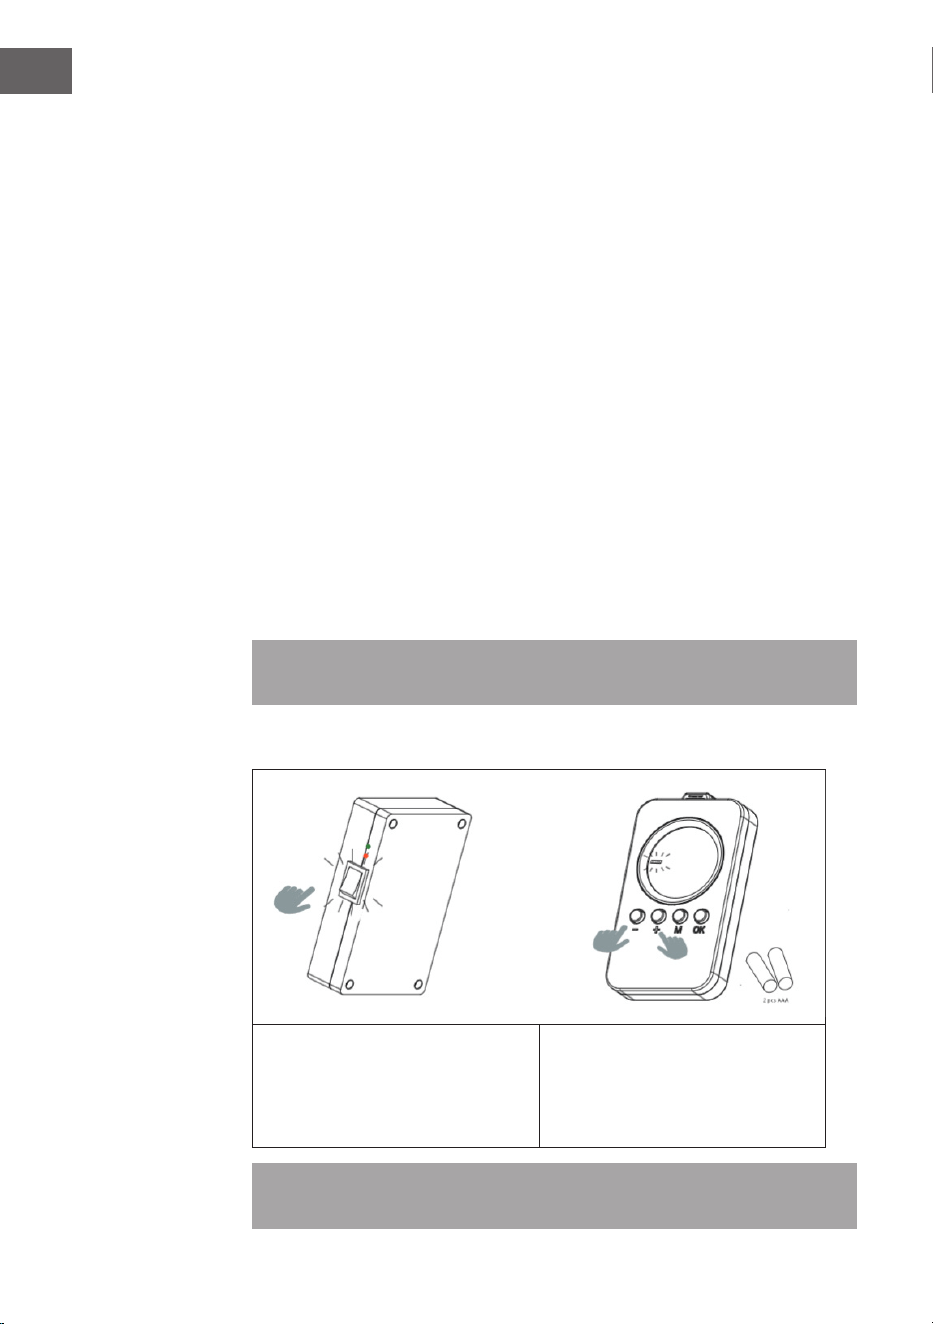
60
IT
Tasto [OK]
• Premere [OK].
• Scegliere l'intervallo 1, 2, 3, 4. Premere [OK] per attivare/disattivare
l'intervallo.
• In stato di programmazione o di impostazione, premere il tasto OK per
confermare e proseguire al passaggio successivo.
Tasti [+] e [-]
• Scegliere gli intervalli di programmazione.
• Premere il tasto per aumentare o diminuire la cifra in modalità di
programmazione e impostazione, tenere premuto [-] o [+] per aumentare/
diminuire rapidamente il valore.
Accoppiamento con la centralina di controllo
1. Tenere premuti [+] e [-] contemporaneamente per avviare l'accoppiamento.
L'icona CONNECT lampeggia sul display per indicare che il telecomando sta
cercando di collegarsi al dispositivo.
2. Accendere la stufa con l'interruttore laterale. Il dispositivo rimarrà in modalità
di accoppiamento per 60 secondi.
3. Attendere che il simbolo CONNECT smetta di lampeggiare e resti acceso in
modo permanente sul display. Il telecomando è ora collegato alla stufa.
Nota: il telecomando funziona solo entro un raggio di 10 metri dal dispositivo.
Solitamente sono necessari 5 secondi per stabilire la connessione.
Accoppiamento con la centralina di controllo
1. Accendere il pannello riscaldante
utilizzando l'interruttore sul retro.
2. Puntare il telecomando verso il
pannello riscaldante e tenere premuti
contemporaneamente "+" e "-". Due
segnali acustici indicano l'avvenuto
accoppiamento.
Nota: il telecomando funziona solo entro un raggio di 10 metri dal dispositivo. Solitamente sono
necessari 5 secondi per stabilire la connessione.

61
IT
AVVIO RAPIDO
Controllo manuale
Premere ripetutamente il tasto [OK] per selezionare una delle seguenti funzioni:
• Impostazione manuale della temperatura
• OFF
• ON
Nota: il funzionamento manuale annulla tutti i programmi degli intervalli e
pone tutti gli intervalli in funzione in stato OFF. Viceversa, l'attivazione degli
intervalli programmati cancellerà tutte le impostazioni manuali.
Il funzionamento manuale prevede che le icone ON/OFF dell'interruttore
rimangano accese, mentre un intervallo programmato prevede che le icone ON/
OFF lampeggino.
Spegnimento manuale
del sistema (il simbolo
resta costantemente
acceso)
Accensione manuale del
sistema (il simbolo resta
costantemente acceso)
Impostazione manuale
della temperatura (il
simbolo resta costante-
mente acceso)
Programma in corso
L'attivazione di uno degli intervalli programmati cancella l'impostazione manuale
ed esegue il programma dell'intervallo in questione.
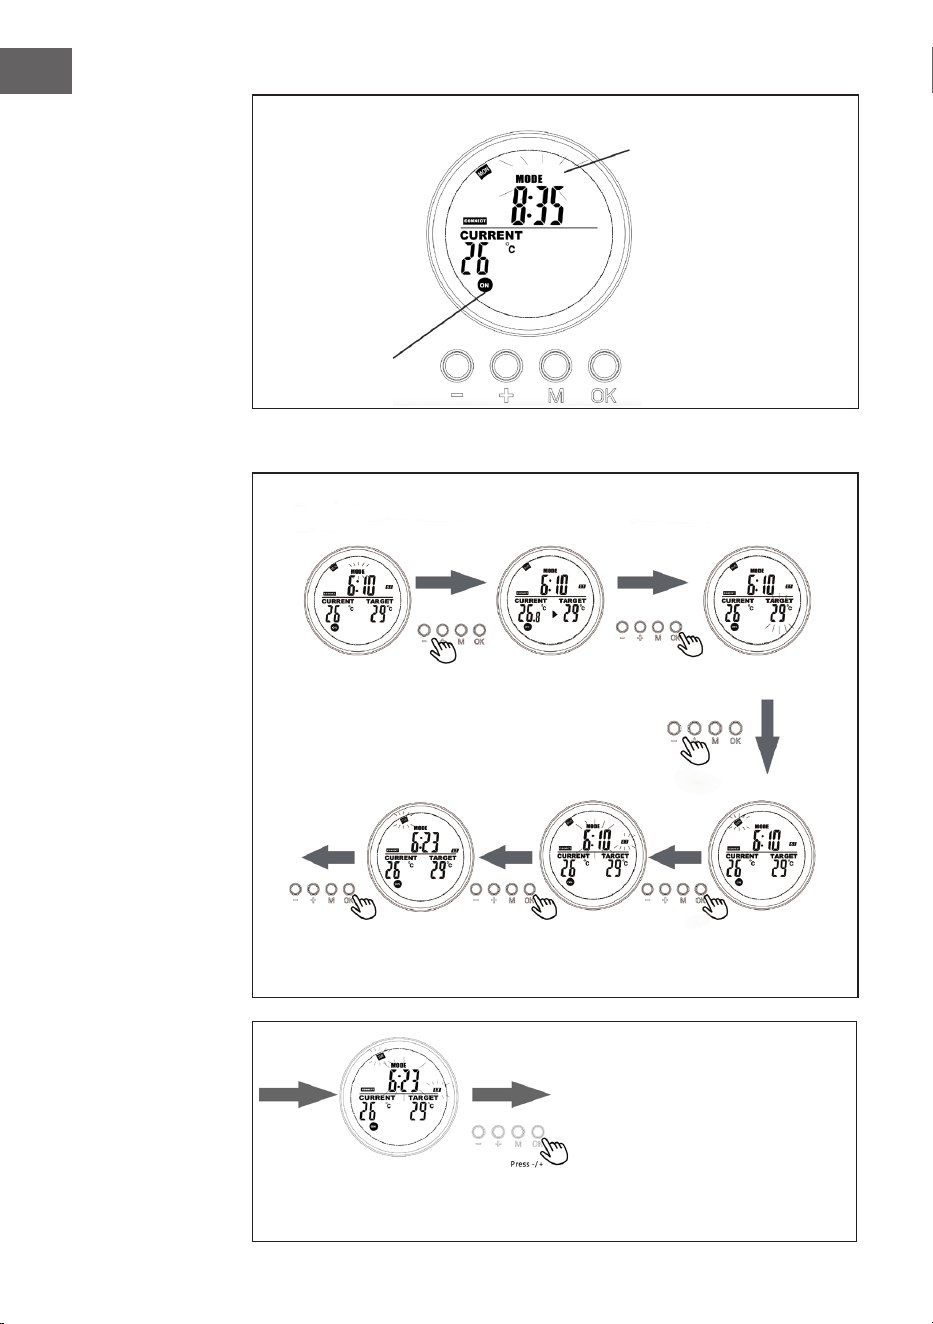
62
IT
Impostare l'ora esatta di conclusione del programma (ora e minuti) con +/- e
confermare con [OK]. La programmazione è ora completa.
Visualizzazione nella pagina di sistema quando il programma è in esecuzione
Il simbolo MODE
lampeggiante indica che il
programma preimpostato
per l'intervallo 3 è
attualmente attivo.
Il simbolo ON/OFF
lampeggiante indi-
ca che il dispositivo
è attualmente
controllato da un
programma.
Programma settimanale Programma
dell'intervallo
In modalità ter-
mostato, premere
[+] o [-].
Impostare il giorno della
settimana per l'ora di
avvio del programma (ST)
con +/-.
Impostare l'ora esatta
di avvio (ora e minuti)
con +/-.
Impostare il giorno della
settimana per l'ora di
conclusione del program-
ma (ET) con +/-.
Selezionare la posizione
da programmare e con-
fermare con [OK].
Premere [+] o [-] e confer-
mare la temperatura da
raggiungere con [OK].

63
IT
Impostazioni del giorno della settimana e dell'ora corrente
Tenere premuto "M" per accedere all'interfaccia di impostazione dell'ora corrente
e del giorno della settimana. Premere "+" e "-" per selezionare. Premere "OK" per
confermare.
1. Premere "+" o "-" per selezionare
24h o 12h e premere il tasto "OK" per
confermare.
2. Premere "+" o "-" per
selezionare il giorno della
settimana.
3. Premere "+" o "-"
per impostare le ore e
premere il tasto "OK" per
confermare.
4. Premere "+" o "-" per
impostare i minuti e
premere il tasto "OK" per
confermare.
5. Premere "+" o "-" per
selezionare Celsius o
Fahrenheit e premere il tasto
"OK" per confermare.

64
IT
In modalità automatica, premere i tasti "+" o "-" per regolare la temperatura da raggiungere
desiderata.
Impostazione della programmazione settimanale
Premere brevemente il tasto "M" per accedere all'interfaccia di impostazione della programmazione
settimanale.
"00" lampeggia a sinistra e
viene mostrato "ST". Premere +
o - per impostare l'ora di avvio
del riscaldamento. Premere il
tasto OK per confermare.
"00" lampeggia a destra e
viene mostrato "ET".
Premere + o - per impostare
l'ora di conclusione del riscal-
damento. Premere il tasto OK
per confermare.
Premere i tasti + o - per
impostare la temperatu-
ra desiderata. Premere
il tasto M per passare
all'impostazione del
giorno successivo.

65
IT
Note sui programmi
• Collocare il telecomando e il pannello riscaldante nella stessa stanza.
• Se l'icona della batteria rimane accesa sullo schermo del telecomando,
signica che la batteria si sta scaricando. Una batteria scarica può causare il
malfunzionamento o l'interruzione del funzionamento del telecomando. Per
evitare interruzioni, sostituire tempestivamente la batteria.
• Per una comunicazione corretta, assicurarsi che la distanza in linea retta tra i
due non superi i 5 metri.
• Luce rossa accesa: il sistema è alimentato e la scheda principale funziona
normalmente.
Luce verde accesa: il pannello riscaldante è attivo e sta riscaldando.
Impostazioni della programmazione settimanale
• Prima di impostare un programma, assicurarsi di impostare il giorno e
l'ora corretti. Senza tale impostazione, la programmazione settimanale non
funzionerà correttamente.
• Scegliere l'ora di accensione e l'ora di spegnimento di ogni giorno. Esempio:
accensione alle 10:00, spegnimento alle 17:00.
• La programmazione settimanale non si attiva se l'ora di accensione è uguale
o successiva all'ora di spegnimento. Ad esempio, se si imposta l'accensione
del riscaldamento alle 10:00 e lo spegnimento alle 8:00, il sistema ignorerà la
programmazione per quel giorno. Per saltare il riscaldamento in un giorno
specico, è suciente impostare l'ora di accensione come uguale o successiva
all'ora di spegnimento.
• Per impostazione predenita, il sistema utilizza il formato a 24 ore. Se si
inserisce un formato orario di 12 ore, il sistema lo converte automaticamente,
senza bisogno di regolarlo manualmente.
• La stufa funziona solo quando vengono rispettate le impostazioni di tempo e
temperatura.
Esempio
• Orario di accensione: 10:00
• Orario di spegnimento: 12:00
• Temperatura impostata: 25 °C
• Il riscaldamento si avvia se la temperatura scende a 22 °C o meno
(temperatura ambiente attuale inferiore di 3 gradi rispetto alla temperatura
impostata).
• Il riscaldamento si arresta se la temperatura sale a oltre 25 °C (temperatura
ambiente attuale superiore di 1 grado rispetto alla temperatura impostata).
• Al di fuori dell'orario programmato, la stufa non si accende, anche se la
temperatura è bassa.
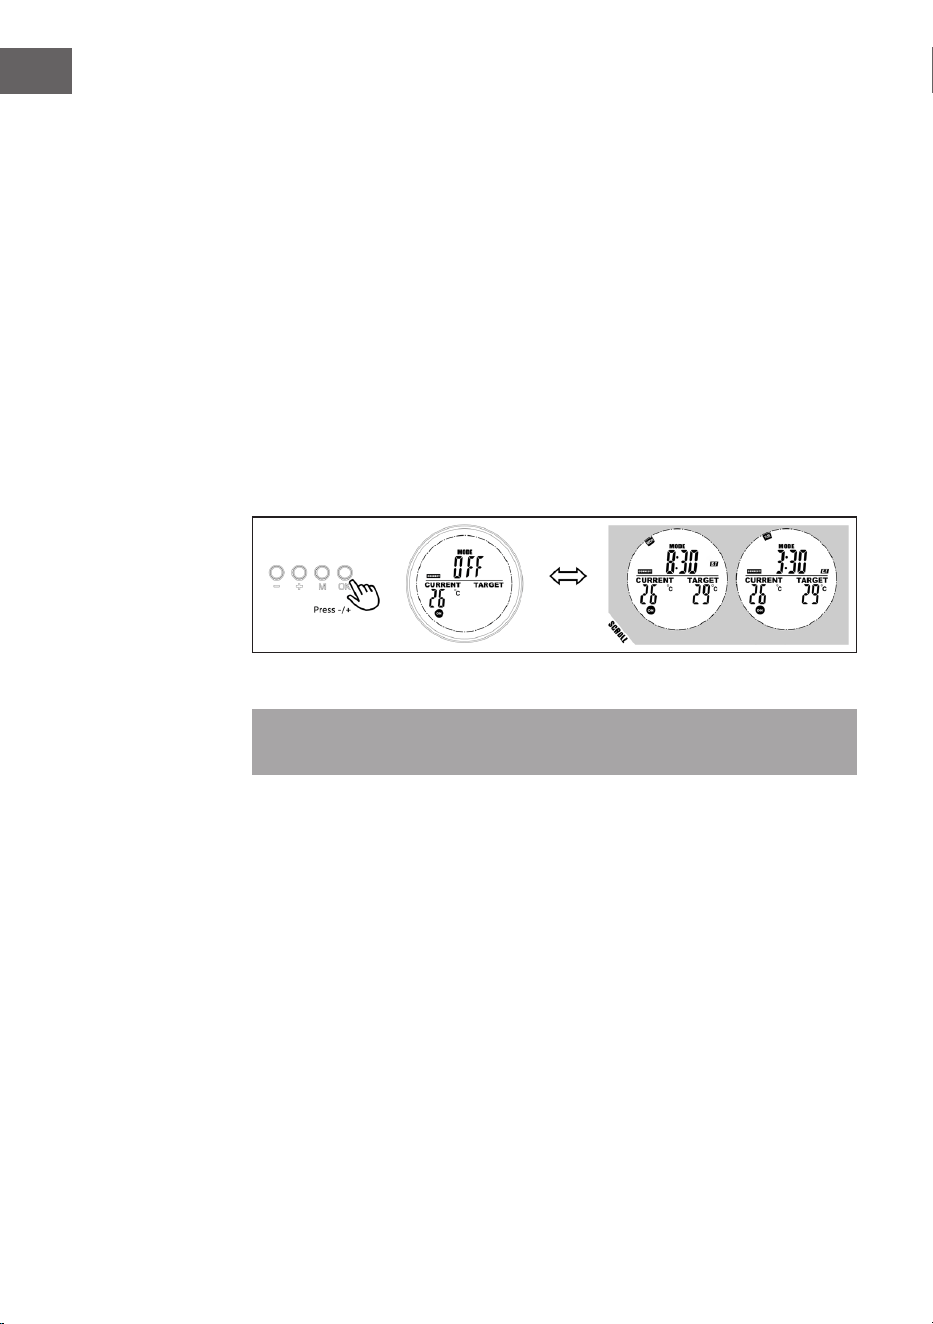
66
IT
Se si sceglie un giorno specico di una settimana come ST (ora di avvio), è
possibile scegliere qualsiasi giorno come ET (ora di conclusione). L'interruttore
verrà attivato/disattivato in base al giorno e all'ora specici di ST per passare a
ET. Programmando giorno e ora in un intervallo di una settimana, il programma si
ripeterà ogni settimana.
Visualizzazione delle informazioni sull'intervallo di programmazione
Gli utenti possono visualizzare l'ora o la temperatura programmata selezionando
l'intervallo in modalità di programmazione e possono chiudere o aprire l'intervallo
con facilità.
1. Passare alla modalità di programmazione.
2. Selezionando la fascia oraria che si desidera visualizzare, l'ora di avvio e l'ora
di conclusione programmate scorreranno in 1 secondo e si ripeteranno;
vengono mostrate anche tutte le altre informazioni.
3. Premere il tasto OK per disattivare questo intervallo e premere nuovamente
per ripristinarlo.
Modalità nestra aperta
Nota: la modalità nestra aperta, quando è in funzione, sovrascrive tutte le
modalità.
• Se la temperatura della stanza si abbassa di oltre 6 °C nell'arco di 20 minuti, il
dispositivo lo interpreta come una nestra aperta e il riscaldamento si spegne
automaticamente.
• Finché la modalità è attiva, sul display lampeggia OPEN.
• Premere un tasto qualsiasi del telecomando per tornare alla modalità di
impostazione manuale.
Sostituzione della batteria
• Rimuovere la copertura del vano batterie.
• Sostituire le vecchie batterie con 2 nuove batterie AA e richiudere il vano.

67
IT
AVVISO DI SMALTIMENTO
Se nel proprio paese si applicano le regolamentazioni
inerenti lo smaltimento di dispositivi elettrici ed
elettronici, questo simbolo sul prodotto o sulla confezione
segnala che questi prodotti non possono essere
smaltiti con i riuti normali e devono essere portati a
un punto di raccolta di dispositivi elettrici ed elettronici.
Grazie al corretto smaltimento dei vecchi dispositivi si
tutela il pianeta e la salute delle persone da possibili
conseguenze negative. Informazioni riguardanti il riciclo
e lo smaltimento di questi prodotti si ottengono presso
l’amministrazione locale oppure il servizio di gestione dei
riuti domestici.
PRODUTTORE
Chal-Tec GmbH, Mühlenstraße 25, 10243 Berlino, Germania.
Contatto: [email protected]


69
ES
Estimado cliente:
Le felicitamos por la adquisición de este producto. Lea
atentamente el siguiente manual y siga cuidadosamente
las instrucciones de uso con el n de evitar posibles daños.
La empresa no se responsabiliza por los daños ocasionados
por un uso indebido del producto o por haber desatendido
las indicaciones de seguridad. Escanee el código QR
para acceder al manual de usuario más reciente y a más
información sobre el producto.
ÍNDICE
Hoja de datos del producto 70
Indicaciones de seguridad 73
Instalación en pared 74
Indicadores de la pantalla del mando a distancia 75
Manejo y funciones 75
Inicio rápido 77
Indicaciones sobre la retirada del aparato 83
Fabricante 83
DATOS TÉCNICOS
Números de
artículo
Potencia
Fuente de
alimentación
Dimensiones
10035168
10035171
300 W (±10%)
220-240 V
~ 50 Hz
505x595x16 mm
10035169
10035172
580 W (±10%) 595x900x16 mm
10035170
10035173
720 W (±10%) 595x1195x16 mm
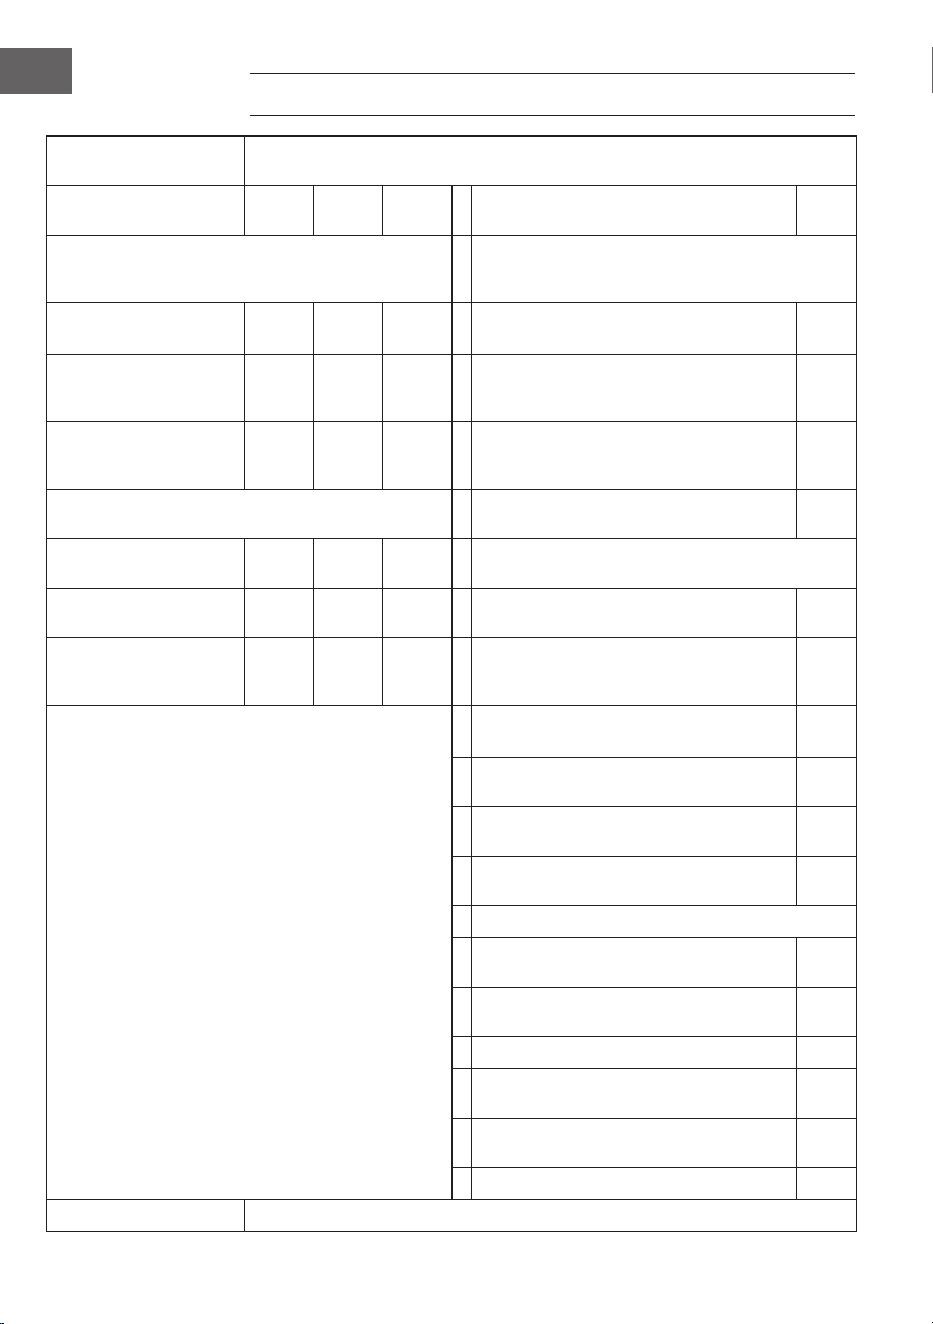
70
ES
HOJA DE DATOS DEL PRODUCTO
Denominación del
modelo
10035168, 10035171
Dato Sím-
bolo
Valor Uni-
dad
Dato Uni-
dad
Potencia térmica Solo con disposítivos de acumulación de calor
eléctricos para abastecimiento local: Tipo de
regulación del abastecimiento de calor
Potencia térmica
nominal
P
nom
0,3 kW Regulación manual del abastecimiento de
calor con termostato integrado:
n/a
Potencia térmica míni-
ma (valor orientativo)
P
min
0,0 kW Regulación manual de abastecimiento de
calor con aviso de temperatura ambiente
y/o exterior
n/a
Potencia térmica con-
tinua máxima
P
max,c
0,3 kW Regulación electrónica de abastecimiento
de calor con aviso de temperatura ambi-
ente y/o exterior
n/a
Consumo de corriente auxiliar Disípación de calor con ventilación
auxiliar
n/a
Con potencia térmica
nominal
el
max
0,300 kW Tipo de potencia térmica/control de temperatura
ambiente
Con potencia térmica
mínima
el
min
0,000 kW Potencia térmica de un solo nivel, sín
control de temperatura ambiente
no
En modo de espera el
SB
0,000 W Dos o más niveles regulables manu-
almente, sín control de temperatura
ambiente
no
Control de temperatura ambiente con
termostato mecánico
no
Con control electrónico de temperatura
ambiente
no
Con control de temperatura ambiente y
regulación del momento del día
no
Con control de temperatura ambiente y
regulación del día de la semana
sí
Otras opciones de regulación
Control de temperatura ambiente con
detección de presencia
no
Control de temperatura ambiente con
detección de ventanas abiertas
sí
Con opción de control remoto no
Con regulación adaptable del comienzo
de la calefacción
no
Con limitación de tiempo de funcionami-
ento
no
Con sensor de bulbo negro no
Información de contacto Chal-Tec GmbH, Wallstraße 16, 10179, Berlín (Alemania)
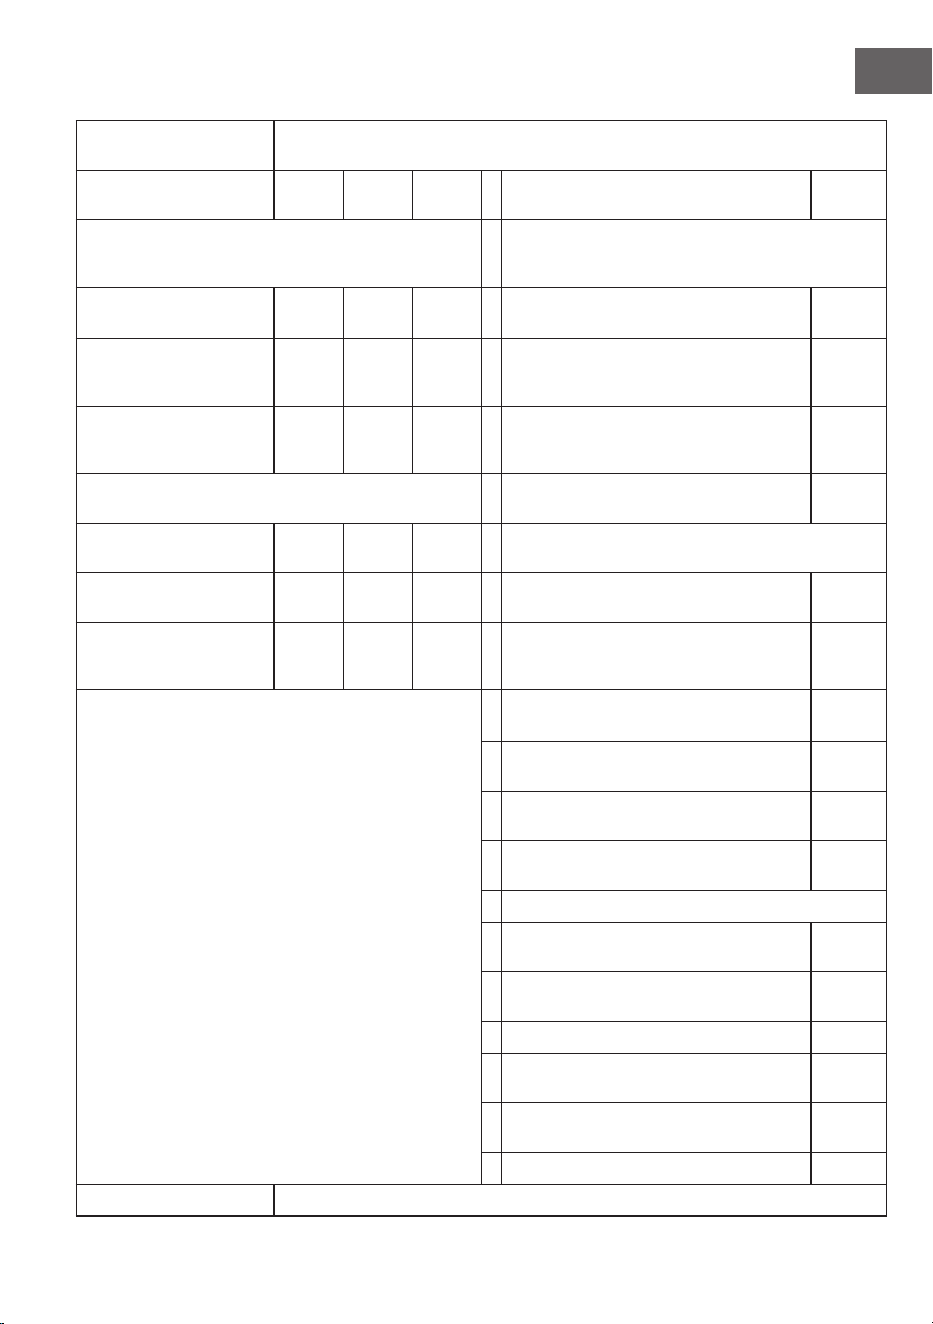
71
ES
Denominación del
modelo
10035169, 10035172
Dato Sím-
bolo
Valor Uni-
dad
Dato Unidad
Potencia térmica Solo con disposítivos de acumulación de calor
eléctricos para abastecimiento local: Tipo de
regulación del abastecimiento de calor
Potencia térmica
nominal
P
nom
0,58 kW Regulación manual del abastecimiento
de calor con termostato integrado:
n/a
Potencia térmica míni-
ma (valor orientativo)
P
min
0,0 kW Regulación manual de abastecimiento
de calor con aviso de temperatura
ambiente y/o exterior
n/a
Potencia térmica con-
tinua máxima
P
max,c
0,58 kW Regulación electrónica de abastec-
imiento de calor con aviso de tempera-
tura ambiente y/o exterior
n/a
Consumo de corriente auxiliar Disípación de calor con ventilación
auxiliar
n/a
Con potencia térmica
nominal
el
max
0,580 kW Tipo de potencia térmica/control de temperatura
ambiente
Con potencia térmica
mínima
el
min
0,000 kW Potencia térmica de un solo nivel, sín
control de temperatura ambiente
no
En modo de espera el
SB
0,000 W Dos o más niveles regulables manu-
almente, sín control de temperatura
ambiente
no
Control de temperatura ambiente con
termostato mecánico
no
Con control electrónico de temperatura
ambiente
no
Con control de temperatura ambiente y
regulación del momento del día
no
Con control de temperatura ambiente y
regulación del día de la semana
sí
Otras opciones de regulación
Control de temperatura ambiente con
detección de presencia
no
Control de temperatura ambiente con
detección de ventanas abiertas
sí
Con opción de control remoto no
Con regulación adaptable del comienzo
de la calefacción
no
Con limitación de tiempo de funcion-
amiento
no
Con sensor de bulbo negro no
Información de contacto Chal-Tec GmbH, Wallstraße 16, 10179, Berlín (Alemania)
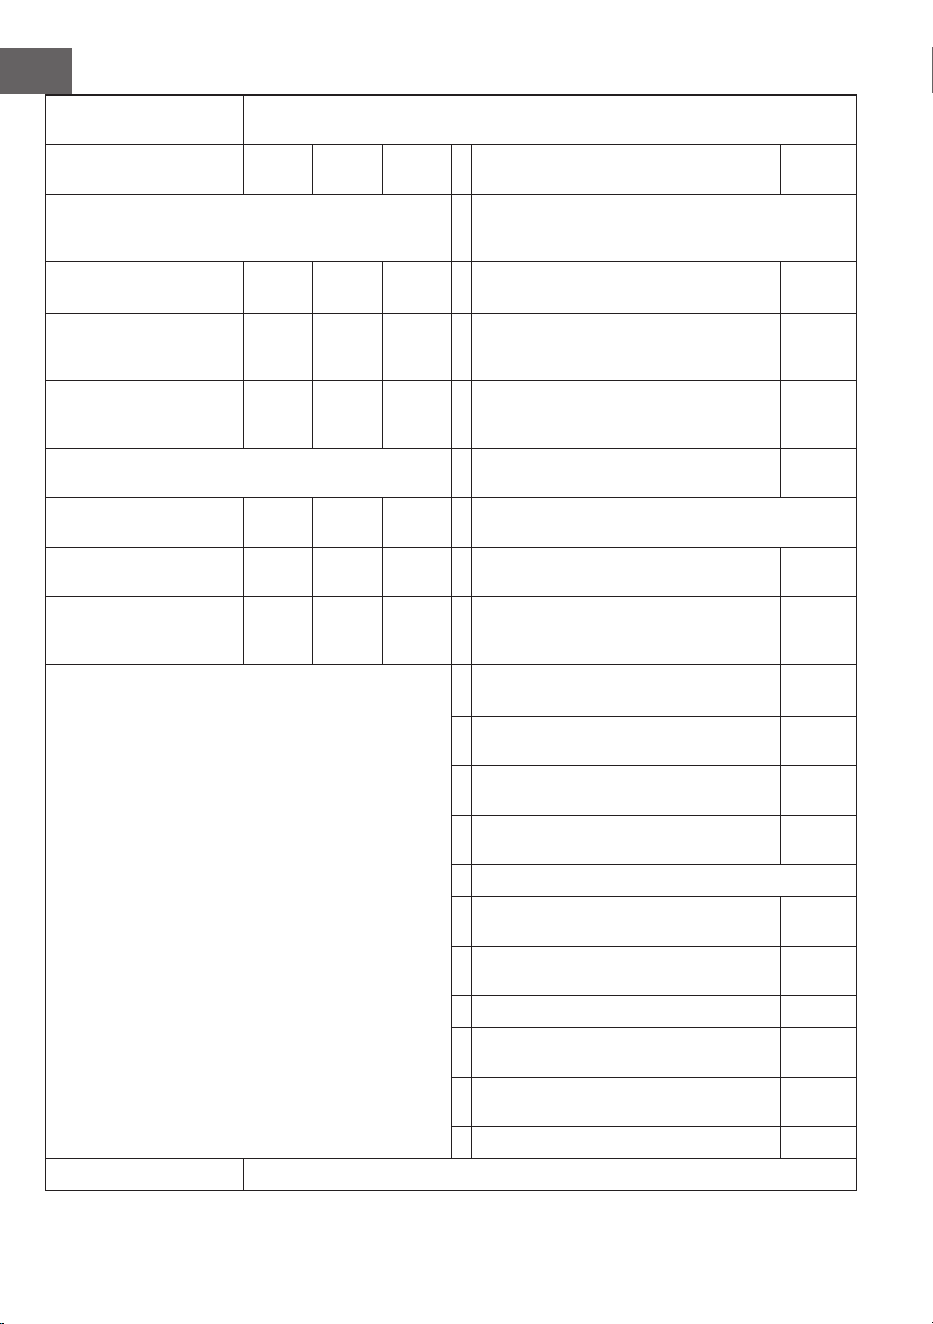
72
ES
Denominación del
modelo
10035170, 10035173
Dato Sím-
bolo
Valor Uni-
dad
Dato Unidad
Potencia térmica Solo con disposítivos de acumulación de calor
eléctricos para abastecimiento local: Tipo de
regulación del abastecimiento de calor
Potencia térmica
nominal
P
nom
0,72 kW Regulación manual del abastecimiento
de calor con termostato integrado:
n/a
Potencia térmica míni-
ma (valor orientativo)
P
min
0,0 kW Regulación manual de abastecimiento
de calor con aviso de temperatura
ambiente y/o exterior
n/a
Potencia térmica con-
tinua máxima
P
max,c
0,72 kW Regulación electrónica de abastec-
imiento de calor con aviso de tempera-
tura ambiente y/o exterior
n/a
Consumo de corriente auxiliar Disípación de calor con ventilación
auxiliar
n/a
Con potencia térmica
nominal
el
max
0,720 kW Tipo de potencia térmica/control de temperatura
ambiente
Con potencia térmica
mínima
el
min
0,000 kW Potencia térmica de un solo nivel, sín
control de temperatura ambiente
no
En modo de espera el
SB
0,000 W Dos o más niveles regulables manu-
almente, sín control de temperatura
ambiente
no
Control de temperatura ambiente con
termostato mecánico
no
Con control electrónico de temperatura
ambiente
no
Con control de temperatura ambiente y
regulación del momento del día
no
Con control de temperatura ambiente y
regulación del día de la semana
sí
Otras opciones de regulación
Control de temperatura ambiente con
detección de presencia
no
Control de temperatura ambiente con
detección de ventanas abiertas
sí
Con opción de control remoto no
Con regulación adaptable del comienzo
de la calefacción
no
Con limitación de tiempo de funcion-
amiento
no
Con sensor de bulbo negro no
Información de contacto Chal-Tec GmbH, Wallstraße 16, 10179, Berlín (Alemania)

73
ES
INDICACIONES DE SEGURIDAD
• No utilice el aparato hasta que esté bien jado como se describe en este manual.
• Compruebe que el voltaje indicado en la placa técnica coincida con el de la red local antes de conectar
el aparato a la red eléctrica.
• Si el cable de alimentación está dañado, deberá ser sustituido por un técnico cualicado para evitar
riesgos.
• El calentador de hogar no debe colocarse directamente debajo de la toma de corriente.
• Mantenga el aparato a una distancia mínima de 1 metro de los muebles, cortinas y otros materiales
inamables.
• No deje el aparato desatendido durante su uso.
• No deje el aparato desatendido mientras esté conectado a la alimentación eléctrica .
• Mantenga el aparato fuera del alcance de los niños y no permita que lo utilicen.
• Este aparato está destinado exclusivamente al uso doméstico y no debe utilizarse con nes
industriales.
• No utilice este aparato si ha sufrido una avería o algún daño.
• Solamente un electricista cualicado debe realizar reparaciones de aparatos eléctricos.
• Las reparaciones indebidas pueden poner en grave peligro al usuario.
• No pase el cable de alimentación por debajo de alfombras, moquetas, etc.
• No deje que el cable de alimentación quede colgado de bordes alados ni entre en contacto con supercies
calientes.
• No cubra el aparato para evitar el sobrecalentamiento.
• No utilice este calefactor con un programador, temporizador, sistema de control remoto
independiente o cualquier otro dispositivo que encienda el aparato automáticamente, ya que existe
riesgo de incendio si el calefactor se tapa o se coloca de forma incorrecta.
• No sumerja nunca el aparato en agua ni en ningún otro líquido.
• No utilice este calefactor en las inmediaciones de un baño, una ducha o una piscina.
• No utilice el aparato al aire libre.
• No utilice el aparato con las manos mojadas.
• No utilice nunca el aparato encima o cerca de supercies calientes.
• No utilice el aparato si el cable está dañado.
• Antes de limpiar el aparato, asegúrese de que está desenchufado de la corriente y de que se ha enfriado
completamente.
• No limpie el aparato con productos químicos abrasivos.
• No utilice nunca accesorios no recomendados o suministrados por el fabricante. Podría causar peligro
para el usuario o daños en el aparato.
• Este aparato no está destinado para que lo usen personas (incluidos niños) con capacidades físicas,
sensoriales o mentales reducidas, o con falta de experiencia y conocimientos, a menos que hayan
recibido supervisión o instrucciones relativas al uso del aparato por parte de una persona responsable
de su seguridad.
• Los niños deben estar bajo supervisión para evitar que jueguen con el aparato.
ATENCIÓN
¡Riesgo de quemaduras! Algunas partes de este producto pueden calentarse mucho y
provocar quemaduras. Preste especial atención cuando están presentes niños y personas
vulnerables.

74
ES
INSTALACIÓN EN PARED
Indicaciones importantes para la instalación
• El uso continuado acorta la vida útil de los calentadores. Si es posible, el
aparato debe ponerse en pausa cada 12 horas.
• No utilice el aparato cuando la temperatura ambiente sea superior a 20 °C, ya
que las altas temperaturas afectarán al rendimiento.
• La salida de aire debe estar al menos a 20 cm del suelo.
• Mantenga la unidad alejada de materiales inamables y explosivos.
• Mantenga una distancia de seguridad de 30 cm alrededor de la unidad por
delante, por arriba y por detrás. Mantenga una distancia de seguridad de 10
cm a derecha e izquierda alrededor de la unidad.
• Durante los primeros uno o dos días, los calentadores nuevos pueden emitir
olores inofensivos para el ser humano.
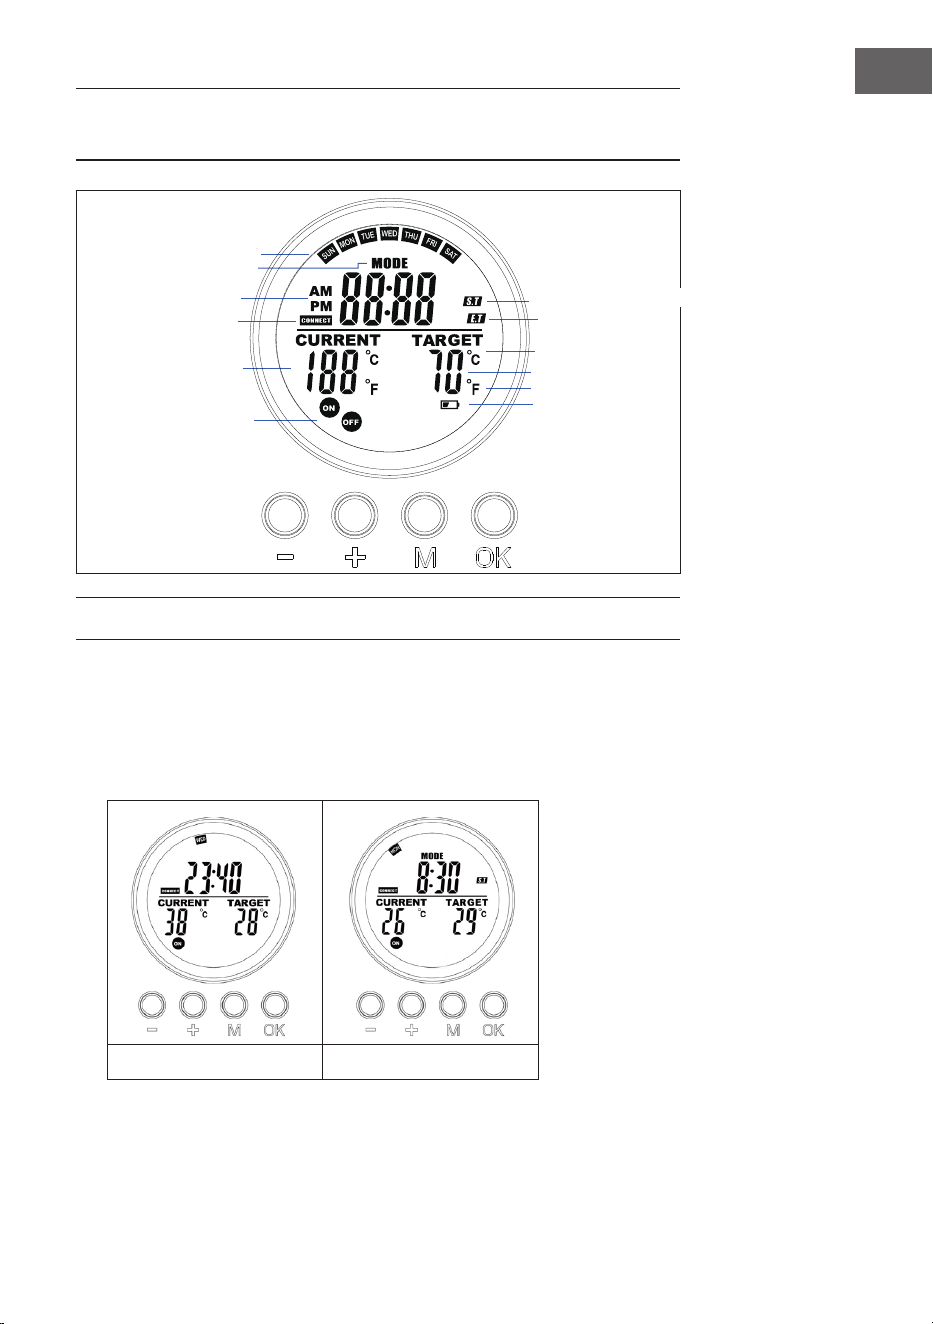
75
ES
INDICADORES DE LA PANTALLA DEL MANDO A
DISTANCIA
MANEJO Y FUNCIONES
Botón [M]
• Pulse el botón [M] para cambiar entre Hora del sistema/Termostato
• Mantenga pulsado el botón [M] bajo una ranura de programa determinada
para iniciar una programación en la ranura.
Sistema Termostato
Día
Tipo de programa
AM/PM
Estado de la
conexión RF
Temperatura actual
Estado de la toma
Temperatura deseada
Grado Celius
Grados Fahrenheit
Aviso de batería baja
Hora de inicio del programa
Hora de nalización del
programa
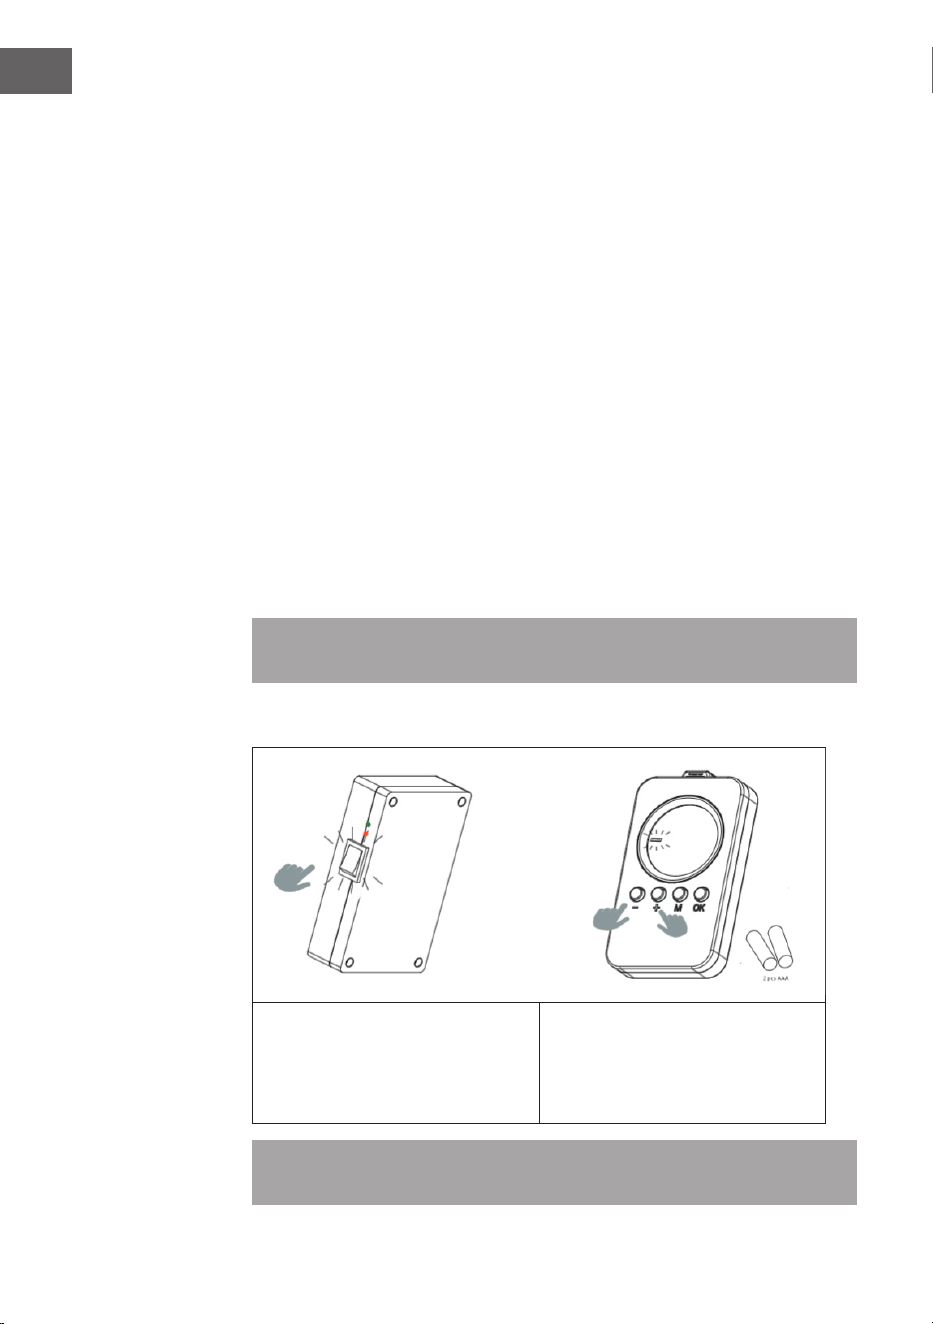
76
ES
Botón [M]
• Pulse [OK].
• Elige la ranura 1,2,3,4. Pulse [OK] para activar o desactivar una ranura.
• En el estado de programación o ajuste, pulse el botón OK para conrmar y
pasar al paso siguiente.
Botón [+] y [-]
• Elija el programa.
• Pulse el botón para aumentar o disminuir, el dígito en modo programación y
ajuste, mantenga pulsado [-] o [+] para aumentar/disminuir rápidamente.
Acoplarlo a la caja de control
1. Mantenga pulsados [+] y [–] simultáneamente para iniciar el emparejamiento.
El icono CONNECT parpadeará en la pantalla para indicar que el mando a
distancia está intentando conectarse a la unidad.
2. Encienda el calentador en el interruptor lateral. El aparato estará ahora en
modo de acoplamiento durante 60 segundos.
3. Espere hasta que el símbolo CONECTAR deje de parpadear y se encienda de
forma permanente en la pantalla. El mando a distancia está ahora conectado
al calentador.
Nota: El mando a distancia sólo está operativo en un radio de 10 metros de la
unidad. El establecimiento de la conexión suele tardar 5 segundos.
Acoplarlo a la caja de control
1. Encienda el panel calefactor mediante el
interruptor situado en la parte posterior.
2. Apunte al panel de calefacción y
mantenga pulsadas las teclas «+» y «–»
simultáneamente. Dos pitidos indican
que el acoplamiento se ha realizado
correctamente.
Nota: El mando a distancia sólo está operativo en un radio de 10 metros de la
unidad. El establecimiento de la conexión suele tardar 5 segundos.
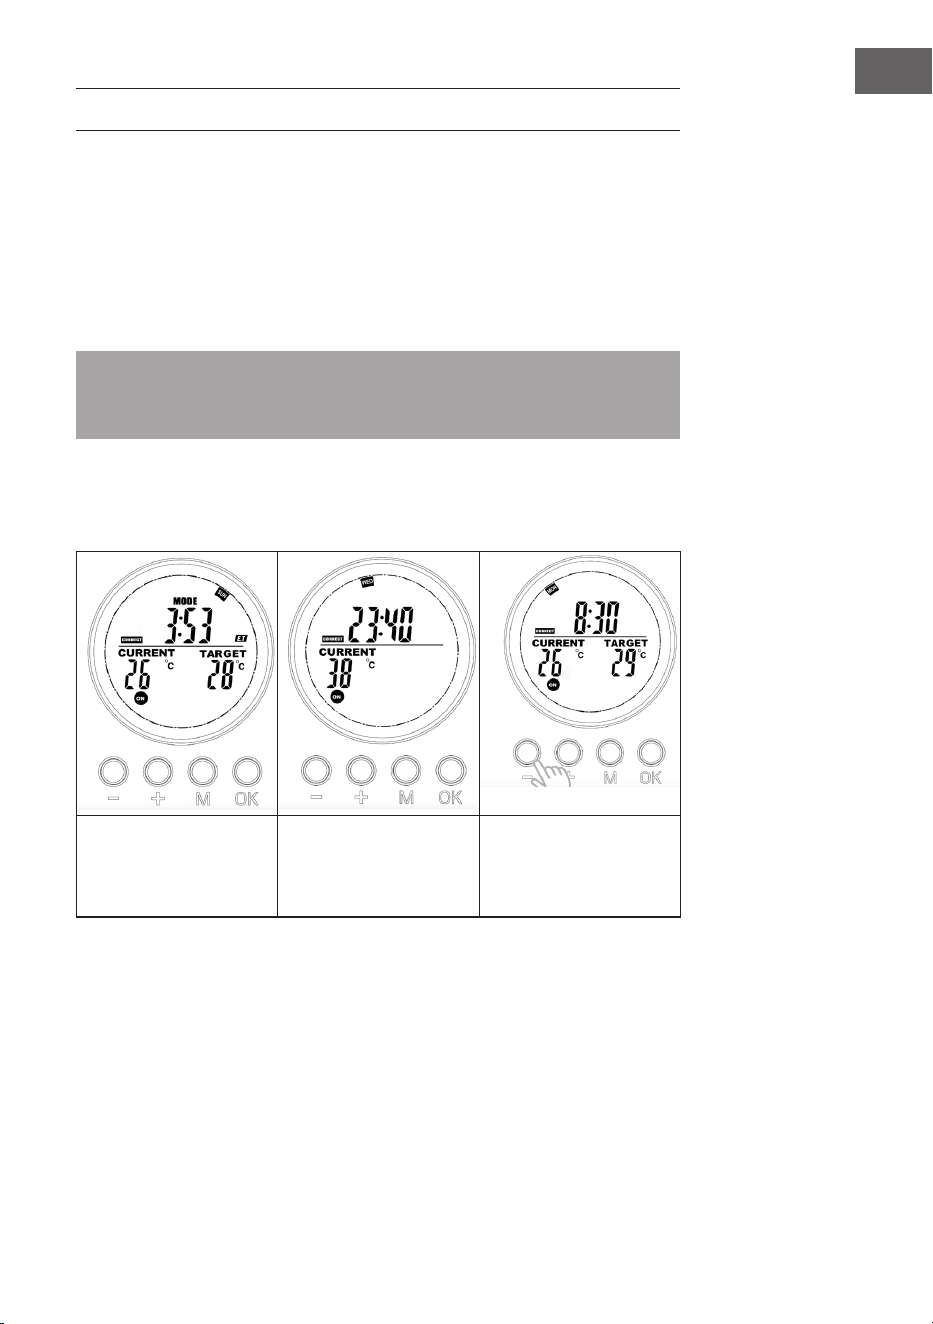
77
ES
INICIO RÁPIDO
Control manual
Pulse repetidamente el botón [OK] para seleccionar una de las siguientes
funciones:
• Ajuste manual de la temperatura
• OFF (apagado)
• ON (encendido)
Nota: La operación manual anula todas las programaciones de las ranuras,
y pone todas las ranuras en funcionamiento en estado OFF. Viceversa, al
encender el programa de las ranuras se borrará todo el ajuste manual.
El funcionamiento manual hará que los iconos ON /OFF del interruptor
permanezcan encendidos mientras que el programa de ranura hará que los iconos
ON/OFF parpadeen.
Desconexión manual
del sistema (el símbolo
se enciende de forma
continua)
Encendido manual del
sistema (el símbolo
se enciende de forma
continua)
Ajuste manual de la
temperatura (el símbolo
se enciende de forma
continua)
Programa en marcha
Al activar cualquiera de los programas de las ranuras se borrará el ajuste manual y
se ejecutará en su lugar el programa de la ranura elegida.
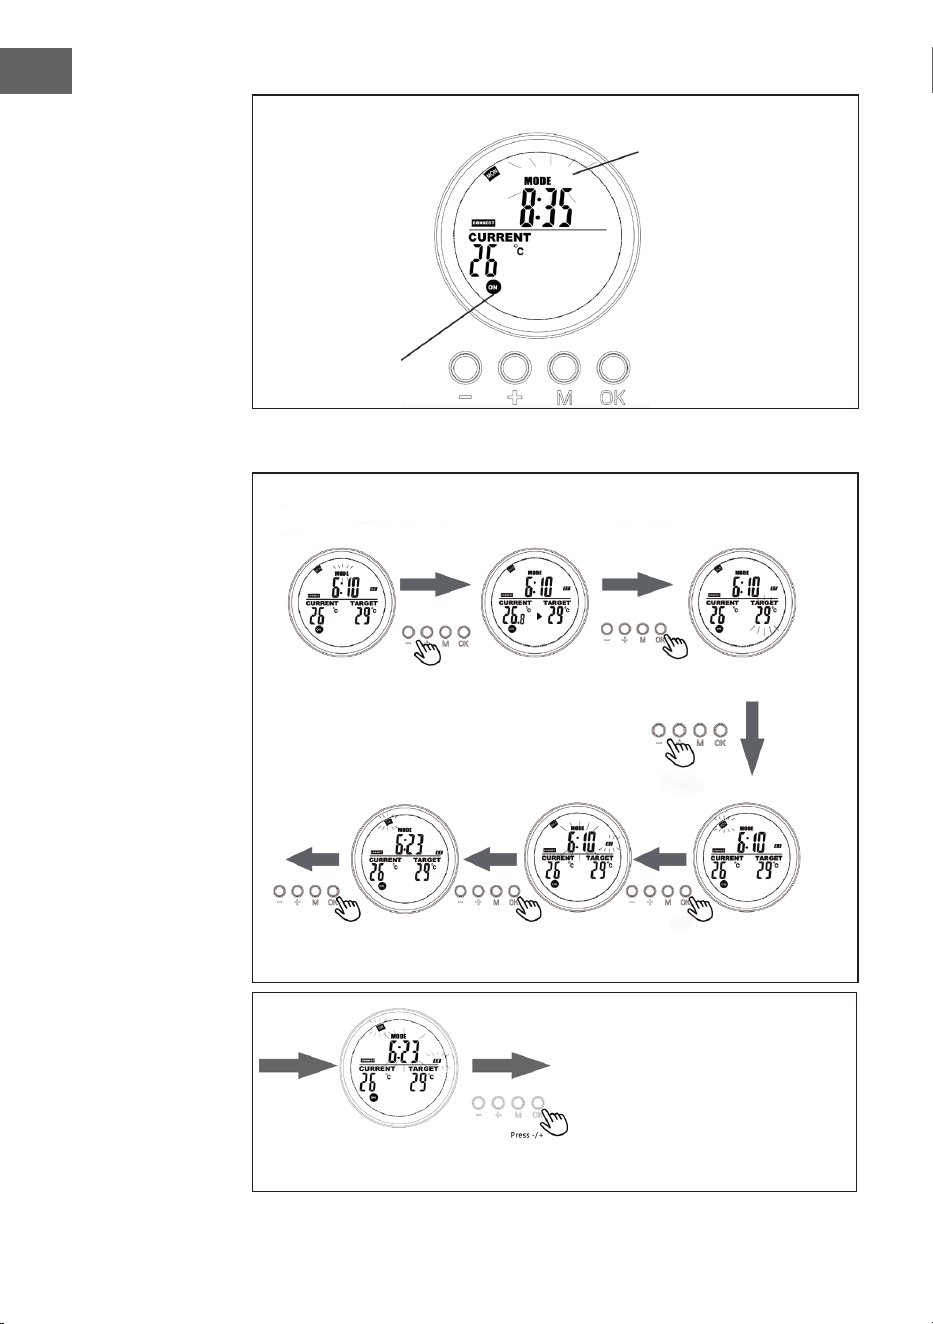
78
ES
Visualización en la página del sistema cuando el programa está en marcha
El símbolo MODE
parpadeante indica que el
programa preestablecido
para la ranura 3 está activo
en ese momento.
El símbolo ON/
OFF parpadeante
indica que el
calentador está
controlado
actualmente por
un programa.
Programa
programa
ranura
programa
En el modo
termostato, pulse
[+] o [–].
Ajuste el día de la sema-
na para la hora de inicio
(ST) con +/–.
Fije la hora exacta de
inicio (hora y minutos)
con +/–.
Fije el día de la
semana para la hora
nal (ET) en +/–.
Seleccione la memoria de
programa a programar y
conrme
con [OK].
Pulse [+] o [–] y conrme la
temperatura objetivo con
[OK].
Ajuste la hora exacta de nalización (hora y minutos) con
+/– y conrme con [OK]. La programación ya está completa.
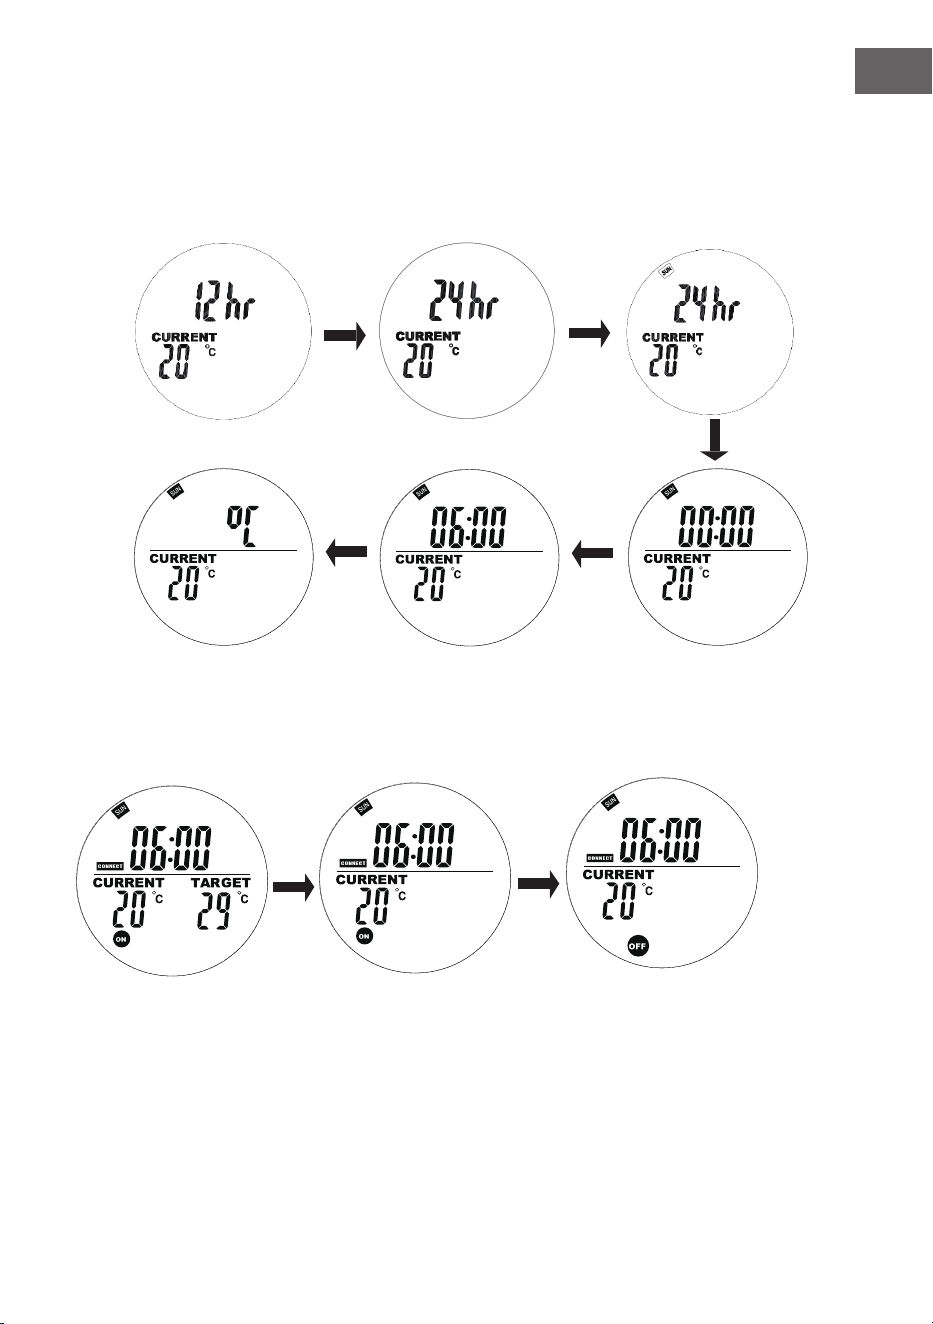
79
ES
Conguración actual del día de la semana y de la hora
Mantenga pulsada la tecla «M »para acceder a la interfaz de ajuste de la hora
actual y el día de la semana. Pulse «+» y «-» para seleccionar. Pulse «OK» para
conrmar.
1. Pulse «+» o «-» para seleccionar 24h
o 12h, pulse «OK » para conrmar.
2. Pulse «+» o «–» para
seleccionar el día de la
semana
3. Pulse «+» o «–» para
ajustar las horas, pulse
el botón «OK» para
conrmar.
4. Pulse «+» o «–» para ajustar
los minutos, pulse el botón
«OK» para conrmar.
5. Pulse «+» o «–» para seleccionar
Celsius o Fahrenheit, pulse «OK» para
conrmar.

80
ES
En el modo automático, pulse los botones «+» o «–» para ajustar la temperatura
objetivo a la deseada.
Programación semanal
Pulse brevemente el botón «M» para entrar en la interfaz de ajuste de la
programación semanal.
«00» a la izquierda
parpadea y aparece «ST»
. Pulse + o – para ajustar
la hora de inicio del
calentamiento . Pulse el
botón OK para conrmar.
«00» a la derecha
parpadea y se visualiza
«ET».
Pulse + o - para ajustar el
tiempo de calentamiento
nal . Pulse el botón OK
para conrmar.
Pulse los botones + o -
para jar la temperatura
deseada. Pulse el botón M
para pasar al ajuste del día
siguiente.

81
ES
Notas sobre los programas
• Coloque el mando a distancia y el panel de calefacción en la misma habitación.
• Si el icono de la pila permanece en la pantalla del mando a distancia, signica
que la pila se está agotando. Una pila con poca carga puede causar que el
mando a distancia funcione mal o deje de funcionar. Por favor, sustituya la
pila lo antes posible para evitar interrupciones.
• Asegúrese de que la distancia en línea recta entre ellos no es superior a 5
metros para una comunicación adecuada.
• Luz roja ENCENDIDA: El sistema está alimentado y la placa base funciona con
normalidad.
Luz verde ENCENDIDA: El panel de calefacción está calentando.
Programaciones semanales
• Antes de jar un horario, asegúrese de jar primero el día y la hora correctos.
Sin esto, la programación semanal no funcionará correctamente.
• Elija la hora de encendido y la hora de apagado cada día. Ejemplo: Encender a
las 10:00, apagar a las 17:00.
• La programación semanal no se activará si la hora de encendido es igual o
posterior a la hora de apagado. Por ejemplo, si congura la calefacción para
que se encienda a las 10:00 y se apague a las 8:00, el sistema ignorará la
programación de ese día. Para omitir la calefacción en un día concreto, sólo
tiene que ajustar la hora de encendido para que sea igual o posterior a la hora
de apagado.
• El sistema utiliza por defecto el formato de 24 horas. Si introduce un formato
de hora de 12 horas, el sistema lo convertirá automáticamente, sin necesidad
de ajustarlo manualmente.
• El calentador sólo funciona cuando se cumplen los ajustes de tiempo y
temperatura.
Ejemplo
• Hora de ENCENDIDO: 10:00
• Hora de APAGADO: 00:00
• Temperatura establecida: 25 °C
• La calefacción se pondrá en marcha si la temperatura desciende a 22 °C o
menos (temperatura ambiente actual 3 grados inferior a la temperatura
jada).
• La calefacción se detendrá si la temperatura supera los 25 °C( temperatura
ambienteactual 1 grado superior a la temperatura programada ).
• Fuera de la hora programada, el calentador no se encenderá, aunque la
temperatura sea baja.
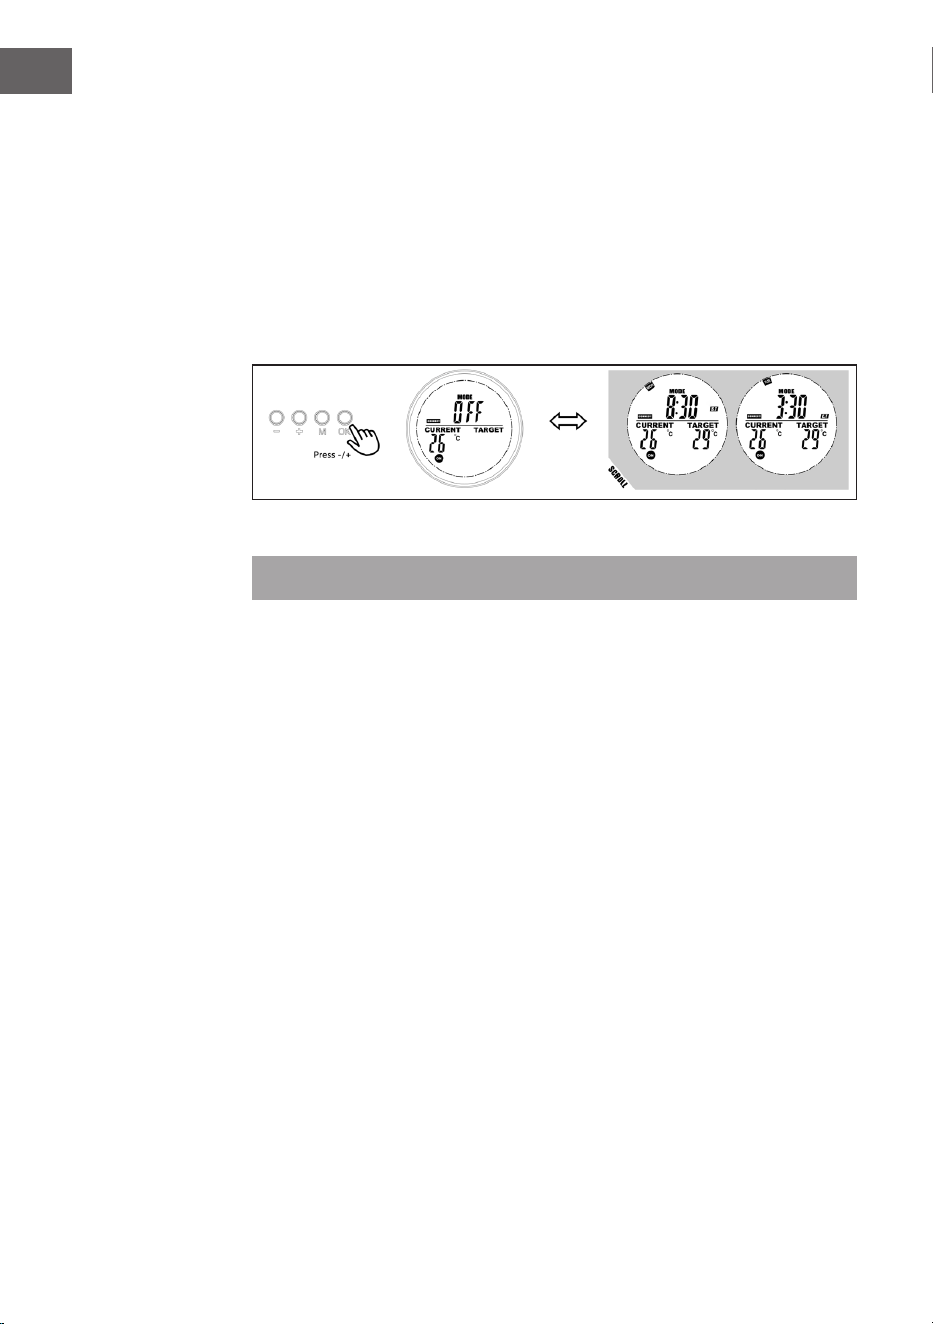
82
ES
Mostrar información de la ranura deseada
Los usuarios pueden ver su tiempo o temperatura programados seleccionando
la ranura en el modo de programación, al usuario se le permite cerrar o abrir la
ranura fácilmente.
1. Pase al modo de programación .
2. Seleccione la ranura de destino que desea ver, la hora de inicio y la hora de
nalización programadas se desplazarán en 1 segundo y se repetirán, el
resto de la información también se muestra.
3. Pulse el botón OK para apagar esta ranura, pulse de nuevo para recuperarla.
Modo de ventana abierta
Nota: El modo de ventana abierta en funcionamiento anula todos los modos.
• Si la temperatura de la habitación desciende más de 6 °C en 20 minutos, el
aparato lo interpreta como una ventana abierta y la calefacción se apaga
automáticamente.
• Mientras el modo esté activo, OPEN parpadeará en la pantalla.
• Pulse cualquier botón del mando a distancia para volver al modo de ajuste
manual.
Cambio de pilas
• Retire la tapa del compartimento de las pilas.
• Sustituya las pilas viejas por 2 pilas AA nuevas y vuelva a cerrar el
compartimento de las pilas.

83
ES
INDICACIONES SOBRE LA RETIRADA DEL APARATO
Si en su país existe una disposición legal relativa a la
eliminación de aparatos eléctricos y electrónicos, este
símbolo estampado en el producto o en el embalaje
advierte que no debe eliminarse como residuo doméstico.
En lugar de ello, debe depositarse en un punto de
recogida de reciclaje de aparatos eléctricos y electrónicos.
Una gestión adecuada de estos residuos previene
consecuencias potencialmente negativas para el medio
ambiente y la salud de las personas. Puede consultar más
información sobre el reciclaje y la eliminación de este
producto contactando con su administración local o con
su servicio de recogida de residuos.
Este producto contiene baterías. Si en su país existe una
disposición legal relativa a la eliminación de baterías,
estas no deben eliminarse como residuo doméstico.
Infórmese sobre la normativa vigente relacionada con
la eliminación de baterías. Una gestión adecuada de
estos residuos previene consecuencias potencialmente
negativas para el medio ambiente y la salud de las
personas.
FABRICANTE
Chal-Tec GmbH, Mühlenstraße 25, 10243 Berlín, Alemania.
Contacto: [email protected]

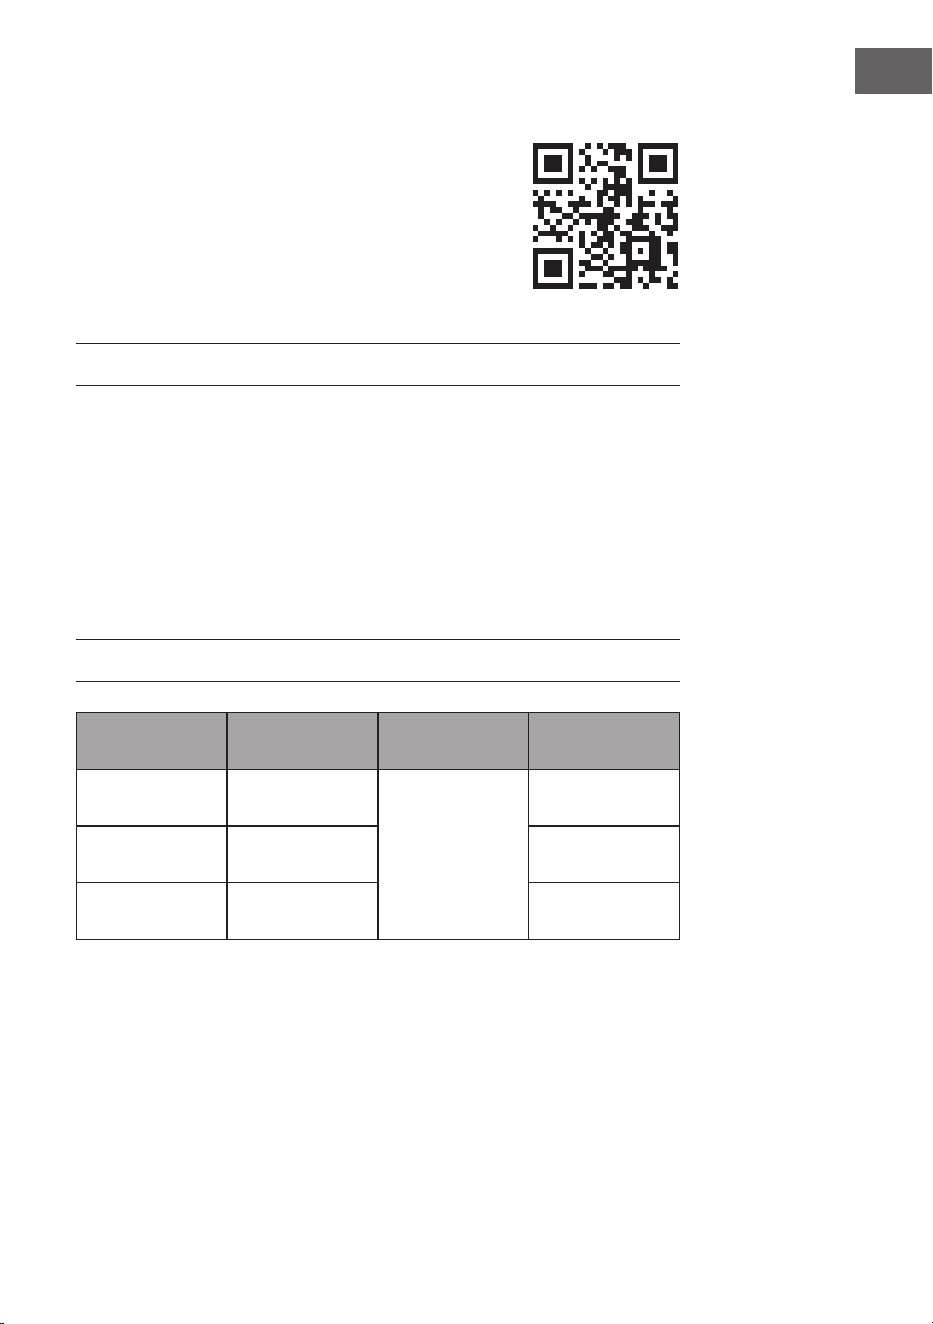
85
NL
Geachte klant,
gefeliciteerd met de aankoop van dit apparaat. Lees deze
handleiding aandachtig door en neem het advies in acht
om schade aan het apparaat te voorkomen. Storingen en
schade veroorzaakt door het niet naleven van de instructies
en waarschuwingen in deze handleiding vallen niet onder
de garantie en de aansprakelijkheid. Scan de QR-code om
toegang tot de nieuwste versie van de handleiding en
andere productinformatie te krijgen.
INHOUD
TECHNISCHE GEGEVENS
Artikelnummer Vermogen
Stroomvoorzie-
ning
Afmetingen
10035168
10035171
300 W (±10%)
220-240 V
~ 50 Hz
505x595x16 mm
10035169
10035172
580 W (±10%) 595x900x16 mm
10035170
10035173
720 W (±10%) 595x1195x16 mm
Technische gegevens 85
Productinformatieblad 86
Veiligheidsinstructies 89
Muurinstallatie 90
Weergave display afstandbediening 91
Werking en functies 91
Snel opstarten 93
Afvoerinstructies 99
Fabrikant & importeur (UK) 99

86
NL
PRODUCTINFORMATIEBLAD
Identicatie mo-
del(len):
10035168, 10035171
Artikel Sym-
bool
Waar-
de
Een-
heid
Artikel Een-
heid
Warmteafgifte Soort warmtetoevoer, voor elektrische opslag
lokale ruimteverwarming
Nominale warmteafgifte P
nom
0,3 kW Handmatige warmtelastregeling met
ingebouwde thermostaat
Nee
Minimale warmteafgifte
(indicatief)
P
min
0,0 kW Handmatige warmtelastregeling met
feedback van kamer- en/of buitentem-
peratuur
Nee
Maximale voortdurende
warmteafgifte
P
max,c
0,3 kW Elektronische warmtelastregeling met
feedback van kamer- en/of buitentem-
peratuur
Nee
Extra elektriciteitsverbruik Warmteafgifte door ventilator Nee
Bij nominale warmte-
afgifte
(ventilatormotor)
el
max
0,300 kW Soort warmteafgifte/ kamertemperatuurcon-
trole
Bij minimale warmte-
afgifte
(ventilatormotor)
el
min
0,000 kW Enkelfasige warmteafgifte bij afwezige
kamertemperatuurcontrole
Nee
In stand-by modus el
SB
0,000 W Twee of meer handmatige fasen, geen
kamertemperatuurcontrole
Nee
Kamertemperatuurcontrole met me-
chanische thermostaat
Nee
Met elektronische kamertemperatuur-
controle
Nee
Elektronische kamertemperatuurcon-
trole plus dagtimer
Nee
Elektronische kamertemperatuurcon-
trole plus weektimer
Ja
Overige controleopties (diverse keuzes moge-
lijk)
Kamertemperatuurcontrole met aan-
wezigheidsdetectie
Nee
Kamertemperatuurcontrole met open
raamdetectie
Ja
Met controle op afstand-optie Nee
Met adaptieve startregeling Nee
Met bedrijfstijdbeperking Nee
Met zwarte bolsensor Nee
Contactgegevens Chal-Tec GmbH, Wallstraße 16, 10179, Berlijn, Duitsland
87
NL
Identicatie mo-
del(len):
10035169, 10035172
Artikel Sym-
bool
Waar-
de
Een-
heid
Artikel Een-
heid
Warmteafgifte Soort warmtetoevoer, voor elektrische opslag
lokale ruimteverwarming
Nominale warmteafgifte P
nom
0,58 kW Handmatige warmtelastregeling met
ingebouwde thermostaat
Nee
Minimale warmteafgifte
(indicatief)
P
min
0,0 kW Handmatige warmtelastregeling met
feedback van kamer- en/of buitentem-
peratuur
Nee
Maximale voortdurende
warmteafgifte
P
max,c
0,58 kW Elektronische warmtelastregeling met
feedback van kamer- en/of buitentem-
peratuur
Nee
Extra elektriciteitsverbruik Warmteafgifte door ventilator Nee
Bij nominale warmte-
afgifte
(ventilatormotor)
el
max
0,580 kW Soort warmteafgifte/ kamertemperatuurcon-
trole
Bij minimale warmte-
afgifte
(ventilatormotor)
el
min
0,000 kW Enkelfasige warmteafgifte bij afwezige
kamertemperatuurcontrole
Nee
In stand-by modus el
SB
0,000 W Twee of meer handmatige fasen, geen
kamertemperatuurcontrole
Nee
Kamertemperatuurcontrole met me-
chanische thermostaat
Nee
Met elektronische kamertemperatuur-
controle
Nee
Elektronische kamertemperatuurcon-
trole plus dagtimer
Nee
Elektronische kamertemperatuurcon-
trole plus weektimer
Ja
Overige controleopties (diverse keuzes moge-
lijk)
Kamertemperatuurcontrole met aan-
wezigheidsdetectie
Nee
Kamertemperatuurcontrole met open
raamdetectie
Ja
Met controle op afstand-optie Nee
Met adaptieve startregeling Nee
Met bedrijfstijdbeperking Nee
Met zwarte bolsensor Nee
Contactgegevens Chal-Tec GmbH, Wallstraße 16, 10179, Berlijn, Duitsland
88
NL
Identicatie mo-
del(len):
10035170, 10035173
Artikel Sym-
bool
Waar-
de
Een-
heid
Artikel Een-
heid
Warmteafgifte Soort warmtetoevoer, voor elektrische opslag
lokale ruimteverwarming
Nominale warmteafgifte P
nom
0,72 kW Handmatige warmtelastregeling met
ingebouwde thermostaat
Nee
Minimale warmteafgifte
(indicatief)
P
min
0,0 kW Handmatige warmtelastregeling met
feedback van kamer- en/of buitentem-
peratuur
Nee
Maximale voortdurende
warmteafgifte
P
max,c
0,72 kW Elektronische warmtelastregeling met
feedback van kamer- en/of buitentem-
peratuur
Nee
Extra elektriciteitsverbruik Warmteafgifte door ventilator Nee
Bij nominale warmte-
afgifte
(ventilatormotor)
el
max
0,720 kW Soort warmteafgifte/ kamertemperatuurcon-
trole
Bij minimale warmte-
afgifte
(ventilatormotor)
el
min
0,000 kW Enkelfasige warmteafgifte bij afwezige
kamertemperatuurcontrole
Nee
In stand-by modus el
SB
0,000 W Twee of meer handmatige fasen, geen
kamertemperatuurcontrole
Nee
Kamertemperatuurcontrole met me-
chanische thermostaat
Nee
Met elektronische kamertemperatuur-
controle
Nee
Elektronische kamertemperatuurcon-
trole plus dagtimer
Nee
Elektronische kamertemperatuurcon-
trole plus weektimer
Ja
Overige controleopties (diverse keuzes moge-
lijk)
Kamertemperatuurcontrole met aan-
wezigheidsdetectie
Nee
Kamertemperatuurcontrole met open
raamdetectie
Ja
Met controle op afstand-optie Nee
Met adaptieve startregeling Nee
Met bedrijfstijdbeperking Nee
Met zwarte bolsensor Nee
Contactgegevens Chal-Tec GmbH, Wallstraße 16, 10179, Berlijn, Duitsland

89
NL
VEILIGHEIDSINSTRUCTIES
• Neem het apparaat niet in gebruik totdat het stevig bevestigd is zoals beschreven in deze handleiding.
• Controleer of de op het artikel aangegeven spanning overeenkomt met de spanning van het lokale
stroomnet voordat u het apparaat aansluit.
• Als de kabel beschadigd is moet deze worden vervangen door een kwaliceerde technicus om een
gevaarlijke situatie te voorkomen.
• De verwarming mag niet direct onder een stopcontact worden geplaatst.
• Plaats het apparaat op minimaal 1 meter afstand van meubilair, gordijnen en andere brandbare
materialen.
• Laat het apparaat niet zonder toezicht wanneer het in gebruik is.
• Laat het apparaat niet zonder toezicht wanneer het aangesloten is op het stroomnet.
• Houdt het apparaat buiten bereik van kinderen en sta niet toe dat ze het apparaat bedienen.
• Dit apparaat is bedoeld van conventionele huishoudens en mag niet voor industriële doeleinden
worden gebruikt.
• Als het apparaat niet goed functioneert of, op welke manier dan ook, beschadigd is mag het niet meer
gebruikt worden.
• Reparaties aan elektrische apparaten mogen uitsluitend door een gekwaliceerde elektricien
uitgevoerd worden.
• Incorrect uitgevoerde reparaties leveren serieus gevaar op voor gebruikers.
• Leg de stroomkabel niet onder vloerbedekking, een kleed, mat of gelijkwaardig.
• Leg de stroomkabel niet over scherpe hoeken of randen en laat hem niet in contact komen met hete
oppervlaktes.
• Bedek de verwarming niet om oververhitting te voorkomen.
• Gebruik deze verwarming niet met een programmeerapparaat, timer, afzonderlijke afstandbediening
of ander apparaat dat het apparaat automatisch aan laat gaan aangezien er brandgevaar bestaat
wanneer de verwarming bedekt is of niet correct gepositioneerd is.
• Dompel het apparaat nooit in water of enig ander soort vloeistof onder, om welke reden dan ook.
• Gebruik deze verwarming niet in de onmiddellijke nabijheid van een bad, douche of zwembad.
• Gebruik het apparaat niet buitenshuis.
• Gebruik het apparaat niet wanneer u natte of vochtige handen heeft.
• Gebruik het apparaat nooit bij of op hete oppervlaktes.
• Gebruik het apparaat niet als de stroomkabel beschadigd is.
• Voordat u het apparaat schoonmaakt dient u de stekker uit het stopcontact te nemen en u ervan te
verzekeren dat het volledig afgekoeld is.
• Maak het apparaat niet schoon met agressieve schoonmaakmiddelen.
• Gebruik nooit accessoires die niet door de fabrikant aanbevolen of geleverd zijn. Dit kan gevaar
opleveren voor de gebruiker of het apparaat beschadigen.
• Dit apparaat mag worden gebruikt door personen (inclusief kinderen) met beperkte fysieke,
zintuiglijke of mentale capaciteiten of een gebrek aan ervaring en kennis, mits zij onder toezicht
staan of instructies hebben gekregen over het veilige gebruik van het apparaat en de gevaren ervan
begrijpen.
• Kinderen moeten altijd onder toezicht staan om er zeker van te zijn dat ze niet met het apparaat
spelen.
LET OP!
Risico op brandwonden! Sommige delen van dit apparaat kunnen heel heet worden en
brandwonden veroorzaken. Speciale aandacht moet aan kinderen en kwetsbare personen
gegeven worden, wanneer die in de ruimte aanwezig zijn.
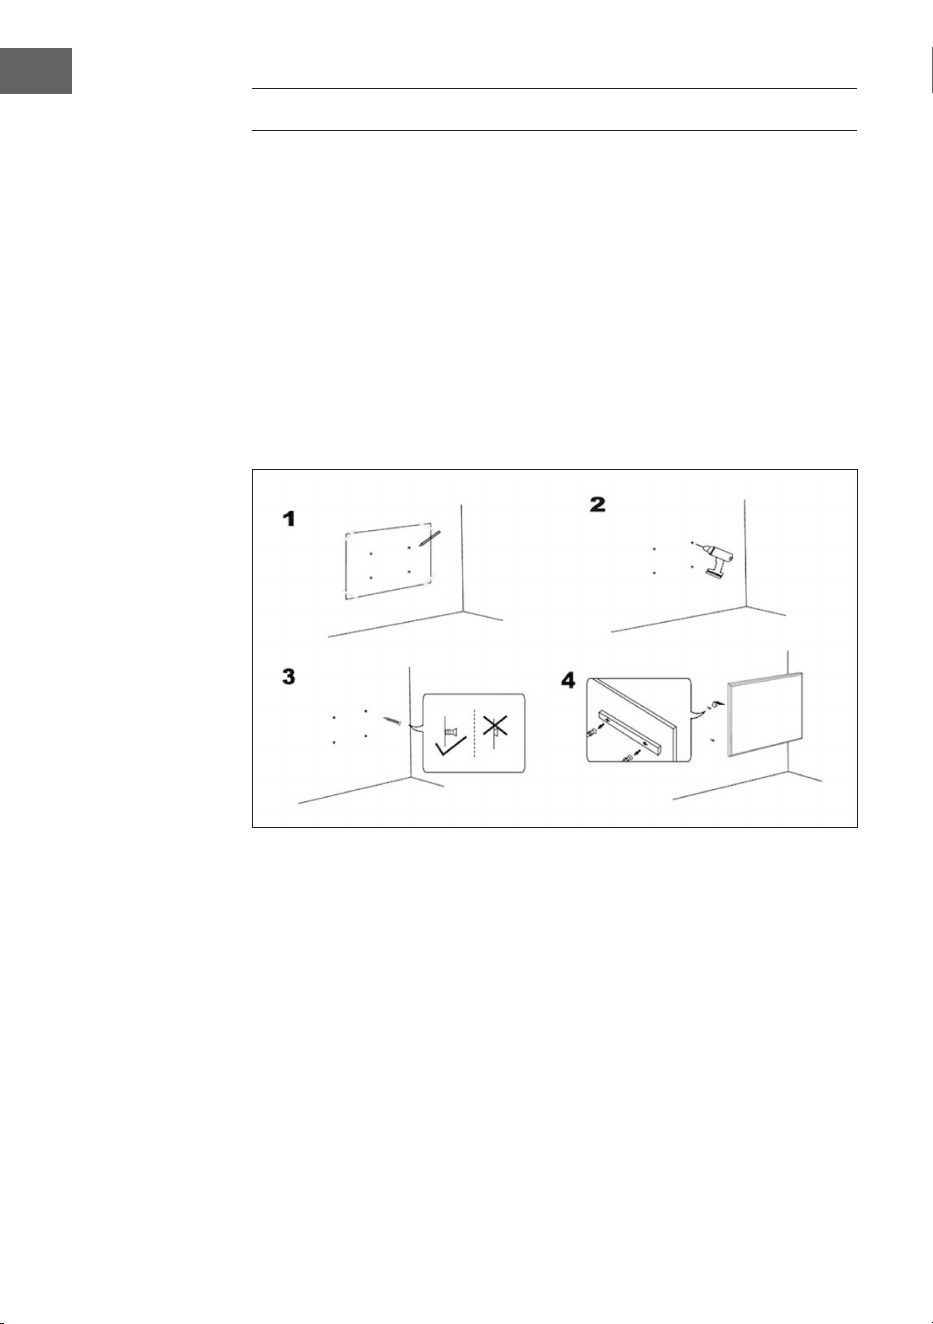
90
NL
MUURINSTALLATIE
Belangrijke instructies voor installatie
• Voortdurend gebruik verkort de levensduur van verwarmingen. Zet het
apparaat, indien mogelijk, na 12 uur even uit.
• Gebruik het apparaat niet wanneer de kamertemperatuur boven de 20 °C is,
aangezien hoge temperaturen de prestaties zullen beïnvloeden.
• Het aansluitpunt moet zich minimaal 20 cm boven de vloer bevinden.
• Houdt het apparaat ver van ontvlambaar en explosief materiaal.
• Laat een veilige afstand van 30 cm aan de voor-, achter- en bovenkant van het
apparaat vrij. Laat een veilige afstand van 10 cm aan de rechter- en linkerkant
van het apparaat vrij.
• Gedurende een of twee dagen na ingebruikname kan het apparaat luchtjes
uitstoten die ongevaarlijk zijn voor mensen.

91
NL
WEERGAVE DISPLAY AFSTANDBEDIENING
WERKING EN FUNCTIES
Knop [M]
• Druk op de [M] knop tussen Systeemtijd/ Thermostaat.
• Hou de [M] knop onder een bepaald programma ingedrukt om
programmering te starten.
Systeem Thermostaat
Dag
Soort programma
AM/PM
RF verbindingsstatus
Huidige temperatuur
Status socket
Gewenste temperatuur
Graden Celsius
Graden Fahrenheit
Waarschuwing
batterij bijna leeg
Starttijd programma
Eindtijd programma
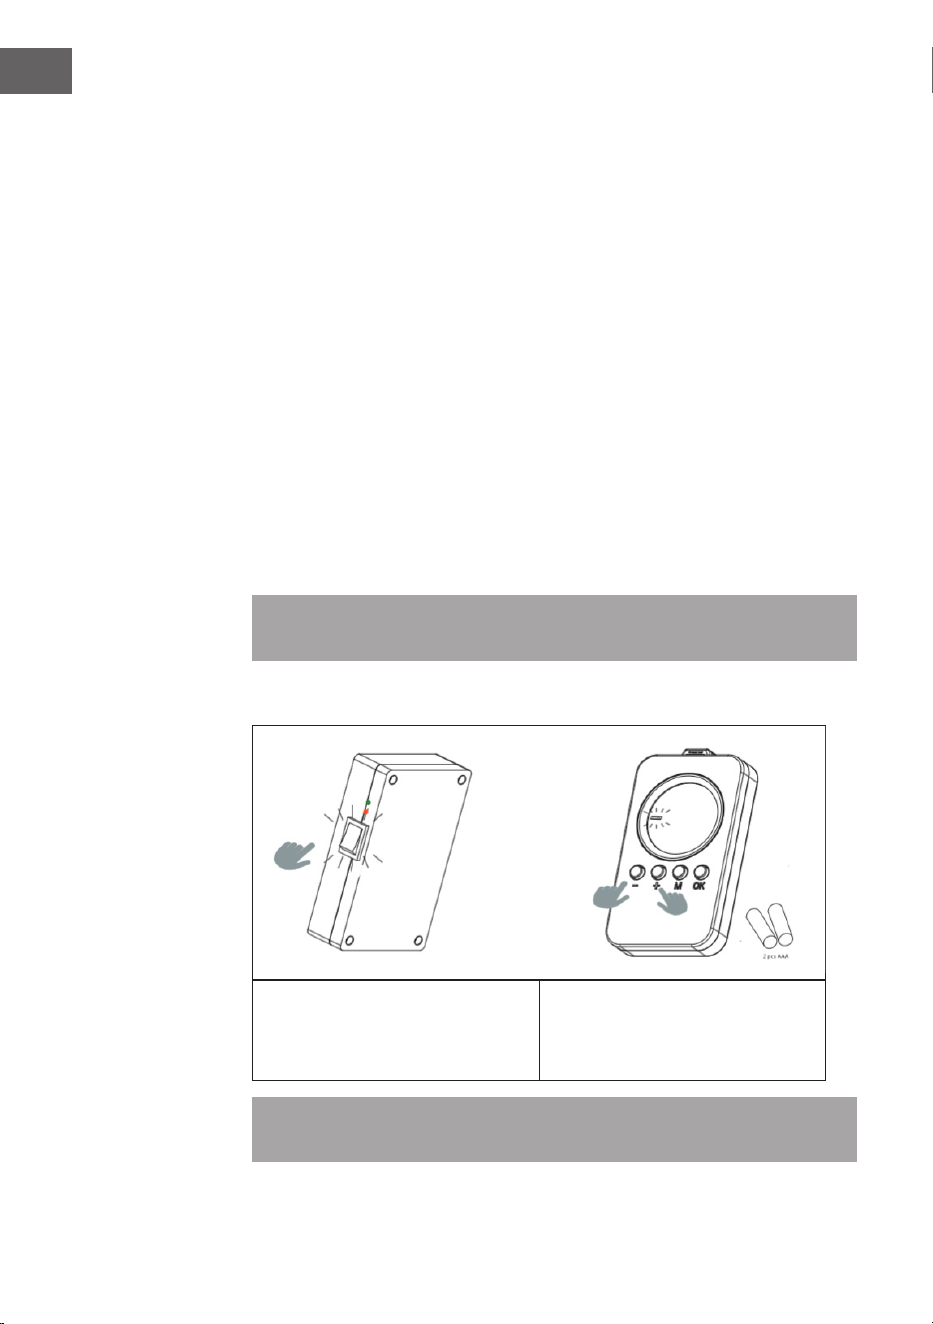
92
NL
Knop [OK]
• Druk [OK]
• Kies de 1, 2, 3, 4 plaats. Druk [OK] om de keuze aan/uit te zetten.
• Tijdens het programmeren of instellen drukt u op OK om te bevestigen en
door te gaan.
Knop [+] en [-]
• Kies de te programmeren plaatsen.
• Druk op de + of - knop, het cijfer in de regelmodus, hou [-] of [+] ingedrukt om
snel te verhogen of te verlagen.
Verbinden met controle unit
1. Hou [+] en [-] tegelijk ingedrukt om de verbinding op te starten. De CONNECT
icoon gaat knipperen om aan te geven dat de afstandbediening probeert te
verbinden.
2. Zet de verwarming aan met de schakelaar aan de zijkant. Het apparaat is nu
gedurende 60 seconden gekoppeld.
3. Wacht tot het CONNECT symbool stopt met knipperen en permanent verlicht
is in het display. De afstandbediening is nu verbonden met de verwarming.
Let op! De afstandbediening werkt alleen binnen een straal van 10 meter van
de verwarming. Verbinding maken duurt meestal circa 5 seconden.
Verbinden met controle unit
1. Zet de verwarming aan met behulp
van de schakelaar aan de achterkant.
2. Hou de afstandbediening richting
het warmtepaneel en druk [+] en [-]
tegelijk in. Twee piepjes geven een
succesvolle verbinding aan.
Let op! De afstandbediening werkt alleen binnen een straal van 10 meter van de verwarming.
Verbinding maken duurt meestal circa 5 seconden.

93
NL
SNEL OPSTARTEN
Handmatige overname
Druk de [OK] knop meerdere malen in om een van de volgende functies te
selecteren:
• Handmatige temperatuurinstelling
• OFF
• ON
Let op! Handmatige handelingen overschrijven alle ingestelde
programma's en zetten alle actieve programma's in OFF-modus. Vice
versa zullen alle handmatige instellingen gewist worden wanneer u instelde
programma's activeert.
Bij handmatige bediening zullen de ON/OFF pictogrammen blijven branden terwijl
bij ingestelde programma's de ON/OFF iconen knipperen.
Handmatig uitschakelen
van het systeem (het
symbool blijft voortdu-
rend branden)
Handmatig inschakelen
van het systeem (het
symbool blijft voortdu-
rend branden)
Handmatig instellen van
de temperatuur (het
symbool blijft voortdu-
rend branden)
Lopend programma
Wanneer een ingesteld programma geactiveerd wordt zal dit handmatige
instellingen wissen en in plaats daarvan het ingestelde programma uitvoeren.

94
NL
Voer de exacte eindtijd (uren en minuten) in met +/- en
bevestig met [OK]. De programmering is nu voltooid.
Display op systeempagina als het programma loopt
De knipperende MODUS
geeft aan dat het
voorgeprogrammeerde
programma voor slot 3 op
dat moment actief is.
Het knipperende
ON/OFF symbool
geeft aan dat de
verwarming op dat
moment gecontro-
leerd wordt door
een programma.
Wekelijks
Programma
Slot
Programma
Druk in thermo-
staatmodus op
[+] of [-].
Voer de dag van de
week in voor de start-
tijd (ST) met +/-.
Voer de exacte start-
tijd (uren en minuten)
in met +/-.
Voer de weekdag in
voor de eindtijd (ET)
met +/-.
Selecteer welke positie
moet worden gepro-
grammeerd en bevestig
met [OK].
Druk [+] of [-] en bevestig
de gewenste temperatuur
met [OK].

95
NL
Huidige dag en tijd instellingen
Hou 'M' ingedrukt om de interface te openen waarmee de huidige tijd en
weekdag kan worden ingegeven. Druk '+' en '-' om te selecteren. Druk 'OK' om te
bevestigen.
1. Druk '+' of '-' om 24h of
12h te selecteren en druk
op 'OK' om te bevestigen.
2. Druk '+' of '-' om de
weekdag te selecteren.
3. Druk '+' of '-' om het
aantal uren te selecteren
en druk op 'OK' om te
bevestigen.
4. Druk '+' of '-' om het
aantal minuten te selecte-
ren en druk op 'OK' om te
bevestigen.
5. Druk '+' of '-' om Celsius of
Fahrenheit te selecteren en
druk op 'OK' om te bevesti-
gen.

96
NL
In automatische modus drukt u op '+' of '-' om de doeltemperatuur aan uw wensen aan te passen.
Wekelijkse programmering
Druk kort op 'M' om de interface van de wekelijkse programmering te openen.
'00' knippert aan de linkerkant
en 'ST' wordt weergegeven.
Druk op + of - om de starttijd
in te geven. Druk op OK om te
bevestigen.
'00' knippert aan de
rechterkant en 'ET' wordt
weergegeven.
Druk op + of - om de eindtijd
in te geven. Druk op OK om te
bevestigen.
Druk op + of - om de
gewenste temperatuur
in te geven. Druk op
de M knop om de
instellingen voor de
volgende dag in te
voeren.

97
NL
Opmerkingen over programma's
• Bewaar de afstandbediening en het warmtepaneel in dezelfde ruimte.
• Als het batterij-icoon zichtbaar blijft op het scherm van de afstandbediening
betekent dit dat de batterij bijna leeg is. Een bijna lege batterij kan ervoor
zorgen dat de afstandbediening niet of niet meer goed functioneert. Vervang
de batterij direct om onderbrekingen te voorkomen.
• Zorg ervoor dat de afstand tussen beide apparaten, in een rechte lijn, nooit
meer is dan 5 meter voor een goede communicatie.
• Rode licht is AAN: het systeem is gekoppeld aan de stroomvoorziening en het
hoofdpaneel functioneert normaal.
Groene licht is AAN: het warmtepaneel is actief.
Wekelijkse programmering
• Vergeet niet eerst de correcte dag en tijd in te stellen voordat u een schema
programmeert. Anders functioneert de weekprogrammering niet zoals het
hoort.
• Kies elke dag het tijdstip waarop het apparaat AAN en UIT moet gaan.
Bijvoorbeeld: AAN om 10.00 uur en UIT om 17.00 uur.
• De weekprogrammering wordt niet actief als de AAN tijd hetzelfde is, of later,
dan de UIT tijd. Bijvoorbeeld: als je de verwarming programmeert om AAN
te gaan om 10.00 uur en UIT om 8.00 uur zal het systeem de programmering
voor die dag negeren. Om verwarming op een specieke dag over te slaan
programmeer je de AAN tijd op hetzelfde moment of later dan de UIT tijd.
• Het systeem gebruikt standaard een 24-uurs format. Als u een 12-uur
tijdsformaat invoert zal het systeem dit automatisch corrigeren - niet nodig
om dit handmatig te doen.
• De verwarming slaat alleen aan als zowel aan de tijd als de
temperatuurinstellingen is voldaan.
Voorbeeld
• AAN tijd: 10.00 uur
• UIT tijd: 12.00 uur
• Geprogrammeerde temperatuur: 25 °C
• De verwarming slaat aan als de temperatuur op of onder de 22 °C komt
(huidige kamertemperatuur 3 graden lager dan ingestelde temperatuur).
• De verwarming slaat af als de temperatuur boven de 25 °C komt (huidige
kamertemperatuur 1 graad lager dan ingestelde temperatuur).
• Buiten de geprogrammeerde tijd zal de verwarming niet aan slaan, zelfs niet
als de temperatuur laag is.
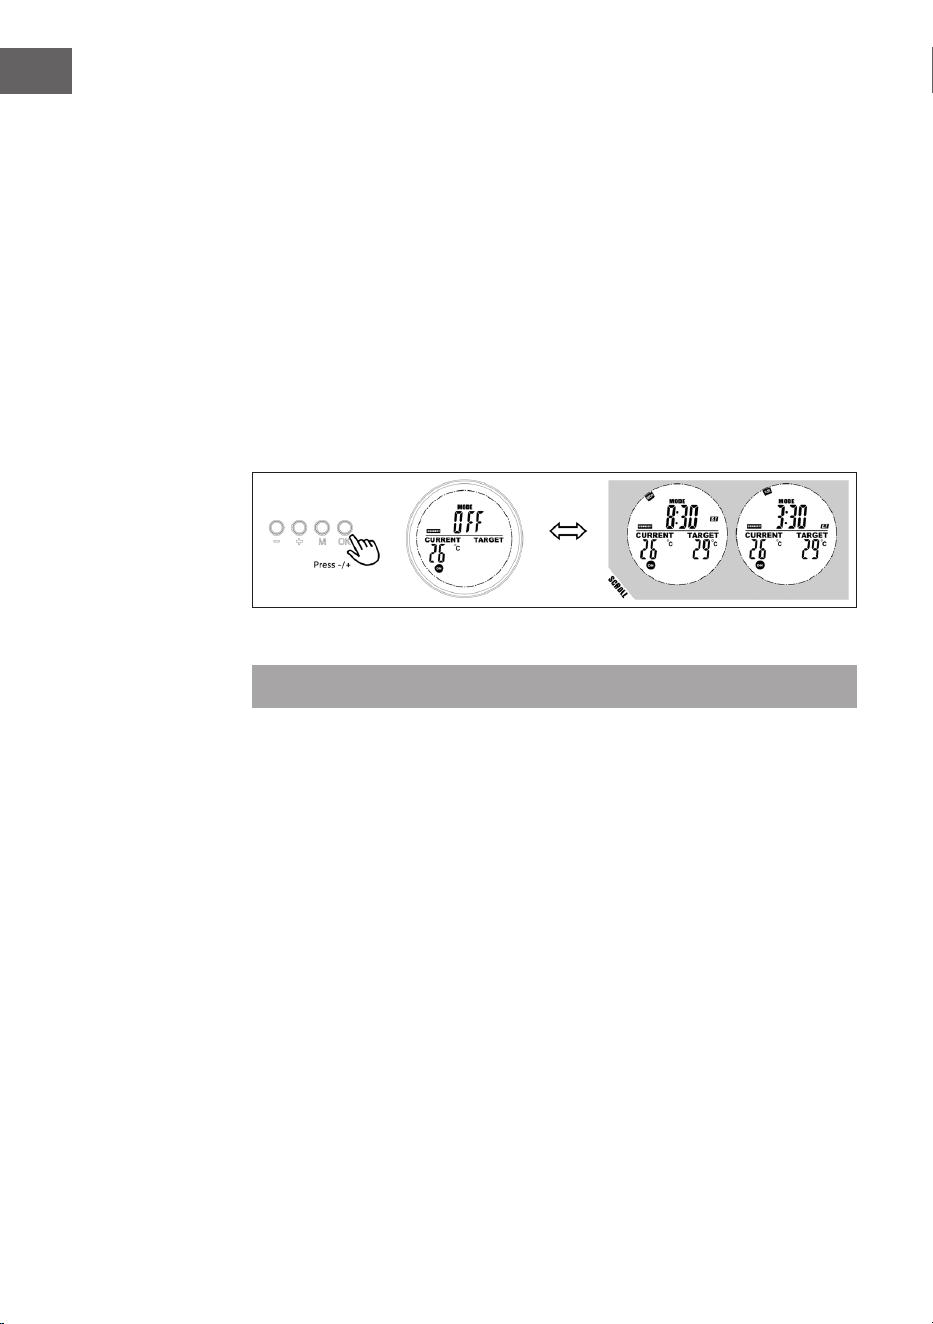
98
NL
Als u een specieke dag van de week als ST kiest kunt u elke willekeurige andere
dag als ET selecteren. De schakelaar gaat AAN/UIT op basis van de specieke ST
dag en tijd tot ET. De dag en tijd liggen binnen het tijdsbestek van een week en het
programma zal zich elke week herhalen.
Display slot info
Gebruikers kunnen de geprogrammeerde tijd en temperatuur bekijken door de
betreffende slot in de programmamodus te selecteren. Gebruikers kunnen de slot
moeiteloos openen of sluiten.
1. Ga naar programmamodus
2. Selecteer de slot die u wilt bekijken, de geprogrammeerde start- en eindtijd
scroll in 1 seconde en herhaal, alle overige informatie wordt ook getoond.
3. Kies de OK knop om deze slot te verlaten, druk nogmaals om de slot te
herstellen.
Open raam-modus
Let op! De open raam-modus, indien actief, herschrijft alle andere modi.
• Als de kamertemperatuur meer dan 6 °C binnen 20 minuten zakt,
interpreteert het apparaat dit als dat er een raam openstaat en wordt het
apparaat automatisch uitgeschakeld.
• Zolang deze modus actief is, knippert OPEN in het display.
• Druk op een willekeurige knop op de afstandbediening om terug naar de
handmatige instelmodus te gaan.
Vervangen van batterijen
• Verwijder de afdekking van het batterijencompartiment.
• Vervang de oude batterijen met 2 nieuwe AA batterijen en sluit het
compartiment.

99
NL
AFVOERINSTRUCTIES
Wanneer het hier afgebeelde symbool zich op het
artikel bevindt betekent dat dat dit artikel niet met het
reguliere huisvuil mag worden afgevoerd, maar dat er
een specieke wetgeving bestaat voor de afvoer van
elektrische en elektronische apparaten. Het artikel moet
naar een verzamelpunt voor het recyclen van elektrische
of elektronische apparatuur worden gebracht. Door
een correcte afvoer van oude apparaten conform de
regels wordt zowel het milieu als de gezondheid van uw
medemens beschermd tegen de mogelijke negatieve
gevolgen Voor meer informatie over het recyclen en
afvoeren van dit artikel neemt u contact op met uw
gemeente of de plaatselijke milieustraat.
Dit product bevat batterijen. Als er in uw land een
wettelijke regeling is voor de afvoer van batterijen, mogen
de batterijen niet met het huishoudelijk afval worden
weggegooid. Informeer naar de plaatselijke voorschriften
over het afvoeren van batterijen. Door een correcte afvoer
van batterijen conform de regels wordt zowel het milieu
als de gezondheid van uw medemens beschermd tegen
de mogelijke negatieve gevolgen
FABRIKANT & IMPORTEUR (UK)
Chal-Tec GmbH, Mühlenstrasse 25, 10243 Berlijn, Duitsland.
Contact: [email protected]