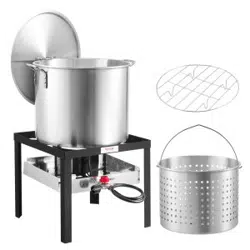
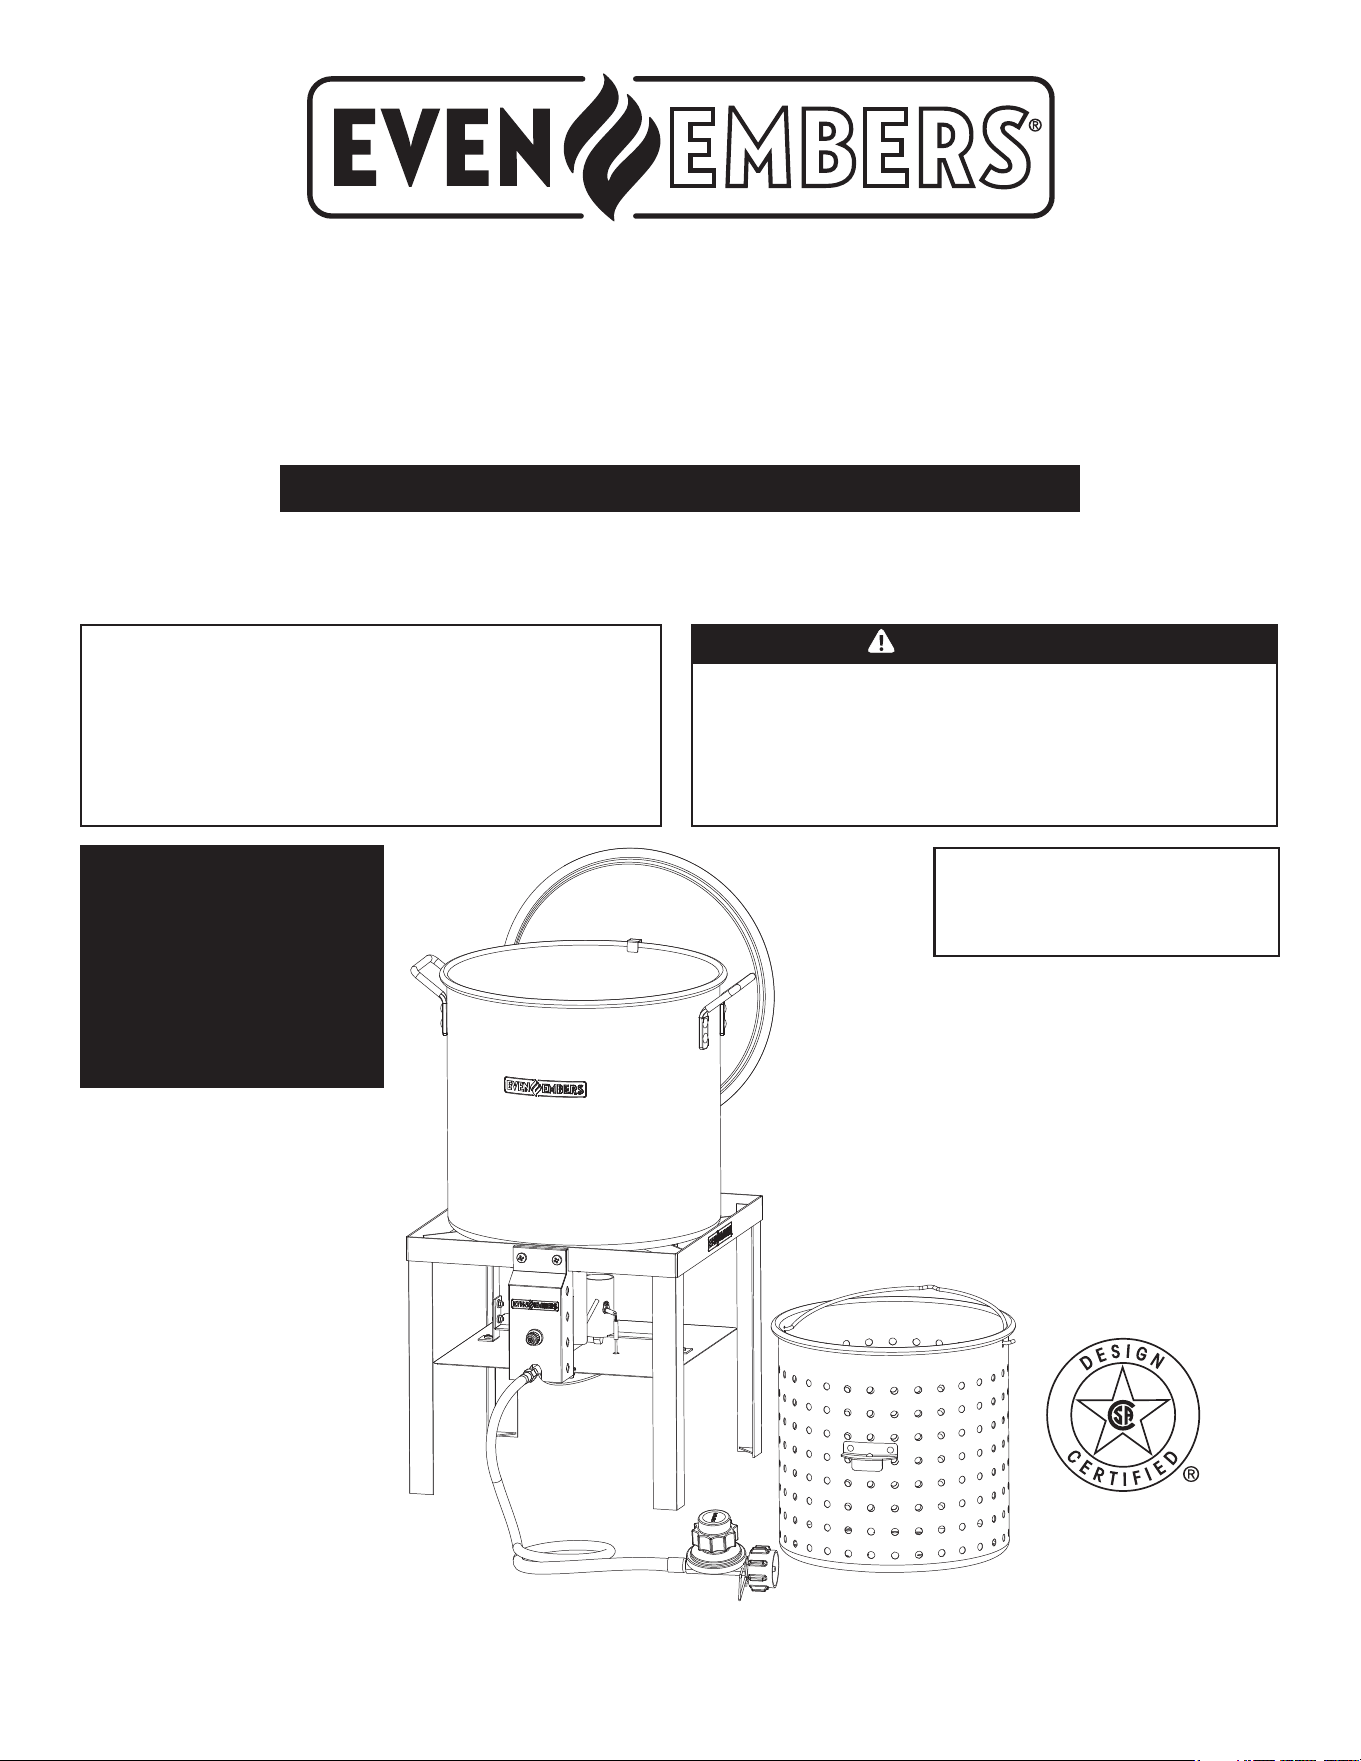
100 Qt. Boiling Kit
OWNER’S MANUAL
ASSEMBLY AND OPERATING IN STRUC TIONS
WARNING
HAZARDOUS EXPLOSION MAY RESULT IF THESE
WARNINGS AND INSTRUCTIONS ARE IGNORED. READ
AND FOLLOW ALL WARNINGS AND INSTRUCTIONS
IN THIS MANUAL TO AVOID PERSONAL INJURY,
INCLUDING DEATH OR PROPERTY DAMAGE.
NOTICE TO
INSTALLER:
LEAVE THESE
INSTRUCTIONS WITH
THE APPLIANCE
OWNER FOR FUTURE
REFERENCE .
SAVE THIS MANUAL FOR FUTURE REFERENCE
Model GAS6199AS
THIS APPLIANCE IS NOT FOR FRYING
THIS INSTRUCTION MANUAL CONTAINS IMPORTANT
INFORMATION NECESSARY FOR THE PROPER
ASSEMBLY AND SAFE USE OF THE APPLIANCE. READ
AND FOLLOW ALL WARNINGS AND INSTRUCTIONS
BEFORE ASSEMBLING AND USING THE APPLIANCE.
FOLLOW ALL WARNINGS AND INSTRUCTIONS WHEN
USING THE APPLIANCE.
NOTE: Pre-installed label on
appliance with safety warnings.
(Do not remove this label.)
1
WE WANT YOU TO ASSEMBLE AND USE YOUR APPLIANCE AS SAFELY AS POSSIBLE.
THE PURPOSE OF THIS SAFETY ALERT SYMBOL
IS TO ATTRACT YOUR ATTENTION
TO POSSIBLE HAZARDS AS YOU ASSEMBLE AND USE YOUR APPLIANCE.
WHEN YOU SEE THE SAFETY ALERT SYMBOL
PAY CLOSE ATTENTION TO THE INFORMATION WHICH FOLLOWS!
READ ALL SAFETY WARNINGS AND INSTRUCTIONS CAREFULLY
BEFORE ASSEMBLING AND OPERATING YOUR APPLIANCE.
DANGER
IMPORTANT SAFETY
WARNINGS
IF YOU SMELL GAS:
• Shut off gas to the appliance.
• Extinguish any open ame.
• If odor continues, keep away from the appliance and immediately call your gas supplier or your
re department.
Failure to follow these instructions could result in re or explosion
which could cause property damage, personal injury or death.
• Never operate this appliance unattended.
• Never operate this appliance within 10 feet (3 m) of any structure, combustible material of other
gas cylinder.
• Never operate this appliance within 25 feet (7.5 m) of any ammable liquid.
• Heated liquids remain at scalding temperatures long after the cooking process. Never touch
cooking appliance until liquids have cooled to 115ºF (45ºC) or less.
• If a re should occur, keep away from the appliance and immediately call your re department.
Failure to follow these instructions could result in re, explosion, or burn hazard
which could cause property damage, personal injury or death.
Do not store a spare LP cylinder under or near this appliance.
Never ll the cylinder beyond 80% full.
If the information above is not followed exactly, a re causing death or
serious injury could occur.
DANGER
DANGER
2
General Warnings . . . . . . . . . . . . . . . . . . . . . . . . . . . . . . . . . . . . . . . . . . . . 3-4
LP Gas Cylinder Speci cations and Installation . . . . . . . . . . . . . . . . . . . . . 5-6
Hose & Regulator Speci cations and Installation . . . . . . . . . . . . . . . . . . . . . .7
Leak Testing. . . . . . . . . . . . . . . . . . . . . . . . . . . . . . . . . . . . . . . . . . . . . . . . . . .8
Pre-start Check List . . . . . . . . . . . . . . . . . . . . . . . . . . . . . . . . . . . . . . . . . . . . . 9
Lighting Instructions . . . . . . . . . . . . . . . . . . . . . . . . . . . . . . . . . . . . . . . . . . 9-10
Operating Instructions . . . . . . . . . . . . . . . . . . . . . . . . . . . . . . . . . . . . . . . . . .11
Proper Care and Maintenance . . . . . . . . . . . . . . . . . . . . . . . . . . . . . . . . . 11-12
Transporting and Storage. . . . . . . . . . . . . . . . . . . . . . . . . . . . . . . . . . . . . . . .12
Troubleshooting . . . . . . . . . . . . . . . . . . . . . . . . . . . . . . . . . . . . . . . . . . . . . . .13
Assembly Instructions . . . . . . . . . . . . . . . . . . . . . . . . . . . . . . . . . . . . . . . 14-20
Warranty Information . . . . . . . . . . . . . . . . . . . . . . . . . . . . . . . . . . . Back Cover
DANGER: Indicates an imminently hazardous situation which, if not avoided, will result in death or serious injury.
WARNING: Be alert to the possibility of serious bodily injury if the instructions are not followed. Be sure to read and
carefully follow all of the messages.
CAUTION: Indicates a potentially hazardous situation which, if not avoided, may result in minor or moderate injury.
TABLE OF CONTENTS
CALIFORNIA PROPOSITION 65 WARNING
WARNING: This product can expose you to chemicals including carbon monoxide, which is
known to the State of California to cause birth defects or other reproductive harm.
For more information, go to www.P65Warnings.ca.gov
WARNING: CONTAINS LEAD. MAY BE HARMFUL IF EATEN OR CHEWED. COMPLIES
WITH FEDERAL STANDARDS. KEEP OUT OF REACH OF CHILDREN.
3
WARNING
• This appliance shall be used OUTDOORS only. Do NOT use in a building, home, garage, balcony, porch,
tent or any other enclosed area. Appliances shall not be used on or under apartment or condominium
balcony or deck. Do NOT install or use in or on recreational vehicles and/or boats or connected to a
recreational vehicles’ low-pressure LP gas system.
• When cooking, the appliance must be on a level, stable, noncombustible surface in an area clear of
combustible material. An asphalt surface (blacktop) may not be acceptable for this purpose.
• Do not use on combustible ooring or surfaces.
• This appliance is not for frying turkeys.
• Do NOT operate appliance any closer than 10 feet from any combustible materials including walls or
railings or under overhead construction.
• Water can cause severe burns and permanent dis gurement; use caution and common sense when
operating this product.
• Keep children and pets away from the appliance at all times. Carefully monitor all activity around
appliance to avoid burns or other injuries. Do not wear loose clothing or allow long hair to hang freely
while lighting or using appliance.
• Use caution when walking or standing near appliance as water may have created a slick surface.
• Avoid bumping of or impact with the appliance to prevent spillage or splashing of hot cooking liquid.
• Never drop food or accessories into hot cooking liquid. Lower food and accessories slowly into the
cooking liquid in order to prevent splashing or over ow. When removing food from the appliance care
shall be taken to avoid burns from hot cooking liquids.
• Never over ll the cooking vessel with water.
• This appliance will be hot during and after use. Use insulated oven mitts or gloves for protection from hot
surfaces or splatter from cooking liquids.
• Check all gas connections by following directions in the “Leak Testing” section on page
8 of this manual.
Never test for gas leaks with a lighted match or open ame. Do not operate this appliance with a gas leak.
• Do not store or use gasoline or other liquid/aerosols with ammable vapors in the vicinity of this
appliance.
• Storage of this appliance indoors is permissible only if the cylinder is disconnected and removed from
the appliance and left outdoors. Cylinders must be stored outdoors out of the reach of children and must
not be stored in a building, garage or any other enclosed area.
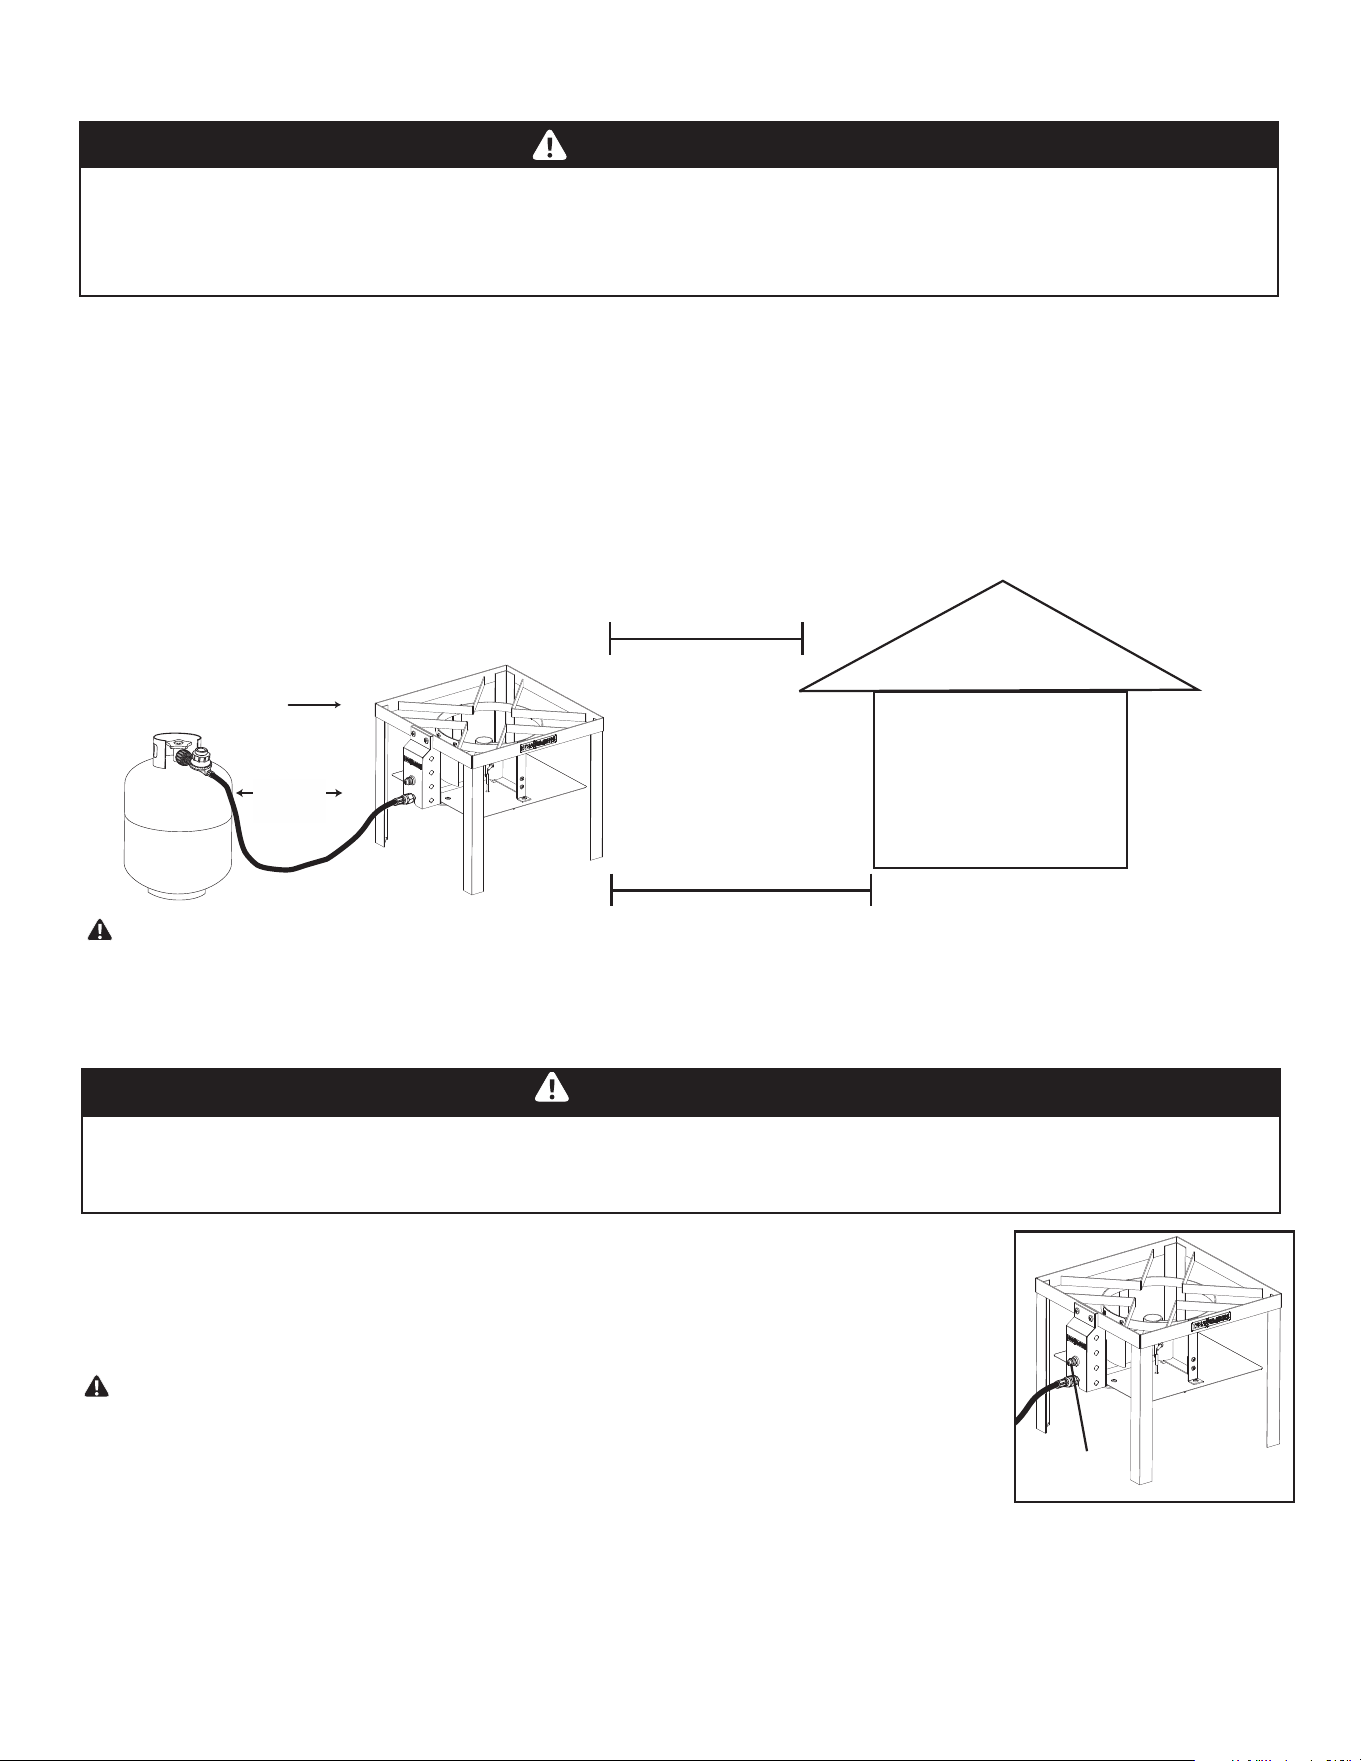
• Position propane cylinder and appliance, as illustrated on page 9, to protect hose from contact with hot
surfaces which could create a leak. Never use a hose that shows signs of cracking or damage.
• DO NOT use external electrical sources with this appliance.
• An appliance is considered to be outdoors if installed with shelter no more inclusive than with walls on
three sides, but with no overhead cover; all openings must be permanently open; sliding doors, garage
doors, windows, or screened openings are not considered as permanent openings.
• An appliance is considered to be outdoors if installed with shelter no more inclusive than within a partial
enclosure that includes an overhead cover and no more than two sidewalls. The sidewalls may be parallel,
as in a breezeway, or at right angles to each other; all openings must be permanently open; sliding doors,
garage doors, windows, or screened openings are not considered as permanent openings.
• An appliance is considered to be outdoors if installed with shelter no more inclusive than within a partial
enclosure that includes an overhead cover and three sidewalls, as long as 30% or more of the horizontal
periphery of the enclosure is permanently open. All openings must be permanently open; sliding doors,
garage doors, windows, or screened openings are not considered as permanent openings.
• The installation shall conform with local codes or, in the absence of local codes CSA B149.1,CSA B149.2.
• The pressure regulator assembly supplied with the appliance must be used. Only use replacement 10 PSI
hose/regulator # 6160-600-6160-15. This regulator can be obtained by contacting Even Embers at 1-855-
735-9922 or [email protected].
• The use of alcohol, prescription or non-prescription drugs may impair your ability to properly assemble or
safely operate this appliance. Use caution and common sense.
GENERAL WARNINGS
4
WARNING
• This appliance is not intended for and should never be used as a heater.
• Do not place empty cooking vessel on the appliance while in operation. Use caution when placing
anything in cooking vessel while the appliance is in operation.
• Never use a cooking vessel larger than the capacity and diameter recommended by the manufacturer.
• Do not use this appliance for other than its intended purpose. Properly dispose of packaging materials.
• Only use replacement/accessory parts manufactured by Even Embers.
• Not for commercial use. DO NOT use this appliance for anything other than its intended purpose.
WARNING: Do not use this appliance under extended awnings. Failure to comply could result in a
re or personal injury.
DANGER: Do not put appliance in storage or travel mode immediately after use. Allow appliance
to cool to touch before moving or storing. Failure to do so could result in re resulting in property
damage, personal injury, or death.
WARNING: Disconnect the appliance from the gas supply prior to storage or transportation.
USE CAUTION AND COMMON SENSE WHEN OPERATING YOUR GAS APPLIANCE.
FAILURE TO ADHERE TO THE SAFETY WARNINGS AND GUIDELINES IN THIS MANUAL
COULD RESULT IN SEVERE BODILY INJURY OR PROPERTY DAMAGE.
SAVE THIS MANUAL FOR FUTURE REFERENCE.
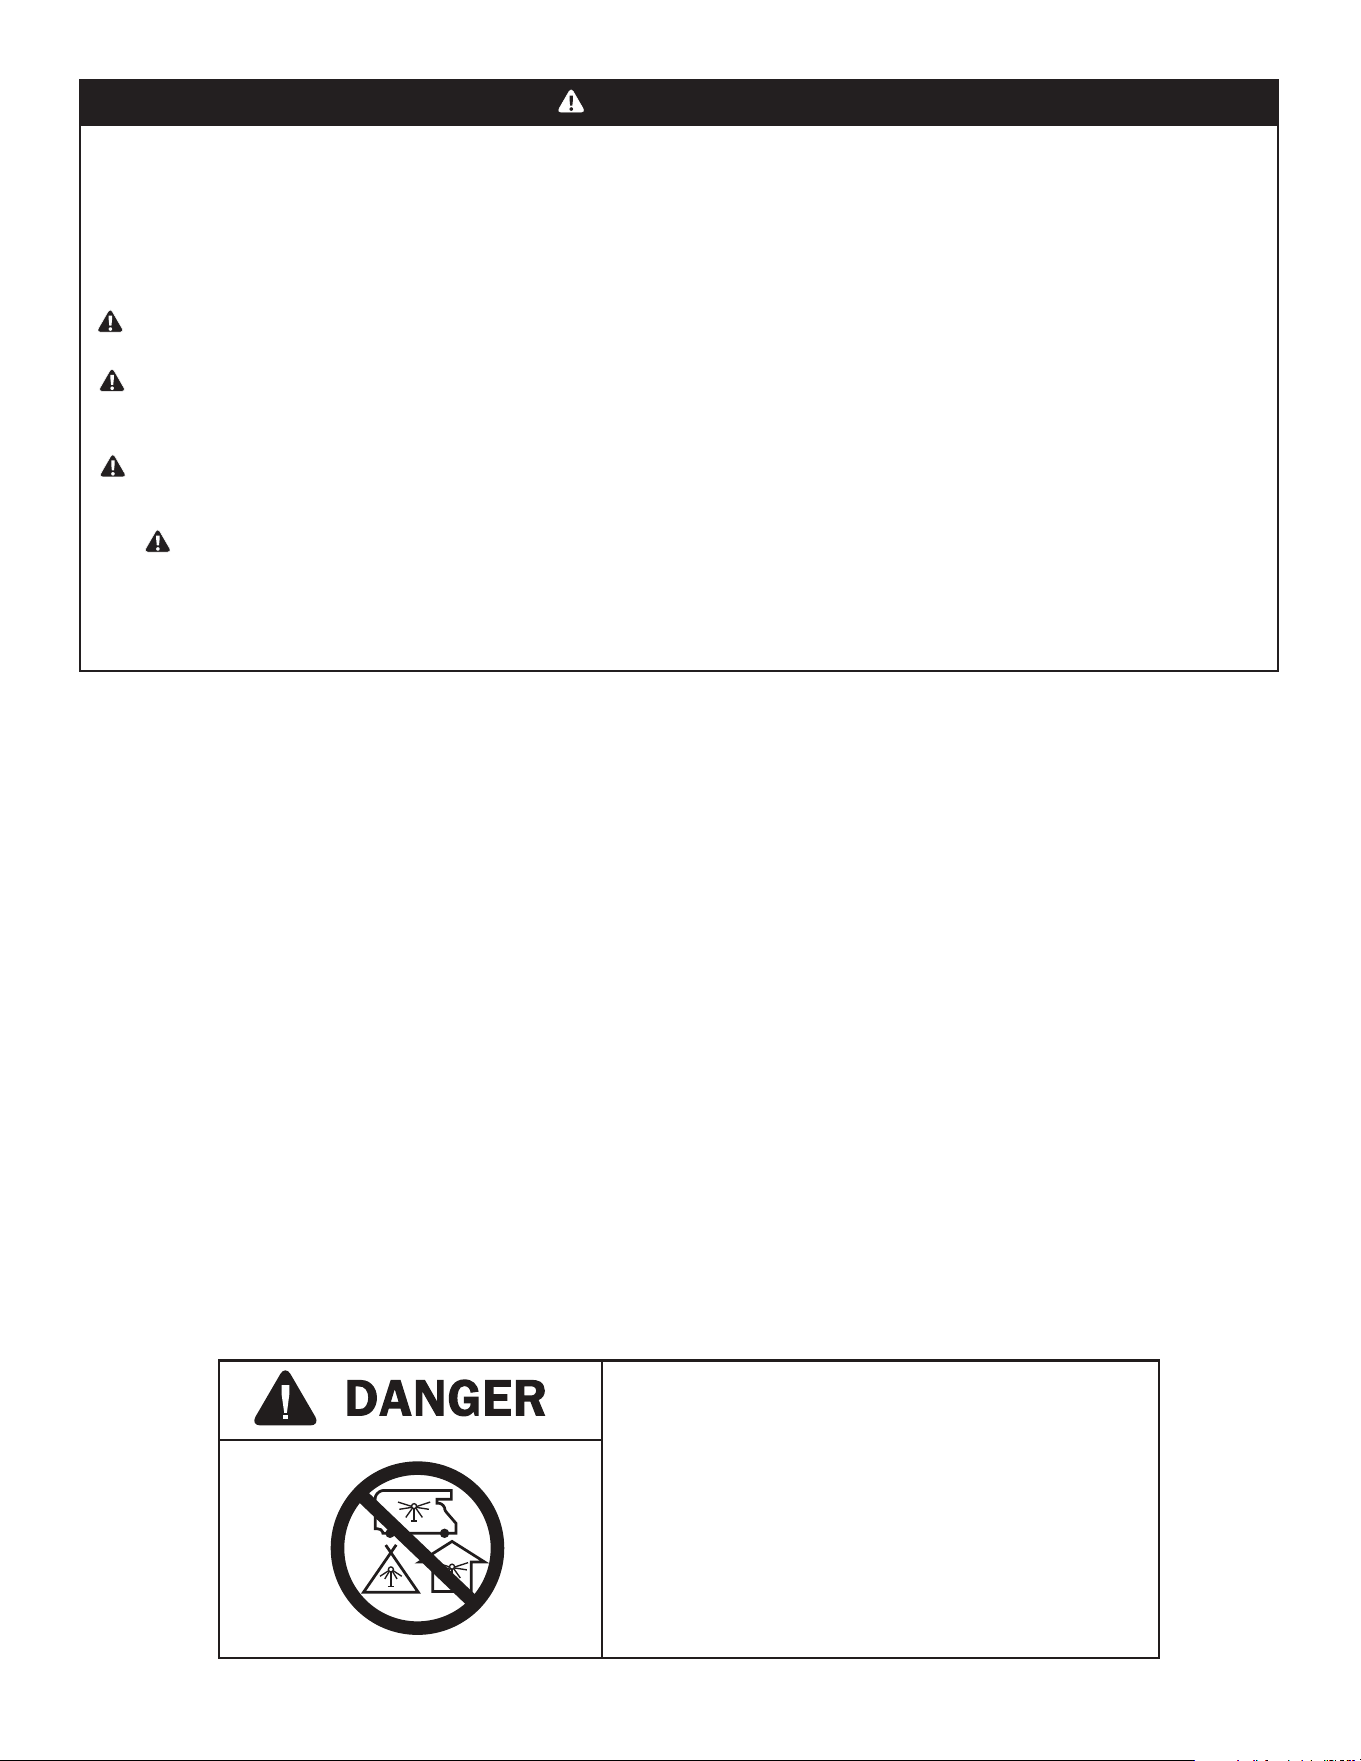
CARBON MONOXIDE HAZARD
This appliance can produce carbon
monoxide which has no odor.
Using it in an enclosed space can kill you.
Never use this appliance in an enclosed
space such as a camper, tent, car or home.
5
LP GAS CYLINDER (TANK) SPECIFICATIONS AND INSTALLATION
WARNING
• ONLY connect this appliance to a Type 1 cylinder valve. The Type 1 valve can be identi ed with the
large external threads on the valve outlet.
• DO NOT connect to a propane cylinder exceeding a 20 lb. (9.1 kg) capacity.
• DO NOT connect to a cylinder that uses any other type of valve connection device.
• Inspect the propane cylinder valve rubber seal for cracks, wear or deterioration prior to use. A
damaged rubber seal can cause a gas leak, possibly resulting in an explosion, re or severe
bodily harm.
• Turn off the cylinder valve when your appliance is not in use.
• Handle the cylinder with care.
• Always secure the cylinder in an upright position.
• Never connect an unregulated LP gas cylinder to your appliance.
• DO NOT expose LP gas cylinders to excessive heat or ignition sources.
• DO NOT store a spare LP gas cylinder under or near your appliance.
• Allow only quali ed LP gas dealers to ll or repair your LP gas cylinder.
• DO NOT allow the cylinder to be lled beyond 80% capacity.
• Read and follow all warnings and instructions that are on the cylinder and that accompany this
product.
• DO NOT store a spare LP gas cylinder (full or empty) near your appliance. This could cause
excess pressure to be expelled through the vapor relief valve resulting in re, explosion, or
severe personal injury, including death.
• Propane gas is heavier than air and will collect in low areas. Proper ventilation is extremely
important. Keep the ventilation opening(s) of the LP gas cylinder enclosure free and clear from
obstructions and debris.
• DO NOT insert any foreign objects into the cylinder valve outlet as this could damage the
rubber seal. Do not use propane cylinder with a damaged rubber seal. A damaged rubber seal
can cause a gas leak, possibly resulting in explosion, re, severe bodily harm, or death. Inspect
rubber seal for cracks, wear or deterioration prior to use.
• Always keep cylinder in upright position during use, transit or storage.
DANGER
LP GAS CYLINDER (TANK) SPECIFICATIONS:
LP gas cylinder (not supplied with this appliance)
The LP (Liquid Propane) gas cylinder speci cally designed to be used with this appliance must be 12” (30.5
cm) diameter x 18” (45.7 cm) tall and have a 20 lb. (9.1 kg) capacity incorporating a Type 1 cylinder valve and
an over- lling protection device (OPD).
This appliance is designed to t Worthington, Manchester or SMPC brand 20 lb. (9.1 kg) cylinders. Other
brand DOT cylinders may t this appliance if the cylinder has similar dimensions of the top and bottom rings.
The installation of this appliance must be in accordance with:
All applicable local codes, or in the absence of local codes, either:
• National Fuel Gas Code ANSI Z223.1 NFPA 54
• Natural Gas and Propane Installation Code: CAN/CGA B149.1
• Natural Gas Installation Code: CAN/CGA B149.1 (Canada)
• Propane Installation Code: CAN/CGA B149.2 (Canada)
To check your local codes, see your local LP gas dealer or natural gas company. This appliance was not
intended to be connected to a natural gas supply line. If an external electrical source is utilized, it must be
electrically grounded in accordance with local codes, or in the absence of local codes, with the National
Electrical Code, ANSI/NFPA 70, or the Canadian Electrical Code, CSA 22.1.
When purchasing or exchanging a cylinder for your gas appliance, it must be constructed and marked in
accordance with the speci cations for LP gas cylinders of the U.S. Department of Transportation (DOT)
or the National Standard of Canada, CAN/CSA-B339 Cylinders, Spheres and Tubes for Transportation of
Dangerous Goods; and Commission, as applicable; and provided with a listed over- lling prevention device
(OPD), and provided with a cylinder connection device compatible with the connection for outdoor cooking
appliances.
The cylinder must also be equipped with:
• A shut-off valve terminating in a Type 1 gas cylinder valve outlet.
• A Type 1 valve that prevents gas ow until a positive seal is obtained.
• An arrangement for vapor withdrawal.
• A collar to protect the cylinder shut-off valve.
• A safety relief device having direct communication with the vapor space of the cylinder.
• A listed over- lling prevention device (OPD).
• Allow only quali ed licensed LP gas dealers to properly ll or repair your LP gas cylinder.
• New cylinders should be purged prior to lling; inform LP gas dealer if you are using a new
cylinder.
• DO NOT allow the cylinder to be lled beyond 80% capacity. Over- lled cylinders can create
a dangerous condition. Over- lled cylinders can build-up pressure and cause the relief valve
to expel propane gas vapors. The vapor is combustible and if it comes in contact with a spark
source or ame an explosion causing severe burns, bodily harm, or death could occur.
• Always use a protective cylinder cap when appliance is not connected to cylinder.
• If you exchange a cylinder with a quali ed exchange program, the new cylinder must have
a Type 1 valve and an over- lling prevention device (OPD).
• Inspect the propane cylinder valve rubber seal for cracks, wear or deterioration prior to use. A
damaged rubber seal can cause a gas leak, possibly resulting in an explosion, re or severe
bodily harm.
FILLING THE LP GAS CYLINDER (TANK):
WARNING
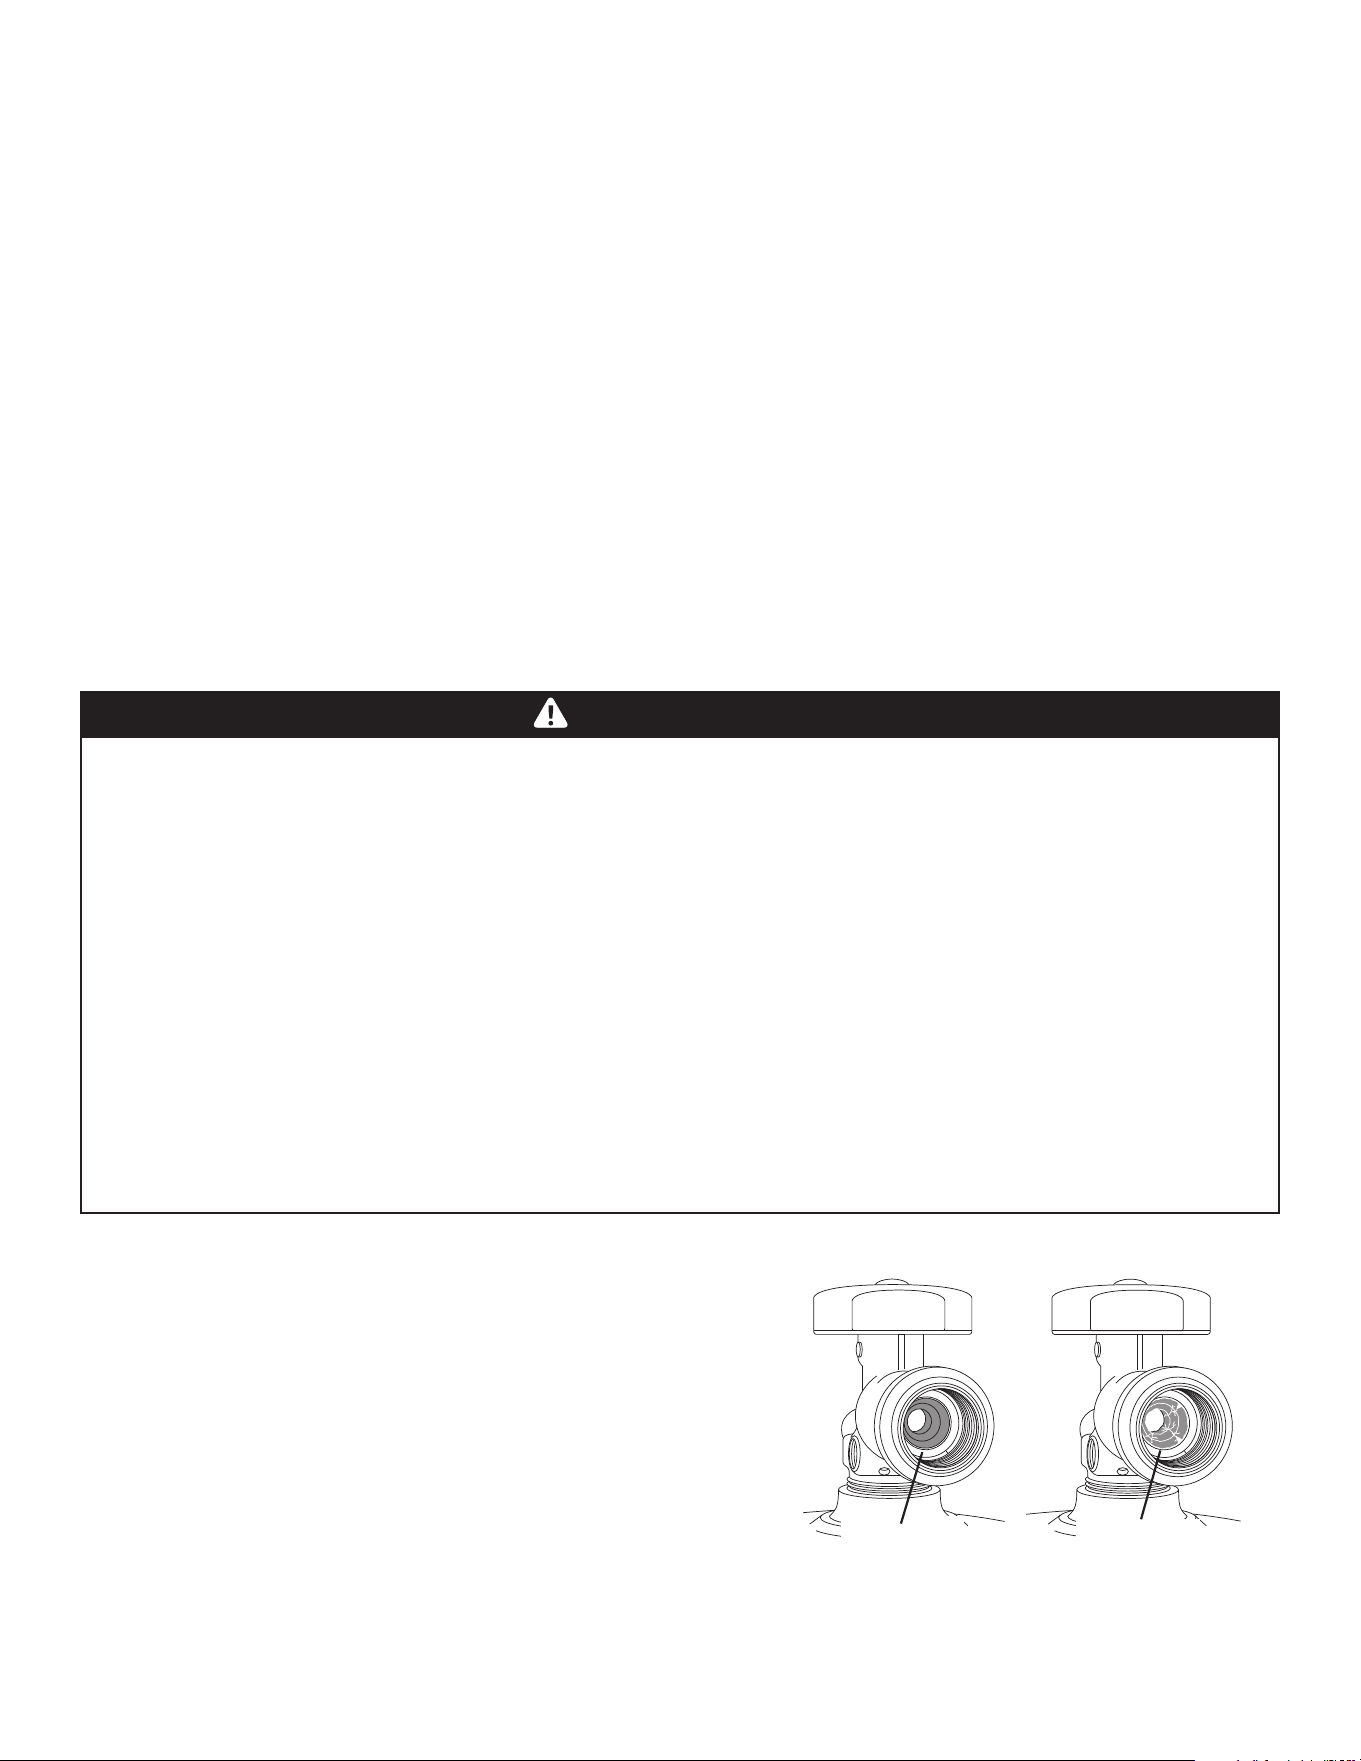
• Inspect the LP cylinder valve rubber seal for cracks,
wear or deterioration prior to use. Over time, a damaged
rubber seal might cause a gas leak even with the
connection tightened.
• A visual inspection of the seal should be done each time
the LP cylinder is connected to the appliance, has been
re lled, exchanged or has not been used for more than
60 days.
• Do not use a LP cylinder with a damaged rubber seal as
shown. The LP cylinder must be returned unused to the
seller.
LP GAS CYLINDER (TANK) RUBBER SEAL INSPECTION:
Good
Rubber Seal
Damaged
Rubber Seal
6
HOSE & REGULATOR SPECIFICATIONS AND INSTALLATION
• DO NOT use any other pressure regulator/hose assembly other than the one supplied with your
appliance. Replacement 10 PSI regulator/hose must be part No 6160-600-6160-15, which can be
obtained by contacting customer service at 1-855-735-9922 or [email protected].
• DO NOT attempt to adjust or repair a regulator. The regulator is designed to operate at a
maximum output pressure of 10 psi (34.5 kPa).
• Ensure the cylinder valve is CLOSED prior to connecting the LP gas cylinder to your appliance.
Turn the valve knob clockwise to properly close the valve. Read and follow all instructions
and warnings on the supply hose safety tags. Read and follow all warnings in this manual
concerning the safe use of LP gas cylinders and the hose and regulator before connecting
cylinder to appliance. Read and follow all warnings on the LP cylinder.
WARNING
7
HOSE AND REGULATOR:
Your appliance is equipped with a Type 1 connection device with the following features:
1. The system will not allow gas ow from the cylinder until a positive connection to the valve has been made.
Note: The cylinder valve and regulator control knob must be turned off before any connection is made or
removed.
2. A regulator ow limiting device, when activated, restricts the ow of gas to 10 cubic feet per hour. If the ow
limiting device is activated, perform Regulator Resetting Procedure.
Note: If your appliance will not get hot enough to cook, the ow limiting device may have been activated.
CONNECTING HOSE AND REGULATOR TO LP GAS CYLINDER:
1. Inspect the propane cylinder valve rubber seal for cracks, wear or deterioration prior to use. A damaged
rubber seal can cause a gas leak, possibly resulting in an explosion, re or severe bodily harm. Do not use
a propane cylinder with a damaged rubber seal.
2. Check that the cylinder valve is closed by turning the knob clockwise.
3. Check that the appliance’s regulator control knob in the off position.
4. Visually inspect the hose assembly prior to each use for evidence of
damage, excess wear, or deterioration. If found, replace the assembly
before using your appliance. Only the manufacturer’s supplied
replacement should be used.
5. Remove the protective plastic cap from the cylinder valve.
6 Check that the hose does not contain kinks, does not contact sharp
edges, and does not contact surfaces that may become hot during use.
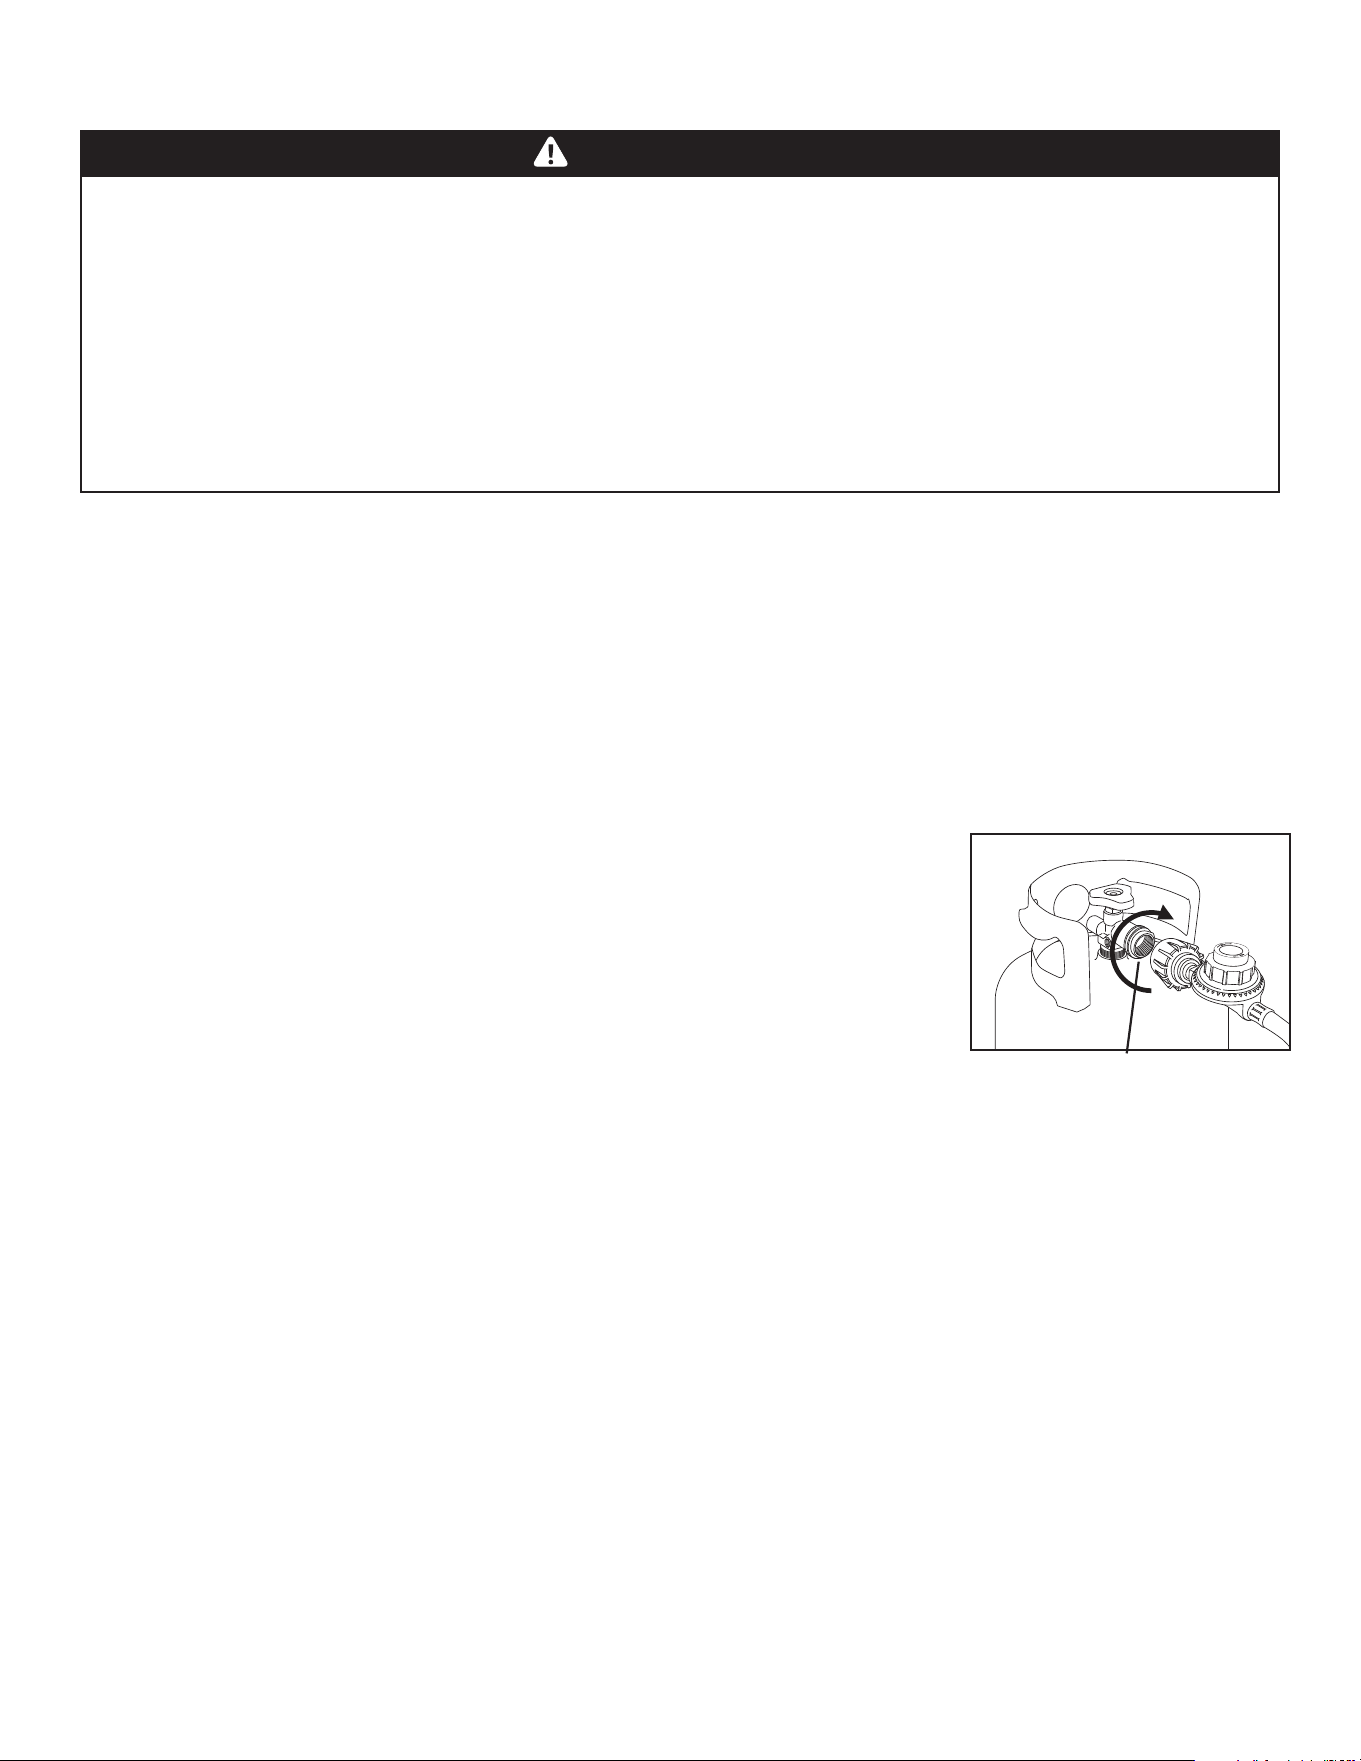
7. Hold regulator and insert the brass nipple into the LP cylinder valve outlet. Ensure that the device is
centered properly.
8. Turn the large coupling nut clockwise by hand and tighten to a full stop. Take care not to cross thread the
coupling nut onto the cylinder valve. Do not use tools to tighten connection.
Note: If you are unable to make the connection, repeat Steps 6 and 7.
9. Leak check all ttings before lighting your appliance. See section on “Leak Testing” in this manual.
Note: To remove regulator from propane cylinder, turn off the cylinder valve and rotate the large coupling
nut counter-clockwise and remove.
REGULATOR RESETTING PROCEDURE:
If your appliance will not get hot enough to cook, the ow limiting device may have been activated.
Mini Reset: Turn regulator control knob to off position, then turn off the cylinder valve. Wait one minute. Slowly
turn cylinder valve on and follow lighting instructions. If burner ame is higher and appliance heats
up properly – proceed with cooking.
Full Reset: Turn regulator control knob to off position, then turn off the cylinder valve. Disconnect hose and
regulator from cylinder. Wait two minutes, reattach hose and regulator and perform leak test.
Inspect Rubber Seal (see page 6)
WARNING
• Never use your appliance without leak testing all gas connections and propane cylinder. Follow
the section on “Leak Testing” in this manual for proper procedures.
LEAK TESTING
To prevent re or explosion hazard:
• DO NOT smoke or permit ignition sources in the area while conducting a leak test.
• Perform test OUTDOORS in a well ventilated area that is protected from the wind.
• Never perform a leak test with a match or open ame.
• Never perform a leak test while the appliance is in use or while appliance is still hot.
DANGER
8
WHEN TO PERFORM A LEAK TEST:
• After assembling your appliance and before lighting for the rst time, even if purchased fully assembled.
• Every time the LP gas cylinder is re lled, exchanged or if any of the gas components are disconnected or
replaced.
• Any time your appliance has been moved.
• At least once per year or if your appliance has not been used for more than 60 days.
CHECKING FOR LEAKS:
CAUTION: Strong odors, colds, sinus congestion, etc. may prevent the detection of propane by smell.
Use caution and common sense when testing for leaks.
Note: The leak test must be performed in an area that has adequate lighting in order to see if bubbles are
developing and not in a windy or noisy area so larger leaks can be detected by smell or sound.
1. Create a mixture of 50% water and 50% liquid dishwashing soap.
2. Turn the cylinder valve knob counter-clockwise to full open. If you hear
a rushing sound or smell gas, turn the gas off. Tighten any leaking
connections. If leak is detected at connection nut and tightening does not
stop leak, reinspect propane tank rubber seal.
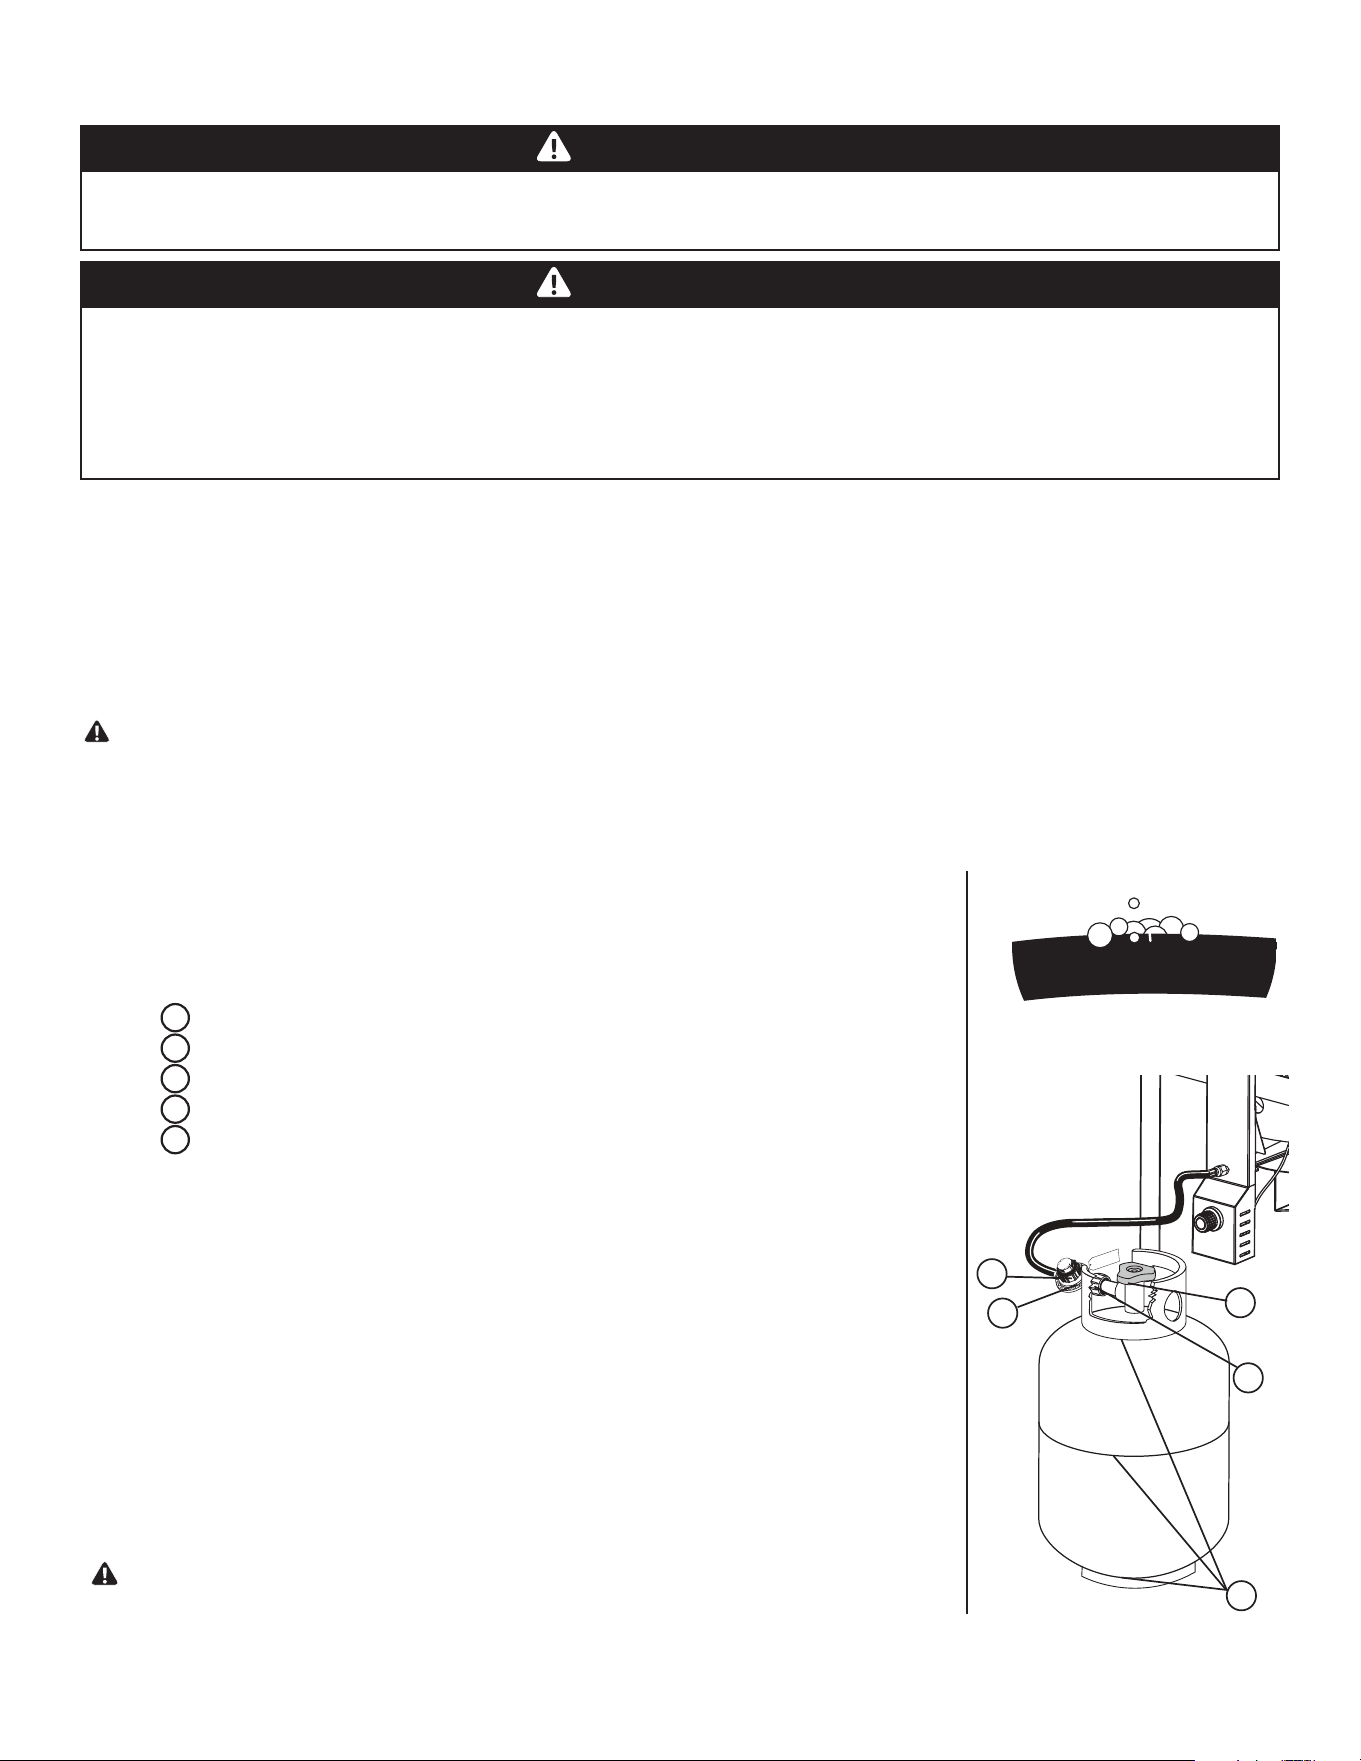
3. Apply the soapy water mixture to the following:
Supply tank (cylinder) weld.
Connection nut to tank valve.
Back side of connection nut to brass nipple.
Brass nipple connection into regulator.
Tank valve to cylinder.
4. Check each place listed (A–E) for growing bubbles, which indicates a leak.
Large leaks may not be detected by bubbles but should produce a rushing
sound or gas smell.
5. Turn off gas supply at cylinder valve.
6. Turn regulator control knob to “OFF” position.
7. Tighten any leaking connections. If leak is detected at connection nut and
tightening does not stop leak, reinspect propane tank rubber seal. (see
page 6)
8. Repeat soapy water test until no leaks are detected.
9. Turn off gas supply at cylinder valve until you are ready to use your
appliance.
10. Wash off soapy residue with cold water and towel dry.
11. Wait 5 minutes to allow all gas to evacuate the area before lighting
appliance.
WARNING: DO NOT use the appliance if leaks cannot be stopped. Contact a
quali ed gas appliance repair service.
A
B
C
D
E
I
M
P
OR
TA
N
T
SA
F
EG
U
AR
D
•
D
O
N
OT
RE
MO
VE
T
H
I
S
TA
G
•
TU
R
N
G
A
S
ON
AN
D
O
F
U
S
I
NG
V
A
L
V
E
O
N
L
.P
. G A
S
TA
N
K
.
US
E T
H
I
S
R
E
D
C
ON
T
R
O
L
VA
LV
E
F
O
R
F
L
A
ME
AD
J
UST
M
E
N
T
ON
L
Y
.
Watch For Bub bles
E
D
C
B
A
9
WARNING
DANGER
Property damage, bodily harm, severe burns, and death could result from failure to follow these
safety steps. These steps should be performed after the appliance has been assembled and prior to
each use. DO NOT operate this appliance until you have read and understand ALL of the warnings
and instructions in this manual.
• Ensure that the appliance is properly assembled.
• Inspect the gas supply hose for burns, chaffing, kinks, and proper routing before each use. If it
is evident there is excessive abrasion or wear, or the hose is cut, it must be replaced prior to the
appliance being used. Replace with 10 PSI hose/regulator Model No. 6160-600-6160-15, which can be
obtained by contacting customer service at 1-855-735-9922 or help@fairgameus.com.
• Leak check all gas connections, hose and propane
. See section on “Leak Testing”.
• Ensure that all electrical supply cords are properly grounded. Keep any electrical supply cord and the
fuel supply hose away from any heated surfaces. Hose should be at least 3 inches from hot surfaces.
• Position your appliance on a non-combustible level surface in a well ventilated location, a safe
distance from combustible materials, buildings and overhangs.
WARNING: Hose is a trip hazard. Do not walk between appliance and cylinder.
Note: Due to the intense heat from burner, it is normal for discoloration to occur on appliance during the
rst few uses.
PRE-START CHECK LIST
LIGHTING INSTRUCTIONS
Follow the instructions exactly. Read, understand and follow all warnings and instructions contained
in this manual. DO NOT skip any of the warnings and instructions contained in the preceding sections
of this manual.
10 ft.
12 ft.
LIGHTING THE BURNER:
1. Make sure cylinder valve and regulator control knob are in the off position.
2. Turn on the fuel supply by rotating the cylinder valve counter-clockwise to full
open.
CAUTION: DO NOT stand with head, body, or arms over the appliance when lighting.
3. Push and hold igniter button, then open regulator control knob by turning slowly
clockwise until burner ignites.
4. If burner does NOT ignite within 5 seconds, turn the regulator control knob and
cylinder valve to off position, wait 5 minutes for gas to dissipate and repeat
lighting procedure.
5. If the burner does not light within the rst few attempts, there is a problem with the gas supply. Turn off the
gas at the regulator control knob and cylinder valve. DO NOT attempt to operate the appliance until the
problem is found and corrected.
Wind Direction
20˝
(50.8 cm)
Igniter
10
TURNING OFF THE APPLIANCE:
1. Turn off the cylinder valve.
2. Turn regulator control knob to the off position.
Note: Turn off LP cylinder rst to prevent gas from being left in the
system under pressure.
3. To disconnect valve regulator/hose assembly, turn the large regulator
coupling counter-clockwise by hand.
CAUTION: The cylinder valve should always be
in the off, or closed, position when the
appliance is not in use.
To turn off the cylinder valve,
turn knob clockwise until it stops.
I
MP
O
RT
ANT
S
A
F
E
G
U
AR
D
T
U
R
N
G
A
S
O
N
A
N
D
O
F
F
U
S
IN
G
V
A
L
V
E
O
N
L
.
P
.
G
A
S
T
A
N
K
.
U
S
E
T
H
I
S
R
ED
C
O
N
TR
O
L
V
A
L
V
E
F
O
R
F
L
A
M
E
A
D
J
U
ST
M
E
N
T
O
N
L
Y
.
MATCH LIGHTING THE BURNER:
1. Make sure cylinder valve and regulator control knob are in the off position.
2. Turn on the fuel supply by rotating the cylinder valve counter-clockwise to full
open.
CAUTION: DO NOT stand with head, body, or arms over the appliance when
lighting.
3. Use a long reach butane lighter and place approximately ½” (1 to 2 cm) from
the burner, then open regulator control knob by turning slowly clockwise until
burner ignites.
4. If the burner does not light within 5 seconds, turn the regulator control knob
and cylinder valve to off position, wait 5 minutes for gas to dissipate and repeat
lighting procedure.
5. If the burner does not light within the rst few attempts of manual lighting, there is a problem with the gas
supply. Turn off the gas at the regulator control knob and cylinder valve. DO NOT attempt to operate the
appliance until the problem is found and corrected.
Note: If burner does not light or ame is too low, see “Troubleshooting” section of the owner’s manual.
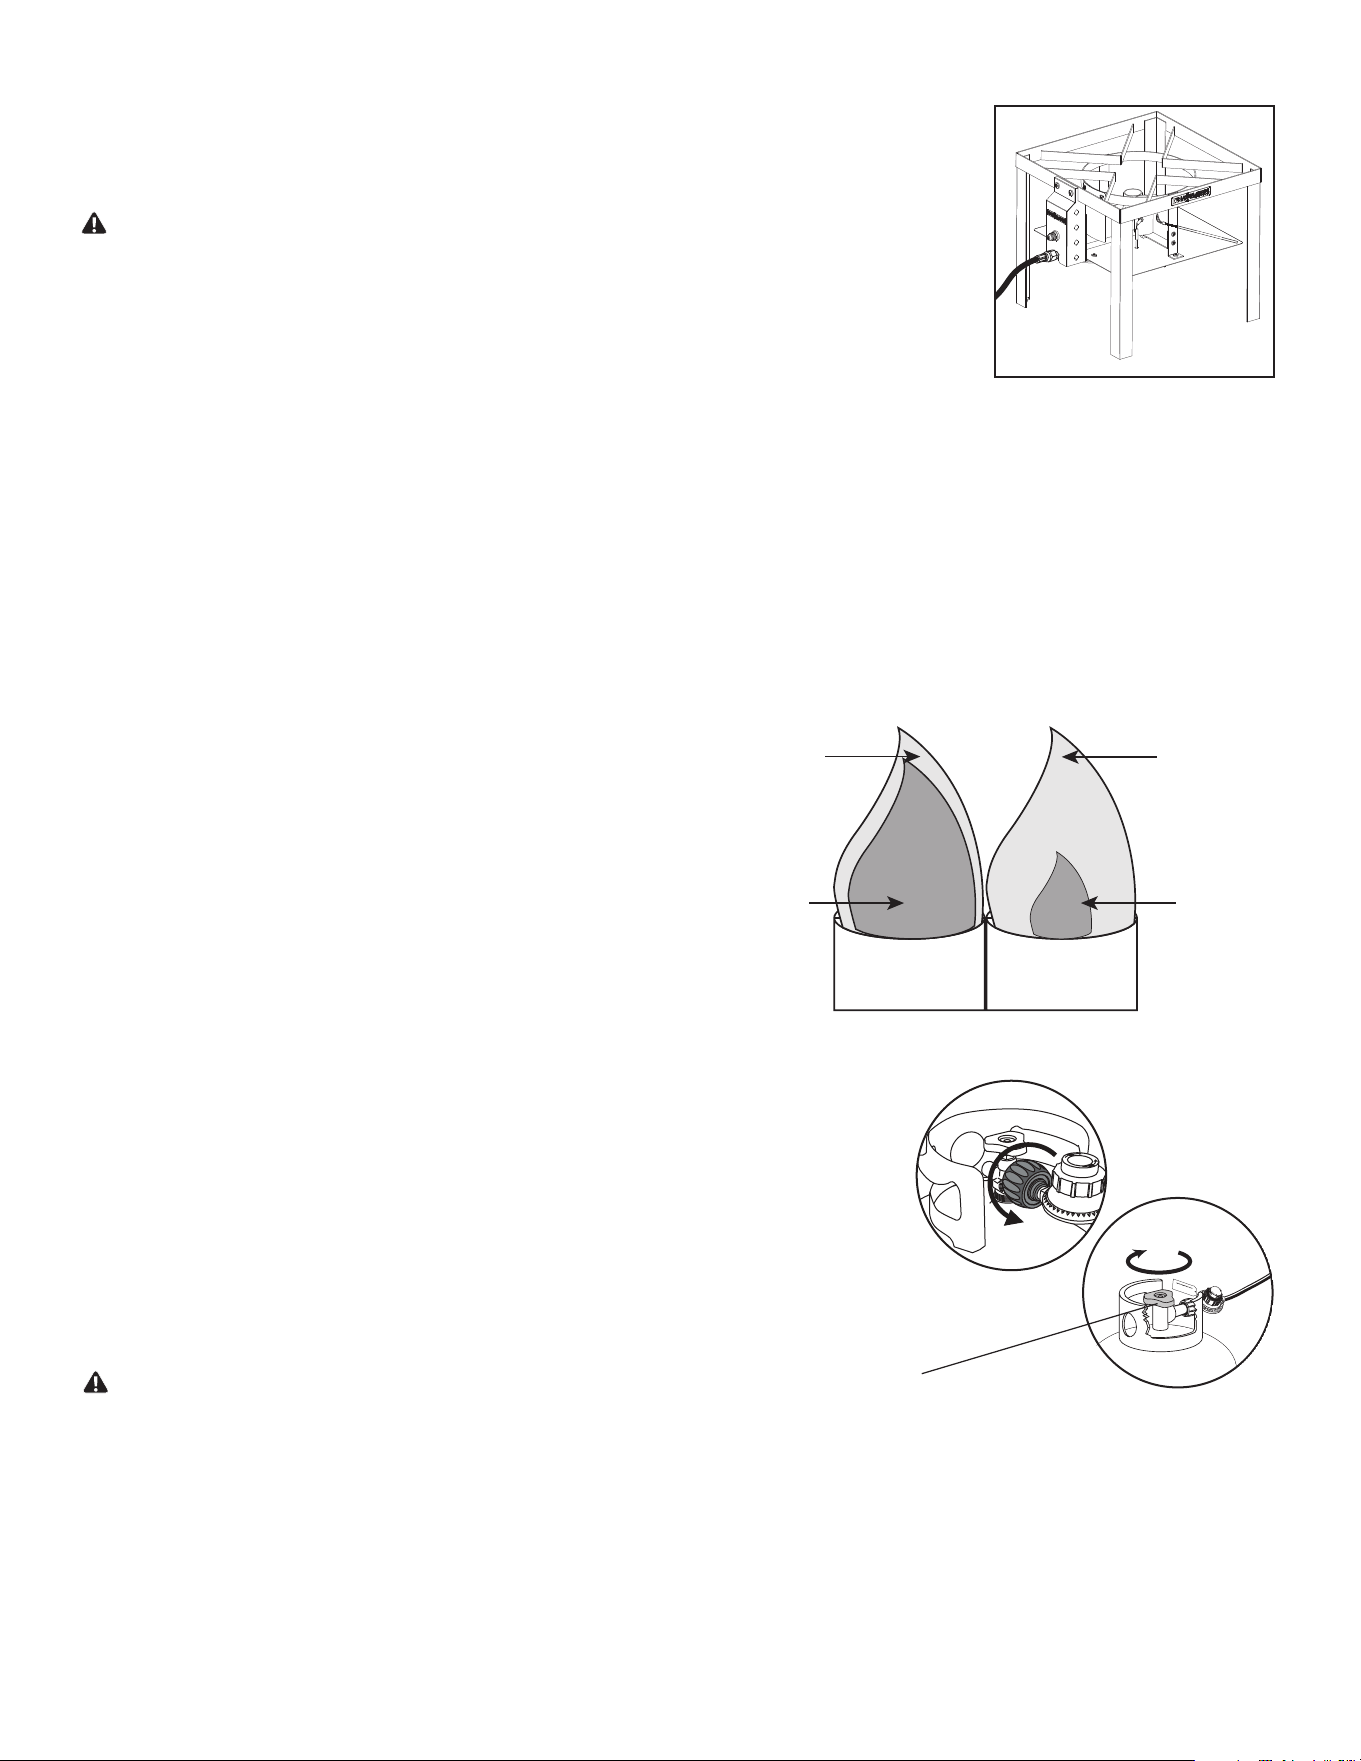
Yellow flame
Blue flame
Yellow flame
Blue flame
Correct Incorrect
BURNER FLAME CHECK
Adjust ame height using regulator control knob. A blue ame with little or no yellow ame provides the
best heat. The manufacturer has properly located the burners with respect to the ori ces to allow the
appliance to burn sufficiently. Do not attempt to adjust the burners.
11
BURNER CLEANING AND MAINTENANCE:
• Keep appliance area clear and free from combustible materials, gasoline and other ammable vapors and
liquids.
• Although your burner is constructed of steel, it may rust as a result of the extreme heat and acids from
cooking foods. Regularly inspect the burner for cracks, abnormal holes, and other signs of corrosion
damage. If found, replace the burner.
WARNING: DO NOT obstruct the ow of combustion and ventilation air. Burner tubes can become blocked
by spiders and other insects building their nests. A blocked burner tube can obstruct gas ow. To
clean the Burner Assembly follow these instructions to clean and/or replace the burner assembly
or if you have trouble igniting the appliance.
PROPER CARE AND MAINTENANCE
OPERATING INSTRUCTIONS
WARNING
HOW TO DETERMINE THE PROPER AMOUNT OF LIQUID:
(For Use With Cooking Vessels That Do not Have Maximum Fill Line).
Never use a cooking vessels larger than 100 quarts or one that does not t within the
retaining ring of the appliance stand.
1. Place the food product on or in the holder. (strainer basket)
2. Place the food product and holder into the empty vessel.
3. Fill the vessel with water just until the food product is completely submerged. There must be a minimum of
1.5 inches (38 mm) between the water level and top of the vessel.
4. Remove the food product from the vessel and either mark the water level on the side of the vessel or
measure the amount of water in the vessel.
5. Remove the water and completely dry the vessel and the food product.
6. This is the amount of water the vessel is to be lled with to cook the food product.
DRAINING LIQUIDS FROM BASKETS:
• Wear protective gloves if necessary.
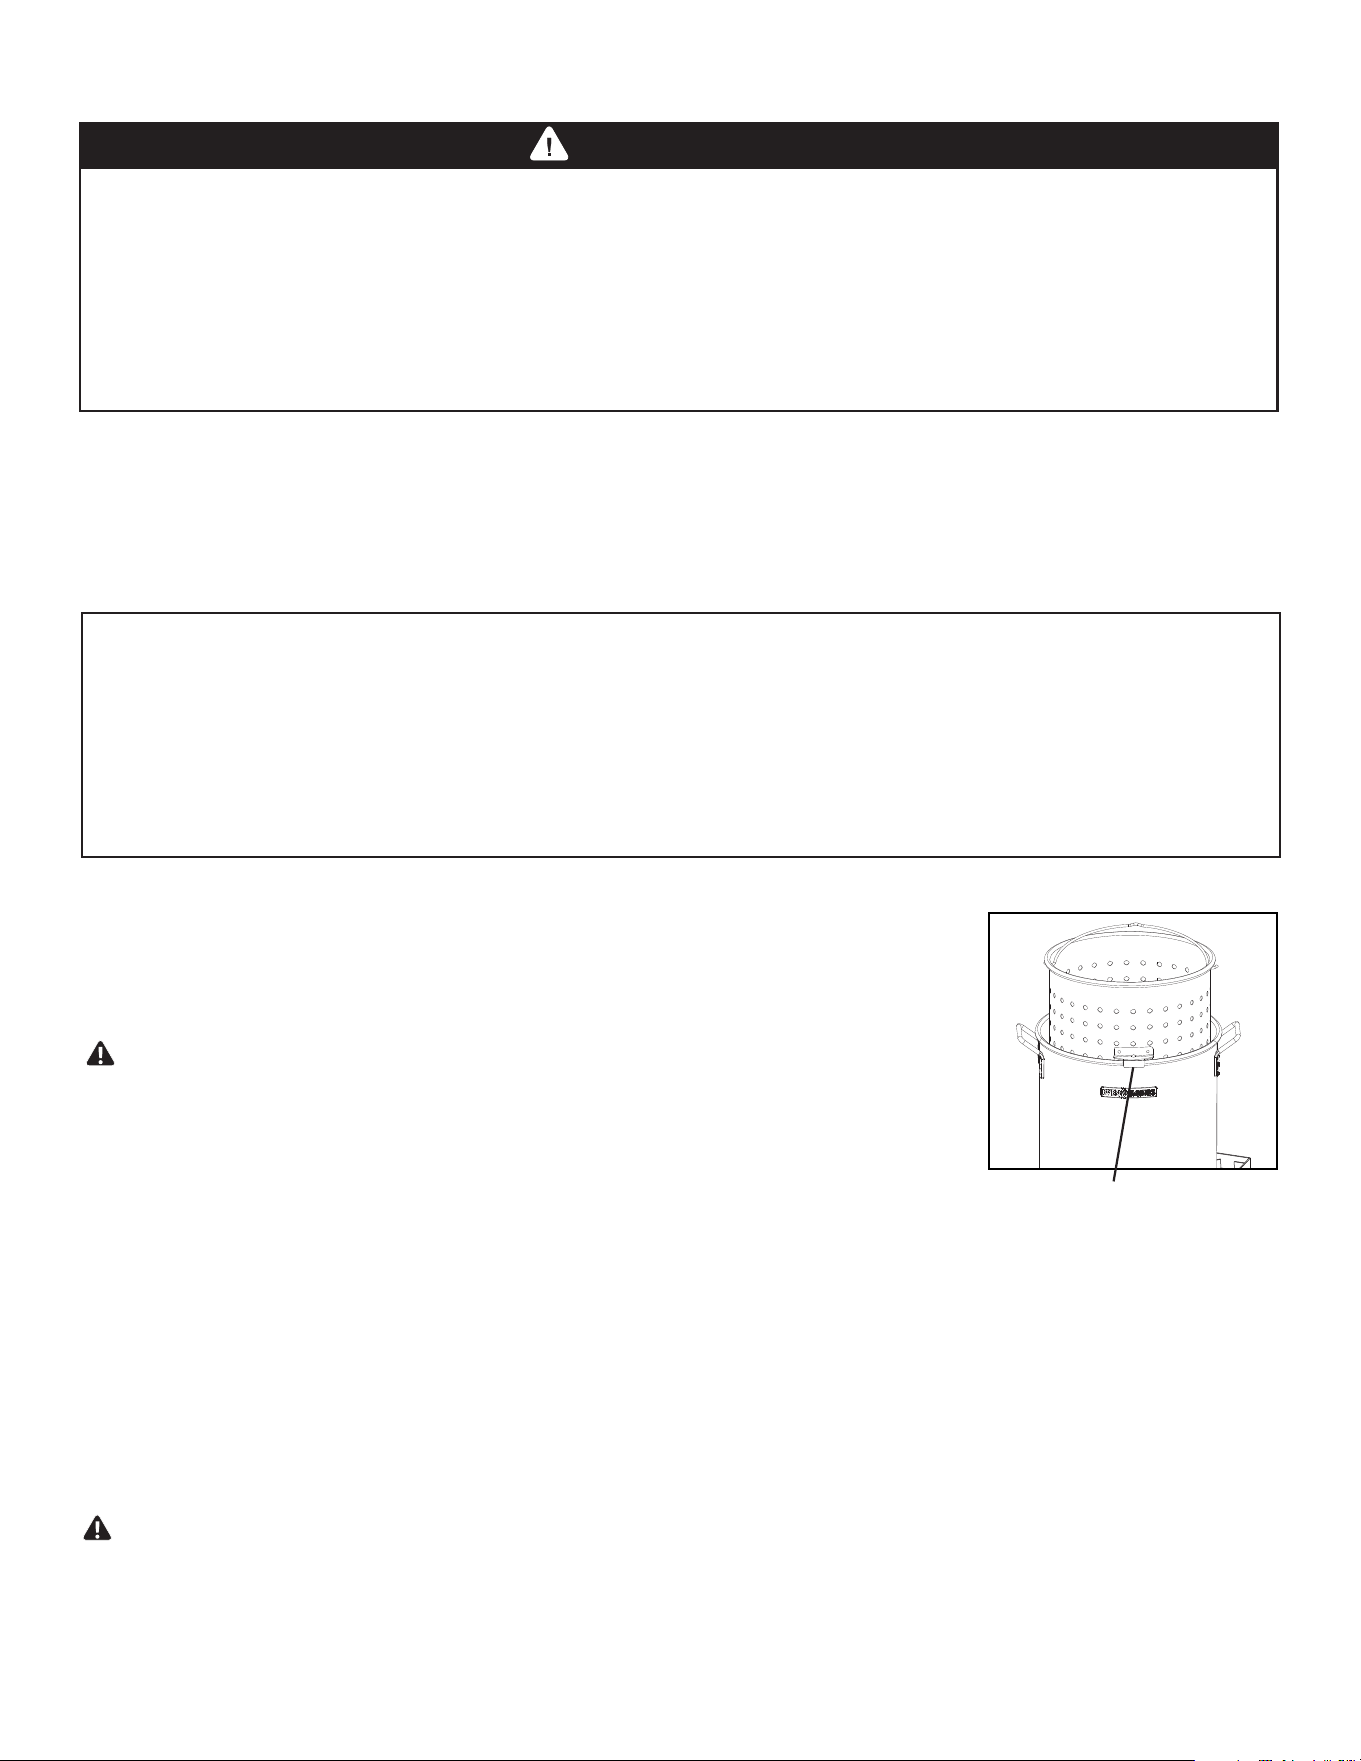
• Hook on side of 100 qt. basket will help to drain liquids from
basket before emptying food.
CAUTION: Always hold handle when resting basket on side of pan to
avoid splashing hot liquids.
100 qt. Basket Support
Read, understand and follow all warnings and instructions contained in this manual. DO NOT skip any of
the warnings and instructions contained in the preceding sections of this manual.
• Make sure appliance is at least 10 ft from all combustible materials including overhangs.
• Do not allow a lled vessel to boil dry on appliance when burner is lit.
• Aluminum pots will melt if placed over burner empty.
• Always monitor your cooking and ensure there is enough liquid in the cooking vessel at all times.
• Use extreme care when lowering or removing food from hot oil or liquid.
12
• For safe cooking and peak performance of your appliance, perform these checks at least twice per year or
after extended periods of storage.
• Be sure to tighten all hardware (nuts, bolts, etc.) before each use.
CAUTION: Some parts may contain sharp edges. Wear protective gloves if necessary.
• Clean appliance with mild dishwashing detergent, hot water and sponge. A soft bristle brush can also be
used.
• Inspect entire appliance, including regulator, and replace any damaged or worn parts. Use only parts
speci ed by Even Embers.
Debris
• Make sure that regulator control knob is in off position.
• DO NOT store a spare LP gas cylinder ( lled or empty) under or near the appliance.
• Never store ammable liquids or spray canisters under or near the appliance.
• If the outdoor cooking gas appliance is not in use, the propane cylinder must be disconnected.
• Storage of an outdoor cooking gas appliance indoors is permissible only if the gas cylinder is
disconnected and removed from the outdoor cooking gas appliance.
• Cylinders must be kept out of reach of children.
WARNING
TRANSPORTING AND STORAGE
BEFORE STORING YOUR APPLIANCE:
• Ensure that the regulator control knob is in the off position and remove propane cylinder from regulator.
• Clean all surfaces. Lightly coat the appliance with cooking oil to prevent excess rusting.
• If storing the appliance indoors, disconnect the propane cylinder.
• Place dust cap on propane cylinder valve outlet whenever the cylinder is not in use. Only install the type of dust cap on
the cylinder valve outlet that is provided with the propane cylinder. Other types of caps or plugs may result in leakage of
propane.
• Check and clean burner prior to use after storing, or after a period of not being used. Spiders and insects like to build
nests in burner tube (especially during colder months). Blocked burner tube can prevent gas ow to the burner and
could result in a burner tube re or re beneath the appliance. See “Burner Assembly/Maintenance” under Proper Care
and Maintenance.
• To extend and maintain the life and condition of the appliance, we recommend that the unit be covered when stored
outside.
1. Turn gas off at control knob and disconnect hose/regulator from LP cylinder tank.
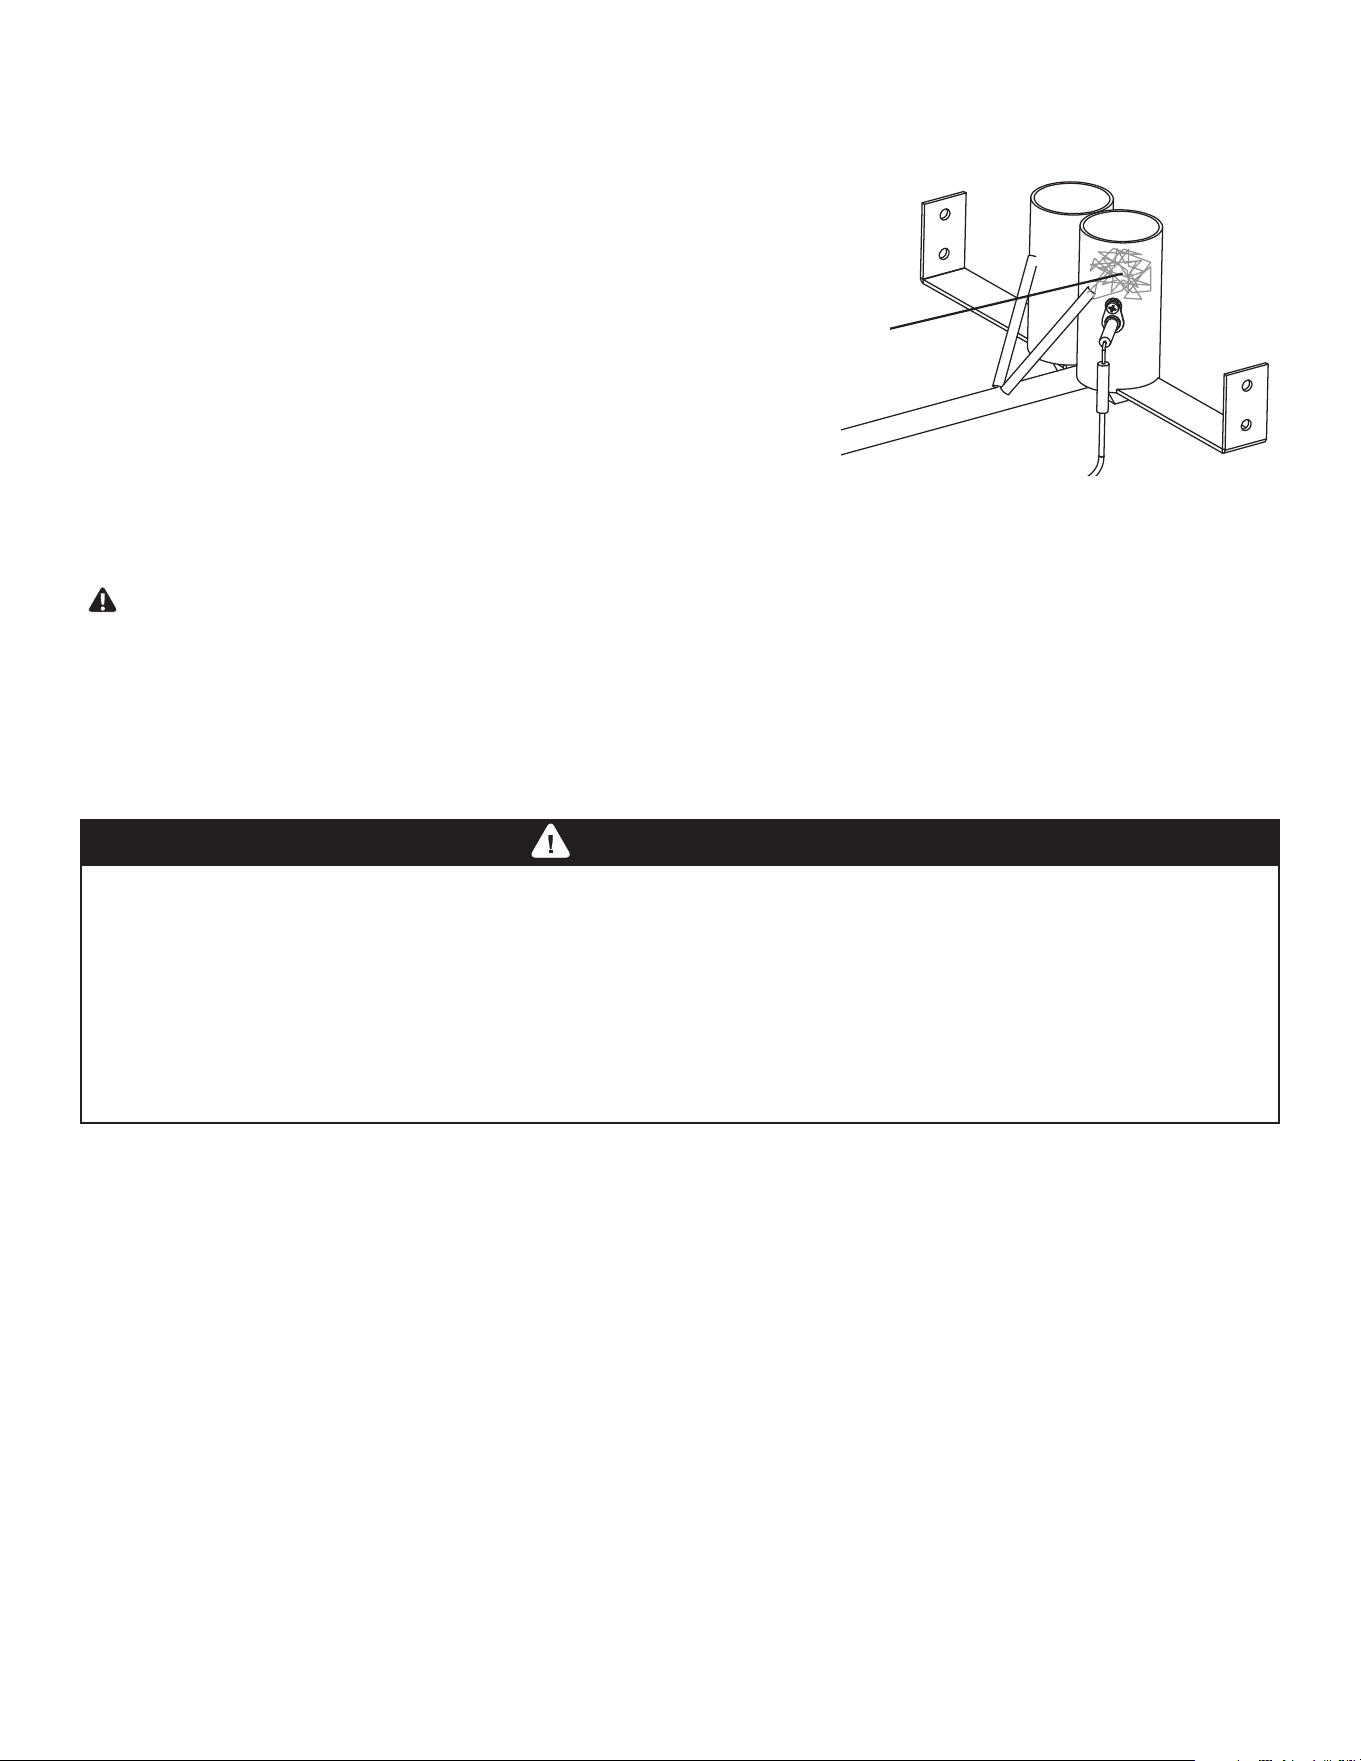
2. Inspect and remove any obstructions from the burner tubes (spider webs, leaves,
dirt or debris, etc.).
Note: Wear eye protection when cleaning burner tubes with
compressed air.
3. Wire brush entire outer surface of burner to remove food
residue and dirt.
4. If burner is damaged, obtain a replacement burner.
13
TROUBLESHOOTING
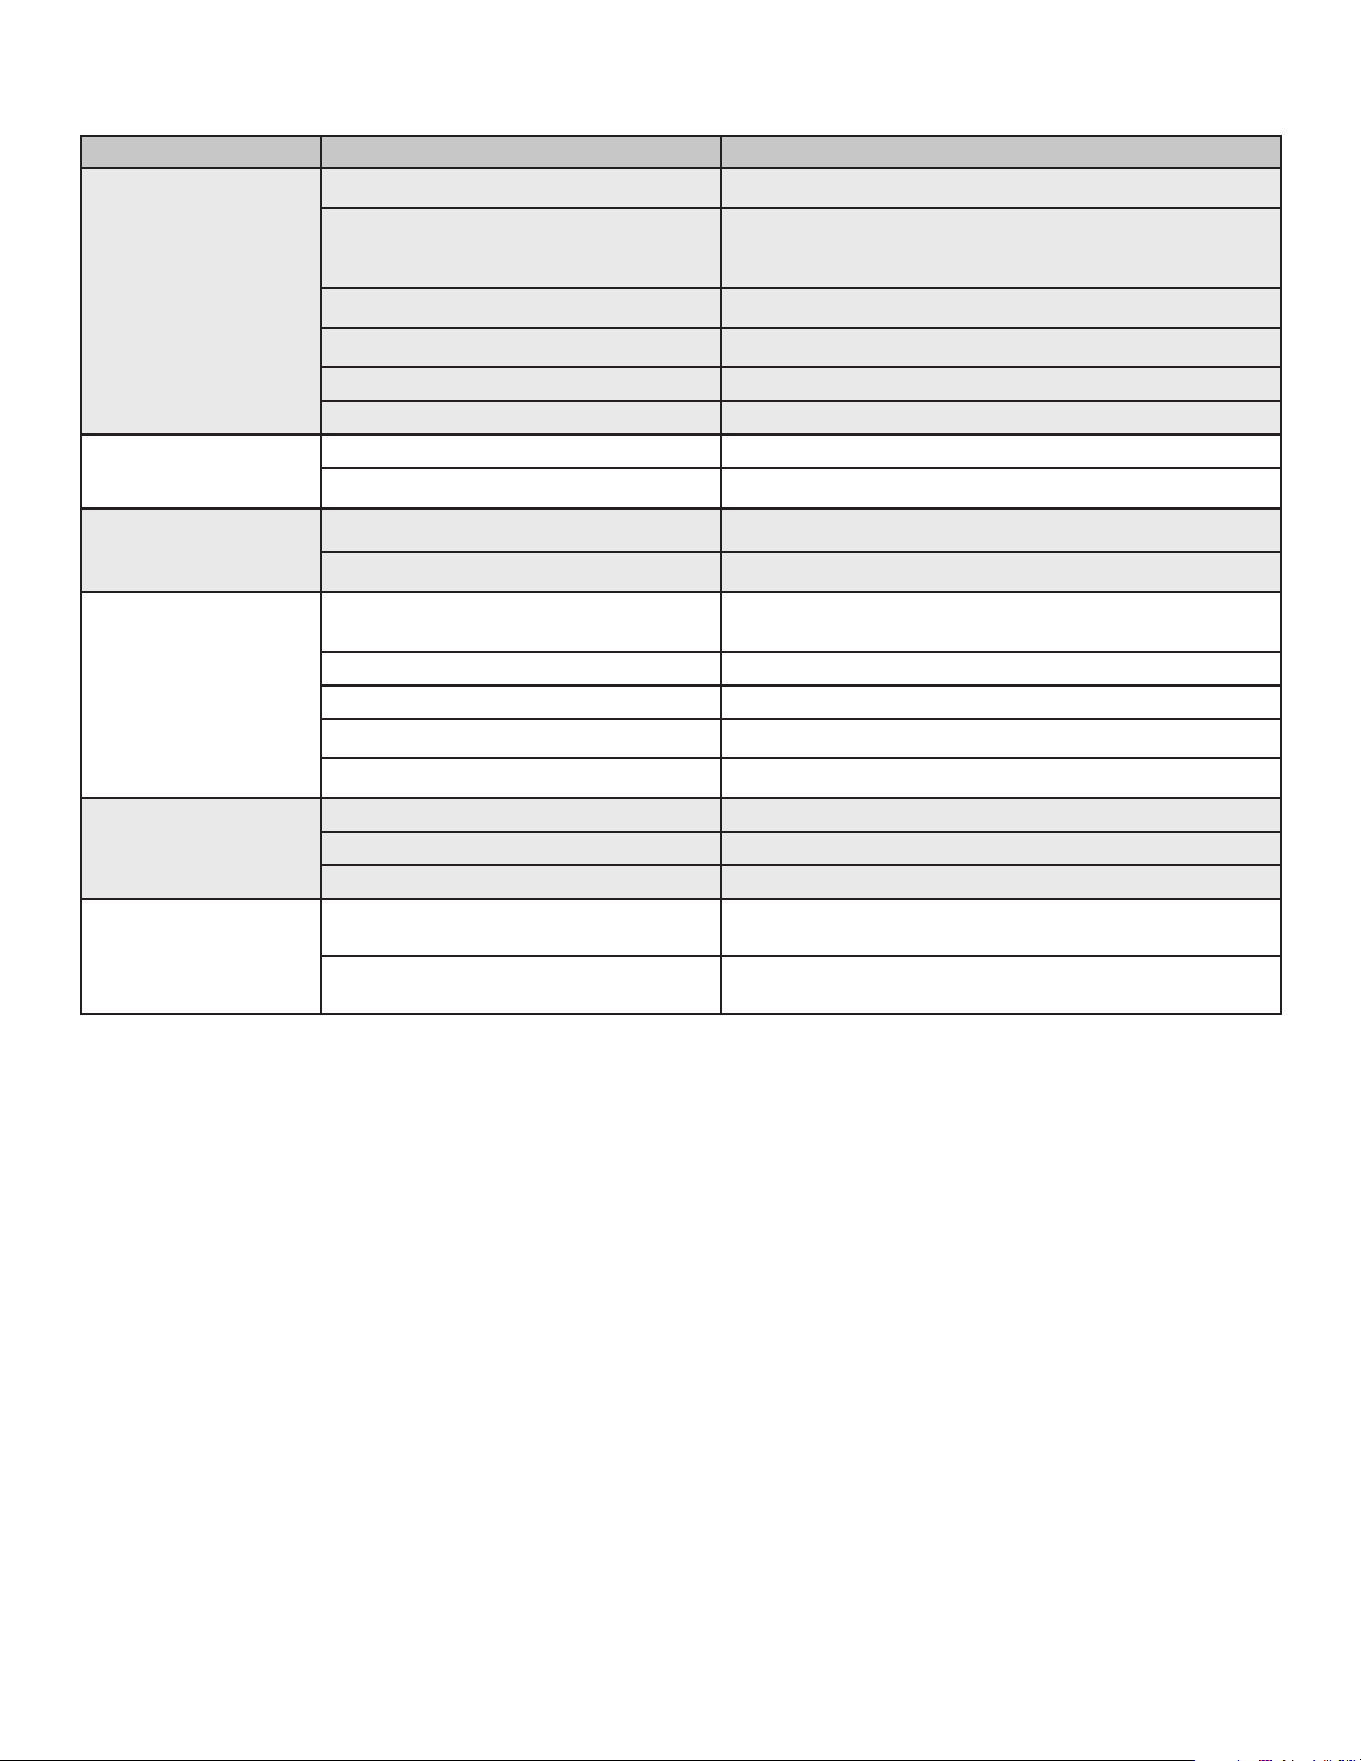
Problem Possible Cause Prevention/Cure
Burner will not light LP gas cylinder is low or empty Check if propane cylinder is empty. If empty, replace.
LP gas leak 1. Turn regulator control knob valve to closed
2. Wait 5 minutes for gas to clear
3. Follow “Leak Testing” in the owner’s manual
LP gas cylinder not fully connected Tighten propane cylinder hand tight to regulator
Obstruction of gas ow in burner ports Clean burner assembly
Spider webs or insect nest in venturi Clean venturi and burner assembly
Burner ports clogged or blocked Clean burner ports
Appliance does not get
hot enough
Out of gas Replace propane cylinder
Regulator ow limiting device may be activated Reset ow limiting device
Irregular ame pattern Burner ports are clogged or blocked Clean burner ports
Air shutter on burner needs adjustment See section on “Burner Adjustment”
Flame is yellow or orange New burner may have residual manufacturing
oils
Burn appliance for 15 minutes on high
Spider webs or insect nest in venturi Clean venturi and burner assembly
Food residue, grease, etc. Clean burner assembly
Poor alignment of valve to burner venturi Make sure burner venturi is properly engaged with valve
Air shutter on burner needs adjustment See section on “Burner Adjustment”
Flame blows out High or gusting winds Do not use appliance in high winds
Low on LP gas Replace propane cylinder
Burner ports may be obstructed Refer to “Burner Assembly/Maintenance” instructions
Oil does not reach
desired temperature
Food is not fully defrosted Do not attempt to fry a frozen or partially frozen food. Ensure the
food is completely thawed prior to frying.
The regulator control knob valve is not fully
opened
Fully open the regulator control knob valve. The regulator control
knob valve is opened in clockwise direction.
14
ASSEMBLY INSTRUCTIONS
READ ALL SAFETY WARNINGS & ASSEMBLY INSTRUCTIONS CAREFULLY
BEFORE ASSEMBLING OR OPERATING YOUR APPLIANCE.
The following tools are required to assemble this Even Embers
100 Qt. Boiling Kit:
• Phillips Screwdriver • Adjustable Wrench
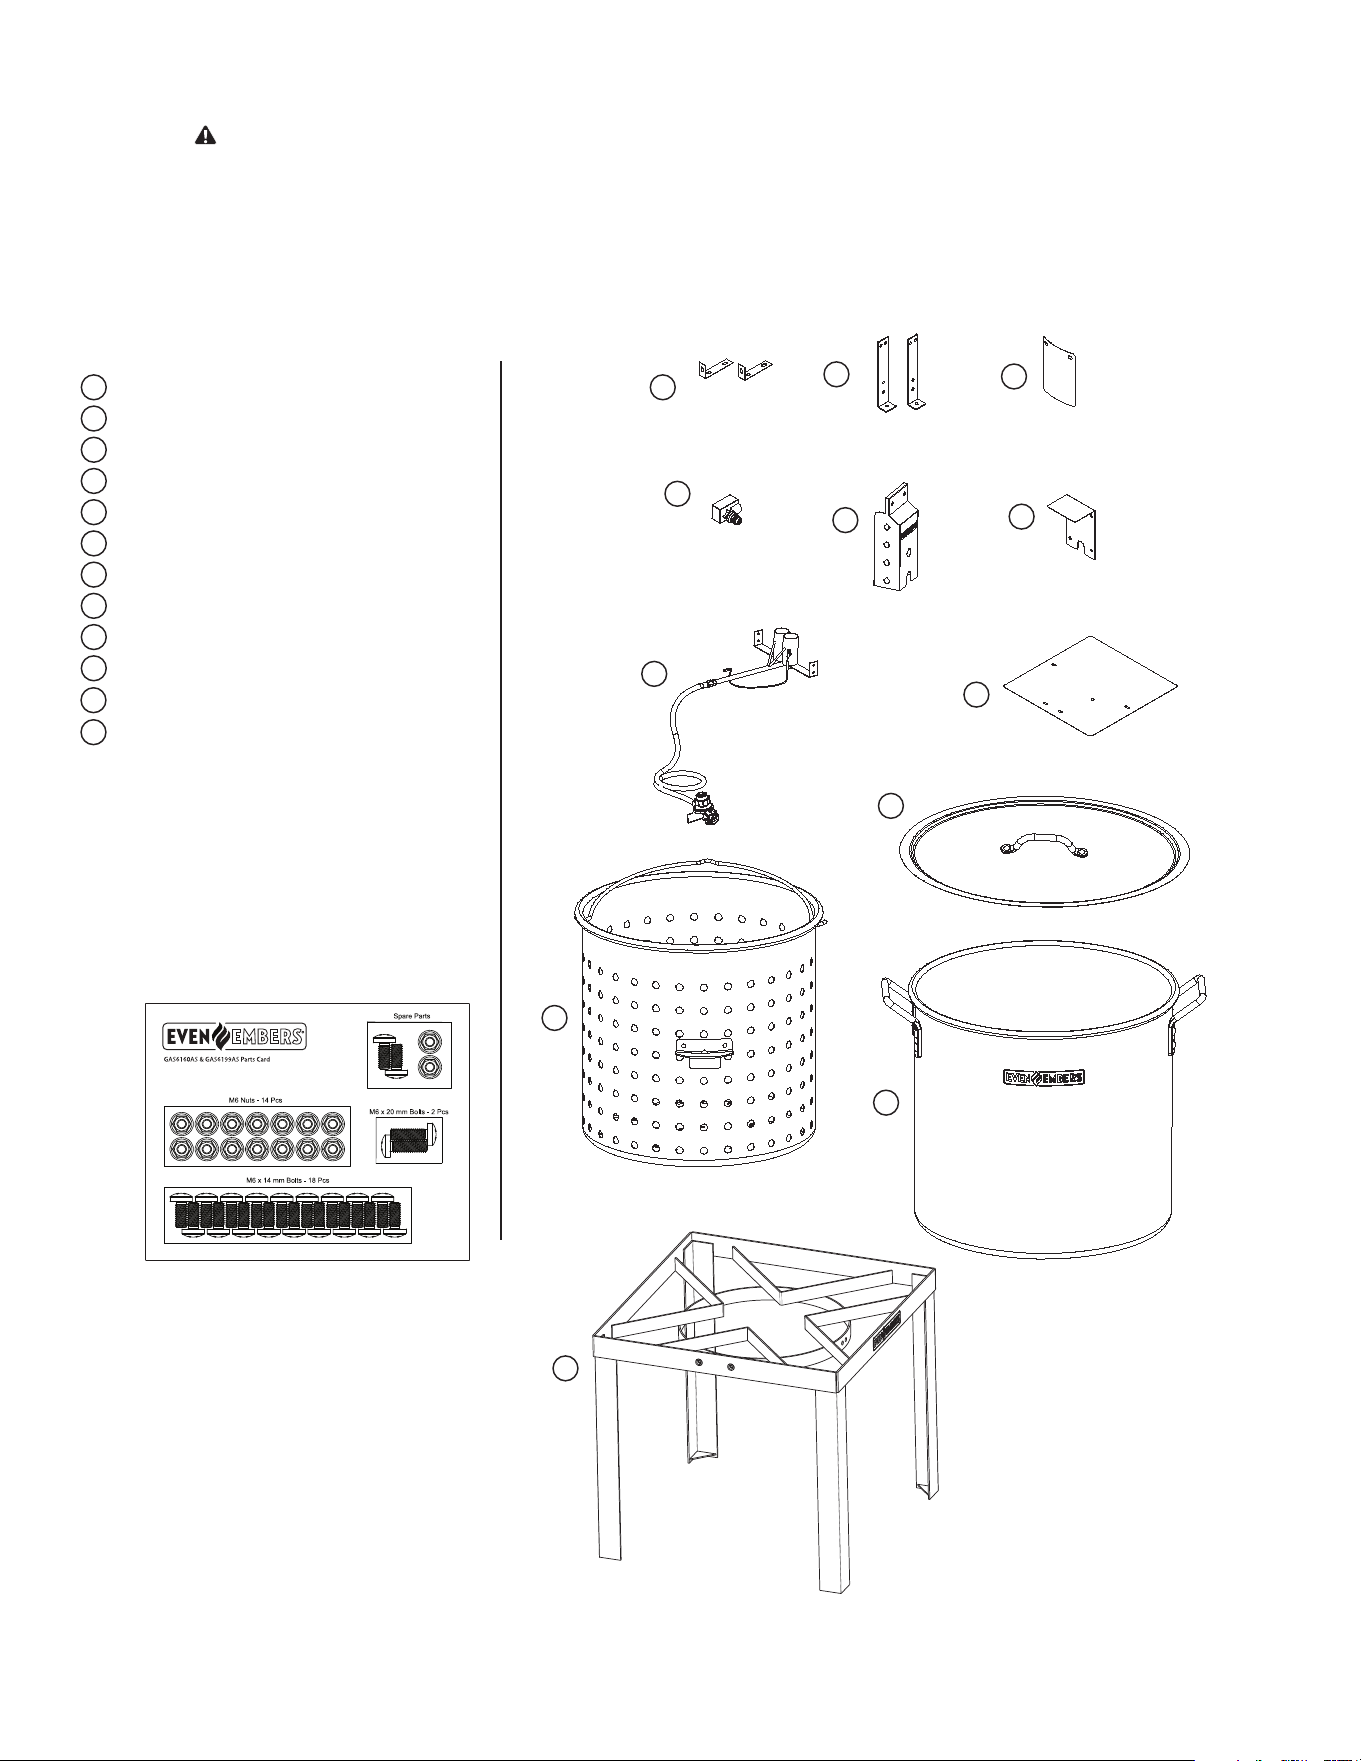
PARTS LIST:
1 Support Brackets
1 Connector Brackets
1 Front Heat Shield
1 Igniter Module
1 Control Panel
1 Igniter Heat Shield
1 Dual Jet Burner Assembly
1 Bottom Heat Shield
1 Lid
1 100 qt. Strainer Basket
1 100 qt. Pot
1 Frame Assembly
1
3
4
2
HARDWARE LIST:
5
6
8
9
7
10
1
3
2
4
5
6
7
8
10
9
11
12
11
12
15
1
2
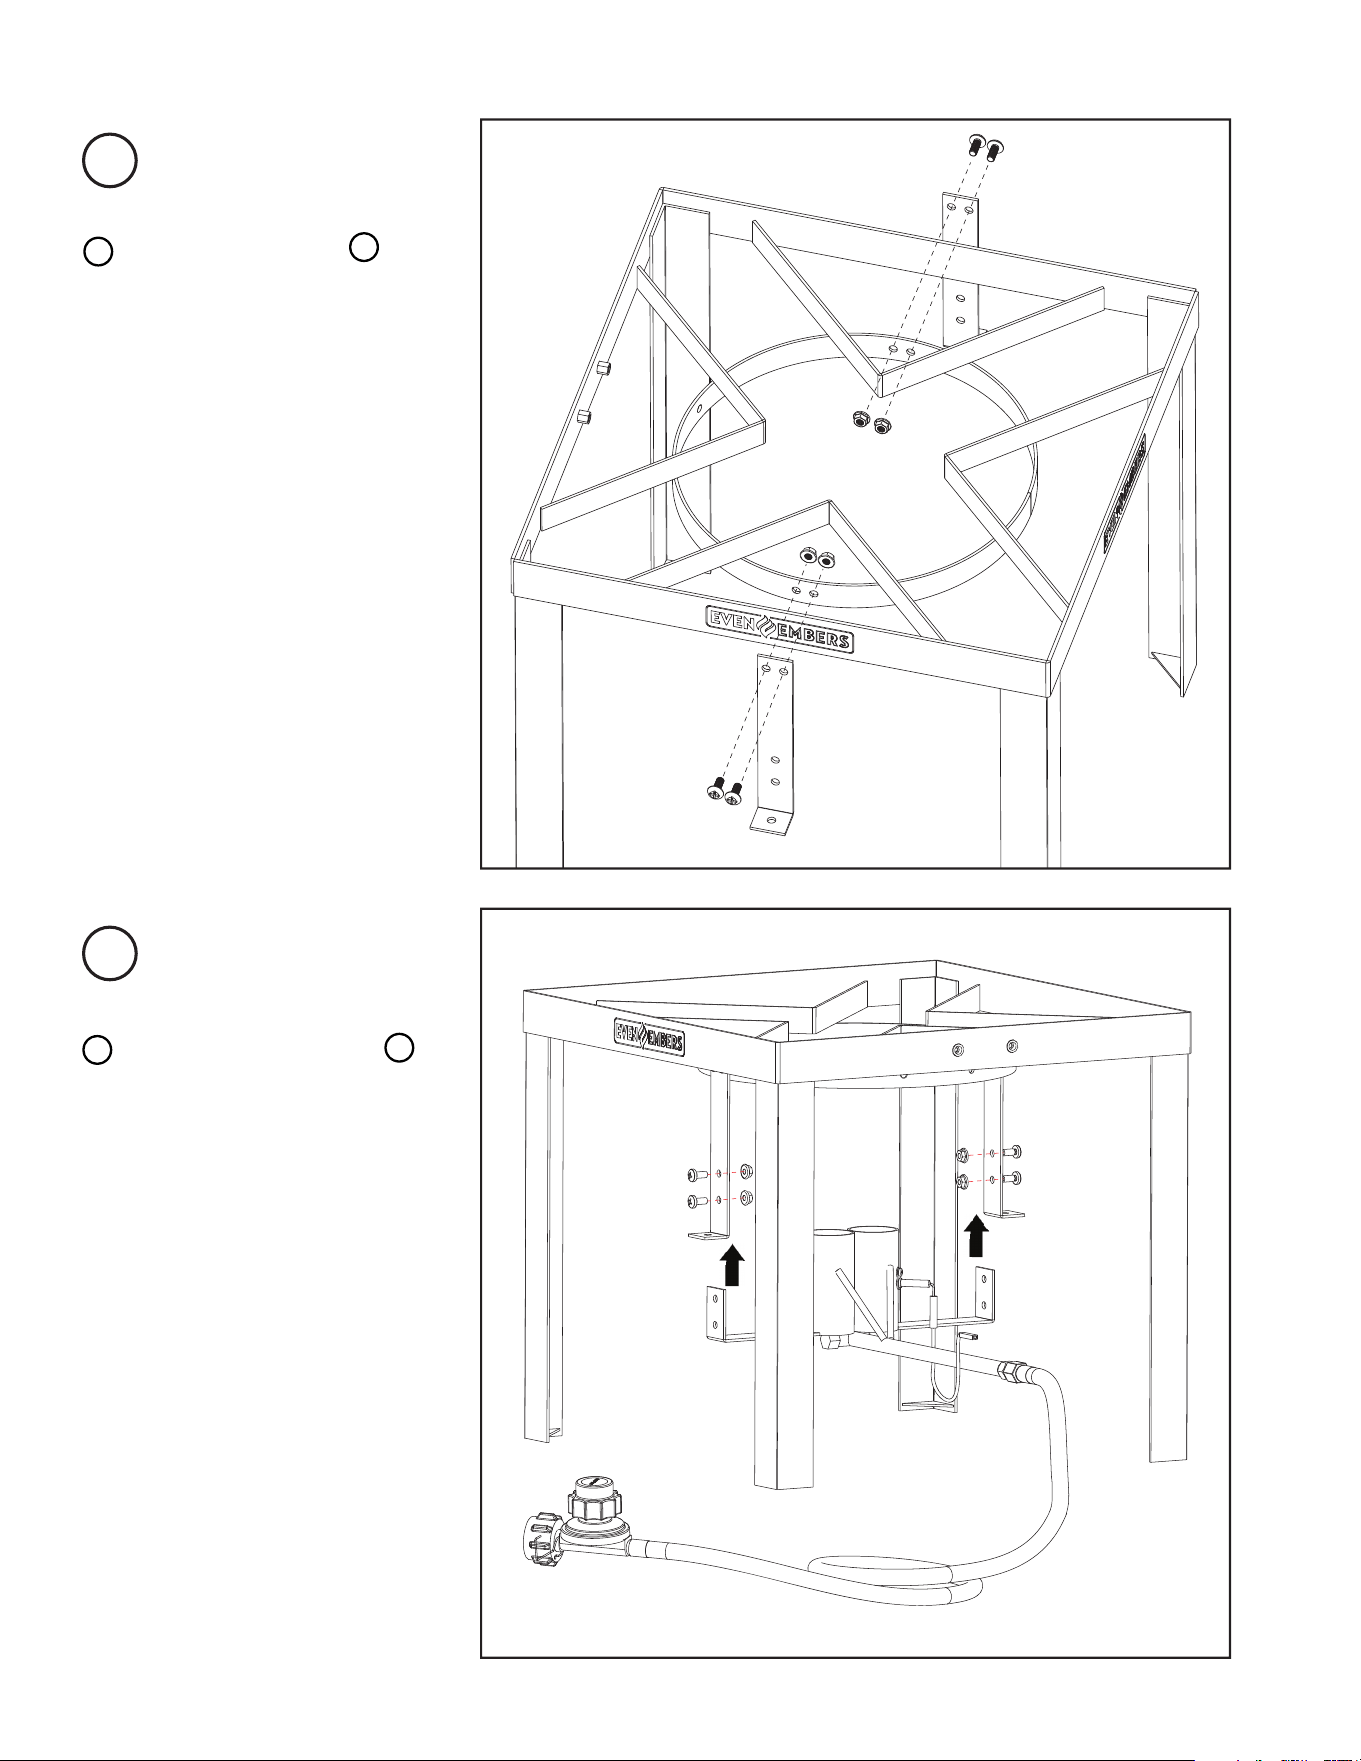
Attach connector brackets
2
to frame assembly
12
using four M6 x 14 mm bolts
and M6 nuts.
Attach dual burner assembly
7
to connector brackets
2
using four M6 x 14 mm bolts
and M6 nuts.
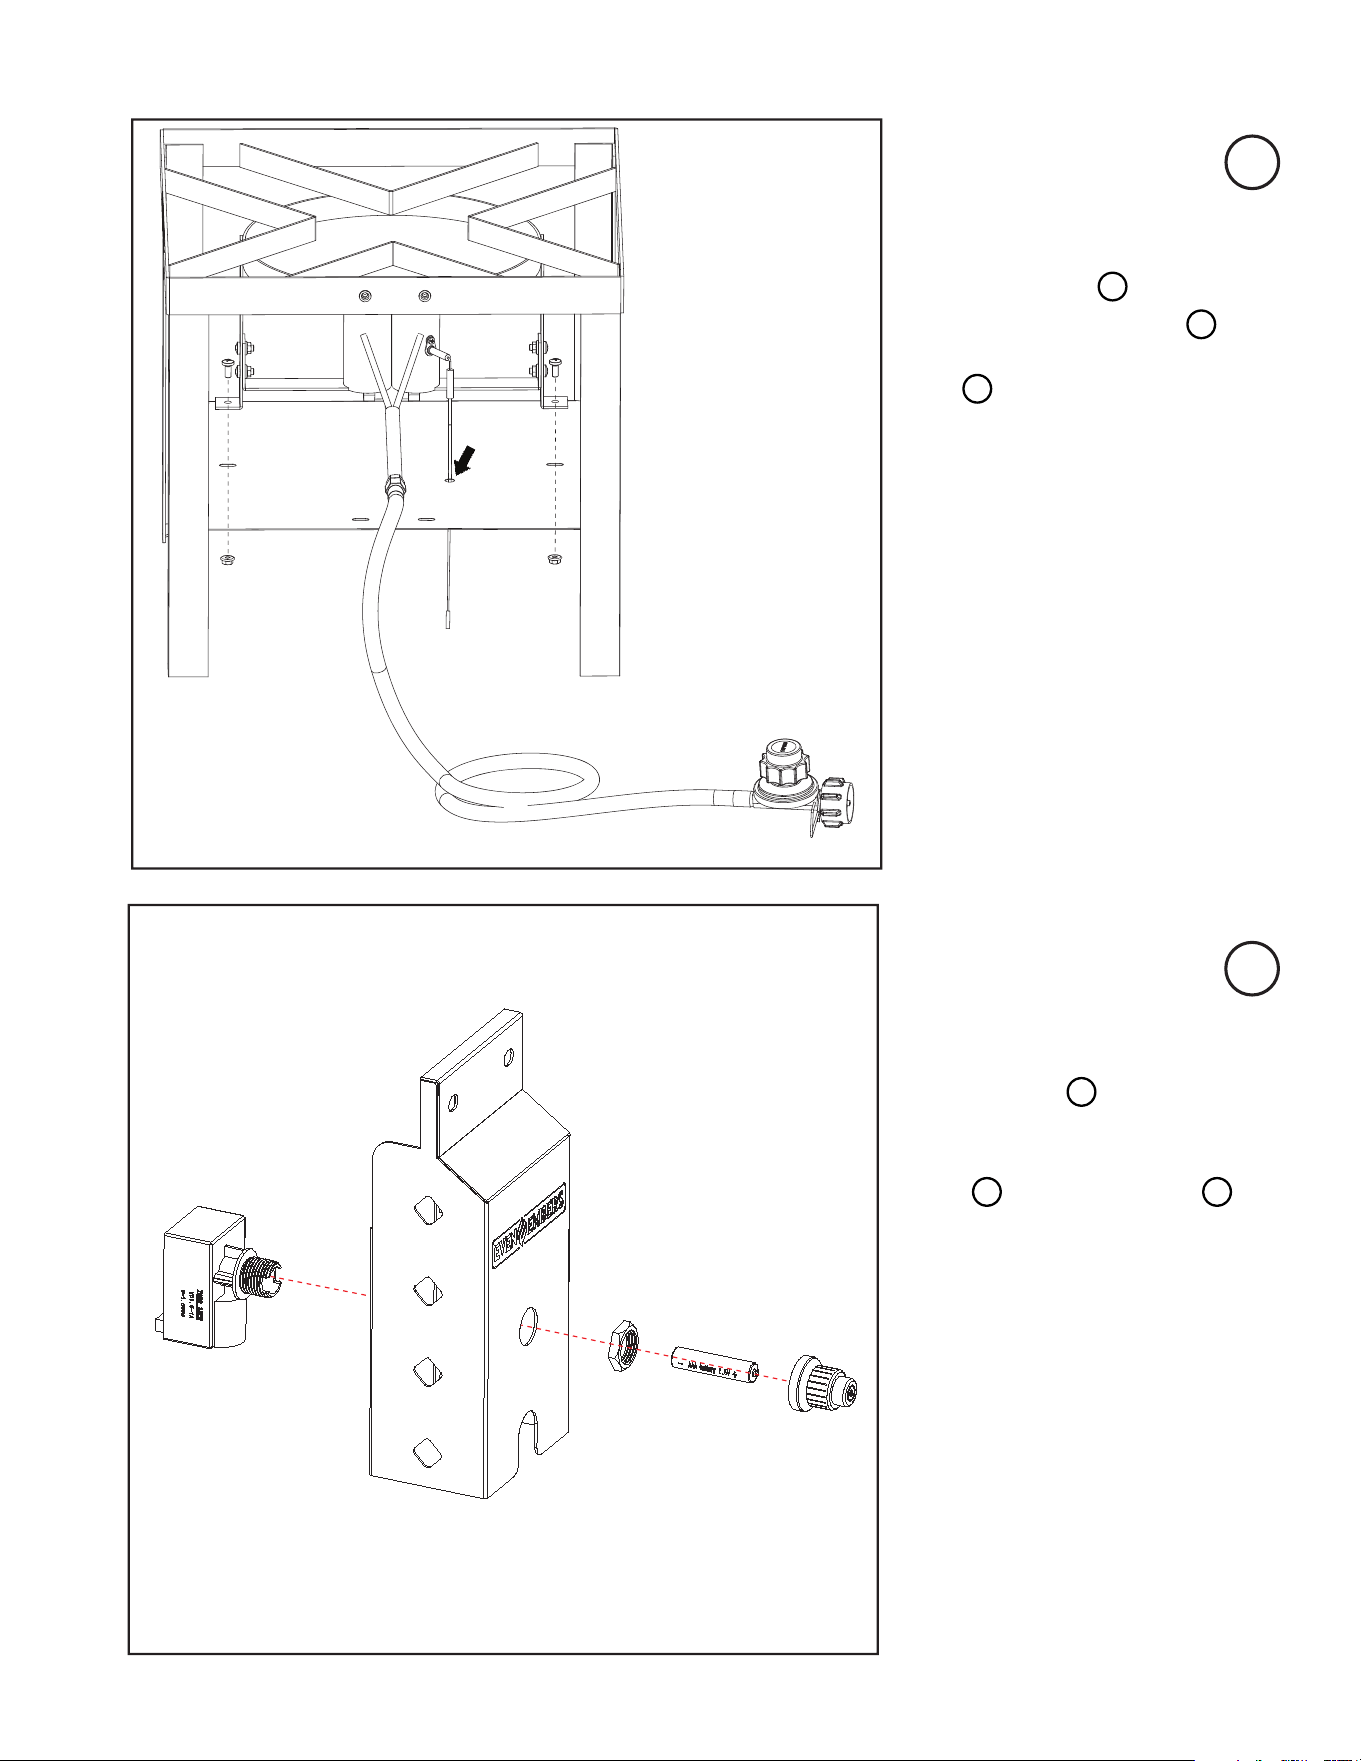
Thread electrode wire
through hole in bottom
heat shield
8
. Attach
bottom heat shield
8
onto connector brackets
2
using two M6 x 14 mm
bolts and M6 nuts
.
16
3
4
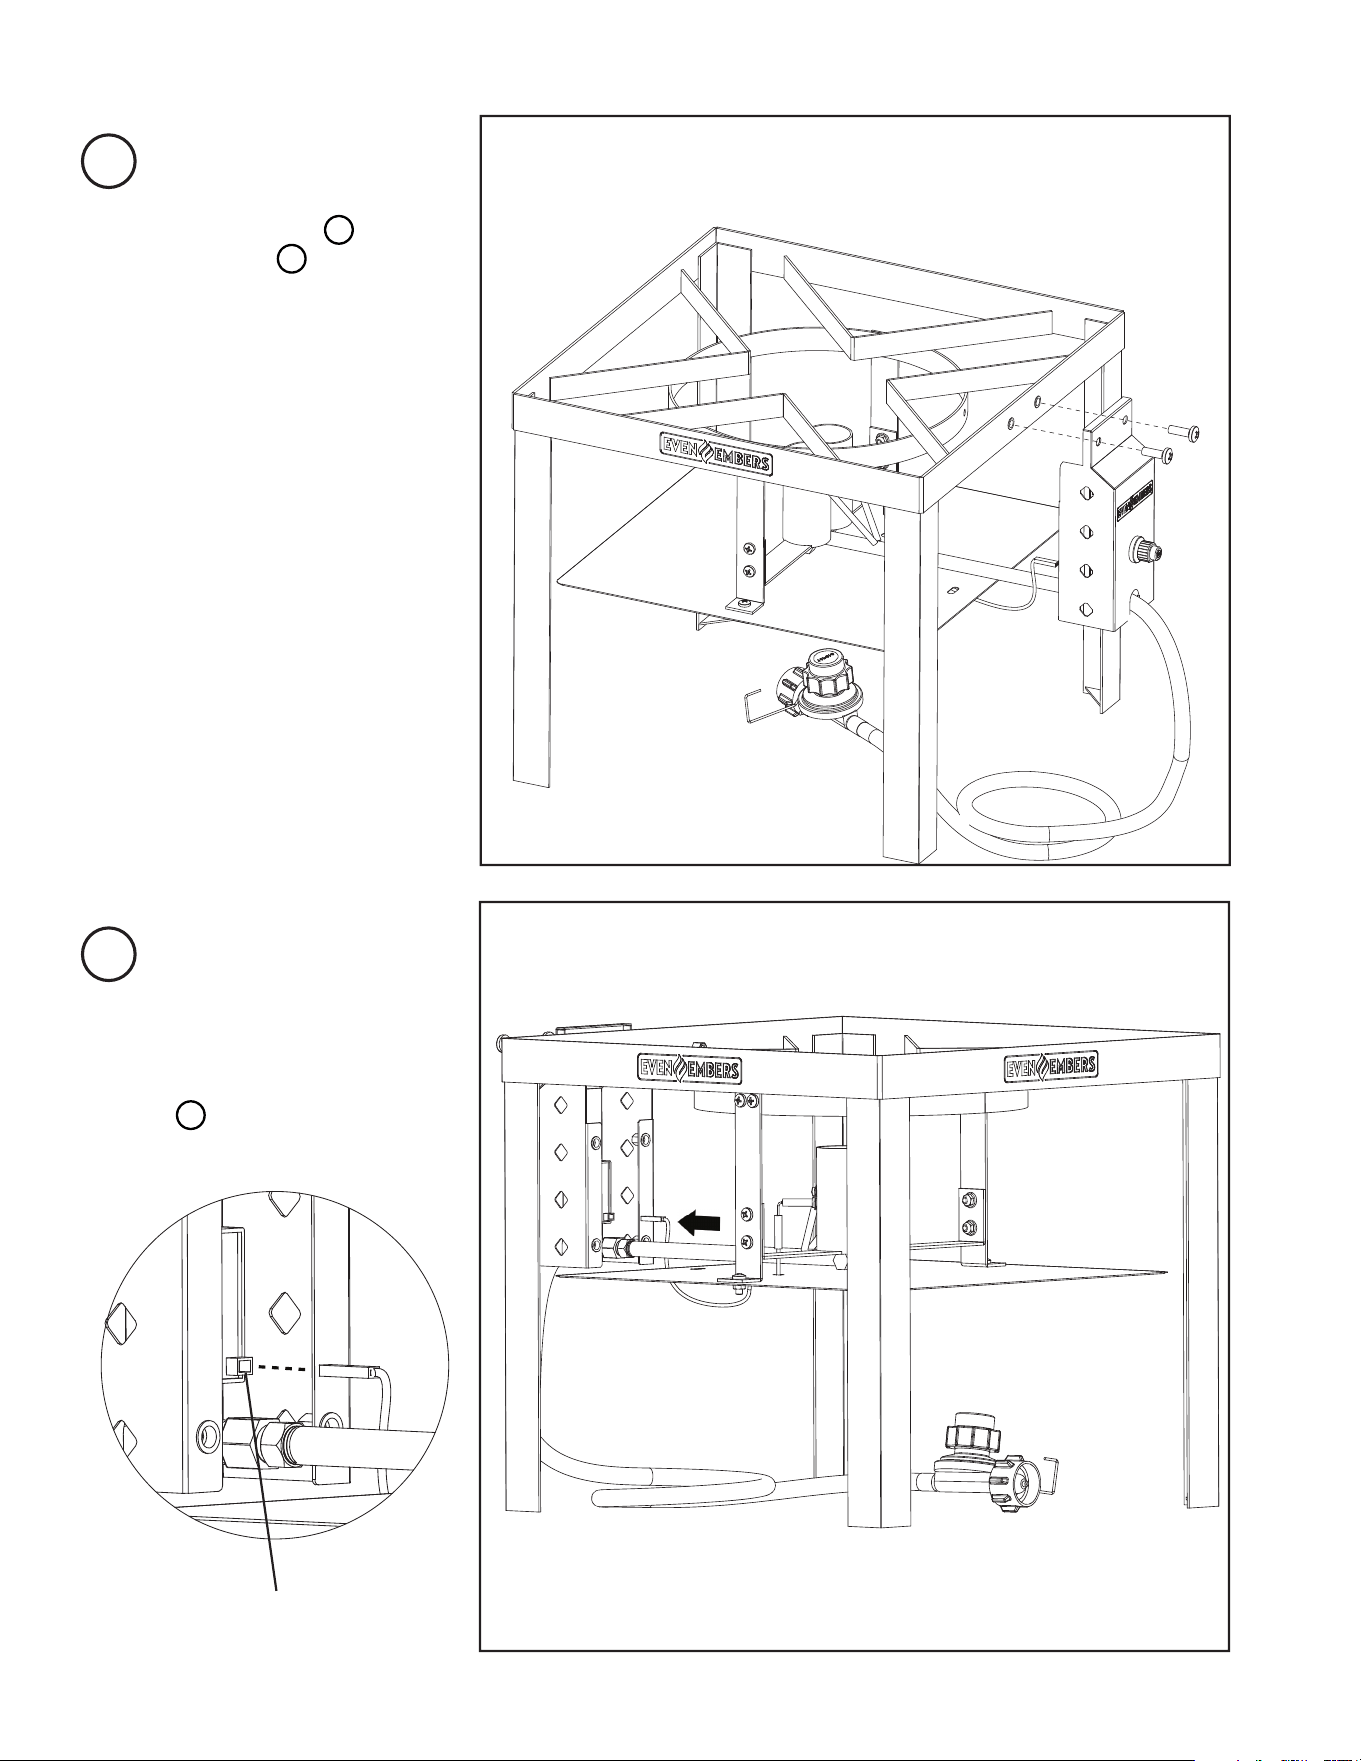
Remove igniter cap and
retaining nut from igniter
module
4
.
Attach igniter module
4
to control panel
5
using retaining nut. Insert
battery with positive end
toward igniter cap and
replace igniter cap.
17
5
6
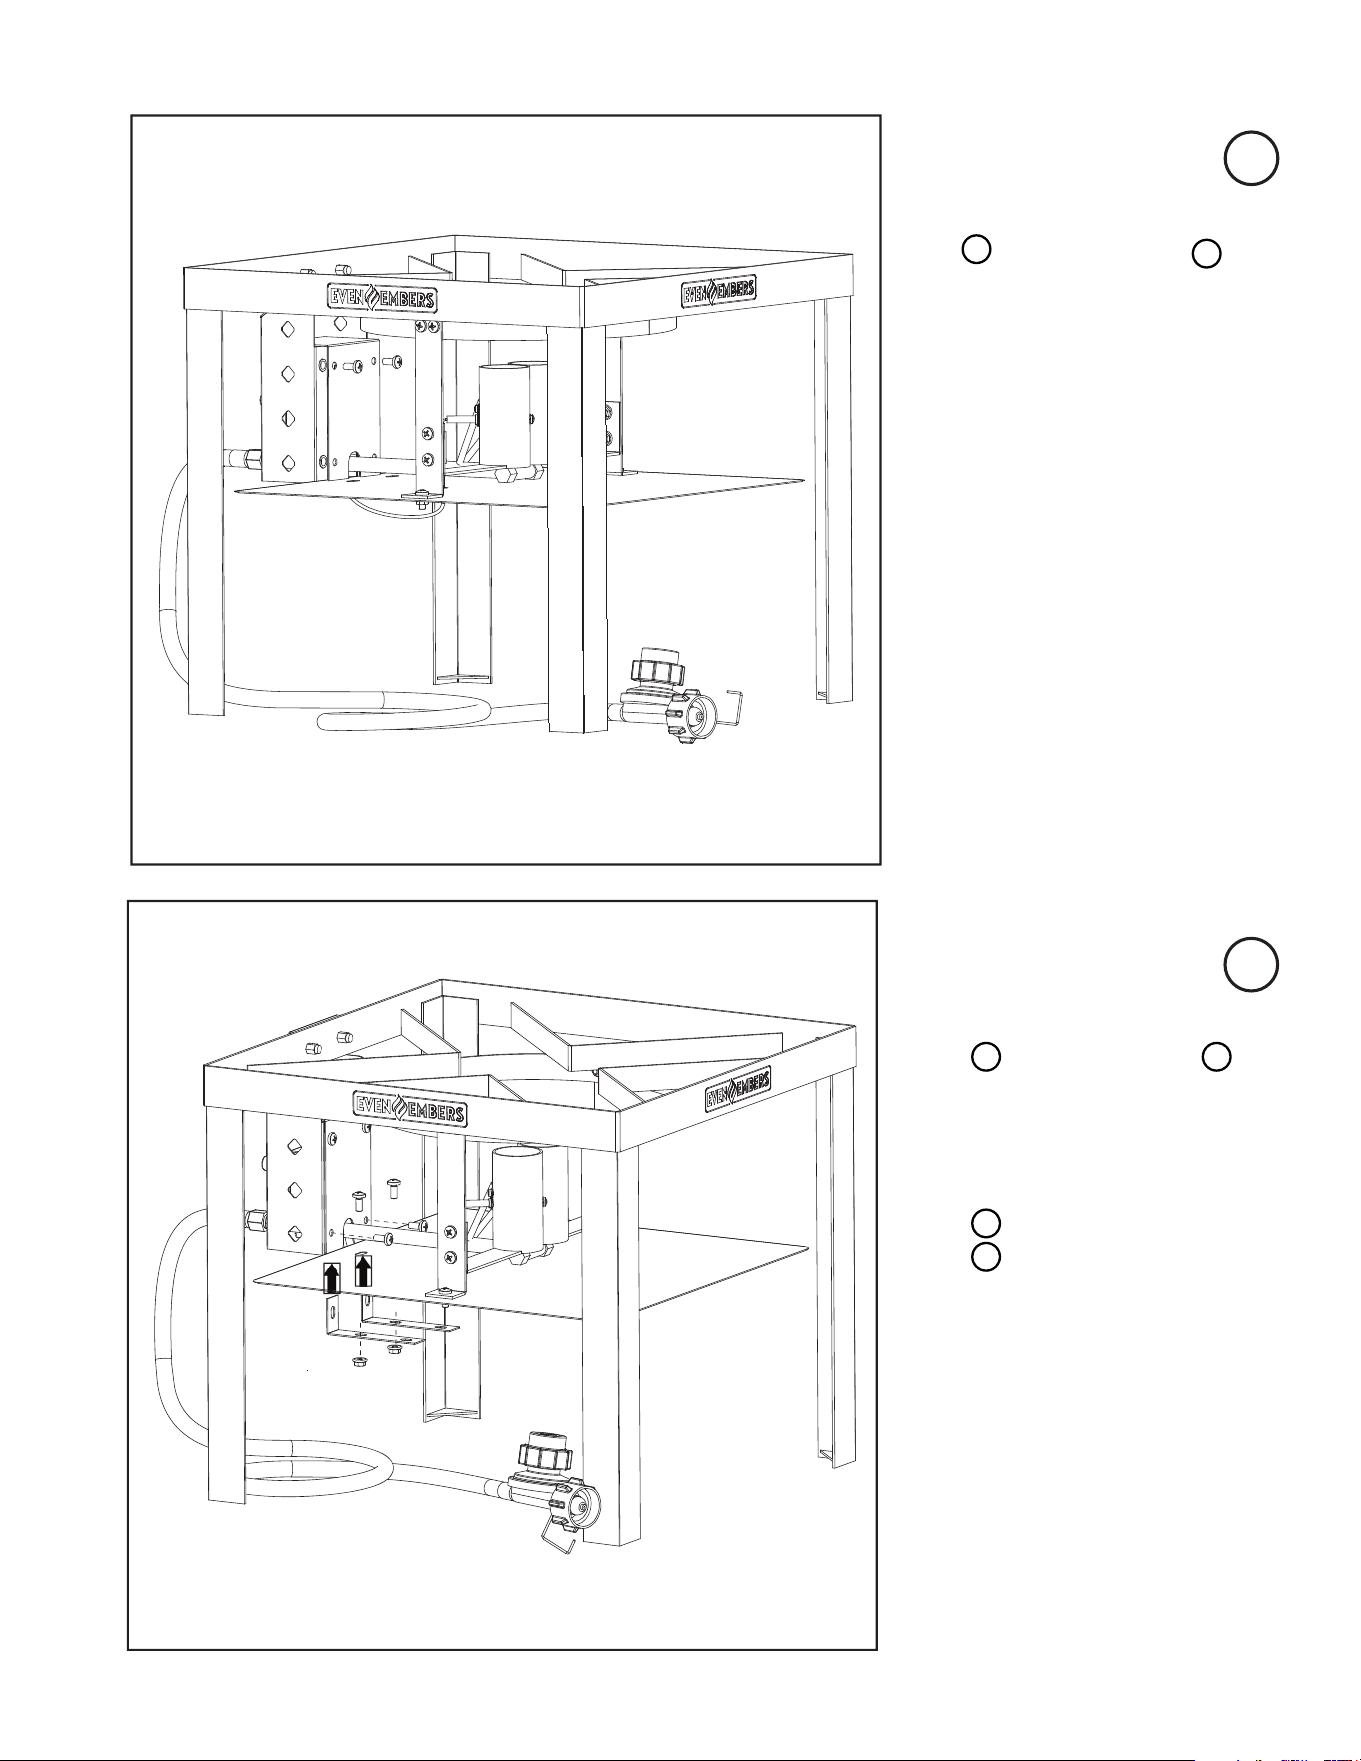
Attach control panel
5
to
frame assembly
12
using
two M6 x 20 mm bolts.
Insert electrode wire from
dual burner assembly into
electrode socket on igniter
module
4
.
Electrode Socket
18
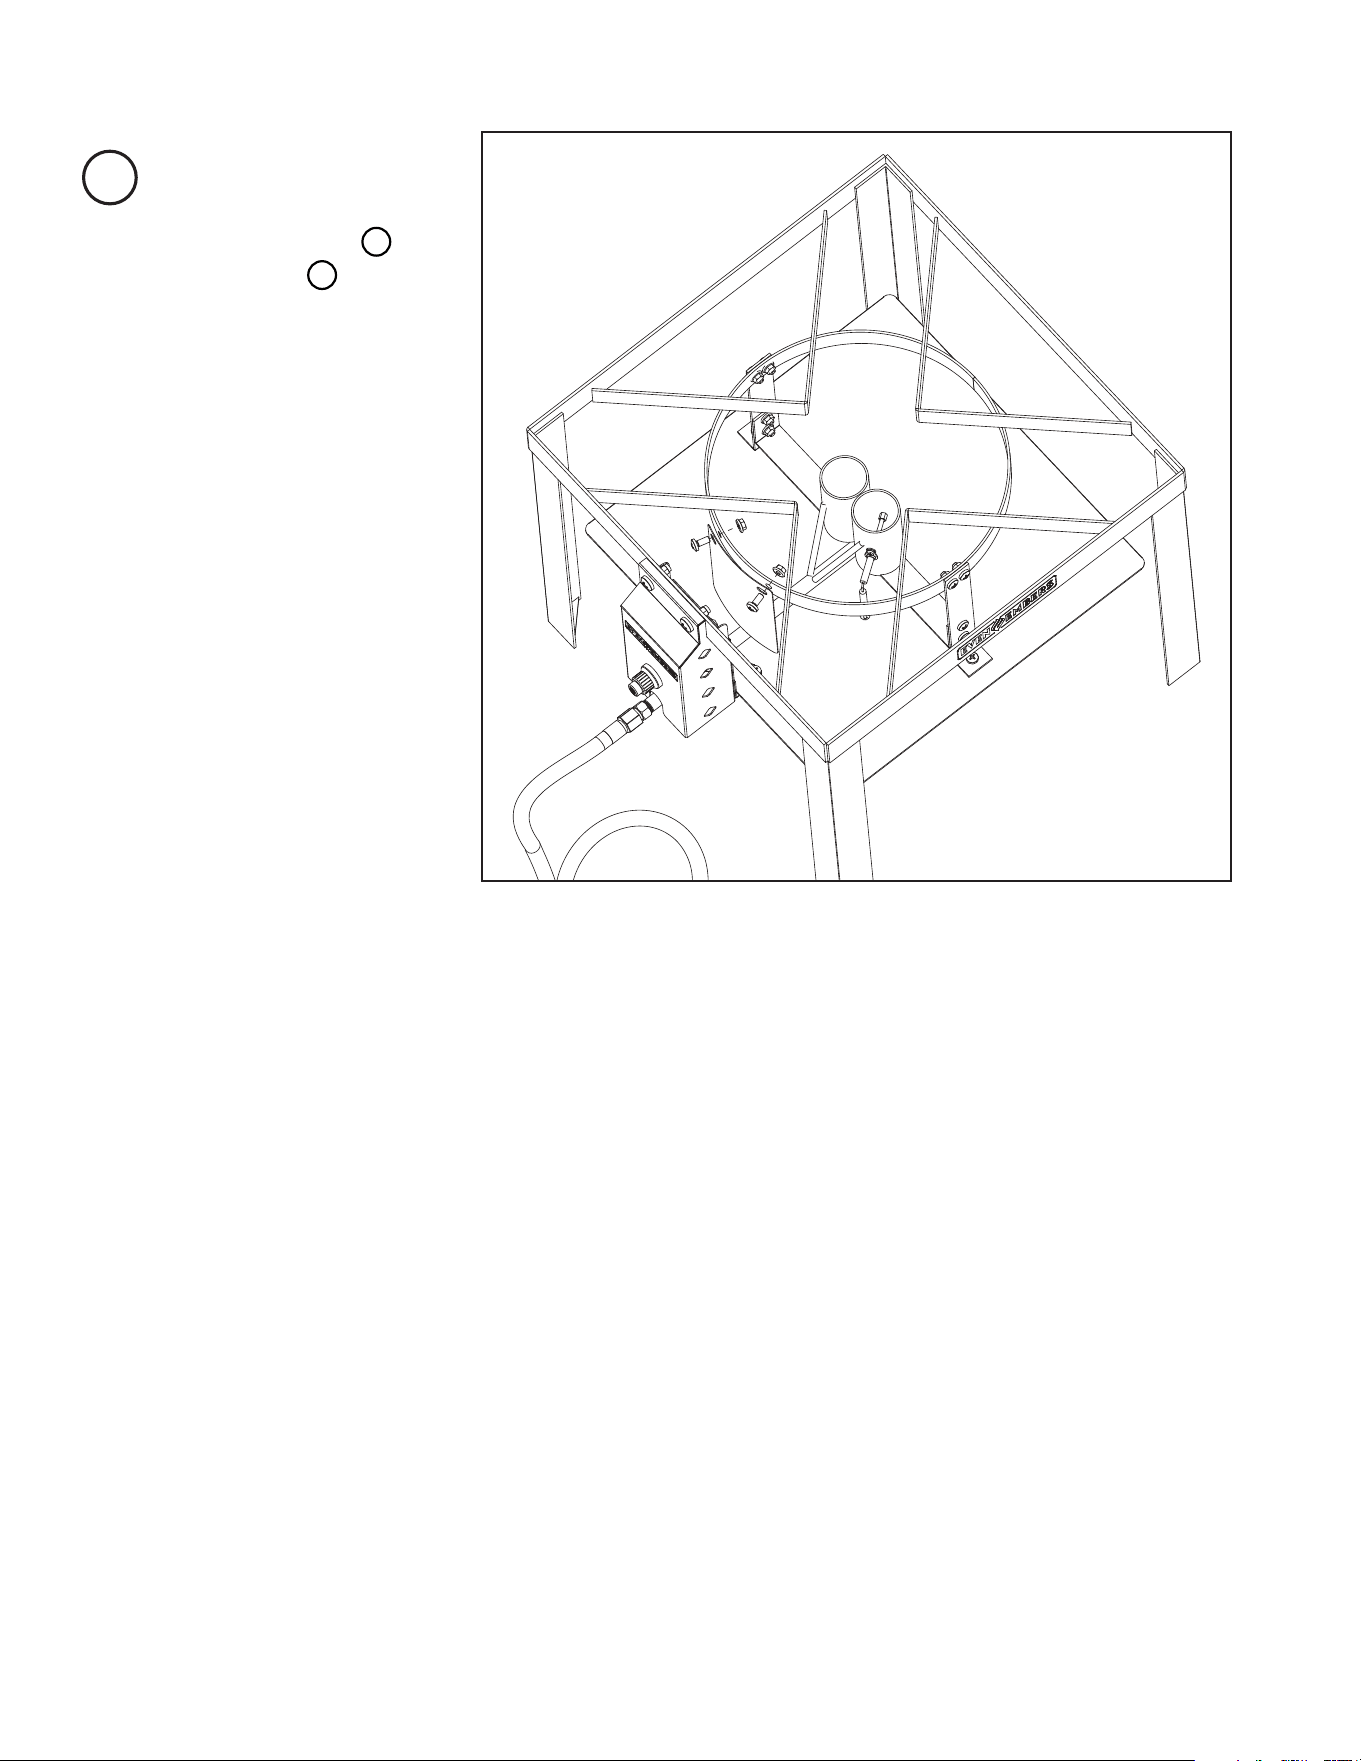
Attach igniter heat shield
6
to control panel
5
using two M6 x 14 mm
bolts.
7
8
Attach support brackets
1
to control panel
5
using two M6 x 14 mm
bolts.
Attach support brackets
1
to bottom heat shield
8
using two M6 x 14 mm
bolts and M6 nuts.
19
9
Attach front heat shield
3
to frame assembly
12
using
two M6 x 14 mm bolts and
M6 nuts.
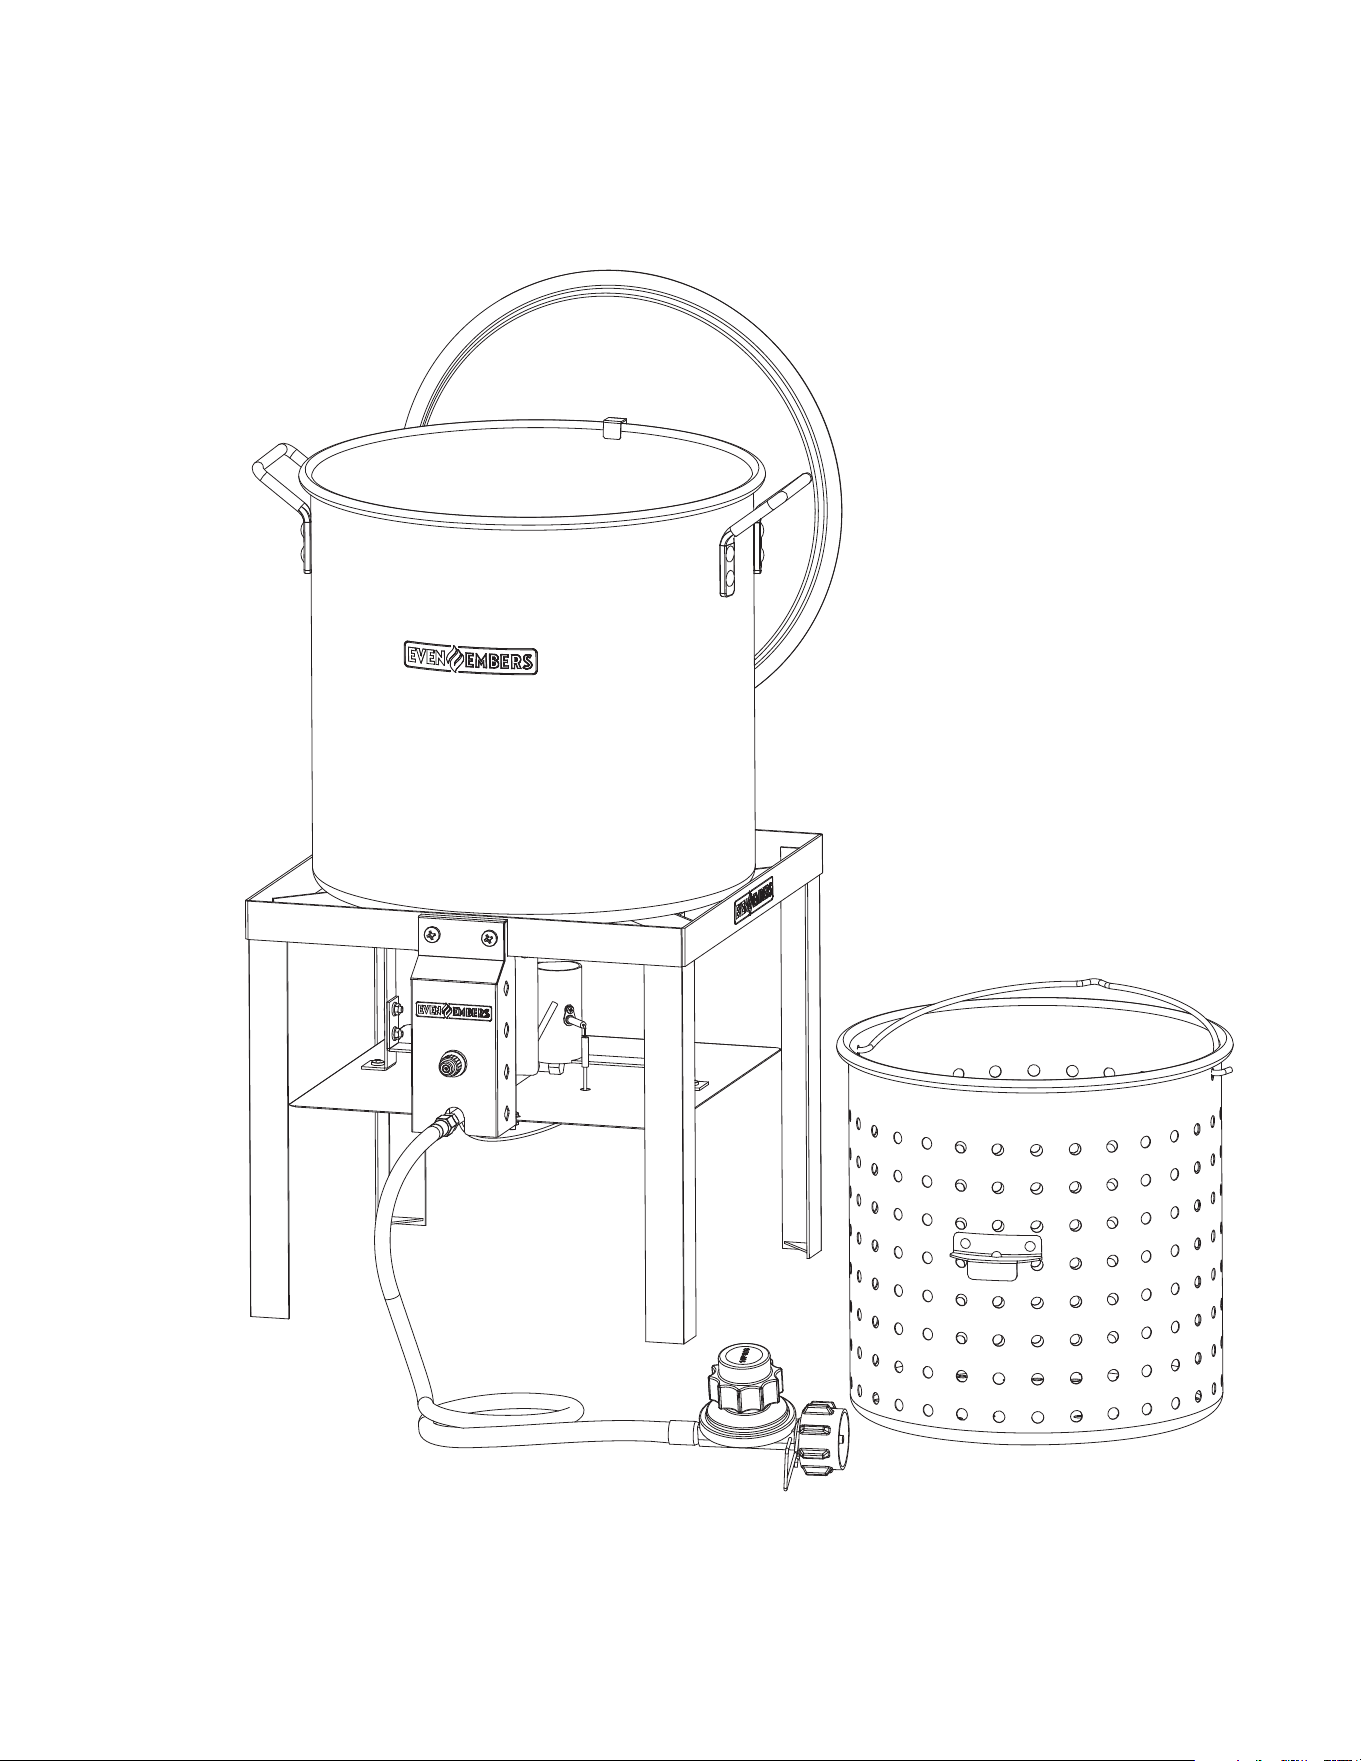
GAS6199AS ASSEMBLED
20

21

22

OM6199AS
112 5
Owner’s Manual for Model
GAS6199AS
©2025 The Fair Game Group LLC.
Carrollton, Texas 75006 U.S.A.
www.evenembers.com
The Fair Game Group warrants to the original pur chas er that the Even Embers 100 Qt. Boiling Kit is free from defects due to workmanship or
materials for:
One-year: on valves, frame, and other related parts
The Fair Game Group’s obligations under this warranty are limited to the following guidelines:
• This warranty does not cover gas appliances that have been altered/modi ed or damaged due to: normal wear, rust, abuse, improper
maintenance and/or improper use.
• This warranty does not cover surface scratches, rust or heat damage to the nish, which is considered normal wear.
• The Fair Game Group may elect to repair or replace damaged units covered by the terms of this warranty.
• This warranty extends to the original purchaser only and is not trans fer able or assignable to subsequent purchasers.
The Fair Game Group requires reasonable proof of purchase. Therefore, we strongly recommend that you retain your sales receipt or invoice. To
obtain replacement parts for your Even Embers 100 Qt. Boiling Kit under the terms of this warranty, please contact Customer Service Department
at 1-855-735-9922 or help@fairgameus.com. A receipt will be required. The Fair Game Group will not be responsible for any gas appliances
forwarded to us without prior authorization.
EXCEPT AS ABOVE STATED, THE FAIR GAME GROUP MAKES NO OTHER EXPRESS WARRANTY.
THE IMPLIED WARRANTIES OF MERCHANTABILITY AND FITNESS FOR A PARTICULAR PURPOSE ARE LIMITED IN DURATION TO THOSE
LISTED ABOVE FROM THE DATE OF PURCHASE. SOME STATES DO NOT ALLOW LIM I TA TIONS ON HOW LONG AN IMPLIED WARRANTY
LASTS, SO THE ABOVE LIMITATION MAY NOT APPLY TO YOU.
ANY LIABILITY FOR INDIRECT, INCIDENTAL OR CONSEQUENTIAL DAMAGES ARISING FROM THE FAILURE OF THE EVEN EMBERS
100 Qt. BOILING KIT TO COMPLY WITH THIS WARRANTY OR ANY IMPLIED WARRANTY IS EXCLUDED. CUSTOMER ACKNOWLEDGES
THAT THE PURCHASE PRICE CHARGED IS BASED UPON THE LIMITATIONS CONTAINED IN THE WARRANTY SET OUT ABOVE. SOME
STATES DO NOT ALLOW THE EXCLUSION OR LIMITATION OF INCIDENTAL OR CONSEQUENTIAL DAMAGES, SO THE ABOVE LIMITATION
OR EXCLUSION MAY NOT APPLY TO YOU. THIS WARRANTY GIVES YOU SPECIFIC LEGAL RIGHTS, AND YOU MAY ALSO HAVE OTHER
RIGHTS WHICH VARY FROM STATE TO STATE.
WARRANTY