User Manual
CARDBOARD CAT TREE
Check if all parts and accessories are included. Contact us via email:
[email protected] if there is any part missing or damaged.
What Is in the Box
01
Cat Scratching Board
(Small, Large)
x2
x2
Block
x7 Cat Tree Post
x8
Block
1. Find the Step 1 marker.
2. Fold the cardboard along the score lines.
3. Insert tabs 1A and 1B into the matching numbered slots.
1. Find the Step 3 marker.
2. Fold the cardboard along the score lines.
3. Insert tabs 3A and 3B into the matching numbered slots.
1. Find the Step 4 marker.
2. Fold the cardboard along the score lines.
3. Insert tabs 4A and 4B into the matching numbered slots.
4. Find the Step 5 marker.
5. Fold the cardboard along the score lines.
6. Align tabs 5A and 5B with their matching slots. (Do not lock
in place yet).
7. Find the Step 6 marker.
8. Fold the cardboard along the score lines.
9. Align tabs 6A and 6B with their matching slots.
10. Press in all tabs (5A, 5B, 6A, 6B) at the same time until secure.
1
3
4
5
1. Find the Step 2 marker.
2. Fold the cardboard along the score lines.
3. Insert tabs 2A and 2B into the matching numbered slots.
2
1. Locate the panel with tabs marked 1A and 1B.
2. Fold the panel along the score lines.
3. Insert tabs 1A and 1B into their corresponding numbered slots.
4. Find the Step 2 marker.
5. Fold the cardboard along the score lines.
6. Insert tab 2A and 2B into their corresponding numbered slot.
7. On the opposite side, find the Step 3 marker.
8. Fold the cardboard along the score lines.
9. Insert tab 3A and 3B into their corresponding numbered slot.
1
Fold up all four sides of the cardboard panel along the
pre-creased score lines.
2
1. Find the Step 7 marker.
2. Fold the cardboard along the score lines.
3. Align tabs 7A and 7B with their matching slots. (Do not lock
in place yet).
4. Find the Step 8 marker.
5. Fold the cardboard along the score lines.
6. Align tabs 8A and 8B with their matching slots.
7. Find the Step 9 marker.
8. Fold the cardboard along the score lines.
9. Align tabs 9A and 9B with their matching slots.
10. Press in all side tabs (7A, 7B, 8A, 8B, 9A, 9B) at the
same time. Assembly is now complete!
Roof and Bridge
Accessory Kit
Round
Metal
Washers
Screws
Plastic
Buckles
Non-Slip
Gloves
Allen
Wrench
x18
x50
x18
PN - CT03
PN - CT04
Roof
x2
Firmly press all tabs into their corresponding slots to complete
the assembly!
3
4
1. Locate the panel with tabs marked 4A and 4B.
2. Fold the panel along the score lines.
3. Insert tabs 4A and 4B into their corresponding numbered slots.
4. Find the Step 5 marker.
5. Fold the cardboard along the score lines.
6. Insert tab 5A and 5B into their corresponding numbered slot.
7. On the opposite side, find the Step 6 marker.
8. Fold the cardboard along the score lines.
9. Insert tab 6A and 6B into their corresponding numbered slot.
Roof Bridge
Ramp
x2
x2
Cat Scratching
Pad Box
Component Assembly Instructions
02
Note:
Please remove all pre-punched cardboard pieces from the holes before assembly.
Bridge x1
x1
x1
1
2
Warnings
1. This product supports a maximum weight of 15 kg (approximately 33 lbs). For your cat's safety, do not exceed this limit.
2. If your cat urinates on the product, clean it immediately. Prolonged exposure to moisture may weaken the cardboard and
damage the structure.
3. Keep the cat tree away from direct heat sources or humid areas.
4. Periodically check all connectors and surfaces for signs of wear or damage.
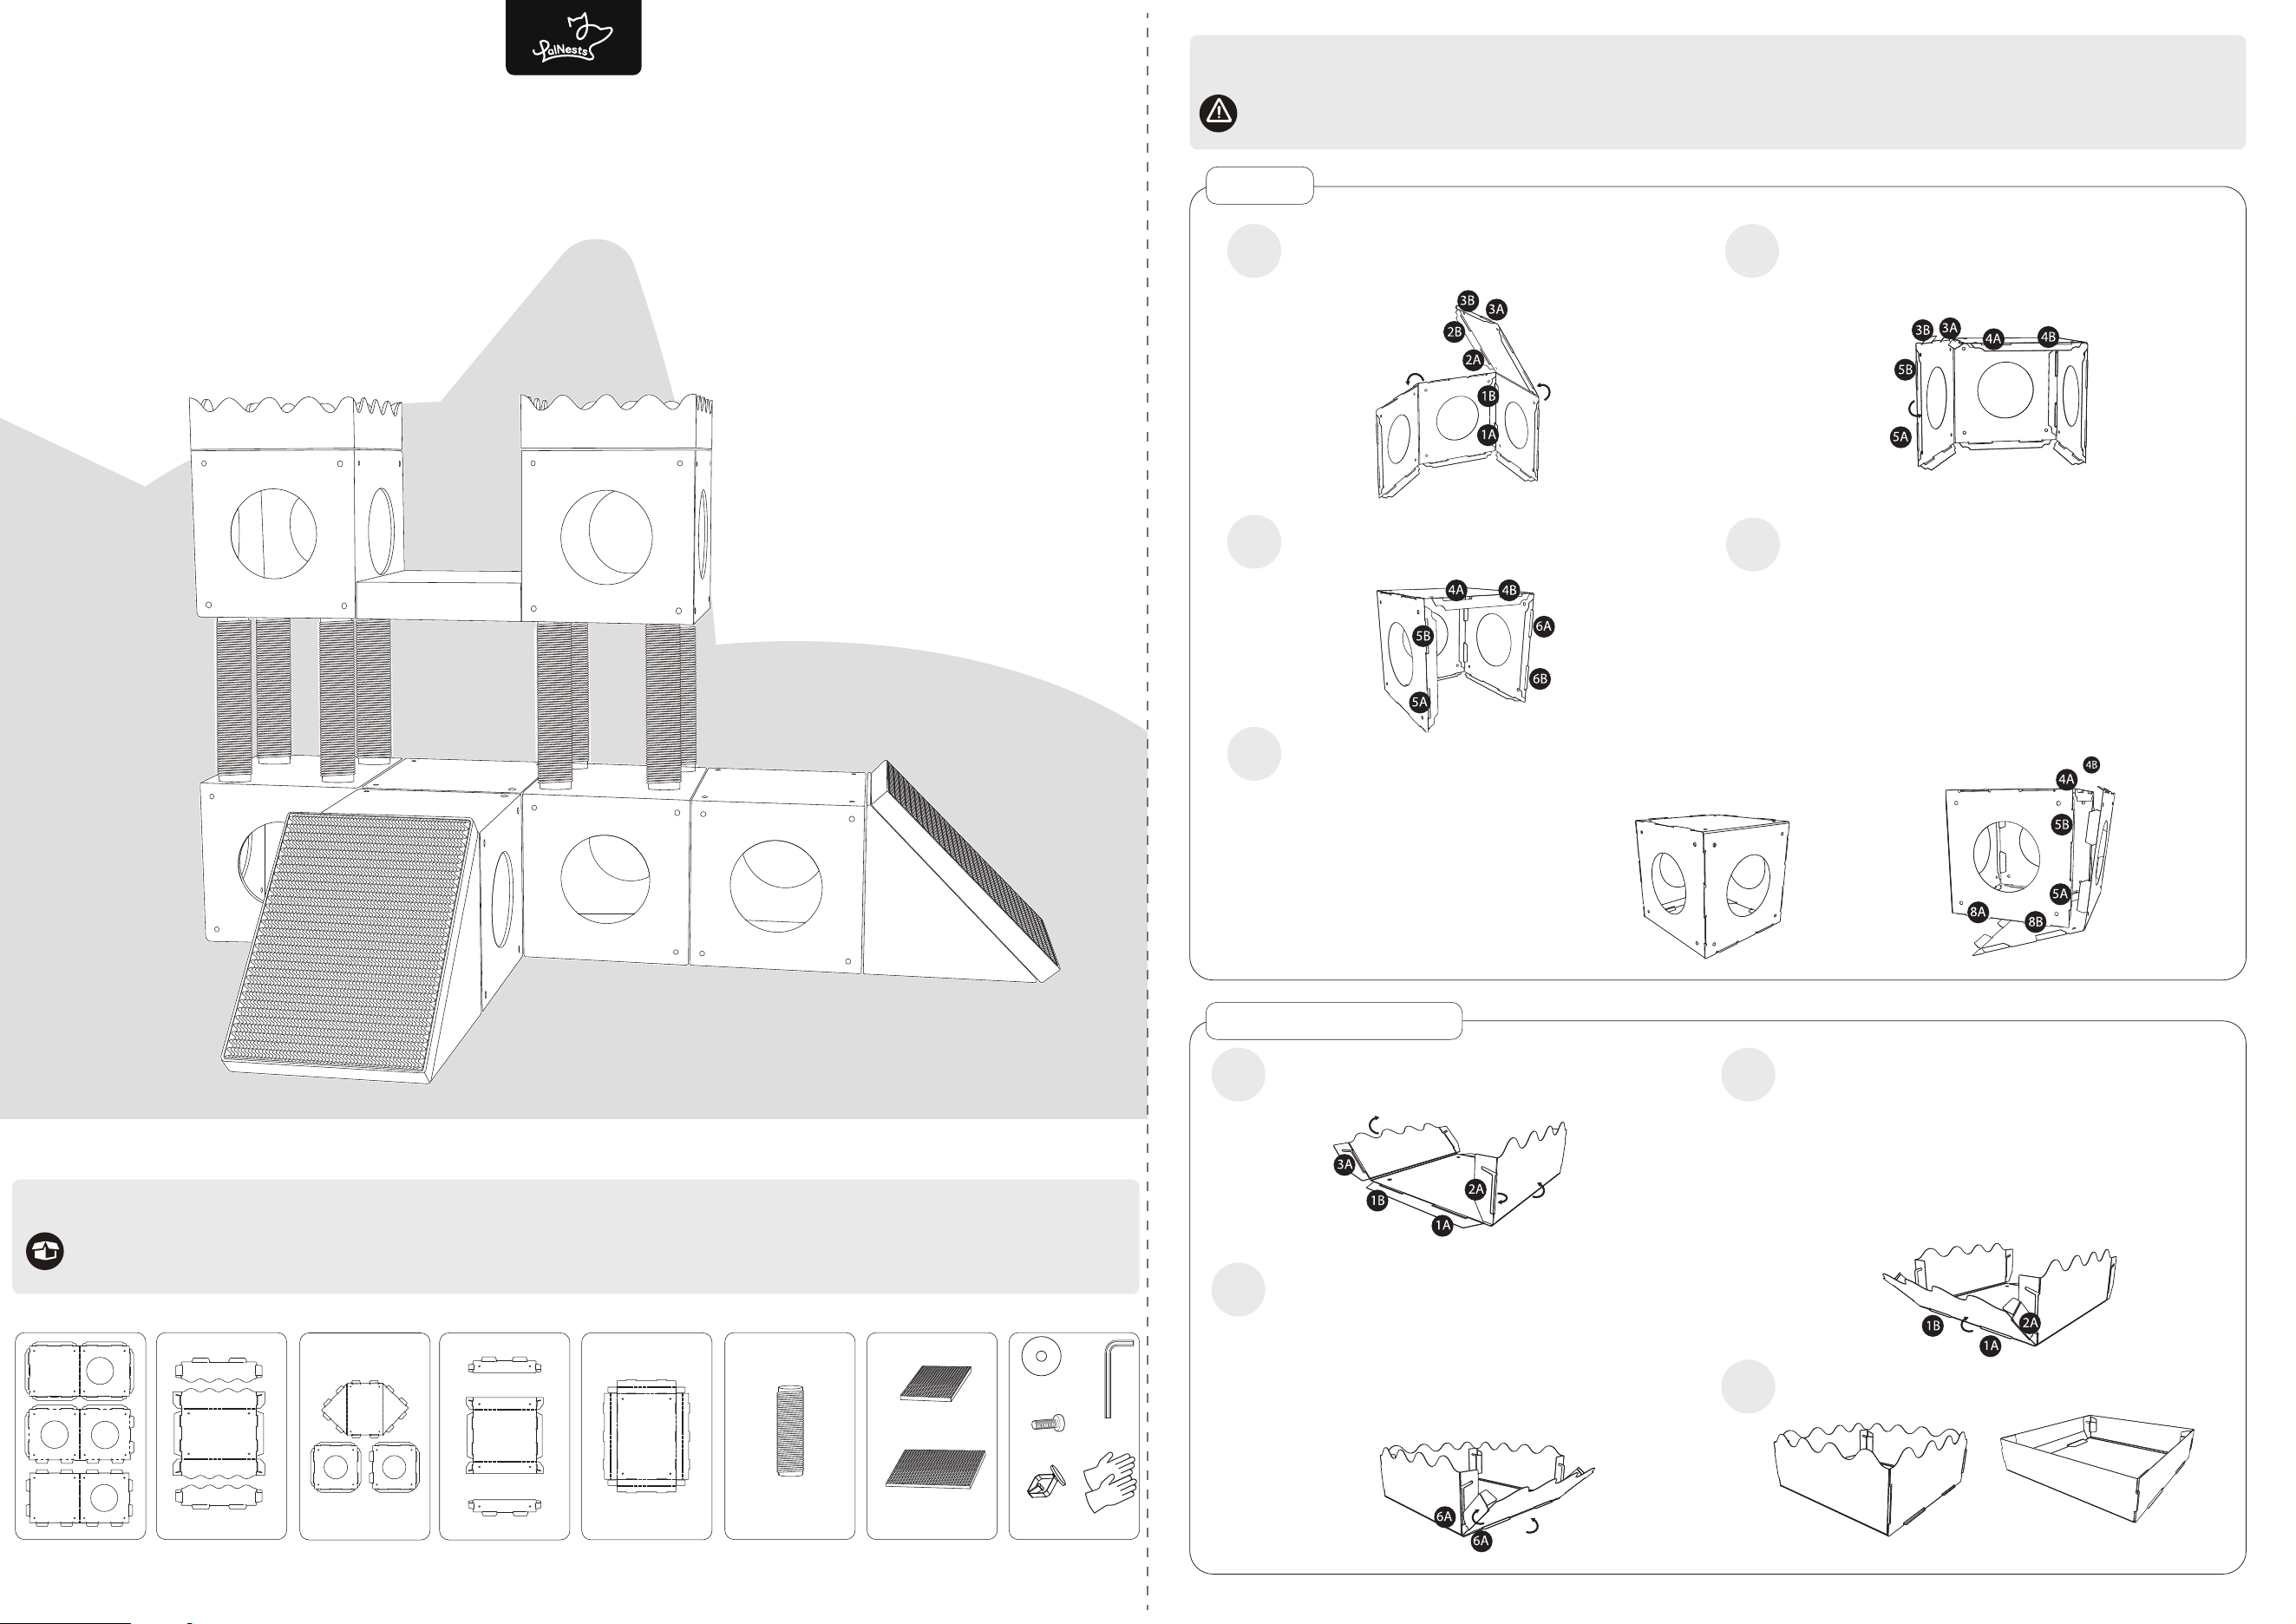
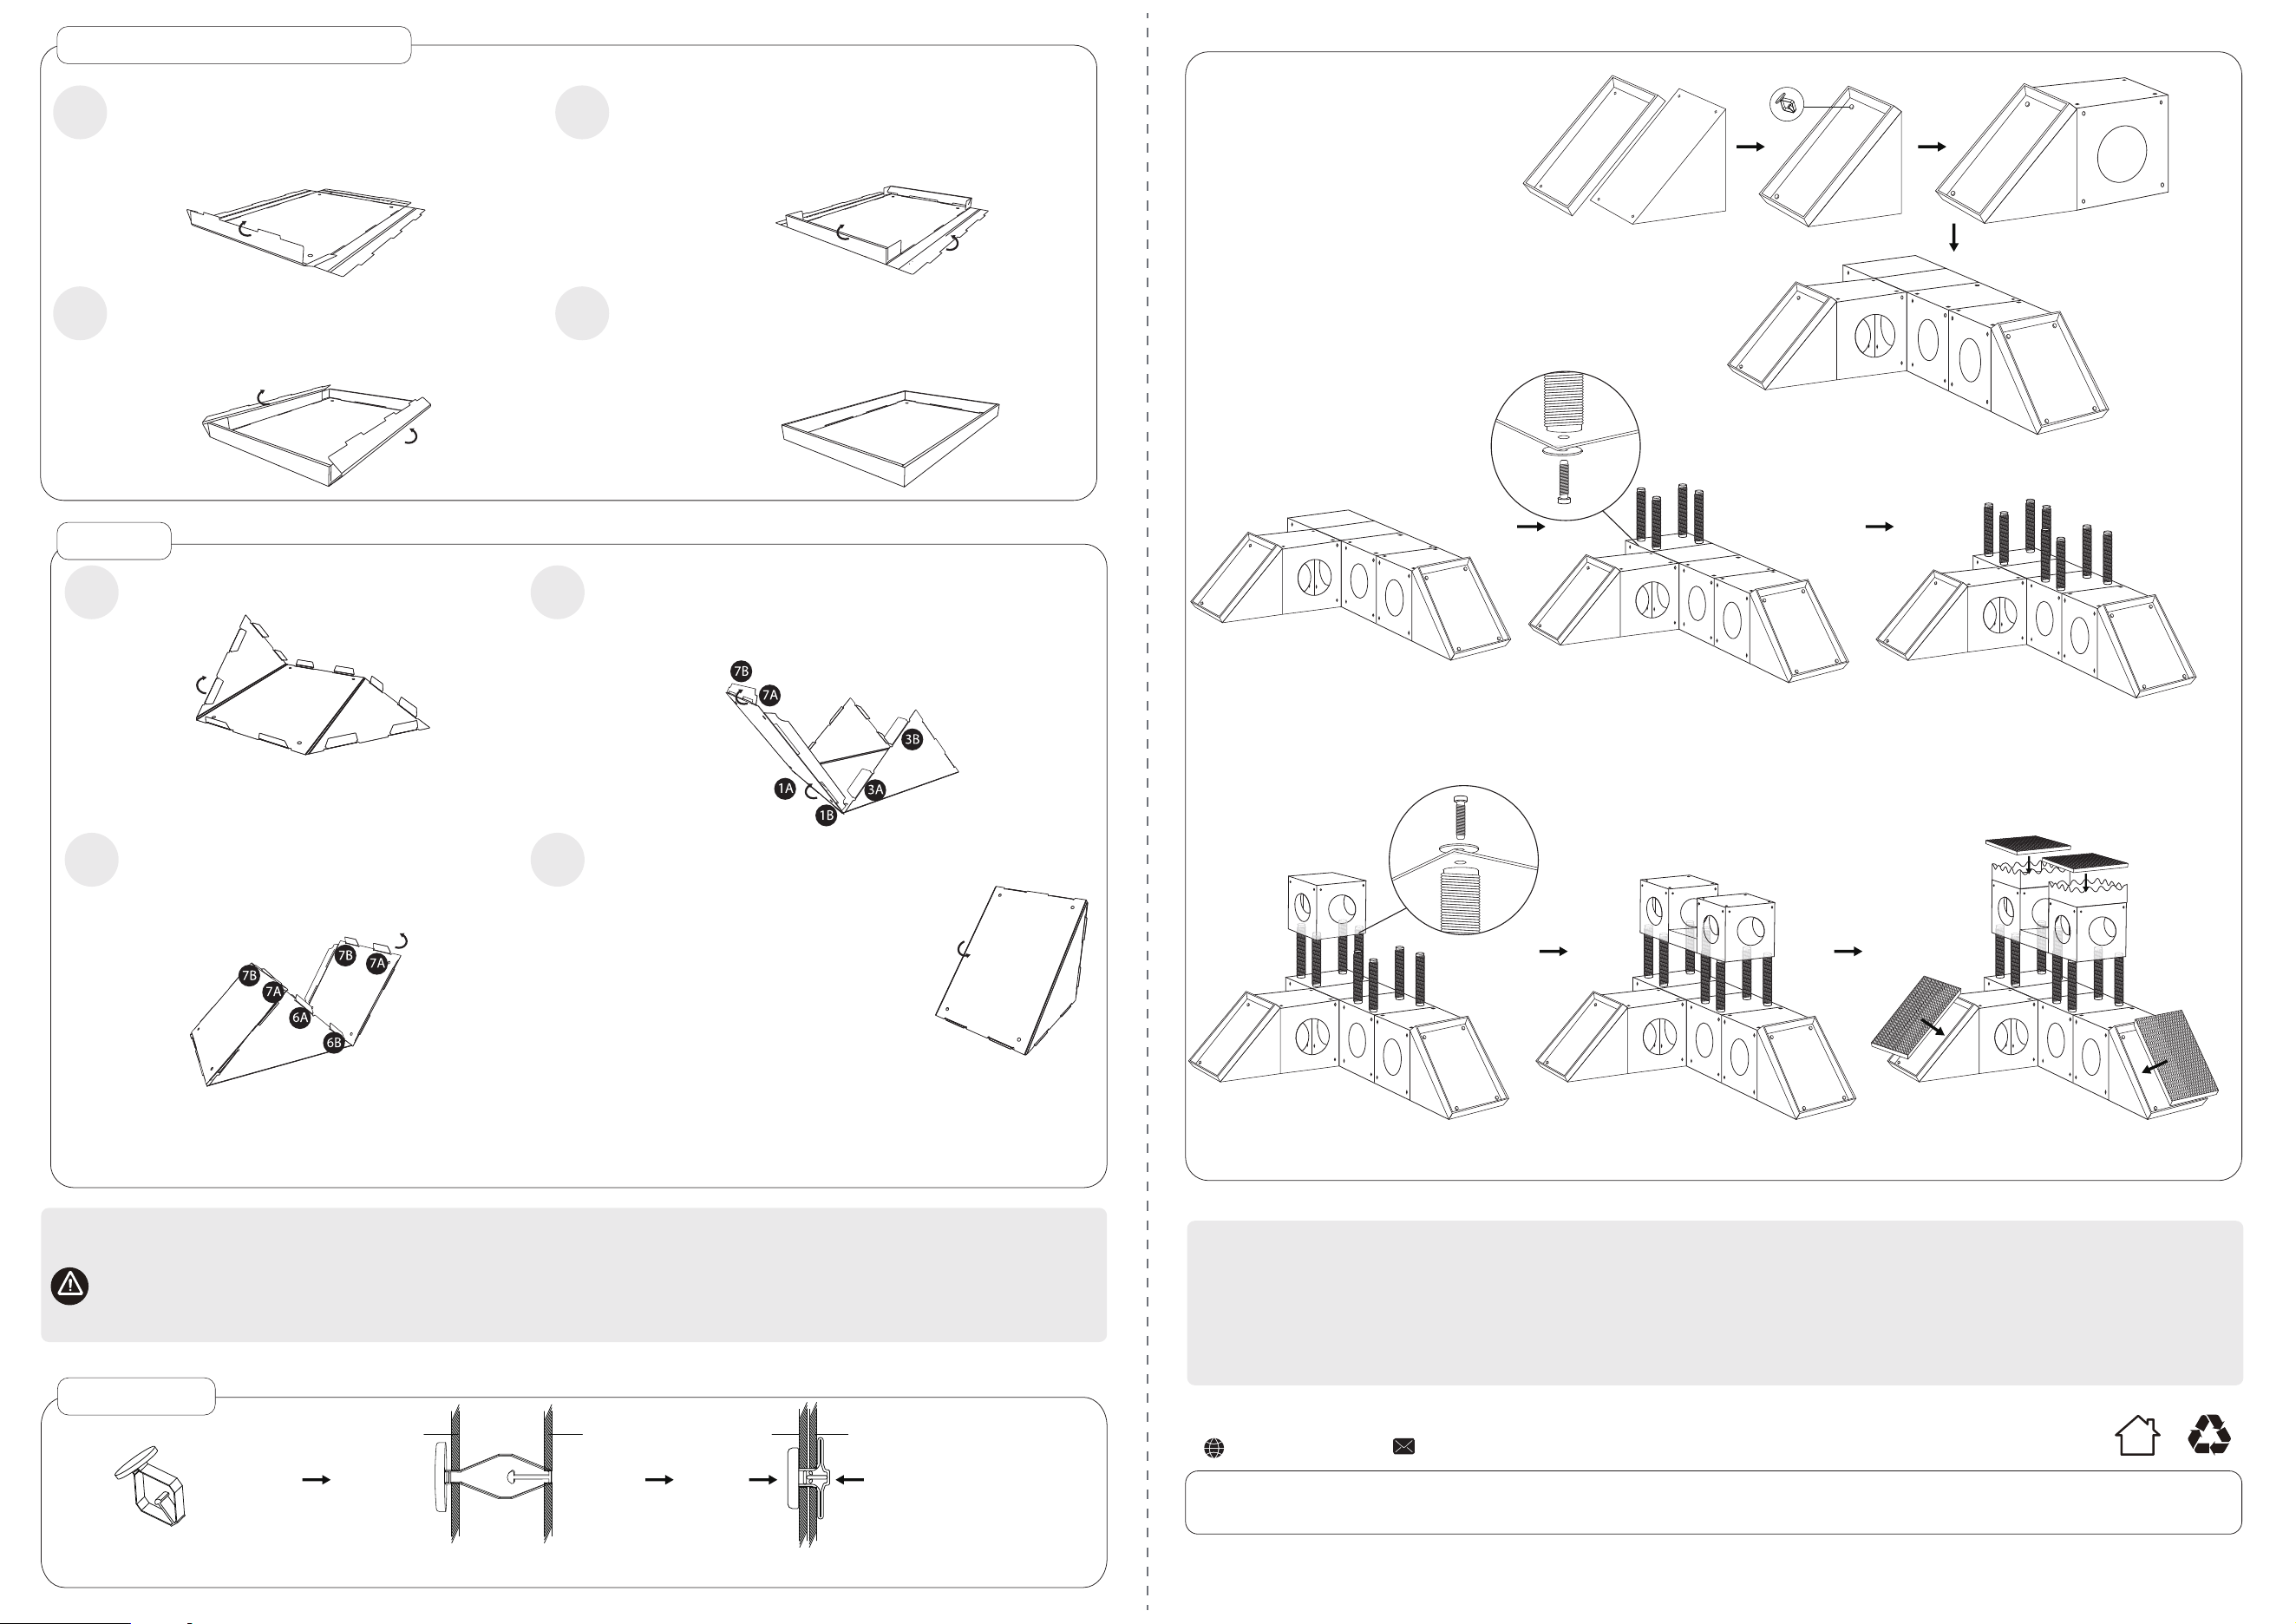
First Level:
1. First, connect the ramp and the scratching
pad box using plastic buckles.
2. Then, connect the ramp to one cube.
3. Finally, refer to the picture layout to
connect and complete the entire bottom layer.
Second Level:
1. Use screws and metal washers to secure the bottom end
of the scratching post for the second level.
2. Connect the cubes to each other using plastic
buckles.
Third Level:
1. Use screws and metal washers to secure the top end of the scratching post.
2. Install the bridge between the two cubes, also using plastic buckles for connection.
www.palnests.com
Manufacturer: Shenzhen Muhui Technology Co., Ltd.
Address: Room 203, Building 3, No.207, Huasheng Road, Shuiwei Community, Dalang Street, Longhua District, Shenzhen, China 518000
How to Assemble the Cat Tree
03
Note:
All components (except the scratching posts) are connected using plastic buckles.
Cardboard
press down
Assemble
Cardboard
Cardboard
Cardboard
1. Locate the marking for Step 1.
2. Fold the cardboard along the pre-creased score lines.
3. Insert tabs 1A and 1B into their corresponding numbered slots.
4. Fold the sections marked Step 3 and Step 4 inward along the
score lines at a 90-degree angle.
1
1. Locate the marking for Step 2.
2. Fold the cardboard along the pre-creased score lines.
3. Insert tabs 2A and 2B into their corresponding numbered slots.
4. Fold the sections marked Step 5 and Step 6 inward along the
score lines at a 90-degree angle.
2
1. Locate the marking for Step 7.
2. Fold the cardboard along the pre-creased score lines.
3. On the opposite side, locate the marking for Step 8.
4. Fold the cardboard along the pre-creased score lines.
3
1. Insert tabs 7A, 7B, and 7C into their corresponding numbered slots.
2. Insert tabs 8A, 8B, and 8C into their corresponding numbered slots.
3. Please note: The extended sections from Steps 3, 4, 5, and 6 should
be enclosed within the structure.
4. Assembly is now complete!
4
1. Locate the marking for Step 1.
2. Fold the cardboard along the score lines.
3. Insert tabs 1A and 1B into their corresponding numbered slots.
4. Fold the side panel inward along the score lines.
1. Locate the marking for Step 4.
2. Fold the cardboard along the score lines.
3. Insert tabs 4A and 4B into their corresponding
numbered slots.
4. Locate the marking for Step 5.
5. Fold the cardboard along the score lines.
6. Insert tabs 5A and 5B into their corresponding
numbered slots.
7. Locate the marking for Step 6.
8. Fold the cardboard along the edge score lines.
9. Insert tabs 6A and 6B into their corresponding
numbered slots.
10. Locate the marking for Step 7.
11. Fold the cardboard along the edge score lines.
12. Insert tabs 7A and 7B into their corresponding
numbered slots.
13. Firmly press all tabs into their slots to complete
the assembly!
1
3
Fold the cardboard along the pre-creased score lines.
4
1.Locate the marking for Step 2.
2.Insert tabs 2A and 2B into their corresponding slots.
3.On the opposite side, locate the marking for Step 3.
4.Insert tabs 3A and 3B into their corresponding slots.
2
Cat Scratching Pad Box
Ramp
How to use plastic buckles:
Align the round holes of the two components to be connected. Insert the plastic buckle through both holes simultaneously, then press down to secure.
Made in China
3
4
Rev_1.0
Note:
Please install the bridge with the
patterned side facing up.