
Technical Support and E-Warranty Certificate
www.vevor.com/support
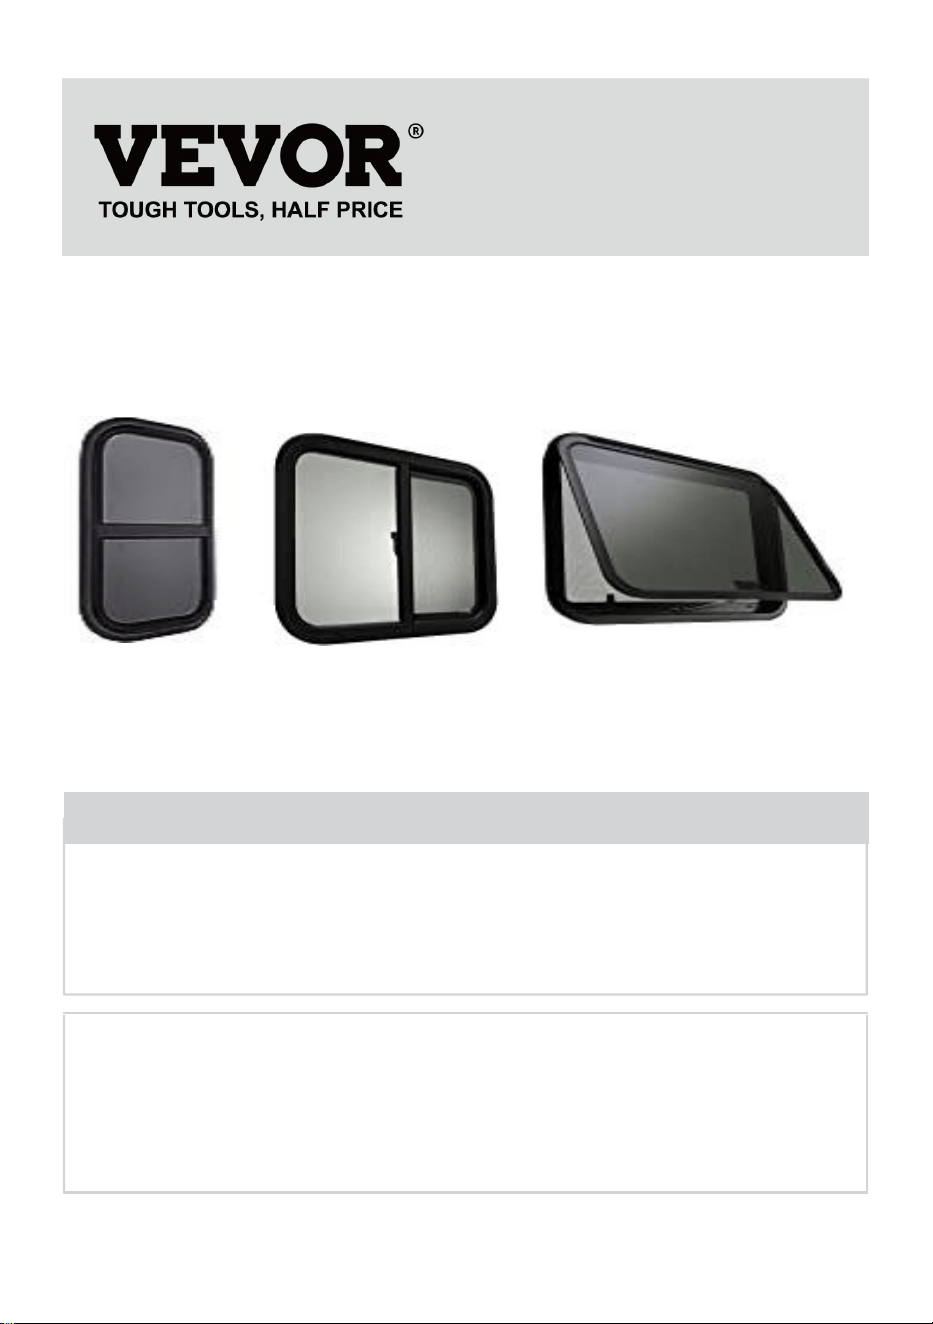
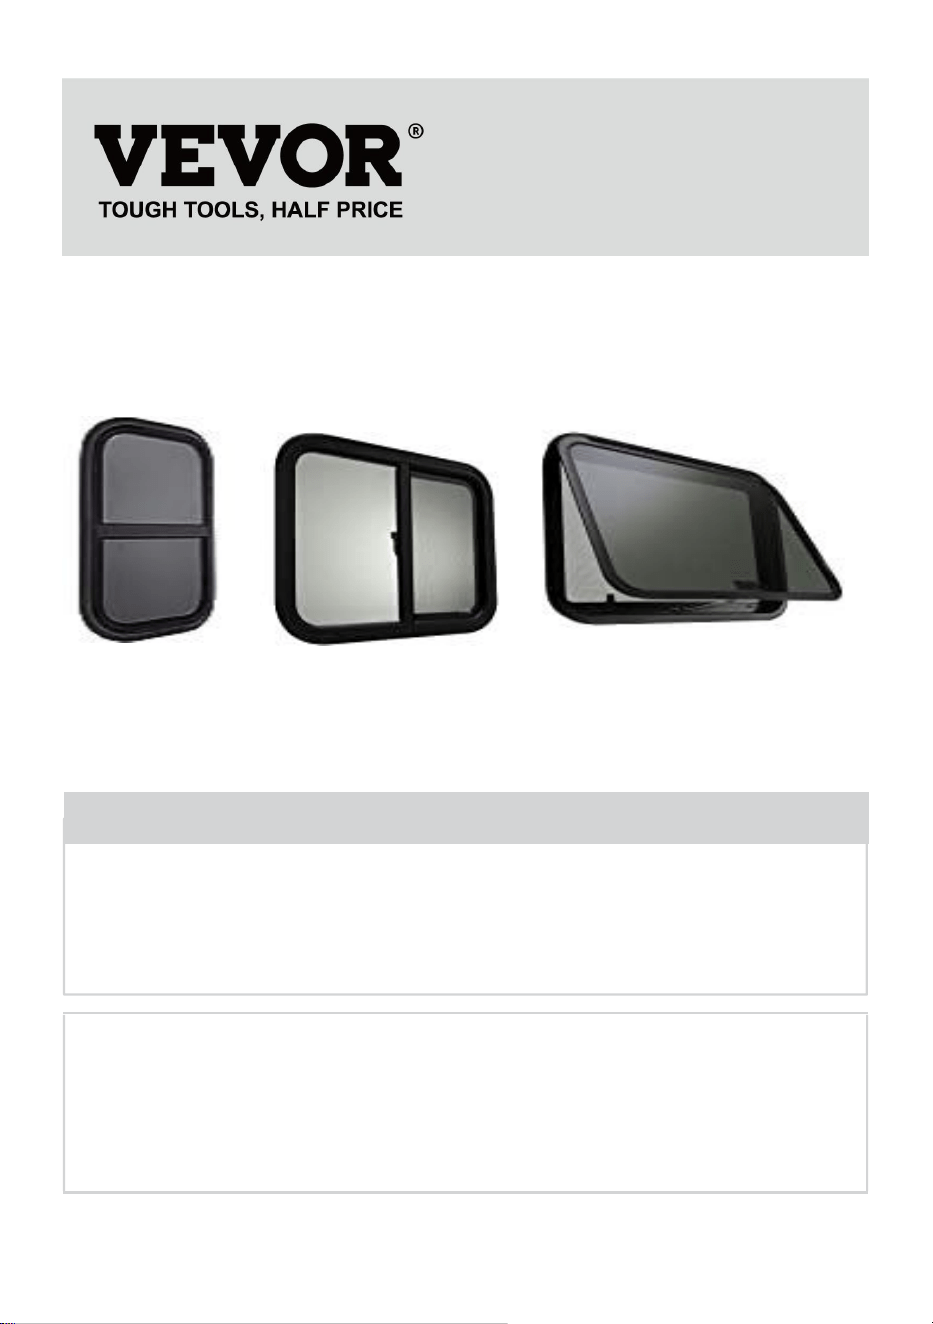
RV WINDOWS USER MANUAL
We continue to be committed to provide you tools with competitive price.
"Save Half", "Half Price" or any other similar expressions used by us only represents an
estimate of savings you might benefit from buying certain tools with us compared to the major
top brands and does not necessarily mean to cover all categories of tools offered by us. You
are kindly reminded to verify carefully when you are placing an order with us if you are
actually saving half in comparison with the top major brands.

- 1 -
Have product questions? Need technical support? Please feel free to
contact us:
Technical Support and E-Warranty Certificate
www.vevor.com/support
NEED HELP? CONTACT US!
This is the original instruction, please read all manual instructions
carefully before operating. VEVOR reserves a clear interpretation of our
user manual. The appearance of the product shall be subject to the
product you received. Please forgive us that we won't inform you again if
there are any technology or software updates on our product.
RV WINDOWS

- 2 -
Warning - To reduce the risk of injury, user must read instructions
manual carefully.
Warning- Be sure to wear ear protectors when using this product.
Warning- Be sure to wear eye protectors when using this product.
Warning- Be sure to wear dust masks when using this product.
Warning- Be sure to wear gloves when using this product.
PRODUCTION CONFIGURATION
Model
Specifications(in)
Border size
(in)
Hole size (in)
Adaptive
thickness
(in)
Opening
method
SSTLC305x559
12x22
12x22
12.17x22.17
0.95-1.8
Up and
down
SSTLC305x610
12x24
12.04x24
12.17x24.17
SSTLC356x406
14x16
14x16
14.17x16.17
SSTLC356x559
14x22
14x22
14.17x22.17
SSXCWT762x508
30x20
29.92x19.96
30.15x20.15
1.25-1.83
Push
outward
SSXCWT762x559
30x22
29.84x21.92
30.15x22.16
SSXCWT914x559
36x22
35.82x21.92
36.14x22.16
SSTLC610x508
24x20
24x20
24.17x20.15
0.95-1.8
Left and
right

- 3 -
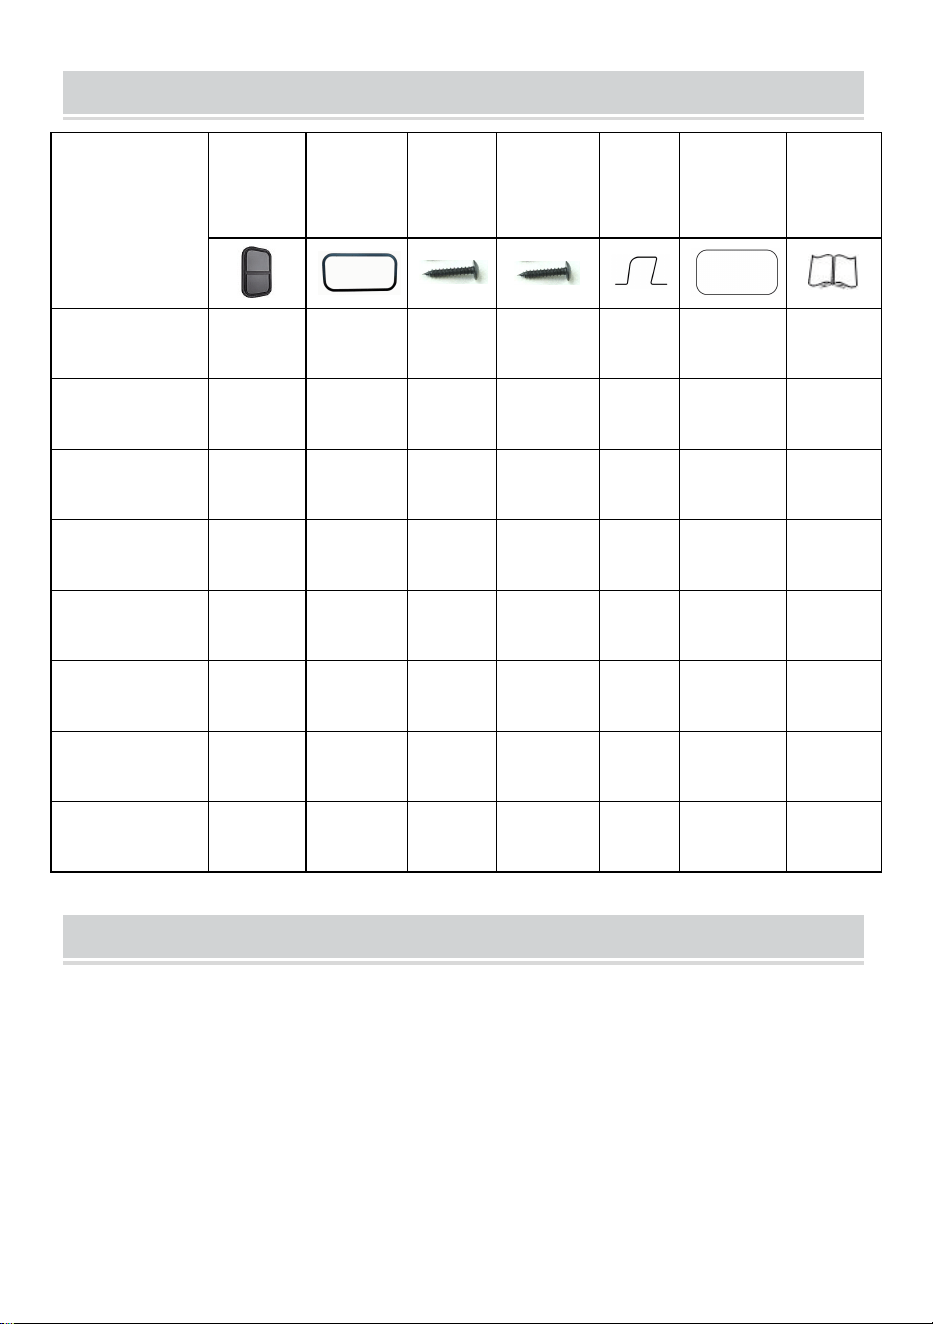
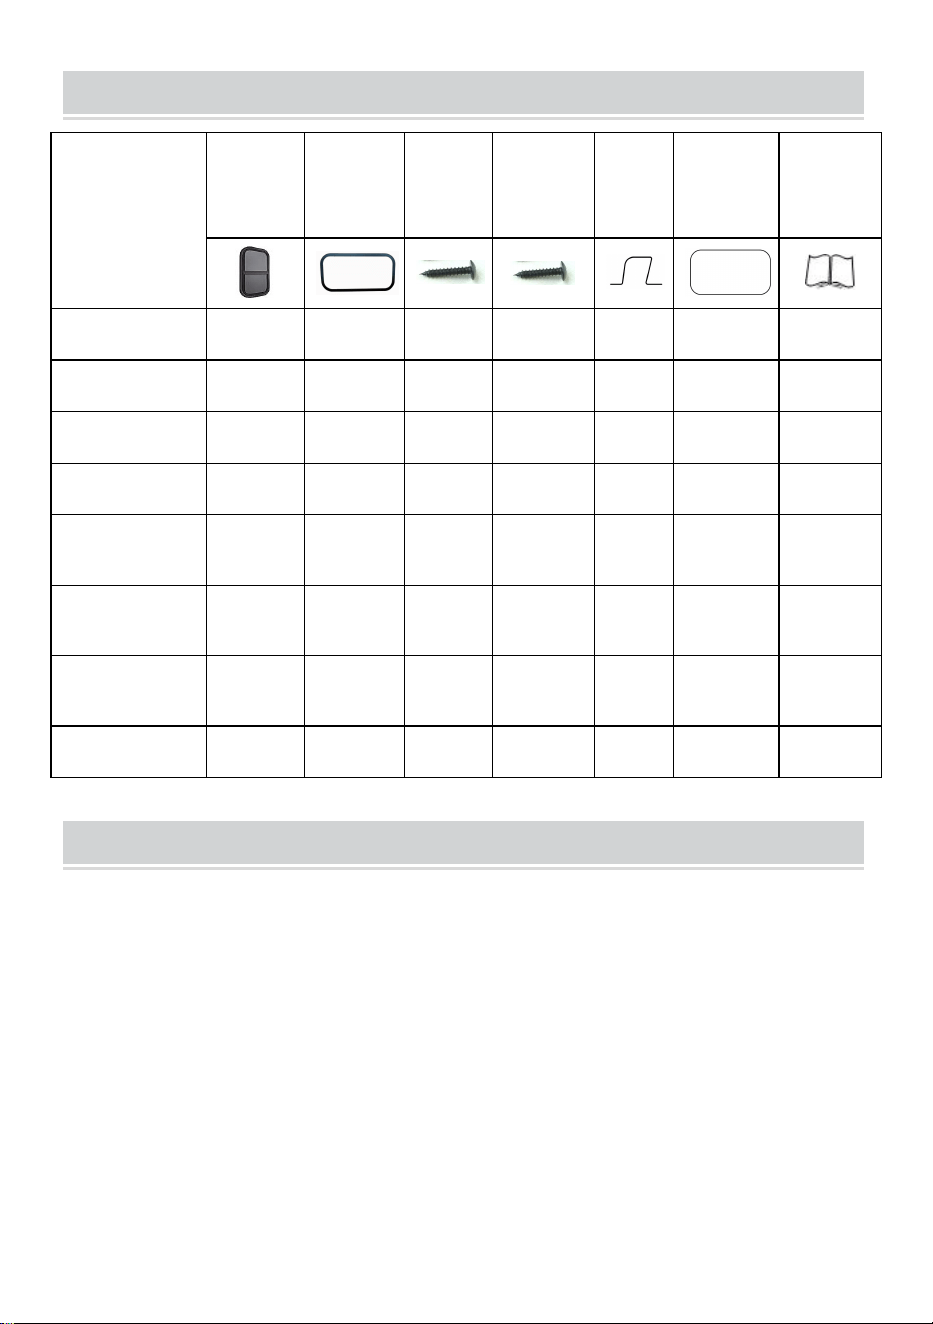
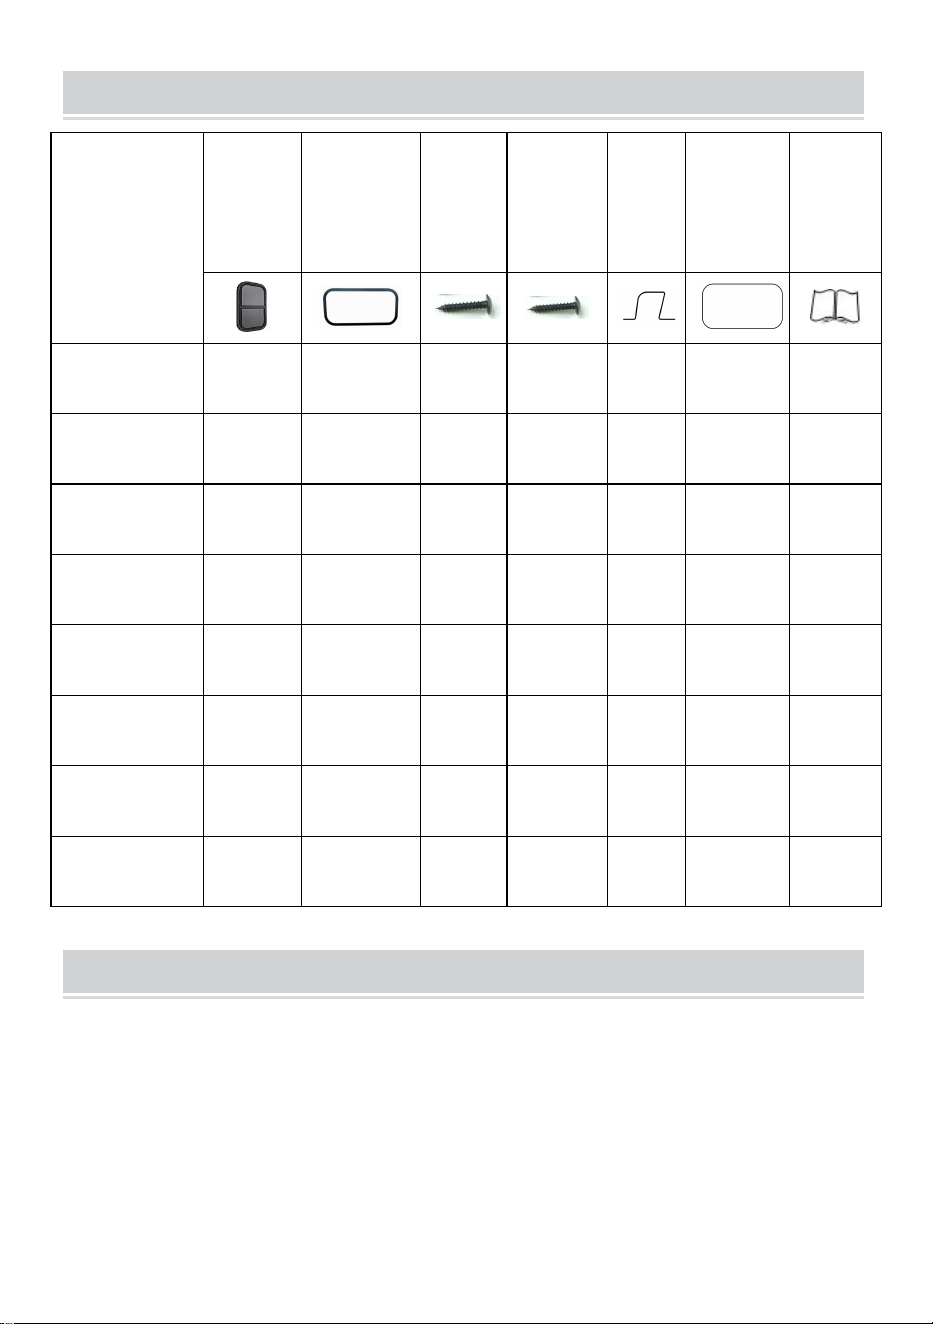
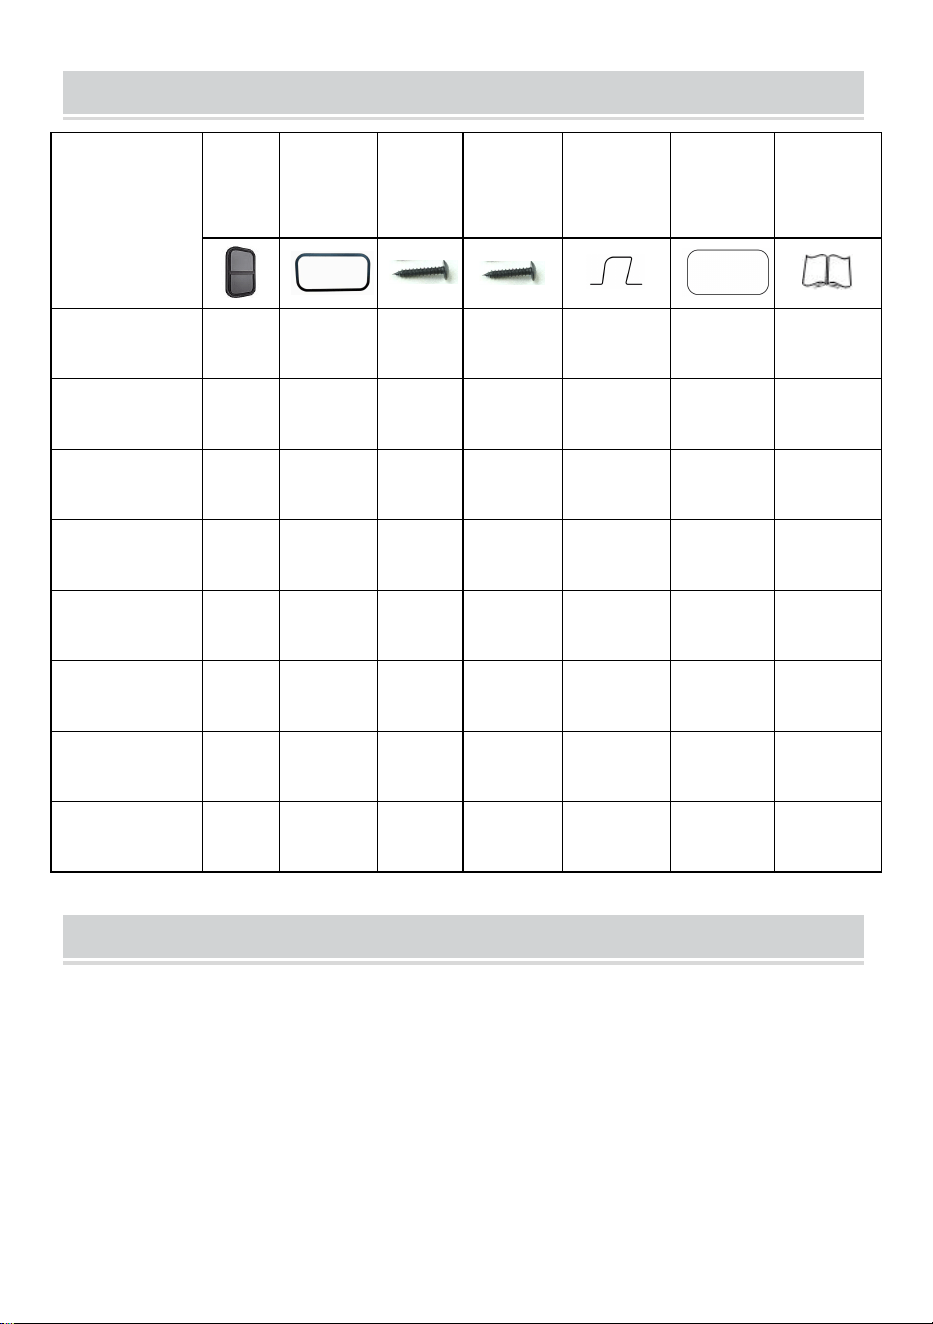
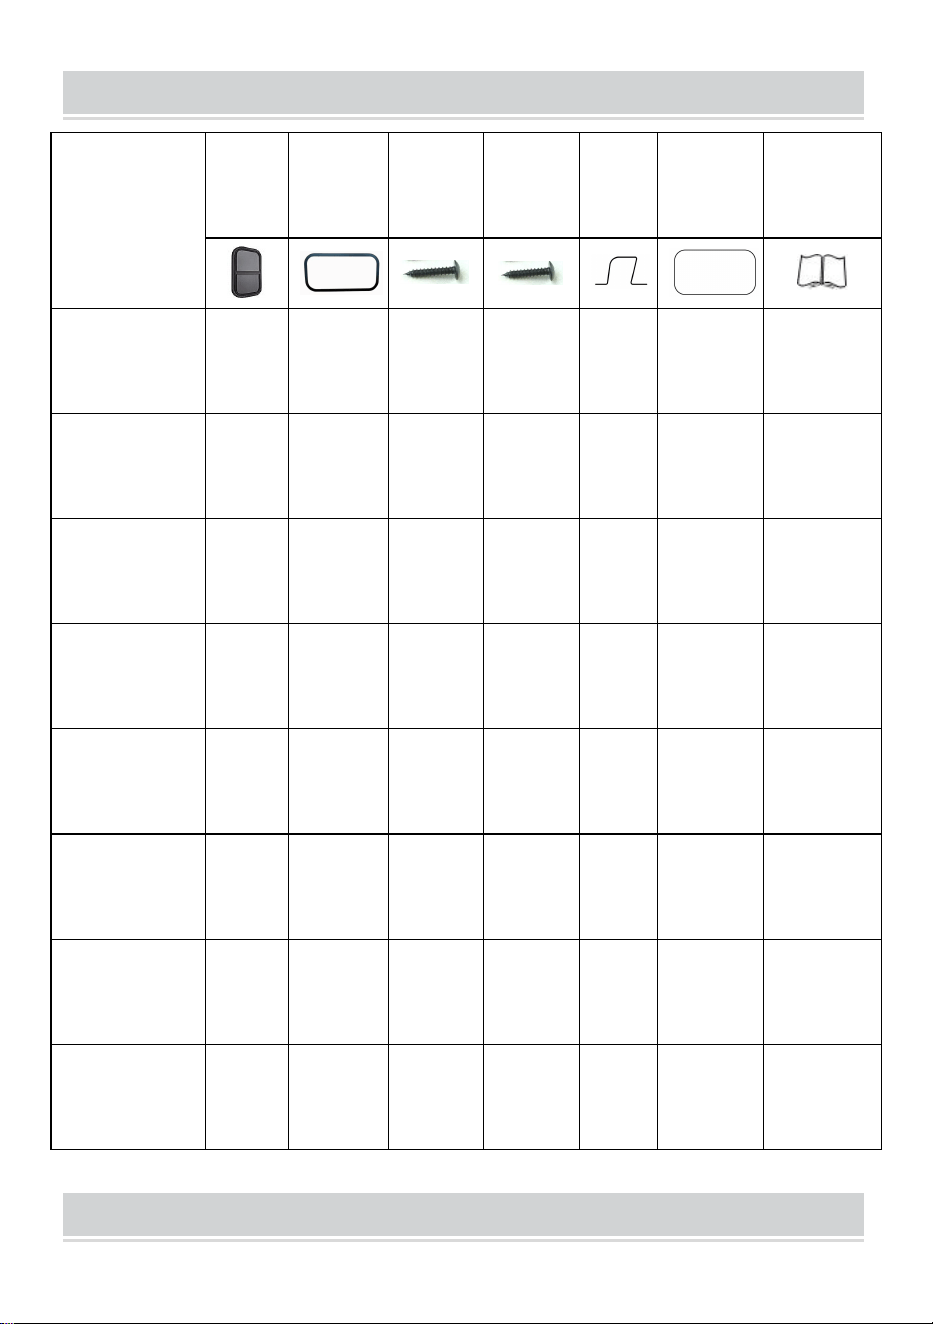
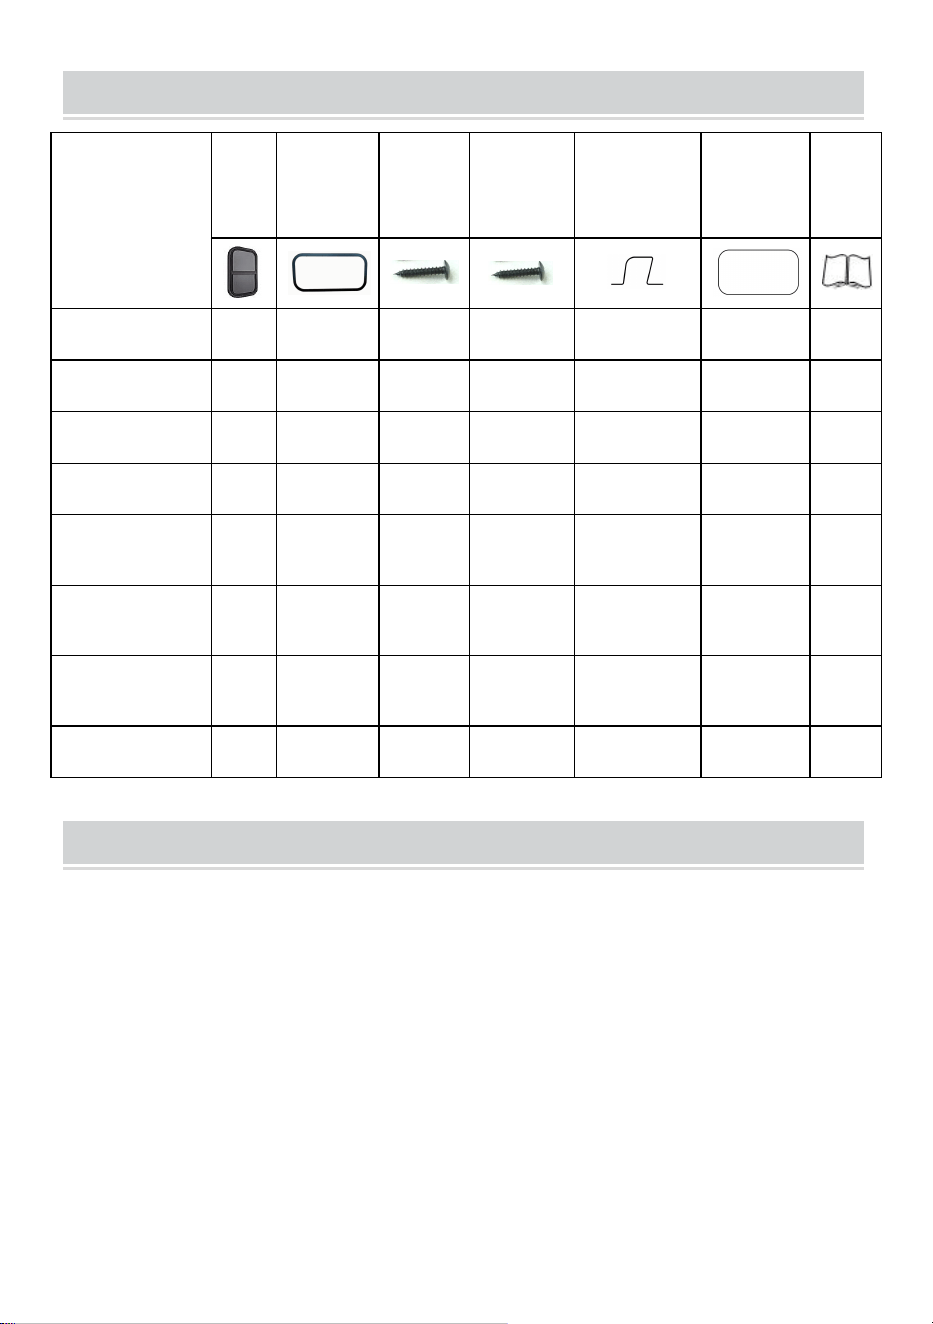
PARTS LIST
Model
Window
Trim ring
M4.2x16
screw
M4.2x30
screw
Spring
buckle
Cardboard
template
Manual
SSTLC305x559
1PCS
1PCS
16PCS
16PCS
-
1PCS
1PCS
SSTLC305x610
1PCS
1PCS
16PCS
16PCS
-
1PCS
1PCS
SSTLC356x406
1PCS
1PCS
16PCS
16PCS
-
1PCS
1PCS
SSTLC356x559
1PCS
1PCS
16PCS
16PCS
-
1PCS
1PCS
SSXCWT762x508
1PCS
1PCS
20PCS
-
4PCS
1PCS
1PCS
SSXCWT762x559
1PCS
1PCS
20PCS
-
4PCS
1PCS
1PCS
SSXCWT914x559
1PCS
1PCS
20PCS
-
4PCS
1PCS
1PCS
SSTLC610x508
1PCS
1PCS
20PCS
20PCS
-
1PCS
1PCS
INSTALLATION INSTRUCTIONS
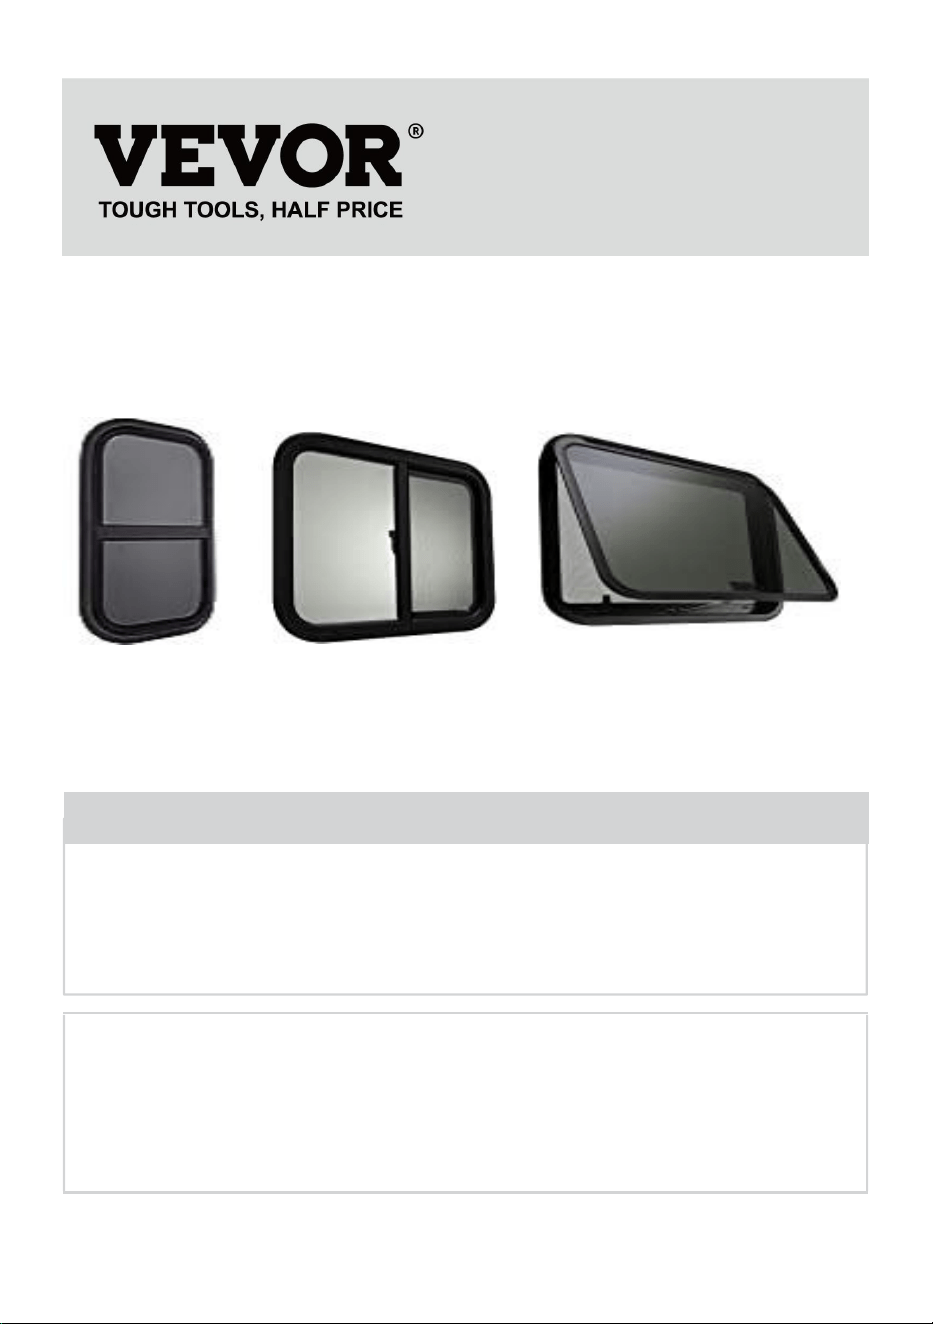
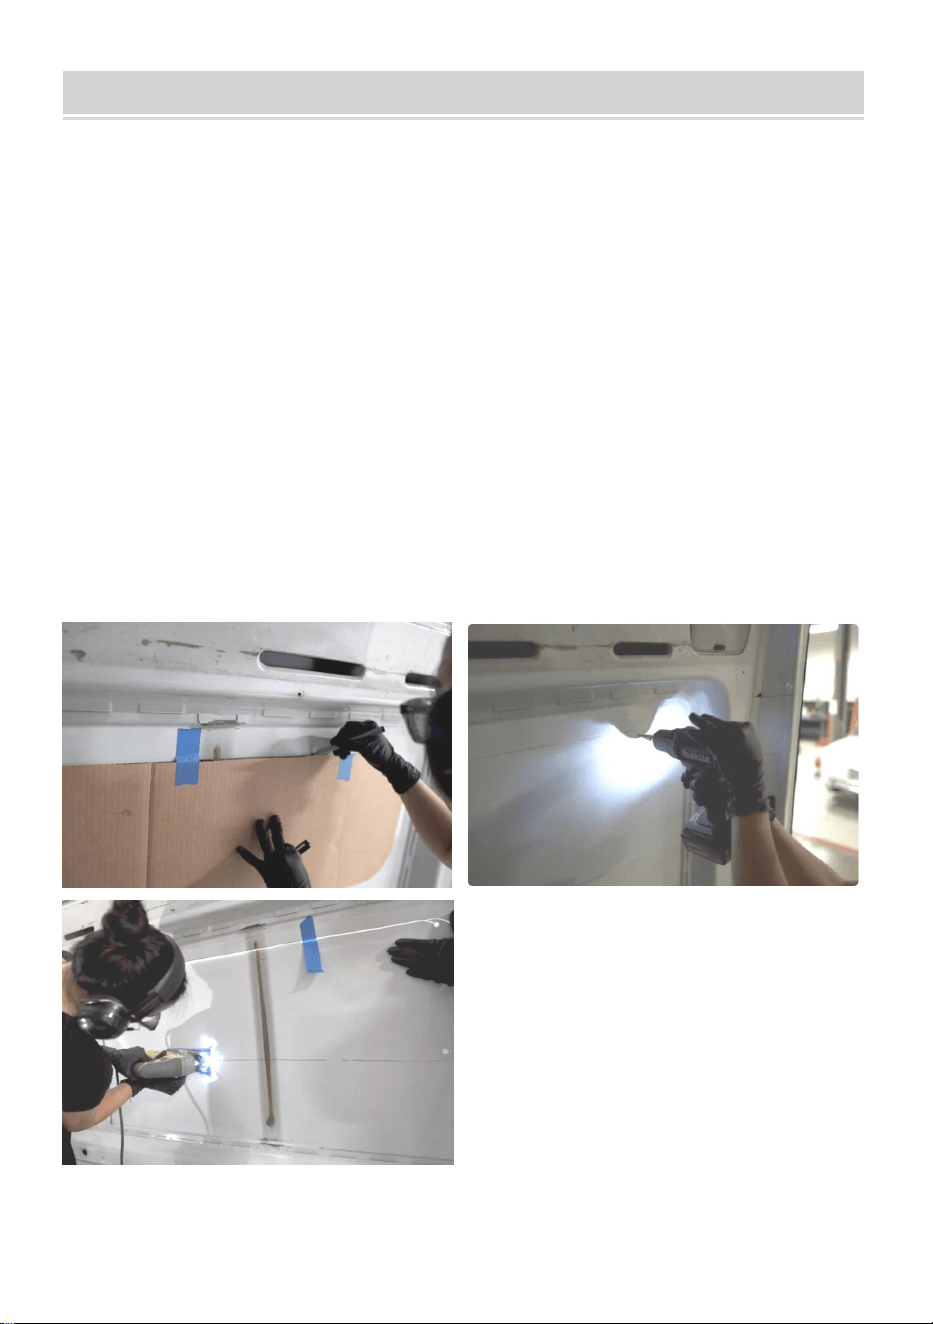
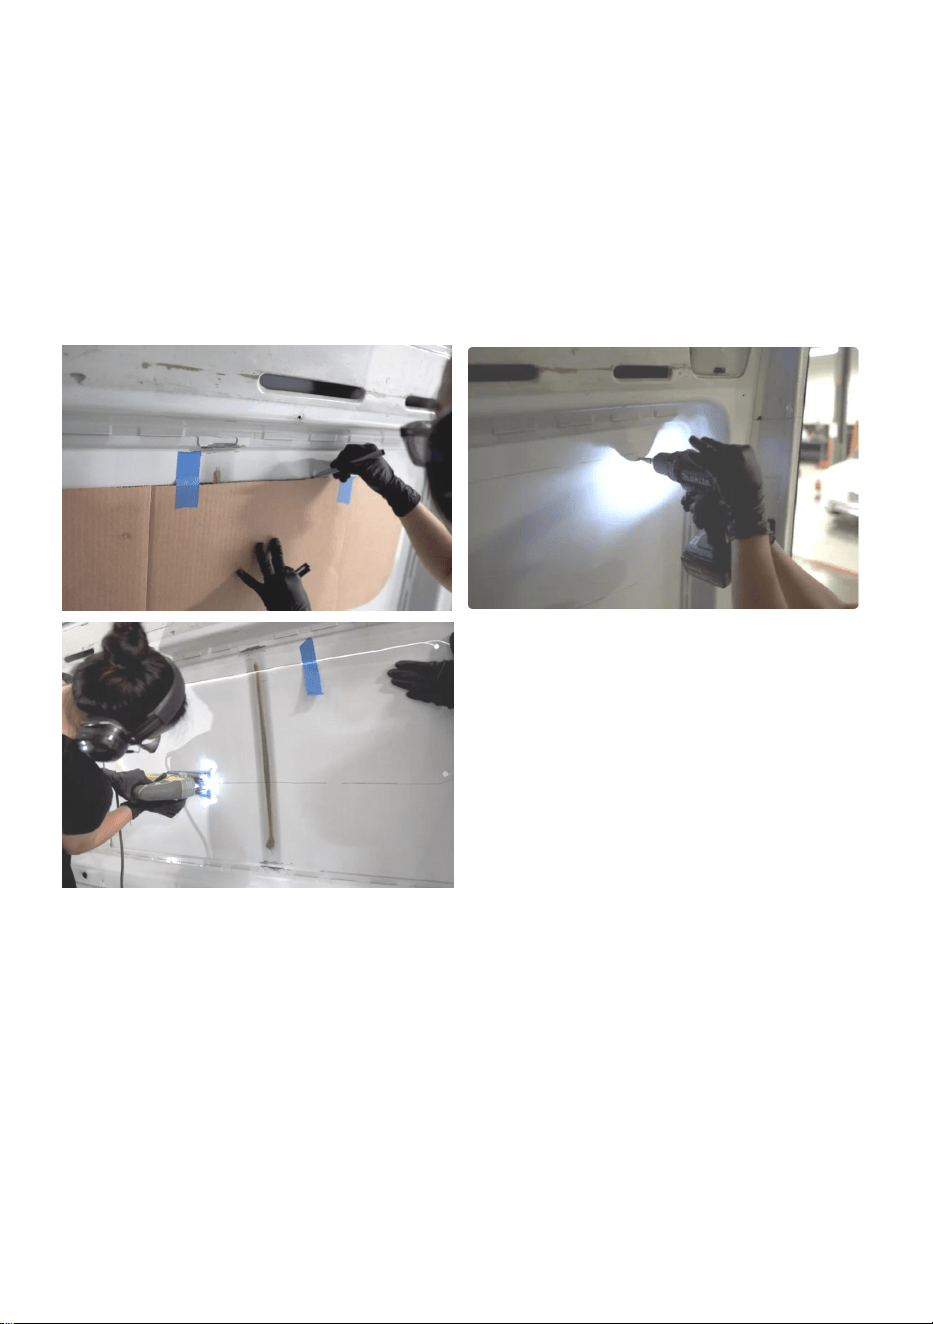
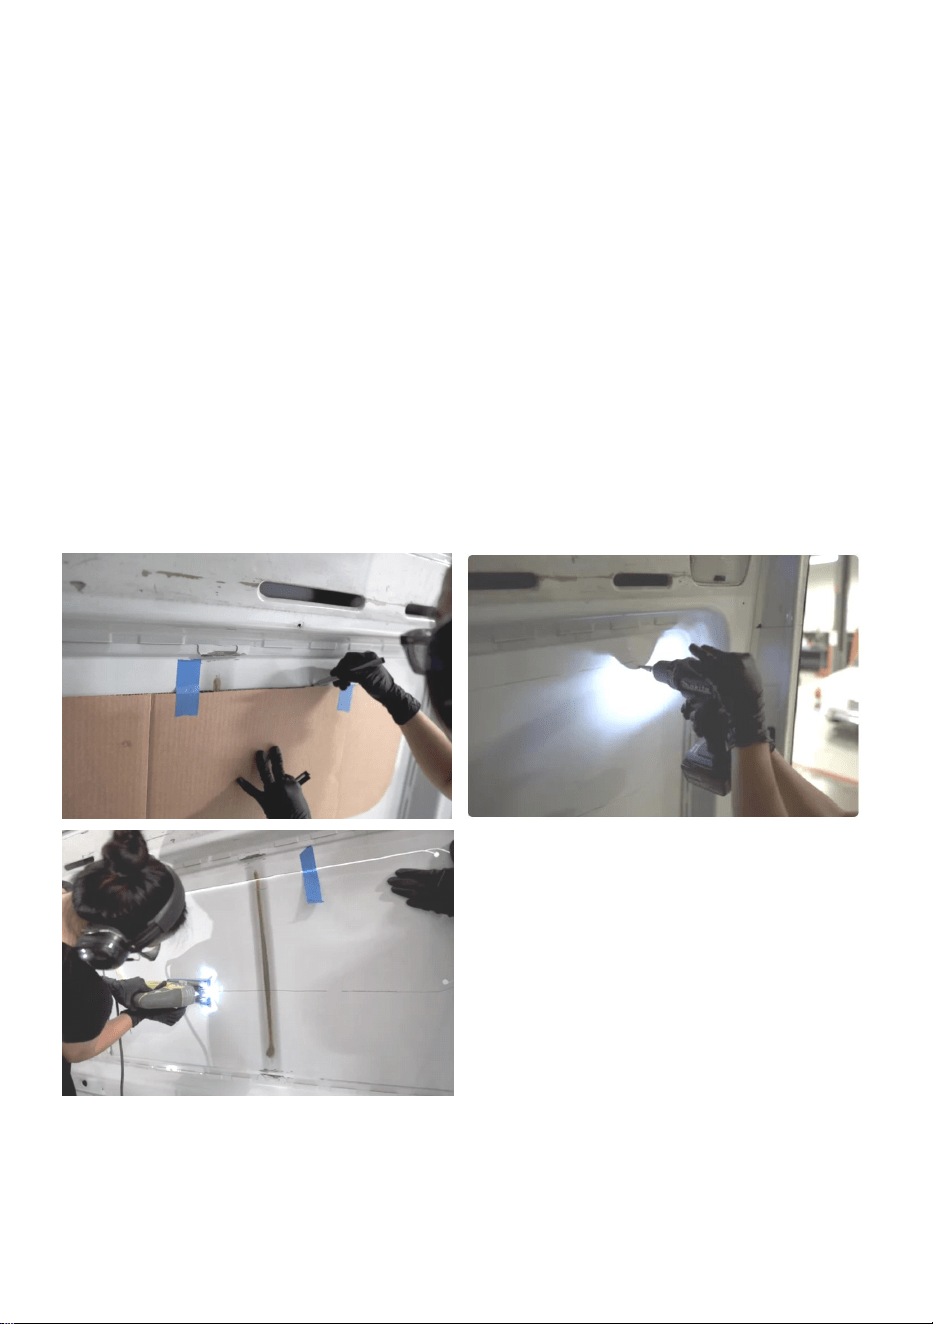
Step 1. Prepare the window opening.
If you are installing a replacement window you will begin by removing the
old window. To do this, remove all the screws around the perimeter of the
window frame (inside the vehicle). Once the screws are removed, the
window is pushed out of the opening applying force from the inside out.
Once the window is out of the hole, you will have to carefully remove any
residual sealant that is stuck to the outside wall.
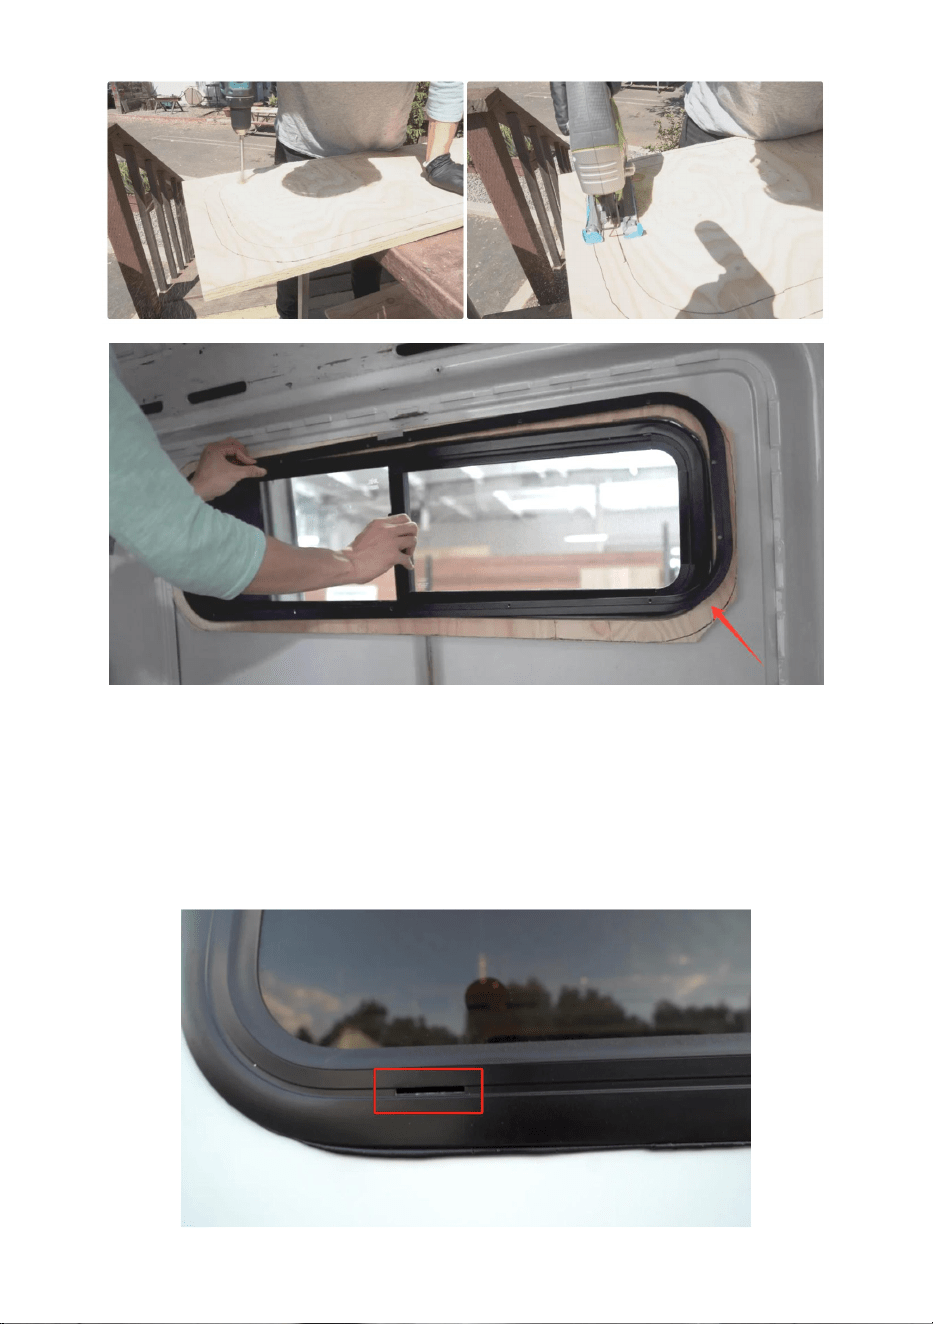
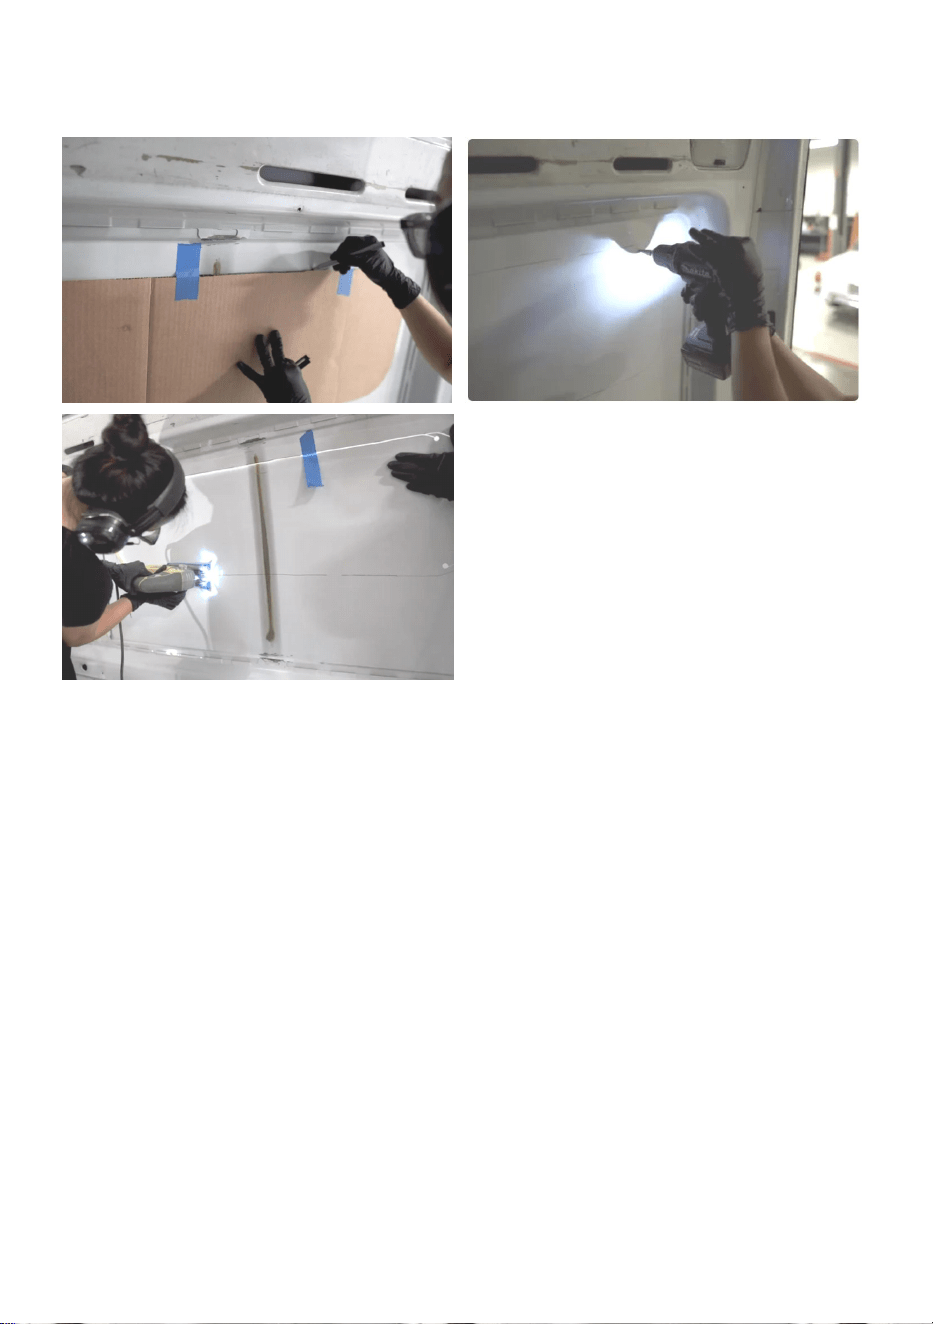
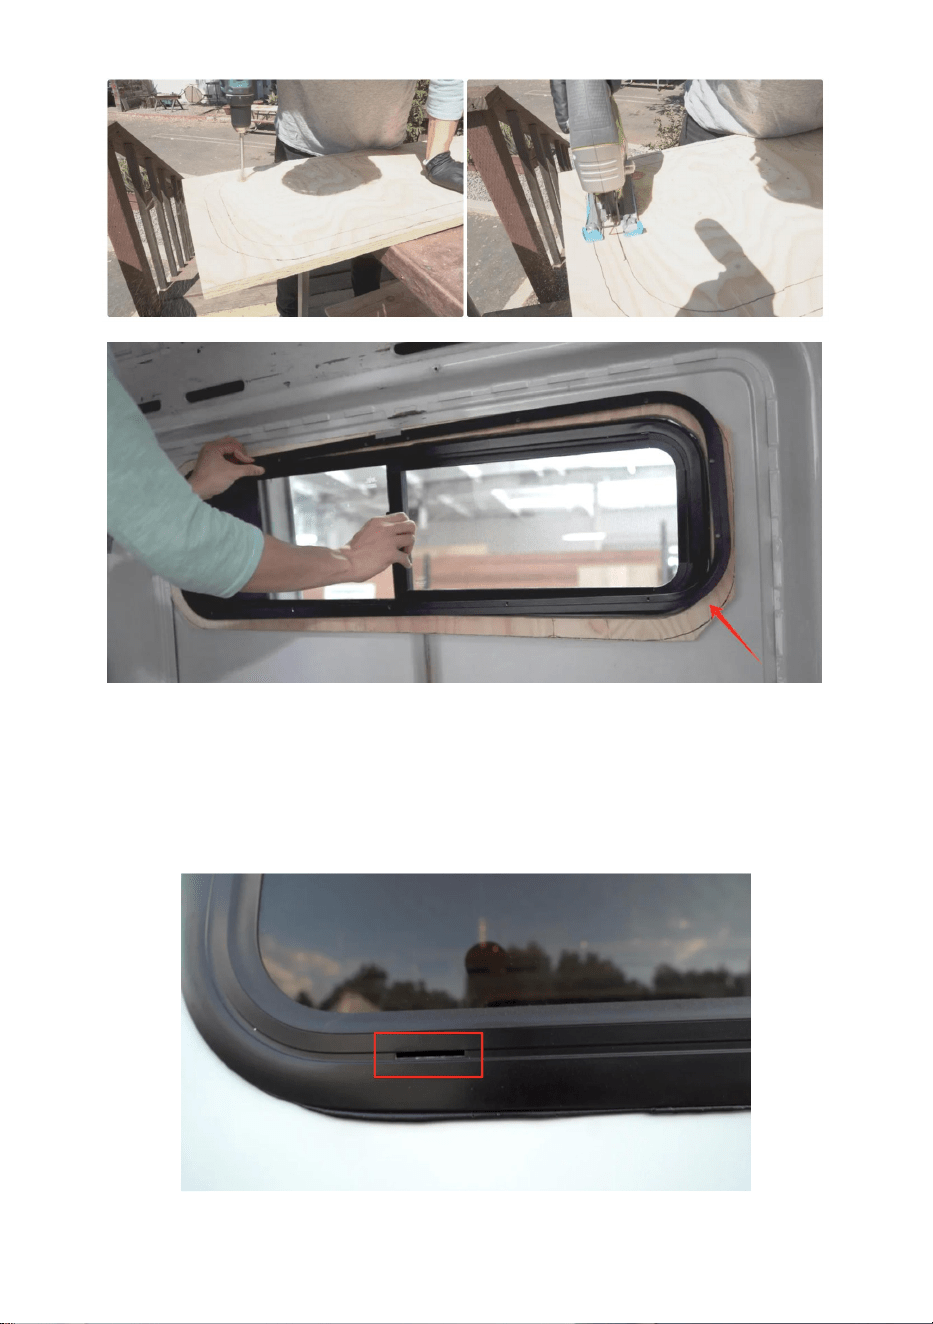
If you are installing a window in a new opening, start by tape cardboard
template to desired location and trace around template. Remove template
and drill holes near each corner with step bit to fit jigsaw blade. Follow
along the marked line until cutout is complete.
- 4 -
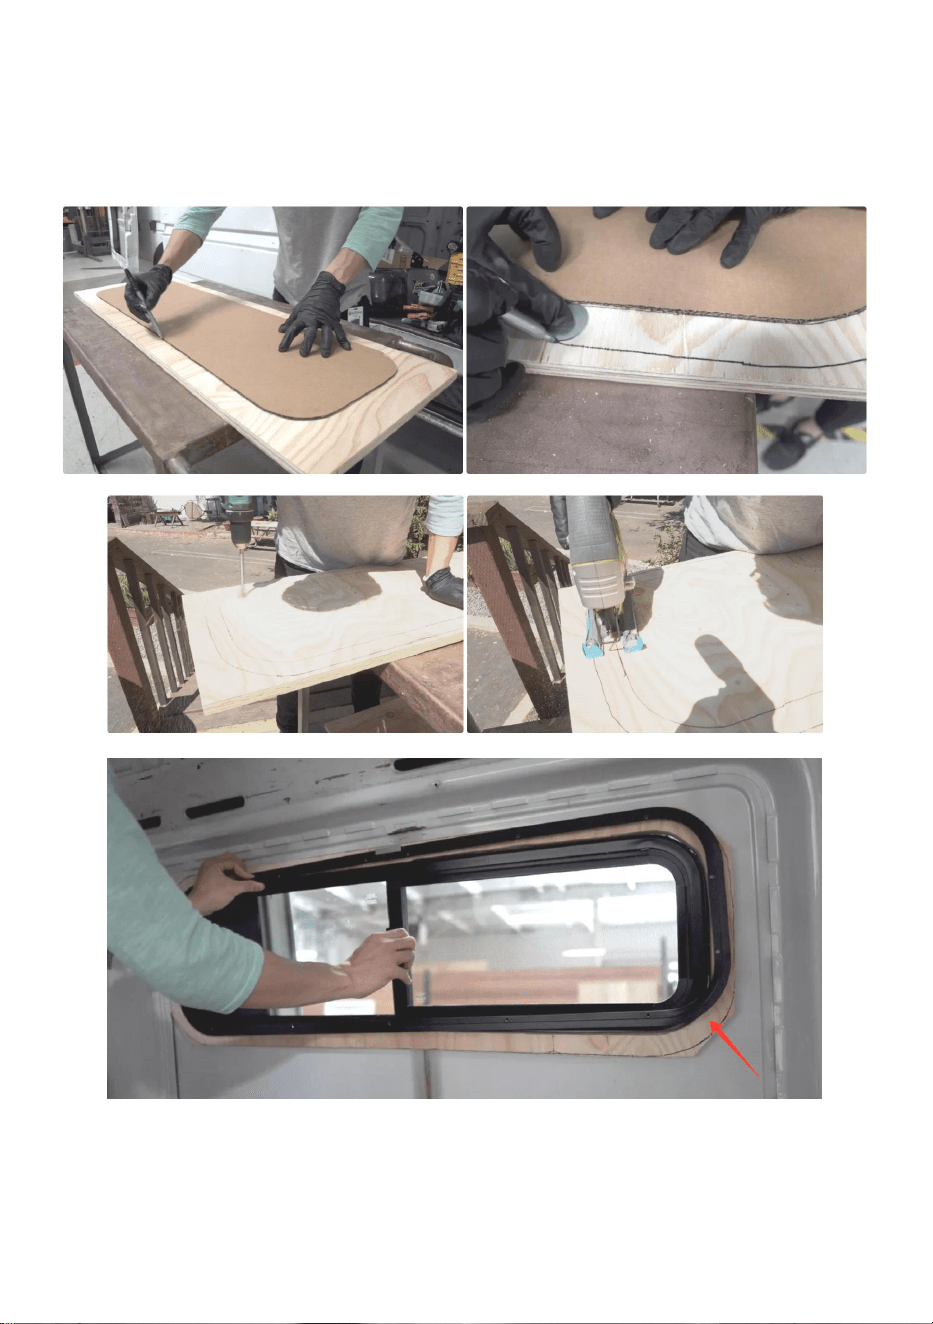
Step 2. Make sure window fit.
Test fit the new window by simply placing it in the rough opening to ensure
a proper fit. The exterior window flange should overlap the opening by 3/8"
or more to provide a good seal to the sidewall. A small gap on the inside
between 1/8"-1/4" is expected.
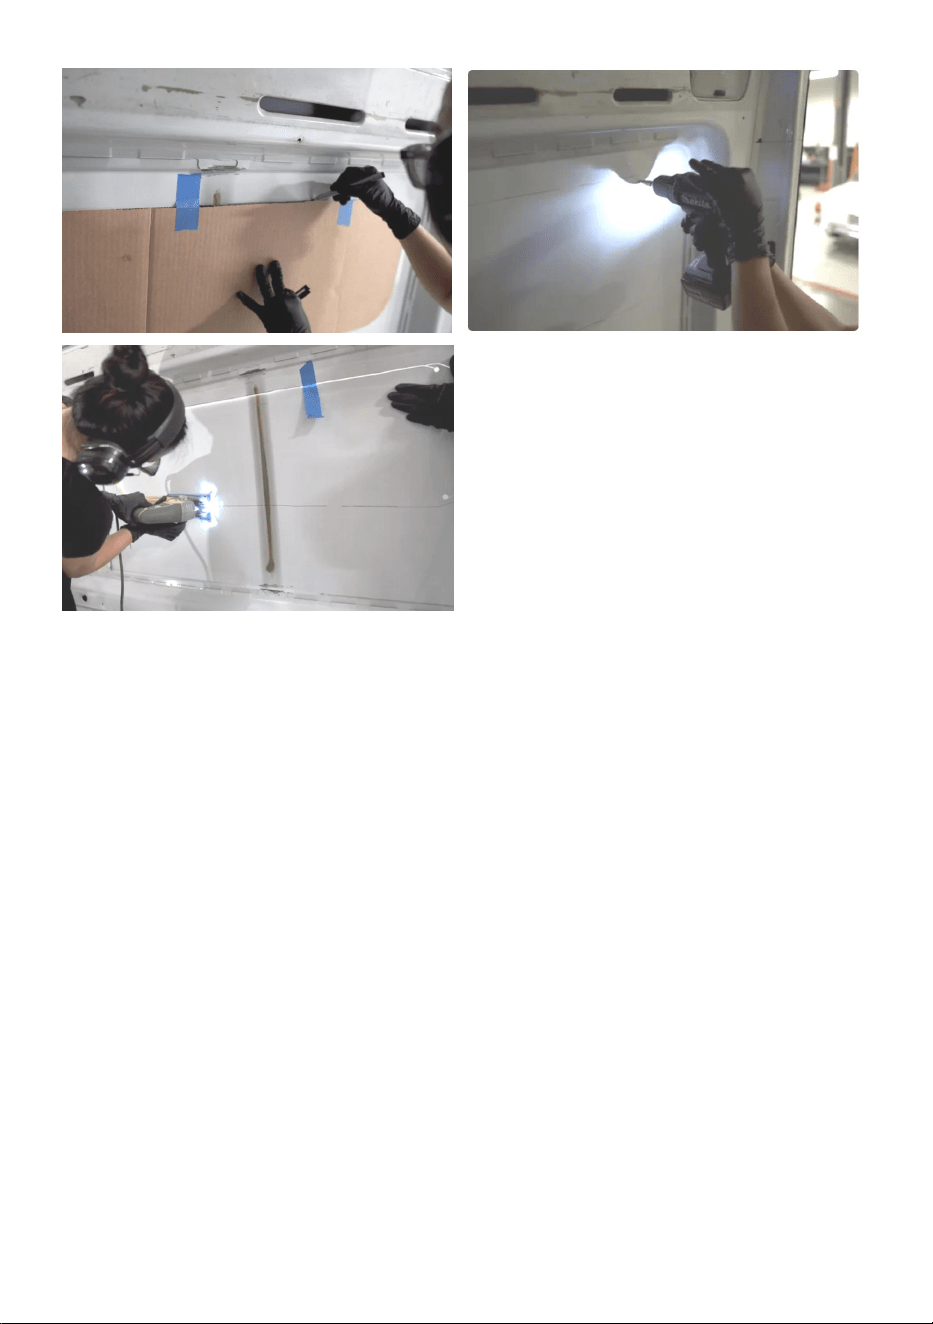
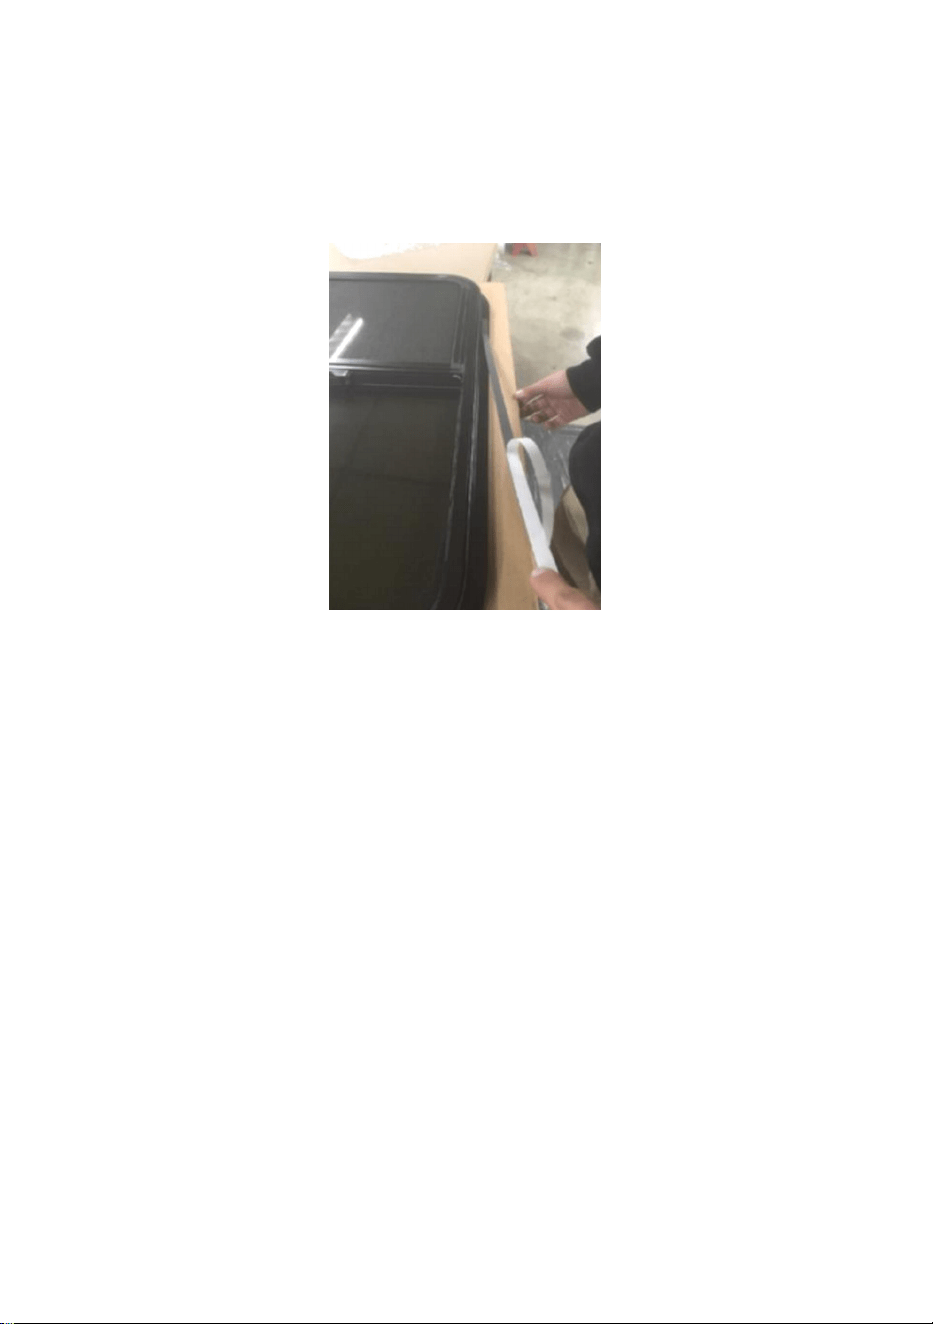
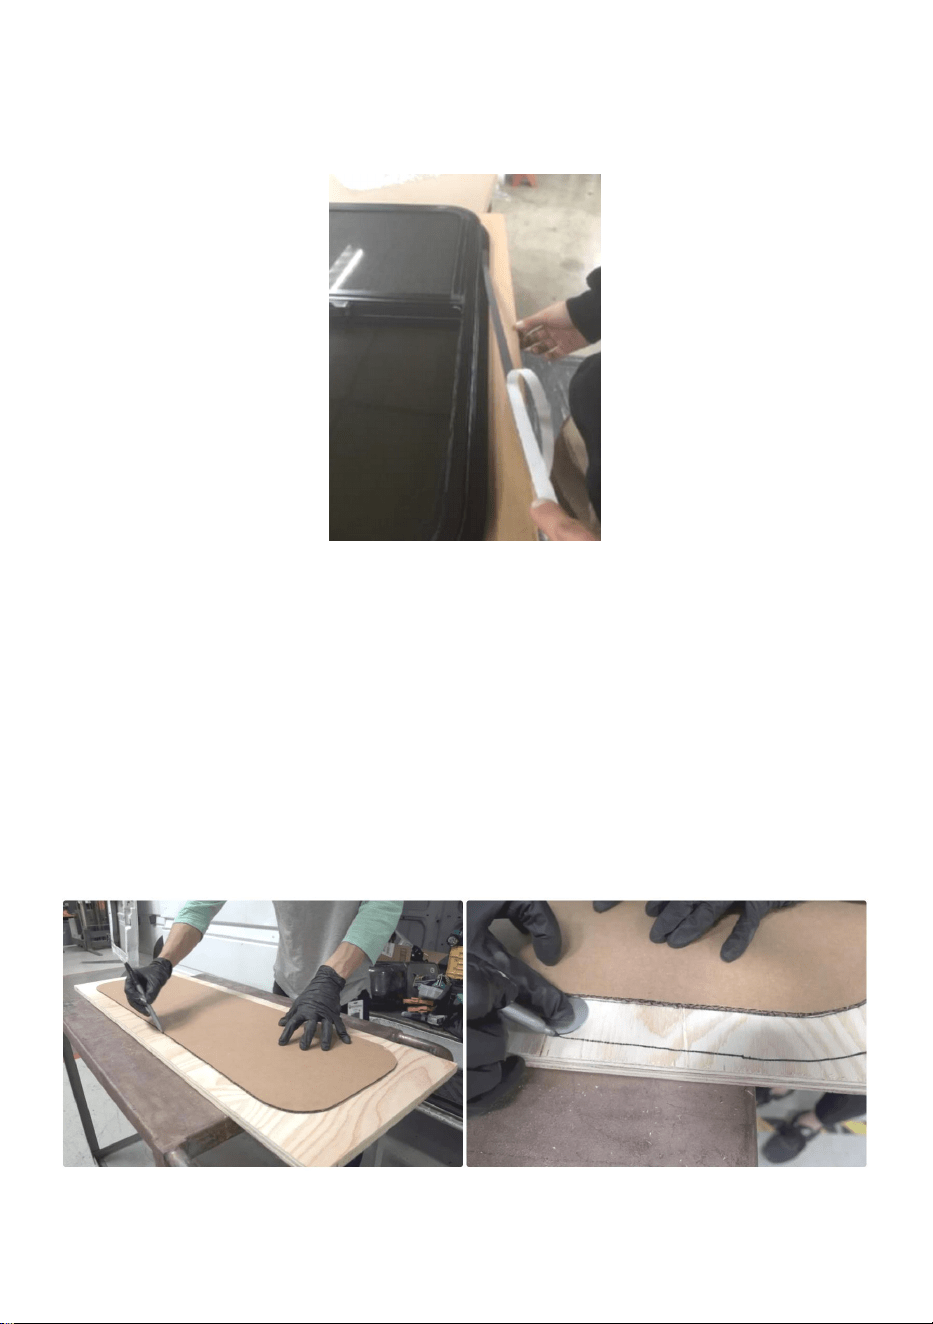
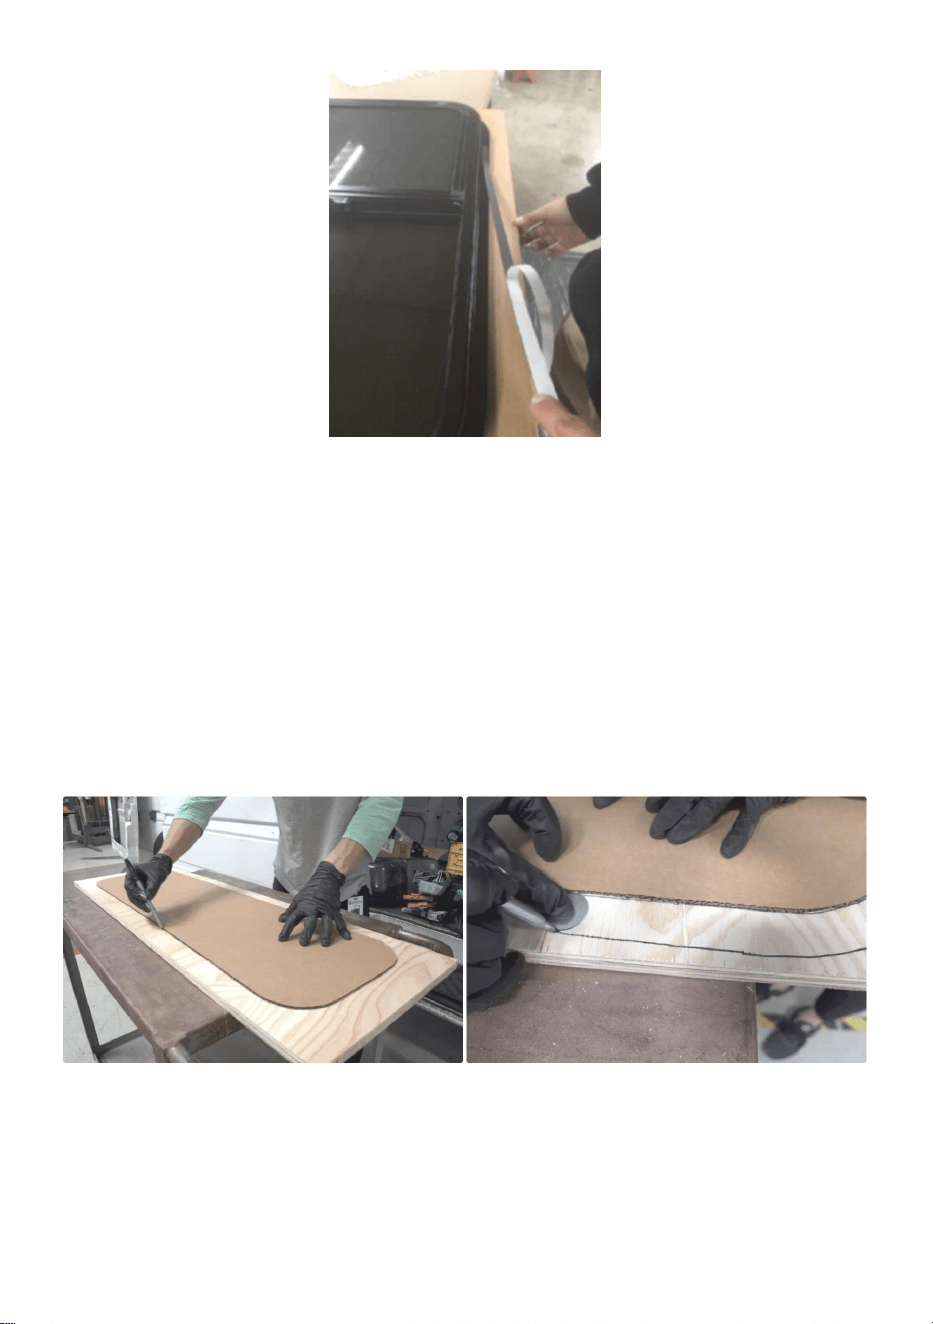
Step 3. Prepare and install sealant
Lay the new window face down on a soft surface careful not to scratch it
and apply seal (Users need to purchase seals of appropriate thickness
according to their actual needs). Start in the center of the bottom side of
the window and apply the seal tape flush all the way around the perimeter
until the ends meet (Note: There should not be a gap where the seal ends
meet).
- 5 -
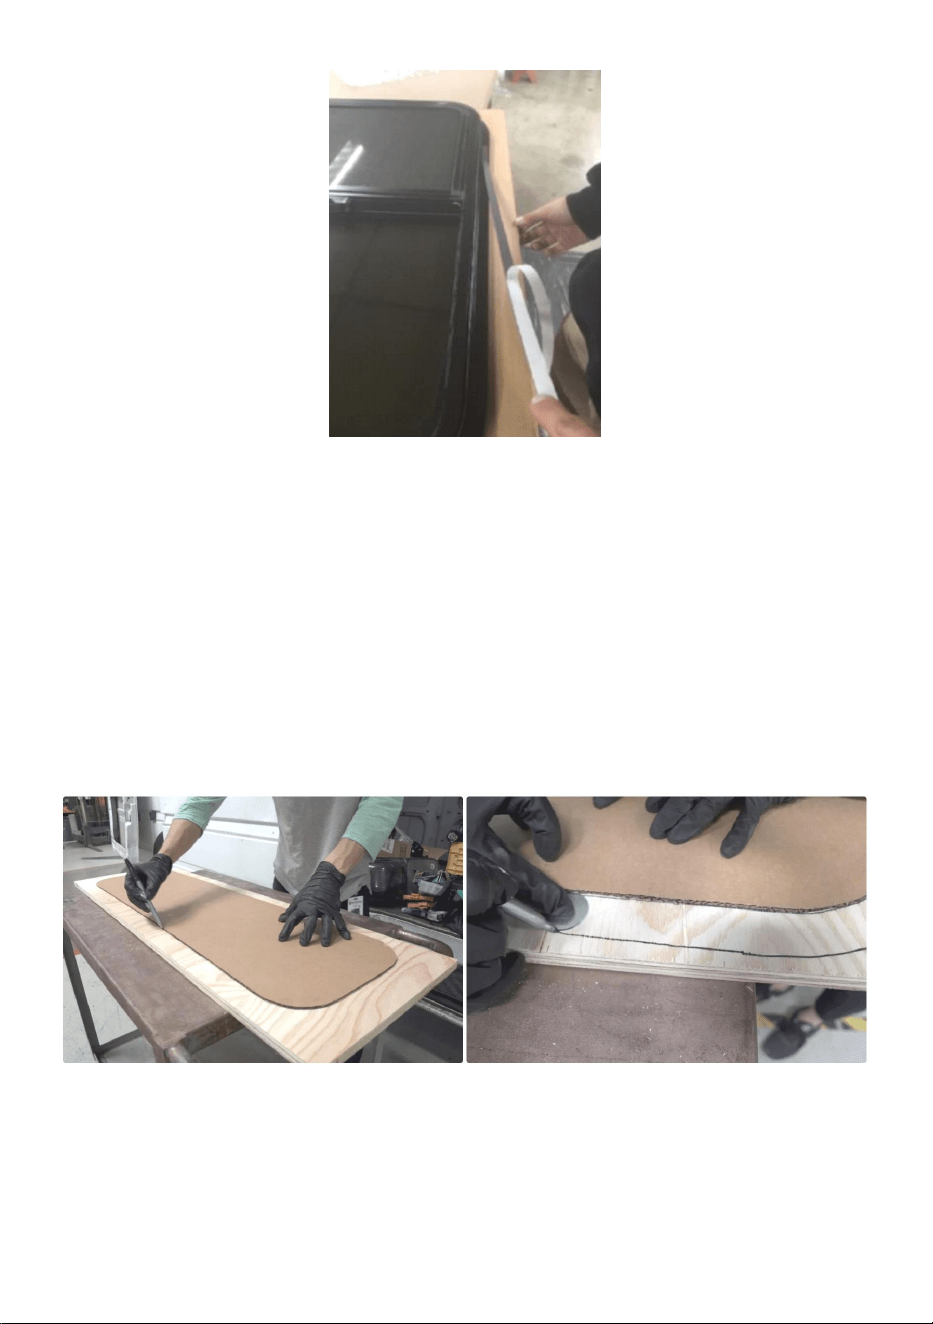
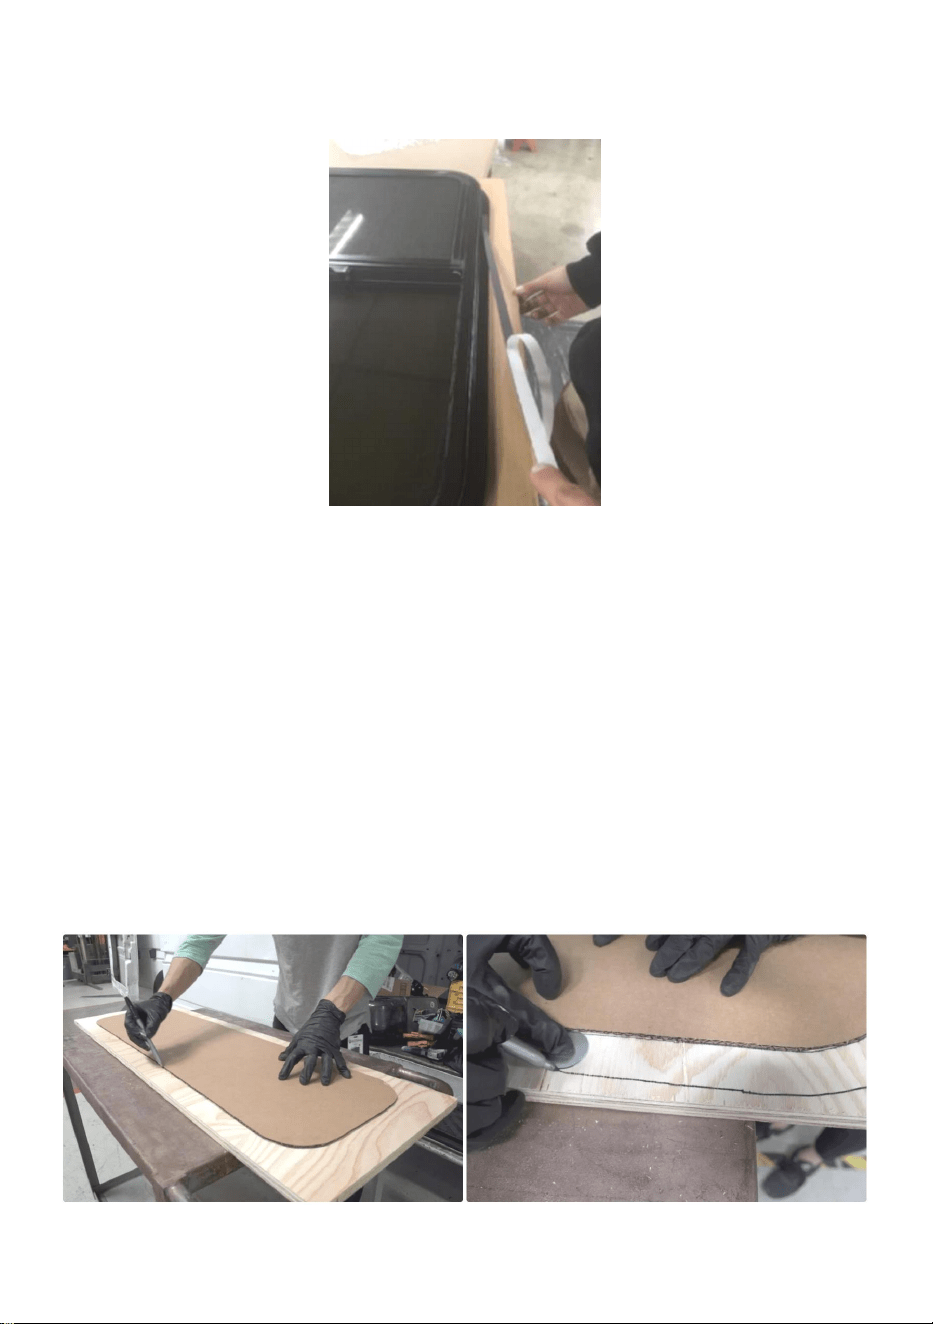
Step 4. Add cushion plates (when the thickness of the installed wall is less
than the product adaptation thickness, follow this step for installation)
According to the thickness of the product, purchase plywood of the
appropriate thickness, use a Cardboard template, draw a line along the
edge of the Cardboard template, and then use a 1-inch baffle washer as a
spacer to draw a boundary around the template.
Cut out the inside and we were left with a rectangular donut we can use to
fit between the window and the trim ring.
- 6 -
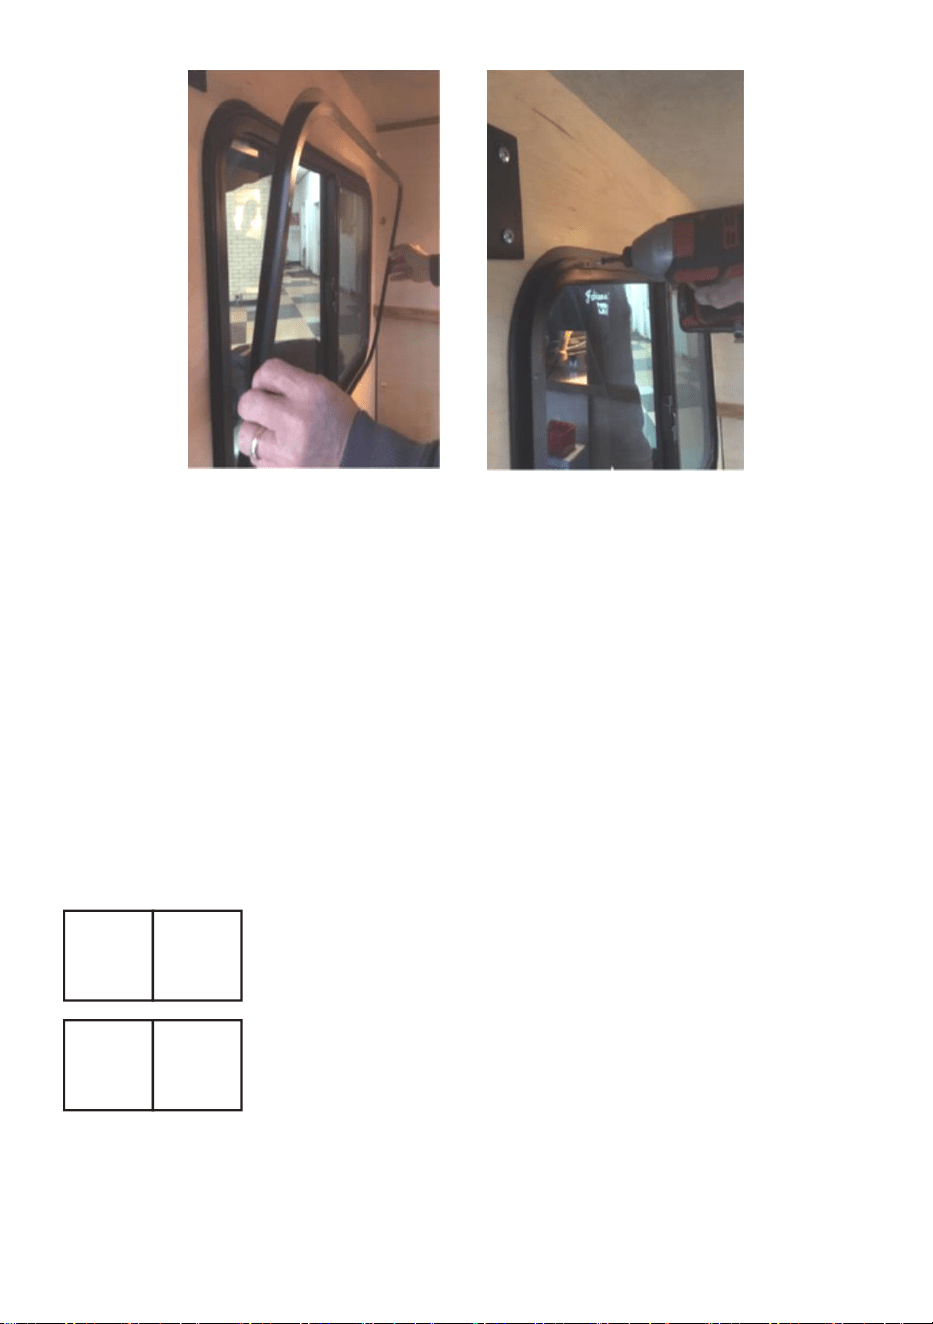
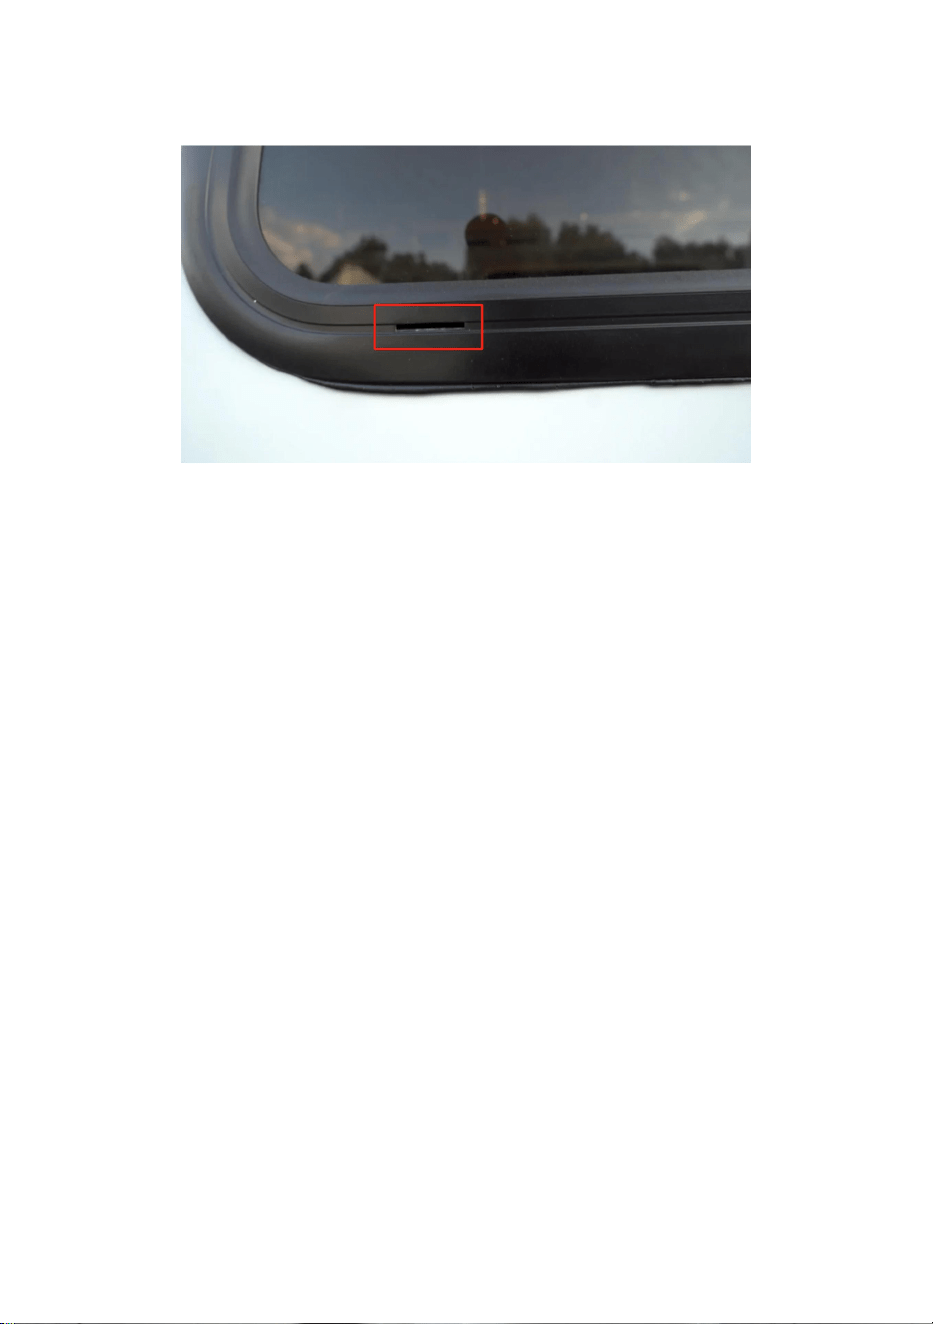
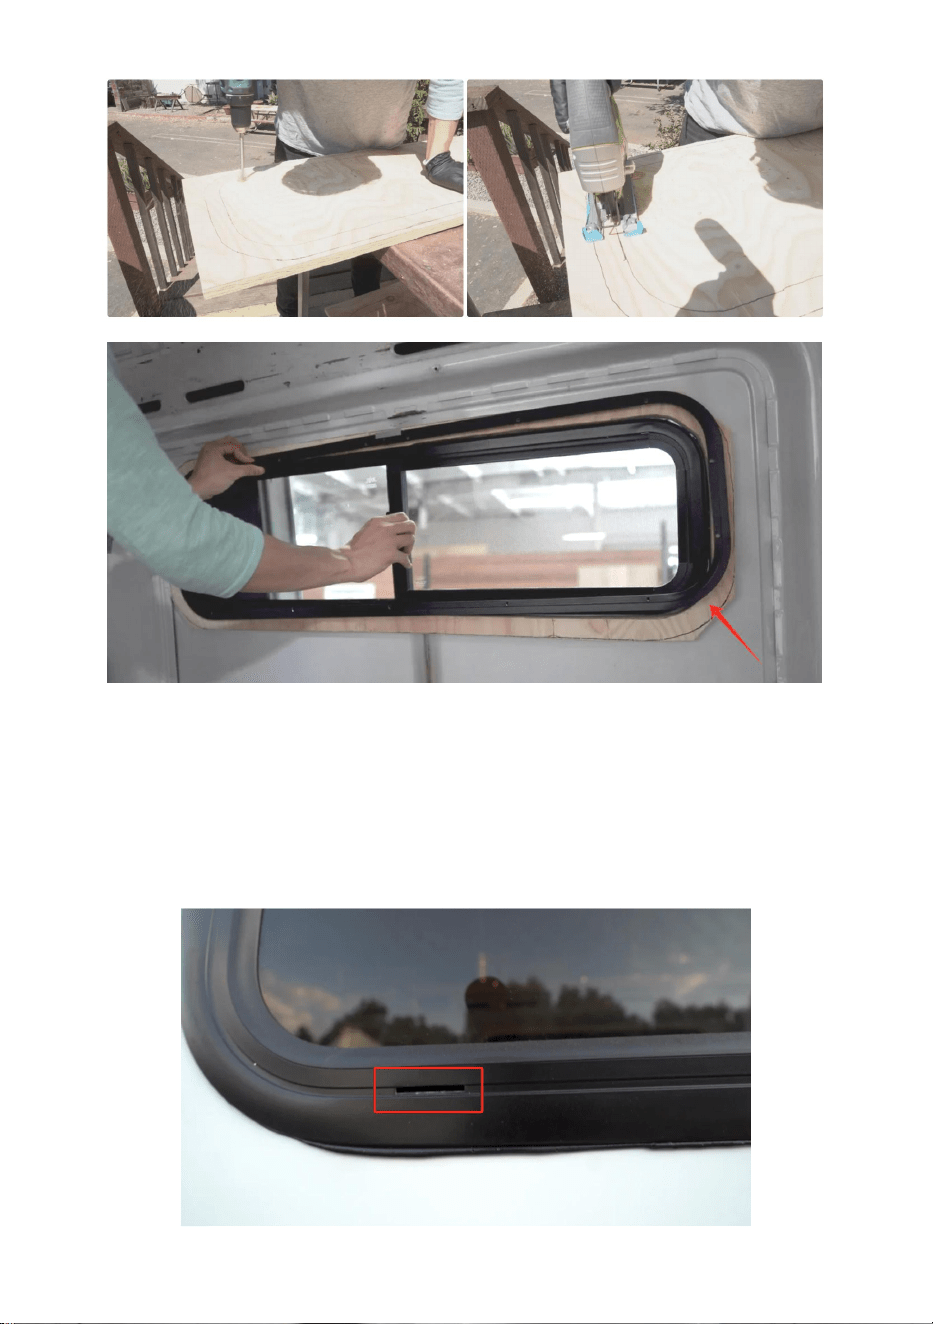
Step 5. Install the new window.
Place the window into the opening from outside the vehicle, while a second
person aligns the trim ring holes to the channel on the interior side of the
window. (Note: When installing Up and Down Sliding Windows and Left
and Right Sliding Windows, be sure to install with the drain facing
downwards)
- 7 -
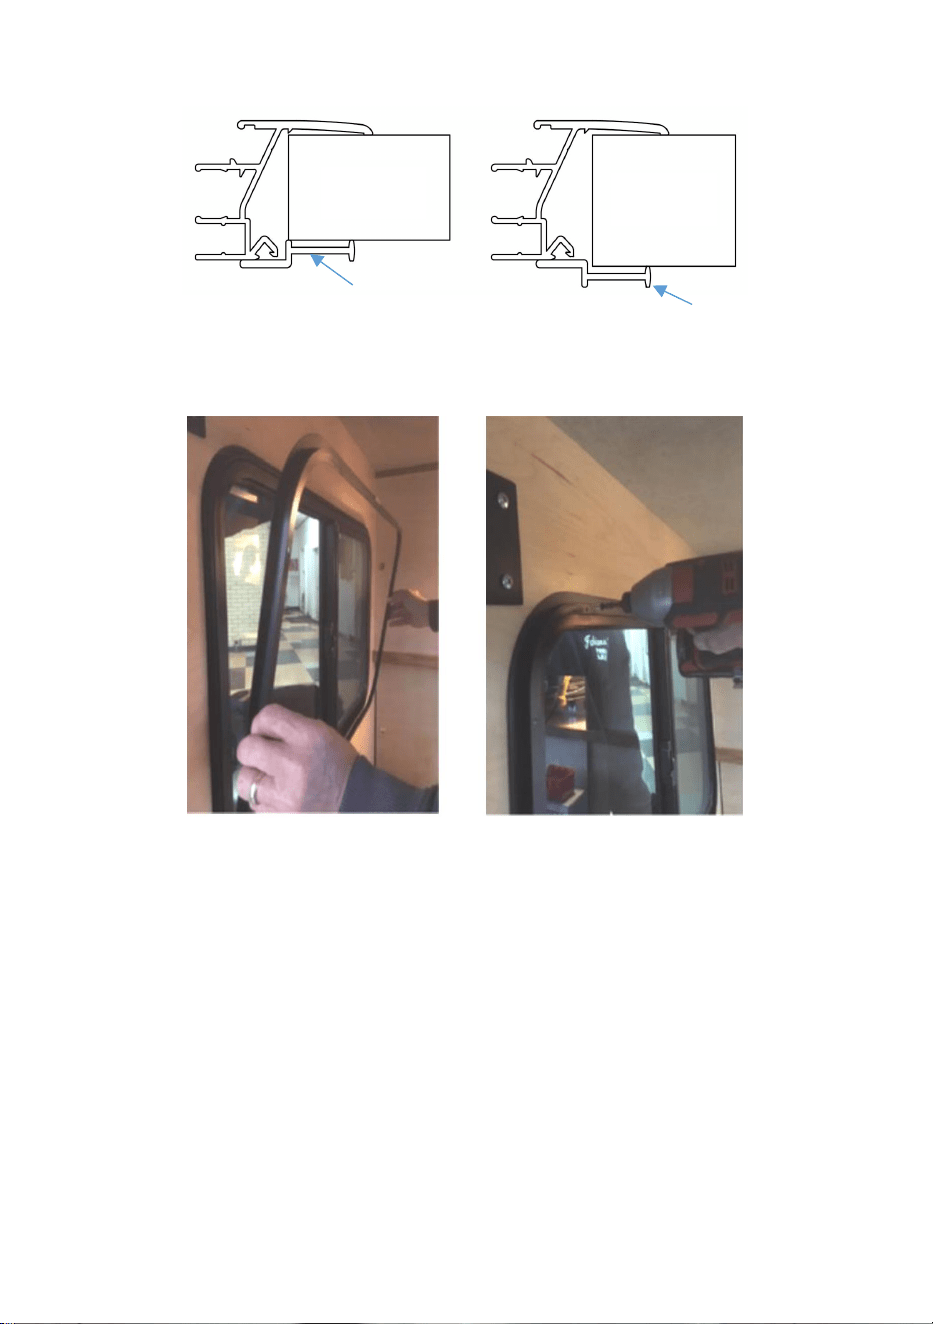
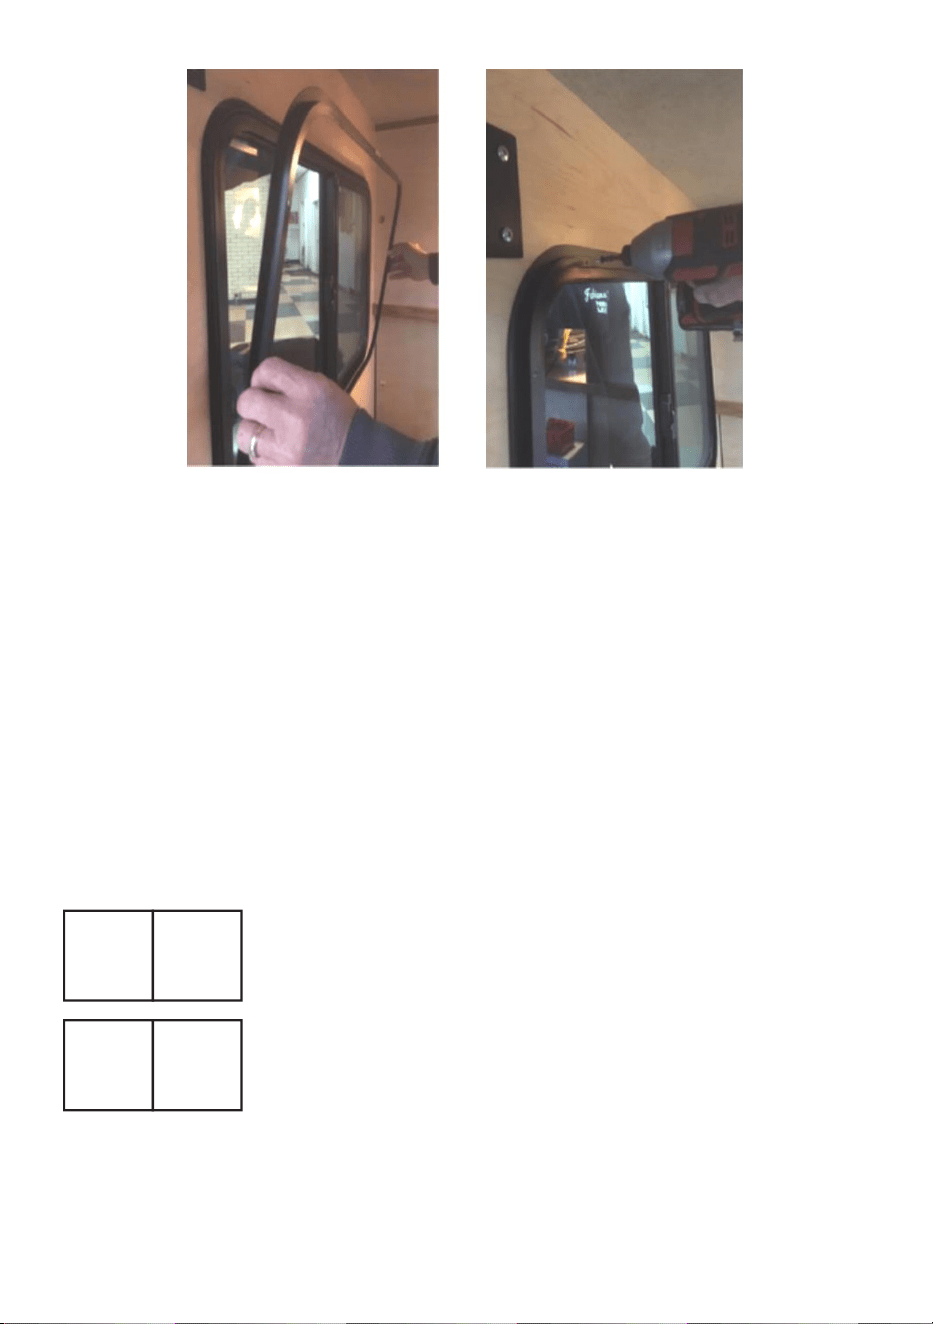
Begin fastening the trim ring with the provided screws, starting with the 4
corners first. Work your way around the perimeter gradually tightening
each screw as you go. This will gently pull the trim ring and window
together. (Note: Use only the screws provided with the new window, as
longer screws could damage the window frame).
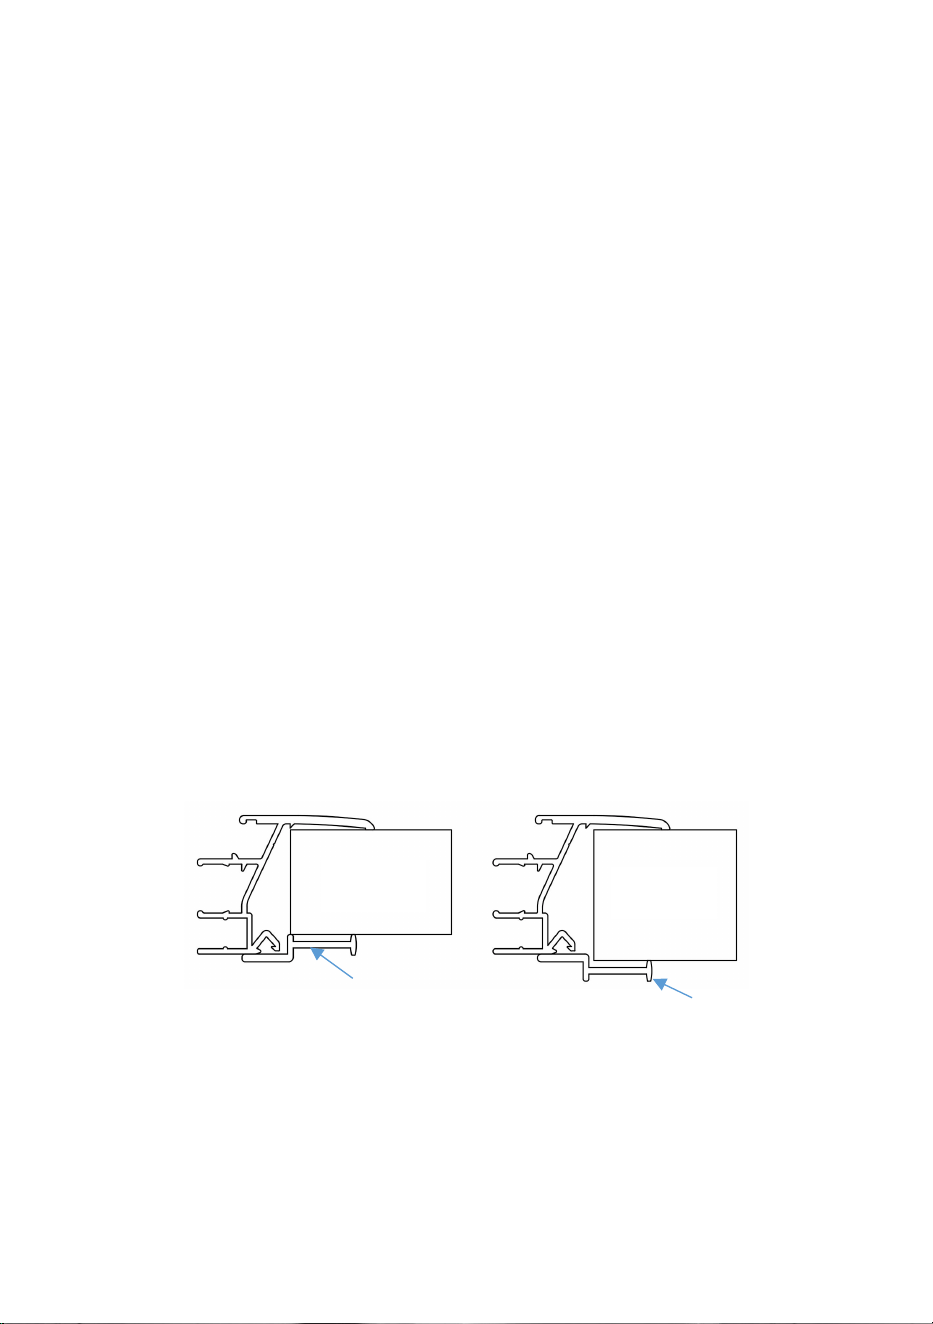
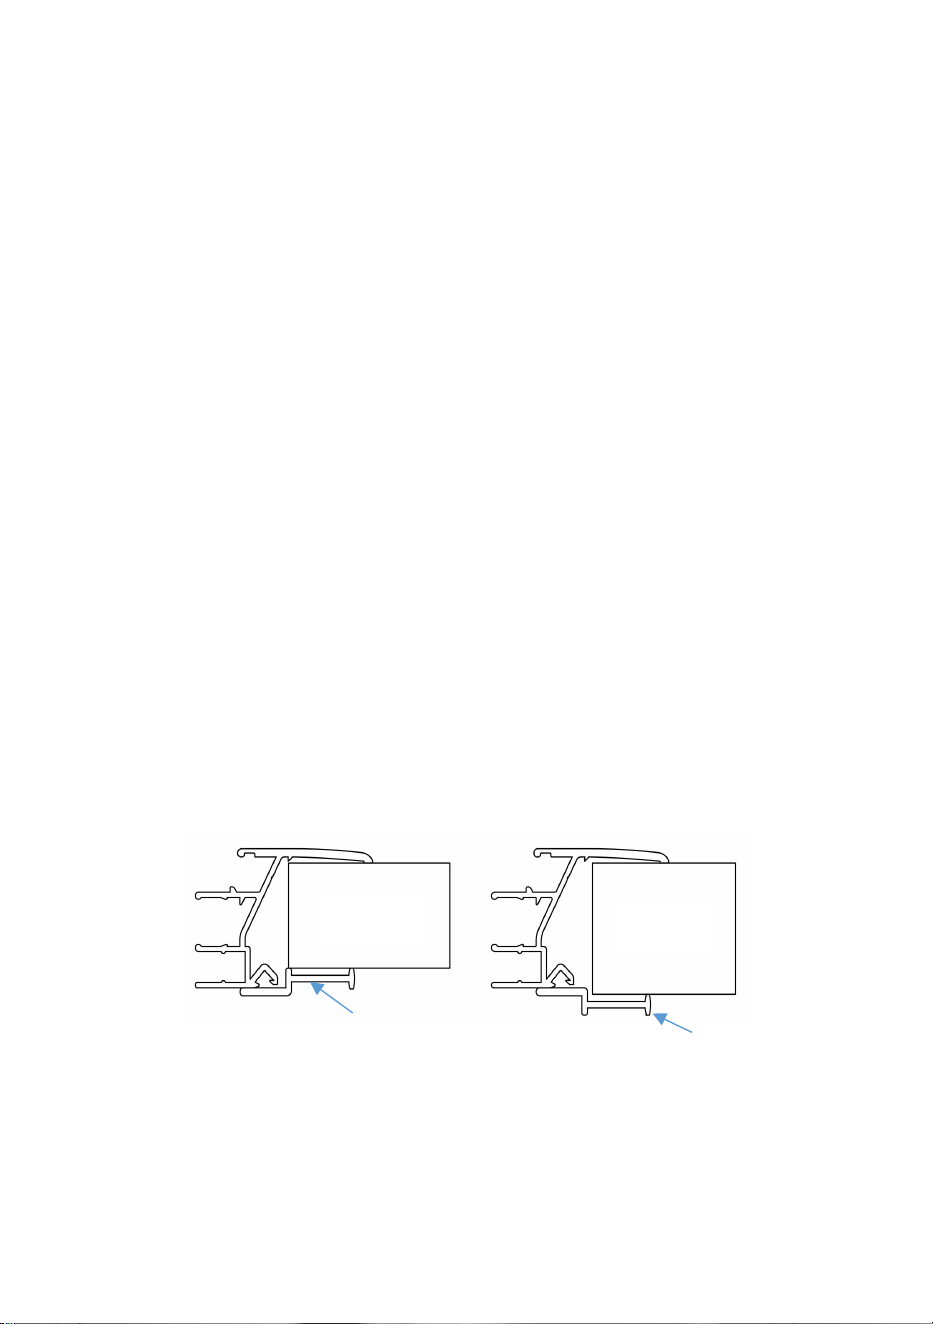
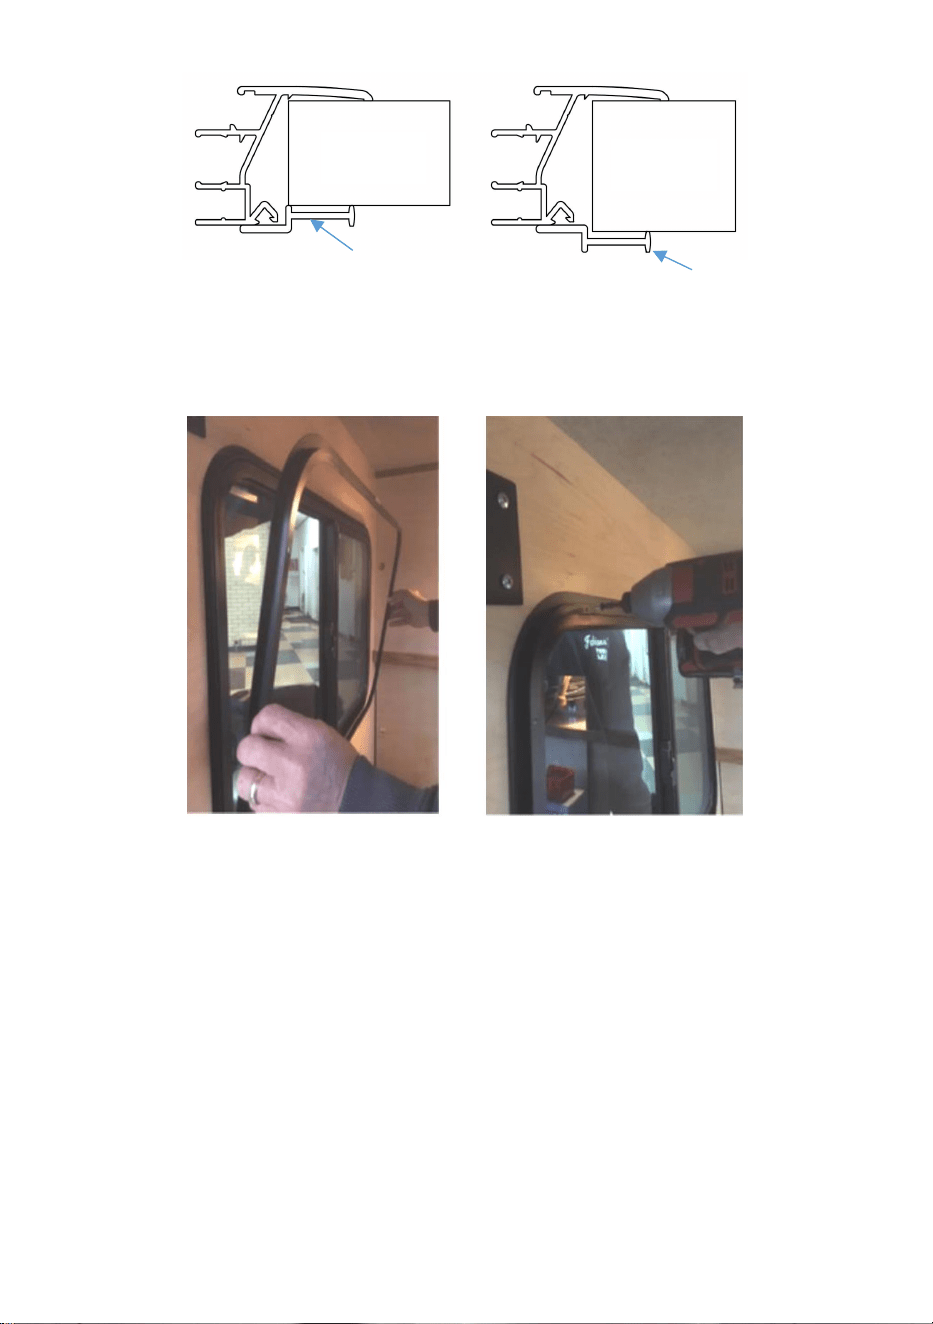
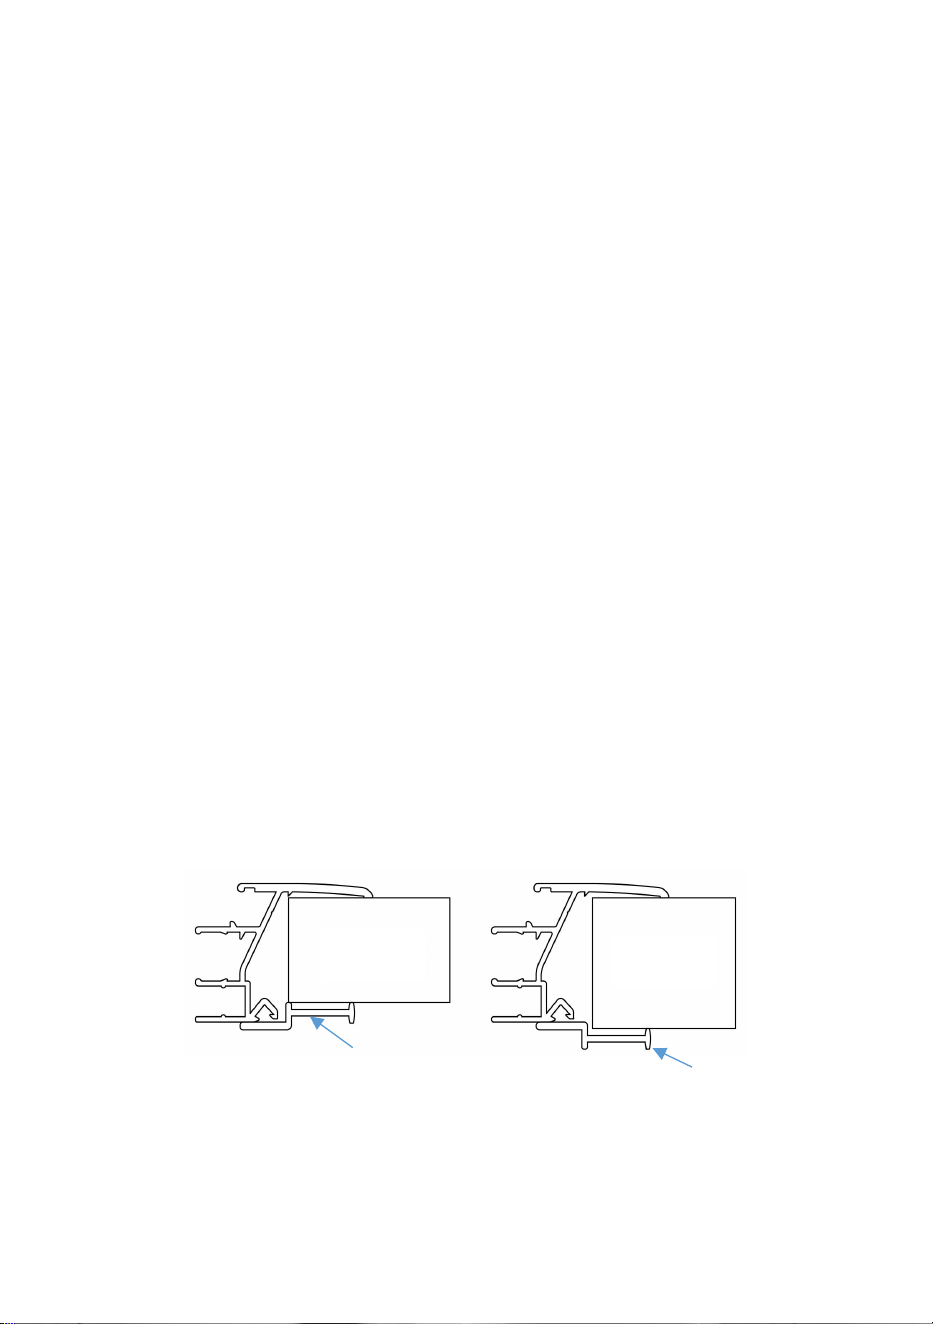
Up and down sliding windows and left and right sliding windows. When
Trim rings are not suitable according to different installation hole
thicknesses, they can be installed in reverse.
Partial products offer two types of screws, 16mm and 30mm in length.
Depending on the thickness of the installation hole, the appropriate length
of screw is selected to ensure that the window frame is not damaged
during screw installation.
Up and Down Sliding Windows and Left and Right Sliding Windows:
The thickness of the wall is 24.2-30mm, and the Trim ring is installed in the
forward direction using 16mm length screws
The thickness of the wall is 30-36mm, and the Trim ring is installed in
reverse using 16mm length screws
The thickness of the wall is 36-45.7mm, and the Trim ring is installed in
reverse using screws with a length of 30mm
Forward installation Reverse installation
Extrapolation type Windows: using 16mm length screws
Trim ring
wall
wall
Trim ring
- 8 -
It is recommended that you can seal or run a fine bead of caulk around the
exterior perimeter of the window to provide an additional barrier to the
elements.
Manufacturer: Shanghaimuxinmuyeyouxiangongsi
Address: Shuangchenglu 803nong11hao1602A-1609shi, baoshanqu,
shanghai 200000 CN.
Imported to AUS: SIHAO PTY LTD, 1 ROKEVA STREETEASTWOOD NSW
2122 Australia
Imported to USA: Sanven Technology Ltd., Suite 250, 9166 Anaheim Place,
Rancho Cucamonga, CA 91730
REP
EC
E-CrossStu GmbH
Mainzer Landstr.69, 60329 Frankfurt am Main.
REP
UK
YH CONSULTING LIMITED.
C/O YH Consulting Limited Office 147, Centurion House,
London Road, Staines-upon-Thames, Surrey, TW18 4AX


Assistance technique et certificat de garantie électronique
www.vevor.com/support
FENÊTRES POUR CAMPING-CAR MANUEL
D'UTILISATION
We continue to be committed to provide you tools with competitive price.
"Save Half", "Half Price" or any other similar expressions used by us only represents an
estimate of savings you might benefit from buying certain tools with us compared to the major
top brands and does not necessarily mean to cover all categories of tools offered by us. You
are kindly reminded to verify carefully when you are placing an order with us if you are
actually saving half in comparison with the top major brands.


- 1 -
Have product questions? Need technical support? Please feel free to
contact us:
Technical Support and E-Warranty Certificate
www.vevor.com/support
NEED HELP? CONTACT US!
This is the original instruction, please read all manual instructions
carefully before operating. VEVOR reserves a clear interpretation of our
user manual. The appearance of the product shall be subject to the
product you received. Please forgive us that we won't inform you again if
there are any technology or software updates on our product.
RV WINDOWS

- 2 -
Avertissement - Pour réduire le risque de blessure, l'utilisateur doit
lire attentivement le manuel d'instructions.
Avertissement – Assurez-vous de porter des protections auditives
lorsque vous utilisez ce produit.
Avertissement – Assurez-vous de porter des lunettes de protection
lorsque vous utilisez ce produit.
Avertissement – Assurez-vous de porter des masques
anti-poussière lorsque vous utilisez ce produit.
Avertissement – Assurez-vous de porter des gants lorsque vous
utilisez ce produit.
PRODUCTION CONFIGURATION
Modèle
Spécifications
(en)
Taille de la
bordure (po)
Taille du trou
(po)
Épaisseur
adaptative
(po)
Méthode
d'ouverture
SSTLC305x559
12 x 22
12 x 22
12,17 x 22,17
0,95-1,8
En haut et
en bas
SSTLC305x610
12 x 24
12,04 x 24
12,17 x 24,17
SSTLC356x406
14 x 16
14 x 16
14,17 x 16,17
SSTLC356x559
14 x 22
14 x 22
14,17 x 22,17
SSXCWT762x508
30 x 20
29,92 x
19,96
30,15 x 20,15
1,25-1,83
Pousser
vers
l'extérieur
SSXCWT762x559
30 x 22
29,84 x
21,92
30,15 x 22,16
SSXCWT914x559
36 x 22
35,82 x
21,92
36,14 x 22,16
SSTLC610x508
24 x 20
24 x 20
24,17 x 20,15
0,95-1,8
Gauche et
droite
- 3 -
PARTS LIST
Modèle
Fenêtre
Bague de
finition
M4.2x1
6
vis
M4,2x30
vis
Boucle
à
ressort
Modèle en
carton
Manuel
SSTLC305x559
1 pièce
1 pièce
16
pièces
16 pièces
-
1 pièce
1 pièce
SSTLC305x610
1 pièce
1 pièce
16
pièces
16 pièces
-
1 pièce
1 pièce
SSTLC356x406
1 pièce
1 pièce
16
pièces
16 pièces
-
1 pièce
1 pièce
SSTLC356x559
1 pièce
1 pièce
16
pièces
16 pièces
-
1 pièce
1 pièce
SSXCWT762x5
08
1 pièce
1 pièce
20
pièces
-
4
pièces
1 pièce
1 pièce
SSXCWT762x5
59
1 pièce
1 pièce
20
pièces
-
4
pièces
1 pièce
1 pièce
SSXCWT914x5
59
1 pièce
1 pièce
20
pièces
-
4
pièces
1 pièce
1 pièce
SSTLC610x508
1 pièce
1 pièce
20
pièces
20 pièces
-
1 pièce
1 pièce
INSTALLATION INSTRUCTIONS
Étape 1. Préparez l’ouverture de la fenêtre.
Si vous installez une fenêtre de remplacement, vous commencerez par
retirer l'ancienne fenêtre. Pour ce faire, retirez toutes les vis autour du
périmètre du cadre de la fenêtre (à l'intérieur du véhicule). Une fois la
fenêtre installée, retirez-la. les vis sont retirées, la fenêtre est poussée hors
de l'ouverture en appliquant une force de l'intérieur vers l'extérieur.
Une fois la fenêtre sortie du trou, vous devrez retirer soigneusement tout
résidu de mastic qui se trouve collé au mur extérieur.

- 4 -
Si vous installez une fenêtre dans une nouvelle ouverture, commencez par
coller le gabarit en carton à l'emplacement souhaité et tracez autour du
gabarit. Retirez le gabarit et percez des trous près de chaque coin avec un
foret étagé pour s'adapter à la scie sauteuse lame. Suivez la ligne
marquée jusqu'à ce que la découpe soit terminée.
Étape 2. Assurez-vous que la fenêtre est bien ajustée.
Testez l'ajustement de la nouvelle fenêtre en la plaçant simplement dans
l'ouverture brute pour vous assurer qu'elle est bien ajustée. La bride
extérieure de la fenêtre doit chevaucher l'ouverture de 3/8" ou plus pour
assurer une bonne étanchéité. le flanc. Un petit espace à l'intérieur entre
1/8"-1/4" est prévu .
Étape 3. Préparez et installez le produit d'étanchéité
Posez la nouvelle fenêtre face vers le bas sur une surface douce avec
précaution. ne pas le rayer et appliquer un joint (les utilisateurs doivent
acheter des joints d'épaisseur appropriée en fonction de leurs besoins

- 5 -
réels ) . Démarrer au centre du côté inférieur de la fenêtre et appliquez le
ruban d'étanchéité affleure tout autour du périmètre jusqu'à les extrémités
se rejoignent (Remarque : il ne devrait pas y avoir d'espace où les
extrémités du joint se rejoignent).
Étape 4. Ajouter des plaques de coussin (lorsque l'épaisseur du mur
installé est inférieure à l'épaisseur d'adaptation du produit, suivre cette
étape pour l'installation)
Selon l'épaisseur du produit, achetez du contreplaqué de l'épaisseur
appropriée, utilisez un gabarit en carton, tracez une ligne le long du bord
du gabarit en carton, puis utilisez une rondelle déflectrice de 1 pouce
comme entretoise pour dessiner une limite autour du gabarit.
Nous avons découpé l'intérieur et nous nous sommes retrouvés avec un
beignet rectangulaire que nous pouvons utiliser pour s'insérer entre la
fenêtre et l'anneau de garniture.

- 6 -
Étape 5. Installez la nouvelle fenêtre.
Placez la fenêtre dans l'ouverture depuis l'extérieur du véhicule, pendant
qu'une deuxième personne aligne la coupez les trous de l'anneau dans le
canal sur le côté intérieur de la fenêtre. (Remarque : lors de l'installation de
fenêtres coulissantes vers le haut et vers le bas et de fenêtres coulissantes
vers la gauche et vers la droite, assurez-vous de l'installer avec le drain
orienté vers le bas)

- 7 -
Commencez à fixer l'anneau de finition avec les vis fournies, en
commençant par les 4 coins. Travail tout autour du périmètre en serrant
progressivement chaque vis au fur et à mesure. Cela tirera doucement le
bague de finition et la fenêtre ensemble. (Remarque : utilisez uniquement
les vis fournies avec la nouvelle fenêtre, car
(des vis plus longues pourraient endommager le cadre de la fenêtre).
Fenêtres coulissantes vers le haut et vers le bas et fenêtres coulissantes
vers la gauche et vers la droite. Lorsque les anneaux de garniture ne
conviennent pas aux différentes épaisseurs de trou d'installation, ils
peuvent être installés à l'envers.
Les produits partiels proposent deux types de vis, de 16 mm et 30 mm de
longueur. En fonction de l'épaisseur du trou d'installation, la longueur de
vis appropriée est sélectionnée pour garantir que le cadre de la fenêtre ne
soit pas endommagé lors de l'installation des vis.
Fenêtres coulissantes vers le haut et vers le bas et fenêtres
coulissantes vers la gauche et vers la droite :
L'épaisseur du mur est de 24,2 à 30 mm et l'anneau de finition est installé
dans le sens avant à l'aide de vis de 16 mm de longueur.
L'épaisseur du mur est de 30 à 36 mm et l'anneau de finition est installé à
l'envers à l'aide de vis de 16 mm de longueur
L'épaisseur du mur est de 36 à 45,7 mm et l'anneau de finition est installé
à l'envers à l'aide de vis d'une longueur de 30 mm

- 8 -
Installation en avant Installation inversée
Type d'extrapolation Fenêtres : en utilisant des vis de 16 mm de
longueur
Il est recommandé de sceller ou de faire couler un fin cordon de
calfeutrage autour du périmètre extérieur de la fenêtre pour fournir une
barrière supplémentaire aux éléments.
Fabricant : Shanghaimuxinmuyeyouxiangongsi
Adresse : Shuangchenglu 803nong11hao1602A-1609shi, baoshanqu,
Shanghai 200000 CN.
Importé en Australie : SIHAO PTY LTD, 1 ROKEVA STREET, ASTWOOD
NSW 2122 Australie
Importé aux États-Unis : Sanven Technology Ltd., Suite 250, 9166 Anaheim
Place, Rancho Cucamonga, CA 91730
Trim ring
wall
wall
Trim ring

- 9 -
REP
EC
E-CrossStu GmbH
Mainzer Landstr.69, 60329 Frankfurt am Main.
REP
UK
YH CONSULTING LIMITED.
C/O YH Consulting Limited Office 147, Centurion House,
London Road, Staines-upon-Thames, Surrey, TW18 4AX


Technischer Support und E-Garantie-Zertifikat
www.vevor.com/support
WOHNMOBILFENSTER BENUTZERHANDBUCH
We continue to be committed to provide you tools with competitive price.
"Save Half", "Half Price" or any other similar expressions used by us only represents an
estimate of savings you might benefit from buying certain tools with us compared to the major
top brands and does not necessarily mean to cover all categories of tools offered by us. You
are kindly reminded to verify carefully when you are placing an order with us if you are
actually saving half in comparison with the top major brands.


- 1 -
Have product questions? Need technical support? Please feel free to
contact us:
Technical Support and E-Warranty Certificate
www.vevor.com/support
NEED HELP? CONTACT US!
This is the original instruction, please read all manual instructions
carefully before operating. VEVOR reserves a clear interpretation of our
user manual. The appearance of the product shall be subject to the
product you received. Please forgive us that we won't inform you again if
there are any technology or software updates on our product.
RV WINDOWS

- 2 -
Warnung – Um das Verletzungsrisiko zu verringern, muss der
Benutzer die Bedienungsanleitung sorgfältig lesen.
Warnung: Tragen Sie bei der Verwendung dieses Produkts
unbedingt einen Gehörschutz.
Warnung: Tragen Sie bei der Verwendung dieses Produkts
unbedingt einen Augenschutz.
Warnung: Tragen Sie bei der Verwendung dieses Produkts
unbedingt eine Staubmaske.
Achtung: Tragen Sie bei der Verwendung dieses Produkts
unbedingt Handschuhe.
PRODUCTION CONFIGURATION
Modell
Spezifikatione
n (in)
Rahmengröß
e (in)
Lochgröß
e (Zoll)
Adaptive
Dicke
(Zoll)
Öffnungsmethode
SSTLC305x559
12 x 22
12 x 22
12,17 x
22,17
0,95–1,8
Hoch und runter
SSTLC305x610
12 x 24
12,04 x 24
12,17 x
24,17
SSTLC356x406
14 x 16
14 x 16
14,17 x
16,17
SSTLC356x559
14 x 22
14 x 22
14,17 x
22,17
SSXCWT762x50
8
30 x 20
29,92 x 19,96
30,15 x
20,15
1,25–1,8
3
Nach außen
drücken
SSXCWT762x55
9
30 x 22
29,84 x 21,92
30,15 x
22,16
SSXCWT914x55
9
36 x 22
35,82 x 21,92
36,14 x
22,16
SSTLC610x508
24 x 20
24 x 20
24,17 x
0,95–1,8
Links und rechts

- 3 -
20,15

- 4 -
PARTS LIST
Modell
Fenste
r
Zierring
M4,2x1
6
schraub
en
M4,2 x
30
schraub
en
Federschn
alle
Kartonschablo
ne
Handbuc
h
SSTLC305x5
59
1
STÜC
K
1
STÜCK
16 STK
16 STK
-
1 STÜCK
1 STÜCK
SSTLC305x6
10
1
STÜC
K
1
STÜCK
16 STK
16 STK
-
1 STÜCK
1 STÜCK
SSTLC356x4
06
1
STÜC
K
1
STÜCK
16 STK
16 STK
-
1 STÜCK
1 STÜCK
SSTLC356x5
59
1
STÜC
K
1
STÜCK
16 STK
16 STK
-
1 STÜCK
1 STÜCK
SSXCWT762
x508
1
STÜC
K
1
STÜCK
20
Stück
-
4 STK
1 STÜCK
1 STÜCK
SSXCWT762
x559
1
STÜC
K
1
STÜCK
20
Stück
-
4 STK
1 STÜCK
1 STÜCK
SSXCWT914
x559
1
STÜC
K
1
STÜCK
20
Stück
-
4 STK
1 STÜCK
1 STÜCK
SSTLC610x5
08
1
STÜC
K
1
STÜCK
20
Stück
20
Stück
-
1 STÜCK
1 STÜCK
- 5 -
INSTALLATION INSTRUCTIONS
Schritt 1. Bereiten Sie die Fensteröffnung vor.
Wenn Sie ein Ersatzfenster einbauen, müssen Sie zunächst das alte
Fenster ausbauen. Entfernen Sie dazu alle Schrauben rund um den
Fensterrahmen (im Fahrzeuginneren). Sobald das Nach dem Entfernen
der Schrauben wird das Fenster mit Krafteinwirkung von innen nach außen
aus der Öffnung gedrückt.
Sobald das Fenster aus dem Loch ist, müssen Sie vorsichtig alle Reste
des Dichtungsmittels entfernen, das an die Außenwand geklebt.
Wenn Sie ein Fenster in eine neue Öffnung einbauen, kleben Sie zunächst
eine Pappschablone an die gewünschte Stelle und zeichnen Sie um die
Schablone herum. Entfernen Sie die Schablone und bohren Sie mit einem
Stufenbohrer Löcher in der Nähe jeder Ecke, damit sie zur Stichsäge
passen Klinge. Folgen Sie der markierten Linie, bis der Ausschnitt fertig ist.
Schritt 2. Stellen Sie sicher, dass das Fenster passt.

- 6 -
Testen Sie die Passform des neuen Fensters, indem Sie es einfach in die
Rohbauöffnung einsetzen, um sicherzustellen, dass es richtig passt. Der
äußere Fensterflansch sollte die Öffnung um 3/8 Zoll oder mehr
überlappen, um eine gute Abdichtung zu gewährleisten die Seitenwand.
Auf der Innenseite ist ein kleiner Spalt zwischen 1/8"-1/4" zu erwarten .
Schritt 3. Dichtungsmittel vorbereiten und installieren
Legen Sie das neue Fenster mit der Vorderseite nach unten auf eine
weiche Unterlage, vorsichtig um es nicht zu zerkratzen und eine
Versiegelung aufzutragen (Benutzer müssen Versiegelungen mit der
richtigen Dicke entsprechend ihrem tatsächlichen Bedarf kaufen ) . Start in
der Mitte der unteren Seite des Fensters und wenden Sie das
Dichtungsband rundherum bündig anbringen, bis die Enden treffen sich
(Hinweis: Es sollte keine Lücke geben, wo bis die Dichtungsenden
zusammentreffen).
Schritt 4. Polsterplatten hinzufügen (wenn die Dicke der installierten Wand
geringer ist als die Produktanpassungsdicke, befolgen Sie diesen Schritt
für die Installation)
Kaufen Sie Sperrholz in der passenden Stärke entsprechend der
Produktstärke, verwenden Sie eine Kartonschablone, ziehen Sie eine Linie
entlang der Kante der Kartonschablone und ziehen Sie mit einer
- 7 -
1-Zoll-Unterlegscheibe als Abstandshalter eine Begrenzung um die
Schablone.
Schneiden Sie die Innenseite aus und wir erhalten einen rechteckigen
Donut, den wir zwischen Fenster und Zierring einpassen können.
Schritt 5. Installieren Sie das neue Fenster.
Setzen Sie das Fenster von außen in die Öffnung ein, während eine zweite
Person das Zierringlöcher an der Innenseite des Fensters an der Rille
anbringen. (Hinweis: Achten Sie beim Einbau von Schiebefenstern nach
- 8 -
oben und unten sowie von Schiebefenstern nach links und rechts darauf,
dass der Abfluss nach unten zeigt.)
Beginnen Sie mit der Befestigung des Zierrings mit den mitgelieferten
Schrauben, beginnend mit den 4 Ecken. Sie sich um den Umfang herum
und ziehen dabei nach und nach jede Schraube fest. Dadurch wird die
Zierring und Fenster zusammen. (Hinweis: Verwenden Sie nur die mit dem
neuen Fenster mitgelieferten Schrauben, da
längere Schrauben könnten den Fensterrahmen beschädigen).
Schiebefenster nach oben und unten sowie Schiebefenster nach links und
rechts. Wenn Zierringe aufgrund unterschiedlicher Einbaulochstärken nicht
geeignet sind, können sie umgekehrt eingebaut werden.
Teilprodukte bieten zwei Arten von Schrauben an, 16 mm und 30 mm lang.
Abhängig von der Dicke des Montagelochs wird die entsprechende
Schraubenlänge ausgewählt, um sicherzustellen, dass der Fensterrahmen
während der Schraubmontage nicht beschädigt wird.
Schiebefenster nach oben und unten sowie Schiebefenster nach
links und rechts :
Die Wandstärke beträgt 24,2 - 30 mm , und der Zierring wird mit 16 mm
langen Schrauben in Vorwärtsrichtung montiert.
Die Wandstärke beträgt 30-36 mm, und der Zierring wird umgekehrt mit 16
mm langen Schrauben montiert.
Die Wandstärke beträgt 36-45,7 mm , und der Zierring wird umgekehrt mit
- 9 -
30 mm langen Schrauben montiert.
Vorwärtsinstallation Umgekehrte Installation
Extrapolationstyp Windows : mit 16mm langen Schrauben
Es wird empfohlen, dass Sie den äußeren Umfang des das Fenster, um
einen zusätzlichen Schutz gegen die Elemente zu bieten.
Hersteller: Shanghaimuxinmuyeyouxiangongsi
Adresse: Shuangchenglu 803nong11hao1602A-1609shi, baoshanqu,
Shanghai 200000 CN.
Nach AUS importiert: SIHAO PTY LTD, 1 ROKEVA STREETEASTWOOD
NSW 2122 Australien
Importiert in die USA: Sanven Technology Ltd., Suite 250, 9166 Anaheim
Place, Rancho Cucamonga, CA 91730
Trim ring
wall
wall
Trim ring

- 10 -
REP
EC
E-CrossStu GmbH
Mainzer Landstr.69, 60329 Frankfurt am Main.
REP
UK
YH CONSULTING LIMITED.
C/O YH Consulting Limited Office 147, Centurion House,
London Road, Staines-upon-Thames, Surrey, TW18 4AX


Supporto tecnico e certificato di garanzia elettronica
www.vevor.com/support
FINESTRE PER CAMPER MANUALE D'USO
We continue to be committed to provide you tools with competitive price.
"Save Half", "Half Price" or any other similar expressions used by us only represents an
estimate of savings you might benefit from buying certain tools with us compared to the major
top brands and does not necessarily mean to cover all categories of tools offered by us. You
are kindly reminded to verify carefully when you are placing an order with us if you are
actually saving half in comparison with the top major brands.


- 1 -
Have product questions? Need technical support? Please feel free to
contact us:
Technical Support and E-Warranty Certificate
www.vevor.com/support
NEED HELP? CONTACT US!
This is the original instruction, please read all manual instructions
carefully before operating. VEVOR reserves a clear interpretation of our
user manual. The appearance of the product shall be subject to the
product you received. Please forgive us that we won't inform you again if
there are any technology or software updates on our product.
RV WINDOWS

- 2 -
Attenzione - Per ridurre il rischio di lesioni, l'utente deve leggere
attentamente il manuale di istruzioni.
Attenzione: assicurarsi di indossare protezioni acustiche quando si
utilizza questo prodotto.
Attenzione: indossare sempre protezioni per gli occhi quando si
utilizza questo prodotto.
Attenzione: assicurarsi di indossare maschere antipolvere quando
si utilizza questo prodotto.
Attenzione: assicurarsi di indossare guanti quando si utilizza
questo prodotto.
PRODUCTION CONFIGURATION
Modello
Specifiche (in)
Dimensioni
del bordo
(pollici)
Dimensione
del foro
(pollici)
Spessore
adattivo
(pollici)
Metodo di
apertura
SSTLC305x559
12 x 22
12 x 22
Dimensioni:
12,17 x 22,17
0,95-1,8
Su e giù
SSTLC305x610
12 x 24
12,04 x 24
Dimensioni:
12,17 x 24,17
SSTLC356x406
14 x 16
14 x 16
14,17 x 16,17
SSTLC356x559
14 x 22
14 x 22
Dimensioni:
14,17 x 22,17
SSXCWT762x508
30x20
29,92 x
19,96
Dimensioni:
30,15 x 20,15
1,25-1,83
Spingere
verso
l'esterno
SSXCWT762x559
30 x 22
29,84 x
21,92
Dimensioni:
30,15 x 22,16
SSXCWT914x559
36 x 22
Dimensioni:
35,82 x
21,92
Dimensioni:
36,14 x 22,16
SSTLC610x508
24x20
24x20
Dimensioni:
0,95-1,8
Sinistra e

- 3 -
24,17 x 20,15
destra
- 4 -
PARTS LIST
Modello
Finestra
Anello a
T
M4.2x1
6
vite
M4.2x30
vite
Fibbia
a
molla
Modello in
cartone
Manuale
SSTLC305x559
1 PZ
1 PZ
16 PZ
16 PZ
-
1 PZ
1 PZ
SSTLC305x610
1 PZ
1 PZ
16 PZ
16 PZ
-
1 PZ
1 PZ
SSTLC356x406
1 PZ
1 PZ
16 PZ
16 PZ
-
1 PZ
1 PZ
SSTLC356x559
1 PZ
1 PZ
16 PZ
16 PZ
-
1 PZ
1 PZ
SSXCWT762x5
08
1 PZ
1 PZ
20 PZ
-
4 PZ
1 PZ
1 PZ
SSXCWT762x5
59
1 PZ
1 PZ
20 PZ
-
4 PZ
1 PZ
1 PZ
SSXCWT914x5
59
1 PZ
1 PZ
20 PZ
-
4 PZ
1 PZ
1 PZ
SSTLC610x508
1 PZ
1 PZ
20 PZ
20 PZ
-
1 PZ
1 PZ
INSTALLATION INSTRUCTIONS
Fase 1. Preparare l'apertura della finestra.
Se stai installando una finestra sostitutiva, inizierai rimuovendo la vecchia
finestra. Per farlo, rimuovi tutte le viti attorno al perimetro del telaio della
finestra (all'interno del veicolo). Una volta che la Dopo aver rimosso le viti,
la finestra viene spinta fuori dall'apertura applicando una forza dall'interno
verso l'esterno.
Una volta che la finestra è fuori dal foro, dovrai rimuovere con attenzione
qualsiasi residuo di sigillante che sia attaccato al muro esterno.
Se stai installando una finestra in una nuova apertura, inizia fissando con

- 5 -
del nastro adesivo il modello di cartone nella posizione desiderata e
tracciandolo attorno al modello. Rimuovi il modello e pratica dei fori vicino
a ogni angolo con una punta a gradini per adattarli al seghetto alternativo
lama. Seguire la linea segnata fino al completamento del ritaglio.
Fase 2. Assicurarsi che la finestra sia adatta.
Prova la nuova finestra semplicemente posizionandola nell'apertura
grezza per garantire una corretta aderenza. La flangia esterna della
finestra dovrebbe sovrapporsi all'apertura di 3/8" o più per fornire una
buona tenuta a la parete laterale. È previsto un piccolo spazio all'interno
tra 1/8"-1/4" .
Fase 3. Preparare e installare il sigillante
Appoggiare la nuova finestra a faccia in giù su una superficie morbida con
attenzione non graffiarlo e applicare il sigillo (gli utenti devono acquistare
guarnizioni di spessore appropriato in base alle loro effettive esigenze ) .
Inizia al centro della parte inferiore della finestra e applicare il nastro
sigillante scorre lungo tutto il perimetro fino a le estremità si incontrano
- 6 -
(Nota: non dovrebbe esserci uno spazio vuoto dove le estremità del sigillo
si incontrano).
Fase 4. Aggiungere piastre ammortizzanti (quando lo spessore della
parete installata è inferiore allo spessore di adattamento del prodotto,
seguire questo passaggio per l'installazione)
In base allo spessore del prodotto, acquistare del compensato dello
spessore appropriato, utilizzare una sagoma in cartone, tracciare una linea
lungo il bordo della sagoma in cartone, quindi utilizzare una rondella
deflettrice da 1 pollice come distanziatore per tracciare un confine attorno
alla sagoma.
Ritagliamo l'interno e ci ritroviamo con una ciambella rettangolare che
possiamo usare per incastrarla tra la finestra e l'anello di rifinitura.
- 7 -
Passaggio 5. Installa la nuova finestra.
Posizionare il finestrino nell'apertura dall'esterno del veicolo, mentre una
seconda persona allinea il rifinire i fori dell'anello sul canale sul lato interno
della finestra. (Nota: quando si installano finestre scorrevoli verso l'alto e
verso il basso e finestre scorrevoli verso sinistra e verso destra, assicurarsi
di installare con lo scarico rivolto verso il basso)
- 8 -
Iniziare a fissare l'anello di rifinitura con le viti fornite, iniziando prima dai 4
angoli. Lavorare il tuo percorso attorno al perimetro stringendo
gradualmente ogni vite man mano che procedi. Questo tirerà
delicatamente il l'anello di rifinitura e la finestra insieme. (Nota: utilizzare
solo le viti fornite con la nuova finestra, come
viti più lunghe potrebbero danneggiare il telaio della finestra).
Finestre scorrevoli su e giù e finestre scorrevoli a sinistra e a destra.
Quando gli anelli di rifinitura non sono adatti in base ai diversi spessori dei
fori di installazione, possono essere installati al contrario.
I prodotti parziali offrono due tipi di viti, da 16 mm e 30 mm di lunghezza. A
seconda dello spessore del foro di installazione, viene selezionata la
lunghezza appropriata della vite per garantire che il telaio della finestra non
venga danneggiato durante l'installazione della vite.
Finestre scorrevoli su e giù e finestre scorrevoli sinistra e destra :
Lo spessore della parete è di 24,2-30 mm e l'anello di rifinitura è installato
nella direzione anteriore utilizzando viti di lunghezza 16 mm
Lo spessore della parete è di 30-36 mm e l'anello di rifinitura viene
installato al contrario utilizzando viti lunghe 16 mm
Lo spessore della parete è di 36-45,7 mm e l'anello di rifinitura viene
installato al contrario utilizzando viti con una lunghezza di 30 mm
Installazione in avanti Installazione inversa
Tipo di estrapolazione Finestre : utilizzando viti da 16 mm di
lunghezza
Trim ring
wall
wall
Trim ring

- 9 -
Si consiglia di sigillare o applicare una sottile striscia di mastice attorno al
perimetro esterno di la finestra per fornire un'ulteriore barriera contro gli
agenti atmosferici.
Produttore: Shanghaimuxinmuyeyouxiangongsi
Indirizzo: Shuangchenglu 803nong11hao1602A-1609shi, baoshanqu,
shanghai 200000 CN.
Importato in AUS: SIHAO PTY LTD, 1 ROKEVA STREETEASTWOOD NSW
2122 Australia
Importato negli USA: Sanven Technology Ltd., Suite 250, 9166 Anaheim
Place, Rancho Cucamonga, CA 91730
REP
EC
E-CrossStu GmbH
Mainzer Landstr.69, 60329 Frankfurt am Main.
REP
UK
YH CONSULTING LIMITED.
C/O YH Consulting Limited Office 147, Centurion House,
London Road, Staines-upon-Thames, Surrey, TW18 4AX


Soporte técnico y certificado de garantía electrónica
www.vevor.com/support
VENTANAS PARA VEHÍCULOS RECREATIVOS
MANUAL DEL USUARIO
We continue to be committed to provide you tools with competitive price.
"Save Half", "Half Price" or any other similar expressions used by us only represents an
estimate of savings you might benefit from buying certain tools with us compared to the major
top brands and does not necessarily mean to cover all categories of tools offered by us. You
are kindly reminded to verify carefully when you are placing an order with us if you are
actually saving half in comparison with the top major brands.

- 1 -
Have product questions? Need technical support? Please feel free to
contact us:
Technical Support and E-Warranty Certificate
www.vevor.com/support
NEED HELP? CONTACT US!
This is the original instruction, please read all manual instructions
carefully before operating. VEVOR reserves a clear interpretation of our
user manual. The appearance of the product shall be subject to the
product you received. Please forgive us that we won't inform you again if
there are any technology or software updates on our product.
RV WINDOWS

- 2 -
Advertencia: Para reducir el riesgo de lesiones, el usuario debe
leer atentamente el manual de instrucciones.
Advertencia: Asegúrese de usar protectores auditivos cuando
utilice este producto.
Advertencia: Asegúrese de usar protectores para los ojos cuando
utilice este producto.
Advertencia: Asegúrese de usar máscaras contra el polvo cuando
utilice este producto.
Advertencia: Asegúrese de usar guantes al utilizar este producto.
PRODUCTION CONFIGURATION
Modelo
Especificaciones
(en)
Tamaño del
borde
(pulgadas)
Tamaño del
orificio
(pulgadas)
Espesor
adaptable
(pulgadas)
Método de
apertura
SSTLC305x559
12 x 22
12 x 22
12,17 x 22,17
0,95-1,8
Arriba y
abajo
SSTLC305x610
12 x 24
12,04 x 24
12,17 x 24,17
SSTLC356x406
14 x 16
14 x 16
14,17 x 16,17
SSTLC356x559
14 x 22
14 x 22
14,17 x 22,17
SSXCWT762x508
30 x 20
29,92 x
19,96
30,15 x 20,15
1,25-1,83
Empujar
hacia
afuera
SSXCWT762x559
30 x 22
29,84 x
21,92
30,15 x 22,16
SSXCWT914x559
36 x 22
35,82 x
21,92
36,14 x 22,16
SSTLC610x508
24 x 20
24 x 20
24,17 x 20,15
0,95-1,8
Izquierda y
derecha
- 3 -
PARTS LIST
Modelo
Ventana
Anillo
embelleced
or
M4,2x1
6
tornillo
M4,2x30
tornillo
Hebill
a de
resort
e
Plantilla
de cartón
Manual
SSTLC305x559
1 piezas
1 piezas
16
piezas
16 piezas
-
1 piezas
1 piezas
SSTLC305x610
1 piezas
1 piezas
16
piezas
16 piezas
-
1 piezas
1 piezas
SSTLC356x406
1 piezas
1 piezas
16
piezas
16 piezas
-
1 piezas
1 piezas
SSTLC356x559
1 piezas
1 piezas
16
piezas
16 piezas
-
1 piezas
1 piezas
SSXCWT762x5
08
1 piezas
1 piezas
20
piezas
-
4
piezas
1 piezas
1 piezas
SSXCWT762x5
59
1 piezas
1 piezas
20
piezas
-
4
piezas
1 piezas
1 piezas
SSXCWT914x5
59
1 piezas
1 piezas
20
piezas
-
4
piezas
1 piezas
1 piezas
SSTLC610x508
1 piezas
1 piezas
20
piezas
20 piezas
-
1 piezas
1 piezas
INSTALLATION INSTRUCTIONS
Paso 1. Prepare la abertura de la ventana.
Si va a instalar una ventana de repuesto, deberá comenzar quitando la
ventana anterior. Para ello, quite todos los tornillos alrededor del perímetro
del marco de la ventana (dentro del vehículo). Una vez que la ventana esté
instalada, Se quitan los tornillos, se empuja la ventana fuera de la abertura
aplicando fuerza desde adentro hacia afuera.
Una vez que la ventana esté fuera del agujero, tendrás que quitar con
- 4 -
cuidado cualquier sellador residual que haya quedado. pegado a la pared
exterior.
Si está instalando una ventana en una nueva abertura, comience
colocando una plantilla de cartón en la ubicación deseada y trace
Alrededor de la plantilla. Retire la plantilla y taladre agujeros cerca de cada
esquina con una broca escalonada para que encaje en la sierra caladora.
cuchilla. Siga la línea marcada hasta completar el corte.
Paso 2. Asegúrese de que la ventana encaje.
Pruebe el ajuste de la nueva ventana simplemente colocándola en la
abertura sin terminar para garantizar un ajuste adecuado. La brida exterior
de la ventana debe superponerse a la abertura por 3/8" o más para
proporcionar un buen sellado. La pared lateral. Se espera un pequeño
espacio en el interior de entre 1/8" y 1/4" .
Paso 3. Prepare e instale el sellador
Coloque la nueva ventana boca abajo sobre una superficie suave con
- 5 -
cuidado. No rayarlo y aplicar el sello (los usuarios deben comprar sellos
del grosor adecuado según sus necesidades reales ) . en el centro de la
parte inferior de la ventana y aplicar La cinta de sellado se coloca a ras de
todo el perímetro hasta los extremos se encuentran (Nota: No debe haber
un espacio donde los extremos del sello se juntan).
Paso 4. Añadir placas de amortiguación (cuando el espesor de la pared
instalada sea menor que el espesor de adaptación del producto, siga este
paso para la instalación)
Según el grosor del producto, compre madera contrachapada del grosor
adecuado, use una plantilla de cartón, dibuje una línea a lo largo del borde
de la plantilla de cartón y luego use una arandela deflectora de 1 pulgada
como espaciador para dibujar un límite alrededor de la plantilla.
Recortamos el interior y nos quedó una dona rectangular que podemos
usar para colocar entre la ventana y el anillo de moldura.

- 6 -
Paso 5. Instalar la nueva ventana.
Coloque la ventana en la abertura desde el exterior del vehículo, mientras
una segunda persona alinea la Agujeros para el anillo de ajuste en el canal
en el lado interior de la ventana. (Nota: Al instalar ventanas corredizas
hacia arriba y hacia abajo y ventanas corredizas hacia la izquierda y hacia
la derecha, asegúrese de instalarlas con el drenaje hacia abajo)

- 7 -
Comience a fijar el anillo de ajuste con los tornillos provistos, comenzando
con las 4 esquinas primero. Ábralo alrededor del perímetro apretando
gradualmente cada tornillo a medida que avanza. Esto tirará suavemente
del anillo de ajuste y ventana juntos. (Nota: Utilice únicamente los tornillos
provistos con la nueva ventana, ya que
Los tornillos más largos podrían dañar el marco de la ventana).
Ventanas corredizas hacia arriba y hacia abajo y ventanas corredizas
hacia la izquierda y hacia la derecha. Cuando los anillos de ajuste no son
adecuados según los diferentes espesores de los orificios de instalación,
se pueden instalar al revés.
Los productos parciales ofrecen dos tipos de tornillos, de 16 mm y 30 mm
de longitud. Según el grosor del orificio de instalación, se selecciona la
longitud adecuada del tornillo para garantizar que el marco de la ventana
no se dañe durante la instalación del tornillo.
Ventanas corredizas hacia arriba y hacia abajo y ventanas corredizas
hacia la izquierda y la derecha :
El espesor de la pared es de 24,2-30 mm , y el anillo de ajuste se instala
en la dirección hacia adelante utilizando tornillos de 16 mm de longitud.
El espesor de la pared es de 30-36 mm, y el anillo de ajuste se instala en
sentido inverso utilizando tornillos de 16 mm de longitud.
El espesor de la pared es de 36-45,7 mm y el anillo de ajuste se instala en
sentido inverso utilizando tornillos con una longitud de 30 mm.
- 8 -
Instalación hacia adelante Instalación inversa
Tipo de extrapolación Ventanas : utilizando tornillos de 16 mm de
longitud
Se recomienda sellar o aplicar una fina capa de masilla alrededor del
perímetro exterior de La ventana para proporcionar una barrera adicional a
los elementos.
Fabricante: Shanghaimuxinmuyeyouxiangongsi
Dirección: Shuangchenglu 803nong11hao1602A-1609shi, baoshanqu,
shanghai 200000 CN.
Importado a AUS: SIHAO PTY LTD, 1 ROKEVA STREETEASTWOOD NSW
2122 Australia
Importado a EE. UU.: Sanven Technology Ltd., Suite 250, 9166 Anaheim
Place, Rancho Cucamonga, CA 91730
Trim ring
wall
wall
Trim ring

- 9 -
REP
EC
E-CrossStu GmbH
Mainzer Landstr.69, 60329 Frankfurt am Main.
REP
UK
YH CONSULTING LIMITED.
C/O YH Consulting Limited Office 147, Centurion House,
London Road, Staines-upon-Thames, Surrey, TW18 4AX


Wsparcie techniczne i certyfikat e-gwarancji
www.vevor.com/support
OKNA DO KAMPERÓW INSTRUKCJA OBSŁUGI
We continue to be committed to provide you tools with competitive price.
"Save Half", "Half Price" or any other similar expressions used by us only represents an
estimate of savings you might benefit from buying certain tools with us compared to the major
top brands and does not necessarily mean to cover all categories of tools offered by us. You
are kindly reminded to verify carefully when you are placing an order with us if you are
actually saving half in comparison with the top major brands.


- 1 -
Have product questions? Need technical support? Please feel free to
contact us:
Technical Support and E-Warranty Certificate
www.vevor.com/support
NEED HELP? CONTACT US!
This is the original instruction, please read all manual instructions
carefully before operating. VEVOR reserves a clear interpretation of our
user manual. The appearance of the product shall be subject to the
product you received. Please forgive us that we won't inform you again if
there are any technology or software updates on our product.
RV WINDOWS

- 2 -
Ostrzeżenie - Aby zminimalizować ryzyko obrażeń, użytkownik
powinien uważnie przeczytać instrukcję obsługi.
Ostrzeżenie: Podczas stosowania tego produktu należy używać
ochronników słuchu.
Ostrzeżenie: Podczas stosowania tego produktu należy nosić
okulary ochronne.
Ostrzeżenie: Podczas stosowania tego produktu należy nosić
maskę przeciwpyłową.
Ostrzeżenie: Podczas stosowania tego produktu należy nosić
rękawiczki.
PRODUCTION CONFIGURATION
Model
Dane techniczne
(w)
Rozmiar
obramowania
(w calach)
Rozmiar
otworu (cale)
Grubość
adaptacyjna
(w calach)
Metoda
otwierania
SSTLC305x559
12x22
12x22
Wymiary
12,17 x
22,17
0,95-1,8
W górę i w
dół
SSTLC305x610
12x24
12,04 x 24
Wymiary
12,17 x
24,17
SSTLC356x406
14x16
14x16
14,17 x
16,17
SSTLC356x559
14x22
14x22
14,17 x
22,17
SSXCWT762x508
30x20
29,92 x 19,96
30,15 x
20,15
1,25-1,83
Pchać na
zewnątrz
SSXCWT762x559
30x22
Wymiary
29,84 x 21,92
Wymiary
30,15 x
22,16

- 3 -
SSXCWT914x559
36x22
Wymiary
35,82 x 21,92
Wymiary
36,14 x
22,16
SSTLC610x508
24x20
24x20
Wymiary
24,17 x
20,15
0,95-1,8
Lewo i
prawo
- 4 -
PARTS LIST
Model
Okno
Pierścień
T- ring
M4.2x1
6
śruba
M4.2x30
śruba
Klamra
sprężyno
wa
Szablon
tekturowy
Instrukcja
SSTLC305x559
1 SZT.
1 SZT.
16 SZT.
16
SZTUK
-
1 SZT.
1 SZT.
SSTLC305x610
1 SZT.
1 SZT.
16 SZT.
16
SZTUK
-
1 SZT.
1 SZT.
SSTLC356x406
1 SZT.
1 SZT.
16 SZT.
16
SZTUK
-
1 SZT.
1 SZT.
SSTLC356x559
1 SZT.
1 SZT.
16
SZTUK
16 SZT.
-
1 SZT.
1 SZT.
SSXCWT762x5
08
1 SZT.
1 SZT.
20
SZTUK
-
4 SZT.
1 SZT.
1 SZT.
SSXCWT762x5
59
1 SZT.
1 SZT.
20
SZTUK
-
4 SZT.
1 SZT.
1 SZT.
SSXCWT914x5
59
1 SZT.
1 SZT.
20
SZTUK
-
4 SZT.
1 SZT.
1 SZT.
SSTLC610x508
1 SZT.
1 SZT.
20
SZTUK
20
SZTUK
-
1 SZT.
1 SZT.
INSTALLATION INSTRUCTIONS
Krok 1. Przygotuj otwór okienny.
Jeśli instalujesz okno zastępcze, zacznij od wyjęcia starego okna. Aby to
zrobić, wykręć wszystkie śruby wokół obwodu ramy okna (wewnątrz
pojazdu). Po Po wykręceniu śrub okno zostaje wypchnięte z otworu, przy
czym siła jest wywierana od wewnątrz na zewnątrz.
Po wyjęciu okna z otworu należy ostrożnie usunąć wszelkie pozostałości
uszczelniacza. przyklejony do ściany zewnętrznej.

- 5 -
Jeśli montujesz okno w nowym otworze, zacznij od przyklejenia
tekturowego szablonu do wybranego miejsca i odrysowania wokół
szablonu. Usuń szablon i wywierć otwory w pobliżu każdego narożnika
wiertłem stopniowym, aby dopasować wyrzynarkę ostrze. Podążaj wzdłuż
zaznaczonej linii, aż wycięcie zostanie ukończone.
Krok 2. Sprawdź, czy okno pasuje.
Przetestuj dopasowanie nowego okna, po prostu umieszczając je w
otworze roboczym, aby upewnić się, że pasuje prawidłowo. Zewnętrzny
kołnierz okna powinien nachodzić na otwór na 3/8" lub więcej, aby
zapewnić dobre uszczelnienie. ściana boczna. Oczekuje się niewielkiej
szczeliny wewnątrz, wynoszącej 1/8"-1/4" .
Krok 3. Przygotuj i zainstaluj uszczelniacz
Połóż nowe okno stroną do dołu na miękkiej powierzchni i ostrożnie aby jej
nie zarysować i zastosować uszczelnienie (Użytkownicy muszą zakupić
uszczelnienia o odpowiedniej grubości, zgodnie ze swoimi rzeczywistymi
potrzebami ) . Rozpocznij na środku dolnej części okna i zastosuj taśmę
- 6 -
uszczelniającą należy nakładać równomiernie na całym obwodzie, aż
końce się stykają (Uwaga: nie powinno być przerwy, gdzie (końce
uszczelki stykają się).
Krok 4. Dodaj płyty amortyzujące (jeśli grubość instalowanej ściany jest
mniejsza niż grubość adaptacyjna produktu, wykonaj ten krok instalacji)
W zależności od grubości produktu należy zakupić sklejkę o odpowiedniej
grubości, użyć szablonu tekturowego, narysuj linię wzdłuż krawędzi
szablonu tekturowego, a następnie użyć podkładki oddzielającej o
grubości 1 cala jako dystansu, aby wyznaczyć granicę wokół szablonu.
Wytnij wnętrze, a otrzymasz prostokątny obwarzanek, który możesz
umieścić między oknem a pierścieniem wykończeniowym.

- 7 -
Krok 5. Zainstaluj nowe okno.
Umieść okno w otworze od zewnątrz pojazdu, podczas gdy druga osoba je
wyrównuje. Przytnij otwory pierścienia do kanału po wewnętrznej stronie
okna. (Uwaga: Podczas montażu okien przesuwnych w górę i w dół oraz
okien przesuwnych w lewo i w prawo, pamiętaj o montażu z odpływem
skierowanym w dół)
- 8 -
Rozpocznij mocowanie pierścienia wykończeniowego za pomocą
dostarczonych śrub, zaczynając od 4 rogów. wokół obwodu stopniowo
dokręcając każdą śrubę. To delikatnie pociągnie pierścień wykończeniowy
i okno razem. (Uwaga: Używaj wyłącznie śrub dostarczonych wraz z
nowym oknem, ponieważ
dłuższe śruby mogą uszkodzić ramę okna).
Okna przesuwne w górę i w dół oraz okna przesuwne w lewo i w prawo.
Jeśli pierścienie wykończeniowe nie pasują do różnych grubości otworów
montażowych, można je zamontować odwrotnie.
Częściowe produkty oferują dwa rodzaje śrub o długości 16 mm i 30 mm.
W zależności od grubości otworu montażowego wybierana jest
odpowiednia długość śruby, aby zapewnić, że rama okna nie zostanie
uszkodzona podczas montażu śrub.
Okna przesuwne w górę i w dół oraz okna przesuwne w lewo i w
prawo :
Grubość ściany wynosi 24,2 -30 mm, a pierścień wykończeniowy
montowany jest w kierunku do przodu za pomocą śrub o długości 16 mm.
Grubość ściany wynosi 30-36 mm, a pierścień wykończeniowy montowany
jest odwrotnie za pomocą śrub o długości 16 mm
Grubość ścianki wynosi 36-45,7 mm , a pierścień wykończeniowy
montowany jest odwrotnie za pomocą śrub o długości 30 mm.
Instalacja do przodu Instalacja odwrotna
Typ ekstrapolacji Okna : za pomocą śrub o długości 16 mm
Trim ring
wall
wall
Trim ring

- 9 -
Zaleca się uszczelnienie lub nałożenie cienkiej warstwy uszczelniacza
wokół zewnętrznego obwodu okno, aby zapewnić dodatkową barierę przed
żywiołami.
Producent: Shanghaimuxinmuyeyouxiangongsi
Adres: Shuangchenglu 803nong11hao1602A-1609shi, baoshanqu, szanghaj
200000 CN.
Importowane do AUS: SIHAO PTY LTD, 1 ROKEVA STREETEASTWOOD
NSW 2122 Australia
Importowane do USA: Sanven Technology Ltd., Suite 250, 9166 Anaheim
Place, Rancho Cucamonga, CA 91730
REP
EC
E-CrossStu GmbH
Mainzer Landstr.69, 60329 Frankfurt am Main.
REP
UK
YH CONSULTING LIMITED.
C/O YH Consulting Limited Office 147, Centurion House,
London Road, Staines-upon-Thames, Surrey, TW18 4AX


Technische ondersteuning en e-garantiecertificaat
www.vevor.com/support
CAMPER RAMEN GEBRUIKERSHANDLEIDING
We continue to be committed to provide you tools with competitive price.
"Save Half", "Half Price" or any other similar expressions used by us only represents an
estimate of savings you might benefit from buying certain tools with us compared to the major
top brands and does not necessarily mean to cover all categories of tools offered by us. You
are kindly reminded to verify carefully when you are placing an order with us if you are
actually saving half in comparison with the top major brands.


- 1 -
Have product questions? Need technical support? Please feel free to
contact us:
Technical Support and E-Warranty Certificate
www.vevor.com/support
NEED HELP? CONTACT US!
This is the original instruction, please read all manual instructions
carefully before operating. VEVOR reserves a clear interpretation of our
user manual. The appearance of the product shall be subject to the
product you received. Please forgive us that we won't inform you again if
there are any technology or software updates on our product.
RV WINDOWS

- 2 -
Waarschuwing - Om het risico op letsel te verkleinen, dient de
gebruiker de gebruiksaanwijzing zorgvuldig te lezen.
Waarschuwing: draag altijd gehoorbescherming wanneer u dit
product gebruikt.
Waarschuwing: draag altijd een oogbescherming wanneer u dit
product gebruikt.
Waarschuwing: draag altijd een stofmasker wanneer u dit product
gebruikt.
Waarschuwing: draag handschoenen wanneer u dit product
gebruikt.
PRODUCTION CONFIGURATION
Model
Specificaties
(in)
Randgrootte (in)
Gatgrootte (in)
Adaptieve
dikte (in)
Openen
methode
SSLC305x559
12x22
12x22
12,17x22,17
0,95-1,8
Omhoog
en naar
beneden
SSTLC305x610
12x24
12,04x24
12,17x24,17
SSTLC356x406
14x16
14x16
14,17x16,17
SSLC356x559
14x22
14x22
14,17x22,17
SSXCWT762x508
30x20
29,92x19,96
30,15x20,15
1,25-1,83
Naar
buiten
duwen
SSXCWT762x559
30x22
29,84x21,92
30,15x22,16
SSXCWT914x559
36x22
35,82x21,92
36,14x22,16
SSTLC610x508
24x20
24x20
24,17x20,15
0,95-1,8
Links en
rechts
- 3 -
PARTS LIST
Model
Raam
T -rand
ring
M4.2x16
schroef
M4.2x
30
schroef
Veer
gesp
Kartonne
n sjabloon
Handmatig
SSLC305x559
1
STUK
S
1 STUKS
16STUK
S
16STUK
S
-
1 STUKS
1 STUKS
SSTLC305x610
1
STUK
S
1 STUKS
16STUK
S
16STUK
S
-
1 STUKS
1 STUKS
SSTLC356x406
1
STUK
S
1 STUKS
16STUK
S
16STUK
S
-
1 STUKS
1 STUKS
SSLC356x559
1
STUK
S
1 STUKS
16STUK
S
16STUK
S
-
1 STUKS
1 STUKS
SSXCWT762x5
08
1
STUK
S
1 STUKS
20STUK
S
-
4
STUK
S
1 STUKS
1 STUKS
SSXCWT762x5
59
1
STUK
S
1 STUKS
20STUK
S
-
4
STUK
S
1 STUKS
1 STUKS
SSXCWT914x5
59
1
STUK
S
1 STUKS
20STUK
S
-
4
STUK
S
1 STUKS
1 STUKS
SSTLC610x508
1
STUK
S
1 STUKS
20STUK
S
20STUK
S
-
1 STUKS
1 STUKS
INSTALLATION INSTRUCTIONS
- 4 -
Stap 1. Maak de raamopening klaar.
Als u een vervangend raam installeert, begint u met het verwijderen van
het oude raam. Verwijder hiervoor alle schroeven rondom de omtrek van
het raamkozijn (binnenin het voertuig). Zodra de Als de schroeven worden
verwijderd, wordt het raam met kracht van binnenuit uit de opening
geduwd.
Zodra het raam uit het gat is, moet u voorzichtig alle resterende kit
verwijderen aan de buitenmuur vastgeplakt.
Als u een raam in een nieuwe opening plaatst, begin dan met het plakken
van een kartonnen sjabloon op de gewenste locatie en trek de lijn over
rond sjabloon. Verwijder sjabloon en boor gaten bij elke hoek met stapbit
om de decoupeerzaag te passen mes. Volg de gemarkeerde lijn totdat de
uitsparing voltooid is.
Stap 2. Controleer of het raam past.
Test de pasvorm van het nieuwe raam door het gewoon in de ruwe
opening te plaatsen om een goede pasvorm te garanderen. De buitenste

- 5 -
raamflens moet de opening met 3/8" of meer overlappen om een goede
afdichting te bieden de zijwand. Een kleine opening aan de binnenkant
tussen 1/8"-1/4" is te verwachten .
Stap 3. Kit voorbereiden en aanbrengen
Leg het nieuwe raam met de voorkant naar beneden op een zachte
ondergrond, voorzichtig om het niet te krassen en breng een afdichting aan
(Gebruikers moeten afdichtingen van de juiste dikte kopen, afhankelijk van
hun werkelijke behoeften ) . Begin in het midden van de onderkant van het
venster en breng aan de afdichtingstape helemaal rondom de omtrek
afdichten totdat de uiteinden raken elkaar (Let op: er mag geen opening
zijn waar de uiteinden van de afdichting raken elkaar).
Stap 4. Voeg bufferplaten toe (als de dikte van de geïnstalleerde wand
kleiner is dan de dikte van de productaanpassing, volg dan deze stap voor
de installatie)
Koop multiplex van de juiste dikte, afhankelijk van de dikte van het product.
Gebruik een kartonnen mal, trek een lijn langs de rand van de kartonnen
mal en gebruik vervolgens een 1-inch afdichtring als afstandhouder om
een grens rond de mal te tekenen.
Nadat we de binnenkant hadden uitgesneden, hielden we een
rechthoekige donut over die we tussen het raam en de sierlijst konden

- 6 -
plaatsen.
Stap 5. Installeer het nieuwe raam.
Plaats het raam van buitenaf in de opening van het voertuig, terwijl een
tweede persoon het raam uitlijnt Maak de gaten in de ring vast aan de gleuf
aan de binnenkant van het raam. (Let op: zorg ervoor dat bij het installeren
van omhoog- en omlaagschuiframen en links- en rechtsschuiframen de
afvoer naar beneden wijst)

- 7 -
Begin met het bevestigen van de sierring met de meegeleverde schroeven,
beginnend met de 4 hoeken eerst. Werk je een weg baant langs de omtrek
en draait elke schroef geleidelijk aan. Dit zal de sierlijst en raam samen.
(Let op: Gebruik alleen de schroeven die bij het nieuwe raam zijn geleverd,
(langere schroeven kunnen het raamkozijn beschadigen).
Omhoog en omlaag schuiframen en links en rechts schuiframen. Wanneer
Trim ringen niet geschikt zijn volgens verschillende installatie gat diktes,
kunnen ze omgekeerd worden geïnstalleerd.
Partial products bieden twee soorten schroeven, 16 mm en 30 mm lang.
Afhankelijk van de dikte van het installatiegat wordt de juiste lengte van de
schroef geselecteerd om ervoor te zorgen dat het raamkozijn niet
beschadigd raakt tijdens de installatie van de schroeven.
Omhoog en omlaag schuiframen en links en rechts schuiframen :
De dikte van de muur is 24,2 - 30 mm en de trimring wordt in de
voorwaartse richting geïnstalleerd met behulp van schroeven met een
lengte van 16 mm
De dikte van de muur is 30-36 mm en de afwerkring wordt omgekeerd
geïnstalleerd met behulp van schroeven van 16 mm lengte
De dikte van de wand bedraagt 36-45,7 mm en de afwerkring wordt
omgekeerd gemonteerd met schroeven met een lengte van 30 mm

- 8 -
Voorwaartse installatie Omgekeerde installatie
Extrapolatie type Vensters : met behulp van schroeven van 16 mm
lengte
Het wordt aanbevolen om de buitenomtrek van de muur af te dichten of
een dunne rups kit aan te brengen. het raam om een extra barrière tegen
de elementen te vormen.
Fabrikant: Shanghaimuxinmuyeyouxiangongsi
Adres: Shuangchenglu 803nong11hao1602A-1609shi, baoshanqu, shanghai
200000 CN.
Geïmporteerd naar AUS: SIHAO PTY LTD, 1 ROKEVA
STREETEASTWOOD NSW 2122 Australië
Geïmporteerd naar de VS: Sanven Technology Ltd., Suite 250, 9166
Anaheim Place, Rancho Cucamonga, CA 91730
Trim ring
wall
wall
Trim ring

- 9 -
REP
EC
E-CrossStu GmbH
Mainzer Landstr.69, 60329 Frankfurt am Main.
REP
UK
YH CONSULTING LIMITED.
C/O YH Consulting Limited Office 147, Centurion House,
London Road, Staines-upon-Thames, Surrey, TW18 4AX


Teknisk support och e-garanticertifikat
www.vevor.com/support
RV WINDOWS ANVÄNDARMANUAL
We continue to be committed to provide you tools with competitive price.
"Save Half", "Half Price" or any other similar expressions used by us only represents an
estimate of savings you might benefit from buying certain tools with us compared to the major
top brands and does not necessarily mean to cover all categories of tools offered by us. You
are kindly reminded to verify carefully when you are placing an order with us if you are
actually saving half in comparison with the top major brands.

- 1 -
Have product questions? Need technical support? Please feel free to
contact us:
Technical Support and E-Warranty Certificate
www.vevor.com/support
NEED HELP? CONTACT US!
This is the original instruction, please read all manual instructions
carefully before operating. VEVOR reserves a clear interpretation of our
user manual. The appearance of the product shall be subject to the
product you received. Please forgive us that we won't inform you again if
there are any technology or software updates on our product.
RV WINDOWS

- 2 -
Varning - För att minska risken för skada måste användaren läsa
bruksanvisningen noggrant.
Varning- Var noga med att bära hörselskydd när du använder
denna produkt.
Varning- Var noga med att bära ögonskydd när du använder
denna produkt.
Varning- Var noga med att bära dammmasker när du använder
denna produkt.
Varning- Var noga med att bära handskar när du använder denna
produkt.
PRODUCTION CONFIGURATION
M odel
Specifikationer
(i)
Kantstorlek
(in)
Hålstorlek
(in)
Adaptiv
tjocklek (in)
O
penningsmetod
SSTLC305x559
12 x 22
12 x 22
12,17 x
22,17
0,95-1,8
Upp och ner
SSTLC305x610
12 x 24
12,04 x 24
12,17 x
24,17
SSTLC356x406
14 x 16
14 x 16
14,17 x
16,17
SSTLC356x559
14 x 22
14 x 22
14,17 x
22,17
SSXCWT762x508
30 x 20
29,92 x
19,96
30,15 x
20,15
1,25-1,83
Tryck utåt
SSXCWT762x559
30 x 22
29,84 x
21,92
30,15 x
22,16
SSXCWT914x559
36 x 22
35,82 x
21,92
36,14 x
22,16
SSTLC610x508
24 x 20
24 x 20
24,17 x
20,15
0,95-1,8
Vänster och
höger

- 3 -
- 4 -
PARTS LIST
M odel
W
inda
n
T fälgring
M4,2x1
6
skruva
M4,2x30
skruva
Fjäderspänn
e
Kartong
mall
M
anual
SSTLC305x559
1 st
1 st
16 st
16 st
-
1 st
1 st
SSTLC305x610
1 st
1 st
16 st
16 st
-
1 st
1 st
SSTLC356x406
1 st
1 st
16 st
16 st
-
1 st
1 st
SSTLC356x559
1 st
1 st
16 st
16 st
-
1 st
1 st
SSXCWT762x50
8
1 st
1 st
20 st
-
4 st
1 st
1 st
SSXCWT762x55
9
1 st
1 st
20 st
-
4 st
1 st
1 st
SSXCWT914x55
9
1 st
1 st
20 st
-
4 st
1 st
1 st
SSTLC610x508
1 st
1 st
20 st
20 st
-
1 st
1 st
INSTALLATION INSTRUCTIONS
Steg 1. Förbered fönsteröppningen.
Om du installerar ett ersättningsfönster börjar du med att ta bort det gamla
fönstret. För att göra detta, ta bort alla skruvar runt omkretsen av
fönsterramen (inuti fordonet). När skruvarna tas bort, fönstret skjuts ut ur
öppningen med kraft inifrån och ut.
När fönstret är ute ur hålet måste du försiktigt ta bort eventuellt
kvarvarande tätningsmedel fast vid ytterväggen.
Om du installerar ett fönster i en ny öppning, börja med att peka på
kartongmallen till önskad plats och spåra runt mall. Ta bort mallen och
- 5 -
borra hål nära varje hörn med en stegbit för att passa sticksågen blad. Följ
den markerade linjen tills utskärningen är klar.
Steg 2. Se till att fönstret passar.
Provmontera det nya fönstret genom att helt enkelt placera det i den grova
öppningen för att säkerställa en korrekt passform. Den yttre fönsterflänsen
bör överlappa öppningen med 3/8" eller mer för att ge en bra tätning
sidoväggen. En liten lucka på insidan mellan 1/8"-1/4" förväntas .
Steg 3. Förbered och installera tätningsmedel
Lägg försiktigt det nya fönstret med framsidan nedåt på en mjuk yta att inte
repa den och applicera tätning (Användare måste köpa tätningar av
lämplig tjocklek enligt deras faktiska behov ) . Start i mitten av fönstrets
undersida och applicera tätningstejpen spolas hela vägen runt omkretsen
tills ändarna möts (Obs: Det bör inte finnas ett gap där tätningsändarna
möts).
- 6 -
Steg 4. Lägg till kuddar (när tjockleken på den installerade väggen är
mindre än produktanpassningstjockleken, följ detta steg för installation)
Beroende på produktens tjocklek, köp plywood av lämplig tjocklek, använd
en kartongmall, rita en linje längs kanten på kartongmallen och använd
sedan en 1-tums baffelbricka som ett mellanlägg för att rita en gräns runt
mallen .
Klipp ut insidan och vi fick en rektangulär munk som vi kan använda för att
passa mellan fönstret och trimringen.
- 7 -
Steg 5 . Installera det nya fönstret.
Placera fönstret i öppningen från utsidan av fordonet, medan en andra
person riktar in fönstret trimma ringhål till kanalen på insidan av fönstret.
(Obs: När du installerar upp och ner skjutbara fönster och vänster och
höger skjutbara fönster, se till att installera med avloppet nedåt)
Börja fästa trimringen med de medföljande skruvarna, börja med de 4

- 8 -
hörnen först. Arbete din väg runt omkretsen gradvis dra åt varje skruv
medan du går. Detta kommer försiktigt att dra trimring och fönster
tillsammans. (Obs: Använd endast skruvarna som medföljer det nya
fönstret, som
längre skruvar kan skada fönsterkarmen).
Upp och ner skjutbara fönster och vänster och höger skjutbara fönster. När
trimringar inte är lämpliga för olika monteringshålstjocklekar kan de
monteras omvänt.
Delprodukter erbjuder två typer av skruvar, 16 mm och 30 mm långa.
Beroende på monteringshålets tjocklek väljs lämplig skruvlängd för att
säkerställa att fönsterkarmen inte skadas vid skruvmontering.
Upp och ned skjutbara fönster och vänster och höger skjutbara
fönster :
Tjockleken på väggen är 24,2 -30 mm, och trimringen installeras i
framåtriktningen med 16 mm långa skruvar
Tjockleken på väggen är 30-36 mm, och trimringen monteras omvänt med
16 mm långa skruvar
Tjockleken på väggen är 36-45,7 mm , och trimringen monteras omvänt
med skruvar med en längd på 30 mm
Framåt installation Omvänd installation
Extrapolationstyp Windows : med 16 mm långa skruvar
Trim ring
wall
wall
Trim ring
- 9 -
Det rekommenderas att du kan försegla eller köra en fin sträng av tätning
runt den yttre omkretsen av fönstret för att ge en ytterligare barriär mot
elementen.
Tillverkare: Shanghaimuxinmuyeyouxiangongsi
Adress: Shuangchenglu 803nong11hao1602A-1609shi, baoshanqu,
shanghai 200000 CN.
Importerad till AUS: SIHAO PTY LTD, 1 ROKEVA STREETEASTWOOD
NSW 2122 Australien
Importerad till USA: Sanven Technology Ltd., Suite 250, 9166 Anaheim
Place, Rancho Cucamonga, CA 91730
REP
EC
E-CrossStu GmbH
Mainzer Landstr.69, 60329 Frankfurt am Main.
REP
UK
YH CONSULTING LIMITED.
C/O YH Consulting Limited Office 147, Centurion House,
London Road, Staines-upon-Thames, Surrey, TW18 4AX


