www.tcl.com
User manual
Manual de utilizador
Manual del usuario
Bedienungsanleitung
Manuel de l’utilisateur
Manuale dell'utente
Felhasználói kézikönyv
Brukerhåndbok
Gebruikershandleiding
Návod k obsluze
Návod na používanie
Käyttöopas
Brukerhåndbok
Brugervejledning
Manual de utilizare

English
- -
2
Table of Contents
Important Information
…………………
3
Important Safety Instructions
…………… 3
Using Electrical Power
……………………… 5
Advice on Eye Health
……………………… 5
Cleaning Your Monitor
……………………… 5
Product Disposal and Recycle
…
6
Information of Your Old Product
……… 6
Preparing and Assembling
…………
7
What's in the Box
………………………………
8
Installing the Monitor
…………………………
9
Setup stand&base
…………………………… 9
Connect to power and turn on monitor
11
Adjusting viewing angle
………………… 12
Wall mounting
……………………………… 14
Using the Monitor
………………………
16
Connections
………………………………… 16
Connect to the monitor
…………………… 16
Monitor terminal description
…………… 17
Joystick Button
………………………………
18
Function description
……………………… 18
OSD function menu
……………………… 20
Specication
…………………………………
26
General specication
……………………… 26
Standard signal mode
…………………… 28
Other Information
………………………
30
Troubleshooting
……………………………
30
Legal Statement
……………………………
31
English
- -
3
Important Information
Ensure you carefully read all the safety information before you set up this
product.
TCL King Electrical Appliances (Huizhou) Co., Ltd. bears no
responsibility for accidents or damages caused by unauthorized
changes, modications or improper use of the product.
Warnings
•
WARNING:
Keep away from water sources or water places such as
bathrooms, kitchens, basements, swimming pools, etc.
•
WARNING:
Ensure that the equipment is mounted and placed in a
stable place, if it falls, it may cause personal injury or equipment damage.
•
WARNING:
Keep away from sources of radiation and heat, please store
and use in a cool, dry and ventilated place.
•
WARNING:
Do not cover or block the ventilation holes in the back case,
and do not use it on the surface of a bed, sofa, blanket or similar object.
•
WARNING:
Do not overload the outlet as this may cause re or electric
shock.
•
WARNING:
Do not put foreign objects into the machine, otherwise it
may cause a short circuit and lead to re or electric shock.
•
WARNING:
Do not disassemble or repair this product by yourself. If
there is any trouble, please contact the after-sales service personnel
directly.
•
WARNING:
Do not pull or twist the power cord excessively.
If your equipment uses an AC adapter:
-Only use the AC Adapter provided with your TCL
product.
-Do not use the power cord with other products.
Ensure that the power outlet is as close as possible to the monitor and
that it is easy to plug in and unplug the power adapter (power cord).
Always unplug the power adapter (power cord) from the power outlet
when you disconnect the device.
•
WARNING:
The power supply voltage range for operation of the unit is
indicated on the rear case label. If you are unable to conrm the voltage
supplied, consult your dealer or local power company.
•
WARNING:
When the equipment is not used for a long period of time,
disconnect the power supply to prevent damage from electric shock and
abnormal power supply voltage during thunderstorms.
•
WARNING:
Sockets should be mounted near the equipment and should
be easily accessible.
•
WARNING:
The power plug or appliance coupler serves as the
disconnecting device, make sure that the disconnecting device is easily
accessible during normal use of the equipment.
Important Safety Instructions
English
- -
4
This symbol is intended to alert the user to the presence of
uninsulated dangerous voltage within the product’s enclosure that
may be of sucient magnitude to constitute a risk of electric shock.
This symbol is intended to alert the user to the presence of
important operating and maintenance (servicing) instructions in the
literature accompanying the product.
To prevent injury, this apparatus must be securely attached to the desk/oor/
wall in accordance with the installation instructions.
Monitor screen
The monitor screen used in this product is made of glass. Therefore, it can
break when the product is dropped or impacted upon by other objects.
The monitor screen is a very high-technology product, giving you nely
detailed pictures. Occasionally, a few nonactive pixels may appear on
the screen as a xed point of blue, green or red. This does not aect the
performance of your product.
ESD regulation
This apparatus meets ESD performance criteria. In case the apparatus does
not recover due to electrostatic discharge, user intervention is required.
Hanging the monitor on the wall
Warning: This operation requires at least two people depending on your
monitor dimension.
To ensure a safe installation, observe the following safety notes:
•
Check that the wall can support the weight of the monitor and wall mount
assembly.
•
Follow the mounting instructions provided with the wall mount. For certain
models, make sure to screw the hexagonal VESA wall mounting screws
provided with the set into the screw bosses for the wall mount at the back
of your set before your wall mounting.
•
The monitor must be installed on a vertical wall.
•
Make sure to use only screws suitable for the material of the wall.
•
Make sure that the monitor cables are placed so that there is no danger
of tripping over them.
All other safety instructions about our monitor are also applicable here.
Multi-Product user manual
The features described in this manual are common to most models. Some
features may not be available on your monitor and/or your monitor may
include features that are not described in this user manual. The illustrations
in this manual may dier from the actual product. Please refer to the actual
product.
RISK OF ELECTRIC SHOCK DO
NOT OPEN
CAUTION
CAUTION: TO REDUCE THE RISK OF ELECTRIC SHOCK, DO NOT
REMOVE COVER (OR BACK). NO USER-SERVICEABLE PARTS
INSIDE. REFER SERVICING TO QUALIFIED SERVICE
PERSONNEL.
Important Safety Instructions
English
- -
5
This product should be used with the type of power supply specied on
the label. If you are uncertain about the type of power supply available,
check with your dealer or local power supply company.
•
Do not place any objects on the power adapter (power cord), and do
not place this product where people will step on the power adapter
(power cord).
•
If a power extension cord is used, make sure that the total amperage
of the appliances connected to it does not exceed the amperage of
the power extension cord. Care should also be taken that the total
rating of all appliances plugged into the same wall outlet does not
exceed the fuse rating. (Applicable to monitors equipped with power
cords).
•
Do not plug in too many devices, as this will cause overloading of
the power outlets and power boards. The overall system load must
not exceed 80% of the branch circuit rating. If a patch panel is used,
the load must not exceed 80% of the patch panel input rating.
Advice on Eye Health
Cleaning Your Monitor
To avoid the possible eye fatigue and pains in the neck/arms/back/
shoulders caused by long-time use of the Monitor, please keep the
following suggestions in mind while using:
Please carefully read and follow the guidelines below when cleaning
your monitor:
•
Place the Monitor at a distance of 20~28 inches (approximately
50~70 cm) from your eyes.
•
When using the Monitor, increase the blinking frequency
appropriately to keep your eyes moist, and use water to moisten
your eyes after long-time use of the Monitor.
•
After using the Monitor for two hours, take a 20-minute break.
•
Take frequent breaks: keep your eyes away from the Monitor and
look at a distant target for at least 20 seconds.
•
During breaks, stretching activities may be performed to soothe the
neck, arms, back and shoulders.
•
Before cleaning the product, ALWAYS make sure to disconnect the
power cord.
•
When cleaning, use a soft cotton or a microber cloth and mild
detergent to clean the product. ALWAYS make sure the cloth is
almost dry, do not allow liquid into the cabinet front and side.
Warning
Using Electrical Power
English
- -
6
Your product is designed and manufactured with high-quality materials
and components, which can be recycled and reused. This product
may contain lead and mercury. Disposal of these materials may be
regulated due to environmental considerations. For disposal of recycling
information, please contact your local authorities.
Information on Disposal of Old Product
WEEE Statement
Conformity
[European Union]
Under the European Union (“EU”) Directive on Waste Electrical
and Electronic Equipment, Directive 2012/19/EU, products
of “electrical and electronic equipment” cannot be discarded
as municipal waste anymore and manufacturers of covered
electronic equipment will be obliged to take back such at the end
of their useful life.
[Business Users]
If you wish to dispose of this product, please contact your
supplier and check the terms and conditions of the purchase
contract.
[Other Countries outside the European Union]
These symbols are only valid in the European Union. If you
wish to dispose of these items, please do so in accordance with
applicable national legislation or other rules in your country for
the treatment of old electrical equipment.
This device complies with the requirements set out in the Council
Directive on the Approximation of the Laws of the Member States
relating to Electromagnetic Compatibility (2014/30/EU), Low-
voltage Directive (2014/35/EU). ErP Directive (2009/125/EC) and
RoHS Directive (2011/65/EU). This product has been tested and
found to comply with the harmonized standard for Information
Technology Equipment published under the Directive of Ocial
Journal of the European Union.
Figures and illustrations in this User Manual are provided for reference only and
may dier from the actual product appearance. Product design and specications
may be changed without notice.
Product Disposal and Recycle
English
- -
7
Warning
Preparing and Assembling
Before taking out and assembling the monitor, please read this carefully:
-
Always use genuine components supplied from the box to ensure safety and product performance.
- For the damage or injury by unauthorized components, the product warranty will not cover.
- If using generic cables not certied by TCL, the screen may not display or there may be image noises.
- Illustrations in this user manual represent typical procedures, there may be dierences among varying monitors
-
Do not use excessive force to tighten screws, otherwise damage may cause to the monitor. Such damage will not be covered by the product
warranty.
- Fall-o or personal injury may happen if you only hold the base upside down. Such damage will not be covered by the product warranty.
- Do not apply excessive force to the screen when lifting or moving the monitor, damage may be caused to the screen if so.
- Negligence, lack of supervision, lack of maintenance or maintenance of the Product not in accordance with the manufacturer's instructions for use
are not covered by the product warranty.
- Modications, adaptations and alterations of the monitor for use in a country dierent from those for which it was originally designed and
manufactured and any deterioration caused by these modications are not covered
by the product warranty.
- Modications, adaptations, interventions and alterations of the monitor (opened or disassembled), carried out by a third party, by an enterprise not
authorized by the manufacturer or by an individual. Such changes are not covered
by the product warranty.
- Maintenance and repairs made or attempted by persons other than the manufacturer or a service center approved by the manufacturer are not
covered by the product warranty.
- An installation or use of the monitor that does not conform to the technical or safety standards and regulations in force in the country where it is
installed and used is not covered
by the product warranty.
- Virus infections or monitor use with software not provided or incorrectly installed are not covered by the product warranty.
- To aesthetic defects, especially scratches, traces of shocks etc. caused on external parts of the monitor that do not interfere with its operation are
not covered by product warranty.
- Defects caused by infestation with parasites or insects are not covered by product warranty.

English
- -
8
This equipment has been tested and found to comply with the limits for a Class B digital device, pursuant to Part 15 of the FCC Rules. These limits are
designed to provide reasonable protection against harmful interference in a residential installation. This equipment generates, uses, and can radiate radio
frequency energy and, if not installed and used in accordance with the instructions, may cause harmful interference to radio communications. However, there is
no guarantee that interference will not occur in a particular installation. If this equipment does cause harmful interference to radio or television reception, which
can be determined by turning the equipment o and on, the user is encouraged to try to correct the interference by one or more of the following measures:
• Reorient or relocate the receiving antenna.
• Increase the separation between the equipment and receiver.
• Connect the equipment into an outlet on a circuit dierent from that to which the receiver is connected.
• Consult the dealer or an experienced radio/TV technician for help.
This Class B digital apparatus complies with Canadian ICES-003.
The series, include models (25/27G64, 27G74)
This device complies with part 15 of the FCC Rules. Operation is subject to the following two conditions:
(1) This device may not cause harmful interference, and
(2) this device must accept any interference received, including interference that may cause undesired operation.
Supplier Name: TTE Technology, Inc. (dba TCL North America)
Supplier Address: 189 Technology Drive, Irvine, CA 92618, USA
Supplier phone number and internet contact information: 1-877-300-9576 support.tcl.com
FCC Information
English
- -
9
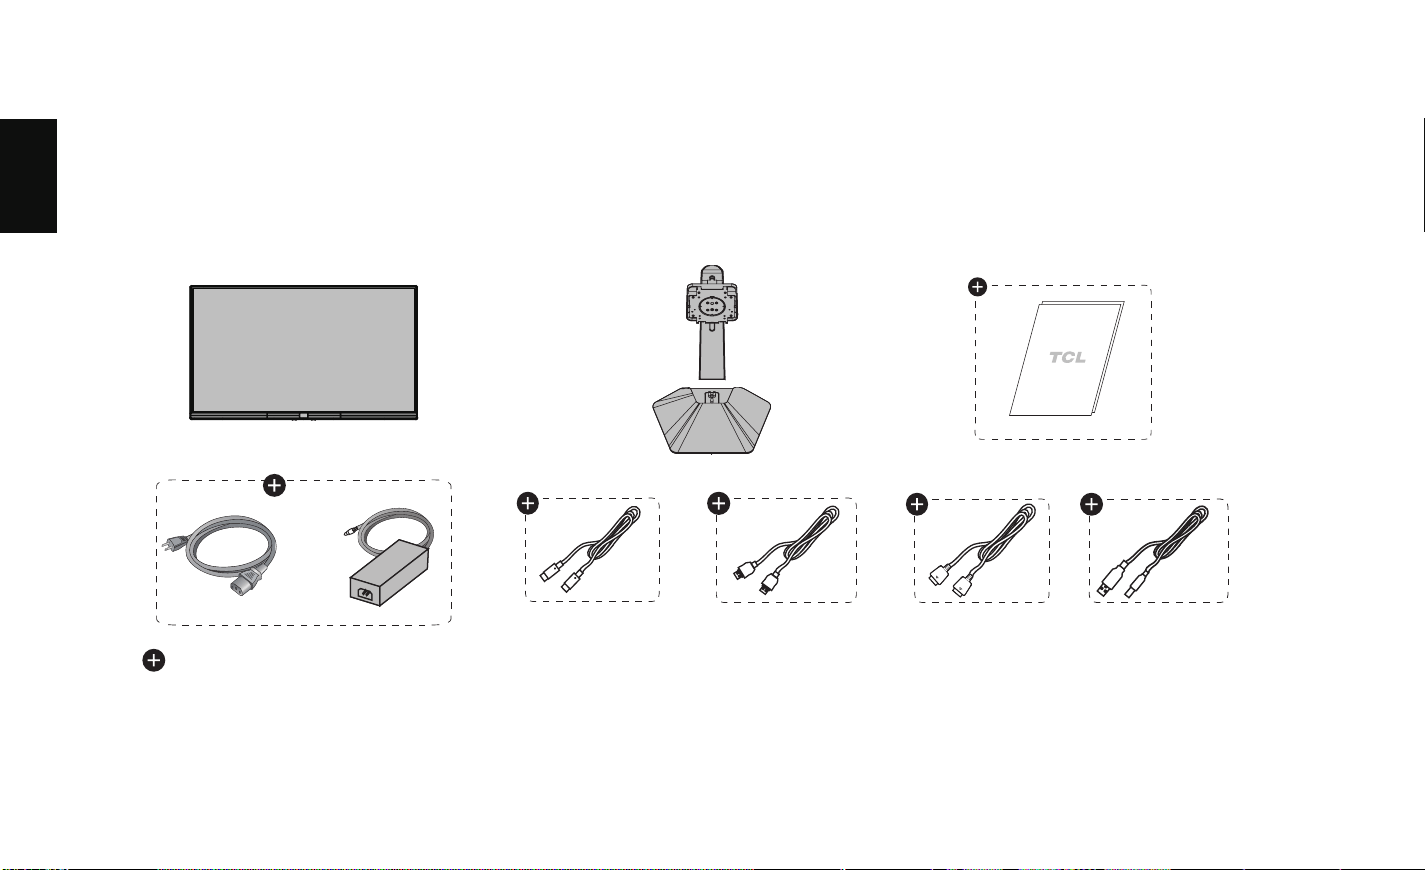
What's in the Box
Please check the following items when you unpack the box, and keep the package in case you need to transport or ship the monitor in future.
Accessories may vary by country and model.
*Length of signal cable: 1.5 meters
比例比例�$�$�$�$
English
- -
10
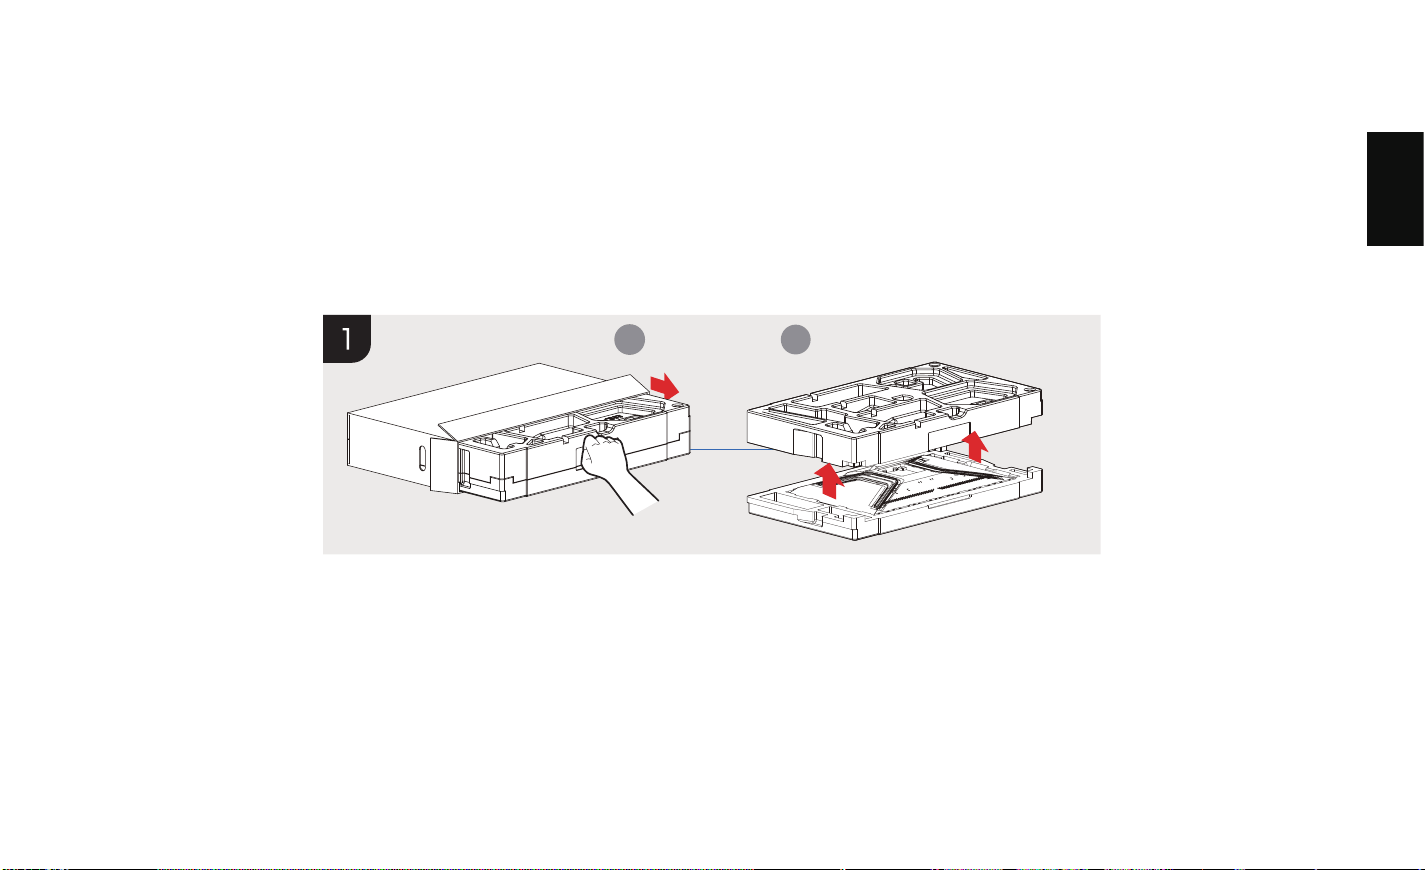
Setup stand & base
Installing the Monitor
2
1
English
- -
11
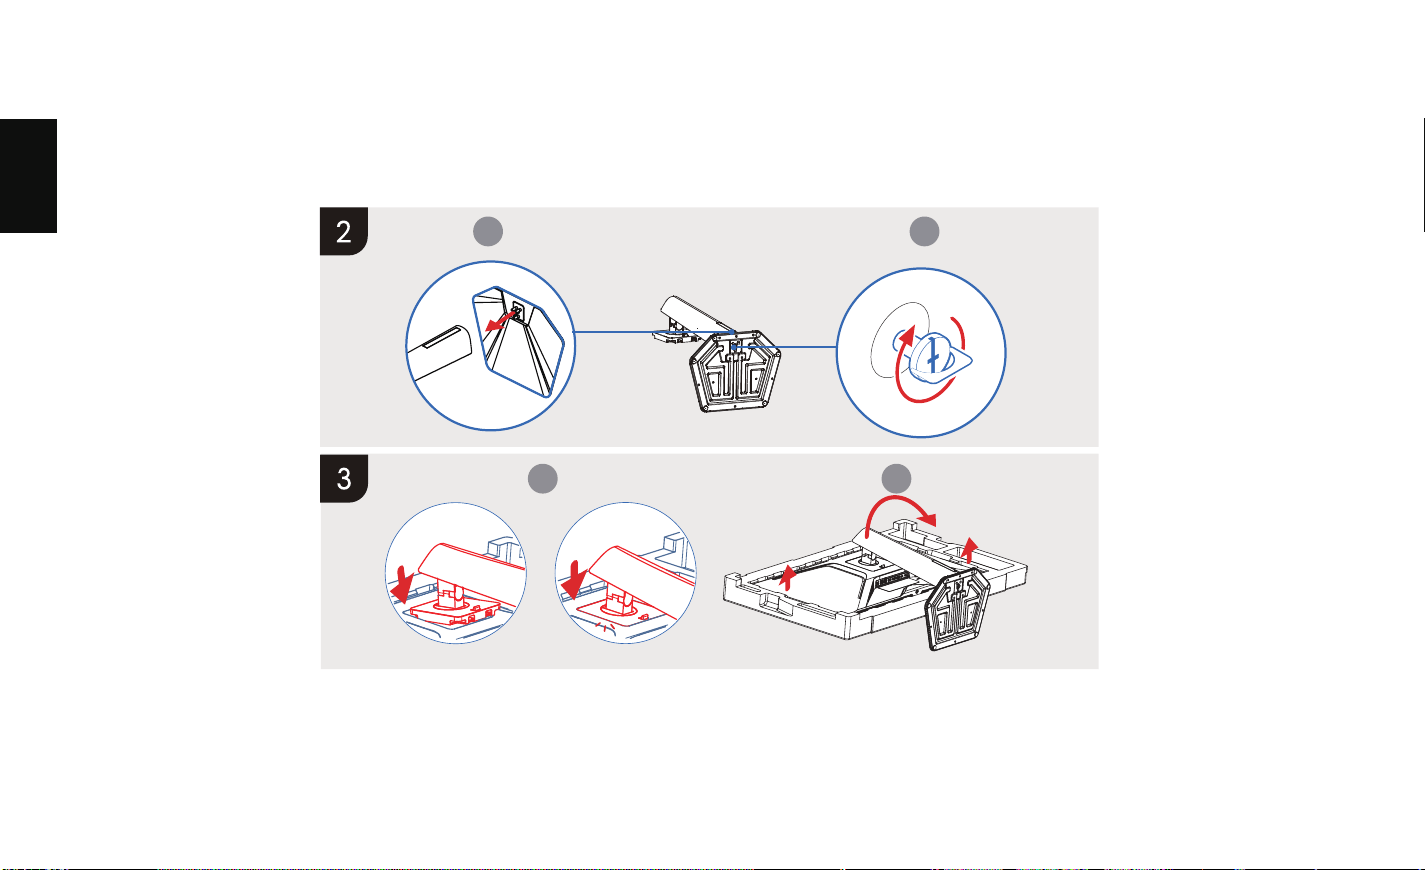
Setup stand & base
3 4
5 6
English
- -
12
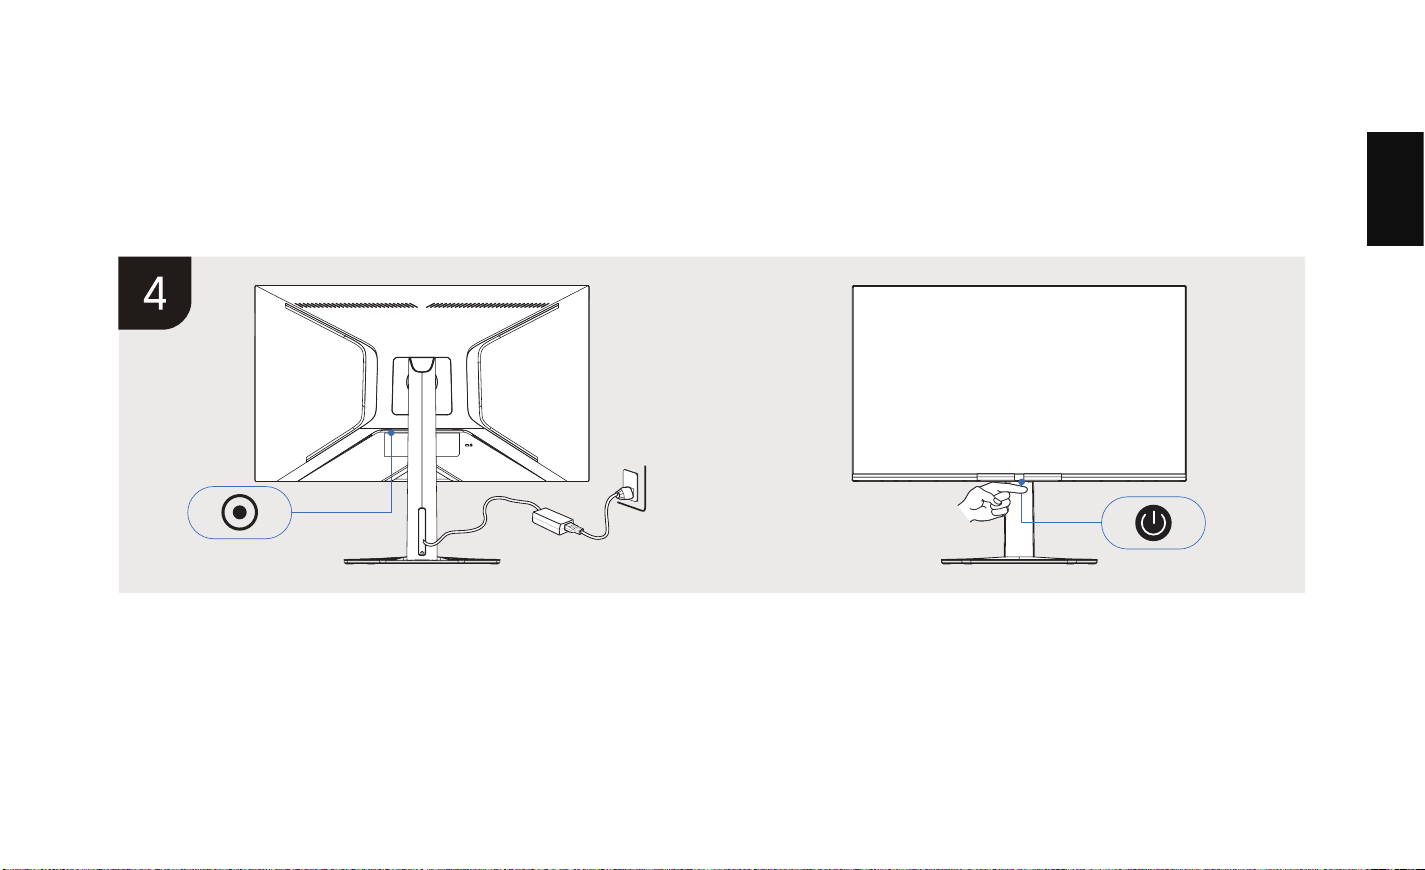
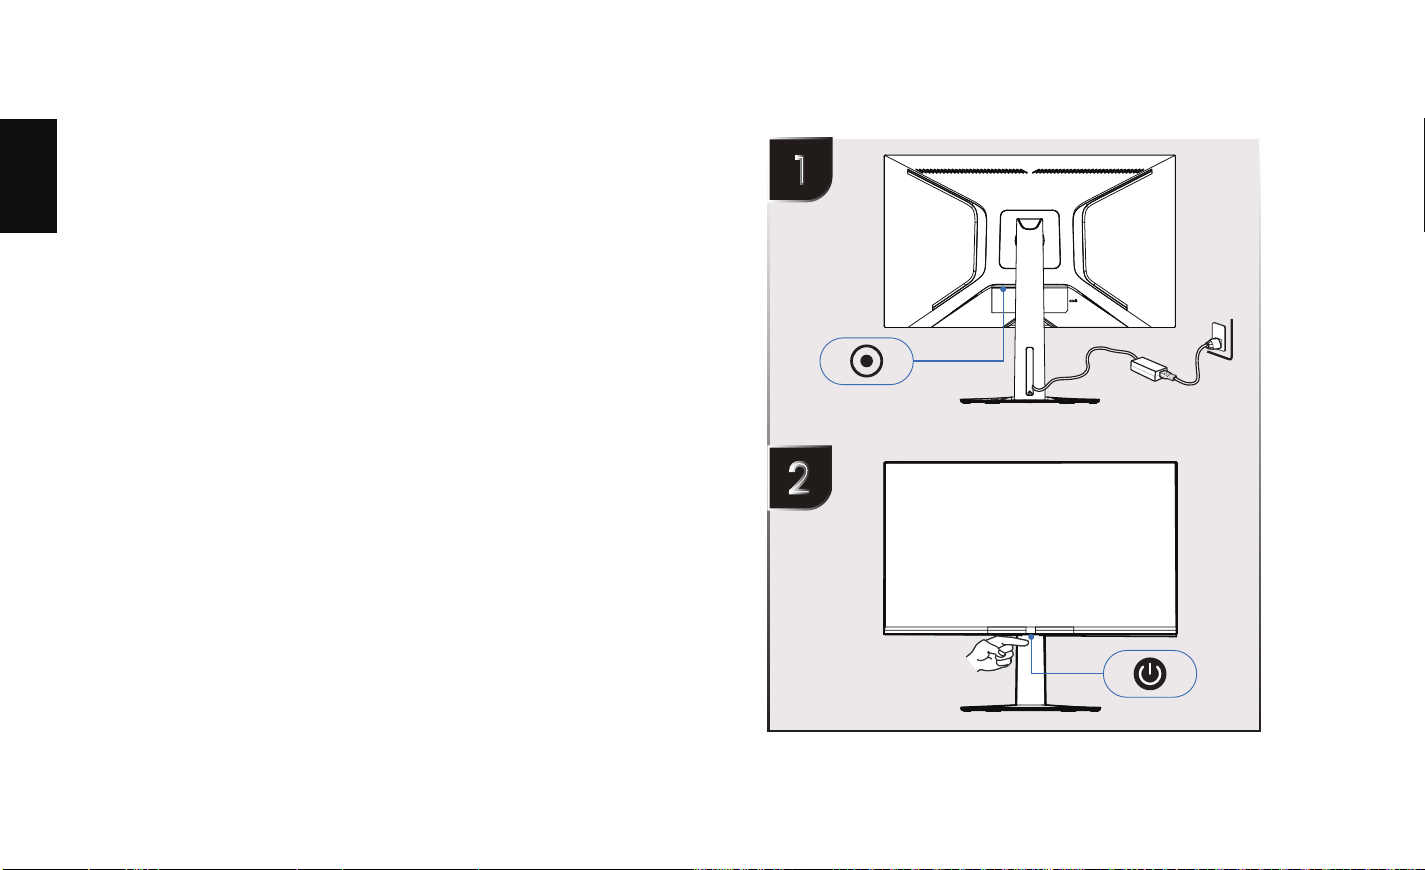
Connect to the power and turn on monitor
English
- -
13
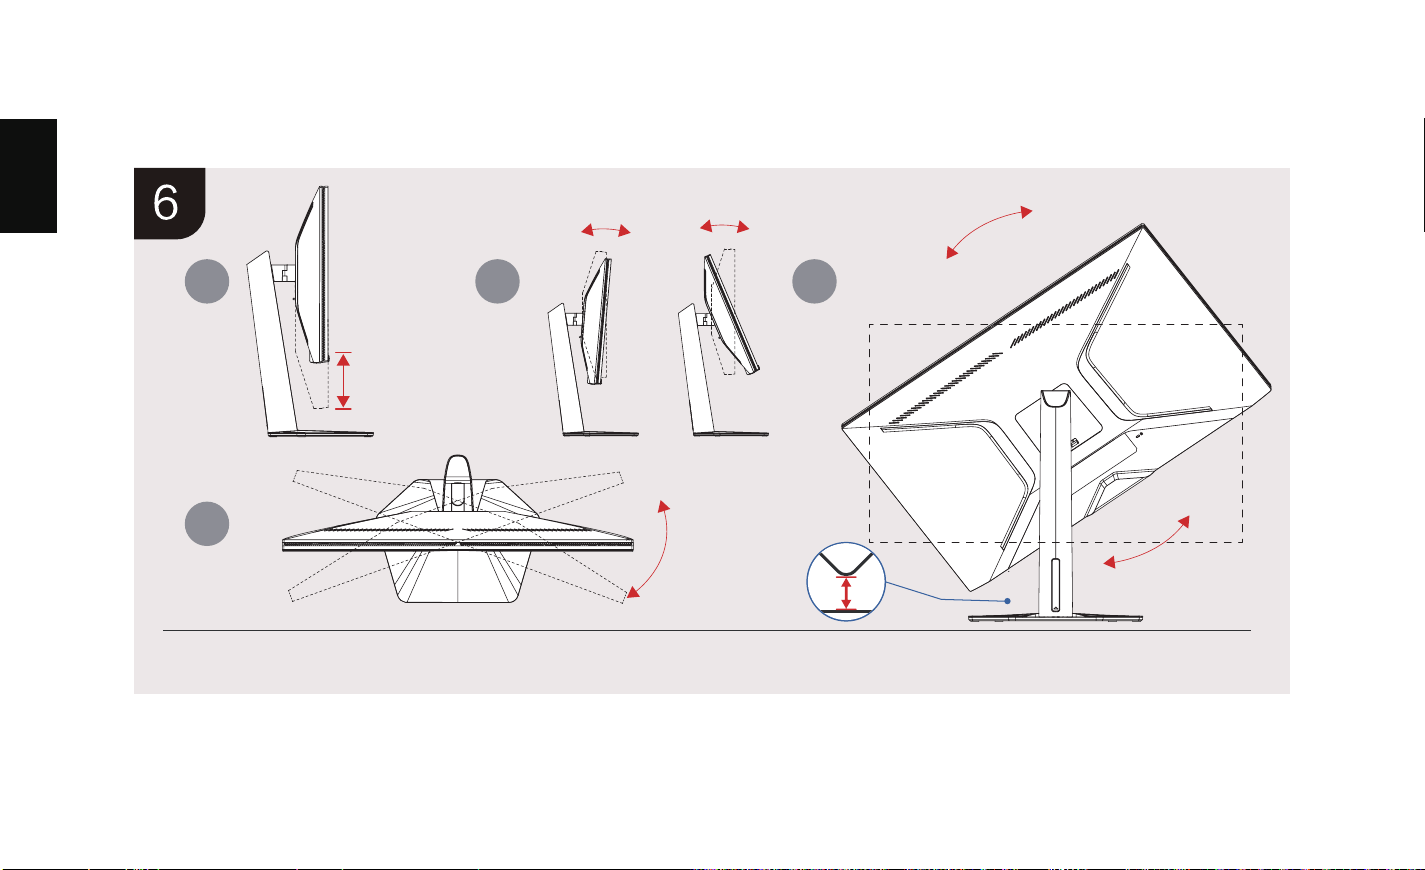
Adjusting viewing angle
2 31
4
125mm±5mm
-5~23˚
±90˚
±20˚
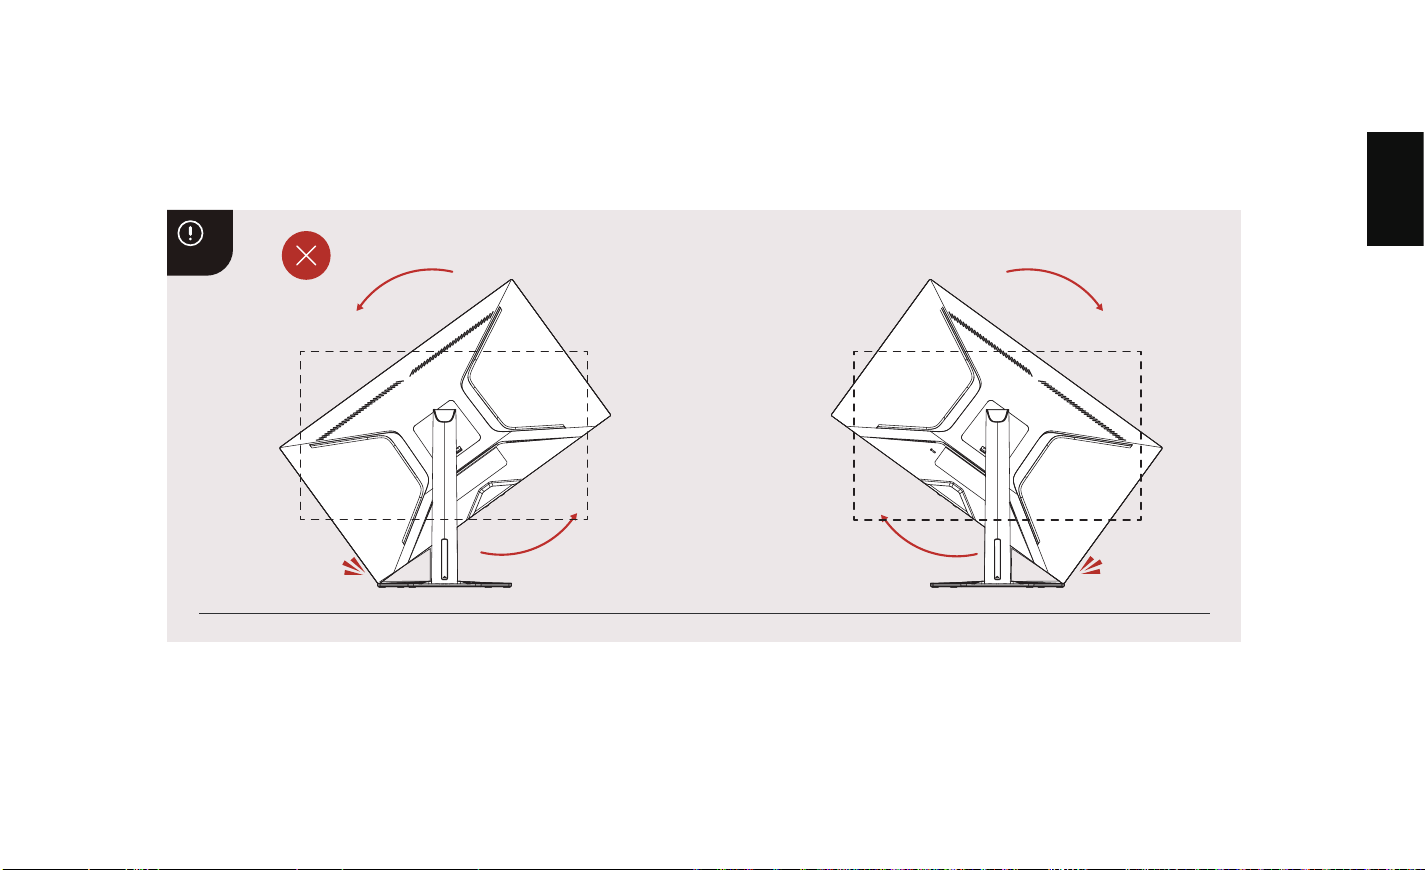
Attention:When using the Pivot as shown in Figure
③
,it is necessary to rotate the Tilt
angle of 23°to avoid contact with the chassis.
English
- -
14
Adjusting viewing angle

English
- -
15
Warning
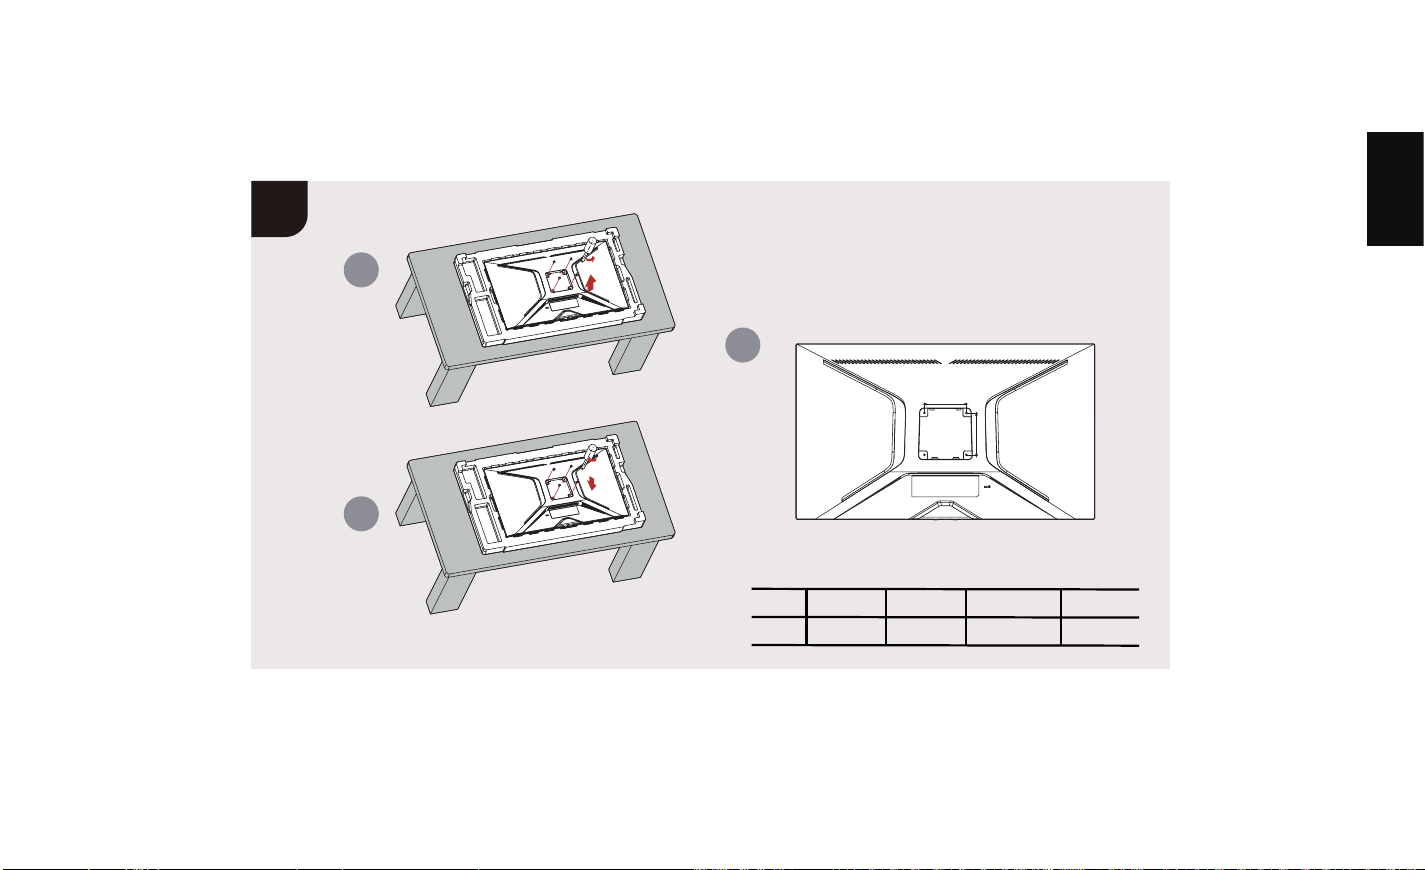
Wall mounting
Never place a monitor set in an unstable location. A monitor set may fall, causing serious personal injury or death. Many injuries, particularly to
children, can be avoided by taking simple precautions such as:
- Check if the wall can support the weight of the monitor and wall mount assembly.
- Follow the mounting instructions provided with the wall mount. For certain models, make sure to screw the VESA wall mounting screws provided
with the set into the screw bosses for the wall mount at the back of your set before your wall mounting.
- If the screws missing by personal accident, ensuring to use only screws recommended in wall mounting part of the User Manual or Quick Start
Guide(attached in accessory box) and suitable for the material of the wall.
- Only use furniture that can safely support the monitor set recommemded in wall mounting part of the User Manual or Quick Start Guide(attached
in accessory box).
- Ensure that the monitor must be installed on a vertical wall.
- Ensure that the monitor is not overhanging the edge of the supporting furniture.
- Not place the monitor on tall furniture (for example, cupboards or bookcases) without anchoring both the furniture and the monitor set to a suitable
support.
- Not place the monitor set on cloth or other materials that may be located between the monitor set and supporting funiture.
- ALWAYS route the cords and cables connected to your monitor so that there is no danger of tripping.
Note:
All other safety instructions about our monitor are also applicable here. If your existing monitor set is being retained and relocated, the same
considerations as above should be applied.
English
- -
16
Wall mounting
7
1
2
3
W
H
32''
W VESA ScrewsH Torque
100mm 100mm M4x10mm--4pcs < 1.2N.m
English
- -
17
Using the Monitor
To connect the monitor to the computer/
laptop
Connections
1. Before connecting to the monitor
,
ensure that your computer/laptop
on the state of o
2. Connect the monitor cable to the compatible port of your computer/
laptop.
3. Assemble the external power adaptor with the power cord
.
4. Plug the end of the external power adaptor to your monitor's power
port.
5. Plug the end of the power cord into an electrical outlet.
6. Press the middle of the joystick button to turn on the monitor.
7. Monitor will identify the signal and show a picture after you turn on
the computer/laptop.
English
- -
18
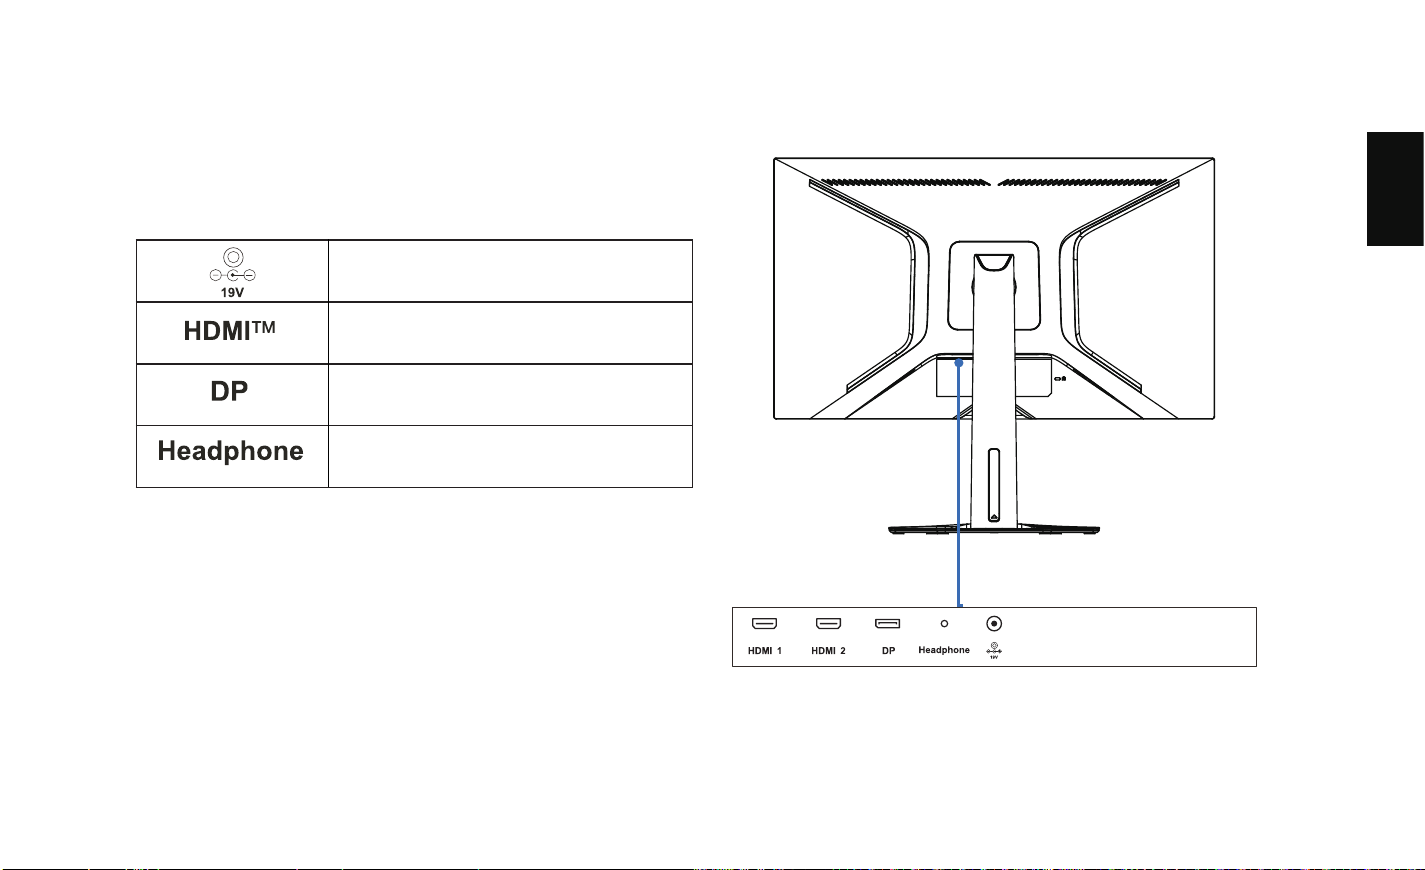
Monitor Terminal Description 32G64
Monitor power input port
HDMI signal access port
DisplayPort (DP) signal access port
Audio output port
Note
: Button and connector locations may vary according to monitor model.
Connections
English
- -
19
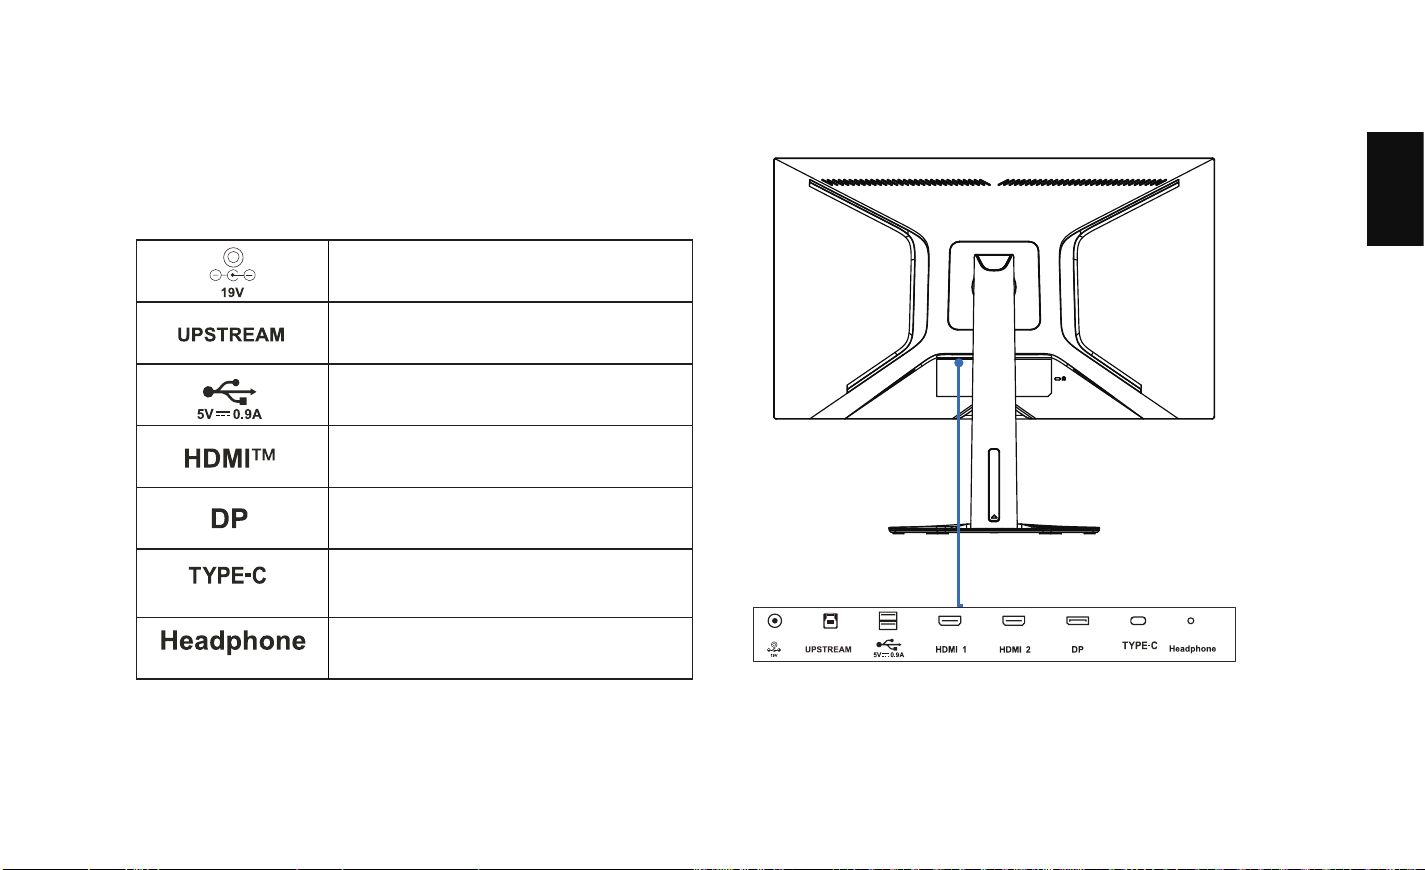
Monitor Terminal Description 32R84
Note
: Button and connector locations may vary according to monitor model.
Connections
(Max )
Monitor power input port
A port that can transmit data from USB-B
to your computer/laptop
Universal Serial Bus(USB) port
HDMI signal access port
DisplayPort (DP) signal access port
Type-C input port (Type-C output:
5VDC/3A, 9VDC/3A, 12VDC/3A,
15VDC/3A,20VDC/4.5A)
Audio output port
90W
(Max 90W)
English
- -
20
Function description
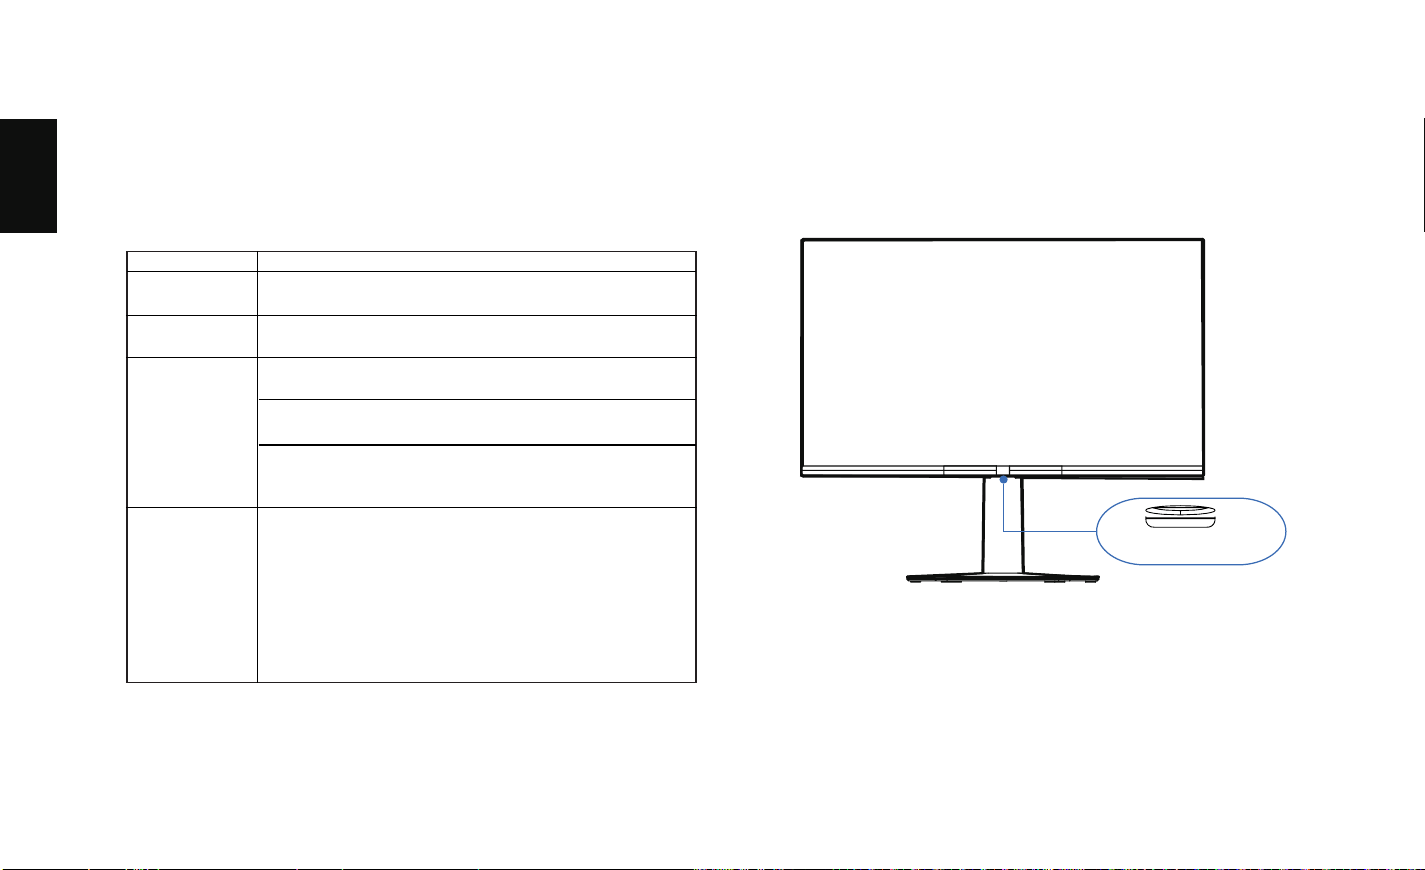
Here are the navigation direction buttons and the Power button on the
bottom of the monitor that you may use frequently.
Turn On
Turn O
Indicator Light
Instructions
Press the joystick button in the middle.
Light o when turning o the monitor
Light turns orange when monitor on standby mode
Light turns white when there is an input signal to
monitor
Press it twice quickly or hold it for 3 seconds.
Joystick Button
Joystick Button
• You can turn on/o the monitor
.
• When the monitor is on (with signal) : Open navigation
menu by pressing button once.
• When the menu is open, it acts as a conrmation
function button.
• When the monitor is on (without signal) : Open input
source shortcut menu by pressing button once.
Middle key
(Press the middle of
joystick button)
English
- -
21
Left key
Right key
Up key
Down key
(Toggle joystick button to
the left)
(Toggle joystick button to
the right)
(Toggle joystick button to
the backward)
(Toggle joystick button to
the forward)
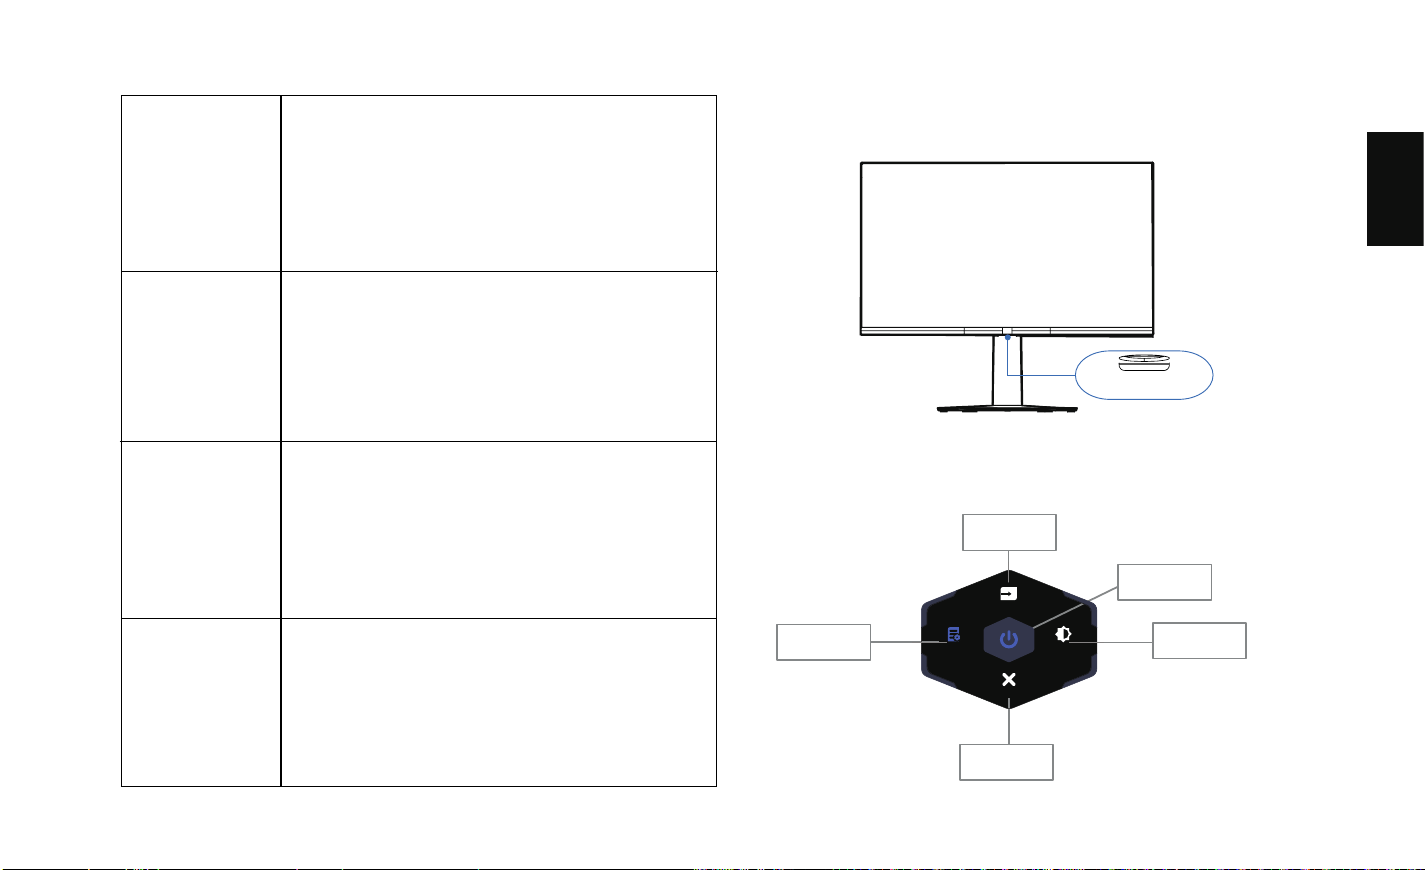
When the monitor is on, you can toggle every direction to open
navigation menu, and follow the instructions mentioned below to adjust.
NOTE: Do not press the joystick button directly against the desktop, as it is
easy to cause damage.
Up Key
Left Key
Right Key
Middle Key
Down Key
• When the monitor is on (with signal): Open navigation
menu by pressing button once.
• When menu is open,select the item to the left to go
back or exit.
• In navigation menu,short/long press to the left to enter
OSD menu.
• When the monitor is on (without signal): Open input
source shortcut menu by pressing button once.
• When the monitor is on (with signal): Open navigation
menu by pressing button once.
• When the menu is open,select the item to the right to
conrm and execute the next-level option function.
• In navigation menu,press to the right to enter shortcut
menu.
• When the monitor is on (without signal): Open input
source shortcut menu by pressing button once.
• When the monitor is on (with signal): Open navigation
menu by pressing button once.
• When menu is open,select next option and add
functions.
• In navigation menu,press to the down to exit
navigation menu.
• When the monitor is on (without signal): Open input
source shortcut menu by pressing button once.
• When the monitor is on : Open navigation menu by
pressin button by pressing button once.
• When menu is open,select previous option and add
functions.
• In navigation menu,press to the back to enter shortcut
menu.
• When the monitor is on (without signal): Open input
source shortcut menu by pressing button once.
Joystick Button
Exit
Display
Input
Menu
English
- -
22
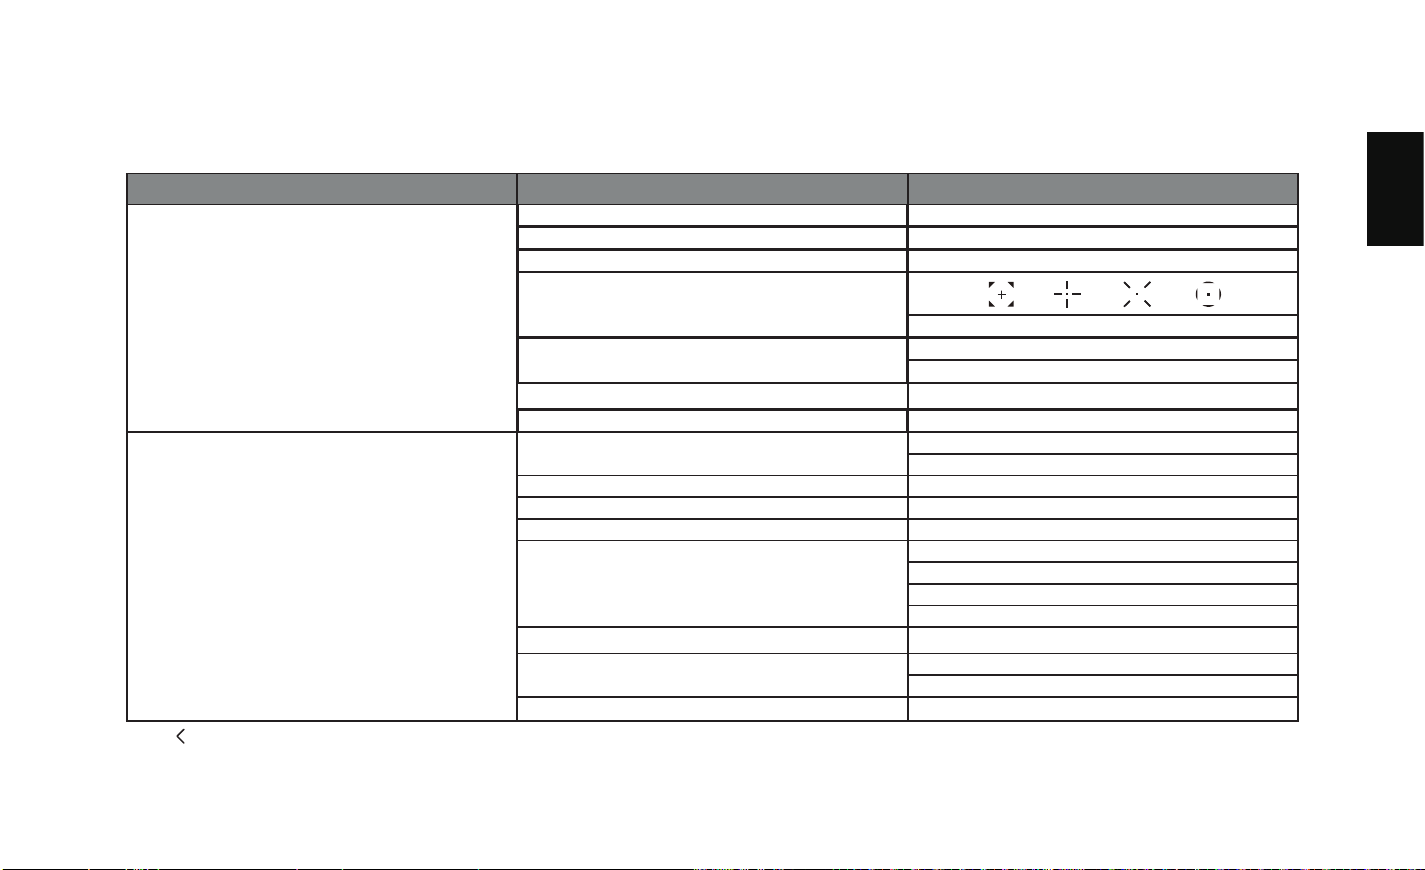
Game mode / Display
This section describes how to optimise the screen display better for playing games.
This section allows you to adjust basic settings or more options of picture.
Level 1 Menu Level 2 Menu Level 3 Menu
Game Mode
FreeSync On/Off
Dark Part Brightening -10 ~ 10
Response Time Normal, Fast, Extreme
Game Crosshair
Turn off/Reset
Timer
15/30/45/60/90/120 minutes
Close
Ambient Light(32R84*)
On/Off
Real-time Refresh Rate
On/Off
Display
Mini LED Control
High, Medium, Standard
Off
Brightness 0 ~ 100
Contrast 0 ~ 100
Dynamic Contrast On/Off
Image Ratio
Auto
16:9
4:3
1:1
Sharpness 0~10
Gamma
Gamma 1
Gamma 2
Reset Display None
Press to return to the previous menu.
Settings may vary for dierent monitors.
OSD function menu
English
- -
23
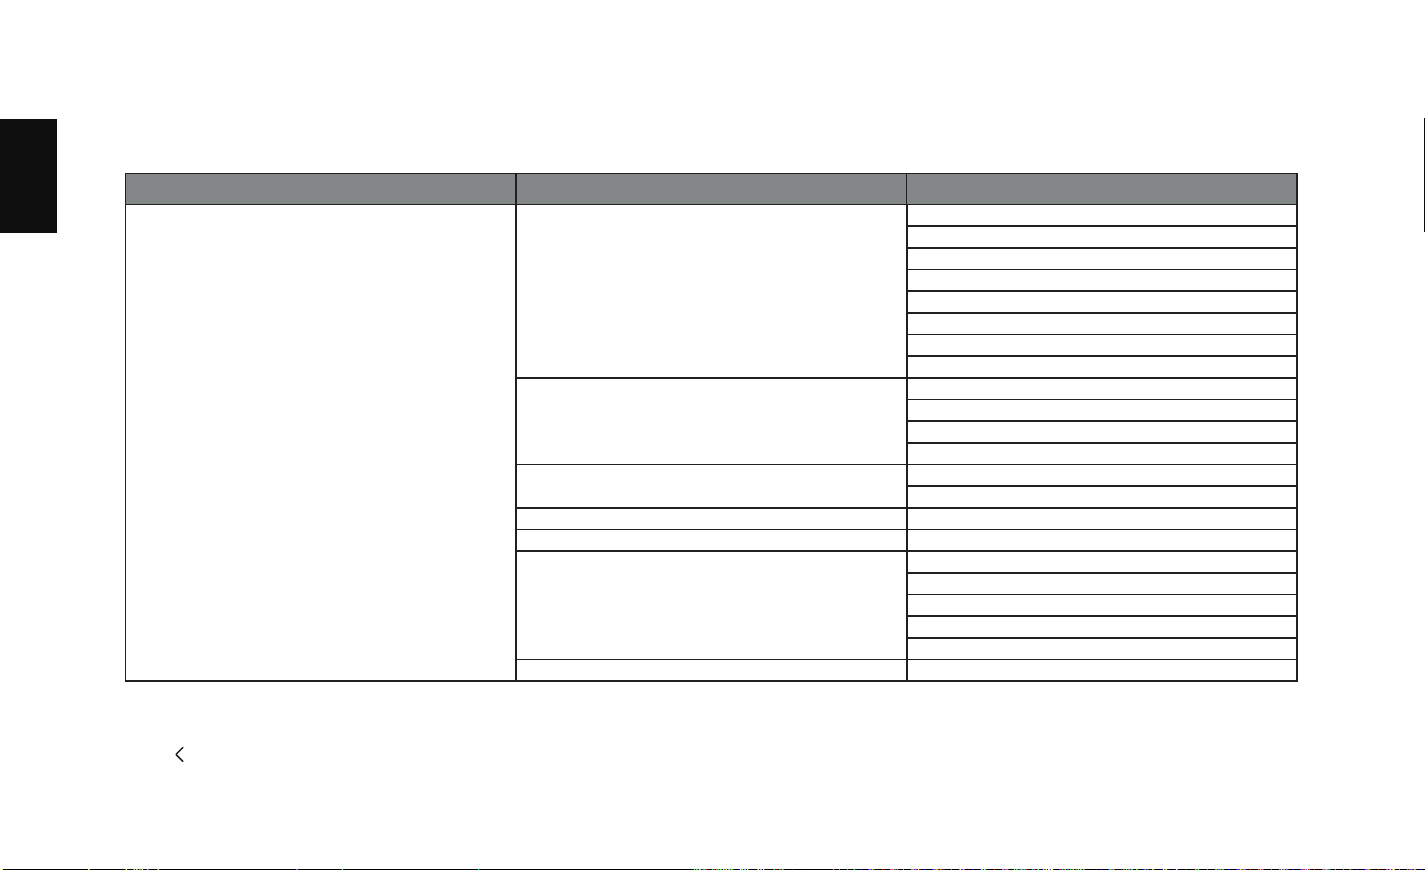
Color
This section allows you to adjust basic settings or more options of picture.
Level 1 Menu Level 2 Menu Level 3 Menu
Color
Scene Mode
Standard Mode
Office Mode
FPS Mode
RPG Mode
RCG Mode
Movie Mode
Eye Care Mode
E-book Mode
Smart HDR
Desktop
Movie HDR
Game HDR
DisplayHDR
Color Temperature
Standard, Warm, Cool
User Setting
Saturation Red, Green, Blue 0 ~ 100
Hue 0 ~ 100
Color Space
Original
sRGB
Rec.709
DCI-P3
Adobe RGB
Reset Color None
Press to return to the previous menu.
Settings may vary for dierent monitors.
OSD function menu
English
- -
24
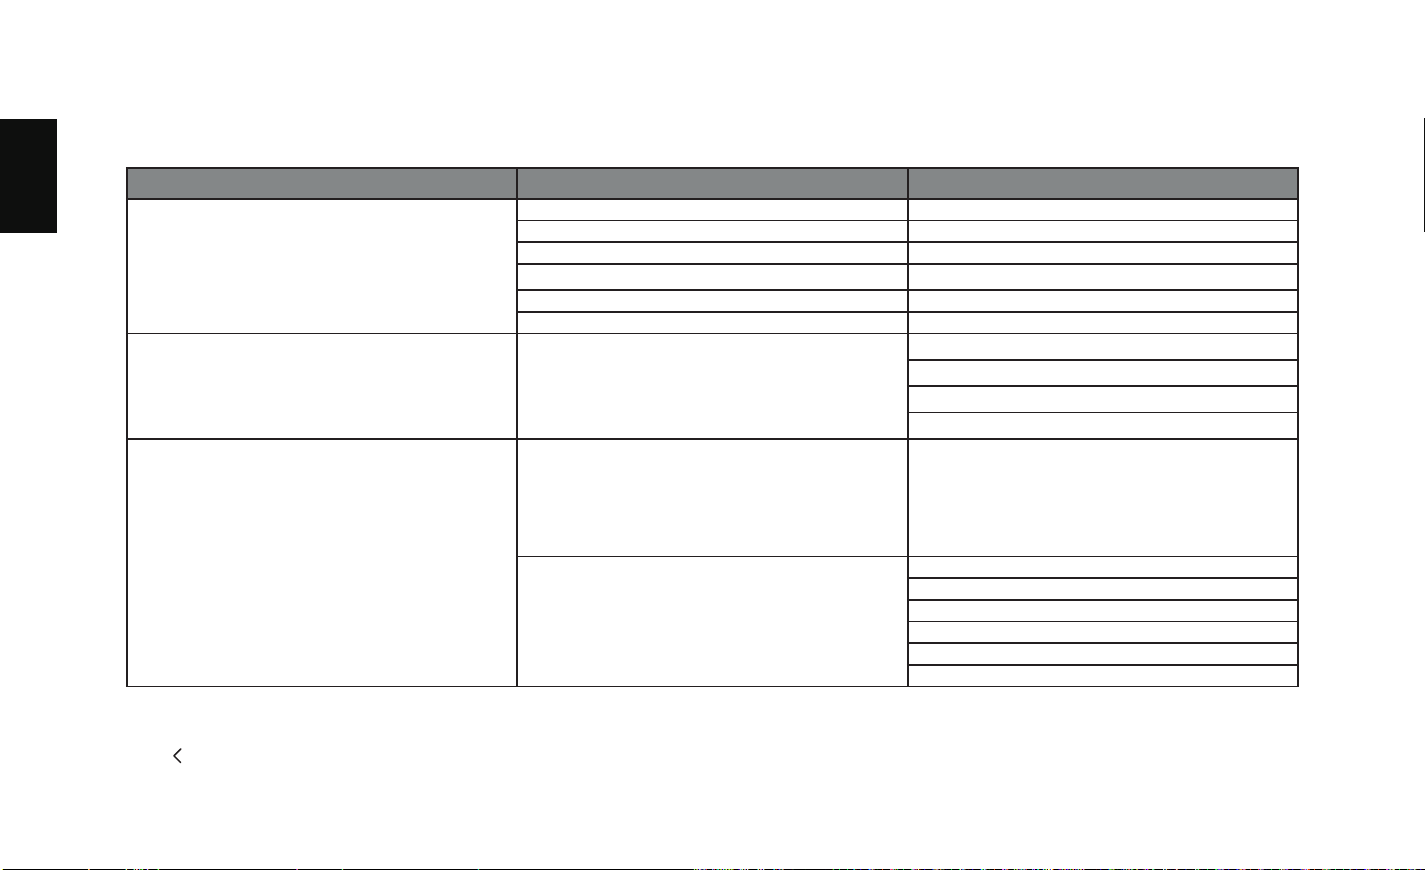
Settings may vary for dierent monitors.
OSD function menu
Input / Setting
This section allows you to select input sources.
This section allows you to select setting mode.
Level 1 Menu Level 2 Menu Level 3 Menu
Input Source
HDMI1 None
HDMI2 None
DP None
TYPE-C (32R84*)
None
Auto Input On/Off
Reset Input Source None
PIP/PBP PIP/PBP Mode
PIP
PBP
Phone mode (32R84*)
None
Settings
Language
Chinese, English, Français, Deutsch,
Italiano, Português, Español,
한국어
, 日
本語 , Magyar, Polski, Svenska, Русский,
Türkçe, Traditional Chinese, Українська,
Indonesia, Dutch
Shortcut Key 1/2
Mini LED Control
Display
Input Source
Scene Mode
Volume
Game Crosshair
Press to return to the previous menu.
English
- -
25
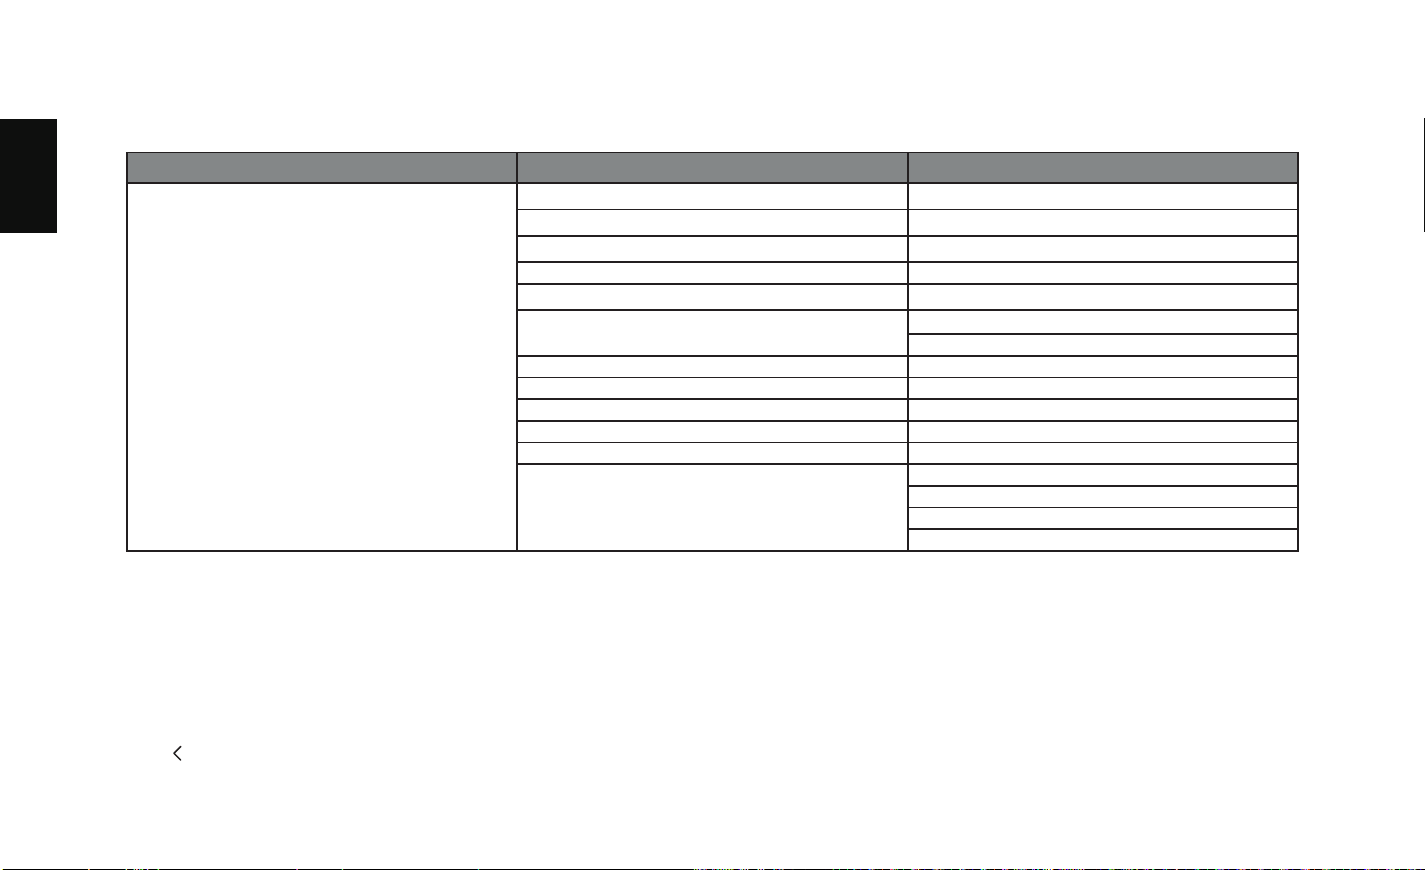
OSD function menu
Press to return to the previous menu.
Setting
This section allows you to select setting mode.
Level 1 Menu Level 2 Menu Level 3 Menu
Setting
Volume 0~100
KVM (32R84*) Auto / USB-B / TYPE-C
DSC (32R84*) On/O
DDC/CI On/O
Standby Charge On/O
OSD Position
Horizontal
Vertical
Rotation 0/90/270
OSD Display Time 5s~60s
Quick Boot On/O
Reset Settings None
Factory Reset None
Related Information
Device Model
Current Resolution
Input Signal Source
FW
Note:The above features may vary depending on the model and software version updates,and should be based on the actual model in use.
English
- -
26
General Specication
Model 32G64 32R84
Product Type MiniLED Gaming MNT MiniLED Gaming MNT
Panel Active Size(Inch) 32 32
Visual Range(mm) 697.344(H)×392.256(V) 697.3056 (H) × 392.2344 (V)
Pixel Pitch(mm) 0.0908(H)× 0.2724(V) 0.06053(H)×0.18159(V)
Color
1.07B (8 bit + FRC)
Highest Resolution 3840x2160@(60Hz)
(HDMI)
3840x2160@(60Hz)
(HDMI&DP&TYPE-C)
Highest Refresh Rate 2560x1440@(180Hz)
(DP)
3840x2160@(165Hz)
(DP&TYPE-C)
Local Dimming Zone 336 1400
Adapter Input
100-240V~50/60Hz
Adapter Output
19V 6.3A 19V 13.69A
Figures and illustrations in this User Manual are provided for reference
only and may dier from the actual product appearance. Product
design and specications may be changed without notice.
Specication
English
- -
27
Model 32G64 32R84
Terminals
¹
HDMI, DP , Headphone HDMI, DP , TYPE-C,Headphone
Power Consumption
(Sleep/O)
0.5W
Dimensions with Stand
WxHxD (mm)
915×190×600
Vertical Adjustable Height 125mm
Tilt Angle -5°~20°(typical)
Pivot
+
90°
Swivel Left&Right Angle
+
20°
Operating Temperature 0~35°C(32°~95°F)
Operating Humidity 20~85%
General Specication
Specication
Figures and illustrations in this User Manual are provided for reference only
and may dier from the actual product appearance. Product design and
specications may be changed without notice.
¹: The exact number of terminals is based on the actual product.
English
- -
28
Standard Signal Mode
32G64
Specication
The above function may be adjusted due to dierent models or software version upgrades, subject to the actual models.
The terms HDMI, HDMI High-Definition Multimedia Interface, HDMI trade dress and the
HDMI Logos are trademarks or registered trademarks of HDMI Licensing Administrator, Inc.
HDMI
(Normal Mode)
640x480
(60/72/75Hz)
720x400
(70 Hz)
720x480
(60Hz)
720x576
(50 Hz)
800 x 600
(60/72/75Hz)
1024x768
(60/70/75Hz)
1280x720
(50/60Hz)
1280x1024
(60/75Hz)
1440x900
(60/120Hz)
1680x1050
(60/120Hz)
1600x900
(60/120Hz)
1920x1080
(50/60/120/180Hz)
2560x1440
(60/120/144Hz)
3840x2160
(60Hz)
DP
(Normal Mode)
640x480
(60/72/75Hz)
720x400
(70 Hz)
720x480
(60Hz)
800 x 600
(60/72/75Hz)
1024x768
(60/70/75Hz)
1280x720
(50/60Hz)
1280x1024
(60/75Hz)
1440x900
(60/120Hz)
1680x1050
(60/120Hz)
1600x900
(60/120Hz)
1920x1080
(60/120Hz)
2560x1440
(60/120/144/165/180Hz)
/
/
English
- -
29
Standard Signal Mode
32R84
Specication
The above function may be adjusted due to dierent models or software version upgrades, subject to the actual models.
The terms HDMI, HDMI High-Definition Multimedia Interface, HDMI trade dress and the
HDMI Logos are trademarks or registered trademarks of HDMI Licensing Administrator, Inc.
HDMI
(Normal Mode)
640x480
(60/72/75Hz)
720x400
(70 Hz)
720x480
(60Hz)
720x576
(50 Hz)"
800 x 600
(60/72/75Hz)
1024x768
(60/70/75Hz)
1280x720
(50/60Hz)
1280x1024
(60/75Hz)
1440x900
(60/120Hz)
1680x1050
(60/120Hz)
1600x900
(60/120Hz)
1920x1080
(50/60/120Hz)
2560x1440
(60/120/144Hz)
3840x2160
(30/60/120/144
/160/165Hz)
DP&TYPE-C
(Normal Mode)
640x480
(60/72/75Hz)
720x400
(70 Hz)
720x480
(60Hz)
800 x 600
(60/72/75Hz)
1024x768
(60/70/75Hz)
1280x720
(50/60Hz)
1280x1024
(60/75Hz)
1440x900
(60/120Hz)
1680x1050
(60/120Hz)
1600x900
(60/120Hz)
1920x1080
(50/60/120Hz)
2560x1440
(60/120/144Hz)
3840x2160
(60/120 /144/160/165Hz)
/

English
- -
30
Other Information
• Make sure the power button is pressed properly to switch the monitor
on.
• Make sure the power cord is properly inserted in the power outlet and
power socket on monitor.
• Make sure your PC is properly matched.
• Make sure your graphic card is properly matched.
• Make sure the computer power is turned on.
• Make sure the graphic card is properly inserted.
• Consider whether the computer is running by pressing the CapsLock
button on the PC keyboard and observing the indicator.
• Consider whether your monitor is interfered by electrical equipment
.
• Reset colour or sound to factory default settings in Setting.
Please check the following list before requesting service.
The power indicator is o:
Screen ickers or ripples on the picture:
No picture appears when the power indicator is on:
The colour or sound is abnormal:
Plug and play does not work:
Picture is too dark, too light or tinted:
Note:
I
f the above suggestions do not solve your technical issue, please
refer to the warranty card for service information.
• Check the colour adjustment.
• Check the brightness setting.
• Check the sharpness function.
Troubleshooting

English
- -
31
Due to the various capabilities of products featuring the monitor -
Services, as well as limitations in the available content, certain features,
applications, and services may not be available on all devices or in
all territories. Some features on monitor may also require additional
peripheral devices or membership fees that are sold separately. Please
visit our website for more information on specic device information
and content availability. The services and availability of content through
monitor are subject to change from time to time without prior notice.
Legal Statement
All content and services accessible through this device belong to third parties
and are protected by copyright, patent, trademark and/or other intellectual
property laws. Such content and services are provided solely for your
personal noncommercial use. You may not use any content or services
in a manner that has not been authorized by the content owner or service
provider. Without limiting the foregoing, unless expressly authorized by the
applicable content owner or service provider, you may not modify, copy,
republish, upload, post, transmit, translate, sell, create derivative works,
exploit, or distribute in any manner or medium any content or services
displayed through this device.
Third party services may be changed, suspended, removed, terminated or
interrupted, or access may be disabled at any time, without notice, and TCL
makes no representation or warranty that any content or service will remain
available for any period of time. Content and services are transmitted by third
parties by means of networks and transmission facilities over which TCL has
no control.
Without limiting the generality of this disclaimer, TCL expressly disclaims any
responsibility or liability for any change, interruption, disabling, removal of or
suspension of any content or service made available through this device. TCL
may impose limits on the use of or access to certain services or content, in
any case and without notice or liability. TCL is neither responsible nor liable
for customer service related to the content and services. Any question or
request for service relating to the content or services should be made directly
to the respective content and service providers.
YOU EXPRESSLY ACKNOWLEDGE AND AGREE THAT USE OF THE
DEVICE IS AT YOUR SOLE RISK AND THAT THE ENTIRE RISK AS TO
SATISFACTORY QUALITY, PERFORMANCE AND ACCURACY IS WITH
YOU. THE DEVICE AND ALL THIRD PARTY CONTENT AND SERVICES
ARE PROVIDED “AS IS” WITHOUT WARRANTY OF ANY KIND, EITHER
EXPRESS OR IMPLIED. TCL EXPRESSLY DISCLAIMS ALL WARRANTIES
AND CONDITIONS WITH RESPECT TO THE DEVICE AND ANY CONTENT
AND SERVICES, EITHER EXPRESS OR, IMPLIED, INCLUDING BUT NOT
LIMITED TO, WARRANTIES OF MERCHANTABILITY, OF SATISFACTORY
QUALITY, FITNESS FOR A PARTICULAR PURPOSE, OF ACCURACY,
OF QUIET ENJOYMENT, AND NON-INFRINGEMENT OF THIRD PARTY
RIGHTS. TCL DOES NOT GUARANTEE THE ACCURACY, VALIDITY,
TIMELINESS, LEGALITY, OR COMPLETENESS OF ANY CONTENT OR
SERVICE MADE AVAILABLE THROUGH THIS DEVICE AND DOES NOT
WARRANT THAT THE DEVICE, CONTENT OR SERVICES WILL MEET
YOUR REQUIREMENTS, OR THAT OPERATION OF THE DEVICE OR
SERVICES WILL BE UNINTERRUPTED OR ERROR-FREE. UNDER NO
CIRCUMSTANCES, INCLUDING NEGLIGENCE, SHALL TCL BE LIABLE,
WHETHER IN CONTRACT OR TORT, FOR ANY DIRECT, INDIRECT,
INCIDENTAL, SPECIAL OR CONSEQUENTIAL DAMAGES, ATTORNEY
FEES, EXPENSES, OR ANY OTHER DAMAGES ARISING OUT OF, OR
IN CONNECTION WITH, ANY INFORMATION CONTAINED IN, OR AS A
RESULT OF THE USE OF THE DEVICE, OR ANY CONTENT OR SERVICE
ACCESSED BY YOU OR ANY THIRD PARTY, EVEN IF ADVISED OF THE
POSSIBILITY OF SUCH DAMAGES.
English
- -
32
ELECTRONICS & PACKAGING RECYCLING
INFORMATION
Recycle Your Device Properly. In accordance with state and local laws, this product may be
encourages consumers to always look for a recycling or reuse alternative to discarding electronic
tcl.com/us/en/sustainability/electronics-
recycling for instructions and authorized collection sites. Click on our convenient interactive map
to quickly locate a solution in your community. For mail-back option, visit www.mrmrecycling.
com/recycle-now.php and follow the instructions.
Look for convenient How2Recycle® labels on the product box for help preparing your new TV
packaging for recycling. These labels show important information identifying the various types
of packaging material included with your new TV along with easy-to-understand
recycling instructions.
children. Do not use packaging bags in cribs, beds, carriages, or playpens.