
WAF Technical Documentation
1. Description
WAF (Worm-and-Gear Automatic Telescope Focuser)
2. Product Description
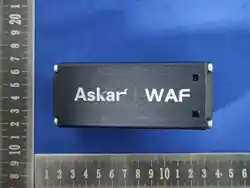
The WAF features a predominantly black appearance, a metal body, and a matte finish. The logo
"Askar | WAF" is laser engraved.
WAF Features:
1. Quick and easy installation
2. Smooth and stable focusing process
3. High motor torque, high load capacity, stable and durable
4. Exquisite appearance
5. Smooth matte finish for a comfortable touch
6. Compatible with 95% of focusers on the market
7. Supports mobile app control with fast response, hands-free operation, stop on release, and
both travel range and step size are adjustable
8. Supports precise focusing and autofocus for deep-sky astrophotography
9. Supports free switching between wired and wireless operation modes
10. Supports ASCOM and various ASCOM-compatible third-party software
11. No additional driver downloads required, plug-and-play
12. Customizable device name
13. Multi-device management, custom grouping; user-definable step size and travel reversal
Package Contents (subject to change)
- Electronic focuser body x1
- Mounting bracket x1
- Wrenches x2 (Allen wrench, Torx)
- Pin x1
- M4x10 screws x2
- Gear mounts x2 (5, 6, 7 mm inner bore)
3. Detailed Specifications
Housing Material Aluminum alloy
End Cap Material ABS+PC
Motor Type Worm gear stepper motor
Step Angle 1.8°
Gear Reduction Ratio 99
Output Torque 20 kgf/cm
Payload Capacity 20 kg

Output Speed 2.6587 rpm
Steps per Revolution 19800
Power/Data Interface 12V / Type-C
Input Current 0.79A
Body Dimensions 101 mm × 47 mm × 43 mm
Body Weight 420 g
Communication Protocol ASCOM Alpaca and Indigo
4. Compatibility List
(1)Software: Supports all third-party software compatible with ASCOM Alpaca, as well as the
company's own Askar App.
(2)Hardware: Fits most telescope focusers on the market, e.g., Sharpstar full series focusers,
Sky-Rover full series focusers, etc.
5. Dimensional Drawing
6. Installation Instructions
(1)Remove the focusing knob from the telescope.
(2)Select the appropriate mounting bracket for your focuser model.
(3)Install the connection bar (mounting plate).
(4)Attach the electronic focuser body to the bracket.
(5)Engage the focuser gear with the bracket gear.
(6)Tighten the handle screw.
Complete connection diagram (including 12V Type-C)
7. How to Configure Parameters
Wired Mode (using N.I.N.A. as an example):
The configuration interface features a black background with white text. The default maximum
travel of the focuser is 100,000 steps, and the position after power-on is the midpoint (i.e.,
position 50,000). In N.I.N.A., first click "Refresh", then select the device from the dropdown list in
the equipment panel, then click "Configure" to open the configuration interface. Here you can
modify the maximum travel of the electronic focuser. The adjustable range is between 100 and
1,000,000 steps. Click "Update" to apply the change. After modification, the maximum travel and
current position will refresh immediately, and the new maximum travel value will be retained for
future use. The detailed steps are as follows:
(1)Connect the Type-C data cable, then open N.I.N.A.
(2) Click "Scan for Devices", then locate and select "Askar-WAF" under the ASCOM Alpaca module
in the taskbar.
(3)Click "Settings" and wait for the web interface to open. (Two image placeholders)
(4)According to the travel of your imaging equipment's focuser, set the maximum travel.
(Reference: Step 19800 = one revolution of the WAF output shaft = one revolution of the focuser

coarse adjustment knob)
(5)After entering the new Max Step value, click "Update". A green message reading "Maximum
travel has been updated to" will appear upon success, then close the web page. Example
illustration (showing 10 revolutions, i.e., Step 198,000):
Wireless Mode (using the Askar App as an example):
When using the device for the first time, you need to configure the network via the mobile app
using Bluetooth. Connect the device to the same local network as your computer/mobile device,
so that you can control it from the app or from your computer. After network configuration is
complete, you can either control it via the app, or via N.I.N.A. (ensuring that your computer and
the device are on the same network). Each time you subsequently use the electronic focuser, it
will automatically connect to the network that was configured last time. If connection fails, it will
enter Bluetooth configuration mode after 7–8 seconds, and you can reconfigure the network
using the app. Detailed steps are as follows:
Network Configuration Procedure
1. Open the "Device" tab at the bottom, then tap "Device Network Configuration".
2. Grant system permissions (Bluetooth, etc.). If previously denied or permanently marked as
denied, go to your system settings, enable the corresponding permissions for the Askar App, and
try again.
3. You will enter the "Scanning for Devices" page:
(1)The app will scan for approximately ten seconds (you can also refresh manually).
(2)The list will distinguish between "Askar" devices and ordinary Bluetooth devices for easy
identification.
(3)If the list is empty, a prompt will usually appear: "No devices found, please confirm that the
device is in network configuration mode."
(4)If Bluetooth is turned off, you can enable it according to the on-screen prompt or go to the
system Bluetooth settings.
4. Select your device from the list and wait for connection. After successful connection, you will
enter the "Wi-Fi Selection and Configuration" page:
(1)The page will indicate: "Connected to this BLE device, please select the Wi-Fi network that
the device will join. The device only supports 2.4 GHz. Failure may occur if the network cannot
switch frequency bands or due to other reasons."
(2)You can first "Scan for Wi-Fi". If no results appear, confirm that location and Wi-Fi are
enabled, then retry.
(3)The list may include "Saved" networks (hotspots for which a password was saved during this
session) and "Available" hotspots. Each entry typically shows frequency band information for
reference.
(4)After selecting the SSID, enter the password (open networks may not require a password).
5. Tap "Start Network Configuration".
The interface will show "Sending network configuration information". Please wait while the
device connects to the network and responds.

6. Upon success, a "Network Configuration Completed" dialog will appear: "[Device] has joined
[Wi-Fi Name]". You can then:
(1)"Return to Home" – go back to the main interface.
(2)"Connect Device" – use the newly obtained address information to enter "Device
Connection" for immediate debugging. (Four image placeholders)
Device Connection and Debugging
After the device has joined the network and exposed its Alpaca service, you can use this function
to discover and connect to the hardware on the same local area network.
Entry and Page Description
1. "Device" tab → "Device Connection and Debugging"
2. This opens the "Device Connection" interface, with the note: "Discover or connect devices via
ASCOM Alpaca."
3. The app will enumerate available Alpaca devices via UDP broadcast (example text: "Discovering
Alpaca devices via UDP broadcast...").
4. Select an item from the "Debug-ready Devices" list to confirm the connection; during
connection you will see prompts such as "Connecting".
5. After successful connection, you will generally enter the control page for that device, and the
device will be recorded in the local list. On the "Device" tab, you will see groupings by type:
"Electronic Focuser" and "Other".
Direct Entry from Network Configuration Result
In the "Network Configuration Completed" dialog, choose "Connect Device" – this will use the
network address returned by the device to attempt connection, saving you the step of manually
finding it in the list. (Two image placeholders)
Electronic Focuser Control
How to Enter
1. "Device" tab: tap the card under the "Electronic Focuser" group.
2. "Home" tab: tap the same electronic focuser device from a custom group (if already added).
3. After a successful "Device Connection", the corresponding control interface will appear
automatically.
If the device is not a Focuser type (e.g., telescope, camera), the control area will show: "The
current device type only supports connection status and basic information viewing."
Interface Areas (for Electronic Focuser)
1. Device Information and Connection
(1)View "Debug Control / Device Information", connection status text (e.g., "Connected /

Disconnected").
(2)You can modify the "Remark", or "Disconnect".
(3)When disconnected, you may "Retry Connection" (ensure you are on the same local
network as the device).
2. Position and Movement
(1)"Current position", with optional mode switching such as "Absolute position / Relative
movement" (depending on device capability and interface).
(2)Set a "Target position" or specify movement via "Relative steps", then tap "Move"; you can
"Stop" at any time.
(3)If a mechanical limit is reached in a certain direction, a prompt will appear: "Focuser has
reached the limit in this direction."
3. Step Buttons (««, «, », »»)
(1)Short press: Move by the step size configured in "Electronic Focuser Settings" (default 30,
adjustable 1–1000).
(2)Long press: Move continuously in that direction; stop when you release.
(3)If "Travel Reversal" is enabled, the direction of the four buttons will be reversed.
4. Temperature
- If supported by the device, you can read the temperature and enable "Temperature
Compensation". Otherwise, a message indicating that temperature compensation is not
supported will appear – this is normal.
5. Moving
- The interface will periodically refresh the focus position, and you will see status updates
while moving until it stops.
Electronic Focuser Settings
This page is accessed from the menu of the electronic focuser control interface, with the title
"Electronic Focuser Settings".
Step Value (Step Size)
1. Label: "Step Value (1–1000)"
2. "Valid range is 1–1000", "Default 30"
3. A preview table below shows the step counts for each button ('««', '«', '»', '»»') after your
modification.
4. After modifying, you must trigger the save action within the interface. If invalid (non-integer or
out of range), a prompt will appear: "Please enter an integer between 1 and 1000". Upon
successful saving, a "Save successful" prompt will appear.
Travel Reversal

1. Option: "Travel Reversal", description: "When enabled, the «« ‹ › ›» buttons will move in
the opposite direction."
2. Used to adapt to the installation orientation of the focus motor or personal operating habits.
Wi-Fi and Reconfiguration
1. "Wi-Fi Name": read-only, shows the name of the wireless network most recently associated
with the device.
2. "Reset WiFi": enters the Bluetooth scan and Wi-Fi writing process again. "It is recommended to
use this only when you already have a stable Alpaca connection with the device." (Read the
on-screen Bluetooth and network hints before operation.)
3. Hardware alternative: "You can long-press the device's Reset button for 5 seconds to perform a
network reset" (consistent with the device's own manual).
8. Precautions
(1)If the WAF emits a sharp beeping alarm, disconnect the power (12V power supply)
immediately and inspect the load and focuser to avoid damage from excessive use.
(2)Before use, confirm that the Max Step value is appropriate for the focuser you are using. An
excessively large travel may damage the focuser, while a travel that is too small may compromise
autofocus accuracy.
9. Autofocus User Guide
Using the WAF for Autofocus – Wired Mode: Connect the Type-C data cable. Wireless Mode:
Ensure that network configuration has been completed and that the WAF and your PC are
connected to the same Wi-Fi (local area network). Detailed steps (using N.I.N.A. as an example):
(1)First, manually locate a star using the mechanical focuser.
(2)Ensure that your camera and other imaging equipment are connected, and that the WAF is
connected.
(3)Use the N.I.N.A. interface to control the WAF and find a rough focus point.
(4)Open the autofocus interface from the main control panel.
(5)Click "Start Autofocus" and wait for the process to complete.
(6)After autofocus completes, the WAF will automatically move to the focused position. You can
then begin scheduled imaging.
If the autofocus results are unsatisfactory or you want to increase autofocus accuracy: You can
modify the autofocus step size and the hyperbola reliability. Detailed steps (using N.I.N.A. as an
example):
(1)Click "Options", then select "Autofocus".
(2)Modify the R² threshold value (range 0–1). The closer to 1, the more reliable the data. A
suggested value is 0.9. Modify the Autofocus step size value. For the first autofocus of the session,

a suggested value is 1000. You can increase it (if autofocus fails) or decrease it (when you are
closer to the focus point) based on the autofocus performance.
(3)After adjusting the parameters, return to the main control panel and start autofocus.
10. After-Sales Service
11. Warranty
12. Appendix
FCC Warning
This device complies with Part 15 of the FCC Rules. Operation is subject to the following two
conditions:
(1) This device may not cause harmful interference, and (2) this device must accept any
interference received, including interference that may cause undesired operation.
NOTE 1: This equipment has been tested and found to comply with the limits for a Class B digital
device, pursuant to part 15 of the FCC Rules. These limits are designed to provide reasonable
protection against harmful interference in a residential installation. This equipment generates,
uses and can radiate radio frequency energy and, if not installed and used in accordance with the
instructions, may cause harmful interference to radio communications. However, there is no
guarantee that interference will not occur in a particular installation. If this equipment does
cause harmful interference to radio or television reception, which can be determined by turning
the equipment off and on, the user is encouraged to try to correct the interference by one or
more of the following measures:
- Reorient or relocate the receiving antenna.
- Increase the separation between the equipment and receiver.
-Connect the equipment into an outlet on a circuit different from that to which the receiver is
connected.
-Consult the dealer or an experienced radio/TV technician for help.
NOTE 2: Any changes or modifications to this unit not expressly approved by the party
responsible for compliance could void the user's authority to operate the equipment.
RF Exposure Statement
To maintain compliance with FCC'S RF Exposure guidelines, This equipment should be installed
and operated with minimum 20cm between the radiator and your body. This device and its
antenna(s) must not be co-located or operation in conjunction with any other antenna or
transmitter.