
2
CONTENTS
TECHNICAL DATA ..............................................................................................................................2
SAFETY INFORMATION...................................................................................................................... 3
SYMBOLS ............................................................................................................................................7
KNOW YOUR ELECTRIC LAWN MOWER............................................................................................ 8
OPERATING INSTRUCTION................................................................................................................12
MAINTENANCE ................................................................................................................................ 15
RECYCLING AND DISPOSAL ............................................................................................................17
TROUBLESHOOTING......................................................................................................................... 18
EXPLODED VIEW AND PART LIST ...................................................................................................19
WARRANTY ...................................................................................................................................... 24
TECHNICAL DATA
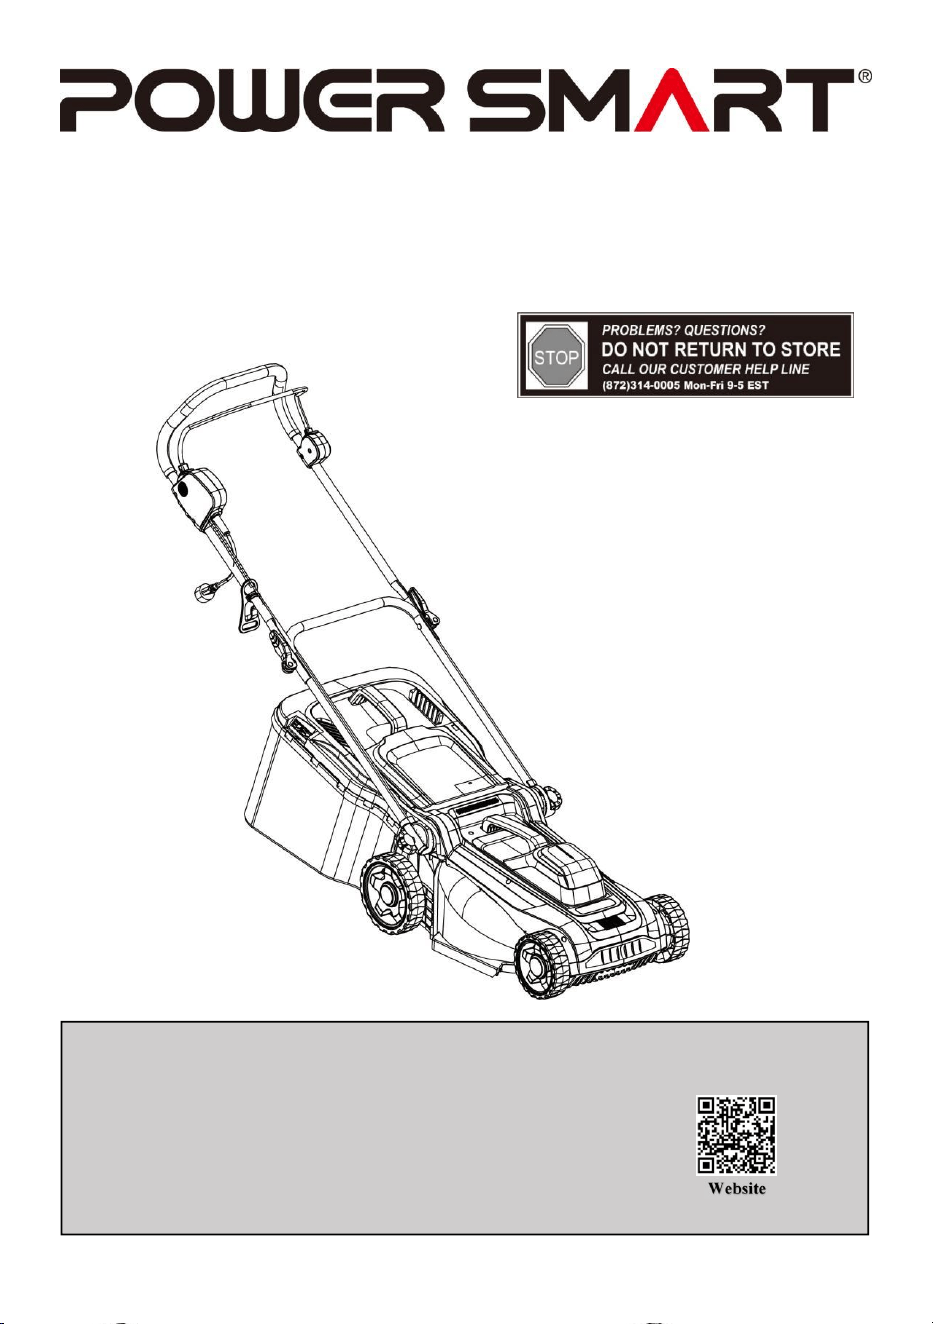
Electric Lawn Mower Model # DB8015
Motor: 120V,60Hz,12.5A
Voltage: 1500W
No-load Speed: 3400RPM
Cutting Width: 14 inch
Cutting Height: 1.0 inch~3.0 inch(6 steps)
Grass Catcher Capacity: 10Gallon
Protection type: IPX4
Wheel: Front:6 inch / Rear: 7 inch
Package Dimensions (l x w x h): 26 x 16.6 x 13.2 inch
Gross Weight: 32 lb.

3
SAFETY INFORMATION
General Safety Rules
Read All Instructions Carefully
Read and understand all safety and operational instructions. Failure to follow the safety rules listed
below and other basic safety precautions may result in serious personal injury. Keep this manual,
sales receipts and applicable warranty forms for future reference.
WARNING: when using electric lawn mowers, basic safety precautions should always be
followed to reduce the risk of fire, electric shock, and personal injury, including:
• Carefully read all instructions on the mower and in the manual before attempting to assemble and
operate the mower. Keep this manual in a safe place for future reference, and consult it regularly.
• Become familiar with all controls and their proper operation. Know how to stop the mower and
how to disengage the power in an emergency.
• In order to avoid contact with the blade or injury caused by a thrown object, stay in the
operating zone behind the handles, and keep children and bystanders at least 100’ (30 m) away
from the mower while it is in operation. Stop the motor immediately if someone enters the
mowing area.
• Thoroughly inspect the area where the mower is to be used. Remove all stones, sticks, wire,
bones, toys, and other objects that could be tripped over or thrown by the blade. Thrown objects
can cause serious personal injury.
• Plan your mowing pattern in such a way as to avoid discharging material toward roads,
sidewalks, bystanders, etc. Do not discharge material against a wall or obstruction. Doing so may
cause the discharged material to ricochet back toward the operator.
• Always wear proper eye protection that complies with ANSI Z87.1 in order to protect your eyes
while operating or performing any adjustment or repair. Thrown objects that ricochet can cause
serious eye injury.
• Always wear a face mask or a dust mask when operating the mower in a dusty environment.
• Dress properly. While mowing, always wear substantial footwear and long trousers. Do not
operate the product when barefoot or wearing open sandals. Avoid wearing clothing that is loose
fitting or that has hanging cords or ties.
• Many injuries occur as a result of the mower being pulled over the operator’s foot during a fall
caused by slipping or tripping. Do not operate this mower in bare feet, or while wearing sandals
or lightweight (e.g., canvas) shoes. Do not hold on to the mower if you are falling. Release the
handle immediately.
Never pull the mower back toward you while you are walking. If you must back the mower
away from a wall or an obstruction, first look down and behind in order to avoid tripping,
and then follow these steps:
• Step back from the mower in order to fully extend your arms.
• Be sure that you are well balanced.

4
• Pull the mower back slowly.
• Do not use the mower for any job except that for which it is intended. Do not force the mower.
• Do not operate the mower while under the influence of alcohol or drugs.
• Stay Alert: Do not operate the mower when you are tired. Pay attention to what you are doing.
Use common sense.
• Do not put hands or feet near rotating parts or under the cutting deck. Contact with the blade
can amputate hands and feet.
• Do not attempt to adjust the wheels or the cutting height while the motor is running.
• Avoid dangerous environments. Do not operate the mower in the rain or in wet or damp grass.
• Mow only in daylight or in good artificial light. Do not rush a mowing job.
• Stop the blade when crossing gravel driveways, walkways, or roads.
• If the mower starts to vibrate excessively, stop the motor, pull plug off and check for the cause
immediately. Vibration is generally a sign that the mower is not working properly or needs repair.
• Stop the motor and wait until the blade comes to a complete stop before removing the grass
catcher or unclogging the chute. The cutting blade will continue to rotate for a few seconds after
the motor is shut off. Do not place any part of your body in the blade area until you are sure that
the blade has stopped rotating.
• Never operate mower without a proper trail shield, discharge cover, grass catcher, switch
control, or other safety device in place and in working order. Do not operate the mower with
damaged safety devices. Doing so can result in injury.
• Don’t force lawn mower. It will do the job better and safer at the rate for which it was designed.
• Store idle lawn mower indoors. When not in use, lawn mower should be stored in an indoor dry
and look-up place, out of reach of children.
• Maintain lawn mower. Keep cutting edges sharp and clean to ensure the best performance and
safety.
If lawn mower strikes a foreign objects follow these steps:
1. Stop lawn mower, release the switch.
2. Unplug the mower.
3. Inspect for damage.
4. Repair any damage before restarting and operating the lawn mower.
5. Disconnect the mower before servicing, cleaning or removing material from lawn mower.
6. Inspect lawn mower cord periodically and if damaged, have it repaired by an authorized service
facility.
7. Use identical replacement blades only.
8. Store indoors, and do not expose to rain or water, avoid direct sunshine.
5
Child Safety
Tragic accidents can occur if the operator is not aware of the presence of children.
• Keep children out of the mowing area and under the watchful care of a responsible adult.
• Do not allow children under the age of 14 to operate this mower. Children who are 14 years of
age and older must read and understand the operating instructions and safety rules in this manual,
and must be trained and supervised by a parent.
• Stay alert, and turn the mower off if a child or any other person enters the mowing area.
• Look behind and down for small children before and while moving backwards.
• Use extreme care when approaching blind corners, doorways, shrubs, trees, or other objects that
may obscure your view of a child who may run into the path of the mower.
Electrical Safety
WARNING: To avoid electrical hazards, fire hazards or damage to the tool, use proper
circuit protection.
This tool is wired at the factory for 120V AC operation. It must be connected to a 120V AC, 12.5
AMP circuit that is protected by a time-delayed fuse or circuit breaker. To avoid shock or fire,
replace power cord immediately if it is worn, cut or damaged in any way.
Extension Cord Safety
WARNING: Keep the extension cord clear of the working area. Position the cord so it will
not get caught on the work-piece, tools or any other obstructions while you are working with
the power tool.
Make sure any extension cord used with this tool is in good condition. When using an extension cord,
be sure to use one of heavy enough gauge to carry the current the tool will draw. An undersized cord
will cause a drop in line voltage resulting in loss of power and overheating.
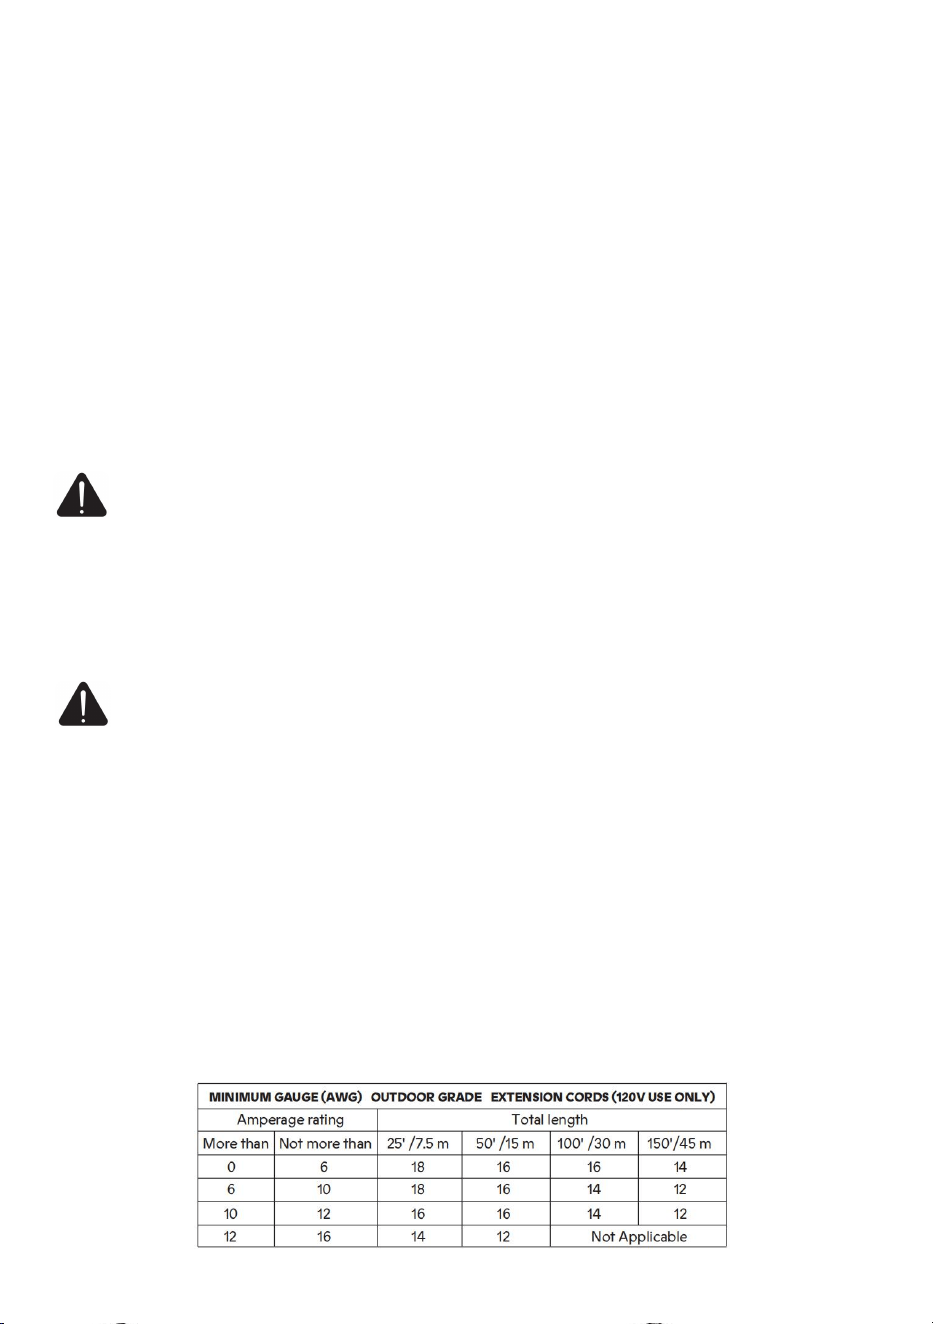
The table below shows the correct size to use according to cord length and nameplate ampere rating.
If in doubt, use the next heavier gauge. The smaller the gauge number the heavier the cord.
Be sure your extension cord is properly wired and in good condition. Always replace a damaged
extension cord or have it repaired by a qualified electrician before using it. Protect your extension
cord from sharp objects, excessive heat and damp or wet areas.
Use a separate electrical circuit for your power tools. This circuit must not be less than 14 gauge wire
and should be protected with either a 15 AMP time delayed fuse or circuit breaker. Before
connecting the power tool to the power source, make sure the switch is in the OFF position and the
power source is the same as indicated on the nameplate. Running at lower voltage will damage the
motor.

6
To reduce the risk of disconnection of lawn mower from the extension cord during operating: Make a
knot as shown in Fig. 1;
Use one of the plug-receptacle retaining straps or connectors described in this guide.
Avoid unintentional starting – Turn off the power switch and disconnect the power cable before
making any adjustments to the unit and before inspecting, servicing, changing accessories or
cleaning the lawn mower.
Handle cord carefully – Never pull electric lawn mower by cord or yank it to disconnect from
power source. Keep cord away from heat, oil, and sharp edges.
Don’t Overreach – Keep proper footing and balance at all times.
Stay Alert – Watch what you are doing. Use common sense. Do not operate tool when you are tired
or under the influence of alcohol, drugs or medications that cause drowsiness.
Disconnect electric lawn mower – Disconnect the electric lawn mower from the power supply
when not in use, before servicing, when changing accessories.
Keep guards in place and in working order.
7
SYMBOLS
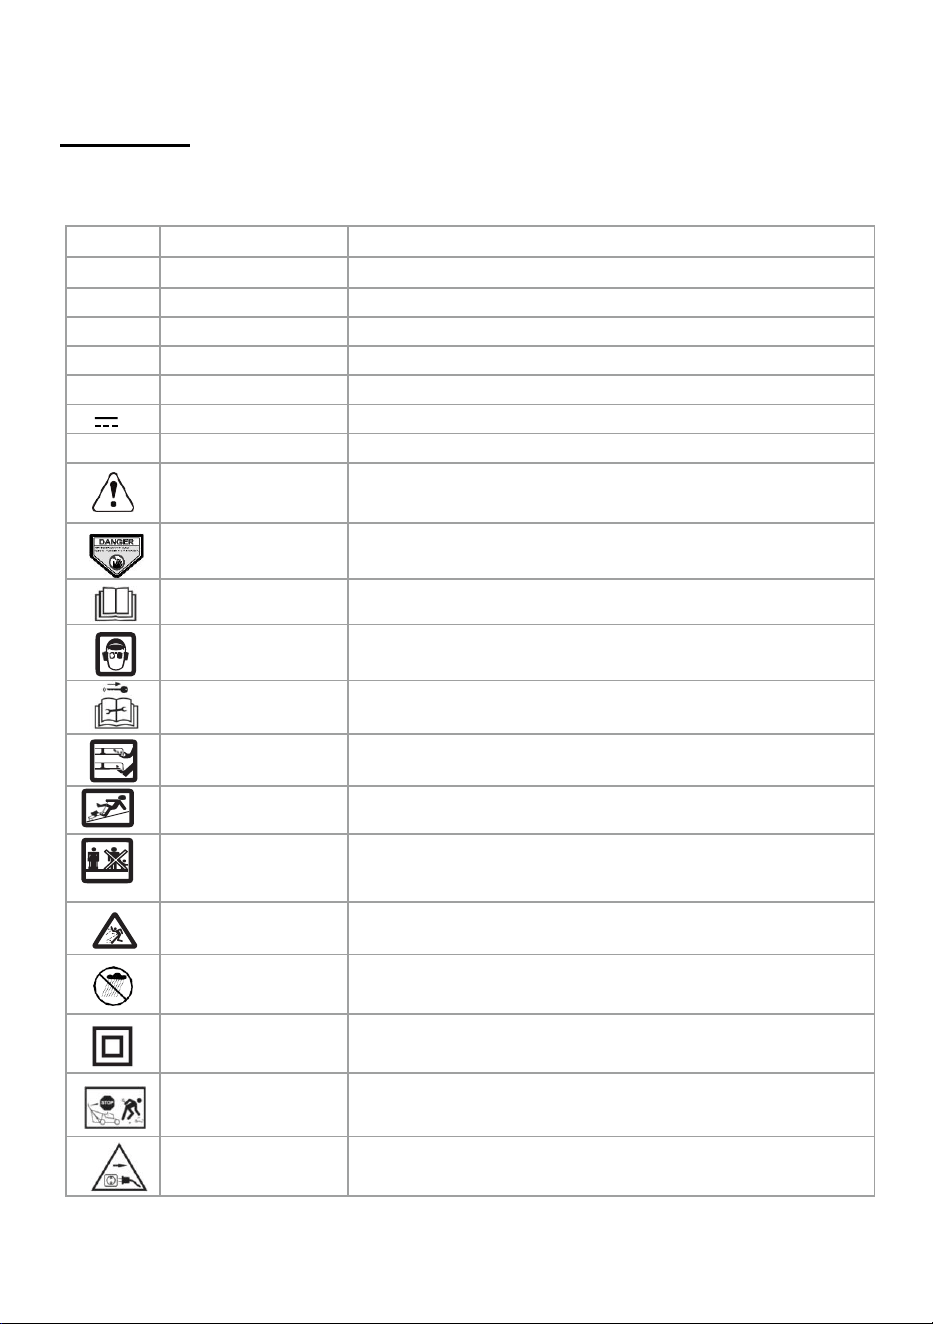
Some of the following symbols may be used on this product. Please study them and learn their meaning. Proper
interpretation of these symbols will allow you to operate the product better and safer.
SYMBOL
NAME
E X P L A N A T I O N
V
Volts
Voltage
A
Amperes
Current
Hz
Hertz
Frequency (cycles per second)
W
Watts
Power
min
Minutes
Time
Direct Current
Type or a characteristic of current.
/min
Per Minute
Revolutions, strokes, surface speed, orbits etc., per minute.
Safety Alert
Indicates a potential personal injury hazard.
DANGER---Keep
hands and feet away
Cutting/dismemberment hazard of hand. Keep hands away from the
rotating blade.
Read the user’s manual
To reduce the risk of injury, user must read instruction manual.
Eye Protection
Wear eye and hearing protection. For protection against injury, wear ear
defenders and safety goggles.
Repairing warning
Always turn the machine OFF and remove the safety key before
conducting inspection, cleaning, and maintenance.
Hand/foot cut
Pay more attention to the operator’s hands and feet to avoid injury.
Slip on slope hazard
Slip on slope hazard – Use extra caution when mowing on slopes to
prevent slip and fall accidents.
Keep Bystanders Away
Keep all bystanders at least 100 ft. away.
Ricochet
Objects picked up and thrown by the rotating blade can cause severe
injury.
Wet Conditions Alert
Do not expose to rain or use in damp locations.
Class II Construction
Class II construction Double Insulated construction
Remove the object
Remove the object before operating the machine.
Unplug the machine
Beware of electric shock hazard. Unplug the machine.
8
KNOW YOUR ELECTRIC LAWN MOWER
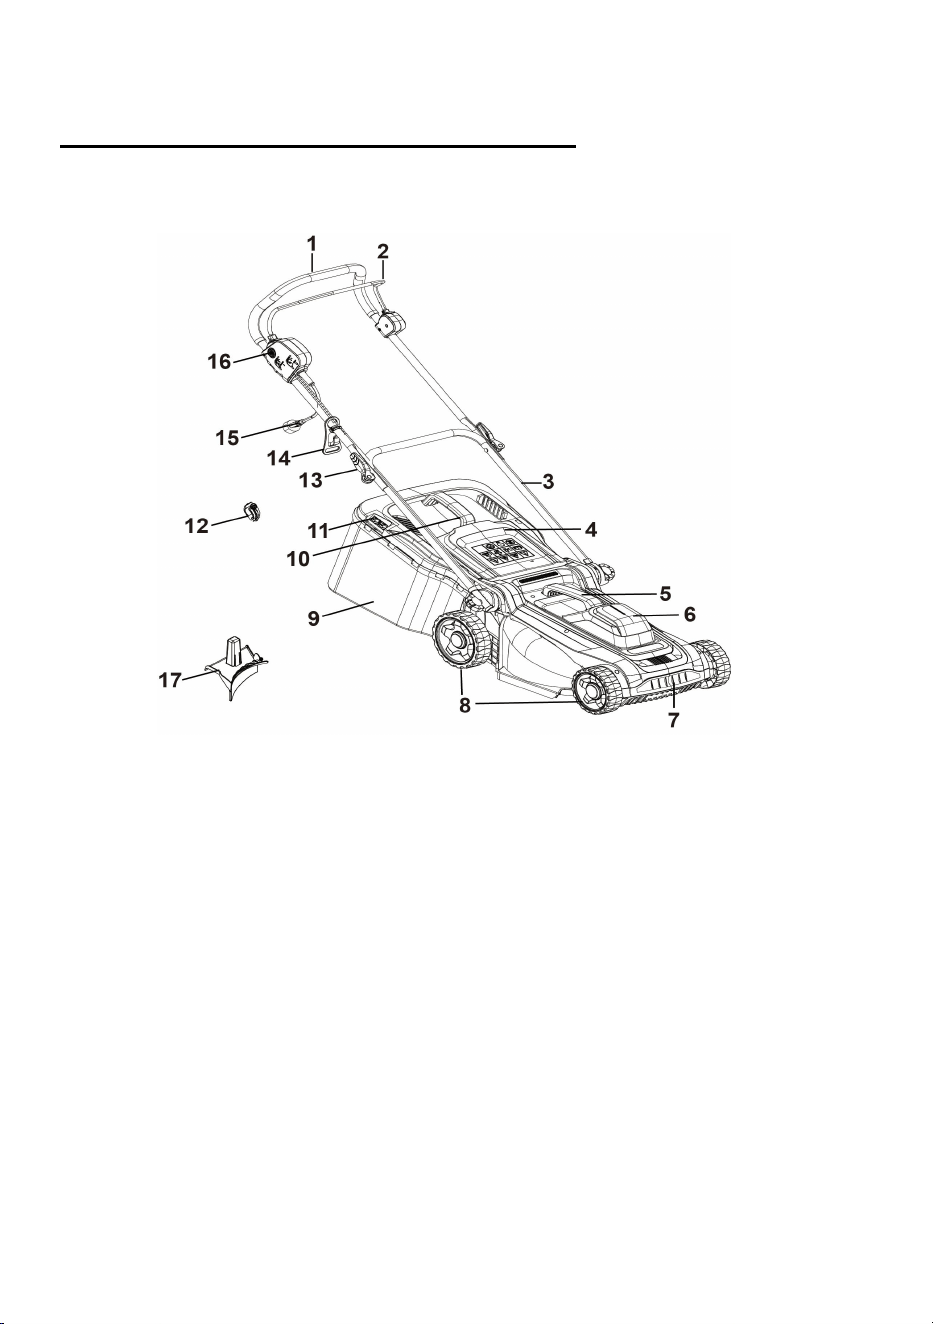
Compare the illustration to your lawn mower in order to familiarize yourself with the location of
various controls and adjustments.
Unpacking
Unpack the machine and all its parts, and compare against the list below. Do not discard the carton or
Including
Lawn Mower / Upper Bar / Lower Bar / Rotary Knob*2 / Bolt*2 / Quick Release Lever*2 /
Washer*4 / Cable Holder / Clip*2 / Grass Catcher / Handle / Mulching Kit / Bar Support*2 /User
Manual
1
Upper Bar
7
Recessed Grip
13
Quick Release Lever
2
Start Lever
8
Wheels
14
Cable Holder
3
Lower Bar
9
Grass Catcher
15
Power Cord With Plug
4
Rear Safety Flap
10
Handle
16
Safety lock-off Switch
5
Carrying Handle
11
Filling Level Indicator
17
Mulching Kit
6
Device Housing
12
Clip
9
ASSEMBLY INSTRUCTION
Unpacking
•
Do not connect the product to a power source before it is completely assembled!
•
Unpack all parts and lay them on a flat, stable surface. Ensure that you have all the accessories and
tools needed for assembly and
operation.
•
Follow the assembly instructions step-by-step and use the pictures provided as a visual guide
to easily assemble the product!
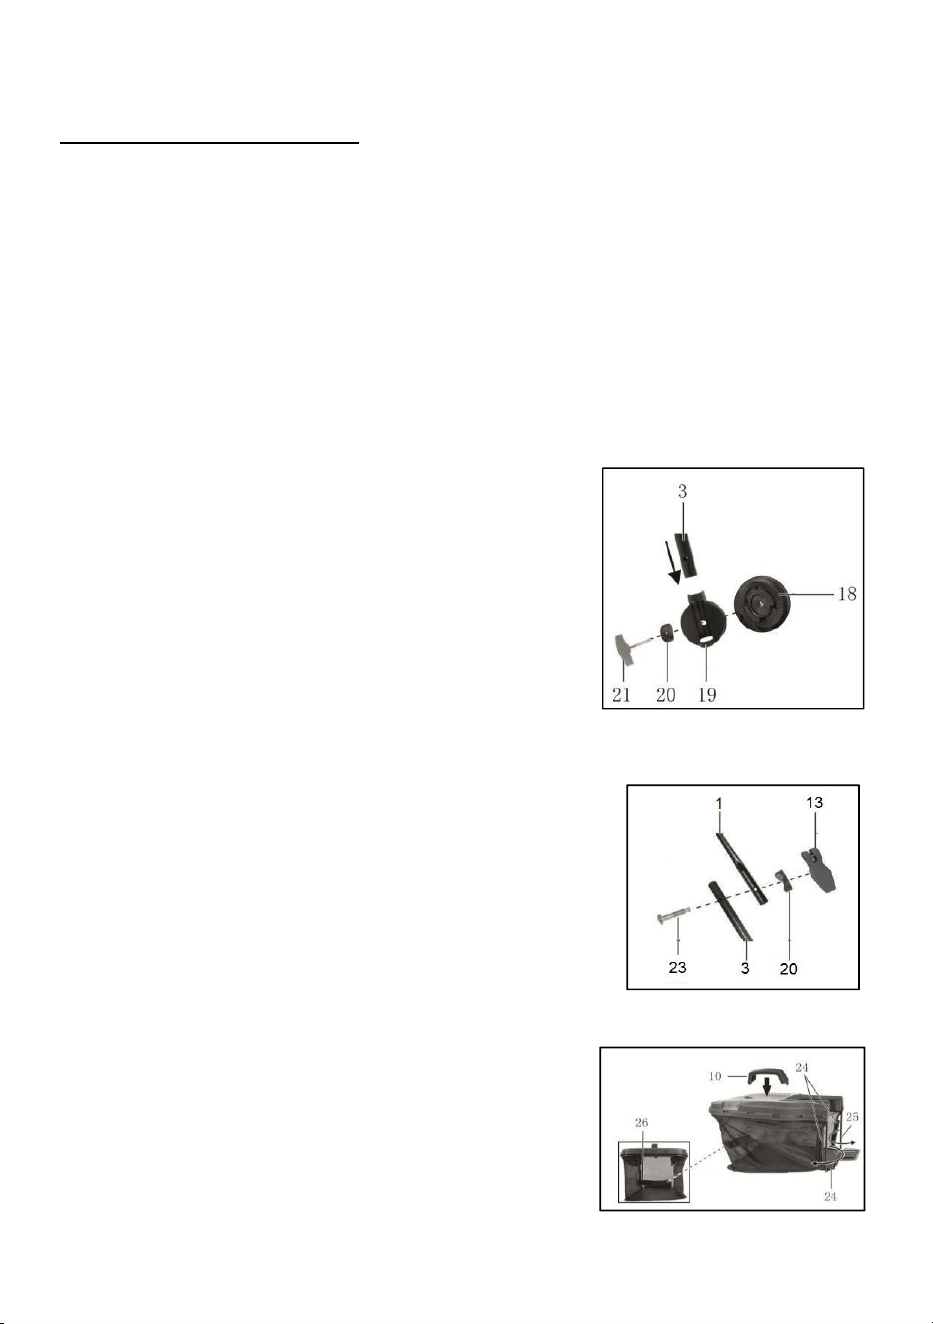
Fitting The Bar
Fitting the lower bar
1. Slide the bar supports (19) over the tube ends of the lower bar (3).
2. Place the lower bar (3) with the bar supports(19) on the bar
support holders(18) on the right and left on the machine
housing(6).
3. Select one of the 3 height settings by adjusting the
corresponding inclination of the bar. The same setting must be
made for both sides.
NOTE: The marking on the bar support holder (18) shows the 3
possible setting options. Ensure that the marking on the bar
support(19)matches the marking on the bar support holder (18)
and that the teeth of the bar support (19) and bar support holder
(18) interlock.
4. Screw the lower bars (3) tight with the wing screws (21) and washers (20).
Fitting the upper bar
1. Align the upper handlebar(1) to the lower handlebar(3). Ensure
the foam handle is pointed up when viewed from behind.
2. Pass the bolts(23) through the mounting holes of handles.
3. Attach the washer(20) to the bolt(23), secure the upper
handlebar by turning the
quick release lever(13)
clockwise and
then turn the lever up to tight the handle.
4. Secure the machine cable(15) with cable clips(14).
Preparing The Grass Catcher
1. Press the handle (10) on the top of the grass catcher (9) into
the holders provided. The handle (10) locks into place.
2. Place the plastic tabs (24) over the grass catcher linkage (25).
NOTE: We can grip the grass catcher by the handle(10) and
auxiliary handle(26) for better emptying the grass catcher.
10
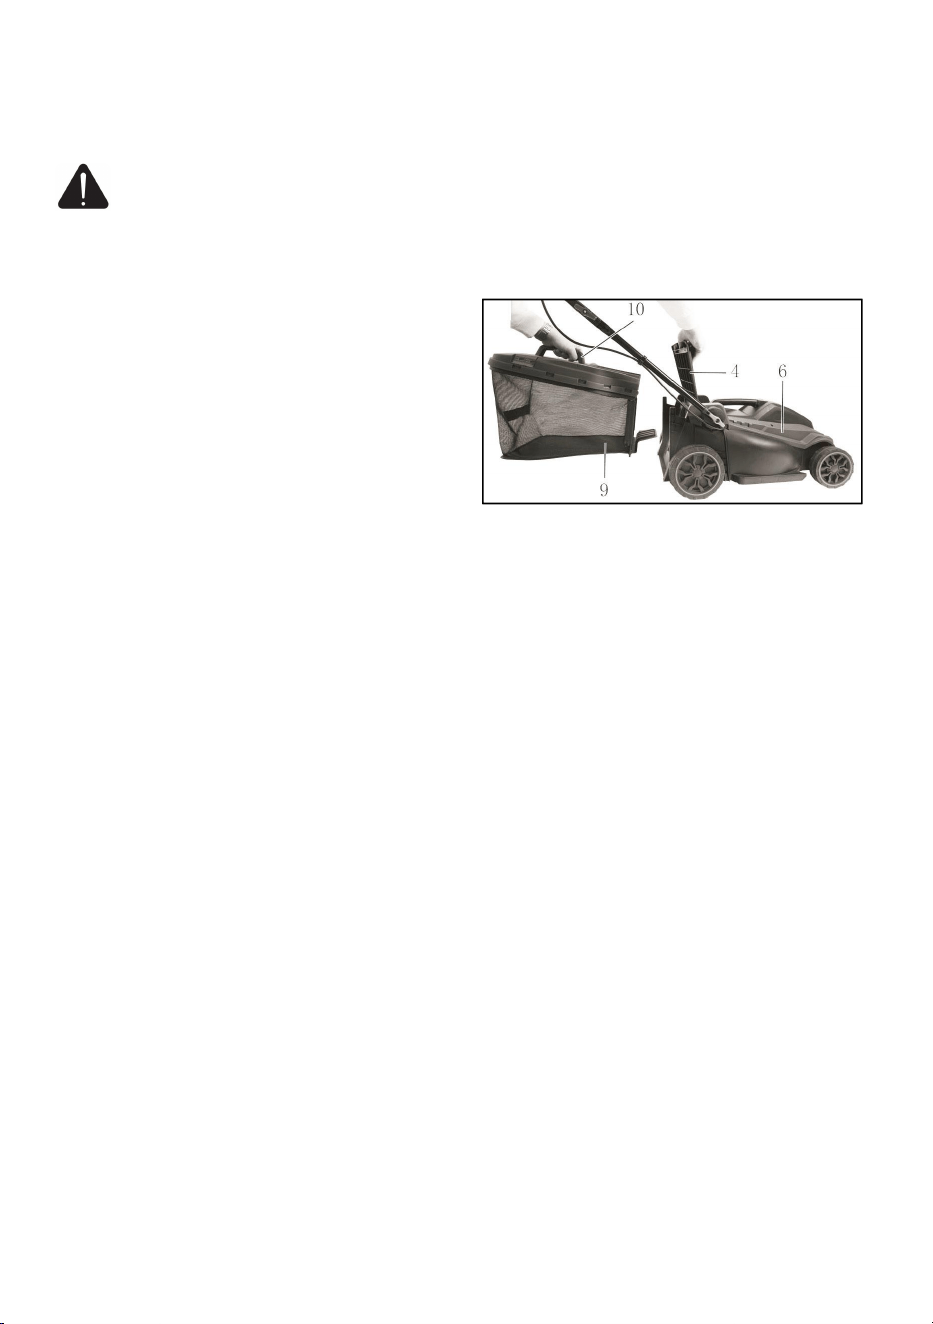
Attaching The Grass Catcher
WARNING: Danger of flying objects! Do not attempt to use the product without the
grass catcher attached or the mulching kit( choke plug) installed. The motor must be
switched off and the blade must have stopped rotating before you remove the grass catcher.
1. Lift the
rear safety flap
(4).
2. Hold the grass catcher(9) by the handle.
3. Hook the grass catcher into the attachment.
4. Fold the
rear safety flap(4) onto the grass
catcher(9). It holds the grass catcher(9) in the
correct position.
NOTE:
When we received the mower, the
mulching kit is inserted in the machine, please
take it off, then insert the grass catcher to start
our collecting work.
Removing The Grass Catcher
1. Lift the
rear safety flap
(4).
2. Hold the grass catcher(9) by the handle(10).
3. Unhook the grass catcher(9).
4. Fold the
rear safety flap(4) back onto the machine housing(6).
5.
Grip the grass catcher(9) by both the handle(10) and
auxiliary handle(26) for a better grip.
6.
Empty the cut grass into a suitable container.
7.
Attach the grass catcher back as per
Attaching The Grass Catcher.
Mulching Option
Difference between mowing lawns and mulching lawns:
When using the mulching kit (17), the grass clippings are not collected in a catcher but are
instead shredded and spread across the lawn. The nutrients contained in the clippings are thus left
to be broken down by soil organisms and form a nutrient cycle.Mulched lawns therefore need to
be fertilized much less frequently.
As a basic rule, the lawn has to be mowed relatively often so that only small amounts of mulch
remain on the lawn. It is therefore best to mulch the lawn at least once a week and to adjust the
mower so that only about 40 % of the total height of the lawn is left as mulch. If the mulch
remains visible on the lawn (for example when cutting the lawn for the first time of the year or
during strong growth), the grass catcher (9) should be used.
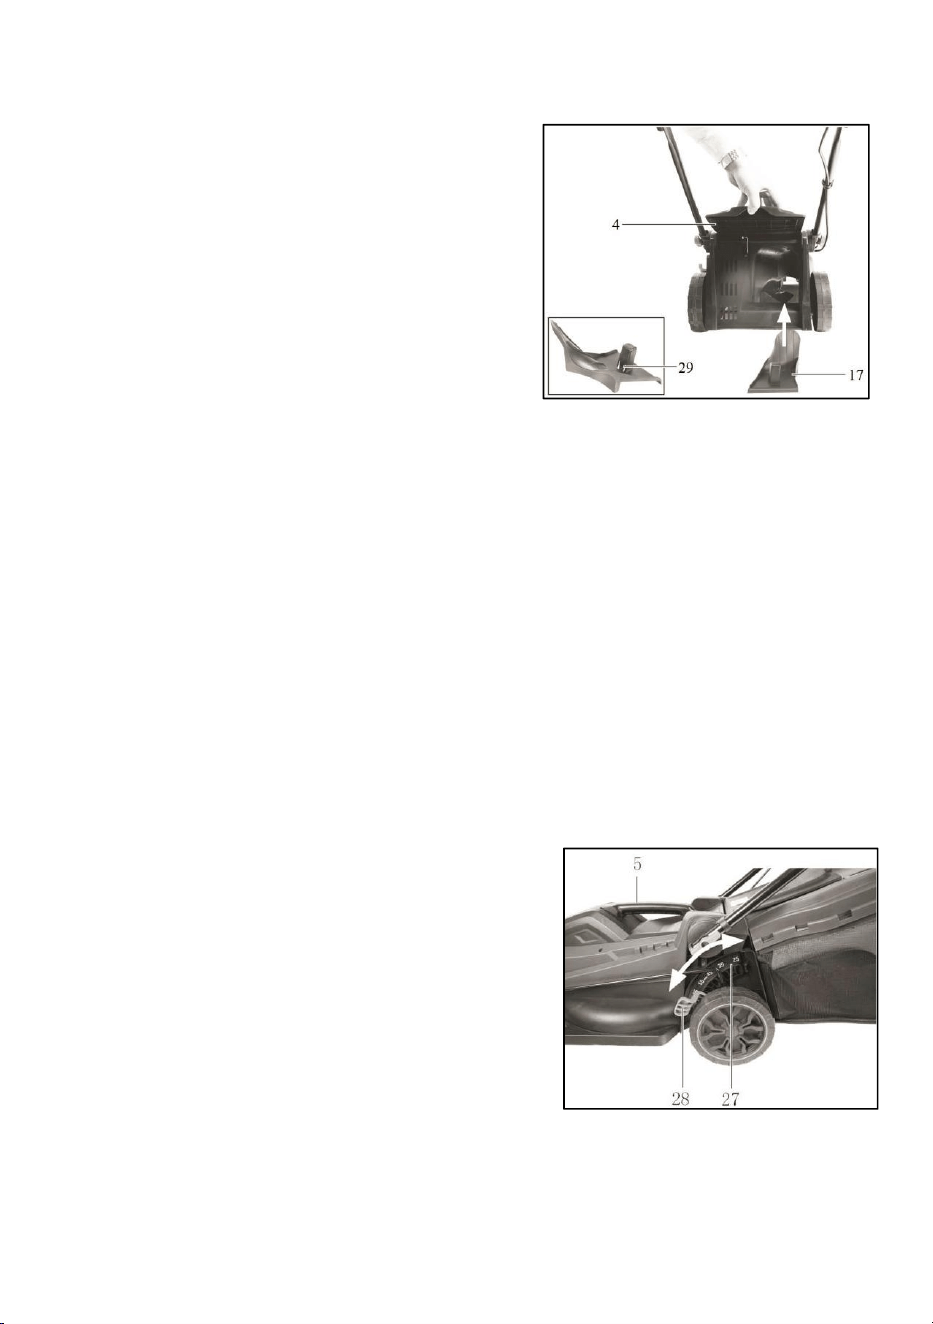
Inserting The Mulching Kit
1. Remove the grass catcher (9), if fitted.
2. Lift the
rear safety flap
(4).
11
3. Slide in the mulching kit (17).The lock (29) on the
mulching kit (17) engages.
4. Fold the
rear safety flap
(4) back onto the mulching
kit (17).
Removing The Mulching Kit
1. Lift the
rear safety flap
(4).
2. Press the lock (29) on the mulching kit (17).
3. Remove the mulching kit (17).
4. Fold the
rear safety flap
(4) onto the machine housing
(6).
Setting The Cutting Height
Lawn care
Regular mowing stimulates the grass to an increased leaf formation, while at the same time
killing weeds. As a result, the lawn becomes denser after each mowing and the outcome is a
healthier lawn in general. The first cut takes place roughly in April when the grass is about
2.6inch to 3.0inch high. During the main growing season, the lawn is mowed at least once a week.
Selecting The Correct Cutting Height
A high cutting height should be selected for the first mowing of the season. The correct cutting
height is between 1.0 inch and 1.4 inch for an ornamental lawn, and about 1.8 inch to 2.2 inch for
a utility lawn.
The machine has 6 cutting heights:
1.0/1.4 inch ---low cutting height;
1.8/2.2 inch ---medium cutting height;
2.6/3.0 inch --- high cutting height.
1. Hold the carrying handle (5) and lift the machine or
push the machine down.
2. Grasp the cutting height adjustment lever (28) and push
it to the side.
3. Move the cutting height adjustment lever (28) past the
ratchet mechanism(27) to the desired cutting height.
4. Press the cutting height adjustment lever (28) to the
side to engage it.

12
OPERATING INSTRUCTION
Before Operating
• Make sure that the product is fully assembled.
• Check the product, as well as accessories for damage before each use. Do not use the product if it
is damaged or shows wear.
• Check that accessories or blade are properly fixed.
• Always push the product by its handle. Keep the handle dry and free from lubricant to ensure safe
support.
• Mow across the face of a slope, and never up and down. Exercise extreme caution when
changing direction on a slope.
• Always be sure of your footing. If you feel like you are losing your balance, release the blade/
motor control handle immediately. The blade will stop rotating within 3 seconds.
• Switch the product off immediately if you are disturbed while working by other people entering
the working area. Always let the product come to complete stop before leaving it unattended.
• Do not overwork yourself. Take regular breaks to ensure you can concentrate on the work and
have full control over the product.
• Do not mow near drop-offs, ditches, or embankments, because you could lose your footing or
balance.
• Do not mow a slope that has an angle of greater than 15°, as determined using the slope gauge.
• Do not mow wet or damp grass. Unstable footing can cause slipping.
• Watch for holes, ruts, rocks, hidden objects, or bumps that may cause a slip or a trip. Tall grass
can hide obstacles.
• Verify that the lawn is free of stones, sticks, wires, and other objects that could damage the blades
or the motor. These objects could be accidentally thrown by the mower in any direction, and could
cause serious personal injury to the operator and to others.
• In order to prevent electric shock, do not operate the mower in damp or wet conditions.
• Do not mow in circles. Travel back and forth across the lawn.
• When cutting thick grass, reduce walking speed in order to allow for a more effective cut and a
proper discharge of the clippings.
• For a healthy lawn, always cut off one-third or less of the total length of the grass. The average
lawn should be approximately 1.0 inch to 2.0inch long during cool months, and between 2.0 inch to
3.0 inch long during hot months.
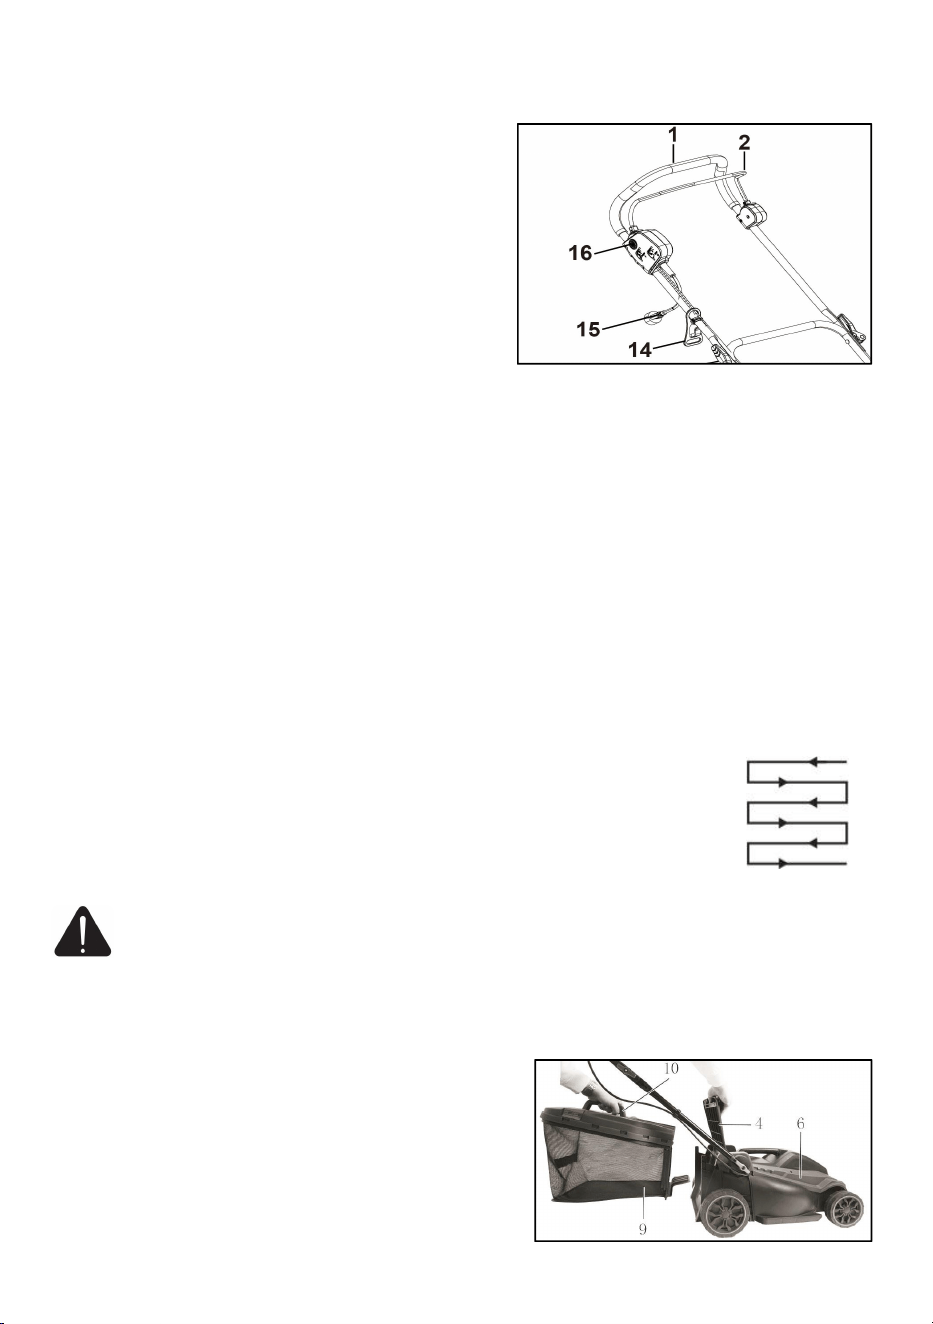
Switching On And Off
Switching on
1. Place the machine on a level surface.
2. Make a loop in the end of the extension cable and hook it into the cable holder(14) and plug in
power.
13
3. Before switching the machine on, make sure that it
is not touching any objects.
4. To switch on, hold down the safety lock-off switch
(16) and pull the bail bar (2).
5. After the mower starts, release the switch lock (16).
NOTE: The mower will not start work if you do not
press the safety lock-off switch when you start to pull
the start lever.
Switching off
To switch off, let go of the bail bar(2), mower stops.
Mowing Tips
• Make sure that the lawn is clear of stones, sticks, wire or other objects that could damage the
product or its product.
• Do not cut wet grass because it tends to stick to the under-body of the product, preventing the
proper discharge of grass clippings, and it could also cause you to slip and fall.
• Never cut off more than one-third of the total length of the grass for a healthy lawn. In the autumn,
lawns should only be cut as long as there is growth.
• Slowly push the product forward.
• Mow in slight overlapping rows. The most effective pattern for mowing lawns is straight lines
along one of the sides. This will keep the rows even and ensures that all the lawn is cut without
missing any spots.
• Circle around flower beds. When reaching a flower bed in the middle of the lawn,
cut a row or two around the circumference of the bed. Pay special attention when
changing direction.
• Empty the grass catcher regularly.
WARNING: If the product strikes a foreign object, stop immediately! Let the product cool
down and thoroughly inspect the product for damage! Have any damage repaired before
restarting!
Emptying The Grass Catcher
1. Lift the
rear safety flap
(4).
2. Hold the grass catcher(9) by the handle, unhook the
grass catcher(9).
3. Fold the
rear safety flap(4) back onto the machine
housing(6).
4. Grip the grass catcher(9) by both the handle(10) and

14
auxiliary handle(26) for a better grip.
5.
Empty the cut grass into a suitable container.
NOTE: A full grass catcher will reduce the performance of this product. Empty the grass catcher
frequently during use. Do not wait until it is completely full. We recommend emptying it when it is
half full.
After Use
1. Switch the product off. Unplug the lawn mower.
2. Check, clean and store the product as described in Maintenance.
15
MAINTENANCE
WARNING:
• Always unplug the lawn mower and let the product cool down before performing inspection,
maintenance and cleaning work!
• Keep the product clean. Remove debris after each use and before storage.
• Regular and proper cleaning will help ensure safe use and prolong the life of the product.
• Inspect the product before each use for worn and damaged parts. Do not operate it if you find
broken and worn parts.
Cleaning The Mower
WARNING: In order to reduce the risk of electric shock, do not expose the mower to
water. The underside of the mower deck should be cleaned after each use, because grass
clippings, leaves, dirt, and other debris will accumulate, which will cause rust and corrosion.
1. Clean the product with a dry cloth. Use a brush for areas that are hard to reach.
2. Remove stubborn dust with high pressure air (43 PSI).
3. Check for any damage and wear. Repair damages in accordance with this instruction manual or
take it to an authorized service centre before using the product again.
Checking The Blade
WARNING: Wear safety gloves when working on the blade and close to it! Use proper
tools to remove debris, e. g. a wooden stick! Never use your bare hands!
Always use original spare parts for replacement. Do not attach any other type of blade! The
replacement of the blade should be done by a qualified specialist!
1. Keep the under-body and cutting device clean and free of debris. Remove clippings from the rear
discharge chute.
2. Check all fasteners, such as nuts and bolts, periodically for tightness before operation. After
prolonged use, especially in sandy soil conditions, the cutting device will become worn and lose
some of the original shape. The cutting efficiency will be reduced and the blade should be replaced.
3. Keep the blade sharp to ensure a good cutting performance. Replace a worn or damaged blade
with a new one of the same type or have it sharpened by a qualified specialist.
4. Loosen the hex bolt counterclockwise using the supplied hex wrench and remove it together with
the washer and the blade.
5. Replace the blade with a new one of the same type. Check the status of the flange onto the blade
holder, then attach the blade properly, and fix it with the washer and the hex bolt . Tighten the hex
bolt clockwise with 33-44 Ft./Lbs. to ensure safe operation of your product.
DANGER: If the blade is not torqued properly, it could become loose and be thrown from
the product and seriously hurt or kill the operator or bystanders.
NOTE: Replace this cutting device after 50 hours mowing or 2 years whichever is sooner regardless

16
of condition. If the cutting device is cracked or damaged, you must immediately replace it with a
new one.
6. Lubricate the blade after each use to prolong the life span of blade and product. Apply light
machine oil along the edge of the blade.
Replacing Blades
NOTES: Once you have loosened the blade screw, you need to replace the washer and snap ring.
• If the blade is blunt, it can be resharpened by a specialist company.
• If the blade is damaged or unbalanced, it must be replaced.
Tools required:Spanner (SW13)
1. Pull out the mains plug and wait for the blade to come to a stop.
2. Turn the machine on its side.
3. Use sturdy gloves and keep hold of the blade. Use a spanner to turn the blade bolt
counterclockwise from the motor spindle.
4. Reassemble the new blade in reverse order. Make sure that the blade is positioned correctly and
that the blade bolt is tightened.
Grass Catcher
1. Inspect the grass catcher before each use. Do not use it if you find any damage.
2. Clean the grass catcher after operation using water and mild soap.
3. Let the grass catcher dry thoroughly before storing to avoid mildew.
Power Cord
Check the power cord before each use.
Do not use the product with a defective or a loose power cord!
Storing The Mower
The following steps should be taken in order to prepare the lawn mower for storage.
1. Turn off the power and unplug the power cord.
2. Clean the product as described above.
3. Store the product and its accessories in a dry, frost-free place.
4. Always store the product in a place that is inaccessible to children. The ideal storage temperature
is between 50˚F/10˚C & 86˚F/30˚C.
5. We recommend using the original package for storage or covering the product with a suitable
cloth or enclosure to protect it against dust.
Transportation
1. Switch the product off, and remove the power plug before transporting it anywhere.
2. Always transport the product by its transport handle .
3. Protect the product from any heavy impact or strong vibrations which may occur during
transportation in vehicles.
4. Secure the product to prevent it from slipping or falling over, damage and injury.

17
RECYCLING AND DISPOSAL
Recycle unwanted materials instead of disposing of them as waste. All tools, hoses and packaging
should be sorted, taken to the local recycling centre, and disposed of in an environmentally safe way.
Recycle rather than dispose of unwanted material in landfill whenever possible. The machine is
delivered in rigid packaging to avoid damage during transportation, but the packaging, roller, and the
machine itself are manufactured from recyclable materials and should be disposed of accordingly.
Do not throw your clippings into a rubbish bin where it will be disposed of in landfill. You can
dispose of clippings on your compost heap, alternating them with other garden material.
Alternatively, many communities provide a public collection point where you can dispose of your
garden waste in an environmentally friendly manner.
Recycle packaging where facilities exist.
18
TROUBLESHOOTING
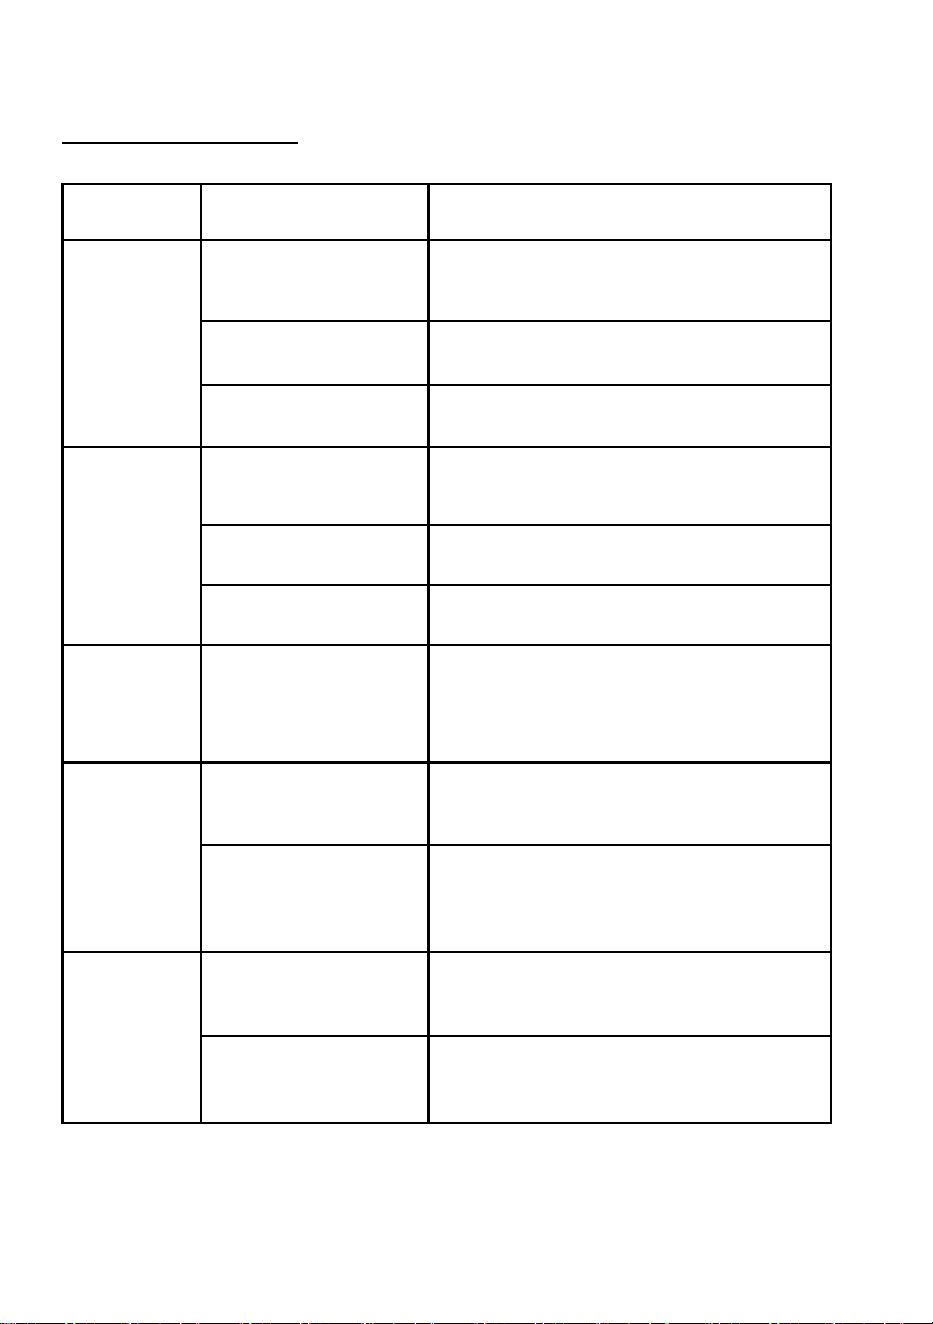
PROBLEM
POSSIBLE CAUSE
SOLUTION
The
mower
does not
start.
Power failure/unit not
plugged into a working
receptacle.
Check to make sure unit is plugged into a
working outlet.
The switch is defective.
Replace the switch.
Grass jammed at blade.
Unplug the machine, check under deck for
jams.
The mower
cuts the
grass
unevenly.
The lawn is rough or
uneven.
Check the mowing area.
The cutting height is
not set properly.
Adjust the lever to a higher setting.
Blades worn.
Sharpen or replace blades.
The mower
does not
mulch
properly.
Wet grass clippings are
sticking to the underside
of the deck.
Wait until the grass dries before mowing.
The mower
is hard to
push.
The grass is too
tall, or the cutting
height is too low.
Raise the cutting height.
The rear of the mower
housing and the blade
are dragging in thick
grass.
Empty the grass clippings from the grass
catcher bag.
The mower
is
excessively
noisy and
vibrates.
The motor shaft is bent.
Stop the motor, and inspect for damage.
The blade is unbalanced.
Repair before restarting. If vibration persists,
call customer service at 1-872-314-0005
19
PROBLEM
POSSIBLE CAUSE
SOLUTION
Blade not
rotating.
Blade is blocked by grass.
Clean grass on the machine.
Blade bolt is loosen.
Tighten the blade bolt.
Abnormal
sounds,
clattering or
vibrations.
Blade bolt is loosen.
Tighten the blade bolt.
Blade is damaged.
Change the blade.
Fill level
indicator is not
work.
Dirt accumulation.
Clean with a soft brush. The fill level
indicator must close by itself after being
opened.
20
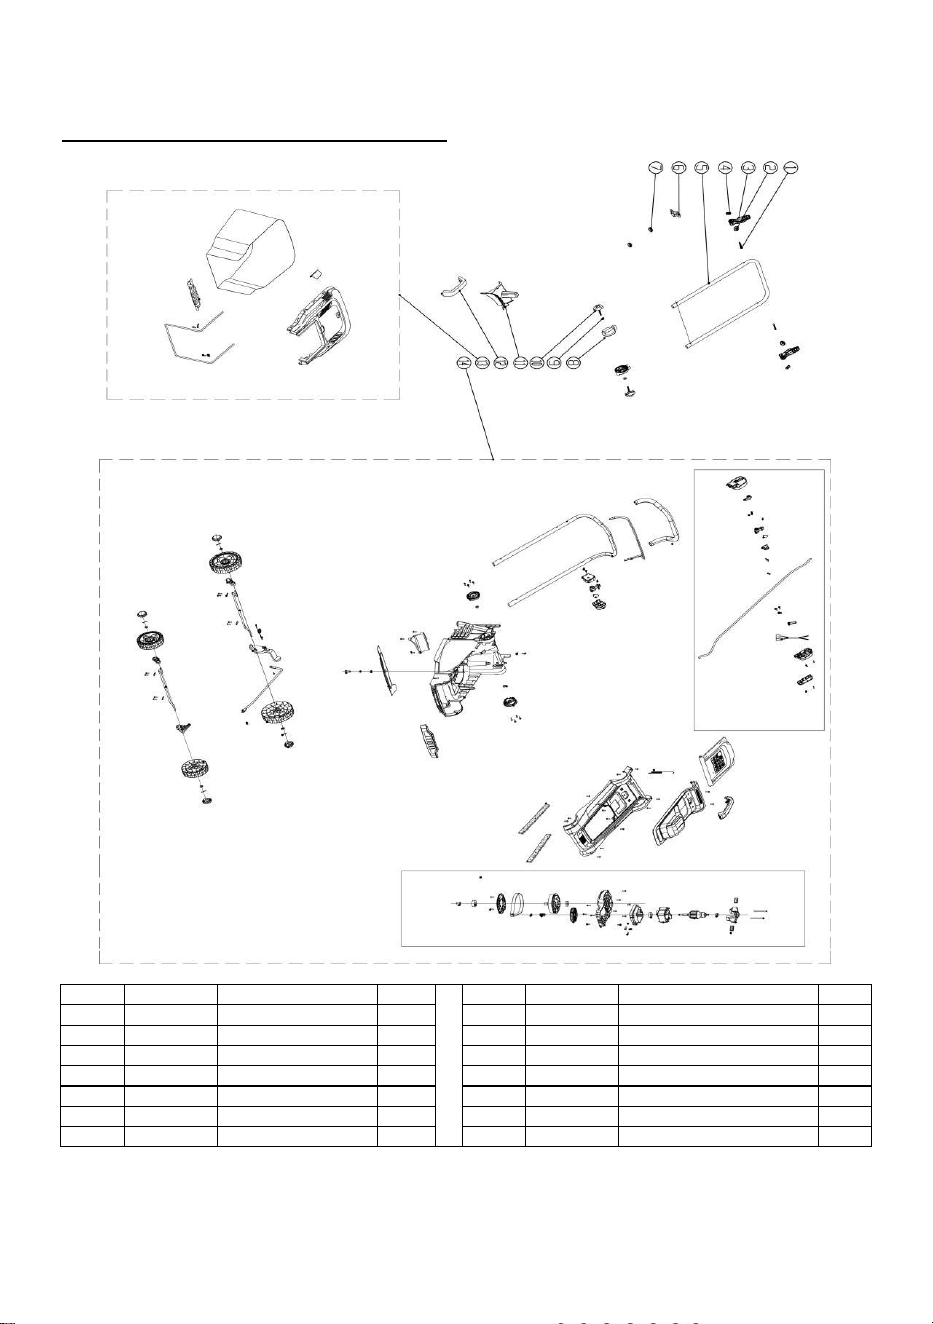
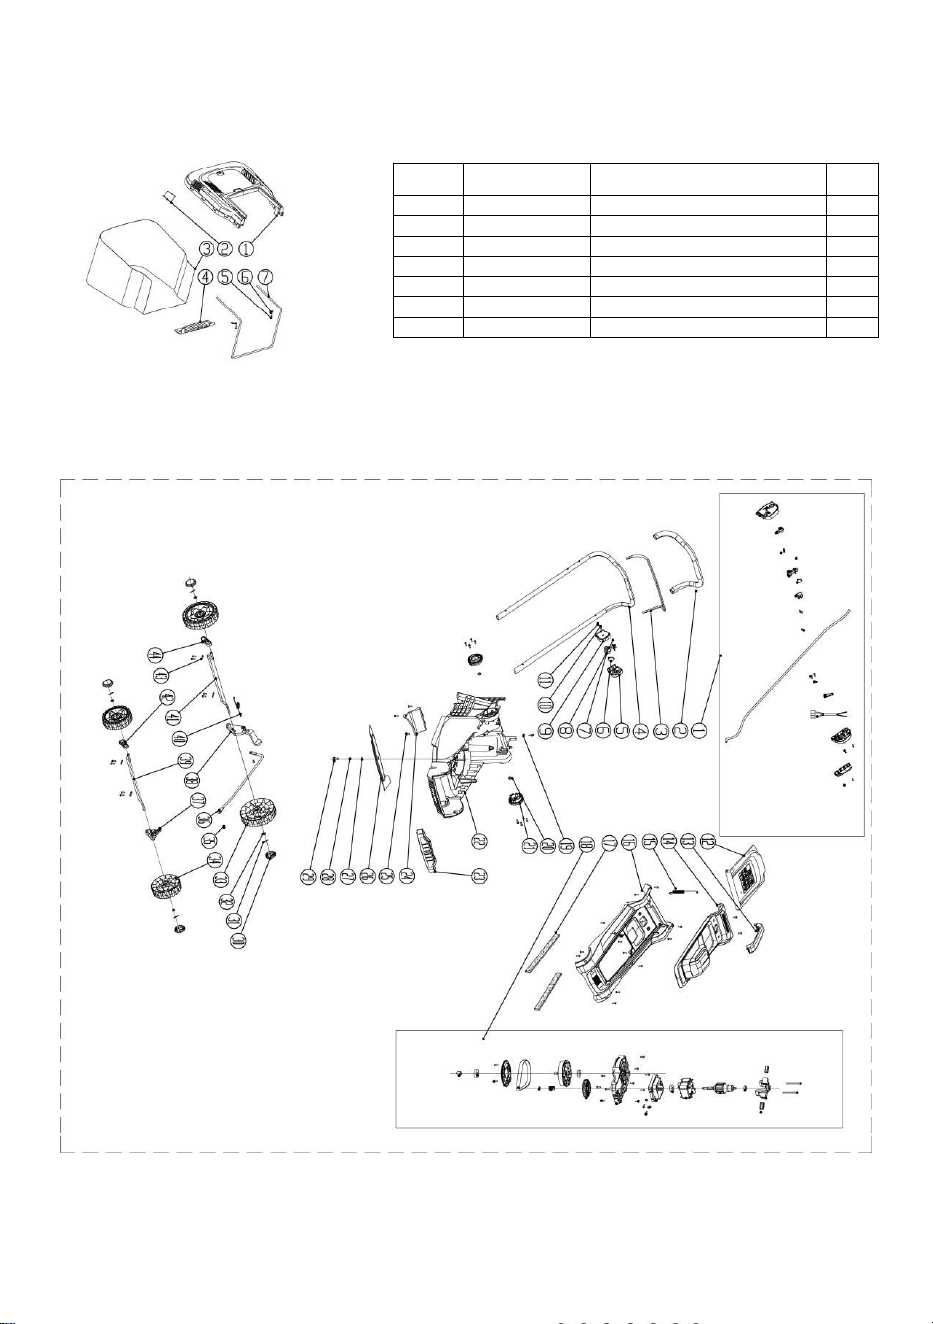
EXPLODED VIEW AND PART LIST
Item
Stock#
Description
Qty
Item
Stock#
Description
Qty
1
31000045
bolt M6X50
2
8
30200553
bar support holder
2
2
31000079
gasket φ6xφ25x2.5
2
9
31000074
gasket Q235/φ6xφ15x1.5
2
3
30200095
toggle clamp
2
10
30200653
knob
2
4
30400025
Quick-clamping nut
2
11
30200582
Mulching Kit
1
5
30900063
Upper Bar
1
12
30200567
handle
1
6
30200092
Cable Holder
1
13
31300440
Grass Catcher assembly
1
7
30200093
Strain Relief
2
14
31300438
main body assembly
1
21
Grass Catcher assembly
Main Body Assembly
Item
Stock#
Description
Qty
1
30100296
Grass frame cover
1
2
30200595
Filling Level Indicator
1
3
31400286
collection bag
1
4
30200594
Grass catching board
1
5
31000009
self-tapping screw BT4×16
2
6
30800011
pressure plate
2
7
30400168
shell frame
1
22
Item
Stock#
Description
Qty
Item
Stock#
Description
Qty
1
31300439
Switch box assembly
1
23
30200680
Front cover
1
2
30300178
Sponge sheath
1
24
30200587
guide board
1
3
30900079
pull-rod operator
1
25
31000008
self-tapping screw
BT4×14
3
4
30900092
Upper Bar
1
26
30400275
blade
1
5
30200084
left lower cover
1
27
31000425
spring washer
1
6
30600015
spring 65Mn
1
28
31000426
flat gasket
1
7
30200089
connecting rod
1
29
31000388
hex head bolt M6×55
1
8
31000532
self-tapping screw BT3X10
1
30
30200312
wheel cover
4
9
30200085
left upper cover
1
31
31000094
split pin
4
10
31000303
self-tapping screw BT4×16
25
32
31000396
flat gasket
4
11
31000010
self-tapping screw BT4×20
9
33
30200311
rear wheel
2
12
30100293
rear safety flap
1
34
30200676
front wheel
2
13
30200671
handle
1
35
31000006
self-tapping screw
BT4×10
2
14
30100342
motor cover
1
36
30400165
Adjust rod shaf
1
15
30600279
spring 65Mn
1
37
30200589
Front wheel rocker
2
16
30100341
Device Housing
1
38
30200590
Raise the handle
1
17
30300160
sponge
2
39
30400166
front axle shaft
1
18
31300441
motor assembly
1
40
30600281
Adjust knob spring
1
19
30200019
cable pressure plate
1
41
30400215
rear axle shaft
20
31000413
Hexagonal nut (M6)
2
42
30200591
positioning sleeve
1
21
30200106
Pipe fixing seat
2
43
30800011
pressure plate
4
22
30100294
chassis
1
44
30200593
positioning sleeve
1
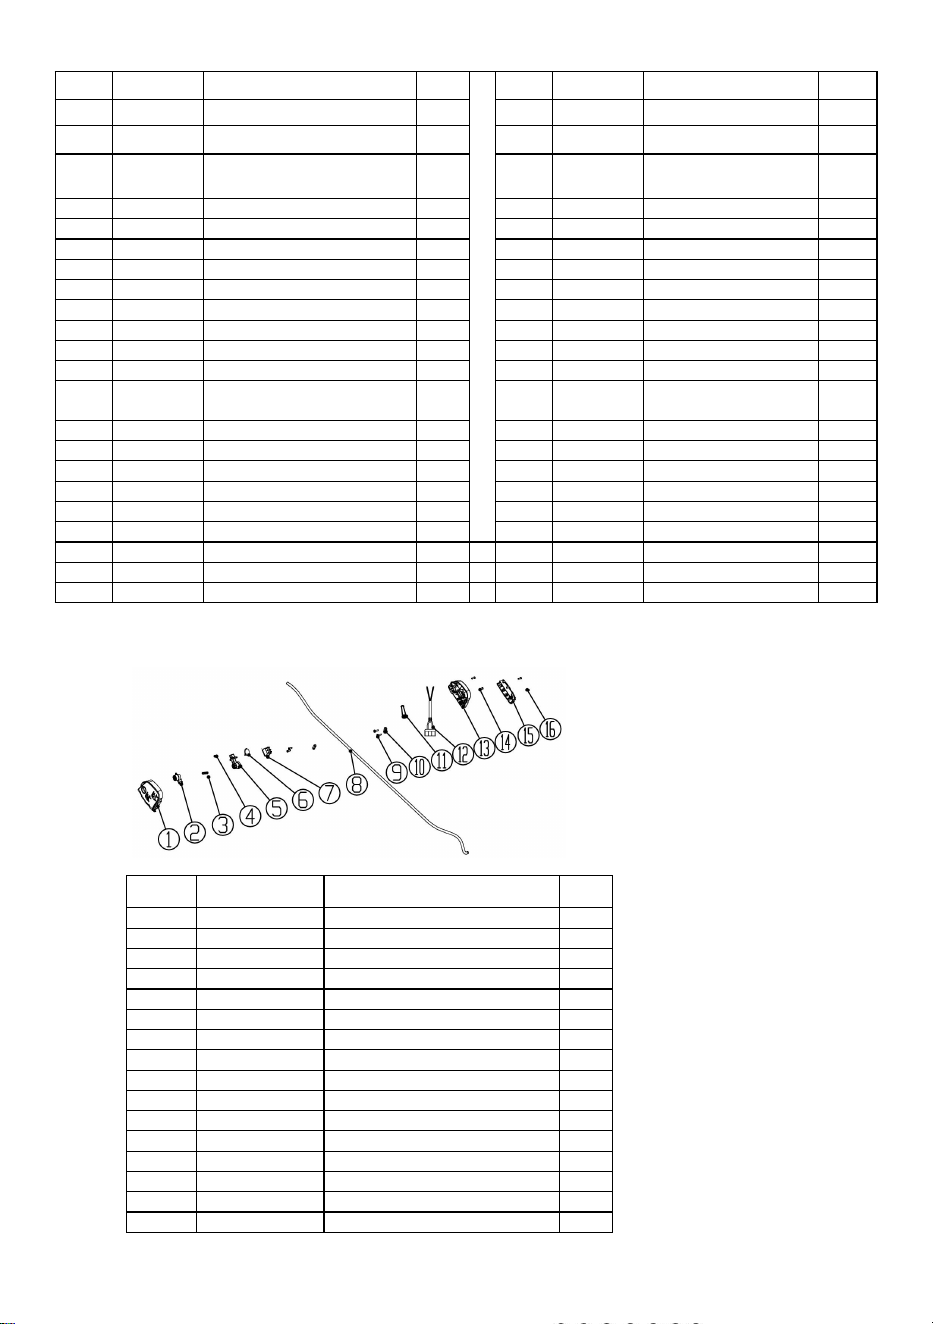
Switch Box Assembly
Item
Stock#
Description
Qty
1
30200375
right lower cover
1
2
30200091
switch button
1
3
30600016
spring 65Mn
1
4
31000532
self-tapping screw BT3X10
1
5
30200089
connecting rod
1
6
30600015
torsion spring 65Mn
1
7
31100270
ON/OFF switch
1
8
31100307
connecting line
1
9
31000007
self-tapping screw BT4×12
4
10
30200019
pressure plate
2
11
30300001
Cable sheath
1
12
31200332
Cable line
1
13
30200374
right upper cover
1
14
31000009
self-tapping screw BT4×16
4
15
30200087
pressure plate
1
16
31000010
self-tapping screw BT4×16
2
23
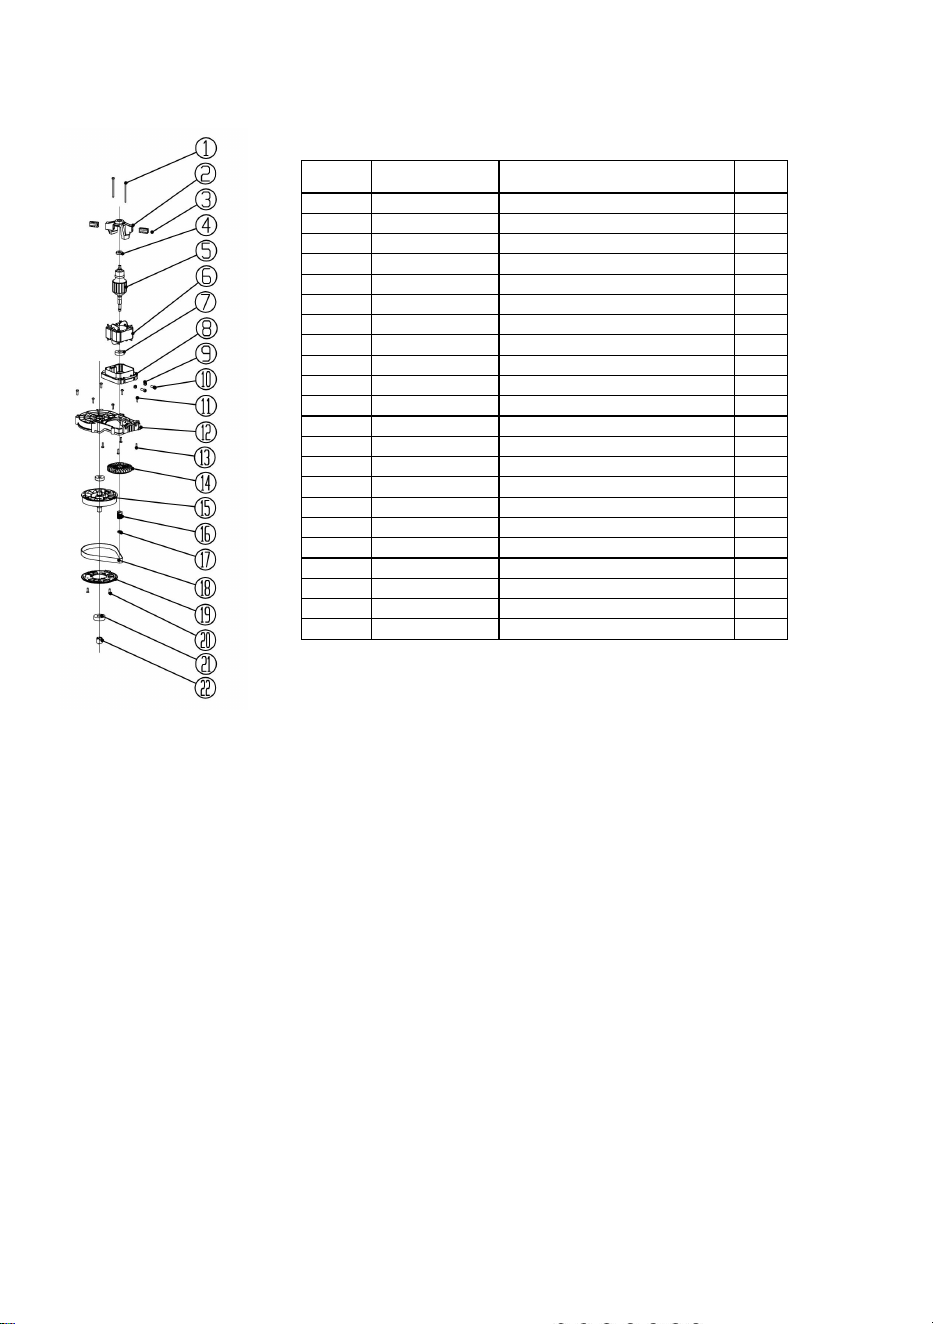
Motor Assembly
Item
Stock#
Description
Qty
1
31000329
self-tapping screw Q235
2
2
30200353
Rear bracket
1
3
31300122
carbon brush
2
4
31000239
bearing
1
5
31300442
rotor
1
6
31300443
stator
1
7
31000104
bearing
2
8
30200555
Front bracket
1
9
31000054
lock nut M6
2
10
30400275
bolt M6X15
2
11
31000303
self-tapping screw BT4×16
6
12
30100290
Belt box
1
13
31000019
self-tapping screw BT5×16
4
14
30200245
fan
1
15
31300217
Large pulley
1
16
30400156
small pulley
1
17
31000055
lock nut M8
1
18
31300192
Multi wedge
1
19
30200557
pulley cover
1
20
31000281
self-tapping screw BT4×10
3
21
31000087
bearing
1
22
30200585
Anti-reverse sleeve
1

24
ONE (1) YEAR LIMITED WARRANTY
PowerSmart
®
is committed to building tools that are dependable for years. Our warranties are consistent with our
commitment and dedication to quality.
ONE (1) YEAR LIMITED WARRANTY OF POWERSMART PRODUCTS FOR HOME USE.
PowerSmart (“Seller") warrants to the original purchaser only, that all PowerSmart consumer power tools will be free
from defects in material or workmanship for a period of one(1) year from date of purchase. Ninety (90) days for all
PowerSmart Products, if the tool is used for professional or commercial use.
SELLER’S SOLE OBLIGATION AND YOUR EXCLUSIVE REMEDY under this one (1) year limited warranty and, to
the extent permitted by law, any warranty or condition implied by law, shall be the repair or replacement of parts,
without charge, which are defective in material or workmanship and which have not been misused, carelessly handled, or
misrepaired by persons other than Seller or Authorized Service Center. To make a claim under this Limited Warranty,
you must return the entire power tool product; transportation prepaid, to PowerSmart Include a legible copy of the
original receipt, which lists the date of purchase (month and year) and the name of the company purchased from.
THIS LIMITED WARRANTY DOES NOT APPLY TO ANY ACCESSORY ITEMS INCLUDED WITH THE TOOL
SUCH AS CIRCULAR SAW BLADES OTHER RELATED ITEMS OR TO ANY REPLACEMENT PARTS LISTED
UNDER MAINTENANCE.
ANY IMPLIED WARRANTIES SHALL BE LIMITED IN DURATION TO TWO (2) YEARS FROM DATE OF
PURCHASE. SOME STATES IN THE U.S. AND SOME CANADIAN PROVINCES DO NOT ALLOW
LIMITATIONS ON HOW LONG AN IMPLIED WARRANTY LASTS, SO THE ABOVE LIMITATION MAY NOT
APPLY TO YOU.
IN NO EVENT SHALL SELLER BE LIABLE FOR ANY INCIDENTAL OR CONSEQUENTIAL DAMAGES
(INCLUDING BUT NOT LIMITED TO LIABILITY FOR LOSS OF PROFITS) ARISING FROM THE SALE OR USE
OF THIS PRODUCT. SOME STATES IN THE U.S. AND SOME CANADIAN PROVINCES DO NOT ALLOW THE
EXCLUSION OR LIMITATION OF INCIDENTAL OR CONSEQUENTIAL DAMAGES, SO THE ABOVE
LIMITATION OR EXCLUSION MAY NOT APPLY TO YOU.
THIS LIMITED WARRANTY GIVES YOU SPECIFIC LEGAL RIGHTS, AND YOU MAY ALSO HAVE OTHER
RIGHTS WHICH VARY FROM STATE TO STATE IN THE U.S., PROVINCE TO PROVINCE IN CANADA AND
FROM COUNTRY TO COUNTRY.
For questions / comments, technical assistance or repair parts –
Please call toll free at: 1-872-314-0005 (M-F 9am – 5pm EST)
Email: support@amerisuninc.com / support@powersmartusa.com
SAVE YOUR RECEIPTS. THIS WARRANTY IS VOID WITHOUT THEM.

25

26