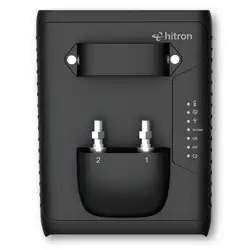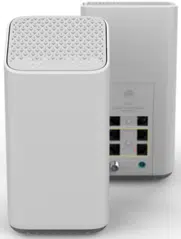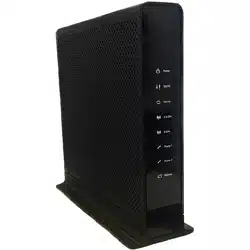

CODA60x1 DOCSIS Wifi Gateway
CODA6011U CODA 6011UV
CODA6021 CODA6021U
User’s
Guide
Version 1.0 - 08/2026

Hitron CODA60x1 User’s Guide
About This User’s Guide
Intended Audience
This manual is intended for people who want to configure the CODA60x1’s features
via its Graphical User Interface (GUI).
How to Use this User’s Guide
This manual contains information on each the CODA60x1’s GUI screens, and
describes how to use its various features.
Use the Introduction to see an overview of the topics covered in this manual.
Use the Table of Contents, List of Figures and List of Tables to quickly find
information about a particular GUI screen or topic.
Use the Index to find information on a specific keyword.
Use the rest of this User’s Guide to see in-depth descriptions of the
CODA60x1’s features.
Related Documentation
Quick Installation Guide: see this for information on getting your CODA60x1
up and running right away. It includes information on system requirements,
package contents, the installation procedure, and basic troubleshooting tips.
Online Help: each screen in the CODA60x1’s Graphical User Interface (GUI)
contains additional information about configuring the screen.
2
Hitron CODA60x1 User’s Guide
Version 1.0, 11/2020. Copyright
2012 Hitron Technologies
3
3
Version 1.0, 08/2026. Copyright
2026 Hitron Technologies
Select UDP to use the User Datagram Protocol.
Click Settings > Advanced Settings.
Press [ENTER] to continue.
Document Conventions
This User’s Guide uses various typographic conventions and styles to indicate
content type:
Bulleted paragraphs are used to list items, and to indicate options.
1 Numbered paragraphs indicate procedural steps.
NOTE: Notes provide additional information on a subject.
Warnings provide information about actions that could harm you or your
device.
Product labels, field labels, field choices, etc. are in bold type. For example:
A mouse click in the Graphical User Interface (GUI) is denoted by a right angle
bracket ( > ). For example:
means that you should click Settings in the GUI, then Advanced settings.
A key stroke is denoted by square brackets and uppercase text. For example:
Customer Support
For technical assistance or other customer support issues, please consult your Hitron
representative.
Hitron CODA60x1 User’s Guide
Version 1.0, 11/2020. Copyright
2012 Hitron Technologies
3
4
Version 1.0, 08/2026. Copyright
2026 Hitron Technologies
Default Login Details
The CODA60x1’s default IP address and login credentials are as follows. For more
information, see Logging in to the CODA60x1.
Table 1: Default Credentials
IP Address
192.168.0.1
Username
cusadmin
Password
password
NOTE: When you have completed the EasyConnect setup wizard, the default
password is replaced with the password you configured for the wireless
network.
Copyright 2026 Hitron Technologies. All rights reserved. All trademarks and
registered trademarks used are the properties of their respective owners.
DISCLAIMER: The information in this User’s Guide is accurate at the time of writing.
This User’s Guide is provided “as is” without express or implied warranty of any kind.
Neither Hitron Technologies nor its agents assume any liability for inaccuracies in this
User’s Guide, or losses incurred by use or misuse of the information in this User’s
Guide.

Hitron CODA60x1 User’s Guide
Version 1.0, 11/2020. Copyright
2012 Hitron Technologies
3
5
Version 1.0, 08/2026. Copyright
2026 Hitron Technologies
About This User’s Guide
.................................................................................. 2
Introduction
..................................................................................................... 7
1.1
CODA60x1 Overview
............................................................................. 7
1.2
Hardware
Connections
........................................................................... 9
1.3
LEDs
......................................................................................................... 11
1.4
IP Address Setup
................................................................................... 12
1.5
Logging in to the CODA60x1
............................................................ 13
1.6
GUI Overview
......................................................................................... 14
1.7
Resetting the CODA60x1
..................................................................... 15
EasyConnect
................................................................................................... 16
2.1
EasyConnect Overview
........................................................................ 16
2.2
EasyConnect:
Welcome
....................................................................... 16
2.3
EasyConnect: Internet Connection
..................................................... 17
2.4
EasyConnect: Wireless Settings
.......................................................... 18
2.5
EasyConnect: Setup Completion
........................................................ 19
Status
............................................................................................................... 21
3.1
Status Overview
...................................................................................... 21
3.2
The System Information Screen
.......................................................... 28
3.3
The Status: DOCSIS Provisioning Screen
....................................... 30
3.4
The Status: DOCSIS WAN Screen
..................................................... 31
3.5
The Status: DOCSIS Event Screen
.................................................... 35
3.6
The Status: Wireless Screen
................................................................ 36
Basic
................................................................................................................ 39
4.1
Basic Overview
....................................................................................... 39
4.2
The Basic: LAN Setup Screen
............................................................. 41
4.3
The Basic: Gateway Function Screen
................................................ 43
4.4
The Basic: Port Forwarding Screen
.................................................... 44
4.5
The Basic: Port Triggering Screen
.................................................... 48
4.6
The Basic: DMZ Screen
........................................................................ 51
4.7
The Basic: DNS Screen
........................................................................ 52
Wireless
........................................................................................................... 54
5.1
Wireless Overview
.................................................................................. 54

Hitron CODA60x1 User’s Guide
Version 1.0, 11/2020. Copyright
2012 Hitron Technologies
3
6
Version 1.0, 08/2026. Copyright
2026 Hitron Technologies
5.2
The Wireless: Basic Settings Screen
.................................................. 60
5.3
The Wireless: Access Control Screen
................................................ 72
5.4
The Advanced Wireless settings Screen
........................................... 73
Administration
............................................................................................... 76
6.1
Administration Overview
...................................................................... 76
6.2
The Administration: Management Screen
......................................... 77
6.3
The Administration: Diagnostics Screen
........................................... 78
6.4
The Administration: Backup Screen
................................................... 79
6.5
The Administration: Time Setting
....................................................... 80
6.6
The Admin: Device Reset Screen
....................................................... 81
6.7
The Admin: IP Passthrough
................................................................. 82
Security
........................................................................................................... 84
7.1
Security Overview
.................................................................................. 84
7.2
The Security: Firewall Screen
.............................................................. 85
7.3
The Security: IPv6 Inbound Firewall
.................................................. 87
7.4
The Security: Port Blocking
................................................................. 89
7.5
The Security: Device Filter Screen
..................................................... 94
7.6
VPN Passthrough
.................................................................................. 98
Advanced
...................................................................................................... 100
8.1
Advanced Overview
............................................................................ 100
8.2
The Advanced: Switch Setup Screen
............................................... 100
8.3
The Advanced: DDNS
......................................................................... 102
8.4
The Advanced: Static Route
.............................................................. 103
8.5
The Advanced: Device Location
....................................................... 104
Troubleshooting
.......................................................................................... 106
Statements and Warnings
......................................................................... 109
Hitron CODA60x1 User’s Guide
Version 1.0, 11/2020. Copyright
2012 Hitron Technologies
3
7
Version 1.0, 08/2026. Copyright
2026 Hitron Technologies
1
Introduction
This chapter introduces the CODA60x1 and its GUI (Graphical User Interface).
1.1
CODA60x1 Overview
Your CODA60x1 is a DOCSIS cable modem, router and wireless access point that
allows you to connect your cabled Ethernet, wireless devices and analog telephones
to one another and to the Internet via your building’s cable connection.
Figure: Application Overview
1.1.1
Model Differentiation
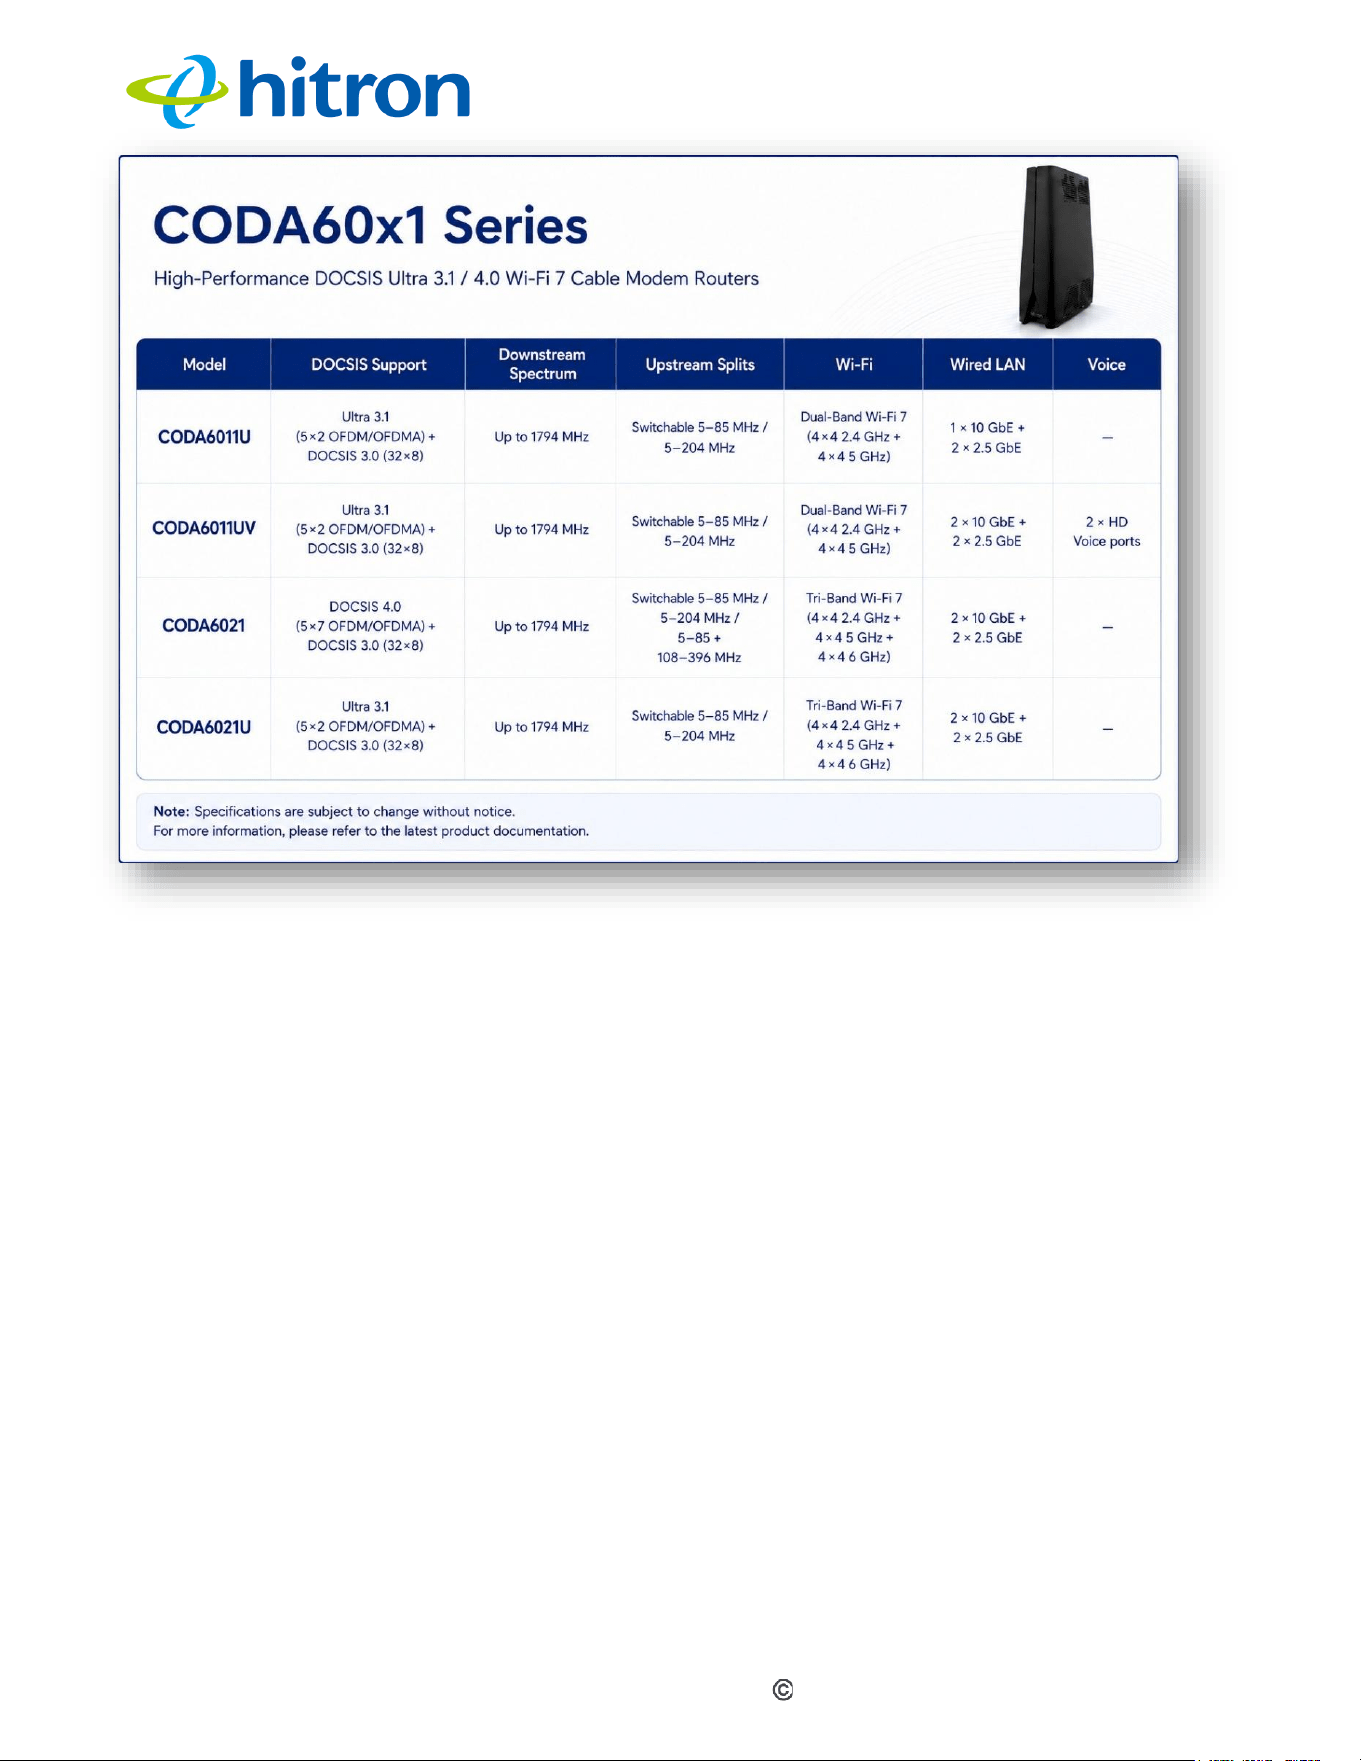
The models covered by this User’s Guide differ in the following specifics:
Hitron CODA60x1 User’s Guide
Version 1.0, 11/2020. Copyright
2012 Hitron Technologies
3
8
Version 1.0, 08/2026. Copyright
2026 Hitron Technologies
1.1.2
Key Features
CODA6011U Series
DOCSIS Ultra 3.1 5x2 OFDM/OFDMA
DOCSIS 3.0 32x8 Channel Bonding.
Extended Downstream 1794MHz.
4x4 2.4GHz 802.11be, 4x4 5GHz 802.11be Dual-band.
16 SSIDs (8 SSIDs per Radio).
Individual Configuration for each SSID.
Two HD Voice Ports, SIP and MGCP Support (CODA6011UV)
TR-069, TR-369 and Remote Management.
Hitron Ecosystem Support (OptiMy, HitronCloud,MyHitron+).

Hitron CODA60x1 User’s Guide
Version 1.0, 11/2020. Copyright
2012 Hitron Technologies
3
9
Version 1.0, 08/2026. Copyright
2026 Hitron Technologies
Low Latency DOCSIS).
CODA6021 Series
DOCSIS 4.0 5×7 OFDM/OFDMA (CODA6021).
DOCSIS Ultra 3.1 5x2 OFDM/OFDMA (CODA6021U).
DOCSIS 3.0 32x8 Channel Bonding
Switchable Upstream: 5-85MHz / 5-204MHz /5-85+108-396MHz.
Downstream up to 1794MHz.
4x4 2.4GHz 802.11be, 4x4 5GHz 802.11be, 4x4 6GHz 802.11be Tri-band
Concurrent MU-MIMO Internal Antennas.
MU-MIMO Internal Antennas.
24 SSIDs (8 SSIDs per Radio).
Two 10 GigE and two 2.5 GigE Ports.
TR-069, TR-369 and Remote Management.
Hitron Ecosystem Support (OptiMy, HitronCloud, MyHitron+)
Low Latency DOCSIS
1.2
Hardware
Connections
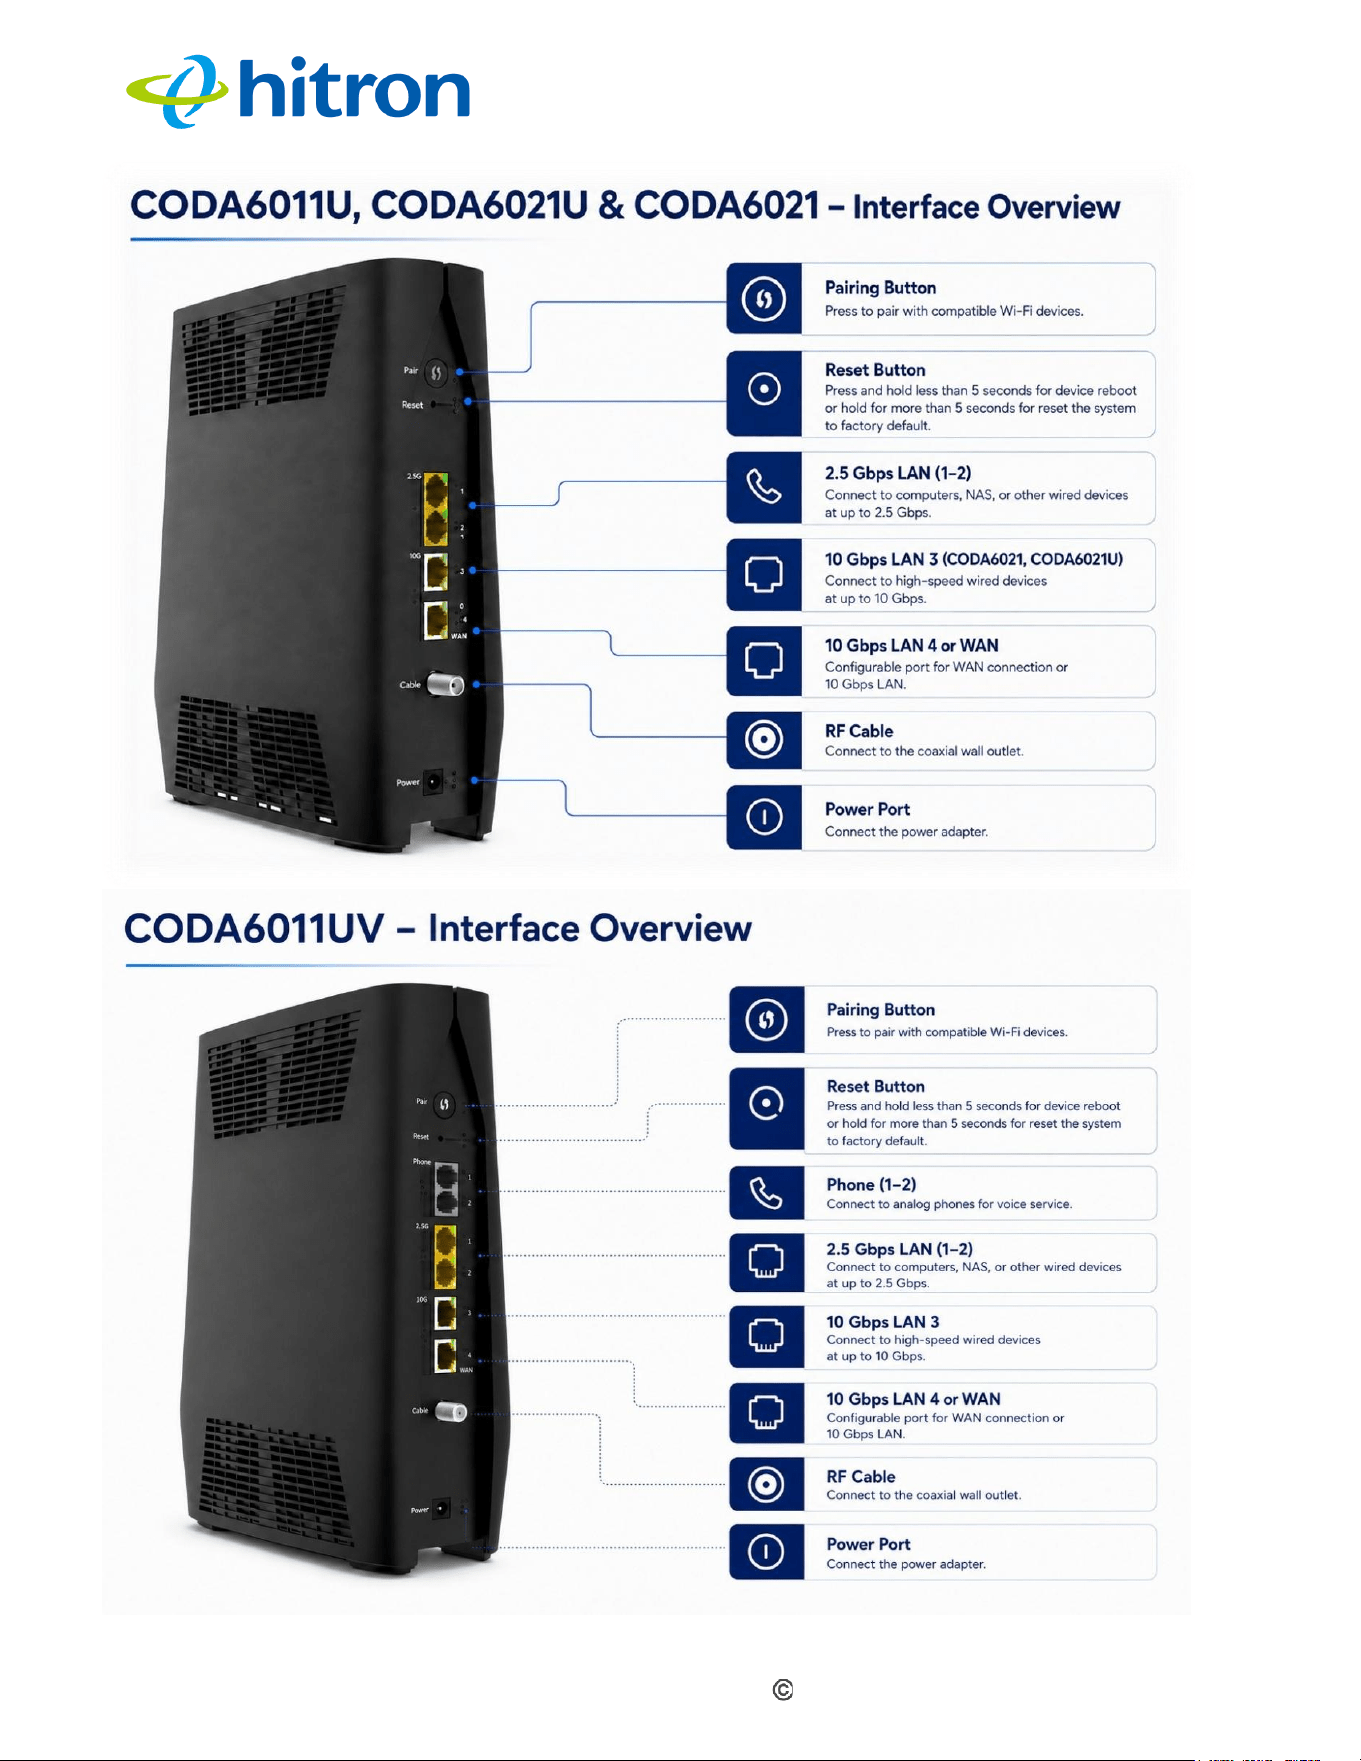
This section provides an overview of the physical ports and buttons on the CODA60x1.
Hitron CODA60x1 User’s Guide
Version 1.0, 11/2020. Copyright
2012 Hitron Technologies
3
10
Version 1.0, 08/2026. Copyright
2026 Hitron Technologies
Hitron CODA60x1 User’s Guide
Version 1.0, 11/2020. Copyright
2012 Hitron Technologies
3
11
Version 1.0, 08/2026. Copyright
2026 Hitron Technologies
1.3
LEDs
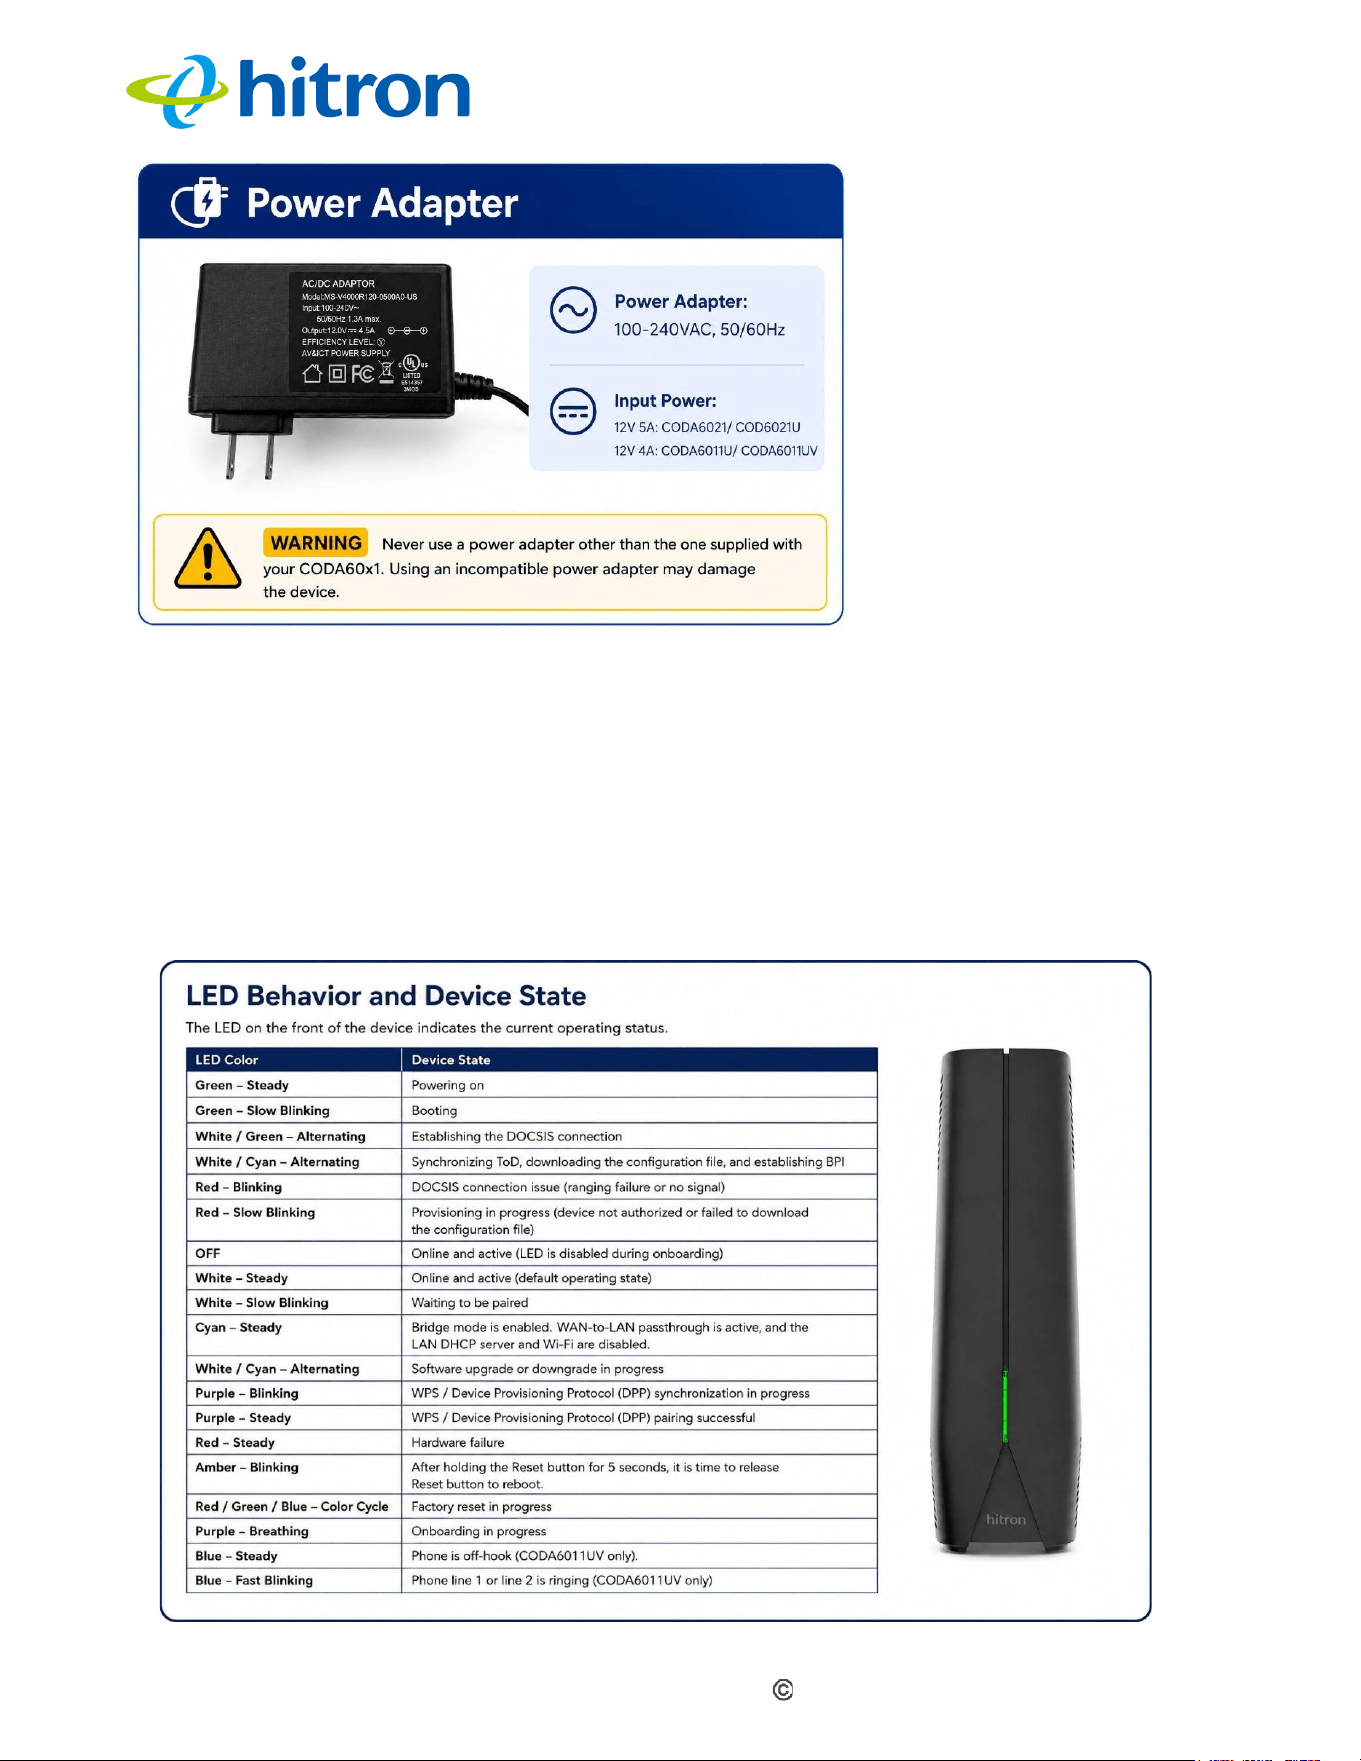
This section describes the LED indicators and their corresponding device states
on the CODA60x1.

Hitron CODA60x1 User’s Guide
Version 1.0, 11/2020. Copyright
2012 Hitron Technologies
3
12
Version 1.0, 08/2026. Copyright
2026 Hitron Technologies
1.4
IP Address Setup
Before you log into the CODA60x1’s GUI, your computer’s IP address must be in the
same subnet as the CODA60x1. This allows your computer to communicate with the
CODA60x1.
NOTE: See When the CODA60x1 is not in routing mode, the service provider
assigns an IP address to each computer connected to the CODA60x1
directly. The CODA60x1 does not perform any routing operations, and traffic
flows between the computers and the service provider. on page 59 for
background information.
If your computer is configured to get an IP address automatically, or if you are not
sure, try to log in to the CODA60x1 (see GUI Overview).
If the login screen displays, your computer is already configured correctly.
If the login screen does not display, your computer is not configured correctly.
Follow the procedure in Manual IP Address Setup and set your computer to get
an IP address automatically. Try to log in again. If you cannot log in, follow the
manual IP address setup procedure again, and set a specific IP address as
shown. Try to log in again.
NOTE: If you still cannot see the login screen, your CODA60x1’s IP settings may
have been changed from their defaults. If you do not know the CODA60x1’s
new address, you should return it to its factory defaults. See Resetting the
CODA60x1. Bear in mind that ALL user-configured settings are lost.
1.4.1
Manual IP Address Setup
By default, your CODA60x1’s local IP address is 192.168.0.1. If your CODA60x1 is
using the default IP address, you should set your computer’s IP address to be
between 192.168.0.2 and 192.168.0.254.
Take the following steps to manually set up your computer’s IP address to connect to
the CODA60x1:
NOTE: This example uses Windows 7; the procedure for your operating system may
be different.
1
Click the Windows Start Orb
, then click Control Panel.
2
In the window that displays, double-click Network And Sharing Center.

Hitron CODA60x1 User’s Guide
Version 1.0, 11/2020. Copyright
2012 Hitron Technologies
3
13
Version 1.0, 08/2026. Copyright
2026 Hitron Technologies
3
In the left-hand panel, click Change Adapter Settings.
4
Right-click your network connection (usually Local Area Connection) and click
Properties.
5
In the Networking tab’s This connection uses the following items list, scroll
down and select Internet Protocol (TCP/IPv4). Click Properties.
6
You can get an IP address automatically, or specify one manually:
If your network has an active DHCP server, select Get an IP address
automatically.
If your network does not have an active DHCP server, select Use the
following IP address. In the IP address field, enter a value between
192.168.0.2 and 192.168.0.254 (default). In the Subnet mask field, enter
255.255.255.0 (default). In the Default Gateway field, enter 192.168.0.1
(default).
NOTE: If your CODA60x1 is not using the default IP address, enter an IP address
and subnet mask that places your computer in the same subnet as the
CODA60x1.
7
Click OK. The Internet Protocol (TCP/IP) window closes. In the Local Area
Connection Properties window, click Close.
Your computer now obtains an IP address from the CODA60x1, or uses the IP
address that you specified, and can communicate with the CODA60x1.
1.5
Logging in to the CODA60x1
Take the following steps to log into the CODA60x1’s GUI.
NOTE: If you did not already complete the EasyConnect setup wizard (see
EasyConnect) you will be prompted to do so before you can log in.
1
Open a browser window.
2
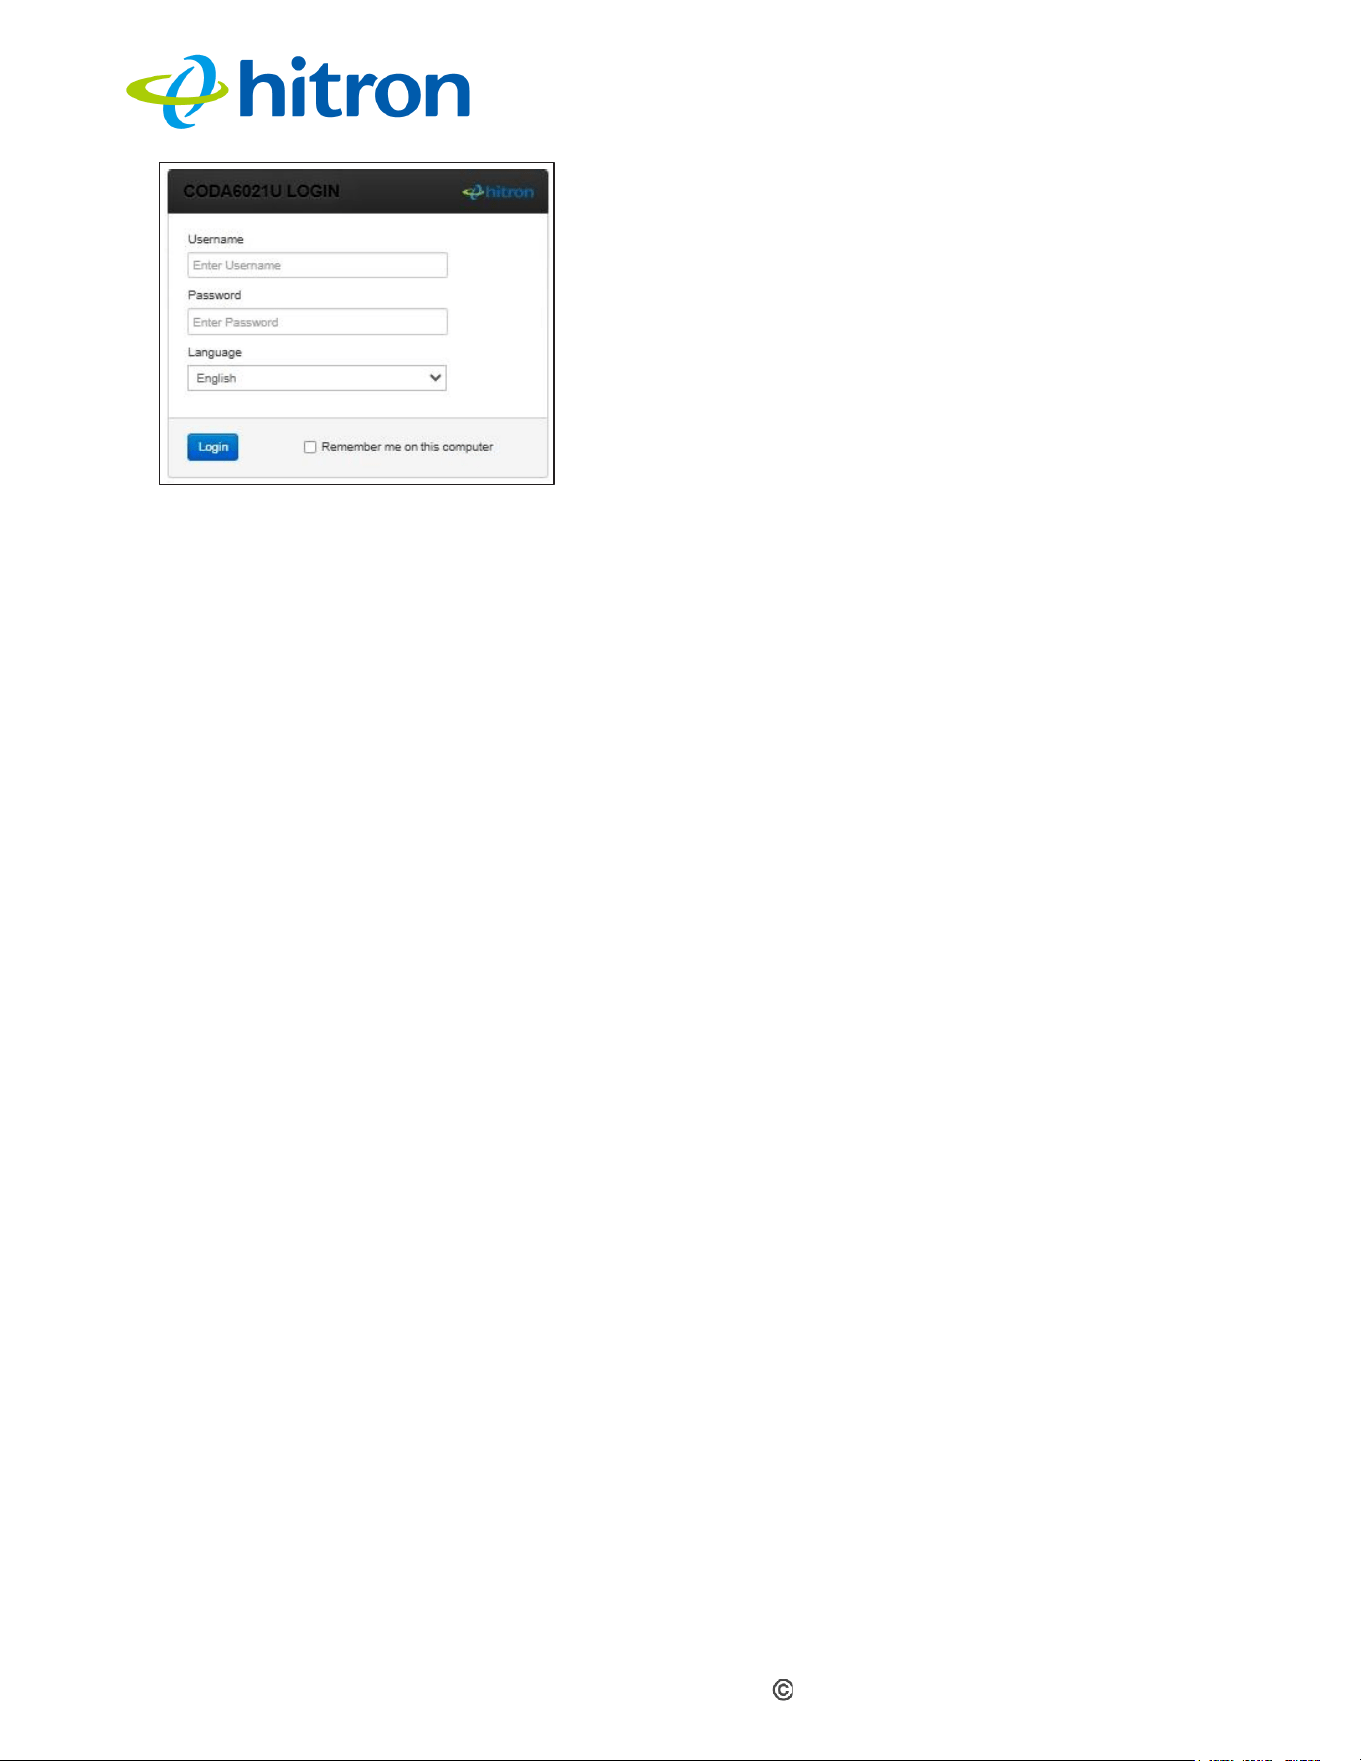
Enter the CODA60x1’s IP address (default 192.168.0.1) in the URL bar. The
Login screen displays.
Hitron CODA60x1 User’s Guide
Version 1.0, 11/2020. Copyright
2012 Hitron Technologies
3
14
Version 1.0, 08/2026. Copyright
2026 Hitron Technologies
Figure: Login
3
Enter the Username and Password. The default user name is cusadmin and
the password is the same as the password you configured for the wireless
network in the EasyConnect wizard (see EasyConnect).
NOTE: The Username and Password are case-sensitive; “password” is not the same
as “PASSWORD”.
4
If you want to log in without entering the password in future, select Remember
me on this computer. Only select this on your own, private computer (not
public computers, or those easily-accessible by others).
5
Click Login. The Status Overview screen displays (see The System
Information Screen).
1.6
GUI Overview
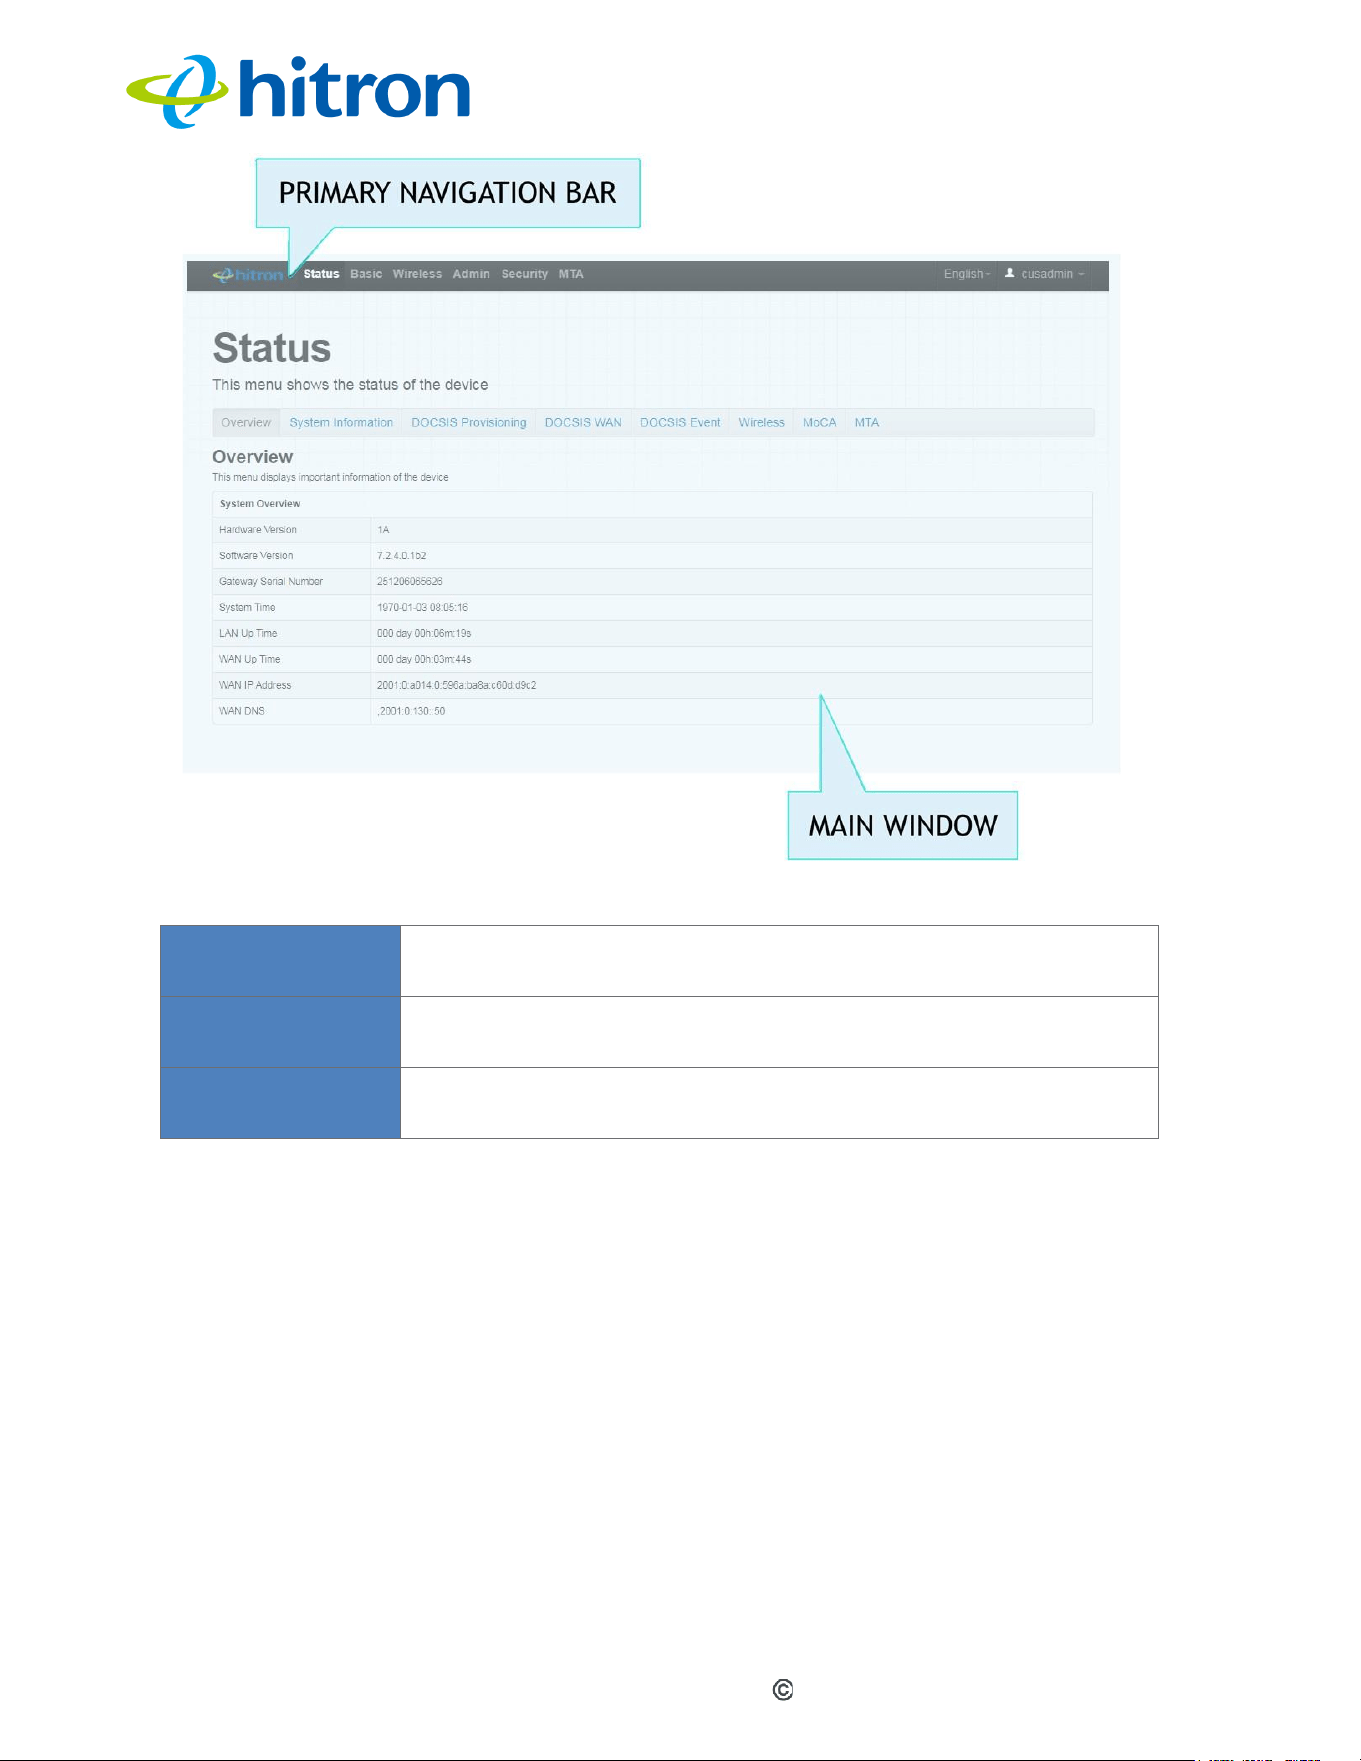
This section describes the CODA60x1’s GUI.
Figure: GUI Overview
Hitron CODA60x1 User’s Guide
Version 1.0, 11/2020. Copyright
2012 Hitron Technologies
3
15
Version 1.0, 08/2026. Copyright
2026 Hitron Technologies
Table: GUI Overview
Primary
Navigation Bar
Use this section to navigate between different areas of the
GUI.
Main Window
Use this section to view information about your CODA60x1’s
configuration and make configuration changes.
Online Help
Use this section to learn more about the fields and options
available on each screen.
1.7
Resetting the CODA60x1
When you reset the CODA60x1 to its factory defaults, all user-configured settings
are lost, and the CODA60x1 is returned to its initial configuration state.
To reset the CODA60x1, press and hold the RESET button for ten seconds, or go to
the Admin > Device Reset screen and click Factory Reset. The CODA60x1 turns off
and on again, using its factory default settings.
NOTE: Depending on your CODA60x1’s previous configuration, you may need to
re-configure your computer’s IP settings; see IP Address Setup.

Hitron CODA60x1 User’s Guide
Version 1.0, 11/2020. Copyright
2012 Hitron Technologies
3
16
Version 1.0, 08/2026. Copyright
2026 Hitron Technologies
2
EasyConnect
This chapter describes the screens that display when you first access the
CODA60x1, and when you access the CODA60x1 after a factory reset (see
Resetting the CODA60x1). It contains the following sections:
EasyConnect Overview
EasyConnect: Welcome
EasyConnect: Internet Connection
EasyConnect: Wireless Settings
EasyConnect: Setup Completion
2.1
EasyConnect Overview
EasyConnect is a setup wizard that allows you to rapidly configure the CODA60x1’s
most important settings, including Internet connection, wireless and password
settings.
2.2
EasyConnect:
Welcome
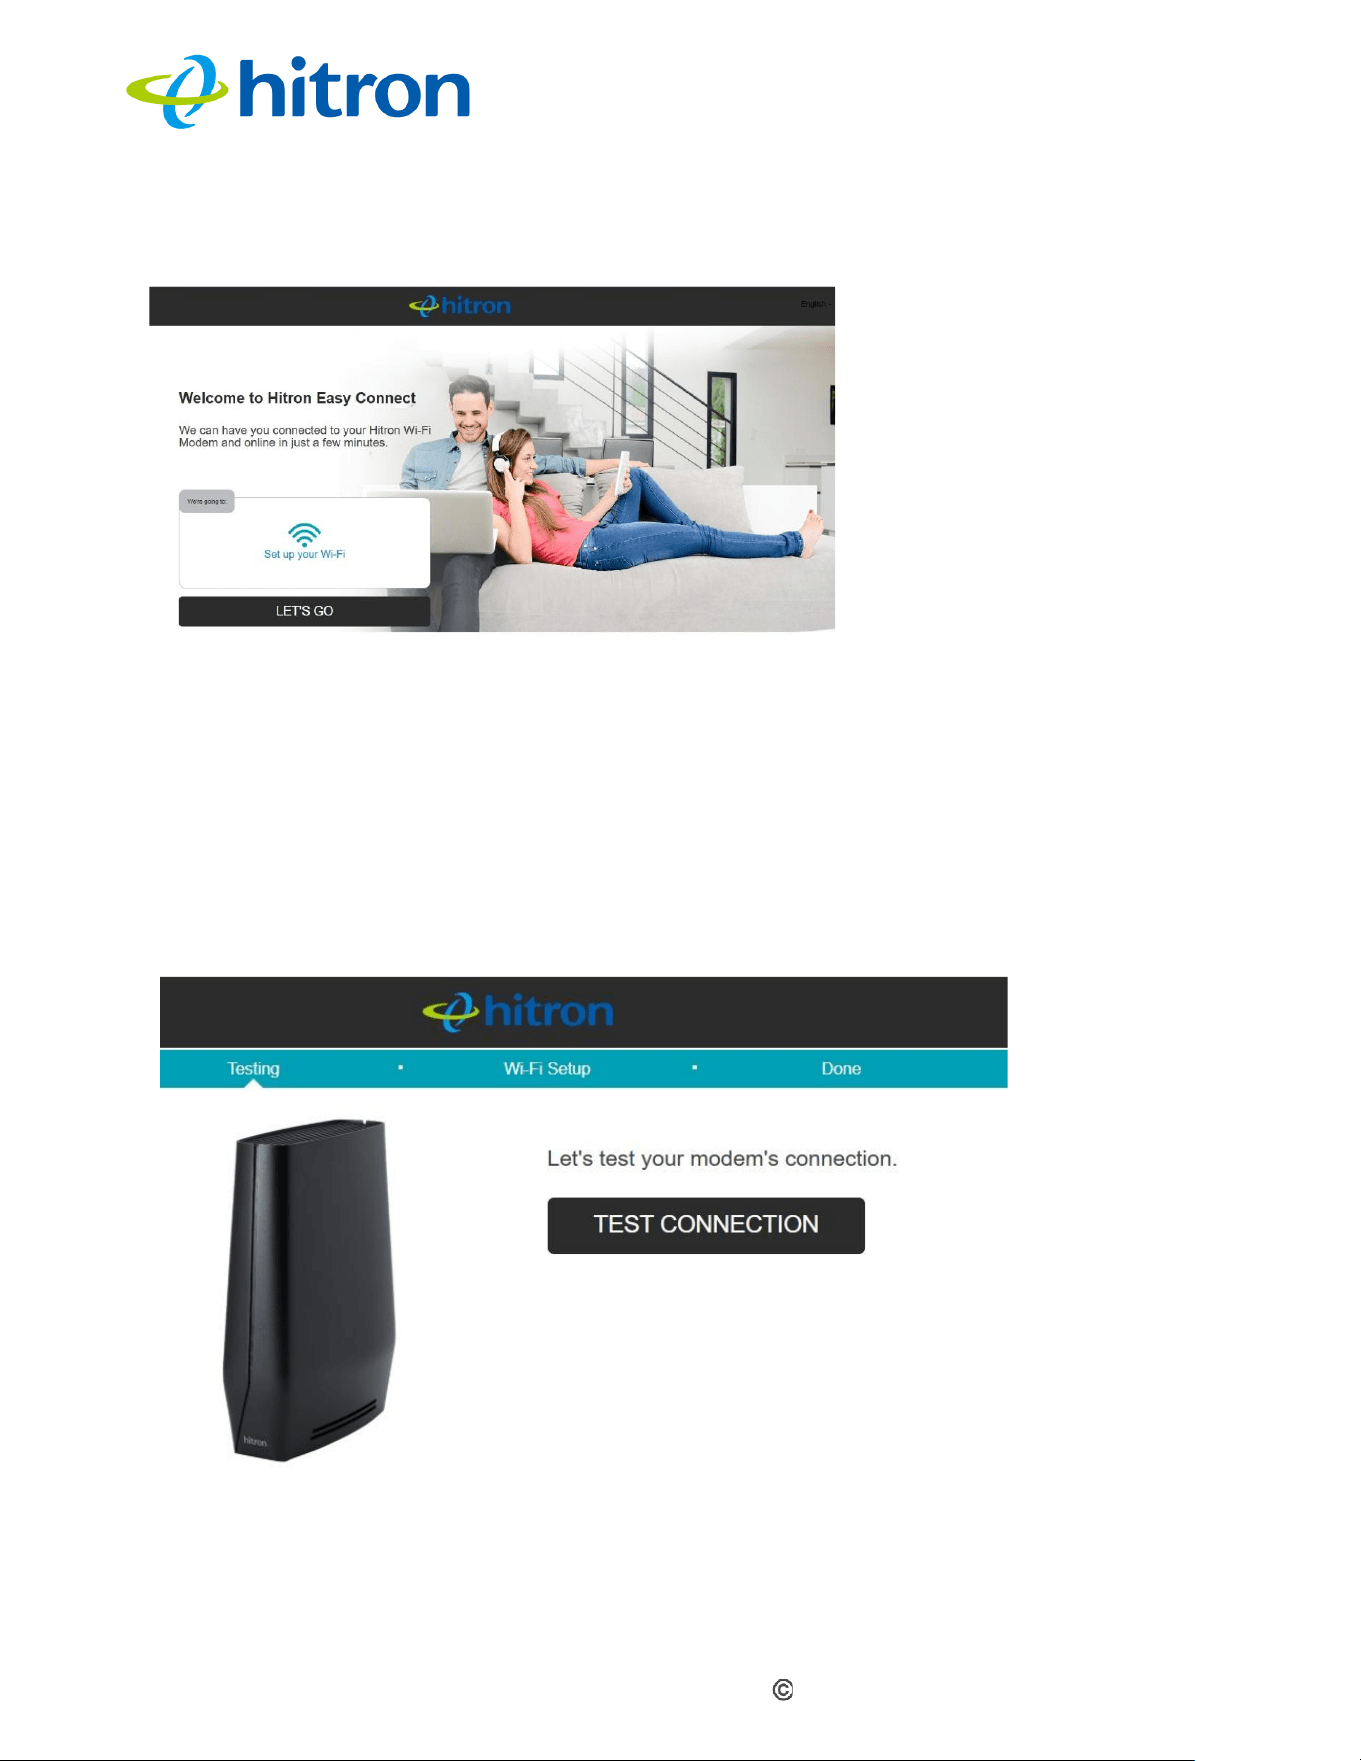
This screen displays when you first access the CODA60x1, or immediately after you
have performed a factory reset. Click Let’s Go to proceed to the Connection
screens (see EasyConnect: Internet Connection).
Hitron CODA60x1 User’s Guide
Version 1.0, 11/2020. Copyright
2012 Hitron Technologies
3
17
Version 1.0, 08/2026. Copyright
2026 Hitron Technologies
Figure 6: The EasyConnect: Welcome Screen
2.3
EasyConnect: Internet Connection
Use these screens to test the CODA60x1’s connection to the Internet.
Click Let’s Go in the EasyConnect Welcome screen. The following screen displays.
Figure: The EasyConnect: Internet Connection Start Screen
Click Test Connection to proceed. The Internet connection test begins.
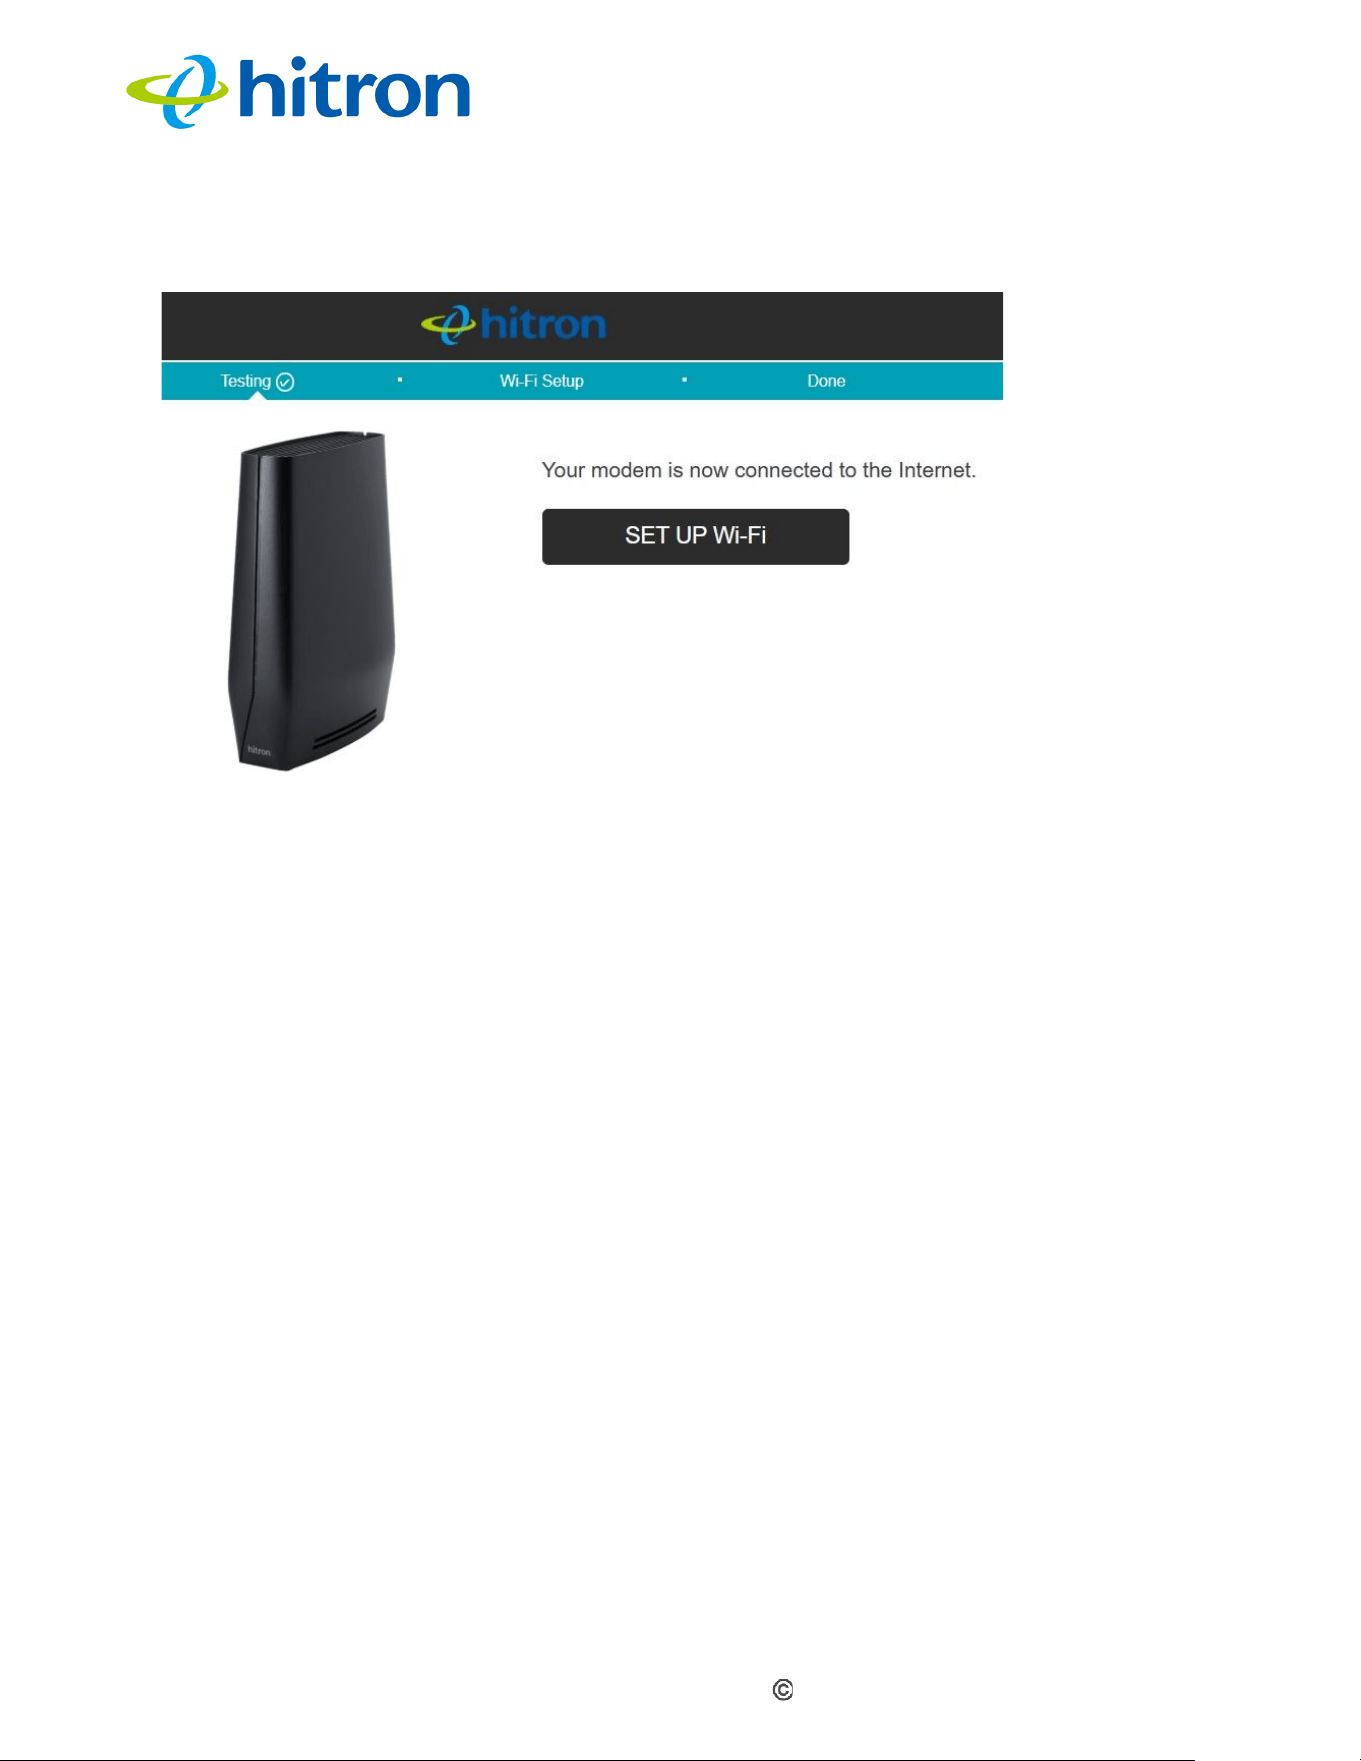
If the test is successful, the following screen displays.
Hitron CODA60x1 User’s Guide
Version 1.0, 11/2020. Copyright
2012 Hitron Technologies
3
18
Version 1.0, 08/2026. Copyright
2026 Hitron Technologies
Figure: The EasyConnect: Internet Connection Success Screen
Click Set up wi-fi to proceed to the wireless network setup screens (see
EasyConnect: Wireless Settings).
2.4
EasyConnect: Wireless Settings
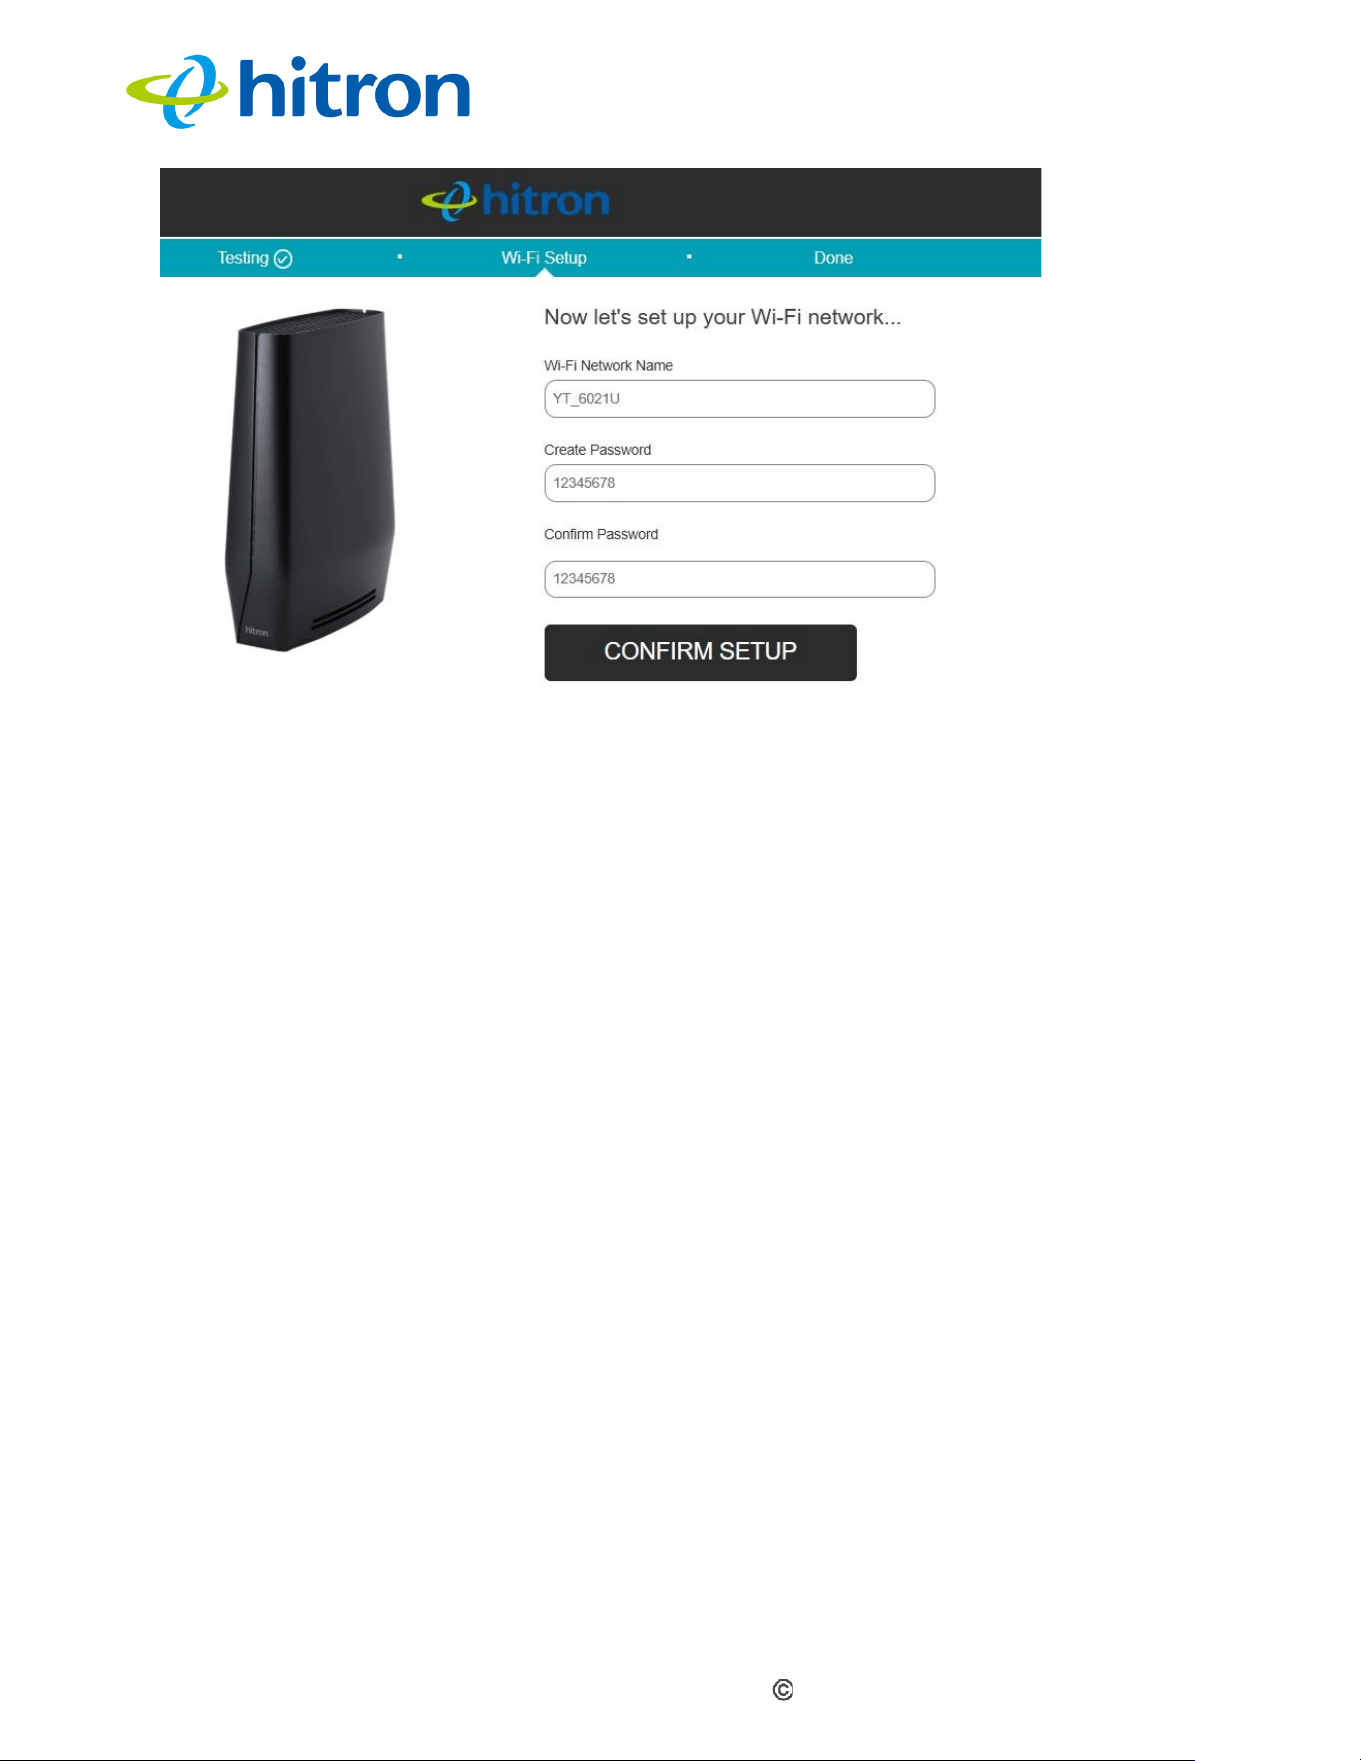
Use this screen to configure the CODA60x1’s wireless network and set the
administrative interface login password.
When EasyConnect’s Internet Connection test has successfully completed, the
following screen displays.
Hitron CODA60x1 User’s Guide
Version 1.0, 11/2020. Copyright
2012 Hitron Technologies
3
19
Version 1.0, 08/2026. Copyright
2026 Hitron Technologies
Figure 10: The EasyConnect: Wireless Settings Screen
Enter the name you want to use for your wireless network in the WiFi Network
Name field. You will use this name to identify and connect to the wireless
network from your client device(s).
Enter the password you want to use for your wireless network in the Create
Password field, and re-enter it in the Confirm Password field.
NOTE: The password you enter in the EasyConnect Wireless Settings screen will
replace the CODA60x1’s default administrative interface password. When
you log into the CODA60x1, you will need to use the password you entered
in the Create Password and Confirm Password fields.
Click Confirm Setup to proceed to the Setup Completion screen.
2.5
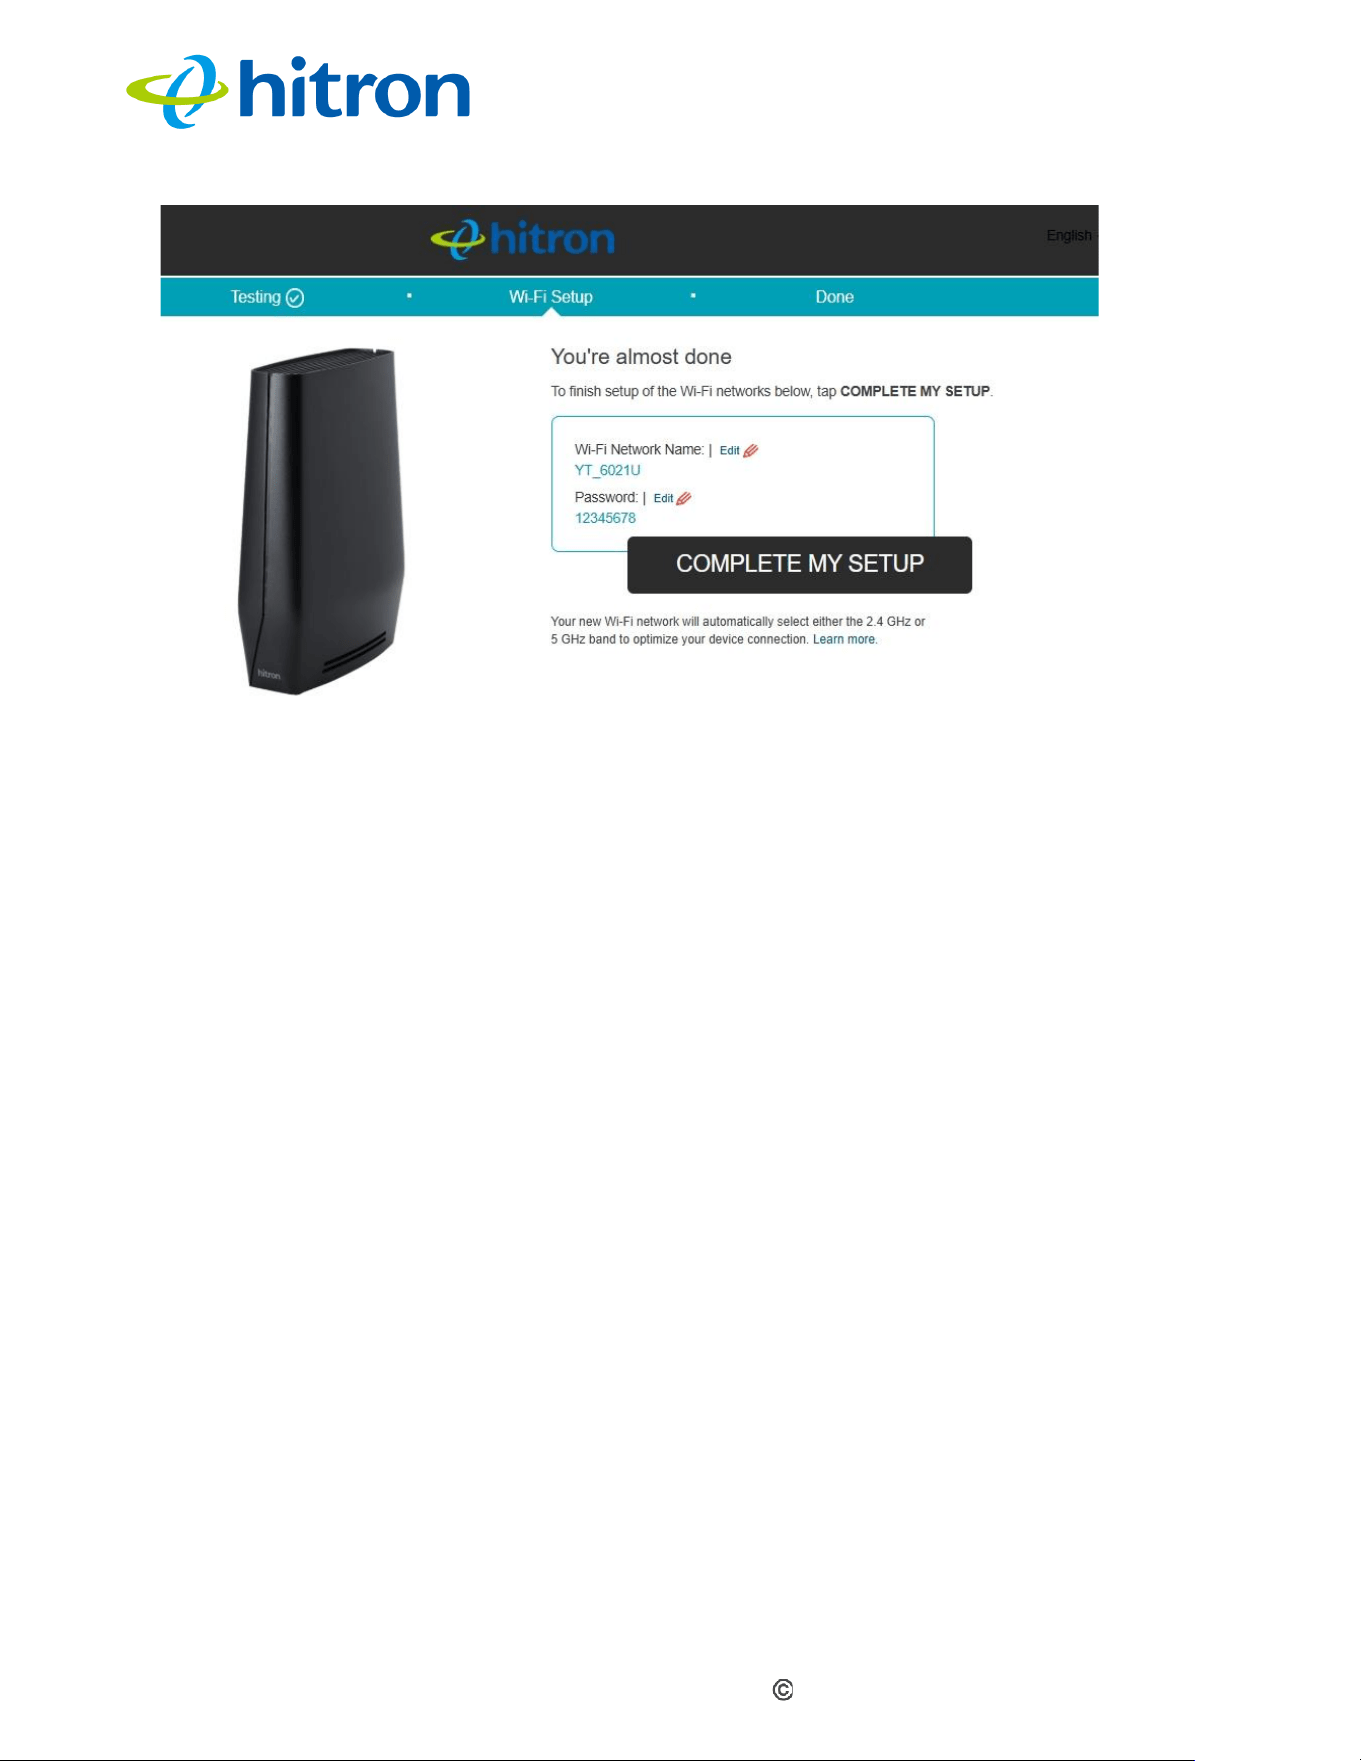
EasyConnect: Setup Completion
Use this screen to save your changes to the CODA60x1’s EasyConnect
configuration.
Click Confirm Setup in the EasyConnect: Wireless Settings screen. The following
screen displays.
Hitron CODA60x1 User’s Guide
Version 1.0, 11/2020. Copyright
2012 Hitron Technologies
3
20
Version 1.0, 08/2026. Copyright
2026 Hitron Technologies
Figure 11: The EasyConnect: Setup Completion Screen
If you are happy with the settings, click Complete my setup.
NOTE: If you changed settings, make sure you keep a note of the new details.
Alternatively, click a setting’s Edit link to modify it before clicking Complete my
setup.

Hitron CODA60x1 User’s Guide
Version 1.0, 11/2020. Copyright
2012 Hitron Technologies
3
21
Version 1.0, 08/2026. Copyright
2026 Hitron Technologies
3
Status
This chapter describes the screens that display when you click Status in the toolbar.
It contains the following sections:
Status Overview
The System Information Screen
The Status: DOCSIS Provisioning Screen
The Status: DOCSIS WAN Screen
The Status: DOCSIS Event Screen
The Status: Wireless Screen
The following table describes the labels in this screen.
NOTE: For background information on the concepts discussed in the Wireless
Status screen, see Wireless Overview.
3.1
Status Overview
This section describes some of the concepts related to the Status screens.
3.1.1
DOCSIS
The Data Over Cable Service Interface Specification (DOCSIS) is a
telecommunications standard that defines the delivery of data services, such as
Internet access, over traditional cable television (CATV) networks.

Hitron CODA60x1 User’s Guide
Version 1.0, 11/2020. Copyright
2012 Hitron Technologies
3
22
Version 1.0, 08/2026. Copyright
2026 Hitron Technologies
3.1.2
IP Addresses and Subnets
Every computer on the Internet must have a unique Internet Protocol (IP) address.
The IP address works much like a street address, in that it identifies a specific
location to which information is transmitted. No two computers on a network can have
the same IP address.
3.1.2.1
IP Address Format
IP addresses consist of four octets (8-bit numerical values) and are usually
represented in decimal notation, for example 192.168.1.1. In decimal notation, this
means that each octet has a minimum value of 0 and a maximum value of 255.
An IP address carries two basic pieces of information: the “network number” (the
address of the network as a whole, analogous to a street name) and the “host ID”
(analogous to a house number) which identifies the specific computer (or other
network device).
3.1.2.2
IP Address Assignment
IP addresses can come from three places:
The Internet Assigned Numbers Agency (IANA)
Your Internet Service Provider
You (or your network devices)
IANA is responsible for IP address allocation on a global scale, and your ISP assigns
IP addresses to its customers. You should never attempt to define your own IP
addresses on a public network, but you are free to do so on a private network.
In the case of the CODA60x1:
The public network (Wide Area Network or WAN) is the link between the cable
connector and your Internet Service Provider. Your CODA60x1’s IP address on
this network is assigned by your service provider.
Hitron CODA60x1 User’s Guide
Version 1.0, 11/2020. Copyright
2012 Hitron Technologies
3
23
Version 1.0, 08/2026. Copyright
2026 Hitron Technologies
The private network is your Local Area Network (LAN) and Wireless Local Area
Network (WLAN), if enabled. You are free to assign IP addresses to computers
on the LAN and WLAN manually, or to allow the CODA60x1 to assign them
automatically via DHCP (Dynamic Host Configuration Protocol). IANA has
reserved the following blocks of IP addresses to be used for private networks
only:
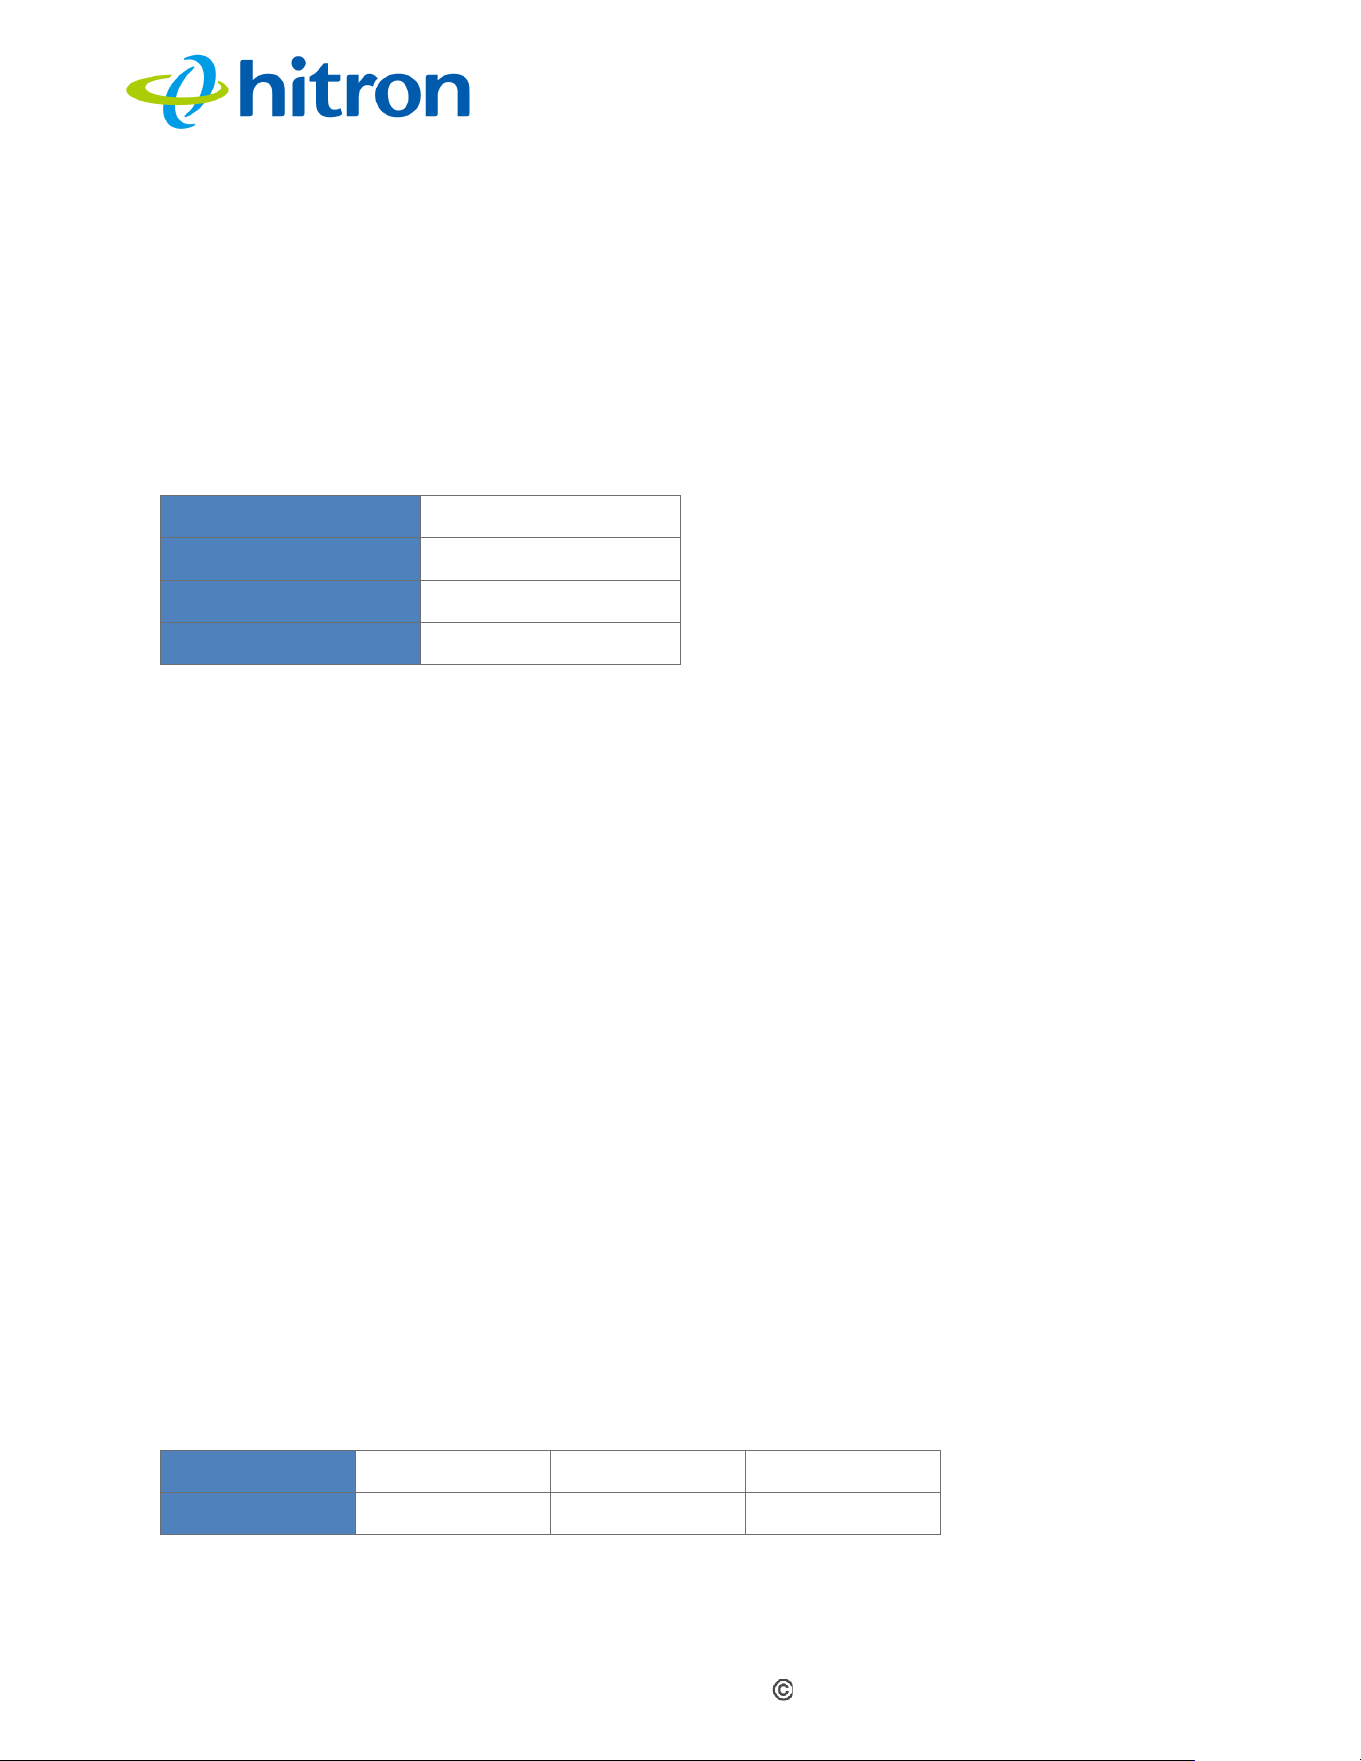
Table 6: Private IP Address Ranges
FROM...
...TO
10.0.0.0
10.255.255.255
172.16.0.0
172.31.255.255
192.168.0.0
192.168.255.255
If you assign addresses manually, they must be within the CODA60x1’s LAN
subnet.
3.1.2.3
Subnets
A subnet (short for sub-network) is, as the name suggests, a separate section of a
network, distinct from the main network of which it is a part. A subnet may contain all
of the computers at one corporate local office, for example, while the main network
includes several offices.
In order to define the extent of a subnet, and to differentiate it from the main network,
a subnet mask is used. This “masks” the part of the IP address that refers to the main
network, leaving the part of the IP address that refers to the sub-network.
Each subnet mask has 32 bits (binary digits), as does each IP address:
A binary value of 1 in the subnet mask indicates that the corresponding bit in the
IP address is part of the main network.
A binary value of 0 in the subnet mask indicates that the corresponding bit in the
IP address is part of the sub-network.
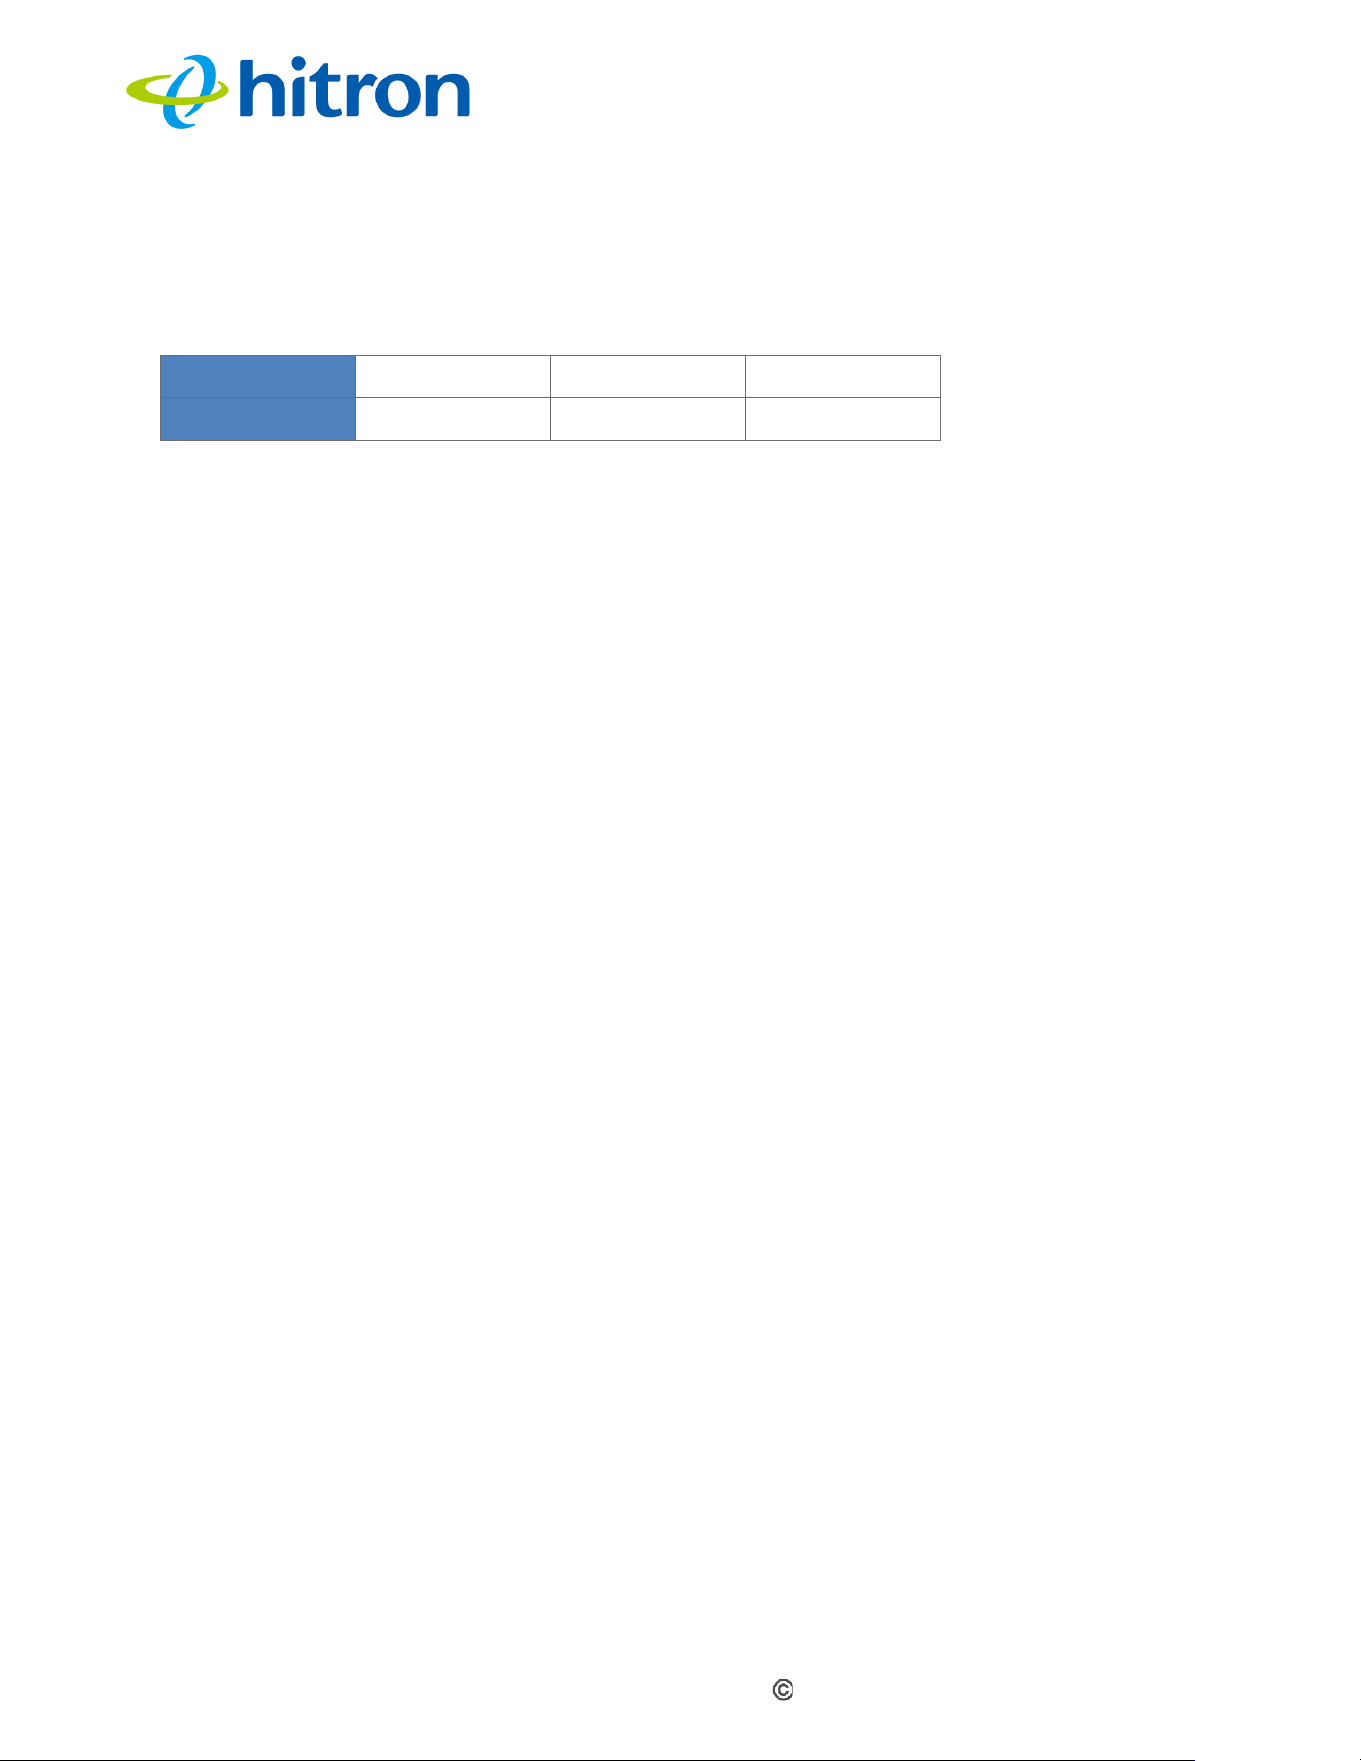
For example, the following table shows the IP address of a computer (192.168.1.1)
expressed in decimal and binary (each cell in the table indicates one octet):
Table: IP Address: Decimal and Binary
192
168
0
1
11000000
10101000
00000000
00000001
Hitron CODA60x1 User’s Guide
Version 1.0, 11/2020. Copyright
2012 Hitron Technologies
3
24
Version 1.0, 08/2026. Copyright
2026 Hitron Technologies
The following table shows a subnet mask that “masks” the first twenty-four bits of the
IP address, in both its decimal and binary notation.
Table: Subnet Mask: Decimal and Binary
255
255
255
0
11111111
11111111
11111111
00000000
This shows that in this subnet, the first three octets (192.168.1, in the example IP
address) define the main network, and the final octet (1, in the example IP address)
defines the computer’s address on the subnet.
The decimal and binary notations give us the two common ways to write a subnet
mask:
Decimal: the subnet mask is written in the same fashion as the IP address:
255.255.255.0, for example.
Binary: the subnet mask is indicated after the IP address (preceded by a forward
slash), specifying the number of binary digits that it masks. The subnet mask
255.255.255.0 masks the first twenty-four bits of the IP address, so it would be
written as follows: 192.168.1.1/24.
3.1.3
DHCP
The Dynamic Host Configuration Protocol, or DHCP, defines the process by which IP
addresses can be assigned to computers and other networking devices
automatically, from another device on the network. This device is known as a DHCP
server, and provides addresses to all the DHCP client devices.
In order to receive an IP address via DHCP, a computer must first request one from
the DHCP server (this is a broadcast request, meaning that it is sent out to the whole
network, rather than just one IP address). The DHCP server hears the requests, and
responds by assigning an IP address to the computer that requested it.
If a computer is not configured to request an IP address via DHCP, you must
configure an IP address manually if you want to access other computers and devices
on the network. See IP Address Setup for more information.
By default, the CODA60x1 is a DHCP client on the WAN (the CATV connection). It
broadcasts an IP address over the cable network, and receives one from the service
provider. By default, the CODA60x1 is a DHCP server on the LAN; it provides IP
addresses to computers on the LAN which request them.

Hitron CODA60x1 User’s Guide
Version 1.0, 11/2020. Copyright
2012 Hitron Technologies
3
25
Version 1.0, 08/2026. Copyright
2026 Hitron Technologies
3.1.4
DHCP Lease
“DHCP lease” refers to the length of time for which a DHCP server allows a DHCP
client to use an IP address. Usually, a DHCP client will request a DHCP lease
renewal before the lease time is up, and can continue to use the IP address for an
additional period. However, if the client does not request a renewal, the DHCP server
stops allowing the client to use the IP address.
This is done to prevent IP addresses from being used up by computers that no longer
require them, since the pool of available IP addresses is finite.
3.1.5
MAC Addresses
Every network device possesses a Media Access Control (MAC) address. This is a
unique alphanumeric code, given to the device at the factory, which in most cases
cannot be changed (although some devices are capable of “MAC spoofing”, where
they impersonate another device’s MAC address).
MAC addresses are the most reliable way of identifying network devices, since IP
addresses tend to change over time (whether manually altered, or updated via
DHCP).
Each MAC address displays as six groups of two hexadecimal digits separated by
colons (or, occasionally, dashes) for example 00:AA:FF:1A:B5:74.
NOTE: Each group of two hexadecimal digits is known as an “octet”, since it
represents eight bits.
Bear in mind that a MAC address does not precisely represent a computer on your
network (or elsewhere), it represents a network device, which may be part of a
computer (or other device). For example, if a single computer has an Ethernet card
(to connect to your CODA60x1 via one of the LAN ports) and also has a wireless
card (to connect to your CODA60x1 over the wireless interface) the MAC addresses
of the two cards will be different. In the case of the CODA60x1, each internal module
(cable modem module, Ethernet module, wireless module, etc.) possesses its own
MAC address.

Hitron CODA60x1 User’s Guide
Version 1.0, 11/2020. Copyright
2012 Hitron Technologies
3
26
Version 1.0, 08/2026. Copyright
2026 Hitron Technologies
3.1.6
Residential Gateway function
When your CODA60x1 is in Residential Gateway function mode, it acts as a gateway
for computers on the LAN to access the Internet. The service provider assigns an IP
address to the CODA60x1 on the WAN, and all traffic for LAN computers is sent to
that IP address. The CODA60x1 assigns private IP addresses to LAN computers
(when DHCP is active), and transmits the relevant traffic to each private IP address.
NOTE: When DHCP is not active on the CODA60x1 in routing mode, each computer
on the LAN must be assigned an IP address in the CODA60x1’s subnet
manually.
When the CODA60x1 is not in Residential Gateway function mode, the service
provider assigns an IP address to each computer connected to the CODA60x1
directly. The CODA60x1 does not perform any routing operations, and traffic flows
between the computers and the service provider.
3.1.7
Configuration Files
The CODA60x1’s configuration (or config) file is a document that the CODA60x1
obtains automatically over the Internet from the service provider’s server, which
specifies the settings that the CODA60x1 should use. It contains a variety of settings
that are not present in the user-configurable Graphical User Interface (GUI) and can
be specified only by the service provider.
3.1.8
Downstream and Upstream Transmissions
The terms “downstream” and “upstream” refer to data traffic flows, and indicate the
direction in which the traffic is traveling. “Downstream” refers to traffic from the
service provider to the CODA60x1, and “upstream” refers to traffic from the
CODA60x1Q to the service provider.
3.1.9
Cable Frequencies
Just like radio transmissions, data transmissions over the cable network must exist
on different frequencies in order to avoid interference between signals.
The data traffic band is separate from the TV band, and each data channel is
separate from other data channels.

Hitron CODA60x1 User’s Guide
Version 1.0, 11/2020. Copyright
2012 Hitron Technologies
3
27
Version 1.0, 08/2026. Copyright
2026 Hitron Technologies
3.1.10
Modulation
Transmissions over the cable network are based on a strong, high frequency periodic
waveform known as the “carrier wave.” This carrier wave is so called because it
“carries” the data signal. The data signal itself is defined by variations in the carrier
wave. The process of varying the carrier wave (in order to carry data signal
information) is known as “modulation.” The data signal is thus known as the
“modulating signal.”
Cable transmissions use a variety of methods to perform modulation (and the
“decoding” of the received signal, or “demodulation”). The modulation methods
defined in DOCSIS 3 are as follows:
QPSK: Quadrature Phase-Shift Keying
QAM: Quadrature Amplitude Modulation
QAM TCM: Trellis modulated Quadrature Amplitude Modulation
In many cases, a number precedes the modulation type (for example 16 QAM). This
number refers to the complexity of modulation. The higher the number, the more data
can be encoded in each symbol.
NOTE: In modulated signals, each distinct modulated character (for example, each
audible tone produced by a modem for transmission over telephone lines) is
known as a symbol.
Since more information can be represented by a single character, a higher number
indicates a higher data transfer rate.
3.1.11
TDMA, FDMA and SCDMA
Time Division Multiple Access (TDMA), Frequency Division Multiple Access (FDMA)
and Synchronous Code Division Multiple Access (SCDMA) are channel access
methods that allow multiple users to share the same frequency channel.
TDMA allows multiple users to share the same frequency channel by splitting
transmissions by time. Each user is allocated a number of time slots, and
transmits during those time slots.
FDMA allows multiple users to share the same frequency channel by assigning a
frequency band within the existing channel to each user.

Hitron CODA60x1 User’s Guide
Version 1.0, 11/2020. Copyright
2012 Hitron Technologies
3
28
Version 1.0, 08/2026. Copyright
2026 Hitron Technologies
SCDMA allows multiple users to share the same frequency channel by assigning
a unique orthogonal code to each user.
3.1.12
OFDM
Orthogonal Frequency-Division Multiplexing (OFDM) is a physical-layer data
encoding method for transmitting and receiving data on Radio Frequency (RF)
media, such as the CODA60x1’s cable connection.
OFDM takes a single wide-band signal and separates it into multiple simultaneous
subcarriers across the available RF spectrum, separated by the minimum frequency
necessary to ensure non-interference among sub-carriers. “Orthogonal”, in this
usage, refers to this non-interfering quality of the technique.
The primary advantage of OFDM is that a signal encoded using the method can
withstand suboptimal conditions on the RF medium. Depending on its
implementation, OFDM can also enable faster signal throughput.
As a DOCSIS 3.1 modem, CODA60x1 supports up to 2 OFDM channels on its
downstream.
3.1.13
FFT
The Fast Fourier Transform (FFT) is an algorithm for rapidly implementing Fourier
analysis of a data stream, used by modulation methods such as OFDM. Fourier
analysis is a mathematical technique that enables the representation of data using
simpler trigonometric functions.
In this implementation, Fourier analysis is used to construct the frequency data for
transmission, and to deconstruct received frequency data.
3.1.14
OFDMA
Orthogonal Frequency-Division Multiple Access (OFDMA) is a multiuser adaptation
of OFDM (see OFDM ) that permits simultaneous use by multiple users by assigning
a specific group of OFDM subcarriers to each individual user.
3.2
The System Information Screen
Use this screen to see general information about your CODA60x1’s hardware, its
software, and its connection to the Internet.
Hitron CODA60x1 User’s Guide
Version 1.0, 11/2020. Copyright
2012 Hitron Technologies
3
29
Version 1.0, 08/2026. Copyright
2026 Hitron Technologies
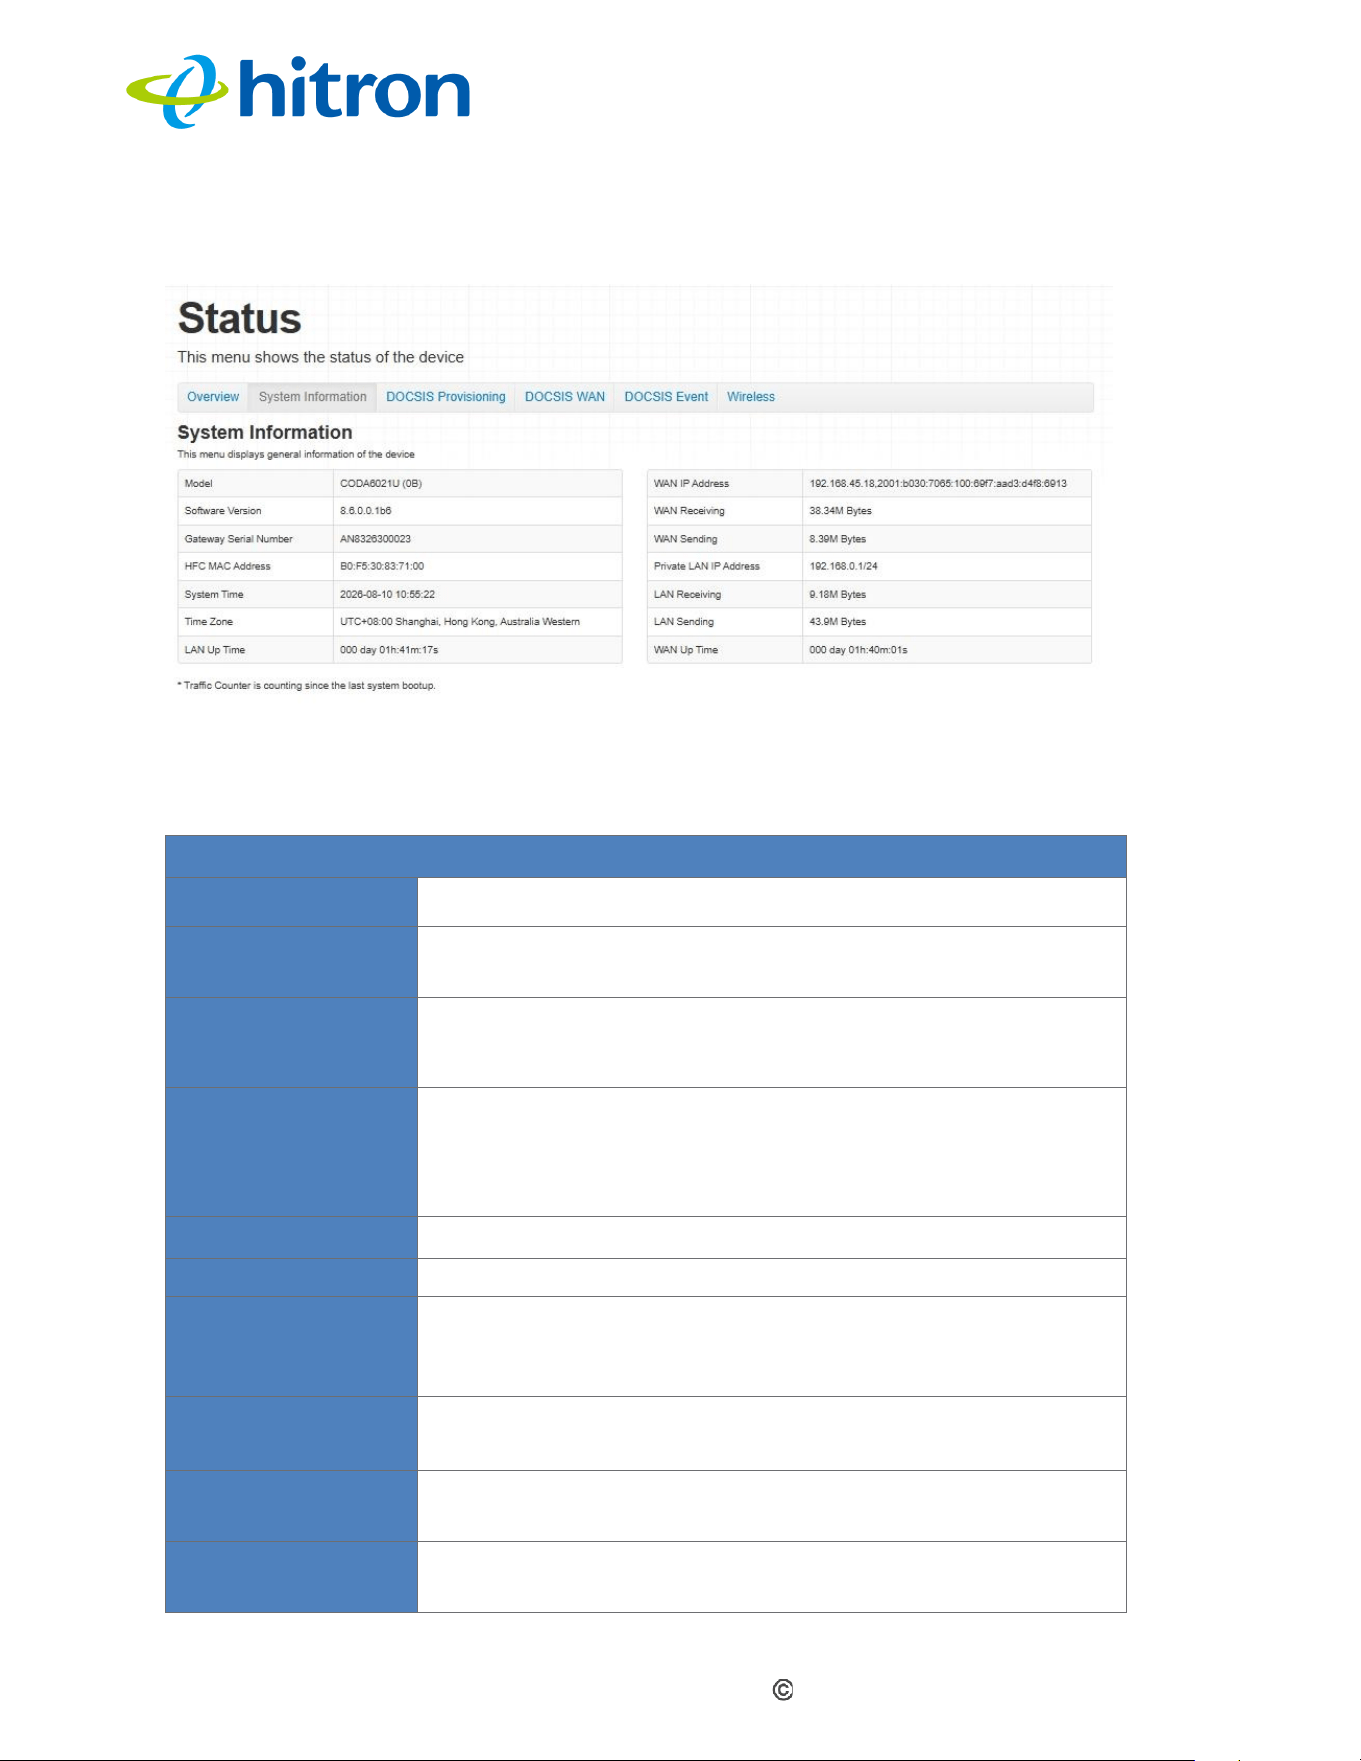
Click Status > System Information The following screen displays.
Figure: The Status: System Information Screen
The following table describes the labels in this screen.
Table: The Status: System Information Screen
System Overview
Model
Displays the model name of the CODA60x1 hardware.
Software Version
Displays the version of the software running on the
CODA60x1.
Gateway
Serial
Number
Displays the unique serial number of the device.
HFC MAC
Address
Displays the Media Access Control (MAC) address of the
CODA60x1's Hybrid Fiber-Coax (HFC) module. This
module provides the Internet connection through the
CATV network.
System Time
Displays the current date and time.
Time Zone
Displays the time zone configured for the CODA60x1.
LAN Uptime
Displays the amount of time that has elapsed since the
CODA60x1's Local Area Network (LAN) connection was
last restarted.
WAN IP Address
Displays the WAN IP address assigned to the
CODA60x1.
WAN Receiving
Displays the amount of data received over the WAN
connection since the device was last started.
WAN Sending
Displays the amount of data transmitted over the WAN
connection since the device was last started.
Hitron CODA60x1 User’s Guide
Version 1.0, 11/2020. Copyright
2012 Hitron Technologies
3
30
Version 1.0, 08/2026. Copyright
2026 Hitron Technologies
Private
LAN IP
Address
Displays the IP address information for the CODA60x1's
LAN subnet.
LAN Receiving
Displays the amount of data received over the LAN
connection since the device was last started.
LAN Sending
Displays the amount of data transmitted over the LAN
connection since the device was last started.
WAN Up Time
Displays the amount of time that has elapsed since the
CODA60x1's Wide Area Network (WAN) connection was
last restarted.
3.3
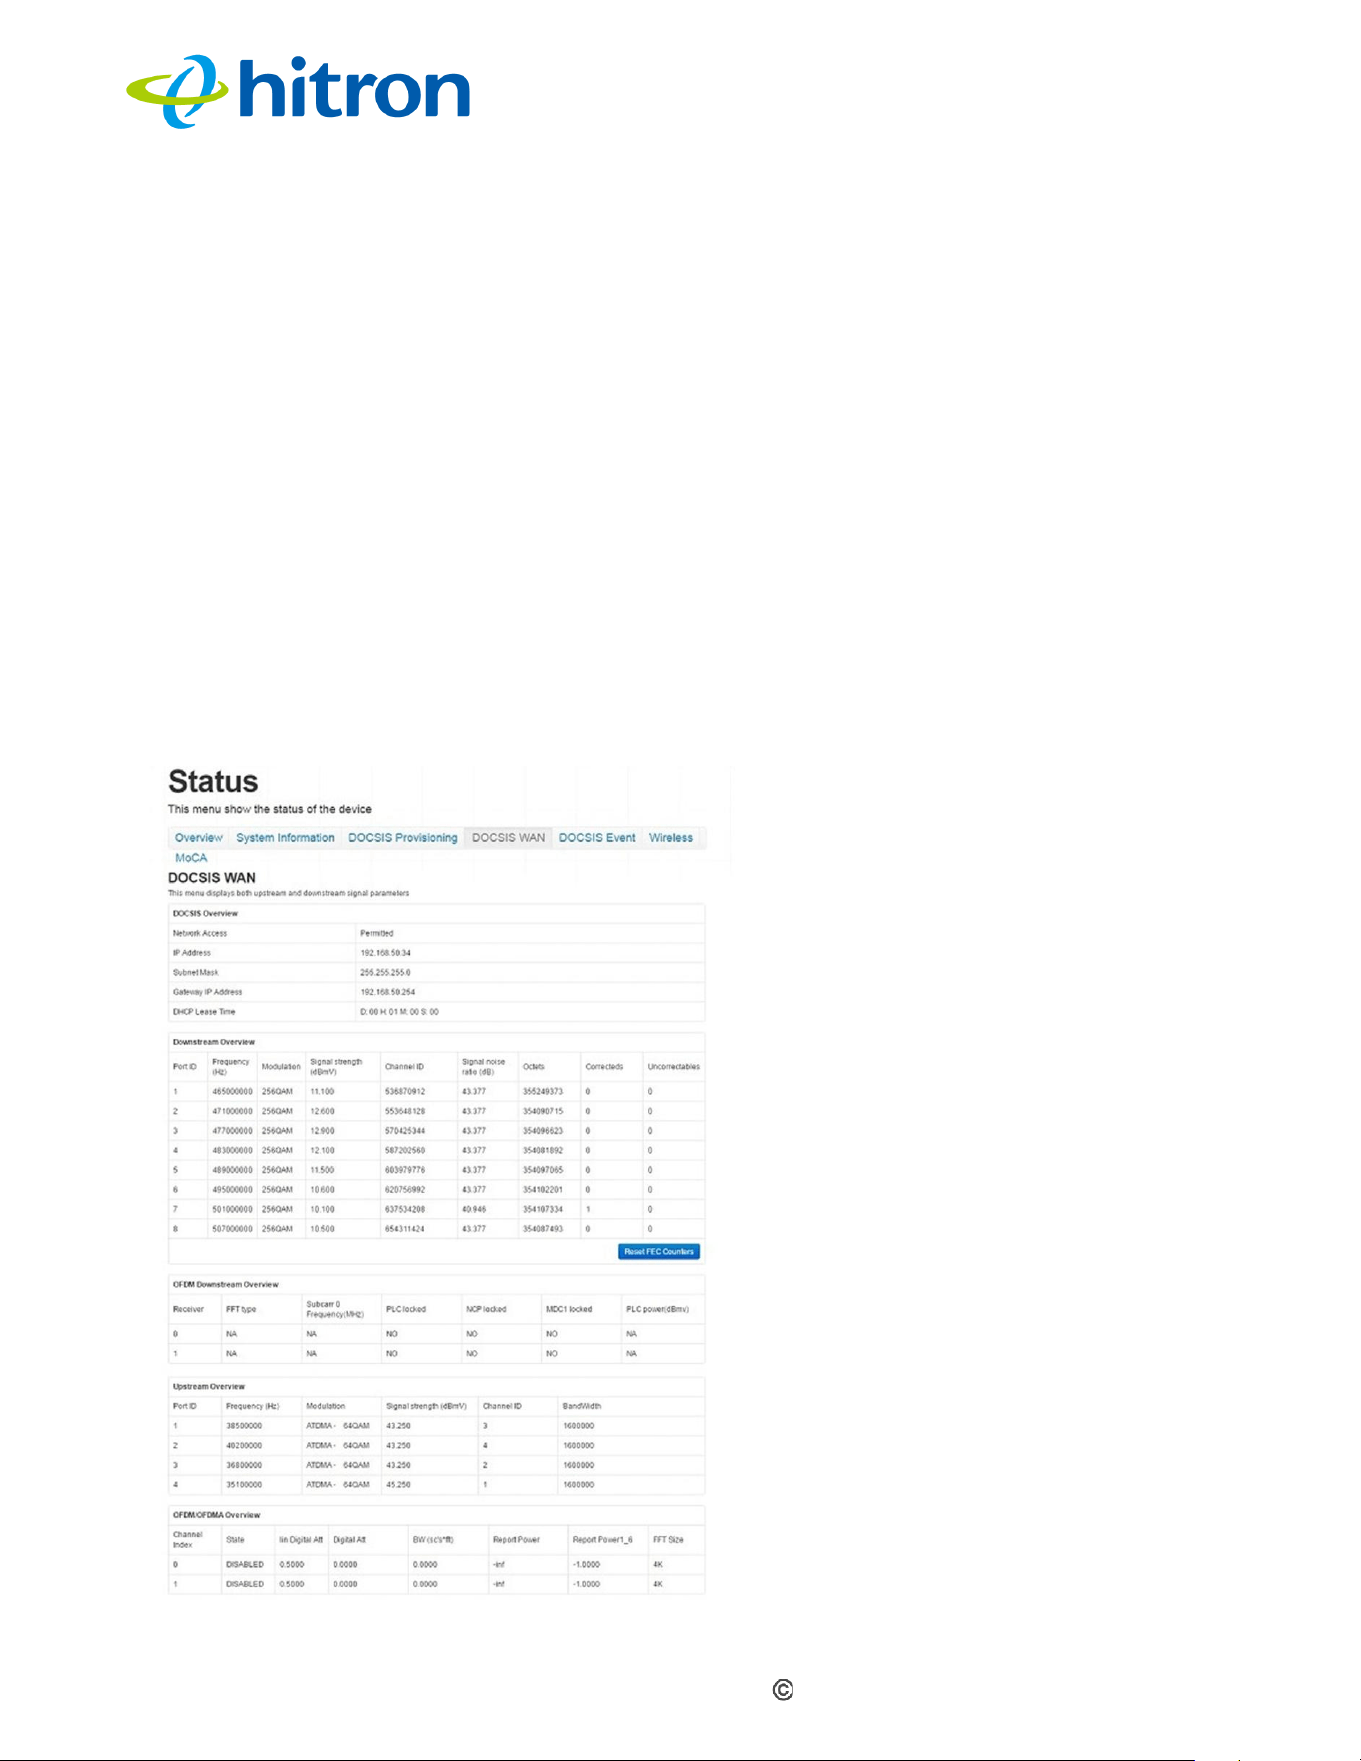
The Status: DOCSIS Provisioning Screen
This screen displays the steps successfully taken to connect to the Internet over the
Cable connection.
Use this screen for troubleshooting purposes to ensure that the CODA60x1 has
successfully connected to the Internet; if an error has occurred you can identify the
stage at which the failure occurred.
Click Status > DOCSIS Provisioning. The following screen displays.
Figure: The Status: DOCSIS Provisioning Screen
For each step:
Process: Indicates that the CODA60x1 is attempting to complete a connection
step.
Hitron CODA60x1 User’s Guide
Version 1.0, 11/2020. Copyright
2012 Hitron Technologies
3
31
Version 1.0, 08/2026. Copyright
2026 Hitron Technologies
Success: Indicates that the CODA60x1 has successfully completed a
connection step.
Disable: Indicates that the relevant feature has been turned off.
3.4
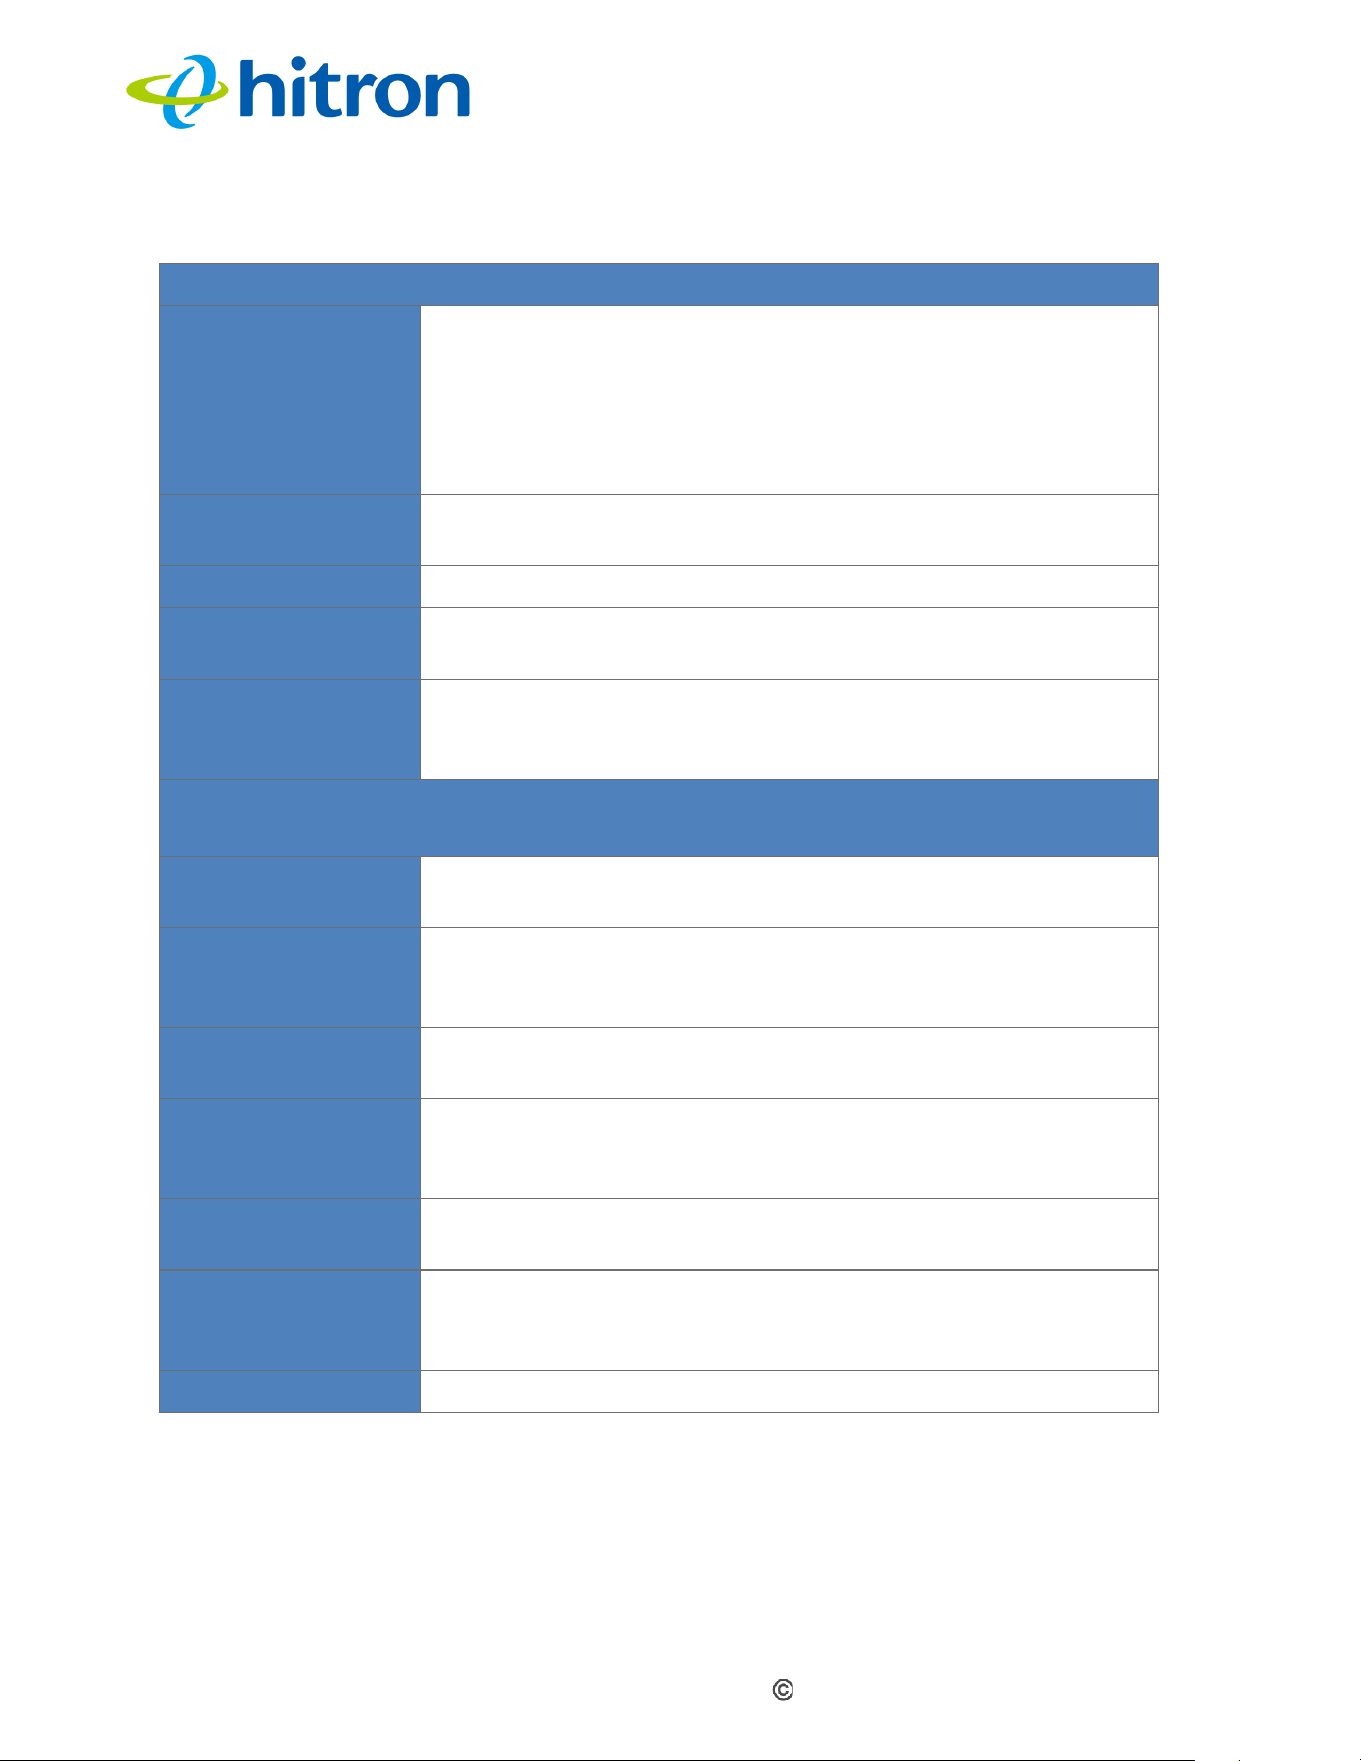
The Status: DOCSIS WAN Screen
Use this screen to discover information about:
The nature of the upstream and downstream connection between the
CODA60x1 and the device to which it is connected through the CABLE
interface.
IP details of the CODA60x1’s WAN connection.
Click Status > DOCSIS WAN. The following screen displays.
Figure: The Status: DOCSIS WAN Screen
Hitron CODA60x1 User’s Guide
Version 1.0, 11/2020. Copyright
2012 Hitron Technologies
3
32
Version 1.0, 08/2026. Copyright
2026 Hitron Technologies
The following table describes the labels in this screen.
Table : The Status: DOCSIS WAN Screen
DOCSIS Overview
Network Access
Indicates whether your service provider allows you to
access the Internet over the CABLE connection.
Permitted: Indicates that you can access the Internet.
Denied: Indicates that you cannot access the Internet.
IP Address
Displays the WAN IP address assigned to the CODA60x1.
Subnet Mask
This displays the CODA60x1’s WAN subnet mask.
Gateway IP
Displays the IP address of the device to which the
CODA60x1 is connected on the WAN.
DHCP Lease
Time
Displays the amount of time remaining before the device's
IP address lease expires and a new IP address is assigned
by the DHCP server.
Downstream Overview
NOTE: The downstream signal is the signal transmitted to the CODA60x1.
Port ID
Displays the ID number of the port used for the downstream
connection.
Frequency (Hz)
Displays the actual frequency, in Hertz (Hz), of each
downstream data channel to which the CODA60x1 is
connected.
Modulation
Displays the modulation type used by each downstream
channel.
Signal
Strength
(dBmV)
Displays the signal power of each downstream data channel
to which the CODA60x1 is connected, measured in dBmV
(decibels relative to 1 millivolt).
Channel ID
Displays the ID number of each channel on which the
downstream signal is transmitted.
Signal Noise
Ratio (dB)
Displays the Signal-to-Noise Ratio (SNR) of each
downstream data channel to which the CODA60x1 is
connected, measured in dB (decibels).
Octets
Displays the total number of octets received.
Hitron CODA60x1 User’s Guide
Version 1.0, 11/2020. Copyright
2012 Hitron Technologies
3
33
Version 1.0, 08/2026. Copyright
2026 Hitron Technologies
Correcteds
Displays the number of blocks received that required
correction due to corruption and were successfully corrected.
Uncorrectables
Displays the number of blocks received that required
correction due to corruption but could not be corrected.
Reset FEC
Counters
Click this button to reset the Forward Error Correction (FEC)
counters (Correcteds and Uncorrectables).
OFDM Downstream Overview
Receiver
Displays the index number of the OFDM receiver (see
OFDM).
FFT Type
Displays the type of Fast Fourier Transform (FFT) in use on
the relevant OFDM receiver (see FFT).
Subcarr 0
Frequency (Hz)
Each OFDM signal consists of multiple subcarriers. Displays
the frequency, in Hertz (Hz), of the first OFDM subcarrier on
the relevant receiver.
PLC Locked
Indicates whether the Physical Link Channel (PLC) data for
the relevant OFDM connection is locked.
The PLC provides the CODA60x1 with information needed
to decode the OFDM signal and determine the appropriate
power level. Once the CODA60x1 receives a PLC without
uncorrectable errors, the PLC is locked and subsequent
communication can continue.
NCP Locked
Indicates whether the Next Codeword Pointer (NCP) data for
the relevant OFDM connection is locked.
The NCP provides the CODA60x1 with information about
which codewords are used for OFDM communication and
which profile is used for each codeword. Once the
CODA60x1 receives an NCP without uncorrectable errors,
the NCP is locked and subsequent communication can
continue.
MDC1 Locked
Indicates whether the Multipath Delay Commutator 1
(MDC1) data for the relevant OFDM connection is locked.
MDC1 provides information about the Fast Fourier
Transform (FFT) method to be used on the OFDM
connection. Once the CODA60x1 receives MDC1 without
errors, MDC1 is locked and subsequent communication can
continue
PLC Power
(dBmV)
Displays the power level that the CODA60x1 has been
instructed to use on the relevant OFDM connection based on
the Physical Link Channel (PLC) data, measured in dBmV
(decibels relative to 1 millivolt).
Hitron CODA60x1 User’s Guide
Version 1.0, 11/2020. Copyright
2012 Hitron Technologies
3
34
Version 1.0, 08/2026. Copyright
2026 Hitron Technologies
Upstream Overview
NOTE: The upstream signal is the signal transmitted from the CODA60x1.
Port ID
Displays the ID number of the port used for the upstream
connection.
Frequency (Hz)
Displays the actual frequency, in Hertz (Hz), of each
upstream data channel to which the CODA60x1 is
connected.
Modulation
Displays the modulation type used by each upstream
channel.
Signal
Strength
(dBmV)
Displays the signal power of each upstream data channel to
which the CODA60x1 is connected, measured in dBmV
(decibels relative to 1 millivolt).
Channel ID
Displays the ID number of each channel on which the
upstream signal is transmitted.
Bandwidth
Displays the maximum available bandwidth on the relevant
channel.
OFDM/OFDMA Overview
NOTE: This section of the GUI provides data about upstream channels.
Channel Index
Displays the index number of the OFDM/OFDMA channel.
State
Displays whether the relevant channel is currently in use.
ENABLED: Indicates that the channel is in use.
DISABLED: Indicates that the channel is not in use.
Lin Digital Att.
Displays the digital attenuation, or signal loss, of the
transmission medium over which the channel's signal is
carried, measured in decibels (dB).
Digital Att.
Displays the measured digital attenuation of the channel's
signal, in decibels (dB). Digital attenuation is affected by the
signal frequency; higher-frequency signals experience
greater attenuation than lower-frequency signals.
BW (sc’s*fft)
Displays the bandwidth of the relevant channel, expressed
as the number of subcarriers multiplied by the channel's
Fast Fourier Transform (FFT) size, in megahertz (MHz).
Report Power
Displays the reported power of the relevant channel,
measured in quarter-decibels relative to 1 millivolt (quarter-
dBmV).
Hitron CODA60x1 User’s Guide
Version 1.0, 11/2020. Copyright
2012 Hitron Technologies
3
35
Version 1.0, 08/2026. Copyright
2026 Hitron Technologies
Report Power
1_6
Displays the target power (P1.6r_n, or power spectral
density at 1.6 MHz) of the relevant channel, measured in
quarter-decibels relative to 1 millivolt (quarter-dBmV).
FFT Size
Displays the Fast Fourier Transform (FFT) size used on the
relevant channel.
3.5
The Status: DOCSIS Event Screen
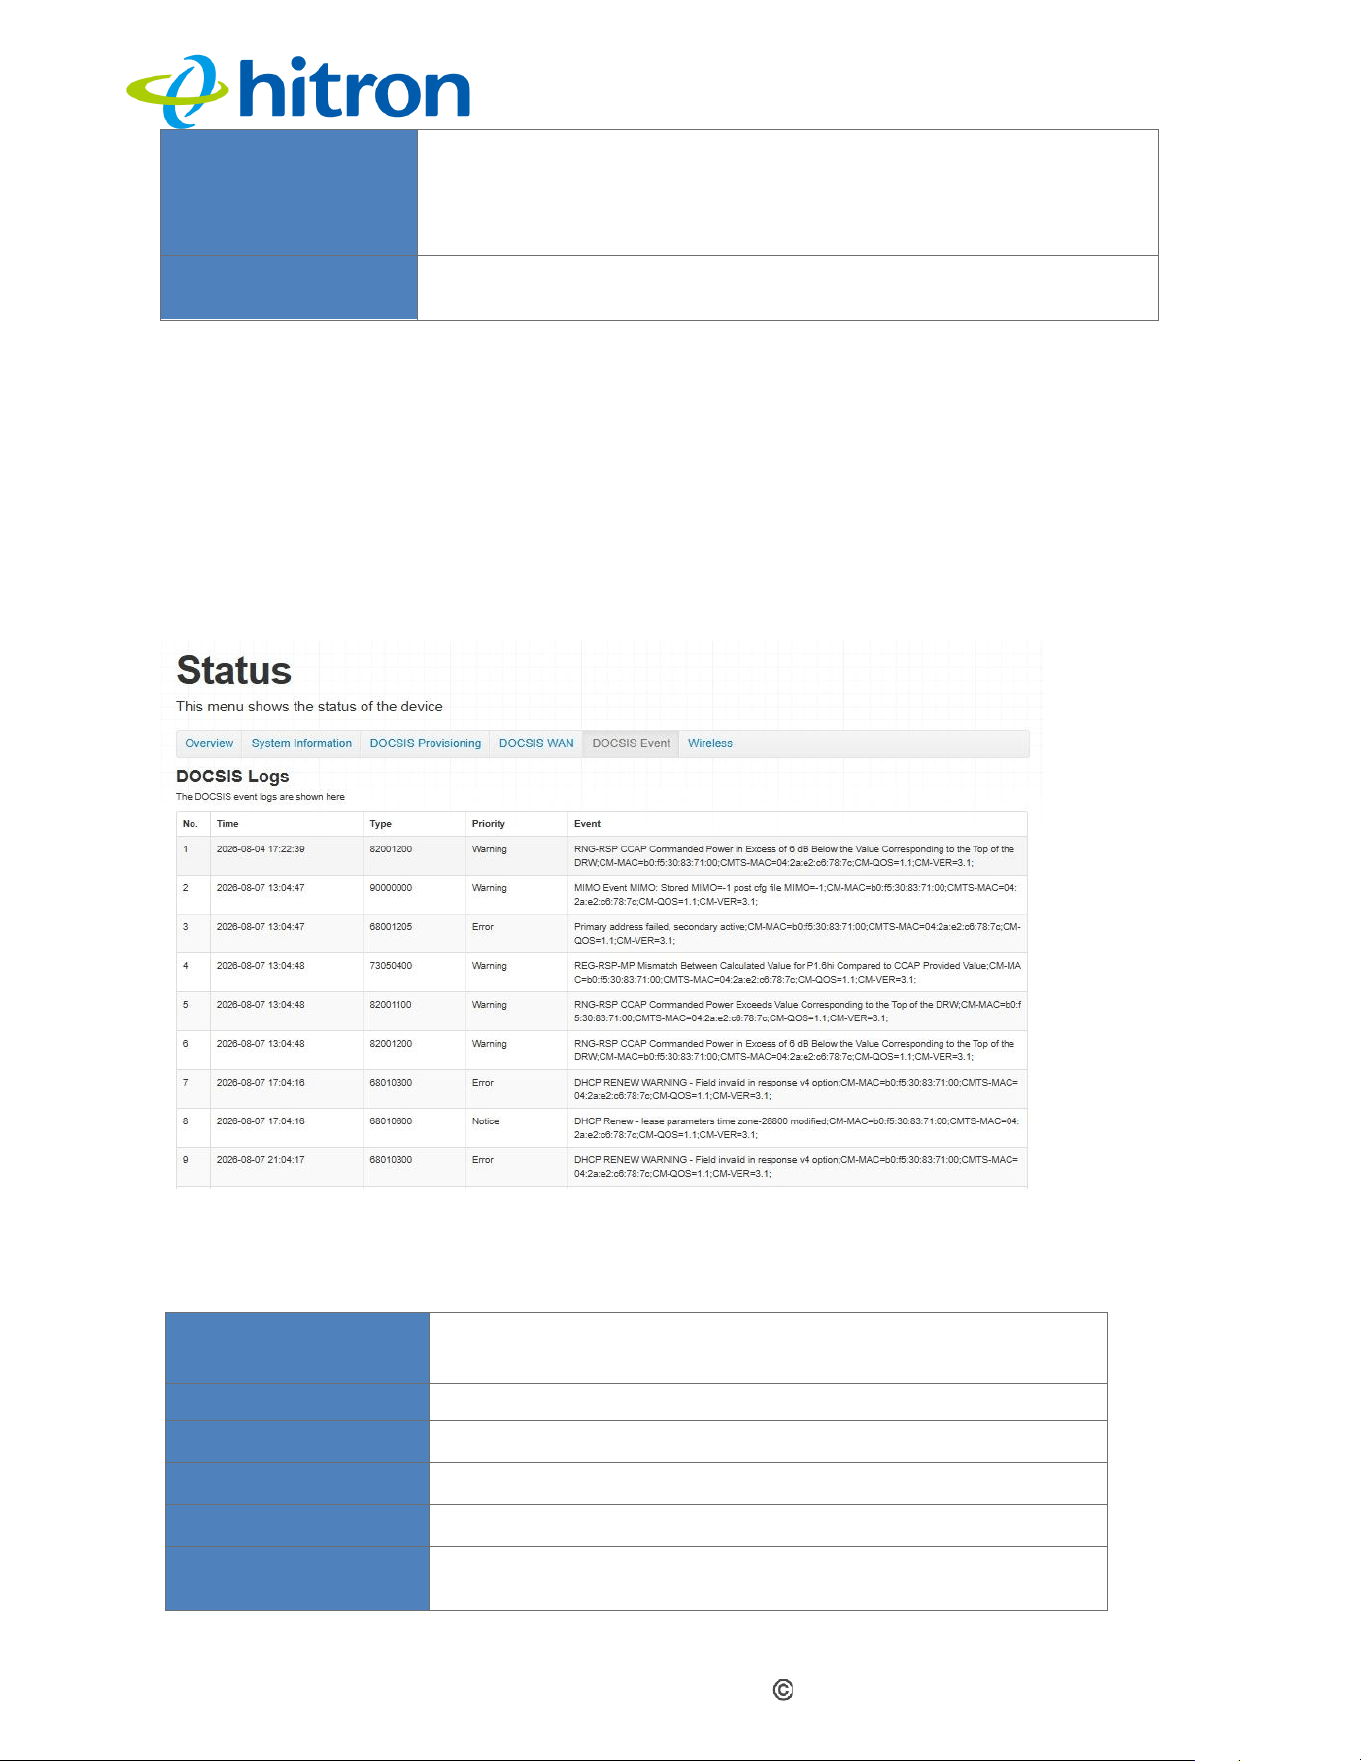
Use this screen to view information about local WAN activity events.
Click Status > DOCSIS Event. The following screen displays.
Figure: The Status: DOCSIS Event Screen
The following table describes the labels in this screen.
Table: The Status: DOCSIS Event Screen
No
Displays the arbitrary, incremental index number
assigned to the event.
Time
Displays the date and time when the event occurred.
Type
Displays the type of event.
Priority
Displays the severity level of the event.
Event
Displays a description of the event.
Clear
Click this button to remove all DOCSIS event logs from
the system.
Hitron CODA60x1 User’s Guide
Version 1.0, 11/2020. Copyright
2012 Hitron Technologies
3
36
Version 1.0, 08/2026. Copyright
2026 Hitron Technologies
3.6
The Status: Wireless Screen
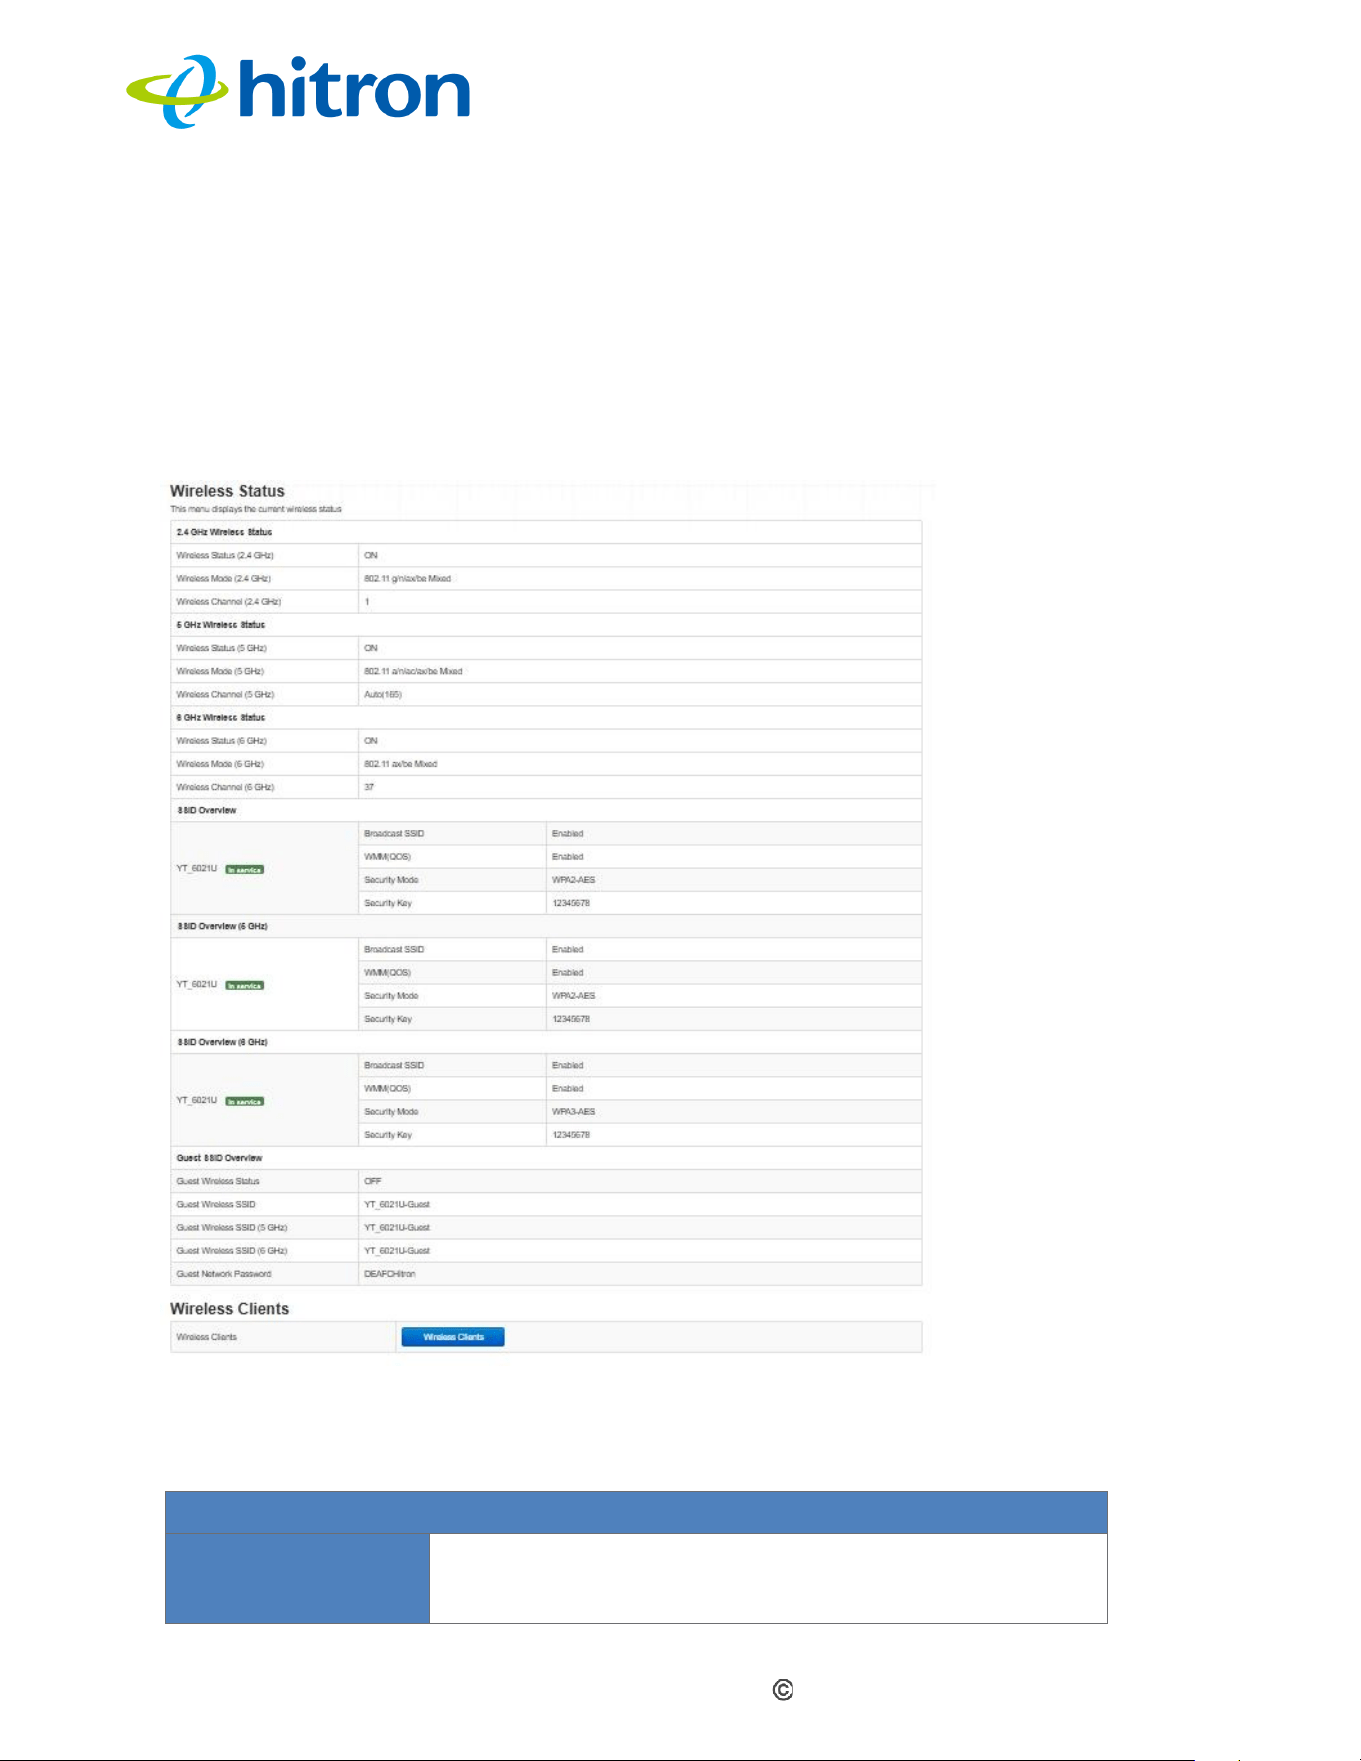
Use this screen to view information about the CODA60x1’s wireless network.
Click Status > Wireless. The following screen displays.
Figure : The Status: Wireless Screen
The following table describes the labels in this screen.
Table: The Status: Wireless Screen
2.4G Wireless Status
Wireless
Status
(2.4GHz)
Displays whether the CODA60x1's 2.4GHz wireless
network is active.
Hitron CODA60x1 User’s Guide
Version 1.0, 11/2020. Copyright
2012 Hitron Technologies
3
37
Version 1.0, 08/2026. Copyright
2026 Hitron Technologies
Wireless
Mode
(2.4GHz)
Displays the wireless mode used by the
CODA60x1's 2.4 GHz wireless network.
Wireless
Channel
(2.4GHz)
Displays the wireless channel currently used by
the CODA60x1's 2. 4GHz wireless network.
5G Wireless Status
Wireless
Status
(5GHz)
Displays whether the CODA60x1's 5 GHz
wireless network is active.
Wireless
Mode
(5GHz)
Displays the wireless mode used by the
CODA60x1's 5 GHz wireless network.
Wireless
Channel
(5GHz)
Displays the wireless channel currently used by
the CODA60x1's 5 GHz wireless network.
6G Wireless Status
Wireless
Status
(6GHz)
Displays whether the CODA60x1's 6 GHz
wireless network is active.
Wireless
Mode
(6GHz)
Displays the wireless mode used by the
CODA60x1's 6 GHz wireless network.
Wireless
Channel
(6GHz)
Displays the wireless channel currently used by
the CODA60x1's 6 GHz wireless network.
SSID Overview (2.4GHz)
Broadcast
SSID
Displays whether the CODA60x1's 2.4 GHz
wireless network SSID is visible to client devices
(Enabled) or hidden (Disabled).
Security
Mode
Displays the security mode and encryption
method currently enabled on the CODA60x1's
2.4 GHz wireless network.
Security
Key
Displays the wireless security key for the
CODA60x1's 2.4 GHz wireless network.
SSID Overview (5GHz)
Broadcast
SSID
Displays whether the CODA60x1's 5 GHz
wireless network SSID is visible to client devices
(Enabled) or hidden (Disabled).
Security
Mode
Displays the security mode and encryption
method currently enabled on the CODA60x1's 5
GHz wireless network.
Security
Key
Displays the wireless security key for the
CODA60x1's 5 GHz wireless network.
SSID Overview (6GHz)
Hitron CODA60x1 User’s Guide
Version 1.0, 11/2020. Copyright
2012 Hitron Technologies
3
38
Version 1.0, 08/2026. Copyright
2026 Hitron Technologies
Broadcast
SSID
Displays whether the CODA60x1's 6 GHz
wireless network SSID is visible to client devices
(Enabled) or hidden (Disabled).
Security
Mode
Displays the security mode and encryption
method currently enabled on the CODA60x1's 6
GHz wireless network.
Security
Key
Displays the wireless security key for the
CODA60x1's 6 GHz wireless network.
Guest SSID Overview
Guest
Wireless
Status
Displays whether the guest wireless network is
active (ON) or inactive (OFF).
Guest
Wireless
SSID
Displays the SSID (Service Set Identifier) of the
CODA60x1's 2.4 GHz wireless guest network.
Guest
Wireless
SSID
(5Ghz)
Displays the SSID (Service Set Identifier) of the
CODA60x1's 5 GHz wireless guest network.
Guest
Wireless
SSID
(6Ghz)
Displays the SSID (Service Set Identifier) of the
CODA60x1's 6 GHz wireless guest network.
Guest
Network
Password
Displays the password for the 2.4 GHz 5 GHz
and 6 GHz wireless guest networks.
Wireless Clients
Wireless
Clients
Click this to display a list of wireless devices
currently connected to the CODA60x1

Hitron CODA60x1 User’s Guide
Version 1.0, 11/2020. Copyright
2012 Hitron Technologies
3
39
Version 1.0, 08/2026. Copyright
2026 Hitron Technologies
4
Basic
This chapter describes the screens that display when you click Basic in the toolbar. It
contains the following sections:
Basic Overview
The Basic: LAN Setup Screen
The Basic: Gateway Function Screen
The Basic: Port Forwarding Screen
The Basic: Port Triggering Screen
The Basic: DMZ Screen
The Basic: DNS Screen
4.1
Basic Overview
This section describes some of the concepts related to the Basic screens.
4.1.1
The Domain Name System
A domain is a location on a network, such as example.com. On the Internet, domain
names are mapped to the IP addresses of the servers to which they refer by the
Domain Name System (DNS). This allows you to enter “www.example.com” into your
web browser and access the correct website, even if the IP address of the website's
server changes.

Hitron CODA60x1 User’s Guide
Version 1.0, 11/2020. Copyright
2012 Hitron Technologies
3
Version 1.0, 08/2026. Copyright
40
2026 Hitron Technologies
4.1.2
Port Forwarding
Port forwarding allows a computer on your LAN to receive specific types of incoming
traffic from the WAN. It is typically used to allow certain applications, such as online
gaming, to receive incoming connections through the firewall on a specific computer
on the LAN. Port forwarding is also commonly used to host a public HTTP server on
a private network.
You can create a port forwarding rule for each application for which you want to
open ports through the firewall. When the CODA60x1 receives incoming traffic from
the WAN with a destination port that matches a port forwarding rule, it forwards the
traffic to the LAN IP address and port number specified in the rule.
NOTE: For information about the ports that need to be opened for a particular
application, refer to the application's documentation.
4.1.3
Port
Triggering
Port triggering is a means of automating port forwarding. The CODA60x1 scans
outgoing traffic (from the LAN to the WAN) to see if any of the traffic’s destination
ports match those specified in the port triggering rules you configure. If any of the
ports match, the CODA60x1 automatically opens the incoming ports specified in the
rule, in anticipation of incoming traffic.
4.1.4
DMZ
In networking, a Demilitarized Zone (DMZ) is a part of your LAN that is isolated from
the rest of the LAN and exposed to the WAN. The term originates from the military
designation for a piece of territory, usually located between two opposing forces, that
is isolated from both sides and occupied by neither.
4.1.5
Routing Mode
When the CODA60x1 is in routing mode, it acts as a gateway that allows computers
on the LAN to access the Internet. The service provider assigns a WAN IP address
to the CODA60x1, and traffic from LAN computers is routed through that IP address.
The CODA60x1 assigns private IP addresses to LAN computers when DHCP is
enabled and forwards the appropriate traffic to each private IP address.
NOTE: When DHCP is disabled on the CODA60x1 in routing mode, each computer
on the LAN must be manually assigned an IP address within the CODA60x1's
subnet.
Hitron CODA60x1 User’s Guide
Version 1.0, 11/2020. Copyright
2012 Hitron Technologies
3
Version 1.0, 08/2026. Copyright
41
2026 Hitron Technologies
When the CODA60x1 is not in routing mode, the service provider assigns an IP
address to each computer directly connected to the CODA60x1. The CODA60x1 does
not perform routing functions; instead, traffic flows directly between the connected
computers and the service provider.
4.2
The Basic: LAN Setup Screen
Use this screen to:
View information about the CODA60x1’s connection to the WAN
Configure the CODA60x1’s internal DHCP server
Define how the CODA60x1 assigns IP addresses on the LAN
View information about the network devices connected to the CODA60x1 on the
LAN.
Click Basic > LAN Setup. The following screen displays.
Figure: The Basic: LAN Setup Screen
The following table describes the labels in this screen.
Hitron CODA60x1 User’s Guide
Version 1.0, 11/2020. Copyright
2012 Hitron Technologies
3
Version 1.0, 08/2026. Copyright
42
2026 Hitron Technologies
Table: The Basic: LAN Setup Screen
Private LAN Setting
Private
LAN IP
Address
Use this field to specify the IP address of the CODA60x1 on
the LAN.
Subnet Mask
Use this field to specify the LAN subnet. Enter the subnet
mask in dotted-decimal notation (for example,
255.255.255.0).
LAN DHCP
Status
Use this field to enable or disable the CODA60x1's DHCP
server.
To enable the DHCP server, select Enabled.
To disable the DHCP server, select Disabled.
Lease Time
Use this field to specify the amount of time before the
device's IP address lease expires and a new IP address is
assigned by the DHCP server.
DHCP Start IP
Use this field to specify the IP address at which the
CODA60x1 begins assigning IP addresses to devices on
the LAN when DHCP is enabled.
DHCP End IP
Use this field to specify the IP address at which the
CODA60x1 stops assigning IP addresses to devices on the
LAN when DHCP is enabled.
NOTE: Devices requesting an IP address after the DHCP
pool is exhausted are not assigned an IP address.
Save Changes
Click this button to save your changes to the fields on this
screen
Cancel
Click this button to restore the fields on this screen to their
last saved values without saving your changes.
Help
Click this button to view information about the fields on this
screen.
Connected Devices
Host Name
Displays the name of each network device connected to the
LAN.
IP Address
Displays the IP address of each network device connected
to the LAN.
MAC Address
Displays the Media Access Control (MAC) address of each
network device connected to the LAN.
Type
Displays whether the device's IP address was assigned by
DHCP (DHCP-IP) or is self-assigned.
Interface
Displays whether the device is connected to the LAN via
Ethernet or to the WLAN via Wireless.
Status
Displays Active when the connected device is online and
Inactive when the connected device is offline.
Refresh
Click this button to refresh the information in this section.
Hitron CODA60x1 User’s Guide
Version 1.0, 11/2020. Copyright
2012 Hitron Technologies
3
Version 1.0, 08/2026. Copyright
43
2026 Hitron Technologies
4.3
The Basic: Gateway Function Screen
Use this screen to enable or disable the CODA60x1’s residential gateway, Universal
Plug n Play (UPnP) and Session Initiation Protocol Application Layer Gateway (SIP
ALG) functions.
Disabling the residential gateway feature sets the unit to use bridge mode only. Use
this mode when your network is already using another router.
Click Basic > Gateway Function. The following screen displays.
Figure 22: The Basic: Gateway Function Screen
The following table describes the labels in this screen.
Table: The Basic: Gateway Function Screen
Capability
Residential
Gateway
function
Select Enabled to enable the CODA60x1's residential
gateway features, or select Disabled to disable them.
Frequency Plan
Select the appropriate DOCSIS frequency plan: North
American, European, or Japanese.
DOCSIS or
LANasWAN
Select the WAN connection type: DOCSIS, LAN as WAN,
or Auto Select.
DOCSIS Router
Mode
Use this field to select the IP provisioning mode: IPv4
only, IPv6 only, or Dual Stack for both IPv4 and IPv6.
Hitron CODA60x1 User’s Guide
Version 1.0, 11/2020. Copyright
2012 Hitron Technologies
3
Version 1.0, 08/2026. Copyright
44
2026 Hitron Technologies
UPnP
Select Enabled to enable the CODA60x1's Universal Plug
and Play (UPnP) features, or select Disabled to disable
them.
SIP ALG
Select Enabled to enable the CODA60x1's Session
Initiation Protocol Application Layer Gateway (SIP
ALG) for VoIP, or select Disabled to disable it.
Save Changes
Click this button to save your changes to the fields on this
screen
Cancel
Click this button to restore the fields on this screen to their
last saved values without saving your changes.
Help
Click this button to view information about the fields on
this screen.
4.4
The Basic: Port Forwarding Screen
Use this screen to configure port forwarding between the WAN and LAN. You can
enable or disable port forwarding and configure new or existing port forwarding rules.
Click Basic > Port Forwarding. The following screen displays.
Figure 23: The Basic: Port Forwarding Screen
The following table describes the labels in this screen.
Table: The Basic: Port Forwarding Screen
Port Forwarding Options
Hitron CODA60x1 User’s Guide
Version 1.0, 11/2020. Copyright
2012 Hitron Technologies
3
Version 1.0, 08/2026. Copyright
45
2026 Hitron Technologies
All Port Forwarding
Rules
Use this field to enable or disable port forwarding.
Select Enabled to enable port forwarding.
Select Disabled to disable port forwarding.
Port Forwarding Rules
Application Name
Displays the arbitrary name assigned to the rule when it
was created.
Public
These fields display the ports to which the rule applies:
The Public field displays the incoming port range.
These are the ports on which the CODA60x1 received
traffic from the originating host on the WAN.
The Private field displays the port range to which the
CODA60x1 forwards traffic to the device on the LAN.
Private
Protocol
Displays the protocol or protocols to which the rule
applies:
Transmission Control Protocol (TCP)
User Datagram Protocol (UDP)
Transmission Control Protocol and User Datagram
Protocol (TCP/UDP)
Generic Routing Encapsulation (GRE)
Encapsulating Security Protocol (ESP)
Local IP Address
Displays the IP address of the computer on the LAN to
which traffic matching the Public Port Range and
Protocol conditions is forwarded.
Remote IP
Address
Displays the IP address of the computer on the WAN
from which traffic matching the Public Port Range and
Protocol conditions is forwarded to the Local IP
Address.
Status
Use this field to enable or disable the port forwarding rule.
Select ON to activate the port forwarding rule.
Select OFF to deactivate the port forwarding rule.
Manage
Click this button to modify the rule.
Action
Click this button to delete the rule.
Add Rule
Click this button to create a new port forwarding rule. See
Adding or Editing a Port Forwarding Rule for information
about the screen that is displayed.
Save Changes
Click this to save your changes to the fields in this screen.
Hitron CODA60x1 User’s Guide
Version 1.0, 11/2020. Copyright
2012 Hitron Technologies
3
Version 1.0, 08/2026. Copyright
46
2026 Hitron Technologies
Help
Click this to see information about the fields in this screen.
4.4.1
Adding or Editing a Port Forwarding Rule
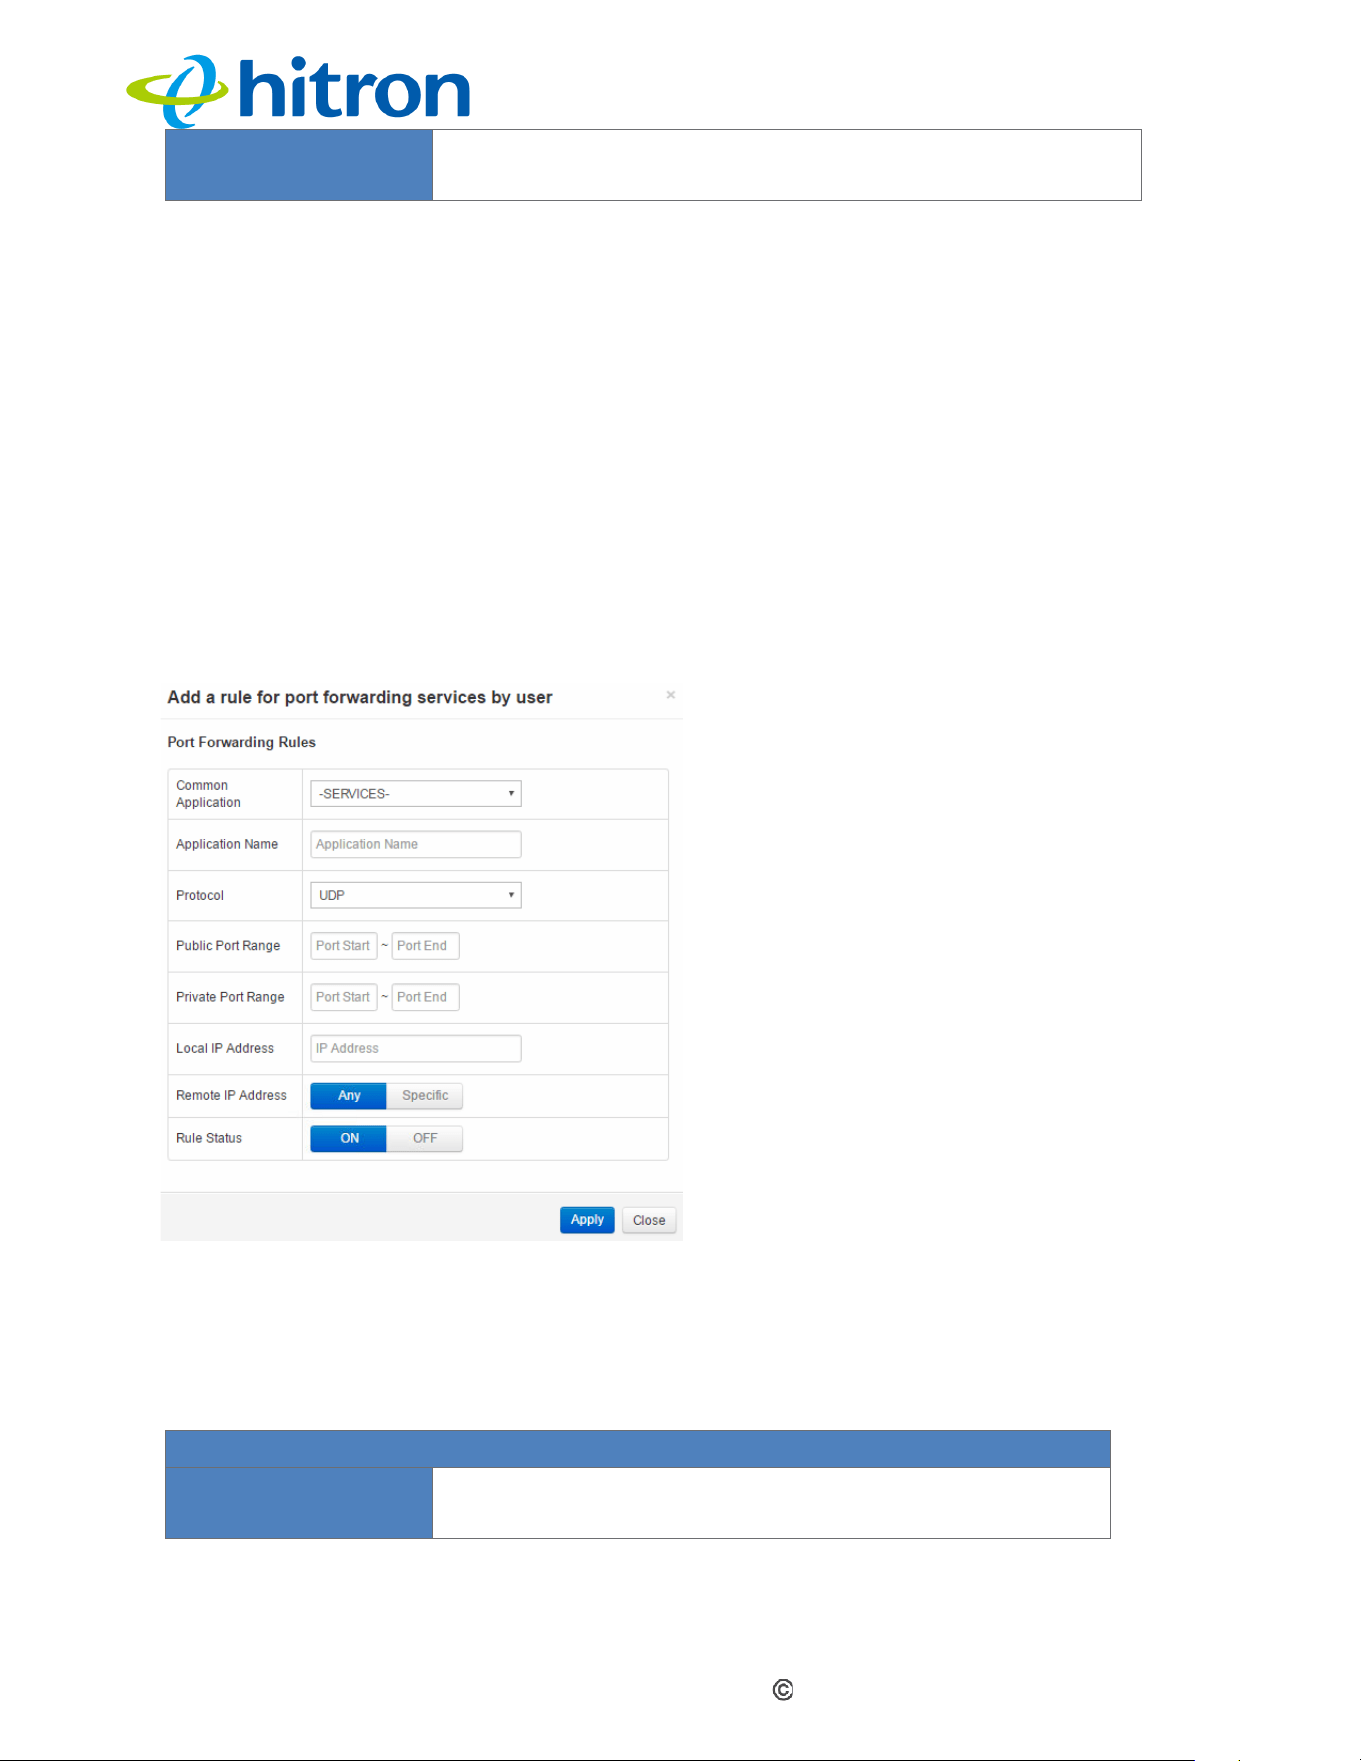
To add a new port forwarding rule, click Add in the Basic > Port Forwarding
screen.
To edit an existing port forwarding rule, select the rule’s radio button in the Basic
> Port Forwarding screen and click the Edit button.
NOTE: Ensure that Enabled is selected in the Basic > Port Forwarding screen in
order to add or edit port forwarding rules.
The following screen displays.
Figure : The Basic: Port Forwarding Add/Edit Screen
The following table describes the labels in this screen.
Table: The Basic: Port Forwarding Add/Edit Screen
Port Forwarding Rules
Common Application
Use this field to select the application for which you
want to create a port forwarding rule, if applicable.
Hitron CODA60x1 User’s Guide
Version 1.0, 11/2020. Copyright
2012 Hitron Technologies
3
Version 1.0, 08/2026. Copyright
47
2026 Hitron Technologies
Application Name
Enter a name for the application for which you want to
create the rule.
NOTE: This name is arbitrary and does not affect
functionality.
Protocol
Use this field to specify whether the CODA60x1 should
forward traffic via:
Transmission Control Protocol (TCP)
User Datagram Protocol (UDP)
Transmission Control Protocol and User
Datagram Protocol (TCP/UDP)
Generic Routing Encapsulation (GRE)
Encapsulating Security Protocol (ESP)
NOTE: If you are unsure which protocol to select,
leave this field at its default setting (TCP/UDP).
Public Port Range
Use these fields to specify the incoming port range.
These are the ports on which the CODA60x1 receives
traffic from the originating host on the WAN.
Enter the starting port number in the first field and the
ending port number in the second field.
To specify a single port, enter the same port number in
both fields.
Private Port Range
Use these fields to specify the ports to which the
received traffic is forwarded.
Enter the starting port number in the first field. The
number of ports must match the number specified in
the Public Port Range, so the CODA60x1
automatically completes the second field.
Local IP Address
Use this field to enter the IP address of the computer
on the LAN to which you want to forward the traffic.
Remote IP Address
Use this field to enter the IP address of the computer
on the WAN from which the traffic originates.
Rule Status
Select ON to enable this rule, or select OFF to disable
it.
Apply
Click this button to save your changes to the fields on
this screen.
Close
Click this button to return to the Port Forwarding
screen without saving your changes to the rule.
Hitron CODA60x1 User’s Guide
Version 1.0, 11/2020. Copyright
2012 Hitron Technologies
3
Version 1.0, 08/2026. Copyright
48
2026 Hitron Technologies
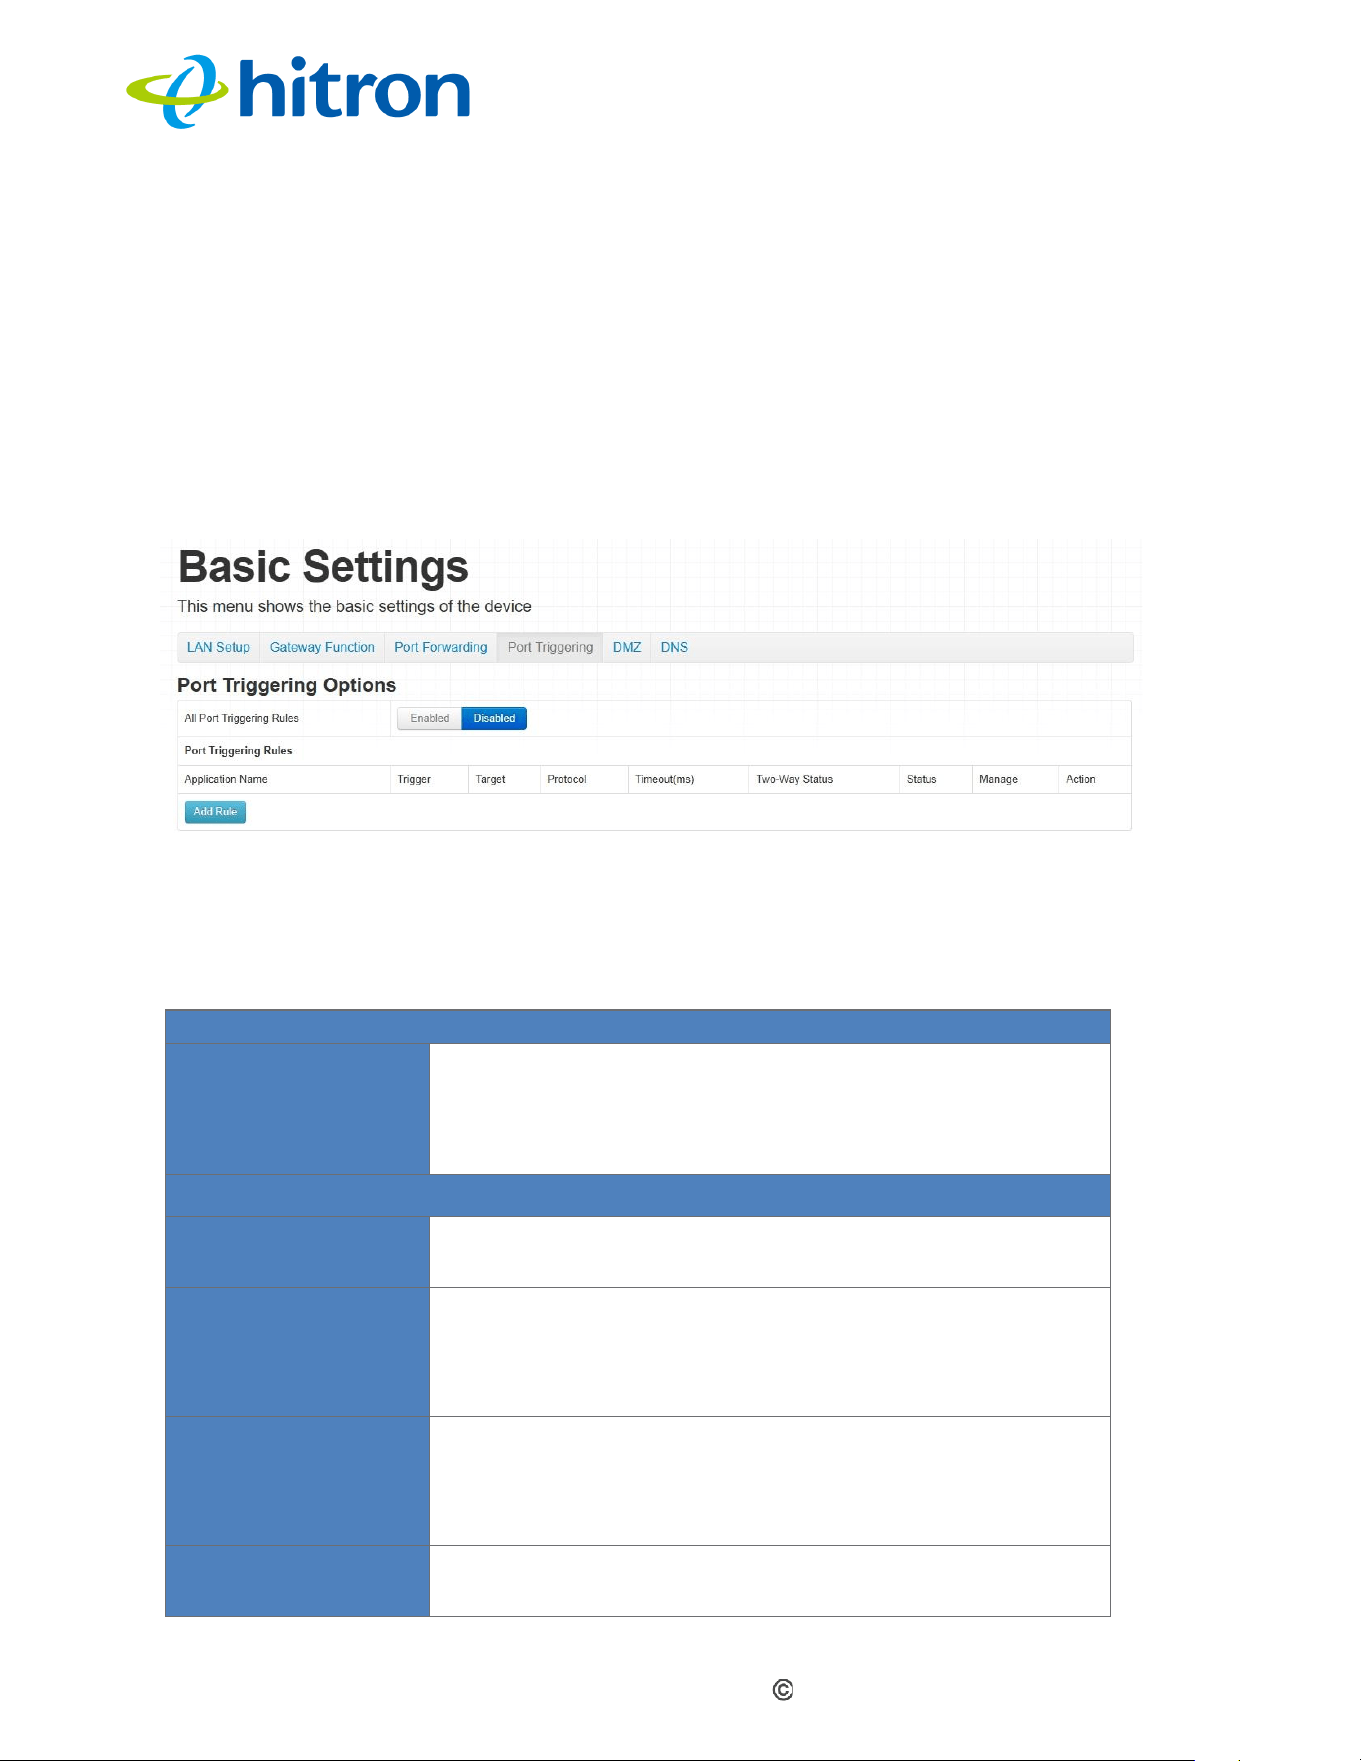
4.5
The Basic: Port Triggering Screen
Use this screen to configure port triggering. You can turn port triggering on or off and
configure new and existing port triggering rules.
Click Basic > Port Triggering. The following screen displays.
Figure 25: The Basic: Port Triggering Screen
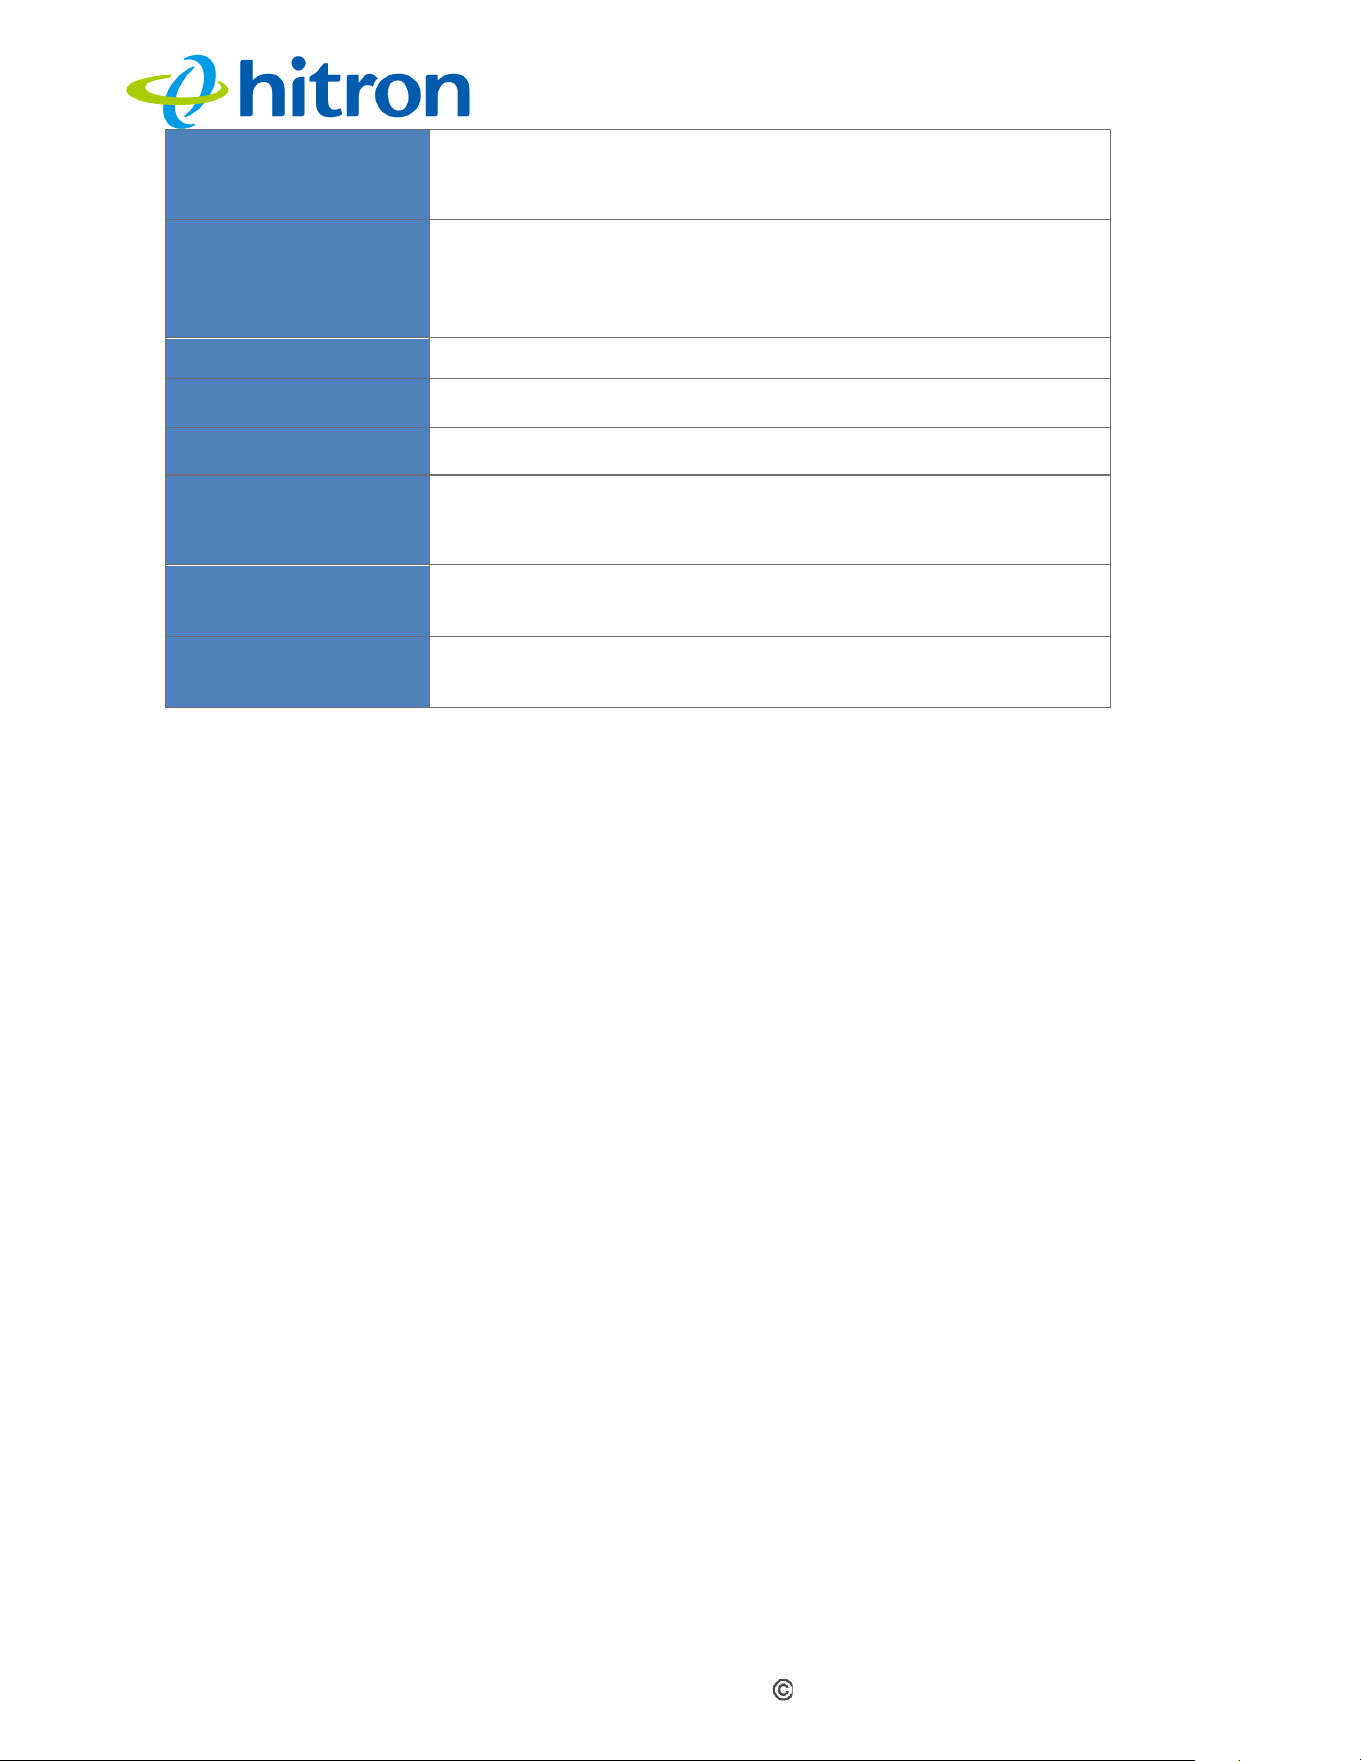
The following table describes the labels in this screen.
Table 18: The Basic: Port Triggering Screen
Port Triggering Options
All Port Triggering
Rules
Use this field to enable or disable port triggering.
Select Enabled to enable port triggering.
Select Disabled to disable port triggering.
Port Triggering Rules
Application Name
Displays the name assigned to the rule when it was
created.
Trigger
Displays the range of outgoing ports. When the
CODA60x1 detects activity (outgoing traffic) on these
ports from computers on the LAN, it automatically
opens the Target ports.
Target
Displays the range of triggered ports. These ports are
opened automatically when the CODA60x1 detects
activity on the Trigger ports from computers on the
LAN.
Protocol
Displays the protocol used by the port triggering rule
(TCP, UDP, or Both).
Hitron CODA60x1 User’s Guide
Version 1.0, 11/2020. Copyright
2012 Hitron Technologies
3
Version 1.0, 08/2026. Copyright
49
2026 Hitron Technologies
Timeout (ms)
Displays the amount of time, in milliseconds, after the
CODA60x1 opens the Target ports before it closes
them.
Twoway Status
Indicates whether the port triggering rule can be used
by multiple IP addresses. When this option is enabled,
other IP addresses are also allowed to use the rule as a
trigger.
Status
Use this field to turn the rule On or Off.
Manage
Click this button to modify the rule.
Action
Click this button to delete the rule.
Add Rule
Click this to define a new port forwarding rule. See
Adding or Editing a Port Forwarding Rule for information
on the screen that displays.
Save Changes
Click this button to save your changes to the fields on
this screen.
Help
Click this button to view information about the fields on
this screen.
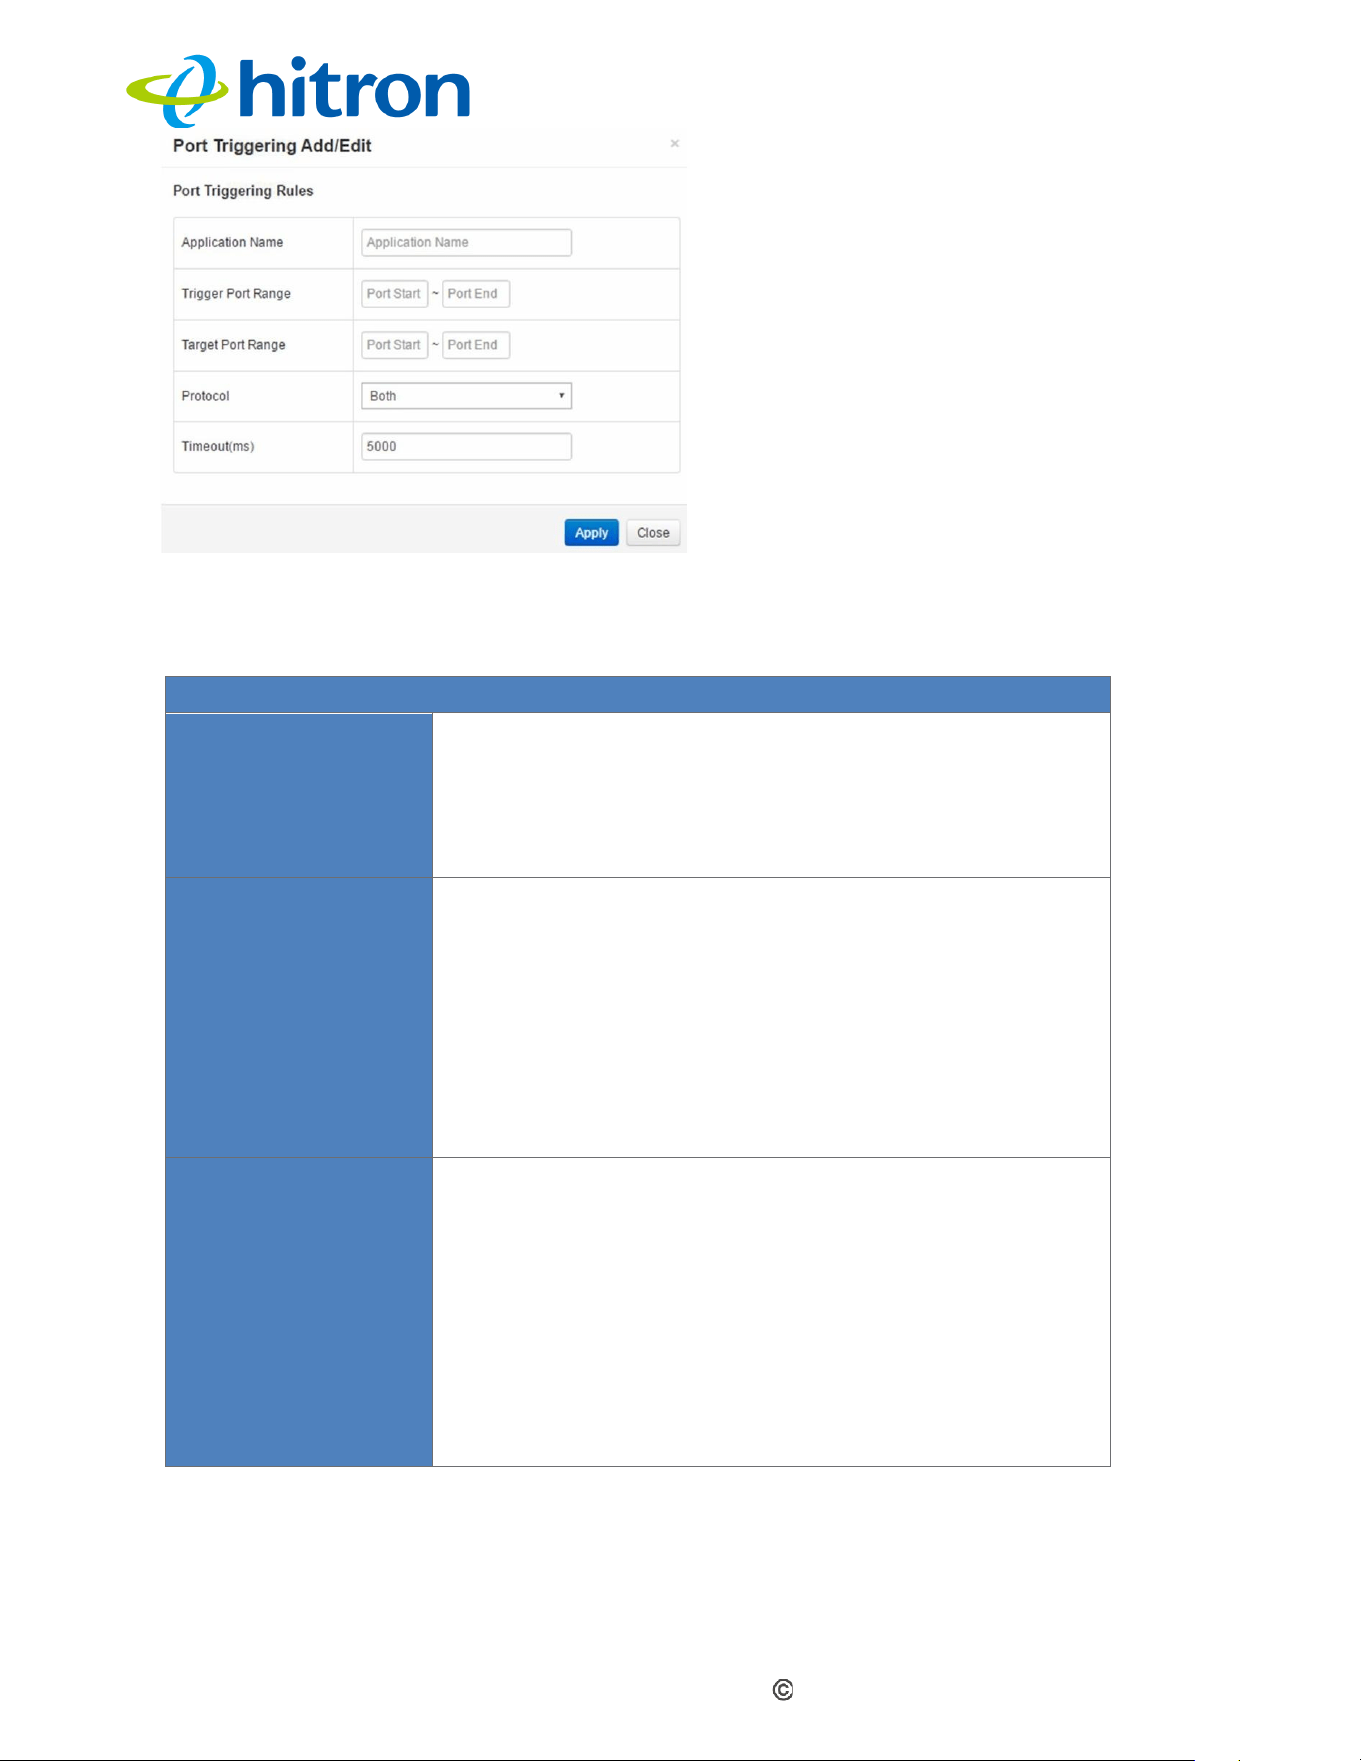
4.5.1
Adding or Editing a Port Triggering Rule
To add a new port triggering rule, click Add in the Basic > Port Triggering
screen.
To edit an existing port triggering rule, select the rule’s radio button in the Basic
> Port Triggering screen and click the Edit button.
NOTE: Ensure that Enabled is selected in the Basic > Port Triggering screen in
order to add or edit port triggering rules.
The following screen displays.
Figure: The Basic: Port Triggering Add/Edit Screen
Hitron CODA60x1 User’s Guide
Version 1.0, 11/2020. Copyright
2012 Hitron Technologies
3
Version 1.0, 08/2026. Copyright
50
2026 Hitron Technologies
The following table describes the labels in this screen.
Table: The Basic: Port Triggering Add/Edit Screen
Port Triggering Add/Edit
Application Name
Enter a name for the application for which you want to
create the rule.
NOTE: This name is arbitrary and does not affect
functionality.
Trigger Port Range
Use these fields to specify the trigger ports. When the
CODA60x1 detects activity on any of these ports
originating from a computer on the LAN, it
automatically opens the Target ports in anticipation of
incoming traffic.
Enter the starting port number in the first field and the
ending port number in the second field.
To specify a single port, enter the same port number in
both fields.
Target Port Range
Use these fields to specify the target ports. The
CODA60x1 opens these ports in anticipation of
incoming traffic whenever it detects activity on any of
the Trigger ports. Incoming traffic is forwarded to
these ports on the computer connected to the LAN.
Enter the starting port number in the first field and the
ending port number in the second field.
To specify a single port, enter the same port number in
both fields.
Hitron CODA60x1 User’s Guide
Version 1.0, 11/2020. Copyright
2012 Hitron Technologies
3
Version 1.0, 08/2026. Copyright
51
2026 Hitron Technologies
Protocol
Use this field to specify the protocol that activates the
trigger when the CODA60x1 detects activity:
Transmission Control Protocol (TCP)
User Datagram Protocol (UDP)
Transmission Control Protocol and User
Datagram Protocol (Both)
NOTE: If you are unsure which protocol to select, leave
this field at its default setting (Both).f in doubt, leave
this field at its default (Both).
Timeout (ms)
Enter the amount of time, in milliseconds, after the
CODA60x1 opens the Target ports before it closes
them.
Apply
Click this button to save your changes to the fields on
this screen.
Close
Click this button to return to the Port Triggering
screen without saving your changes to the rule.
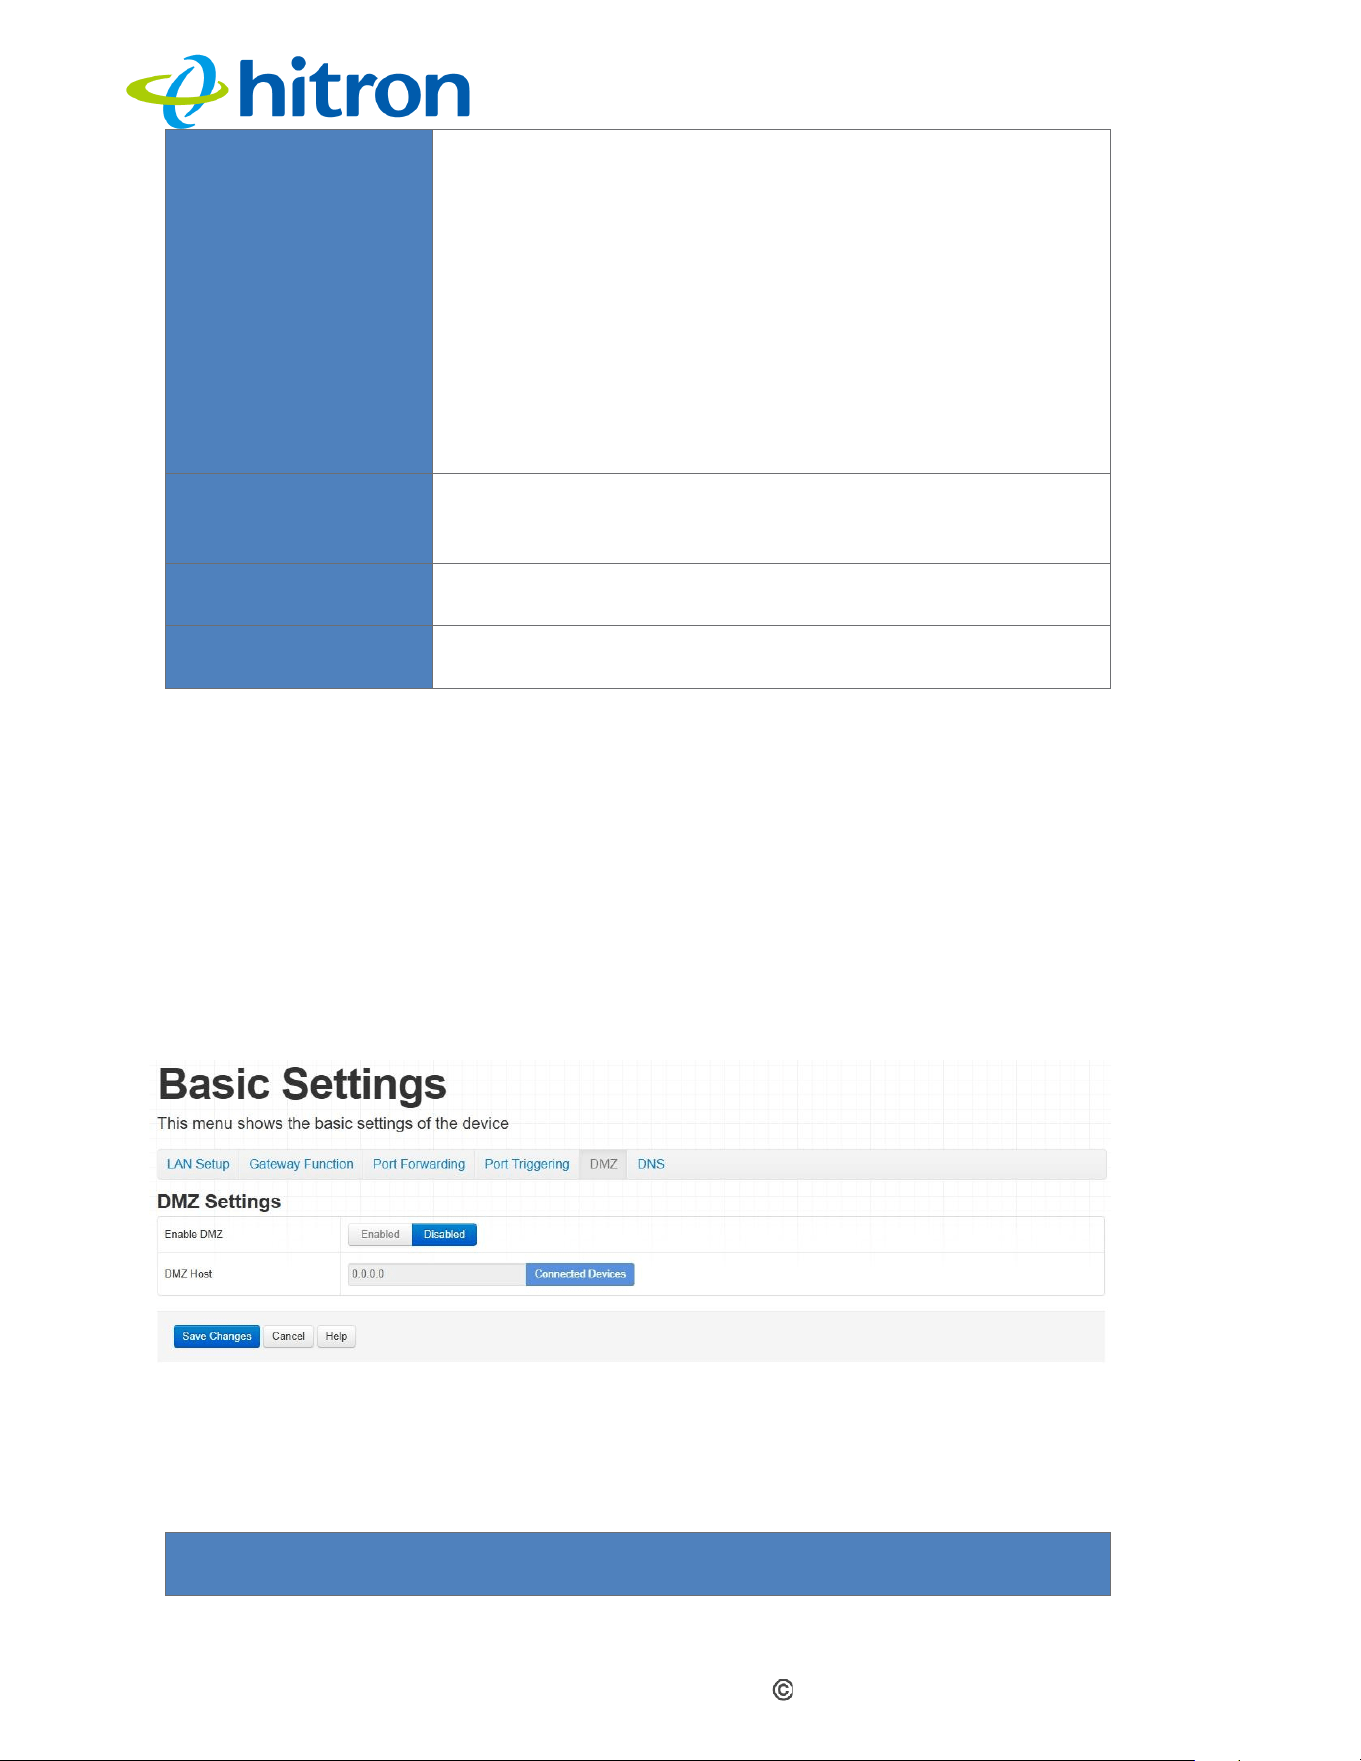
4.6
The Basic: DMZ Screen
Use this screen to configure your network’s Demilitarized Zone (DMZ).
Click Basic > DMZ. The following screen displays.
Figure :The Basic: DMZ Screen
The following table describes the labels in this screen.
Table 20: The Basic: DMZ Screen
DMZ Settings
Hitron CODA60x1 User’s Guide
Version 1.0, 11/2020. Copyright
2012 Hitron Technologies
3
Version 1.0, 08/2026. Copyright
52
2026 Hitron Technologies
Enable DMZ
Use this field to turn the DMZ on or off.
Select Enabled to turn the DMZ on.
Select Disabled to turn the DMZ off. Computers that
were previously in the DMZ are now on the LAN.
DMZ Host
Enter the IP address of the computer that you want to
add to the DMZ.
Connected Devices
Click this to see a list of the computers currently
connected to the CODA-60x1 on the LAN.
Save Changes
Click this to save your changes to the fields in this
screen.
Cancel
Click this to return the fields in this screen to their last-
saved values without saving your changes.
Help
Click this to see information about the fields in this
screen.
4.7
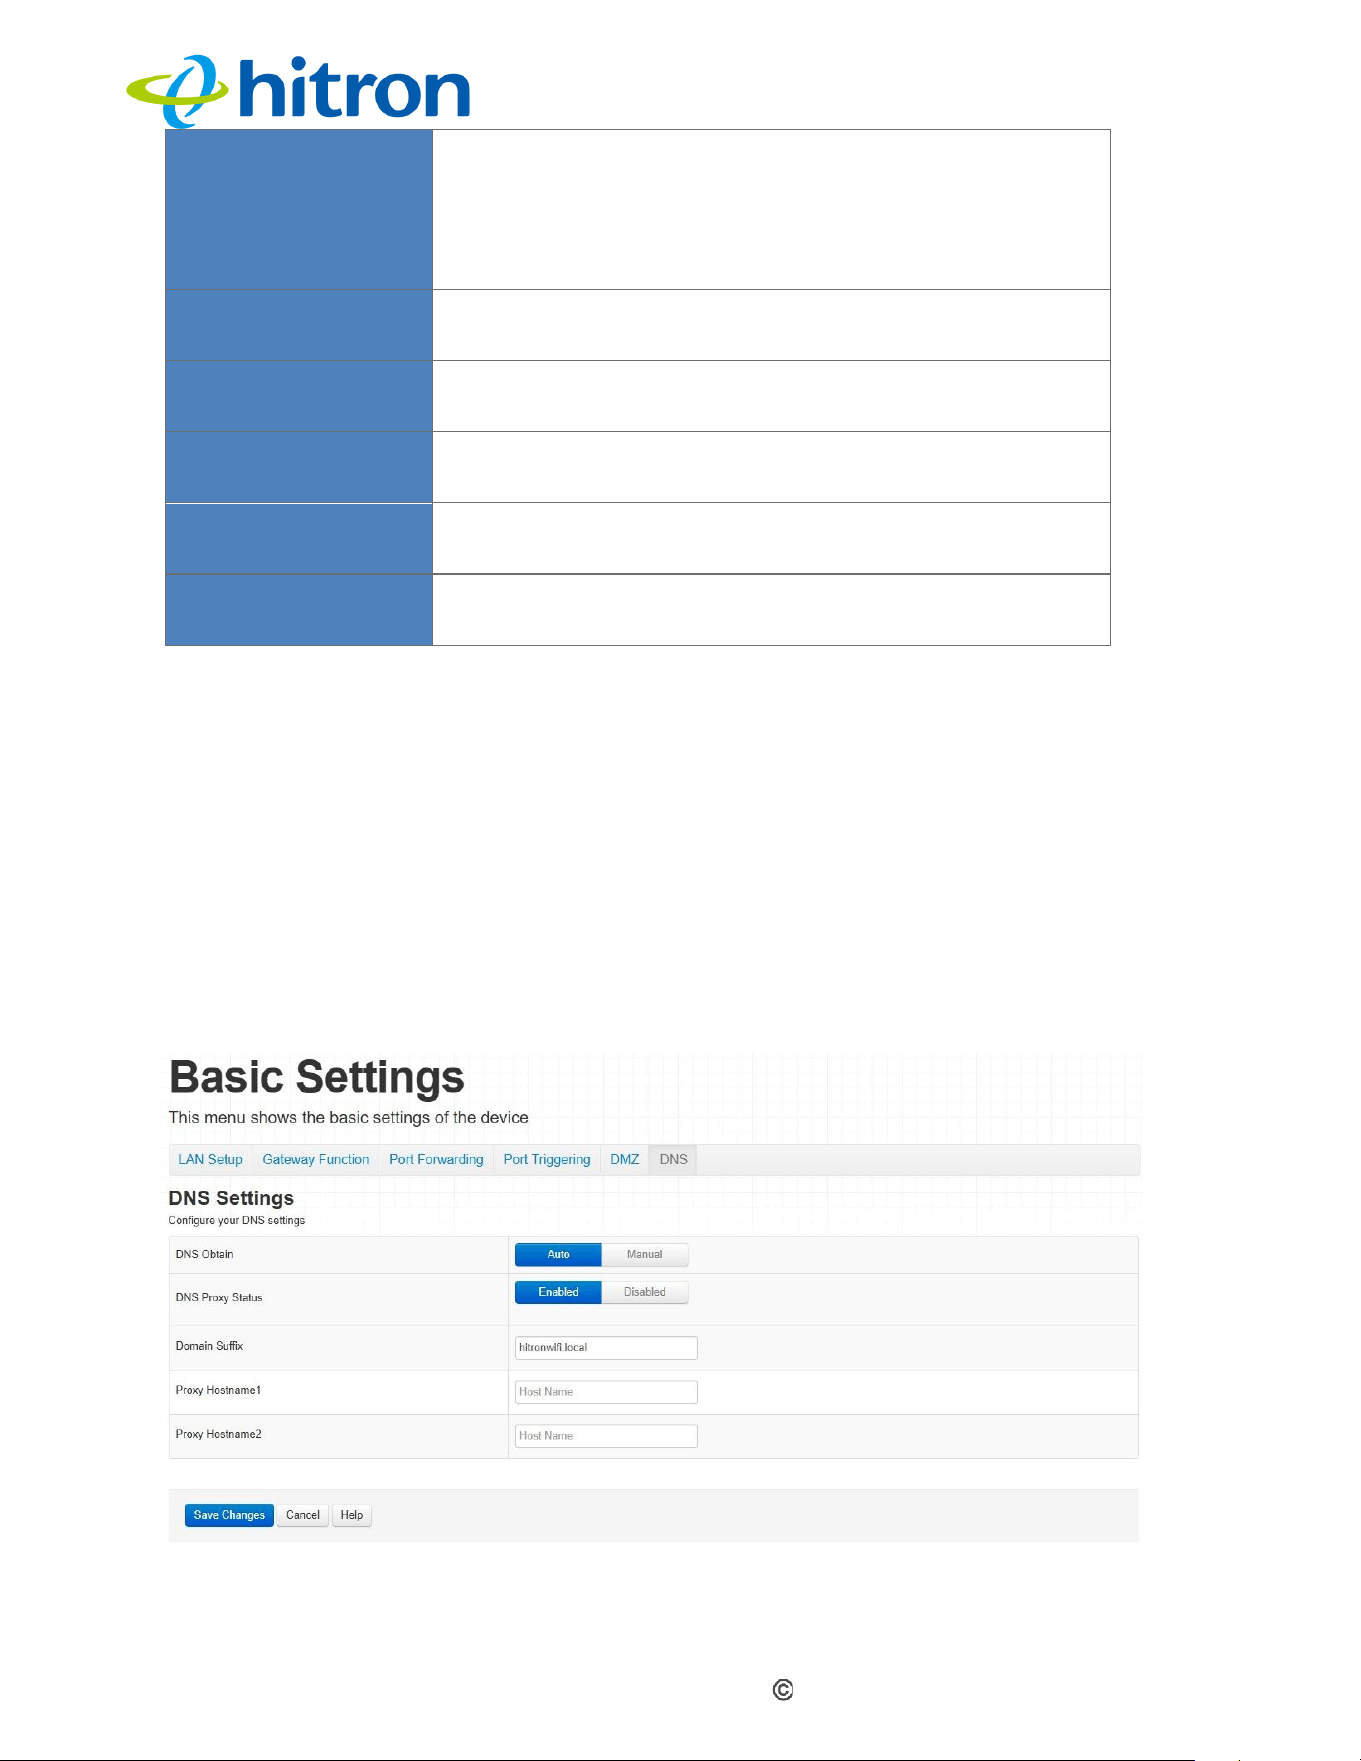
The Basic: DNS Screen
Use this screen to configure the CODA60x1’s LAN DNS settings, including its subnet
mask, domain suffix and proxy hostname.
Click Basic > DNS. The following screen displays.
Figure: The Basic: DNS Screen
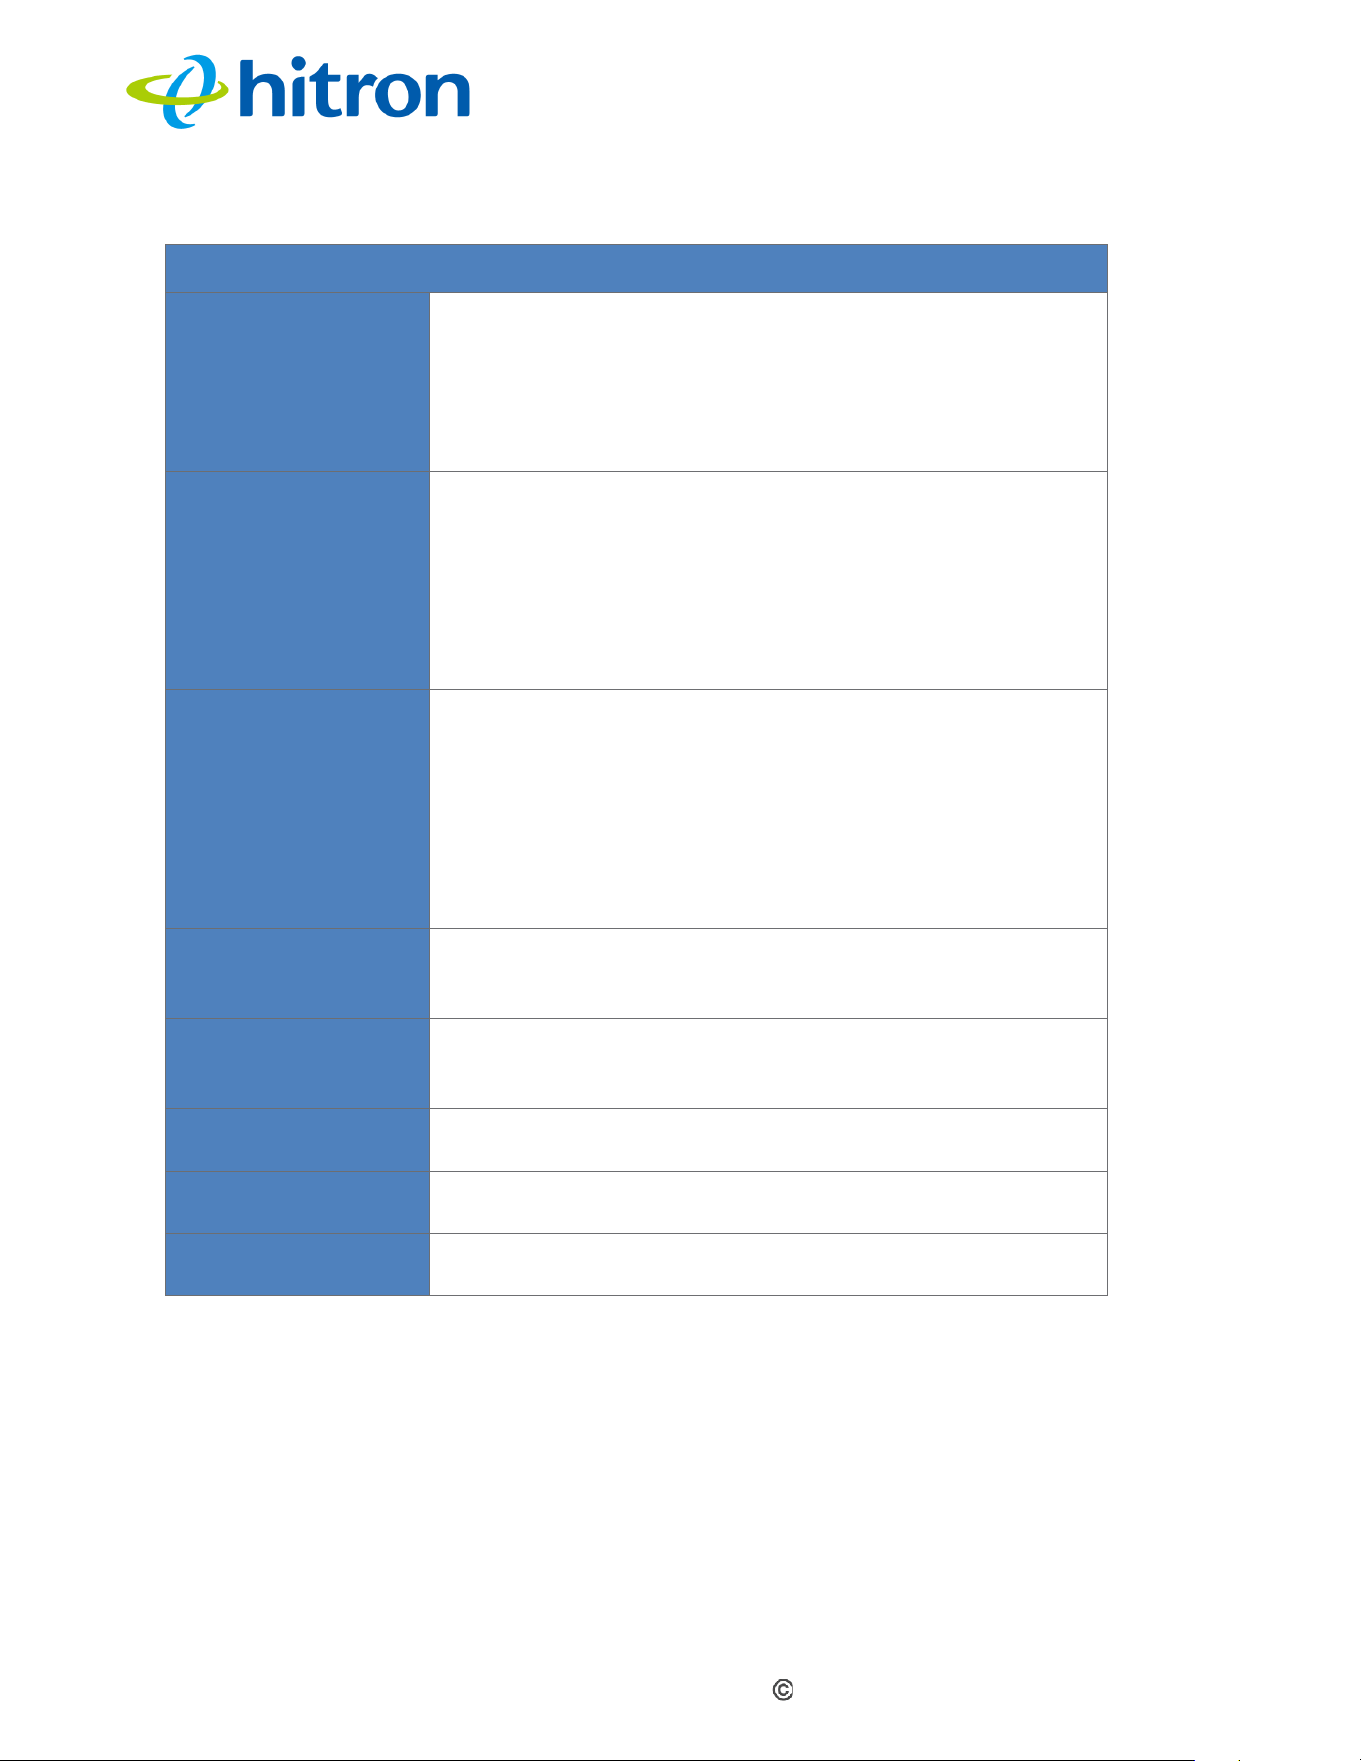
Hitron CODA60x1 User’s Guide
Version 1.0, 11/2020. Copyright
2012 Hitron Technologies
3
Version 1.0, 08/2026. Copyright
53
2026 Hitron Technologies
The following table describes the labels in this screen.
Table 21: The Basic: DNS Screen
DNS Settings
DNS Obtain
Use this field to select whether to obtain DNS
information automatically over the network or configure
it manually.
Select Auto to obtain DNS information automatically.
Select Manual to obtain DNS information manually.
DNS Proxy Status
Use this field to enable or disable DNS proxy on the
LAN. When DNS proxy is enabled (the default), the
DHCP server provides the CODA60x1's LAN IP
address as the DNS server for name resolution.
Select Enabled to enable DNS proxy.
Select Disabled to disable DNS proxy.
Domain Suffix
Use this field to specify the domain suffix that you can
enter in a web browser instead of an IP address to
access the CODA60x1 on the LAN.
NOTE: It is recommended that you make a note of
your device's Domain Suffix in case you need to
access the CODA60x1's GUI without knowing its IP
address.
Proxy Hostname 1
When LAN DNS Obtain is set to Manual, enter the
hostname of the computer that you want to manually
add to the DNS.
Proxy Hostname 2
When LAN DNS Obtain is set to Manual, enter the
hostname of another computer that you want to
manually add to the DNS
Save Changes
Click this button to save your changes to the fields on
this screen.
Cancel
Click this button to restore the fields on this screen to
their last saved values without saving your changes.
Help
Click this button to view information about the fields on
this screen.

Hitron CODA60x1 User’s Guide
Version 1.0, 11/2020. Copyright
2012 Hitron Technologies
3
Version 1.0, 08/2026. Copyright
54
2026 Hitron Technologies
5
Wireless
This chapter describes the screens that display when you click Wireless in the
toolbar. It contains the following sections:
Wireless Overview
The Wireless: Basic Settings Screen
The Wireless: Access Control Screen
The Advanced Wireless settings Screen
5.1
Wireless Overview
This section describes some of the concepts related to the Wireless screens.
5.1.1
Wireless Networking Basics
Your CODA60x1's wireless network is part of the Local Area Network (LAN), also
known as a Wireless Local Area Network (WLAN). The WLAN uses wireless radio
links to connect the CODA60x1 to computers and other devices on the network.
5.1.2
Architecture
A wireless network consists of two types of devices: access points (APs) and
clients.
The access point manages the wireless network and provides a wireless
connection to each client.
Wireless clients connect to the access point to access the WAN and wired
LAN through the wireless network.

Hitron CODA60x1 User’s Guide
Version 1.0, 11/2020. Copyright
2012 Hitron Technologies
3
Version 1.0, 08/2026. Copyright
55
2026 Hitron Technologies
The CODA60x1 acts as the access point, while the computers and other devices
connected to the CODA60x1 wirelessly are the wireless clients.
5.1.3
Wireless Frequency Ranges and Channels
Wireless communication between a client and the access point takes place within
specific ranges of the radio spectrum. The most commonly used Wi-Fi frequency
bands are the 2.4 GHz, 5 GHz, and 6 GHz bands.
The 2.4 GHz band operates approximately from 2400 MHz to 2500 MHz, while the 5
GHz band covers several frequency ranges, depending on the region and regulatory
requirements. Wi-Fi 7 also supports the 6 GHz band, which provides additional
spectrum and more available channels for wireless communication. The specific
frequencies and channels available in the 6 GHz band vary by country or region.
These frequency ranges are divided into multiple channels to allow multiple wireless
networks to operate in the same or overlapping locations. On a wireless network,
the access point and its clients communicate using the same radio channel.
In the 2.4 GHz band, there are up to fourteen channels, although not all channels
are available in every region. For example, in North America, channels 1 through 11
are available. Each channel is typically 20 MHz wide, although compatible devices
can combine two adjacent channels to use a 40 MHz channel and increase
bandwidth. Because the center frequencies of adjacent 2.4 GHz channels are only 5
MHz apart, the channels overlap. This can cause interference between nearby
wireless networks.
To minimize interference and maximize wireless performance, select channels that
are not heavily used by nearby wireless networks and, where possible, do not
overlap with neighboring networks.
The 5 GHz band provides more channels and generally has less channel overlap
than the 2.4 GHz band. However, the channels available for use vary by region, and
some channels may be subject to Dynamic Frequency Selection (DFS)
requirements.
The 6 GHz band, introduced for Wi-Fi 6E and also supported by Wi-Fi 7, provides
additional spectrum for wireless communication. Wi-Fi 7 can use wider channels,
including 320 MHz channels, where supported by the device, regulatory domain,
and available spectrum. The additional spectrum and wider channels can provide
higher throughput and reduce congestion compared with the 2.4 GHz and 5 GHz
bands.
Note: The frequency ranges, available channels, channel widths, and transmit
power limits vary by country or region and are subject to local regulatory
requirements..
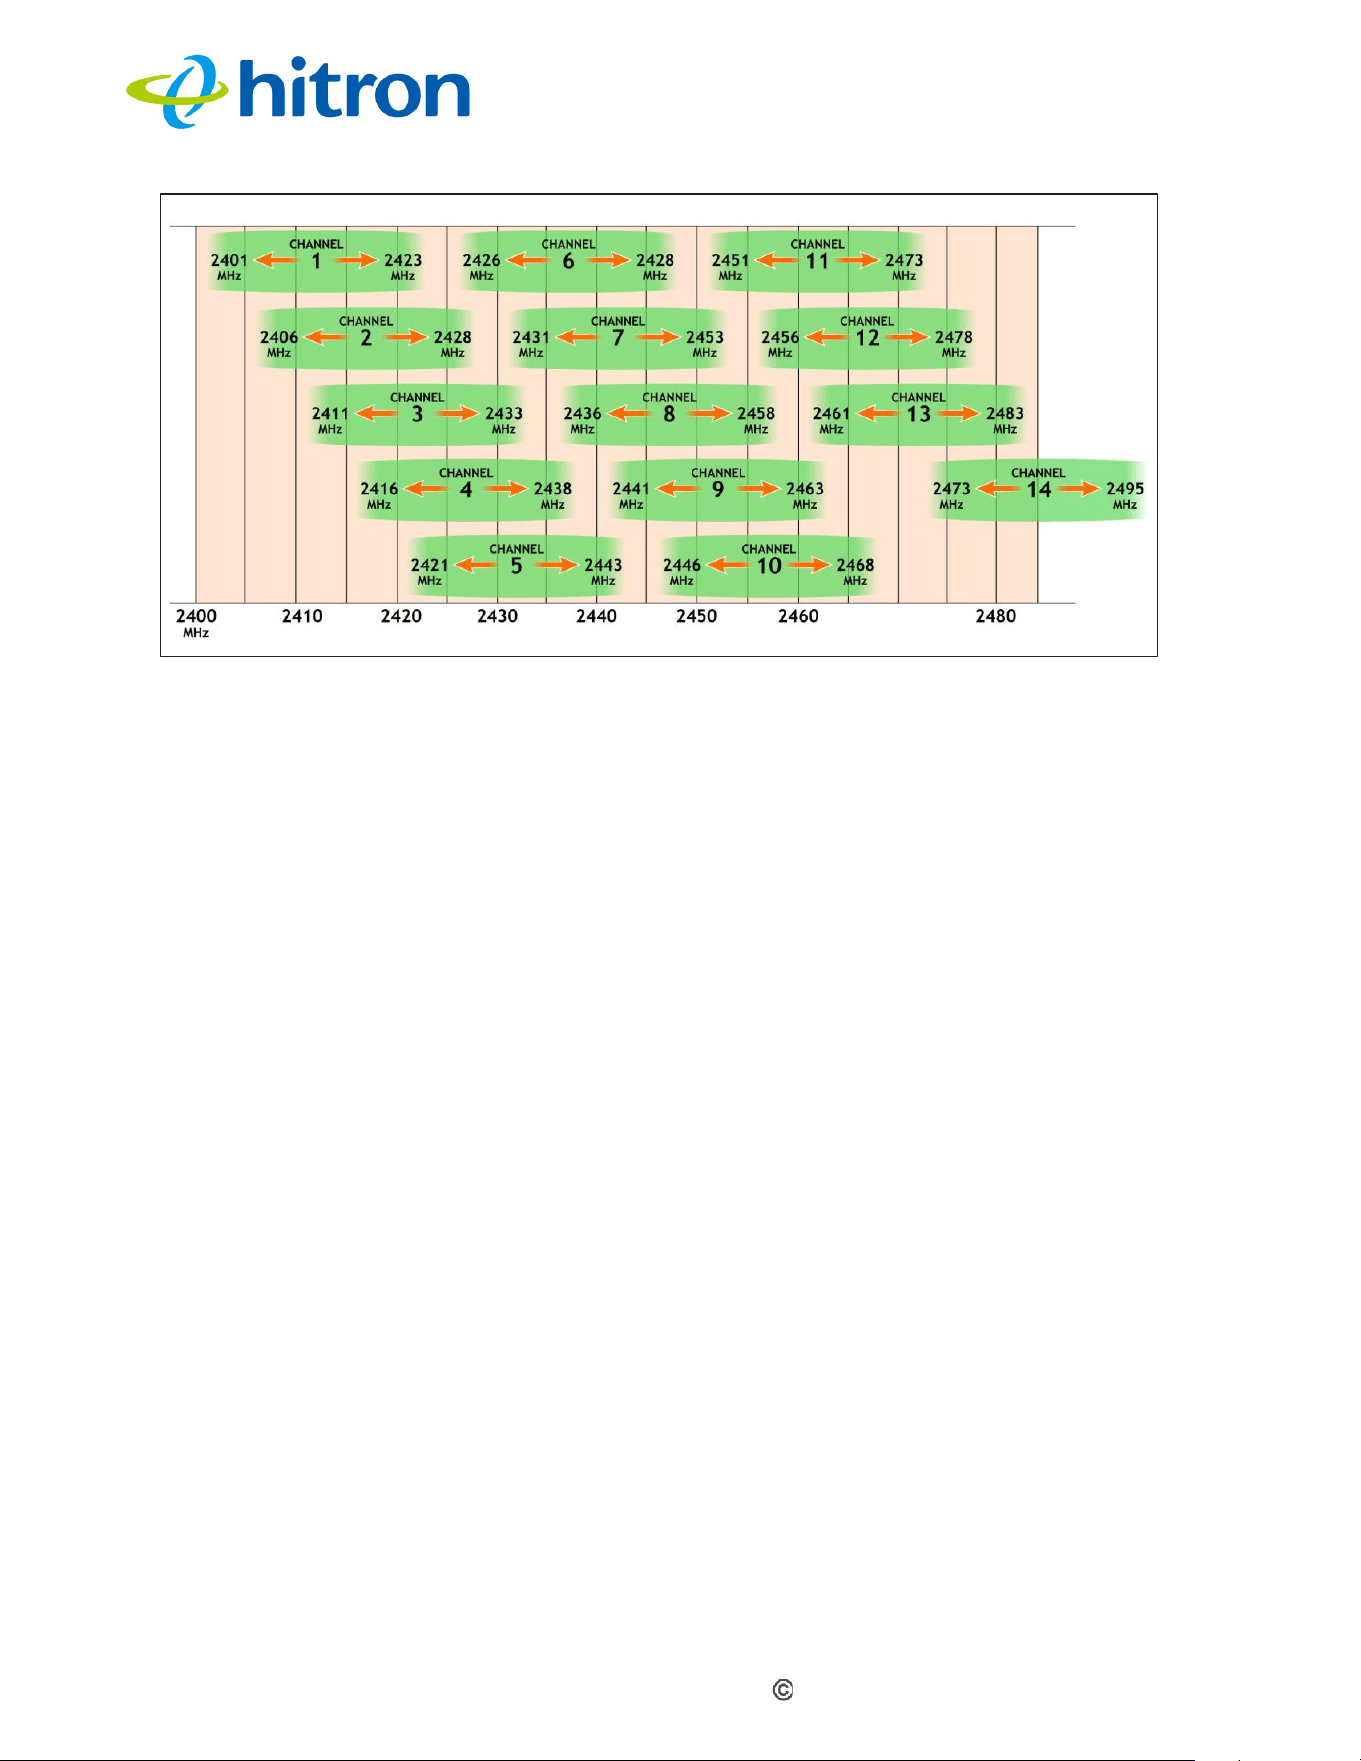
Hitron CODA60x1 User’s Guide
Version 1.0, 11/2020. Copyright
2012 Hitron Technologies
3
Version 1.0, 08/2026. Copyright
56
2026 Hitron Technologies
Figure: 2.4GHz Wireless Channel Overlap
5.1.3.1
Automatic Channel Selection
The CODA60x1's Automatic Channel Selection (ACS) feature enables the wireless
module to scan the surrounding wireless environment, identify the channel with the
least interference, and automatically use that channel for wireless communication on
the relevant network.
The wireless environment is analyzed and a channel is selected when the
CODA60x1's wireless network starts with the relevant radio channel set to Auto,
when Auto mode is selected, when the Refresh button is pressed, or under certain
conditions when Dynamic Channel Change is enabled (see Dynamic Channel
Change).
5.1.3.2
Band Steering
When wireless client devices are capable of operating on both the 2.4GHz band and
the 5GHz band, it is generally desirable for them to connect to the CODA60x1 on the
5GHz wireless network, due to the likelihood of there being less interference on that
band. When enabled, band steering does this by detecting whether wireless clients
are also 5GHz-capable and, if so, encouraging the client to connect on the 5GHz
wireless network rather than the 2.4GHz wireless network.

Hitron CODA60x1 User’s Guide
Version 1.0, 11/2020. Copyright
2012 Hitron Technologies
3
Version 1.0, 08/2026. Copyright
57
2026 Hitron Technologies
5.1.3.3
Dynamic Channel Change
Dynamic Channel Change (DCC) improves strength and continuity of wireless signal
even when environmental conditions change, by enabling Automatic Channel
Selection (see Automatic Channel Selection) to be triggered when the current
channel’s interference reduces the data transmission rate below a threshold level.
When DCC is enabled, a check of all available wireless channels is performed
regularly. If the signal quality of the current channel deteriorates below the threshold
level, the CODA60x1 switches to a channel with superior signal quality.
NOTE: At the time of writing, the DCC check is performed sixty times a minute.
When environmental conditions mean there is no available channel with acceptable
signal quality, DCC is automatically disabled if channel switching occurs too often in
any period, in order to avoid the inconvenience of rapid unnecessary switching.
NOTE: At the time of writing, DCC is automatically disabled if automatic channel
switching occurs more than three times in any five minute period.
NOTE: At the time of writing, DCC is only available on the 5GHz wireless network.
5.1.4
Wireless Standards
Wireless communication standards are defined by the Institute of Electrical and
Electronics Engineers (IEEE). IEEE standards for wireless local area networks
(WLANs) are identified by the 802.11 designation.
There are several WLAN standards, and the CODA60x1 supports the following
standards, listed from older to newer generations:
IEEE 802.11a
IEEE 802.11g
IEEE 802.11n
IEEE 802.11ac
IEEE 802.11ax
IEEE 802.11be

Hitron CODA60x1 User’s Guide
Version 1.0, 11/2020. Copyright
2012 Hitron Technologies
3
Version 1.0, 08/2026. Copyright
58
2026 Hitron Technologies
5.1.5
Service Sets and SSIDs
Each wireless network, including the devices that comprise it, is known as a
Service Set.
NOTE: Depending on its capabilities and configuration, a single wireless access
point can support multiple Service Sets. This is often used to provide
different levels of service or security to different clients.
Each Service Set is identified by a Service Set Identifier (SSID), which is the name
of the wireless network. Wireless clients must know the SSID to connect to the
access point (AP).
You can configure the CODA60x1 to broadcast the SSID, allowing wireless clients
that scan for available networks to discover it. Alternatively, you can configure the
CODA60x1 to hide the SSID, in which case the SSID is not included in broadcast
network information. Clients that know the SSID can still attempt to connect to the
network.
5.1.6
Wireless Security
Wireless communication uses radio signals, which can potentially be intercepted by
devices within the wireless coverage area. Wireless security mechanisms are
therefore used to authenticate wireless clients and protect transmitted data through
encryption.
The CODA60x1 supports the following wireless security modes:
WPA2-Personal (WPA2-PSK): WPA2-Personal uses a pre-shared key (PSK)
to authenticate wireless clients and uses the Advanced Encryption Standard
(AES) with Counter Mode with Cipher Block Chaining Message Authentication
Code Protocol (CCMP) to protect wireless communications. WPA2-Personal
provides broad compatibility with wireless client devices.
WPA3-Personal: WPA3-Personal provides enhanced wireless security and
uses Simultaneous Authentication of Equals (SAE) instead of the pre-
shared key authentication method used by WPA2-Personal. WPA3-Personal
provides stronger protection against password-guessing attacks and is
recommended for wireless clients that support WPA3.
WPA3-Personal-Transition: WPA3-Personal-Transition mode allows both
WPA3-Personal and WPA2-Personal wireless clients to connect to the same
wireless network. WPA3-capable clients can use WPA3 security, while clients
that do not support WPA3 can connect using WPA2-Personal. This mode
provides compatibility with older wireless clients while allowing newer clients to
use enhanced WPA3 security.
NOTE: The wireless security modes available on the CODA60x1 may vary

Hitron CODA60x1 User’s Guide
Version 1.0, 11/2020. Copyright
2012 Hitron Technologies
3
Version 1.0, 08/2026. Copyright
59
2026 Hitron Technologies
depending on the wireless frequency band, regulatory requirements, and
client device capabilities.
5.1.6.1
WPS
Wi-Fi-Protected Setup (WPS) is a standardized method of allowing wireless devices
to quickly and easily join wireless networks, while maintaining a good level of
security. The CODA60x1 provides two methods of WPS authentication:
Push-Button Configuration (PBC): when the user presses the PBC button on
the AP (either a physical button, or a virtual button in the GUI), any user of a
wireless client that supports WPS can press the corresponding PBC button on
the client within two minutes to join the network.
Personal Identification Number (PIN) Configuration: all WPS-capable
devices possess a PIN (usually to be found printed on a sticker on the device’s
housing). When you configure another device to use the same PIN, the two
devices authenticate with one another.
Once authenticated, devices that have joined a network via WPS use the WPA2
security standard.
5.1.7
WMM
Wi-Fi Multimedia (WMM) is a Quality of Service (QoS) enhancement that prioritizes
different types of data traffic over the wireless network. WMM provides four traffic
categories, listed in order of priority from highest to lowest:
Voice
Video
Best effort
Background
Enabling WMM can improve the performance of latency-sensitive applications, such
as voice and video, by prioritizing their traffic over less time-sensitive applications,
such as web browsing and FTP transfers.
You can also modify the WMM QoS parameters. However, it is recommended that
you do not change these parameters unless you have a specific reason to do so, as
incorrect settings may negatively affect wireless network performance.

Hitron CODA60x1 User’s Guide
Version 1.0, 11/2020. Copyright
2012 Hitron Technologies
3
Version 1.0, 08/2026. Copyright
60
2026 Hitron Technologies
5.2
The Wireless: Basic Settings Screen
Use this screen to configure your CODA60x1’s 2.4GHz, 5GHz, 6GHz Wi-fi Protected
Setup (WPS) and guest network wireless settings.
Use the 2.4GHz network screen to enable 2.4GHz wireless clients to connect to
the CODA60x1. See The Wireless: Basic Settings: 2.4G Screen.
Use the 5GHz network screen to enable 5GHz wireless clients to connect to the
CODA60x1. See The Wireless: Basic Settings: 5G Screen.
Use the 5GHz network screen to enable 6GHz wireless clients to connect to the
CODA60x1. See The Wireless: Basic Settings: 6G Screen
Use the WPS screen to enable WPS-capable wireless clients to connect to the
CODA60x1 via a simple push-button, or by entering a password. See The
Wireless: Basic Settings: WPS Screen.
Use the Guest Network screen to enable wireless clients to connect to the
CODA60x1 with reduced privileges. See The Wireless: Basic Settings: Guest
Screen.
5.2.1
The Wireless: Basic Settings: 2.4G Screen
Use this screen to configure the CODA60x1’s 2.4GHz wireless network.
Click Wireless > Basic Settings > 2.4G. The following screen displays.
Figure : The Wireless: Basic Settings: 2.4G Screen
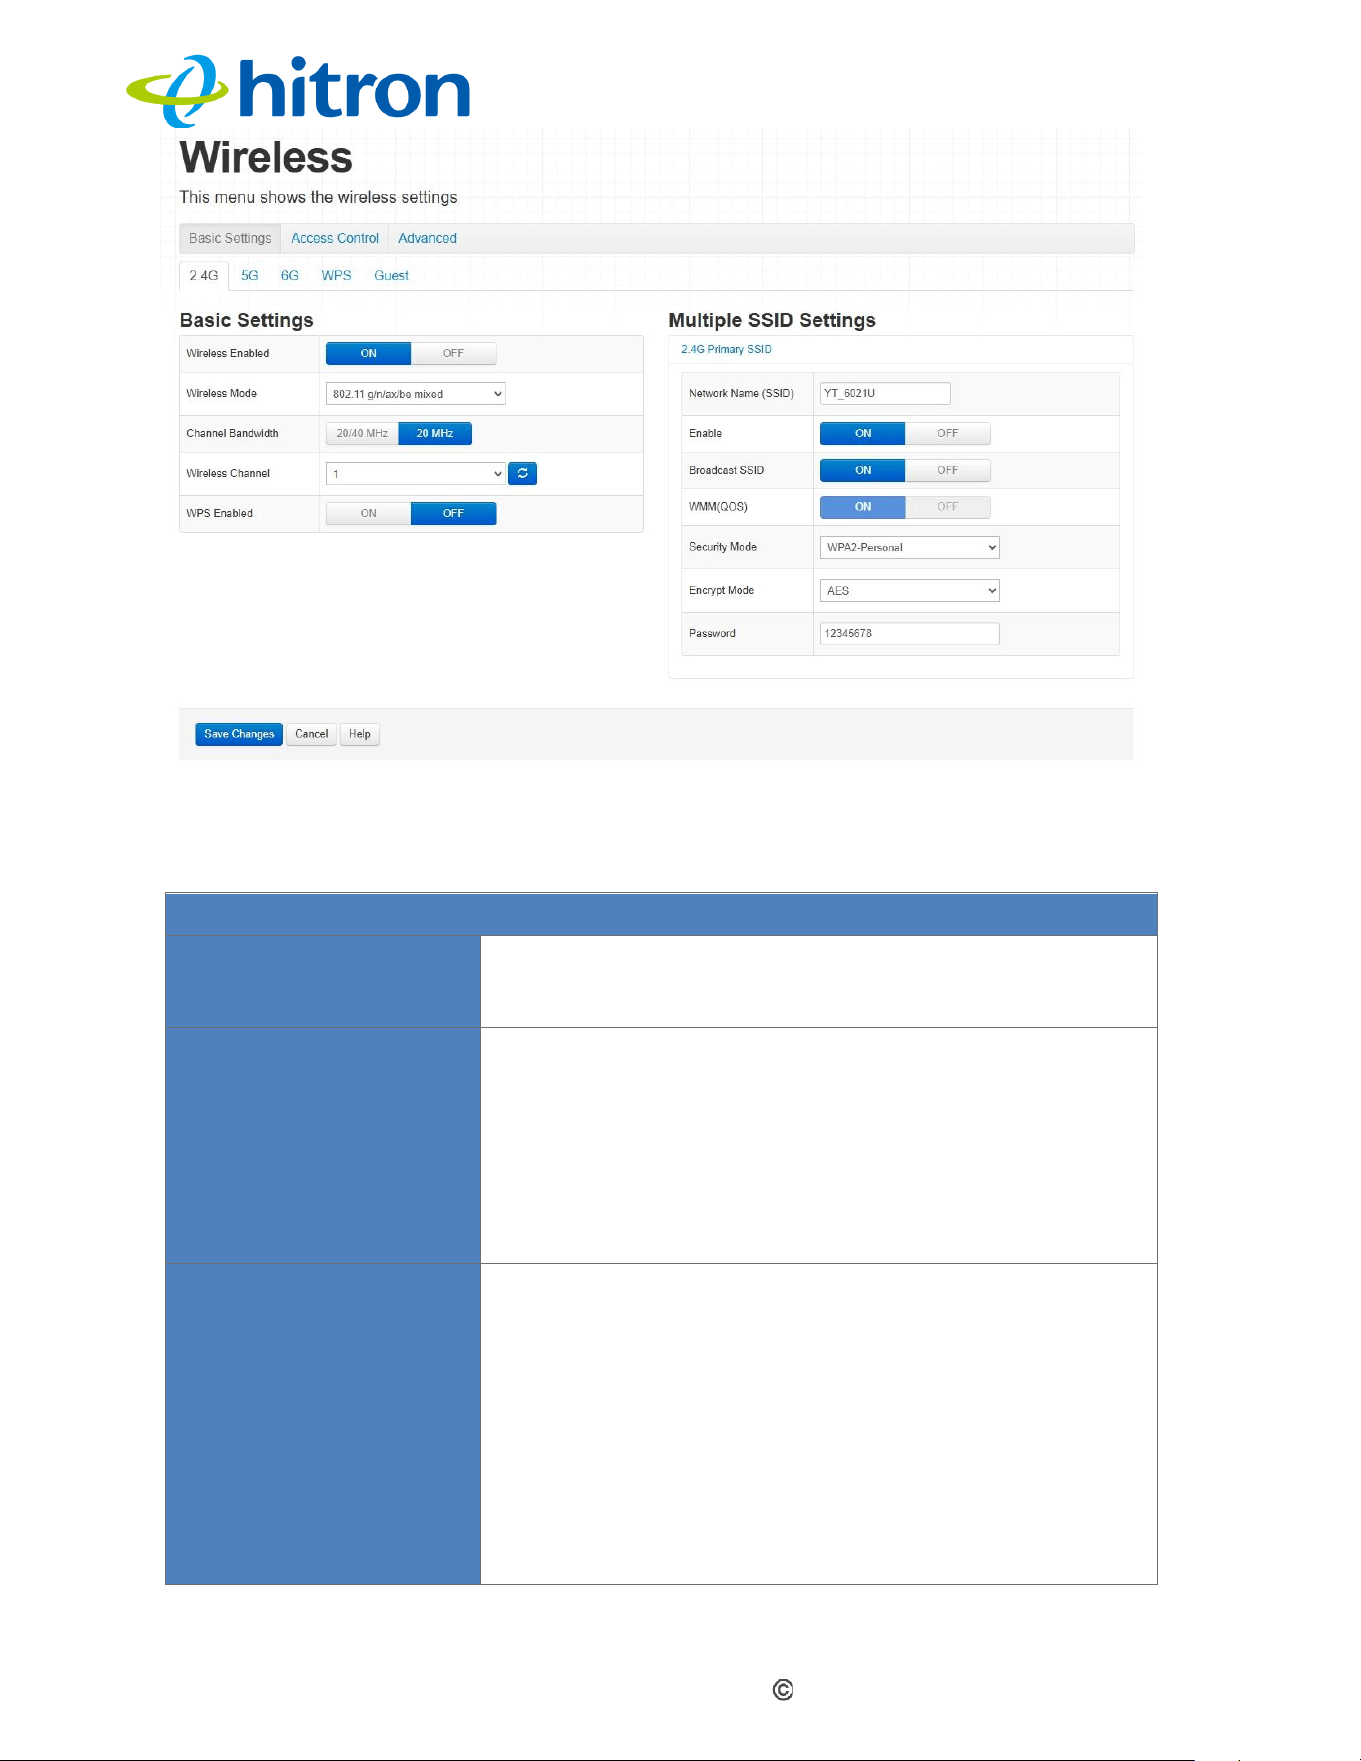
Hitron CODA60x1 User’s Guide
Version 1.0, 11/2020. Copyright
2012 Hitron Technologies
3
Version 1.0, 08/2026. Copyright
61
2026 Hitron Technologies
The following table describes the labels in this screen.
Table: The Wireless: Basic Settings: 2.4G Screen
2.4 Basic Settings
Wireless Enabled
Select On to enable the 2.4GHz wireless network.
Select Off to disable the 2.4GHz wireless network.
Wireless Mode
Select the type of 2.4GHz wireless network that you
want to use:
802.11 g/n/ax/be Mixed: Supports IEEE 802.11g,
802.11n, 802.11ax, and 802.11be.
Only wireless clients that support the selected wireless
standard can connect to the wireless network.
Channel Bandwidth
Use this field to configure the width of the radio channel
that the CODA60x1 uses to communicate with wireless
clients on the 2.4 GHz network.
A wider channel can provide higher data throughput,
but may also be more susceptible to interference and
may not be supported in all environments.
Select 20 MHz to use a 20 MHz channel.
Select 20/40 MHz to allow the CODA60x1 to use a
40 MHz channel when possible, or a 20 MHz
channel when a 40 MHz channel is unavailable.
Hitron CODA60x1 User’s Guide
Version 1.0, 11/2020. Copyright
2012 Hitron Technologies
3
Version 1.0, 08/2026. Copyright
62
2026 Hitron Technologies
Wireless Channel
Select the 2.4 GHz wireless channel that you want to
use, or select Auto to allow the CODA60x1 to
automatically select the optimal channel.
NOTE: Use Auto unless you have a specific reason to
select a channel manually.
Click the Refresh button ( )o have the CODA60x1
recheck the current wireless environment and
automatically select the optimal 2.4 GHz wireless
channel(see Automatic Channel Selection).
WPS Enabled
Use this field to turn Wifi Protected Setup (WPS) on or
off on the 2.4GHz network (see WPS).
Select ON to enable WPS.
Select OFF to disable WPS.
Multiple SSID Settings
Network Name (SSID)
Enter the name that you want to use for this SSID. This
is the name that identifies your wireless network and is
used by wireless clients to connect to the network.
NOTE: It is recommended that you change the default
SSID for security reasons.
Enable
Use this field to enable or disable the SSID.
Select ON to enable the SSID.
Select OFF to disable the SSID.
Broadcast SSID
Use this field to enable or disable SSID broadcasting.
Select ON to broadcast the SSID. Wireless
devices within the coverage area can discover the
SSID when scanning for available networks and
may attempt to connect to the network.
Select OFF to prevent the CODA60x1 from
broadcasting the SSID. Wireless clients must
know the SSID to attempt to connect to the
network.
WMM(QoS)
This field displays whether Wi-Fi Multimedia (WMM)
Quality of Service (QoS) is Enabled or Disabled for
this SSID.
Security Mode
Select the type of wireless security to use on the 2.4
GHz network.
Select Open to use no wireless security.
Wireless devices within the coverage area
can attempt to connect to the network without
authentication.
Select WPA2-Personal to use Wi-Fi
Hitron CODA60x1 User’s Guide
Version 1.0, 11/2020. Copyright
2012 Hitron Technologies
3
Version 1.0, 08/2026. Copyright
63
2026 Hitron Technologies
Protected Access 2 (WPA2) with a pre-
shared key (PSK).
Select WPA3-Personal to use Wi-Fi
Protected Access 3 (WPA3) with
Simultaneous Authentication of Equals
(SAE).
Select WPA3-Personal-Transition to allow
both WPA2-Personal and WPA3-Personal
wireless clients to connect to the network.
Select Enhanced Open (OWE) to provide
encryption without requiring a password or
pre-shared key.
Encrypt Mode
Select the encryption method to use on the 2.4 GHz
network. The available options depend on the security
mode selected in the other fields on this screen.
Select AES to use the Advanced
Encryption Standard (AES).
Password
Enter the security key or password to use for the 2.4
GHz wireless network. Wireless clients must use the
same security key or password to connect to the
network.
Save Changes
Click this button to save your changes to the fields on
this screen.
Cancel
Click this button to restore the fields on this screen to
their last saved values without saving your changes.
Help
Click this button to view information about the fields on
this screen.
5.2.2
The Wireless: Basic Settings: 5G Screen
Use the 5GHz network screen to enable 5GHz wireless clients to connect to the
CODA60x1.
Click Wireless > Basic Settings > 5G. The following screen displays.
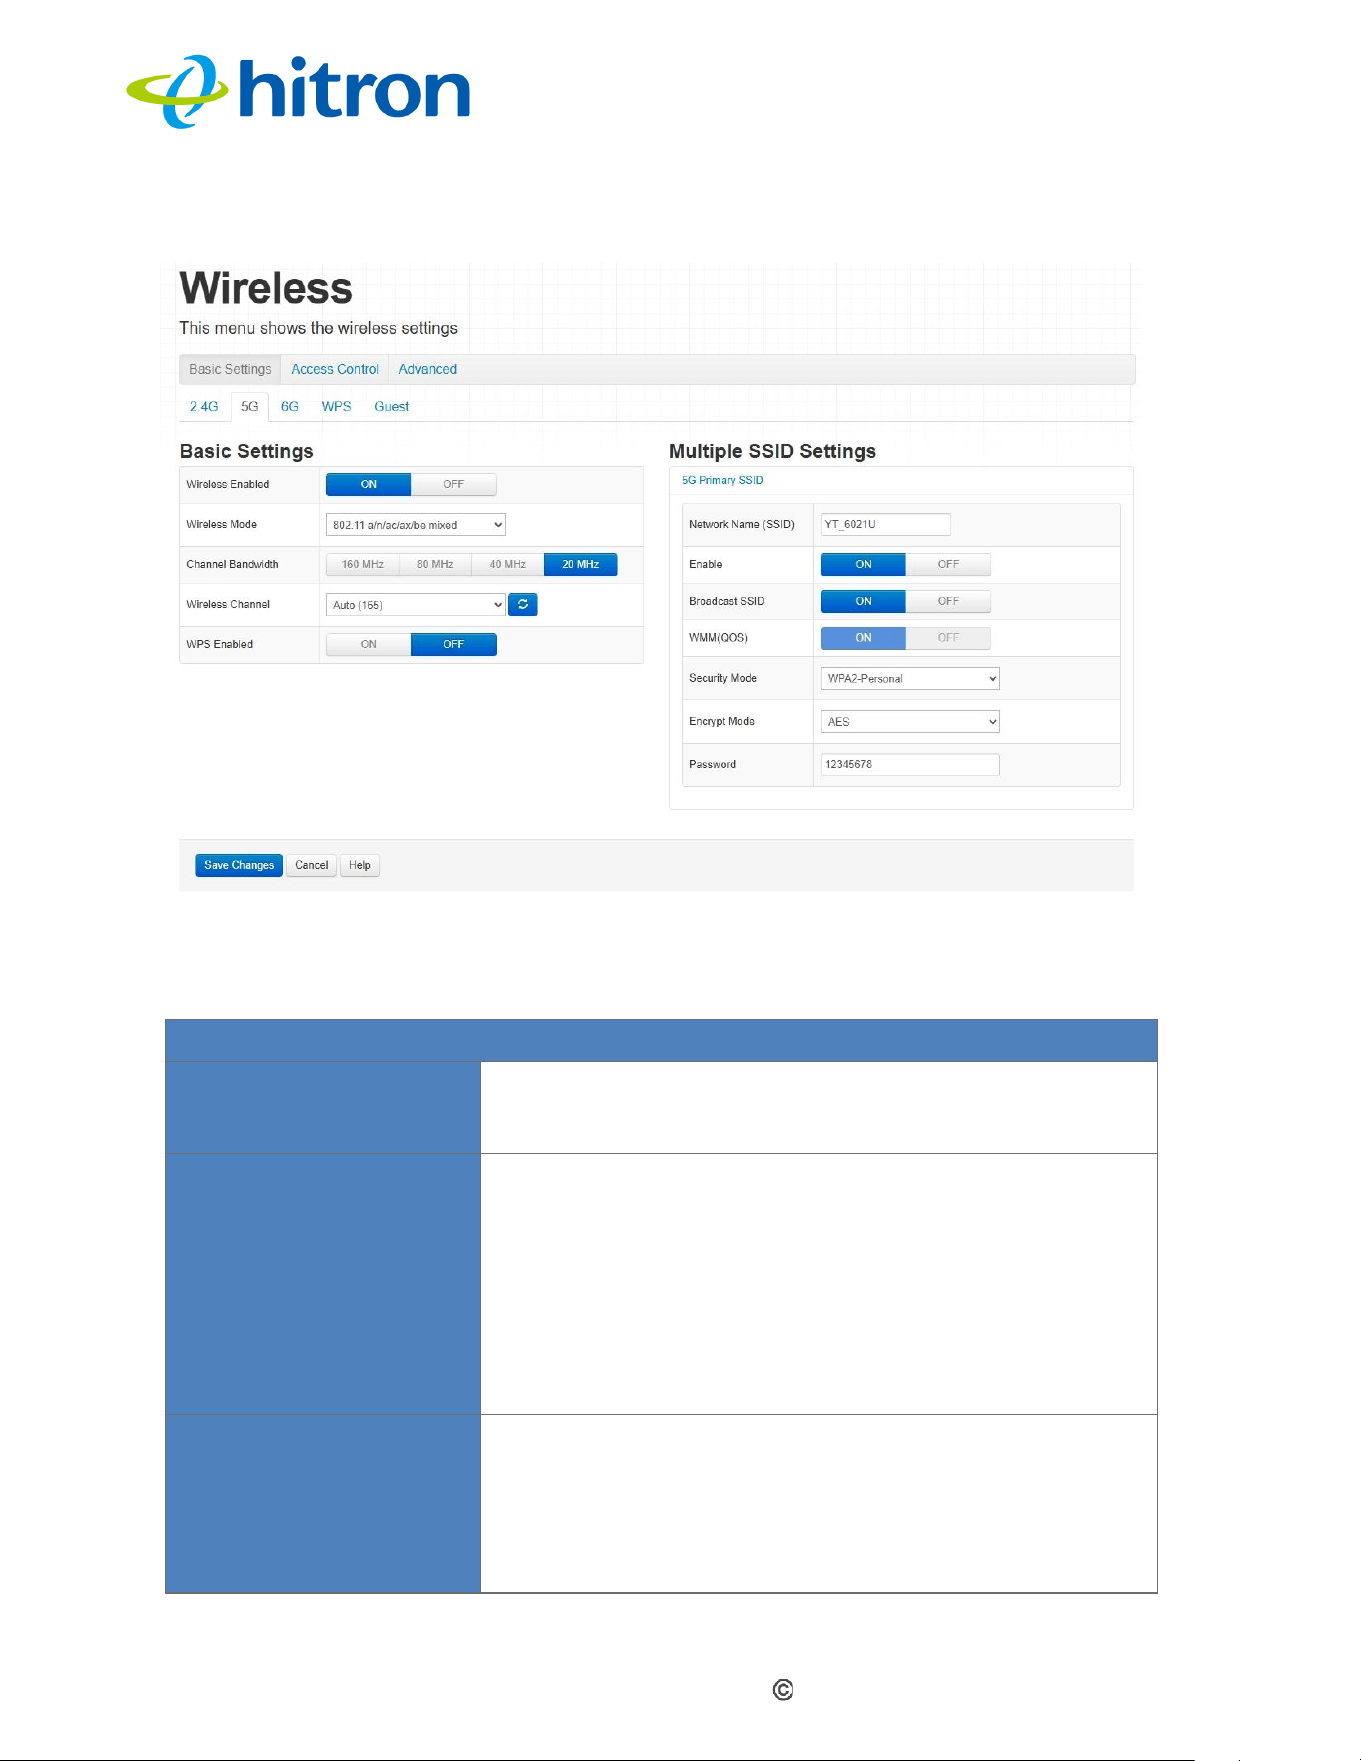
Hitron CODA60x1 User’s Guide
Version 1.0, 11/2020. Copyright
2012 Hitron Technologies
3
Version 1.0, 08/2026. Copyright
64
2026 Hitron Technologies
Figure: The Wireless: Basic Settings: 5G Screen
The following table describes the labels in this screen.
Table: The Wireless: Basic Settings: 5G Screen
5G Basic Settings
Wireless Enabled
Select On to enable the 5GHz wireless network.
Select Off to disable the 5GHz wireless network.
Wireless Mode
Select the type of 5GHz wireless network that you want
to use:
802.11 a/n/ac/ax/be Mixed: Supports IEEE
802.11a, 802.11n, 802.11ac, 802.11ax and
802.11be.
Only wireless clients that support the selected wireless
standard can connect to the wireless network.
Channel Bandwidth
Use this field to configure the width of the radio channel
that the CODA60x1 uses to communicate with wireless
clients on the 5 GHz network.
A wider channel can provide higher data throughput,
but may also be more susceptible to interference and
may not be supported in all environments.
Hitron CODA60x1 User’s Guide
Version 1.0, 11/2020. Copyright
2012 Hitron Technologies
3
Version 1.0, 08/2026. Copyright
65
2026 Hitron Technologies
Select 20 MHz to use a 20 MHz channel.
Select 20/40 MHz to allow the CODA60x1 to use a
40 MHz channel when possible, or a 20 MHz
channel when a 40 MHz channel is unavailable.
Select 80 MHz to use an 80 MHz channel.
Select 160 MHz to use a 160 MHz channel, where
supported by the wireless client and available in the
selected regulatory domain.
Wireless Channel
Select the 5 GHz wireless channel that you want to
use, or select Auto to allow the CODA60x1 to
automatically select the optimal channel.
NOTE: Use Auto unless you have a specific reason to
select a channel manually.
Click the Refresh button ( )o have the CODA60x1
recheck the current wireless environment and
automatically select the optimal 5 GHz wireless
channel(see Automatic Channel Selection).
WPS Enabled
Use this field to turn Wifi Protected Setup (WPS) on or
off on the 5 GHz network (see WPS).
Select ON to enable WPS.
Select OFF to disable WPS.
Multiple SSID Settings
Network Name (SSID)
Enter the name that you want to use for this SSID. This
is the name that identifies your wireless network and is
used by wireless clients to connect to the network.
NOTE: It is recommended that you change the default
SSID for security reasons.
Enable
Use this field to enable or disable the SSID.
Select ON to enable the SSID.
Select OFF to disable the SSID.
Broadcast SSID
Use this field to enable or disable SSID broadcasting.
Select ON to broadcast the SSID. Wireless
devices within the coverage area can discover the
SSID when scanning for available networks and
may attempt to connect to the network.
Select OFF to prevent the CODA60x1 from
broadcasting the SSID. Wireless clients must
know the SSID to attempt to connect to the
network.
Hitron CODA60x1 User’s Guide
Version 1.0, 11/2020. Copyright
2012 Hitron Technologies
3
Version 1.0, 08/2026. Copyright
66
2026 Hitron Technologies
WMM(QoS)
This field displays whether Wi-Fi Multimedia (WMM)
Quality of Service (QoS) is Enabled or Disabled for
this SSID.
Security Mode
Select the type of wireless security to use on the 5 GHz
network.
Select Open to use no wireless security.
Wireless devices within the coverage area
can attempt to connect to the network without
authentication.
Select WPA2-Personal to use Wi-Fi
Protected Access 2 (WPA2) with a pre-
shared key (PSK).
Select WPA3-Personal to use Wi-Fi
Protected Access 3 (WPA3) with
Simultaneous Authentication of Equals
(SAE).
Select WPA3-Personal-Transition to allow
both WPA2-Personal and WPA3-Personal
wireless clients to connect to the network.
Select Enhanced Open (OWE) to provide
encryption without requiring a password or
pre-shared key.
Encrypt Mode
Select the encryption method to use on the 5 GHz
network. The available options depend on the security
mode selected in the other fields on this screen.
Select AES to use the Advanced
Encryption Standard (AES).
Password
Enter the security key or password to use for the 5 GHz
wireless network. Wireless clients must use the same
security key or password to connect to the network.
Save Changes
Click this button to save your changes to the fields on
this screen.
Cancel
Click this button to restore the fields on this screen to
their last saved values without saving your changes.
Help
Click this button to view information about the fields on
this screen.
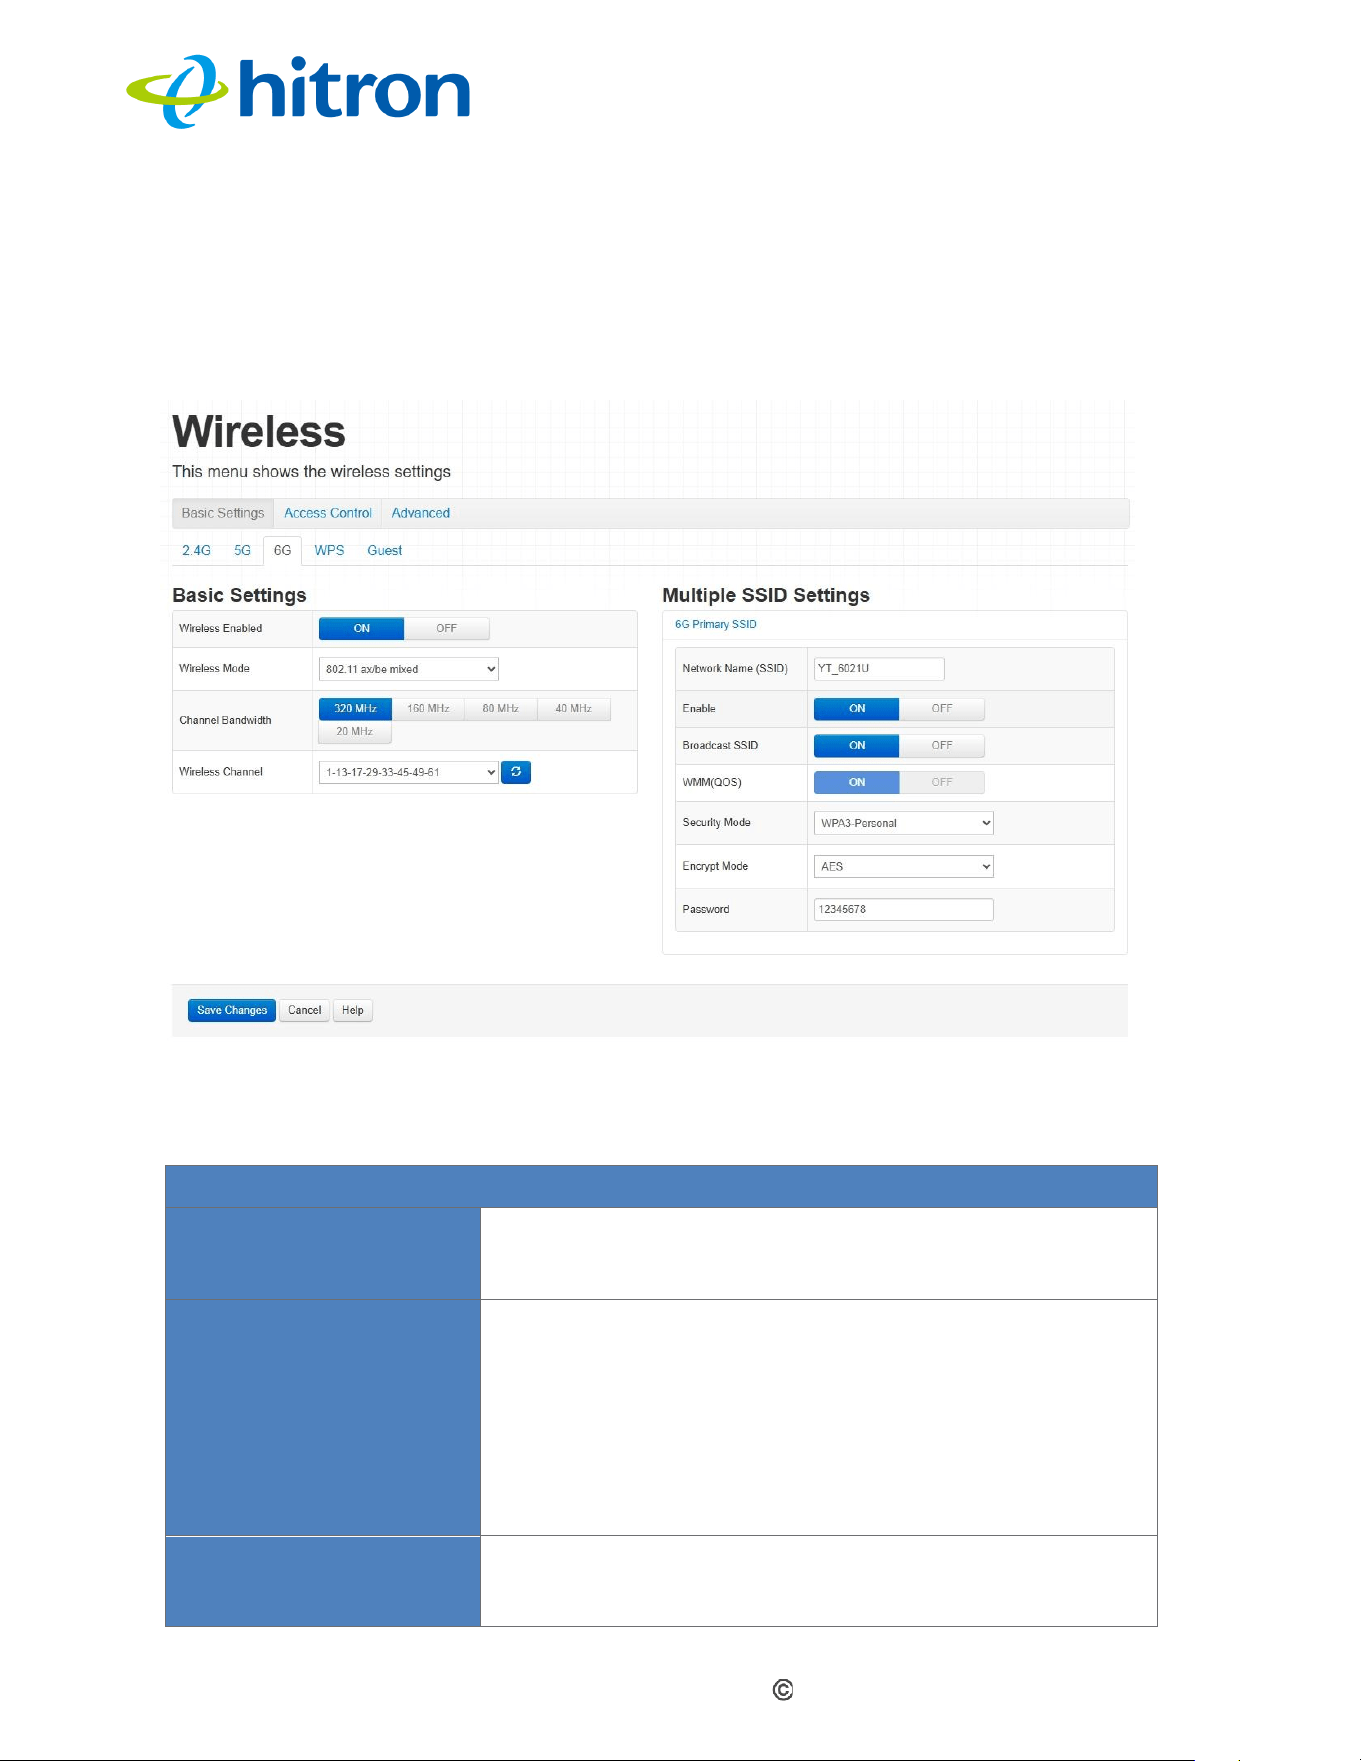
Hitron CODA60x1 User’s Guide
Version 1.0, 11/2020. Copyright
2012 Hitron Technologies
3
Version 1.0, 08/2026. Copyright
67
2026 Hitron Technologies
5.2.3
The Wireless: Basic Settings: 6G Screen
Use the 6GHz network screen to enable 6GHz wireless clients to connect to the
CODA60x1.
Click Wireless > Basic Settings > 6G. The following screen displays.
Figure: The Wireless: Basic Settings: 6G Screen
The following table describes the labels in this screen.
Table: The Wireless: Basic Settings: 6G Screen
6G Basic Settings
Wireless Enabled
Select On to enable the 6 GHz wireless network.
Select Off to disable the 6 GHz wireless network.
Wireless Mode
Select the type of 6GHz wireless network that you want
to use:
802.11 ax/be Mixed: Supports IEEE 802.11ax and
802.11be.
Only wireless clients that support the selected wireless
standard can connect to the wireless network.
Channel Bandwidth
Use this field to configure the width of the radio channel
that the CODA60x1 uses to communicate with wireless
clients on the 6 GHz network.
Hitron CODA60x1 User’s Guide
Version 1.0, 11/2020. Copyright
2012 Hitron Technologies
3
Version 1.0, 08/2026. Copyright
68
2026 Hitron Technologies
A wider channel can provide higher data throughput,
but may also be more susceptible to interference and
may not be supported in all environments.
Select 20 MHz to use a 20 MHz channel.
Select 40 MHz t to use a 40 MHz channel.
Select 80 MHz to use an 80 MHz channel.
Select 160 MHz to use a 160 MHz channel, where
supported by the wireless client and available in the
selected regulatory domain.
Select 320 MHz to use a 320 MHz channel, where
supported by the wireless client and available in the
selected regulatory domain.
Wireless Channel
Select the 6 GHz wireless channel that you want to
use, or select Auto to allow the CODA60x1 to
automatically select the optimal channel.
NOTE: Use Auto unless you have a specific reason to
select a channel manually.
Click the Refresh button ( )o have the CODA60x1
recheck the current wireless environment and
automatically select the optimal 6 GHz wireless
channel(see Automatic Channel Selection).
WPS Enabled
Use this field to turn Wi-Fi Protected Setup (WPS) on or
off on the 5 GHz network (see WPS).
Select ON to enable WPS.
Select OFF to disable WPS.
Multiple SSID Settings
Network Name (SSID)
Enter the name that you want to use for this SSID. This
is the name that identifies your wireless network and is
used by wireless clients to connect to the network.
NOTE: It is recommended that you change the default
SSID for security reasons.
Enable
Use this field to enable or disable the SSID.
Select ON to enable the SSID.
Select OFF to disable the SSID.
Broadcast SSID
Use this field to enable or disable SSID broadcasting.
Select ON to broadcast the SSID. Wireless
devices within the coverage area can discover the
SSID when scanning for available networks and
may attempt to connect to the network.
Select OFF to prevent the CODA60x1 from
broadcasting the SSID. Wireless clients must
Hitron CODA60x1 User’s Guide
Version 1.0, 11/2020. Copyright
2012 Hitron Technologies
3
Version 1.0, 08/2026. Copyright
69
2026 Hitron Technologies
know the SSID to attempt to connect to the
network.
WMM(QoS)
This field displays whether Wi-Fi Multimedia (WMM)
Quality of Service (QoS) is Enabled or Disabled for
this SSID.
Security Mode
Select the type of wireless security to use on the 5 GHz
network.
Select WPA3-Personal to use Wi-Fi
Protected Access 3 (WPA3) with
Simultaneous Authentication of Equals
(SAE).
Select Enhanced Open (OWE) to provide
encryption without requiring a password or
pre-shared key.
Encrypt Mode
Select the encryption method to use on the 5 GHz
network. The available options depend on the security
mode selected in the other fields on this screen.
Select AES to use the Advanced
Encryption Standard (AES).
Password
Enter the security key or password to use for the 6 GHz
wireless network. Wireless clients must use the same
security key or password to connect to the network.
Save Changes
Click this button to save your changes to the fields on
this screen.
Cancel
Click this button to restore the fields on this screen to
their last saved values without saving your changes.
Help
Click this button to view information about the fields on
this screen.
5.2.4
The Wireless: Basic Settings: WPS Screen
Use the WPS screen to enable WPS-capable wireless clients to connect to the
CODA60x1 via a simple push-button, or by entering a password. See WPS.
Click Wireless > Basic Settings > WPS. The following screen displays.
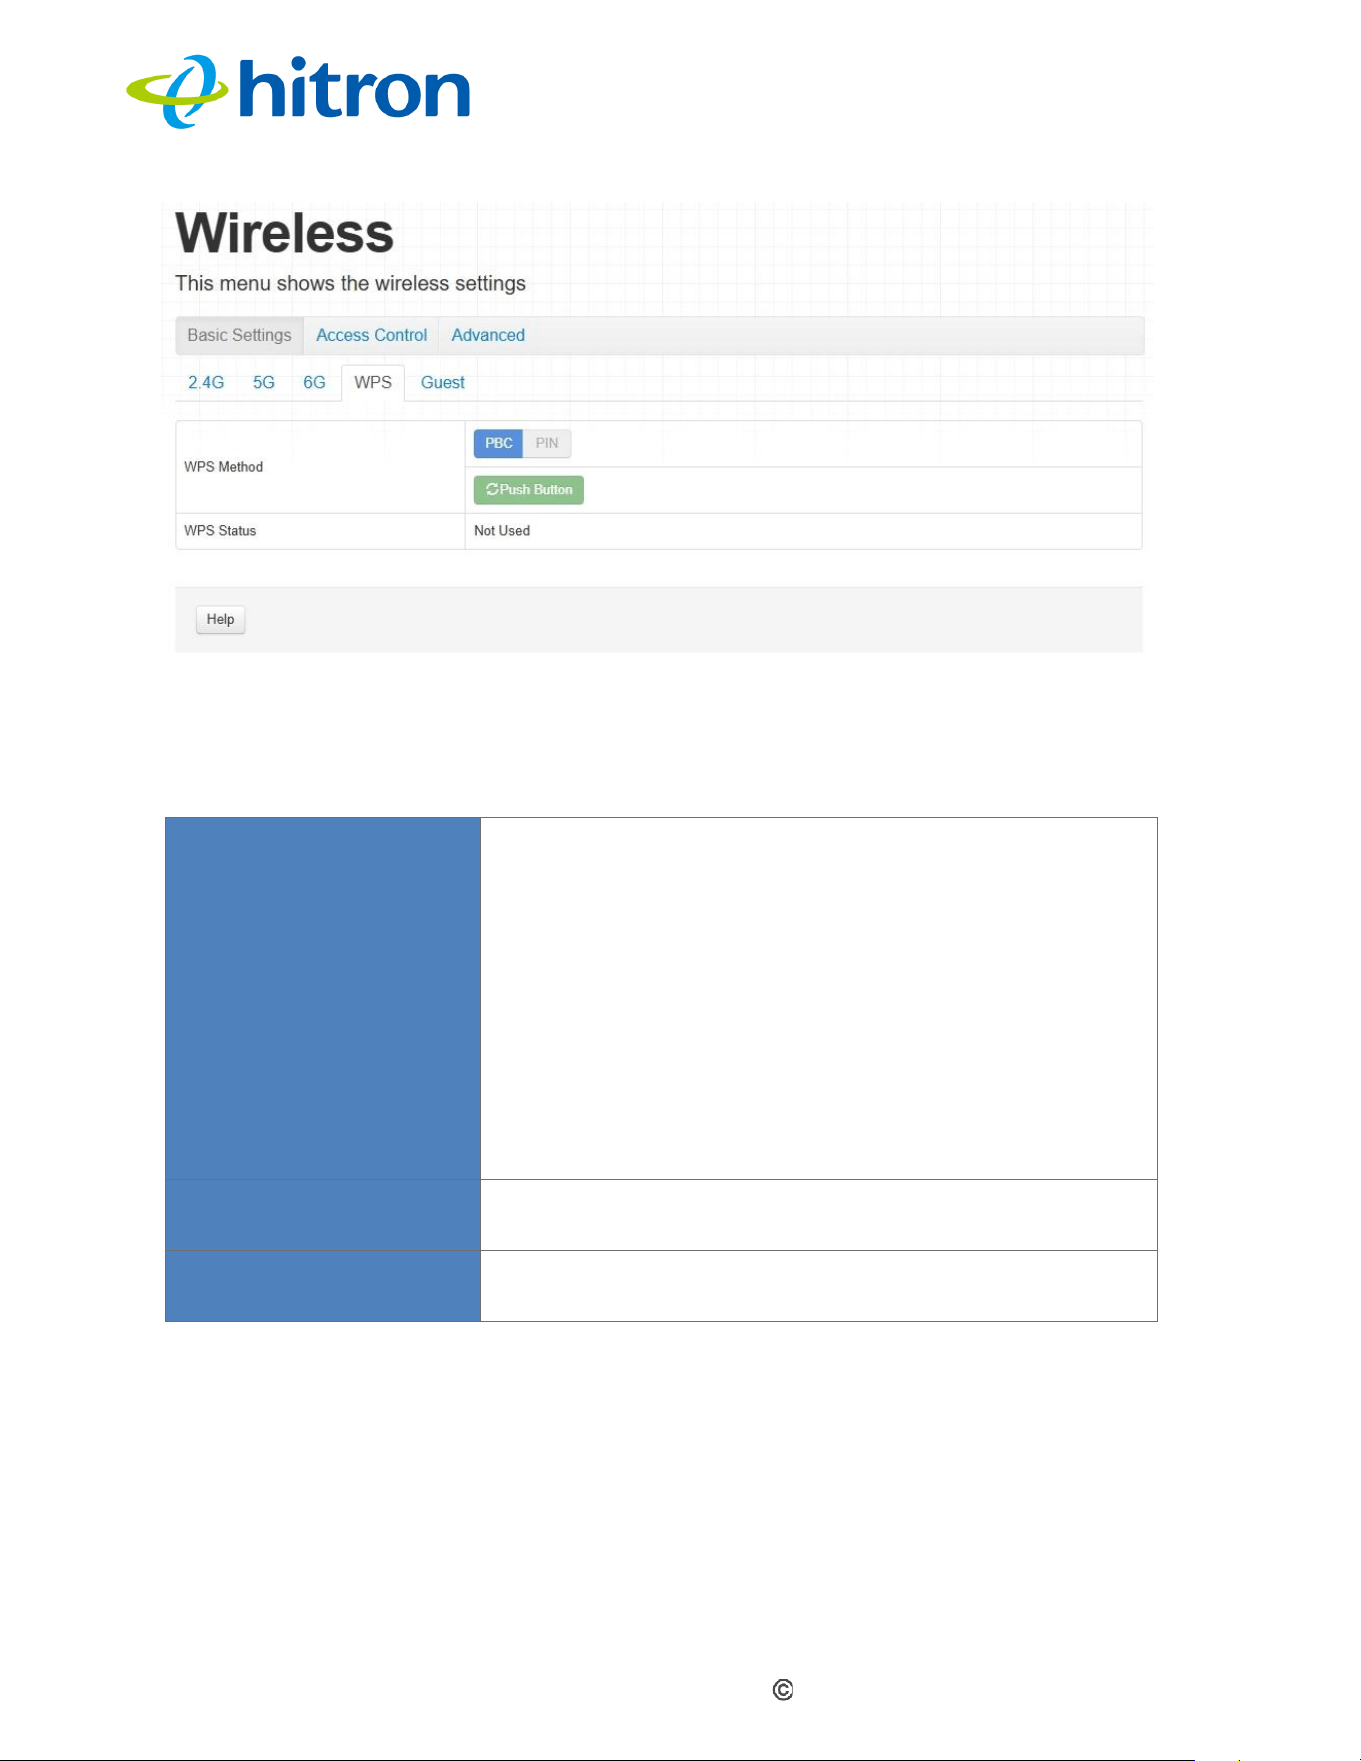
Hitron CODA60x1 User’s Guide
Version 1.0, 11/2020. Copyright
2012 Hitron Technologies
3
Version 1.0, 08/2026. Copyright
70
2026 Hitron Technologies
Figure: The Wireless: Basic Settings: WPS Screen
The following table describes the labels in this screen.
Table: The Wireless: Basic Settings: WPS Screen
WPS Method
Use these buttons to run Wifi Protected Setup (WPS):
Click the PBC button and then Push Button to
begin the Push Button Configuration process.
Within two minutes, press the WPS button on the
wireless client device to register it with the wireless
network.
Click the PIN button to begin the PIN configuration
process. On the screen that appears, enter the
WPS PIN of the CODA60x1 or the WPS PIN of the
wireless client device that you want to add to the
network.
WPS Status
Displays whether the CODA60x1 is currently using Wi-
Fi Protected Setup (WPS).
Help
Click this button to view information about the fields on
this screen.
5.2.5
The Wireless: Basic Settings: Guest Screen
Use the Guest Network screen to enable wireless clients to connect to the
CODA60x1 with reduced privileges.
Click Wireless > Basic Settings > Guest. The following screen displays.
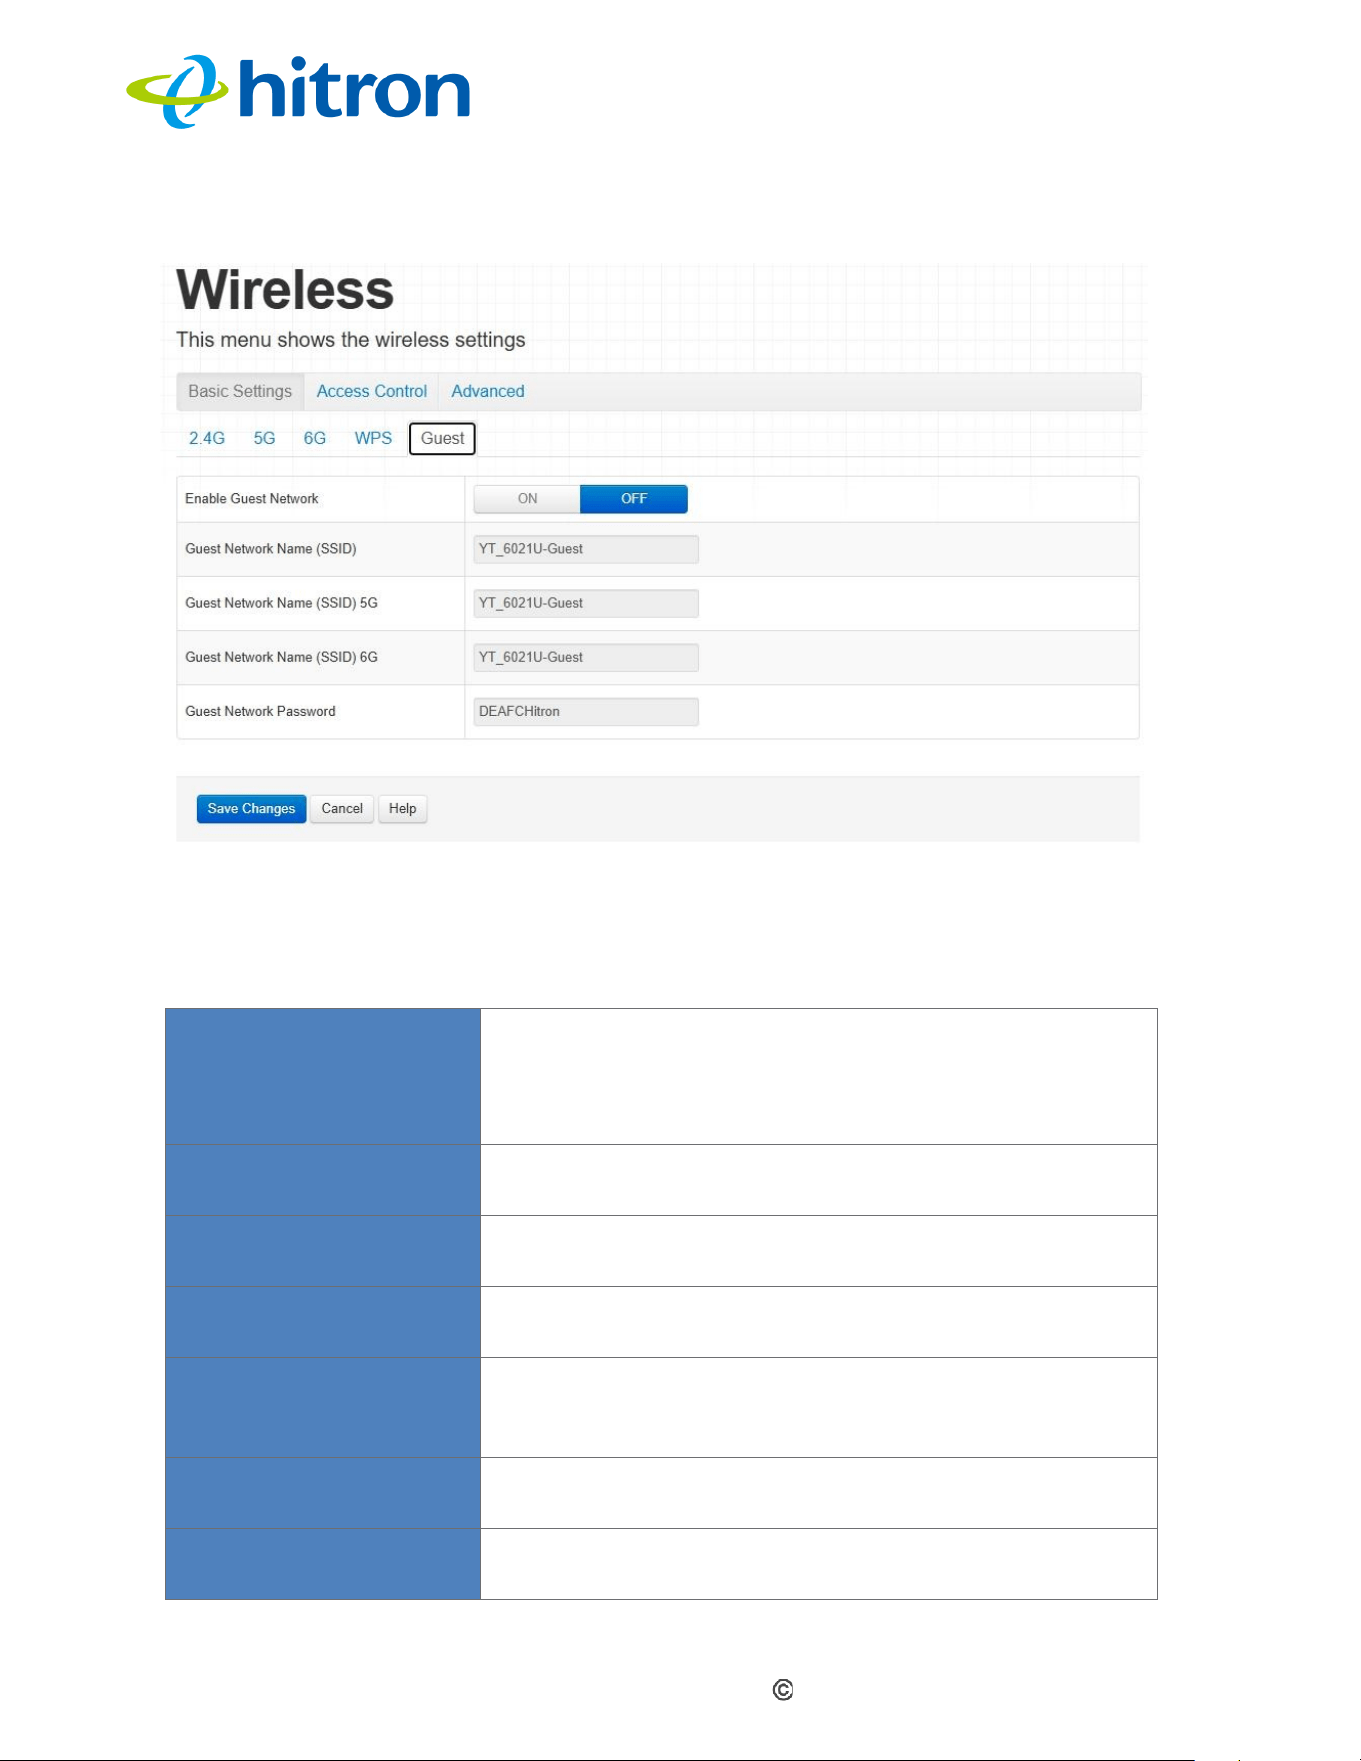
Hitron CODA60x1 User’s Guide
Version 1.0, 11/2020. Copyright
2012 Hitron Technologies
3
Version 1.0, 08/2026. Copyright
71
2026 Hitron Technologies
Figure: The Wireless: Basic Settings: Guest Screen
The following table describes the labels in this screen.
Table: The Wireless: Basic Settings: Guest Screen
Enable Guest Network
Use this field to enable or disable the guest network.
Select ON to enable the guest network.
Select OFF to disable the guest network.
Guest Network Name
(SSID)
Enter the SSID to use for the 2.4 GHz wireless guest
network.
Guest Network Name
(SSID) 5G
Enter the SSID to use for the 5 GHz wireless guest
network.
Guest Network Name
(SSID) 6G
Enter the SSID to use for the 6 GHz wireless guest
network.
Guest Network Password
Enter the password that wireless clients must use to
connect to the 2.4 GHz, 5 GHz, or 6 GHz wireless
guest network.
Save Changes
Click this button to save your changes to the fields on
this screen.
Cancel
Click this button to restore the fields on this screen to
their last saved values without saving your changes.
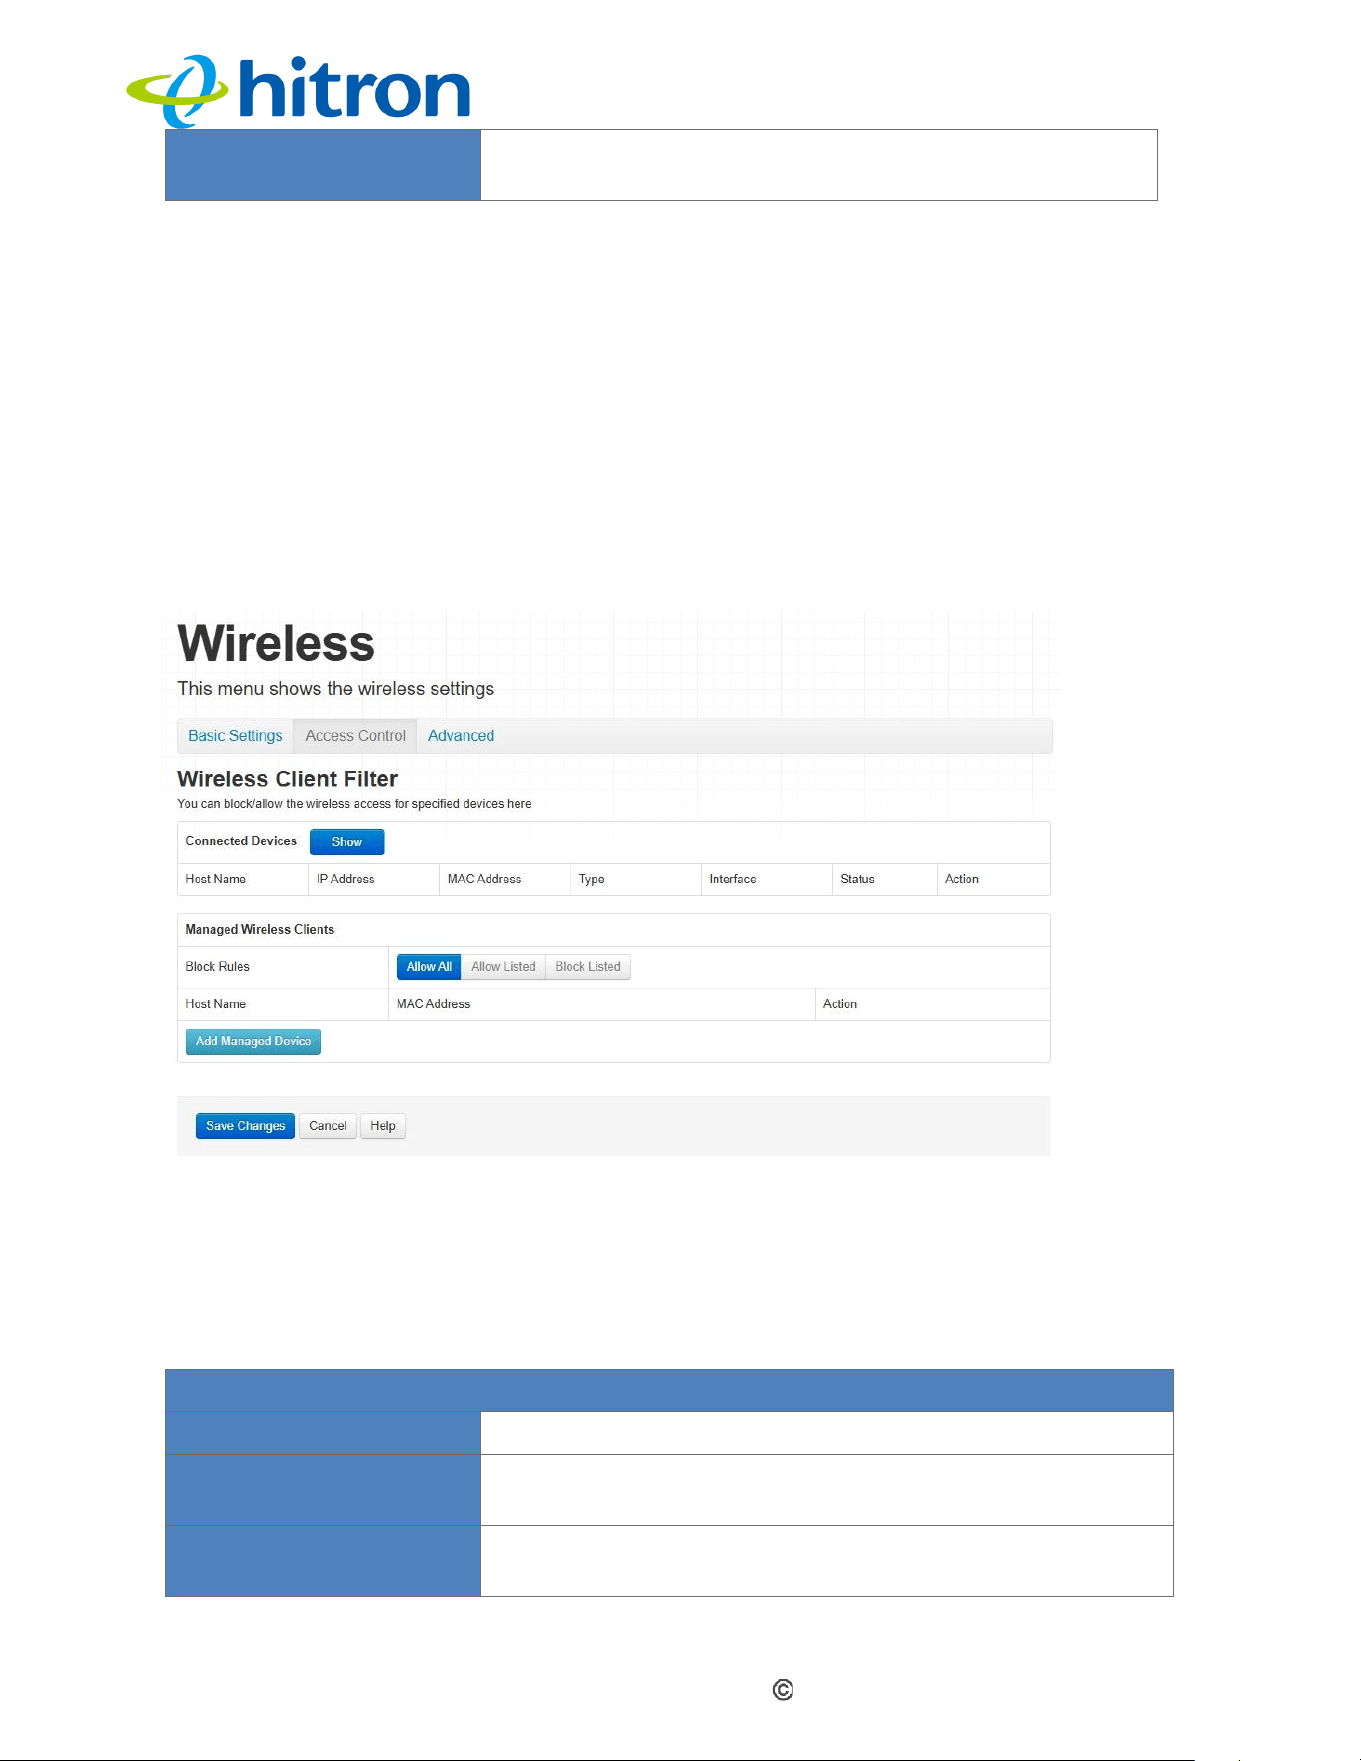
Hitron CODA60x1 User’s Guide
Version 1.0, 11/2020. Copyright
2012 Hitron Technologies
3
Version 1.0, 08/2026. Copyright
72
2026 Hitron Technologies
Help
Click this to see information about the fields in this
screen.
5.3
The Wireless: Access Control Screen
Use this screen to manage the CODA60x1's wireless network SSIDs and control
which devices can connect to the wireless network.
Click Wireless > Access Control. The following screen displays.
Figure: The Wireless: Access Control Screen
The following table describes the labels in this screen.
Table: The Wireless: Access Control Screen
Connected Devices
Show/Refresh
Click this button to refresh the Connected Devices list.
Host Name
Displays the name of each network device connected to
the wireless network.
IP Address
Displays the IP address of each network device
connected to the wireless network.
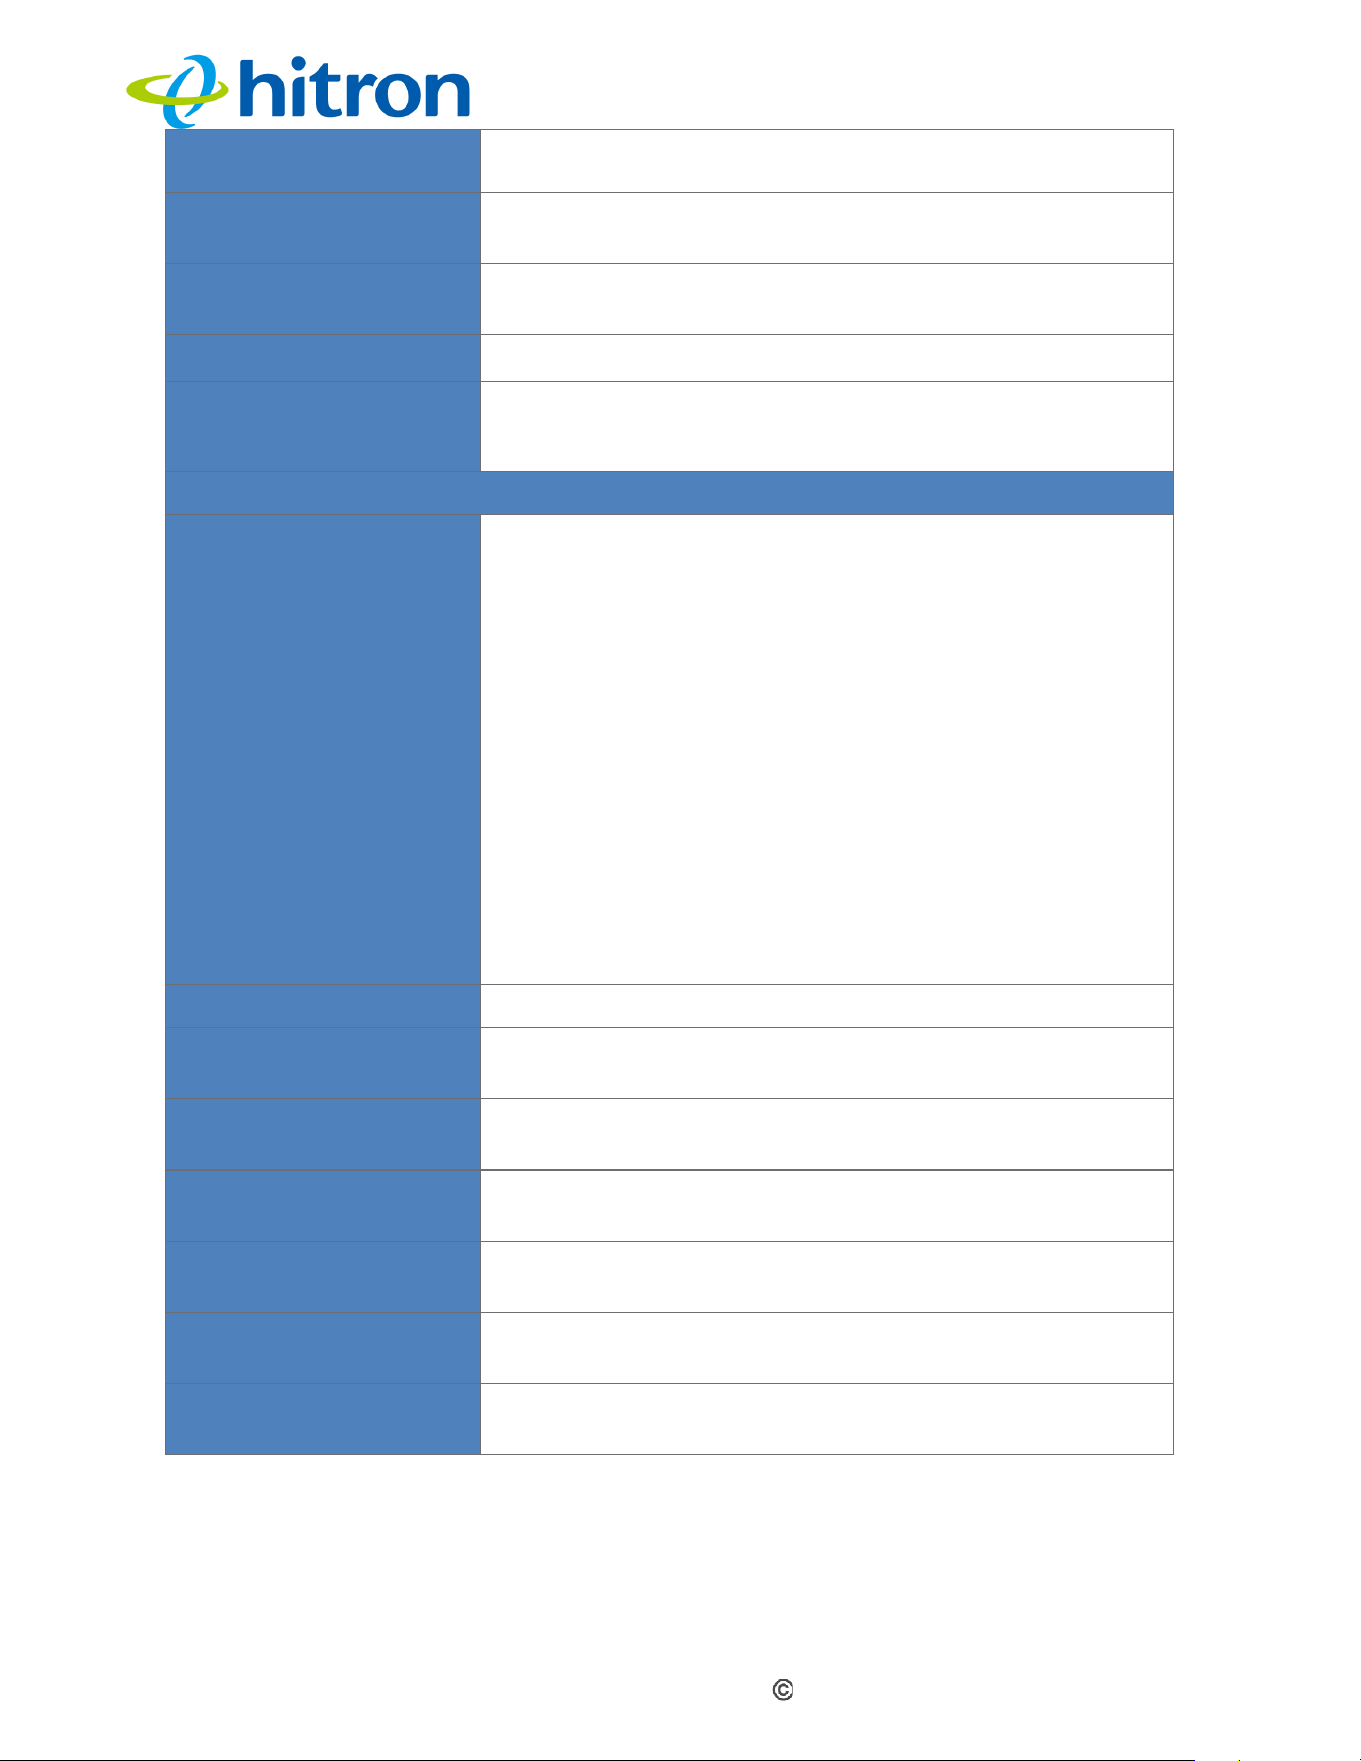
Hitron CODA60x1 User’s Guide
Version 1.0, 11/2020. Copyright
2012 Hitron Technologies
3
Version 1.0, 08/2026. Copyright
73
2026 Hitron Technologies
MAC Address
Displays the Media Access Control (MAC) address of
each network device connected to the wireless network.
Type
Displays whether the device's IP address was assigned
by DHCP (DHCP-IP) or is self-assigned.
Interface
Displays the name of the interface to which the relevant
device is connected.
Status
Displays whether the connected device is active.
Action
Click Manage to modify the device's filtering status. see
Adding or Editing a Managed Device for information
about the screen that is displayed.
Managed Wireless Clients
Block Rules
Use these options to control access for the devices
listed:
Select Allow All to ignore the Managed Devices
list and allow all devices to connect to the
CODA60x1.
Select Allow Listed to allow only the devices
added to the Managed Devices list to access the
CODA60x1 and the network. All other devices are
denied access.
Select Block Listed to allow all devices except
those added to the Managed Devices list to
access the CODA60x1 and the network. The
specified devices are denied access.
Host Name
Displays the name of each network device in the list.
MAC Address
Displays the Media Access Control (MAC) address of
each network device in the list.
Action
Click Remove to remove a managed device rule from
the list.
Save Changes
Click this button to save your changes to the fields on
this screen.
Add Managed Device
Click this button to add a new managed device rule(see
Adding or Editing a Managed Device).
Cancel
Click this button to restore the fields on this screen to
their last saved values without saving your changes.
Help
Click this button to view information about the fields on
this screen.
5.4
The Advanced Wireless settings Screen
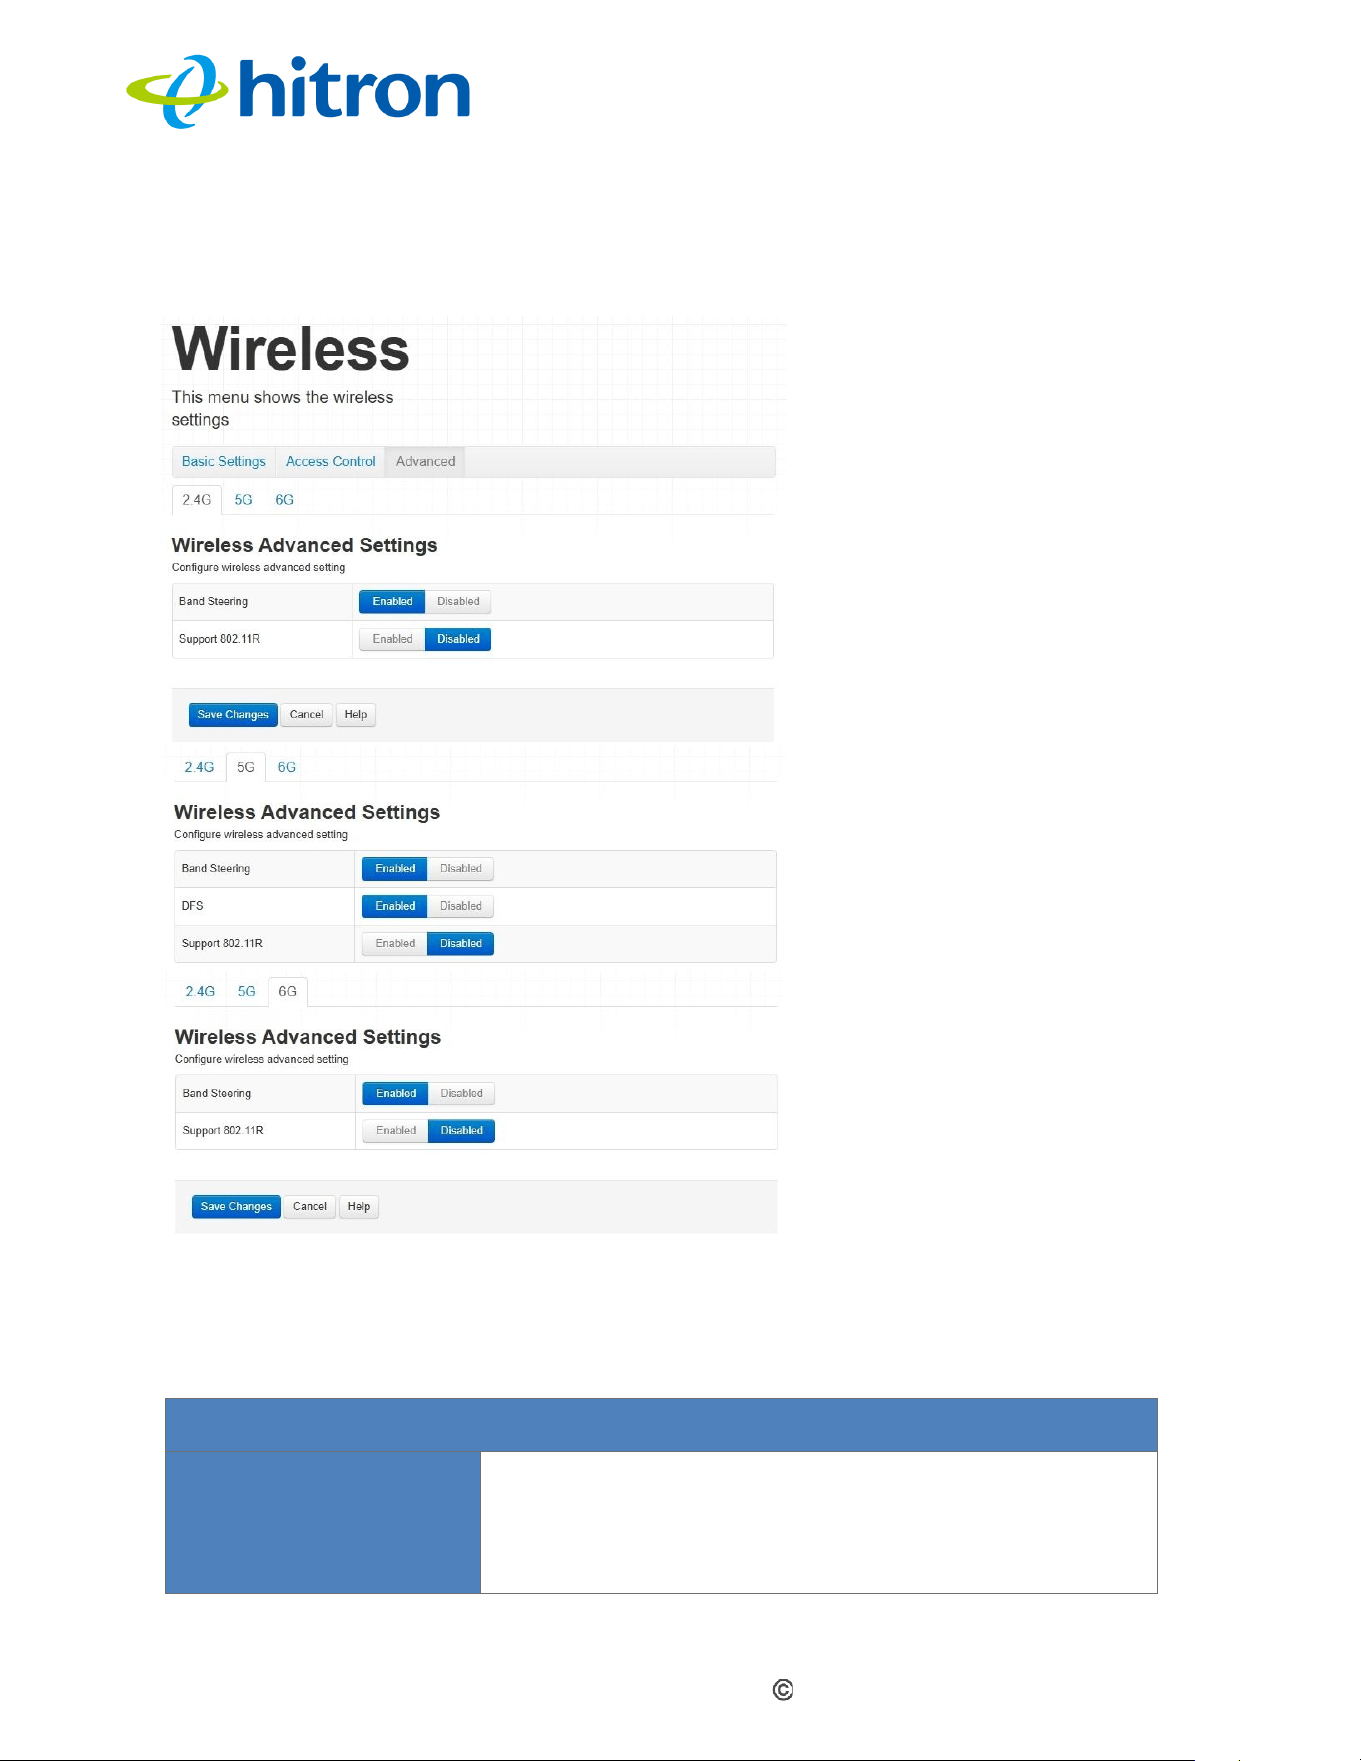
Hitron CODA60x1 User’s Guide
Version 1.0, 11/2020. Copyright
2012 Hitron Technologies
3
Version 1.0, 08/2026. Copyright
74
2026 Hitron Technologies
Use this screen to configure the advanced wireless settings.
Click Wireless > Advanced. The following screen
Figure: The Wireless Advanced settings
The following table describes the labels in this screen.
Table: The Wireless Advanced settings
2.4 G Wireless Advanced Settings
Band Steering
Use this field to enable or disable Band Steering for
the relevant wireless network.
Select Enable to enable Band Steering for the
relevant wireless network.
Hitron CODA60x1 User’s Guide
Version 1.0, 11/2020. Copyright
2012 Hitron Technologies
3
Version 1.0, 08/2026. Copyright
75
2026 Hitron Technologies
Select Disable to disable Band Steering for the
relevant wireless network
Support 802.11R
Use this field to enable or disable support for IEEE
802.11r Fast Roaming.
Select Enable to enable 802.11r support.
Select Disable to disable 802.11r support.
5 G Wireless Advanced Settings
Band Steering
Use this field to enable or disable Band Steering for
the relevant wireless network.
Select Enable to enable Band Steering for the
relevant wireless network.
Select Disable to disable Band Steering for the
relevant wireless network.
DFS
Use this field to enable or disable Dynamic Frequency
Selection (DFS) for the 5 GHz wireless network.
Select Enable to enable DFS.
Select Disable to disable DFS.
Support 802.11R
Use this field to enable or disable support for IEEE
802.11r Fast Roaming.
Select Enable to enable 802.11r support.
Select Disable to disable 802.11r support.
6 G Wireless Advanced Settings
Band Steering
Use this field to enable or disable Band Steering for
the relevant wireless network.
Select Enable to enable Band Steering for the
relevant wireless network.
Select Disable to disable Band Steering for the
relevant wireless network.
Support 802.11R
Use this field to enable or disable support for IEEE
802.11r Fast Roaming.
Select Enable to enable 802.11r support.
Select Disable to disable 802.11r support.
Save Changes
Click this to save your changes to the fields in this
screen.
Cancel
Click this to return the fields in this screen to their last-
saved values without saving your changes.
Help
Click this to see information about the fields in this
screen.

Hitron CODA60x1 User’s Guide
Version 1.0, 11/2020. Copyright
2012 Hitron Technologies
3
Version 1.0, 08/2026. Copyright
76
2026 Hitron Technologies
6
Administration
This chapter describes the screens available under Admin in the toolbar. It contains
the following sections:
Admin Overview
The Admin: Management Screen
The Admin: Diagnostics Screen
The Admin: Backup Screen
The Admin: Backup Screen
The Admin: Time Setting
The Admin: USB Storage Screen
The Admin: Device Reset Screen
The Admin: IP Passthrough Screen
6.1
Administration Overview
This section describes some of the concepts related to the Admin screens.
Ping: This tool allows you to enter an IP address and determine whether a
computer or other network device responds to that address on the network.
The name is derived from the pulse emitted by submarine SONAR
systems when detecting underwater objects, as the process is
conceptually similar. You can use this tool to determine whether an IP
address is in use or to check whether a device with a known IP address is
operating properly.
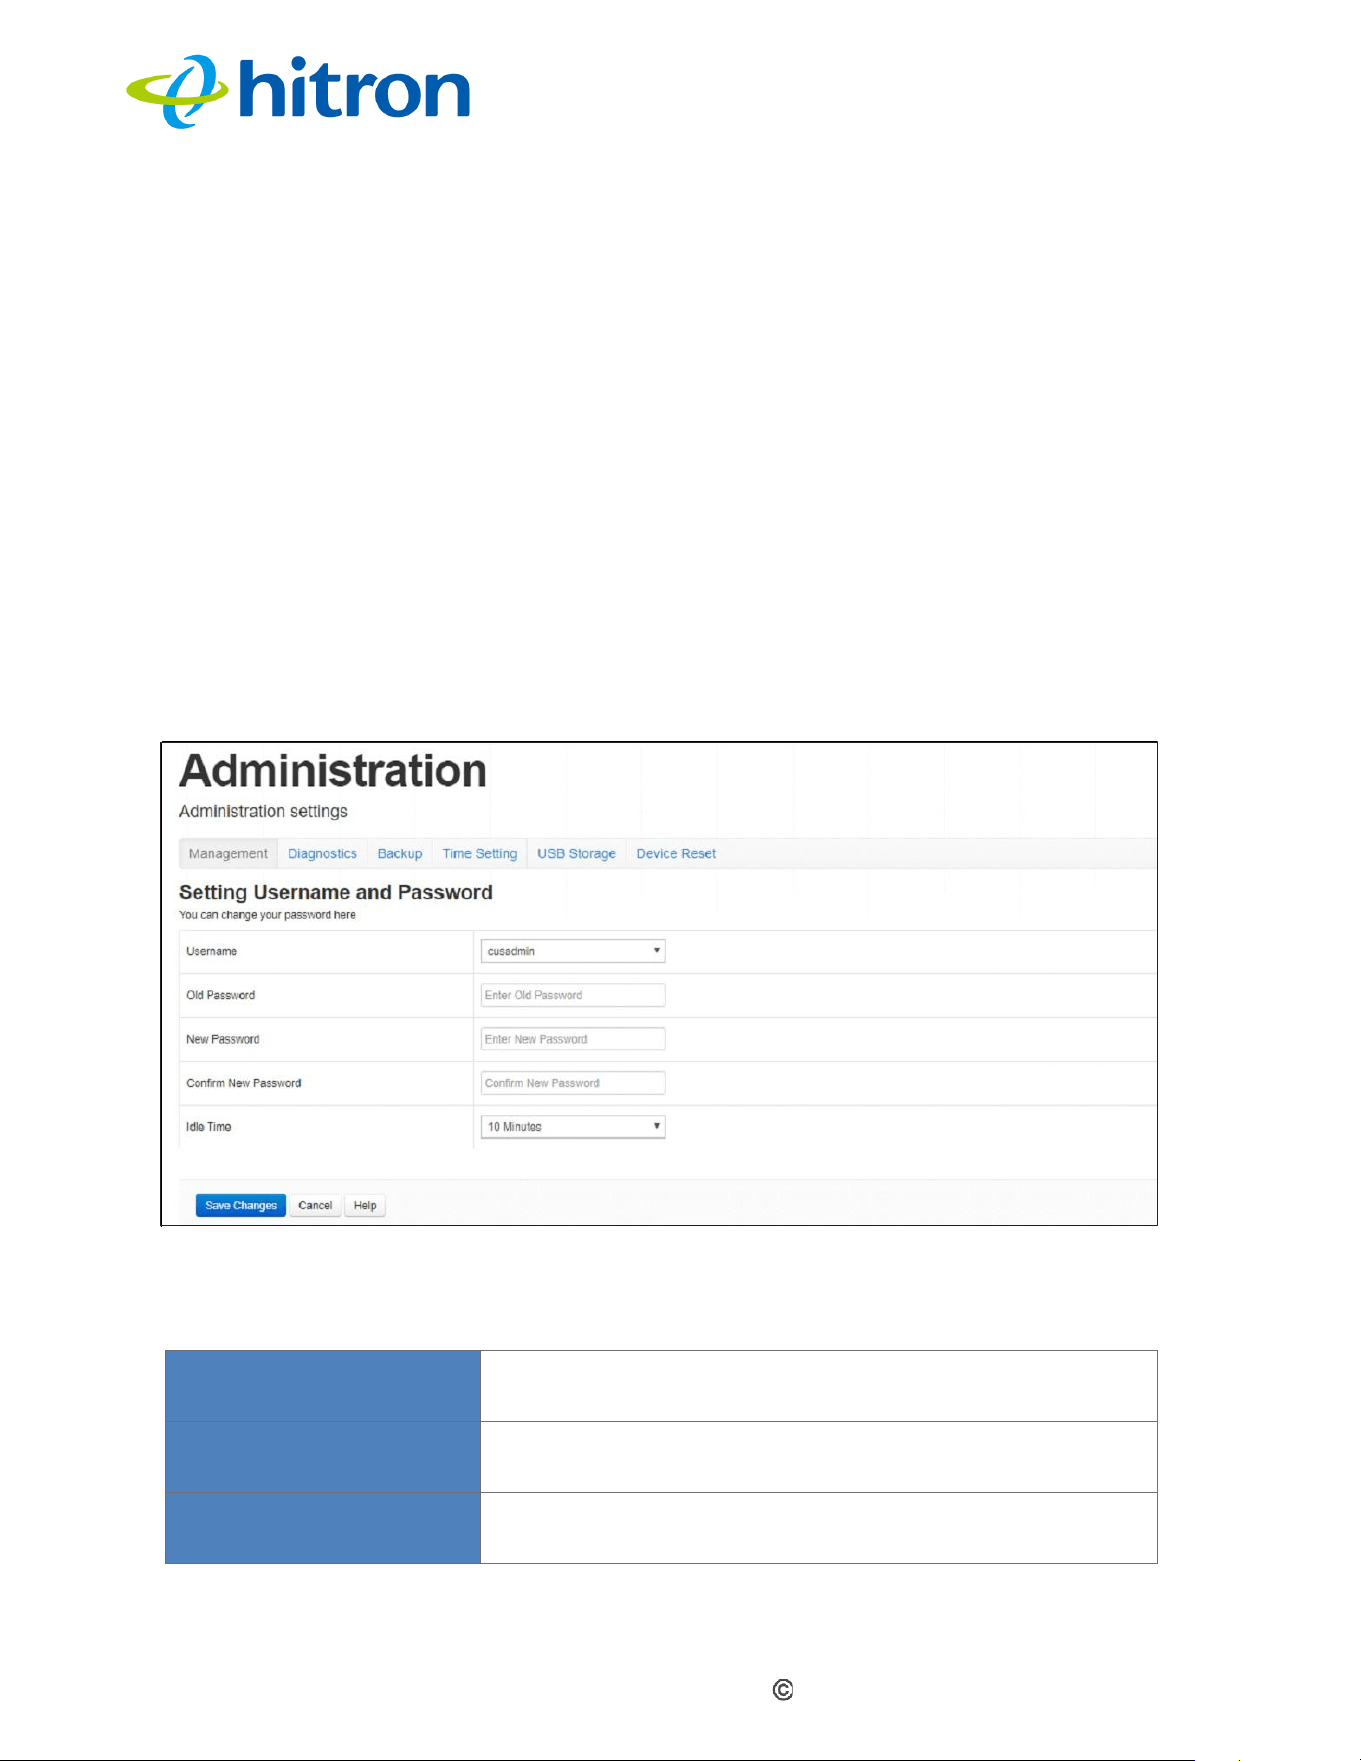
Hitron CODA60x1 User’s Guide
Version 1.0, 11/2020. Copyright
2012 Hitron Technologies
3
Version 1.0, 08/2026. Copyright
77
2026 Hitron Technologies
Traceroute: This tool allows you to view the route taken by data packets from
the CODA60x1 to a specified destination. You can use this tool to
troubleshoot routing problems or identify network devices or firewalls that may
be blocking access to a computer or service.
6.2
The Administration: Management Screen
Use this screen to change the CODA60x1's login credentials, including the
username and password, and configure the inactivity timeout.
NOTE: If you forget your password, you must reset the CODA60x1 to its factory
default settings.
Click Admin > Management. The following screen displays.
Figure: The Admin: Management Screen
The following table describes the labels in this screen.
Table: The Admin: Management Screen
Username
If the CODA60x1 supports multiple user accounts,
select the account that you want to modify from the list.
Old Password
Enter the password currently used to log in to the
CODA60x1 with this account.
New Password
Enter the new password that you want to use to log in
to the CODA60x1 with this account.
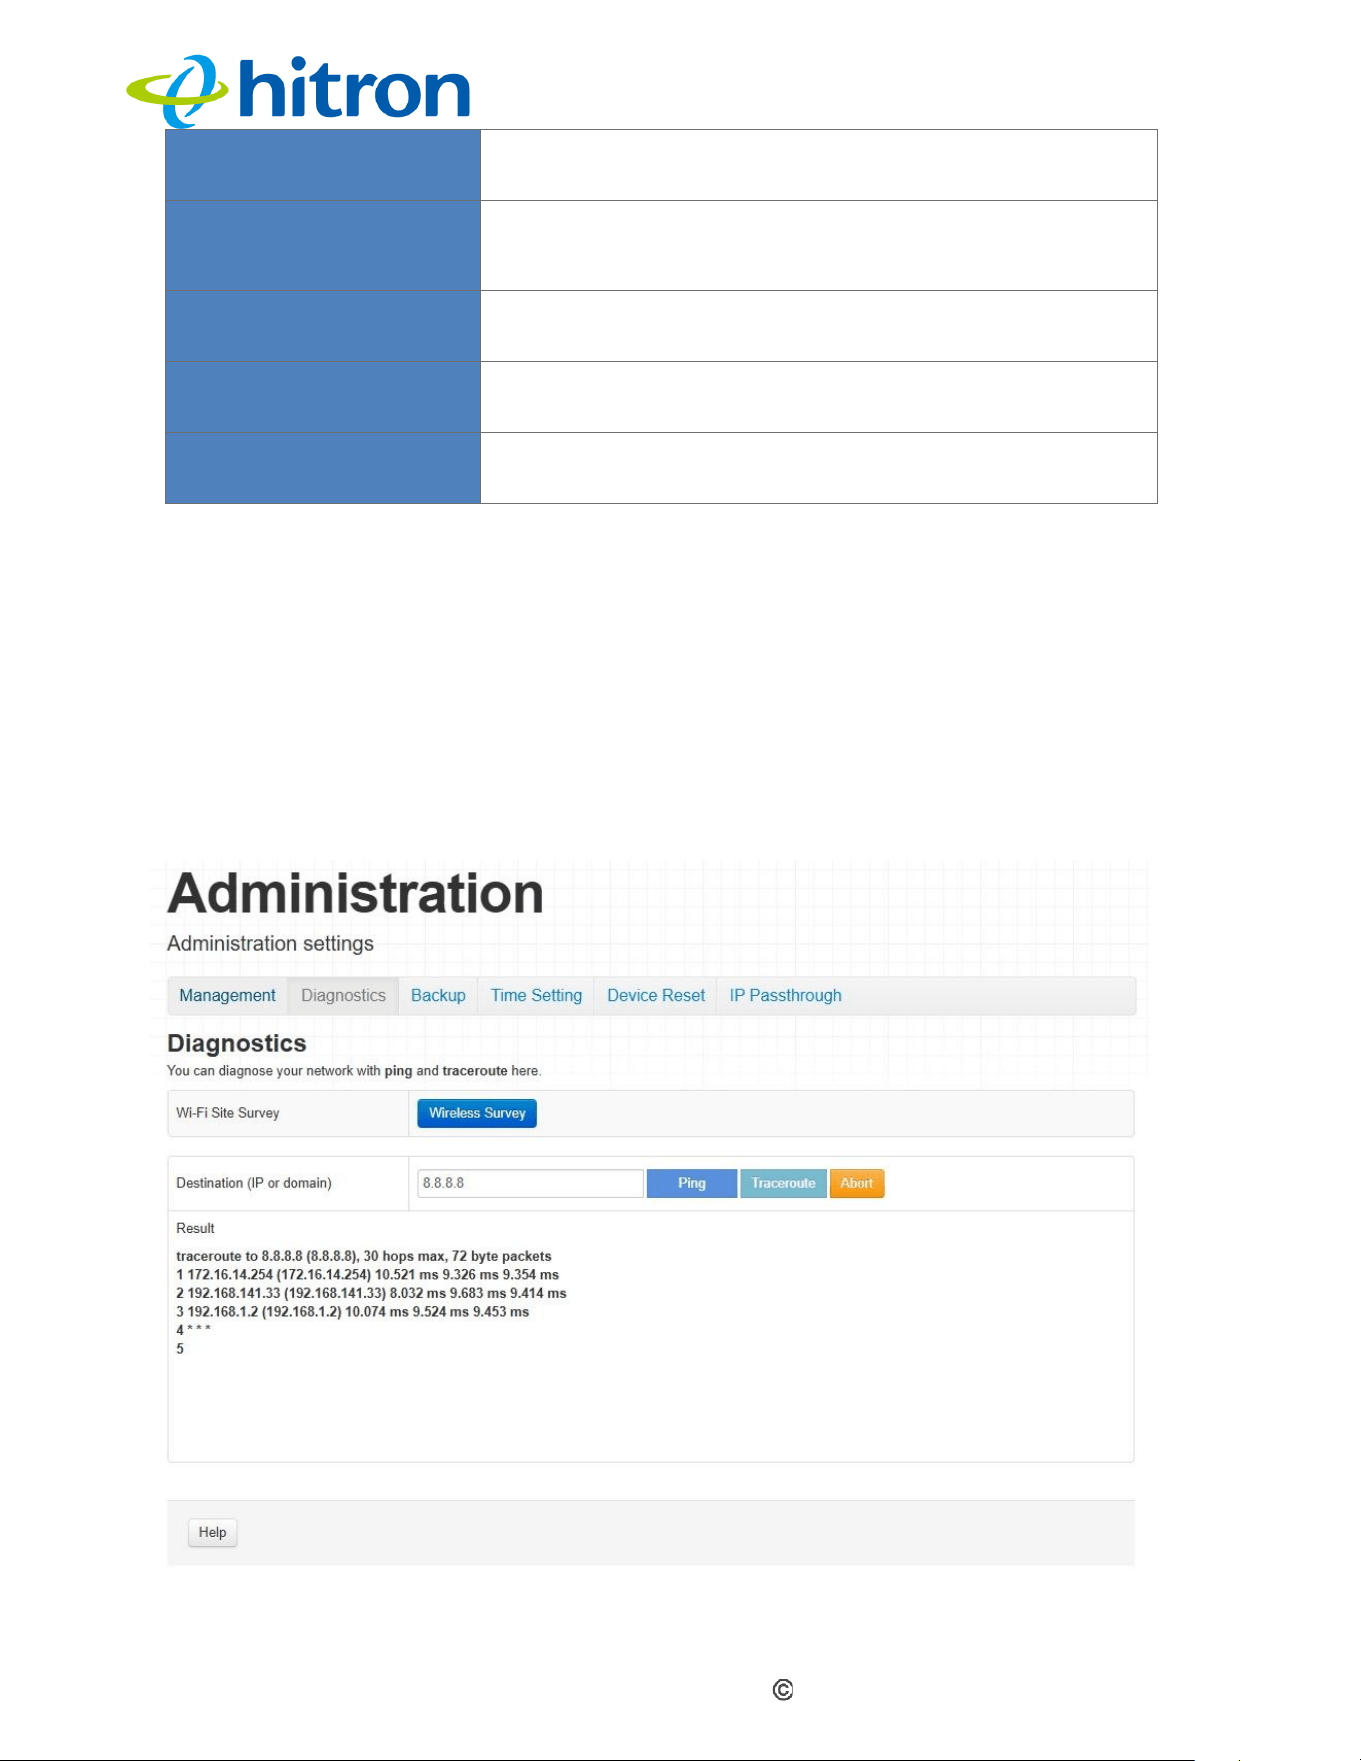
Hitron CODA60x1 User’s Guide
Version 1.0, 11/2020. Copyright
2012 Hitron Technologies
3
Version 1.0, 08/2026. Copyright
78
2026 Hitron Technologies
Confirm New Password
Re-enter the new password to confirm that it is correct.
Idle Time
Select the time interval after which an inactive user is
automatically logged out of the CODA60x1's admin
interface.
Save Changes
Click this button to save your changes to the fields on
this screen.
Cancel
Click this button to restore the fields on this screen to
their last saved values without saving your changes.
Help
Click this button to view information about the fields on
this screen.
6.3
The Administration: Diagnostics Screen
Use this screen to perform ping and traceroute tests on IP addresses or URLs.
Click Admin > Diagnostics The following screen displays.
Figure: The Admin: Diagnostics Screen
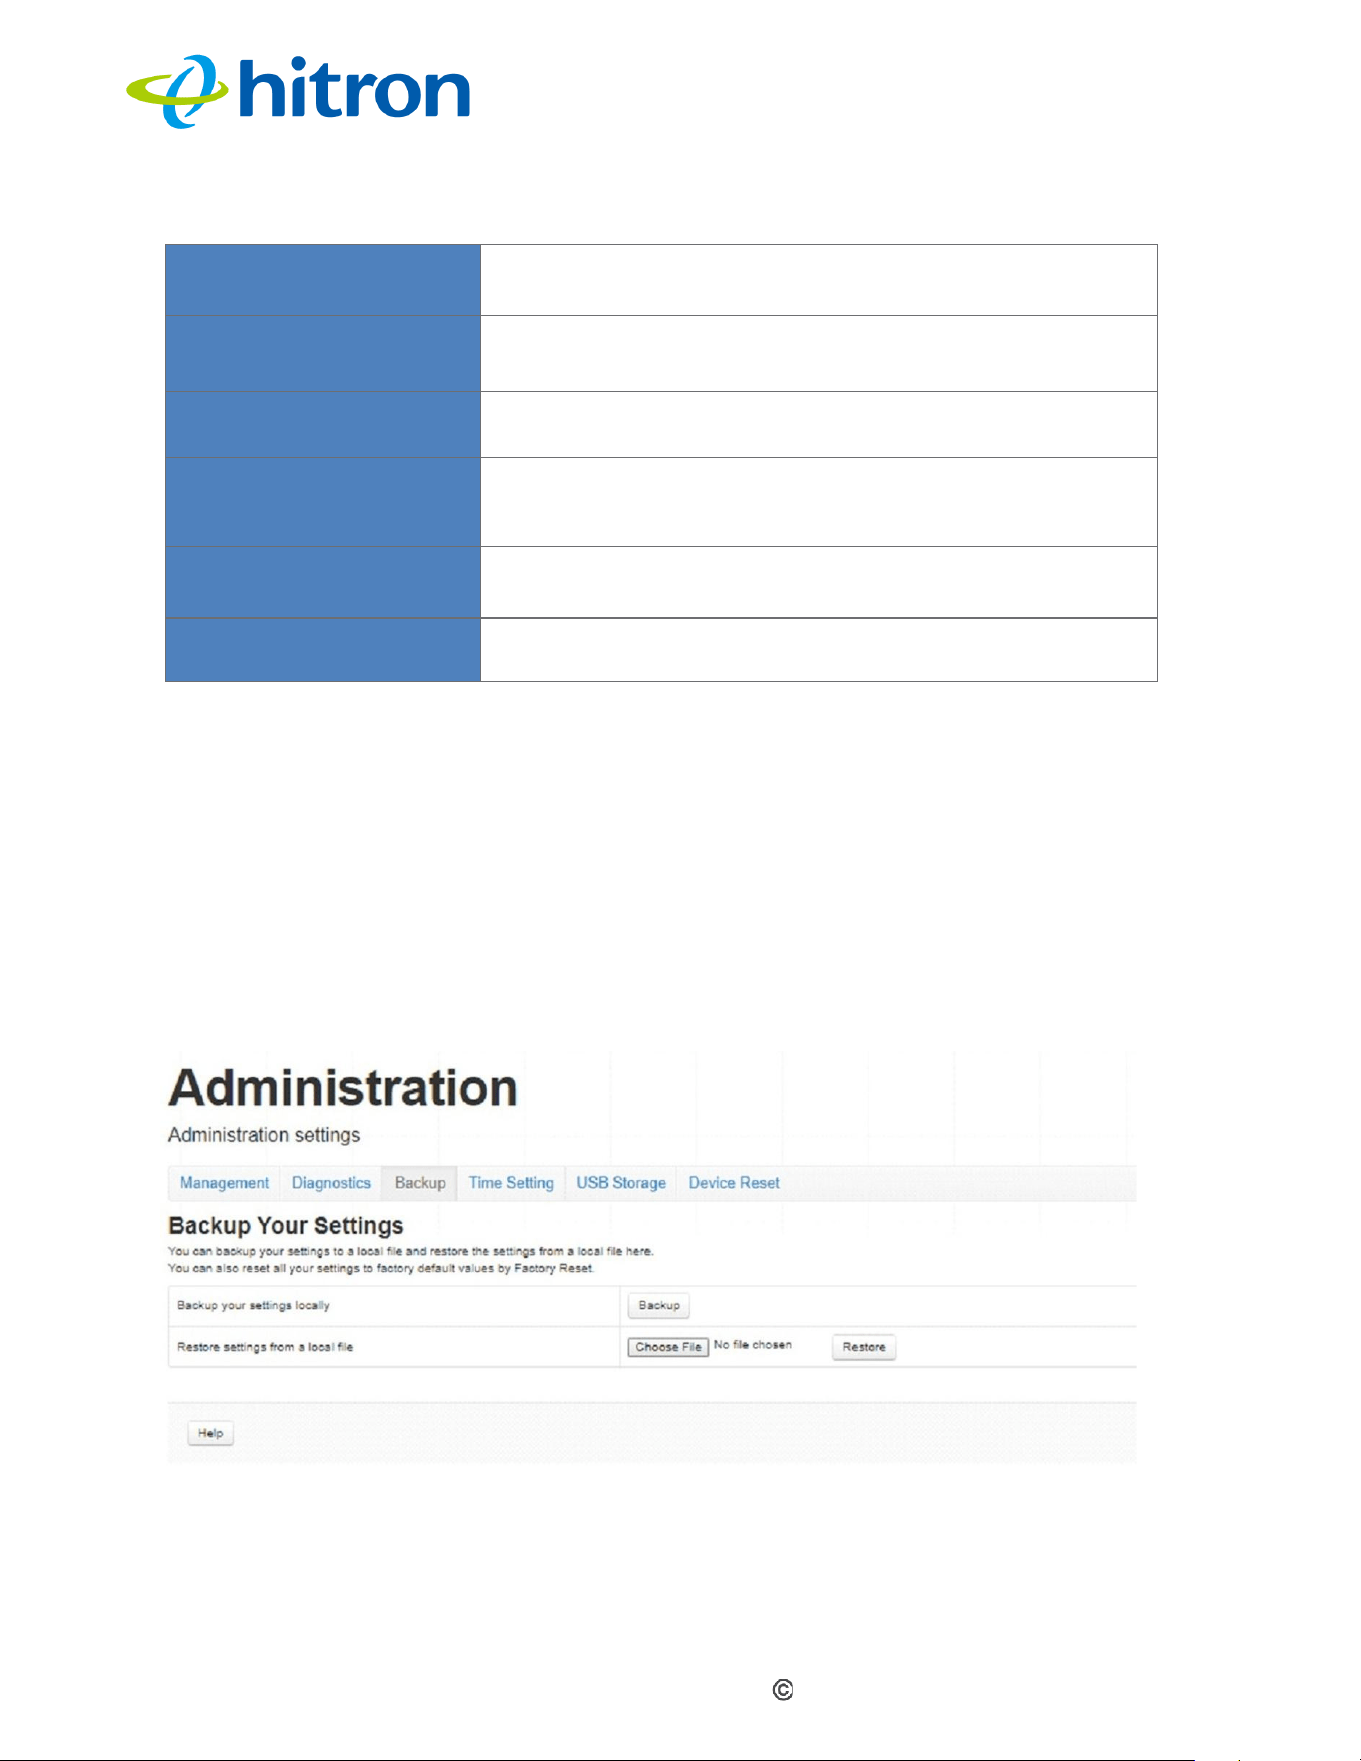
Hitron CODA60x1 User’s Guide
Version 1.0, 11/2020. Copyright
2012 Hitron Technologies
3
Version 1.0, 08/2026. Copyright
79
2026 Hitron Technologies
The following table describes the labels in this screen.
Table: The Admin: Diagnostics Screen
Wi-Fi Site Survey
Click the Wireless Survey button to start a Wi-Fi site
survey.
Destination (IP or
Domain)
Enter the IP address or domain name that you want to
test.
Ping
Select Ping to test whether the specified Destination is
reachable.
Traceroute
Select Traceroute to trace the route from the
CODA60x1 to the specified Destination
Result
Displays the results of the most recently performed
test.
Abort
Click this button to terminate a test that is currently in
progress.
6.4
The Administration: Backup Screen
Use this screen to back up your CODA60x1’s settings to your computer or load
settings from a backup you created earlier.
Click Admin > Backup. The following screen displays.
Figure 40: The Admin: Backup Screen
The following table describes the labels in this screen.
Table: The Admin: Backup Screen
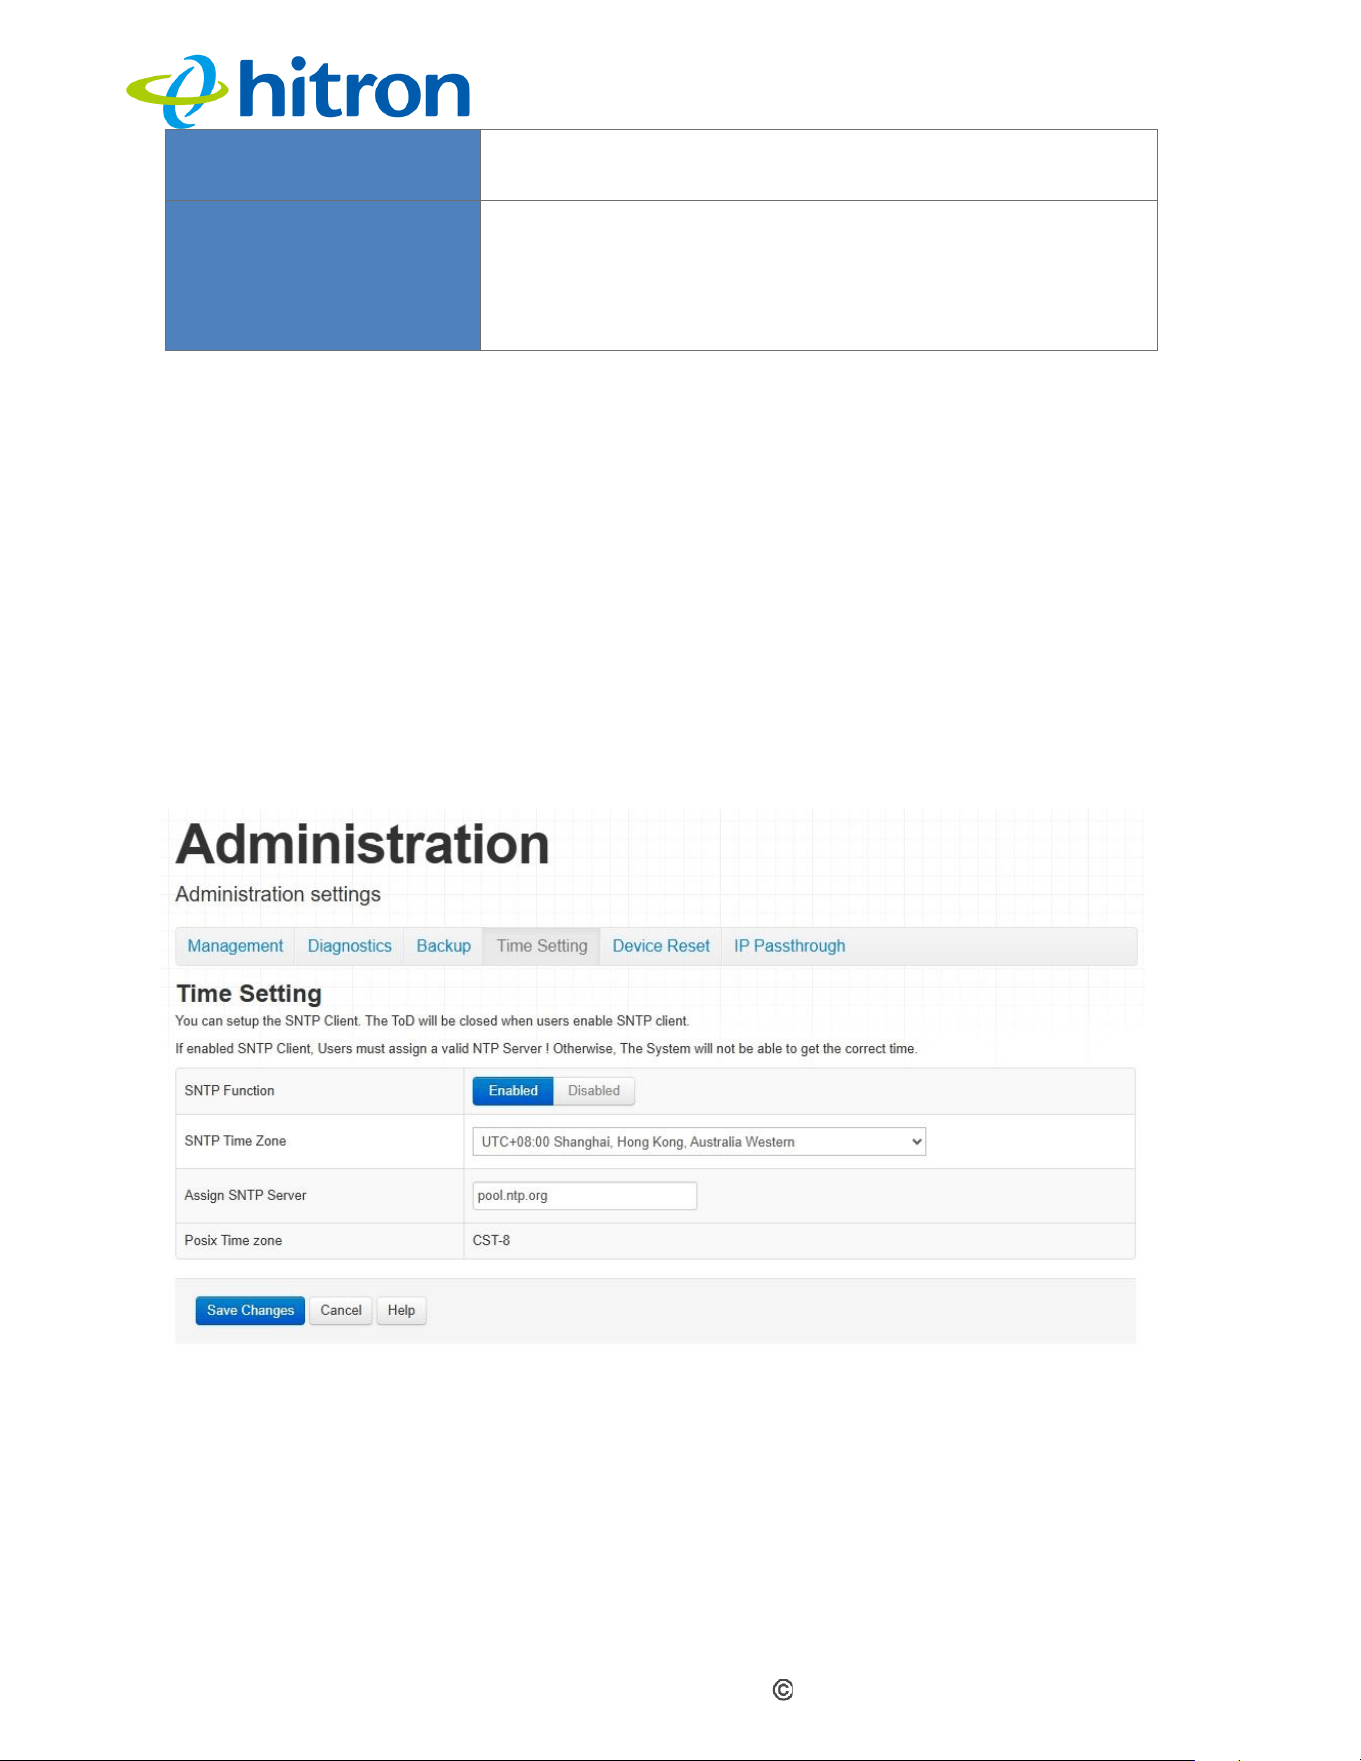
Hitron CODA60x1 User’s Guide
Version 1.0, 11/2020. Copyright
2012 Hitron Technologies
3
Version 1.0, 08/2026. Copyright
80
2026 Hitron Technologies
Back Up Your Settings
Locally
Click this button to create a backup of all your
CODA60x1's settings on your computer.
Restore Settings From a
Local File
Use these fields to restore your CODA60x1's settings
from a backup file that you created previously.
Click Choose File to select a backup file, and then
click Restore to restore your CODA60x1's settings
from the selected backup file.
6.5
The Administration: Time Setting
Use this screen to setup your CODA60x1 as a SNTP client, The ToD will be closed
when users enable SNTP client. If enabled SNTP client, User must assign a valid
NTP server. Otherwise, the system will not be able to get the correct time.
Click Admin > Time Setting The following screen displays.
Figure 41: The Admin: Time Setting Screen
The following table describes the labels in this screen.
Table: The Admin: Time Setting Screen
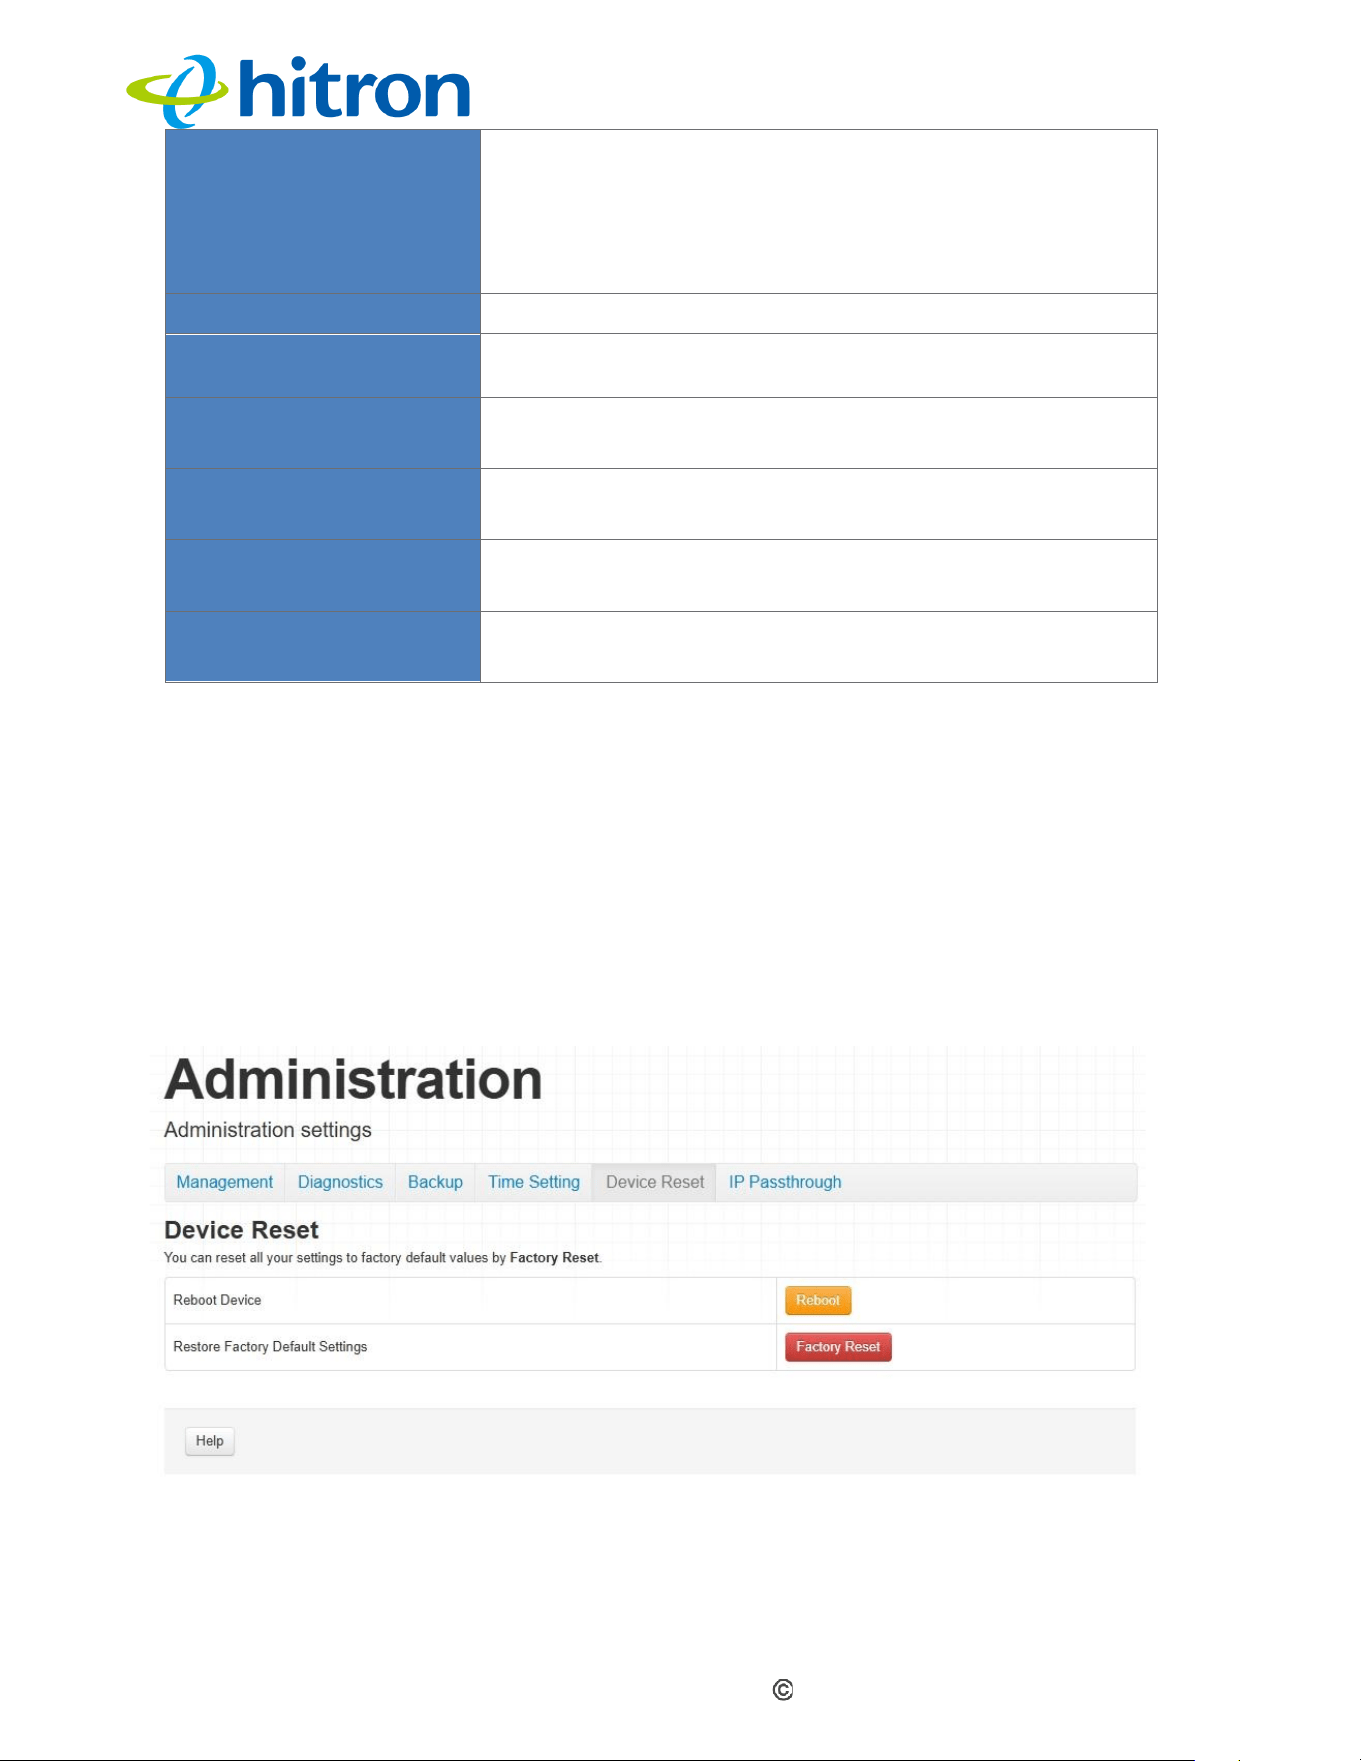
Hitron CODA60x1 User’s Guide
Version 1.0, 11/2020. Copyright
2012 Hitron Technologies
3
Version 1.0, 08/2026. Copyright
81
2026 Hitron Technologies
SNTP Function
Displays whether the SNTP function is enabled or
disabled.
Select Enabled to enable the SNTP function.
Select Disabled to disable the SNTP function.
SNTP Time Zone
Select the SNTP time zone from the drop-down list.
Assign SNTP Server
Enter or select the SNTP server to use for time
synchronization.
Automatically adjust for
daylight saving
Select this option to enable or disable automatic
adjustment for daylight saving time.
Save Changes
Click this button to save your changes to the fields on
this screen.
Cancel
Click this button to restore the fields on this screen to
their last saved values without saving your changes.
Help
Click this button to view information about the fields on
this screen.
6.6
The Admin: Device Reset Screen
Use this screen to reboot the CODA60x1 or restore it to its factory default settings.
Click Admin > Device Reset. The following screen displays.
Figure: The Admin: Device Reset Screen
The following table describes the labels in this screen.
Table 35: The Admin: Device Reset Screen
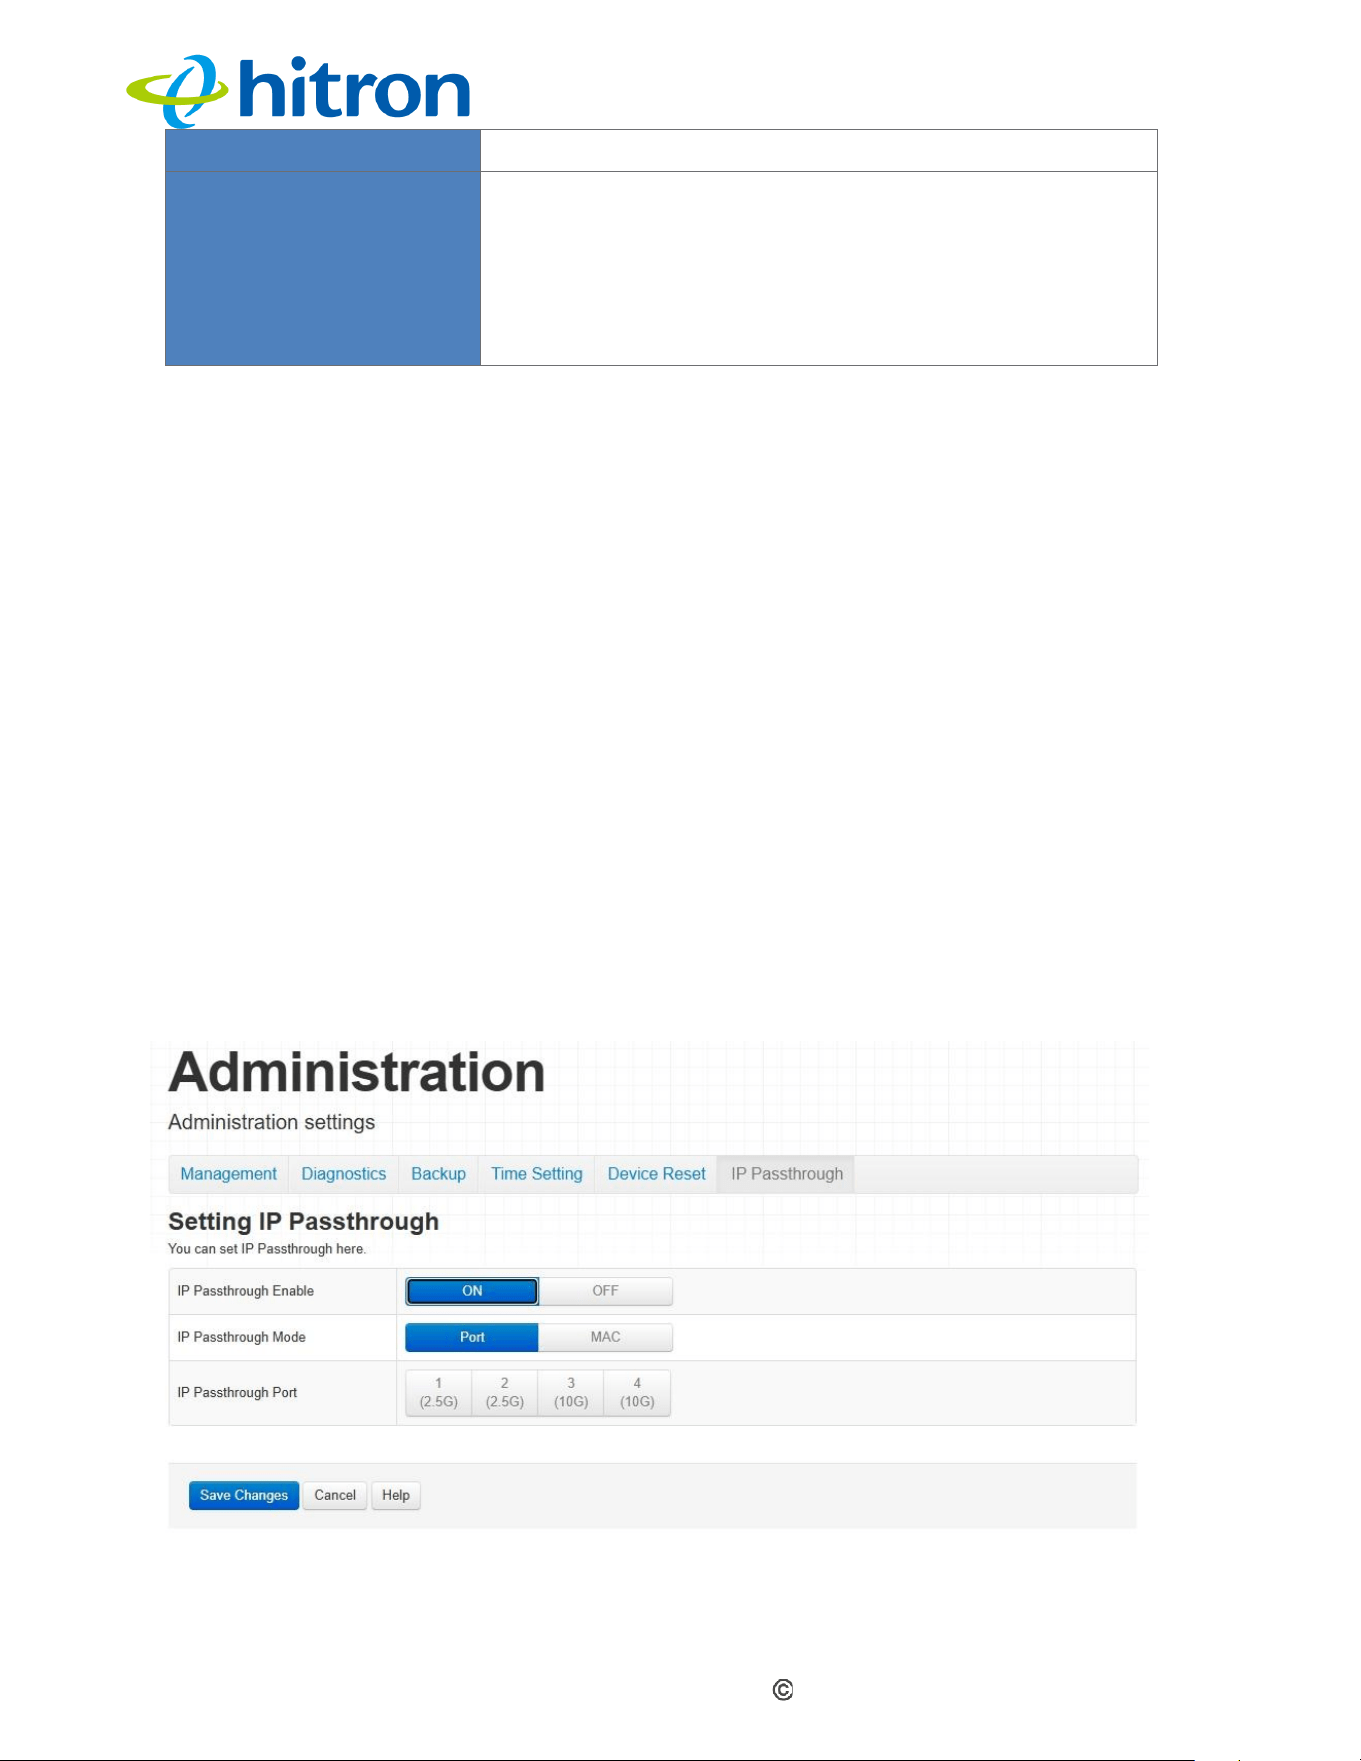
Hitron CODA60x1 User’s Guide
Version 1.0, 11/2020. Copyright
2012 Hitron Technologies
3
Version 1.0, 08/2026. Copyright
82
2026 Hitron Technologies
Reboot Device
Click this button to reboot the CODA60x1.
Restore Factory Default
Settings
Click this button to restore the CODA60x1 to its factory
default settings.
Note: Restoring the factory default settings permanently
deletes all user-configured settings. These settings cannot
be recovered.you do this, all your user-configured
settings are lost, and cannot be retrieved.
6.7
The Admin: IP Passthrough
IP Passthrough allows a selected device connected to the CODA60x1 to receive
the public IP address assigned by the service provider. This allows the selected
device to use its own routing and firewall functions while bypassing the
CODA60x1's routing functions.
IP Passthrough is typically used when a downstream router or other network device
needs to receive the public IP address directly.
Use this screen to configure IP Passthrough for one or more selected ports on the
CODA60x1, or for a specific PC or network device by specifying its MAC address.
Click Admin > IP Passthrough. The following screen displays.
Figure: The Admin: IP Passthrough
The following table describes the labels in this screen.
Hitron CODA60x1 User’s Guide
Version 1.0, 11/2020. Copyright
2012 Hitron Technologies
3
Version 1.0, 08/2026. Copyright
83
2026 Hitron Technologies
Table: The Admin: IP Passthrough Screen
IP Passthrough Enable
Select ON to enable IP Passthrough, or OFF to disable
it.
IP Passthrough Mode
Select Port to configure IP Passthrough for one or
more selected LAN ports, or MAC to configure IP
Passthrough for a specific PC or network device by its
MAC address
IP Passthrough MAC
When MAC mode is selected, enter the MAC address
of the PC or network device for which you want to
enable IP Passthrough.
IP Passthrough Port
When Port mode is selected, select the LAN port or
ports on which to enable IP Passthrough.
Save Changes
Click this button to save your changes to the fields on
this screen.
Cancel
Click this button to restore the fields on this screen to
their last saved values without saving your changes.
Help
Click this button to view information about the fields on
this screen.

Hitron CODA60x1 User’s Guide
Version 1.0, 11/2020. Copyright
2012 Hitron Technologies
3
Version 1.0, 08/2026. Copyright
84
2026 Hitron Technologies
7
Security
This chapter describes the screens that display when you click Security in the
toolbar. It contains the following sections:
Security Overview
The Security: Firewall Screen
The Security: IPv6 Inbound Firewall
The Security: Device Filter Screen
The Security: VPN Passthrough Screen
7.1
Security Overview
This section describes some of the concepts related to the Security screens.
7.1.1
Firewall
The term “firewall” comes from a construction technique designed to prevent the
spread of fire from one area to another. Similarly, the CODA60x1's firewall helps
protect devices on your LAN by blocking unauthorized access attempts and other
unwanted traffic originating from the WAN.
You can also use filtering features to control which computers and other devices are
allowed to access the network and to block specific types of traffic from the LAN to
the WAN.

Hitron CODA60x1 User’s Guide
Version 1.0, 11/2020. Copyright
2012 Hitron Technologies
3
Version 1.0, 08/2026. Copyright
85
2026 Hitron Technologies
7.1.2
Device Filtering
Every network device has a unique Media Access Control (MAC) address that
identifies it on the network. When MAC address filtering is enabled on the
CODA60x1's firewall, you can create a list of devices identified by their MAC
addresses and specify whether to:
Block the devices on the list from accessing the CODA60x1 and the network.
All other devices are allowed to access the network.
or
Allow only the devices on the list to access the CODA60x1 and the
network. All other devices are denied access.
7.1.3
Port Blocking
Port blocking is a method of controlling connections from devices on the LAN to
devices on the WAN through specific services, protocols, or applications. The
CODA60x1 allows you to block or allow traffic based on its destination port,
preventing access to specified services or applications.
7.2
The Security: Firewall Screen
Use this screen to enable or disable firewall features and allow or block specific
applications and protocols. You can select a firewall protection level from the
predefined options or create a custom protection profile.
NOTE: To block specific ports, use the Port Blocking screen (see The Security:
IPv6 Inbound Firewall).
Click Security > Firewall Settings. The following screen displays.
Figure: The Security: Firewall Screen
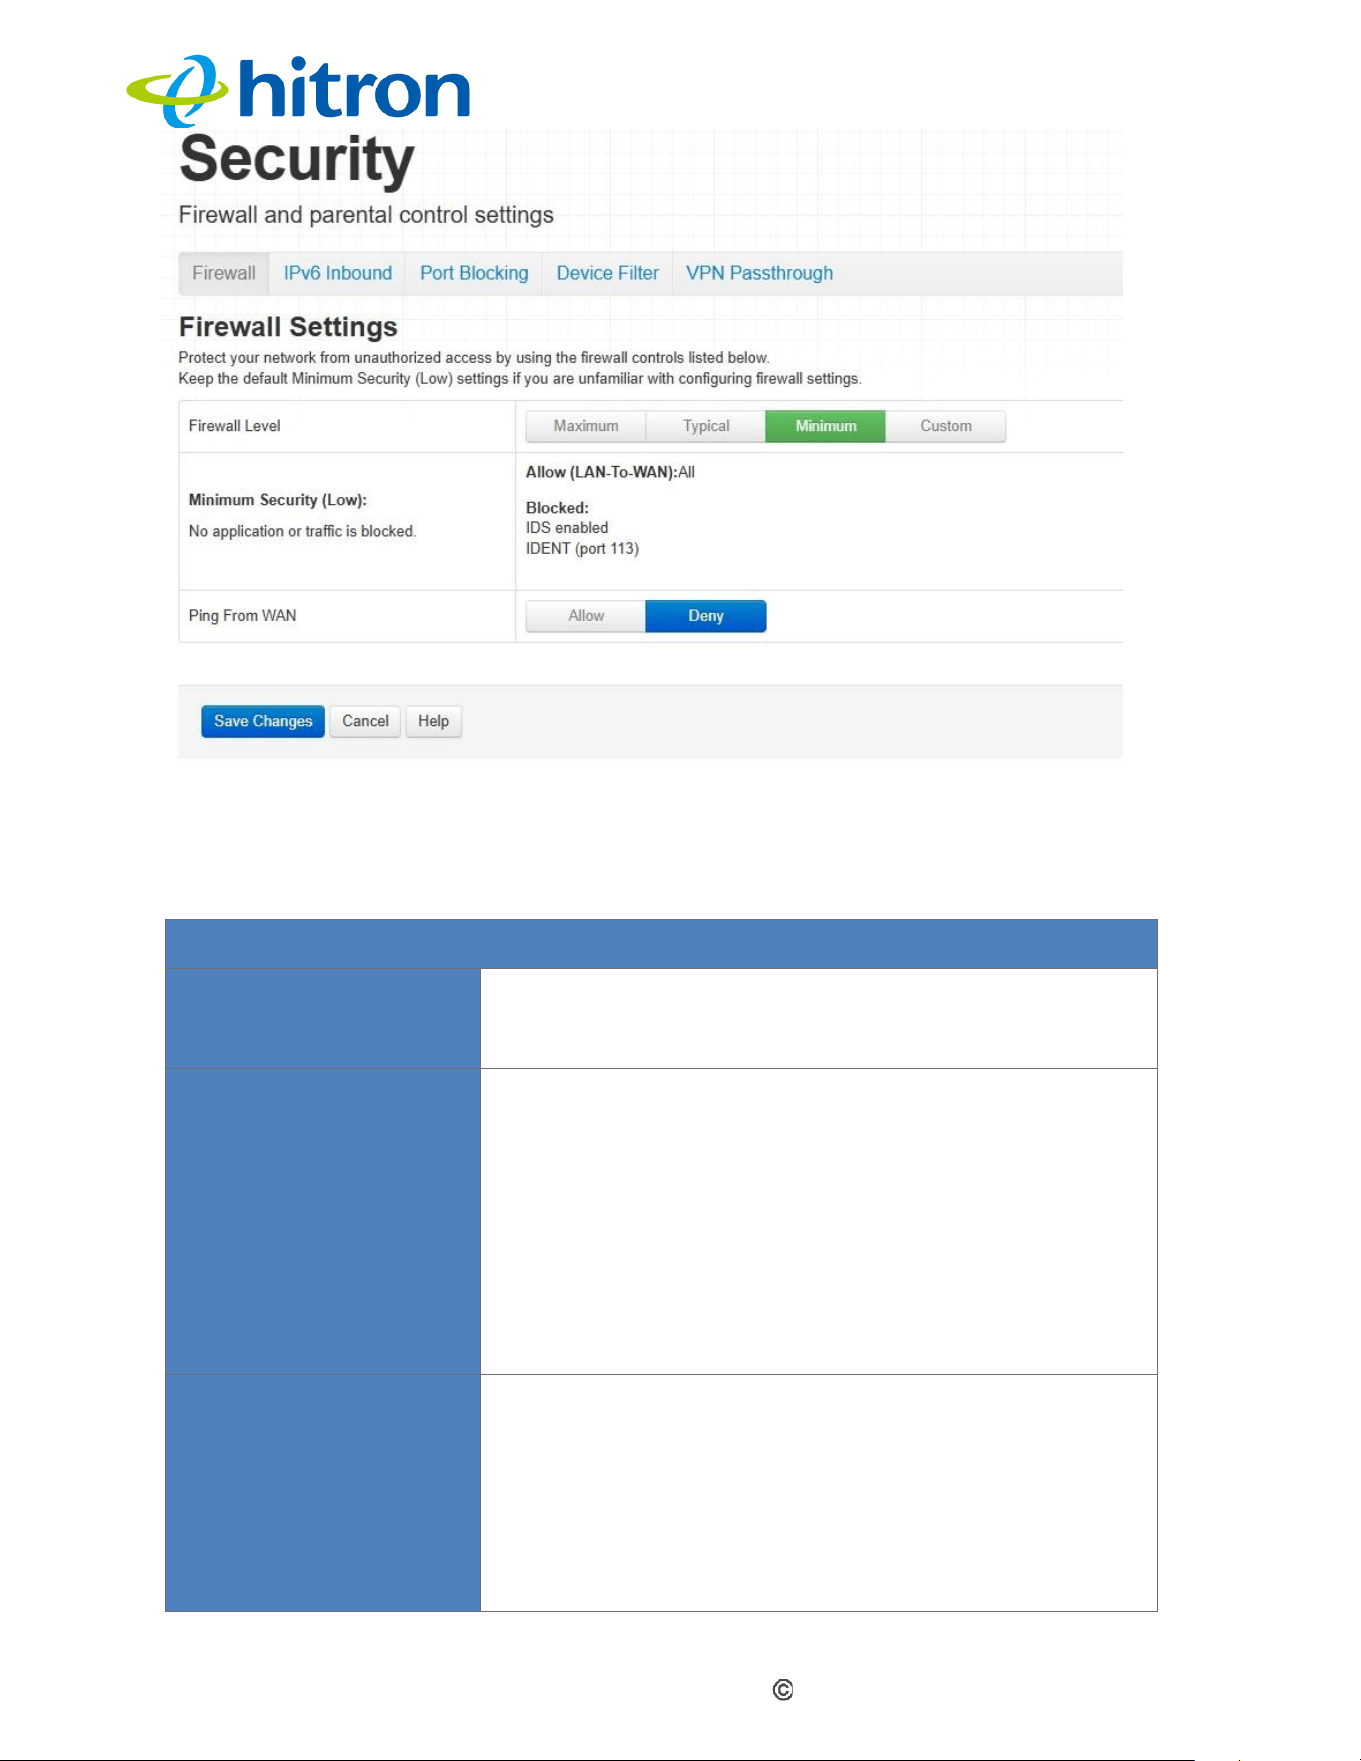
Hitron CODA60x1 User’s Guide
Version 1.0, 11/2020. Copyright
2012 Hitron Technologies
3
Version 1.0, 08/2026. Copyright
86
2026 Hitron Technologies
The following table describes the labels in this screen.
Table: The Security: Firewall Screen
Firewall Settings
Firewall Level
Select the level of firewall protection to apply to your
LAN. Details about the selected protection level are
displayed below the buttons.
(Security Level)
These fields describe the specific protocols and
applications that are permitted or blocked by the
selected firewall security level.
When you select Custom in the Firewall Level field,
additional fields are displayed, allowing you to enable
or disable specific firewall features:
Entire Firewall: select ON to enable firewall
security protection, or select OFF to disable it (not
recommended).
Ping from WAN
Use this field to allow or block Internet Control
Message Protocol (ICMP) echo requests received on
the WAN interface.
Select Allow to allow ping requests from
the Internet to the WAN interface.
Select Deny to block ping requests from the
Internet to the WAN interface.
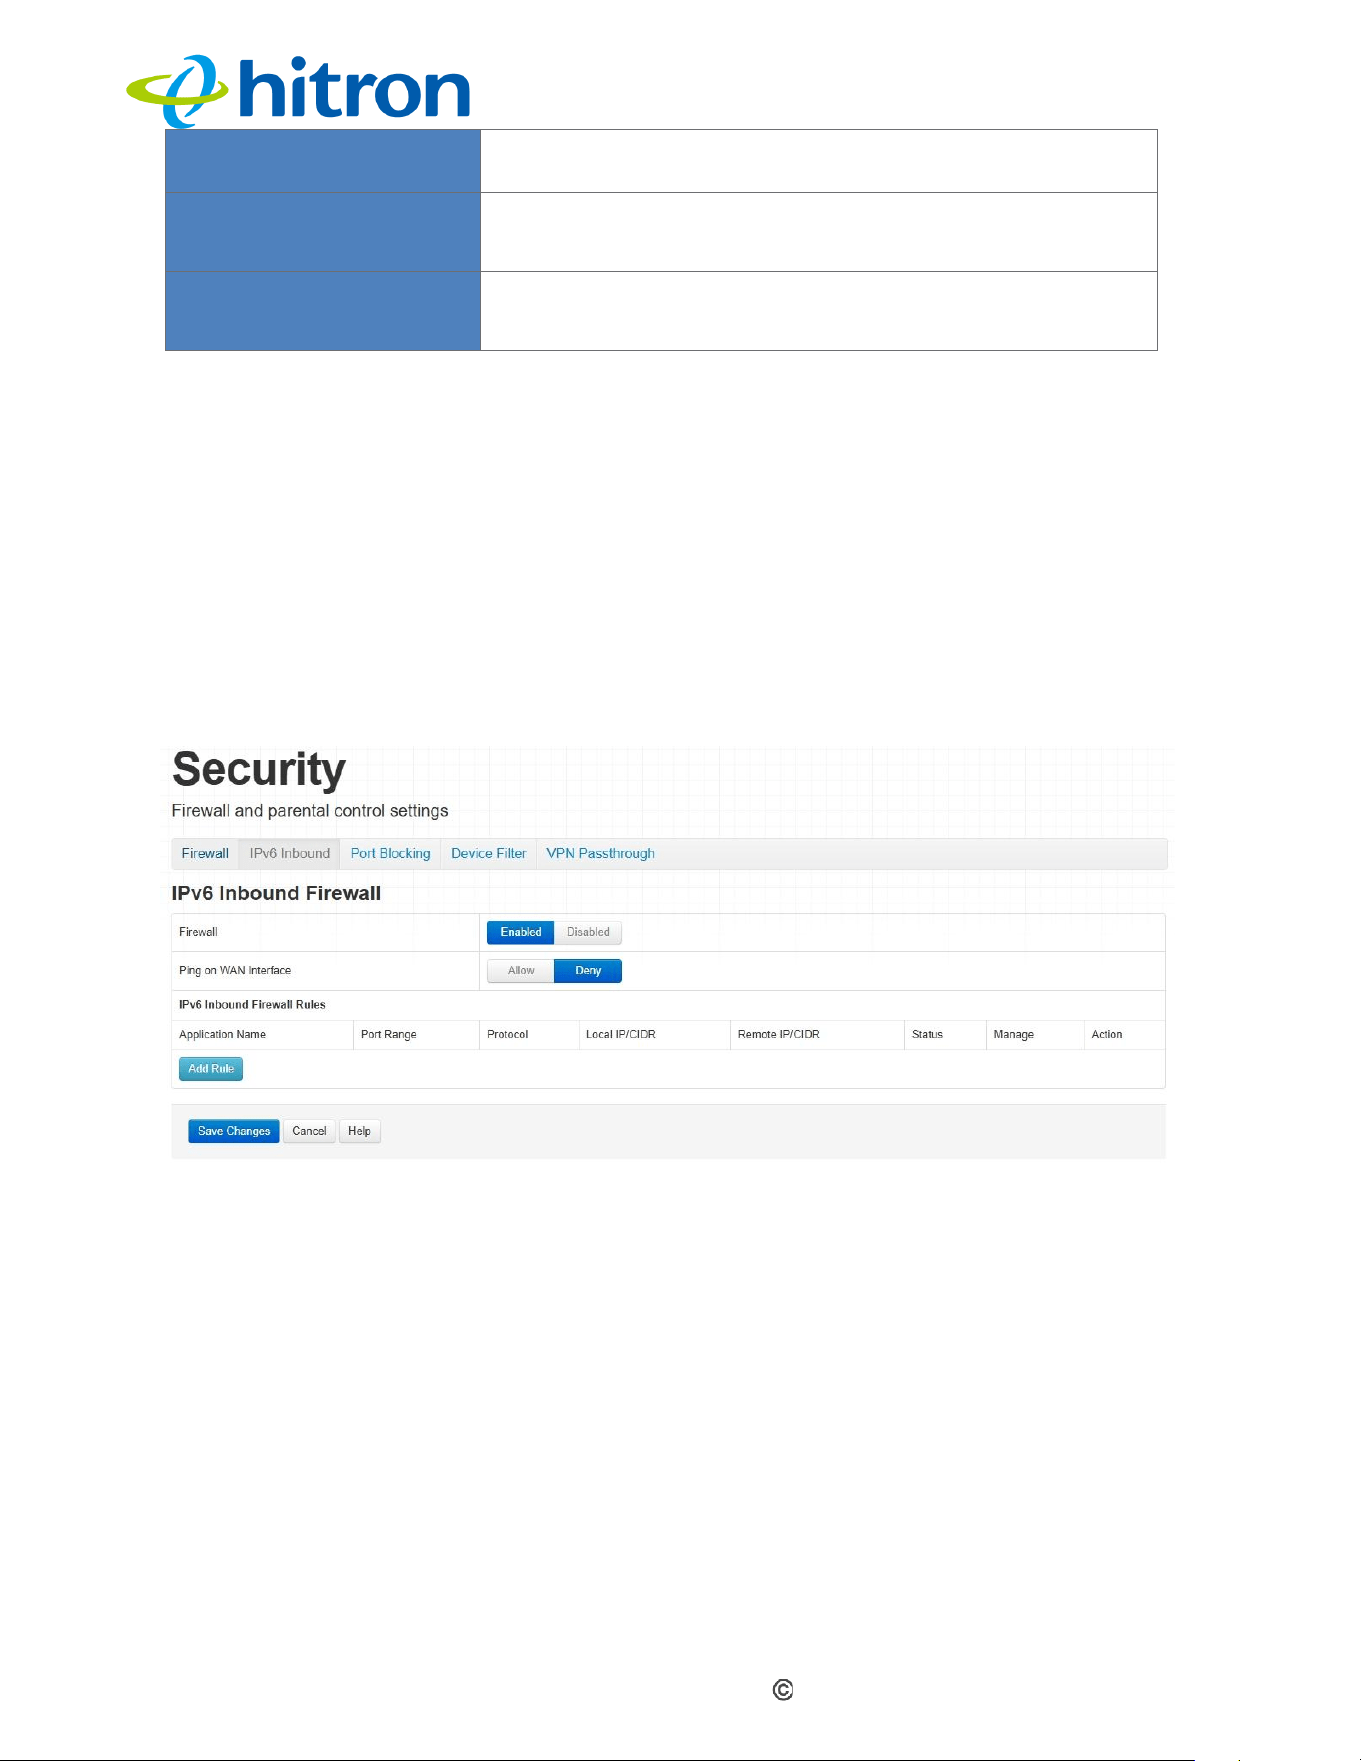
Hitron CODA60x1 User’s Guide
Version 1.0, 11/2020. Copyright
2012 Hitron Technologies
3
Version 1.0, 08/2026. Copyright
87
2026 Hitron Technologies
Save Changes
Click this button to save your changes to the fields on
this screen.
Cancel
Click this button to restore the fields on this screen to
their last saved values without saving your changes.
Help
Click this button to view information about the fields on
this screen.
7.3
The Security: IPv6 Inbound Firewall
Use this screen to configure IPv6 Inbound Firewall.
Click Security > IPv6 Inbound. The following screen displays.
Figure: The Security: IPv6 Inbound Firewall Screen
Figure :The Security: IPv6 Inbound Firewall Screen
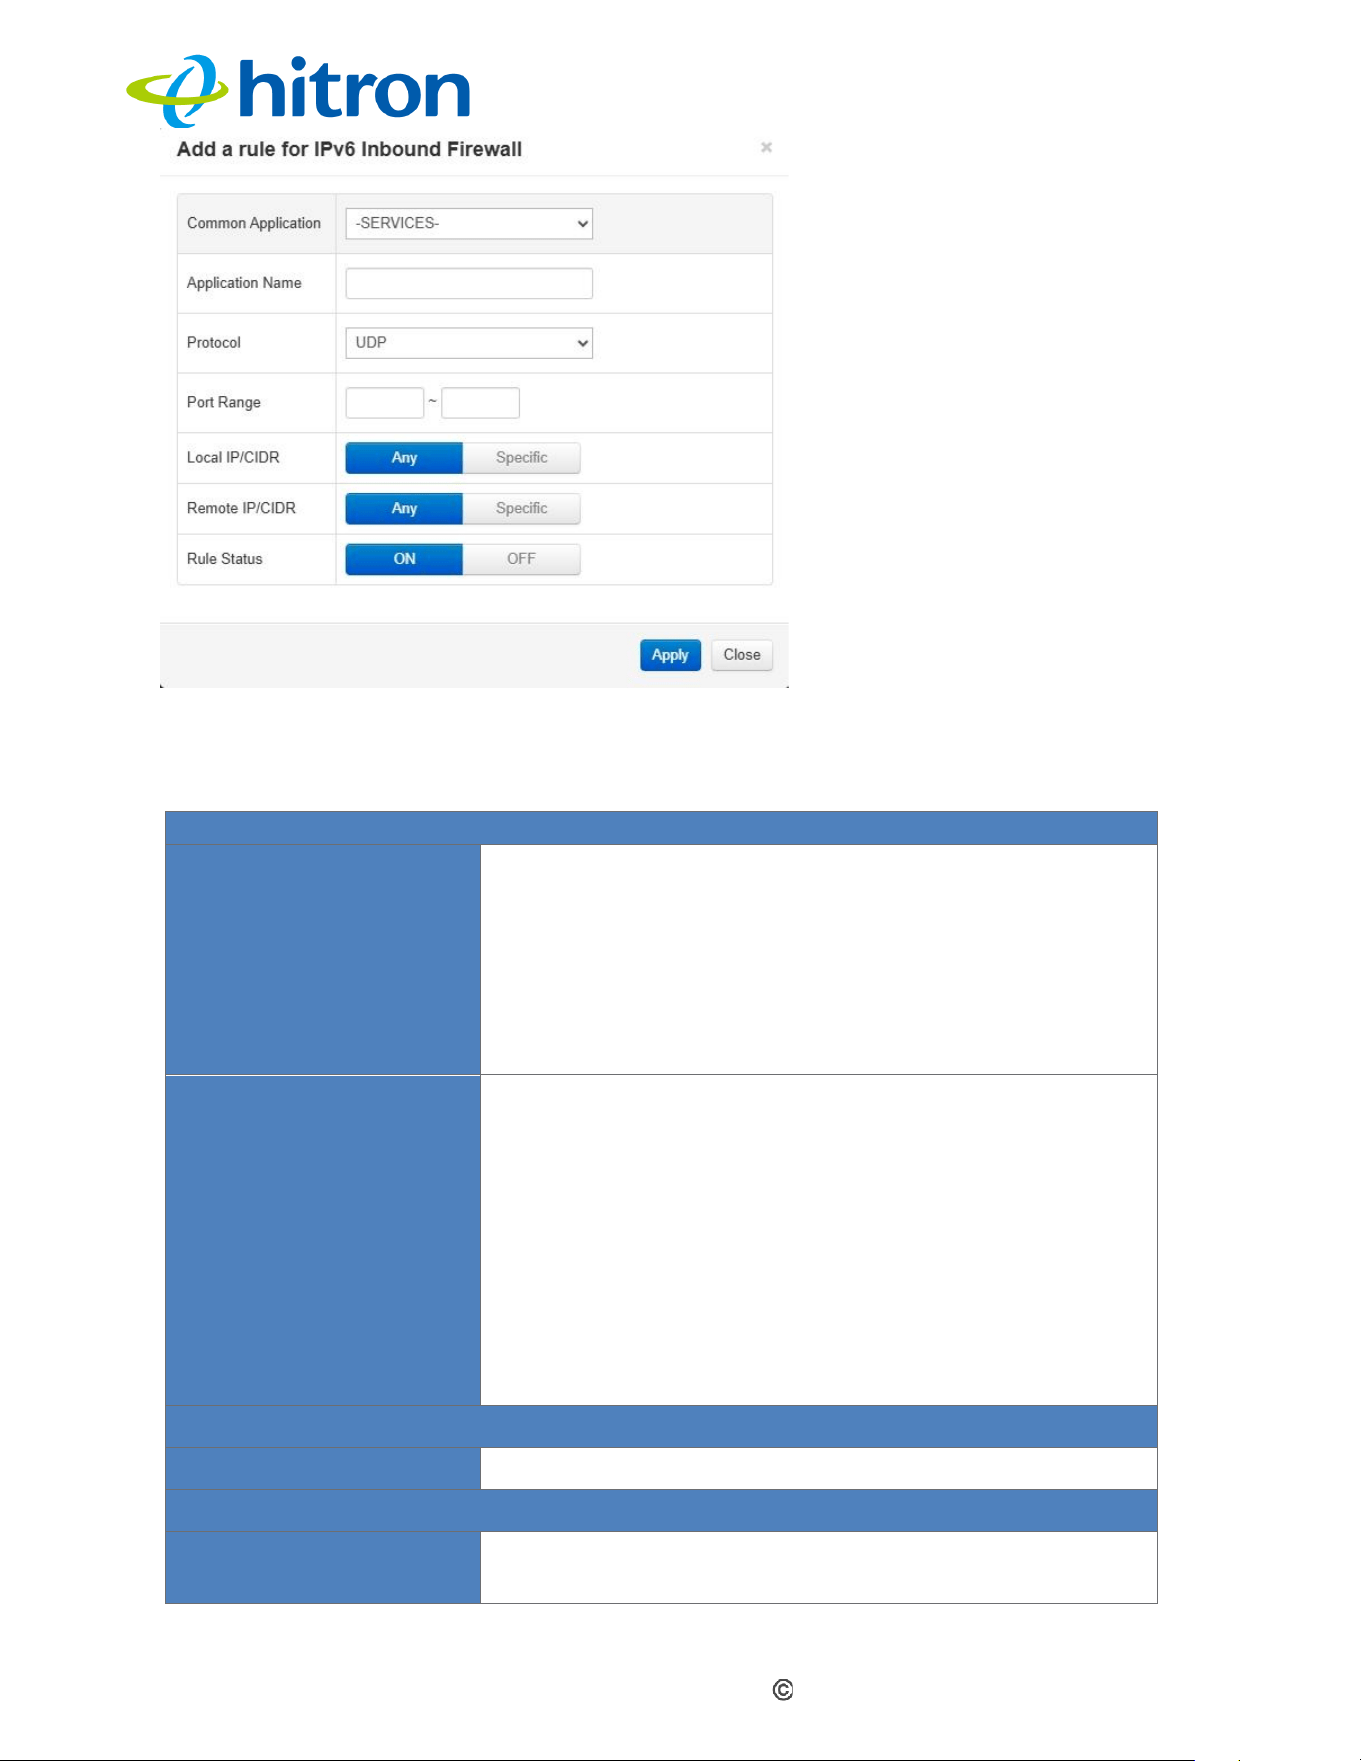
Hitron CODA60x1 User’s Guide
Version 1.0, 11/2020. Copyright
2012 Hitron Technologies
3
Version 1.0, 08/2026. Copyright
88
2026 Hitron Technologies
The following table describes the labels in this screen.
Table : The Security: IPv6 Inbound Firewall Screen
IPv6 Inbound Firewall
Firewall
Use this field to enable or disable the IPv6 Inbound
Firewall.
Select Enabled to enable the IPv6 Inbound
Firewall.
Select Disabled to disable the IPv6 Inbound
Firewall.
Ping on WAN
Interface
Use this field to allow or block Internet Control
Message Protocol (ICMP) echo requests received on
the WAN interface.
Select Allow to allow ICMP echo requests
from the Internet to the WAN interface.
Select Deny to block ICMP echo requests from
the Internet to the WAN interface.
When Deny is selected, ICMP echo requests received
on the WAN interface are silently discarded.
IPv6 Inbound Firewall Rules
Add Rule
Click Add Rule to add an IPv6 Inbound Firewall rule.
Add a rule for IPv6 Inbound Firewall
Common Application
Use this field to select the application for which you
want to create a port blocking rule, if desired.
Hitron CODA60x1 User’s Guide
Version 1.0, 11/2020. Copyright
2012 Hitron Technologies
3
Version 1.0, 08/2026. Copyright
89
2026 Hitron Technologies
Application Name
Displays the name you assigned to the blocking rule
when you created it.
Protocol
Use this field to specify the protocol or protocols to
which the blocking rule applies:
Transmission Control Protocol (TCP)
User Datagram Protocol (UDP)
Both TCP and UDP (TCP/UDP)
Port Range
Displays the starting and ending port numbers to which
this blocking rule applies.
Local IP/CIDR
Use this field to specify the local IP address or IP
address range to which the inbound filter rule applies.
Select Any to apply the rule to any IP address on
the LAN.
Select Specific to specify an IP address for the
rule.
Remote IP/CIDR
Use this field to specify the remote IP address or IP
address range to which the inbound filter rule applies.
Select Any to apply the rule to any IP address on
the WAN.
Select Specific to specify an IP address for the
rule.
Rule Status
Use this field to enable or disable the filtering rule.
Select ON to activate the rule. Matching traffic is
blocked.
Select OFF to deactivate the rule. Matching traffic
is allowed.
7.4
The Security: Port Blocking
Port blocking is used to block outbound traffic from specific computers on the internal
network when the traffic is destined for specific ports or port ranges.
Use this screen to configure port blocking settings.
Click Security > Port Blocking. The following screen displays.
Figure: The Security: Port Blocking Screen
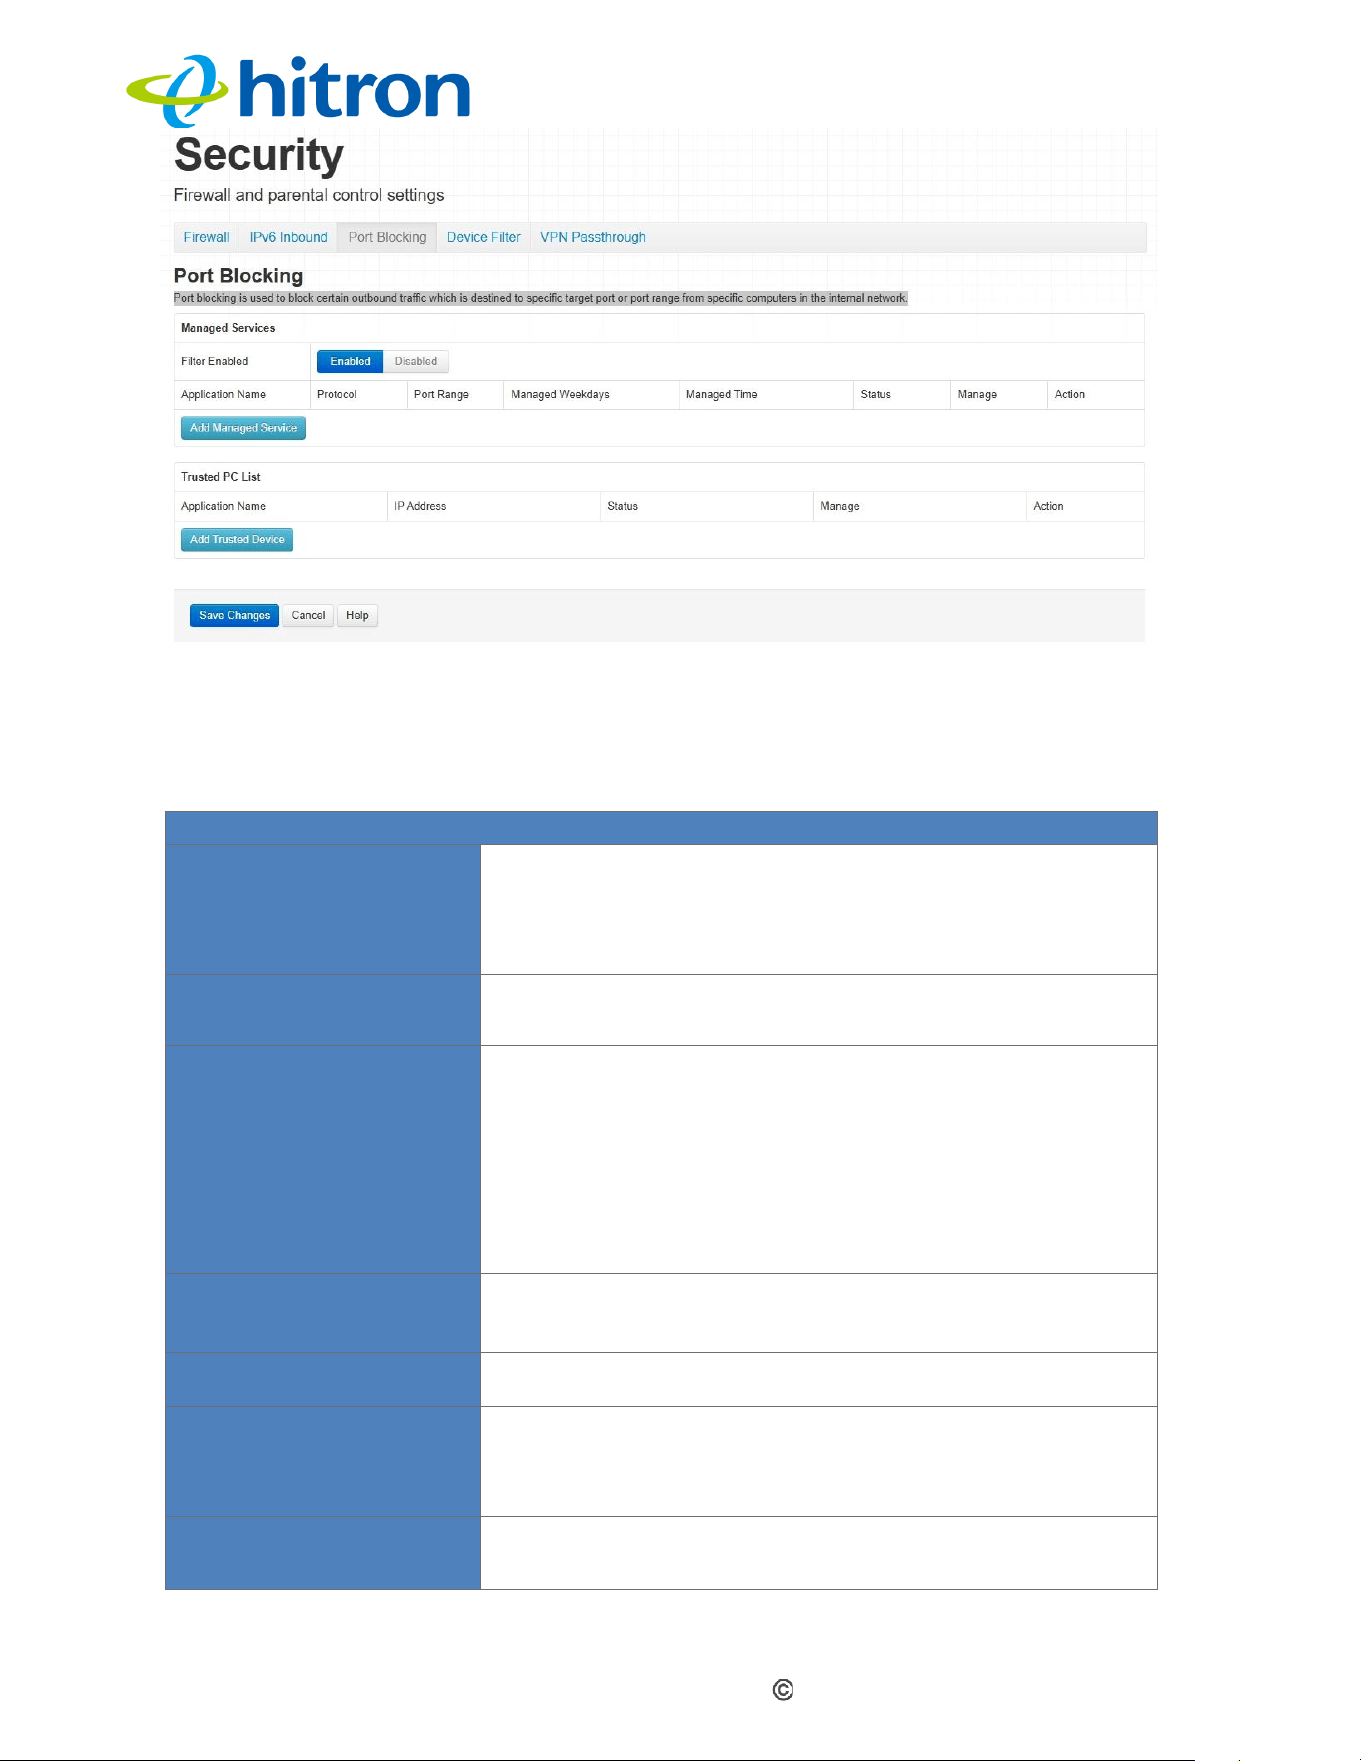
Hitron CODA60x1 User’s Guide
Version 1.0, 11/2020. Copyright
2012 Hitron Technologies
3
Version 1.0, 08/2026. Copyright
90
2026 Hitron Technologies
The following table describes the labels in this screen.
Table : The Security: Port Blocking Screen
Managed Service
Filter Enabled
Use this field to turn port blocking on or off.
Select Enabled to turn port blocking on.
Select Disabled to turn port blocking off.
Application Name
Displays the name you assigned to the blocking rule
when you created it.
Protocol
Use this field to specify the protocol or protocols to
which the blocking rule applies:
Transmission Control Protocol (TCP)
User Datagram Protocol (UDP)
Both TCP and UDP (TCP/UDP)
Port Range
Displays the start and end port for which this blocking
rule applies.
Managed Weekdays
Displays the days of the week on which this rule applies.
Managed Time
Displays the start (From) and end (To) times of the
period during which this rule applies on the specified
Managed Weekdays.
Status
Displays whether the blocking rule is currently active
(Enabled) or inactive (no status is displayed).
Hitron CODA60x1 User’s Guide
Version 1.0, 11/2020. Copyright
2012 Hitron Technologies
3
Version 1.0, 08/2026. Copyright
91
2026 Hitron Technologies
Managed
Click Manage to make changes to a blocking rule (see
Adding or Editing a Port Blocking Rule).
Action
Click Remove to delete a rule from the CODA60x1.
Add Managed Service
Click this button to add a new port blocking rule (see
Adding or Editing a Port Blocking Rule ).
Trusted PC List
Host Name
Displays the arbitrary name assigned to each trusted
PC.
IP Address
Displays the LAN IP address of each trusted PC.
Status
Displays whether the device is currently trusted
(Enabled) or untrusted (Disabled).
Manage
Click Manage to modify the trusted device rule.
Action
Click Delete to remove the trusted device rule.
Add Trusted Device
Click this button to create a new trusted device rule.
Save Changes
Click this button to save your changes to the fields on
this screen.
Help
Click this to see information about the fields in this
screen.
7.4.1
Adding or Editing a Port Blocking Rule
To add a new port blocking rule, click Add Managed Service on the Security >
Port Blocking screen.
To edit an existing port blocking rule, locate the rule on the Security >
Port Blocking screen and click its Manage button.
NOTE: Make sure Enabled is selected on the Security > Port Blocking screen
before adding or editing port blocking rules.
The following screen displays.
Figure: The Security: Port Blocking Add/Edit Screen
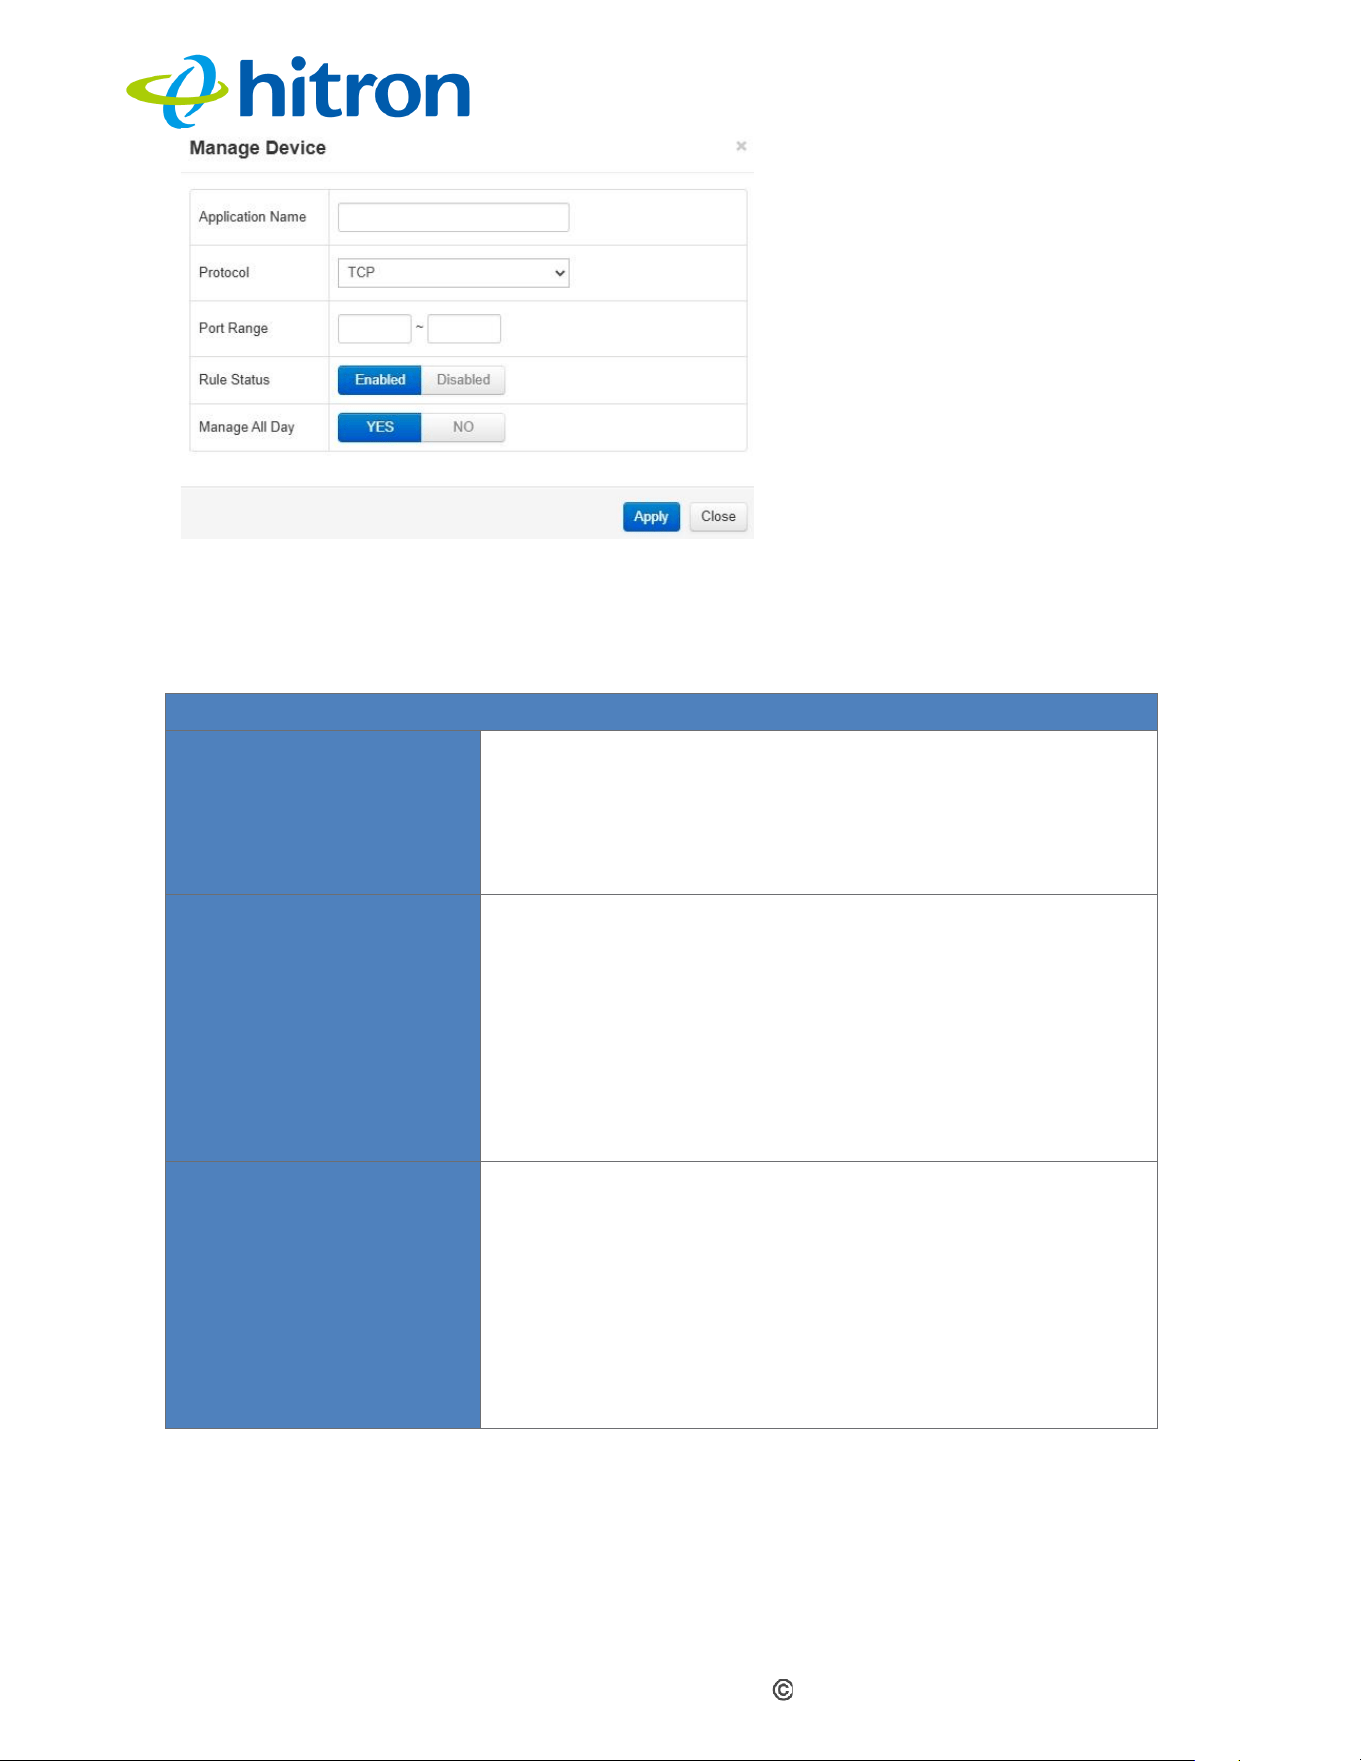
Hitron CODA60x1 User’s Guide
Version 1.0, 11/2020. Copyright
2012 Hitron Technologies
3
Version 1.0, 08/2026. Copyright
92
2026 Hitron Technologies
The following table describes the labels in this screen.
Table 38: The Security: Port Blocking Add/Edit Screen
Manage Device
Application Name
Enter a name for the application for which you want to
create the rule.
NOTE: This name is arbitrary and does not affect the
functionality of the rule.
Protocol
Use this field to specify the protocol or protocols to
which the port blocking rule applies:
Transmission Control Protocol (TCP)
User Datagram Protocol (UDP)
Both TCP and UDP (TCP/UDP).
NOTE: If in doubt, leave this field at its default setting.
Port Range
Use these fields to specify the start and end ports to
which this filtering rule applies. Traffic destined for
these ports will be blocked.
Enter the start port number in the first field and the end
port number in the second field.
To specify a single port, enter the same port number in
both fields.
Hitron CODA60x1 User’s Guide
Version 1.0, 11/2020. Copyright
2012 Hitron Technologies
3
Version 1.0, 08/2026. Copyright
93
2026 Hitron Technologies
Rule Status
Use this field to enable or disable the filtering rule.
Select Enabled to activate the rule. Matching
traffic is blocked.
Select Disabled to deactivate the rule. Matching
traffic is allowed.
Manage All Day
Use this field to specify whether the filtering rule should
apply at all times or only during specified days and
times.
Select YES to apply the rule at all times.
Select NO to apply the rule only during specified
days and times.
When NO is selected, additional fields are displayed,
allowing you to specify when the rule should be
applied.
Use the Managed Weekdays fields to specify the days
on which the rule should be applied. A red background
indicates that the rule is active on that day and
matching traffic will be blocked. A green background
indicates that the rule is inactive on that day and
matching traffic will not be blocked. Click a day to
toggle the rule on or off for that day.
Use the Manage Time Start fields to specify the time
period during which the rule should be applied. Enter
the start time in the From fields and the end time in the
To fields, using 24-hour notation.
Apply
Click this button to save your changes to the fields on
this screen.
Close
Click this button to return to the Port Blocking screen
without saving your changes to the rule.
7.4.2
Adding or Editing a Port Blocking Trusted Device
Rule
To add a new trusted device rule, click Add Trusted PC in the Security > Port
Blocking screen.
To edit an existing trusted device rule, locate the rule in the Security > Port
Blocking screen and click its Manage button.
The following screen displays.
Figure: The Security: Port Blocking Trusted Device Add/Edit Screen
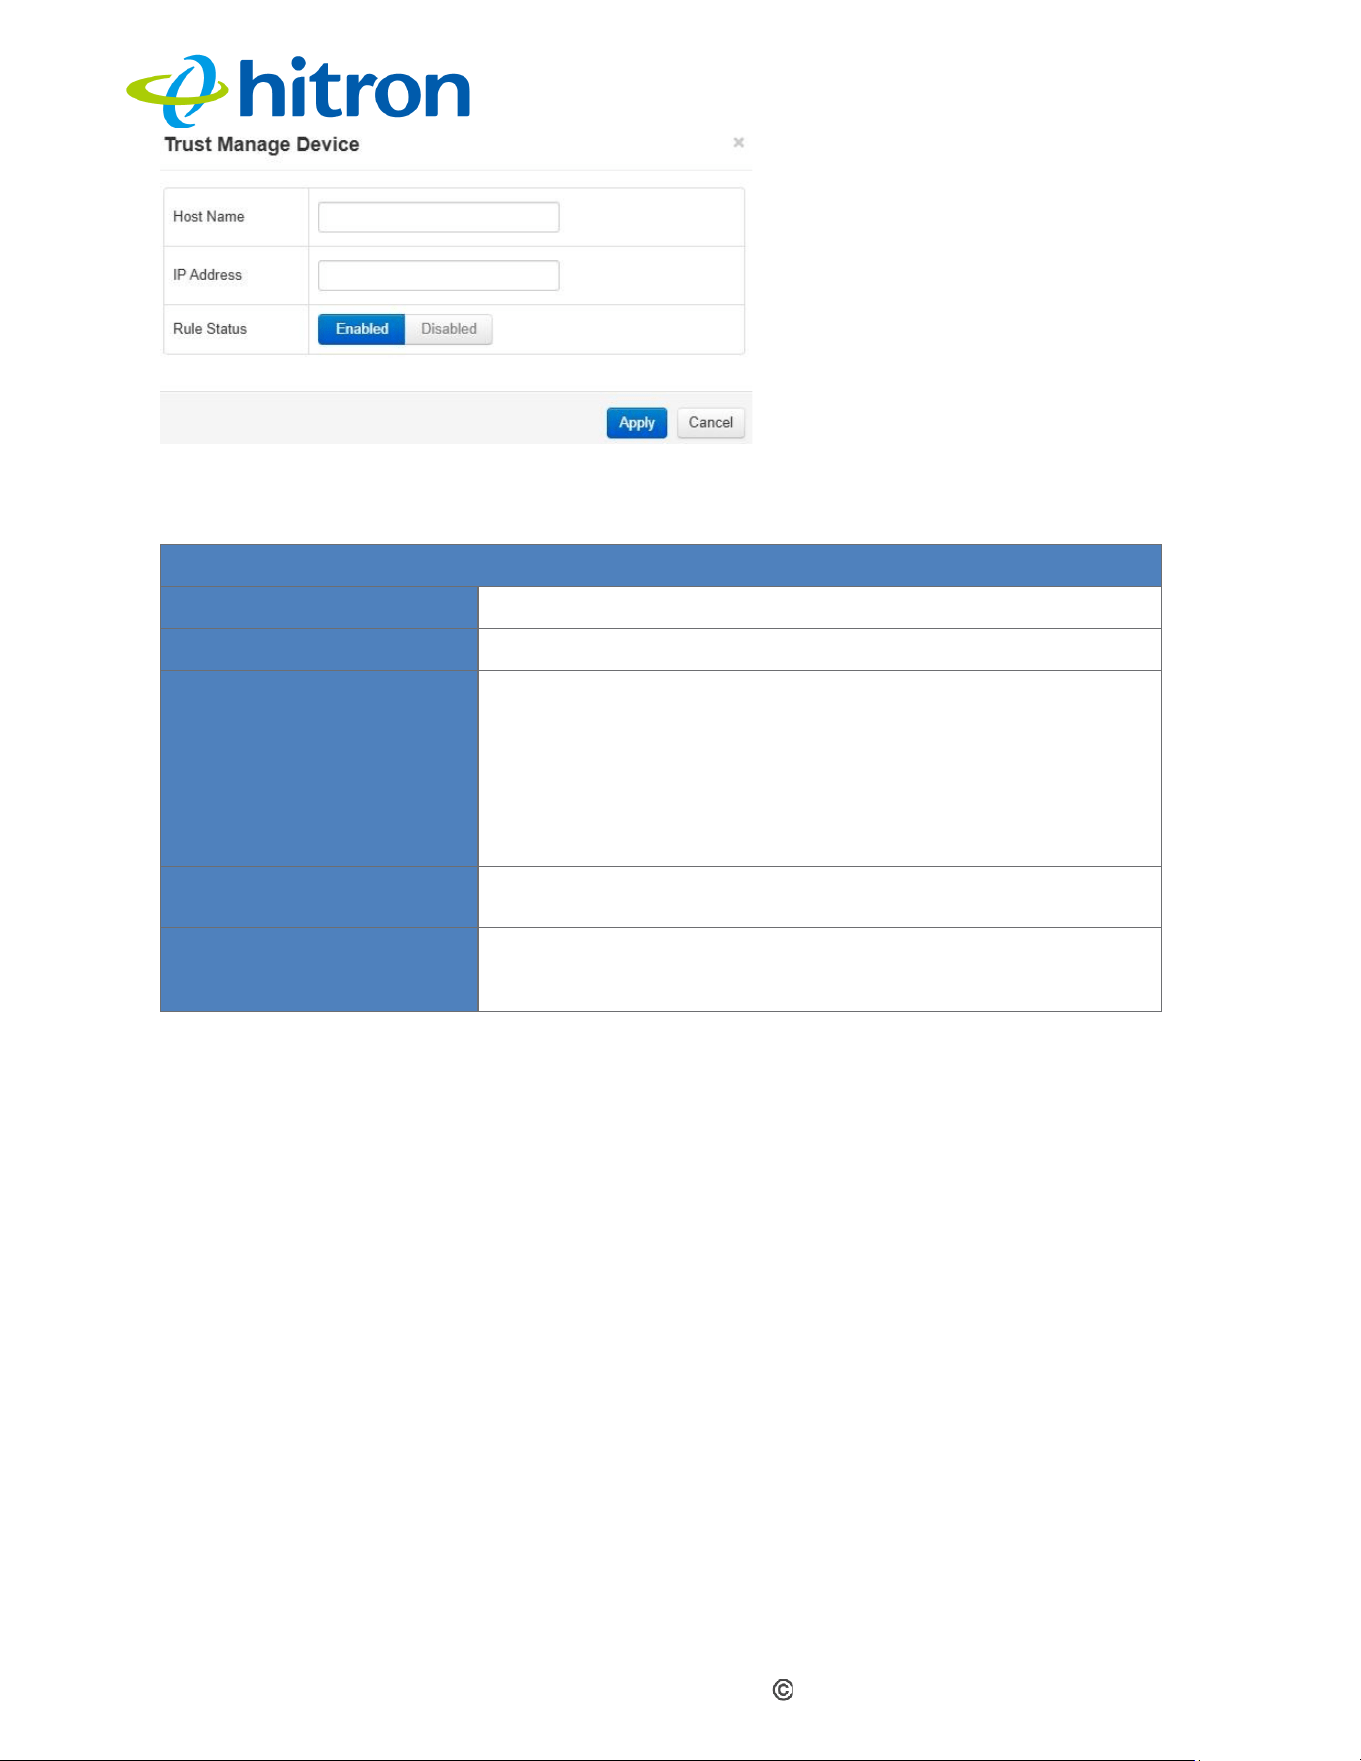
Hitron CODA60x1 User’s Guide
Version 1.0, 11/2020. Copyright
2012 Hitron Technologies
3
Version 1.0, 08/2026. Copyright
94
2026 Hitron Technologies
The following table describes the labels in this screen.
Table: The Security: Port Blocking Trusted Device Add/Edit Screen
Trust Manage Device
Host Name
Enter a name to identify the device.
IP Address
Enter the local IP address of the device.
Rule Status
Use this field to enable or disable the trusted device
rule.
Select Enabled to activate the trusted device rule.
Select Disabled to deactivate the trusted device
rule.
Apply
Click this button to save your changes to the fields on
this screen.
Close
Click this button to return to the Port Blocking screen
without saving your changes to the rule.
7.5
The Security: Device Filter Screen
Use this screen to configure Media Access Control (MAC) address filtering and IP
filtering for network traffic on the LAN.
NOTE: To configure MAC address filtering on the wireless network, see The
Wireless Access Control Screen.
Click Security > Device Filter. The following screen displays.
Figure 50: The Security: Device Filter Screen
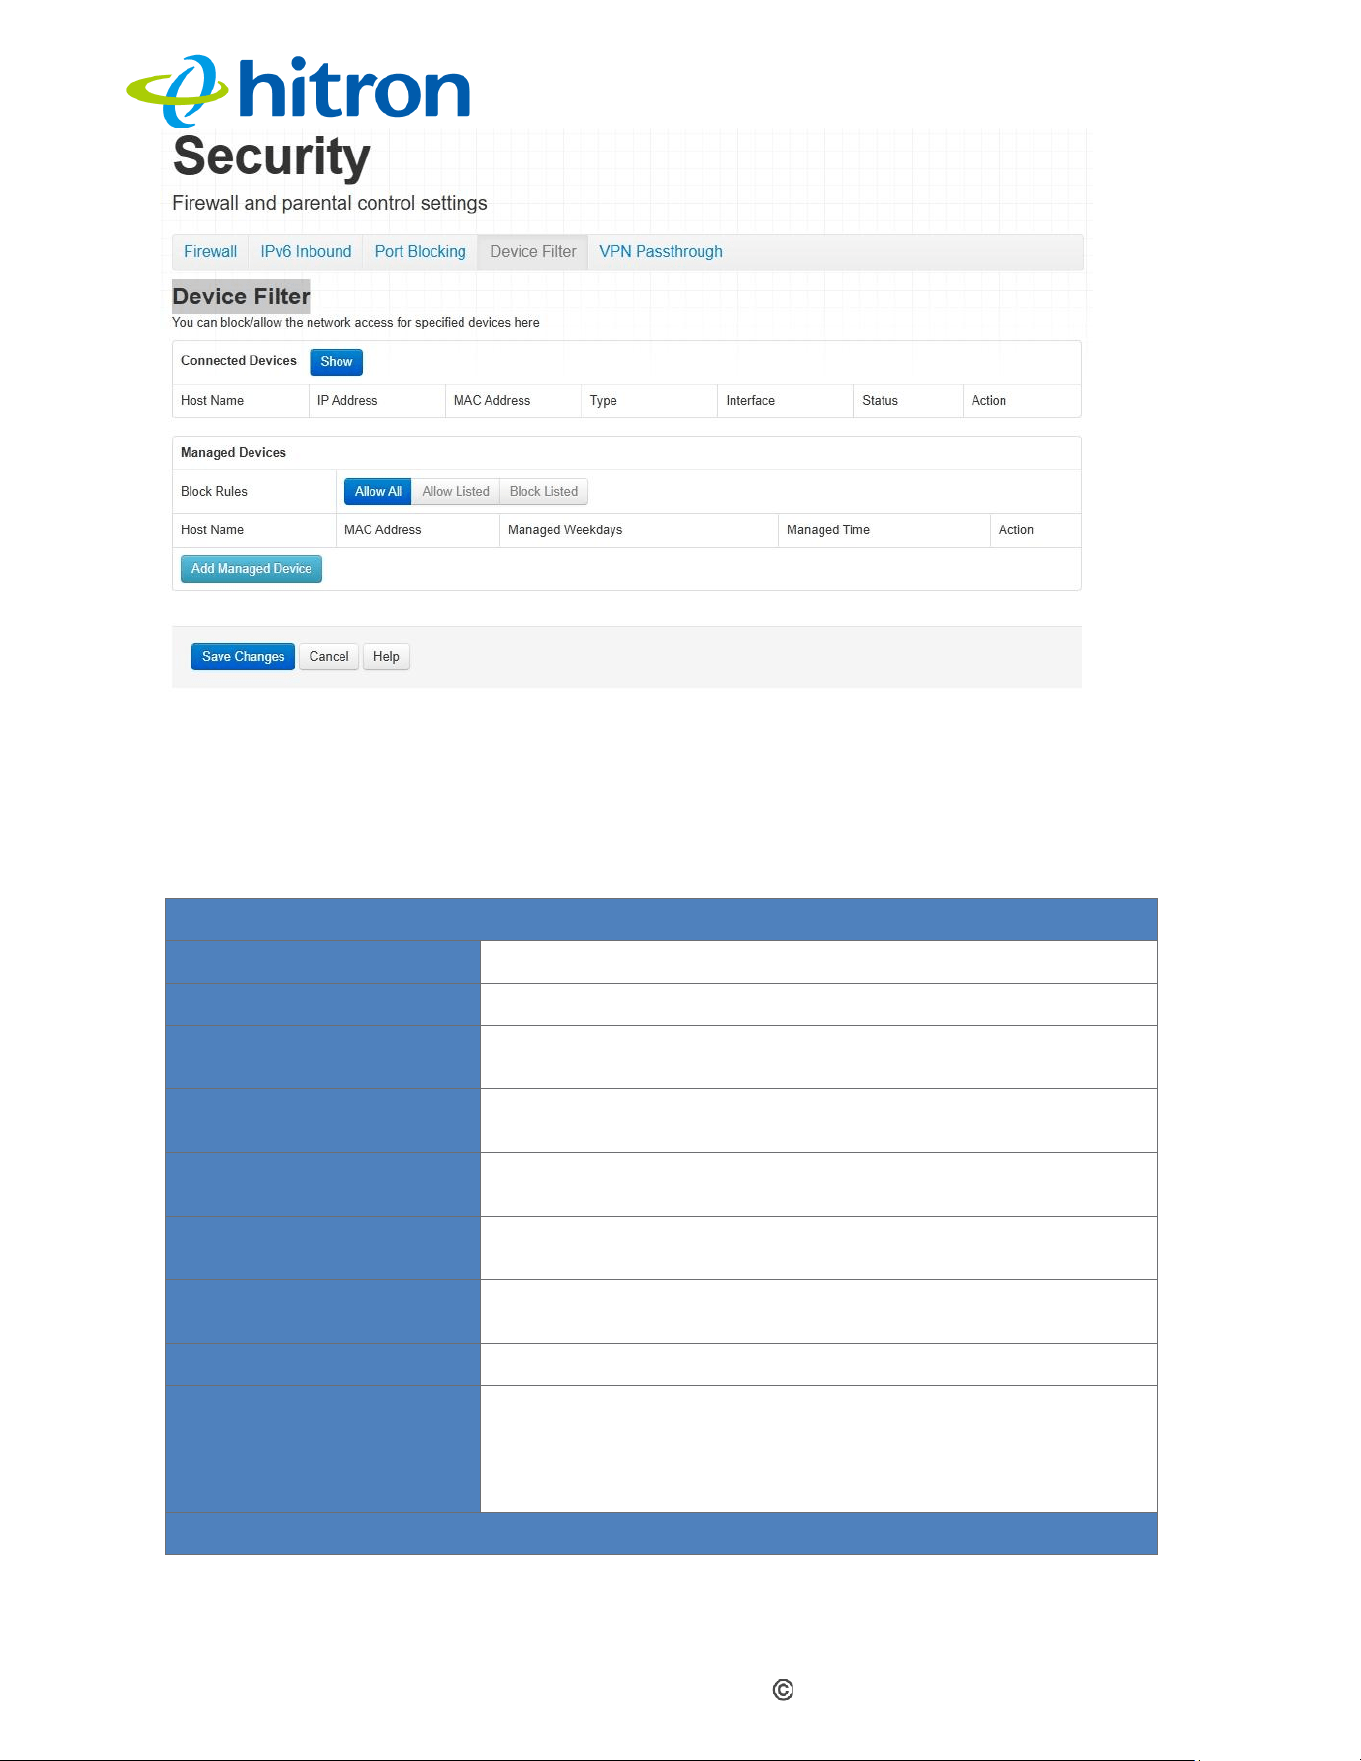
Hitron CODA60x1 User’s Guide
Version 1.0, 11/2020. Copyright
2012 Hitron Technologies
3
Version 1.0, 08/2026. Copyright
95
2026 Hitron Technologies
The following table describes the labels in this screen.
Table: The Security: Device Filter Screen
Connected Devices
Show
Click this to load the Connected Devices list.
Refresh
Click this to reload the Connected Devices list.
Host Name
Displays the name of each network device connected to
the LAN.
IP Address
Displays the IP address of each network device
connected to the LAN.
MAC Address
Displays the Media Access Control (MAC) address of
each network device connected to the LAN.
Type
Displays whether the device's IP address was assigned
by DHCP (DHCP-IP) or is self-assigned.
Interface
Displays the name of the interface to which the relevant
device is connected.
Status
Displays whether the connected device is active.
Action
Click Add to make changes to the device’s filtering
status; see Adding or Editing a Managed Device for
information on the screen that displays.
Click Clear to remove the device from the list.
Managed Devices
Hitron CODA60x1 User’s Guide
Version 1.0, 11/2020. Copyright
2012 Hitron Technologies
3
Version 1.0, 08/2026. Copyright
96
2026 Hitron Technologies
Block Rules
Use these options to control access for the devices
listed:
Select Allow All to ignore the Managed Devices
list and let all devices connect to the CODA60x1.
Select Allow Listed to permit only devices you
added to the Managed Devices list to access the
CODA60x1 and the network. All other devices are
denied access.
Select Block Listed to permit all devices except
those you added to the Managed Devices list to
access the CODA60x1 and the network. The
specified devices are denied access
Host Name
Displays the name of each network device in the list.
MAC Address
Displays the Media Access Control (MAC) address of
each network device in the list.
Managed Weekdays
Displays the days of the week on which the device is
managed.
Managed Time
Displays the start (From) and end (To) times of the
period during which the device is managed on the
specified Managed Weekdays.
Action
Click Manage to make changes to a managed device
rule (see Adding or Editing a Managed Device).
Save Changes
Click this to save your changes to the fields in this
screen.
Add Managed Device
Click this to add a new managed device rule (see
Adding or Editing a Managed Device).
Help
Click this to see information about the fields in this
screen.
7.5.1
Adding or Editing a Managed Device
To add a new managed LAN device, click Add Managed Device in the Security
> Device Filter screen.
To edit an existing managed LAN device, locate the device in the Security >
Device Filter screen and click its Add button.
To add a new managed wireless network device, click Add Managed Device in
the Wireless > Access Control screen.
To edit an existing managed wireless network device, locate the device in the
Wireless > Access Control screen and click its Manage button.
The following screen displays.
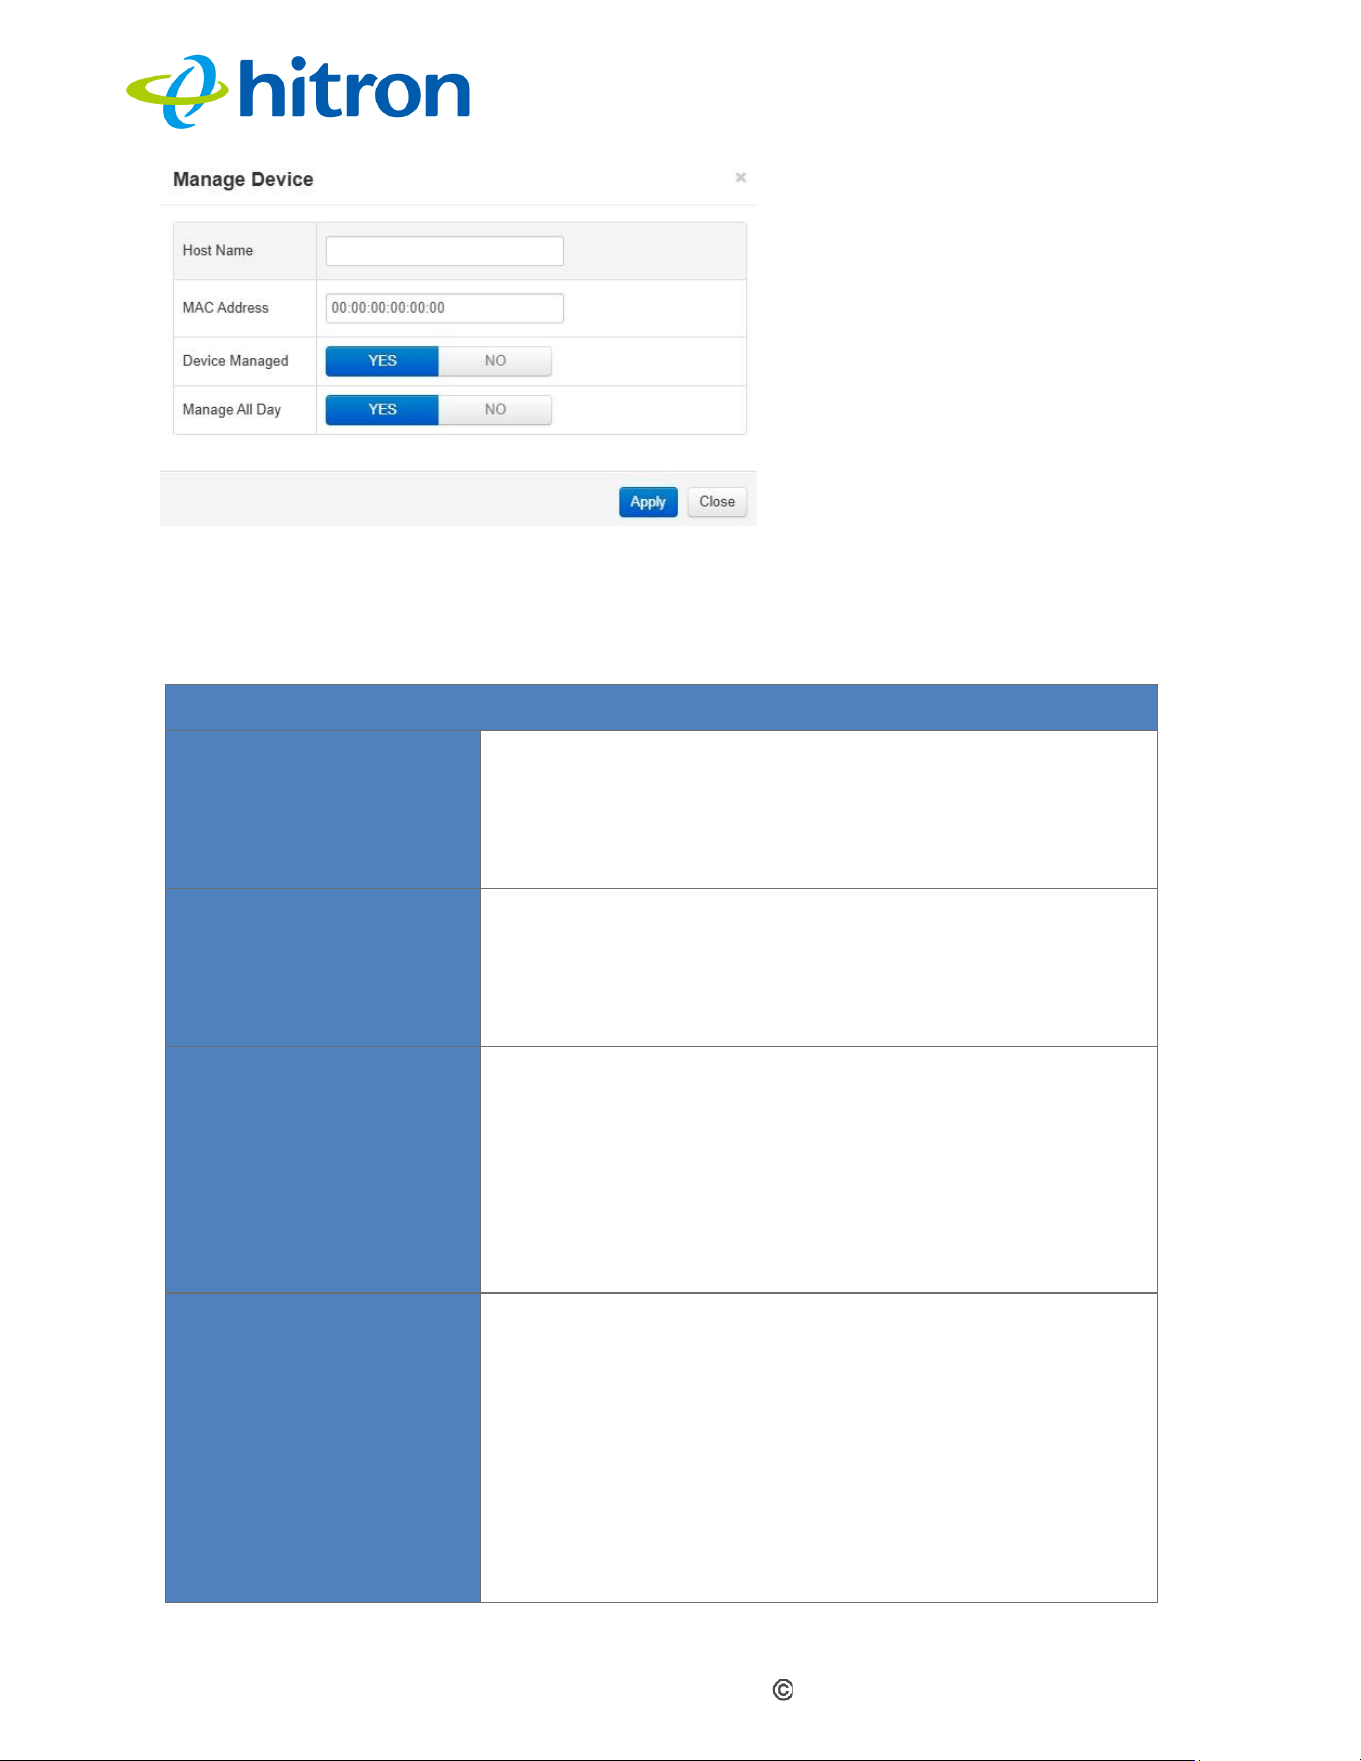
Hitron CODA60x1 User’s Guide
Version 1.0, 11/2020. Copyright
2012 Hitron Technologies
3
Version 1.0, 08/2026. Copyright
97
2026 Hitron Technologies
Figure: The Security: Device Filter Add/Edit Screen
The following table describes the labels in this screen.
Table: The Security: Device Filter Add/Edit Screen
Manage Device
Host Name
If you are managing a device that already connected via
the LAN, this field displays the device’s name.
Alternatively, if you are managing a device that is not
connected via the LAN, you can enter its name here if
you know it.
MAC Address
If you are managing a device that already connected via
the LAN, this field displays the device’s MAC (Media
Access Control) address. Alternatively, if you are
managing a device that is not connected via the LAN,
you can enter its MAC address here if you know it.
Device Managed
Use this field to define whether the device should have
its access privileges filtered or not.
Click Yes to filter the device’s access privileges.
Click No not to filter the device’s access privileges.
When a device is not being managed, the Manage All
Day field, and related fields, do not display.
Manage All Day
Use this field to specify whether the filtering rule should
apply at all times or only during specified days and
times.
Select YES to apply the rule at all times.
Select NO to apply the rule only during specified
days and times.
When NO is selected, additional fields are displayed,
allowing you to specify when the rule should be
Hitron CODA60x1 User’s Guide
Version 1.0, 11/2020. Copyright
2012 Hitron Technologies
3
Version 1.0, 08/2026. Copyright
98
2026 Hitron Technologies
applied.
Use the Managed Weekdays fields to specify the days
on which the rule should be applied. A red background
indicates that the rule is active on that day and
matching traffic will be blocked. A green background
indicates that the rule is inactive on that day and
matching traffic will not be blocked. Click a day to
toggle the rule on or off for that day.
Use the Manage Time Start fields to specify the time
period during which the rule should be applied. Enter
the start time in the From fields and the end time in the
To fields, using 24-hour notation.
Apply
Click this to save your changes to the fields in this
screen.
Close
Click this to return to the Device Filter screen without
saving your changes to the rule.
7.6
VPN Passthrough
Use this screen to enable or disable VPN Passthrough for IPSec, PPTP, and L2TP
VPN connections.
VPN Passthrough allows VPN traffic from devices on the LAN to pass through the
CODA60x1 and establish a VPN connection to a remote VPN server over the WAN.
The CODA60x1 supports the following VPN Passthrough protocols:
IPSec Passthrough: Allows IPSec VPN traffic to pass through the CODA60x1.
PPTP Passthrough: Allows Point-to-Point Tunneling Protocol (PPTP) VPN traffic to
pass through the CODA60x1.
L2TP Passthrough: Allows Layer 2 Tunneling Protocol (L2TP) VPN traffic to pass
through the CODA60x1.
Note: VPN Passthrough allows LAN devices to establish VPN connections through
the CODA60x1; it does not provide VPN server or VPN client functionality on the
CODA60x1.
Click Security > VPN Passthrough. The following screen
displays.
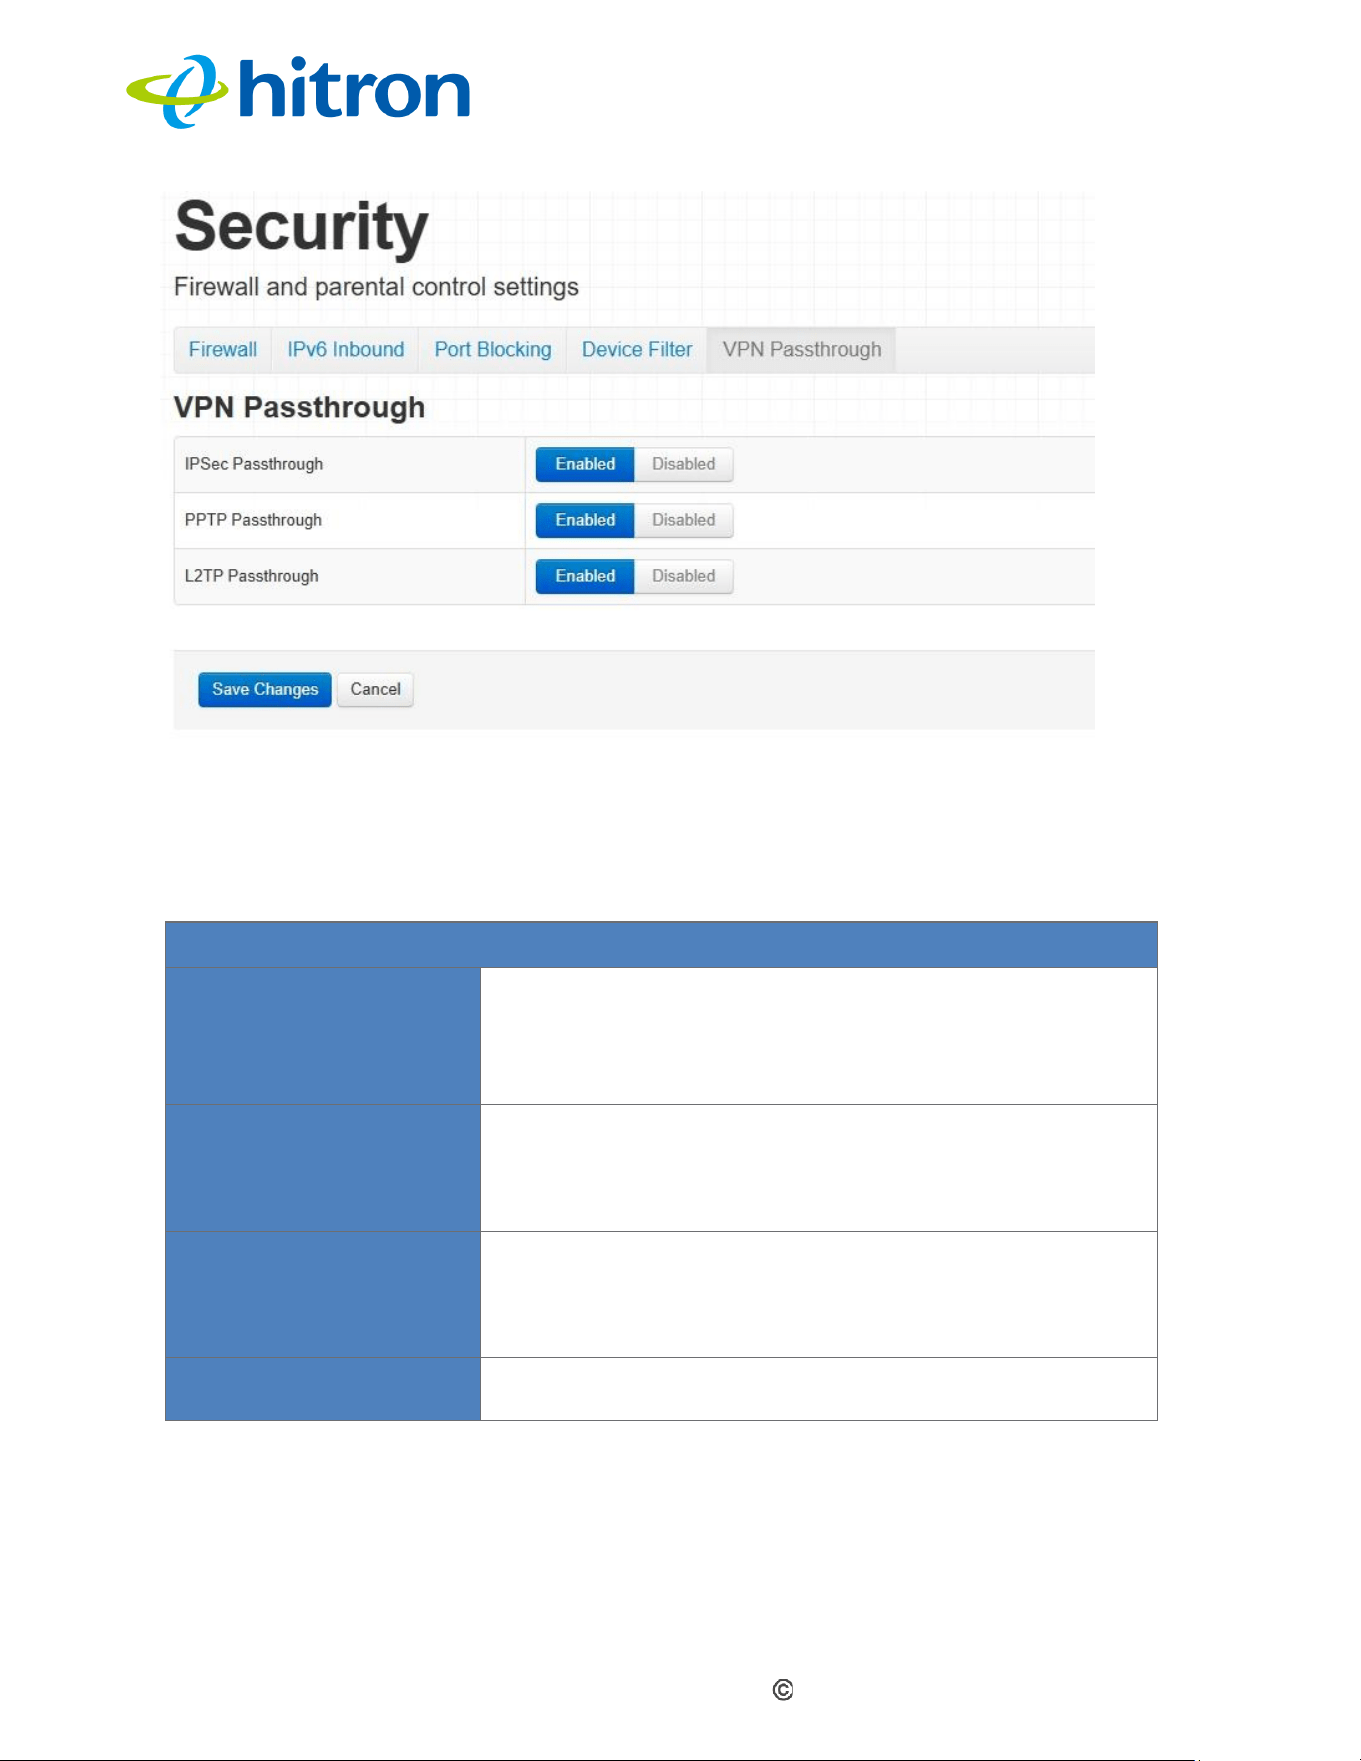
Hitron CODA60x1 User’s Guide
Version 1.0, 11/2020. Copyright
2012 Hitron Technologies
3
Version 1.0, 08/2026. Copyright
99
2026 Hitron Technologies
Figure: The Security: VPN Passthrough Screen
The following table describes the labels in this screen.
Table: The Security: VPN Passthrough
VPN Passthrough
IPSec Passthrough
Select Enable to allow IPSec VPN traffic from
devices on the LAN to pass through the
CODA60x1.
Select Disable to block IPSec VPN passthrough.
PPTP Passthrough
Select Enable to allow Point-to-Point Tunneling
Protocol (PPTP) VPN traffic from devices on the
LAN to pass through the CODA60x1.
Select Disable to block PPTP VPN passthrough.
L2TP Passthrough
Select Enable to allow Layer 2 Tunneling Protocol
(L2TP) VPN traffic from devices on the LAN to
pass through the CODA60x1.
Select Disable to block L2TP VPN passthrough.
Save Changes
Click this to save your changes to the fields in this
screen.

Hitron CODA60x1 User’s Guide
Version 1.0, 11/2020. Copyright
2012 Hitron Technologies
3
Version 1.0, 08/2026. Copyright
100
2026 Hitron Technologies
8
Advanced
This chapter describes the screens that display when you click Advanced in the
toolbar. It contains the following sections:
Advanced Overview
The Advanced: Switch Setup
The Advanced: DDNS
The Advanced: Static Route
The Advanced: Device Location
8.1
Advanced Overview
This section describes some of the concepts related to the Advanced screens.
8.2
The Advanced: Switch Setup Screen
Use this screen to see information about the data rate and flow of each of the
CODA60x1’s LAN ports, and to activate or deactivate each port.
Click Advanced > Switch Setup. The following screen displays.
Figure: The Advanced: Switch Setup Screen
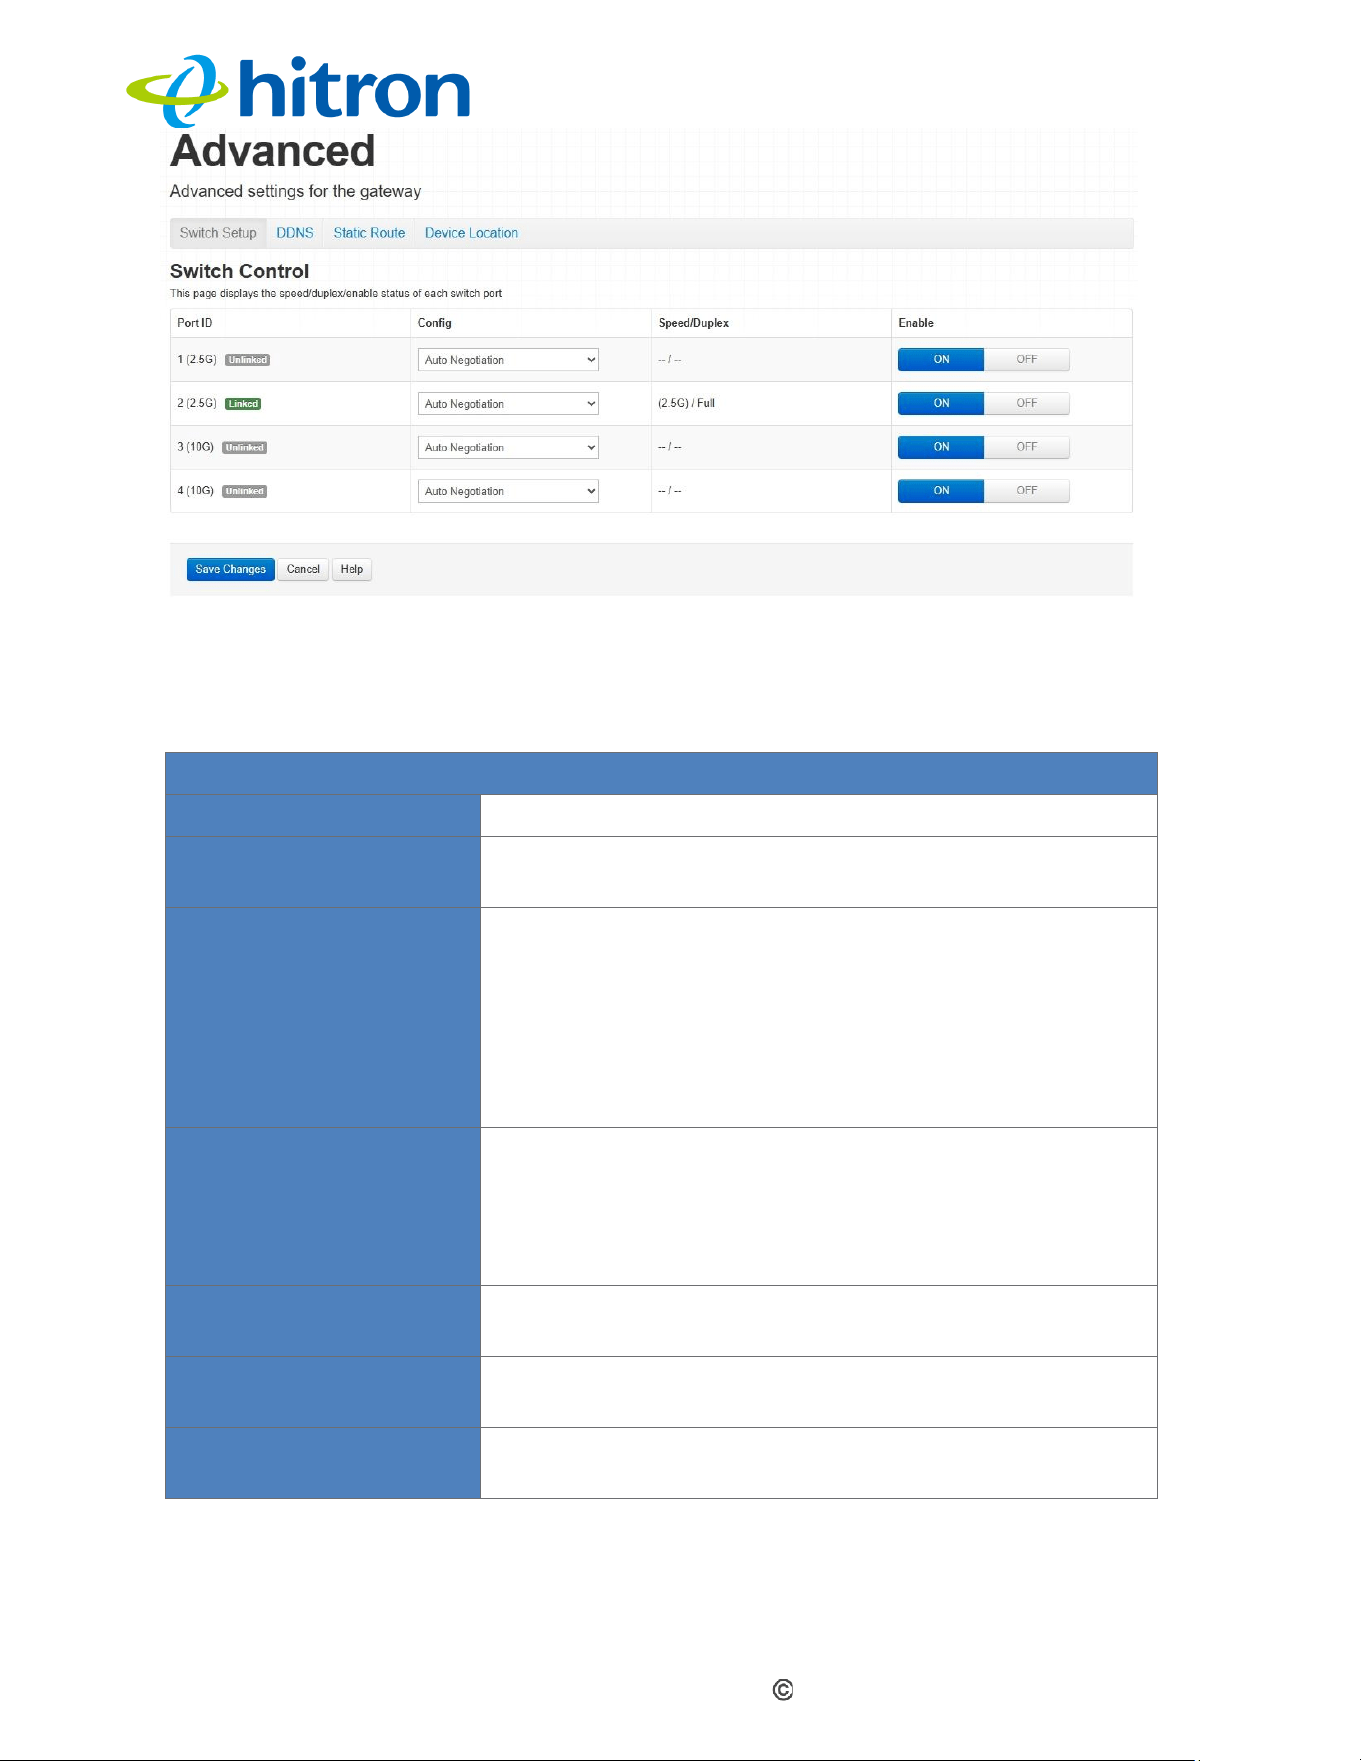
Hitron CODA60x1 User’s Guide
Version 1.0, 11/2020. Copyright
2012 Hitron Technologies
3
Version 1.0, 08/2026. Copyright
101
2026 Hitron Technologies
The following table describes the labels in this screen.
Table: The Advanced: Switch Setup Screen
Switch Control
Port
This displays the physical LAN port number.
Speed
This displays the maximum achievable data speed in
megabits per second (Mbps).
Duplex
This displays Full when data can flow between the
CODA60x1 and the connected device in both
directions simultaneously.
This displays Half when data can flow between the
CODA60x1 and the connected device in only one
direction at a time.
Enable
Select ON to enable communications between the
CODA60x1 and devices connected to the port.
Select OFF to disable communications between the
CODA60x1 and devices connected to the port.
Save Changes
Click this to save your changes to the fields in this
screen.
Cancel
Click this to return the fields in this screen to their last-
saved values without saving your changes.
Help
Click this to see information about the fields in this
screen.
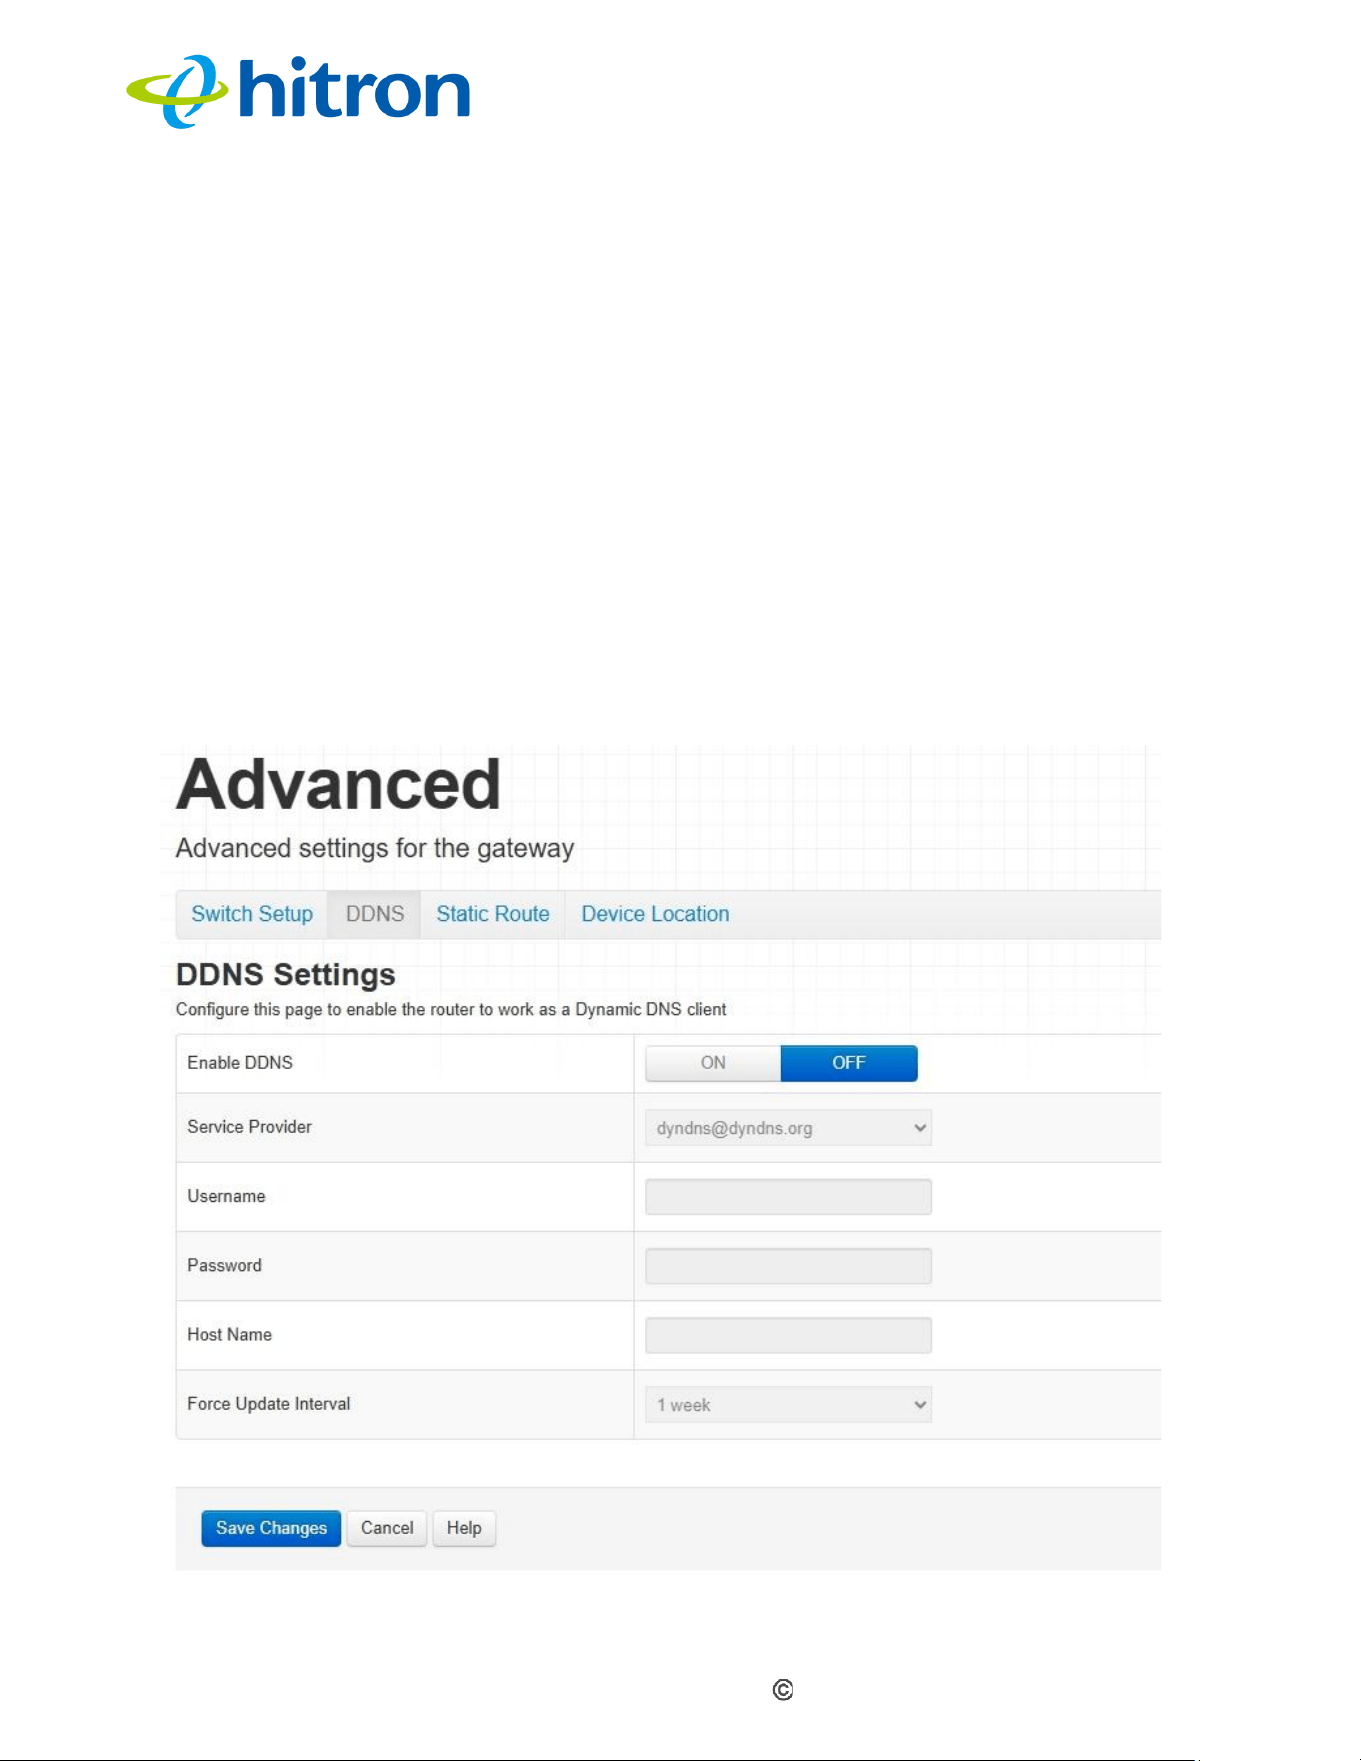
Hitron CODA60x1 User’s Guide
Version 1.0, 11/2020. Copyright
2012 Hitron Technologies
3
Version 1.0, 08/2026. Copyright
102
2026 Hitron Technologies
8.3
The Advanced: DDNS
Dynamic Domain Name System (DDNS) allows you to associate a hostname with the
CODA60x1's public IP address.
When DDNS is enabled, the CODA60x1 automatically updates the DDNS service
whenever its public IP address changes. This allows you to use a consistent
hostname to access services or devices on your network without needing to know the
current public IP address.
DDNS is particularly useful when your Internet service provider assigns a dynamic
public IP address.
Use this screen to configure the CODA60x1's DDNS settings.
Click Advanced > DDNS. The following screen displays.
Figure: The Advanced: DDNS Settings Screen
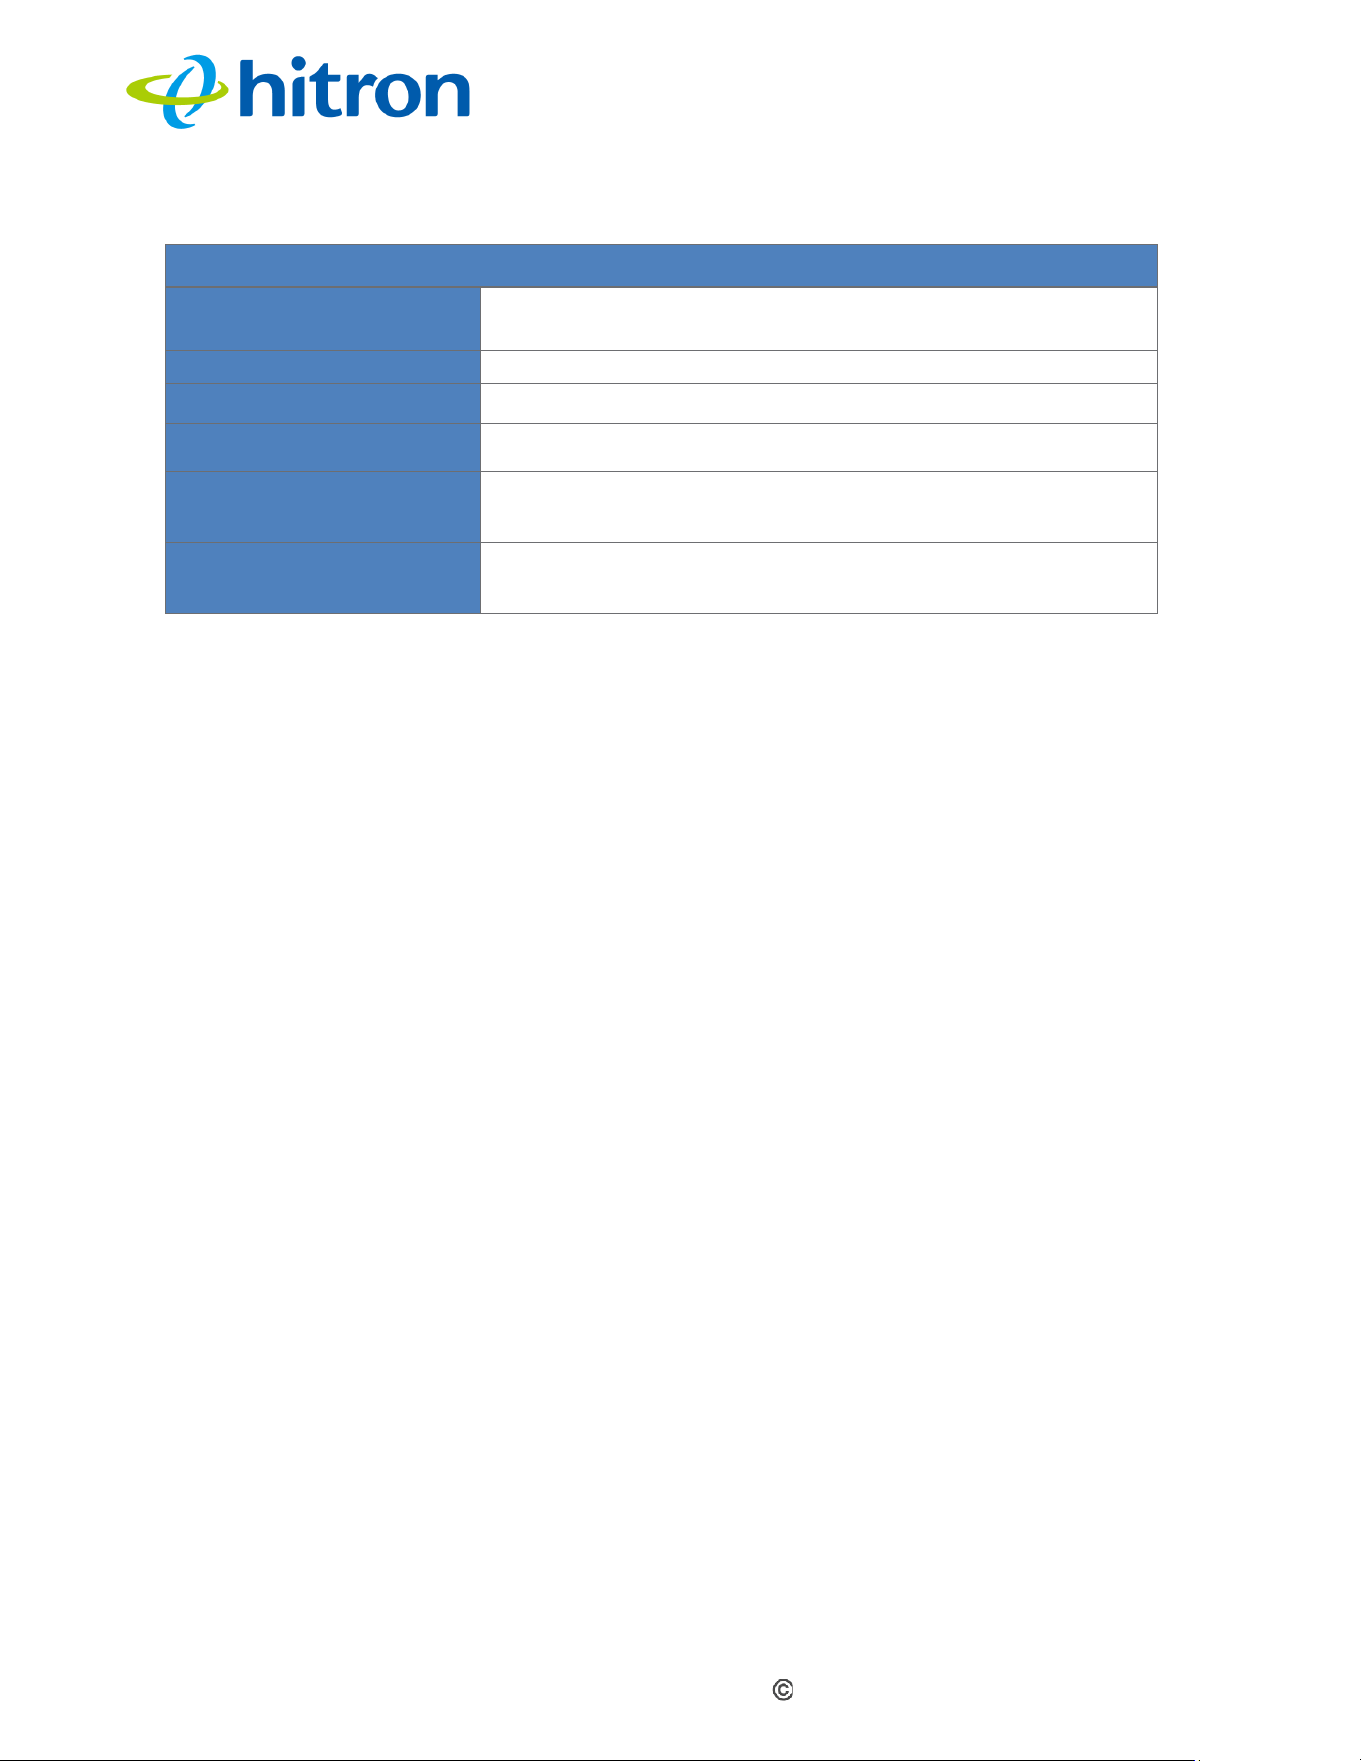
Hitron CODA60x1 User’s Guide
Version 1.0, 11/2020. Copyright
2012 Hitron Technologies
3
Version 1.0, 08/2026. Copyright
103
2026 Hitron Technologies
The following table describes the labels in this screen.
Table: The Advanced: Switch Setup Screen
DDNS Settings
Enable DDNS
Select Enabled to enable DDNS, or select Disabled to
disable DDNS.
Service Provider
Select the DDNS service provider that you want to use.
Username
Enter the username for your DDNS service account.
Password
Enter the password for your DDNS service account.
Host Name
Enter the hostname registered with your DDNS service
provider.
Force Update Interval
Select the interval at which the CODA60x1 should
force an update to the DDNS service.
8.4
The Advanced: Static Route
A static route is a manually configured routing rule that specifies how traffic destined
for a particular network or subnet should be forwarded. Unlike dynamic routing, static
routes do not change automatically based on network conditions.
Use this screen to configure static routes on the CODA60x1. You can specify the
destination network, subnet mask, gateway, and interface to define the path that
traffic should take.
Static routes are useful when devices on the LAN need to communicate with another
network or subnet through a specific router or gateway. For example, you can
configure a static route when a downstream router provides access to a separate
private network.
Click Advanced > Static Route. The following screen displays.
Figure: The Advanced: Static Route Settings Screen
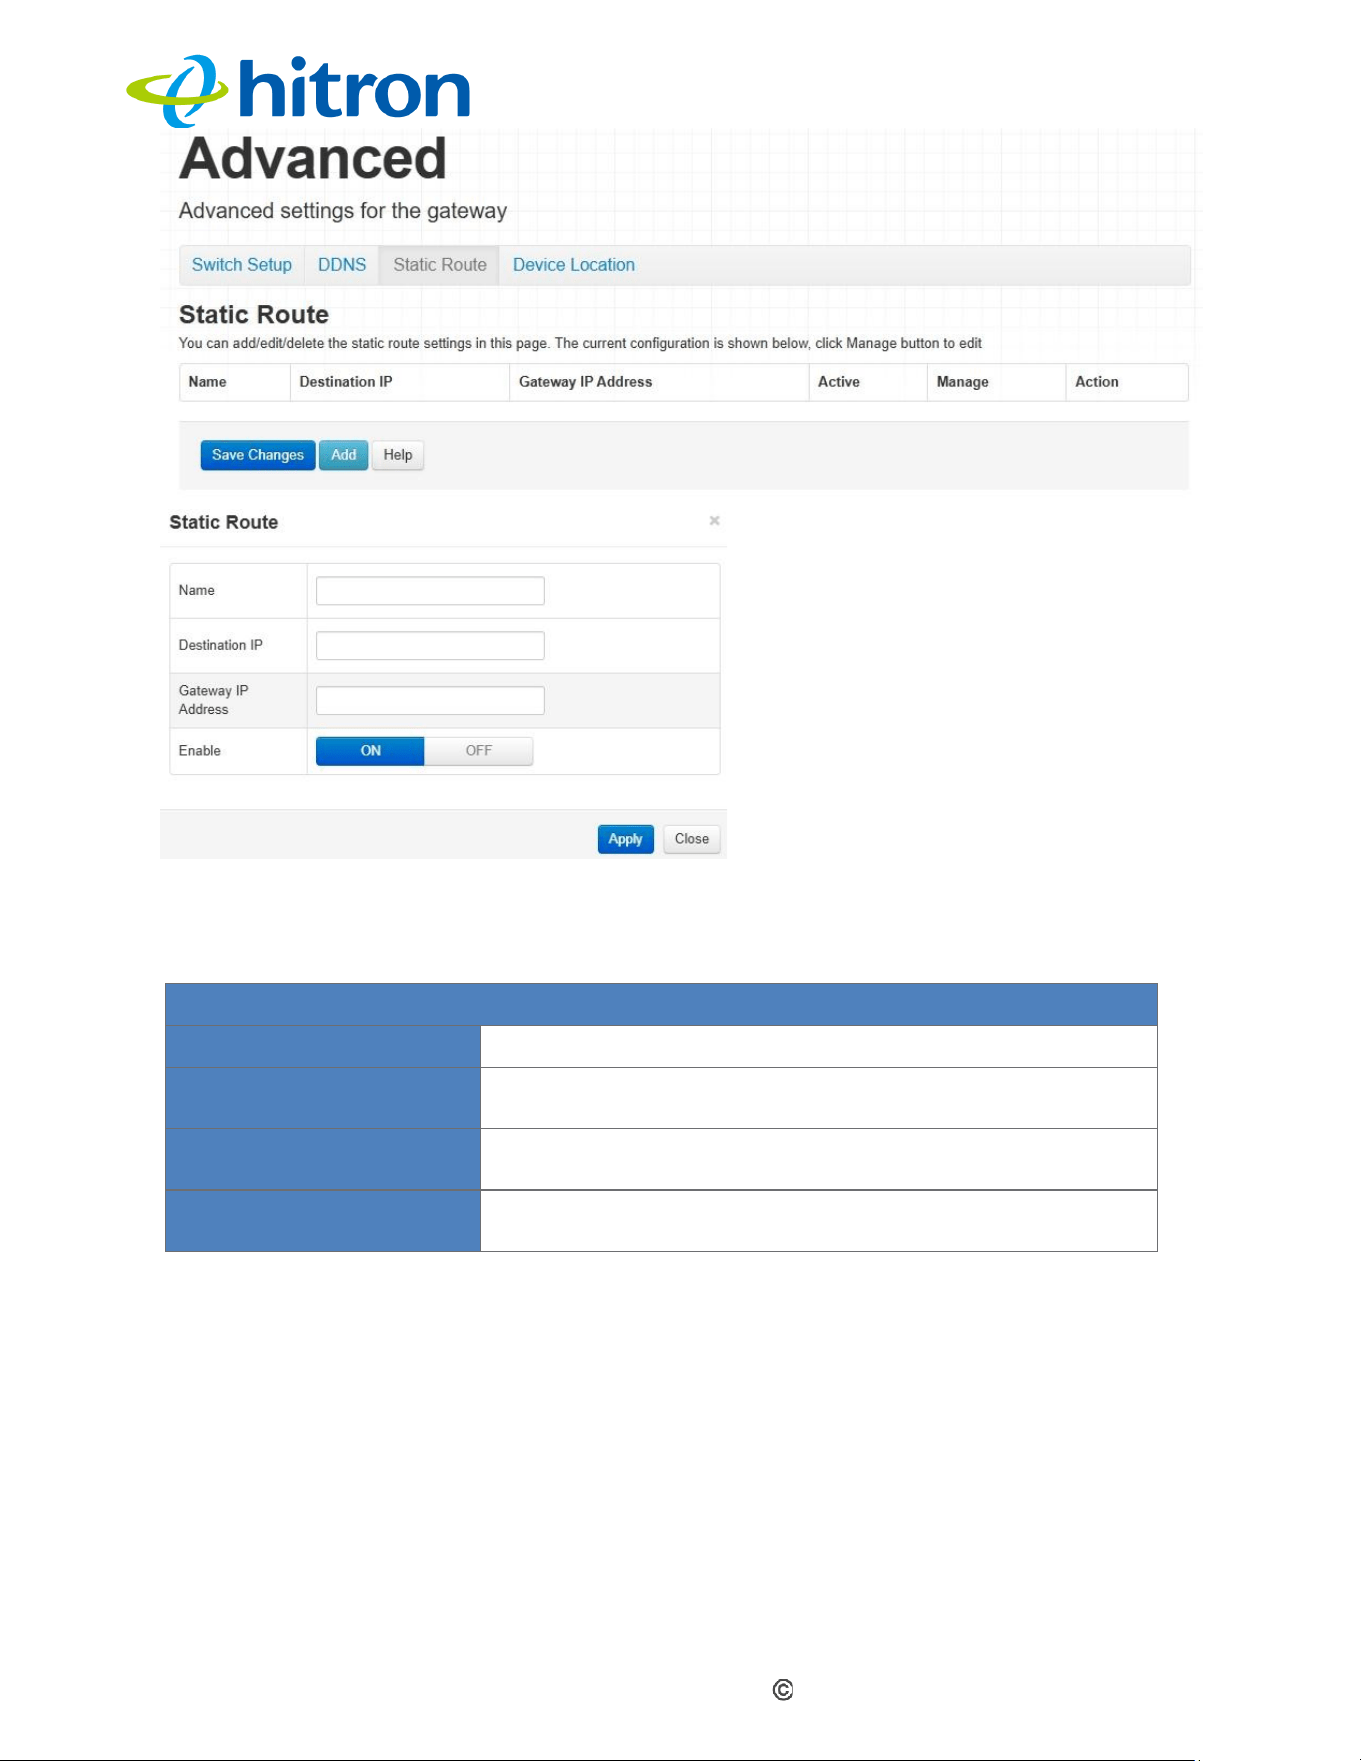
Hitron CODA60x1 User’s Guide
Version 1.0, 11/2020. Copyright
2012 Hitron Technologies
3
Version 1.0, 08/2026. Copyright
104
2026 Hitron Technologies
The following table describes the labels in this screen.
Table: The Advanced: Static Route
Static Route Settings
Name
Enter a name to identify the static route.
Destination IP
Enter the IP address of the destination network or host
to which the static route applies.
Gateway IP Address
Enter the IP address of the gateway through which
traffic to the destination network or host is forwarded.
Enable
Select ON to enable the static route, or OFF to disable
it.
8.5
The Advanced: Device Location
Use this screen you can set where your device locates. This will help to optimize the
network quality if more than one extender is connected,
Click Advanced > Device Location. The following screen displays.
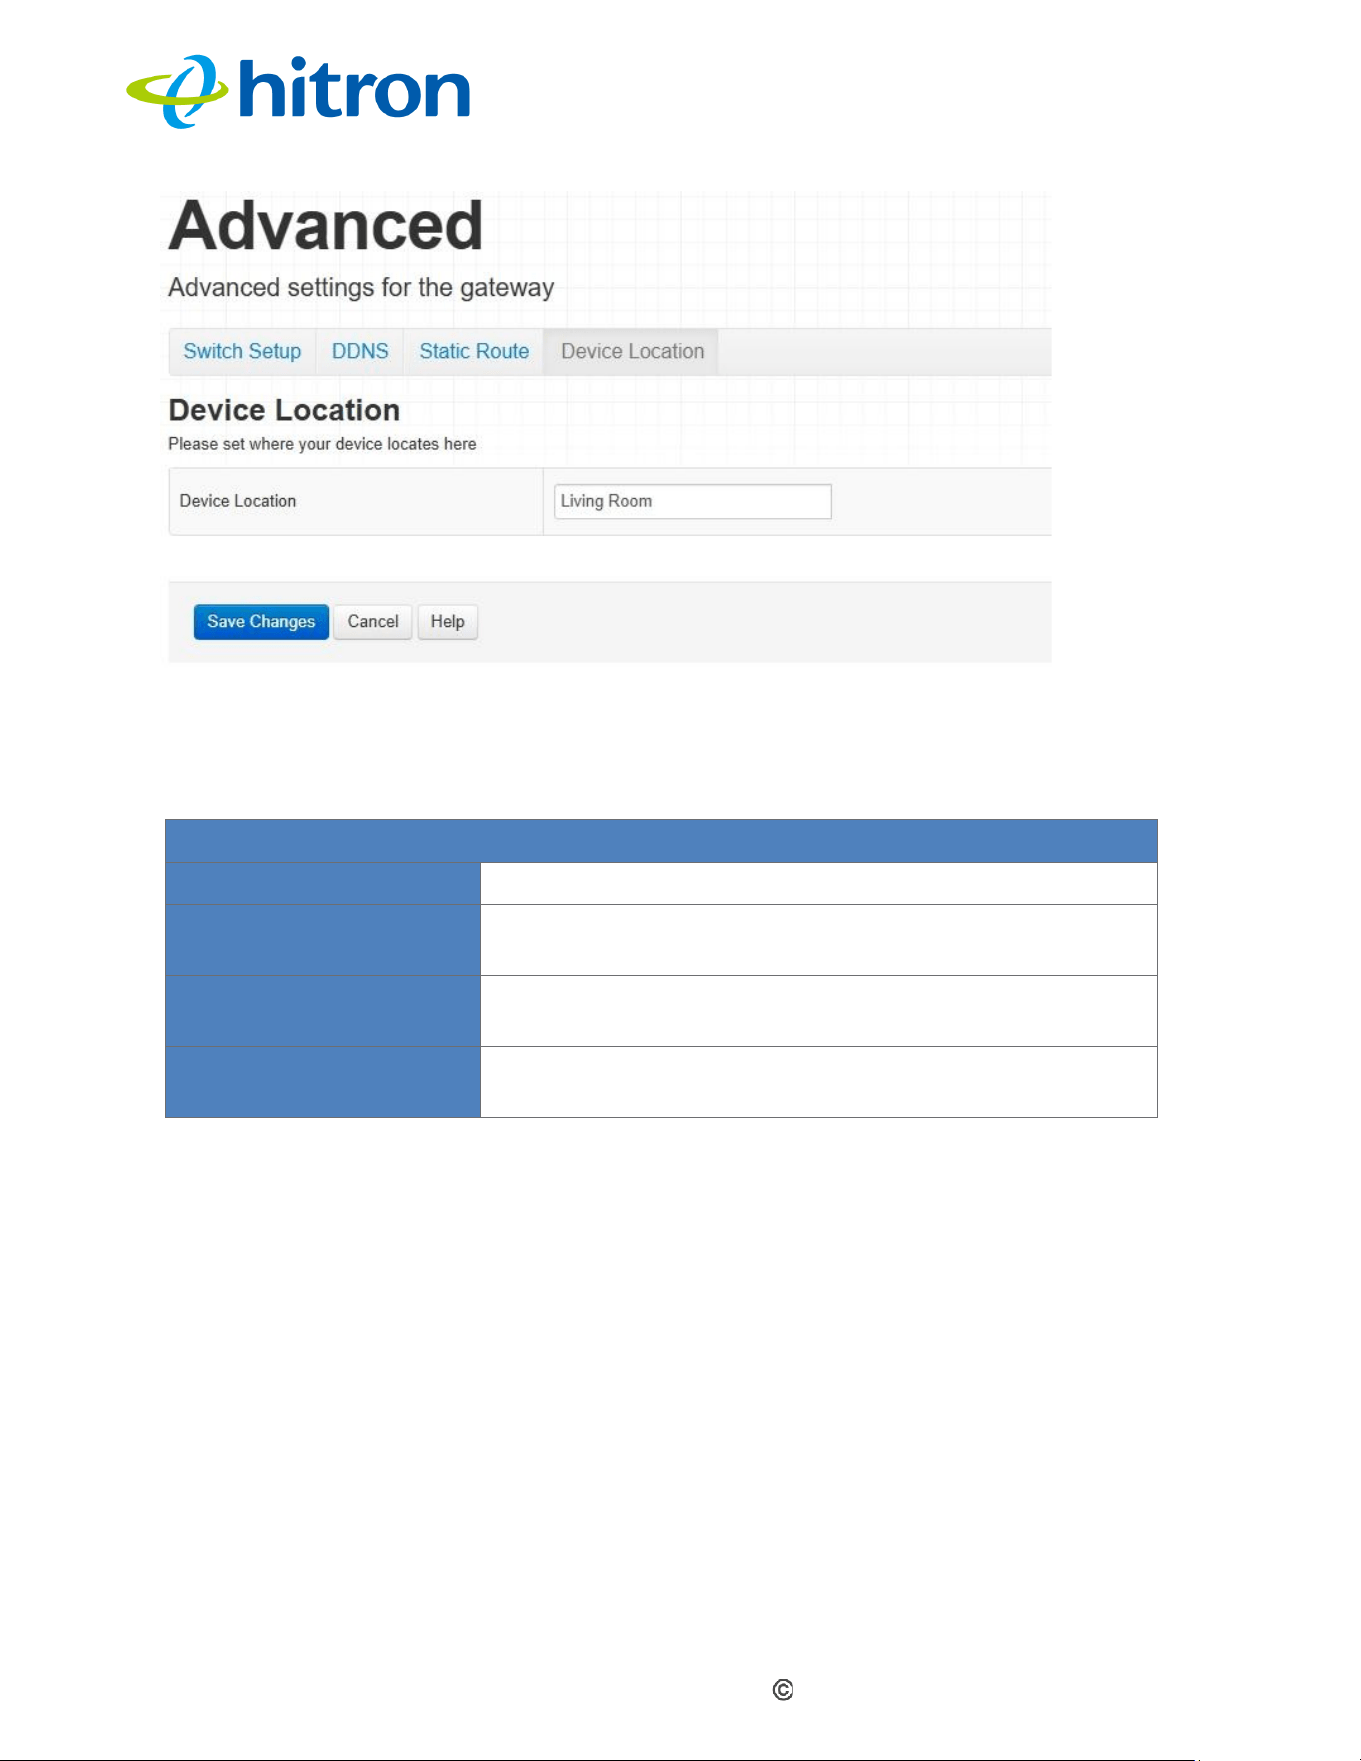
Hitron CODA60x1 User’s Guide
Version 1.0, 11/2020. Copyright
2012 Hitron Technologies
3
Version 1.0, 08/2026. Copyright
105
2026 Hitron Technologies
Figure: The Advanced: Device Location Screen
The following table describes the labels in this screen.
Table: The Advanced: Device Location Screen
Device Location
Device Location
Enter the location of the device.
Save
Click this button to save your changes to the fields on
this screen.
Cancel
Click this button to restore the fields on this screen to
their last-saved values without saving your changes.
Help
Click this button to view information about the fields on
this screen.

Hitron CODA60x1 User’s Guide
Version 1.0, 11/2020. Copyright
2012 Hitron Technologies
3
Version 1.0, 08/2026. Copyright
106
2026 Hitron Technologies
9
Troubleshooting
Use this section to solve common problems with the CODA60x1 and your network. It
contains the following sections:
The LED doesn't turn on
The LED does not Display as Expected
I Forgot the CODA60x1’s Admin Username or Password
I Cannot Access the CODA60x1 or the Internet
I Cannot Connect My Wireless Device
Problem: The LED doesn't turn on
The CODA60x1 is not receiving power, or there is a fault with the device.
1
Ensure that you are using the correct power adaptor.
Using a power adaptor other than the one that came with your
CODA60x1Q can damage the CODA60x1.
2
Ensure that the power adaptor is connected to the CODA60x1 and the wall
socket (or other power source) correctly.
3
Ensure that the power source is functioning correctly. Replace any broken fuses
or reset any tripped circuit breakers.
4
Disconnect and re-connect the power adaptor to the power source and the
CODA60x1.
5
If none of the above steps solve the problem, consult your vendor.

Hitron CODA60x1 User’s Guide
Version 1.0, 11/2020. Copyright
2012 Hitron Technologies
3
Version 1.0, 08/2026. Copyright
107
2026 Hitron Technologies
Problem: The LED does not Display as Expected
1
Ensure that you understand the LED’s normal behavior (see LEDs).
2
Check your network’s hardware connections, and that the CODA60x1’s LEDs
display correctly (see LEDs)
3
Disconnect and re-connect the power adaptor to the CODA60x1.
4
If none of the above steps solve the problem, consult your vendor.
Problem: I Forgot the CODA60x1’s Admin Username or Password
The default username is cusadmin, and the password is the same as the password
you configured for the wireless network in the EasyConnect setup wizard (see
EasyConnect).
Problem: I Cannot Access the CODA60x1 or the Internet
1
Ensure that you are using the correct IP address for the CODA60x1.
2
Check your network’s hardware connections, and that the CODA60x1’s LEDs
display correctly (see LEDs).
3
Make sure that your computer is on the same subnet as the CODA60x1; see IP
Address Setup.
4
If the above steps do not work, you need to reset the CODA60x1. See Resetting
the CODA60x1. All user-configured data is lost, and the CODA60x1 is returned
to its default settings. If you previously backed-up a more recent version your
CODA60x1’s settings, you can now upload them to the CODA60x1; see The
Admin: Backup Screen.
5
If the problem persists, contact your vendor.
Problem: I Cannot Connect My Wireless Device
1
Ensure that your wireless client device is functioning properly, and is configured
correctly. See the wireless client’s documentation if unsure.
2
Ensure that the wireless client is within the CODA60x1’s radio coverage area.
Bear in mind that physical obstructions (walls, floors, trees, etc.) and electrical
interference (other radio transmitters, microwave ovens, etc) reduce your
CODA60x1’s signal quality and coverage area.

Hitron CODA60x1 User’s Guide
Version 1.0, 11/2020. Copyright
2012 Hitron Technologies
3
Version 1.0, 08/2026. Copyright
108
2026 Hitron Technologies
3
Ensure that the CODA60x1 and the wireless client are set to use the same
wireless mode, SSID and security settings (see The Wireless Basic Settings
Screen and The WPS & Security Screen).
4
Re-enter any security credentials (WEP keys, WPA(2)-PSK password, or WPS
PIN).
5
If you are using WPS’s PBC (push-button configuration) feature, ensure that you
are pressing the button on the CODA60x1 and the button on the wireless client
within 2 minutes of one another.
Hitron CODA60x1 User’s Guide
Version 1.0, 11/2020. Copyright
2012 Hitron Technologies
3
Version 1.0, 08/2026. Copyright
109
2026 Hitron Technologies
10
Statements and
Warnings
Federal Communication Commission Interference Statement
This equipment has been tested and found to comply with the limits for a Class B digital device,
pursuant to Part 15 of the FCC Rules. These limits are designed to provide reasonable protection
against harmful interference in a residential installation. This equipment generates, uses and can
radiate radio frequency energy and, if not installed and used in accordance with the instructions, may
cause harmful interference to radio communications. However, there is no guarantee that interference
will not occur in a particular installation. If this equipment does cause harmful interference to radio or
television reception, which can be determined by turning the equipment off and on, the user is
encouraged to try to correct the interference
by one of the following measures:
● Reorient or relocate the receiving antenna.
● Increase the separation between the equipment and receiver.
● Connect the equipment into an outlet on a circuit different from that to which the receiver is
connected.
● Consult the dealer or an experienced radio/TV technician for help.
FCC Caution: Any changes or modifications not expressly approved by the party responsible for
compliance could void the user’s authority to operate this equipment.
This device complies with Part 15 of the FCC Rules. Operation is subject to the following two
conditions:
(1) This device may not cause harmful interference, and
(2) This device must accept any interference received, including interference that may cause undesired
operation.
This device is restricted for indoor use.
FCC regulations restrict the operation of this device to indoor use only. FCC regulations restrict the
operation of this device to indoor use only.
The operation of this device is prohibited on oil platforms, cars, trains, boats, and aircraft, except that
operation of this device is permitted in large aircraft while flying above 10,000 feet.
Operation of transmitters in the 5.925-7.125 GHz band is prohibited for control of or Communications
with unmanned aircraft systems.

Hitron CODA60x1 User’s Guide
Version 1.0, 11/2020. Copyright
2012 Hitron Technologies
3
Version 1.0, 08/2026. Copyright
110
2026 Hitron Technologies
IMPORTANT NOTE:
FCC Radiation Exposure Statement:
This equipment complies with FCC radiation exposure limits set forth for an uncontrolled environment.
This equipment should be installed and operated with minimum distance 27cm between the radiator &
your body.
FCC regulations restrict the operation of this device to indoor use only.
Output of the external power source shall complied with ES1 and PS2 requirements, output rating 12
Vdc, minimum 5A with minimum rated ambient temperature 40°C and evaluated in accordance to IEC
60950-1 and/or IEC 62368-1.
Ensure to connect the power cord of power adapter to a socket-outlet with earthing connection. La
sortie de la source d'alimentation externe doit être conforme aux exigences ES1 et PS2, avec une
puissance de sortie de 12 Vcc, un minimum de 5A et une température ambiante nominale minimale de
40°C et évaluée conformément à la norme IEC 60950-1 et/ou
IEC 62368-1.
Assurez-vous de connecter le bloc d'alimentation à une prise de courant avec mise à la terre.
Industry Canada statement:
This device contains licence-exempt transmitter(s)/receiver(s) that comply with Innovation,
Science and Economic Development Canada’s licence-exempt RSS(s). Operation is subject
to the following two conditions:
(1) This device may not cause interference.
(2) This device must accept any interference, including interference that may cause
undesired operation of the device.
Cet appareil contient des émetteurs / récepteurs exempts de licence qui sont conformes
au (x) RSS (s) exemptés de licence d'Innovation, Sciences et Développement économique
Canada. L'opération est soumise aux deux conditions suivantes:
(1) Cet appareil ne doit pas provoquer d'interférences.
(2) Cet appareil doit accepter toute interférence, y compris les interférences susceptibles
de provoquer un fonctionnement indésirable de l'appareil.
The device for operation in the band 5150–5250 MHz is only for indoor use to reduce the
potential for harmful interference to co-channel mobile satellite systems.
les dispositifs fonctionnant dans la bande 5150-5250 MHz sont réservés uniquement pour
une utilisation à l’intérieur afin de réduire les risques de brouillage préjudiciable aux
systèmes de satellites mobiles utilisant les mêmes canaux.
Devices shall not be used for control of or communications with unmanned aircraft systems.
Les appareils ne doivent pas être utilisés pour contrôler ou communiquer avec des systèmes
d'aéronefs sans pilote.
Devices shall not be used on oil platforms.
Les appareils ne doivent pas être utilisés sur les plates-formes pétrolières.
Devices shall not be used on aircraft, except for the low-power indoor access points, indoor
subordinate devices, low-power client devices, and very low-power devices operating in the
5925-6425 MHz band, that may be used on large aircraft as defined in the Canadian Aviation
Regulations, while flying above 3,048 metres (10,000 feet).
Les appareils ne doivent pas être utilisés sur les avions, à l'exception des points d'accès
intérieure à faible puissance, des dispositifs subordonnés intérieurs, des dispositifs clients de
faible puissance et des dispositifs de très faible puissance fonctionnant dans la bande
5925-6425 MHz, qui peut être utilisée sur de grands avions tel que défini dans la
réglementation de l'aviation canadienne, tout en volant au-dessus de 3 048 mètres (10 000
pieds).
Devices shall not be used on automobiles.
Les appareils ne doivent pas être utilisés sur les automobiles.
Devices shall not be used on trains.
Les appareils ne doivent pas être utilisés dans les trains.
IC Statement
Devices shall not be used on maritime vessels.

Hitron CODA60x1 User’s Guide
Version 1.0, 11/2020. Copyright
2012 Hitron Technologies
3
Version 1.0, 08/2026. Copyright
111
2026 Hitron Technologies
Les appareils ne doivent pas être utilisés sur les navires maritimes.
Operation shall be limited to indoor use only.
Le fonctionnement doit être limité à une utilisation en intérieur uniquement.
IMPORTANT NOTE:
IC Radiation Exposure Statement:
This equipment complies with IC RSS-102 radiation exposure limits set forth for an
uncontrolled environment. This equipment should be installed and operated with minimum
distance IC 32cm between the radiator & your body.
Cet équipement est conforme aux limites d'exposition aux rayonnements IC établies pour un
environnement non contrôlé. Cet équipement doit être installé et utilisé avec un minimum
de IC 32cm de distance entre la source de rayonnement et votre corps.
For indoor use only.
Pour une utilisation en intérieur uniquement.
(Applicable to CODA6021U/ CODA6021)
© Hitron Technologies Inc.