
This manual contains important safety, performance and maintenance
information. Read the manual before taking your first ride on your
new bicycle, and keep the manual handy for future reference.
Bicycle
Owner’s
Manual

Adult & Juvenile Bicycle
Owner’s Manual
13th Edition-B, 202613th Edition-B, 2026
Copyright, PeopleForBikes Coalition 2023Copyright, PeopleForBikes Coalition 2023
This manual meets EN ISO-4210, 16 CFR 1512 and EN 16054 Standards
IMPORTANT:
This manual contains important safety, performance and service information. Read
it before you take the rst ride on your new bicycle, and keep it for reference.
Additional safety, performance and service information for specic components
such as suspension or pedals on your bicycle, or for accessories such as
helmets or lights that you purchase, may also be available. Make sure that
your authorized retailer has given you all the manufacturers’ literature that
was included with your bicycle or accessories. In case of a conict between
the instructions in this manual and information provided by a component
manufacturer, always follow the component manufacturer’s instructions.
If you have any questions or do not understand something, take responsibility for
your safety and consult with your authorized retailer or the bicycle’s manufacturer.
NOTE: This manual is not intended as a comprehensive use, service, repair
or maintenance manual.
A01257
050426

GENERAL WARNING:
Like any sport, bicycling involves risk of injury and damage. By choosing to
ride a bicycle, you assume the responsibility for that risk, so you need to know —
and to practice — the rules of safe and responsible riding and of proper use and
maintenance. Proper use and maintenance of your bicycle reduces risk of injury.
This Manual contains many “Warnings” and “Cautions” concerning the
consequences of failure to maintain or inspect your bicycle and of failure to follow
safe cycling practices.
• The combination of the safety alert symbol and the word WARNING
indicates a potentially hazardous situation which, if not avoided, could result in
serious injury or death.
• The combination of the safety alert symbol and the word CAUTION
indicates a potentially hazardous situation which, if not avoided, could result in
minor or moderate injury, or is an alert against unsafe practices.
• The word CAUTION used without the safety alert symbol indicates a
situation which, if not avoided, could result in serious damage to the bicycle or
the voiding of your warranty.
Many of the Warnings and Cautions say, “You may lose control and fall”.
Because any fall can result in serious injury or even death, we do not always
repeat the warning of possible injury or death.
Because it is impossible to anticipate every situation or condition that can
occur while riding, this Manual makes no representation about the safe use
of the bicycle under all conditions. There are risks associated with the use
of any bicycle which cannot be predicted or avoided, and which are the sole
responsibility of the rider.

Contents
1. First 2
A. Bike Fit 2
B. Safety First 2
C. Mechanical Safety Check 3
D. First Ride 5
2. Safety 6
A. The Basics 6
B. Riding Safety 7
C. Off-Road Safety 8
D. Wet-Weather Riding 8
E. Night Riding 8
F. Extreme, Stunt or Competition Riding 10
G. Changing Components or Adding Accessories 11
3. Fit 12
A. Standover Height 12
1. Diamond-frame bicycles 12
2. Step-through frame bicycles 12
B. Saddle Position 12
C. Handlebar Height and Angle 15
D. Control Position Adjustments 16
E. Brake Reach 16
4. Tech 17
A. Wheels 17
1. Front wheel secondary retention devices 19
2. Wheels with cam-action systems 19
3. Thru-axle wheel mounting system 20
4. Removing and installing wheels 21
B. Seat Post Cam-Action Clamp 24
C. Brakes 26
1. Brake controls and features 27
2. How brakes work 27
D. Shifting Gears 28
1. How a derailleur drivetrain works 28
2. How an internal gear hub drivetrain works 30
E. Pedals 30
F. Bicycle Suspension 32
G. Tires and Tubes 32
1. Tires 33
2. Tubeless rims and tires 34
3. Tire and rim width/diameter 35
4. Tire clearance 35
5. Tire valves 37

5. Service 38
A. Service Intervals 38
B. If Your Bicycle Sustains an Impact: 40
Appendix A: Teaching Your Child the Rules 41
Appendix B: Intended Use of Your Bicycle 44
Appendix C: The Lifespan of Your Bike and its Components 50
Appendix D: Coaster Brake 56
1
A special note for parents:
WARNING: This manual covers both Adult and Juvenile, BMX and
other types of youth-sized bicycles. And your child may be sold or
may ride an adult-sized bicycle as well.
As a parent or guardian, you are responsible for the activities and safety
of your minor child, and that includes making sure that the bicycle is properly
tted to the child; that it is in good repair and safe operating condition; that you
and your child have learned and understand the safe operation of the bicycle;
and that you and your child have learned, understand and obey not only the
applicable local motor vehicle, bicycle and trafc laws, but also the common
sense rules of safe and responsible bicycling. As a parent, you should read this
manual, as well as review its warnings and the bicycle’s functions and operating
procedures with your child, before letting your child ride the bicycle.
WARNING: Make sure that your child always wears an approved
bicycle helmet when riding; but also make sure that your child
understands that a bicycle helmet is for bicycling only, and must be
removed when not riding. A helmet must not be worn while playing, in play
areas, on playground equipment, while climbing trees, or at any time while
not riding a bicycle. Failure to follow this warning could result in serious
injury or death.

2
1. First
NOTE: We strongly urge you to read this Manual in its entirety before your rst
ride. At the very least, read and make sure that you understand each point in this
section, and refer to the cited sections on any issue that you don’t completely
understand. Please note that not all bicycles have all of the features described in
this Manual. Ask your authorized retailer to point out the features of your bicycle.
A. Bike Fit
1. Is your bike the right size? To check,
refer to Page 12, Section 3: “Fit”,
subsection A: “Standover Height”
.
If your bicycle is too large or too small for
you, you may lose control and fall. If your new bike is not the right size, ask
your authorized retailer to exchange it before you ride it.
2. Is the saddle at the right height? To check, refer to Page 12, Section 3:
“Fit”, subsection B: “Saddle Position”. If you adjust your saddle height,
follow the Minimum Insertion instructions in Section 3.B.
3. Are saddle and seat post securely clamped? A correctly tightened saddle will
allow no saddle movement in any direction. Refer to Page 12, Section 3:
“Fit”, subsection B: “Saddle Position”.
4. Are the stem and handlebars at the right height for you? If not,
refer to Page
15, Section 3: “Fit”, subsection C: “Handlebar Height and Angle”
.
5. Can you comfortably operate the brakes? If not, you may be able to adjust
their angle and reach. Refer to Page 16, Section 3: “Fit”, subsection D:
“Control Position Adjustments” and subsection E: “Brake Reach”.
6. Do you fully understand how to operate your new bicycle? If not, before your
rst ride, have your authorized retailer explain any functions or features that
you do not understand.
B. Safety First
1. Always wear an approved helmet when riding your bike, and follow the
helmet manufacturer’s instructions for t, use and care.
2. Do you have all the other required and recommended safety equipment?
Refer to Page 6, Section 2: “Safety”. It’s your responsibility to familiarize
yourself with the laws of the areas where you ride, and to comply with all
applicable laws.
3. Do you know how to correctly secure your front and rear wheels? Refer to
Page 19, Section 4: “Tech”, subsection A.1: “Front wheel secondary
retention devices” to make sure. Riding with an improperly secured wheel
can cause the wheel to wobble or disengage from the bicycle, and cause
serious injury or death.
4. If your bike has toeclips and straps or clipless (“step-in”) pedals, make sure
you know how they work (refer to Page 30, Section 4: “Tech”, subsection
E: “Pedals”). These pedals require special techniques and skills. Follow the
pedal manufacturer’s instructions for use, adjustment and care.
5. Do you have “toe overlap”? On smaller framed bicycles your toe or toeclip
may be able to contact the front wheel when a pedal is all the way forward
and the wheel is turned. Refer to Page 30, Section 4: “Tech”, subsection
E: “Pedals” to check whether you have toeclip overlap.
3
6. Does your bike have suspension? If so, refer to Page 32, Section 4:
“Tech”, subsection F: “Bicycle Suspension”. Suspension can change the
way a bicycle performs. Follow the suspension manufacturer’s instructions
for use, adjustment and care.
C. Mechanical Safety Check
Routinely check the condition of your bicycle before every ride.
• Nuts, bolts screws and other fasteners: Because manufacturers use a
wide variety of fastener sizes and shapes made in a variety of materials,
often differing by model and component, the correct tightening force or
torque cannot be generalized. To make sure that the many fasteners on
your bicycle are correctly tightened, refer to the torque specications in the
instructions provided by the manufacturer of the component in question.
Correctly tightening a fastener requires a calibrated torque wrench. A
professional bicycle mechanic with a torque wrench should torque the
fasteners on you bicycle. If you choose to work on your own bicycle, you
must use a torque wrench and the correct tightening torque specications
from the bicycle or component manufacturer. If you need to make an
adjustment at home or in the eld, we urge you to exercise care, and to
have the fasteners you worked on checked by a qualied bicycle mechanic
as soon as possible. Note that there are some components that require
special tools and knowledge. In Sections 3 and 4 we discuss the items
that you may be able to adjust yourself. All other adjustments and repairs
should be done by a qualied bicycle mechanic.
WARNING: Correct tightening force on fasteners – nuts, bolts, screws
– on your bicycle is important. Too little force, and the fastener may
not hold securely. Too much force, and the fastener can strip threads,
stretch, deform or break. Either way, incorrect tightening force can result in
component failure, which can cause you to lose control and fall.
• Make sure nothing is loose. Lift the front wheel off the ground by two or
three inches, then let it bounce on the ground. Anything sound, feel or look
loose? Do a visual and tactile inspection of the whole bike. Any loose parts
or accessories? If so, secure them. If you’re not sure, ask someone with
experience to check.
• Tires and Wheels: Make sure tires are correctly inated (refer to Page
33, Section 4: “Tech”, subsection G.1: “Tires”). Check by putting one
hand on the saddle, one on the intersection of the handlebars and stem,
then bouncing your weight on the bike while looking at tire deection.
Compare what you see with how it looks when you know the tires are
correctly inated; and adjust if necessary.
• Tires in good shape? Spin each wheel slowly and look for cuts in the
tread and sidewall. Replace damaged tires before riding the bike.
• Wheels true? Spin each wheel and check for brake clearance and
side-to-side wobble. If a wheel wobbles side to side even slightly, or rubs
against or hits the brake pads, take the bike to a qualied bike shop to have
the wheel trued.

4
CAUTION: Wheels must be true for rim brakes to work effectively.
Wheel truing is a skill that requires special tools and experience. Do
not attempt to true a wheel unless you have the knowledge, experience and
tools needed to do the job correctly.
• Wheel rims clean and undamaged? Make sure the rims are clean and
undamaged at the tire bead and, if you have rim brakes, along the braking
surface. A worn braking surface can mean your wheel rim needs to be
replaced. Some wheel rims have a rim wear indicator that either becomes
visible or disappears as the rim’s braking surface wears. Riding a wheel
that is worn out and at the end of its usable life can result in wheel failure,
which can cause you to lose control and fall.
WARNING: Bicycle wheel rims are subject to wear. Riding a wheel that is
at the end of its usable life can result in wheel failure, which can cause
you to lose control and fall.
• Brakes: Check the brakes for proper operation (refer to Page 26,
Section 4: “Tech”, subsection C: “Brakes”). Squeeze the brake levers.
Are the brake quick-releases closed? Are all control cables seated and
securely engaged? If you have rim brakes, do the brake pads contact
the wheel rim squarely and make full contact with the rim? Do the brakes
begin to engage within an inch of brake lever movement? Can you apply
full braking force at the levers without having them touch the handlebar? If
not, your brakes need adjustment. Do not ride the bike until the brakes are
properly adjusted by a professional bicycle mechanic.
• Wheel retention system: Make sure the front and rear wheels are correctly
secured. Refer to Page 17, Section 4: “Tech”, subsection A: “Wheels”.
• Seat post: If your seat post has an over-center cam-action fastener for
easy height adjustment, check that it is properly adjusted and in the locked
position. Refer to Page 24, Section 4: “Tech”, subsection B: “Seat Post
Cam-Action Clamp”.
• Handlebar and saddle alignment: Make sure the saddle and handlebar
stem are parallel to the bike’s center line and clamped tight enough so
that you can’t twist them out of alignment. Refer to Section 3: “Tech”,
subsection B: “Saddle Position”, Page 12 and subsection C:
“Handlebar Height and Angle”, Page 15.
• Handlebar grips: Make sure the handlebar grips are secure and in good
condition. If your grips are loose, or have cuts, tears or worn-out areas,
replace them.
• Handlebar ends:
Make sure the ends of the handlebar and any extensions
are plugged. If not, plug them before you ride. If the handlebars have bar
end extensions, make sure they are clamped according to the handlebar
and extension manufacturer’s instructions. Make sure your handlebar,
extensions, grips and brake and shifting controls are secure and allow the
safe operation of your bicycle, including the ability to steer, brake and shift
without any interference.

5
WARNING: Loose or damaged handlebar grips or unsecured
handlebar extensions can cause you to lose control, causing a crash
resulting in serious injury or death.
WARNING: The ends of handlebars and handlebar extensions must be
plugged at all times. Unplugged handlebars or extensions can cut or
impale you even in a minor crash, resulting in serious injury or death.
Some handlebars are equipped with grips that lock on with a mechanical
connection. They must have adequate space to properly align the grips with the
handlebar ends and be properly plugged so no portion of the handlebar end is
exposed. Locking grips must be properly tightened to avoid movement.
WARNING: Improperly secured locking grips could lead to a loss of
control or a crash, resulting in serious injury or death.
VERY IMPORTANT SAFETY NOTE:
Please also read and become thoroughly familiar with the important
information on the lifespan of your bicycle and its components in Appendix
C on Page 50.
D. First Ride
When you buckle on your helmet and go for your rst familiarization ride on
your new bicycle, be sure to pick a controlled environment, away from cars, other
cyclists, obstacles or other hazards. Ride to become familiar with the controls,
features and performance of your new bike.
Familiarize yourself with the braking action of the bike (refer to Page 26,
Section 4: “Tech”, subsection C: “Brakes”). Test the brakes at slow speed,
putting your weight toward the rear and gently applying the brakes, rear brake
rst. Sudden or excessive application of the front brake could pitch you over the
handlebars. Applying brakes too hard can lock up a wheel, which could cause
you to lose control and fall. Skidding is an example of what can happen when a
wheel locks up.
If your bicycle has toeclips or clipless pedals, practice getting in and out
of the pedals. See paragraph B.4 above and refer to Page 30, Section 4:
“Tech”, subsection E: “Pedals”.
If your bike has suspension, familiarize yourself with how the suspension
responds to brake application and rider weight shifts. See paragraph B.6 above
and refer to Page 32, Section 4: “Tech”, subsection F: “Bicycle Suspension”.
Practice shifting the gears (
refer to Page 28, Section 4: “Tech”, subsection
D: “Shifting Gears”
). Remember to never move the shifter while pedaling backward,
nor pedal backwards immediately after having moved the shifter. This could jam the
chain and cause serious damage to the bicycle.
Check the handling and response of the bike; and check the comfort. If you
have any questions, or if you feel anything about the bike is not as it should be,
consult a qualied bicycle mechanic before you ride again.
6
2. Safety
A. The Basics
WARNING: The area in which you ride may require specic safety
devices. It is your responsibility to familiarize yourself with the laws of
the area where you ride and to comply with all applicable laws, including
properly equipping yourself and your bike as the law requires.
Observe all local bicycle laws and regulations. Observe regulations
about bicycle lighting, licensing of bicycles, riding on sidewalks, laws
regulating bike path and trail use, helmet laws, child carrier laws and
special bicycle trafc laws. It’s your responsibility to know and obey the
laws.
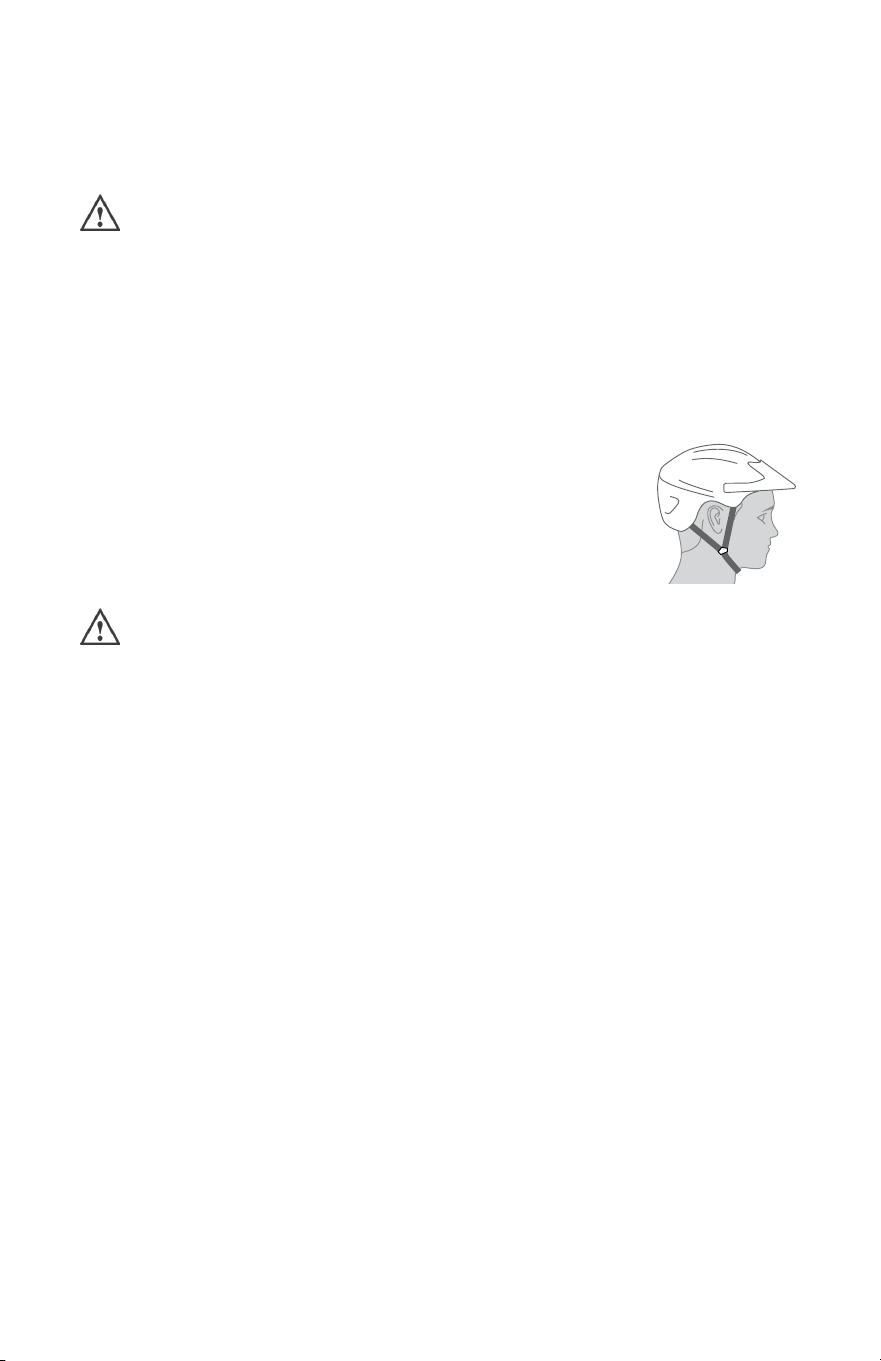
g. 1
1. Always wear a cycling helmet (g. 1) that meets the latest
certication standards and is appropriate for the type of
riding you do. Always follow the helmet manufacturer’s
instructions for t, use and care of your helmet. Most serious
bicycle injuries involve head injuries that might have been
avoided if the rider had worn an appropriate helmet.
WARNING: Failure to wear a helmet when riding may result in serious
injury or death.
2. Always do the Mechanical Safety Check (
refer to Page 3, Section 1:
“First”, subsection C: “Mechanical Safety Check”
) before you get on a bike.
3. Be thoroughly familiar with the controls of your bicycle. Refer to Section 4:
“Tech”, subsection C: “Brakes”, Page 26, subsection D: “Shifting Gears”,
Page 28 and subsection E: “Pedals”, Page 30.
4. Be careful to keep body parts and other objects away from the sharp teeth of
chainrings, the moving chain, the turning pedals and cranks, and the spinning
wheels of your bicycle.
5. Always wear:
• Shoes that will stay on your feet and will grip the pedals. Make sure that
shoelaces cannot get into moving parts, and never ride barefoot or in
sandals.
• Bright, visible clothing that is not so loose that it can be tangled in the
bicycle or snagged by objects at the side of the road or trail.
• Protective eyewear, to protect against airborne dirt, dust and bugs — tinted
when the sun is bright, clear when it’s not.
6. Unless your bicycle was specically designed for jumping (See Appendix
B, Intended Use of Your Bicycle) don’t jump with your bike. Jumping a bike,
particularly a BMX or mountain bike, can be fun; but it can put huge and
unpredictable stress on the bicycle and its components. Riders who insist
on jumping their bikes risk serious damage, to their bicycles as well as to
themselves. Before you attempt to jump, do stunt riding or race with your
bike, read and understand Page 10, Section 2: “Safety”, subsection F:
“Extreme, Stunt or Competition Riding”.
7. Ride at a speed appropriate for conditions. Higher speed means higher risk.

7
B. Riding Safety
1. Obey all Rules of the Road and all local trafc laws.
2. You are sharing the road or the path with others — motorists, pedestrians
and other cyclists. Respect their rights.
3. Ride defensively. Always assume that others do not see you.
4. Look ahead, and be ready to avoid:
• Vehicles slowing or turning, entering the road or your lane ahead of you, or
coming up behind you.
• Parked car doors opening.
• Pedestrians stepping out.
• Children or pets playing near the road.
• Pot holes, sewer grating, railroad tracks, expansion joints, road or sidewalk
construction, debris and other obstructions that could cause you to swerve
into trafc, catch your wheel or cause you to crash.
• The many other hazards and distractions which can occur on a bicycle ride.
5. Ride in designated bike lanes, on designated bike paths or as close to the
edge of the road as practicable, in the direction of trafc ow or as directed
by local governing laws.
6. Stop at stop signs and trafc lights; slow down and look both ways at street
intersections. Remember that a bicycle always loses in a collision with a
motor vehicle, so be prepared to yield even if you have the right of way.
7. Use approved hand signals for turning and stopping.
8. Never ride with headphones or earbuds. They mask trafc sounds and
emergency vehicle sirens, distract you from concentrating on what’s going
on around you, and their wires can tangle in the moving parts of the bicycle,
causing you to lose control.
9. Never carry a passenger, unless the bicycle was designed to carry a
passenger. Before installing a child carrier or trailer, check with the bicycle
manufacturer to make sure the bicycle is designed for it. If the bicycle is
suitable for a child carrier or trailer, make sure that the carrier or trailer is
correctly mounted and the child is secured and wearing an approved helmet.
10. Never carry anything which obstructs your vision or your complete control
of the bicycle, or which could become entangled in the moving parts of the
bicycle.
11. Never hitch a ride by holding on to another vehicle.
12. Don’t do stunts, wheelies or jumps. If you intend to do stunts, wheelies,
jumps or go racing with your bike despite advice to the contrary, refer
to Page 10, Section 2: “Safety”, subsection F: “Extreme, Stunt or
Competition Riding”, now. Think carefully about your skills before deciding to
take the large risks that go with this kind of riding.
13. Don’t weave through trafc or make any moves that may surprise people with
whom you are sharing the road.
14. Observe and yield the right of way.
15. Never ride your bicycle while under the inuence of alcohol or drugs.
16. If possible, avoid riding in bad weather, when visibility is obscured, at dawn,
dusk or in the dark, or when extremely tired. Each of these conditions
increases the risk of a crash.

8
C. Off-Road Safety
We recommend that children not ride on rough terrain unless they are
accompanied by an adult.
1. The variable conditions and hazards of off-road riding require close attention
and specic skills. Start slowly on easier terrain and build up your skills.
If your bike has suspension, the increased speed you may develop also
increases your risk of losing control and falling. Get to know how to handle
your bike safely before trying increased speed or more difcult terrain.
2. Wear safety gear appropriate to the kind of riding you plan to do.
3. Don’t ride alone in remote areas. Even when riding with others, make sure
that someone knows where you’re going and when you expect to be back.
4. Always take along some kind of identication, so that people know who you
are in case of a crash; and take along some cash for food, a cool drink or an
emergency phone call.
5. Yield right of way to pedestrians and animals. Ride in a way that does
not frighten or endanger them, and give them enough room so that their
unexpected moves don’t endanger you.
6. Be prepared. If something goes wrong while you’re riding off-road, help may
not be close.
7. Before you attempt to jump, do stunt riding or race with your bike, read and
understand Page 10, Section 2: “Safety”, subsection F: “Extreme, Stunt
or Competition riding”.
Off-Road Respect
Obey the local laws regulating where and how you can ride off-road, and
respect private property. You may be sharing the trail with others — hikers, trail
runners, equestrians and other cyclists. Respect their rights. Stay on the designated
trail. Don’t contribute to erosion by riding in mud or with unnecessary sliding. Don’t
disturb the ecosystem by cutting your own trail or shortcut through vegetation or
streams. It is your responsibility to minimize your impact on the environment. Leave
things as you found them; and always take out everything you brought in.
D. Wet-Weather Riding
WARNING: Wet weather impairs traction, braking and visibility, both
for the bicyclist and for other vehicles sharing the road. The risk of a
crash is dramatically increased in wet conditions.
Under wet conditions, the stopping power of your brakes (as well as the
brakes of other vehicles sharing the road) is dramatically reduced and your tires
don’t grip nearly as well. This makes it harder to control speed and easier to lose
control. To make sure that you can slow down and stop safely in wet conditions,
ride more slowly and apply your brakes earlier and more gradually than you
would under normal, dry conditions. Also refer to Page 26, Section 4: “Tech”,
subsection C: “Brakes”.
E. Night Riding
Riding a bicycle at night is much more dangerous than riding during the
day. A bicyclist is very difcult for motorists and pedestrians to see. Therefore,
children should never ride at dawn, at dusk or at night. Adults who choose to
9
accept the greatly increased risk of riding at dawn, at dusk or at night need to
take extra care both riding and choosing specialized equipment that helps reduce
that risk.
WARNING: Reectors are not a substitute for required lights. Riding at
dawn, at dusk, at night or at other times of poor visibility without an
adequate bicycle lighting system and without reectors is dangerous and
may result in serious injury or death.
Bicycle reectors are designed to pick up and reect car lights and street
lights in a way that may help you to be seen and recognized as a moving bicyclist.
CAUTION: Check reectors and their mounting brackets regularly to
make sure that they are clean, straight, unbroken and securely
mounted. Replace damaged reectors and straighten or tighten any that
are bent or loose.
The mounting brackets of front and rear reectors are often designed as
brake straddle cable safety catches which prevent the straddle cable from
catching on the tire tread if the cable jumps out of its yoke or breaks.
WARNING: Do not remove the front or rear reectors or reector brackets
from your bicycle. They are an integral part of the bicycle’s safety system.
Removing the reectors reduces your visibility to others using the roadway.
Being struck by other vehicles may result in serious injury or death.
The reector brackets may protect you from a brake straddle cable
catching on the tire in the event of brake cable failure. If a brake straddle
cable catches on the tire, it can cause the wheel to stop suddenly, causing
you to lose control and fall.
If you choose to ride under conditions of poor visibility, check and be sure
you comply with all local laws about night riding, and take the following strongly
recommended additional precautions:
• Purchase and install battery- or generator-powered head and tail lights
which meet all regulatory requirements for where you live and provide
adequate visibility.
• Wear light-colored, reective clothing and accessories, such as a
reective vest, reective arm and leg bands, reective stripes on your
helmet, ashing lights attached to your body and/or your bicycle ... any
reective device or light source that moves will help you get the attention of
approaching motorists, pedestrians and other trafc.
• Make sure your clothing or anything you may be carrying on the bicycle
does not obstruct a reector or light.
• Make sure that your bicycle is equipped with correctly positioned and
securely mounted reectors.
While riding at dawn, at dusk or at night:
• Ride slowly.
• Avoid dark areas and areas of heavy or fast-moving trafc.
• Avoid road hazards.
• If possible, ride on familiar routes.
10
If riding in trafc:
• Be predictable. Ride so that drivers can see you and predict your movements.
• Be alert. Ride defensively and expect the unexpected.
F. Extreme, Stunt or Competition Riding
Whether you call it Aggro, Hucking, Freeride, North Shore, Downhill,
Jumping, Stunt Riding, Racing, Enduro or something else: if you engage in this
sort of extreme, aggressive riding, you voluntarily assume a greatly increased
risk of injury or death.
Not all bicycles are designed for these types of riding, and those that are
may not be suitable for all types of aggressive riding. Check with the bicycle’s
manufacturer about the suitability of your bicycle before engaging in extreme
riding.
When riding fast down hill, you can reach speeds achieved by motorcycles,
and therefore face similar hazards and risks. Have your bicycle and equipment
carefully inspected by a qualied mechanic and be sure it is in perfect condition.
Consult with expert riders, area site personnel and race ofcials on conditions
and equipment advisable at the site where you plan to ride. Wear appropriate
safety gear, including an approved full-face helmet, full-nger gloves, and body
armor. Ultimately, it is your responsibility to have proper equipment and to be
familiar with course conditions.
WARNING: Although many catalogs, advertisements and articles
about bicycling depict riders engaged in extreme riding, this activity is
extremely dangerous, increases your risk of injury or death, and increases
the severity of any injury. Remember that the action depicted is being
performed by professionals with many years of training and experience.
Know your limits and always wear a helmet and other appropriate safety
gear. Even with state-of-the-art protective safety gear, you could be
seriously injured or killed when jumping, stunt riding, riding downhill at
speed or in competition.
WARNING: Bicycles and bicycle parts have limitations with regard to
strength and integrity, and this type of riding can exceed those
limitations or dramatically reduce the length of their safe use.
We recommend against this type of riding because of the increased risks; but
if you choose to take the risk, at least:
• Take lessons from a competent instructor rst
• Start with easy learning exercises and slowly develop your skills before
trying more difcult or dangerous riding
• Use only designated areas for stunts, jumping, racing or fast downhill riding
• Wear a full-face helmet, safety pads and other safety gear
• Understand and recognize that the stresses imposed on your bike by this
kind of activity may break or damage parts of the bicycle and void the
warranty
• Do not ride your bicycle when any part is damaged.
If you ride downhill at speed, do stunt riding or ride in competition, know the
limits of your skill and experience. Ultimately, avoiding injury is your responsibility.
11
G. Changing Components or Adding Accessories
There are many components and accessories available to enhance the
comfort, performance and appearance of your bicycle. However, if you change
components or add accessories, you do so at your own risk. The bicycle’s
manufacturer may not have tested that component or accessory for compatibility,
reliability or safety on your bicycle. Before installing any component or accessory,
including but not limited to a different size tire, a lighting system, a luggage rack,
a child seat or a trailer, make sure that it is compatible with your bicycle. Be sure
to read, understand and follow the instructions that accompany the products you
purchase for your bicycle. See also Appendix B, Page 44 and C, Page 50.
WARNING: Failure to conrm compatibility, properly install, operate
and maintain any component or accessory can result in serious injury
or death.
WARNING: Exposed springs on the saddle of any bicycle tted with a
child seat can cause serious injury to the child.
WARNING: Changing the components on your bike with other than
genuine replacement parts may compromise the safety of your bicycle
and may void the warranty.
WARNING: Any accessory or component attached to, on or near a
rotating wheel poses a risk of contacting or stopping the wheel,
leading to a crash resulting in serious injury or death. Before every ride
check to ensure that all such accessories and components, and the
fasteners used to attach them, are securely mounted to your bicycle.
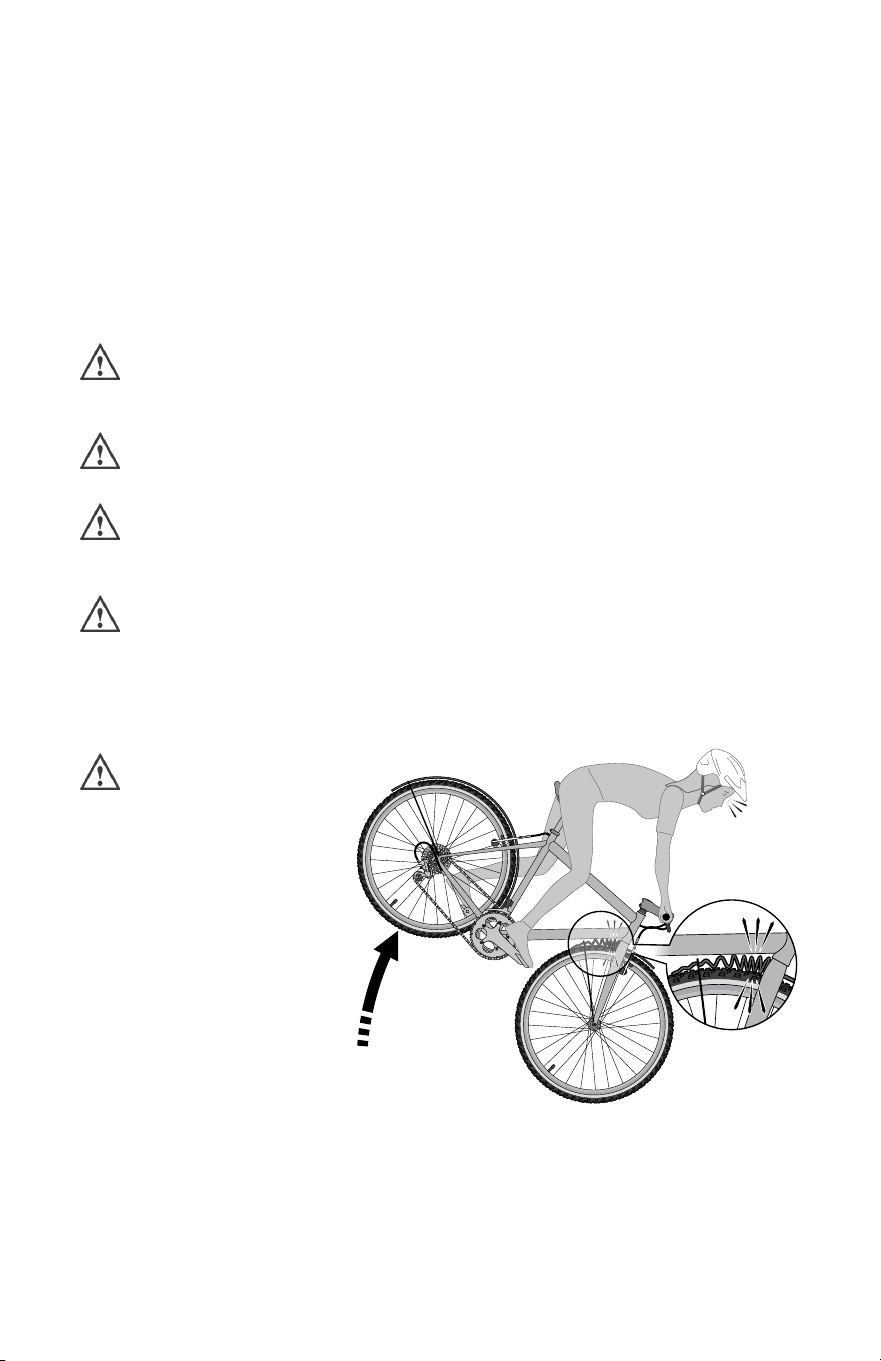
g. 2
WARNING: Any object
that unexpectedly and
abruptly stops the rotation
of the front wheel can cause
the bike and rider to pitch
forward (g. 2), which can
result in serious injury or
death.
12
3. Fit
NOTE: Correct t is an essential element of bicycling safety, performance
and comfort. Making the adjustments to your bicycle that result in
correct t for your body and riding conditions requires experience, skill
and special tools. Always have a qualied bicycle mechanic make the
adjustments on your bicycle; or, if you have the experience, skill and tools,
have a qualied bicycle mechanic check your work before riding.
WARNING: If your bicycle does not t properly, you may lose control
and fall. If your new bike doesn’t t, ask your authorized retailer to
exchange it before you ride it.
A. Standover Height
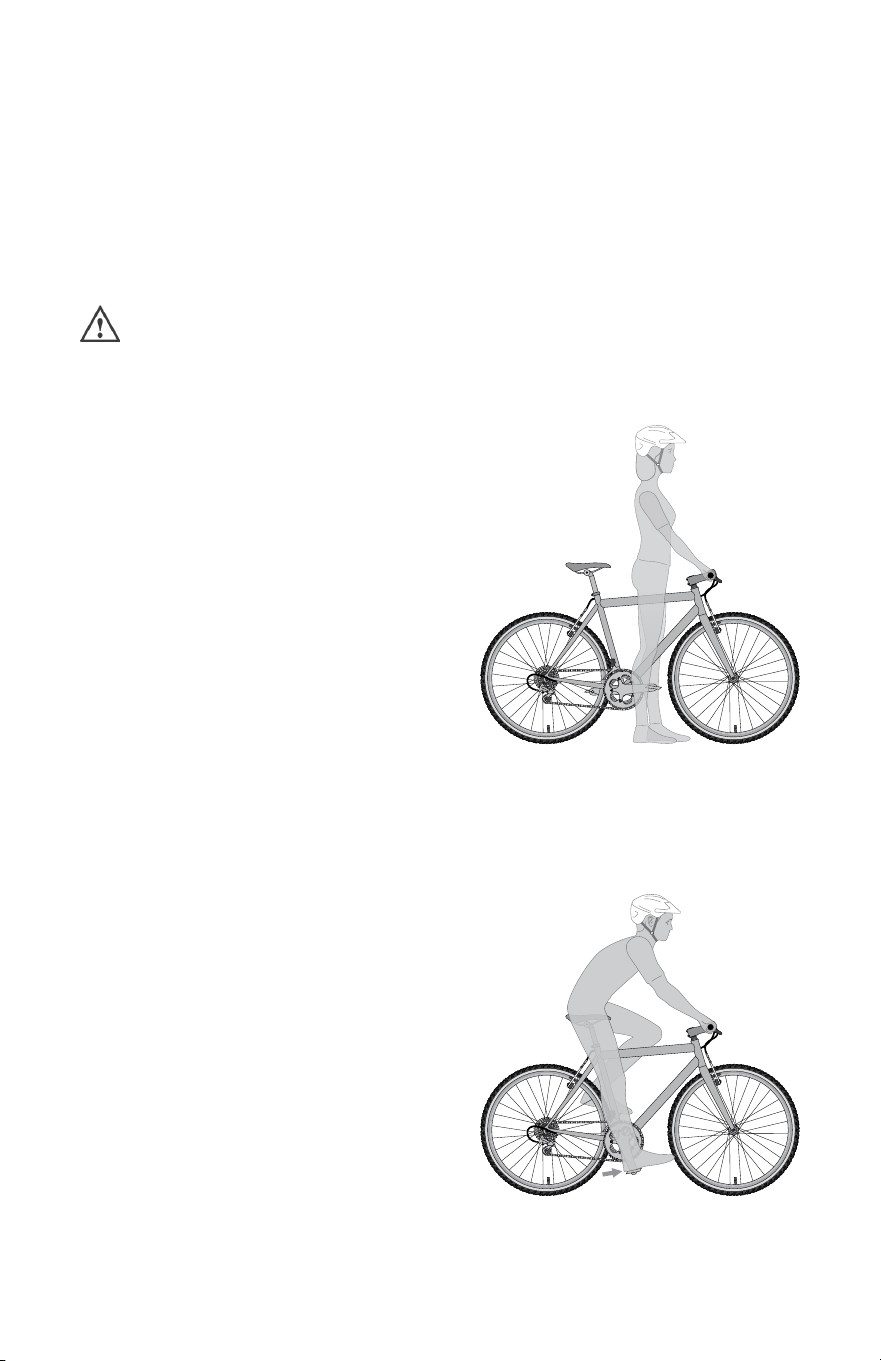
g. 3
1. Diamond-frame bicycles
Standover height is the basic element
of bike t (g. 3). It is the distance from
the ground to the top of the bicycle’s frame
at that point where your crotch is when
straddling the bike. To check for correct
standover height, straddle the bike while
wearing the kind of shoes in which you’ll
be riding, and bounce vigorously on your
heels. If your crotch touches the frame,
the bike is too big for you. Don’t even ride
the bike around the block. A bike which
you ride only on paved surfaces and never take off-road should give you a
minimum standover height clearance of two inches (5 cm). A bike that you’ll ride
on unpaved surfaces should give you a minimum of three inches (7.5 cm) of
standover height clearance. And a bike that you’ll use off-road should give you
four inches (10 cm) or more of clearance.
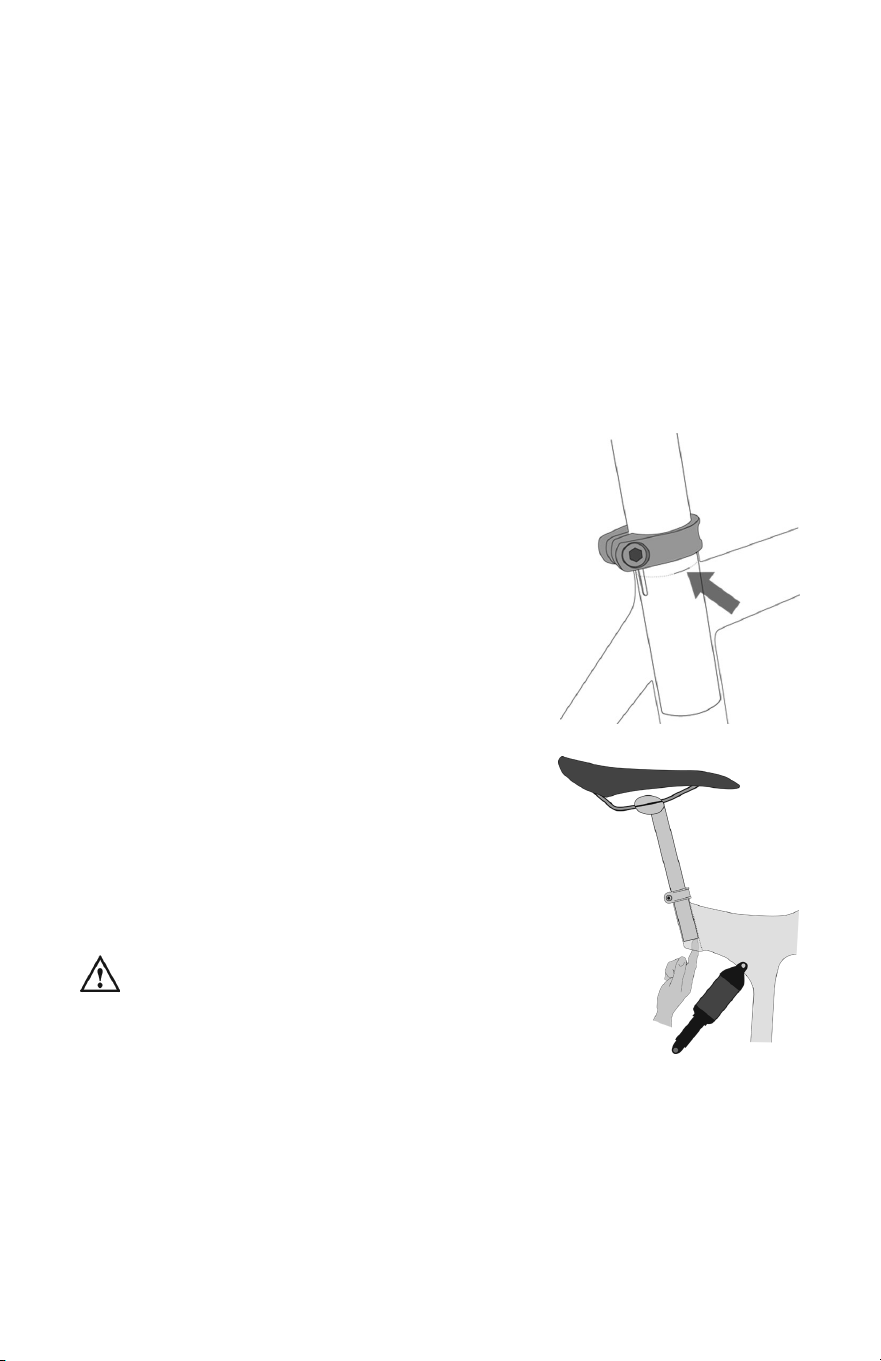
g. 4
2. Step-through frame bicycles
Standover height does not apply to
bicycles with step-through frames. Instead,
the limiting dimension is determined by
saddle height range. You must be able to
adjust your saddle position as described
in 3.B without exceeding the limits set by
the height of the top of the seat tube and
the ”Minimum Insertion” or “Maximum
Extension” mark on the seat post.
B. Saddle Position
Correct saddle adjustment is an
important factor in getting the most performance and comfort from your bicycle.
13
The saddle can be adjusted in three directions:
1. Up and down adjustment. To check for correct saddle height (g. 4):
• sit on the saddle
• place one heel on a pedal
• rotate the crank until the pedal with your heel on it is in the down position
and the crank arm is parallel to the seat tube.
If your leg is not completely straight, your saddle height needs to be adjusted.
If your hips must rock for the heel to reach the pedal, the saddle is too high. If
your leg is bent at the knee with your heel on the pedal, the saddle is too low.
If you choose to make your own saddle height adjustment:
• loosen the seat post clamp
• raise or lower the seat post in the seat tube
• make sure the saddle is level fore and aft
• re-tighten the seat post clamp to the recommended torque (Appendix D or
the manufacturer’s instructions).
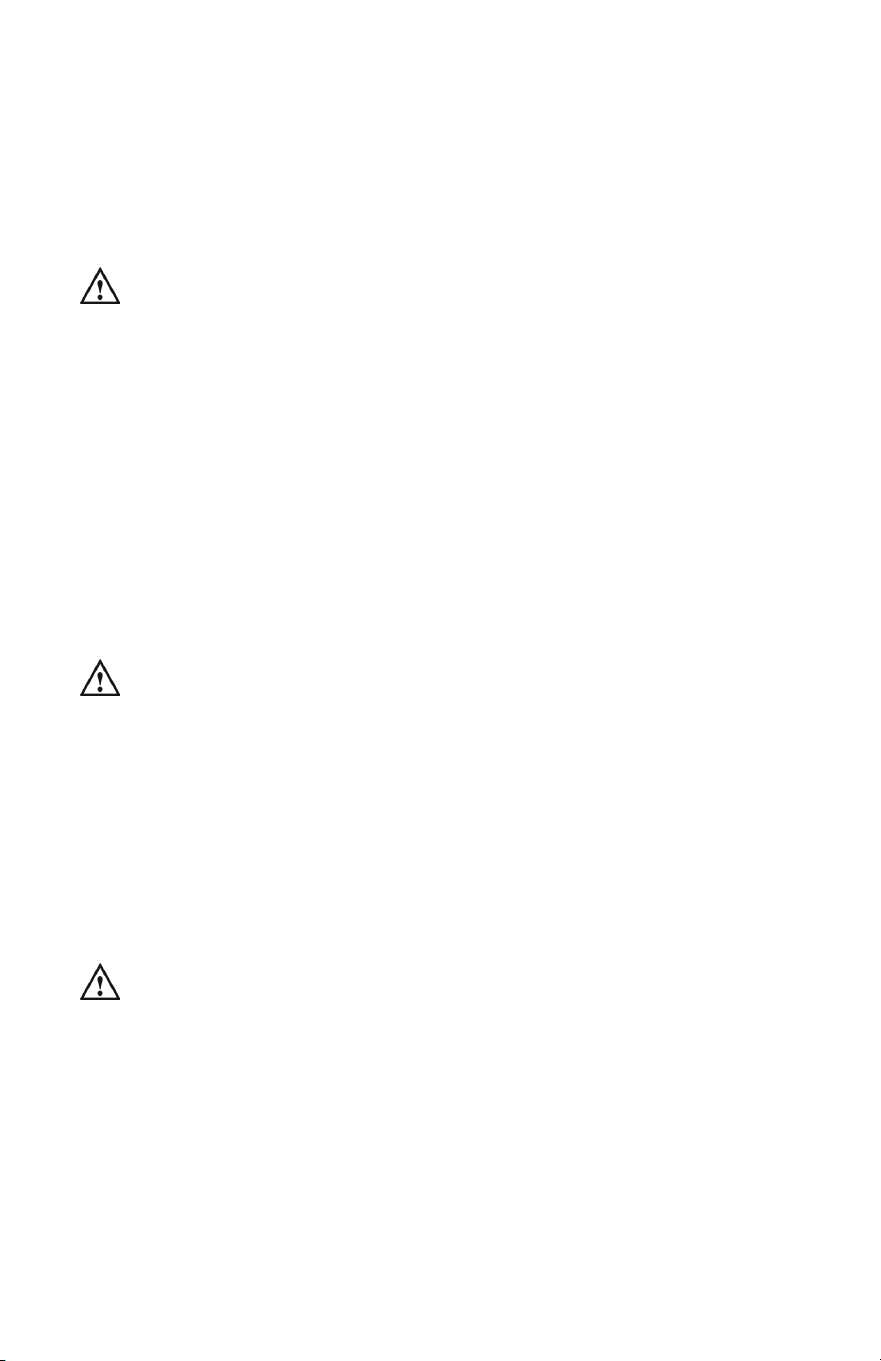
g. 5
g. 6
Once the saddle is at the correct height, make
sure that the seat post does not project from
the frame beyond its “Minimum Insertion” or
“Maximum Extension” mark (g. 5).
NOTE: Some bicycles have a sight hole in the seat
tube, the purpose of which is to make it easy to see
whether the seat post is inserted in the seat tube far
enough to be safe. If your bicycle has such a sight
hole, use it in addition to the “Minimum Insertion” or
“Maximum Extension” mark to make sure the seat
post is inserted in the seat tube far enough to be
visible through the sight hole.
If your bike has an interrupted seat tube, as is
the case on some suspension bikes, you must also
make sure that the seat post is far enough into the
frame so that you can touch it through the bottom of
the interrupted seat tube with the tip of your nger
without inserting your nger beyond its rst knuckle.
Also see NOTE above and g. 6.
WARNING: If your seat post is not inserted
in the seat tube as described in B.1 above,
the seat post, binder or even frame may break,
which could cause you to lose control and fall.
2. Front and back adjustment. The saddle can be adjusted forward or back to
help you get the optimal position on the bike. If you choose to make your own
front and back adjustment, make sure that the clamp mechanism is clamping
on the straight part of the saddle rails and is not touching the curved part of
the rails, and that you are using the recommended torque on the clamping
fastener(s).
14
3. Saddle angle adjustment. Most people prefer a horizontal saddle; but some
riders like the saddle nose angled up or down just a little. If you choose
to make your own saddle angle adjustment and you have a single bolt
saddle clamp on your seat post, it is critical that you loosen the clamp bolt
sufciently to allow any serrations on the mechanism to disengage before
changing the saddle’s angle, and then that the serrations fully re-engage
before you tighten the clamp bolt to the recommended torque.
WARNING: When making saddle angle adjustments with a single bolt
saddle clamp, always check to make sure that the serrations on the
mating surfaces of the clamp are not worn. Worn serrations on the clamp
can allow the saddle to move, causing you to lose control and fall.
Always tighten fasteners to the correct torque. Bolts that are too tight
can stretch and deform. Bolts that are too loose can move and fatigue.
Either mistake can lead to a sudden failure of the bolt, causing you to lose
control and fall.
NOTE: If your bicycle is equipped with a suspension seat post, the suspension
mechanism may require periodic service or maintenance. Consult the
manufacturer for recommended service intervals for your suspension seat post.
Small changes in saddle position can have a substantial effect on performance
and comfort. To nd your best saddle position, make only one adjustment at a time.
WARNING: After any saddle adjustment, be sure that the saddle
adjusting mechanism is properly seated and tightened before riding.
A loose saddle clamp or seat post clamp can cause damage to the seat
post, or can cause you to lose control and fall. A correctly tightened
saddle adjusting mechanism will allow no saddle movement in any
direction. Periodically check to make sure that the saddle adjusting
mechanism is properly tightened.
If, in spite of carefully adjusting the saddle height, tilt and fore-and-aft
position, your saddle is still uncomfortable, you may need a different saddle
design. Saddles, like people, come in many different shapes, sizes and
resilience.
WARNING: Some people have claimed that extended riding with a
saddle which is incorrectly adjusted or which does not support your
pelvic area correctly can cause short-term or long-term injury to nerves and
blood vessels, or even impotence. If your saddle causes you pain,
numbness or other discomfort, listen to your body and stop riding until the
saddle is adjusted or replaced.
15
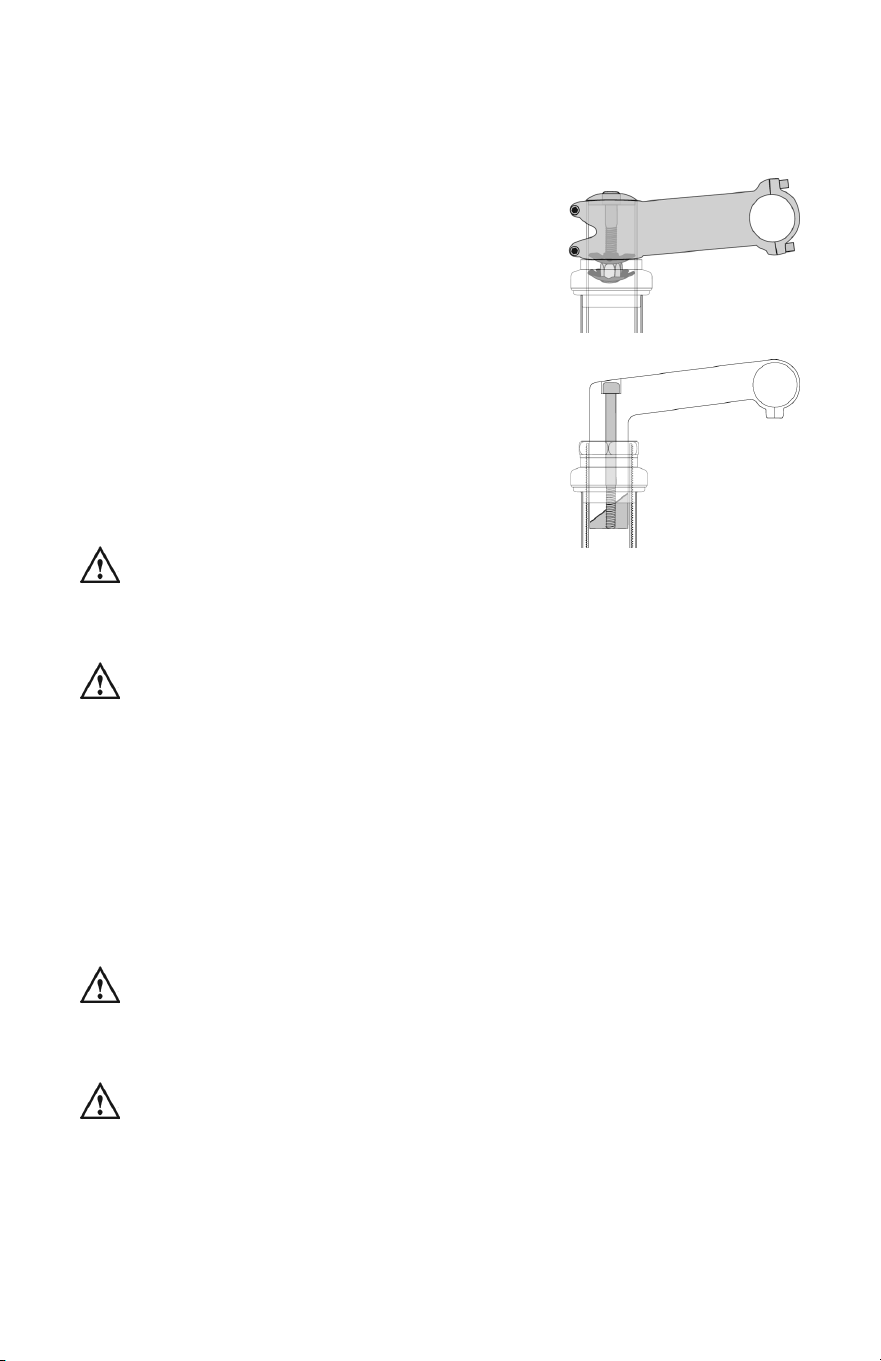
C. Handlebar Height and Angle
Your bike is equipped either with a “threadless” stem, which clamps on to the
outside of the steerer tube, or with a “quill” stem, which clamps inside the steerer
tube by way of an expanding binder bolt.
g. 7
If your bike has a “threadless” stem (g. 7) a
qualied bicycle mechanic may be able to change
handlebar height by moving height adjustment
spacers from below the stem to above the stem,
or vice versa. Otherwise, you’ll have to get a stem
of different length or rise. Do not attempt to do this
yourself, as it requires special knowledge.
g. 8
If your bike has a “quill” stem (g. 8) a qualied
bicycle mechanic can adjust the handlebar height a
bit by adjusting stem height.
A quill stem has an etched or stamped mark
on its shaft that designates the stem’s “Minimum
Insertion” or “Maximum Extension”. This mark must
not be visible above the headset.
WARNING: A quill stem’s Minimum Insertion
Mark must not be visible above the top of the headset. If the stem is
extended beyond the Minimum Insertion Mark the stem may break or damage
the fork’s steerer tube, which could cause you to lose control and fall.
WARNING: On some bicycles, changing the stem or stem height can
affect the tension of the front brake cable, locking the front brake or
creating excess cable slack which can make the front brake inoperable. If
the front brake pads move in toward the wheel rim or out away from the
wheel rim when the stem or stem height is changed, the brakes must be
correctly adjusted before you ride the bicycle.
Some bicycles are equipped with an adjustable angle stem. If your bicycle
has an adjustable angle stem, ask a qualied bicycle mechanic to show you how
to adjust it. Do not attempt to make the adjustment yourself, as changing stem
angle may also require adjustments to the bicycle’s controls. A qualied bicycle
mechanic can also change the angle of the handlebar or bar end extensions.
WARNING: Always tighten fasteners to the correct torque. Bolts that
are too tight can stretch and deform. Bolts that are too loose can
move and fatigue. Either mistake can lead to a sudden failure of the bolt,
causing you to lose control and fall.
WARNING: An insufciently tightened stem clamp bolt, handlebar
clamp bolt or bar end extension clamping bolt may compromise
steering action, which could cause you to lose control and fall. Place the
front wheel of the bicycle between your legs and attempt to twist the
handlebar/stem assembly. If you can twist the stem in relation to the front
wheel, turn the handlebars in relation to the stem, or turn the bar end
extensions in relation to the handlebar, the bolts are insufciently tightened.

16
WARNING: Be aware that adding aerodynamic extensions to handlebars
will change the steering and braking response of the bicycle.
D. Control Position Adjustments
The angle of the brake and shift control levers and their position on the
handlebars can be changed. Ask a qualied bicycle mechanic to make the
adjustments for you. If you choose to make your own control lever angle
adjustment, be sure to re-tighten the clamp fasteners to the recommended
torque.
E. Brake Reach
Many bikes have brake levers that can be adjusted for reach. If you have
small hands or nd it difcult to squeeze the brake levers, a qualied bicycle
mechanic can either adjust the reach or t shorter-reach brake levers.
WARNING: The shorter the brake lever reach, the more critical it is to
have correctly adjusted brakes, so that full braking power can be
applied within available brake lever travel. Brake lever travel insufcient to
apply full braking power can result in loss of control, which may result in
serious injury or death.

17
4. Tech
It’s important to your safety, performance and enjoyment to understand how
things work on your bicycle. We urge you to ask a qualied bicycle mechanic
how to do the things described in this section before you attempt them yourself,
and that you have a qualied bicycle mechanic check your work before you ride
the bike. If you have even the slightest doubt as to whether you understand
something in this section of the Manual, contact Pacic Cycle Consumer Care.
See also Appendix B, C, and D.
A. Wheels
Bicycle wheels are designed to be removable for easier transportation
and for repair of a tire puncture. The wheel axles are inserted into slots, called
“dropouts” in the fork and frame, but some bikes use what is called a “thru-axle”
wheel mounting system.
If you have a bicycle with a thru-axle wheel mounting system, refer to Page
20, Section 4: “Tech”, subsection A.3: “Thru-axle wheel mounting system”.
If you do not have a bicycle with a thru-axle wheel mounting system, it will
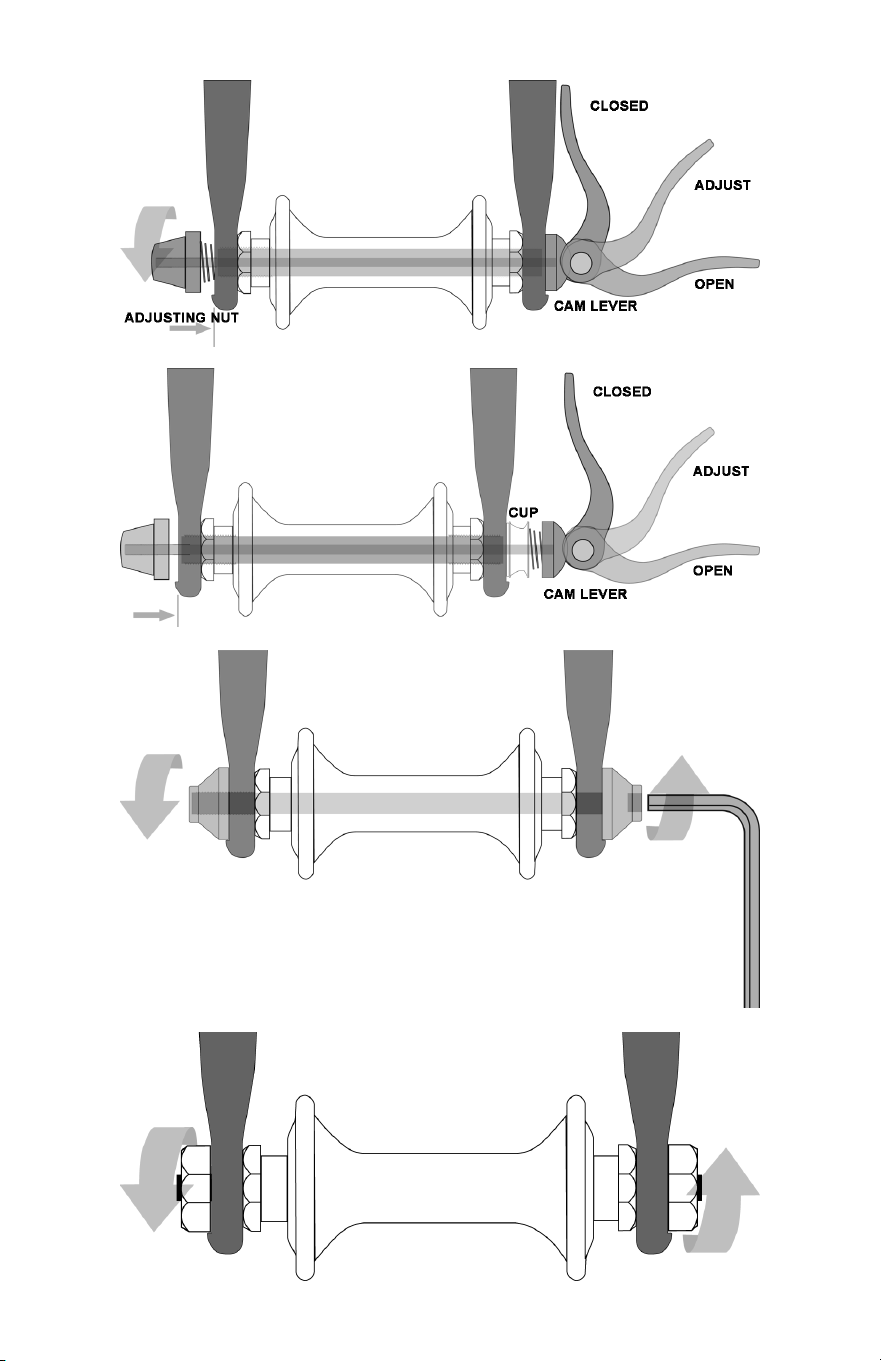
have wheels secured in one of three ways:
1. A hollow axle with a shaft (“skewer”) running through it which has an
adjustable tension nut on one end and an over-center cam lever on the other
(cam-action system, g.9a & 9b).
2. A hollow axle with a shaft (“skewer”) running through it which has a nut on
one end and a tting for a hex key, lock lever or other tightening device on
the other (through-bolt, g. 10).
3. Hex nuts or hex key bolts which are threaded on to or into the hub axle
(bolt-on wheel, g. 11).
Your bicycle may be equipped with a different securing method for the front
wheel than for the rear wheel.
18
g. 9a
g. 9b
g. 10
g. 11
19
It is very important that you understand the type of wheel securing method on
your bicycle, that you know how to secure the wheels correctly, and that you
know how to apply the correct clamping force that safely secures the wheel.
WARNING: Riding with an improperly secured wheel can allow the
wheel to wobble or fall off the bicycle, which can cause serious injury
or death. Therefore, it is essential that you:
1. Know how to install and remove your wheels safely.
2. Understand and apply the correct technique for clamping your wheel
in place.
3. Each time before you ride the bike, check that the wheel is securely
clamped.
The clamping action of a correctly secured wheel must emboss the
surfaces of the dropouts.
1. Front wheel secondary retention devices
Most bicycles equipped with an over-center cam, through-bolt or bolt-on front
wheel retention have front forks with slotted dropouts that utilize a secondary
wheel retention device to reduce the risk of the wheel disengaging from the fork if
the wheel is incorrectly secured. Secondary retention devices are not a substitute
for correctly securing your front wheel.
Secondary retention devices fall into two basic categories:
a. The clip-on type is a part that the manufacturer adds to the front wheel hub
or front fork.
b. The integral type is molded, cast or machined into the outer faces of the
front fork dropouts.
WARNING: Do not remove or disable the secondary retention device.
As its name implies, it serves as a back-up for a critical adjustment. If
the wheel is not secured correctly, the secondary retention device can
reduce the risk of the wheel disengaging from the fork. Removing or
disabling the secondary retention device may also void the warranty.
Secondary retention devices are not a substitute for correctly securing
your wheel. Failure to properly secure the wheel can cause the wheel
to wobble or disengage, which could cause you to lose control and fall,
resulting in serious injury or death.
2. Wheels with cam-action systems
There are currently two types of over-center cam wheel retention
mechanisms: the traditional over-center cam (g. 9a) and the cam-and-cup
system (g. 9b). Both use an over-center cam-action to clamp the bike’s wheel in
place. Your bicycle may have a cam-and-cup front wheel retention system and a
traditional rear wheel cam-action system.
a. Adjusting the traditional cam-action mechanism (g. 9a)
The wheel hub is clamped in place by the force of the over-center cam
pushing against one dropout and pulling the tension adjusting nut, by way of the
skewer, against the other dropout. The amount of clamping force is controlled
20
by the tension adjusting nut. Turning the tension adjusting nut clockwise while
keeping the cam lever from rotating increases clamping force; turning it coun-
terclockwise while keeping the cam lever from rotating reduces clamping force.
Less than half a turn of the tension adjusting nut can make the difference
between safe clamping force and unsafe clamping force.
WARNING: The full force of the cam-action is needed to clamp the
wheel securely. Holding the nut with one hand and turning the lever
like a wing nut with the other hand until everything is as tight as you can
get it will not clamp a cam-action wheel safely in the dropouts. See also the
rst WARNING in this Section, Page 19.
b. Adjusting the cam-and-cup mechanism (g. 9b)
The cam-and-cup system on your front wheel will have been correctly adjusted
for your bicycle by your authorized retailer. Do not use a cam-and-cup front
wheel on any bicycle other than the one for which your authorized retailer
adjusted it.
3. Thru-axle wheel mounting system
If you have a bike equipped with thru-axle front or rear wheels, make
sure that your authorized retailer has given you the manufacturer’s
instructions, and follow those when installing or removing a thru-axle
wheel.
If your bike is equipped with a thru-axle, the thru-axle length, diameter,
and thread pitch must match the specications of your frame, fork, and wheel
hubs. Always install or remove your wheel in accordance with the thru-axle
manufacturer’s instructions, and consult the manufacturer if you have questions.
If you intend to replace the thru-axle, make sure that the new thru-axle is
compatible with your bicycle. Do not remove the thru-axle from your bicycle and
use it on a different bicycle, as it may not be compatible and will not properly
secure your wheel.
WARNING: A wheel attachment device that is not properly secured
can allow the wheel to loosen or come off, suddenly stop the wheel,
decrease your control, and cause you to fall, resulting in serious injury or
death. Ensure the thru-axle is not interfering with any part of the bicycle
and is fully secured.
21
g. 12a
OPEN
ADJUST
CLOSED
g. 12b
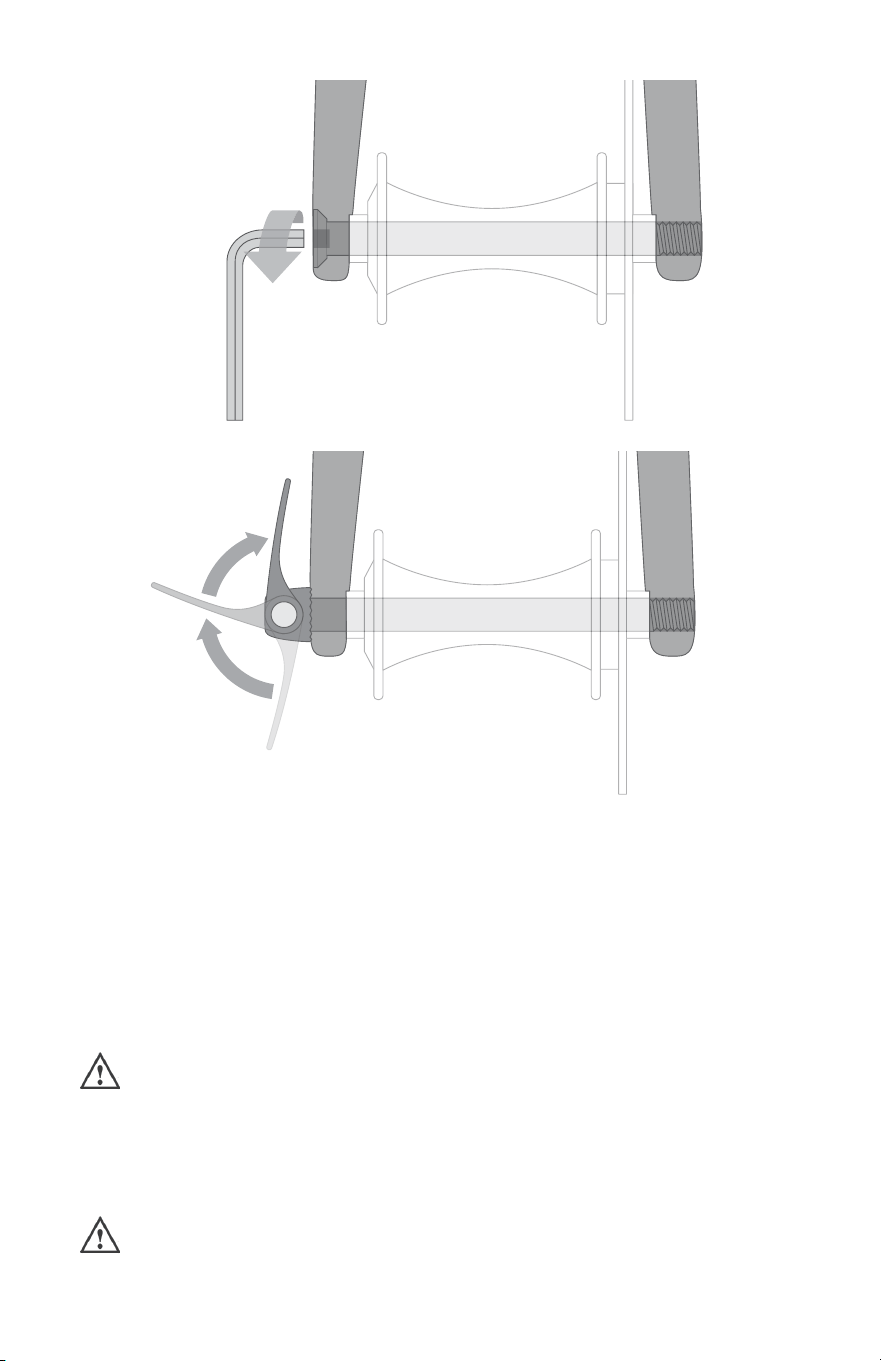
a. Adjusting the thru-axle mechanism (g. 12a & 12b)
The thru-axle is inserted through the unthreaded hole in the frame or fork’s
dropout, through the wheel hub, and is threaded directly into the opposing
dropout by tightening the thru-axle. Common installation methods may use
an Allen hex key (g. 12a) or a cam lever (g. 12b). Please refer to the
manufacturer’s instructions for specic information about your thru-axle’s
operation, including correct torque specications or lever adjustment information.
4. Removing and installing wheels
WARNING: If your bike is equipped with a hub brake such as a rear
coaster brake, front or rear drum, band or roller brake; or if it has an
internal gear rear hub, do not attempt to remove the wheel. The removal
and re-installation of most hub brakes and internal gear hubs requires
special knowledge. Incorrect removal or assembly can result in brake or
gear failure, which can cause you to lose control and fall.
CAUTION: If your bike has a disc brake, exercise care in touching the
rotor or caliper. Disc rotors have sharp edges, and both rotor and
caliper can get very hot during use.
22
a. Removing a disc brake or rim brake Front Wheel
(1) If your bike has rim brakes, disengage the brake’s quick-release
mechanism to increase the clearance between the tire and the brake pads (refer
to Page 26, Section 4: “Tech”, subsection C: “Brakes”, gs. 14 through 18).
(2) If your bike has a
cam-action
front wheel retention, move the cam lever
from the locked or CLOSED position to the OPEN position (gs. 9a & 9b). If your
bike has through-bolt or bolt-on front wheel retention, loosen the fastener(s) a few
turns counter-clockwise using an appropriate wrench, lock key or the integral lever.
(3) If your front fork has a clip-on type secondary retention device, disengage
it. If your front fork has an integral secondary retention device, and a traditional
cam-action system (g. 9a) loosen the tension adjusting nut enough to allow
removing the wheel from the dropouts. If your front wheel uses a cam-and-cup
system, (g. 9b) squeeze the cup and cam lever together while removing the
wheel. No rotation of any part is necessary with the cam-and-cup system.
(4) If your bike has a thru-axle front wheel mounting system (gs. 12a
& 12b), loosen and remove the thru-axle according to the manufacturer’s
instructions, then remove the front wheel.
You may need to tap the top of the wheel with the palm of your hand to
release the wheel from the front fork.
b. Installing a disc brake or rim brake Front Wheel
CAUTION: If your bike is equipped with a front disc brake, be careful
not to damage the disc, caliper or brake pads when re-inserting the
disc into the caliper. Never activate a disc brake’s control lever unless the
disc is correctly inserted in the caliper. Also refer to Page 26, Section 4:
“Tech”, subsection C: “Brakes”.
(1) If your bike has a cam-action front wheel retention, move the cam lever
so that it curves away from the wheel (gs. 9a & 9b). This is the OPEN position.
If your bike has a thru-axle, through-bolt or bolt-on front wheel retention, go to the
next step.
(2) With the steering fork facing forward, insert the wheel between the fork
blades so that the axle seats rmly at the top of the fork dropouts. The cam lever,
if there is one, should be on rider’s left side of the bicycle (g. 9a & 9b). If your
bike has a clip-on type secondary retention device, engage it.
(3) If your bike has a thru-axle front wheel mounting system, insert the
thru-axle through the unthreaded dropout side and through the hub body, then
thread the thru-axle into the threads of the opposing dropout.
(4) If your bike has a traditional cam-action mechanism: holding the cam
lever in the ADJUST position with your right hand, tighten the tension adjusting
nut with your left hand until it is nger tight against the fork dropout (g. 9a). If
you have a cam-and-cup system: the nut and cup (g. 9b) will have snapped into
the recessed area of the fork dropouts and no adjustment should be required.
(5) While pushing the wheel rmly to the top of the slots in the fork dropouts,
and at the same time centering the wheel rim in the fork:
(a) With a
cam-action
system, move the cam lever upwards and swing it into
the CLOSED position (g. 9a & 9b). The lever should now be parallel to the
fork blade and curved toward the wheel. To apply enough clamping force,
you should have to wrap your ngers around the fork blade for leverage, and
the lever should leave a clear imprint in the palm of your hand.

23
(b) With a through-bolt or bolt-on system, tighten the fasteners to the
torque specications in the hub manufacturer’s instructions.
(c) With a thru-axle system, tighten the thru-axle (gs. 12a & 12b)
according to the manufacturer’s instructions.
NOTE: If, on a traditional cam-action system, the lever cannot be pushed all the
way to a position parallel to the fork blade, return the lever to the OPEN position.
Then turn the tension adjusting nut counterclockwise one-quarter turn and try
tightening the lever again.
WARNING: Securely clamping the wheel with a cam-action retention
device takes considerable force. If you can fully close the cam lever
without wrapping your ngers around the fork blade for leverage, the lever
does not leave a clear imprint in the palm of your hand, and the serrations on
the wheel fastener do not emboss the surfaces of the dropouts, the tension is
insufcient. Open the lever; turn the tension adjusting nut clockwise a quarter
turn; then try again. See also the rst WARNING in this Section, Page 19.
(6) If you disengaged the brake quick-release mechanism in 4. a. (1) above,
re-engage it to restore correct brake pad-to-rim clearance.
(7) Spin the wheel to make sure that it is centered in the frame and clears
the brake pads; then squeeze the brake lever and make sure that the brakes are
operating correctly.
c. Removing a disc brake or rim brake Rear Wheel
(1) If you have a multi-speed bike with a derailleur gear system: shift the rear
derailleur to high gear (the smallest, outermost rear sprocket).
If you have an internal gear rear hub, do not attempt to remove the rear
wheel. Consult the hub manufacturer’s instructions for additional information.
If you have a single-speed bike with rim or disc brake, go to step (4) below.
(2) If your bike has rim brakes, disengage the brake’s quick-release mechanism
to increase the clearance between the wheel rim and the brake pads (refer to Page
26, Section 4: “Tech”, subsection C: “Brakes”, gs. 14 through 18).
(3) On a derailleur gear system, pull the derailleur body back with your right hand.
(4) If your bike has a
cam-action
front wheel retention, move the cam lever
from the locked or CLOSED position to the OPEN position (gs. 9a & 9b). If your
bike has through-bolt or bolt-on front wheel retention, loosen the fastener(s) a few
turns counter-clockwise using an appropriate wrench, lock key or the integral lever.
(5) If your bike has a thru-axle rear wheel mounting system (gs. 12a & 12b),
loosen and remove the thru-axle according to the manufacturer’s instructions.
(6) Push the rear wheel forward far enough to be able to remove the chain
from the rear sprocket, then lift the rear wheel off the ground a few inches and
remove it from the rear dropouts.
d. Installing a disc brake or rim brake Rear Wheel
CAUTION: If your bike is equipped with a rear disc brake, be careful
not to damage the disc, caliper or brake pads when re-inserting the
disc into the caliper. Never activate a disc brake’s control lever unless the
disc is correctly inserted in the caliper.
24
(1) With a cam-action system, move the cam lever to the OPEN position
(see gs. 8a & 9b). The lever should be on the side of the wheel opposite the
derailleur and freewheel sprockets.
(a) On a derailleur bike, make sure that the rear derailleur is still in its
outermost, high gear, position; then pull the derailleur body back with your
right hand. Put the chain on top of the smallest freewheel sprocket.
(b) On a single-speed bike, remove the chain from the front sprocket, so
that you have plenty of slack in the chain. Put the chain on the rear wheel
sprocket.
(2) Then, insert the wheel into the frame dropouts and pull it all the way in to
the dropouts.
NOTE: On a single-speed or an internal gear hub, replace the chain on the rear
sprocket and front chainring; then pull the wheel back in the dropouts so that it is
straight in the frame and the chain has about 1/4 inch of up-and-down play.
(a) With a cam-action system, move the cam lever upwards and swing
it into the CLOSED position (gs. 9a & 9b). The lever should now be
parallel to the seat stay or chain stay and curved toward the wheel. To
apply enough clamping force, you should have to wrap your ngers
around the fork blade for leverage, and the lever should leave a clear
imprint in the palm of your hand.
(b) With a through-bolt or bolt-on system, tighten the fasteners to the
torque specications in the hub manufacturer’s instructions.
(c) With a thru-axle system, tighten the thru-axle (gs. 12a & 12b)
according to the manufacturer’s instructions.
NOTE: If, on a traditional cam-action system, the lever cannot be pushed all the
way to a position parallel to the seat stay or chain stay, return the lever to the
OPEN position. Then turn the tension adjusting nut counterclockwise one-quarter
turn and try tightening the lever again.
WARNING: Securely clamping the wheel with a cam-action retention
device takes considerable force. If you can fully close the cam lever
without wrapping your ngers around the seat stay or chain stay for
leverage, the lever does not leave a clear imprint in the palm of your hand,
and the serrations on the wheel fastener do not emboss the surfaces of the
dropouts, the tension is insufcient. Open the lever; turn the tension
adjusting nut clockwise a quarter turn; then try again. See also the rst
WARNING in this Section, Page 19.
(3) If you disengaged the brake quick-release mechanism in 4. c. (2) above,
re-engage it to restore correct brake pad-to-rim clearance.
(4) Spin the wheel to make sure that it is centered in the frame and clears
the brake pads; then squeeze the brake lever and make sure that the brakes are
operating correctly.
B. Seat Post Cam-Action Clamp
Some bikes are equipped with a cam-action seat post binder. The seat
post cam-action binder works exactly like the traditional wheel cam-action
fastener (refer to Page 19, Section 4: “Tech”, subsection A.2: “Wheels
with cam-action systems”). While a cam-action binder looks like a long bolt
25
with a lever on one end and a nut on the other, the binder uses an over-center
cam-action to rmly clamp the seat post (see g. 9a).
WARNING: Riding with an improperly tightened seat post can allow the
saddle to turn or move and cause you to lose control and fall. Therefore:
1. Know how to correctly clamp your seat post.
2. Understand and apply the correct technique for clamping your seat
post.
3. Before you ride the bike, rst check that the seat post is securely
clamped.
Adjusting the seat post cam-action mechanism
The action of the cam squeezes the seat collar around the seat post to hold
the seat post securely in place. The amount of clamping force is controlled by the
tension adjusting nut. Turning the tension adjusting nut clockwise while keeping
the cam lever from rotating increases clamping force; turning it counterclockwise
while keeping the cam lever from rotating reduces clamping force. Less than half
a turn of the tension adjusting nut can make the difference between safe and
unsafe clamping force.
WARNING: The full force of the cam-action is needed to clamp the
seat post securely. Holding the nut with one hand and turning the
lever like a wing nut with the other hand until everything is as tight as you
can get it will not clamp the seat post safely.
WARNING: If you can fully close the cam lever without wrapping your
ngers around the seat post or a frame tube for leverage, and the
lever does not leave a clear imprint in the palm of your hand, the tension is
insufcient. Open the lever; turn the tension adjusting nut clockwise a
quarter turn; then try again.
26
C. Brakes
There are three general types of bicycle brakes: rim brakes, which operate
by squeezing the wheel rim between two brake pads; disc brakes, which operate
by squeezing a hub-mounted disc between two brake pads; and internal hub
brakes. All three can be operated by way of a handlebar-mounted lever. On some
models of bicycle, the internal hub brake is operated by pedaling backwards. This
is called a Coaster Brake and is described in Appendix D.
WARNING:
1. Riding with improperly adjusted brakes, worn brake pads, or wheels
on which the rim wear mark is visible is dangerous and can result in
serious injury or death.
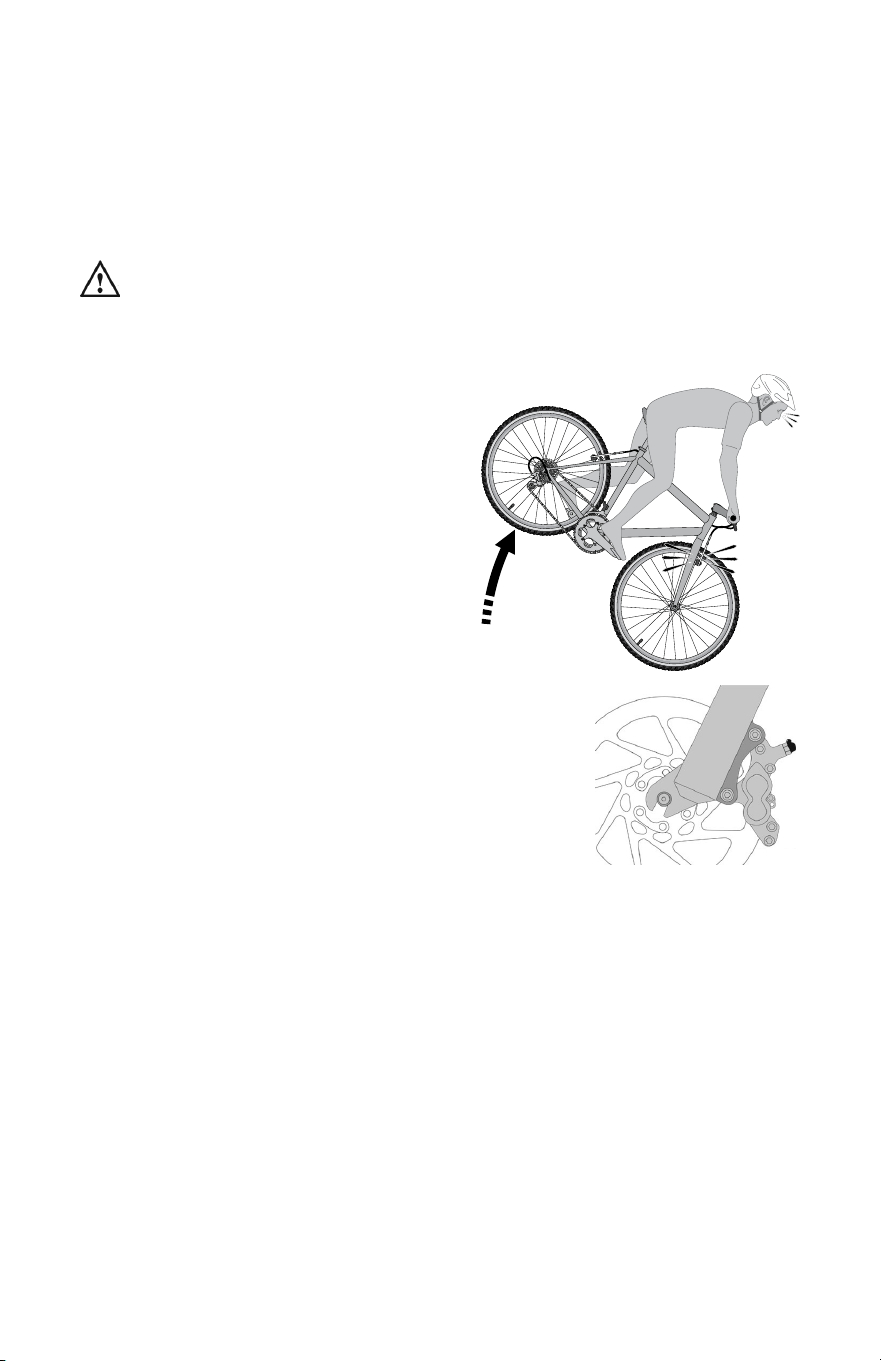
g. 14
g. 13
2. Applying brakes too hard or too
suddenly can lock up a wheel,
which could cause you to lose
control and fall (see g. 13).
Sudden or excessive application of
the front brake may pitch the rider
over the handlebars, which may
result in serious injury or death.
3. Some bicycle brakes, such as
disc brakes (g. 14) and linear-pull
brakes (g. 15), are extremely
powerful. Take extra care in
becoming familiar with these
brakes and exercise particular
care when using them.
4. Some bicycle brakes are equipped with a
brake force modulator, a small, cylindrical
device through which the brake control cable
runs and which is designed to provide a more
progressive application of braking force.
A modulator makes the initial brake lever
force more gentle, progressively increasing force until full force is
achieved. If your bike is equipped with a brake force modulator, take
extra care in becoming familiar with its performance characteristics.
Some brake force modulators are adjustable. If you don’t like the feel
of your brakes, ask a qualied bicycle mechanic about adjusting the
brake force modulation.
5. Disc brakes can get extremely hot with extended use. Be careful not
to touch a disc brake until it has had plenty of time to cool.
6. See the brake manufacturer’s instructions for operation and care
of your brakes, and for when brake pads must be replaced. If you
do not have the manufacturer’s instructions, contact the brake
manufacturer.
7. If replacing worn or damaged parts, use only manufacturer-approved
genuine replacement parts.
27
1. Brake controls and features
It’s very important to your safety that you learn and remember which brake
lever controls which brake on your bike. Traditionally, in the U.S. the right brake
lever controls the rear brake and the left brake lever controls the front brake; but, to
check how your bike’s brakes are set up, squeeze one brake lever and look to see
which brake, front or rear, engages. Now do the same with the other brake lever.
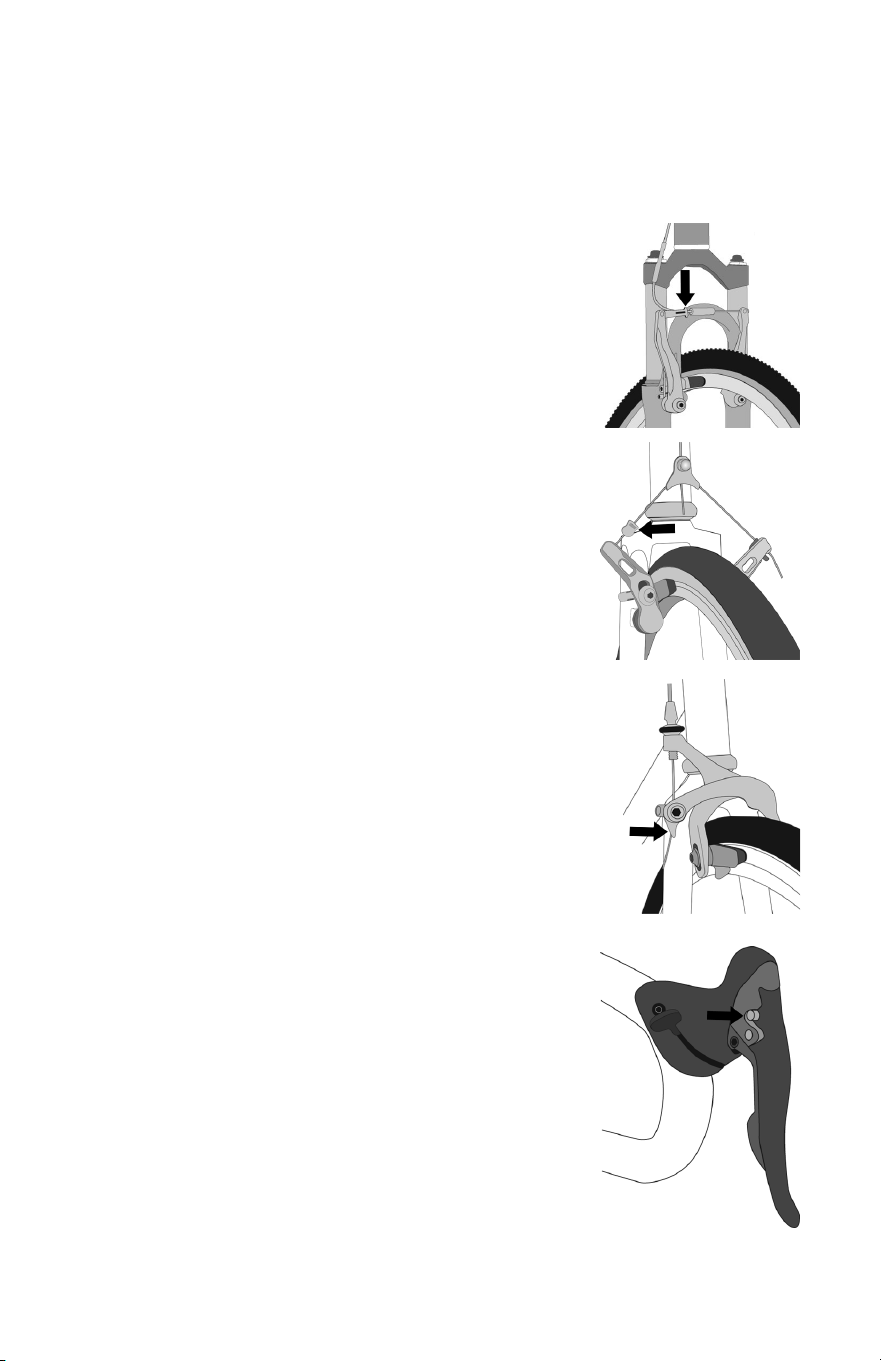
g. 15
g. 16
g. 17
g.
18
Make sure that your hands can reach and squeeze
the brake levers comfortably. If your hands are too small to
operate the levers comfortably, consult a qualied bicycle
mechanic before riding the bike. The lever reach may be
adjustable; or you may need a different brake lever design.
Most rim brakes have some form of quick-release
mechanism to allow the brake pads to clear the tire
when a wheel is removed or reinstalled. When the brake
quick-release is in the open position, the brakes are
inoperative. Make sure that you understand the way the
brake quick-release works on your bike (see gs. 15, 16,
17 & 18) and check each time to make sure both brakes
work correctly before you get on the bike.
2. How brakes work
The braking action of a bicycle is a function of the
friction between the braking surfaces. To make sure that
you have maximum friction available, keep your wheel
rims and brake pads or the disc rotor and caliper clean
and free of dirt, lubricants, waxes or polishes.
Brakes are designed to control your speed, not just
to stop the bike. Maximum braking force for each wheel
occurs at the point just before the wheel “locks up” (stops
rotating) and starts to skid. Once the tire skids, you
actually lose most of your stopping force and all directional
control. You need to practice slowing and stopping
smoothly without locking up a wheel. The technique is
called progressive brake modulation. Instead of jerking the
brake lever to the position where you think you’ll generate
appropriate braking force, squeeze the lever, progressively
increasing the braking force. If you feel the wheel begin
to lock up, release pressure just a little to keep the wheel
rotating just short of lockup. It’s important to develop a feel
for the amount of brake lever pressure required for each
wheel at different speeds and on different surfaces. To
better understand this, experiment a little by walking your
bike and applying different amounts of pressure to each
brake lever, until the wheel locks.
When you apply one or both brakes, the bike begins
to slow, but your body wants to continue at the speed
at which it was going. This causes a transfer of weight
to the front wheel (or, under heavy braking, around the
front wheel hub, which could send you ying over the
handlebars).

28
A wheel with more weight on it will accept greater brake pressure before
lockup; a wheel with less weight will lock up with less brake pressure.
So, as you apply brakes and your weight is transferred forward, you need
to shift your body toward the rear of the bike, to transfer weight back on to the
rear wheel; and at the same time, you need to both decrease rear braking and
increase front braking force. This is even more important on descents, because
descents shift weight forward.
Two keys to effective speed control and safe stopping are controlling wheel
lockup and weight transfer. This weight transfer is even more pronounced if your
bike has a front suspension fork. Front suspension “dips/compresses/dives”
under braking, increasing the weight transfer (refer to Page 32, Section
4: “Tech”, subsection F: “Bicycle Suspension”). Practice braking and weight
transfer techniques where there is no trafc or other hazards and distractions.
Everything changes when you ride on loose surfaces or in wet weather. It will
take longer to stop on loose surfaces or in wet weather. Tire adhesion is reduced,
so the wheels have less cornering and braking traction and can lock up with less
brake force. Moisture or dirt on the brake pads reduces their ability to grip. The
way to maintain control on loose or wet surfaces is to go more slowly.
D. Shifting Gears
Your multi-speed bicycle will have a derailleur drivetrain (see 1. below),
an internal gear hub drivetrain (see 2. below) or, in some special cases, a
combination of the two.
1. How a derailleur drivetrain works
If your bicycle has a derailleur drivetrain, the gear-changing mechanism will
have:
• a rear cassette or freewheel sprocket cluster
• a rear derailleur
• usually a front derailleur
• one or two shifters
• one, two or three front sprockets called chainrings
• a drive chain
a. Shifting gears
There are several different types and styles of shifting controls: levers, twist
grips, triggers, combination shift/brake controls and push-buttons. Ask your
authorized retailer to explain the type of shifting controls that are on your bike,
and to show you how they work.
The vocabulary of shifting can be pretty confusing. A downshift is a shift to a
“lower” or “slower” gear, one that is easier to pedal. An upshift is a shift to a “higher”
or “faster”, harder-to-pedal gear. What’s confusing is that what’s happening at the
front derailleur is the opposite of what’s happening at the rear derailleur (for details,
read the instructions on Shifting the Rear Derailleur and Shifting the Front Derailleur
below). For example, you can select a gear which will make pedaling easier on a
hill (make a downshift) in one of two ways: shift the chain down the gear “steps” to a
smaller gear at the front, or up the gear “steps” to a larger gear at the rear. So, at the
rear gear cluster, what is called a downshift looks like an upshift. The way to keep
things straight is to remember that shifting the chain in towards the centerline of the
bike is for accelerating and climbing and is called a downshift. Moving the chain out
or away from the centerline of the bike is for speed and is called an upshift.
29
Whether upshifting or downshifting, the bicycle derailleur system design
requires that the drive chain be moving forward and be under at least some
tension. A derailleur will shift only if you are pedaling forward.
CAUTION: Never move the shifter while pedaling backward, nor pedal
backwards immediately after having moved the shifter. This could jam
the chain and cause serious damage to the bicycle.
b. Shifting the Rear Derailleur
The rear derailleur is controlled by the right shifter.
The function of the rear derailleur is to move the drive chain from one gear
sprocket to another. The smaller sprockets on the gear cluster produce higher
gear ratios. Pedaling in the higher gears requires greater pedaling effort, but
takes you a greater distance with each revolution of the pedal cranks. The larger
sprockets produce lower gear ratios. Using them requires less pedaling effort,
but takes you a shorter distance with each pedal crank revolution. Moving the
chain from a smaller sprocket of the gear cluster to a larger sprocket results in a
downshift. Moving the chain from a larger sprocket to a smaller sprocket results
in an upshift. In order for the derailleur to move the chain from one sprocket to
another, the rider must be pedaling forward.
c. Shifting the Front Derailleur:
The front derailleur, which is controlled by the left shifter, shifts the chain
between the larger and smaller chainrings. Shifting the chain onto a smaller
chainring makes pedaling easier (a downshift). Shifting to a larger chainring
makes pedaling harder (an upshift).
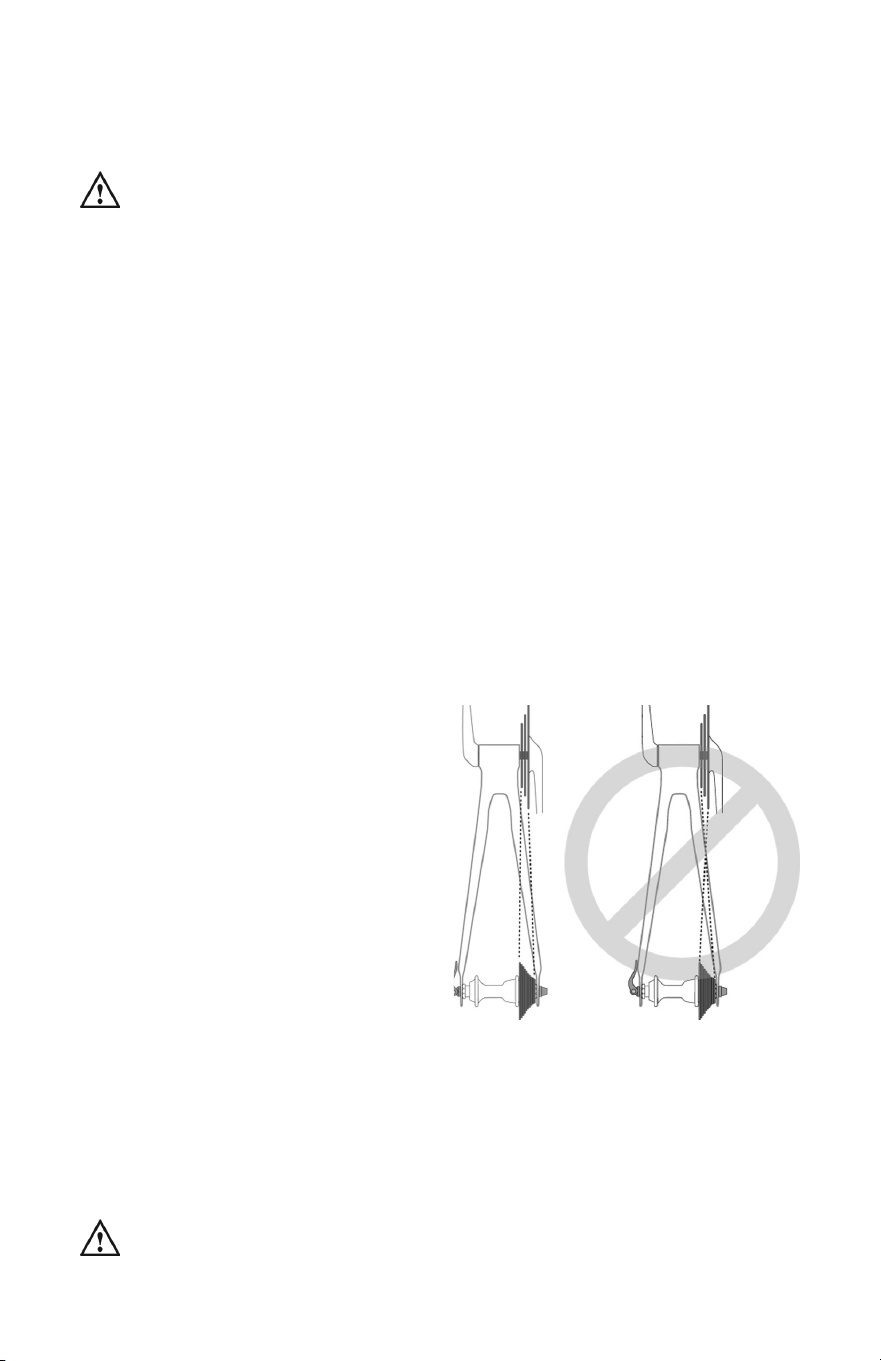
g. 19
d. Which gear should I be in?
The combination of largest rear
and smallest front sprockets (g. 19) is
for the steepest hills. The smallest rear
and largest front combination is for the
greatest speed. It is not necessary to
shift gears in sequence. Instead, nd
the “starting gear” which is right for
your level of ability — a gear which is
hard enough for quick acceleration but
easy enough to let you start from a stop
without wobbling — and experiment with
upshifting and downshifting to get a feel for the different gear combinations. At
rst, practice shifting where there are no obstacles, hazards or other trafc, until
you’ve built up your condence. Learn not to use either the “smallest to smallest”
or “largest to largest” gear combinations because they may cause unacceptable
stress on the drive train. Learn to anticipate the need to shift, and shift to a
lower gear before the hill gets too steep. If you have difculties with shifting, the
problem could be mechanical adjustment.
WARNING: Never shift a derailleur onto the largest or the smallest
sprocket if the derailleur is not shifting smoothly. The derailleur may be
out of adjustment and the chain could jam, causing you to lose control and fall.

30
e. What if it won’t shift gears?
If moving the shift control one click repeatedly fails to result in a smooth shift
to the next gear, chances are that the mechanism is out of adjustment. Take the
bike to a qualied bicycle mechanic to have it adjusted.
2. How an internal gear hub drivetrain works
If your bicycle has an internal gear hub drivetrain, the gear changing
mechanism will consist of:
• a nite set of speeds (anywhere from three to 18 speeds or more), or
possibly an innitely variable internal gear hub
• one, or sometimes two shifters
• one or two control cables
• one front sprocket, also called a chainring
• one rear sprocket, also called a cog
• a drive chain
a. Shifting internal gear hub gears
Shifting with an internal gear hub drivetrain is simply a matter of moving the
shifter to the indicated position for the desired gear ratio. After you have moved
the shifter to the gear position of your choice, ease the pressure on the pedals for
an instant to allow the hub to complete the shift.
b. Which gear should I be in?
The numerically lowest gear (1) is for the steepest hills. The numerically
largest gear is for the greatest speed.
Shifting from an easier, “slower” gear (like 1) to a harder, “faster” gear (like 2
or 3) is called an upshift. Shifting from a harder, “faster” gear to an easier, “slower”
gear is called a downshift. It is not necessary to shift gears in sequence. Instead,
nd the “starting gear” for the conditions — a gear which is hard enough for quick
acceleration but easy enough to let you start from a stop without wobbling — and
experiment with upshifting and downshifting to get a feel for the different gears. At
rst, practice shifting where there are no obstacles, hazards or other trafc, until
you’ve built up your condence. Learn to anticipate the need to shift, and shift to
a lower gear before the hill gets too steep. If you have difculties with shifting, the
problem could be mechanical adjustment.
c. What if it won’t shift gears?
If moving the shift control one click repeatedly fails to result in a smooth shift
to the next gear, chances are that the mechanism is out of adjustment. Take the
bike to a qualied bicycle mechanic to have it adjusted.
E. Pedals
Toe overlap is when your toe can touch the front wheel when you turn the
handlebars to steer while a pedal is in the forward-most position. This is common
on small-framed bicycles, and is avoided by keeping the inside pedal up and the
outside pedal down when making sharp turns. On any bicycle, this technique will
also prevent the inside pedal from striking the ground in a turn.
NOTE: Changing tire size or pedal crank arm length affects toe overlap.
31
WARNING: Toe overlap could cause you to lose control and fall.
Determine if the combination of frame size, crank arm length, pedal
design and shoes you will use results in pedal overlap. Whether you have
overlap or not, you must keep the inside pedal up and the outside pedal
down when making sharp turns.
Some bicycles come equipped with pedals that have sharp and potentially
dangerous surfaces. These surfaces are designed to increase grip between
the rider’s shoe and the pedal. If your bicycle has this type of high-performance
pedal, you must take extra care to avoid serious injury from the pedals’ sharp
surfaces. Based on your riding style or skill level, you may prefer a less
aggressive pedal design, or choose to ride with shin pads.
Toeclips and straps are a means to keep feet correctly positioned and
engaged with the pedals. The toeclip positions the ball of the foot over the pedal
spindle, which gives maximum pedaling power. The toe strap, when tightened,
keeps the foot engaged throughout the rotation cycle of the pedal. While toeclips
and straps give some benet with any kind of shoe, they work most effectively
with cycling shoes designed for use with toeclips. Shoes with deep treaded soles
or welts which might make it more difcult for you to insert or remove your foot
should not be used with toeclips and straps.
WARNING: Getting into and out of pedals with toeclips and straps
requires skill which can only be acquired with practice. Until it
becomes a reex action, the technique requires concentration that can
distract your attention and cause you to lose control and fall. Practice the
use of toeclips and straps where there are no obstacles, hazards or trafc.
Keep the straps loose, and don’t tighten them until your technique and
condence in getting in and out of the pedals warrants it. Never ride in
trafc with your toe straps tight.
Clipless pedals (sometimes called “step-in pedals”) are another means
to keep feet securely in the correct position for maximum pedaling efciency.
They have a plate, called a “cleat,” on the sole of the shoe, which clicks into a
mating spring-loaded xture on the pedal. They only engage or disengage with
a very specic twisting motion that must be practiced until it becomes instinctive.
Clipless pedals require shoes and cleats which are compatible with the make and
model pedal being used.
Many clipless pedals are designed to allow the rider to adjust the amount of
force needed to engage or disengage the foot. Follow the pedal manufacturer’s
instructions to make this adjustment. Use the easiest setting until engaging
and disengaging becomes a reex action, but always make sure that there is
sufcient tension to prevent unintended release of your foot from the pedal.
WARNING: Clipless pedals are intended for use with shoes specically
made to t them and are designed to rmly keep the foot engaged with
the pedal. Do not use shoes which do not engage the pedals correctly.
Practice is required to learn to engage and disengage the foot safely. Until
engaging and disengaging the foot becomes a reex action, the technique
requires concentration which can distract your attention and cause you to
lose control and fall. Practice engaging and disengaging clipless pedals in a
32
place where there are no obstacles, hazards or trafc; and be sure to follow
the pedal manufacturer’s setup and service instructions. If you do not have the
manufacturer’s instructions, contact the manufacturer.
F. Bicycle Suspension
Many bicycles are equipped with suspension systems. There are many
different types of suspension systems — too many to deal with individually in this
Manual. If your bicycle has a suspension system of any kind, be sure to read and
follow the suspension manufacturer’s setup and service instructions. If you do not
have the manufacturer’s instructions, contact the manufacturer.
WARNING: Failure to maintain, check and properly adjust the
suspension system may result in suspension malfunction, which may
cause you to lose control and fall.
If your bike has suspension, the increased speed you may develop also
increases your risk of injury. For example, when braking, the front of a suspended
bike dips, compresses or dives. You could lose control and fall if you do not have
experience with this system. Learn to handle your suspension system safely.
WARNING: Changing suspension adjustment can change the handling
and braking characteristics of your bicycle. Never change suspension
adjustment unless you are thoroughly familiar with the suspension system
manufacturer’s instructions and recommendations, and always check for
changes in the handling and braking characteristics of the bicycle after a
suspension adjustment by taking a careful test ride in a hazard-free area.
Suspension can increase control and comfort by allowing the wheels to
better follow the terrain. This enhanced capability may allow you to ride faster;
but you must not confuse the enhanced capabilities of the bicycle with your own
capabilities as a rider. Increasing your skill will take time and practice. Proceed
carefully until you have learned to handle the full capabilities of your bike.
WARNING: Not all bicycles can be safely retrotted with some types
of suspension systems. Before retrotting a bicycle with any
suspension, check with the bicycle’s manufacturer to make sure that what
you want to do is compatible with the bicycle’s design. Failing to do so can
result in catastrophic frame failure.
G. Tires and Tubes
WARNING: Some bicycles intended for competition are tted with tires
that are glued on to specially made rims. These are called “sew-up” or
“tubular” tires. Properly mounting these tires requires specialized
knowledge and skills. An incorrectly installed tubular tire can come off the
rim, causing you to lose control and fall.
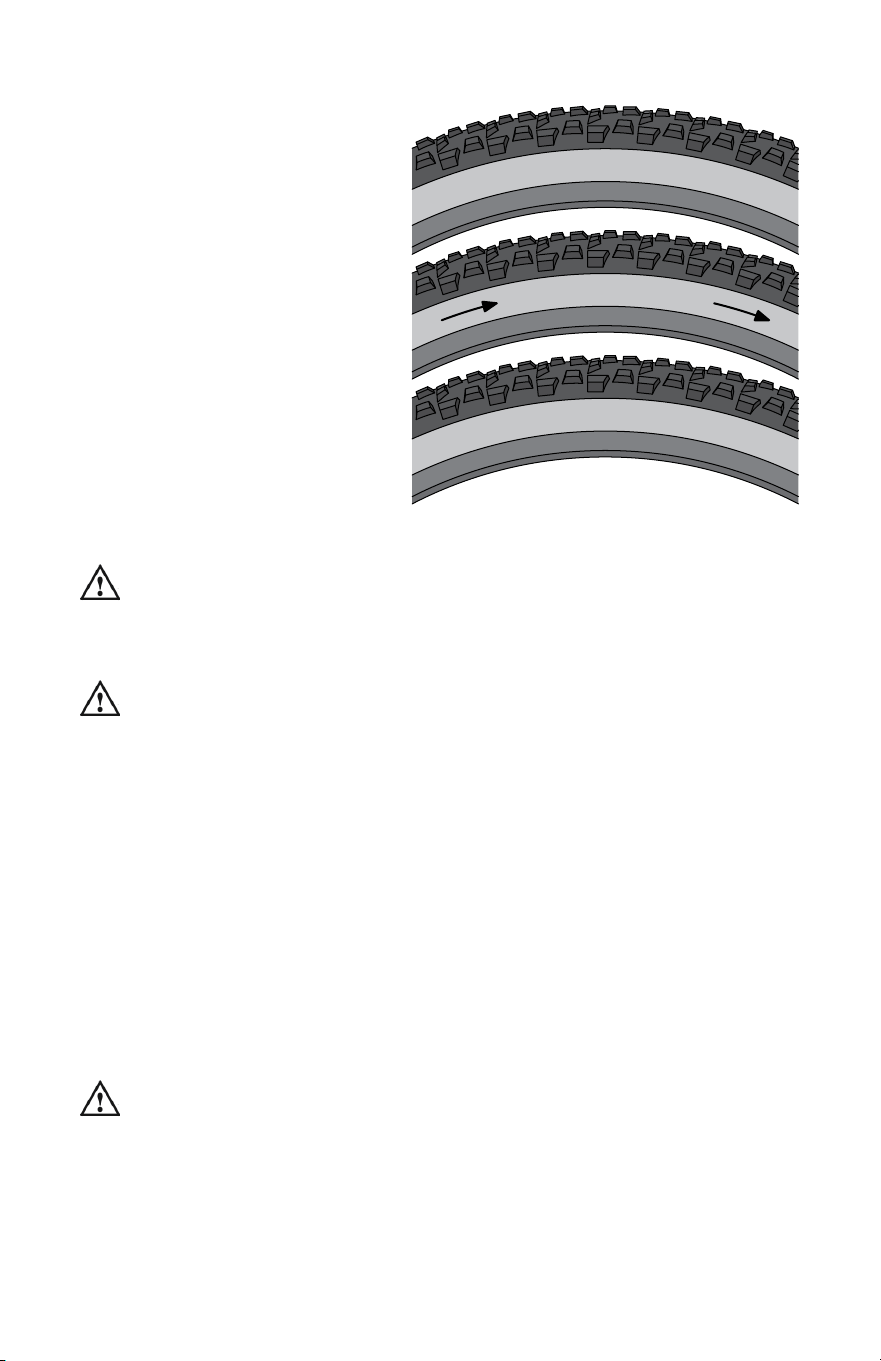
33
3
0
-
8
0
P
S
I
(
2
.
5
-
5
.
5
B
A
R
)
6
0
-
6
2
2
(
2
9
X
2
.
3
)
g. 20
1. Tires
Bicycle tires are available in
many designs and specications,
ranging from general-purpose
designs to tires designed to perform
best under very specic weather or
terrain conditions.
The size, pressure rating,
and on some high-performance
tires the specic recommended
use, are marked on the sidewall
of the tire (g. 20). Some wheel
rim manufacturers also specify
maximum tire pressure with a label
on the rim.
The best and safest way to
inate a bicycle tire to the correct
pressure is with a bicycle pump that has a built-in pressure gauge.
WARNING: There is a safety risk in using gas station air hoses or
other air compressors. They are not made for bicycle tires. They move
a large volume of air very rapidly, and will raise the pressure in your tire
very rapidly, which could cause the tube to explode.
CAUTION: Pencil-type automotive tire gauges can be inaccurate and
should not be relied upon for consistent, accurate pressure readings.
Instead, use a high-quality dial or digital gauge.
Tire pressure is given either as maximum pressure or as a pressure range.
How a tire performs under different terrain or weather conditions depends largely
on tire pressure. Inating the tire to near its maximum recommended pressure
gives the lowest rolling resistance; but also produces the harshest ride. High
pressures work best on smooth, dry pavement.
Very low pressures, at the bottom of the recommended pressure range, give
the best performance on smooth, slick terrain such as hard-packed clay, and on
deep, loose surfaces such as deep, dry sand.
Tire pressure that is too low for your weight and the riding conditions can
cause a puncture of the tube by allowing the tire to deform sufciently to pinch
the inner tube between the rim and the riding surface. This may also result in
rim damage.
WARNING: Never inate a tire beyond the maximum pressure marked
on the tire’s sidewall or the wheel rim. If the maximum pressure rating
for the wheel rim is different from the maximum pressure shown on the tire,
always use the lower rating. Exceeding the recommended maximum
pressure may blow the tire off the rim or damage the wheel rim during
installation or while riding, resulting in a loss of control or crash causing
serious injury or death, as well as damage to the tire, tube, and/or wheel rim.
R
O
T
A
T
I
O
N
D
I
R
E
C
T
I
O
N
34
WARNING: Never ride a tire inated below the minimum pressure
marked on the tire’s sidewall. Tire pressure below the minimum may
cause a at tire and/or the tire to detach from the rim while riding, resulting
in a loss of control or crash causing serious injury or death, as well as
damage to the tire, tube, and/or wheel rim.
Check ination as described in Page 3, Section 1: “First”, subsection
C: “Mechanical Safety Check” so you’ll know how correctly inated tires should
look and feel when you don’t have access to a gauge. Some tires may need to
be brought up to pressure every week or two, so it is important to check your tire
pressures before every ride.
Some special high-performance tires have unidirectional treads: their tread
pattern is designed to work better in one direction than in the other. The sidewall
marking of a unidirectional tire will have an arrow showing the correct rotation
direction. If your bike has unidirectional tires, be sure that they are mounted to
rotate in the correct direction.
2. Tubeless rims and tires
Some bicycles come equipped with rims (the circular, outermost portion of
the wheel to which the tire is mounted) and tires that can be set up without the
use of an inner tube. Tubeless rims and tires have special rim and tire bead
proles that form a seal and retain air when properly mounted. Tubeless rims
come in a variety of styles and may require additional components such as a rim
tape, valve cores, sealant and tubeless-compatible tires to complete the tubeless
setup. The rim manufacturer may identify the rims as “tubeless compatible” or
“tubeless ready” depending on which components are required. If you choose to
utilize the tubeless features of your rims, carefully review the rim manufacturer’s
instructions regarding what additional components you need to convert to or
maintain a tubeless setup.
Tubeless rims have a wide range of proles that can affect the type of tubeless
tire that can be mounted to the rim. For example, your rim manufacturer may refer
to the rim prole as “hooked” or “hookless” depending on whether there is a hook
protruding on the inside of the rim. Likewise, the bead prole of tubeless tires
differs between tire manufacturers. Given the wide range of tubeless tires and rims
available, the compatibility of tubeless tires with different types of tubeless rims
varies signicantly. If you choose to run a tubeless setup, make sure the tires and
rims are compatible. Only use tubeless tires that have been approved by the rim
manufacturer or tire manufacturer for use on your rims.
Mounting tubeless tires on a tubeless rim requires specialized knowledge,
skills and equipment. A tubeless setup may require the installation of additional
components, including rim tape, valve cores and sealant. Carefully review
the instructions from both the rim and tire manufacturer regarding how to set
up tubeless tires before attempting to do so. If you have any concerns about
properly setting up your rims and tires to run as a tubeless setup, consult a
qualied bicycle mechanic.
WARNING: Riding on an improperly installed, incompatible or
damaged tubeless tire and rim combination can cause the tire to
unexpectedly lose pressure and detach from the rim, resulting in a crash
causing serious injury or death. Ensure the components are compatible
according to the component manufacturers before installation.
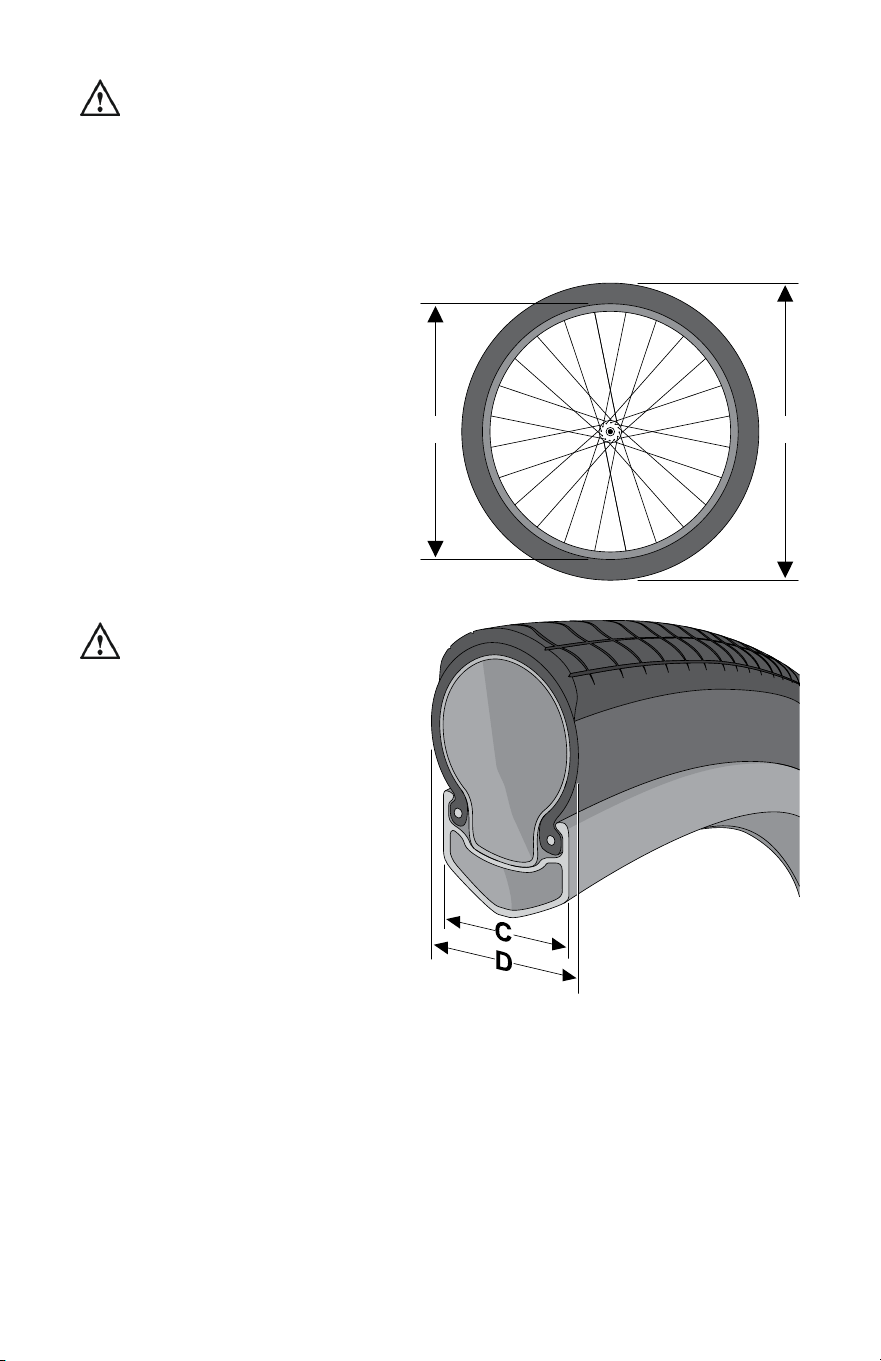
35
CAUTION:
During installation, an incompatible or damaged tubeless
tire and rim combination can cause the tire to unexpectedly lose
pressure and tire sealant and detach from the rim, resulting in damage to
the wheel or other components, and may injure the installer. Use of eye and
ear protection is recommended. Ensure the components are compatible
according to the component manufacturers before installation.
3. Tire and rim width/diameter
BA
g. 21
g. 22
Wheel rims and tires come in
a wide range of diameters (g. 21)
and widths (g. 22). The nominal
diameter of the rim (A) must match
the nominal diameter of the tire (B),
and the width of the rim (C) must
be compatible with the width of the
tire (D).
Always follow the rim and tire
manufacturer’s recommendations
concerning tire models and sizes
that are compatible with your
specic rims.
WARNING: Failure to use a
compatible tire and rim
combination can cause the tire to
unexpectedly lose pressure and
detach from the rim, resulting in
a crash causing serious injury or
death. Ensure the components
are compatible according to the
component manufacturers before
installation.
4. Tire clearance
The diameter and width of the
original equipment wheels and tires
on your bicycle have been selected
to ensure they provide adequate
clearance between the rotating tire and wheel, and the frame, fork or other
components. Any change to your wheels or tires can affect this clearance.
Tires that are marked as being the same size may have different widths when
installed, properly inated and mounted on your bike. Always verify your tire
clearance with the tires mounted and fully inated even if the replacement tires
are marked as being the same size as the tires that are being replaced.
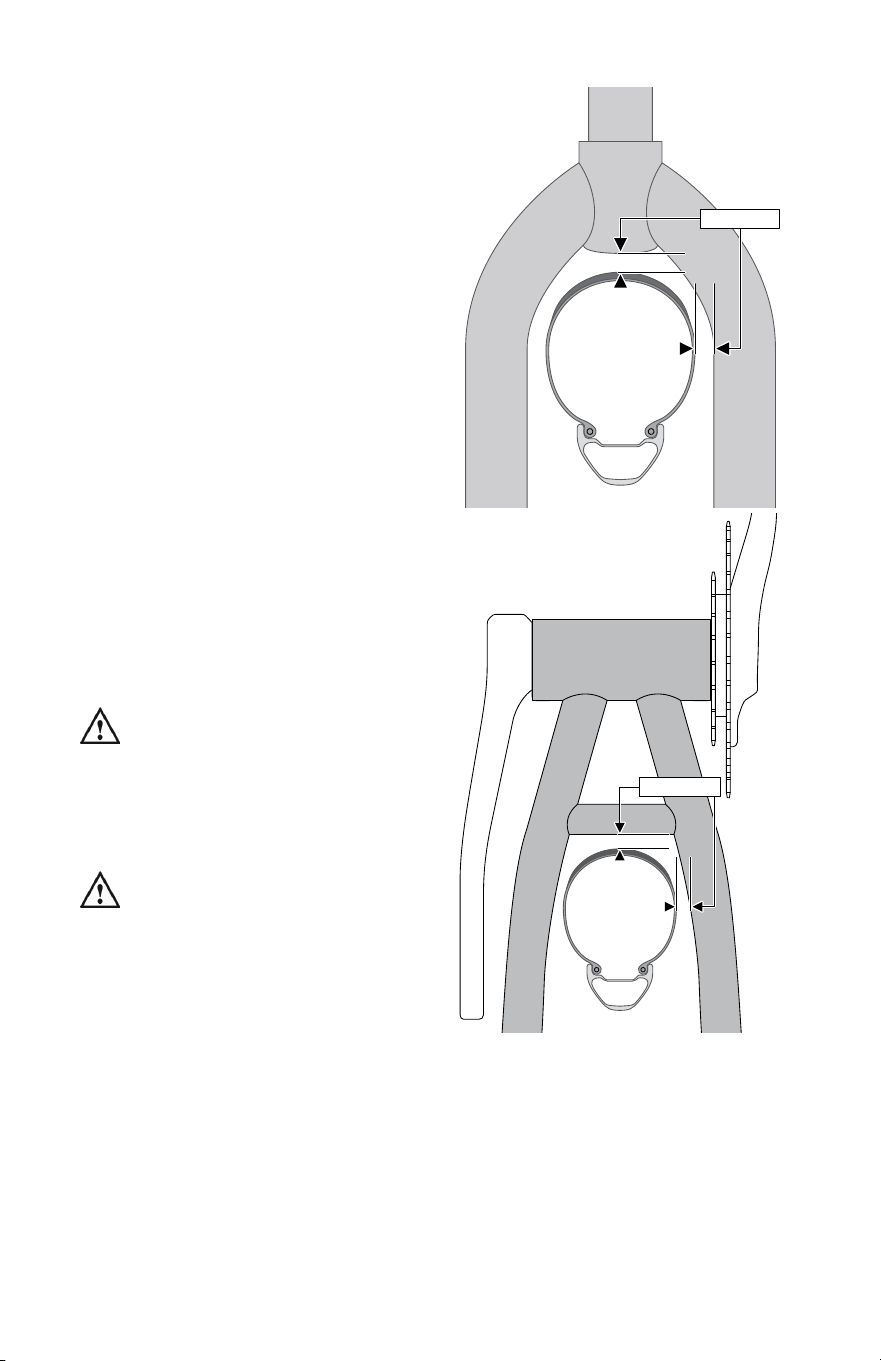
36
≥ 6mm
g. 23a
≥ 6mm
g. 23b
Minimum clearance between a
properly inated tire and any part
of the bike typically should be at
least 6mm (g. 23a & 23b). Some
regulations allow for clearance as low
as 1.6mm. Please refer to your bike
manufacturer for additional information
about tire clearance.
Always maintain enough clearance
between the rotating tire and rim (g.
23a & 23b), and the frame, fork or
other components. Regularly inspect
the frame and fork for damage, as
well as the area around the wheel for
debris or objects that could become
stuck.
When riding your bike, the tires
must not be able to contact the fork,
frame or any components when a
suspension system is fully compressed
or the wheels are subjected to ex
from side loads. For example, with a
suspension fork, the front tire must
clear the fork crown when the fork is
fully compressed.
WARNING: Inadequate tire
clearance can allow debris or
objects to become trapped or cause
the wheels to stop unexpectedly,
which could cause a crash resulting
in serious injury or death.
WARNING:
Inadequate tire
clearance that results in
contact between the tire and any
part of the bicycle can result in
damage which can lead to failure,
which could cause a crash resulting
in serious injury or death.
If you have mounted additional accessories or components on your bicycle,
particularly fenders, these products may require additional clearance between
the tire/wheel and the accessory or component. You should verify the required
clearance for any accessory or component mounted on your bicycle with the
manufacturer, and do not use the product if the specied clearance cannot
be maintained. For additional information on changing components or adding
accessories, refer to Page 11, Section 2: “Safety”, subsection G: “Changing
Components or Adding Accessories”.
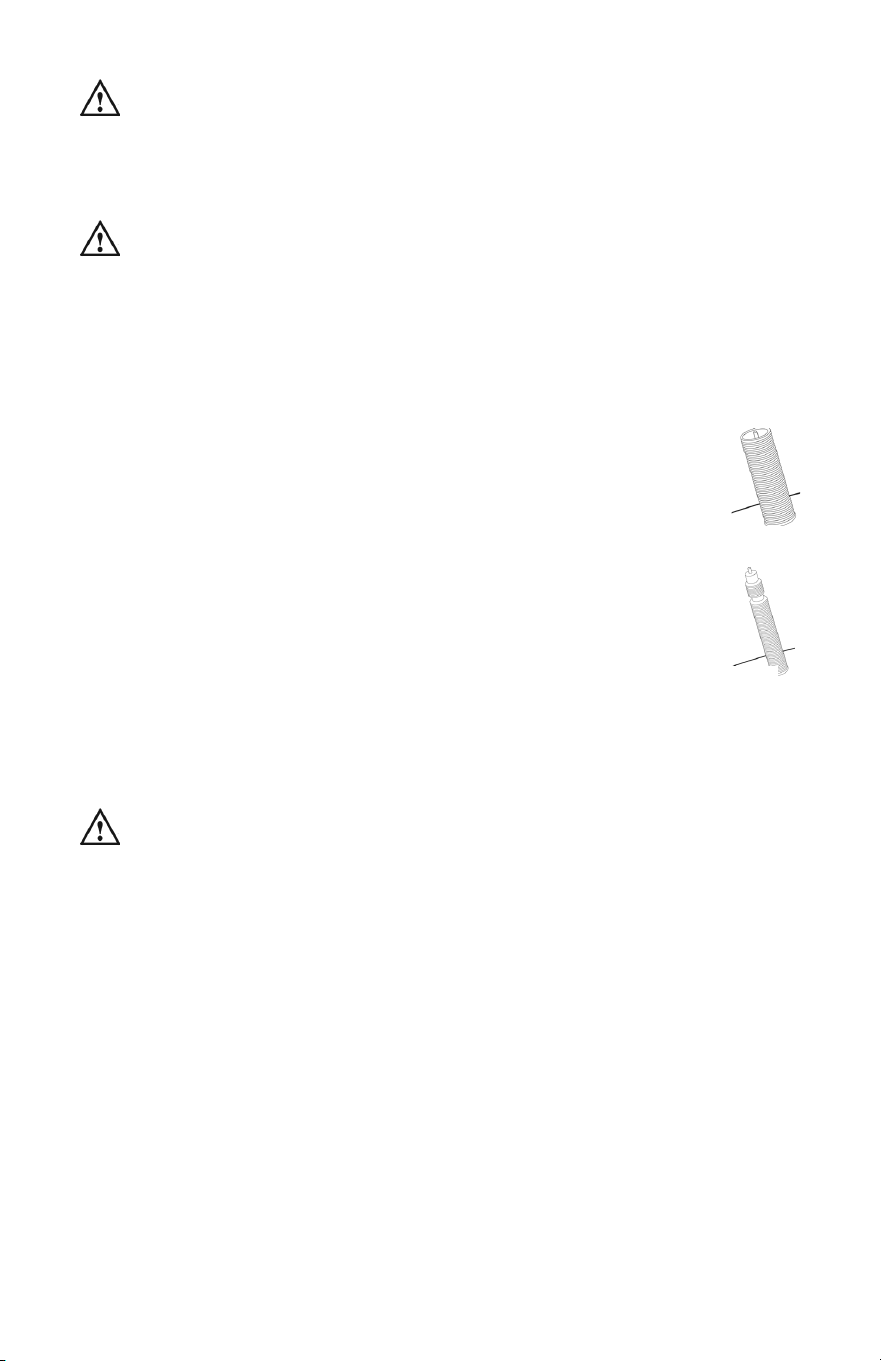
37
WARNING: Any accessory or component attached to, on or near a
rotating wheel poses a risk of contacting or stopping the wheel,
leading to a crash resulting in serious injury or death. Before every ride
check to ensure that all such accessories and components, and the
fasteners used to attach them, are securely mounted to your bicycle.
WARNING: Any object that unexpectedly and abruptly stops the
rotation of the front wheel can cause the bike and rider to pitch
forward (g. 2), which can result in serious injury or death.
5. Tire valves
There are primarily two kinds of bicycle tire valves: The Schrader Valve and
the Presta Valve. The bicycle pump you use must have the tting appropriate to
the valve stems on your bicycle.
g. 24a
g. 24b
The Schrader valve (g. 24a) is like the valve on a car tire. To
inate a Schrader valve tire, remove the valve cap and clamp the pump
tting onto the end of the valve stem. To let air out of a Schrader valve,
depress the pin in the end of the valve stem with the end of a key or
other appropriate object.
The Presta valve (g. 24b) has a narrower diameter and is only
found on bicycle tires. To inate a Presta valve tire using a Presta
headed bicycle pump, remove the valve cap; unscrew (counterclock-
wise) the valve stem lock nut; and push down on the valve stem to free
it up. Then push the pump head on to the valve head, and inate. To
inate a Presta valve with a Schrader pump tting, you’ll need a Presta
adapter (available at your bike shop) which screws on to the valve stem once
you’ve freed up the valve. The adapter ts into the Schrader pump tting. Close
the valve after ination. To let air out of a Presta valve, open up the valve stem
lock nut and depress the valve stem.
WARNING: We highly recommend that you carry a spare inner tube
when you ride your bike. Patching a tube is an emergency repair. If
you do not apply the patch correctly or apply several patches, the tube can
fail, resulting in possible tube failure, which could cause you to lose
control and fall. Replace a patched tube as soon as possible.

38
5. Service
WARNING: Technological advances have made bicycles and bicycle
components more complex, and the pace of innovation is increasing.
It is impossible for this manual to provide all the information required to
properly repair and/or maintain your bicycle. In order to help minimize the
chances of a crash and possible injury, it is critical that you have any repair
or maintenance that is not specically described in this manual performed
by a qualied bicycle mechanic. Equally important is that your individual
maintenance requirements will be determined by everything from your
riding style to geographic location.
WARNING: Many bicycle service and repair tasks require special
knowledge and tools. Do not begin any adjustments or service on your
bicycle until you have learned how to properly complete them. Improper
adjustment or service may result in damage to the bicycle or in a crash
which can cause serious injury or death.
A. Service Intervals
Some service and maintenance can and should be performed by the owner,
and require no special tools or knowledge beyond what is presented in this manual.
The following are examples of the type of service you should perform
yourself. All other service, maintenance and repair should be performed in a
properly equipped facility by a qualied bicycle mechanic using the correct tools
and procedures specied by the manufacturer.
1. Break-in Period: Your bike will last longer and work better if you break it in
before riding it hard. Control cables and wheel spokes may stretch or “seat”
when a new bike is rst used and may require readjustment by a qualied
bicycle mechanic. Your Mechanical Safety Check (Page 3, Section 1:
“First”, subsection C: “Mechanical Safety Check”) will help you identify some
things that need readjustment. But even if everything seems ne to you, it’s
best to take your bike back to a qualied bicycle mechanic for a checkup.
Authorized retailers typically suggest a 30-day checkup. Another way to judge
when it’s time for the rst checkup is to bring the bike in after three to ve
hours of hard off-road use, or about 10 to 15 hours of on-road or more casual
off-road use. But if you think something is wrong with the bike, take it to a
qualied bicycle mechanic before riding it again.
2. Before every ride: Mechanical Safety Check (Page 3, Section 1: “First”,
subsection C: “Mechanical Safety Check”).
3. After every long or hard ride; if the bike has been exposed to water or grit;
or at least every 100 miles: Clean the bike and lightly lubricate the chain’s
rollers with a good-quality bicycle chain lubricant. Wipe off excess lubricant
with a lint-free cloth.
4. After every long or hard ride or after every 10 to 20 hours of riding:
• Squeeze the front brake and rock the bike forward and back. Everything
feel solid? If you feel a clunk with each forward or backward movement
of the bike, you probably have a loose headset. Have a qualied bicycle
mechanic check it.

39
• Lift the front wheel off the ground and swing it from side to side. Feel
smooth? If you feel any binding or roughness in the steering, you may
have a tight headset. Have a qualied bicycle mechanic check it.
• Grab one pedal and rock it toward and away from the centerline of the
bike; then do the same with the other pedal. Anything feel loose? If so,
have a qualied bicycle mechanic check it.
• Take a look at the brake pads. Are they worn or not hitting the wheel rim
squarely? Time to have a qualied bicycle mechanic adjust or replace
them.
• Carefully check the control cables and cable housings. Any rust? Kinks?
Fraying? If so, have a qualied bicycle mechanic replace them.
• Squeeze each adjoining pair of spokes on either side of each wheel
between your thumb and index nger. Do they all feel about the same?
If any feel loose, have a qualied bicycle mechanic check the wheel for
tension and trueness.
• Check the tires for excess wear, cuts or bruises. Have a qualied bicycle
mechanic replace them if necessary.
• Check the wheel rims for excess wear, dings, dents and scratches. Consult
a qualied bicycle mechanic if you see any rim damage.
• Check to make sure that all parts and accessories are still secure, and
tighten any that are not.
• Check the frame (particularly in the area around all tube joints), the
handlebars, the stem and the seatpost for any deep scratches, cracks or
discoloration. These are signs of stress-caused fatigue and indicate that
a part is at the end of its useful life and needs to be replaced. See also
Appendix C.
5. Disc brakes require a different set of inspection steps. Check for these issues
before every ride:
• Pads rubbing on rotors.
• Worn-out pads (which can lead to over-extended pistons).
• Pistons that are stuck and/or won’t retract fully.
• Disc rotors that are bent and need straightening.
• Hydraulic brakes that feel “sponge-y” and/or levers that can be depressed
all the way to the grips without generating adequate stopping power (due
to trapped air and/or leaks).
WARNING: Like any mechanical device, a bicycle and its components
are subject to wear and stress. Different materials and mechanisms
wear or fatigue from stress at different rates and have different life cycles.
If a component’s life cycle is exceeded, the component can suddenly and
catastrophically fail, causing serious injury or death to the rider.
Scratches, cracks, fraying and discoloration are signs of stress-caused
fatigue and indicate that a part is at the end of its useful life and needs to
be replaced. While the materials and workmanship of your bicycle or of
individual components may be covered by a warranty for a specied period
of time by the manufacturer, this is no guarantee that the product will last
the term of the warranty. Product life is often related to the kind of riding
you do and to the treatment to which you submit the bicycle. The bicycle’s
warranty is not meant to suggest that the bicycle cannot be broken or will
40
last forever. It only means that the bicycle is covered subject to the terms
of the warranty. Please be sure to read Appendix B, Intended Use of your
bicycle and Appendix C, The lifespan of your bike and its components,
starting on Page 44.
6. As required: If either brake lever fails the Mechanical Safety Check (Page
3, Section 1: “First”, subsection C: “Mechanical Safety Check”), don’t
ride the bike. Have a qualied bicycle mechanic check the brakes. If the
chain won’t shift smoothly and quietly from gear to gear, the derailleur may
be out of adjustment. See a qualied bicycle mechanic.
B. If Your Bicycle Sustains an Impact:
First, check yourself for injuries, and take care of them as best you can. Seek
medical help if necessary.
Next, check your bike for damage.
After any crash, take your bike to a qualied bicycle mechanic for a thorough
check. Carbon composite components, including fames, wheels, handlebars,
stems, cranksets or brakes which have sustained an impact must not be ridden
until they have been disassembled and thoroughly inspected by a qualied
mechanic.
See also Appendix C, Lifespan of your bike and its components.
WARNING: A crash or other impact can put extraordinary stress on
bicycle components, causing them to fatigue prematurely.
Components suffering from stress fatigue can fail suddenly and cata-
strophically, causing loss of control, serious injury or death.

41
Appendix A: Teaching Your Child the Rules
In addition to The Basics (Page 6), Riding Safely (Page 7), Off-Road
Safety (Page 8), Wet-Weather Riding (Page 8), Night Riding (Page
8), Bicycling in Trafc (Page 7 and Appendix A) and Extreme, Stunt and
Competition Biking (Page 10), kids need to be taught ... and to have frequently
reinforced ... the following rules and lessons which adults are already expected to
know. We urge you to take the time to familiarize yourself with these rules and to
teach them to your child before you let your child ride unsupervised.
1. Rules
• No playing in the road or in the street.
• No riding on busy streets.
• No riding at dawn, dusk or at night.
• Stop for all STOP signs.
• Ride on the right of trafc.
2. Lessons
The lessons that follow relate to some of the most common real situations
that children encounter when riding their bikes. Go over these situations with your
child and make sure the lesson objective is accomplished.
a. Driveway Rideout
When a youngster rides out of the driveway and is struck by a car, that is
called a rideout crash.
What can you do? First, realize the danger of your own driveway. If there
are obstructions to the view of passing motorists (like bushes or trees), trim them
back. You might park your car in front of the driveway, if local ordinance permits.
This way, your child can’t use the driveway as a launching pad. But the most
important thing you can do is teach your child about driveway safety. Take your
child outside to the driveway and have him/her practice the following steps:
1) Stop before entering the street.
2) Look left, right and left again for trafc.
3) If there’s no trafc, proceed into the roadway.
b. Running a Stop Sign
Car/bike crashes can happen when a cyclist runs a stop sign. Most cyclists
who get hit riding through stop signs know that they were supposed to stop. They
just thought it would be OK this time; or they may have been distracted. The
thing to impress upon your child is that while he/she may not get hit every time,
running stop signs will eventually result in a crash.
What can you do? Take your child to a stop sign near home. Explain what it
means by emphasizing the following points:
1) Stop at all stop signs, regardless of what is happening.
2) Look in all directions for trafc.
3) Watch for oncoming cars making left turns.

42
4) Watch for cars behind you making right turns.
5) Wait for any cross trafc to clear.
6) Proceed when safe.
In order to make this lesson stick, you may have to change your own driving
habits. If you creep through intersections controlled by stop signs, you are
showing your child that you don’t really believe what you preach. For your child’s
sake, stop at stop signs.
c. Turning Without Warning
Another major crash type involves cyclists who make unexpected left turns.
They neither look behind for trafc, nor do they signal. The key factor here is
neglecting to look to the rear. If the cyclist had looked, he/she would have seen
the danger coming up from behind.
What can you do? Of course, you ought to teach your child not to ride
across busy streets - at least until the child has had some advanced training and
is old enough to understand trafc. But in the meantime, for residential street
riding, you can teach your child to always look and signal before turning left. A big
part of this lesson is teaching the child how to look to the rear without swerving.
Take your child to a playground or a safe area away from trafc or obstructions to
practice riding along a straight line while looking behind. Stand alongside and hold
up a different number of ngers on your hand after the child rides by. Call his/her
name. After 15 minutes of practice, a ten year old should be able to look behind
his/herself and identify how many ngers you are holding up - without swerving.
d. Riding at Dawn, at Dusk or at Night (also refer to Page 8, Section 2:
“Safety”, subsection E: “Night Riding”).
Most car/bicycle crashes happen at night where an overtaking car hits a bike.
(An overtaking car is one that comes up from behind and passes the cyclist on
the left.) These overtaking crashes can be very serious.
What can you do? First, you should keep your youngster from riding at
dawn, dusk or at night. It requires special skills and equipment. Few children
have either. Secondly, make sure your child understands that if he/she gets
caught out at dusk or after dark on a bike, the thing to do is to call you for a ride
home. One suggestion is to have your child carry a cell phone, and as an added
precaution, tape a phone number to the bike so that, in an emergency, an adult
will be able to call home.
e. Following the Leader
There is increased risk of car/bike collision if children are following each
other, because if the rst one does something dangerous, those following may do
it too.
What can you do? Teach your child to always assess the trafc situation
for him/herself. When a group is riding around, each cyclist should stop for stop
signs; each cyclist should look to the rear before making left turns; and so on.
One way to get the message across is to play a game with the child similar to

43
‘Simon Says’. In this game, however, the emphasis should not be on doing what
‘Simon Says’, but rather have the child make a decision based on the situation.
The child should learn to ignore what ‘Simon Says’. Children need to learn to
think for themselves to ride safely.
SUMMARY
Teach your child early - the earlier the better. Learning skills such as looking
and avoiding hazards takes time. Be prepared to repeat lessons until your child
understands what you’re trying to get across. Be patient. Your efforts will be
rewarded, knowing that your child is aware of safe riding skills.
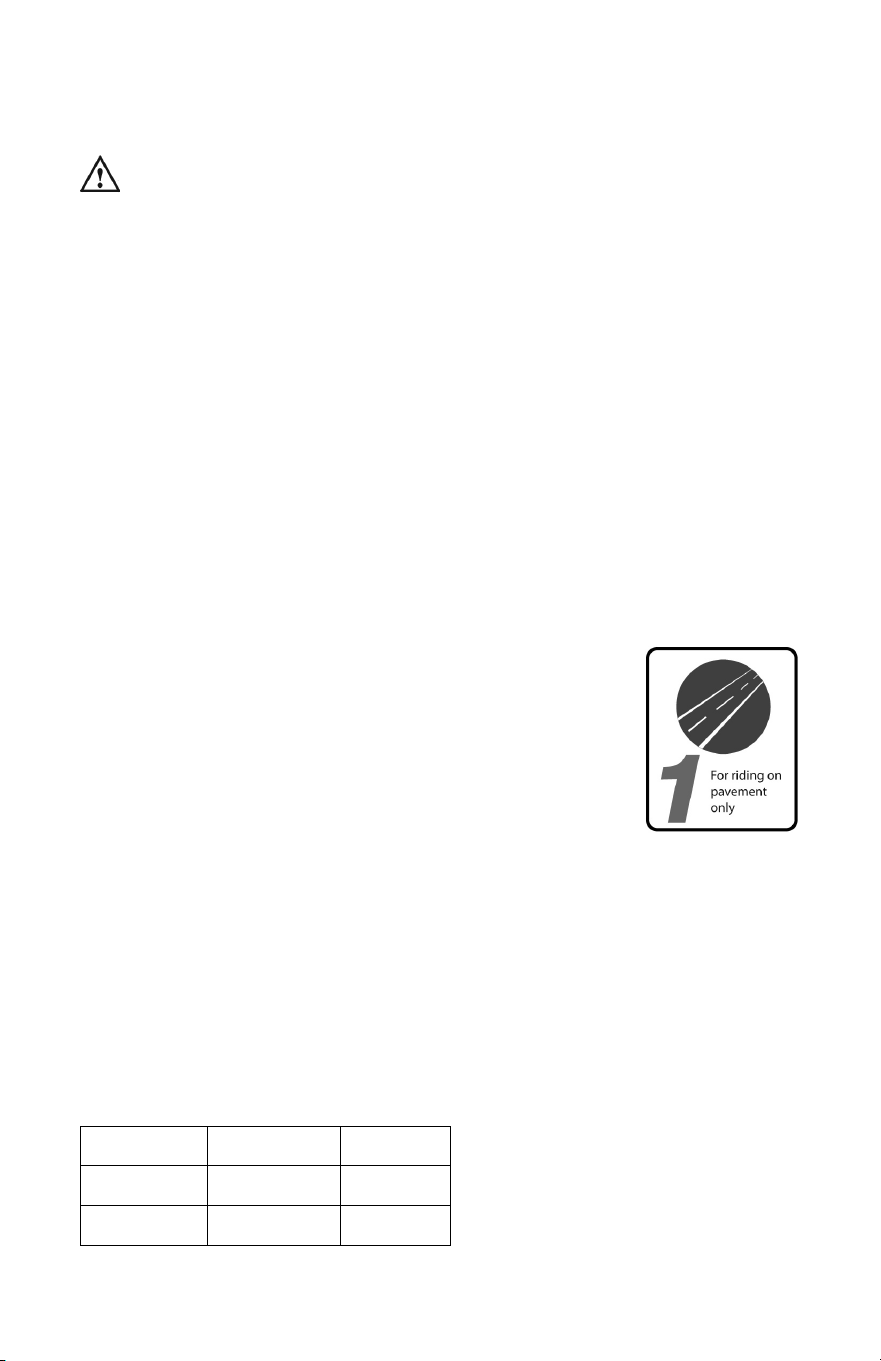
44
Appendix B: Intended Use of Your Bicycle
WARNING: Understand your bike and its intended use. Choosing the
wrong bicycle for your purpose can be hazardous. Using your bike the
wrong way is dangerous.
No one type of bicycle is suited for all purposes. Your authorized retailer can
help you pick the “right tool for the job” and help you understand its limitations. There
are many types of bicycles and many variations within each type. There are many
types of mountain, road, racing, hybrid, touring, cyclo-cross and tandem bicycles.
There are also bicycles that mix features. For example, there are road/racing
bikes with triple cranks. These bikes have the low gearing of a touring bike, the
quick handling of a racing bike, but are not well suited for carrying heavy loads
on a tour. For that purpose you want a touring bike.
Within each of type of bicycle, one can optimize for certain purposes. Visit
your bicycle shop and nd someone with expertise in the area that interests you.
Do your own homework. Seemingly small changes such as the choice of tires
can improve or diminish the performance of a bicycle for a certain purpose.
On the following pages, we generally outline the intended uses of various
types of bikes.
Industry usage conditions are generalized and evolving. Consult your
authorized retailer about how you intend to use your bike.
High-Performance Road
CONDITION 1
Bikes designed for riding on a paved surface where the
tires do not lose ground contact.
INTENDED To be ridden on paved roads only.
NOT INTENDED For off-road, cyclo-cross, or touring with
racks or panniers.
TRADE OFF Material use is optimized to deliver both light weight and
specic performance. You must understand that (1) these types of bikes are
intended to give an aggressive racer or competitive cyclist a performance
advantage over a relatively short product life, (2) a less aggressive rider will enjoy
longer frame life, (3) you are choosing light weight (shorter frame life) over more
frame weight and a longer frame life, (4) you are choosing light weight over more
dent resistant or rugged frames that weigh more. All frames that are very light
need frequent inspection. These frames are likely to be damaged or broken in a
crash. They are not designed to take abuse or be a rugged workhorse. See also
Appendix C.
MAXIMUM WEIGHT LIMIT
RIDER LUGGAGE* TOTAL
lbs / kg lbs / kg lbs / kg
275 / 125 10 / 4.5 285 / 129
* Seat Bag/Handlebar Bag Only
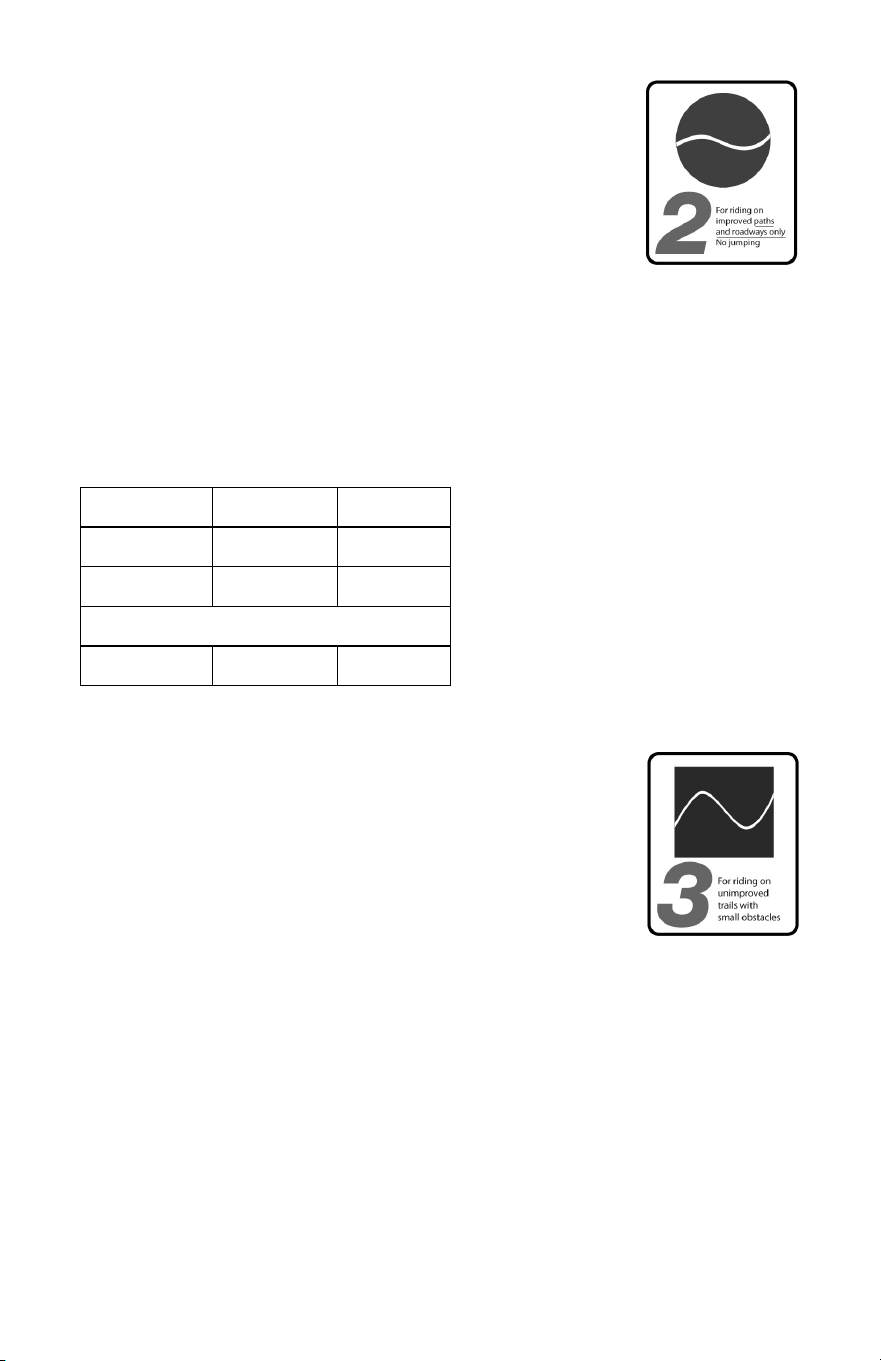
45
General Purpose Riding
CONDITION 2
Bikes designed for riding Condition 1, plus smooth gravel
roads and improved trails with moderate grades where the
tires do not lose ground contact.
INTENDED For paved roads, gravel or dirt roads that are
in good condition, and bike paths.
NOT INTENDED For off-road or mountain bike use, or for any kind of
jumping. Some of these bikes have suspension features, but these features are
designed to add comfort, not off-road capability. Some come with relatively wide
tires that are well-suited to gravel or dirt paths. Some come with relatively narrow
tires that are best suited to faster riding on pavement. If you ride on gravel or
dirt paths, carry heavier loads or want more tire durability, talk to your authorized
retailer about wider tires.
MAXIMUM WEIGHT LIMIT
RIDER LUGGAGE TOTAL
lbs / kg lbs / kg lbs / kg
300 / 136 30 / 14 330 / 150
for Touring or Trekking
300 / 136 55 / 25 355 / 161
Cross-Country, Marathon, Hardtails
CONDITION 3
Bikes designed for riding Conditions 1 and 2, plus rough
trails, small obstacles, and smooth technical areas,including
areas where momentary loss of tire contact with the ground
may occur. NOT jumping. All mountain bikes without rear
suspension are Condition 3, and so are some lightweight rear
suspension models.
INTENDED For cross-country riding and racing which ranges from mild to
aggressive over intermediate terrain (e.g., hilly with small obstacles like roots,
rocks, loose surfaces and hard pack and depressions). Cross-country and
marathon equipment (tires, shocks, frames, drive trains) are light weight, favoring
nimble speed over brute force. Suspension travel is relatively short since the bike
is intended to move quickly on the ground.
NOT INTENDED For Hardcore Freeriding, Extreme Downhill, Dirt Jumping,
Slopestyle, or very aggressive or extreme riding. No spending time in the air
landing hard and hammering through obstacles.
TRADE OFF Cross-Country bikes are lighter, faster to ride uphill, and more
nimble than All-Mountain bikes. Cross-Country and Marathon bikes trade off
some ruggedness for pedaling efciency and uphill speed.
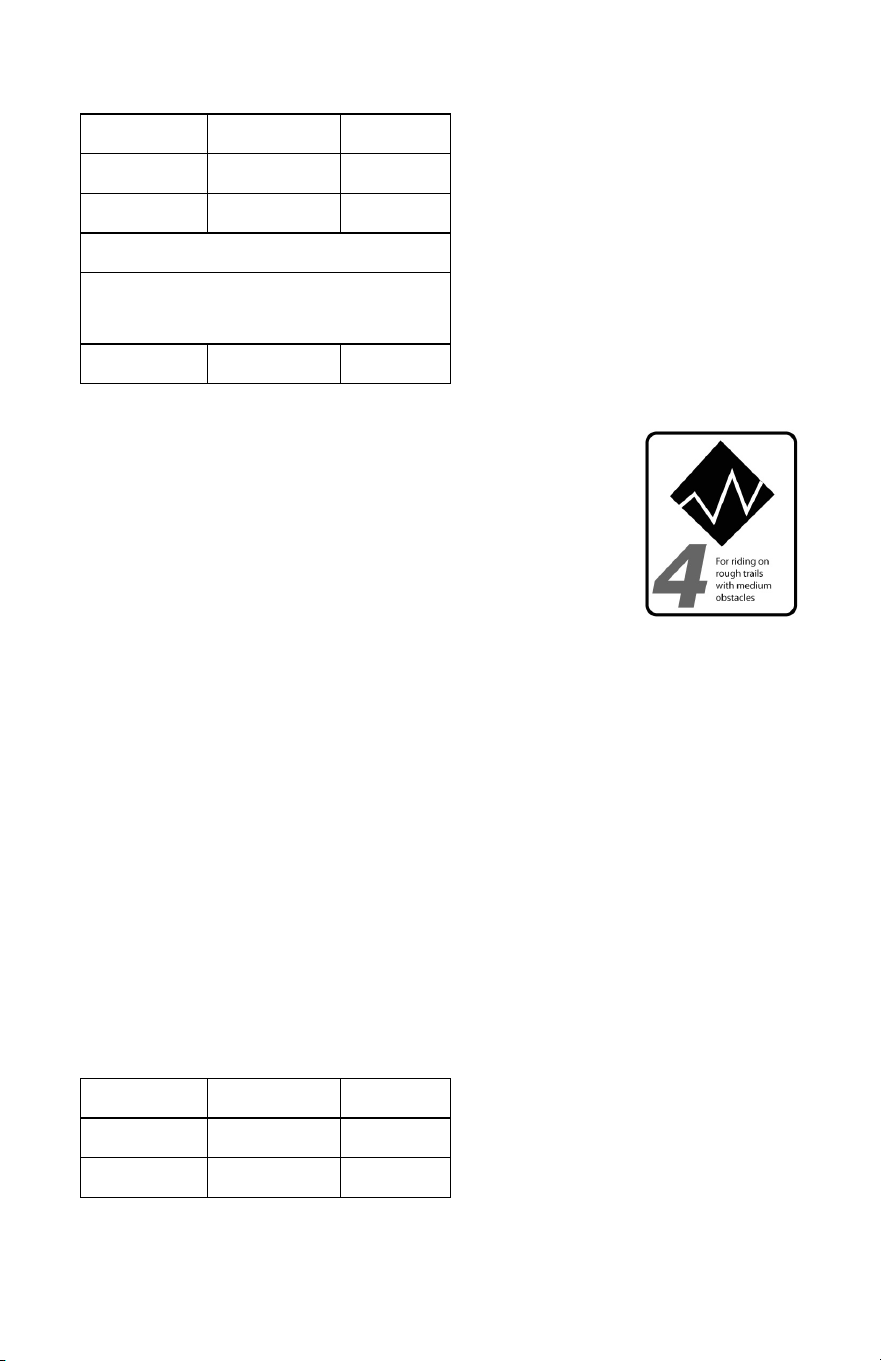
46
MAXIMUM WEIGHT LIMIT
RIDER LUGGAGE* TOTAL
lbs / kg lbs / kg lbs / kg
300 / 136 5 /2.3 305 / 138
* Seat Bag Only
Front suspension frames manufactured with
original equipment seat stay and dropout
rack mounts only
300 / 136 55 / 25 355 / 161
All Mountain
CONDITION 4
Bikes designed for riding Conditions 1, 2, and 3, plus
rough technical areas, moderately sized obstacles, and small
jumps.
INTENDED For trail and uphill riding. All-Mountain bicycles
are: (1) more heavy-duty than cross-country bikes, but less
heavy-duty than Freeride bikes, (2) lighter and more nimble than Freeride
bikes, (3) heavier and have more suspension travel than a cross-country bike,
allowing them to be ridden in more difcult terrain, over larger obstacles and
moderate jumps, (4) intermediate in suspension travel and use components that
t the intermediate intended use, (5) cover a fairly wide range of intended use,
and within this range are models that are more or less heavy-duty. Talk to your
authorized retailer about your needs and these models.
NOT INTENDED For use in extreme forms of jumping/riding such as
hardcore mountain, Freeriding, Downhill, North Shore, Dirt Jumping, Hucking etc.
No large drop-offs, jumps or launches (wooden structures, dirt embankments)
requiring long suspension travel or heavy-duty components; and no spending
time in the air landing hard and hammering through obstacles.
TRADE OFF All-Mountain bikes are more rugged than cross-country bikes,
for riding more difcult terrain. All-Mountain bikes are heavier and harder to ride
uphill than cross-country bikes. All-Mountain bikes are lighter, more nimble and
easier to ride uphill than Freeride bikes. All-Mountain bikes are not as rugged as
Freeride bikes and must not be used for more extreme riding and terrain.
MAXIMUM WEIGHT LIMIT
RIDER LUGGAGE* TOTAL
lbs / kg lbs / kg lbs / kg
300 / 136 5 / 2.3 305 / 138
* Seat Bag Only
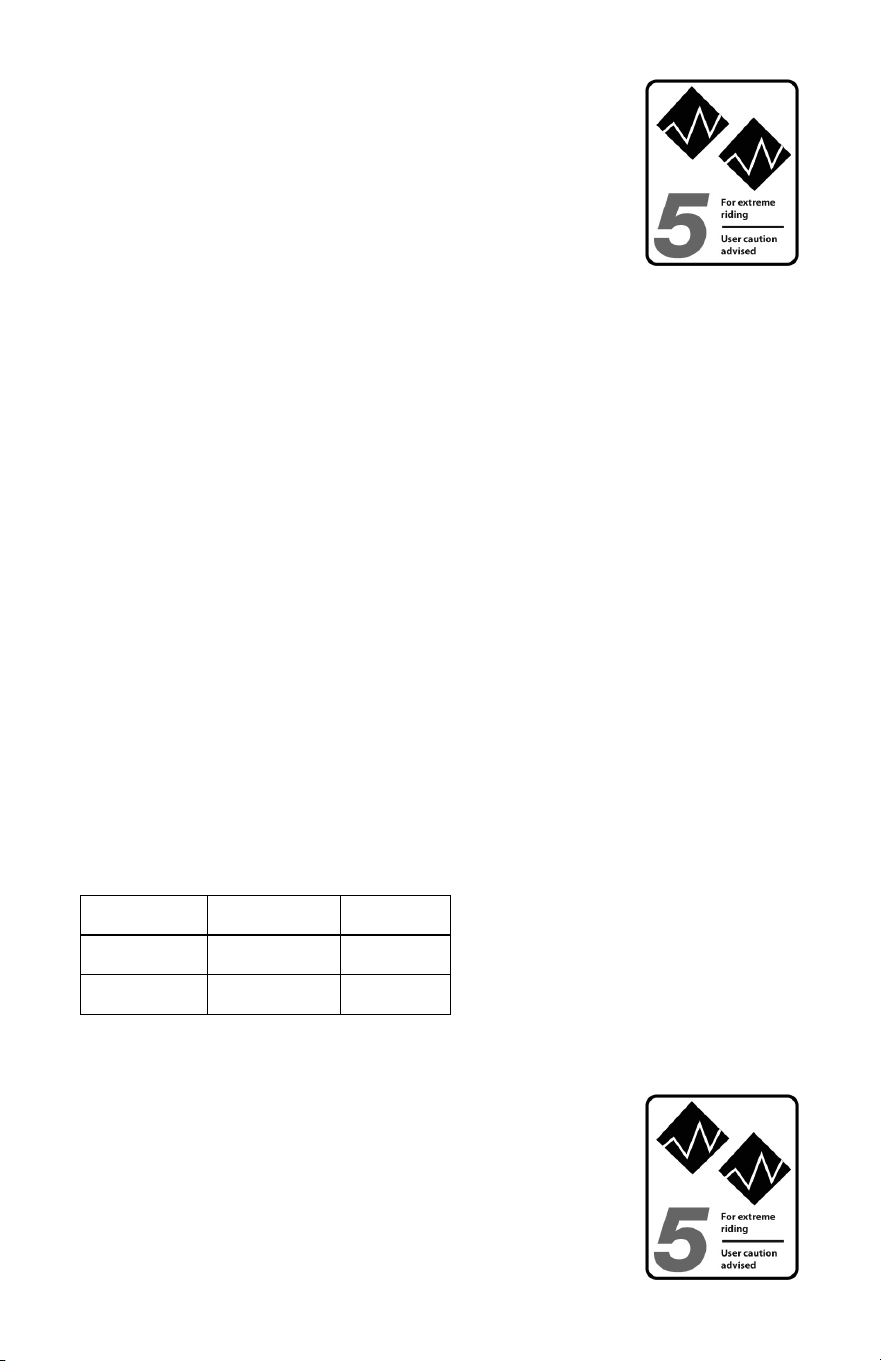
47
Gravity, Freeride, and Downhill
CONDITION 5
Bikes designed for jumping, hucking, high speeds, or
aggressive riding on rougher surfaces, or landing on at
surfaces. However, this type of riding is extremely hazardous
and puts unpredictable forces on a bicycle which may overload
the frame, fork or parts. If you choose to ride in Condition 5
terrain, you should take appropriate safety precautions such as more frequent bike
inspections and replacement of equipment. You should also wear comprehensive
safety equipment such as a full-face helmet, pads and body armor.
INTENDED For riding that includes the most difcult terrain that only very
skilled riders should attempt.
Gravity, Freeride, and Downhill are terms that describe hardcore mountain,
north shore or slopestyle. This is “extreme” riding and the terms describing it are
constantly evolving.
Gravity, Freeride, and Downhill bikes are: (1) heavier and have more
suspension travel than All-Mountain bikes, allowing them to be ridden in
more difcult terrain, over larger obstacles and larger jumps, (2) the longest
in suspension travel and use components that t heavy-duty intended use.
While all that is true, there is no guarantee that extreme riding will not break a
Freeride bike.
The terrain and type of riding that Freeride bikes are designed for is
inherently dangerous. Appropriate equipment, such as a Freeride bike, does not
change this reality. In this kind of riding, bad judgment, bad luck, or riding beyond
your capabilities can easily result in a crash, where you could be seriously
injured, paralyzed or killed.
NOT INTENDED To be an excuse to try anything. Refer to Page 10,
Section 2: “Safety”, subsection F: “Extreme, Stunt or Competition Riding”.
TRADE OFF Freeride bikes are more rugged than All-Mountain bikes, for
riding more difcult terrain. Freeride bikes are heavier and harder to ride uphill
than All-Mountain bikes.
MAXIMUM WEIGHT LIMIT
RIDER LUGGAGE* TOTAL
lbs / kg lbs / kg lbs / kg
300 / 136 5 / 2.3 305 / 138
* Seat Bag Only
Dirt Jump
CONDITION 5
Bikes designed for jumping, hucking, high speeds, or
aggressive riding on rougher surfaces, or landing on at
surfaces. However, this type of riding is extremely hazardous
and puts unpredictable forces on a bicycle which may overload
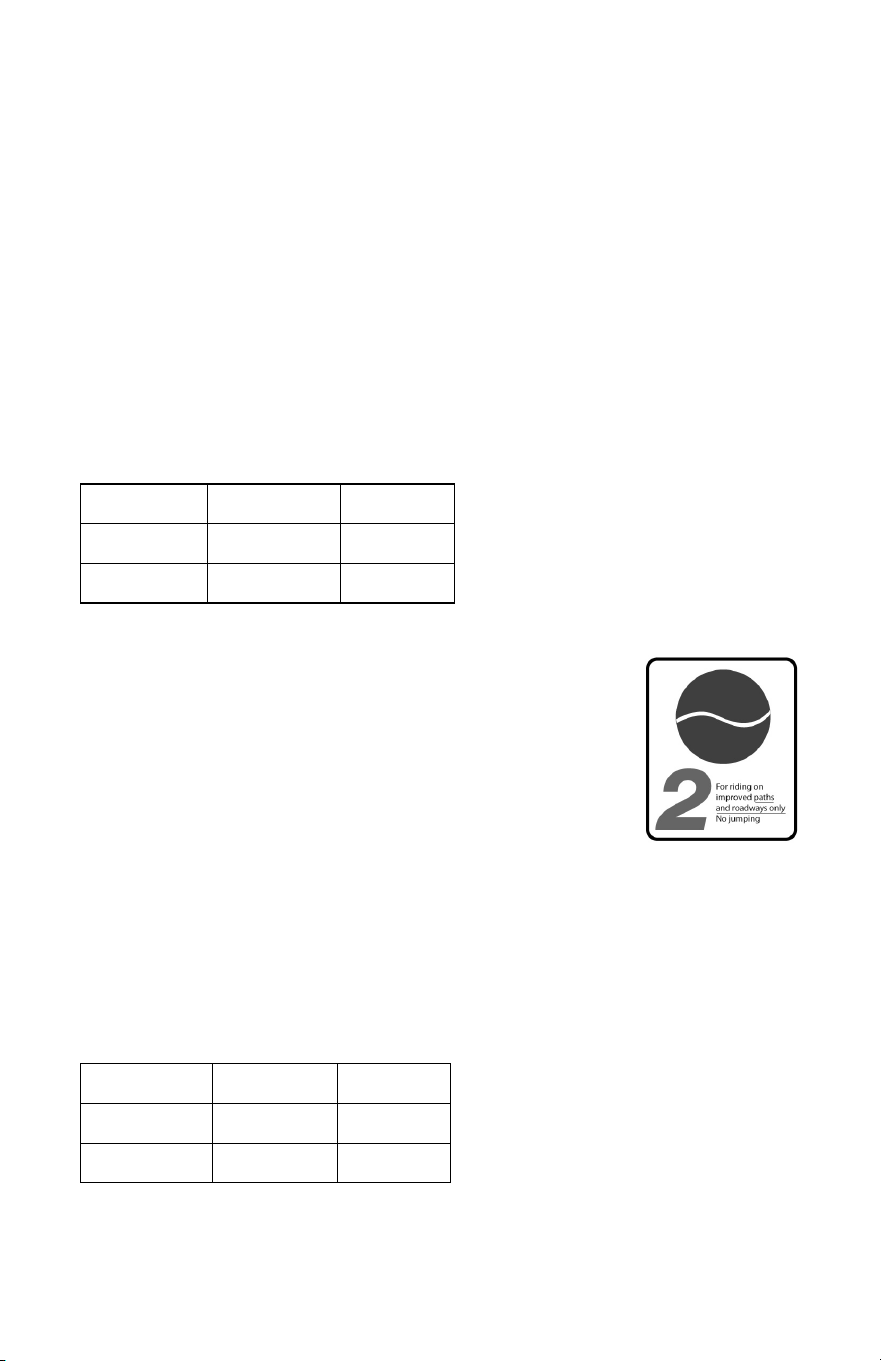
48
the frame, fork or parts. If you choose to ride in Condition 5 terrain, you should
take appropriate safety precautions such as more frequent bike inspections
and replacement of equipment. You should also wear comprehensive safety
equipment such as a full-face helmet, pads and body armor.
INTENDED For man-made dirt jumps, ramps, skate parks other predictable
obstacles and terrain where riders need and use skill and bike control, rather
than suspension. Dirt Jumping bikes are used much like heavy-duty BMX bikes.
A Dirt Jumping bike does not give you skills to jump. Refer to Page 10,
Section 2: “Safety”, subsection F: “Extreme, Stunt or Competition Riding”.
NOT INTENDED For terrain, drop-offs or landings where large amounts
of suspension travel are needed to help absorb the shock of landing and help
maintain control.
TRADE OFF Dirt Jumping bikes are lighter and more nimble than Freeride
bikes, but they have no rear suspension and the suspension travel in the front is
much shorter.
MAXIMUM WEIGHT LIMIT
RIDER LUGGAGE TOTAL
lbs / kg lbs / kg lbs / kg
300 / 136 0 300 / 136
Gravel / Cyclo-cross
CONDITION 2
Bikes designed for riding Condition 1, plus gravel roads
and improved trails with moderate grades where the tires do
not lose ground contact.
INTENDED For gravel and cyclo-cross riding, training
and racing. Gravel and cyclo-cross riding involves a variety
of terrain and surfaces including dirt or mud. These bikes also work well for
all-weather rough road riding and commuting.
NOT INTENDED For off-road or mountain bike use or jumping. Gravel and
cyclo-cross bikes are not intended for mountain bike use. The larger road bike
size wheels are faster and lighter than mountain bike wheels, but not as strong.
Cyclo-cross riders and racers dismount before reaching an obstacle, carry their
bike over the obstacle and then remount.
MAXIMUM WEIGHT LIMIT
RIDER LUGGAGE TOTAL
lbs / kg lbs / kg lbs / kg
300 / 136 30 / 13.6 330 / 150
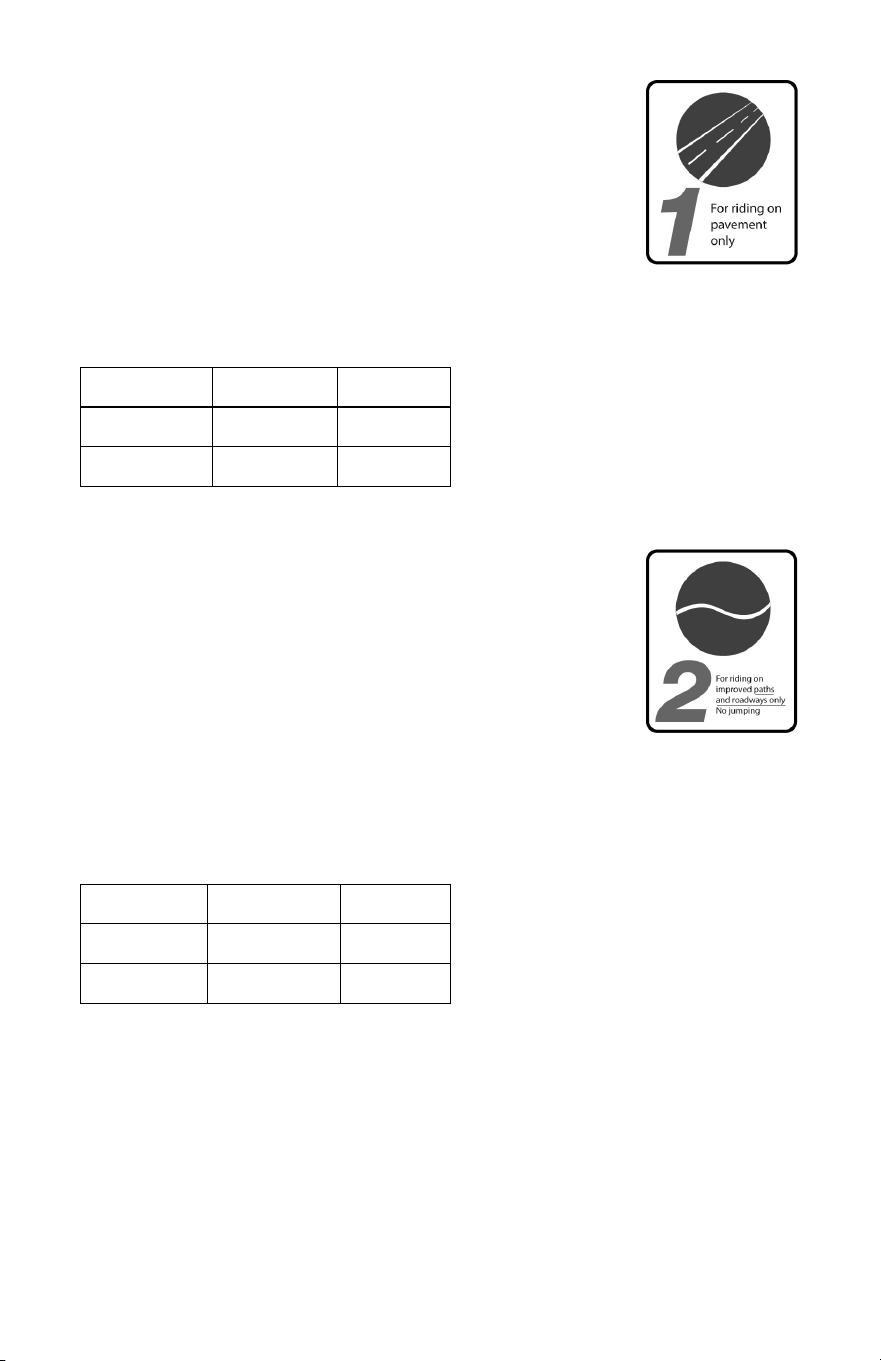
49
Road Tandems
CONDITION 1
Bikes designed for riding on a paved surface where the
tires do not lose ground contact.
INTENDED Are designed to be ridden on paved roads
only. They are not designed for mountain biking or off-road
use.
NOT INTENDED Road tandems should not be taken off-road or used as a
mountain tandem.
MAXIMUM WEIGHT LIMIT
RIDER LUGGAGE TOTAL
lbs / kg lbs / kg lbs / kg
500 / 227 75 / 34 575 / 261
Mountain Tandems
CONDITION 2
Bikes designed for riding Condition 1, plus smooth gravel
roads and improved trails with moderate grades where the
tires do not lose ground contact.
INTENDED The challenges of mountain biking are
obvious. The added challenges of tandem riding mean that
you should limit off-road tandem riding to easy-moderate terrain.
NOT INTENDED For very aggressive mountain bike riding. Mountain
tandems are most denitely NOT for Downhill, Freeriding or North Shore. Choose
terrain with the abilities of both the tandem’s captain and stoker in mind.
MAXIMUM WEIGHT LIMIT
RIDER LUGGAGE TOTAL
lbs / kg lbs / kg lbs / kg
500 / 227 75 / 34 575 / 261

50
Appendix C: The Lifespan of Your Bike and
its Components
1. Nothing Lasts Forever, Including Your Bike.
When the useful life of your bike or its components is over, continued use is
hazardous.
Every bicycle and its component parts have a nite, limited useful life. The
length of that life will vary with the construction and materials used in the
frame and components; the maintenance and care the frame and components
receive over their life; and the type and amount of use to which the frame and
components are subjected. Use in competitive events, trick riding, ramp riding,
jumping, aggressive riding, riding on severe terrain, riding in severe climates,
riding with heavy loads, commercial activities and other types of non-standard
use can dramatically shorten the life of the frame and components. Any one or a
combination of these conditions may result in an unpredictable failure.
All aspects of use being identical, lightweight bicycles and their components will
usually have a shorter life than heavier bicycles and their components. In selecting
a lightweight bicycle or components you are making a tradeoff, favoring the higher
performance that comes with lighter weight over longevity. So, If you choose
lightweight, high-performance equipment, be sure to have it inspected frequently.
You should have your bicycle and its components checked periodically by
a qualied bicycle mechanic for indicators of stress and/or potential failure,
including cracks, deformation, corrosion, paint peeling, dents, and any other
indicators of potential problems, inappropriate use or abuse. These are important
safety checks and very important to help prevent crashes, bodily injury to the
rider and shortened product life.
2. Perspective
Today’s high-performance bicycles require frequent and careful inspection
and service. In this Appendix we try to explain some underlying material science
basics and how they relate to your bicycle. We discuss some of the trade-offs
made in designing your bicycle and what you can expect from your bicycle; and
we provide important, basic guidelines on how to maintain and inspect it. We
cannot teach you everything you need to know to properly inspect and service
your bicycle; and that is why we repeatedly urge you to take your bicycle to a
qualied bicycle mechanic for professional care and attention.
WARNING: Frequent inspection of your bike is important to your safety.
Follow the Mechanical Safety Check on Page 3, Section 1: “First”,
subsection C: “Mechanical Safety Check” of this Manual before every ride.
Periodic, more detailed inspection of your bicycle is important. How
often this more detailed inspection is needed depends upon you.
You, the rider/owner, have control and knowledge of how often you
use your bike, how hard you use it and where you use it. Because your
authorized retailer cannot track your use, you must take responsibility
for periodically bringing your bike to a qualied bicycle mechanic for

51
inspection and service. A qualied bicycle mechanic can help you decide
what frequency of inspection and service is appropriate for how and where
you use your bike.
For your safety and understanding, we urge you to read this Appendix in
its entirety. The materials used to make your bike determine how and how
frequently to inspect.
Ignoring this WARNING can lead to frame, fork or other component
failure, which can result in serious injury or death.
A. Understanding metals
Steel is the traditional material for building bicycle frames. It has good
characteristics, but in high-performance bicycles, steel has been largely replaced
by aluminum and some titanium. The main factor driving this change is interest in
lighter bicycles by cycling enthusiasts.
Properties of Metals
Please understand that there is no simple statement that can be made that
characterizes the use of different metals for bicycles. What is true is how the
metal chosen is applied is much more important than the material alone. One
must look at the way the bike is designed, tested, manufactured and supported
along with the characteristics of the metal rather than seeking a simplistic
answer.
Metals vary widely in their resistance to corrosion. Steel must be protected
or rust will attack it. Aluminum and Titanium quickly develop an oxide lm that
protects the metal from further corrosion. Both are therefore quite resistant to
corrosion. Aluminum is not perfectly corrosion resistant, and particular care must
be used where it contacts other metals and galvanic corrosion can occur.
Metals are comparatively ductile. Ductile means bending, buckling and
stretching before breaking. Generally speaking, of the common bicycle frame
building materials steel is the most ductile, titanium less ductile, followed by
aluminum.
Metals vary in density. Density is weight per unit of material. Steel weighs 7.8
grams/cm
3
(grams per cubic centimeter), titanium 4.5 grams/cm
3
, aluminum 2.75
grams/cm
3
. Contrast these numbers with carbon ber composite at 1.45 grams/cm
3
.
Metals are subject to fatigue. With enough cycles of use, at high enough
loads, metals will eventually develop cracks that lead to failure. It is very
important that you read the basics of metal fatigue below.
Let’s say you hit a curb, ditch, rock, car, another cyclist or other object. At any
speed above a fast walk, your body will continue to move forward, momentum
carrying you over the front of the bike. You cannot and will not stay on the bike,
and what happens to the frame, fork and other components is irrelevant to what
happens to your body.
What should you expect from your metal frame? It depends on many
complex factors, which is why we tell you that crashworthiness cannot be a
design criteria. With that important note, we can tell you that if the impact is hard
enough the fork or frame may be bent or buckled. On a steel bike, the steel fork
may be severely bent and the frame undamaged. Aluminum is less ductile than
steel, but you can expect the fork and frame to be bent or buckled. Hit harder and

52
the top tube may be broken in tension and the down tube buckled. Hit harder and
the top tube may be broken, the down tube buckled and broken, leaving the head
tube and fork separated from the main triangle.
When a metal bike crashes, you will usually see some evidence of this
ductility in bent, buckled or folded metal.
It is now common for the main frame to be made of metal and the fork of
carbon ber. See Section B, Understanding composites below. The relative
ductility of metals and the lack of ductility of carbon ber means that in a crash
scenario you can expect some bending or bucking in the metal but none in the
carbon. Below some load the carbon fork may be intact even though the frame is
damaged. Above some load the carbon fork will be completely broken.
The Basics of Metal Fatigue
Common sense tells us that nothing that is used lasts forever. The more you
use something, and the harder you use it, and the worse the conditions you use it
in, the shorter its life.
Fatigue is the term used to describe accumulated damage to a part caused
by repeated loading. To cause fatigue damage, the load the part receives must
be great enough. A crude, often-used example is bending a paper clip back
and forth (repeated loading) until it breaks. This simple denition will help you
understand that fatigue has nothing to do with time or age. A bicycle in a garage
does not fatigue. Fatigue happens only through use.
So what kind of “damage” are we talking about? On a microscopic level, a crack
forms in a highly stressed area. As the load is repeatedly applied, the crack grows.
At some point the crack becomes visible to the naked eye. Eventually it becomes so
large that the part is too weak to carry the load that it could carry without the crack.
At that point there can be a complete and immediate failure of the part.
One can design a part that is so strong that fatigue life is nearly innite. This
requires a lot of material and a lot of weight. Any structure that must be light and
strong will have a nite fatigue life. Aircraft, race cars and motorcycles all have
parts with nite fatigue lives. If you wanted a bicycle with an innite fatigue life, it
would weigh far more than any bicycle sold today. So we all make a tradeoff: the
wonderful, lightweight performance we want requires that we inspect the structure.
What to Look For
• ONCE A CRACKS STARTS IT CAN GROW AND
GROW FAST. Think about the crack as forming a path-
way to failure. This means that any crack is potentially
dangerous and will only become more dangerous.
SIMPLE RULE 1 : If you nd a
crack, replace the part.
• CORROSION SPEEDS DAMAGE. Cracks grow more
quickly when they are in a corrosive environment. Think
about the corrosive solution as further weakening and
extending the crack.
SIMPLE RULE 2 : Clean
your bike, lubricate your bike,
protect your bike from salt,
remove any salt as soon as
you can.
• STAINS AND DISCOLORATION CAN OCCUR NEAR
A CRACK. Such staining may be a warning sign that a
crack exists.
SIMPLE RULE 3 : Inspect and
investigate any staining to see
if it is associated with a crack.

53
• SIGNIFICANT SCRATCHES, GOUGES, DENTS
OR SCORING CREATE STARTING POINTS FOR
CRACKS. Think about the cut surface as a focal point
for stress (in fact engineers call such areas “stress ris-
ers,” areas where the stress is increased). Perhaps you
have seen glass cut? Recall how the glass was scored
and then broke on the scored line.
SIMPLE RULE 4 : Do not
scratch, gouge or score any
surface. If you do, pay fre-
quent attention to this area or
replace the part.
• SOME CRACKS (particularly larger ones) MAY MAKE
A CREAKING NOISE AS YOU RIDE. Think about such
a noise as a serious warning signal. Note that a well-
maintained bicycle will be very quiet and free of creaks
and squeaks.
SIMPLE RULE 5 : Investi-
gate and nd the source of
any noise. It may not be a
crack, but whatever is caus-
ing the noise should be xed
promptly.
Fatigue Is Not A Perfectly Predictable Science
Fatigue is not a perfectly predictable science, but here are some general
factors to help you determine how often your bicycle should be inspected. The
more you t the “shorten product life” prole, the more frequent your need to
inspect. The more you t the “lengthen product life” prole, the less frequent your
need to inspect.
Factors that shorten product life:
• Hard, harsh riding style
• “Hits”, crashes, jumps, other “shots” to the bike
• High mileage
• Higher body weight
• Stronger, more t, more aggressive rider
• Corrosive environment (wet, salt air, winter road salt,
accumulated sweat)
• Presence of abrasive mud, dirt, sand, soil in riding environment
Factors that lengthen product life:
• Smooth, uid riding style
• No “hits”, crashes, jumps, other “shots” to the bike
• Low mileage
• Lower body weight
• Less aggressive rider
• Non-corrosive environment (dry, salt-free air)
• Clean riding environment
WARNING: Do not ride a bicycle or component with any crack, bulge
or dent, even a small one. Riding a cracked frame, fork or component
could lead to complete failure, with risk of serious injury or death.
B. Understanding composites
All riders must understand a fundamental reality of composites. Composite
materials constructed of carbon bers are strong and light, but when crashed or
overloaded, carbon bers do not bend, they break.

54
What Are Composites?
The term “composites” refers to the fact that a part or parts are made up of
different components or materials. You’ve heard the term “carbon ber bike.” This
really means “composite bike.”
Carbon ber composites are typically a strong, light ber in a matrix of
plastic, molded to form a shape. Carbon composites are light relative to metals.
Steel weighs 7.8 grams
/cm
3
(grams per cubic centimeter), titanium 4.5 grams
/
cm
3
, aluminum 2.75 grams
/cm
3
. Contrast these numbers with carbon ber
composite at 1.45 grams
/cm
3
.
The composites with the best strength-to-weight ratios are made of carbon
ber in a matrix of epoxy plastic. The epoxy matrix bonds the carbon bers
together, transfers load to other bers, and provides a smooth outer surface. The
carbon bers are the “skeleton” that carries the load.
Why Are Composites Used?
Unlike metals, which have uniform properties in all directions (engineers call
this isotropic), carbon bers can be placed in specic orientations to optimize
the structure for particular loads. The choice of where to place the carbon bers
gives engineers a powerful tool to create strong, light bicycles. Engineers may
also orient bers to suit other goals such as comfort and vibration damping.
Carbon ber composites are very corrosion resistant, much more so than
most metals. Think about carbon ber or berglass boats.
Carbon ber materials have a very high strength-to-weight ratio.
What Are The Limits Of Composites?
Well designed “composite” or carbon ber bicycles and components have
long fatigue lives, usually better than their metal equivalents.
While fatigue life is an advantage of carbon ber, you must still regularly
inspect your carbon ber frame, fork or components.
Carbon ber composites are not ductile. Once a carbon structure is
overloaded, it will not bend; it will break. At and near the break, there will be
rough, sharp edges and maybe delamination of carbon ber or carbon ber fabric
layers. There will be no bending, buckling or stretching.
If You Hit Something Or Have A Crash, What Can You Expect From Your
Carbon Fiber Bike?
Let’s say you hit a curb, ditch, rock, car, other cyclist or other object. At
any speed above a fast walk, your body will continue to move forward, the
momentum carrying you over the front of the bike. You cannot and will not
stay on the bike and what happens to the frame, fork and other components is
irrelevant to what happens to your body.
What should you expect from your carbon frame? It depends on many
complex factors. But we can tell you that if the impact is hard enough, the fork
or frame may be completely broken. Note the signicant difference in behavior
between carbon and metal. Refer to Page 51, Section 2.A: “Understanding
metals” in this Appendix. Even if the carbon frame was twice as strong as a
metal frame, once the carbon frame is overloaded it will not bend, it will break
completely.
WARNING: Be aware that high temperature in a conned environment
can affect the integrity of composite materials, resulting in component
failure which could cause you to lose control and fall.

55
Inspection of Composite Frame, Fork and Components
Cracks:
Inspect for cracks, broken or splintered areas. Any crack is serious. Do not
ride any bicycle or component that has a crack of any size.
Delamination:
Delamination is serious damage. Composites are made from layers of fabric.
Delamination means that the layers of fabric are no longer bonded together. Do
not ride any bicycle or component that has any delamination. These are some
delamination clues:
• A cloudy or white area. This kind of area looks different from the ordinary
undamaged areas. Undamaged areas will look glassy, shiny, or “deep,” as
if one was looking into a clear liquid. Delaminated areas will look opaque
and cloudy.
• Bulging or deformed shape. If delamination occurs, the surface shape
may change. The surface may have a bump, a bulge, soft spot, or not be
smooth and fair.
• A difference in sound when tapping the surface. If you gently tap the
surface of an undamaged composite you will hear a consistent sound,
usually a hard, sharp sound. If you then tap a delaminated area, you will
hear a different sound, usually duller, less sharp.
Unusual Noises:
Either a crack or delamination can cause creaking noises while riding. Think
about such a noise as a serious warning signal. A well-maintained bicycle will be
very quiet and free of creaks and squeaks. Investigate and nd the source of any
noise. It may not be a crack or delamination, but whatever is causing the noise
must be xed or replaced before riding.
WARNING: Do not ride a bicycle or component with any delamination or
crack. Riding a delaminated or cracked frame, fork or other component
could lead to complete failure, with risk of serious injury or death.
C. Understanding components
It is often necessary to remove and disassemble components in order to
properly and carefully inspect them. This is a job for a professional bicycle
mechanic with the special tools, skills and experience to inspect and service
today’s high-tech high-performance bicycles and their components.
Aftermarket “Super Light” Components
Think carefully about your rider prole as outlined above. The more you t
the “shorten product life” prole, the more you must question the use of super
light components. The more you t the “lengthen product life” prole, the more
likely it is that lighter components may be suitable for you.
Take these choices seriously and understand that you are responsible for
the changes.
Original Equipment Components
Bicycle and component manufacturers test the fatigue life of the components
that are original equipment on your bike. This means that they have met test
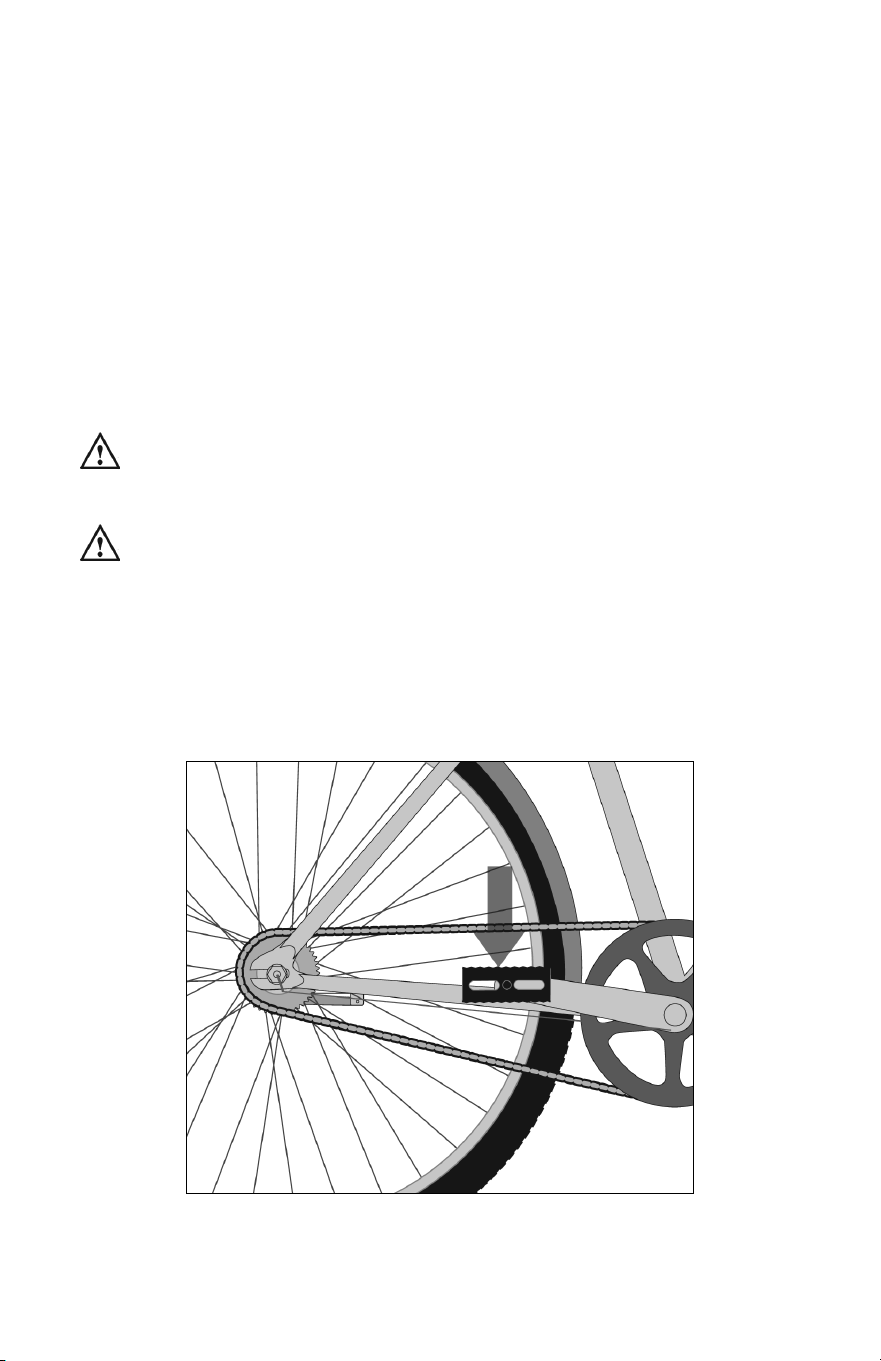
56
criteria and have reasonable fatigue life. It does not mean that the original
components will last forever. They won’t.
Appendix D: Coaster Brake
1. How the coaster brake works
The coaster brake is a sealed mechanism that is a part of the bicycle’s rear
wheel hub. The brake is activated by reversing the rotation of the pedal cranks
(see g. 25). Start with the pedal cranks in a nearly horizontal position, with the
front pedal in about the 4 o’clock position, and apply downward foot pressure
on the rearward pedal. About 1/8
th
rotation will activate the brake. The more
downward pressure you apply, the more braking force, up to the point where the
rear wheel stops rotating and begins to skid.
WARNING: Before riding, make sure that the brake is working
properly. If it is not working properly, have the bicycle checked by a
qualied bicycle mechanic before you ride it.
WARNING: If your bike has only a coaster brake, ride conservatively. A
single rear brake does not have the stopping power of front-and-rear
brake systems.
2. Adjusting your coaster brake
Coaster brake service and adjustment requires special tools and special
knowledge. Do not attempt to disassemble or service your coaster brake. Take
the bicycle to a qualied bicycle mechanic for coaster brake service.
g. 25

Limitations apply. For complete details visit schwinnbikes.com
LIMITED
Lifetime Warranty
Bicycle Frame
A01257-S 050426
WARNING: This product can expose you
to chemicals including lead and lead compounds,
which is known to the State of California to cause
cancer, birth defects and other reproductive harm.
For more information go to .P65Warnings.ca.gov
© 2026 PACIFIC CYCLE, INC. SCHWINN
®
is a registered trademark of Pacific Cycle, Inc.
schwinnbikes.com
1-800-626-2811
The Brand
You Tr u st