
Part Number: 9291544-GEN2 12/24
Installation, Operation and Maintenance Manual
Original Document
,
Caution
Read this instruction before operating this equipment.
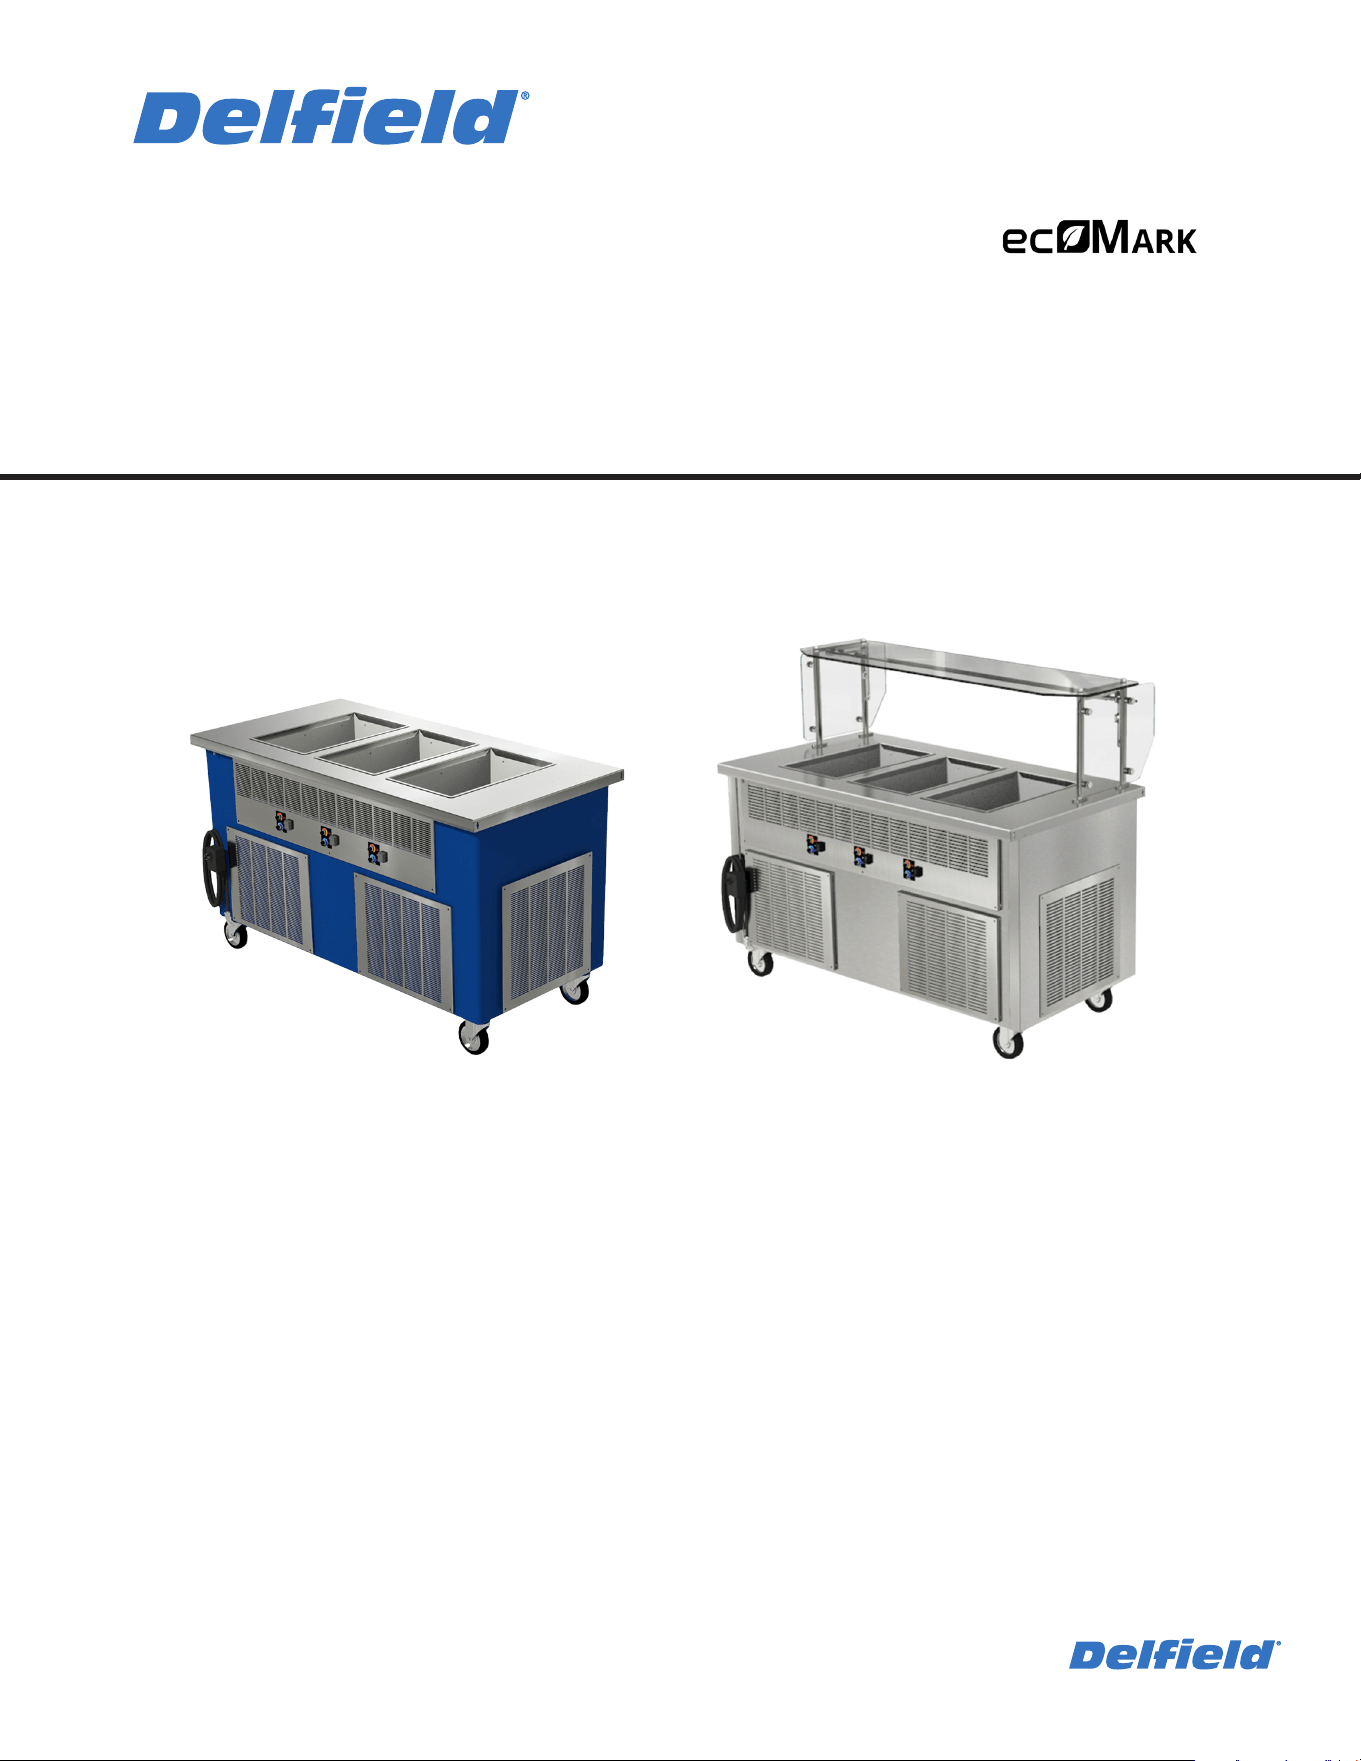
FlexiWell™
Dry Serving Lines
Shelleybasic
TM
by Deleld
Shelleyglas
TM
by Deleld
Shelleysteel
TM
by Deleld
Shelleyglas
TM
by Deleld
Shelleysteel
TM
by Deleld
Shelleyspeed
TM
by Deleld
Shelleybasic
TM
by Deleld
Shelleyglas
TM
by Deleld
Shelleysteel
TM
by Deleld
Shelleyglas
TM
by Deleld
Shelleysteel
TM
by Deleld
Shelleyspeed
TM
by Deleld

2 Part Number: 9291544-GEN2 03/24
Section 1
General Information
Model Numbers .................................................................................................................. 5
Serial Number Location .....................................................................................................5
Warranty Information ........................................................................................................5
Regulatory Certifications ..................................................................................................5
Section 2
Specifications
General Specifications .......................................................................................................6
Weight ................................................................................................................................. 7
Dimensions ......................................................................................................................... 8
Clearance Requirements ..................................................................................................13
Electrical Service ..............................................................................................................13
Voltage .................................................................................................................................................... 13
Ground Fault Circuit Interrupter .................................................................................................... 13
Section 3
Installation
Location ............................................................................................................................16
Leveling .............................................................................................................................17
Stabilizing .........................................................................................................................17
Leg & Caster Installation ..................................................................................................17
Self-Contained Flexi Drop-In Cabinet Dimensions ........................................................ 18
Section 4
Operation
Best Practices .................................................................................................................... 20
Heated and Refrigerated Combo Counter Operation ...................................................21
Operation ............................................................................................................................................... 21
On/Off Switch - Unit Power ............................................................................................................. 21
Temperature Controls ........................................................................................................................ 21
Section 5
Maintenance
Cleaning and Sanitizing Procedures ...............................................................................22
General .................................................................................................................................................... 22
Interior Cleaning .................................................................................................................................. 23
Exterior Cleaning ................................................................................................................................. 23
Counter Protector, Glass & Hardware Cleaning ........................................................................23
Defrosting .............................................................................................................................................. 23
Cleaning the Condenser Coil ..........................................................................................................23
Section 6
Diagrams & Parts
Wiring ................................................................................................................................ 24
Parts ..................................................................................................................................27
Table of Contents

Table of Contents (continued)
Part Number: 9291544-GEN2 03/24 3
THIS PAGE INTENTIONALLY LEFT BLANK
Safety Notices
n
Warning
Read this manual thoroughly before operating, installing
or performing maintenance on the equipment. Failure
to follow instructions in this manual can cause property
damage, injury or death.
DANGER
Failure to disconnect the power at the main power
supply disconnect could result in serious injury or death.
The power switch DOES NOT disconnect all incoming
power.
DANGER
Do not install or operate equipment that has been
misused, abused, neglected, damaged, or altered/
modified from that of original manufactured
specifications.
DANGER
All utility connections and fixtures must be maintained
in accordance with local and national codes.
DANGER
Serious injury or death can occur from inhaling high
concentrations of refrigerant vapors. These vapors also
reduce oxygen levels in confined areas. Contact with
liquid can cause frostbite. All containers, equipment
and hoses are under high pressure. Do not puncture or
damage these components.
n
Warning
Use caution when handling metal surface edges of all
equipment.
n
Warning
This appliance is not intended for use by persons
(including children) with reduced physical, sensory
or mental capabilities, or lack of experience and
knowledge, unless they have been given supervision
concerning use of the appliance by a person responsible
for their safety. Do not allow children to play with this
appliance.
n
Warning
Do not store or use gasoline or other flammable vapors
or liquids in the vicinity of this or any other appliance.
Never use flammable oil soaked cloths or combustible
cleaning solutions, for cleaning.
n
Warning
This product contains chemicals known to the State
of California to cause cancer and/or birth defects or
other reproductive harm. Operation, installation, and
servicing of this product could expose you to airborne
particles of glasswool or ceramic fibers, crystalline
silica, and/or carbon monoxide. Inhalation of airborne
particles of glasswool or ceramic fibers is known to the
State of California to cause cancer. Inhalation of carbon
monoxide is known to the State of California to cause
birth defects or other reproductive harm.
n
Warning
Authorized Service Representatives are obligated to
follow industry standard safety procedures, including,
but not limited to, local/national regulations for
disconnection / lock out / tag out procedures for all
utilities including electric, gas, water and steam.
n
Warning
DO NOT touch refrigeration lines inside units; some may
exceed temperatures of 200°F (93.3°C).
n
Warning
Do not damage the refrigeration circuit when installing,
maintaining or servicing the unit.
,
Caution
Maintenance and servicing work, other than cleaning as
described in this manual, must be done by an authorized
service personnel.
Notice
Proper installation, care and maintenance are
essential for maximum performance and trouble-free
operation of your equipment. Visit our website www.
mtwkitchencare.com for manual updates, translations,
or contact information for service agents in your area.
Notice
This product utilizes Ecomate blowing agent methyl
formate
Notice
These units are intented to hold previously cooked
product at a food safe temperature during time of
serving. This product is NOT intented for cooking or
increasing the temperature of held product. Improper
use of unit may result in shorter unit lifespan.
Part Number: 9291544-GEN2 03/24 5
Model Numbers
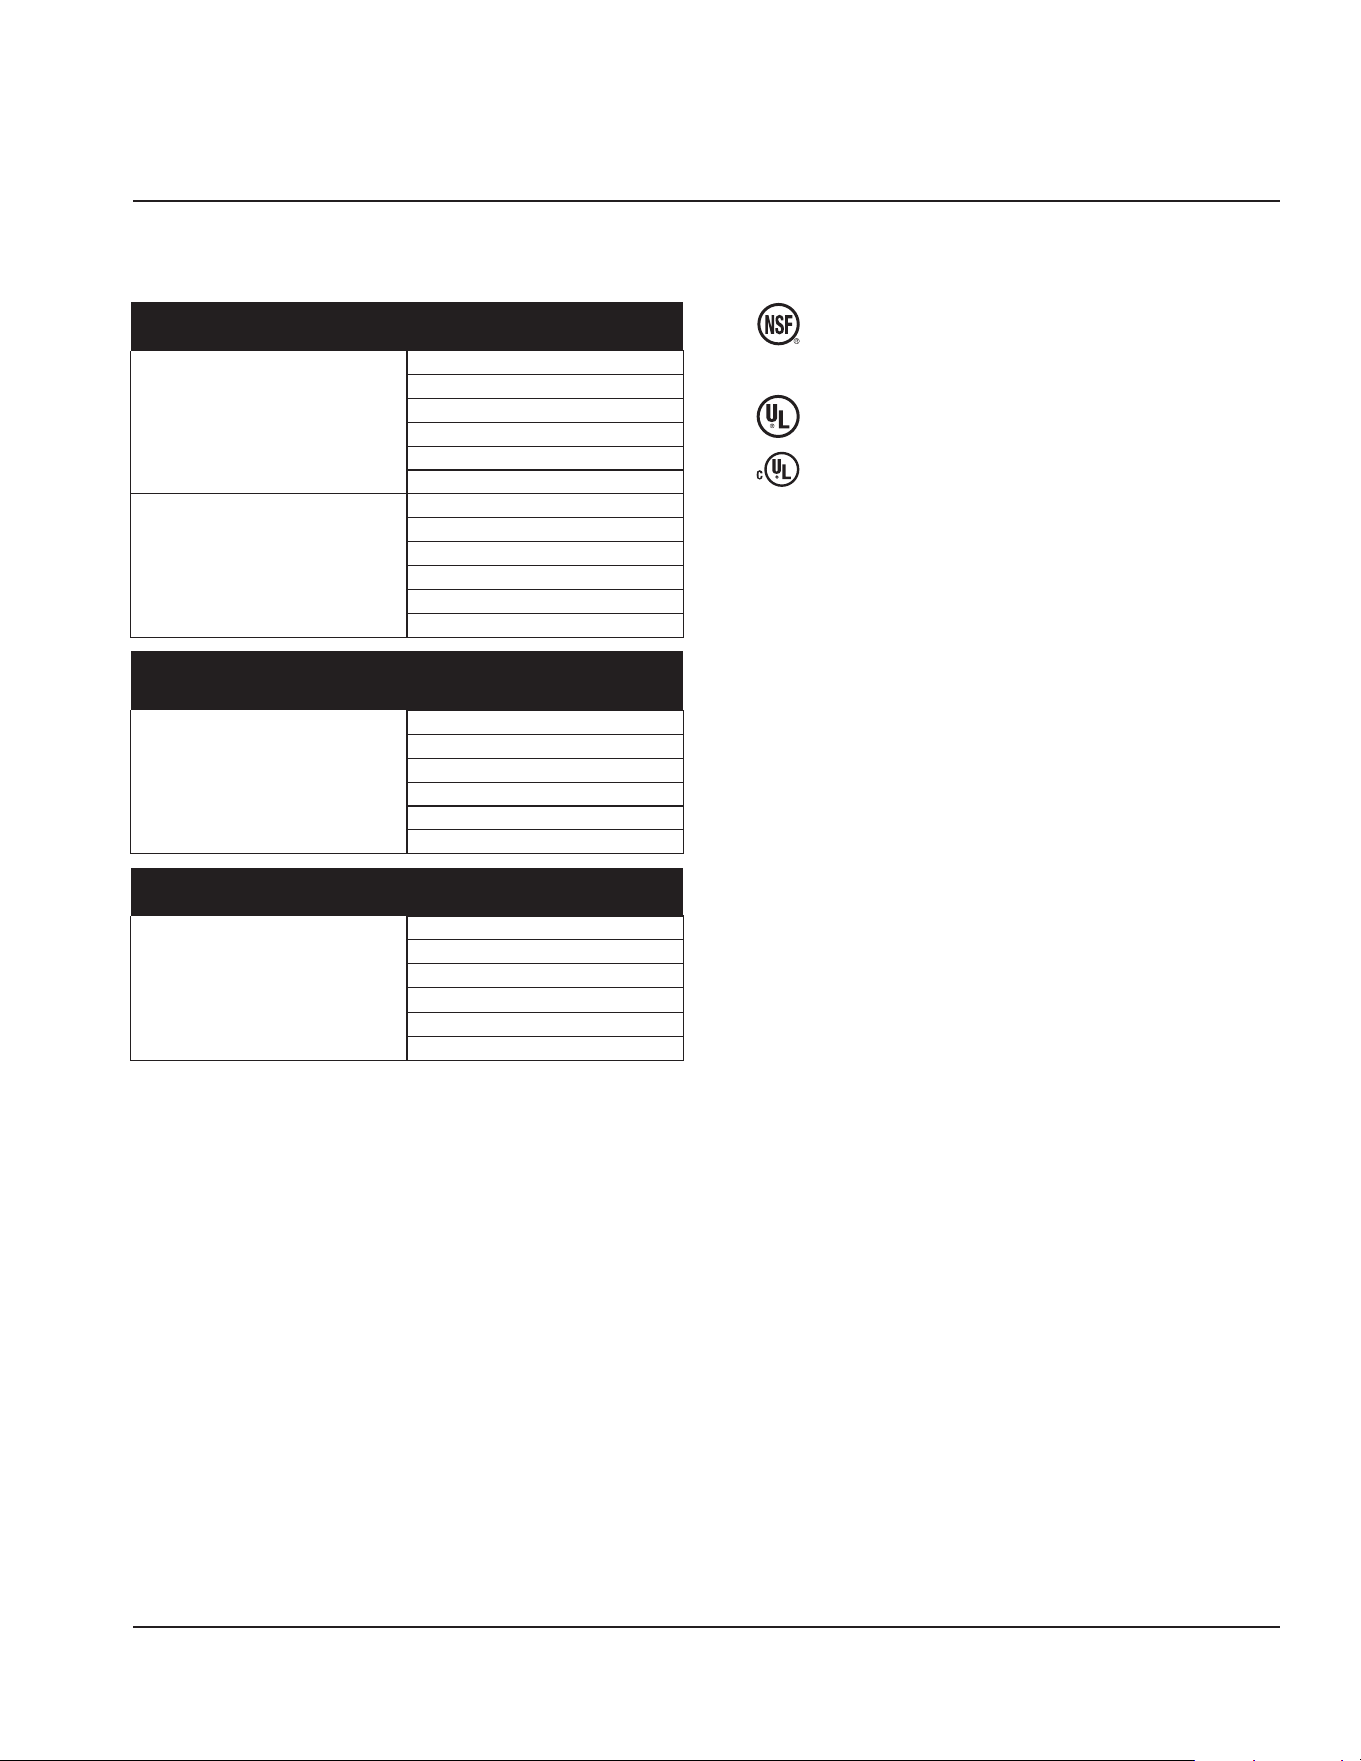
This manual covers the following standard counters.
FlexiWell™
Mobile Hot and Cold Combination Serving Counters
Shelleyglas®
KFW-1-NU
KFW-2-NU
KFW-3-NU
KFW-4-NU
KFW-5-NU
KFW-6-NU
Shelleysteel®
SFW-1-NU
SFW-2-NU
SFW-3-NU
SFW-4-NU
SFW-5-NU
SFW-6-NU
FlexiWell™
Hot and Cold Combination Serving Counters
EcoMark®
1042G
1042H
1042I
1042J
1042K
1042L
FlexiWell™
Drop-In Hot and Cold Combination Serving Counters
Drop-In
N8618-FWP
N8633-FWP
N8648-FWP
N8663-FWP
N8678-FWP
N8693-FWP
Serial Number Location
Always have the serial number of your unit available
when calling for parts or service. Serial numbers are
printed on serial tags.
• Serial tags are located near the on/off switch, on the left
inside the storage area or at the top of the pylon on the
back of the unit.
Warranty Information
• Register your product for warranty,
• Verify warranty information,
• View and download a copy of your warranty,
at www.delfield.com/warranty
Regulatory Certifications
All models are certified by:
• National Sanitation Foundation (NSF)
All models with electrical are certified by:
• Underwriters Laboratories (UL)
• Underwriters Laboratories of Canada (cUL)
Section 1
General Information
Section 2
Specifications
6 Part Number: 9291544-GEN2 12/24
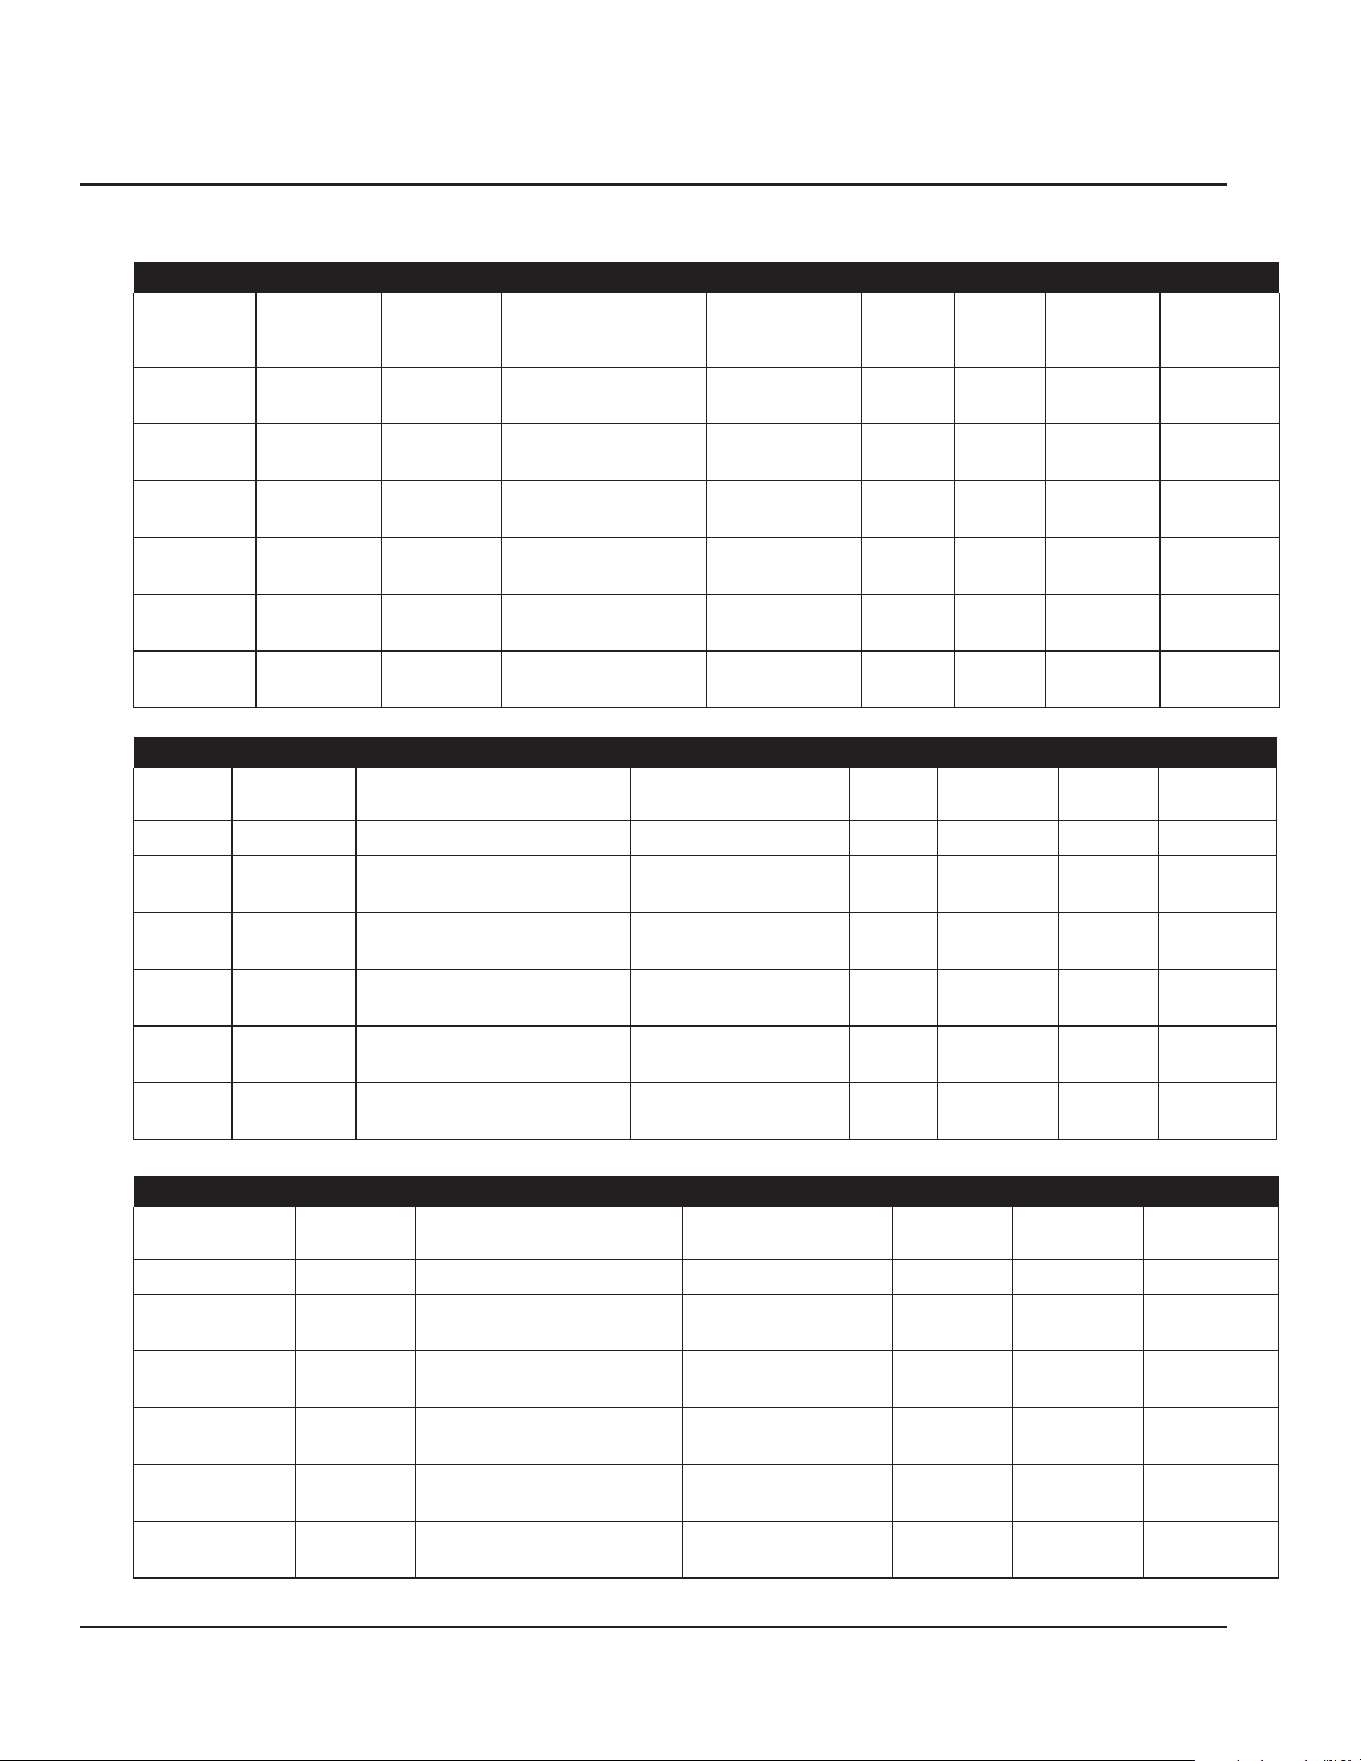
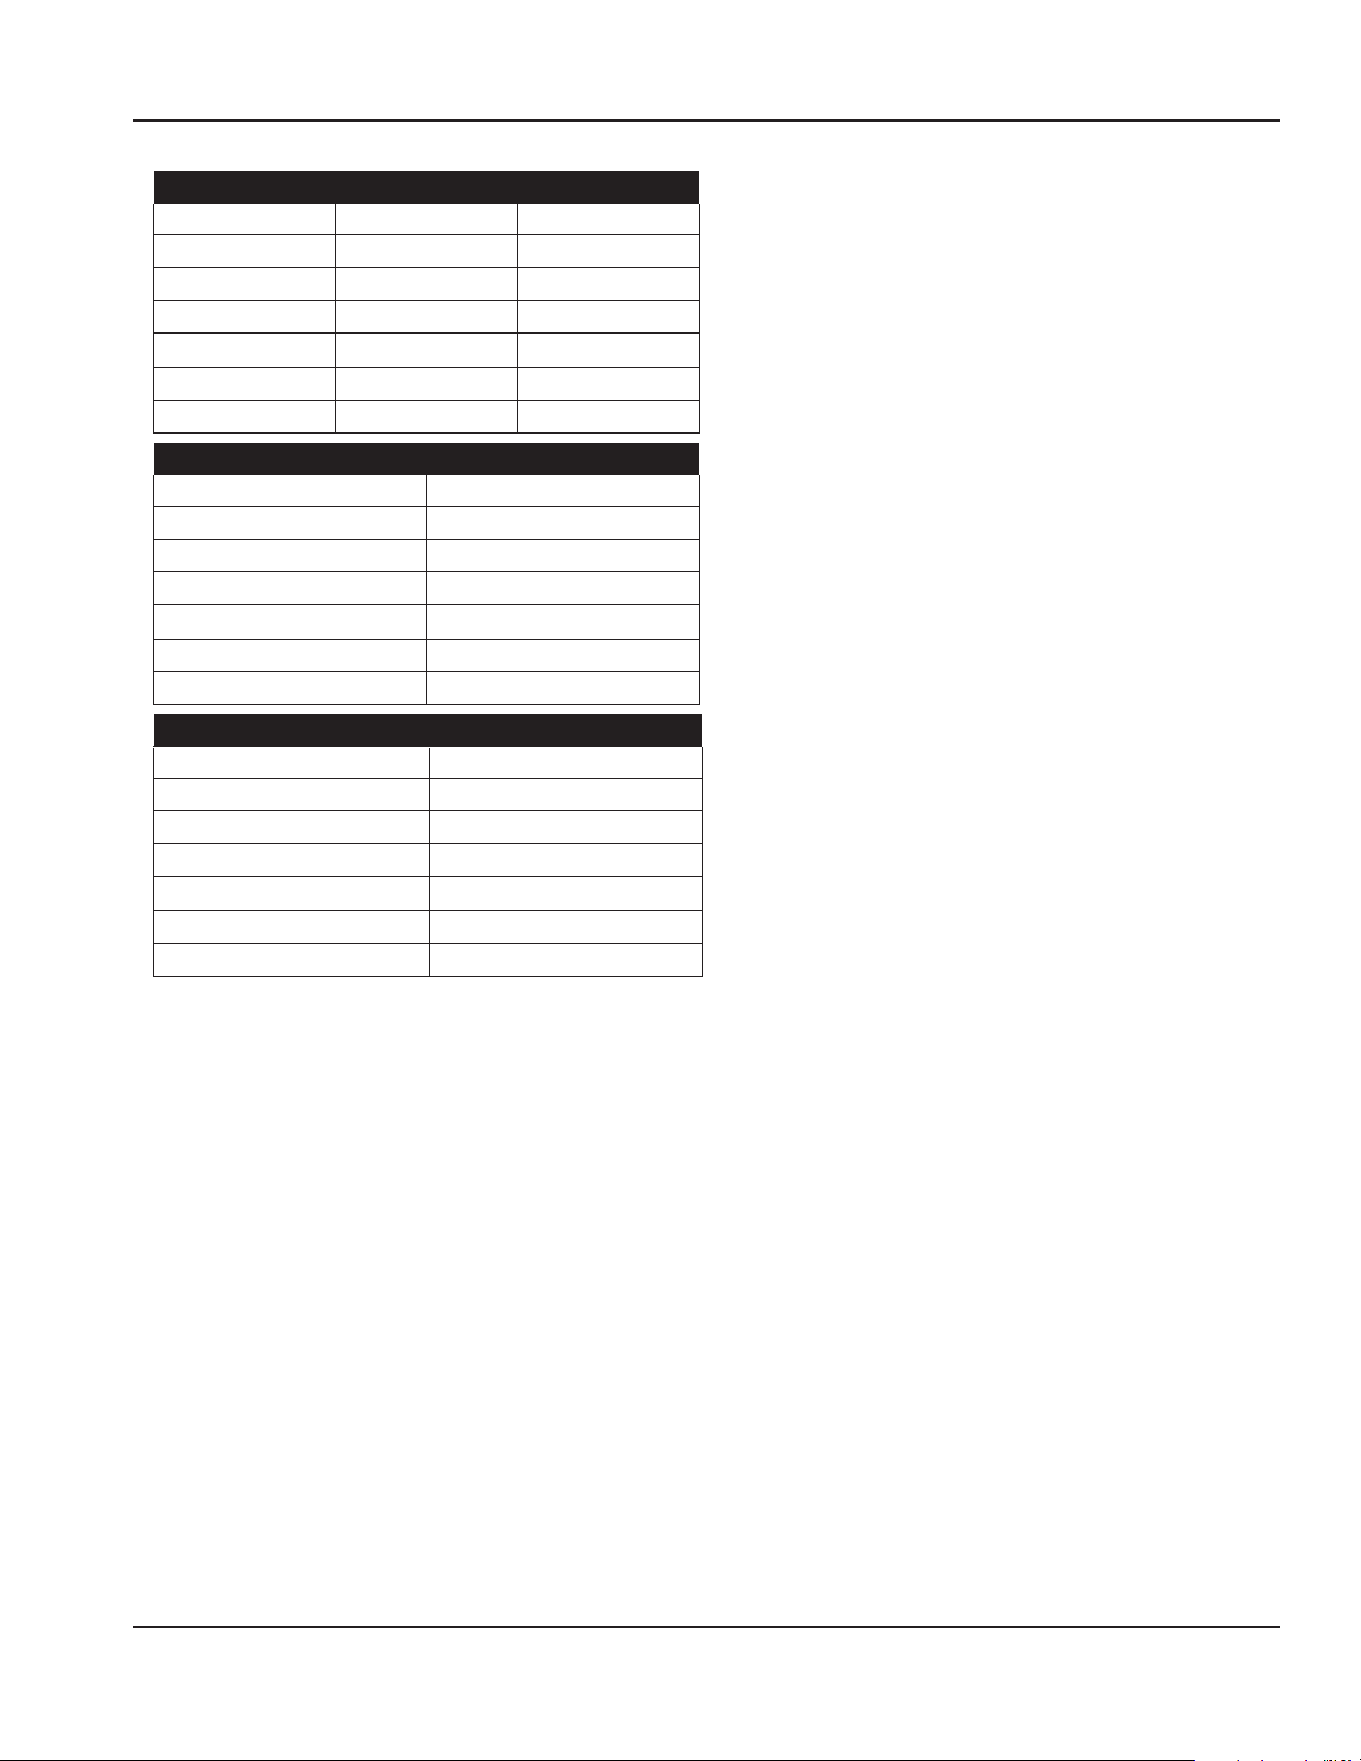
GENERAL SPECIFICATIONS CHART
FlexiWell™ Mobile Hot and Cold Combo Serving Counters
Shelleyglas® Shelleysteel® 12” x20” Pan
Capacity
Hot Electrical Cold Electrical Nema
Plug
System
Capacity
Heat of
Rejection
(BTU)
R290 Charge
Amount
KFW-1-NU SFW-1-NU 1 500 W, 120/208Y-240V,
2.0 A
120 V, 1/5HP,
2.3A
14-20P 870 331 75g
KFW-2-NU SFW-2-NU 2 (2) 500 W,
120/208Y-240V, 4.0 A
(2) 120 V, 1/5HP,
2.3A
14-20P 1740 662 (2) 75g
KFW-3-NU SFW-3-NU 3 (3) 500 W,
120/208Y-240V, 6.0 A
(3) 120 V, 1/5HP,
4.6A
14-20P 2610 993 (3) 75g
KFW-4-NU SFW-4-NU 4 (4) 500 W,
120/208Y-240V, 8.0 A
(4) 120 V, 1/5HP,
4.6A
14-20P 3480 1324 (4) 75g
KFW-5-NU SFW-5-NU 5 (5) 500 W,
120/208Y-240V, 10.0 A
(5) 120 V, 1/5HP,
6.9A
14-20P 4350 1655 (5) 75g
KFW-6-NU SFW-6-NU 6 (6) 500 W,
120/208Y-240V, 12.0 A
(6) 120 V, 1/5HP,
6.9A
14-20P 5220 1986 (6) 75g
FlexiWell™ Hot and Cold Combo Serving Counters
EcoMark® 12” x20” Pan
Capacity
Hot Electrical Cold Electrical Nema
Plug
System
Capacity
Heat of
Rejection
R290 Charge
Amount
1042G 1 500 W, 120/208Y-240V, 2.0 A 120 V, 1/5HP, 2.3A 14-20P 870 331 75g
1042H 2 (2) 500 W, 120/208Y-240V, 4.0
A
(2) 120 V, 1/5HP, 2.3A 14-20P 1740 662 (2) 75g
1042I 3 (3) 500 W, 120/208Y-240V, 6.0
A
(3) 120 V, 1/5HP, 4.6A 14-30P 2610 993 (3) 75g
1042J 4 (4) 500 W, 120/208Y-240V, 8.0
A
(4) 120 V, 1/5HP, 4.6A 14-50P 3480 1324 (4) 75g
1042K 5 (5) 500 W, 120/208Y-240V,
10.0 A
(5) 120 V, 1/5HP, 6.9A 14-50P 4350 1655 (5) 75g
1042L 6 (6) 500 W, 120/208Y-240V,
12.0 A
(6) 120 V, 1/5HP, 6.9A 14-50P 5220 1986 (6) 75g
FlexiWell™ Drop-In Hot and Cold Combo Serving Counters
Drop-In 12” x20” Pan
Capacity
Hot Electrical Cold Electrical System
Capacity
Heat of Rejec-
tion
R290 Charge
Amount
N8618-FWP 1 500 W, 120/208Y-240V, 2.0 A 120 V, 1/5HP, 2.3A 870 331 75g
N8633-FWP 2 (2) 500 W, 120/208Y-240V,
4.0 A
(2) 120 V, 1/5HP, 2.3A 1740 662 (2) 75g
N8648-FWP 3 (3) 500 W, 120/208Y-240V,
6.0 A
(3) 120 V, 1/5HP, 4.6A 2610 993 (3) 75g
N8663-FWP 4 (4) 500 W, 120/208Y-240V,
8.0 A
(4) 120 V, 1/5HP, 4.6A 3480 1324 (4) 75g
N8678-FWP 5 (5) 500 W, 120/208Y-240V,
10.0 A
(5) 120 V, 1/5HP, 6.9A 4350 1655 (5) 75g
N8693-FWP 6 (6) 500 W, 120/208Y-240V,
12.0 A
(6) 120 V, 1/5HP, 6.9A 5220 1986 (6) 75g
*SEE PAGE 24 FOR SINGLE POINT ELECTRICAL CONNECTION INFORMATION
Section 2 Specifications
Part Number: 9291544-GEN2 12/24 7
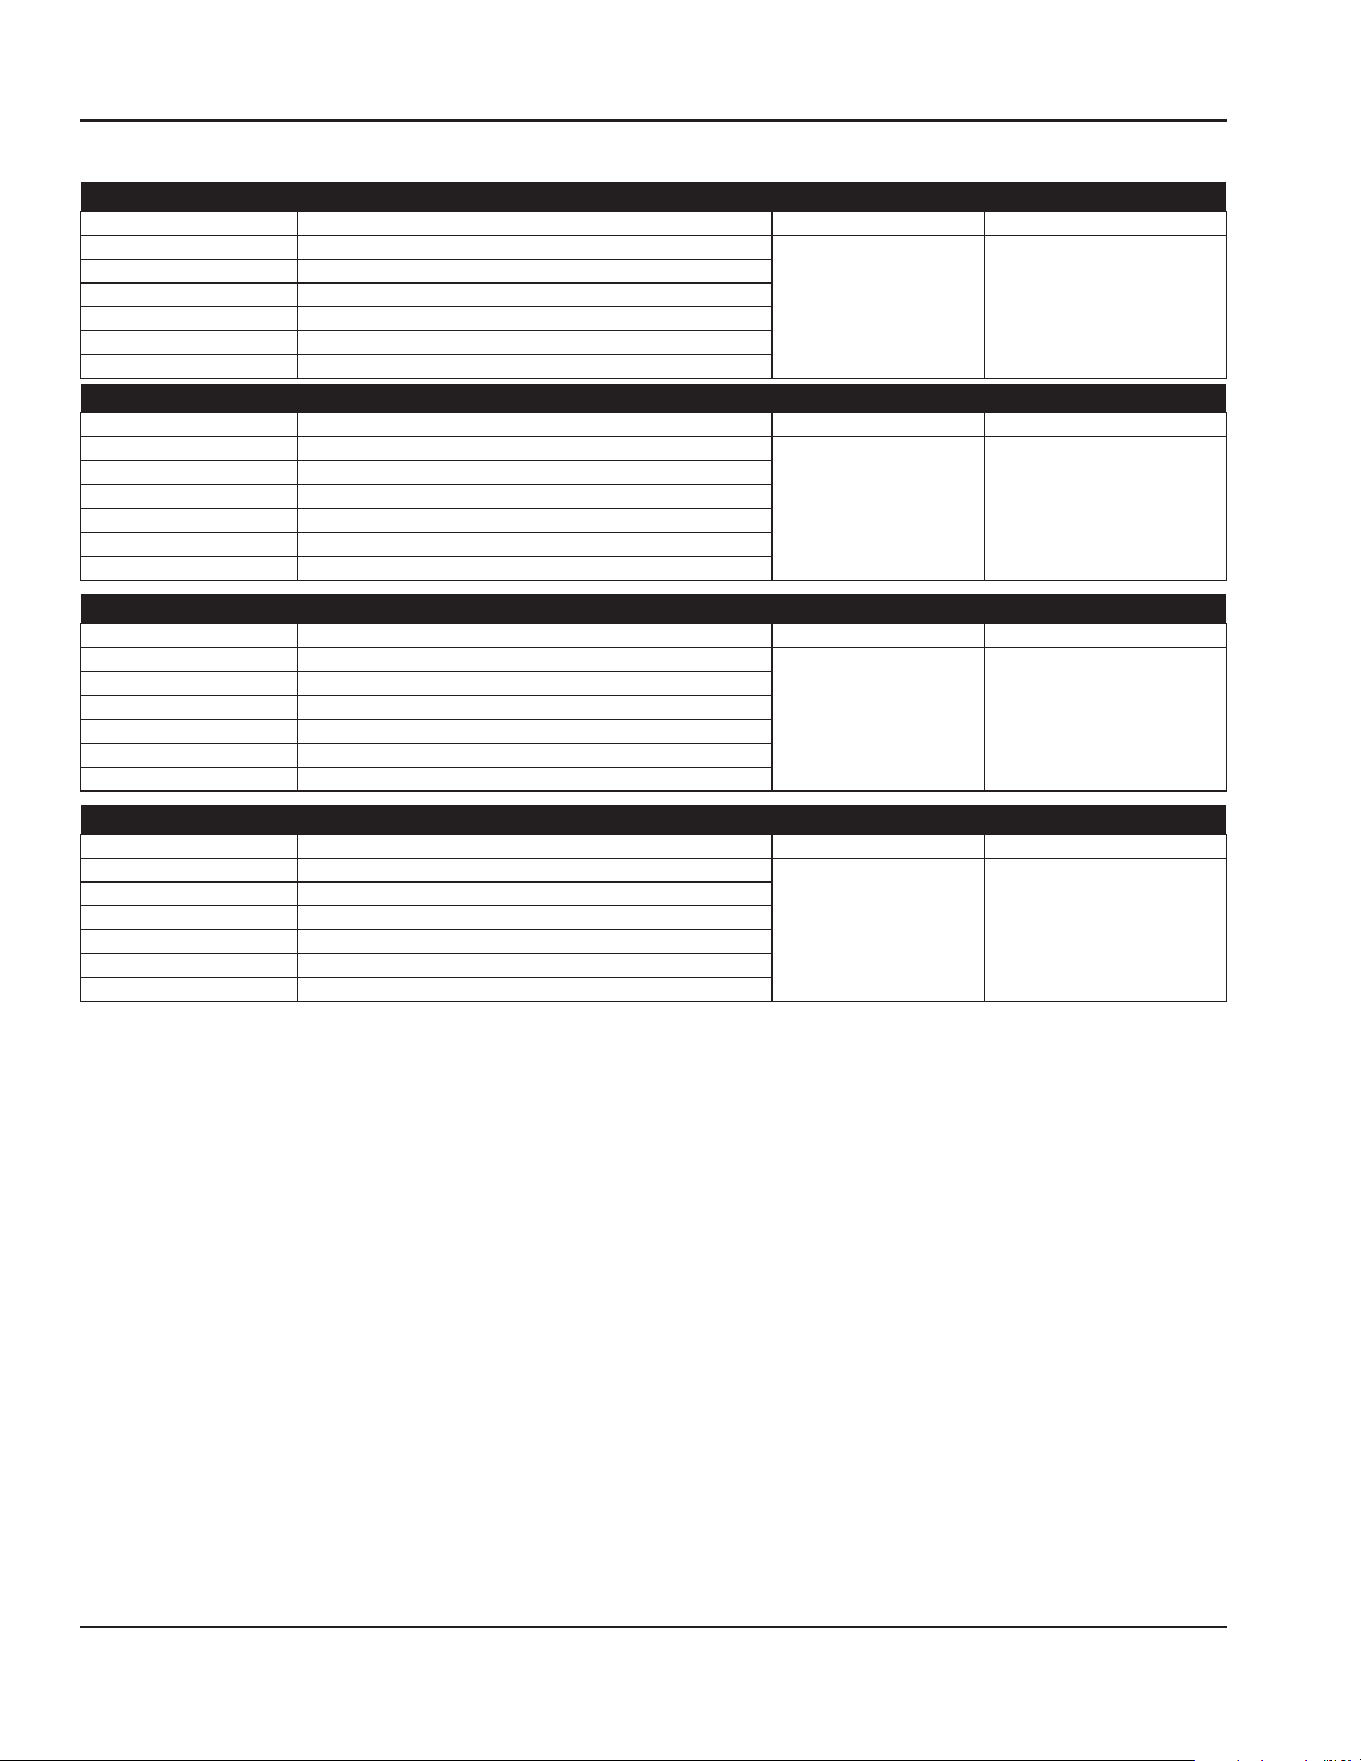
WEIGHT
FlexiWell™ Mobile Hot and Cold Combo Serving Counters
Shelleyglas® Shelleysteel® Weight
KFW-1-NU SFW-1-NU 300lbs (136kg)
KFW-2-NU SFW-2-NU 380lbs (172kg)
KFW-3-NU SFW-3-NU 460lbs (209kg)
KFW-4-NU SFW-4-NU 550lbs (249kg)
KFW-5-NU SFW-5-NU 660lbs (299kg)
KFW-6-NU SFW-6-NU 720lbs (327kg)
FlexiWell™ Hot and Cold Combo Serving Counters
EcoMark® Weight
1042G 300lbs (136kg)
1042H 380lbs (172kg)
1042I 460lbs (209kg)
1042J 550lbs (249kg)
1042K 660lbs (299kg)
1042L 720lbs (327kg)
FlexiWell™ Drop-In Hot and Cold Combo Serving Counters
Drop-In Weight
N8618-FWP 300lbs (136kg)
N8633-FWP 380lbs (172kg)
N8648-FWP 460lbs (209kg)
N8663-FWP 550lbs (249kg)
N8678-FWP 660lbs (299kg)
N8693-FWP 720lbs (327kg)
Specifications Section 2
8 Part Number: 9291544-GEN2 12/24
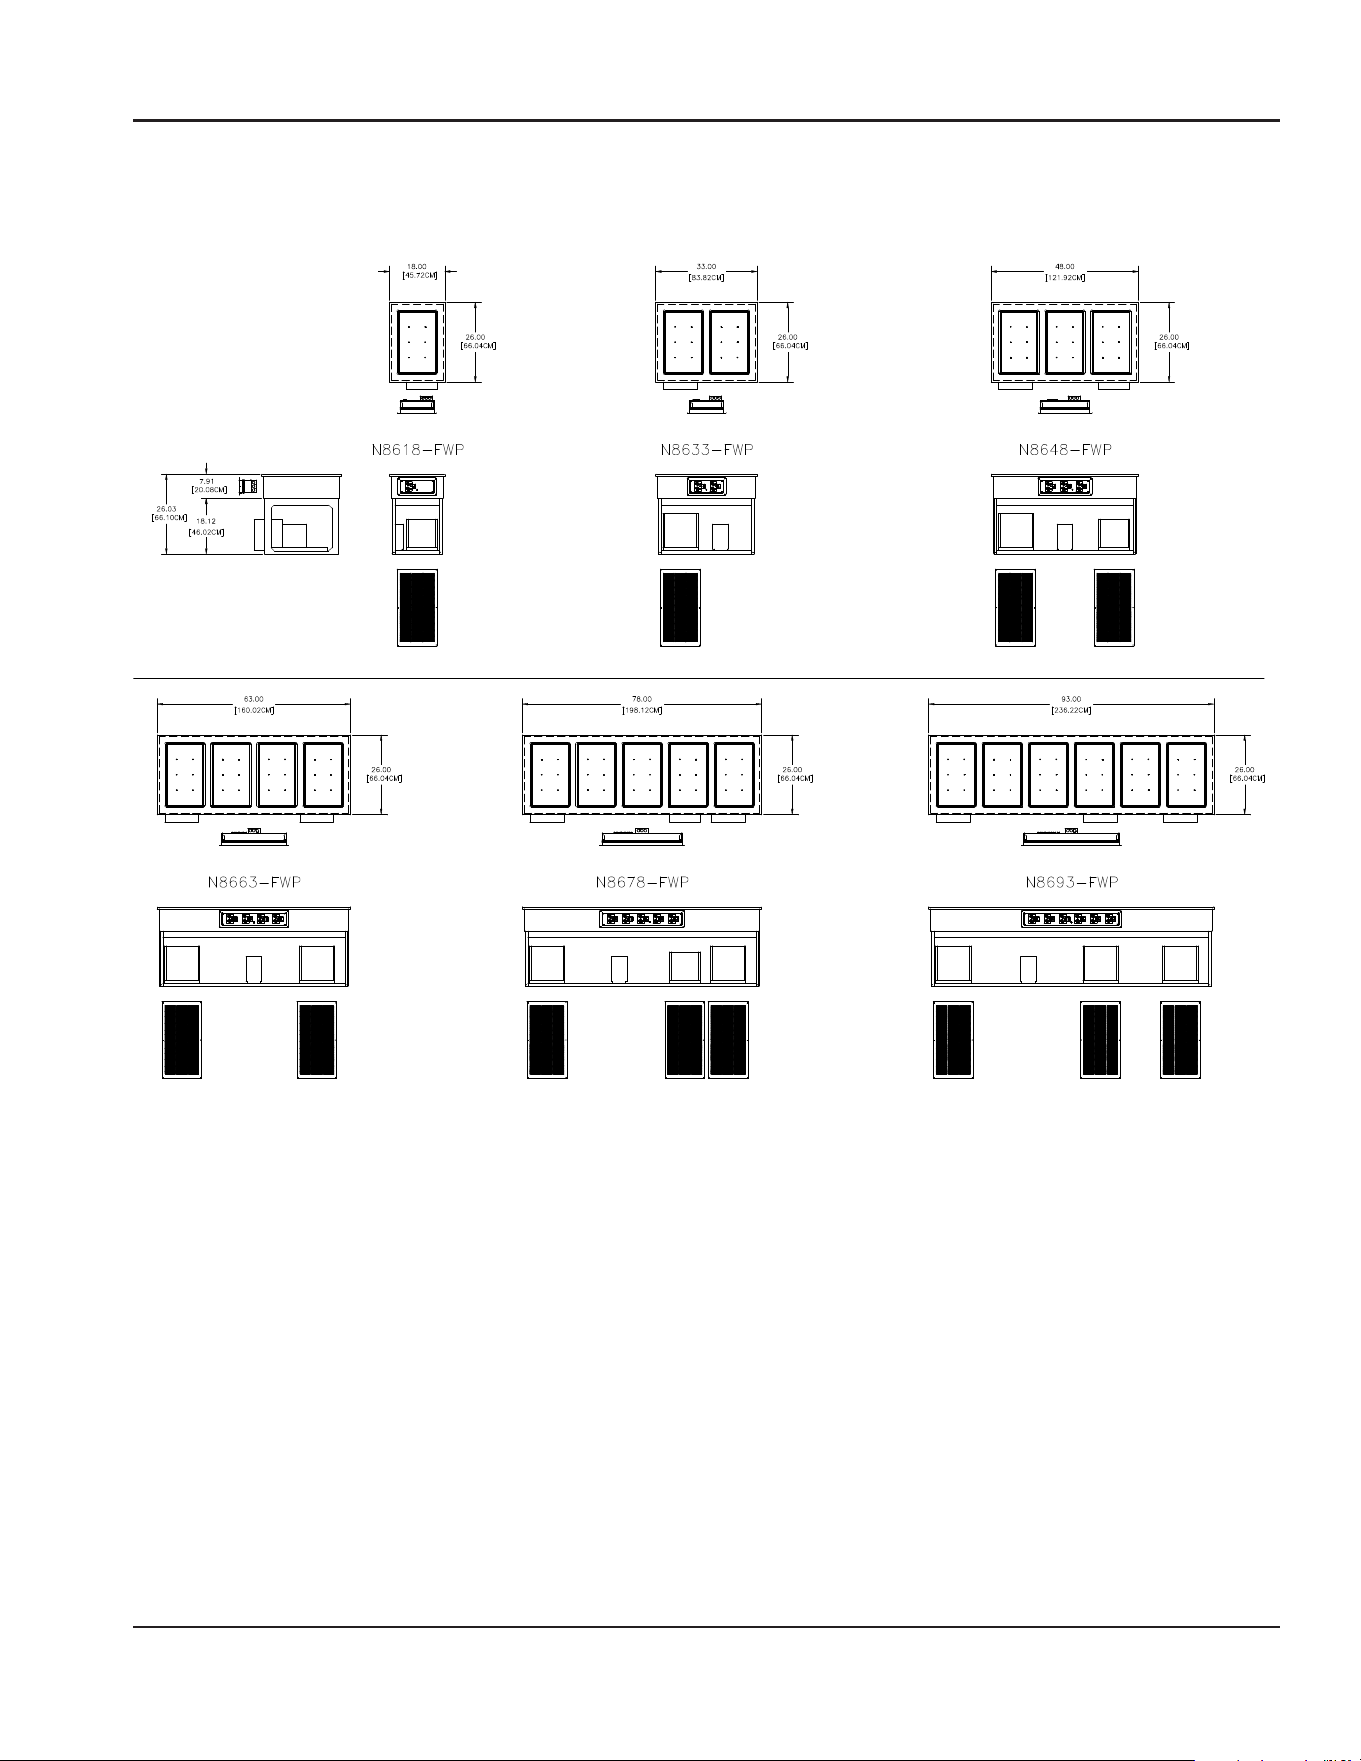
DIMENSIONS
FlexiWell™ Drop-In Hot and Cold Combo Serving Counters
Model Length
Depth Height
N8618-FWP 18” (46cm)
26”
(66cm)
26.03”
(67cm)
N8633-FWP 33” (84cm)
N8648-FWP 48” (122cm)
N8663-FWP 63” (160cm)
N8678-FWP 78” (198cm)
N8693-FWP 93” (237cm)
FlexiWell™ ShelleySteel Mobile Hot and Cold Combo Serving Counters
Model Length
Depth Height
SFW-1-NU 28” (71cm)
30”
(76cm)
36”
(91cm)
SFW-2-NU 42” (107cm)
SFW-3-NU 56” (143cm)
SFW-4-NU 72” (183cm)
SFW-5-NU 86” (219cm)
SFW-6-NU 102” (259cm)
FlexiWell™ ShelleyGlas Mobile Hot and Cold Combo Serving Counters
Model Length
Depth Height
KFW-1-NU 28” (71cm)
30”
(76cm)
36”
(91cm)
KFW-2-NU 50” (127cm)
KFW-3-NU 60” (152cm)
KFW-4-NU 74” (188cm)
KFW-5-NU 96” (244cm)
KFW-6-NU 112” (285cm)
FlexiWell™ EcoMark Hot and Cold Combo Serving Counters
Model Length
Depth Height
1042G 28” (71cm)
31.5 ”
(80cm)
40”
(91cm)
1042H 42” (107cm)
1042I 56” (143cm)
1042J 72” (183cm)
1042K 86” (219cm)
1042L 102” (259cm)
Section 2 Specifications
Part Number: 9291544-GEN2 12/24 9
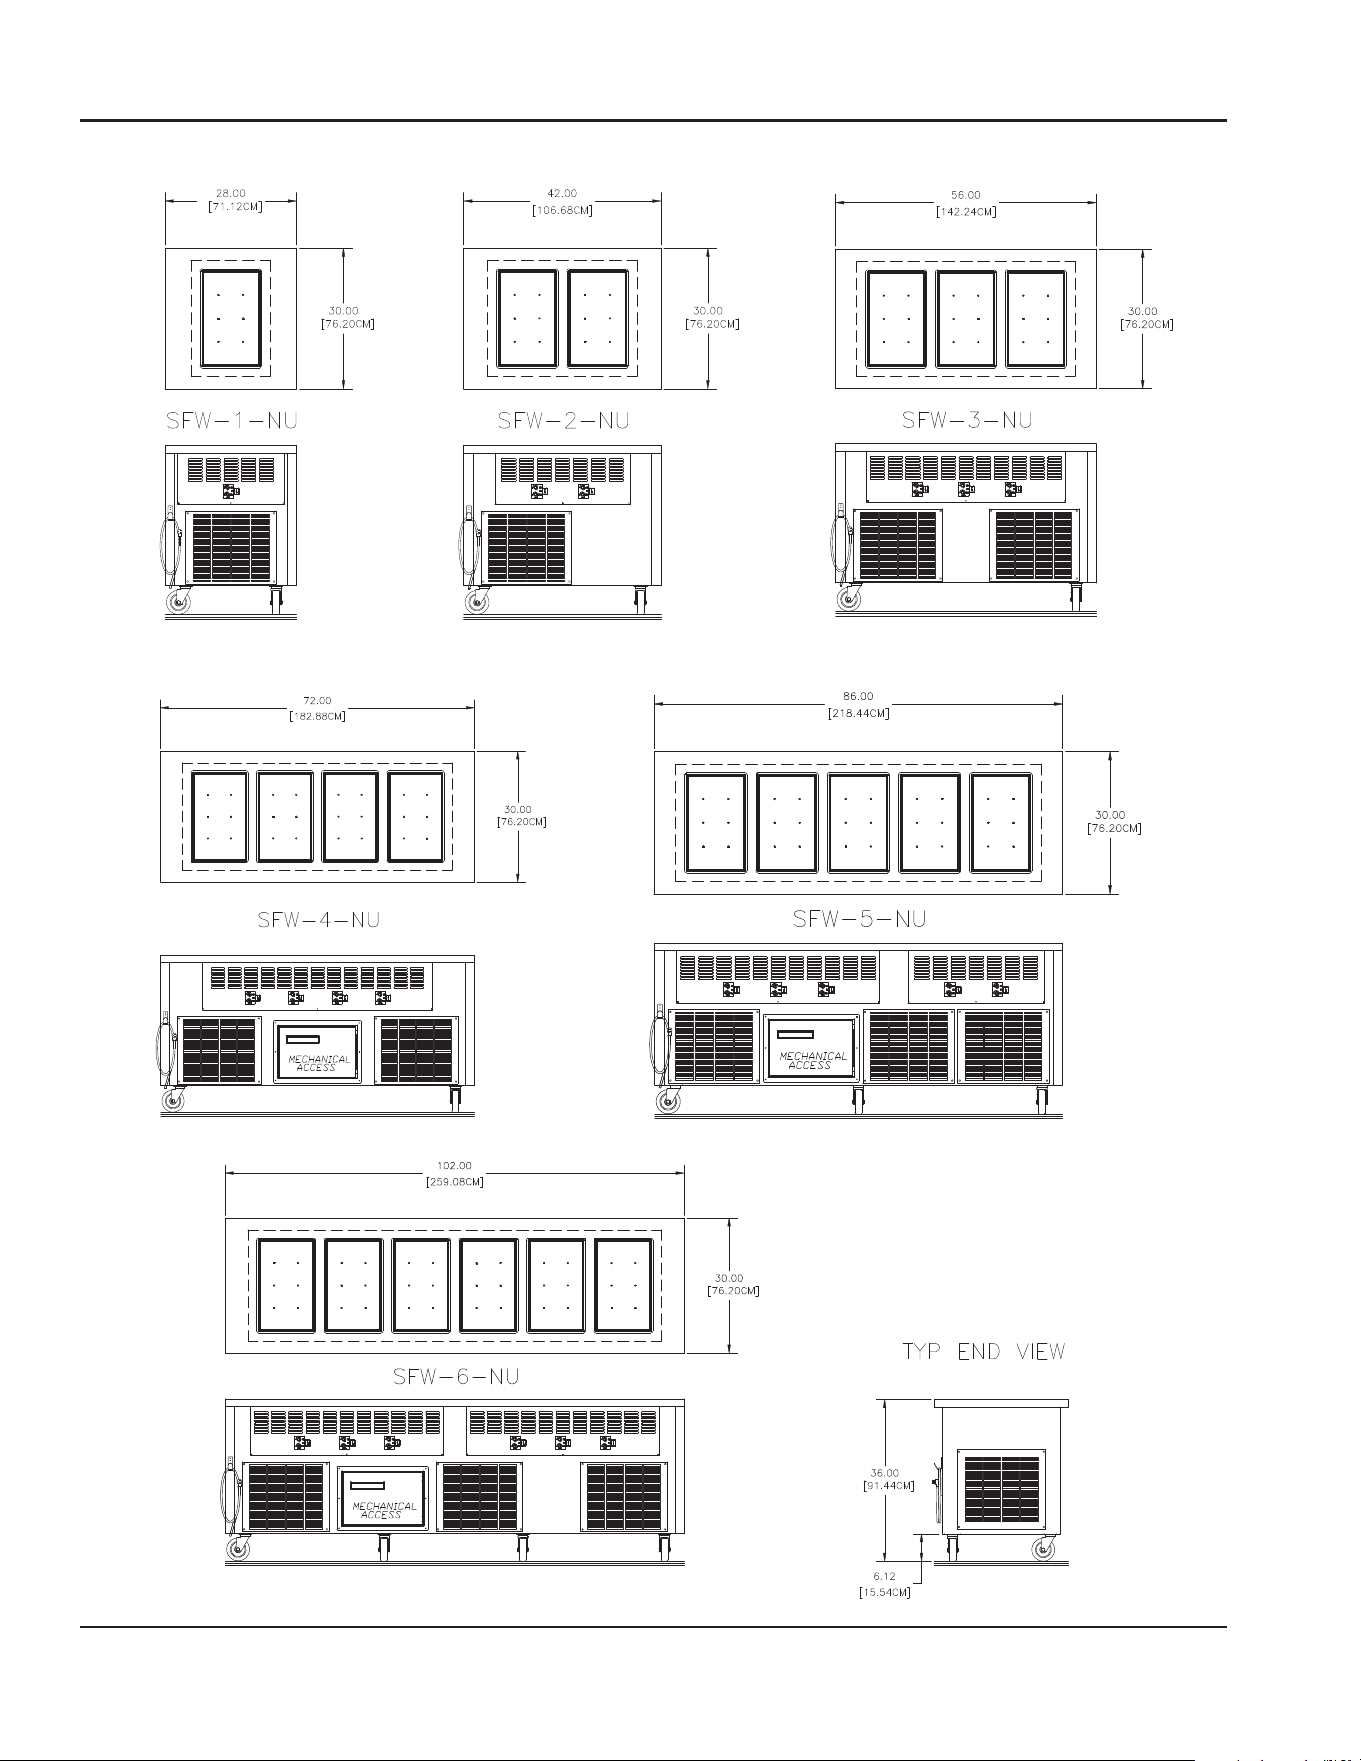
Dimension Images
FlexiWell™ N8600 Drop-In Series
Specifications Section 2
10 Part Number: 9291544-GEN2 12/24
FlexiWell™ SFW ShelleySteel® Series
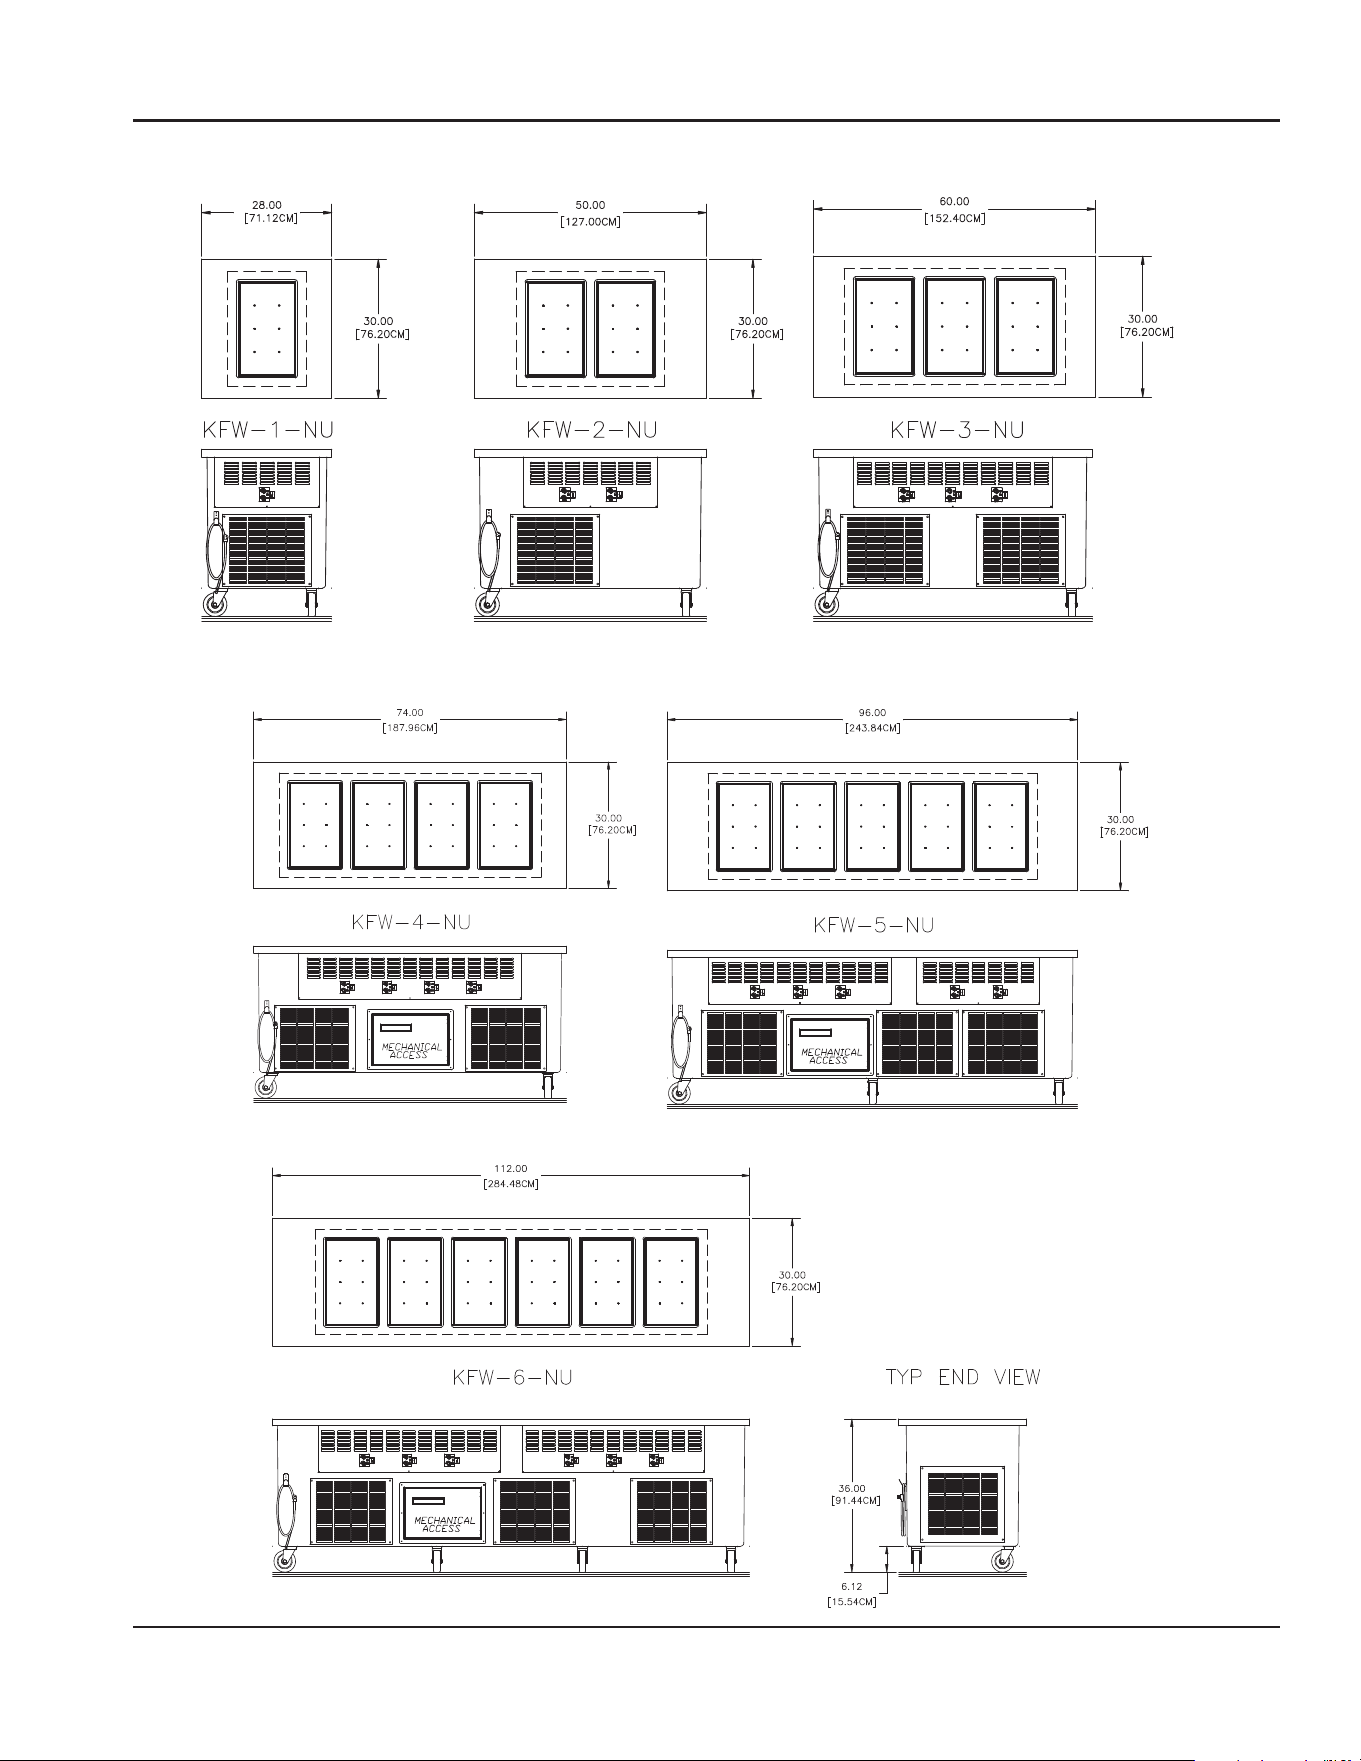
Section 2 Specifications
Part Number: 9291544-GEN2 12/24 11
FlexiWell™ KFW ShelleyGlas® Series
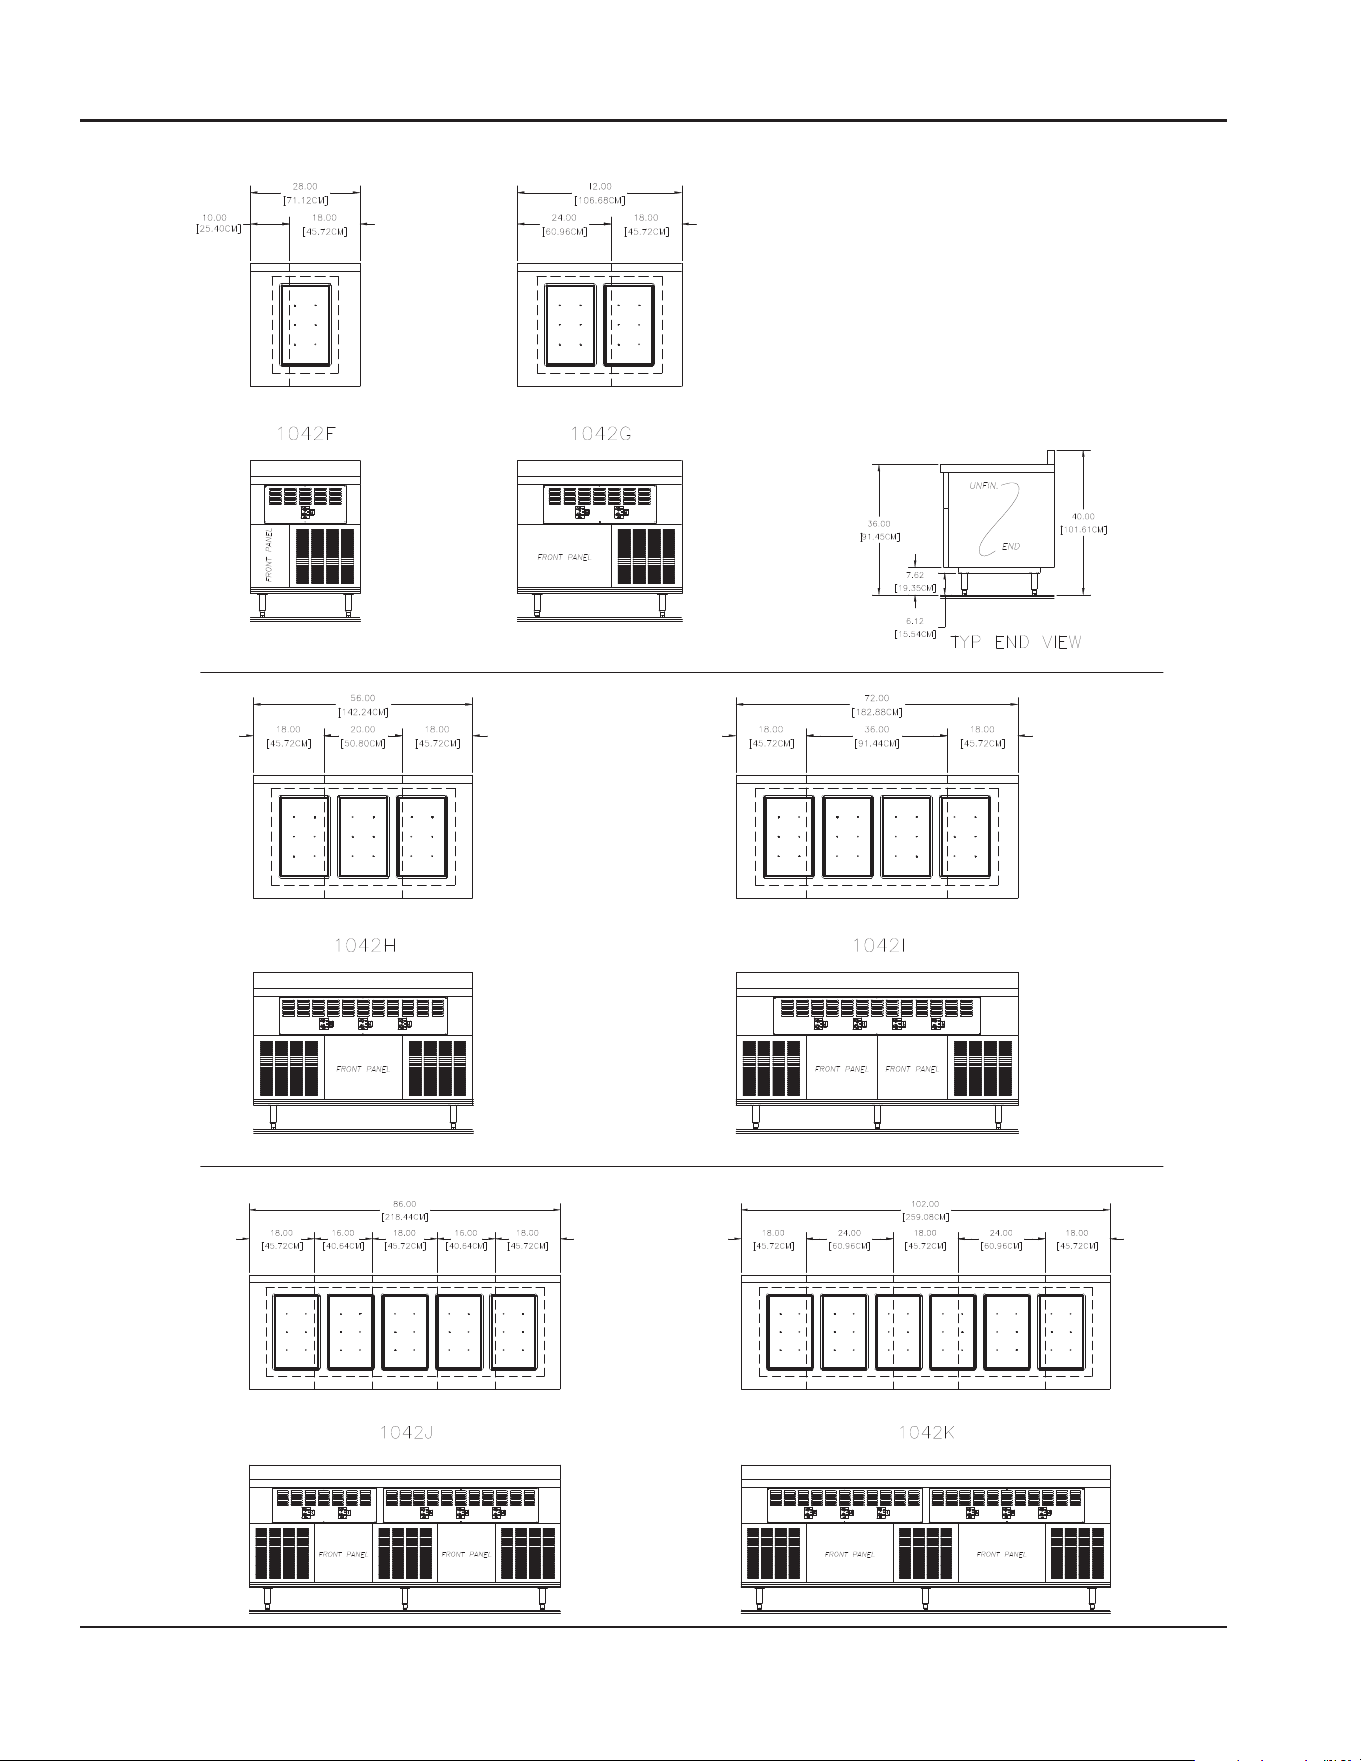
Specifications Section 2
12 Part Number: 9291544-GEN2 12/24
FlexiWell™ EcoMark® 1042 Series
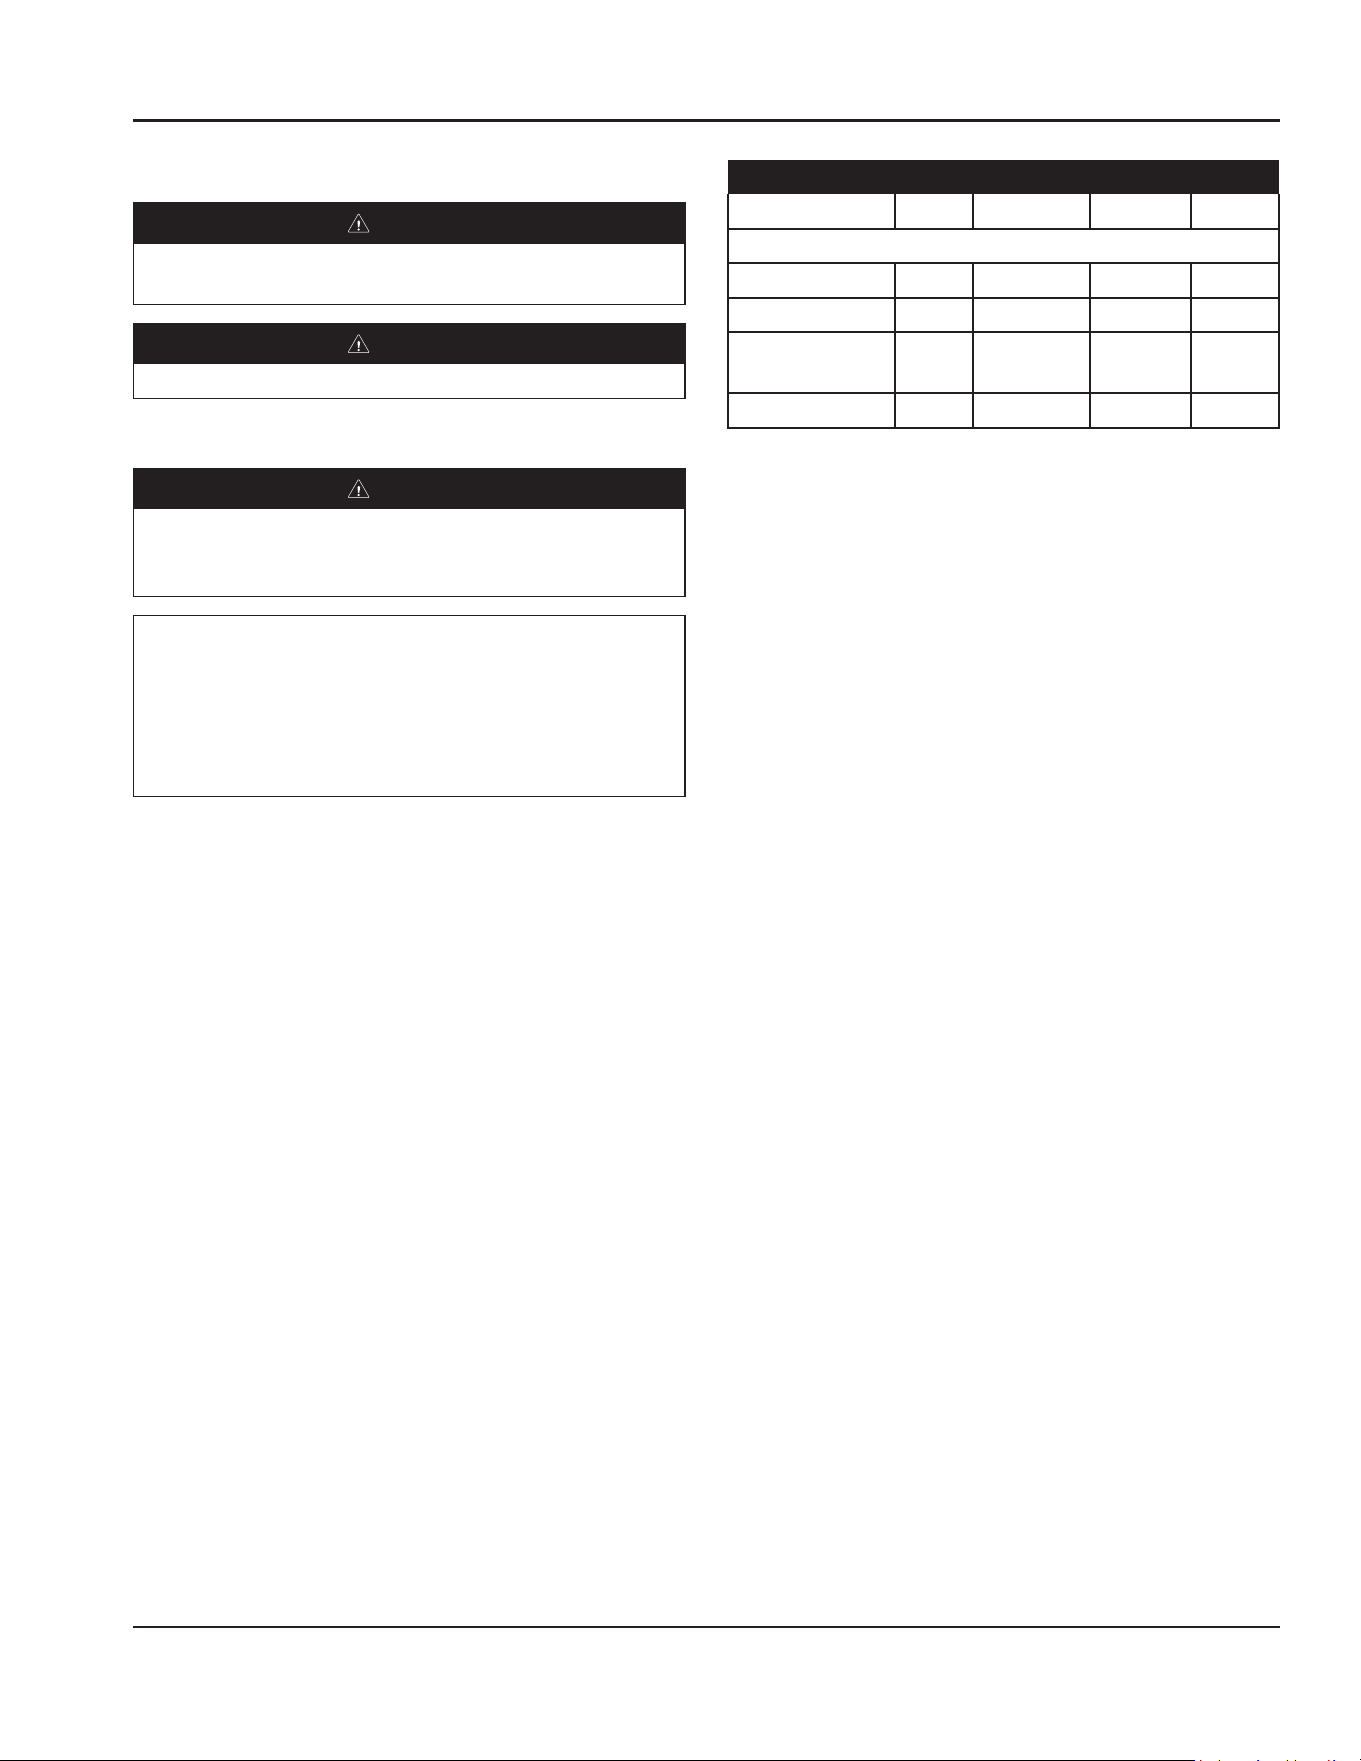
Section 2 Specifications
Part Number: 9291544-GEN2 12/24 13
Clearance Requirements
CAUTION
DANGER
The flooring under the appliance must be made of a
noncombustible material.
CAUTION
DANGER
Risk of fire/shock. Do not obstruct vents or openings.
Electrical Service
CAUTION
DANGER
Check all wiring connections, including factory
terminals, before operation. Connections can become
loose during shipment and installation.
n
Warning
This appliance must be grounded and all field wiring
must conform to all applicable local and national
codes. Refer to rating plate for proper voltage. It is the
responsibility of the end user to provide the disconnect
means to satisfy the authority having jurisdiction.
VOLTAGE
All electrical work, including wire routing and grounding,
must conform to local, state and national electrical codes.
The following precautions must be observed:
• The equipment must be grounded.
• A separate fuse/circuit breaker must be provided for
each unit.
• The maximum allowable voltage variation is ±10% of
the rated voltage at equipment start-up (when the
electrical load is highest).
• Check all green ground screws, cables and wire
connections to verify they are tight before start-up.
GROUND FAULT CIRCUIT INTERRUPTER
Ground Fault Circuit Interrupter (GFCI/GFI) protection is
a system that shuts down the electric circuit (opens it)
when it senses an unexpected loss of power, presumably
to ground. Welbilt does not recommend the use of GFCI/
GFI circuit protection to energize our equipment. If code
requires the use of a GFCI/GFI then you must follow the
local code. The circuit must be dedicated, sized properly
and there must be a panel GFCI/GFI breaker. We do not
recommend the use of GFCI/GFI outlets to energize our
equipment as they are known for more intermittent
nuisance trips than panel breakers.
Clearance Dimensions
Model Top Bottom Sides Back
FlexiWell™
KFW Series 12” 0” 0” 0”
SFW Series 12” 0” 0” 0”
EcoMark
1042 Series
12” 0” 0” 0”
N8600 Series 12” 0” 0” 2.75”

THIS PAGE INTENTIONALLY LEFT BLANK
Specifications Section 2
14 Part Number: 9291544-GEN2 12/24

THIS PAGE INTENTIONALLY LEFT BLANK
Section 2 Specifications
Part Number: 9291544-GEN2 12/24 15
16 Part Number: 9291544-GEN2 12/24
DANGER
Installation must comply with all applicable fire and
health codes in your jurisdiction.
DANGER
Use appropriate safety equipment during installation
and servicing
n
Warning
Remove all removable panels before lifting and
installing.
Location
n
Warning
This equipment must be positioned so that the plug is
accessible unless other means for disconnection from
the power supply (e.g., circuit breaker or disconnect
switch) is provided.
n
Warning
Adequate means must be provided to limit the
movement of this appliance without depending on or
transmitting stress to the electrical conduit or gas lines.
n
Warning
To avoid instability the installation area must be capable
of supporting the combined weight of the equipment
and product. Additionally the equipment must be level
side to side and front to back.
n
Warning
This equipment is intended for indoor use only. Do not
install or operate this equipment in outdoor areas.
,
Caution
Do not position the air intake vent near steam or heat
exhaust of another appliance.
Section 3
Installation
The location selected for the equipment must meet the
following criteria. If any of these criteria are not met, select
another location.
• Units are intended for indoor use only.
• The location MUST be level, stable and capable of
supporting the weight of the equipment.
• The location MUST be free from and clear of
combustible materials.
• Equipment MUST be level both front to back and side to
side.
• Position the equipment so it will not tip or slide.
• Front casters MUST be locked once positioned.
• Recommended air temperature is 60° - 100°F
(16° - 38°C).
• Proper air supply for ventilation is REQUIRED AND
CRITICAL for safe and efficient operation. Refer to
Clearance Requirements chart on page 6.
• Do not obstruct the flow of ventilation air. Make sure the
air vents of the equipment are not blocked.
• Do not install the equipment directly over a drain.
Steam rising up out of the drain will adversely affect
operation, air circulation, and damage electrical /
electronic components.
Section 3 Installation
Part Number: 9291544-GEN2 12/24 17
Cooled Wells
n
Warning
If a refrigerated base does not have a condensate
evaporator supplied, you must connect the condensate
line to a suitable drain. Otherwise, water will collect on
the floor, causing a potentially hazardous situation.
Leveling
After the cabinet has been placed in the desired location,
cabinets with legs must be leveled. Level units from front to
back and from side to side. Leveling will insure proper door
operation and removal of condensate. Cabinets with casters
must have the caster brake set so the cabinet cannot move.
Stabilizing
It is very important that all legs are properly adjusted to
keep the cabinet level, evenly distribute the weight and to
make sure the unit will not rock, lean or be unstable.
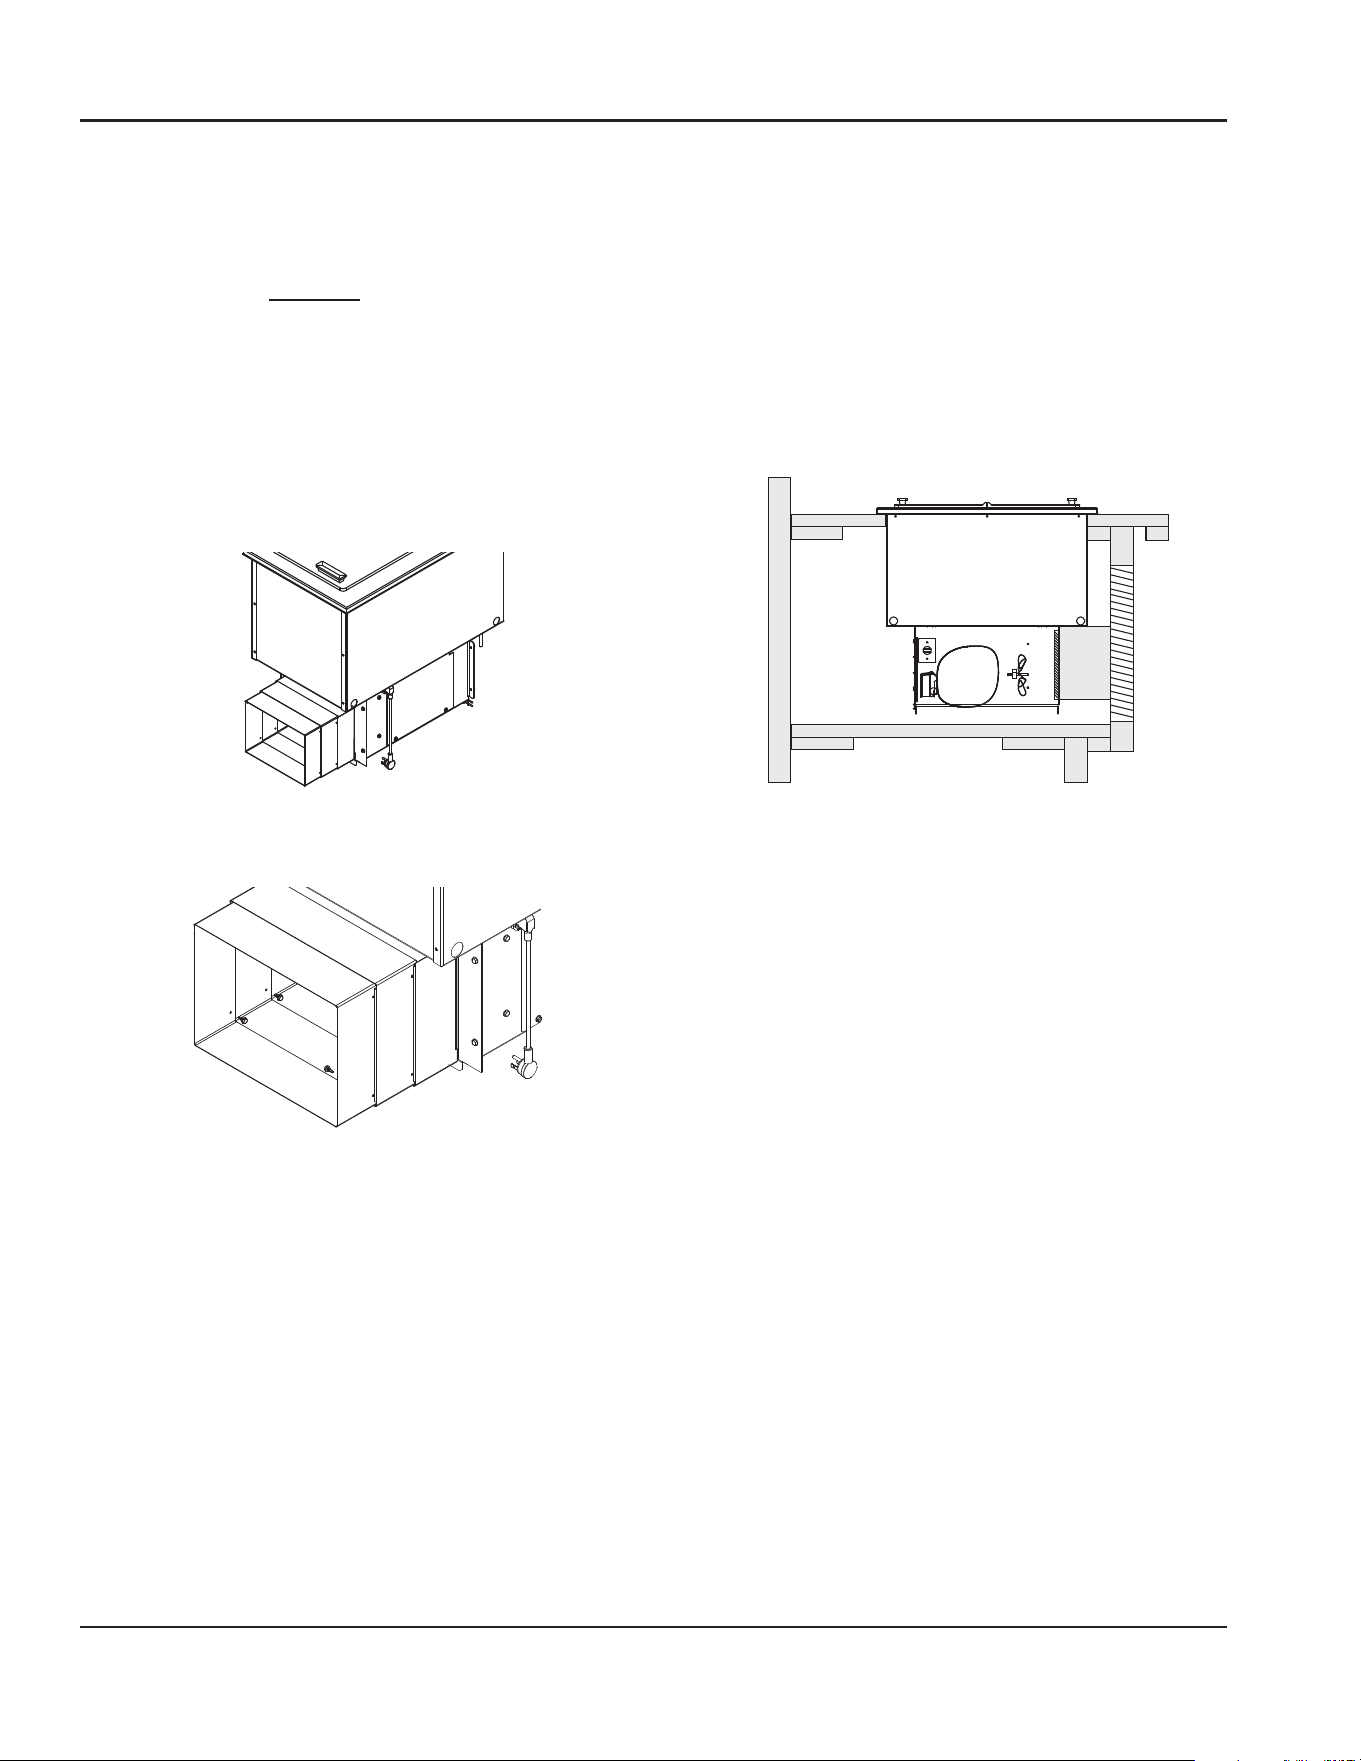
Leg & Caster Installation
Legs or casters must be installed and the legs or casters
must be screwed in completely to prevent bending.
When casters are installed the mass of this unit will
allow it to move uncontrolled on an inclined surface.
These units must be tethered/secured to comply with
all applicable codes.
n
Warning
The unit must be installed in a stable condition with
the front wheels locked. Locking the front casters after
installation is the owner’s and operator’s responsibility.
n
Warning
Use a jack to lift the refrigeration unit off the ground
just far enough to remove the leg/caster. Place blocking
underneath the unit. Do not work underneath a raised
unit without proper blocking. Do not lift the unit more
than necessary to remove the leg/caster. Lifting the unit
too far can make the unit unstable.
,
Caution
All single-section units require that the swivel casters be
mounted on the front and rigid casters be mounted on
the rear.
Installation Section 3
18 Part Number: 9291544-GEN2 12/24
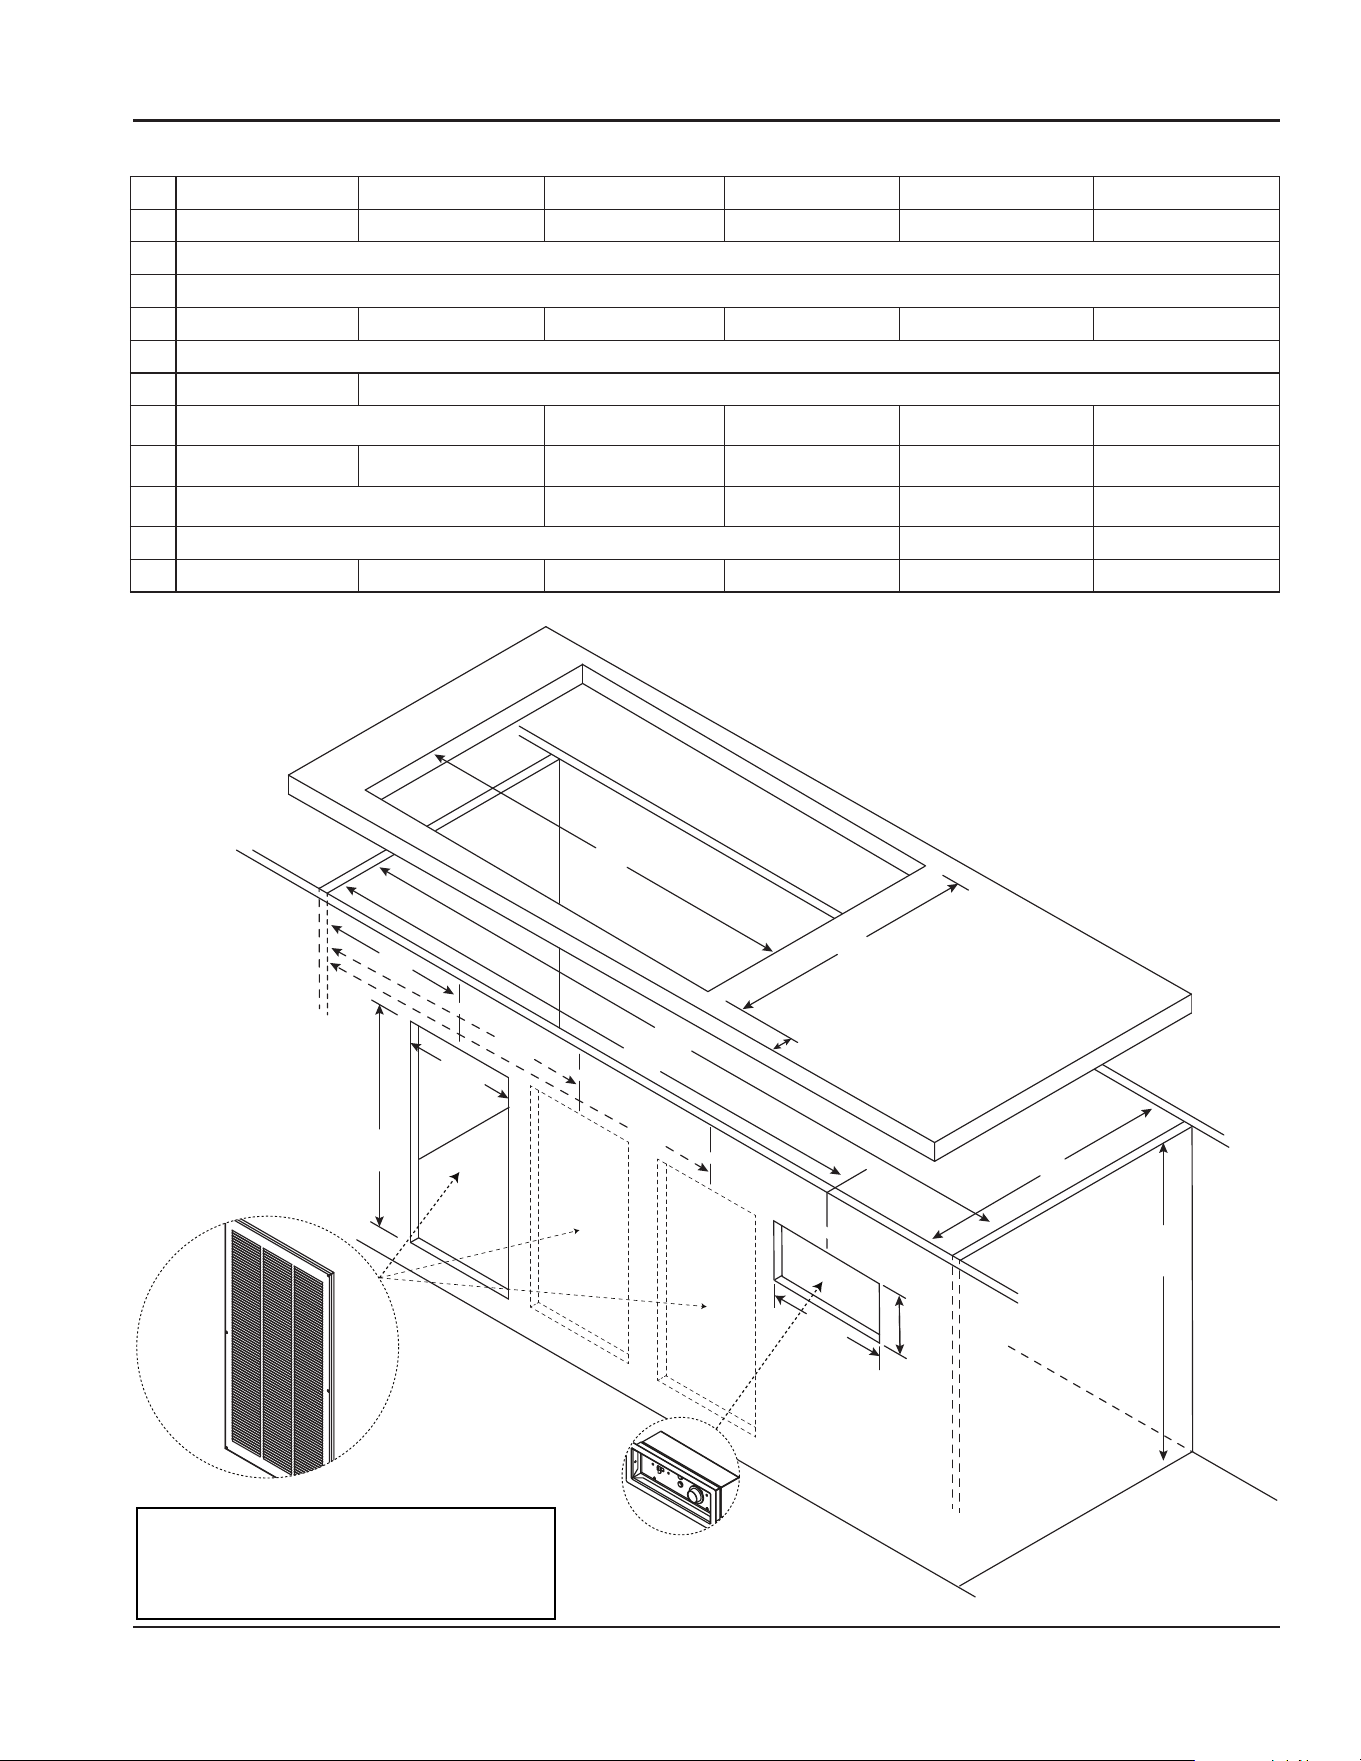
SELF-CONTAINED FLEXIWELL DROP-IN UNITS
FlexiTop N8600-FWP Cut-Out Dimentions
For any non-standard installation consult the factory.
1. Cabinet interior minimum dimensions on following page.
2. Install a GFCI receptacle a minimum of 14” (36cm) up
from the cabinet bottom inside the partitions.
3. Place the condensing unit through the counter cutout.
4. Extend the telescoping duct from the front of the
condensing unit to the back of the louver. This will
prevent recirculation of discharge air. Export models do
not have a telescoping duct, skip to step 6.
5. Put eight provided screws through the telescoping duct
side walls to hold it at the desired depth.
Use Screws to Secure Desired Depth
3 of 8 Screws Shown
6. Partitions must fully extend front to back and top to
bottom.
7. Louver cutout must extend to bottom of cabinet
and align with condenser face.
NOTE: The louver provided must be installed in
front of CONT: the condensing unit’s finned coil.
Any restriction to the proper air flow will void the
compressor warranty.
• Louver measures 13.00” x 25.00” (33cm x 64cm).
• Louver Cutout Size is 12” x 23.5” (31cm x 60cm)
(typical installation).
Finned Coil
Duct
Partitions Not Shown
Louver
Section 3 Installation
Part Number: 9291544-GEN2 12/24 19
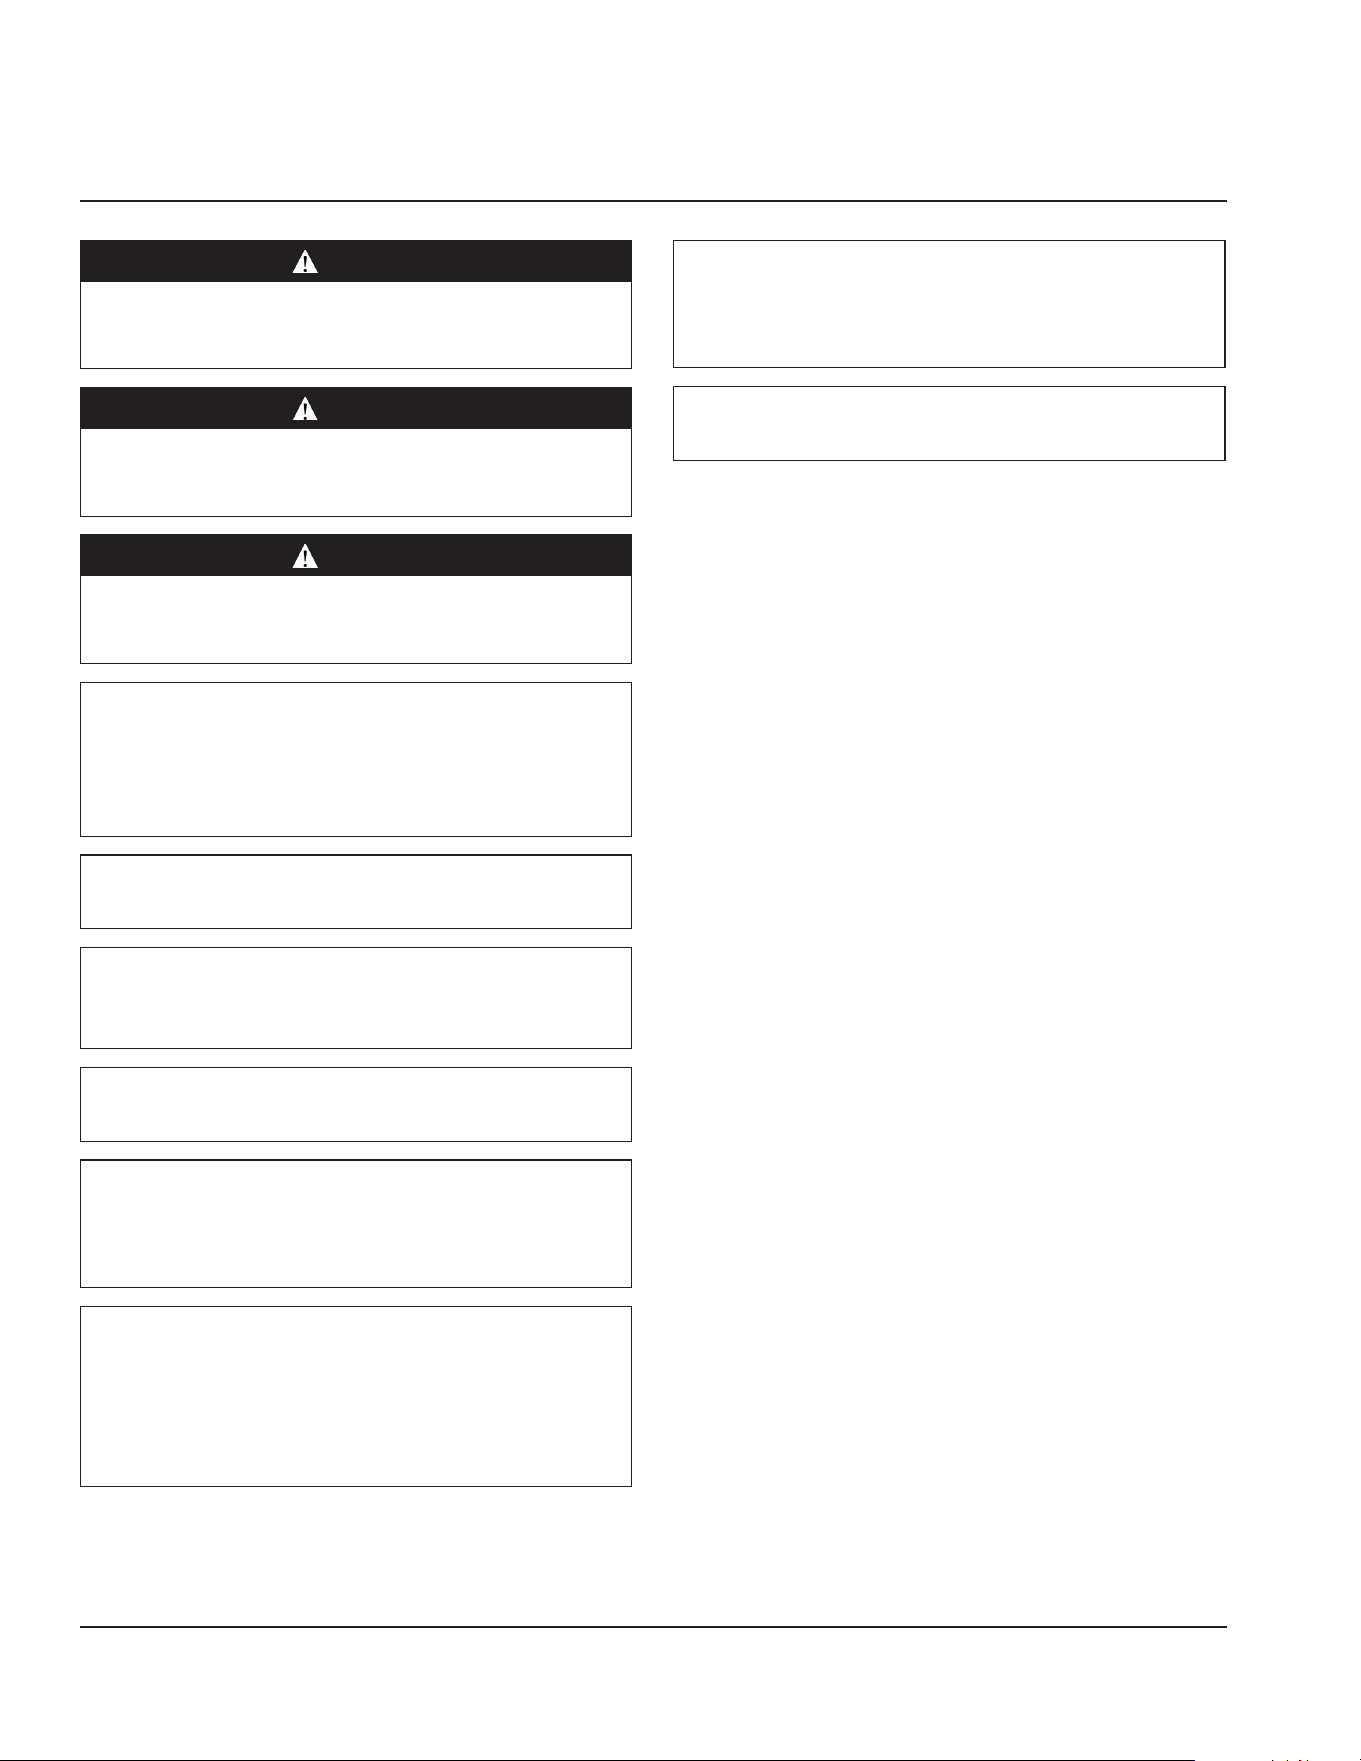
CABINET INTERIOR MINIMUM DIMENSIONS
N8618-FWP N8633-FWP N8648-FWP N8663-FWP N8678-FWP N8693-FWP
A 29.75"/76cm 36.25"/103cm 51.25"/130cm 64"/163cm 79"/201cm 94"/239cm
B 29"/74cm
C 28"/71cm
D 17"/43cm 32"/82cm
47"/120cm 62"/158cm 77"/196cm 92"/234cm
E 25"/64cm
F 4.75"/12cm "Min 2.75""/7cm - Max 4.75""/12cm"
G
11.38"/29cm 16.38"/42cm 21.38"/55cm 26.38"/67cm 31.38"/80cm
H1 8.50"/22cm 8.0"/21cm 8.00"/21cm 8.00"/22cm 8.00"/22cm 8.00"/22cm
H2 n/a 39.50"/101cm 52"/132cm 52"/132cm 56"/143cm
H3 n/a 68"/173cm 82"/208cm
I 26.50"/67cm 25"/64cm 23.50"/60cm 31"/79cm 30"/76cm 32"/81cm
23.50”
(60cm)
C
A
B
12”
(31cm)
I
G
4.38”
(11cm)
H1
H2
H3
E
D
F
Center of cutout
Center of cutout
Center of cutout
Center of cutout
NOTE:
Measurement H & I are from Left edge of
drop-in cutout to CENTER of Louver cut-out
(12”) and CENTER of Control cut-out (G)
Minimum of 5.6” clearance
depth needed from cabinet
face for control box.
20 Part Number: 9291544-GEN2 12/24
DANGER
The on-site supervisor is responsible for ensuring that
operators are made aware of the inherent dangers of
operating this equipment.
DANGER
Do not operate any appliance with a damaged cord
or plug. All repairs must be performed by a qualified
service company.
DANGER
Never stand on the unit! They are not designed to
hold the weight of an adult, and may collapse or tip if
misused in this manner.
n
Warning
The operator of this equipment is solely responsible
for ensuring safe holding temperature levels for all
food items. Failure to do so could result in unsafe food
products for customers.
n
Warning
Do not contact moving parts.
n
Warning
All covers and access panels must be in place and
properly secured, before operating this equipment.
n
Warning
Damp or wet hands may stick to cold surfaces.
n
Warning
Never use sharp objects or tools to remove ice or frost.
Do not use mechanical devices or other means to
accelerate the defrosting process.
n
Warning
Do not block the supply and return air grills or the air
space around the air grills. Keep plastic wrappings,
paper, labels, etc. from being airborne and lodging in
the grills. Failure to keep the air grills clear will result in
unsatisfactory operation of the system.
,
Caution
Units with pans should be operated with pans in place.
Operating the unit without all pans in place will lower
efficiency and may damage the unit.
Notice
Never place food directly in well. Always use pans.
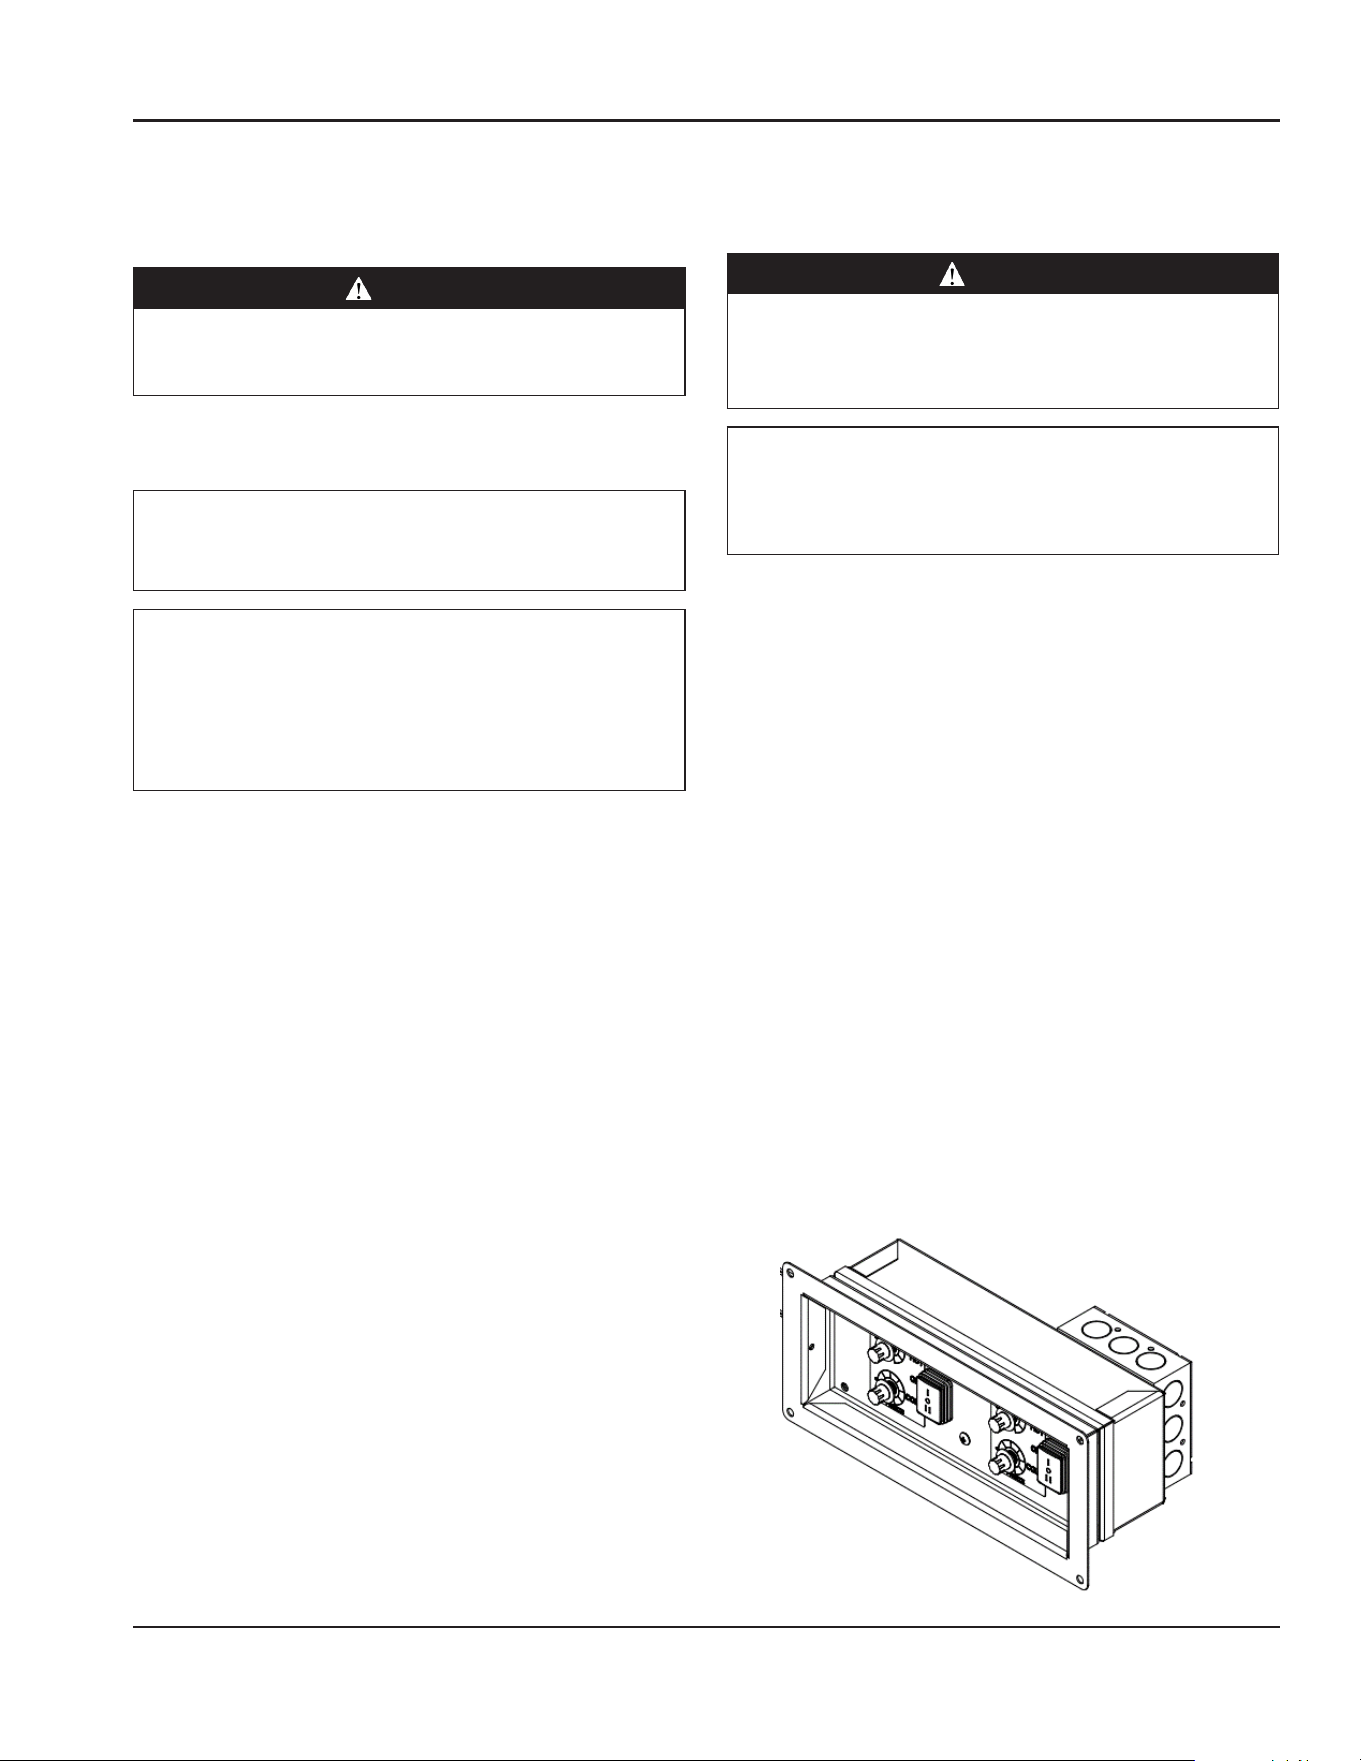
Best Practices
• Dry operation only, no water in wells
• For optimal performance, 4”-6” deep pans are
recommended
• Designed to hold warm food product at NSF4
temperatures, between 140° F to 165° F
• Density of product in pan may affect product
temperatures if using pans other than 4”-6”
deep
• To set to highest temperature, turn control
knob counter-clockwise until it clicks
• Not intended for cooking or increasing
product temperatures
• Food pans should be free of damage, warping
edges to make adequate contact with
aluminum collar
• If using fractional pans, fill well with pans,
even if some pans are empty
• For most efficient operation, keep pans
covered in each well during preheating or
when empty
• Always place covers on pans when not serving
to prevent food from drying out
• Sheet pan use on standard units is not
recommended
Section 4
Operation
Section 4 Operation
Part Number: 9291544-GEN2 12/24 21
Heated and Refrigerated Combo Counter
Operation
OPERATION
DANGER
When operated at the highest temperature setting, the
top of the unit will become very hot. Staff and customers
using the equipment should be informed about this.
No Water is required. Unit to be operated in dry operation
only.
,
Caution
DO NOT fill dry wells with water during operation or
cleaning. Doing so WILL void warranties.
Notice
These units are intented to hold previously cooked
product at a food safe temperature during time of
serving. This product is NOT intented for cooking or
increasing the temperature of held product. Improper
use of unit may result in shorter unit lifespan.
FlexiWell units are designed to hold warm food product
between 140ºF to 160ºF (60ºC to 71ºC).
FlexiWell units are designed to hold cold food product
between 33°F to 41°F.
FlexiWell units in the freeze mode are designed to hold
product between 0°F and -3°F maximum 1- 2 hours.
FlexiWell First Time Use
Verify the unit is plugged in. Before the unit is used the first
time for serving, turn the temperature knob to HI and heat
each well for 20 to 30 minutes.
FlexiWell Daily Use
Verify the unit is plugged in; turn the unit on. A knob is
provided for each individual heated food well. Select
desired temperature by selecting Hot or Cold on the rocker
switch and rotating temperature control. Food temperature
will vary depending on type and amount of product. Set
control at lowest setting that will maintain proper food
temperature. If the same temperature settings for each well
are used every day, the temperature knobs can be left in
their set position and the wells can be turned off using the
on/off switch.
• Never place food directly in well. Always use pans.
• For most efficient operation, keep covered pans in each
well during preheating or when empty.
• Always place covers on pans when not serving to
prevent food from drying out.
DANGER
Steam can cause serious burns. Always use some type
of protective covering on your hands and arms when
removing lids from the unit. Lift the lid in a way that will
direct escaping steam away from your face and body.
,
Caution
After operating a heated well, a unit must rest to cool
down at a minimum of 1 hour, before starting cold
operation.
ON/OFF SWITCH - UNIT POWER
A remote On/Off switch controls power to the unit. For
repetitive use, user may leave individual well rockers and
dials in a preferred setting and power off with remote unit
power.
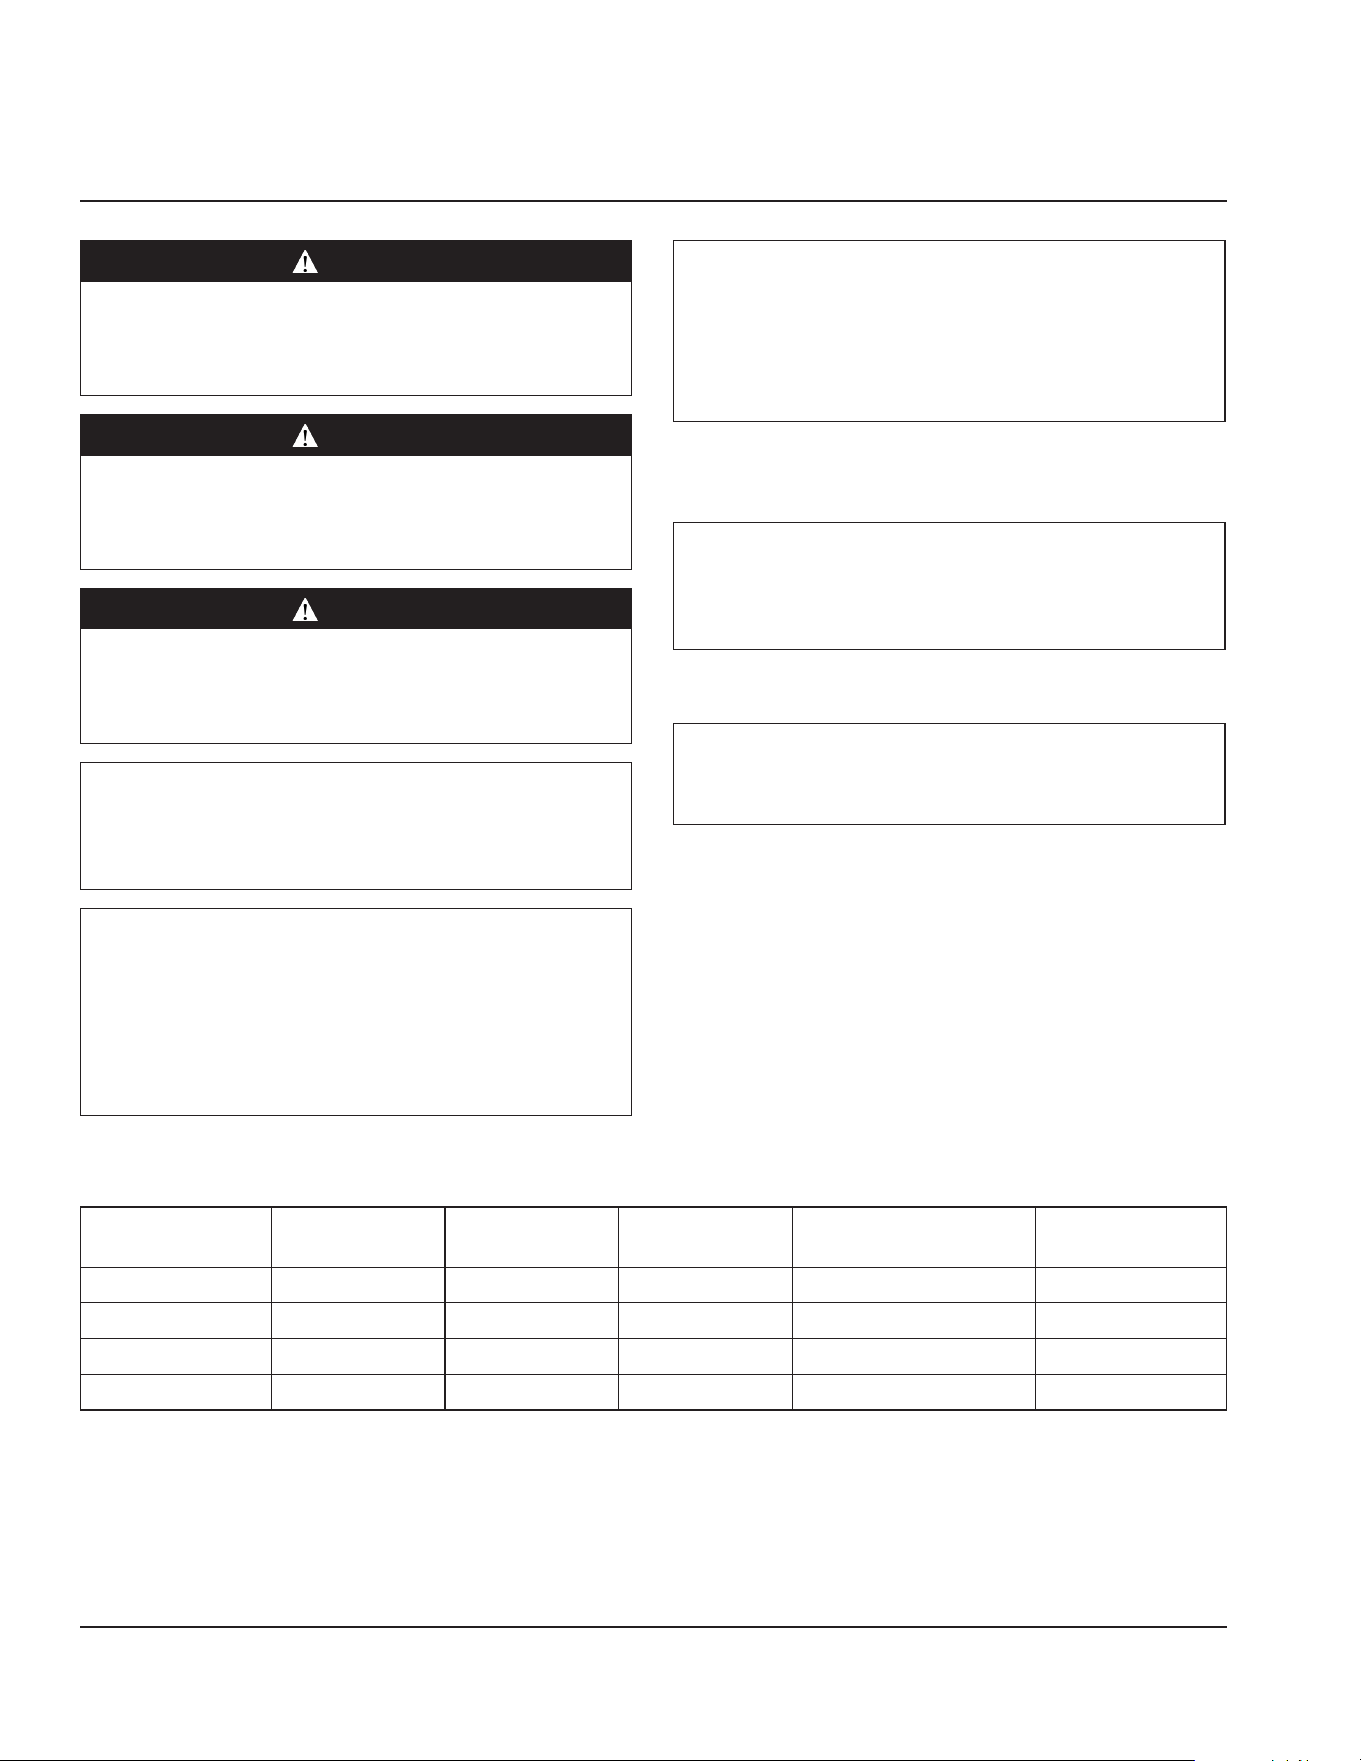
TEMPERATURE CONTROL
Individual three-position rocker switch with corresponding
dials allows each well to be adjusted independently. The
three-position rocker allows the well to be in Cold/Off/Hot
while the dials control the temperature when in the Hot
positon.
Any combination of rocker position is availible as well as
only operating one of the wells with the others in the off
position. Not all wells need to be in operation.
22 Part Number: 9291544-GEN2 03/24
DANGER
It is the responsibility of the equipment owner to
perform a personal protective equipment hazard
assessment to ensure adequate protection during
maintenance procedures.
DANGER
Failure to disconnect the power at the main power
supply disconnect could result in serious injury or death.
The power switch DOES NOT disconnect all incoming
power.
DANGER
Disconnect electric power at the main power disconnect
for all equipment being serviced. Observe correct
polarity of incoming line voltage. Incorrect polarity can
lead to erratic operation.
n
Warning
Never use sharp objects or tools to remove ice or frost.
Do not use mechanical devices or other means to
accelerate the defrosting process.
n
Warning
Use a jack to lift the refrigeration unit off the ground
just far enough to remove the leg. Place blocking
underneath the unit. Do not work underneath a raised
unit without proper blocking. Do not lift the unit more
than necessary to remove the leg. Lifting the unit too far
can make the unit unstable.
n
Warning
Never use a high-pressure water jet for cleaning or hose
down or flood interior or exterior of units with water.
This will void the warranty. Do not use power cleaning
equipment, steel wool, scrapers or wire brushes on
stainless steel or painted surfaces.
Cleaning and Sanitizing Procedures
,
Caution
Maintenance and servicing work other than cleaning as
described in this manual must be done by an authorized
service personnel.
GENERAL
n
Warning
When using cleaning fluids or chemicals, rubber gloves
and eye protection (and/or face shield) must be worn.
You are responsible for maintaining the equipment
in accordance with the instructions in this manual.
Maintenance procedures are not covered by the warranty.
Section 5
Maintenance
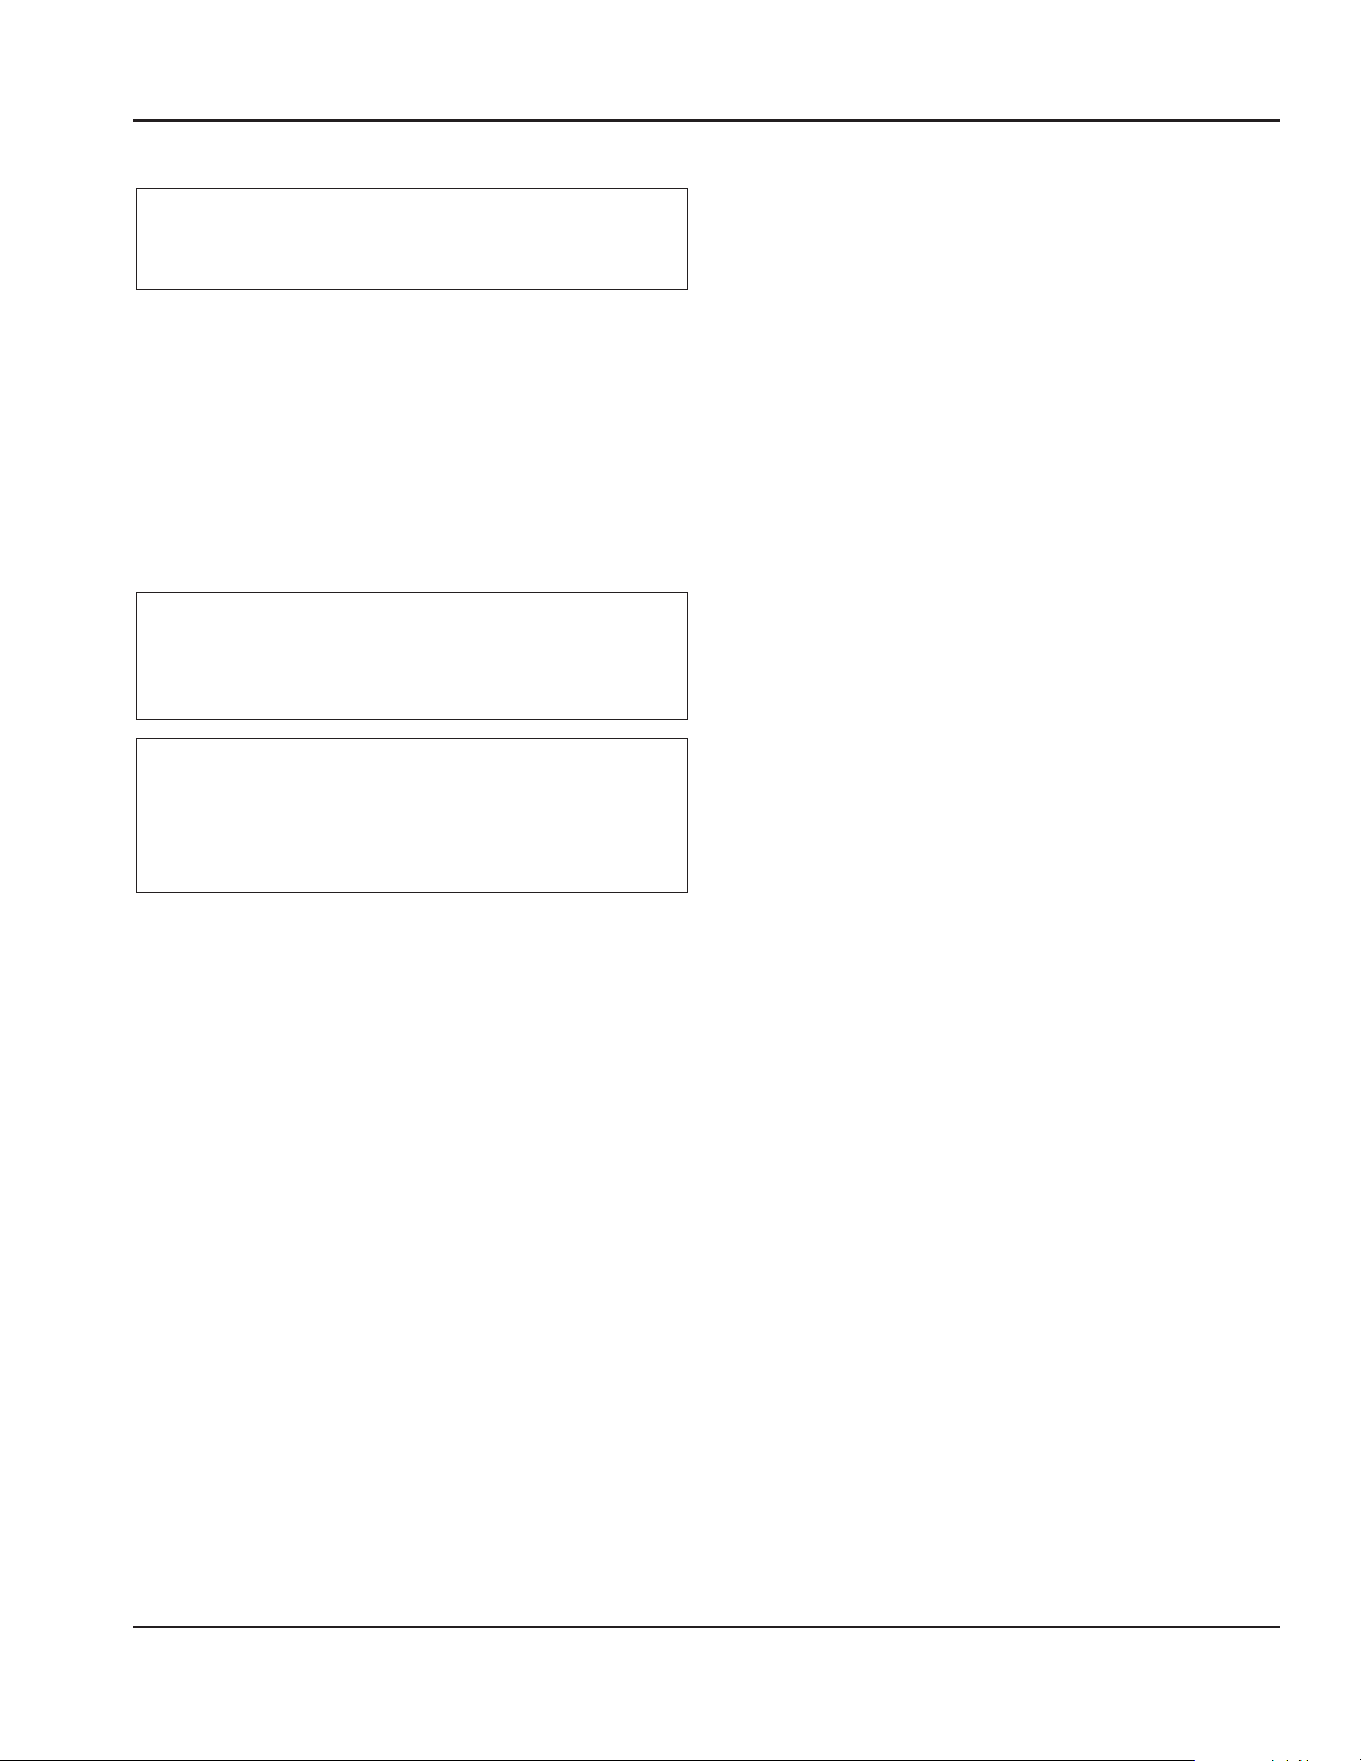
Maintenance Daily Weekly Monthly
After Prolonged
Shutdown
At Start-Up
Interior X X X
Exterior X X X
Drain X X X
Condenser Coil X X X
Section 5 Maintenance
Part Number: 9291544-GEN2 03/24 23
INTERIOR CLEANING
,
Caution
DO NOT fill dry wells with water during operation or
cleaning. Doing so WILL void warranties.
The interior can be cleaned using a lightly damp wash cloth.
If this isn’t sufficient, try ammonia and/or a nonabrasive
liquid cleaner with a damp wash cloth.
Preventing Blower Coil Corrosion
To help prevent corrosion of the blower coil, store all acidic
items, such as pickles and tomatoes, in seal-able containers.
Immediately wipe up all spills.
EXTERIOR CLEANING
n
Warning
When cleaning the unit, care should be taken to avoid
the front power switch and the rear power cord. Keep
water and/or cleaning solutions away from these parts.
,
Caution
Never use an acid based cleaning solution! Many food
products have an acidic content, which can deteriorate
the finish. Be sure to clean the stainless steel surfaces of
ALL food products.
Clean the area around the unit as often as necessary to
maintain cleanliness and efficient operation.
Wipe casters with a damp cloth to prevent corrosion.
Wipe surfaces with a damp cloth rinsed in water to remove
dust and dirt from the unit. Always rub with the “grain” of
the stainless steel to avoid marring the finish. If a greasy
residue persists, use a damp cloth rinsed in a mild dish soap
and water solution. Wipe dry with a clean, soft cloth.
Never use steel wool or abrasive pads for cleaning. Never
use chlorinated, citrus based or abrasive cleaners.
Stainless steel has a clear coating that is stain resistant and
easy to clean. Products containing abrasives will damage
the coating and scratch the panels. Daily cleaning may be
followed by an application of stainless steel cleaner which
will eliminate water spotting and fingerprints. Early signs of
stainless steel breakdown are small pits and cracks. If this
has begun, clean thoroughly and start to apply stainless
steel cleaners in attempt to restore the steel.
Fiberglass can be polished to eliminate water spotting,
fingerprints and bring out the color of the fiberglass. To
maintain the rich, brilliant color of the fiberglass and to
remove shallow surface scratches, wax twice a year. This can
be done in the same manner in which a car is waxed.
Counter Protector Glass & Hardware Cleaning
Routine cleaning can be done with soap and water. Extreme
stains or grease should be cleaned with a nonabrasive
cleaner and plastic scrub pad. Polish the chrome when
necessary with a soft cotton cloth.
Defrosting
Refrigerated cold pans should be defrosted daily. Never
use sharp objects or tools to clean or scrape ice/frost build
up from the refrigerated cold pans. A puncture to the pan
could cause irreparable damage to the refrigeration system.
Units with a Eutectic Fluid Cold Pan require the same
precautions. The fluid is NOT refillable and loss of fluid due
to a puncture would cause irreparable damage.
CLEANING THE CONDENSER COIL
In order to maintain proper refrigeration performance, the
condenser fins must be cleaned of dust, dirt and grease
regularly. It is recommended that this be done monthly. If
conditions are such that the condenser is totally blocked
in a month, the frequency of cleaning should be increased.
Clean the condenser with a vacuum cleaner or stiff brush. If
extremely dirty, a commercially available condenser cleaner
may be required.
Failure to maintain a clean condenser coil can initially cause
high temperatures and excessive run times. Continuous
operation with a dirty or clogged condenser coil can
result in compressor failure. Neglecting the condenser coil
cleaning procedures will void any warranties associated
with the compressor and cost to replace the compressor.
24 Part Number: 9291544-GEN2 12/24
Section 6
Diagrams & Parts
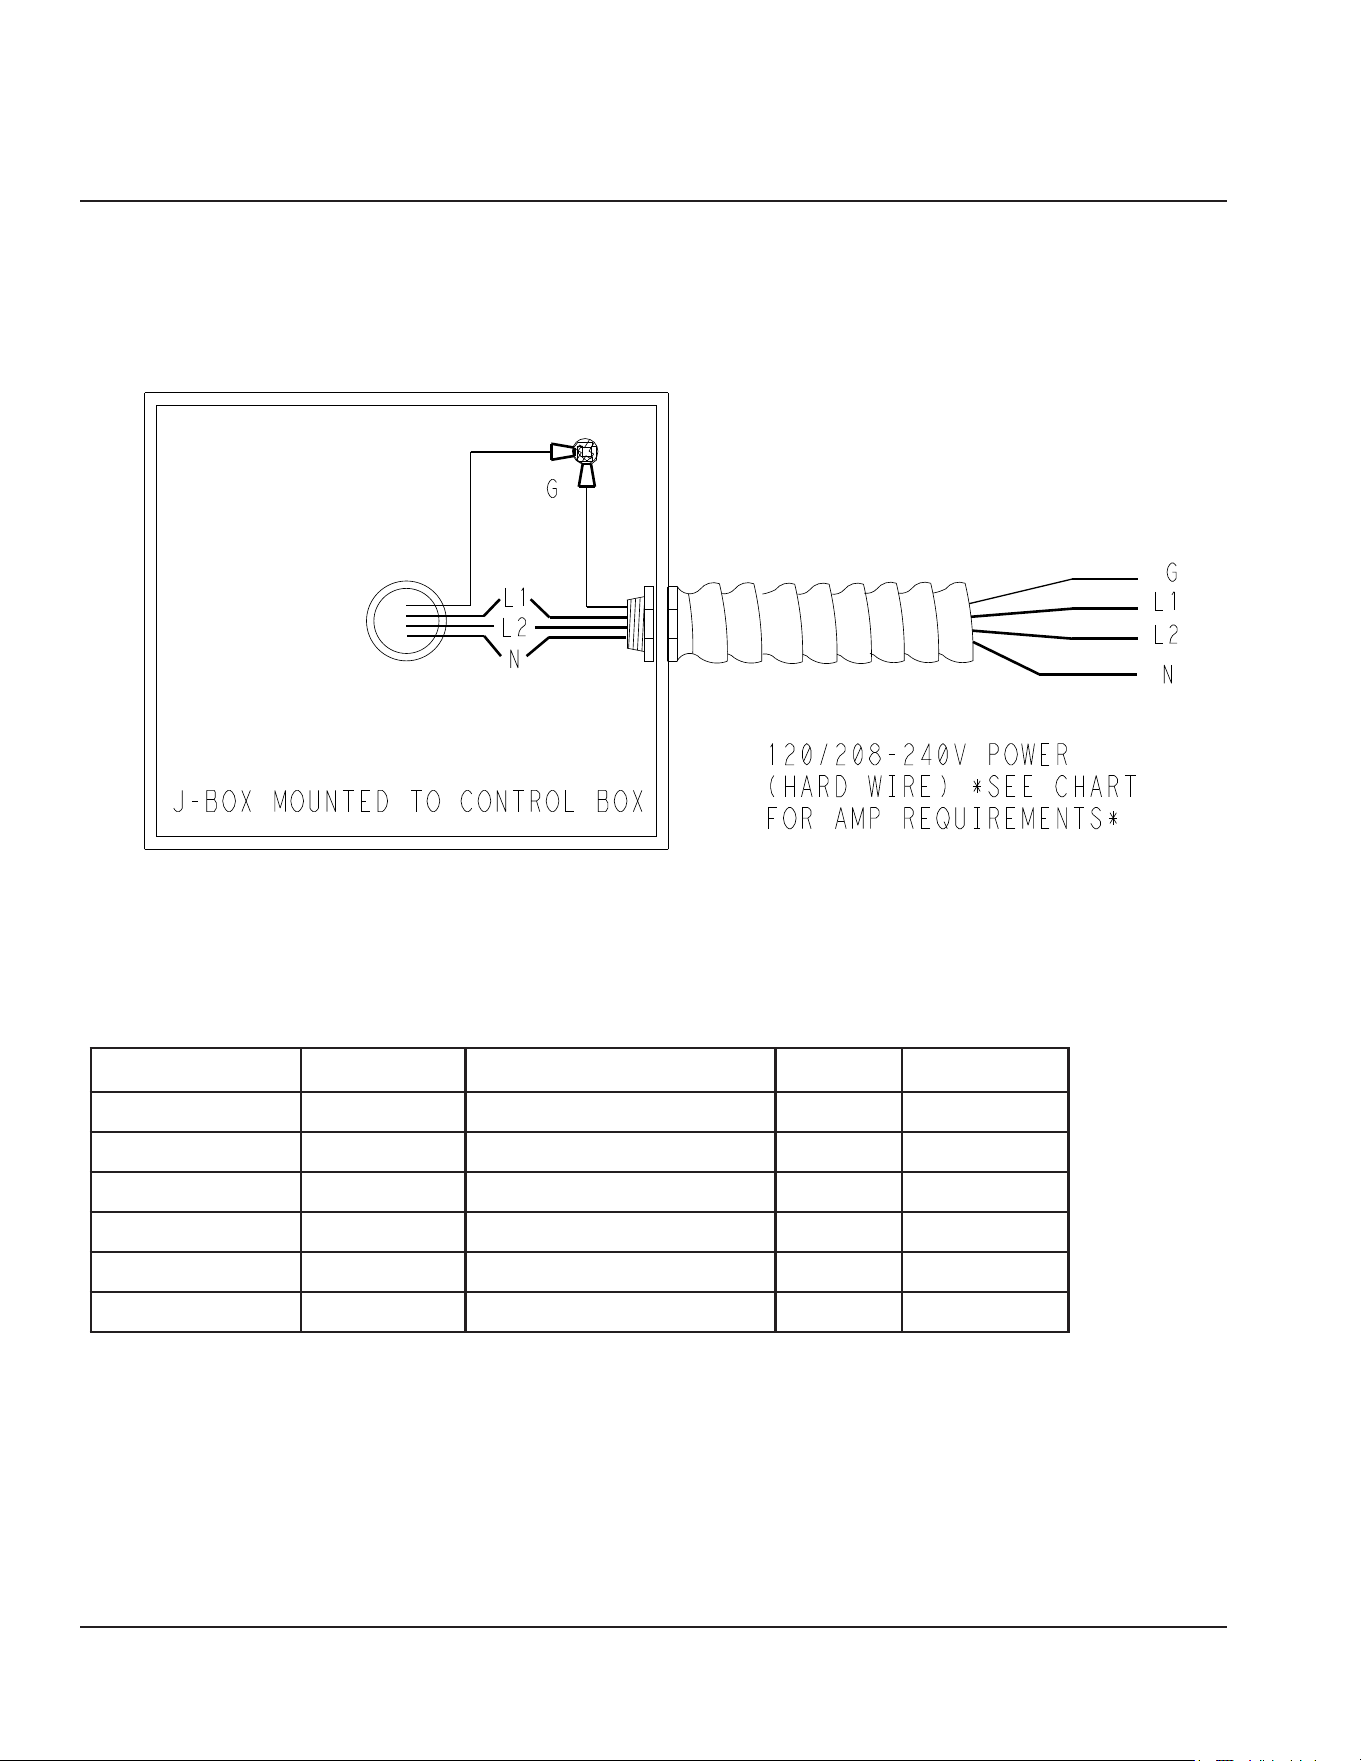
FLEXIWELL DIAGRAMS
Power Supply Wiring
SINGLE POINT ELECTRICAL CONNECTION INFORMATION
All units must be hard wired to a single point connection at installation.
Model 12”x20”
Pan Capacity
V/Hz/Ph Amps (max) Ship Weight
N8618-FWP 1 well 120/208-240/60/1 2.3 300
N8633-FWP 2 well 120/208-240/60/1 4.6 380
N8648-FWP 3 well 120/208-240/60/1 6.0 460
N8663-FWP 4 well 120/208-240/60/1 8.0 550
N8678-FWP 5 well 120/208-240/60/1 10.0 660
N8693-FWP 6 well 120/208-240/60/1 12.0 720
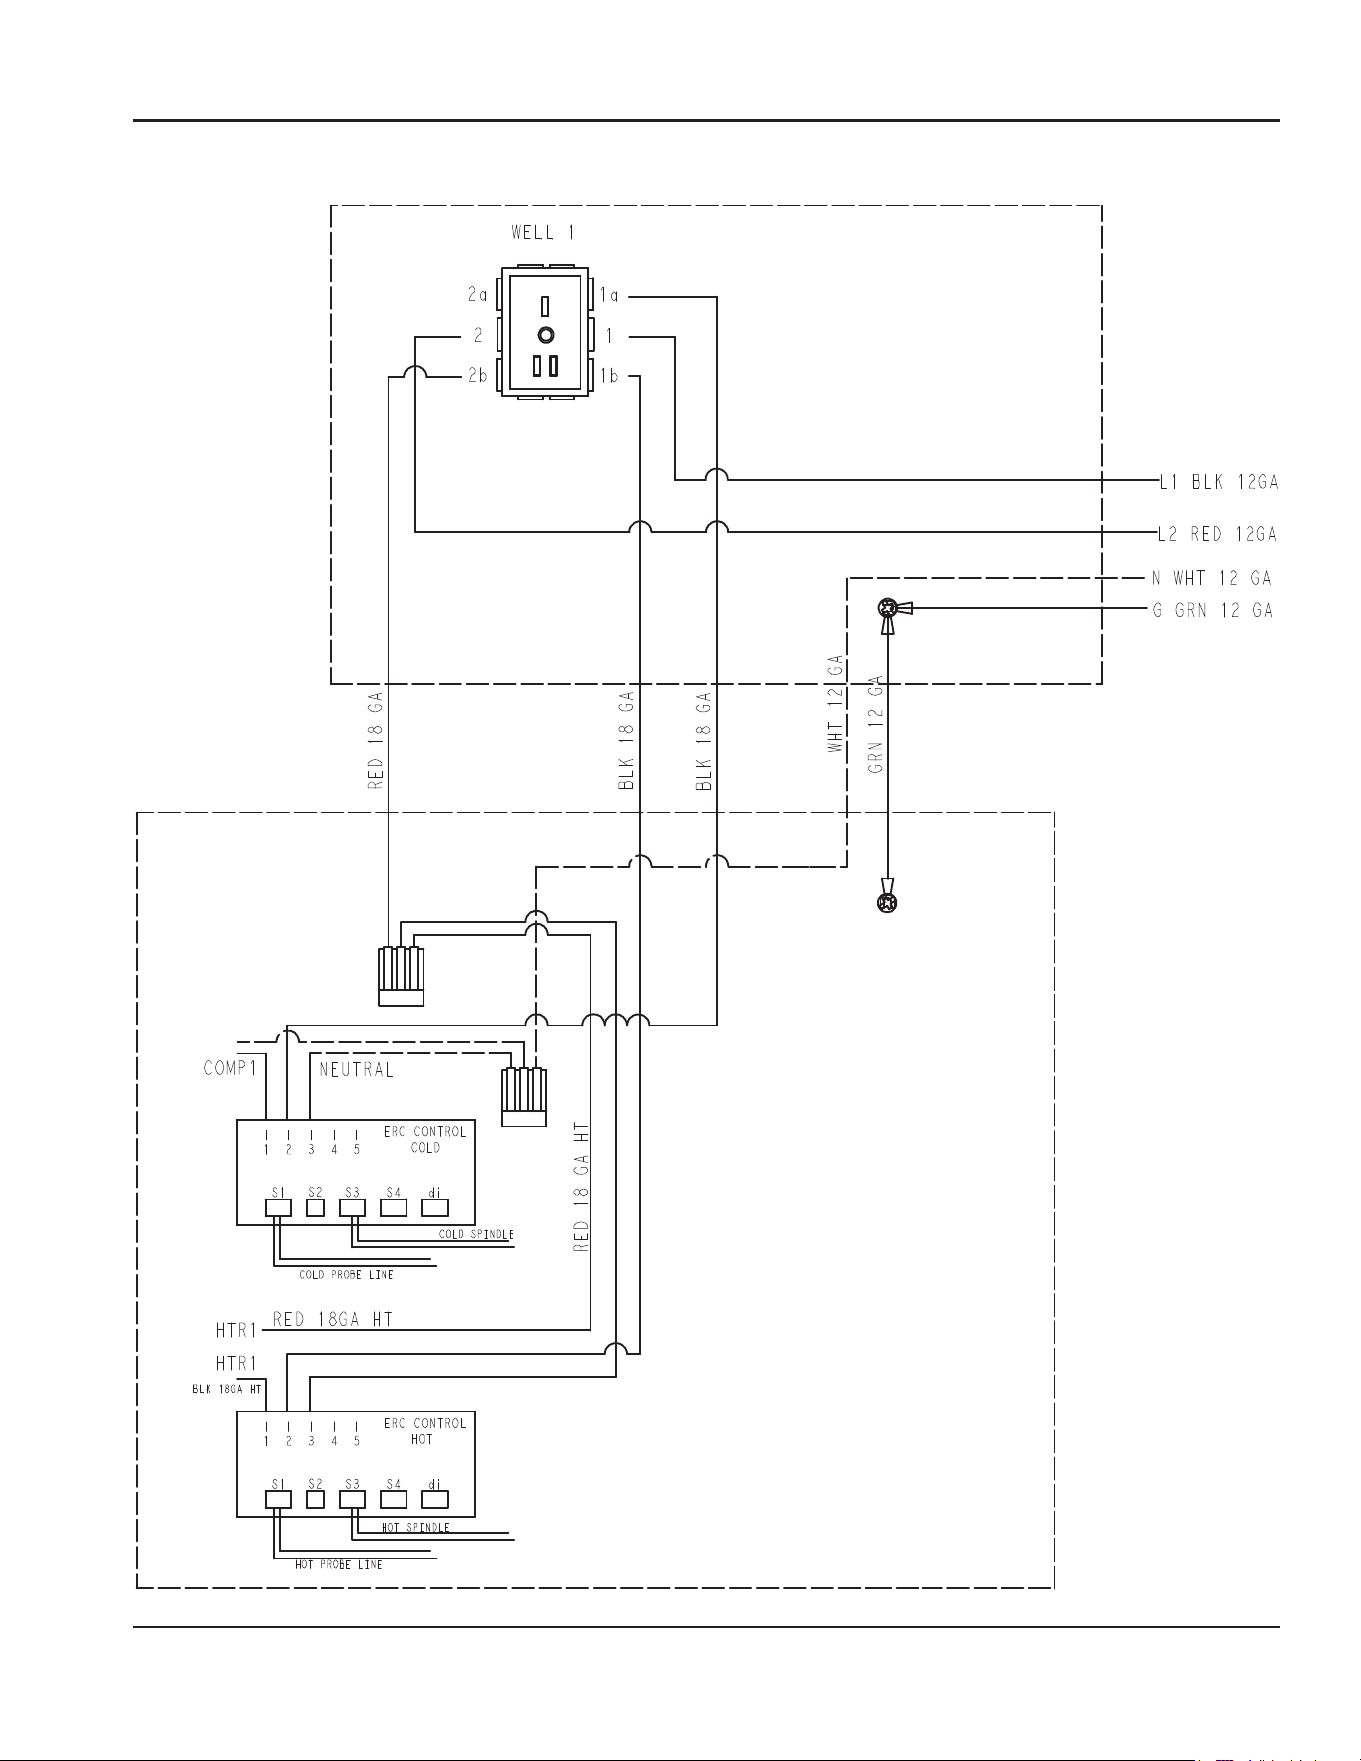
Section 6 Diagrams
Part Number: 9291544-GEN2 12/24 25
FLEXIWELL DIAGRAMS
Single Well Wiring
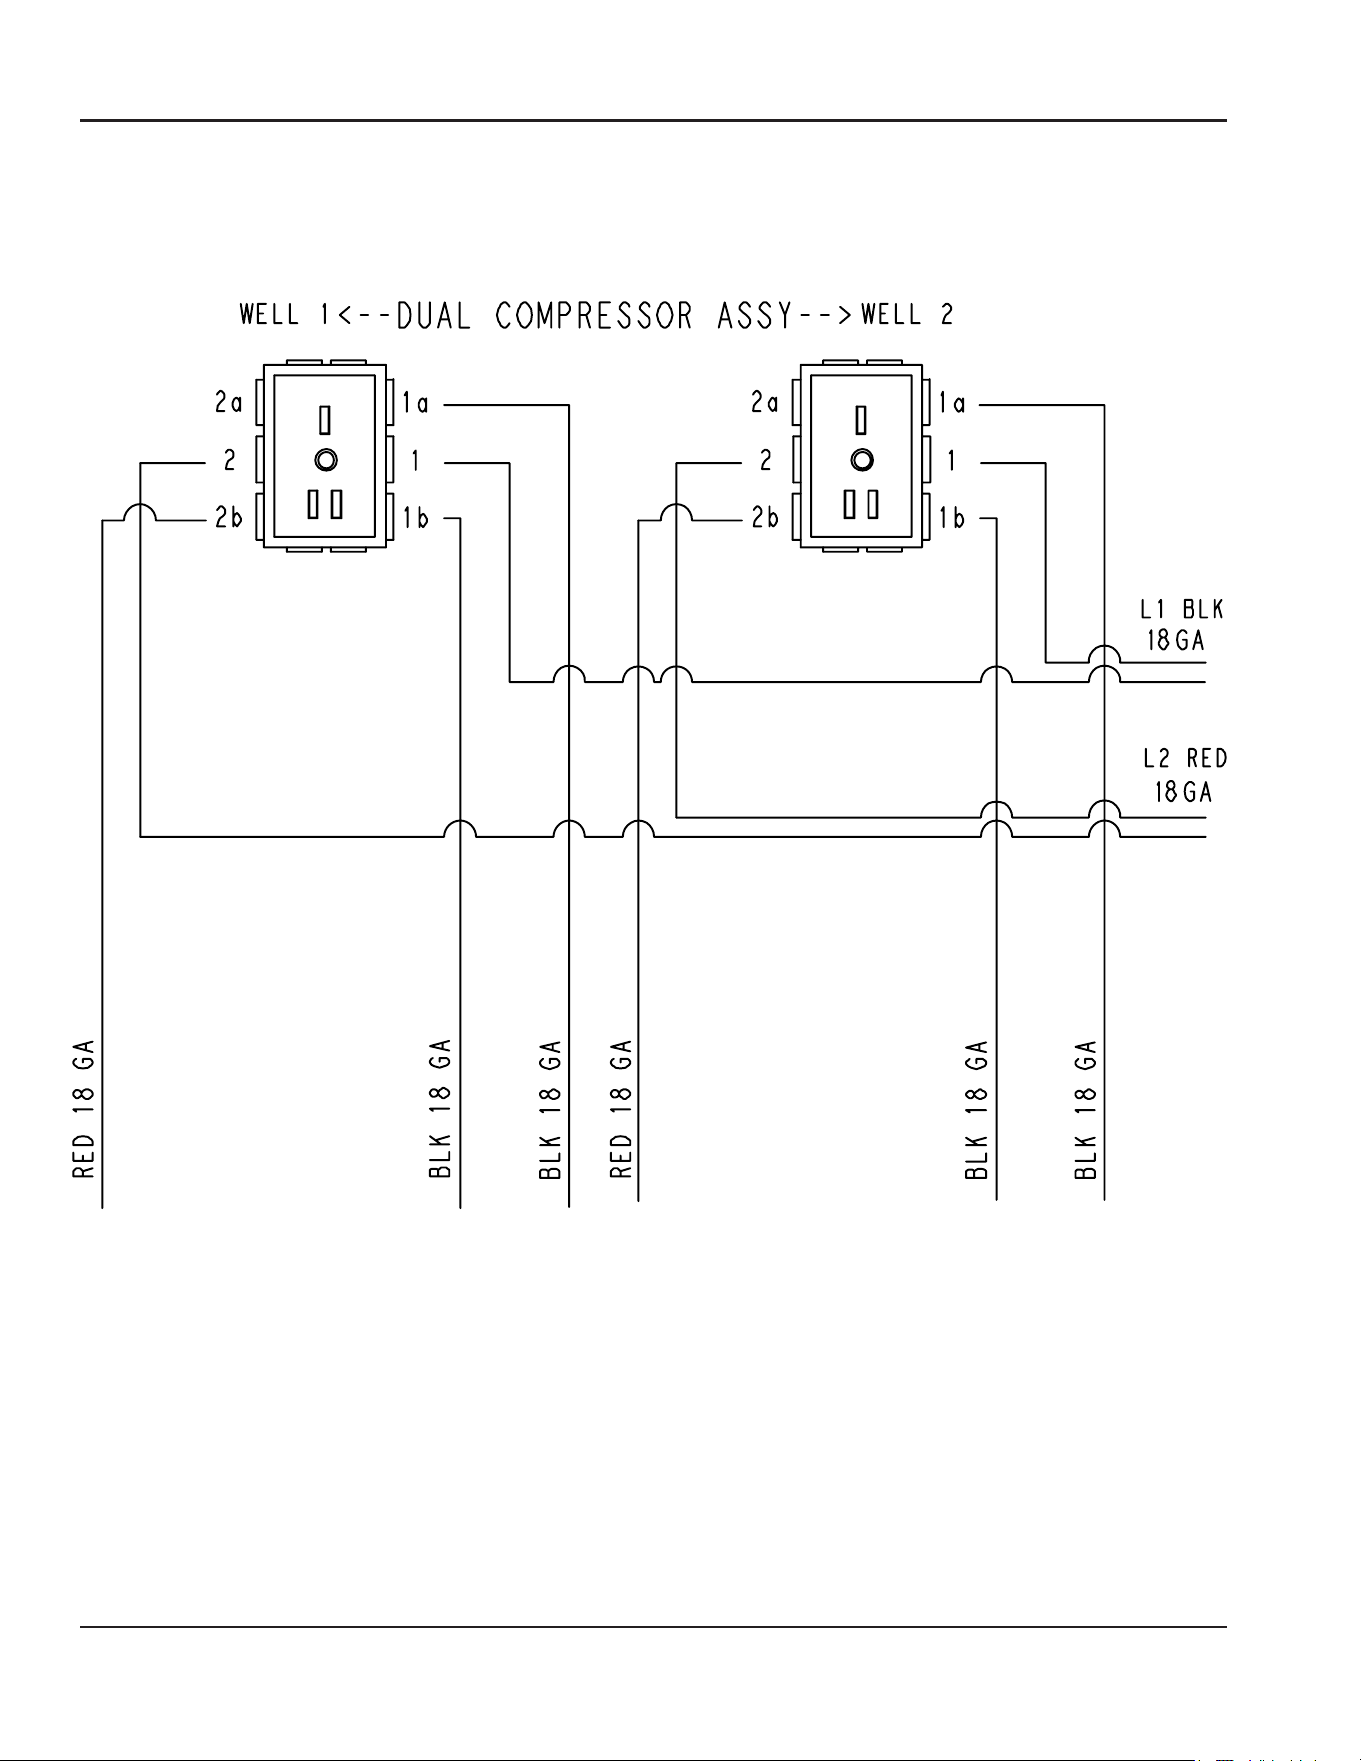
Diagrams Section 6
26 Part Number: 9291544-GEN2 12/24
FLEXIWELL DIAGRAMS
Multi-Well Wiring
*above is an example of a two well unit.
Multi well units will have the same repeating wiring schematic per number of wells.
2 Well Self Contained Assembly
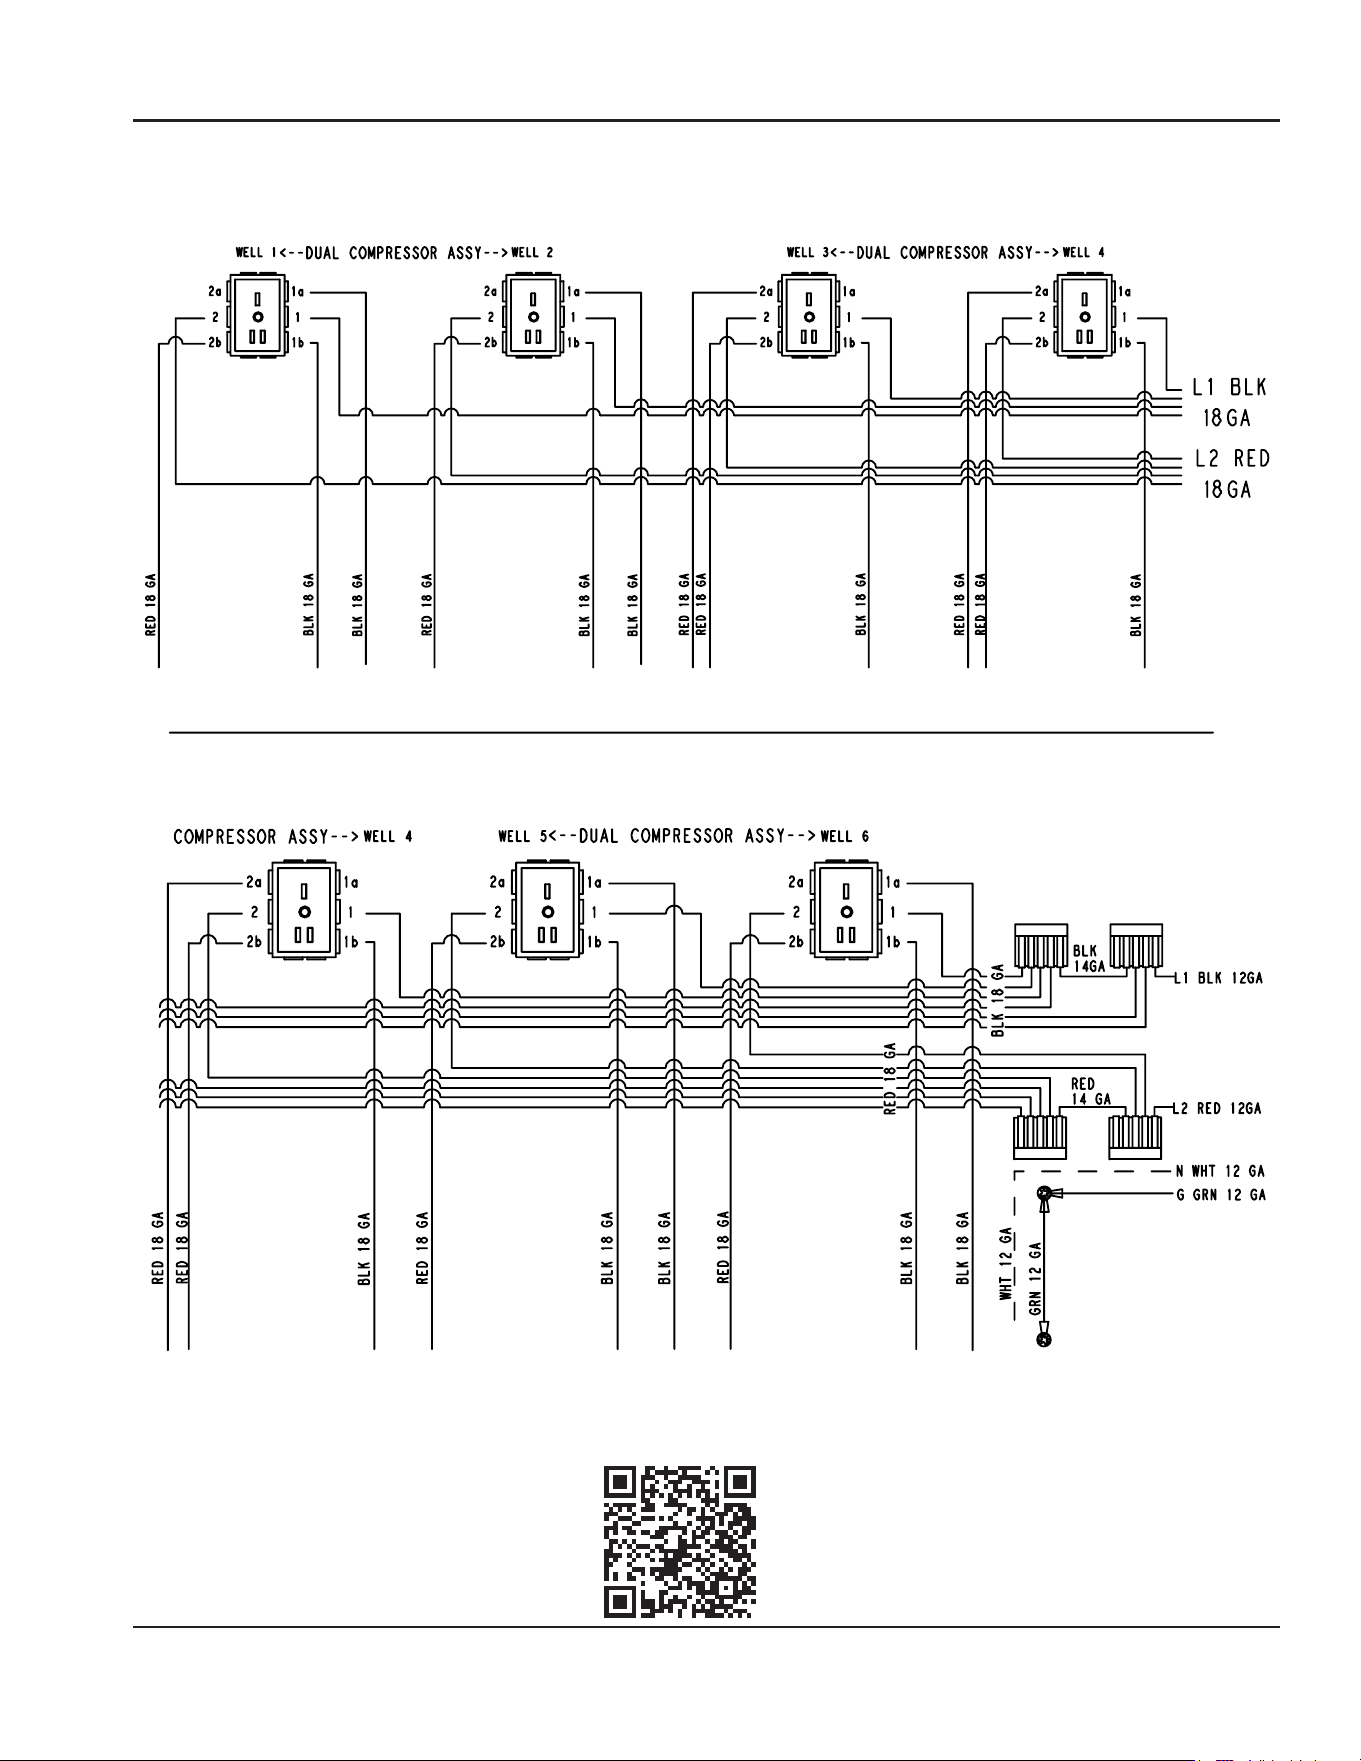
Section 6 Diagrams
Part Number: 9291544-GEN2 12/24 27
For the most up-to-date parts list, visit
https://www.Delfield.com/Service/Parts-Lists
4 Well Self Contained Assembly
6 Well Self Contained Assembly
DELFIELD
980 SOUTH ISABELLA ROAD, MOUNT PLEASANT, MI 48858
800-733-8821
WWW.DELFIELD.COM
©2019 Welbilt Inc. except where explicitly stated otherwise. All rights reserved.
Part Number: 9291544-GEN2 12/24

