Service Department
9900 Jordan Circle
Santa Fe Springs, CA 90670
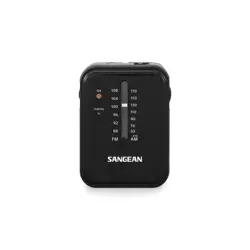
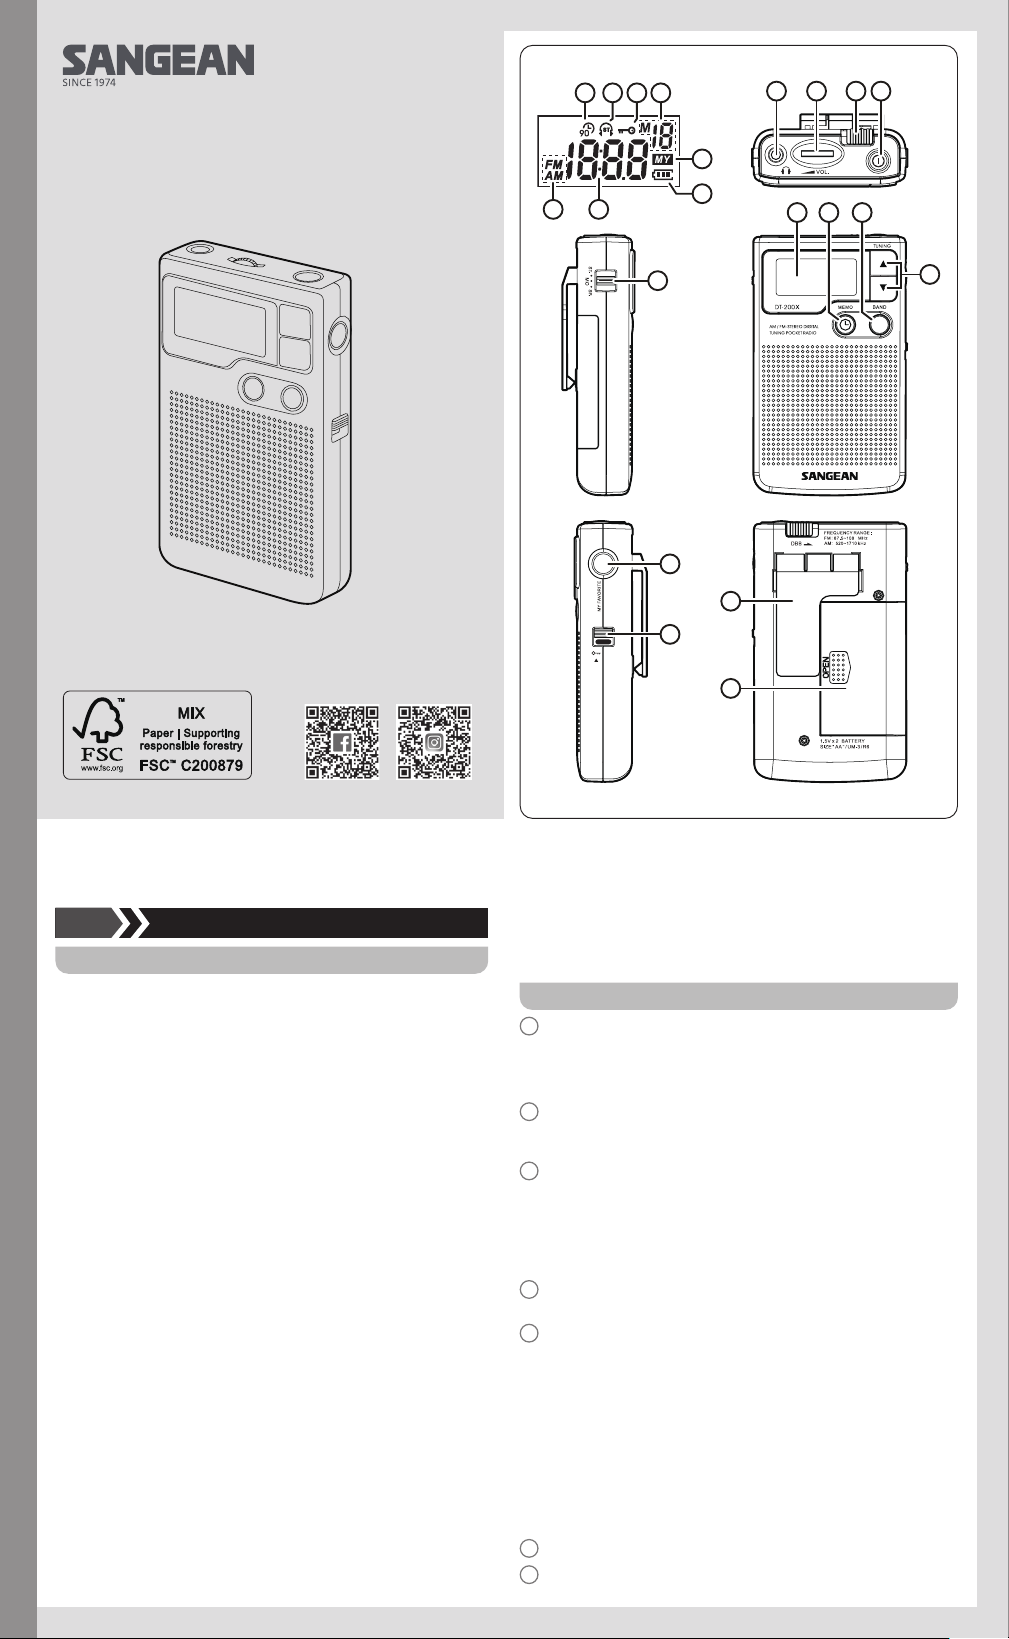
Controls
1
Headphone / Antenna Jack
Note:
To improve reception during speaker use, leave headphones or
external
antenna device plugged in through earphone jack.
2
Volume Control
You can rotate the volume control wheel located on the top of the unit
clockwise to increase volume, counter-clockwise to decrease volume.
3
Deep Bass Boost
The deep bass boost selector switch located on the top back of the
unit provides better bass response. Best result will be achieved when
using headphones.
● To select Deep Bass Boost slide switch to the left.
● To turn o slide switch to right.
4
Power switch
Allows you to turn the unit on and off.
5
Speaker / Headphone Selector
On the top left side of the radio you will find the output selector switch.
With this selector switch you can choose to use the built-in speaker, or
headphones.
To use speaker:
Set selector switch to SP. Selection
To use Headphones:
● In Stereo Mode: Set selector to ST. If the station is tuned in stereo
there will be a headphone indicator with ST. on the top middle part
of the display.
● In Mono: Set selector to MO.
6
LCD Display
7
Memory Button / Clock Set
Operating instruction
GB
Limited Warranty
Sangean America, Inc. warrants this product to be free from defects in
material and workmanship under normal use and conditions for a period
of 90 (Ninety) days from the date of original purchase on parts and labor.
Should service be necessary for any reason due to manufacturing
defect or malfunction during the warranty period Sangean America, Inc.
will repair
or replace at its description, the defective merchandise at no
charge (except
for small charge for handling, packing, return postage
and insurance), upon delivery of this product to Sangean America, Inc.
service center with a copy of proof of purchase date.
Warranty is only valid in the United States of America, Canada, and Mexico
and is not transferable to owners subsequent to the original owner.
This warranty does not cover intentional or accidentally damaged product,
or items used in ways other than the item was intended to be, units
repaired
or altered by persons other than Sangean America, Inc., or
damage caused by parts, accessories, or batteries not supplied or
approved
for use by Sangean America, Inc.
Any applicable implied warranties, including the warranty of merchantability,
are limited in duration to a period of 90 (Ninety) days from the date of
original purchase. No other warranties, whether expressed or implied
shall apply to this product thereafter. Sangean America, Inc. is not liable
for any
loss or damage, direct or consequential arising out of the use of,
or inability to use this product. (Some states do not allow limitation or
implied
warranties
or exclusion of consequential damage, therefore, these
restrictions may not apply to you.)
This warranty gives you specific legal rights and these and additional
rights may vary from state to state.
To return product for warranty repair:
1. Remove the batteries (if applicable) and carefully pack the unit along
with all it’s accessories in a suitable well padded corrugated box.
2. Enclose copy of proof of purchase with date and a letter describing
your specic problem.
3. Enclose your check or money order payable to Sangean America, Inc.
for the sum of $6.00 for return processing and shipping.
4. Insure and ship the unit via UPS, FedEx, or Parcel Post to:
Sangean America, Inc.
3A81VX0S20GB0
DT-200X
01 02
1
A
GH
B C
F
D
E
6
5
9
12
13
10
11
7 8
2 3 4
8
Band Selection
9
Manual Tuning
10
My Favorites
11
Lock Switch
The lock switch prevents accidental changing of any of the radio
settings.
● To enable the lock function slide the lock button located on the right
side of the unit to the up position. When lock is activated there will
be this symbol located on the top of the display. At this time no
buttons should function.
● To disable the lock function, slide the switch to the down position.
12
Belt Clip
A removable belt clip is provided on the back of the unit.
Removal:
It can be removed by gently pushing on the center tab of the clip
where indicated, and sliding the clip downward towards the bottom of
the radio.
Replacement:
You can easily connect the belt clip by inserting the top of the clip into
the designated receiver slots and gently pushing the clip in an upwards
motion towards the top of the radio.
13
Battery Compartment
Display
A
90 Minutes Auto Timer Indicator
B
Stereo Tuned Indicator
C
Lock Button Activated
D
Memory Preset Position
E
MY Favorites Feature Activated
F
Battery Life Indicator
G
Time Display
H
Band Indicator
Battery Installation
NOTE:
A flashing “E” appearing on the LCD display indicates a weak battery and
that replacement of batteries is required.
● Turn radio o.
● Prepare replacement batteries to ensure a quick and easy change.
Failure to change batteries within 1 minute will reset presets and clock
settings.
● The battery cover is located on the back of the unit. Apply a gentle
downward pressure and slide the door to the right side of the unit.
● Place 2 ‘AA’ batteries inside the unit oriented to the illustration located
just below the battery compartment.
Tuning the Radio
Seek Tuning
● Turn radio on using the On / O button located on the top of the radio.
● Select desired band by pressing the “Band” selector on the front of the unit.
● Press and hold the proper tuning button (Up / Down) for approximately
½ second. Radio will seek for next active signal station.
● Repeat as many times as desired.
Manual Step Tuning
● Turn radio on using the On / O button located on the top of the radio.
● Select desired band by pressing the “Band” selector on the front of the
unit.
● Press the desired tuning button (Up / Down) repeatedly until desired
frequency is found.
Memory Tuning
To tune in stations already programmed into memory. See Setting
Memory Section for instructions on how to program stations into radio
memory.
● Turn radio on using the On / O button located on the top of the radio.
● Press “My Favorites” button located on the right side of the radio. “MY”
should appear on the right hand of the display indicating function is on.
● Use tuning controls (Up / Down) to navigate through memory
programmed stations.
● Press “My Favorites” button to turn o memory tuning.
Setting Memory
● Turn radio on using the On / O button located on the top of the radio.
● Select desired band by pressing the “Band” selector on the front of the
unit.
●
Tune to desired station using either Manual Step Tuning or Scan
Tuning
options.
● Press Memory Button located on the front of radio unit and use the
tuning controls (Up / Down) to reach memory position as indicated in
the top-right of the display.
● Press Memory Button located on the front of the unit to lock station into
memory.
Setting the Clock
This unit features a clock that will display the current time while off. To set
the clock:
● Turn unit o by depressing the power button located on the top of the
radio.
● Press and hold MEMO or CLOCK button until the hour setting begins
blinking and the colon is no longer blinking.
● Select hour by using the Tuning Control Buttons located just to the right
of the display. Adjust UP or DOWN accordingly until desired hour is
displayed.
● Press MEMO or CLOCK button once to set the minutes.
● The minute indicator should now be blinking. Using the Tuning Control
Buttons located just to the right of the display. Adjust UP or DOWN
accordingly
until desired minutes is displayed.
● Once time displayed matches desired setting press MEMO or CLOCK
button once more.
● Time should display solidly, with the colon blinking periodically.
Auto shut off timer
For battery saving, this radio equips with 90 minutes auto shut off timer.
Radio will be turned off automatically after 90 minutes of listening. You
have to turn on the power again to continue the listening.
To disable 90 minutes auto shut off device, you can long press the power
button for more than 2 seconds each time you turn on the radio until display
auto shut off symbol disappears.
Specifications
Band Frequency
AM 520 - 1710 kHz
FM 87.5 - 108 MHz
Earphone Jack
3.5mm mini-plug
16 ohm impedance (stereo)
Output Power
60mW (10% THD) via built-in speaker
16 ohm impedance (stereo)
Speaker 1
inch diameter, 4 ohms impedance
External Power
Speaker Earphones
AM 60 50mA
FM 70 60mA
Batteries 3 Volts (AA size)x2
Dimensions (WxHxD) 2.5” W x 4.2” H x 1.2” D
Weight 3.8 ounces approximately without batteries
※ The barcode label on the product is defined as below:
Serial number
Production month
Production year
Product code
Sangean reserves the right to amend the specifications without notice.
RECYCLING This product bears the selective sorting symbol for
Waste electrical and electronic equipment (WEEE). This means
that this product must be handled pursuant to European directive
2012/19/EU in order to be recycled or dismantled to minimize its
impact on the environment.
03 04
05 06