
User Manual
www.zlinekitchen.com
MONUMENT DISHWASHERS
WITH DURAWASH
DWMT MODELS

ZLINE Kitchen and Bath provides Attainable Luxury, where the kitchen and bath of your dreams
is never out of reach. Through our unique designs and unparalleled quality, we’re dedicated to
providing you an elevated experience in the heart of your home. With an endless selection of
features and finishes, our inspiration is your reality.

ZLINE is fueled by a passion for innovation; A relentless pursuit of bringing the
highest end luxury designs and professional features into everyone’s homes.
Because we continually strive to improve our products, we may change
specifications and designs without prior notice.
Scan the QR code to view the most up-to-date version of the Installation
Manual and User Manual.
WARNING: This product can expose you to chemicals including nickel, which is known to the
State of California to cause cancer. For more information, go to www.P65Warnings.ca.gov.

IMPORTANT SAFETY INSTRUCTIONS . . . . . . . . . . . . . . . . 1
OPERATION . . . . . . . . . . . . . . . . . . . . . . . . . . . . . . . . . . . . . 6
Filter System . . . . . . . . . . . . . . . . . . . . . . . . . . . . . . . . . 7
Control Panel . . . . . . . . . . . . . . . . . . . . . . . . . . . . . . . . 8
Preparing Dishes . . . . . . . . . . . . . . . . . . . . . . . . . . . . . . . 11
Adjusting Racks . . . . . . . . . . . . . . . . . . . . . . . . . . . . . . .12
Loading Racks . . . . . . . . . . . . . . . . . . . . . . . . . . . . . . . . 14
Using Detergent . . . . . . . . . . . . . . . . . . . . . . . . . . . . . . .17
Using Rinse Aid . . . . . . . . . . . . . . . . . . . . . . . . . . . . . . .18
MAINTENANCE AND CLEANING . . . . . . . . . . . . . . . . . .20
TROUBLESHOOTING . . . . . . . . . . . . . . . . . . . . . . . . . . . . . 25
WARRANTY . . . . . . . . . . . . . . . . . . . . . . . . . . . . . . . . . . . . . 30
TABLE OF CONTENTS

1
IMPORTANT SAFETY INSTRUCTIONS
General Safety
CAUTION
CAUTION
RISK OF ELECTRIC SHOCK
DO NOT OPEN
CAUTION
This symbol indicates that dangerous voltage constituting a risk of
electric shock is present within your dishwasher.
This symbol indicates there are important operating and maintenance
instructions in the manuals accompanying your dishwasher.
WARNING
BEFORE YOU BEGIN
• Read these instructions completely and carefully.
• Keep these instructions.
• Heed all warnings.
• Follow all instructions.
• Clean your unit only with a damp cloth.
• Do not block any ventilation openings. Install in accordance with the manufacturer’s
instructions.
• Make sure that the available AC power matches the voltage requirements of
this appliance.
• Refer all servicing to a qualified service personnel. Servicing is required when the
appliance has been damaged in any way or it does not operate normally.
CAUTION
ELECTRIC SHOCK HAZARD
Failure to follow these instructions can result in electric shock,
fire, or death.
• WARNING-DANGER: Never allow children to play with, operate, or crawl inside
the dishwasher.
• Turn off the dishwasher before carrying out user maintenance on it.
• If a component or part is damaged, it must be replaced by the manufacturer, a
professional service agent, or similar qualified persons in order to avoid a hazard.
• This appliance is intended to be used in a household and similar environments.

2
Product Specifications
IMPORTANT SAFETY INSTRUCTIONS
IMPORTANT
• Observe all governing codes and ordinances.
• Note to Installer – Be sure to leave these Installation Manual instructions for the
consumer’s and local inspector’s use.
• Note to Consumer – Keep these Installation Manual instructions with your User
Manual for future reference.
• Skill Level – Installation of this dishwasher requires basic mechanical and electrical
skills. Proper installation is the responsibility of the installer. Product failure due to
improper installation is not covered under the appliance warranty.
• Completion Time – One to three hours. New installations require more time than
replacement installations.
• The dishwasher MUST be installed in a manner that allows for easy future removal
from the enclosure if service is required.
• Do not install this dishwasher if it has missing or broken parts. If the dishwasher
arrives damaged, contact ZLINE Customer Service at 1-614-777-5004 for help.
FOR YOUR SAFETY
Read and observe all CAUTIONS and WARNINGS shown throughout these
instructions. While performing installations described in this booklet, gloves and safety
glasses or goggles should be worn.
WARNING
This dishwasher comes with a heating element to heat the water. To avoid the risk of a
serious burn, don’t touch the heating element when the dishwasher is on.
WARNING
To reduce the risk of electrical shock, fire, or injury to persons, the
installer must ensure that the dishwasher is completely enclosed at
the time of installation.

3
General Safety
IMPORTANT SAFETY INSTRUCTIONS
FOR YOUR SAFETY
Read and observe all CAUTIONS and WARNINGS shown throughout these
instructions. While performing installations described in this booklet, gloves and safety
glasses or goggles should be worn. Basic precautions before use:
• Read all instructions before using the dishwasher.
• NOTE: This Installation Manual does not cover every possible condition and
situation that may occur.
• Use the dishwasher only for the intended functions as described in this
Installation Manual.
• To ensure the longevity of the dishwasher’s optimal wash performance, we
recommend rinsing off any large pieces of food from your dishes prior to placing
them in the unit for a wash cycle.
• When loading items to be washed:
• Load sharp items and knives so that they are not likely to damage the door seal,
racks, spray arms, and tub.
• Load sharp items and knives with the handles up to reduce the risk of being cut
or suffering other injury.
• Do not wash plastic items (e.g. plastic tableware or Tupperware) unless they
are marked dishwasher-safe or the equivalent. If not marked, check with the
manufacturer for recommendation — items that are not dishwasher-safe may melt
and create a potential fire hazard.
• If the dishwasher drains into a garbage disposal, make sure disposal is completely
empty before running dishwasher.
• Do not tamper with the control panel on the dishwasher.
• Do not operate your dishwasher unless all enclosure panels are properly in place.
• Do not touch the heating element during or immediately after use, especially if the
sanitize option has been selected.
• Do not abuse, sit, or stand on the door or racks of the dishwasher and do not allow
children to tamper with the spray arms, baskets, or other elements inside the unit.
• Do not store or use combustible materials, gasoline, or other flammable vapors
and liquids in the vicinity of this or any other appliance.
• Use only detergents or rinse agents recommended for use in a dishwasher and
keep them out of the reach of children and pets.

4
General Safety
IMPORTANT SAFETY INSTRUCTIONS
• Some dishwasher detergents are strongly alkaline. They can be extremely dangerous
if swallowed. Avoid contact with the skin and eyes and keep children away from
the dishwasher when the door is open.
• Under certain conditions, hydrogen gas may be produced in a hot water system
that has not been used for two weeks or more. HYDROGEN GAS IS EXPLOSIVE.
• If your home’s hot water system has not been used for a period of time, before
using the dishwasher again, let the water flow for several minutes. This will release
any accumulated hydrogen gas. Hydrogen gas is flammable. Do not smoke or use
an open flame during this time.
• Keep young children and infants away from dishwasher when it is operating.
• Do not use the dishwasher if it has a damaged power line or plug, and do not plug
the dishwasher into a damaged outlet; failure to observe these instructions may
result in electrical shock.
• Care shall be exercised, when the appliance is installed or removed, to reduce the
likelihood of damage to the power-supply cord.
• Remove the door to the washing compartment when removing an old dishwasher
from service or discarding it.
• To reduce the risk of injury, do not allow children to play in or on a dishwasher.
• This dishwasher is intended for residential use only and should not be used in
commercial establishments. This appliance is not applicable for outdoor usage. The
manufacturer disclaims responsibility for damage or injury caused by improper use
of this appliance.
PLEASE SAVE THESE INSTRUCTIONS
5
General Safety
IMPORTANT SAFETY INSTRUCTIONS
DWMT-24 SPECIFICATIONS
Panel Ready Dimensions
• 23 7/8" W x 24 1/2" D x 33 3/4" (min) - 35" (max) H
• 606 mm W x 622 mm D x 832 mm (min) - 889 mm (max) H
2
General Safety
FOR YOUR SAFETY
Read and observe all CAUTIONS and WARNINGS shown throughout these
instructions. While performing installations described in this booklet, gloves and
safety glasses or goggles should be worn.
WARNING
This dishwasher comes with a heating element to heat the water. To avoid the risk of a
serious burn, don’t touch the heating element when the dishwasher is on.
WARNING
To reduce the risk of electrical shock, fire, or injury to persons, the
installer must ensure that the dishwasher is completely enclosed at
the time of installation.
IMPORTANT SAFETY INSTRUCTIONS
SPECIFICATIONS
Dimensions
(W x D x H)
• Unit with decorated door and handle: 23.9 x 26.5 x 33.7 in.
• Unit without decorated door and handle: 23.9 x 24 x 33.7 in.
Basket Handle
Top rack
Cup shelf
Tub gasket
Silverware
basket
Bottom rack
Heating
element
Rinse aid
dispenser
Detergent
dispenser
Lower spray arm
Vortex wash arm
(left side)
Spray arm
Door latch
Top light
Adjustable
upper rack
NOTE: Minimum and maximum heights take into account the legs, which can be extended
by roughly 1 1/4" (32 mm).

6
Dishwasher Features
IMPORTANT NOTES
1. Water supply temperature should be between 120 °F–150 °F (49 °C–66 °C).
2. Dispose of the discarded appliance and packing material properly.
3. The dishwasher must be grounded or it can result in a risk of electric shock.
4. If there is any damage to the dishwasher, please contact ZLINE Customer Service
at 1-614-777-5004. Do to attempt to repair or replace any part by yourself. For
information on installing and setting up your dishwasher, refer to the Installation
Manual provided with your appliance.
BEFORE USING YOUR DISHWASHER
1. Remove the interior packing.
2. Clean the interior surface with lukewarm water using a soft cloth.
FINDING A SUITABLE LOCATION
• This dishwasher is designed to be built-in.
• The dishwasher door must be able to swing fully open.
PROVIDING A PROPER POWER SUPPLY
Check your local power source. This dishwasher requires a 120VAC, 60Hz power
supply. Refer to the Installation Manual for additional information.
HOW YOUR DISHWASHER CLEANS
The dishwasher fills with water, covering the filter area at the bottom. Water is then
pumped through the various filter and spray arms, spraying a mixture of hot water
and detergent against the soiled surfaces of your dishes and silverware. Soil particles
are separated and go down the drain as the dirty water is drained and replaced with
clean water. The number of water fills is determined by the cycle selected.
WASH CYCLE SELECTIONS
Cycle times are approximate and will vary with options selected. Hot water is
necessary to activate dishwasher detergent and melt fatty food soils. An automatic
sensor checks the incoming water temperature and, if it is not hot enough, the timer will
be delayed to allow for the water to heat for the main wash of all cycles. This happens
even when hi-temp wash is selected, so that higher temperature will be available to
handle heavier soil loads.
OPERATION

7
Filter System
FILTER SYSTEM
Your dishwasher has a multiple filter system that includes four separate filter meshes. It
separates dirty water and clean water into different chambers. The multiple filter system
helps your dishwasher operate with better performance by using less water and less energy.
SMART WASH SYSTEM
Your dishwasher has a smart wash system under the normal wash program that selects
the wash cycle based on how large and soiled the load is, permitting your dishwasher to
clean more efficiently every time. When a partial load of lightly soiled dishes is placed in
the unit, a short wash cycle is automatically selected. When a full load of heavily soiled
dishes is placed in the unit, a heavy wash cycle is automatically selected.
ADJUSTABLE UPPER RACK
The upper rack of your dishwasher can be raised or lowered to accommodate loading
dishes of varying heights in either rack. After removing the third rack, the upper rack
clearance height can be adjusted from 8" to 10" (203 mm to 254 mm). The lower rack
clearance height can be adjusted from 11" to 13" (279 mm to 330 mm). See "Adjusting
the Upper Rack" on page 12 for more details.
OPERATION

8
Control Panel
CONTROL PANEL
USING THE CONTROL PANEL
Your dishwasher’s control panel is located on the top edge of the door. The door must
be open to select wash cycle settings and operate the dishwasher.
POWER On/Off 3sec - Hold this button, located on the far left of the control panel,
down for three seconds to turn the unit’s power on or off.
CYCLES
Select a cleaning cycle based on the type of dishes to be washed and the level of
soil on the dishes. Cycle times are approximate and will vary with options selected.
The timer will be delayed to allow for the water to heat for the main wash of all cycles
if the sensor detects the water is not hot enough. Below is water use and cycle times
under standard conditions.
# CYCLE DESCRIPTION WATER USE
CYCLE TIME
(MINUTES)
1 AUTO
Auto sensing wash, lightly, or heavily soiled
dishes, with or with out dried-on food.
3.0 - 5.9 gal.
(11.4 - 22.5 l)
100 - 133
2 NORMAL
Use for regularly soiled dinner dishes
or silverware.
3.0 - 5.9 gal.
(11.4 - 22.5 l)
102 - 120
3 HEAVY
Use for hard-to-clean, heavily soiled dishes,
pots, and pans.
6.9 gal.
(26.2 l)
13 8
4 DELICATE Use for lightly soiled dishes and glass.
5.9 gal.
(22.5 l)
114
5 EXPRESS
Use for lightly soiled and pre-rinsed dishes
and silverware.
4.0 gal.
(15.1 l)
60
6 RINSE
Use for pre-rinsing dishes or glasses. This is
only a rinse that keeps food from drying on
your dishes and reduces odor buildup in your
dishwasher until you are ready to wash a full
load. Do not use detergent.
2.0 gal.
(7.7 l)
20
OPERATION

9
Control Panel
CONTROLS AND INDICATORS
7. DISPLAY - Shows the remaining hours and minutes of the current cycle, delay hours remaining,
and error codes (see "Error Codes" on page 25).
8. Rinse Aid - Turns on when you need to add rinse aid.
9. Sanitized - Turns on when a sanitized cycle is finished. Turns off after 30 seconds, when the
door is opened.
10. Clean - Turns on after a cycle finished. Turns off after 30 seconds when the door is opened.
11 . DELAY - Press repeatedly to delay the start of the selected wash cycle until the delay time you
want is shown on the display. “H” will show. This is not an error code. You can select from 1
to 24 hours for a delay. After you select the time you want, press START/CANCEL once, then
close the door within four seconds. The delay begins to count down. If you open the door
while delay is running, press the START/CANCEL, then close the door within four seconds
to begin the cycle from that point. To cancel the delay and begin the cycle before the delay
period is complete, open the door, then press and hold DELAY for three seconds.
OPTIONS
12. HEATED DRY - Use to heat-dry your dishes. This function is not available for rinse only cycle.
13. SANITIZE - Use to sanitize your dishes and glassware. Maintains the water temperature at
158 °F (70 °C) maximum and is available with the AUTO, NORMAL, and HEAVY cycles.
NOTE:
• Certified residential dishwashers are not intended for licensed food establishments.
• The sanitize cycle is NSF certified.
14. HI TEMP WASH - Use to maintain the water temperature at 140 °F (60 °C) max. This option
is available with the AUTO, NORMAL, and HEAVY cycles.
OPERATION

10
Control Panel
15. START/CANCEL - Press to start the dishwasher after you have selected a cycle and
function (if desired). Close the door. The cycle indicator begins to blink and the function
indicator turns on. If you don’t close the door within four seconds of pressing START/
CANCEL, the dishwasher pauses. Press START/CANCEL again to continue with the
cycle. To cancel a running cycle, open the door, then press and hold START/CANCEL
for three seconds. The dishwasher will return to standby status. To load more dishes or
pause the dishwasher while it’s already running, open the door. A safety mechanism
stops the cycle.
NOTE: You can add more dishes before the main wash cycle has started. To determine
this, check the detergent dispenser in the door. If the detergent dispenser is still closed, you
can add more dishes. If it is open, you can add dishes to the dishwasher if the dish quantity
is small. If the quantity is large, restart the cycle.
PERFORMING A DRAIN CYCLE
It may be necessary at times to perform a drain cycle to empty water in the dishwasher.
This can be done by canceling any cycle or program. Press START/CANCEL for three
seconds to cancel a program. After a cancelation has been initiated and the door has
been closed, the unit will prompt a 60 second drain cycle.
BASIC OPERATION
1. Load the dishwasher (See "Preparing and Loading Dishes" on page 9).
2. Add detergent (See "Filling the Detergent Dispenser" on page 17).
3. Add rinse aid, if needed (See "Filling the Rinse Aid Dispenser" on page 18).
4. Select the cycle you want (See "Cycles" on page 8). The indicator will light when
the selection is made.
5. Select the function you want. The indicator will light when the selection is made.
6. To start, press START/CANCEL on the control pad.
7. Close the door within four seconds and the wash cycle will begin.
CAUTION
To avoid injury, open the door slowly and carefully. There is a possibility
of hot steam from inside the dishwasher.
OPERATION

11
Preparing Dishes
PREPARING AND LOADING DISHES
PREPARING DISHES
Preparing dishes for washing
• Scrape away large pieces of food, bones, pits, toothpicks, and similar items. The
continuous filtered wash system will remove the remaining food particles.
• Burned-on foods should be loosened before loading into the dishwasher.
• Empty liquids from glasses and cups.
• Foods such as mustard, mayonnaise, vinegar, lemon juice, and tomato-based
products may cause discoloration of stainless steel and plastics if allowed to sit for a
long period of time. Unless the dishwasher is to be operated at once, it is best to rinse
off these types of foods.
• If the dishwasher drains into a garbage disposal, be sure the disposal is completely
empty before starting dishwasher.
OPERATION

12
Loading the Dishwasher
ADJUSTING RACKS
ADJUSTING THE UPPER RACK
This dishwasher has a convenient top rack for silverware, cutlery, and small items. This
rack can be adjusted to accommodate varying loads, as shown below.
43
OPERATION
ADJUSTING THE UPPER RACK
This dishwasher has a convenient top rack for silverware,
This rack can be adjusted to accommodate varying loads, as sh
Lef
t and right racks aligned
Loading the Dishwasher
ADJUSTING THE UPPER RACK
This dishwasher has a convenient top rack for silverware, cutlery, and small items.
This rack can be adjusted to accommodate varying loads, as shown below.
Left rack is lower position and right rack angled
Left rack adjusted to lower position and right rack to upper position
Left rack adjusted to lower position and right rack moved to the left
Left rack adjusted to lower position and right rack removed
Left rack in lower position and right rack angled
43
OPERATION
ADJUSTING THE UPPER RACK
This dishwasher has a convenient top rack for silverware,
This rack can be adjusted to accommodate varying loads, as sh
Lef
t and right racks aligned
Loading the Dishwasher
ADJUSTING THE UPPER RACK
This dishwasher has a convenient top rack for silverware, cutlery, and small items.
This rack can be adjusted to accommodate varying loads, as shown below.
Left rack is lower position and right rack angled
Left rack adjusted to lower position and right rack to upper position
Left rack adjusted to lower position and right rack moved to the left
Left rack adjusted to lower position and right rack removed
Left rack adjusted to lower position and right rack to upper position
43
OPERATION
ADJUSTING THE UPPER RACK
This dishwasher has a convenient top rack for silverware,
This rack can be adjusted to accommodate varying loads, as sh
Lef
t and right racks aligned
Loading the Dishwasher
ADJUSTING THE UPPER RACK
This dishwasher has a convenient top rack for silverware, cutlery, and small items.
This rack can be adjusted to accommodate varying loads, as shown below.
Left rack is lower position and right rack angled
Left rack adjusted to lower position and right rack to upper position
Left rack adjusted to lower position and right rack moved to the left
Left rack adjusted to lower position and right rack removed
Left rack adjusted to lower position and right rack moved to the left
43
OPERATION
ADJUSTING THE UPPER RACK
This dishwasher has a convenient top rack for silverware,
This rack can be adjusted to accommodate varying loads, as sh
Lef
t and right racks aligned
Loading the Dishwasher
ADJUSTING THE UPPER RACK
This dishwasher has a convenient top rack for silverware, cutlery, and small items.
This rack can be adjusted to accommodate varying loads, as shown below.
Left rack is lower position and right rack angled
Left rack adjusted to lower position and right rack to upper position
Left rack adjusted to lower position and right rack moved to the left
Left rack adjusted to lower position and right rack removed
Left rack adjusted to lower position and right rack removed
OPERATION

13
Rack Adjustment Procedure
ADJUSTING THE UPPER RACK
The height of the upper rack can be adjusted to accommodate loading taller dishes in
either rack.
1. Lift the rack to move it to the upper position.
2. Press the handle to move it to the lower position.
LOADING THE UPPER RACK
The upper rack is designed for cups, glasses, small plates, bowls, and plastic items marked
dishwasher-safe. For best results, place the items with the soiled surface facing down or
toward the center. Tilt them slightly for better drainage.
NOTE: Make sure the loaded dishes do not interfere with the rotation of the middle spray
arm, which is located just below the upper rack. You can check this by rotating the middle
spray arm by hand.
OPERATION
14
Loading the Dishwasher
LOADING RACKS
LOADING THE TOP RACK
You can place the items in the top rack randomly or in an orderly fashion. The image
below shows how to load the top rack for 16 place settings:
Large forks Large spoons
Large spoons
Small spoons
Forks
Knives
Spoons
Small forks
Knives
Loading suggestions are shown below.
8 place settings
14 place settings
12 place settings
16 place settings
OPERATION
15
Loading the Dishwasher
LOADING THE BOTTOM RACK
The bottom rack is designed to accommodate plates, bowls, saucers, and cookware.
The adjustable rack lets you load items up to 13" (330 mm) high. Large items should
be placed along the edge, with the inside faces down, so they do not interfere with
the middle or lower spray arms or prevent the detergent dispenser from opening.
The fold-down tines on the bottom rack are provided to support extra large and hard-
to-fit items. The tines may be left up for normal use or folded down for more flexible
loading of larger items.
Loading suggestions are shown below:
8 place settings
14 place settings 16 place settings
12 place settings
OPERATION

16
Loading the Dishwasher
LOADING THE SILVERWARE BASKET
The silverware basket is divided into three separate sections, which can be placed in either
the upper or lower racks.
CAUTION: Make sure nothing protrudes through the bottom of the silverware
basket that would block the lower spray arm from turning effectively.
ADDING A DISH
CAUTION
TO AVOID BURN INJURY: Open the door slowly and wait until the spray
arms and wash action stop. Hot water may splash out of dishwasher. Failure
to do so may result in injury.
Before adding dishes, refer to "Preparing and Loading Dishes" on page 9 for
instructions on loading more dishes. Also see information on Start/cancel in the "Controls
and Indicators" on page 9. To add or remove items after the wash cycle starts:
• Open the door slightly and wait a few seconds until wash action stops before
completely opening.
• Add the item.
• Press START/CANCEL on the control pad and close the door within four seconds. The
cycle automatically resumes.
OPERATION

17
Filling the Detergent Dispenser
USING DETERGENT
FILLING THE DETERGENT DISPENSER
1. Push the detergent dispenser cover latch downward to open the detergent cup.
2. Add detergent (dry powder, liquid, or packet) to the cup.
3. Close the detergent dispenser cover.
The amount of detergent required depends on the cycle selected and the soil level
on the dishes. Refer to the following table for the recommended amount. Loading
suggestions are shown below:
NOTE: Detergent pods are not designed to be used in this dispenser. They should be
thrown into the bottom of the tub.
Cycle
Soft Water
(0-3 grains)
Medium Hard
Water
(4-8 grains)
Hard Water
(9-12 grains)
Very Hard
Water
(over 12 grains)
AUTO
NORMAL
HEAVY
DELICATE
EXPRESS
2 tsp.
(main wash cup
1/4 full)
5 tsp. (main
wash cup
fill to line
above regular)
8 tsp. (main
wash cup
completely full)
Main wash cup
completely full
(water softener
recommended)
Rinse
No detergent No detergent No detergent No detergent
OPERATION

18
Filling the Rinse Aid Dispenser
USING RINSE AID
FILLING THE RINSE AID DISPENSER
Your dishwasher is designed to use a liquid rinse aid. The use of rinse aid greatly improves
drying performance after the final rinse. Do not use a solid or bar-type rinse aid. Under
normal conditions, the rinse aid will last approximately one month. Try to keep the
dispenser full, but do not over fill it.
1. Turn rinse aid dispenser cap 1/4 turn counterclockwise and lift it out.
2. Add rinse aid until liquid touches the indicated fill level. Do not overfill since this
can cause over sudsing. Wipe up any spills with a damp cloth. The dispenser holds
enough for 35 to 140 washes, depending on the dial setting.
3. Replace the cap and turn it 1/4 turn clockwise.
OPERATION

19
Filling the Rinse Aid Dispenser
Rinse aid greatly improves drying and reduces water spots and filming. Without rinse aid, your
dishes and dishwasher interior will have excessive moisture. In addition, the heated dry option will
not perform as well without rinse aid. The rinse aid dispenser, located next to the detergent cup,
automatically releases a measured amount of rinse aid during the last rinse. If spotting and poor
drying is a problem, increase the amount of rinse aid dispensed by rotating the dial to a higher
number. The dial is located under the dispenser cap.
NOTE: While rinse aid will assist in the drying process, the dishwasher is not designed to
completely dry every dish. Some water will naturally accumulate in items that have reservoirs,
such as plastic containers and the bottom of coffee mugs. This is a normal occurrence in nearly all
dishwasher models.
WATER TEMPERATURE
Hot water is required for optimal dishwashing and drying results. Water entering the dishwasher
should be at least 120 °F (49 °C) to achieve satisfactory results. To check water temperature:
1. Turn on the hot water faucet near the dishwasher and let it run for several minutes.
2. Hold a thermometer (a candy or meat thermometer will work) in the water stream to check the
temperature. If temperature is below 120 °F (49 °C), have a qualified person raise the hot
water heater thermostat setting.
IMPORTANT: To make sure that the water entering the dishwasher is hot, run hot water from the
nearest hot water faucet to clear cool water from the pipe before starting the cycle.
HEAT DRY FUNCTION
The heat dry function, when used with a rinse aid, enhances drying performance. If you do
not choose the heat dry function, items in your load may be wetter than anticipated at the end
of the cycle.
WATER PRESSURE
For optimal performance, the hot water supply line for your dishwasher must provide water pressure
of at least 20 psi and not more than 120 psi. You may experience low water pressure during high-
demand periods, such as when laundry or showers are in use while you are washing the dishes.
To eliminate this problem, wait until hot water demand is reduced before starting the dishwasher.
OPERATION

20
Cleaning and Maintenance
FACTORS AFFECTING PERFORMANCE
CAUTION
TO AVOID BURN INJURY: Allow the heating element to cool before
attempting to clean the interior of your dishwasher.
CLEANING THE STAINLESS STEEL PANEL
Clean the stainless steel door and handle regularly with a soft cloth and standard
household cleaner to remove the debris.
CAUTION
Do not use appliance wax, polish, bleach or products containing chlorine to
clean the stainless steel door.
CLEANING THE CONTROL PANEL
Clean the control panel gently with a soft, lightly dampened cloth.
CLEANING THE STAINLESS STEEL INNER DOOR AND TUB
The tub is made of stainless steel. It will not rust or corrode, even if the dishwasher should
be scratched or dented. Clean the spots on the steel inner door and tub with a damp
non-abrasive cloth.
CLEANING THE FILTERS
The filters are designed to collect debris and need to be cleaned monthly to maximize
wash performance.
1. Remove the bottom rack.
51
MAINTENANCE AND CLEANING
FACTORS AFFECTING PERFORMANCE
CLEANING THE STAINLESS STEEL PANEL
Clean the stainless steel door and handle regularly with a soft cloth and standard
household cleaner to remove the debris.
CLEANING THE CONTROL PANEL
Clean the control panel gently with a soft, lightly dampened cloth.
CLEANING THE STAINLESS STEEL INNER DOOR AND TUB
The tub is made of stainless steel. It will not rust or corrode, even if the dishwasher
should be scratched or dented. Clean the spots on the steel inner door and tub with
a damp non-abrasive cloth.
CLEANING THE FILTERS
The filters are designed to collect debris and need to be cleaned monthly to maximize
wash performance.
1. Remove the bottom rack.
Caution:
TO AVOID BURN INJURY: Allow the heating element to cool before
attempting to clean the interior of your dishwasher.
Caution:
Do not use appliance wax, polish, bleach or products containing chlorine
to clean the stainless steel door.
Cleaning and Maintenance
MAINTENANCE AND CLEANING

21
Cleaning and Maintenance
2. Rotate the cylinder filter, then lift it out.
3. Lift the fine filter from the bottom of the tub.
4. Take out the fabric filter.
MAINTENANCE AND CLEANING
22
Cleaning and Maintenance
5. Flush the filters by holding them under running water.
6. Replace the fabric filter.
7. Replace the fine filter.
8. Replace the cylinder filter.
9. Replace the bottom rack.
CLEANING THE DOOR AND TUB GASKETS
Clean the door gasket with a damp cloth to remove food particles regularly.
53
MAINTENANCE AND CLEANING
Cleaning and Maintenance
5. Flush the filters by holding them under running water.
6. Replace the fabric filter.
7. Replace the fine filter.
8. Replace the cylinder filter.
9. Replace the bottom rack.
CLEANING THE DOOR AND TUB GASKETS
Clean the door gasket with a damp cloth to remove food particles regularly.
MAINTENANCE AND CLEANING

23
Cleaning and Maintenance
The inside of the dishwasher is self-cleaning under normal use. If needed, the tub gasket can
be cleaned with a damp cloth. Use a brush to clean the opening in the end of the gasket.
54
MAINTENANCE AND CLEANING
Cleaning and Maintenance
The inside of the dishwasher is self-cleaning under normal use. If needed, the tub
gasket can be cleaned with a damp cloth. Use a brush to clean the opening in the
end of the gasket.
CLEANING THE AIR GAP
If there is an air gap installed with your dishwasher, make sure it is clean so the
dishwasher will drain properly. Air gap is not part of your dishwasher. Before you
clean the air gap, turn off the dishwasher, then remove the plastic air gap cover and
clean with a toothpick.
MAINTENANCE AND CLEANING

24
Cleaning and Maintenance
CLEANING THE AIR GAP
If there is an air gap installed with your dishwasher, make sure it is clean so the dishwasher
will drain properly. Before you clean the air gap, turn off the dishwasher, then remove the
plastic air gap cover and clean with a toothpick.
DISCONNECTING SERVICE
Your dishwasher should be protected from freezing if you plan to leave it for extended
periods in an unheated place. Have a qualified person do the following:
To disconnect service:
1. Turn off the electrical power to the dishwasher at the supply source by moving fuses or
tripping the circuit breaker.
2. Turn off the water supply.
3. Place a pan under the inlet valve, then disconnect water line from the inlet valve and
drain it into a pan.
4. Disconnect the drain line from pump and drain the water into a pan.
To restore service:
1. Reconnect the water, drain, and electrical power.
2. Turn on water and electrical power supply.
3. Fill the detergent cup and the rinse aid cup and run the dishwasher through a
heated-wash cycle.
4. Check all connections to make sure they do not leak.
MAINTENANCE AND CLEANING

25
Troubleshooting
Refer to this table to correct minor issues before calling for service.
CODE MEANING POSSIBLE CAUSE
E1
Slow fill time/fill time has exceeded
time alloted
• Faucet is not opened
• Water intake is restricted
• Water pressure is too low
E4 Overflow A leak in the dishwasher
Ed Communication exception or issue
The display board can’t receive or the
main board can’t send a signal for
over 20 seconds.
CAUTION
• If a water overflow occurs, turn off the main water supply before calling for service.
• If there is water in the base pan because of an overfill or small leak, the water should
be removed before restarting the dishwasher.
TROUBLESHOOTING

26
Troubleshooting
PROBLEM POSSIBLE CAUSE POSSIBLE SOLUTION
The
dishwasher won’t start
The door may not be
closed properly.
Make sure that the door is
closed and latched.
The power is off or
not connected.
Make sure that the
power is connected
and turned on.
The delay start option is selected.
Refer to the “Delay” section
under "Controls and
Indicators" on page 9.
The dishwasher beeps
at the end of the cycle
This is normal and indicates
that the wash cycle is complete.
This is a normal occurrence.
The rinse
aid light is on
The rinse aid level is low. Add rinse aid.
The dishwasher
runs too long
The dishwasher is connected to a
cold water supply.
Make sure that the
dishwasher is connected to
a hot water supply. If not,
change the water supply to
a hot water source.
The cycle time varies, depending
on the soil level of the dishes.
When heavy soil is
detected, the wash times
will be longer.
Depends on the option selected.
Some options will add time
to the cycle.
The dishes are not
drying enough
The rinse aid dispenser is empty
or the setting is too low.
Fill the rinse aid dispenser.
Increase the rinse
aid setting.
Dishes are loaded improperly.
Reload the dishwasher
as shown in "Preparing
and Loading
Dishes" on page 9.
The cycle you chose did not
include drying.
Choose a cycle
with drying.
TROUBLESHOOTING

27
Troubleshooting
PROBLEM POSSIBLE CAUSE POSSIBLE SOLUTION
The dishes are not
clean enough
The water pressure is too low.
Make sure that the water
pressure is above 20 psi.
Use your dishwasher when
water demand is low.
The inlet water
temperature is too low.
Make sure that the
dishwasher is connected to
a hot water supply. If not,
change the water supply
to a hot water source. Use
your dishwasher when hot
water demand is low.
Dishes are too close together.
Reload the dishwasher
as shown in "Preparing
and Loading
Dishes" on page 9.
Improper use of detergent.
Add detergent depending
on the water hardness and
washing cycle you choose.
Use fresh detergent.
The selected cycle is not suitable
for the soil level on the dishes.
Choose a different cycle
with a longer washing time.
The spray arms are blocked.
Make sure that the spray
arms are not blocked and
are free to rotate.
TROUBLESHOOTING

28
Troubleshooting
TROUBLESHOOTING
PROBLEM POSSIBLE CAUSE POSSIBLE SOLUTION
Spots and
filming on dishes
Water hardness is too high.
For extremely hard water,
install a water softener.
Dishes are loaded improperly.
Reload the dishwasher
as shown in "Preparing
and Loading
Dishes" on page 9.
Old or damp rinse aid
power is used.
Use fresh, liquid rinse aid.
The rinse aid dispenser is empty
or the setting is too low.
Fill the rinse aid dispenser.
Increase the rinse
aid setting.
Etching
Using too much detergent.
Use less detergent if you
have soft water.
The inlet water temperature
exceeds 150 °F (66 °C).
Lower the inlet water
temperature.
Detergent left in
dispenser cup
Detergent may be too old. Use fresh detergent.
The spray arm is blocked.
When you load the dishes,
make sure that the spray
arms are not blocked.
The detergent
dispenser
will not close
Improper operation of the
detergent cover.
Add detergent and rinse
aid only as indicated in
this manual. See "Filling
the Detergent Dispenser"
on page 17 and
"Filling the Rinse Aid
Dispenser" on page 18.
Water remains in
the dishwasher.
The previous cycle has not
finished or has been interrupted.
Make sure that the current
cycle is finished.

29
Troubleshooting
TROUBLESHOOTING
PROBLEM POSSIBLE CAUSE POSSIBLE SOLUTION
The dishwasher does
not drain properly.
The drain is clogged.
Check the air gap (if so
equipped). Make sure that
the disposer is empty (if
so connected).
The drain hose is kinked.
Make sure that the drain
hose is not kinked and is
properly connected.
A drain cycle may need to
be performed
Cancel any cycle by
holding START/CANCEL
for three seconds and close
the door. This will prompt a
60 second drain cycle.
Suds in the tub
Using improper detergent or pod
style cleaners.
Make sure to use
only automatic
dishwasher detergent.
The dispenser is not
designed for the use of
pods. To use pods, throw
them into the bottom of the
tub and it will release the
detergent like normal.
The dishwasher leaks
Excessive suds caused by using
improper detergent.
Make sure to use
only automatic
dishwasher detergent.
The dishwasher is not level.
Level the dishwasher (refer
to the Installation Manual).

30
TROUBLESHOOTING
Troubleshooting
PROBLEM POSSIBLE CAUSE POSSIBLE SOLUTION
There are black
or gray marks
on the dishes
Aluminum utensils have rubbed
against the dishes.
Make sure that the water
inlet temperature is not less
than 120 °F (49 °C).
The interior of the
tub is stained
Coffee or tea stains.
Use a spot cleaner to
remove the stains.
Reddish stain.
Some tomato-based
products may cause this.
Use of the rinse only
cycle right after loading
will help this.
Noises
Detergent cup
opening/drain pump.
This is normal.
A hard object has entered the
wash module. When the object is
ground up the noise will stop.
If the noise continues after
the cycle is complete, call
for service.
The dishwasher
won’t fill (the
dishwasher will beep)
The water valve is turned off. Turn on the water valve.
The door may not be
closed completely.
Make sure that the door is
closed and latched.

WARRANTY
COVERAGE
ZLINE Kitchen and Bath (“ZLINE”) dishwashers have a one year parts and service warranty.
ZLINE warranty periods begin from the original date of product delivery and solely cover the
original purchaser of the product, delivered new and in its original carton. The limited warranty
covers all parts and labor for necessary repairs if any part of the product, or the product itself,
proves to be defective in materials or workmanship. The product must be deemed serviceable
via troubleshooting with the ZLINE Customer Experience team. All service on ZLINE products
under warranty must be performed by ZLINE-approved and ZLINE-certified service providers
unless otherwise specified by ZLINE. Service will be provided during normal business hours.
Products must be unobstructed and accessible to the service provider at the time of service.
ZLINE’s liability is limited to the original purchase price of the product. Additional injuries,
losses, damages, or other inconveniences caused by product malfunction or defects in materials
are not covered under the terms of this warranty.
TERMS
ZLINE warranties apply only to the original purchaser of a ZLINE product installed for normal
residential use. This is defined as a single-family, residential dwelling in a non-commercial
setting. Any warranty claim stemming from installation, operation, or any other use within a
commercial setting is not covered under this limited warranty. Commercial settings include,
but are not limited to: schools, churches, hotels, restaurants, vacation rentals such as Airbnb,
daycare centers, private clubs, fire stations, common areas in multi-family dwellings, nursing
homes, food service locations, and institutional food service locations such as hospitals or
correctional facilities.
This warranty is non-transferable and will not under any circumstance be extended based on
the date of installation — the warranty period takes effect from the date of delivery and only
covers the original purchaser. The warranty applies only to products installed in the contiguous
United States and the District of Columbia. Failure to secure certified warranty service per these
terms will result in a forfeiture of the remaining warranty.
Out-of-pocket payments will not be reimbursed unless prior approval is received from ZLINE
and/or ZLINE-certified service contract partners. Unapproved out-of-pocket payments
for service will not be reimbursed. All warranty procedures must be followed to maintain
warranty coverage.

WARRANTY
If a product qualifies within the service window provided under these warranty terms, and ZLINE
is unable to repair the product or a defective part of the product after a reasonable number
of attempts, ZLINE reserves the right to offer to replace the defective part or the product or
provide the original purchaser a full refund of the purchase price of the product (not including
installation, removal, or other charges that were not included in the original purchase price).
The original purchaser of the product must provide the original proof of purchase, including the
purchase date, when filing a claim to obtain replacement parts, service, or refunds. Additionally,
the original purchaser of the product must provide the serial number of the product when filing
a claim to obtain replacement parts, service, or refunds.
This warranty shall not apply to any ZLINE product in which the original factory serial
number has been removed, altered, or cannot be readily determined for any reason. Further,
ZLINE is not responsible for damage resulting from, but not limited to: shipment, delivery, or
improper installation; negligence or improper maintenance, misuse, or abuse of the product;
unauthorized alteration, modification, or tampering with the product; accident, fire, floods,
pest infestations, pandemics, natural disasters, or any other unpreventable or unexplained
acts of nature, commonly referred to as “acts of God”; flare-up fires or damages caused by
improper electric supply, electrical line current, voltage, or power surges; and service to correct
installation not in accordance with the instructions contained in ZLINE’s product manuals and/
or with local government codes.
This warranty does not apply to aesthetic damage, scratches, or natural wear caused by normal
use; second-hand, open box products, or products purchased from an unauthorized retailer;
and damages or issues stemming from alteration or tampering with the dishwasher, including,
but not limited to, painting any portion of the product’s interior or exterior and altering or
otherwise manipulating the power cord.
In the event service is dispatched, and it is discovered that the reported issue is not covered
under warranty based on the disclaimers above, the customer will be responsible for all service
fees. Failure to pay these fees will result in the forfeiture of remaining warranty coverage.

WARRANTY
Information contained within ZLINE’s installation and user manuals, in addition to product
information included on ZLINE’s website and all related digital listings, do not cover every
possible condition and situation that may occur during the installation or operation of
ZLINE products.
ZLINE reserves the right to make changes at any time to its products when considered safe,
necessary, and useful. Always check the ZLINE website for the most up-to-date version of its
product manuals: www.zlinekitchen.com/pages/manuals.
Do not install or operate any ZLINE product if it has missing or broken parts or if it arrives
damaged due to shipping. If ZLINE products arrive damaged, contact ZLINE Customer
Experience at 1-614-777-5004 for help. Failure to report a damaged appliance prior to
installation or operation may void the warranty.
ZLINE disclaims responsibility for damage or injury caused by improper installation or use of
any of its products. ZLINE is under no obligation, by law or otherwise, to provide concessions,
including repairs, prorates, rebates, discounts, or replacements, once the warranty has expired.
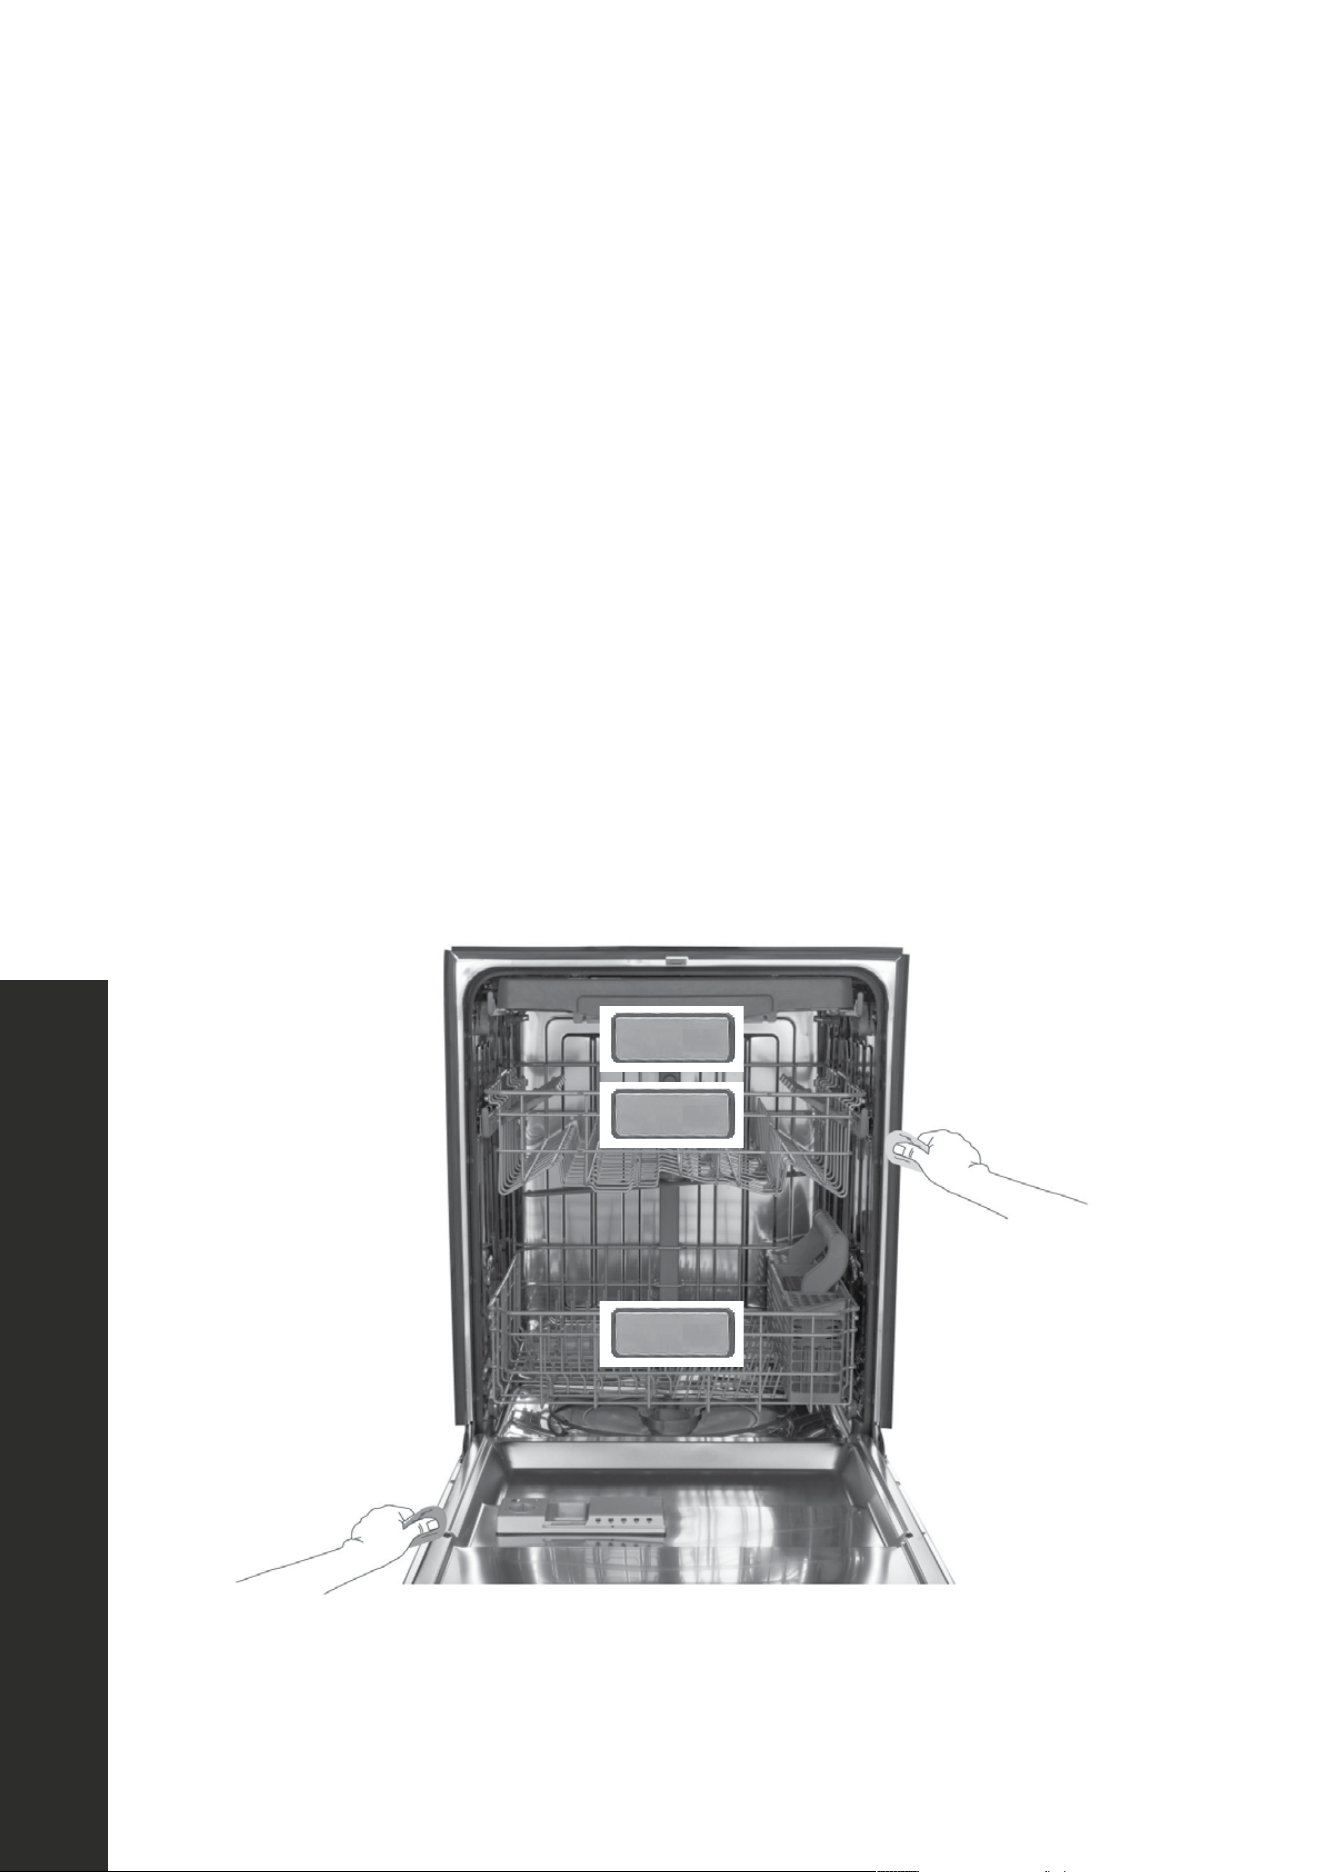
SERIAL NUMBER LOCATION
Please write down the model number and serial number of
your appliance. Both numbers are located on the rating
tag located on the right-hand side of the inner door of the
dishwasher. The tag is visible when the dishwasher door is
open. Do not remove permanently affixed labels,
warnings, or plates from the product. This will void the
warranty. You may also consider attaching your receipt or
proof of purchase to this manual.

WARRANTY
SERVICE
For warranty service, please contact our Customer Service team at
1-614-777-5004 or visit www.zlinekitchen.com/contact to utilize our online
Customer Experience Portal.
Scan the QR code to view the most up-to-date version of our User Manual and
Installation Manual.
Need to purchase a part or accessory for your ZLINE product?
Visit www.zlineparts.com, ZLINE’s official parts distribution partner.