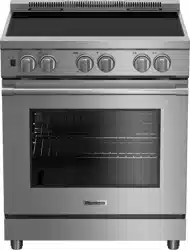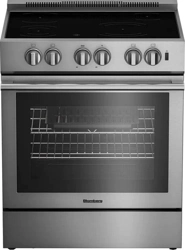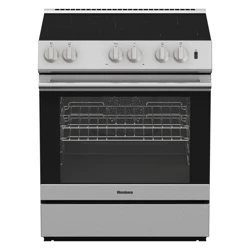
Electric Range
Owner's Manual
285600425/ EN/ R.AA/ 2.12.2025 11:25
7732188030
BIRU30424SS
2
CONGRATULATIONS ON THE PURCHASE OF YOUR NEW
PRODUCT
This stainless steel slide-in range has been manufactured in modern facilities with the ut-
most care and meticulous quality controls. We are so confident in the quality of this
product that we back it with a two year parts and labor warranty. Please read this entire
owners manual before using your product to ensure you understand all of its features and
benefits and know how to operate it properly. This manual should be kept in an easily ac-
cessible location and passed on to any future owners.
• Always observe the applicable safety instructions.
• Please read any other documents provided with the product.
Take a moment to complete the following information so it can be easily referenced when
contacting Customer Service:
Browse the Blomberg website for helpful information on using your slide-in range, care and
maintenance, troubleshooting and more just visit
https://www.blombergappliances.com

3
TABLE OF CONTENTS
TECHNICAL INFORMATION ...................................................................................
4
PRODUCT OVERVIEW.............................................................................................
5
CONTROL PANEL OVERVIEW .................................................................................
6
PREPARATION.......................................................................................................
7
OPERATION-HOB...................................................................................................
8
OPERATION-OVEN.................................................................................................
15
CARE AND MAINTENANCE ....................................................................................
21
TROUBLESHOOTING..............................................................................................
25
WARRANTY AND SERVICE .....................................................................................
26

4
TECHNICAL INFORMATION
General specifications
Overall Height 36" (914 mm)
Overall Width 29 - 13/16" (757 mm)
Overall Depth 29 - 17/32" (750 mm)
Total electric power 13 kW
Electrical connection 120/240 V~;60 Hz 2AC~N
Cable type / Cross section / Fuse SRDT 8/3 + 10/1 AWG / min. 40 A
Cable length max. 6 ft.
Rear right Induction cooking zone
Dimension 11"
Power max.: 2600/ Booster: 3700 W
Front right Induction cooking zone
Dimension 6"
Power max.: 1400/ Booster: 2200 W
Rear left Induction cooking zone
Dimension 6"
Power max.: 1400/ Booster: 2200 W
Front left Induction cooking zone
Dimension 9"
Power max.: 2300/ Booster: 3700 W
Main oven
Bake 2450 W
Broil 3550 W
Convection Roast 4000 W
The device corresponds to the following standarts: UL 858 Household Electrcic Ranges dir-
ective.
5
PRODUCT OVERVIEW
1
2
3
4
5
6
7
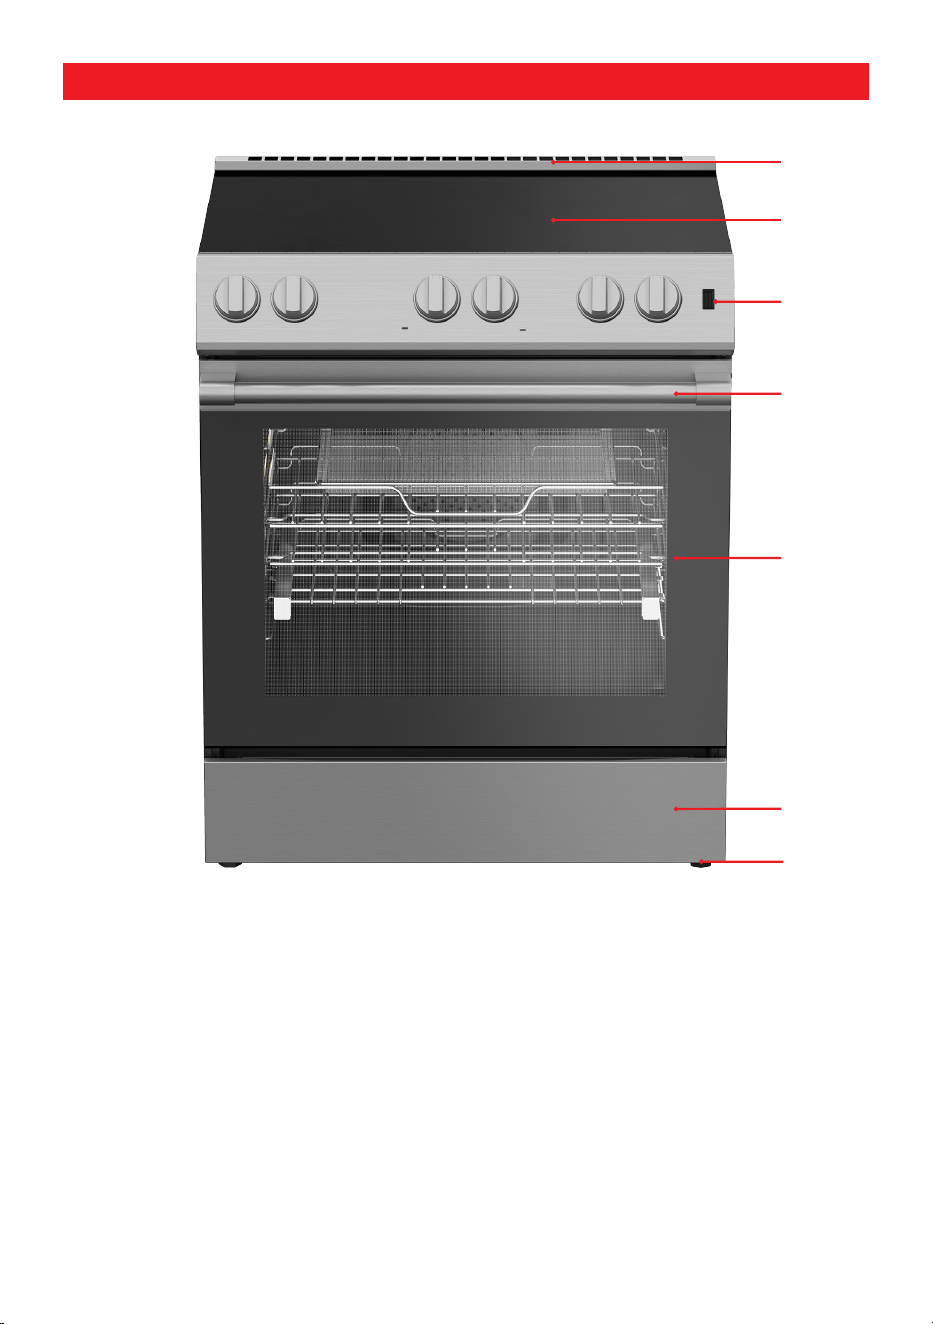
1 Splashback 2 Hob section
3 Control panel 4 Handle
5 Front door 6 Bottom part
7 Oven foot
6
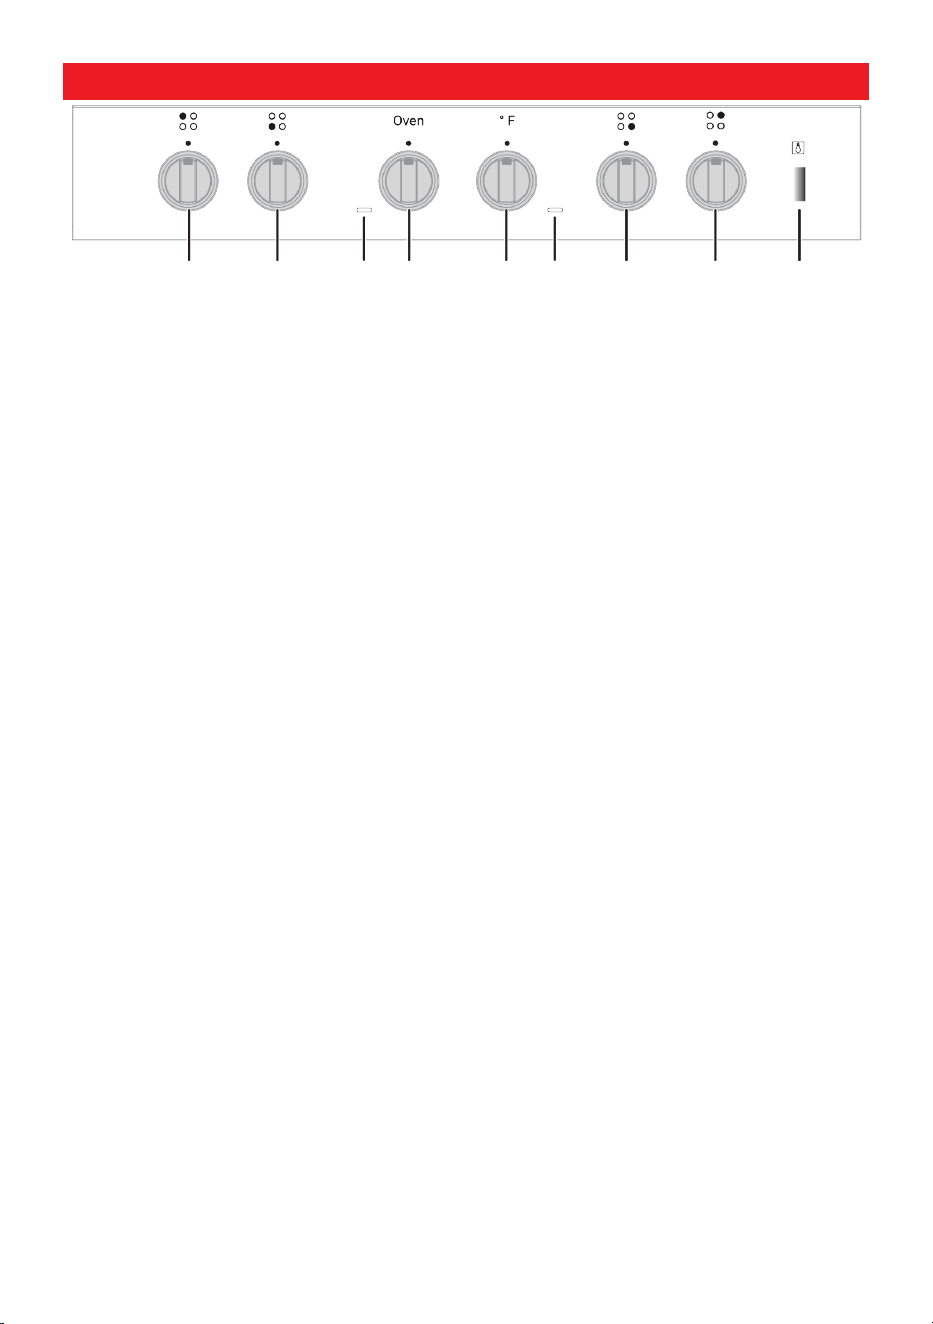
CONTROL PANEL OVERVIEW
1
2
3
4
5
6
7
8
9
1 Hob control knob 2 Hob control knob
3 Function indicator light 4 Function selection knob
5 Temperature knob 6 Thermostat lamp
7 Hob control knob 8 Hob control knob
9 Lamp button
Function selection knob
You can select the oven operating func-
tions with the function selection knob. Turn
left / right from OFF (top) position to select.
Temperature knob
You can select the temperature you want to
cook with the temperature knob. Turn
clockwise from the closed (top) position to
select.
Temperature lamp
You can understand the oven interior tem-
perature from the temperature lamp. The
thermostat lamp is located on the control
panel. The temperature lamp will be on and
the buzzer beeps 3 times for once when the
oven has reached the set temperature.
When the temperature inside the oven
drops below the set temperature, the ther-
mostat lamp turns off again.
Hob control knobs
You can operate your hob with the hob con-
trol knobs. Each knob operates the respect-
ive burner/zone. You may infer which
burner/zone it controls from the symbols
on the control panel.
Lamp button
You can turn your oven's lamp on and off
with the lamp button. In case of power out-
age, the lamp and the lamp button do not
work.
Function indicator light
You can tell whether any function is actively
working or not from the function indicator
light on the control panel.

7
PREPARATION
Browse the Blomberg website for helpful in-
formation on using your slide-in range, care
and maintenance, troubleshooting and
more just visit https://www.blombergappli-
ances.com
TIPS FOR SAVING ENERGY
• Use dark-colored or -enamel coated
cookware to improve heat transfer.
• Properly preheat the oven when cooking
instructions suggest to do so.
• Refrain from opening the oven door while
cooking.
• Cook multiple items at the same time or
one right after the other while the oven is
still hot.
• Defrost frozen meals prior to cooking.
• Turn oven off a few minutes before the
cooking time ends. Make sure to keep
the oven door closed to preserve the heat
necessary to finish cooking.
FIRST CLEANING OF THE APPLI-
ANCE
• Remove all packaging materials.
• Wipe the surfaces of the appliance with a
damp cloth or sponge and dry with a
cloth.
• The surface might get damaged by
some detergents or cleaning materials.
• Do not use aggressive detergents,
cleaning powders/creams or any sharp
objects during cleaning.
INITIAL HEATING
• Heat up the product for about 30 minutes
and then switch it off. Thus, any produc-
tion residues or layers will be burnt off
and removed.
• Smoke and smell may emit for a
couple of hours during the initial opera-
tion.This is quite normal. Ensure that the
room is well ventilated to remove the
smoke and smell. Avoid directly inhaling
the smoke and the smell that emits.
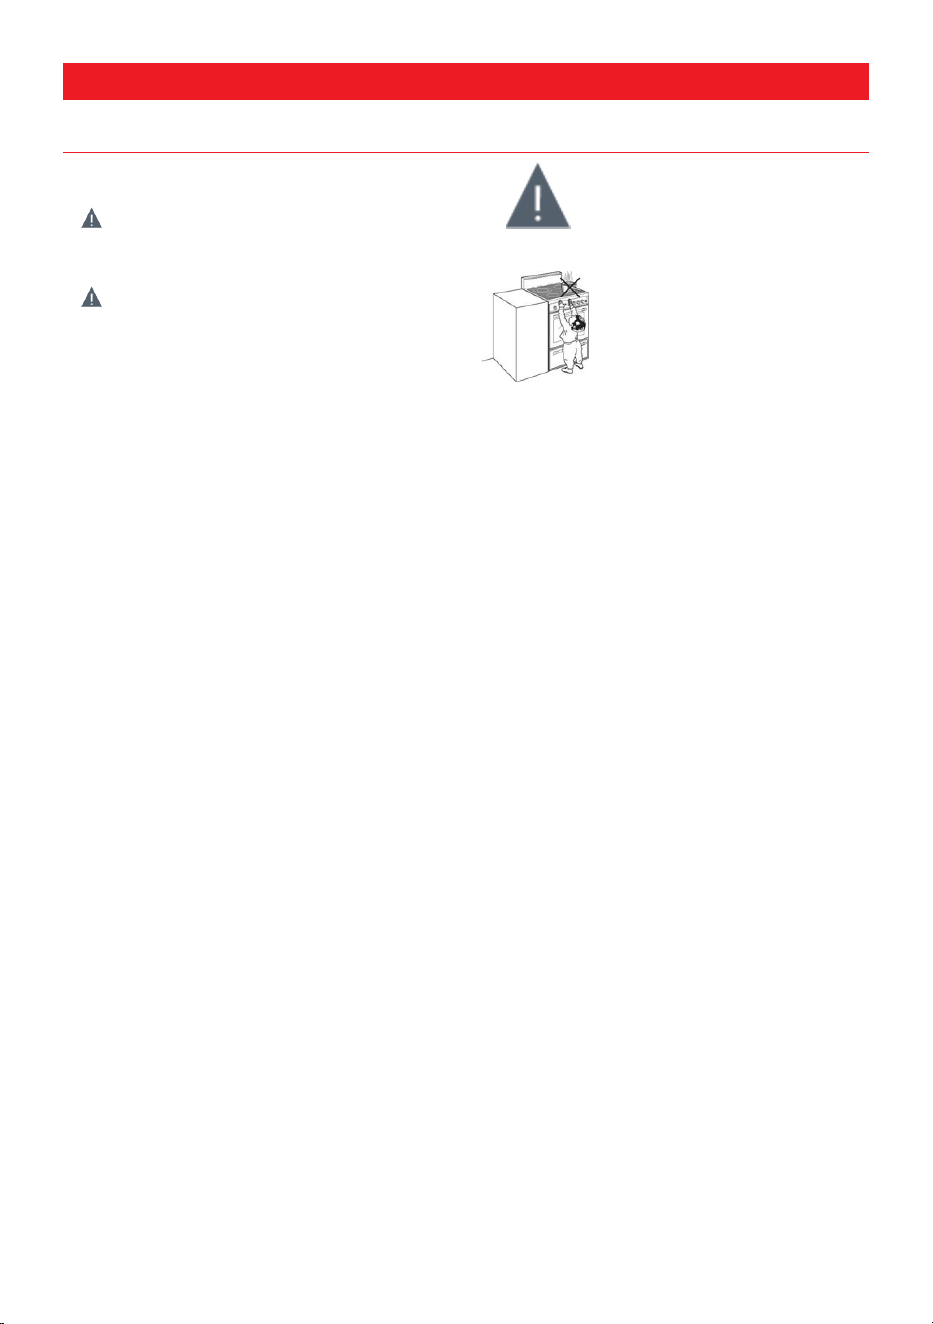
• Warning: Hot surfaces cause burns!
Product may be hot when it is in use.
Never touch the hot burners. Keep chil-
dren away.
8
OPERATION-HOB
GENERAL INFORMATION ABOUT USING THE COOKTOP
General warnings
• Risk of fire over by overheated oil!
When you heat oil, do not leave it unat-
tended.
• Do not place or store items that can
melt or catch fire on the glass cook top,
even when it is not being used. If the
cook top is inadvertently turned on, they
may ignite. Heat from the cook top or
oven vent after it is turned off may cause
them to ignite also.
• Before frying foods, always dry them well
and gently place into the hot oil. Ensure
complete thawing of frozen foods before
frying.
• Do not cover the vessel you use when
heating oil.
• Make sure reflector pans or drip bowls
are in place. Absence of these pans or
bowls during cooking may subject wiring
or components underneath to damage.
• Do not cook popcorn in prepackaged alu-
minum containers on the cook top. They
could leave aluminum marks that cannot
be removed completely.
• For foods containing sugar in any form,
clean up all spills and soils as soon as
possible. Allow the cooktop to cool down
slightly. Then, while wearing oven mitts,
remove the spills while the surface is still
warm. If sugary spills are allowed to cool
down, they can adhere to the cooktop
and can cause pitting and permanent
marks.
• Avoid scratching the glass cook top. The
cook top can be scratched with items
such as knives, sharp instruments, rings
or other jewelry and rivets on clothing.
Tipping of pan
Make sure that the handles
of cookware do not stick out
over the edge of the
appliance, to avoid them
being knocked over by
accident. This also makes it
more difficult for children to
reach the cooking pans.
DANGER
• Do not allow any object to fall onto the
glass cooking surface. Even small ob-
jects such as salt shakers can damage
the glass cooking surface. Do not use a
cracked glass cooking surface. Water
can seep into these cracks and cause a
short circuit. If the surface is damaged in
any way (for example, visible cracks),
first turn off the fuse, then unplug the
product and call the authorized service to
reduce the risk of electric shock.
• Do not use unstable or easily tipping
cookware on the glass cooking surface.
• Do not heat empty cookware. Cookware
and the product may be damaged.
• Be sure to turn off the cooking zones
after each use.
• If you operate the cooking zones without
the cookware, you will damage the
product. Turn off the cooking zones after
each use.
• The cooking zones will be hot after each
use, so do not place plastic cookware on
the cooking zones. Clean up any melted
material on the surface immediately.
• Sudden temperature changes on the
glass cooking surface may cause dam-
age, be careful not to spill cold liquid dur-
ing cooking.
• Put the appropriate amount of food in the
cookware. This will prevent the food from
overflowing and you will not have to do
unnecessary cleaning.

9
• Do not place lids of cookware on the
cooking zones.
• Place the cookware so that it is centered
on the cooking zones. If you want to
move the cookware to another cooking
zone, lift it up and place it on the desired
cooking zone instead of sliding it.
Working principle of induction hob
An induction hob is like an open circuit.
When an induction-compatible cookware is
placed on it, the circuit is completed and an
electronic system located just below the
glass cooking surface produces a magnetic
field. The metal base of the cookware
heats up by receiving energy from this mag-
netic field. In this way, the heat is produced
not on the glass surface of the hob, but dir-
ectly in the cookware above it. The glass
surface heats up with the heat of the cook-
ware.
Advantages of induction cooking
Induction hobs offer some advantages as
the heat is transferred directly to the cook-
ware.
• Foods that overflow during cooking do
not burn quickly as the cooking glass sur-
face is not directly heated. Easier clean-
ing is provided.
• Since the heat is generated directly in the
cookware, cooking is faster, thus saving
time and energy compared to other types
of hobs.
• Since the heat is given directly to the
cookware, there is no heat loss and more
efficient cooking is achieved.
• As soon as the cookware is removed
from the cooking zone, heat transfer
stops and the cooking zone does not
heat up directly, providing safer use
against possible accidents that may oc-
cur during cooking.
For safe use:
• Do not select high heating levels when
using non-stick cookware coated with no
oil or very little oil (Teflon type).
• Do not use the glass cooking area as a
surface to place items on or to cut on.
• Do not place metal objects such as cut-
lery or cookware lids on the cooking zone
as they can get hot.
• Never use aluminum foil for cooking.
Never place food wrapped in aluminum
foil on the induction cooking zone.
• Keep magnetic objects, such as credit
cards or tapes, away from the product
while the cooking zones are in operation.
• If there is an oven under your hob and it
is operating, the sensors in the product
may reduce the cooking level or turn the
product off.
• Your hob has an automatic shut-off sys-
tem. Detailed information about this sys-
tem is available in the following sections.
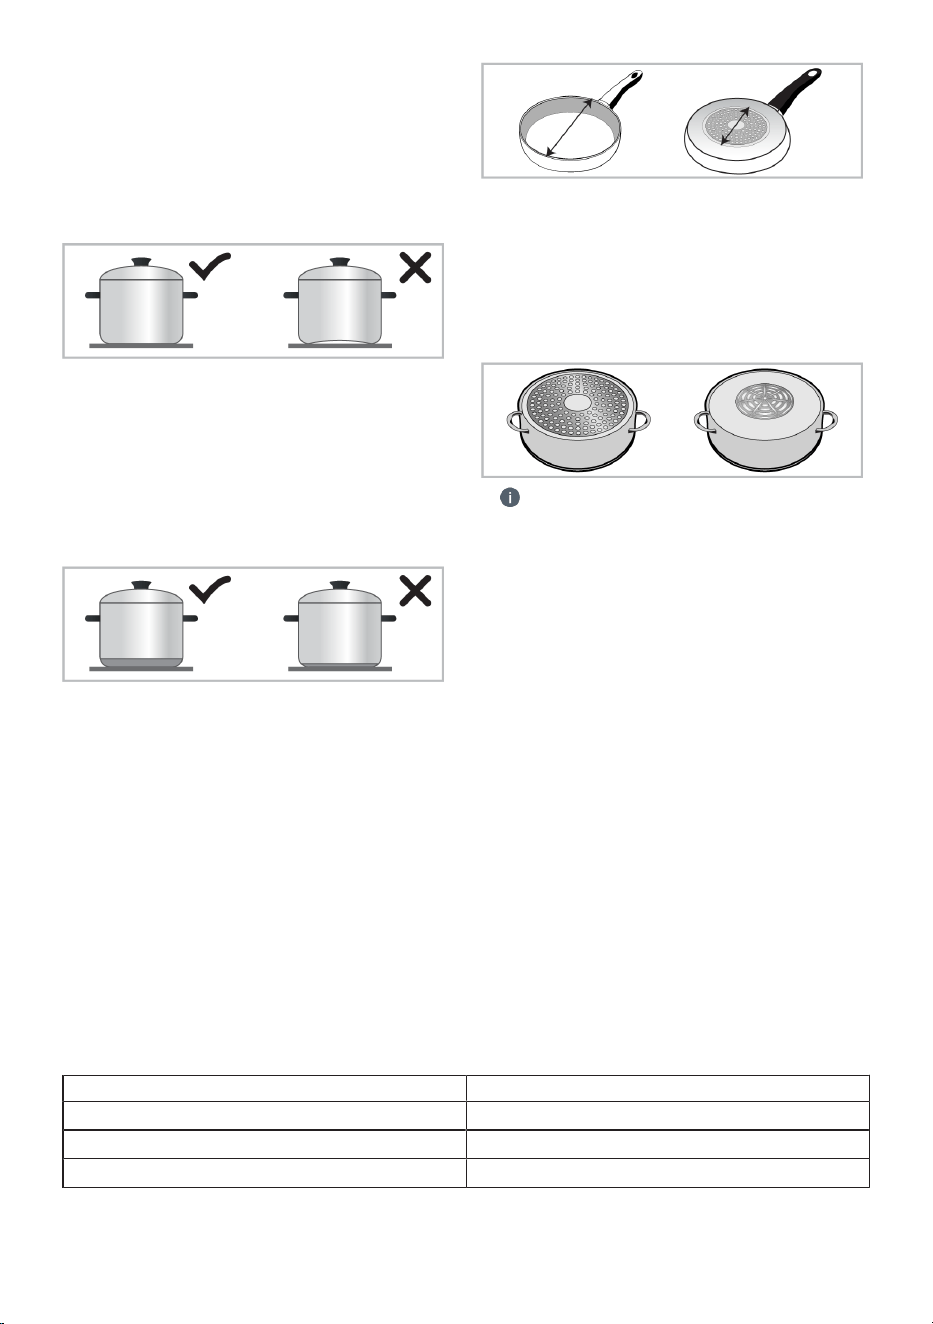
Cookware
It is recommended that you use only cook-
ware that is ferromagnetic, of good quality
and labeled or marked as induction com-
patible for your induction hob. In general,
the higher the iron content, the better the
cookware will perform. The diameter of the
cookware base should match the induction
cooking area. Recommended sizes are lis-
ted below.
Suitable cookware:
• Cast iron cookware
• Enameled steel cookware
• Steel and stainless steel cookware (with
a label or warning indicating that it is in-
duction compatible)
Unsuitable cookware:
• Aluminum cookware
• Copper cookware
• Brass cookware
• Glass cookware
10
• Clay cooking pots
• Ceramic and porcelain cookware
Recommendations:
• Use only flat-bottomed cookware. Do not
use cookware with concave or convex
bases.
• Only use thick-based, processed cook-
ware. If you use thin-based cookware,
these cookware will heat up very quickly
and the base of the cookware may melt
before the automatic shut-off system is
activated, damaging the cooking surface
and the product. Sharp edges will scratch
the surface.
• Some cookware has a ferromagnetic
field at the bottom that is smaller than its
actual diameter. Only this area is heated
by the cooking zone. Therefore, the heat
is not distributed evenly and the cooking
performance decreases. In addition, such
cookware may not be detected by large
induction cooking zones. For this reason,
the cooking zone should be selected ac-
cording to the size of the ferromagnetic
field.
• Some cookware has a base that contains
non-ferromagnetic materials such as alu-
minum. These types of cookware may
not heat up sufficiently or may not be de-
tected by the induction cooking zone at
all. In some cases, a bad cookware warn-
ing may appear.
• When cooking multiple dishes on in-
duction cooking zones, distributing the
cookware equally to the right-left and
middle areas when selecting the cooking
zone positively affects the cooking per-
formance.
Cookware test
Test if your cookware is compatible with in-
duction hobs using the methods below.
1. If the base of the cookware holds a
magnet, it is compatible.
Recommended cookware sizes
The boiling behavior can vary depending on
the type of cookware, the size of the cook-
ware and the size of the cooking zone. For
a more uniform boiling behavior, a cooking
zone that is one size larger can be used.
Using a larger cooking zone does not waste
energy on induction hobs, because the heat
is only created in the relevant cookware.
Recommended cooking pots/pans sizes
Cooking zone diameter Pot diameter
6” min. 4” - max. 5-1/2”
9” min. 5-1/2” - max. 8-1/4”
11” min. 5” - max. 11”
11
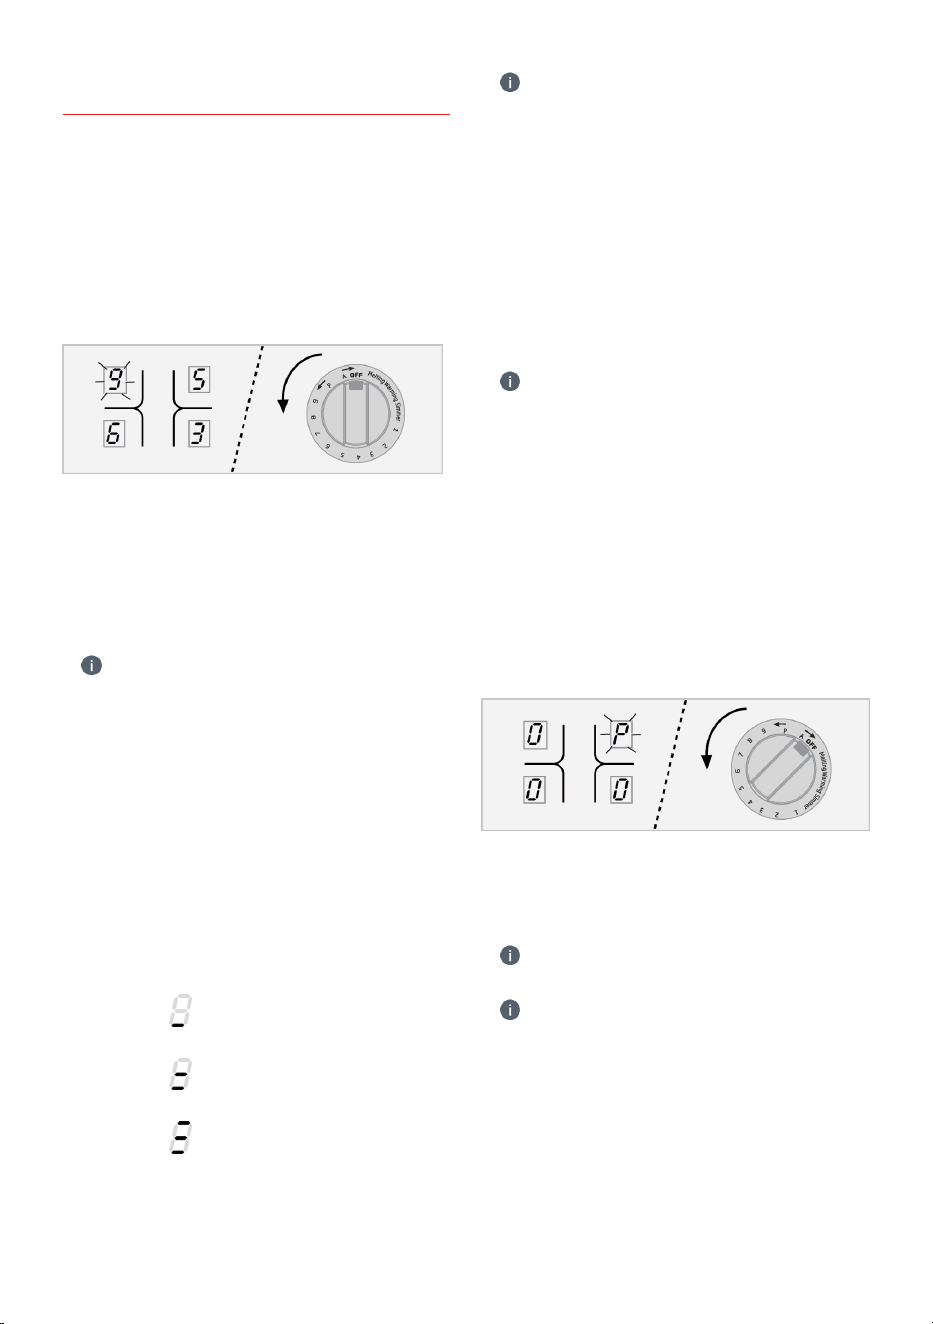
USING THE BURNERS/ZONES
Turning on the cooking zones
Turning the hob control knob counterclock-
wise the power of the according cooking
zone can be increased. To reduce the
power of the cooking zone again it is ne-
cessary to turn the hob control knob clock-
wise. The current power level is on the dis-
play unit of the hob.
Turning off the cooking zones
The hob control knob is turned from the
locked “OFF” position to switch a cooking
zone on as well as when the hob control
knob is turned back to the OFF position to
switch a cooking zone off.
• If all knobs are turned to OFF locked
position the display disappears after sev-
eral times. If a buzzer is implemented a
signal is played when the control is
switched off.
Cooking leves
There are 10 (1-9 level with booster(p))
cooking levels on the hob control hobs. Ad-
ditionally the hob has 3 different cooking
levels as melting,warming and simmer.
Level Symbol Temperature
(⁰F/°C)
melting
“ ”symbol
flashes
107/42
warming
“ ”symbol
flashes
158/70
simmer
“ ”symbol
flashes
201/94
• The melting and warming levels can
be defined dependently of variant. The
simmer level 94°C (201°F) is fixed tem-
perature value.
Residual heat indicator
"H" symbol that appears on the cooking
zone display indicates that the hob is still
hot and may be used to keep a small
amount of food warm. The symbol will dis-
appear when the cooking zone cools down
or when it is activated.
• When power is cut off, residual heat in-
dicator will not light up and does not
warn the user against hot cooking zones.
High Power (Booster)
Booster is a function which facilitates
cooking. All cooking zones indicated with
"P" symbol in the Technical Specifications
table are equipped with Booster function.
Turning on High Power (Booster):
1. Push and turn the related hob control
knob counter clockwise to position “P”.
2. Turn the hob control knob in the left
overwind position to activate High
power (Booster “P”). “P” will appear on
related cooking zone display.
• The hob will drop to level 9 after sev-
eral minutes (optional) automatically.
• Not each pan suitable to reach the full
boost power due its magnetic and elec-
trical characteristic.
Turning off High Power (Booster):
Turn the hob control knob in the left over-
wind position to turn off High power
(Booster “P”). “9” will appear on related
cooking zone display.
12
Child Lock
You can protect the hob by child lock to
prevent children from changing hob func-
tions.
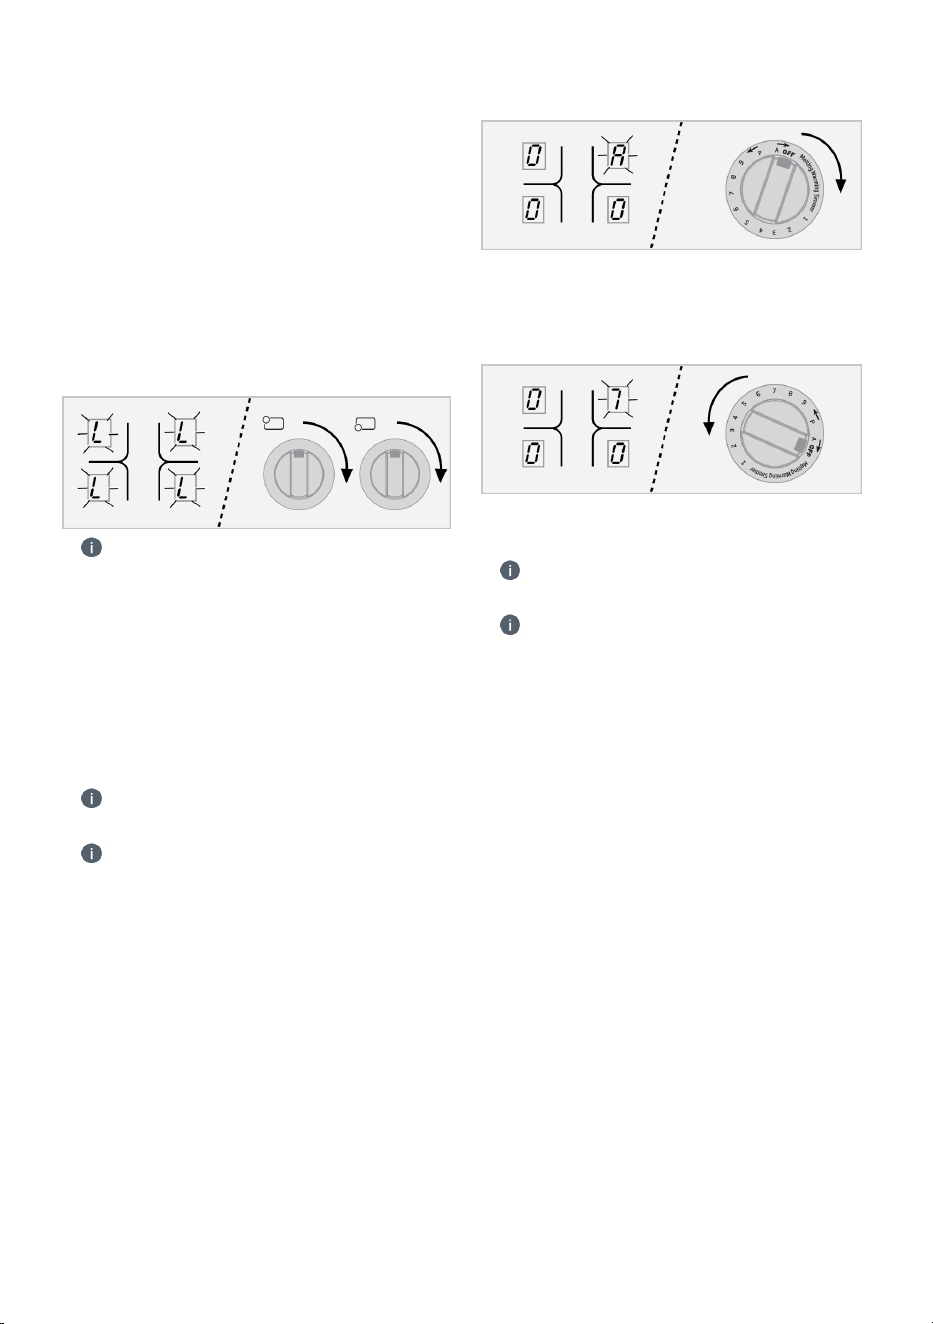
Activating the Child Lock
1. Turn the first two hob control knobs
from the left simultaneously in to the
right overwind and hold in that position
at least 2 second.
ð Child lock function will be activ-
ated.
• If any key is pressed when the child
lock is active, "L" symbol will appear on
cooking zone displays.
Deactivating child lock
Turn the first two hob control knobs from
the left simultaneously in to the right over-
wind and hold in that position at least 2
second. Child lock function will be deactiv-
ated.
• If the hob is turned off and on in this
condi-tion, child lock will be still active.
• If any hob control knob was in a posi-
tion different from “OFF”, after unlocking
all hob control knobs have to be turned
back in the “OFF” position.
Quick Heating Function
Quick heating is a function which facilitates
cooking. All cooking zones are equipped
with Quick heating function. This function
can be operated by setting temperature
level beforehand.
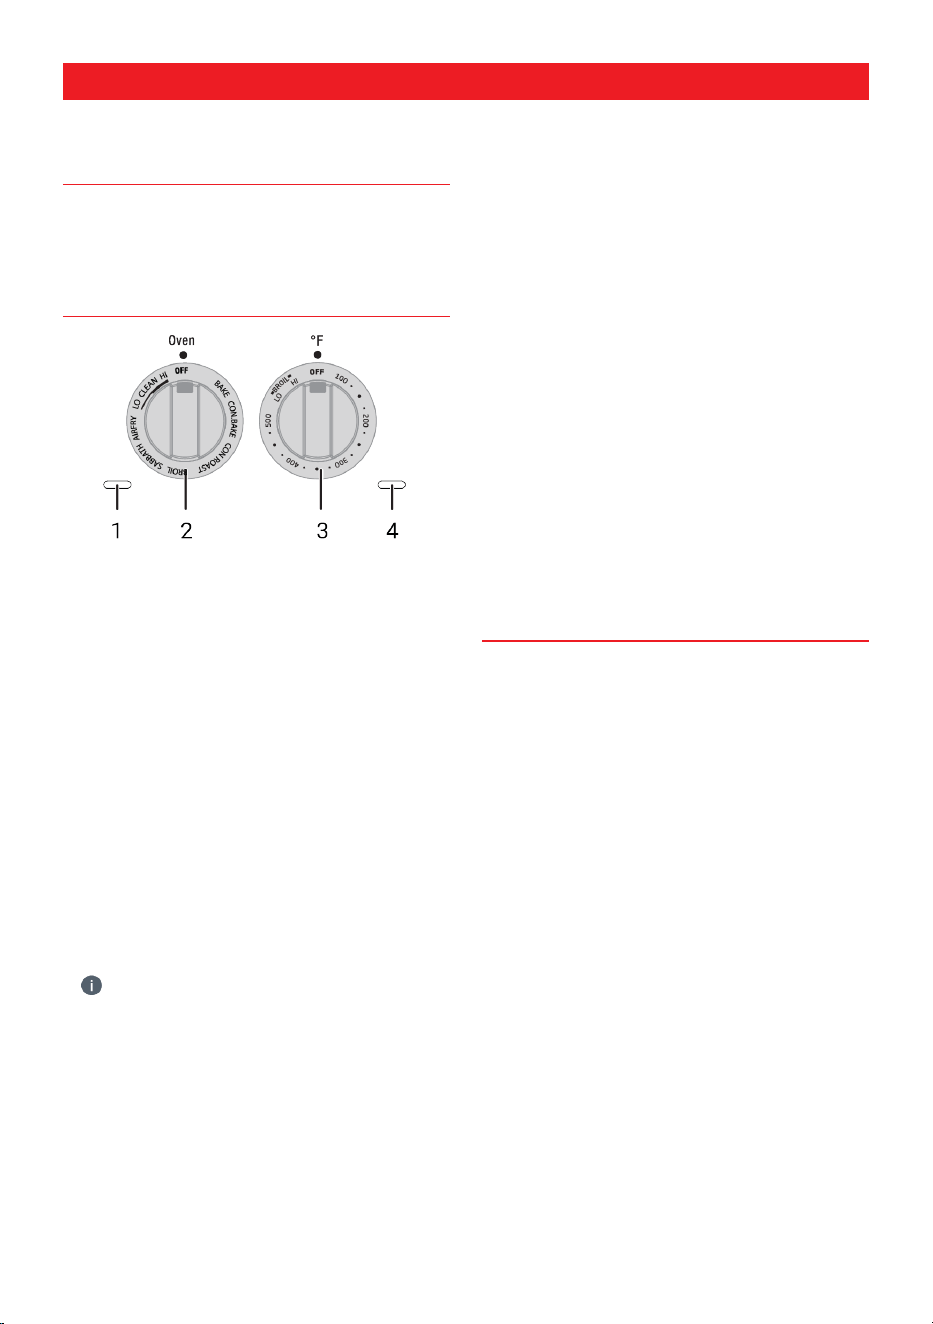
Turning on Quick Heating Function:
1. Turn the related hob control knob in to
the right overwind and hold in that posi-
tion at least 2 second.
ð A” will appear on related cooking
zone display.
2. Turn the hob control knob counter-
clockwise to set heating level (it is sup-
posed that level 7 is selected for the ex-
ample).
ð “A” and “7” will appear on related
cooking zone display alternately.
• Within the next 10 seconds a valid
cooking level has to be selected.
• When the Quick operation time is up,
the hob will continue operating at the set
temperature level.
Turning off Quick Heating Function:
The hob control knob is turned from the
locked “Off” position to turn off the Quick
Heating function.

13
Table: Quick Heating Operation Times
Temperature
level
Quick Heating Operation
Times -Second
0 0
melting -
warming -
simmer -
1 48
2 144
3 230
4 312
5 408
6 120
7 168
8 216
9 -
Using induction cooking zones safely and
efficiently
Operating principles: Induction hob heats
directly the cooking vessel as a feature of
its operating principles. Therefore, it has
various advantages when compared to
other hob types. It operates more efficiently
and the hob surface does not heat up.
Induction hob is equipped with superior
safety systems that will provide you max-
imum usage safety.
• Your hob can be equipped with induc-
tion cooking zones with a diameter of
145 (6”), 210 (9”) and 260(11”) mm de-
pending on the model. With induction
feature, each cooking zone detects each
vessel placed on them. Energy builds up
only where the vessel contacts with the
cooking zone and thus, mini-mum energy
consumption is achieved.
Operation time constraints
The hob control is equipped with an opera-
tion time limit. When one or more cooking
zones are left on, the cooking zone will
automatically be deactivated after a certain
period of time (see Table-1). If there is a
timer assigned to the coo-king zone, the
timer display will also turn off later.
Operation time limit depends on the selec-
ted temperature level. Maximum operation
time is applied at this temperature level.
The cooking zone may be restarted by the
user after it is turned off automatically as
described above.
Table-1: Operation time limits
Temperature
level
Operation time limit -
minutes
0 0
melting 120
warming 120
simmer 120
1 360
2 360
3 300
4 300
5 240
6 90
7 90
8 90
9 90
Booster 10 (*)
(*) The hob will drop to level 9 after 10 minutes
(optional)
Overheating protection
Your hob is equipped with some sensors
ensu-ring protection against overheating.
Following may be observed in case of over-
heating:
• Active cooking zone may be turned off.
• Selected level may drop. However, this
condition cannot be seen on the indic-
ator.
• E2 error might be given.
Power management
The power managment is independently
done by the induction system.The latest set
cooking level has priority. If it is not pos-

14
sible to output the required power on a
cooking zone it will not be displayed. The
display changes only when the actual cook-
ing level is reached by turning the knob left.
Precise power setting
Induction hob reacts the commands imme-
diately as a feature of its operating prin-
ciples. It changes the power settings very
fast. Thus, you can pre-vent a cooking pot
(containing water, milk and etc.) from over-
flowing even if it was just about to over-
flow.
Operating noisy
Some noises may arise from the induction
hob. These sounds are normal and a part of
induction cooking.
• Noise becomes prominent in high tem-
perature levels.
• Alloy of the saucepan can cause noise.
• In low levels, a regular on/off sound can
be heard because of the operating prin-
ciples.
• Noise can be heard if an empty saucepan
is heated. When you put water or food in
it, this sound will clear away.
• The noise of the fan that cools electric
sys-tem can be heard.
Error messages
Table-2: Error codes and error sources
Cause of error Indicator Display
Overheat error "E2" symbol
flashes
Cooking zone
display
Hob over-
heated
"H" symbol
flashes
Cooking zone
display
Mains errors "E6" symbol
flashes
Cooking zone
display
Sensor failure "E9" symbol
flashes
Cooking zone
display
Permanent
use of knobs
“ ”symbol
flashes
Cooking zone
display
Incorrect fan
speed
"E8" symbol
flashes
Cooking zone
display
Companent
failure
"EA" symbol
flashes
Cooking zone
display
Inapplicable
pot
"E3" symbol
flashes
Cooking zone
display
Cooking zone
does not exist
"E4" symbol
flashes
Cooking zone
display
Error on filter
board
"E5" symbol
flashes
Cooking zone
display
• For further information about error
messages that may appear on the touch
control panel, see Table-2.
• If the surface of the touch control
panel is exposed to intense vapor, entire
control system may become deactivated
and give error signal.
• Keep the surface of the touch control
panel clean. Erroneous operation may be
observed.
15
OPERATION-OVEN
OVEN LIGHTS
You can turn on the lighting in your oven by
pushing the lamp button. Push the lamp
button again to turn it off.
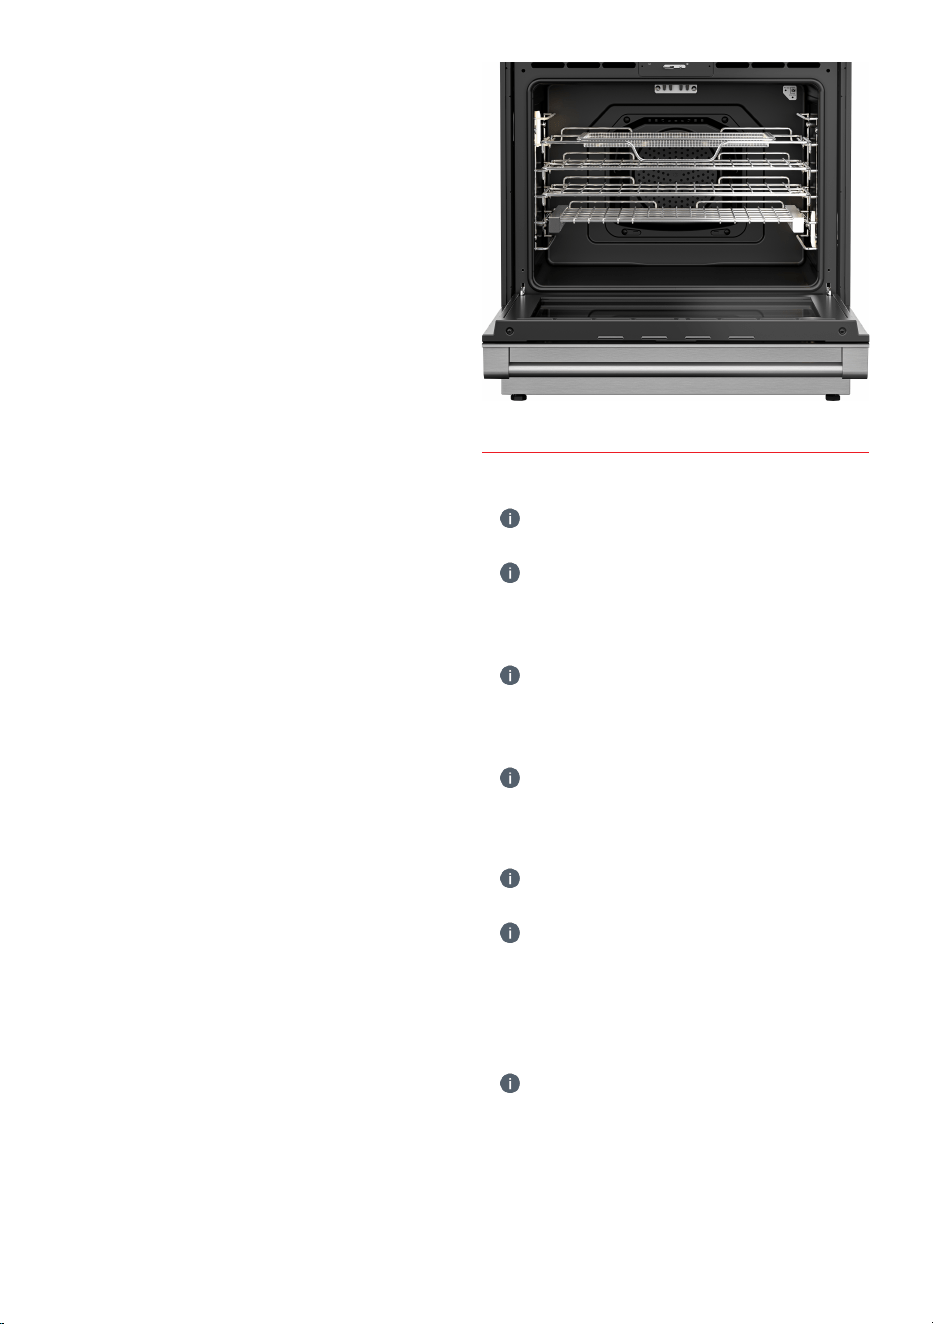
USING THE ELECTRIC OVEN
1 Function indicator light
2 Function selection knob
3 Temperature knob
4 Thermostat lamp
1. Set the function selection knob to the
desired operating mode. The function
indicator light will be ON when you turn
the function knob
2. Set the Temperature knob to the desired
temperature.
ð Oven heats up to the adjusted temper-
ature and maintains it. The temperat-
ure lamp will be ON and the buzzer
beeps 3 times for once when the oven
has reached the set temperature.
• Buzzer has no effect on the oven func-
tions. It is used for information purposes.
As soon as the desired temperature you
set has reached, the buzzer gives you an
audible warning and the temperature
lamp turns ON.
Switch off the electric oven
1. Turn the function and thermostat knobs
to off (upper) position.
Preheating
Preheating is necessary for selected dishes
and this is indicated in the cooking table.
king table. If the oven temperature is below
the set temperature, the temperature lamp
is OFF. This indicates that the temperature
has not yet reached the desired value.
When the oven reaches the set temperat-
ure, the temperature lamp will be ON and
the buzzer beeps 3 times for once.
As long as the temperature does not fall be-
low the set value, the temperature lamp re-
mains ON.
If the oven temperature drops due to chan-
ging the set temperature or opening the
oven door, the temperature lamp turns OFF
until it reaches the desired temperature
again.
COOKING TIPS
Baking
• Use dark-colored or -enamel coated
cookware to improve heat transfer.
• Use rack space efficiently.
• When cooking one item, place item in the
middle of the rack.
• Select the preferred rack position before
the oven starts heating. Do not change
rack position when oven is hot.
• DO NOT broil with the door open.
Roasting
• Seasoning with lemon juice and black
pepper will improve the cooking perform-
ance when cooking a whole chicken, tur-
key, or large piece of meat.
• Roasting meat with bones takes about 15
to 30 minutes longer than roasting meat
with bones removed.
• Estimate 4 to 5 minutes of cooking time
per centimeter height of meat.
16
• Fish should be cooked on the middle or
lower rack positions during roasting.
Broiling
• Broiling is ideal for cooking meat, fish
and poultry and will achieve a nice brown
surface without drying out. Flat pieces,
meat skewers, sausages, and vegetables
with high water content are particularly
suited for broiling.
• Distribute pieces directly on the wire
shelf. Place pan underneath to catch the
drippings. Add water to the drip pan for
easy cleaning.
Cooking Vegetables
• Cook vegetables in a pan with a lid to
keep them from running out of liquid and
drying out.
• Boil vegetables before cooking in the
oven to make sure they cook fully.
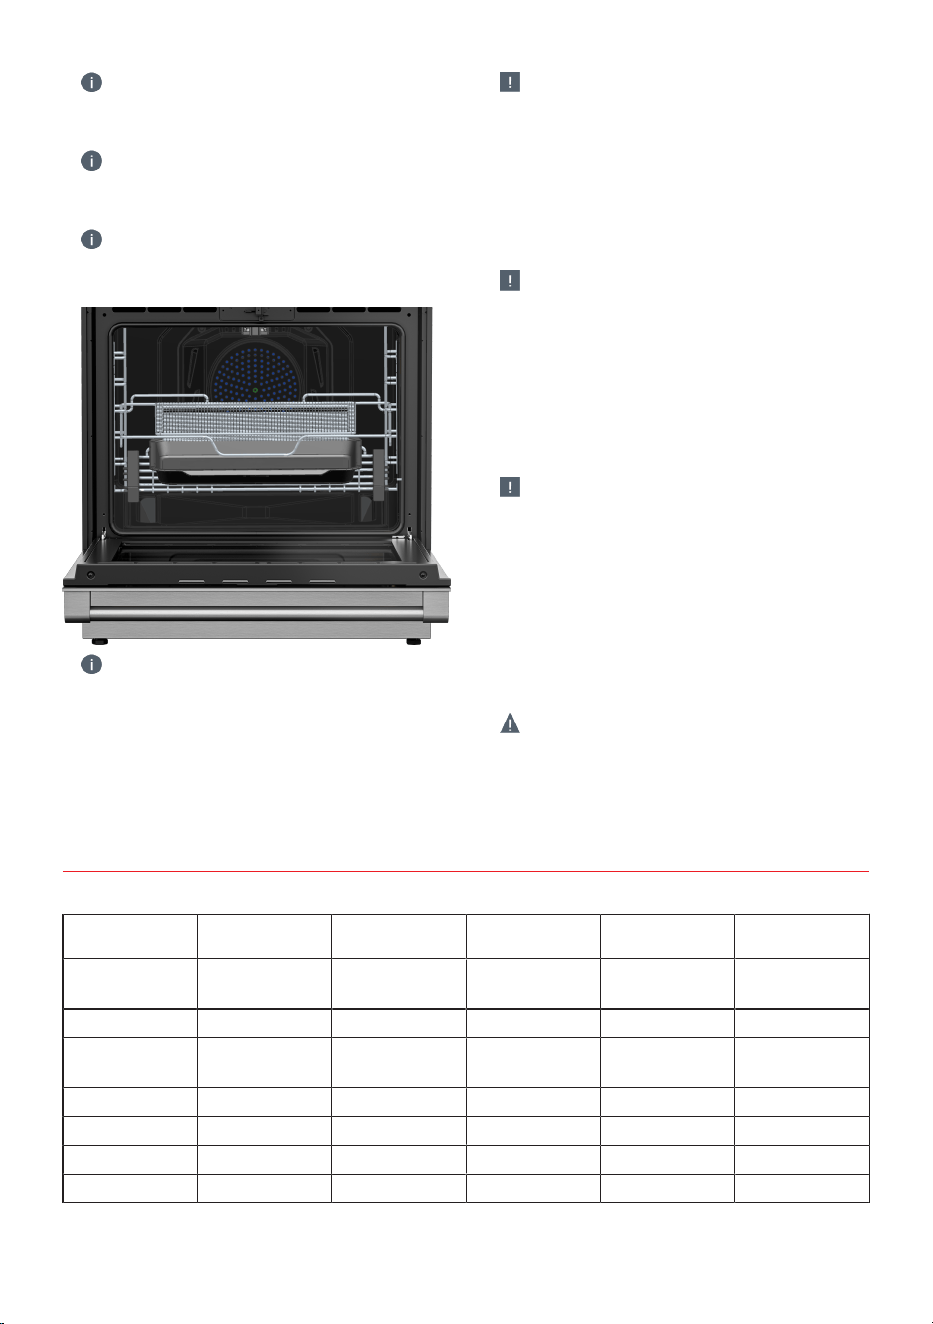
Rack Positions
• The oven racks can easily be removed
and/or rearranged to fit your cooking
needs. There are six rack positions, and
rack position 1 is the bottom most rack
position.
• For best results with conventional baking,
do not use more than one rack at a time.
If the use of two racks is required during
conventional baking, it is recommended
to leave one rack empty in between the
two racks in use.
• For optimal broiling coverage, it is recom-
mended to position the cooking vessel
closest to the oven door just out of con-
tact with the glass. Placing the cooking
vessel towards the rear of the oven will
reduce broiling coverage.
OVEN FUNCTION MODES
Bake
• For best results, preheat oven when
using bake mode.
• Heat radiates from the bake element,
situated at the bottom of the oven cavity.
The bake mode can be used for a variety
of food items, from cakes to casseroles.
• Bake food on a single rack with items
positioned in the middle of the rack. En-
sure 1 in. (25 mm) to 1.5 in. (38 mm) of
space is between item and oven walls.
• Baking time will vary with the size,
shape, and material of the pan used.
Convection Bake
• For best results, preheat oven when
using bake mode.
• Heat radiates from the bake element,
situated at the bottom of the oven cavity.
while the convection fan circulates the
heat throughout the oven. Convection
bake mode can be used to cook a variety
of food items, from cakes to breads.
• Convection bake mode is also ideal for
sponge cakes, pastries, and biscuits
cooking. Position items toward the rear
of the top racks and toward the front of
lower racks. Ensure 1 in. (25 mm) to 1.5
in. (38 mm) of space is between item and
oven walls.

17
• Baking time will vary with the size,
shape, and material of the pan used.
Broil
• For best results, preheat oven for 5 to
6 minutes when using the broil mode.
Turn items once while cooking. Broiling
time will vary based on size, weight,
thickness, starting temperature, and per-
sonal preference of doneness.
• Heat radiates from the broil element,
situated at the top of the oven cavity.
Broil mode can be used to cook small
cuts and flat pieces of meat, poultry, and
fish. Broil mode can also be used to
brown breads and other foods.
• Broil items on a single rack using a
broiler pan positioned under the broil ele-
ment.
• The broil mode has two settings: low
“LO” and high “HI”.
• To use this mode, Turn the funciton se-
lection knob to “Broil”. Then select the
broil setting low “LO” or high “HI”with
temperature knob.
Convection Roast
• For best results, preheat oven when
using convection roast mode.
• Heat radiates from the bake and broil
elements. The convection fan circulates
heat throughout the oven. The roast
mode can be used for large cuts of meat
and poultry or to roast several items at
the same time. Convection roast mode
can be used to reduce roast times while
keeping the item moist and tender. Roast
items on a single rack using a roasting
tray or broiler pan, and position in the
middle of the rack.
• DO NOT cover meat or use roasting
bags in this mode.
Sabbath
• Heat radiates from the bake element
only.
• Cook food on a single rack with items po-
sitioned in the middle of the rack. Ensure
1 in. (25 mm) to 1.5 in. (38 mm) of space
is between item and oven walls.
• Sabbath mode should be used only on
the Jewish Sabbath and Holidays.
• The health of some birds and pets is ex-
tremely sensitive to the fumes given off
during the Sabbath mode. Always move
birds and pets to another closed and well
ventilated room. Keep the kitchen well-
ventilated during the Sabbath mode also
for your health.
• All food should be placed in the oven be-
fore the Sabbath begins, since none may
be placed in the oven during the Sabbath.
• On the Sabbath the oven door may only
be opened once, all the food removed
and then closed. On the Holidays, the
oven door may be opened/closed at any
time as often as desired.
• In sabbath mode function indicator light
and temperature lamp (4) remain ON un-
til the end of the program while the mode
is running.
• Maximum time for Sabbath mode is 75
hours.
• Oven light is off when the Sabbath func-
tion in use. No change in light if you
press the button without Sabbath mode.
AirFry
• Warning: Airfry accessories should
only be used with the airfry function.
When the Airfry accessory is used with
functions where the oven burners work
(bake, convection bake, roast, convection
roast, etc.), oil falling off the accessory
may cause smoke and fire in the oven
due to the heat.
• The AirFry mode is designed to pro-
duce foods with a crispier exterior than
traditional oven cooking.
• Rack position 3 is recommended most
foods. Use rack position 2 for thicker
foods.
18
• Foods may cook faster than expected
if the oven is already hot when food is
placed in the oven.
• If foods are browning too quickly, try a
lower rack position or lower oven set
temperature.
• Rack position 3 is recommended most
foods. Use rack position 2 for thicker
foods.
• Place a proper size(larger than AirFry
tray) baking sheet or tray on the rack be-
low the AirFry tray to catch any drippings
from food. This will help to reduce splat-
ter and smoke.If you dont use tray to
catch oil, oil can causing a fire hazard or
poor oven performance.
• Caution: Foods high in fat will smoke
when using the AirFry mode. For best res-
ults, follow these recommendations
when air frying foods that are high in fat,
such as chicken wings, bacon, sausage,
hot dogs, turkey legs, lamb chops, ribs,
pork loin, duck, or some plantbased pro-
teins.
• Caution: Never cover slots, holes, or
passages in the oven bottom or cover en-
tire racks with materials such as alu-
minum foil.
Doing so blocks airflow through the oven
and can result in carbon monoxide poison-
ing. Aluminum foil can also trap heat, caus-
ing a fire hazard or poor oven performance.
• Caution:Turn on your exhaust hood at
a high fan setting before you start AirFry
and leave it on for 15 minutes after you're
done.
• Clean the grease filters on your exhaust
hood regularly.
• Keep the oven free from grease buildup.
Wipedown the interior of the oven before
and after airfrying.
• Warning: Accessible parts may be-
come hot during use. Make sure it is cold
enough to clean.
COOK GUIDE
Suggested Airfry times chart
Food Cooking Mode Oven Temp. Rack Position Time (min.) Recommended
amount
Homemade
potato*
AirFry 430°F (220°C) 4 35 … 45 200-1400 g
Frozen potato AirFry 430°F (220°C) 4 30 … 40 200-1400 g
Chicken leg/
wing
AirFry 430°F (220°C) 4 40 … 50 500-1500 g
Chicken breast AirFry 430°F (220°C) 4 30 … 40 200-700 g
Frozen nugget AirFry 430°F (220°C) 4 15 … 25 400-1000 g
Meatball AirFry 430°F (220°C) 3 20 … 30 20-25 pieces
Whole fish AirFry 430°F (220°C) 3 30 … 40 2-5 pieces
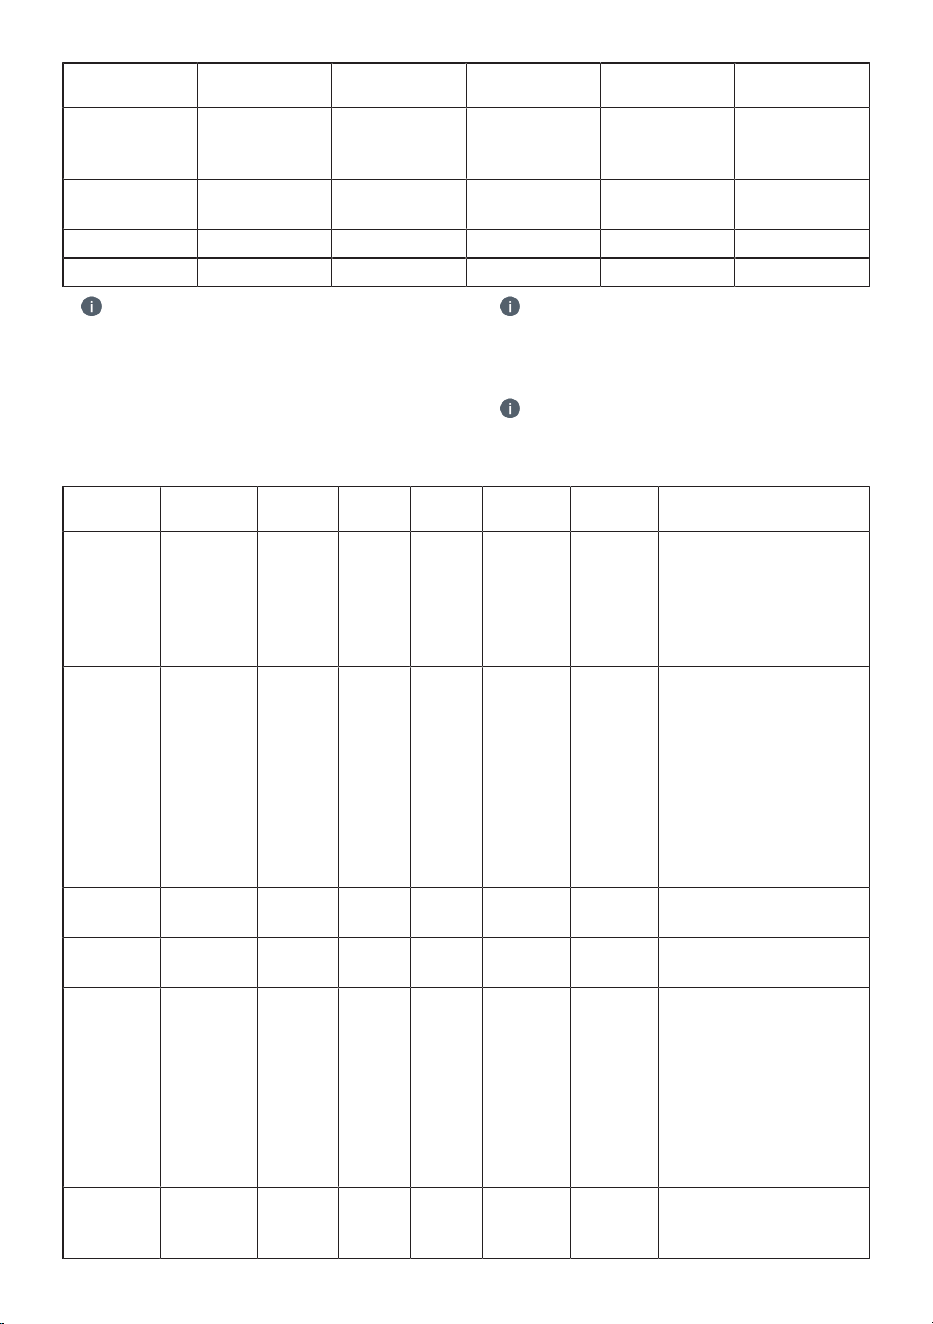
19
Food Cooking Mode Oven Temp. Rack Position Time (min.) Recommended
amount
Frozen crunchy
fish (fish fin-
gers)
AirFry 430°F (220°C) 3 15 … 25 500-1500 g
Frozen pastry AirFry 430°F (220°C) 3 25 … 35
200-800 g
(10-40 pieces)
Frozen pizza AirFry 430°F (220°C) 3 10 … 20 2-4 pieces
Sausage AirFry 430°F (220°C) 3 15 … 25 10-20 pieces
• *Hold the potatoes in water for 30
minutes, dry and add ¼ to 1 tablespoon
of oil.
• Place a baking sheet or tray on the
rack position 1 to catch any drippings
from food. This will help to reduce splat-
ter and smoke.
• For best results, preheat oven when
using AirFry mode.
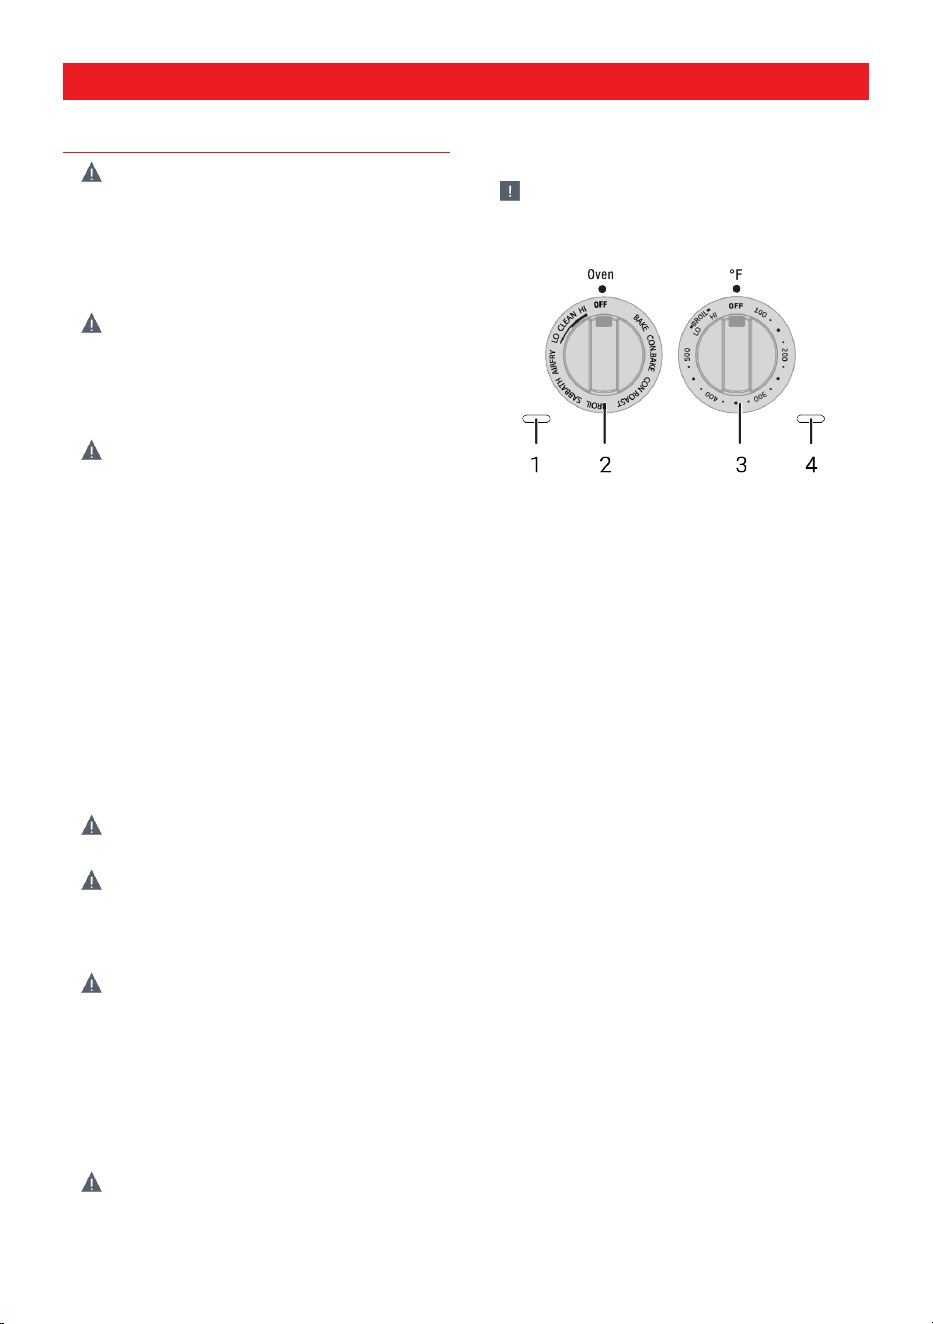
Suggested bake/roast times chart
Food Cooking
Mode
Oven
Temp.
Number
of Racks
Rack Po-
sition
Time(min.) Pan Size
and Type
Explanation
Sponge
cake
Bake
350°F
(175°C)
Single 4 25 - 35
8"
(200mm)
or 9"
(230mm)
round
The cakes are positioned
in the middle of the oven.
Bake foods with 1" (25
mm) - 1.5" (38 mm)
space between pans and
oven wall.
Sponge
cake
Convection
Bake
300°F
(150°C)
Multiple 3 and 5 25 - 35
8"
(200mm)
or 9"
(230mm)
round
The cakes are positioned
with the top rack cakes
toward the rear of the
oven and lower rack
cakes towards front of
the oven door. Bake
foods with 1" (25 mm) -
1.5" (38 mm) space
between pans and oven
wall.
Loaf
(leavened)
Bake
400°F
(205°C)
Single 4 40 - 50
Baking
tray
Loaf
(leavened)
Convection
Bake
400°F
(205°C)
Single 3 35 - 45
Baking
tray
Puff pastry
Convection
Bake
375°F
(190°C)
Multiple 3 and 5 25 - 35
Cookie
sheet
The sheets are posi-
tioned with the top rack
sheet toward the rear of
the oven and lower rack
sheet towards the oven
door. Bake foods with 1"
(25 mm) - 1.5" (38 mm)
space between pans and
oven wall.
Fresh
pizza, thin
Bake
425°F
(220°C)
Single 2 8 - 15
Pizza pan
or baking
tray

20
Food Cooking
Mode
Oven
Temp.
Number
of Racks
Rack Po-
sition
Time(min.) Pan Size
and Type
Explanation
Fresh
pizza, thick
Bake
425°F
(220°C)
Single 2 12 - 20
Pizza pan
or baking
tray
Frozen
pizza, thick
Bake
425°F
(220°C)
Single 2 10 - 15
Pizza pan
or baking
tray
Chicken,
whole (4-5
lb)
Convection
Roast
375°F
(190°C)
Single 3 80 - 120
Roasting
pan or
broiler
tray
Minimum internal tem-
perature is 180°F (85°C)
in thigh.
Turkey,
whole, un-
stuffed
(18-20 lb)
Convection
Roast
325°F
(160°C)
Single 1 200 - 240
Roasting
pan
Minimum internal tem-
perature is 180°F (85°C)
in thigh. Foil the top sur-
face of turkey to prevent
browning in last 30
minutes of cooking, if ne-
cessary.
Sirloin,
boneless
(4-4.5 lb)
Convection
Roast
325°F
(160°C)
Single 3 55 - 70
Broiler
tray
Internal temperature is
145°F (62°C) for medium-
rare, 160°F (71°C) for me-
dium.
Toast
bread
Broil High Single 5 2 - 2:30
Broiler
tray
Place broiler tray cent-
rally located under broil
element.
Chicken
thigh (2-2.5
lb)
Broil High Single 4
Side 1: 16
- 20
Side 2: 8 -
12
Broiler
tray
Place broiler tray cent-
rally located under broil
element. Minimum in-
ternal temperature is
180°F (82°C) in thigh.
Chicken
thigh (2-2.5
lb)
Broil Mid Single 4
Side 1: 20
- 24
Side 2: 14
- 16
Broiler
tray
Place broiler tray cent-
rally located under broil
element. Minimum in-
ternal temperature is
180°F (82°C) in thigh.
Ground
beef, (0.3" -
0.5" thick,
Broil High Single 4
Side 1: 5 -
7
Side 2: 3 -
5
Broiler
tray
Place broiler tray cent-
rally located under broil
element.
Ham-
burger,
frozen
(0.3" - 0.5"
thick, 6
patties)
Broil High Single 4
Side 1: 7 -
10
Side 2: 2 -
4
Broiler
tray
Place broiler tray cent-
rally located under broil
element.
Leavening Bake 100/40 Single 3 30-40
Bowl or
pan with
cover
21
CARE AND MAINTENANCE
SELF CLEANING FUNCTION
• Warning: If the oven is hot, self clean-
ing mode cannot be operated until the
oven is cold. If the self cleaning mod mal-
functions (power cut), turn the oven off
and disconnect the power supply, and
call the service.
• Warning: Hot surfaces cause burns!
Do not touch the product during self
cleaning step and keep children away
from it. Keep at least 30 minutes before
removing the remnants.
• Warning: The oven is equipped with
self-cleaning function. The oven is
heated to approx. 790 °F and existing dirt
is burned to ashes. A strong smoke de-
velopment may arise. Provide for good
ventilation.
• Clean the control panel and knobs with a
damp cloth and wipe them dry.
• The self-cleaning should be used after
approx. every 10th oven usage. The self-
cleaning has two levels. It can be selec-
ted according to level of dirtiness.
1. Low level (Low): It takes 3 hours.
2. High Level (High): It takes 5 hours.
• Warning: Remove all accessories from
the oven.
• Warning: If the self-cleaning mode
malfunctions, turn the oven off and dis-
connect the power supply. Have it ser-
viced by a qualified technician.
• Warning: Before operating the self-
clean cycle, remove dirt from exterior sur-
faces and oven interior with a damp
cloth, wipe grease and food soils from
the oven. Excessive amount of grease
may ignite, leading to smoke damage to
your home. Remove all accessories from
the oven.
• Warning: Do not clean the door gasket.
Fiberglass gasket is highly sensitive and
can get damaged easily. In case of a
damage on the oven door gasket, replace
with the new one from the authorized ser-
vice.
• Caution: Before the self-cleaning cycle,
remove dirt from exterior surfaces and
oven interior with a damp cloth.
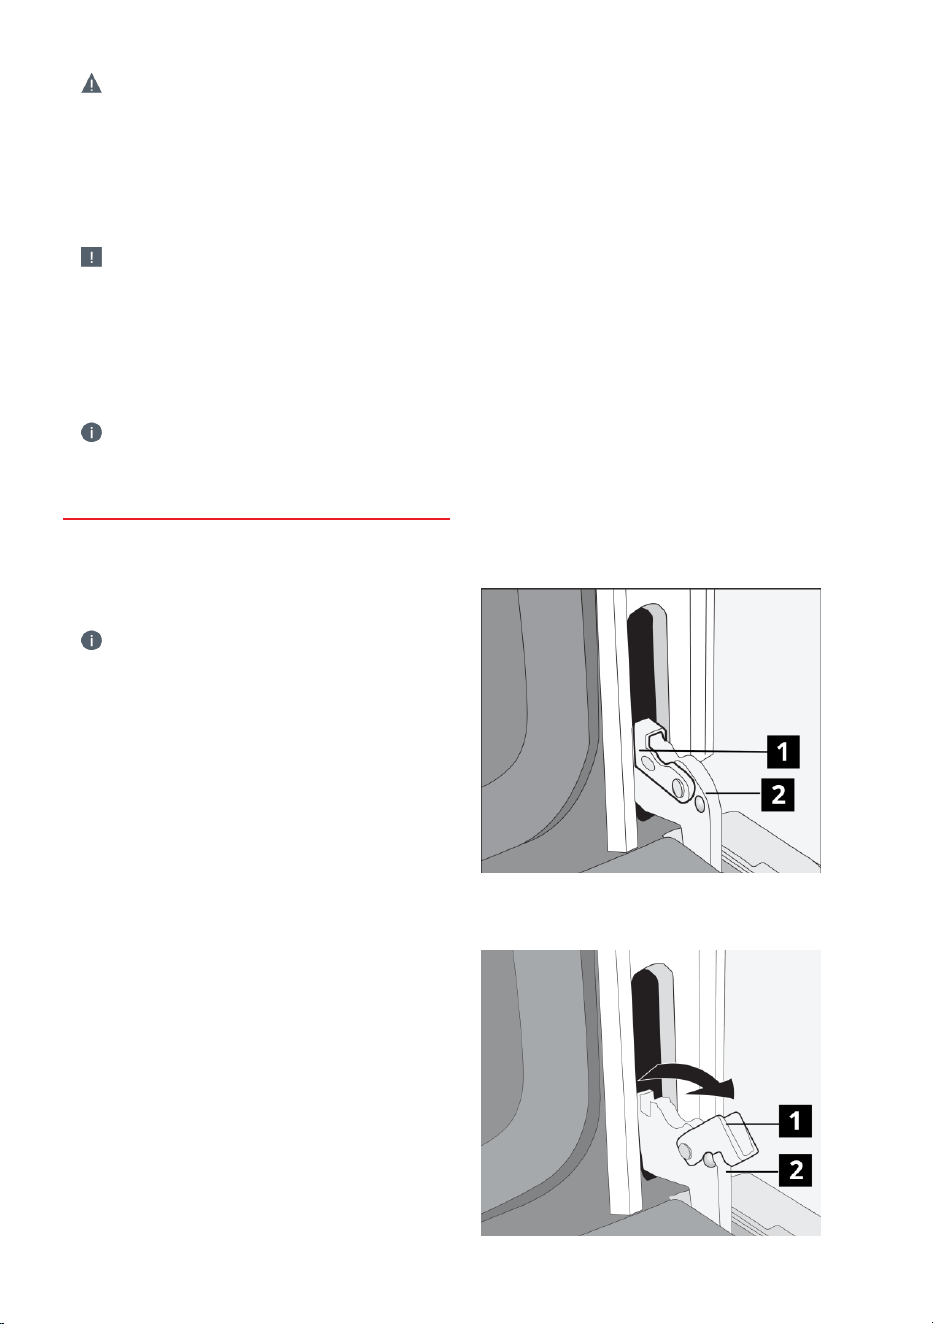
1 Function indicator light
2 Function selection knob
3 Temperature knob
4 Thermostat lamp
1. Keep the function knob pressed and
turn it clockwise to desired level of
“Clean”. (LO or HI). This duration cannot
be changed.
ð In self-cleaning function indicator
light and temperature indicator
lamp remain OFF until the end of
the program while the mode is run-
ning.
2. Oven door cannot be opened during self
cleaning. It remains locked for a while
after the self-cleaning function ends. Do
not force the door lock with handle until
the oven get cool.
3. After a clean cycle, remove soil deposits
with vinegar water.
4. If there is a fire in the oven during self-
clean, turn the oven off and wait for the
fire to go out. Do not force the door
open. Introduction of fresh air at self-
clean temperatures may led to a burst
of flame from the oven. Failure to follow
this instruction may result in severe
burns.
22
• Warning: The health of some birds and
pets is extremely sensitive to the fumes
given off during the Self-Cleaning cycle.
Always move birds and pets to another
closed and well ventilated room. Keep
the kitchen well-ventilated during the
Self-Cleaning cycle also for your health.
• Caution: During the Self-Cleaning
cycle, the electrical flow to hob burners
will be cut. After turning the function and
thermostat knob to off position, the door
lock will be automatically opened. When
the oven gets cool , the electrical flow to
hob burners will be started.
• During the Self-Cleaning cycle, the
lamp cannot be operated.
CLEANING OVEN DOOR
• To clean the oven door, use warm water
with washing liquid, a soft cloth or
sponge to clean the product and wipe it
with a dry cloth.
• Don't use any harsh abrasive cleaners
or sharp metal scrapers for cleaning the
oven door. They could scratch the sur-
face and destroy the glass.
• When removing the oven door, make sure
oven is cool and power to the oven has
been turned off before removing the
door.
• Warning: Failure to do so could result in
electrical shock or burns.
• The oven door is heavy and parts of it are
fragile. Use both hands to remove the
oven door. The door front is glass.
Handle carefully to avoid breakage.
• Grasp only the sides of the oven door. Do
notgrasp the handle as it may swing in
your hand and cause damage or injury.
• Warning: Failure to grasp the oven door
firmly and properly could result in per-
sonal injury or product damage.
• To avoid injury from hinge bracket snap-
ping closed, be sure that both levers are
securely in place before removing the
door. Also, do not force door open or
closed the hinge could be damaged and
injury could result.
• Do not lay removed door on sharp or
pointed objects as this could break the
glass. Lay on a flat, smooth surface, posi-
tioned so that the door cannot fall over.
• Oven door can be removed in order to
clean the inside of oven easily.
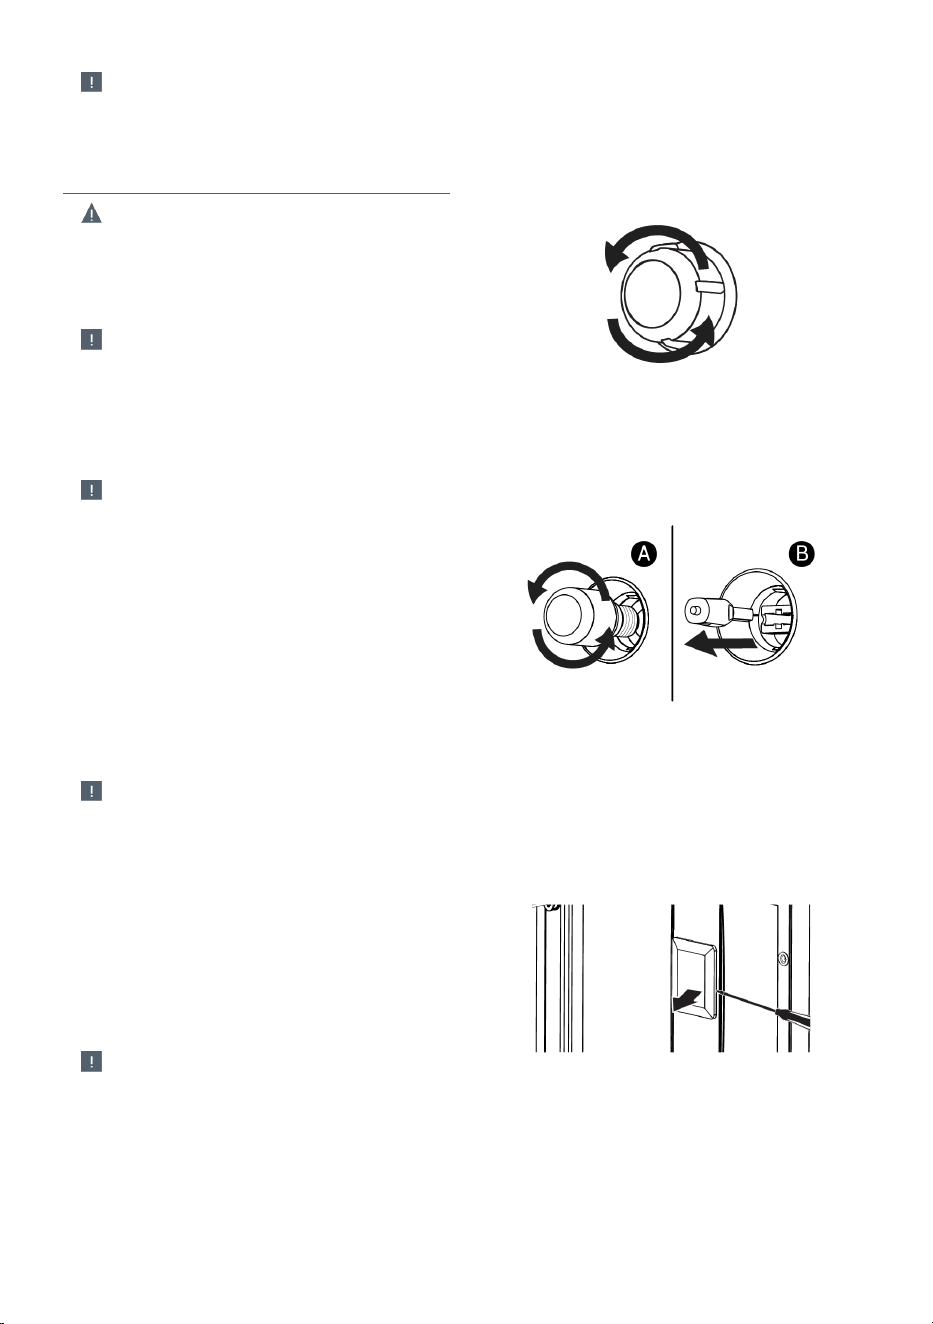
1. Open the oven door completely.
2. Press the hinge clamps located at both
sides of the door backwards.
3. Move the oven door to a slightly inclined
position.
4. Raise the oven door forwards with your
two hands.
5. Once you complete cleaning, perform
the same procedure in reverse order to
reinstall the oven door.
1 Hinge Clamps
2 Hinge
23
• Caution: Once you complete cleaning,
perform the same procedure in reverse
order to reinstall the oven door.
REPLACING THE OVEN LAMP
• Warning: Hot surfaces cause burns!
Before replacing the oven lamp, make
sure that the product is disconnected
from mains and cooled down in order to
avoid the risk of an electrical shock.
• Caution: The oven lamp is a special
electric light bulb that can resist up to
300°C (573 °F). See Technical specifica-
tions. for details. Oven lamps can be ob-
tained from Authorised Service Agents or
technician with license.
• Caution: Position of lamp might vary
from the figure.
• The oven lights can be illuminated with
lamp button. The lights are switched on
when the door is opened or when the
oven is in a cooking cycle. The oven
lights are not illuminated during self
clean. Each light assembly consist of a
removable lens, a light bulb as well as a
light socket housing that is fixed in place.
Light bulb replacement is considered to
be a routine maintenance item.
• Caution: In this oven, an incandescent
lamp with a power of less than 40 W, a
height of less than 60 mm, a diameter of
less than 30 mm or a halogen lamp with
socket type G9, a power of less than 60
W is used. The lamps are suitable for op-
eration at temperatures above 300 °C.
Oven lamps can be obtained from Au-
thorised Service Agents or technician
with licence.This product contains a
lamp of energy class G.
• Caution: The lamp used in this appli-
ance is not suitable for household room
illumination. The intended purpose of this
lamp is to assist the user to see food
stuffs.
If your oven has a round lamp,
1. Turn off power at the main power supply
(your fuse or breaker box).
2. Remove the glass cover by turning it
counter clockwise.
3. If your oven lamp is type (A) shown in
the figure below, rotate the oven lamp
as shown in the figure and replace it
with a new one. If it is type (B) model,
pull it out as shown in the figure and re-
place it with a new one.
4. Refit the glass cover.
If your oven has a square lamp,
1. Turn off power at the main power supply
(your fuse or breaker box).
2. Remove the wire shelves according to
the description.
3. Lift the lamp's protective glass cover
with a screwdriver. Remove the screw
first, if there is a screw on the square
lamp in your product.
4. If your oven lamp is type (A) shown in
the figure below, rotate the oven lamp
as shown in the figure and replace it
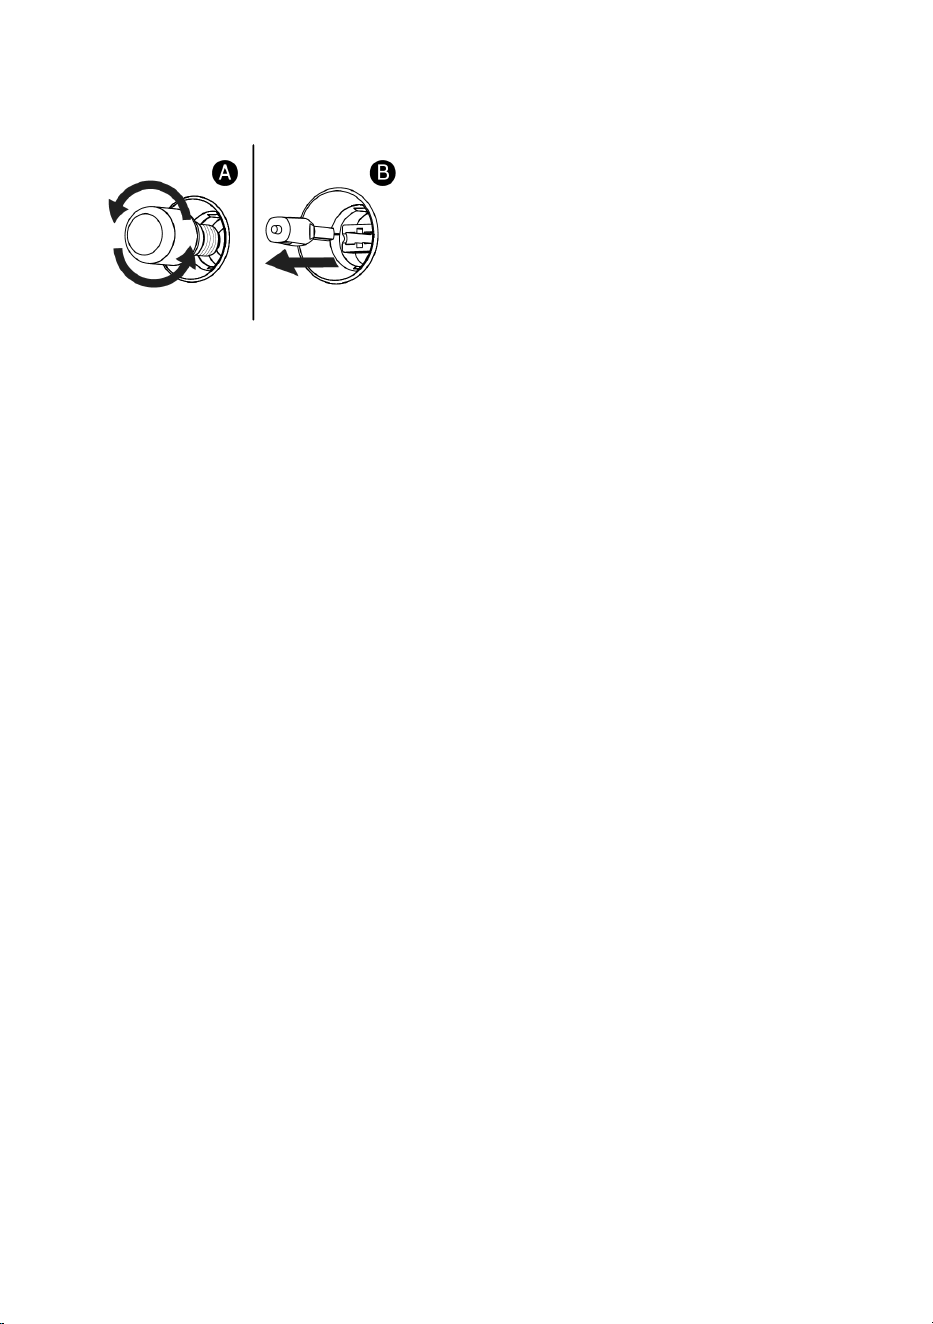
24
with a new one. If it is type (B) model,
pull it out as shown in the figure and re-
place it with a new one.
5. Refit the glass cover and wire shelves.

25
TROUBLESHOOTING
• Warning: Consult your Authorized Ser-
vice Agent or the dealer where you pur-
chased the product if the instruction
above do not remedy your issue. Never
attempt to repair a defective product
yourself.
OVEN EMITS STEAM WHEN IN USE
• Steam escaping during operation is nor-
mal. >>>No corrective action needed.
METALLIC NOISES EMITTED DUR-
ING HEATING AND COOLING
• Metal parts expand during temperature
change. >>>No corrective action needed.
PRODUCT DOES NOT OPERATE
• Defective or tripped main fuse or circuit
breaker. >>>Reset fuse or breaker. If de-
fective, have an electrician replace the
circuit breaker.
• Key lock enabled. >>>Disable key lock,
see Operation.
OVEN LIGHTS DO NOT TURN ON
• Defective oven light bulb. >>>Replace
bulb.
• Defective or tripped main fuse or circuit
breaker. >>>Reset fuse or breaker. If de-
fective, have an electrician replace the
circuit breaker.
OVEN DOES NOT HEAT
• Function and/or temperature not set.
>>>Set function and/or temperature.
• Time not set. >>>Set the time.
• Defective or tripped main fuse or circuit
breakerl. >>>Reset fuse or breaker. If de-
fective, have an electrician replace the
circuit breaker.
CLOCK DISPLAY BLINKING OR
CLOCK SYMBOL ON
• Power outage occurred. >>>Set oven
time, see Settings.

26
WARRANTY AND SERVICE
The warranties provided by Blomberg in
these statements only apply to Blomberg
electric and gas cooktop sold to the ori-
ginal purchaser or homeowner in the US
and Canada. This warranty is not transfer-
able.
To obtain warranty service, please contact
our nearest distributor as listed by state or
call 1800-459-9848. You will need your
electric and gas range model number, serial
number, retailer name and address, where
purchased and purchase date / installation
date.
This warranty gives you specific legal
rights, and you may also have other rights
which vary from state to state.
All warranties stated below are based upon
normal household use. The use of the
product in a commercial setting will void all
warranties.
Service must also be performed by an au-
thorized Blomberg Service Agency.
Cosmetic defects must be reported within
10 business days from installation.
1 year * limited warranty from date of first installa-
tion
Blomberg will repair or replace at no cost to the
consumer any defective parts of the electric and
gas cooktop
2 year * ++ limited warranty from date of first in-
stallation (Parts only
Blomberg will repair or replace any parts at no
cost to the consumer if material defects or work-
manship have caused the damage or failure of
these components. Labor charges are the re-
sponsibility of the consumer
2-5 year * ++ limited warranty from date of first in-
stallation (Parts only)
Blomberg will repair or replace oven cavitiy at no
cost to the consumer if material defects or work-
manship have caused the damage or failure of
these components. Labor charges are the re-
sponsibility of the consumer
Disclaimers of Warranties and Exclusions
Warranty does not cover service costs by
an authorized service agent to correct in-
stallation, electrical problems or educa-
tional instruction on the use of the electric
and gas cooktop. The warranty also does
not cover defects or damage caused by an
act of god (such as storms, floods, fires,
mudslides, etc.), damage cause by use of
the electric and gas cooktop for pur-poses
other than those for which it was designed,
misuse, abuse, accident, alteration, im-
proper
installation, maintenance, travel fees, ser-
vice calls outside normal service hours, un-
authorized service work or work.
This product is fully tested and went
through official quality assurance inspec-
tions before leaving the original manufac-
turing site. Warranty
terms for this Blomberg household appli-
ance is not valid if the product is altered,
tampered, modified, additional parts as-
sembled, fixed and re-packed by an author-
ized distributor, servicer, a third party re-
tailer, reseller or by any other unauthorized
person(s).
TO THE EXTENT PERMITTED BY LAW, THIS
WARRANTY IS IN LIEU OF ALL OTHER EX-
PRESSED AND IMPLIED WARRANTIES, IN-
CLUDING THE IMPLIED WARRANTIES OF
MERCHANTABILITY AND FITNESS FOR A
PARTICULAR PURPOSE. BLOMBERG UN-
DERTAKES NO RESPONSIBILITY FOR THE
QUALITY OF THIS PRODUCT EXCEPT AS
OTHERWISE PROVIDED IN THIS WAR-

27
RANTY STATEMENT. BLOMBERG AS-
SUMES NO RESPONSIBILITY THAT THE
PRODUCT WILL BE FIT FOR ANY PARTICU-
LAR PURPOSE FOR WHICH YOU MAY BE
BUYING THIS PRODUCT, EXCEPT AS OTH-
ERWISE PROVIDED IN THIS WARRANTY
STATEMENT.
Blomberg does not assume any responsib-
ility for incidental or consequential dam-
ages. Such damages include, but are not
limited to, loss of profits, loss of savings or
revenue, loss of use of the cooker or any
associated equipment, cost of capital, cost
of any substitute equipment, facilities or
services, downtime, the claims of third
parties, and injury to property. Some states
do not allow the exclusion or limitation of
incidental or consequential damages, so
the above limitations or exclusion may not
apply to you.
* installation date shall refer to either pur-
chase date or 5 business days after deliv-
ery of the product to the home, whichever is
later.
++ Parts replaced will assume the identity
of the original parts + their original war-
ranty.
No Other Warranties. This Warranty State-
ment is the complete and exclusive war-
ranty from the manufacturer. No employee
of Blomberg or any other party is author-
ized to make any warranty statements in
addition to those made in this Warranty
Statement. Please keep this warranty card,
user manual and your sales slip for future
reference.
Service
Please contact the Distributor for your
State or Province as listed on the Distrib-
utor Contact List, or call our Toll Free Num-
ber at 1 800 459 9848 for direction to an
Authorized Blomberg Service Agent. 02 01
For Québec consumers only - Notice on the
warranty of availability of spare parts, repair
services and information necessary for repair
or maintenance (s. 39 of the Consumer Pro-
tection Act)
Please be advised that Beko Canada Inc.,
as well as its affiliates, subsidiaries, parent
companies, insurers, successors and as-
signs, does not guarantee, within the mean-
ing of section 39 of the Consumer Protec-
tion Act, CQLR, c. P-40.1 and sections
79.18 to 79.20 of the Regulation respecting
the application of the Consumer Protection
Act, CQLR, c P-40.1, r. 3, the availability of
replacement parts, repair services, or the in-
formation necessary for the maintenance
or repair of goods manufactured, imported,
advertised, or sold by Beko or its subsidiar-
ies.

28
NOTES