- 02 -
ROCAM
R
Version 1.0
Mad e in PRC
Http://www.yelaw.net
CR1001eM
Alarm Clock with Vibrator
CREATE YOUR PERFECT SLEEP ENVIRONMENT
Speak with our Experts
+1 (240) 514-4451
Mon-Fri: 9:00am ~01:00pm PST
8:00am ~12:00pm PST
- 01 -
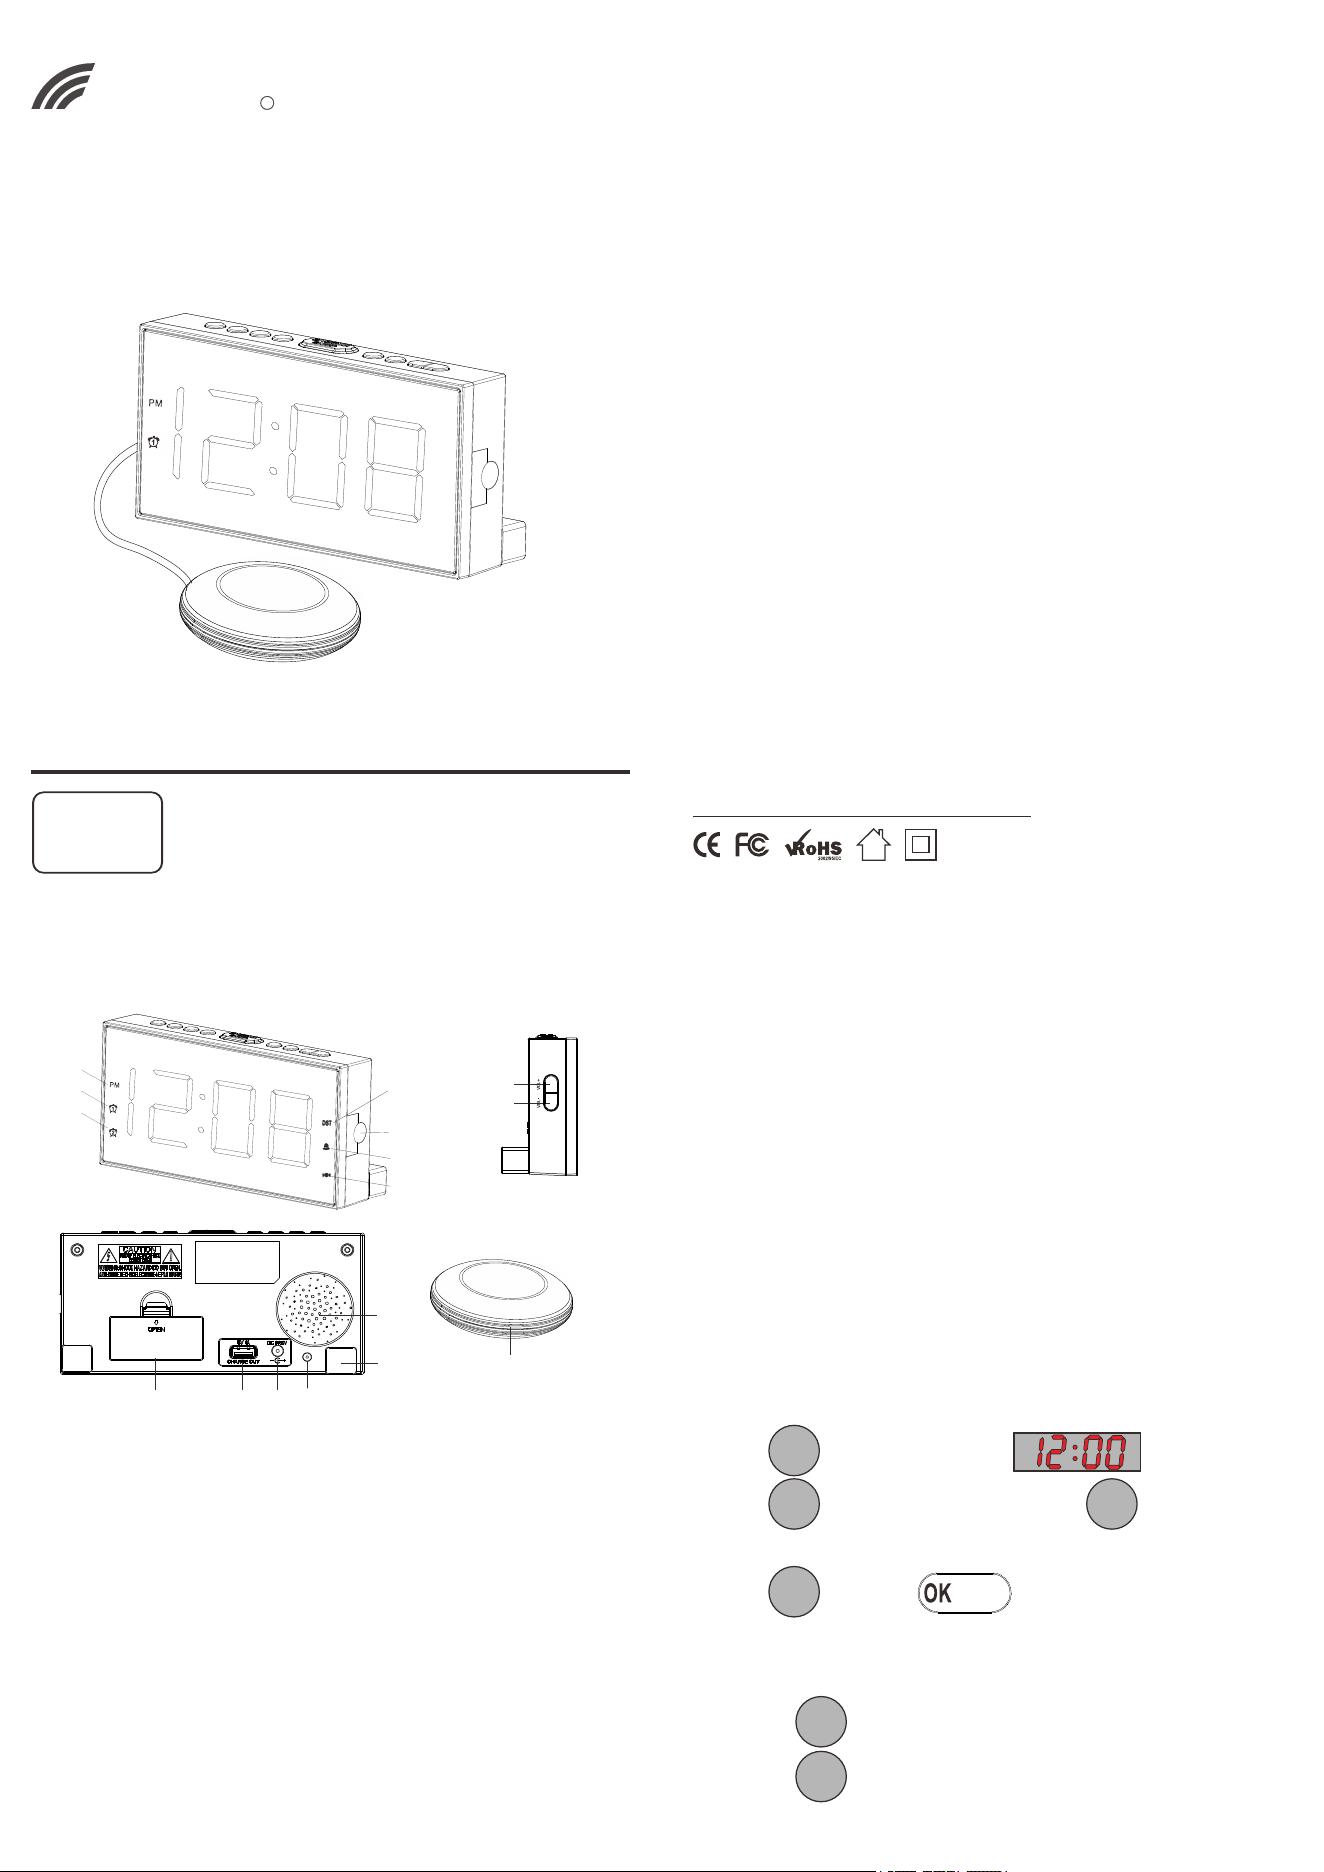
Chapter 1 LOCATION OF CONTROLS
17
18
1.Set Time & 12/24H Button 2.Hour Button
3.Minute Button 4.Dimmer & DST Button
5.OK & SNOOZE Button 6.Alarm Pause Button
7.Alarm OFF Button 8.Alarm 1 Button
9. Alarm 2 Button 10. PM Indicator
11.Alarm 1 Indicator 12.Alarm 2 Indicator
13.DST Indicator 14.Bell Indicator
15.Vibrator Indicator 16.Bell & Vibrator Toggle Button
17.Volume + Button 18.Volume - Button
19.Battery Compartment 20.USB Port
21.DC Jack 22.Vibrator Insert Port
23.Holder ( x 2pcs) 24.Speaker
25.Vibrator
Note: Battery is not included
9
1
2
3
4
5
6
7
8
13
16
10
11
12
14
15
24
19
21
20
23
22
25
Chapter 2 POWER RESOURCES
Insert the two included holders into the back of the clock to avoid it
being knocked over.
1. Install 2pcs 1.5V “AAA” size batteries to the proper terminals in
the battery compartment to memorize the time setting in case
of power outage.
NOTE: Batteries(not included) don't support time display but can back up
time & alarm setting and trigger an alarm in case of AC power failure.
2. Connect the adapter line to DC jack , then plug into a 100~240V
AC wall power outlet.
Chapter 3 TIME SETTING
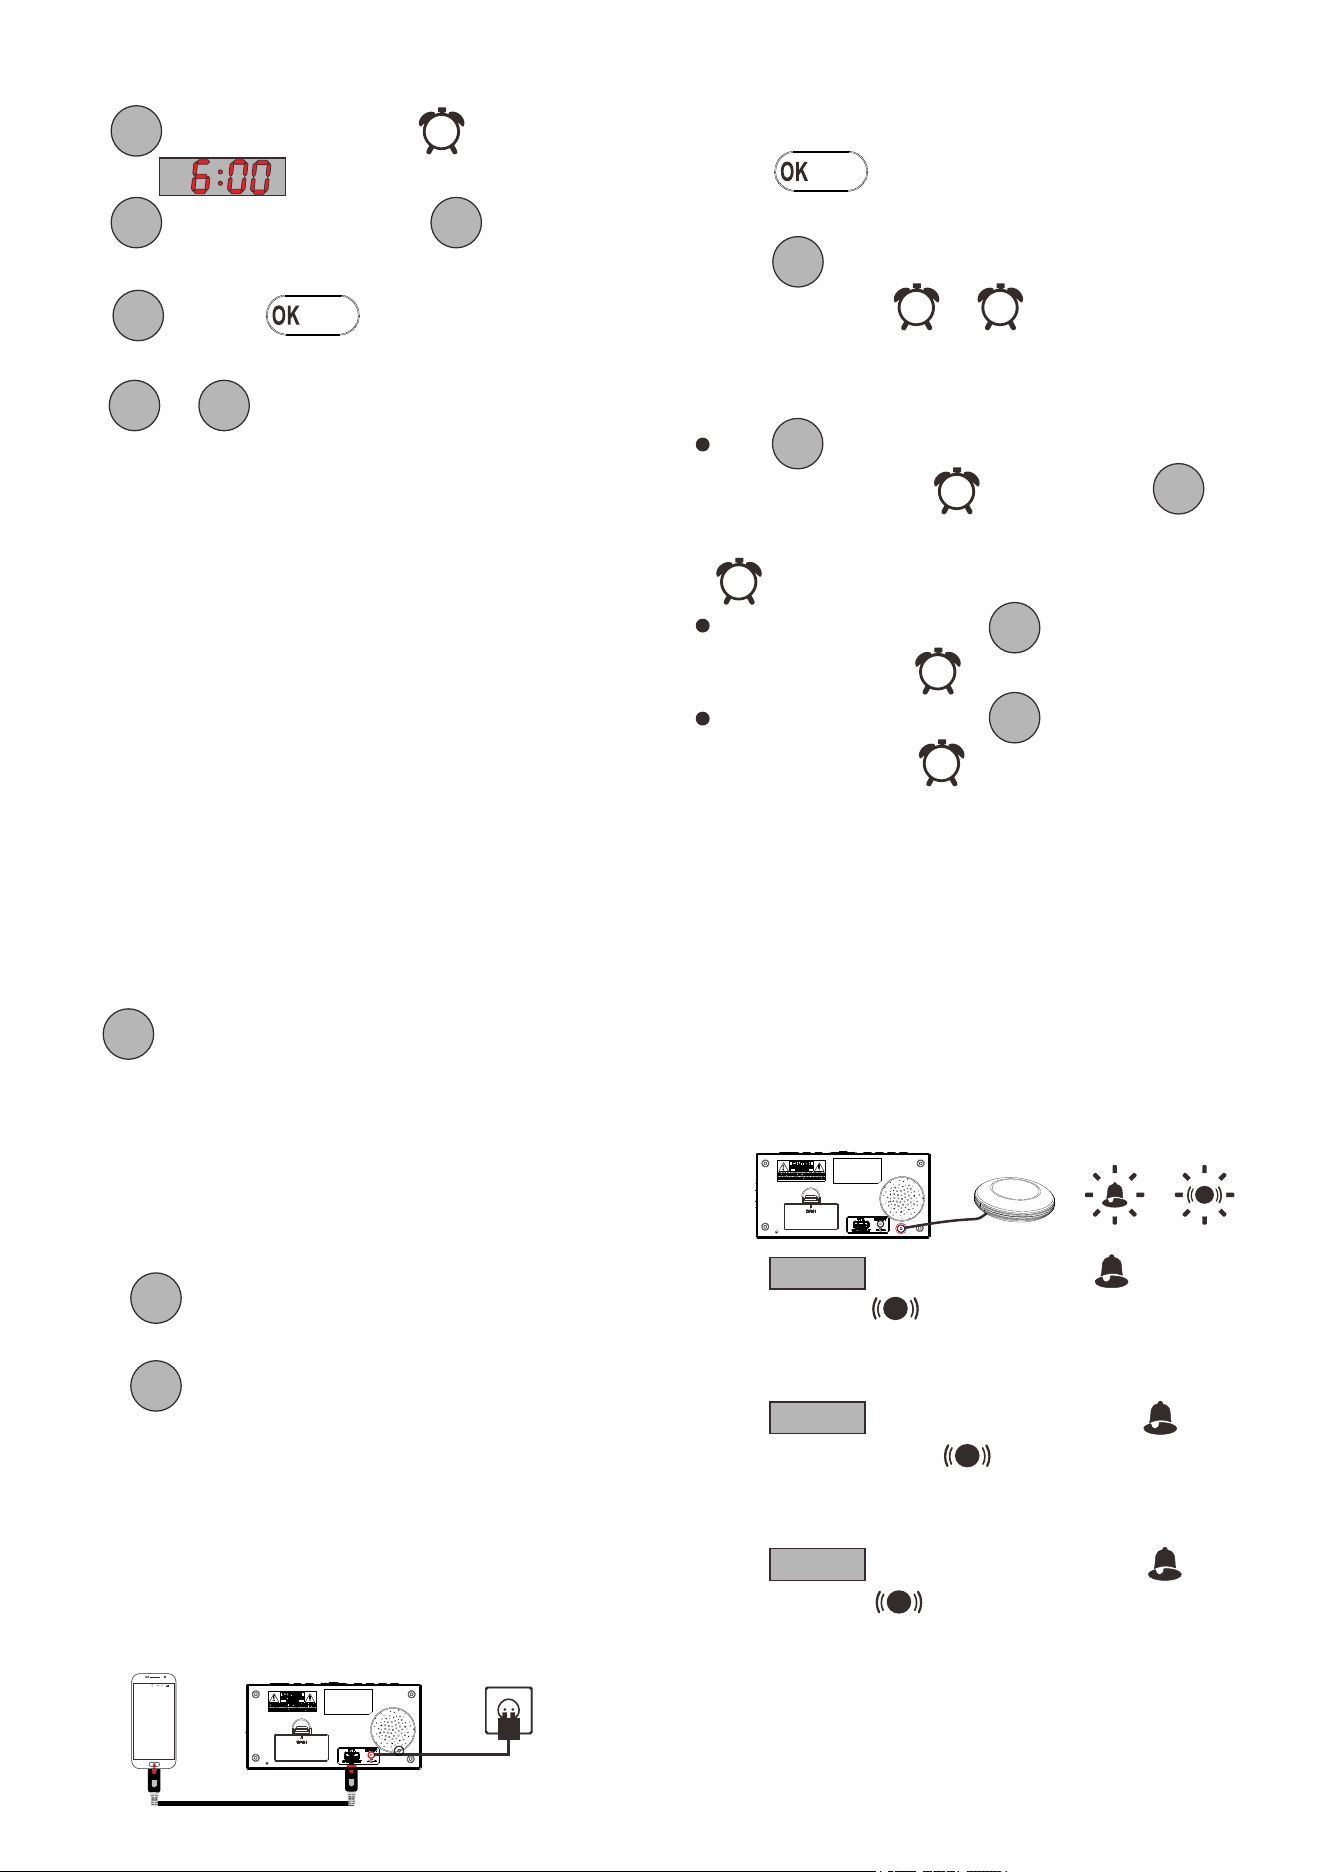
HOUR MIN
1. Press button once, display starts flashing.
2. Press button to set the hour. press button to set
the minute.
3. Press button or button to save time or wait
for another 5 seconds to confirm automatically.
To change 12H/24H time format
Hold press button to switch 24H time format.
Hold press button again to switch 12H time format.
SET TIME
12/ 24H
SET TIME
12/ 24H
SET TIME
12/ 24H
SET TIME
12/ 24H
SNOOZE
- 05 - - 06 -
- 04 -- 03 -
Chapter 7 USB CHARGING
Plug charging cable into device such as phone or tablet.
Device can charge both your phone or tablet at the same time.
The maximum charge current is 1 Ampere.
22:23
2
89%
E
E
1
Chapter 5 DIMMER
Repeat button to adjust the brightness of display for your
preference.
There is 5 levels, The sequence is as follows:
3-4-5-4-3-2-1-2-3........
Hold press button to switch DST function.
DST indicator will turn on.
Hold press button again to turn off DST function.
DST indicator will turn off.
Chapter 6 DST
DIMMER
DST
DIMMER
DST
DIMMER
DST
Chapter 8 Vibrator
1. Insert the vibrator plug into the vibrator jack of the machine, the bell
indicator and the vibrator indicator will light up, indicating that the bell
and the vibrator will be effective at the same time.
Chapter 4 ALARM SETTING
1
1
Turn off Alarm
When alarm goes off:
1. Press button to temporarily turn off alarm for 9
minutes. Alarm will ring every next 9 minutes.
2. Press button to turn off alarm for 24 hours.
The alarm indicator or is still on, which means
alarm is still activated and will ring after 24 hours.
3. Cancel Alarm
Press button to turn off alarm 2 permanently,
corresponding indicator will turn off. Press button
again to turn off alarm 1 permanently, corresponding indicator
will turn off.
If alarm 1 goes off, then press button, just turn off
alarm1 permanently. indicator will turn off .
If alarm 2 goes off, then press button, just turn off
alarm 2 permanently. indicator will turn off.
2
1. Press button, the alarm indicator will light up,
the display starts flickering.
2. Press button to set the hour, press button to set
the minute.
3. Press button or button to save alarm time or
just wait for another 5 seconds to confirm automatically.
4. Push or button to adjust alarm volume.
Setting ALARM 2 is the same as ALARM 1.
ALARM
1
1
VOL+ VOL-
HOUR MIN
ALARM
1
2
ALARM
OFF
ALARM
OFF
ALARM
OFF
ALARM
PAUSE
1
2
ALARM
OFF
SNOOZE
SNOOZE
2. Press button, the ring indicator goes off, and the
vibrator indicator stays on, which means that when the
alarm goes off, the vibrator will take effect, but the bell will not
sound.
3. Press button again, the ring indicator goes on,
and the vibrator indicator goes off, which means that
when the alarm goes off, the bell will sound, but the vibrator will
not shake.
4. Press button again, the ring indicator and the
vibrator indicator goes on, which means that when the
alam goes off, the bell and the vibrator will be effective at the
same time.
2-3-4 will continue to loop.
BUZZ/VIB
BUZZ/VIB
BUZZ/VIB