Please read and keep the manual properly, it contains important information.
Instruction manual
KIDS SLIDE
This product conforms to the safety requirements of CPSIA, ASTM F963-17
Standard: ASTM-F963-17
Eco-friendly Material
Multiple ways to play
Safe and stable
THANK YOU
We appreciate the trust and confidence you have placed in BIERUM through the purchase of this
KIDS SLIDE. We strive to continually create quality products designed to enhance your life.
Thank you for choosing BIERUM !
E-mail Service :[email protected]
FE-HT-LXC
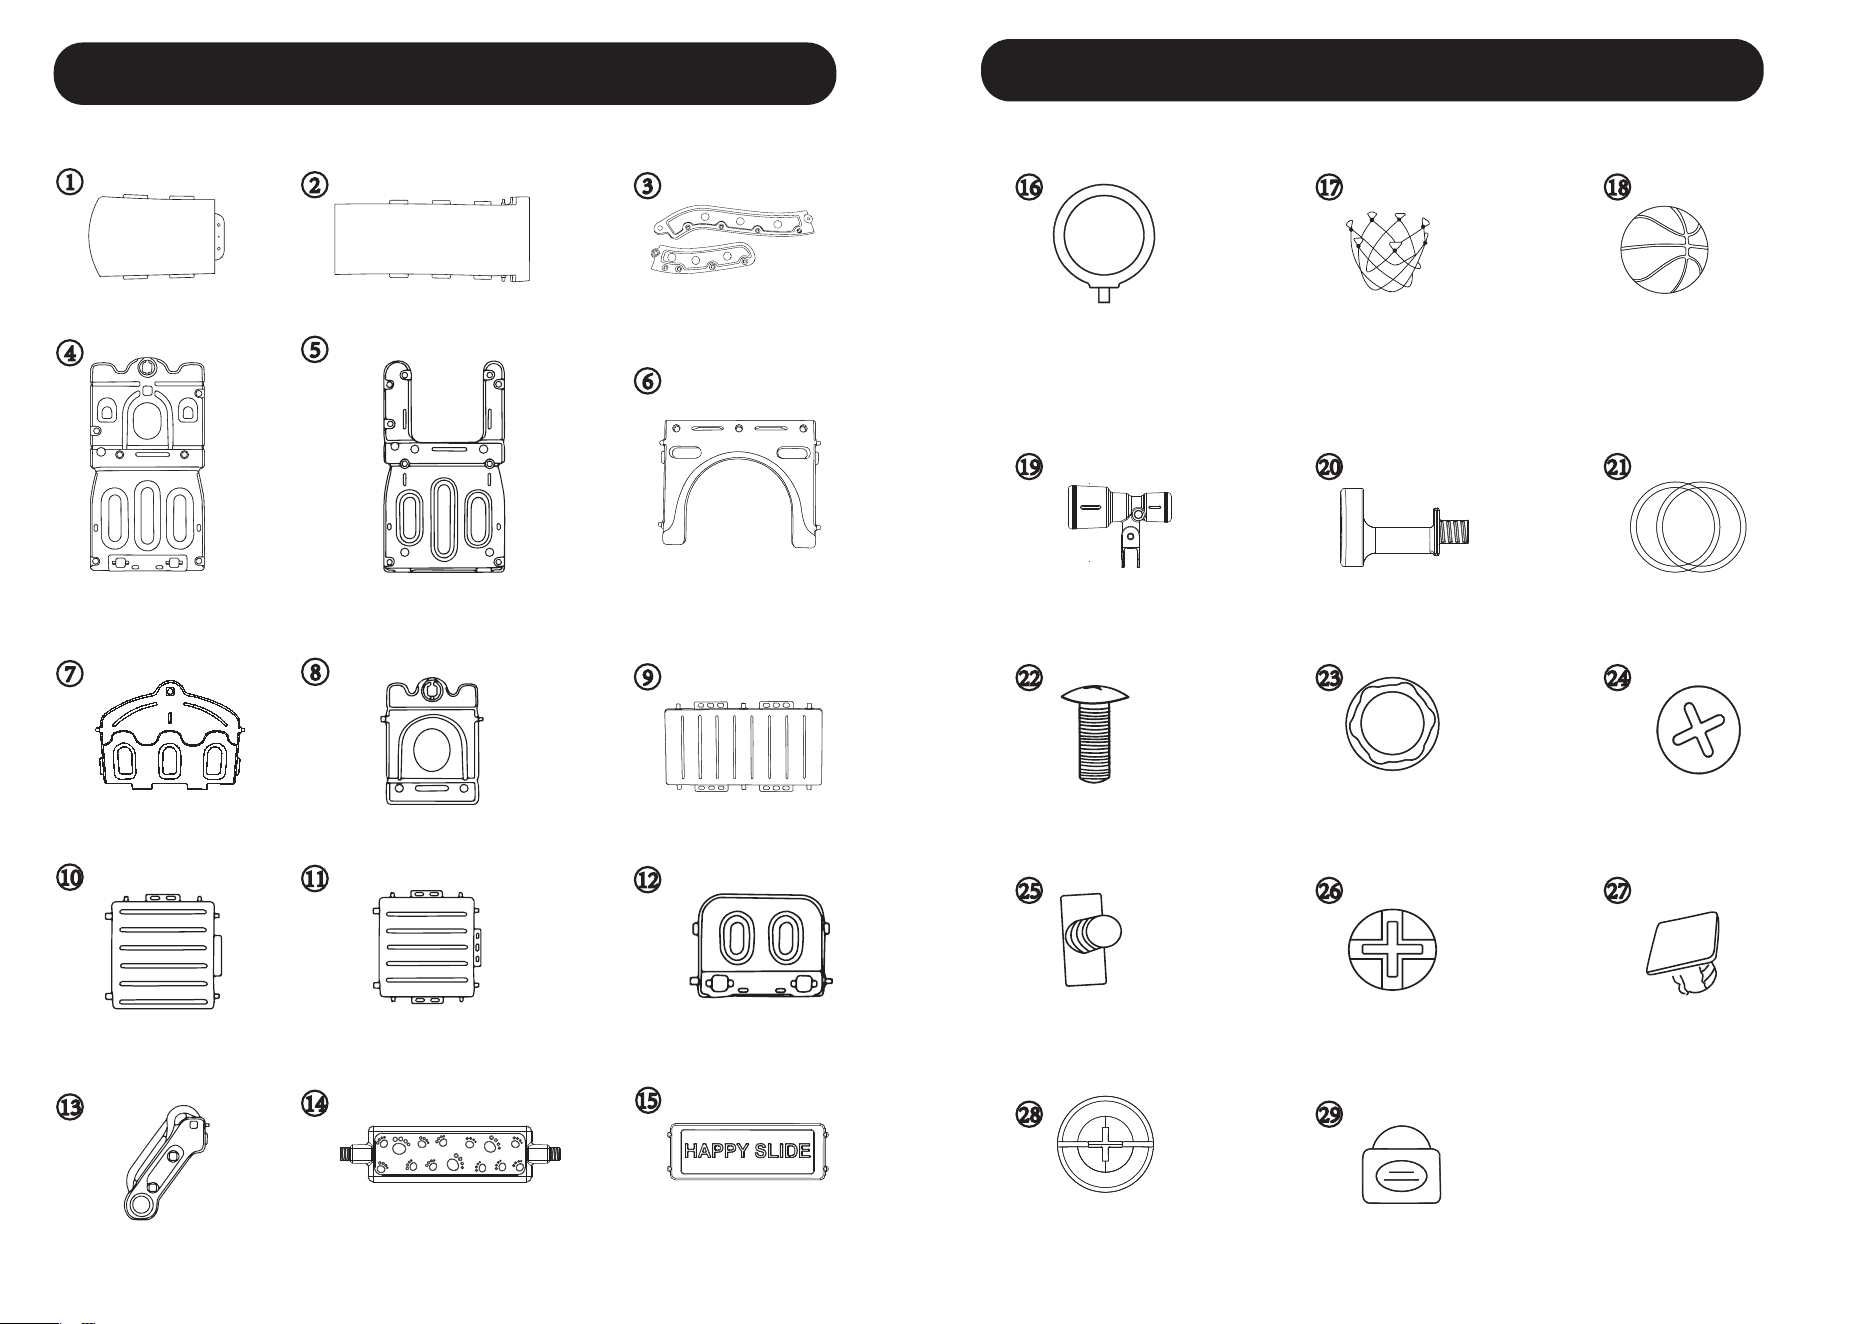
INFORMATION BEFORE ASSEMBLING
Check if following spare parts are in the box:
Buffer board *1
Slide*1 Each slide
handrail*2
Large Side plate*1
U-shaped side
panel*3
Tunnel panel *2
Pedal *3
Bridge Fence *2 Round hole panel *3
Tunnel platform *1
Small platform*1
11
L-shaped gate
tower *4
Stair handrail *2
Baffle*2
14
13
Check if following spare parts are in the box:
INFORMATION BEFORE ASSEMBLING
Ring Thrower*1
Basketball
net*1
Basketball*1
16
17
18
19 20 21
22 23 24
25 26 27
28
Ring*4
Screw*1
Small cross
nut* 18
Little prodigy
nut*50
Square screw*2
Long square screw*2
Large nut*8
29
Plastic
screwdriver*1
10
8
9
7
6
5
4
3
1
Telescope *1
Large platform *1
Basketball hoop*1
Cross-shaped
nut*2
12
15
ASSEMBLING ASSEMBLING
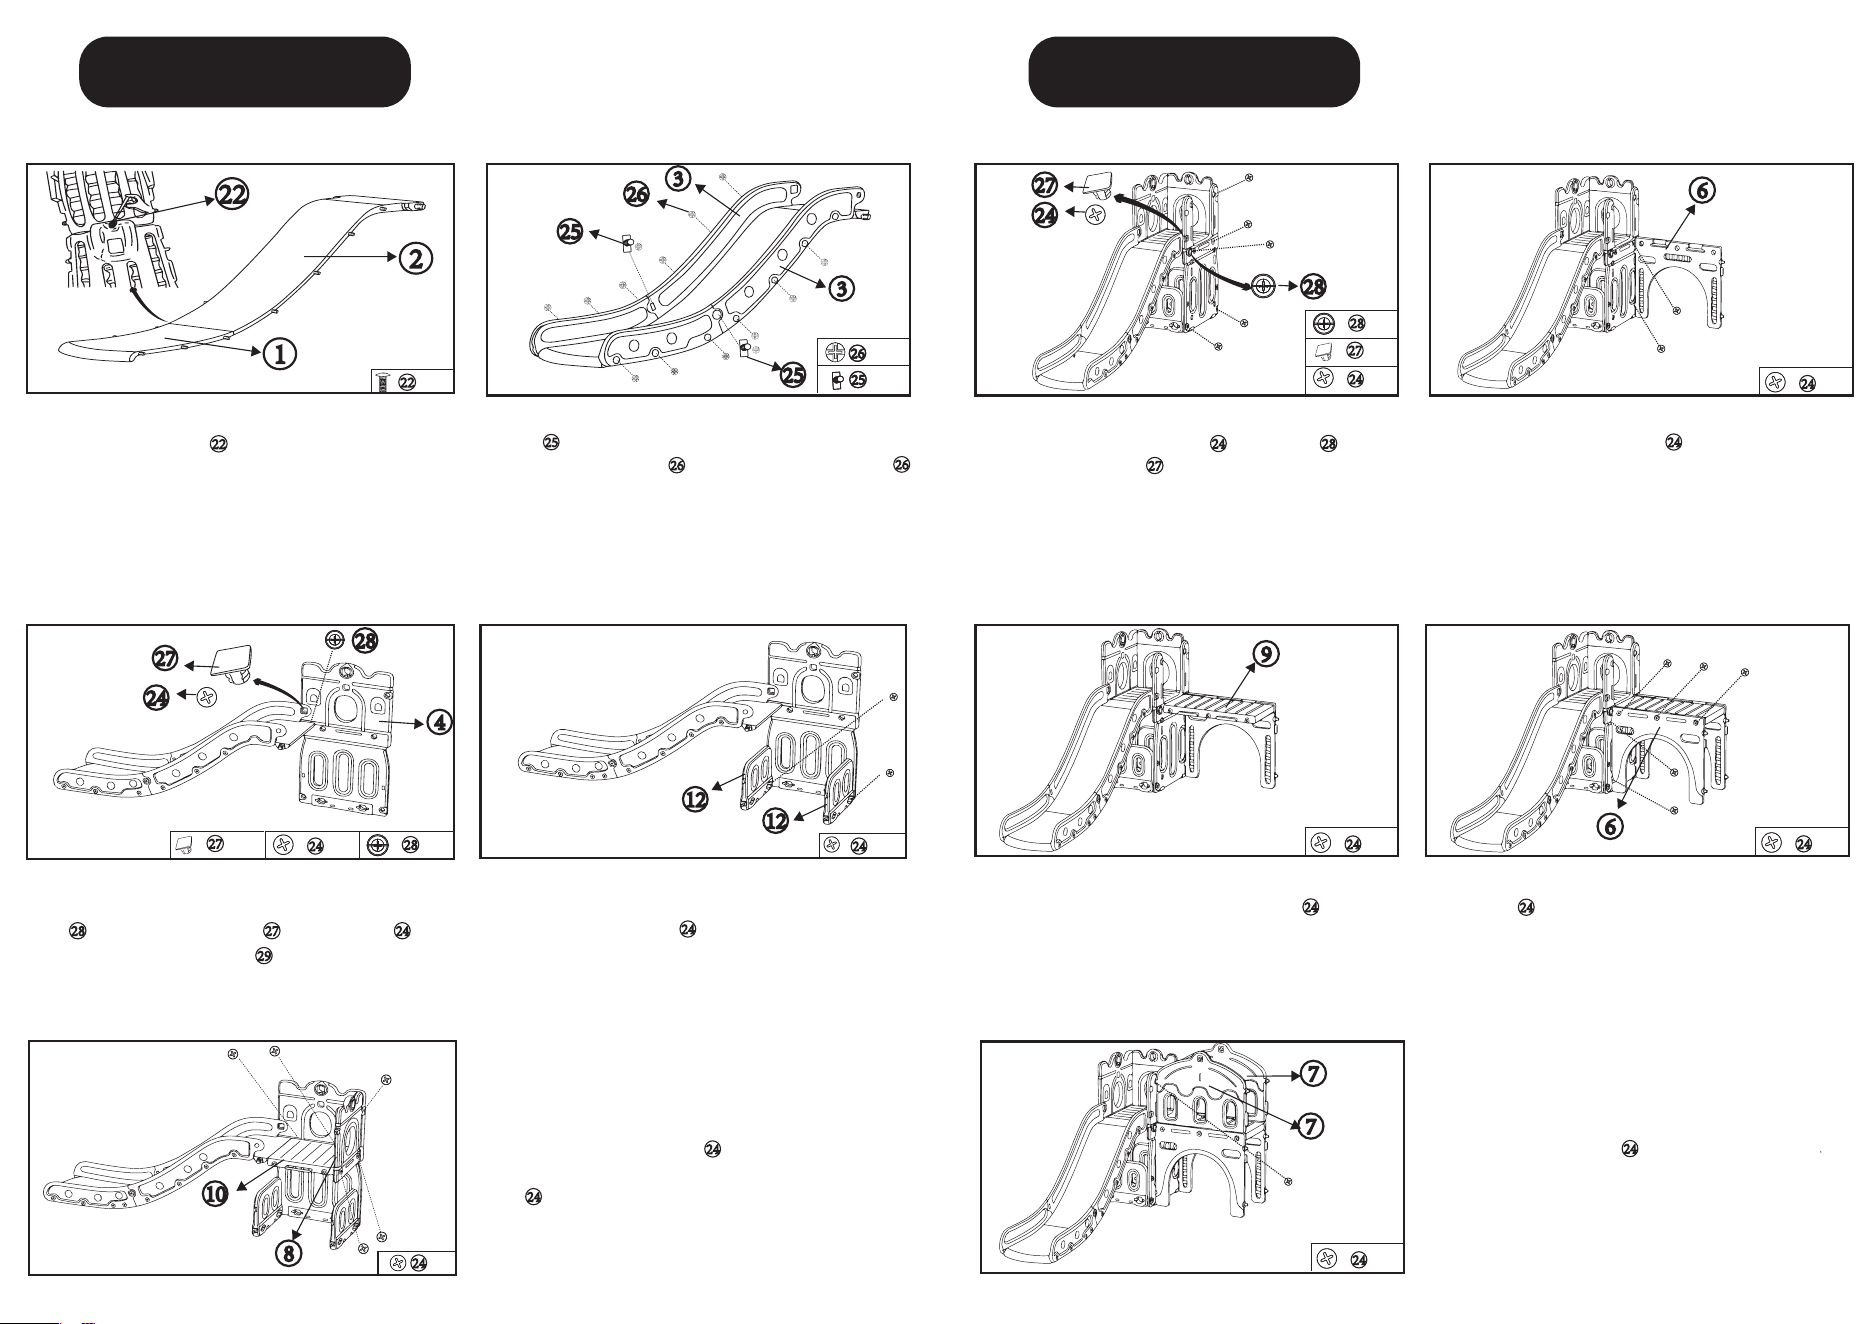
STEP 1
* 1
22
1
22
* 14
* 2
26
25
* 14
* 2
26
25
25
3
3
25
26
* 1
* 1
* 1
4
24
27
28
28
24
27
STEP 2
STEP 3
24
Connect the Slide section previously assembled
to the Large Slide Panel, securing them with 1pc
Nut , 1pc Square Screw and1pc Nut ,
using Plastic Screwdriver .
28
27
29
Connect the Handrails together with Long Square
Screw ,and then attach the long handrail to Slide,
secure with 7pcs Nut on each side,14pcs Nut
in total. Tighten with Plastic Screwdriver.
( Suitable for the installation of both handrails)
26
26
25
Attach the Slide to the Buffer Board, and
secure with Screw or the back.
22
STEP 4
* 2
12
12
24
Take 2 L-shaped gate towers , insert them
through the holes on the Large Side Panel, and
secure with 2pcs Nut .
24
STEP 5
Connect the Round hole panel and small
Platform with 2 pcs Nut . Then attach this
part to the slide section, secure with 3 pcs
Nut .
24
24
* 5
24
10
8
24
27
28
* 1
28
* 1
27
* 6
24
STEP 6
Attach the U-shaped Side Panel as illustrated,
and secure with 6 pcs Nut , 1pc Nut and
1pc Square Screw .
24
28
27
6
* 2
24
Install the Tunnel Panel to the assembled section.
And secure with 2 pcs Nut .
24
STEP 7
* 5
24
9
Position Tunnel Platform as illustrated, secure it
to the assembled part with 5 pcs Nut .
24
STEP 8
6
* 5
24
Attach another Tunnel Plate and secure with
5 pcs Nut .
24
STEP 9
7
7
* 2
24
Install the Bridge Fences and
secure with 2 pcs Nut .
24
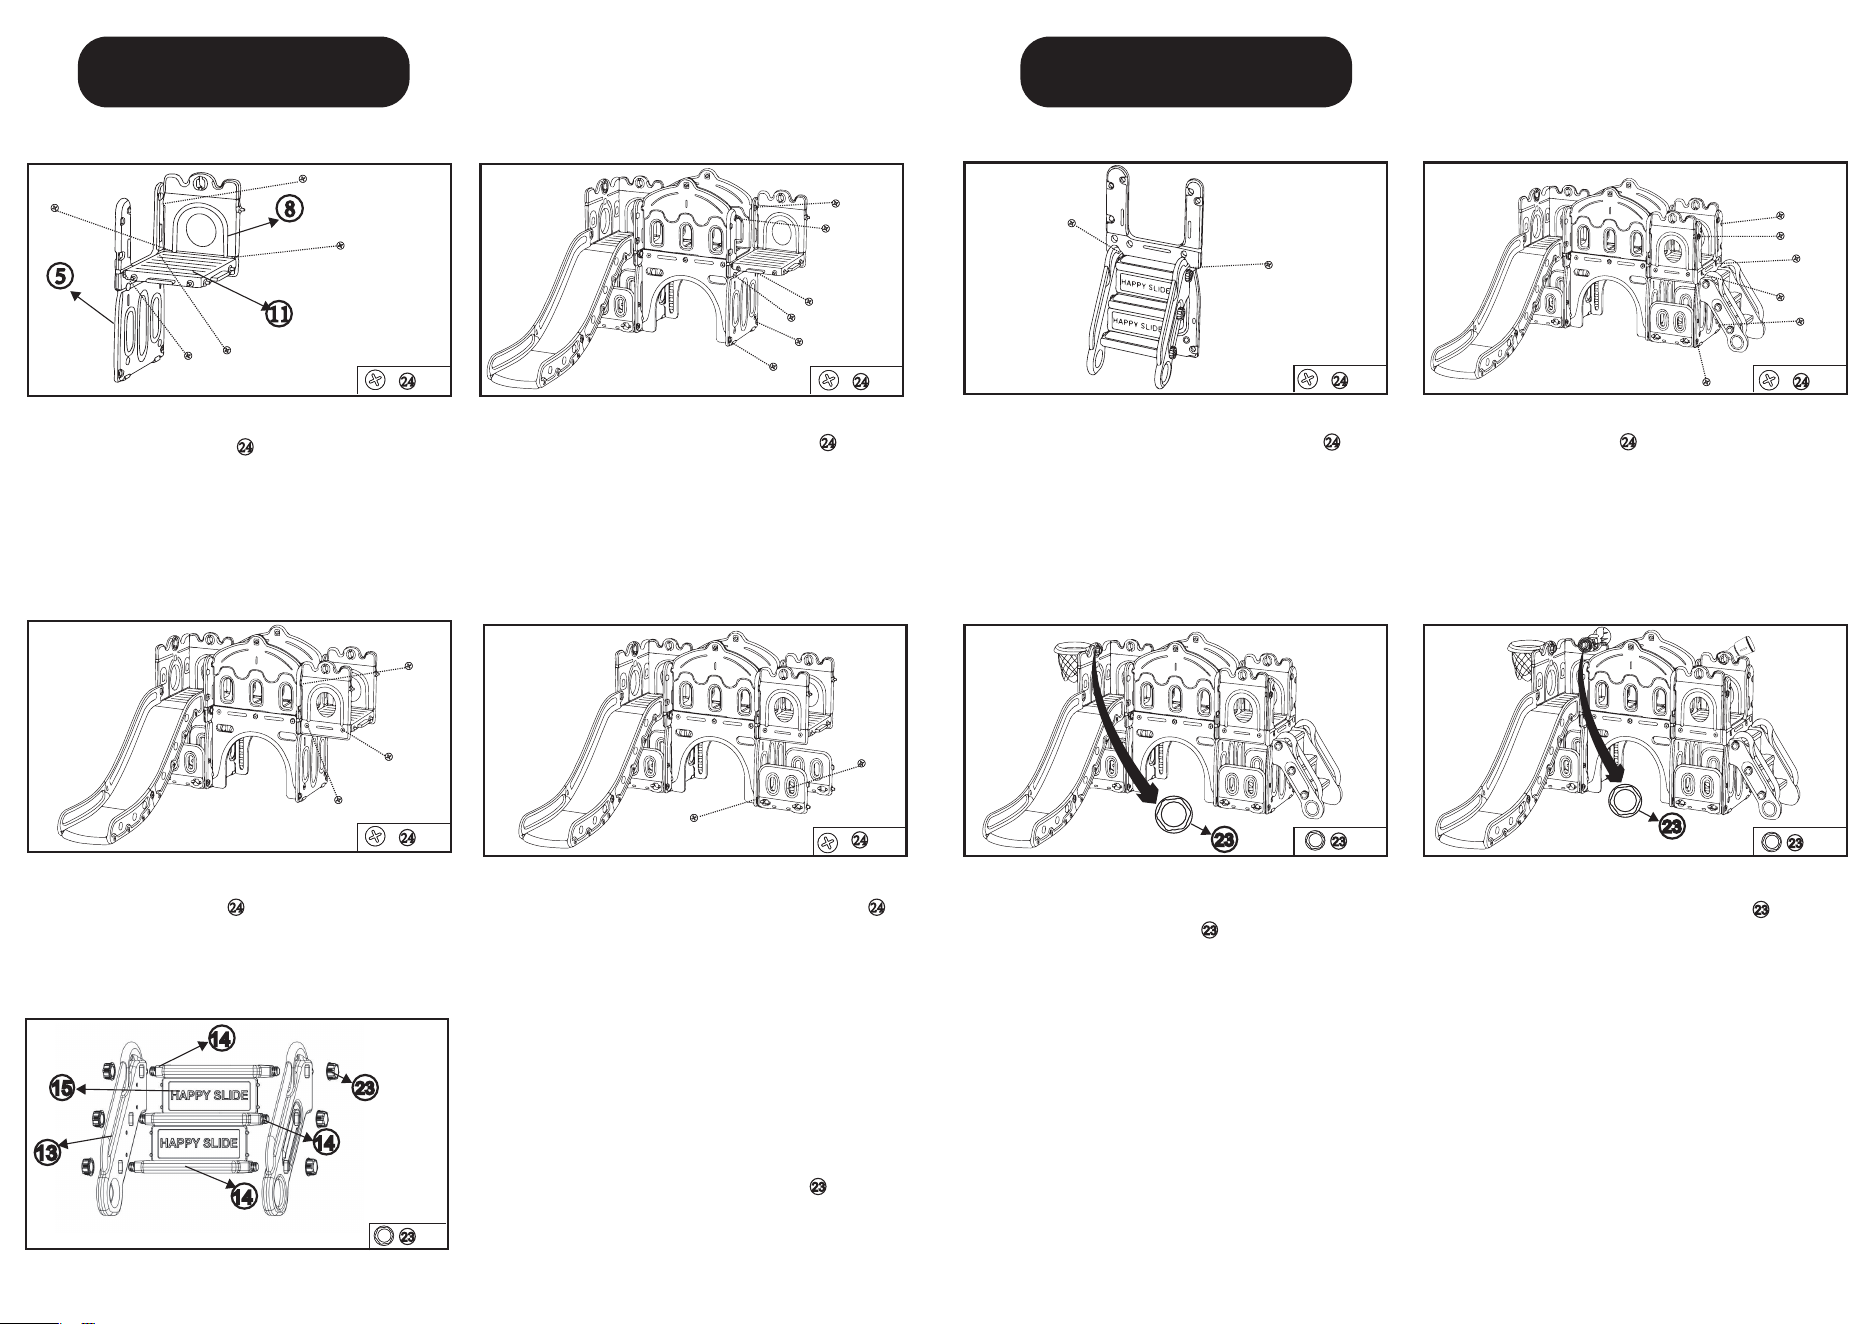
STEP 10
ASSEMBLING
5
11
8
* 5
24
Connect the Round Hole Panel and the Large
Platform with 5 pcs Nut .
24
STEP 11
* 6
24
Attach the U-shaped Side Panel section to the
assembled part,secure with 6 pcs Nut .
24
STEP 12
* 2
24
Add the 3rd Round Hole Panel as illustrated,
secure with 3 pcs Nut .
24
* 3
24
STEP 13 STEP 14
Insert 2 L-shaped gate towers to the bottom of
U-shaped Side Panel,secure with 2pcs Nut .
24
J
P
* 6
23
23
14
15
13
14
14
Insert the Pedals and baffles into the holes in Stair
Handrails, and secure with 6 pcs Nut .
23
STEP 15
ASSEMBLING
* 2
24
STEP 16
Connect the Stair and the U-shaped Side Panel
as illustrated, and secure with 2 pcs Nut .
24
* 6
24
STEP 17
Attach the stair set to the assembled section and
secure with 6 pcs Nut .
24
* 1
23
23
Put the basketball net on the basketball hoop,
then install the basketball hoop on the Large side
panel and fix it with screw .
23
23
* 1
23
Attaching the ring thrower to one of the round
hole side panels and fix it with screw .
23
STEP 18 STEP 19

MAINTENANCE INSTRUCTIONS
1. Check the product regularly to prevent loose and broken components.
2. Use mild soap and water for daily cleaning.
3. The following examines are required at the beginning of each season
(twice a month)
(1)Check if any parts are missing or broken.
(2)Check if all the connection parts are tight.
!
WARNING
1.CHOKING HAZARD-Small parts. Sharp points.Only for adults assemble
it and the product should be used under the supervision of an adult.
2.Children on this product should not wear scarf, gloves, cloak or any
clothes with long strip.
3.Children on this product should not wear necklace or hang anything
around the neck.
4. MAKE SURE the surface of the product is dry and free of foreign objects
before use Stay away from fire
5. MAKE SURE all the connection parts are tightly assembled before
allowing children to play on it.
6.DO NOT cut, heat or change the shape of the product.
7.DO NOT use jump rope, clothes line, etc. to hang items not specially
designed for this product.
8.DO NOT place the product in direct sunlight to reduce the risk of sunburn.
9.DO NOT use the product in an unintended way.
10.DO NOT use the product when it it wet or in a snow day.
11.Falling to a hard ground like concrete floor may cause severe injury
or evend eath.Close supervision of an adult is required during use.
12.Stop using the product when the temperature is below 32℉ (0℃),
because the plastic material may get more fragile and easier to broken.