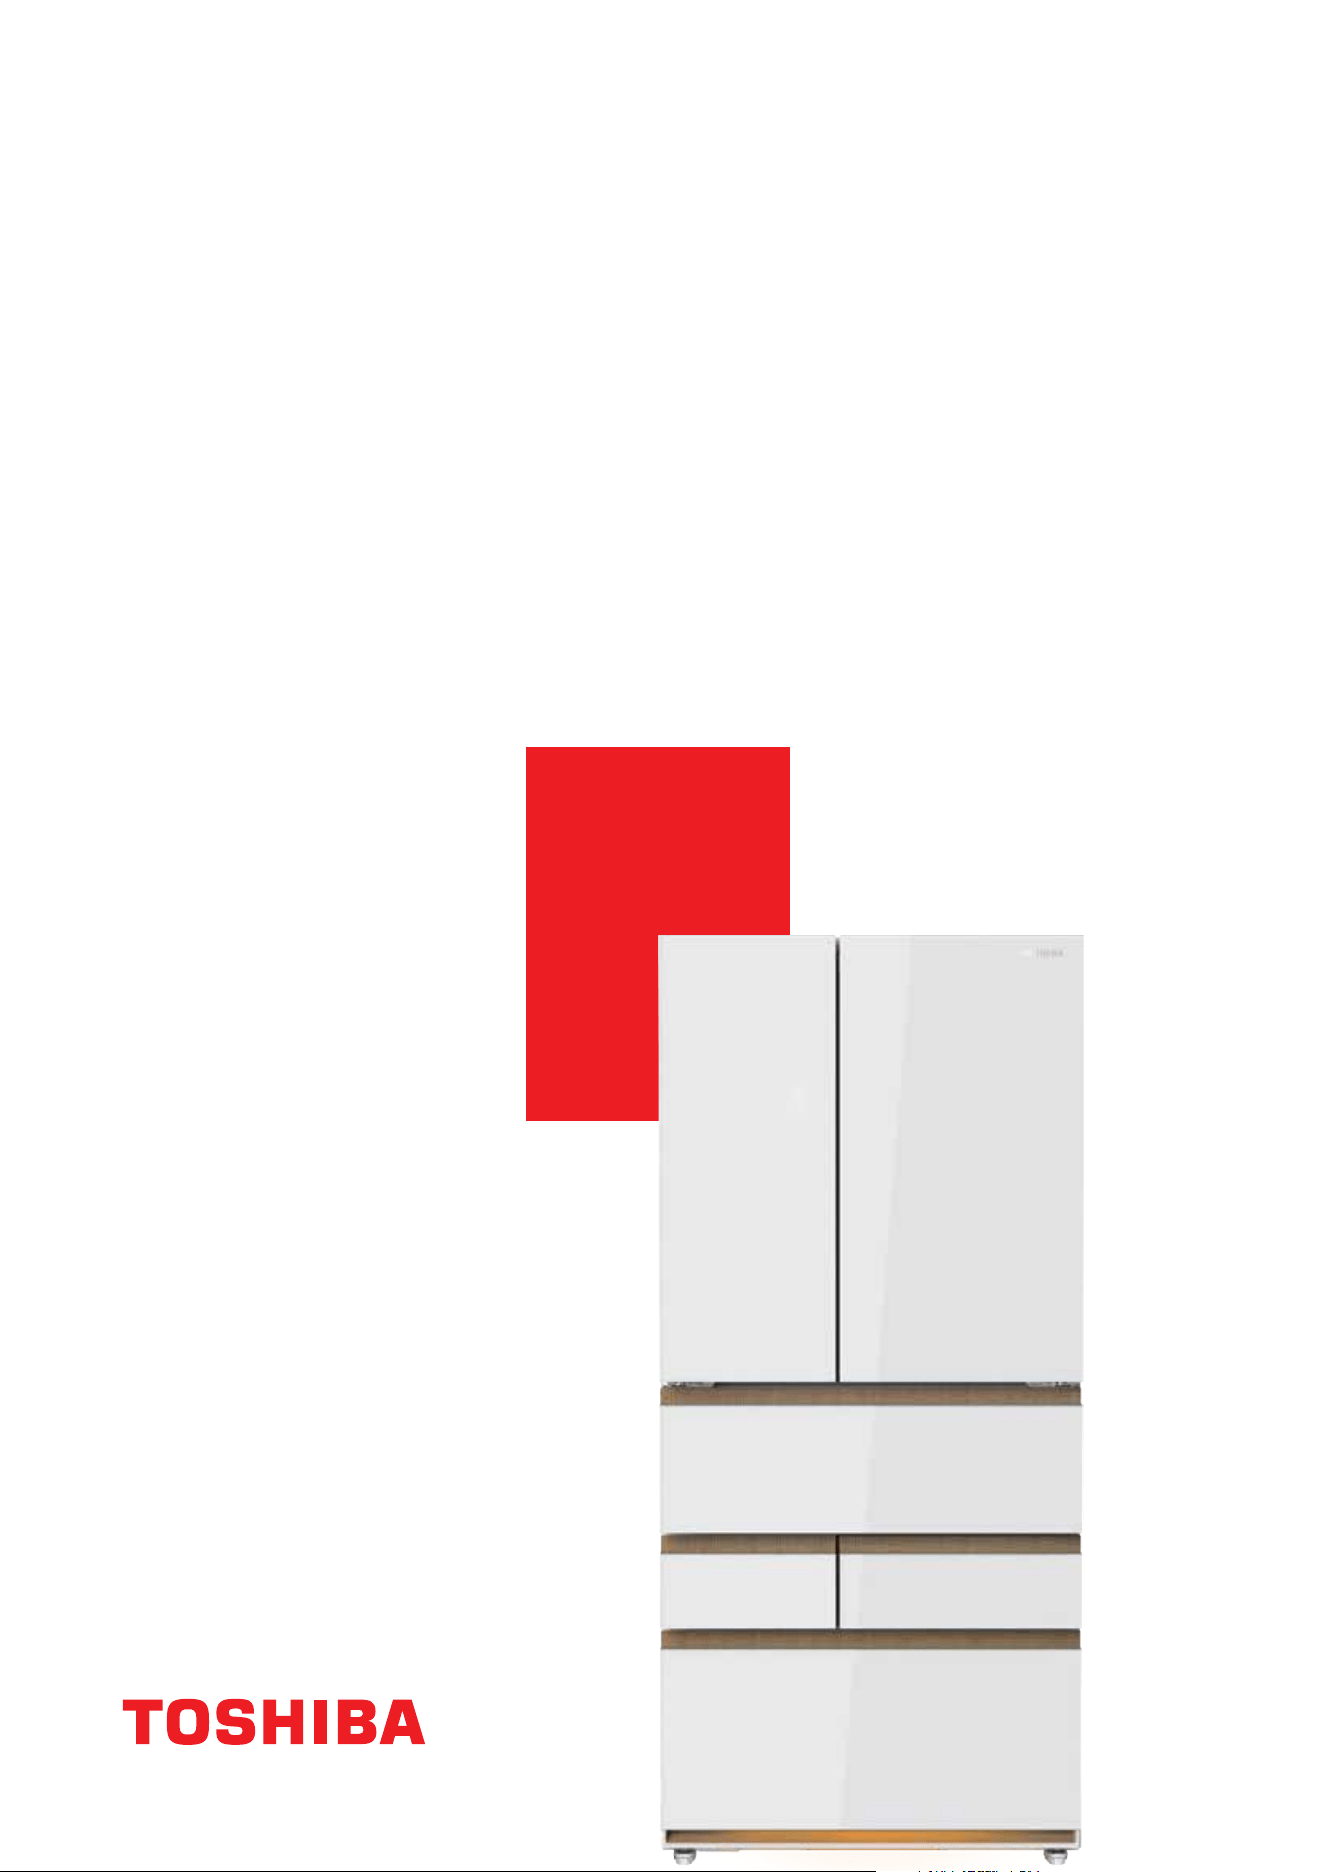
USER
MANUAL
REFRIGERATOR FREEZER
For Home Use Only
GR-RM919WI-PGX(B3)
ENGLISH
Safety information
Before the installation and use of the appliance,
carefully read the supplied instructions. The
manufacturer is not responsible if an incorrect
installation or use causes injuries or damages.
Always keep the instructions with the appliance
for future reference.
WARNING:
Risk of fire / Flammable materials
t
t
t
This appliance incorporates an earth connection
for functional purposes.
If the supply cord is damaged, it must be replaced
by the manufacturer, its service agent or similarly
qualified persons in order to avoid a hazard.
t
t
WARNING:
the appliance enclosure or in the built-in
structure, clear of obstruction.
t
t
WARNING:
Do not use electrical appliances
inside the food storage compartments of the
appliance, unless they are of the type recommended
by the manufacturer.
Do not store explosive substances such as aerosol
cans with a flammable propellant in this appliance.
t
WARNING:
When positioning the appliance,
ensure the supply cord is not trapped or damaged.
t
t
WARNING:
Do not locate multiple portable
socket-outlets or portable power supplies at the
rear of the appliance.
This appliance is not intended for use by persons
t
t
The refrigerant of the appliance is flammable,
(including children) with reduced physical,
sensory or mental capabilities, or lack of
experience and knowledge, unless they have
beengiven supervision or instruction concerning
useof the appliance by a person responsible for
their safety.
Children should be supervised to ensure that
they do not play with the appliance.
WARNING:
:
Fill with potable water only.
WARNING
To avoid a hazard due to instability
t
WARNING:
Do not use mechanical
devices or other means to accelerate the
defrosting process, other than those
recommended by the manufacturer.
Keep ventilation openings, in
t
t
This appliance is intended to be used in household
and similar applications such as:
——staff kitchen areas in shops, offices and other
working environments;
——farm houses and by clients in hotels, motels
and other residential type environments;
——bed and breakfast type environments;
——catering and similar non-retail applications.
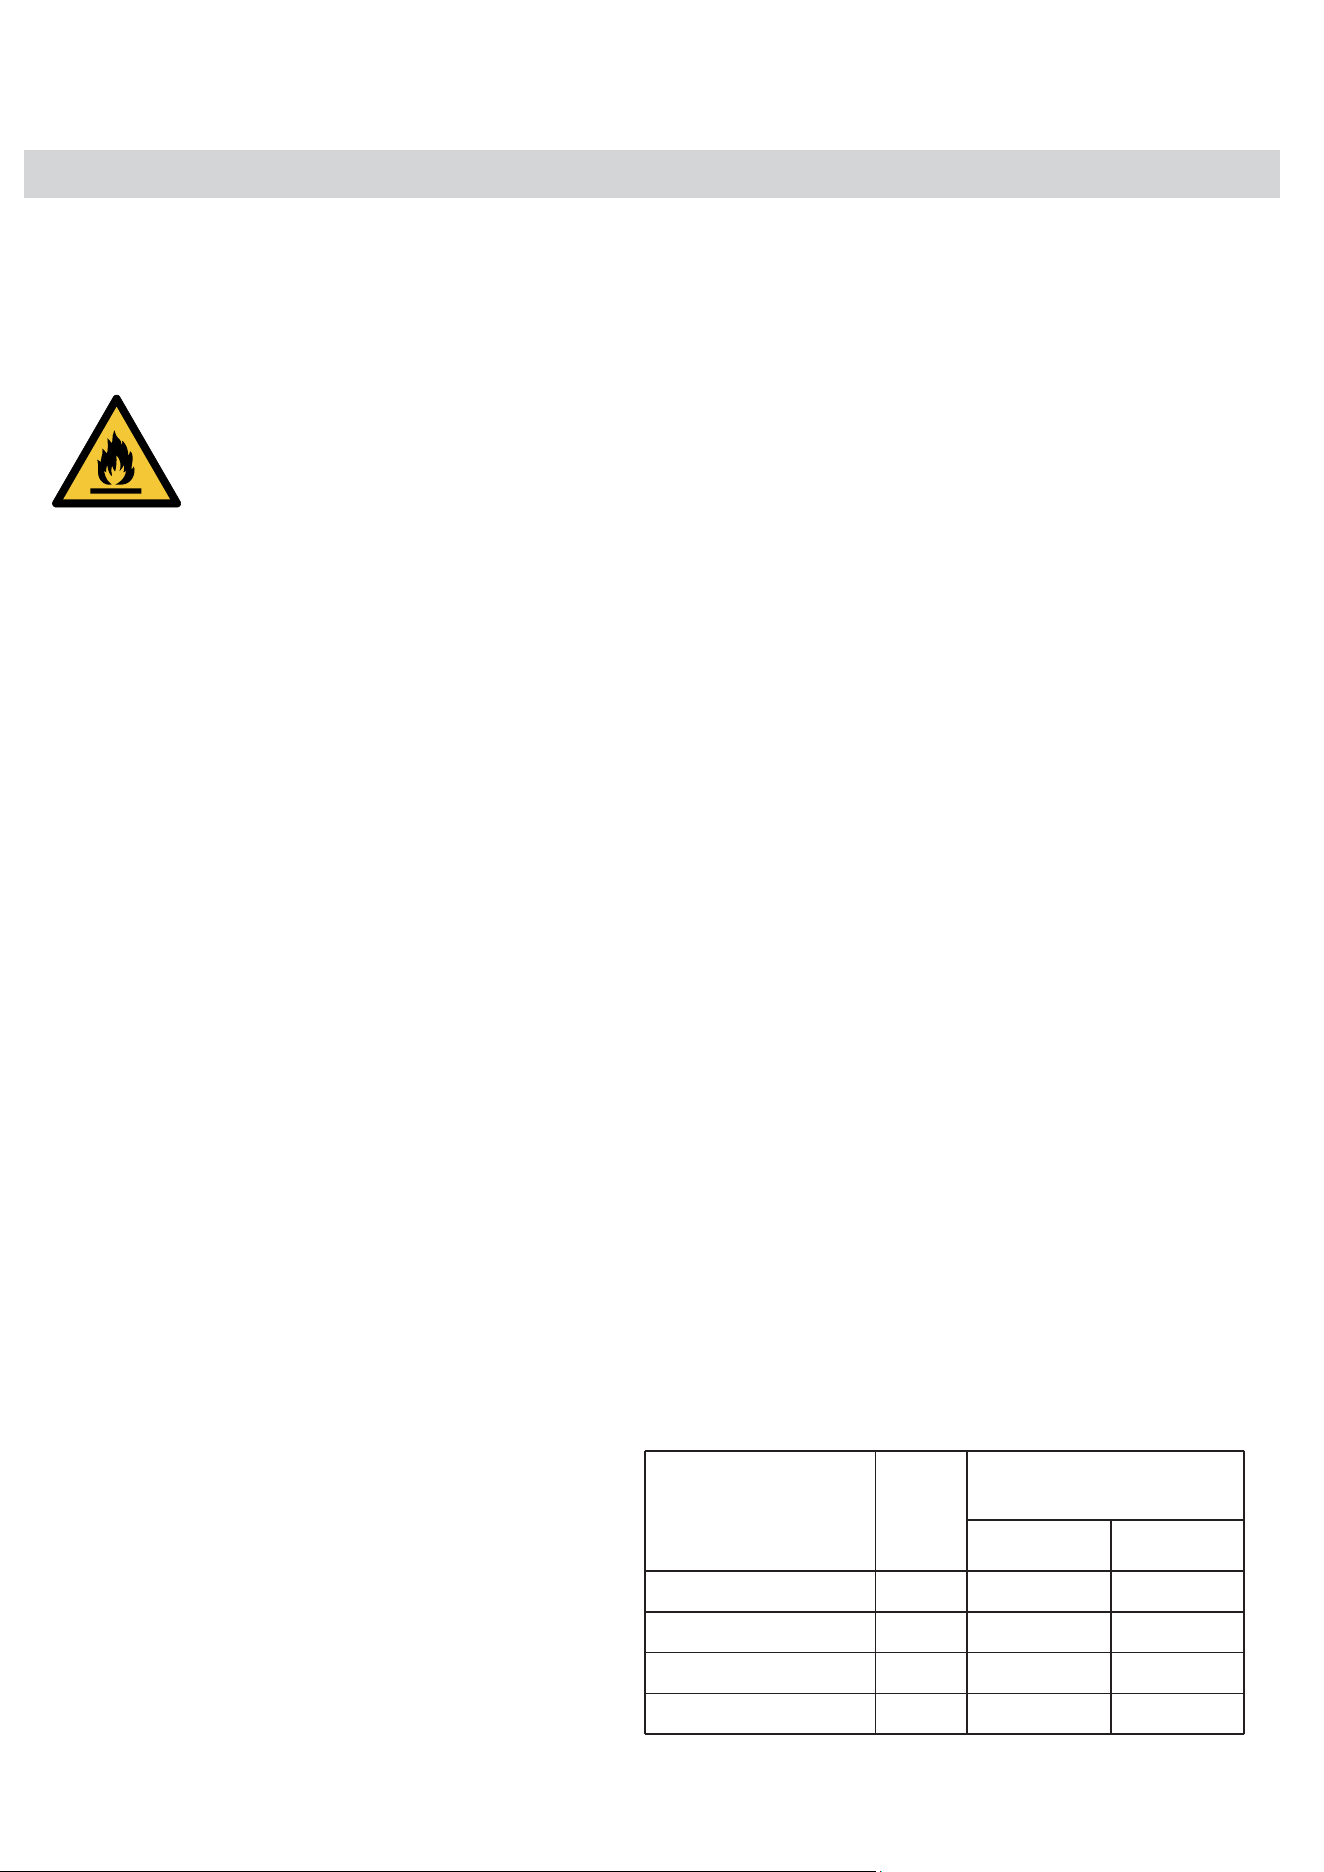
Class
Extended Temperate
Symbol
SN
N
ST
T
Ambient Temperature
IEC 62552
(ISO 15502)
+10 to +32
+16 to +32
+16 to +38
+16 to +43
ISO 8561
+10 to +32
+16 to +32
+18 to +38
+18 to +43
range
(℃)
of the appliance, it must be fixed in accordance with
The refrigerator is designed to operate normally
in the temperature range specified by its class
rating.
Temperate
Subtropical
Tropical
02
the instructions.
Disconnect the mains plug from the mains socket
before carrying out care, maintenance, installation
and repair work on the product.
Any replacement or maintenance of the LED lamps
is intended to be made by the manufacturer, its
service agent or similar qualified person.
If the refrigerator operates outside the climate
class (ambient temperaturerange) for which it
is rated then it may not be able to maintain
satisfactory internal temperatures.
please be care not to damage the cooling
pipes during installation and transportation.
If gas leakage happens, please contact the
distributor or local service agent, and the
following precautions should be always taken:
Open the windows for ensuring good ventilation.
No fire around and please do not use other
electric appliance.
When the refrigerator is scraped, it shall be kept
away from any fire source and be recovered by a
special recovering company with corresponding
qualification other than be disposed by
combustion, so as to prevent damage to the
environment or any other harm.
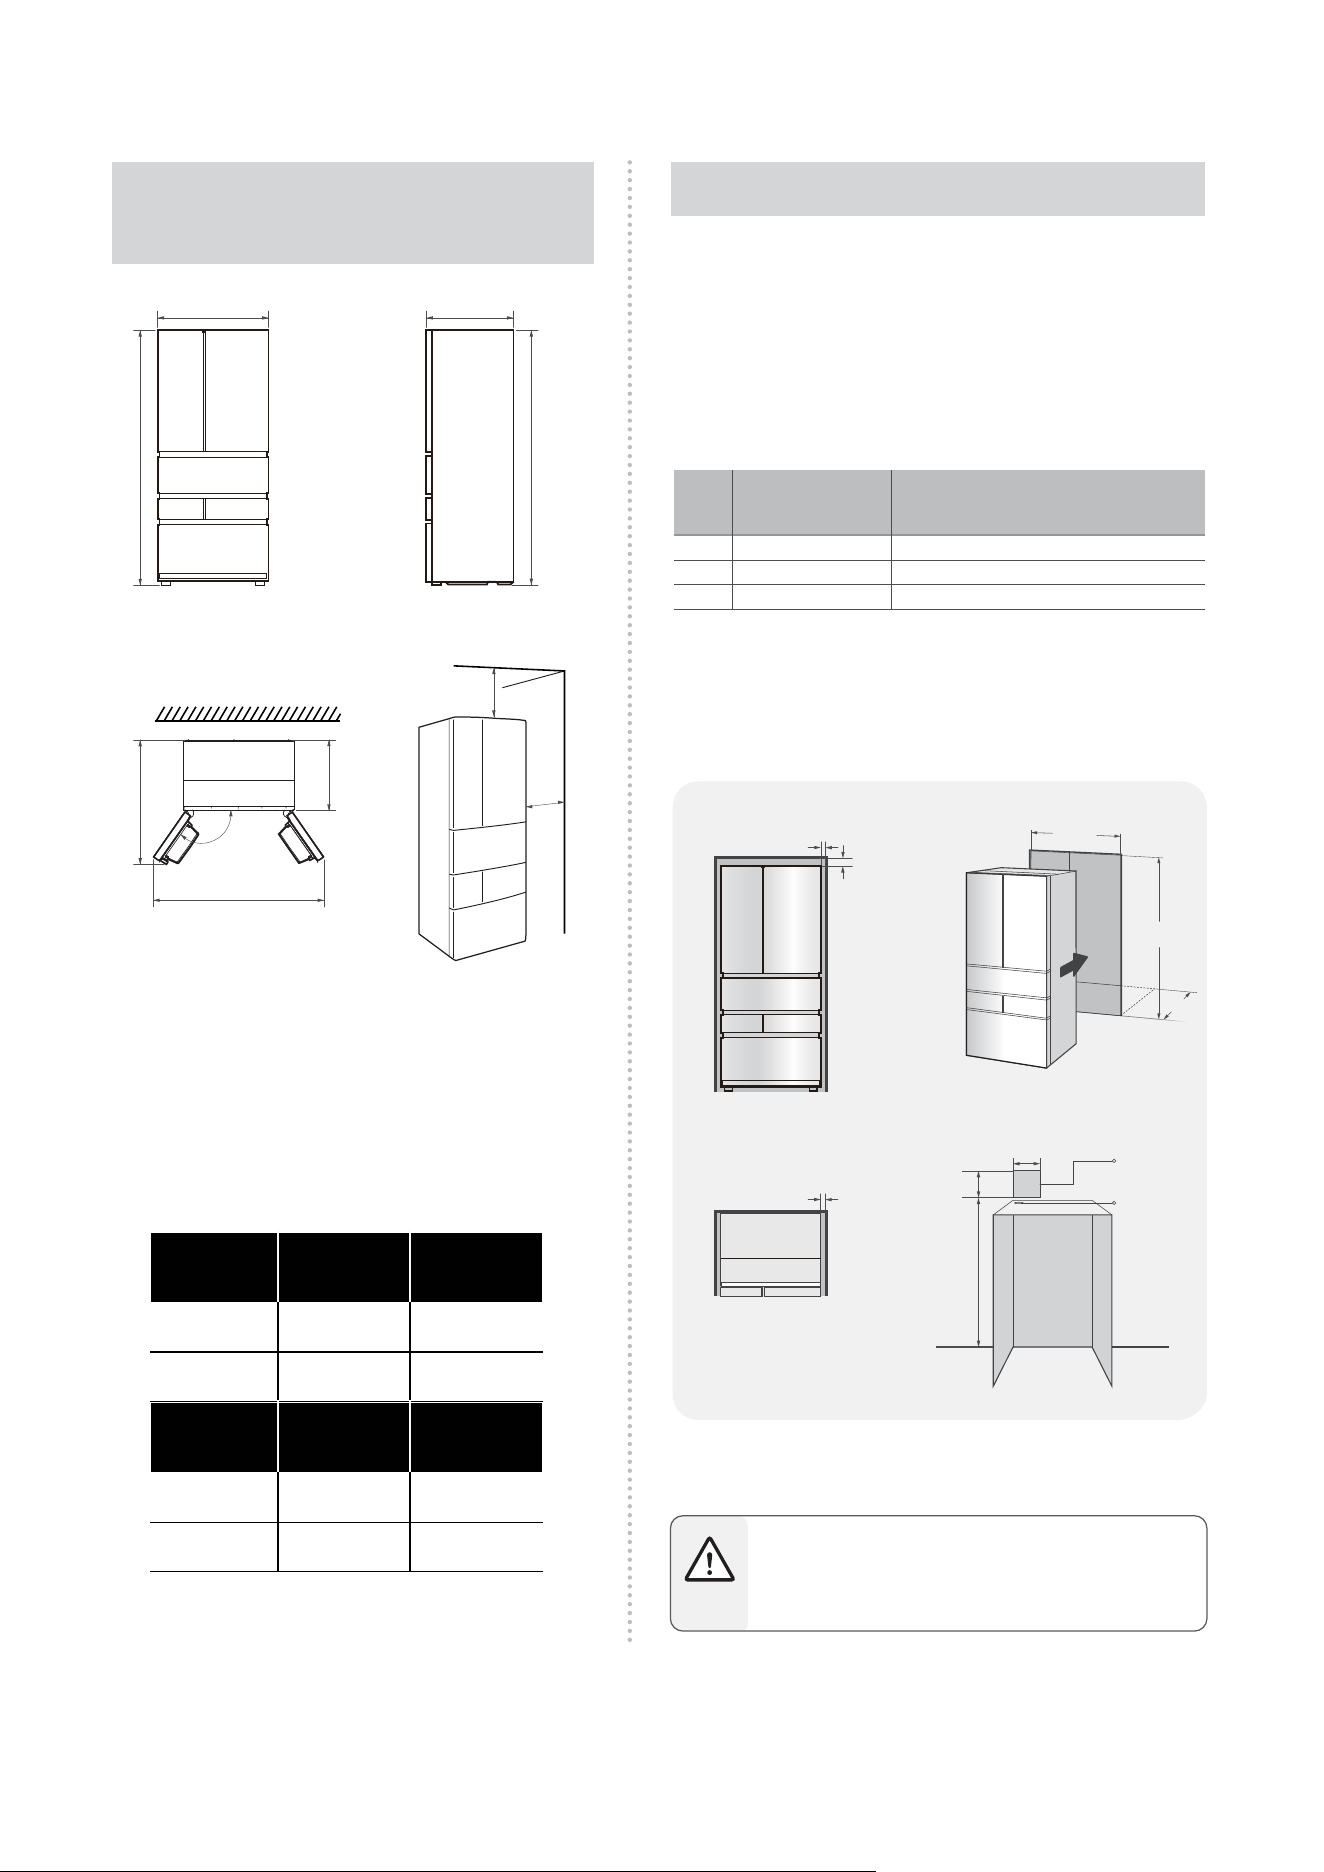
Width
A
830
Notice: All dimensions in mm
7001910
B C
Depth
Overall
Height
Space requirement diagram
This product can be used as stationary and built-in.
(when the door is open and
when the door is closed)
640
C1
Depth Only
Cabinet
1104
D
Depth doors
open 120°
1220
E
Width doors
open 120 °
Ultra-thin built-in design
Do not damage or crush the power cord or plug with
the back of the refrigerator.
Avoid tying, bending, placing heavy items on the
cord, or pressing it against the back of the refrigerator,
as it may cause fire or electric shock.
Waring
Front View - Centered
Installation
Above 8 mm
Above 4mm
Top View - Centered
Installation
Above 4mm
Flat and solid ground
2000mm
200mm
200mm
Power outlet
Cable hole
Figure 1
In order to ensure the proper functioning of the refrigerator
when used in an embedded manner, a gap should be left
between the refrigerator and the interior of the embedded
cabinet (primarily considering cabinet deformation and ease of
installation). When the door opening angle is 90°, the minimum
dimensions of the interior of the embedded cabinet should
meet the following requirements:
It is recommended to install the socket at a height greater than
2,000 mm above the rear of the refrigerator. The diameter of
the cable hole on the cabinet board shall be greater than 60
mm, and the cable hole shall be reserved below the socket (see
Figure 1) (pay attention to preventing damage to the power
cable. It is recommended that customers use invisible sockets).
Width
Depth
Height
830
700
1910
838
700
1918
If you want the maximum door opening of 120°, a 40 mm
gap is required between both sides of the refrigerator and
the embedded cabinet.
˔
Overall dimensions
of the refrigerator
Recommended minimum dimensions of
the interior of the embedded cabinet
(mm) (mm)
Width
Height
Depth
A
E
C
B
D
B
C1
20mm
3mm
120°
03
area
The top space of the refrigerator shall be greater
When used as stationary
than 20mm, and the side space of the refrigerator
shall be greater than 3mm to facilitate heat
dissipation.
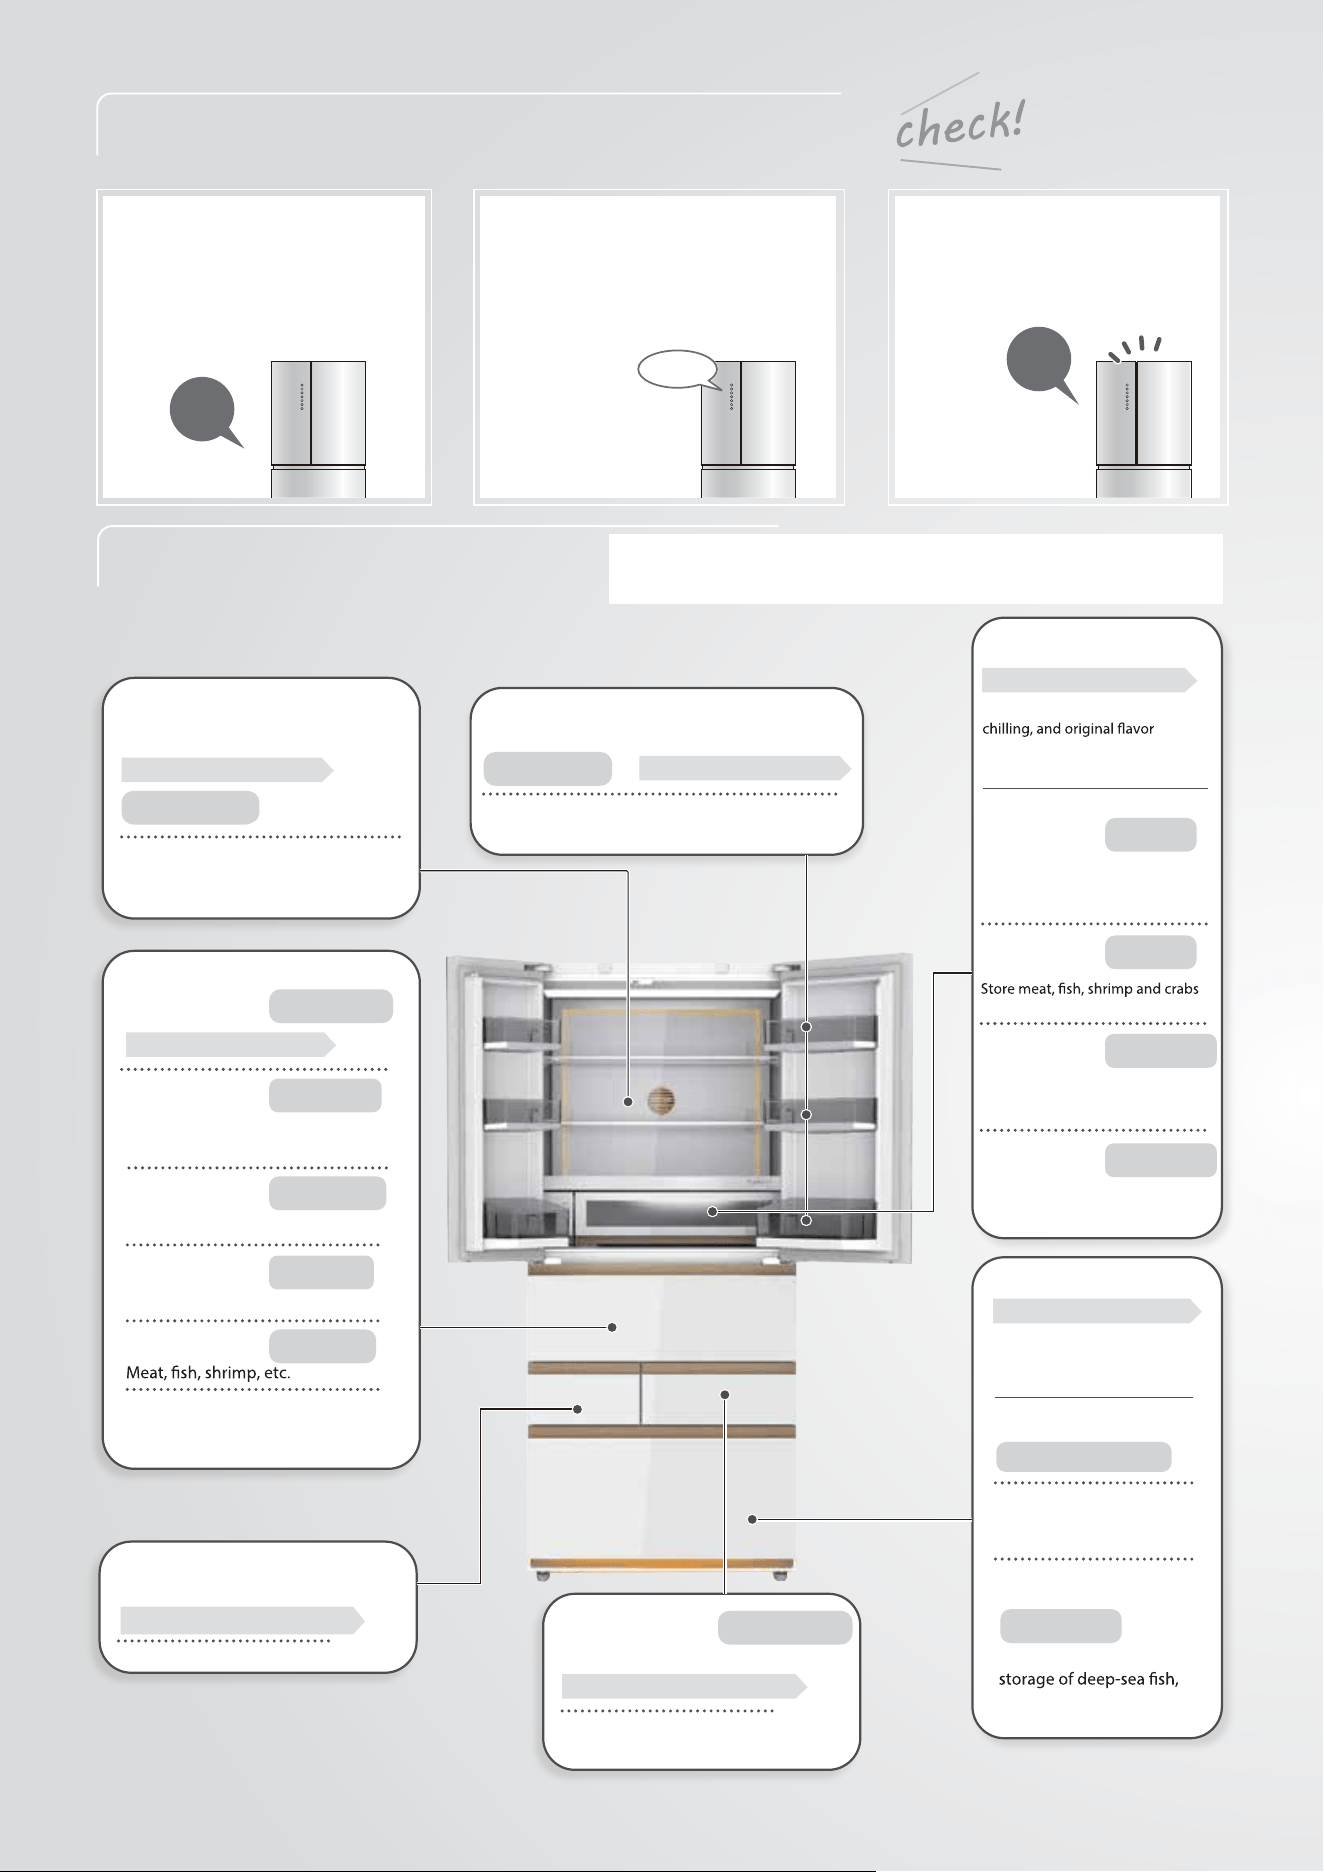
Food storage location and
recommended temperature
Common questions from customers
?
Why isn't the
refrigerator
cooling?
Why can't the door
be closed and
misaligned?
Page 32 Pages 12~16
Page 11 and
Page 35
How to use
the
touch panel
Beep
After the power supply is turned on, wait for 3~4 hours and
refrigerate before putting in food.
Temperature values shown are based on 32°C ambient temperature, with no
food inside and the door closed after cooling has stabilized.
?
About 2~8°C
Refrigerator chamber
See page 17 for details
Cooked food, small refrigerated
items, condiments, etc.
About 2~8°C
Refrigerator chamber
See page 18 for details
Condiments, canned foods, squeeze-tube
sauces, milk, beer, juice, etc.
Variable temperature
chamber
Quick chill drawer
See page 18 for details
Quick soft freezing, Low-temp
unfreezing modes all operate in
the quick chill drawer.
Freezer chamber
See page 22 for details
Suitable for storing meat,
seafood, and frozen foods.
Freezing and Deep Freezing
modes both operate in the
freezer chamber.
Suitable for long-term
meat, seafood, ice cream,
frozen foods, etc.
Freezing mode
Deep Frz
About -30°C
Pro Age
Unfreeze
Fruit & Veg
Soft Frz
for a short time.
Fish, shrimp, meat and quick-frozen
food that require unfreezing.
Eggs, dairy products, canned food,
condiments, beverages, etc.
or items that spoil or ferment
Meat, fish, dairy, processed foods,
easily.
Fruit & Veg
0°C Fresh
Semi Frz
Freezer
Multi-function
chamber
Quick freezing of food and direct
freezing of vegetables are supported.
Fruits, vegetables, canned food,
sauces, eggs, etc.
Fish, shrimp, crabs, meat, etc.
Fish, meat, etc.
To maintain freshness, it's
recommended to wrap food with
plastic wrap before storing.
Ice making chamber
(automatic ice maker)
Automatic ice making.
About 1~8°C
About -8°C
About -18°C
About -2~2°C
About -18~5°C
About -24~-16°C
About -24~-16°C
See page 23~24 for details
See page 20~21 for details
About 3~5°C
About -8
ᾛ
-3°C
See page 19 for details
About -1°C
About -3°C
04
(interior)
(shelf on the door)
CONTENTS
1. Safety information .........................................................................................02
3. Safety precautionss ........................................................................................06
4. Installation Method ........................................................................................10
2. Space requirement diagram ..........................................................................03
5. Functions of the touch panel .........................................................................12
6. Refrigerator chamber .....................................................................................17
7. Variabel temperature chamber .....................................................................19
8. Multi-function chamber .................................................................................20
9. Freezer chamber .............................................................................................22
10. Ice making chamber (automatic ice maker) ...............................................23
11. Cleaning and maintenance ..........................................................................25
12. Maintenance of automatic ice maker .........................................................29
13. Various maintenance procedures ...............................................................31
14. Load capacity of shelves and containers ....................................................31
15. If something goes wrong .............................................................................32
16. When moving the refrigerator ....................................................................38
17. Circuit diagram .............................................................................................39
Thank you very much for purchasing this Toshiba product.
Read this user manual and become completely familiar
with the product before use in order to use this product safely
and correctly.
Keep this user manual in a handy place for future reference.
Make sure that you received your warranty.
Dear user :
About refrigerants and
This refrigerator uses a freon-free refrigerant (isobutane) and a freon-free foamed
thermal insulation material(cyclopentane) that do not destroy the ozone layer and
have no effect on the greenhouse effect of the earth. The freon-free refrigerant is a
hydrocarbon with flammability. Sealed in the refrigeration circuit, it will not leak
foamed thermal insulation materials
during normal use. In case of accidental damage to the refrigeration circuit, please
avoid using open fire and electrical appliances, and open the windows for
ventilation. Then get in touch with the dealer or call the service hotline.
05
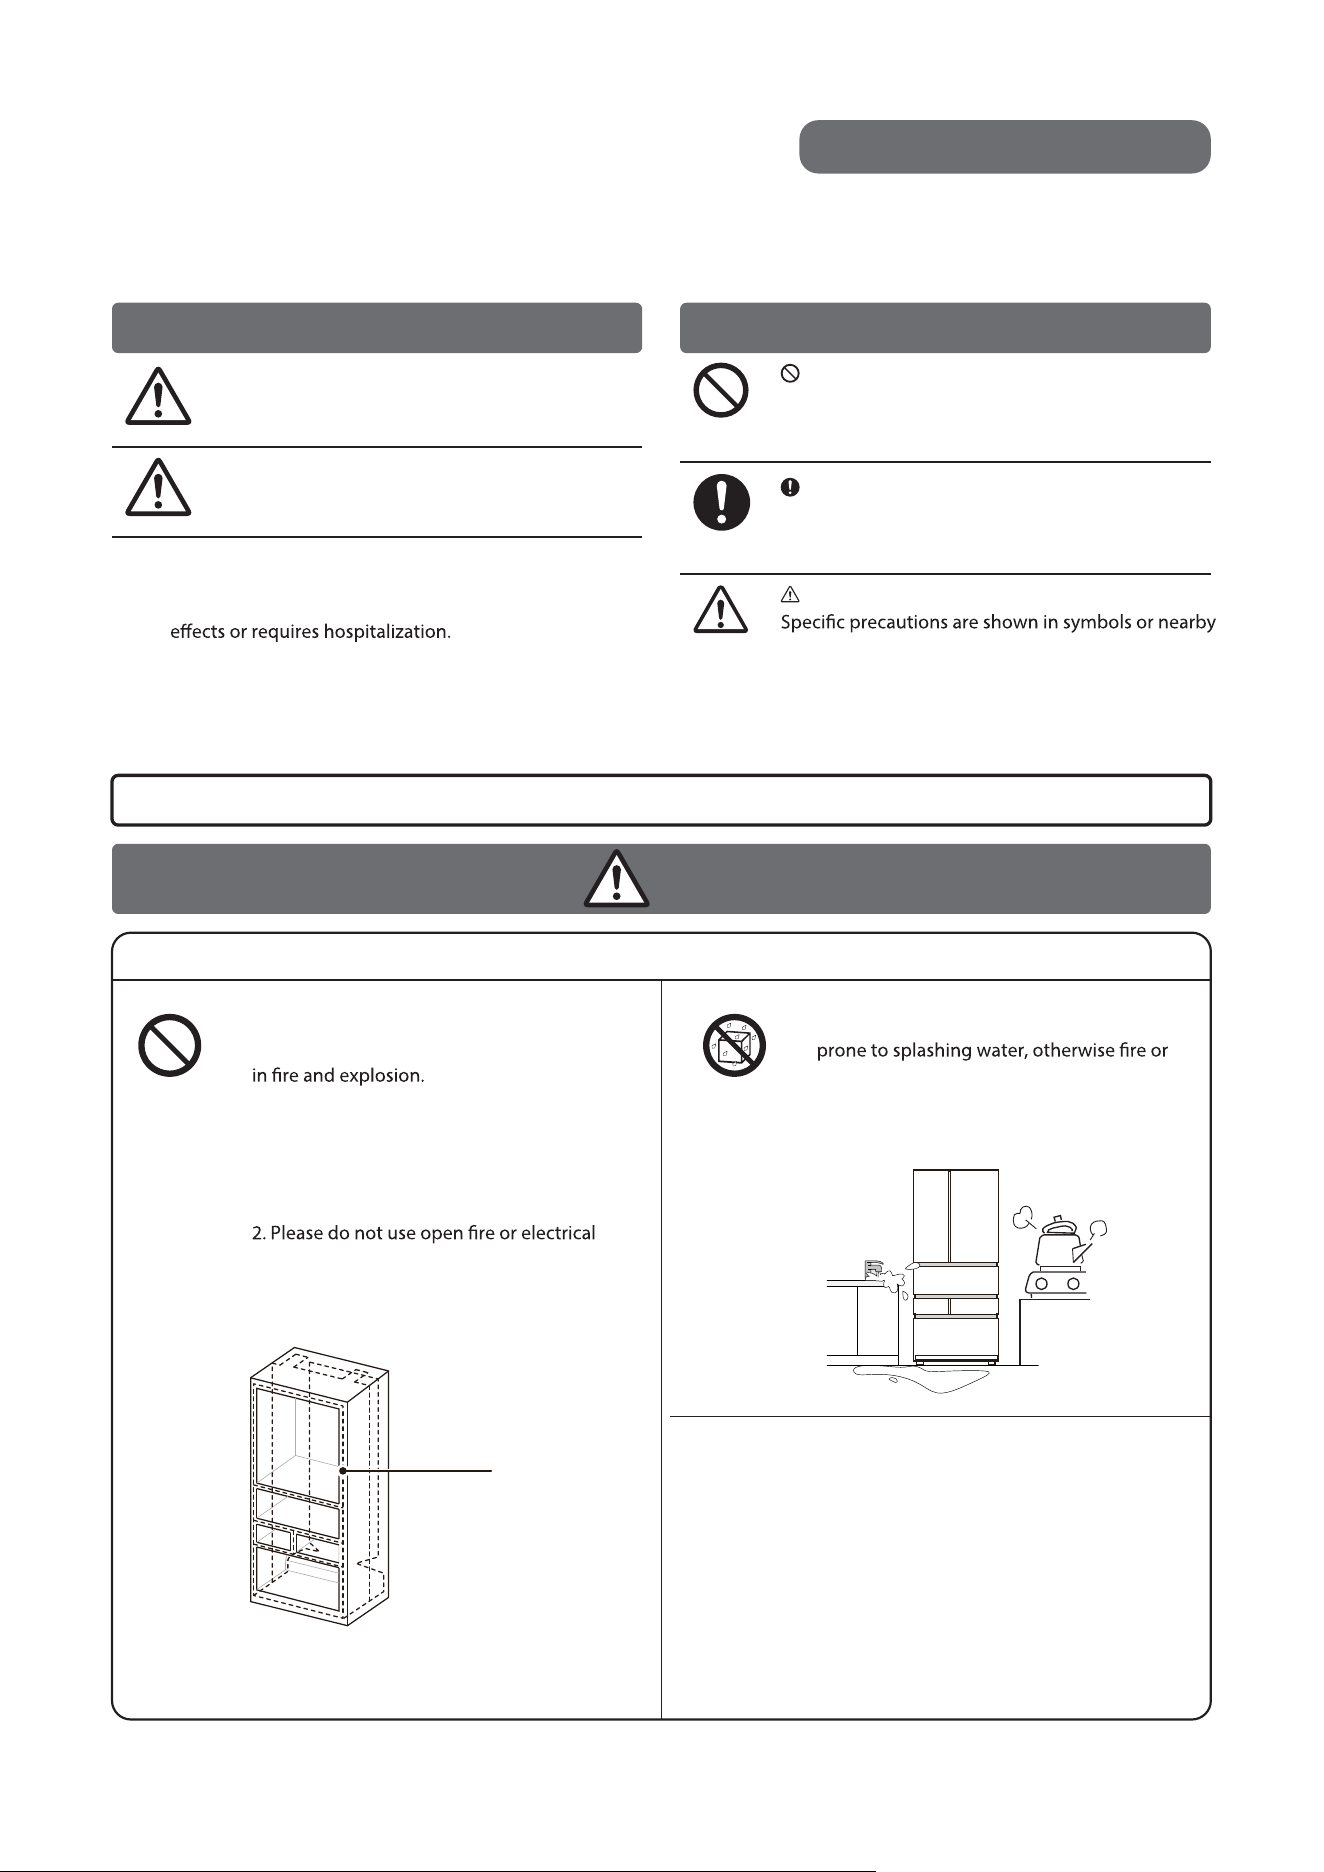
Indicates something is prohibited (not allowed)
Indicates a required action (mandatory)
Important notice
Do not
damage the
refrigeration
circuit
About Settings
Remarks
To use this product safely and properly, please read this manual carefully.
Safety precautions
To prevent injury or damage and ensure safe use, this manual contains important safety instructions. Please read the
instructions after fully understanding the following contents (markings, graphic symbols), and follow all safety
precautions.
Improper use may result in
serious injury or even death (*1).
Prohibited actions are shown in warning icons or
nearby text/images.
Mandatory actions are shown in symbols or nearby
text/images.
text/images.
Description of marking symbols Explanation of graphic symbols
WARNING
WARNING
Indicates that misoperation may
cause injury (*2) or damage to
property (*3).
Serious injury refers to harm such as blindness, burns,
scalds, frostbite (from high or low temperatures), electric
shock, fractures, or poisoning that causes long-term
Injury refers to burns, shocks, or wounds that do not
require hospitalization or long-term medical care.
Damage to property refers to long-term harm to
household items, pets, or other animals.
Warning: Do not damage the chilling loop.
If damaged, the refrigerant may leak, resulting
If the refrigerator is damaged, do not touch
it. Follow the safety instructions and contact
your dealer or call customer service.
1. Open the window and replace the indoor air.
(Please do not use exhaust fan)
appliances.
*1:
*2:
*3:
Prohibited
Mandatory
Remarks
dž
Do not place it in a damp place or a place
electric shock may be caused.
dž
No moisture
Mandatory for Safety
06
dž
Warning: There is no obstruction
around the appliance or in the
embedded structure, and keep
smooth ventilation.
Condenser tube
(Refrigerant circuit)
No wet
hands
Mandatory
Safety precautions
… Continued
WARNING
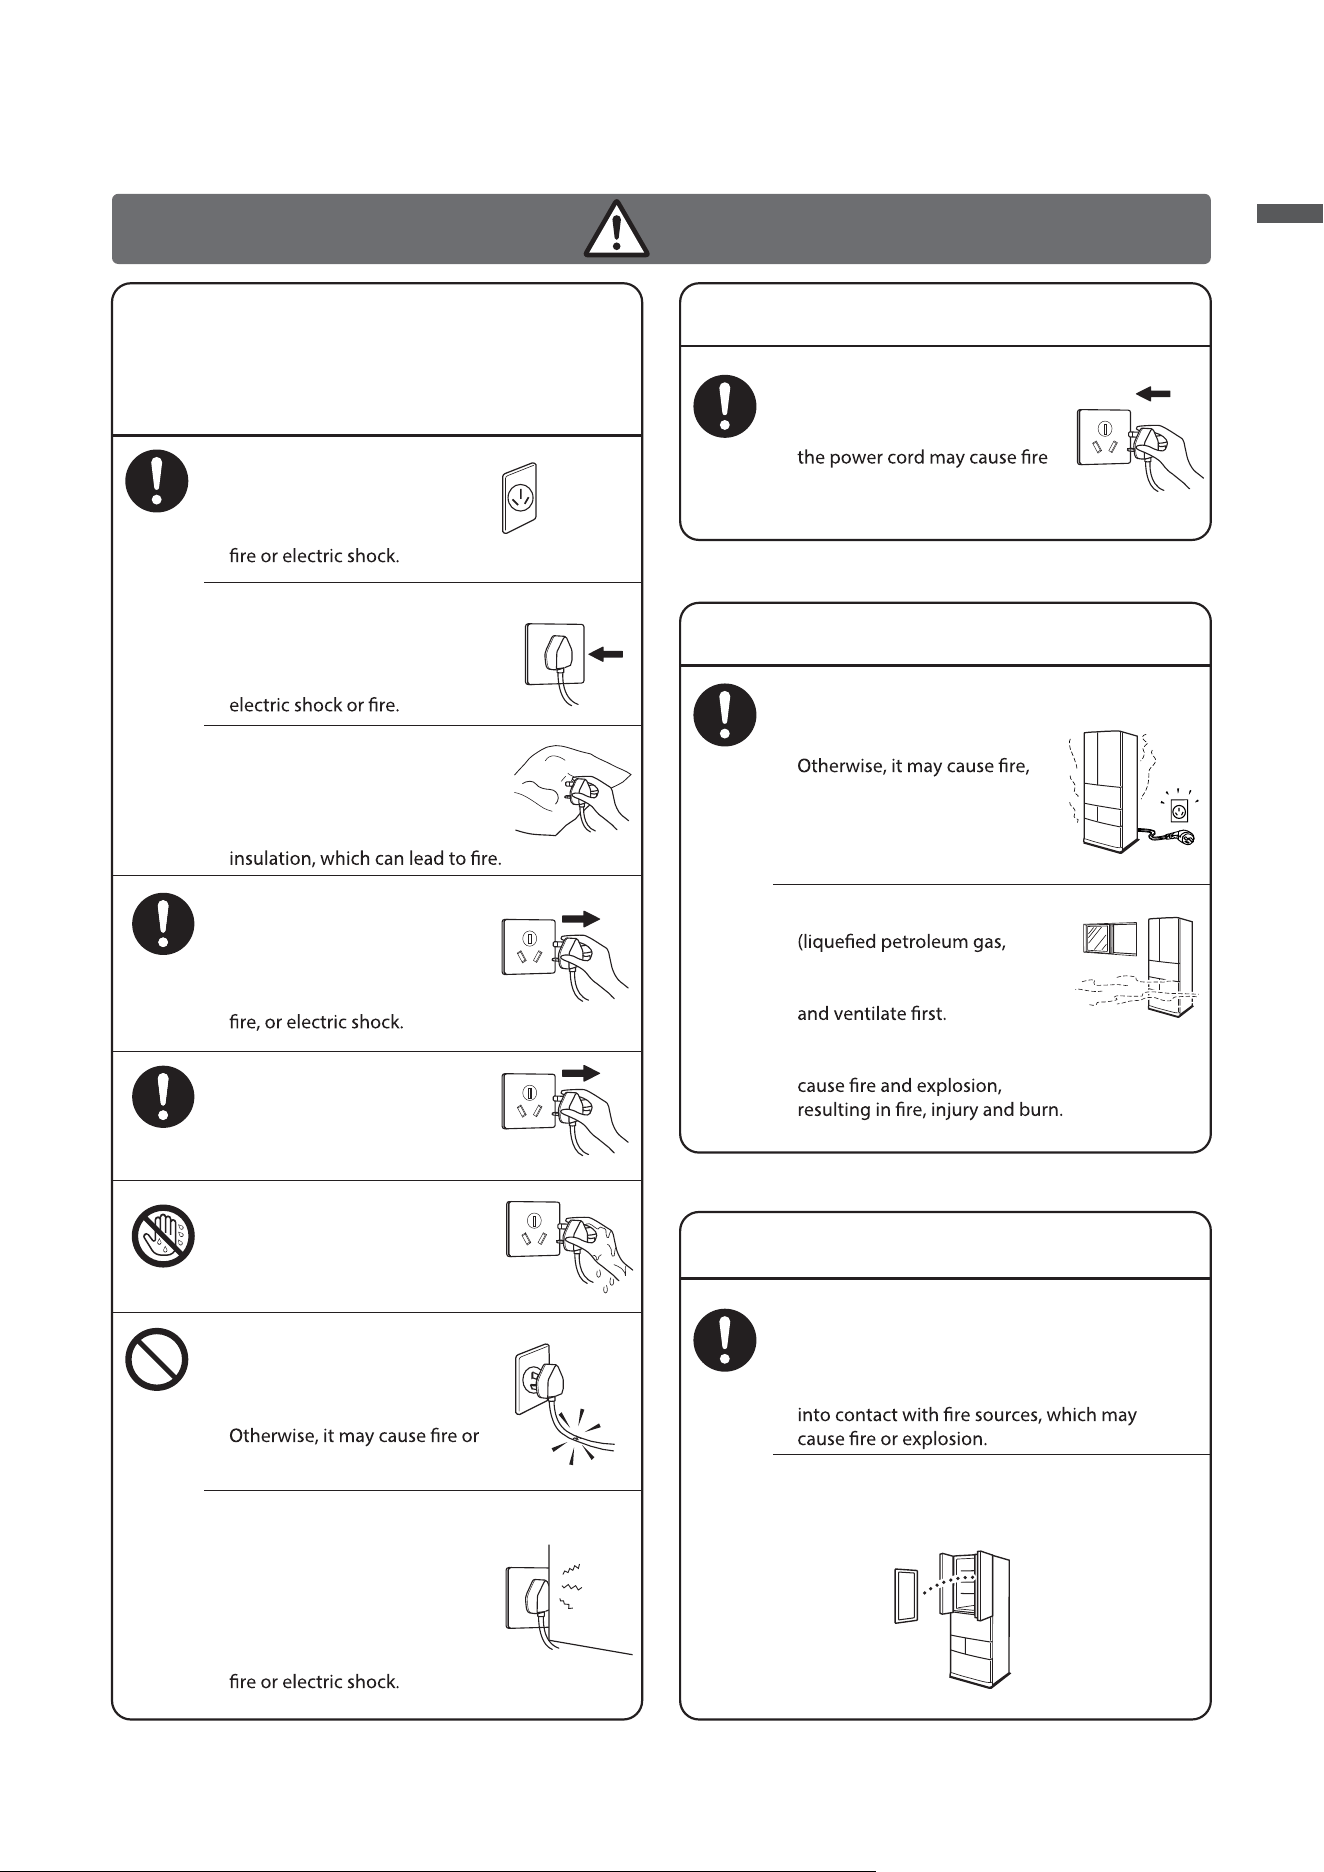
About power plugs/wires
For power plug and cord repairs, please call customer
service. "Any damaged power cord must be replaced by
professionals from the manufacturer, its maintenance
department, or similar departments to avoid danger."
Use a separate 220-240V AC
power socket.
Using extension cords or
multi-pin sockets may cause
dž
Ensure that the power plug is
fully inserted into the socket.
If not fully plugged in, the power
cords may overheat or cause
dž
Unplug the power cord and wipe
with a dry cloth to remove dust
regularly.
Dust buildup may cause poor
dž
When pulling out the plug
from the power socket, please
hold the plug and pull it out.
Pulling the power cord to
unplug it may cause damage,
dž
When not in use for a long
time, please take out the food
and pull the power plug from
the socket.
dž
Do not pull out or insert the
power plug with wet hands.
Otherwise, it may lead to
electric shock.
dž
Do not use damaged power
cords and plugs, or when you
feel loose when inserting them
into the socket.
electric shock.
dž
Do not damage or crush the
power cord or plug with the
back of the refrigerator.
Avoid tying, bending, placing
heavy items on the cord, or
pressing it against the back of
the refrigerator, as it may cause
dž
220-240V
Hold the
plug and
unplug it
Unplug the
power cord
Prohibited
Mandatory
About power plugs/wires
Insert the power plug with the
cord facing downward.
Forcibly squeezing or twisting
or electric shock.
dž
Mandatory
In abnormal cases
In case of abnormality or fault,
please pull out the power plug
and stop using it.
electric shock, injury, or scalding.
When repairs are required,
please contact your dealer or call
the service hotline.
dž
When combustible gas
natural gas, etc.) leaks, do not
touch the freezer or power plug,
Otherwise, sparks at the
electrical connection points may
dž
Mandatory
When disposed
When the refrigerator is scrapped, please hand
it over to a dealer or special scrapping
organization.
If scrapped arbitrarily, the refrigerant and
foaming layer materials may accidentally come
dž
When disposing of the refrigerator, please
remove the door seal; otherwise, young children
may be trapped inside and cause accidents.
dž
07
Before Use
dž
dž
dž
dž
dž
dž
dž
dž
dž
dž
dž
Safety precautions
… Continued
WARNING
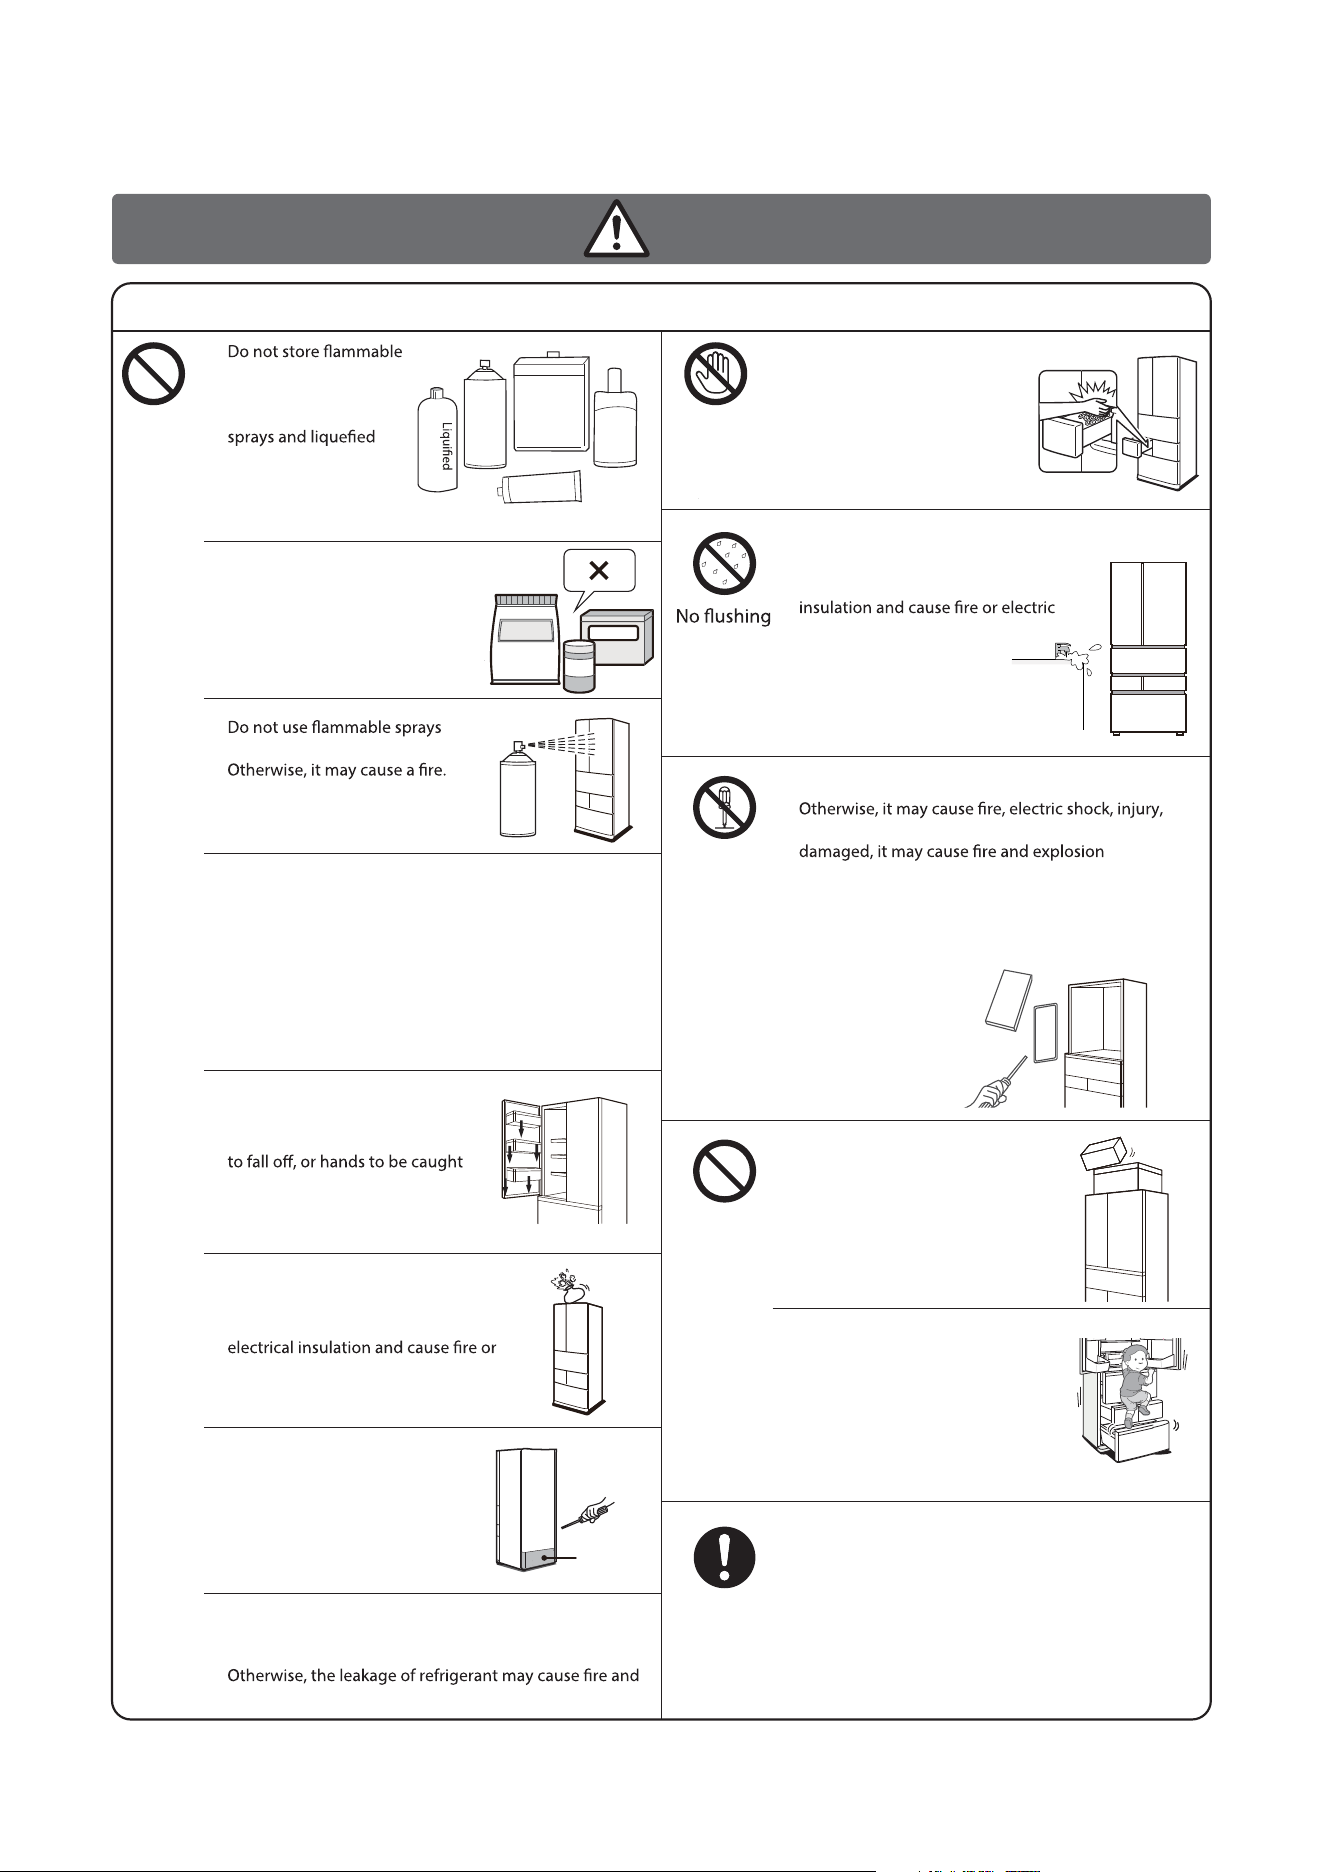
About Settings
and explosive items.
Ether, gasoline, alcohol,
combustion-supporting
petroleum gases may
explode, causing
accidents.
dž
Do not put pharmaceuticals or
academic samples in the
refrigerator.
Household refrigerators cannot
store items that have strict
temperature management
requirements.
dž
nearby.
dž
Do not eat food with peculiar smell or discoloration.
Food may spoil even if it is stored in the refrigerator
for a long time. Eating food with peculiar smell or
discoloration may cause food poisoning or illness.
dž
Do not climb or sit on the door.
Otherwise, it may cause the
refrigerator to tip over, the door
and injured.
dž
Do not place containers containing
water on the refrigerator.
Otherwise, spilled water may reduce
electric shock.
dž
Do not open the rear cover at the
lower part of the back of the
refrigerator, and do not put your
hands into the machine room.
Failure to do so may result in
burns, injuries and electric shock.
dž
Warning: The electrical appliance shall not be used in
the food storage room of the appliance except for the
types recommended by the manufacturer.
explosion accidents.
dž
Do not rinse the inside and outside of
the refrigerator.
Failure to do so may reduce electrical
shock.
dž
Do not disassemble, modify or repair it by yourself.
or scalding. And if the refrigeration circuit is
accidents.
When repairs are required, please contact your
dealer or call the service hotline.
dž
Do not place items on the
refrigerator.
Otherwise, objects may fall when
the refrigerator door is opened
and closed, which may cause
injury.
dž
Prohibited
Prohibited
Before cleaning the freezer, please disconnect the
power plug, or it may cause electric shock.
dž
Spray
No disassembly
Unplug the
power cord
08
Do not touch the ice making
part of the automatic ice maker
with your hands (upper side of
the Ice making chamber).
Otherwise, it may cause injury
when the ice making tray
rotates.
dž
No touch
Diluent
Spray
Ether
Adhesive
petroleum gas
Mechanical
chamber
behind
Blood
Biological products
Drugs
Please do not allow children to
climb on the refrigerator, as it
may cause the refrigerator to tip
over, parts to become loose, or
children to get locked inside,
resulting in injury to them.
dž
Do not store explosives in the appliance, such
as combustion supporting spray.
dž
Safety precautions
… Continued
Precautions for use
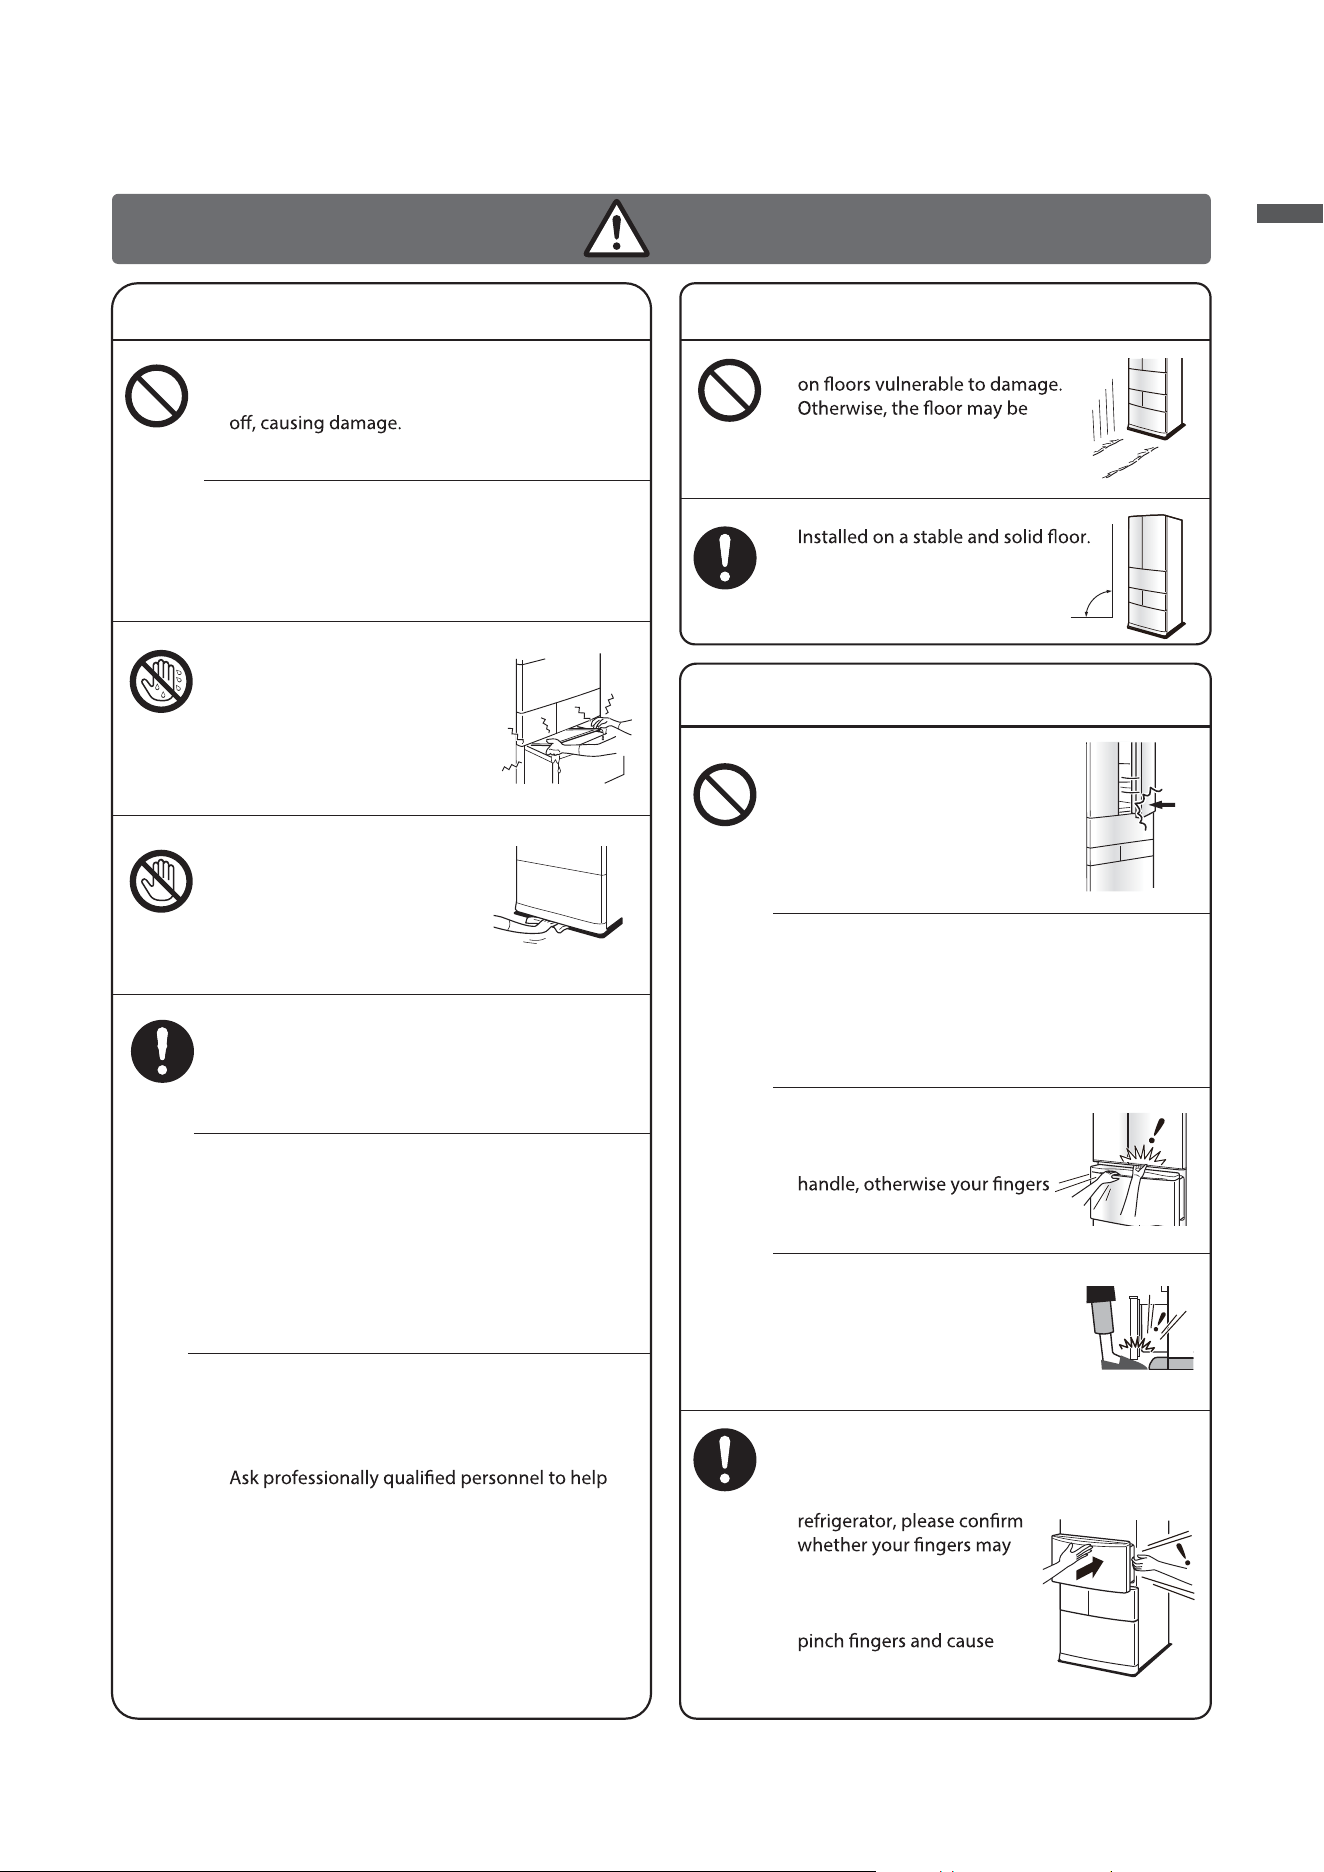
Do not let food go beyond the shelf.
Otherwise, it may be hooked by bottles and fall
dž
Do not put bottled items in the freezer
chamber.
Otherwise, the bottled items may freeze and
crack, causing damage.
dž
Do not touch food and
containers (metallic) in the
freezer chamber and
multi-functional room with
wet hands.
Because low temperatures
can cause frostbite.
dž
Do not put your hands
and feet into the bottom
of the freezer.
Otherwise, injuries may be
caused by iron plates.
dž
Remarks
Prohibited
No wet
hands
No touch
Forbidden
Precautions for handling and moving
Do not use casters under the freezer
damaged.
Please lay a protective plate when
moving.
dž
Placing it in an unstable location
can easily cause it to tip over,
resulting in injury.
dž
Mandatory
09
Mandatory
Precautions for door switch
Please do not close the
refrigerator door by pressing it
with your back, as it may easily
cause personal injury accidents.
dž
Do not open or close the freezer
door while grabbing the
refrigerator chamber door
may be pinched in the door gap
and cause injury.
dž
Do not put your feet close to
the freezer chamber door,
otherwise your feet may be
caught in the gap of the door,
resulting in injury.
dž
When opening and closing
the door or when someone
else is in contact with the
be caught by the door. The
gaps between the
refrigerator doors may
injuries.
dž
Do not close the door forcefully, otherwise
falling food may cause injury.
dž
Prohibited
dž
dž
dž
Please ensure that the grounding electrode of
the power socket is equipped with a reliable
grounding wire.
check whether the socket is equipped with a
reliable grounding wire.
The user shall be responsible for changing the
ungrounded socket to a grounded socket
without authorization.
Mandatory
90°
This refrigerator is not designed for use by
individuals with physical, sensory, or mental
disabilities, or those lacking experience and
knowledge in using it (including children)
unless they are supervised or instructed by
someone responsible for their safety.
dž
Make sure children won't play with the
refrigerator.
dž
Before Use
10
Installation Method
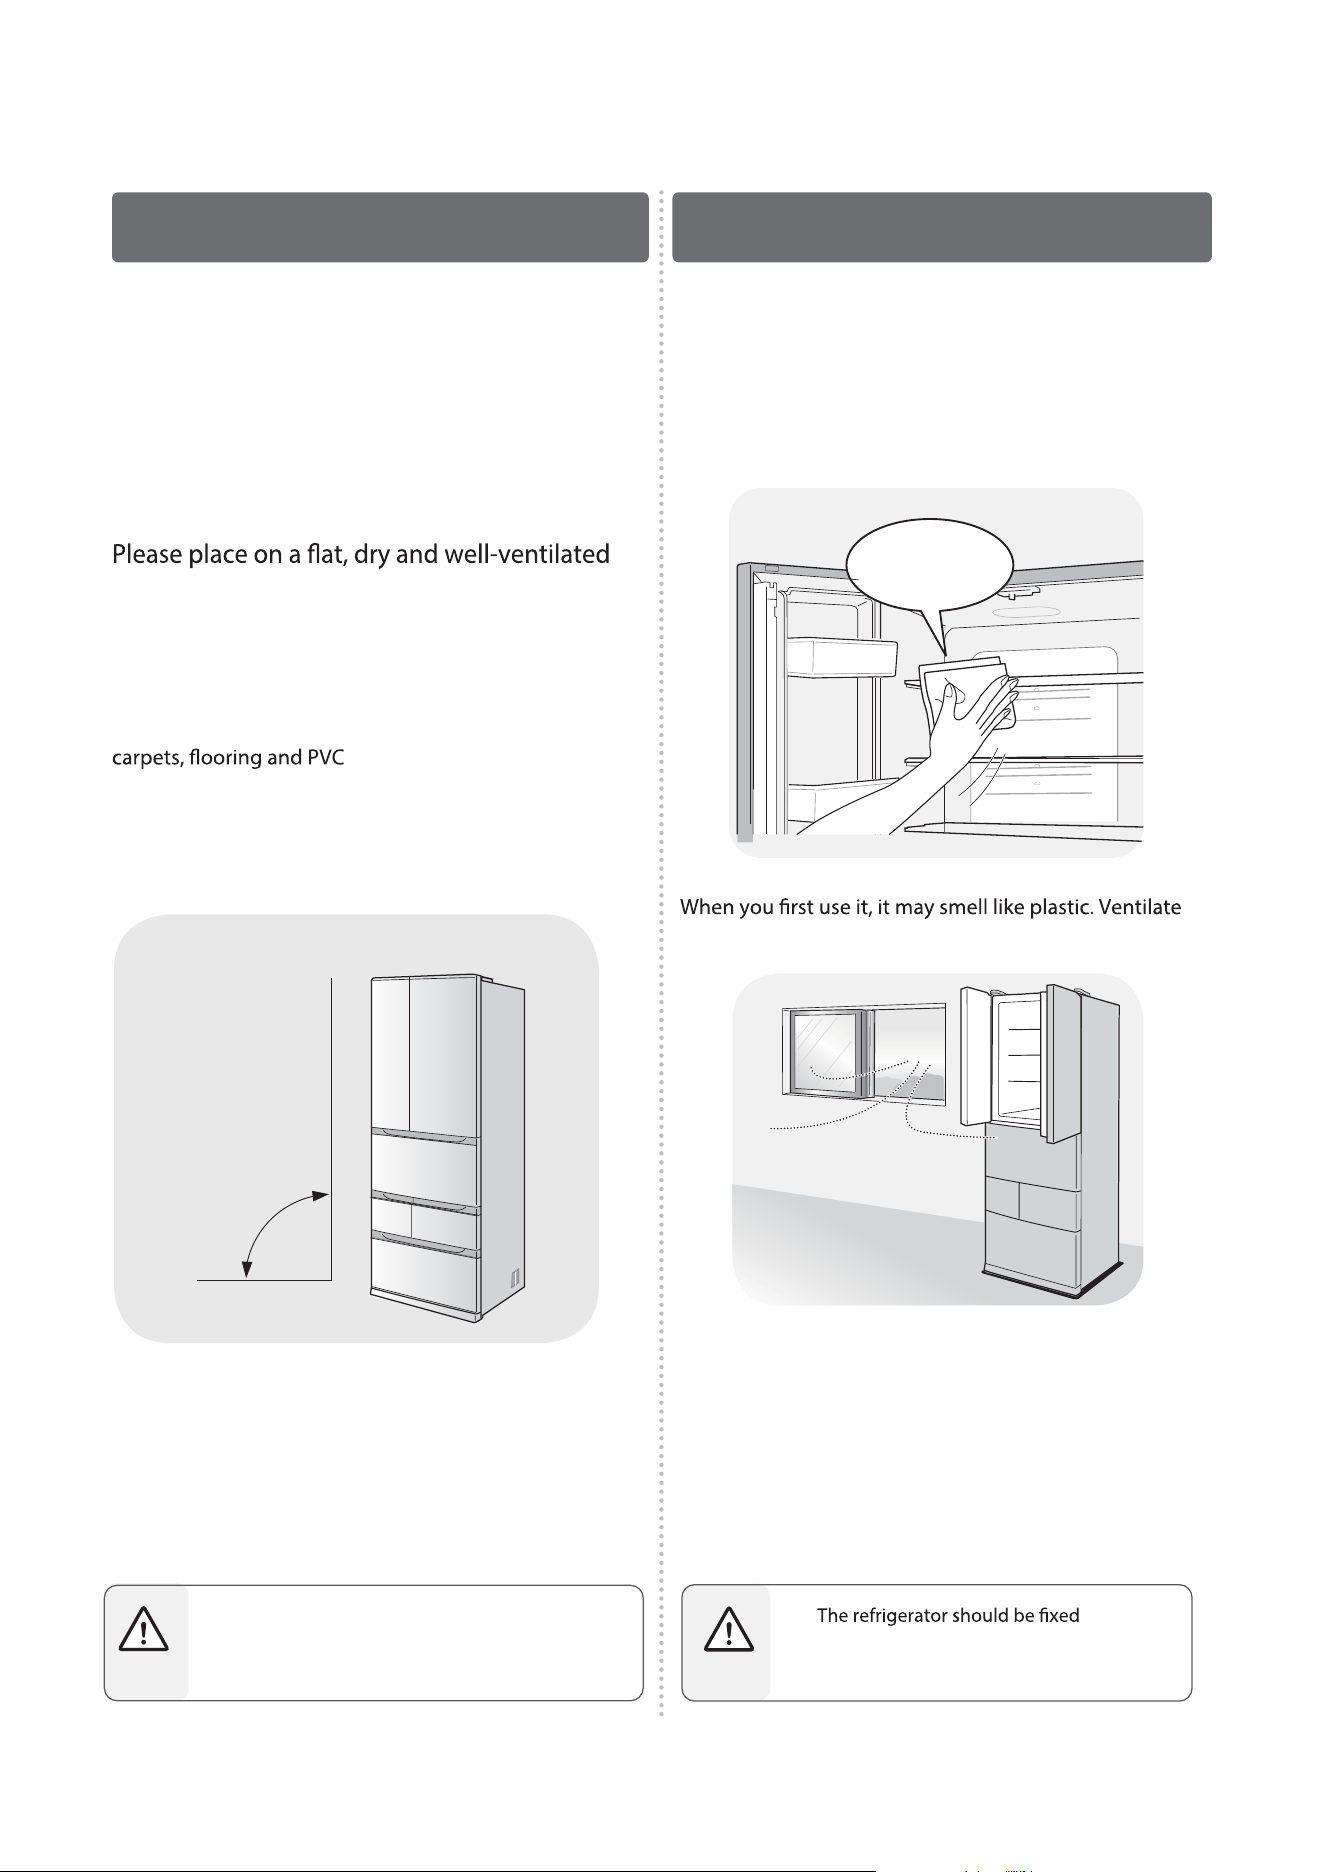
Selection method of installation
location
Wipe the inside of refrigerator
Keep away from heat sources and direct sunlight
˔
It can avoid the reduction of cooling capacity and
save electricity cost.
surface
˔
Condensation and rusting can
be avoided.
Otherwise, vibration (noise) may
be caused. When there are
products on the ground, the heat
at the bottom of the refrigerator
will cause discoloration. Please
pave a solid wooden board.
90°
˔
the chamber so that the odor will dissipate.
If the lubricant is accidentally stained on any part other
than the storage container or guide rail, please wipe it
clean with a soft wet cloth.
For ease of use, the food storage containers and rails
in the refrigerator are coated with lubricants.
Location Cleaning
Remarks
horizontally to avoid tilting forward.
As a result, the door cannot be completely
closed.
Depending on the installation status of the
refrigerator, noise or image disorder may occur in
telephones, walkie-talkies, radios and TV sets. In this
case, keep the equipment as far away from the
refrigerator as possible.
Remarks
Soft damp cloth
The freezer should be placed stably, and can only be
powered at least 4~6 hours after being transported or
moved.
Before use, please remove all packaging materials,
including internal cushion blocks, adhesive tape, foam,
Settling
etc. If the shell has a covering film, please tear it off.
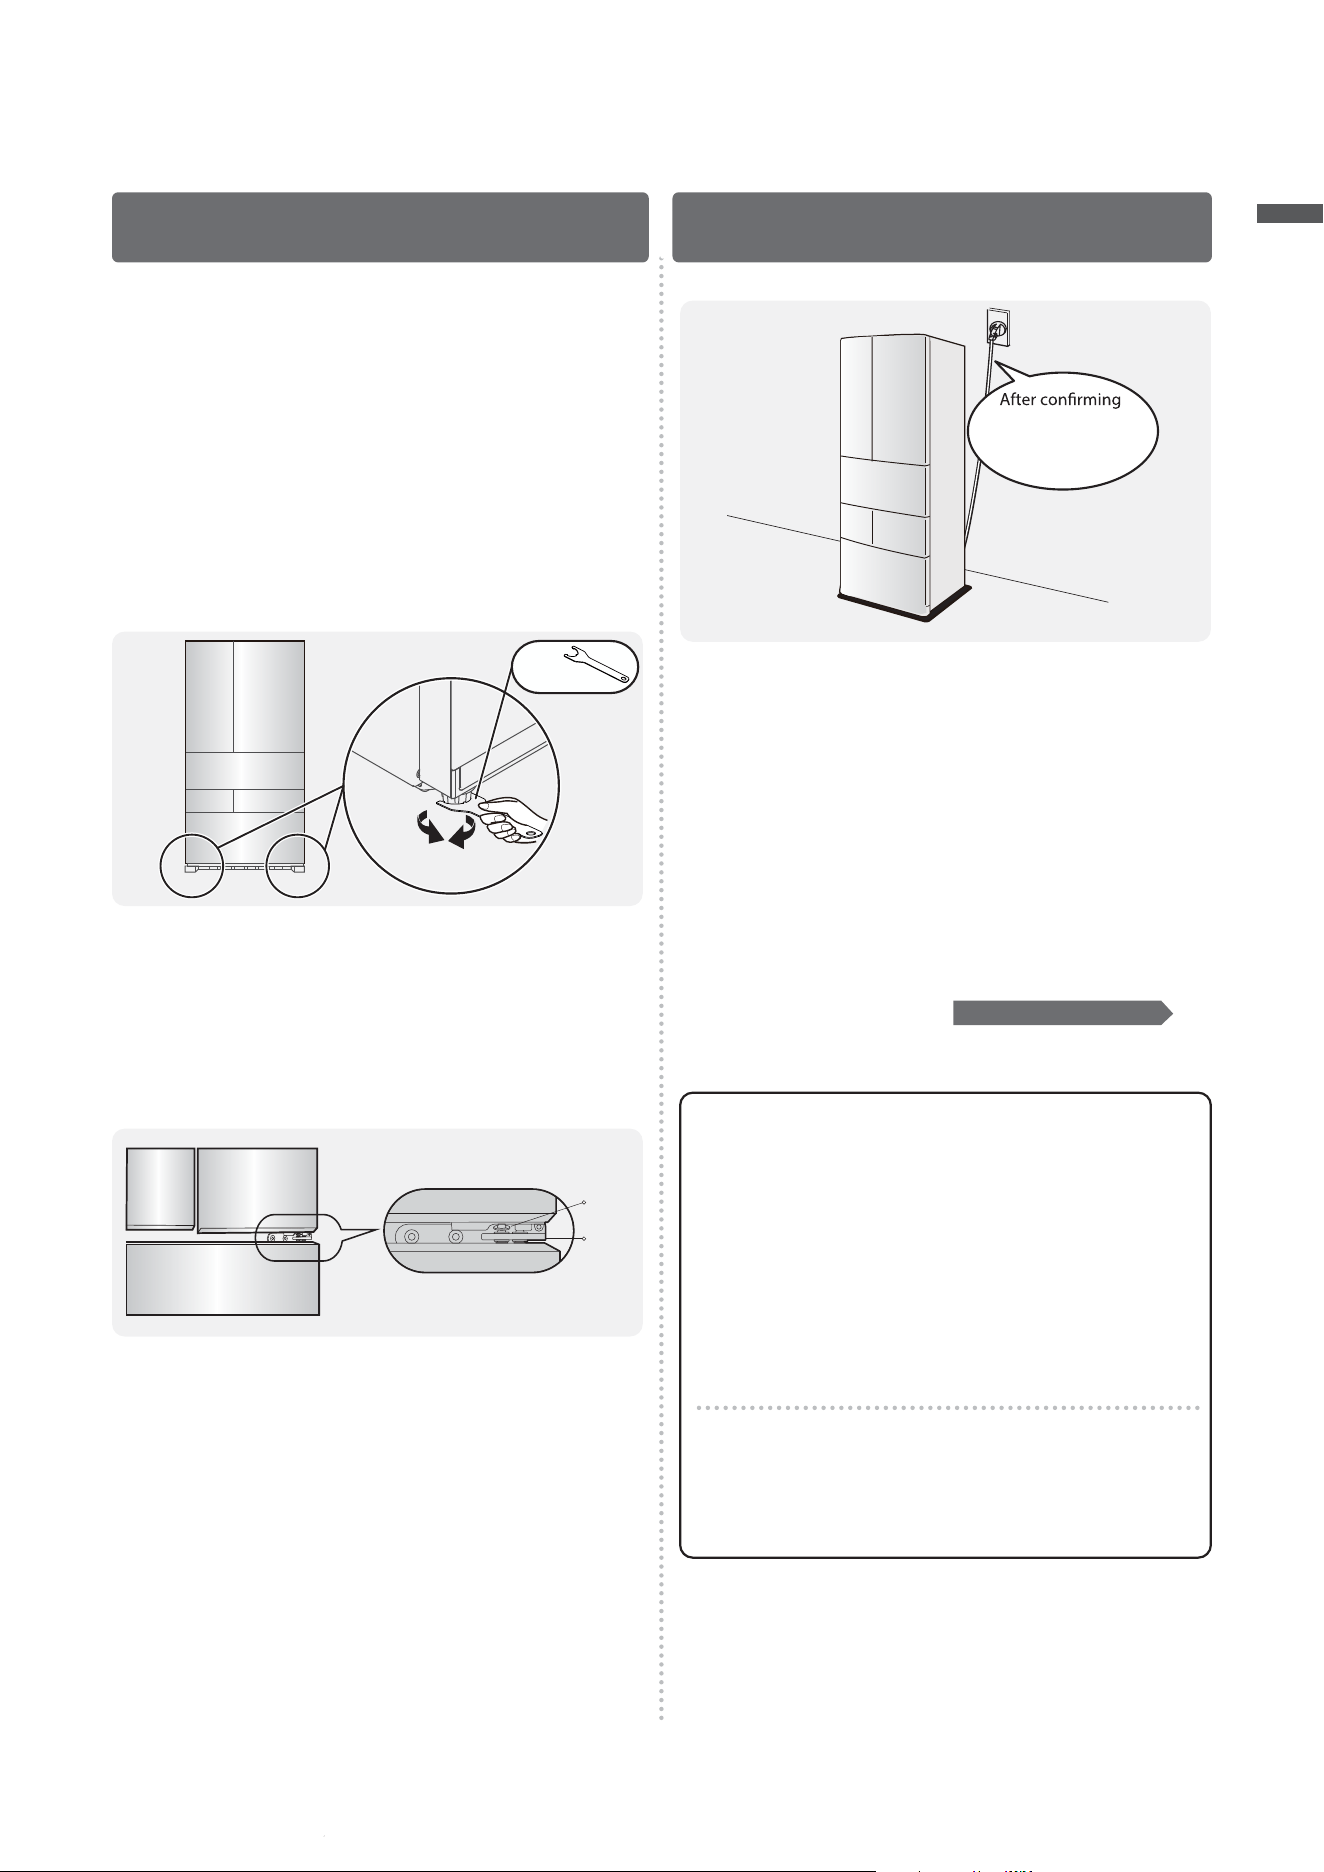
Lower the
refrigerator
Raise the
refrigerator
Wrench
1
Plug the power cord into a power socket
(Please use a separate power socket of 220-240V AC)
2
Please check whether it is in demo mode
dž
In the demonstration mode, the refrigeration
system is not running.
When installed in a
high-humidity area
Grounding method
To prevent electric shock, proper grounding
is required.
Be sure to properly connect the ground wire.
If the refrigerator is installed in a location with excess
moisture or humidity, grounding is required and a
leakage protection device should also be installed.
11
proper installation
and grounding, plug
in the power cord
Leveling Plug in the power
Disable demo mode
See page 13 for details
Installation Method
… Continued
After transportation and handling, the refrigerator may
exhibit tilting forward, leaning backward, or unevenness
at the bottom. In such cases, leveling feet (located at the
front bottom of the refrigerator, 2 in total) can be
adjusted for leveling. Rotate the leveling feet clockwise
to raise the refrigerator and counterclockwise to lower it.
If the leveling foot cannot be turned by hand, use the
wrench shown below. Insert the wrench into the
leveling foot slot from underneath and turn it in the
direction shown to raise or lower the foot.
Lift the lower side of the door and insert the adjustable
spacer between the door and the hinge using your hand
or pliers.
Adjustable
plastic
gasket
Hinge
Uneven bottom of refrigerator
Refrigerator Doors Height
Adjustment
Before Use
12
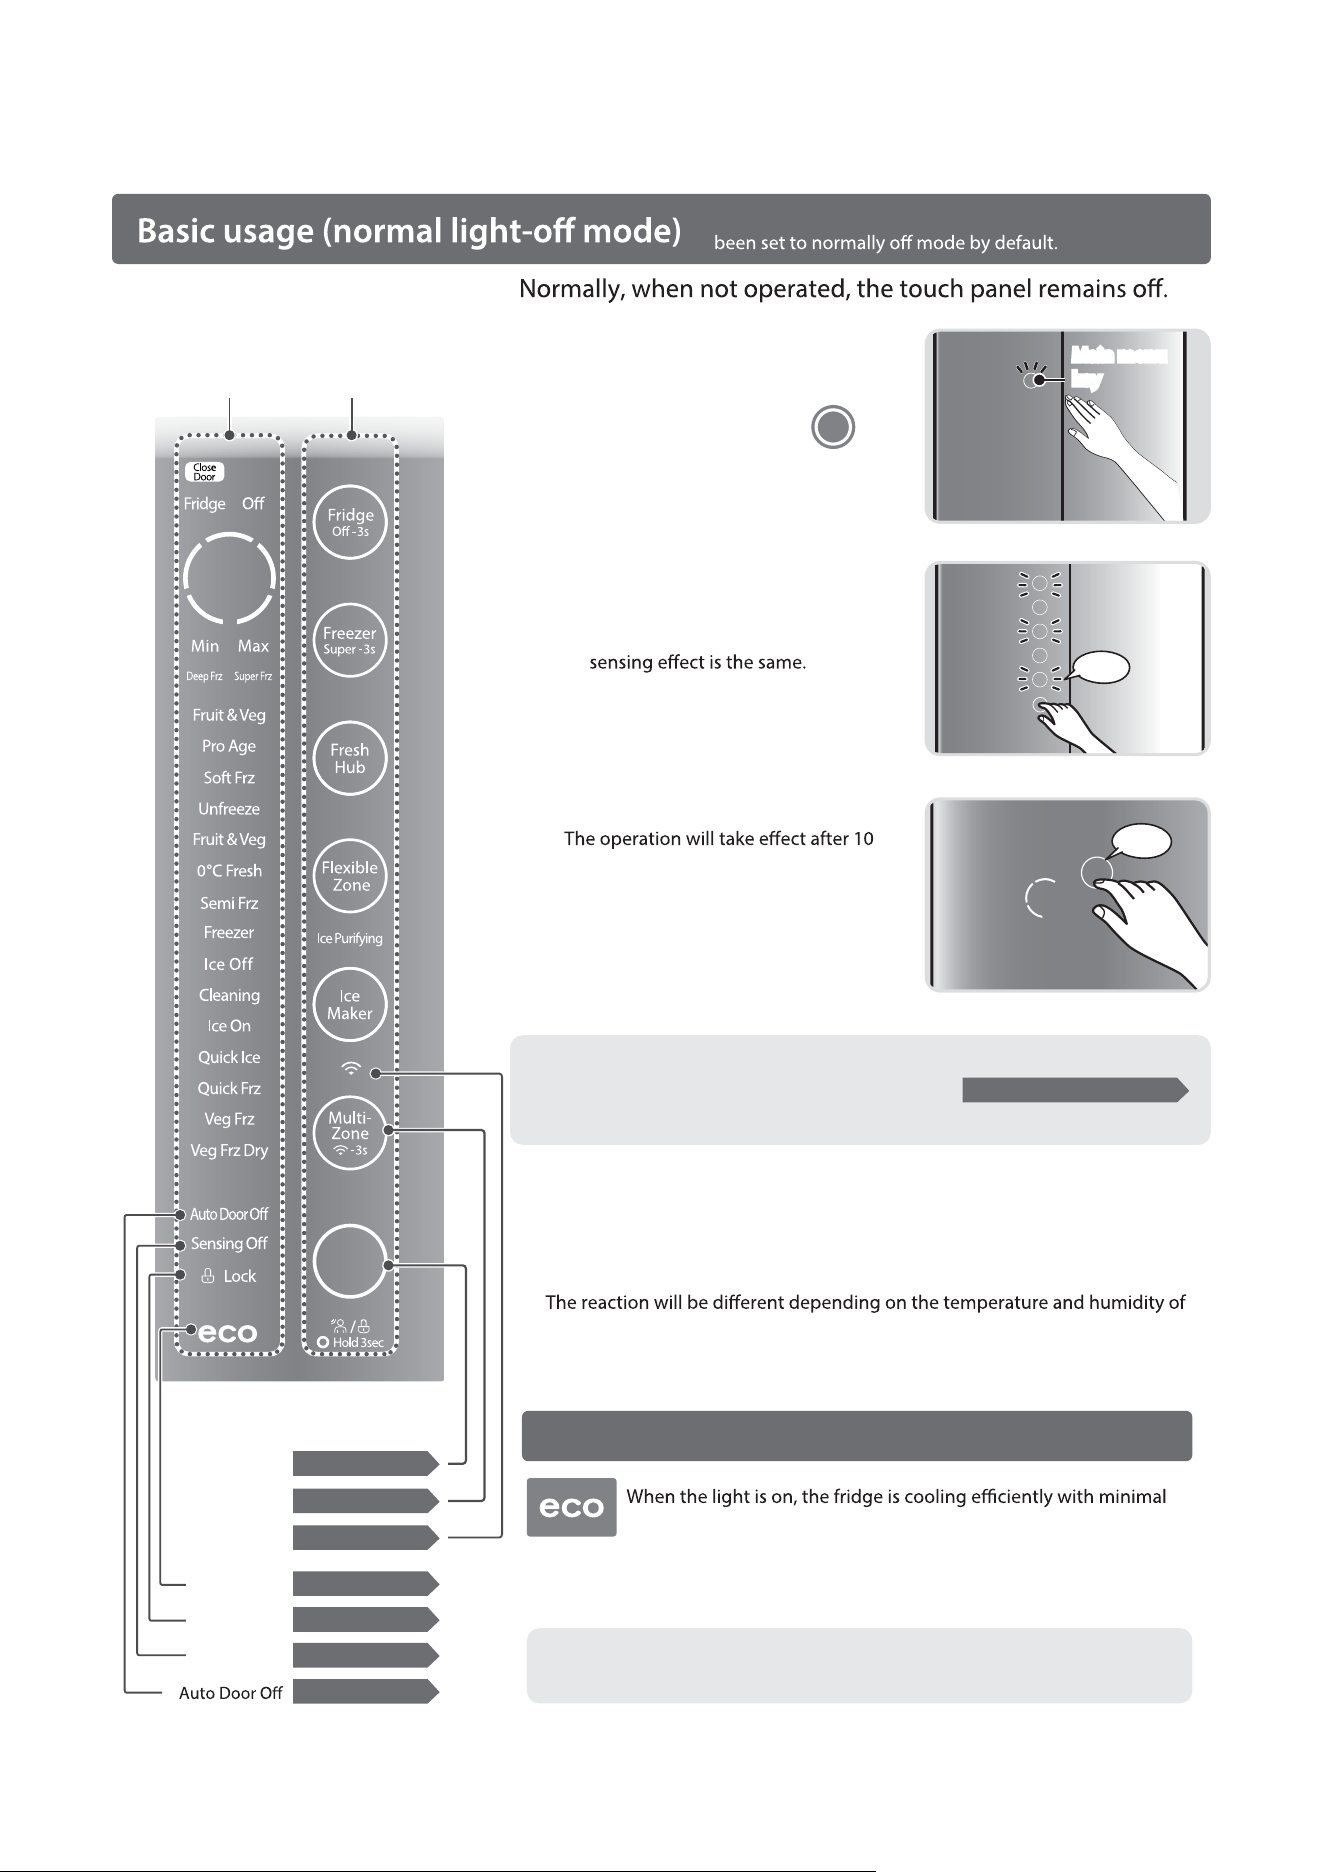
Touch the main menu button to turn on
the touch panel for operation.
Functions of the touch panel
2
dž
3
Even if you touch with force, the
Attention
In the following cases, touching the operating part of the panel may not respond.
dž
The time interval between touches is too short (i.e., touching buttons too quickly).
dž
The operating area of the touch panel is wet or dirty (stained with oil or food, etc.).
dž
the surrounding environment, the user's physical condition, and the
operating status of the surrounding electrical products.
dž
Human-sensing release function
See page 15 for details
Select the operation to be performed.
seconds of interruption, and the light
will go out after 10 seconds.
At the beginning of use, the refrigerator has
This illustration is provided for explanation
only. Certain elements may not be displayed
during actual operation.
ECO mode
Attention
˔
The eco mode is only used to indicate the operating status
of the refrigerator, and its ON/OFF cannot be set forcibly.
See page 15 for details
See page 15 for details
Main menu
key
See page 12 for details
Multi-function
button
See page 14 for details
ECO mode
See page 12 for details
Button lock
Human-
sensing release
See page 16 for details
Wi-Fi icon
See page 14 for details
Display
Operation
1
When someone approaches, the
ambient light under the freezer chamber
turns on. The main menu key light
up. The touch-to-open button will then
light up.
It will not be displayed during frequent door openings or immediately after
power-on.
power.
Beep
Beep
Main menu
key
Main menu
key
13
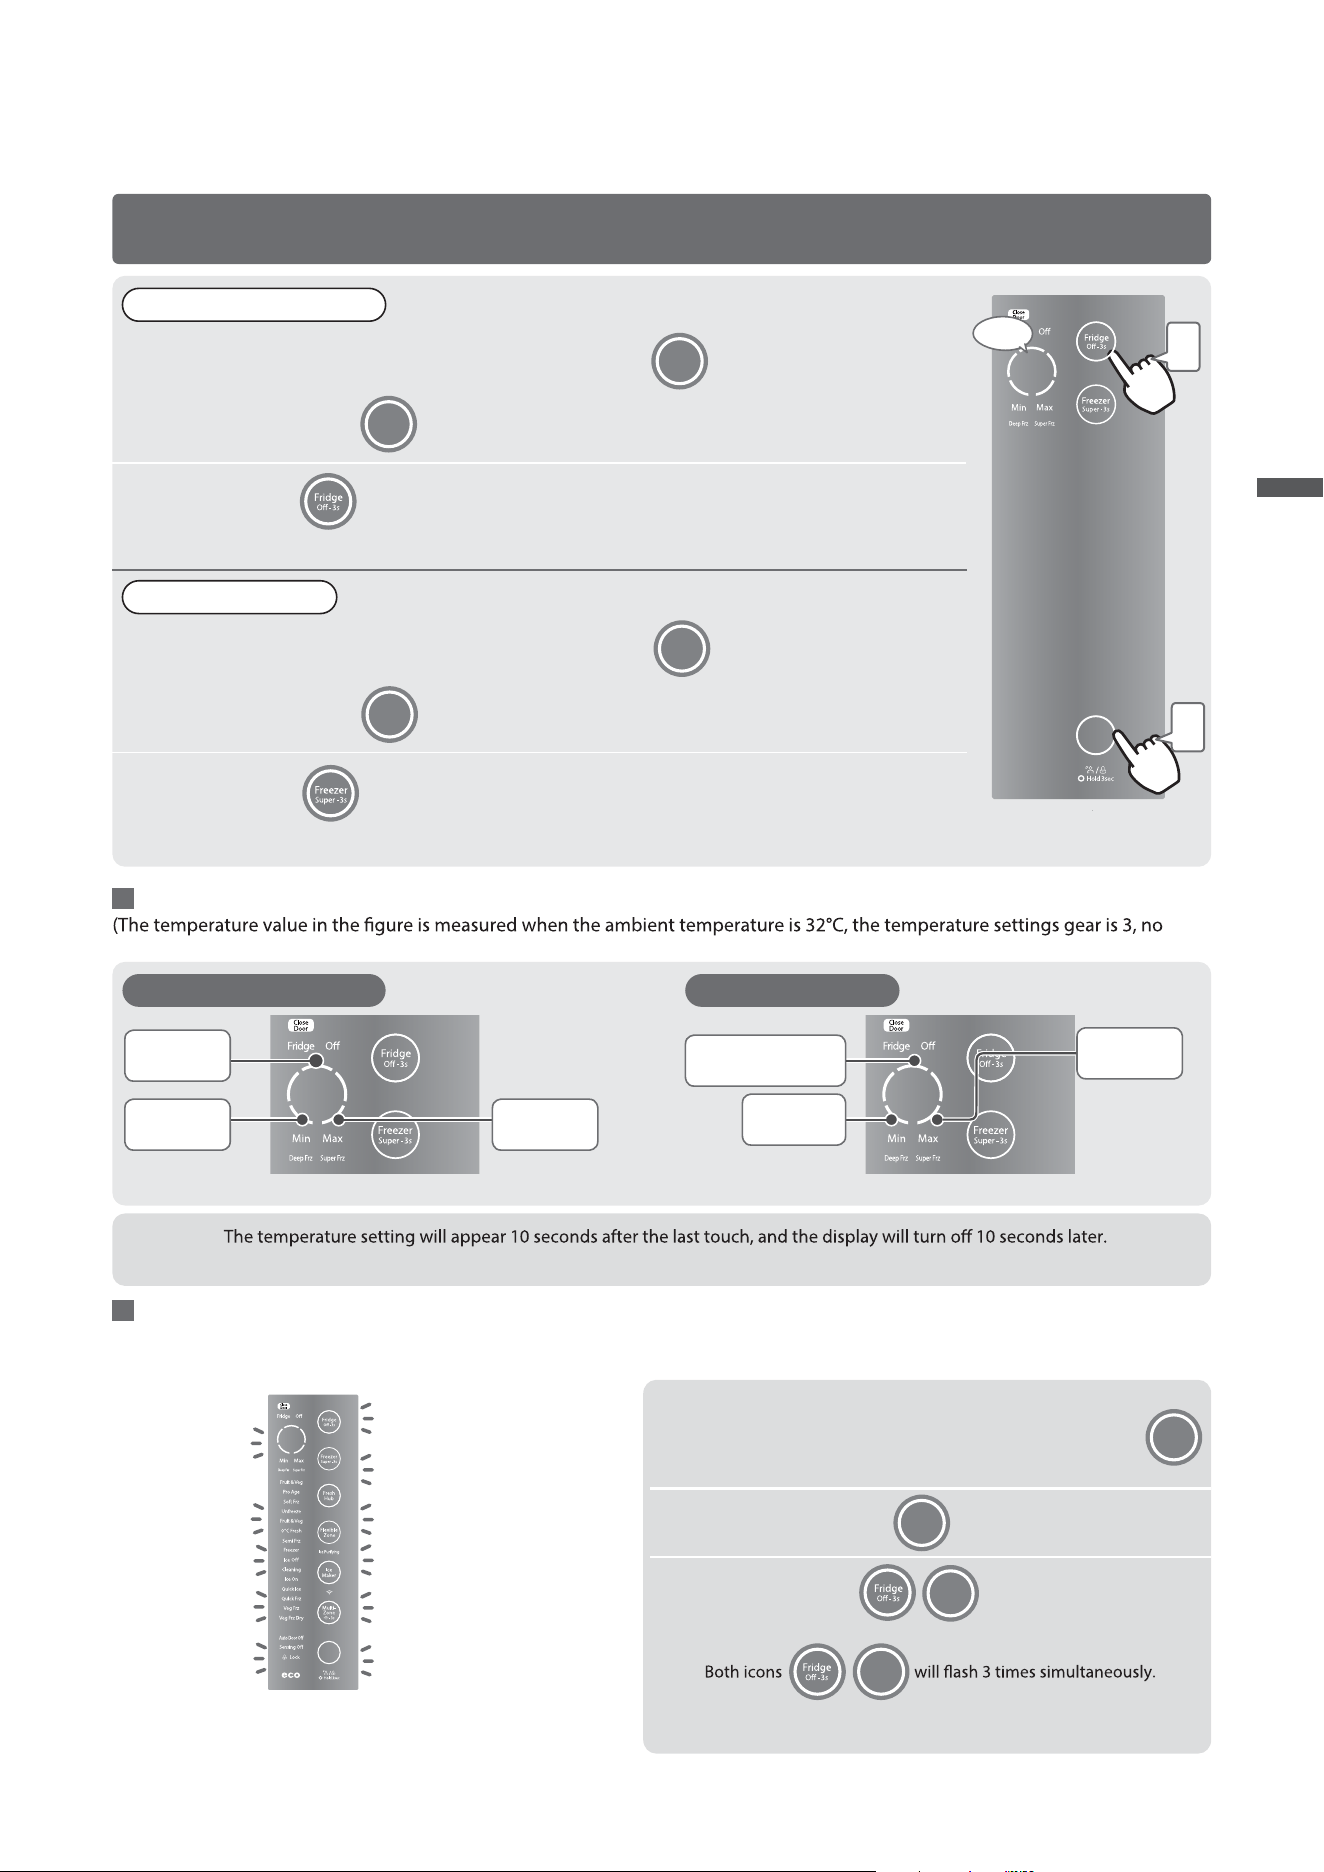
(The contents of the display panel
are for illustration only)
Tap repeatedly to select the desired temperature level.
Once the light for the selected temperature level turns on, the setting is complete.
Tap repeatedly to select the desired temperature level.
Display of temperature settings and current temperature inside the refrigerator
food is put in, the refrigerator door is closed and the temperature is stable.)
When someone approaches the fridge, the main menu key lights up.
Tap the main menu key to light up the panel.
When someone approaches the fridge, the main menu key lights up.
1
2
˛
Once the light for the selected temperature level turns on, the setting is complete.
˛
1
2
Refrigerator chamber
Refrigerator chamber Freezer chamber
Freezer chamber
About 3~5°C
About -18ᾛ-22°C
2~3°C higher
than Level 3
Tap the main menu key to light up the panel.
Temperature settings
Beep
2
1
Disable demo mode
If cooling does not resume after adjusting the temperature, the unit may be in Demo Mode. Please check the touch
panel. If the touch panel remains lit, the refrigerator is in demo mode. In this mode, the refrigerator will not cool.
(The contents of the display
panel are for illustration only)
How to disable demo mode
˛
If no buttons are pressed for 10 seconds, Demo Mode will be
automatically disabled.
When someone approaches the fridge, the main menu key
lights up.
Touch both buttons at the same time for 7
seconds until a beep is heard.
1
3
2
Tap the main menu key to light up the panel.
Gear 3
Gear 3
3~4°C higher
than Level 3
2~3°C lower
than Level 3
3~4°C lower
than Level 3
Functions of the touch panel
… Continued
Attention
˔
˔
When in deep freezing mode, the door may require slightly more force to open and operating noise may increase slightly.
Method of Use
14
Functions of the touch panel
… Continued
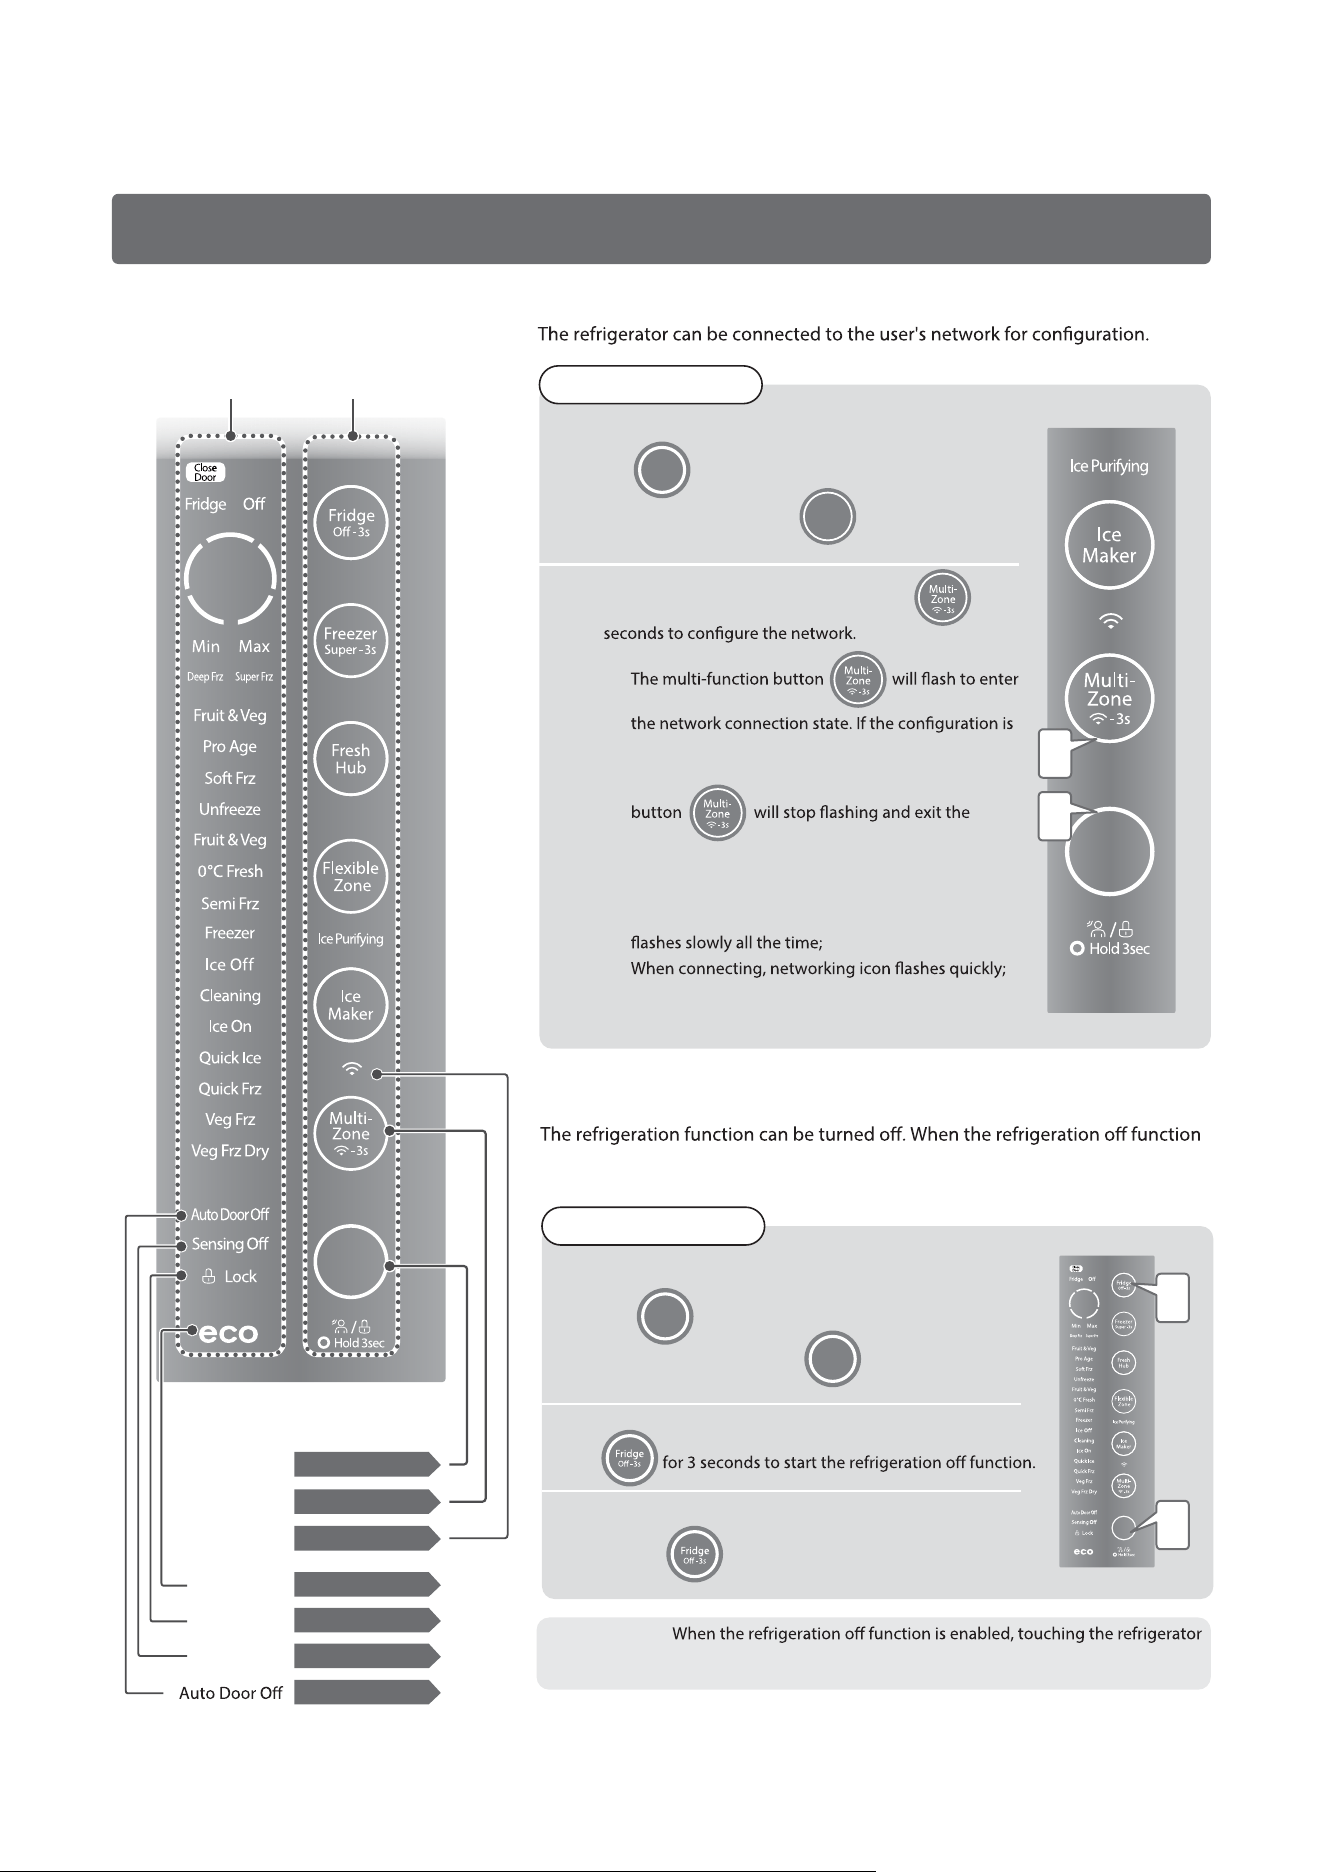
Networking Setting
This illustration is provided for explanation
only. Certain elements may not be displayed
during actual operation.
˛ ˛
not successful after 10 seconds, the multi-function
wireless network connection.
Networking icon display status:
When waiting for connection, networking icon
When the connection is successful, networking icon
stays on.
Setting method
When someone approaches the fridge, the main menu
key lights up.
Touch the main menu key to light up the
touch panel.
1
Press and hold the multi-function button for 3
2
Networking settings
1
2
Refrigeration OFF function
is turned on, the refrigerator chamber does not cool, while other chambers
continue to operate.
temperature button will emit a beep, and the temperature of the
refrigerator chamber cannot be adjusted at this time.
Setting method
When someone approaches the fridge, the main menu
key lights up.
Touch the main menu key to light up the
touch panel.
1
Press and hold the refrigerator temperature button
To cancel, press and hold the refrigerator temperature
button for 3 seconds.
2
3
Attention
˔
Display
Operation
2
1
(The contents of the display panel are for illustration only)
(The contents of the display panel are for illustration only)
See page 15 for details
See page 15 for details
Main menu
key
See page 12 for details
Multi-function
button
See page 14 for details
ECO mode
See page 12 for details
Button lock
Human-
sensing release
See page 16 for details
Wi-Fi icon
See page 14 for details
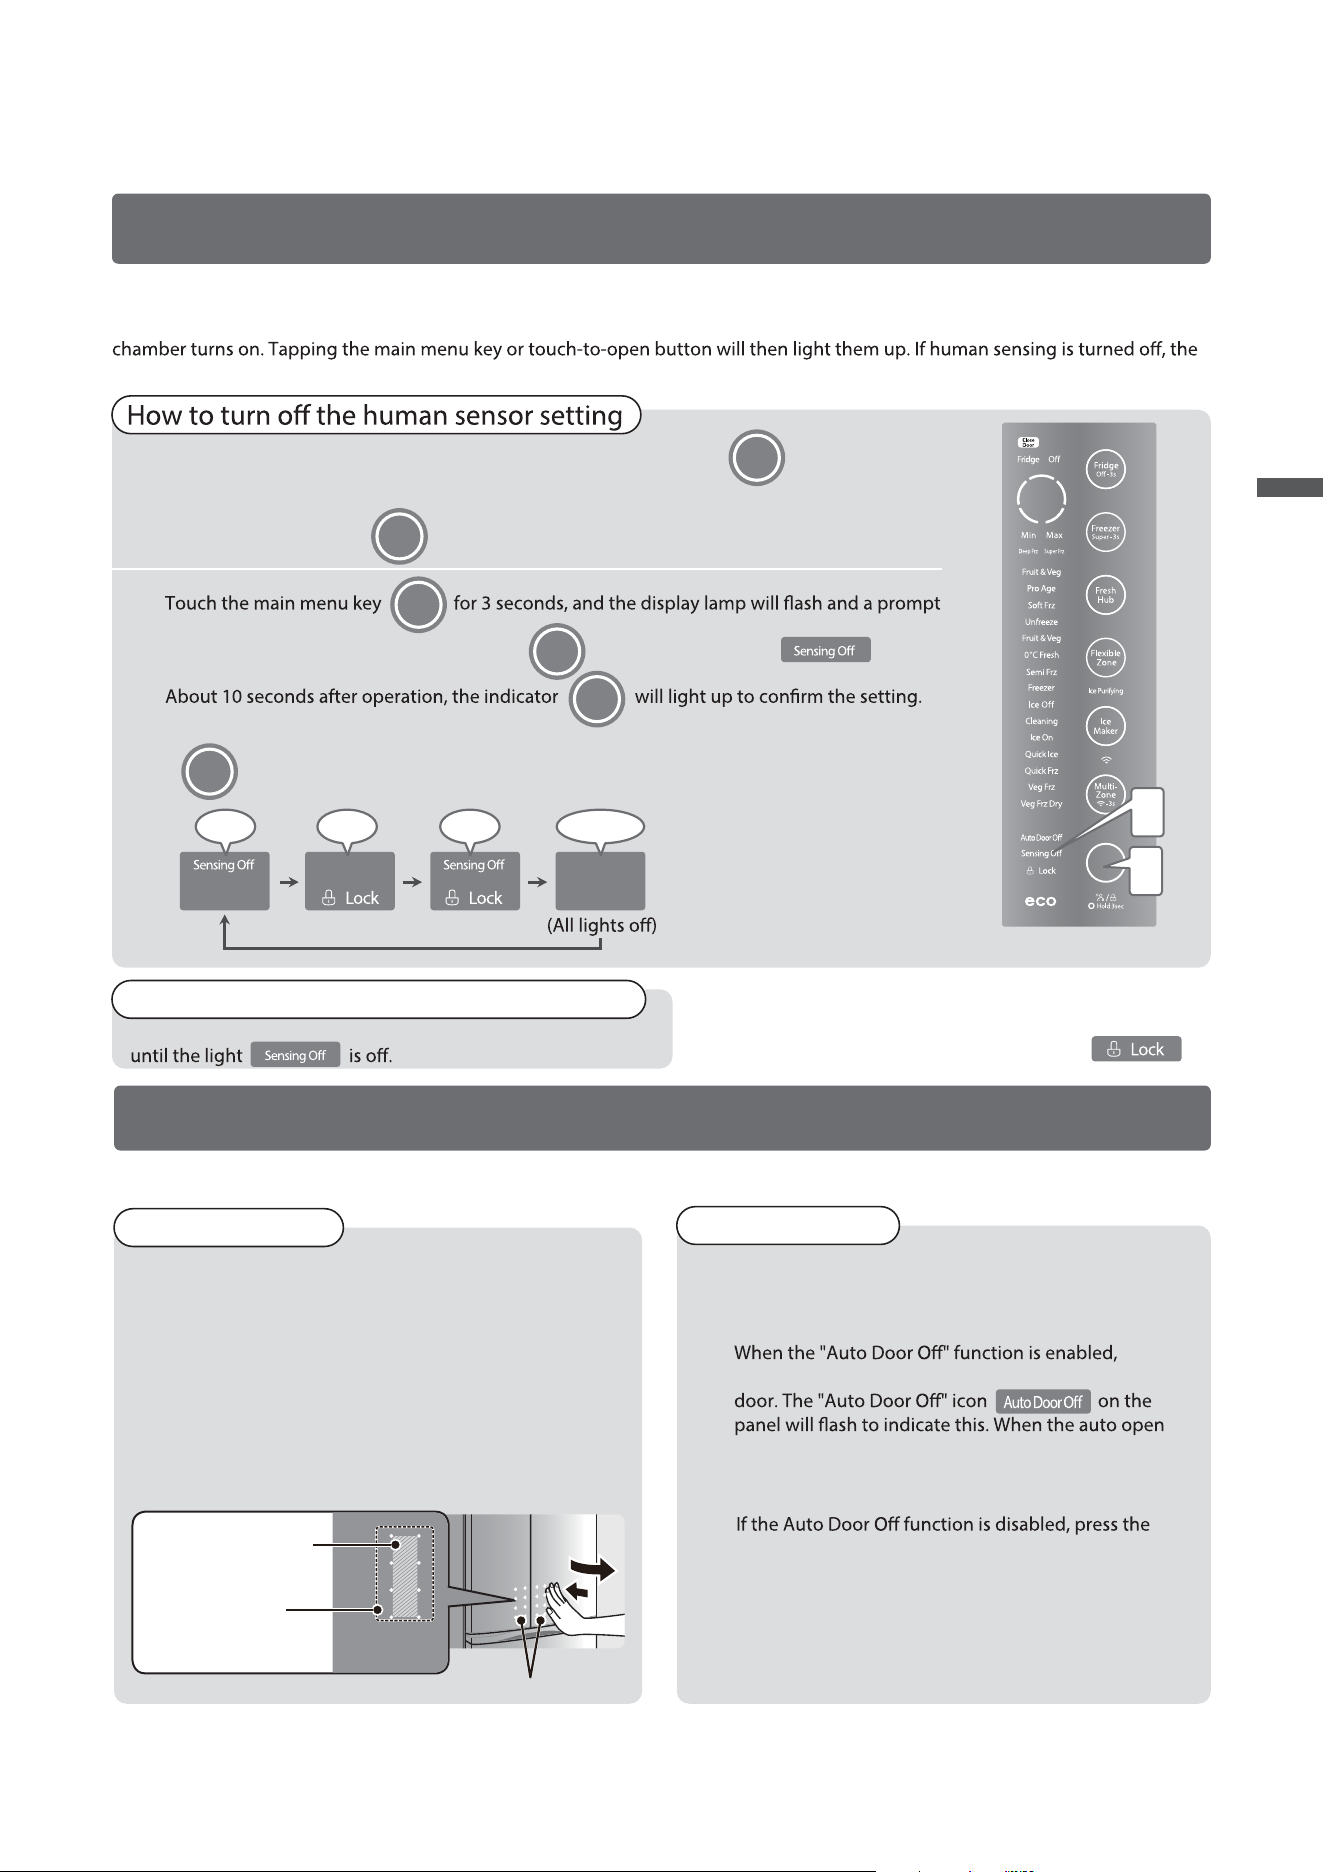
15
1
When a person approaches the refrigerator, the main menu button lights up and
touch-to-open button will also illuminate the light.
Ą It can be set at the same time as key locking .
2
tone will sound. Touch the main menu key repeatedly to turn on the light.
Each press of this button will cycle through the display options as shown.
How to turn on the human sensor setting
The operation steps are the same as the setting method,
(All lights on)
Beep Beep Beep
Beep~
Tap the main menu key to light up the panel.
The refrigerator is set to human-sensing mode by default. When someone approaches, the ambient light under the freezer
ambient light under the freezer chamber will not turn on if someone approaches.
Human sensing function
About the human sensing function
Remarks:
(The contents of the display panel are for illustration only)
How to remove
Setting method
Touch-to-open button for the refrigerator chamber door
Touch-to-open button (auto door opening)
When someone approaches the refrigerator, touch-to-open
button lights up. Tap the button on the refrigerator
chamber door to open it automatically.
You can choose to open one or both refrigerator chamber
doors through the APP.
Tip: To prevent accidental operation, the touch-to-open
button will not respond if the refrigerator chamber door is
already open.
Tap the touch-to-open button lightly, and the refrigerator chamber door will open automatically.
2
1
Touch-to-open button
Touch response area
Warning electrode
(Touching here may not
trigger a response)
1
2
The following can be achieved through the "Auto
Door Off” function in the APP:
tapping the touch-to-open button will not trigger the
function is disabled, the refrigerator chamber door
can only be opened manually.
touch-to-open button on the refrigerator chamber
door to open it automatically.
Functions of the touch panel
… Continued
Method of Use
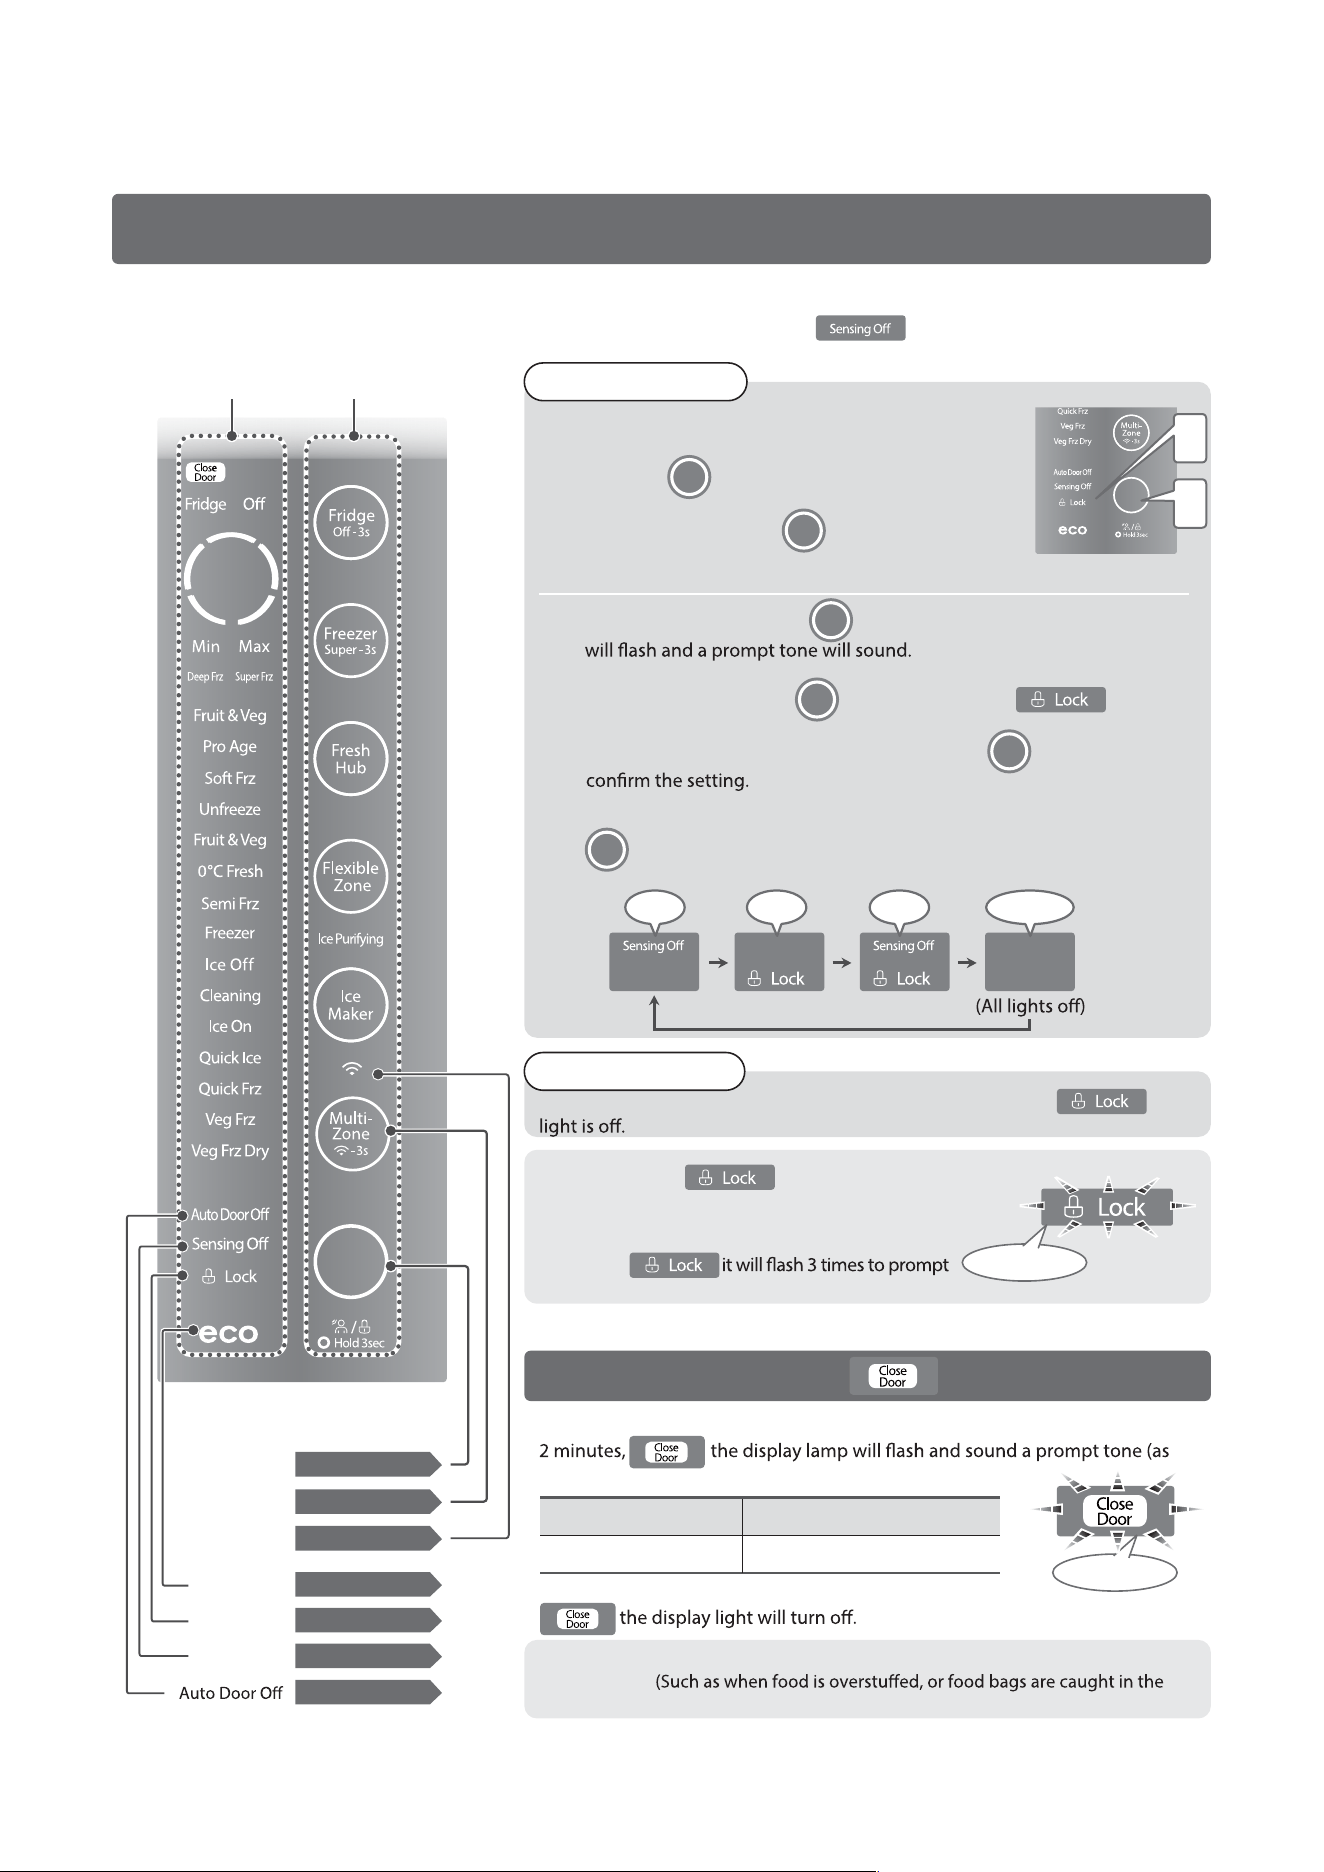
16
This illustration is provided for explanation
only. Certain elements may not be displayed
during actual operation.
Functions of the touch panel
… Continued
Attention
˔
While a setting is in progress,
If other operations are carried out,
that the operation is not possible.
Button lock
Ą You can also choose to disable the human sensing function.
The operation steps are the same as the setting method, until the
1
When someone approaches the fridge, the main
menu key lights up.
2
Touch the main menu key for 3 seconds, and the display lamp
Each press of this button will cycle through the display options
as shown.
About 10 seconds after operation, the indicator will light up to
Setting method
How to remove
(All lights up)
Beep Beep Beep
Beep~
Tap the main menu key to light up the panel.
Touch the main menu key repeatedly to turn on the light.
Remarks:
(The contents of the display panel are for illustration only)
Display
Operation
Flash 3 times
Beep~
2
1
Attention
˔
Once the door is closed, the prompt sound will stop and
Door open duration Prompt tone
After 2 minutes Continuous prompt sound
When any door of the refrigerator chamber, and freezer chamber than
shown in the table below).
When the door is only slightly opened, there will be no prompt sound.
door, etc.)
Please close the door
Beep~beep~
See page 15 for details
See page 15 for details
Main menu
key
See page 12 for details
Multi-function
button
See page 14 for details
ECO mode
See page 12 for details
Button lock
Human-
sensing release
See page 16 for details
Wi-Fi icon
See page 14 for details
only locking is allowed.
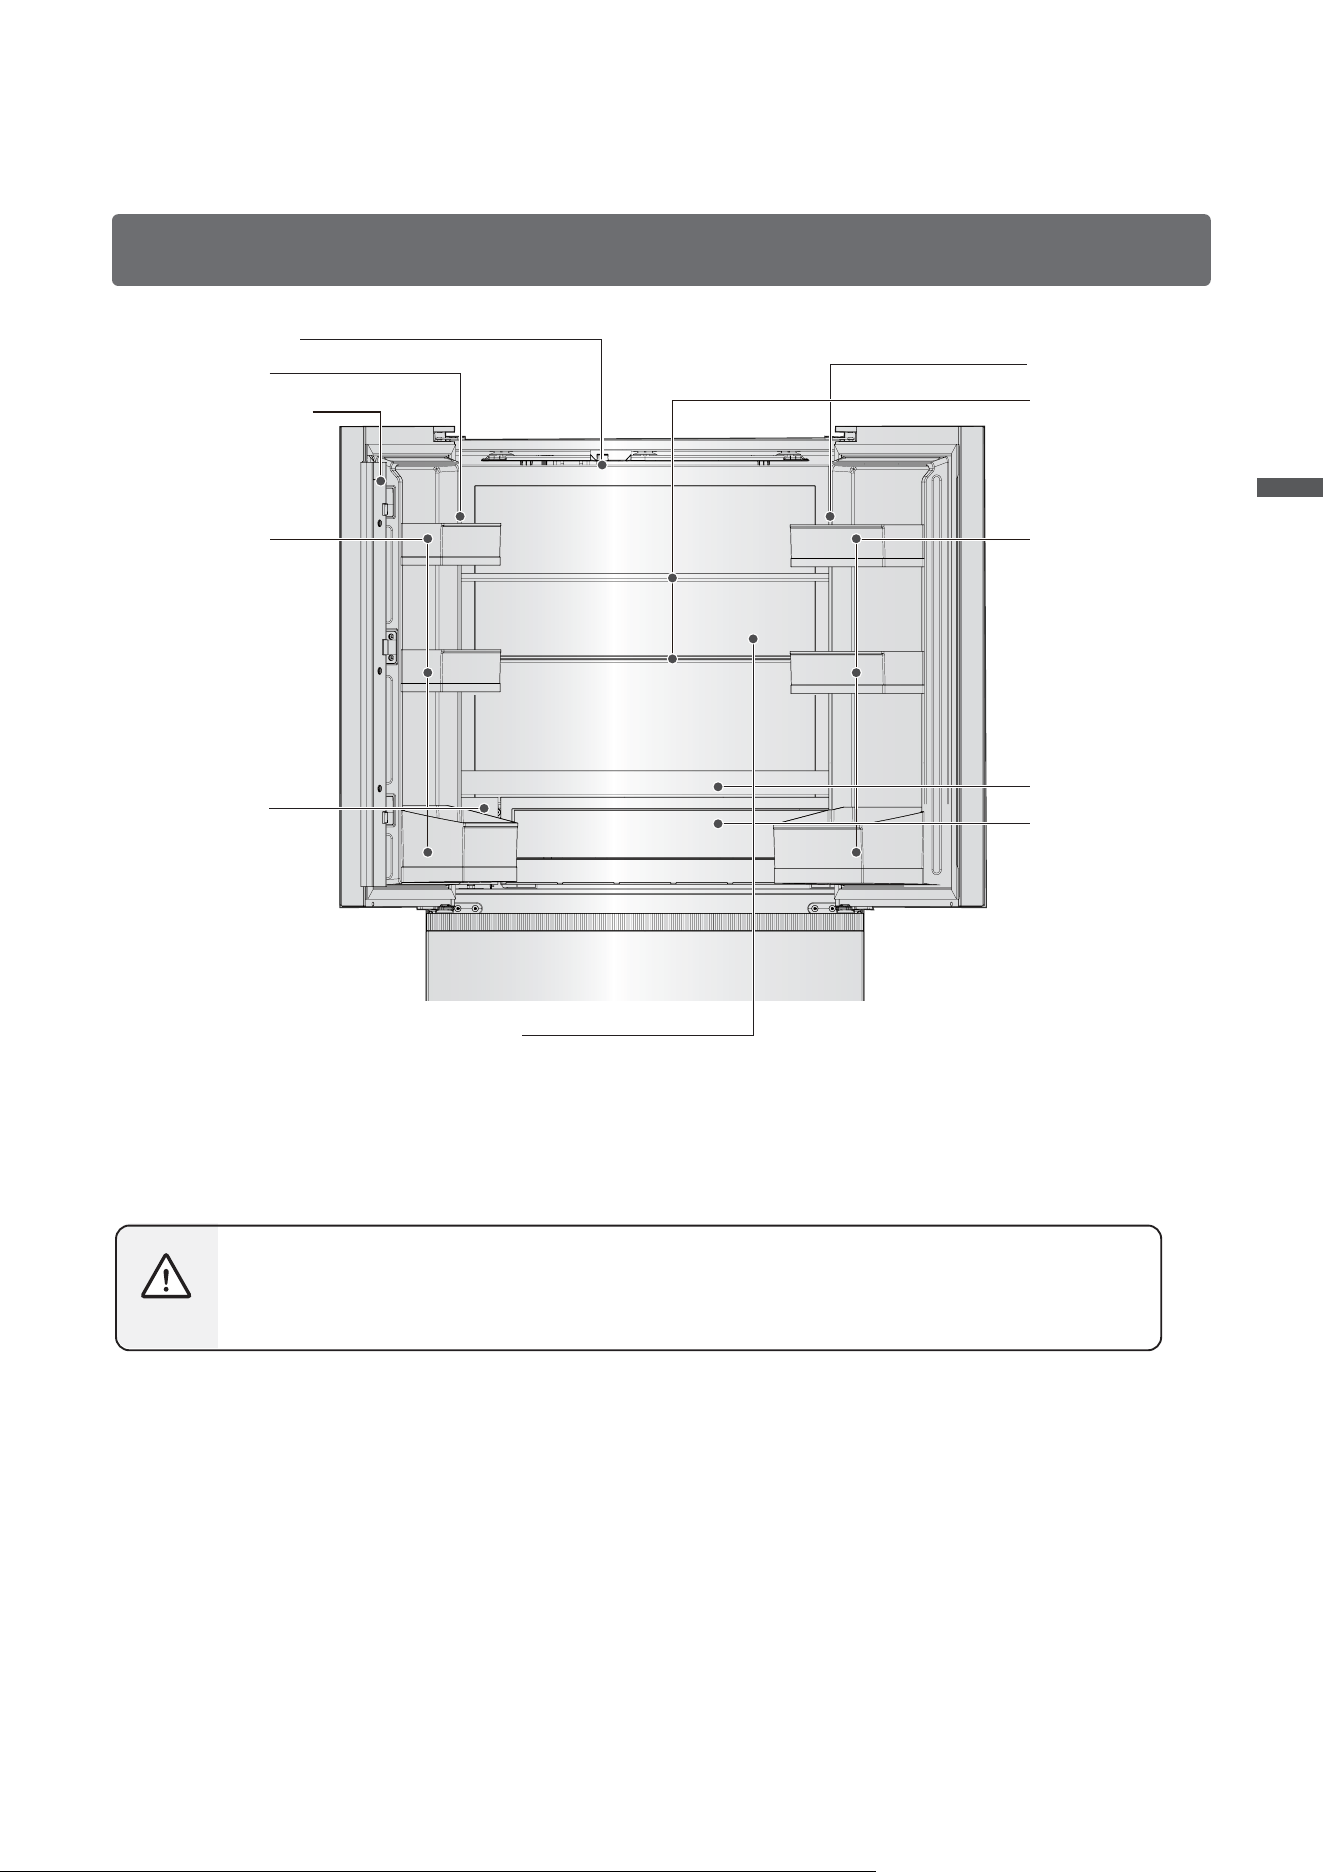
17
Refrigerator chamber
Food, eggs and beverages with high moisture are easy to freeze when placed in front of the cold air
outlet. Please store them in the front of the shelf.
(Especially carbonated drinks, which may burst when frozen)
Remarks
Introduction to the refrigerator chamber
LED ceiling lamp
LED side light
Rotating partition
Shelf on door
Sterilization and odor-purifying device
Automatic Ice
Maker Water
Storage Box
Shelf on door
Quick chill drawer
(contains a quick fresh tray)
LED side light
Glass shelf
Sliding tray
The electronic odor removal unit is used to neutralize odors and eliminate bacteria in the refrigerator chamber.
˔
(Cannot be seen from the outside)
Method of Use
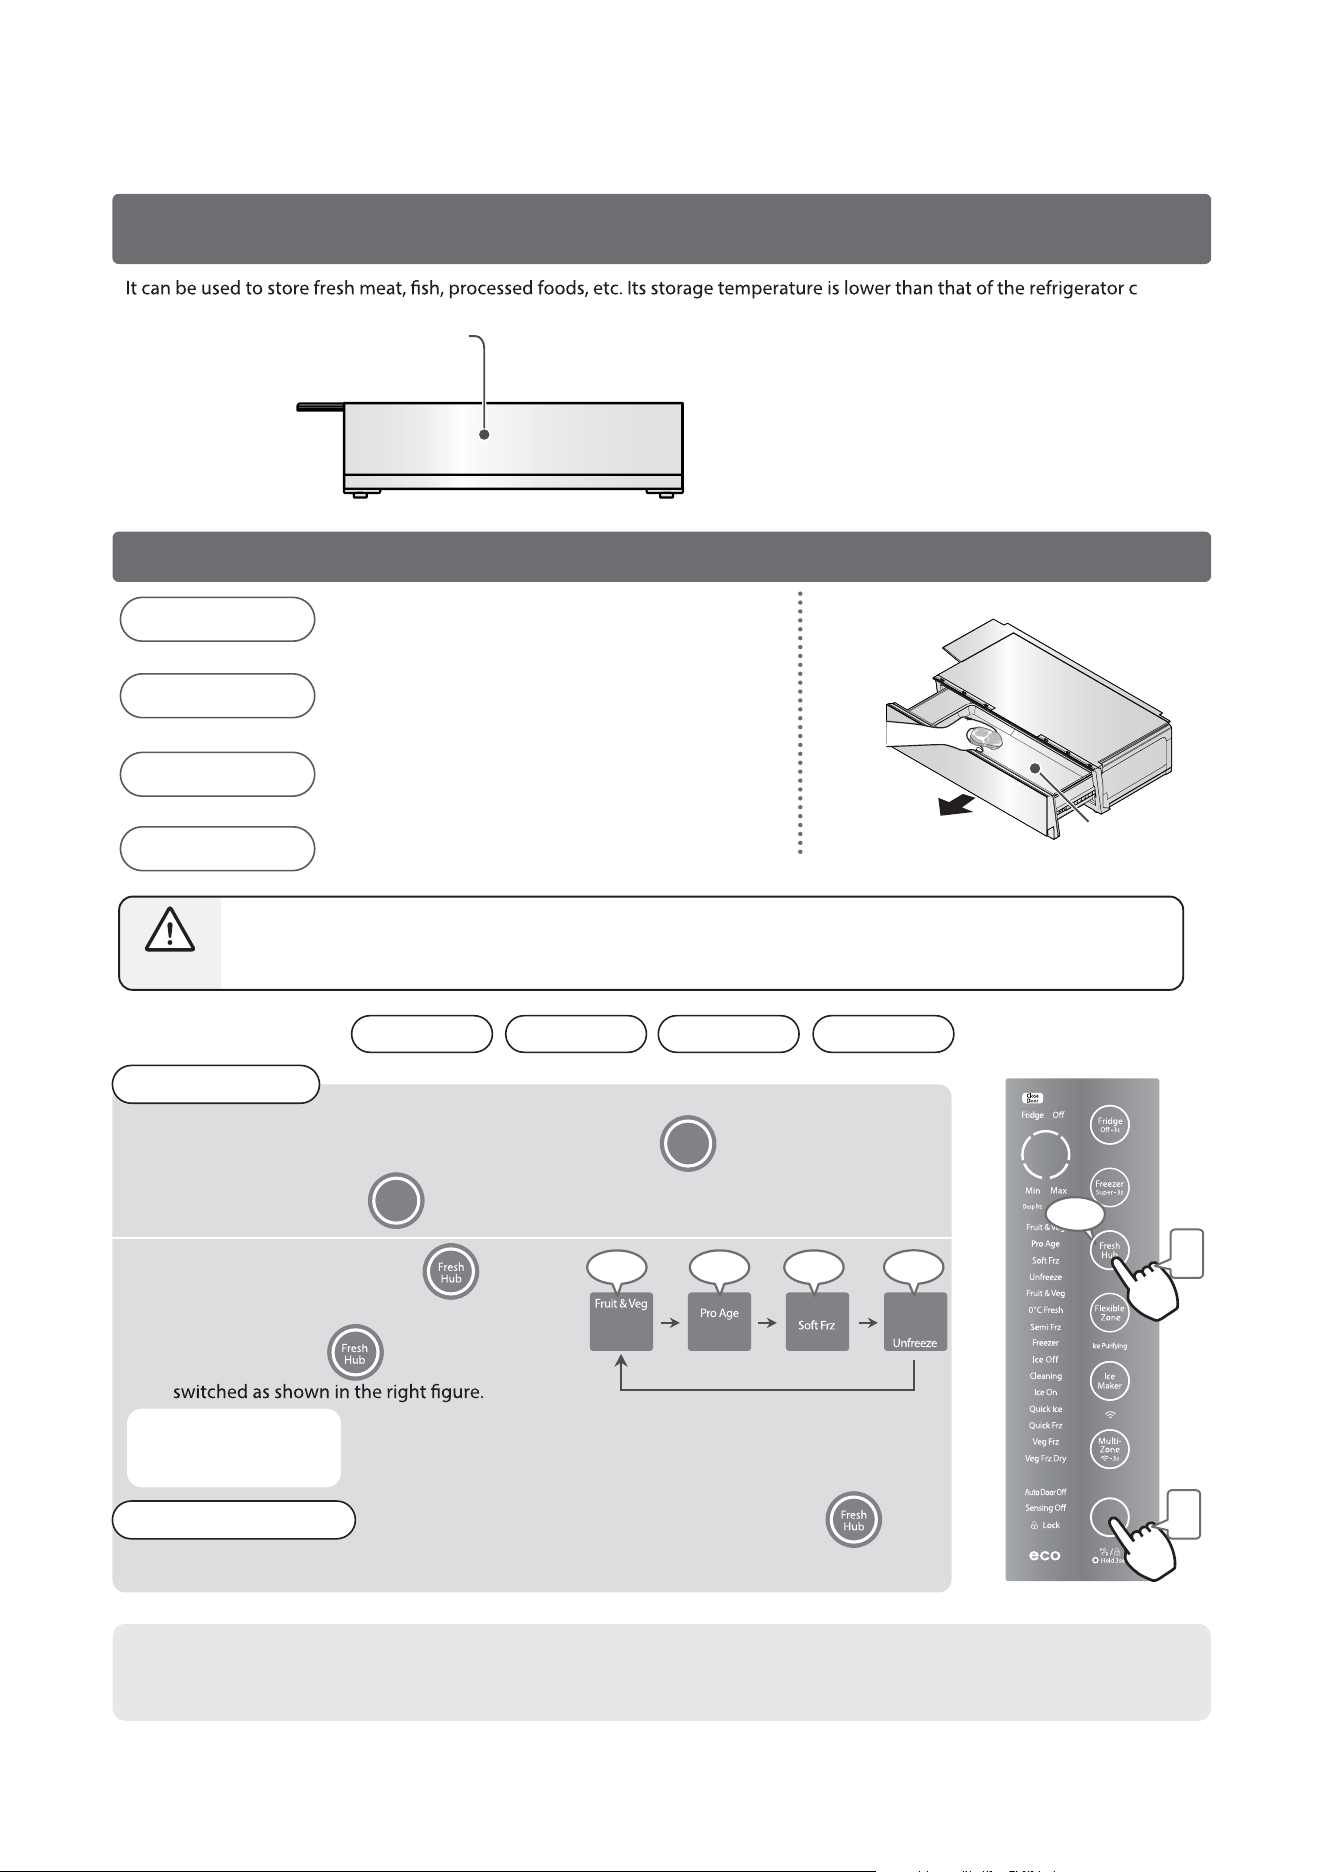
The setup and operation are the same.
18
2
Beep
1
Same operation as for setting other functions. Touch
repeatedly to turn off the corresponding function indicator.
Setting method
If stopped midway
1
When someone approaches the fridge, the main menu key lights up.
2
Touch the quick-fresh button repeatedly
to set the required function. Each time you
touch this button , the display will be
Beep Beep Beep
When the desired
function lights up, the
setting is completed.
Tap the main menu key to light up the panel.
Attention
Food with high water content, eggs, beverages, etc. are easy to freeze (especially carbonated drinks, which may break after freezing).
Frost may appear on moist foods or dairy products.
When “Fruit & Veg” is activated, this chamber works as a refrigerator chamber.
dž
dž
dž
hamber.
Refrigerator chamber
… Continued
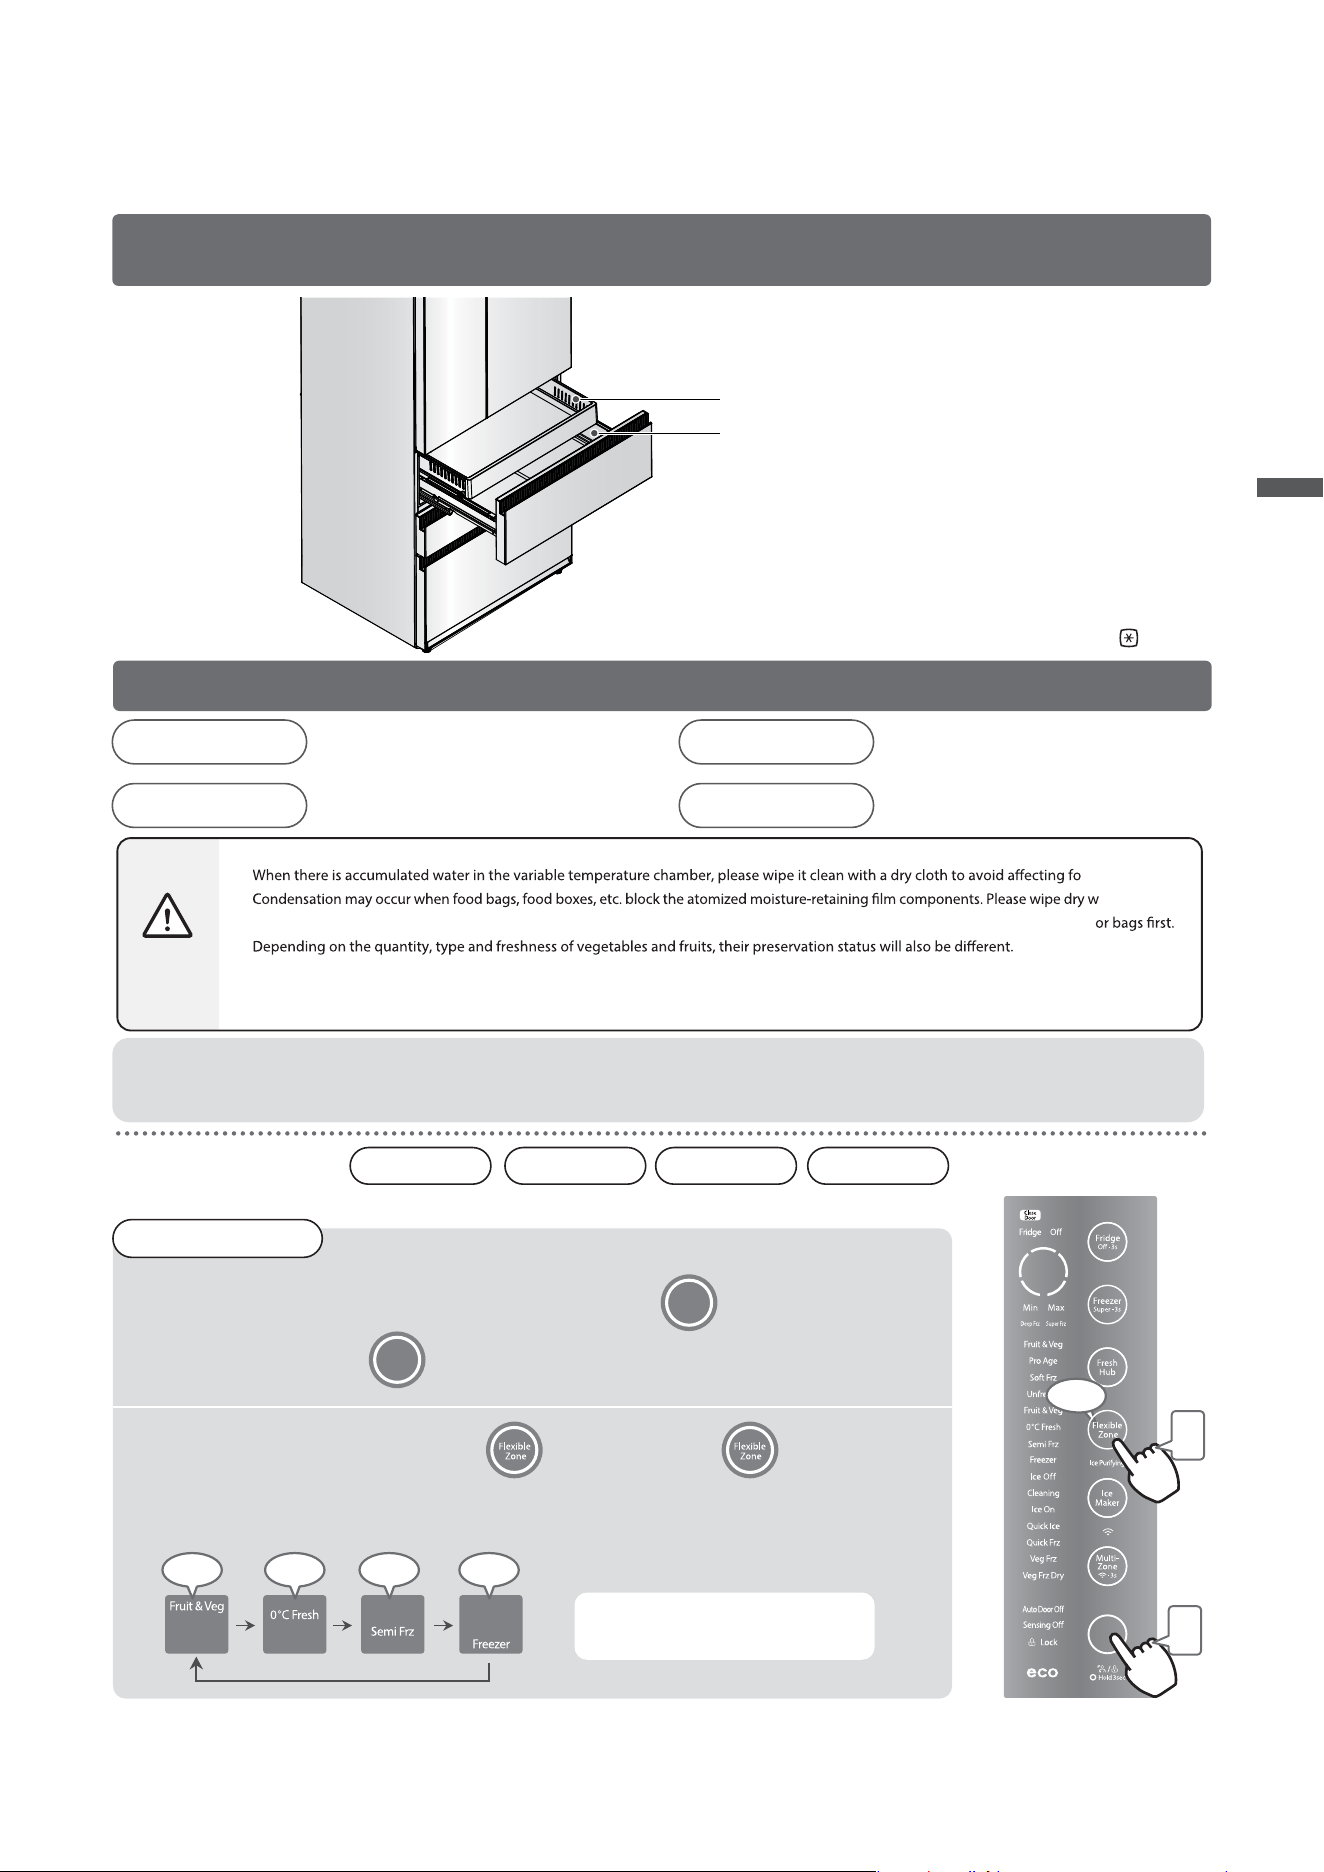
Pro Age Soft Frz Unfreeze Fruit & Veg
Food with high moisture is easy to freeze when placed in front of the cold air outlet. Leave a bit of space when
placing the appliance.
Quick chill drawer
Using Pro Age, Soft Frz, Unfreeze, and Fruit & Veg modes
Choose from four modes: Pro Age,
Soft Frz, Unfreeze, and Fruit & Veg.
Quick fresh tray
dž
Soft Frz
Unfreeze
Fruit & Veg
Fish, shrimp, meat and quick-frozen food that
Store meat, fish, shrimp and crabs for a
require unfreezing.
Eggs, dairy products, canned food, condiments,
beverages, etc.
Pro Age
prone to fermentation or spoilage.
Fermented or spoiled food, etc.
Meat, fish, dairy products, processed foods
Remarks
Beep
(The contents of the display panel are for illustration only)
short time.
19
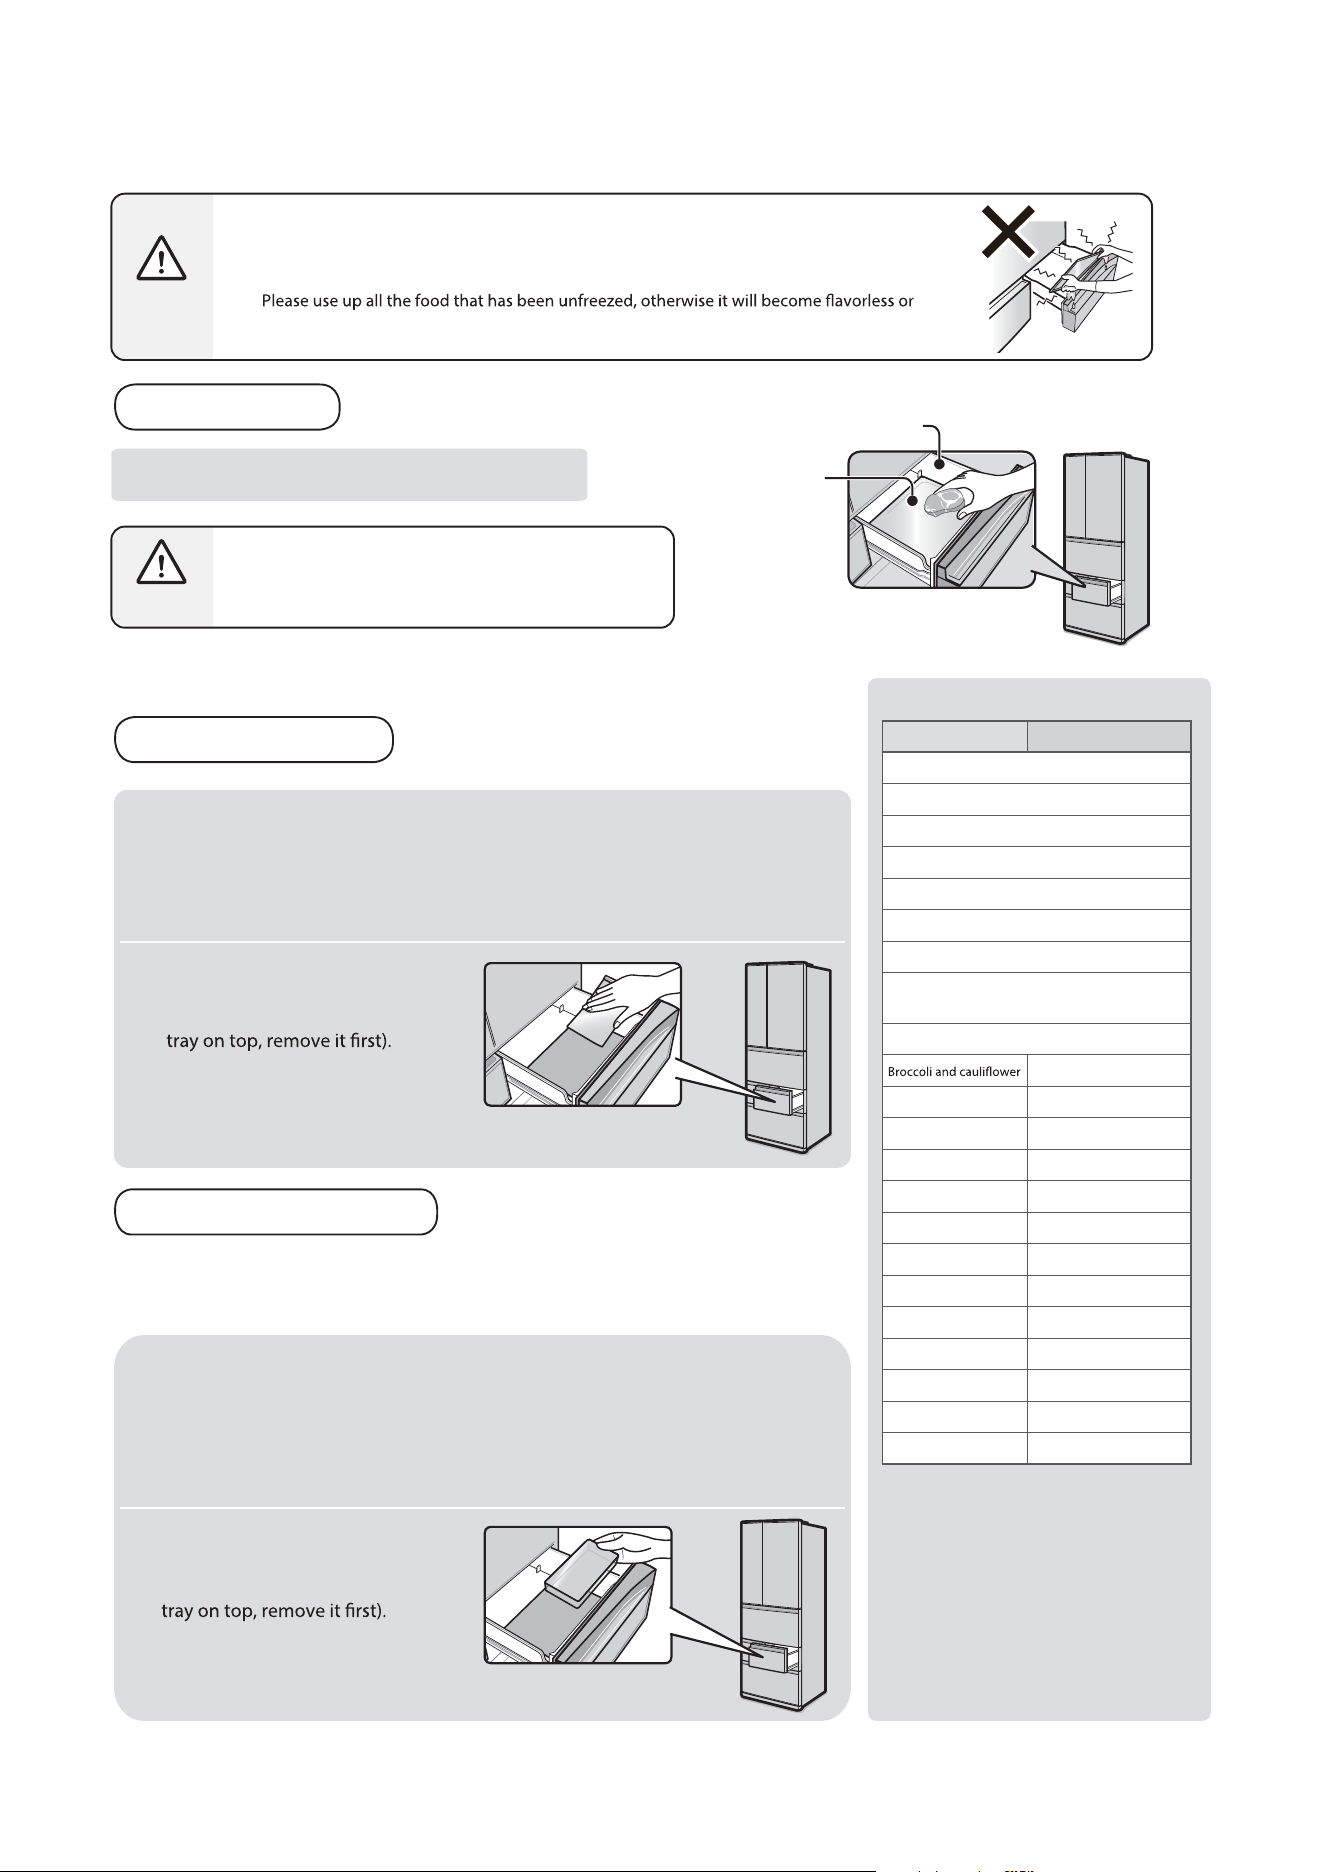
Variable temperature chamber
Introduction to the variable temperature chamber
Setting method
1
When someone approaches the fridge, the main menu key lights up.
2
Tap the variable temperature button repeatedly to select the required
function. The display will cycle as shown.
When the desired function lights
up, the setting is completed.
Tap the main menu key to light up the panel.
2
Beep
1
Beep Beep Beep Beep
(The contents of the display
panel are for illustration only)
Using Fruit & Veg, 0ĆFresh, Semi Frz, and Freezer modes
dž
cheese, butter, etc.
Fresh meat, fish, milk, yogurt,
Fruits, vegetables, eggs, drinks, etc.
(Factory default setting)
Frozen meat, seafood,
quick-frozen foods, etc.
Poultry, shellfish, beef,
When switching between refrigeration and freezing in the variable temperature chamber, check the optimal storage temperature
of the food and adjust accordingly. Note: Not all foods are suitable for switching between chilled and frozen states. If the current
storage temperature is unsuitable, move the food to the appropriate chamber to maintain quality and safety.
Variable temperature
chamber drawer
Variable temperature tray
(Includes atomizing moisture
membrane module)
Package foods appropriately before placing them in the fresh or frozen chambers to avoid spoilage or frost damage.
Remarks
dž
od.
dž
dž
ith a dry cloth.
dž
When rice, seaweed and other dry foods need to be placed in the variable temperature chamber, please seal them with containers
dž
dž
When there is a small amount of food stored in the variable temperature chamber, it may not be able to maintain high humidity.
dž
When storing leafy vegetables such as onions, leeks, and celery that have strong odors or are prone to drying, it is recommended to use plastic
wrap or plastic bags.
The setup and operation are the same.
*
The variabletemperature chamber includes both the
refrigerator chamber and a single-star chamber.
The variable temperature chamber is rated as .
Method of Use
Fruit & Veg
0Ć'SFTI
Semi Frz
'SFF[FS
mutton, etc.
Fruit & Veg 0°C Fresh Semi Frz Freezer
20
Remarks
dž
Please choose food with better freshness.
dž
To prevent food from drying out, please use plastic wrap or sealed containers, sealed bags,
etc. to store food.
(Except for vegetable freezing dry)
dž
taste worse.
dž
Do not touch the frozen aluminum tray with wet hands, otherwise it is easy to get frostbite.
Multi-function chamber
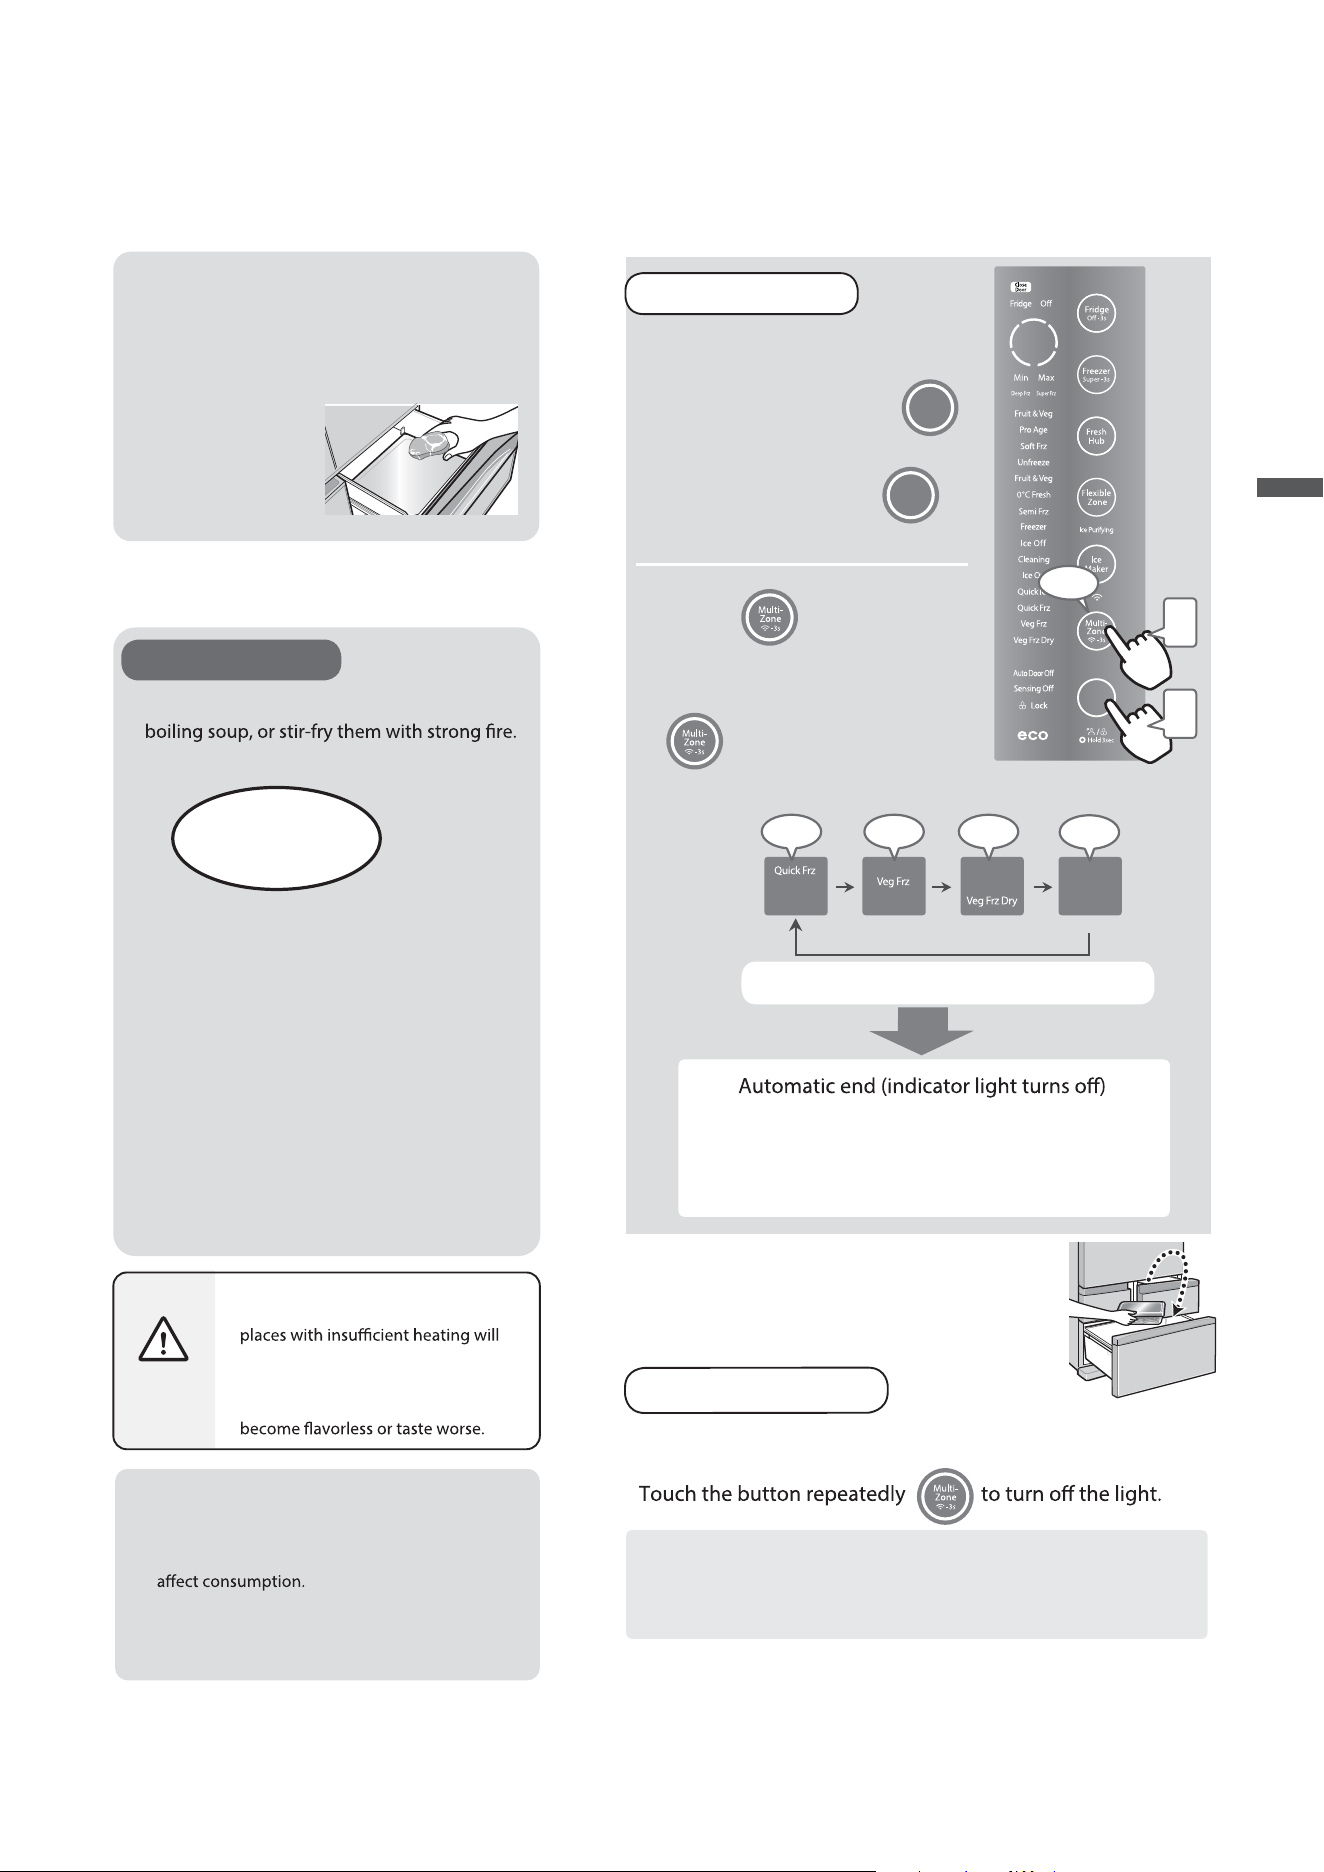
Quickly freezing food
Quick Frz
Veg Frz
Veg Frz Dry
dž
Place the sealed food on the quick freezing tray.
Please place vegetables on sealed boxes in the multi-function chamber.
1
1
2
2
Suitable vegetables
Veg Frz Veg Frz Dry
Cabbage
Radish
Carrot
Onion
Red pepper
Zucchini
Pumpkin
Sweet potato, yam and taro
(Use water to remove astringency)
Mushrooms (shiitake, etc.)
—
Asparagus —
Oilseed rape —
Cabbage —
Celery —
Green beans —
Broad beans —
Tomato —
Bean sprouts —
Potato —
Corn —
Mushrooms —
Okra —
Ą
Performance may vary slightly
depending on the freshness and
variety of vegetables.
Unsuitable vegetables
e
Eggplant, spinach, burdock, peas
and other astringent vegetables
e
Lettuce, cucumber, perilla leaves,
radish seedlings and other raw
vegetables
Suitable for long-term storage or leftover vegetables.
Remove moisture from vegetables with dry
air conditioning
Suitable for vegetables prepared for stewing,
frying, and similar cooking methods.
Cut fresh vegetables into sizes suitable for cooking, remove excess moisture,
and seal properly.
To prevent vegetables from drying out, please use plastic wrap or sealed
containers, or freezer-safe bags.
Put the sealed vegetables in the
container inside the freezer
chamber (If there's an aluminum
Cut fresh vegetables into sizes suitable for cooking and remove any excess
moisture.
To prevent stacking, place fresh vegetables in shallow unsealed containers
or on plastic wrap.
Put fresh vegetables in the
container inside the Multi-function
chamber (If there's an aluminum
Direct freezing of vegetables
Remarks
Multi-function chamber
Quick freezing tray
Multi-function chamber
Multi-function chamber
Multi-function chamber drawer
Do not put in hot food (recommended below 55°C),
otherwise it may cause burns or deformation of the
container.
21
Remarks
Attention
dž
Quick Frz, Veg Frz and Veg Frz Dry cannot be set at the
same time.
Food processed with Veg Frz or Veg Frz Dry
should be stored in the freezing chamber.
2
1
Touch repeatedly until
the function to be set is on.
Each press of this button
will cycle through the
display options as shown.
If stopped midway
Same operation as for setting other functions.
When the indicator light is on, the corresponding
function is active
Quick Frz
……………
……………
……………
After about 180 minutes
Veg Frz
Veg Frz Dry
(The contents of the display
panel are for illustration only)
Depending on the variety of vegetables or their
freshness before freezing, discoloration, taste or
odor may occur after freezing, but this does not
The shelf life of "Veg Frz" is about 1 month.
(However, it will vary according to the freshness
before freezing.)
dž
Quickly heat the frozen vegetables into
dž
Do not cook food in a microwave oven.
Due to uneven heating, the color of
change.
dž
dž
dž
Please use up all the food that has
been unfreezed, otherwise it will
During cooking
Cooking methods after "Veg Frz"
… Boiling, stir-frying
Cooking methods after "Veg Frz Dry"
… Boiling, stir-frying, deep-frying (avoid dry
frying)
Rapid heating from
frozen state!
Quick freezing of warm foods.
When processing warm food with quick
freezing, please do not put it together with
other frozen foods to avoid heat transfer.
Setting method
Multi-function chamber
… Continued
Attention
When someone approaches the
fridge, the main menu key
lights up.
Tap the main menu key to
light up the panel.
Beep Beep Beep
2
Beep
1
Please do not deep-fry vegetables processed
with Veg Frz.
Because of moisture, the oil is easy to splash
out and cause burns.
After about 180 minutes
About 8 hours later
Beep
Method of Use
22
Freezer chamber
Attention
In the following cases, food stored in the freezer chamber may frost depending on its storage status:
dž
Set to Super Frz.
dž
When the refrigerator door is opened frequently, or for a long time.
dž
When putting in hot food.
˔
˔
˔
˔
When set to "Super Frz" mode, the whole machine may produce louder noise, which is normal.
The "Super Frz" mode will automatically end after running for about 40 hours, and the indicator light will turn off.
The "Deep Frz" mode will automatically end after running for about 50 hours, and the indicator light will turn off.
˔
No frozen food can be in direct contact with the food stored in the chamber, and if it is necessary to freeze the
food every day, the amount of frozen food should be reduced.
dž
When the ambient temperature is lower than 28°C and the humidity is about RH80% or less, the lowest temperature can reach below -30°C when
it's refrigerated without load.
The freezer chamber contains 2 partitions for orderly sorting of frozen food, and the position of the partition can be moved and
adjusted according to actual use.
The temperature of Deep Frz mode is about -30°C, suitable for storing deep-sea fish and other food that need to be frozen
at low temperatures.
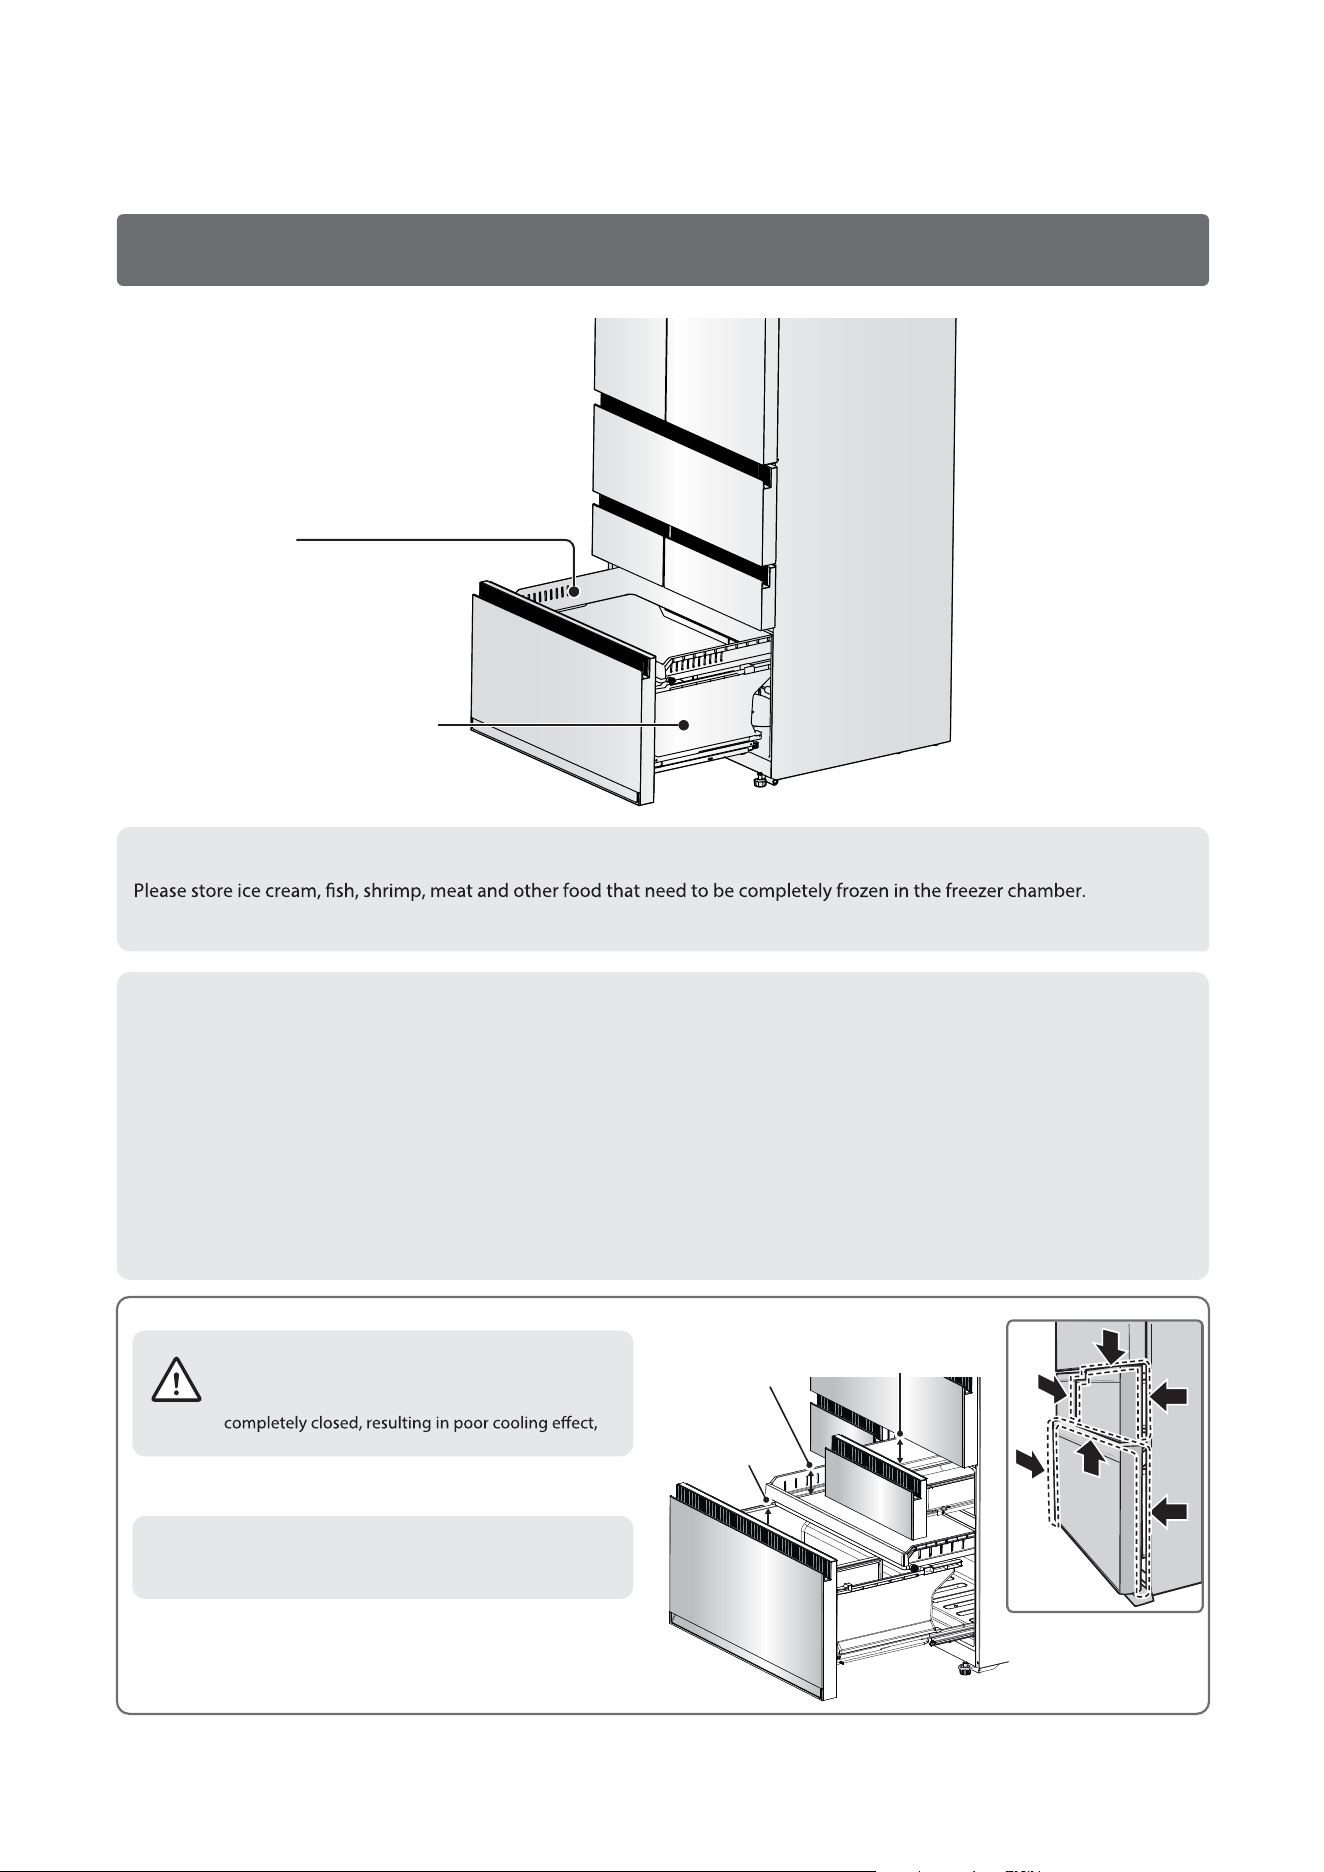
Introduction to freezer chamber
Gap state
Do not allow the amount of food stored in drawers or
trays to exceed the upper storage limit shown on the
right.
Otherwise, the refrigerator door will not be
frosting or damage.
Food exceeding the upper storage limit will
result in the door not being able to be fully
closed. (Gap is generated)
Attention
dž
Remarks
Multi-purpose room
drawer storage limit
Upper storage
limit of freezer
chamber tray
Upper storage
limit of freezer
chamber
drawer
Freezer chamber drawer
(Including sliding partition)
Freezer tray
23
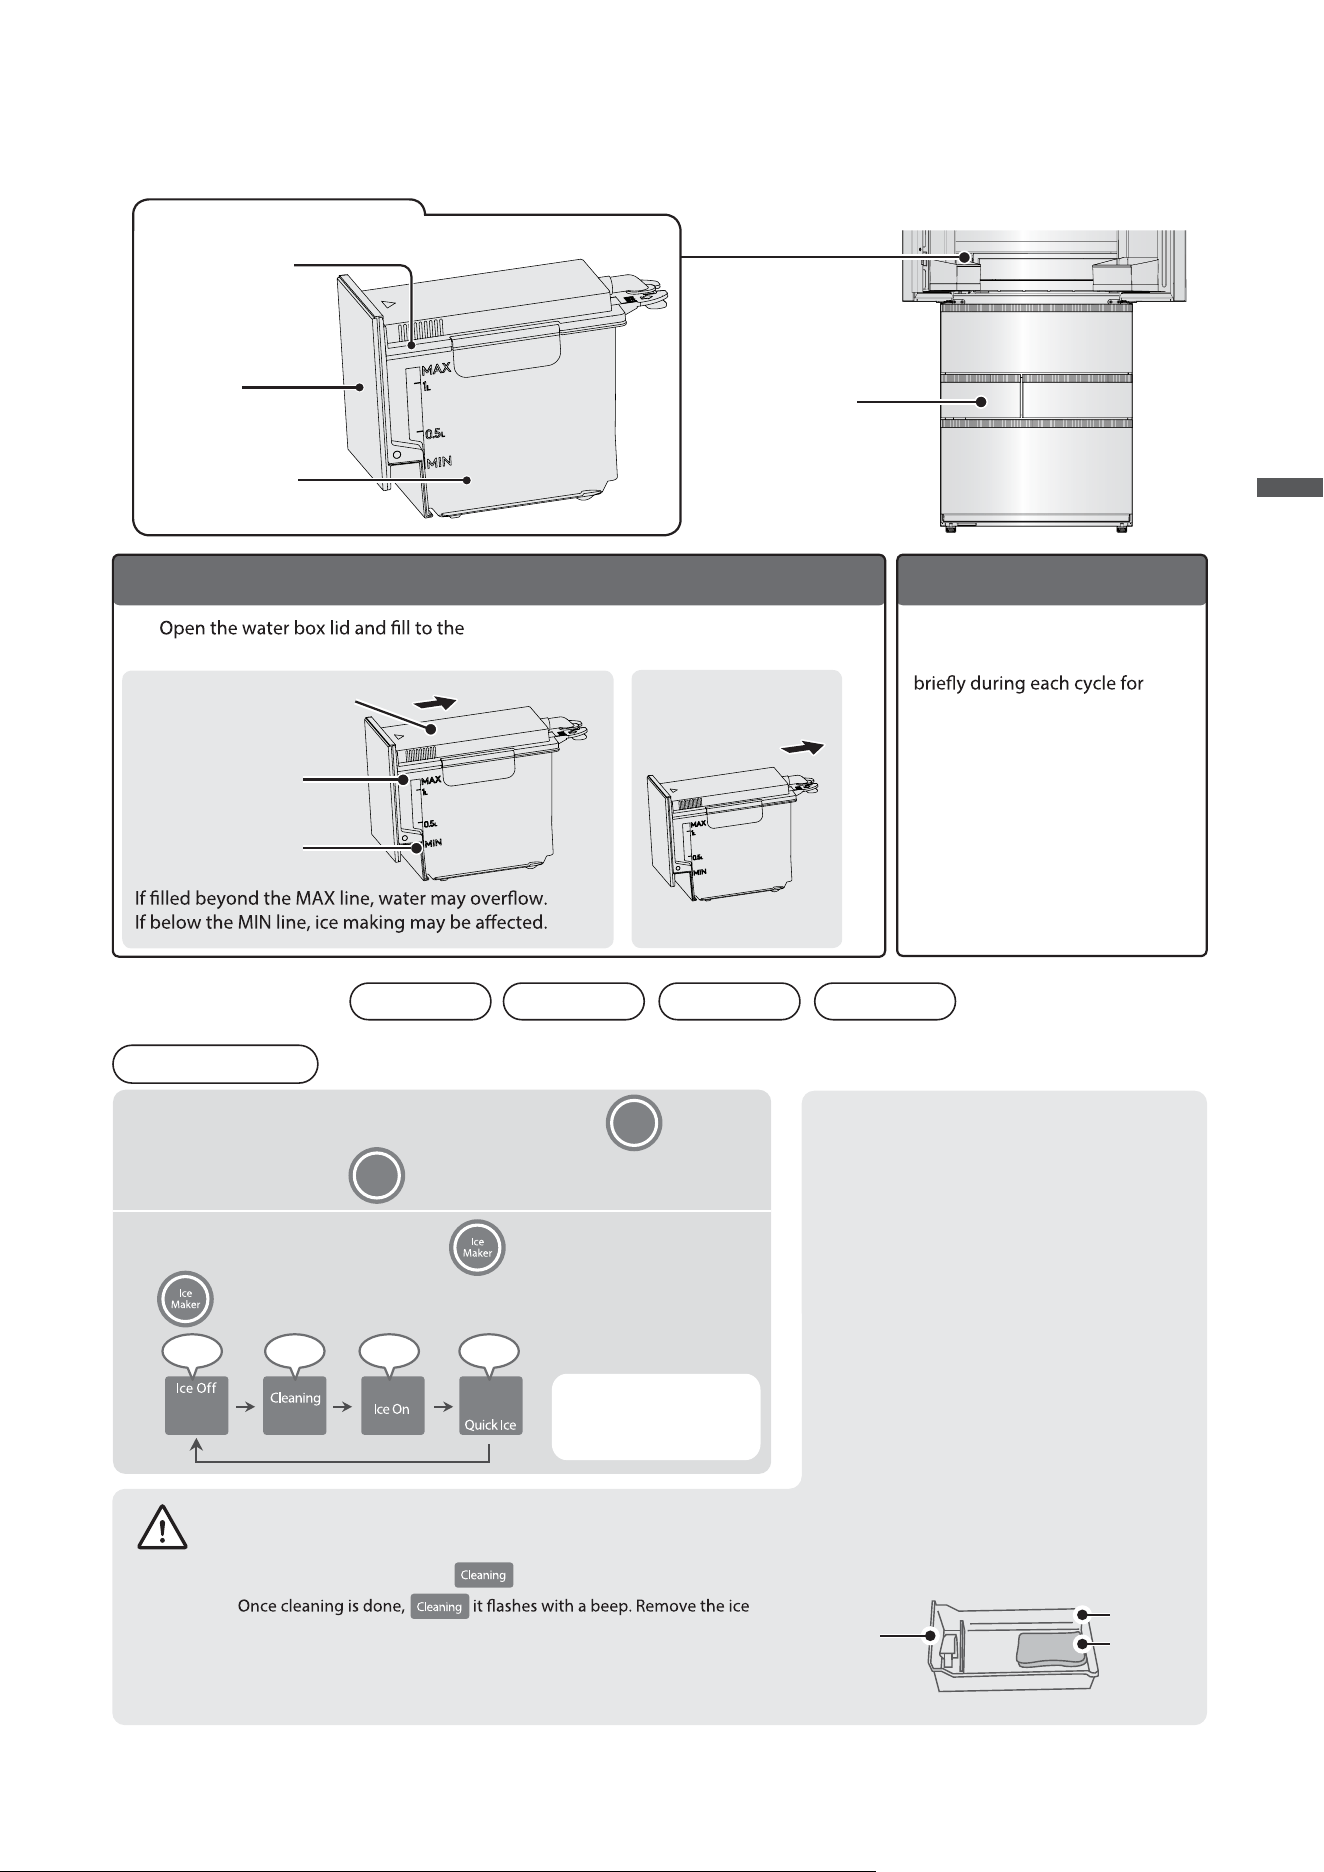
Ice making chamber (automatic ice maker)
Ice making
chamber
Pre-ice stage
Ice Purifying
Gently push the water storage box inside.
Ice won't be made unless the box is fully
pushed in.
2
MAX line.
1
When the Ice Making function is
on, the UV light will turn on
sterilization. While it's active, the
"Ice Purifying" icon on the panel
will light up to indicate the UV
process is in progress. This
function runs automatically and
cannot be set manually.
Remarks
dž
Notched
area
Towel
dž
dž
dž
dž
Before activating the Cleaning mode, install the ice storage box
properly and place a dry towel underneath to absorb draining water.
When Cleaning mode starts, the icon stays on.
storage box, take out the towel, and wipe away any remaining water.
Do not disassemble the ice maker or
clean it with solvents.
After each Cleaning cycle, empty and dry the ice storage box.
If the freezer chamber door is opened
during cleaning, the process will pause
until it’s closed again.
dž
When set to "Quick Ice" mode, ice
making noise may increase. This is
normal.
dž
If there's no water in the water storage
box or the ice storage box is full, Quick
Ice will not activate, even if the indicator
light is on.
Ice Storage
Box
Setting method
1
When someone approaches the fridge, the main menu key lights up.
2
Tap the Ice Maker button repeatedly to select the required function
Each press of this button will cycle through the display options as shown.
When the desired
function lights up, the
setting is completed.
Tap the main menu key to light up the panel.
Beep Beep Beep Beep
(Includes ice storage
box and ice scoop)
Panel
Water tank
(Capacity: about 1.2L)
Automatic Ice Maker Water Storage Box
Installation direction
of water storage box
Water box lid
MAX line
MIN line
Water box lid
The setup and operation are the same.
Method of Use
Cleaning Ice On Quick Ice Ice O
24
dž
dž
dž
dž
dž
dž
dž
dž
dž
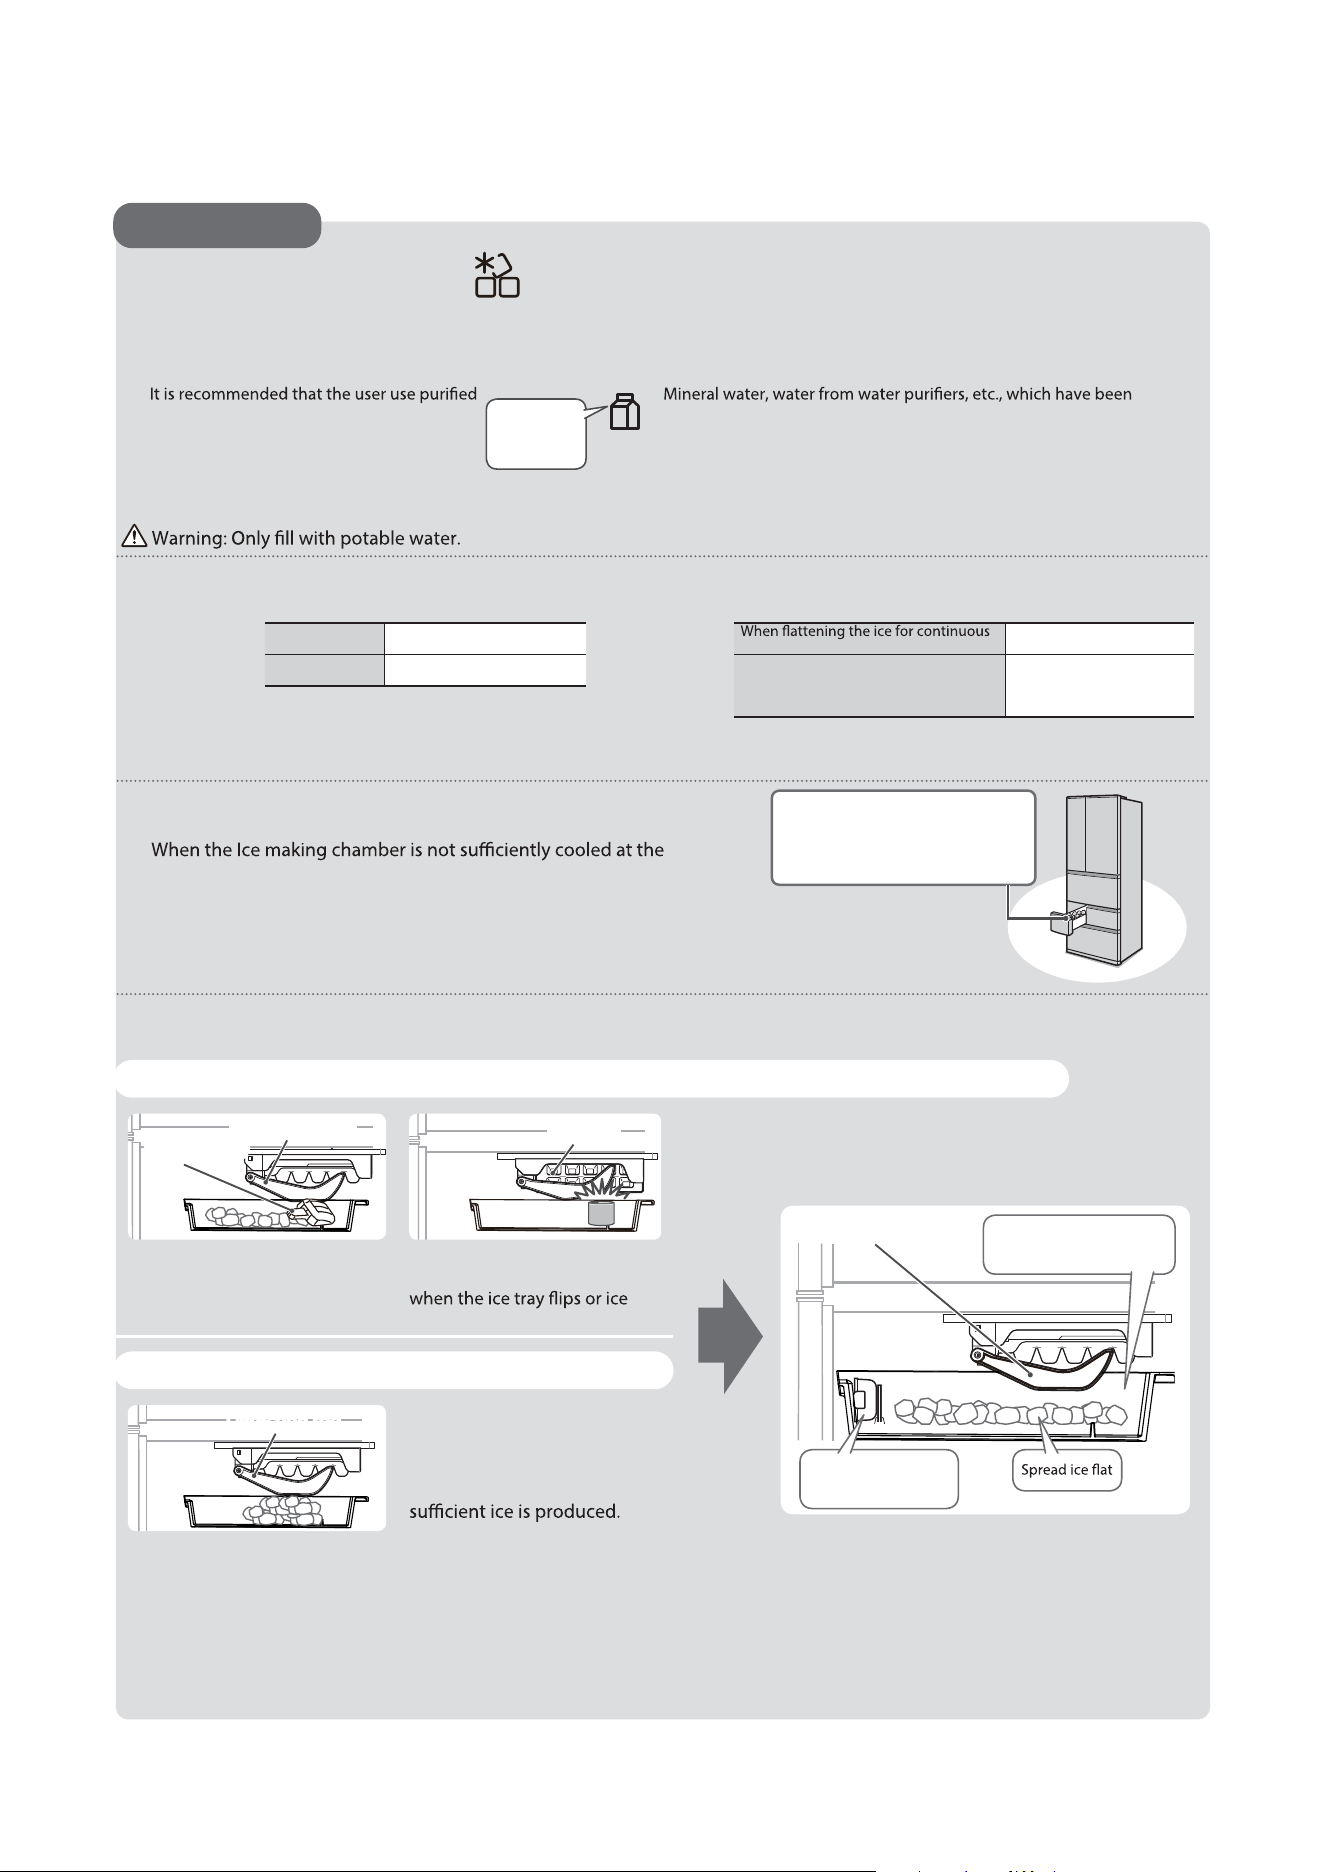
Ice making
time
In Ice On mode, about 10 ice blocks can be made at one time. Depending on the operating status of the refrigerator,
the ice making time may be extended.
(Ambient temperature is 20°C, without door opening)
Once every about 2 hours
Quick Ice
Ice On
About 1 hour/time
Pre-ice stage/ice making water
Precautions for Ice Making
Ice making time and ice storage capacity
In the following cases, ice making time may be extended.
beginning of use.
When the chamber temperature is low in winter or very hot in summer.
When the refrigerator door is opened and closed many times, or when a large amount of food is
put in at one time.
Ice will continue to be made until the probe touches the ice.
dž
Ice storage
capacity
ice making
About 110
When ice blocks are accumulated in local
areas and the door of the Ice making
chamber is not opened or closed
About 40~70
Detection rod
After using the ice
shovel, return it to its
original position
Do not put anything other
than ice cubes inside
Ice tray
Detection rod
Ice shovel
Precautions
In the case on the left, the
ice making time may be
extended.
If there is water in the water storage box, ice making may be unable to proceed due to the following situations:
Items other than ice cubes are
stored, resulting in collision
making stop.
Items other than ice are stored
and the detection rod is
touched.
When some ice cubes accumulate in
a local area, they may hit the
detection rod prematurely, resulting
in stopping ice making before
When using the ice maker, please do not place items other than ice in the ice storage box. If you put items other than ice
into it, collision damage or ice making stop will be caused when the ice tray is turned over.
When other items need to be stored, please stop using the ice making function.
When the ice making function is enabled again, please remove other items from the ice storage box and clean it.
When putting in other items, please be careful not to go too high to avoid jamming the ice maker.
Low ice production may be caused by the following situations
dž
dž
Before use, it is recommended to clean the water storage box with water to remove dust.
For the first use, it is recommended to activate the “Cleaning” function before making ice.
dž
dž
Do not put hot water above 55°C or liquid other than clear water such as fruit juice, otherwise it will cause failure.
water.
When using mineral water to make ice,
please use mineral water with a hardness of
less than 100mg/L.
dechlorinated, are more likely to breed bacteria and scale, and cause
the inner wall of the water supply tank to be sticky, so they need to be
cleaned carefully.
Hardness
below
100mg/L
Ice making chamber (automatic ice maker)
… Continued
Detection rodDetection rod
25
Cleaning and maintenance
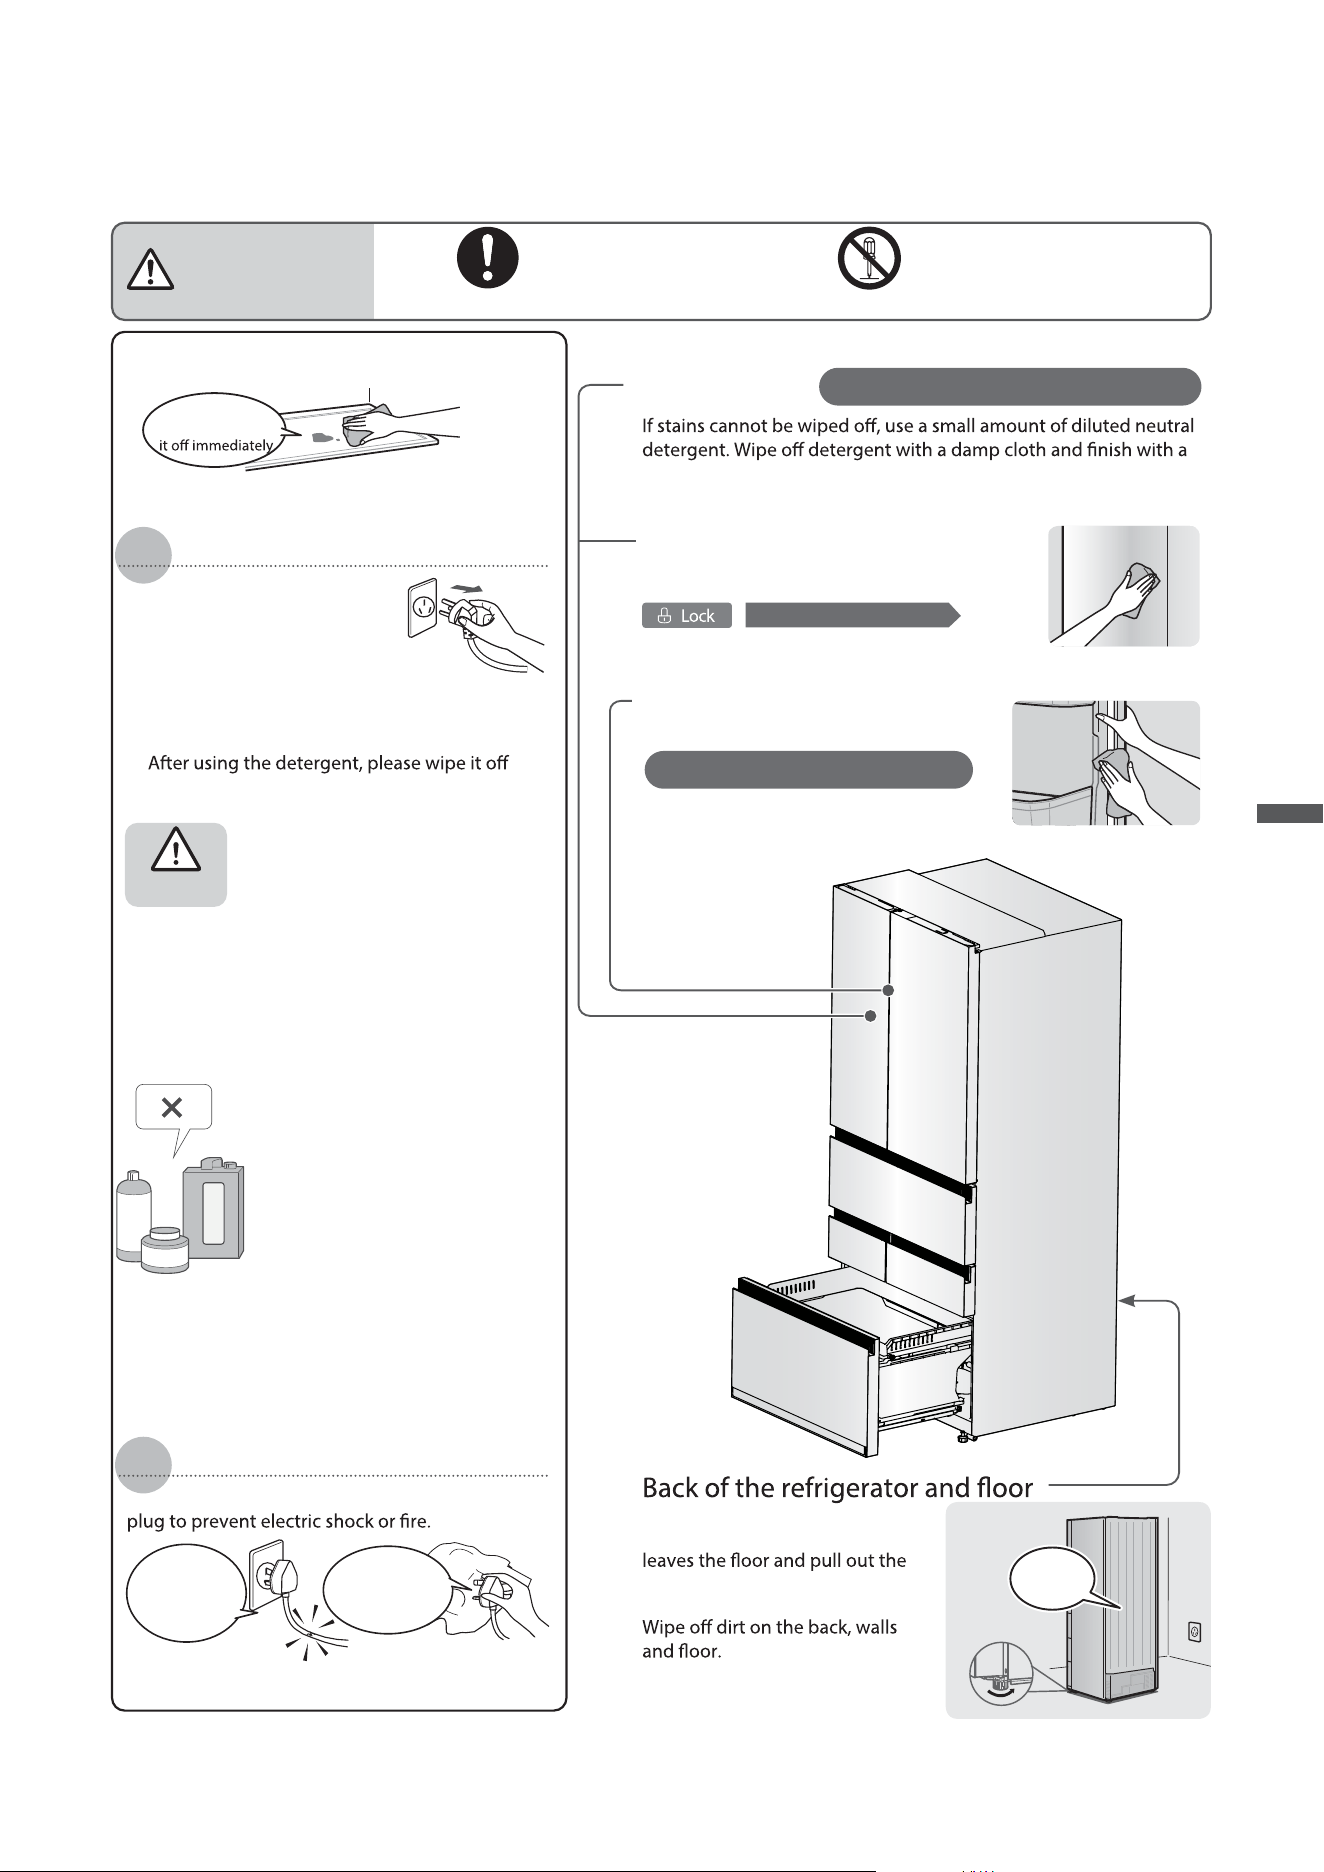
Door seal and adsorption
Door surface
Touch panel
Before cleaning, please set it to key lock.
No disassembly
Do not disassemble, modify
or repair it by yourself
Please unplug the power
plug when cleaning
1
Pull out the power plug
2
If you have any questions, please call the service
hotline immediately.
Do not use the following items:
Alkaline detergents for kitchen use or
detergents marked as weakly alkaline
(otherwise, it may cause breakage or
damage to plastic parts, shelves,
doors, etc.)
Grinding powder, washing powder,
alcohol (ethanol, methanol, etc.),
gasoline, thinner, acid, alkali, wax,
petroleum, hot water, brush, etc.
(otherwise, it may cause crack or
damage to plastic parts, shed frame,
door, etc., or painted surface is
damaged)
Cleaning steps
Inspection after cleaning
dž
dž
dž
dž
dž
dž
dž
The temperature rise of frozen foods
during maintenance or cleaning may
shorten the storage period.
dž
If there is any stain at ordinary times, wipe it
with a dry cloth.
Wipe with a soft cloth and
warm water
Please clean the invisible parts once or twice a year.
Unplug the power cord
If there is any
stain, please wipe
Dust, etc.
See page 16 for details
WARNING
When using neutral detergent for kitchen,
please dilute it before use.
with water and then with a dry cloth.
If oil or fruit juice is stained on plastic
parts, shelves and doors, please wipe
them clean immediately. Failure to do
so may cause these parts to crack or
discolor.
Do not apply force to the glass surface
and edges by impact. Failure to follow
instructions may cause the glass to
crack or chip.
dry one.
Rotate the adjusting foot until it
refrigerator.
It is easy to be damaged after being dirty,
which will cause cold air leakage.
After cleaning, please inspect the power cord and
Wipe with damp or dry cloth
Wipe with damp cloth
Grinding Pink
Wash Reagent
Vehicle Oil
Remarks
Damaged
power cord, hot
plug, or loose
connection
If dusty, wipe
clean with a
dry cloth
surface
Maintenance
26
Cleaning and maintenance
… Continued
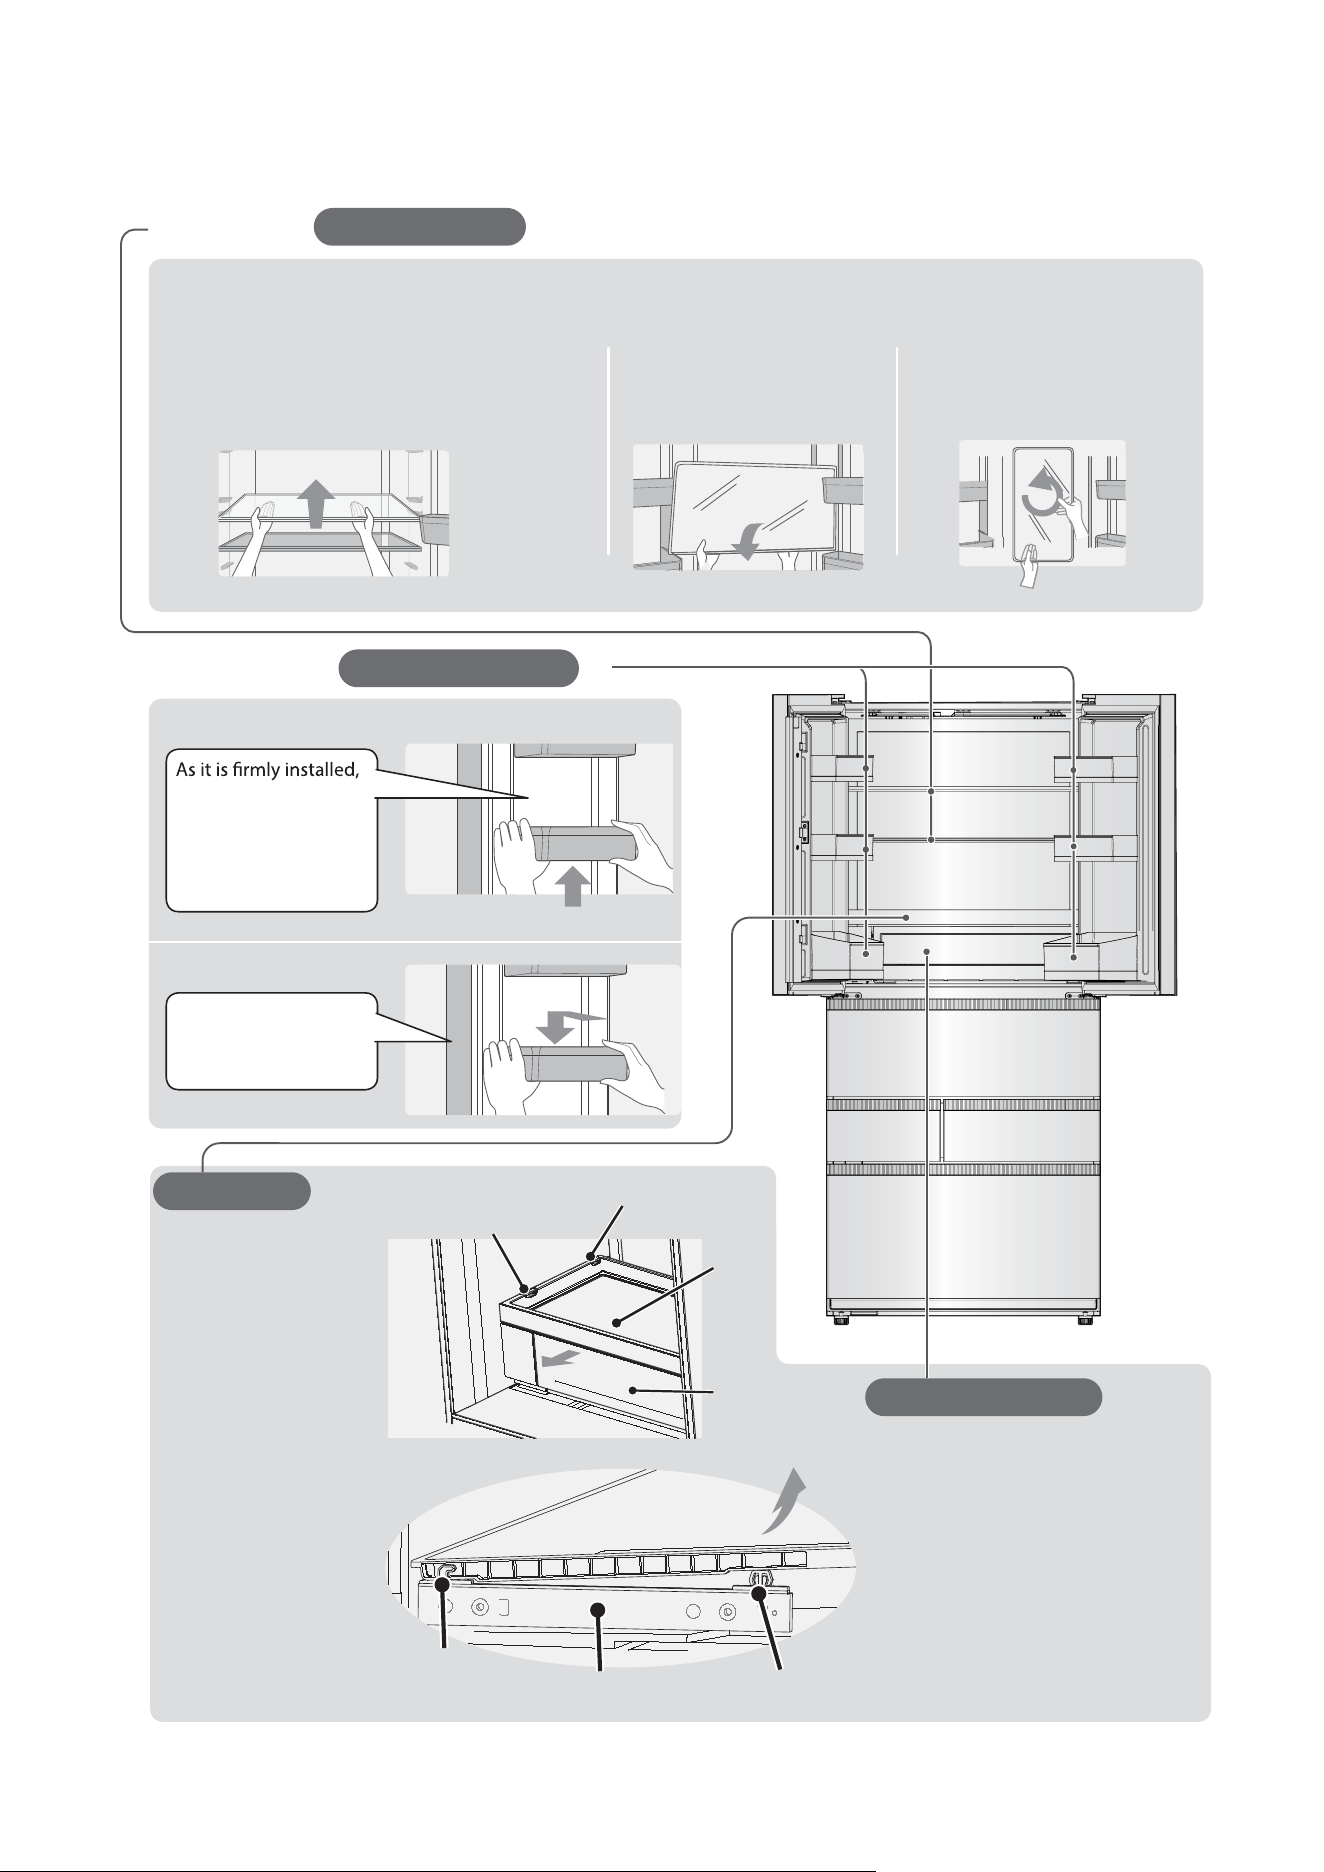
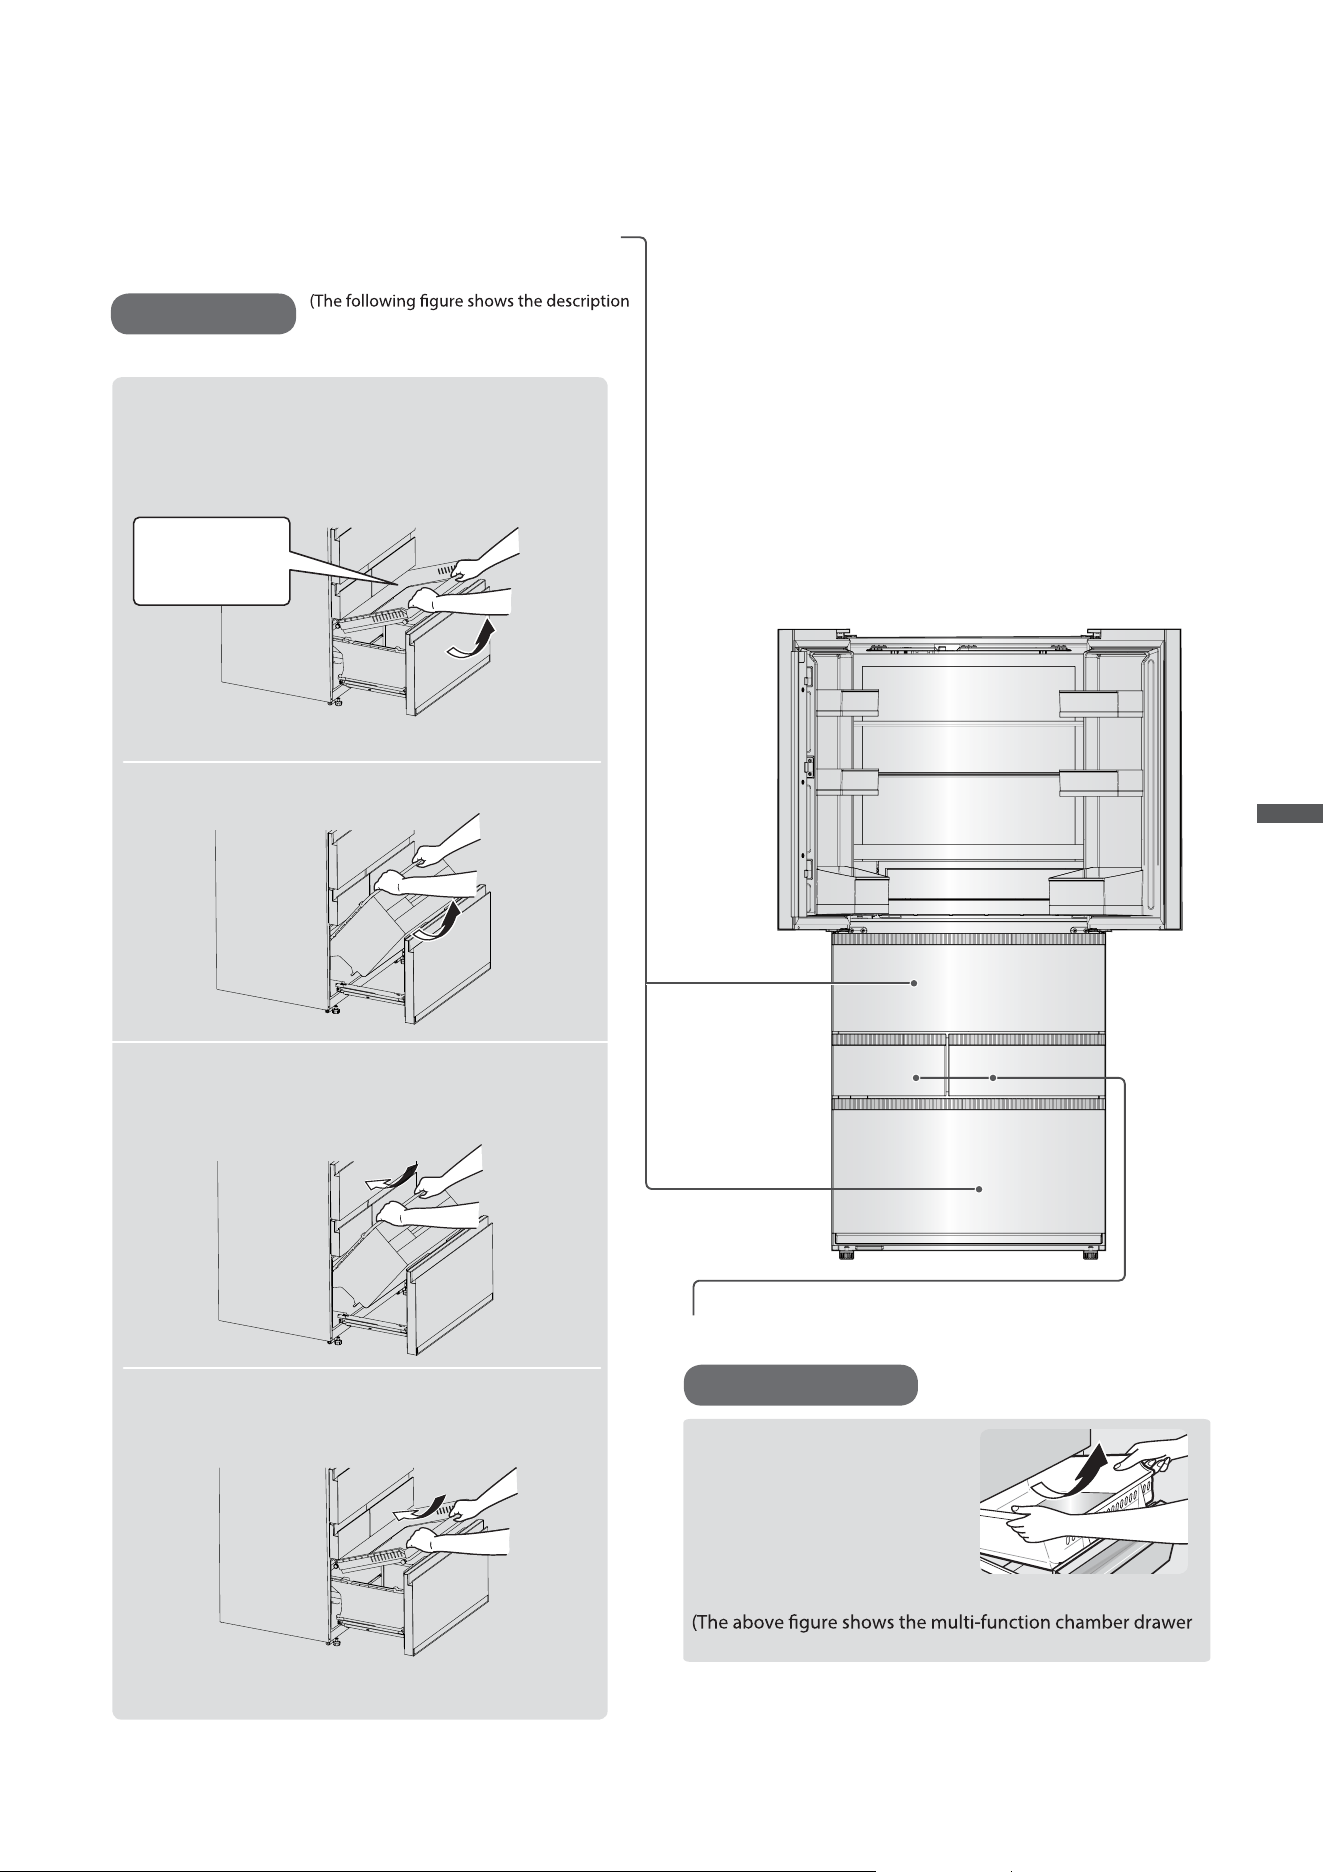
Glass shelf
Glass shelf
The installation method is reverse to the disassembly method.
21
Disassembly method
Disassembly method
Installation method
Disassembly method
The installation method is reverse to
the disassembly method .
Pull the sliding tray out.
Tap both bottom-side
rails upward to release
the front clips from the
guide rails, then slide it
forward to disengage the
rear clips and remove the
tray.
Front clip
Front clip
Rear clip
Rear clip
Sliding
tray
Quick chill
drawer
Guide rail
Hold the bottom rail on the left side of
the Quick Chill Drawer, lift the front
upward until you hear a click to release
the front clip. Repeat on the right side,
then lift the drawer diagonally upward
to remove it.
Insert the rear clip of the
sliding tray into the
guide rail, then align the
front clip and press down
until it clicks into place.
Lift the front of the shelf slightly to release the
lower clip, then lift the entire shelf to release
the upper clip and remove it.
Rotate the glass shelf 90°
forward and backward.
Water washing
Shelf on door
Disassembly method
Installation method
the left and right ends
of the overhead rack
need to be alternately
lifted from below
before being taken out.
Put the shelf
horizontally and press
it down.
Water washing
dž
The glass shelf is heavy and must be taken and placed with both hands!
3
Rotate the glass shelf left
and right to take it out.
Quick chill drawer
Sliding tray
27
Cleaning and maintenance
… Continued
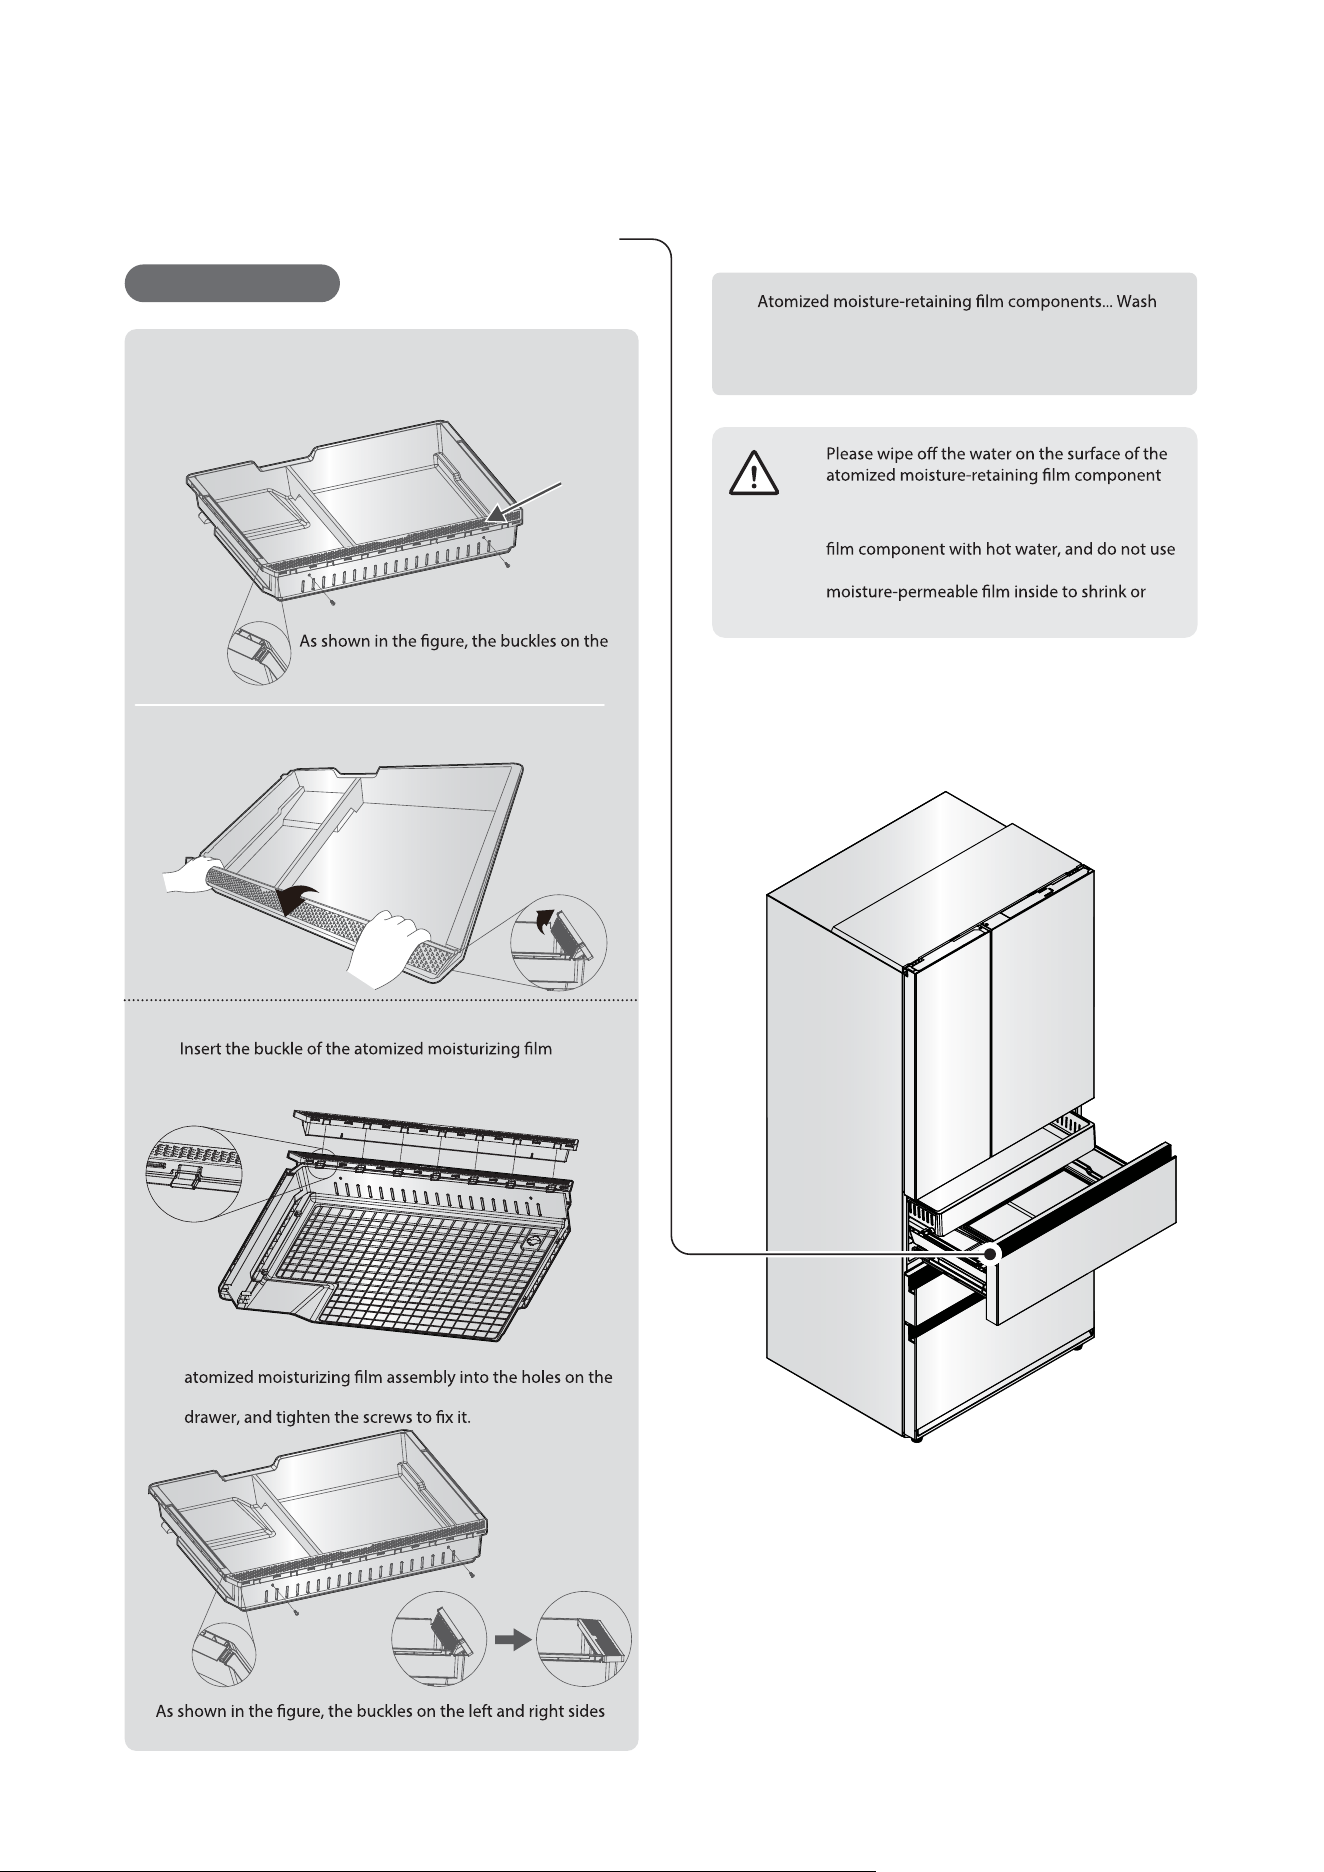
Ice storage box, multi-function chamber drawer
Pull it out and remove
diagonally upward.
e
The installation method is
reverse to the disassembly
method.
Disassembly method
Water washing
Freezer chamber drawers and trays,
variable temperature drawers and trays
1
2
1
Pull the door to its maximum position to insert
the freezer chamber drawer.
2
Insert the freezer tray afterward.
Disassembly method
Installation method
Remove the freezer chamber drawer obliquely
upward.
Pull the door out to its maximum and remove
the freezer tray.
Remove the
freezer tray
obliquely upward
of the freezer chamber drawer and tray.
The operation of the variable temperature
chamber drawer and tray is the same)
Water washing
instructions, and the ice storage box operation is the same)
Maintenance
28
Cleaning and maintenance
… Continued
with water or wipe with a damp cloth.
For stubborn stains, neutral detergent in the kitchen can
be diluted with water for cleaning.
dž
before installation.
Do not contact the atomized moisture-retaining
a dryer or hair dryer, as this may cause the
deform.
dž
dž
Remarks
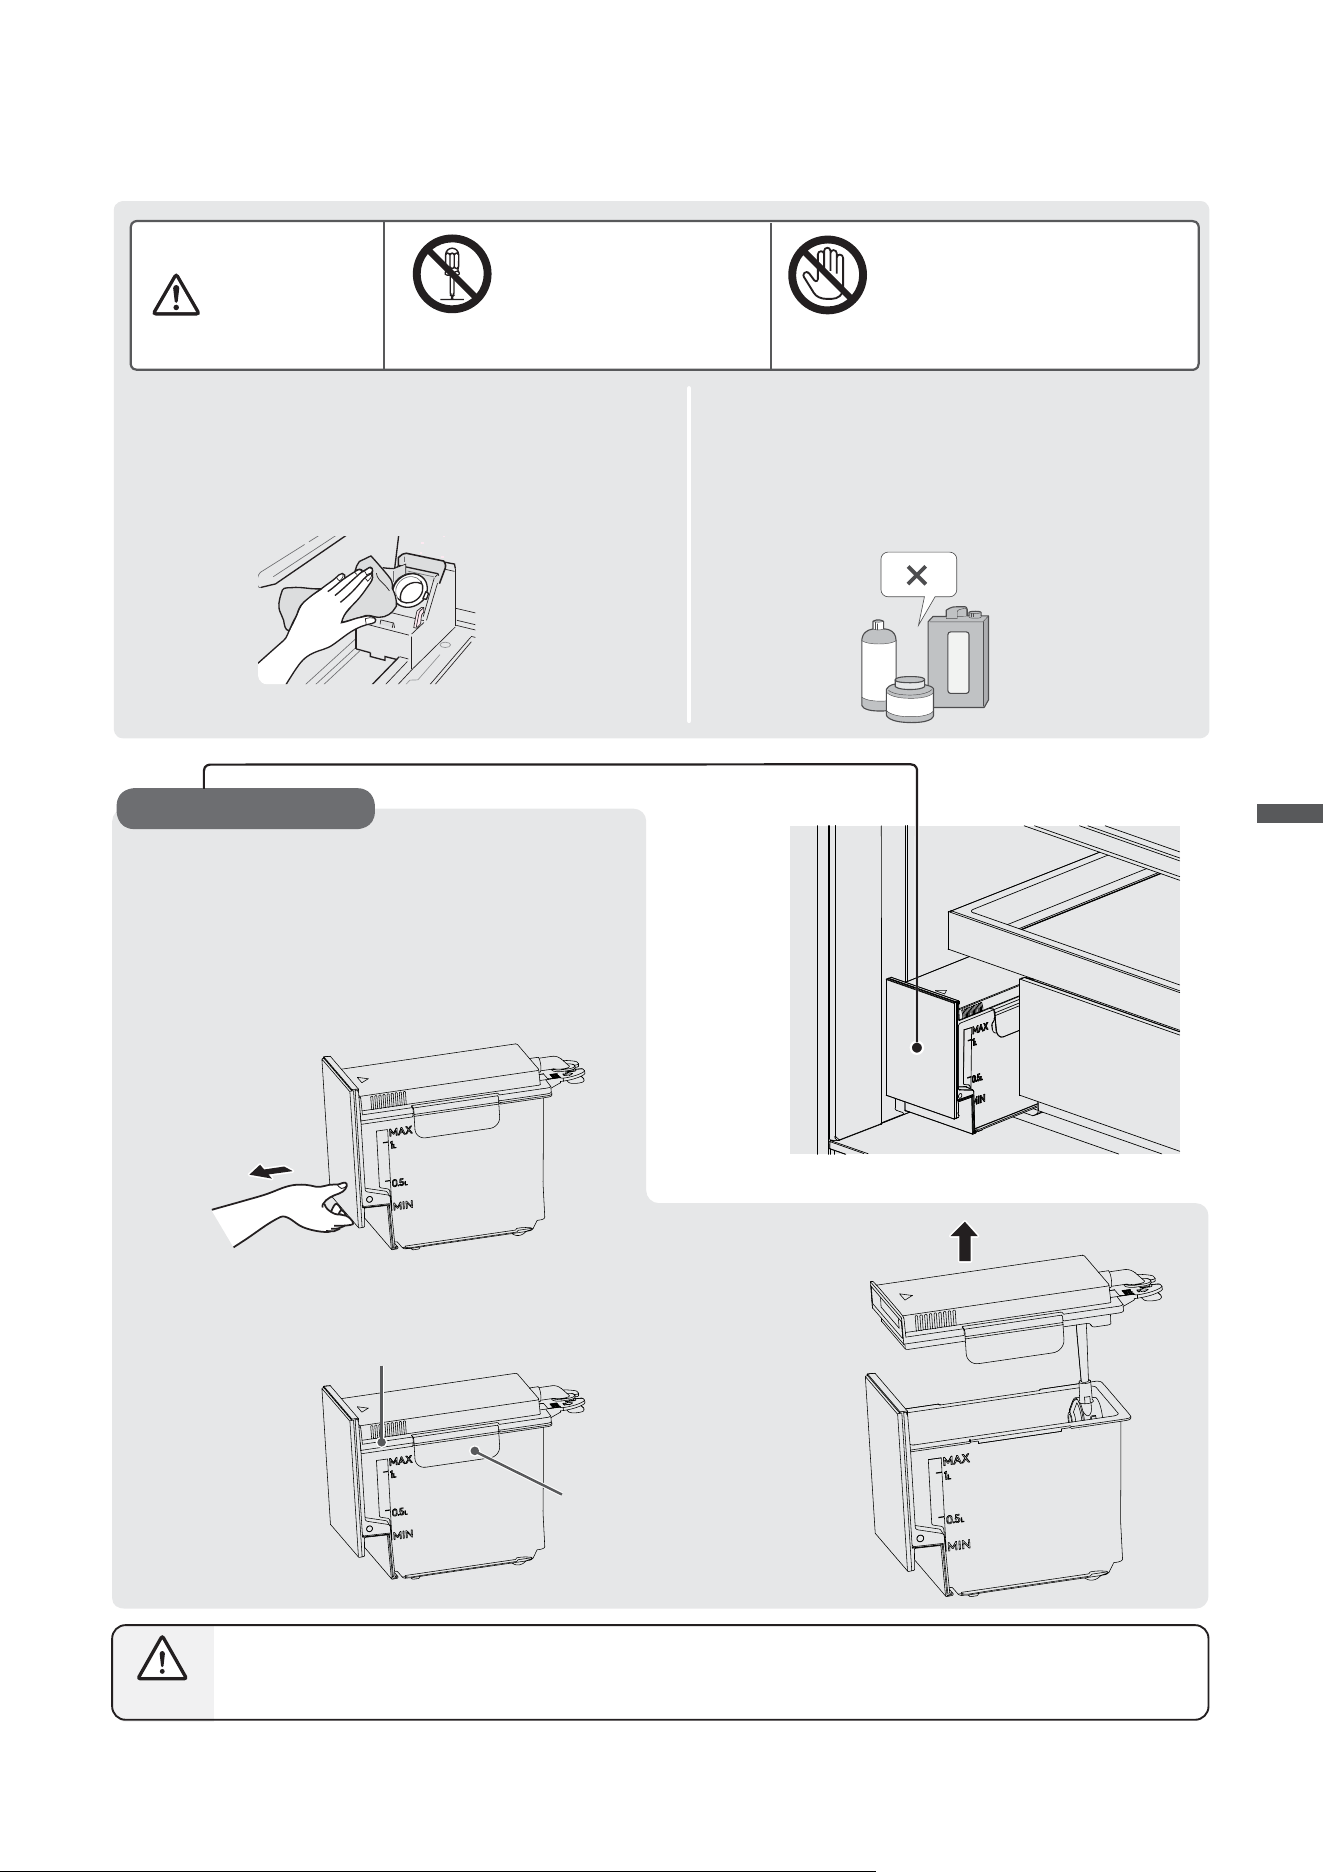
Atomizing moisture membrane module
Water washing
Disassembly method
1
Take out the variable temperature room drawer from the
variable temperature chamber and unscrew the two screws
at the front with a cross screwdriver.
2
Hold both ends of the atomized moisturizing membrane
assembly and remove it obliquely upward along the outer
edge.
left and right sides of the bottom need to
be loosened
Installation method
1
assembly obliquely into the corresponding hole at the front
end of the variable temperature chamber drawer.
2
Press inward, insert the buckles at both ends of the
left and right sides of the variable temperature chamber
Atomizing moisture
membrane module
of the bottom need to be tightened
29
Maintenance of automatic ice maker
Do not disassemble, modify
or repair it by yourself
WARNING
No disassembly
Be sure to use a soft damp cloth or sponge
for cleaning, and the parts that need to be
cleaned must be washed with clean water.
(Prevent mould, rust, etc.)
Do not touch the ice making part
of the automatic ice maker with
your hands
(Upper side of ice making
chamber)
No touch
Do not use the following items:
dž
Detergents, bleaching agents, grinding
powders, brushes, diluent, gasoline, etc.
(Otherwise, odor or malfunction may result)
dž
Hot water
Grinding powder
Detergent
Gasoline
The installation method is reverse to the disassembly
method.
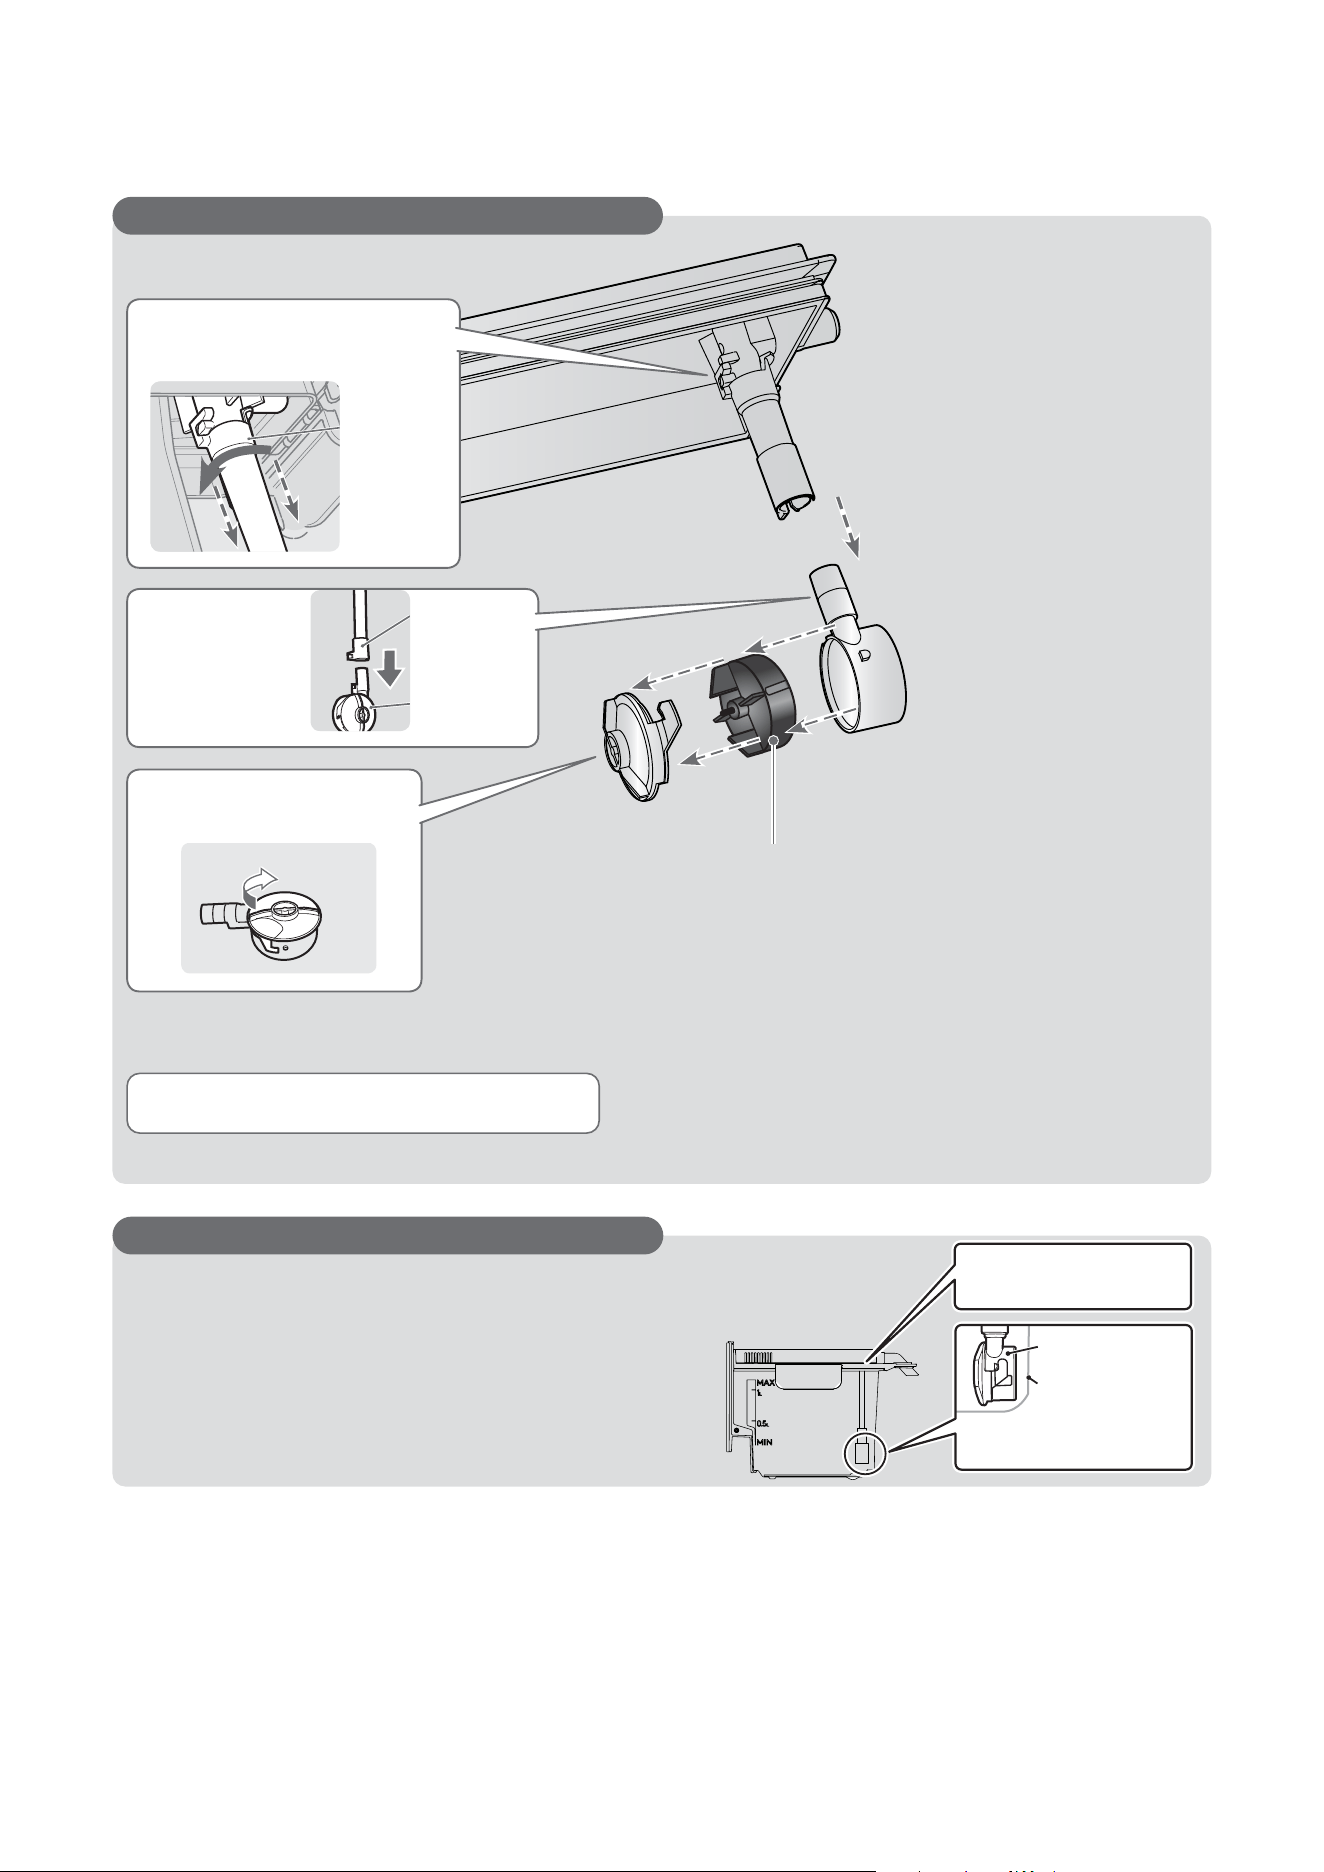
Water box and lid
Pull the handle to slide out and remove the water
storage box.
Unclip both sides of the water box lid and lift to remove it.
Disassembly method
1
2
dž
Water storage box
Water box lid
Buckle
Be careful when cleaning the water box lid. Do not place the water box near the edge of a table as it may tip over.
Remarks
dž
Maintenance
30
Disassembly method
The installation method is reverse to the disassembly method.
Rotate the pump box cover in
the direction of arrow and
remove it.
3
Remove the
water supply
pump from
the water
supply pipe.
2
Make sure all components are properly installed;
otherwise, water cannot be supplied.
Water supply pipe and water supply pump
Rotate the water supply pipe in
the direction of the arrow to
remove it.
1
Precautions for installing the water box lid
When installing the water box lid, ensure there are no gaps between the lid and the box.
If the installation is not in place, it will lead to failure of water
supply and ice making or noise from the water supply pump.
Maintenance of automatic ice maker
… Continued
Impeller
Check whether there is any foreign matter adhering.
Make sure the water pump is
aligned with the back of the
water box
Water supply pump
Parallel to the back
Check for any gaps between
the water box and its lid
Water supply
Water supply
pipe
Water supply
pipe
pump
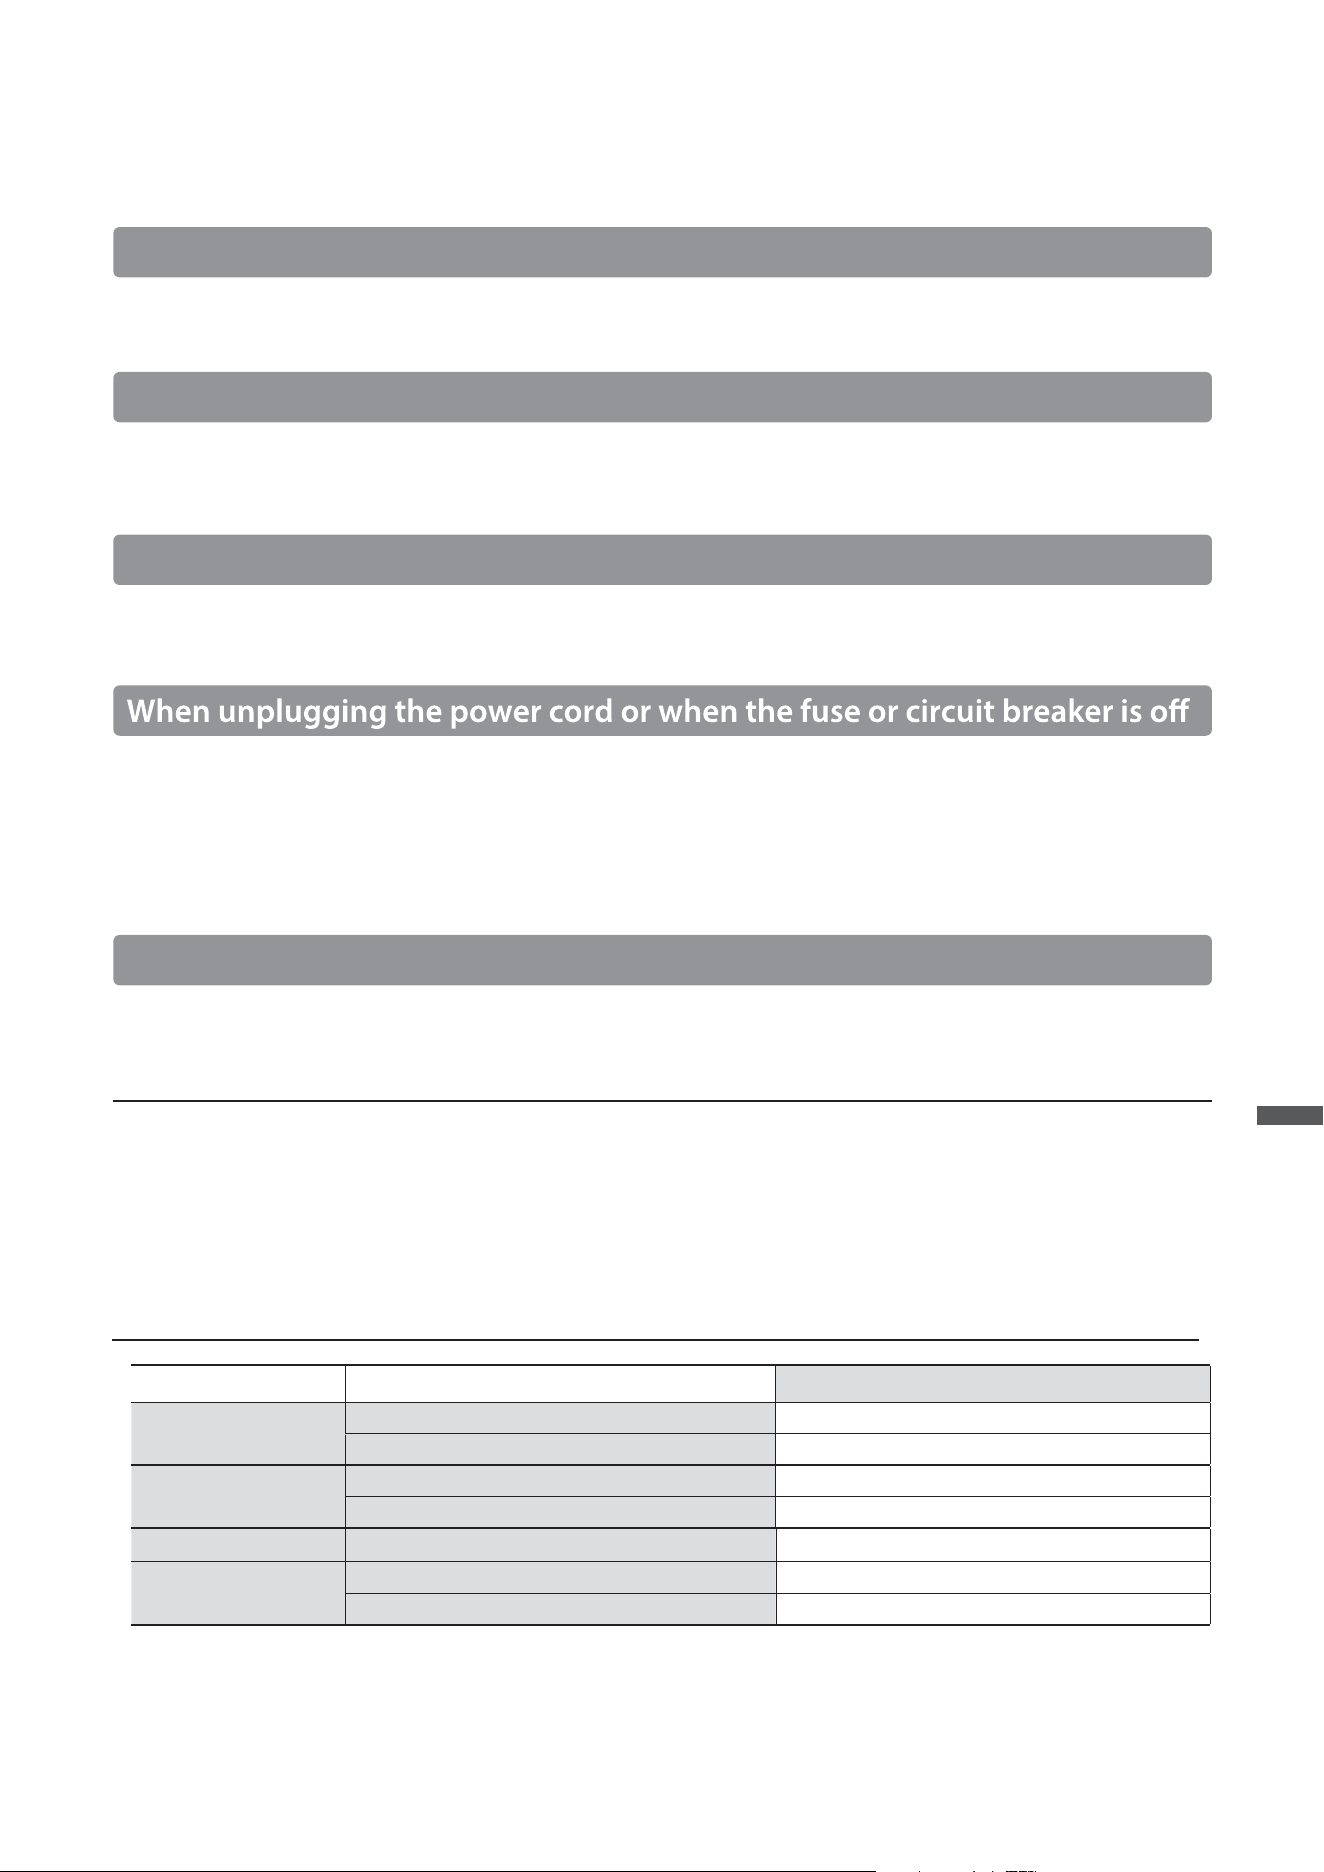
31
Empty any remaining ice and water from the automatic ice maker.
(See Step 2 of "Before Movement and Handling" for details)
Various maintenance procedures
dž
dž
dž
Do not touch broken glass. Call the customer service immediately.
When the refrigerator is not used for a long time
Pull out the power plug, clean up the inside of the refrigerator, open the refrigerator door for 2-3 days and dry it.
If glass parts are broken
In case of power failure
Minimize the number of times the door is opened, and avoid storing new items. (Otherwise, the temperature inside the
refrigerator will rise)
Immediately reinserting the plug or resetting the breaker may overload the compressor and cause malfunction.
Wait at least 5 minutes before plugging in or resetting the circuit breaker.
Depending on the temperature inside the refrigerator and the start-up status of the compressor, sometimes the compressor
protection timer may activate, causing the unit to not operate for about 6 minutes after plugging in the power plug.
1
2
dž
When the light is damaged
Please contact professionals to replace the light.
Load capacity of shelves and containers
Location Shelves and containers
GR-RM919WI-PGX(B3)
Refrigerator chamber
Glass shelf
Sliding tray
Variable temperature
chamber
Variable temperature chamber tray
Lower drawer of variable temperature chamber
Multi-function chamber Quick freezing tray
Freezer chamber
Freezer chamber tray
Lower drawer of the freezer chamber
≤36kg
≤36kg
≤17kg
≤23kg
≤13kg
≤14kg
≤39kg
Q&A Guide
32
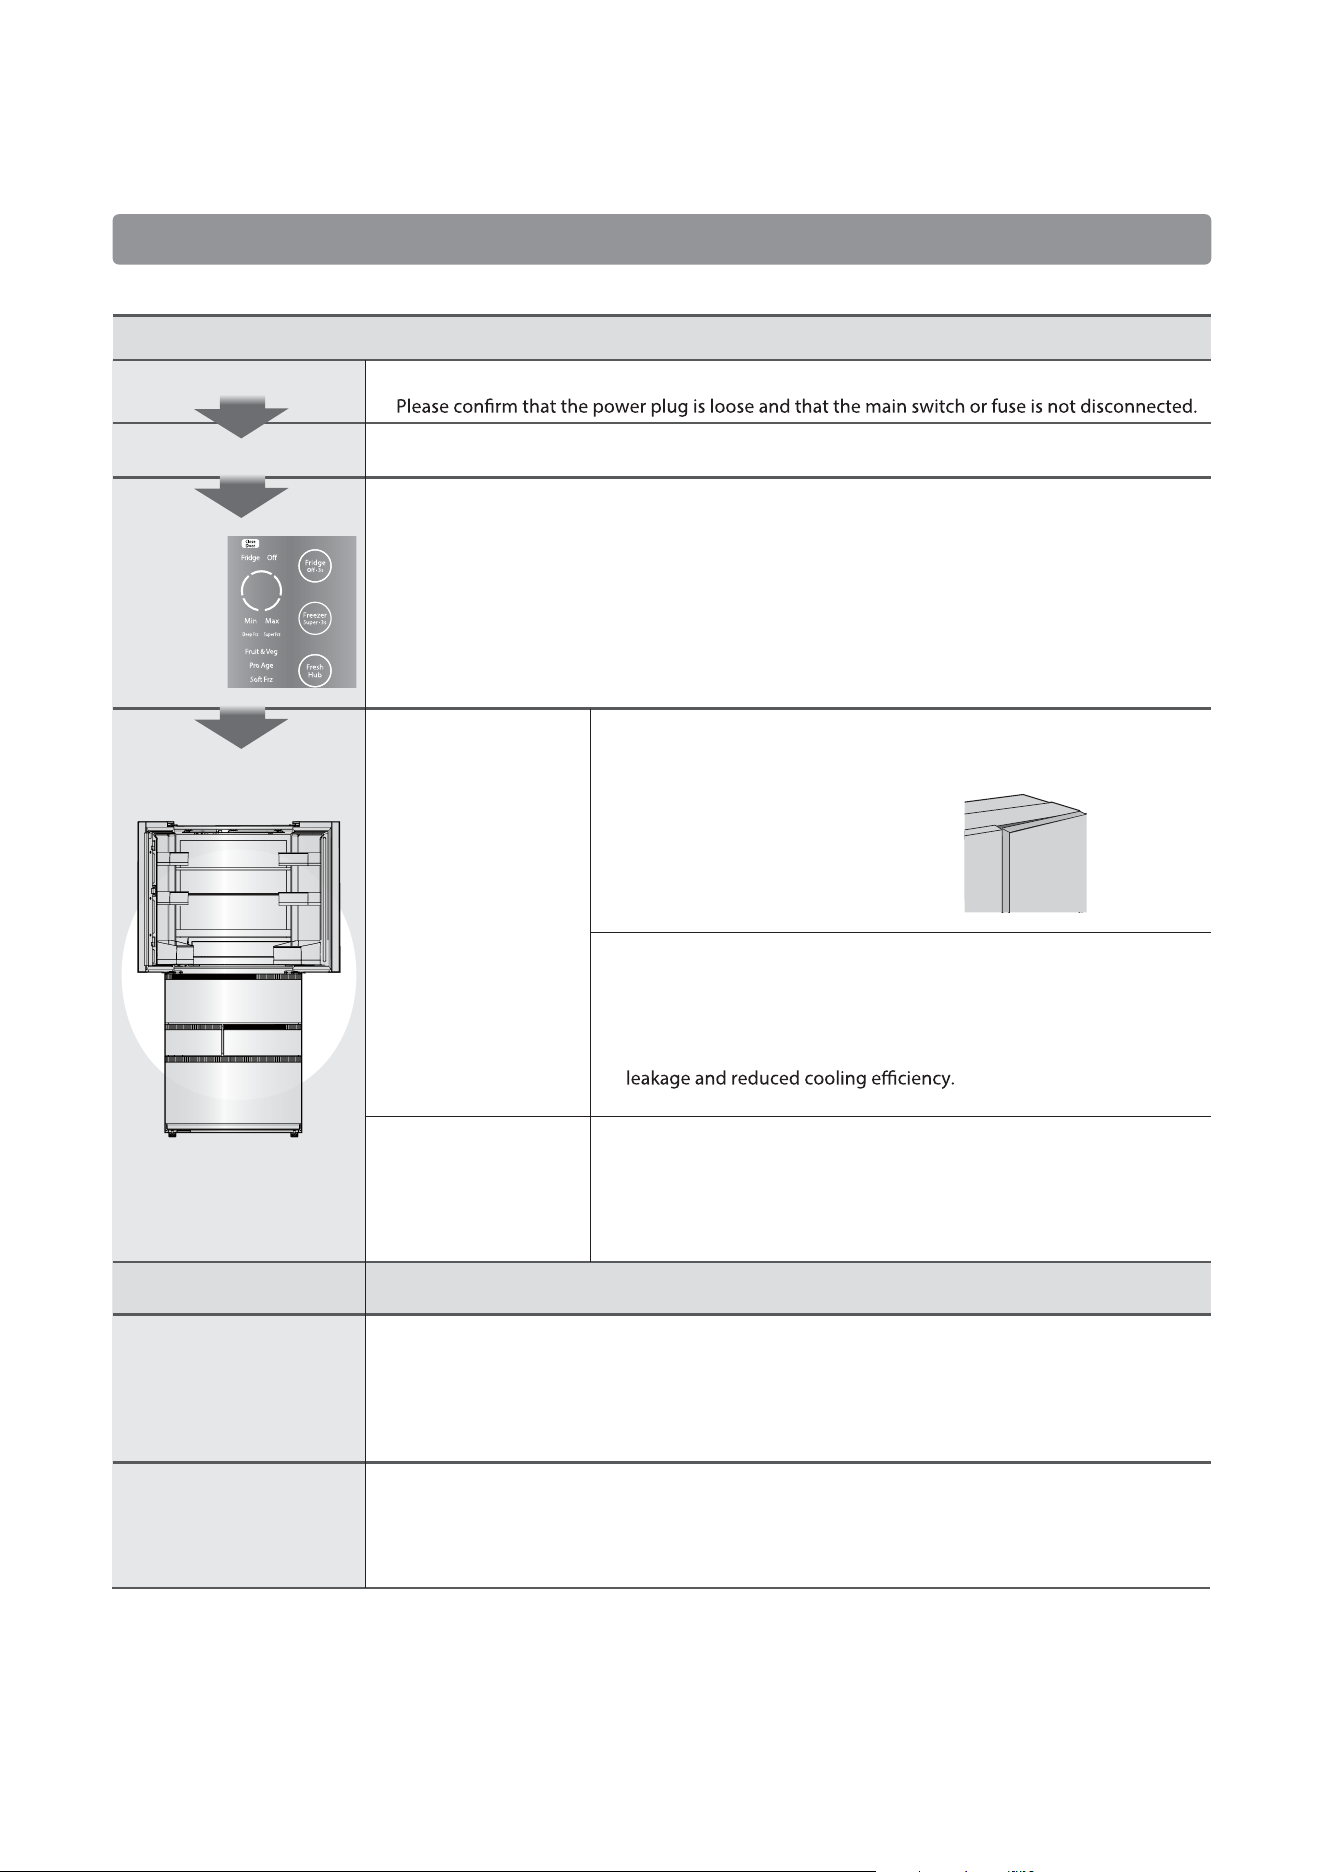
Not cooling at all · Poor cooling capacity... Please check the following items one by one.
Checklist · Causes / Solutions
Checklist · Causes / Solutions
Power supply
Time since power-on
Touch panel
Door
Phenomenon
Freezing of food in the
refrigerator chamber
The food in the quick-chill
fresh drawer will not be
completely frozen
Is the power supply normal?
ǀ
ǀ
It takes some time to cool the inside of a refrigerator, and the cooling time may be extended in
hot summers.
Is the temperature adjustment gear set to "Min"?
ǀ
Please set the temperature adjustment gear to "Medium" or "Max".
ǀ
Do not let food go beyond the shelf.
ǀ
Do you open the
refrigerator door
frequently?
Are foods with excessive moisture placed in the innermost part of the refrigerator chamber or in a
quick-chilling drawer?
ǀ
The refrigeration is too fast because the deep part of the refrigerator chamber is close to the cold
air outlet, and the temperature in the quick-chilling fresh drawer is low.
Do not place food with excessive moisture in front of the cold air outlet.
Is there any gap around
the door sealing strip?
Condition of the refrigerator chamber
door
Does the food on the shelf extend
beyond the shelf and hit the
refrigerator door, creating a gap?
Condition of variable temperature chamber door or freezer chamber door
Are there any food bags stuck in the door, causing a gap in the door?
In addition, do the food in the drawer reach the tray?
ǀ
The food in the quick-chill fresh drawer is usually not completely frozen.
(However, food placed near the cold air outlet may freeze completely.)
Frequent opening of the refrigerator door will cause outside air (heating)
to enter the refrigerator, causing the temperature inside the refrigerator
to temporarily rise. The temperature will return to normal in about one
night, please keep an eye on it.
If there is, it will cause the door to close improperly, leading to cold air
If something goes wrong
Cooling functions
33
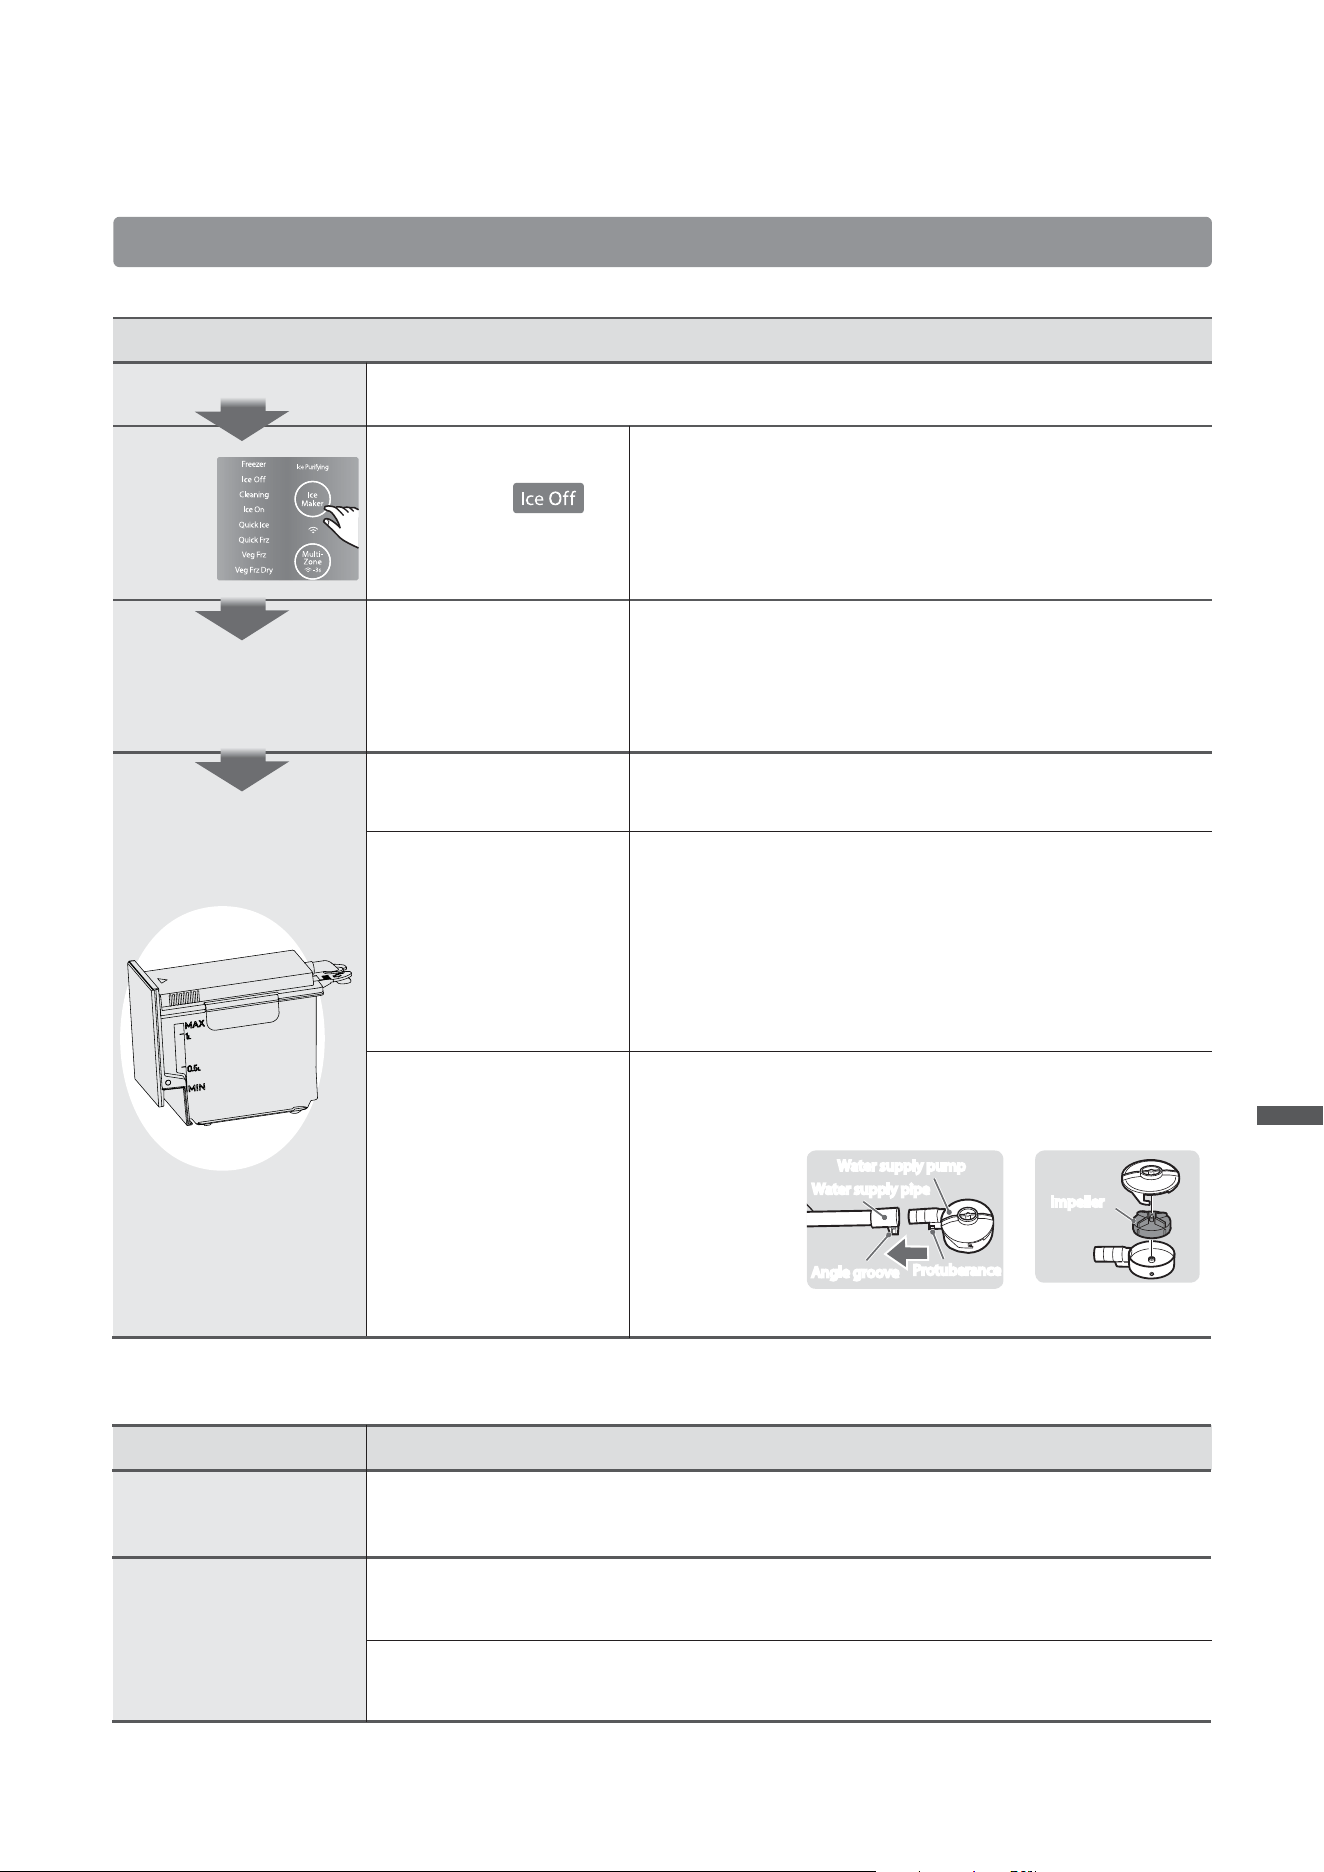
No ice production/Low ice production Please check the following items one by one.
Checklist · Causes / Solutions
Checklist · Causes / Solutions
Time since power-on
Touch panel
Ice Storage Box
Water storage box
Phenomenon
ǀ
Is the indicator
Please turn off the Ice Off funtion.
light on?
Are items other than ice
placed in the ice storage
box?
Is the water storage box
properly installed?
Is ice being stored for an extended period?
Storing ice too long may cause it to clump together.
Ice may become rounder and smaller over time due to sublimation during long storage.
Is it set to Quick Ice or Quick Frz mode?
Quick freezing can trap air in the ice, forming bubbles, which makes the ice cubes appear white.
Are you using water with high mineral content (e.g., mineral water)? White residue may appear in
ice due to minerals freezing, which is harmless.
Ice cubes are bonded to
each other, or in spherical
shape or become smaller
Ice is white, or with
sediment
Do not put anything other than ice cubes into the ice storage box.
The object may touch the detection rod to stop ice making, or
cause damage due to impact when the ice tray is turned over,
resulting in failure of ice making.
After using the ice scoop, please put it back in place.
When the refrigerator is not fully refrigerated at the beginning of operation, it takes about 5-6
hours to make ice cubes.
In hot summer and other conditions, ice making time may take longer.
ǀ
Please make sure the water storage box is installed in proper
position.
Please install the
raised part of the
water supply
pump into the
corner groove of
the water supply
pipe.
About ice making
Water supply pipes
and pumps
Impeller
ǀ
Is the water supply pipe
and impeller installed
properly?
Is there enough water in
the water storage box?
ǀ
Ensure the water level in the box is between the MIN and MAX
lines.
If something goes wrong
… Continued
Water supply pipe
Water supply pump
Angle groove
Protuberance
Impeller
Water supply pipe
Water supply pump
Angle groove
Protuberance
Impeller
Q&A Guide
34
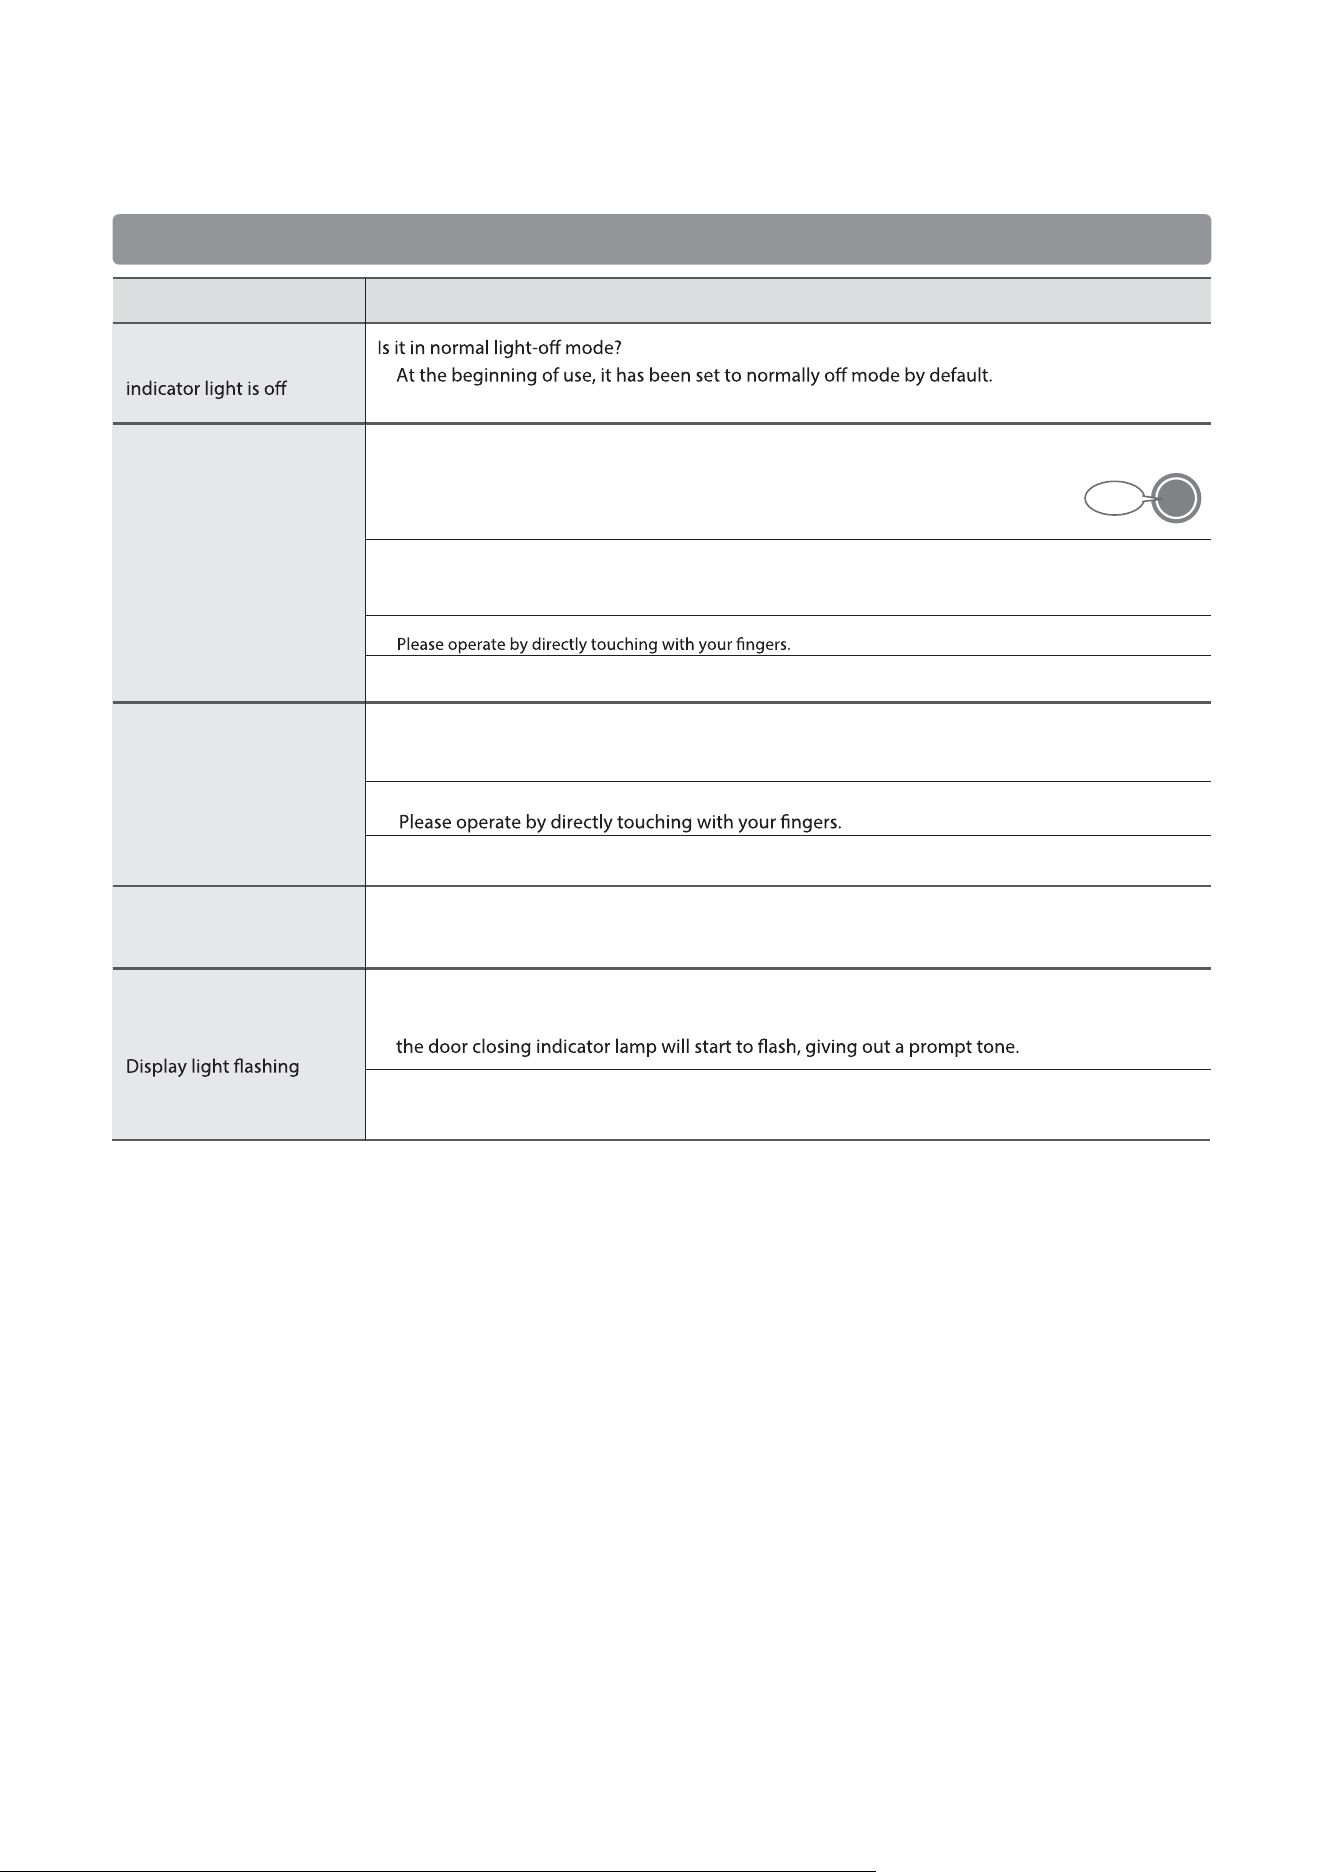
About Touch Panel
If something goes wrong
… Continued
Checklist · Causes / SolutionsPhenomenon
ǀ
The main menu key
No response after
touching the panel
(operation part)
No response when tapping
the main menu key
Main menu key does not
light up when tapped
Approaching the refrigerator will turn on the light.
Are you operating it with wet hands?
ǀ
Please dry your hands with a dry cloth before operating.
Are you operating it with wet hands?
ǀ
Please dry your hands with a dry cloth before operating.
Are you wearing gloves or operating with a band-aid on your hand?
ǀ
Are you wearing gloves or operating with a band-aid on your hand?
ǀ
ǀ
Did you fail to touch the illuminated main menu button?
First, approach the refrigerator until the main menu button lights up, then
touch the illuminated main menu button to turn on the touch panel.
ǀ
Is the touch panel wet or stained?
Wipe the touch panel lightly with a soft cloth to remove water or stains.
ǀ
Is the main menu button wet or stained?
Wipe the main menu button lightly with a soft cloth to remove water or stains.
Beep
ǀ
Is the person too far away from the refrigerator door during operation?
ǀ
Are the doors of refrigerator chamber and freezer chamber closed?
If one of the doors of refrigerator chamber, and freezer chamber opened for more than 2 minute,
ǀ
If the refrigerator malfunctions, please call the service hotline.
Does the display light of Quick Frz and Quick Ice keep flashing?
Please operate within approximately 0.7m of the refrigerator chamber door.
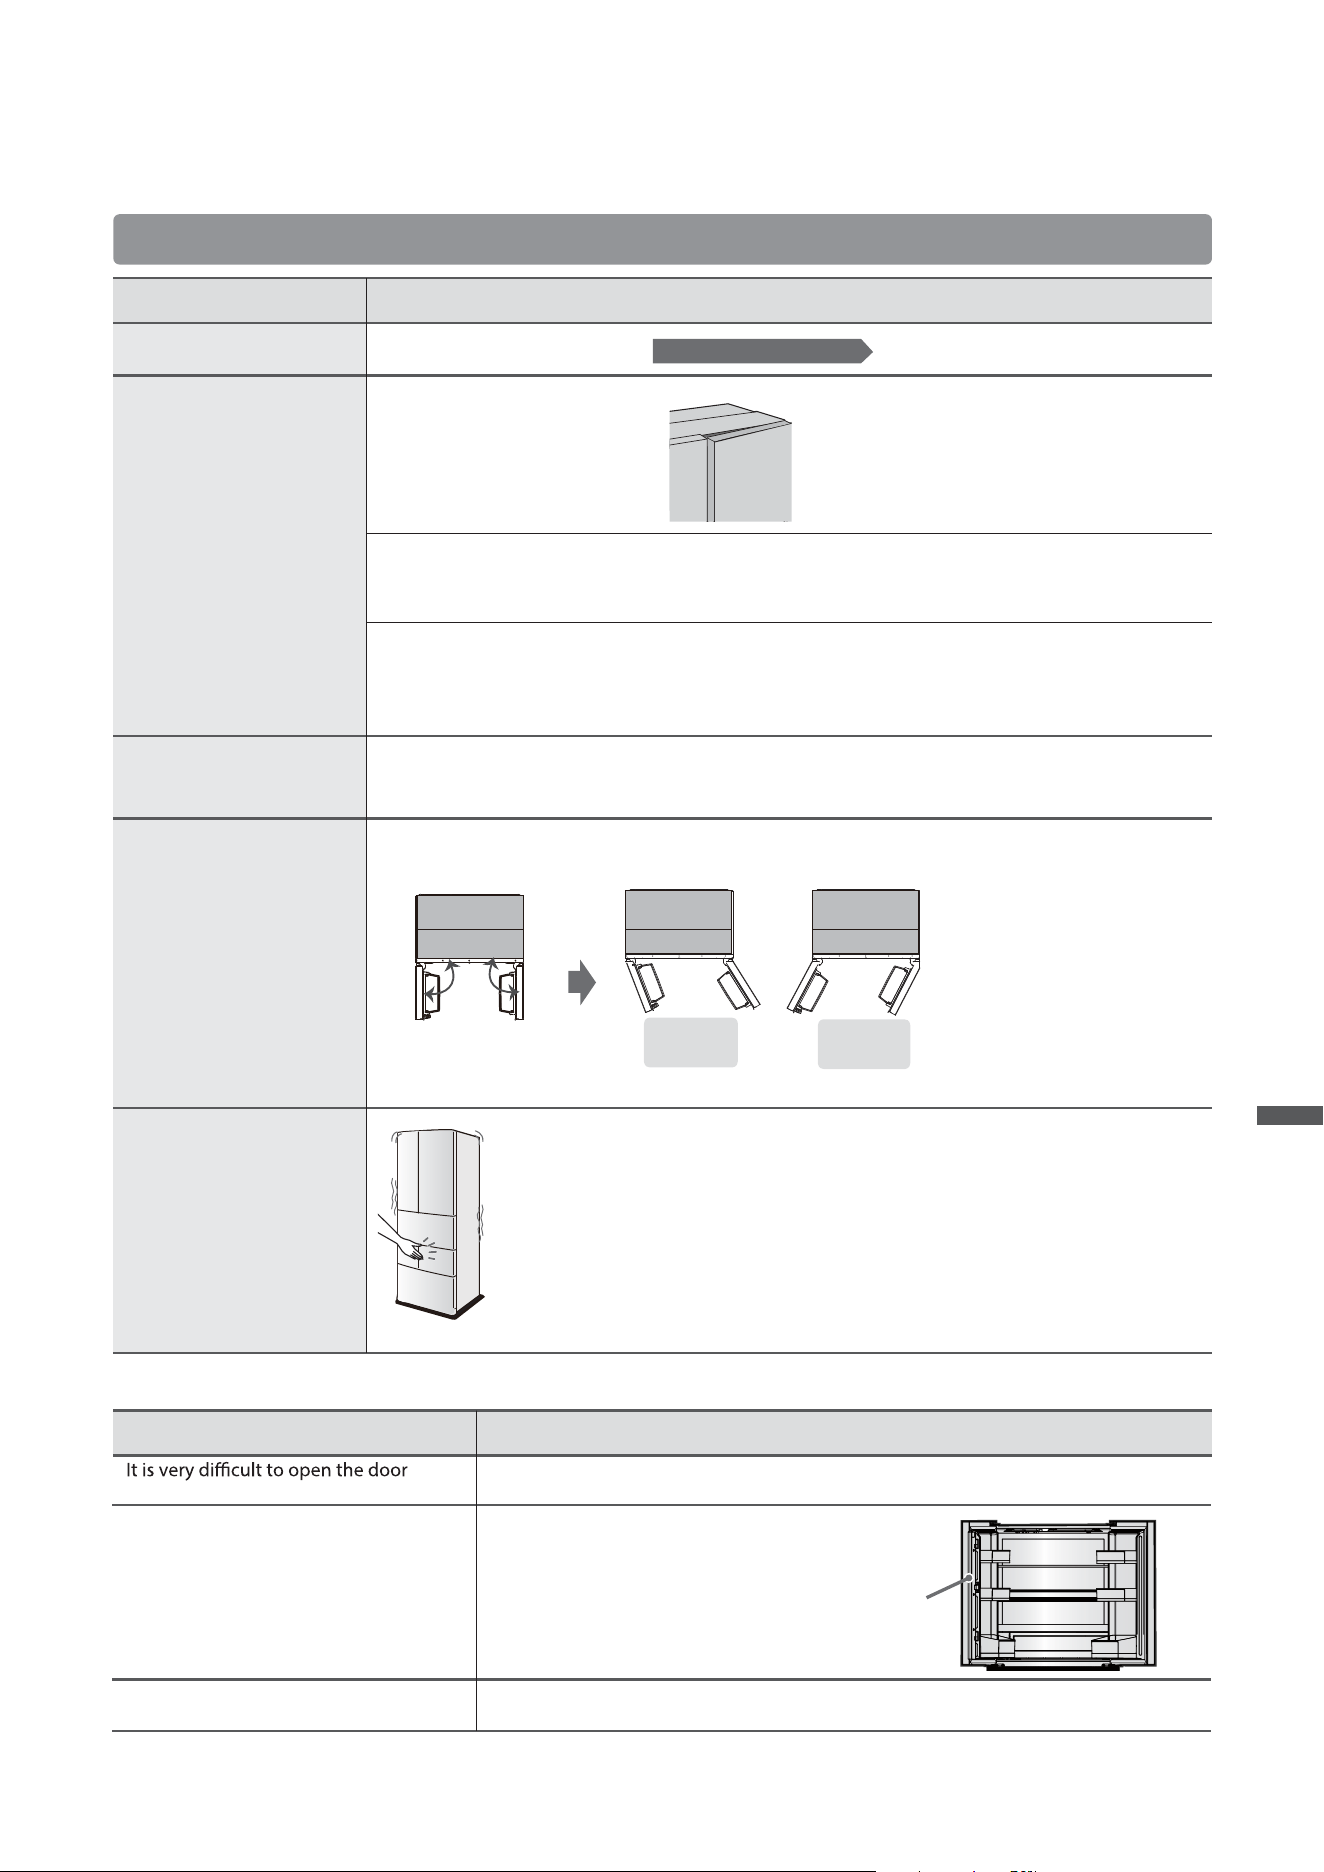
35
Please adjust the left and right leveling feet toward the ground until the
refrigerator is stable and does not shake.
If the refrigerator cannot be stabilized by adjusting the leveling feet,
please place a board underneath.
The following conditions are normal
90°
90°
Situation of tilting to
the right
Situation of tilting to
the left
Doors on both
sides swing to
the right
Doors on both
sides swing to
the left
Checklist · Causes / SolutionsPhenomenon
Checklist · Causes / SolutionsPhenomenon
ǀ
The door of the refrigerator
chamber is misaligned
The door cannot be closed
The door swings freely
When opening the freezer
chamber door, it is very
laborious
When the door is closed, other doors
will open instantly
When opening the refrigerator chamber
door, the left door is harder to open
than the right door
directly after closing it
The refrigerator is
unstable when the door
is opened and closed
ǀ
Please remove the trapped food.
Do not let food go beyond the shelf.
ǀ
Please rotate the leveling
feet to adjust the parallelism
of the door.
Or put a board under the
castors.
Are there any food bags, etc.
caught by the door, or are food
placed beyond the shelf,
resulting in gaps?
ǀ
Does the food in the variable temperature chamber drawer or freezer chamber drawer touch the
tray above?
Do not let food touch the tray.
ǀ
Is the refrigerator tilted forward?
If it cannot be adjusted, please contact the selected dealer or call the service hotline.
Please rotate the leveling feet to make the refrigerator horizontal.
Is the door left unopened for a long time?
When water droplets on the metal rail are frozen, it will cause the door to open and close
unsmoothly. It will return to normal after several times of opening and closing.
If only one side door shakes, there is no problem.
But if both doors shake in the same direction, it is caused by a large tilt of the refrigerator. Please
adjust the horizontal placement.
Open both doors of the
refrigerator chamber to a
90° angle and release
ǀ
About the door
As the air rushing in the refrigerator is quickly cooled, pressure drops inside the
refrigerator, making the door harder to open temporarily.
Closing one door may cause another to pop open due to air pressure.
There is a rotating partition on the left door.
Rotating partition
How to level the refrigerator
See page 11 for details
If something goes wrong
… Continued
Q&A Guide
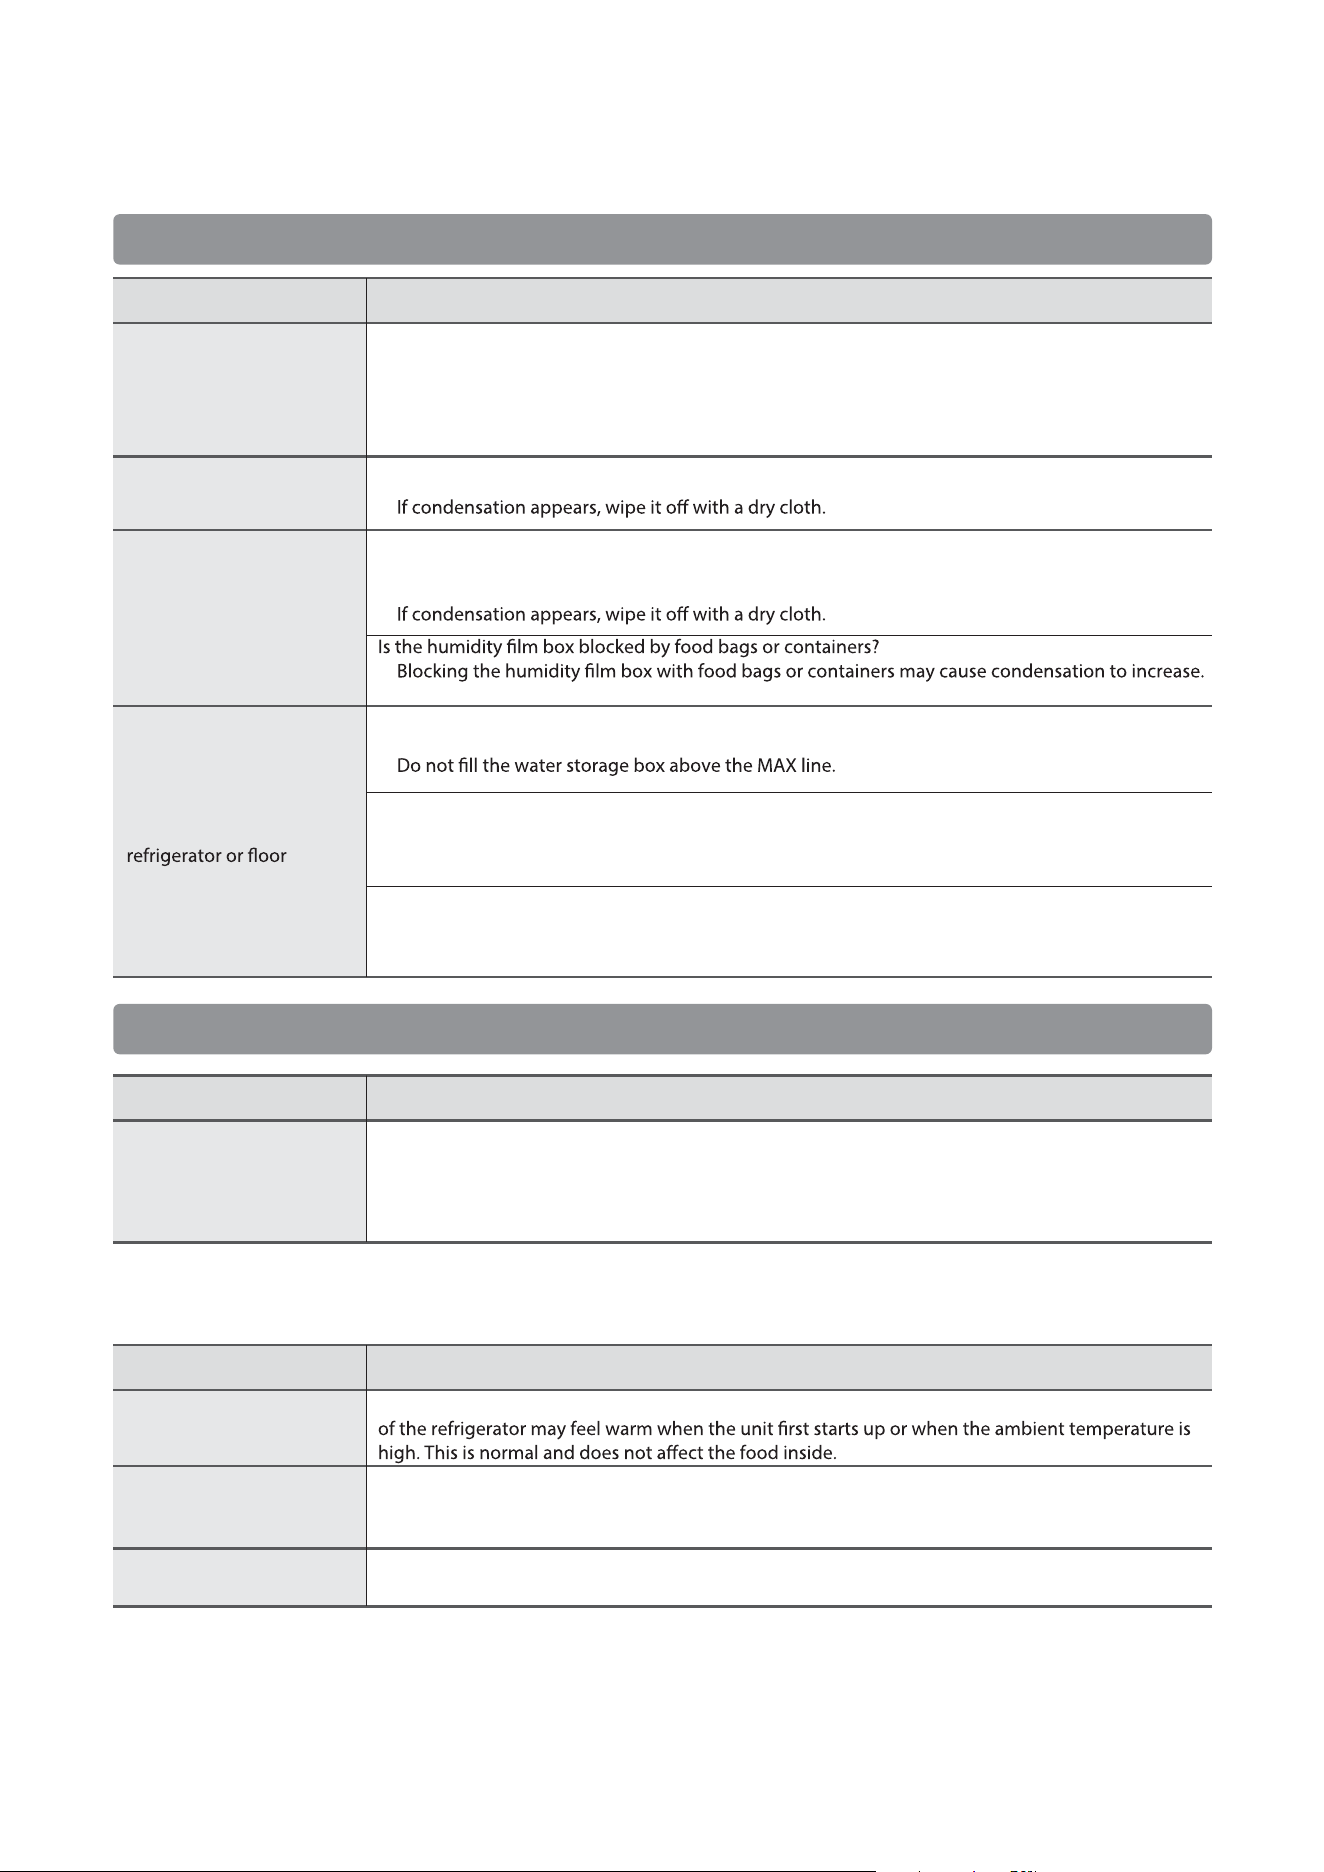
36
The following is normal
About condensation, frost and water leakage
Miscellaneous
Checklist · Causes / Solutions
Phenomenon
ǀ
Is there a gap in the door seal due to too much food?
Too much food can prevent the door from closing completely, causing gaps and frost.
Even small gaps can lead to frost.
Frost in the freezer
chamber
Condensation on the
exterior of the refrigerator
or rotating partition
Inside condensation of
variable temperature
chamber or refrigerator
chamber
Water leaks into the
There is a peculiar smell
in the refrigerator
Do not let food exceed the maximum storage line. Please check for any gaps around the door seal.
ǀ
Is the humidity too high? Is the door not fully closed?
ǀ
Is the door opened frequently or left open for extended periods? Is the door not fully closed?
Due to high humidity, condensation may appear on bottled items.
ǀ
Please remove any obstructions.
ǀ
Have you placed foods with strong odors (such as onions, garlic, or ginger) without wrapping
them in plastic or storing them in sealed containers?
It is not possible to eliminate the original smell of food. To prevent odors from spreading,
wrap food tightly or use sealed containers.
ǀ
When adding water, make sure it does not exceed the MAX line of the water storage box.
ǀ
Is the water box lid installed properly?
Please install the water box lid securely.
ǀ
Whether the water outlet pipe is installed in place?
Make sure the water outlet pipe is properly installed.
Checklist · Causes / Solutions
Phenomenon
The outside and door seals
of the refrigerator are hot
The interior surfaces are
slightly damp or greasy
Interior lighting may be dim
The refrigerator contains built-in heat pipes around the body to prevent condensation. The exterior
A lubricant is applied to the box and rails for smooth operation.
If lubricant accidentally gets on other surfaces, wipe it clean.
Cause
Phenomenon
Is the refrigerator light blocked by food?
ǀ
Remove any food blocking the interior light.
If something goes wrong
… Continued
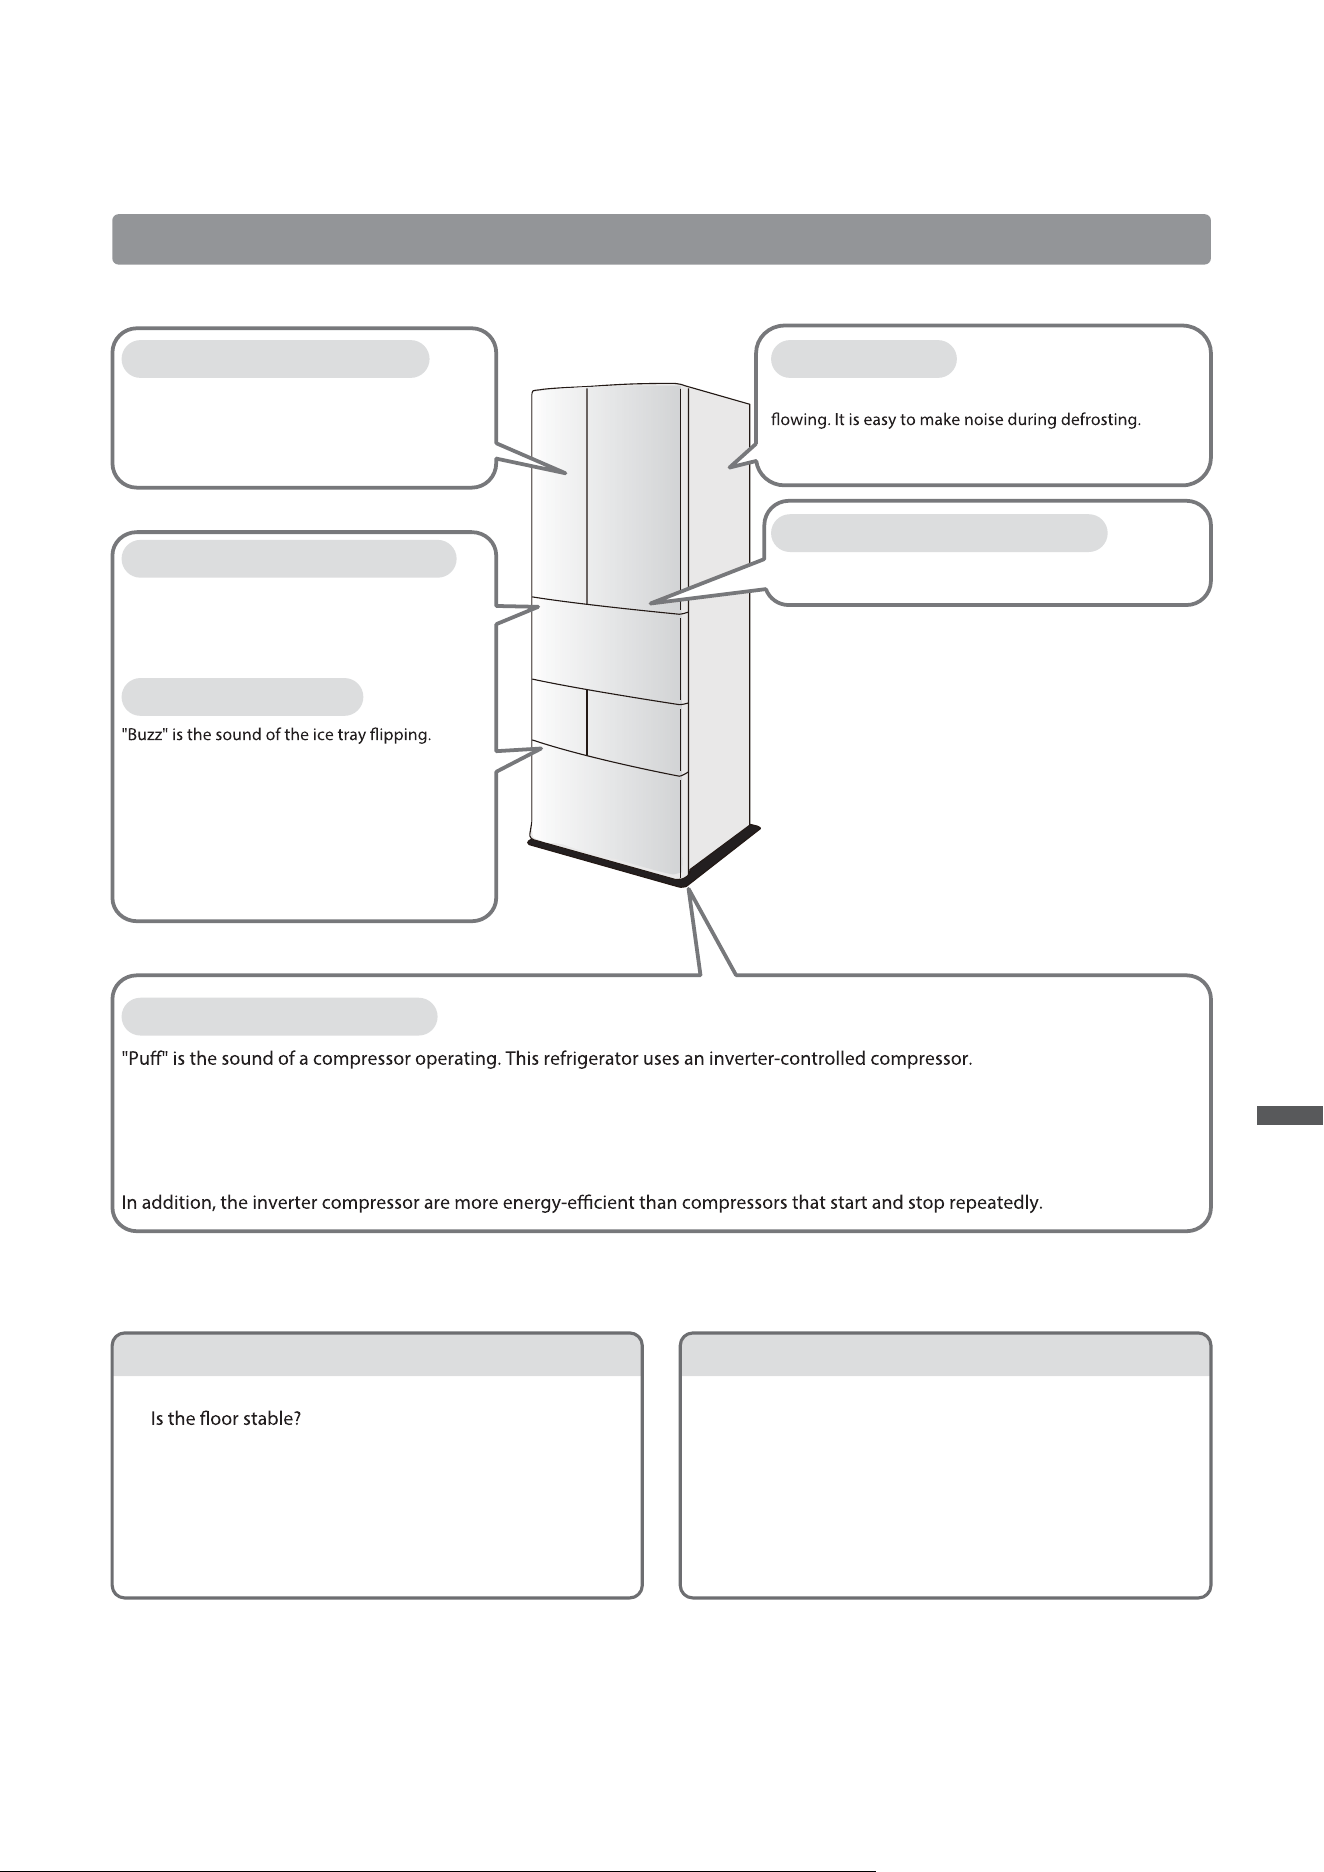
37
About operational noise
If something goes wrong
… Continued
Some operational noises are normal, such as... The following is normal.
Is the refrigerator touching surrounding walls?
Is the refrigerator placed stably?
Please note the following occasions
"Gada Gada", "Dongdong"
dž
dž
dž
Is the door not properly closed?
At any time, when the door of the freezer chamber or
refrigerator chamber is open for more than 2 minutes,
the door opening alarm will activate, sounding until the
door is closed or any button is pressed to cancel the
buzzer alarm sound.
If it does not stop after all doors are closed, please call
the service hotline.
ǔAlarm toneǕ
dž
Variable frequency control...
The rotation speed can be controlled according to the ambient temperature or the cooling status inside the refrigerator, so the
operation is almost never stopped.
In summer or at the beginning of operation, if quick freezing and ice making are carried out, the rotation speed will increase and
the sound of compressor running will be louder.
Lower part of refrigerator
"Beep" and "Qie" are sounds of parts rubbing
against each other due to temperature changes.
After opening the refrigerator chamber door for
about 5 seconds, it starts to make this sound
easily.
"Flowing water sound" and "Chi" are sounds of refrigerant
Summer... About 1 time a day, in winter... About 1 time in
2 days.
"Buzz" is the sound of the fan rotating when the door is
closed.
"Gurgling" is the sound of a water supply pump.
It occurs approximately once every 2 hours,
lasting about 3 seconds. (about once every
1 hour when Quick Ice)
"Dong Dong" is the sound of ice cubes falling. It
occurs approximately once every 2 hours, lasting
about 3 seconds. (About once every 1 hour
when Quick Ice) You can set it to "Ice Off"
to stop such sounds.
The inside of refrigerator Near the back
In the refrigerator chamber
Near the water supply tank
Near the ice maker
Q&A Guide
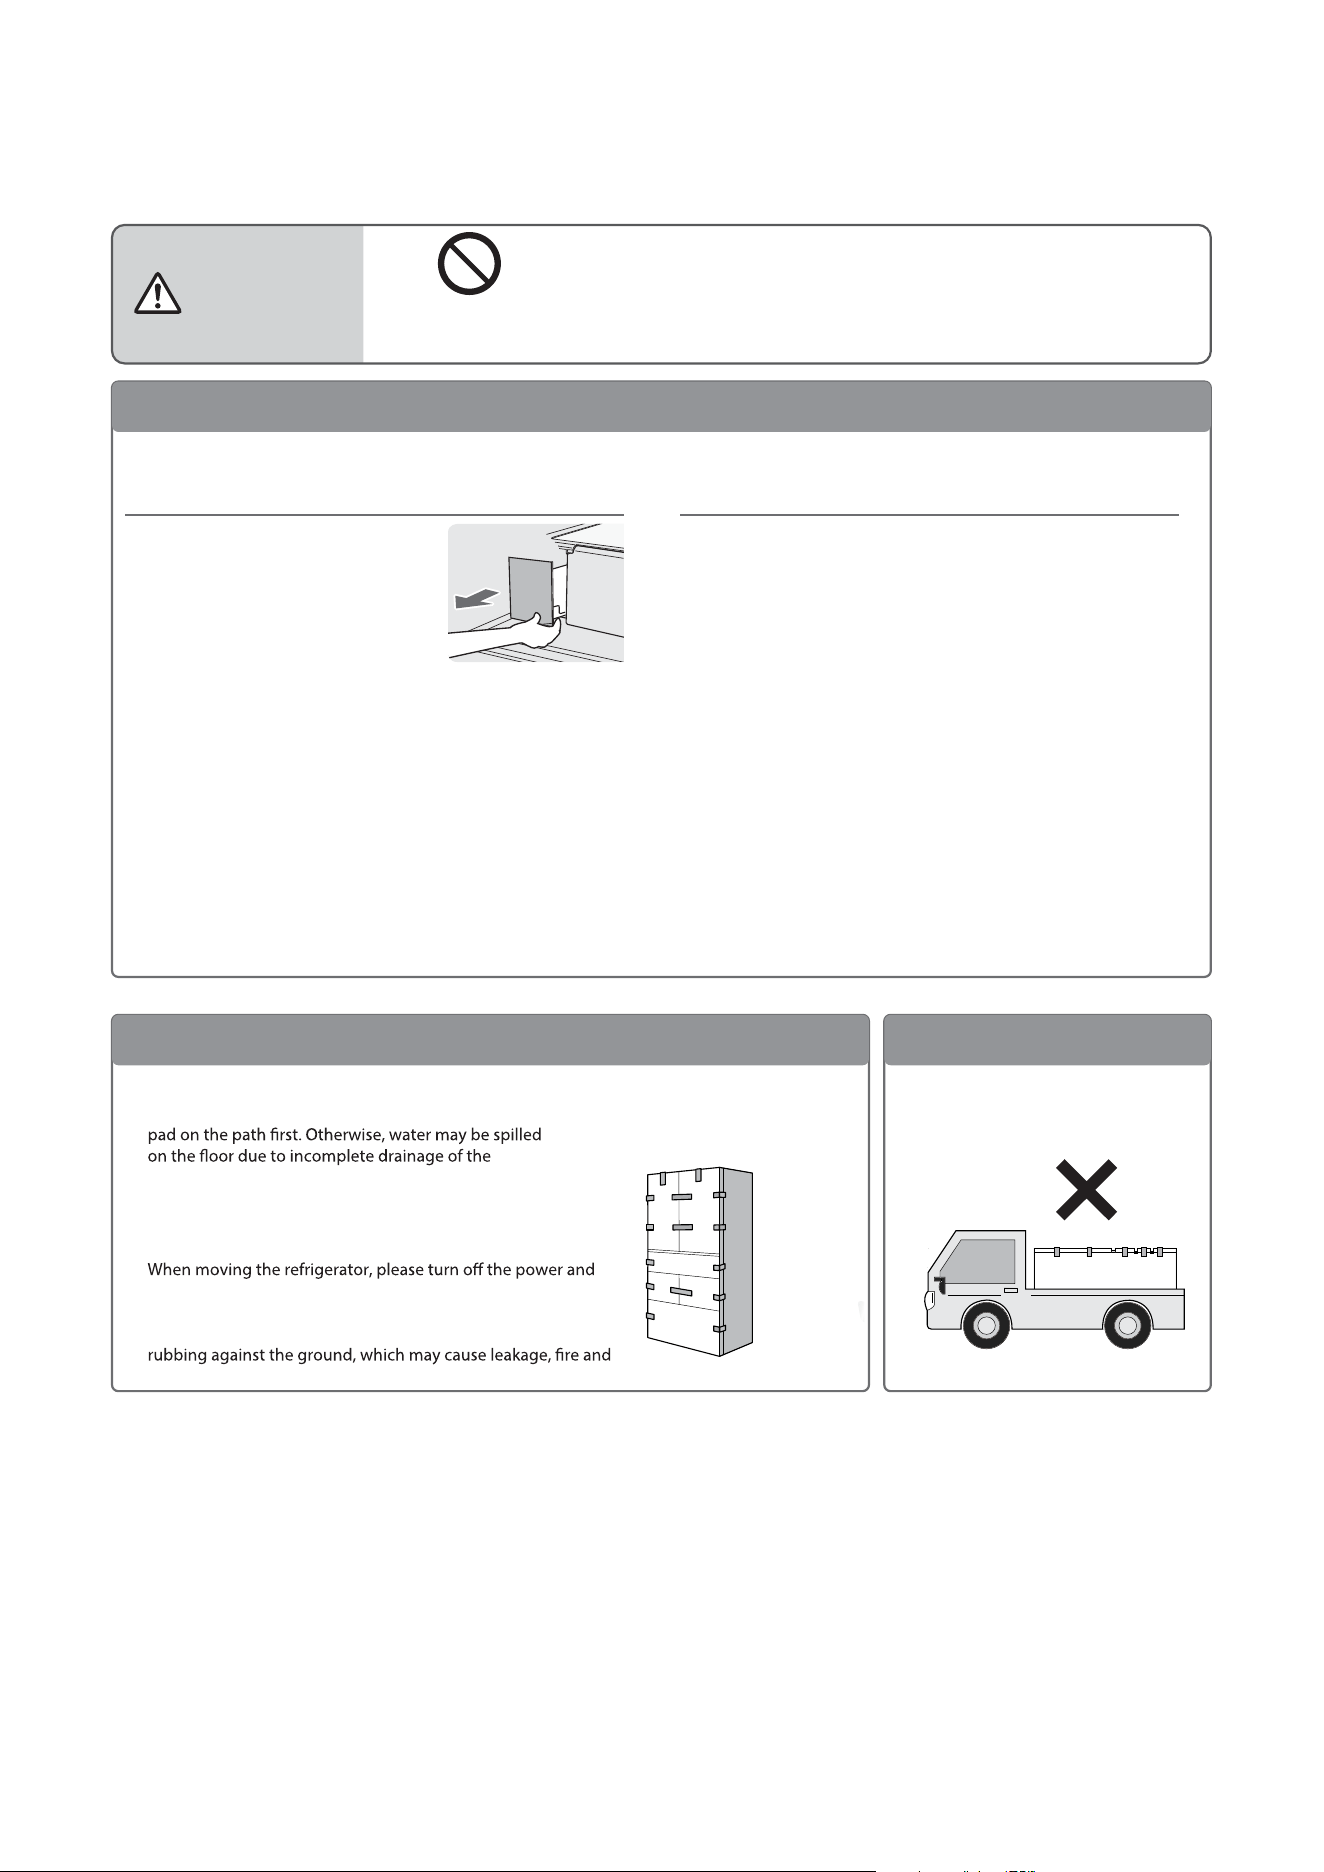
38
dž
dž
dž
When moving the refrigerator
WARNING
Do not damage the refrigeration circuit on the back or side panels
Do not damage the
refrigeration circuit
Before moving and handling
Moving and handling
During movement
1
Take out the food from the refrigerator.
Requires 2 or more persons for handling.
When moving the refrigerator, please lay a protective
evaporation tray.
Always wear non-slip gloves when moving the refrigerator.
Otherwise, the refrigerator may fall, be damaged or people may
be injured.
To prevent the door from opening
automatically, please secure the
door seal with tape.
or the compressor may fall.
Do not lay the refrigerator flat,
3
Pull out the power plug.
4
Raise and level the leveling feet so that the bottom
casters touch the ground. If anti-overturning measures
are installed, they must be removed.
2
Pour out the water in the ice tray.
Take out the water
storage box and pour
out the remaining water.
(1)
Wash the ice storage box, ice shovel and water
storage box with water, wipe them clean and put
them back in place.
(4)
Switch the refrigerator to "Cleaning" mode.
(2)
After the "Cleaning" mode ends, the buzzer
prompt sounds. Open the ice making chamber
door, and pour out the water and ice in the ice
storage box.
(3)
dž
hang the power cord on the designated hook at the back of the
refrigerator before moving the refrigerator. Avoid the insulation
of the power cord from being damaged due to dragging or
other dangers.
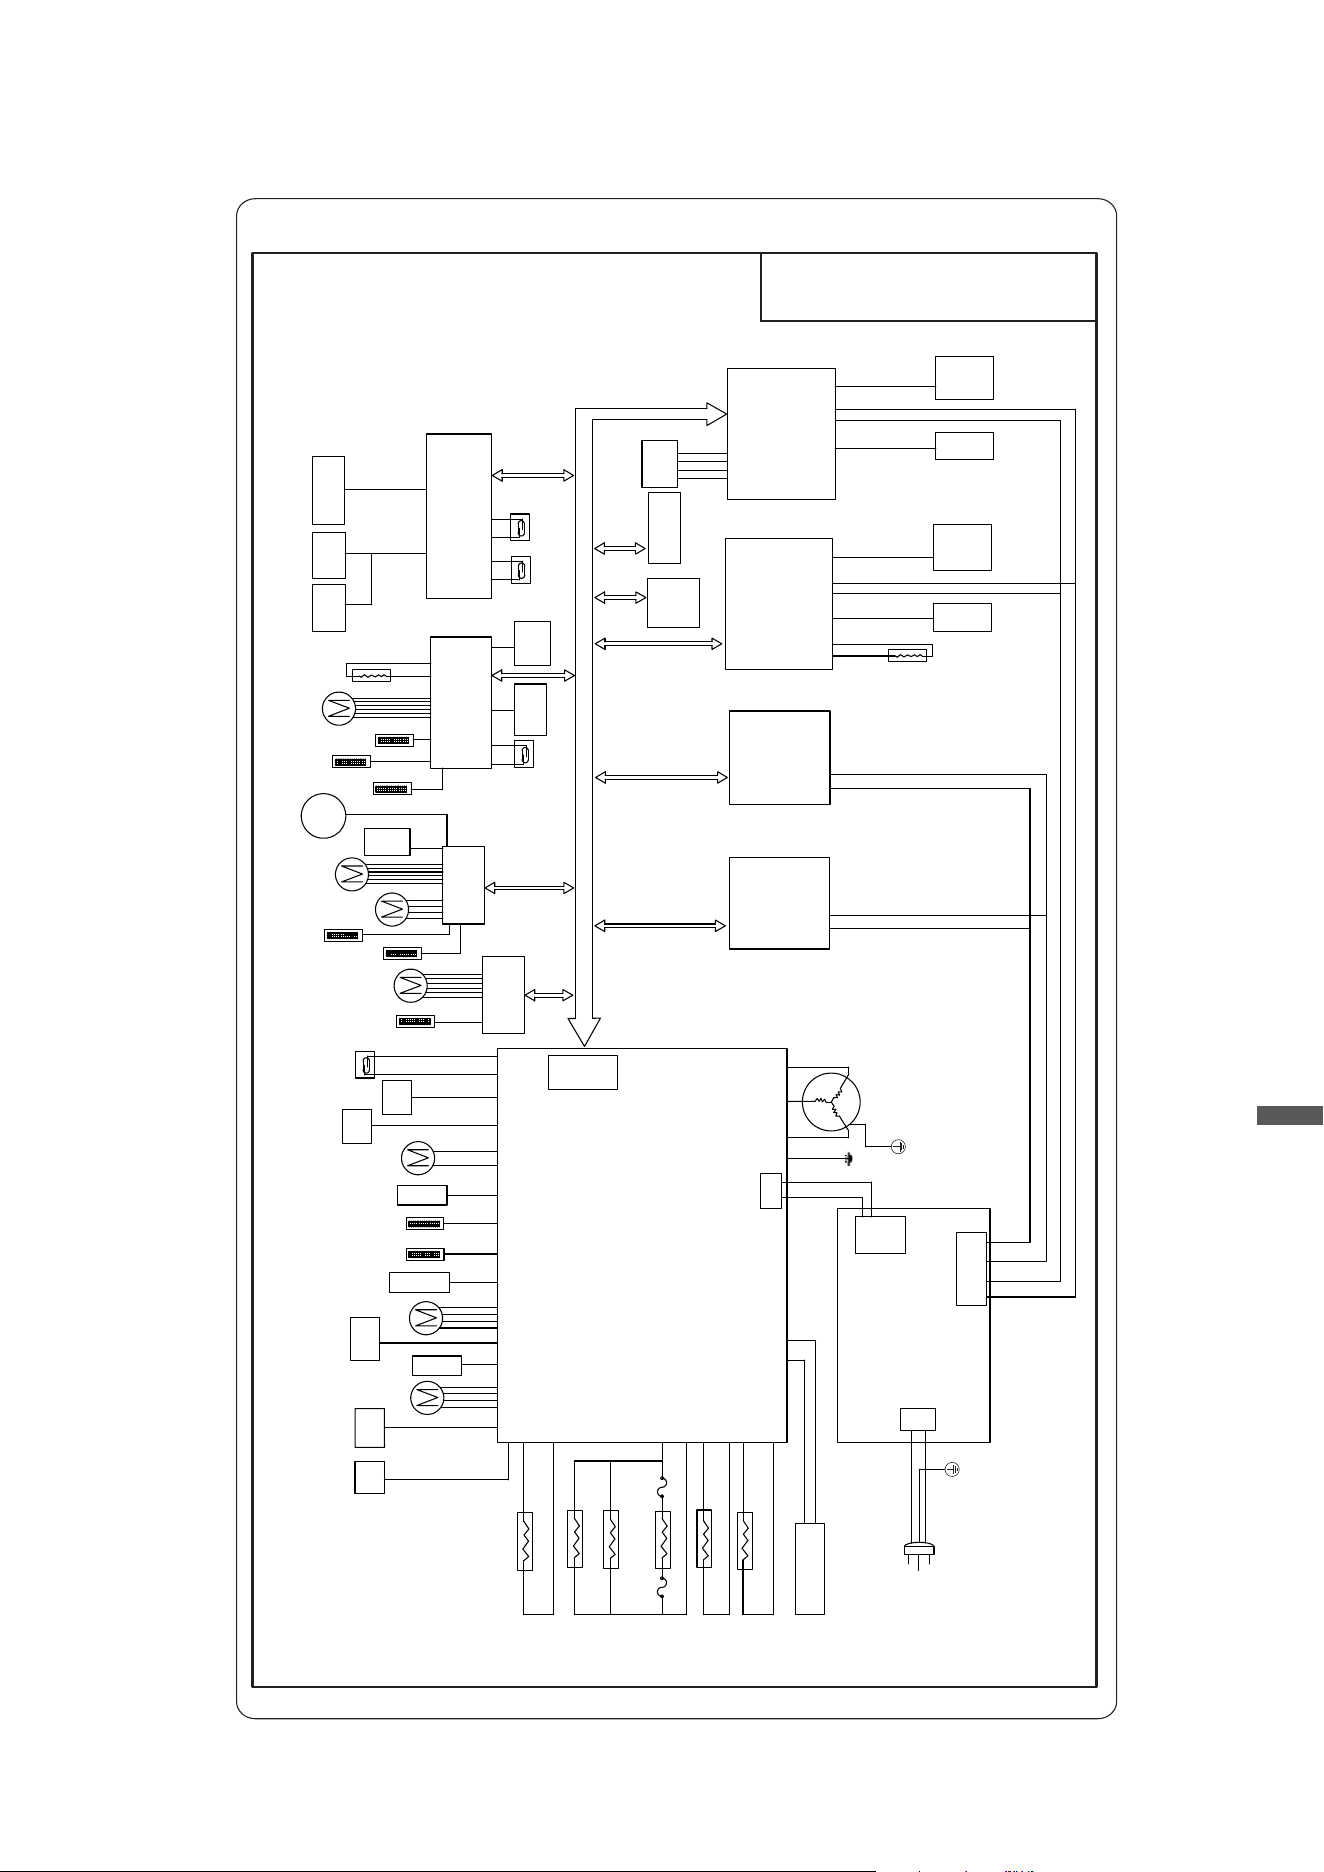
39
Circuit diagram
GR-RM919WI-PGX(B3)
Circuit diagram of frost-free refrigerator-freezer
R-T
LED
R-R
LED
R-L
LED
FR-Electric
damper
RD-Heater
FR-Snr
FR-Snr
FR-Snr
R-Snr
V-Snr
FD-Snr
Power AC
220-240V
F-Snr
Ice Maker
Valv
RD-Snr
MBUS Board1
MBUS
Door-opening
motor1
Door-opening
motor2
MBUS Board2 MBUS Board3
RT&HT
Snr
Touch
Board
LEDLED
Heater1
Touch
Board
Control
Board
Ultrasonic
Snr
Compensation heater1
Compensation heater2
Compensation heater3
FUSE2FUSE1
FD-Heater
V-B-Heater
R-B-Heater
Power filter
Power
board
Output
DC 12V
Compressor
Power AC
220-240V
L
E
N
BUS
12V
5V
GND
DPS
LED
DSP
F-FAN
F1-SW
I-SW
Pump
F-FAN
C-FAN
F2-SW
F-LEDWifi
UV
LED
V-SW
R-Electric
damper
V-Electric
damper
FR-MBUS
Board
R-MBUS
Board
V-MBUS
Board
Main board
R-L-SW
FR-SW
R-LEDFR-LED
R-R-SW
Q&A Guide

https://www.toshiba-lifestyle.com/sg/
MD (Singapore) Consumer Product Co. Pte. Ltd
151 Lorong Chuan New Tech Park (Lobby E) #04-05, Singapore (556741)
version:(X5HL-A)
MADE IN CHINA