1
All-in-One Pet Health
& Location Collar
User Manual

2
Device and APP Usage Process
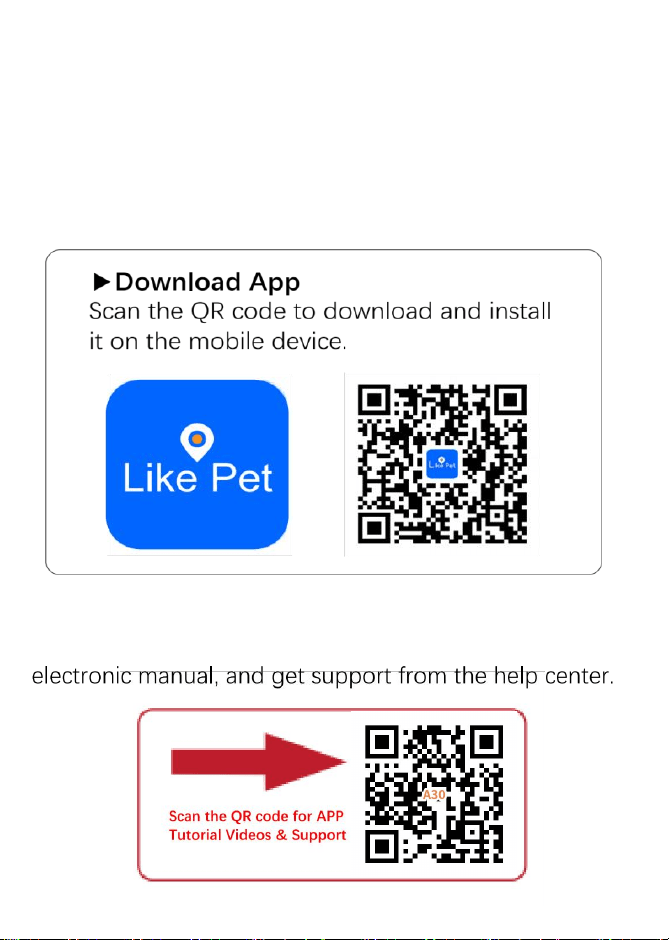
1. Download the APP
Scan the QR code on the packaging box or this
card to download the official APP from the Apple
App Store or Google Play Store, depending on
your mobile system.
2. Access Help Materials
Scan the QR code on the packaging box or this
card to visit the Help Center, where you can view
the electronic manual, instructional videos, and
other support content.
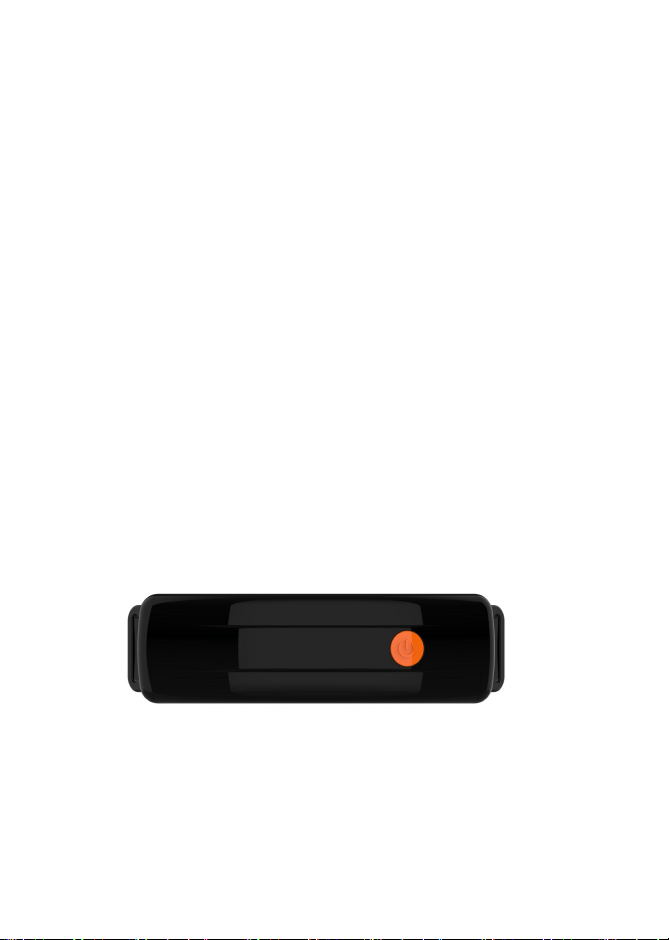
3. Power On
Briefly press the power button on the device to
turn it on.
4.Device Binding and Subscription
After opening the APP, complete the following
steps in order:
① Register an account → ② Log in → ③ Bind the
device (scan the QR code on the device body)
④ Top up the subscription fee → ⑤ Wait about 2
minutes, then restart the device → ⑥ Subscription
successful

3
5.Power Off
Press and hold the device's power button to turn
it off.
6.Charging Status Indicator
•Charging: Red light flashes slowly.
•Fully Charged: Red light stays steadily lit.
Important: Check the tightness of the collar by
inserting one finger between the end of a contact
point and your dog's skin. The fit should be snug
but not constricting.
Important: Avoid leaving the collar on your dog
for more than 12 hours a day, and never attach a
leash or ID tag to it - use a separate collar for that
Thank you for purchasing our products! This
manual provides important information that will
helpyou safelyoperate this collar.
Please read this user manual carefully before using
this product. Thankyou! If you have any problem
with the product, please don't hesitate toemailus
at:
( A30CS@maxhom.com)
We will reply to you within 24 hours and give you
the best solution.

4
Catalog
Introduction................................................................5
Warning.......................................................................5
Getting Started......................................................... 8
Login &Register.................................................... 10
Add Device............................................................ 12
Subscription..............................................................16
Electronic Fence Setup........................................... 17
Main Page Introduction........................................21
Product Specification...........................................34
Warranty.................................................................. 35

5
Introduction
This collar integrates three practical core functions:
Real-TimeTracking,Wireless GPS Electronic Fence,Heart
Rate Monitoring and
Remote Dog Training,
providing all-
round protection and scientific management for your
beloved pet.
Warning
★Please read all safety instructions thoroughly.Ignoring
these warnings could result in injury to you,your pet,
or others,as well as property damage.
★The collar is powered by a battery.Allowing your pet to
chew on the collar or its battery may damage the product,
create a fire hazard,or endanger your pet.Always inspect
the battery and its plastic cover for punctures before
placing the collar on your pet.
★The collar contains electronic components,including a
lithium-ion battery,which are sensitive to high temperatures.
Do not leave the collar in hot environments for prolonged
periods.Only use the provided charger for recharging.
If you notice any punctures on the battery or its cover,
stop using the collar immediately and contact
customer support at once.
★No containment system can guarantee 100%containment
of all pets.Some dogs may be clever enough to escape any

6
containment system,and these systems may occasionally fail
or malfunction.It is essential to monitor your pet regularly
while using this collar.If your dog poses a danger to others, do
not rely on the containment system without supervision.
★The collar is specifically designed for dogs.It must not be
used on humans.
★Do not disassemble or attempt to modify the collar, as
doing so willvoid the warranty.
★The GPS accuracy of the collar may vary depending on
location.It is designed for OUTDOOR use only and cannot
receive GPS signals indoors.
★This containment system cannot prevent predators from
entering the fenced area.
★The Collar is not designed to serve as your pet's primary
restraint.Always ensure your dog is properly secured and safe.
★The collar meets the IP67 standard,meaning it is dustproof
and water-resistant.It can resist dust,spills,splashes,drool,
and rain.Note that over time,normal wear and tear may
affect its waterproof performance.
★The collar performs best when pet owners invest time in
training their dogs,just as they would with any obedience
program—especially in the initial stage.Spend time helping
your dog learn the location of the fence boundaries and the
alerts that keep them safely contained.We cannot guarantee
that the system will contain all pets.If you are concerned that
your pet might pose a danger to others or itself,do not rely
solely on the collar to keep it within the boundary.
★The collar requires the mobile app for operation,along with
sufficient battery power.The performance of tracking and
7
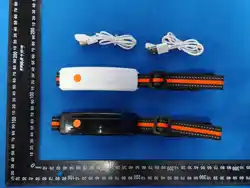
Package List
notifications may vary based on the strength of the cellular
network signal in your area.
★The collar is not a toy.Adult supervision and close attention
are necessary when the collar is used by or near children
Note: Please check the product packaging carefully,
if any accessories are missing,
please contact the after-sales service personnel by
email at
A30CS@maxhom.com

8
Getting Started
● Fitting the Collar Straps
Adjust the strap to fit snugly around your dog's neck,
ensuring the static contact points make full contact with
your dog's skin.You should only be able to slide one finger
between the collar and your dog's neck.
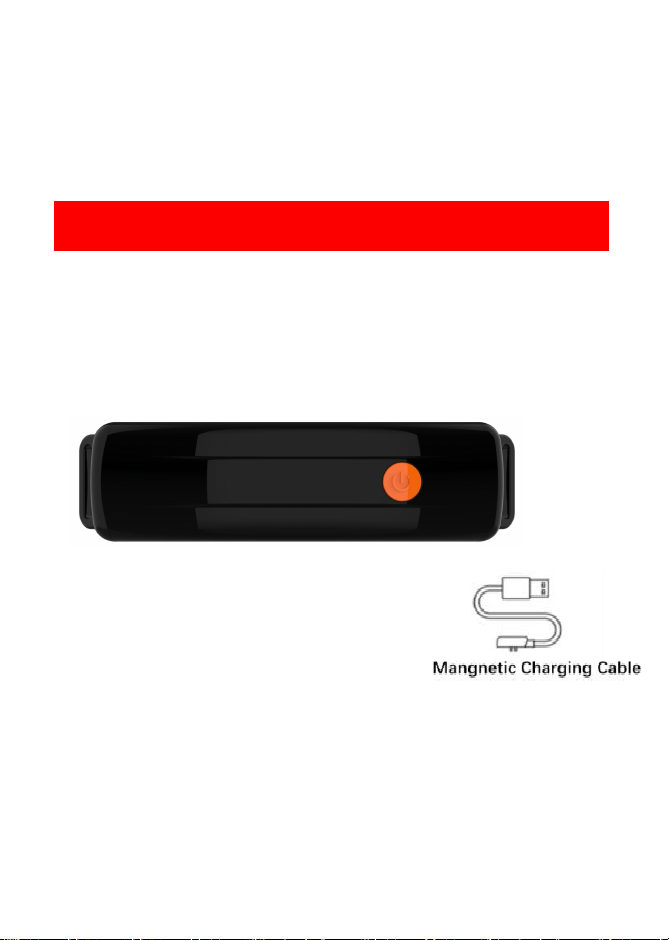
● Charge the collar
1.Connect the magnetic charging cable to a power adapter.
2.Carefully attach the magnetic charger to the collar's
charging port;it will automatically snap into place.
●Charging Status Display
Charging: Red LED flashes.
Fully Charged: Red LED stays on steadily.
Charging Time: Approx. 3 hours for a full charge.
9
● Download the Like Pet App
please download the Like Pet App.
Note: Before installation,ensure that your mobile device's
browser is set to allow the installation of unknown apps.
You can scan the QR code below to watch the detailed
operation tutorial video of Like Pet App,access the

10
Login &Register
▶
Open the downloaded Link Pet App to enter the login
screen,then log in by entering your [registered email]and
[password]and clicking [Login],or directly via third-party
accounts such as [Google Login]or [Apple ID Login].
▶
If you don't have an account,click [Register]to enter to
the registration screen.
1.Enter your [Nickname],[Email],then set a login password;
Click the eye icon to view the password.
2.Click [Get Code]—the code will be sent to the email you
entered;
3.Enter the code,check the box to agree to the terms,then
click [Register].
4.After successful registration,you will be automatically
redirected back to the login screen.
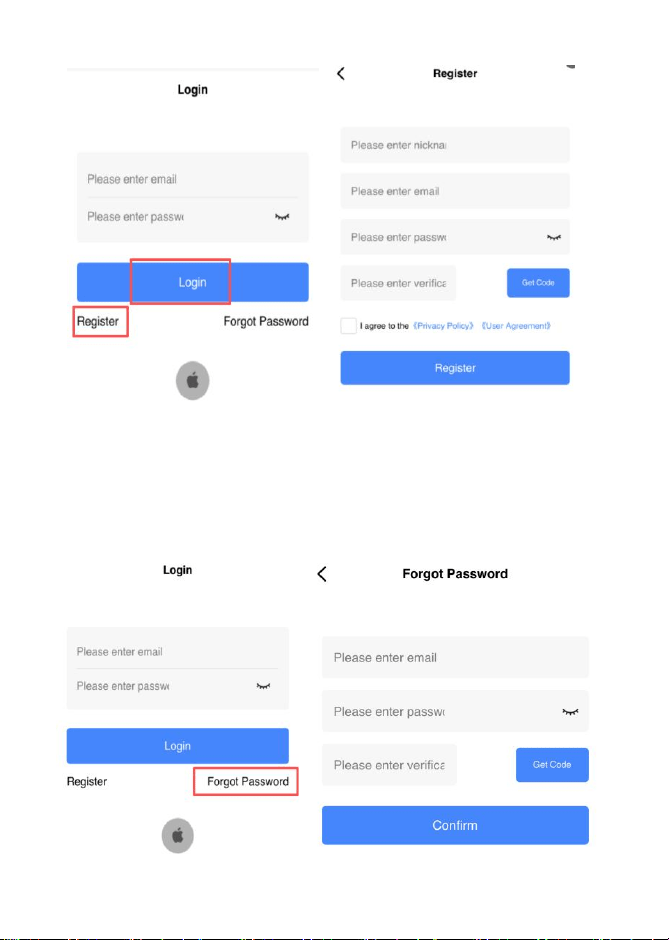
11
▶ If you forget your password,click [Forgot Password]on the
right side of the login screen:
1.Enter your registered email and set a new password;
2.Click [Get Code],enter the code,then click [Confirm]—this
will reset your password and return you to the login screen
.
12
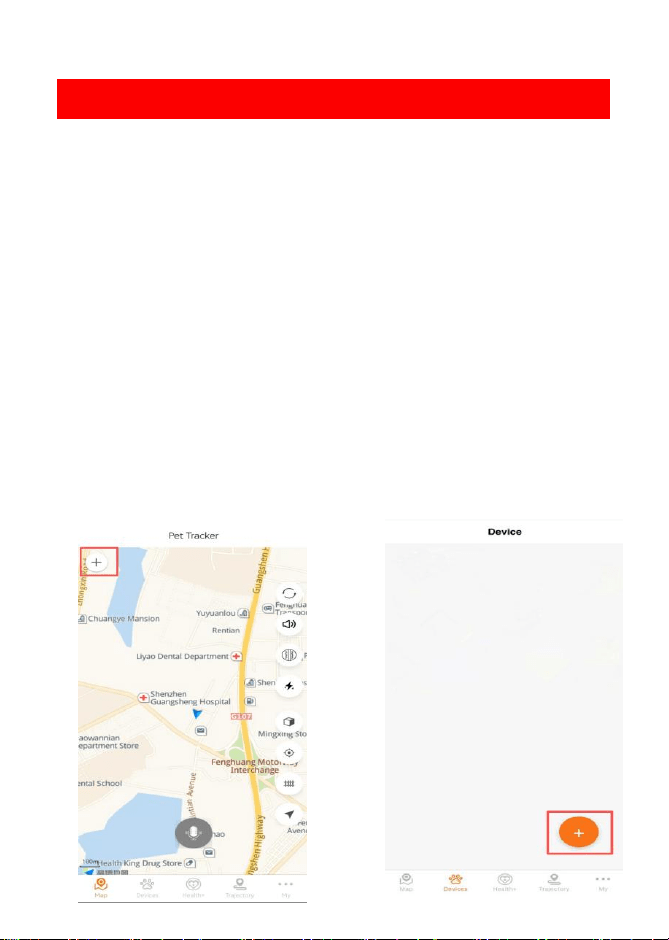
Add Device
This collar supports 3 entry points for adding a device.You can
choose any one to access the [Add Device Interface]. The
detailed operation process is as follows:
● Select an Entry Point for Device Addition (3 Methods)
1.First Login Guidance:After successfully logging into the
APP for the first time,the system will automatically pop up a
prompt window asking "Add Device?".Click [Confirm]to directly
enter the [Add Device Interface].
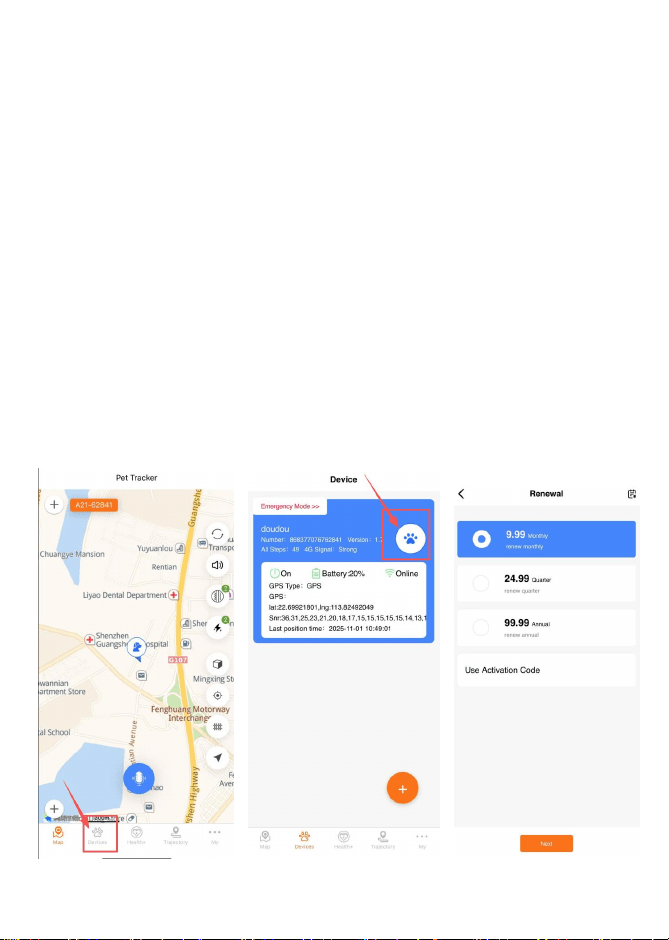
2.Map Interface Entry:Open the APP and enter the [Map
Interface],then click the [+]icon at the top-left corner of the
interface to access the interface.
3.Devices Interface Entry:Open the APP and enter the
[Devices Interface],then click the[+]icon at the bottom-right
corner of the interface to access the interface.
13
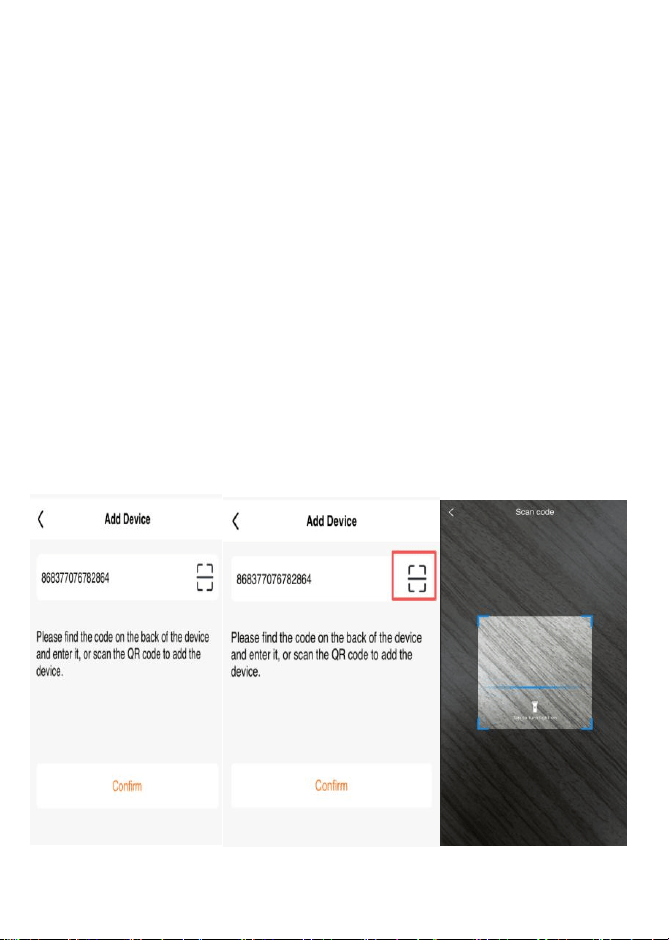
● Enter Device Information(2 Methods)
After accessing the [Add Device Interface],enter the device
ID via one of the following methods:
1.Manual Entry: Enter the device ID manually in the
designated input field.
2.QR Code Scanning: Click the "Scan"icon,then align the
APP's scanning frame with the QR code on the device.The
system will automatically enter the device ID.
Then click [Confirm].The system will automatically jump to
the "Pet Information Editing Interface".
14
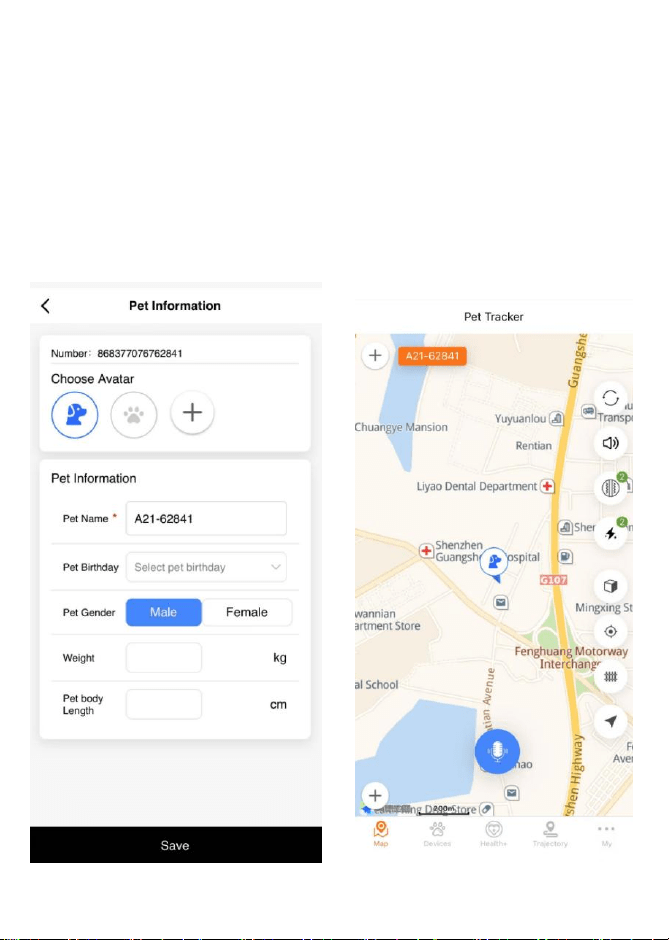
● Completing Pet Information
Please complete the following information:
Select a pet avatar:Choose from the system-provided
avatars,or click [+]icon to add a custom image.
Enter pet name(required).
Finally,click [Save]to complete the device addition.
15
▶ Remote Device Control: Remotely restart or shut down
the collar—no need for close contact with the device,
enabling convenient management.
Plus,there are many more useful features to enhance your
pet safety experience!
● Purchase a Subscription
On the list page, tap your pet's avatar/icon.
Three renewal options are available on the Renewal
Interface:
▶ Monthly/Quarterly/Annual Plan:
Select your preferred plan,then click [Next].The page will
redirect to the Payment login page.Log in to your account
and complete the payment.

16
Subscription
● Subscription Instructions
This collar is a connected device.After activating the
subscription service,you can unlock the following core
features to fully protect your pet's safety:
▶ Create an Electronic Fence: Customize safe areas
(e.g.,home,park boundaries)to monitor your pet's
activity range in real time.
▶ Receive Escape Alerts: Get instant alarm notifications
when your pet goes beyond the electronic fence,
allowing you to respond quickly.
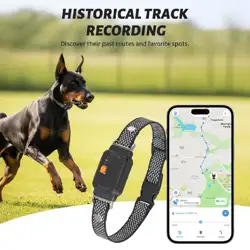
▶ View Location History: Trace your pet's past activity
routes to learn about their frequently visited areas and
movement patterns.

17
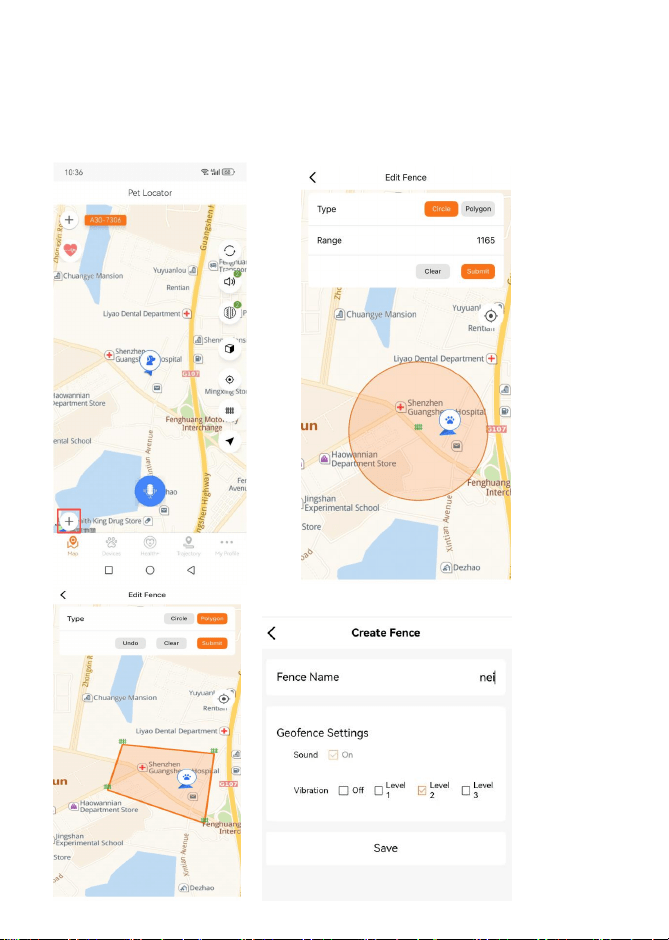
Electronic Fence Setup
After successful subscription,click the [+]icon in the bottom
left corner of the [Map Interface]to enter the electronic
fence setup interface.
You can set up two types of electronic fences:circular
electronic fences and polygonal electronic fences.
When the dog approaches the virtual boundary,the device
will automatically emit a warning sound,vibration,—no
manual operation is required—to help the dog form a
boundary memory.
● Circular Electronic Fences
1.Enter the range of the circular electronic fence
(65-3280 feet).Click anywhere on the map to generate a
circular fence;if the settings are incorrect,click [Clear]to
delete the created fence.
2.Click [Save],then enter the fence name.Next,set the
vibration level
3.Click [Save]again,and the circular electronic fence will be
created successfully.
● Polygonal Electronic Fences
1.Click [Polygon]to switch to the polygonal electronic
fence setup mode.
2.Click on the map to add vertices(up to 6 points can be set).
Use the following functions as needed:
*Click [Undo]to delete the last added vertex(at least 3
vertices must be retained to form a polygon).
*Click [Clear]to delete all currently added vertices.
18
3.Click [Save],then enter the fence
name.Next,set the vibration level
4.Click [Save]again,and the polygonal electronic
fence will be created successfully.

19
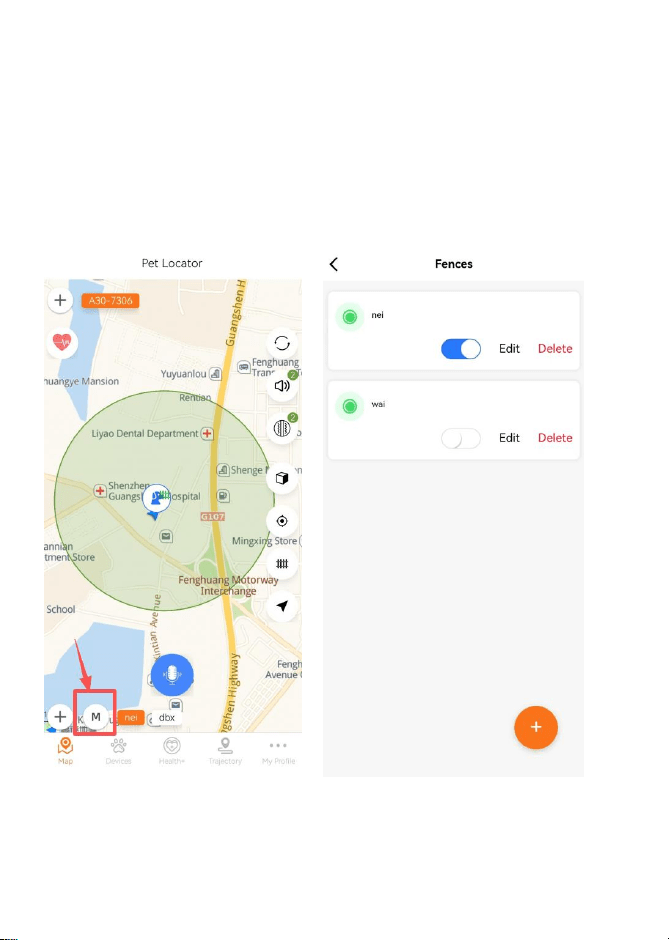
▶ Click the fence name on the [Map Interface]to
switch the currently used fence
20
▶ Click the [M]icon at the bottom left corner of the [Map
Interface]to enter the Fence Management Interface.On
this interface,you can turn on/off,edit,and delete
existing fences;you can also click the[+]icon at the bottom
right corner to create a new fence.
21
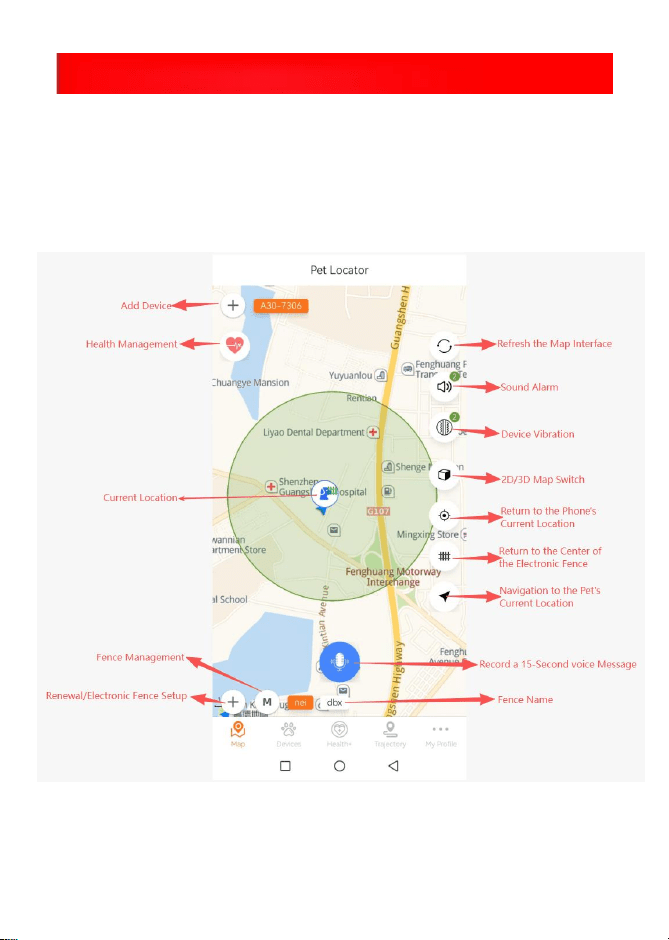
Main Page Introduction
The Like Pet app features 5 main interfaces in total:
[Map Interface],[Devices Interface],[Health+Interface],
[Trajectory Interface],and [My Interface].
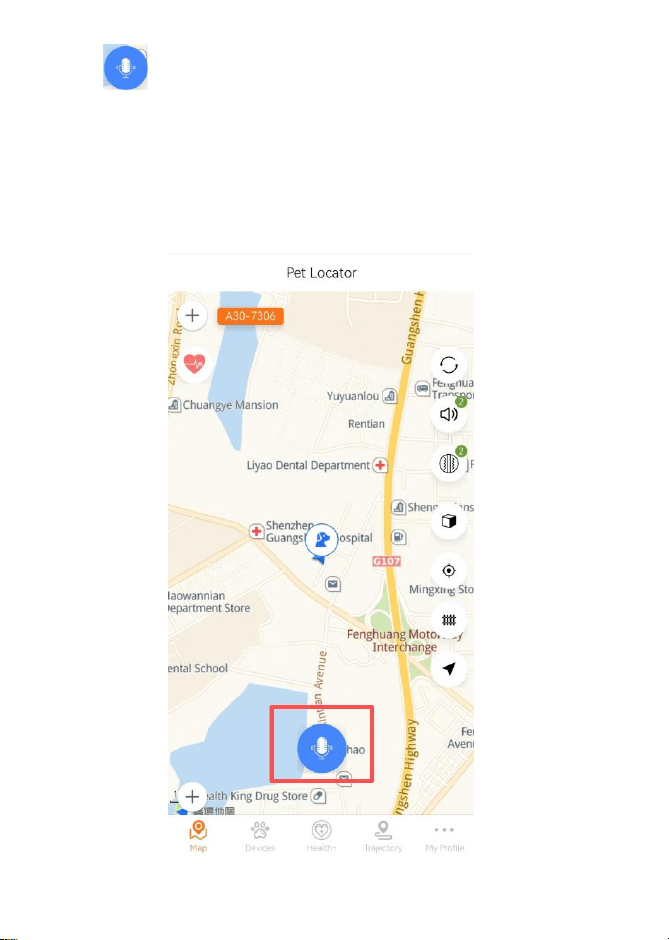
● Map Interface
22
Click to record a 15-second voice message.After
recording is complete,click [CONFIRM]—the device will then
play
back the recorded message,allowing you to call your beloved
pet anytime,anywhere.
23
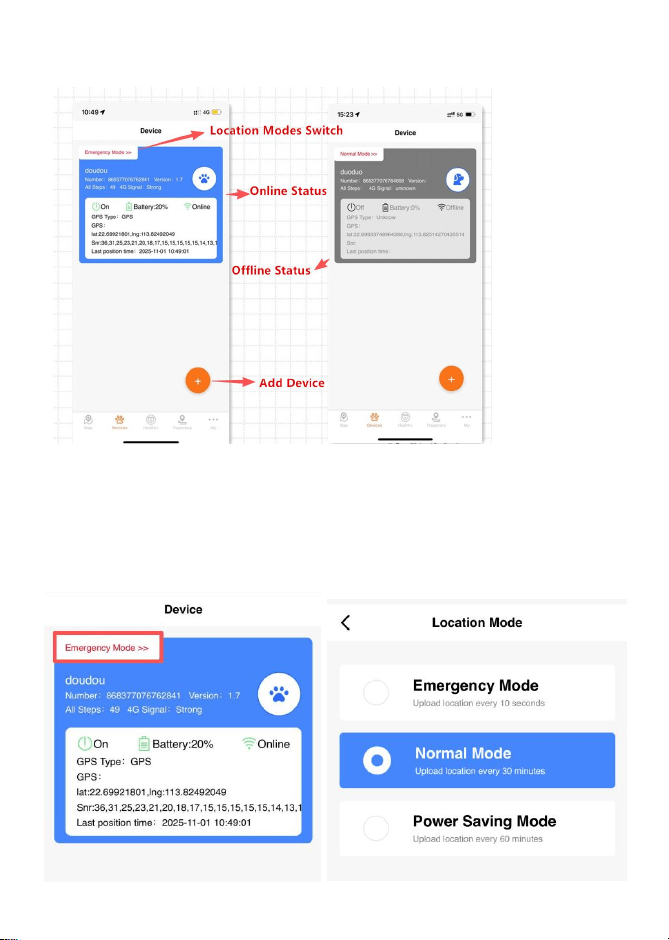
●
Devices Interface
▶ When the device is online,you can switch the location
mode by clicking the red text in the upper left corner.
1.Emergency Mode: Upload location every 10 seconds.
2.Normal Mode: Upload location every 30 minutes.
3.Power Saving Mode:Upload location every 60 minutes.
24
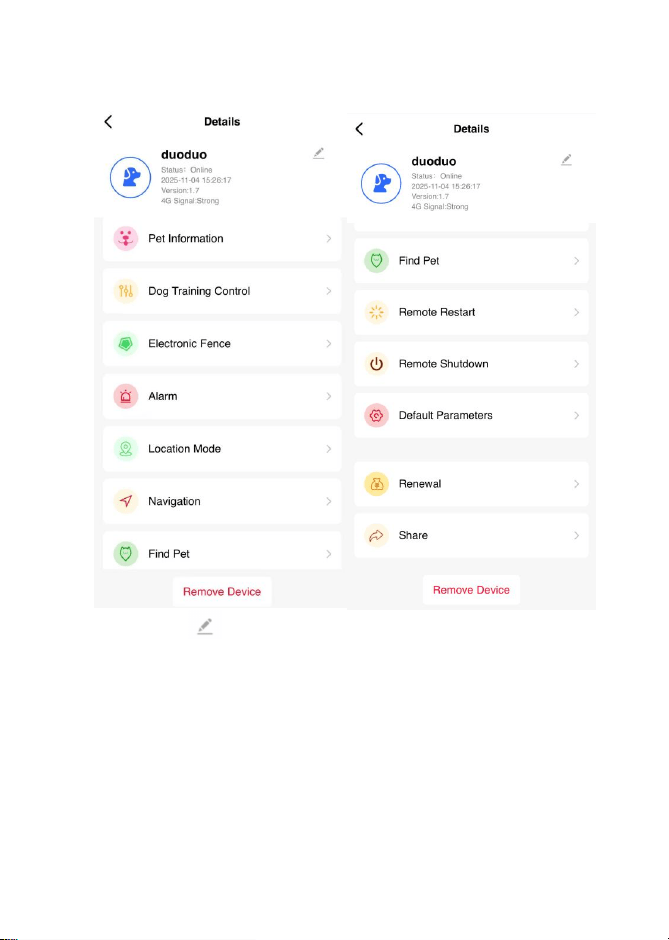
▶Click any area in the top frame to access the Device Details
Interface.
Pet's Name/
Click to rename tne pet's name.
Pet Information
View and edit your pet's avatar and name.
Dog Training Mode
1.Sound:Click it and the device will play the voice
prompt "Go home". Click the corresponding level
(Level 1/Level 2/Level 3)

25
2.Vibration Level 1~3:Click the corresponding level
(Level 1/Level 2/Level 3),and the device will vibrate.
Electronic Fence
Enter the fence management interface.You can open/close,
edit,and delete the fence.
Alarm
Check alarm information,including geofence breaches and
low battery alerts.
Location Mode
Switch the location mode between three options:Emergency
Mode,Normal Mode,and Power Saving Mode.
Navigation
Click to open the map and navigate to the device's location.
Find Pet
Click it and confirm the operation,and the collar will play
the voice prompt "Go home
Remote Restart
Click it and confirm the operation to remotely restart
the device.
Remote Shutdown
Click it and confirm the operation to remotely turn off
the device.
26
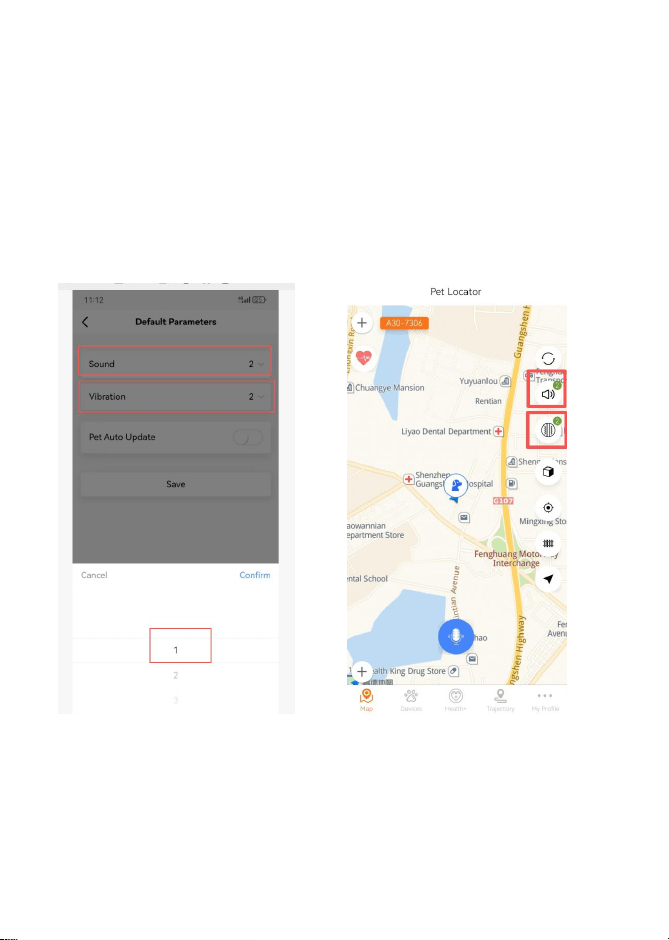
Default Parameters
You can adjust the Sound level and vibration level,then
click [Save].After successful saving,the vibration and
shock levels on the right side of the map interface will
be updated
synchronously.

27
Renewal
Click to enter the renewal page.There are three renewal
options: Monthly,Quarterly,Annual. Click the icon in the top
right corner to view the device's expiration date,activation
date,and renewal records
Share
Click to share the device.Enter the recipient's user ID
and click the[+]icon to complete the sharing.
Remove Device
Click to delete the current device.
28
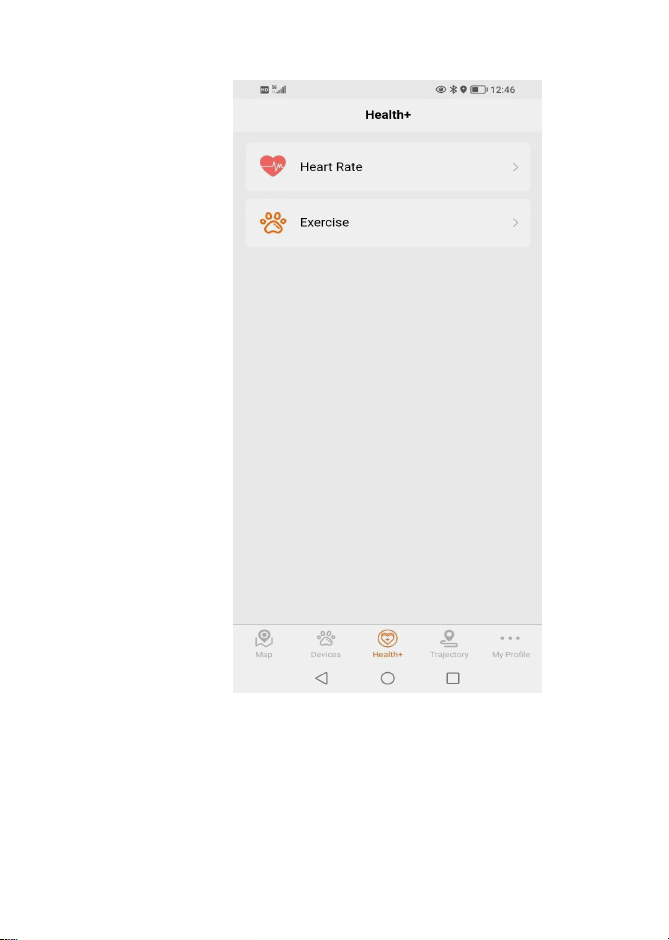
● Health+Interface
1. Click on Heart Rate
Click the "Heart Rate" tab to view your pet's real-time health
data, including heart rate, respiratory rate, and activity level.
2. Click on Pet Name to Switch Devices
Tap your pet's name at the top of the screen to switch
between different connected devices.
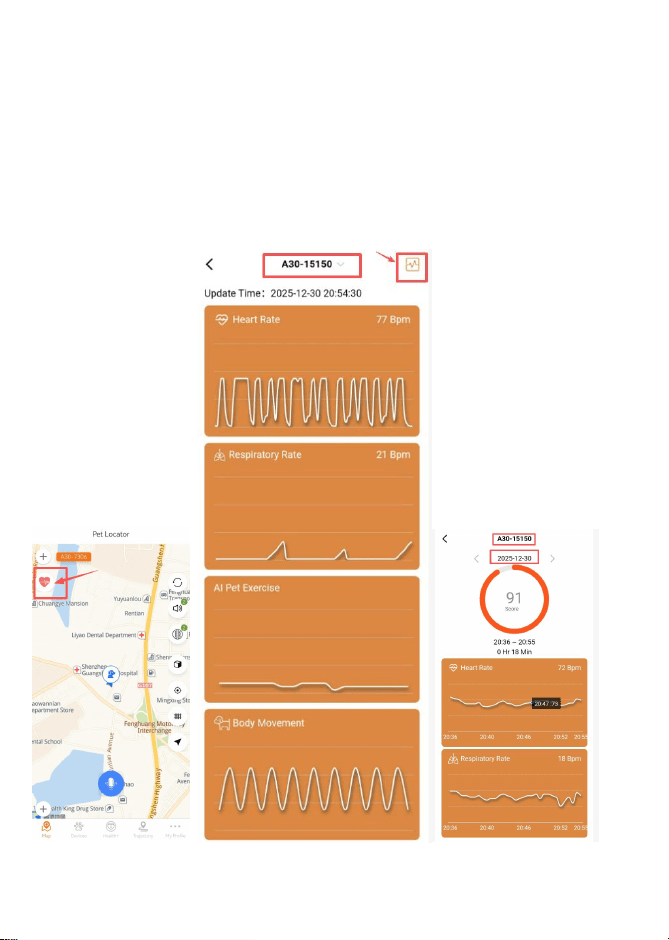
29
3. Click the Icon or Date
Tap the Health Report icon to view the comprehensive
monitoring report.
Tap the date to select a different day and review historical
monitoring data.
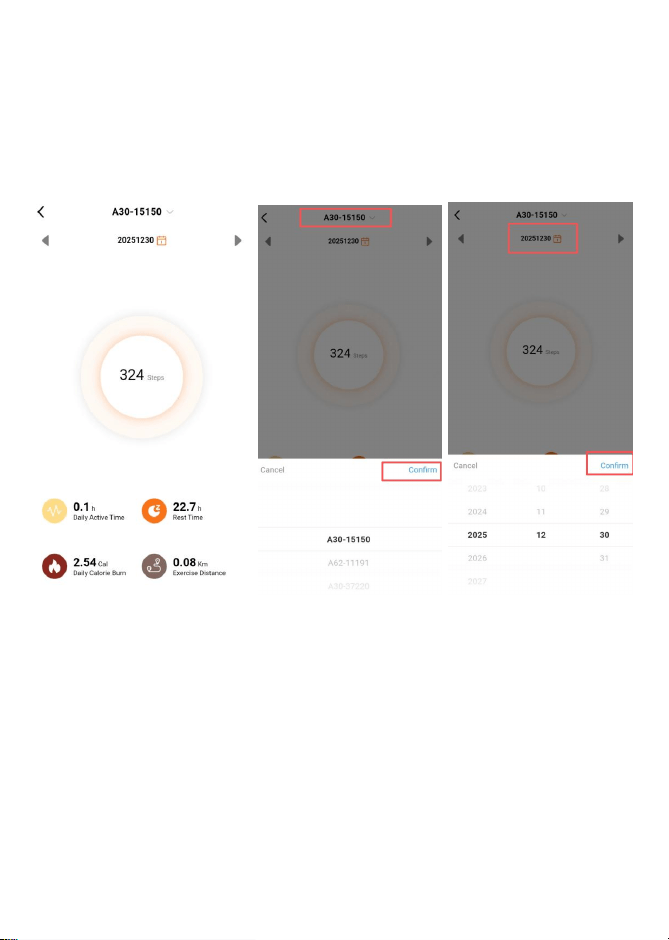
30
4.Click the pet's name to switch between other devices.
Click the date to switch to another date and view
historical activity data.

31
●Trajectory Interface
This is the [Trajectory Interface],where you can the
device's movement track.
Click the pet's name at the top to switch devices.
Click the week options to switch and view the device's
trajectories for different days within the latest 7 days.
32
The green marker represents the device's starting location, and
the red marker represents the device's ending location.
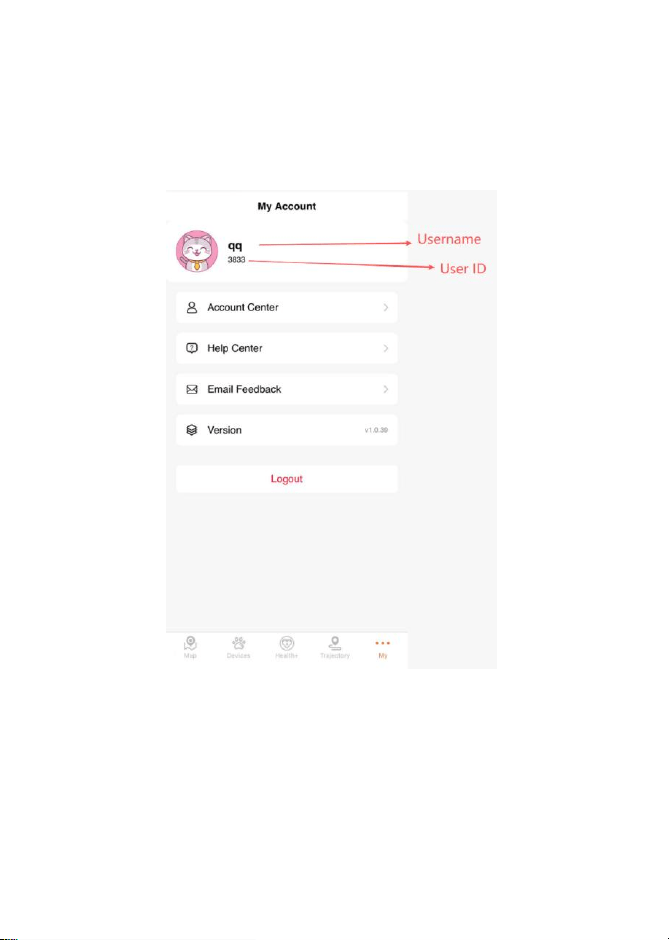
● My Interface
This is the [My Account] interface. It displays the and
user ID, where the user ID can be used for device sharing.
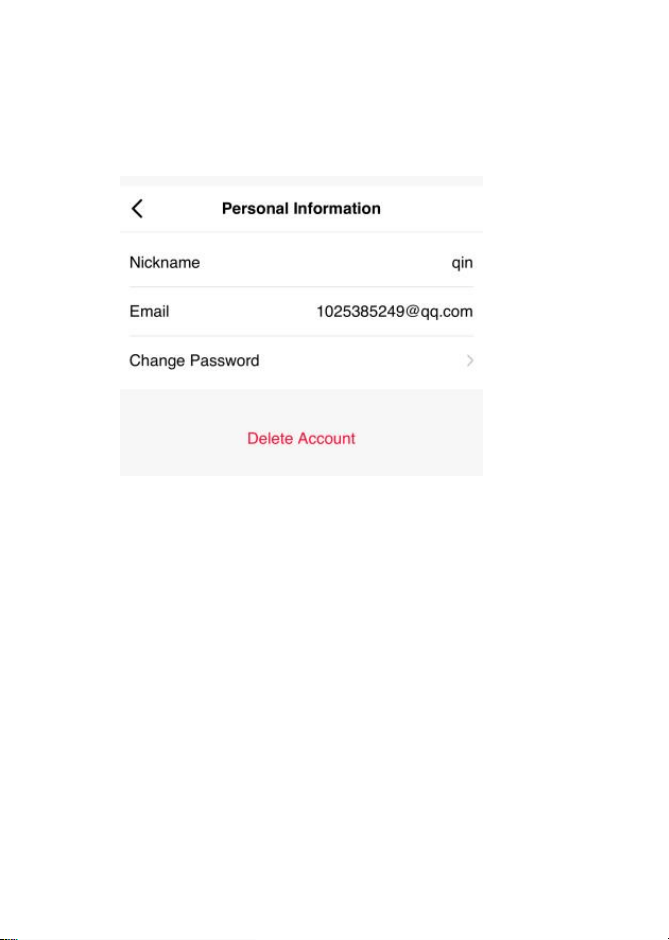
Account Center
Shows the nickname and registered email.It supports
changing password and deleting account.
Help Center
Click to navigate to the Help Center interface.
Email Feedback
Click to initiate email feedback.
Logout
Click to log out of the current account.

Product Specification
Product Name
All-in-One Pet Health & Location Collar
Material
ABS
Waterproof
Rating
IP67
Function
GPS +Electronic Fence,+Activity
Monitoring+One-Way Voice (APP
Remote Calling), Heart Rate Health
Monitoring, Remote DogTraining+App
Synchronization
Communication
Mode
4G LTE
Positioning
Modes
GPS + AGPS + WiFi + LBS
Positioning
Accuracy
3-5 meters (No Interference)
Battery
750mAh
Charging Method
Magnetic Charging
Product Size
124.4*34*33.2MM
Product Weight
84.4g


36
All-in-One Pet Health & Location Collar
User Manual

FCC warning statements:
This equipment has been tested and found to comply with the limits for a Class
B digital device, pursuant to part 15 of the FCC Rules. These limits are
designed to provide reasonable protection against harmful interference in a
residential installation. This equipment generates, uses and can radiate radio
frequency energy and, if not installed and used in accordance with the
instructions, may cause harmful interference to radio communications.
However, there is no guarantee that interference will not occur in a particular
installation. If this equipment does cause harmful interference to radio or
television reception, which can be determined by turning the equipment off and
on, the user is encouraged to try to correct the interference by one or more of
the following measures:
• Reorient or relocate the receiving antenna.
• Increase the separation between the equipment and receiver.
• Connect the equipment into an outlet on a circuit different from that to which
the receiver is connected.
• Consult the dealer or an experienced radio/TV technician for help.
Caution: Any changes or modifications to this device not explicitly approved
by manufacturer could void your authority to operate this equipment.
This device complies with part 15 of the FCC Rules. Operation is subject to the
following two conditions: (1) This device may not cause harmful interference,
and (2) this device must accept any interference received, including
interference that may cause undesired operation.
The device has been evaluated to meet general RF exposure requirement This
equipment complies with FCC radiation exposure limits set forth for an uncontrolled
environment.
This equipment should be installed and operated with minimum distance 20cm
between the radiator & your body.