NOTE: PLEASE INSPECT HOOD
IMMEDIATELY UPON RECEIVING.
CLAIM OF DAMAGE AFTER 7 DAYS
OF DELIVERY WILL BE DENIED.
This unit is designed for indoor
residential use only. DO NOT USE
OVER A WOOD GRILL OR MOUNT
IN OUTDOOR ENVIRONMENT.
www.windsterhood.com
User’s Manual
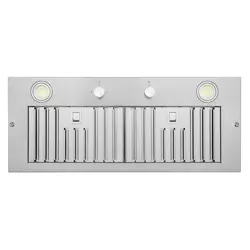
WS-6730SS
WS-6736SS
Please read this operation manual thoroughly before
using your range hood. Store it in a safe location for
when you need to reference it in the future.

TABLE OF CONTENTS 1
Safety Information .......................................................... 2 – 4
Content Checklist ................................................................... 5
Measurements ....................................................................... 6
Preparation ............................................................................. 7
Installation .............................................................................. 8
Installation Diagram .............................................................. 9
Operation & Features .......................................................... 10
Cleaning & Maintenance .................................................... 11
Troubleshooting .................................................................. 12
Parts List / Replacement ..................................................... 13
Warranty / Contact Us................................................. 14 – 16
2 SAFETY INFORMATION
TO REDUCE THE RISK OF A FIRE, ELECTRICAL SHOCK,
AND/OR INJURY OBSERVE THE FOLLOWING:
•
Unit is intended for indoor residential use only. If you should have questions,
contact the manufacturer at the address or telephone number listed in the
warranty.
•
In case the unit should need to be cleaned or repaired, switch power off at
service panel and lock service disconnecting means to prevent power from
being switched on accidentally. When the service disconnecting means cannot
be locked, securely fasten a prominent warning device, such as a tag, to the
service panel.
•
Installation work and electrical wiring must be done by a qualified technician in
accordance with all applicable codes and standards, including fire-rated
construction.
•
Sufficient air is needed for proper combustion and exhausting of gases
through the flue (chimney) of fuel burning equipment to prevent back drafting.
Follow the heating equipment manufacturer’s guideline and safety standards
such as those published by the National Fire Protection Association (NFPA),
and the American S
ociety of Heating, Refrigeration and Air Conditioning
Engineers (ASHRAE), and the local code authorities.
•
Because the unit is made of stainless steel, it may contain sharp edges. Be
careful to avoid cuts and abrasions by wearing protective gloves during
installation and cleaning.
•
Before you begin to cut or drill into the wall, verify that there is no electrical
wiring or any other hidden electrical components.
•
Ducted fans must always be vented to the outdoors.
•
The unit must be properly grounded and installed at the recommended height
before beginning operation.
•
To reduce the risk of fire, use only metal ductwork.
CAUTION: FOR GENERAL VENTILATING USE ONLY. DO NOT
USE TO EXHAUST HAZARDOUS OR EXPLOSIVE MATERIALS
AND VAPORS
SAFETY INFORMATION 3
TO REDUCE THE RISK OF FIRE, OR ELECTRIC SHOCK, DO NOT
USE THIS FAN WITH ANY SOLID-STATE SPEED CONTROL DEVICE.
•
Regardless of heat level, never leave any surface materials unattended
whileoperating an open flame.
•
Always turn hood ON when cooking at high heat or when flambéing food (i.e.
Crepes Suzette, Cherries Jubilee, Peppercorn Beef Flambé).
•
Depending on amount of usage, clean ventilating fans and filters frequently.
Grease should not be allowed to accumulate on fan or filter. For instructions
on the how to clean, see maintenance page.
•
Never leave surface units unattended at high settings. Boil-overs may cause
smoking and greasy spillovers may ignite as result. Heat oils slowly on low or
medium settings.
•
Use proper pan size. Always use cookware appropriate for the size of the
surface element.
TO REDUCE THE RISK OF INJURY TO PERSONS IN THE
EVENT OF A RANGE TOP GREASE FIRE, OBSERVE THE
FOLLOWING:
•
SMOTHER FLAMES with a close-fitting lid, cookie sheet, or metal tray, then
turn off the burner. BE CAREFUL TO PREVENT BURNS. If the flames do not
go out immediately, EVACUATE AND CALL 911.
•
NEVER PICK UP A FLAMING PAN — Doing so may result in serious burns
and possibly spread the fire.
•
DO NOT USE WATER – Grease fire must be extinguished before further
action may be taken. Using water will agitate the grease and may cause a
violent steam explosion.
•
Use a Fire Extinguisher ONLY if:
You know
you have a Class ABC extinguisher, and you already know
how to operate it.
The fire is small and contained in the area where it started.
The fire department is being called.
You are able to safely control the fire with your back to an open exit. *
Based on “Kitchen Fire safety Tips” published by NFPA.

4
SAFETY INFORMATION
PROP. 65 WARNING FOR CALIFORNIA RESIDENTS:
•
This product may contain chemicals known to the State of California to cause
cancer, birth defects, or other reproductive harm.

CONTENT CHECKLIST 5
1.
CONTENTS INCLUDED
a. (1) 120V, 60Hz, 4A WS-67 series (30”/36”) hood assembly
b. (1) User’s manual
c. (2) LED lights (30”/36”)
d. (2) Baffle filters (30”)
(3) Baffle filters (36”)
2.
CONTENTS NOT INCLUDED
a. WS-67CFMR (CFM reducer)
b. 6” / 7” Aluminum or metal piping
3.
TOOLS REQUIRED (NOT INCLUDED)
a. Safety gloves
b. Safety glasses
c. Electric drill w/ starter bit
d. Utility knife
e. Philips screwdriver
f. Spirit level
g. Measuring tape
h. Writing instrument (pen, marker, pencil)
i. Aluminum tape
6
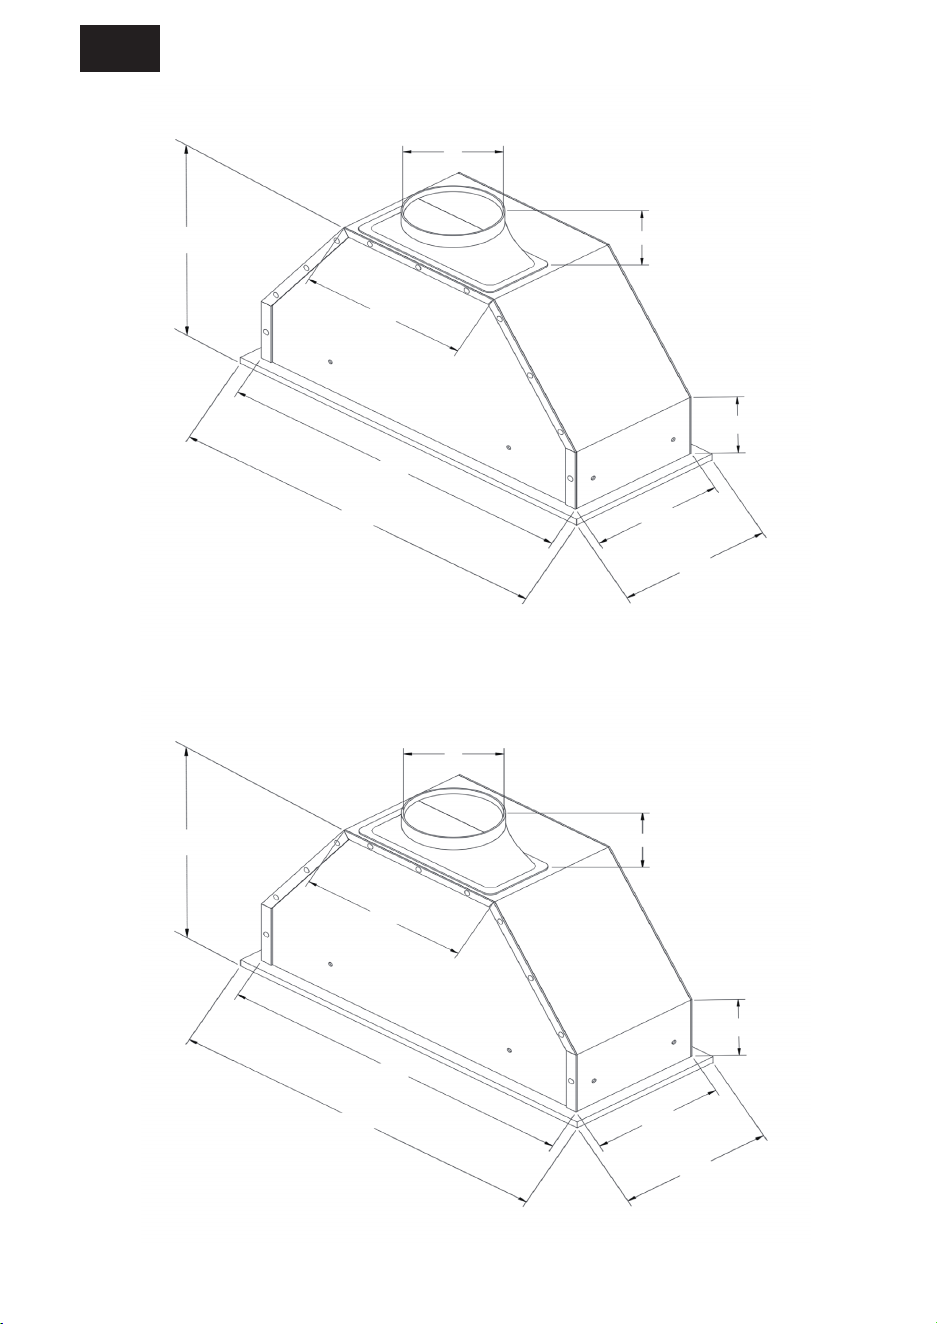
MEASUREMENTS
WS-6730SS
10-3/8''
6''
4''
2-1/2''
10-1/4''
11-3/8''
26''
27-3/4''
11-3/4''
10-3/8''
6''
4''
2-1/2''
10-1/4''
11-3/4''
33-7/8''
35-3/8''
11-3/4''
Wood Hood Cut-Out Size:
26-1/8" x 10-3/8"
Wood Hood Cut-Out Size:
34" x 10-3/8"
WS-6736SS

PREPARATION
7
1. BEFORE YOU START
**DO NOT INSTALL IF DAMAGED**
**RETURN OR EXCHANGE WILL BE DENIED IF INSTALLED**
a. Be sure you have all the content of your purchase and required tools for
this installation.
b. Installation may take at least 1 to 2 hours from start to finish.
c. Plan to use as few elbows or turns as possible for more efficient air flow.
d. Collar size may need to be increased if utilizing a long duct run.
e. At least 12” of vertical duct is required before any turn.
f. Do not try to install this unit by yourself, SERIOUS IN
JURY MAY OCCUR.
g. At least two people are needed for installation.
h. Hiring a certified installer and electrician is recommended.
i. Cold weather installation will require make-up air or a CFM reducer.
Check with your local building codes for more detail.
2. LOCATION
a. Determine the exact location you want to install the range hood.
b. Depending on the height of your ceiling, distance between cooktop and
range hood should be between 27”-33”.
c. Range hood should be mounted at stated measurements to ensure
performa
nce and lifespan of electrical components.
d. Correctly measure the dimension needed to install the unit.
3. HOOD LINER
a. Inspect for any sign of defect or damage. ( i.e. scratches, dents, loose
seams, etc.)
b. Power up the unit to make sure it is working properly.
c. Remove the baffle filters and unscrew the fillers.
d. Remove the protective file on the baffle filters and fillers.
Use Fig. 1a and 1b on page 5 for measurements

8 INSTALLATION
1.
DUCTED INSTALLATION
**DO NOT INSTALL CLOSER THAN 29” ABOVE COOKING SURFACE**
a. Make sure all preparation steps are completed.
b. Determine where you would like to mount the hood.
d. Lift the unit up flush against the wall.
e. Be sure the unit is leveled and parallel.
f. Using the screws and washers provided, tightly secure the unit against
the wall and the cabinet frame.
NOTE: Install additional screws through the back of the unit if necessary.
g. Use the conversion collar for 7” ducting. (OPTIONAL)
h. Connect 6” or 7” ducti
ng to the collar of the hood.
i. Finish off by sealing the connection point with aluminum tape.
2.
COLD WEATHER INSTALLATION (OPTIONAL)
NOTE: WS-67CFMR is only compatible with 6” top round outlet
a. Check with your local building codes to see if a CFM reducer is an
acceptable alternative to make-up air.
b. Remove the WS-67CFMR (CFM Reducer) and inspect for any sign of
defect or damage. (i.e. Cracks, broken/defective sections)
c. AFTER COMPLETING Step A – E of Section 1 DUCTED
INSTALLATION (Top round outlet)
d. Place the CFM reducer onto the outlet of the unit and seal the connection
point with aluminum tape. (Be sure it is secured with no opening or gaps)
e. Connect a 6” ducting to the collar of the CFM reducer.
f. Finish off by sealing other connection points with aluminum tape.
Installation diagram available on next page
c. Refer to diagram on page 9 to remove lower panel for installation.
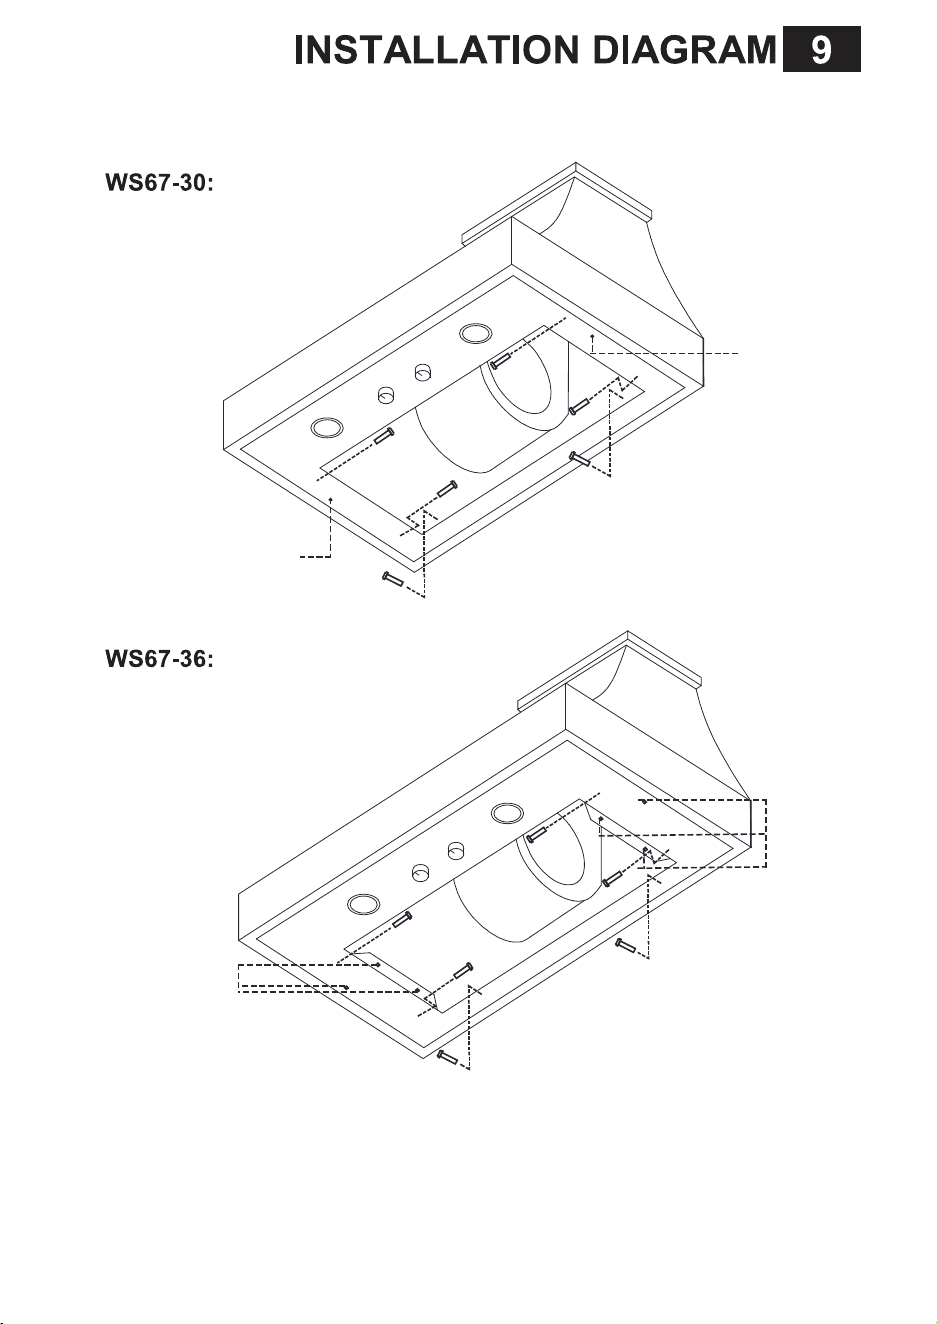
Lower panel screws
• To access the side mounting holes the lower panel must be removed.
• Secure the lower panel prior to loosening the screws as the panel will drop.
• Remove the screws shown in the image above. (See image for screw location)
• Return to page 8 and continue with step d.
Lower panel screws
Lower panel screws
Lower panel screws

OPERATION & FEATURES
10
1. EASY ACCESS KNOB CONTROL
a. Knob 1 – Light ON / OFF
b. Knob 2 – Speed
i. 1 – Low speed
ii. 2 – Medium speed
iii. 3 – High speed
2. BAFFLE FILTERS
a. (2) baffle filters (30’’)
b. (3) baffle filters (36”)
CLEANING & MAINTENANCE
11
WARNING!!!
To prevent the possibility of a fire and explosion, do not use
flammable liquids or solvents to clean the unit or any of its parts.
Check to make sure all power sources are disconnected before
servicing or taking unit apart for cleaning.
Please thoroughly clean the unit weekly as stainless steel
can rust under certain condition or by improper cleaning.
1. RANGE HOOD
a. Use household cleaner to remove grease or dirt from the outer shell of the unit.
Spray on wiping cloth or sponge and wipe in the direction of the grain to avoid
scratching the unit. (DO NOT SPRAY DIRECTLY ONTO UNIT)
b. Clean the inner working of the unit periodically to avoid grease build-up.
c. Do not open control switch panel while the hood is connected to power.
d. Use stainless steel cleaner to bring back the shine to the unit.
2. BAFFLE FILTERS
a. Remove baffle filters from unit and place in warm soapy water.
b. Clean the baffle filters regularly for the most efficient suction power.
c. Do not drop
baffle filters or filler.
d. Let it soak thoroughly and then clean it with wiping cloth or sponge.
e. Baffle filters may also be cleaned using residential dishwasher.
TROUBLESHOOTING
12
WARNING!!!
Check to make sure all power sources are disconnected
before starting any troubleshooting. Safety gloves and glasses
should be worn when working on the unit. Serious injury or death
may occur if safety precautions are not followed.
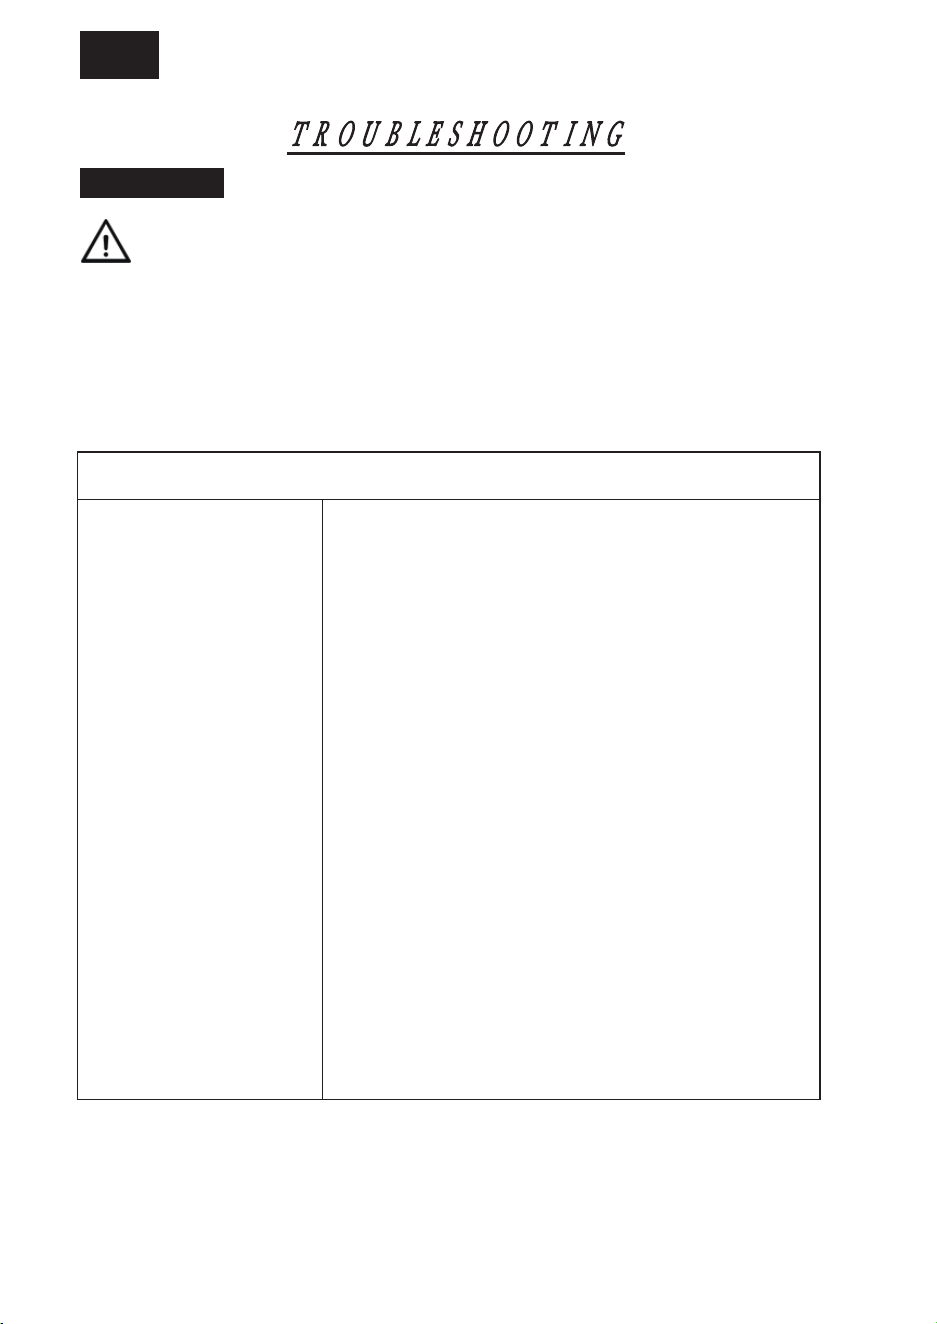
WS-67 Series
LED Light Issue
(One light not turning on
or all not turning on)
Filters loose 1. Ensure inside springs are properly expanded
Control Knobs not
working correctly
1. Control Knob replacement is required.
Speed levels not
working correctly
1. Control Knob replacement may be required.
2. Motor replacement may be required.
Unit lacking smoke
intake
1. Make sure a reducer has not been installed.
2. Check ducting for foreign object.
3. Ensure all ducting is properly sealed.
4. Maintenance may be required to increase air-flow
Unit showing no power
indication
1. Ensure 120v electrical power source is working
correctly.
Unit making humming
noise/ motor not starting.
/Lights operating
correctly.
1. Capacitor replacement is required.
1. replacement is required.
LED Light
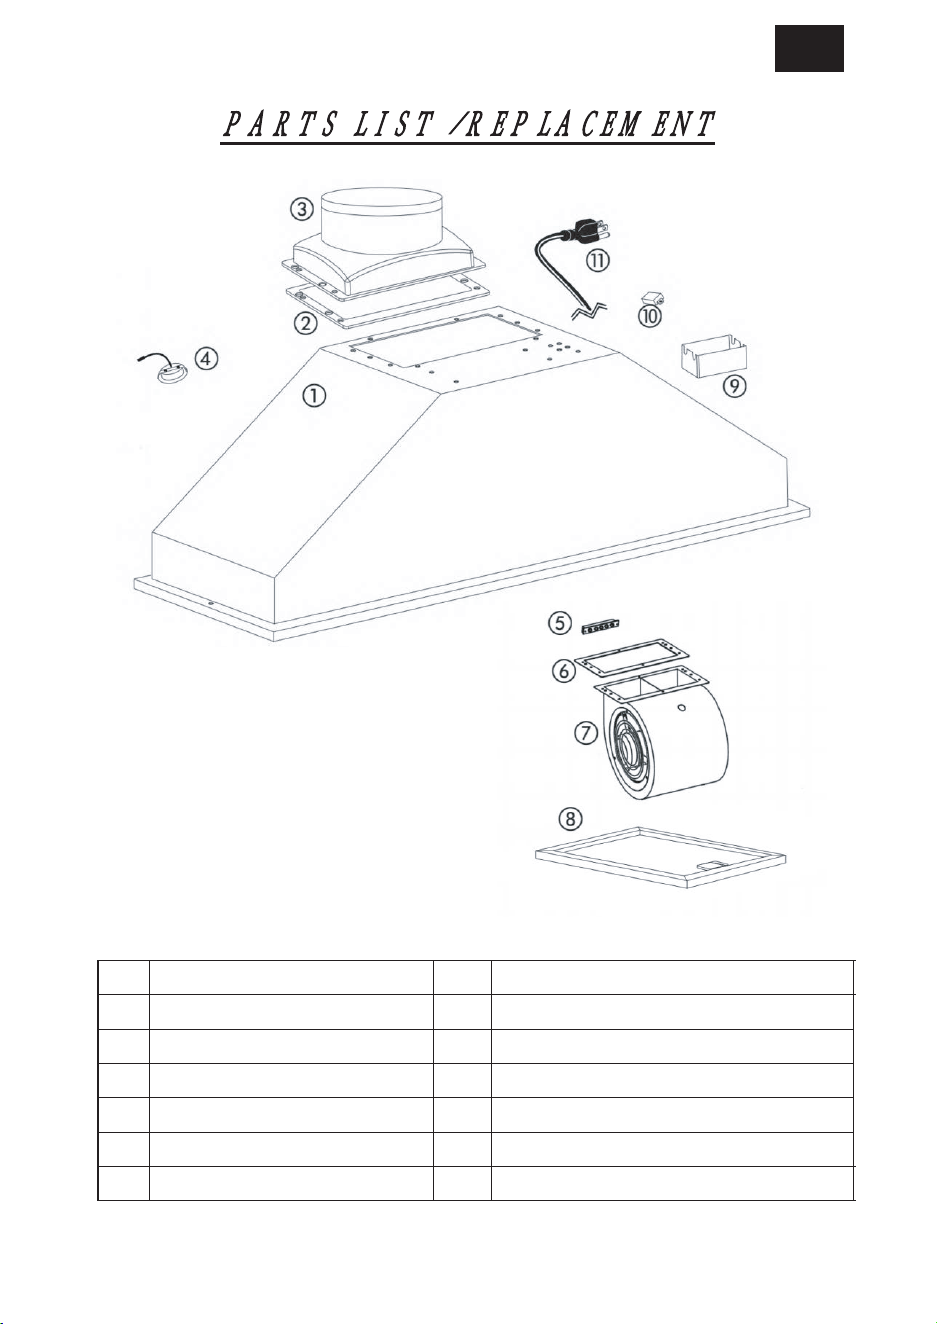
PARTS LIST / REPLACEMENT
13
#
Description
#
Description
1
Stainless steel body 7 Motor
2
Gasket of Duct Connector 8 Filter
3 Duct connector 9 Electric Box
4 LED light 10 Capacitor
5 Controller 11 Plug
6 Gasket of motor

WARRANTY / CONTACT US
14
LIMITED WARRANTY
Windster Hoods Inc. warrants its product against defects in material or workmanship as
follows:
Parts: Windster Hoods, Inc. will supply, at no charge, new or rebuilt replacements in
exchange for defective parts for a period of two (2) years. After the warranty period,
consumer will be responsible for all parts costs. During the "parts" warranty period,
there will be no charge for parts.
Motor: Windster Hoods, Inc. will also provide, at no charge, new or rebuilt motor parts
in exchange for defective parts for a period of five (5) years, excluding motor cages.
After the warranty period, consumer will be responsible for all motor parts costs. During
the “motor” warranty period, there will be no charge for motor parts.
Please keep the original sales receipt, as it will constitute as your proof of purchase.
Consumer must provide the serial number and the original sales receipt to submit a
warranty claim. Warranty claims submitted wi
thout serial number and original sales
receipt will be denied. This warranty applies only to products purchased and serviced in
the United States.
For products purchased in Canada, please contact your local retailer where you
purchased the unit for service.
Windster Hoods, Inc. will not be held liable for removal and/or installation fees of the
malfunctioning, defective, and/or replacement unit.

WARRANTY / CONTACT US
15
*Windster Hoods, Inc. reserves the right to determine the validity of your warranty
claim.
WHAT IS NOT COVERED BY MANUFACTURER WARRANTY
1. Damages resulting from any of the following:
a. Improper installation or maintenance
b. Any repair, modification, alteration or adjustment not authorized by
the manufacturer or an authorized service dealer
c. Misuse, accidents, and/or neglect
d. Incorrect electric current, voltage or power supply
e. Improper setting of any control (Pressing multiple se
lections at the
same time)
f. Improper chemical cleaning (commercial or industrial cleaning agents)
2. Products purchased for use in an outdoor, commercial, and/or industrial
setting (such as in a hotel, office, restaurant, or other business)
3. Damage resulting from natural disasters (earthquake, flood, storm, etc.)
4. Regular maintenance for the product
5. Wear and maintenance items such as:
a. Aluminum Filters, Baffle Filters, Charcoal Filters, Mesh Filters, Oil
cups, Lighting bulbs, light f
ixtures etc.
6. Corrosion
7. Oil Cup
8. Motor Cage
9. Light Bulbs
No returns refunds exchanges if the hood
•
Is missing parts
•
Been Installed
•
Been Used

WARRANTY / CONTACT US
16
Windster Hoods, Inc.
www.windsterhood.com
Information subject to change without notice
CONTACT US