1
User manual Of Eluntrix Solar Landscape Spotlight SLS1
IMPORTANT TIPS
Control Method: The light must be connected to the App for control and normal
operation.
Energy-Saving Mode: After connecting to the app, the light enters Energy-
Saving Mode by default, automatically adjusting brightness based on the battery
level: the lower the battery level, the lower the brightness.
If you prefer the light to remain at 100% brightness or any fixed brightness level,
please disable Energy-Saving Mode in the App. Once disabled, the light will
operate continuously at the brightness level you set.
Runtime: If the light’s runtime is shorter than expected, it may be caused by
insufficient charging due to inadequate sunlight. In this case, lowering the
brightness is recommended to extend the lighting duration.
Installation Location: To ensure optimal charging duration and better overall
performance, install the light in a location with abundant sunlight, keeping the
solar panel unshaded and fully exposed to direct sunlight.
First-Time Use: For best performance, it is recommended to charge the light
continuously for 48 hours before the first use.
Introduction
Our smart solar spotlight features an easy, wire-free installation with a plug-and-play
solar-powered design. The adjustable angles allow for flexible illumination. The light
automatically detects ambient lighting—turning on at night and off at dawn. Smart
control can also be achieved through the mobile app.
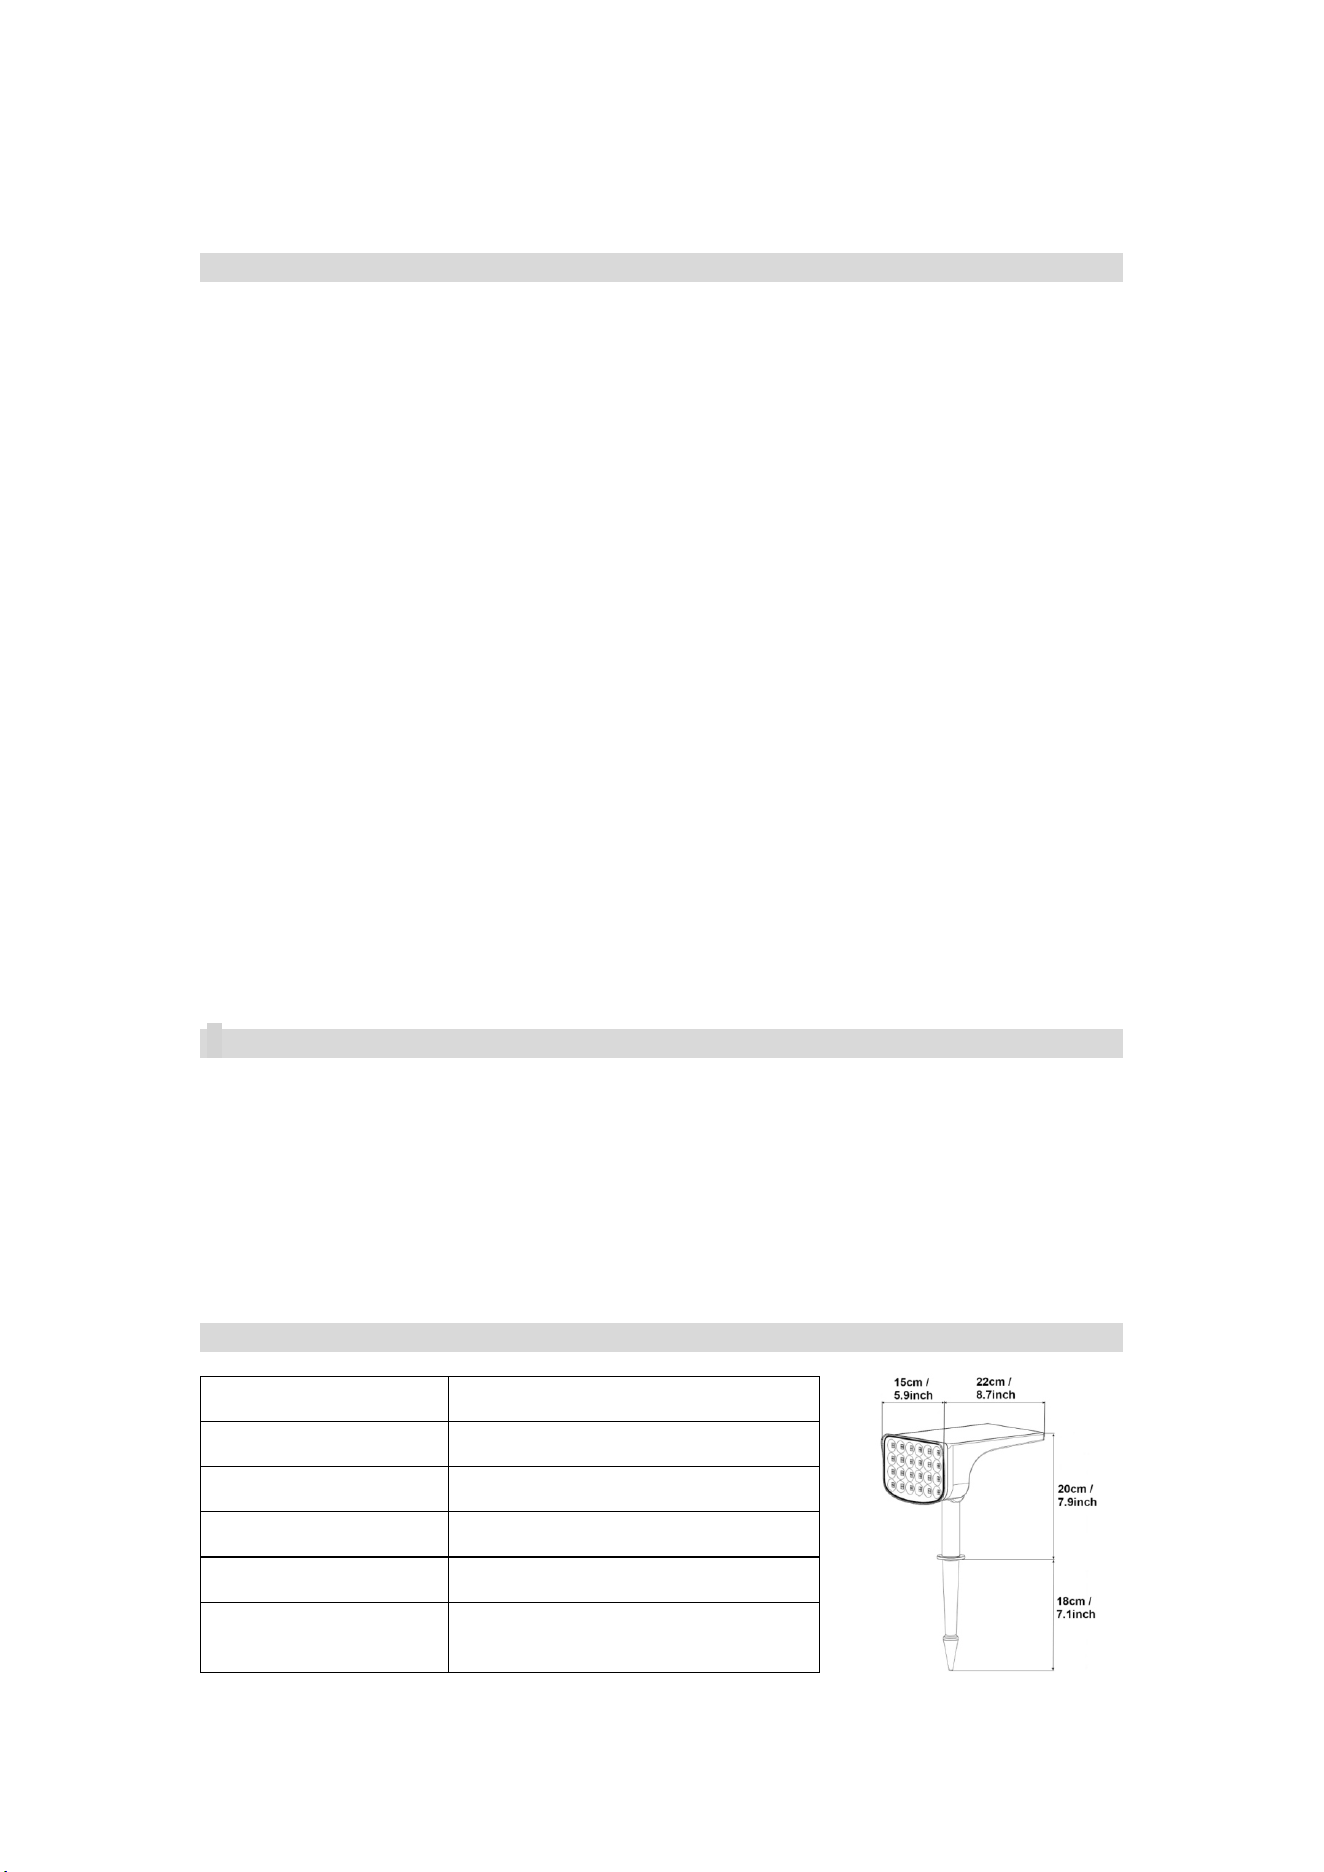
Specifications
LED QTY
96 PCS
IP rating
IP65
Temperature Range
14℉ - 104℉ (-10°C - 40°C)
Materials
ABS body + PC lens
Beam Angle
90°
Colors
Warm White + Cold White +
RGB
2
Installation
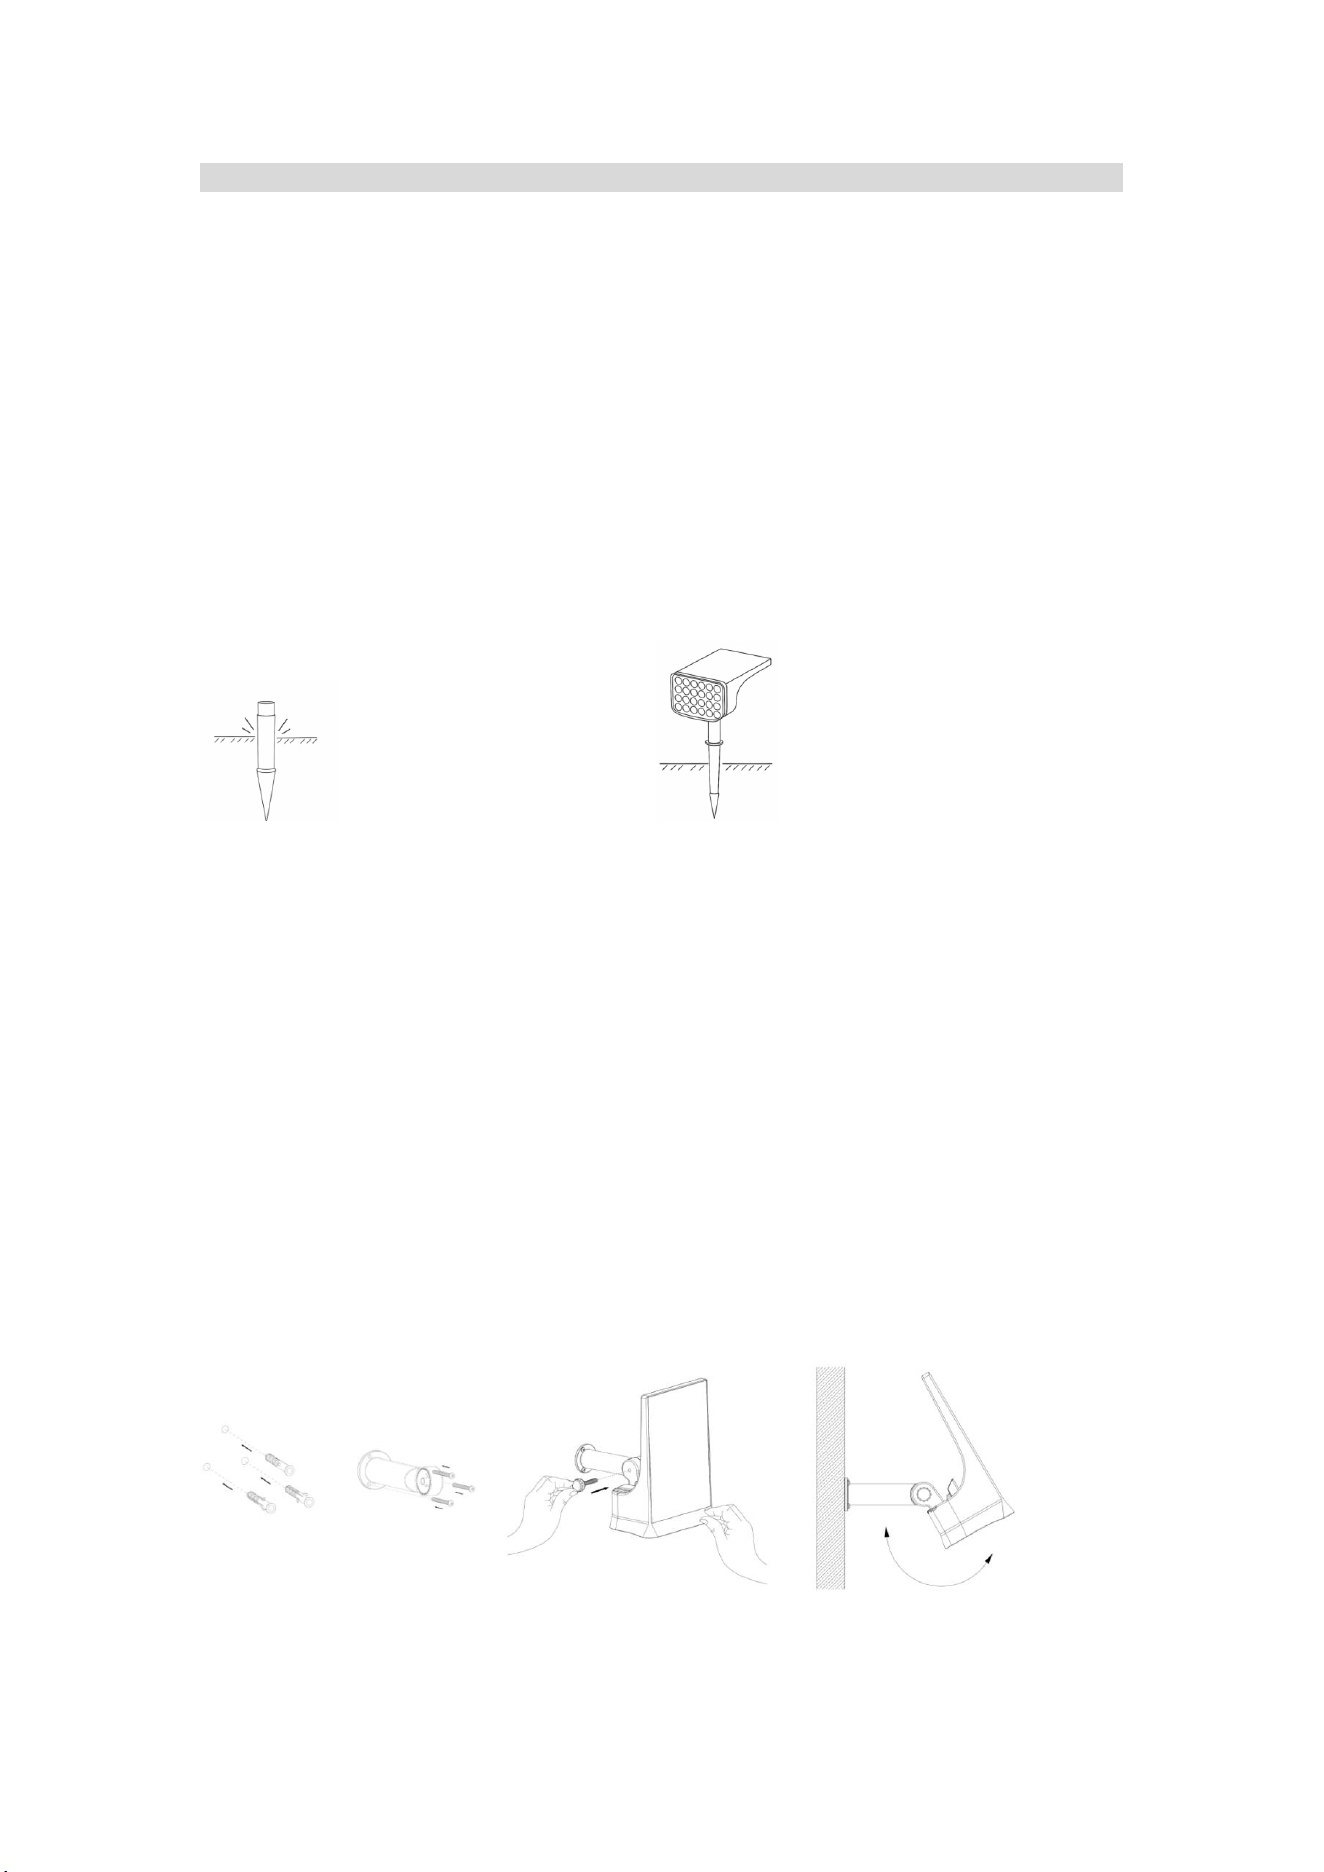
Method 1: Wall-Mounted Installation
STEP 1: Insert the ground stake vertically into the soil and ensure it is firmly secured.
STEP 2: Attach the light to the ground stake using the mounting pole of the light, then
adjust the lighting angle (ensure it can receive adequate sunlight). After adjustment,
tighten the locking screw on the mounting pole.
(Note: do not press the light with your hands to force it into the ground, as this may
damage the fixture. Secure the ground stake firmly first, then gently insert the light
into the stake using the mounting pole.)
STEP 1 STEP 2
Method 2: Wall-Mounted Installation
Step 1: If installing on a hard surface such as concrete, drill two holes first and insert
the wall anchors. (If installing on softer materials like wood, this step can be skipped.)
Step 2: Use screws to secure the mounting pole to the drilled positions.
Step 3: Hand-tighten the screws to attach the light to the mounting pole.
Step 4: Adjust the lighting angle as needed, then tighten the fixture to lock it in place.
Step 1 Step 2 Step 3 Step 4
3
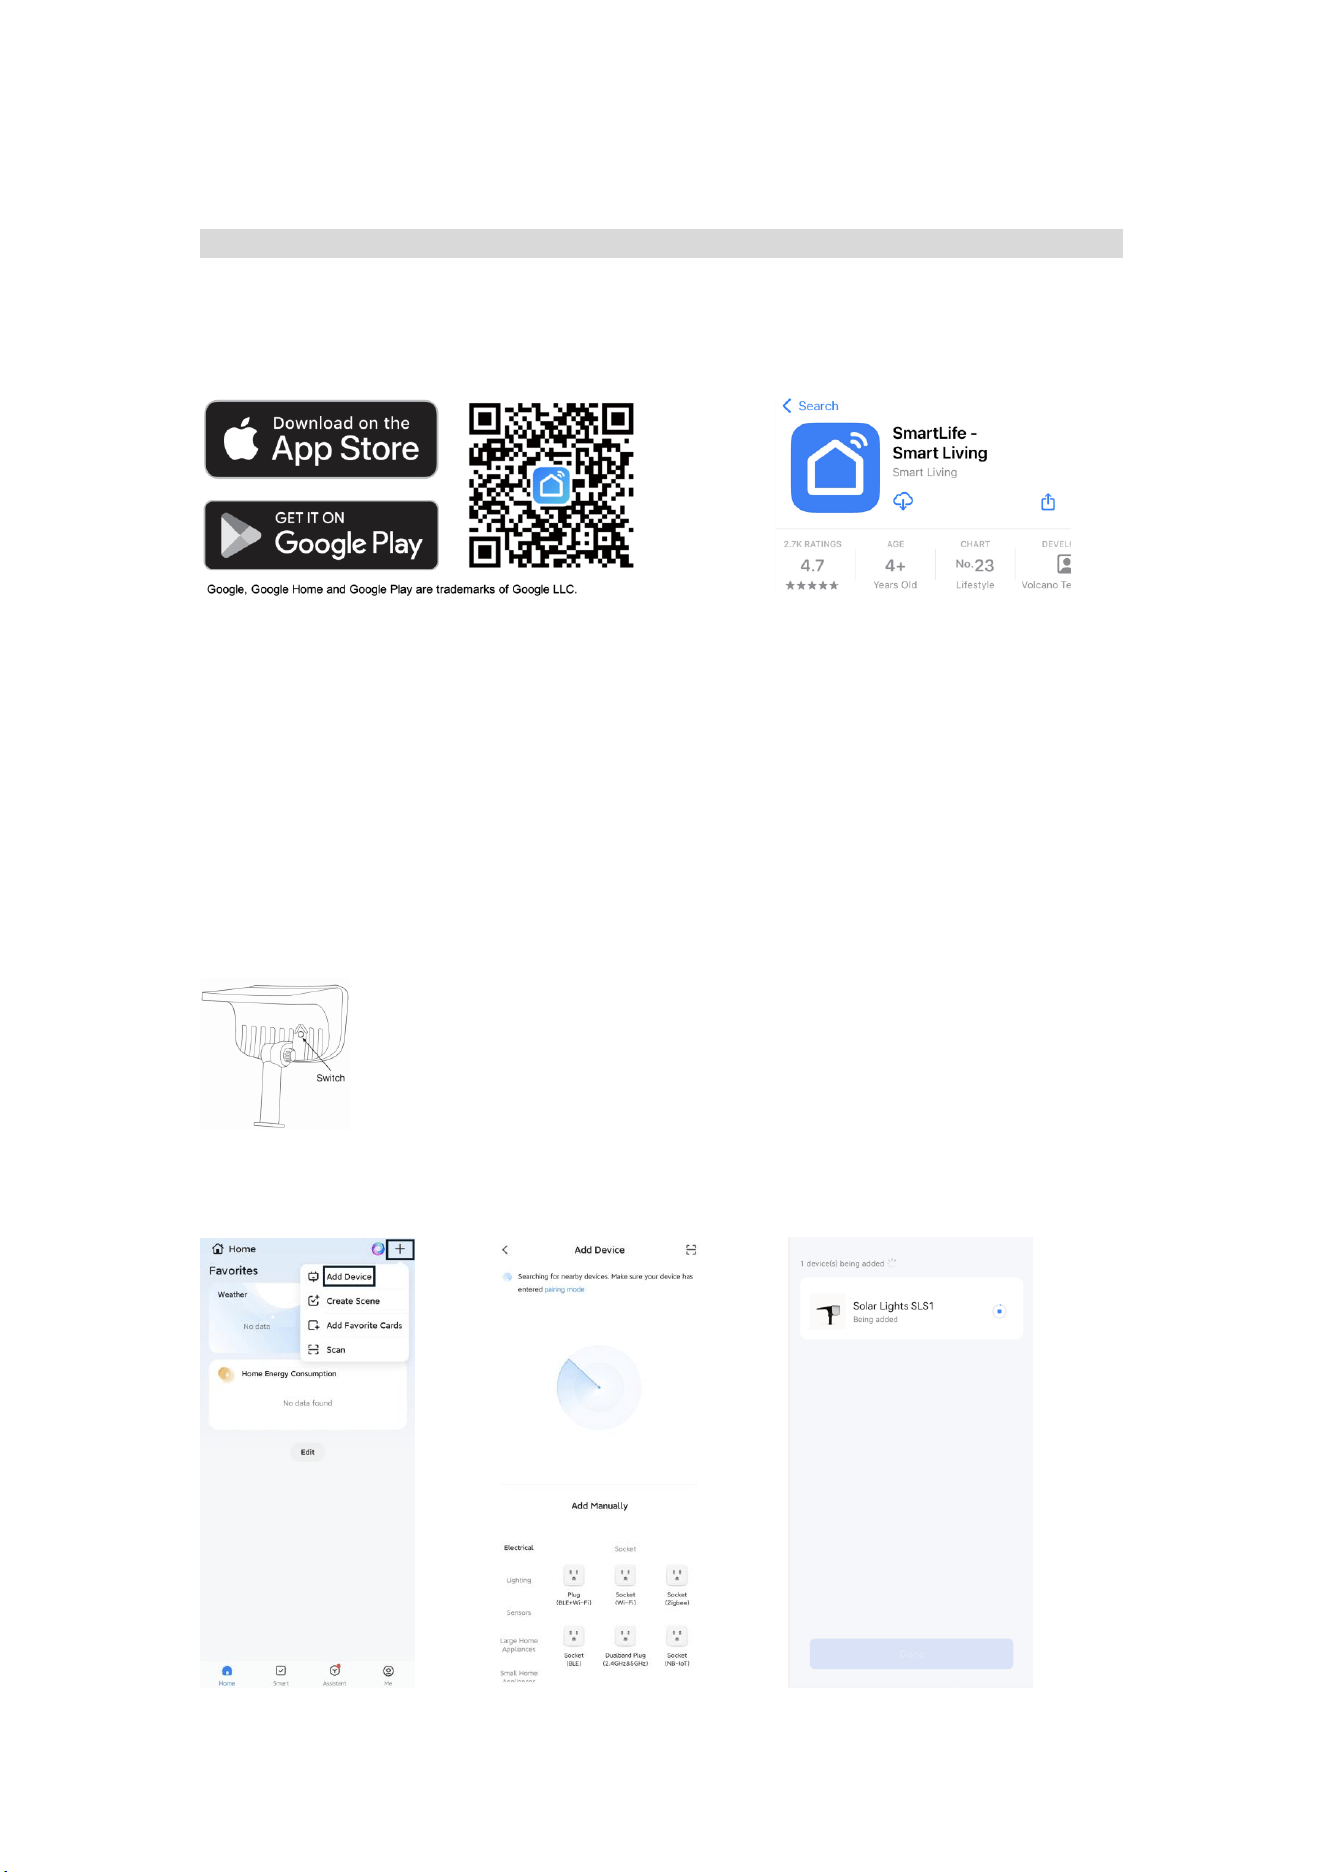
Download and Connect the App
1. Scan the QR code below to download the App, or search for SmartLife in the App
Store or Google Play.
2. Open the App and log in or create a new account.
3. Enable Bluetooth on your phone.
4. Pair Mode: Turn on the light using the power switch. The light will enter pairing
mode immediately: it will flash for 3 seconds and then remain on at low brightness for
up to 10 minutes. If pairing is not completed within 10 minutes, pairing mode will end
and the light will switch to steady high brightness. To re-enter pairing mode, toggle
the power switch 6 times consecutively (OFF–ON–OFF–ON–OFF–ON).
5. Tap the “+” button in the App and select “Add Device” to add the light to the App.
4
6. When no obstructions, the control range of the light can reach up to 98 ft (30 m).
Using the App for Control and Settings
1. You can check the battery level in the App.
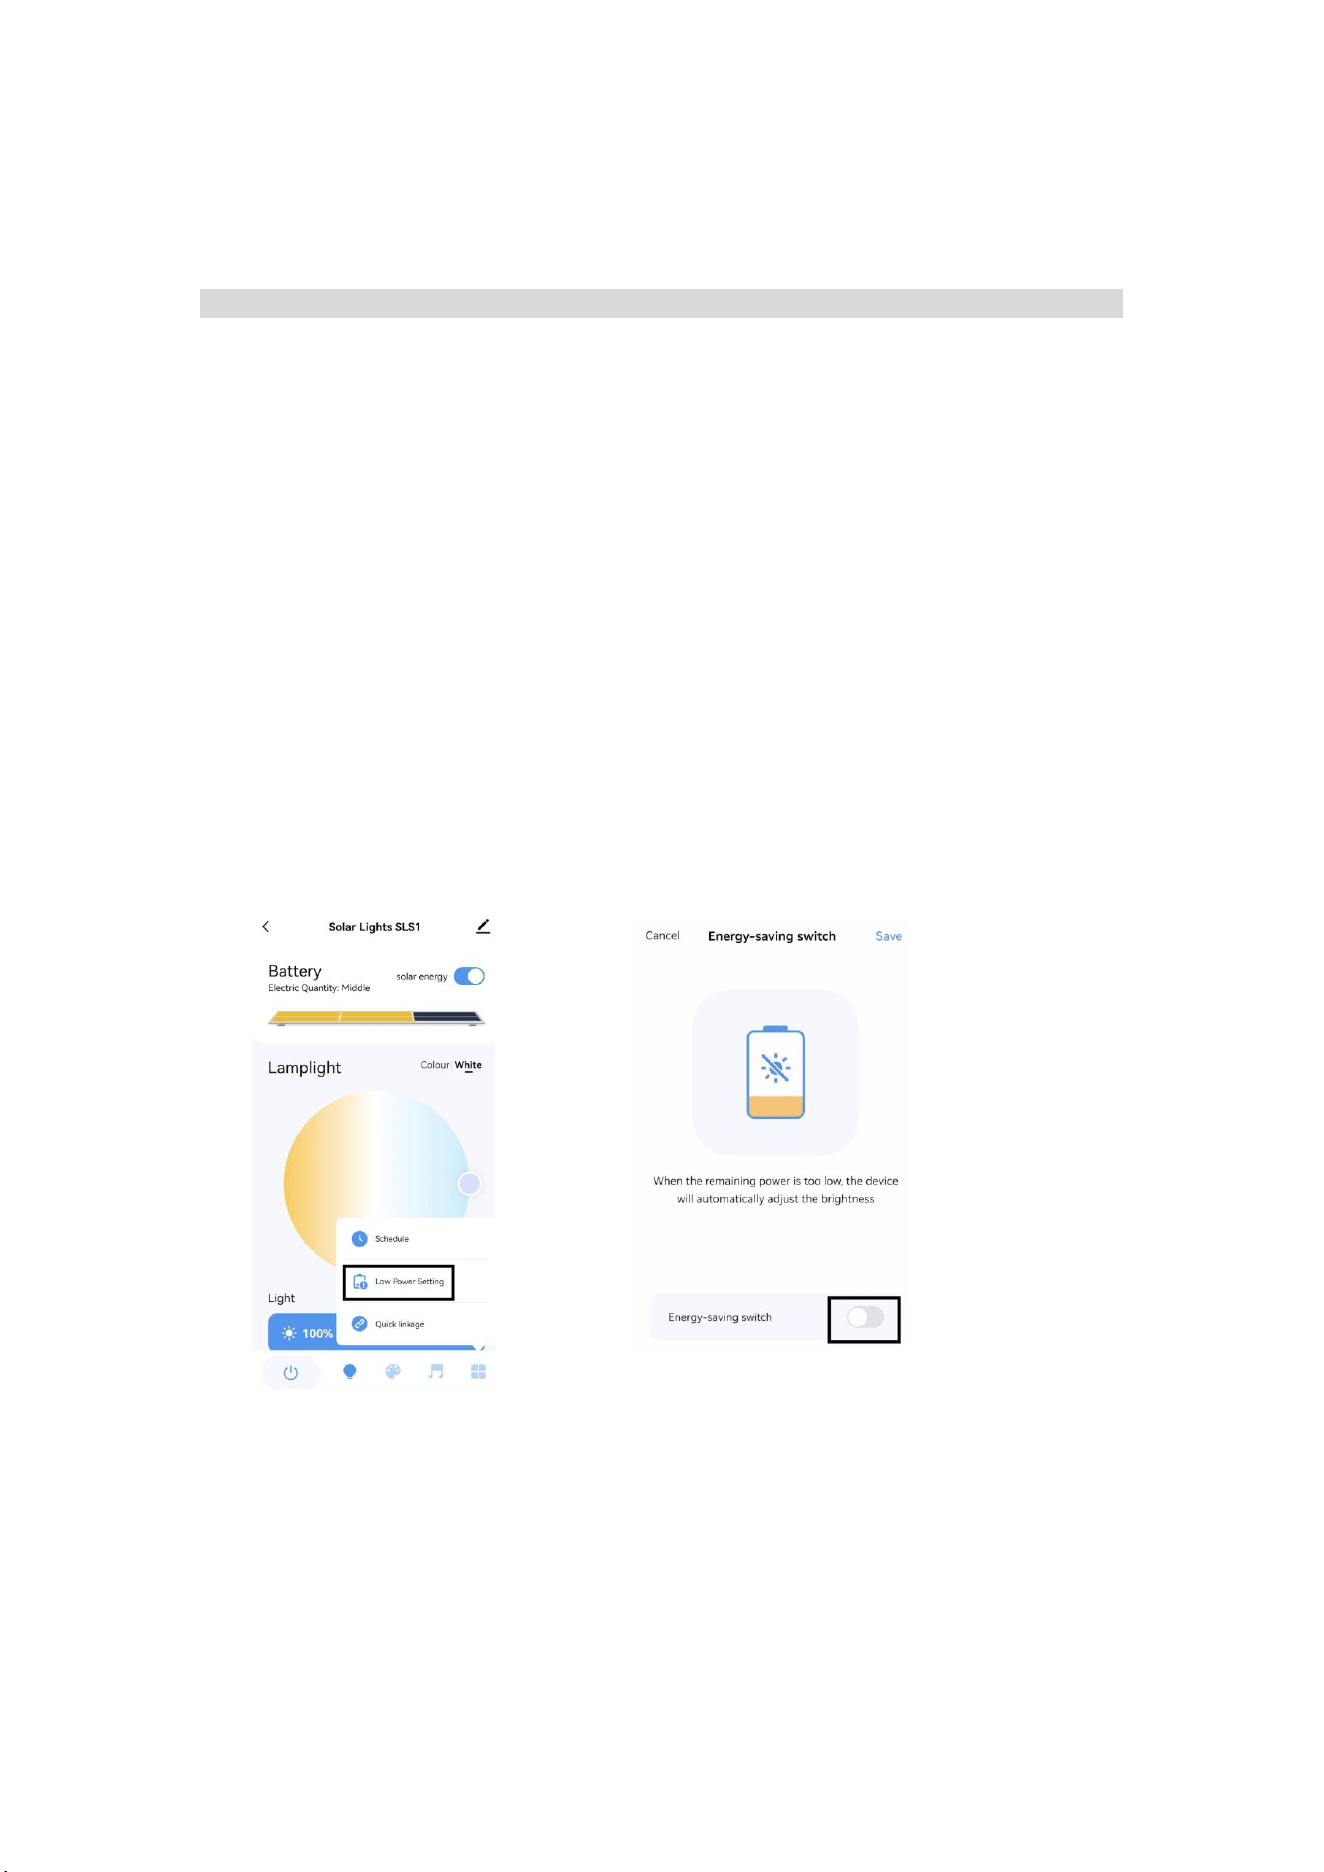
2. Energy-Saving Mode:
The solar light is set to Energy Saving Mode by default, as follows:
70%–100% battery: 100% brightness
50%–70% battery: 90% brightness
20%–50% battery: 70% brightness
Below 20% battery: 10% brightness
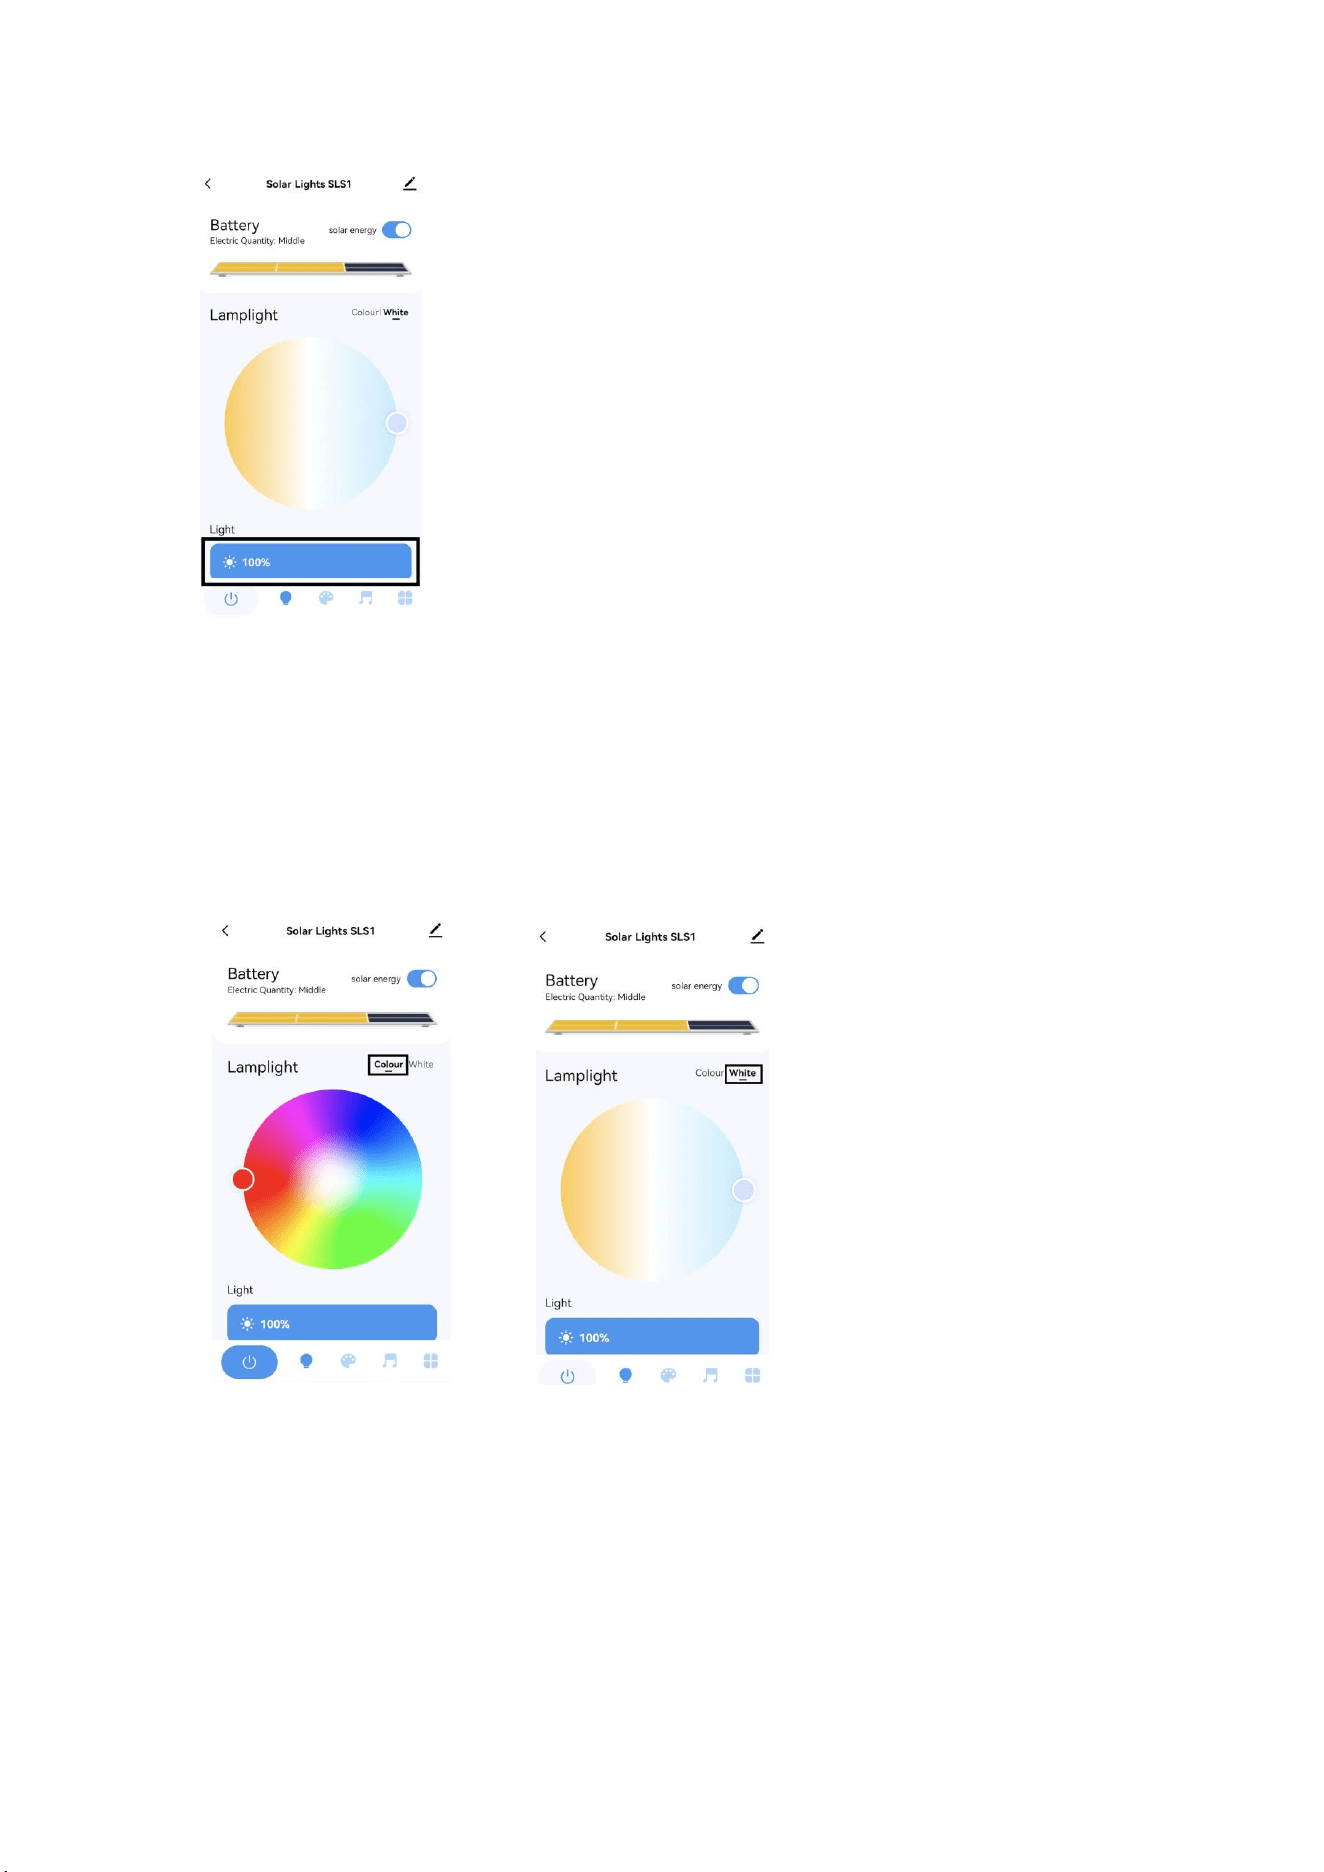
If you prefer the light to run at 100% brightness or any other fixed brightness level,
please disable Energy Saving Mode in the App, as shown below. Once disabled, the
light will operate at the brightness level you set.
3. You can adjust the brightness as needed.
5
(Note: If the lighting duration is insufficient, it is recommended to lower the
brightness.)
4. Color Selection: Tap the “Colour” icon to select colors such as Red, Green, and
Blue. Tap the “White” icon to select white light, with any color temperature between
3000K and 6500K.
5. Scenes Selection: Tap the icon below to choose different light effects and themes.
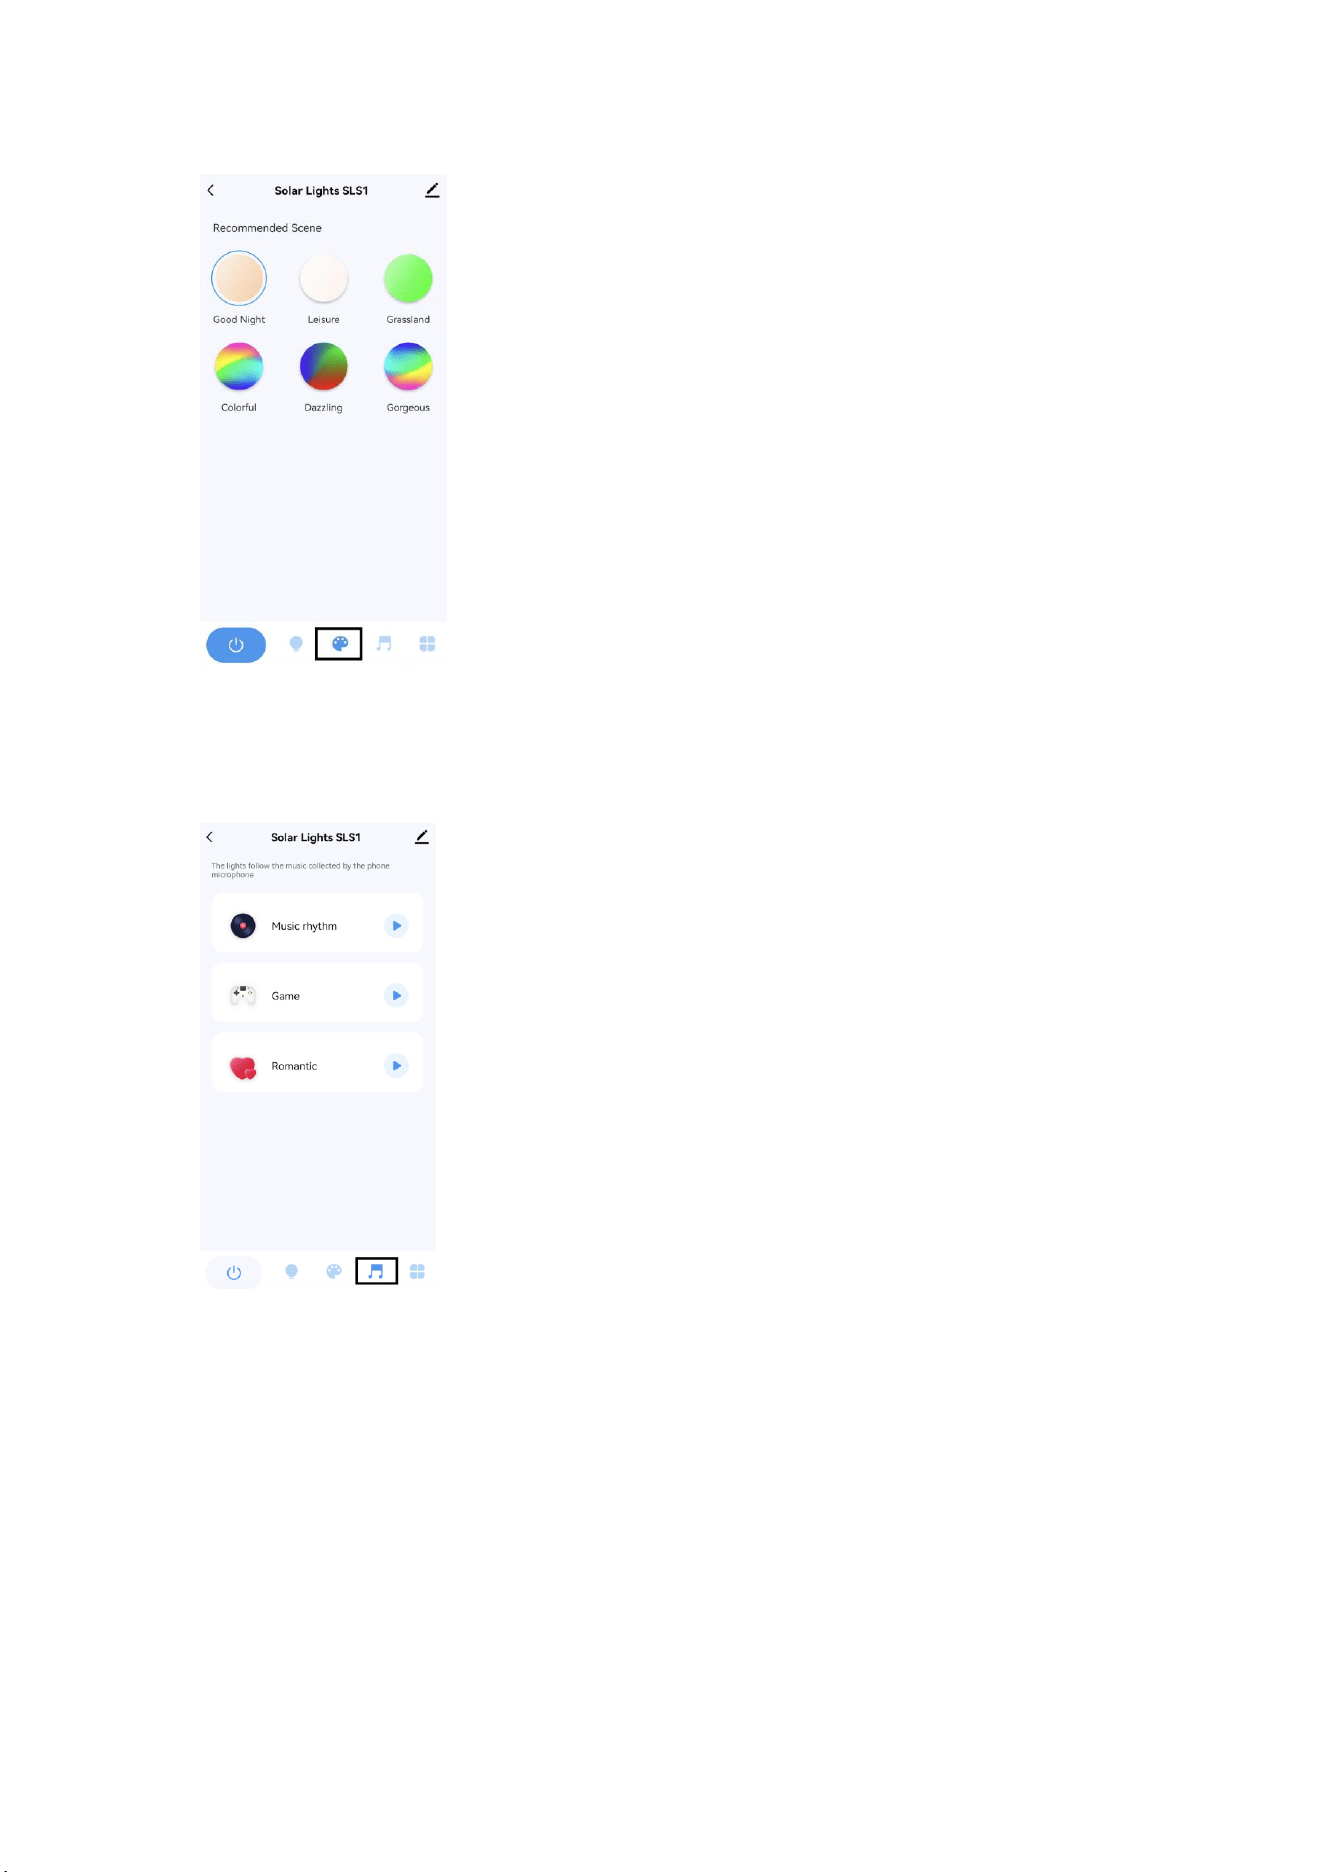
6
6. Music Sync: You can Sync lights with music in section below.
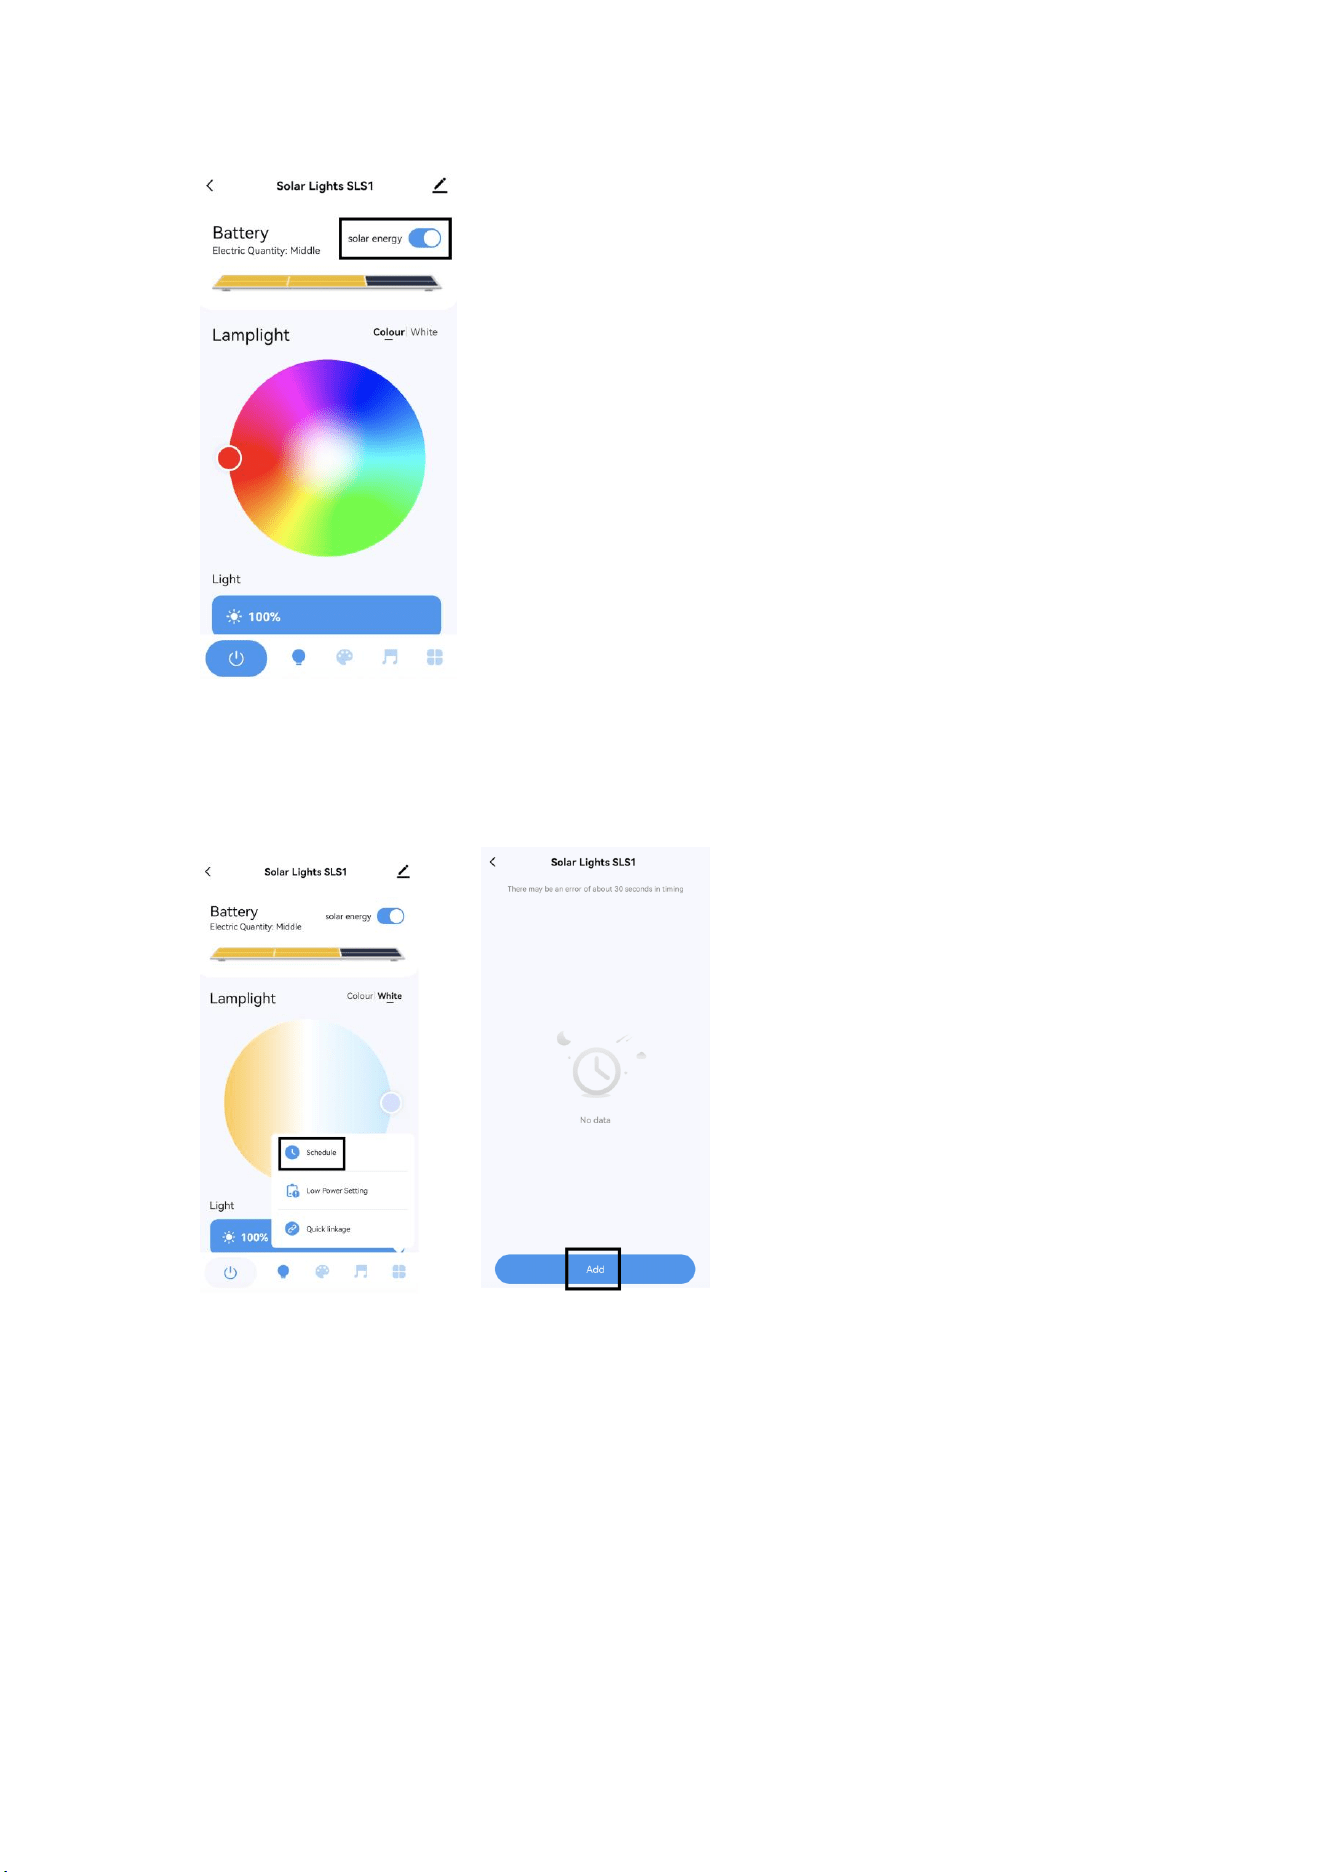
7. Auto On and Off: You can use the button below to enable or disable the “Solar
Energy” feature. When enabled, the light will automatically detect ambient light—
turning on at night and turning off at dawn.
7
8. Schedule: You can set the light to turn on or off automatically at any desired time,
as shown in the images below. Please note that the scheduled on/off time may
experience a tolerance of about 30 seconds.”
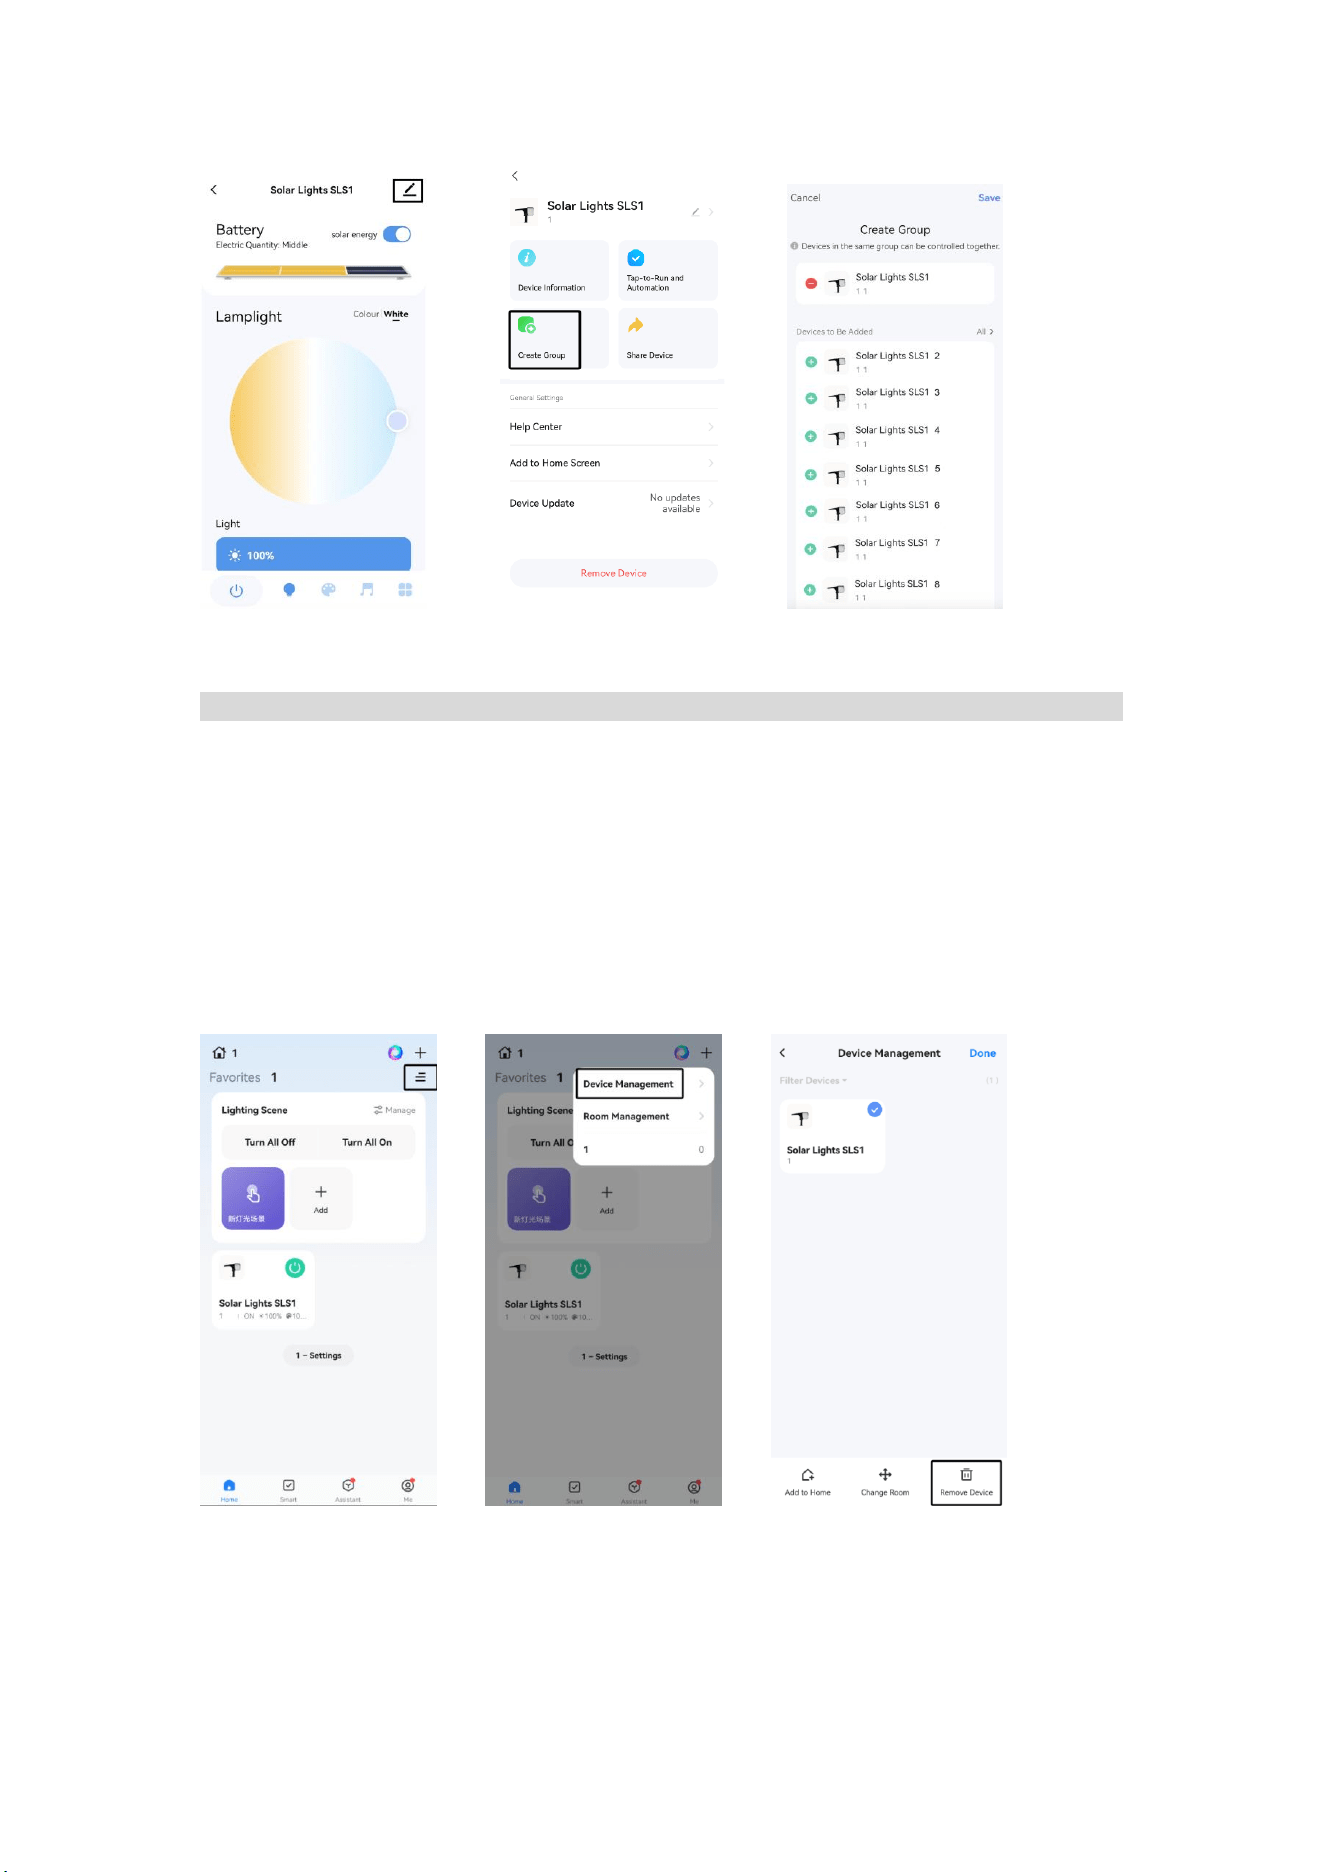
9. Create Group: You can add multiple lights to a group. You can control all lights in
the group together and use all functions simultaneously, except scheduling.
Schedules must be set individually for each light.
Tap the edit icon in the upper-right corner of the App, then select “Create Group” in
the pop-up window to set up a group.
8
Restoring to factory settings & Re-Pairing the light
During later use, if you need to re-pair the light, or if the light has already been paired
with one mobile phone and you would like to install the app and connect the light on
a different phone, you must first restore the light to factory settings. Follow the steps
below:
1. If the previously installed App is still accessible, you can remove the light from the
device list in the app’s Device Management page, as shown below:
2. Toggle the light’s power switch consecutively to restore to factory setting.
If the power switch is in the ON position, toggle the switch six times consecutively
(OFF–ON–OFF–ON–OFF–ON) to restore the light to factory settings.
9
If the power switch is in the OFF position, toggle the switch five times consecutively
(ON–OFF–ON–OFF–ON) to restore the light to factory settings.
When the light flashes for 3 seconds, this indicates that the factory reset has been
completed and the light has entered pairing mode. Once in pairing mode, follow the
pairing instructions described earlier in this manual to connect the light to the app.
Troubleshooting
Issue
Troubleshooting steps
Unable to find the light
when trying to add the
light to the App.
1. Make sure the light is in Pair Mode. Turn on the light
using the power switch. The light will enter pairing mode
immediately: it will flash for 3 seconds and then remain
on at low brightness for up to 10 minutes, during which
you can pair the light.
If the light is not in pairing mode, restore it to factory
settings by toggling the power switch consecutively (see
the factory reset instructions in this manual.)
2. Ensure that Bluetooth on your phone is enabled.
3. If the light has previously been added by another
user, please ensure it is removed from that user’s App
first. The light can only be linked to one user account at
a time. Then restore the light to factory settings to enter
pairing mode.
The light does not turn
on at night
1. If you manually turned off the light in the App, you will
need to turn it back on manually.
2. Make sure the Auto On and Off feature is enabled in
the App by turning on the “Solar Energy” option. This
allows the light to automatically turn on at night and turn
off in the morning.
3. Check whether there are bright light sources nearby.
Surrounding light may prevent the light from turning on
automatically. If so, consider adjusting the installation
position of the light or relocating the other light source.
4. The battery level may be too low. This is more likely to
occur during periods of insufficient sunlight, such as on
cloudy, rainy, or snowy days. The light will automatically
turn on again after charging under sunlight.
10
The light is not bright
enough, or the
brightness becomes
dim.
When the light is in Energy-Saving Mode, its brightness
will decrease as the battery level drops. You can disable
Energy-Saving Mode in the App to prevent this
(However, on the other hand, operating the light at a
fixed high-level brightness will cause shorter runtime.)
The light turns on
during the day.
1. Make sure to connect the light to App to enable
control, otherwise the light may work during the day.
2. Make sure the Auto On and Off feature is enabled in
the App by turning on the “Solar Energy” option. This
allows the light to automatically turn on at night and turn
off in the morning.
The lights in the same
area turn on at different
times.
Our lights automatically turn on when the ambient light
level drops to 30 lux.
Since the surrounding light conditions may vary slightly
at each unit’s location, the activation time may differ from
one light to another.
FCC Compliance Statement
1.This device complies with Part 15 of the FCC Rules. Operation is subject to the
following two conditions:
(1)This device may not cause harmful interference.
(2)This device must accept any interference received, including interference that may
cause undesired operation.
2. Changes or modifications not expressly approved by the party responsible for
compliance could void the user’s authority to operate the equipment.
Note:This equipment has been tested and found to comply with the limits for a class
B
digital device,pursuant to Part 15 of the FCC Rules. These limits are designed to
provide reasonable protection against harmful interference in a residential
installation.
This equipment generates uses and can radiate radio frequency energy and,if not
installed and used in accordance with the instructions,may cause harmful
interference to radio communications.However,there is no guarantee that
interference will not occur in a particular installation.if this equipment does cause
harmful interference to radio or television reception,which can be determined by

11
turning the equipment off and on,the user is encouraged to try to correct the
interference by one or more of the following measures:
• Reorient or relocate the receiving antenna.
• Increase the separation between the equipment and receiver.
• Connect the equipment into an outlet on a circuit different from that to which the
receiver is connected.
• Consult the dealer or an experienced radio/TV technician for help.
The device has been evaluated to meet general RF exposure requirement.
The device can be used in portable exposure condition without restriction.
Customer Support
If you need assistance with product installation, feature setup, troubleshooting,
warranty or after-sales support, please feel free to contact our customer service team
via Email: service@eluntrix.com
We typically respond within 24–48 hours. Thank you for choosing our product!