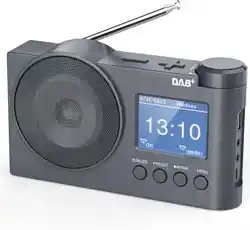
The newly upgraded 3rd generation of DAB + radio
is very practical as it combines DAB/FM/BT/USB/
AUX-IN/ALARM CLOCK functions.The DAB radio
allows automatic time calibration and has a choice
of five languages.The simple appearance design of
the radio, clear LCD screen and easy to operate, it is
a good choice for you.Hope you enjoy this DAB radio.
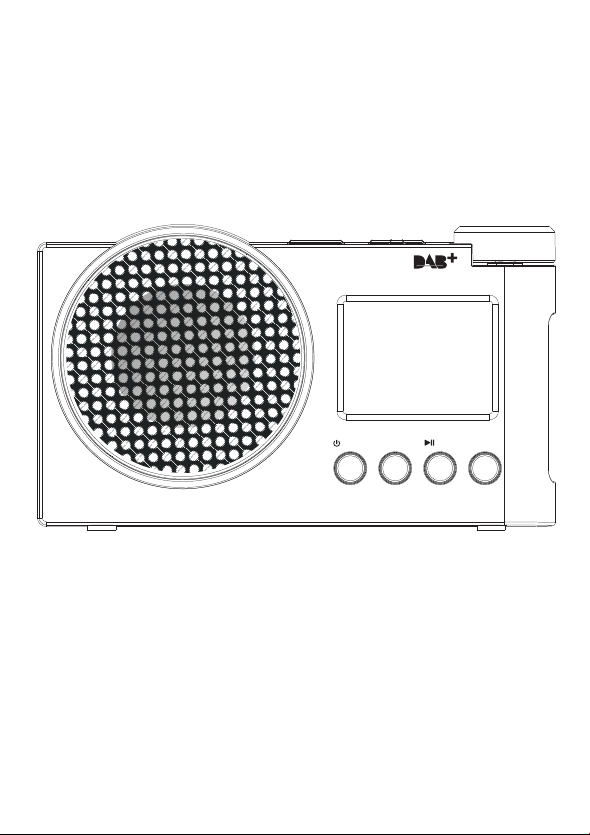
Radio On/Off Switch/Band Switch
Menu/Information
Play/Pause/Scanning
Preset Recall/Preset Store
User Manual
DAB/DAB+/FM Digital Radio
/MODE PRESET
/PAIR
MENU
/MODE PRESET
/PAIR
MENU
FUNCTION OF BUTTONS
BATTERY INDICATOR REFERENCE
POWER ON/OFF
DAB MODE
FM MODE
SYSTEM SETTING
BLUETOOTH
USB PLAYBACK
AUX PLAYBACK
EARPHONE JACK
SPECIFICATIONS
SAFETY INSTRUCTIONS
WARRANTY
PACKING LIST
1
2
2
3
3
5
6
9
3
6
5
3
6
7
CONTENTS
FUNCTION OF BUTTONS Power the device POWER ON/OFF
●Long press the " " button to turn on the radio, and the
screen display the time.
●Press and hold it again to turn off the radio.(When using
DC Power, long press the " " in radio mode can return
to the clock screen.)
●Turn on your mobile phone or other devices on the Blue
tooth, click search Bluetooth device (Bluetooth name:
“DAB-01” ) to pair, after hearing the voice prompts that
pairing is successful.
●Volume Control: After successful pairing, you can adjust
the volume using the "+"/"-" buttons on the top of the radio.
●Operation functions: Press “ ” to play/pause. Rotate
“ ”switch songs (Rotate to the left to switch to the
Last Song \ Rotate to the right to switch to the Next Song).
●Long press " " to disconnect the Bluetooth connection.
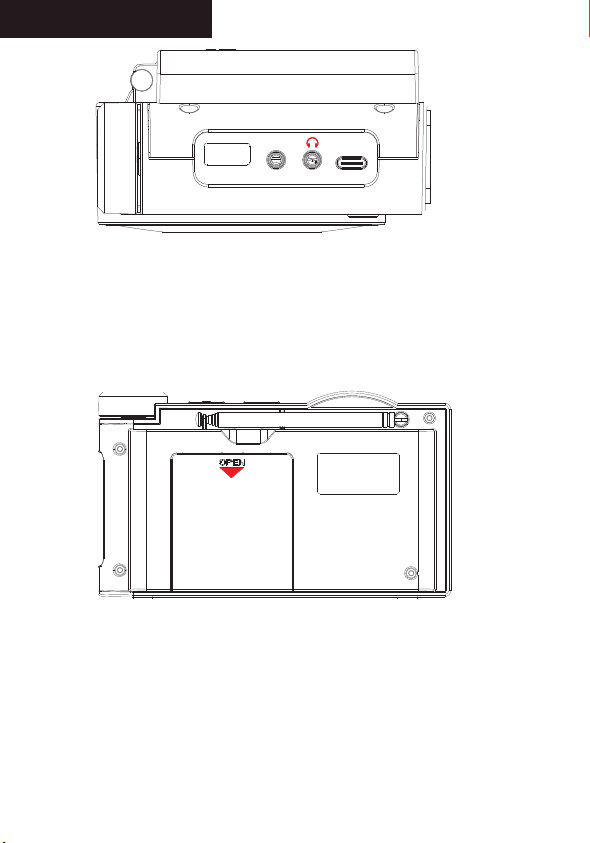
● Battery powered:Remove the battery compartment cover
on the back of the device and place 4 AA batteries into
the battery compart ment.
NOTE:
Ensure the negative (-) end is placed against the spring.
Remove the AA dry batteries when not in use.
● Type-C Direct Current: Plug in the type-c cable and plug
the adapter into a wall outlet.
NOTE:
Priority to use the type-c direct current power supply.
Please use a 5V/1A adapter or it will not charge.
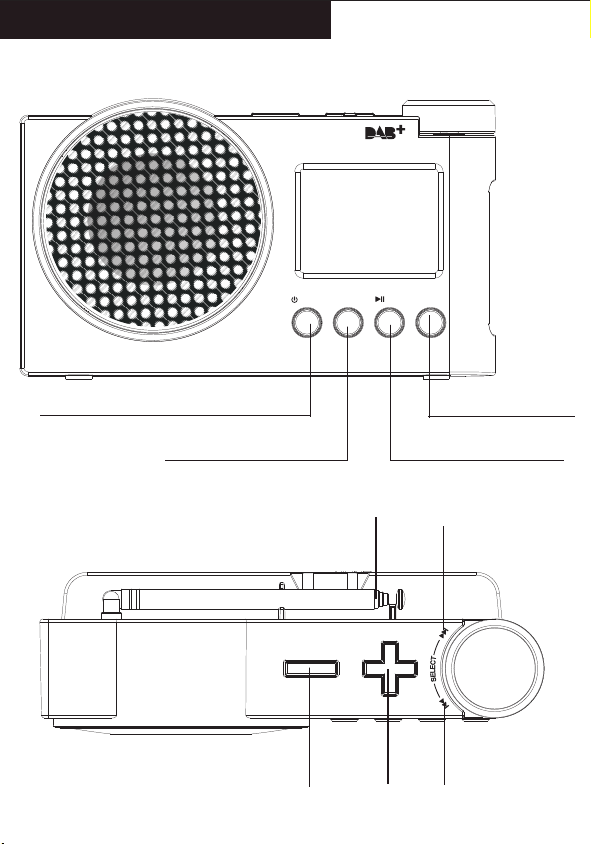
Antenna
VOL-
VOL+
Previous song
/ Tuning
Next song
/ Tuning
USB
AUX IN
DC 5V
USB
AUX IN
DC 5V
OPEN
/MODE
DAB MODE
●Press " " to switch to DAB mode after you turn on this
radio, and then long press " " button to access the
DAB setting.
Full Scan
●In the <Full scan> screen, press the " " button
to scan all the frequencies. All the stations received are
saved in the DAB program list in a dictionary order of short
labels. (If the DAB program list is empty, the DAB mode
will always be displayed in DAB menu mode.)
NOTE:
In DAB mode,you can also long press " " to full
scan.Then rotate " " to select.
Manual Tune
●In the <Manual Tune> screen, press the " "button
to enter “Manual Tune” setting.
●Rotate " " to select the band. Then press
" "to confirm and press the " " to return.
DRC
●Select “DRC” Settings to access the DAB Dynamic Range
setting, which has three levels of selection:off、low、high.
Rotate " " to select and press " " to
confirm. (Note: The selected item is marked with an "*" in
the upper right corner.)
Prune
●Select the "Prune" setting, if you select "YES", the invalid
programs in the DAB list will be cleared.(Note: Invalid
programs is that have no stations or weak radio signals
on the local reception frequency.)
●Rotate " "to select the duration time(15,30,45,60,
90) of the alarm clock and press " " to confirm and
access the next step.
●Rotate " "to select the ringtone source of the
alarm clock:<Buzzer>,<DAB>, <FM> or <USB>and press
" " to confirm and access the next step.(If you
select <DAB> or <FM>, you can select the ringtone of the
station you want to set.)
●Rotate " " to select the frequency of the ringtone:
<Once> <Daily>,<Weekends> or <Weekdays>, and press
" " to confirm and access the next step.(If you
choose the frequency of the alarm is < Once>, please
rotate " " to select the date of ringing and press
" " to confirm and access the next step. If not,
please skip this step.)
●Rotate " " to select the volume of ringing and press
" " to confirm and access the next step
●Rotate " " to select whether the ring is on and press
" " to save the setting.
Time Setting
●Select <Time>, and press " " to access the time
setting. Rotate " " to select<Set Time/Date>,
<Auto update>,<Set 12/24 hour>,<Set date format>.
●<Set Time/Date>: Rotate " " to set the date/time
one by one, and press “ " to save.
●<Auto update>: Rotate " " to select <Update from
Any>,<Update from DAB>,<Update from FM>,<No Update>,
and press " " to save the setting.(Already
selected will be marked with “*”)
●<Set 12/24 hour>: Rotate " " to select <Set 24
hour>, <Set 12 hour>, and press " " to save
the setting.(Already selected will be marked with “*”)
●<Set date format>: Rotate " " to select <DD-MM
-YYYY> or <MM-DD-YYYY>, press " " to save
the setting. (Already selected will be marked with “*”)
●<On level>:Press " " to set display brightness,
rotate " "to select <High>,<Medium>, <Low>.
Press " " to save the setting.(Already selected
will be marked with “*”)
●<Dim level>:Press " " to set backlight level,
Rotate " "to select <Low>,<Medium>,<High>.
Press " " to save the setting.(Already selected
will be marked with “*”)
Language
●Select <Language>(default is <English>), and press
" " to confirm and save.(NOTE: There are five
preset languages: <Deutsch> German, <Italiano> Italian,
<Français> French, <Chinese> Chinese)
Factory Reset
●Press “ ” to enter the <Factory Reset>, rotate
" "to select "Yes" or "No". (If you select Yes, all states
of the radio will be restored to the factory-set defaults.)
SW Version
●Press the “ ” to <SW Versiont> and know the
software version numbers, short press “ ” to
return to the menu.
Backlight
●Select <Backlight>, and press “ ” to access
the time setting.Rotate " " to select<Timeout>,
<On level> or <Dim level>.
●<Timeout>:Press " " to set the duration of the
time display, and rotate " " to select <On>,
<10 Sec>,<20 Sec>,<30 Sec>,<45 Sec>,<60 Sec>,<90
Sec>,<120 Sec>,<180 Sec>.Press " "to save
the setting.(Already selected will be marked with “*”)
/MODE
FM MODE
●Press " " to switch to FM mode after you turn on this
radio,and then long press the " " button to access
the FM setting.
Scan Setting
●In the <Scan Setting> screen, press " " to access
the Scan setting.
●Rotate " " to select <All stations> or <strong
stations only>, and then press " " to save the
settings. (The selected one will be marked with a “*”)
BLUETOOTH
●Turn on the radio, short press “ ” to switch to Bluetooth
mode.
USB PLAYBACK
●Turn on the radio, short press “ ” to switch to USB mode.
●Plug in a USB flash drive to play.
●Operation function: Press “ ” to play/pause.Rotate
“ ”switch songs (Rotate to the left to switch to the
Last Song \ Rotate to the right to switch to the Next Song).
/MODE
/MODE
/MODE
Auto Scan & Stored Stations
Auto Scan
●In the FM mode, long press the " " button for 2
seconds and the radio will start to scanning for stations
auto matically.When the radio receives the station signal,
it will automatically save the frequency as a preset
station (P01-30).
Preset Recall
●Short press the " " button to call out the preset stations
(P01-30). Rotate" "to select preset station, short
press" "to confirm.
Preset Store
●Long press the " " button to call out the Preset Store
(P01-30). Rotate" " to select preset station,short
press" " to confirm.
/MODE
MENU
MENU
MENU
MENU
PRESET
PRESET
System Setting
●Long press the " " button to access the FM/DAB
setting after you choose the radio band.
●Rotate " " to find the < System> ,and press the
" " to confirm.
Sleep Time Setting
●Rotate " " to select <sleep>,press " "
to select the sleep time ( OFF, 15, 30, 45, 60, 90 minutes)
you want to set by rotating " " button, then
press " " to save the setting.
Alarm Clock Setting
●Select <Alarm>, and press“ ” to access the alarm
setting, Rotate " "to select alarm clock 1 or clock
2, and press " " to access the alarm time setting.
●Rotate " " to select the time of the alarm clock
and press
"
"
to confirm and access the next step.
/PAIR
/PAIR
/PAIR
AUX PLAYBACK
●Turn on the radio, short press “ ” to switch to AUX mode.
●Select the AUX function, then connect an external sound
source to the radio with the AUX cable, and the radio will
play a song when it detects it.
●The radio has the function of amplifying and outputting
all external audio sources.(e.g. mobile phones, MP3
players,tape Walkman,CD player, radios, etc.)
EARPHONE JACK
●In order to meet the multiple listening needs of our custoers,
our radios are set up with a "headphone" jack, simply plug
the headphones into the radio without being disturbed or
disturbing others.
SPECIFICATIONS
●Frequency:FM:87.5-108MHz
●DAB:174.928-239.200MHz
●Battery:4x1.5V AA
●Bluetooth:5.1
●Output:3.5mm earphone
●Language:5 languages
●Maximum power:1.2W
●Charger: DC IN 5V/1A
PACKING LIST
● DAB Radio*1
● AUX Cable*1
● Type-C Cable*1
● User Manual*1
●Do not expose it to direct sunlight,high temperature or
humidity.
●Please check it with qualified maintenance personnel if
there is any debris falling into the radio.
●Please wipe it with a soft cloth dampened with detergent
solution. Never use strong solvents such as alcohol, thinner
to clean.
●Not to use the earphone to avoid traffic accidents when
driving.
●Keep listening at the proper volume so that you can pay
attention to your surroundings to ensure safety.
SAFETY INSTRUCTIONS
●Avoid violent shocks or falling to the ground.
WARRANTY
●This radio has 12 months warranty against manufacturing
defects.
●The warranty period begins from the date of purchase.
/MODE
Earphones are not included
included in the scope of delivery.
-1- -2- -3- -4- -5-
-7- -8- -9- -10- -11-
-6-

The newly upgraded 3rd generation of DAB + radio
is very practical as it combines DAB/FM/BT/USB/
AUX-IN/ALARM CLOCK functions.The DAB radio
allows automatic time calibration and has a choice
of five languages.The simple appearance design of
the radio, clear LCD screen and easy to operate, it is
a good choice for you.Hope you enjoy this DAB radio.
Radio On/Off Switch/Band Switch
Menu/Information
Play/Pause/Scanning
Preset Recall/Preset Store
User Manual
DAB/DAB+/FM Digital Radio
/MODE PRESET
/PAIR
MENU
/MODE PRESET
/PAIR
MENU
FUNCTION OF BUTTONS
BATTERY INDICATOR REFERENCE
POWER ON/OFF
DAB MODE
FM MODE
SYSTEM SETTING
BLUETOOTH
USB PLAYBACK
AUX PLAYBACK
EARPHONE JACK
SPECIFICATIONS
SAFETY INSTRUCTIONS
WARRANTY
PACKING LIST
1
2
2
3
3
5
6
9
3
6
5
3
6
7
CONTENTS
FUNCTION OF BUTTONS Power the device POWER ON/OFF
●Long press the " " button to turn on the radio, and the
screen display the time.
●Press and hold it again to turn off the radio.(When using
DC Power, long press the " " in radio mode can return
to the clock screen.)
●Turn on your mobile phone or other devices on the Blue
tooth, click search Bluetooth device (Bluetooth name:
“DAB-01” ) to pair, after hearing the voice prompts that
pairing is successful.
●Volume Control: After successful pairing, you can adjust
the volume using the "+"/"-" buttons on the top of the radio.
●Operation functions: Press “ ” to play/pause. Rotate
“ ”switch songs (Rotate to the left to switch to the
Last Song \ Rotate to the right to switch to the Next Song).
●Long press " " to disconnect the Bluetooth connection.
● Battery powered:Remove the battery compartment cover
on the back of the device and place 4 AA batteries into
the battery compart ment.
NOTE:
Ensure the negative (-) end is placed against the spring.
Remove the AA dry batteries when not in use.
● Type-C Direct Current: Plug in the type-c cable and plug
the adapter into a wall outlet.
NOTE:
Priority to use the type-c direct current power supply.
Please use a 5V/1A adapter or it will not charge.
Antenna
VOL-
VOL+
Previous song
/ Tuning
Next song
/ Tuning
USB
AUX IN
DC 5V
USB
AUX IN
DC 5V
OPEN
/MODE
DAB MODE
●Press " " to switch to DAB mode after you turn on this
radio, and then long press " " button to access the
DAB setting.
Full Scan
●In the <Full scan> screen, press the " " button
to scan all the frequencies. All the stations received are
saved in the DAB program list in a dictionary order of short
labels. (If the DAB program list is empty, the DAB mode
will always be displayed in DAB menu mode.)
NOTE:
In DAB mode,you can also long press " " to full
scan.Then rotate " " to select.
Manual Tune
●In the <Manual Tune> screen, press the " "button
to enter “Manual Tune” setting.
●Rotate " " to select the band. Then press
" "to confirm and press the " " to return.
DRC
●Select “DRC” Settings to access the DAB Dynamic Range
setting, which has three levels of selection:off、low、high.
Rotate " " to select and press " " to
confirm. (Note: The selected item is marked with an "*" in
the upper right corner.)
Prune
●Select the "Prune" setting, if you select "YES", the invalid
programs in the DAB list will be cleared.(Note: Invalid
programs is that have no stations or weak radio signals
on the local reception frequency.)
●Rotate " "to select the duration time(15,30,45,60,
90) of the alarm clock and press " " to confirm and
access the next step.
●Rotate " "to select the ringtone source of the
alarm clock:<Buzzer>,<DAB>, <FM> or <USB>and press
" " to confirm and access the next step.(If you
select <DAB> or <FM>, you can select the ringtone of the
station you want to set.)
●Rotate " " to select the frequency of the ringtone:
<Once> <Daily>,<Weekends> or <Weekdays>, and press
" " to confirm and access the next step.(If you
choose the frequency of the alarm is < Once>, please
rotate " " to select the date of ringing and press
" " to confirm and access the next step. If not,
please skip this step.)
●Rotate " " to select the volume of ringing and press
" " to confirm and access the next step
●Rotate " " to select whether the ring is on and press
" " to save the setting.
Time Setting
●Select <Time>, and press " " to access the time
setting. Rotate " " to select<Set Time/Date>,
<Auto update>,<Set 12/24 hour>,<Set date format>.
●<Set Time/Date>: Rotate " " to set the date/time
one by one, and press “ " to save.
●<Auto update>: Rotate " " to select <Update from
Any>,<Update from DAB>,<Update from FM>,<No Update>,
and press " " to save the setting.(Already
selected will be marked with “*”)
●<Set 12/24 hour>: Rotate " " to select <Set 24
hour>, <Set 12 hour>, and press " " to save
the setting.(Already selected will be marked with “*”)
●<Set date format>: Rotate " " to select <DD-MM
-YYYY> or <MM-DD-YYYY>, press " " to save
the setting. (Already selected will be marked with “*”)
●<On level>:Press " " to set display brightness,
rotate " "to select <High>,<Medium>, <Low>.
Press " " to save the setting.(Already selected
will be marked with “*”)
●<Dim level>:Press " " to set backlight level,
Rotate " "to select <Low>,<Medium>,<High>.
Press " " to save the setting.(Already selected
will be marked with “*”)
Language
●Select <Language>(default is <English>), and press
" " to confirm and save.(NOTE: There are five
preset languages: <Deutsch> German, <Italiano> Italian,
<Français> French, <Chinese> Chinese)
Factory Reset
●Press “ ” to enter the <Factory Reset>, rotate
" "to select "Yes" or "No". (If you select Yes, all states
of the radio will be restored to the factory-set defaults.)
SW Version
●Press the “ ” to <SW Versiont> and know the
software version numbers, short press “ ” to
return to the menu.
Backlight
●Select <Backlight>, and press “ ” to access
the time setting.Rotate " " to select<Timeout>,
<On level> or <Dim level>.
●<Timeout>:Press " " to set the duration of the
time display, and rotate " " to select <On>,
<10 Sec>,<20 Sec>,<30 Sec>,<45 Sec>,<60 Sec>,<90
Sec>,<120 Sec>,<180 Sec>.Press " "to save
the setting.(Already selected will be marked with “*”)
/MODE
FM MODE
●Press " " to switch to FM mode after you turn on this
radio,and then long press the " " button to access
the FM setting.
Scan Setting
●In the <Scan Setting> screen, press " " to access
the Scan setting.
●Rotate " " to select <All stations> or <strong
stations only>, and then press " " to save the
settings. (The selected one will be marked with a “*”)
BLUETOOTH
●Turn on the radio, short press “ ” to switch to Bluetooth
mode.
USB PLAYBACK
●Turn on the radio, short press “ ” to switch to USB mode.
●Plug in a USB flash drive to play.
●Operation function: Press “ ” to play/pause.Rotate
“ ”switch songs (Rotate to the left to switch to the
Last Song \ Rotate to the right to switch to the Next Song).
/MODE
/MODE
/MODE
Auto Scan & Stored Stations
Auto Scan
●In the FM mode, long press the " " button for 2
seconds and the radio will start to scanning for stations
auto matically.When the radio receives the station signal,
it will automatically save the frequency as a preset
station (P01-30).
Preset Recall
●Short press the " " button to call out the preset stations
(P01-30). Rotate" "to select preset station, short
press" "to confirm.
Preset Store
●Long press the " " button to call out the Preset Store
(P01-30). Rotate" " to select preset station,short
press" " to confirm.
/MODE
MENU
MENU
MENU
MENU
PRESET
PRESET
System Setting
●Long press the " " button to access the FM/DAB
setting after you choose the radio band.
●Rotate " " to find the < System> ,and press the
" " to confirm.
Sleep Time Setting
●Rotate " " to select <sleep>,press " "
to select the sleep time ( OFF, 15, 30, 45, 60, 90 minutes)
you want to set by rotating " " button, then
press " " to save the setting.
Alarm Clock Setting
●Select <Alarm>, and press“ ” to access the alarm
setting, Rotate " "to select alarm clock 1 or clock
2, and press " " to access the alarm time setting.
●Rotate " " to select the time of the alarm clock
and press
"
"
to confirm and access the next step.
/PAIR
/PAIR
/PAIR
AUX PLAYBACK
●Turn on the radio, short press “ ” to switch to AUX mode.
●Select the AUX function, then connect an external sound
source to the radio with the AUX cable, and the radio will
play a song when it detects it.
●The radio has the function of amplifying and outputting
all external audio sources.(e.g. mobile phones, MP3
players,tape Walkman,CD player, radios, etc.)
EARPHONE JACK
●In order to meet the multiple listening needs of our custoers,
our radios are set up with a "headphone" jack, simply plug
the headphones into the radio without being disturbed or
disturbing others.
SPECIFICATIONS
●Frequency:FM:87.5-108MHz
●DAB:174.928-239.200MHz
●Battery:4x1.5V AA
●Bluetooth:5.1
●Output:3.5mm earphone
●Language:5 languages
●Maximum power:1.2W
●Charger: DC IN 5V/1A
PACKING LIST
● DAB Radio*1
● AUX Cable*1
● Type-C Cable*1
● User Manual*1
●Do not expose it to direct sunlight,high temperature or
humidity.
●Please check it with qualified maintenance personnel if
there is any debris falling into the radio.
●Please wipe it with a soft cloth dampened with detergent
solution. Never use strong solvents such as alcohol, thinner
to clean.
●Not to use the earphone to avoid traffic accidents when
driving.
●Keep listening at the proper volume so that you can pay
attention to your surroundings to ensure safety.
SAFETY INSTRUCTIONS
●Avoid violent shocks or falling to the ground.
WARRANTY
●This radio has 12 months warranty against manufacturing
defects.
●The warranty period begins from the date of purchase.
/MODE
Earphones are not included
included in the scope of delivery.
-1- -2- -3- -4- -5-
-7- -8- -9- -10- -11-
-6-
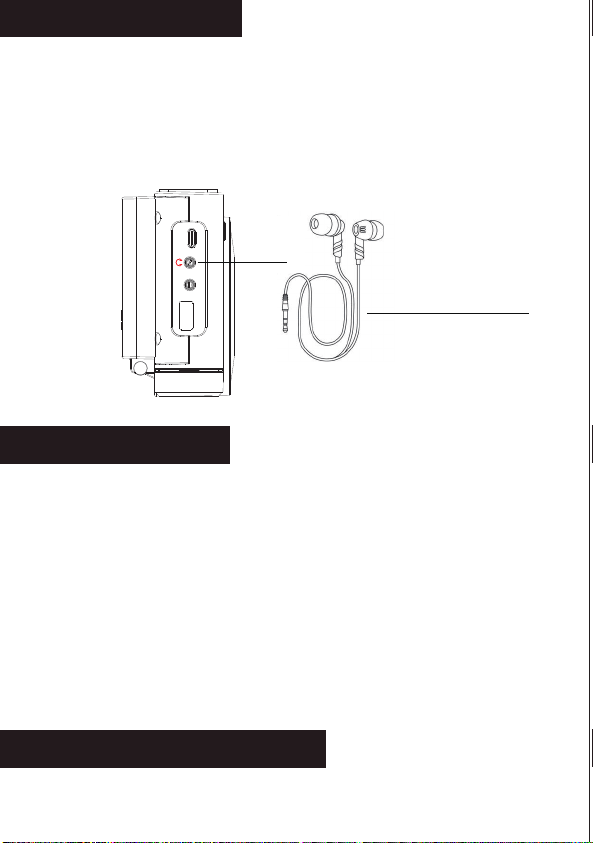
