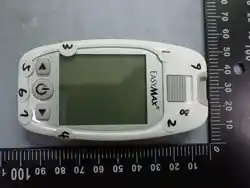

MU Self-Monitoring Blood Glucose System
User’s Manual
Please read this User’s Manual thoroughly
Before using your blood glucose meter

2
Dear EASYMAX
®
MU SMBG System Owner,
Thank you for using the EASYMAX
®
MU Self-Monitoring Blood Glucose (SMBG) System. We designed this
system to be dependable, easy-to-use, compact, lightweight and portable to help you monitor your blood
glucose on a regular basis.
Please read this manual thoroughly before you begin testing. This manual provides you and your diabetes
care team with important information and step-by-step direction to use the EASYMAX
®
MU Self-Monitoring
Blood Glucose System.
Thanks again for choosing the EASYMAX
®
MU SMBG.
Intended Use
The EASYMAX
®
MU Self Monitoring Blood Glucose Test System is intended for the quantitative
measurement of glucose in fresh capillary whole blood samples drawn from the fingertip, palm, or forearm.
Testing is done outside the body (In Vitro diagnostic use). It is indicated for use at home (over the counter
[OTC]) by a single patient with diabetes and should not be shared, as an aid to monitor the effectiveness of
diabetes control. The system is not to be used on neonates, nor for the diagnosis of, or screening for diabetes
mellitus. Alternative site testing can be only used during steady-state blood glucose conditions.

3
Important Safety Instructions
Lancets and meters are for single use only. A new, sterile lancet should be used one time you perform a test.
The lancing device, lancets and meter are NOT to be shared between users or other family members. Do
NOT use on multiple individuals. Sharing a lancing device and lancets may transmit blood borne pathogens,
such as viral hepatitis.
All parts of the kit are considered biohazardous and may transmit infection, even if you have performed
cleaning and disinfection. Wash hands thoroughly with soap and water after handling the meter or lancing
device.
For further information, please see: "FDA Public Health Notification: Use of Fingerstick Devices on More
than One Person Poses Risk for Transmitting Bloodborne Pathogens: Initial Communication" (2010)
http://www.fda.gov/MedicalDevices/Safety/AlertsandNotices/ucm224025.
"CDC Clinical Reminder: Use of Fingerstick Devices on More than One Person Poses Risk for Transmitting
Blood borne Pathogens" (2010) http://www.cdc.gov/injectionsafety/Fingerstick-DevicesBGM.html

4
Standard Accessories
The EASYMAX
®
MU Blood Glucose meter and accessories are working together to measure the amount of
glucose in your blood. The system includes:
Optional Accessories
• EASYMAX
®
MU Blood Glucose Meter
• EASYMAX
®
MU Glucose Test Strips (10 pcs)
• Carrying Case
• Alkaline Battery (2 ct.)
• Lancets (10 pcs)
• Lancing device
• AST Lancing Device Cap
• User’s Manual
• Test Strip Instructions
• Self-Test Log Book
• EASYMAX
®
MU Level 2 Control Solution
• Glucose Control Solution Instructions
• Quick Reference Guide
•
EASYMAX
®
MU Level 3 Control Solution
Note:
1. EASYMAX
®
MU Level 2 Control Solution is included with the system.
2. EASYMAX
®
MU Level 3 Control Solution is available. For purchase, please call the Customer
Care Service toll-free at 866-994-3345 (Eastern Time, Mon-Fri 8:00AM~6:00PM).

5
Why is it so important to test blood glucose regularly?
Testing your blood glucose regularly can make a big difference in how you manage your diabetes every day.
We have made this SMBG system as simple as possible to help you use it regularly. Your meter is easy to
use, and you can adjust the lancing device for your comfort.
Do you need help?
If you have questions or need assistance, please call the Customer Care Service toll-free at 866-994-3345
(Eastern Standard Time, Mon-Fri 8:00AM~6:00PM). During non-service hours, please contact your healthcare
provider.
Note:
Although the EASYMAX
®
MU SMBG System is easy to use, you may need to consult with
your healthcare professional (this may be your doctor, pharmacist or diabetes nurse
educator) for instructions on how to use the system. Only the correct use of the system will
ensure accurate results.

6
Important Information about Your New Meter
EASYMAX
®
MU blood glucose meter is designed and approved for testing fresh capillary whole blood
samples from your fingertip, palm or forearm. The meter is for in vitro diagnostic use ONLY (for testing
outside the body). It should not be used to diagnose or screen for diabetes.
EASYMAX
®
MU blood glucose meter can only be used with EASYMAX
®
MU Blood Glucose Test Strips.
Other test strips will give inaccurate results.
Testing is not valid for neonatal blood specimens.
Do not disassemble the meter as this may cause damage to the components resulting in incorrect
readings. Disassembling the meter will also void the warranty.
Always keep the meter clean and store it in a safe place. Protect the meter from direct sunlight to ensure
a longer lifespan.
You should not store the meter and test strips in a car, bathroom, or refrigerator.
Keep the meter, test strips and lancing device away from children and pets.
You should not test critically ill patients with home-use blood glucose meters.
Incorrect results may occur when performing the test. If you believe you are not feeling well, please
contact your healthcare professional.
Remove batteries if the meter will not be used for one month or more.

7
Note:
Consult with your healthcare professional before testing on your fingertip, palm or forearm.
Do not touch the strips with wet hands.
Do not use expired strips (the expiration date is shown on the bottle.)
Do not bend, cut or twist the strips.
Altitude up to 10,000 feet above sea level has no effect on readings.
It should not be used to diagnose or screen for diabetes.

8
Health-Related Information
If you are experiencing dehydration, frequent urination, low blood pressure, shock or hyperosmolar
hyperglycemic nonketotic coma (HHNKC), you may get a test result that is lower than what your blood
glucose really is. If you think you are dehydrated, call your doctor right away.
If you have followed the steps in the user’s manual, but still have symptoms that don’t seem to match
your test results, contact your Healthcare Professional or physician immediately. If you have questions
regarding the use of the meter, please call the Customer Care Service toll-free at 866-994-3345 (Eastern
Standard Time, Mon-Fri 8:00AM~6:00PM). During non-service hours, please contact your healthcare
provider.
Please read your test strip instructions carefully for additional health-related information.

9
Table of Contents
Chapter 1: Understanding Your Meter ….......................................................................................................11
The EASYMAX
®
MU Blood Glucose Meter …...........................................................................................11
The EASYMAX
®
MU Accessories..............................................................................................................13
Installing Batteries.......................................................................................................................................14
Setting the Time and Date.........................................................................................................................15
Using EASYMAX
®
MU Blood Glucose Test Strips ...................................................................................16
Chapter 2: Control Solution Testing..............................................................................................................17
Why Run a Control Solution Test ...............................................................................................................17
About the Control Solutions ......................................................................................................................18
Running a Control Solution Test ................................................................................................................19
Understanding Control Solution Test Results ............................................................................................22
Chapter 3: Testing Your Blood Glucose .......................................................................................................23
Using the Lancing Device .........................................................................................................................23
Inserting a Lancet into the Lancing Device ................................................................................................24
Running a Blood Glucose Test with Blood from Your Fingertip .................................................................26
Alternative Site Testing (AST)……...………………………………………………………………………….28
Running a Blood Glucose Test with Blood from Your Forearm ……..........................................................30
Running a Blood Glucose Test with Blood from Your Palm ……...............................................................31
Discarding Used Lancets …......................................................................................................................32

10
Understanding Your Test Results - Expected Values………......................................................................33
Unusual Test Results…..............................................................................................................................33
Comparing Your Meter Result to Lab Results …........................................................................................34
Chapter 4: Meter Memory, Setup …...............................................................................................................35
Memory, Storing Test Results …................................................................................................................35
Viewing Test Results ….................................................................................................................36
Chapter 5: Maintenance and Troubleshooting ….........................................................................................37
Installing Batteries …..................................................................................................................................37
Cleaning and Disinfecting Your Meter and Lancing Device...……...........................................................38
Cleaning and Disinfection Frequency.........................................................................................................43
Maintenance and Testing ...........................................................................................................................45
Screen Messages and Troubleshooting ….................................................................................................46
Chapter 6: Technical Information …..............................................................................................................49
Specifications ….........................................................................................................................................49
Limitations…...............................................................................................................................................50
Device Information ….................................................................................................................................54
Warranty ...................................................................................................................................................54
11
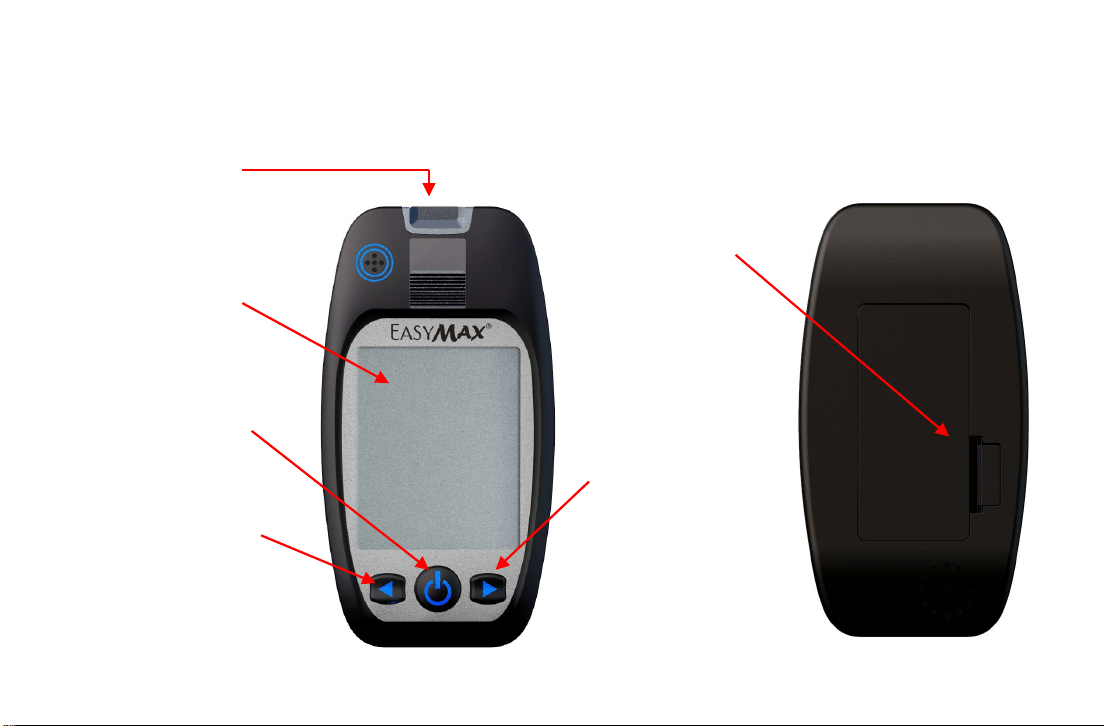
Chapter 1: Understanding Your Meter
The EASYMAX
®
MU Blood Glucose Meter
Display-
Shows results,
messages, and results
stored in memory.
Left () Button-
Press to enter
Memory, adjust setting,
and scroll through
results.
Test Strip Slot-
A light shows you the
direction. Insert test strip
here.
Battery Door-
Flip open the
battery door by
pushing the tab in
the direction of the
arrow and pulling
the door up.
Right () Button-
Press to enter
Memory, adjust setting,
and scroll through
results.
Power Button-
Press to turn on the
meter, confirm the
setting.
12
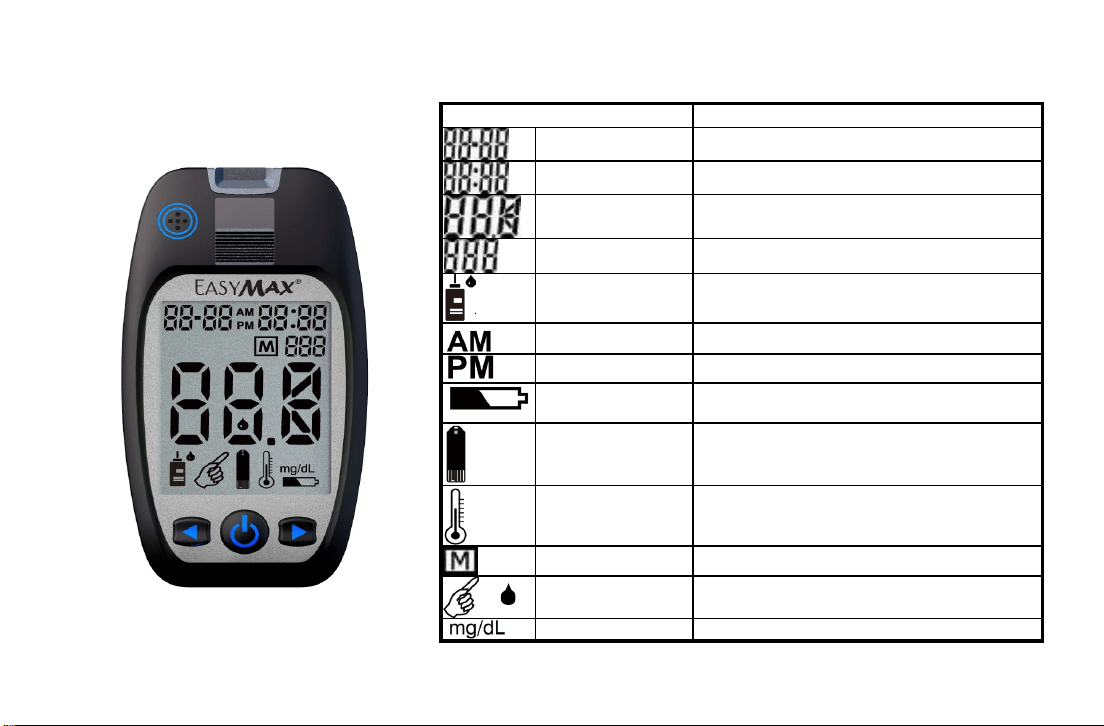
Explanation of Meter Symbols
Folder Symbol
Meaning
Date Show the moment of month and day.
Time Show the moment of time.
Test result Show the test result.
Record display Tracking all the test results
Control Solution
Control Solution test and the result is not
included in the memory.
AM Indicate before noon
PM Indicate after noon
Batteries status
When the battery symbol appears, prepare
new batteries for installation.
Insert strip Insert the test strip to test blood glucose.
Thermometer
W
hen the thermometer icon appears, the
temperature is too high or too low.
Memory Show the memorized results
Apply blood Apply blood to the test strip
Glucose unit
The testing unit of blood glucose is mg/dL.
13
The EASYMAX
®
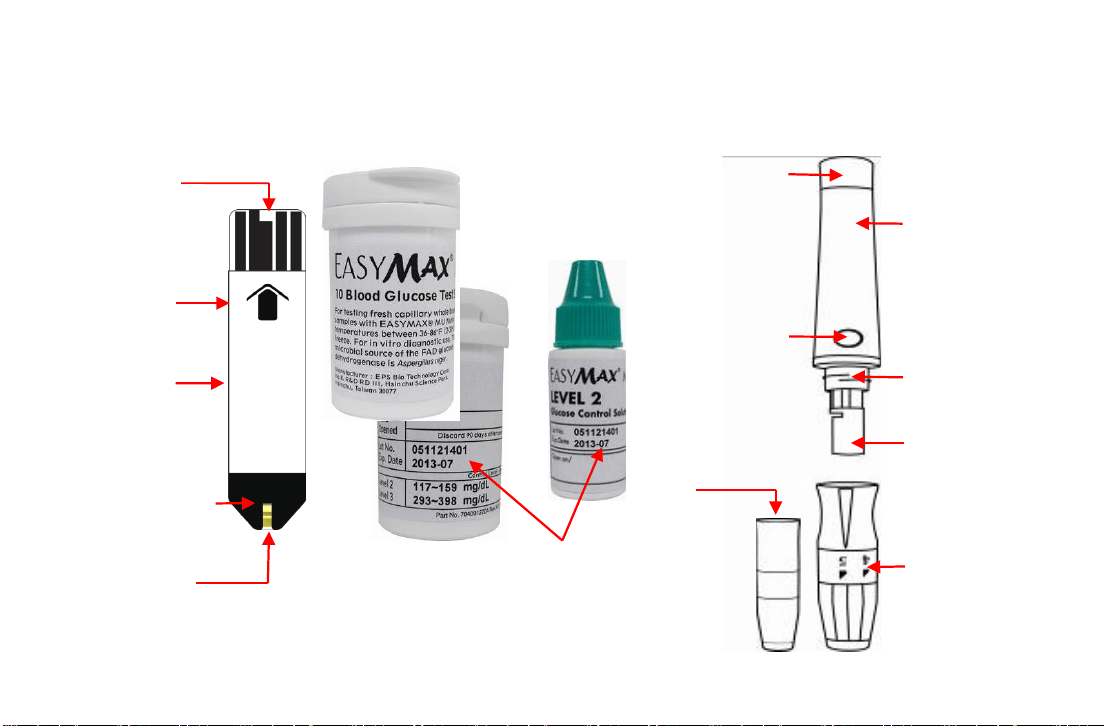
MU Accessories
Blood Glucose Test Strip
Test Strip Bottle
Control Solution Bottle
Lancing Device
Strip Insert
Direction
Reaction area
Hand Hold
Area
Blood collection
area
Electrode
Trigger button-
Press the trigger
button to activate
the lancing device
Carrier-
Insert the lancet
into the carrier
Adjustable tip-
Select the
desired
penetration depth
Hub-
Unscrew or
Recap the Cap.
Sleeve-
Hand Hold
Area
AST
Lancing
Device Cap-
Use this
transparency
cap for AST
testing
Sliding barrel -
Pull on until it clicks
and then release to
enable lancing
device.
Expiration
Date
14
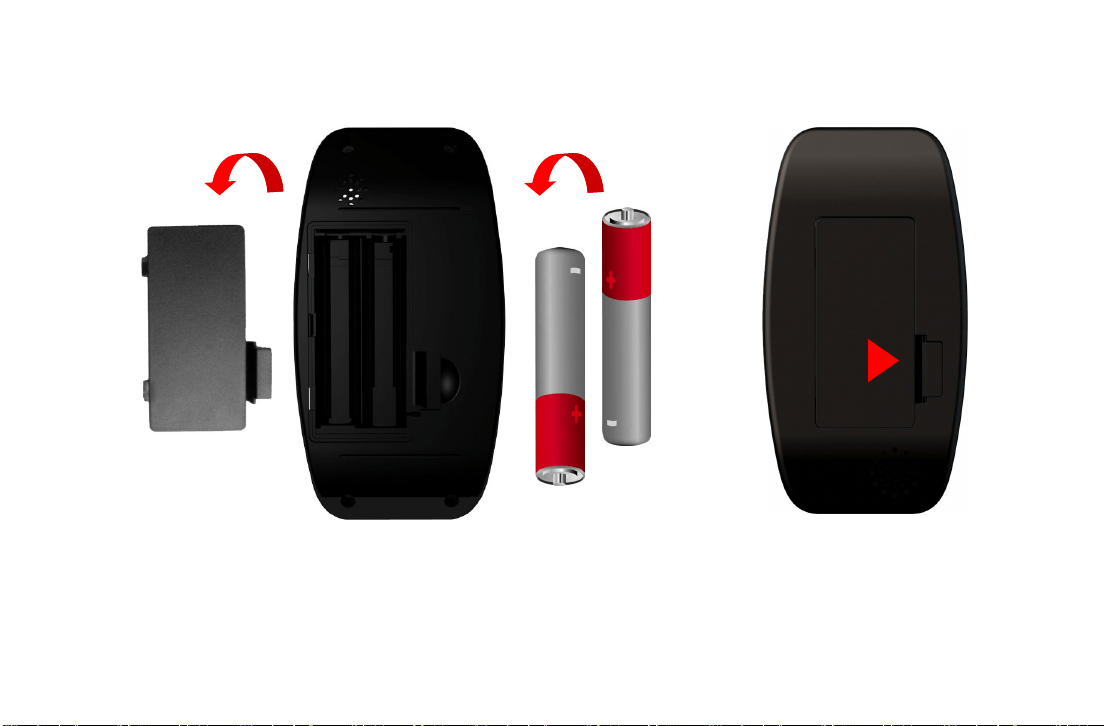
Installing Batteries
1. Open the battery door on the back of the meter by pushing the tab in the direction of the
arrow and pulling the door up.
2. Insert two batteries. You will hear greeting music.
3. Put the battery door back in place and snap it closed.
15
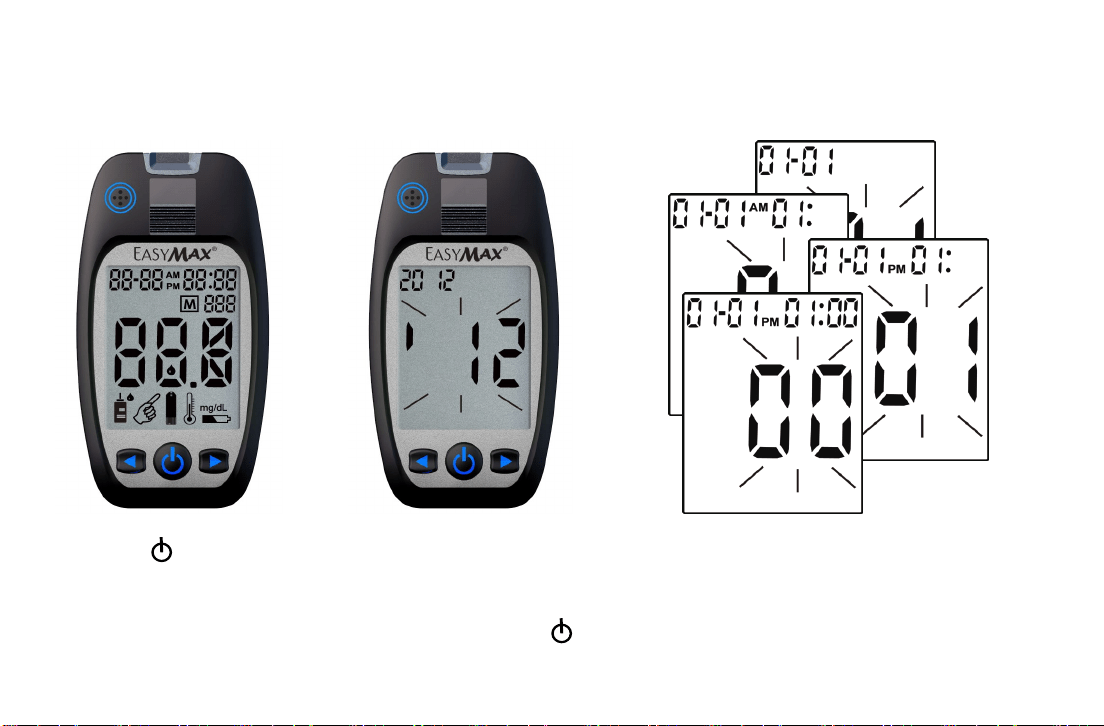
Setting The Time and Date
Setting the current time and date in your meter is important if you use the meter memory.
3. Repeat step 2 to set the date and
time. The flashing field is the one
you are currently setting. (A=AM,
P=PM)
1. Press (Power
Button) to turn the
meter on.
2. The last 2-digits of the year flashes
at the top of the display. Press
(Left button) or (Right button) to
adjust the year and press (Power
Button) to confirm the setting.

16
Using EASYMAX
®
MU Blood Glucose Test Strips
Use only with EASYMAX
®
MU Blood Glucose Meters.
Run a control solution test every time you open a new box of test strips (See Chapter 2 "Control Solution
Te sting.")
Keep the test strips in their original bottle.
After you take a test strip out of the bottle, tightly close the bottle immediately. This keeps the test strips
dry.
Use the test strip within three minutes after taking it out of the bottle.
The strip is for single use only. Do not reuse it.
Record the date you open the test strip bottle. Be sure to check the expiration date on the test strip bottle.
The test strip is good for three months from the date the bottle is opened or until the expiration date on
the bottle, whichever comes first.
Store the test strip bottle and your meter in a cool dry place.
Store the test strips between 35.6°F - 86°F (2°C ~30°C). Do not freeze.
Do not apply blood or control solution to the test strip before you insert it into the meter.
Do not touch the test strip with wet hands. Do not bend, cut, or twist the test strips.
EASYMAX
®
MU Self-Monitoring Blood Glucose Test System is a “no code”system and does not
require any test strip calibration.

17
Chapter 2: Control Solution Testing
Why Run a Control Solution Test
We recommend that you run the EASYMAX
®
MU control solution test because it lets you know that your
meter and test strips are working properly to give reliable results. You should run the control solution tests
when:
You use the EASYMAX
®
MU Blood Glucose Meter for the first time.
You open a new bottle of test strips.
You think the meter or test strips may be working incorrectly.
You drop the meter.
You have repeated a test and the test results are still lower or higher than expected.
You are practicing the test procedure.

18
About The Control Solutions
Use with EASYMAX
®
MU test strips.
Write the date you opened the control solution bottle on the bottle label. The control solutions are good
for three months from the date the bottle is opened or until the expiration date on the bottle, whichever
comes first.
Do not use a control solution that is past the expiration date.
Control solutions can stain clothing. If you spill it, wash your clothes with soap and water.
Close the bottle tightly after every use.
Left over control solution should not be added back into the control bottle.
Store control solution at room temperature, between 35.6°F - 86°F (2°C~30°C). Do not freeze.
If you would like to purchase EASYMAX
®
MU level 2 and level 3 Control Solutions, please contact your
local dealer.
19
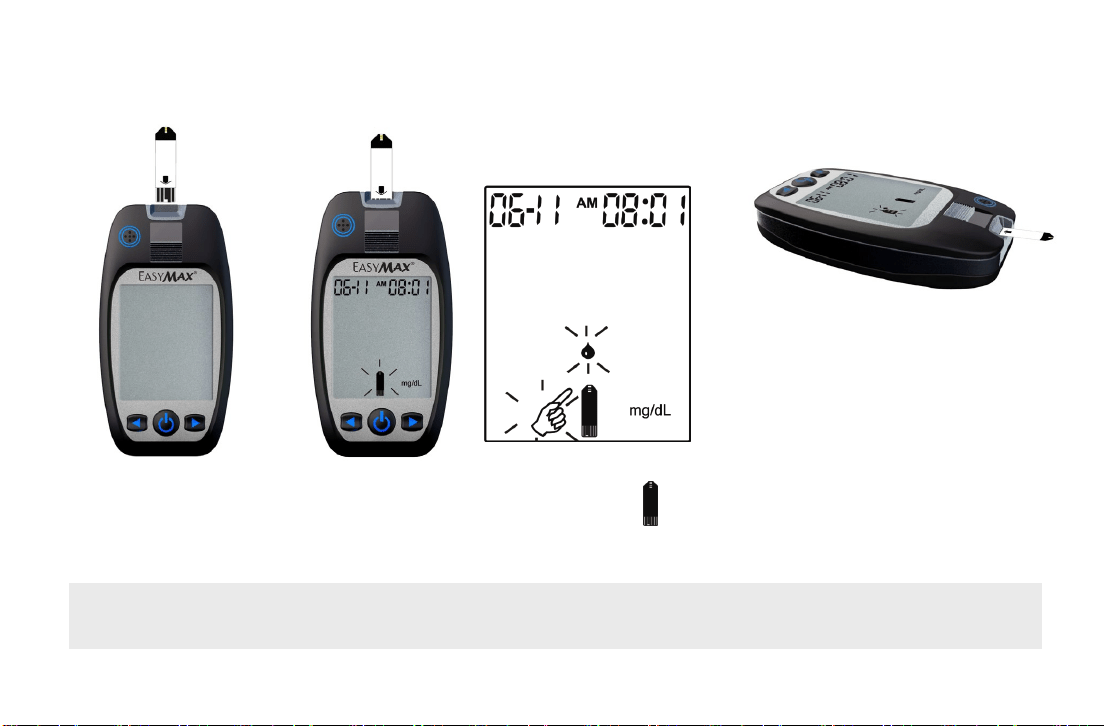
Running a Control Solution Test
You need the meter, a test strip, and control solution.
1. Put a test strip into
the meter in the
direction of the
arrow.
3. Place the meter on a flat
surface, like a table.
4. Remove the control solution
bottle cap and wipe the tip of
the bottle with a tissue.
5. Squeeze the bottle until a
tiny drop forms at the tip of
the bottle and place solution
on top of bottle cap.
Note: Upon detecting a control solution test, EASYMAX MU meter will automatically record the
results in the blood test memory.
2. The meter turns on
automatically and the icon of
shows itself.
20
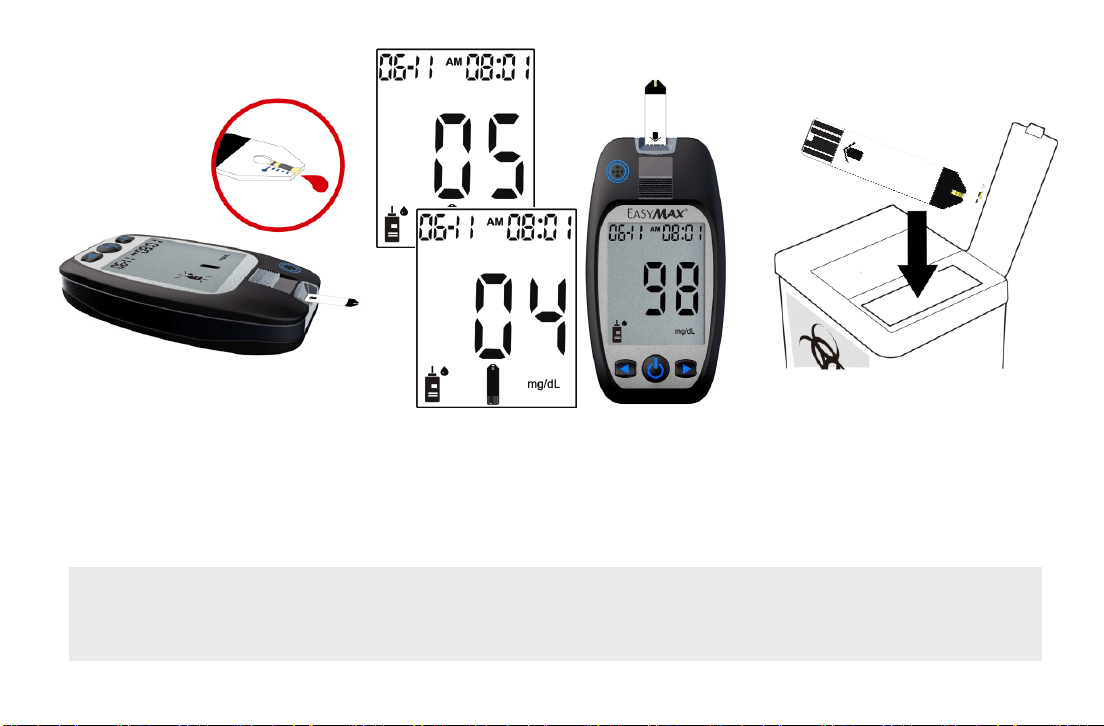
6. Touch the drop on the bottle
to cap the tip of the test
strip.
7. The meter starts to count
down from 5 seconds and
then will display result.
8. Do not remove the test strip
yet. Check if the reading
falls within the range printed
on the test strip bottle.
9. Remove the test strip and throw it
away after you have compared
the reading to the range printed
on the test strip bottle.
Note: Be aware that there are Level 2 and Level 3 ranges listed on your test strip bottle. The Level
2 and Level 3 refer to the two different control solutions that are available. Please be sure
that you are looking at the correct range.

21
Understanding Control Solution Test Results
The label on your test strip bottle shows the acceptable ranges for the Control Solutions – Level 2 and Level 3.
The result you get should be inside the acceptable range for the appropriate control solution level. Make sure
you compare the result to the correct level of control.
When the control solution result is inside the range on the test strip bottle, your test strips and your meter are
working properly.
If your control solution result is not inside the acceptable range (printed on your test strip bottle), here are
some things you can do to solve the problem:

22
Troubleshooting Check Action
Was the test strip exposed to open air for a long
period of time?
If yes, repeat the control test with properly stored
strips.
Does test strip cap close tightly? Or was test
strip cap left open?
If the cap was not tight, or the bottle was left
uncapped, open a new bottle of test strips.
Do not reuse the strips from the affected bottle.
Is the meter functioning well?
You can use the control solutions to verify the
meter’s functions.
Is the control solution expired or contaminated?
If yes, replace with a new control solution to check
the performance of SMBG system.
Were test strips and control solutions stored in
cool, dry places?
If no, repeat the control test with properly stored
strips or control solutions.
Did you follow the testing steps properly?
If you have followed the steps properly, contact
physician. If you continue to have problems please
contact Customer Support at 1-866-994-3345.
23
Chapter 3: Testing Your Blood Glucose
Using the Lancing Device
The best depth setting is the lowest number that draws enough blood for a test. Try different settings to
find the one that’s right for you.
Please do not share your lancing device with anyone. And always use a new, sterile lancet. Lancets are for
one time use only.
If the meter and lancing device are being operated by a second person who is providing testing assistance
to the user, the meter and lancing device should be disinfected prior to use by the second person. For the
disinfection instruction, please refer to Chapter 5: Maintenance And Troubleshooting “Cleaning and
disinfect your meter and supplies”.
Note:
Used test strips and lancets are considered bio-hazardous waste in accordance with U.S. local
regulations and should be handled as if capable of transmitting infection. The users may discuss
methods for disposing used test strips and lancets with their doctor.
24
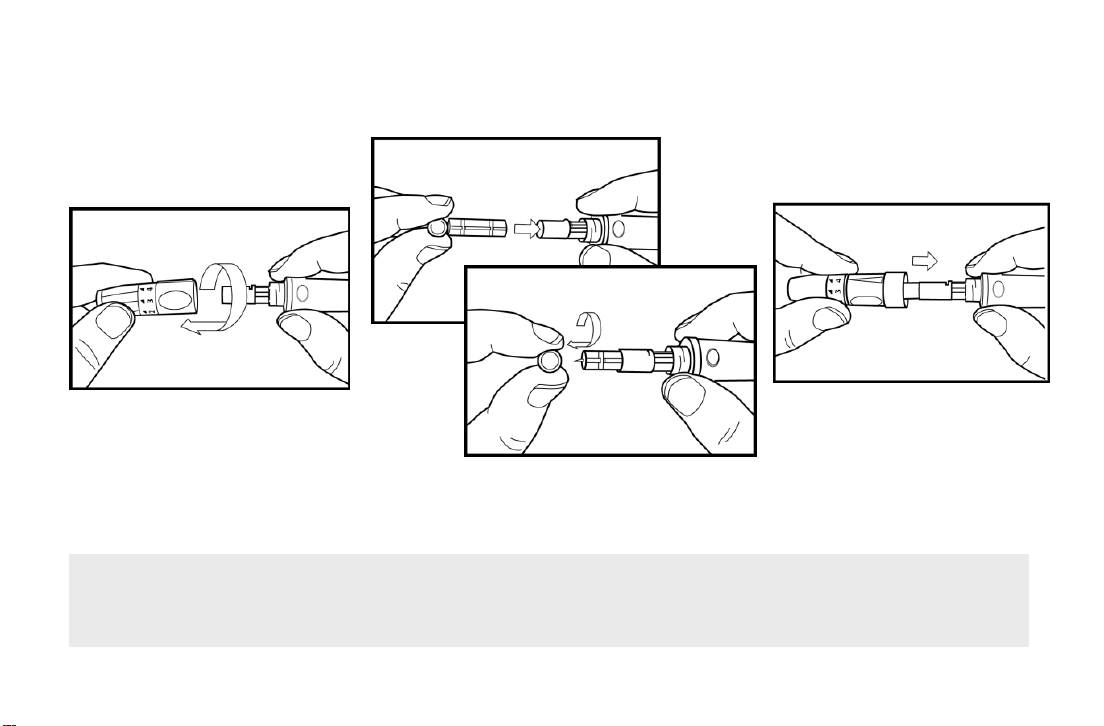
Inserting a Lancet into the Lancing Device
You must first load the lancet into the lancing device to get it ready for use.
1. Unscrew the Cap.
2. Insert the lancet into the lancing
device firmly then twist off the
protective cover.
3. Recap the front cap.
Note:
Lancets are for single use only and a new, sterile lancet should be used each time you perform a
test.
25
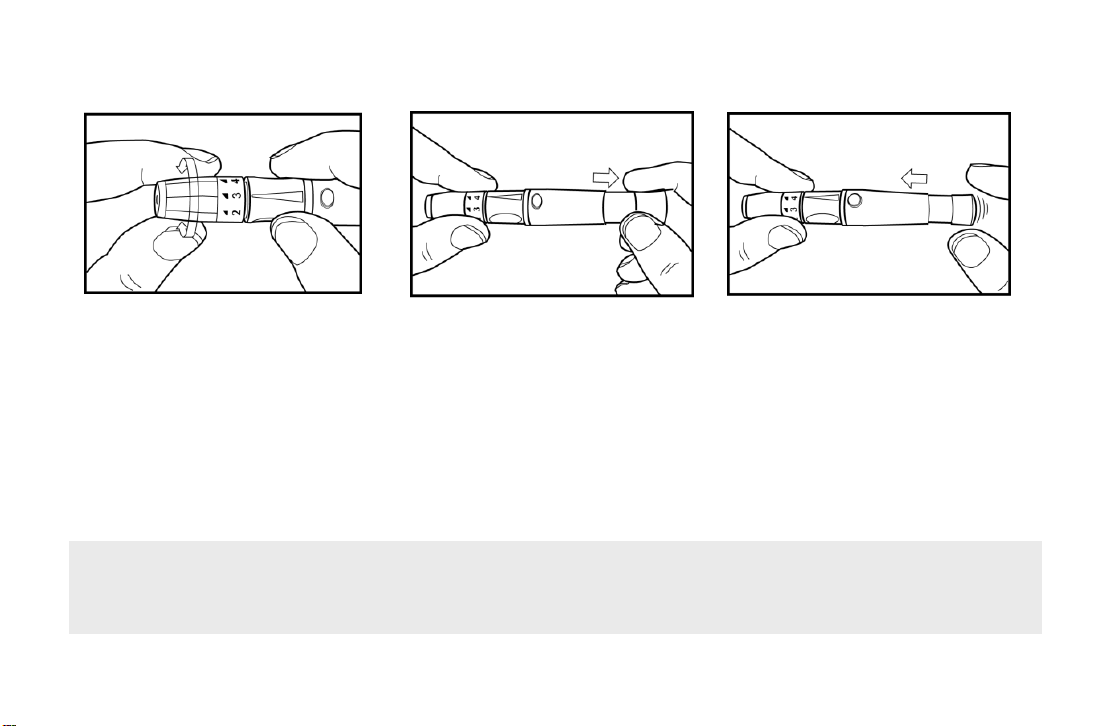
Note: 1. Select 1-2 for soft or thin skin, 3 for average, and 4-5 for thick or calloused skin.
2. Lancing device and lancets are not to be shared between users. Sharing lancing devices
and lancets may transmit blood borne pathogens, such as viral hepatitis.
6. Set the lancing device aside
until later in the test.
5. Pull on the sliding barrel of the
lancing device until it clicks and
then release.
Now the lancing device is ready.
Do not prick your finger until your
meter and strip are prepared.
4. Select the desired penetration
depth.
26
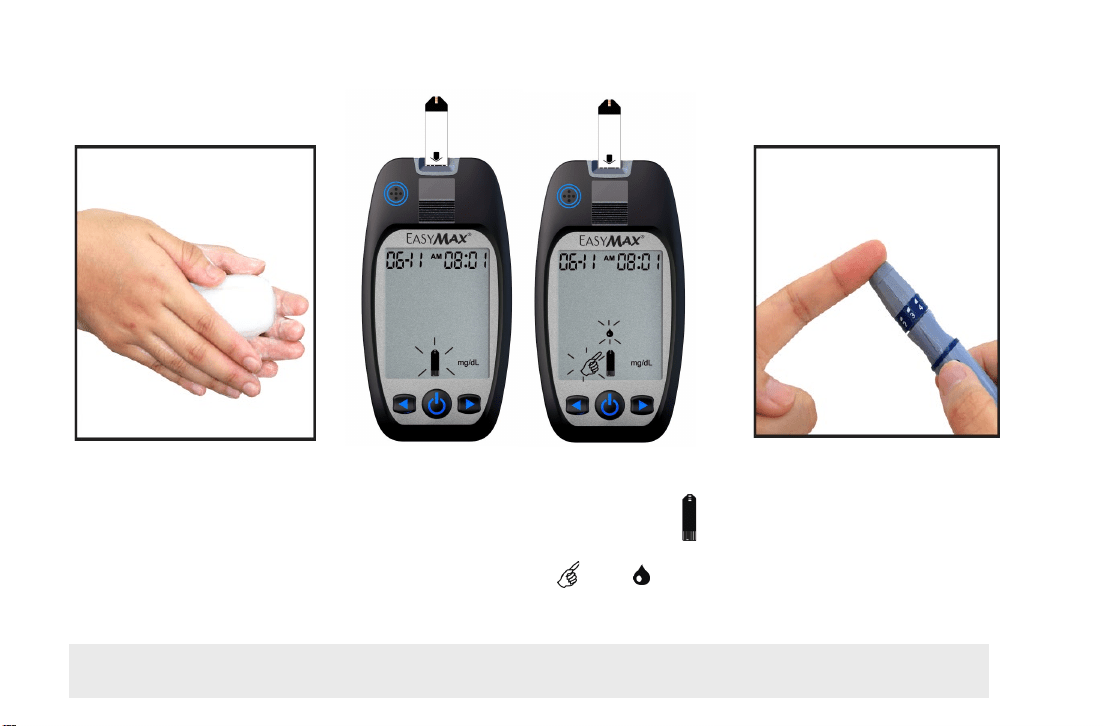
Running A Blood Glucose Test With Blood From Your Fingertip
Note: You can also turn on the meter by inserting a test strip.
1. Wash your hands with
soap and warm water.
Rinse and dry thoroughly.
4. Place the lancing device against
the pad of your finger. Press the
trigger button to activate the
lancing device.
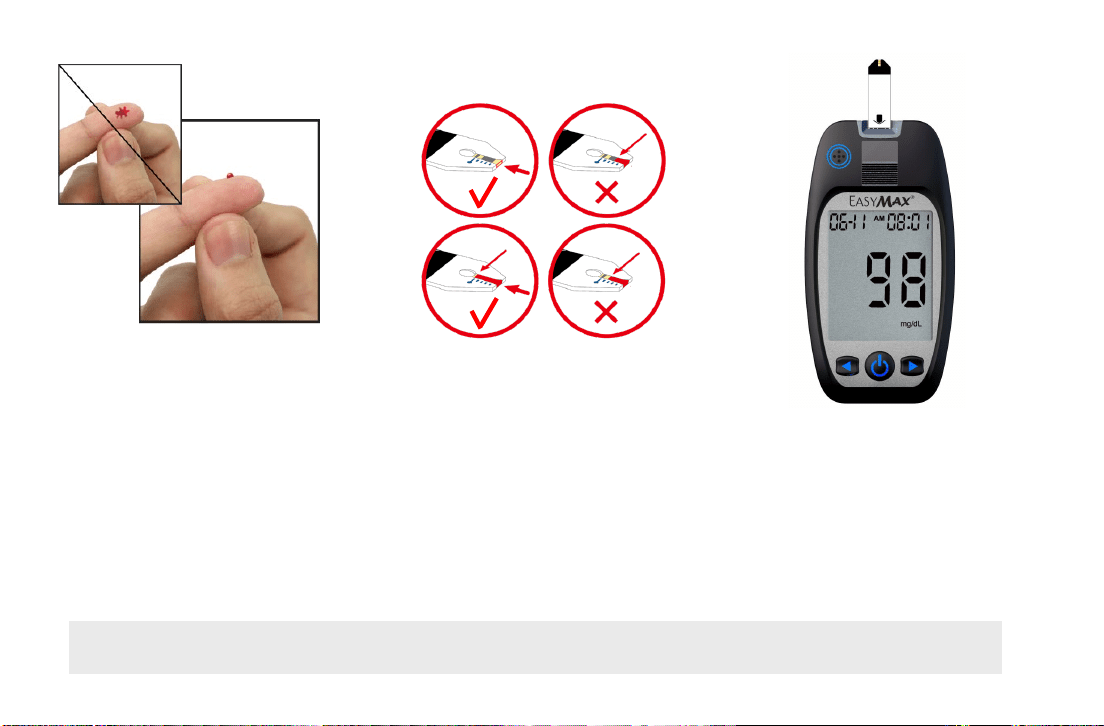
2. Put a test strip into the meter in the
direction of the arrow. The meter
turns on automatically. The icon
shows itself.
3. When the icons of and
flashes on the display, the testing
mode of blood drop is starting.
27
Note: 1. please make sure to apply blood when the blood drop appears on the display.
5. Gently squeeze and/or
massage your fingertip
until a round drop of blood
on your fingertip.
6. Wipe away the first drop
with a tissue and use the
second drop.
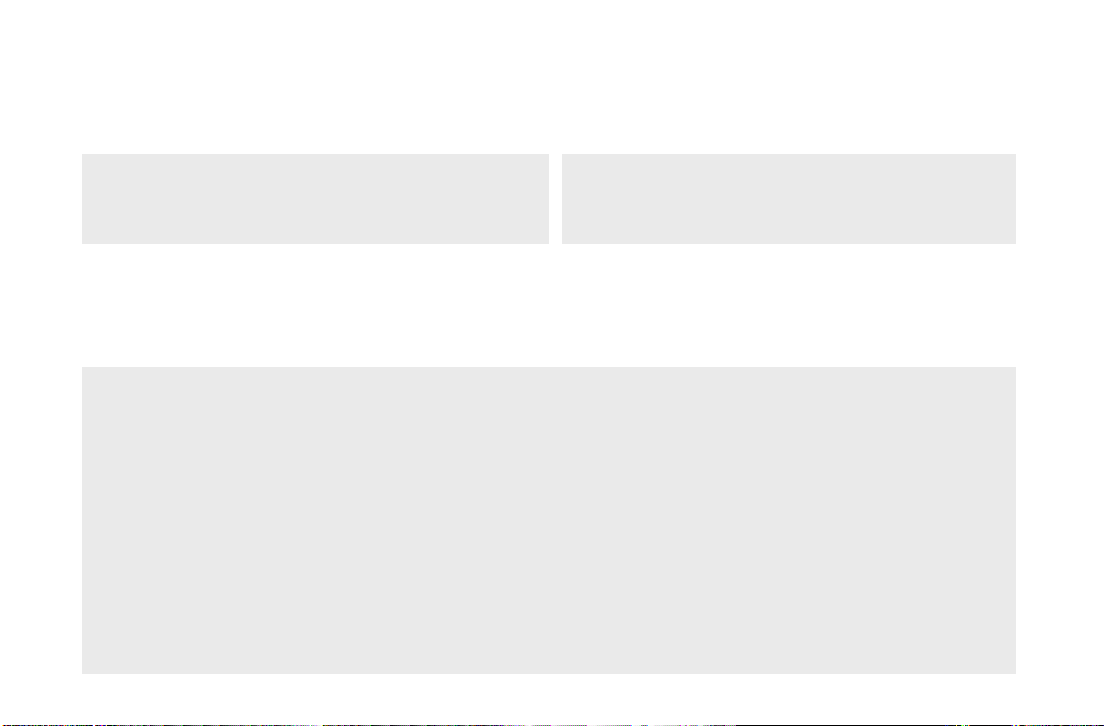
7. Touch the blood drop at the tip of the
transparent window of the test strip.
Do not put blood on top of the strip.
Be sure to get enough blood on the
strip’s reaction zone. Otherwise, an
inaccurate reading may result.
8. The meter starts to count down from 5
seconds.
9. Push the Strip Ejector button to
remove the test strip and throw
it away. The meter turns off
automatically.
10. Wash hands thoroughly with
soap and water after handling
the meter, lancing device and
test strips.
Apply blood to the edge of
the test strip.
Do not apply blood on top
of the test strip.
Be sure to get enough
blood on strip to make it to
the confirmation window.
Not enough blood on
strip to get a test result.
28
Alternative Site Testing (AST)
Understanding Alternative Site Testing
Consult your health care professional before you begin using the palm or forearm for testing. Blood glucose
test results obtained from your palm or forearm may differ significantly from fingertip samples.
We strongly recommend that you:
Do AST ONLY in the following intervals:
In a pre-meal or fasting state (more than 2 hours since the last meal).
Two hours or more after taking insulin.
Two hours or more after exercise.
Do NOT use AST if:
You think your blood glucose is low.
You are unaware of hypoglycemia.
Your AST results do not match the way you feel.
You are testing for hyperglycemia.
Your routine glucose results are often fluctuating.
If you are pregnant.
What is AST?
Besides the fingertip, you can test your palm or
forearm.
What is the advantage of AST?
You have the option of testing other places on
your body besides the fingertip.
29
Fingertip test only:
If sick
If blood glucose is low
After exercising
Two hours or less after eating
When you have just taken insulin
After injecting rapid-acting insulin (two hours or less)
AST Results:
If the blood glucose test result from the alternative site test does not match how you feel, do a
fingertip test to confirm the result again.
Do NOT change your treatment just because of an alternative site result, do a fingertip test to
confirm the result.
If you often do not notice when your blood glucose is low, do a fingertip test.
Caution:
Talk with your healthcare professional before you test palm or forearm.
Do NOT ignore symptoms of high or low blood glucose.
Fingertip samples are able to show the rapid change of glucose faster than forearm and palm
samples.
Measurements from alternative site testing should never be used to calibrate a continuous glucose
monitor (CGM) or entered into insulin dose calculators for insulin dosing recommendations.
30
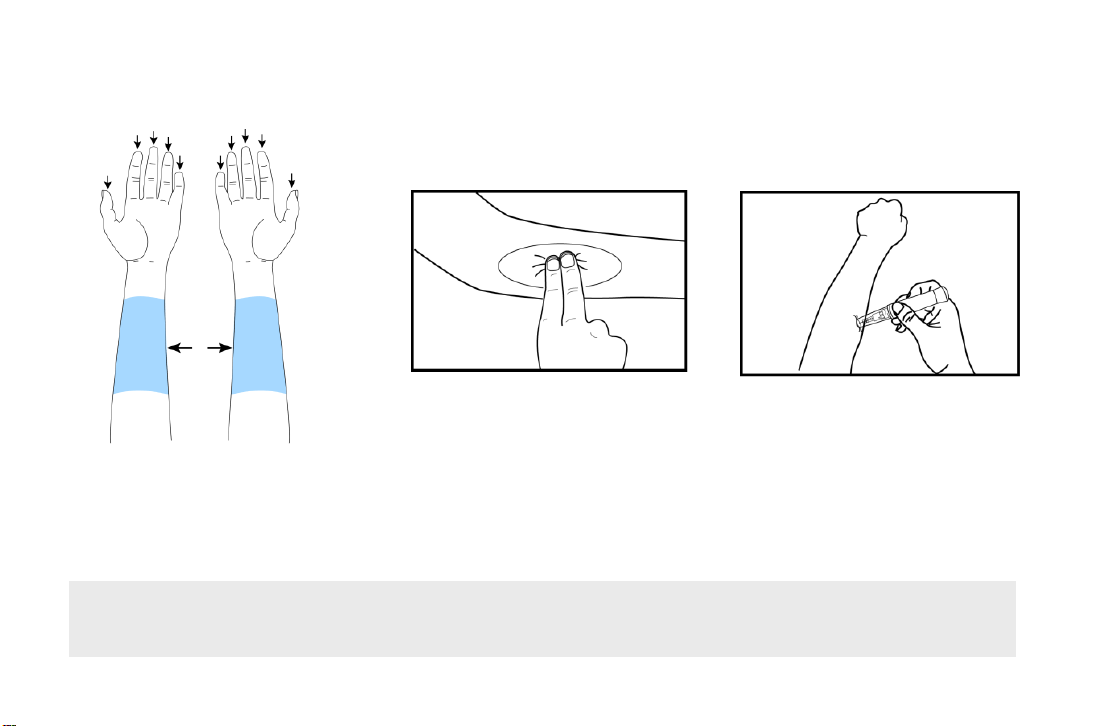
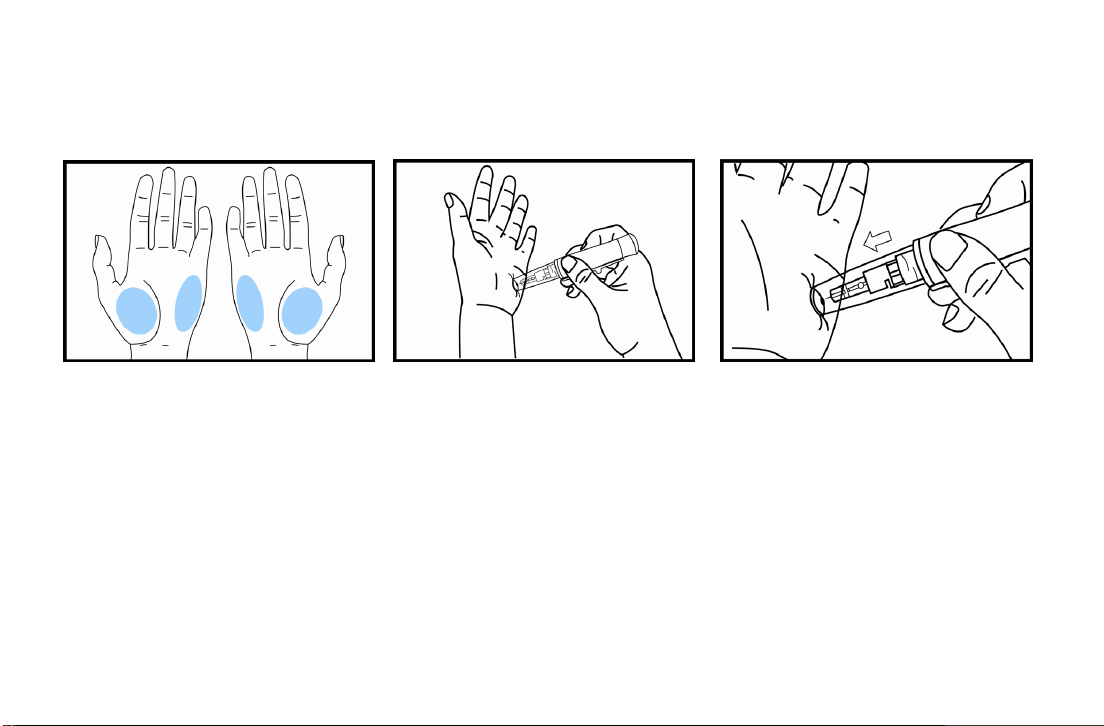
1. This graphic shows where the
meter cleared for alternate site
testing.
2. Massage the puncture area
of forearm for a few seconds.
3. Press and hold the device
with a clear adjustable tip
against the forearm.
3. Press the trigger button to
activate the lancing device. Hold
the device against forearm and
increase pressure until the blood
sample size is sufficient.
4. Wipe away the first drop with a
tissue and use the second drop.
Running a Blood Glucose Test with Blood from Your Forearm
Please use the clear cap with the lancing device for AST testing
Note: 1. Check with your healthcare professional before testing sites other that the fingertip.
2. Please do NOT use the first drop of blood sample.
31
2. Press and hold the device
with a clear adjustable tip
against the palm
3. Press the trigger button to activate
the lancing device.
4. Hold the device against palm and
increase pressure until the blood
sample size is sufficient.
1. Massage the puncture area
of palm for a few seconds.
Running A Blood Glucose Test With Blood From Your Palm
32
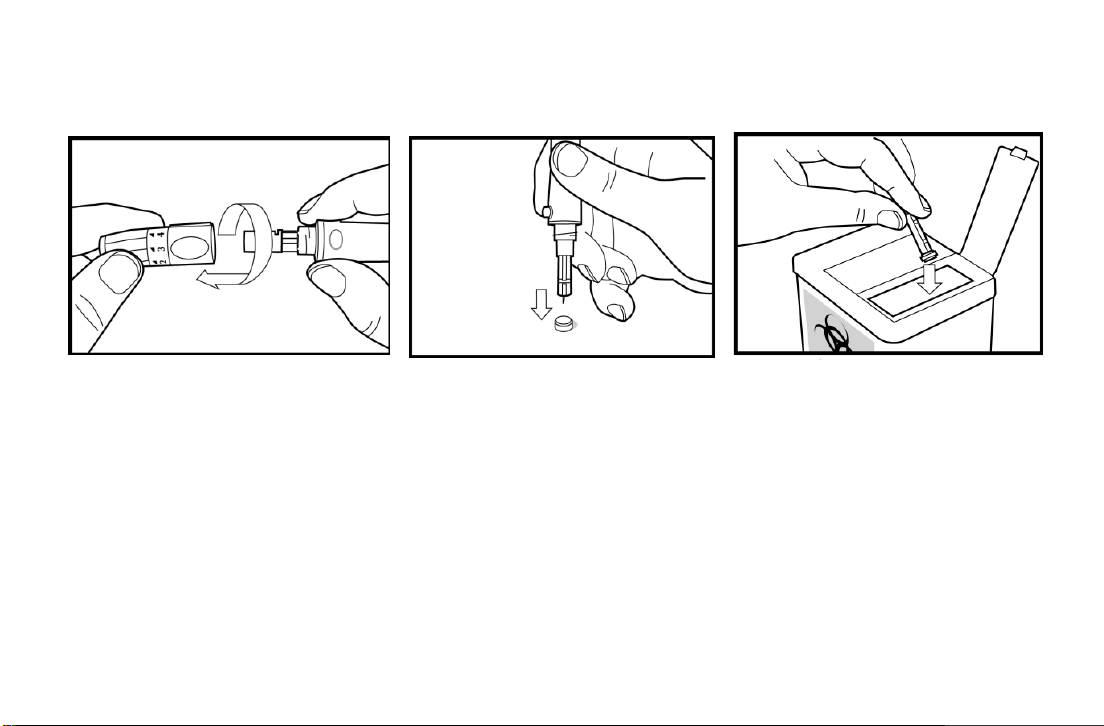
Discarding Used Lancets
1. Unscrew and remove the
cap.
2. Without touching the
used lancet, stick the
lancet tip into its
protective cover
3. Please discard used disposable
lancets according to the
recommendations of your
healthcare professional. Or
discard the used disposable
lancet into an appropriate
sharps or biohazard container.
4. After discarding, wash hands
thoroughly with soap and water.
Rinse and dry thoroughly.

33
Understanding Your Test Results
Expected Values*
The EASYMAX
®
MU Blood Glucose test strips are whole-blood referenced and calibrated for easier
comparison to lab results. The American Diabetes Association recommends a post-meal glucose level of less
than 180 mg/dL and a pre-meal glucose of 70–130 mg/dL
*. For people with diabetes: please consult with your
doctor for the appropriate blood glucose range.
Unusual Test Results
If your test result does not match the way you feel, please follow these steps:
1. Run a control test, Chapter 2, "Control Solution Testing."
2. Repeat a blood glucose test, Chapter 3, "Testing Your Blood glucose."
3. If your test results still do not reflect the way you feel, call your doctor immediately.
* Reference: American Diabetes Association. Standards of medical care in diabetes-Table 10. Diabetes
care. 2011; Vol. 34, Suppl. 1, S21.
Note:
1. Extremely high humidity may affect the test results. A relative humidity greater than 90%
may cause inaccurate results.
2. Hematocrit below 20% may cause higher results. Hematocrit above 60% may cause lower
results.

34
Comparing Your Meter Result To A Lab Result
A common question is how the blood glucose results on your meter compare to the lab results. Your blood
glucose can change quickly, especially after eating, taking medication, or exercising. If you test yourself in the
morning, then go to the doctor’s office for a blood glucose test. The results will probably not match, even if you
are fasting. This is typically not a problem with your meter, it just means that time has elapsed and your blood
glucose has changed.
If you want to compare your meter result to the lab result, you must be fasting. Bring your meter to the
doctor’s office, and test yourself by fingertip within five minutes of having blood drawn from your arm by a
healthcare professional. Keep in mind that the lab could use different technology than EASYMAX
®
MU
blood glucose meter, and that blood glucose meters for self testing generally read somewhat lower or higher
than the lab result.
For accuracy and precision data and for important information on limitations, see the instructions that come
with your test strips.
35
Chapter 4: Meter Memory, Setup
Memory, Storing Test Results
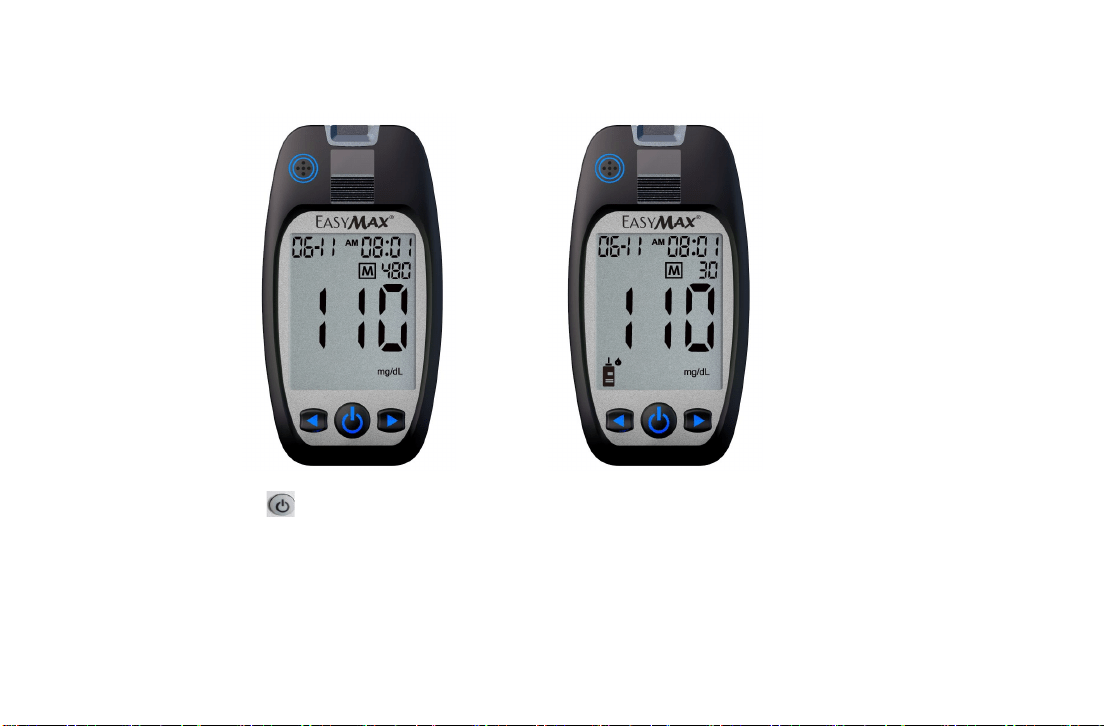
Your meter stores a maximum of 880 test results with the time and date of the test. You can review them at
any time. When the memory is full, the oldest result is dropped as the newest is added, so it is very important
to have the correct time and date set in the meter.
Note:
1. Do not change your therapy based on one individual result in memory.
2. The memory is not lost when you replace the battery. You do need to check that the time and
date are still correct for future readings. See Section "Setting the time and date" in Chapter 1.
3. Once 880 results are in memory, adding a new result causes the oldest one to be deleted
36
Viewing Test Results
2. Press to turn on the meter
3. Press (Left button) or (Right
button) to view the last test result.
1. The records are shown in order
from 880 to 1.
37
Chapter 5: Maintenance and Troubleshooting
Installing Batteries
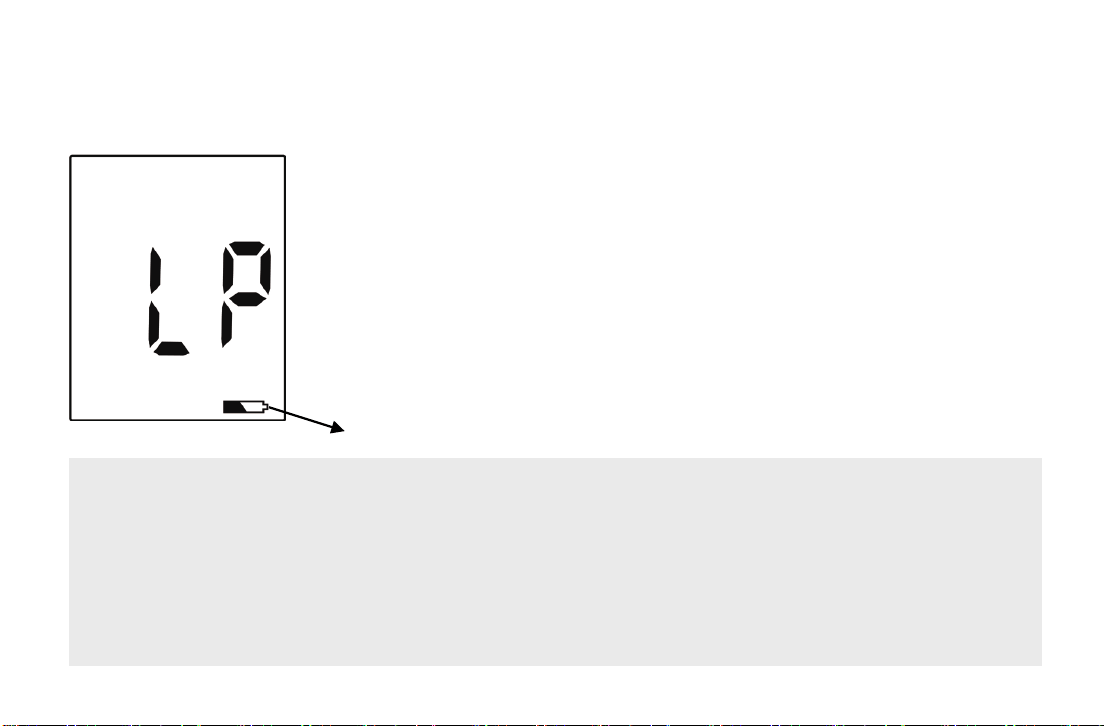
The meter uses two alkaline 1.5V (AAA) batteries. Batteries will normally last for
more than 2000 tests. Other types of 1.5V (AAA) batteries are also acceptable, but
the capacity of test times may differ. Install the batteries when you first use the
meter or replace with new batteries when the "LP" (low power) message and the
low battery symbol appear on the display.
The meter will not turn on the first time batteries are installed.
Please press and hold power button or insert the test strip to turn your meter on.
The meter will turn off automatically. Or you can press and hold power button to
turn your meter off.
Low battery symbol
Note:
1. The meter won’t delete earlier records after you replace batteries.
2. You should reset the time and date again after you replace the batteries. See Section "Setting
the time and date" in Chapter 1.
3. 1.5V (AAA) x 2 batteries are available at most stores. You may take the old batteries with you
for replacement.
4. Remove batteries when you will not be using the meter for one month or more.

38
Cleaning and Disinfecting Your Meter and Lancing Device
Choosing the disinfectant
The recommended EPA-registered disinfected product is as follow:
PDI® Super SANI-CLOTH® Germicidal disposable wipe (EPA Reg. No.:9480-4)
Super Sani-Cloth germicidal wipe contains active ingredients: n-Alkyl (60% C14, 30%C16, 5%C12, 5%C18)
dimethyl benzyl ammonium chlorides and n-Alkyl (68%C
12, 32%C14) dimethyl ethylbenzyl ammonium
chlorides and they have been shown to be safe for use with the EASYMAX
®
MU meter, but any other
disinfectant product with the EPA registration number may be used on this device.
Please purchase in retail stores like Walmart and Office Depot. You could also purchase on the PDI
website:http://www.pdipdi.com/
or online retail sites like amazon.com, medline.com, and Expression medical
supply Inc. http://www.exmed.net/.
Cleaning and Disinfection Instruction
Please keep the meter and lancing device free of dirt, dust, bloodstain, and water stains. Please follow the
following guidelines to clean and disinfect your meter and lancing device.
The meter and lancing device have been validated so that they can withstand cleaning for up to 9 times per
day.
After every use, follow the cleaning instruction to prevent the growth of any microorganism and also to
help improving the effectiveness of disinfection. Then follow disinfection instruction once per week which
could effectively kill blood borne pathogens, such as viral hepatitis and prevent cross-contamination. If the
devices are being operated by a second person who is providing testing assistance to the user, the meter and
lancing device should be disinfected prior to use by the second person.

39
Cleaning
Instruction: All blood and other body fluids must be thoroughly cleaned from surfaces and
objects before disinfection by the germicidal wipe. Open, unfold and use first germicidal wipe to remove heavy
soil after every use.
Disinfection Instruction
: Unfold a clean wipe and thoroughly wet all the surface of the meter, including the
strip port and other connection port. Unfold a clean wipe and thoroughly wet all the surface of the lancing
device, including cap or AST cap if used. Treated area must remain visibly wet for a full 2 minutes. Let the
devices air dry for 0.5 minute. Do disinfection once per week.
Do Not:
Get any moisture in the test strip slot.
Spray any cleaning solution directly onto the
meter.
Put the meter under water or liquid.
Pour liquid into the meter.
Do:
Make sure the meter is turned off during cleaning
and disinfection.
Keep the test strip vials tightly closed when
performing the cleaning and disinfection
procedures because the fumes from the
disinfectant may affect the performance of the strip
After cleaning or disinfection, please perform the
physical appearance and performance check of
devices.
Please follow the instruction on page 41 to 43.
40
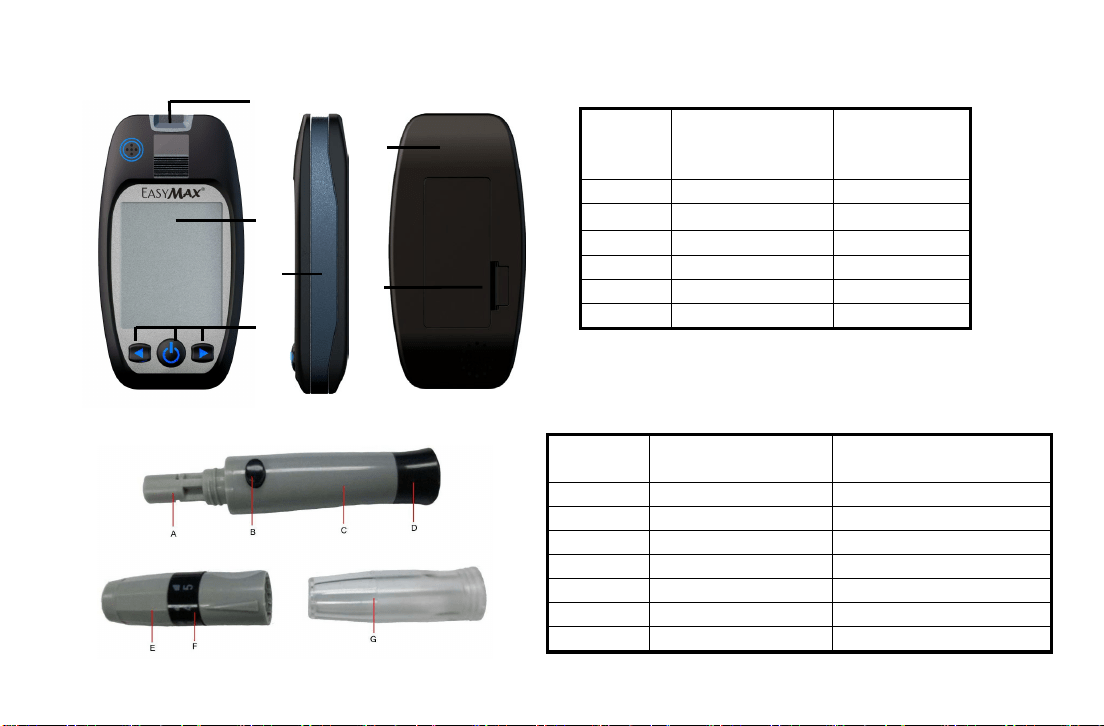
1. Meter clearing/disinfection area
2. Lancing device clearing/disinfection area
Code
Name
Possibility
of contact
with blood
A
Strip Slot
High
B
Front Case
High
C
Side Case
High
D
Front Buttons
High
E
Back Case
High
F
Battery Cover
High
Code
Name
Possibility of
contact with blood
A
Lancet holder
High
B
Trigger button
High
C
Body
High
D
Sliding barrel
High
E
Cap
High
F
Depth adjust ring
High
G
AST Cap
High
A
B
C
D
E
F
41
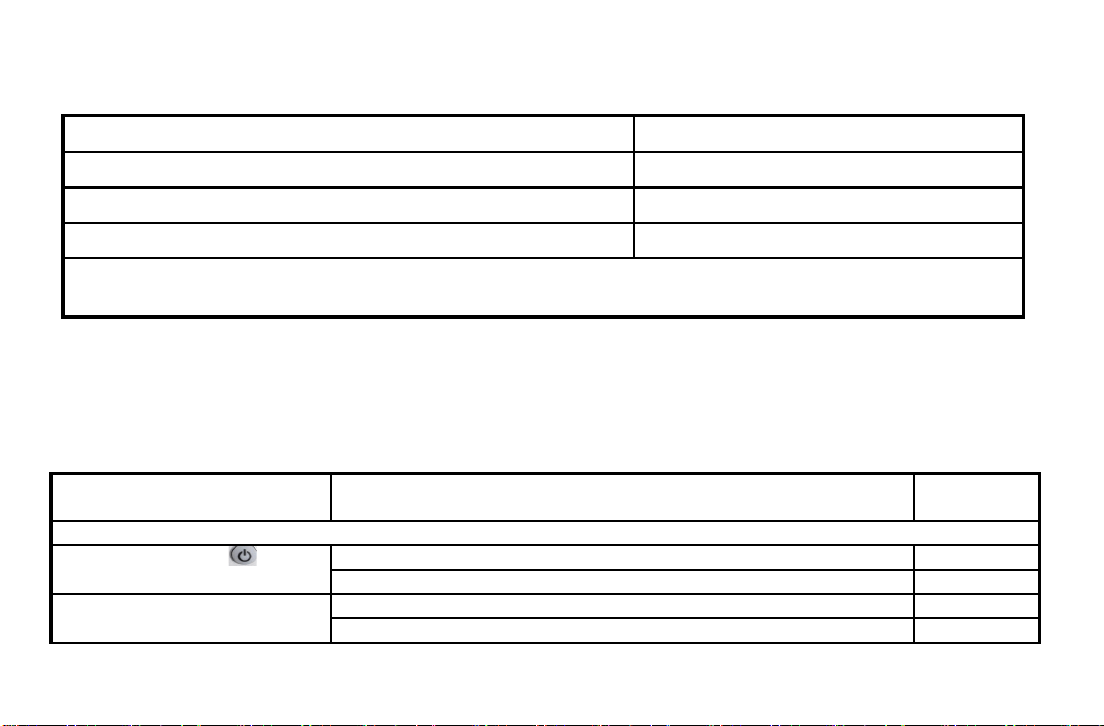
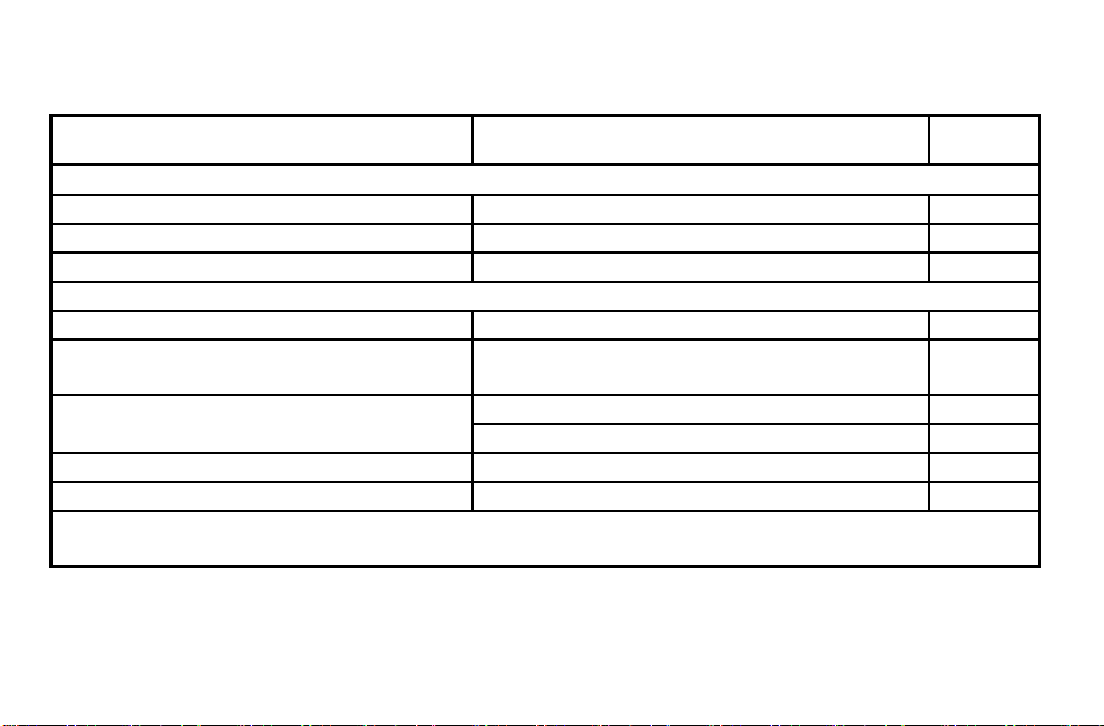
Physical Appearance check of the meter after each cleaning or disinfection
Check item
Accept Result
Is it clear to see through the transparency part, like display?
Yes
Are the strip slot and other components free from erosion?
Yes
Is the labeling on the meter legible?
Yes
Action: If any of the results is “No” the user should call the Customer Care Service toll-free at
866-994-3345 (Eastern Standard Time, Mon-Fri 8:00AM~6:00PM) for assistance.
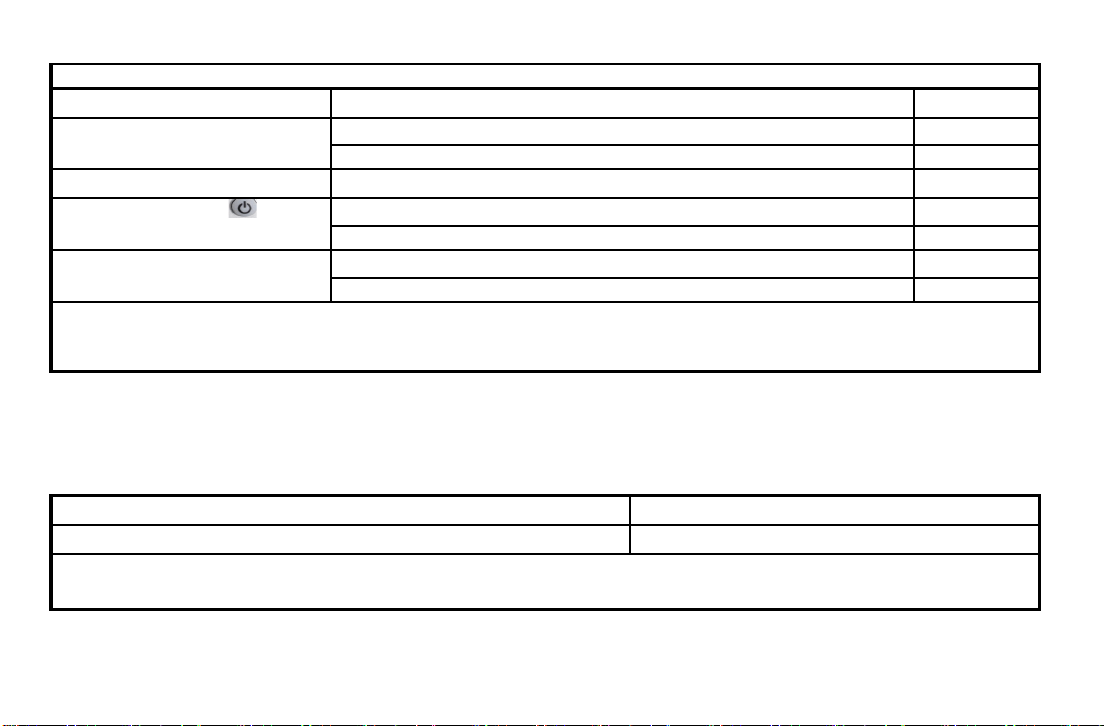
Performance check of the meter
Steps Check item
Accept
Result
After each cleaning
1. Press and hold button
for 3 sec.
Is meter powered on?
Yes
Did the meter beep?
Yes
2. Press and release or
button.
Is the testing result correctly stored in the memory?
Yes
Can the result be clearly read?
Yes
42
After each disinfection
1. Insert test strip
Is the meter powered on?
Yes
2. Apply Level 2 control
solution
Any reading?
Yes
Is the reading within control range?
Yes
3. Remove test strip
Is meter powered off?
Yes
4. Press and hold
button for 3 sec.
Is meter powered on?
Yes
Did the meter beep?
Yes
5. Press and release or
button.
Is the testing result correctly stored in the memory?
Yes
Can the result be clearly read?
Yes
Action: If any of the results is “No”, stop using the device. Please call the Customer Care Service toll-free at
866-994-3345 (Eastern Standard Time, Mon-Fri 8:00AM~6
:00PM) for replacement with a new
meter.
Physical Appearance check of the lancing device after each cleaning or disinfection
Check item
Accept Result
Are all components free from erosion?
Yes
Action: If any of the results is “No” the user should call the Customer Care Service toll-free at
866-994-3345 (Eastern Standard Time, Mon-Fri 8:00AM~6:00PM) for assistance.
43
Performance check of the Lancing device
Step Check item
Accept
Result
After each cleaning
1. Cap the normal cap to the lancing device.
Can the cap be screwed on the lancing device?
Yes
2. Pull on the sliding barrel and then release.
Can the lancing device click?
Yes
3. Press trigger button.
Can the lancet be fired?
Yes
After each disinfection
1. Install the lancet on the lancet holder.
Can the lancet be fixed on the lancet holder?
Yes
2. Cap the AST cap to the lancing device.
Can the AST cap be screwed on the lancing
device?
Yes
3. Remove the AST cap. Recap the normal
cap to the lancing device.
Can the cap be screwed on the lancing device?
Yes
Can the penetration depth ring be adjusted?
Yes
4. Pull on the sliding barrel and then release.
Can the lancing device click?
Yes
5. Press trigger button.
Can the lancet be fired?
Yes
Action: If any of the results is “No”, please call the Customer Care Service toll-free at 866-994-3345(Eastern
Standard Time, Mon-Fri 8:00AM~6:00PM) for replacement with a new device.

44
Cleaning and Disinfection Frequency
The meter and lancing device can sustain 14,000 cleaning cycles and 208 disinfection cycles which
represents cleaning 9 times per day and disinfecting (with a pre-clean step) once per week over the 4 year
use life of the device.
4 year product life is for properly cleaning and disinfection. After 4 years, the meter must be replaced
with a new meter.
45
Maintenance and Testing
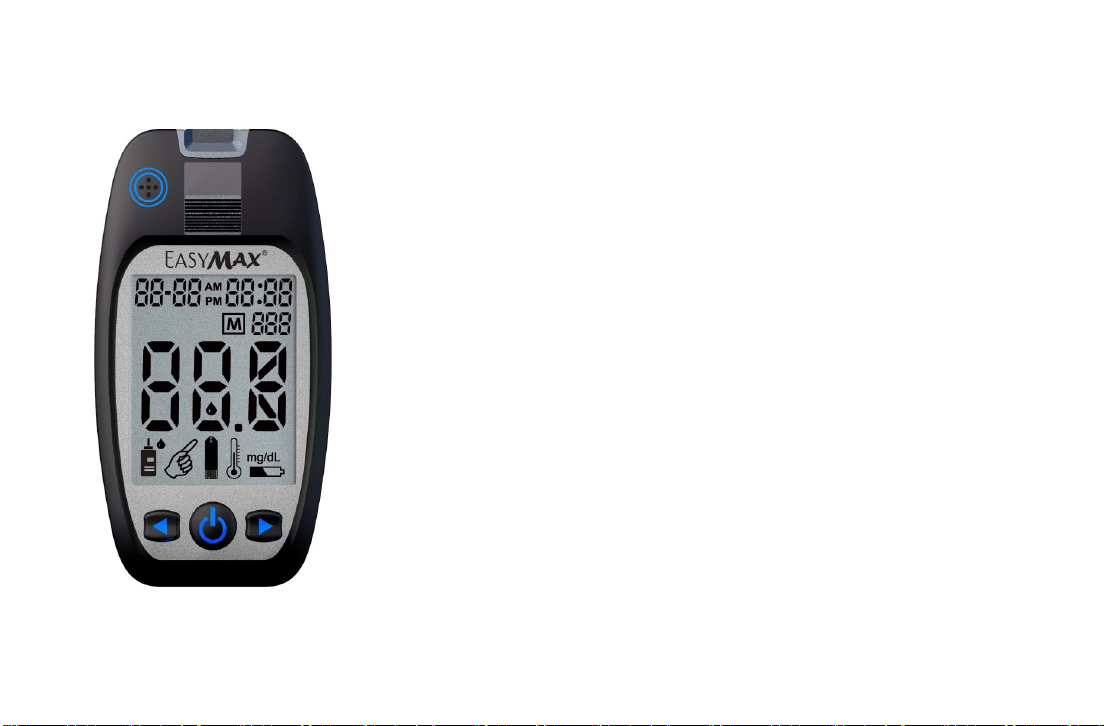
Your meter needs little or no maintenance with normal use. It automatically
tests its own systems every time you turn it on and lets you know if
something is wrong. (See "Screen Messages" and what to do about them.)
To make sure the display is working properly, turn off the meter. Press and
hold power button to see the complete display. All the indicators should be
clear and look exactly like the picture to the left. If not, please call the
Customer Care Service toll-free at 866-994-3345 (Eastern Standard Time,
Mon-Fri 8:00AM~6:00PM). During non-service hours, please contact your
healthcare provider.
46
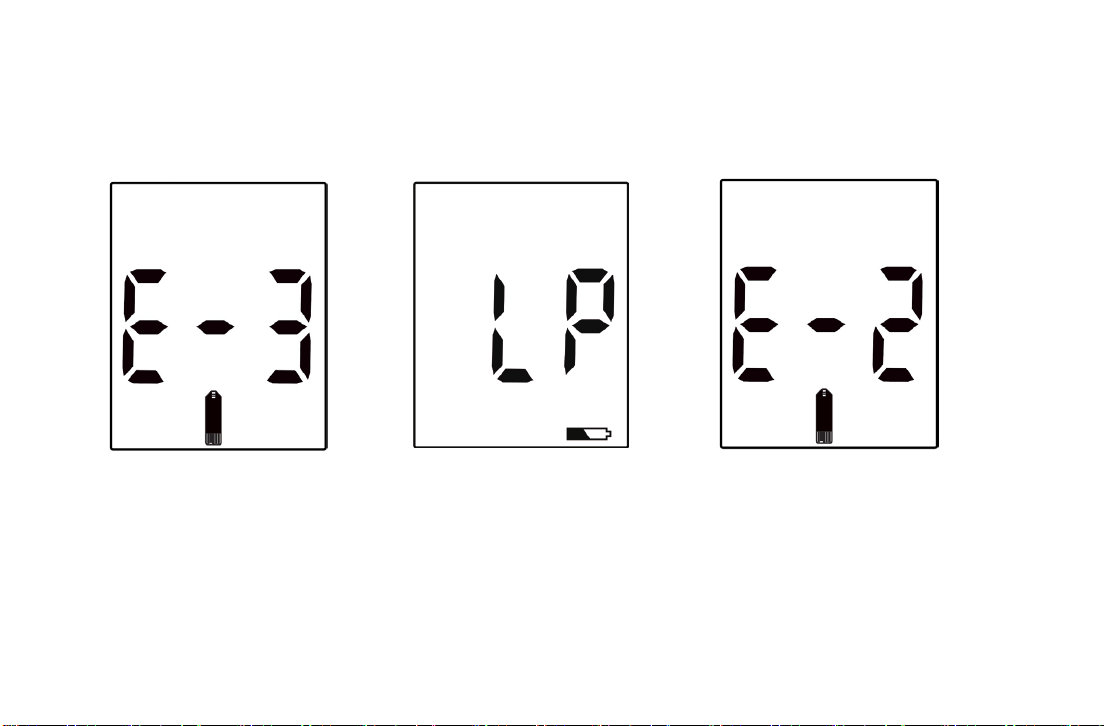
Screen Messages and Troubleshooting
Never make treatment decisions based on an error message. If you have any concerns, call the Customer
Care Service toll-free at 866-994-3345 (Eastern Standard Time, Mon-Fri 8:00AM~6:00PM).
Low power
Action: Replace with new
batteries.
Humidified/Used strips
Action: Replace with a
new strip.
Volume detector error
Action: Replace with a new
strip.
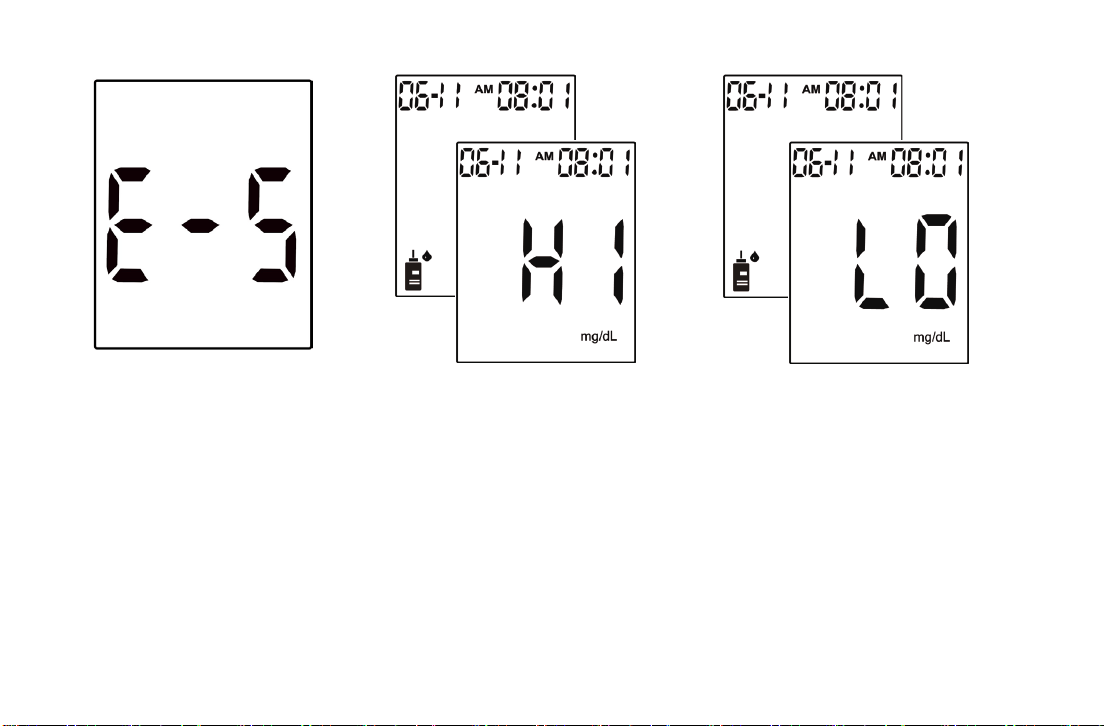
47
Memory Error
Action: Replace the
batteries first. If ERROR
005 appears again,
please call the Customer
Care Service toll-free at
866-994-3345 (Eastern
Standard Time, Mon-Fri
8:00AM~6:00PM). During
non-service hours, please
contact your healthcare
provider.
Test result is higher than 600
mg/dL
Action: Test again. If the result is still
the same, try a control solution test
and if the control solution test falls
within the correct range, please call
the Customer Care Service toll-free
at 866-994-3345. (Eastern Standard
Time, Mon-Fri 8:00AM~6:00PM).
During non-service hours, please
contact your healthcare provider.
The test result is lower than 20
mg/dL
Action: Test again. If the result is
still the same, try a control solution
test and if the control solution test
falls within the correct range,
please call the Customer Care
Service toll-free at 866-994-3345.
(Eastern Standard Time, Mon-Fri
8:00AM~6:00PM). During
non-service hours, please contact
your healthcare provider.
48
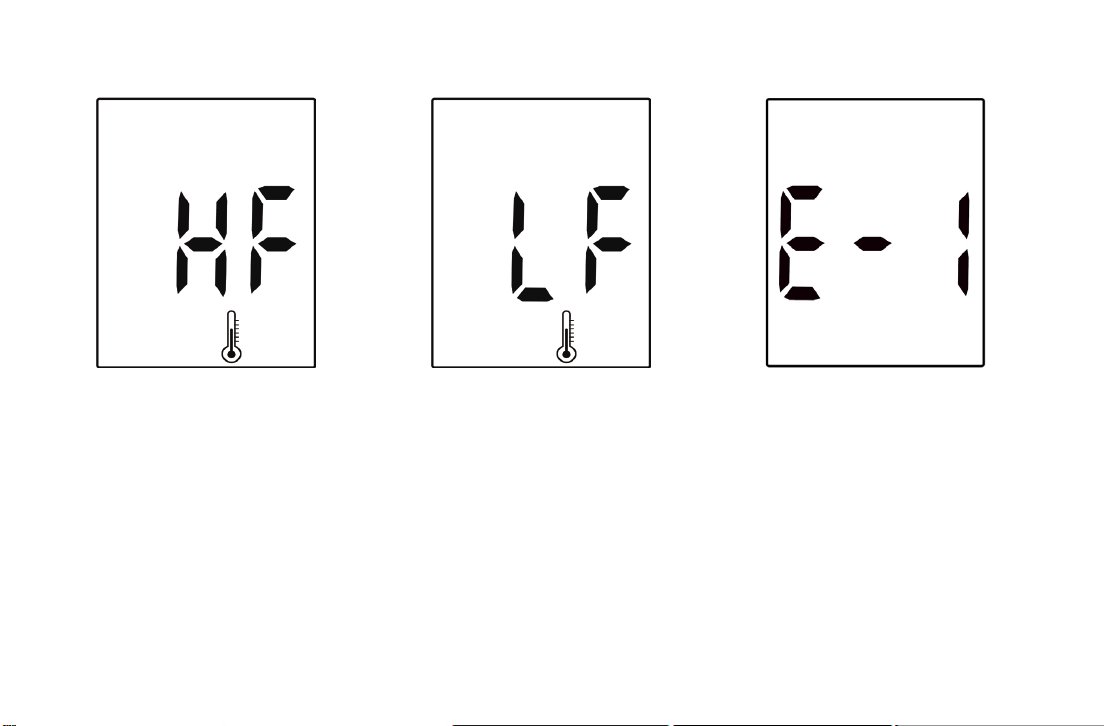
The “Ht” and thermometer
icon appears. Temperature is
too high, outside the required
range of 50°F - 104°F (10°C -
40°C). This alerts users that
an incorrect result may occur
if the test continues.
Action: Relocate the meter to a
location with temperature
between 50°F - 104°F (10°C -
40°C).
The “Lt” and thermometer icon
appears. Temperature is too
low, outside the required range
of 50°F - 104°F (10°C - 40°C).
This alerts users that an
incorrect result may occur if
the test continues.
Action: Relocate the meter to a
location with temperature
between 50°F - 104°F (10°C -
40°C).
System fault
Action: Replace the batteries first.
If Err appears again, please call
the Customer Care Service
toll-free at 866-994-3345
(Eastern Standard Time, Mon-Fri
8:00AM~6:00PM). During
non-service hours, please contact
your healthcare provider..
49
Chapter 6: Technical Information
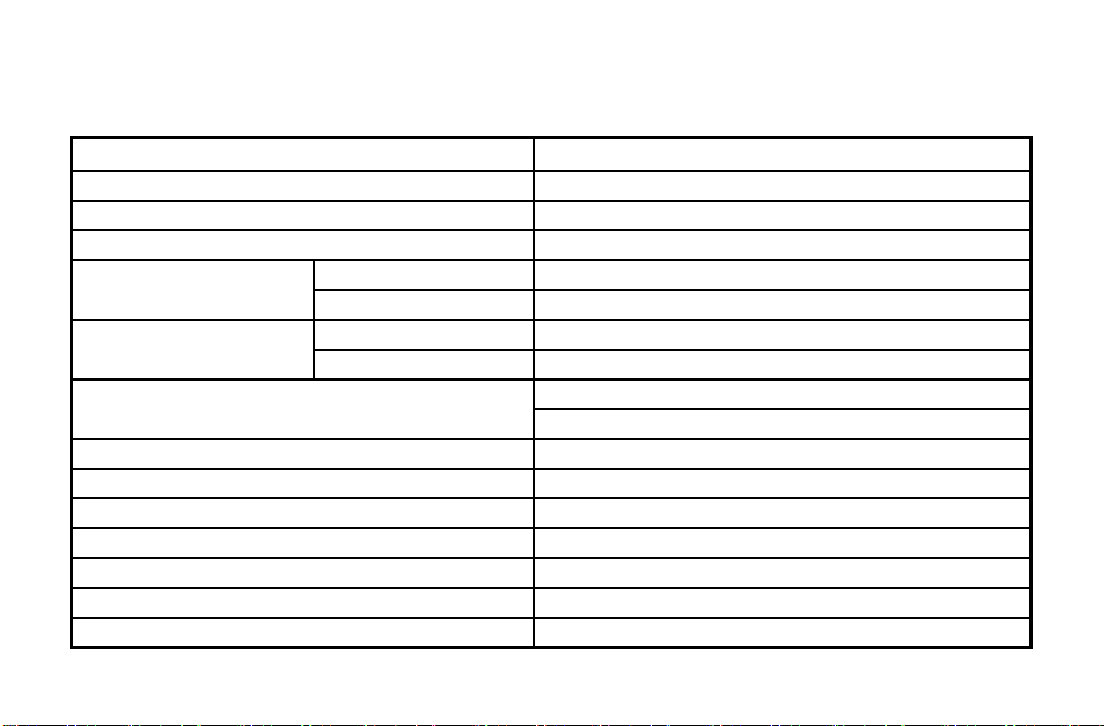
Specifications
Brand name
EASYMAX
®
MU Blood Glucose Meter
Range
20~600 mg/dL
Response time
5 seconds
Memory sets
880 test results
Operating condition
Te m p.
50°F -104°F (10°C-40°C)
Relative Humidity
R.H.
≦
90%
Storage and
transportation condition
Temp.
35.6°F -86°F (2°C -30°C)
Relative Humidity
40-85 % RH
Blood sample
0.6 μL
Fresh blood from fingertip, palm, or forearm
Hematocrit (Hct)
20~60%
Power
Alkaline Battery (2 pcs)
Battery life
Over 2000 tests
Display dimension
34.0 x 42.0 mm
Device dimension H × W × D
95 x 50 x 15 mm
Weight
39.1grams (without batteries)
Principles
Electrochemical biosensor technology
50
Limitations
The test strips are used for fresh capillary whole blood samples.
1. DO NOT use neonate blood sample.
2. Not to be used for diagnosis or screening of diabetes.
3. Alternative site testing with this system can be used only during steady-state blood glucose conditions.
4. Measurements from alternative site testing should never be used to calibrate a continuous glucose monitor
(CGM) or entered into insulin dose calculators for insulin dosing recommendations.
5. Extreme humidity may affect the results. A relative humidity greater than 90 % may cause incorrect results.
6. The system should be used at a temperature between 50°F and 104°F (10°C and 40°C). Outside this
range, the system may get incorrect results.
7. DO NOT reuse the test strips. The test strips are for single use only.
8. Hematocrit: The hematocrits between 20% and 60% will not significantly affect the results. Hematocrit
below 20% may cause higher results. Hematocrit above 60% may cause lower results. If you do not know
your hematocrit level, please consult with your healthcare professional.
9. Altitude up to 10,000 feet above sea level has no effect on readings.
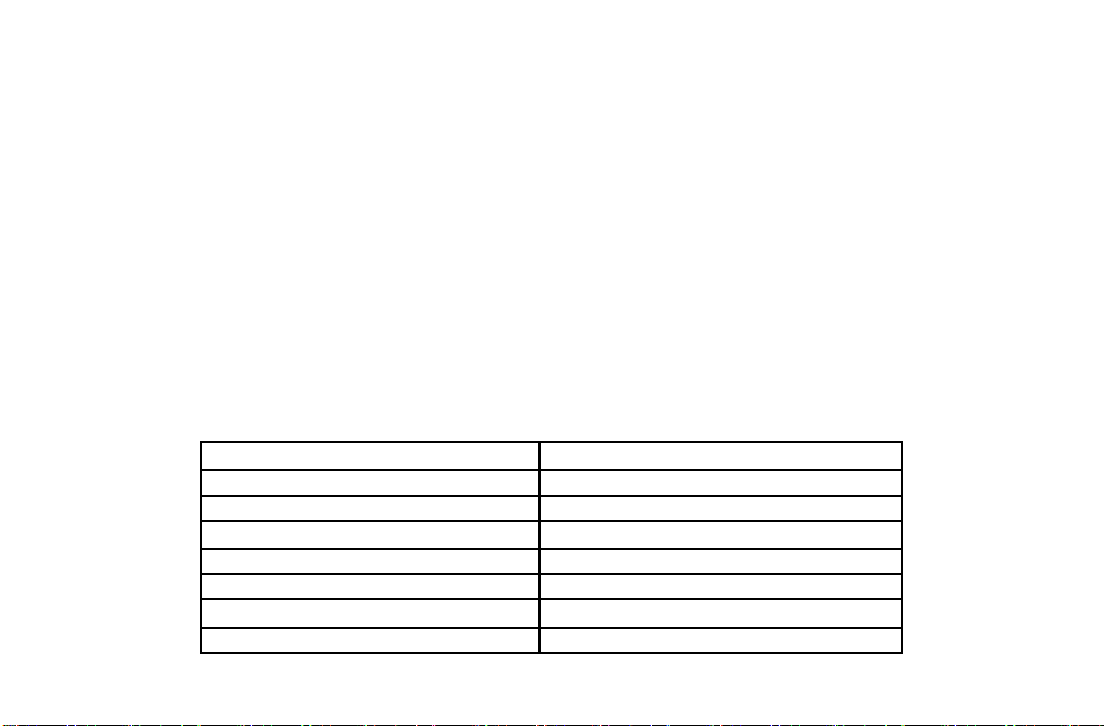
10. The below substances up to the test concentration will not affect the test results.
Interfering substance
Concentration tested up to (mg/dL)
Gentisic Acid
6
Ascorbic Acid
4
Ibuprophen
50
Methyldopa
2
Sodium Salicylate
50
Tetracycline
1.5
Tolbutamide
100
51
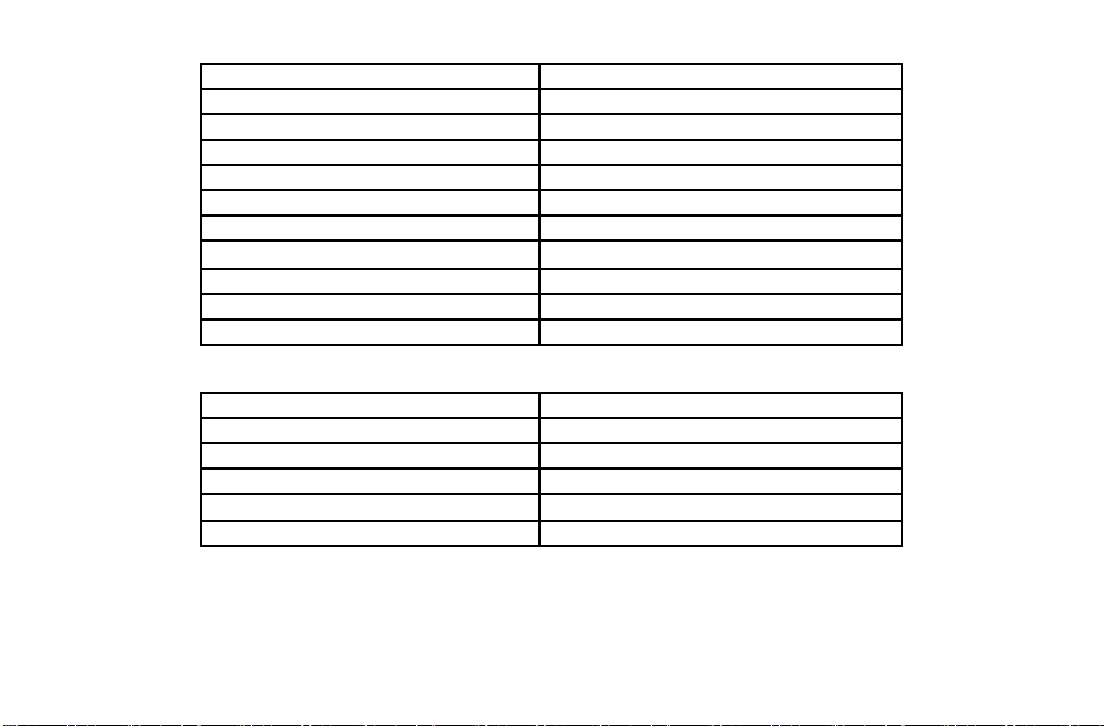
Galactose
20
Maltose
20
Manose
10
Sucrose
50
Xylitol
200
Glipizide
8
Bilirubin
25
Cholesterol
500
Creatinine
30
Triglycerides
1000
Fructose
30
11. Interference was observed with the substances below at the concentrations listed.
Interfering substance
Interference observed at (mg/dL)
Acetaminophen
8
Dopamine
5.2
L-Dopa
4
Xylose
8
Uric Acid
15.9

52
Near-field communication (NFC) Technology
This blood glucose meter utilizes Near Field Communication (NFC) wireless technology for data sharing. NFC
operates at 13.56 MHz with a data rate of up to 53 Kbit/s, allowing communication when the meter and smartphone
are within 1 cm proximity. Only one device can connect at a time, minimizing data transmission interference.
NFC communication involves two components: an initiator that generates an RF field, and a target that utilizes
this field. For the meter to function with a device, the device must support NFC technology and have compatible
software to read the meter’s data.
The device complies with United States Federal Communication Commission (FCC) regulations, specifically
FCC Part 15, ensuring:
1. The device may not cause harmful interference.
2. must accept any interference received, including interference that may cause undesired operation.
Adhering to these rules ensures proper functionality without disrupting other devices. If interference occurs,
relocating the meter or other devices, such as turning them off, can resolve issues. Common sources of
interference include environmental factors and cross-interference.
This equipment has been tested and found to comply with the limits for a Class B digital device, pursuant to part
15 of the FCC Rules. These limits are designed to provide reasonable protection against harmful interference
in a residential installation. This equipment generates, uses and can radiate radio frequency energy and, if not
installed and used in accordance with the instructions, may cause harmful interference to radio communications.
However, there is no guarantee that interference will not occur in a particular

53
installation. If this equipment does cause harmful interference to radio or television reception, which can be
determined by turning the equipment off and on, the user is encouraged to try to correct the interference by
one or more of the following measures:
• Adjusting or relocating the receiving antenna.
• Increasing distance between the equipment and receiver.
• Using separate electrical circuits for the equipment and receiver.
• Seeking assistance from a dealer or radio/TV technician.
Modifications not approved by EPS Bio Technology Corp. may void the user's authority to operate the device.
The equipment complies with FCC and IC radiation exposure limits for uncontrolled environments, designed
for direct contact with the user's body under normal operation. It should not be co-located or operated with
other antennas or transmitters.
Additionally, ensure a minimum distance of 20 cm between the radiator and your body during installation and
operation.
Electromagnetic Compatibility
This meter complies with the electromagnetic immunity requirements specified by EN ISO 15197. Electrostatic
discharge immunity testing was based on the standard IEC 61000-4-2. Additionally, the meter meets
electromagnetic emission requirements according to EN 60601-1-2, ensuring low electromagnetic emissions.
It is not expected to interfere with other electrically-driven equipment.
Performance Analysis
Please refer to the test strip instructions.

54
Device Information
EASYMAX
®
MU SMBG System,
EASYMAX
®
MU Blood Glucose Test Strips,
EASYMAX
®
MU Blood Glucose Meter,
EASYMAX
®
MU Level 2 Control Solution,
EASYMAX
®
MU Level 3 Control Solution
Reference:
* American Diabetes Association. Standards of medical care in diabetes-Table 10 Diabetes care. 2011; Vol.
34, Suppl. 1, S21.
Manufacturer:
EPS BIO TECHNOLOGY CORP.
No.8, R&D RD. III, Hsinchu Science Park, Hsinchu County, Taiwan 30076
TEL:+886-3-6686868 FAX:+886-3-6686866
E-mail:info@epsbio.com.tw Website:
http://www.epsbio.com
Warranty
EPS warrants the original purchaser for a period of 4 years from the date of purchase. This means during the
warranty period if the Self-Monitoring Blood Glucose System does not work for any reason (other than obvious
abuse), EPS will replace it with a new system or an equivalent product free of charge.

55
Please read EASYMAX
®
MU User’s Manual before operation. If you have any questions and/or need
assistance, please contact us as follows:
• Within the USA, call toll-free: 866-994-3345 (Eastern Standard Time, Mon-Fri 8:00AM~6:00PM). During
non-service hours, please contact your healthcare provider.
• Outside the USA, call your authorized representative or write to:
Customer Service E-mail: info@epsbio.com.tw
Lancing Device
Meets the requirements of MDD 93/42/EEC
Manufacturer:
STERILANCE MEDICAL (SUZHOU) INC.
No. 32 Xinlian RD. Pingjiang Suzhou P.R. China 215031
TEL:0086 (512) 67217661 FAX:0086 (512) 67217663
E-mail:guopings@xinda-medical.com
Lancet
Meets the requirements of MDD 93/42/EEC
Manufacturer:
SAE HAN MEDICAL CORP.
# 700-113 PUB GOT-DONG, IL SAN-GU, GOYANG-CITY, KYUNGGI-DO, KOREA
TEL:82-31-923-4330 FAX:82-31-923-4331
E-mail:saehan@saehanmed.com
P/N: 71800520A_0042A_2026-07-28_03