

NEW TECHNOLOGICAL STANDARD
REQUIREMENTS FOR NEW RF PRODUCTS
1. Constant light output when operating on battery power.
2. CRI > 90.
3. CCT Stepping: 2200K – 2700K – 3000K – 4000K.
4. DIMMING Step Cycle: 100% – 75% – 50% – 25% – OFF – 100% – 75% – …...
5. 2A charging (full charge in no more than 3 hours).
6. OVP (Over Voltage Protection).
7. Product is supplied without a plug-in charging power supply.
8. Round, white charging cable with USB Type-C connector (compatible with PD
charging).
o L = 1100mm for table models.
o L = 1800mm for floor or reading models.
9. Thermal protection for the battery against overheating.
10. BATTERY LIFE of at least 8 hours at 100% intensity.
PRODUCT USAGE FUNCTIONALITY: STANDARD
MODE (Without Remote Control)
1. Switching OFF (from ON state): Long-press the touch control for 1 second.
2. LED Indicator Colors:
o Red: Battery status (charging/low battery).
o Green: Battery status (fully charged).
o Blue: Kelvin (CCT) selection mode.
o Pink: Timer mode active.
3. Dimming:
o STEP Cycle: 100% – 75% – 50% – 25% – OFF – 100% – 75% – …...
o No dimming memory in manual mode. Every time the lamp is turned ON
from an OFF state, it always starts at 100% light intensity, regardless of the
previous setting.
o ((ONLY and EXCLUSIVELY for POLDINA lamp: every time the lamp is
turned ON (with a touch) from an OFF state, both the TOP and BOTTOM
lights are lit and ON), regardless of whether the TOP light was previously
deactivated by remote control ))

4. Kelvin (CCT) Change: With the lamp OFF, long-press the touch control for 3
seconds to enter Kelvin selection (Blue LED turns on). Each subsequent tap cycles
through the steps: 4000K → 3000K → 2700K → 2200K. Press and hold for 2
seconds to confirm the chosen Kelvin and turn the lamp OFF.
5. CHARGING/BATTERY Status LED Indicator Signals:
o Battery < 10%: Flashing red light (or flashing pink light if Timer mode is
active).
o Battery < 3%: The main light flashes 3 times + the status LED indicator
blinks RED 3 times, then the lamp switches OFF automatically.
o Battery < 3%: RF is temporarily deactivated. RF functionality reactivates once
the lamp is charged to >3% capacity.
6. Factory SETTINGS Reset:
o Procedure: Performed ONLY when the main light is ON and the lamp
is NOT on the charging base. Press and hold the touch control for 8
seconds.
o Confirmation: After 8 seconds, the main LED light flashes twice + the status
LED indicator blinks WHITE twice, reverts to factory defaults (4000K, 100%
intensity), and then switches OFF into "Sleep" mode.
o Result: All lamp and RF functions go offline, and the lamp's memory is
completely erased (like new). All previously paired/saved remotes are
removed from memory.
o A quick touch "wakes up"/turns ON the lamp, reactivating all
functions except RF (to activate RF go to “Section 1: Remote Control
Pairing – point 3”)
PRODUCT USAGE FUNCTIONALITY : RF MODE (With
Remote Control)
IMPORTANT: The remote control must be paired with the lamp before use. Without
pairing, the lamp will not respond to commands.
Section 1: Remote Control Pairing
Step-by-Step Pairing Procedure:
1. The lamp is delivered in a "Sleep" state. Wake the lamp with a quick tap on its
touch control.
2. All lamp functions are now active except for RF (remote control functionality).
3. RF Activation / Entering Pairing Mode:
o This step must be performed ONLY and EXCLUSIVELY when the main LED
light is ON and the lamp is placed on its charging base.

o Press and hold the lamp's touch control for 8 seconds to activate RF/Pairing
Mode. The main light will flash twice and the status LED will blink WHITE
twice to confirm that Pairing Mode is active.
o You have 1 minute after RF activation to complete the pairing process.
o Press the Pairing button (Pairing Key) on the remote control. The main
light will flash twice to confirm command receipt and that the lamp has
been successfully paired.
Important Notes:
• Pairing Mode automatically deactivates after 1 minute.
• If pairing fails, repeat the procedure starting from point 3 above.
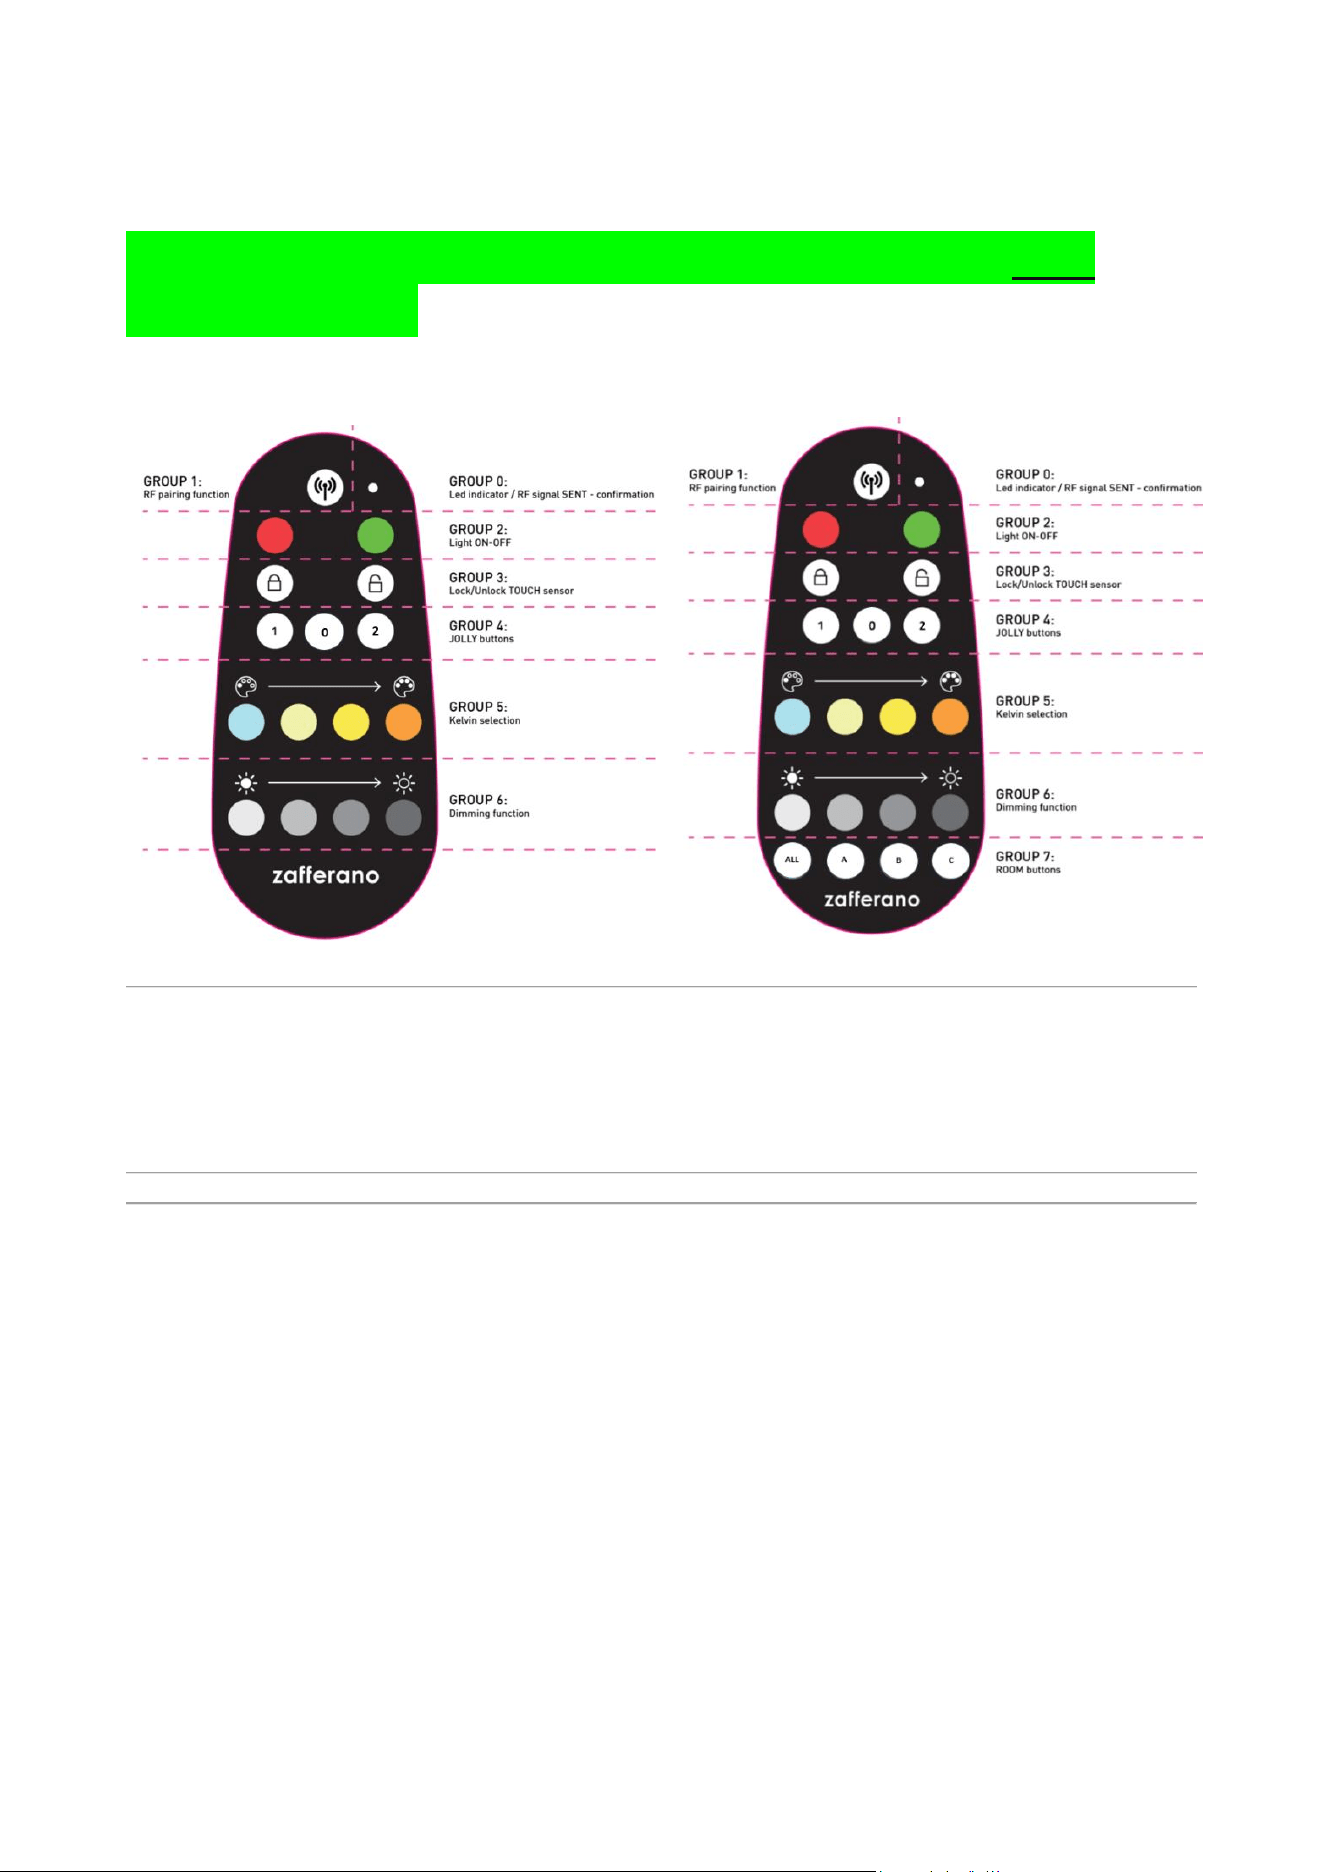
Section 2: Remote Control Functions
1. Switching ON/OFF (Group 2):
o Use the red (OFF) and green (ON) buttons on the remote.
o Dimming Memory Function with Remote: Every time the lamp is turned
ON (from an OFF state) using the remote's green button, it lights up at
the previously set light intensity.
▪ Example: Turn the lamp ON with the remote's green button → Set
light intensity to 25% using the remote → Turn the lamp OFF with the
red button → Turn the lamp ON again with the green button. The
lamp will light at 25% intensity due to the memory function.
2. Step Dimming (Group 6): Use the dedicated remote buttons to set intensity levels
to 25%, 50%, 75%, or 100%.
3. Kelvin (CCT) Change (Group 5): Use the dedicated remote buttons to select the
light color: 4000K, 3000K, 2700K, or 2200K.
4. Touch Control Lock/Unlock (Group 3) – Prevents accidental activation by locking
the lamp's touch controls.
o Lock Touch Controls:
▪ Press the closed padlock button on the remote.
▪ The lamp's LEDs will flash twice to confirm.
o Unlock Touch Controls:
▪ Press the open padlock button on the remote.
▪ The lamp's LEDs will flash twice to confirm.
o Important Note: While the lamp is on the charging base, the Lock/Unlock
function is automatically disabled and cannot be activated. If you press

the Lock/Unlock buttons during charging, the lamp will not react or emit any
confirmation flashes.
5. Jolly Buttons (Group 4):
o Jolly 1: Disables the top light (ONLY FOR POLDINA model)
o Jolly 2: Activates the top light (ONLY FOR POLDINA model)
o Jolly 0: Disables the charge status LED (only effective during charging).
o Jolly 1 + Jolly 2 (Pressed Together): Sets a 1-hour timer.
▪ The timer can be activated ALSO while the lamp is on the charging
base (only after RF has been reactivated).
▪ The main LED light flashes twice to confirm timer activation.
▪ LED indicator remains steadily lit for the duration of the timer
countdown with a PINK colour
▪ LED indicator Flashing PINK (Low Battery Warning during
Timer): This occurs ONLY and EXCLUSIVELY if the timer is set
and, during the 1-hour countdown, the battery capacity drops
below 20
▪ Timer Logic: During the 1-hour countdown, the lamp will perform
the opposite action of its current state.
▪ If activated while the lamp is ON, the lamp will automatically
turn OFF after one hour.
▪ If activated while the lamp is OFF, the lamp will automatically
turn ON after one hour.
▪ How to Cancel the Timer:
▪ If the lamp is already charging on the base: Simply lift the
lamp off and place it back on the base.
▪ If the lamp is not on the base (not charging): Place the lamp
on the charging base.
Section 3: Advanced Pairing and Memory Management
IMPORTANT: the following special functions (ADDING and UNPAIRING) MUST be
operated ONLY and EXCLUSIVELY with RF activated on the lamps, and specifically in
these conditions:
• with the lamp(s) out of the charging base(s)
• if lamp(s) is(are) charging, please REACTIVATE the RF receiver by touching the touch
sensor of the lamp(s)
1) Adding a Second Remote Control (via an already paired remote)
1. Press Pairing + ON together until the lamp flashes twice (enters RF mode for 10
seconds).
2. Within 10 seconds, press the Pairing button on the new remote control.
3. The lamp(s) flash twice for final confirmation.
2) Unpairing a Remote Control from the Lamp(s)
1. Press and hold the PAIRING + OFF keys together for 3 seconds.
2. The lamp flashes twice for final confirmation.
3. The remote control is unpaired and can no longer control the lamps. (This function
deletes the remote control's ID from the lamp's memory.)
Memory Limit
• Maximum of 10 remote controls per lamp.
• The oldest paired remote control is deleted when an 11th is paired.
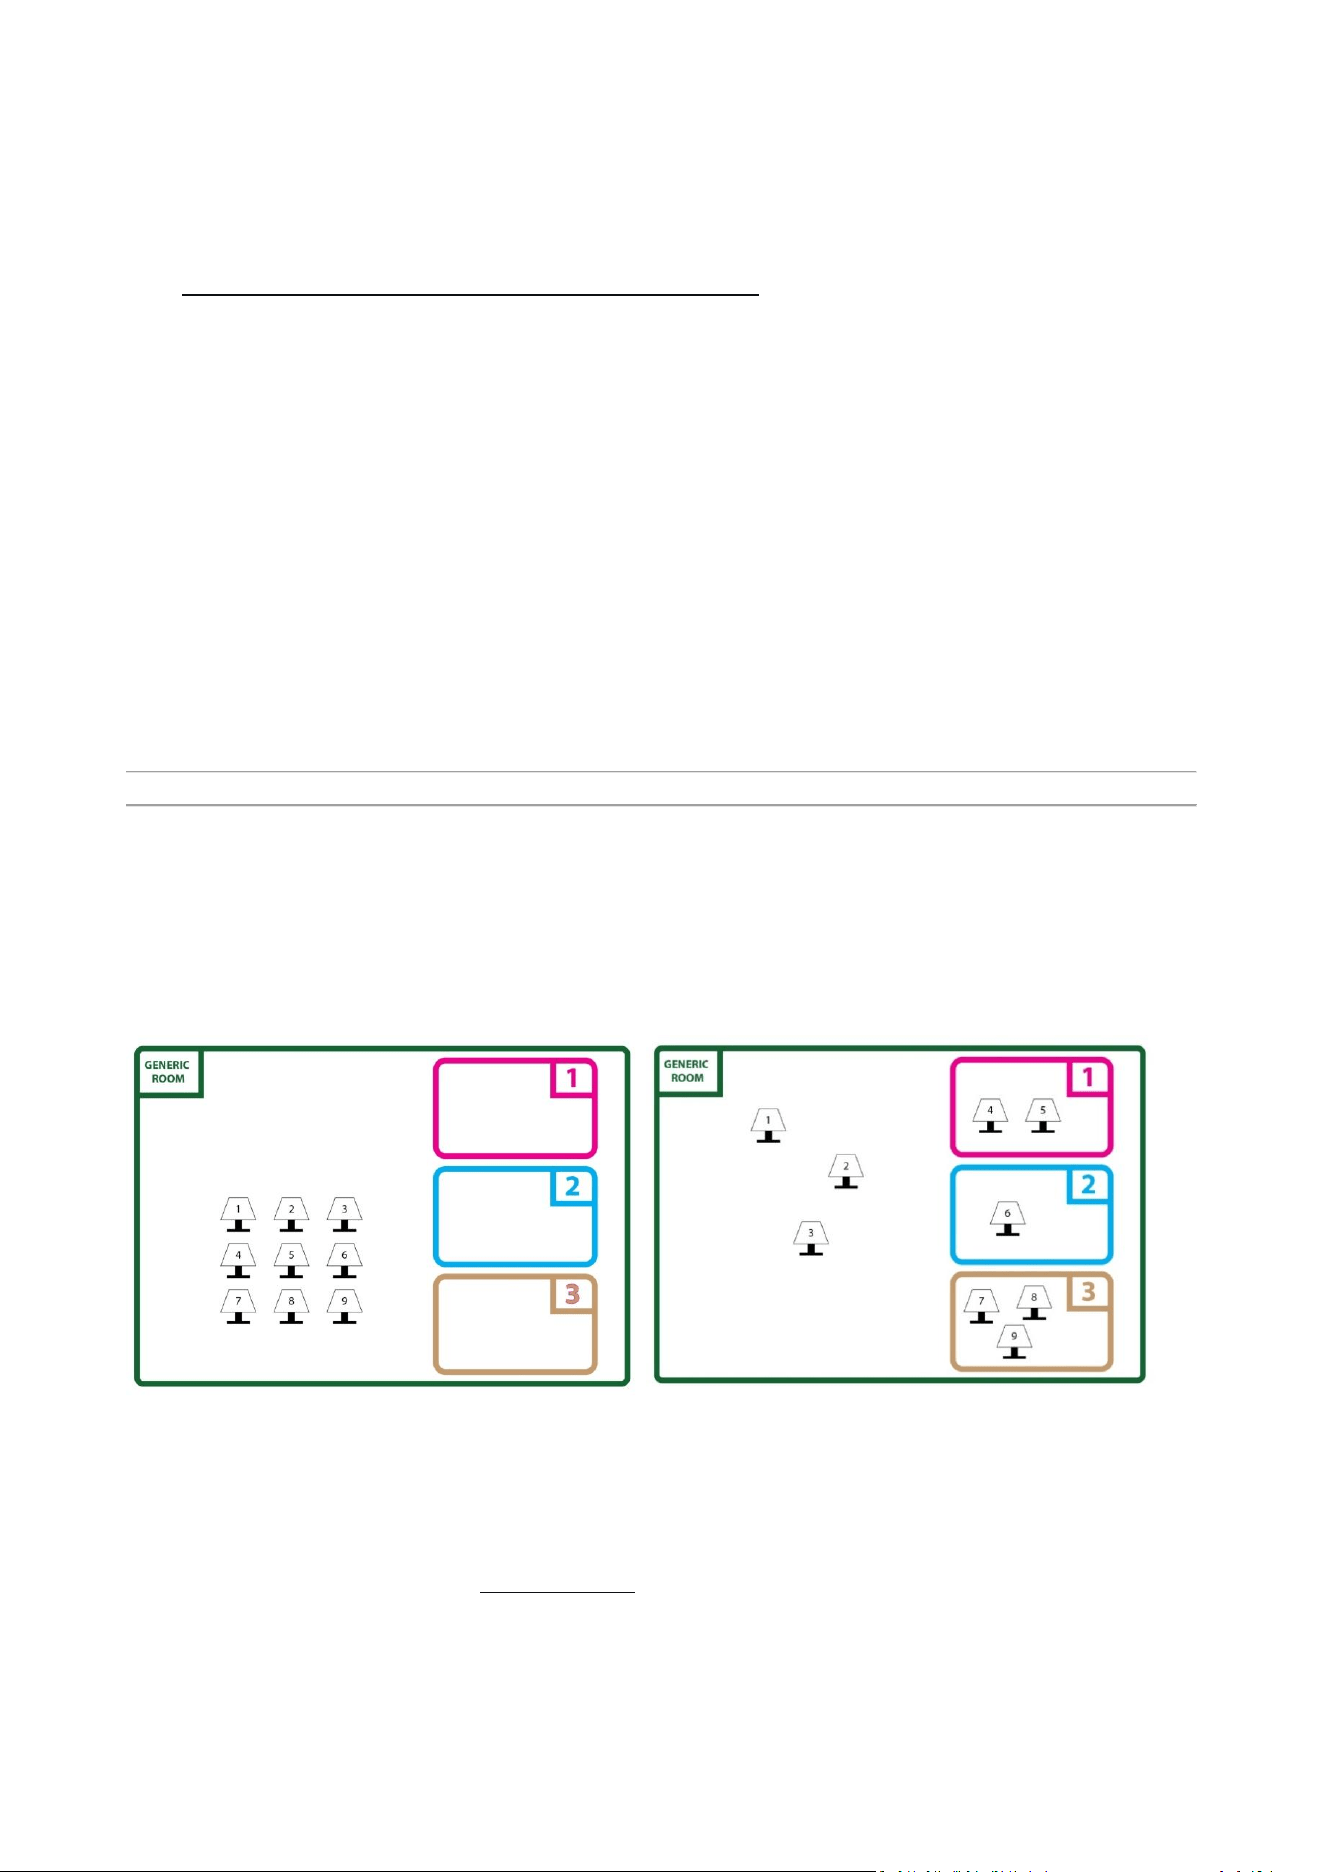
Section 4: Multi-Environment Control (Group 7)
Control multiple lamps in different rooms with a single
remote control.
Assigning a Room
After pairing the lamp with the remote control, to assign the lamp to a specific room,
proceed as follows:
1. Place the powered-ON lamp on its charging base.
2. Press and hold the touch control for 8 seconds to enter PAIRING
MODE. The lamp led will flash twice 100% intensity to confirm
2. Room Assignment

1. Press the desired room button (A, B, or C) until the lamps flash twice
again
o Once flashed, the lamp will only be controllable if the assigned room button
is pressed before the command (or by pressing “ALL” button)
Important Notes
• From the moment you press the room button, you have 1 minute to modify the
lamp settings, after which it returns to the initial "Generic Room" mode.
• After the minute expires, to continue setting the same lamps, you must press the
room button again.
• If you want to re-assign the lamp to a different room, repeat the entire procedure
above.
• If you want to "remove" the assigned room and leave the lamp in the virtual
"Generic Room," repeat the procedure and press the ALL key instead of a room
button (A-B-C).
Room Buttons
After completing the pairing of the lamps with the remote control, a specific room can be
assigned. The remote control has 3 distinct room buttons (A-B-C) and an ALL button for
simultaneous control.
• ALL: Controls all paired lamps simultaneously, including lamps in the "Generic
Room."
• A, B, C: Assigns and controls individual rooms.
Controlling Lamps in a Room
Press the desired room button (A, B, or C) and then press any function command
(e.g., ON/OFF, brightness, color). All lamps in that room will respond simultaneously.
Controlling Lamps in the Generic Room (ALL)
No room selection is needed. Lamps in the Generic Room can be commanded
immediately.
Why the 1-Minute Limit?
It prevents interference and accidental reconfiguration in environments with many lamps
(e.g., restaurants, offices).
Section 5: ASSEMBLY LINE BUTTON COMBINATIONS
• RESET Function (Pairing + 4000K + 100%)

Section 6: FCC Warning Statement
This device complies with part 15 of the FCC Rules. Operation is subject to the
following two conditions: (1) This device may not cause harmful interference, and (2)
this device must accept any interference received, including interference that may
cause undesired operation.
Caution: Changes or modifications to this unit not expressly approved by the party
responsible for compliance could void the user's authority to operate the equipment.
NOTE: This equipment has been tested and found to comply with the limits for a
Class B digital device, pursuant to part 15 of the FCC Rules. These limits are designed
to provide reasonable protection against harmful interference in a residential
installation. This equipment generates, uses and can radiate radio frequency energy
and, if not installed and used in accordance with the instructions, may cause harmful
interference to radio communications. However, there is no guarantee that
interference will not occur in a particular installation. If this equipment does cause
harmful interference to radio or television reception, which can be determined by
turning the equipment off and on, the user is encouraged to try to correct the
interference by one or more of the following measures:
—Reorient or relocate the receiving antenna.
—Increase the separation between the equipment and receiver.
—Connect the equipment into an outlet on a circuit different from that to which the
receiver is connected.
—Consult the dealer or an experienced radio/TV technician for help.

**NUOVI REQUISITI STANDARD
TECNOLOGICI PER NUOVI
PRODOTTI RF**
________________________________________________________________________________
1. Emissione luminosa costante durante il funzionamento a batteria.
2. CRI > 90.
3. Passi di CCT: 2200K – 2700K – 3000K – 4000K.
4. Ciclo di regolazione DIMMING: 100% – 75% – 50% – 25% – SPENTO – 100% – 75% – …...
5. Ricarica a 2A (carica completa in non più di 3 ore).
6. OVP (Protezione da Sovratensione).
7. Il prodotto è fornito senza alimentatore esterno per la ricarica (plug-in).
8. Cavo di ricarica bianco e tondo con connettore USB Type-C (compatibile con ricarica PD).
o L = 1100mm per i modelli da tavolo.
o L = 1800mm per i modelli da terra o da lettura.
9. Protezione termica della batteria contro il surriscaldamento.
10. AUTONOMIA della batteria di almeno 8 ore al 100% dell'intensità.
________________________________________________________________________________
**FUNZIONALITÀ D'USO DEL PRODOTTO: MODALITÀ STANDARD (Senza Telecomando)**
1. Spegnimento (dallo stato ON): Premere a lungo il controllo touch per 1 secondo.
2. Colori dell'indicatore LED:
o Rosso: Stato batteria (in carica/batteria scarica).
o Verde: Stato batteria (completamente carica).
o Blu: Modalità di selezione Kelvin (CCT).
o Rosa: Modalità Timer attiva.
3. Regolazione intensità (Dimming):
o Ciclo a PASSI: 100% – 75% – 50% – 25% – SPENTO – 100% – 75% – …...
o Nessuna memoria del livello in modalità manuale. Ogni volta che la lampada viene accesa da uno stato
SPENTO, parte sempre al 100% dell'intensità luminosa, indipendentemente dall'impostazione precedente.
o ((SOLO ed ESCLUSIVAMENTE per la lampada POLDINA: ogni volta che la lampada viene accesa (con un
tocco) da uno stato SPENTO, si accendono sia la luce SUPERIORE che INFERIORE), indipendentemente dal
fatto che la luce SUPERIORE fosse stata precedentemente disattivata via telecomando)).
4. Cambio Kelvin (CCT): Con la lampada SPENTA, premere a lungo il controllo touch per 3 secondi per
entrare nella selezione Kelvin (si accende il LED blu). Ogni tocco successivo cicla tra i passi: 4000K → 3000K
→ 2700K → 2200K. Premere e tenere premuto per 2 secondi per confermare il Kelvin scelto e spegnere la
lampada.
5. Segnali dell'indicatore LED di STATO RICARICA/BATTERIA:
o Batteria < 10%: Luce rossa lampeggiante (o luce rosa lampeggiante se è attiva la modalità Timer).
o Batteria < 3%: La luce principale lampeggia 3 volte + l'indicatore LED di stato lampeggia ROSSO 3 volte,
poi la lampada si spegne automaticamente.
o Batteria < 3%: La funzionalità RF viene temporaneamente disattivata. La RF si riattiva una volta che la
lampada è stata caricata ad una capacità >3%.
6. Ripristino IMPOSTAZIONI di FABBRICA:
o Procedura: Eseguita SOLO quando la luce principale è ACCESA e la lampada NON è sulla base di
ricarica. Premere e tenere premuto il controllo touch per 8 secondi.
o Conferma: Dopo 8 secondi, il LED principale lampeggia due volte + l'indicatore LED di stato lampeggia
BIANCO due volte, ritorna alle impostazioni predefinite di fabbrica (4000K, 100% intensità) e quindi si
spegne entrando in modalità "Riposo".
o Risultato: Tutte le funzioni della lampada e RF vanno offline e la memoria della lampada viene
completamente cancellata (come nuova). Tutti i telecomandi precedentemente associati/salvati vengono
rimossi dalla memoria.
o Un tocco rapido "risveglia"/accende la lampada, riattivando tutte le funzioni tranne la RF (per attivare
la RF andare a "Sezione 1: Associazione del Telecomando – punto 3").
________________________________________________________________________________
**FUNZIONALITÀ D'USO DEL PRODOTTO: MODALITÀ RF (Con Telecomando)**

**IMPORTANTE:** Il telecomando deve essere associato alla lampada prima dell'uso. Senza associazione,
la lampada non risponderà ai comandi.
________________________________________________________________________________
**Sezione 1: Associazione del Telecomando**
Procedura passo-passo di associazione:
1. La lampada viene consegnata in stato di "Riposo". Risvegliare la lampada con un tocco rapido sul suo
controllo touch.
2. Tutte le funzioni della lampada sono ora attive tranne la RF (funzionalità telecomando).
3. Attivazione RF / Ingresso in Modalità di Associazione:
o Questo passaggio deve essere eseguito SOLO ed ESCLUSIVAMENTE quando la luce LED principale è
ACCESA e la lampada è posizionata sulla sua base di ricarica.
o Premere e tenere premuto il controllo touch della lampada per 8 secondi per attivare la Modalità
RF/Associazione. La luce principale lampeggerà due volte e l'LED di stato lampeggerà BIANCO due volte per
confermare che la Modalità di Associazione è attiva.
o Si hanno a disposizione 1 minuto dopo l'attivazione RF per completare il processo di associazione.
o Premere il tasto di Associazione (Pairing Key) sul telecomando. La luce principale lampeggerà due
volte per confermare la ricezione del comando e l'avvenuta associazione.
Note Importanti:
* La Modalità di Associazione si disattiva automaticamente dopo 1 minuto.
* Se l'associazione fallisce, ripetere la procedura a partire dal punto 3 sopra.
________________________________________________________________________________
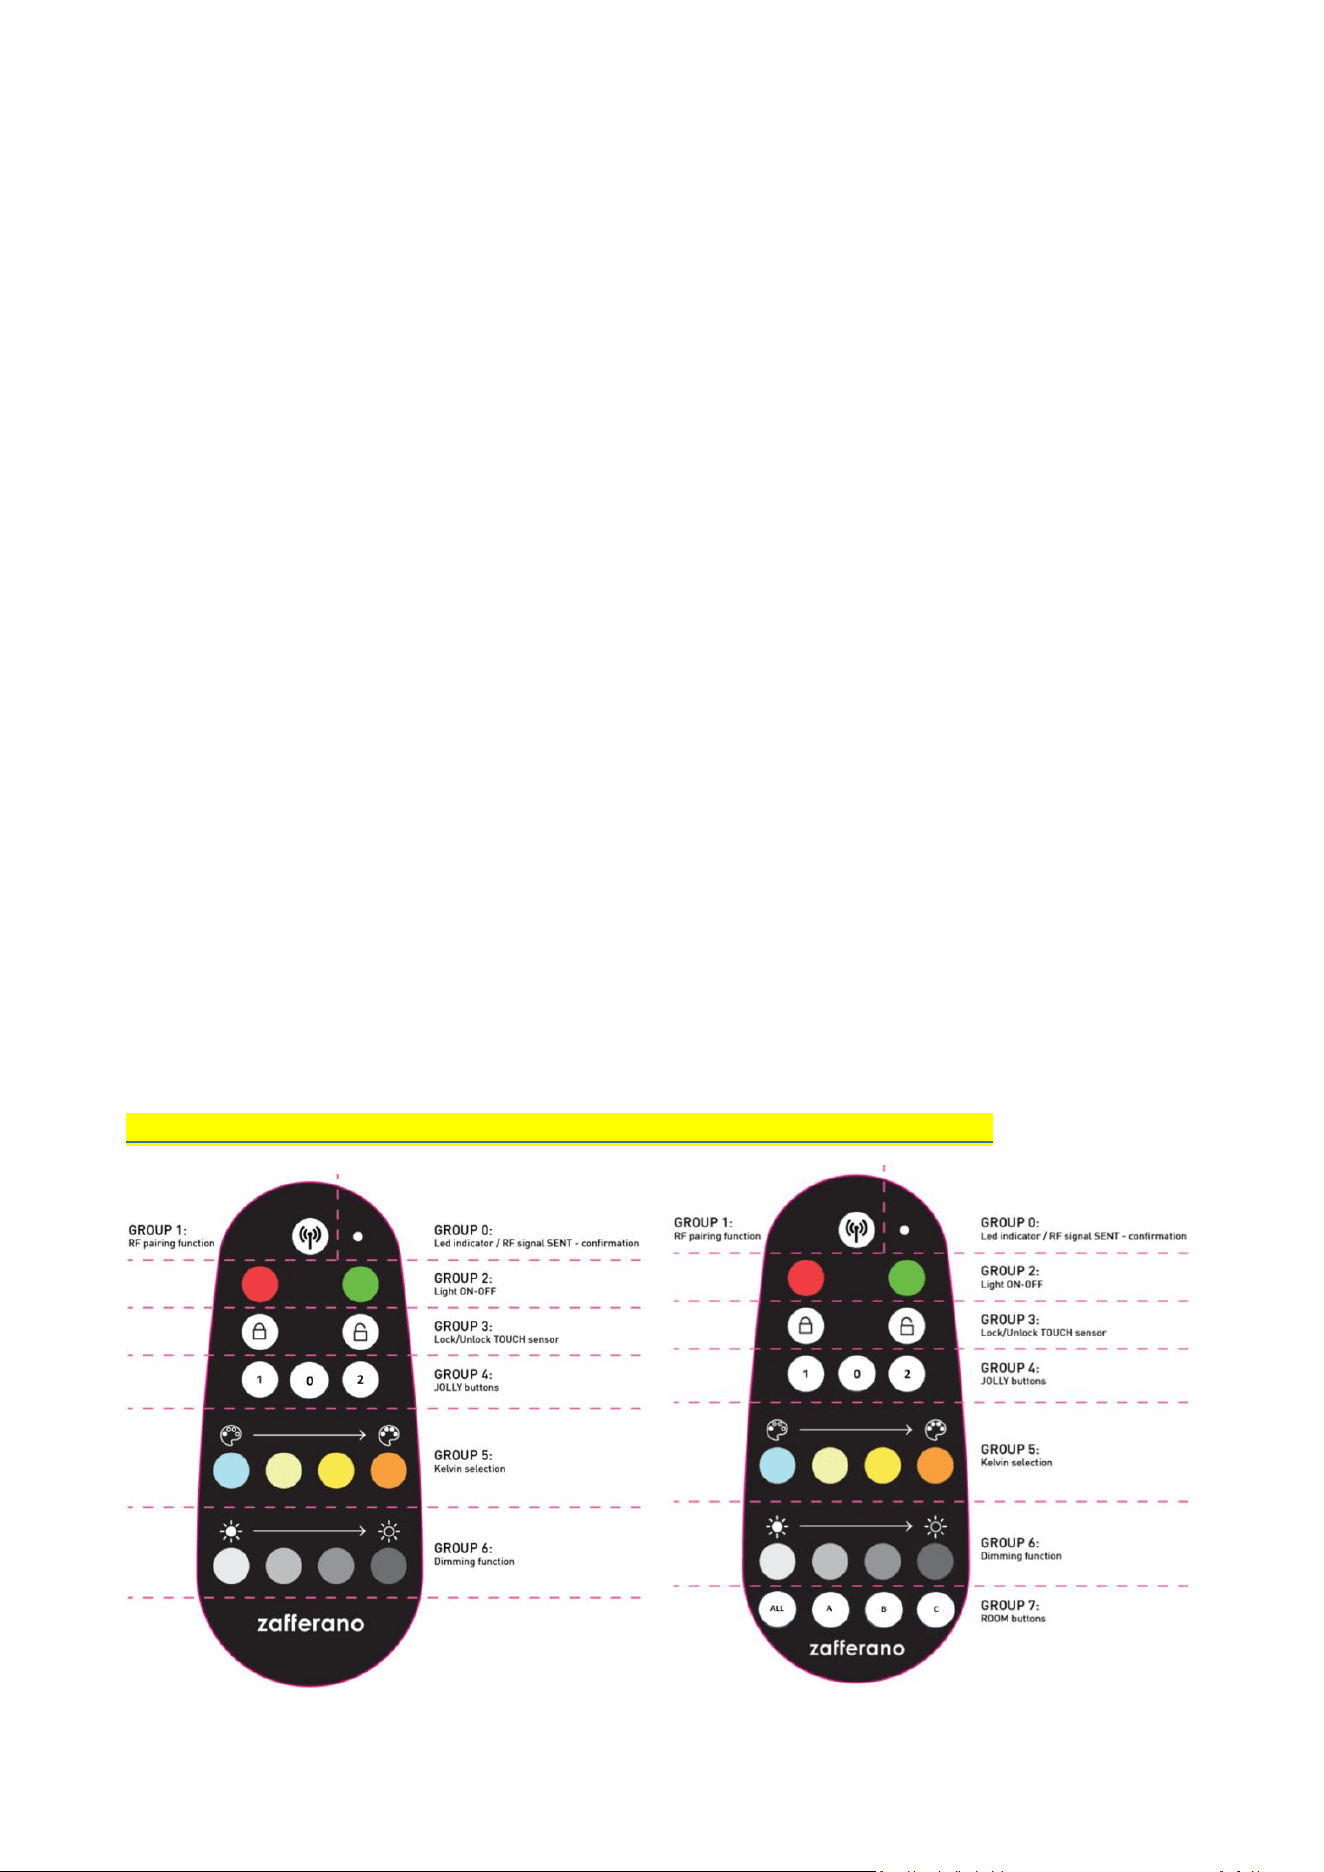
**Sezione 2: Funzioni del Telecomando**
1. Accensione/Spegnimento (Gruppo 2):
o Utilizzare i tasti rosso (OFF) e verde (ON) sul telecomando.
o Funzione Memoria Dimming con Telecomando: Ogni volta che la lampada viene accesa (da uno stato
SPENTO) utilizzando il tasto verde del telecomando, si illumina all'intensità luminosa impostata in
precedenza.
* Esempio: Accendi la lampada con il tasto verde del telecomando → Imposta l'intensità luminosa al
25% usando il telecomando → Spegni la lampada con il tasto rosso → Accendi di nuovo la lampada con il
tasto verde. La lampada si accenderà al 25% di intensità grazie alla funzione memoria.
2. Regolazione intensità a Passi (Gruppo 6): Utilizzare i tasti dedicati sul telecomando per impostare i livelli
di intensità al 25%, 50%, 75% o 100%.
3. Cambio Kelvin (CCT) (Gruppo 5): Utilizzare i tasti dedicati sul telecomando per selezionare il colore della
luce: 4000K, 3000K, 2700K o 2200K.
4. Blocco/Sblocco Controllo Touch (Gruppo 3) – Previene l'attivazione accidentale bloccando i controlli
touch della lampada.
o Bloccare Controlli Touch:
* Premere il tasto con il lucchetto chiuso sul telecomando.

* I LED della lampada lampeggeranno due volte per conferma.
o Sbloccare Controlli Touch:
* Premere il tasto con il lucchetto aperto sul telecomando.
* I LED della lampada lampeggeranno due volte per conferma.
o Nota Importante: Mentre la lampada è sulla base di ricarica, la funzione Blocco/Sblocco viene
automaticamente disabilitata e non può essere attivata. Se si premono i tasti Blocco/Sblocco durante la
ricarica, la lampada non reagirà né emetterà lampeggi di conferma.
5. Tasti Jolly (Gruppo 4):
o Jolly 1: Disabilita la luce superiore (SOLO PER IL MODELLO POLDINA).
o Jolly 2: Attiva la luce superiore (SOLO PER IL MODELLO POLDINA).
o Jolly 0: Disabilita l'indicatore LED dello stato di carica (efficace solo durante la ricarica).
o Jolly 1 + Jolly 2 (Premuti Insieme): Imposta un timer di 1 ora.
* Il timer può essere attivato ANCHE mentre la lampada è sulla base di ricarica (solo dopo che la RF è
stata riattivata).
* La luce LED principale lampeggia due volte per confermare l'attivazione del timer.
* L'indicatore LED rimane costantemente acceso per la durata del conteggio del timer con un colore
ROSA.
* Indicatore LED Lampeggiante ROSA (Avviso Batteria Scarica durante Timer): Si verifica SOLO ed
ESCLUSIVAMENTE se il timer è impostato e, durante il conteggio di 1 ora, la capacità della batteria scende
sotto il 20%.
* Logica del Timer: Durante il conteggio di 1 ora, la lampada eseguirà l'azione opposta al suo stato
attuale.
* Se attivato mentre la lampada è ACCESA, la lampada si spegnerà automaticamente dopo un'ora.
* Se attivato mentre la lampada è SPENTA, la lampada si accenderà automaticamente dopo un'ora.
* Come Annullare il Timer:
* Se la lampada è già in carica sulla base: Basta sollevare la lampada dalla base e rimetterla a posto.
* Se la lampada non è sulla base (non in carica): Posizionare la lampada sulla base di ricarica.
________________________________________________________________________________
**Sezione 3: Gestione Avanzata Associazione e Memoria**
**IMPORTANTE:** le seguenti funzioni speciali (AGGIUNGI e DISSOCIA) DEVONO essere operate SOLO ed
ESCLUSIVAMENTE con RF attivata sulle lampade, e precisamente in queste condizioni:
* con la/e lampada/e fuori dalla/e base/i di ricarica
* se la/e lampada/e è/sono in carica, si prega di RIATTIVARE il ricevitore RF toccando il sensore touch della
lampada/e.
1. **Aggiunta di un Secondo Telecomando** (tramite un telecomando già associato)
1. Premere **Pairing + ON** insieme fino a quando la lampada lampeggia due volte (entra in modalità
RF per 10 secondi).
2. Entro 10 secondi, premere il tasto **Pairing** sul nuovo telecomando.
3. La/e lampada/e lampeggiano due volte per conferma finale.
2. **Dissociazione di un Telecomando** dalla/e lampada/e
1. Premere e tenere premuti insieme i tasti **PAIRING + OFF** per 3 secondi.
2. La lampada lampeggia due volte per conferma finale.
3. Il telecomando viene dissociato e non può più controllare le lampade. (Questa funzione cancella l'ID
del telecomando dalla memoria della lampada.)
**Limite di Memoria**
* Massimo 10 telecomandi per lampada.
* Il telecomando associato da più tempo viene cancellato quando se ne associa un 11°.
________________________________________________________________________________
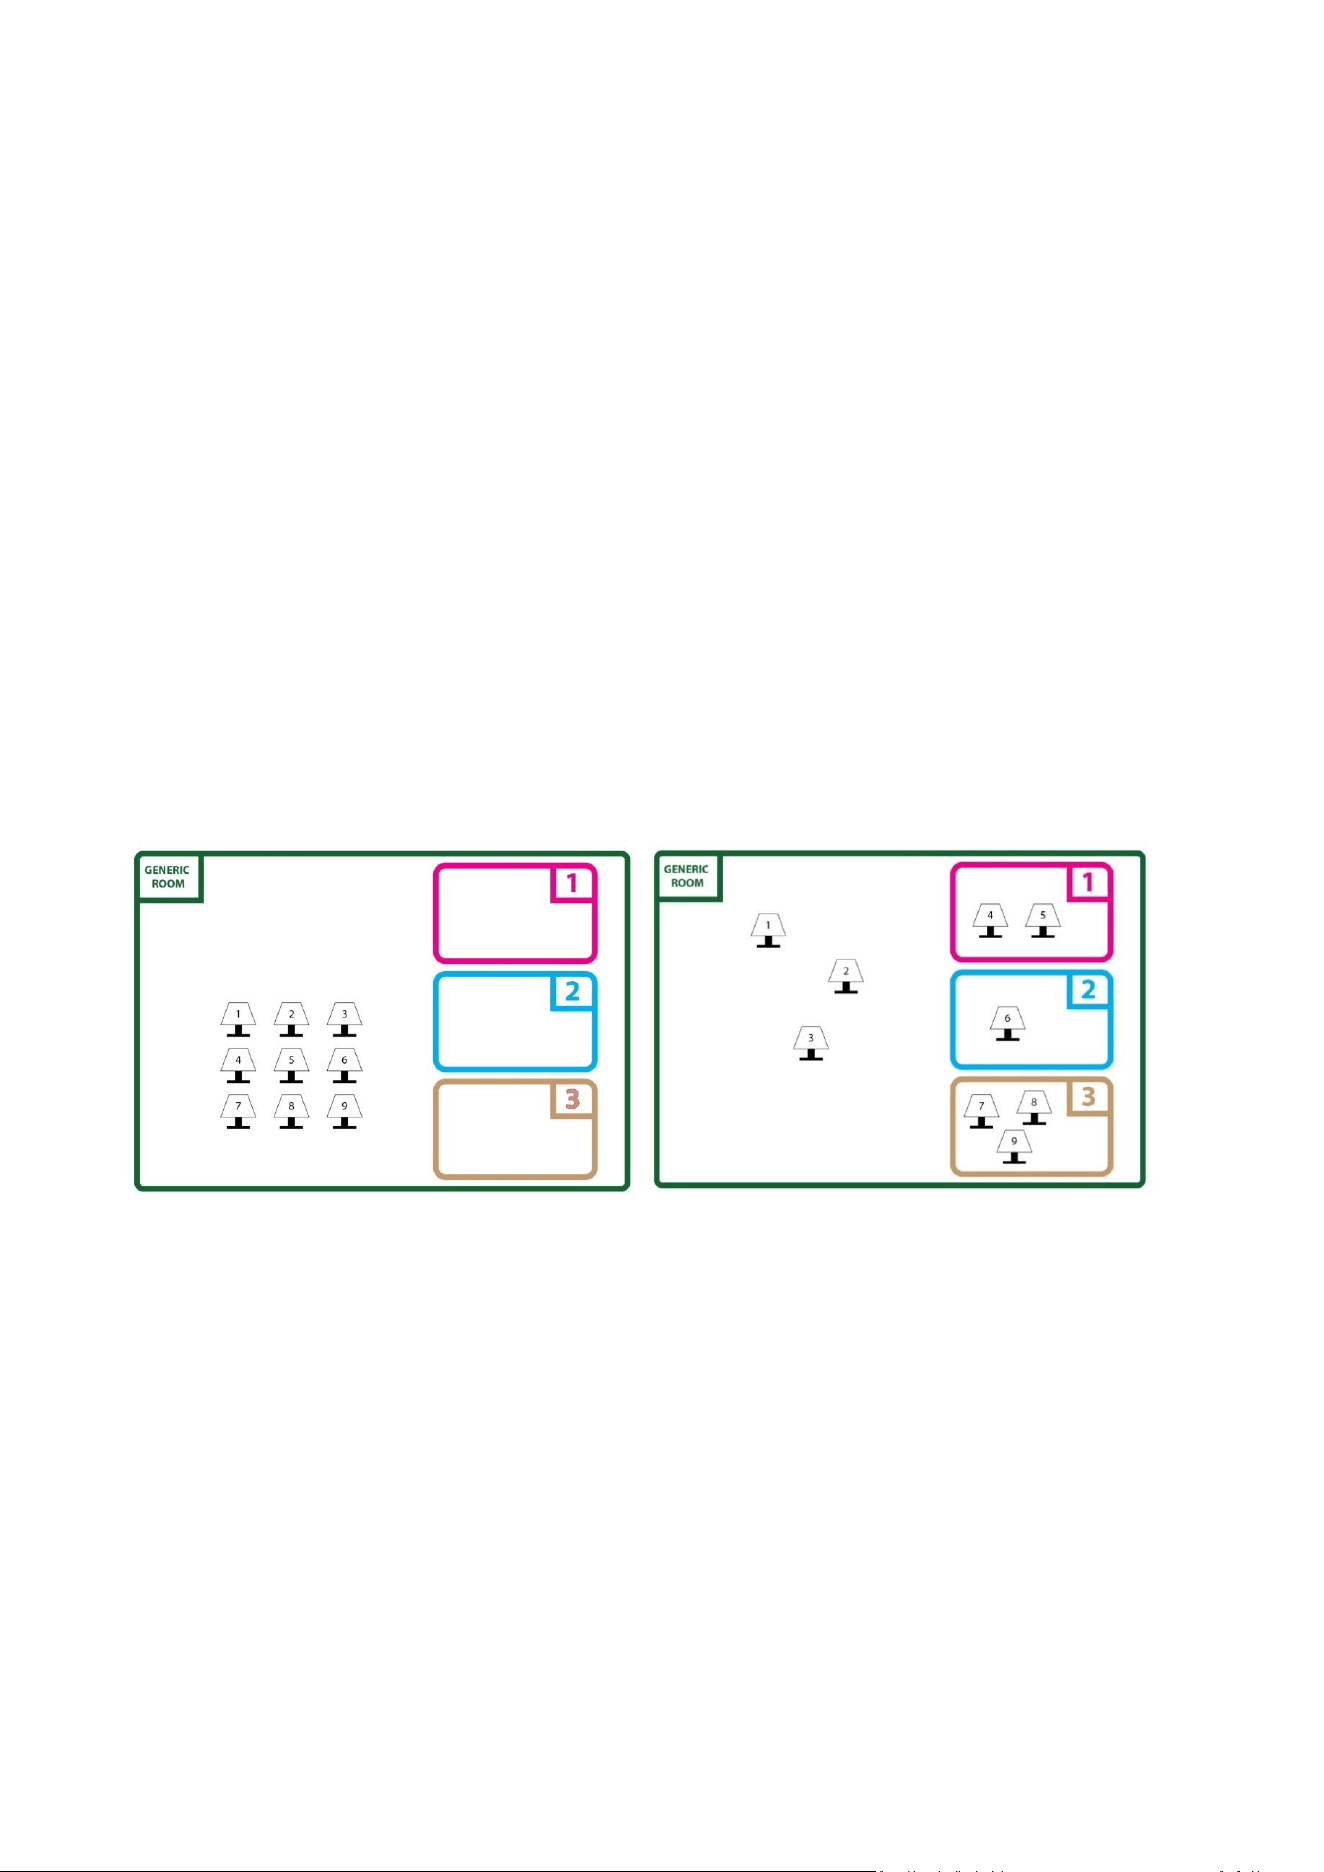
**Sezione 4: Controllo Multi-Ambiente (Gruppo 7)**
Controlla più lampade in stanze diverse con un unico telecomando.
**Assegnazione di una Stanza**
Dopo aver associato la lampada al telecomando, per assegnare la lampada a una stanza specifica,
procedere come segue:
1. Posizionare la lampada ACCESA sulla sua base di ricarica.
2. Premere e tenere premuto il controllo touch per 8 secondi per entrare nella MODALITÀ DI
ASSOCIAZIONE. I LED della lampada lampeggeranno due volte al 100% di intensità per confermare.
3. **Assegnazione Stanza**
1. Premere il tasto stanza desiderato (A, B o C) fino a quando le lampade non lampeggiano di nuovo due
volte.
* Una volta lampeggiate, la lampada sarà controllabile solo se viene premuto il tasto stanza assegnato
prima del comando (o premendo il tasto "ALL").

**Note Importanti**
* Dal momento in cui si preme il tasto stanza, si hanno a disposizione 1 minuto per modificare le
impostazioni della lampada, dopo di che essa ritorna alla modalità "Stanza Generica" iniziale.
* Scaduto il minuto, per continuare a impostare le stesse lampade, è necessario premere nuovamente il
tasto stanza.
* Se si desidera riassegnare la lampada a una stanza diversa, ripetere l'intera procedura sopra.
* Se si desidera "rimuovere" la stanza assegnata e lasciare la lampada nella "Stanza Generica" virtuale,
ripetere la procedura e premere il tasto ALL invece di un tasto stanza (A-B-C).
**Tasti Stanza**
Dopo aver completato l'associazione delle lampade con il telecomando, è possibile assegnare una stanza
specifica. Il telecomando ha 3 tasti stanza distinti (A-B-C) e un tasto ALL per il controllo simultaneo.
* **ALL:** Controlla simultaneamente tutte le lampade associate, comprese quelle nella "Stanza
Generica".
* **A, B, C:** Assegna e controlla le singole stanze.
**Controllo delle Lampade in una Stanza**
Premere il tasto stanza desiderato (A, B o C) e poi premere qualsiasi comando di funzione (es. ON/OFF,
luminosità, colore). Tutte le lampade in quella stanza risponderanno simultaneamente.
**Controllo delle Lampade nella Stanza Generica (ALL)**
Non è necessaria alcuna selezione stanza. Le lampade nella Stanza Generica possono essere comandate
immediatamente.
**Perché il Limite di 1 Minuto?**
Previene interferenze e riconfigurazioni accidentali in ambienti con molte lampade (es. ristoranti, uffici).
________________________________________________________________________________
**Sezione 5: COMBINAZIONI DI TASTI PER CATENA DI MONTAGGIO**
* **Funzione RESET** (Pairing + 4000K + 100%)