
Technical Support and E-Warranty Certificate www.vevor.com/support
BUBBLE-TENT USER MANUAL
We continue to be committed to provide you tools with competitive price.
"Save Half", "Half Price" or any other similar expressions used by us only represents an
estimate of savings you might benefit from buying certain tools with us compared to the major
top brands and does not necessarily mean to cover all categories of tools offered by us. You
are kindly reminded to verify carefully when you are placing an order with us if you are
actually saving half in comparison with the top major brands.

1
Model: 120970, 120971
Have product questions? Need technical support? Please feel free to
contact us:
Technical Support and E-Warranty Certificate
www.vevor.com/support
NEED HELP? CONTACT US!
This is the original instruction, please read all manual instructions
carefully before operating. VEVOR reserves a clear interpretation of our
user manual. The appearance of the product shall be subject to the
product you received. Please forgive us that we won't inform you again if
there are any technology or software updates on our product.
BUBBLE-TENT

2
ASSEMBLY AND SAFETY INSTRUCTIONS
Please pay close attention to the following instructions in order to
reduce the risk of injuries, accidents or damage to the product by
itself.
IMPORTANT
Please follow ALL safety instructions listed below.
Please remove the packaging material before assembling or using
the product.
Please make sure that all listed parts are included in the package
and that they are not damaged.
Please read these assembly and safety instructions carefully before
usage of the tent and keep them for future reference.
This product should only be used in a non-commercial way.
SAFETY INFORMATION
The tent was not tested for wind and snow loads, unless that is
clearly indicated otherwise. Therefore, these loads are not covered
by guarantee. Please watch the weather forecasts to be able to
properly protect or disassemble the tent before problems appear.
Tents should only be used as temporary accommodation and should
be disassembled in adverse weather conditions.
Make sure to keep sufficient distance to houses as well as gas and
power lines to avoid possible damage. Please check the area for
power cables and gas lines. Ask your local authority for further
information if needed.
When making use of suitable heaters, keep a minimum distance
from 1.2 m to tarp material. Open fire or heaters with open flames
such as patio heaters, umbrella heaters, gas heaters etc. should
NOT be used inside the tent in any case.
3
SPECIFICATIONS
Model
120970
Product Size
50×50in
Color
Transparent
Model
120971
Product Size
72×72in
Color
Transparent
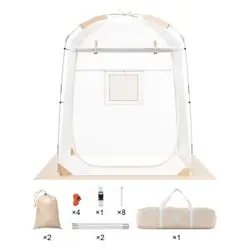
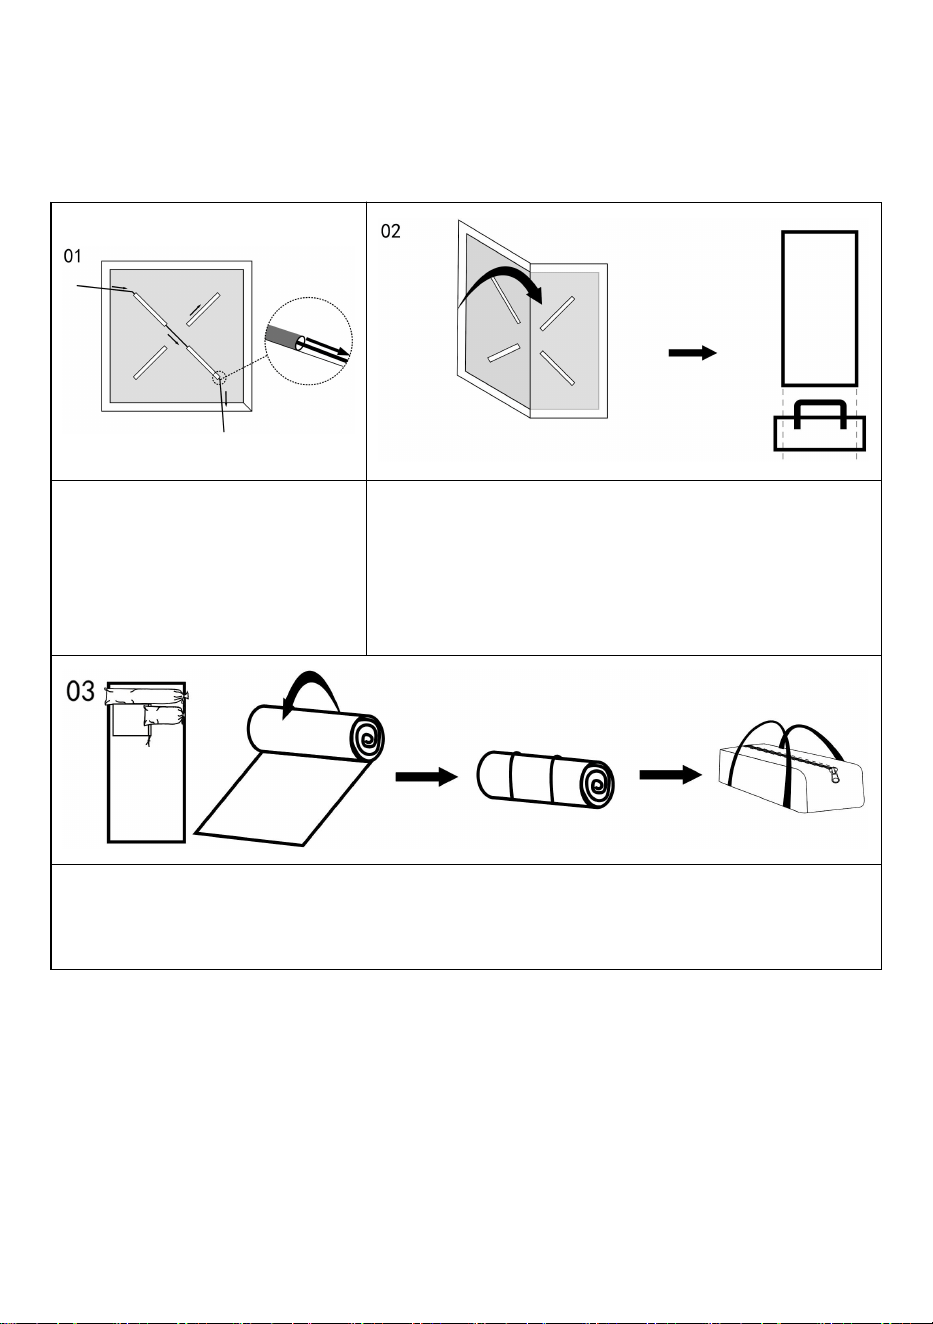
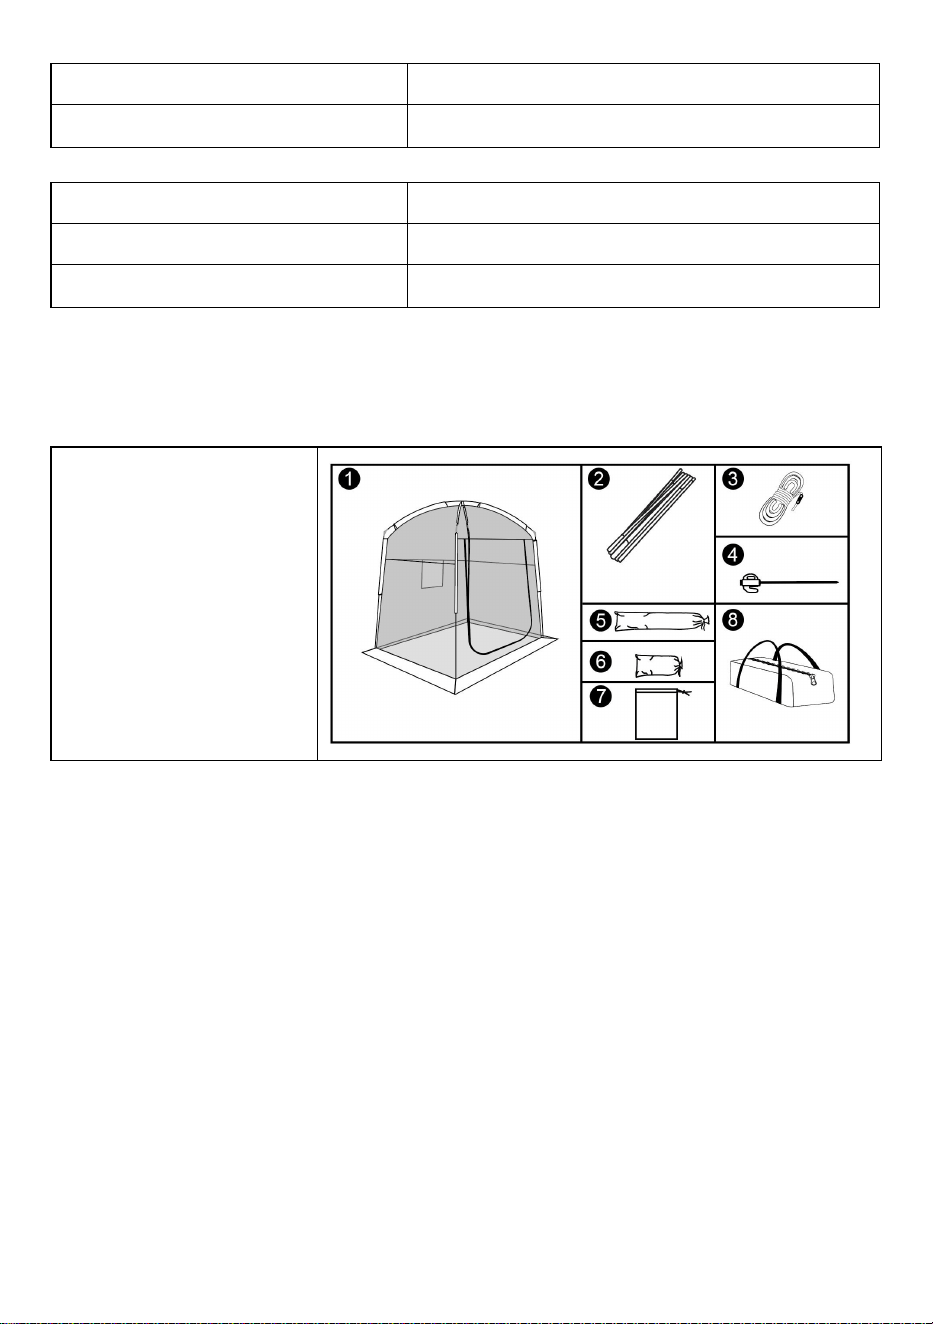
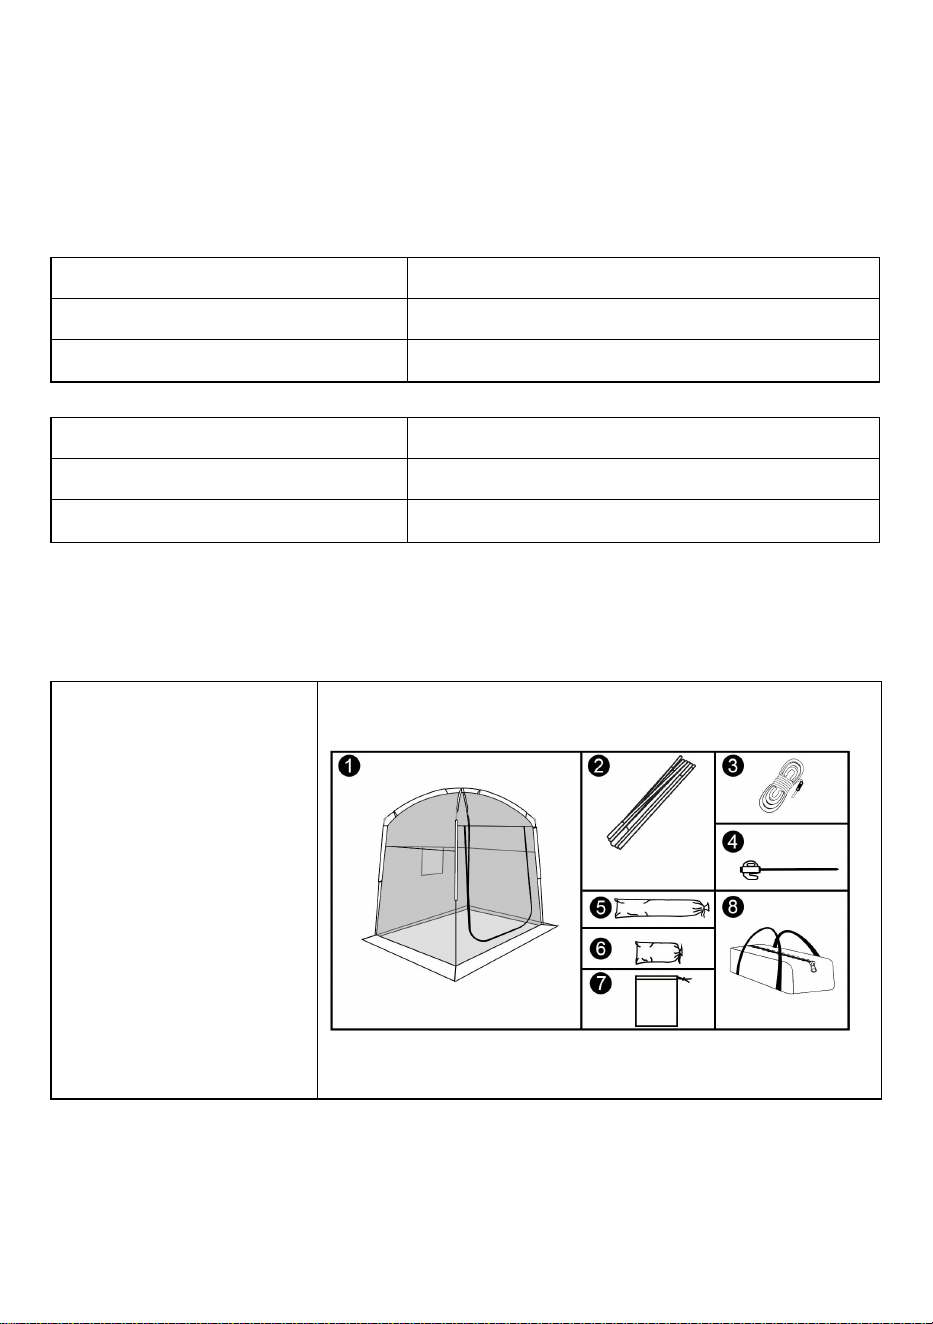
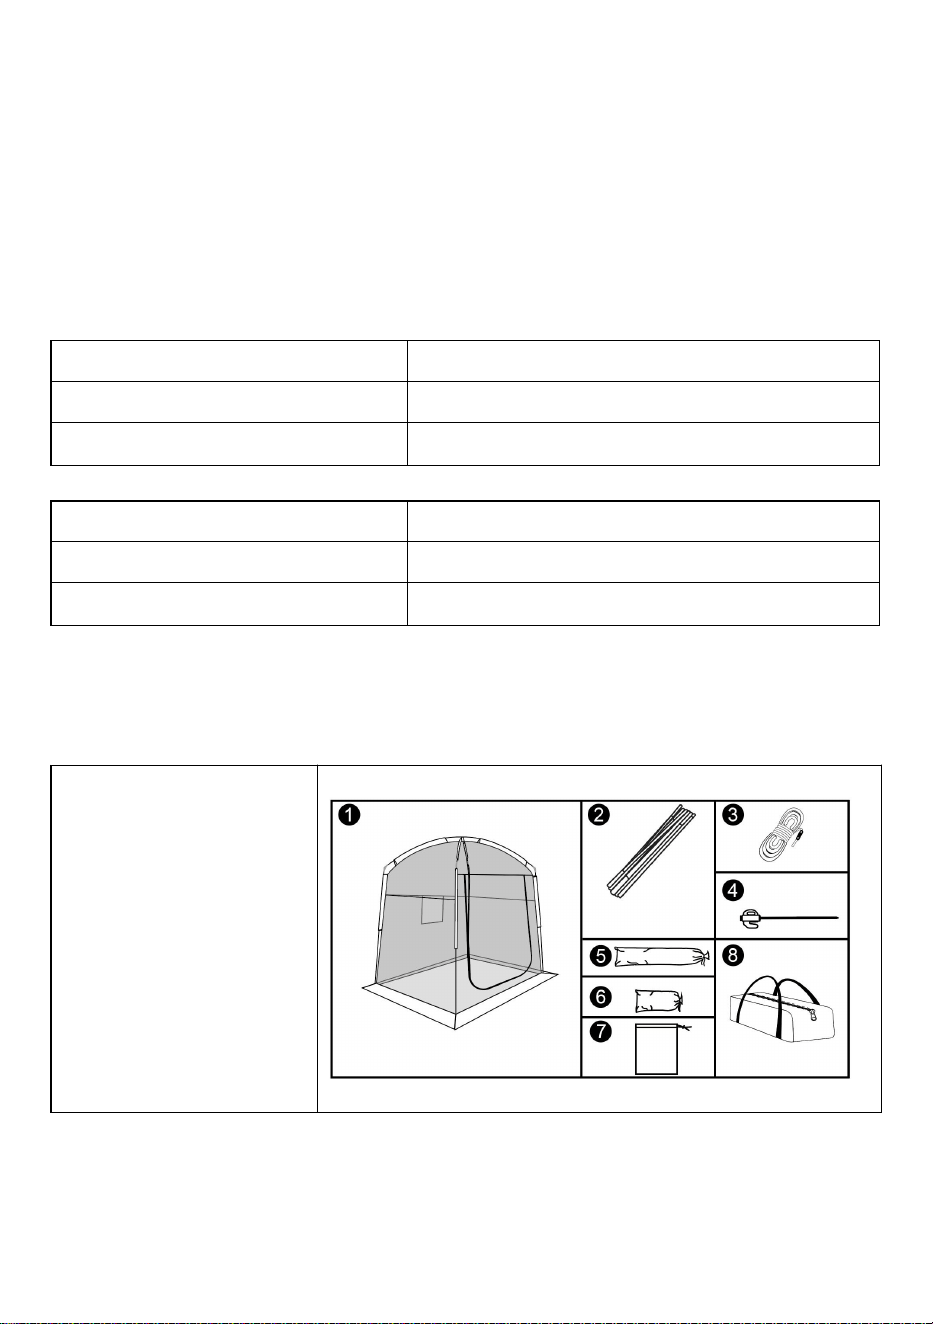
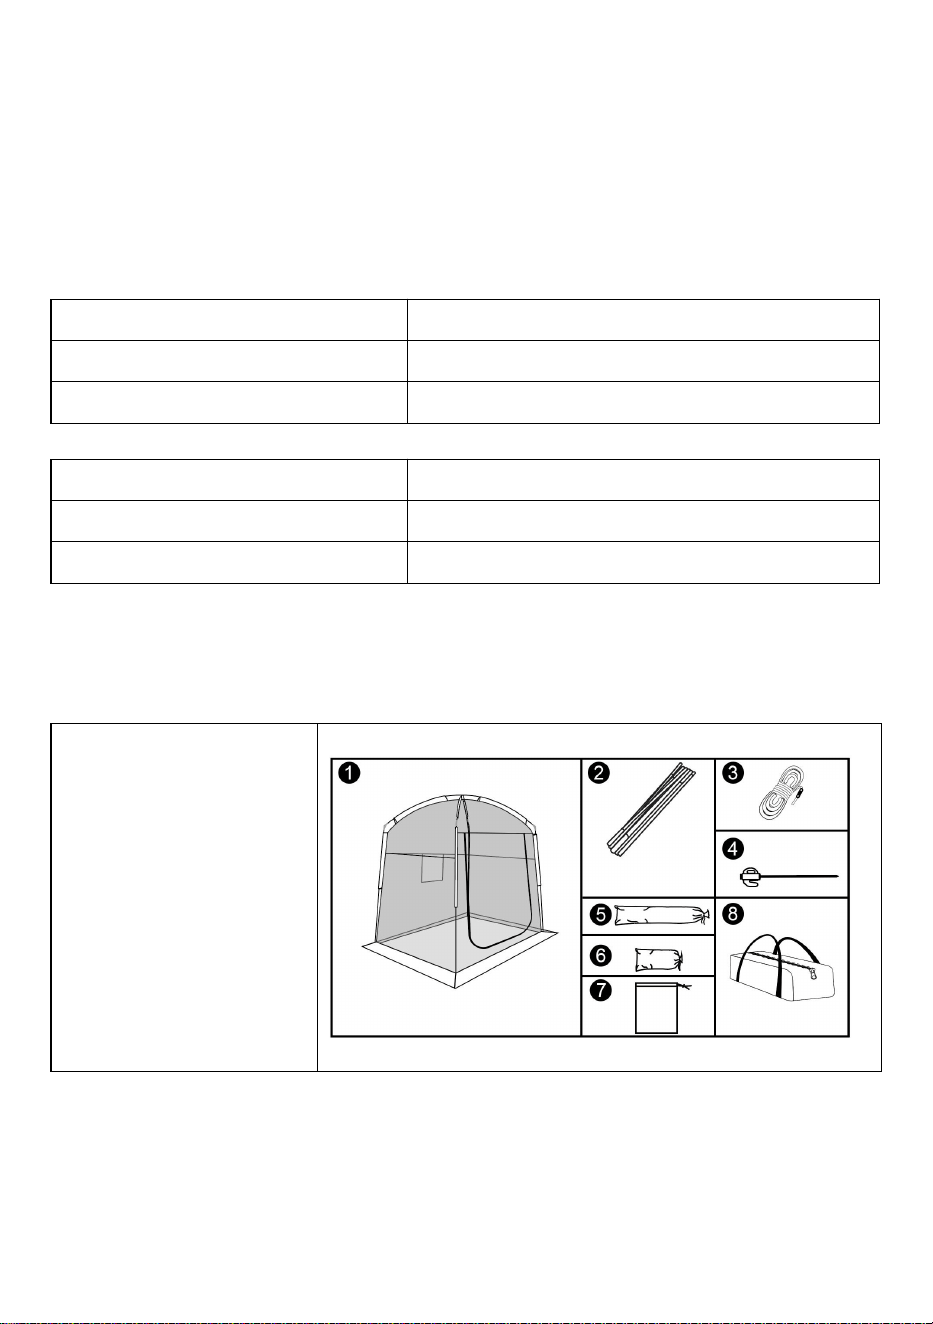
Components
1. Tent *1
2. Fiber rod *2
3. Camp rope *4
4. Camp nail *8
5. Pole Bag *1
6. Pegs & Ropes Bag *1
7. Sandbag *2
8.Carrying Bag *1
Please read, understand, and practice the guidelines in this user
manual before use, and keep it for future reference.

4
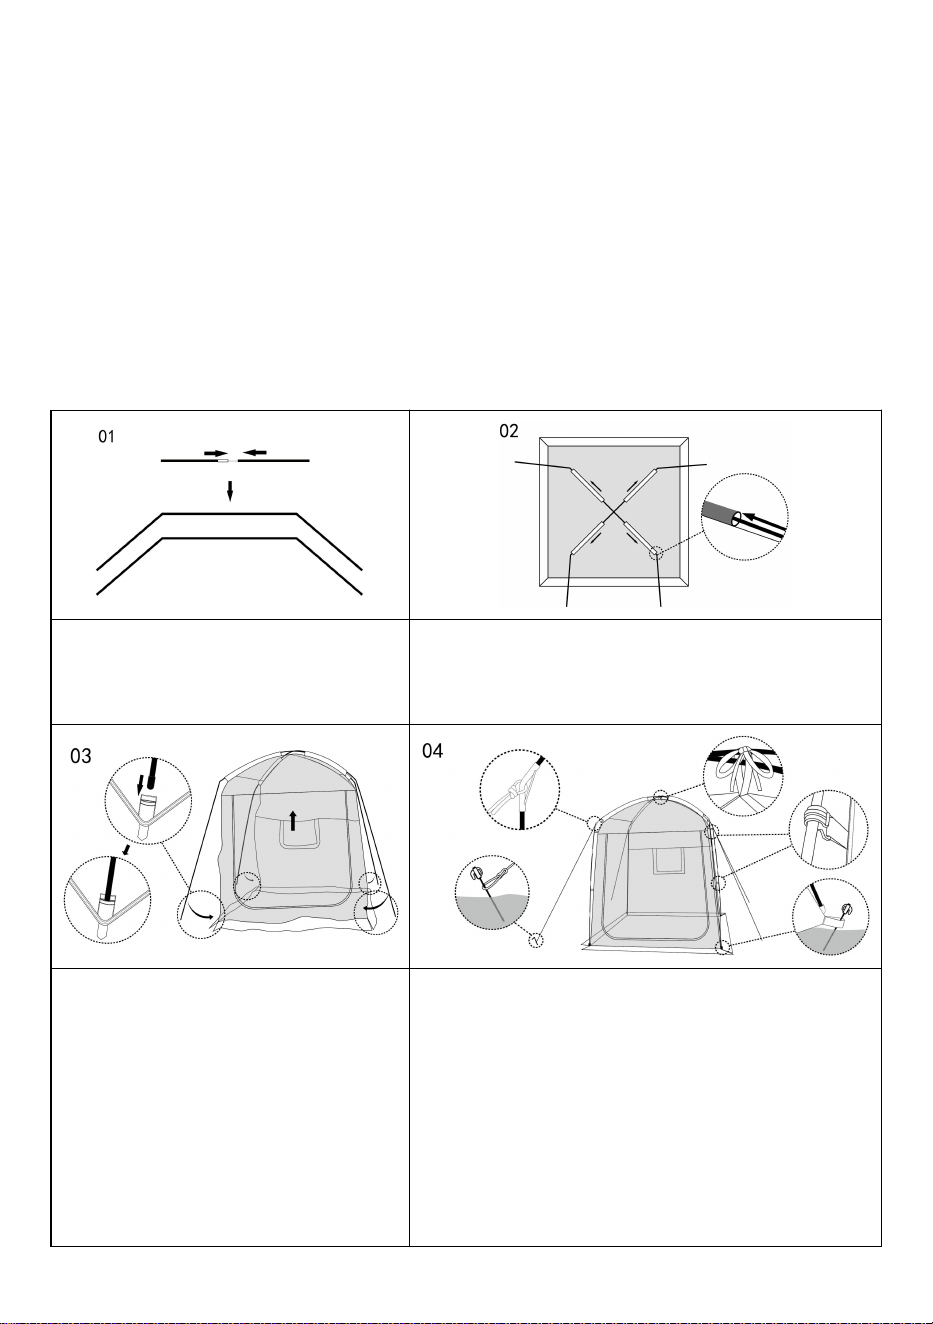
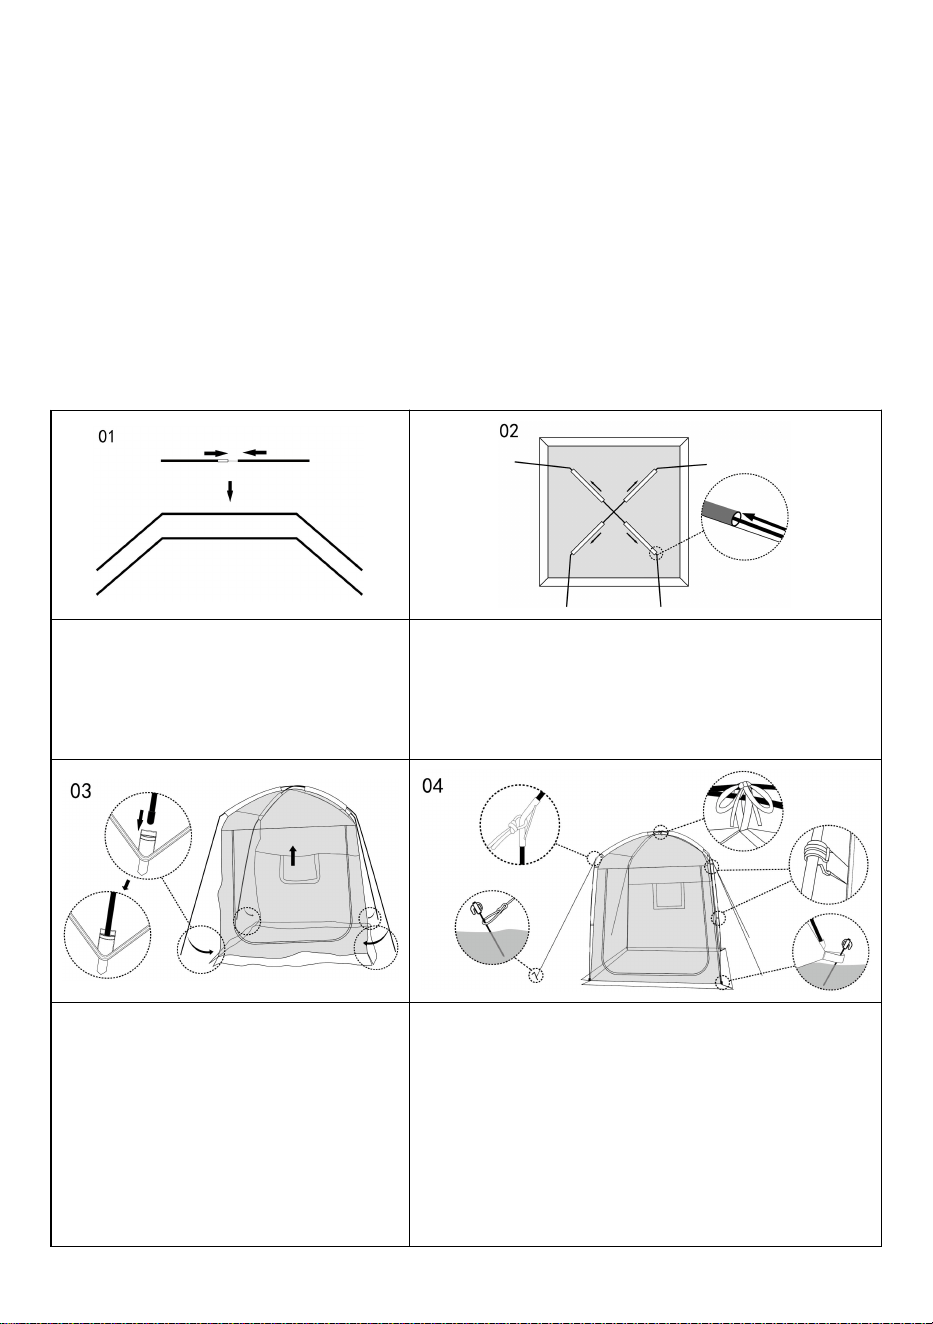
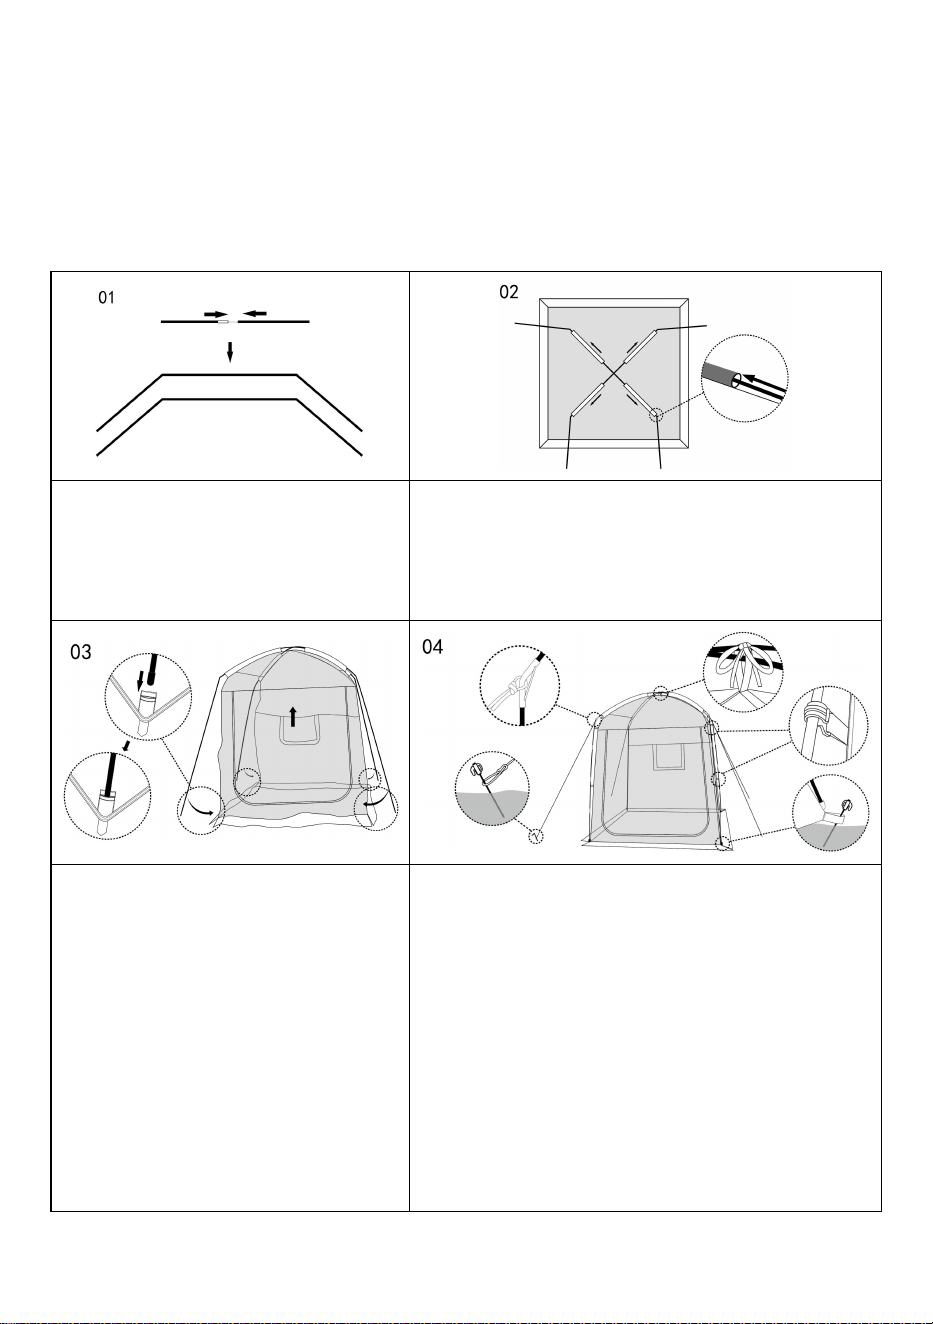
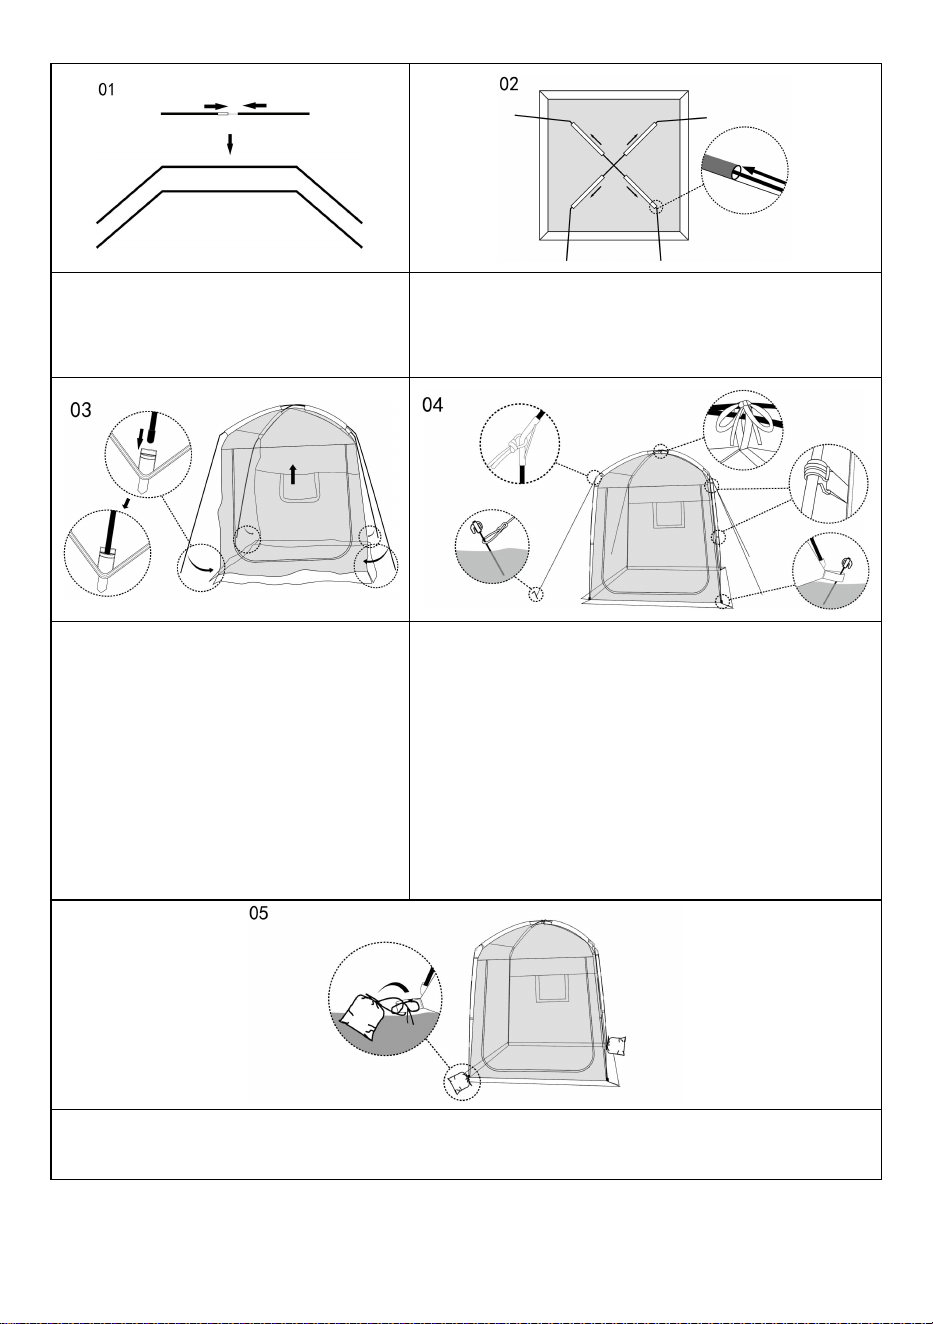
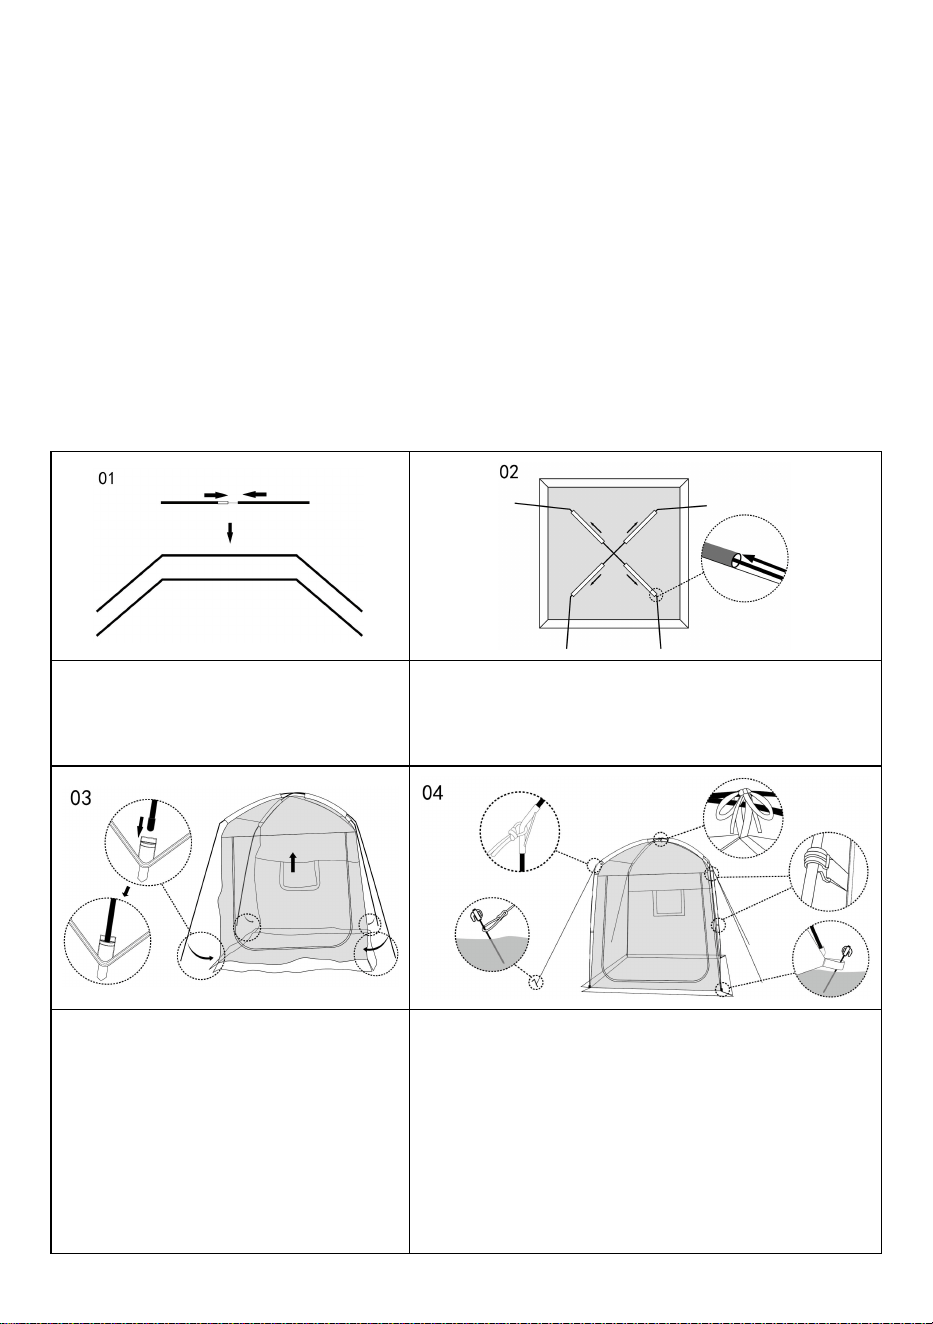
Assembly instructions:
Assemble two fiber rods.
The tent is laid flat on the ground, and two poles
are crossed and pushed into the cloth tube at the
top of the tent as shown in the picture.
Insert two poles into each of the four
white pockets at the bottom of the
tent.
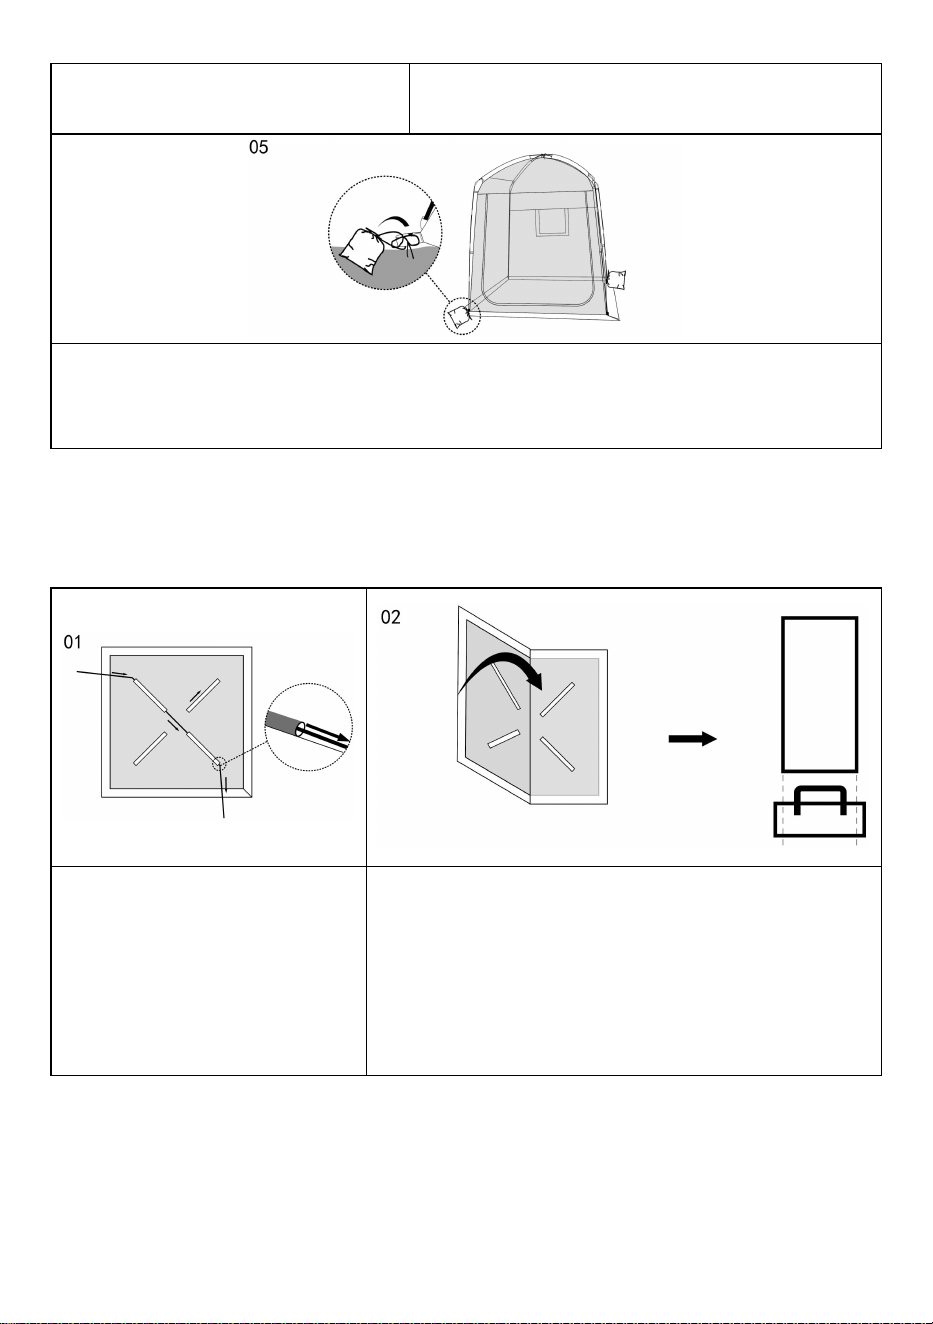
Use the straps on the top of the tent to tie the
intersection of two poles tightly; Use the latch on
the edge of the tent to secure the pole; Then tidy
and level the four corners of the tent, and insert
ground nails; Finally, tie the camp ropes to the four
metal joints in the middle of the tent and fix them to
the ground with ground nails to complete the
construction.
In cases where ground nails cannot be used, matching sandbags can be filled with sand,
stones, or other heavy objects, and tied to the bottom corner of the tent for fixation.
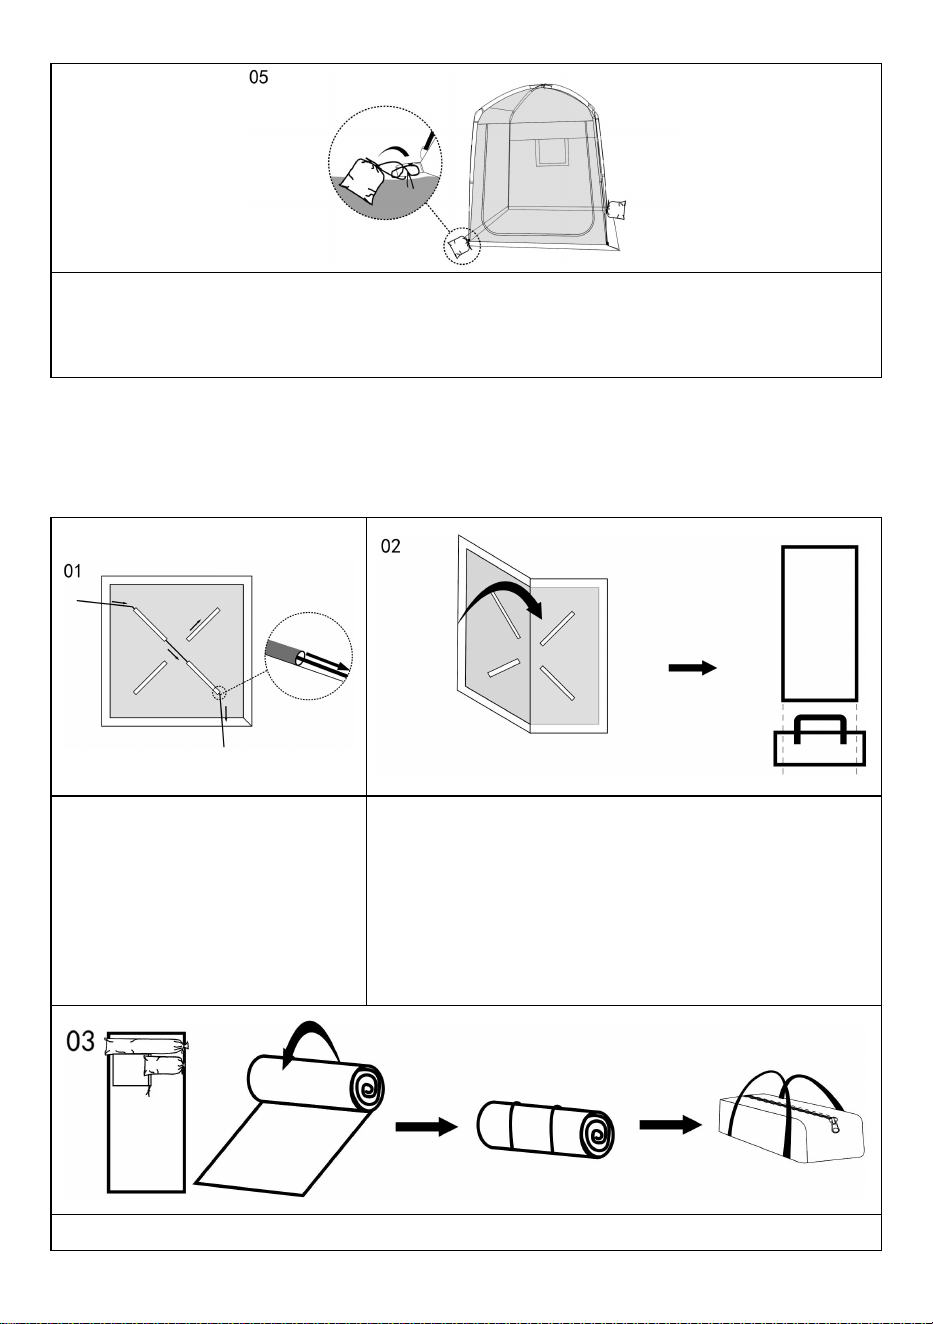
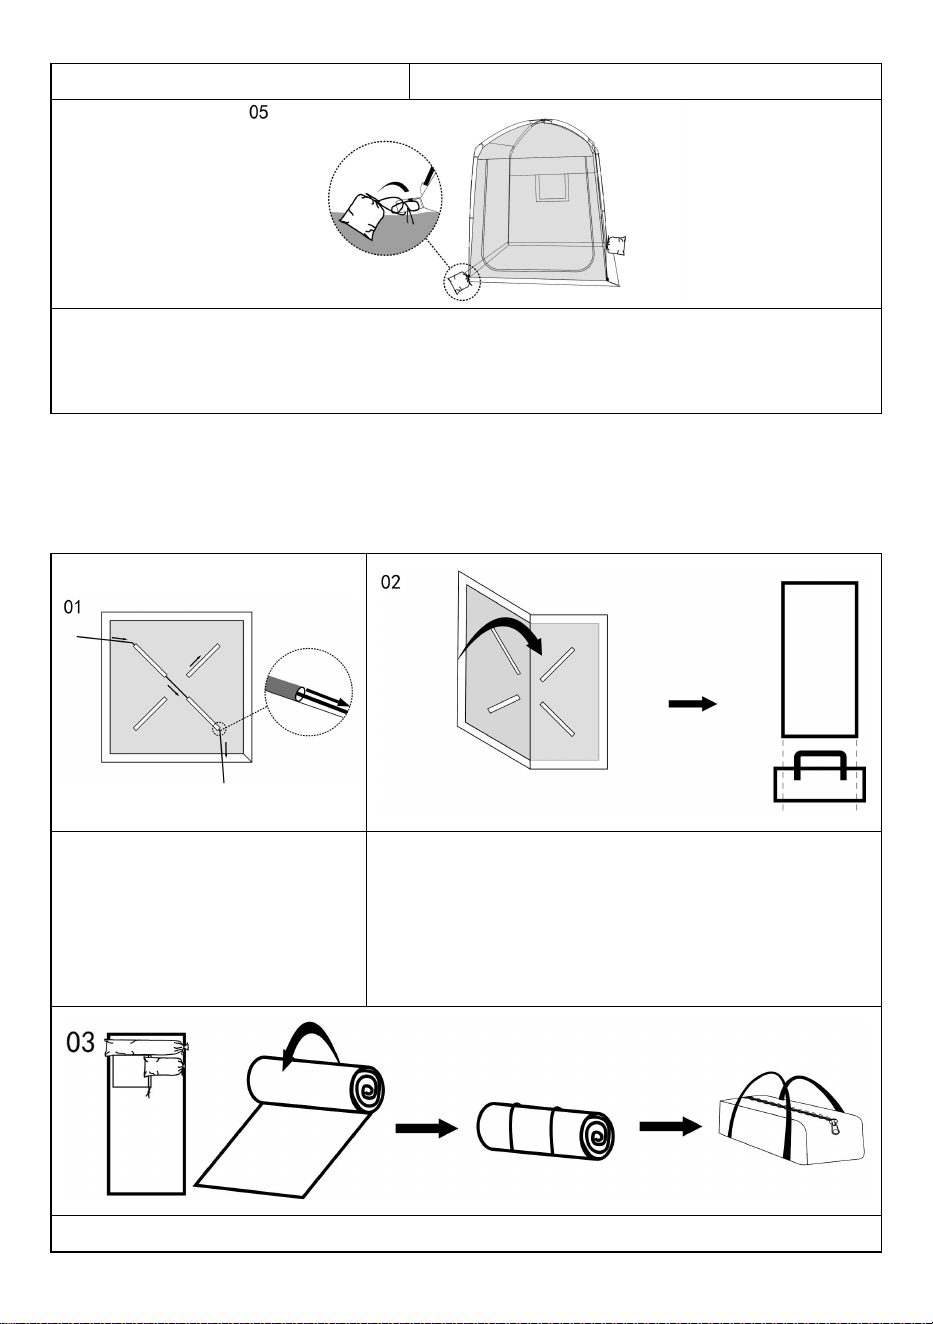
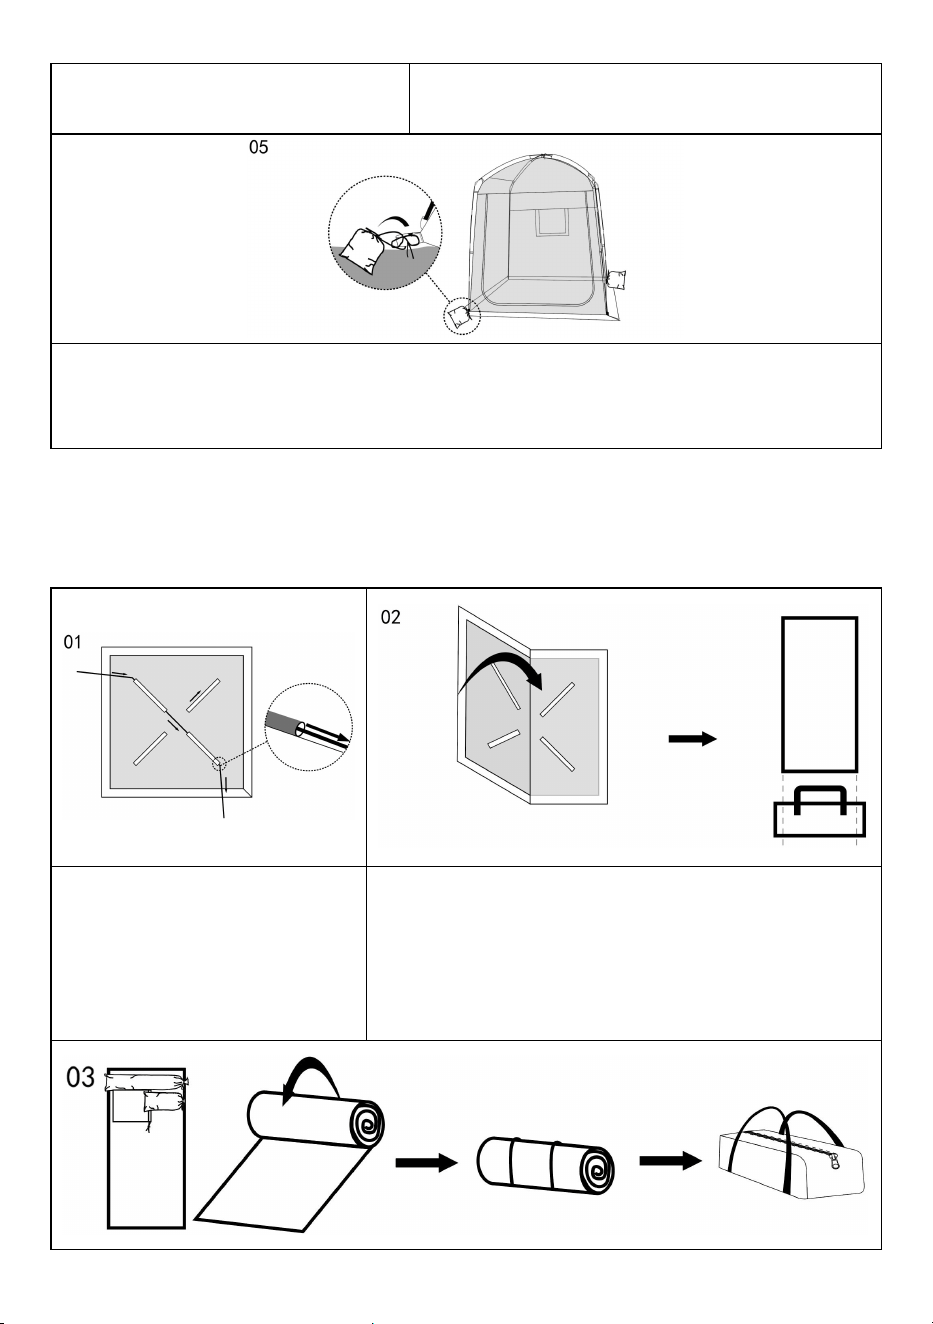
5
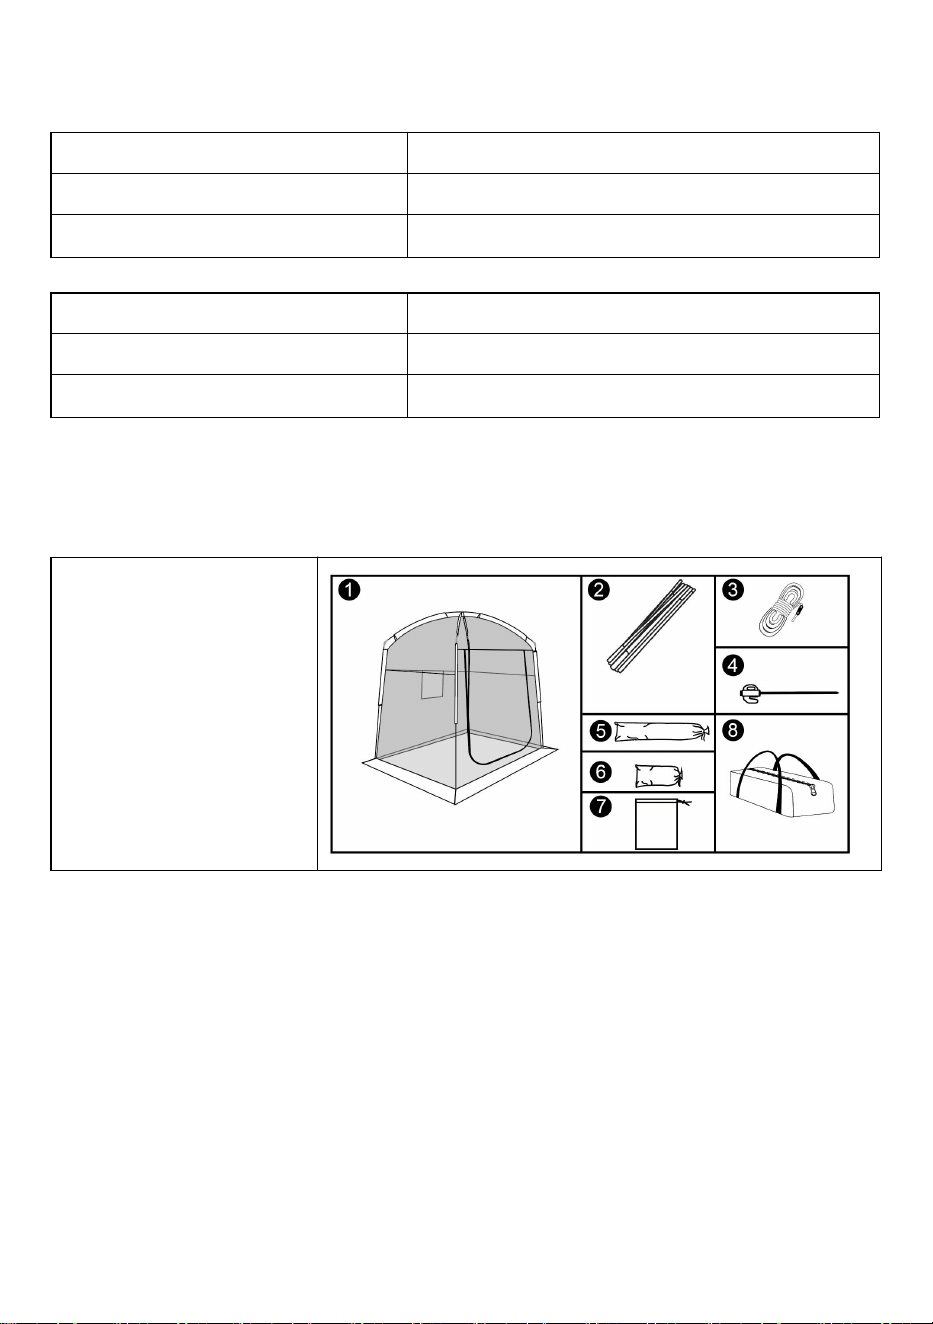
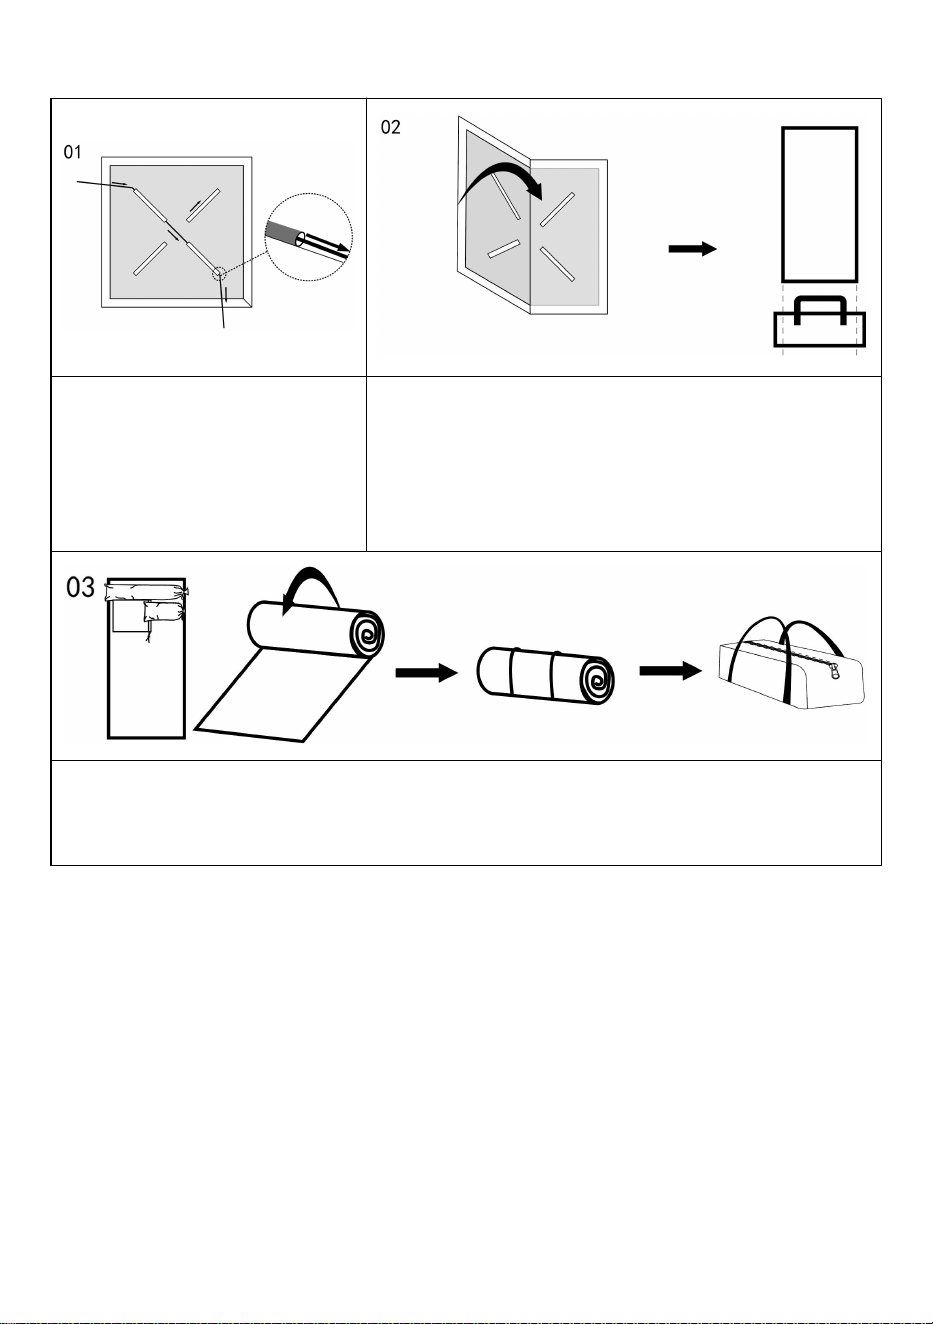
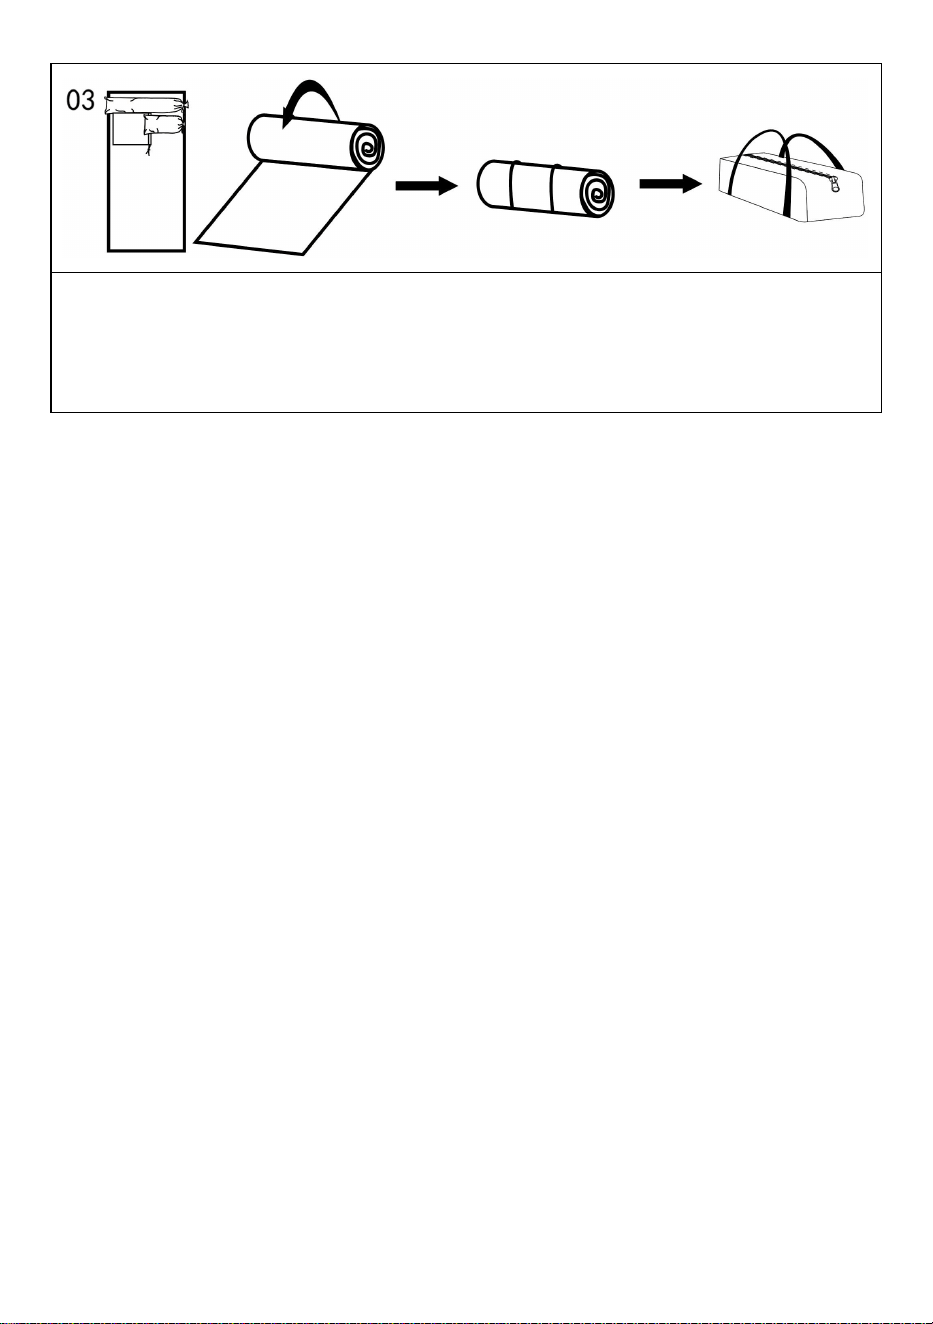
Storage instructions:
(Note: Snow layer cannot accumulate on the top of the product, please clean or put it away
in a timely manner)
Remove the camp rope, ground
nails, and poles.
(Note: The pole needs to be
pushed out from one end and
cannot be pulled out)
Fold the tent into a rectangle, with the shortest side
slightly shorter than the longest side of the storage bag.
Put the poles, ground nails, and camping ropes into the corresponding accessory bags,
then roll up the tent and accessories together, tie them tightly with straps, and finally put
them into the storage bag to complete the storage.

6
Manufacturer:Shanghaimuxinmuyeyouxiangongsi
Address: Shuangchenglu 803nong11hao1602A-1609shi, baoshanqu,
shanghai 200000 CN.
Imported to AUS: SIHAO PTY LTD. 1 ROKEVA STREETEASTWOOD
NSW 2122 Australia
Imported to USA: Sanven Technology Ltd. Suite 250, 9166 Anaheim
Place, Rancho Cucamonga, CA 91730
REP
EC
E-CrossStu GmbH
Mainzer Landstr.69, 60329 Frankfurt am Main.
REP
UK
YH CONSULTING LIMITED.
C/O YH Consulting Limited Office 147, Centurion House,
London Road, Staines-upon-Thames, Surrey, TW18 4AX


Technisch Support und E-Garantie-Zertifikat www.vevor.com/support
BUBBLE-ZELT BENUTZERHANDBUCH
We continue to be committed to provide you tools with competitive price.
"Save Half", "Half Price" or any other similar expressions used by us only represents an
estimate of savings you might benefit from buying certain tools with us compared to the major
top brands and does not necessarily mean to cover all categories of tools offered by us. You
are kindly reminded to verify carefully when you are placing an order with us if you are
actually saving half in comparison with the top major brands.

1
Modell: 120970 , 120971
Have product questions? Need technical support? Please feel free to
contact us:
Technical Support and E-Warranty Certificate
www.vevor.com/support
NEED HELP? CONTACT US!
This is the original instruction, please read all manual instructions
carefully before operating. VEVOR reserves a clear interpretation of our
user manual. The appearance of the product shall be subject to the
product you received. Please forgive us that we won't inform you again if
there are any technology or software updates on our product.
BUBBLE-TENT

2
MONTAGE UND SICHERHEIT ANWEISUNGEN
Beachten Sie die folgenden Hinweise genau, um das Risiko von
Verletzungen, Unfällen oder Schäden am Produkt zu verringern.
selbst.
WICHTIG
Bitte befolgen Sie ALLE unten aufgeführten Sicherheitshinweise.
Bitte entfernen Sie vor der Montage und Inbetriebnahme des
Produktes das Verpackungsmaterial.
Bitte achten Sie darauf, dass alle aufgeführten Teile im Paket
enthalten sind und diese nicht beschädigt sind.
Bitte lesen Sie diese Aufbau- und Sicherheitshinweise vor
Inbetriebnahme des Zeltes sorgfältig durch und bewahren Sie diese
zur späteren Verwendung auf.
Dieses Produkt darf nur für nicht-kommerzielle Zwecke verwendet
werden.
SICHERHEITSINFORMATION
Das Zelt wurde nicht auf Wind- und Schneelasten getestet, es sei
denn, dies ist ausdrücklich anders angegeben. Daher sind diese
Lasten nicht durch die Garantie abgedeckt. Bitte beachten Sie die
Wettervorhersagen, um das Zelt richtig schützen oder abbauen zu
können, bevor Probleme auftreten. Zelte sollten nur als
vorübergehende Unterkunft verwendet und bei widrigen
Wetterbedingungen abgebaut werden.
Achten Sie auf ausreichenden Abstand zu Häusern sowie Gas- und
Stromleitungen, um mögliche Schäden zu vermeiden. Bitte
überprüfen Sie die Umgebung auf Stromkabel und Gasleitungen.
Fragen Sie bei Bedarf Ihre Gemeindeverwaltung nach weiteren
Informationen.
3
Bei der Nutzung geeigneter Heizgeräte ist ein Mindestabstand von
1,2 m zum Planenmaterial einzuhalten. Offenes Feuer oder
Heizgeräte mit offener Flamme wie z.B. Heizpilze, Heizschirme,
Gasheizer etc. sollten im Zeltinneren grundsätzlich NICHT genutzt
werden.
SPEZIFIKATIONEN
Modell
120970
Produktgröße
50×50 Zoll
Farbe
Transparent
Modell
12097 1
Produktgröße
72×72 Zoll
Farbe
Transparent
Komponenten
2. Zelt *1
2. Faserstab *2
3. Lagerseil * 4
4. Lagernagel * 8
5. Stangentasche * 1
6. Heringe und Seile
Tasche * 1
7. Sandsack *2
8. Tragetasche * 1
Bitte lesen Sie die Richtlinien in diesem Benutzerhandbuch vor der
Verwendung, verstehen Sie sie, befolgen Sie sie und bewahren Sie
sie zum späteren Nachschlagen auf.
4
Montageanleitungen:
Montieren Sie zwei Faserstäbe .
Das Zelt wird flach auf den Boden, und zwei Pole
werden gekreuzt und in den Stoffschlauch oben
am Zelt, wie in der Abbildung gezeigt.
Stecken Sie je zwei Stangen in die
vier weißen Taschen an der
Unterseite des Zeltes.
Verwenden Sie die Riemen an der Oberseite des
Zelts, um die Kreuzung zweier Stangen
festzubinden. Verwenden Sie den Riegel an der
Zeltkante, um die Stange zu sichern. Räumen Sie
dann die vier Ecken des Zelts auf, richten Sie sie
aus und stecken Sie Bodennägel hinein. Binden
Sie zum Schluss die Campingseile an die vier
Metallverbindungen in der Mitte des Zelts und

5
befestigen Sie sie mit Bodennägeln am Boden, um
die Konstruktion fertigzustellen.
In Fällen, in denen Bodennägel nicht Hierzu können passende Sandsäcke mit Sand,
Steinen oder anderen schweren Gegenständen gefüllt und zur Fixierung an der unteren
Zeltecke festgebunden werden.
Lagerungshinweise:
(Hinweis: Auf der Oberseite des Produkts kann sich keine Schneeschicht ansammeln. Bitte
reinigen oder räumen Sie diese rechtzeitig weg.)
Entfernen Sie das Campingseil,
die Bodennägel und die
Stangen.
(Hinweis: Die Stange muss an
einem Ende herausgeschoben
werden und kann nicht
herausgezogen werden)
Falten Sie das Zelt zu einem Rechteck, wobei die
kürzeste Seite etwas kürzer ist als die längste Seite des
Aufbewahrungsbeutels.

6
Legen Sie die Stangen, Bodennägel und Campingseile in die entsprechenden
Zubehörtaschen, rollen Sie dann Zelt und Zubehör zusammen, binden Sie sie mit Riemen
fest und stecken Sie sie schließlich in die Aufbewahrungstasche, um die Lagerung
abzuschließen.

6
Hersteller : Shanghaimuxinmuyeyouxiangongsi
Adresse: Shuangchenglu 803nong11hao1602A-1609shi, Baoshanqu,
Shanghai 200000 CN.
Nach AUS importiert: SIHAO PTY LTD. 1 ROKEVA
STREETEASTWOOD NSW 2122 Australien
Importiert in die USA: Sanven Technology Ltd. Suite 250, 9166 Anaheim
Ort, Rancho Cucamonga, CA 91730
REP
EC
E-CrossStu GmbH
Mainzer Landstr.69, 60329 Frankfurt am Main.
REP
UK
YH CONSULTING LIMITED.
C/O YH Consulting Limited Office 147, Centurion House,
London Road, Staines-upon-Thames, Surrey, TW18 4AX


Technique Assistance et certificat de garantie électronique
www.vevor.com/support
TENTE-BULLE MANUEL DE L'UTILISATEUR
We continue to be committed to provide you tools with competitive price.
"Save Half", "Half Price" or any other similar expressions used by us only represents an
estimate of savings you might benefit from buying certain tools with us compared to the major
top brands and does not necessarily mean to cover all categories of tools offered by us. You
are kindly reminded to verify carefully when you are placing an order with us if you are
actually saving half in comparison with the top major brands.

1
Modèle : 120970 , 120971
Have product questions? Need technical support? Please feel free to
contact us:
Technical Support and E-Warranty Certificate
www.vevor.com/support
NEED HELP? CONTACT US!
This is the original instruction, please read all manual instructions
carefully before operating. VEVOR reserves a clear interpretation of our
user manual. The appearance of the product shall be subject to the
product you received. Please forgive us that we won't inform you again if
there are any technology or software updates on our product.
BUBBLE-TENT

2
MONTAGE ET SÉCURITÉ INSTRUCTIONS
Veuillez prêter une attention particulière aux instructions suivantes
afin de réduire le risque de blessures, d'accidents ou de dommages
au produit en
lui-même.
IMPORTANT
Veuillez suivre TOUTES les instructions de sécurité répertoriées
ci-dessous.
Veuillez retirer le matériau d'emballage avant d'assembler ou
d'utiliser le produit.
Veuillez vous assurer que toutes les pièces répertoriées sont
incluses dans l'emballage et qu'elles ne sont pas endommagées.
Veuillez lire attentivement ces instructions de montage et de sécurité
avant d'utiliser la tente et les conserver pour référence future.
Ce produit ne doit être utilisé que de manière non commerciale.
INFORMATION DE SÉCURITÉ
La tente n'a pas été testée pour les charges de vent et de neige,
sauf indication contraire claire. Ces charges ne sont donc pas
couvertes par la garantie. Merci de surveiller les prévisions météo
pour pouvoir bien protéger ou démonter la tente avant que des
problèmes n'apparaissent. Les tentes ne doivent être utilisées que
comme hébergement temporaire et doivent être démontées en cas
de conditions météorologiques défavorables.
Assurez-vous de garder une distance suffisante par rapport aux
maisons ainsi qu'aux lignes de gaz et d'électricité pour éviter
d'éventuels dommages. Veuillez vérifier la zone pour les câbles
électriques et les conduites de gaz. Renseignez-vous auprès de
votre autorité locale si nécessaire.

3
Lorsque vous utilisez des radiateurs adaptés, gardez une distance
minimale de 1,2 m par rapport au matériau de la bâche. Les feux
ouverts ou les radiateurs à flammes nues tels que les radiateurs de
terrasse, les radiateurs parasols, les radiateurs à gaz, etc. ne
doivent en aucun cas être utilisés à l'intérieur de la tente.
CARACTÉRISTIQUES
Modèle
120970
Taille du produit
50 × 50 pouces
Couleur
Transparent
Modèle
12097 1
Taille du produit
72 × 72 pouces
Couleur
Transparent
Composants
3. Tente *1
2 . Tige de fibre * 2
3 . Corde de camping * 4
4 . Clou de camp * 8
5 . Sac à poteaux * 1
6 . Sac à piquets et
cordes * 1
7 . Sac de sable * 2
8. Sac de transport * 1
Veuillez lire, comprendre et mettre en pratique les directives de ce
manuel d'utilisation avant utilisation, et conservez-le pour référence
future.
4
Instructions de montage:
Assemblez deux tiges de fibres .
La tente est posée à plat sur le sol, et deux
poteaux sont croisés et poussés dans le tube en
tissu en haut de la tente comme indiqué sur
l'image.
Insérez deux poteaux dans chacun
des quatre blancs poches au bas de
la tente.
Utilisez les sangles sur le dessus de la tente pour
attacher fermement l'intersection de deux
poteaux ; Utilisez le loquet sur le bord de la tente
pour fixer le poteau ; Ensuite, rangez et nivelez les
quatre coins de la tente, et insérez des clous de
terre ; Enfin, attachez les cordes de camp aux
quatre joints métalliques au milieu de la tente et

5
fixez-les au sol avec des clous de terre pour
terminer la construction.
Dans les cas où les clous au sol ne peuvent pas être Utilisés, les sacs de sable assortis
peuvent être remplis de sable, de pierres ou d'autres objets lourds et attachés au coin
inférieur de la tente pour être fixés.
Instructions de stockage :
(Remarque : la couche de neige ne peut pas s'accumuler sur le dessus du produit, veuillez
le nettoyer ou le ranger en temps opportun)
Retirez la corde de camp, les
clous de terre et les poteaux.
(Remarque : le poteau doit être
poussé d'une extrémité et ne
peut pas être retiré)
Pliez la tente en rectangle, le côté le plus court étant
légèrement plus court que le côté le plus long du sac de
rangement.

6
Mettez les poteaux, les clous de terre et les cordes de camping dans les sacs d'accessoires
correspondants, puis enroulez la tente et les accessoires ensemble, attachez-les
fermement avec des sangles et enfin mettez-les dans le sac de rangement pour terminer le
rangement.

6
Fabricant : Shanghaimuxinmuyeyouxiangongsi
Adresse : Shuangchenglu 803nong11hao1602A-1609shi, baoshanqu,
Shanghai 200000 CN.
Importé en Australie : SIHAO PTY LTD. 1 ROKEVA STREETASTWOOD
NSW 2122 Australie
Importé aux États-Unis : Sanven Technology Ltd. Suite 250, 9166
Anaheim
Lieu, Rancho Cucamonga, CA 91730
REP
EC
E-CrossStu GmbH
Mainzer Landstr.69, 60329 Frankfurt am Main.
REP
UK
YH CONSULTING LIMITED.
C/O YH Consulting Limited Office 147, Centurion House,
London Road, Staines-upon-Thames, Surrey, TW18 4AX


Technisch Ondersteuning en e-garantiecertificaat www.vevor.com/support
BUBBLE-TENT HANDLEIDING
We continue to be committed to provide you tools with competitive price.
"Save Half", "Half Price" or any other similar expressions used by us only represents an
estimate of savings you might benefit from buying certain tools with us compared to the major
top brands and does not necessarily mean to cover all categories of tools offered by us. You
are kindly reminded to verify carefully when you are placing an order with us if you are
actually saving half in comparison with the top major brands.

1
Modellen: 120970 , 120971
Have product questions? Need technical support? Please feel free to
contact us:
Technical Support and E-Warranty Certificate
www.vevor.com/support
NEED HELP? CONTACT US!
This is the original instruction, please read all manual instructions
carefully before operating. VEVOR reserves a clear interpretation of our
user manual. The appearance of the product shall be subject to the
product you received. Please forgive us that we won't inform you again if
there are any technology or software updates on our product.
BUBBLE-TENT

2
MONTAGE EN VEILIGHEID INSTRUCTIES
Neem de volgende instructies nauwlettend in acht om het risico op
letsel, ongevallen of schade aan het product te verminderen
zelf.
BELANGRIJK
Volg ALLE onderstaande veiligheidsinstructies.
Verwijder het verpakkingsmateriaal voordat u het product monteert
of gebruikt.
Zorg ervoor dat alle vermelde onderdelen in het pakket zitten en dat
ze niet beschadigd zijn.
Lees deze montage- en veiligheidsinstructies zorgvuldig door
voordat u de tent gebruikt en bewaar ze voor toekomstig gebruik.
Dit product mag uitsluitend op niet-commerciële wijze worden
gebruikt.
VEILIGHEIDSINFORMATIE
De tent is niet getest op wind- en sneeuwbelasting, tenzij dat
duidelijk anders is aangegeven. Daarom vallen deze ladingen niet
onder de garantie. Houd de weersverwachtingen in de gaten om de
tent goed te kunnen beschermen of demonteren voordat er zich
problemen voordoen. Tenten mogen alleen worden gebruikt als
tijdelijke accommodatie en moeten worden gedemonteerd bij
ongunstige weersomstandigheden.
Zorg ervoor dat u voldoende afstand houdt tot huizen en gas- en
elektriciteitsleidingen om mogelijke schade te voorkomen.
Controleer het gebied op stroomkabels en gasleidingen. Vraag
indien nodig uw plaatselijke overheid om meer informatie.
Houd bij gebruik van geschikte verwarmingstoestellen een minimale
afstand van 1,2 m tot het zeildoek aan. Open vuur of kachels met

3
open vuur zoals terrasverwarmers, parasolverwarmers, gaskachels
etc. mogen in ieder geval NIET in de tent worden gebruikt.
SPECIFICATIES
Model
120970
Product grootte
50×50in
Kleur
Transparant
Model
12097 1
Product grootte
72×72in
Kleur
Transparant
Componenten
4. Tent *1
2 . Vezelstaaf *2
3 . Kamptouw * 4
4 . Kampnagel * 8
5 . Stoktas *1
6 . Zak voor haringen en
touwen *1
7 . Zandzak *2
8. Draagtas *1
Lees, begrijp en oefen de richtlijnen in deze gebruikershandleiding
vóór gebruik, en bewaar deze voor toekomstig gebruik.
4
Montage-instructies:
Monteer twee vezelstaven .
De tent wordt plat op de grond gelegd grond, en
twee palen worden gekruist en in de grond
geduwd stoffen buis aan de bovenkant van de
tent, zoals weergegeven op de afbeelding.
Steek twee stokken in elk van de vier
witte zakken aan de onderkant van de
tent.
Gebruik de riemen aan de bovenkant van de tent
om de kruising van twee stokken stevig vast te
maken; Gebruik de grendel aan de rand van de
tent om de paal vast te zetten; Maak vervolgens
de vier hoeken van de tent schoon en waterpas,
en plaats grondspijkers; Bind tenslotte de
kamptouwen aan de vier metalen verbindingen in
het midden van de tent en bevestig ze met
grondspijkers aan de grond om de constructie te
voltooien.
5
In gevallen waarin geslepen nagels niet mogelijk zijn Gebruikte, bijpassende zandzakken
kunnen worden gevuld met zand, stenen of andere zware voorwerpen en ter bevestiging
aan de onderste hoek van de tent worden vastgemaakt.
Bewaarinstructies:
(Opmerking: de sneeuwlaag kan zich niet ophopen op de bovenkant van het product. Maak
het product tijdig schoon of berg het op)
Verwijder het kamptouw, de
grondspijkers en de palen.
(Opmerking: de paal moet vanaf
het ene uiteinde naar buiten
worden geduwd en kan niet
worden uitgetrokken)
Vouw de tent op tot een rechthoek, waarbij de kortste
zijde iets korter is dan de langste zijde van de
opbergtas.
Doe de stokken, grondspijkers en kampeertouwen in de bijbehorende accessoiretassen, rol

6
de tent en de accessoires vervolgens op, bind ze stevig vast met riemen en stop ze ten
slotte in de opbergtas om de opslag te voltooien.
6
Fabrikant : Shanghaimuxinmuyeyouxiangongsi
Adres: Shuangchenglu 803nong11hao1602A-1609shi, baoshanqu,
shanghai 200000 CN.
Geïmporteerd naar AUS: SIHAO PTY LTD. 1 ROKEVA
STREETEASTWOOD NSW 2122 Australië
Geïmporteerd in de VS: Sanven Technology Ltd. Suite 250, 9166
Anaheim
Plaats, Rancho Cucamonga, CA 91730
REP
EC
E-CrossStu GmbH
Mainzer Landstr.69, 60329 Frankfurt am Main.
REP
UK
YH CONSULTING LIMITED.
C/O YH Consulting Limited Office 147, Centurion House,
London Road, Staines-upon-Thames, Surrey, TW18 4AX


Teknisk Support och e-garanticertifikat www.vevor.com/support
BUBBEL-TÄLT ANVÄNDARMANUAL
We continue to be committed to provide you tools with competitive price.
"Save Half", "Half Price" or any other similar expressions used by us only represents an
estimate of savings you might benefit from buying certain tools with us compared to the major
top brands and does not necessarily mean to cover all categories of tools offered by us. You
are kindly reminded to verify carefully when you are placing an order with us if you are
actually saving half in comparison with the top major brands.
1
Modell: 120970 , 120971
Have product questions? Need technical support? Please feel free to
contact us:
Technical Support and E-Warranty Certificate
www.vevor.com/support
NEED HELP? CONTACT US!
This is the original instruction, please read all manual instructions
carefully before operating. VEVOR reserves a clear interpretation of our
user manual. The appearance of the product shall be subject to the
product you received. Please forgive us that we won't inform you again if
there are any technology or software updates on our product.
BUBBLE-TENT

2
MONTERING OCH SÄKERHET INSTRUKTIONER
Var noga med att följa följande instruktioner för att minska risken för
personskador, olyckor eller skador på produkten
sig.
VIKTIG
Följ ALLA säkerhetsinstruktioner nedan.
Ta bort förpackningsmaterialet innan du monterar eller använder
produkten.
Se till att alla listade delar ingår i paketet och att de inte är skadade.
Läs dessa monterings- och säkerhetsinstruktioner noggrant innan du
använder tältet och spara dem för framtida referens.
Denna produkt bör endast användas på ett icke-kommersiellt sätt.
SÄKERHETSINFORMATION
Tältet testades inte för vind- och snölast, om inte annat tydligt anges.
Därför täcks dessa laster inte av garantin. Vänligen titta på
väderprognoserna för att kunna skydda eller demontera tältet
ordentligt innan problem uppstår. Tält bör endast användas som
tillfälligt boende och bör tas isär vid ogynnsamma väderförhållanden.
Se till att hålla tillräckligt avstånd till hus samt gas- och kraftledningar
för att undvika eventuella skador. Kontrollera området för elkablar
och gasledningar. Fråga din lokala myndighet om ytterligare
information om det behövs.
När du använder lämpliga värmare, håll ett minimiavstånd från 1,2 m
till presenningsmaterial. Öppen eld eller värmare med öppen låga
som altanvärmare, paraplyvärmare, gasolvärmare etc. ska i alla fall
INTE användas inne i tältet.
SPECIFIKATIONER
Modell
120970
3
Produktstorlek
50×50 tum
Färg
Transparent
Modell
12097 1
Produktstorlek
72×72tum
Färg
Transparent
Komponenter
5. Tält *1
2 . Fiberstav *2
3 . Lägerrep * 4
4 . Lägerspik * 8
5 . Stångväska *1
6 . Pegs & Ropes Bag *1
7 . Sandsäck *2
8 .Bärväska *1
Vänligen läs, förstå och öva på riktlinjerna i denna bruksanvisning
före användning och spara den för framtida referens.
Monteringsanvisningar:
4
Montera två fiberstavar .
Tältet läggs platt på marken, och två stolpar
korsas och skjuts in i tygrör i toppen av tältet som
visas på bilden.
Sätt in två stolpar i var och en av de
fyra vita fickor i botten av tältet.
Använd remmarna på toppen av tältet för att knyta
skärningspunkten mellan två stolpar hårt; Använd
spärren på kanten av tältet för att säkra staven;
Städa och jämna sedan till tältets fyra hörn, och
sätt in markspik; Bind slutligen ihop lägerrepen till
de fyra metallfogarna i mitten av tältet och fixera
dem i marken med markspikar för att slutföra
konstruktionen.
I de fall där slipade naglar inte kan vara använda, matchande sandsäckar kan fyllas med
sand, stenar eller andra tunga föremål och knytas till tältets nedre hörn för fixering.
Förvaringsinstruktioner:
5
(Obs: Snölager kan inte samlas på toppen av produkten, rengör eller lägg undan det i tid)
Ta bort lägerrep, markspik och
stolpar.
(Obs: Stången måste tryckas ut
från ena änden och kan inte dras
ut)
Vik tältet till en rektangel, med den kortaste sidan något
kortare än den längsta sidan av förvaringsväskan.
Lägg stavarna, markspikarna och campinglinorna i motsvarande tillbehörspåsar, rulla
sedan ihop tältet och tillbehören, knyt dem hårt med remmar och lägg dem till sist i
förvaringsväskan för att slutföra förvaringen.

6
Tillverkare : Shanghaimuxinmuyeyouxiangongsi
Adress: Shuangchenglu 803nong11hao1602A-1609shi, baoshanqu,
shanghai 200000 CN.
Importerad till AUS: SIHAO PTY LTD. 1 ROKEVA STREETEASTWOOD
NSW 2122 Australien
Importerad till USA: Sanven Technology Ltd. Suite 250, 9166 Anaheim
Place, Rancho Cucamonga, CA 91730
REP
EC
E-CrossStu GmbH
Mainzer Landstr.69, 60329 Frankfurt am Main.
REP
UK
YH CONSULTING LIMITED.
C/O YH Consulting Limited Office 147, Centurion House,
London Road, Staines-upon-Thames, Surrey, TW18 4AX


Técnico Soporte y certificado de garantía electrónica www.vevor.com/support
TIENDA DE BURBUJAS MANUAL DE USUARIO
We continue to be committed to provide you tools with competitive price.
"Save Half", "Half Price" or any other similar expressions used by us only represents an
estimate of savings you might benefit from buying certain tools with us compared to the major
top brands and does not necessarily mean to cover all categories of tools offered by us. You
are kindly reminded to verify carefully when you are placing an order with us if you are
actually saving half in comparison with the top major brands.

1
Modelo: 120970 , 120971
Have product questions? Need technical support? Please feel free to
contact us:
Technical Support and E-Warranty Certificate
www.vevor.com/support
NEED HELP? CONTACT US!
This is the original instruction, please read all manual instructions
carefully before operating. VEVOR reserves a clear interpretation of our
user manual. The appearance of the product shall be subject to the
product you received. Please forgive us that we won't inform you again if
there are any technology or software updates on our product.
BUBBLE-TENT

2
MONTAJE Y SEGURIDAD INSTRUCCIONES
Preste mucha atención a las siguientes instrucciones para reducir el
riesgo de lesiones, accidentes o daños al producto al
sí mismo.
IMPORTANTE
Siga TODAS las instrucciones de seguridad que se enumeran a
continuación.
Retire el material de embalaje antes de ensamblar o utilizar el
producto.
Asegúrese de que todas las piezas enumeradas estén incluidas en
el paquete y que no estén dañadas.
Lea atentamente estas instrucciones de montaje y seguridad antes
de utilizar la tienda y consérvelas para consultarlas en el futuro.
Este producto sólo debe utilizarse de forma no comercial.
INFORMACIÓN DE SEGURIDAD
La tienda no ha sido probada contra cargas de viento y nieve, a
menos que se indique claramente lo contrario. Por lo tanto, estas
cargas no están cubiertas por garantía. Esté atento a las previsiones
meteorológicas para poder proteger adecuadamente o desmontar la
tienda antes de que aparezcan problemas. Las tiendas de campaña
sólo deben utilizarse como alojamiento temporal y deben
desmontarse en condiciones climáticas adversas.
Asegúrese de mantener una distancia suficiente con las casas, así
como con las líneas de gas y electricidad para evitar posibles daños.
Verifique el área en busca de cables de alimentación y líneas de gas.
Solicite más información a su autoridad local si es necesario.
Cuando utilice calentadores adecuados, mantenga una distancia
mínima de 1,2 m al material de la lona. En ningún caso se deben
3
utilizar dentro de la tienda fuegos abiertos o calentadores con llamas
abiertas, como calentadores de patio, calentadores de sombrillas,
calentadores de gas, etc.
ESPECIFICACIONES
Modelo
120970
Tamaño del producto
50×50 pulgadas
Color
Transparente
Modelo
12097 1
Tamaño del producto
72×72 pulgadas
Color
Transparente
Componentes
6. Tienda *1
2 . Varilla de fibra *2
3 . Cuerda de
campamento * 4
4 . Clavo de
campamento * 8
5 . Bolsa para poste * 1
6 . Bolsa de clavijas y
cuerdas * 1
7 . Bolsa de arena * 2
8. Bolsa de transporte *
1
Lea, comprenda y practique las pautas de este manual del usuario
antes de usarlo y consérvelo para consultarlo en el futuro.

4
Instrucciones de montaje:
Ensamble dos varillas de fibra .
La tienda se coloca plana sobre el tierra, y dos
postes se cruzan y se empujan hacia el interior del
tubo de tela en la parte superior de la tienda como
se muestra en la imagen.
Inserte dos polos en cada uno de los
cuatro blancos. Bolsillos en la parte
inferior de la tienda.
Utilice las correas en la parte superior de la tienda
para atar firmemente la intersección de dos
postes; Utilice el pestillo en el borde de la tienda
para asegurar el poste; Luego ordene y nivele las
cuatro esquinas de la tienda e inserte clavos
rectificados; Finalmente, ata las cuerdas del
campamento a las cuatro juntas metálicas en el
5
medio de la tienda y fíjalas al suelo con clavos
para completar la construcción.
En los casos en los que no se puedan colocar clavos rectificados Los sacos de arena
usados se pueden llenar con arena, piedras u otros objetos pesados y atar a la esquina
inferior de la tienda para fijarlos.
Instrucciones de almacenamiento:
(Nota: la capa de nieve no se puede acumular en la parte superior del producto; límpiela o
guárdela de manera oportuna)
Retire la cuerda del
campamento, los clavos y los
postes.
(Nota: el poste debe empujarse
hacia afuera desde un extremo y
no se puede sacar)
Dobla la tienda en un rectángulo, con el lado más corto
ligeramente más corto que el lado más largo de la
bolsa de almacenamiento.
6
Coloque los postes, los clavos para el suelo y las cuerdas para acampar en las bolsas de
accesorios correspondientes, luego enrolle la tienda y los accesorios, átelos firmemente
con correas y finalmente colóquelos en la bolsa de almacenamiento para completar el
almacenamiento.

6
Fabricante : Shanghaimuxinmuyeyouxiangongsi
Dirección: Shuangchenglu 803nong11hao1602A-1609shi, baoshanqu,
shanghai 200000 CN.
Importado a AUS: SIHAO PTY LTD. 1 ROKEVA STREET ASTWOOD
NSW 2122 Australia
Importado a EE. UU.: Sanven Technology Ltd. Suite 250, 9166 Anaheim
Lugar, Rancho Cucamonga, CA 91730
REP
EC
E-CrossStu GmbH
Mainzer Landstr.69, 60329 Frankfurt am Main.
REP
UK
YH CONSULTING LIMITED.
C/O YH Consulting Limited Office 147, Centurion House,
London Road, Staines-upon-Thames, Surrey, TW18 4AX


Tecnico Supporto e certificato di garanzia elettronica www.vevor.com/support
TENDA A BOLLE MANUALE D'USO
We continue to be committed to provide you tools with competitive price.
"Save Half", "Half Price" or any other similar expressions used by us only represents an
estimate of savings you might benefit from buying certain tools with us compared to the major
top brands and does not necessarily mean to cover all categories of tools offered by us. You
are kindly reminded to verify carefully when you are placing an order with us if you are
actually saving half in comparison with the top major brands.

1
Modello: 120970 , 120971
Have product questions? Need technical support? Please feel free to
contact us:
Technical Support and E-Warranty Certificate
www.vevor.com/support
NEED HELP? CONTACT US!
This is the original instruction, please read all manual instructions
carefully before operating. VEVOR reserves a clear interpretation of our
user manual. The appearance of the product shall be subject to the
product you received. Please forgive us that we won't inform you again if
there are any technology or software updates on our product.
BUBBLE-TENT

2
MONTAGGIO E SICUREZZA ISTRUZIONI
Si prega di prestare particolare attenzione alle seguenti istruzioni al
fine di ridurre il rischio di lesioni, incidenti o danni al prodotto
si.
IMPORTANTE
Si prega di seguire TUTTE le istruzioni di sicurezza elencate di
seguito.
Rimuovere il materiale di imballaggio prima di assemblare o
utilizzare il prodotto.
Assicurati che tutte le parti elencate siano incluse nella confezione e
che non siano danneggiate.
Si prega di leggere attentamente queste istruzioni di montaggio e di
sicurezza prima di utilizzare la tenda e di conservarle per riferimento
futuro.
Questo prodotto deve essere utilizzato solo in modo non
commerciale.
INFORMAZIONI SULLA SICUREZZA
La tenda non è stata testata contro i carichi di vento e neve, a meno
che non sia chiaramente indicato diversamente. Pertanto questi
carichi non sono coperti da garanzia. Si prega di guardare le
previsioni del tempo per poter proteggere adeguatamente o
smontare la tenda prima che si verifichino problemi. Le tende
devono essere utilizzate solo come alloggio temporaneo e devono
essere smontate in condizioni meteorologiche avverse.
Assicurati di mantenere una distanza sufficiente dalle case e dalle
linee del gas e dell'elettricità per evitare possibili danni. Si prega di
controllare l'area per cavi elettrici e linee del gas. Se necessario,
chiedi alla tua autorità locale ulteriori informazioni.
3
Quando si utilizzano riscaldatori adeguati, mantenere una distanza
minima di 1,2 m dal materiale del telone. All'interno della tenda NON
devono essere in nessun caso utilizzati fuochi aperti o stufe a
fiamma libera come stufe da esterno, stufe per ombrelli, stufe a gas,
ecc.
SPECIFICHE
Modello
120970
Taglia del prodotto
50×50 pollici
Colore
Trasparente
Modello
120971
Taglia del prodotto
72×72 pollici
Colore
Trasparente
Componenti
7. Tenda *1
2 . Asta in fibra *2
3 . Corda da campo * 4
4 . Chiodo da campo * 8
5 . Borsa per aste *1
6 . Borsa per picchetti e
corde *1
7 . Sacco di sabbia *2
8. Borsa per il trasporto
*1
Si prega di leggere, comprendere e mettere in pratica le linee guida
contenute in questo manuale utente prima dell'uso e conservarlo per
4
riferimento futuro.
Istruzioni di montaggio:
Assemblare due aste in fibra .
La tenda è distesa sul terra, e due poli vengono
incrociati e spinti nel tubo di stoffa nella parte
superiore della tenda, come mostrato in figura.
Inserisci due poli in ciascuno dei
quattro bianchi tasche sul fondo della
tenda.
Utilizzare le cinghie sulla parte superiore della
tenda per legare saldamente l'intersezione di due
pali; Utilizzare la chiusura sul bordo della tenda
per fissare il palo; Quindi riordina e livella i quattro
angoli della tenda e inserisci i chiodi a terra; Infine,
lega le corde del campo ai quattro giunti metallici
al centro della tenda e fissale a terra con chiodi da
5
terra per completare la costruzione.
Nei casi in cui i chiodi macinati non possono essere usati, i sacchi di sabbia abbinati
possono essere riempiti con sabbia, pietre o altri oggetti pesanti e legati all'angolo inferiore
della tenda per il fissaggio.
Istruzioni per la conservazione:
(Nota: lo strato di neve non può accumularsi sulla parte superiore del prodotto, pulirlo o
riporlo tempestivamente)
Rimuovi la corda del campo, i
chiodi da terra e i pali.
(Nota: il palo deve essere spinto
fuori da un'estremità e non può
essere estratto)
Piega la tenda in un rettangolo, con il lato più corto
leggermente più corto del lato più lungo della custodia.
Metti i pali, i chiodi da terra e le corde da campeggio nelle corrispondenti borse per

6
accessori, quindi arrotola insieme la tenda e gli accessori, legali saldamente con le cinghie
e infine mettili nella custodia per completare lo stoccaggio.

6
Produttore : Shanghaimuxinmuyeyouxiangongsi
Indirizzo: Shuangchenglu 803nong11hao1602A-1609shi, baoshanqu,
shanghai 200000 CN.
Importato in AUS: SIHAO PTY LTD. 1 ROKEVA STREETEASTWOOD
NSW 2122 Australia
Importato negli Stati Uniti: Sanven Technology Ltd. Suite 250, 9166
Anaheim
Luogo, Rancho Cucamonga, CA 91730
REP
EC
E-CrossStu GmbH
Mainzer Landstr.69, 60329 Frankfurt am Main.
REP
UK
YH CONSULTING LIMITED.
C/O YH Consulting Limited Office 147, Centurion House,
London Road, Staines-upon-Thames, Surrey, TW18 4AX


Techniczny Certyfikat wsparcia i e-gwarancji www.vevor.com/support
NAMIOT BĄBELKOWY INSTRUKCJA OBSŁUGI
We continue to be committed to provide you tools with competitive price.
"Save Half", "Half Price" or any other similar expressions used by us only represents an
estimate of savings you might benefit from buying certain tools with us compared to the major
top brands and does not necessarily mean to cover all categories of tools offered by us. You
are kindly reminded to verify carefully when you are placing an order with us if you are
actually saving half in comparison with the top major brands.

1
Model: 120970 , 120971
Have product questions? Need technical support? Please feel free to
contact us:
Technical Support and E-Warranty Certificate
www.vevor.com/support
NEED HELP? CONTACT US!
This is the original instruction, please read all manual instructions
carefully before operating. VEVOR reserves a clear interpretation of our
user manual. The appearance of the product shall be subject to the
product you received. Please forgive us that we won't inform you again if
there are any technology or software updates on our product.
BUBBLE-TENT

2
MONTAŻ I BEZPIECZEŃSTWO INSTRUKCJE
Aby zmniejszyć ryzyko obrażeń, wypadków lub uszkodzenia
produktu, należy zwrócić szczególną uwagę na poniższe instrukcje
samo.
WAŻNY
Należy przestrzegać WSZYSTKICH instrukcji bezpieczeństwa
wymienionych poniżej.
Przed montażem lub użyciem produktu należy usunąć opakowanie.
Upewnij się, że wszystkie wymienione części znajdują się w
opakowaniu i nie są uszkodzone.
Przed użyciem namiotu prosimy o dokładne zapoznanie się z
niniejszą instrukcją montażu i bezpieczeństwa oraz zachowanie jej
na przyszłość.
Produkt ten powinien być używany wyłącznie w sposób
niekomercyjny.
INFORMACJE DOTYCZĄCE BEZPIECZEŃSTWA
Namiot nie był testowany pod kątem obciążenia wiatrem i śniegiem,
chyba że wyraźnie wskazano inaczej. Dlatego też obciążenia te nie
są objęte gwarancją. Prosimy o śledzenie prognoz pogody, aby móc
odpowiednio zabezpieczyć lub zdemontować namiot zanim pojawią
się problemy. Namioty należy używać wyłącznie jako tymczasowego
zakwaterowania i należy je demontować w przypadku
niesprzyjających warunków atmosferycznych.
Należy zachować odpowiednią odległość od domów oraz linii
gazowych i energetycznych, aby uniknąć ewentualnych uszkodzeń.
Proszę sprawdzić okolicę pod kątem kabli zasilających i gazowych.
W razie potrzeby poproś władze lokalne o dalsze informacje.
Korzystając z odpowiednich grzejników, należy zachować minimalną
3
odległość 1,2 m od materiału plandeki. Wewnątrz namiotu NIE
należy w żadnym przypadku używać otwartego ognia lub grzejników
z otwartym płomieniem, takich jak grzejniki tarasowe, grzejniki
parasolowe, grzejniki gazowe itp.
SPECYFIKACJE
Model
120970
Rozmiar produktu
50×50 cali
Kolor
Przezroczysty
Model
12097 1
Rozmiar produktu
72×72 cale
Kolor
Przezroczysty
składniki
8. Namiot * 1
2 . Pręt włóknisty *2
3 . Lina obozowa * 4
4 . Gwóźdź obozowy * 8
5 . Torba na kije * 1
6 . Torba na kołki i liny *
1
7 . Worek z piaskiem *2
8. Torba do
przenoszenia *1
Przed użyciem należy przeczytać, zrozumieć i zastosować się do
wskazówek zawartych w niniejszej instrukcji obsługi oraz zachować
ją na przyszłość.

4
Instrukcje składania:
Zmontuj dwa pręty z włókna .
Namiot jest rozłożony płasko na ziemi, a dwa
bieguny są skrzyżowane i wepchnięte w rurka z
tkaniny na górze namiotu, jak pokazano na
rysunku.
Włóż dwa bieguny do każdego z
czterech białych kieszenie na dole
namiotu.
Użyj pasków na górze namiotu, aby mocno
zawiązać skrzyżowanie dwóch słupków; Użyj
zatrzasku na krawędzi namiotu, aby zabezpieczyć
słupek; Następnie uporządkuj i wypoziomuj cztery
rogi namiotu, a następnie włóż szlifowane
gwoździe; Na koniec przywiąż liny obozowe do
czterech metalowych łączników na środku namiotu
5
i przymocuj je do podłoża za pomocą szlifowanych
gwoździ, aby zakończyć konstrukcję.
W przypadkach, gdy nie można szlifować gwoździ używane, pasujące worki z piaskiem
można wypełnić piaskiem, kamieniami lub innymi ciężkimi przedmiotami i przywiązać do
dolnego rogu namiotu w celu zamocowania.
Instrukcje przechowywania:
(Uwaga: warstwa śniegu nie może gromadzić się na wierzchu produktu, należy ją
wyczyścić lub odłożyć w odpowiednim czasie)
Usu
ń
linę obozową, uziemione
gwoździe i słupki.
(Uwaga: drążek należy
wypchnąć z jednego ko
ń
ca i nie
można go wyciągnąć)
Złóż namiot w prostokąt, tak aby najkrótszy bok był
nieco krótszy niż najdłuższy bok torby.

6
Włóż drążki, szlifowane gwoździe i liny kempingowe do odpowiednich toreb na akcesoria,
następnie zwiń namiot i akcesoria, mocno zawiąż je paskami, a na koniec włóż je do torby
do przechowywania, aby zakończyć przechowywanie.
6
Producent : Shanghaimuxinmuyeyouxiangongsi
Adres: Shuangchenglu 803nong11hao1602A-1609shi, baoshanqu,
szanghaj 200000 CN.
Import do AUS: SIHAO PTY LTD. 1 ROKEVA STREETEASTWOOD NSW
2122 Australia
Import do USA: Sanven Technology Ltd. Suite 250, 9166 Anaheim
Place, Rancho Cucamonga, Kalifornia 91730
REP
EC
E-CrossStu GmbH
Mainzer Landstr.69, 60329 Frankfurt am Main.
REP
UK
YH CONSULTING LIMITED.
C/O YH Consulting Limited Office 147, Centurion House,
London Road, Staines-upon-Thames, Surrey, TW18 4AX