1 / 8
VeiPhlox
Electric Vehicle (EV) Charger
Galaxy Series
Smart App w/ LED Indicator Version
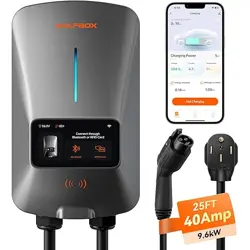
Model: UC101S
User Guide
Revised Version: 1.01
Contact us for after-sales service
Scan the code to get the
user guide & FAQS
1. Safety cautions
Any Changes or modifications not expressly approved by the party responsible for compliance could void the user's
authority to operate the equipment.
This device complies with part 15 of the FCC Rules. Operation is subject to the following two conditions: (1) This
device may not cause harmful interference, and (2) this device must accept any interference received, including
interference that may cause undesired operation.
Note: This equipment has been tested and found to comply with the limits for a Class B digital device, pursuant to
part 15 of the FCC Rules. These limits are designed to provide reasonable protection against harmful interference in
a residential installation. This equipment generates, uses and can radiate radio frequency energy and, if not installed
and used in accordance with the instructions, may cause harmful interference to radio communications. However,
there is no guarantee that interference will not occur in a particular installation. If this equipment does cause harmful
interference to radio or television reception, which can be determined by turning the equipment off and on, the user is

2 / 8
encouraged to try to correct the interference by one or more of the following measures:
—Reorient or relocate the receiving antenna.
—Increase the separation between the equipment and receiver.
—Connect the equipment into an outlet on a circuit different from that to which the receiver is connected.
—Consult the dealer or an experienced radio/TV technician for help.
This equipment complies with FCC radiation exposure limits set forth for an uncontrolled environment. This
equipment should be installed and operated with minimum distance 20cm between the radiator& your body.
2.Technical parameters
Item
Parameter
Rated voltage
AC240V
Rated power
9.6kW
Max output current
40A
Cable length
25 feet (7.62m)
Mechanical life
no-load plug in/pull out
>
10,000 times
Charging mode
RFID Card / Tuya App
Product function
OTA upgrade / remote control via APP
Human-computer
interface
RGB LED light panel & smart APP
Protection
Over-voltage protection; under-voltage protection;
Over-current protection; Current leakage protection;
Grounding detection; Over- temperature protection
Relay bonding
Support relay adhesion detection and alarm; (does not
affect the charging, this function under the condition of
the grounding with good effective)
System power
consumption
Stand-by power consumption
:
3W
;
Operating power consumption
:
6W
Shell material
UV resistance & fireproof PC
Protection grade
IP65 (NEMA4)
Operating ambient Temp
-22℉~122 ℉ (-30℃
~+
50℃)
Storage temperature
-40℉~185 ℉ (-40℃
~+
85℃)
Ambient humidity
5%
~
95% without condensation
Dimension control box
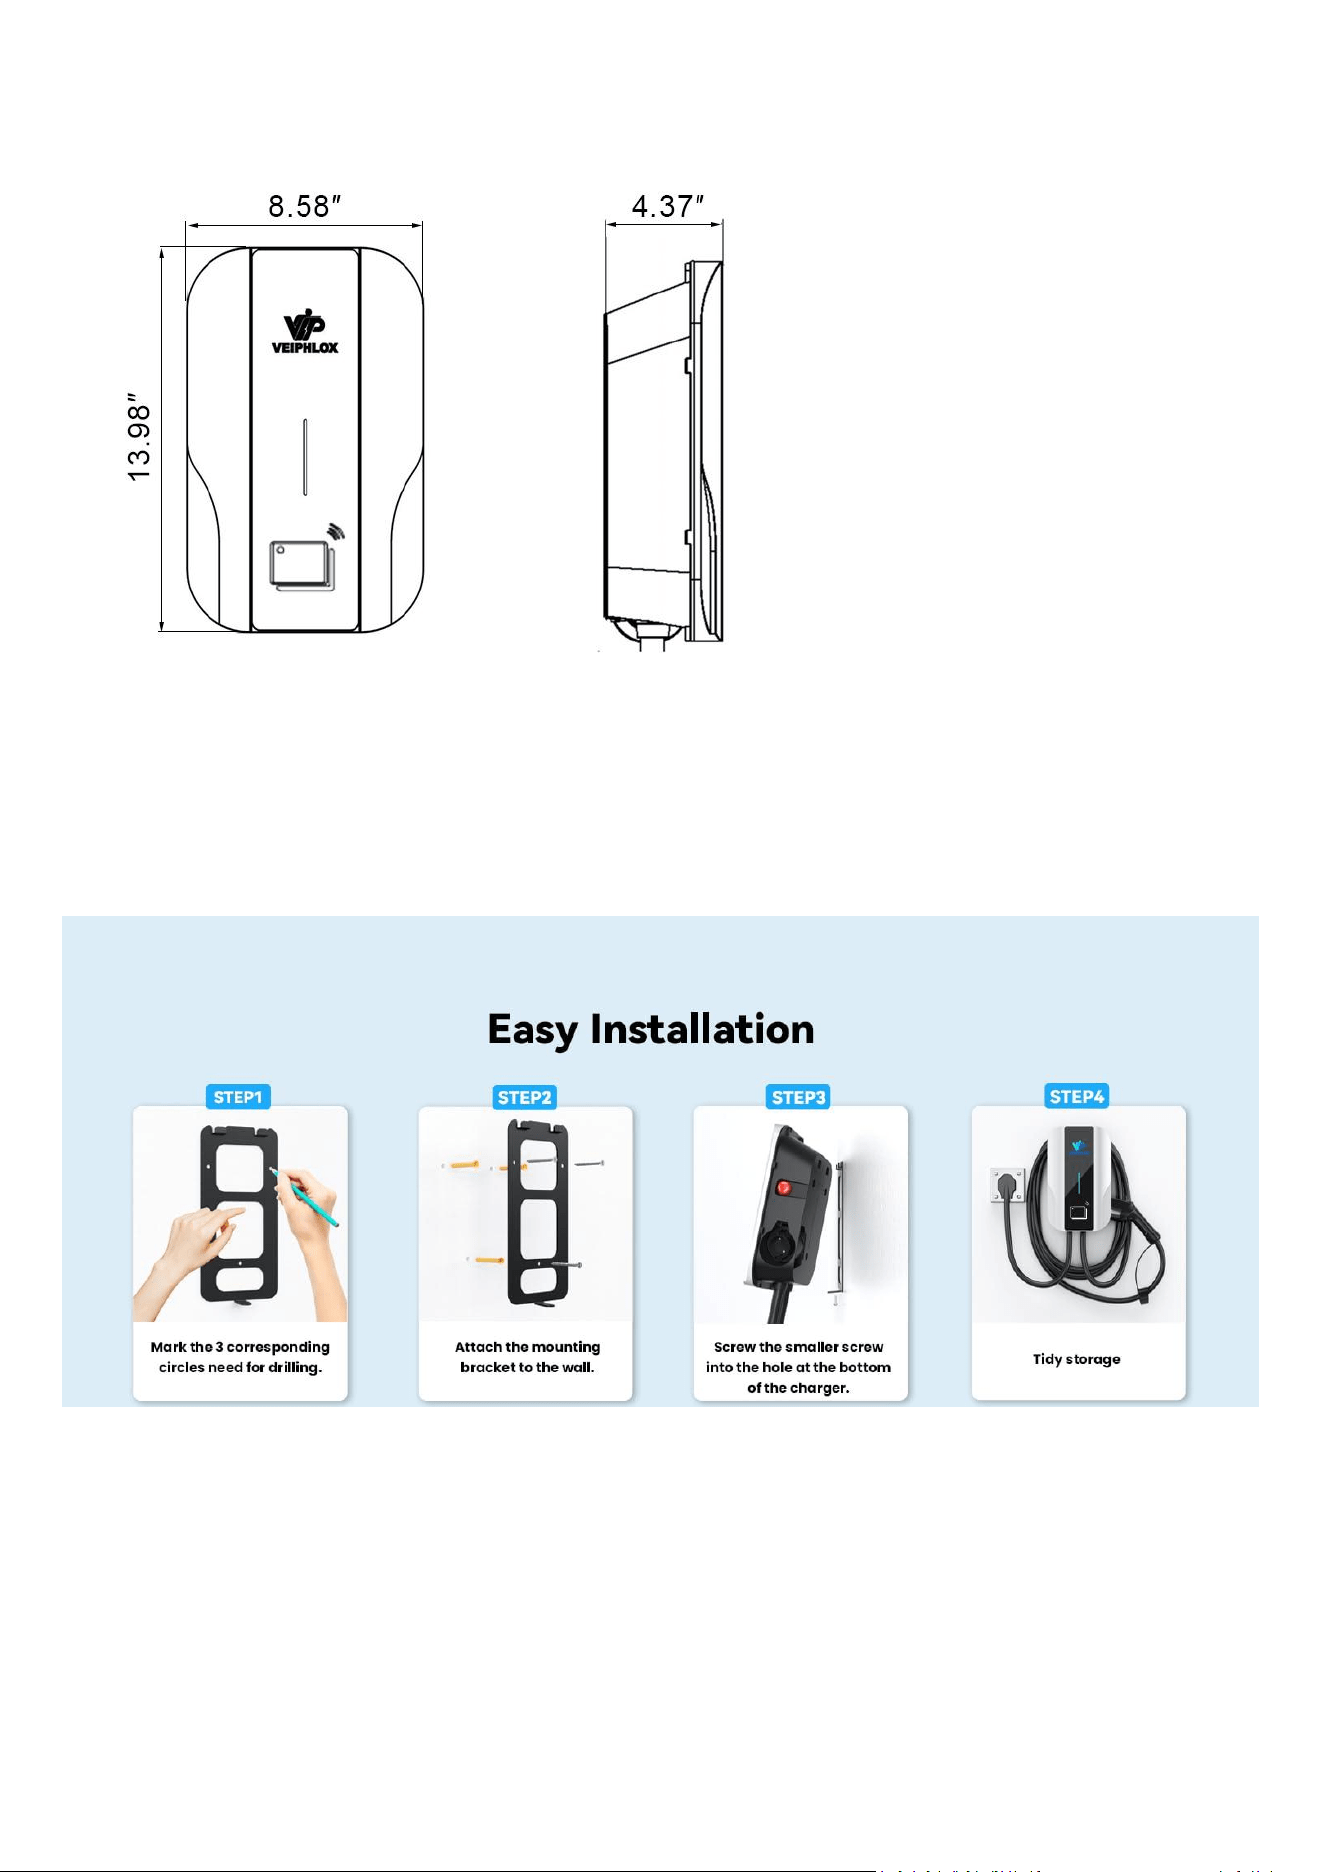
13.98”×8.58”×4.37”
Connector type
SAE J1772
3 / 8
3.Dimension
4. Wall-mounting installation
Choose a suitable position on the wall and marked, then drill 3 holes and put in plastic expansion pipes. Then use the
screws to mount the bracket on the wall. Finally, mount the charging station on the bracket, and lock the screw at the
bottom.
Ambient requirements of installation
:
4.1 Recommend electrical box equipped if EV charger installed in outdoor.
4.2 Be sure the ambient temperature within the scope of -22℉~122 ℉. Keep away from fire or baking. Avoid high
temperature and direct sunlight. Handle gently and avoid dropping.
4 / 8
4.3 The installation site and surroundings should be well-ventilated, free from violent vibration / flammable or
explosive materials. Avoid exposing to corrosive or humid environments.
4.4 The installation site should not be at the low-lying or water-logged area. The altitude cannot exceed 2km.
4.5 It is recommended to prioritize wall-mounted installation. If choose pedestal installation, the charger body should
be mounted vertically and away from the possible route of vehicles.
4.6. Recommend 60A circuit breakers over 50A.
50A circuit breaker may cause nuisance tripping since charger's built-in protective mechanism. In contrast, a 60A
circuit breaker provides a higher safety margin, allowing the charger to charge more reliably under normal
conditions.If there is repeated tripping, please lower the current via the DIP switch and contact us.
4.7 Do not install it on the same circuit or same socket with other high-power electrical appliances; do not operate it
simultaneously with other high-power electrical appliances.
4.8 Do not use aged, substandard, or loose outlet, as this may lead to poor contact, melted plugs, or even cause a
fire. Please regularly check whether sockets and wire connections are in normal condition; if there is any problem,
replace or repair them in a timely manner.
5. Connection
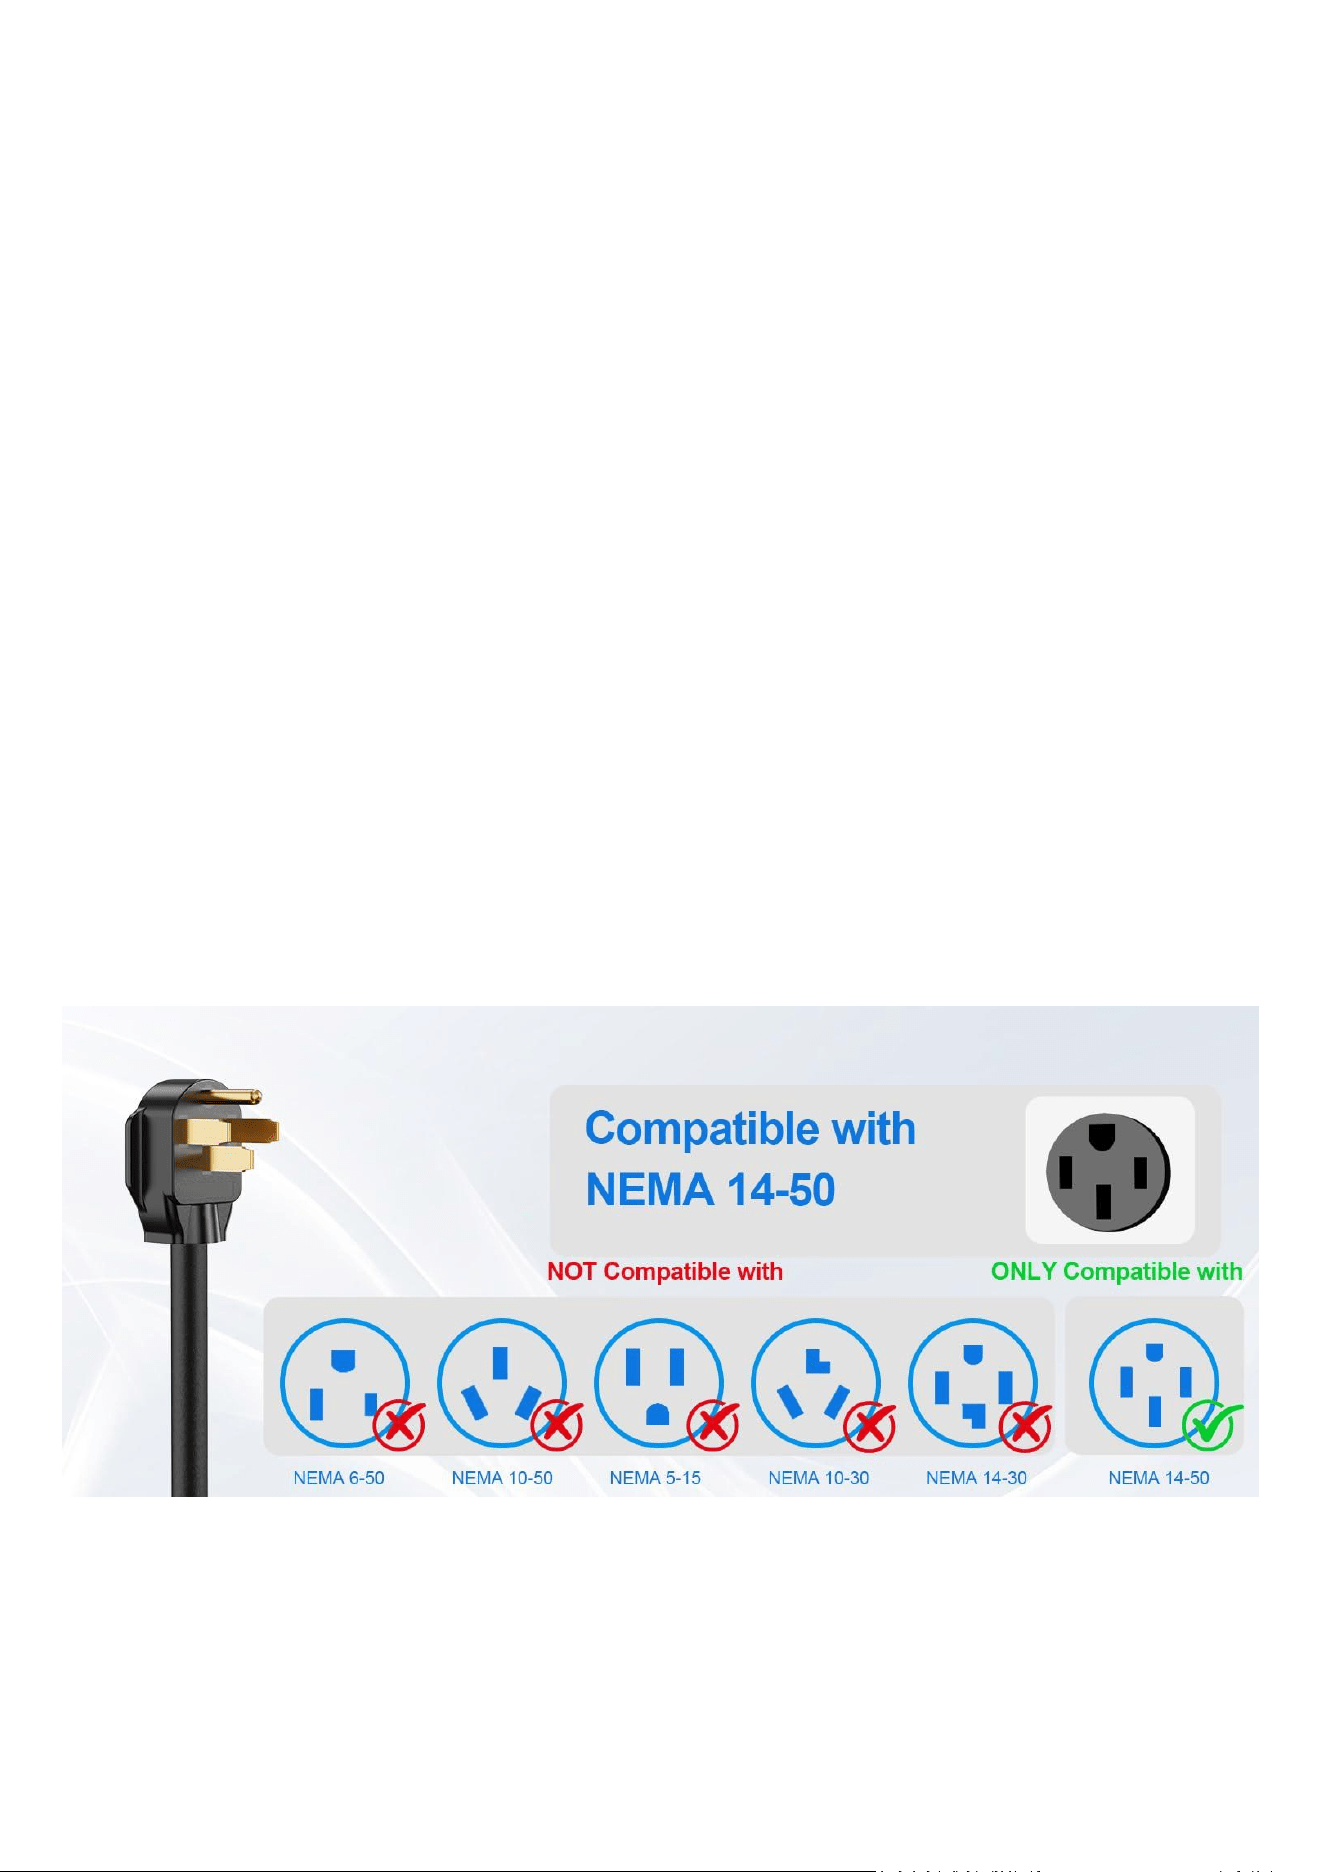
The plug is NEMA 14-50P. Plug in NEMA14-50R receptacle and charge successfully.
Electrical Characteristics:
▪ Power supply: 240V (L1+L2+PE).
▪ Power configurable from 0 to 9.6kW:
✓ Maximum Power of 9.6 kW at 40A when connected in 240V (L1+L2+PE).
▪ Integrated cable with J1772 Type1 connector.

5 / 8
▪ Rated Current: 40A. Recommend 60A circuit breaker
▪ Input Cable: 2.62 fts (The scope includes the cables necessary for the connection at both ends).
▪ Output Cable: 25 fts (stretch between charger and charging connector).
6. Usage instructions
6.1 Start charging
6.1.1 Turn on the power supply of the EV charger and then the device is going to self-test. After it completed, the
indicator light is steady blue, indicating the EV charger is in normal idle state.
Before plugging and charging connector, ensure that the emergency stop switch is off and indicator light is blue.
6.1.2 Plug the charging connector into the charging port of the vehicle. The indicator light is solid green, indicating
that the connection is successful.
6.1.3 Swiping card 1 time at Card Reader place, it starts charging immediately. The indicator light flashes Green,
indicating it is charging ongoing.
6.1.4 The factory default charging mode is "swiping card". "Plug and play" is the alternative mode. The two charging
modes can be switched:
When the charging station is idle/ free state (the charging connector disconnect with car), swipe the card 6 times,
then you will hear "beep" sound. The charging mode has been switched successfully.
6.1.5. Once "Swiping card" mode switched to "Plug and play" mode, it’s effect and starts charging immediately when
you plug the charging connector to vehicle.
6.2 End charging
6.2.1 After charging, press and hold the button on the head of the charging connector and pull out the connector. It is
reminded that the press should continue until the connector is completely pulled out. Then, unplug the NEMA 14-50P
to stop the power supply.
6.2.2 The control box features an integrated storage design for neatly storing. Cable can be efficiently wrapped
around the box, and the charging connector can be securely inserted into the holder embedded on the side of box.
6.3 Tuya APP operation
6.3.1 Press the Emergency-Stop button(It is on the right side of EV Charger) and then reset it. After repeating this
process 3 times, the equipment would be activated.
6.3.1 Open Bluetooth/ Wifi/ Hotspot on smart phone.
6 / 8
6.3.2 Download Tuya App or smartlife app on smart phone, and Open it.
6.3.4 Click on the + icon in the upper right corner.
6.3.5 Click”Add Device”, there would be “LGT EVSE” on screen. Click it and enter the interface.
6.3.4 Operate following to the interface information prompts, like start charging or end charging.
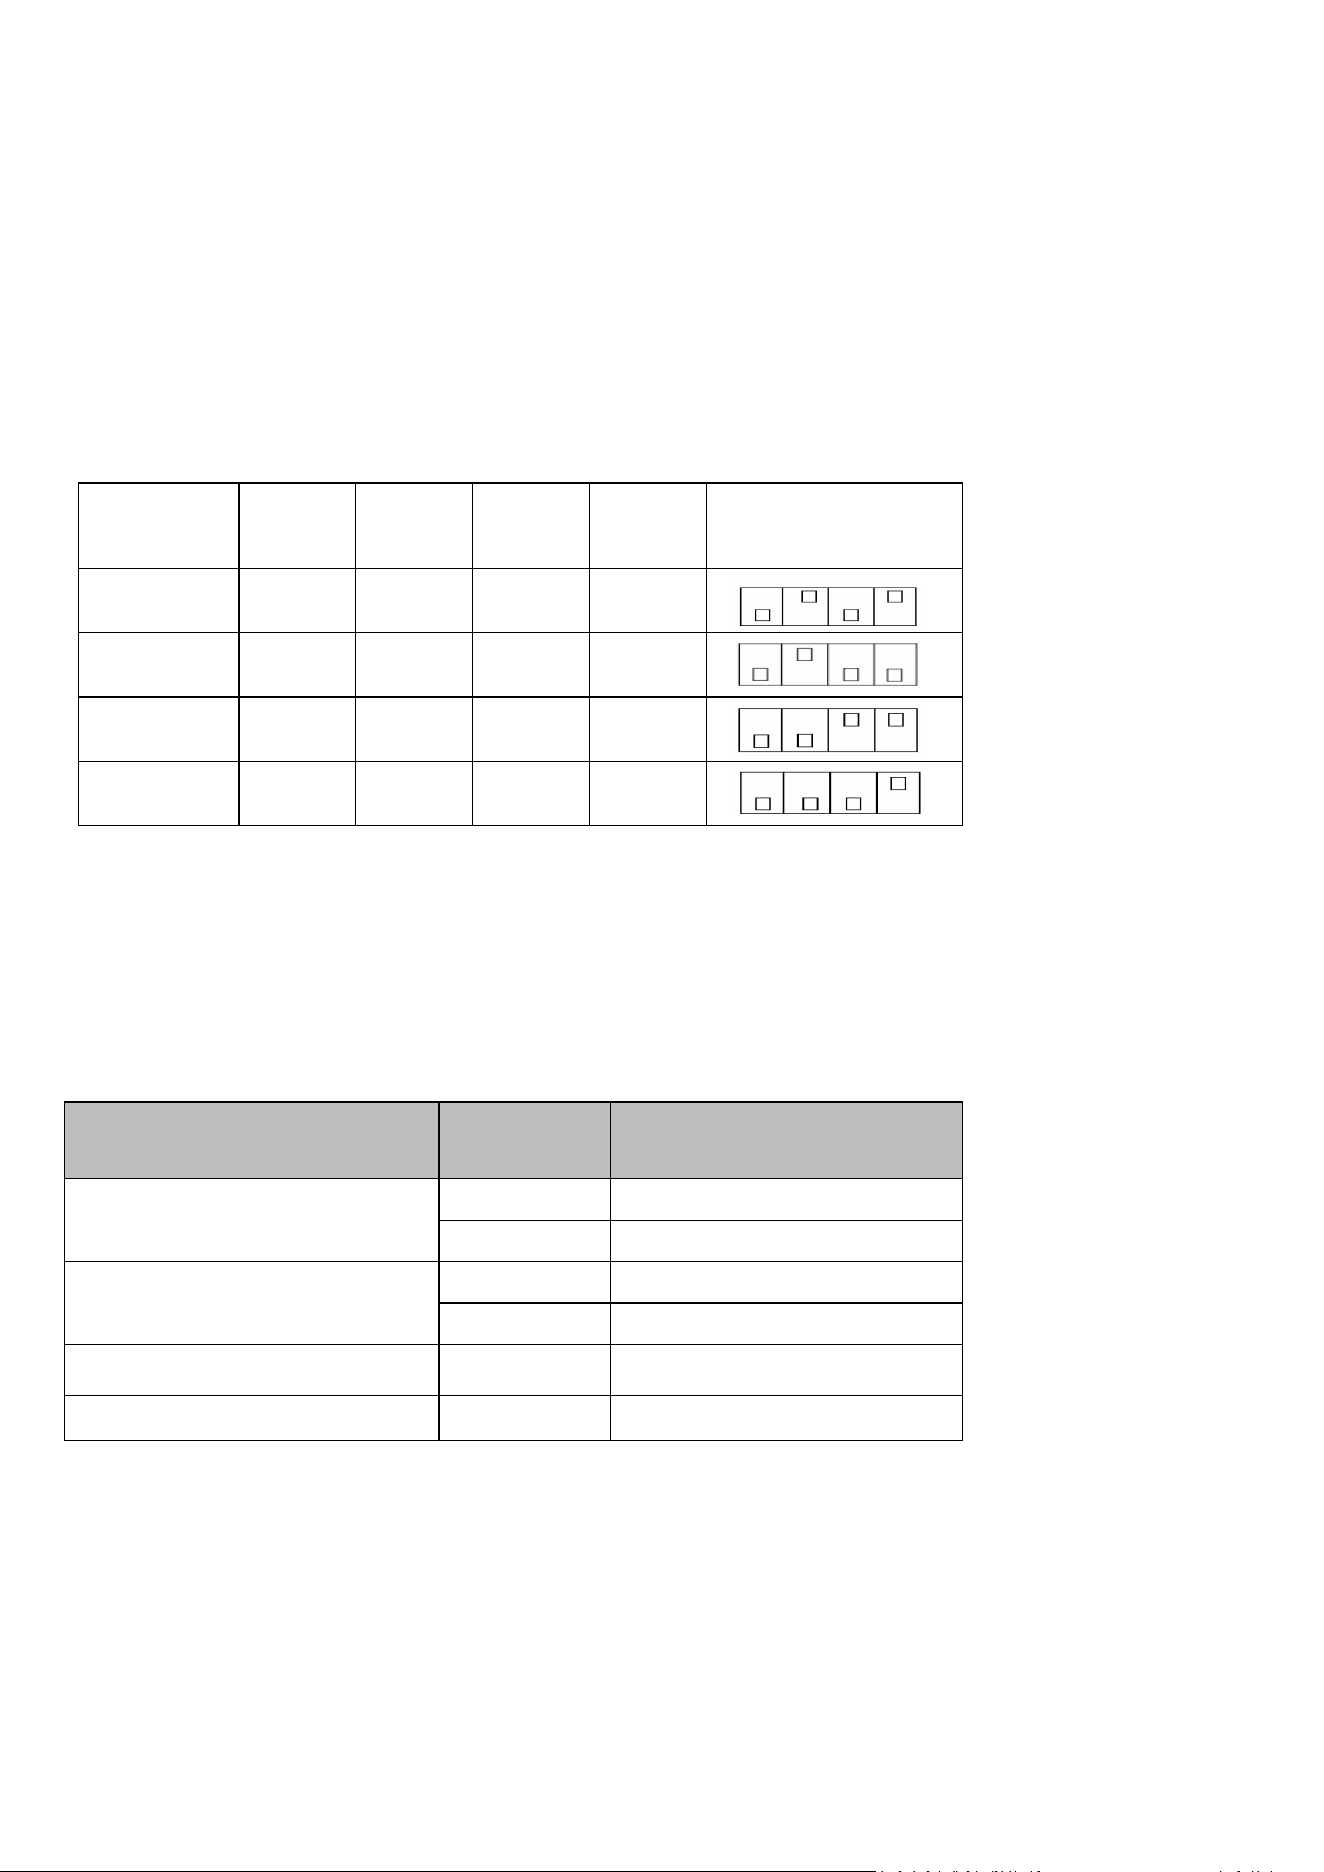
7.Adjust the output current on PCBA
The EV charger default factory maximum current output setting is 40A (9.6 kW) for use with a 60A circuit breaker.
It is not recommend to open control box to adjust current on PCBA board. Please contact Veiphlox in advance if you
have to adjust it due to unavoidable factors. Operate following current DIP switch settings:
8.LED indicator
LED light panel with R/G/B 3 colors, the EV charger displays the system status via different color light.
Fast blink: 0.5 seconds;
Slow blink: 2 seconds.
EV charger State
Earth wire
Lamp panel
(
Red / Green /Blue
)
Idle
w/EW
B light is on
no/EW
B light slow blink
Charging
w/EW
G light slow blink
no/EW
G light fast blink
Charging finished
G light solid on
Emergency stop
R light slow blink
Max Current
Output
Switch
1
Switch
2
Switch
3
Switch
4
DIP Switch Setting
40A
down
up
down
up
32A
down
up
down
down
24A
down
down
up
up
16A
down
down
down
up

7 / 8
9. Troubleshooting
10. After-sales service
During the guarantee period, we provide customers with free service due to product quality problem itself. The following
non-warranty terms happen, our service will be charged:
10.1 Product failure due to incorrect operation method.
10.2 Product failure or damage due to placed in poor circumstance, improper storage or natural disaster.
10.3 Products were overhauled or append the component by unauthorized person (include user).
10.4 The appearance of product occurred obvious deformations or damage.
10.5 We could accept the product exchange under the surface is clean and unbroken without any damage.
10.6 Product failure or damage under the irresistible flood, fire, lightning stroke or earthquake. The User Manual will be
updated periodically, please check our website www.watt-sz.com for the latest version.
Any questions,please contact with service: support@watt-sz.com
Issue phenomenon
Cause reason
Solution
EV charger LED is off
Power supply is not
connected
Check whether the power inlet is energized, and the power
switch is on.
Unable to start
charging
The charging connector is
not fully connected
Ensure the charging connector is fully and securely inserted
into the charging port.
The Emergency Stop
Button is wrongly activated
and pressed
Twist the red button clockwise until it pops out. The light turns
blue.
Charging current
lower than rated
value
Equipment failure
1.The charging current decrease when it will be in a trickle
charging state nearly fully charged.
2.Check the vehicle control panel to see if the current at the
vehicle end has been limited or mistakenly set to low current.
3. If not the above situation, please contact customer service
for help.
Vehicle close to fully
charged or the charging
current has been setting by
vehicle
Equipment red
indicator light on
Major failure
1.Turn the Emergency Stop Button to the right indicated
direction to reset this switch.
2.Short circuit: Check whether L1/N is in short circuit. After
removing the short circuit doubts, insert the charging
connector and reset it.
3.Leakage: Check whether L1/N is well insulated to the
ground.
4.Grounding: Check whether the PE cable is grounded.
General failure
1.Under-voltage: Check whether the AC input voltage is
normal.
2.Over-voltage: Check whether the AC input voltage is normal.
3.Over-current: Check whether L/N is short-circuited. After
removing the short circuit doubts, plug the charging
connector and reset it.
4.Overheat: Unplug the charger connector to stop charging
and wait till the internal temperature of the EV charger returns
to normal.
8 / 8
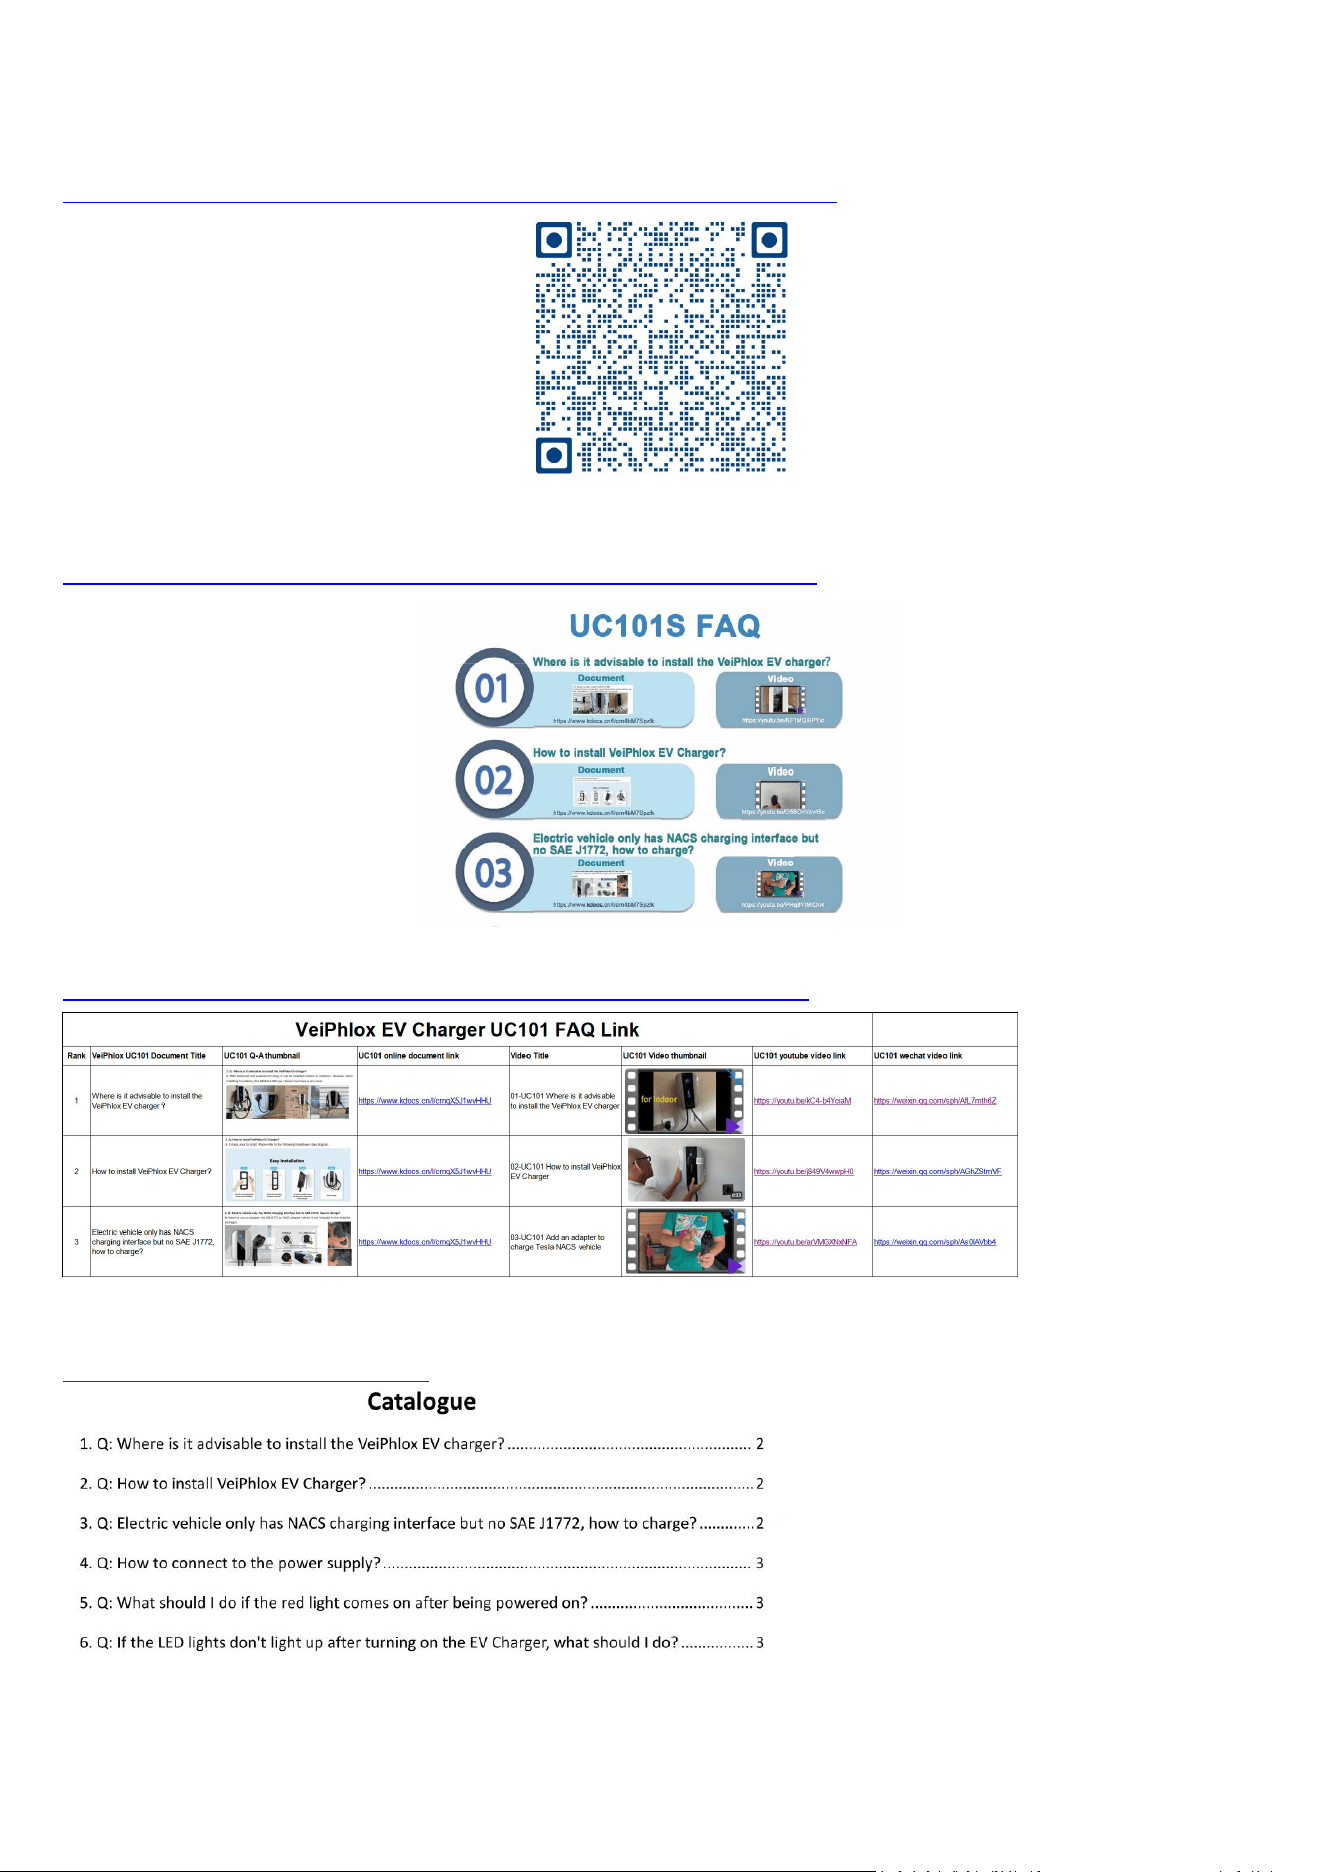
11. FAQ solution
You can preview or download the latest online document of FAQ solutions through the following link or QR code.
Online document:
https://drive.google.com/drive/folders/1d-UpJaEOioA947CGs30PWpw6_Qn0IoAh
Online video (icon):
https://drive.google.com/file/d/1RUwdwJmjm784gNOlefXGIWr_G8iFe1y7/view
Online video link (excel):
https://drive.google.com/file/d/1TT19KG5CBApmC0xFc_6jTsrXe_GmIBpC/view
FAQs Catalogue:
https://www.kdocs.cn/l/crn4bM7Spzlk