GARMIN SIGNAL
™
VHF
Marine Radio
Owner's
Manual

Table of Contents
Important Safety Information............4
Device Overview............................... 5
Fist Mic......................................... 5
Getting Started................................. 7
ActiveCaptain
®
App.......................... 7
Getting Started with the
ActiveCaptain
®
App....................... 7
Connecting to a Mobile Device with
the ActiveCaptain
®
App...................7
Programming the Radio Using the
ActiveCaptain
®
App.......................... 8
Programming the Radio Manually.....8
Selecting your VHF Region.................8
Selecting Your Local Weather
Channel......................................... 8
VHF Radio...................................... 10
Changing the VHF Channel...............10
Changing the VHF Channel Using the
Fist Mic.....................................10
Changing the VHF Channel Using the
Dial.......................................... 10
Changing the Volume......................11
Changing the Range of VHF
Transmissions...............................11
Changing Transmit Power Using the
Fist Mic.....................................11
Changing Transmit Power Using the
Touchscreen.............................. 11
Saving a VHF Channel as a Preset..... 12
Clearing a Preset.........................12
Adjusting the Squelch..................... 12
Watch Modes................................ 12
Scanning All Channels..................13
Monitoring Multiple Channels
Simultaneously........................... 13
Monitoring Channel 16 and the Current
Channel Simultaneously............... 13
Replaying Recent VHF Activity.......... 14
Downloading Saved Recordings of
VHF Activity............................... 14
Digital Selective Calling.................. 15
Placing an Individual or Group Call.....15
Requesting a Vessel's Position..........15
Calling All Vessels Within Range........15
Placing a Distress Call.....................15
Specifying the Nature of a Distress
Call.......................................... 16
Canceling a Distress Call.............. 16
Placing a Test Call..........................16
DSC Call Categories........................16
Directory........................................ 17
Adding a Vessel to your Contacts...... 17
Adding a Vessel Group to Your
Contacts...................................... 17
AIS Plotter......................................18
AIS Plotter Icons............................ 18
AIS Alarms....................................18
Filtering the Plotter View..................19
Changing the Plotter Orientation........19
Viewing AIS Target Information.........19
Turning Off Position Reports............ 20
Hailer............................................. 21
Using the Hailer............................. 21
Intercom.........................................22
Using the Intercom......................... 22
Status Bar...................................... 23
Controls Panel...............................23
System Alerts................................ 23
Automatic Transmitter Identification
System........................................... 25
Entering Your ATIS ID Number.......... 25
Enabling ATIS................................25
Accessing Data Over the Wi‑Fi
®
Network..........................................26
NMEA
®
0183 Messages................... 26
Settings..........................................28
Pairing a Fist Mic........................... 28
Preferences.................................. 28
DSC Configuration..........................29

Alarm Settings...............................29
Collision Alarm Settings............... 29
MOB Alarm Settings.................... 29
Position Settings............................29
NMEA 2000
®
Settings......................29
Configuring the Wi‑Fi
®
Network..........29
Restoring Factory Default Settings.....30
Software Updates........................... 31
Checking for Software Updates in the
ActiveCaptain
®
App.........................31
Reprogramming the Radio.............. 32
Reprogramming the Radio Using a
Computer..................................... 32
Specifications................................ 33
NMEA 2000
®
PGN Information.......... 33
Viewing Device Information..............34
Network Interfaces and Services....... 34

Important Safety Information
WARNING
See the Important Safety and Product Information guide in the product box for product warnings and other
important information.
4 Garmin Signal™ VHF Marine Radio
Owner's Manual
Important Safety Information
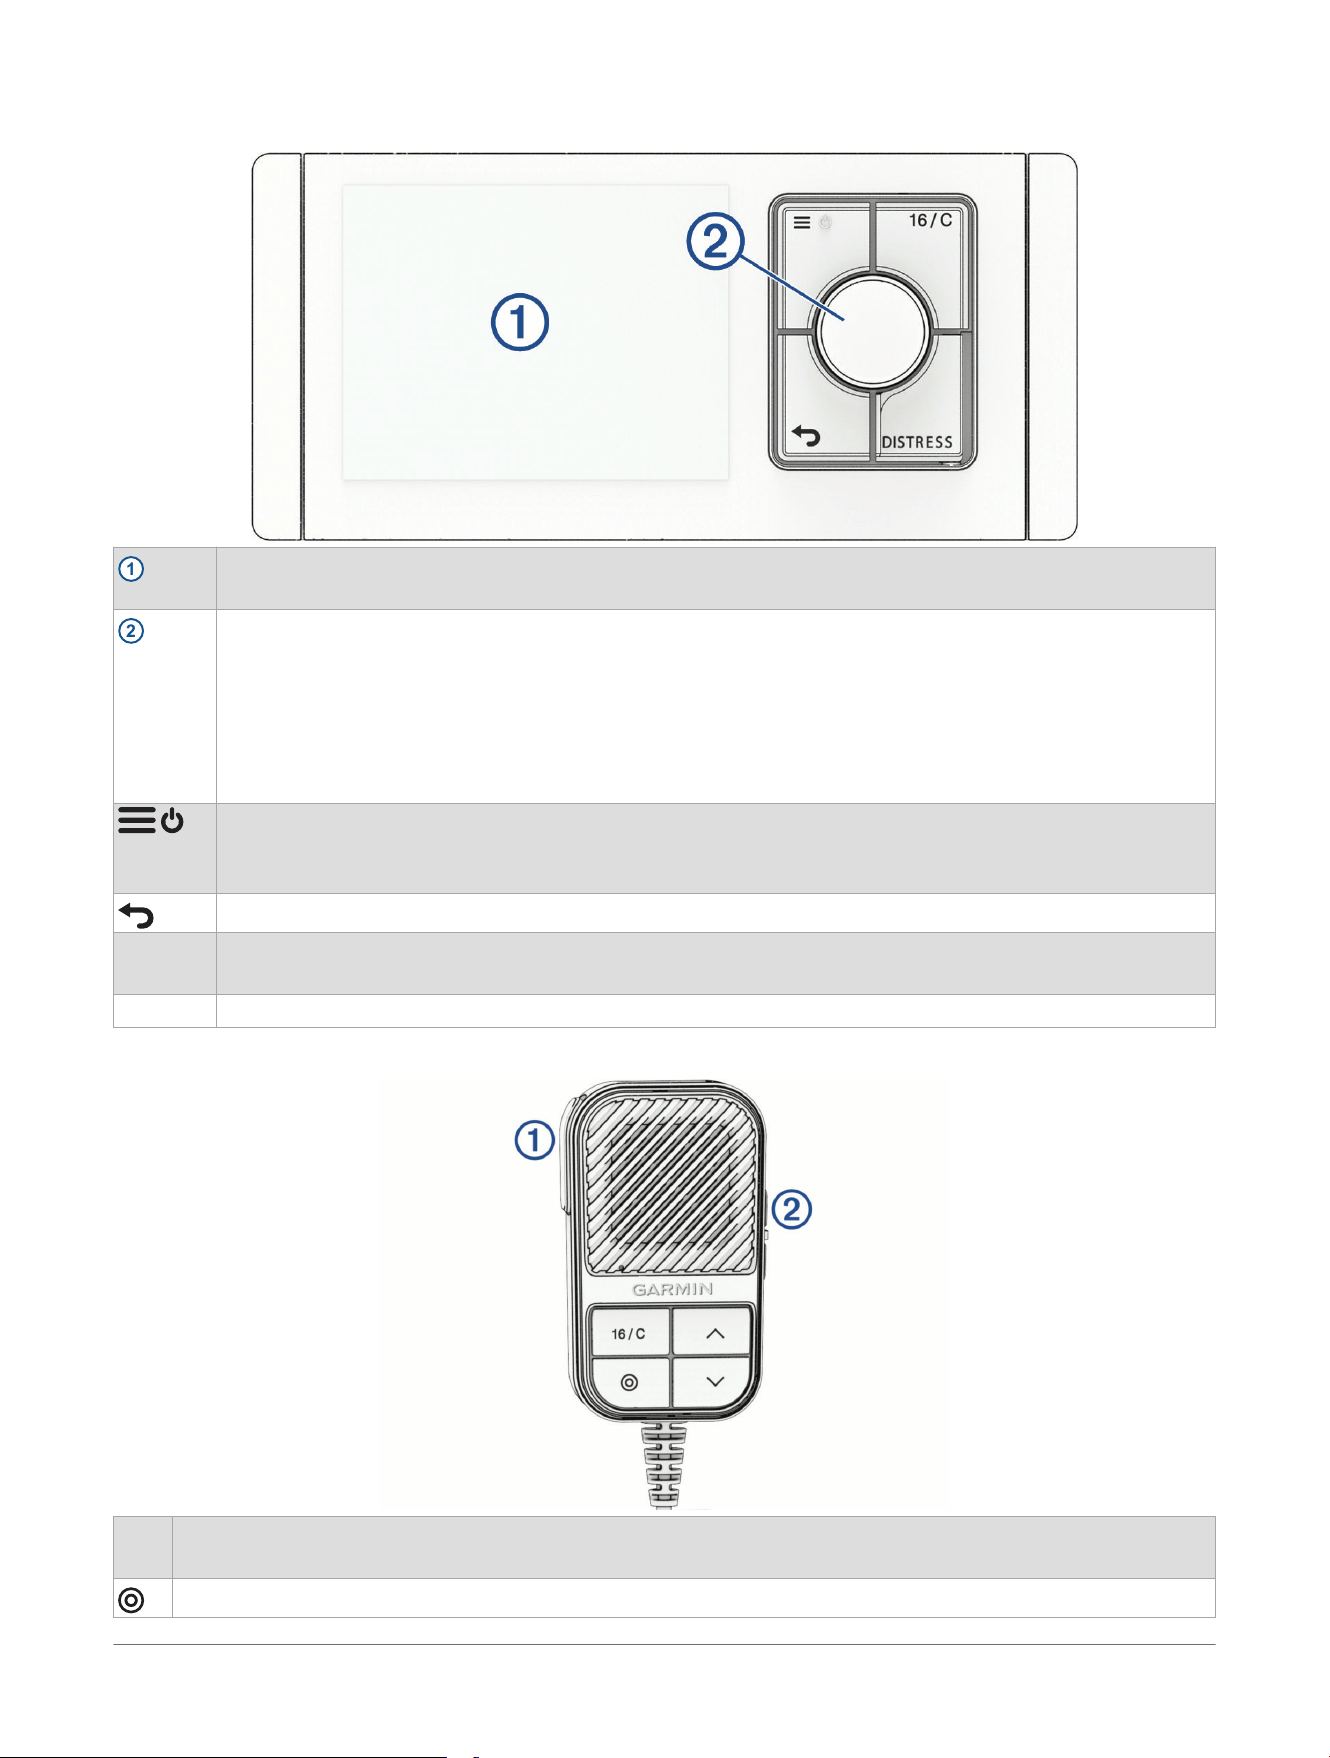
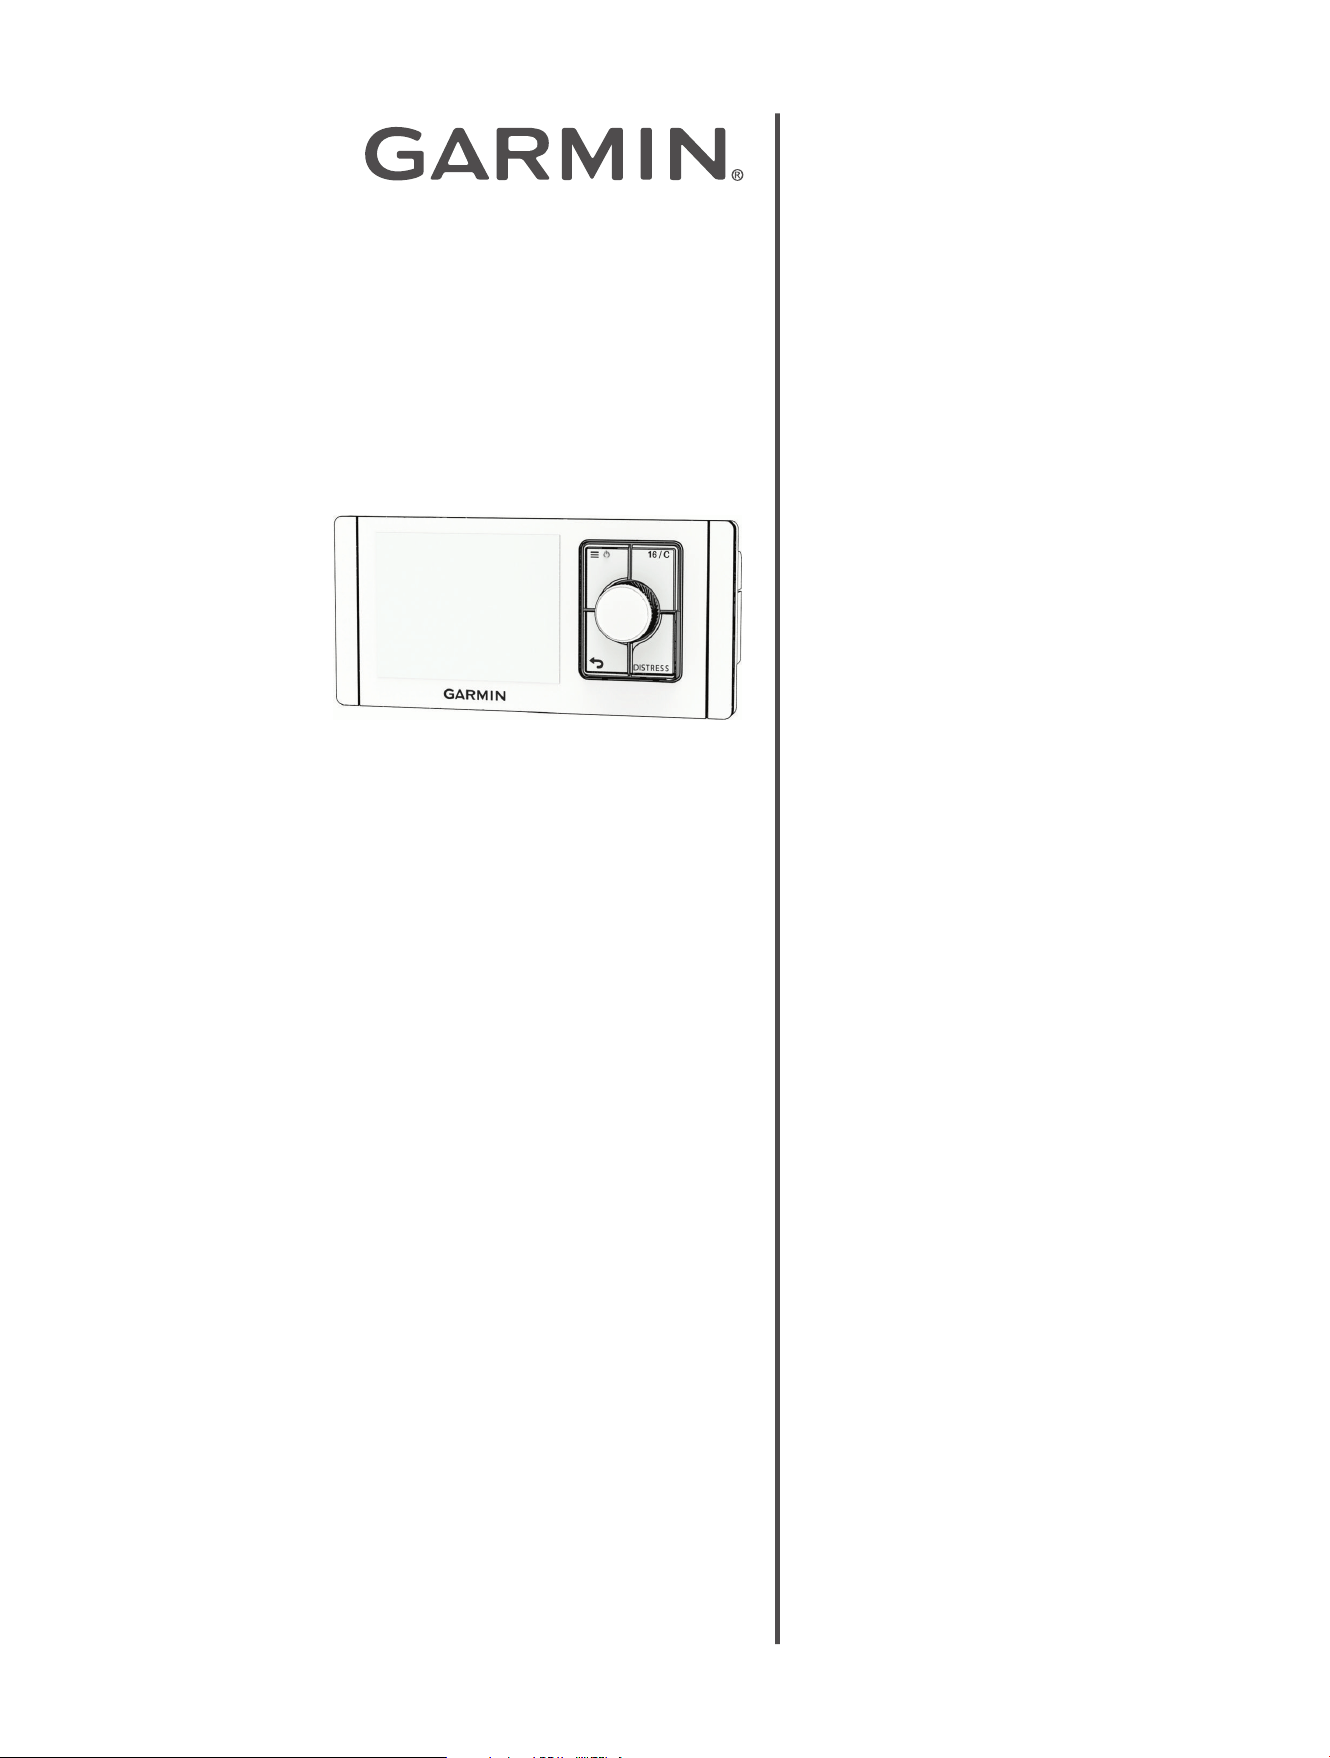
Device Overview
1
Touch to select options on the screen.
Drag to scroll through menus.
2
From the VHF screen:
• Turn the dial to increase or decrease the volume for the fist mic speaker (Changing the Volume,
page11).
• Press the dial to open the squelch screen (Adjusting the Squelch, page12).
From other screens:
• Turn the dial to cycle through the options on the screen.
• Press the dial to select the highlighted option on the screen.
Press to open the menu.
Press to turn the radio on.
Hold to turn the radio off.
Press to return to the previous screen.
16/C Press to switch between the current channel and channel 16.
NOTE: Pressing the 16/C button automatically turns off watch modes (Watch Modes, page12).
DISTRESS Lift the door and hold to initiate a distress call.
Fist Mic
16/C Press to switch between the current VHF channel and channel 16.
NOTE: Pressing the 16/C button turns off watch modes automatically (Watch Modes, page12).
Press to switch between low power (1W) and high power (25W) (not available on some VHF channels).
Device Overview Garmin Signal™ VHF Marine Radio
Owner's Manual
5
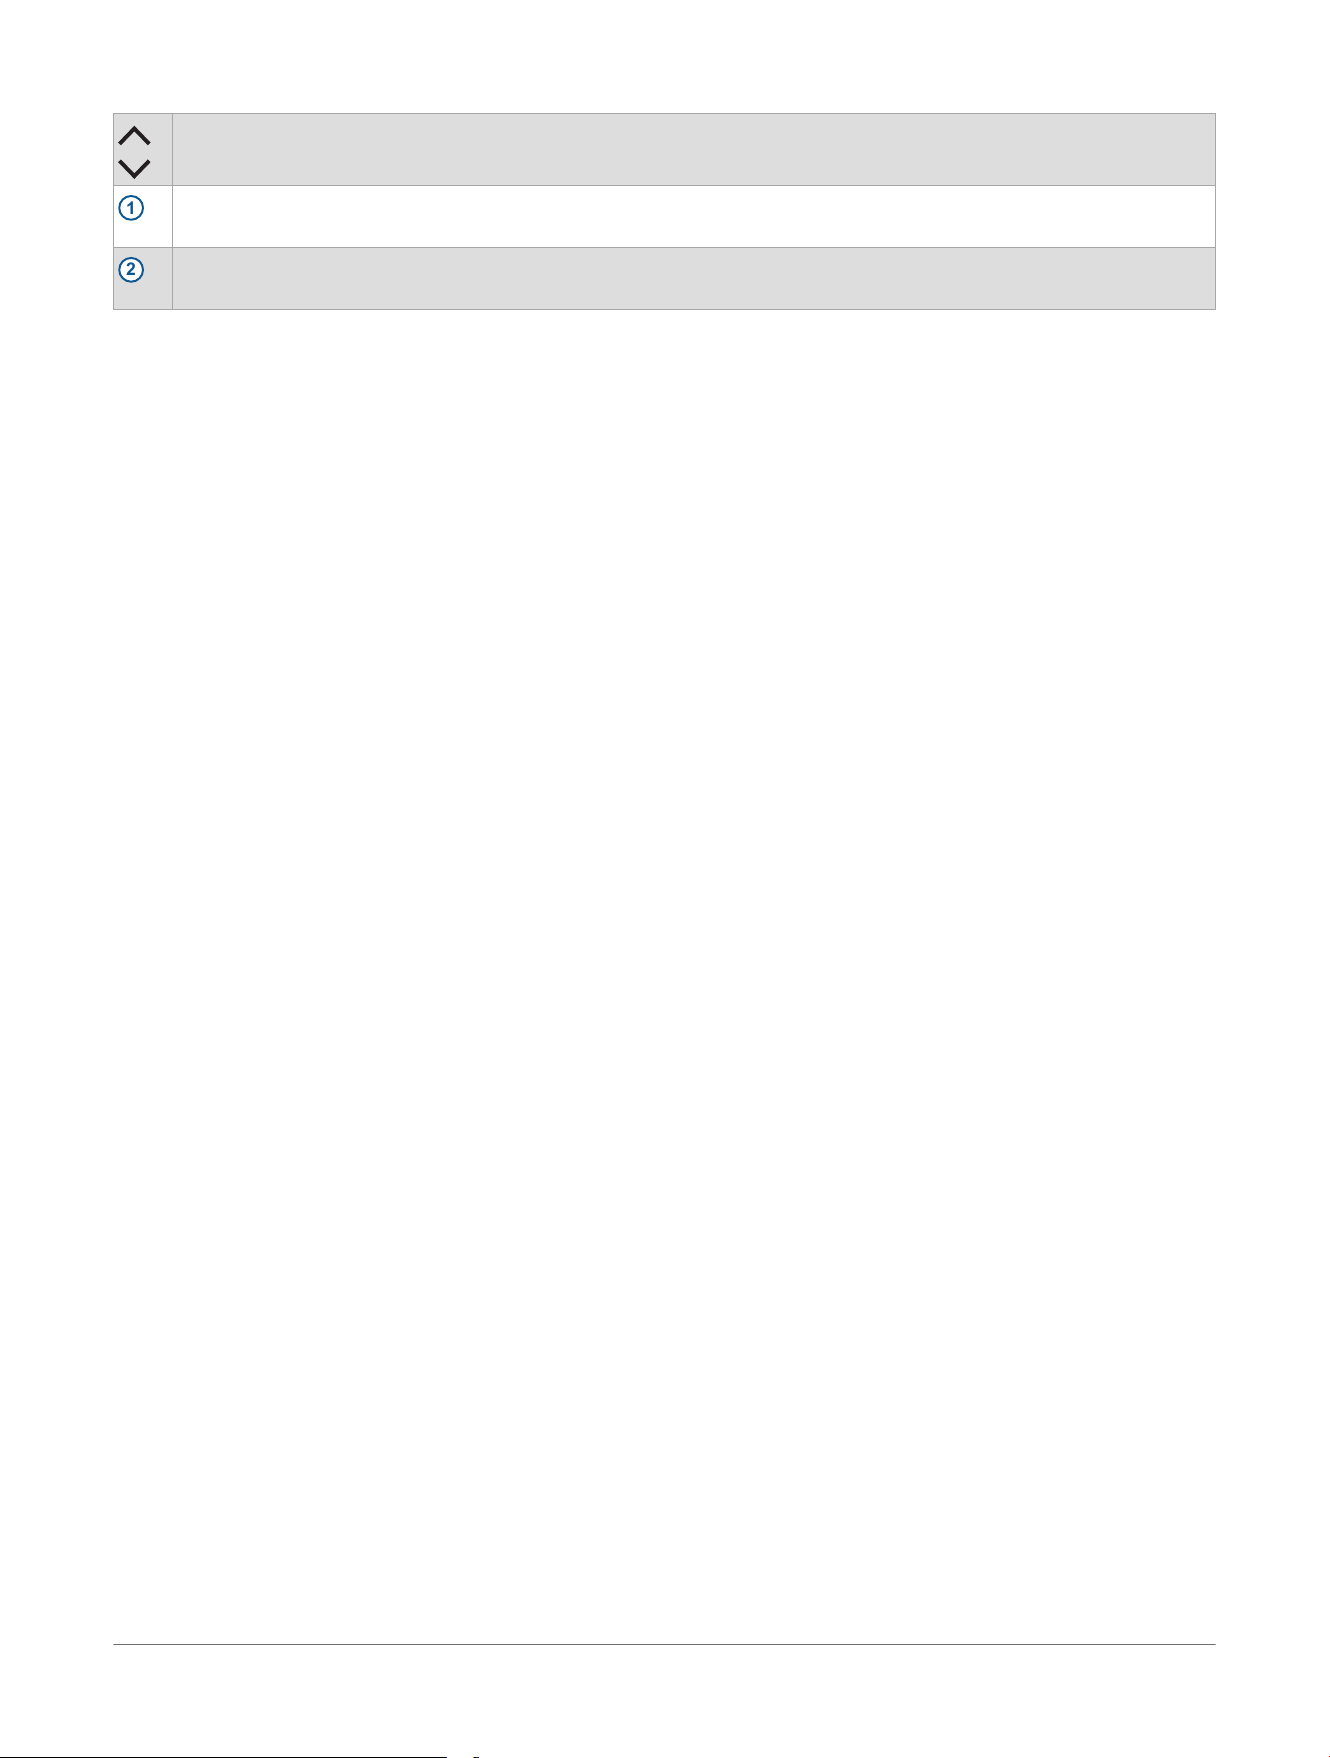
Press to change the current VHF channel.
1
Push-to-talk (PTT) button
Hold to transmit on the current VHF channel.
2
Volume buttons
Press + or − to increase or decrease the fist mic speaker volume.
6 Garmin Signal™ VHF Marine Radio
Owner's Manual
Device Overview
Getting Started
When you turn on the Garmin Signal
™
VHF radio for the first time, the device prompts you to select your
language, units of measure, and VHF region.
Before you can start using the radio, you may need to complete these additional configuration steps.
• Connect the device to the ActiveCaptain
®
app (ActiveCaptain
®
App, page7).
• Program the radio with your vessel details and MMSI number (Programming the Radio Using the
ActiveCaptain
®
App, page8).
• If you are navigating on inland waterways in European countries that require the use of ATIS, enable ATIS
(Enabling ATIS, page25).
ActiveCaptain
®
App
The ActiveCaptain app provides a connection between your mobile device and your Garmin
®
marine devices.
You can use the ActiveCaptain app to program the radio with your vessel information and MMSI number, and to
install software updates.
NOTE: In the United States, you must connect the radio to the ActiveCaptain app to automatically program it
with the vessel information and MMSI number you submitted to your Garmin dealer when you purchased the
radio.
You should observe these considerations before connecting the radio to the ActiveCaptain app.
•
If your Garmin Signal
™
VHF radio is connected to a compatible Garmin chartplotter using the Garmin
BlueNet
™
network port, and the chartplotter is already connected to the ActiveCaptain app, the radio
connects to the app automatically.
• If your compatible connected Garmin chartplotter is not connected to the ActiveCaptain app, you must follow
the instructions in the chartplotter Owner's Manual to configure the ActiveCaptain app.
• If your radio is not connected to a Garmin chartplotter, you must connect the ActiveCaptain app to the radio
directly (Connecting to a Mobile Device with the ActiveCaptain
®
App, page7).
Getting Started with the ActiveCaptain
®
App
1 Scan the QR code with your mobile device to download and install the ActiveCaptain app.
2 Open the ActiveCaptain app.
3 Log in or create a new Garmin
®
account.
For more information about the ActiveCaptain app, go to garmin.com/ActiveCaptain.
Connecting to a Mobile Device with the ActiveCaptain
®
App
Before you can connect the radio to your mobile device, you must install the ActiveCaptain app (Getting Started
with the ActiveCaptain
®
App, page7).
NOTE: If your radio is connected to a compatible chartplotter, these instructions do not apply. You must follow
the instructions in the chartplotter Owner's Manual to set up the ActiveCaptain app.
1 On the VHF radio, select > Settings> Wi-Fi.
2 If necessary, select Enable Wi-Fi.
3 Note the Wi‑Fi
®
network SSID shown in the SSID field.
4 Select Password.
5 Using the virtual keyboard on the radio screen, enter a password for the radio's Wi‑Fi network.
NOTICE
The Wi‑Fi network provides access to configuration and data stored on your radio. You should keep the
password secret to prevent unauthorized access.
6 Select Done.
7 Select an option:
• If you have an iOS
®
device, use the device Wi‑Fi settings to connect to the Wi‑Fi network on the VHF radio,
using the Wi‑Fi network SSID you noted and the password you set.
•
If you have an Android
™
device, open the ActiveCaptain app, select Connect, and enter the Wi‑Fi network
SSID you noted and the password you set.
Getting Started
Garmin Signal™ VHF Marine Radio
Owner's Manual
7
Programming the Radio Using the ActiveCaptain
®
App
Before you can program the radio using the ActiveCaptain app, you must connect the radio to the app
(ActiveCaptain
®
App, page7).
The radio must have a GPS position fix before you can program it.
NOTICE
Operating a radio transmitter with an MMSI number that is assigned to a different vessel may lead to penalties
from your country's telecommunications authorities.
NOTE: In the United States, you cannot enter your MMSI number and vessel information directly. You must
submit the MMSI number and vessel information to your Garmin
®
dealer, and the radio is programmed
automatically when you connect it to the ActiveCaptain app (Connecting to a Mobile Device with the
ActiveCaptain
®
App, page7).
Outside the United States, you can program the radio by entering the MMSI number and vessel information in
the ActiveCaptain app.
1 In the ActiveCaptain app, select Settings.
2 Under Connected Devices, select Signal VHF Radio.
The MMSI programming screen appears.
3 Enter your MMSI number, ATIS ID number (if applicable), and all the required information about your vessel.
4 Select Save.
NOTICE
After you have programmed the radio with an MMSI number and vessel information, you cannot readily change
it. If you move the radio to a new vessel, you must reprogram it before you can legally operate it on the new
vessel (Reprogramming the Radio, page32).
Programming the Radio Manually
The radio must have a GPS position fix before you can program it.
NOTICE
Operating a radio transmitter with an MMSI number that is assigned to a different vessel may lead to penalties
from your country's telecommunications authorities.
NOTE: In the United States, you cannot enter your MMSI number and vessel information directly. You must
submit the MMSI number and vessel information to your Garmin
®
dealer and connect the radio to the
ActiveCaptain
®
app to program it (Connecting to a Mobile Device with the ActiveCaptain
®
App, page7).
Outside the United States, you can program the radio by entering the MMSI number and vessel information.
1 Select > Settings> Vessel Details.
2 Enter your MMSI, vessel name, callsign, vessel type, and vessel dimensions.
3 Select Program.
NOTICE
After you have programmed the radio with an MMSI number and vessel information, you cannot readily change
it. If you move the radio to a new vessel, you must reprogram it before you can legally operate it on the new
vessel (Reprogramming the Radio, page32).
Selecting your VHF Region
NOTICE
You must select the correct VHF region for your location. Operating the radio with the wrong VHF region may
lead to penalties from your local telecommunications authority.
1 Select > Settings> VHF Region.
2 Select Region.
3 Select a VHF region from the list.
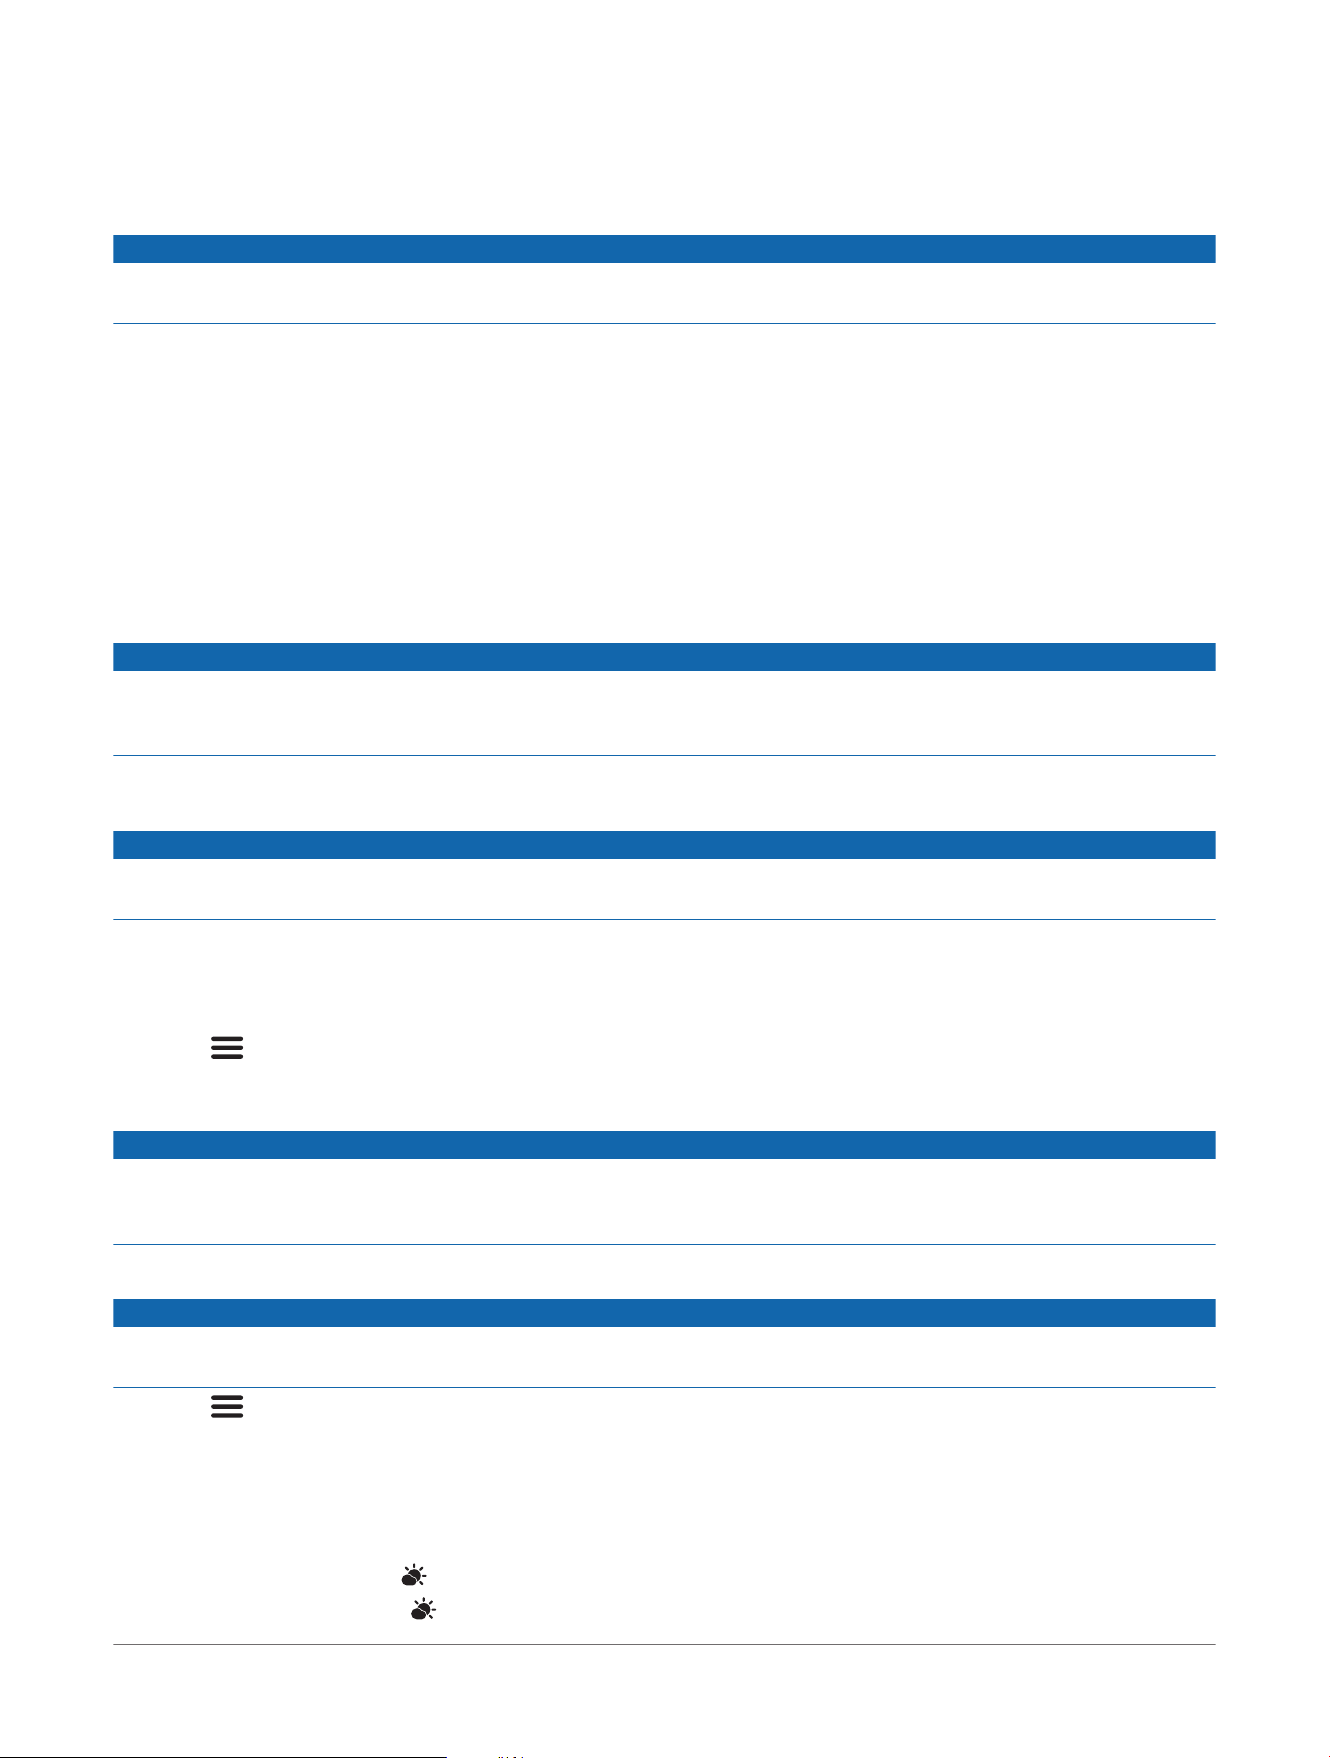
Selecting Your Local Weather Channel
Weather broadcasts may be available on different channels depending on your location. You can set the local
weather channel and use the
icon on the VHF screen as a shortcut to quickly switch to it.
1 From the VHF screen, hold .
8
Garmin Signal™ VHF Marine Radio
Owner's Manual
Getting Started

2 Select Yes to confirm that you want to set your weather channel.
3 Turn the dial to select a weather channel.
NOTE: The options are limited to designated weather channels and other broadcast channels. To select
other channels, you can turn off Broadcast Channels Only.
4 Press the dial to confirm the weather channel selection.
Getting Started Garmin Signal™ VHF Marine Radio
Owner's Manual
9
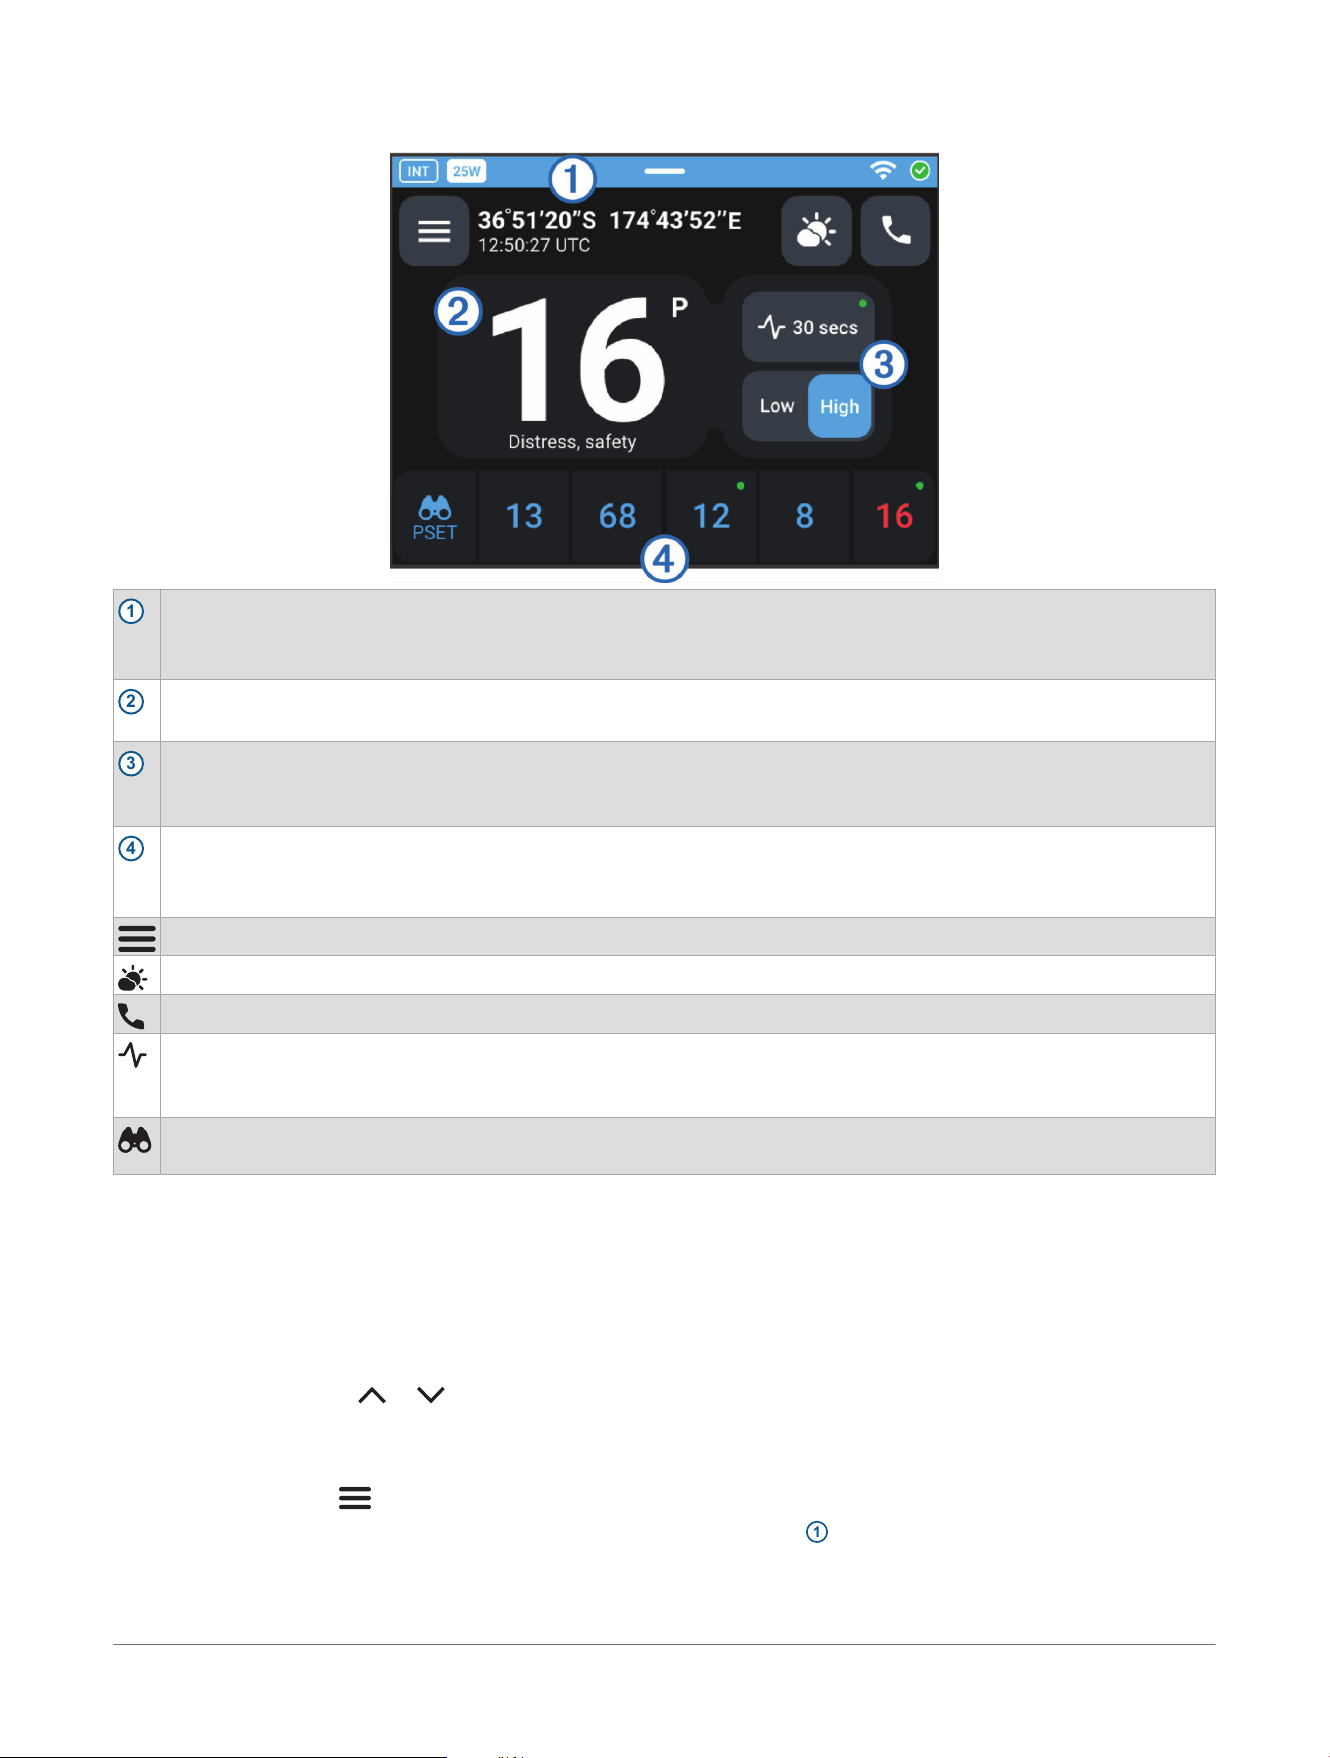
VHF Radio
1
Status bar
Displays device status labels (Status Bar, page23).
Drag down to open the controls panel (Controls Panel, page23).
2
Current VHF channel
Select to open the channel selection screen (Changing the VHF Channel, page10).
3
Transmit power
Select to switch between low-power (1W) and high-power (25W) transmit modes (not available on all channels)
(Changing the Range of VHF Transmissions, page11).
4
VHF channel presets
Select to switch to a preset channel.
Hold to save the current channel to a preset slot (Saving a VHF Channel as a Preset, page12).
Select to open the main menu.
Select to switch to your weather channel (Selecting Your Local Weather Channel, page8).
Select to initiate a DSC call (Digital Selective Calling, page15).
Shows the time since the most recent activity on the current channel.
Select to view and play recordings of recent VHF activity on the current channel (Replaying Recent VHF Activity,
page14).
Select to open the watch mode selection screen, where you can monitor multiple channels at the same time
(Watch Modes, page12).
Changing the VHF Channel
You can change the VHF channel using the fist mic, or using the touchscreen and the dial.
TIP: You can always quickly switch between the current channel and channel 16 by pressing 16/C on the radio
or on the fist mic.
Changing the VHF Channel Using the Fist Mic
You can always change the VHF channel using the fist mic, even when the radio is not showing the VHF screen.
On the fist mic, press or .
The radio tunes up or down through the channels in the current frequency band.
Changing the VHF Channel Using the Dial
1 If necessary, select > VHF Radio to open the VHF screen.
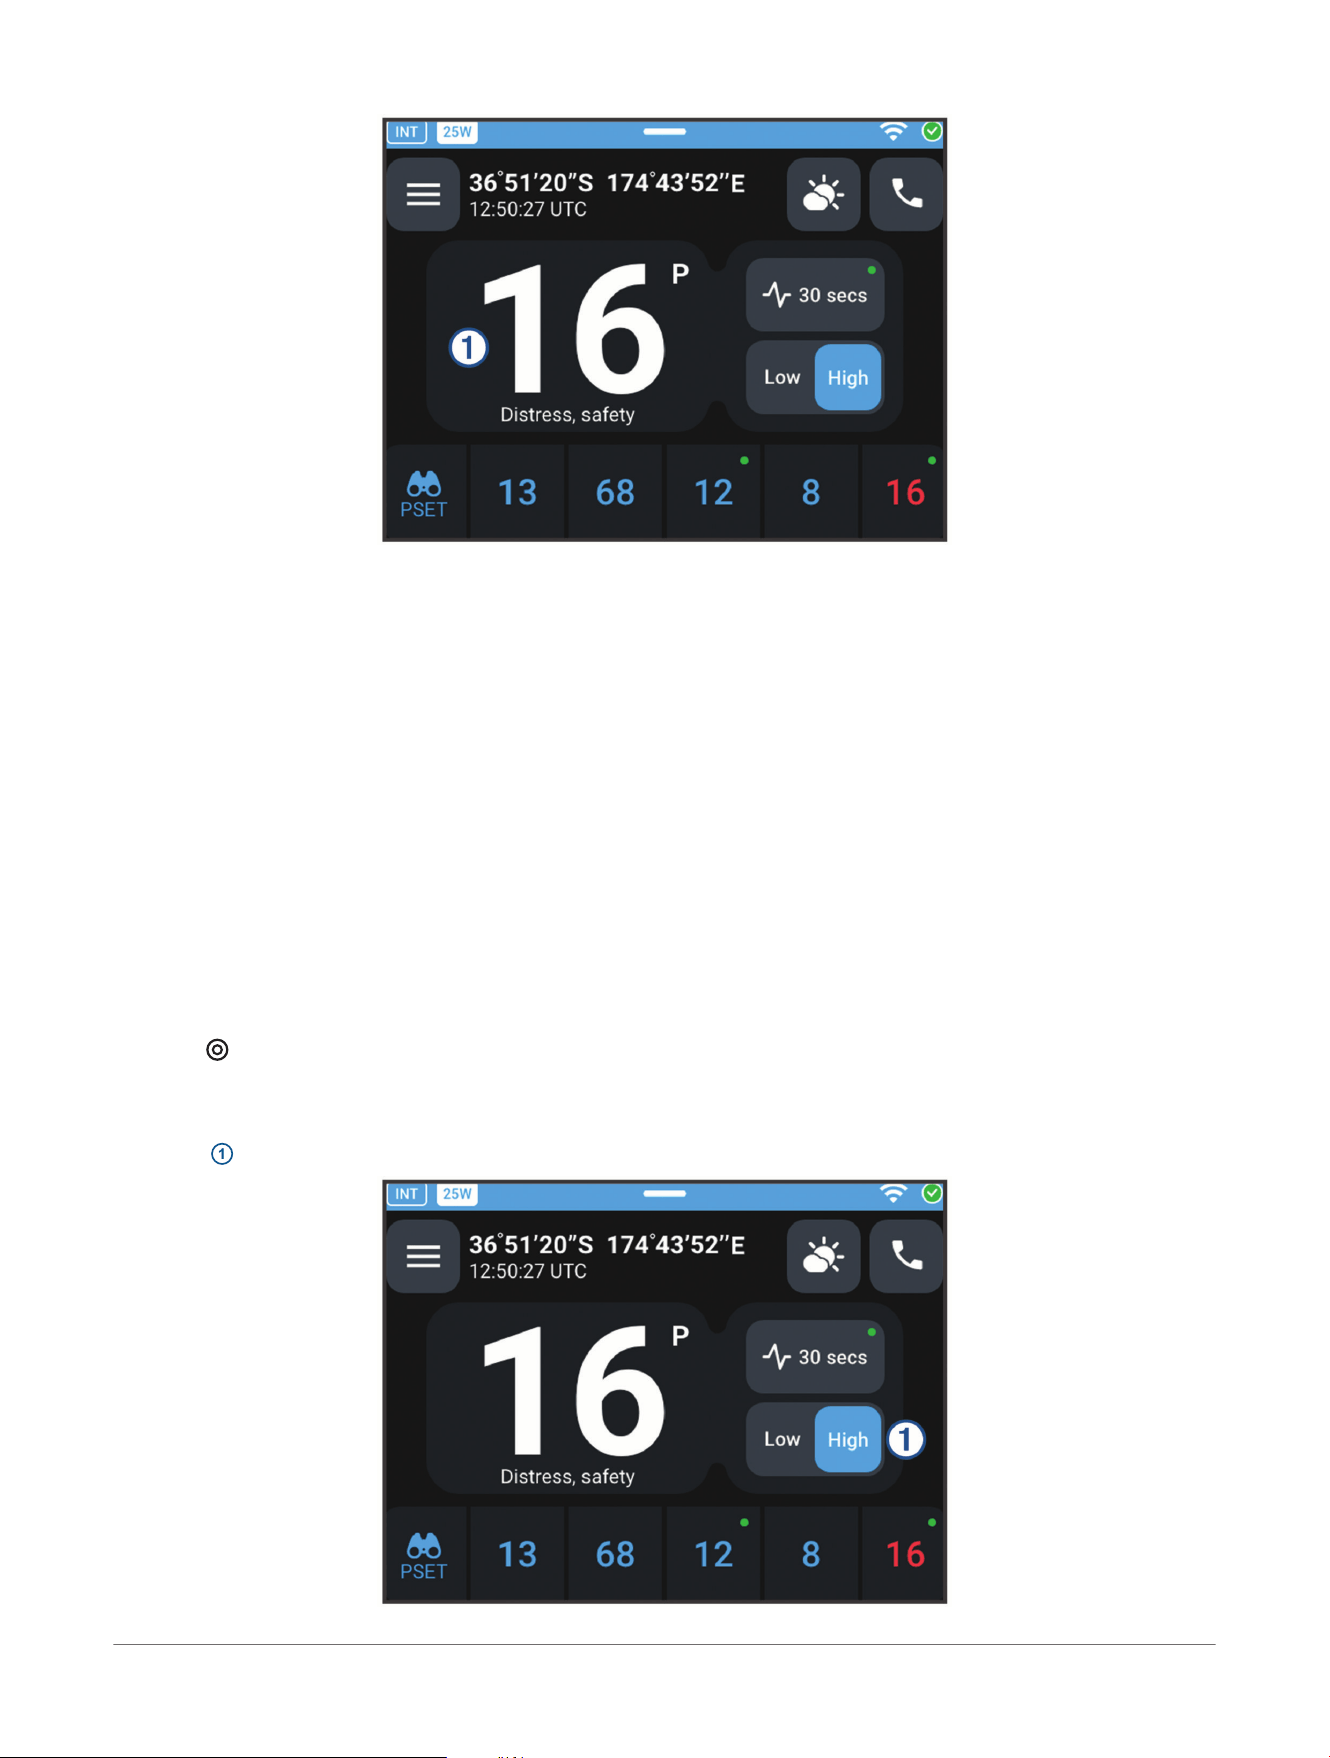
2 Select the area of the screen that displays the current VHF channel
1
.
10
Garmin Signal™ VHF Marine Radio
Owner's Manual
VHF Radio
3 Turn the dial clockwise or counterclockwise.
The radio tunes up or down through the channels in the current frequency band.
4 Press the dial to return to the VHF screen.
Changing the Volume
1 From the VHF screen, turn the dial to increase or decrease the fist mic speaker volume.
2 If there is an external speaker connected, use the slider under External Speaker to control the external
speaker volume.
For more information on connecting an external speaker to the radio, see the Installation Instructions at
garmin.com/manuals/SignalVHF.
Changing the Range of VHF Transmissions
By default, the radio operates in low-power mode (1W) on all channels except channel 16. On channels that
support both modes, you can switch between high-power and low-power mode.
NOTE: If you switch to high-power mode and change to a different channel, the radio remains in high-power
mode if the new channel allows it.
Changing Transmit Power Using the Fist Mic
Press .
If the current VHF channel allows it, the radio switches between high-power mode and low-power mode.
Changing Transmit Power Using the Touchscreen
Select
1
.
VHF Radio
Garmin Signal™ VHF Marine Radio
Owner's Manual
11
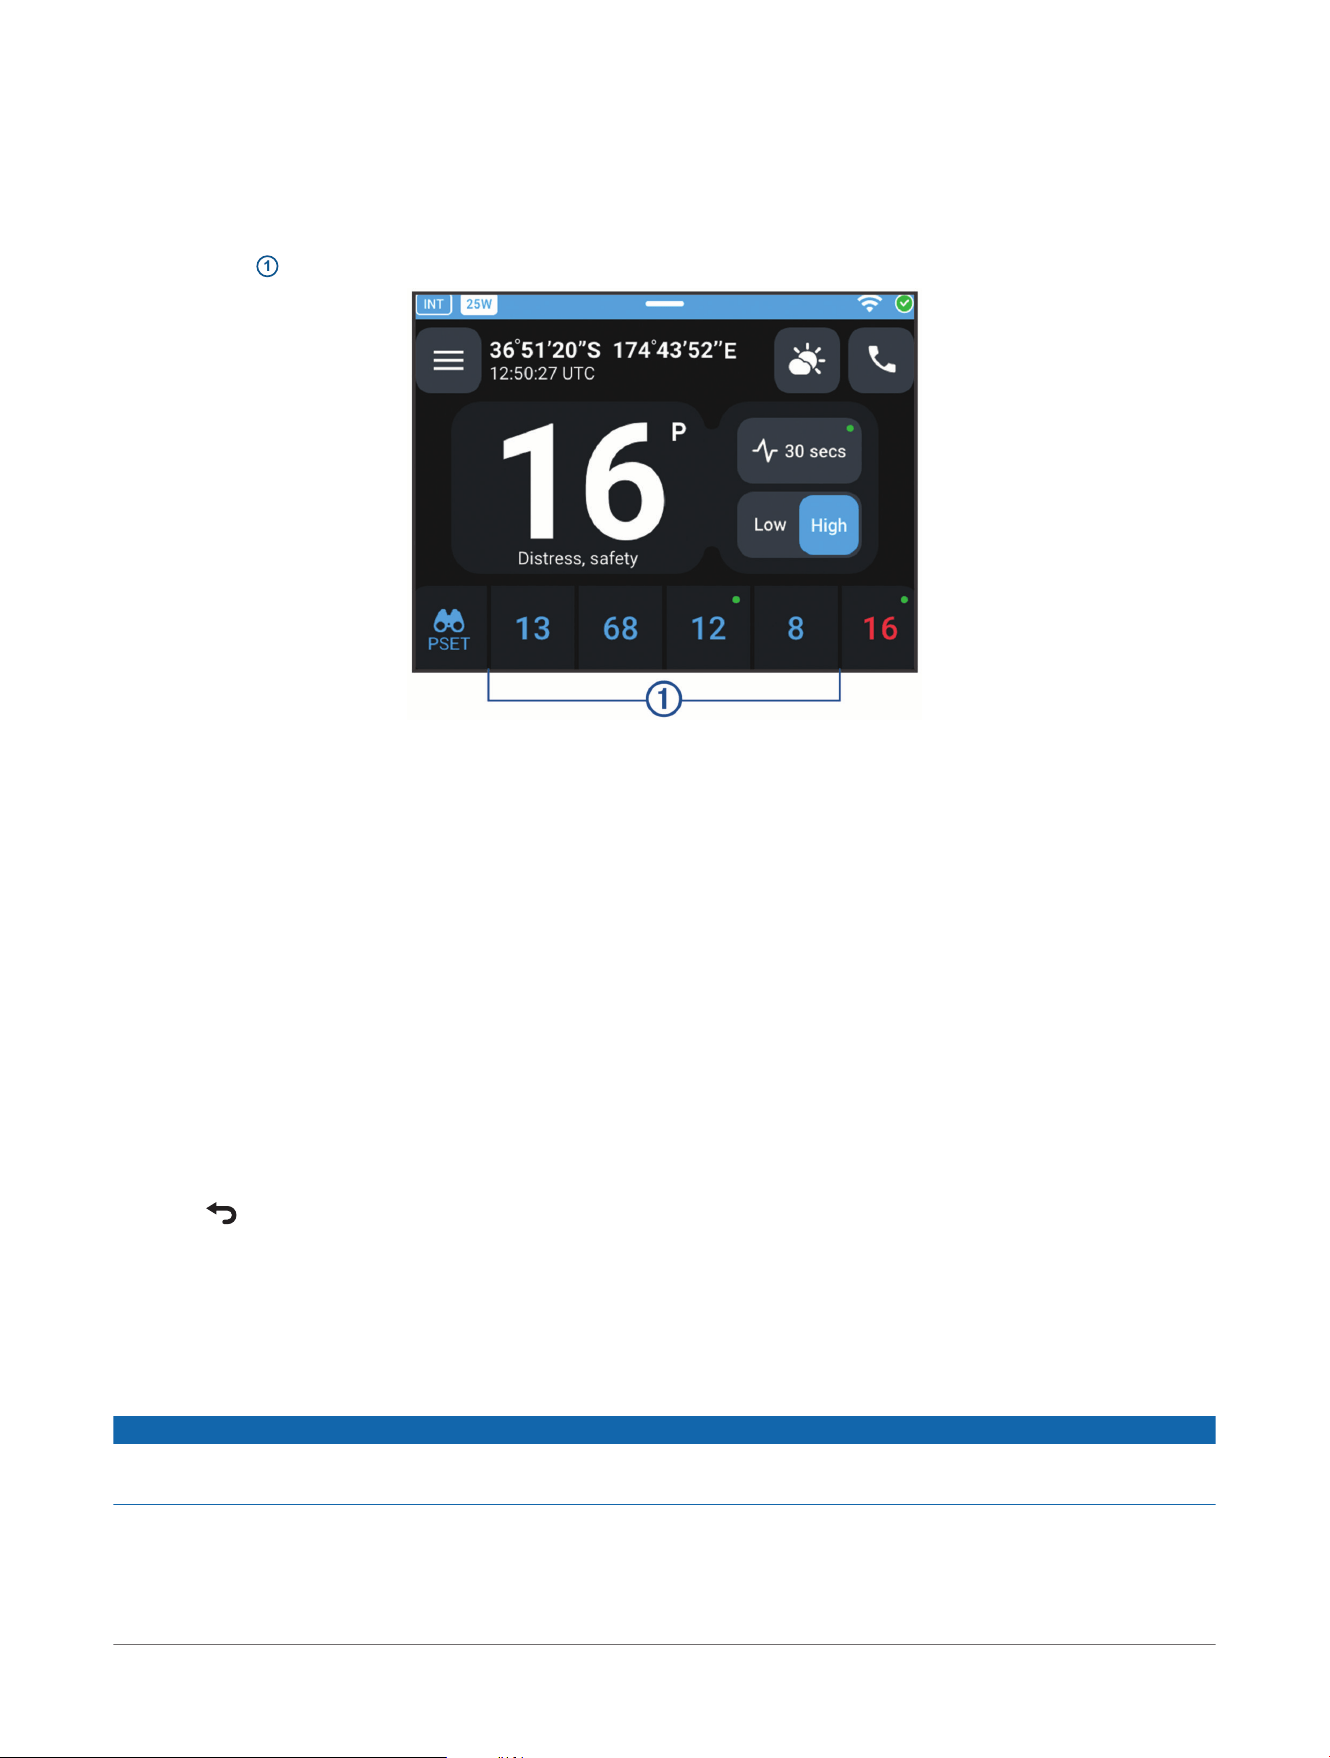
If the current VHF channel allows it, the radio switches between high-power mode and low-power mode.
Saving a VHF Channel as a Preset
You can save the VHF channels you use most often to four configurable slots on the VHF screen.
1 Tune the radio to a VHF channel you want to save as a preset.
2 Hold a slot
1
to save the current channel to that slot.
3 Select Set.
If there was already a channel saved to the slot, the new channel overwrites the old one.
You can touch the slot to tune to the preset channel.
A green dot appears on the top right corner of the preset button if there has been activity on that channel in the
last three minutes.
NOTE: You can use the Presets watch mode to monitor all your presets at the same time (Watch Modes,
page12).
Clearing a Preset
1 Hold the slot with the preset you want to clear.
2 Select Clear.
Adjusting the Squelch
The Garmin Signal
™
VHF radio sets the squelch level automatically to filter out static noise. To listen for weak
VHF signals that might not break squelch, you can set the squelch level manually.
1 From the VHF screen, press the dial to open the squelch screen.
2 Turn the dial to adjust the squelch level.
3 Press to return to the VHF screen.
The manual squelch setting applies only to the current channel. When you switch channels and return to the
original channel, the saved manual squelch setting persists.
You can return to the squelch screen and select Auto to restore automatic squelch for the current channel. You
can reset all squelch levels to restore automatic squelch for all channels (Restoring Factory Default Settings,
page30).
Watch Modes
NOTICE
Regulations may require you to monitor channel 16 at all times. You should check with your local maritime
safety authority and make sure you understand your watchkeeping responsibilities.
You can use watch modes to scan the entire VHF band, or monitor channel 16 and one or more other channels
at the same time.
NOTE: Pressing the 16/C button automatically turns off watch modes.
12
Garmin Signal™ VHF Marine Radio
Owner's Manual
VHF Radio
Scanning All Channels
You can scan all channels to get an overall picture of VHF traffic in your area.
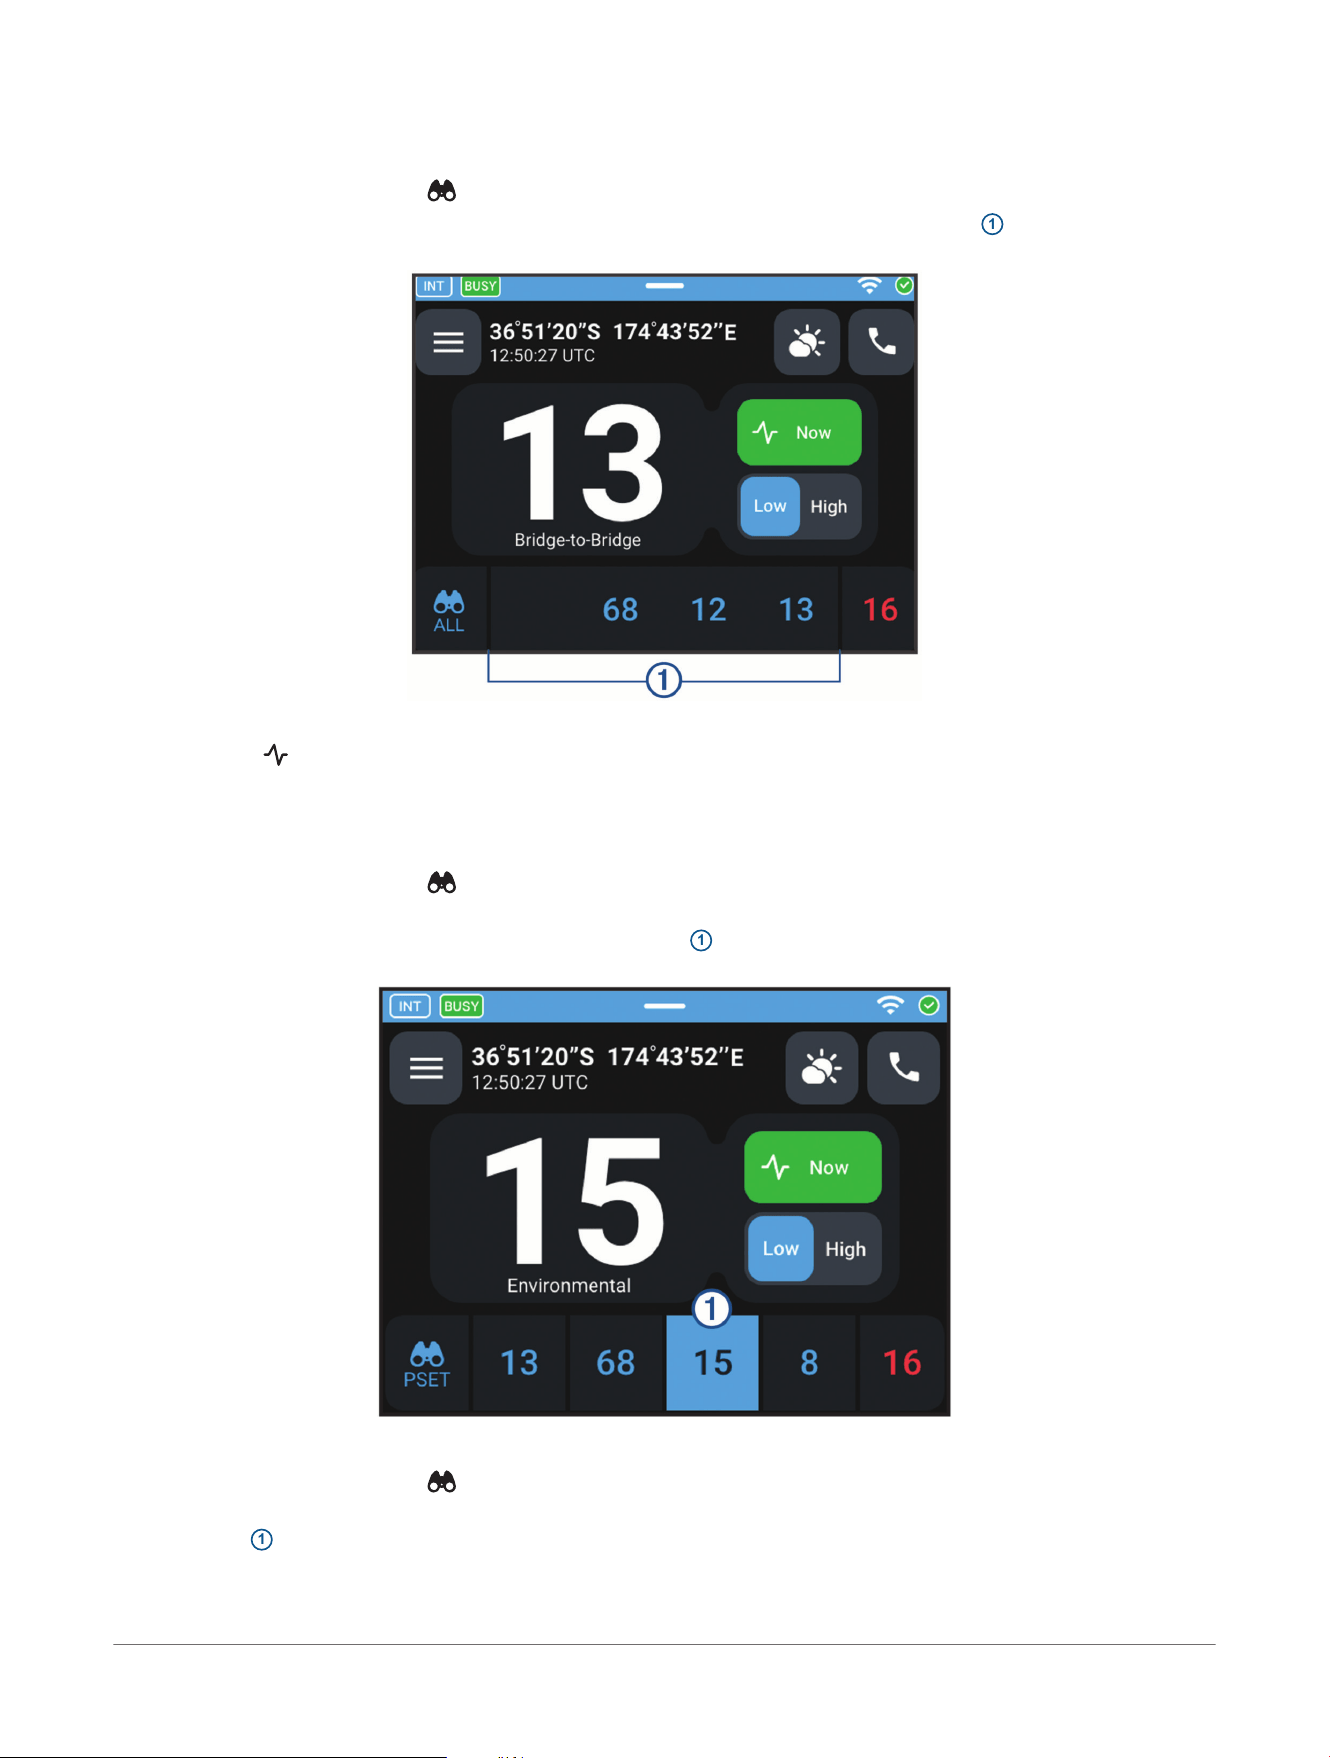
From the VHF screen, select > All.
As the radio detects traffic, the channel numbers appear along the bottom of the screen
1
, with the most recent
traffic on the right.
You can select a channel on the bottom of the screen to tune to it and stop scanning.
You can select to replay recent traffic on the current channel (Replaying Recent VHF Activity, page14).
Monitoring Multiple Channels Simultaneously
Before you can monitor more than two channels simultaneously, you must save the channels you want to
monitor as presets (Saving a VHF Channel as a Preset, page12).
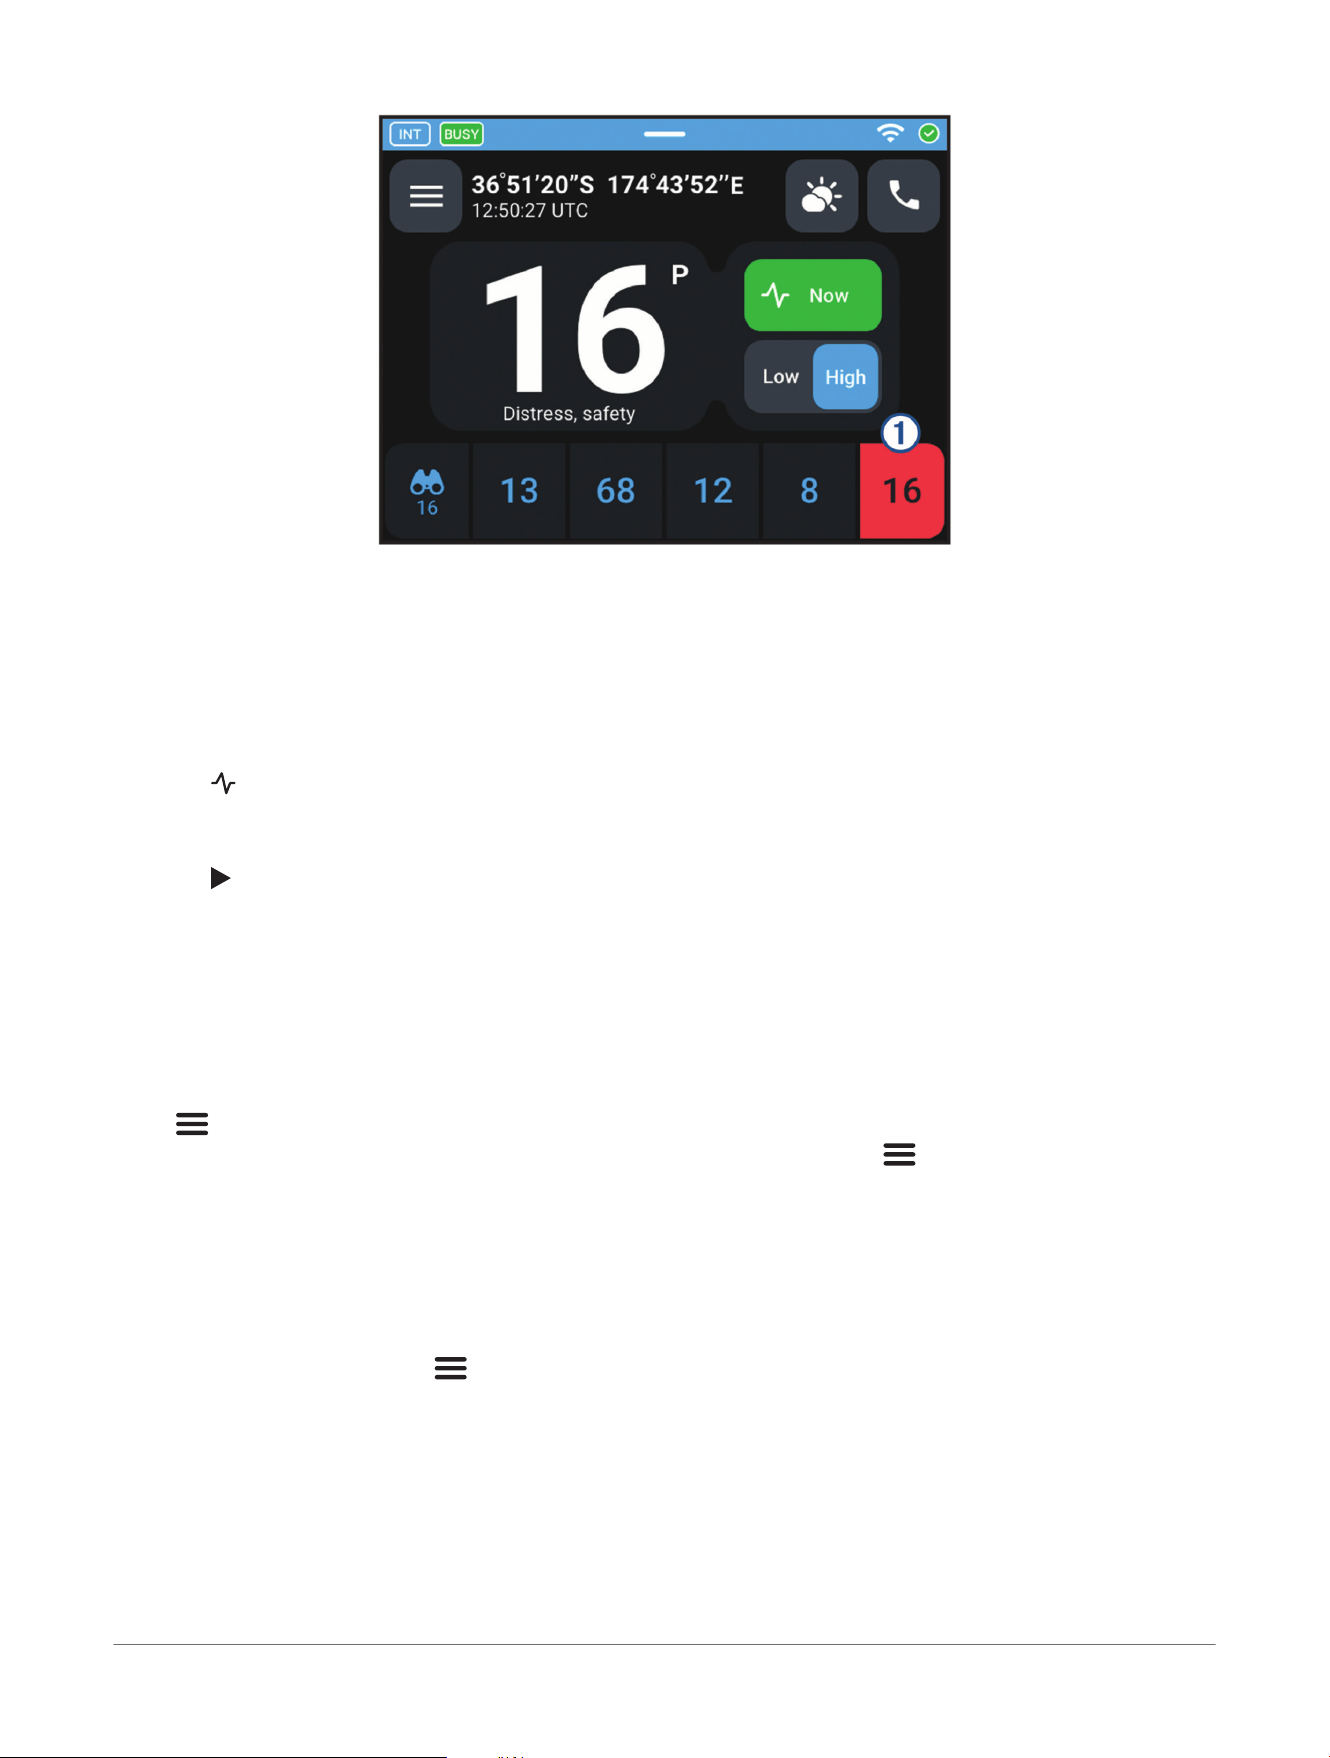
From the VHF screen, select > Presets.
When the radio is playing traffic from channel 16 or one of your presets while you are tuned to another channel,
the preset button for the channel with traffic is highlighted
1
, and that channel number appears in the middle of
the screen instead of the number for the channel you are tuned to.
Monitoring Channel 16 and the Current Channel Simultaneously
From the VHF screen, select > 16 Only.
When the radio is playing traffic from channel 16 while you are tuned to another channel, the channel 16 button
is highlighted
1
, and that channel number appears in the middle of the screen instead of the number for the
channel you are tuned to.
VHF Radio
Garmin Signal™ VHF Marine Radio
Owner's Manual
13
Replaying Recent VHF Activity
The radio records VHF activity from all channels within the last three minutes, including channels that have not
been monitored. You can replay the recordings, and save them permanently to download later.
NOTE: The radio records traffic on up to three channels simultaneously. If there is traffic on more than three
channels, the radio prioritizes channel 16, the current channel, all your presets, and severe weather alerts on
your local weather channel.
1 From the VHF screen, tune in to the channel for which you want to view and replay recent activity.
2 Select .
Recordings of the last three minutes of VHF activity on the current channel are listed on the screen.
3 Swipe up to scroll through the list of recorded clips.
4 Select to play a recorded clip.
TIP: You can touch Noise canceled to toggle between filtering out static noise and playing the raw audio clip.
You can select Save to permanently store the last three minutes of recordings from all channels. You can
download the recordings using a computer or mobile device over the Wi‑Fi
®
network.
Downloading Saved Recordings of VHF Activity
1 If necessary, enable the Wi‑Fi
®
network (Configuring the Wi‑Fi
®
Network, page29).
2 Select an option:
•
If the radio is connected to a compatible Garmin
®
chartplotter over the Garmin BlueNet
™
network, select
> Settings> Garmin Marine Network.
• If the radio is not connected to a compatible Garmin chartplotter, select > Settings> Wi-Fi.
3 Note the address shown in the IP Address field.
This is the IP address you can use to access the radio over Wi‑Fi, using a web browser.
4 On the computer or mobile device, connect to the Wi‑Fi network.
If the radio is connected to a Garmin chartplotter over the Garmin BlueNet network, you must connect to the
chartplotter Wi‑Fi network.
5 Open a web browser, and enter the radio's IP address into the address bar.
6 From the admin panel, select > VHF Recordings.
7 Select the name of a recording.
The recording file is downloaded and saved to your computer or mobile device.
14
Garmin Signal™ VHF Marine Radio
Owner's Manual
VHF Radio
Digital Selective Calling
NOTE: Before you can use Digital Selective Calling, you must program the radio with an MMSI number
(Programming the Radio Using the ActiveCaptain
®
App, page8).
Digital Selective Calling (DSC) is a method of exchanging information and requesting to communicate with
other vessels by voice.
Channel 70 is reserved exclusively for DSC. The Garmin Signal
™
VHF radio uses a dedicated receiver to monitor
it.
When placing a non-distress DSC call, you must select a follow-up channel for voice communication. Vessels
accepting your call automatically tune their receivers to the follow-up channel.
You should familiarize yourself with DSC call categories and standards (DSC Call Categories, page16).
NOTE: Digital Selective Calling is not available when ATIS is turned on. All VHF transmissions are automatically
identified when ATIS is on.
Placing an Individual or Group Call
1 From the VHF screen, select .
2 Select an option:
• Select to call a vessel by selecting it from the AIS plotter screen (AIS Plotter, page18).
• Select Individual to call a vessel by entering its MMSI number or selecting it from a list.
• Select Group to call a group of vessels by entering its group MMSI number or selecting it from a list.
Individual and group calls are always categorized as Routine DSC calls.
3 Under To:, select the vessel or group of vessels to call.
4 Turn the dial to select the follow-up channel for voice communication.
5 Press the dial or select Call on this channel to place the call.
Requesting a Vessel's Position
You can use DSC to request and receive another vessel's position digitally, without the need for voice
communication.
1 From the VHF screen, select .
2 Select Position.
NOTE: Position Requests are always categorized as Safety DSC calls.
3 Under To:, select the vessel or group whose position you want to request.
4 Select Request position.
Calling All Vessels Within Range
1 From the VHF screen, select .
2 Select All Ships.
3 Under Category, select the DSC call category:
• Select Safety if the call is related to important navigation or weather information.
• Select Urgency if the call is related to the safety of a ship or person, such as an equipment failure or a
medical emergency, but does not require immediate action from nearby vessels.
NOTE: If the reason for your call requires immediate action from nearby vessels, you should send a distress
call (Placing a Distress Call, page15).
4 Turn the dial to select the follow-up channel for voice communication.
5 Press the dial or select Call on this channel to place the call.
Placing a Distress Call
A distress call is a DSC call of the highest priority, and should be used only in emergency situations to request
immediate help from nearby vessels and maritime safety authorities.
Lift the protective cover off the DISTRESS button, and hold the button for three seconds.
Distress calls are automatically resent every four minutes until canceled.
NOTICE
Maritime safety authorities, such as the coast guard, respond to DSC distress calls, and your distress call may
be relayed by other vessels over long distances. If you send a distress call by accident, you must cancel it
Digital Selective Calling
Garmin Signal™ VHF Marine Radio
Owner's Manual
15
immediately, and make a cancellation announcement on channel 16. Failure to cancel a false DSC distress call
promptly may lead to penalties from your local maritime safety authority (Canceling a Distress Call, page16).
Specifying the Nature of a Distress Call
You can specify the nature of your emergency before placing a distress call, to convey relevant details to
vessels responding to your call.
1 Select > DSC Calling> Distress.
2 Select Nature:.
3 Select an option from the list that accurately describes the reason for the distress call.
4 Send the distress call (Placing a Distress Call, page15).
Canceling a Distress Call
1 While a DSC distress call is active, select Cancel.
2 Select Yes to confirm the cancellation of your distress call.
The radio switches to channel 16 and shows a cancellation announcement script, generated automatically
using your callsign and MMSI number.
3 Pick up the fist mic, hold the push-to-talk (PTT) button, and read the cancellation message.
For example, "All stations, all stations, all stations, this is _____(callsign), _____(callsign), _____(callsign),
MMSI ____ (MMSI number). Cancel my distress alert of ____(time)."
Placing a Test Call
Before placing a test call, you should obtain the MMSI number for a local station that is known to respond to
DSC test calls, such as those operated by local maritime safety authorities to help mariners verify their radio's
calling capability.
TIP: You can also verify your radio's calling capability by sending a position request to a nearby station that is
known to respond to position requests (Requesting a Vessel's Position, page15).
1 Select > DSC Calling> Test Call.
2 Under To:, select the vessel or vessel group to call.
3 Select Make a test call.
The radio places a test call to the selected station and waits for an acknowledgement.
DSC Call Categories
DSC calls are categorized based on their urgency, using a digital code. When receiving a call, radios use
different alert tones depending on the call category.
Category
Name
Description Situation
Distress An urgent call for immediate help. Used when in immediate life-threatening danger.
Urgency An urgent message concerning the
safety of a vessel or a person.
Used when the safety of a vessel or a person is at risk, but is
not in immediate life-threatening danger.
Safety An important navigational or mete
orological warning.
Used to inform nearby vessels of hazards such as a
submerged object nearby, or that you are initiating a maneuver
that may pose a danger to nearby vessels.
Routine All other calls. All other situations.
The Distress, Urgency, and Safety DSC call categories correspond to the words Mayday, Pan-Pan, and Sécurité,
used at the beginning of voice communications to convey the urgency of the message that follows. It is
customary to use these terms during follow-up voice communication after a DSC call.
16
Garmin Signal™ VHF Marine Radio
Owner's Manual
Digital Selective Calling
Directory
You can select > Directory to view your list of DSC contacts, add vessels or groups to it, and place calls.
Adding a Vessel to your Contacts
TIP: When a vessel is in AIS range, you can quickly add it to your contacts from the target information screen
(Viewing AIS Target Information, page19).
1 Select > Directory.
2 Select .
3 Enter the vessel name, MMSI, and, optionally, a callsign.
4 Select Add Vessel to Contacts.
Adding a Vessel Group to Your Contacts
A vessel group can be added to your directory under a special group MMSI number. Calling the group MMSI
number calls all vessels in the group at the same time.
When you add a vessel group to your directory, your vessel becomes part of the group. Calls placed to the group
are received by your radio and all other radios within range that have added the group MMSI number to their
directories.
1 Select > Directory.
2 Select .
3 Enter a group name and MMSI number.
NOTE: Group MMSI numbers do not require registration, but there may be local guidelines for selecting a
group MMSI number for your use.
4 Select Add Group to Contacts.
The vessel group is added to your directory. Your radio receives DSC calls to the group's MMSI number, in
addition to your vessel's own MMSI number.
Directory
Garmin Signal™ VHF Marine Radio
Owner's Manual
17
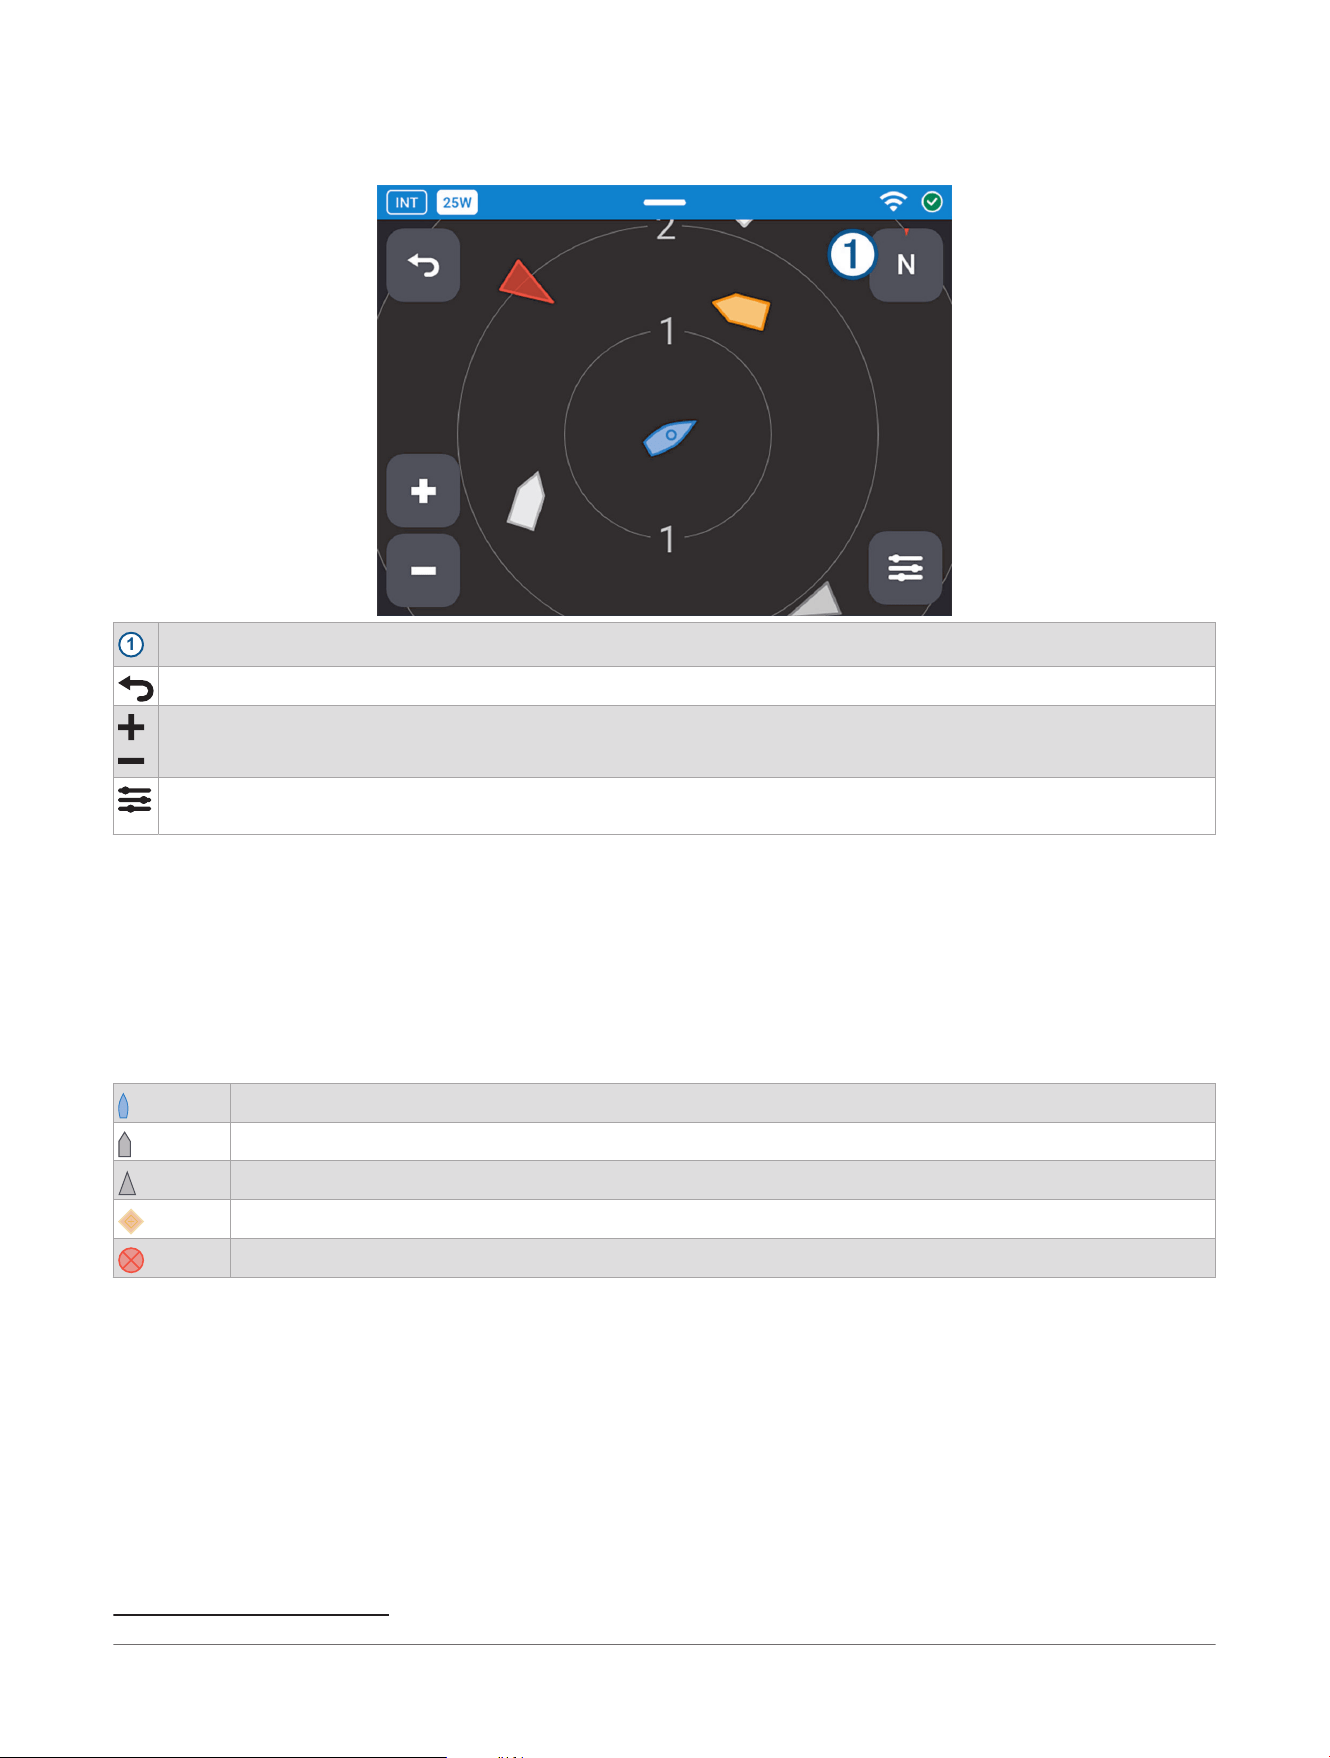
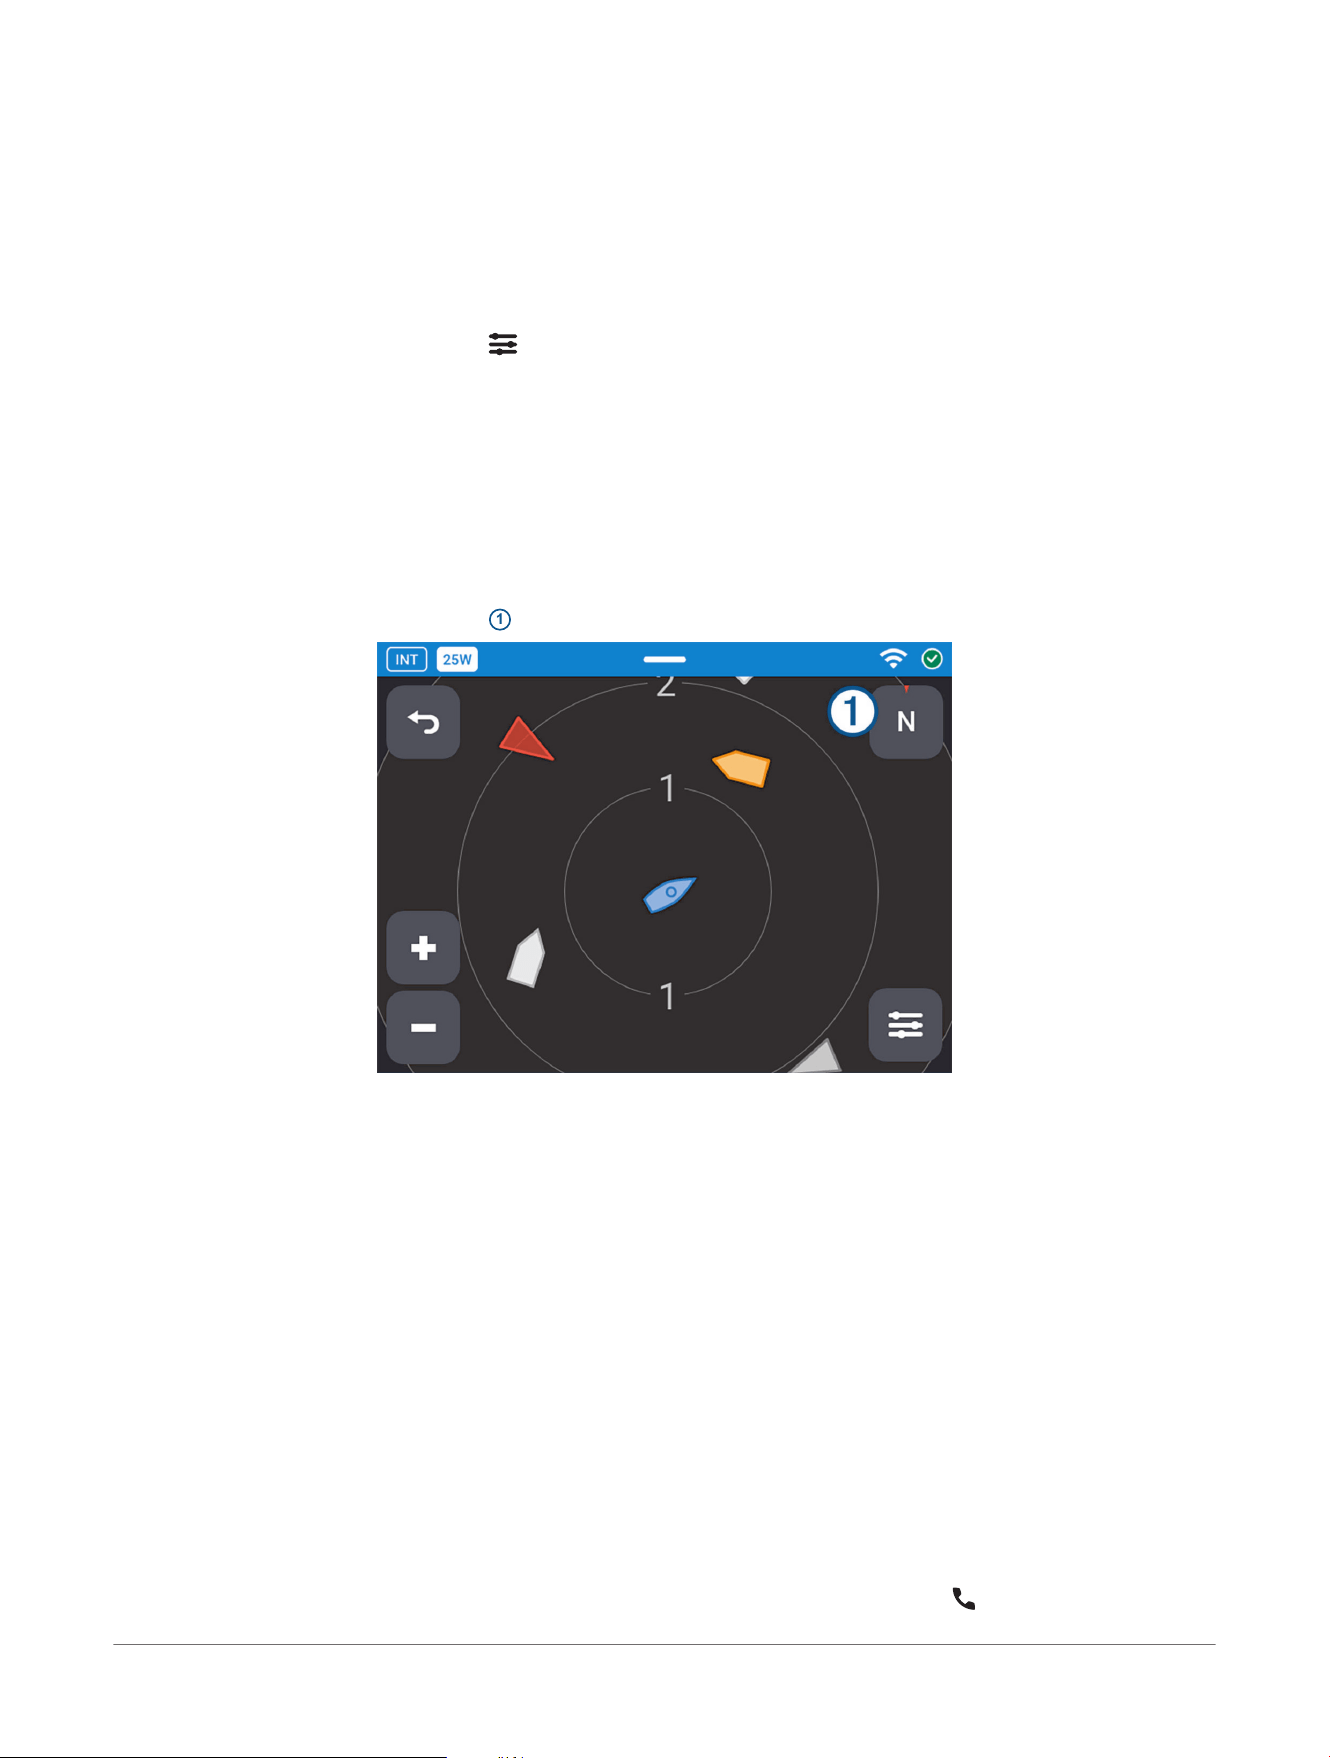
AIS Plotter
The plotter screen shows the location of nearby AIS targets in relation to you.
1
Select to change the plotter orientation (Changing the Plotter Orientation, page19).
Select to return to the VHF screen.
Select to zoom in and out of the plotter view.
Select to apply a filter to the plotter screen, reducing the number of vessels shown (Filtering the Plotter View,
page19).
You can select any AIS target on the screen to view more information (Viewing AIS Target Information,
page19).
When there is a risk of colliding with a vessel, the icon on the plotter screen is shown in orange. If the risk of
collision persists, the icon turns red, and the radio issues a collision alarm (AIS Alarms, page18). You can
customize your collision alarms to different conditions (Alarm Settings, page29).
AIS targets are represented by different icons depending on what type of target they are (AIS Plotter Icons,
page18).
AIS Plotter Icons
Your vessel
Class A vessel
1
Class B vessel
1
Aid to Navigation (AtoN) device
Man Overboard (MOB) device
The vessel class depends on the type of AIS transmitter on the vessel. Class A transmitters tend to be on larger
ocean-going vessels, and class B transmitters tend to be on smaller coastal vessels. A class A AIS transmitter
reaches longer distances and reports more information than a class B transmitter.
AIS Alarms
The device issues an audible alarm and shows a notification banner at the top of the screen when AIS traffic
indicates a situation that may require your immediate attention.
When the device detects an AIS-enabled MOB (Man Overboard) device, indicating that there is a person
overboard near you, it issues an MOB alarm.
When the device detects a risk of collision between your vessel and an AIS target, based on its speed and
course relative to you, it issues a collision alarm.
1
Shown in orange or red when there is a risk of collision.
18 Garmin Signal™ VHF Marine Radio
Owner's Manual
AIS Plotter
You can select View to see information about the target that triggered the alarm, and call it using DSC (Viewing
AIS Target Information, page19).
You can use the controls panel to silence all collision alarms (Controls Panel, page23).
You can customize your AIS alarms (Alarm Settings, page29).
Filtering the Plotter View
You can filter the plotter view to reduce the number of targets shown on the screen and focus on the most
relevant targets.
1 From the AIS plotter screen, select .
2 Select an option:
• Select All to show all AIS targets.
• Select Moving to show moving AIS targets only.
• Select High Risk to show high-risk AIS targets only. High-risk targets are those that may be in a collision
path with you (Alarm Settings, page29).
• Select Contacts to show only vessels you have added to your contacts (Adding a Vessel to your Contacts,
page17).
Changing the Plotter Orientation
1 From the AIS plotter screen, select
1
.
2 Select an option:
• Select North Up to keep north at the top of the screen.
• Select Heading Up to rotate the plotter automatically so the top of the screen always matches your
heading (the direction the bow points toward).
NOTE: If there is no heading sensor connected to your NMEA 2000
®
network, the device estimates your
heading using GPS data.
• Select Course Up to rotate the plotter automatically so the top of the screen always matches your course
(the vessel's direction of travel).
When you select Heading Up or Course Up, the icon on the plotter screen shows your present heading
or course in degrees. You can change the north reference used for calculating your heading and course
(Preferences, page28).
Viewing AIS Target Information
You can view information about an AIS target such as the name, class, speed, callsign, and MMSI number.
1 From the AIS plotter screen, touch a target icon or turn the dial to select a target.
2 Select More, or press the dial.
The AIS target information screen appears.
3 Swipe the screen or turn the dial to view different pages of information about the target.
You can select Add Vessel to Contacts to add the target to your contact list, or select to call it now using DSC
(Digital Selective Calling, page15).
AIS Plotter
Garmin Signal™ VHF Marine Radio
Owner's Manual
19

Turning Off Position Reports
To avoid transmitting your position over AIS (Garmin Signal
™
VHF 400 radio only) or responding to DSC position
requests, you can enable stealth mode.
1 Swipe down from the top of the screen to open the controls panel.
2 Select Stealth.
The Stealth option is highlighted when stealth mode is on.
20 Garmin Signal™ VHF Marine Radio
Owner's Manual
AIS Plotter

Hailer
If the radio is connected to a hailer loudspeaker, you can address the crew and nearby vessels using the fist
mic.
See the Installation Instructions at garmin.com/manuals/SignalVHF for more information on connecting a hailer
loudspeaker.
NOTE: You must use a head unit to speak through the hailer loudspeaker. You cannot use the hailer from a
remote station.
Using the Hailer
1 Select > Hailer.
The fist mic or external speaker begins playing sound picked up by the loudspeaker.
NOTE: While in hailer mode, the radio does not play VHF traffic.
2 Hold the push-to-talk (PTT) button on the fist mic to broadcast through the hailer louspeaker.
Hailer
Garmin Signal™ VHF Marine Radio
Owner's Manual
21

Intercom
If you have one or more Garmin Signal
™
RM 100 remote stations connected to the Garmin Signal VHF 400/220
head unit through the Garmin BlueNet
™
network, you can use the intercom to speak to the other stations.
See the Installation Instructions at garmin.com/manuals/SignalVHF for more information on remote stations.
Using the Intercom
1 Select > Intercom.
The intercom screen appears.
NOTE: While in intercom mode, the radio does not play VHF traffic.
2 Hold the push-to-talk button (PTT) on the fist mic to speak to all connected remote stations.
22 Garmin Signal™ VHF Marine Radio
Owner's Manual
Intercom
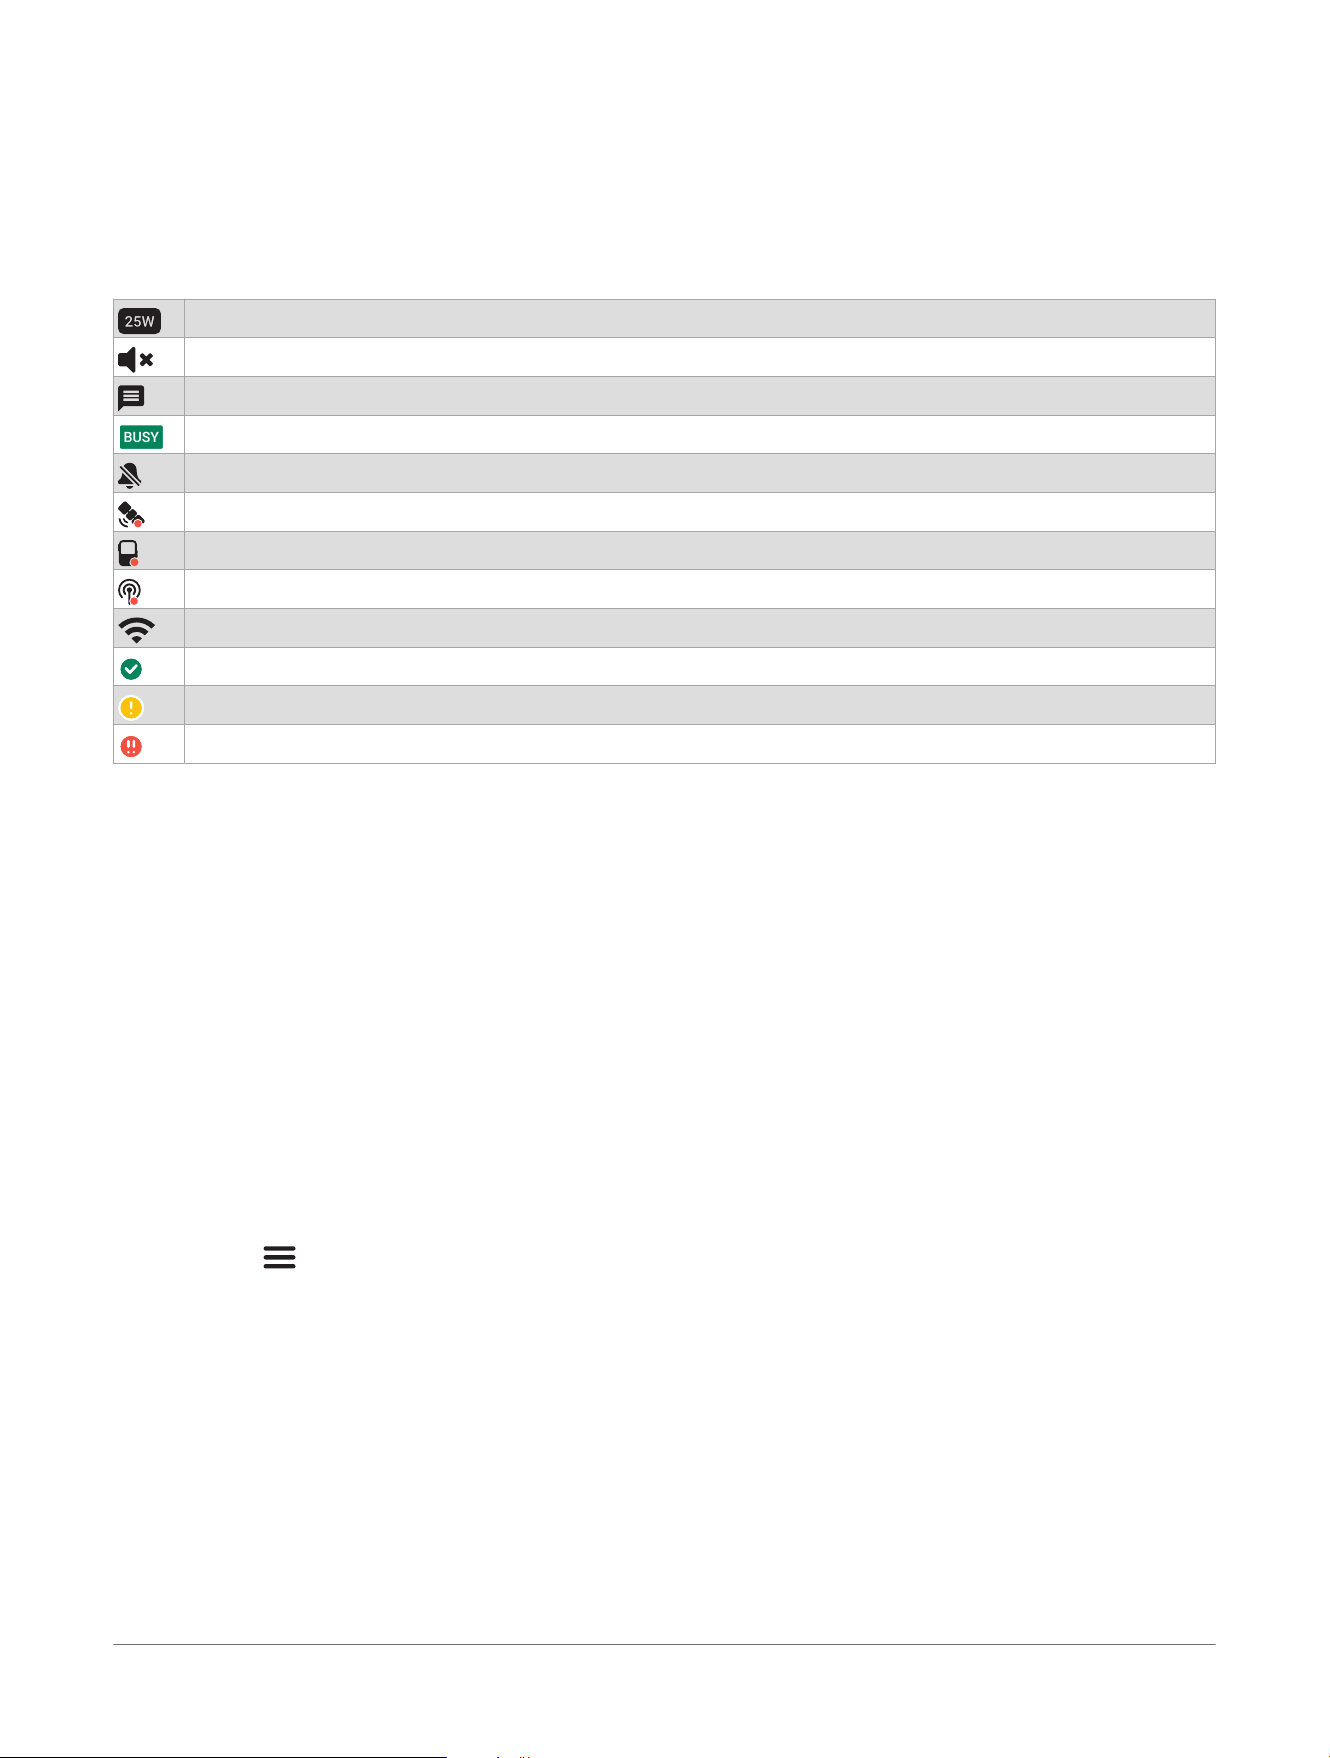
Status Bar
The status bar at the top of the screen displays labels and icons to report the status of the device.
The first label on the left indicates the current VHF region. Other labels and icons on the left indicate VHF
status. The icons on the right side of the status bar relate to general device status.
You can drag the bar down from the top of the screen to open the controls panel (Controls Panel, page23).
Refer to the table to identify the other labels and icons on the status bar.
Transmit power is set to high.
The volume for the fist mic and the external speaker (if applicable) are both set to zero.
There are unread DSC messages.
BUSY
The VHF antenna is receiving a VHF transmission.
AIS collision alarms are turned off.
There is no GPS signal.
The fist mic is disconnected.
There is a problem with the VHF, DSC, or AIS system.
The radio's Wi‑Fi
®
network is on.
All systems are operating normally.
There is a potential issue with one or more systems.
There is a system error.
TIP: You can drag the status bar down from the top of the screen, and select Alerts to see all the current system
alerts.
Controls Panel
You can swipe down from the top of the screen to open the controls panel. The options in the controls panel are
highlighted when they are turned on.
Stealth: Select to turn off AIS transmissions (Garmin Signal
™
VHF 400 only) and ignore DSC position requests
(Turning Off Position Reports, page20).
Alarms: Select to silence AIS collision alarms (AIS Alarms, page18).
Night: Select to set the screen to night mode.
Intercom: Select to open the intercom screen (Intercom, page22).
Alerts: Select to view system-related alerts.
Display Brightness: Touch the bar or turn the dial to change the brightness of the screen.
System Alerts
The radio reports errors using notification banners at the top of the screen. You can select View to open a
diagnostics page that may help you investigate the issue.
You can select > Settings> Alerts to view current system alerts.
Check the list for additional information on certain system alerts.
System Error: A system fault has been detected.
If the error persists, contact Garmin
®
support at support.garmin.com.
Receiver Error: A radio receiver fault has been detected.
If the error persists, contact Garmin support at support.garmin.com.
Transmitter Error: A radio transmitter fault has been detected.
If the error persists, contact Garmin support at support.garmin.com.
VHF Antenna Fault: The VHF antenna is not functioning correctly.
Check the connection between the radio and the antenna.
AIS position reports: The radio is not sending AIS position reports.
Look for other system alerts that may explain the reason the radio is not sending AIS position reports, such
as that stealth mode is turned on or that a base station is restricting AIS traffic.
Status Bar
Garmin Signal™ VHF Marine Radio
Owner's Manual
23

Device Power Supply: The radio detected an unusual voltage drop during the last transmission.
Check the connection between the radio and the power supply. Make sure the power supply is adequate for
the radio (Specifications, page33).
System Temperature: The radio is too hot. Some functions are disabled temporarily to prevent overheating.
Check for adequate ventilation around the metallic portion of the back of the device.
High Background Noise: The fist mic is detecting too much background noise.
Hold the fist mic closer to your mouth when transmitting, or eliminate sources of excess background noise.
VHF Antenna: The VHF antenna performance is poor.
Check the connection between the radio and the antenna. Make sure the antenna is well tuned for marine
VHF and AIS. Make sure the antenna cable is rated appropriately for the antenna in use.
GPS Position: GPS position accuracy is low, or GPS position has been lost.
If using an external GPS antenna, check the connection between the radio and the GPS antenna connection.
If using the internal GPS antenna, make sure there are no metallic objects near the radio that may cause
interference.
No AIS Targets Detected: The AIS receiver is not detecting any AIS targets.
Check the connection between the radio and the VHF/AIS antenna.
DSC Self-Test Failure: The automated DSC system self-test has failed.
There may be an issue with the DSC system. If the error persists, contact Garmin support at
support.garmin.com.
AIS Self-Test Failure: The automated AIS system self-test has failed.
There may be an issue with the AIS system. If the error persists, contact Garmin support at
support.garmin.com.
AIS Quiet Mode: A base station in your area is temporarily restricting AIS transmissions.
Base stations restrict AIS transmissions from some vessel classes to prevent AIS congestion in high traffic
areas. AIS transmissions resume automatically after you leave the area or the base station lifts restrictions.
GPS Antenna Fault: The GPS antenna is not functioning correctly.
Check the connection between the radio and the GPS antenna.
Fist Mic Connection: The radio has lost connection with the fist mic.
Check the fist mic power connection. Reconnect the fist mic, if necessary (Pairing a Fist Mic, page28).
Heading Sensor: The radio has stopped receiving data from the heading sensor.
Check the connection between the radio and the NMEA 2000
®
network. Check the connection between the
heading sensor and the NMEA 2000 network.
Stealth Mode is Active: The radio is not transmitting AIS position reports or responding to DSC position reports
because stealth mode is turned on.
Turn off stealth mode (Turning Off Position Reports, page20).
MMSI Not Programmed: The radio cannot transmit VHF or AIS because it has not been programmed with an
MMSI number.
Program the radio with an MMSI number (Programming the Radio Using the ActiveCaptain
®
App, page8).
Transmitter Protection: The radio was transmitting continuously for too long and was turned off automatically.
Make sure the push-to-talk (PTT) button on the fist mic is operating normally. If the error persists, contact
Garmin support at support.garmin.com.
24
Garmin Signal™ VHF Marine Radio
Owner's Manual
Status Bar
Automatic Transmitter Identification System
Automatic Transmitter Identification System (ATIS) is a marine VHF radio identification system required on
inland waterways in some European countries.
With ATIS enabled, the radio automatically ends each VHF transmission with a digital tone that identifies your
vessel to listening stations.
Entering Your ATIS ID Number
1 Select > Settings> ATIS ID.
2 Enter your ATIS ID number.
3 When prompted, select Yes to confirm.
Enabling ATIS
Before you can enable ATIS, you must enter an ATIS ID (Entering Your ATIS ID Number, page25) and select an
applicable VHF region (Selecting your VHF Region, page8).
1 Select > Settings> VHF Region.
2 Select Inland Waterways to turn on ATIS.
NOTE: ATIS is available only in the regions in which it is used. If the Inland Waterways option is not available,
you must select a different VHF region before you can turn it on (Selecting your VHF Region, page8).
NOTE: When ATIS is turned on, watch modes and DSC (Digital Selective Calling) are disabled, and some VHF
channels on the international band are restricted to low power (1W).
Automatic Transmitter Identification
System
Garmin Signal™ VHF Marine Radio
Owner's Manual
25
Accessing Data Over the Wi‑Fi
®
Network
The Garmin Signal
™
VHF radio broadcasts NMEA
®
0183 messages over the Wi‑Fi network. Compatible third-
party devices and applications can connect to the Wi‑Fi network and integrate data from the radio and from
other devices in your NMEA 2000
®
network (NMEA
®
0183 Messages, page26).
1 If necessary, enable the Wi‑Fi network on the radio (Configuring the Wi‑Fi
®
Network, page29).
2 Connect the third-party device or application to the Wi‑Fi network.
3 Select an option:
•
If the radio is connected to a compatible Garmin
®
chartplotter over the Garmin BlueNet
™
network, select
> Settings> Garmin Marine Network.
• If the radio is not connected to a compatible Garmin chartplotter, select > Settings> Wi-Fi.
4 Note the address shown in the IP Address field.
This is the IP address used to connect to the radio.
5 Connect the third-party device or application, using the IP address you noted in the previous step, and TCP
port number 39150.
NMEA
®
0183 Messages
The radio broadcasts these NMEA 0183 messages over the Wi‑Fi
®
network to share data with third-party devices
and applications.
Messages Generated by the Device
Message Description
AITXT AIS system status
ABK UAIS addressed and binary broadcast acknowledgment
ACA UAIS regional channel assignment message
ACS UAIS channel management information source
ALR Set alarm state
GSA GNSS DOP and activesatellites
GST GNSS pseudo range error statistics
GSV GNSS satellites in view
RMB Recommended minimum navigation information
RMC Recommended minimum specific GNSS data
SSD UAIS ship static data (if queried using AIQ)
VDM UAIS VHF data-link message
VDO UAIS VHF data-link own-vessel report
Messages Translated from NMEA 2000
®
Sources, if Available
Message Description
APB Heading/Track controller (autopilot) sentence "B"
BOD Bearing: origin to destination
BWW Bearing: waypoint to waypoint
DBT Depth below transducer
DPT Depth
HDG Heading, deviation, and variation
HDT Heading, true
HDM Heading, magnetic
MTW Water temperature
MWD Wind direction and speed
MWV Wind speed and angle
VHW Water speed and heading
26 Garmin Signal™ VHF Marine Radio
Owner's Manual
Accessing Data Over the Wi‑Fi
®
Network
Message Description
VLW Dual ground/water distance
VTG Course over ground and ground speed
WPL Waypoint location
XDR Transducer measurements
XTE Cross-Track error, measured
You can find more information about the NMEA 0183 standard at nmea.org.
Accessing Data Over the Wi‑Fi
®
Network Garmin Signal™ VHF Marine Radio
Owner's Manual
27
Settings
Select > Settings.
Fist Mic: Manages the fist mic connection.
Preferences: Sets user interface preferences (Preferences, page28).
VHF Region: Sets the VHF region (Selecting your VHF Region, page8) and turns ATIS on or off (Automatic
Transmitter Identification System, page25).
Weather: Sets the weather channel shortcut (Selecting Your Local Weather Channel, page8).
DSC Configuration: Sets digital selective calling (DSC) preferences (DSC Configuration, page29).
Inactivity Timeout: Sets the inactivity timeout. When you don't use the radio for longer than this time value, it
automatically switches to the VHF screen.
Noise Cancellation: Enables or disables background noise cancellation for sent and received VHF
transmissions.
Long Range: Enables long range AIS transmission (Garmin Signal
™
VHF 400 only).
Plotter: Sets AIS plotter filters (Filtering the Plotter View, page19) and changes the plotter orientation (Changing
the Plotter Orientation, page19).
Heading Sensor: Shows information on the heading sensor connected to the radio through the NMEA 2000
®
network, if available.
AIS Alarms: Configures AIS collision and MOB alarms (Alarm Settings, page29).
Stealth Mode: Pauses the transmission of position reports (Turning Off Position Reports, page20).
Position Settings: Sets GNSS position preferences (Position Settings, page29).
Satellite View: Shows the quality of your GNSS signal.
Wi-Fi: Configures the Wi‑Fi
®
network (Configuring the Wi‑Fi
®
Network, page29).
Garmin Marine Network: Shows the IP address for the radio within the Garmin BlueNet
™
network.
NMEA 2000: Sets NMEA 2000 preferences (NMEA 2000
®
Settings, page29).
Vessel Details: Shows your MMSI number and vessel information.
ATIS ID: Sets your ATIS ID (Entering Your ATIS ID Number, page25).
Alerts: Shows alerts related to the VHF, DSC, and AIS systems.
Diagnostics: Shows antenna VSWR measurements and other diagnostic data about your VHF, DSC, and AIS
systems.
About: Shows device information, such as model, software version, and serial number.
Reset: Restores device settings to the factory defaults (Restoring Factory Default Settings, page30).
Pairing a Fist Mic
The fist mic connects to the radio wirelessly, and is paired at the factory. If you replace your fist mic, you must
pair the new fist mic with the radio.
NOTE: You cannot connect two fist mics to the same head unit or remote station.
1 On the radio, select > Settings> Fist Mic> Fist Mic Connection.
2 Select to remove the old fist mic.
3 On the fist mic, hold 16/C and for six seconds.
The button LED pulses white while the fist mic is in pairing mode.
4 Select Connect to New Fist Mic.
The radio searches for a fist mic in pairing mode.
5 Select the new fist mic when it appears on the screen.
Preferences
Select > Settings> Preferences.
Language: Sets the interface language.
Units: Sets the units of measure used in the user interface.
VHF Channel Designation: Labels simplex variants of duplex channels with a prefix (10 or 20) or a suffix (A or
B).
Bearings: Sets the north reference for displaying bearings (the direction from your vessel to something else,
such as an AIS target).
28
Garmin Signal™ VHF Marine Radio
Owner's Manual
Settings
Headings: Sets the north reference for displaying headings (the direction the bow points toward).
COGs: Sets the north reference for displaying course over ground (the vessel's actual direction of travel).
Position Format: Sets the format for displaying GPS coordinates.
DSC Configuration
Select > Settings> DSC Configuration.
Reply Unable: Automatically replies "Unable" to all incoming DSC calls. Replying "Unable" indicates to potential
callers that you cannot respond to their call.
Test Calls: Automatically accepts test calls from other vessels (Placing a Test Call, page16).
Auto Accept Timer: Sets the amount of time to wait before the radio accepts a call automatically.
Distress Call Timeout: Sets the amount of time to wait before the radio ignores a distress call automatically.
Non-Distress Call Timeout: Sets the amount of time to wait before the radio ignores a non-distress call
automatically.
Alarm Settings
Collision Alarm Settings
Select > Settings> AIS Alarms> Collision Alarms.
Collision Alarms: Sets and disables collision alarms.
Closest Point of Approach (CPA): Sets the closest point of approach (CPA) value for all targets. If a target is
projected to approach your vessel closer than the specified distance, it is considered a collision risk.
Advanced warning (TCPA): Sets the Advanced warning (Time to Closest Point of Approach) value for all
targets. When a target is considered a collision risk, the radio issues an alert at the specified time before the
vessel is projected to reach its closest point of approach to you.
Target Speed: Sets the threshold speed for all targets. If a target is considered a collision risk, but their speed is
lower than the specified value, the radio does not issue a collision alarm.
MOB Alarm Settings
Select > Settings> AIS Alarms> MOB Alarms.
MOB Alarms: Sets and disables man overboard (MOB) alarms.
Test MOB Alarms: If turned on, the radio issues an MOB alarm when it detects a test transmission from an
AIS-equipped MOB device.
Position Settings
Select > Settings> Position Settings.
Constellations: Sets the GNSS system to use for position data.
Antenna Choice: Sets whether to use the device's internal GNSS antenna or a connected GNSS antenna.
See the Installation Instructions at garmin.com/manuals/SignalVHF for more information on using an
external antenna.
Update Rate: Sets how often to obtain a position fix.
SBAS: Enables the use of satellite-based augmentation systems (SBAS) to enhance your position accuracy.
NMEA 2000
®
Settings
Select > Settings> NMEA 2000.
Identification: Sets numeric identifiers for the device within the NMEA 2000 network.
Diagnostics Alarms: Enables or disables sharing system alerts over the NMEA 2000 network.
COG Rate: Sets how often the device reports your course over ground over the NMEA 2000 network, in
miliseconds.
Position Rate: Sets how often the device reports your position over the NMEA 2000 network, in miliseconds.
Configuring the Wi‑Fi
®
Network
NOTE: If your radio is connected to a compatible Garmin
®
chartplotter over a Garmin BlueNet
™
network, you
cannot configure a Wi‑Fi network on the radio. You must use the chartplotter Wi‑Fi network instead. See the
chartplotter Owner's Manual for instructions on setting up the chartplotter Wi‑Fi network.
1 Select > Settings> Wi-Fi.
Settings
Garmin Signal™ VHF Marine Radio
Owner's Manual
29
2 If necessary, select Enable Wi-Fi.
3 Note the Wi‑Fi network SSID shown in the SSID field.
4 Select Password.
5 Using the virtual keyboard on the radio screen, enter a password for the radio's Wi‑Fi network.
NOTICE
The Wi‑Fi network provides access to configuration and data stored on your radio. You should keep the
password secret to prevent unauthorized access.
6 Select Done.
Restoring Factory Default Settings
1 Select > Settings> Reset.
2 Select an option:
• To clear the squelch level and turn on automatic squelch for all VHF channels, select Reset squelch
levels.
• To reset all settings back to factory defaults, select Reset settings to factory defaults.
NOTE: Restoring factory default settings does not clear the MMSI number and vessel information. You
must contact a Garmin
®
dealer to reprogram your radio (Reprogramming the Radio, page32).
30 Garmin Signal™ VHF Marine Radio
Owner's Manual
Settings
Software Updates
NOTICE
Failure to regularly update the software on your radio and connected devices may result in poor product
performance.
Garmin
®
releases software updates for marine devices on a regular basis. These software updates provide
support for new products, software improvements, or product performance enhancements. You should update
the software regularly throughout the life of the product for the best performance.
If your Garmin Signal
™
VHF radio is connected to the ActiveCaptain
®
app on your mobile device, the app
automatically prompts you to install new software updates when they become available.
If your Garmin Signal VHF radio is connected to a Garmin BlueNet
™
network with a compatible Garmin
chartplotter, the software on the Garmin Signal VHF radio updates automatically when you update the software
on the chartplotter.
You can find information on the latest Garmin marine device software updates at garmin.com/support/
software/marine/.
Checking for Software Updates in the ActiveCaptain
®
App
Before you can check for software updates using the ActiveCaptain app, you must connect the device to the app
(Connecting to a Mobile Device with the ActiveCaptain
®
App, page7).
You should follow these steps while you have good internet access on your mobile device, such as while
connected to your home network.
TIP: By default, the ActiveCaptain app downloads software updates from the internet only over Wi‑Fi
®
. You can
change the app data usage settings to download updates over a cellular network when Wi‑Fi is unavailable.
1 In the ActiveCaptain app, select My Marine Devices.
The app checks for software updates for your devices.
2 If an update is available, select Download.
The app downloads and stores the update to install it the next time the app connects to the applicable
device.
NOTE: In some cases, the app may have already downloaded the update in the background.
When you open the ActiveCaptain app and connect to your device, the software update is automatically
transferred and installed.
TIP: If the ActiveCaptain app does not automatically connect to your device, you can select Connect to
reconnect to it.
Software Updates
Garmin Signal™ VHF Marine Radio
Owner's Manual
31
Reprogramming the Radio
NOTICE
Operating a radio transmitter with an MMSI number that is assigned to a different vessel may lead to penalties
from your country's telecommunications authorities.
If you need to clear or change the MMSI number and vessel information that has been programmed into the
radio, you must contact your Garmin
®
dealer to obtain a new programming file. You do not need to bring the
radio to your dealer or remove it from your vessel.
1 Contact your Garmin dealer and request to clear the programming on your radio, or reprogram it with new
vessel information.
You must provide information to the dealer, including your Garmin account email address, and your device
serial number and unit ID (Viewing Device Information, page34). If you already have new vessel information
to program into the radio, you can provide it to the dealer at the same time.
The dealer enters the information into Garmin servers.
2 Check your inbox for an email notification from Garmin.
The email notification is sent with a programming file attached as a backup. This file is also delivered and
applied to the radio automatically through the ActiveCaptain
®
app.
TIP: In case you run into internet connectivity issues and need to load the programming file manually, you
should save a copy of it to your mobile device or computer.
3 Open the ActiveCaptain app.
The ActiveCaptain app downloads the programming file over the internet and stores it. The app applies the
programming file to the radio automatically, as soon as the radio turns on and connects to the app.
NOTE: If you do not have access to the internet on your mobile device, you can manually load the
programming file that was attached to the email notification by opening it or sharing it to the ActiveCaptain
app. If you are unable to use the ActiveCaptain app, you can use a computer to load the programming file
directly onto the radio (Reprogramming the Radio Using a Computer, page32).
If you provided your new vessel information and MMSI number to the dealer, the radio is programmed and ready
to use on the new vessel. If you did not provide new information, the previous programming is cleared. The radio
cannot transmit until you program it again with your new vessel information and MMSI number.
The steps for programming the radio with new vessel information after clearing it are the same as when the
radio was programmed the first time (Programming the Radio Using the ActiveCaptain
®
App, page8).
Reprogramming the Radio Using a Computer
1 If necessary, enable the Wi‑Fi
®
network on the radio (Configuring the Wi‑Fi
®
Network, page29).
2 Select an option:
•
If the radio is connected to a compatible Garmin
®
chartplotter over the Garmin BlueNet
™
network, select
> Settings> Garmin Marine Network.
• If the radio is not connected to a compatible Garmin chartplotter, select > Settings> Wi-Fi.
3 Note the address shown in the IP Address field.
This is the IP address you can use to access the radio over Wi‑Fi, using a web browser.
4 On the computer, connect to the Wi‑Fi network.
If the radio is connected to a Garmin chartplotter over the Garmin BlueNet network, you must connect to the
chartplotter Wi‑Fi network.
5 Open a web browser, and enter the radio's IP address, as noted in the previous step, into the address bar.
6 Select Secure programming.
7 Select Browse, and locate the programming file that was attached to the email notification from Garmin.
8 Select Upload.
32
Garmin Signal™ VHF Marine Radio
Owner's Manual
Reprogramming the Radio
Specifications
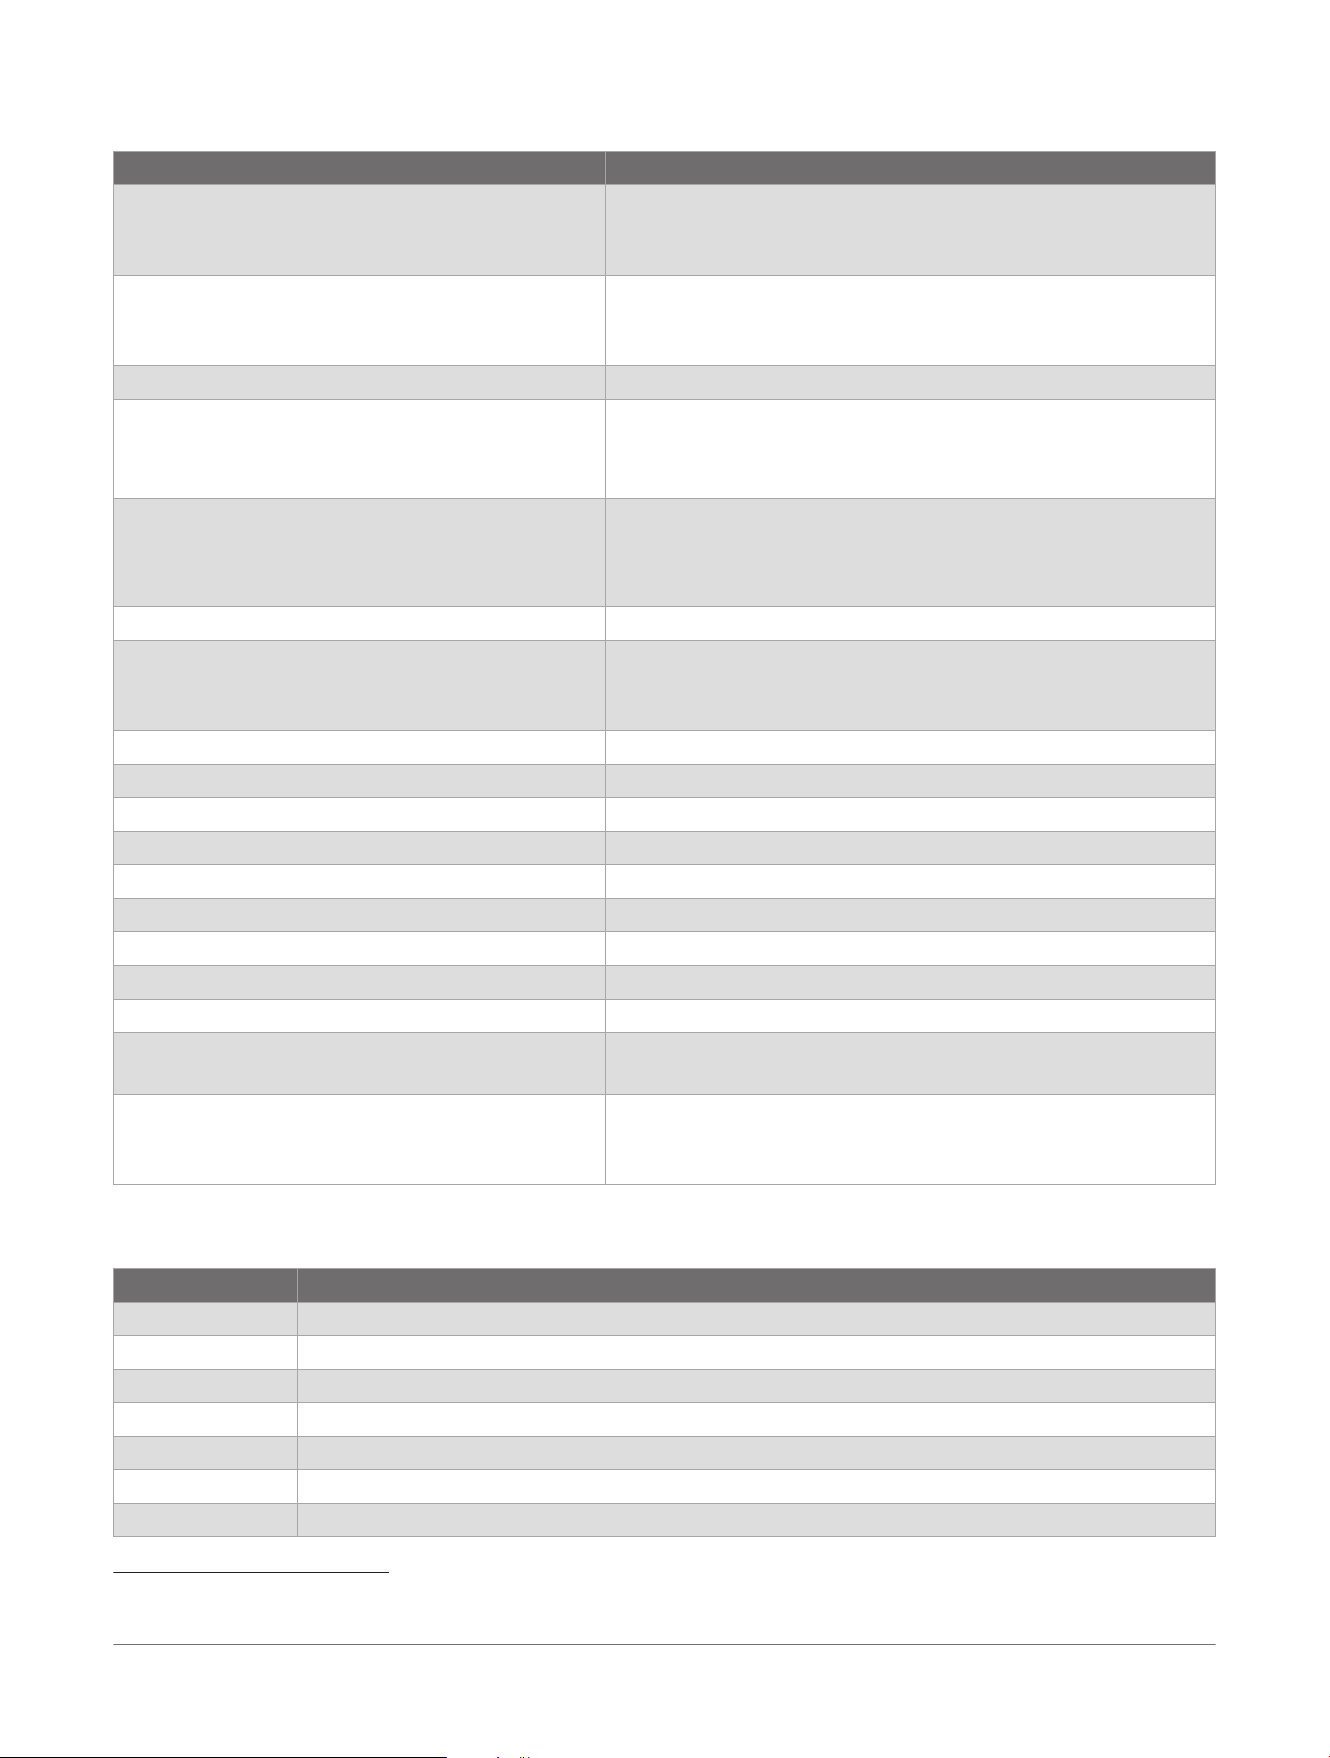
Specification Measurement
Dimensions (H x W x D) Head unit: 75 x 160 x 104mm (3.0 × 6.3 × 4.1in.)
Remote station: 75 x 160 x 29mm (3.0 × 6.3 × 1.2in.)
Fist mic: 100 × 60 × 31 mm (3.9 × 2.4 × 1.2 in.)
Weight Head unit: 655 g (1.45 lbs.)
Remote station: 240 g (0.53 lbs.)
Fist mic: 245g (0.54 lbs.)
Operating temperature range From −20° to 55°C (from −4° to 131°F)
Water rating
Head unit: IEC 60529 IPX6 and IPX7
2
Remote station: IEC 60529 IPX6 and IPX7
2
Fist mic: IEC 60529 IPX7
3
Compass-safe distance
Head unit: 70 cm (27
9
/
16
in.)
Remote station: 70 cm (27
9
/
16
in.)
Fist mic and fist mic hanger: 40 cm (15
3
/
4
in.)
Operating voltage From 9.6 to 32Vdc
Current draw @ 12V Head unit: 700mA, 6A maximum
Remote station: 400mA, 1.8A maximum
Fist mic: 90mA, 0.9A maximum
VHF/AIS antenna connector S0-239 (50ohms)
Maximum antenna gain 6dBi
Antenna port impedance 50ohms
External GNSS antenna connector SMA
Maximum fist mic speaker output power 5W RMS, <1% THD
Maximum external speaker output power 15W RMS, <1% THD, 4 Ω
Maximum hailer loudspeaker output power 25W RMS, <1% THD, 4 Ω
Remote station support
Up to five Garmin Signal
™
RM 100 remote stations
NMEA 2000
®
LEN @ 12.0 Vdc 1 (50mA)
VHF Frequency Range Tx: 156.025 – 162.025 MHz
Rx: 156.025 – 163.275 MHz
Wireless frequency and output power 156.025 – 162.025 MHz: < 44 dBm
2401 – 2473 MHz: < 16.5 dBm
2400 – 2480 MHz: < 10dBm
NMEA 2000
®
PGN Information
Transmit
PGN Description
059392 ISO acknowledgment
060928 ISO address claim
061184 Single-frame proprietary
126208 NMEA
®
request group function
126464 PGN group's function
126720 Fast-packet proprietary
126983 Alert
2
The device withstands incidental exposure to water of up to 1m for up to 30min, and is protected against powerful jets of water. For more
information, go to www.garmin.com/waterrating.
3
The device withstands incidental exposure to water of up to 1m for up to 30min. For more information, go to www.garmin.com/waterrating.
Specifications Garmin Signal™ VHF Marine Radio
Owner's Manual
33
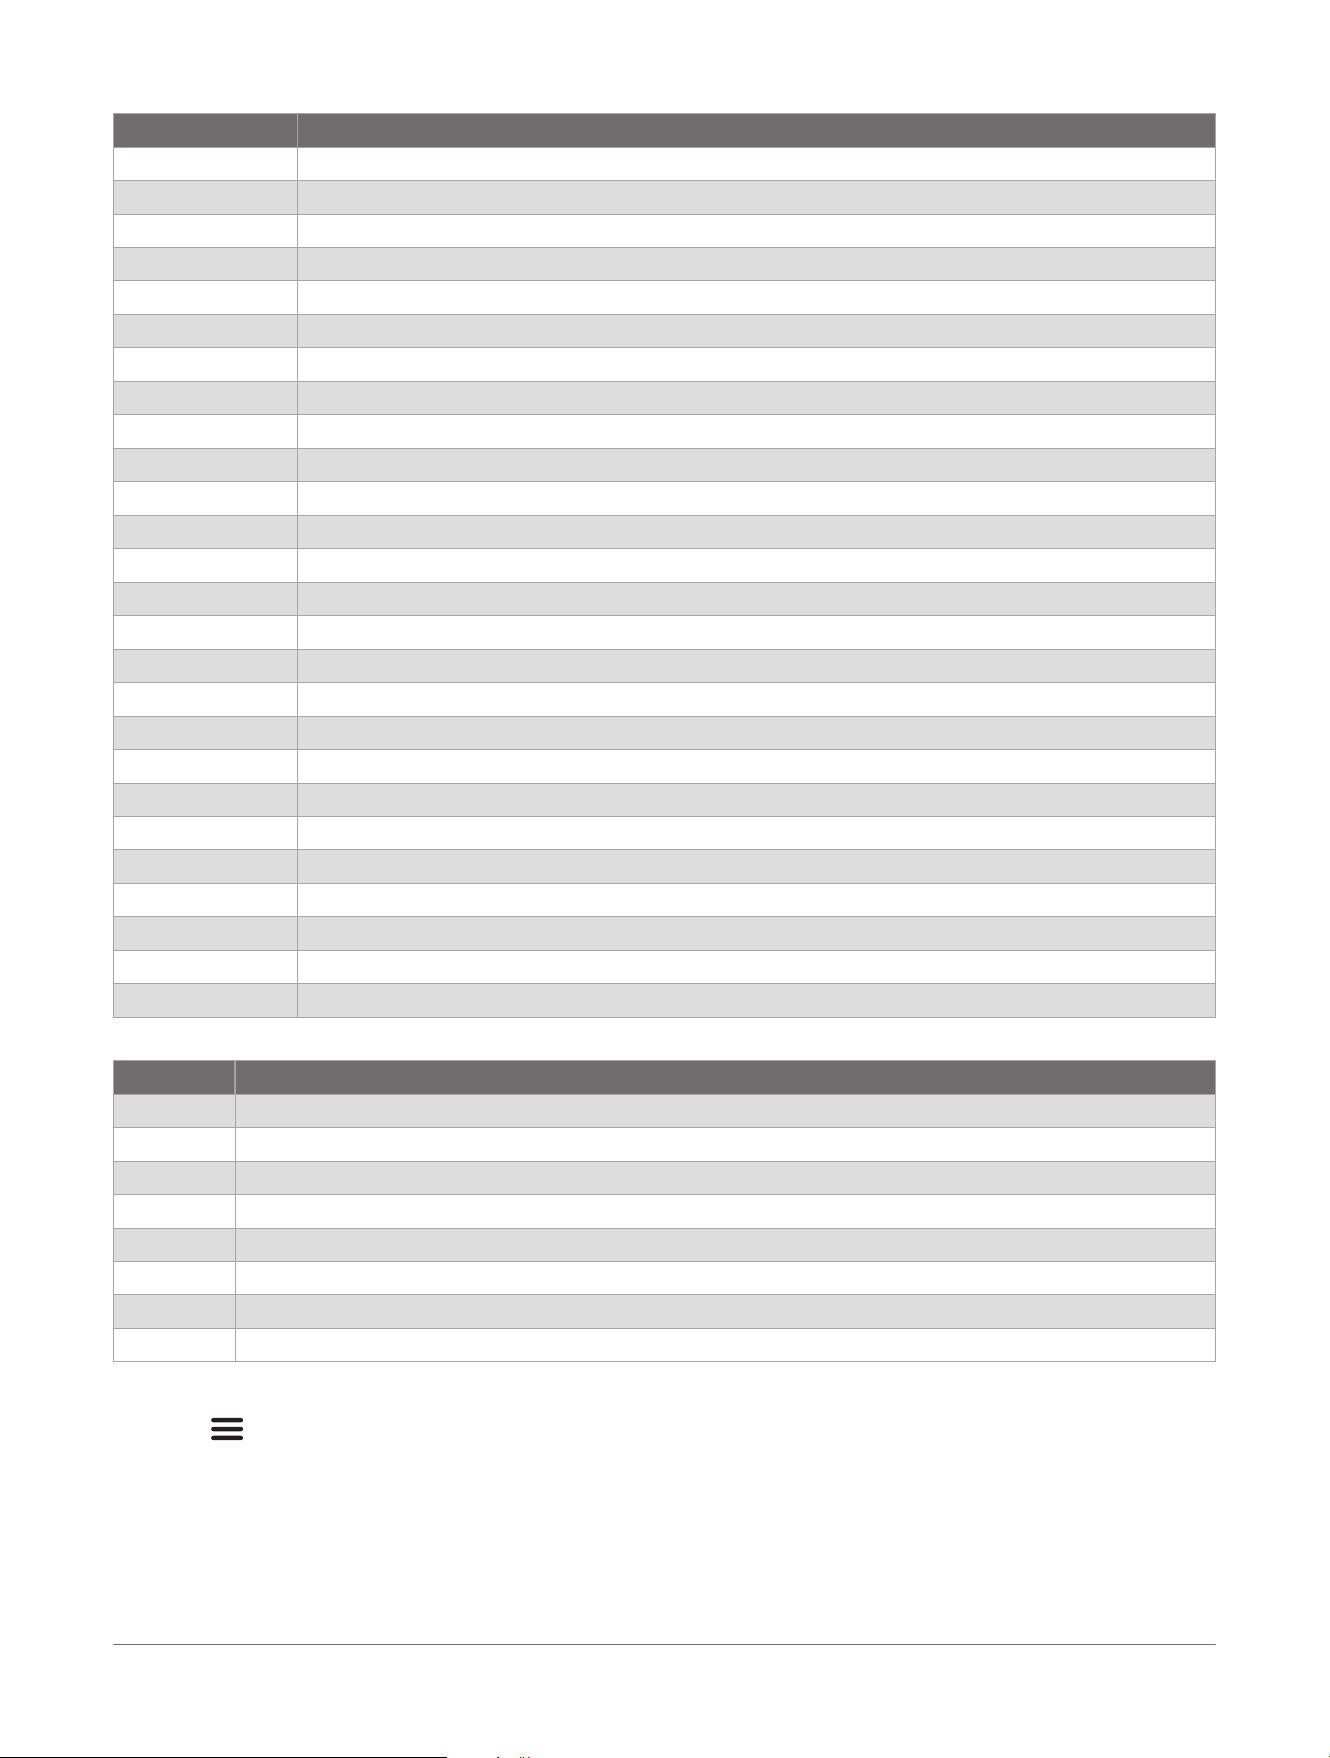
PGN Description
126985 Alert text
126993 Heartbeat
126996 Product information
126998 Configuration information
127233 Man overboard (MOB) notification
127258 Magnetic variation
129025 Position, rapid update
129026 COG & SOG, rapid update
129029 GNSS position data
129539 GNSS DOPs
129540 GNSS satellites in view
129044 Datum
129038 AIS class A position report
129039 AIS class B position report
129040 AIS class B extended position report
129041 AIS Aids to Navigation (AtoN) report
129794 AIS class A static and voyage-related data
129795 AIS addressed binary message
129797 AIS binary broadcast message
129798 AIS SAR aircraft position report
129799 Radio frequency, mode, and power
129801 AIS addressed safety-related message
129802 AIS safety-related broadcast message
129808 DSC call information
129809 AIS class B "CS" static data, part A
129810 AIS class B "CS" static data, part B
Receive
PGN Description
059904 ISO request
060160 ISO transport protocol, data transfer
060416 ISO transport protocol, connection management: RTS group function
060928 ISO address claim
065240 ISO commanded address
126208 NMEA request group function
126986 Alert configuration
127250 Vessel heading
Viewing Device Information
Select > Settings> About.
Network Interfaces and Services
The equipment, when connected using Wi‑Fi
®
, may use these network interfaces and services. These interfaces
and services are enabled by default, cannot be disabled, and are required for proper equipment operation.
• Garmin
®
proprietary services
• TCP
• HTTP
34
Garmin Signal™ VHF Marine Radio
Owner's Manual
Specifications

• mDNS
NOTE: When you connect the equipment to the network, private information is synchronized with the newly-
added equipment.
Specifications Garmin Signal™ VHF Marine Radio
Owner's Manual
35

support.garmin.com
© 2026 Garmin Ltd. or its subsidiaries
Garmin
®
and the Garmin logo are trademarks of Garmin Ltd. or its subsidiaries, registered in the USA and other countries. Garmin Signal
™
is a trademark of
Garmin Ltd. or its subsidiaries. These trademarks may not be used without the express permission of Garmin.
NMEA
®
and NMEA 2000
®
are registered trademarks of the National Marine Electronics Association. iOS
®
is a registered trademark of Cisco Systems, Inc. used
under license by Apple Inc. Android
™
is a trademark of Google LLC. Wi‑Fi
®
is a registered mark of Wi-Fi Alliance Corporation. Other trademarks and trade
names are those of their respective owners.
June 2026 GUID-376DCF06-863E-4772-9B73-834F8852F379 v1