
H200 Handset Guide DRAFT
Proprietary and Confidential
Page | 1
Handset Operations Manual
H200
Technical Reference Document
Version 1
© Jan-2026 RTX A/S, Denmark

H200 Handset Guide DRAFT
Proprietary and Confidential
Page | 5
1 About This Document
This document describes the features and functionalities available in the RTX SME VoIP DECT H200 Handset. We
describe how to operate the handset without going into details of its mechanical features. The reference for
features and operation in this manual is RTX generic mode.
1.1 Audience
This guide is intended for everyday users as well as system administrators.
1.2 Abbreviations
For the purpose of this document, the following abbreviations hold:
DECT: Digital Enhanced Cordless Telecommunications
IPEI: International Portable Equipment Identity
MAC: Media Access Control
PBX: Private Branch Exchange
1.3 References/Related Documentations
VoIP System Guide
1.4 Document History
REVISION AUTHOR ISSUE DATE COMMENTS
1 LIP 30-01-2026 First draft
1.5 What is new
What new features have been added.
REVISION WHAT IS NEW
1 First draft, new document
2 Making Handset Ready
In this chapter we briefly describe how to prepare the handset for use, install, and how to insert and charge new
batteries.
H200 Handset Guide DRAFT
Proprietary and Confidential
Page | 6
2.1 Package - Contents/Damage Inspection
2.1.1 Before Package Is Opened
Examine the shipping package for evidence of physical damage or mishandling prior to opening. If there is proof
of mishandling prior to opening, you must report it to the relevant support center of the regional representative
or operator.
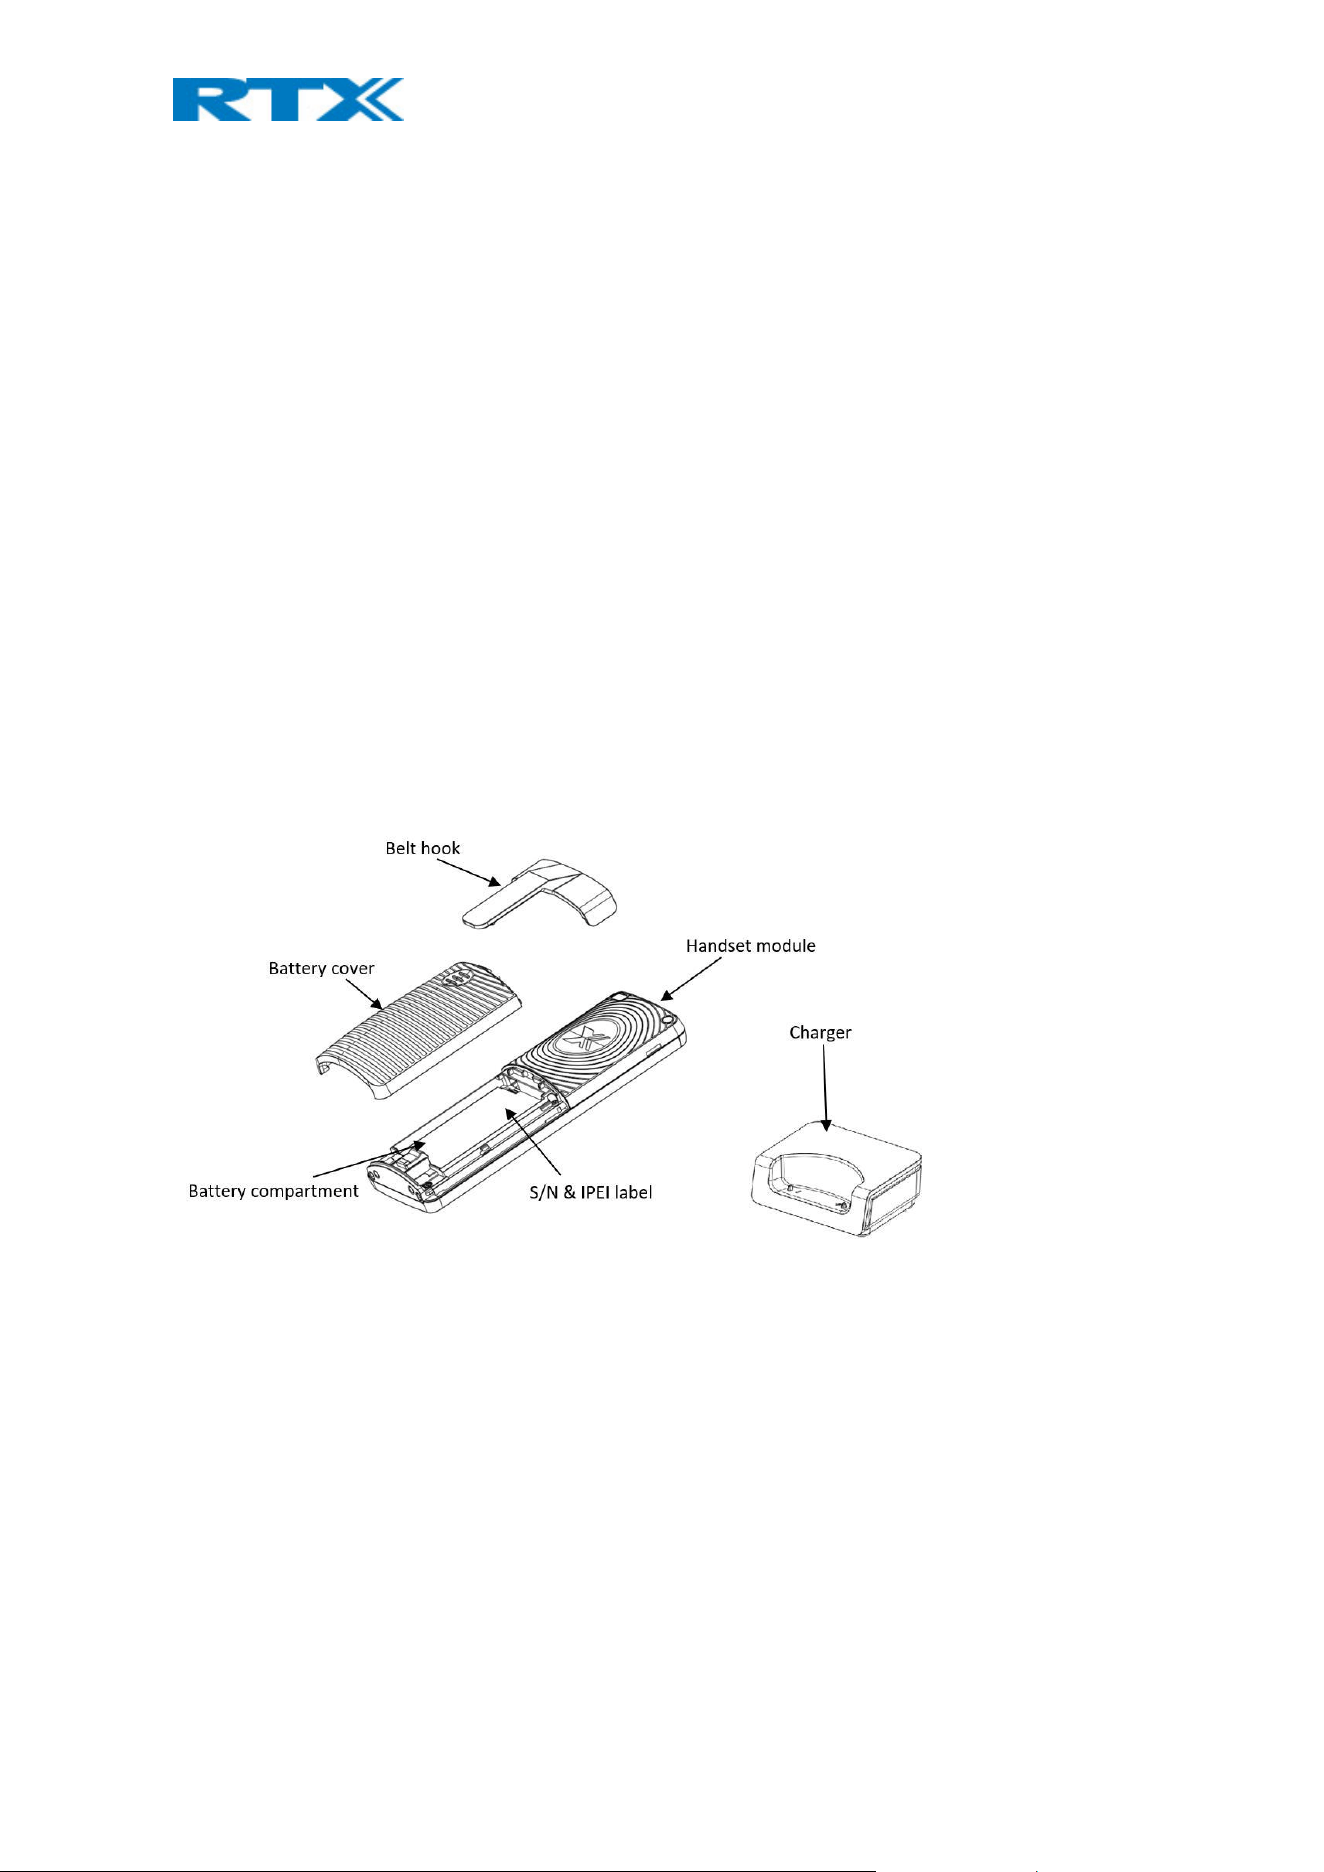
2.1.2 Contents of Package
Make sure all relevant components are available in the package before proceeding to the next step.
In principle, every shipped handset unit package/box contains the following items:
• 1 x Handset unit
• 1 x Battery cover
• 1 x Handset belt clip
• 1 x Charger
• 1 x A/C Adaptor
• 1 x Battery
• 1 x plastic cover to replace the belt clip

H200 Handset Guide DRAFT
Proprietary and Confidential
Page | 7
2.1.3 Damage Inspection
The following is the recommended procedure for you to use for damage inspection:
1. Examine all relevant components for damage.
2. Make a “defective on arrival - DOA” report or RMA to the operator. Do not move the shipping carton
until the operator has examined it. The operator/regional representative will initiate the necessary
procedure to process this RMA. They will guide the network administrator on how to return the
damaged package if necessary.
3. If no damage is found, then unwrap all the components and dispose of empty package/carton(s) in
accordance with country specific environmental regulations.
2.2 Before Using the Phone
The following are the precautions users should read before using the handset:
2.2.1 Installing the Battery
1. Never dispose a battery in fire, otherwise it will explode. It must be delivered to a recycling company.
2. Never replace the batteries in potentially explosive environments, e.g. close to inflammable
liquids/gases.
3. ONLY use approved batteries and chargers from the vendor or operator.
4. Do not disassemble, customize, or short circuit the battery
2.2.2 Using the Charger
Each handset is charged using a handset charger. The charger is a compact desktop unit designed to charge and
automatically maintain the correct battery charge levels and voltage. The handset charger is powered by AC
supply from 100-240VAC that supplies 5.0VDC at 1000mA. When charging the battery for the first time, it is
necessary to leave the handset in the charger for at least 10 hours before the battery is fully charged, and the
handset is ready for use.
2.2.3 Handset in the Charger
For correct charging, ensure that the room temperature is between 0°C and 25°C / 32°F and 77°F. Do not place
the handset in direct sunlight. The battery has a built-in heat sensor which will stop charging if the battery
temperature is too high.
If the handset is turned off when placed in charger, the handset turns on and shows (shortly) the charging
message “The battery is charging”. After a while the display backlight first dim and then turns off (if demo mode
is not enabled). There will be response for e.g. incoming calls.
If the handset is turned on when placed in charger, the display shows (shortly) the charging message “The
battery is charging”. After a while the display backlight first dim and then turns off if unless “Idle Screen Saver” is
switched on.
H200 Handset Guide DRAFT
Proprietary and Confidential
Page | 8
2.2.4 How to Open Back Cover
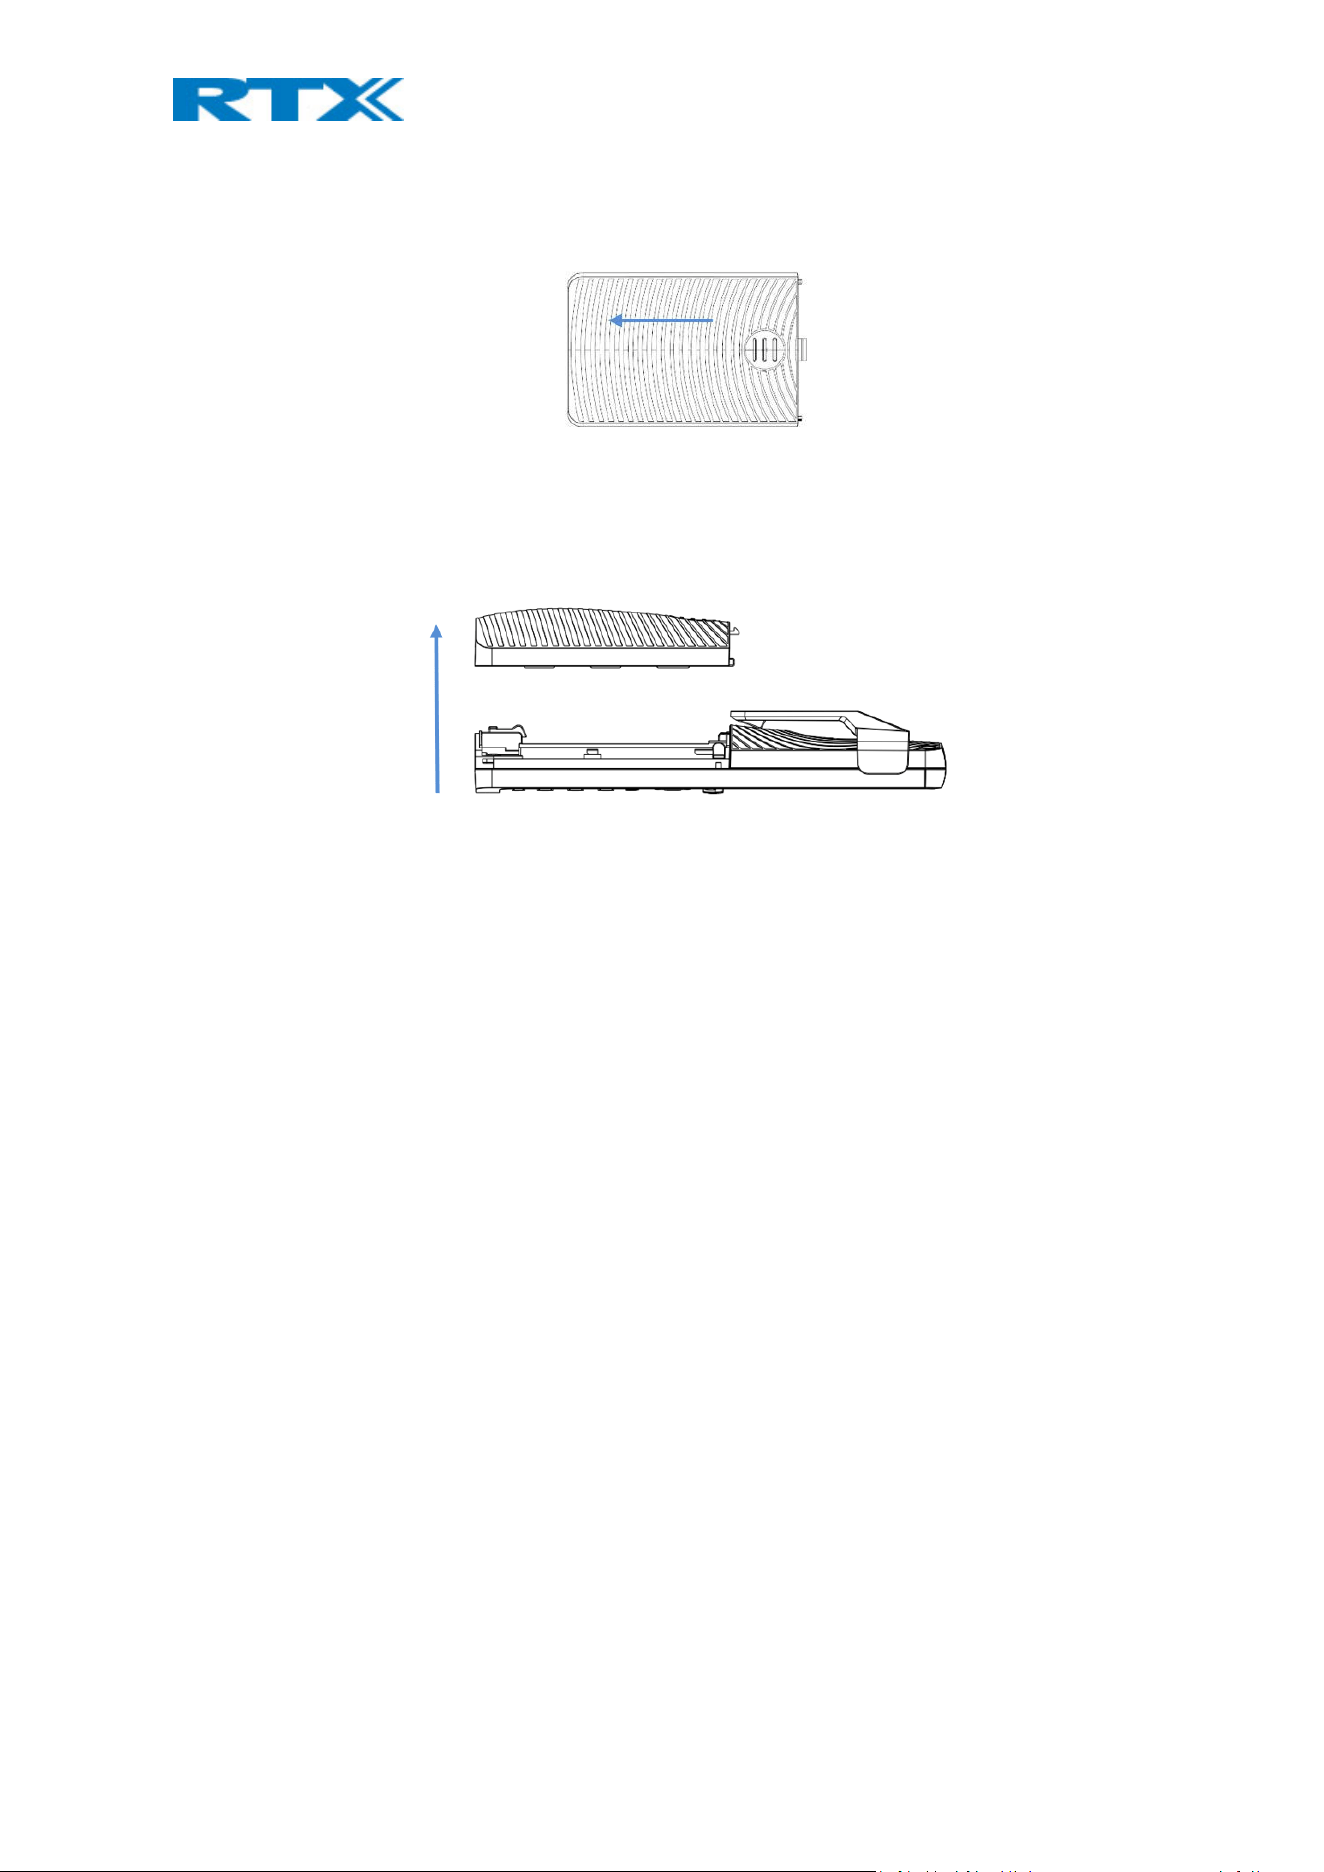
1. Open the belt lock and slide down the back-cover as shown on the image below
2. Remove Back Cover from Handset
2.2.5 How to Replace Battery
Remove the back cover from the handset as showed in section 2.2.4 How to Open Back Cover above. Then
remove the old battery and replace with a new one.
Note: The old and unused batteries must be delivered to a recycling company.
2.2.6 Handset Serial and IPEI/IPUI Number
The serial number and IPEI/IPUI number of each handset is found either on a label, which is placed behind the
battery, or on the packaging label. First, lift off handset back cover and lift the battery and read the serial
number.
3 Phone Overview
This section contains an overview of the handset from the front and rear side.
3.1 Handset – Front View
H200 Handset Guide DRAFT
Proprietary and Confidential
Page | 9
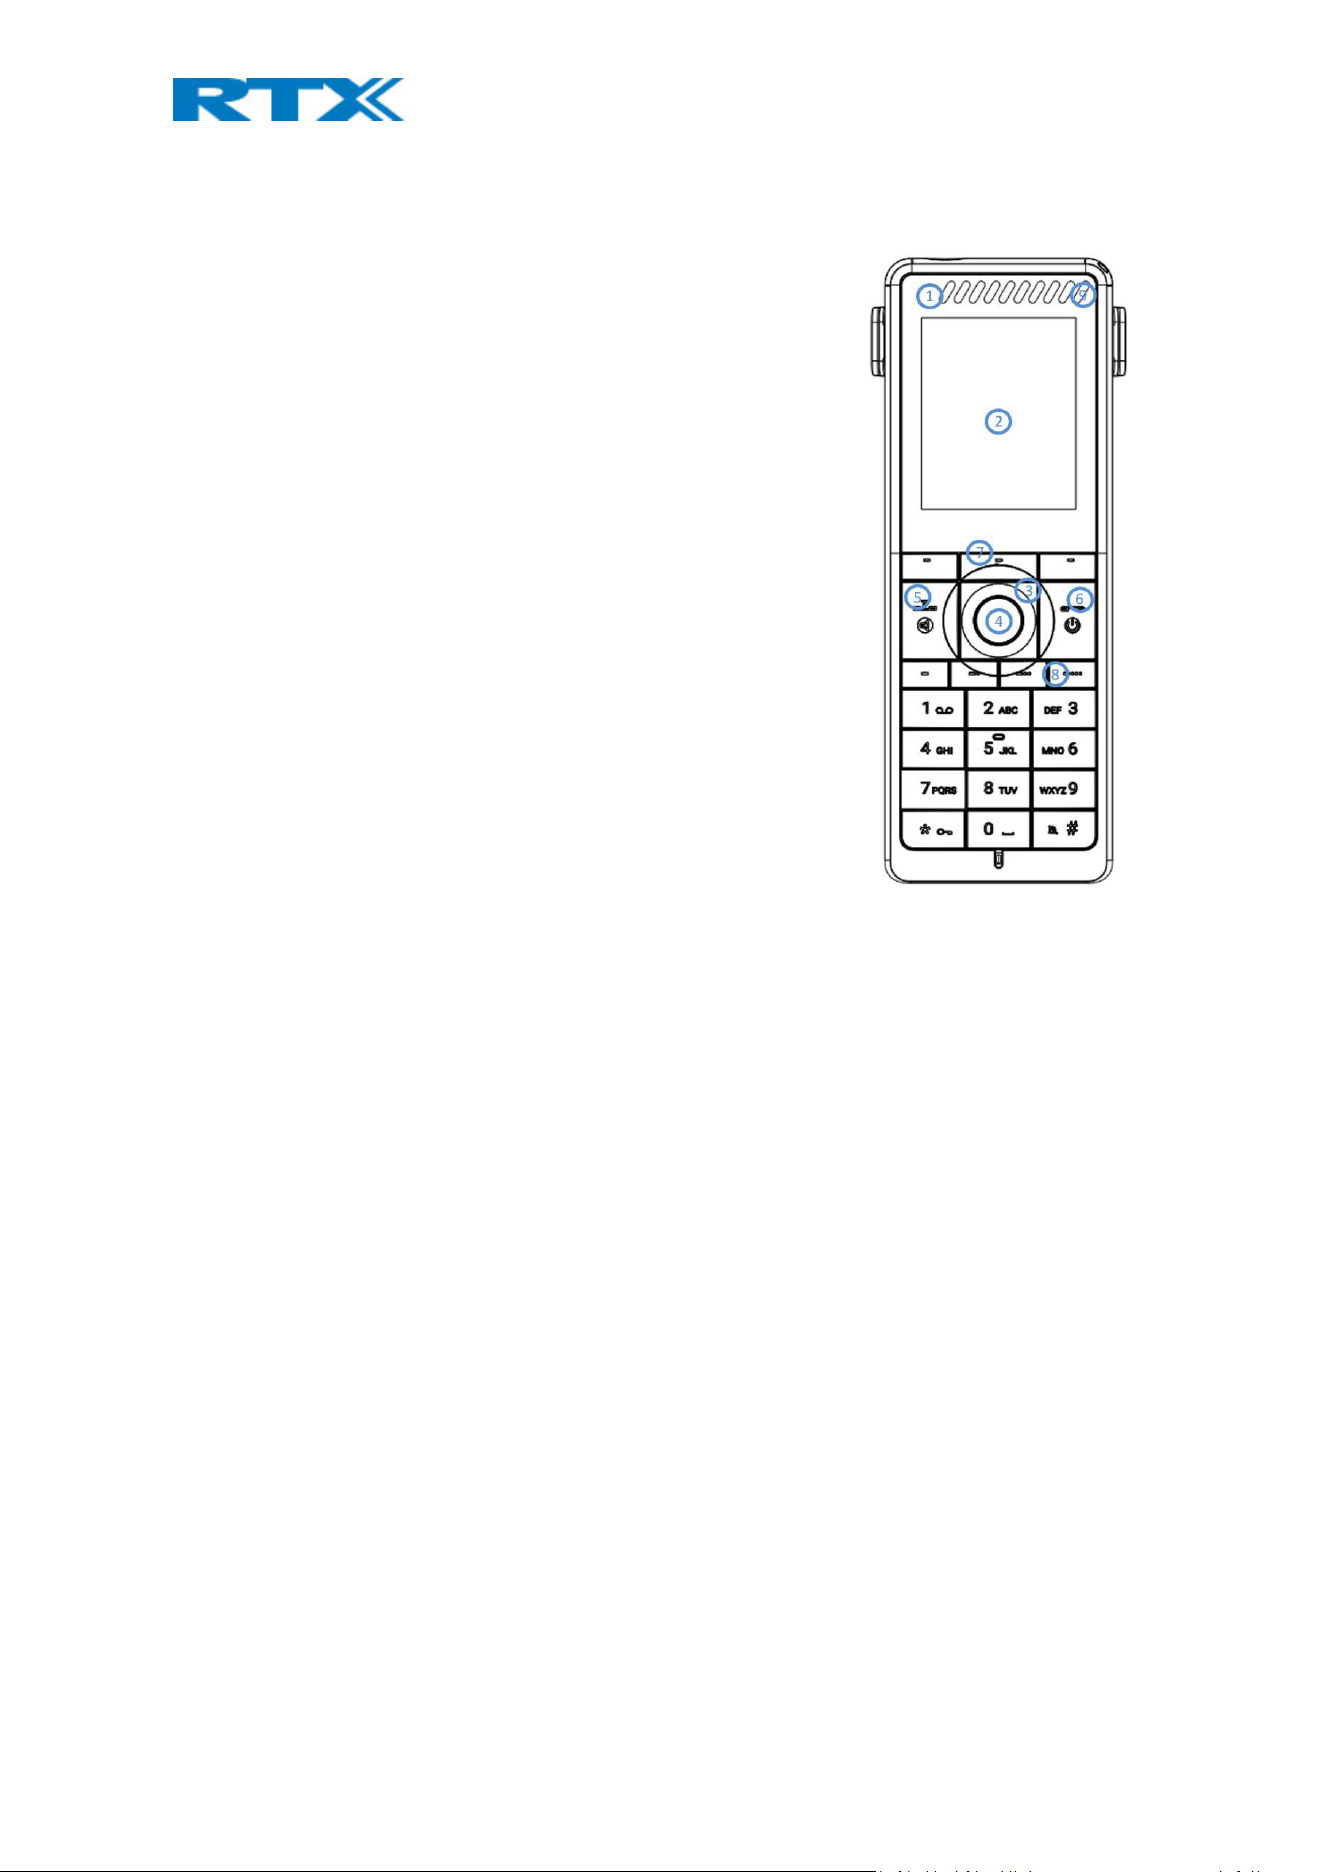
1. Earpiece Speaker
2. Screen
3. Navigation Keys (Up/Down/Right/left)
Used to navigate through the menu.
Volume keys (Up/Down)
To increase/ decrease the volume during call.
Mute key (Left) To mute during call.
4. Selection Key (Centre of Navigation Keys)/ Activity Menu
Key
To enter all the menus available on the handset.
5. Call Key/ Accept Call Key (Off-hook key)
To answer a call, and functions as a short cut to the Call
list.
Speaker Key
To enable/disable speaker mode during call.
6. End, ON/OFF Key, Back Key (On-hook key)
To end call, to return to a previous menu, and to switch
the handset on/off by long press.
7. 3 Softkeys
Are used for different commands in the different menus
on the handset and changes according to what is
displayed on the screen.
8. 4 Function keys
Program the keys to different shortcuts to easily access
different menus
9. LED
Indicates incoming call, missed call, messaging, low
battery, and charging.
H200 Handset Guide DRAFT
Proprietary and Confidential
Page | 10
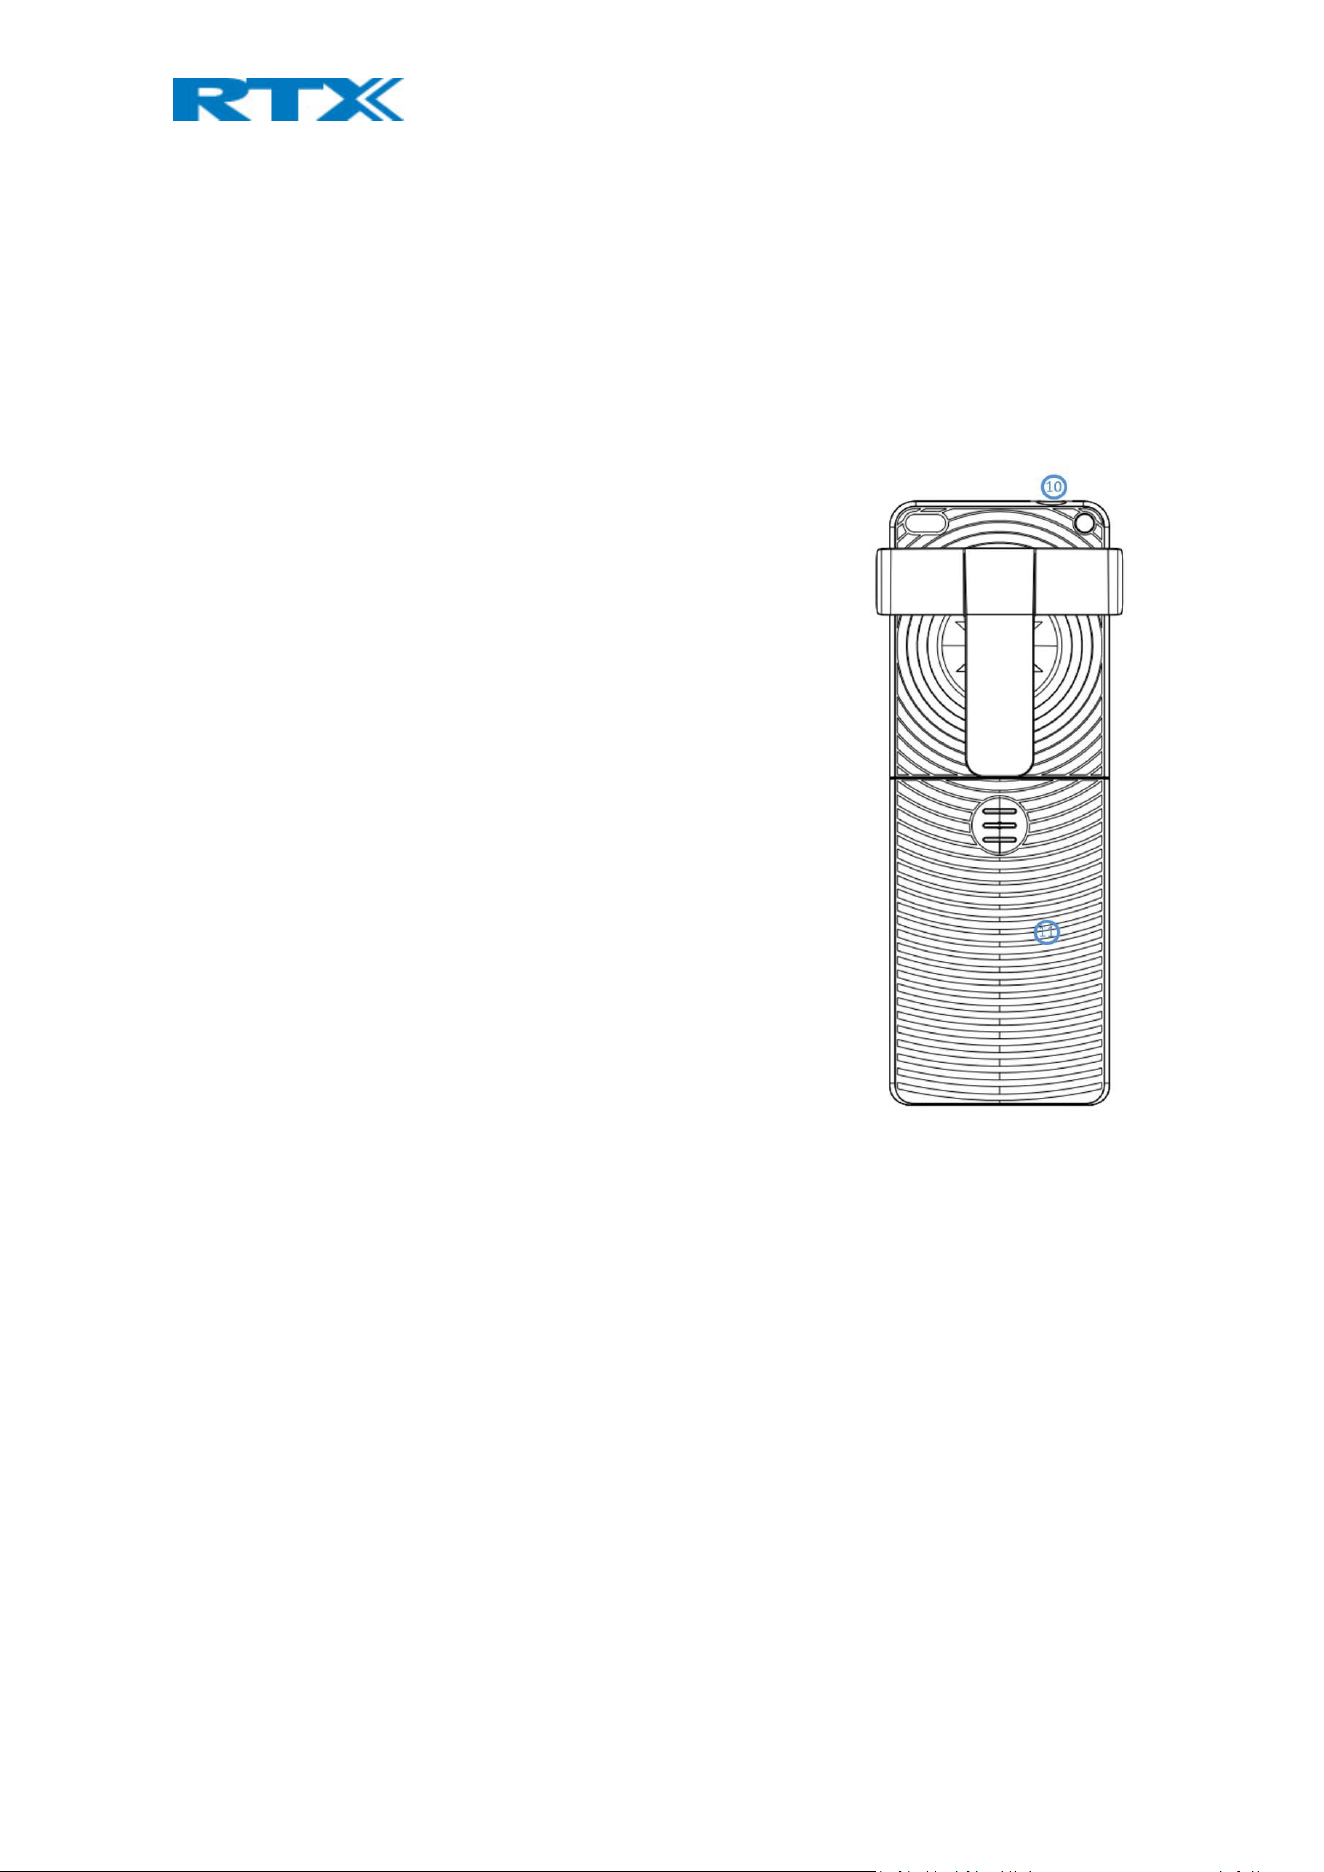
3.2 Rear View - Handset
10. Headset connector (3.5mm)
This is for connecting a headset. The connector is
protected against dust by the headset connector cover.
11. Battery
H200 Handset Guide DRAFT
Proprietary and Confidential
Page | 11
4 Display
This section contains a description of the different icons seen in the idle and in the menu.
IMPORTAINT: New MMI design is on the way, and some icons, menus and screen captures
might not be the same!
4.1 Icons and Text on the Display
All functions and settings available to the handset user are shown as icons and text in the display. The icons and
text in the display indicate functions and settings to which you have access.
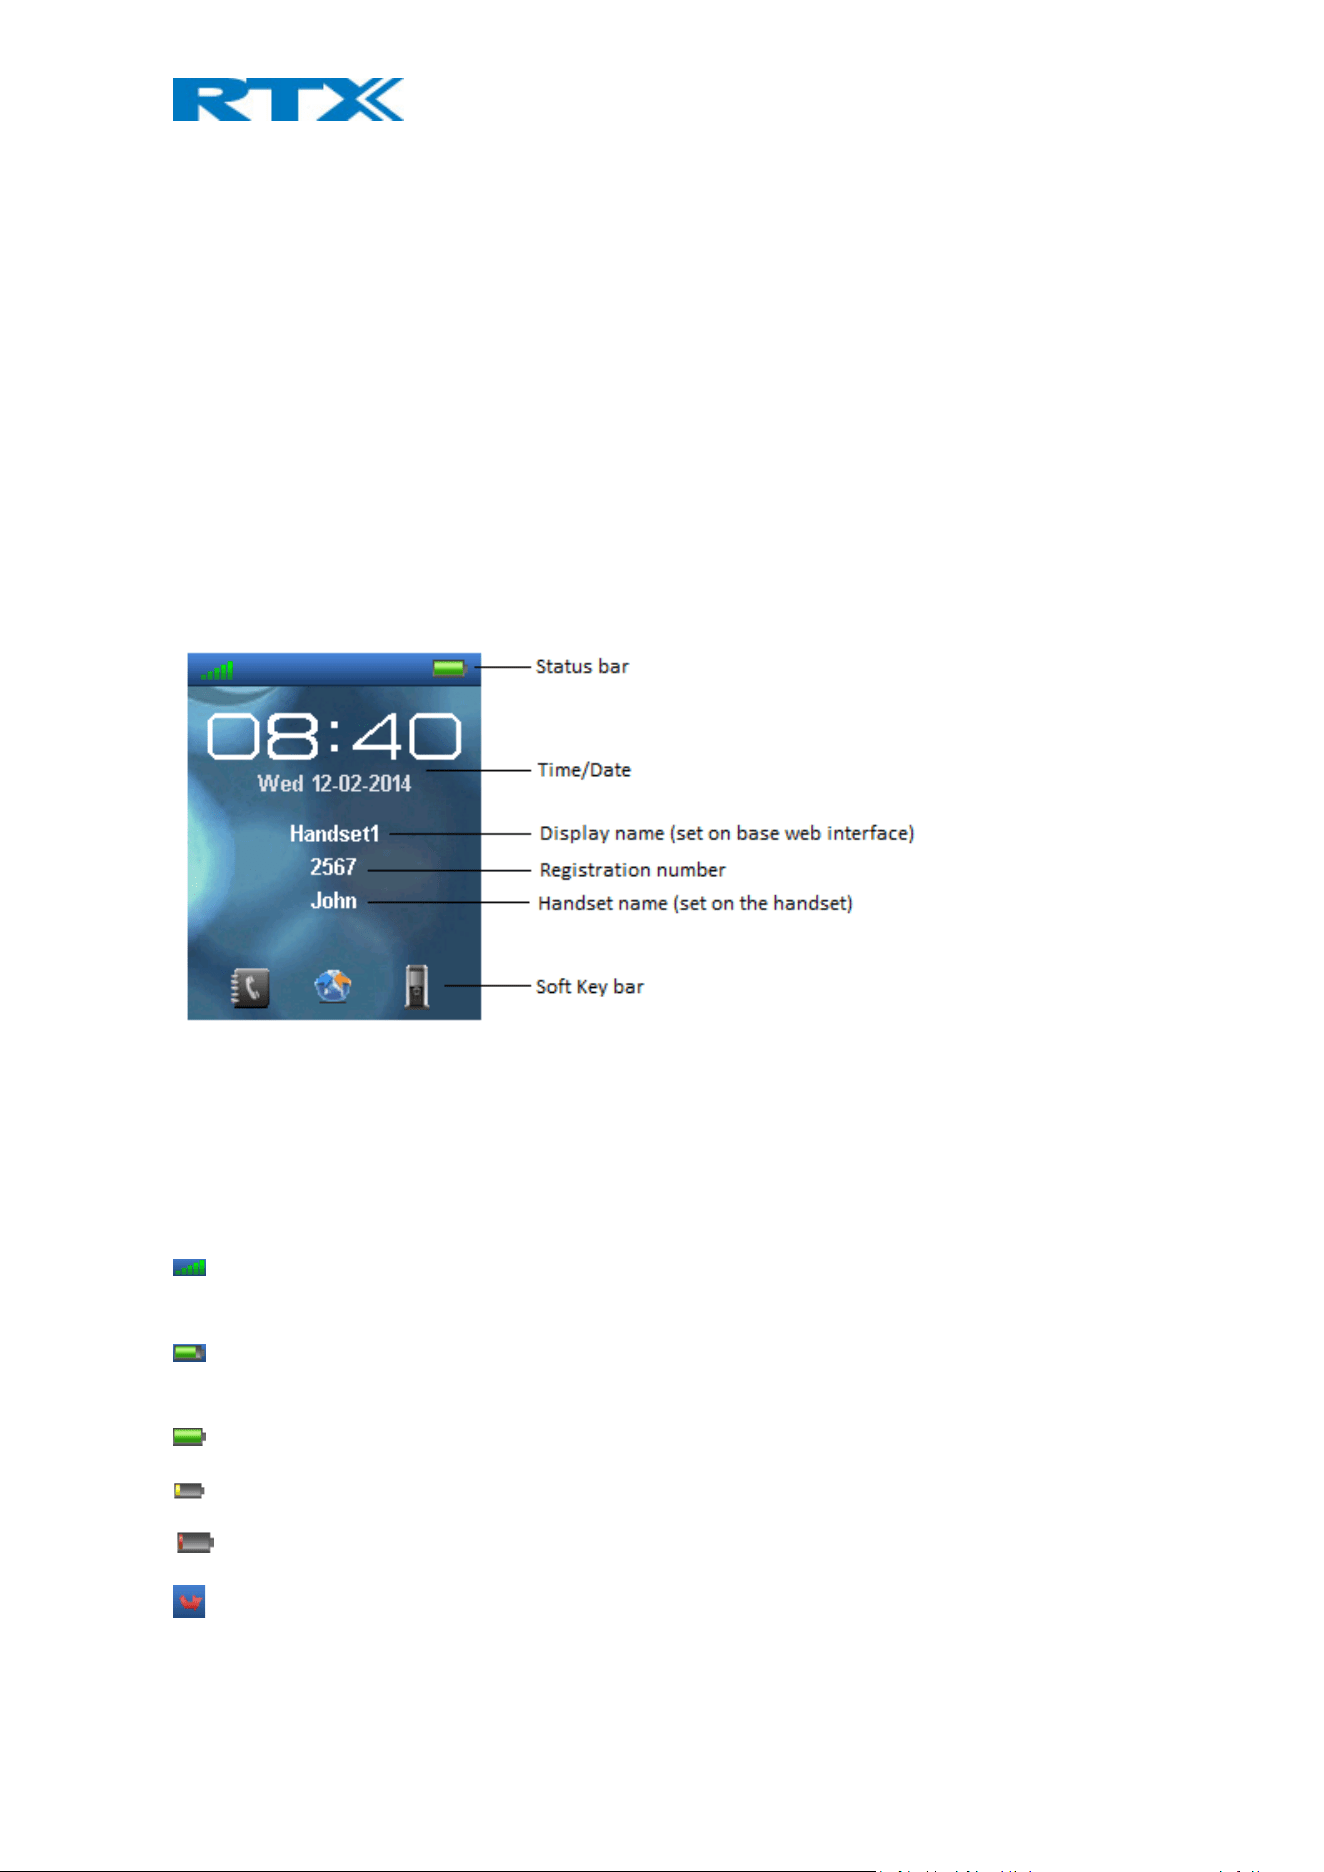
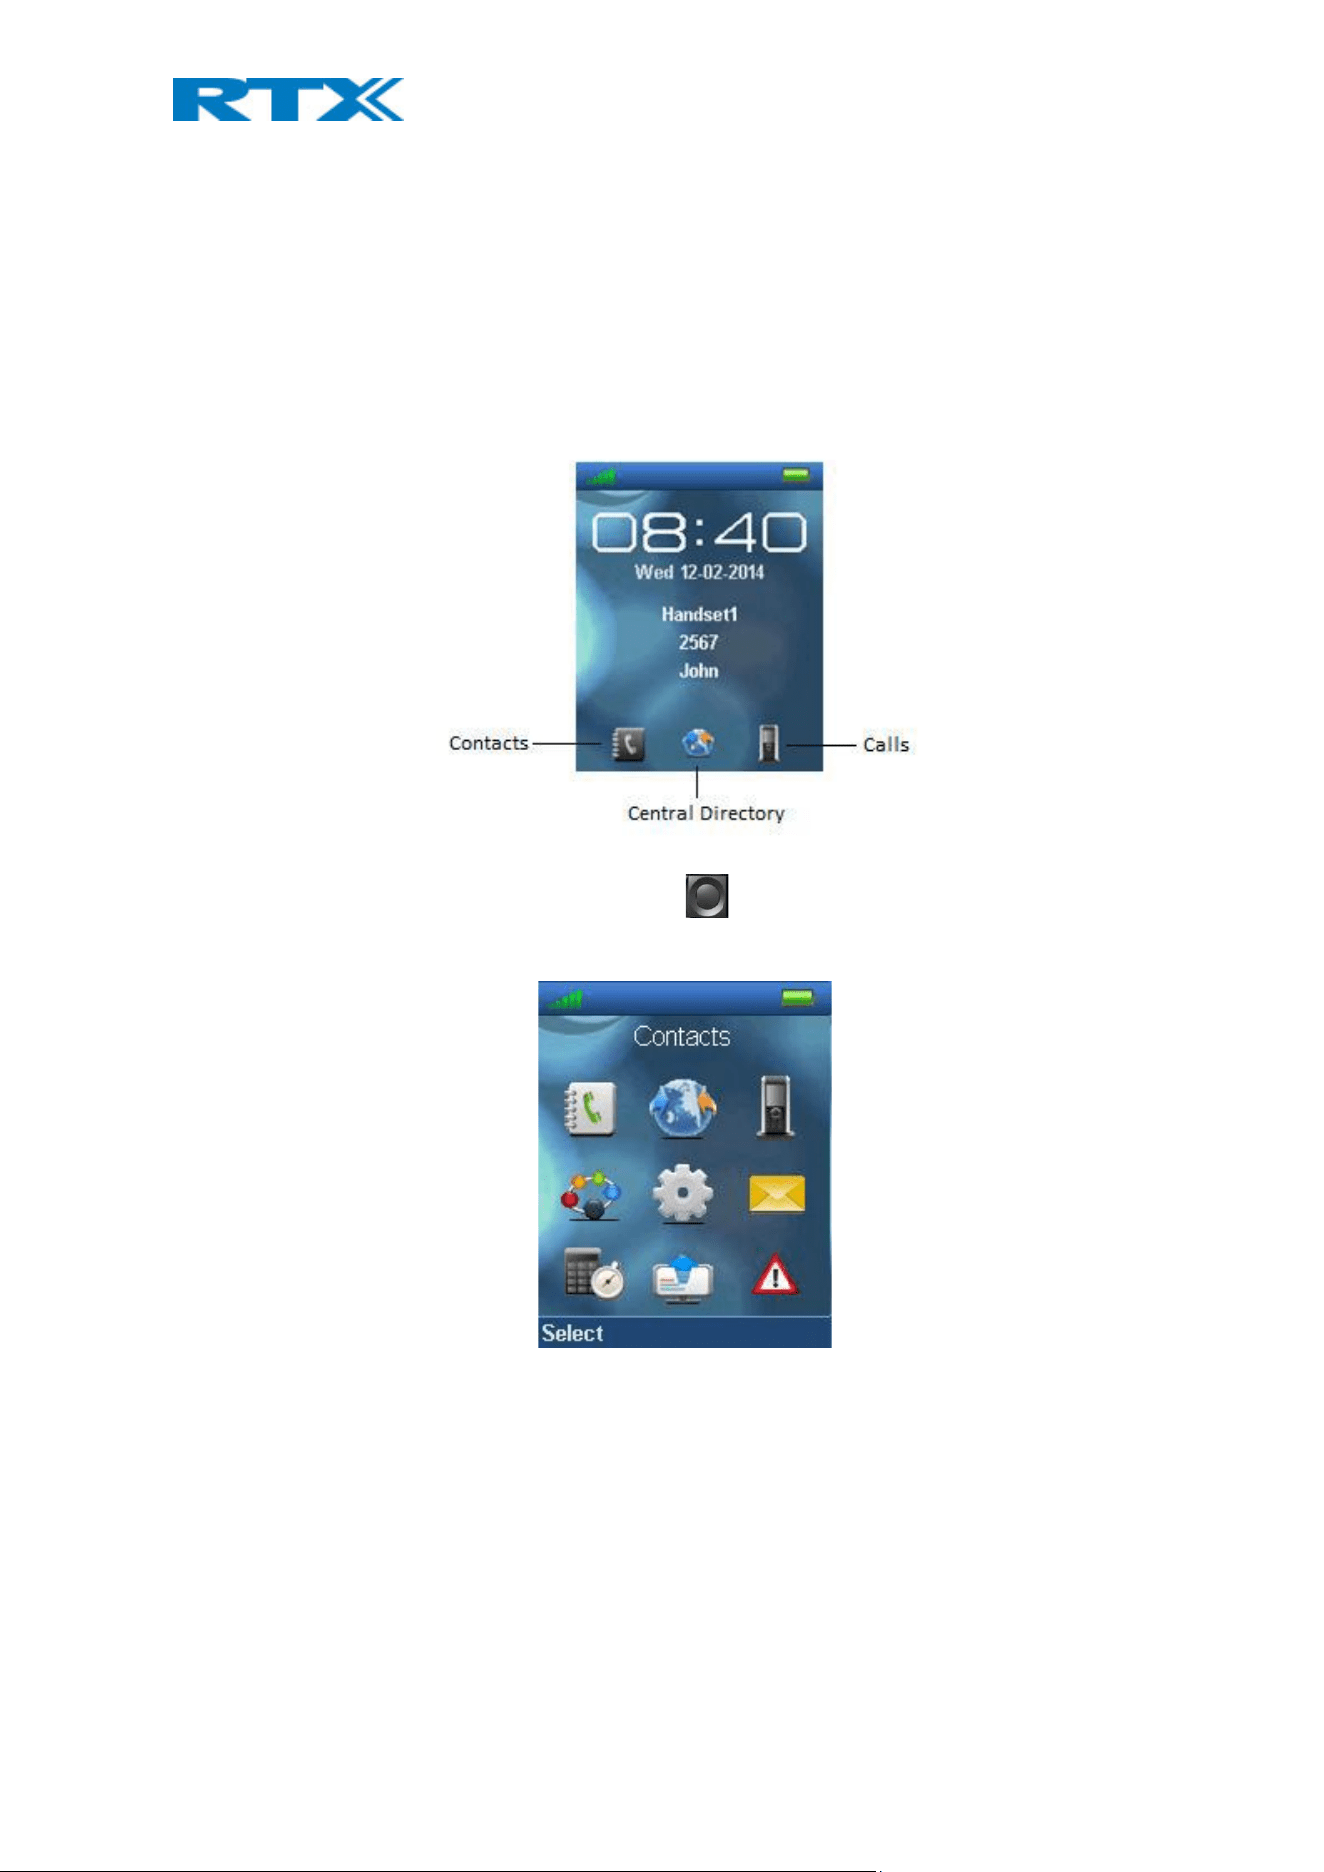
The picture below shows a typical idle screen that displays the time and date, display name which is set on the
web interface of the base station, registration number, and handset name which is set locally on the handset.
This active area is also the area for dialog window text if there has been a missed call, or an action needs to be
confirmed.
In the softkey bar at the bottom of the idle screen it is possible to access from the left: Contacts, Central
Directory, and Calls.
The status bar at the top of the idle screen is always visible in all screens. This displays icons which give the user
information about signal strength, missed call, new message, phone lock, key lock, sound off, time, and battery
status. These icons are shown and explained shortly in the following:
“Signal strength” icon is always visible in the upper left corner. The number of green staples is displayed
according to the strength of the signal.
“Battery” icon is always visible in the upper right corner, and shows how much battery that is left on the
handset.
“Full battery” icon is displayed when the handset is fully charged.
This battery icon is displayed when there is 20% to 32% battery left on the handset.
” Low battery” icon is displayed when there is 10% to 20% battery left on the handset.
“Missed call” icon is displayed in the status bar, and indicates that there has been a missed call which can be
seen in the call list.
H200 Handset Guide DRAFT
Proprietary and Confidential
Page | 12
“Voice mail message” icon is displayed in the status bar when there are voice mails that have not been
listened to. This icon remains until the voice mail has been listened to.
“Message” icon is displayed in the status bar when there are messages on the handset that have not been
read.
“Alarm” icon is displayed in the status bar and indicates that an alarm has been set on the handset.
“Silent Alarm” icon is displayed in the status bar when the handset is in silent mode, or if the volume is set
to the mute and an alarm is enabled.
“Sound off”/”Silent” icon is displayed in the status bar when silent mode is enabled on the handset.
“Keylock” icon indicates when the keypad is locked, and the user needs to long press the *-key to be able to
use the handset again.
“Do not disturb” icon is displayed in the status bar when this feature is enabled; in this case the handset
does not react on any incoming calls.
“HD” icon is displayed during a call if the quality of the call is “High Definition” and hereby using the 722
codec (also called a wideband call).
4.2 Menu icons
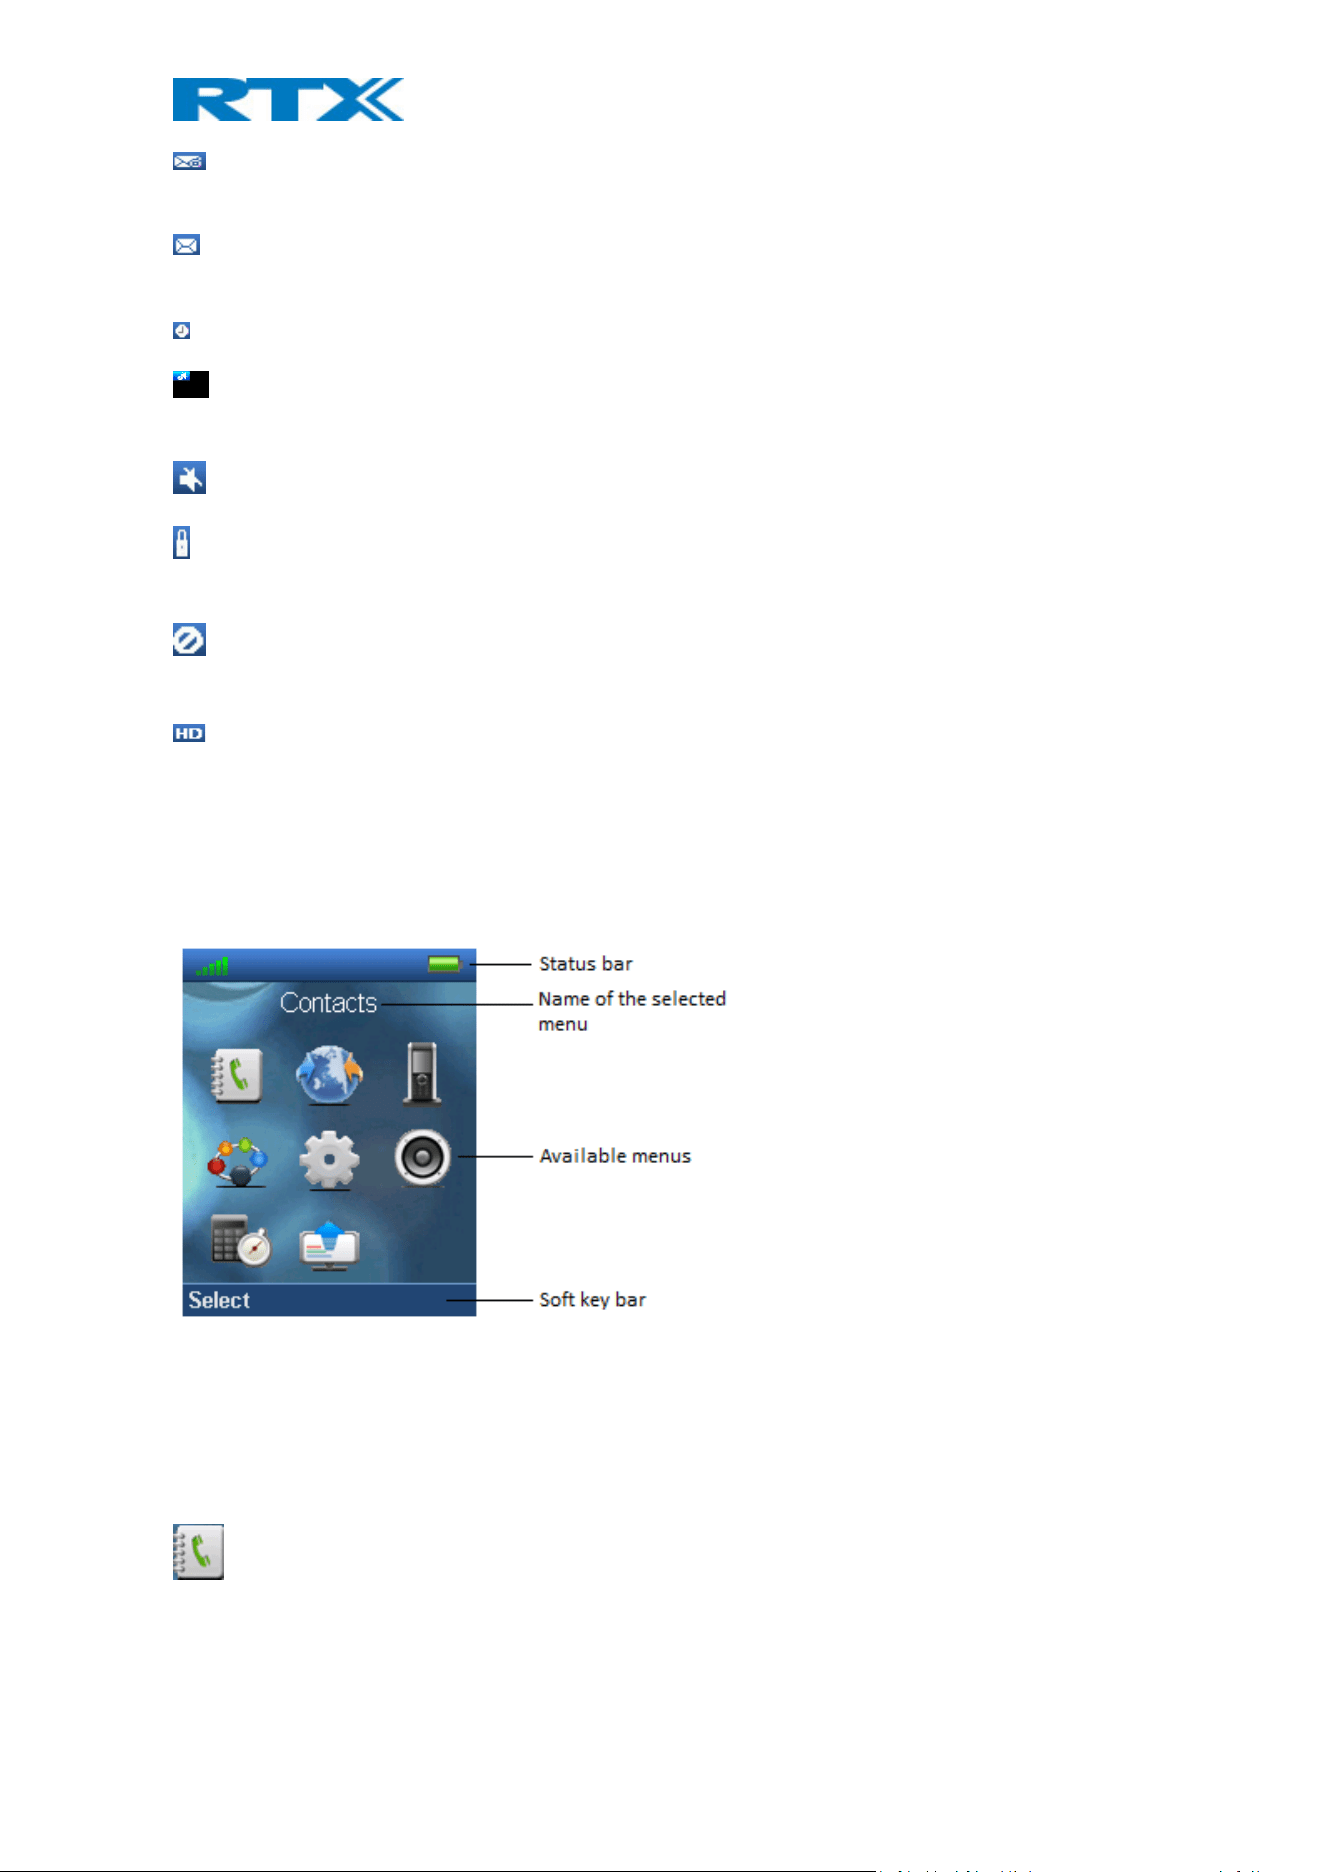
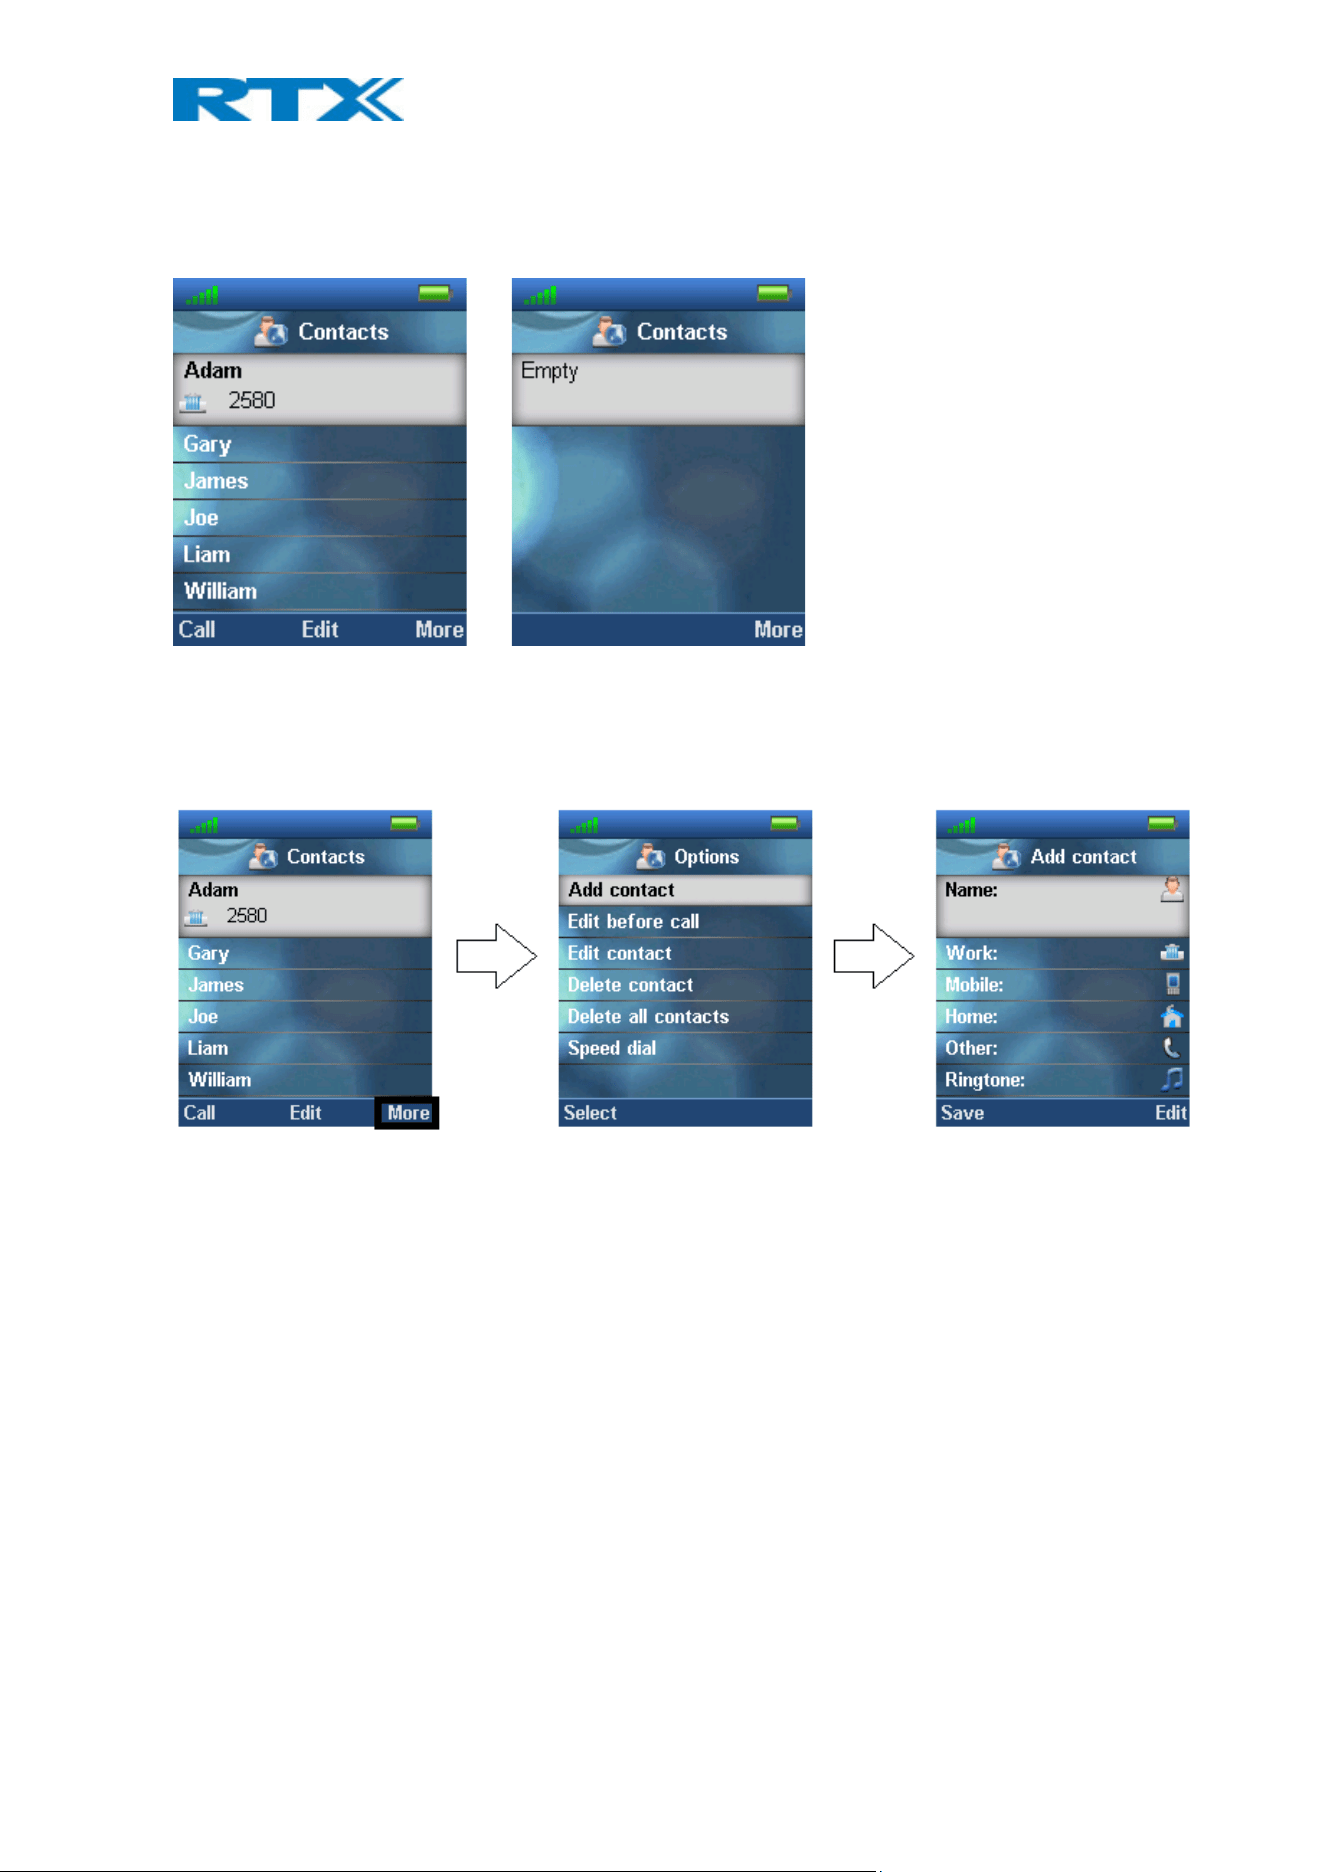
All the menus available on the handset are displayed when the menu key is pressed from idle. The available
menus are seen in the screen below.
The status bar at the top of the display is always displayed independent of which menu is selected, and the
softkey bar gives the possible options to select in every menu. In the active area of the screen the name of the
menu selected is displayed at top, and all the available menus to select are displayed. During navigation across
the different menus the highlighted icon is moving to indicate where the navigation key is. The menu icons are
showed and shortly explained in the following:
The “Contacts” menu contains all names/numbers in the local phonebook.

H200 Handset Guide DRAFT
Proprietary and Confidential
Page | 13
The “Central directory” menu contains all names/numbers in the central directory of the system. This is
set up in the web interface of the base system (see the additional base station manual document for further
information on this via [2])
The “Calls” menu contains call lists and call times.
The “Connectivity” menu contains options to register/deregister the handset and network options.
The “Settings” menu contains personal handset settings such as time/date, language, handset name, etc.
The “Messaging” menu contains messages received on and sent from the handset along with the
available messaging settings.
The “Alarms” menu contains personal handset settings for the alarm.
The “F-Keys” menu contains personal handset settings for the F-Keys.
The “Alarm List” menu contains alarms received on the handset.
4.3 Keys and Buttons
4.3.1 Navigation Keys/Selection Key/ Activity Menu Key
Use this key when navigating in menus, and to move the cursor when writing some text or a number. The
navigation keys are used for stepping left/right and up/down when navigating in the menus. When
selecting or entering a menu use the selection key in the middle of the navigation keys.
When using this key from idle the activity menu is opened from which all the different menus available on the
handset can be opened.
During call the Up and Down navigation keys are used to control the volume. By pressing up the volume will be
increased and by pressing down, it will be decreased.
4.3.2 Softkeys
The handset has three softkeys located just beneath the display, and the function of these is
indicated by text on the display just above each softkey according to the respective screen.
4.3.3 Function keys
The H200 has extra 4 function keys on top of the number keypad. These buttons allow the
user to assign functions to them in order to easily access different menus. The keys can be configured in the
“Settings” menu. For further details, please go to chapter 6.5.18.
H200 Handset Guide DRAFT
Proprietary and Confidential
Page | 14
4.3.4 Speaker Key/ Off-hook Key
The speaker/hook off key is used for answering an incoming call, or dialling a number either directly from
the idle, or from the contact list, call list, or central directory. Pressing this key in idle opens the call list. It is also
used to shift between speaker mode and normal mode during call. When the handset is set to speaker mode
during call the speaker key lights up in red, and the sound comes from the speaker on the back of the handset.
4.3.5 On-hook, and On/Off Key
The On-hook key is used for disconnecting calls and returning to the previous menus when navigating in any
menu. A long-press in idle will switch the handset off, and a long-press when the handset is switched off will
switch the handset on.
4.3.6 Speed Dial Keys
Any key from “2” – “9” can be set as a speed dial key. A long press on any of these numbers when the handset is
in idle can be set to a short cut to calling any contact in the contact list, or in the F-Key list. For additional
information on this feature see 7.1.4 Speed Dial/On Touch Dial.
4.4 The Keypad
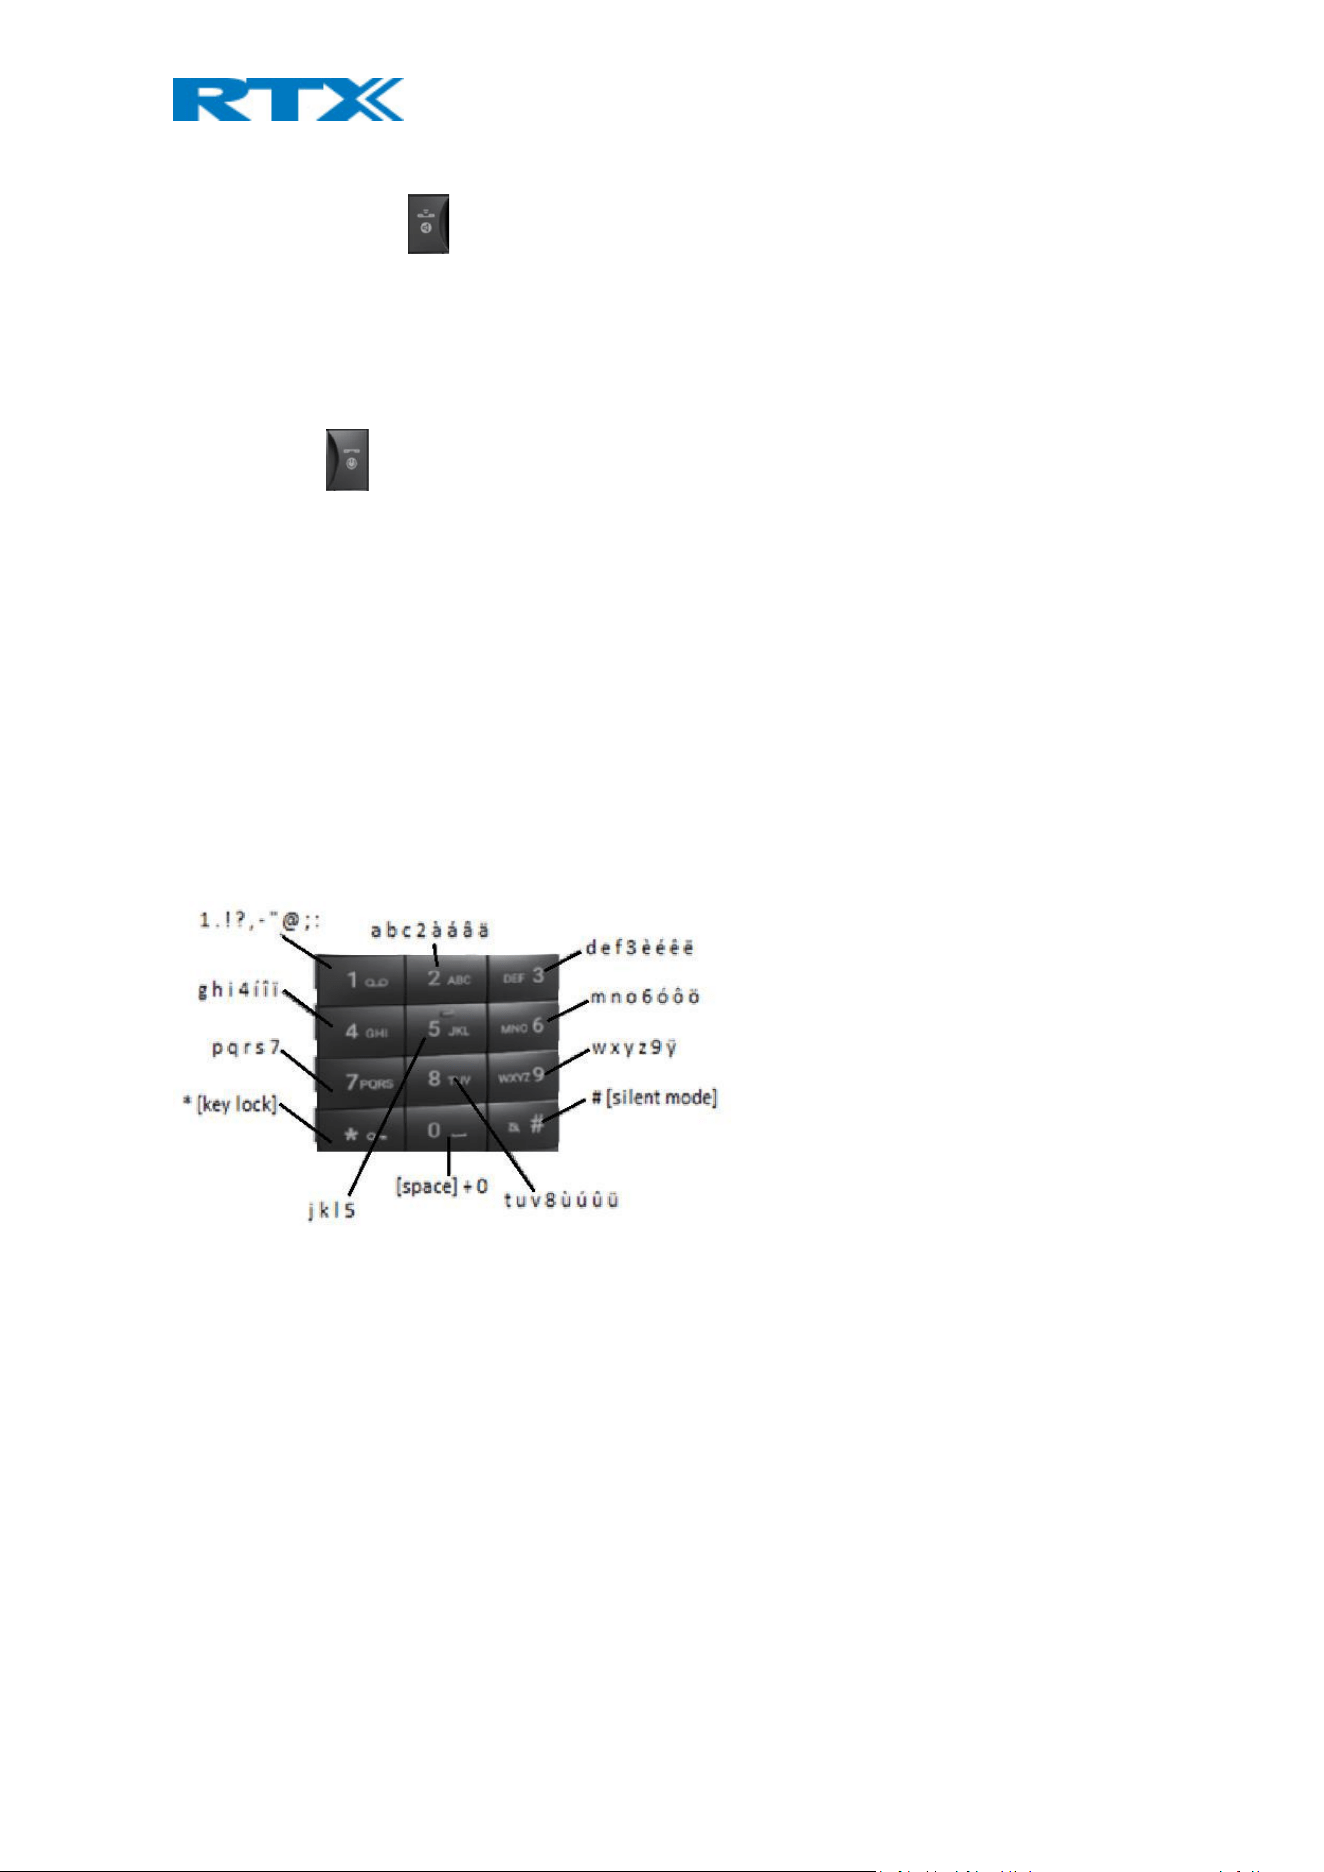
The keypad is used when entering a name or number, and the sketch below shows the available characters on
the handset.
NOTE: Depended on the selected menu language, other characters can be available. Therefore, the character
order can differ from the table above.
4.4.1 Idle Mode, and Number Input Mode
When in idle a short press on a key enters the digits “0” – “9” and the characters * and #.
In number input mode, a long press on “0” generates a +.
4.4.2 In Text Input Mode
While in text input mode a short press on a key 0-9 displays the first available character on that specific key. The
marked character is then selected after a timeout, or when another key is pressed.
By pressing the *-key it is possible to change the text to be upper/lower case or only numeric (Abc, abc, ABC, or
123).

H200 Handset Guide DRAFT
Proprietary and Confidential
Page | 15
Use the 0 to add a space in the text.
4.4.3 Silent Mode from #-Key
By long-pressing the #-key when the handset is in idle, the handset will turn to silent mode, and a “Sound Off”
icon will be shown in the status bar. This feature enables that the user rapidly can turn on silent mode. To
turn off silent mode again long press the #-key.
NOTE: When this mode is enabled it is possible to switch on the vibrator on the handset in Settings > Audio
Settings > Vibrator (see 6.5.1.5 Vibrator for further information). Please note that all the other audio settings will
be greyed out when the handset is in this silent mode.

H200 Handset Guide DRAFT
Proprietary and Confidential
Page | 16
5 Basic Operation
The following explains three basic operations of the handset: how to switch the handset on/off, how to
lock/unlock the keypad, and the available options when entering a number in idle.
5.1 How to Switch the Handset On/Off
Switching on the handset
To switch the handset on, long press the on-hook key
. When the handset is on, it will display “Searching” for a short while until a signal is detected, and then the
handset is showing the registration number and is ready for use.
Switching off the handset
To switch the handset off return to the idle screen and long press the on-hook button , and the handset will
turn off.
5.2 Lock/Unlock the Keypad
To prevent accidentally pressing keys and making a call, the keypad can be locked.
Locking the keypad
To lock the keypad long press the in idle, and a text message is displayed “Press and hold *”. When the
keypad is locked, the “Key Lock” icon is displayed in the status bar.
Unlocking the keypad
To unlock the keypad long press until the text message “Press and hold *” disappears.
NOTE: It is possible to answer/reject an incoming call while the keypad is locked.
5.3 Entering a number in idle
When entering a number in idle it is possible to call the number by pressing the off-hook key
Otherwise, the following three different options are available when a number is entered in idle.
Save
With this option the number can be added as a local contact by pressing the left softkey “Save”.
Clear
Using the right softkey “Clear” deletes one character at a time to the left of the cursor.
H200 Handset Guide DRAFT
Proprietary and Confidential
Page | 17
6 Menu Operation
In the following a description of the different menus and submenus on the handset will be given. Before the
functions of every menu are explained a menu tree will be showed at top to give an overview of how to enter the
different menus.
From idle it is possible to enter some of the menus directly via the three softkeys as displayed on the image
below. By pressing the left softkey the menu ‘Contacts’ is entered, via the middle softkey ‘Central Directory’ is
entered, and using the right softkeys enters ‘Calls’ to see the different calls lists.
To enter the menu from idle press the menu activity key on the keypad, and all the different menus can be
entered:
H200 Handset Guide DRAFT
Proprietary and Confidential
Page | 18
6.1 Contacts
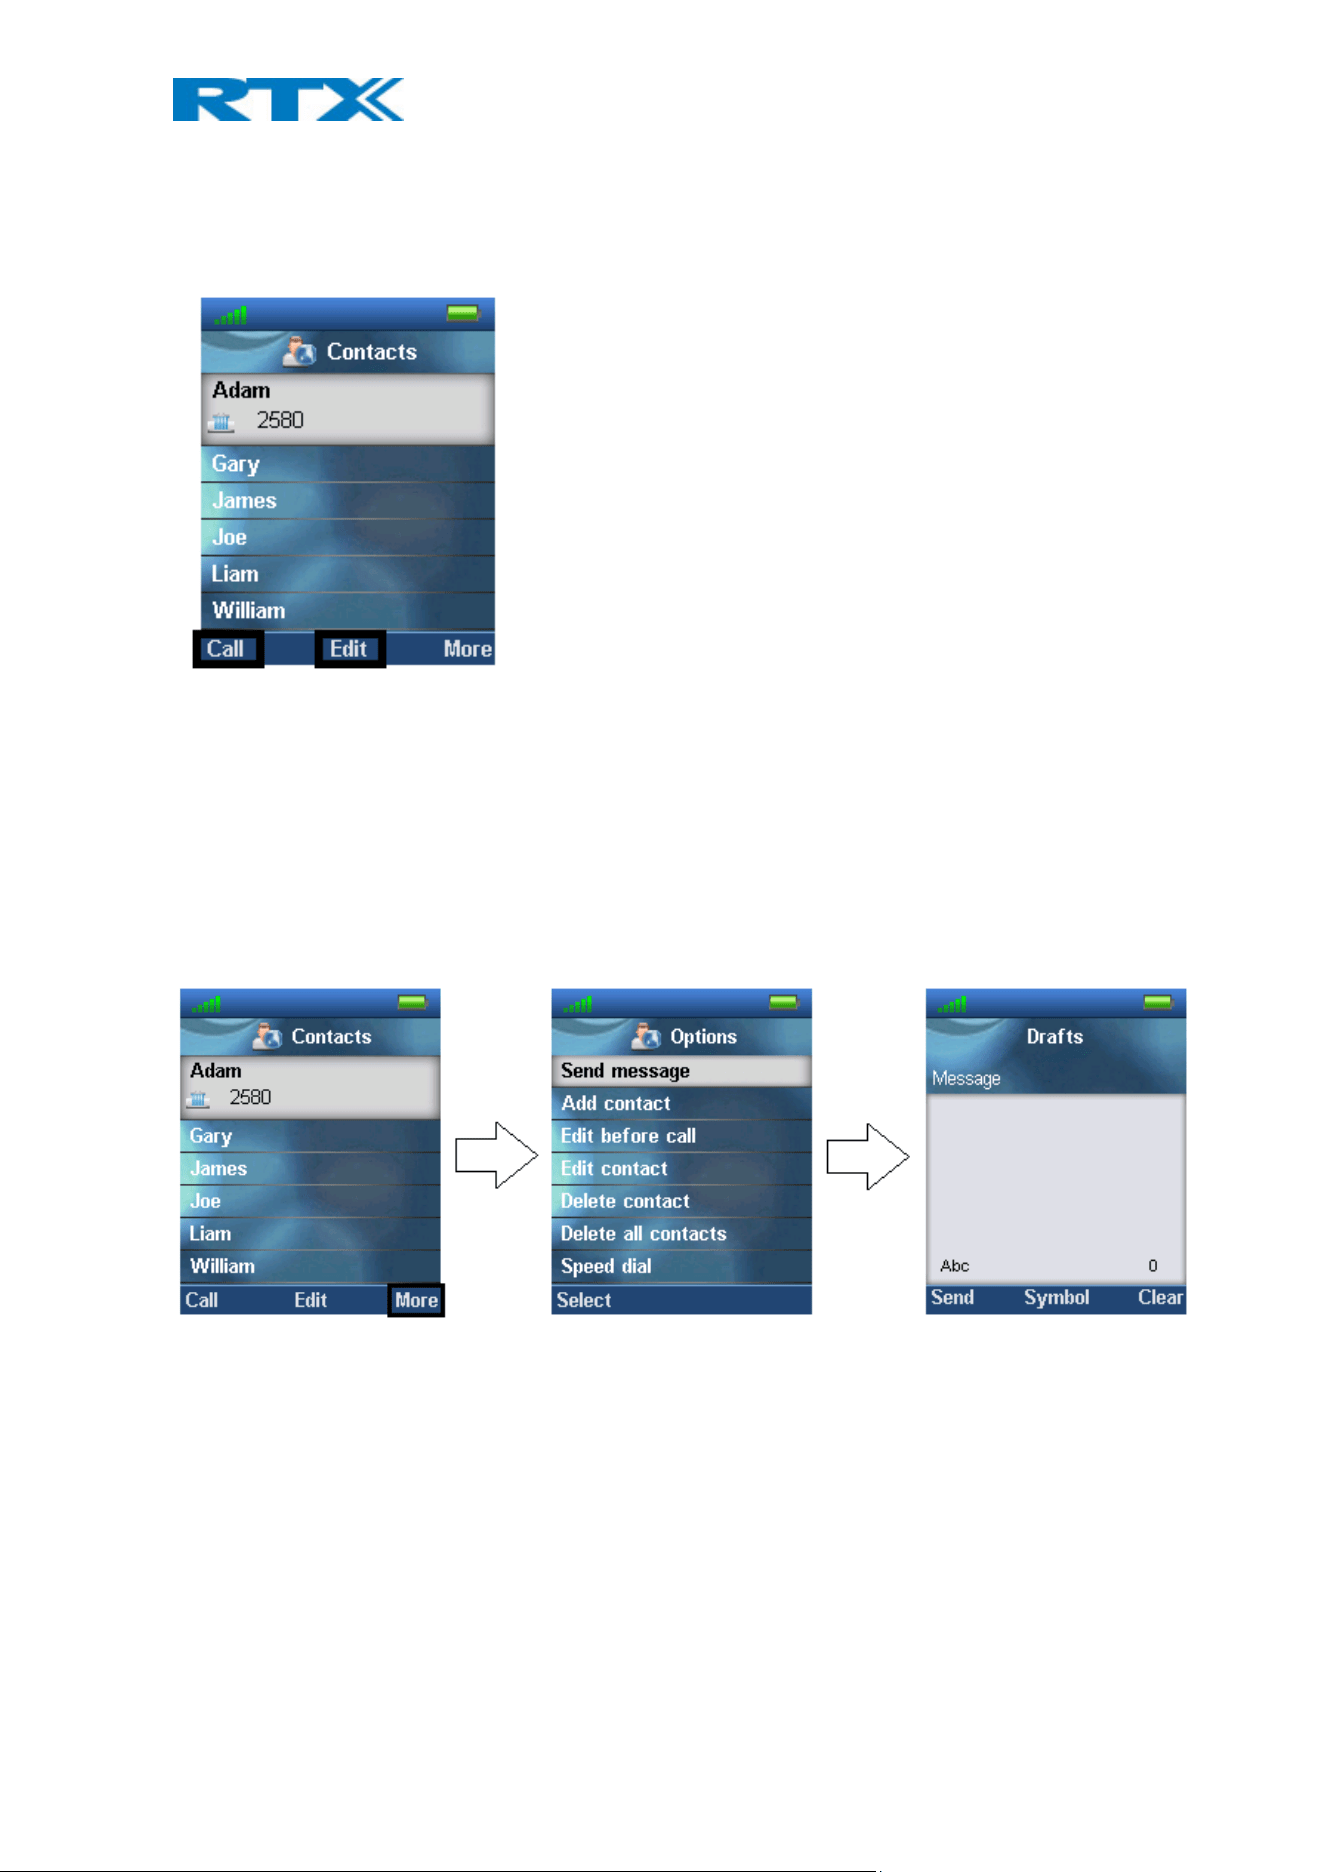
In this menu all the local contacts on the handset are displayed. Below both a full and an empty local phonebook
is displayed.
6.1.1 Add Contact
To add a new contact, press the right softkey “More”, select “Add contact”, and the information displayed in the
menu tree below can be filled out for the contact.
Hereby, it is possible to edit the name, add different phone numbers (work, mobile, home, and other), and add a
specific ringtone to be used for exactly this contact.
To save a new contact, press the left softkey “Safe”.
H200 Handset Guide DRAFT
Proprietary and Confidential
Page | 19
6.1.2 Call/Edit a Contact
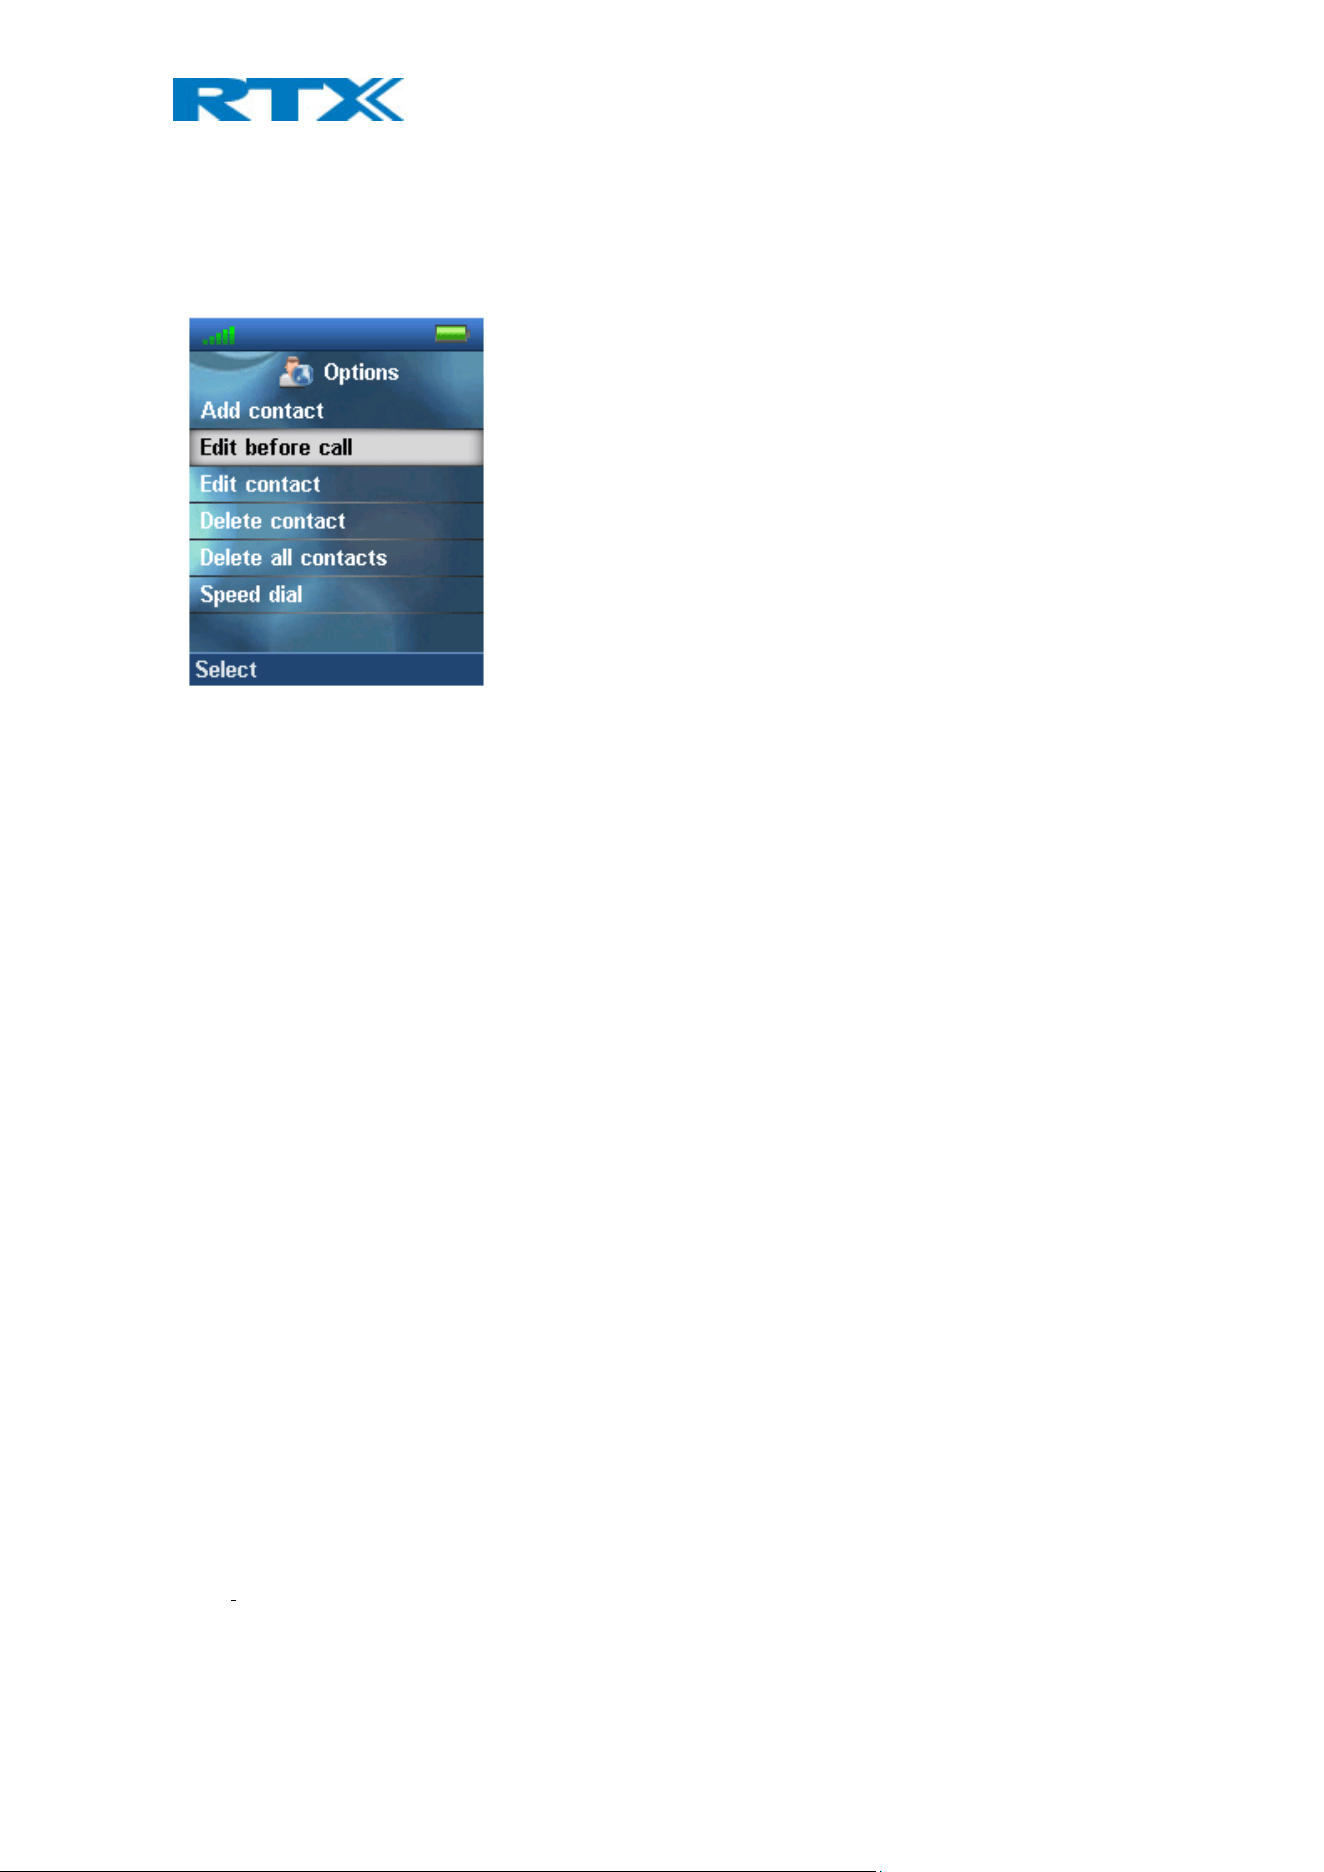
When the “Contacts” menu contains contacts, it is possible to “Call” or “Edit” each contact with the left and
middle softkey, respectively.
Pressing “Call” initiates a call to this contact.
When pressing “Edit” it is possible to edit the name, work, mobile, home, other, or ringtone for the highlighted
contact.
6.1.3 Send Message to Contact
From Contacts it is possible to send a message directly to a contact in the list. How to do this is displayed in the
images below:
In this way, it is possible to send a text message directly to a specific contact. For more information on the text
messaging feature see section 6.6 Messaging.
H200 Handset Guide DRAFT
Proprietary and Confidential
Page | 20
6.1.4 More Contacts Options
When a specific contact is highlighted, pressing “More” in the “Contacts” menu enables the features seen below.
Edit before call
This function makes it possible to edit the number of the contact before calling the contact.
Edit contact
This has the same function as pressing “Edit” directly from the “Contacts” menu, and makes it possible to edit
the name, work, mobile, home, other, or ringtone for the contact.
Delete contact
By selecting this feature, the following text message is displayed: “Delete current contact from local contact list?”
To delete the selected contact, press the left softkey “Yes”.
To go back to the “More” menu, press the right softkey “No”.
Delete all contacts
With this function all the contacts in the local contact list can be deleted, and by selecting this option the
following text message is displayed: “Delete entire local contact list?”
To delete all contacts in the local contact list, press the left softkey “Yes”.
To go back to the “More” menu, press the right softkey “No”.
6.1.5 Speed dial/One Touch Dial
With this feature it is possible to add a contact to the speed dial. Hereby, this contact can be called directly from
idle by long pressing the speed dial number that the contact is added to. The speed dial feature allows the user
to assign a speed dial number (2 – 9) to a contact. This enables the user to call a contact by making a single long
press on one of the number keys (2 – 9) when in idle.
A contact can only be assigned to one speed dial number at a time. The defined number of the contact will be
dialed when the speed dial key is pressed.
NOTE: The ‘1’ key is reserved for voicemail. Long key press on ‘0’ is used for starting a normal dial string with ‘+’.
H200 Handset Guide DRAFT
Proprietary and Confidential
Page | 21
6.1.5.1 How to setup speed dial
Prerequisite: There must be at least one contact in the contact list.
Steps:
1. Go to the contact list > Move to the contact that you want to assign a speed dial number to.
2. Select “More” > Select “Speed dial”
3. Move to the speed dial number (2 – 9) that you want to assign the contact number to.
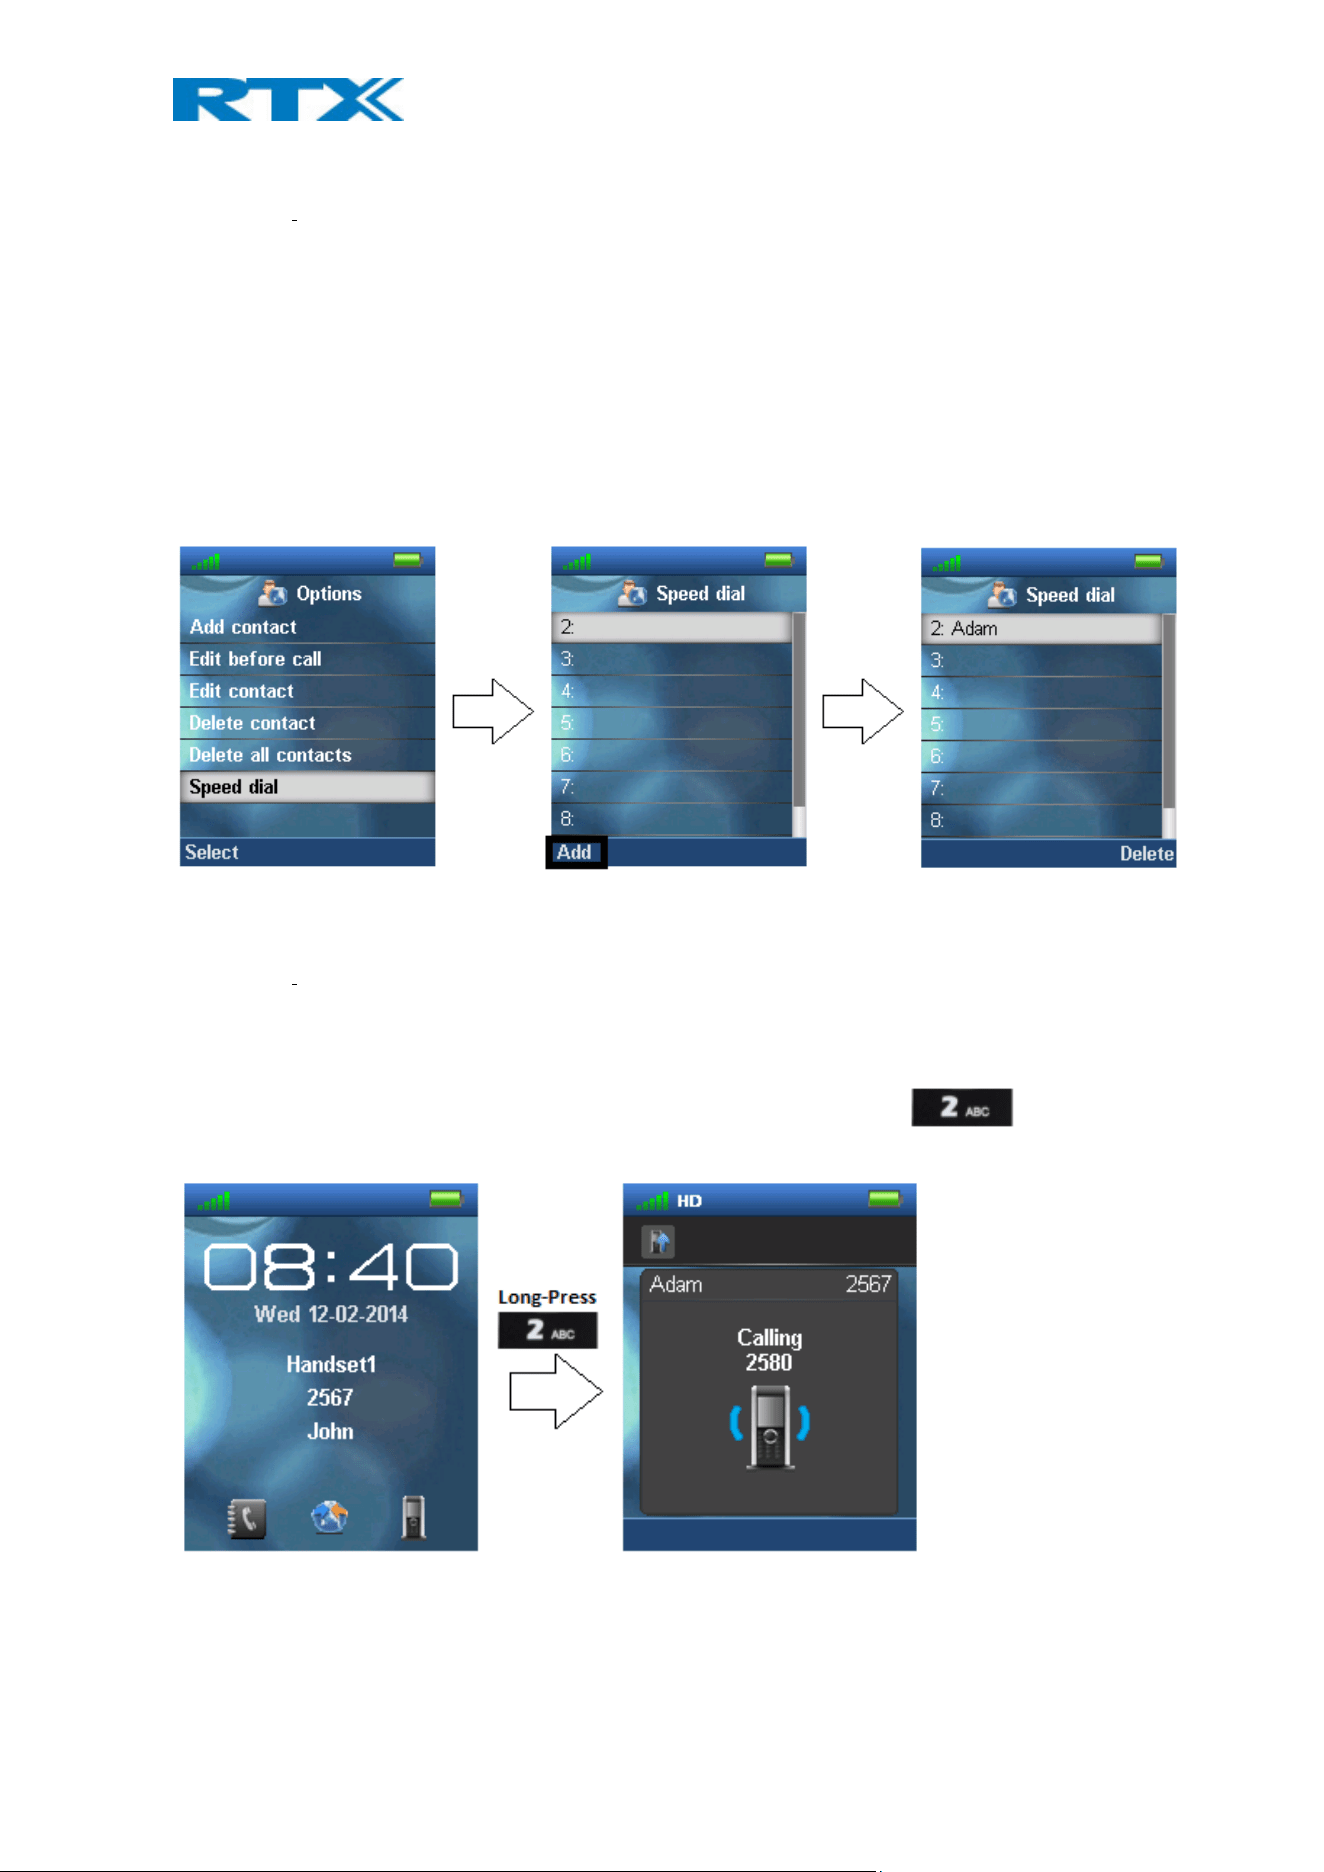
4. Select “Add”. The contact name should be appended to the speed dial number.
5. Leave the speed dial list by pressing the red “On-hook” key > Press “On-hook” key to exit “More” menu,
and exit contacts list by pressing “On-hook” key again.
In the picture below it is showed how the local contact ‘Adam’ is added as a speed dial number to 2.
6.1.5.2 How to call a speed dial number
Prerequisite: The handset is in idle and the key lock is not active.
Steps:
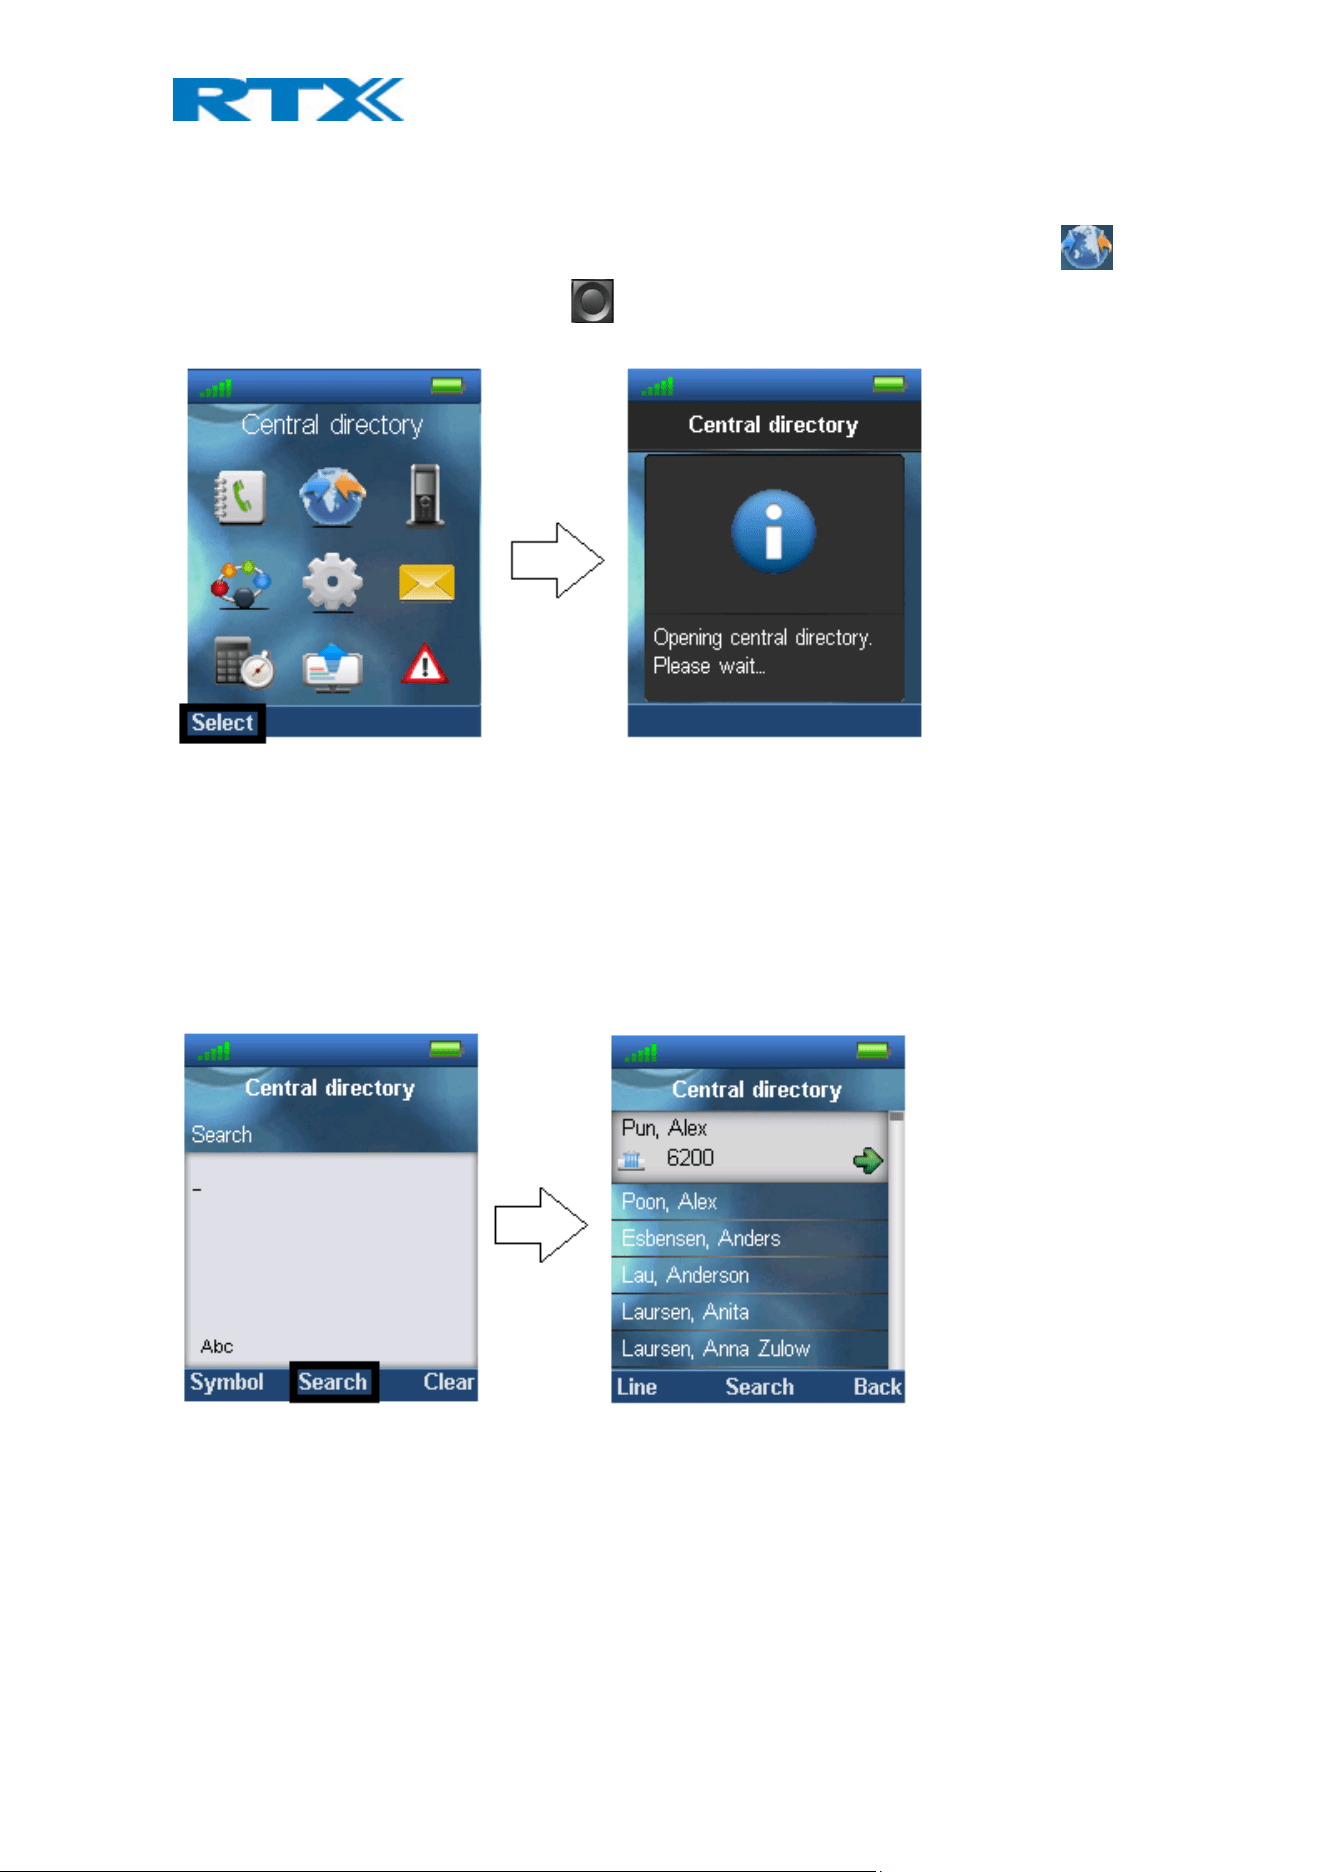
1. Make a long key press (> 2 seconds) on a speed dial key that is assigned to a contact. The first number
defined is dialed.
Hereby, the local contact ‘Adam’ can be called directly from idle by long-pressing as displayed
below:
NOTE: The speed dial function can also be set up for the F-Keys (for additional information on this see section 7.8
F-Keys)
H200 Handset Guide DRAFT
Proprietary and Confidential
Page | 22
6.2 Central Directory
In the “Central directory” menu different contacts can be called according to which list the system administrator
has setup in the base system. This menu can be entered directly from idle with the middle softkey , or from
the menu by pressing the menu activity key and choosing “Central directory”.
6.2.1 LDAP Mode and Local Mode
The “Central directory” can be set to LDAP Mode or Local Mode via the web interface of the base station (see [2]
for additional information on this).
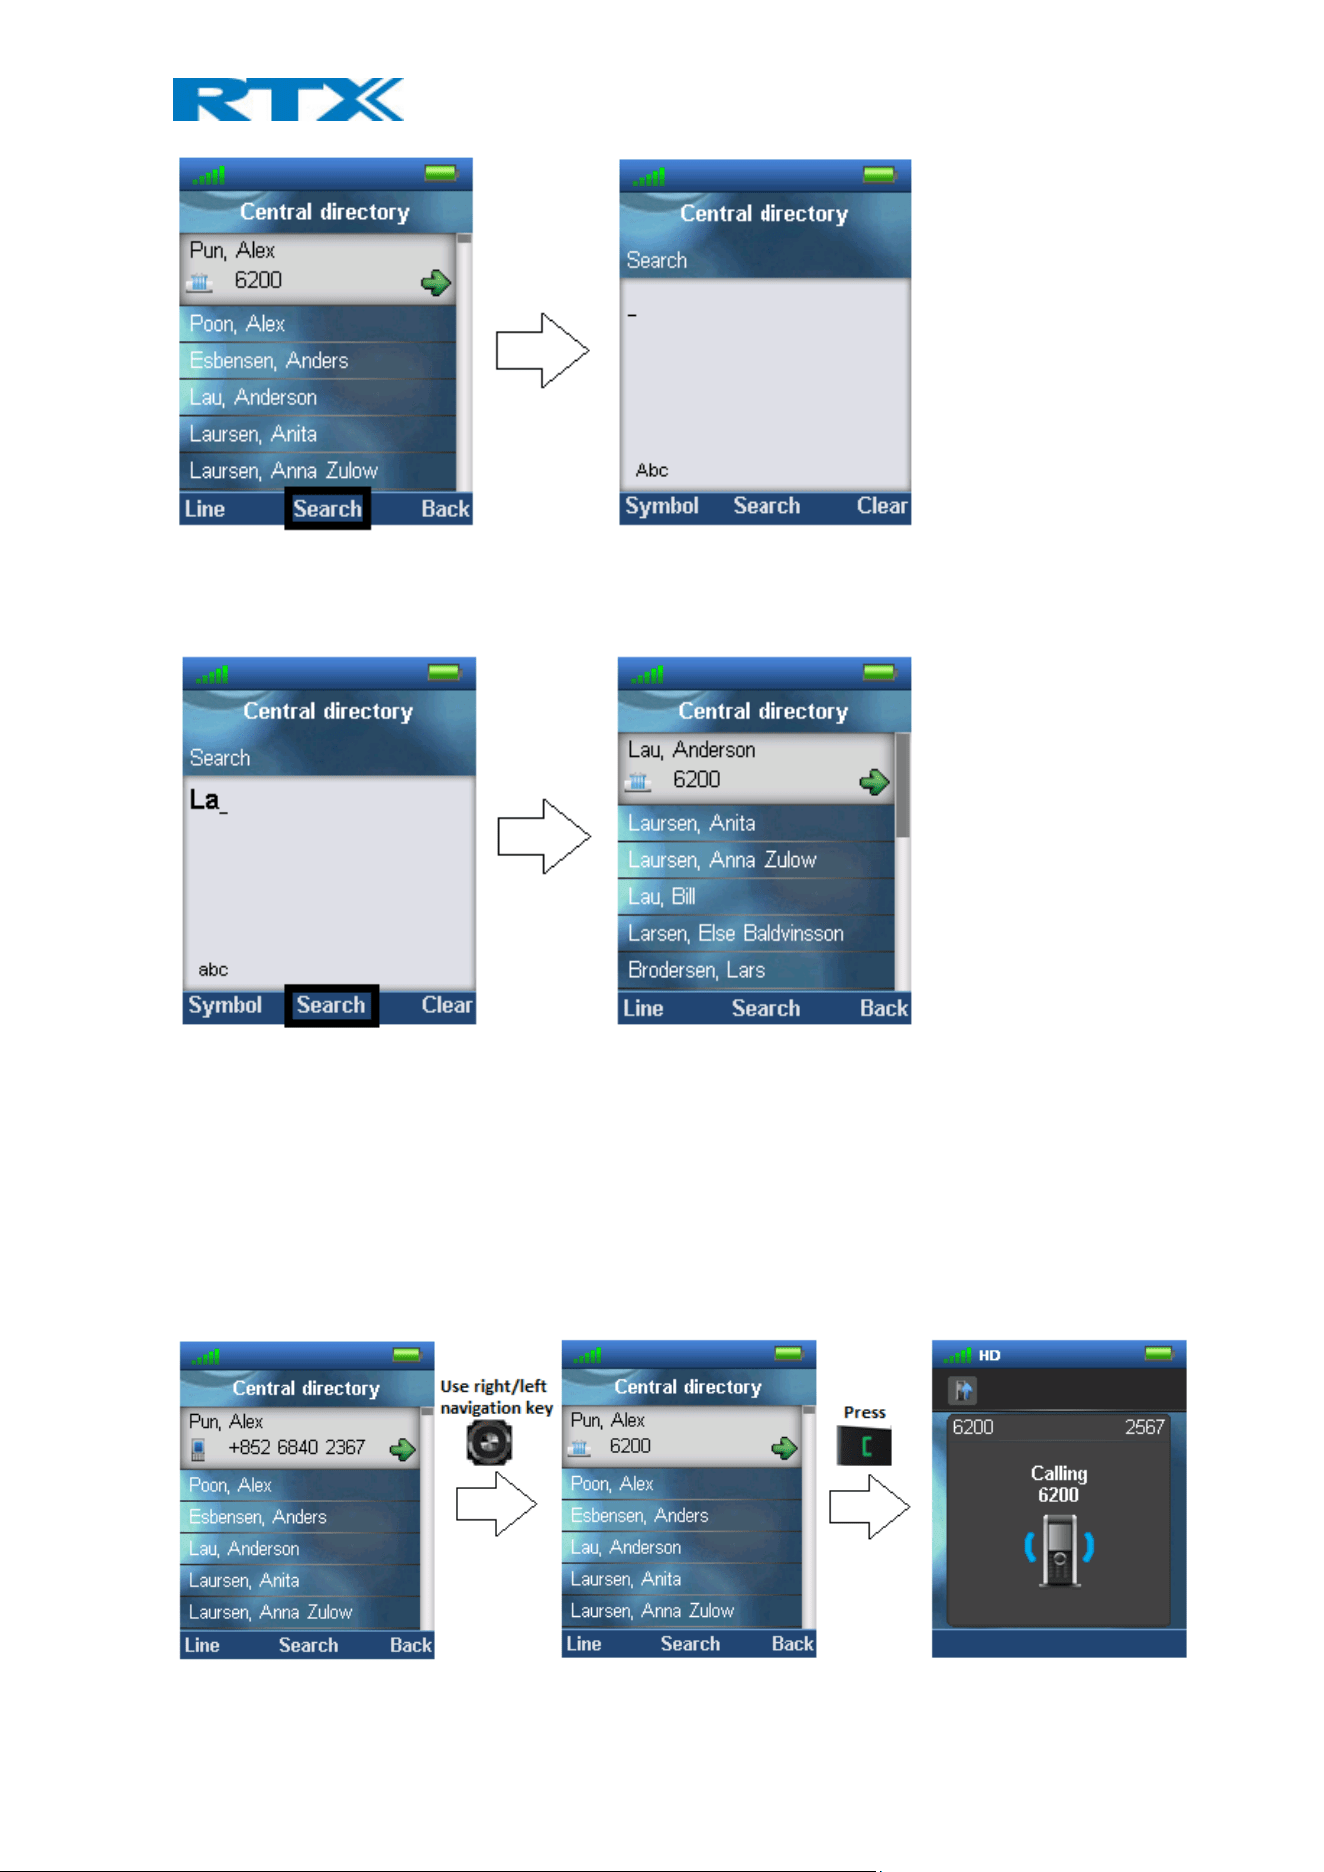
When set to LDAP mode, opening the central directory will show a search screen as displayed in the following. By
leaving the search field empty and pressing the middle softkey “Search” all the contacts in the central directory
will be displayed.
NOTE: When the central directory is in LDAP mode pressing right softkey “Back” the handset will return to the
“Search” field, and a new search for a contact can be made. Pressing the red “On-hook” button, in the central
directory, will send the user back to idle.
If the central directory instead of LDAP Mode is set to Local mode, opening the central directory will get you
directly to browsing mode, and to enter the search mode press the middle softkey as displayed below.
H200 Handset Guide DRAFT
Proprietary and Confidential
Page | 23
The search function is similar in these two modes. When typing something in the search field, and pressing
search the results of the search will be displayed. This is showed in the following images.
To scroll through the search results, use the navigation keys up and down and you will scroll through the list. If a
green arrow is seen to the right of a contact (as seen above), this contact has more than one number added, and
to scroll through these different numbers use the left/right navigation keys.
6.2.2 Calling a Contact in the Central Directory
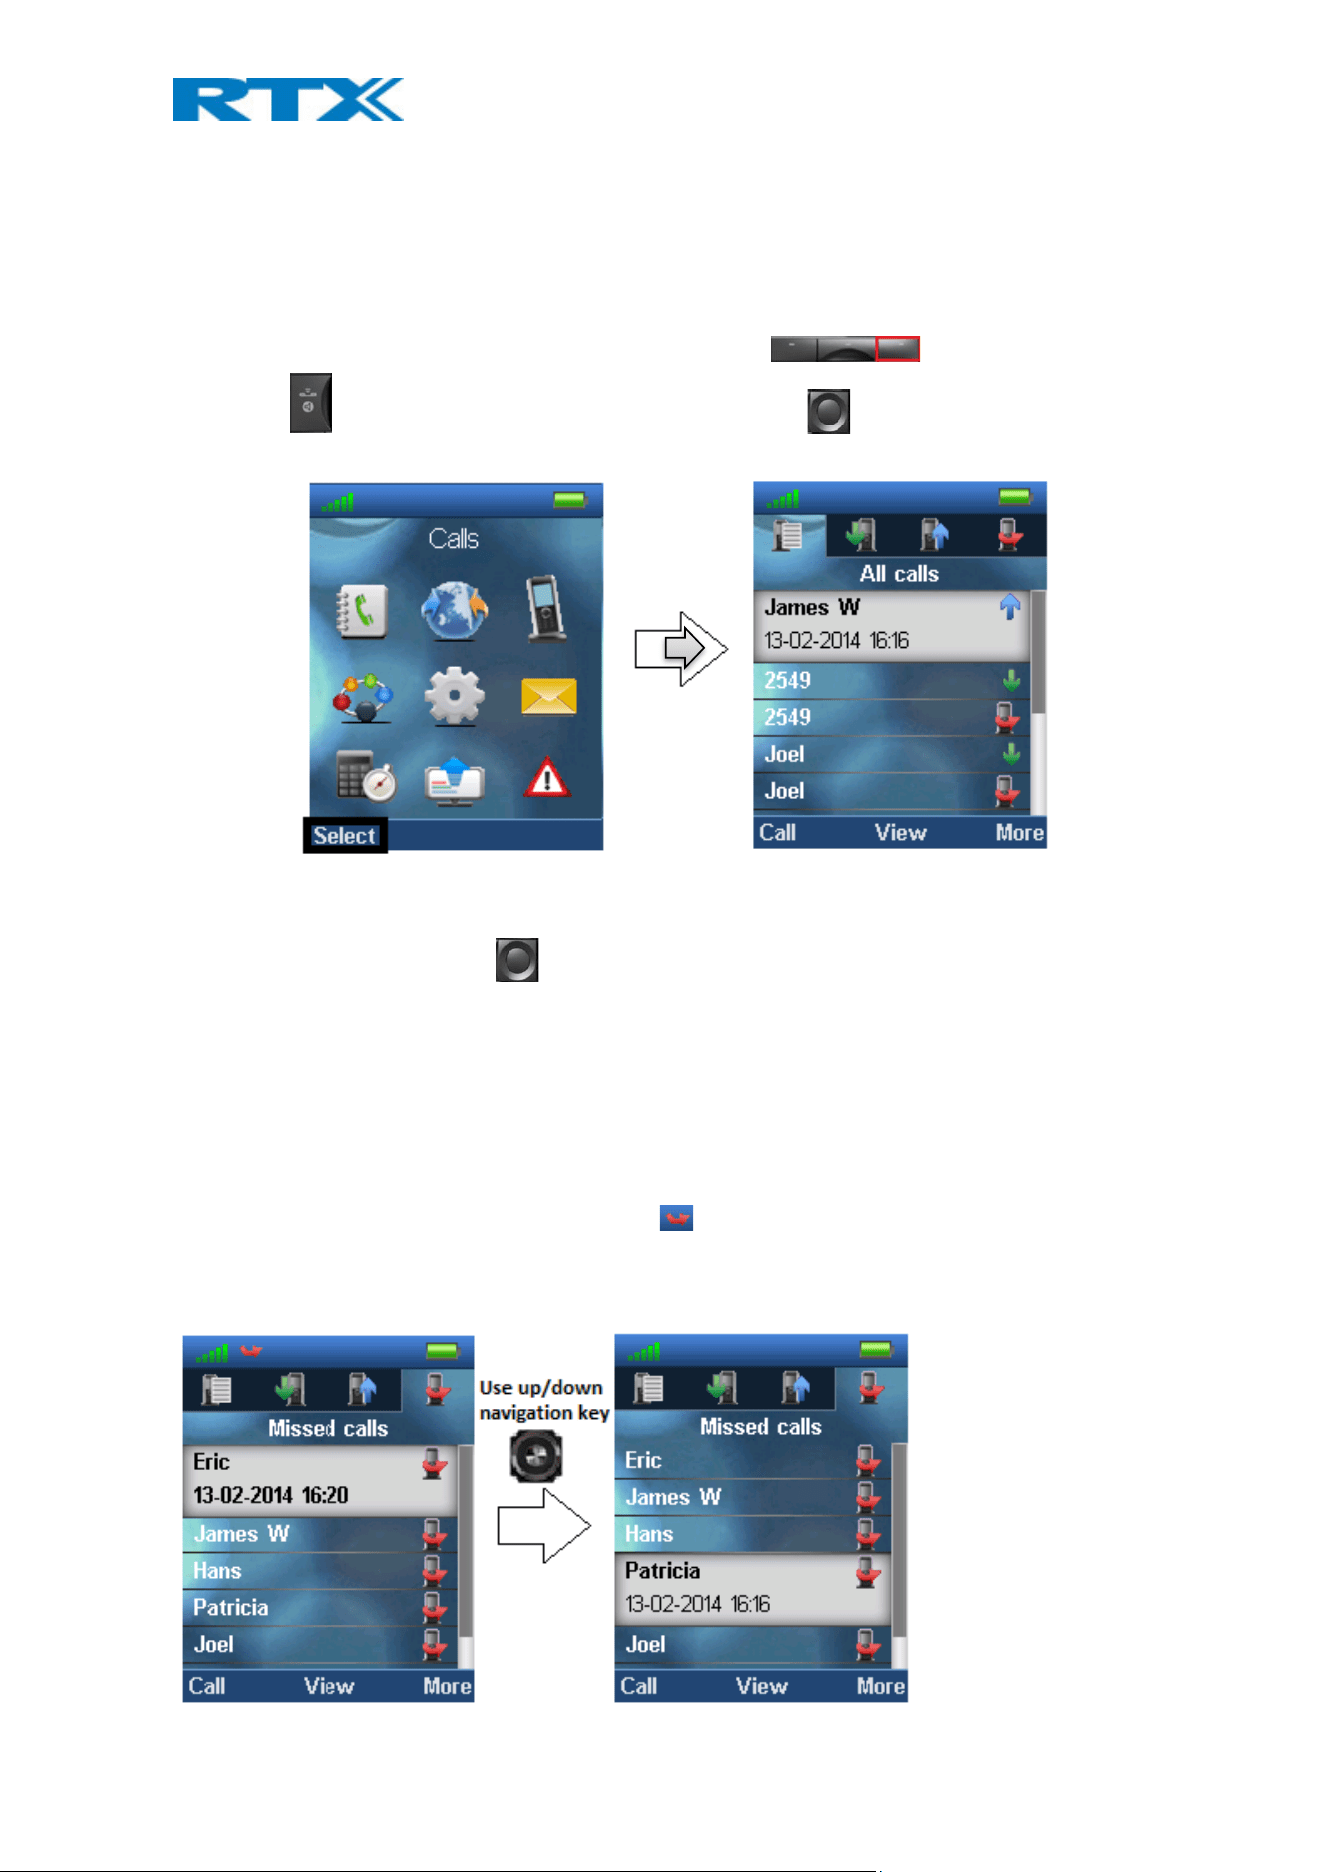
To call a contact from the central directory you can either press the green “Off-hook” button or the left softkey
“Call”. The contact number that currently appears on the screen will be called. Use right/left navigation key to
scroll through the names.
If a contact has more numbers added an arrow is shown to the right of the contact, and by pressing the right/left
H200 Handset Guide DRAFT
Proprietary and Confidential
Page | 24
navigation keys it is possible to navigate between the different numbers assigned to that contact. The number
that currently appears on the screen is the one that is called.
6.3 Calls
The menu “Calls” consists of lists of all the calls that have been made to or from the handset.
This menu can be entered directly from idle with the right softkey , by pressing the green off-
hook button or from the menu by pressing the menu activity key and choosing “Calls”.
When opening the “Calls” menu, the list “All calls” is automatically opened.
Using the up/down navigation keys it is possible to view the four different statuses.
Answered calls: The incoming calls that have been answered are listed with a green arrow pointing downwards.
Dialed calls: All the calls that have been dialled from the handset are listed with a green up arrow on the left.
Missed calls: This lists all the incoming calls to the handset that have not been answered by displaying a red icon
with a white cross.
When there is a missed call on the handset a red icon is displayed in the status bar until the entry has been
displayed in the missed call list. As shown in the images below, the information displayed about the missed call in
the call list is in bold text until the entry has been scrolled over once.
H200 Handset Guide DRAFT
Proprietary and Confidential
Page | 25
Using the up/down navigation keys scrolls through the list of missed calls. When the entries has been displayed
once, the text displaying call information is no longer bold, and the red missed call icon disappears from the
status bar indicating that the user has seen missed call; this is displayed in the second image above.
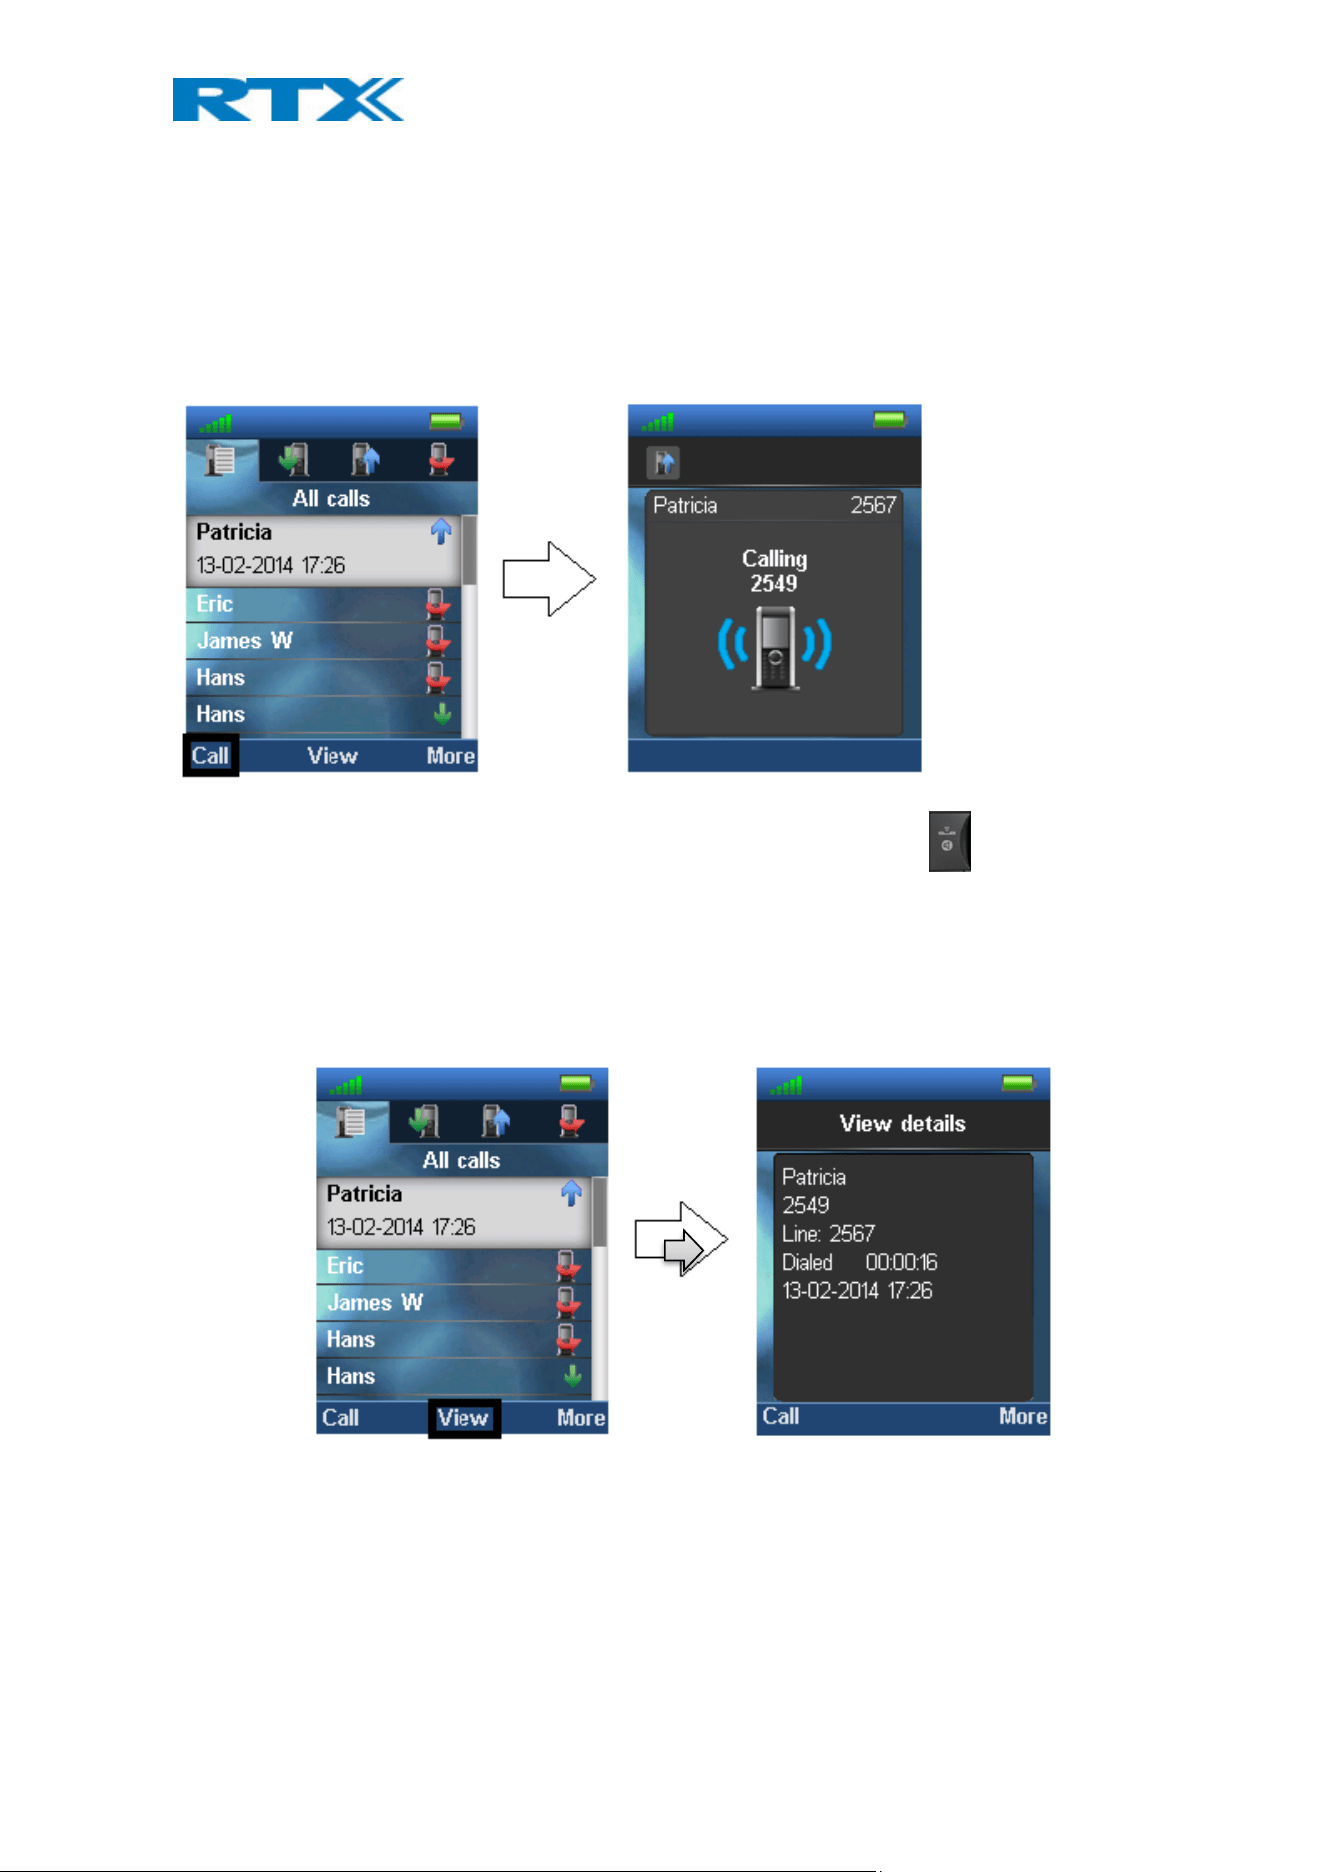
6.3.1 Call
To initiate a call directly from the local call list, use the up and down navigation keys to highlight an entry, and
press the left softkey “Call”. This will initiate a call to the highlighted entry as display in the images below.
A call can also be made to the highlighted entry by pressing the green off-hook key .
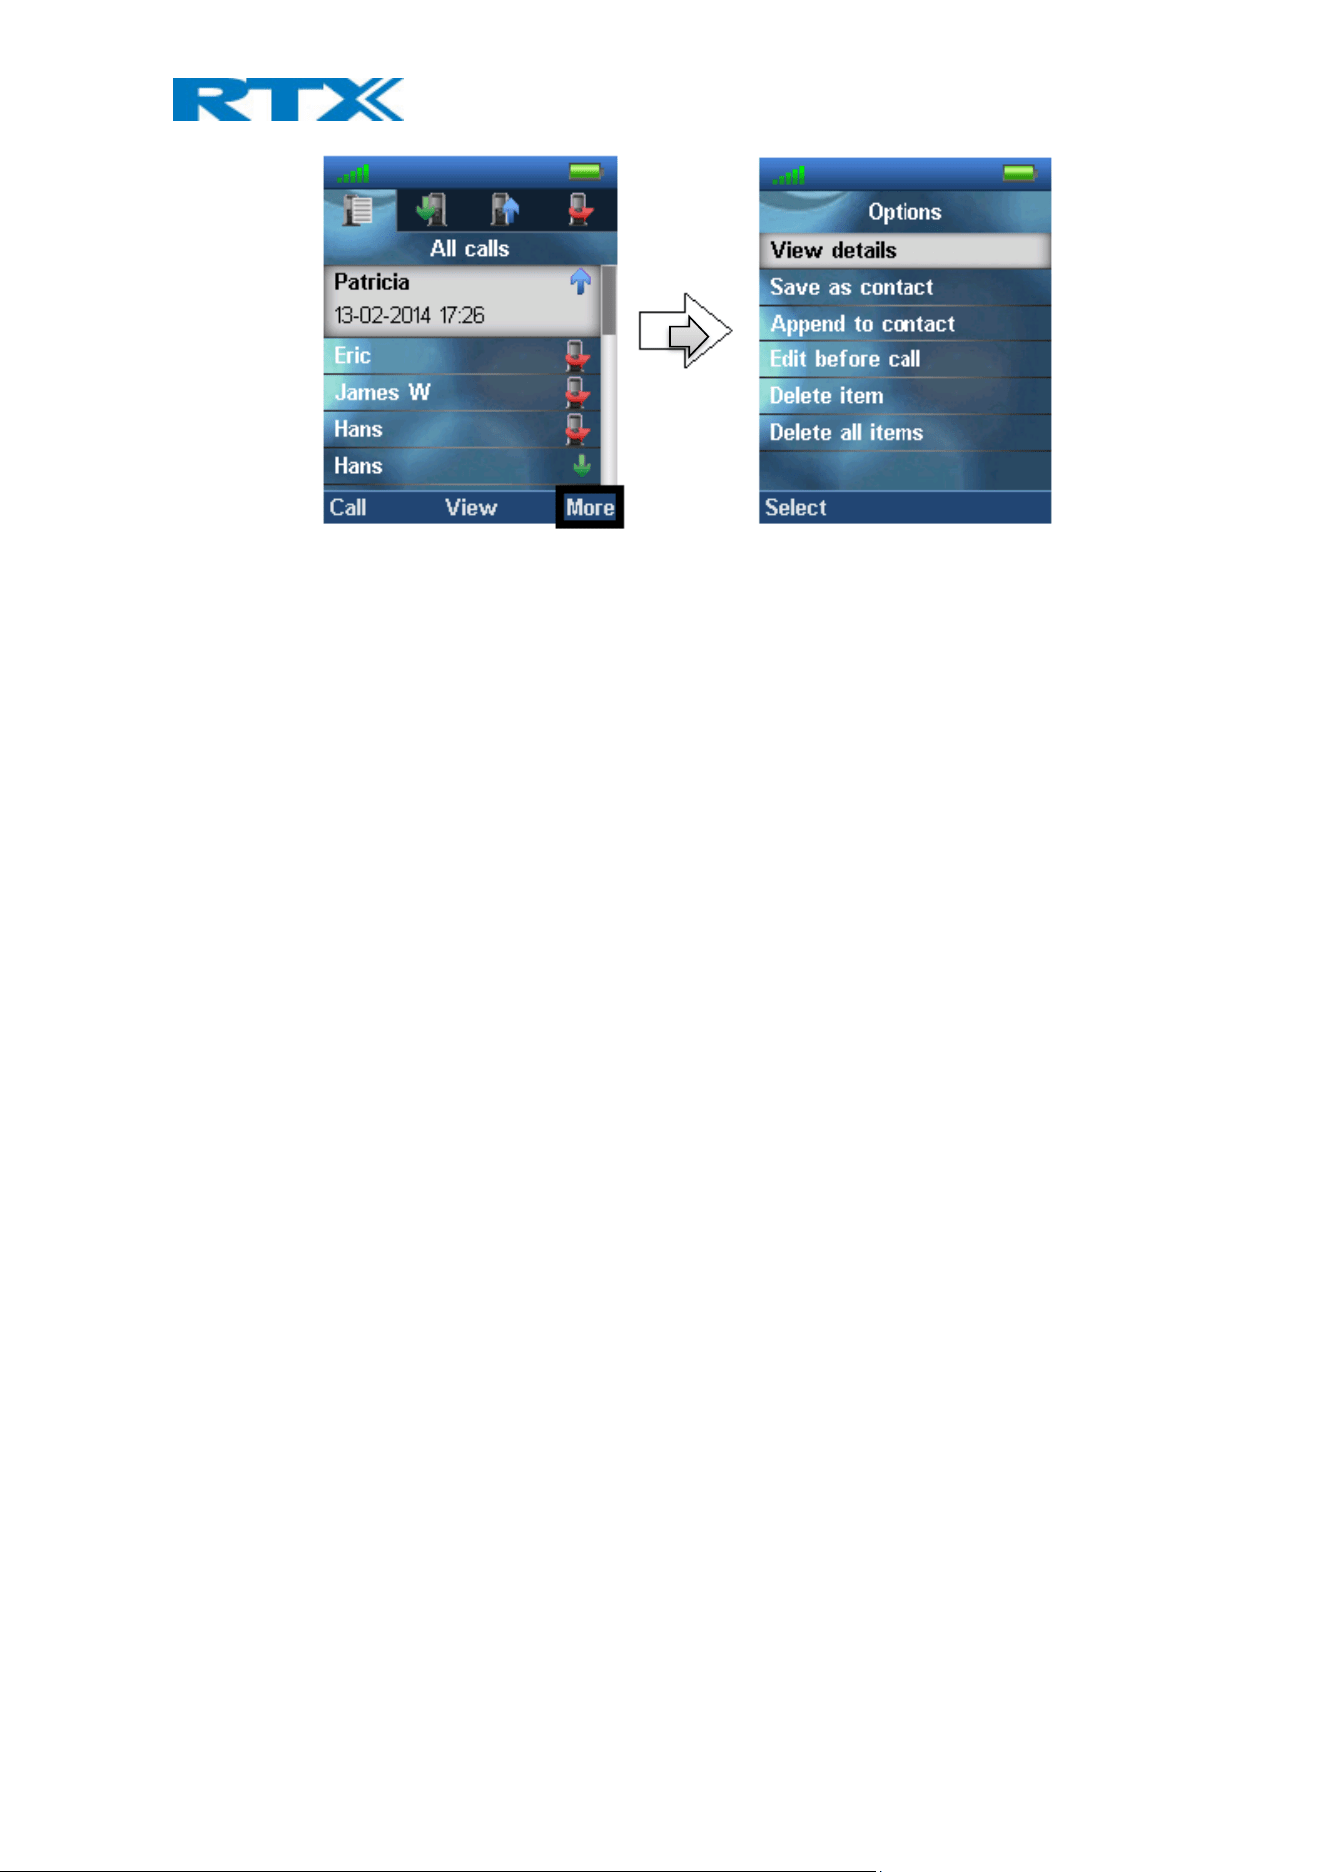
6.3.2 View
The middle softkey enters a “View” function for each entry. With this feature the following details of the call can
be seen: number, line number, status (answered, dialled, missed), duration, and time stamp as displayed in the
image below.
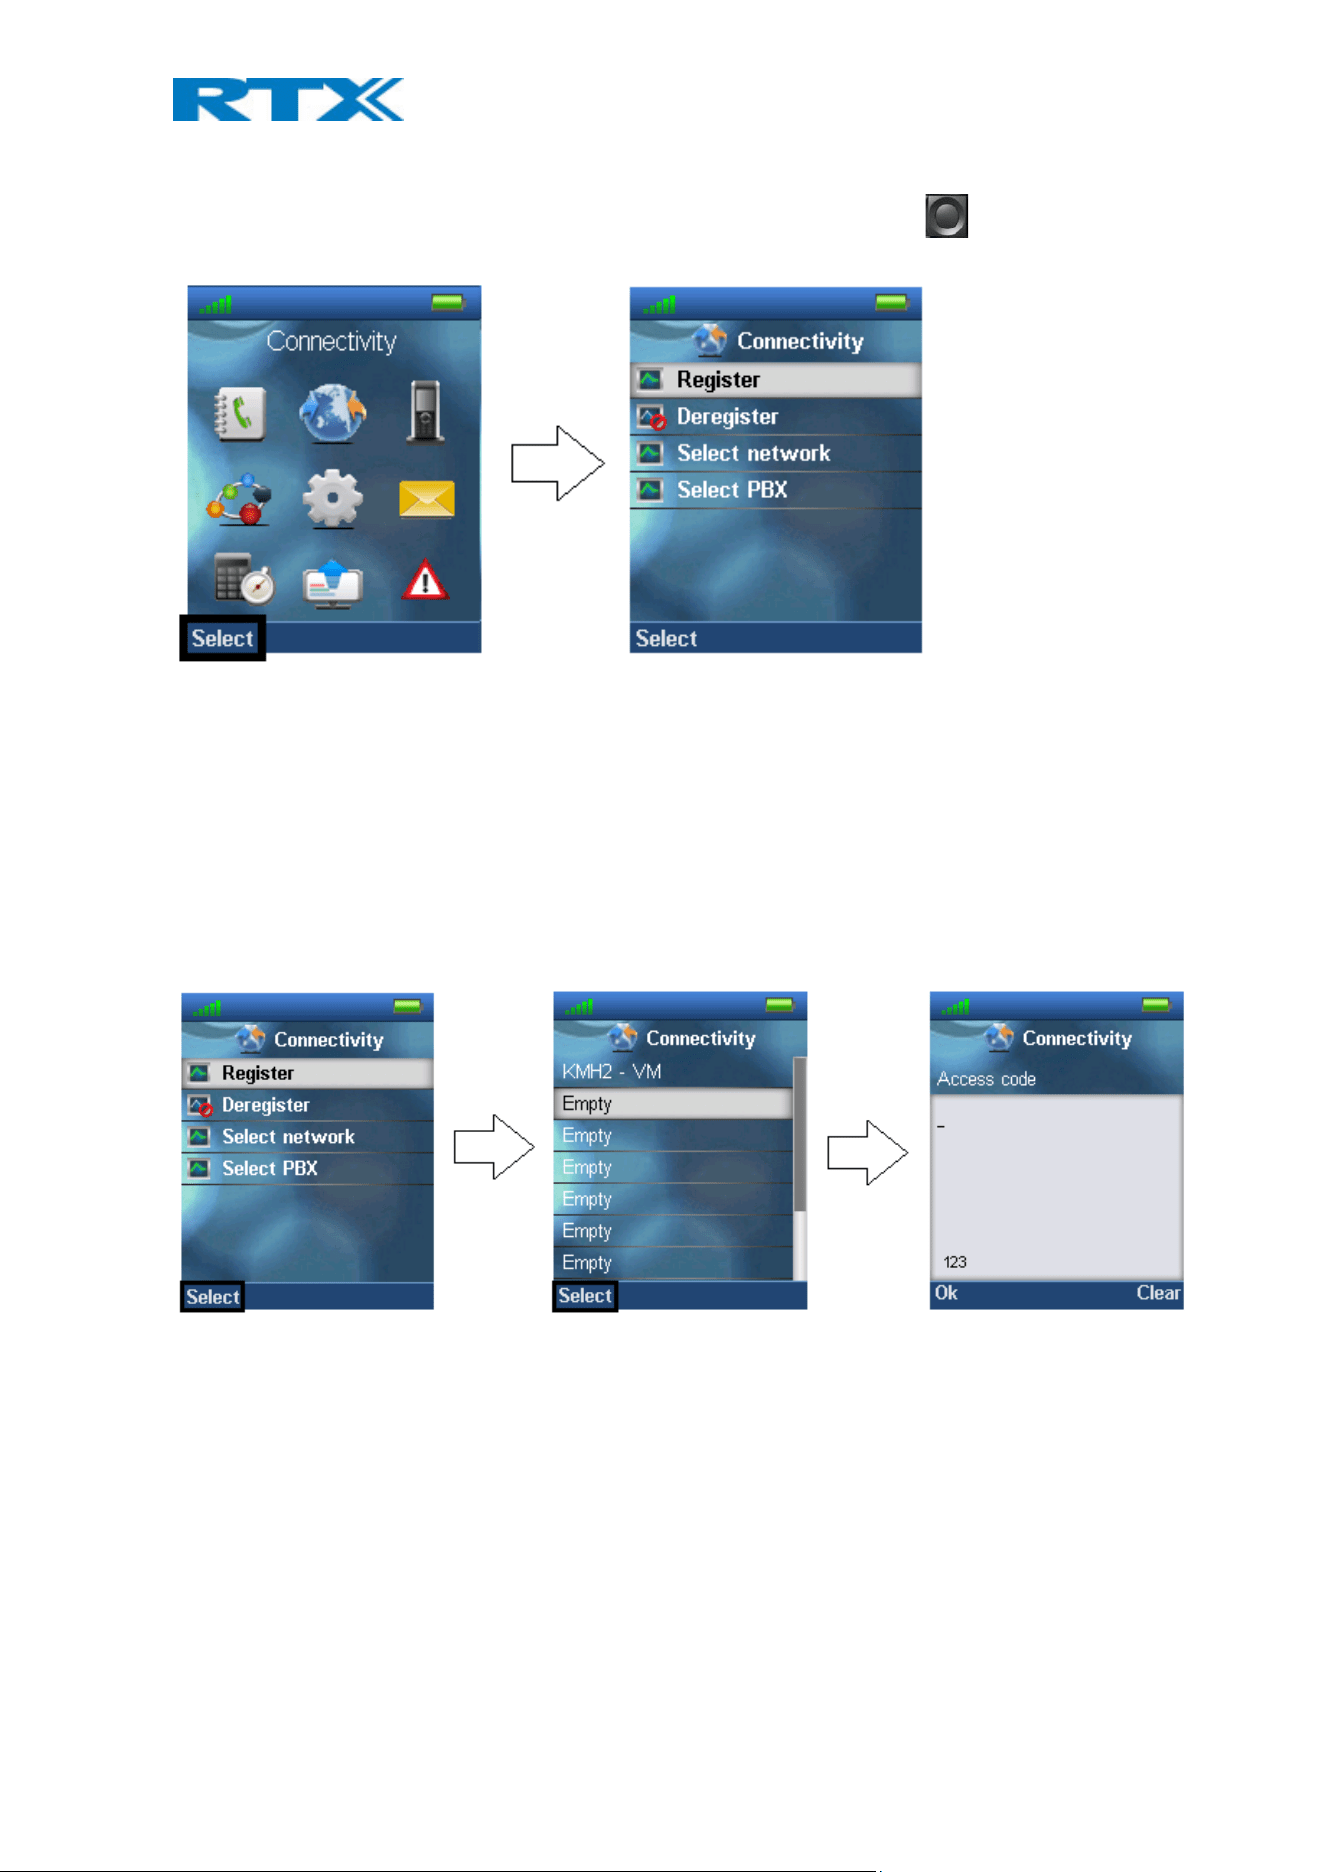
6.3.3 More Calls Options
When a specific call is highlighted, pressing “More” in the “Calls” menu enables the features seen below.
H200 Handset Guide DRAFT
Proprietary and Confidential
Page | 26
View details
This shows the same details about the call as the “View” function explained in 7.3.1 Call/View.
Save as contact
With this feature it is possible to save the number in the call list as a contact.
Append to contact
This function makes it possible to add the number in the call list to an existing contact.
Send message
With this feature a text message can be sent to the selected number in the call list.
Edit before call
With this function the number in the call list can be edited before calling.
Delete item
By selecting “Delete item” the following text message is displayed: “Delete current item from list?”
To delete the item from the call list, press the left softkey “Yes”.
To return to the call list, press the right softkey “No”.
Delete all items
This feature makes it possible to delete all items in the specific call list. By selecting “Delete all items” the
following text message is displayed: “Delete all items in this list?”
To delete all items in the specific list, press the left softkey “Yes”.
To return to the call list, press the right softkey “No”.
H200 Handset Guide DRAFT
Proprietary and Confidential
Page | 27
6.4 Connectivity
The “Connectivity” menu is entered in the menu by pressing the menu activity key in idle.
In this menu it is possible to register or deregister the handset to a certain base system. Moreover, the “Select
network” function makes it possible to register the handset to more than one base system.
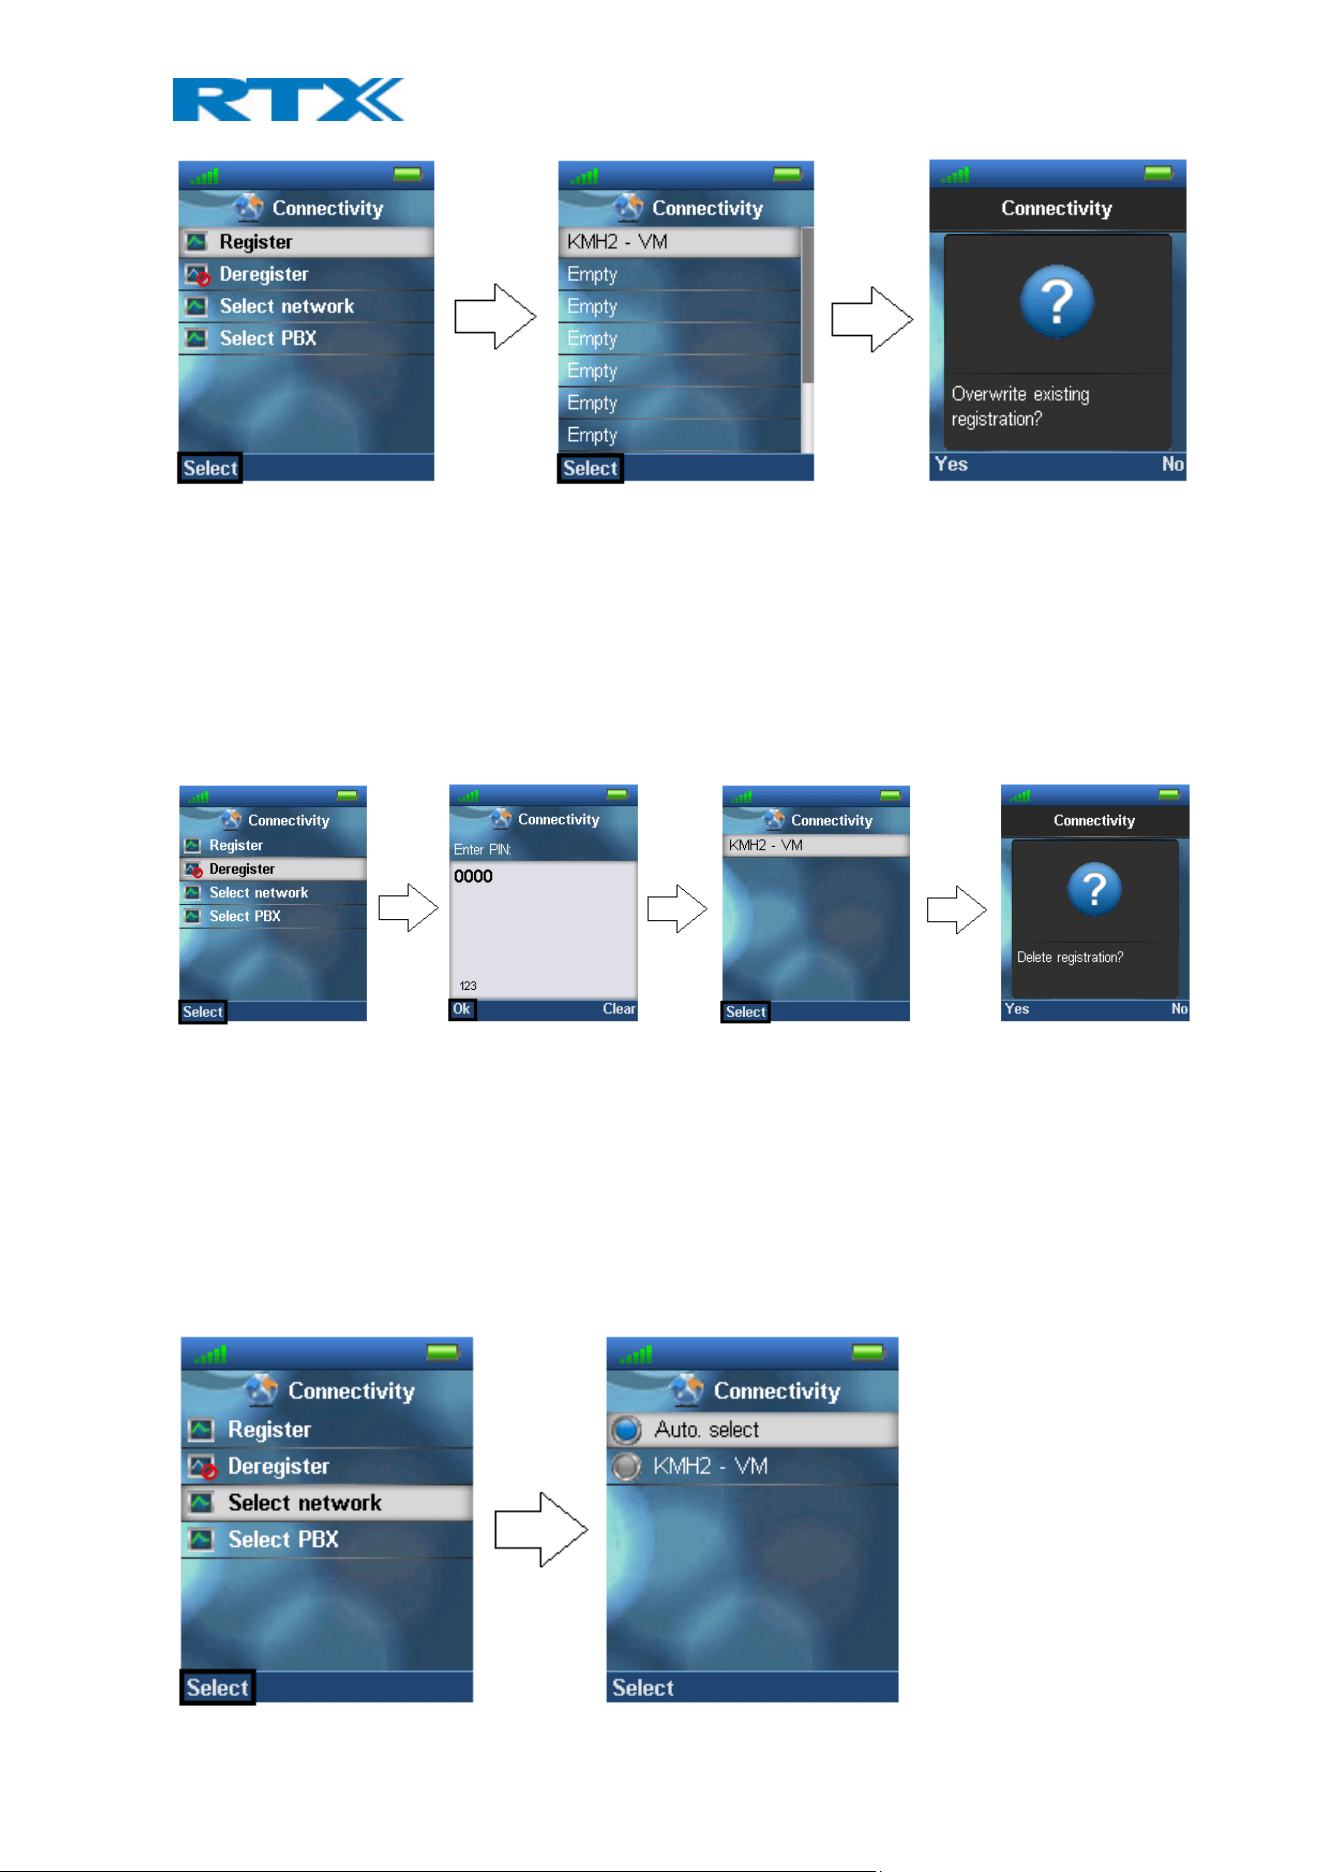
6.4.1 Register
When a handset is to be registered on a base system, the user will be prompted for an access code (base
registration PIN) before the registration procedure is started. Since it is possible for the handset to be registered
on different base systems that are out of range of each other, the “Register” menu displays 10 different entries
with which the handset can be assigned to different base systems. When selecting an “Empty” entry the user is
prompted for the PIN code as shown below.
The access PIN code is default “0000” and cannot be changed via the handset. The access PIN code can only be
changed via the web interface on the base (please check the additional document via [2] for more information
about handset registration on a base system).
It is also possible to overwrite an existing registration by selecting that entry that should be overwritten instead
of selecting an “Empty” slot. This is displayed below.
H200 Handset Guide DRAFT
Proprietary and Confidential
Page | 28
NOTE: For the handset to function on different base systems, the handset must be completely out of range of
system 1 to connect to system 2.
6.4.2 Deregister
The handset can be deregistered from a registration. The user will in this case be prompted for a PIN code (base
deregistration PIN), the PIN code is default “0000” and cannot be changed via the handset. This is displayed
below.
When the registration that should be deregistered is selected, a warning message “Delete registration?” will be
displayed as seen above. The user then has to accept by pressing the left softkey “Yes”, or the right softkey “No”
to cancel the operation.
6.4.3 Select PBX
If the handset is registered to different base systems (networks) the preferred network can be chosen in this
menu by highlighting it and pressing the left softkey “Select” as shown below.
H200 Handset Guide DRAFT
Proprietary and Confidential
Page | 29
For the handset to automatically select a network “Auto. select” can be selected. In this way, the handset
automatically chooses the network in range.
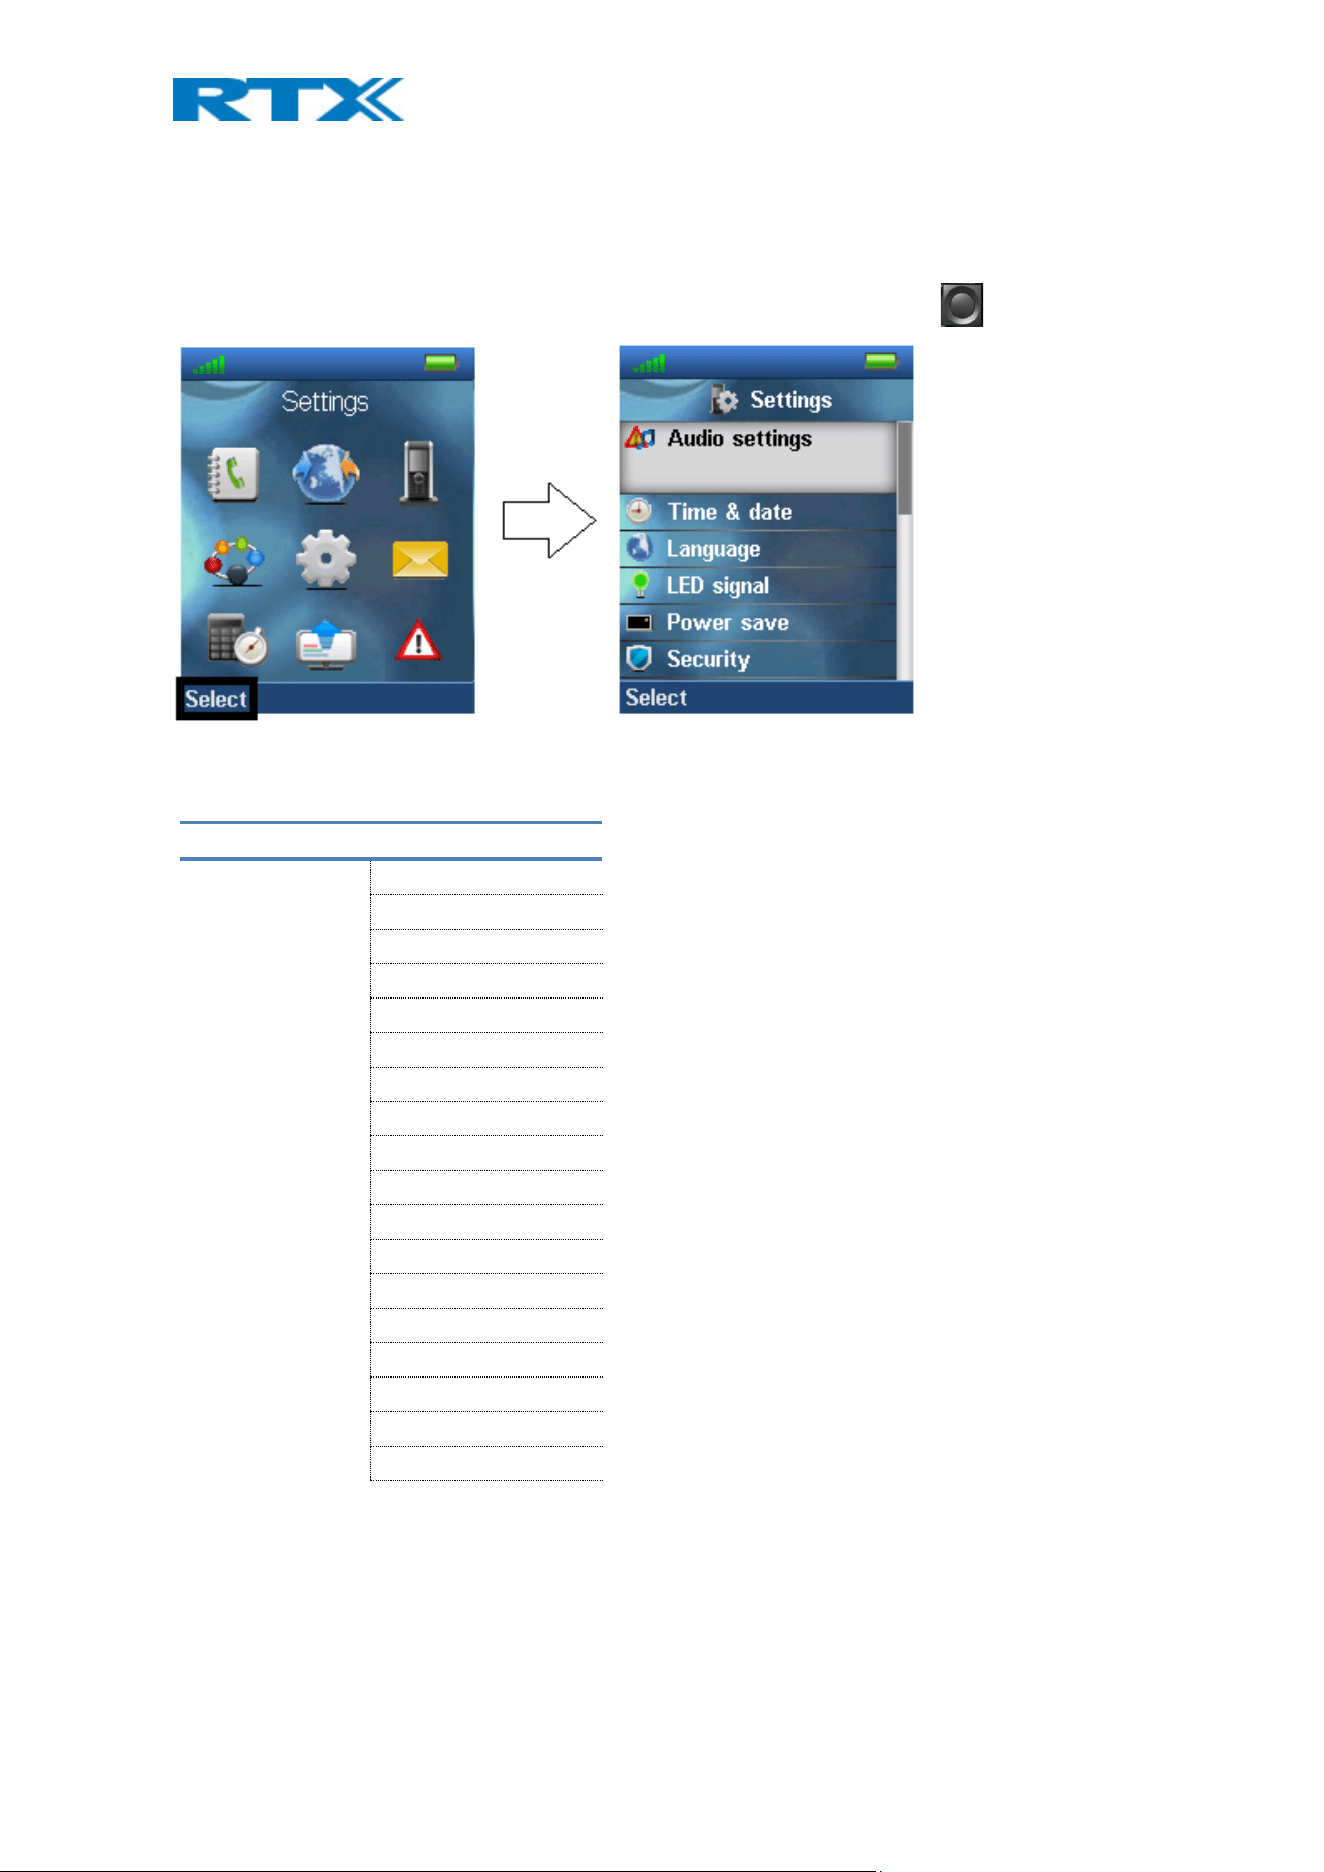
6.5 Settings
The “Settings” menu is entered through the menu by pressing the activity menu key in idle.
The “Settings” menu contains the following personal handset settings:
SETTINGS
Audio settings
Time & Date
Language
LED Signal
Power save
Security
Handset name
Line
Reset settings
Status
Auto answer
Silent charging
Do not disturb
Hide number
Call Forward
Idle Screen Saver
Idle Clock
Push To Talk
Each of these settings will be described in the following.
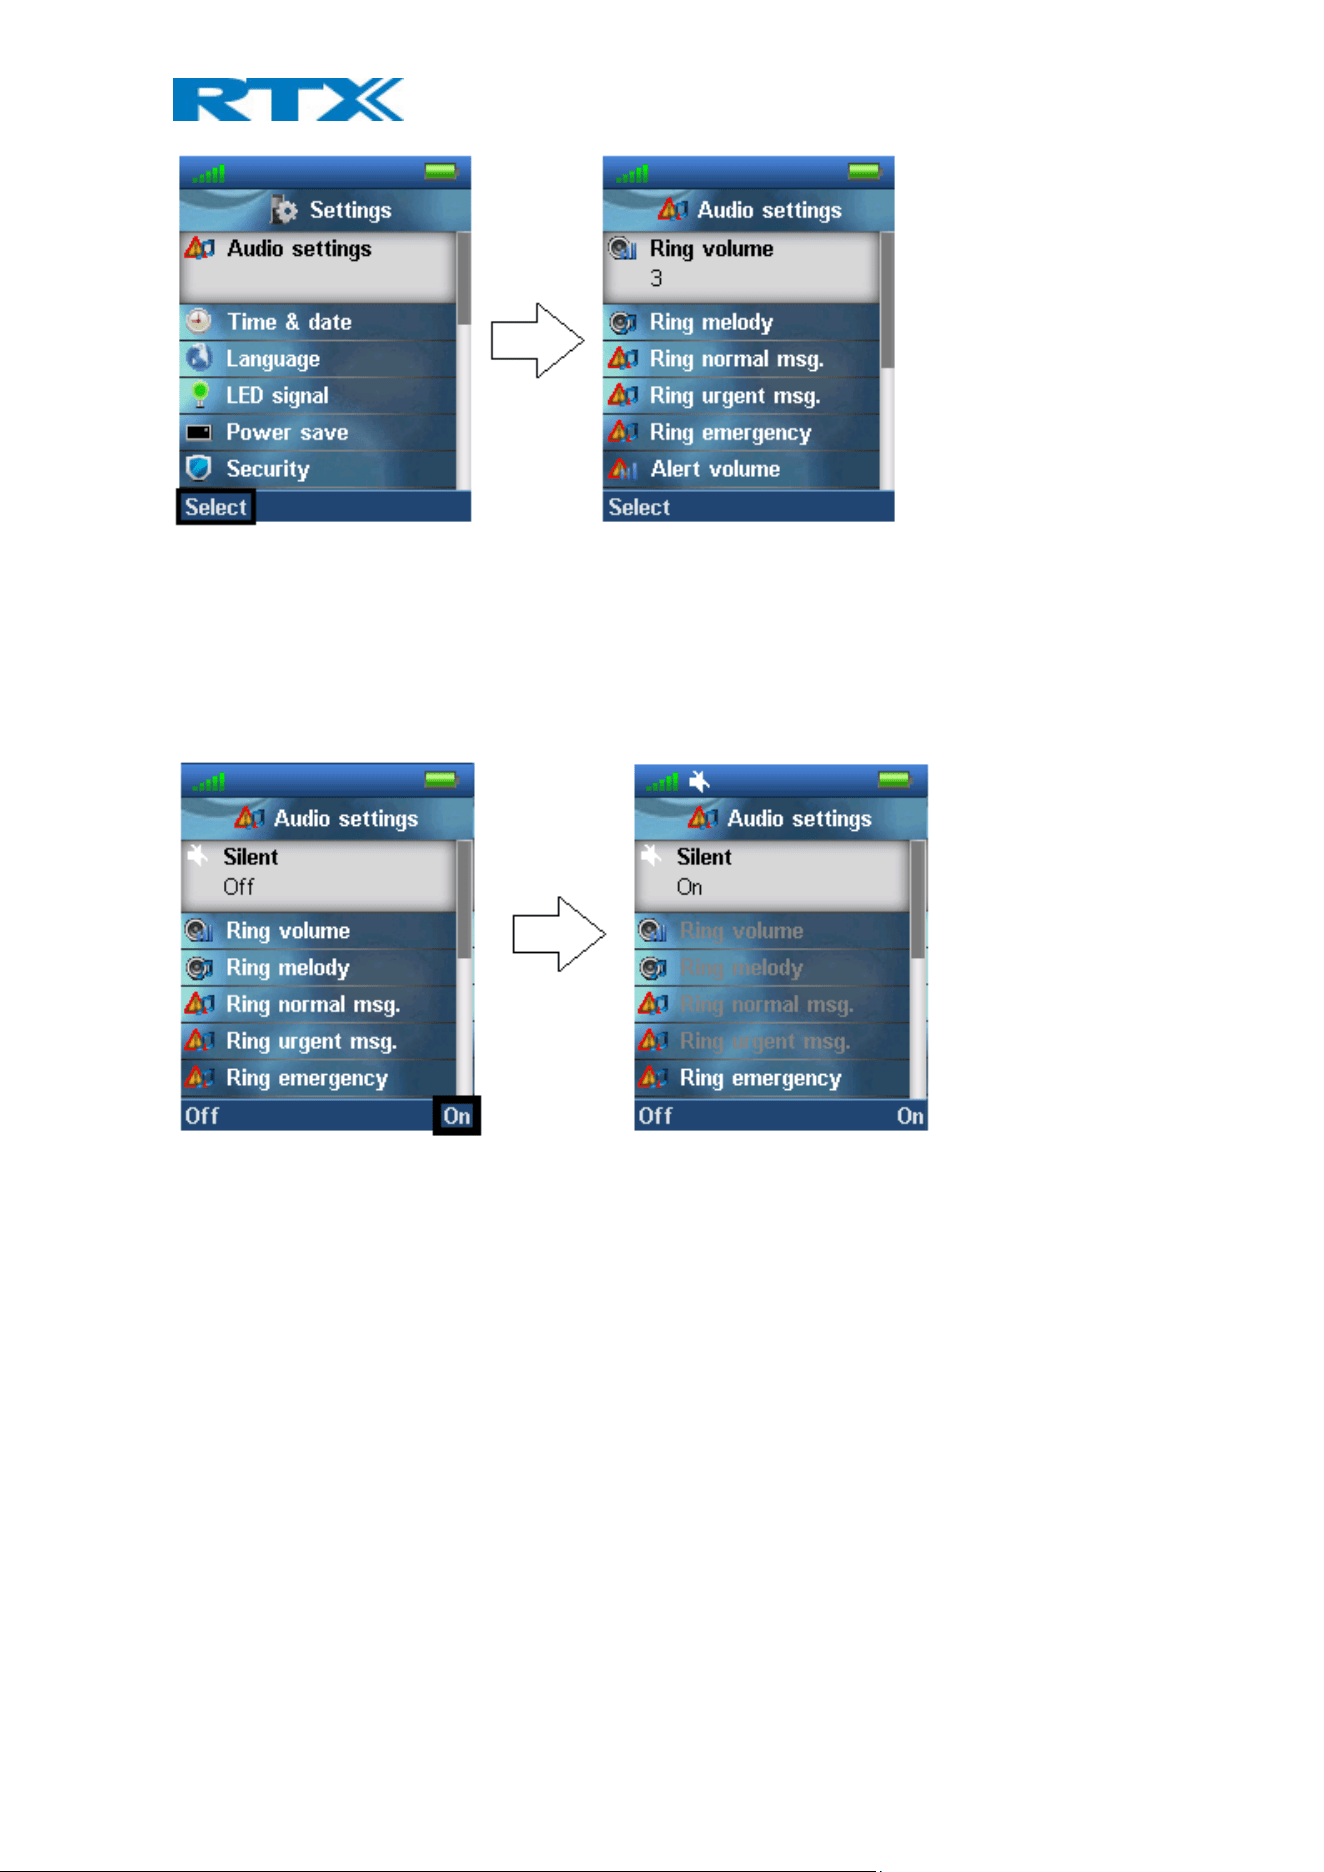
6.5.1 Audio Settings
The “Audio settings” menu contains different settings for the sounds on the handset.
H200 Handset Guide DRAFT
Proprietary and Confidential
Page | 30
6.5.1.1 Silent
The “Silent” profile can be either enabled with the right softkey “On”, or disabled with the left softkey “Off”.
When the “Silent” profile is enabled no sounds are played on the handset, and the handset does not ring on
incoming calls or messages.
In the “Audio settings” menu only “Ring emergency”, “Vibrator” and “Noise reduction” can be entered when the
“Silent” profile is enabled.
NOTE: With the “Silent” profile enabled, a ring melody will still be played when the handset receives an
emergency alarm message.
6.5.1.2 Ring Volume and Ring Melody
When the handset receives an incoming call, message, or alarm different ring volumes and melodies can be
selected.
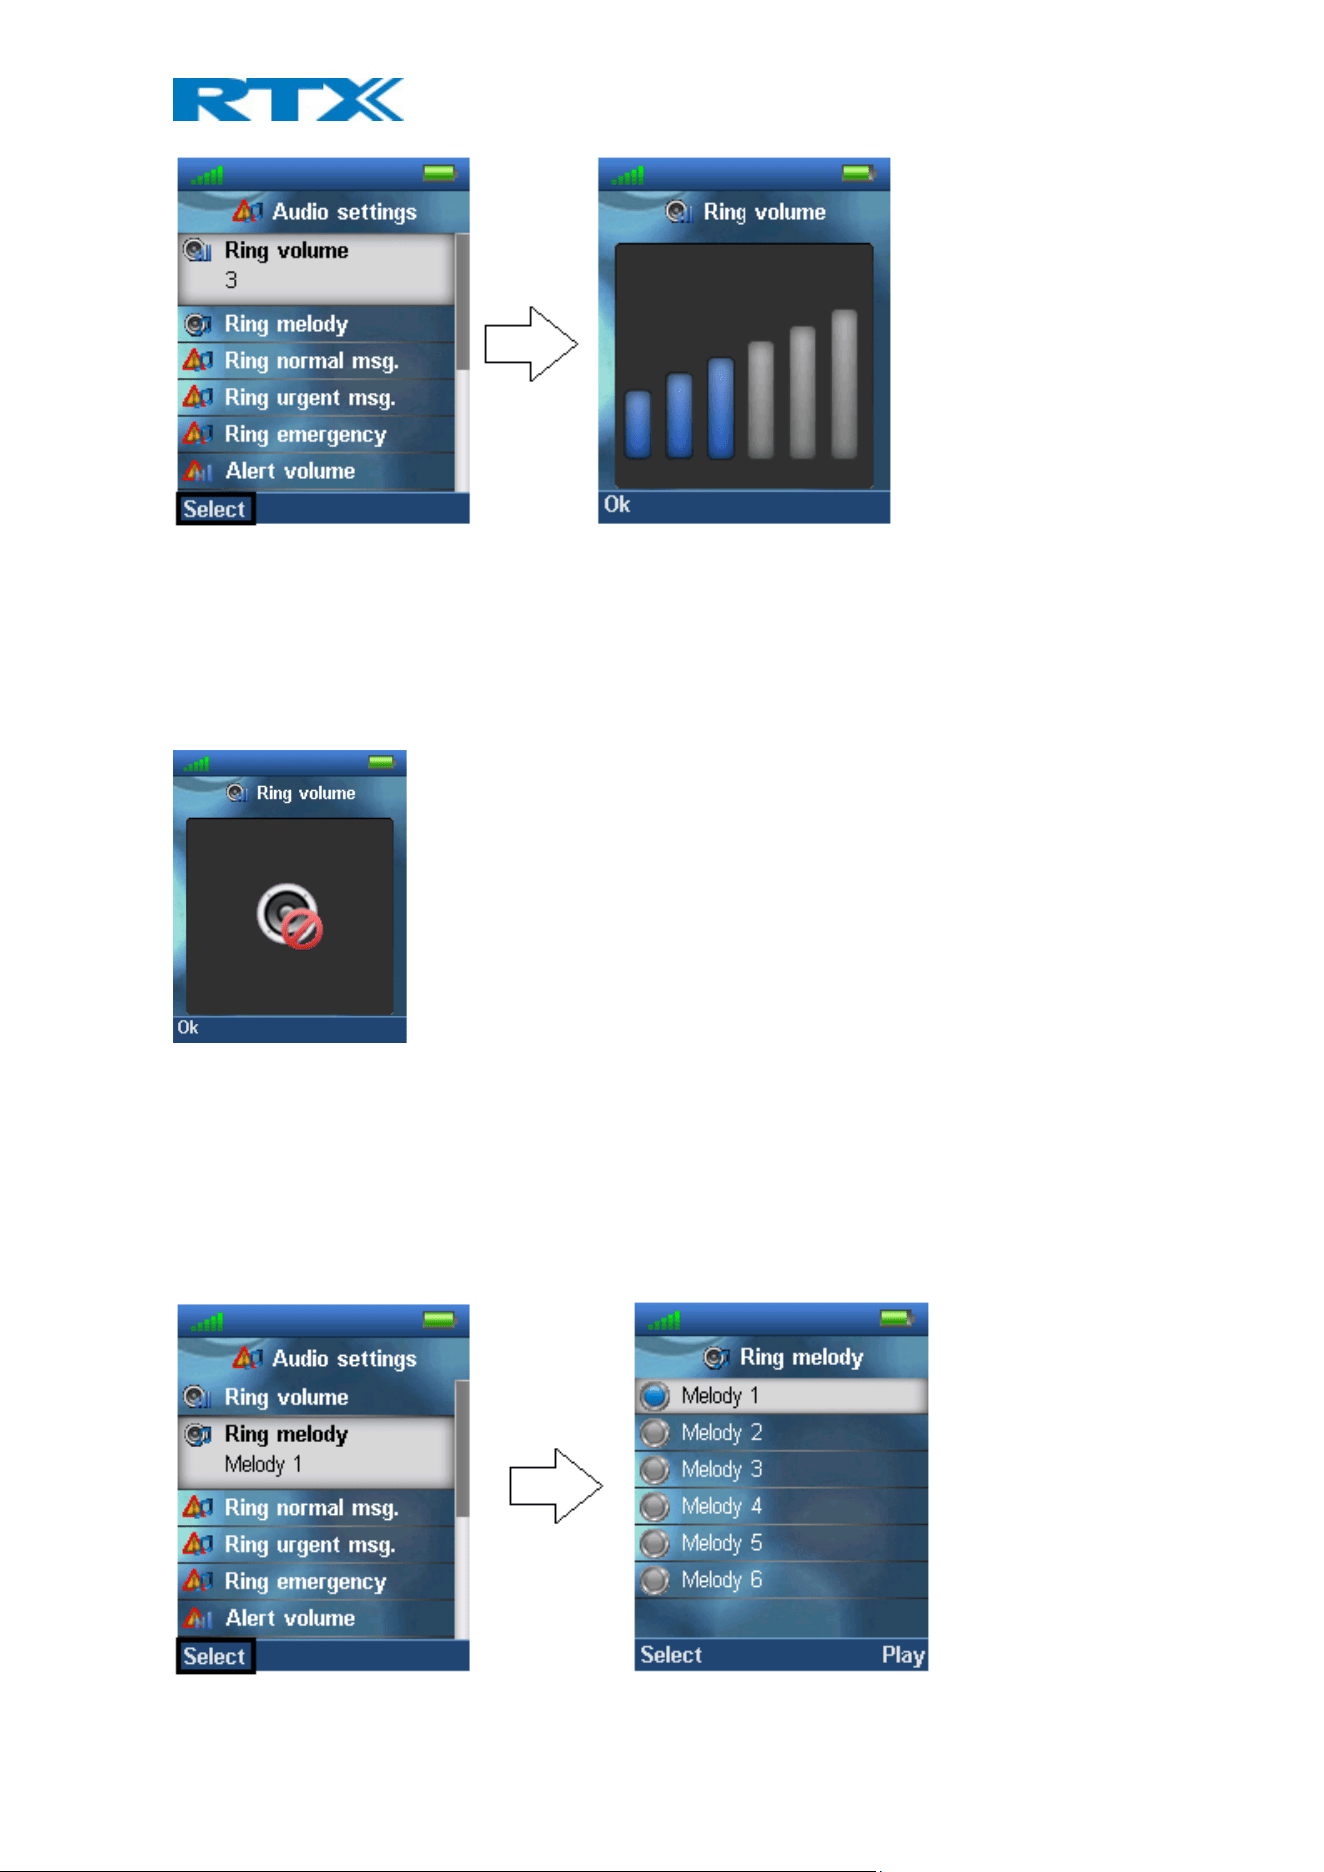
Ring volume
The ring volume for calls can be adjusted from mute to volume 6. The currently applied level is displayed when
entering the menu “Ring volume”.
H200 Handset Guide DRAFT
Proprietary and Confidential
Page | 31
To select the desired ring volume the navigation keys up/down or right/left is used to respectively increase or
decrease the volume. Thereby, pressing “Ok” saves the current ring volume. The currently applied ring melody is
played when adjusting the ring volume so that the respective ring volume can be heard before selected.
Ringer mute
The ringer is switched off when the lowest level is selected in “Ring volume”, and a mute image is showed in the
display as seen below.
When the ring volume is set to mute, the “Sound off” icon is displayed in the status bar, and no sound is heard
when receiving an incoming call or message.
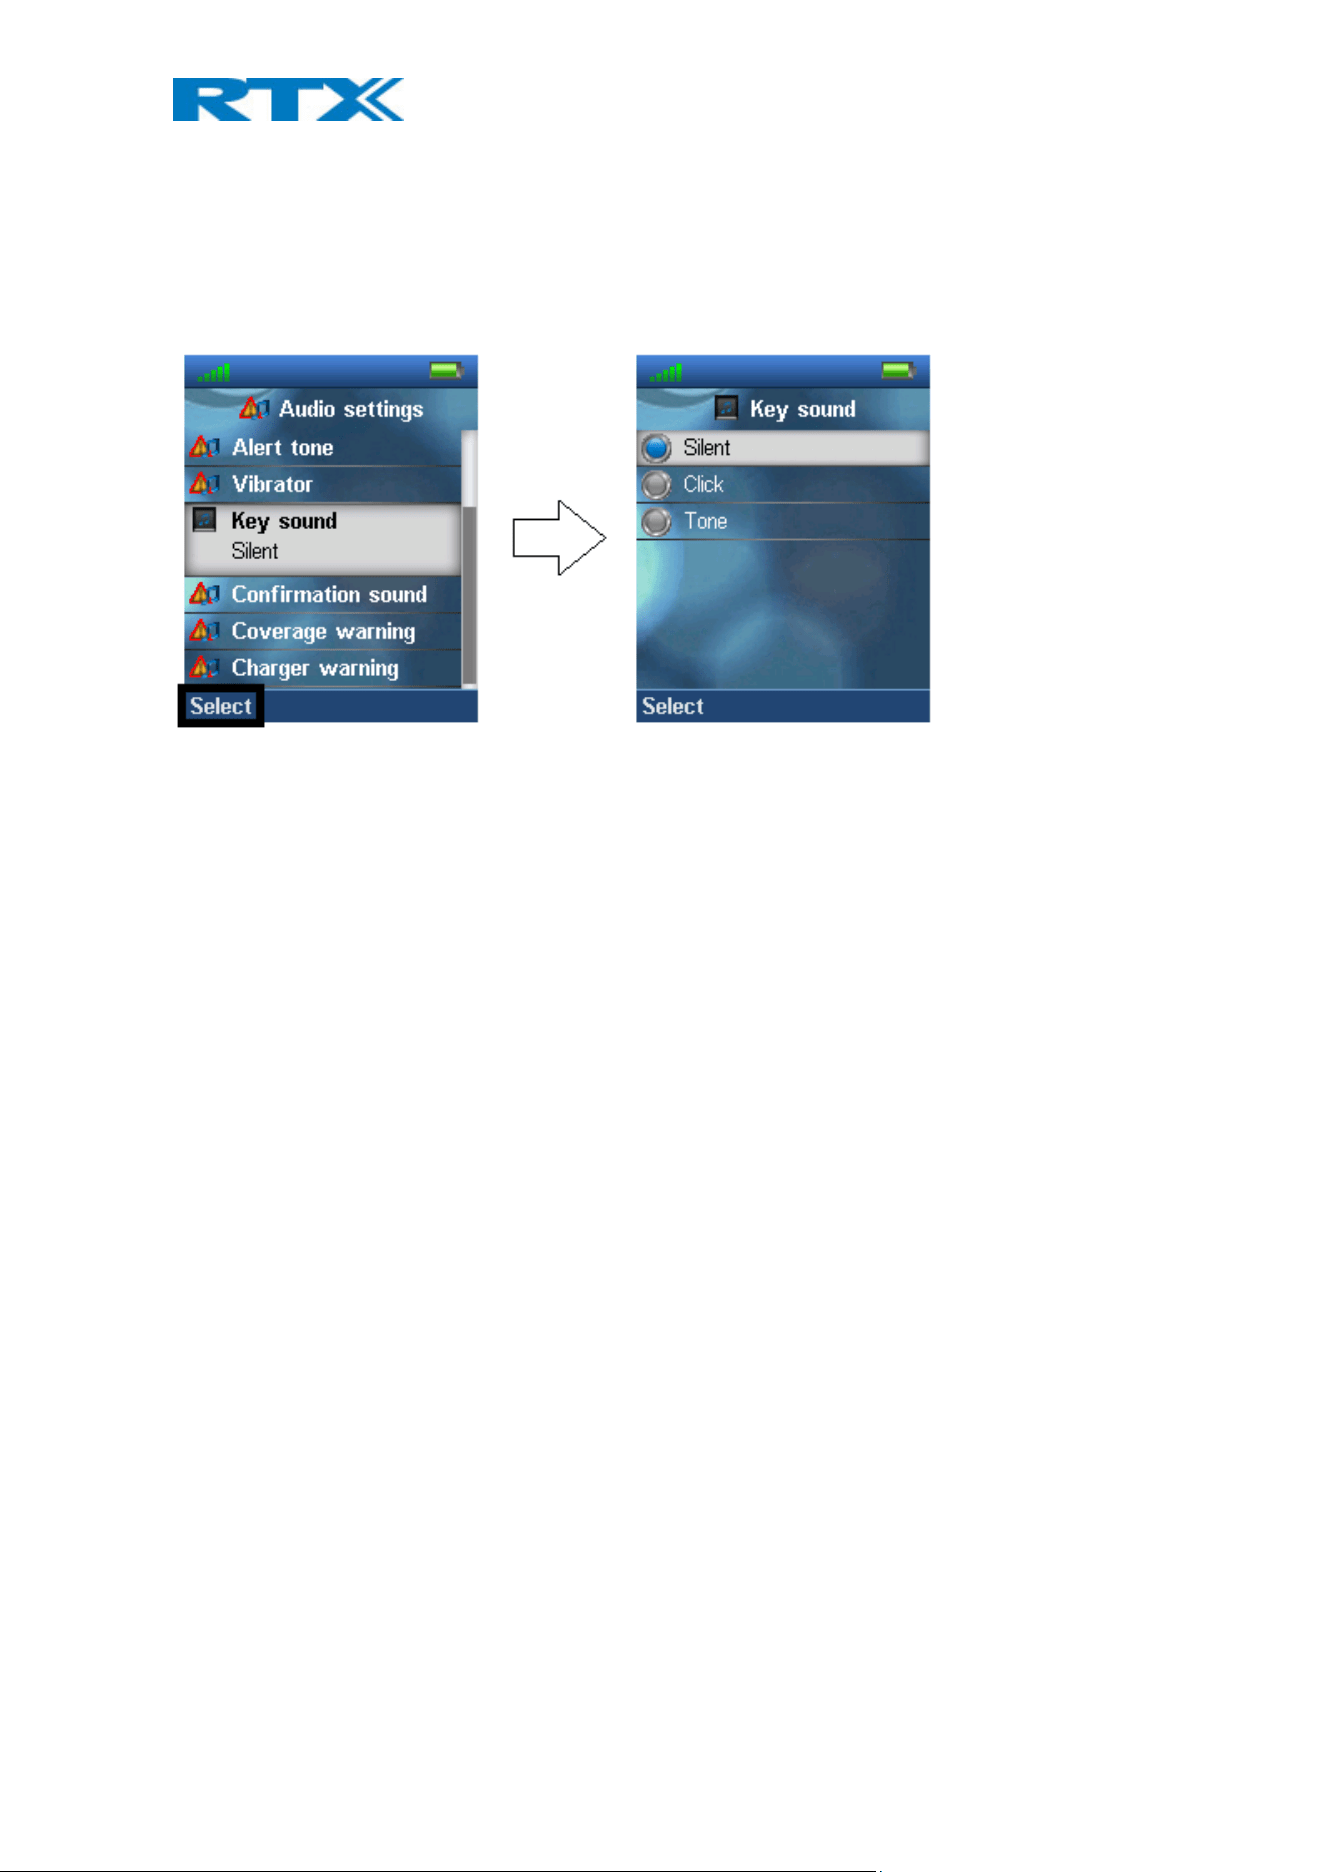
Ring melody
Many different ring melodies can be chosen for the handset to play when receiving an incoming call. A list of
melodies is displayed when entering the menu. Each displayed melody on the list can be selected by pressing the
left softkey “Select”.
To hear the melody before selecting it, each melody in the list can be played by selecting the right softkey “Play”.
H200 Handset Guide DRAFT
Proprietary and Confidential
Page | 32
The softkey “Play” changes to “Stop” during playback and the playback can then be stopped by pressing this
button.
6.5.1.3 Key Sound
The “Key Sound” settings controls if a key sound is heard as the keys are pressed on the handset, or if no sound is
made. The following three different options can be selected for the key sounds:
Silent
If this feature is chosen, there will not be heard any sounds when pressing the keys on handset.
Click
With this function enabled a click sound is heard when a key is pressed.
Tone
When this option is enabled a tone will be heard when a key is pressed.
NOTE: No key sound will be generated when pressing the keys during “key lock state” even though one of the
options “Click” or “Tone” is enabled.
H200 Handset Guide DRAFT
Proprietary and Confidential
Page | 33
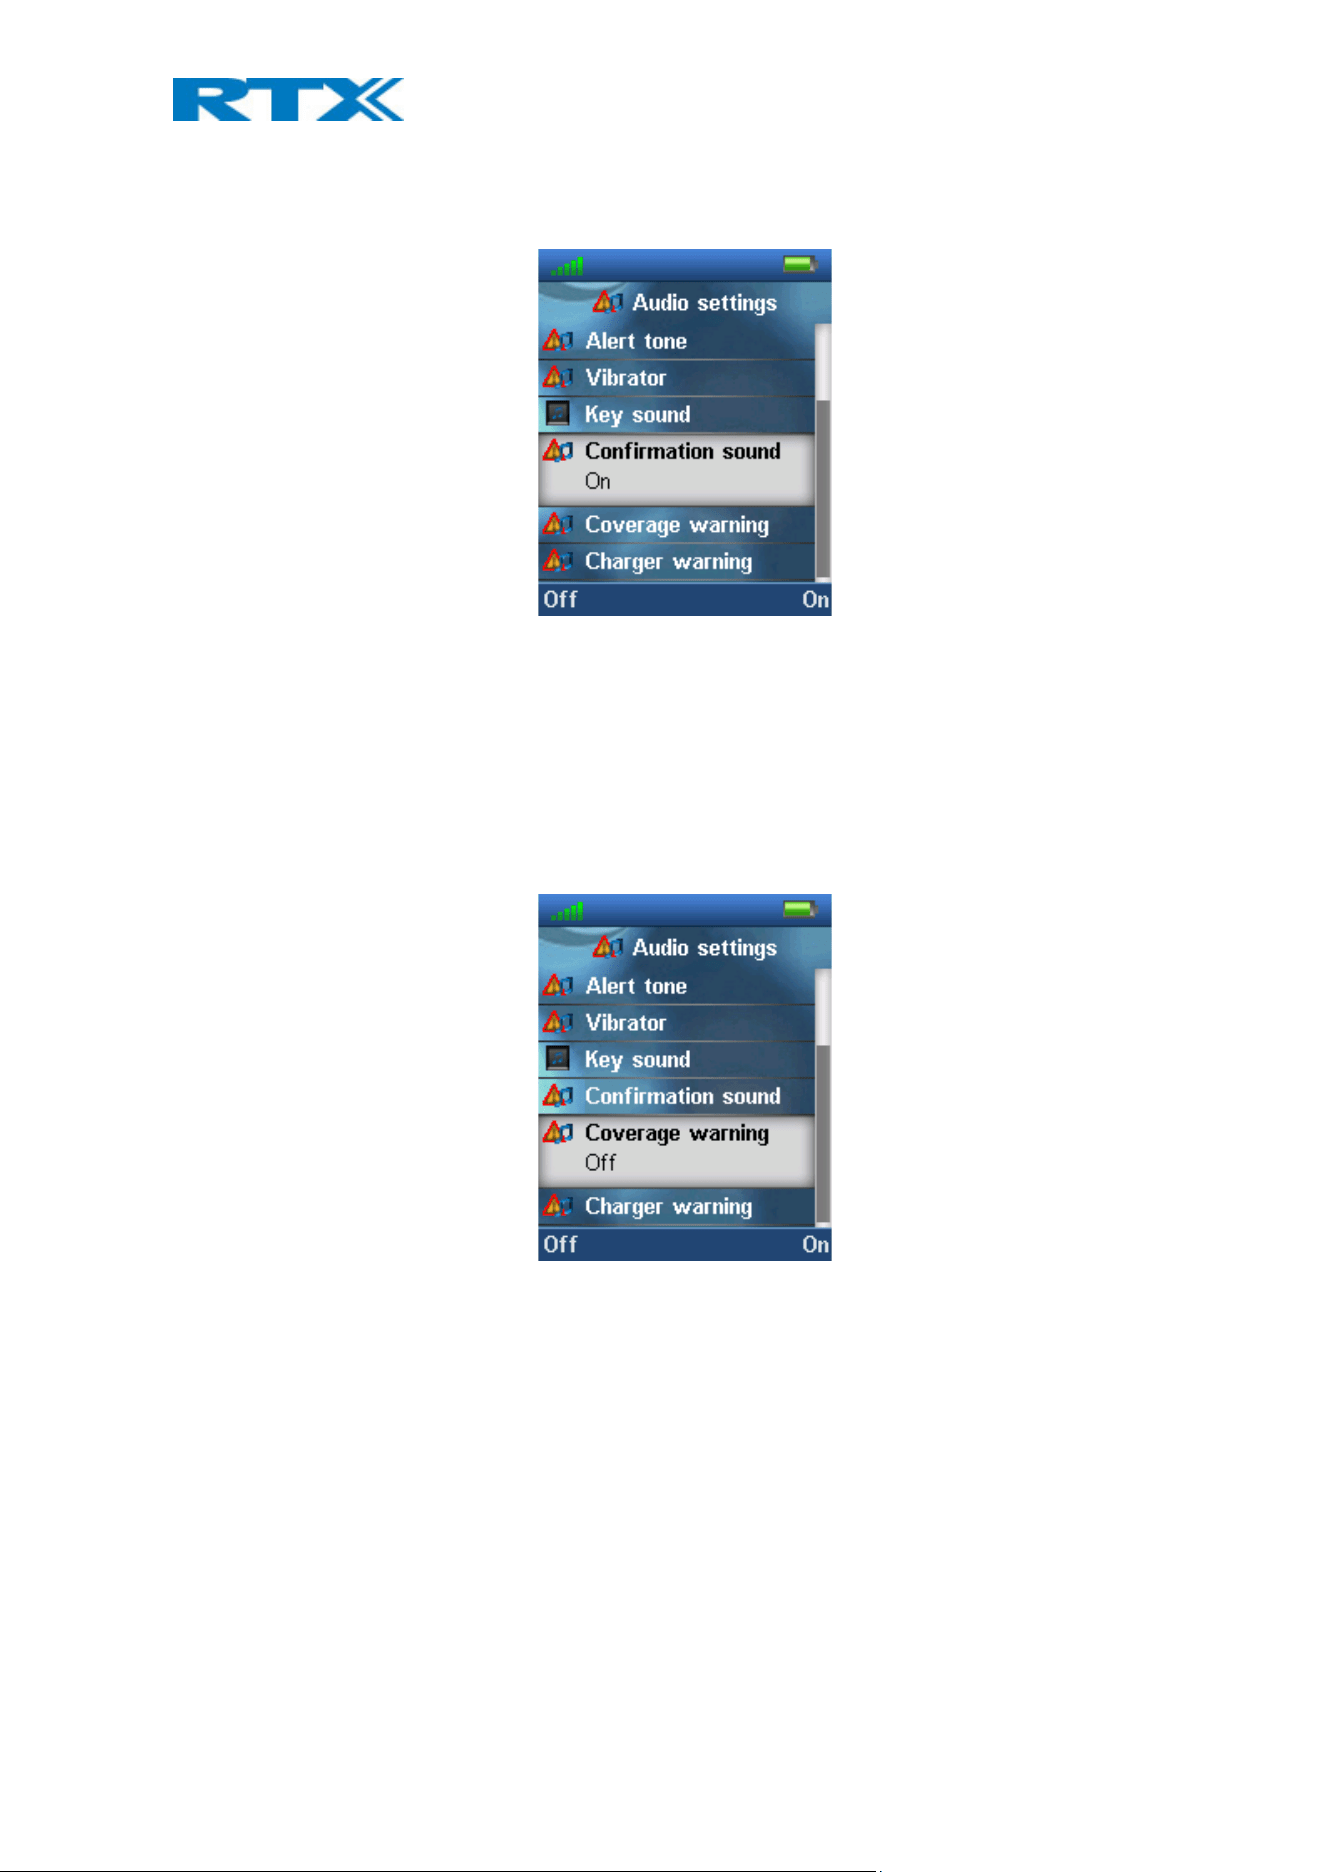
6.5.1.4 Confirmation Sound
This feature either enables or disables confirmation sounds on the handset.
When the function “Confirmation sound” is enabled (On), an audible indication is given when an event succeeds
or fails. For example, a positive confirmation sound is generated when a new setting is set or an entry is saved
successfully in the phonebook. A negative confirmation sound is generated if the action fails.
When the confirmation sound is set to “Off” no sounds are generated in either case.
6.5.1.5 Coverage Warning
A coverage warning can be set to occur when the handset is out of range of a base station in the system.
When the feature “Coverage warning” is enabled (On) an audible indication is given in the earpiece of the
handset when the user is close to the maximum range of the nearest base station in the system. Hereby, the user
knows that the call is at the edge of the possible coverage of the call, and that the user must move back in
coverage to keep the call going.
NOTE: This feature is only working when the handset is in call. Not when in idle.
H200 Handset Guide DRAFT
Proprietary and Confidential
Page | 34
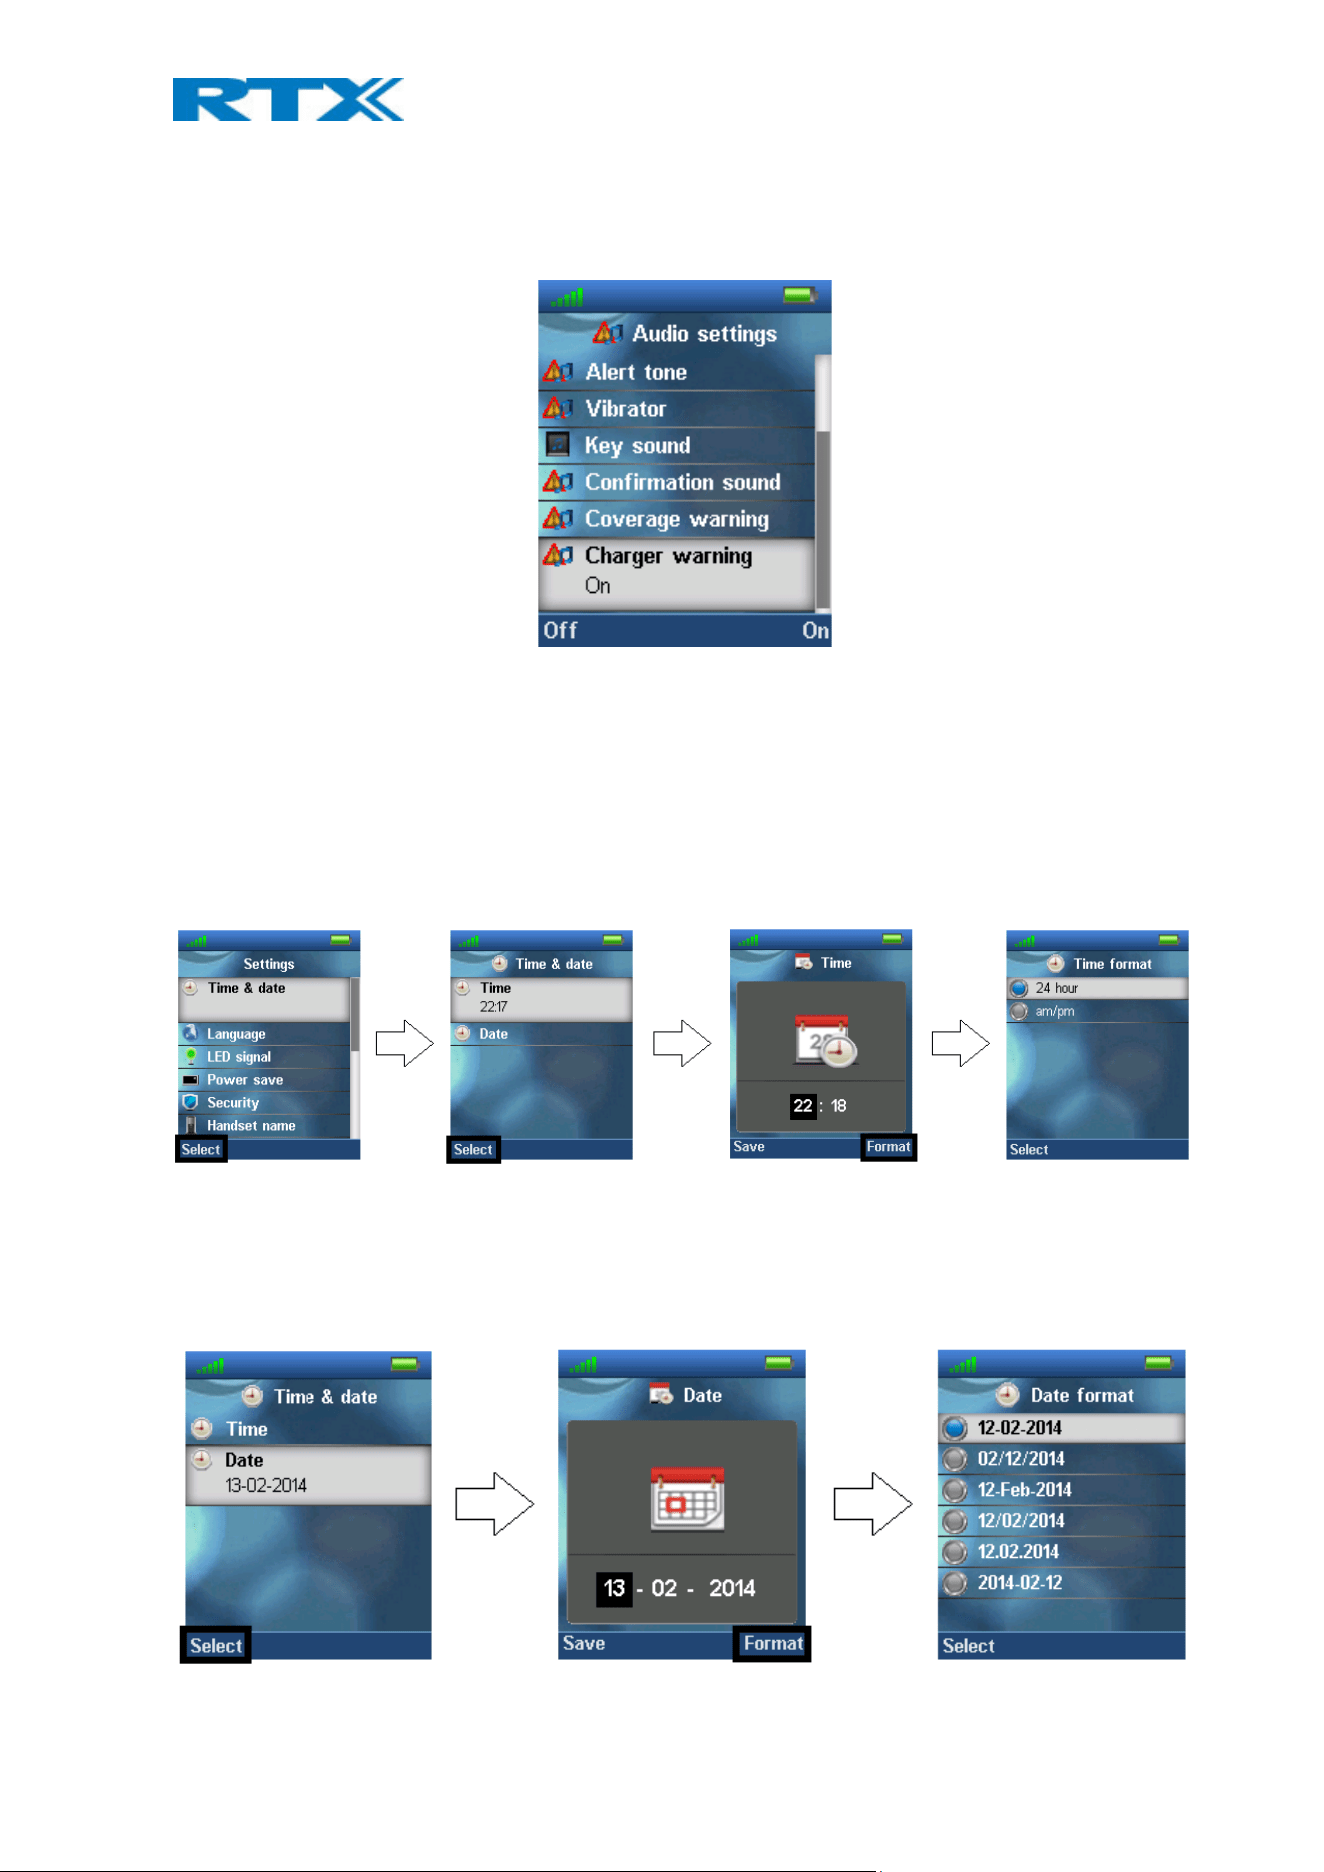
6.5.1.6 Charger Warning
“Charger Warning” is a feature that enables the handset to make a sound when put in the charger to indicate
that the handset is charging.
When the feature “Charger warning” is enabled (On), then an audible indication will be given when the handset
is correctly connected to the charger. If the feature is set to “Off” no audible indication will be given when the
handset is put in the charger.
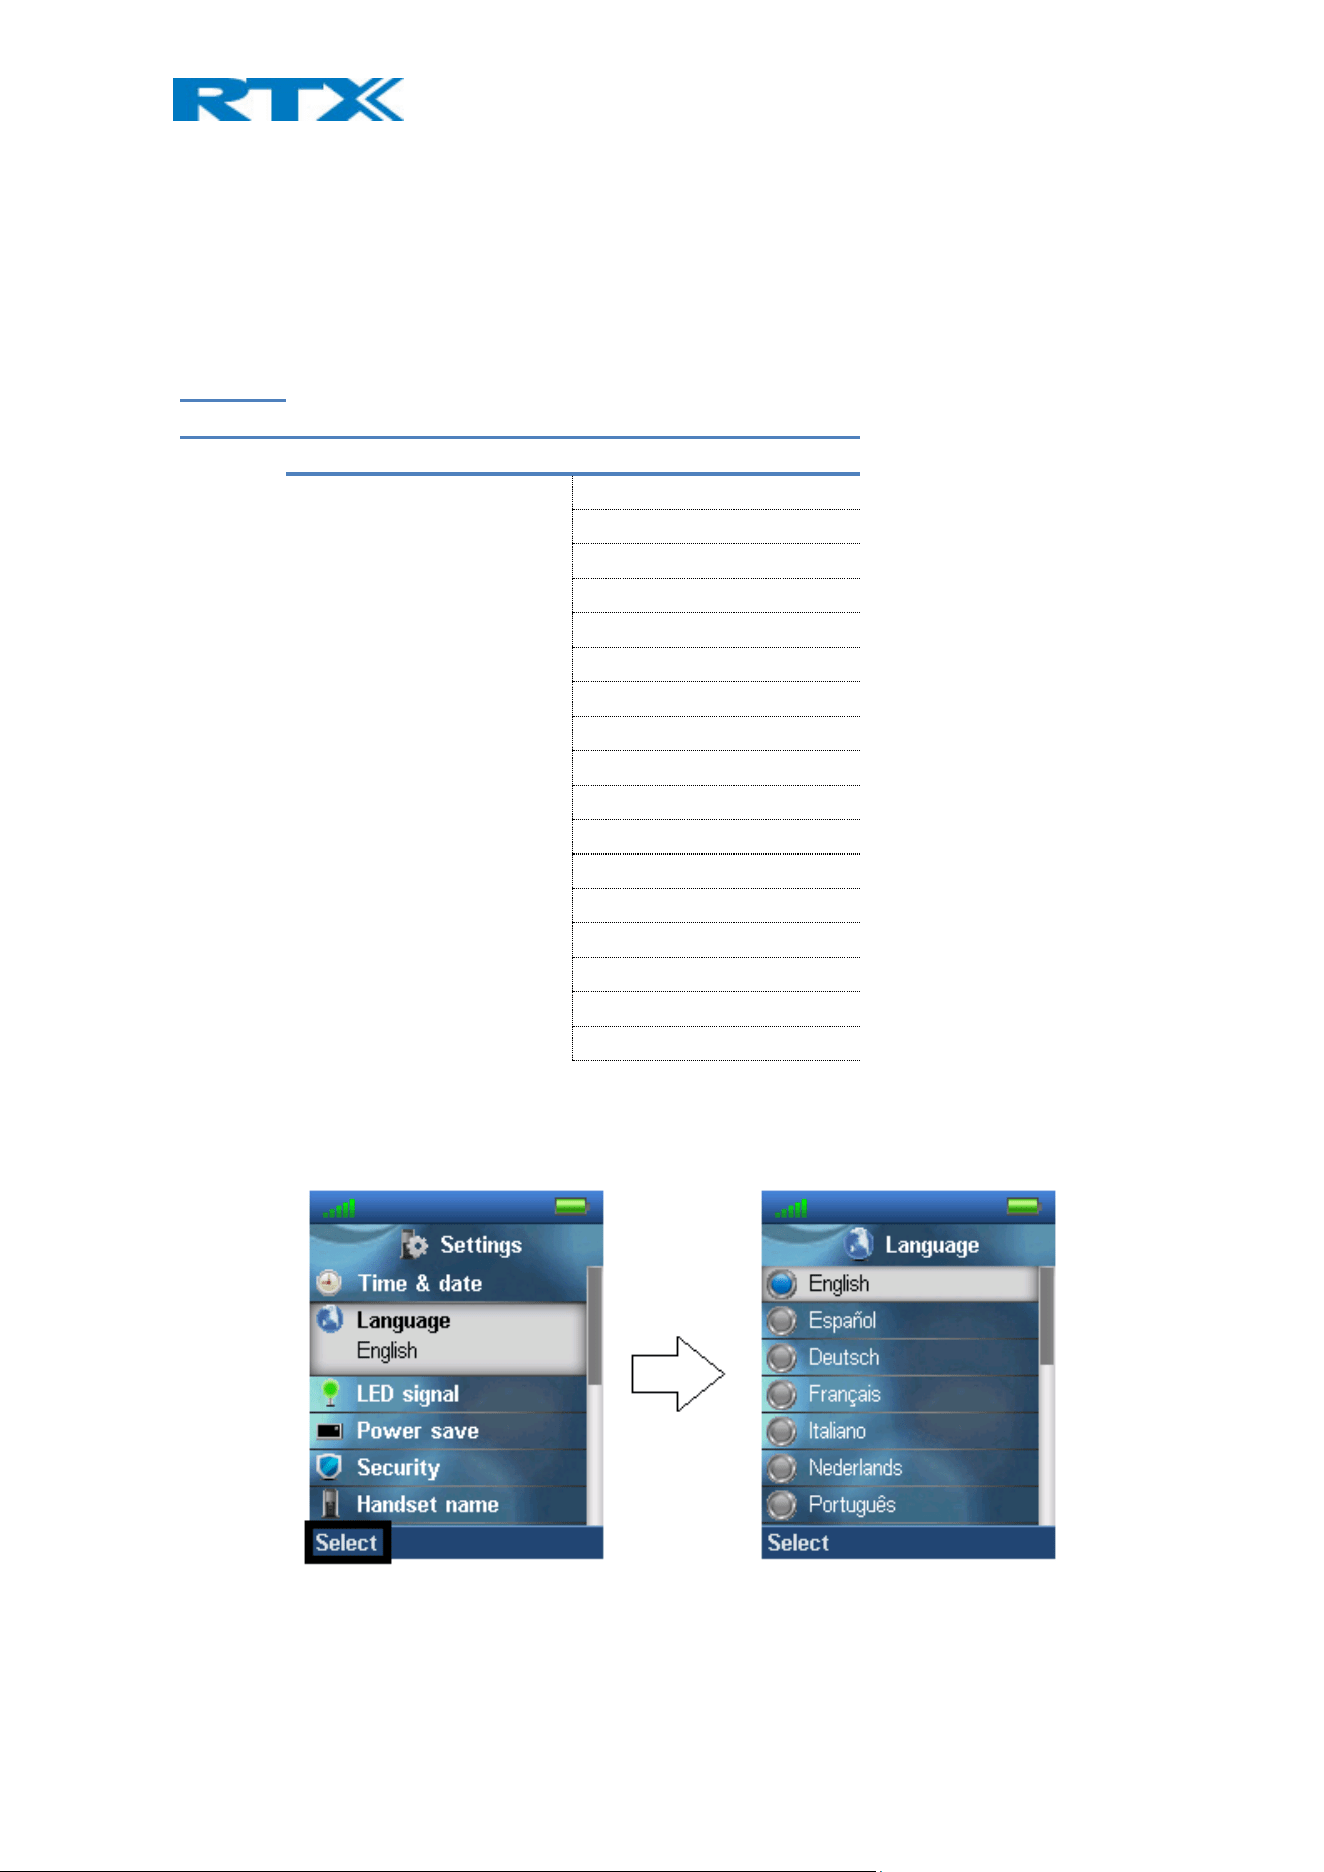
6.5.2 Time & Date
To set the time and date in the handset select the “Time & date” menu. Below it is shown how the time and time
format can be changed.
To change the time, use the keypad, or the navigation keys to set the time to be what you want, and press save;
as seen in the third image. The time format can also be changed by pressing the right softkey “Format”. In “Time
format” the preferred time format (24 or 12 hours) can be selected.
In the same way the date can be changed as seen in the images below:
H200 Handset Guide DRAFT
Proprietary and Confidential
Page | 35
In “Date format” the preferred date format (i.e. dd-mm-yyyy) can be selected by using the up/down navigation
keys.
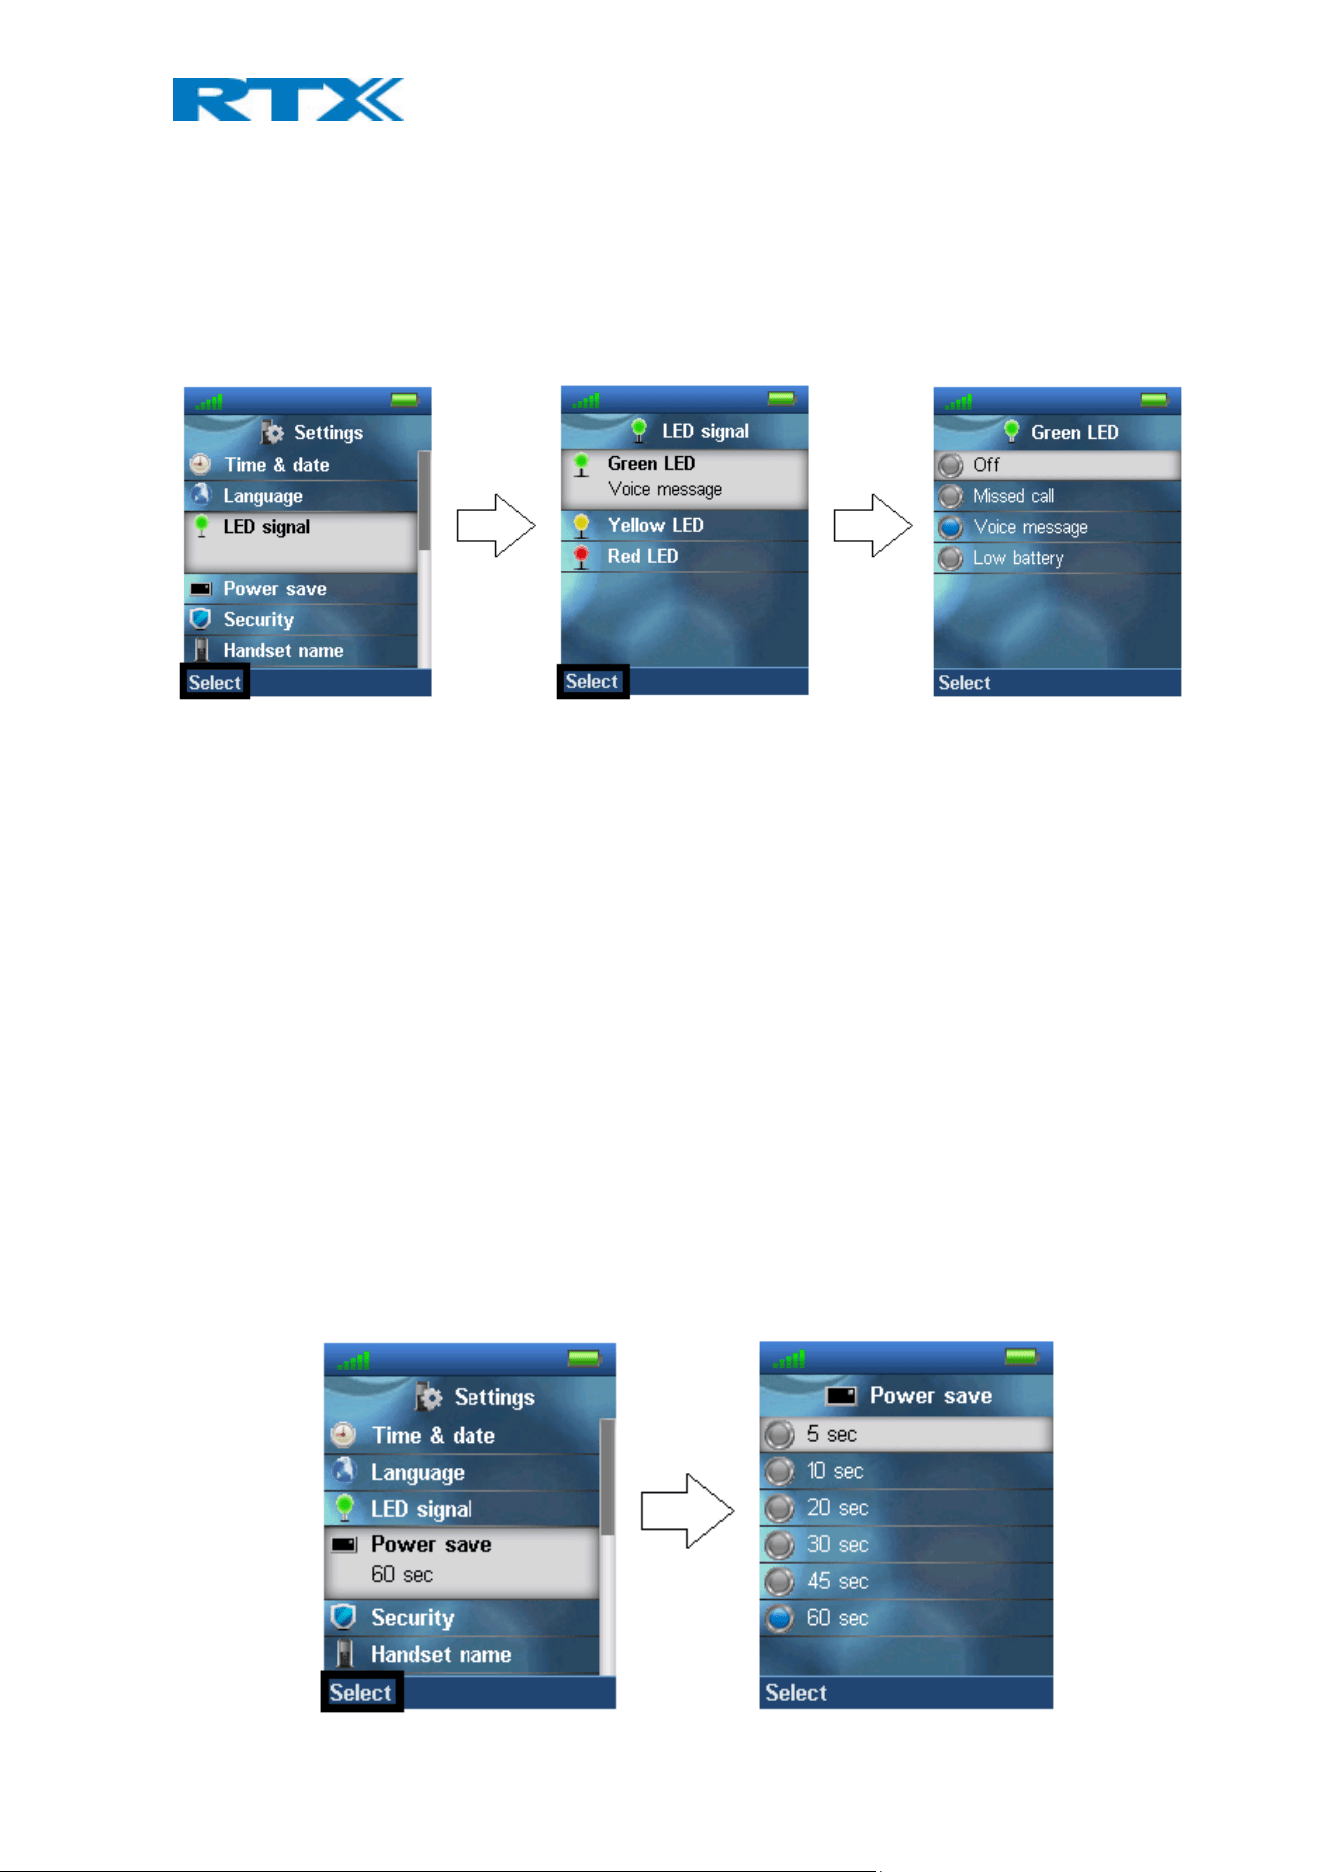
6.5.3 Language
In this menu it is possible to select different languages for the handset. The menu tree below shows the different
languages available on the handset.
SETTINGS
LANGUAGE
English
Espanol
Deutsch
Francais
Italiano
Nederlands
Portugues
Dansk
Svenska
Turkce
Polski
Norsk
Russian-1
Russian-2
Hrvatski
Srpski
Slovenian
The currently applied language is displayed when highlighting the menu “Language”.
When entering this menu, a specific language can be selected by scrolling through the menu using the up/down
navigation keys and pressing the left softkey “Select” when the desired language is highlighted.
H200 Handset Guide DRAFT
Proprietary and Confidential
Page | 36
6.5.4 LED Signal
The LED at the upper left corner of the handset has three different colors: green, yellow, and red. The different
colors can be assigned to distinctive situations by the user.
As seen in the images above each color of the LED signal (green, yellow, and red) can respectively be configured
to indicate:
Missed call
The LED signal blinks in the chosen color when there is a missed call.
Voice message
The LED signal blinks in the chosen color when there is a voice mail message that has not been listened to.
Low battery
The LED signals blinks in the chosen color when the battery is low (below 20% battery on the handset).
Off
The LED signal is disabled and does not blink in any situation.
6.5.5 Power Save
The power save option makes the handset less battery consuming by turning off the display after a certain
amount of time.
H200 Handset Guide DRAFT
Proprietary and Confidential
Page | 37
In the images above, it is displayed how the power save can be set between 5 seconds and 60 seconds. A certain
time interval is chosen by pressing the left softkey “Select” when the desired time interval is highlighted.
6.5.6 Security
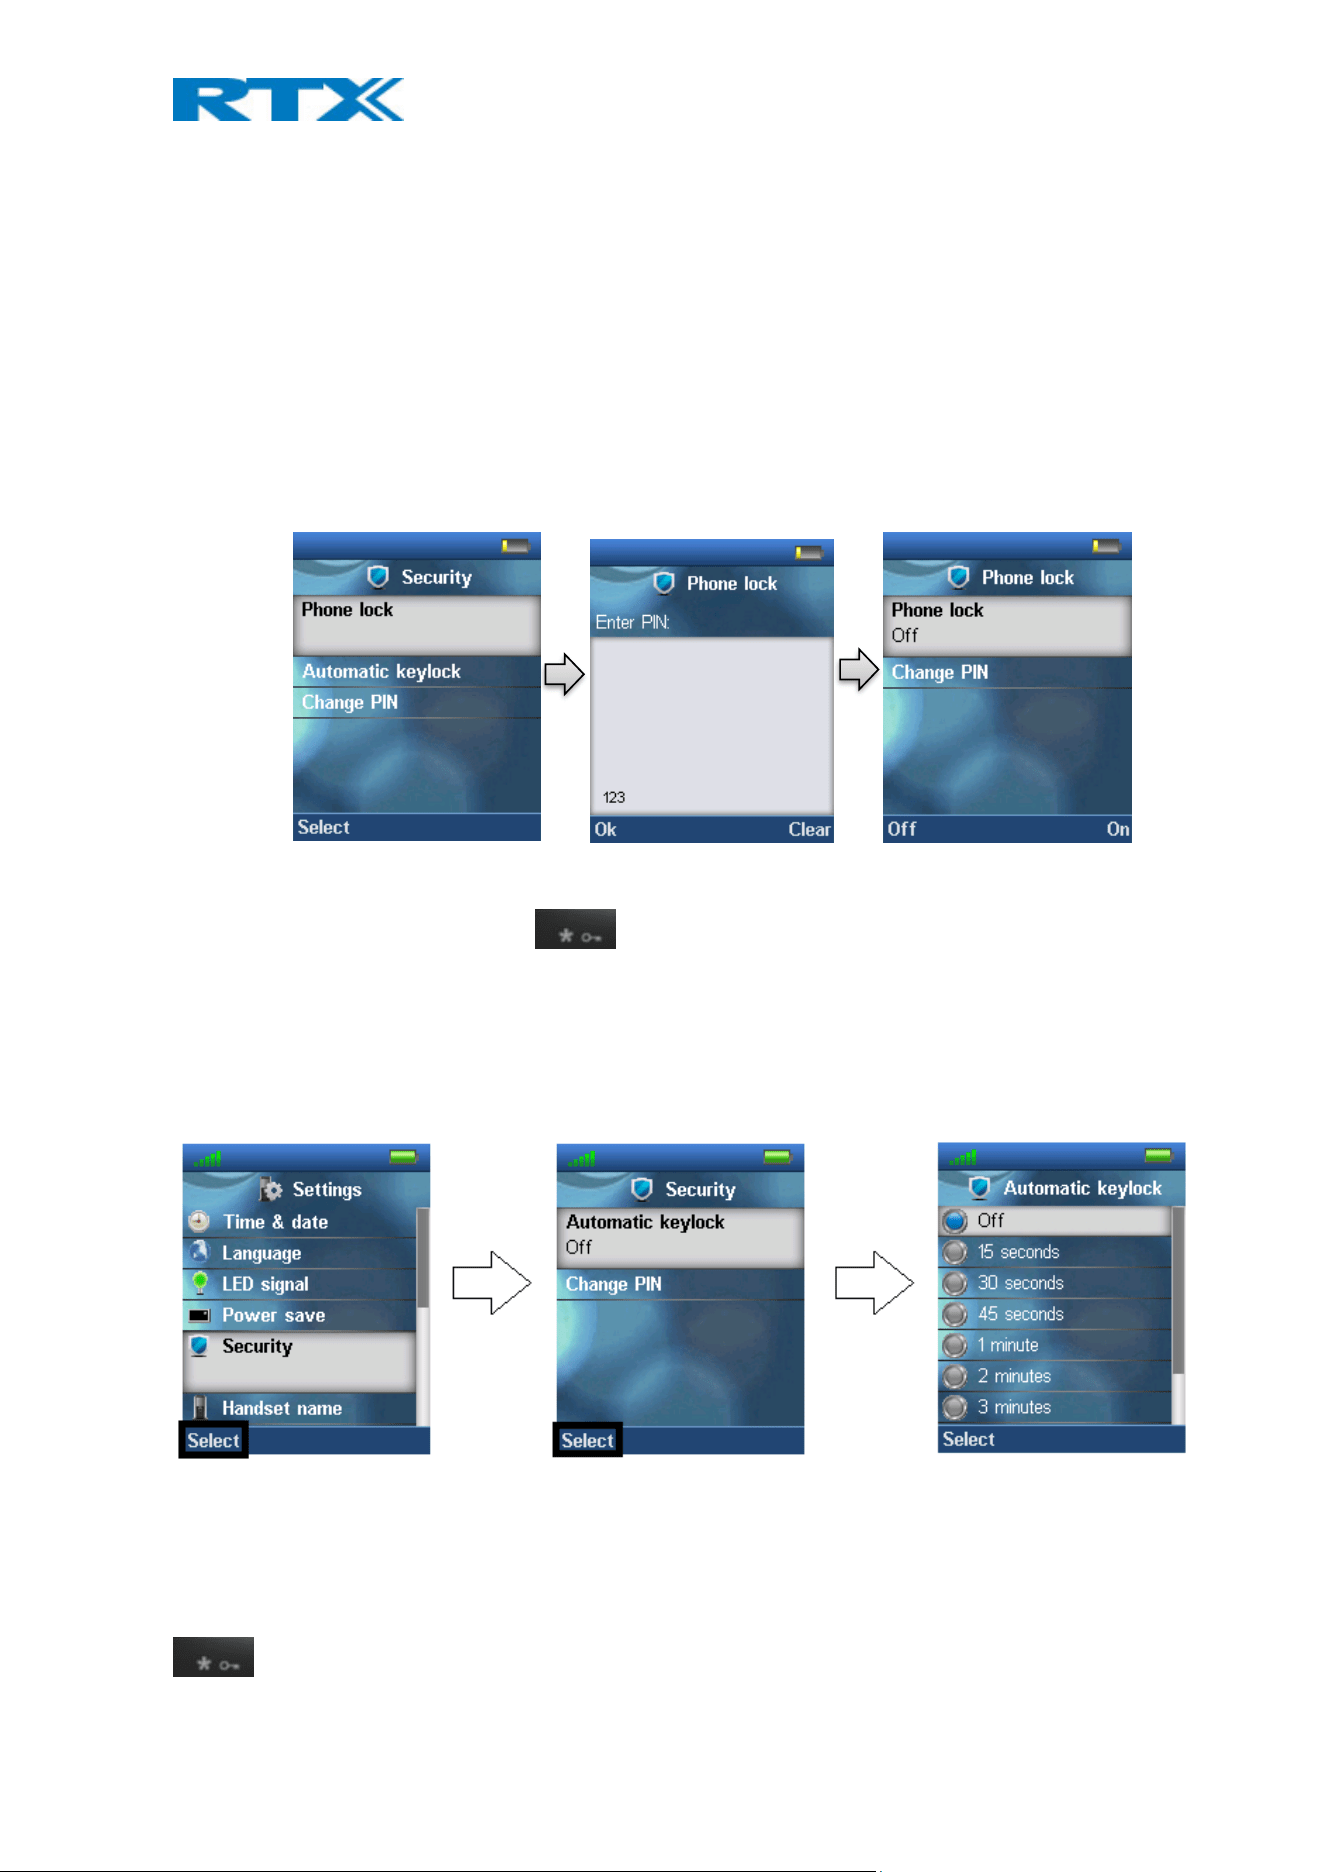
In the “Security” menu it is possible to set an automatic keylock and change the PIN of the handset.
Phone lock
This feature locks the phone, when the it is in standby mode.
The code needs to be entered before the phone can be accessed.
NOTE: No action is possible without the code, incl. Power off.
After activating the Phone Lock the handset needs to be rebooted, for this to take effect.
To unlock the phone press and hold the key and enter the access code.
Automatic keylock
If the “Automatic keylock” feature is enabled, the keypad will lock automatically after a certain amount of time
that the handset has not been used. The currently applied setting is displayed when highlighting or selecting the
menu “Automatic keylock”.
A list of selectable timeouts is displayed when the user enters the “Automatic keylock” menu. Any one of these
can be selected by pressing the left softkey “Select” when the desired time interval is highlighted. Afterwards,
when the handset has been inactive in the selected time interval the keypad will lock automatically.
NOTE: It is not possible to use the keys when these are locked. The user must unlock the keys by long-pressing
. Only emergency numbers (e.g. 911 or 112) can be called without having to unlock the keypad.
H200 Handset Guide DRAFT
Proprietary and Confidential
Page | 38
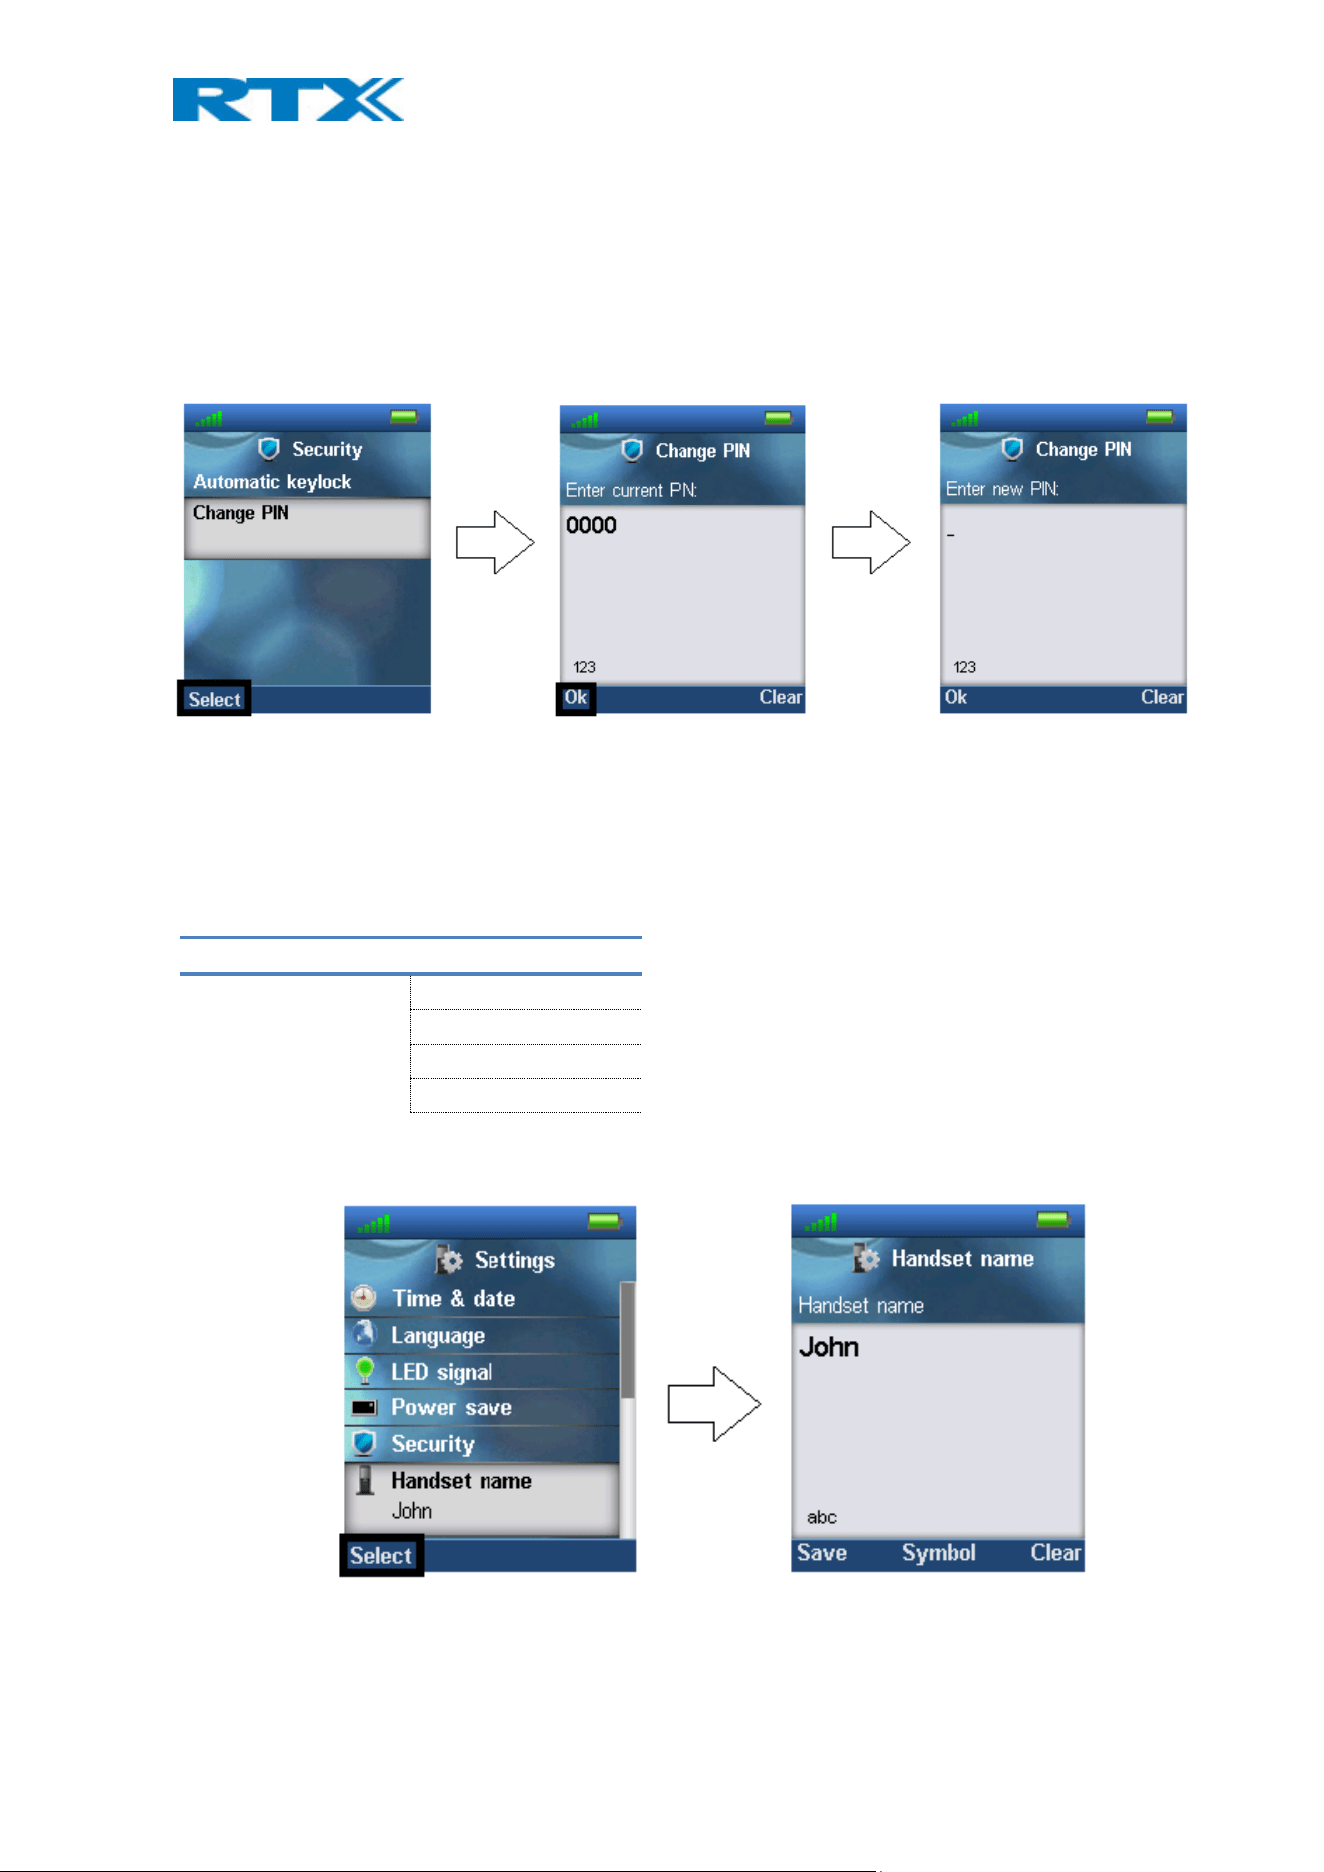
Change PIN
In “Change PIN” the handset security PIN code can be changed – the PIN code is i.e. used when settings are reset.
As seen above the current PIN code must be entered first to change it to a new PIN code.
6.5.7 Handset Name
In the following settings, it is possible to change the handset name, select a line, reset settings, and see the
status data from the base station.
SETTINGS
Handset name
Line
Reset settings
Status
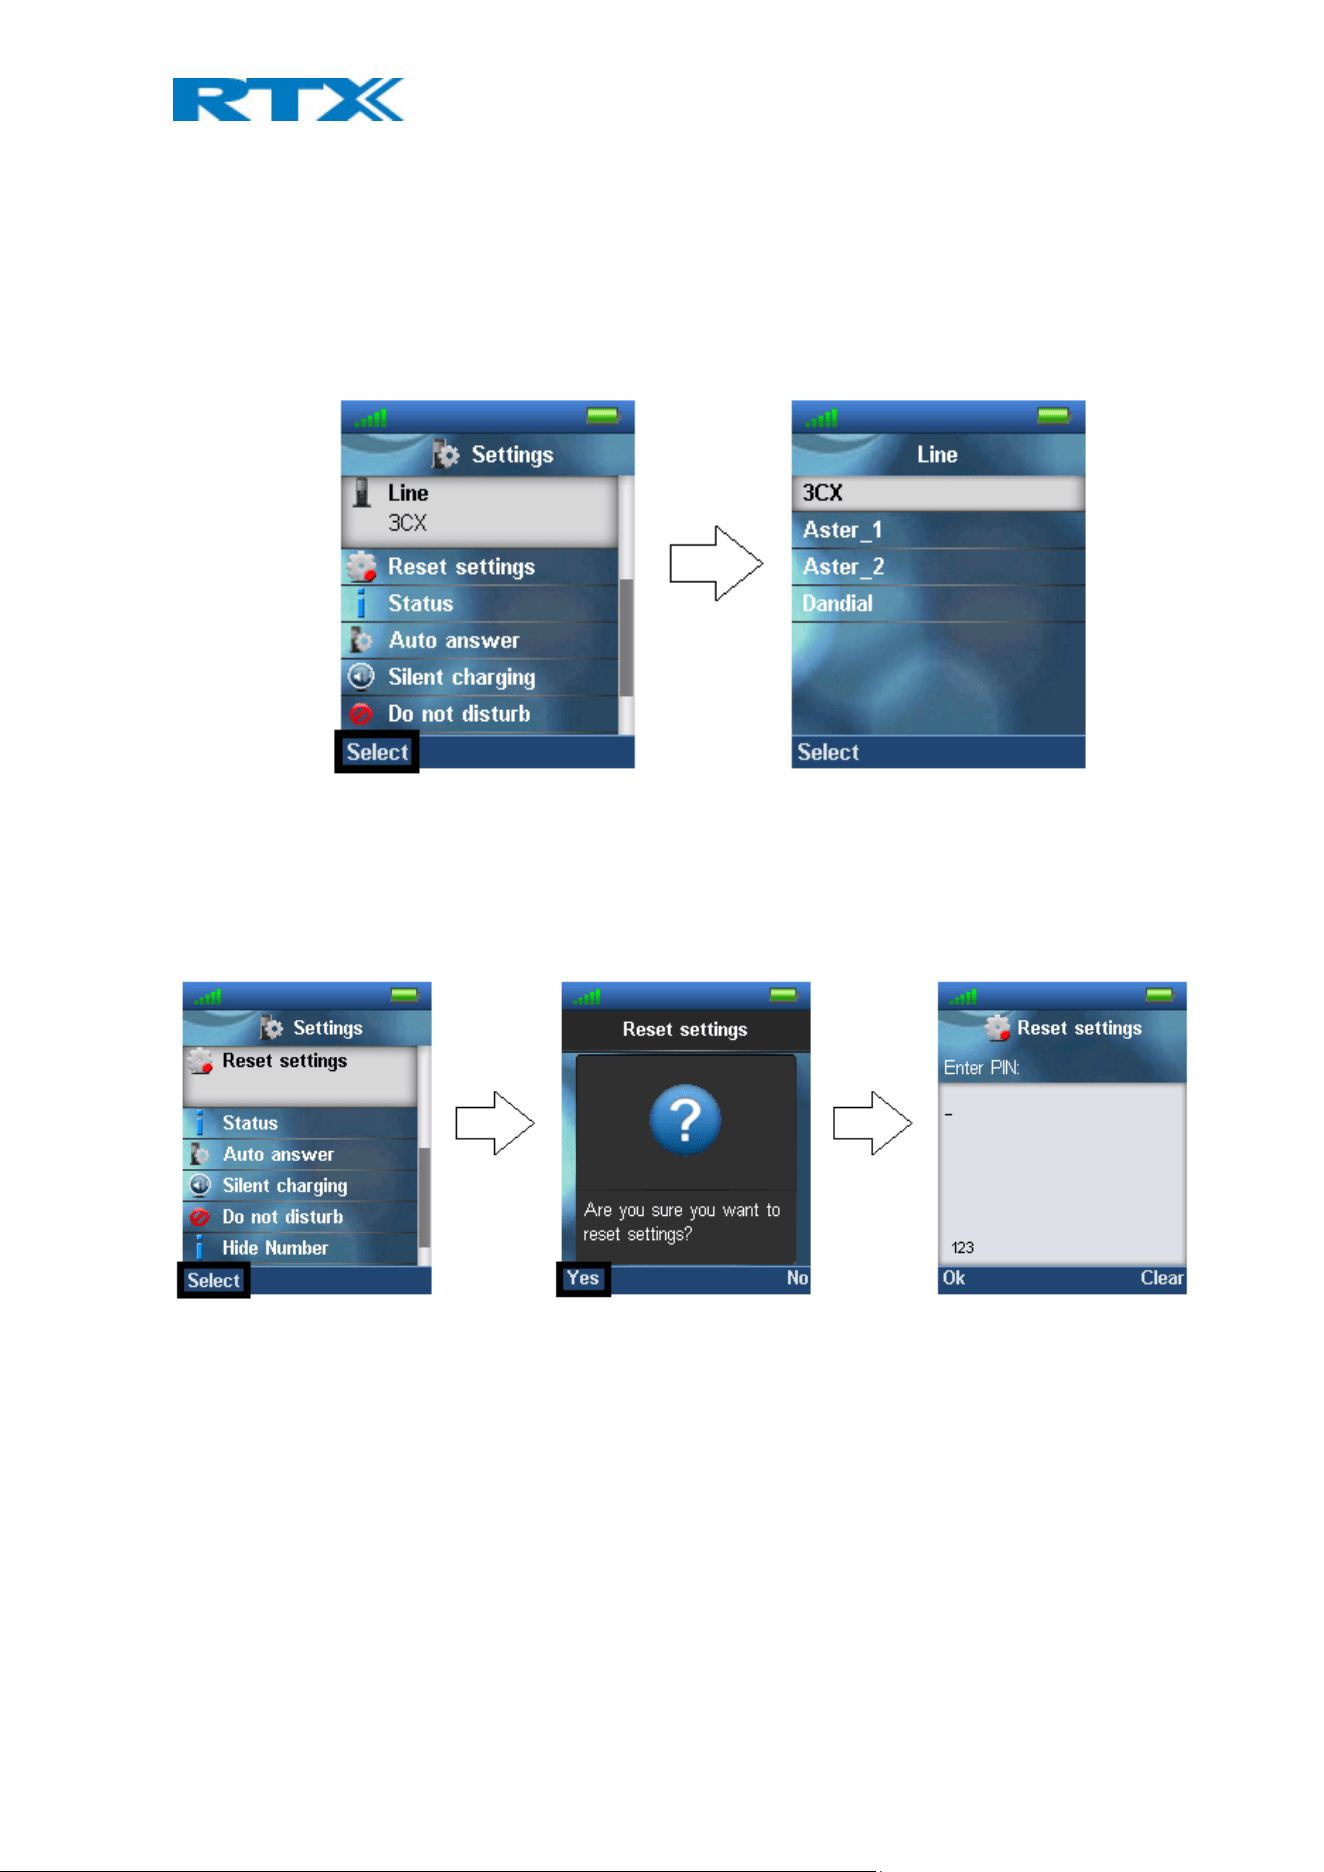
By selecting “Handset name” the name of the handset can be changed.
As seen above, an editor is displayed when entering the menu. The handset name is typed in by using the
numeric keys and afterward pressing the left softkey “Save”. The handset name is displayed in the third line of
the idle display.
H200 Handset Guide DRAFT
Proprietary and Confidential
Page | 39
6.5.8 Line
If the handset is used in a multiline environment, it is possible to select preferred lines for the handset to make
outgoing calls from this “Line” menu as shown below.
NOTE: To see additional information on this “Line” feature, please check the base system document via [2].
6.5.9 Reset settings
The handset settings can be reset to default settings by selecting menu “Reset settings”.
As it can be seen above, the handset PIN code is required to reset the handset to its default settings.
After such a reset the handset is still registered. The base is not reset to default when selecting this feature.
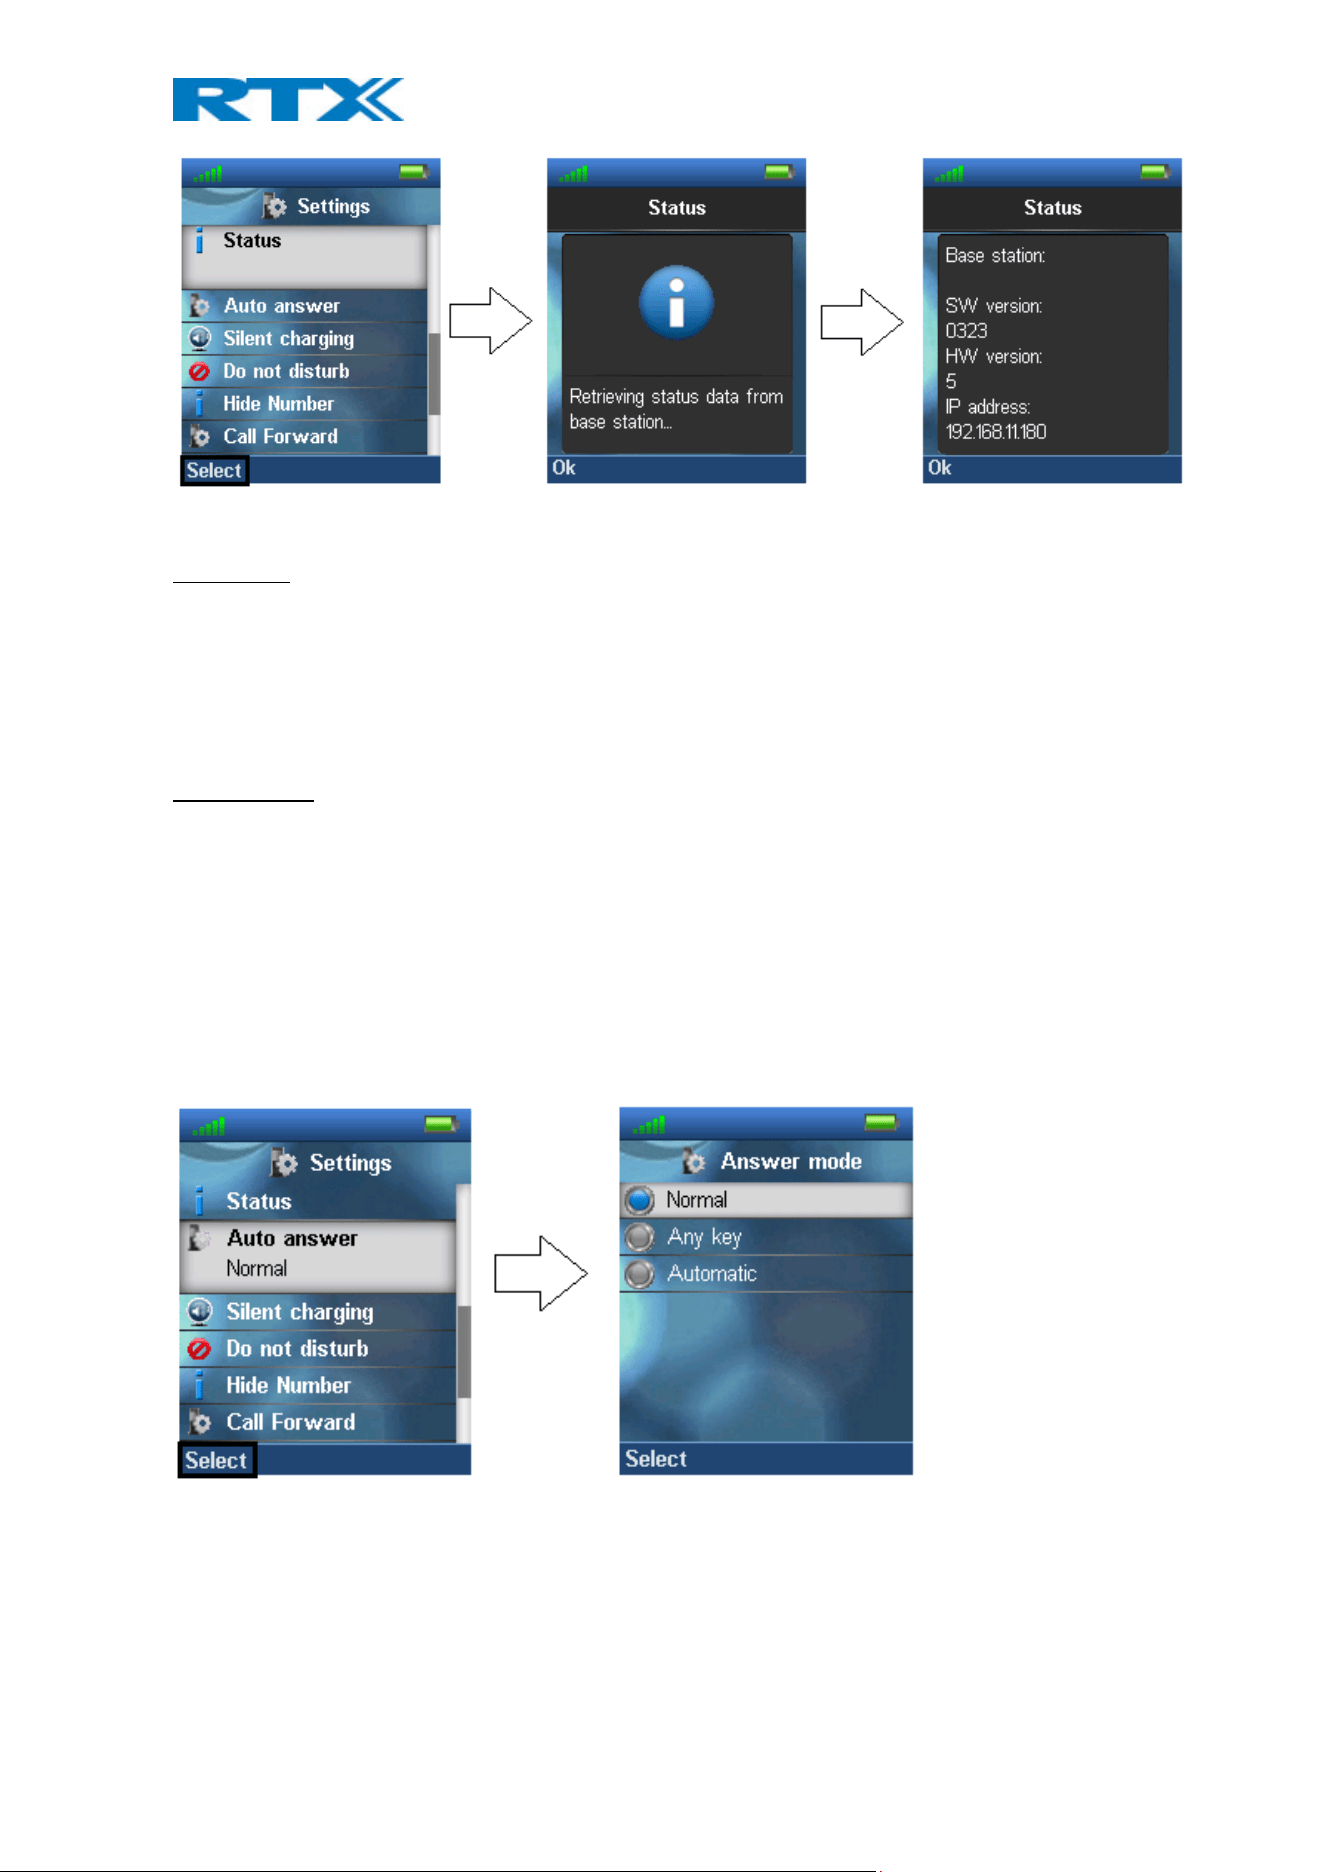
6.5.10 Status
The menu “Status” delivers some useful information to the end user about the base station that the handset is
currently using and the handset status.
H200 Handset Guide DRAFT
Proprietary and Confidential
Page | 40
The displayed information is as follows.
Base station:
- Software version (the current software version of the base station)
- Hardware version (the hardware version of the base station)
- IP address (the IP address of the base station)
- MAC address (the MAC address of the base station)
- System name (the name of the system of base stations that the handset is registered to)
Handset status:
- Software version (the current software version of the handset)
- Hardware version (the hardware version of the handset)
- DECT band (the DECT band that the handset is using, e.g. EU or US)
- Battery level (the current battery level of the handset)
- IPEI (the IPEI/IPUI number of the handset is a static number identifying the specific handset)
6.5.11 Auto Answer
In this menu it is possible to change the settings for auto answer on the handset.
The “Auto answer” feature makes it possible for the handset to automatically answer an incoming call. This
setting can be set to the following conditions:
Normal
With this enabled the handset does not answer a call automatically, but the user must always press the green
“Off-hook” key to answer a call. The call is not answered by removing the handset from the charger.

H200 Handset Guide DRAFT
Proprietary and Confidential
Page | 41
Any key
In this mode pressing any key on the keypad (except from the red “On-hook” key, and the three softkeys that still
have their different functions) will answer an incoming call. The call is not answered by removing the handset
from the cradle/charger.
Automatic
If the feature “Automatic” is enabled on the handset, then the incoming call is answered automatically after 5
seconds.
H200 Handset Guide DRAFT
Proprietary and Confidential
Page | 42
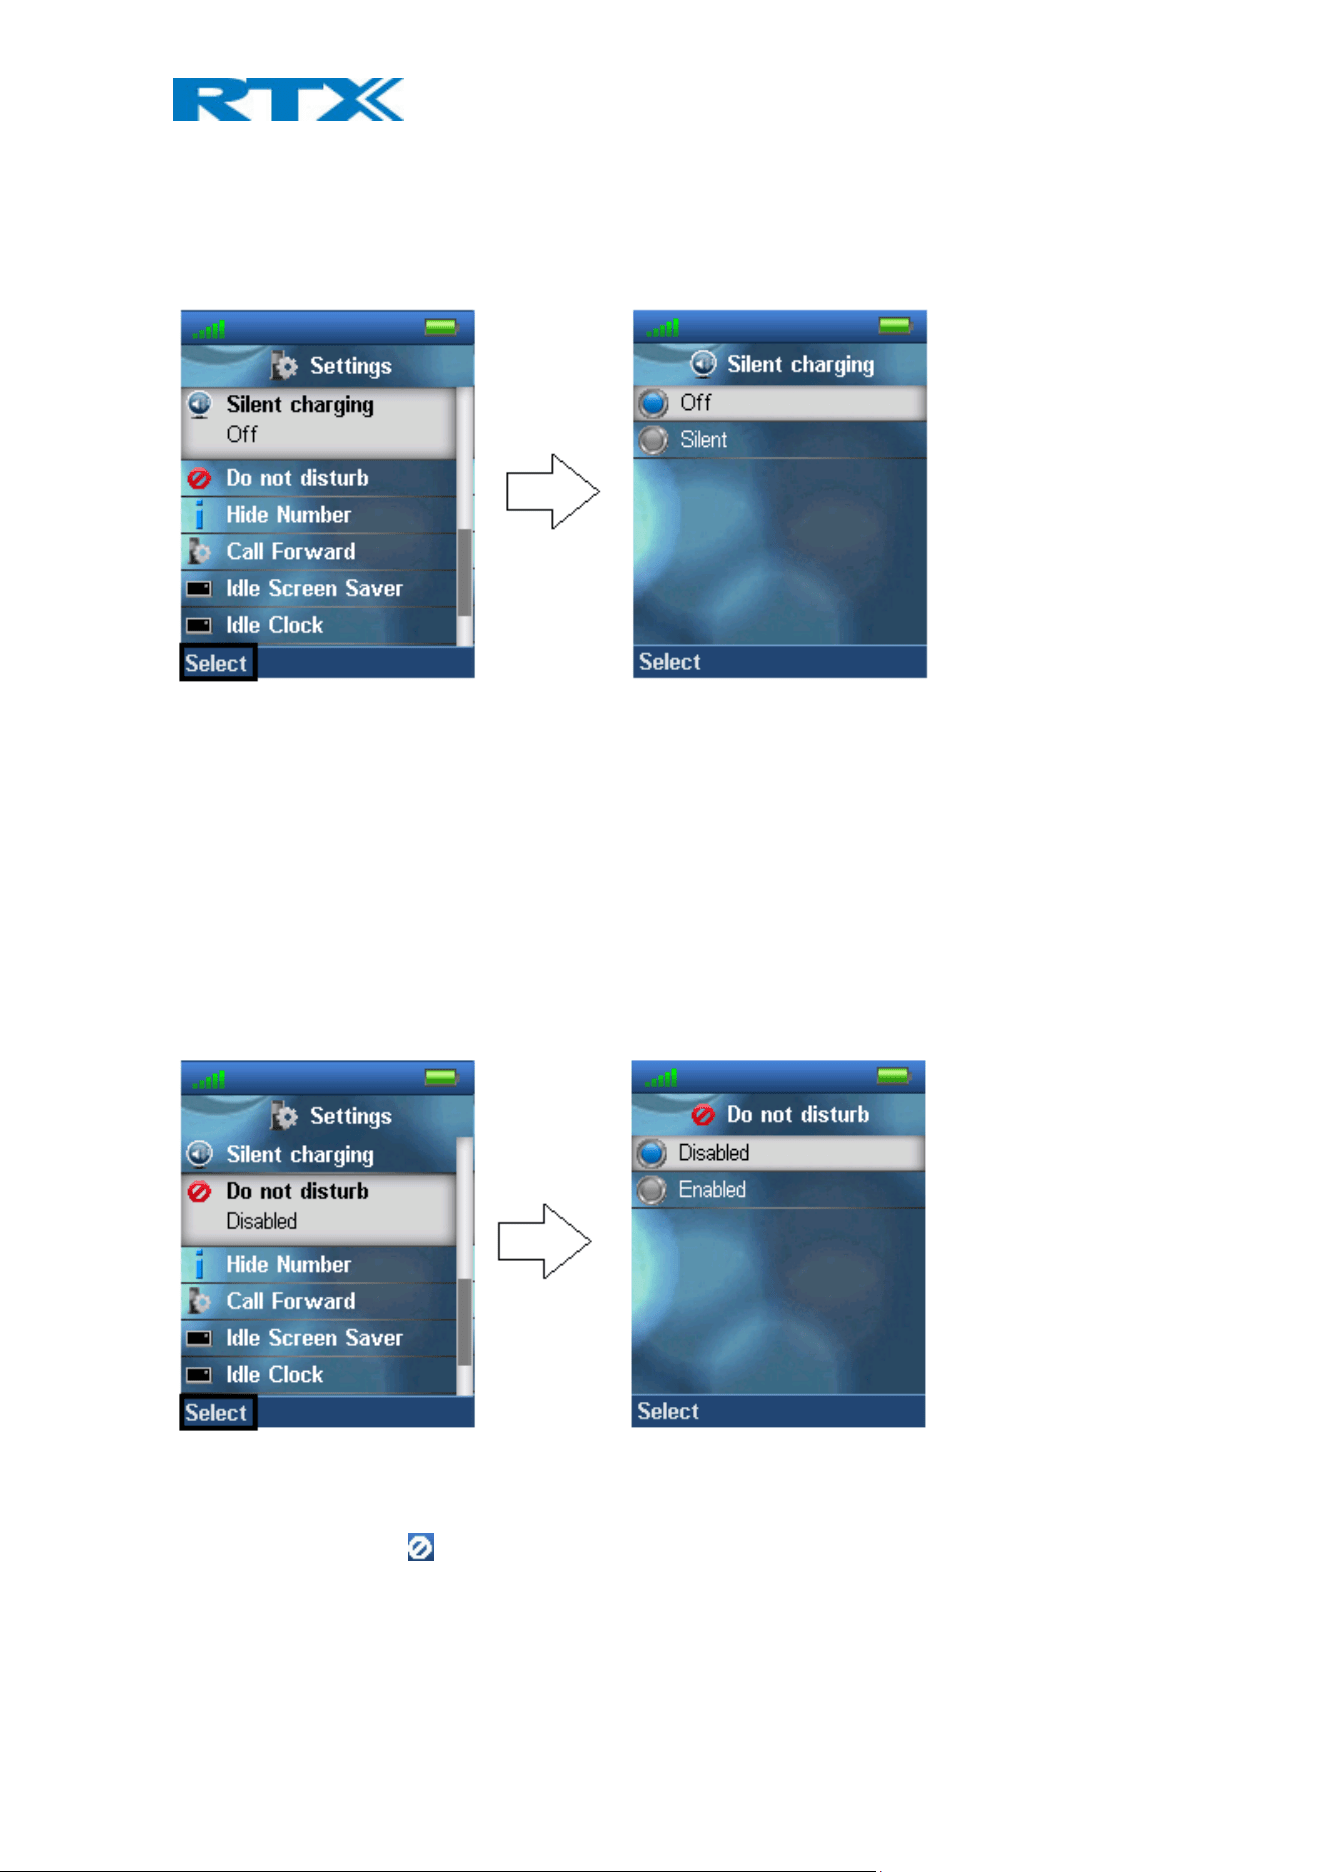
6.5.12 Silent Charging
The option of “Silent charging” enables the possibility of the handset not ringing during charging. The handset
must be placed in the charger in order for this to work as mentioned below. The options of silent charging are
seen below.
Off
The handset is ringing when receiving incoming calls (audio alert and incoming call screen displayed).
Silent
The handset receives an incoming call as normal, but it does not ring (i.e. no audio alert but the incoming call
screen is displayed).
6.5.13 Do Not Disturb
This “Do not disturb” feature is to be used when the handset user does not want to be disturbed.
With this feature disabled, the handset reacts as normal on all incoming activity. If the function is enabled,
though, the handset will not react, and the calling counterpart will be directed to voice mail if this feature is
enabled.
The “Do not disturb” icon is displayed in the status bar when “Do not disturb” is enabled on the handset.
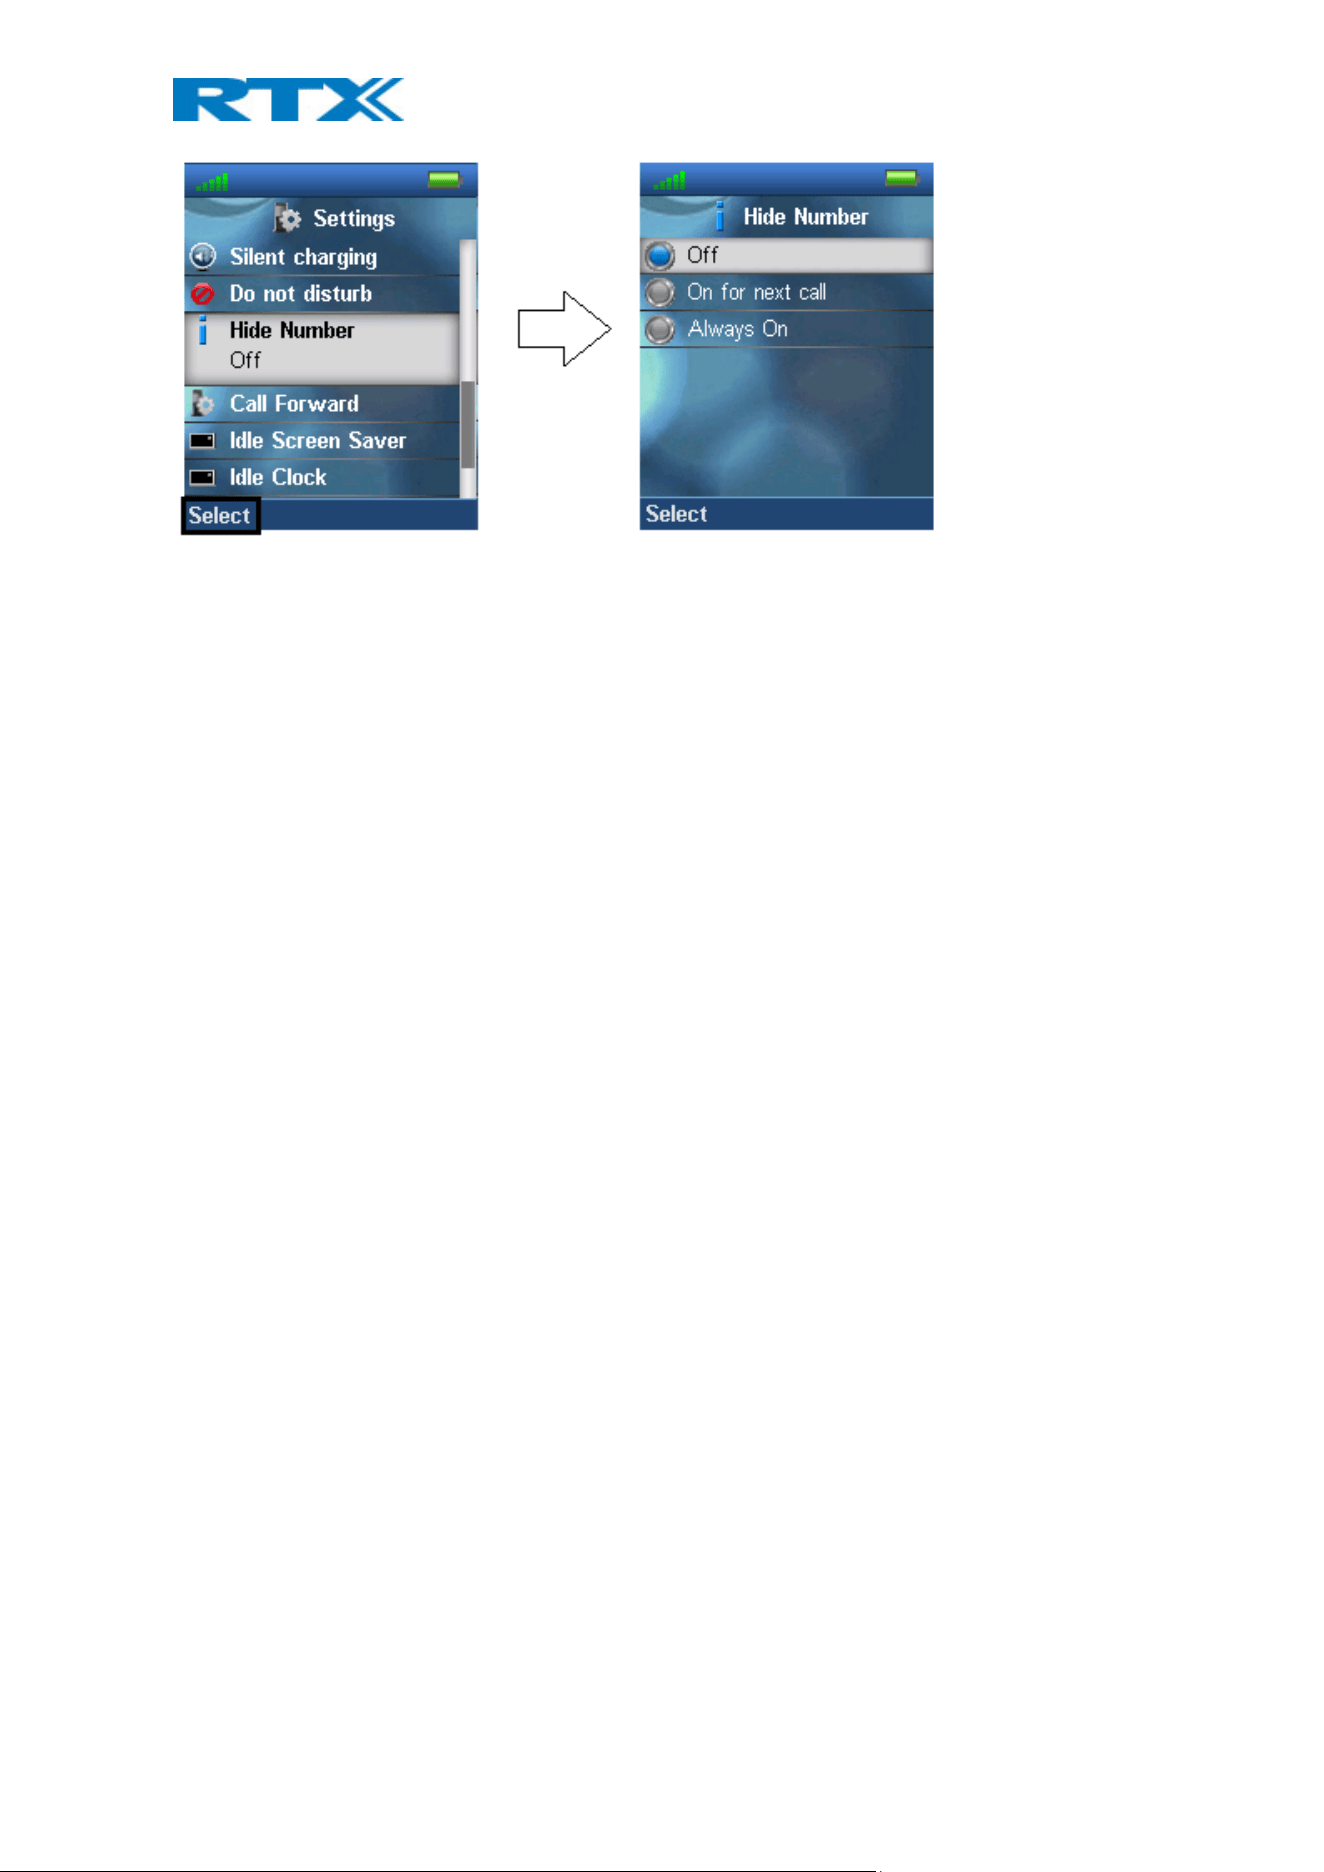
6.5.14 Hide Number
The “Hide Number” function enables that the user can make a call where the counterpart cannot see the caller
ID of the caller.
H200 Handset Guide DRAFT
Proprietary and Confidential
Page | 43
Off
When the “Hide Number” function is set to “Off” with the left softkey, the caller ID of the handset is displayed to
the counterpart of the call.
On for next call
If this function is enabled, then the caller ID will be hidden to the counterpart only for the next outgoing call, and
then for the following calls the number will not be hidden anymore.
Always on
With the “Always on” enabled, the caller ID will be hidden for the counterpart for all outgoing calls initiated until
this feature is disabled again.
NOTE: When hide number enabled, base sends SIP header “Privacy: id” to address
sip:anonymous@anonymous.invalid
The PBX must support anonymous calls otherwise the call will be rejected, and the handset cannot make an
outgoing call if this feature is enabled.
H200 Handset Guide DRAFT
Proprietary and Confidential
Page | 44
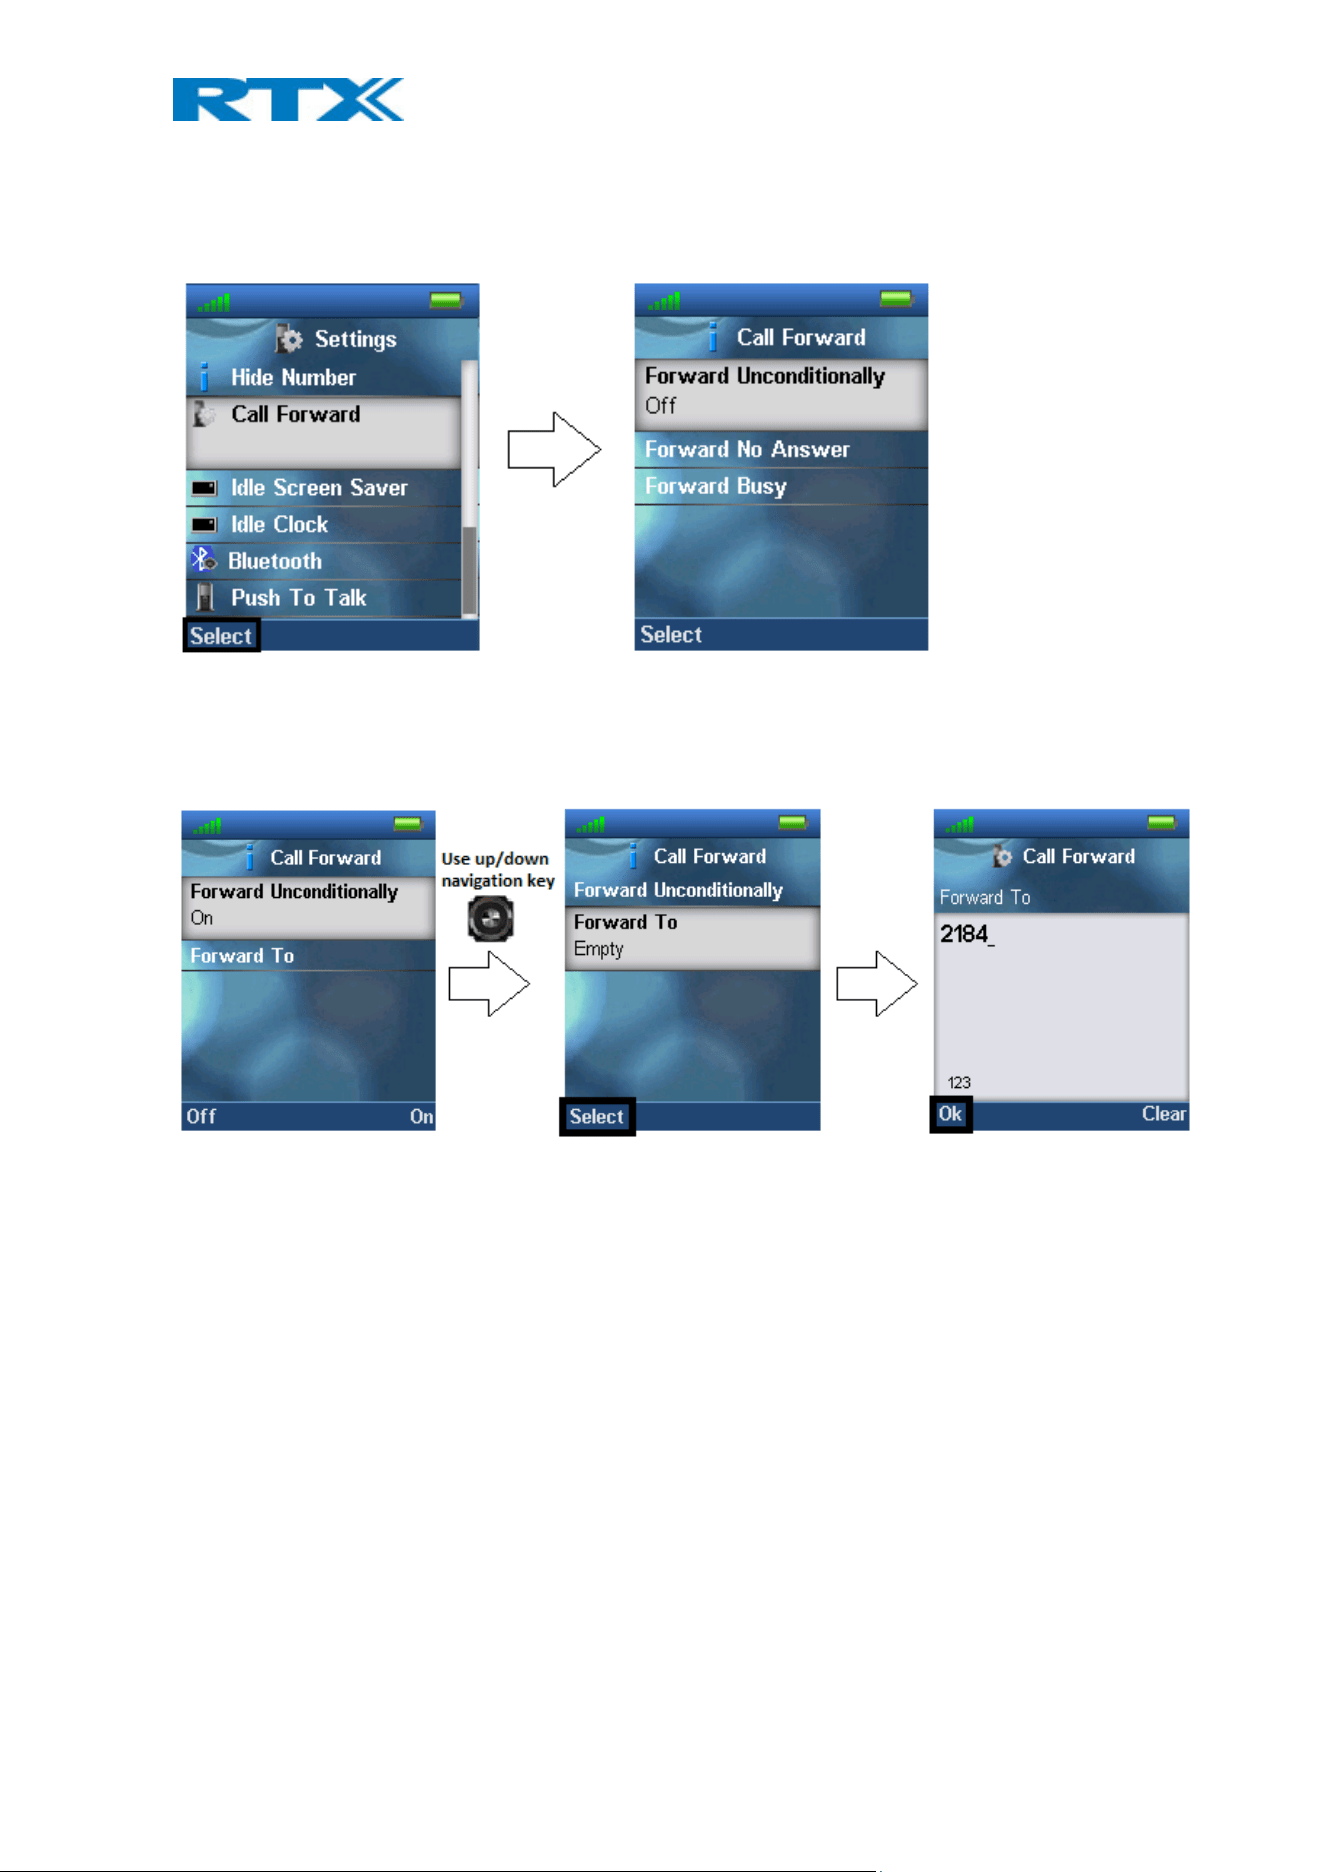
6.5.15 Call Forward
The “Call Forward” feature enables the user to forward all incoming calls in different cases as described below.
Forward Unconditionally
If this feature is enabled all incoming calls to the handset will be forwarded to the number setup in “Forward To”
as seen below.
In this case the handset will not receive any incoming calls, but all calls will automatically be forwarded to the
number setup in “Forward To”.
H200 Handset Guide DRAFT
Proprietary and Confidential
Page | 45
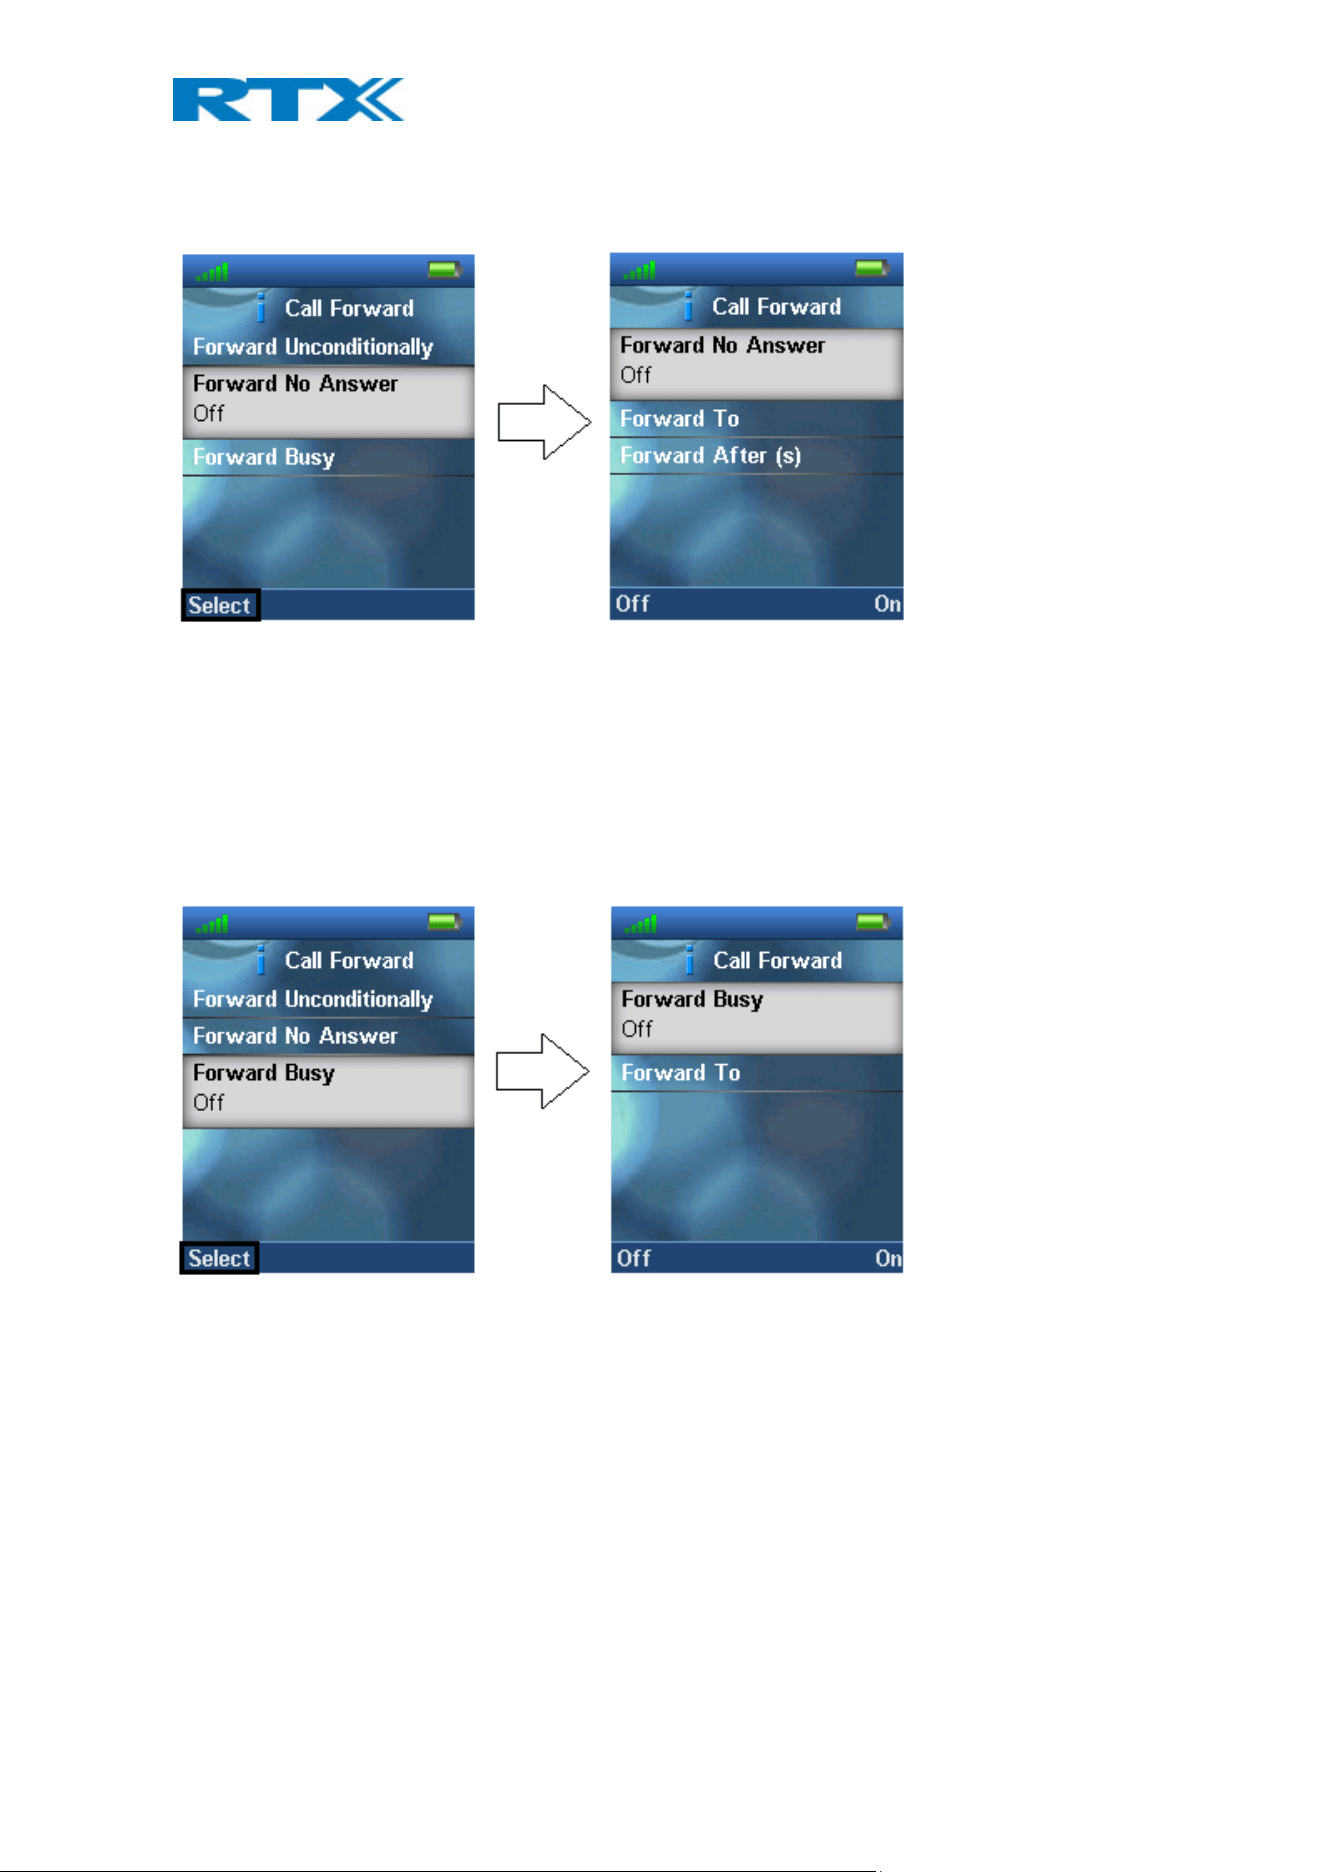
Forward No Answer
This feature controls if incoming calls to the handset should be forwarded if the call is not answered.
By enabling “Forward No Answer” incoming calls to the handset is forwarded if the call has not been answered
during a certain time period as for example 30 seconds [Forward After (s)]. This feature is setup in the same way
as “Forward Unconditionally” as displayed above.
Forward Busy
The “Forward Busy” function controls if the handset will forward the call when busy; e.g. when the user is in
another call.
When “Forward Busy” is enabled the handset forwards all incoming calls if the handset is busy, or if the user
presses “Reject” on the call. This feature is enabled in the same way as “Forward Unconditionally” which is
showed above.
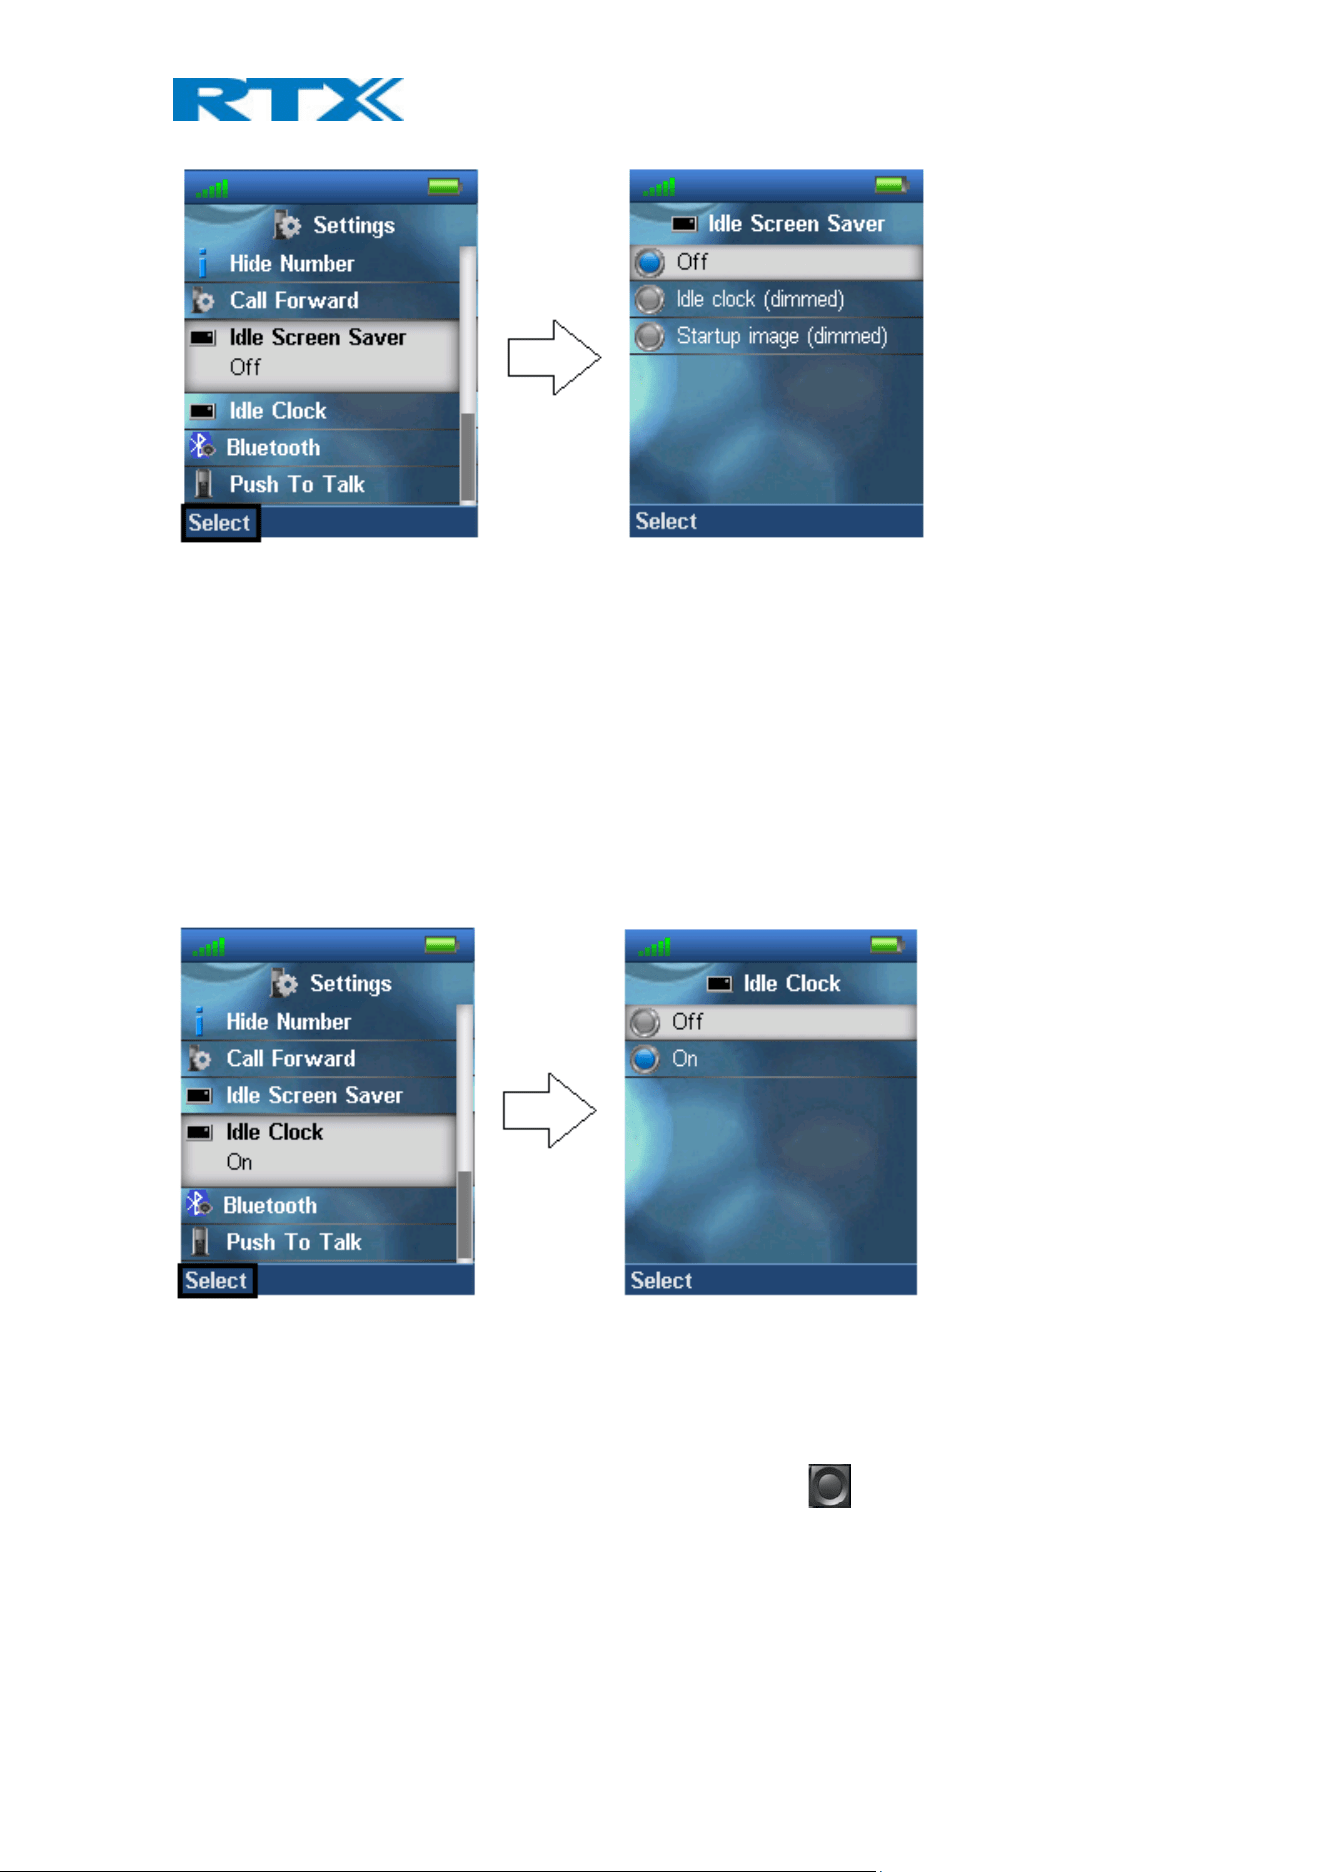
6.5.16 Idle Screen Saver
The idle screen saver has the function that when the handset is in the charger, the handset screen will dim the
lights, but it will not turn off if this feature is enabled.
H200 Handset Guide DRAFT
Proprietary and Confidential
Page | 46
Idle clock (dimmed)
By choosing this option the handset will show the idle screen with dimmed lights when the handset enters power
save mode when in charger.
Startup image (dimmed)
If this option is selected the handset will show the startup image with dimmed lights when the handset enters
power save mode when in charger.
6.5.17 Idle Clock
The “Idle Clock” function controls if the clock is showed in the idle display or not.
By selecting “Off” the idle clock will not be displayed in idle, and by selecting “On” the clock is displayed in idle.
6.6 Messaging
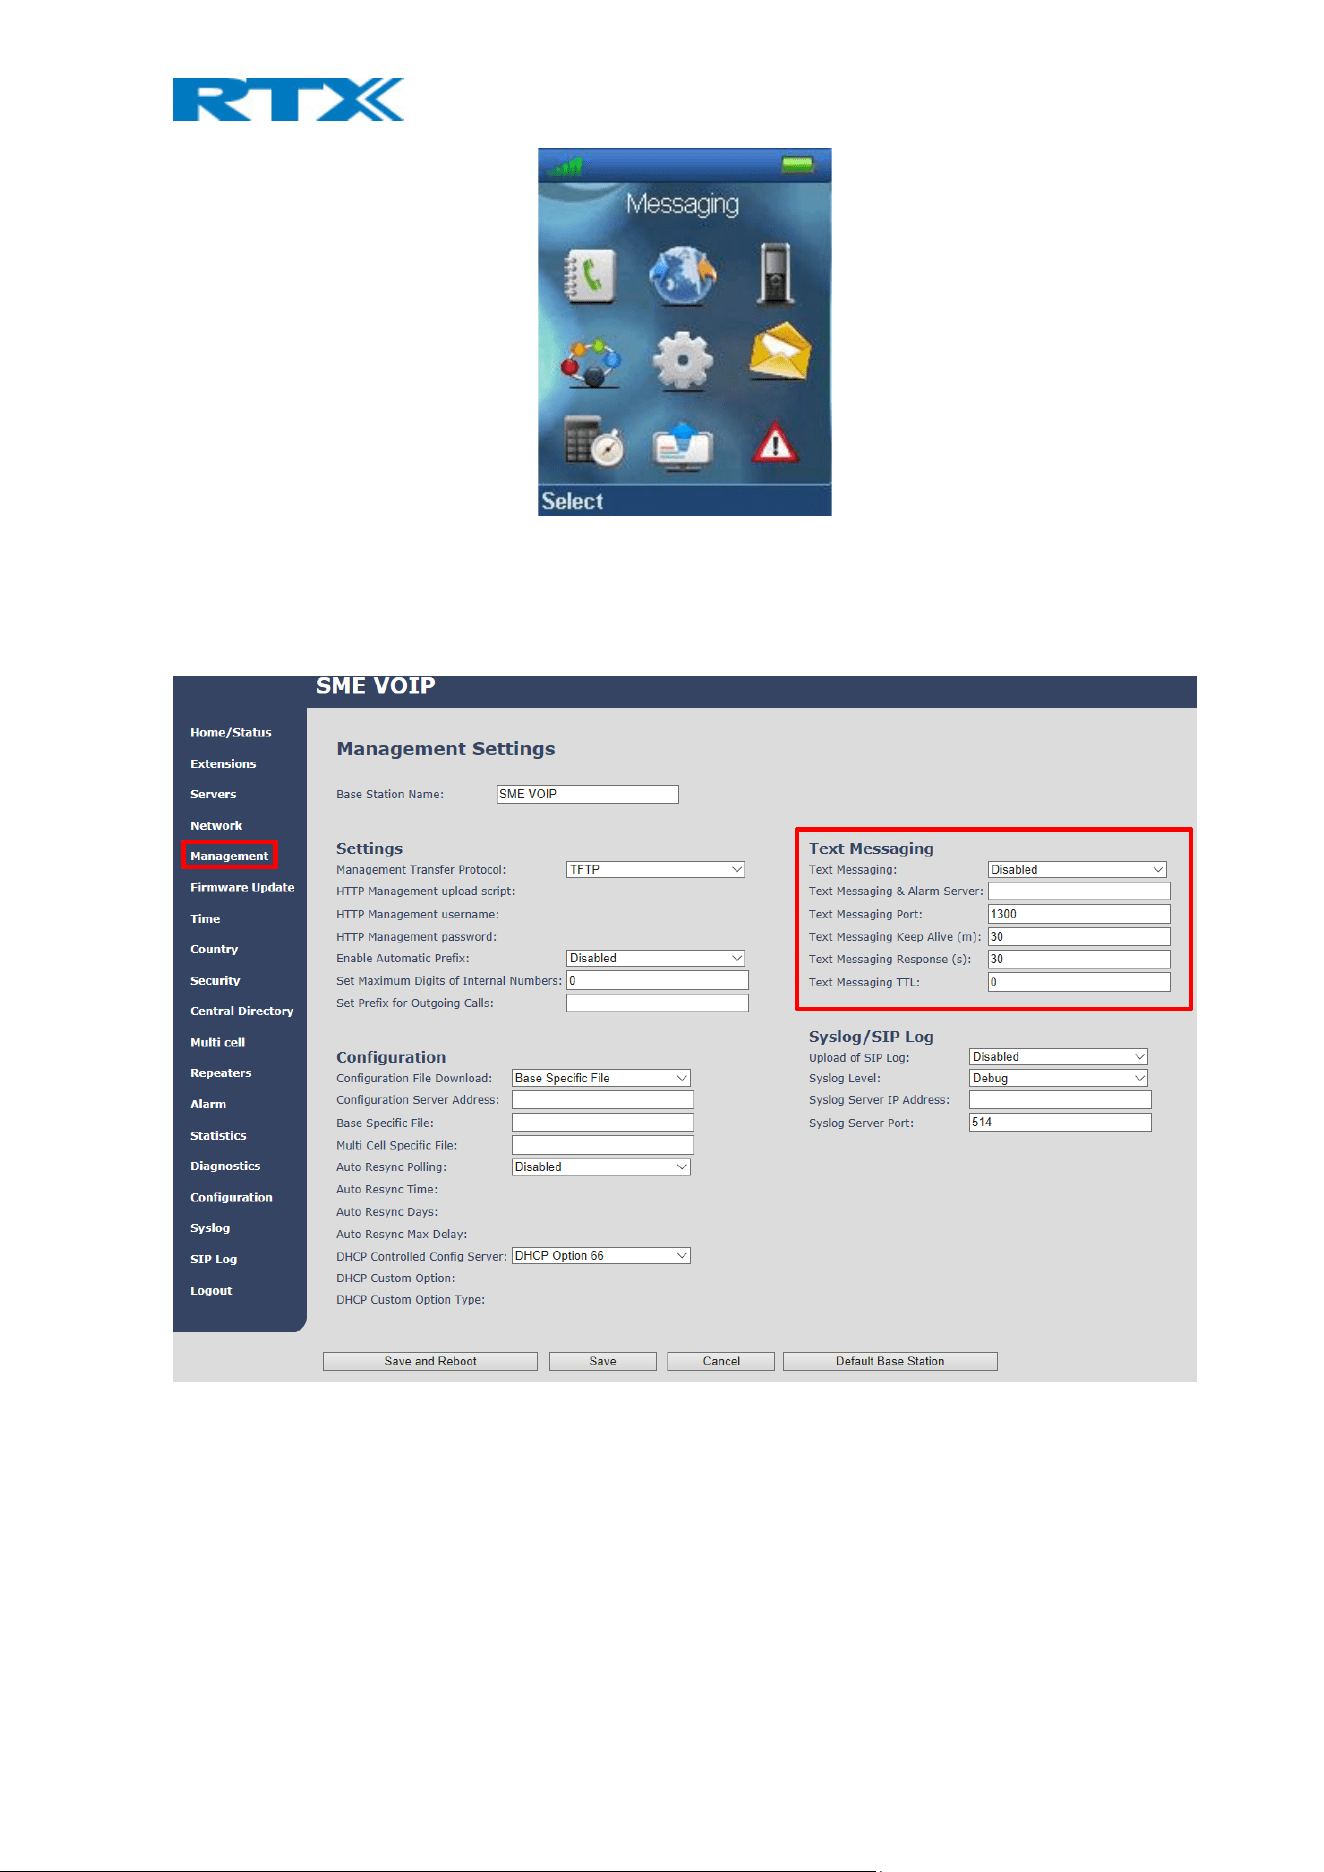
The text messaging function makes it possible to send text messages to other handsets on the system. From idle
the text messaging menu is reached by pressing the menu activity key , and then selecting the ‘Messaging’
menu as displayed below.
H200 Handset Guide DRAFT
Proprietary and Confidential
Page | 47
6.6.1 How to Setup Text Messaging
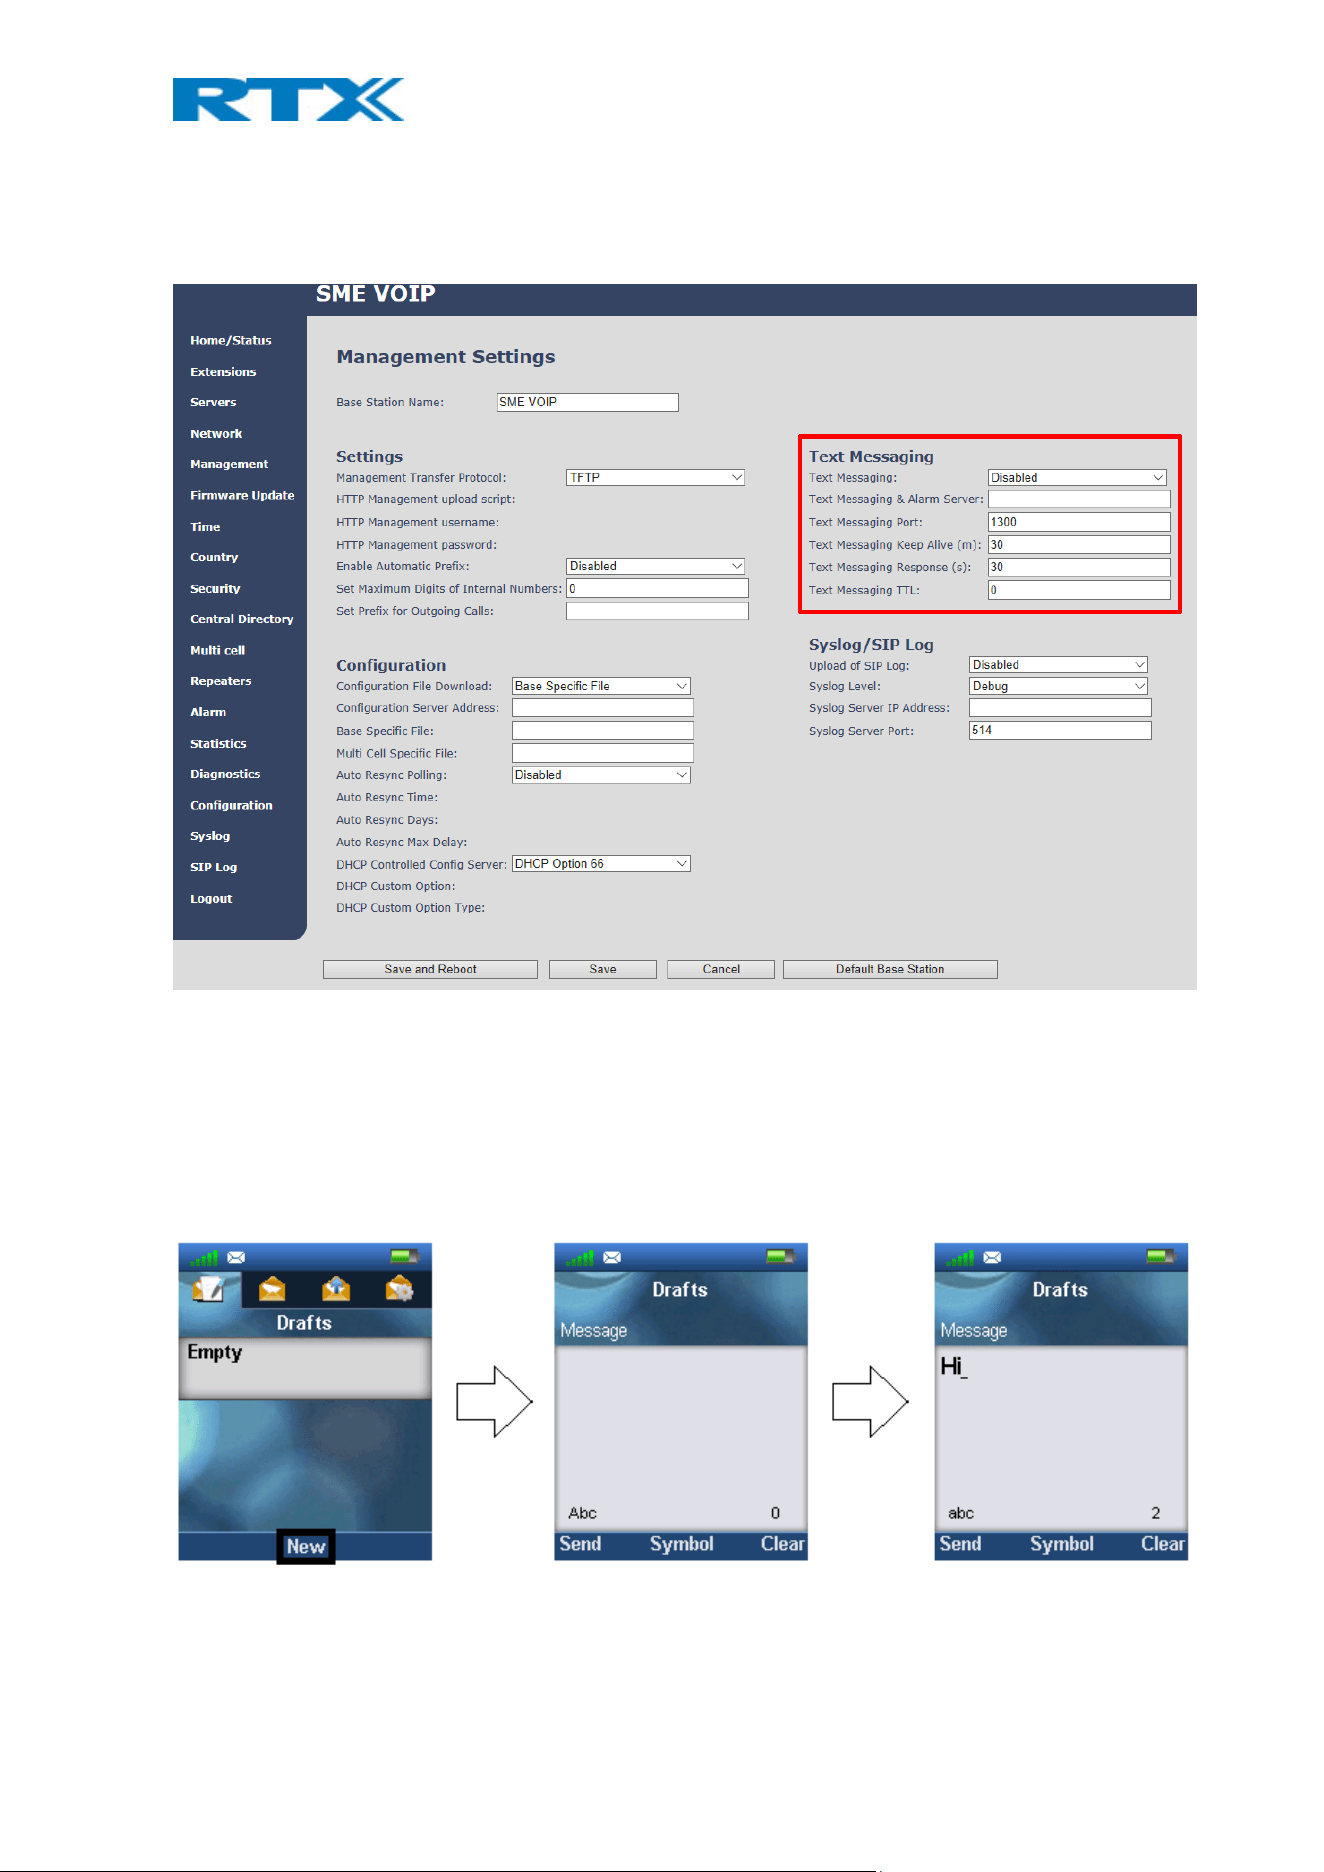
For the text messaging function to work on the handset, this needs to be enabled on the base station web
interface.
As seen above the text messaging feature is enabled on the handsets via “Management” on the base station web
interface. With this feature enabled it is possible to send text messages from one handset on the system to
another handset on the system. In this case, the “Text Messaging” needs to be enabled (with or without a
server).
H200 Handset Guide DRAFT
Proprietary and Confidential
Page | 48
Additionally, it is possible to send the text messages via a text messaging server (MobiCall server) which enables
handsets on different systems of base stations to send text messages to one another. When using a text
messaging server for text messaging, the “Text Messaging” must be “Enabled”, the “Text Messaging & Alarm
Server” needs to be filled out, and the correct port number must be entered in “Text Messaging Port”. An
example of this is seen below:
For further information on the text messaging feature and setup on the base station see the base station manual
via reference [3].
6.6.2 How to Write a New Message
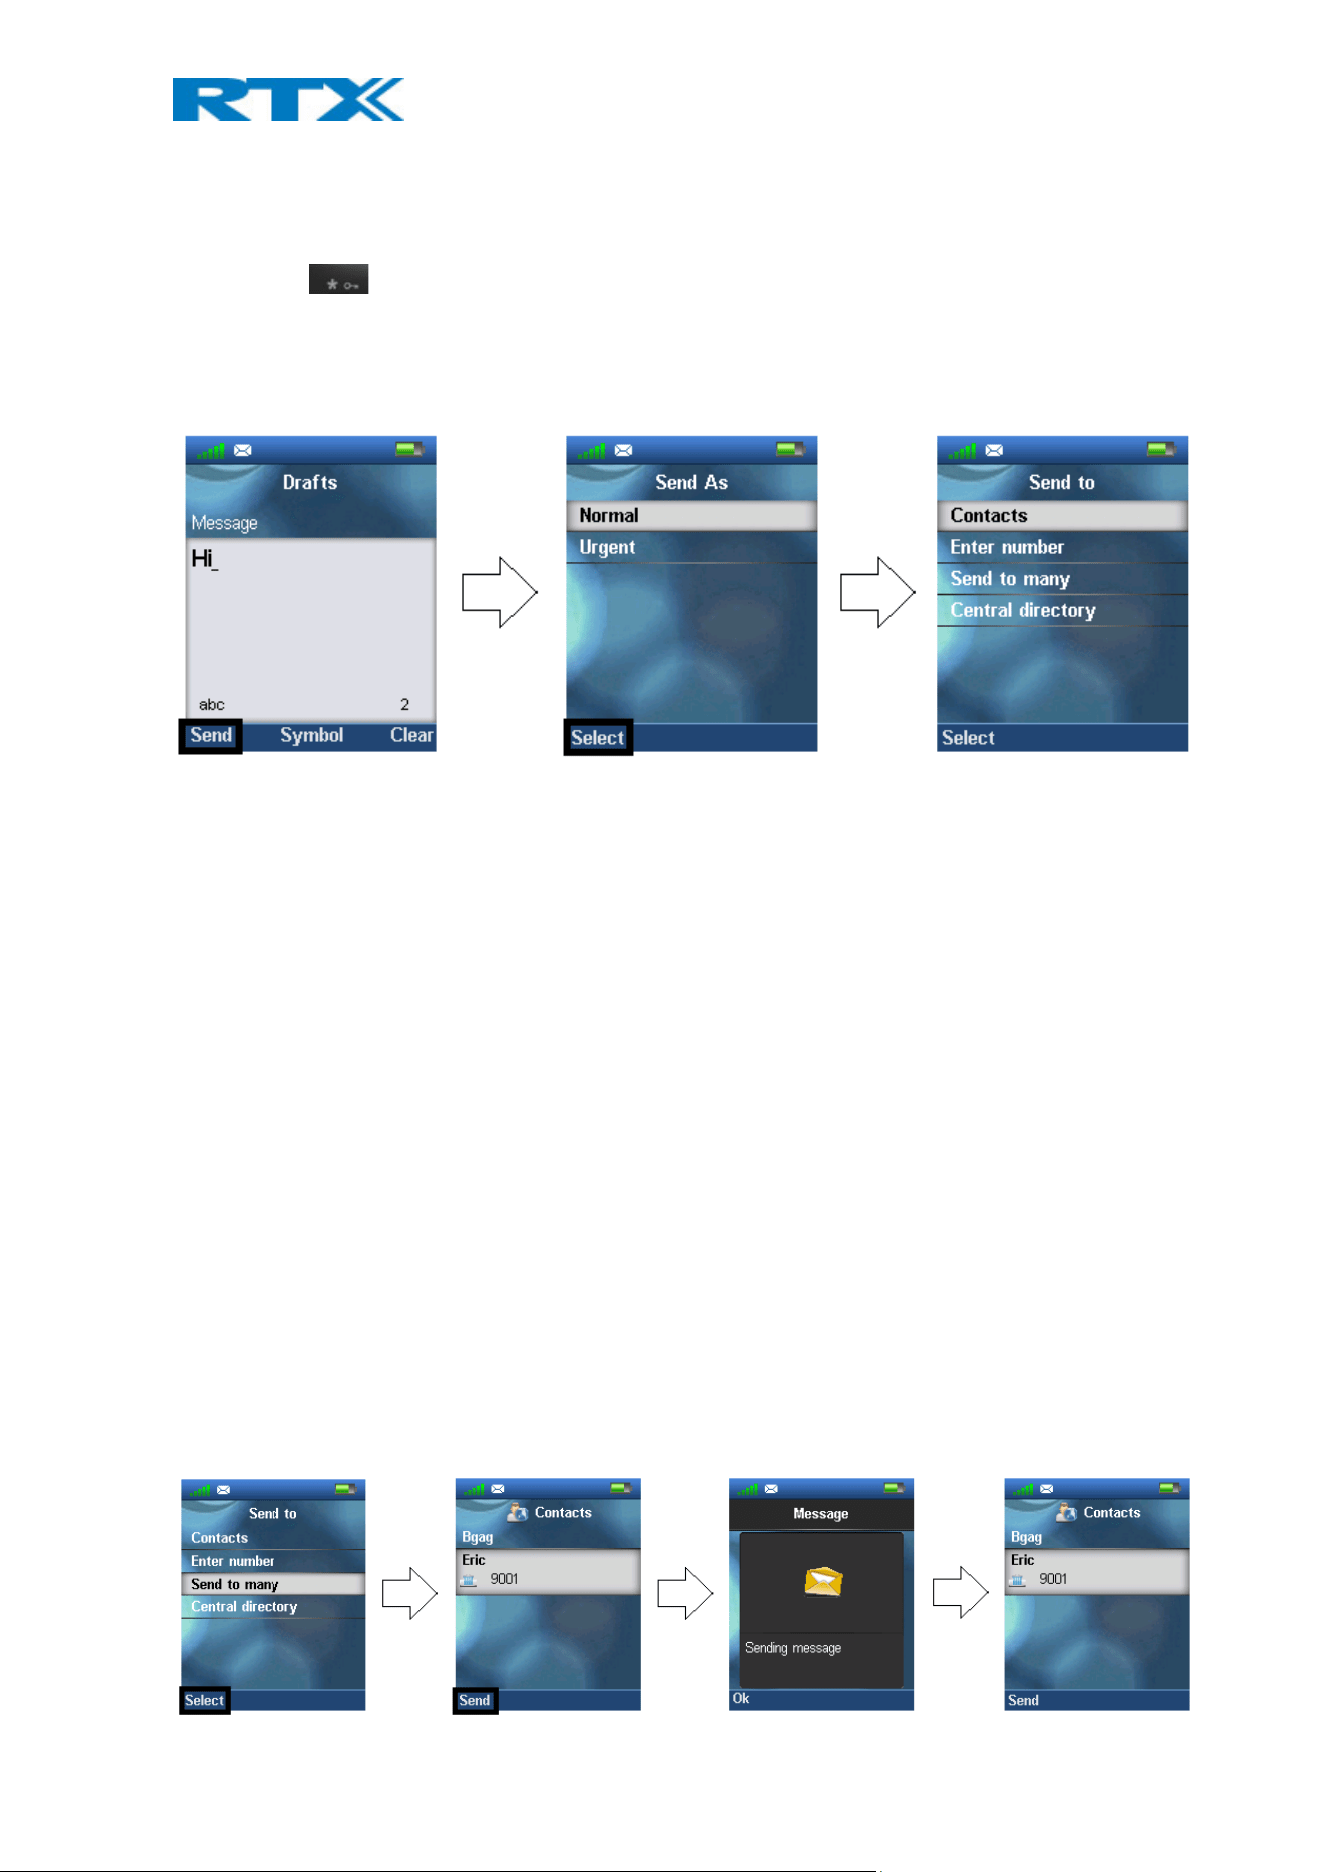
When opening the menu ‘Messaging’ the menu ‘Drafts’ is reached, and it is possible to write a new message by
pressing the middle navigation key, or the middle softkey called “New”.
As displayed above, pressing ’New’ makes it possible to write a new message by using the keypad. The maximal
message text length is 160 characters, and the number of characters typed are displayed at the bottom right
corner of the text field.
H200 Handset Guide DRAFT
Proprietary and Confidential
Page | 49
To choose other symbols than those available on the keypad press the middle softkey ‘Symbol’, and an amount
of symbols will be available to select. If in need of deleting what has just been written the right softkey ‘Clear’
can be pressed, and the previous character is hereby deleted.
NOTE: Use the -key to switch between the input modes ‘Abc’, ‘ABC’, ‘123’, and ‘abc’.
6.6.3 How to Send a New Message
When a new message has been written, press the left softkey “Send” to send it.
By pressing ‘Send’ two options are presented. The message can either be sent as ‘Normal’, or as ‘Urgent’.
Normal
If a message is sent as ’Normal’ the message is displayed as normal in the counterpart’s inbox.
Urgent
When a message is sent as ‘Urgent’ the message is displayed with an exclamation mark in the counterpart’s
inbox, and with an exclamation mark in the ‘Sent messages’. Urgent messages are always displayed at the top of
the inbox.
Choosing either of these two options, four different possibilities are given as to who the message can be sent to
as seen above.
Contacts
By selecting this option the contact list is displayed, and the message can be sent to one of the local contacts in
the contact list.
Enter number
In this option it is possible to enter a number, and thereby sending a message to this number.
Send to many
By choosing ‘Send to many’ the message can be sent to more than one contact in the contact list without exiting
from the list of contacts. This is displayed below.
H200 Handset Guide DRAFT
Proprietary and Confidential
Page | 50
In this way, when the message has been sent to one contact, the handset returns to the contact list, and it is
possible to select another contact to send the message to immediately after the first one has been sent.
Central directory
Selecting the ‘Central directory’ option opens the central directory list of contacts, and makes it possible to send
the message to contacts in this list.
6.6.4 How to Open and Reply to a Message
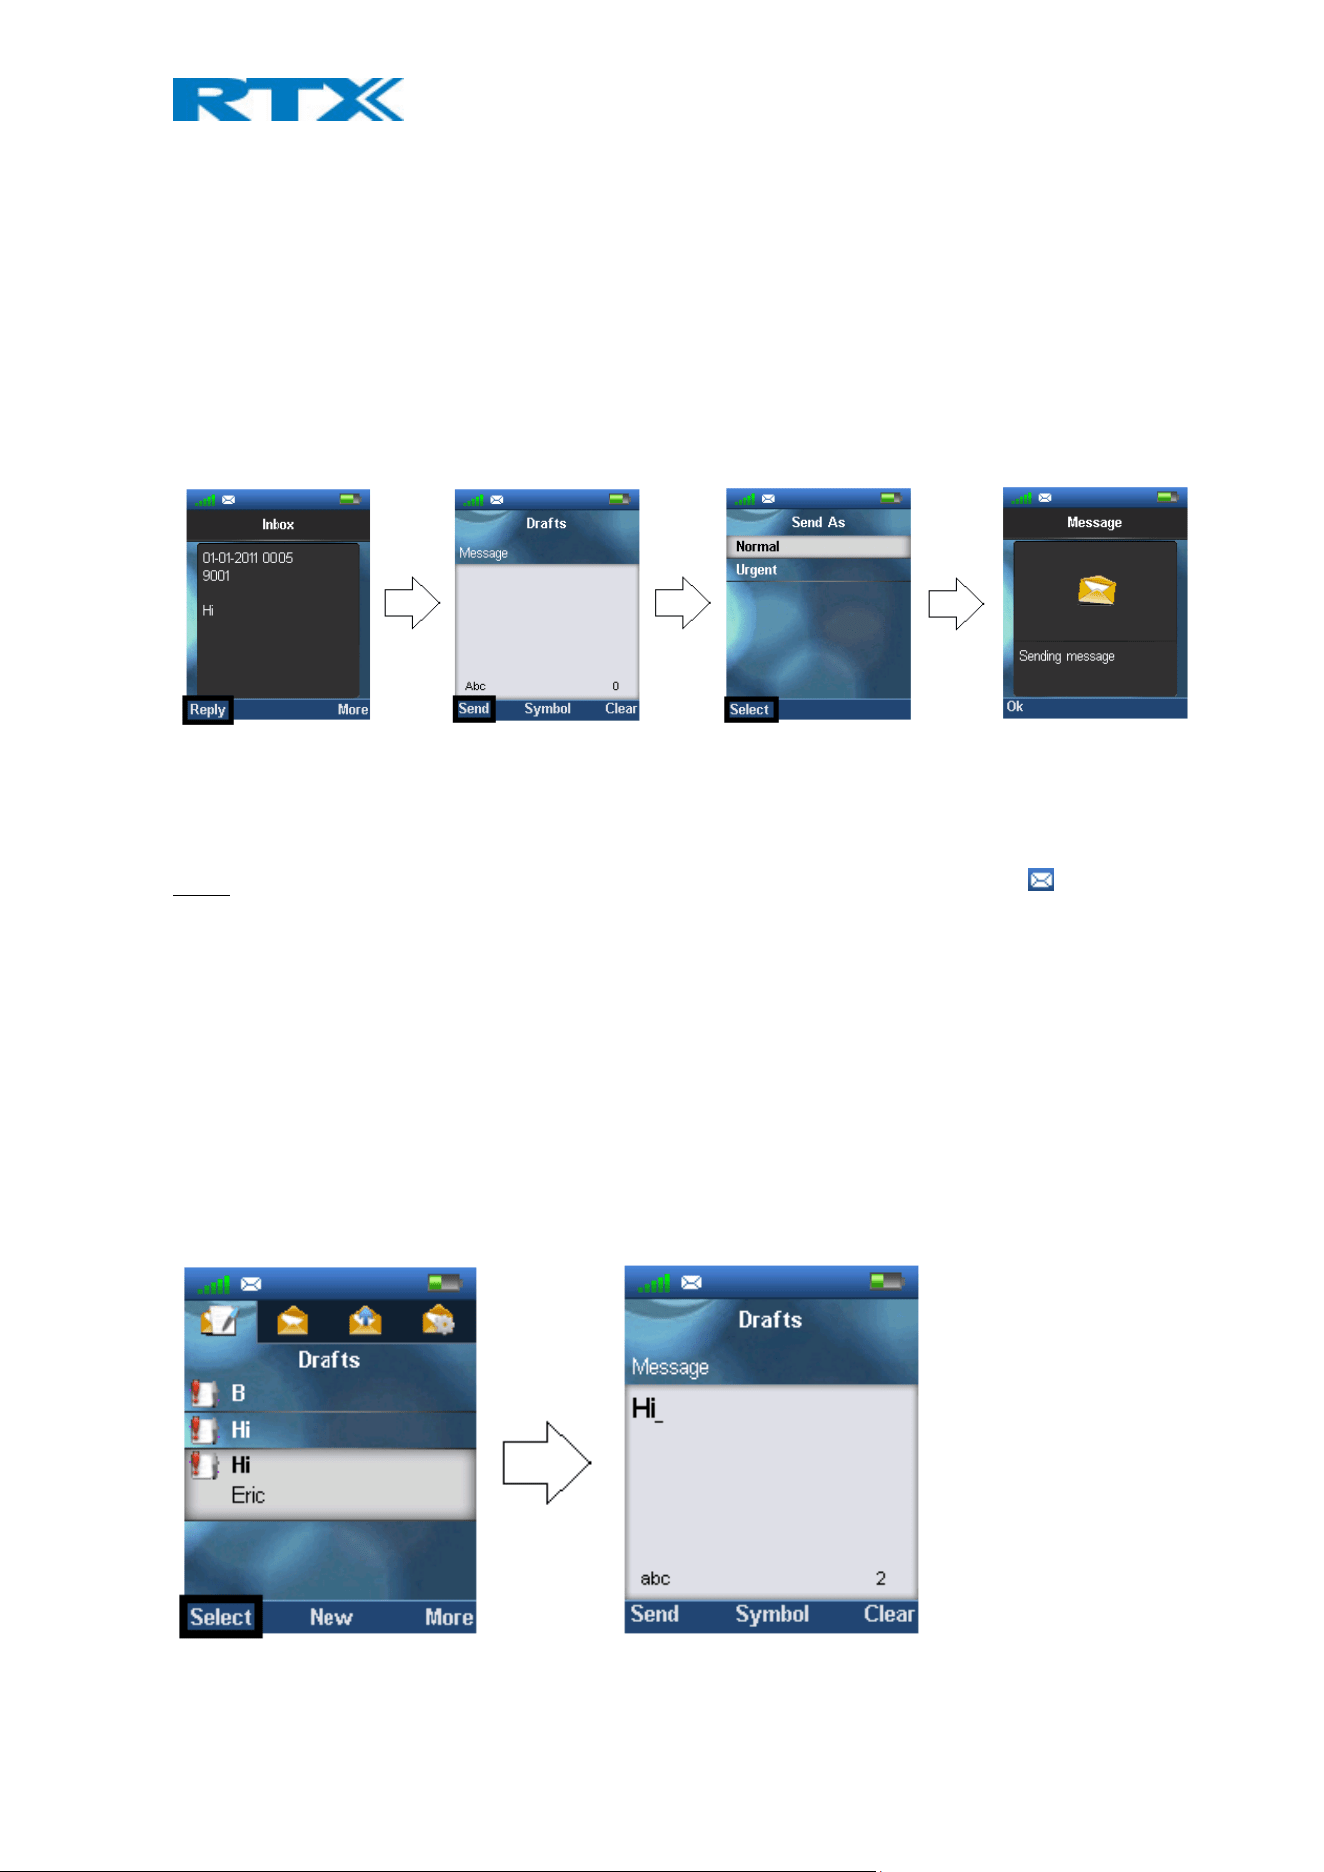
When a new message is received on the handset, the idle screen is displayed as seen on the first picture in the
sequence below.
Press the left softkey to reply to the received message. The reply message can either be sent as ‘Normal’ or
‘Urgent’, and when choosing either of these two options the message is sent to the counterpart from whom it
was received.
NOTE: When a new message is received and has not yet been read the following message icon is displayed in
the status bar at top of the display.
6.6.5 Four Messaging Submenus
When opening the messaging menu, it is possible to select the four submenus: Drafts, Inbox, Sent messages, and
Settings. The submenus are organized in tabs whereby the left and right navigation keys are used to navigate
between them. The content of these four submenus are described in the following sections.
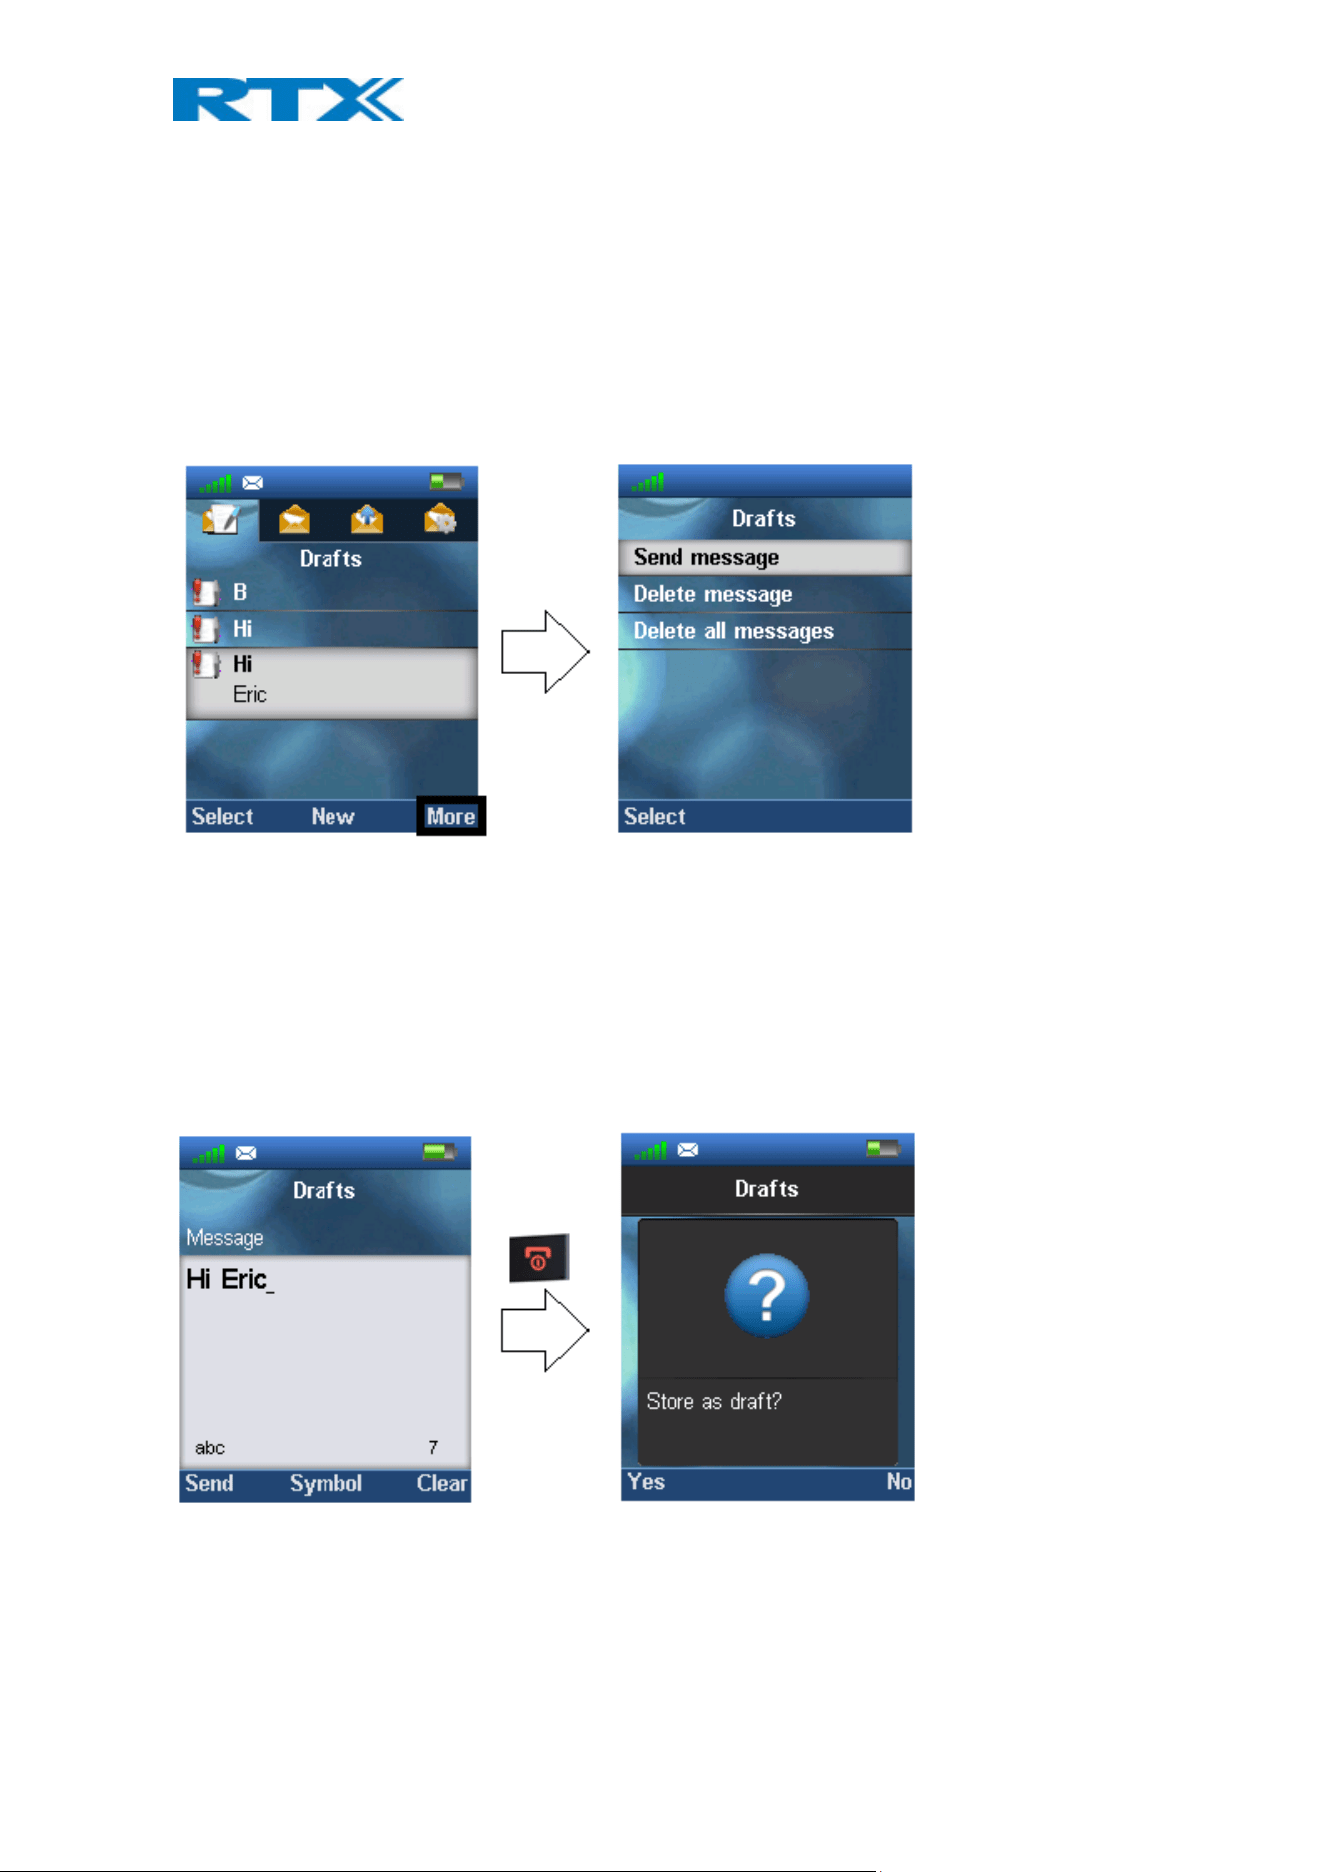
6.6.6 Drafts
‘Drafts’ is the submenu that is opened when the ‘Messaging’ menu is selected. In this menu drafts are saved if a
message has been written but was not sent.
H200 Handset Guide DRAFT
Proprietary and Confidential
Page | 51
When pressing select on a highlighted draft, this is opened according to the last time that it was edited, and it is
possible to edit it, and send it again.
To write a new message press the middle softkey ‘New’ in this ‘Drafts’ menu (this function is described in more
detail in section 6.6.2 How to Send a New Message)
6.6.6.1 The More Option
When pressing the right softkey ‘More’ in ‘Drafts’ it gives the three possibilities that is displayed and explained
below.
The option ‘Send message’ enters the message to edit and send. If ‘Delete message’ is chosen the current
message can be deleted, and ‘Delete all messages’ gives the possibility to delete all messages in the ‘Drafts’
menu.
6.6.6.2 What is Stored in Drafts?
When writing a new message and then exiting with the red on-hook key before the message is sent, this message
can be saved as a draft. This is displayed below.
By pressing the left softkey ‘Yes’ the message is saved as a draft, and can be opened again in the ‘Drafts’ menu.
If the right ‘No’ softkey is pressed the message is not stored as a draft, and the handset returns to the previously
opened menu without saving the message.
H200 Handset Guide DRAFT
Proprietary and Confidential
Page | 52
6.6.7 Inbox
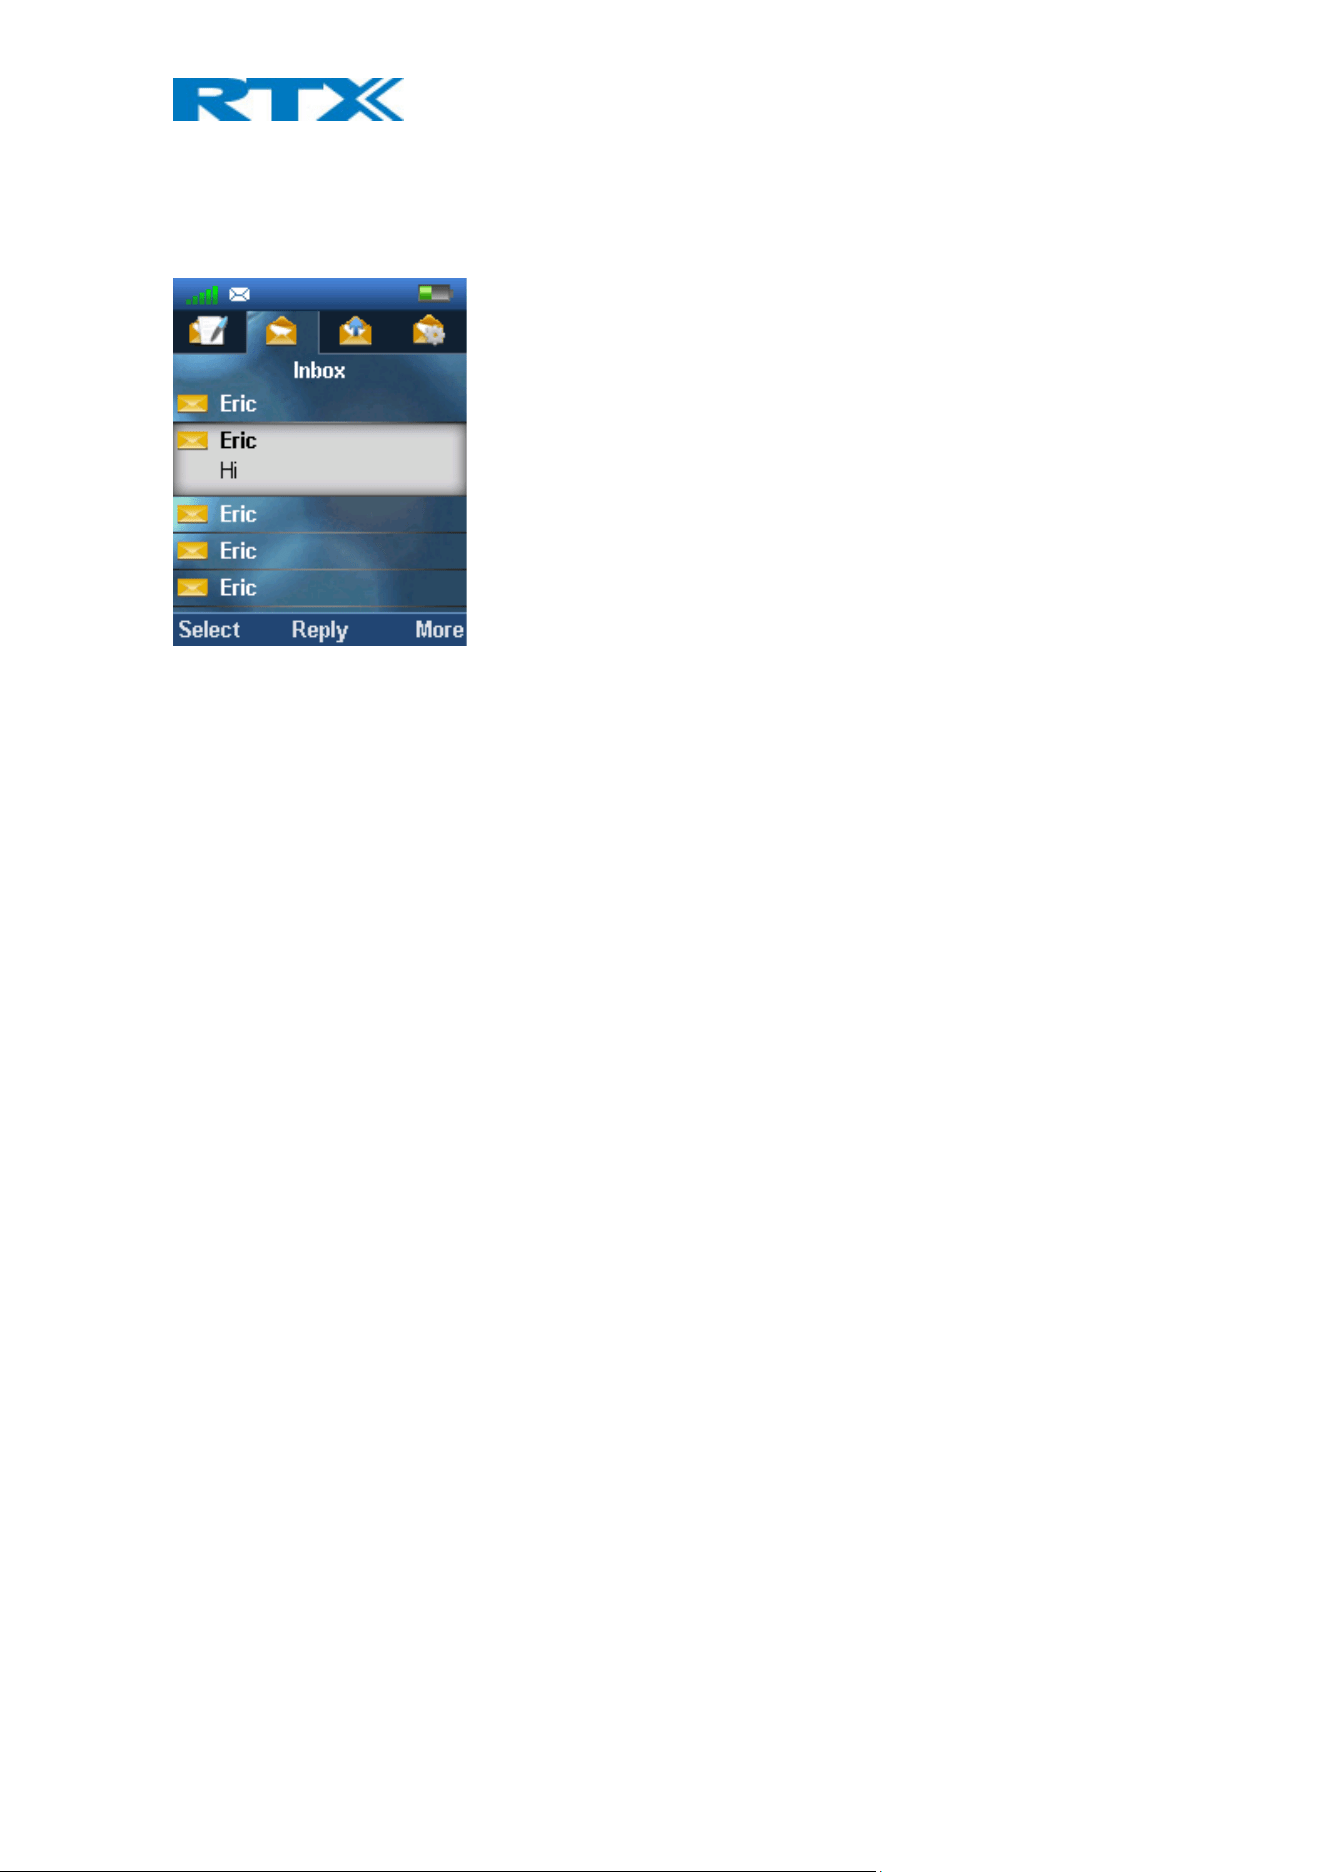
When pressing the right navigation key one time in the messaging menu, the submenu ‘Inbox’ is opened. This
menu contains all received messages on the handset.
By pressing the middle softkey ‘Reply’ it is possible to reply to the highlighted message.
When selecting a highlighted message with the left softkey ‘Select’ this message is opened, and it is possible to
use the left softkey to reply, or to enter the ‘More’ option described below directly from the message.
H200 Handset Guide DRAFT
Proprietary and Confidential
Page | 53
6.6.7.1 The More Option
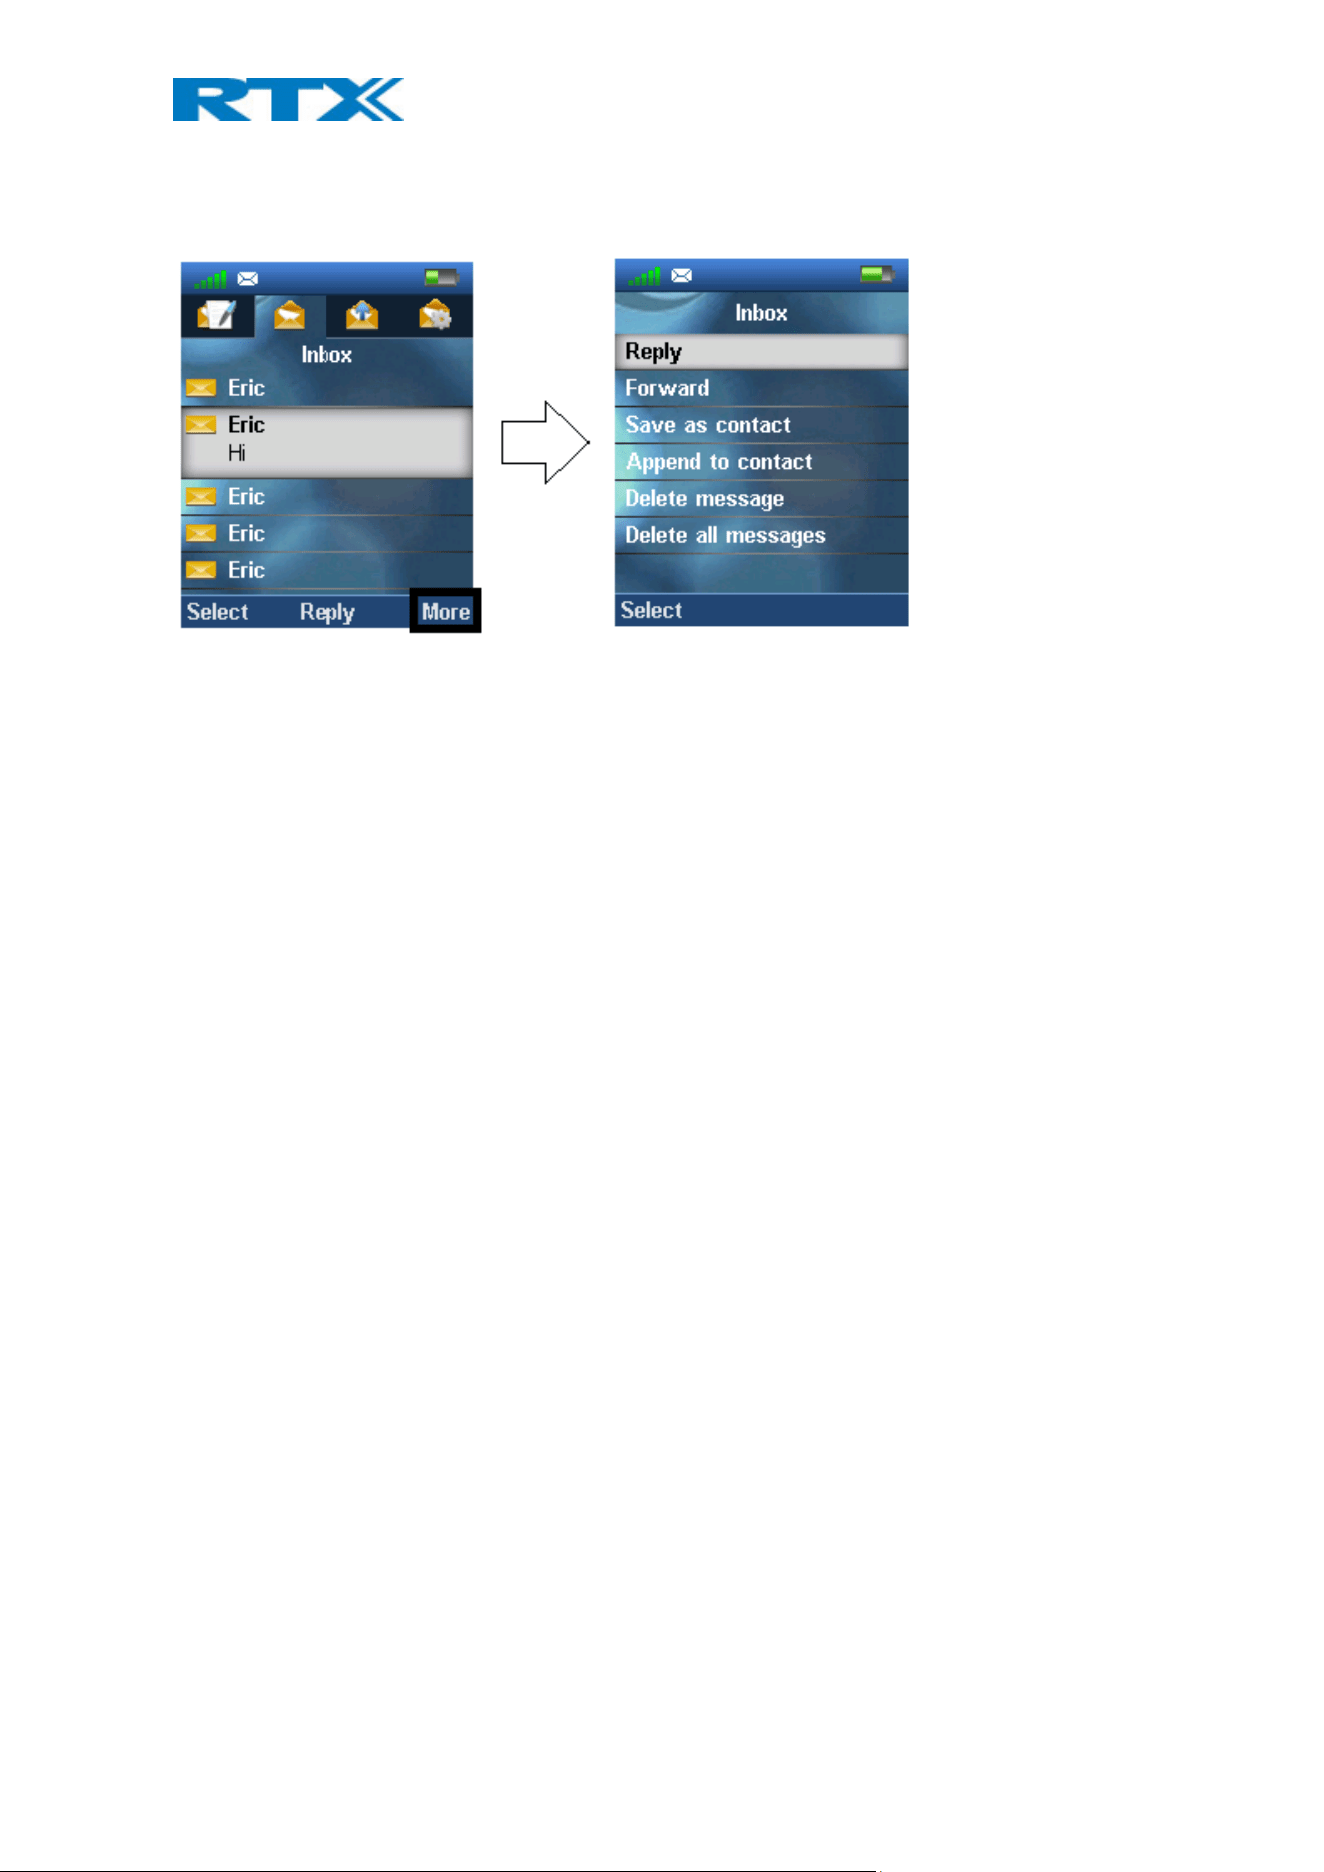
The right softkey ‘More’ gives a list of options in the inbox which are described below.
Reply
With this option it is possible to reply the counterpart of the received message.
Forward
By selecting ‘Forward’, the newly received message is entered again, and can be edited and forwarded to
another number.
Save as contact
With the function ‘Save as contact’ it is possible to save the number that the message was received from in the
local phonebook.
Append to contact
With the ‘Append to contact’ option it is possible to append the number that the message came from to an
already existing contact in the local phonebook of the handset.
Delete message
By pressing ‘Delete message’ either ‘Yes’ can be pressed to delete the message, or ‘No’ can be pressed return to
the ‘Inbox’ menu.
Delete all messages
This option gives the possibility to delete all messages in the messaging inbox, and a ‘Yes’ or ‘No’ option is given.
By pressing the left softkey ‘Yes’ all messages in the inbox are deleted, by pressing the right softkey ‘No’ the
handset goes to the message inbox.
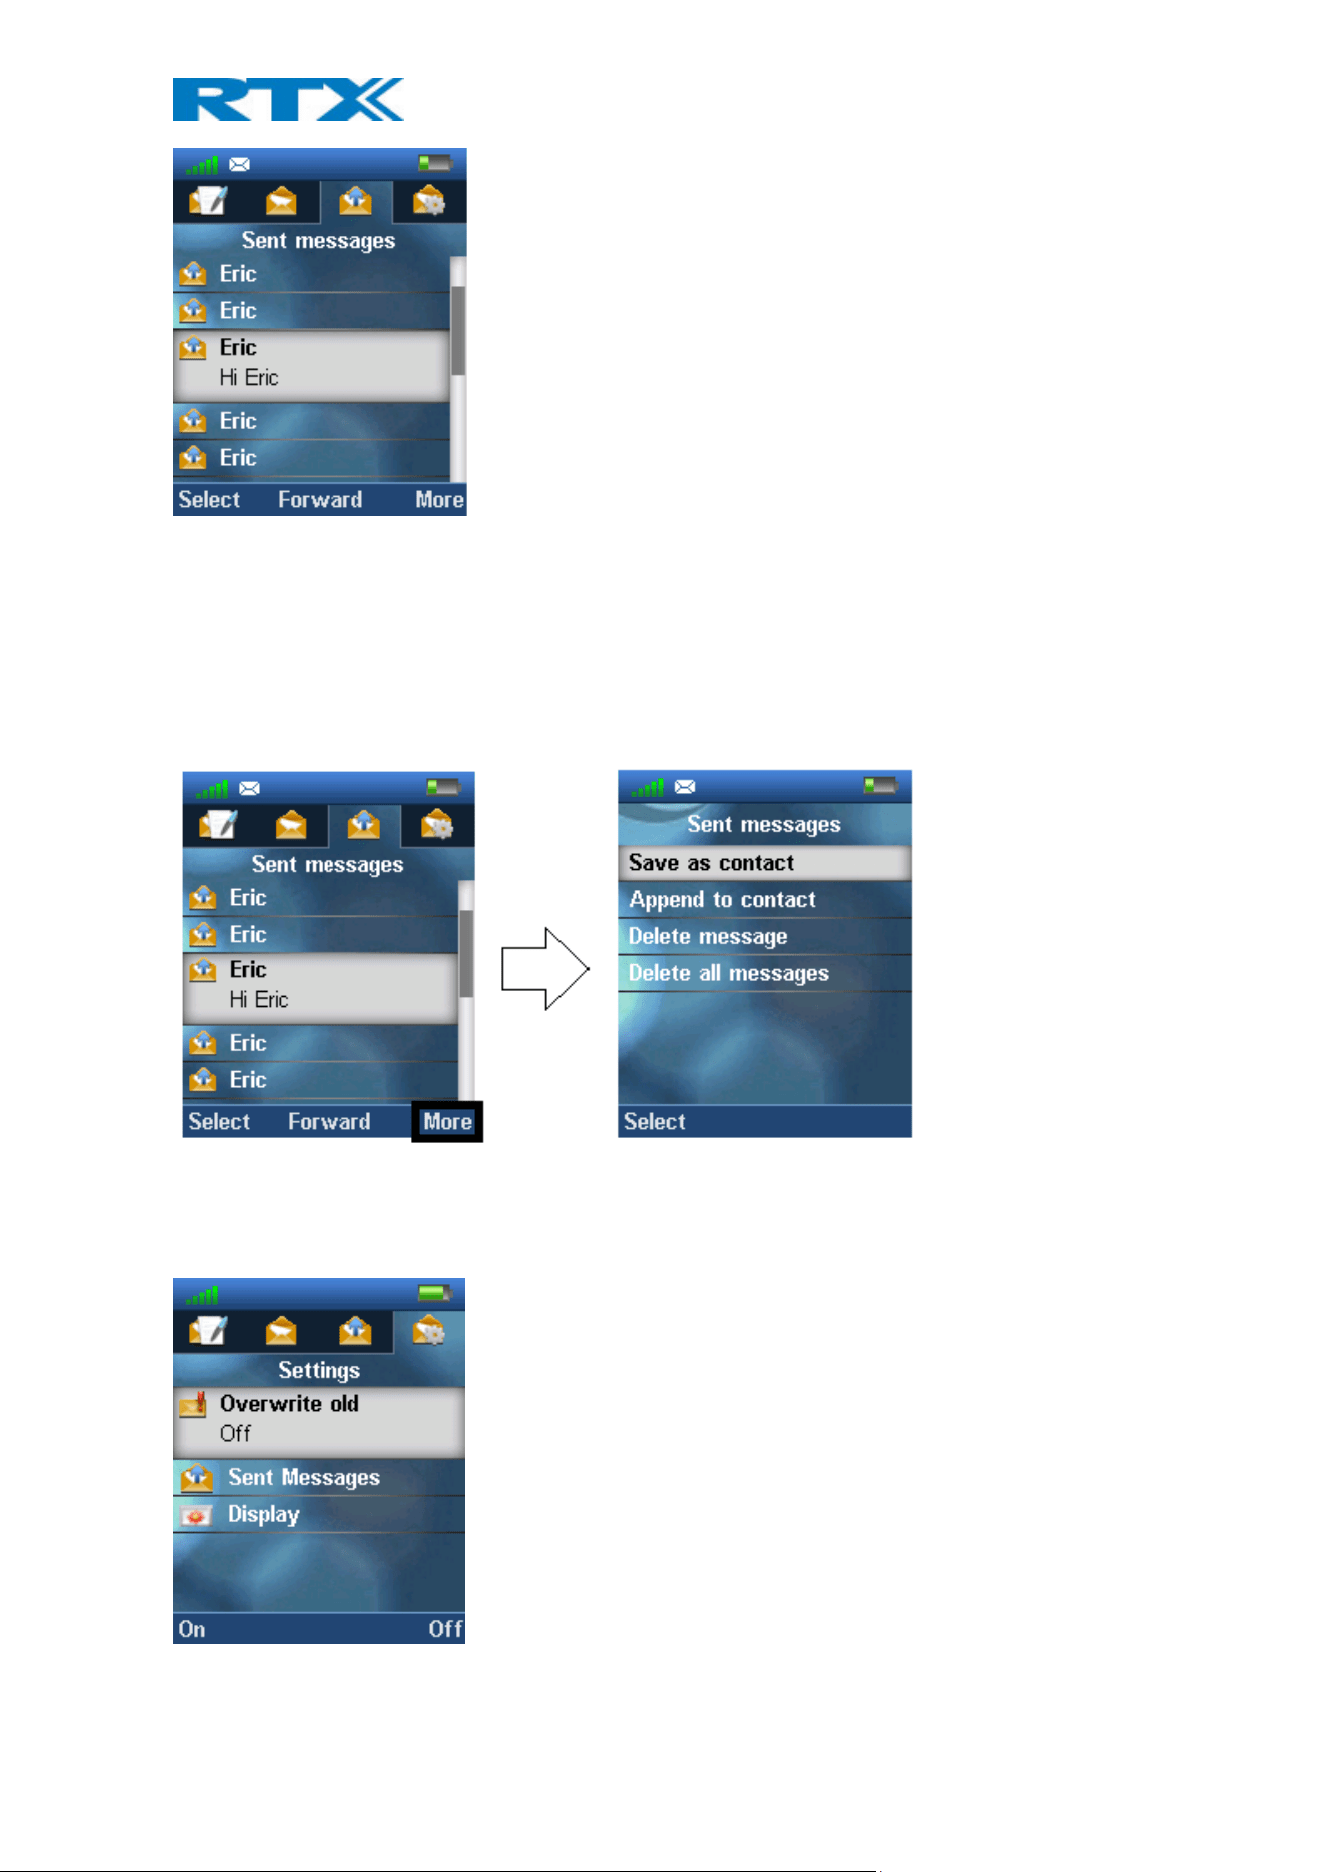
6.6.8 Sent Messages
In the ‘Sent messages’ menu a complete list of the messages sent from the handset is displayed.
H200 Handset Guide DRAFT
Proprietary and Confidential
Page | 54
To open a sent message scroll up/down to highlight it, and then press the left softkey ‘Select’. By pressing the
middle softkey, the message is opened, and it is possible to forward it to another handset than it was originally
sent to.
6.6.8.1 The More Option
When pressing the right softkey ‘More’ a list of options is given as seen below.
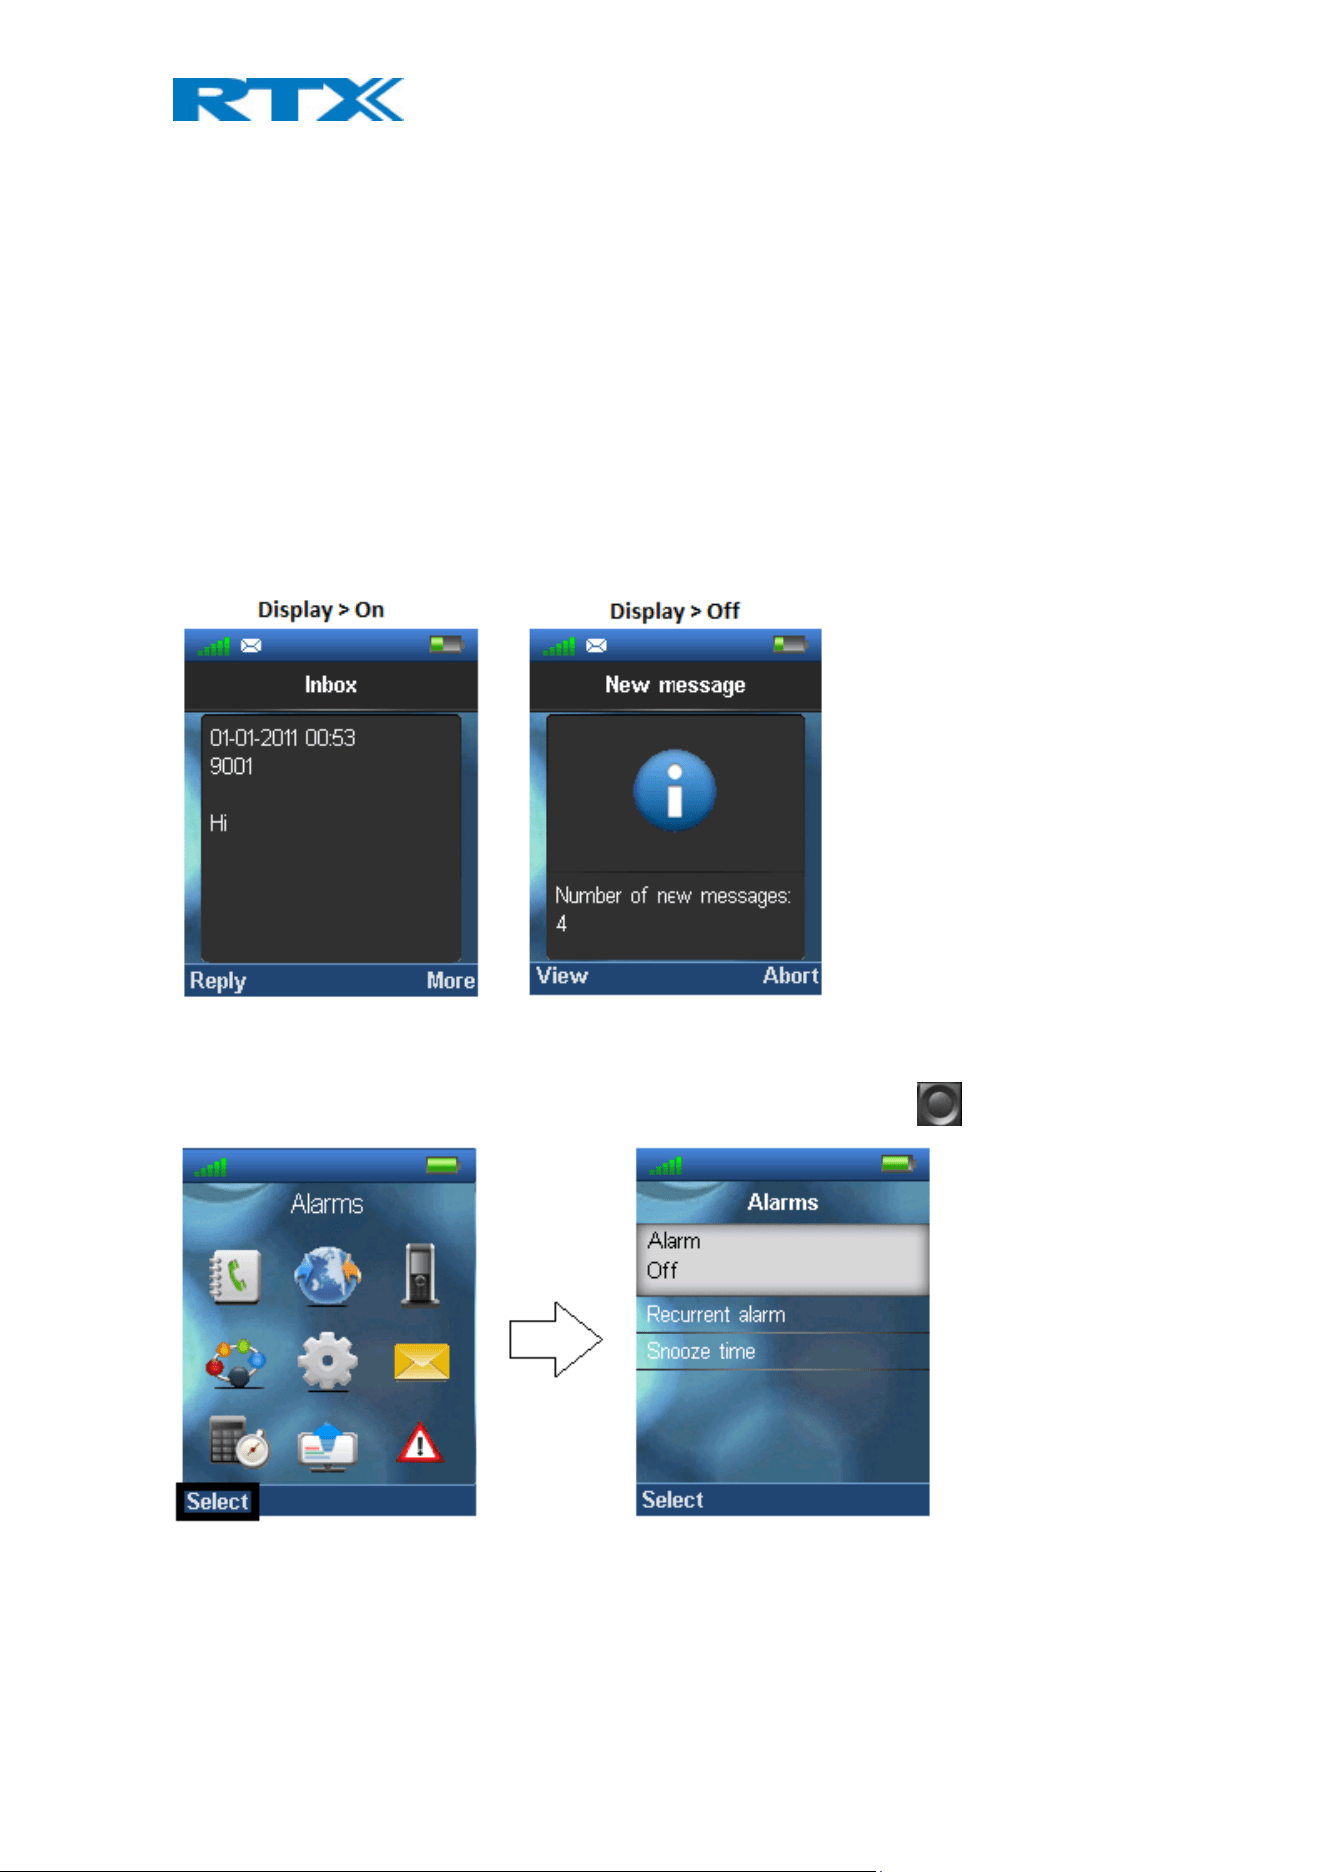
6.6.9 Settings
In the ‘Settings’ menu it is possible to set messaging options on or off. These options will be described below.
H200 Handset Guide DRAFT
Proprietary and Confidential
Page | 55
Overwrite old
If this option is set to ‘On’ with the left softkey, then the oldest messages is overwritten if the maximum number
of messages is reached. The maximum number of messages that can be stored in drafts, inbox, and sent
messages is 250. If the number of 250 messages is exceeded, and the option is set to ‘Off’ then no new messages
can be received before deleting some old messages manually.
Sent Messages
If this function is set to ‘On’ then the sent messages will be saved, whereas the sent messages will not be saved if
it is set to ‘Off’.
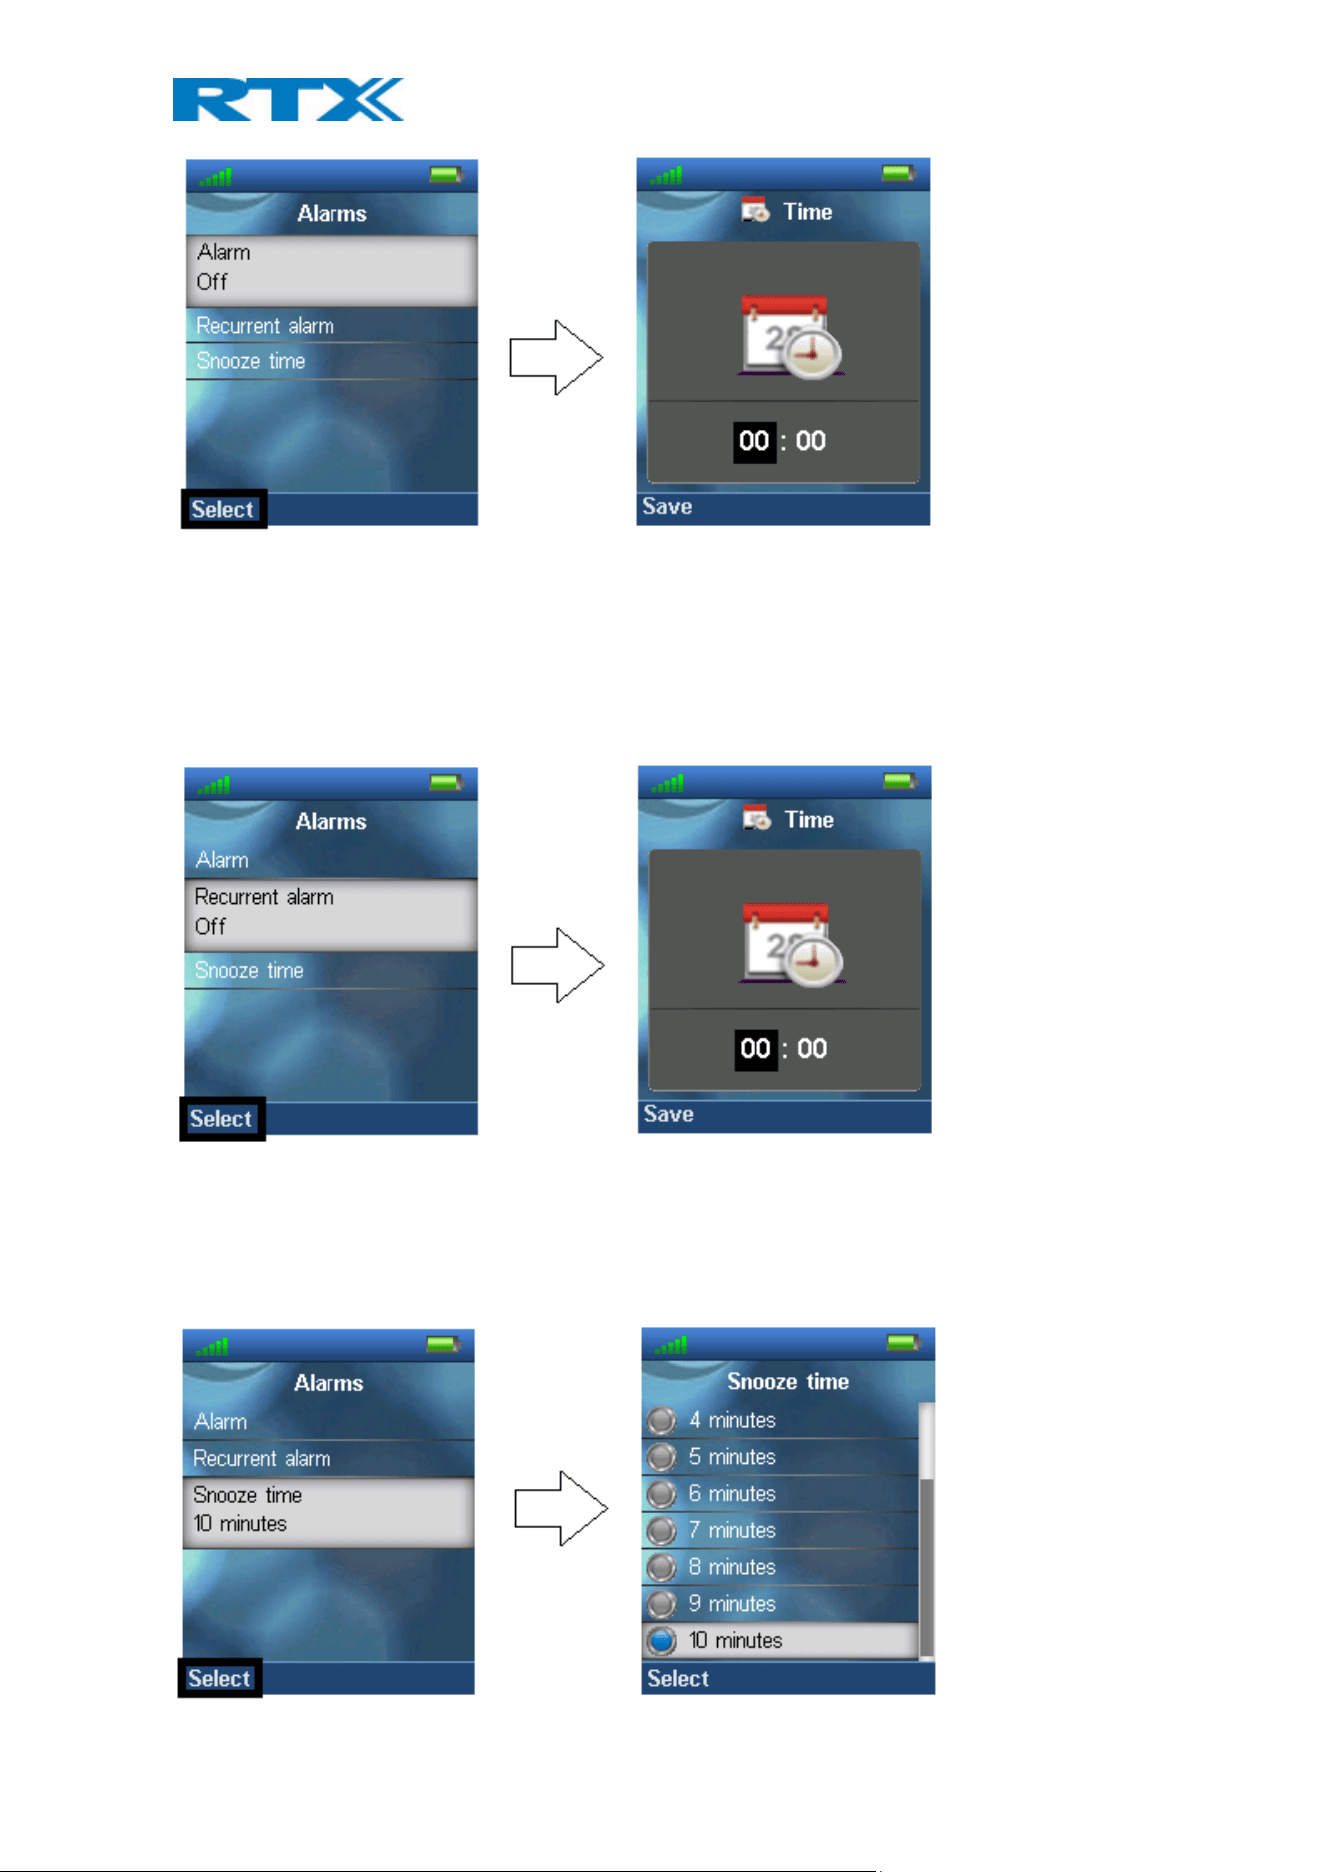
Display
This function controls if the content of new messages are displayed in idle when they are received, or if it is just
displayed that a new message has been received. Below, it is displayed how the two settings are displayed in idle
when a new message is received.
6.7 Alarms
The “Alarm” menu is entered through the menu by pressing the activity menu key in idle.
This feature allows that alarms can be set on the handset to occur at a specific time.
Alarm
When “Alarm” is selected it is possible to set a time for an alarm to occur, and then press left softkey “Save” to
save the alarm.
H200 Handset Guide DRAFT
Proprietary and Confidential
Page | 56
An alarm will then occur at the time that has been set. The time can both be set with the numeric keypad, or
with the up/down navigation keys.
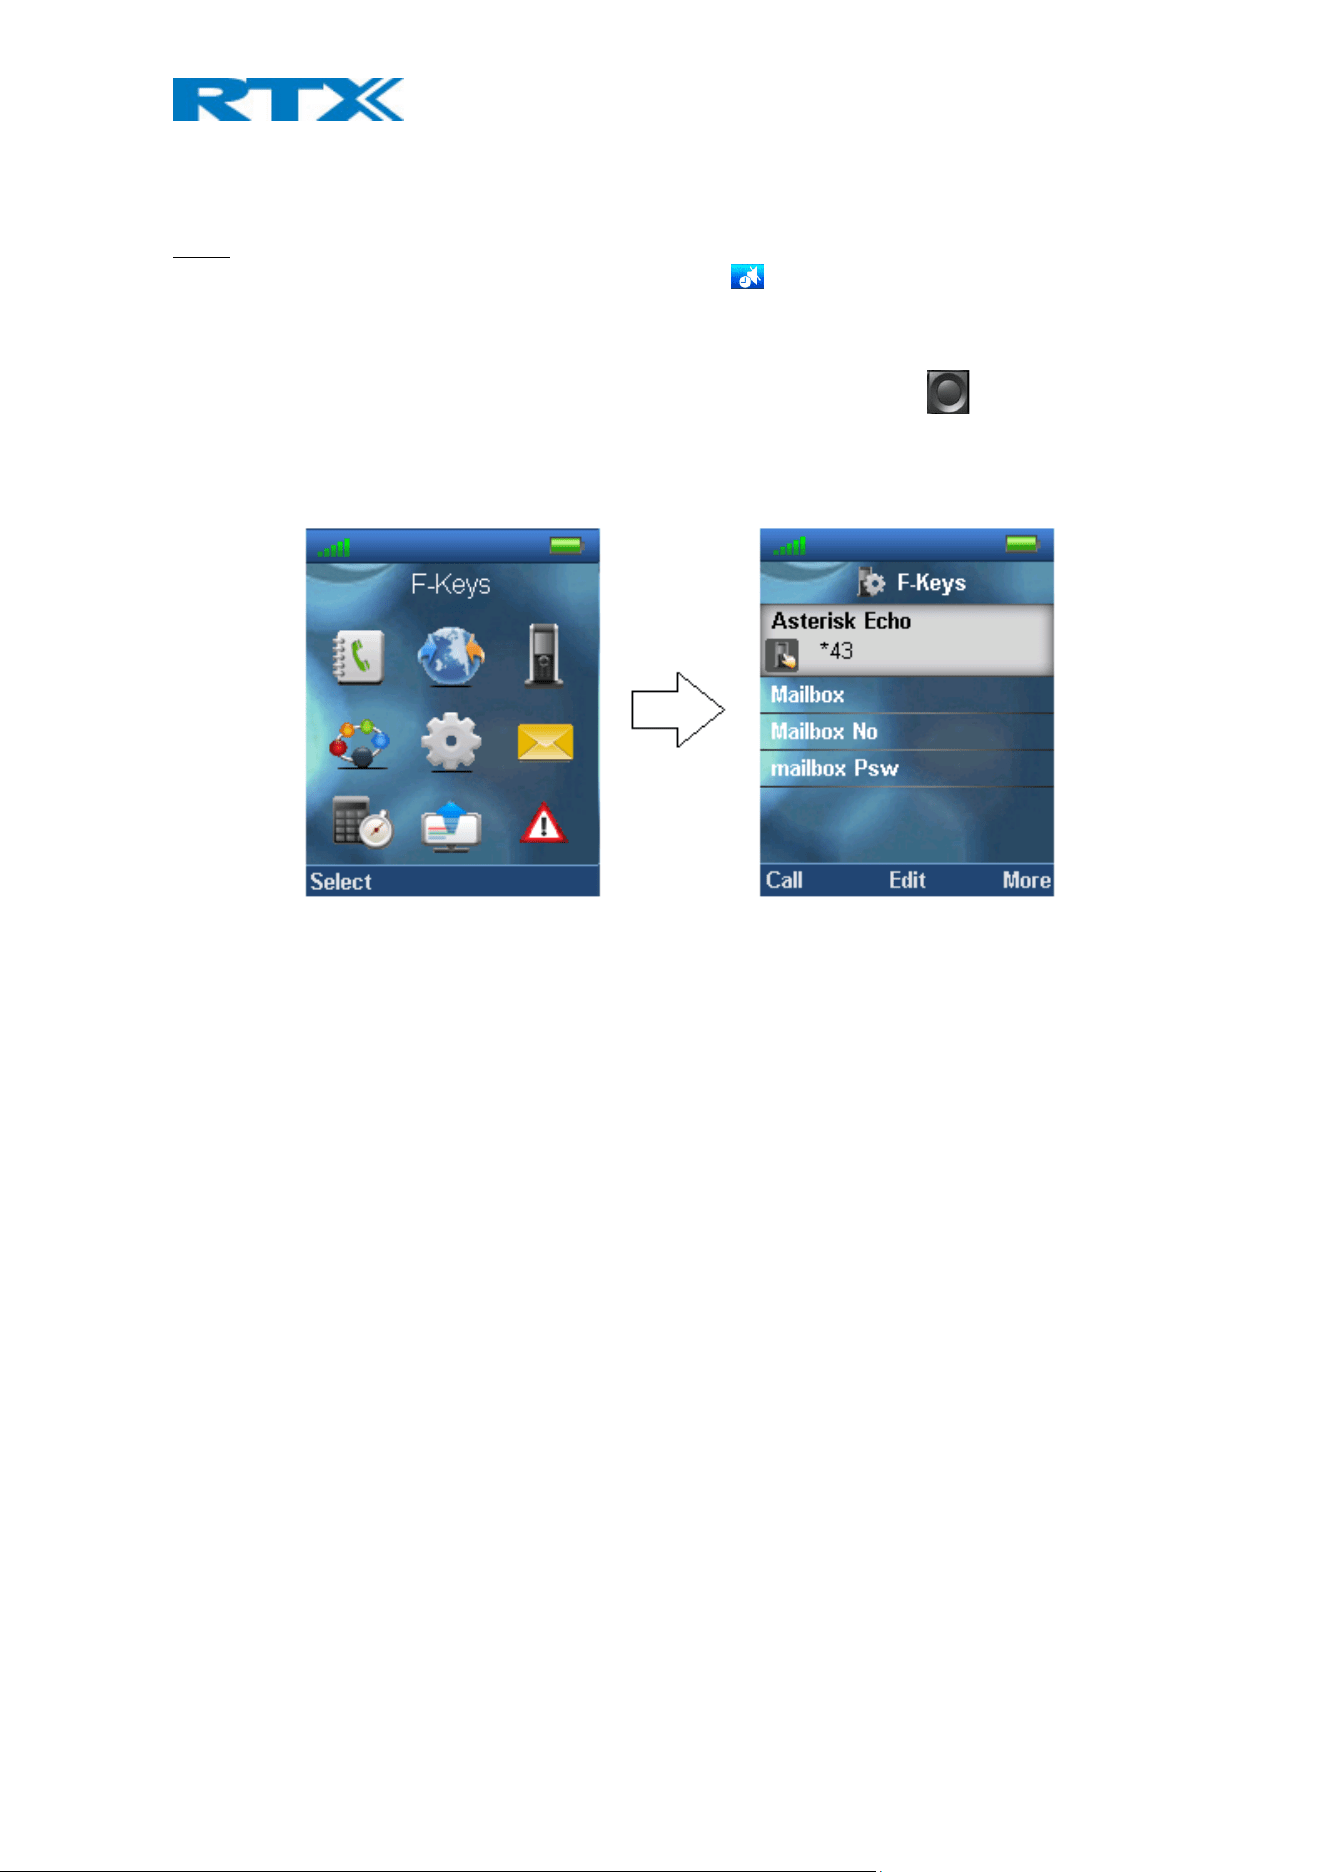
Recurrent alarm
This feature enables another alarm to be set, thereby another time can be saved by pressing left softkey “Save”.
In this way, two alarms can occur.
The time can both be set with the numeric keypad, or with the up/down navigation keys.
Snooze time
The “Snooze time” indicates the time for the alarm to be snoozed when it goes off.
H200 Handset Guide DRAFT
Proprietary and Confidential
Page | 57
This means that when the alarm occurs the user can either “Dismiss” it with the right softkey, or “Snooze” it with
the left softkey. In this case the snooze time gives the time before the alarm occurs again.
NOTE: If the handset is in silent mode or if the volume is set to mute then an alarm will be a silent alarm, and no
sound will be heard during the alarm. The “Silent Alarm” icon will be displayed in the status bar.
6.8 F-Keys
The “F-Keys” menu is entered through the menu by pressing the activity menu key in idle. This menu
controls functional keys to be set on the handset. This means that the handset user can add certain functional
numbers in this menu; as for example the number to the user’s mailbox.
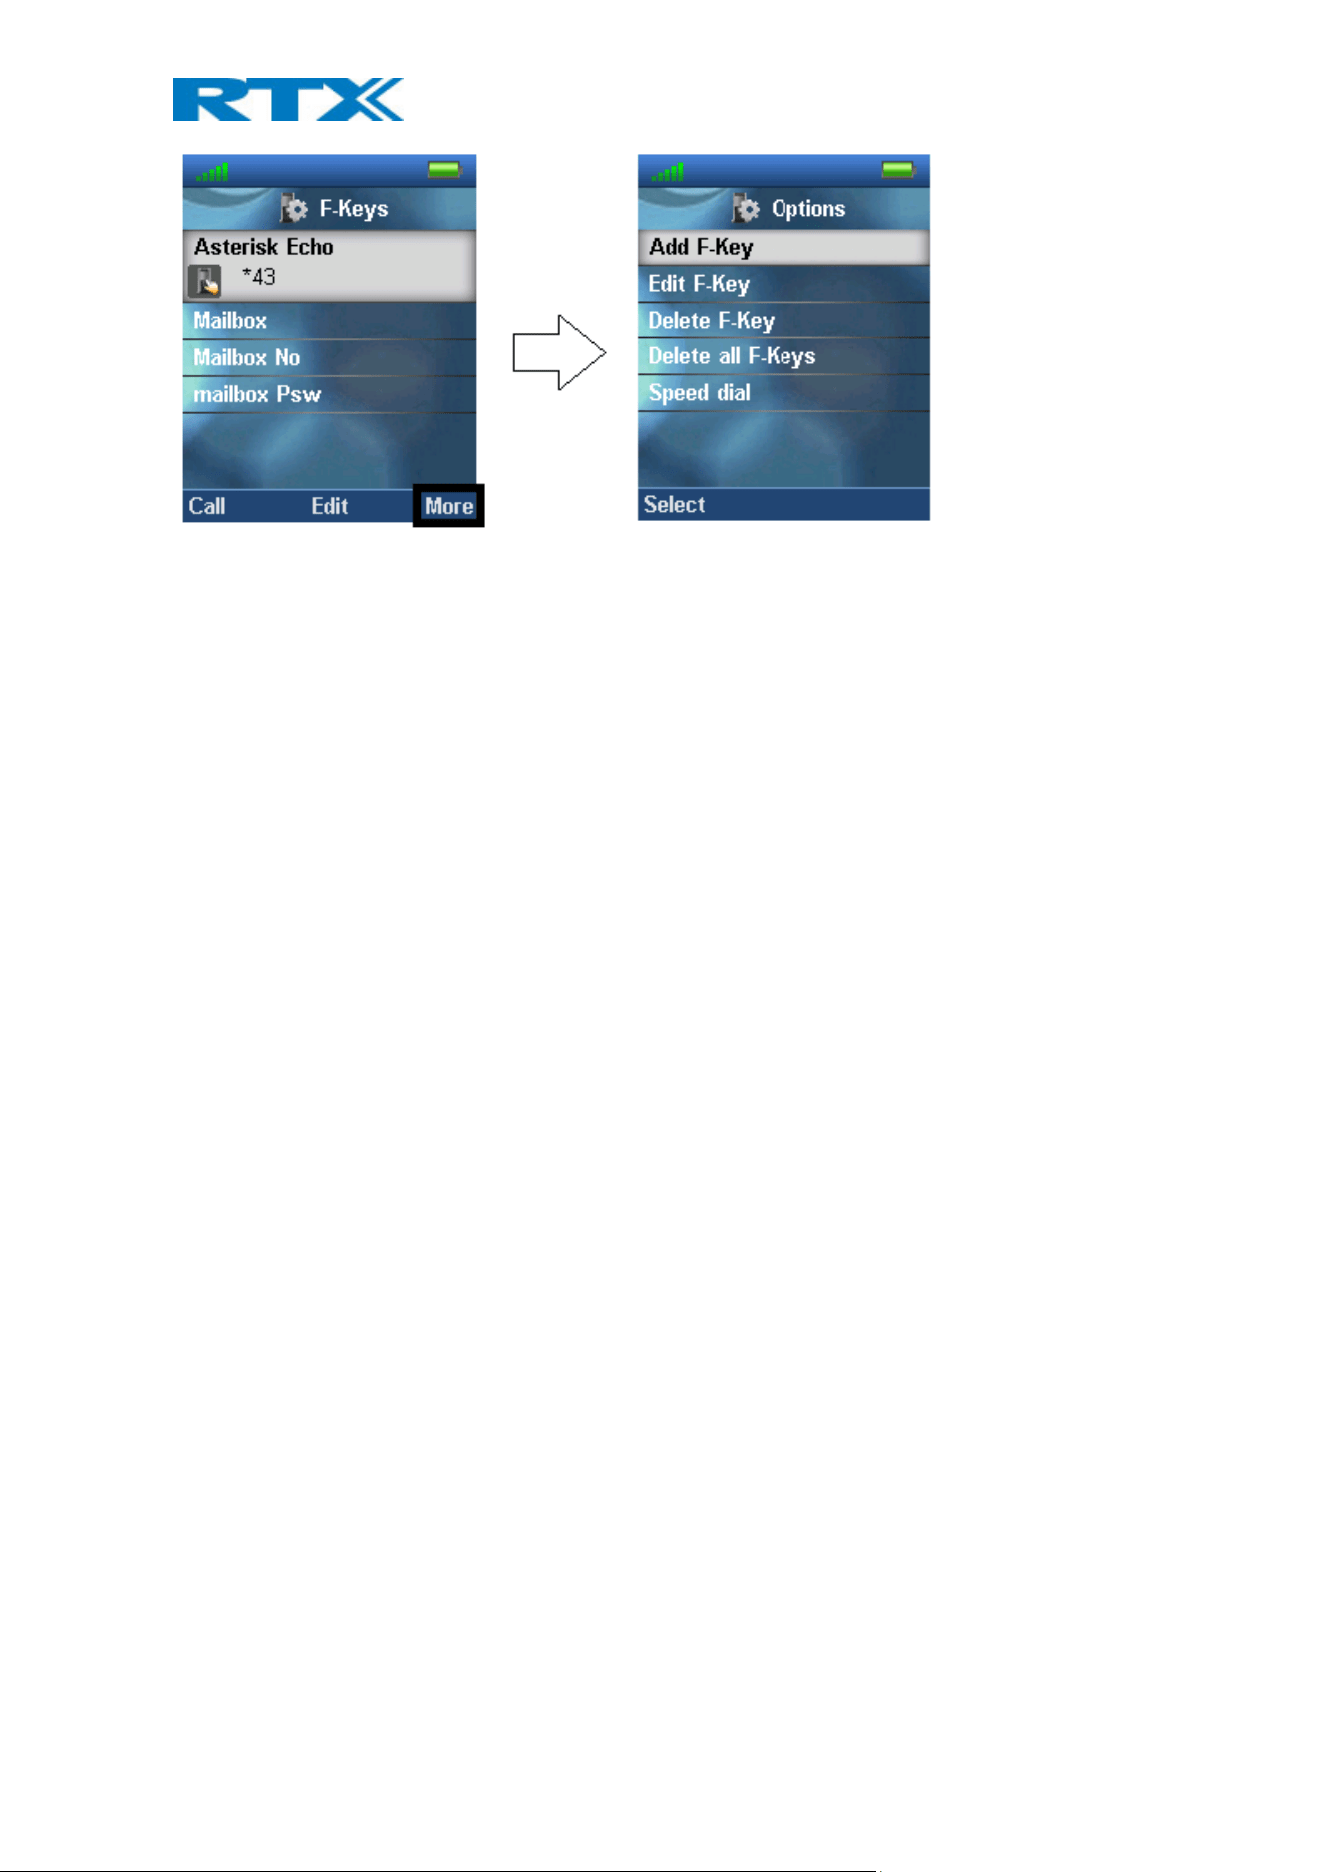
When there are F-Keys saved in the list, it is possible to call each F-Key number by pressing the left softkey “Call”.
Additionally, each F-Key contact can be edited directly from the F-Key list by pressing the middle softkey “Edit”.
When pressing the right softkey “More” the following options are possible to select:
H200 Handset Guide DRAFT
Proprietary and Confidential
Page | 58
Add F-Key
To add a new F-key, press the right softkey “More” and then select “Add F-Key”. A menu with two settings will
pop-up, allowing the user to set a name and a phone number. Press “Edit” in order to type the needed
information. For the new F-key to be saved, press the left softkey “Save”, and this F-key will be added to F-keys.
Edit F-Key
This feature enables an existing F-key to be edited, if the name or number needs changes.
Delete F-Key
By selecting “Delete F-Key” the message “Delete current contact from F-Key list?” appears on the screen, and it is
possible to press the left softkey “Yes”, to delete the currently highlighted F-Key, or to press the right softkey
“No”, to cancel and go back to the F-Keys menu.
Delete all F-Keys
With this function it is possible to delete all the saved F-Keys on the handset. When selecting “Delete all F-Keys”
the message “Delete entire F-Key list?” appears, and by pressing left softkey “Yes”, this action is performed,
whereas pressing the right softkey “No”, cancels the action and returns to the F-Keys menu.
Speed dial
When selecting “Speed dial”, the list with speed dial numbers appears. Those are the numbers that are assigned
to keys 2-9.
From this menu it is possible to add the chosen F-Key to a speed dial number with the left softkey “Add”. If an
already existing speed dial entry is highlighted the left softkey gives the opportunity to “Replace” the current
speed dial entry with this one.
To delete a speed dial entry, press the right softkey “Delete” and the entry is deleted straightaway.
NOTE: This speed dial list uses both contacts from the contact list, and from the F-Keys list. For additional
information on this feature see the section 6.1.4 Speed Dial/On Touch Dial.
H200 Handset Guide DRAFT
Proprietary and Confidential
Page | 59
6.9 Alarm List
The handset can receive and send emergency alarms.
These different emergency settings are defined and controlled from the web interface of the base station. But
triggering an emergency alarm is done from the handset. For further explanation about the emergency settings
see the base station manual via reference [3].
6.9.1 How to Trigger Alarms on the Handset
Five different alarm types can be triggered on the handset which is described in more detail in the following.
Alarm Button
This alarm is triggered by long-pressing (3 seconds) the red button on top of the handset.
Pull Cord Alarm
The Pull Cord alarm can be triggered by pulling a cord containing a magnet from the pull cord hole on the right
side of the handset.
Running Alarm
To trigger the Running Alarm the handset needs to be shaken up and down for a couple of seconds. Hereby the
running alarm is triggered by running if the user has the handset in the hand or in a pocket or similar during
running.
Man Down Alarm
The Man Down alarm is triggered if the handset is lying down in an angle from 60degrees. The time for the
handset to be still before the alarm is triggered can be set on base station web interface (in reference to next
chapter 6.9.2)
No Movement Alarm
To trigger the No Movement alarm the handset needs to be in no movement. As with the man down alarm the
time for this before the no movement alarm is triggered is set on the base station web interface emergency
settings.
H200 Handset Guide DRAFT
Proprietary and Confidential
Page | 60
6.9.2 How to Control the Emergency Settings on the Base Station Web
Interface
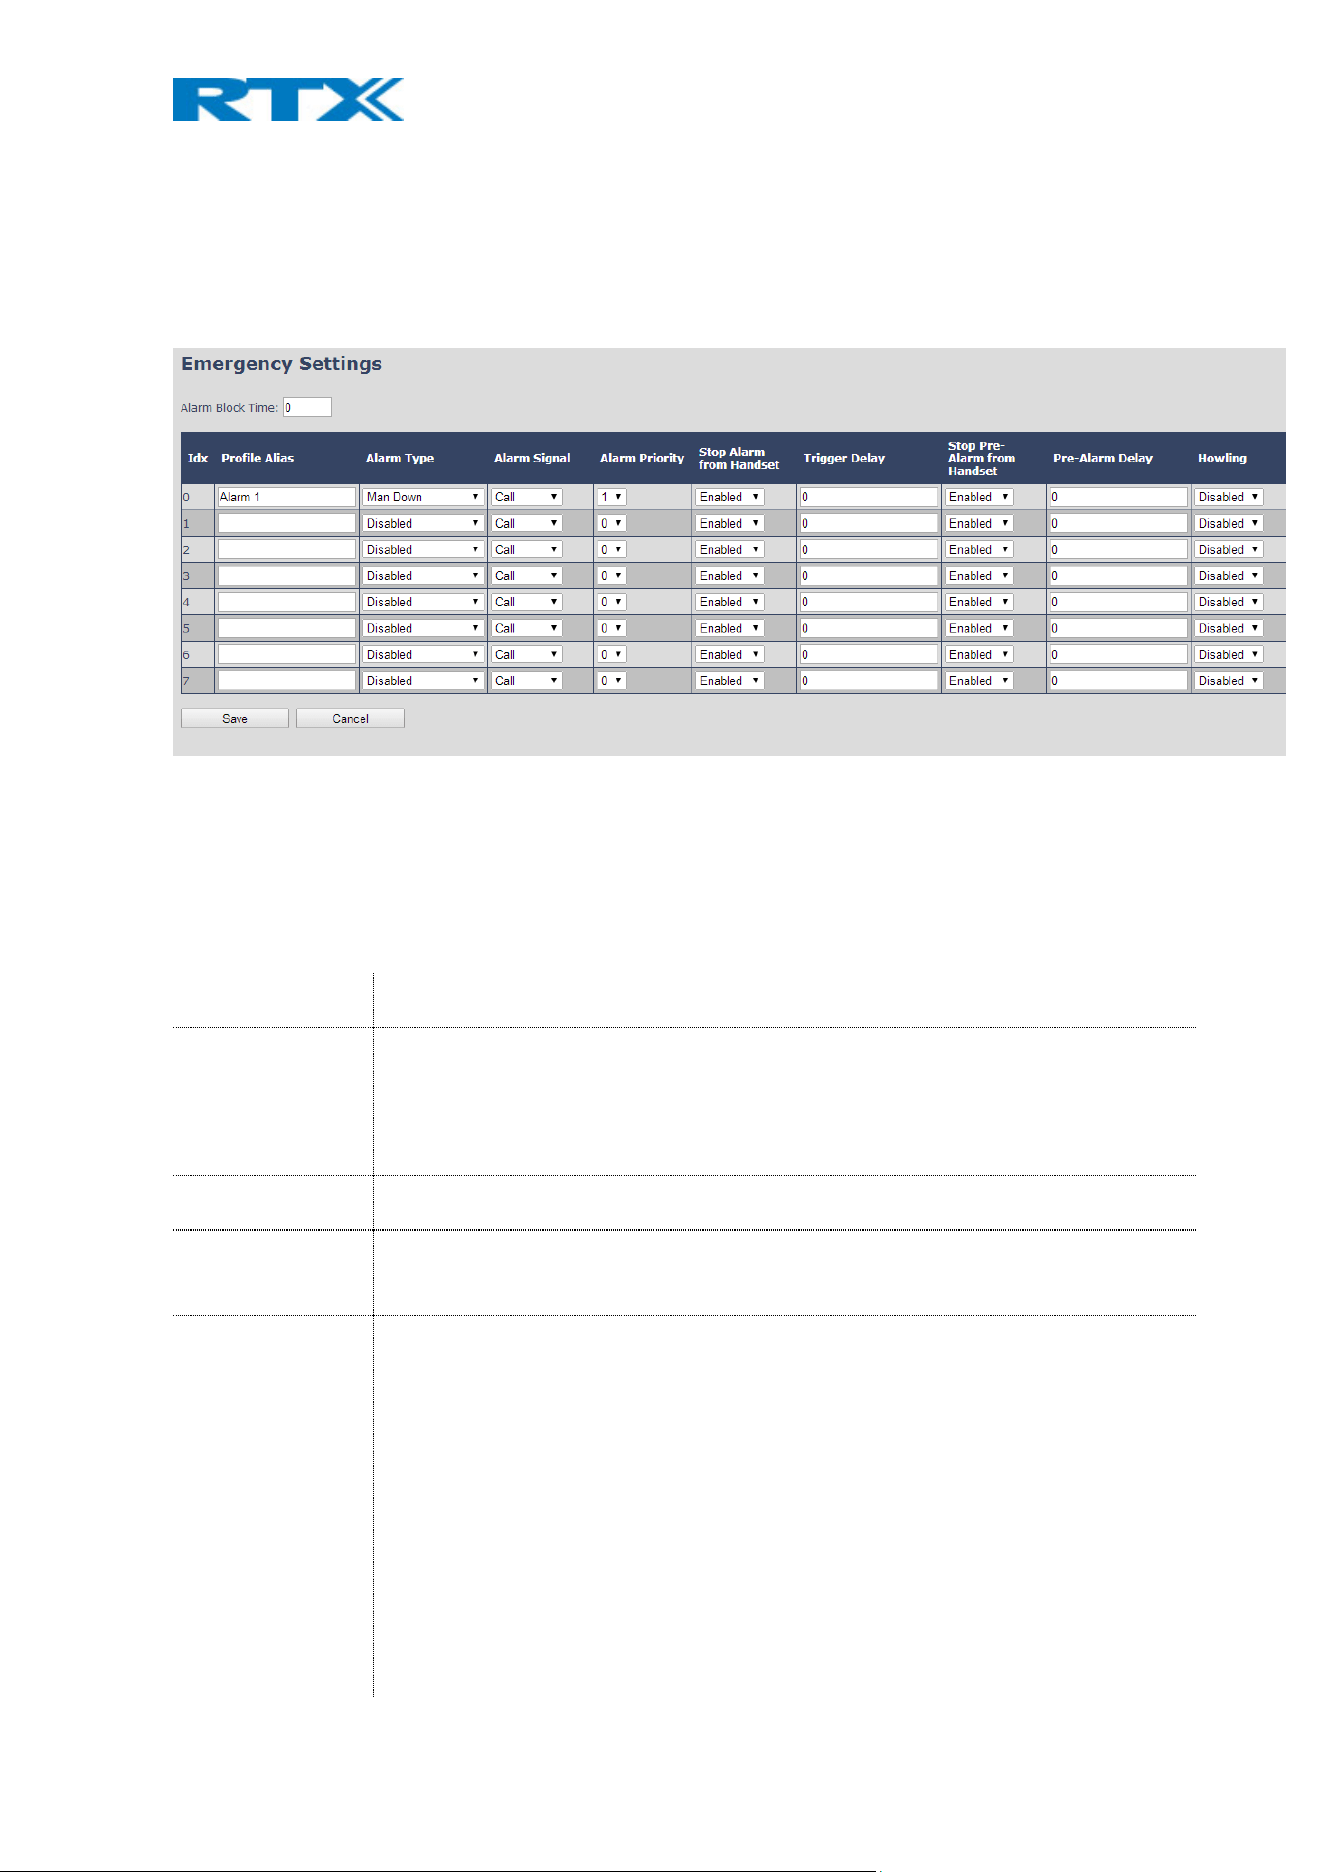
In the Emergency Settings menu on the web interface of the system base station it is controlled how an alarm
appears on the handset. As for example if the handset detects “Man Down”, it is defined in this menu what
alarm signal this type of alarm will send out and which priority the alarm has etc.
All configuration of the handset Emergency Settings is done from the base station. The concept is that on the
“Emergency Settings” page on the web server, eight different alarm profiles can be configured.
The parameters that can be configured are:
PARAMETERS DESCRIPTION
ALARM BLOCK
TIME
This is the period from one alarm has fired until a new alarm is allowed. That is, if a new
alarm fires before the Alarm Block Time has expired, the alarm will be ignored by the
handset. The Alarm Block Time parameter is the same for all alarms, and hence it is not
part of the profiles that can be configured.
IDX Indicates the index number of a specific alarm.
PROFILE ALIAS
An alias or user-friendly name to help identify the different profiles when selecting
which profiles to enable for the individual handsets.
ALARM TYPE
The type of alarm is dependent of what kind of event that has triggered the alarm on
the handset. The handset supports either of the following categories:
Man Down
No Movement
Running
Pull Cord
Alarm Button
Disabled
H200 Handset Guide DRAFT
Proprietary and Confidential
Page | 61
ALARM SIGNAL The way the alarm is signaled as it is received on the handset.
Message: The alarm is sent as a text message to an alarm server, and is accordingly
received as an alarm message on the handset(s) receiving the alarm.
Call: The alarm is made as an outgoing call to the specified emergency number for the
extension.
ALARM PRIORITY
The priority of the alarm. A higher priority alarm can interrupt a lower priority alarm
(higher number = higher priority).
0-7: The Alarm Priority can be set from 0-7.
STOP ALARM
FROM HANDSET
Enable/disable the possibility to stop/cancel the alarm from the handset.
TRIGGER DELAY
The period from when the alarm has fired until the handset shows a pre-alarm warning.
If set to 0, there will be no pre-alarm warning, and the alarm will be signaled
immediately.
STOP PRE-ALARM
FROM HANDSET
Enable/disable the possibility to stop/cancel the pre-alarm from the handset.
PRE-ALARM DELAY The period from the pre-alarm warning is shown until the actual alarm is signaled.
HOWLING
Enable/disable if howling shall be started in the handset, when the alarm is signaled. If
disabled, only the configured signal is sent (call or message).
6.9.2.1 Alarms Sent as Messages
When the “Alarm Signal” is set to “Messages”, an alarm messaging server needs to be setup on the base station.
This is done by entering the menu “Management”, enabling “Text Messaging Enabled” and filling out “Text
Messaging Server” and “Text Messaging Port” (see 6.6.1 How To Setup Text Messaging).
6.9.2.2 How to Configure Alarms on the Handset
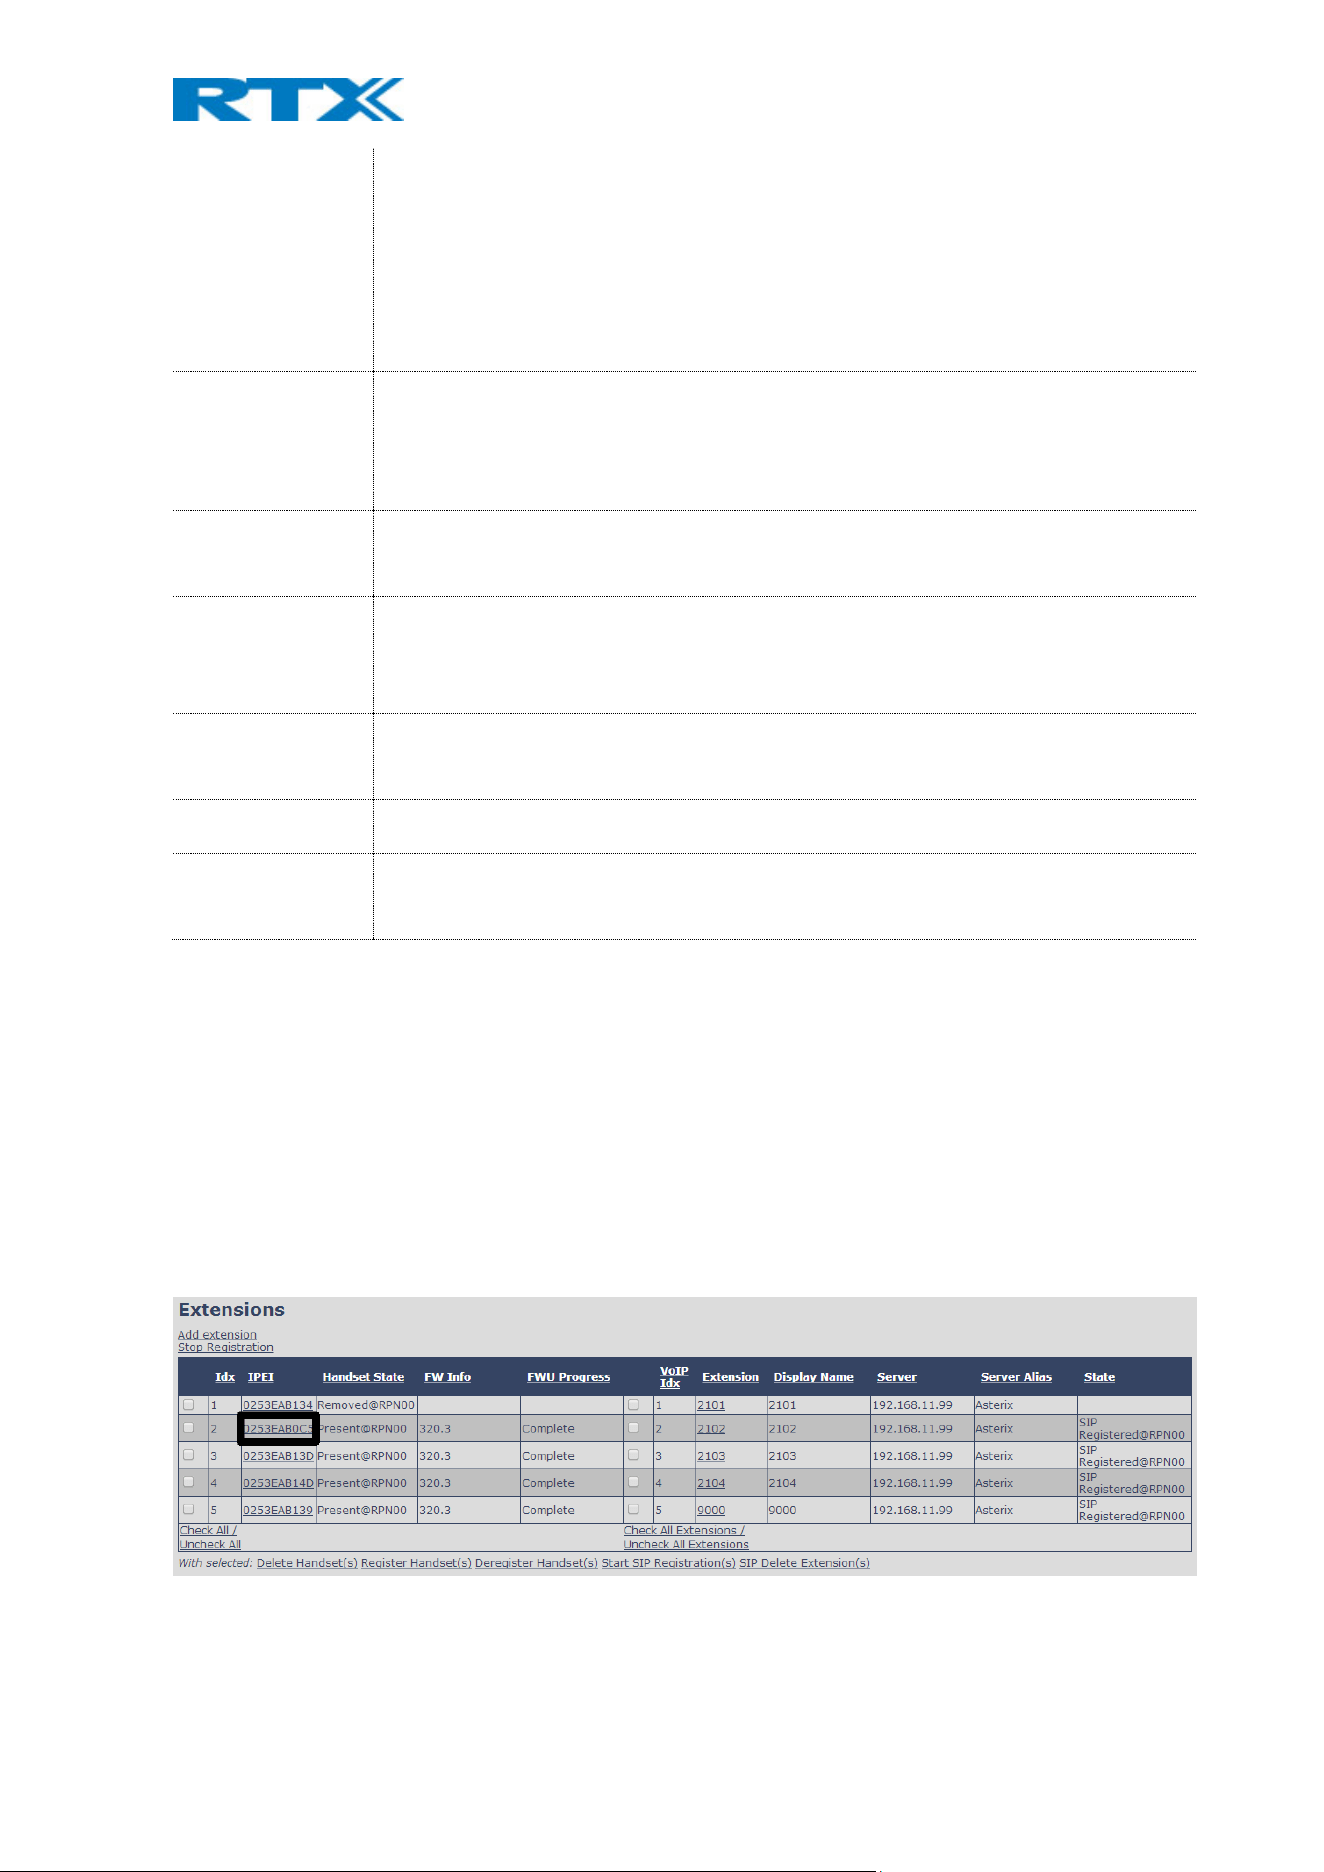
Afterwards for each handset in the extension page, it can be selected which of the configured alarm profiles, the
given handset shall subscribe to.
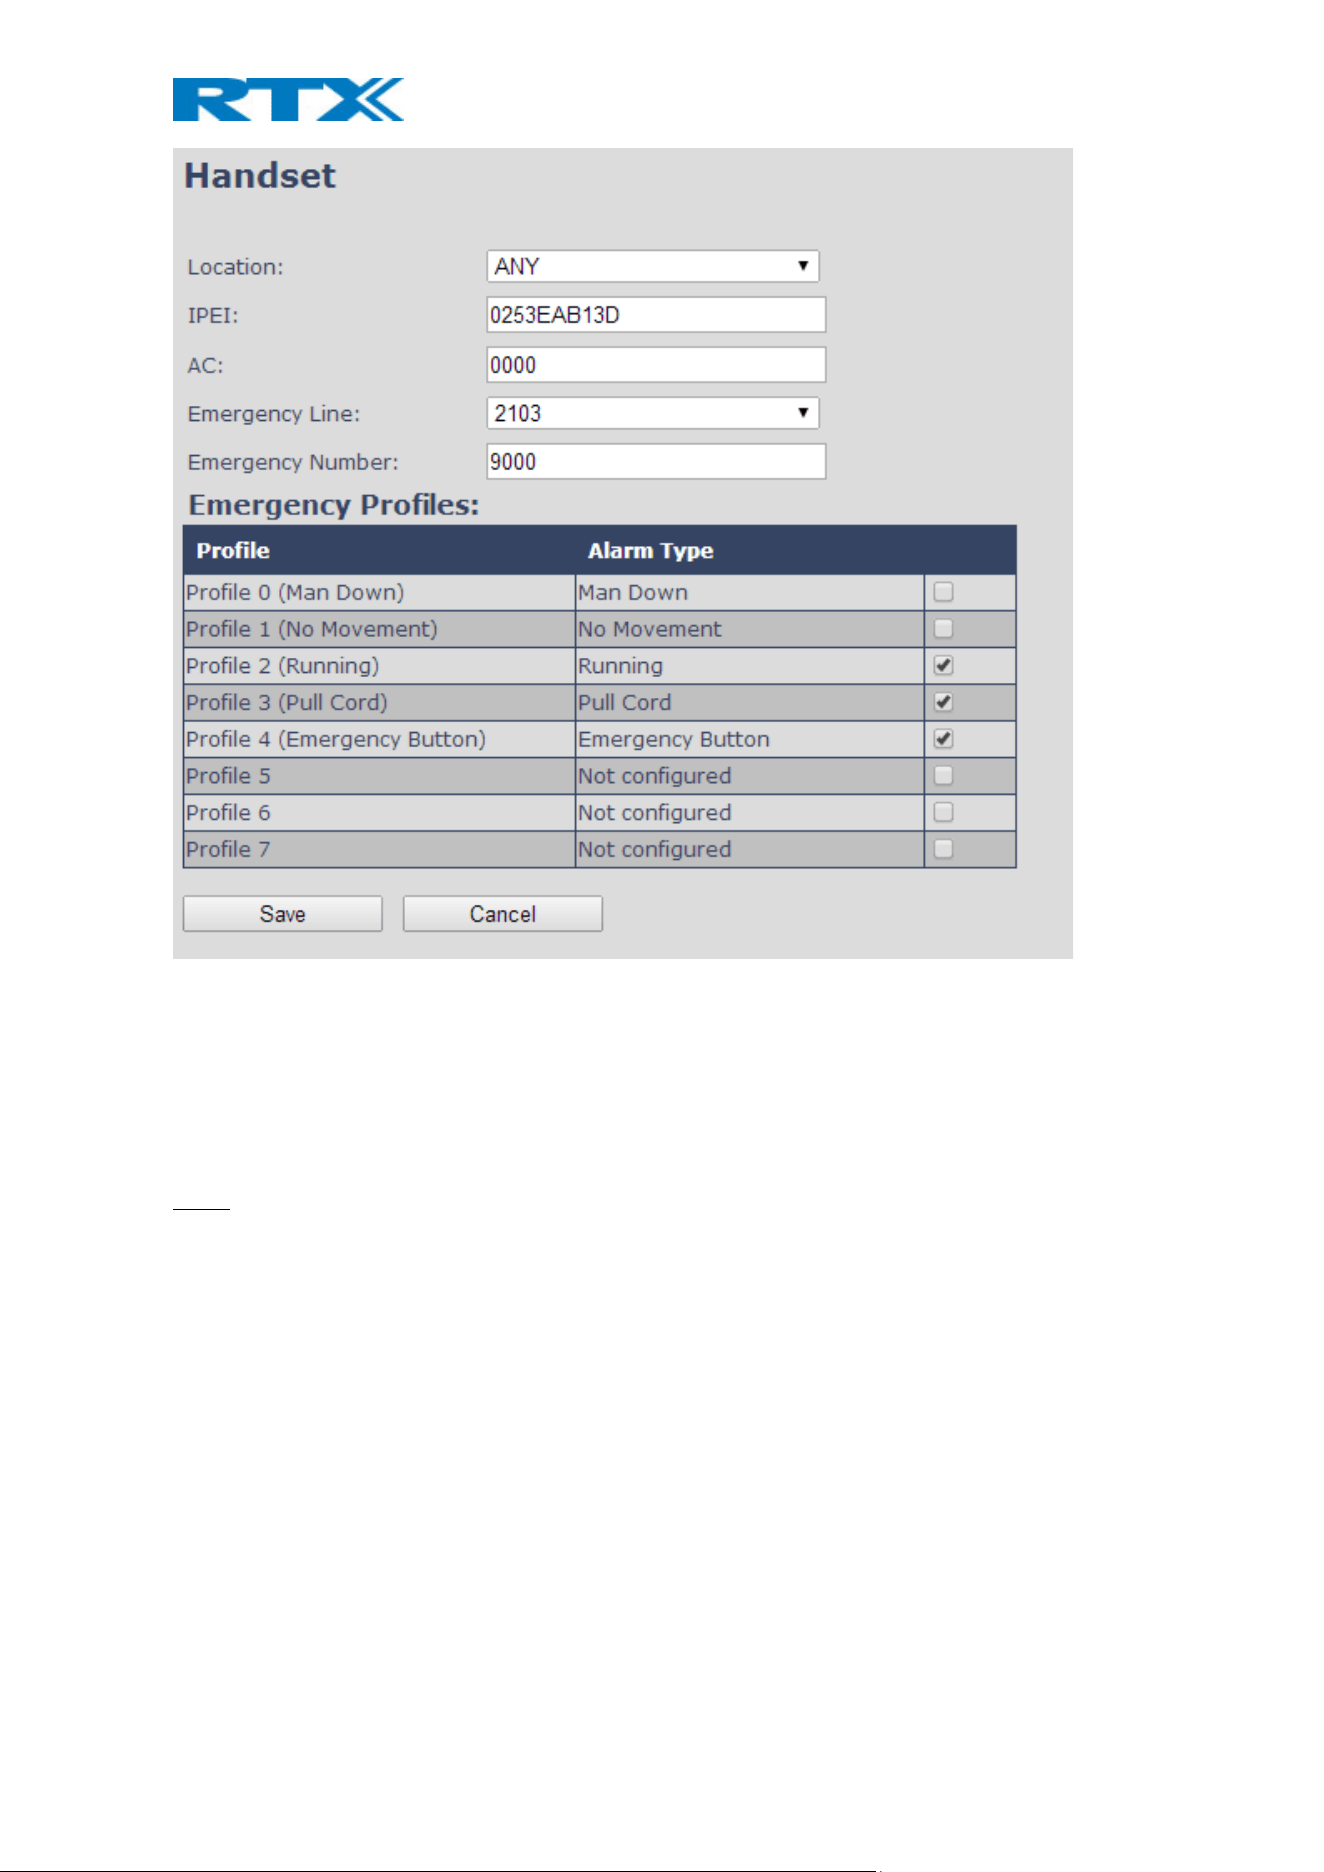
To configure an alarm profile for a certain handset click on the IPEI of that handset, and the following screen will
appear allowing you to setup emergency settings for the handset.
H200 Handset Guide DRAFT
Proprietary and Confidential
Page | 62
Before the emergency settings can be set on the handset an “Emergency Line” must be set, and an according
“Emergency Number” to be called if one of the alarms are triggered.
To activate a certain alarm type on the handset, it must be ticked as seen above. For the handset shown above it
means that Running, Pull Cord, and Alarm Button can be triggered from that handset whereas Man Down and No
Movement are not ticked meaning that these alarms cannot be triggered on that handset.
NOTE: After saving these emergency settings for the extension the handset or the base station must be power
cycled for the changes to take effect. When this is done the selected alarm profiles are sent to the handset.
6.9.3 The Alarm List Menu
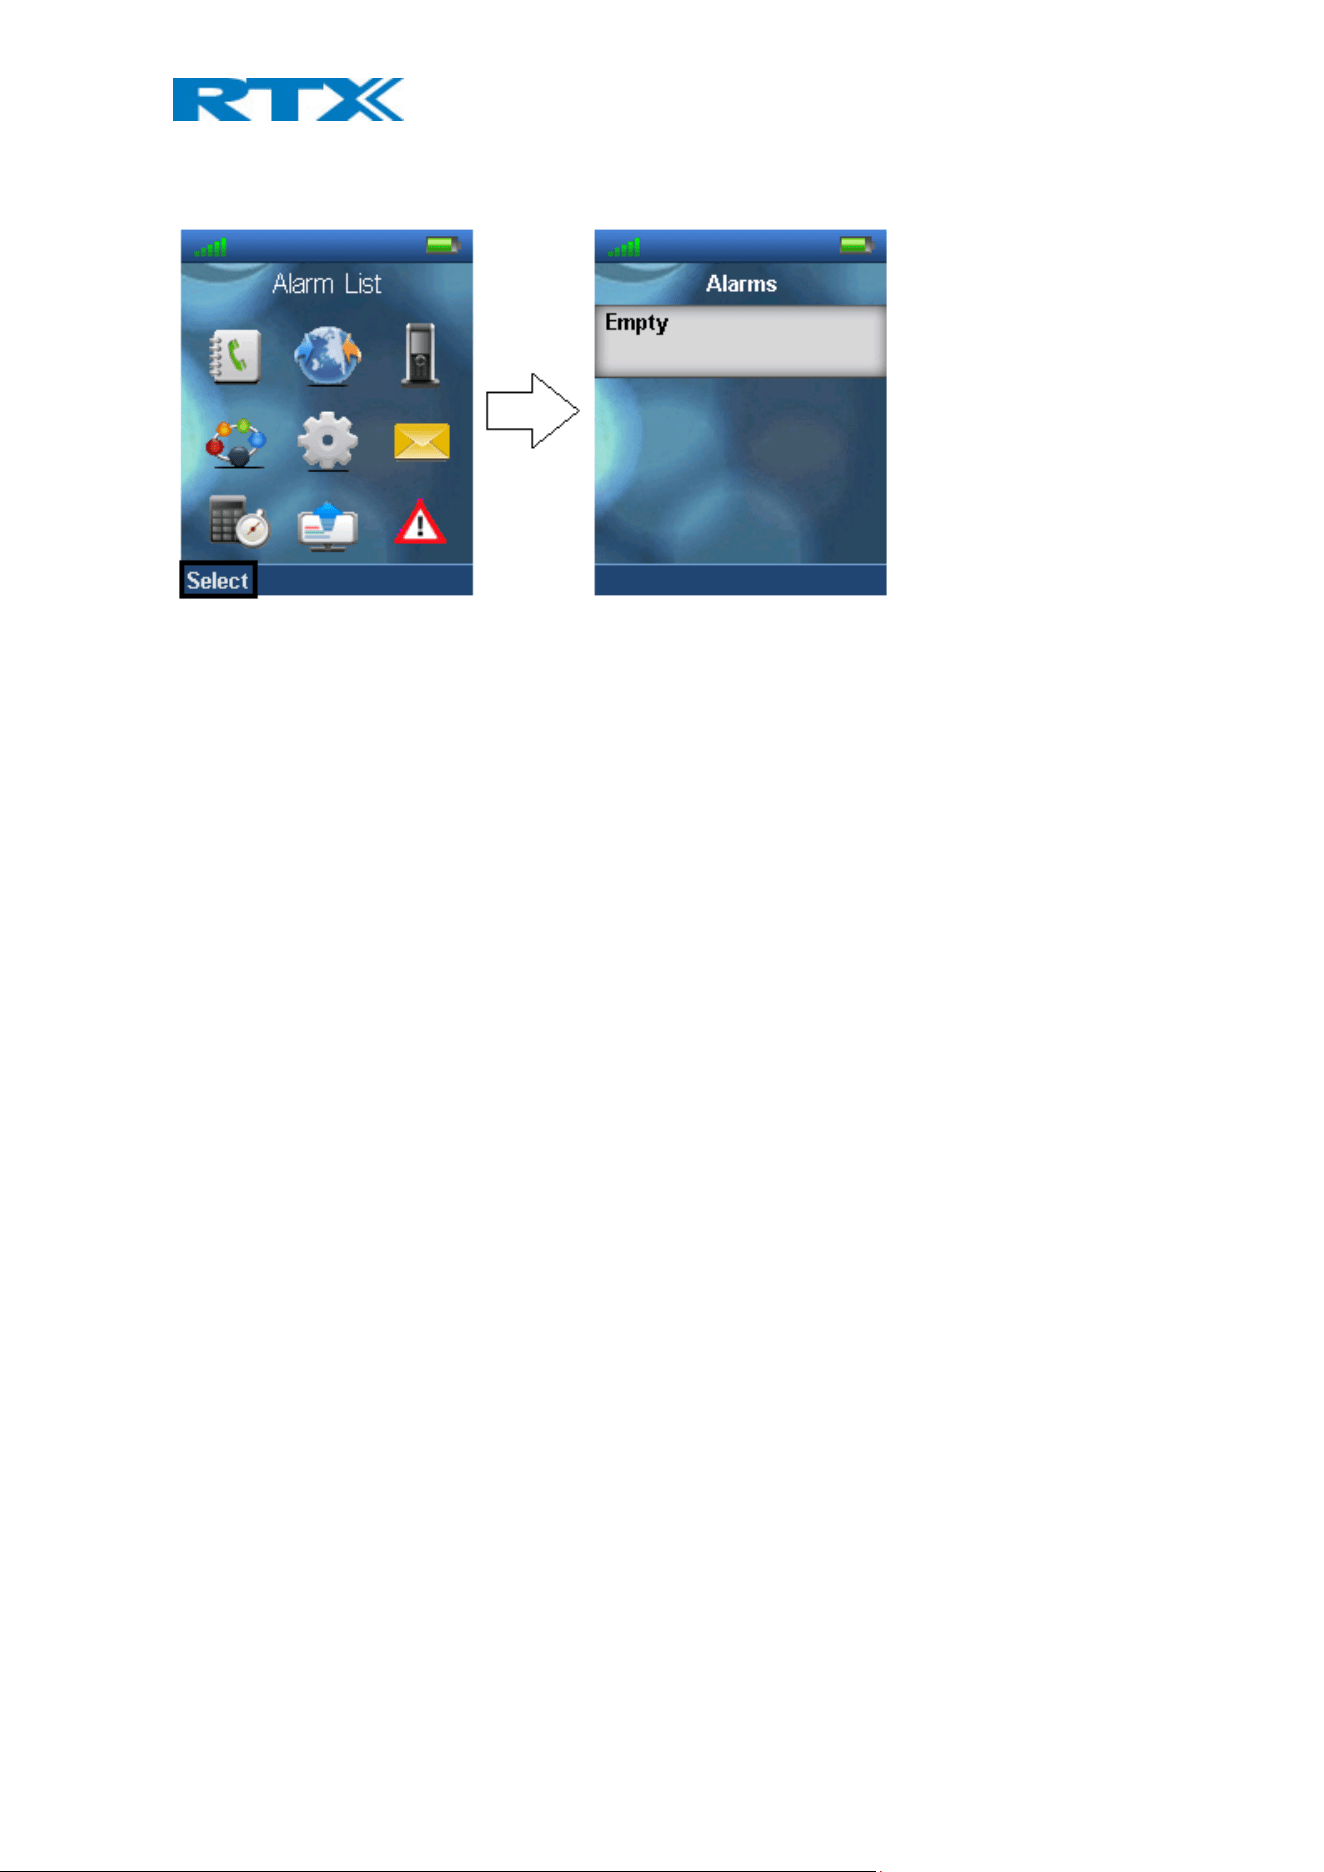
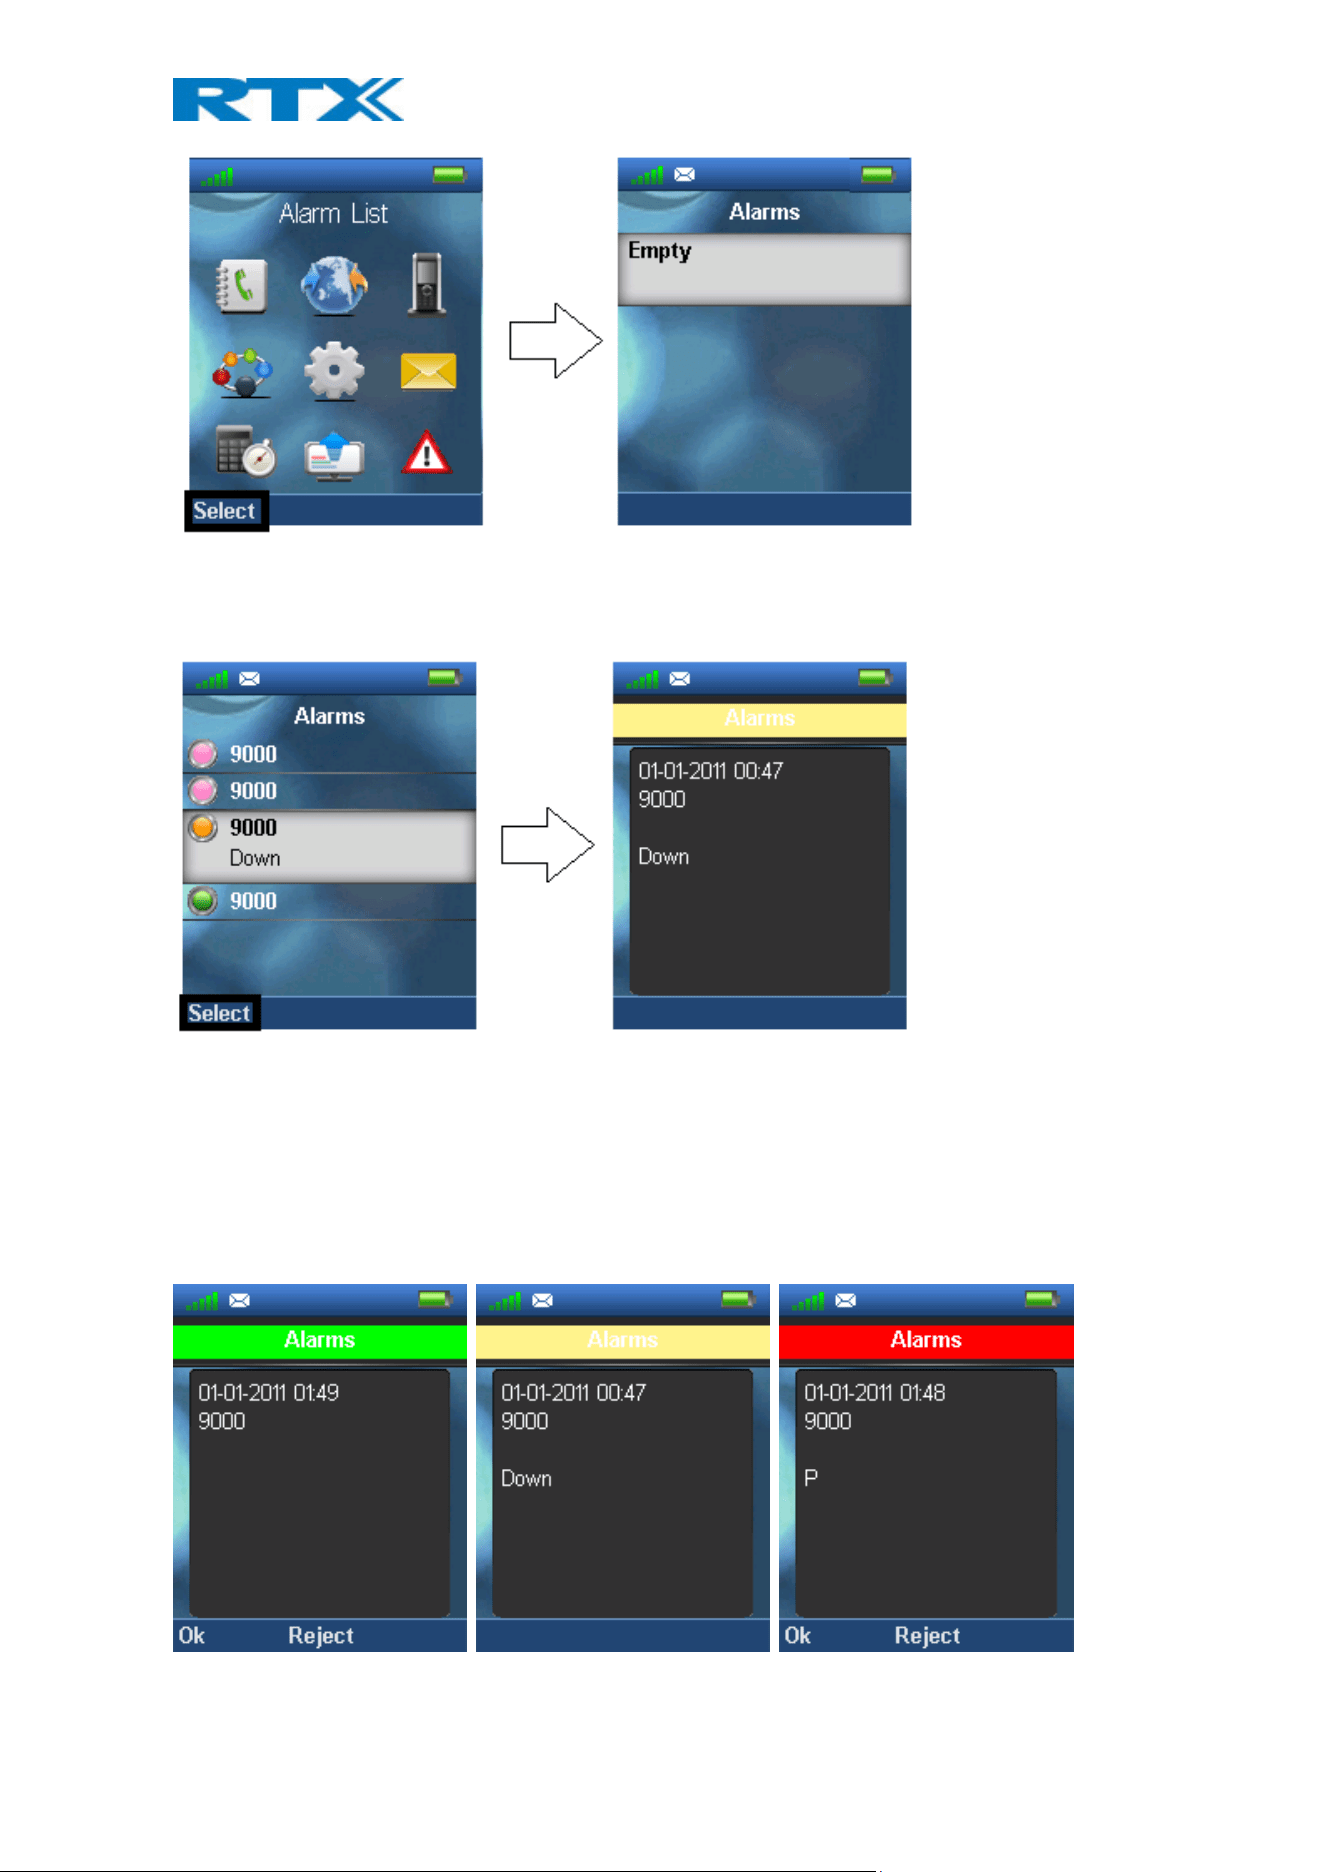
The “Alarm List” menu is reached from the menu, and in this submenu the alarms that the handset has received
are displayed. Below it is displayed if there are no alarms on the handset.
H200 Handset Guide DRAFT
Proprietary and Confidential
Page | 63
If any alarms has been received on the handset these is displayed in the “Alarms” menu. Additionally, each alarm
is indicated with a specific color according to the specific priority of each alarm which is displayed below.
By selecting a specific alarm the details regarding it is displayed as seen above.
6.9.4 An Incoming Alarm
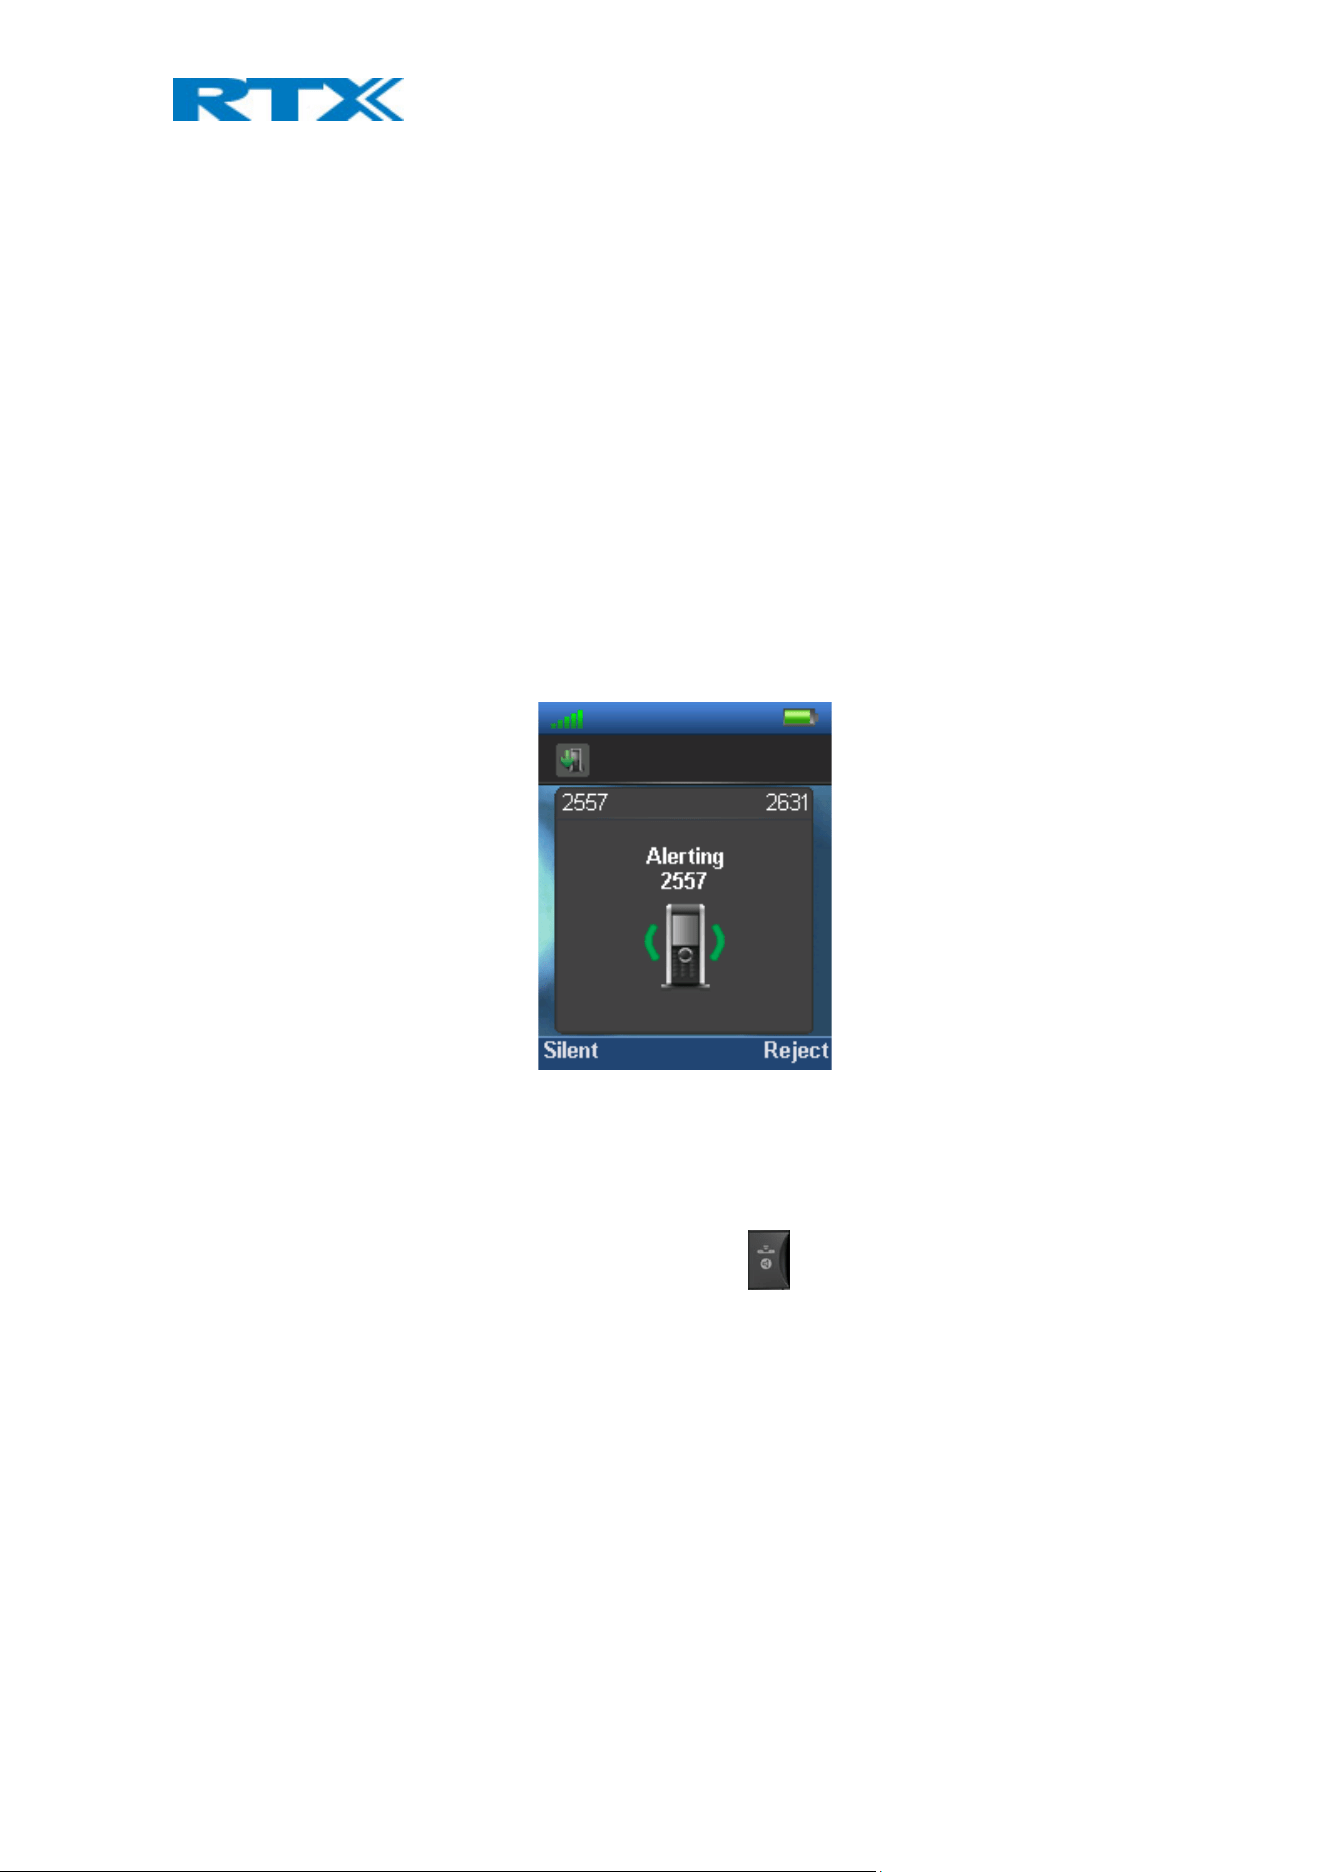
When the handset receives an alarm a specific alarm tone is played, and the alarm can be green, yellow, or red
as displayed below. The alarm can be viewed by pressing the left softkey “Ok”, or it can be rejected by pressing
the middle softkey “Reject” whereas it is not saved in the “Alarms” menu.
H200 Handset Guide DRAFT
Proprietary and Confidential
Page | 64
The color of the alarm represents what priority the alarm has. The priority of different scenarios to start the
alarm is set on the server, and it is defined what should send a green, yellow, or red alarm to the handset.
Additionally, an alarm can be sent out to either one handset, or more handsets which is also defined in the
server settings.
7 Calls Operations
In this section the different types of calls and call handling are described.
7.1 Incoming call
As the handset receives an incoming call an alerting screen will be displayed as displayed below. This will be
accompanied by a ring signal and/or a vibrating handset according to the respective settings on the handset.
The calling party’s handset number will be shown in the display, and an additional name is displayed if the calling
party’s handset number is stored in the local phonebook.
7.1.1 Answering an Incoming Call
To answer an incoming call, press the green “Off-hook” button . Press it once again to access speaker mode.
NOTE: When “Auto answer” is set to “Automatic” an incoming call is answered automatically after one ring
signal. If “Auto answer” is set to “Any key” an incoming call can be answered by pressing any key on the keypad,
and not just the green “Off-hook” button.
7.1.2 Reject an Incoming Call
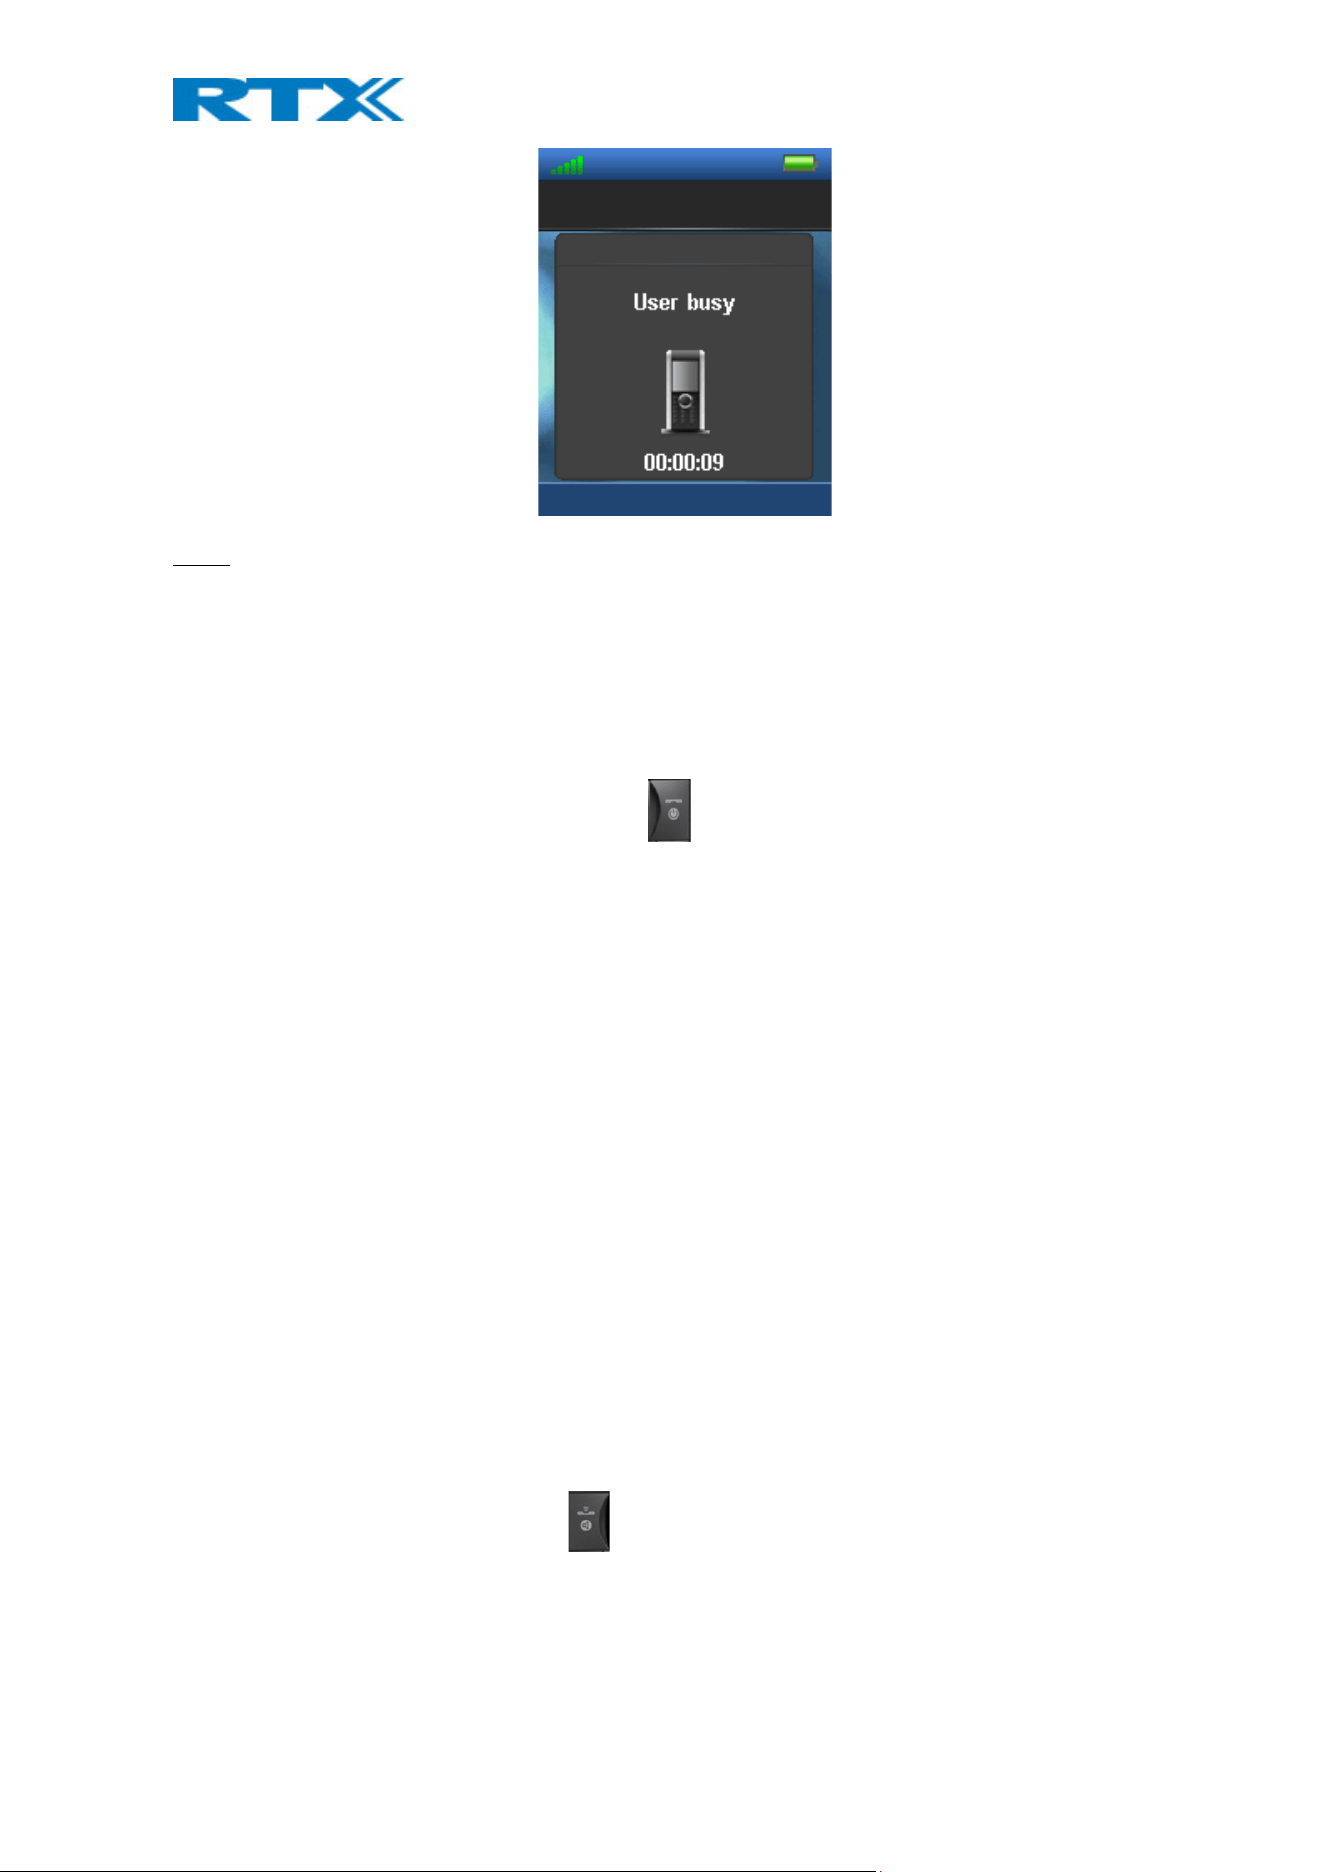
It is possible to reject an incoming call by pressing the right softkey “Reject” when receiving an incoming call. This
way the calling party will receive a busy tone, and “User busy” displayed on the screen as shown in the picture
below.
H200 Handset Guide DRAFT
Proprietary and Confidential
Page | 65
NOTE: An incoming call can also be rejected by pressing the red “On-hook” key.
7.1.3 Silencing an Incoming Call
When the handset is alerting it is possible to press the left softkey “Silent” whereas the handset will continue to
alert, but without any heard ringing.
7.1.4 Ending a Call
To end an ongoing call, press the red “On-hook” key , and the call will be terminated. The duration of the
call is shown in the display. Furthermore, this duration time can also be viewed from the call list where the call is
stored.
NOTE: If one call is active and another call is on hold, then the active call will be terminated when pressing the
red “On-hook” button, and the handset automatically returns to the call on hold; i.e. the call on hold is now
active, and the user must press the red “On-hook” button again to terminate this call.
7.2 Initiating a Call
A call can be initiated from different locations on the handset:
- By entering the number directly from idle
- From the “Contacts” menu
- From the “Calls” menu
- From the “Central Directory”
How to initiate a call from these different directories is explained in the following sub sections.
7.2.1 Initiating a Call from Idle
When initiating a call, it must be done according to the following:
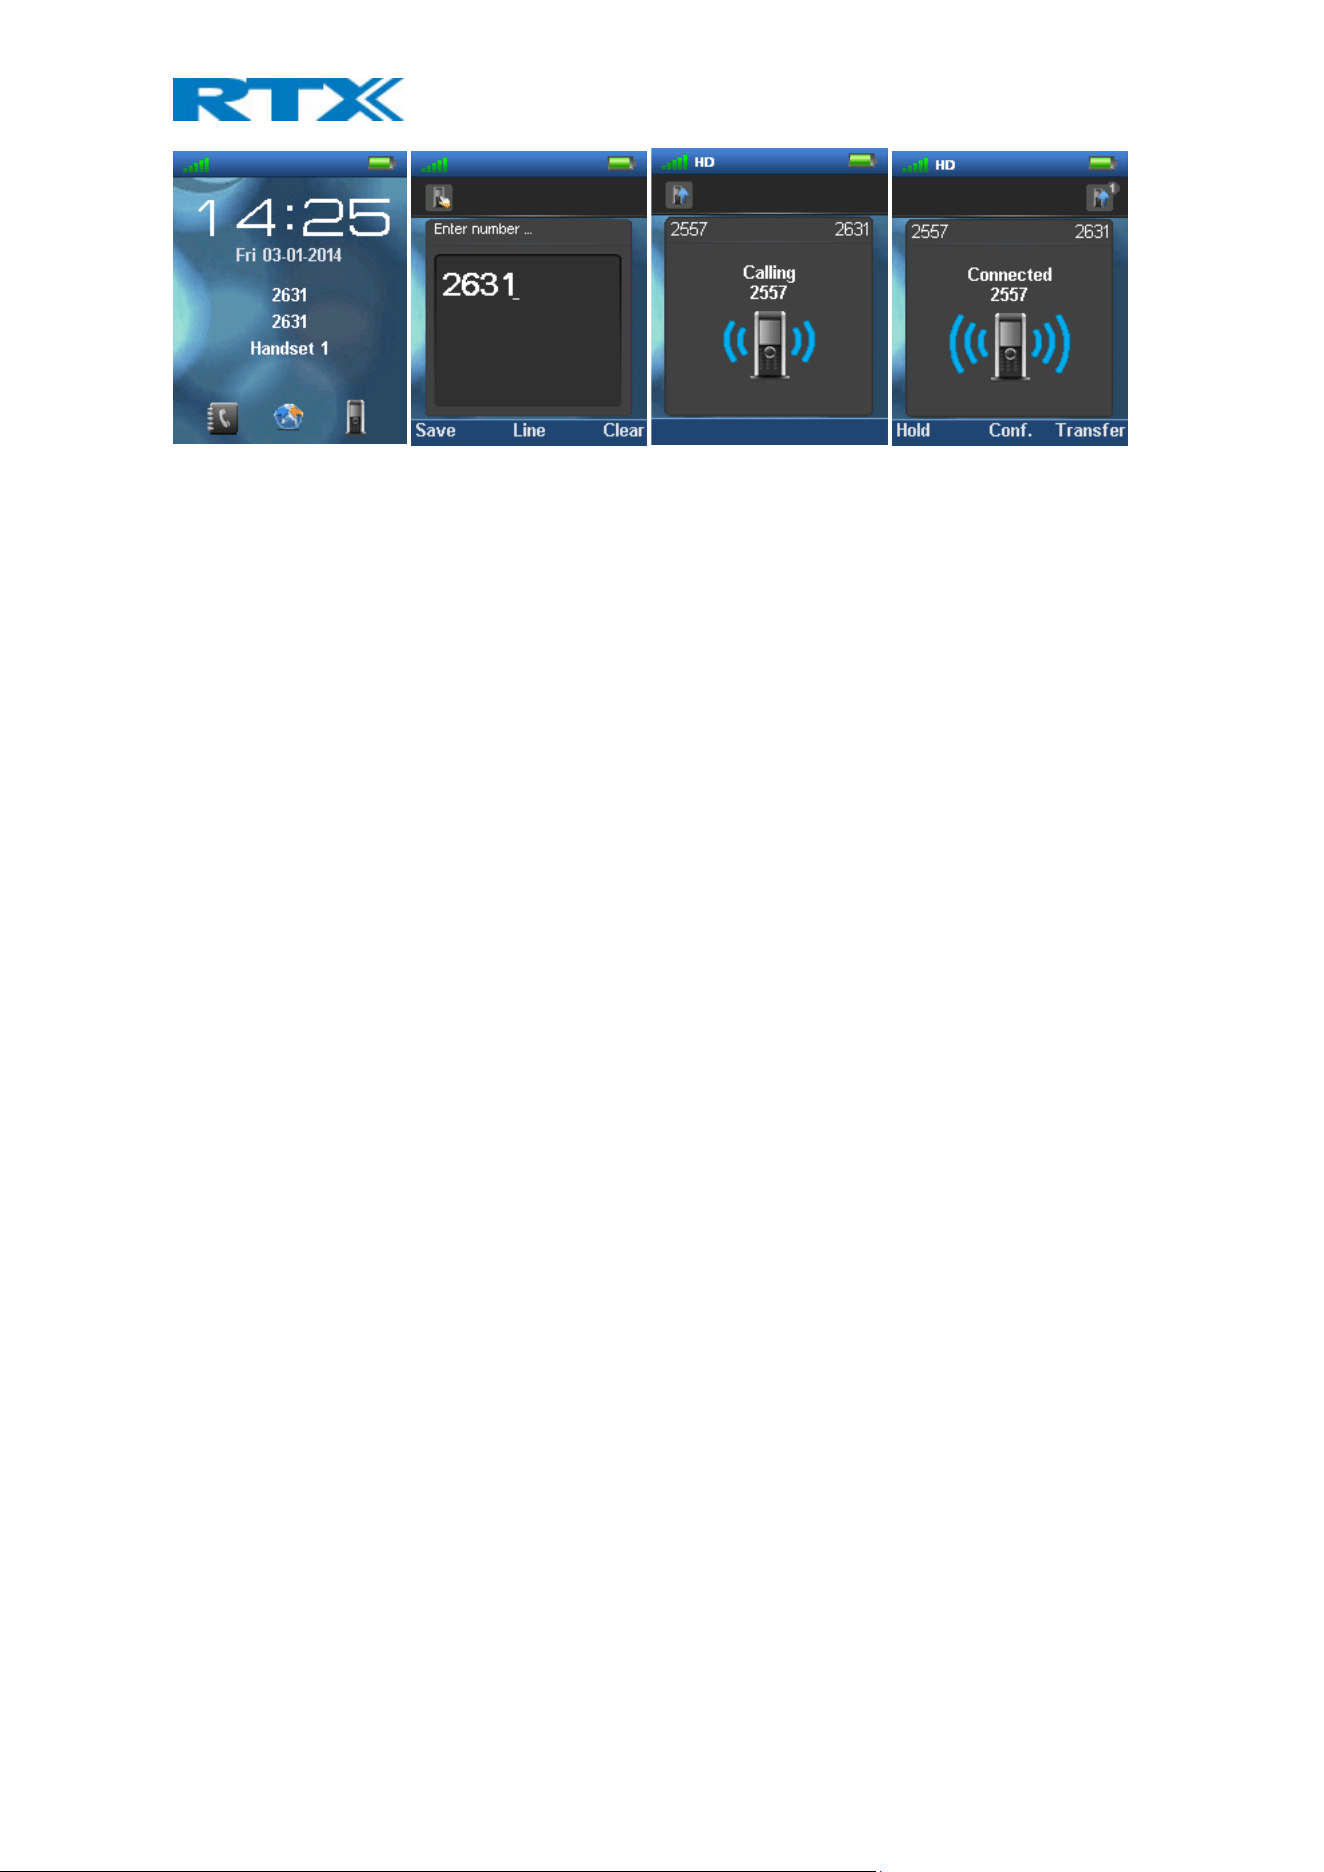
1. Enter the number of the person you want to call when the handset is in idle.
2. Press the green “Off-hook” button to call the number.
H200 Handset Guide DRAFT
Proprietary and Confidential
Page | 66
1. The handset will show a “Calling” screen as seen above.
2. When the counterpart answers the call the screen will show “Connected”, and the two parts are now in
call.
7.2.2 Initiating a Call from Contacts
To initiate a call from the contact list, there must be contacts added to the local phonebook. When this
prerequisite is met, a local contact can be called by highlighting the contact in the contact list and then pressing
the left softkey “Call”, or pressing the green “Off-hook” button.
NOTE: The list of local contacts can be reached from the menu “Contacts” or directly from idle by pressing the
left softkey when in idle.
7.2.3 Initiating a Call from Calls
The number of outgoing, incoming, or missed calls can be called directly from the call list by highlighting the
number and pressing the left softkey “Call” or the green “Off-hook” button to call the entry.
NOTE: The “Calls” list can be reached from the menu “Calls” or directly from idle by pressing either the green
“Off-hook” button or the right softkey when in idle.
7.2.4 Initiating a Call from the Central Directory
When opening the “Central directory” a call can be made to a specific contact by searching for this contact and
thereby enter the list from which a contact can be called by pressing the green “Off-hook” key.
If different numbers are assigned to one contact a green arrow is showed to the right of the contact, and the
right/left navigation keys can be used to choose which number that should be called.
NOTE: The “Central Directory” can be reached both from the menu “Central Directory” or directly from the idle
by pressing the middle softkey when in idle.
7.3 Call Holding/Retrieving
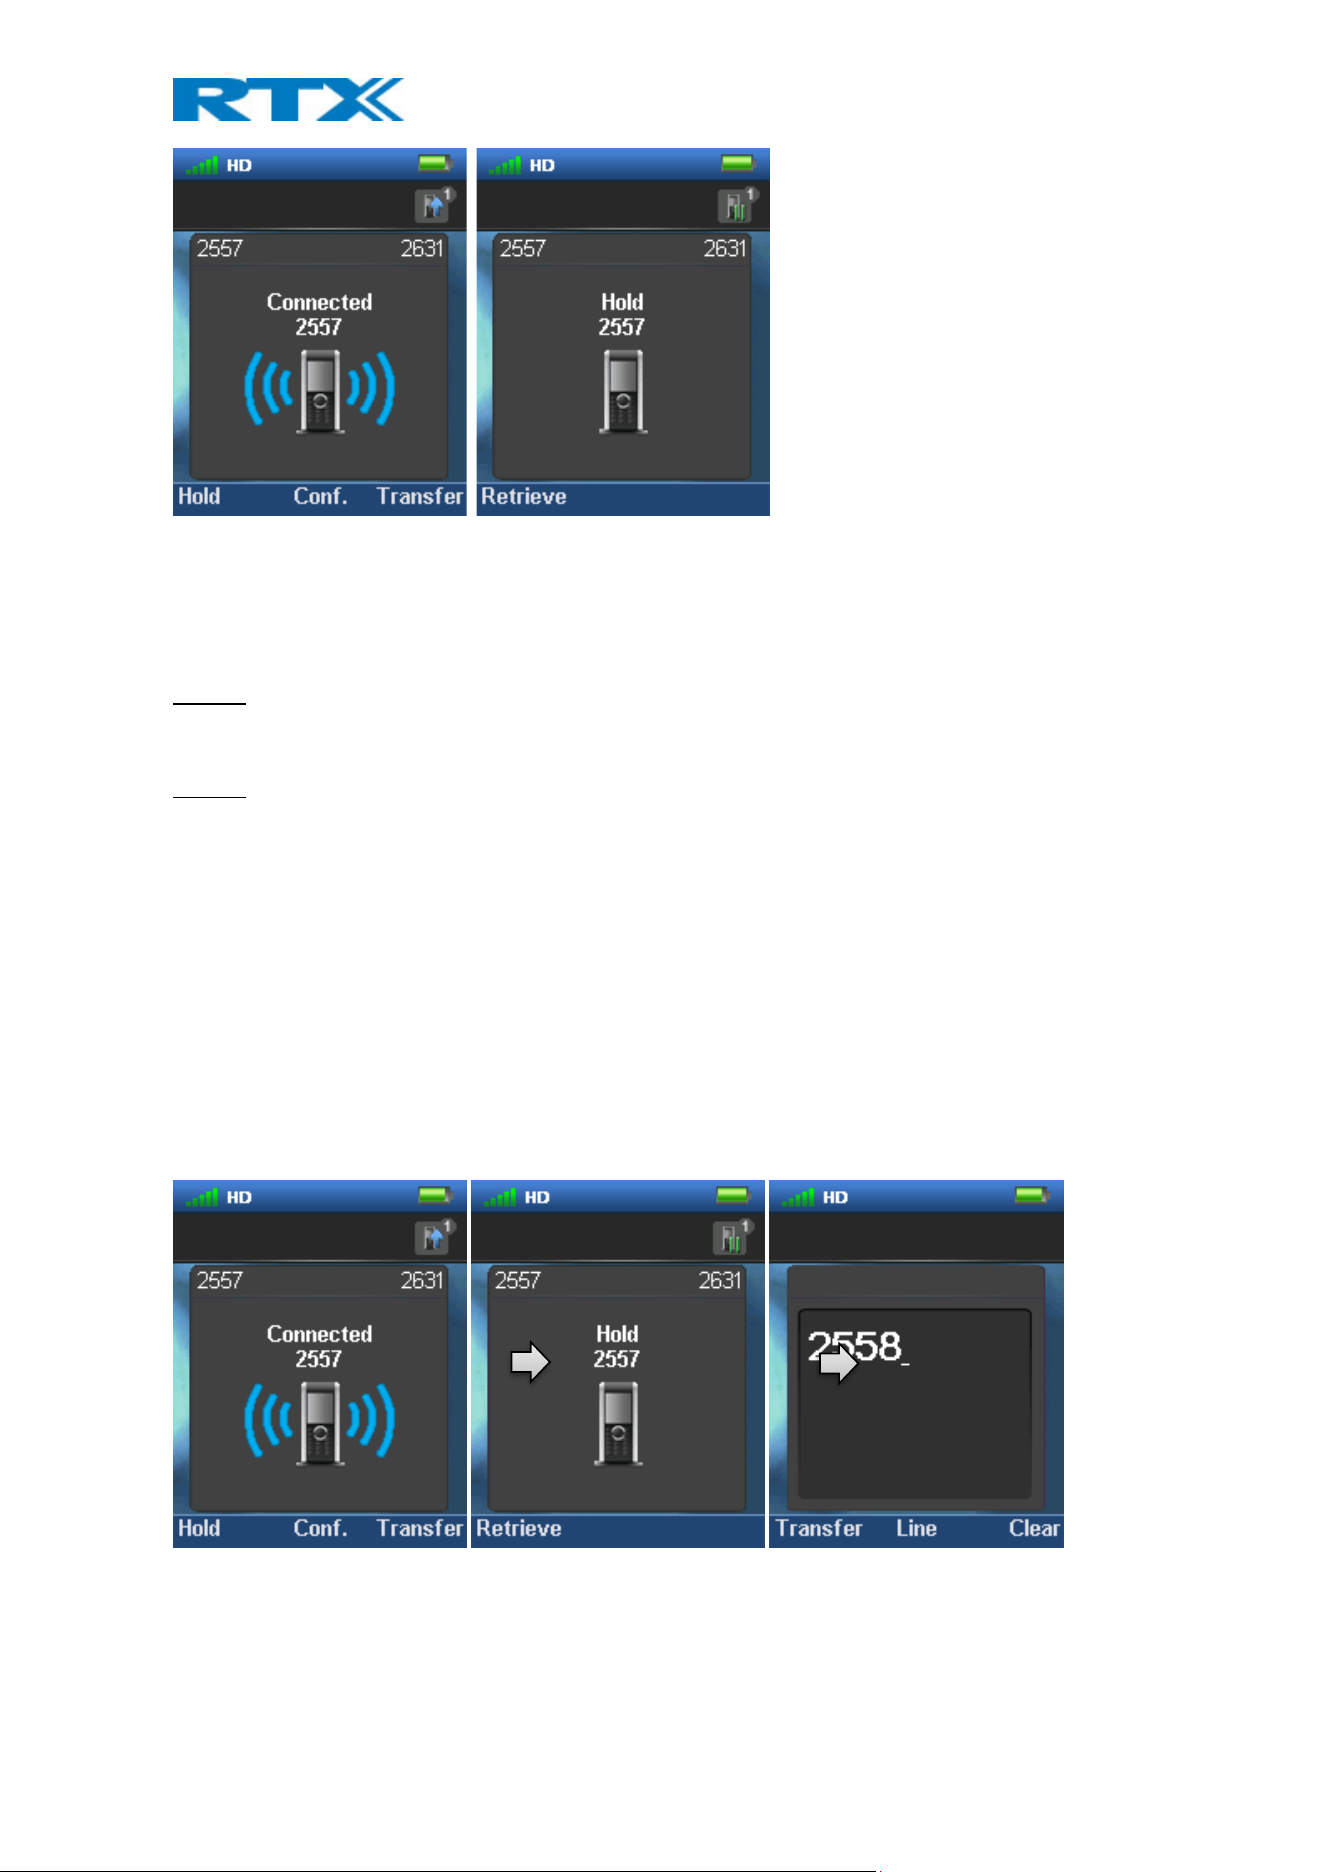
It is possible to hold a call which means that the one party of the call is put on hold and cannot hear the other
party but can only hear a repeated short tone on hold until the call is retrieved.
H200 Handset Guide DRAFT
Proprietary and Confidential
Page | 67
To put the counterpart of the call on hold press the left softkey “Hold”, and this party is put on hold.
To retrieve the call, and thereby continue the conversation, press left softkey “Retrieve” which is only showed on
the screen when the other party of the call is put on hold.
NOTE 1: If one call is active and another call is on hold, then the active call will be terminated when pressing the
red “On-hook” button, and the handsets automatically returns to the call on hold, i.e. the call on hold is now
active, and the user has to press the red “On-hook” button again to terminate this call.
NOTE 2: When the counterpart is put on hold it is also possible establish a second call and make a conference,
swap or transfer which will be explained in the following sections.
7.4 Attended and Unattended Transfer of a Call
When in an ongoing call, it is possible for either party to transfer the call, either attended or unattended, to
another handset.
7.4.1 Attended Transfer
In an attended transfer the party that call is transferred to, is called before the transfer is made. The procedure
to do this is as follows.
1. Initiate a call with a counterpart, so that the handset displays “Connected” as shown below.
Press the right softkey “Transfer” on either of the handsets in call, and the counterpart of the call is put on hold.
2. Press the right softkey “Transfer” on either of the handsets in call, and the counterpart of the call is put
on hold.
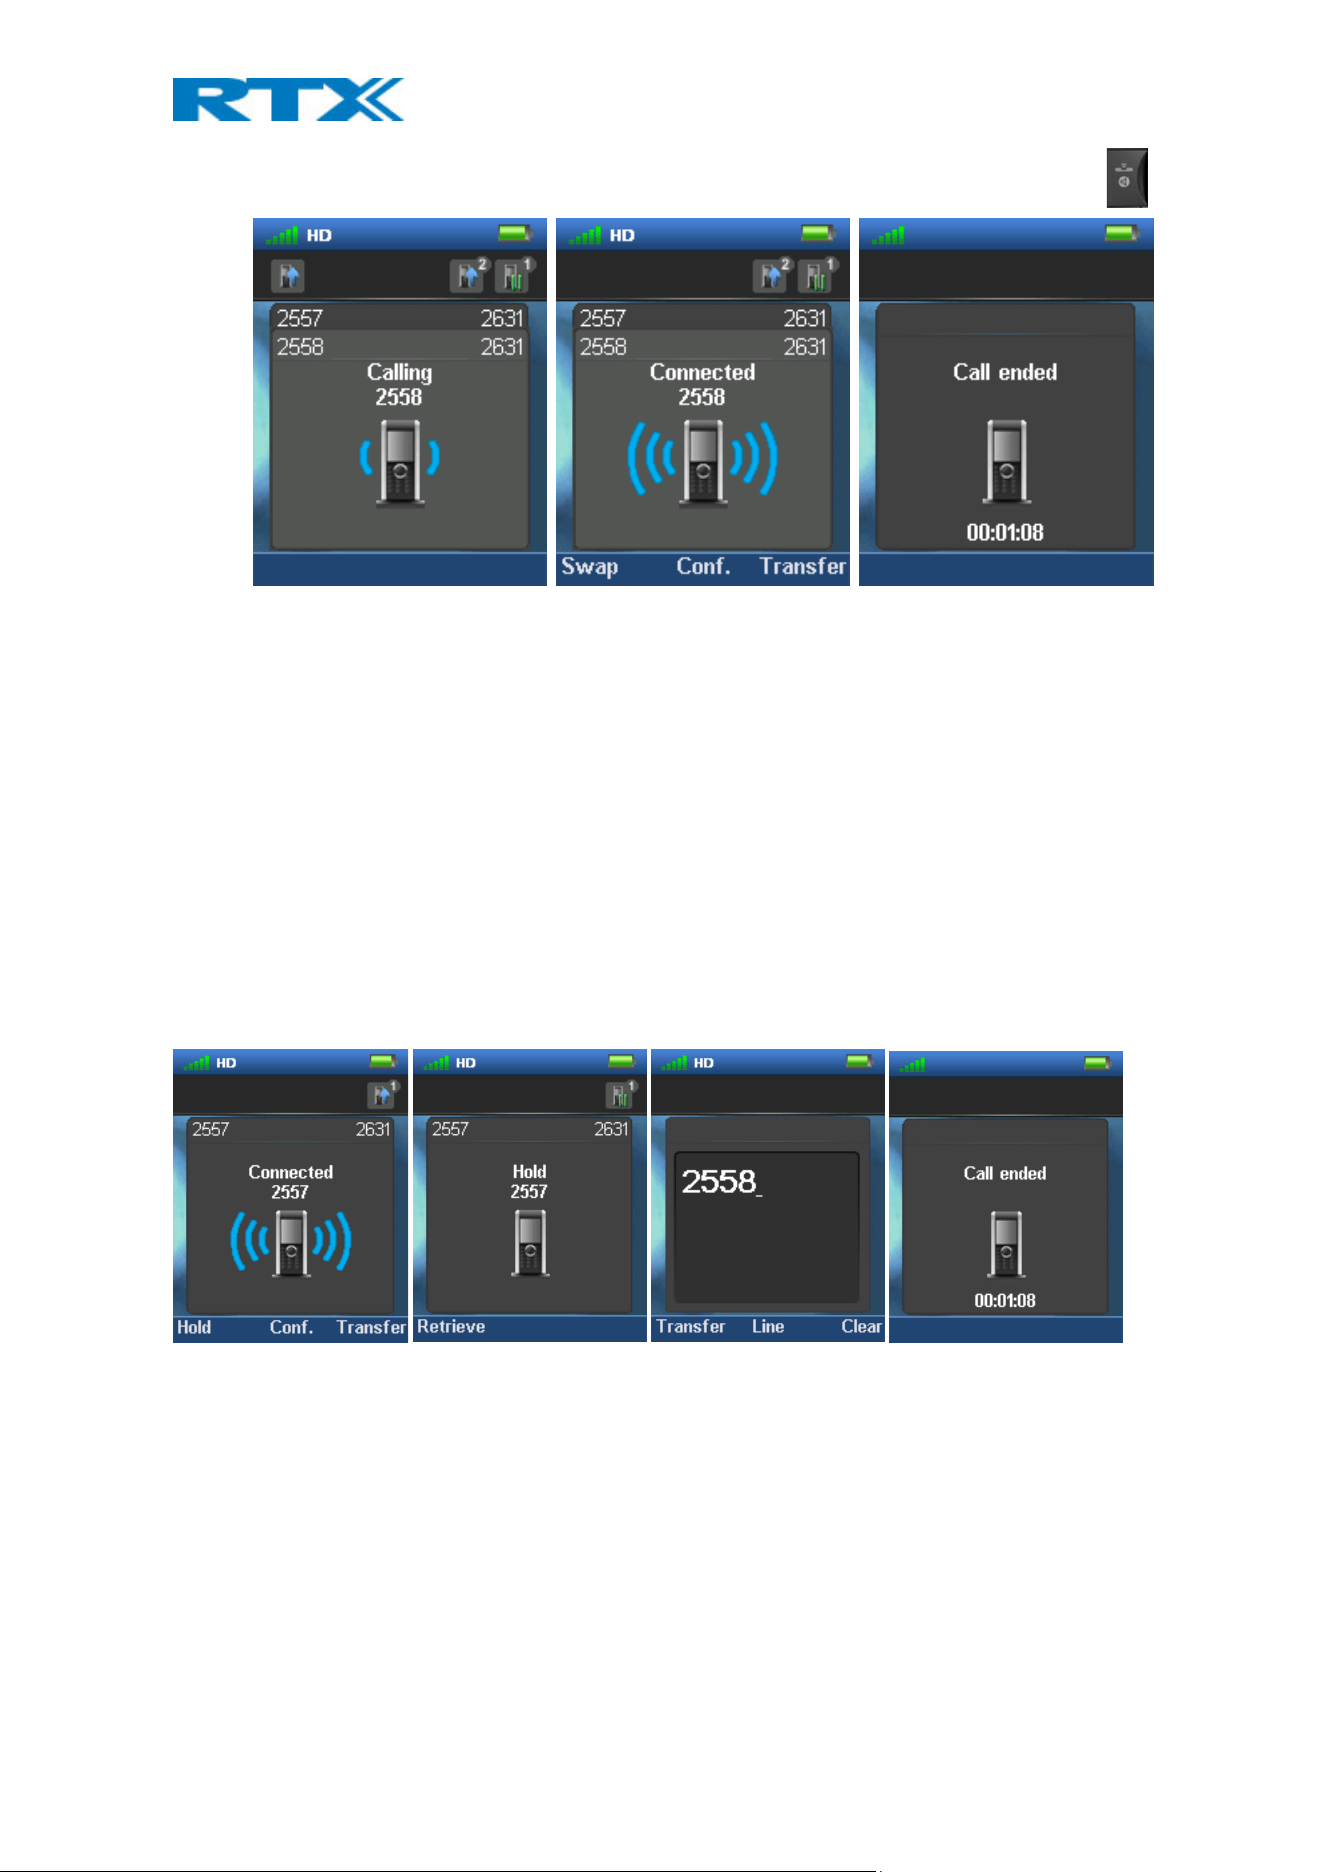
H200 Handset Guide DRAFT
Proprietary and Confidential
Page | 68
3. Enter the number that the transfer should be made to, and press the green “Off-hook” button
4.
5. A ring back tone is heard, and a third party is called.
6. As the third party answers the call the handset user initiating the transfer will show a connected screen
as seen above.
7. To make the transfer after the third party has answered the call, press the right softkey “Transfer”, and
the call is transferred so that the second and third party are now in call, and a “Call ended” screen is
displayed on the handset that initiated the transfer as seen above.
NOTE: The original calling parties and the third party to whom the transfer has been made are displayed at the
top of the active screen. Here, it is seen that it is the handset with number 2631 that is trying to make an
attended transfer to the third party with number 2558.
7.4.2 Unattended Transfer
When making an unattended transfer, the call will be transferred directly to a third party without the party
initiating the transfer needing to call this third party before the transfer.
1. Initiate a call with a counterpart so that the handset displays “Connected” as shown above.
2. Press the right softkey “Transfer” on either of the handsets in call, and the counterpart of the call is put
on hold.
3. Enter the number that the transfer should be made to, and press transfer.
4. This will end the call on the first handset party (screen showing “Call ended”) and the second party will
stop being on hold and hear a ring back tone instead, which indicates that this handset is now calling the
third party.
5. When the third party answers the call, an unattended transfer has been made and the second and third
party are now in call.

H200 Handset Guide DRAFT
Proprietary and Confidential
Page | 69
NOTE: As with attended transfer, it is also possible to make an unattended transfer by pressing either the left
softkey “Hold”, or the middle softkey “Conf.” instead of pressing the right softkey “Transfer” in step 2.
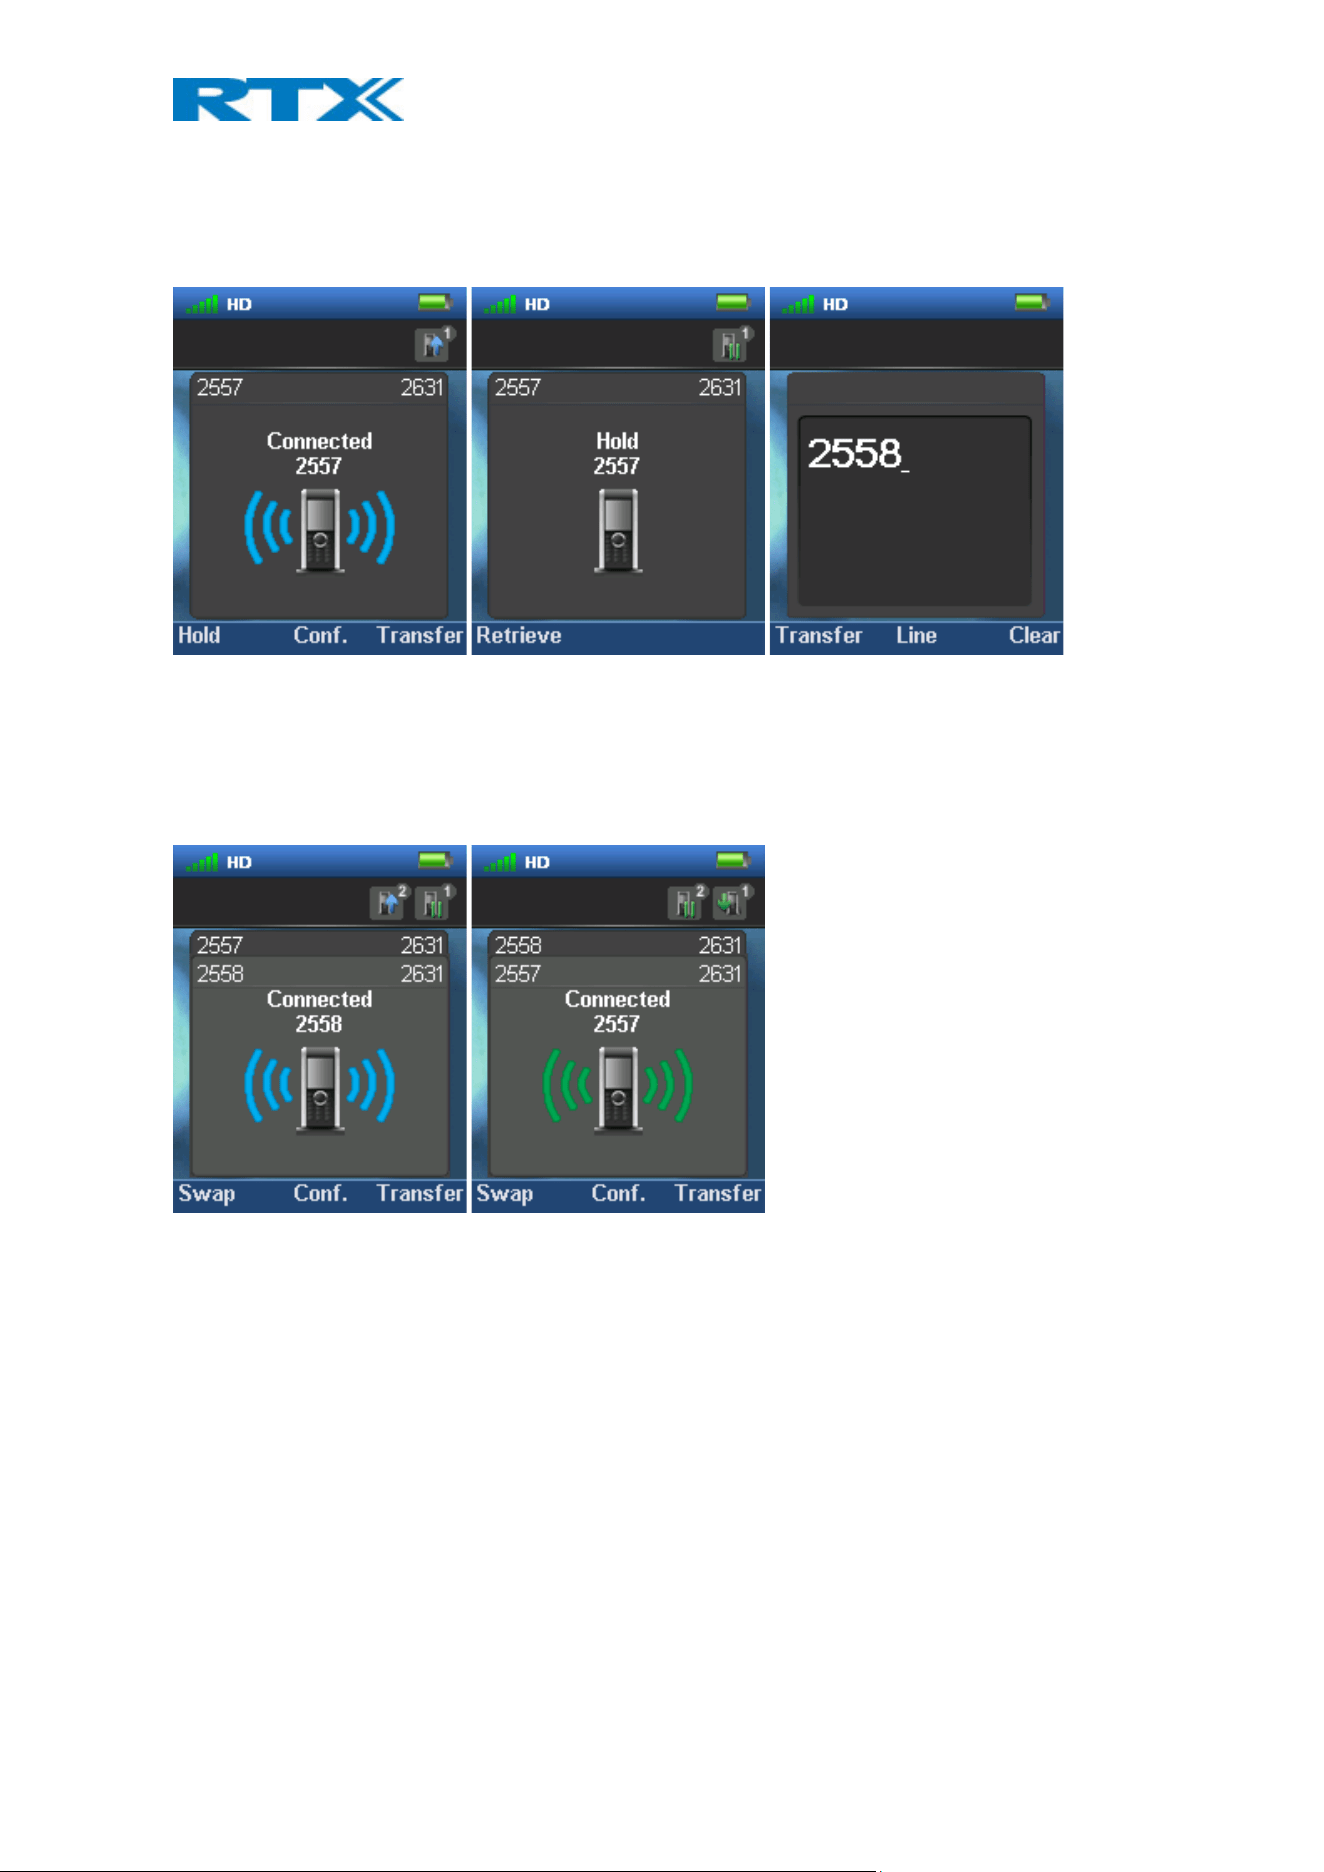
H200 Handset Guide DRAFT
Proprietary and Confidential
Page | 70
7.5 Swap between Two Calls
It is possible to swap between two calls. In this case, one party will be in ongoing call, and the second party will
be on hold. I.e. “Swap” means that it is possible to toggle between these two parties.
1. Initiate a call with a counterpart so that the handset displays “Connected” as shown above.
2. Put this call on hold by pressing the left softkey “Hold”.
3. Enter the number of a second party, and press the green “Off-hook” button.
4. A ring back tone is now heard in the handset as the second party is alerting.
5. As the second party answers the call a blue “Connected” screen as above is displayed.
6. By pressing the left softkey “Swap” the green “Connected” screen is displayed instead which indicates
that the ongoing call is now between the first party whereas the second party is now put on hold.
7. From this point, it is possible to toggle between the two parties by pressing “Swap”. For each time that
“Swap” is pressed a toggle is made between the two external parties, and the “Connected” screen
shows either blue or green signal lines to indicate if it is the first or second call that is ongoing.
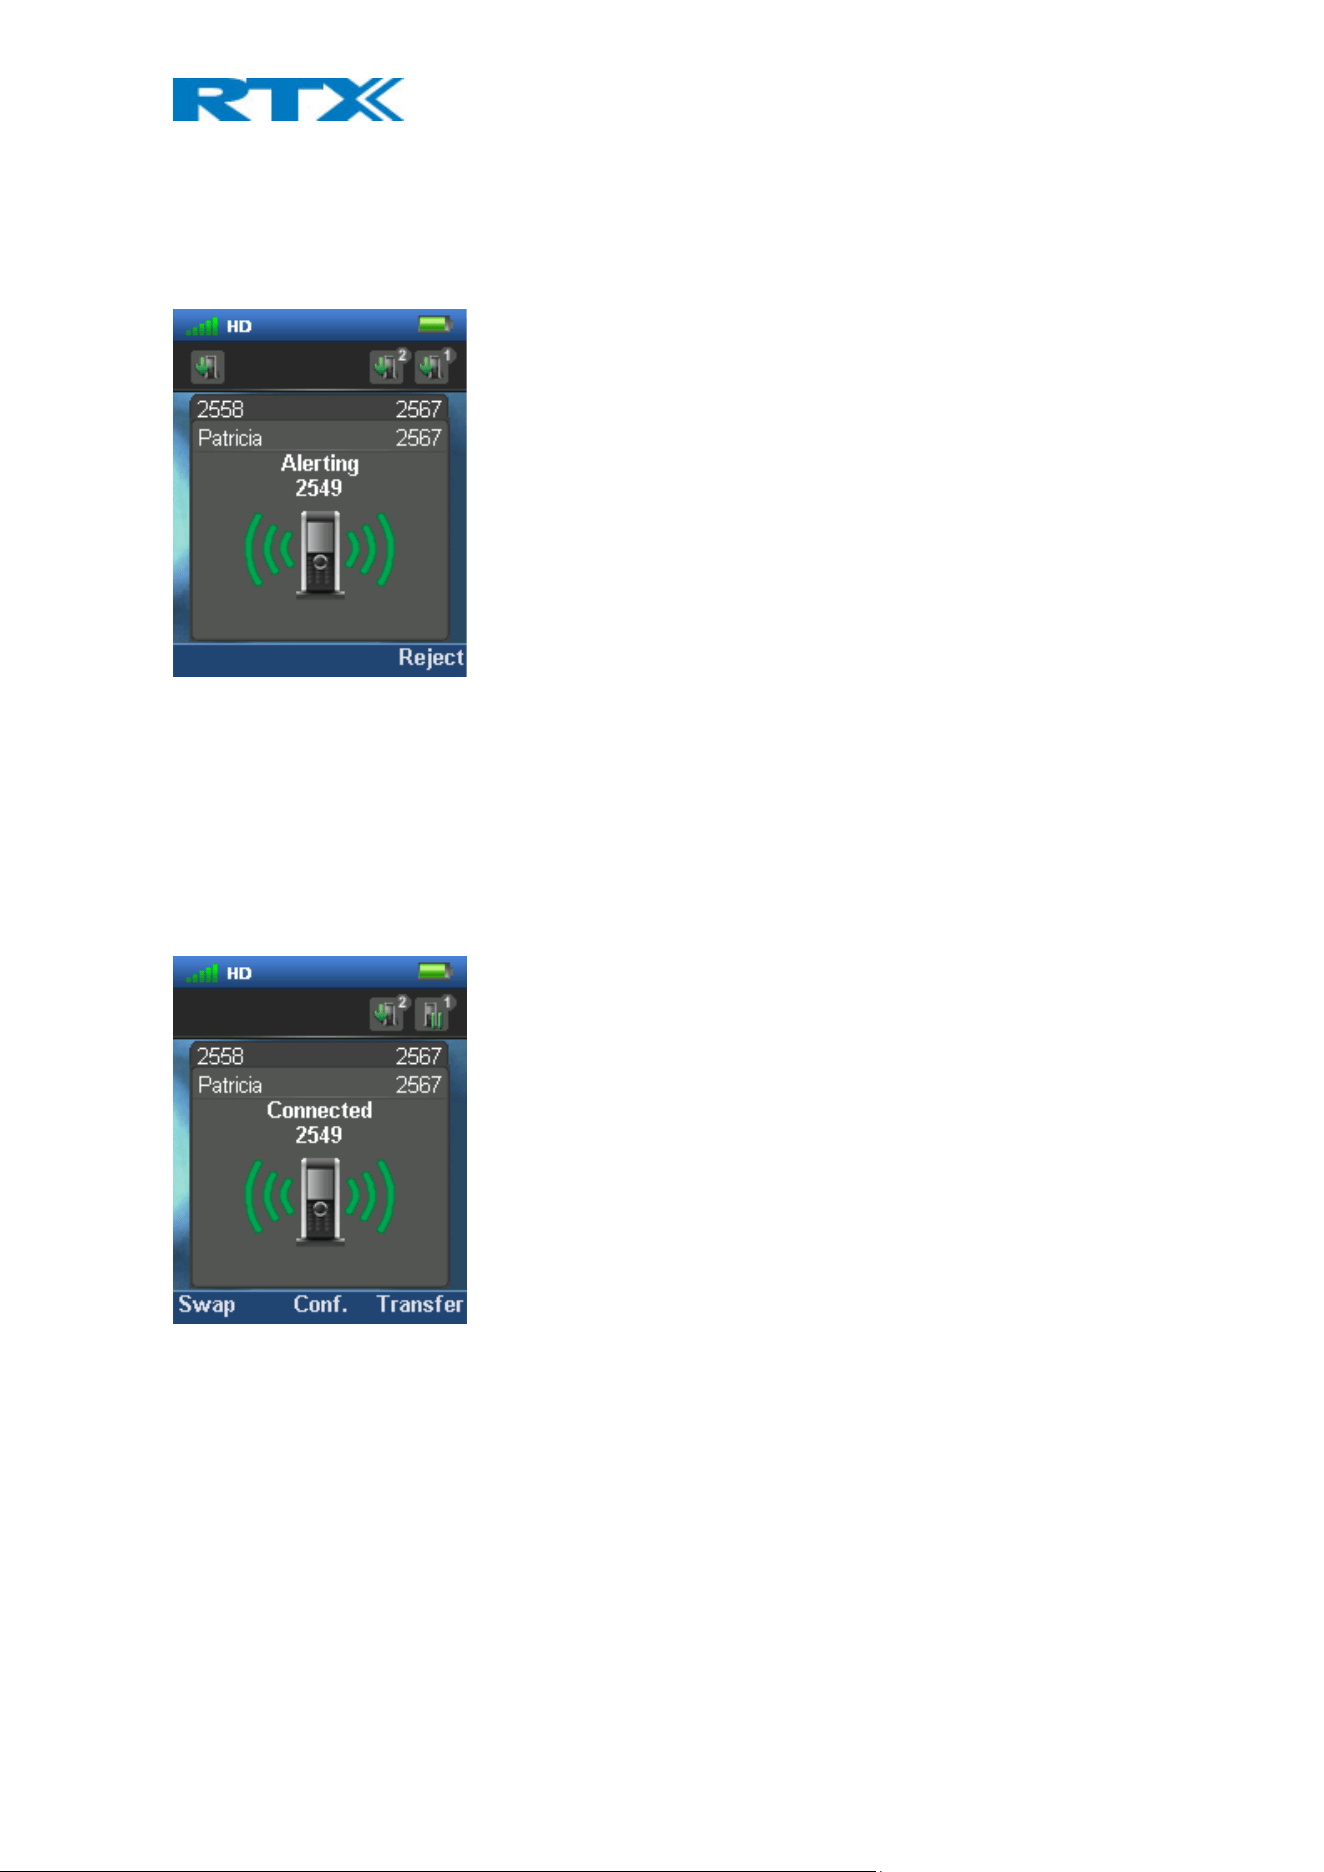
H200 Handset Guide DRAFT
Proprietary and Confidential
Page | 71
7.6 Call Waiting
When two parties are in call it is possible to receive a call waiting on one of the handsets which means that a
third party calls one of the two parties already in call. During a call waiting two short beeps are heard every three
seconds in the handset receiving the call waiting, and the following screen is displayed:
In this case it is seen that the ongoing call is with party 2558 whereas the call waiting is from party 2549 (that is
called Patricia in the local phonebook).
It is possible to reject the call waiting with the right softkey “Reject”, and hereby continuing the ongoing call with
party 2558.
If the call party wants to answer the call waiting the green off-hook key should be pressed, and the following
screen is displayed:
This indicates that the party 2567 now has two ongoing calls with one of them on hold, and it is possible to swap
between them, make a conference, or transfer one of the parties.
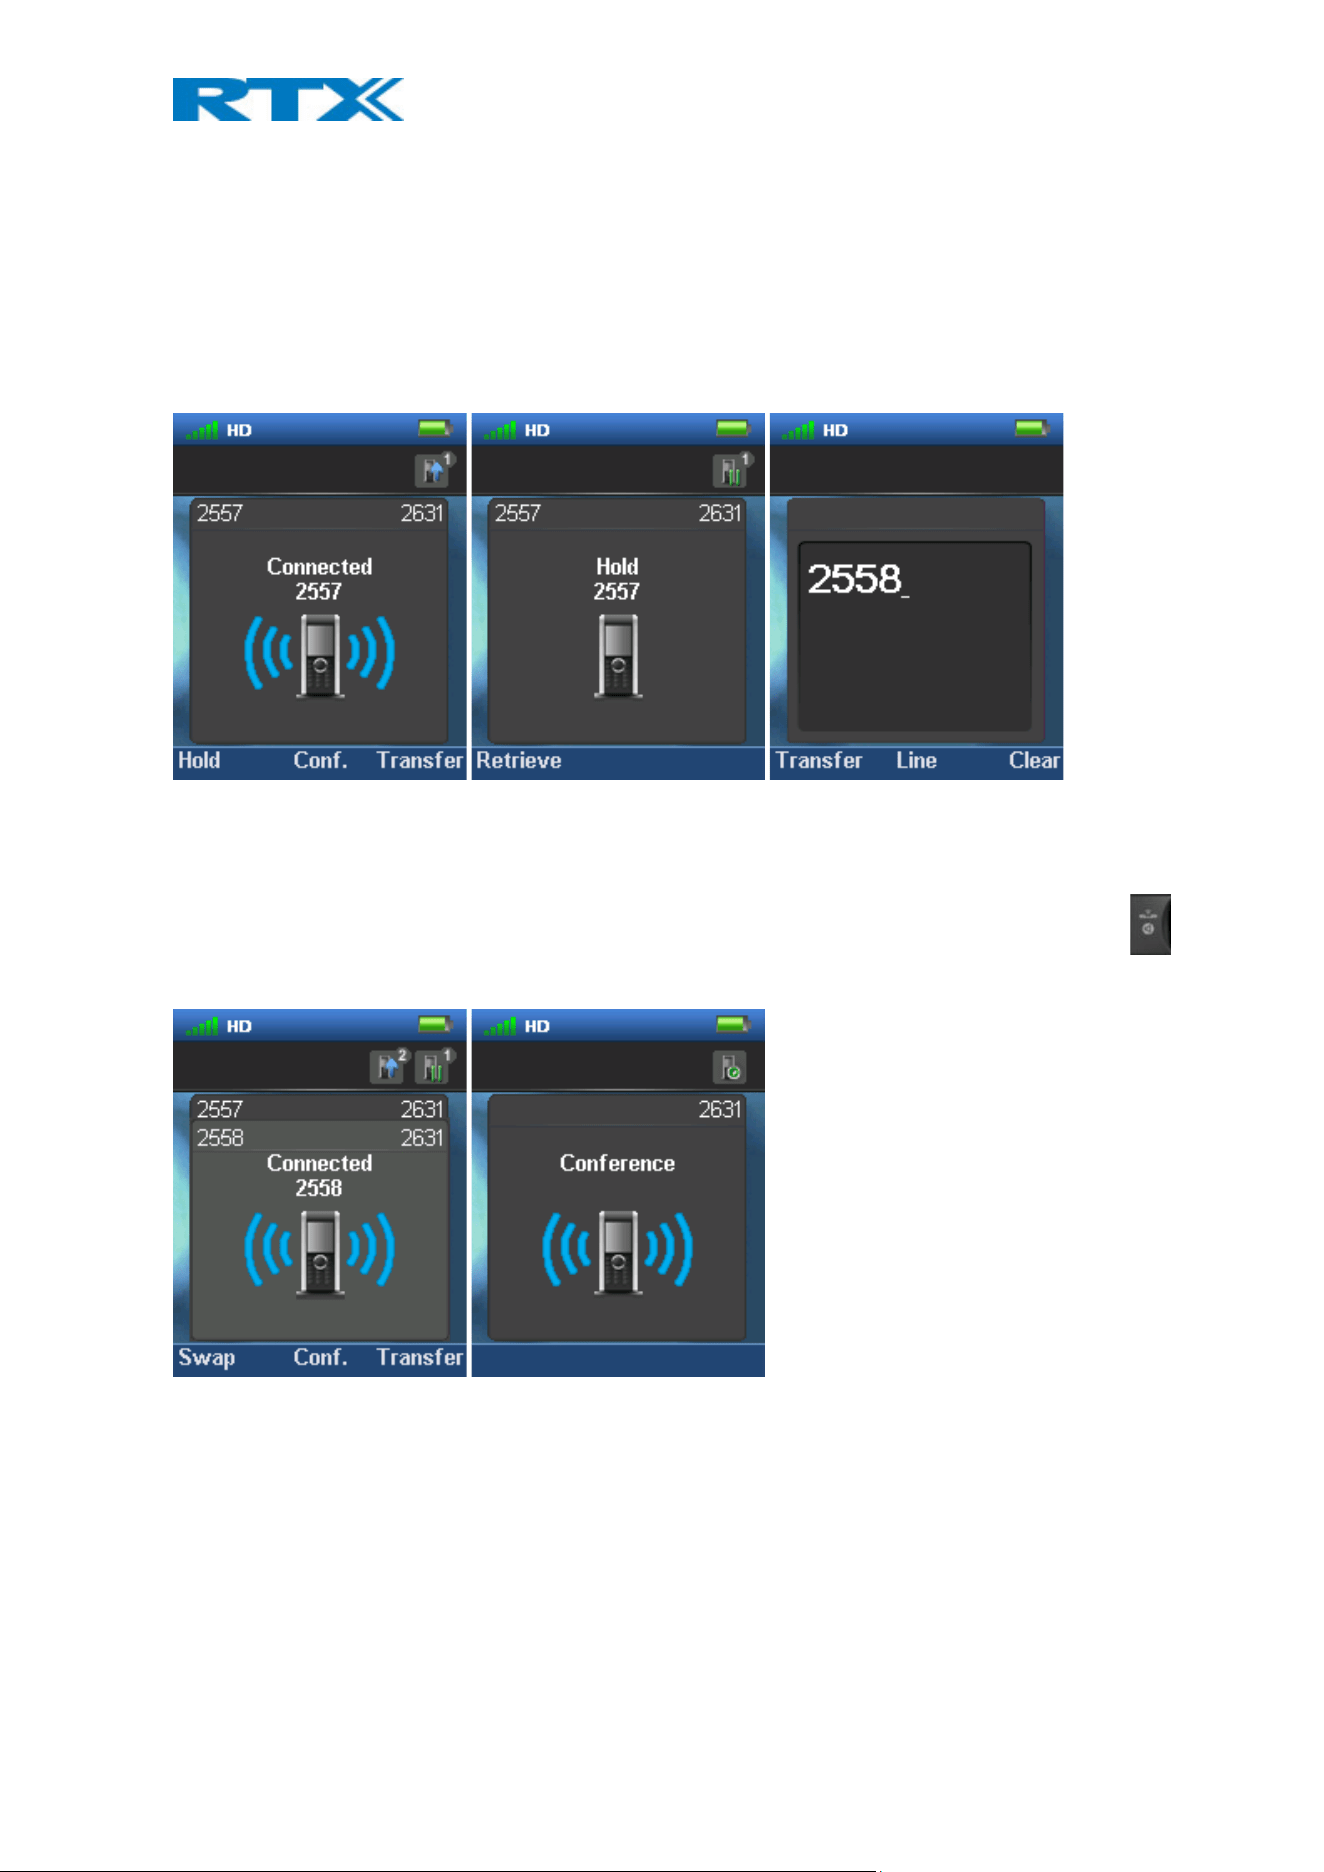
H200 Handset Guide DRAFT
Proprietary and Confidential
Page | 72
7.7 Conference Call
In a conference call there are always at least three parties in the same conversation. Hereby, this feature enables
the user to have an ongoing call with more than one person – the parties in a conference call are called
participants.
7.7.1 Establishing a Conference Call
In the following, it is described how to establish a conference call between three parties.
1. Initiate a call with a counterpart so that the handset displays “Connected” as shown above.
2. Press the middle softkey “Conf.” to start a conference call.
3. The second party is put on hold and will hear a tone on hold.
4. Enter the number of the party to invite to the conference and press the green “Off-hook” button to
call this participant.
1. When the called party answers the call the second party is still on hold, and the conversation is only
between the third party and the first party, i.e. initiator of the conference.
2. To start conversation between the three parties – i.e. a conference – press the middle softkey “Conf.”
3. The “Conference” screen as seen above will then be displayed, and the three participants will be in a
conference call. Thereby the conversation is between all three parties.
NOTE 1: When using a Conference server, the procedure is slightly different from the steps above. If a
Conference server is used, you need to start the conference with the second party before you press “Hold” and
call the third party. If you follow the standard procedure by immediately pressing “Hold” and calling the third
party without initiating first the network-based conference, the Conf key will not be present on the display.

H200 Handset Guide DRAFT
Proprietary and Confidential
Page | 73
NOTE 2: It is possible to invite more participants to the conference by repeating the steps 2-6 for one of the
participants in the conference that has not yet invited a party to the conference. Once a participant has invited a
new party to the conference it is not possible for this participant to invite new parties to the conference.
NOTE 3: The maximal number of participants to participate in a conference call is set according to the number of
bases in a system. In a system with two bases it should be possible to have 10 participants in a conference call.
7.7.2 Terminating a Conference Call
When a conference call is terminated it is dependent of which participant that terminates it, if the whole
conference is terminated, or if the conference is ongoing between the two participants left in the conference.
Option 1
1. The user who has started the conference presses the red “On-hook” key to terminate the
conference call.
2. The whole conference is terminated, and none of the participants continue to be in call.
Option 2
1. One of the participants that have been invited to the conference presses the red “On-hook” key to
terminate the conference call.
2. The call is only terminated for the participant that terminated the call
3. There is still an ongoing call between the initiator of the conference and the participant that has not
ended the call.
NOTE: Different configurations on the PBX that the base system uses may result in different terminations of a
conference call. E.g. the configuration of some PBX’s could cause that the whole conference call is not
terminated if the initiator of the conference presses the red “On-hook” key to terminate.

H200 Handset Guide DRAFT
Proprietary and Confidential
Page | 74
8 Accessories
It is possible to get different accessories to the H200 handset. These different accessories are listed in the
following:
- Single Charger
- Adapter for Charger
- Belt Clip
- Battery
- Battery Cover

H200 Handset Guide DRAFT
Proprietary and Confidential
Page | 75
9 Troubleshooting
This troubleshooting section contains information on how to solve some operational problems that you may
experience on the handset.
9.1 Operational problems
State: The handset does not ring
Problem cause: The sound off icon is seen in the status bar; hence the handset is silent mode.
Action: Increase the volume in Audio Settings, or long press the #-key in idle.
NOTE: If the Audio Settings is greyed out and cannot be changed, it is because the silent mode is enabled by long
pressing the #-key. Please, long press the #-key in idle to disable this silent mode.
State: The handset does not respond when pressing on the keys
Problem cause: The keylock is enabled, and a “Press and hold *” screen is displayed when pressing any key.
Action: Long press (press for more than 2 seconds) the *-key.
State: The handset shows “Searching” in the display
Problem cause: The handset is out of the coverage area of the base station system.
Action: Please move the handset back in coverage of the base system.

FCC Caution:
Any Changes or modifications not expressly approved by the party responsible for compliance could void the
user's authority to operate the equipment.
This device complies with part 15 of the FCC Rules. Operation is subject to the following two conditions: (1)
This device may not cause harmful interference, and (2) this device must accept any interference received,
including interference that may cause undesired operation.
Note: This equipment has been tested and found to comply with the limits for a Class B digital device, pursuant to
part 15 of the FCC Rules. These limits are designed to provide reasonable protection against harmful interference
in a residential installation. This equipment generates, uses and can radiate radio frequency energy and, if not
installed and used in accordance with the instructions, may cause harmful interference to radio communications.
However, there is no guarantee that interference will not occur in a particular installation. If this equipment does
cause harmful interference to radio or television reception, which can be determined by turning the equipment off
and on, the user is encouraged to try to correct the interference by one or more of the following measures:
—Reorient or relocate the receiving antenna.
—Increase the separation between the equipment and receiver.
—Connect the equipment into an outlet on a circuit different from that to which the receiver is connected.
—Consult the dealer or an experienced radio/TV technician for help.
Privacy of communications may not be ensured when using this phone.
FCC Radiation Exposure Statement:
For Handset
This is a radio transmitter and receiver. It is designed and manufactured not to exceed the emission limits
for exposure to radio frequency (RF) energy set by the Federal Communications Commission (FCC) of
the U.S.Government. These limits are part of comprehensive guidelines and establish permitted levels of
RF energy for the general population. The guidelines are based on the safety standards previously set by
both U.S. and international standards bodies. These standards include a substantial safety margin
designed to assure the safety of all persons, regardless of age and health. This device and its antenna
must not be collocated or operating in conjunction with any other antenna or transmitter. This product
has been shown to be capable of compliance for localized specific absorption rate (SAR) for
uncontrolled environment/general population exposure limits specified in ANSI/IEEE Std. C95.1-1992
and had been tested in accordance with the measurement procedures specified in FCC/OET Bulletin 65
Supplement C (2001) and IEEE 1528.
This device was tested for typical body-worn operations with the back of the DECT Cordless Phone. To
comply with FCC RF exposure requirements. Third-party belt-clips, holsters and similar accessories
containing metallic components shall not be used

ISEDC Warning:
This device complies with Innovation, Science, and Economic Development Canad licence-exempt RSS
standard(s). Operation is subject to the following two conditions:
(1) this device may not cause interference, and
(2) this device must accept any interference, including interference that may cause undesired operation of the
device.
Le présent appareil est conforme aux CNR d' Innovation, Sciences et Développement économique Canada
applicables aux appareils radio exempts de licence. L'exploitation est autorisée aux deux conditions suivantes:
(1) l'appareil nedoit pas produire de brouillage, et
(2) l'utilisateur de l'appareil doit accepter tout brouillage radioélectrique subi, même si le brouillage est susceptible
d'en compromettre le fonctionnement.
ISEDC Radiation Exposure Statement:
The device has been tested and compliance with SAR limits, users can obtain Canadian information on RF exposure
and compliance
Le présent appareil est conforme Après examen de ce matériel aux conformité aux limites DAS et/ou aux
limites d’intensité de champ RF, les utilisateurs peuvent sur l’exposition aux radiofréquences et la
conformité and compliance d’acquérir
For Handset
SAR: SMA Usage Rules. The placement of transmission equipment and their operation in all certification tests shall
comply with the following rule: even though the maximum power level is defined, the actual power output in specific
use cases can be significantly lower than the maximum reference value.
All equipment models sold to the public, their RF exposure tests and certification, maximum SAR limit, as well as
all relevant documents and test equipment placement, shall conform to the specified requirements.
The physical prototype and test hardware shall comply with the SMA radio frequency exposure guidelines, and no
metallic components shall be contained in the designated accessories for this product specified in the annex or its
spare parts under normal use conditions.
SAR l’utilisation des règles sma l’emplacement Le matériel de transmission et fonctionnant dans tous les essais à la
certification, même si la puissance suprême a décidé le niveau, utilisation spécifique peut être très en deçà de la
valeur de référence maximale.Types de matériel sont vendus au public un ancien, d’essai et de certification de
l’exposition, limite maximum sma, chaque document et l’emplacement du matériel d’essai et conformément au
document.Le modèle en physique, matériel d’essai et conforme aux directives d’exposition des radiofréquences sma
quand une annexe désigné pour ce produit lors de leur utilisation ou des pièces de rechange ne contiennent pas de
métal.
This product meets the applicable Innovation, Science and Economic Development Canada technical specifications.
This Class B digital apparatus complies with Canadian ICES-003.
Cet appareil numérique de la classe B est conforme à la norme NMB-003 du Canada.

This device meets HAC and CS03 Part V.
This device meets the applicable Innovation, Science and Economic Development Canada technical specifications.
Ce produit répond à la innovation, des sciences et de .Développement économique Canada spécifications techniques
applicables.