Copyright 2026 Thunder Da
ta Co., Ltd.
Quick S
tart Guide
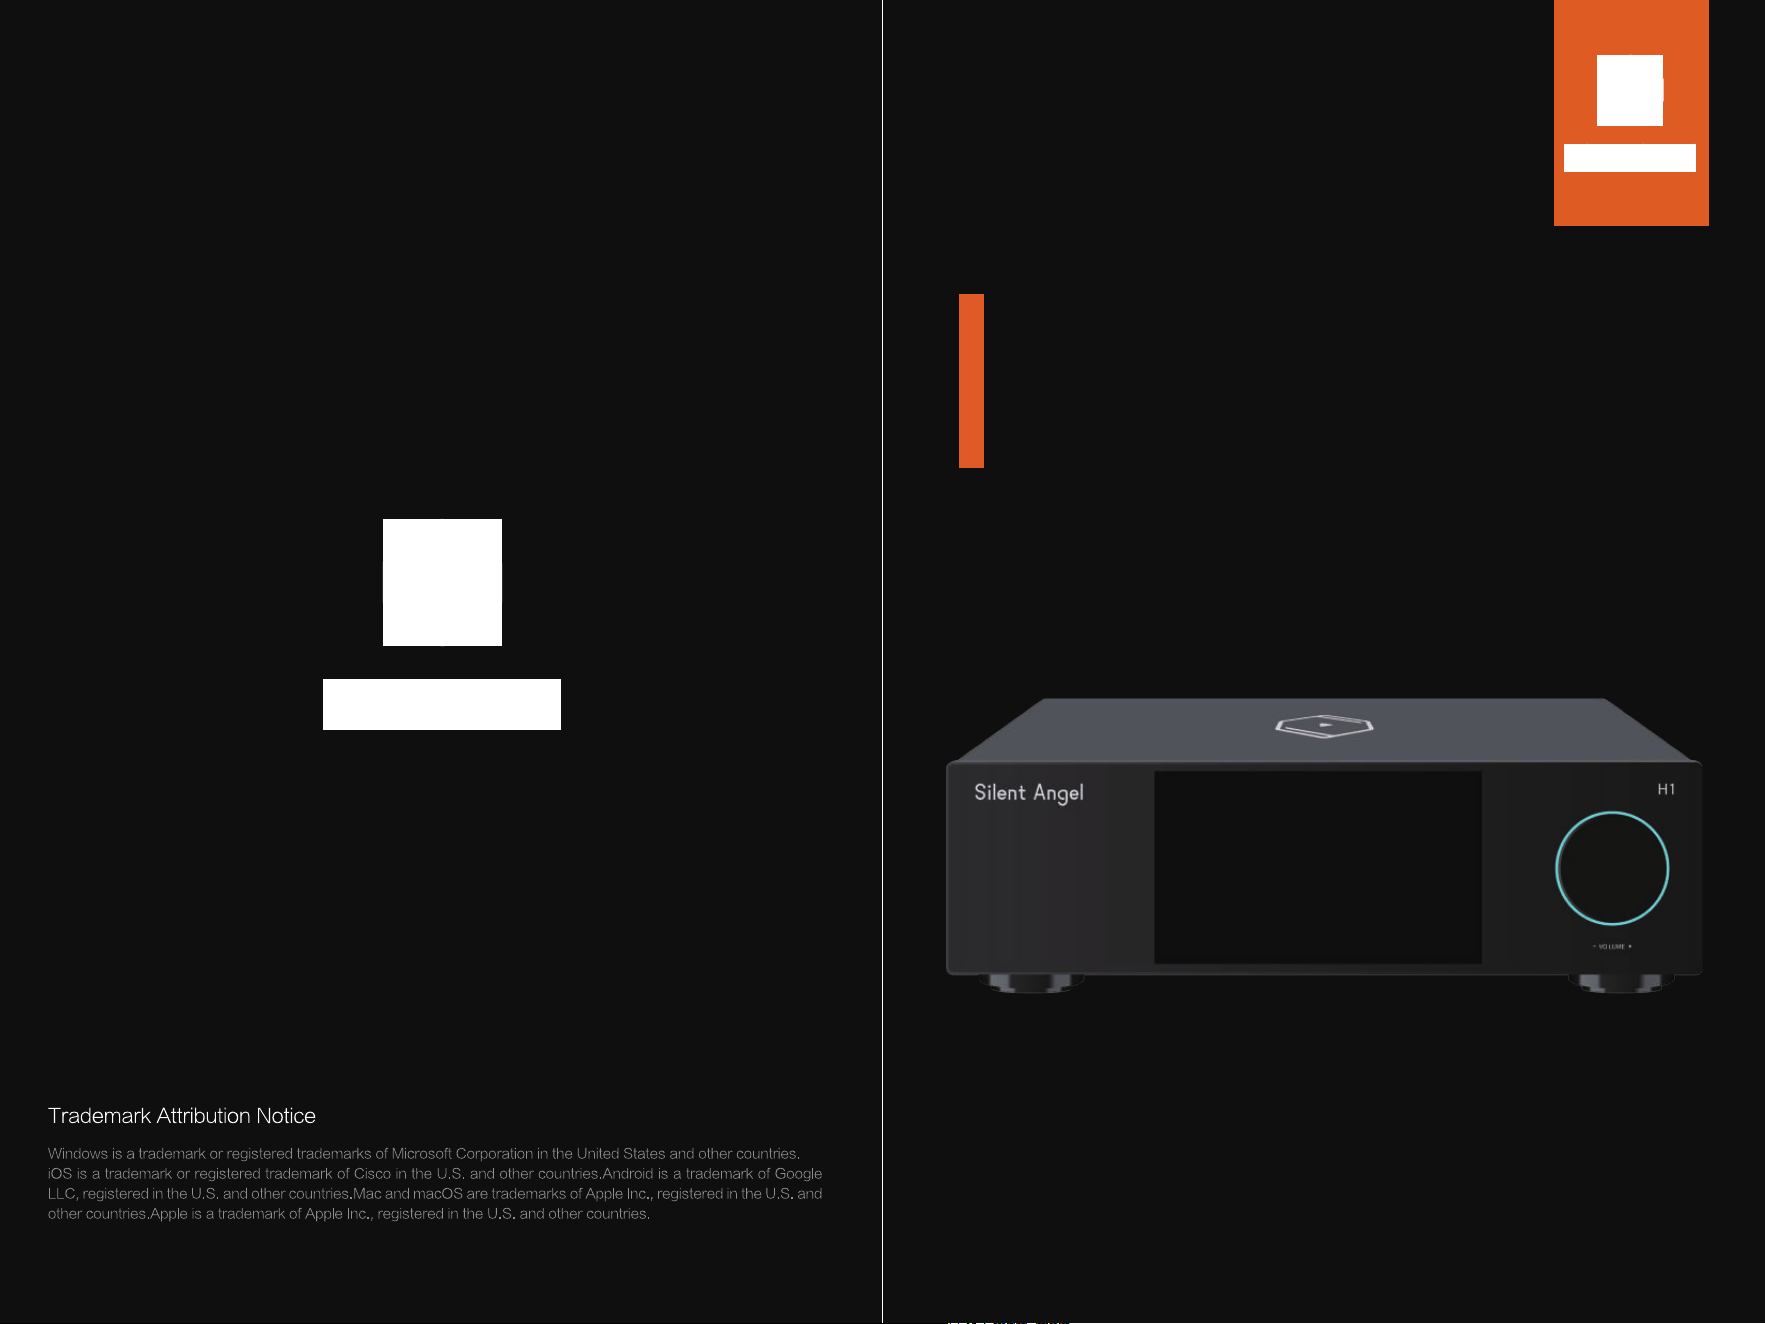
Silent Ang
el H1
Int
egrated High-resolution
Music Streamer and DAC
Thank y
ou for choosing the Silent Angel
H1 All-in-One Digital Streamer & DAC.
Y
ou may contact us via the methods below
for prompt support services.
www.silentangel.com
Scan the QR code above to install the VitOS Orbiter app
on your smartphone or tablet.
S
TART EXPLORING...
PRODUC
T OVERVIEW
BASIC OPERATION
SYSTEM SETTINGS
Precautions Before Use
Interface Description
Main Interface Guide
APP Download
Network Connection
Music Streaming
Network Storage
USB Storage
My Favorites
Language Settings
Service Account Management
Analog & Digital Output Settings
USB Audio Output Settings
AP Mode Settings
Display Settings
System Upgrade
Album Management
I/O Connection Settings
Rear Panel Wiring Diagram
Specifications
Pr
ecautions for Product Use
Ser
vice
About This Manual
Plac
ement
P
ower Supply
Mois
ture Prevention
The Silent Ang
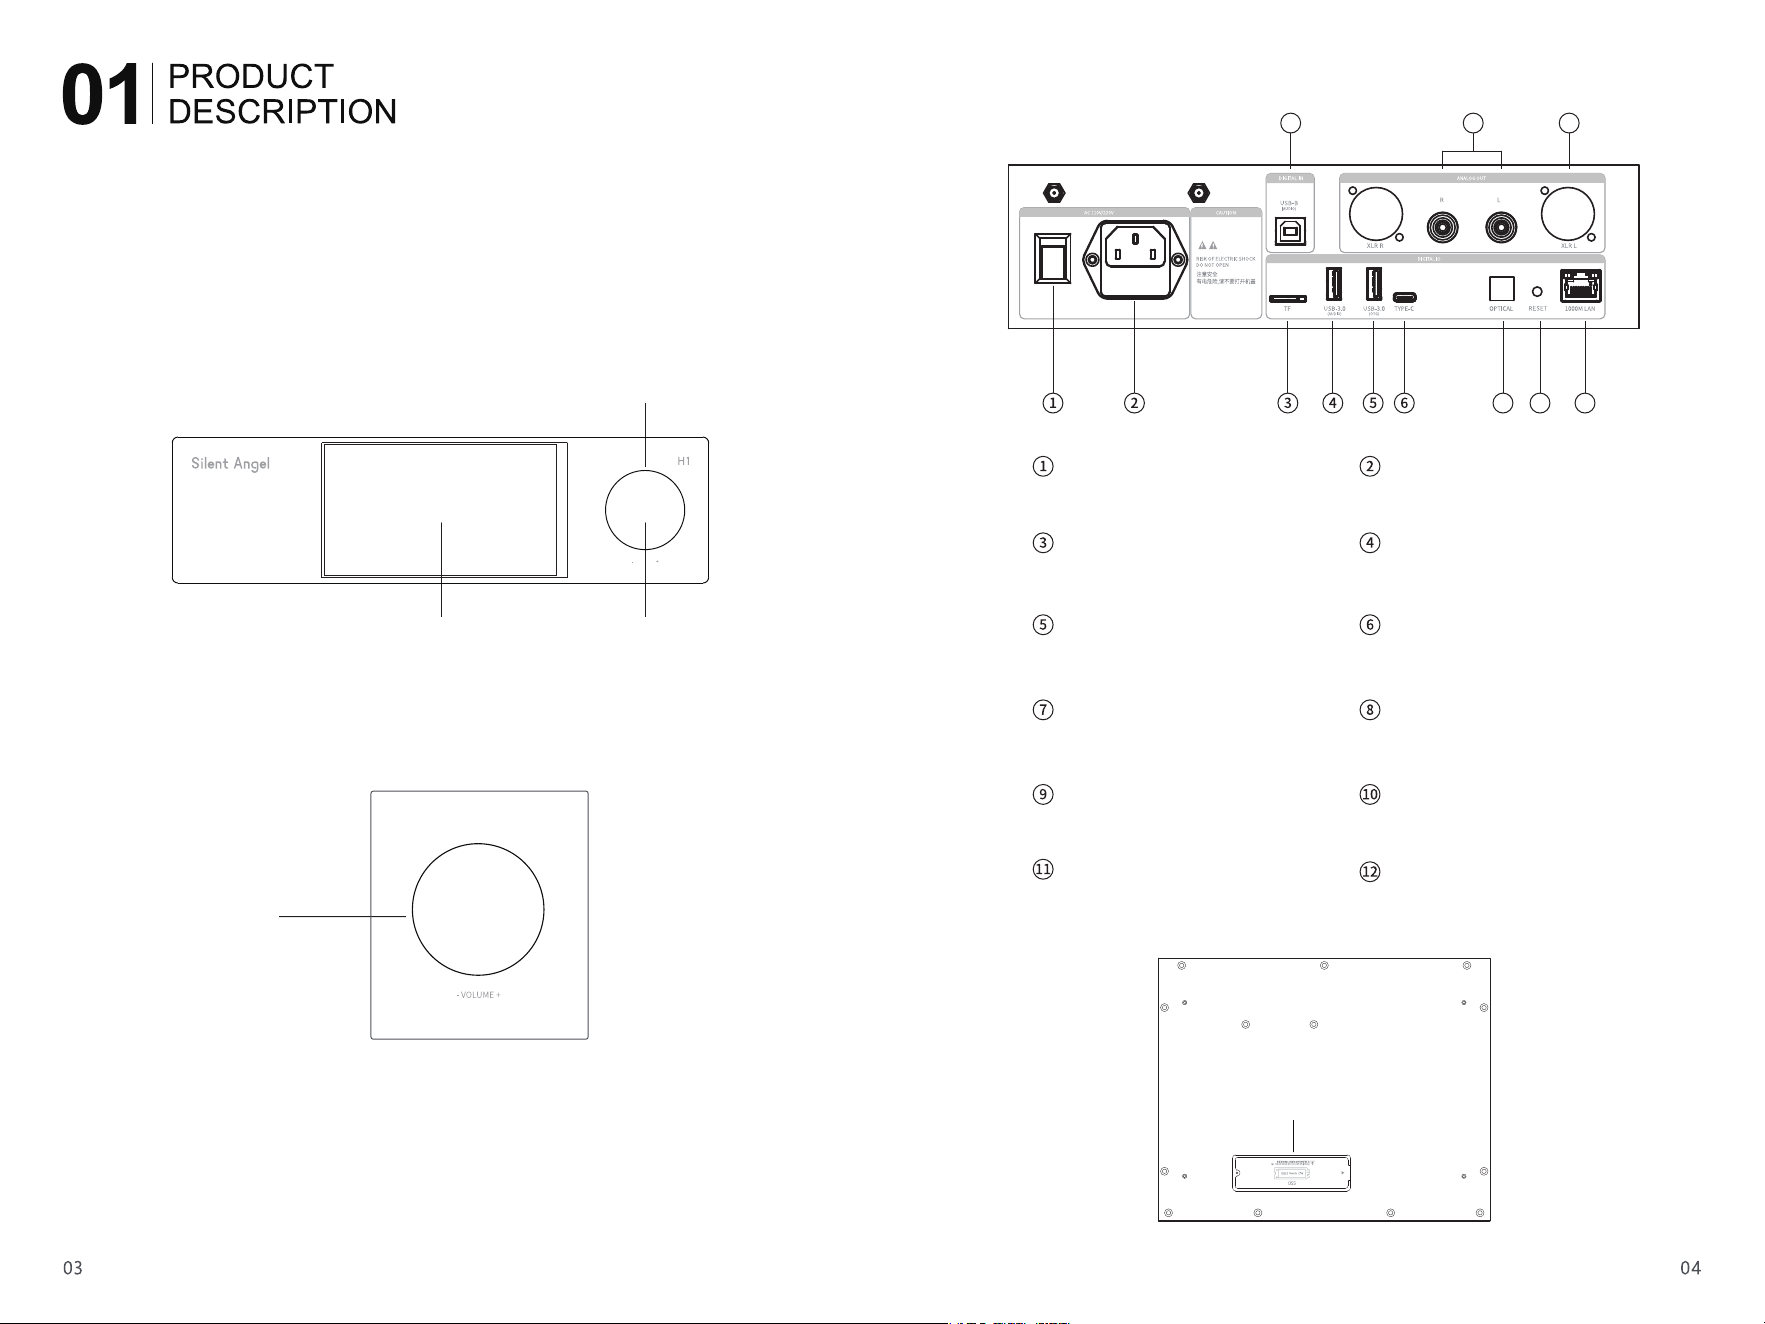
el H1 is equipped with a comprehensive range of audio
input/output interfaces and data transmission interfaces. Please refer to
this manual for details.
9
12
11
10
87
Int
erface Description
F
ront Panel
Rear Panel
Volume Knob
V
OLUME
RGB LED
Display
Short pr
ess: Mute/Unmute
Rotate: Volume adjustment
Notice:
Volume Knob
Press and hold the volume knob for 5 seconds to enter AP configuration
mode. Refer to this manual for detailed AP network configuration instruc-
tions.
S
SD Storage Bay
P
ower Switch
T
urns the player on and off.
A
C IN
Connec
t the AC power cord
TF
F
or installing the system TF card
U
SB3.0 Audio Port:
Support
s connection to external USB storage devices,
external DACs and other peripherals.
U
SB3.0 Audio Port:
Support
s connection to external USB storage
devices, external DACs and other peripherals.
T
ype-C Port (USB 2.0):
F
or connecting external DAC devices.
Op
tical Interface:
Support
s PCM up to 24Bit/192kHz; DSD audio
is supported via D2P and DOP encapsulation.
RESET
R
estart the unit
RCA L and RCA R:
Unb
alanced RCA audio output connectors for
left channel and right channel.
U
SB-B Port:
U
SB audio input for connecting mobile phones,
computers and other devices; maximum support for
DSD512 and PCM 768kHz/32bit.
E
thernet Port:
1Gbps Gigabit Ethernet
XLR
-L & XLR-R:
Balanced XLR audio output interfaces for left channel
and right channel respectively.
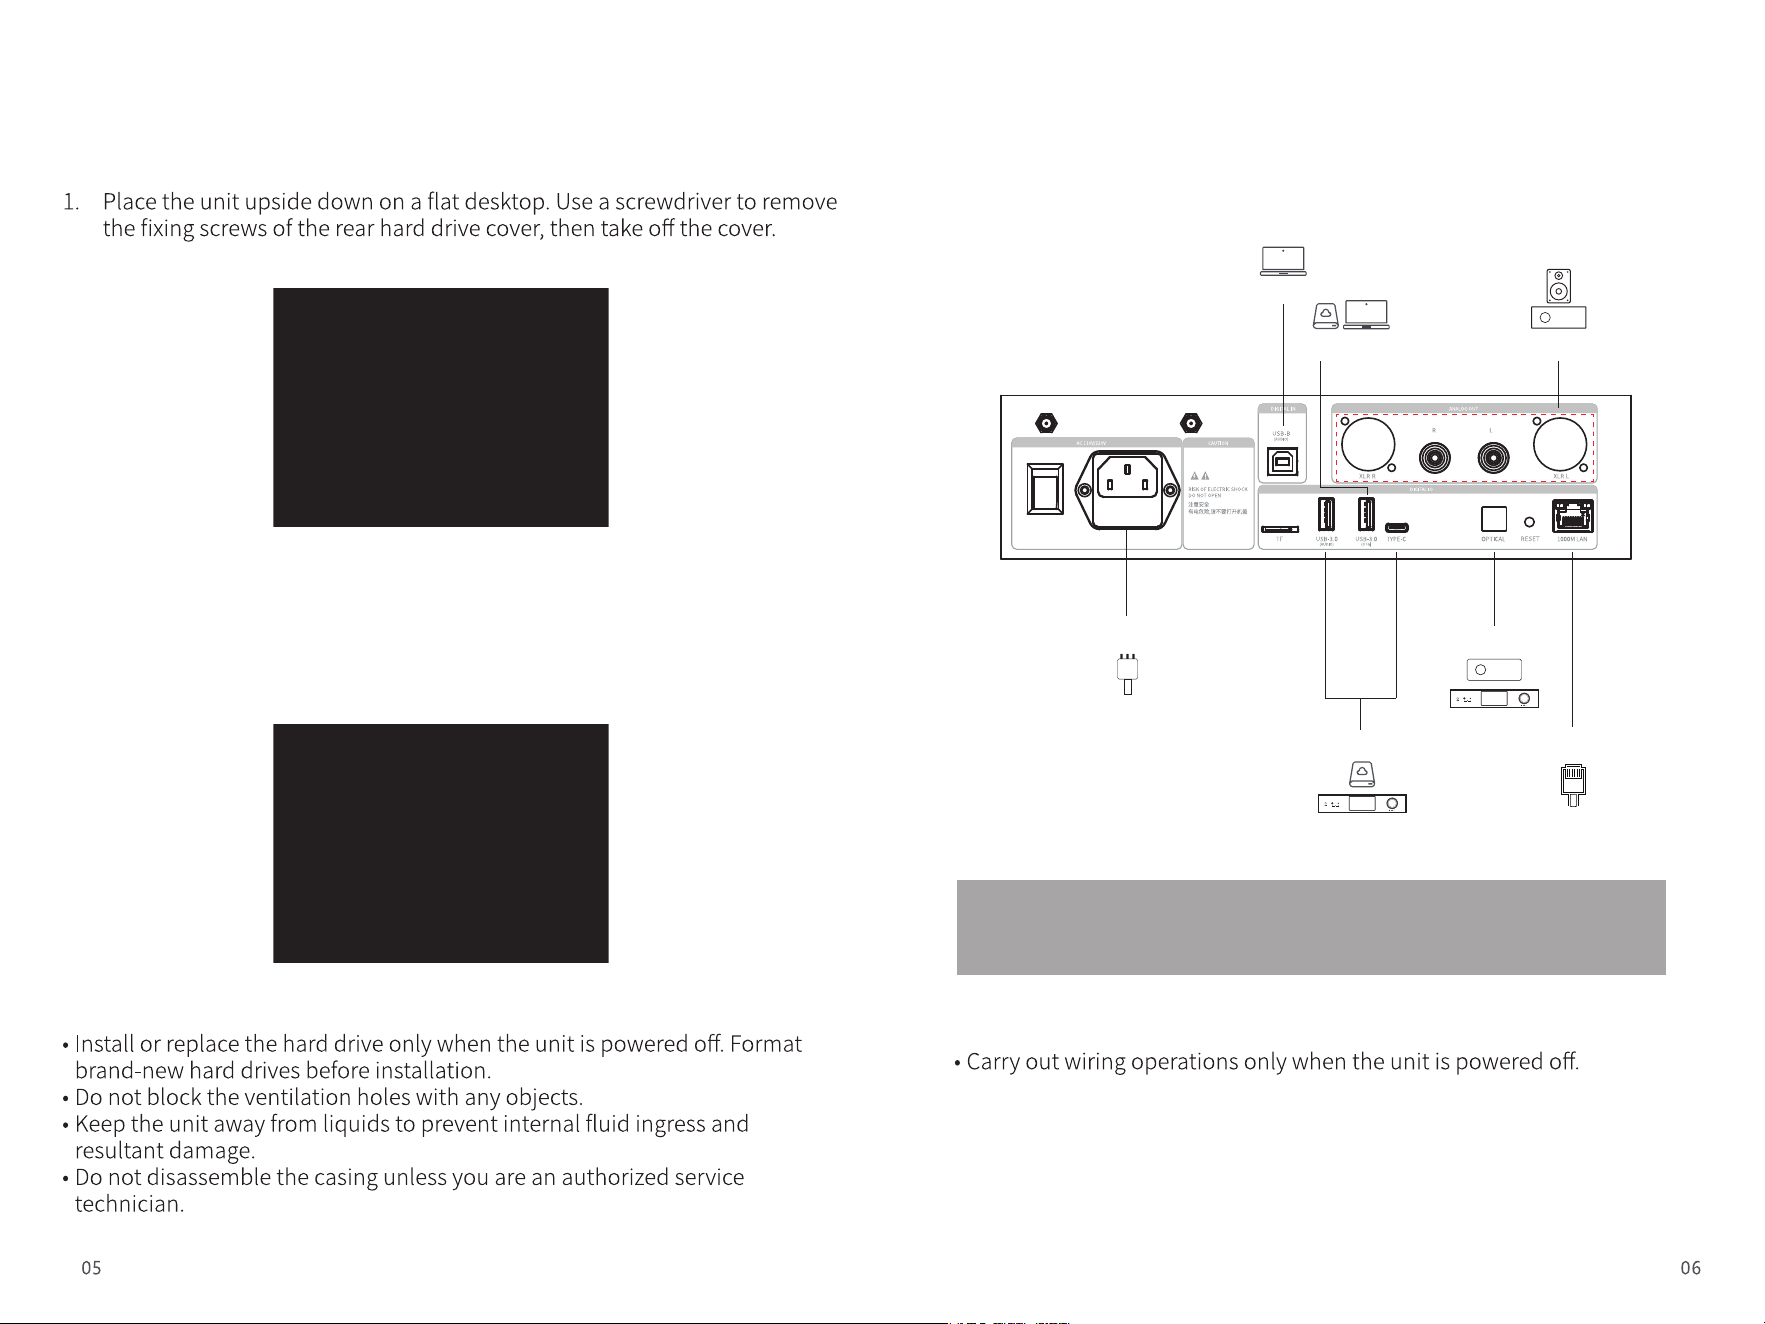
2. Flip open the S
SD locking buckle, insert the prepared solid-state drive into
the interface, press the buckle to secure the SSD firmly, then reinstall the
hard drive cover.
Notes:
No
tes:
The diagr
am only illustrates partial device connections;
more devices can be connected in actual use.
PC
Mobile s
torage / PC AV amplifier / speakers
AC three-prong power cord
Mobile storage / Decoder
AV amplifier / Decoder
Ethernet cable
S
SD Installation Procedure
Rear Panel Wiring Diagram
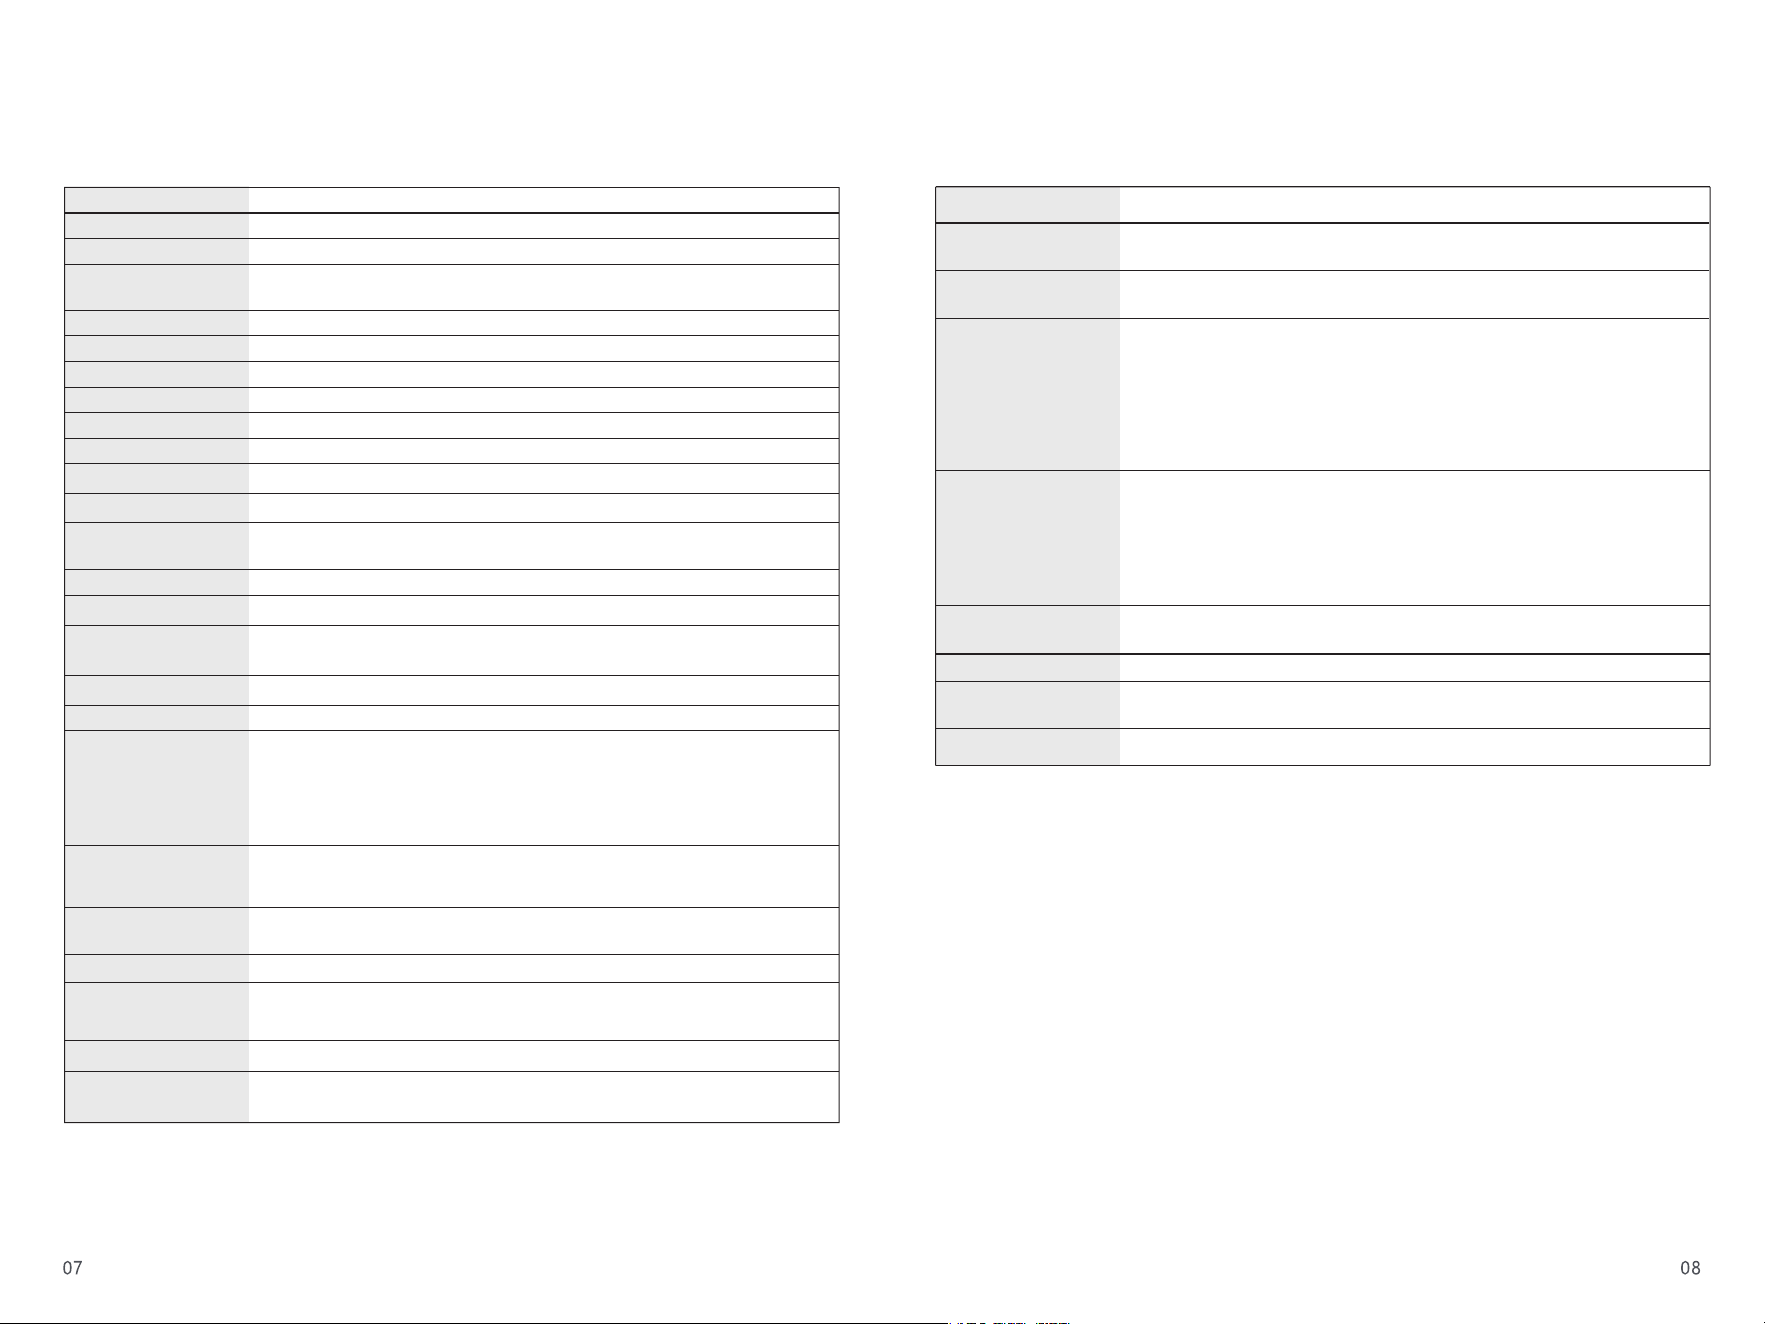
Specific
ations
XLR A
udio Output
Characteristics
Output Level (Vrms): 4.5 Vrms (Bandwidth: 20 Hz~20 kHz)
Total Harmonic Distortion plus Noise (THD+N): <0.00008% @ 1 kHz (-121 dB @ 1 kHz)
Noise Floor: <1.7 μVrms
Signal-to-Noise Ratio (SNR): 129 dB @ 1 kHz
Frequency Response: 20 Hz‒20 kHz (±0.07 dB)
Channel Separation (Crosstalk): -120 dB
Dynamic Range (DNR): 129 dB @ 1 kHz
RCA Audio Output
Characteristics
Output Level (Vrms): 2.5 Vrms (Bandwidth: 20 Hz~20 kHz)
Total Harmonic Distortion plus Noise (THD+N): <0.0001% @ 1 kHz (-118 dB @ 1 kHz)
Noise Floor: <1.5 μVrms
Signal-to-Noise Ratio (SNR): 126 dB @ 1 kHz
Frequency Response: 20 Hz~20 kHz (+0.06 dB)
Channel Separation (Crosstalk): -120 dB
Dynamic Range (DNR): 126 dB @ 1 kHz
Control Method
Supports control via dedicated APP on mobile phones and tablets running Android and
iOS systems; the APP enables full-function operation of the player.
Power Input AC 110‒120 V~/AC 220‒240 V~, 50/60 Hz
Rated Power
Consumption
25 W
Overall Dimensions 280*220*77.7mm
USB-AUDIO Audio Output Max support PCM 32Bit/768kHz, DSD256; DSD audio can be output in D2P and DOP modes.
USB-C Audio Output
Max support PCM 32Bit/768kHz and DSD256; DSD signals can be output via D2P and
DOP modes.
OPT Optical Audio Output Max support PCM 24Bit/192kHz; DSD can be output in D2P and DOP modes.
Pr
oduct Name Integrated Digital Music Player & Decoder
Model Silent Angel H1
Color Black
Body Material
Aerospace-grade full aluminum chassis with matte blasting process consistent with
Apple’s finishing standard
Display Screen Size: 5.5-inch non-touch screen. Resolution: 720×1280, landscape orientation
Operating System Linux OS
UI Language Multi-language selection available
Chip Solution CPU Model: RK3568 quad-core ARM Cortex-A55, maximum main frequency up to 2.0 GHz
Memory Configuration DDR4: 4GB
TF Card Built-in 32GB TF Card
Audio DAC Dual ES9039Q2M
Audio Processor XMOS XU316 3rd Generation, 16-core
Operational
Amplifier Chips
6 units of Silent Angel self-developed Kmuse + 2 units of OPA1612
Power Supply High-quality low-ripple audiophile-grade power supply
Hard Disk Interface M.2 (NVMe PCIe 3.0) interface
Wired Network RJ-45 (1000M/100M/10Mbps)
Wireless Network Model AP6275PR3, supports dual-band Wi-Fi (2.4GHz)
File Management Supports automatic scanning of music files to generate albums; functions including
favorites collection, custom playlists, album browsing and content search are available.
Playback Display Supports display of lyrics, album covers and song metadata.
Playback Settings
Playback modes include sequential playback, shuffle play, single-track repeat and
all-track repeat.
Compatible with NAS and streaming servers.
System Settings Audio output configuration, language settings, advanced settings, device information
USB-B Audio Input
Supports DSD512 Native, PCM up to 768kHz/32bit
System compatibility: Windows 7~11, macOS, Android, iOS, HarmonyOS
Network Streaming &
Audio Casting
High-Resolution Audio (Beta), AirPlay 2, DLNA Renderer
Built-in apps: Xianlai Premium version of QQ Music, Spotify Connect, TIDAL Connect,
Internet Radio
Music Playback &
DAC Decoding
DSD: Supports DSD64 to DSD256, compatible with DSF, DFF, ISO-DSD and ISO DST formats.
PCM: Supports sampling rates from 44.1kHz to 768kHz (16Bit ~ 32Bit).
Supports audio formats including DXD, WAV, FLAC, AIFF, ALAC, MP3, MP2, AIF; sampling
rate coverage: 8kHz ~ 768kHz (16Bit ~ 32Bit).
CUE file supported, enabling automatic track splitting, track selection playback, fast
forward and rewind functions.
USB Interfaces
USB-C (USB 2.0): Supports audio transmission
2 × USB 3.0 ports: Compatible with external removable storage devices and audio output
Scan the QR code above to install the VitOS Orbiter app
on your smartphone or tablet.
Main Interface Introduction
Wired Network Connection
Intelligent Control APP Download
Note: The display screen of this device is used to display album artwork, audio
information, lyrics, artist name, album name, track title and other playback-related
information during playback.
The Silent Angel H1 is fully operated via connection with the mobile APP. Please
download the VitOS Orbiter intelligent control APP prior to use.
The QR code below serves as the download entry for Android devices, which can be
scanned directly for downloading.
For iOS devices, search for VitOS Orbiter directly in the App Store to complete
download and installation.
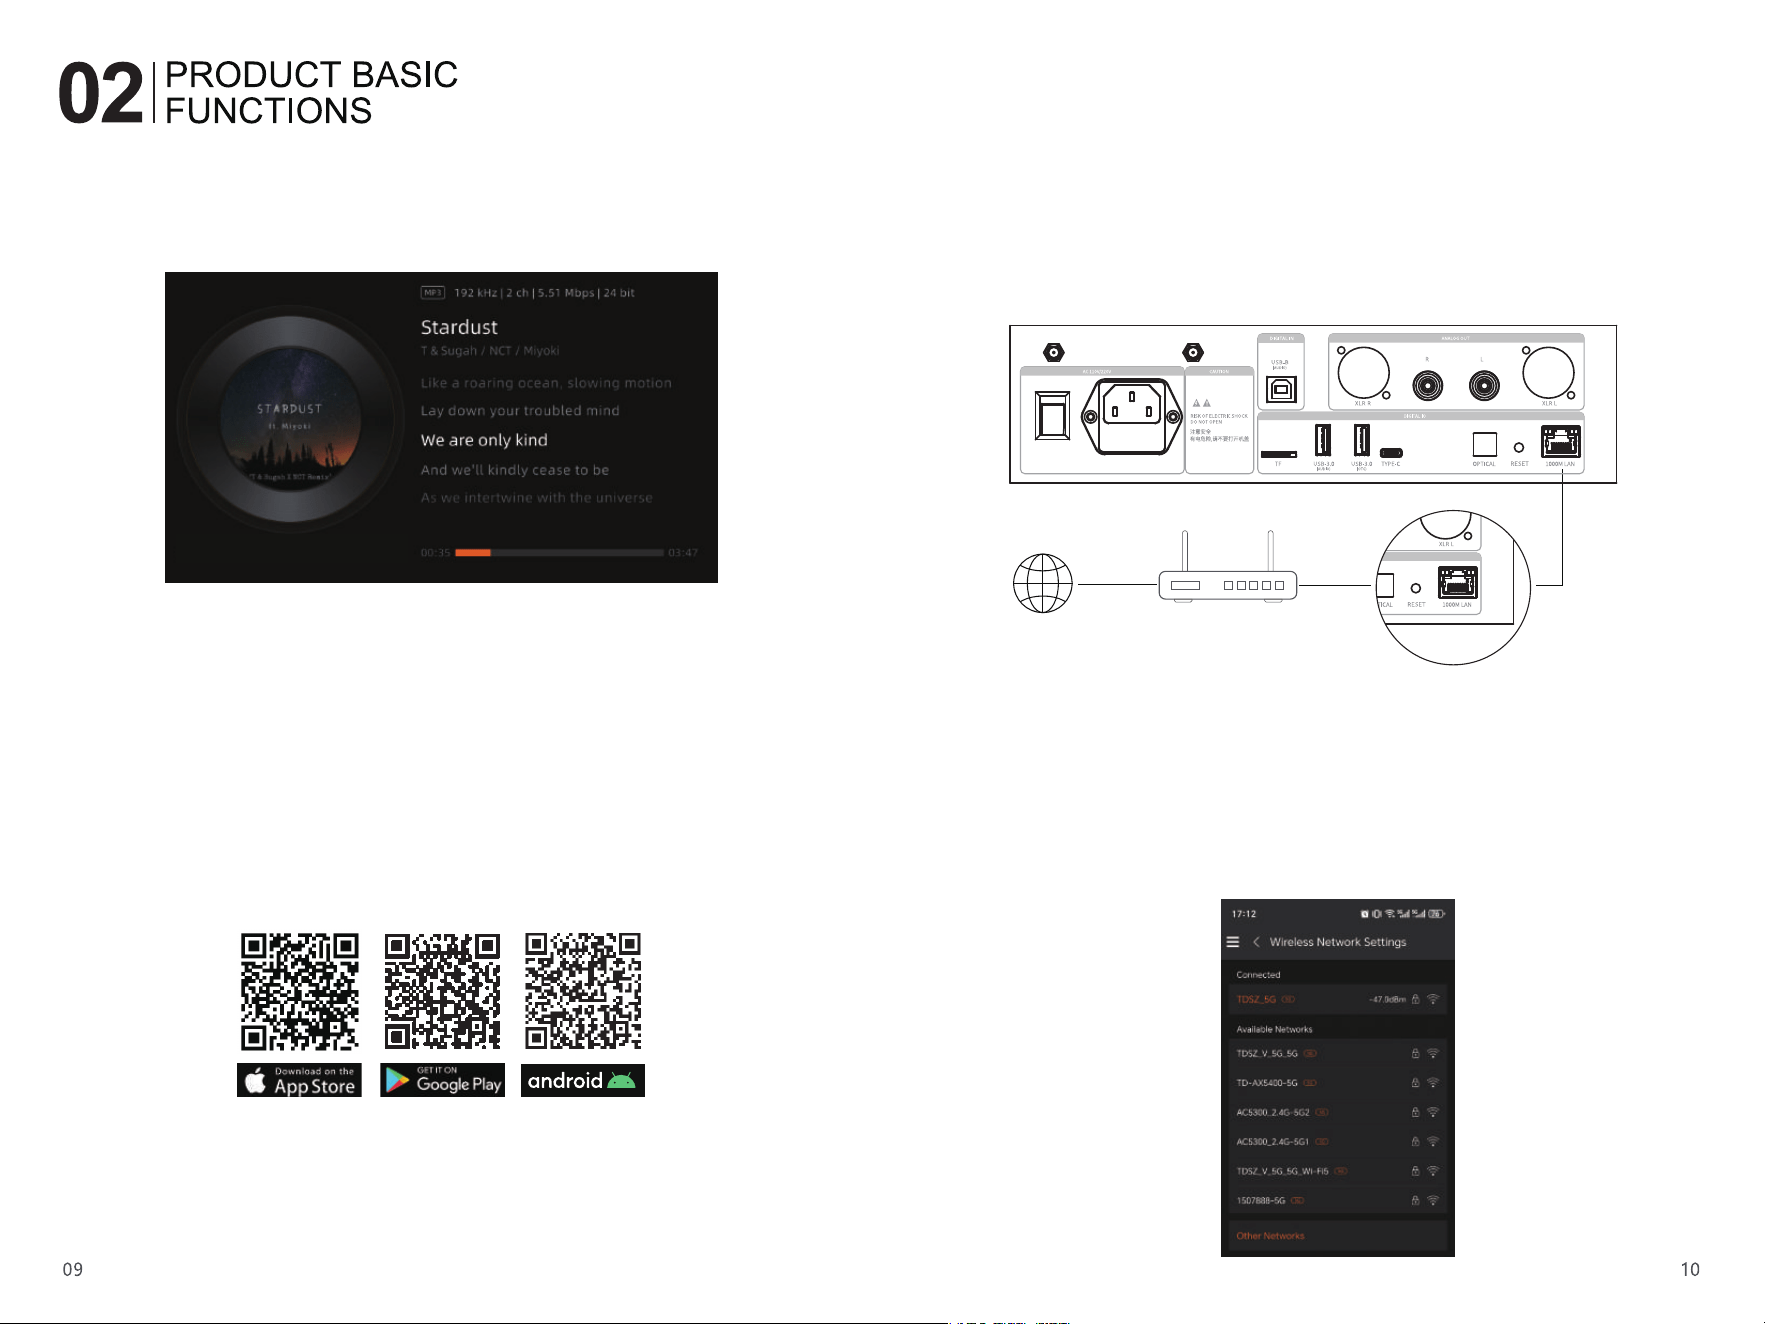
Before using the Silent Angel H1, please complete network connection first. For wired
networking, connect an Ethernet cable routed from the LAN port of your router or switch to
the network port on the device; the unit will obtain network access automatically.
Afterwards, launch the installed VitOS Orbiter control APP on a mobile device within the
same local area network. The APP will automatically detect the Silent Angel H1. Select the
corresponding device and tap to enter the control page, then you can fully operate the
player for audio playback and all other functions.
Wi-Fi Connection
When the device is already connected via wired Ethernet and paired normally with your
mobile device, navigate to More Settings > Network Settings > Wireless Network Settings in
the left sidebar menu to configure Wi-Fi connection. Once connected successfully, you may
disconnect the Ethernet cable. The player will automatically reconnect to the saved Wi-Fi
upon subsequent power-on for convenient control.
Alternatively, you may set up Wi-Fi via AP Mode without a pre-existing wired network
connection. Refer to the section AP Mode Configuration in this manual for detailed
operating steps.
Note:
Silent Angel H1 must be connected to the network first, and it can only be discovered
by your mobile device when both are on the same local network.
Ethernet cable
Network Router
Ethernet cable
Streaming Music
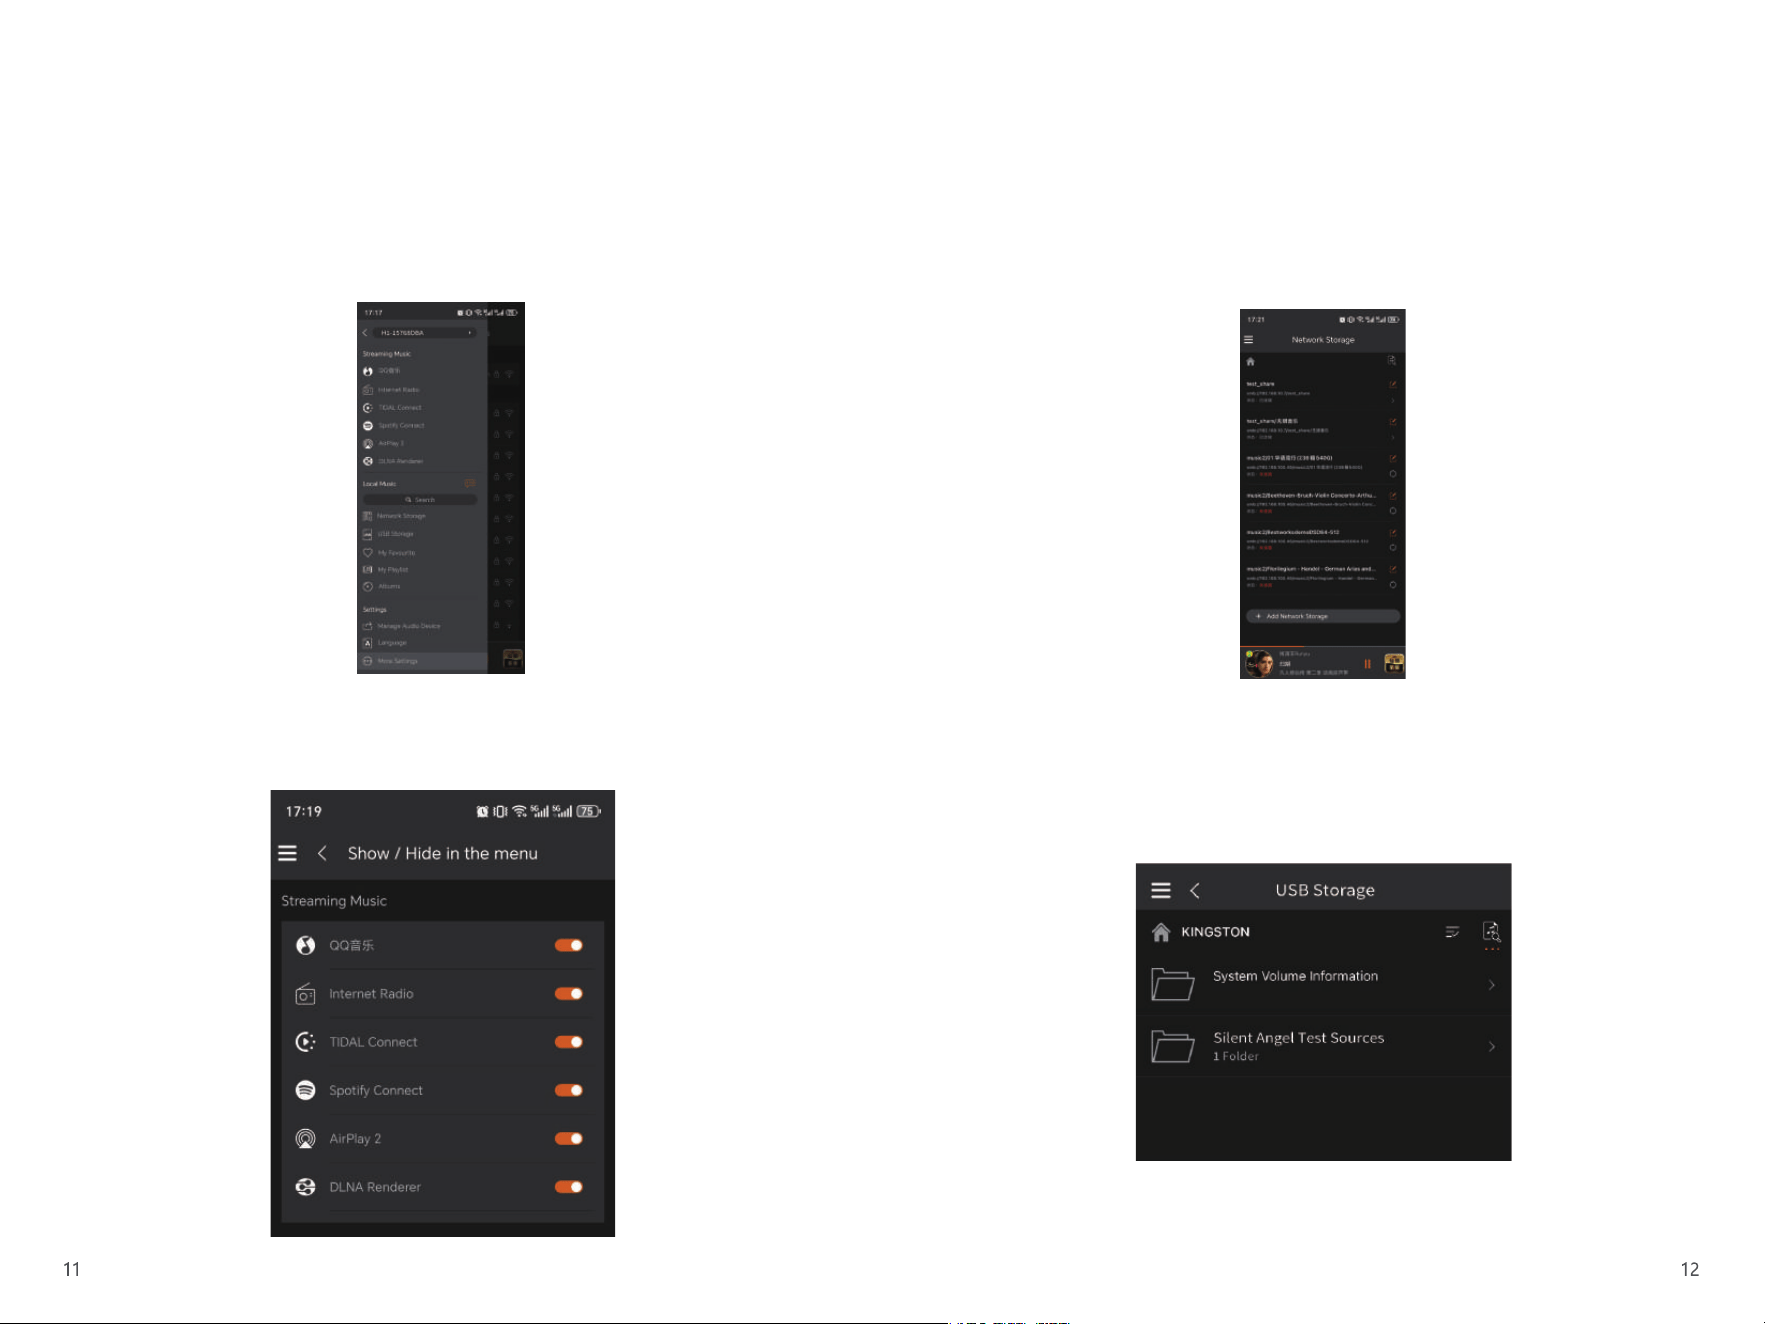
The Silent Angel H1 is pre-installed with QQ Music Silent Angel Premium, HIGHRESAUDIO
(beta), Internet Radio, TIDAL Connect, Spotify Connect, AirPlay 2 and DLNA Renderer.
Simply tap the target application to control playback directly.
Network Storage
Silent Angel H1 supports playback from LAN NAS and SMB network shares. Navigate to
Network Storage > Add Network Storage in the left menu bar; the device will automatically
scan all shared devices on the local network. If automatic scanning fails, perform a manual
scan instead. Select the target storage device, complete login and connection, then you can
access and play music files conveniently.
(Note: If the selected path contains a large number of music files, please wait patiently
during the NAS scanning process.)
USB Storage
Silent Angel H1 supports external USB storage devices. After plugging the USB drive into the
unit’s USB port, tap USB Storage in the left sidebar menu. The player will recognize the
external storage, allowing you to play music tracks, add songs to favorites, create playlists
and perform other related operations.
Note:
For portable hard drives without separate power supply, the maximum supported capacity
is 1 TB. Supported file systems: exFAT, FAT32, NTFS.
The streaming music sidebar on the left supports showing or hiding individual apps. Go to
More Settings in the menu bar > Show/Hide in Menu to toggle the display status of apps in
the list.
My Favorites
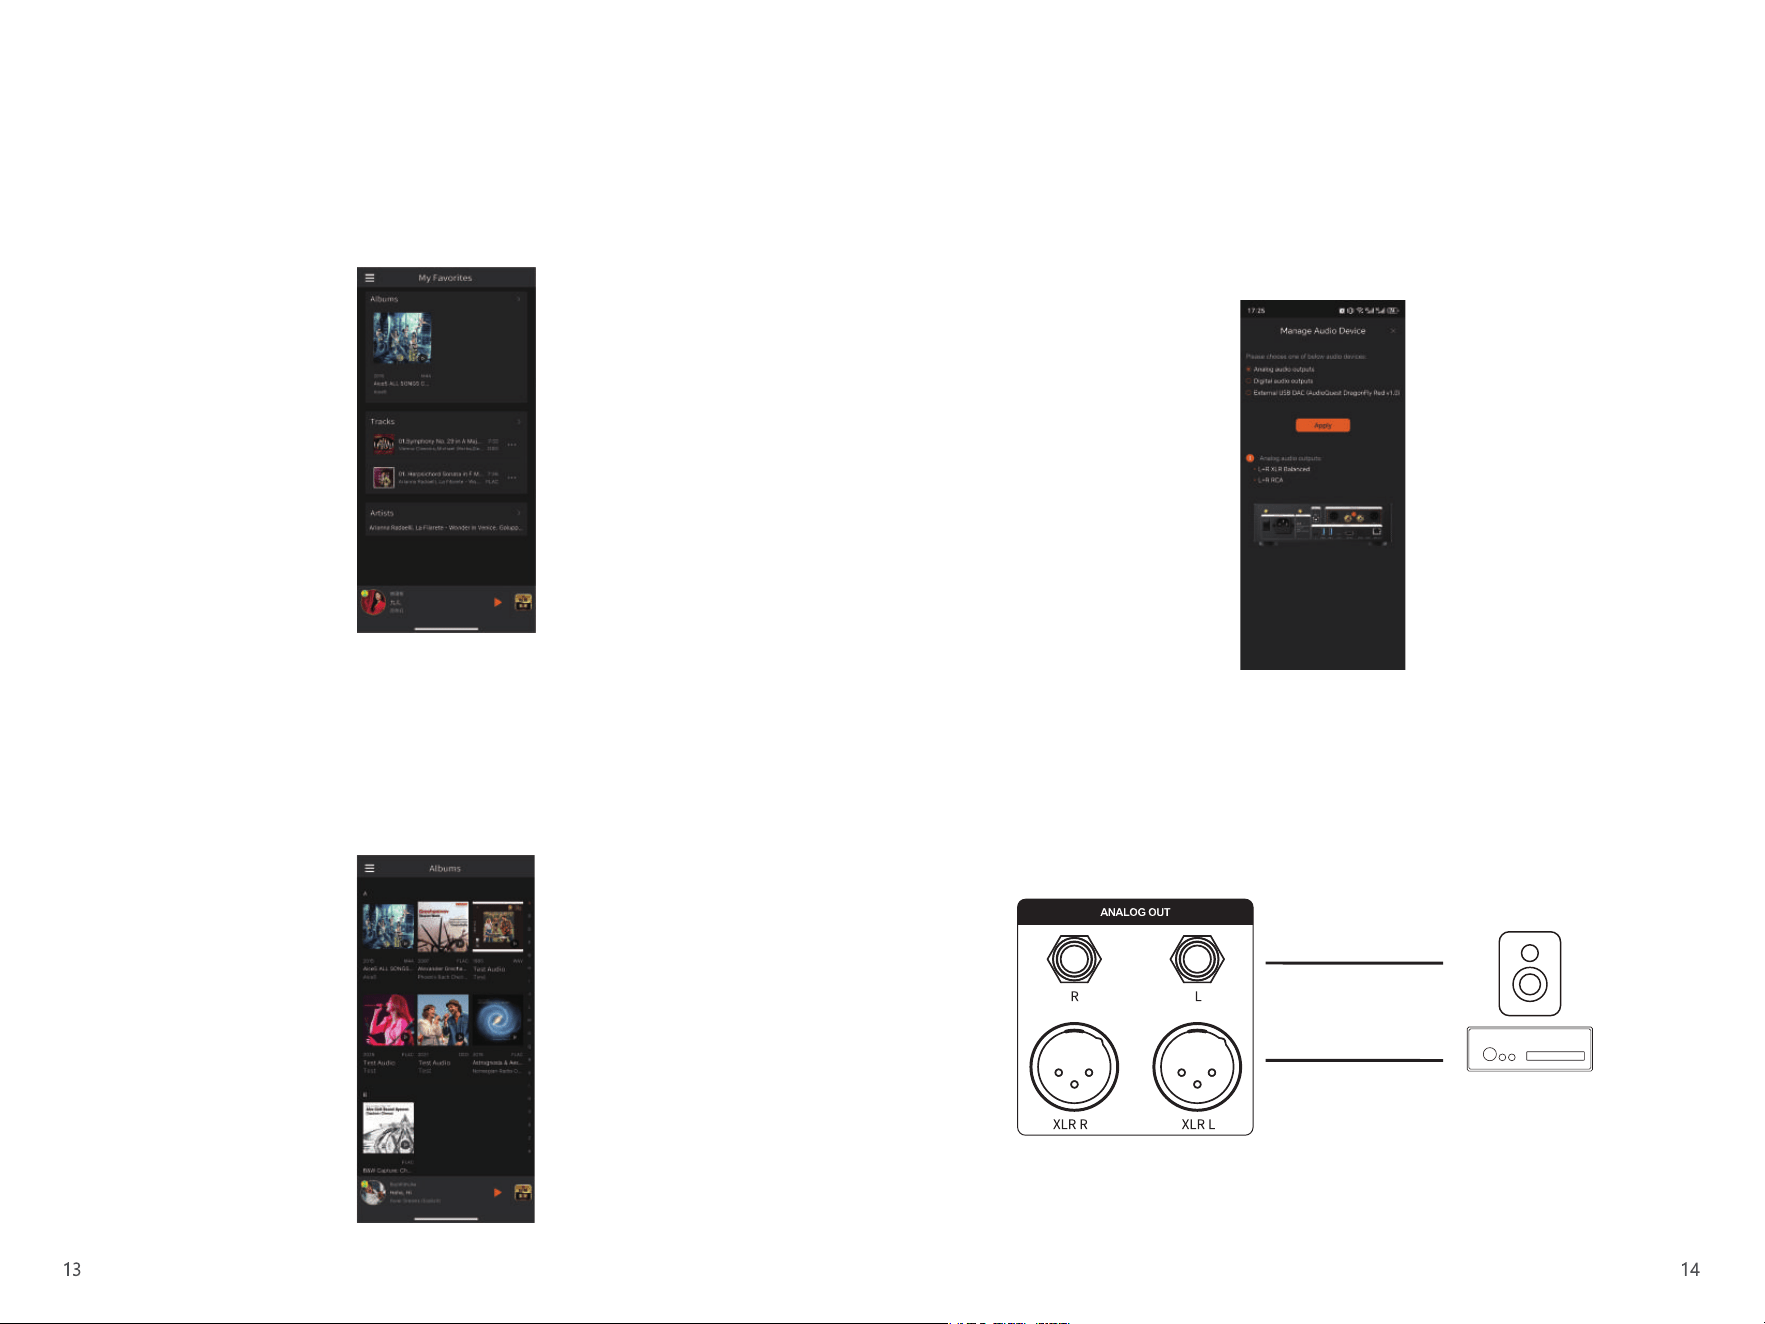
The My Favorites function supports favoriting albums, tracks and artists. You may manage
them according to your preferences for quick one-tap access to your favourite music.
Selection and Connection of
Inputs and Outputs
Select the corresponding input and output options according to your actual device
connection configuration.
Options include output to an external USB decoder. Details of connection and operation for
the three output modes are shown below:
The device defaults to playback via its built-in player. Available output options include
analog audio output and digital audio output.
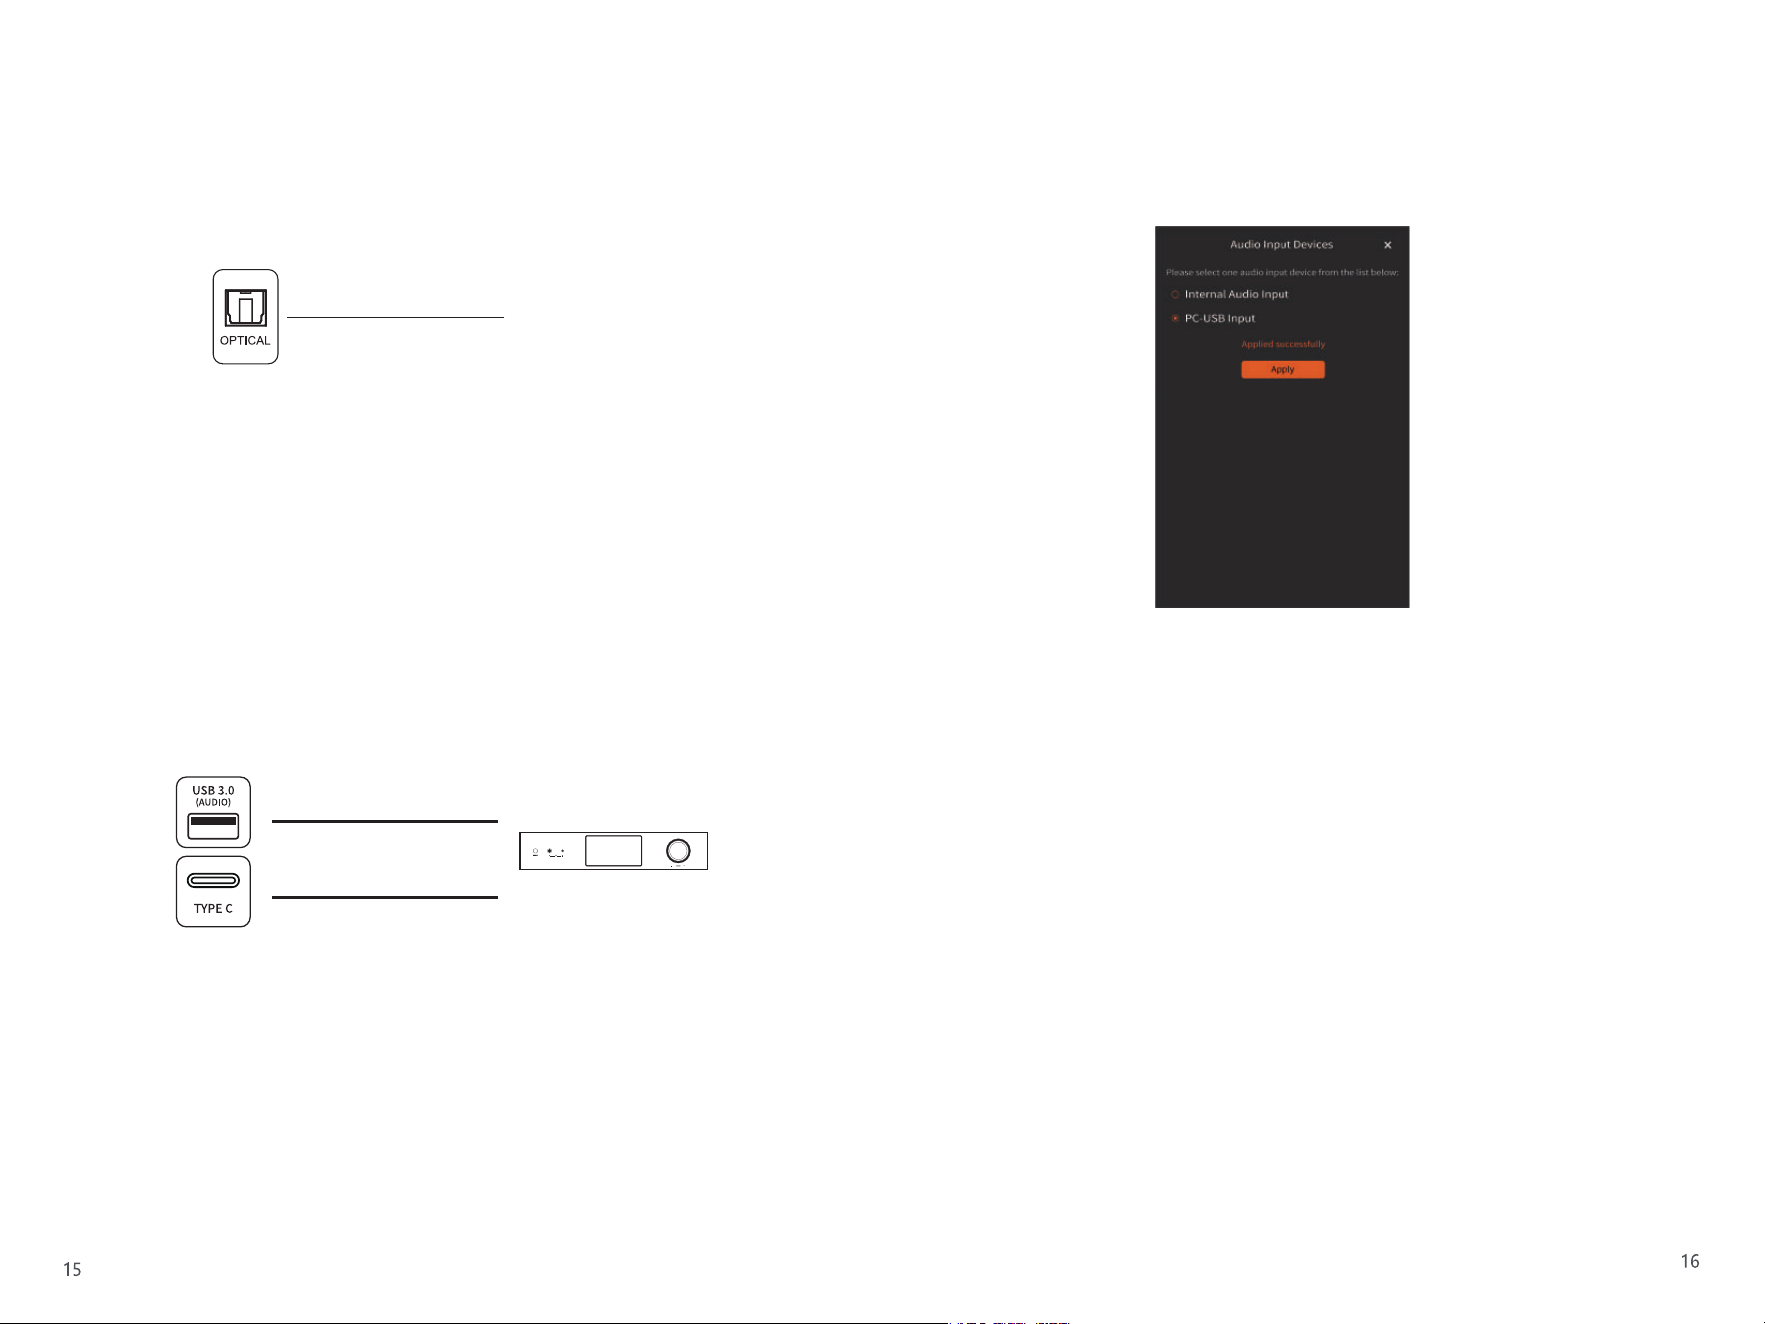
1. Analog Audio Output Mode
Use a pair of XLR balanced audio cables or high-quality RCA audio cables to connect the left
and right channels of the unit’s XLR balanced port or RCA port to the corresponding XLR
balanced input or RCA input of your power amplifier or active speakers.
Set the audio output to Analog Audio Output within the control APP and tap Apply to
confirm the setting. Switch the input source of the power amplifier to XLR or RCA according-
ly; you may then play local music and music from built-in streaming applications directly.
Note:
*XLR and RCA signals are hardware-decoded by the built-in DAC, supporting up to DSD256
and PCM 32bit/768kHz.
Album Usage
After installing the internal SSD and connecting USB storage devices, tap Albums in the left
menu bar to enter the album page. The device will automatically scan album covers of
music files stored in local USB storage, sort albums alphabetically by the initial letter, and
you can start playback directly.
RCA audio cable
XLR balanced audio cable
Power Amplifier / Speakers
USB Input Mode
When using the USB-B port for input, analog audio output (XLR/RCA) is available. The
connection and operation steps are as follows:
1. Connect a high-quality well-shielded DAC cable to the USB-B female port on the rear
panel of the Silent Angel H1, then plug the other USB-A or USB-C connector into a comput-
er, mobile phone or other devices.
2. Use a pair of XLR balanced audio cables or high-quality RCA audio cables to connect the
left and right channels of the unit’s XLR balanced interface or RCA interface to the
corresponding XLR balanced input or RCA input of your power amplifier or active speakers.
3. In the menu bar of the control APP, go to More Settings > Device Settings > General >
Audio Input Device, switch to PC-USB Input and tap Apply. Set the input source of the
power amplifier or active speakers to XLR or RCA accordingly. Meanwhile, set the audio
output to Analog Audio Output in the control APP and tap Apply to confirm.
4. After properly installing the driver and playback software on a Windows PC following the
tutorial, the device can normally play audio files up to DSD512 and PCM 32bit/768kHz.
5. When connected to the Type-C port of a mobile phone, the phone can stream audio
directly for decoding and playback via the Silent Angel H1.
2. Digital Audio Output Mode
Connect the optical port of this unit to the input port of a decoder or AV amplifier with a
square-ended optical audio cable. Set the audio output mode to Digital Audio Output in the
control APP and tap Apply. You can then play local music and music from built-in streaming
applications directly.
3. External USB DAC Output Mode
Connect this unit’s USB AUDIO or Type-C port to the USB input port of an external DAC via a
USB audio cable.
Set the audio output option to External USB DAC Output in the control APP and tap Apply.
Afterwards, local music and tracks from built-in streaming apps can be played directly.
Note:
*The USB audio output supports up to PCM 32bit/768kHz and DSD256.
Note:
*The optical output supports a maximum PCM resolution of 24bit/192kHz. For DSD audio,
only D2P and DOP64 modes are available.
optical audio cable
AV receiver / Decoder
USB A to USB B audio decoding cable
USB-C to USB B audio decoding cable
DAC
Menu Language Setting
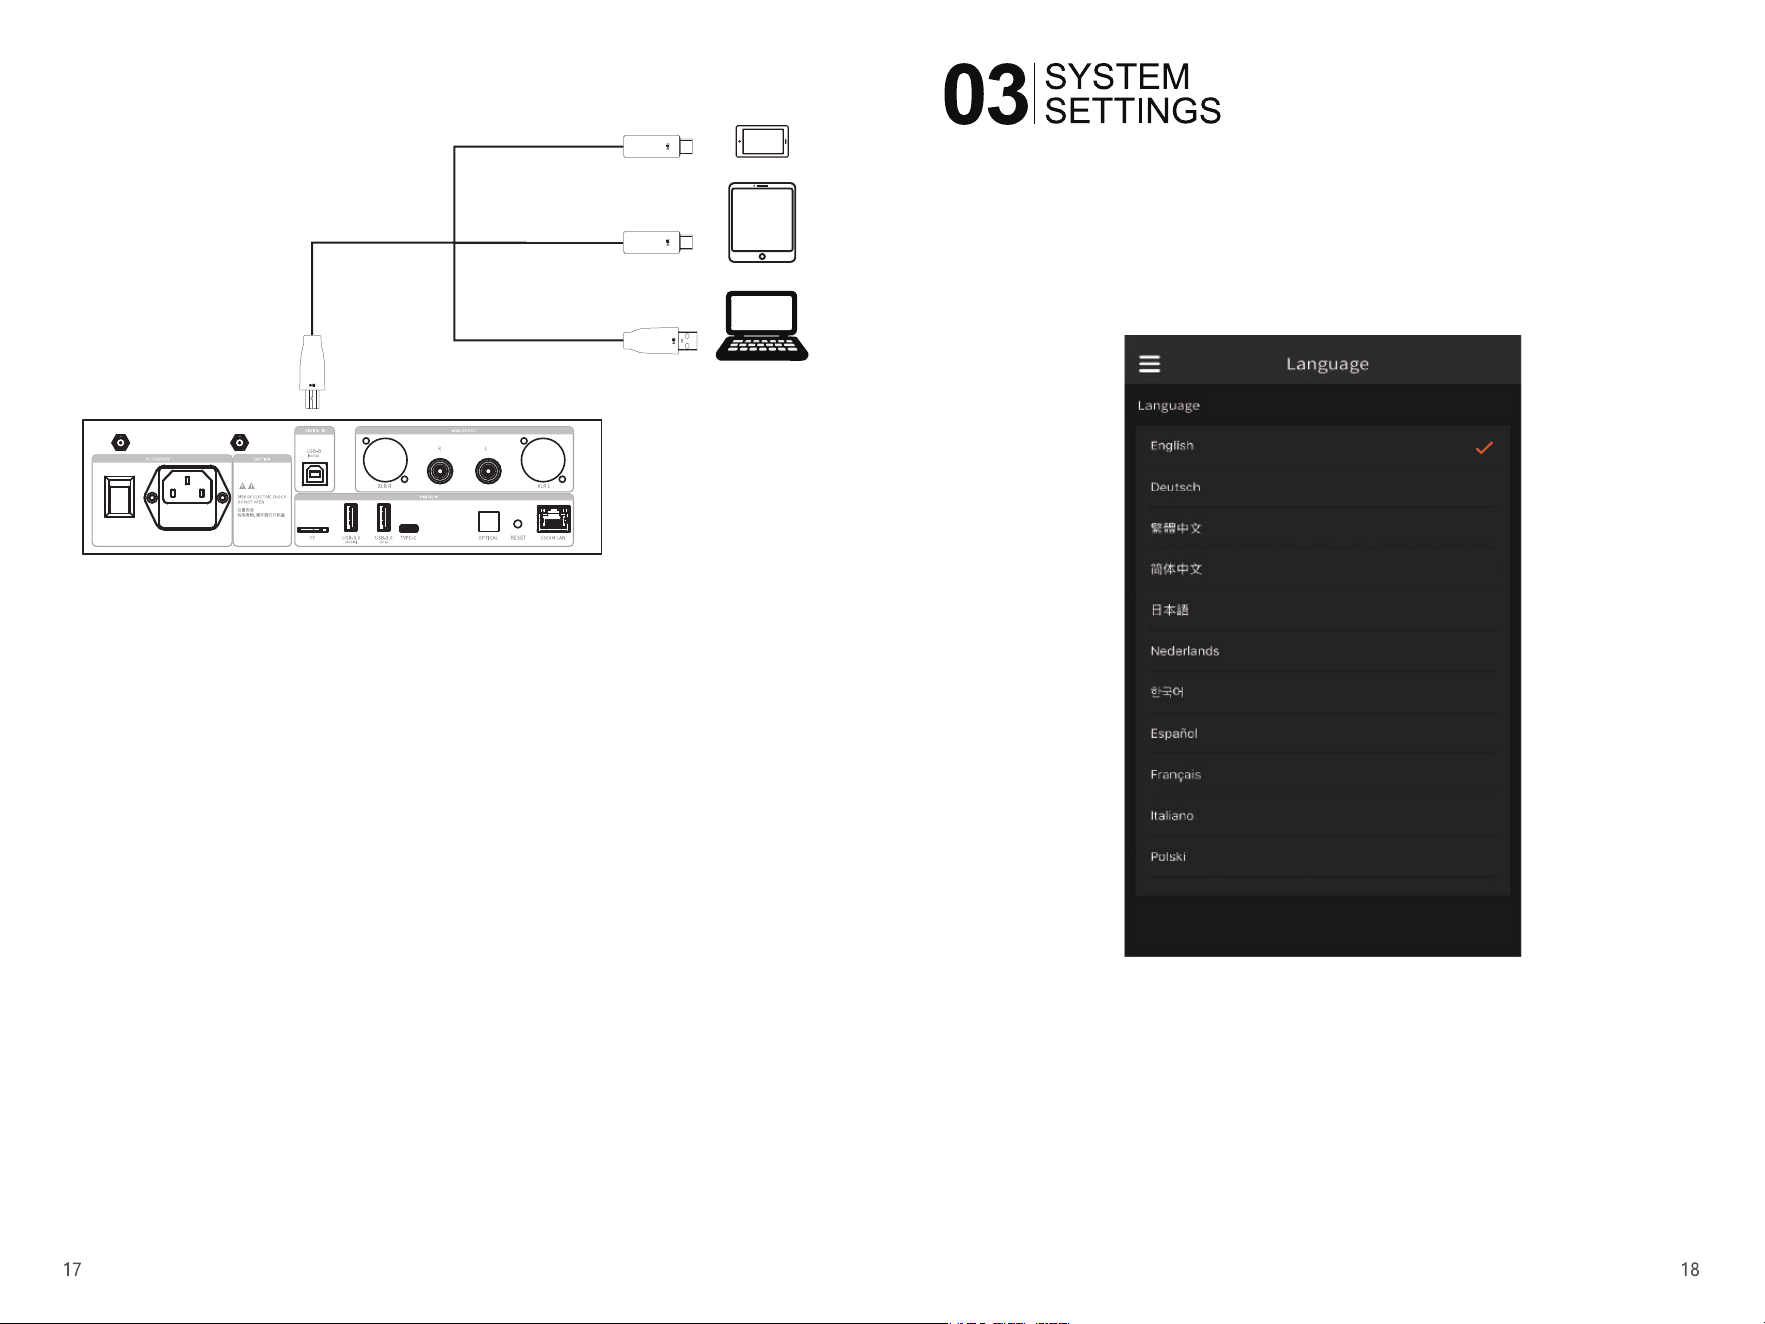
Go to the left sidebar menu of the control APP > Language, then select your preferred
display language for the interface menus.
Notes
*For Windows PCs, download and install the driver from the official Kaiboer website. Scan
the QR code on the right to access relevant video tutorials and driver downloads.
*Mac computers install the driver automatically. Simply select this USB device as the system
audio output in system settings.
*Certain Android smartphones such as Huawei require switching the USB connection mode
to MIDI prior to connecting the cable. If no audio is heard, reconnect the cable and turn up
the device volume.
*For OPPO, VIVO and similar mobile phones, enable the OTG switch under Additional
Settings before making the connection. Playback anomalies may stem from APP compati-
bility issues and are not attributable to this unit itself.
*To play DSD audio on mobile phones, use a compatible playback APP and activate the
exclusive USB audio mode within the APP.
(Remark: The driver is incompatible with Windows XP; Windows 7 or newer operating
systems are required.)
Service Account Management
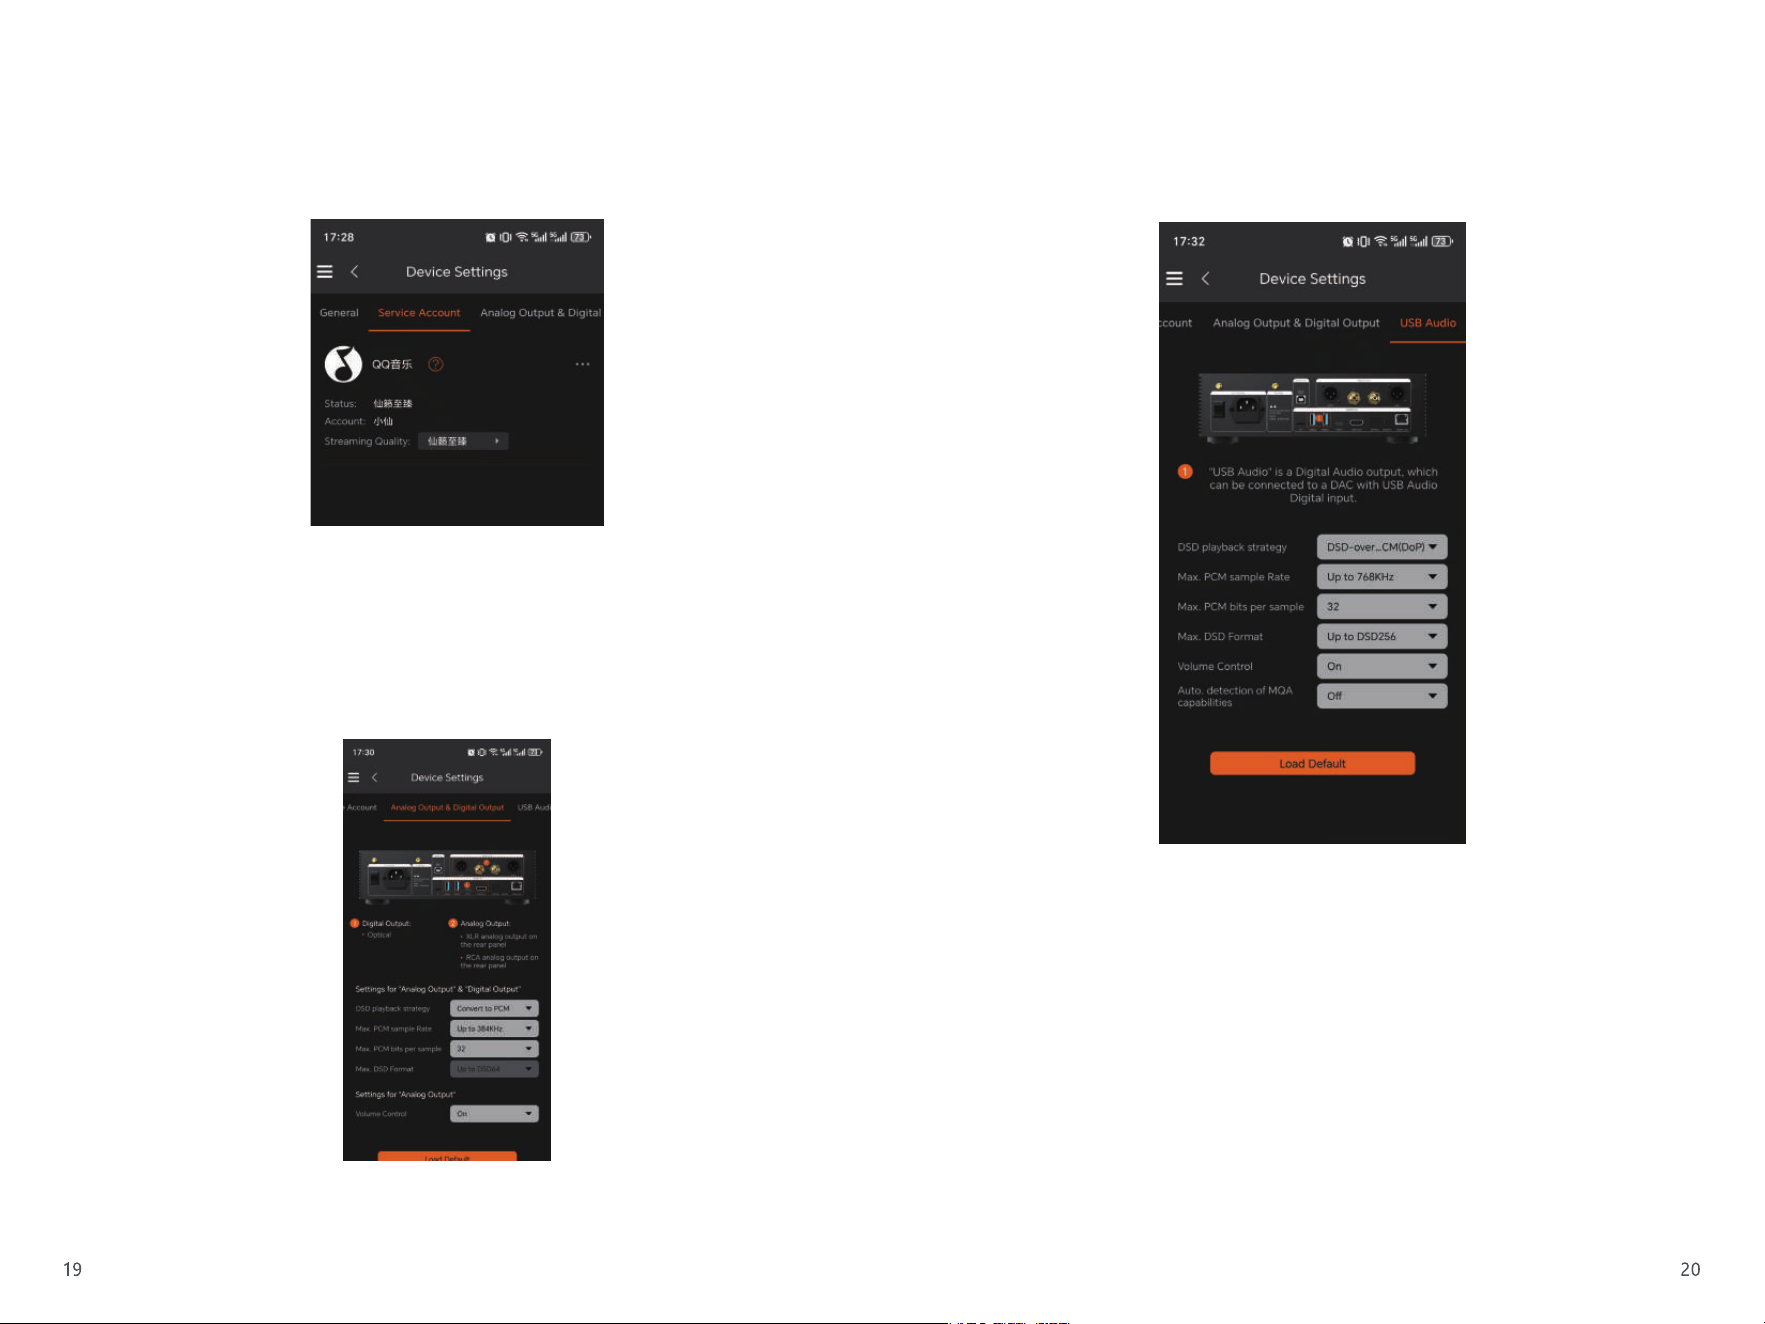
In the left menu bar of the control APP: More Settings > Device Settings > Service Account.
This page displays the login account information for the streaming apps built into the
device. You may check account status and configure streaming audio quality here.
USB Audio Output Settings
On the left menu bar of the control APP: More Settings > Device Settings > USB Audio
Output.
Parameters such as format, sampling rate and bit depth sent via USB to an external DAC can
be configured on this page.
Analog & Digital Output Settings
Navigate via the left menu bar of the control APP: More Settings > Device Settings > Analog &
Digital Output.
On this page, you may configure parameters including format, sampling rate and bit depth
for optical output as well as XLR/RCA output.
Note:
*The optical audio output supports a maximum of PCM 24bit/192kHz and DOP64.
Note:
*USB audio output supports up to DOP256, D2P, and PCM 32bit/768kHz.
Product certificate card
Inspected and qualified in accordance with technical specifications,
approved for delivery.
AP Mode Configuration
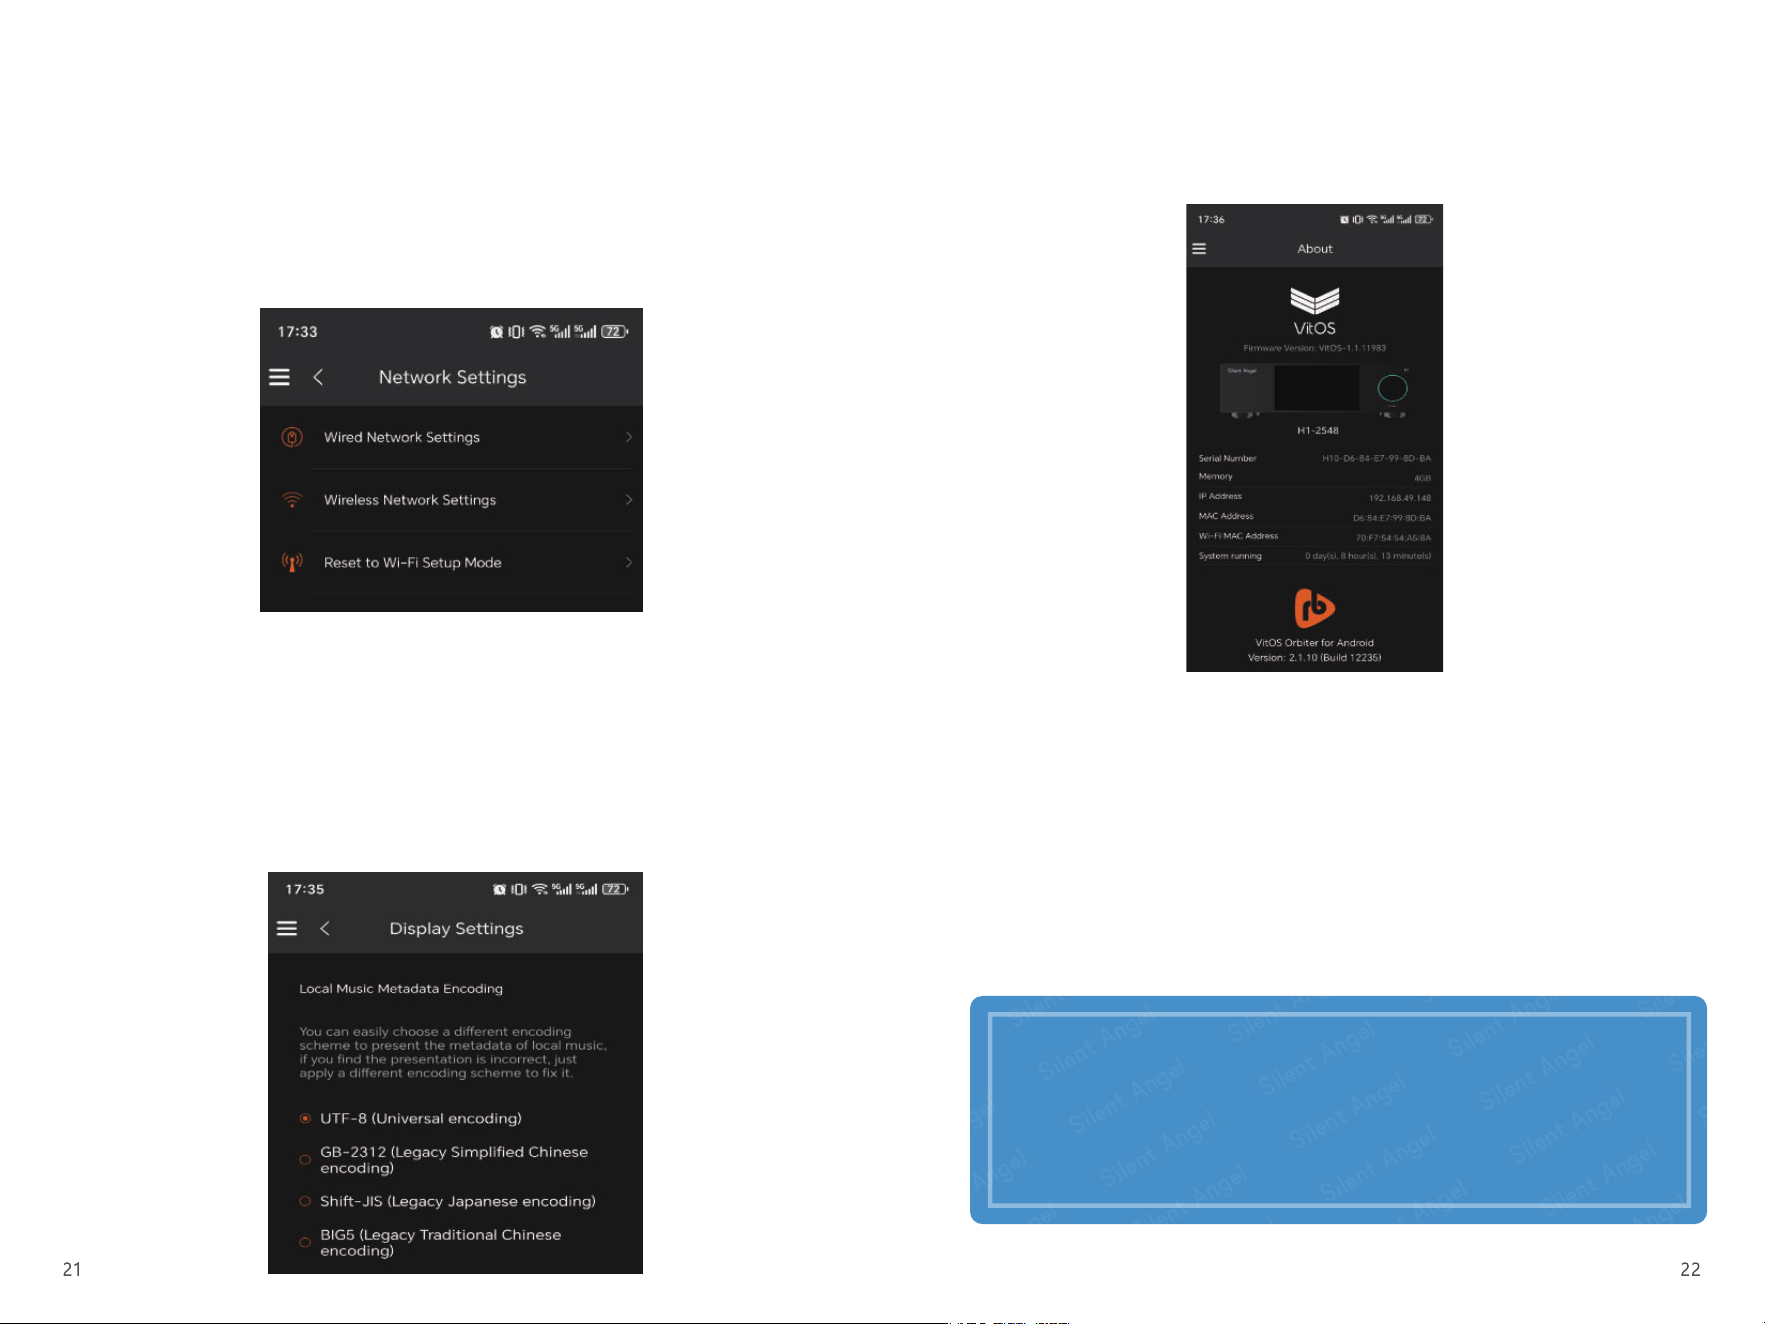
On the left menu bar of the control APP: More Settings > Network Settings > Reset to AP
Mode. You may reset the network to AP mode on this page.
Alternatively, press and hold the volume knob on the front panel of the unit for more than 5
seconds to reset the network to AP mode. This configuration method requires no network
cable for network provisioning.
Go to the Wi-Fi settings on your mobile phone, search for the Wi-Fi signal named H1-xxxxxx
and connect to it without a password. Launch the VitOS Orbiter control APP afterwards,
navigate to the left menu bar: More Settings > Network Settings > Wireless Network Settings,
then select an available Wi-Fi network to complete the connection.
System Upgrade
Navigate through the left menu bar of the control APP: About.
The latest firmware upgrade information can be viewed on this page. Tap the upgrade
button directly if an update is needed, then follow the on-screen prompts to finish the
upgrade process. The unit will restart automatically once the upgrade is completed.
Display Settings
Go to the left menu bar of the control APP: More Settings > Display Settings.
Different metadata encoding formats can be selected on this page to fix abnormal display
issues of local music information.
Special Statement
Silent Angel will release irregular firmware updates to continuously optimize user experi-
ence.
The contents of this manual may differ slightly from the actual operation of the product. We
reserve the right to adjust the functions and specifications of the device without prior
notice.
For further operation guidelines, please visit our official website: www.silentangel.com
Note:
*After you configure the unit to connect to Wi-Fi via your mobile phone, please ensure your
mobile phone is connected to the same Wi-Fi network as the device.
Note:
*Do not power off the device during the firmware upgrade process.

This device complies with part 15 of the FCC Rules. Operation is subject to the
following two conditions: (1) This device may not cause harmful interference, and (2)
this device must accept any interference received, including interference that may cause
undesired operation.
Any Changes or modifications not expressly approved by the party responsible for
compliance could void the user's authority to operate the equipment.
Note: This equipment has been tested and found to comply with the limits for a Class B
digital device, pursuant to part 15 of the FCC Rules. These limits are designed to
provide reasonable protection against harmful interference in a residential installation.
This equipment generates uses and can radiate radio frequency energy and, if not
installed and used in accordance with the instructions, may cause harmful interference
to radio communications. However, there is no guarantee that interference will not
occur in a particular installation. If this equipment does cause harmful interference to
radio or television reception, which can be determined by turning the equipment off and
on, the user is encouraged to try to correct the interference by one or more of the
following measures:
-Reorient or relocate the receiving antenna.
-Increase the separation between the equipment and receiver.
-Connect the equipment into an outlet on a circuit different from that to which the
receiver is connected.
-Consult the dealer or an experienced radio/TV technician for help.
-This equipment complies with FCC radiation exposure limits set forth for an
uncontrolled environment. This equipment should be installed and operated with
minimum distance 20cm between the radiator & your body.