
OPERATING GUIDE FOR SD-425X-E, SD-825X-E, SD-1225X-E & SD-1825X-E
PLEASE READ THIS ENTIRE GUIDE BEFORE BEGINNING
MANUEL D’UTILISATION POUR SD-425X-E, SD-825X-E, SD-1225X-E ET SD-1825X-E
VEUILLEZ LIRE CE MANUEL DANS SON INTÉGRALITÉ AVANT DE COMMENCER
GEBRAUCHSANWEISUNG FÜR SD-425X-E, SD-825X-E, SD-1225X-E UND SD-1825X-E
BITTE VOR BEGINN DIE GESAMTE ANWEISUNG LESEN
GUIDA ALL’USO PER SD-425X-E, SD-825X-E, SD-1225X-E E SD-1825X-E
LEGGERE QUESTA GUIDA PER INTERO PRIMA DI INIZIARE
MANUAL DE FUNCIONAMIENTO PARA SD-425X-E, SD-825X-E, SD-1225X-E Y SD-1825X-E
LEA POR COMPLETO ESTE MANUAL ANTES DE EMPEZAR
GEBRUIKSAANWIJZING VOOR SD-425X-E, SD-825X-E, SD-1225X-E EN SD-1825X-E
LEES DE HELE GEBRUIKSAANWIJZING VOORDAT JE BEGINT
2 WWW.SPORTDOG.COM
Hereinafter Radio Systems Corporation, Radio Systems PetSafe Europe Ltd., Radio Systems Australia Pty Ltd.
and any other affiliate or Brand of Radio Systems Corporation may be referred to collectively as “We” or “Us”.
Thank you for choosing SportDOG® Brand training products. Used properly, this product will help you train
your dog efficiently and safely. To ensure your satisfaction, please review the Operating Guide thoroughly.
Please contact our Customer Care Centre for further assistance. For a listing of telephone numbers in your
area, visit our website at www.sportdog.com.
To get the most protection out of your warranty, please register your product within 30 days at
www.sportdog.com. By registering and keeping your receipt you will enjoy the product’s full warranty and,
should you ever need to call the Customer Care Centre, we will be able to help you faster. Most importantly,
your valuable information will never be given or sold to anyone. Complete warranty information is available
online at www.sportdog.com.
OTHER IMPORTANT INFORMATION
Use of this product implies acceptance of any and all terms, conditions, and notices related to this product
including, but not limited to, those found in this Operating Guide and the Insert containing important
Regulatory Compliance and Safety information that came with your unit.
TABLE OF CONTENTS
COMPONENTS ................................................................................................................. 3
HOW THE SYSTEM WORKS .............................................................................................. 3
KEY DEFINITIONS ............................................................................................................ 4
CHARGE THE REMOTE TRANSMITTER ............................................................................. 5
CHARGE THE COLLAR RECEIVER .....................................................................................6
FIT THE COLLAR RECEIVER..............................................................................................8
FIND THE BEST INTENSITY LEVEL ................................................................................... 8
CHANGING STATIC STIMULATION RANGES ...................................................................... 9
GENERAL TRAINING TIPS ................................................................................................ 9
PROGRAM THE REMOTE TRANSMITTER ........................................................................10
MATCH THE COLLAR RECEIVER AND REMOTE TRANSMITTER .......................................14
PROGRAM THE SYSTEM FOR MULTI-DOG OPERATION ...................................................14
CHANGE ID CODES ..........................................................................................................16
ACCESSORIES .................................................................................................................16
FREQUENTLY ASKED QUESTIONS ................................................................................... 17
TROUBLESHOOTING ...................................................................................................... 18
TEST LIGHT INSTRUCTIONS .......................................................................................... 19
BATTERY ........................................................................................................................ 19
videos available at www.youtube.com/sportdogintl or on each products’ VIDEOS tab at
sportdog.com.
3WWW.SPORTDOG.COM
• Remote Transmitter
• Collar Receiver
• Charging Adaptor
• Charging Cradle (SD-1225X-E & SD-1825X-E)
• Short/Long Contact Points
• Lanyard
• Belt Clip (SD-825X-E, SD-1225X-E, SD-1825X-E)
• Test Light Tool
HOW THE SYSTEM WORKS
Your SportDOG® Brand system has been proven safe, comfortable, and effective for all dogs over 3.6 kilograms.
Consistent, correct use of this product allows you to reinforce commands and correct misbehaviour as far
as1,600 metres, depending on your system (see below). The Remote Transmitter sends asignal, activating the
Collar Receiver to deliver a harmless stimulation. With proper training, a dog will learn to associate this signal
with a command. Like all SportDOG® products, this model features adjustable static stimulation levels so you
can tailor the stimulation level to your dog’s temperament, eliminating the risk of over-stimulation.
SD-425X-E: 450 METRES
SD-825X-E: 800 METRES
SD-1225X-E: 1,200 METRES
SD-1825X-E: 1,600 METRES
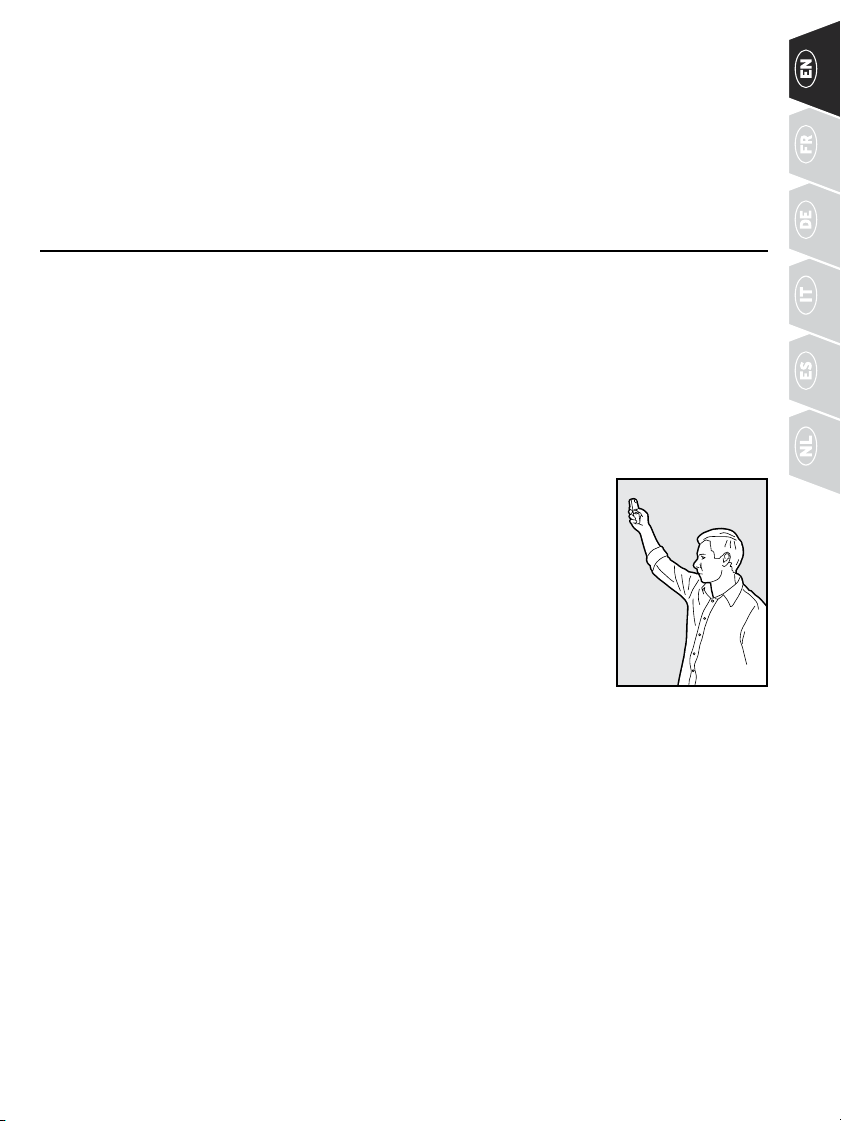
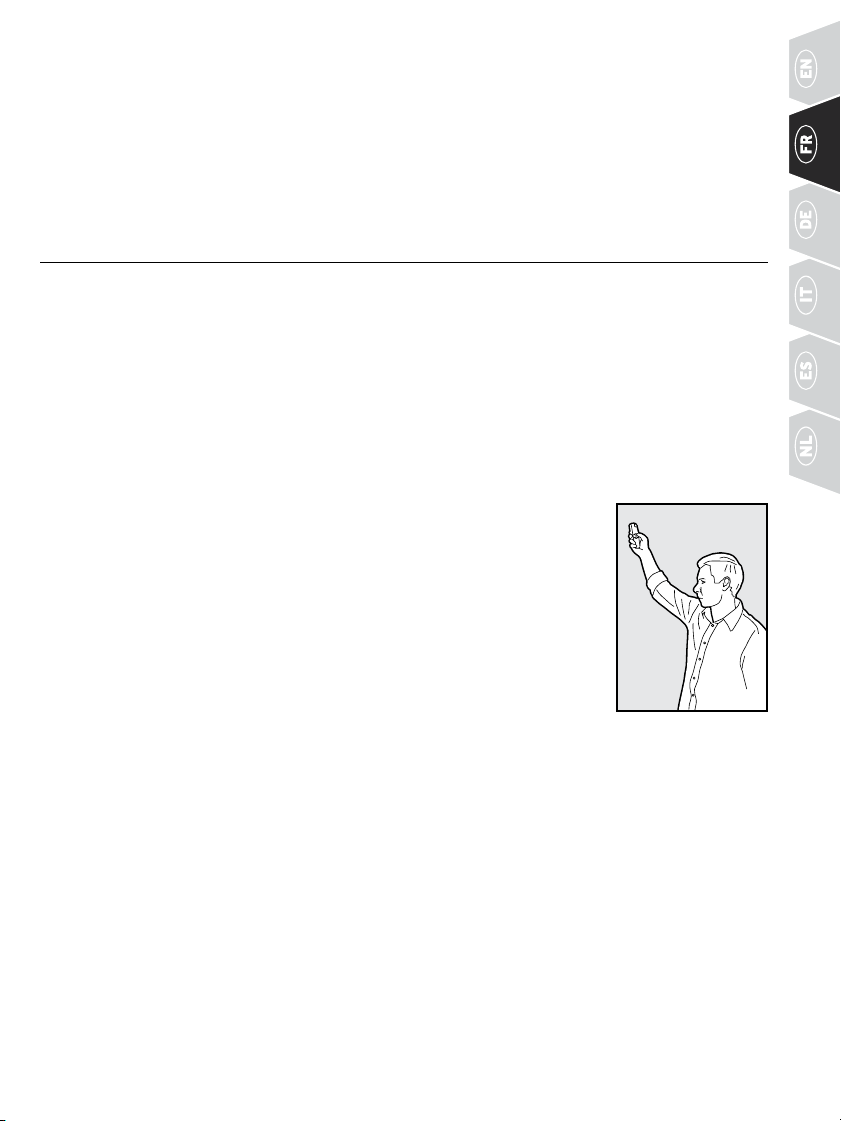
IMPORTANT: DEPENDING ON THE WAY YOU HOLD THE REMOTE TRANSMITTER,
THE MAXIMUM RANGE MAY VARY. FOR CONSISTENT RESULTS AT LONGER
RANGES, HOLD THE REMOTE TRANSMITTER IN A VERTICAL POSITION AWAY
FROM YOUR BODY AND ABOVE YOUR HEAD. TERRAIN, WEATHER, VEGETATION,
TRANSMISSION FROM OTHER RADIO DEVICES, AND OTHER FACTORS WILL
AFFECT THE MAXIMUM RANGE.
COMPONENTS
YOUR SD-425X-E, SD-825X-E, SD-1225X-E, OR SD-1825X-E SYSTEM
INCLUDES THE FOLLOWING:
4 WWW.SPORTDOG.COM
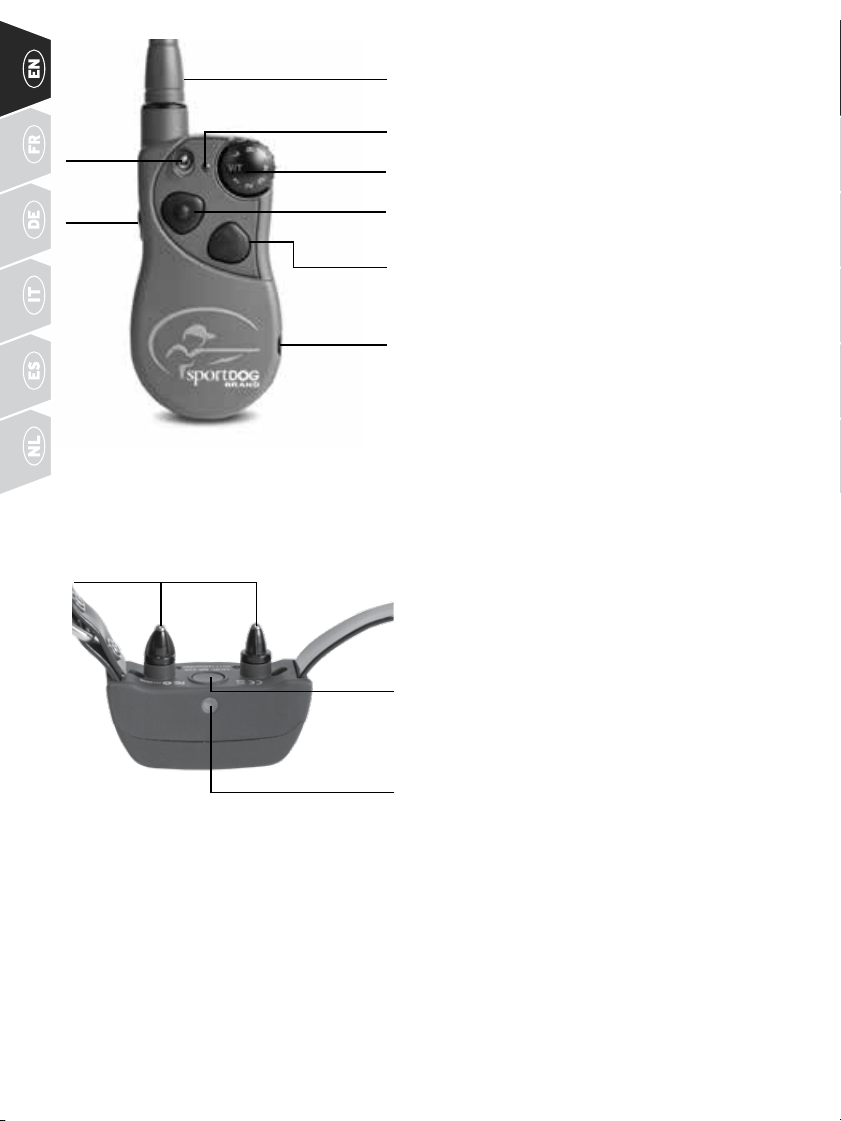
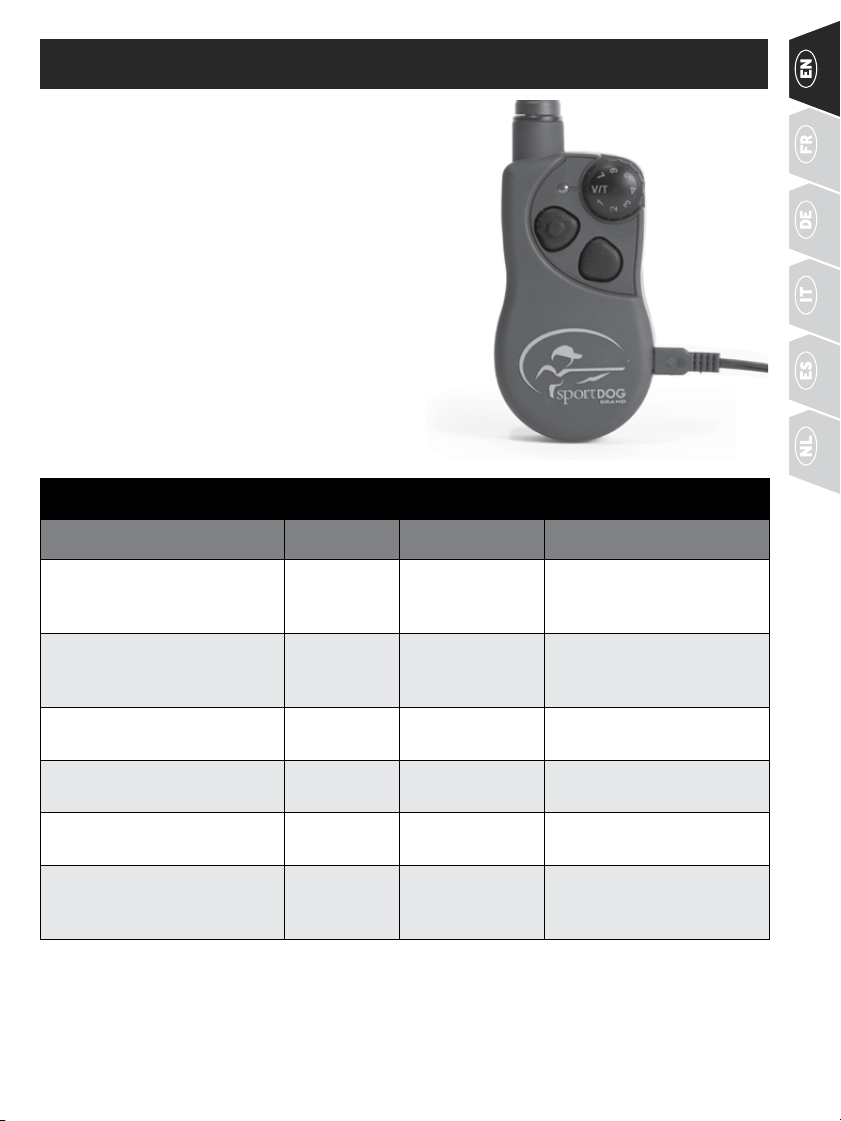
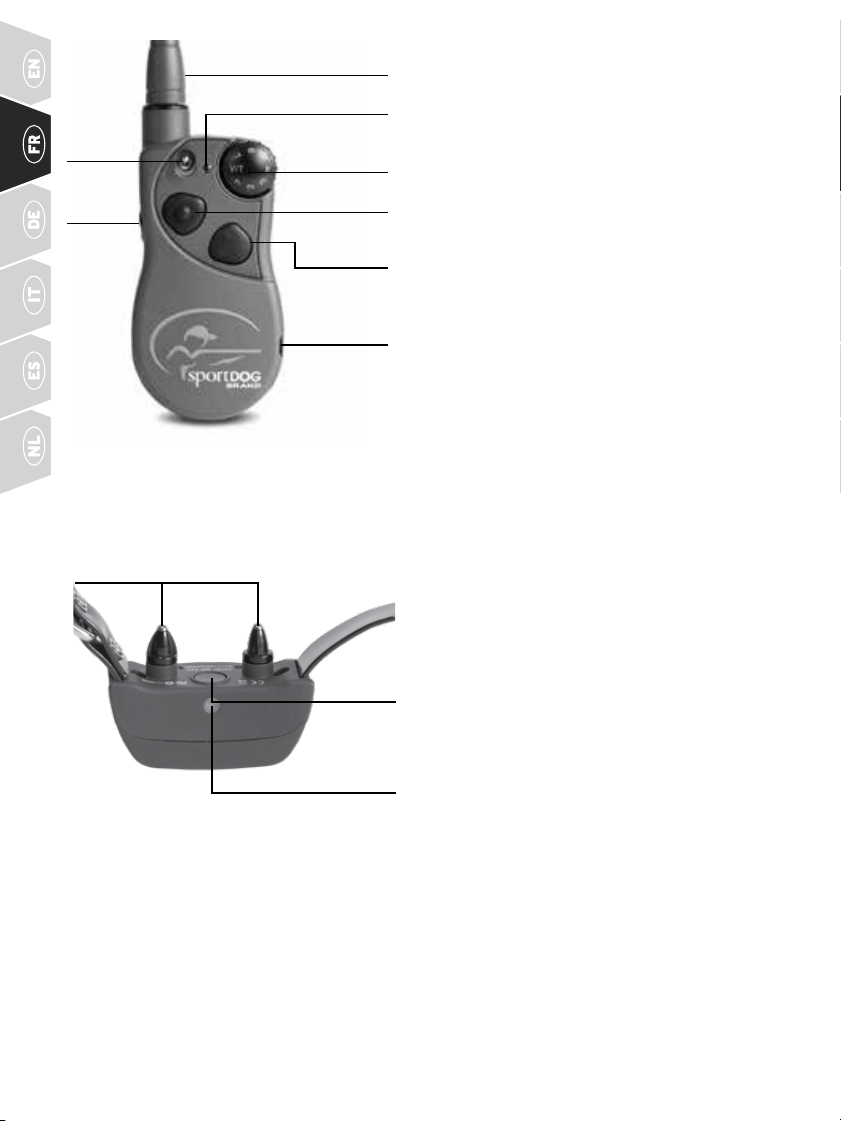
TRANSMITTER
INDICATOR LIGHT
TRANSMITTER
ANTENNA
INTENSITY DIAL
UPPER BUTTON
LOWER
BUTTON
CHARGING
JACK
SIDE
BUTTON
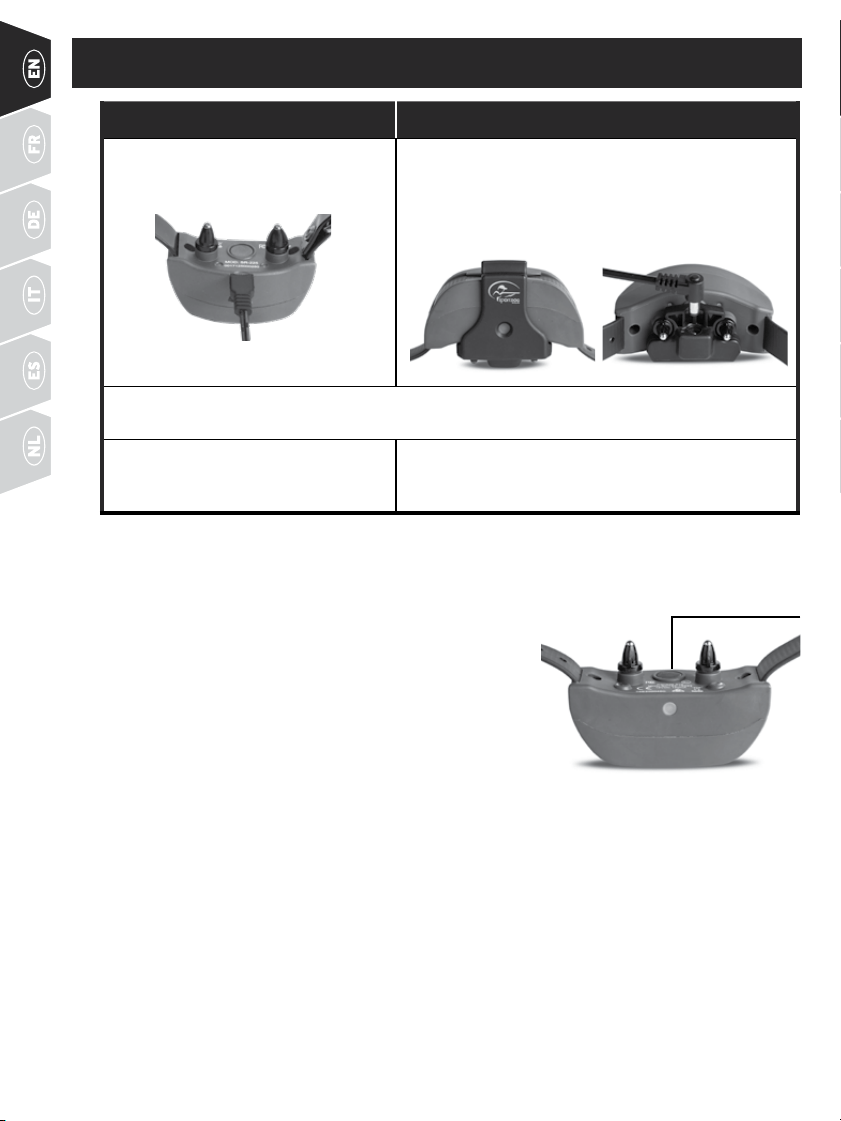
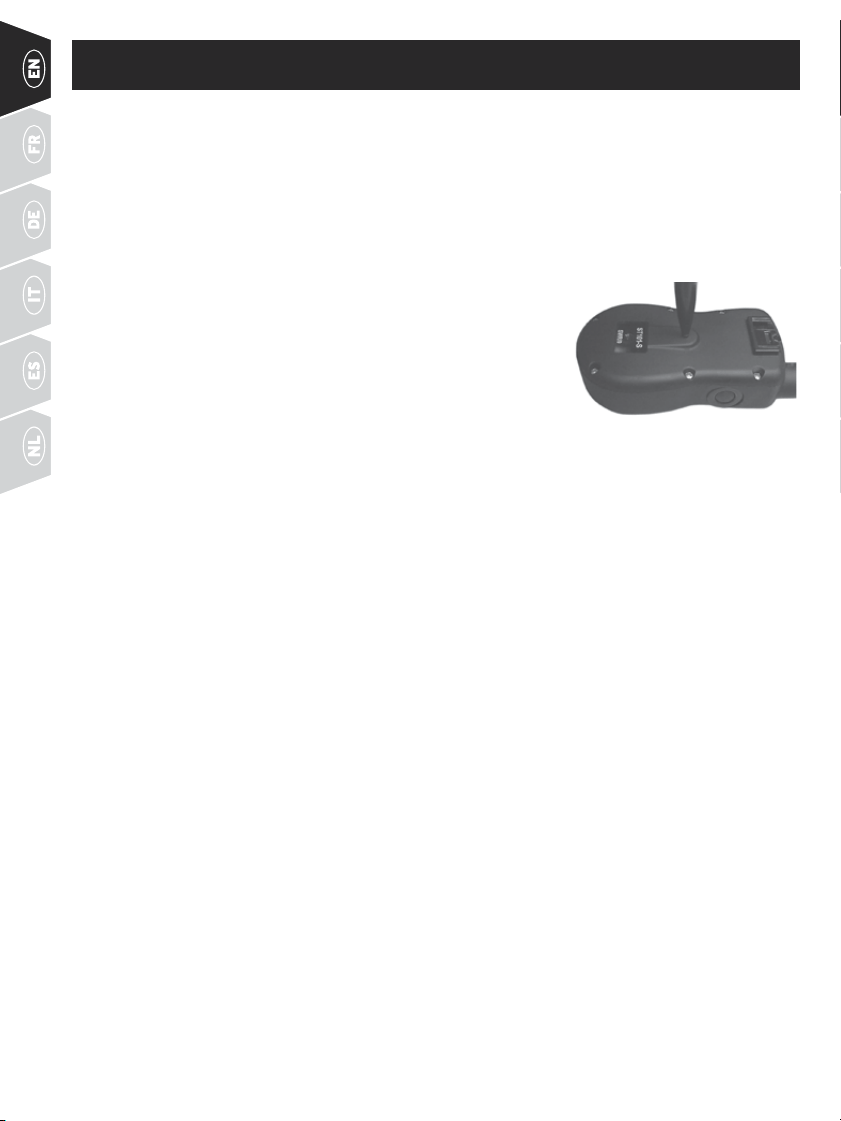
COLLAR RECEIVER: Receives the radio signal from the
Remote Transmitter and delivers the static, vibration, or
tone stimulation for correcting or cueing your dog. It is
waterproof and can be submerged in water to a depth of
7.5 metres.
RECEIVER INDICATOR LIGHT: Indicates when the Collar
Receiver has been turned on or off, serves as a low-
battery indicator, and also indicates when a continuous or
momentary (nick) static stimulation button is pressed.
CONTACT POINTS: The contacts through which the Collar
Receiver delivers static stimulation.
ON/OFF BUTTON: Momentarily pressing and releasing
this button turns the Collar Receiver on and off.
KEY DEFINITIONS
REMOTE TRANSMITTER: Transmits the radio signal to the
Collar Receiver. It is waterproof and can be submerged in
water to a depth of 7.5 metres.
INTENSITY DIAL: Provides multiple levels of static
stimulation so you can match the stimulation to your dog’s
temperament.
TRANSMITTER INDICATOR LIGHT: Indicates that a button
is pressed and also serves as a low-battery indicator.
TOGGLE SWITCH: This switch is factory-set so that the
Remote Transmitter can control two Collar Receivers.
UPPER BUTTON: This button is factory-set to deliver
medium continuous static stimulation.
LOWER BUTTON: This button is factory-set to deliver low
continuous static stimulation.
SIDE BUTTON: This button is factory-set to deliver high
continuous static stimulation.
CHARGING JACK: For connecting the charger. Although
the Remote Transmitter is waterproof without it, keep the
cover in place when not charging to keep debris out of the
opening.
MODE BUTTON: This button gives you the ability to change
the mode of your Remote Transmitter (see page 10).
ON/OFF
BUTTON
RECEIVER
INDICATOR LIGHT
CONTACT POINTS
THE COLLAR RECEIVER IS CAPABLE OF DELIVERING FOUR TYPES OF STIMULATION
CONTINUOUS: You control both when and how long static stimulation is delivered, up to a maximum of 10
seconds. After 10 seconds, the stimulation will “time out” and the Transmitter button needs to be released and
then pressed again before additional static stimulation can be delivered.
MOMENTARY (NICK): Static stimulation is delivered for 1/10 of a second, regardless of how long the button
is pressed.
TONE: The Collar Receiver will make a rapid beeping noise when a Tone button is pressed.*
VIBRATION: The Collar Receiver will vibrate when a Vibration button is pressed, up to a maximum of 10
seconds.*
*Tone and vibration come preset and are not adjustable
TOGGLE
SWITCH
(
1825X-E
ONLY
)
5WWW.SPORTDOG.COM
AFFECT THEMAXIMUM RANGE.
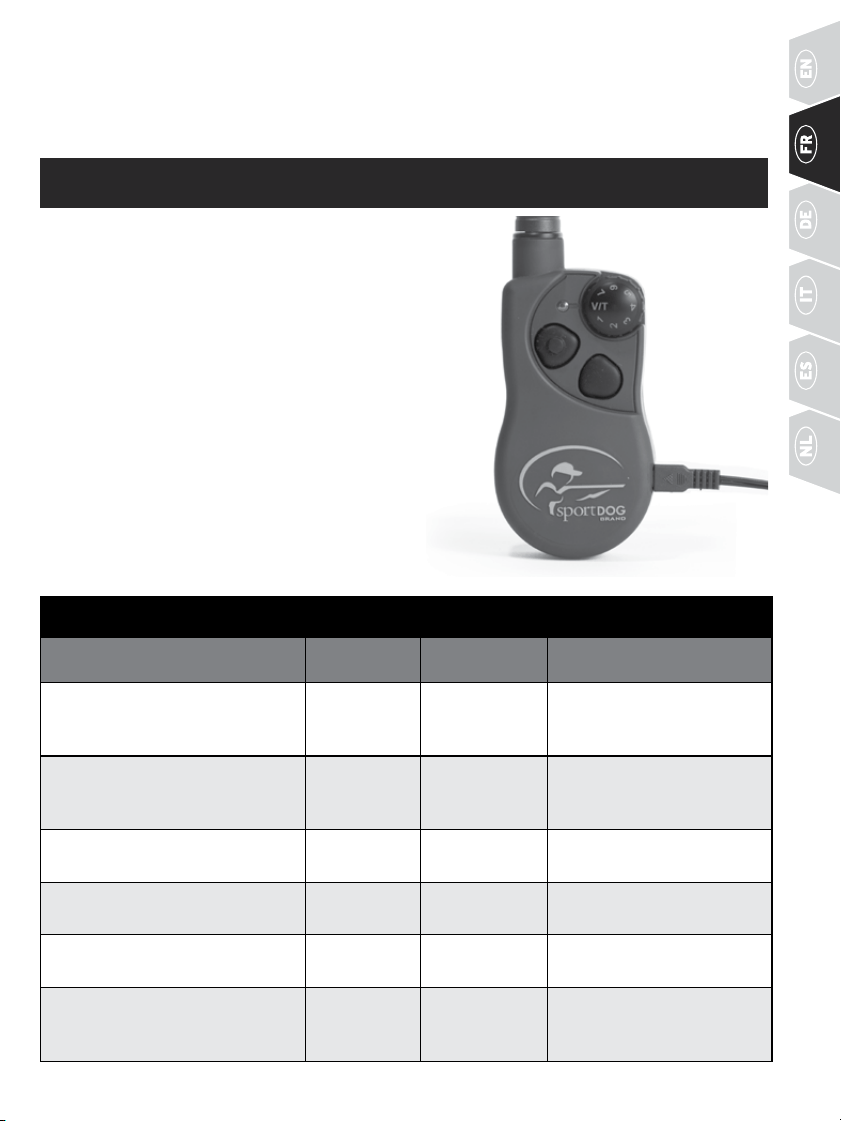
STEP
::
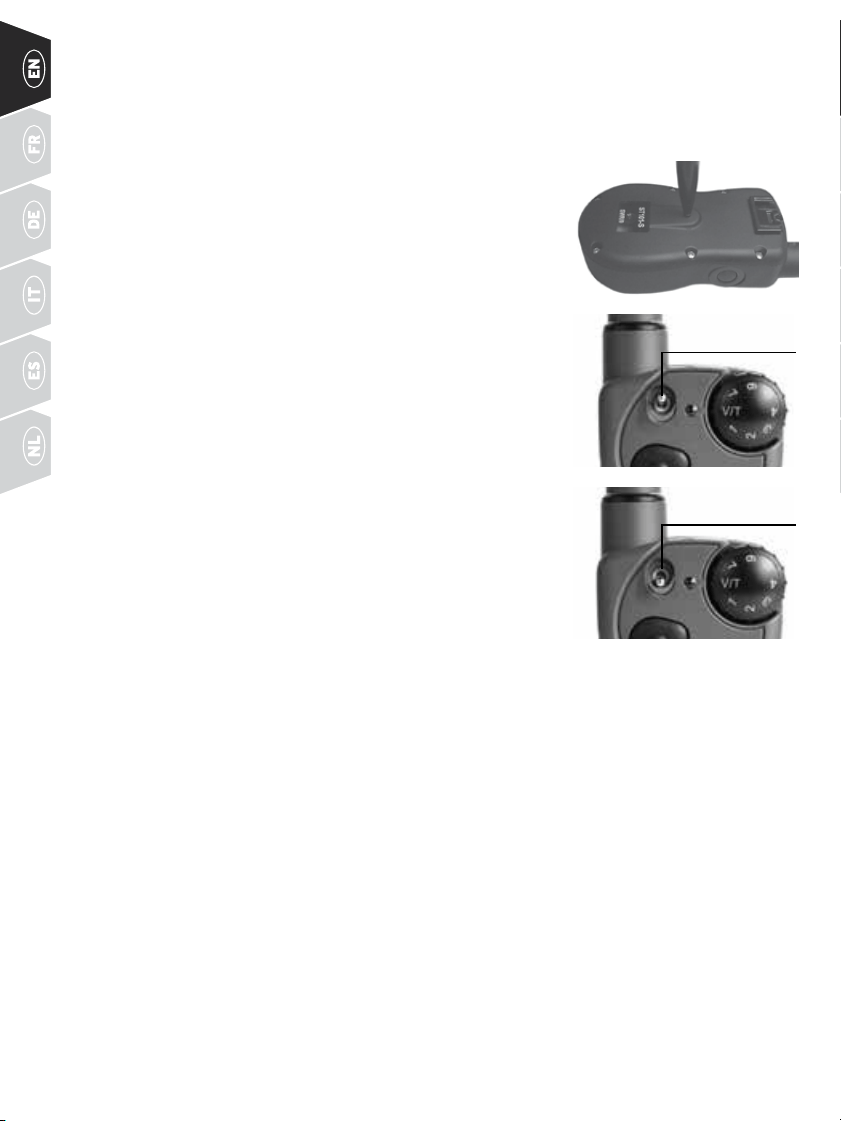
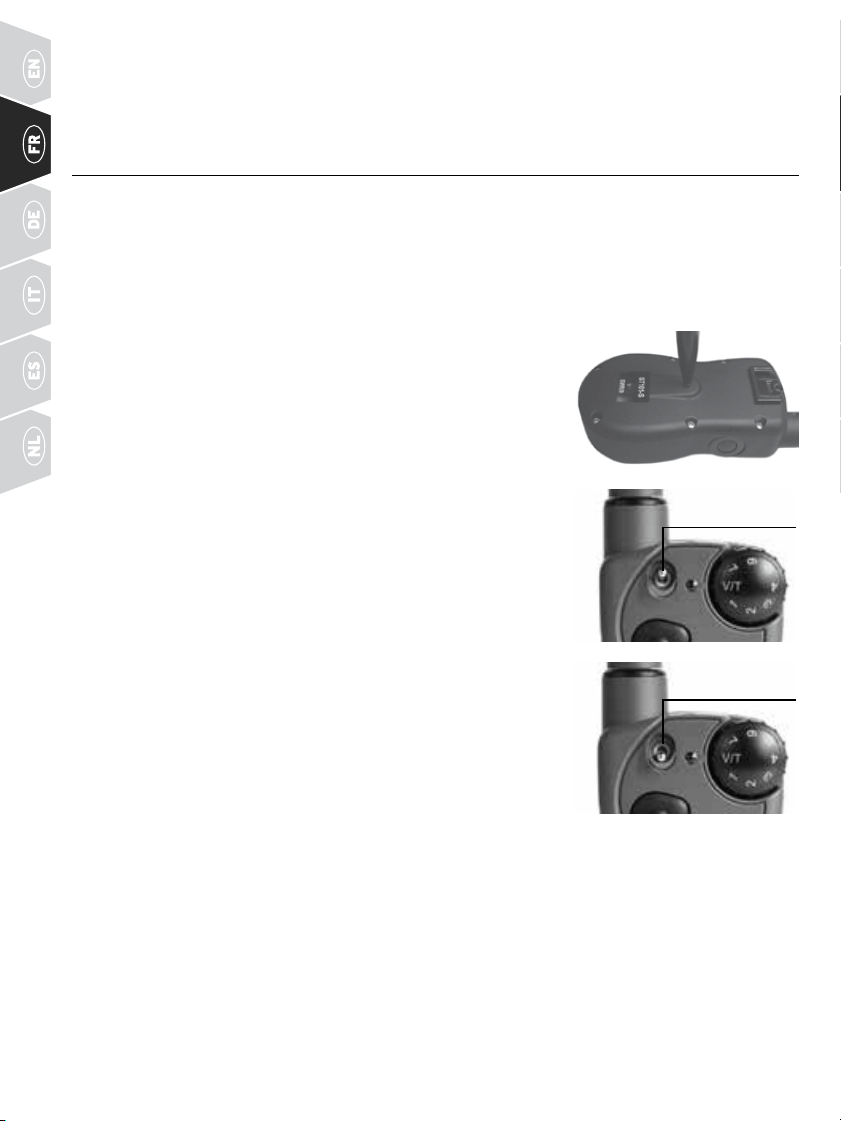
1 CHARGE THE REMOTE TRANSMITTER
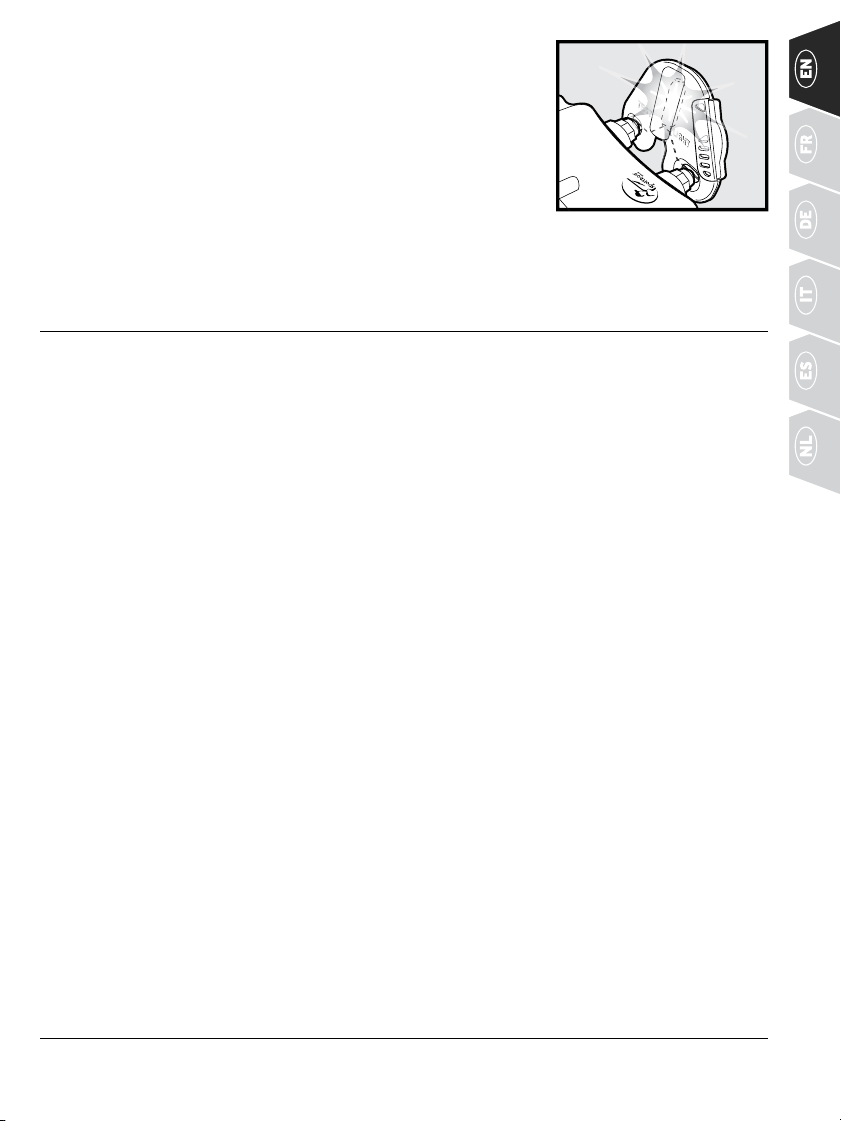
1. Lift the rubber cover protecting the Charging Jack and
connect the corresponding charge connector.
2. Plug the charger into a standard wall outlet for 2
hours every time you charge.
3. When charging is complete, indicated by the light
flashing green once per second, replace the rubber
cover.
Using Li-Ion technology, the Remote Transmitter only
requires a 2-hour charge. It is not harmful to let the unit
charge for more than 2 hours.
NOTE: Approximate battery life between charges is 50 to 70
hours for SD-425X-E / SD-825X-E and 40 to 60 hours for
SD-1225X-E / SD-1825X-E, depending on frequency of use.
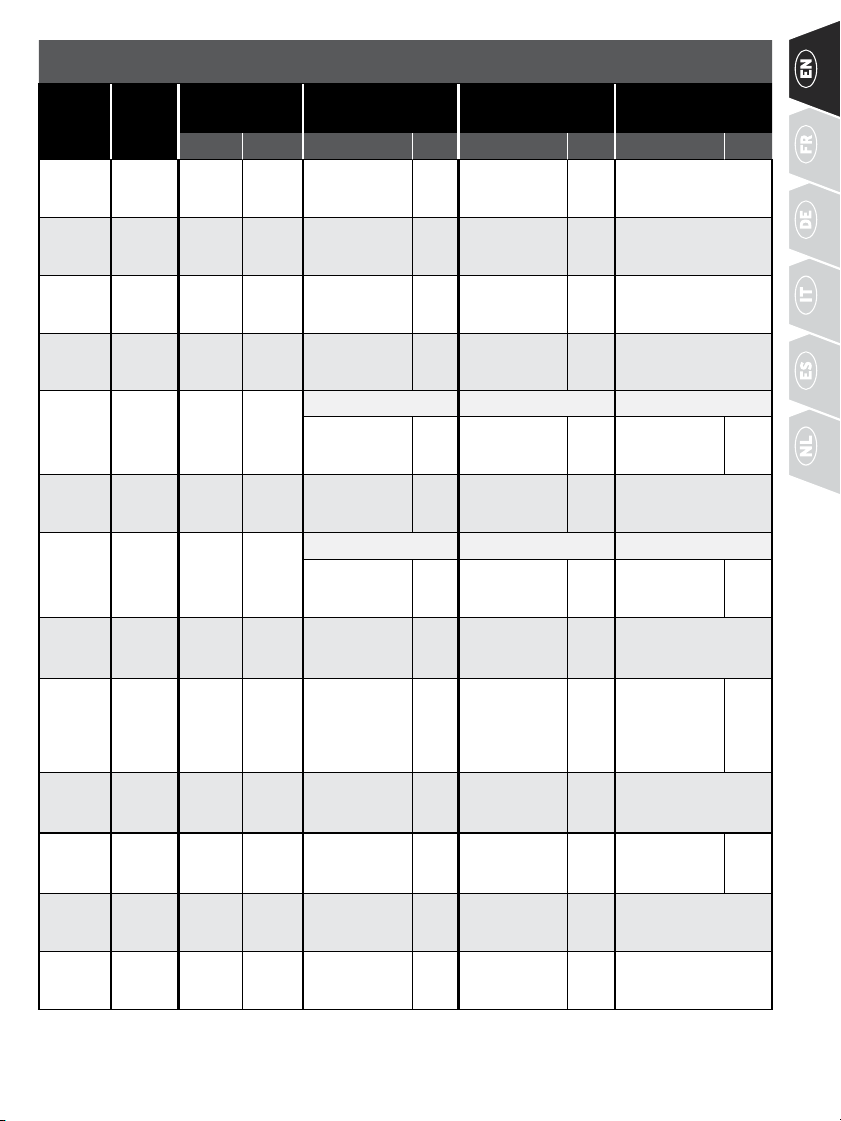
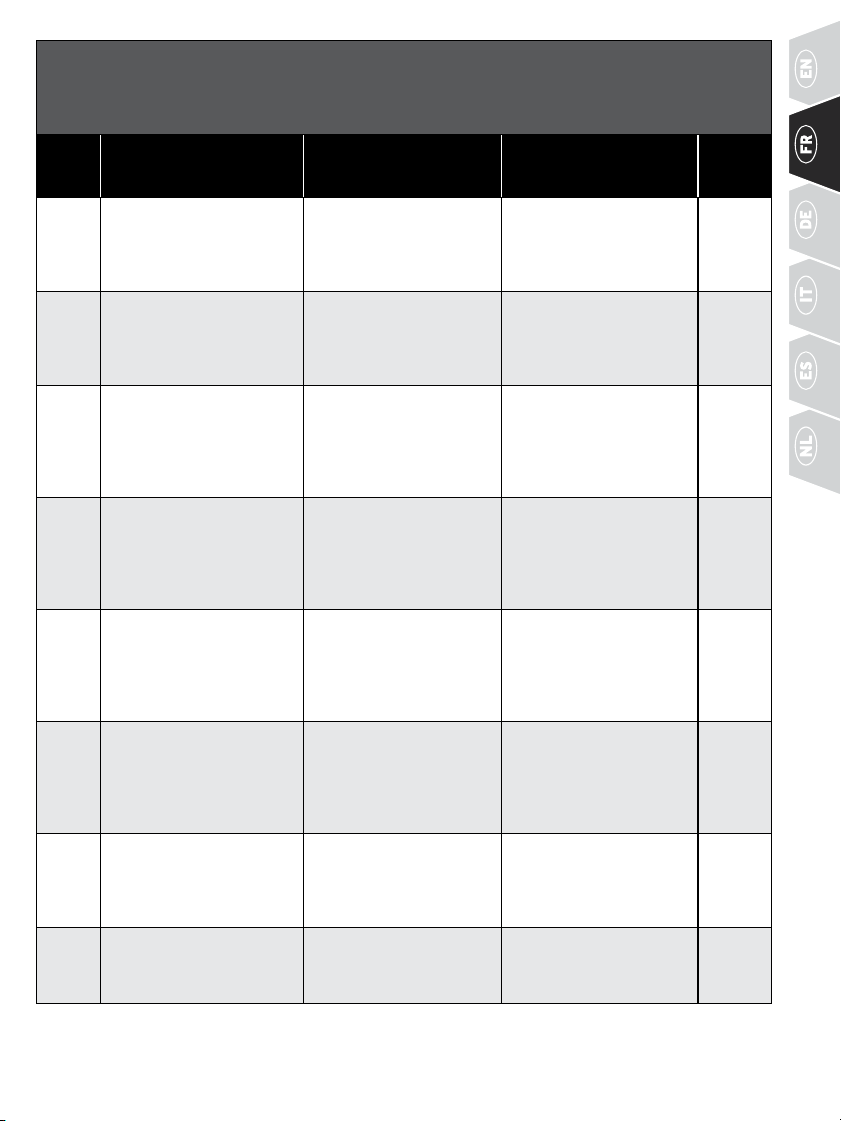
TRANSMITTER INDICATOR LIGHT
OPERATIONAL MODE LIGHT COLOUR BATTERY STATUS LIGHT FUNCTION
Continuous static, tone, or
vibration stimulation button
pressed
Green Good Light is solid in colour while
button is pressed
Continuous static, tone, or
vibration stimulation button
pressed
Red Low Light is solid in colour while
button is pressed
Momentary static stimulation
button pressed
Green Good Light flashes once and turns off
Momentary static stimulation
button pressed
Red Low Light flashes once and turns off
Unit is charging Green Low Light is solid in colour while on
the charger
Unit is fully charged
(charger still connected)
Green Good Light flashes once per second
once the battery is completely
charged
CHARGE
CONNECTOR
PLACED IN
THE REMOTE
TRANSMITTER
CHARGING JACK
6 WWW.SPORTDOG.COM
STEP
::
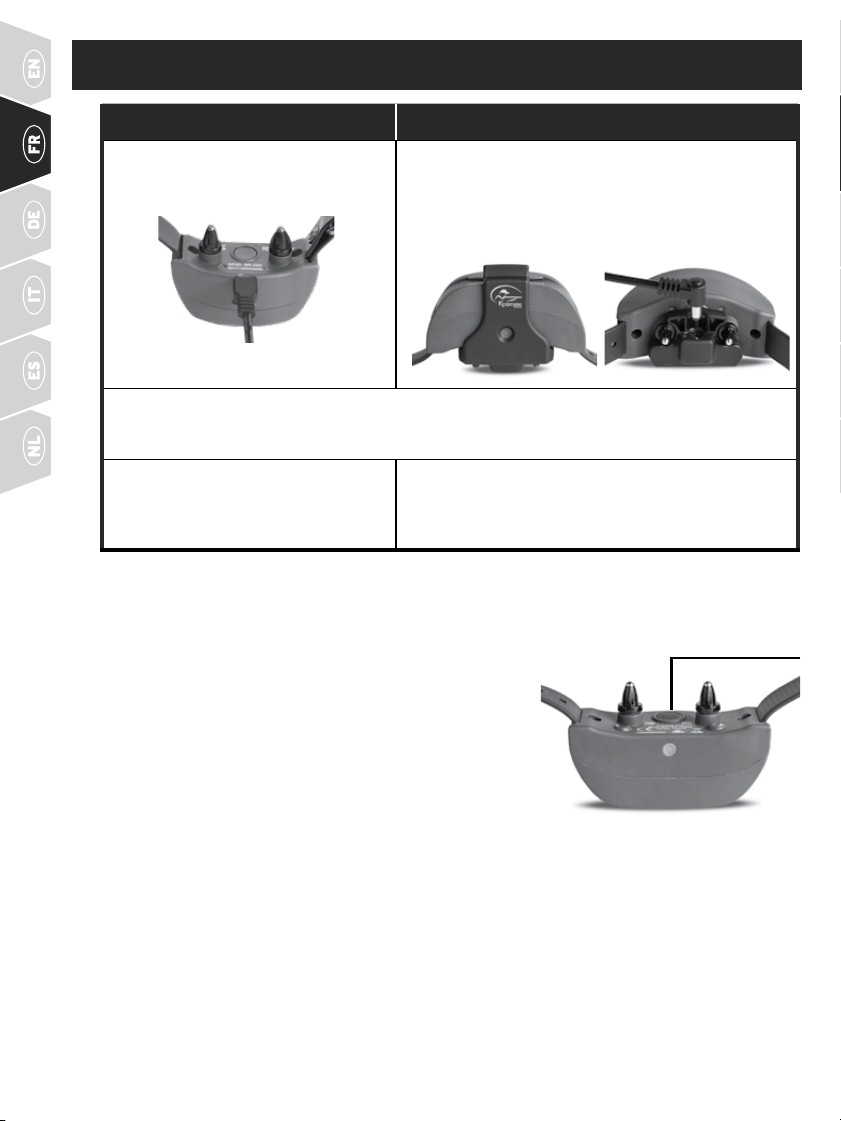
2 CHARGE THE COLLAR RECEIVER
425X-E or 825X-E 1225X-E or 1825X-E
1.
Lift the rubber cover protecting the
collar Charging Jack and connect the
charger.
Align the Contact Points with the Charging Cradle,
making sure the hole on the Cradle aligns with the
Receiver Indicator Light, and push the Cradle up and
back until it snaps in to place. Connect the charger to
theCharging Cradle.
2.
Plug the charger into a standard wall outlet for 2 hours every time you charge. The Receiver Indicator
Light will flash green once per second once the battery is completely charged.
3.
Remove the charger and secure the
rubber cover fully to ensure debris
doesnot enter the Charging Jack.
Remove both the charge connector and Charging Cradle
from the Collar Receiver. The Charging Cradle is not
intended to be attached when the Collar Receiver is in use.
Using Li-Ion technology, the Collar Receiver only requires a 2-hour charge. It is not harmful to let the unit
charge for more than 2 hours.
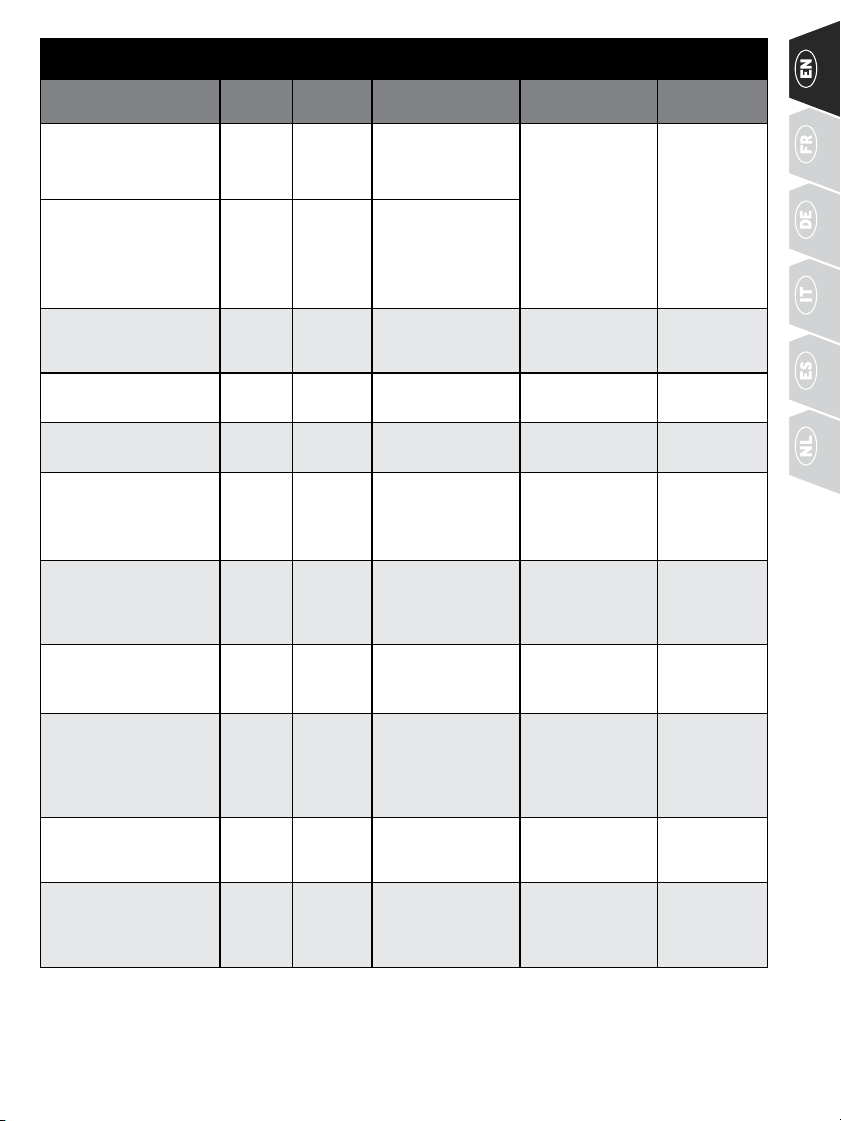
TO TURN THE COLLAR RECEIVER ON
Press and release the On/Off Button. The Collar Receiver Indicator
Light will come on and the Collar Receiver will beep 1-2 times for
the SD-425X-E / SD-825X-E and 1-3 times for the SD-1225X-E /
SD-1825X-E, depending on what stimulation range is chosen. The
default is 2 (medium).
TO TURN THE COLLAR RECEIVER OFF
Press and release the On/Off Button. The Receiver Indicator Light comes
on solid red and the Collar Receiver beeps for 2 seconds. To extend the
life between charging cycles, turn the Collar Receiver off when it is not in use.
NOTE: Approximate battery life between charges is 50 to 70 hours for SD-425X-E / SD-825X-E and 140 to 160
hours for SD-1225X-E / SD-1825X-E, depending on frequency of use.
ON/OFF
BUTTON
7WWW.SPORTDOG.COM
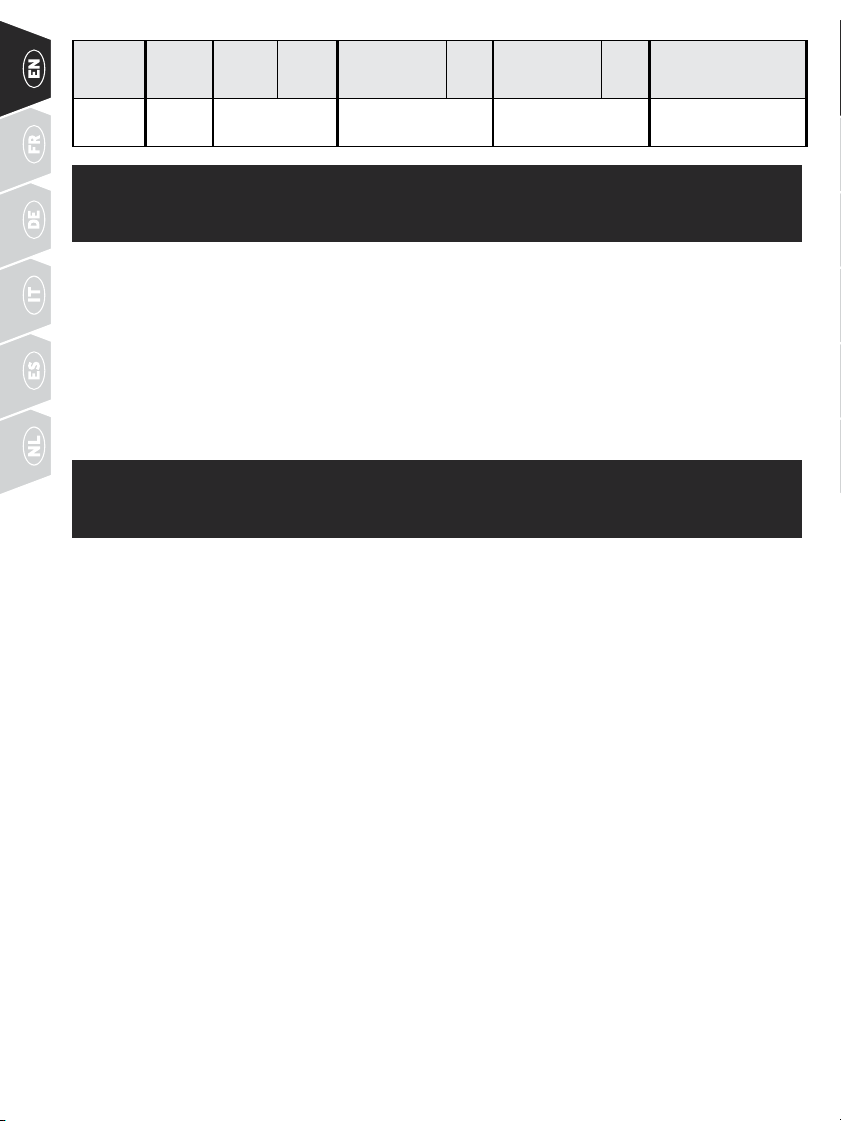
RECEIVER INDICATOR LIGHT
OPERATIONAL MODE
LIGHT
COLOUR
BATTERY
STATUS
LIGHT FUNCTION
SPEAKER
FUNCTION
VIBRATION
Unit is turned on via
On/Off button
Green Good Light is solid in
colour during beep
sequence
Beeps 1-2 times
(1-3 times for
SD-1225X-E &
SD-1825X-E)
depending on
stimulation range
setting (2 is the
default setting).
Please see page 09.
N/A
Unit is turned on via
On/Off button
Red Low Light is solid in
colour during beep
sequence
Unit is turned off via
On/Off button
Red N/A Light is solid in
colour during beep
sequence
Beeps
continuously for 2
seconds
N/A
Unit is on Green Good Light flashes every 2
seconds
N/A N/A
Unit is on Red Low Light flashes every 2
seconds
N/A N/A
Unit is delivering
continuous static
stimulation
Red N/A Light is solid in
colour for as long as
button is pressed (up
to 10 seconds)
N/A N/A
Unit is delivering
momentary static
stimulation
Red N/A Light will quickly
flash once no matter
how long button is
pressed
N/A N/A
Unit is delivering tone
stimulation
Off N/A N/A Unit will beep for
as long as button is
pressed
N/A
Unit is delivering
vibration stimulation
Off N/A N/A N/A Unit will
vibrate for as
long as button
is pressed (up
to 10 seconds)
Unit is charging Green Low Light is solid in
colour while on the
charger
N/A N/A
Unit is fully charged
(charger still connected)
Green Good
Light flashes once
per second once the
battery is completely
charged
N/A N/A
8 WWW.SPORTDOG.COM
STEP
::
3 FIT THE COLLAR RECEIVER
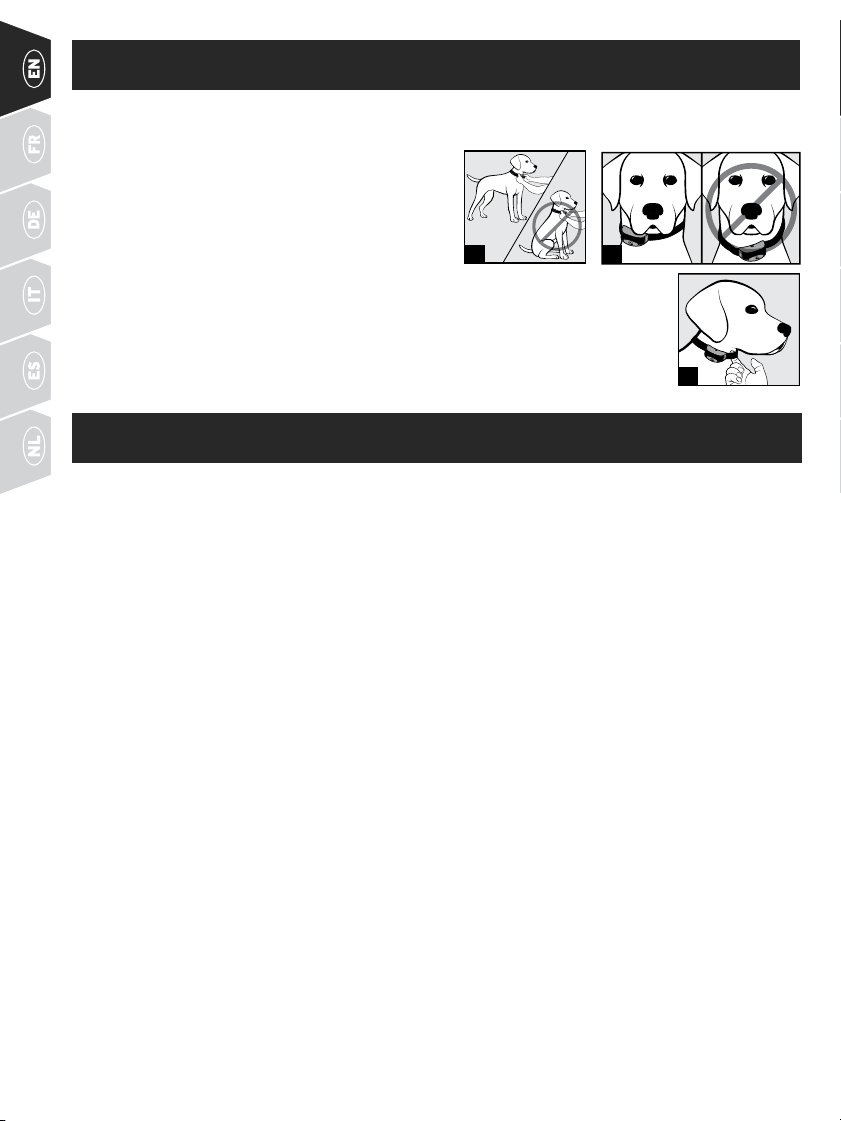
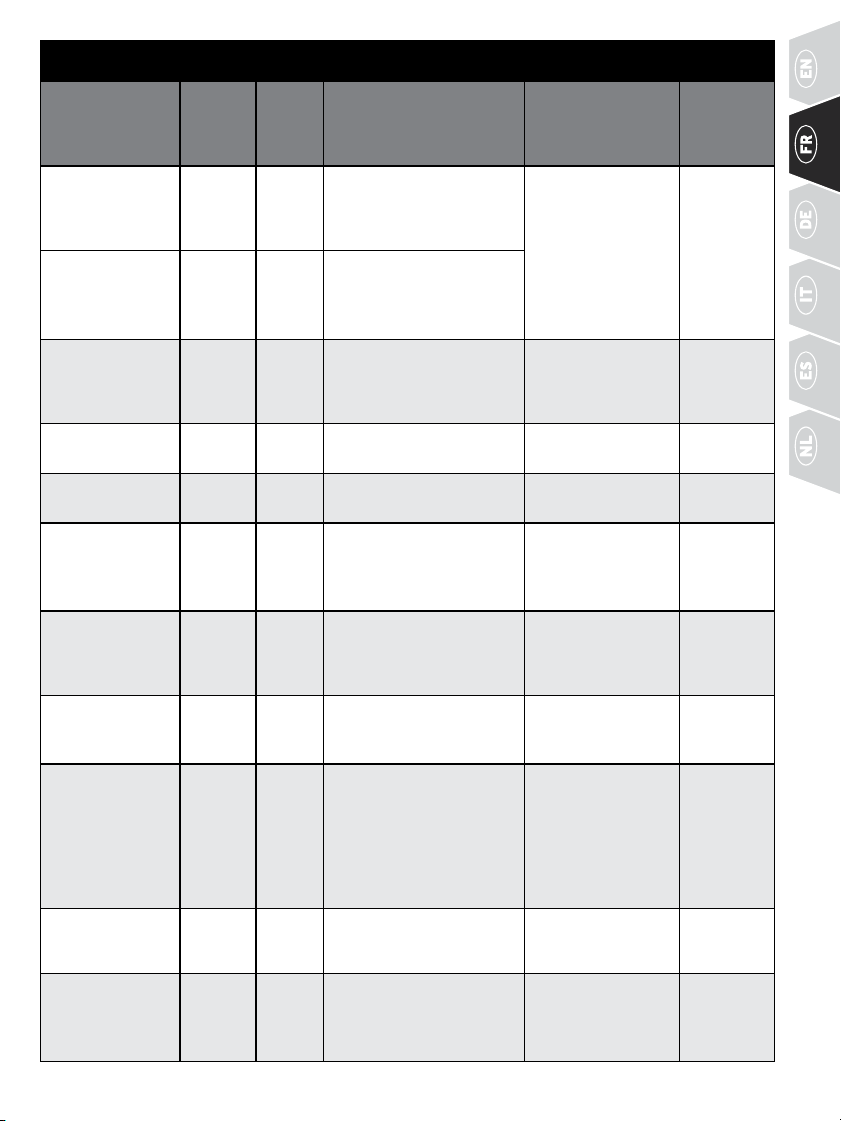
IMPORTANT: THE PROPER FIT AND PLACEMENT OF THE COLLAR RECEIVER IS IMPORTANT FOR
EFFECTIVE TRAINING. THECONTACT POINTS MUST HAVE DIRECT CONTACT WITH YOUR DOG’S SKIN.
To ensure a proper fit, follow these steps:
1. With your dog standing (3A), place the Collar Receiver
as high as possible on your dog’s neck, slightly to
either side, so the Contact Points are touching the skin
(3B). If your dog has a long or thick coat, you have two
options to ensure consistent contact: either trim the
hair around the Contact Points or switch to the longer
Contact Points included with your system.
2. The Collar Receiver should fit snugly, yet loose enough to allow one finger to fit
between the strap and your dog’s neck (3C).
3. Allow your dog to wear the collar for several minutes, and then recheck the fit. Check
the fit again as your dog becomes more comfortable wearing the Collar Receiver.
STEP
::
4 FIND THE BEST INTENSITY LEVEL
Your SportDOG® Brand system has multiple intensity levels. This allows you to choose the static stimulation
level that is best for your dog. For training efficiency, it is important to find the right intensity level for your
dog. This is called the Recognition Level, at which your dog looks around in curiosity, or flicks his ears.
NOTE: Always start at the lowest level and work your way up.
FINDING YOUR DOG’S RECOGNITION LEVEL
NOTE: Every dog is different and you cannot predict where your dog’s Recognition Level will be. Watch closely
for any slight change in behaviour that demonstrates your dog is feeling the static stimulation.
1. With the Collar Receiver turned on and properly fitted to your dog, set the Remote Transmitter’s Intensity
Dial at Level 1 and press the Continuous Static Stimulation Button for 1 to 2 seconds.
2. If your dog shows no reaction to Level 1, go to Level 2 and repeat the process until you find your dog’s
Recognition Level. This is the level you should use when you begin a training exercise.
3. YOUR DOG SHOULD NOT VOCALISE OR PANIC WHEN RECEIVING STATIC STIMULATION. IF THIS HAPPENS,
THE STATIC STIMULATION LEVEL IS TOO HIGH AND YOU NEED TO GO BACK TO THE PREVIOUS LEVEL AND
REPEAT THE PROCESS.
4. If you have progressed to the highest static stimulation level while searching for your dog’s Recognition
Level and your dog continues to show no response, check to see if the Collar Receiver is snug against your
dog’s neck. Then go back to Intensity Level 1 and repeat the process. If your dog still does not indicate he
is feeling the static stimulation, you have two options: you may either have to trim the hair beneath the
Contact Points, or switch to the longer Contact Points included in your system.
If after completing all of these steps your dog still does not indicate he is feeling the static stimulation or
if the static stimulation seems too high, you can try changing your Collar Receiver’s stimulation range
using thefollowing instructions. Contact the Customer Care Centre if you are not able to find your dog’s
RecognitionLevel.
3C
3A 3B
9WWW.SPORTDOG.COM
CHANGING STATIC STIMULATION RANGES
Your SportDOG® Brand Collar Receiver comes with 2-3 static stimulation ranges depending on the model.
Inthe Remote Transmitter’s default mode there are 21 static stimulation levels within each range, with 1 being
the lowest and 21 being the highest. The default range setting is 2 or medium.
To change the range of static stimulation, follow these steps:
1. Make sure the Collar Receiver is off.
2. Then turn the unit on by pressing and releasing the On/Off button.
3. After the Indicator Light turns off and within 5 seconds, press and hold the On/Off button for 3 seconds.
4. The Collar Receiver will then beep and the Indicator Light will flash orange as indicated by the chart below.
Continue to hold the button until the number of beeps/orange flashes equals the desired stimulation
rangeshown.
5. Release the button once the desired range is selected; the Collar Receiver will turn off.
6. Turn the unit back on. It will then beep according to the static stimulation range selected in Step 4.
BEEPS STATIC STIMULATION RANGE DOG TEMPERAMENT MODEL
1 beep Low Mild SD-425X-E, SD-825X-E, SD-1225X-E,
SD-1825X-E
2 beeps Medium Moderate SD-425X-E, SD-825X-E, SD-1225X-E,
SD-1825X-E
3 beeps High Stubborn SD-1225X-E, SD-1825X-E
GENERAL TRAINING TIPS
BEFORE TRAINING YOUR DOG WITH THIS PRODUCT
You will have the most success using this remote trainer if you always remember to teach a command before
trying to reinforce the command with a remote trainer. Your training will be easier and proceed faster if you
follow the guidelines in this Operating Guide. In addition, always keep the following training tips in mind:
• Eliminate one misbehaviour or teach one obedience command at a time. If you move too fast with the
training, your dog may become confused.
• Keep your training sessions positive, short, and frequent. If you or your dog become frustrated or confused,
it’s best to take a break.
• Be consistent. Give your dog a tone, vibration, or static stimulation with each misbehaviour.
• Do not overcorrect your dog. Use as few stimulations as possible to train your dog.
• Restrict your dog from situations in which he has a history of misbehaving unless you can supervise him and
use your remote trainer for applying tone, vibration, or static stimulation.
• If you notice one situation in which your dog misbehaves repeatedly, set up this situation as a training
session. This will dramatically increase your chances of success.
• If your dog has a timid reaction to the tone, vibration, or static stimulation (especially the first couple
of times), do not be alarmed. Redirect his attention to a simple and appropriate behaviour (i.e. a known
command, such as “Sit”).
• Never use your remote trainer to correct or eliminate any form of aggressive behaviour. If your dog exhibits
such behaviour, contact a professional trainer. Aggression in dogs is the result of many factors – it may be
a learned behaviour or it may be brought on as a result of fear. Another factor contributing to aggression in
dogs is social dominance. Every dog is different.
At this point, your remote trainer is ready to use. The Transmitter is factory set to mode 5 (mode 5 toggle up
for SD-1825X-E), but you may wish to change the mode to fit your situation. See STEP 5 for an explanation of
mode options.
10 WWW.SPORTDOG.COM
STEP
::
5 PROGRAM THE REMOTE TRANSMITTER
SD-425X-E, SD-825X-E, SD-1225X-E
Your Remote Transmitter has seven operational modes to allow you to select the best match for your type or
style of training. There is also one programming mode (Mode V/T) which allows you to change the system’s ID
code. The Remote Transmitter is factory set to mode 5.
TO CHANGE THE MODE
1. Referring to the following table, adjust the Intensity Dial to your desired mode.
2. Turn the Remote Transmitter over and remove the belt clip if attached (SD-825X-E and SD-1225X-E only).
3. Using a pen or the tine on the buckle of your collar strap, press and
release the Mode Button. When the Mode Button is pressed, the
Transmitter Indicator Light will be solid in colour. When it is released, it
will flash the mode selected.
For example, if mode 6 is desired, adjust the Intensity Dial to Level 6. Once the
Mode Button has been depressed, the Transmitter Indicator Light will be solid,
and once the Mode Button is released, the Transmitter Indicator Light will flash
6 times.
11WWW.SPORTDOG.COM
SD-425X-E, SD-825X-E, SD-1225X-E MODE CHART
(
REFER TO PAGE 10 TO CHANGE MODE
)
MODE UPPER BUTTON FUNCTION LOWER BUTTON FUNCTION SIDE BUTTON FUNCTION
NUMBER
OF DOGS
1 Continuous stimulation (Level
set by Intensity Dial) OR Vibe if
V/T on dial
Momentary stimulation
(Level set by Intensity Dial)
OR Vibe if V/T on dial
Tone only 1
2 Continuous stimulation (Level
set by Intensity Dial) OR Tone
if V/T on dial
Momentary stimulation
(Level set by Intensity Dial)
OR Tone if V/T on dial
Vibe only 1
3 Dog 1: Continuous stimulation
(Level set by Intensity Dial) OR
Tone if V/T on dial
Dog 2: Continuous
stimulation (Level set by
Intensity Dial) OR Tone if
V/Ton dial
Dog 3: Continuous
stimulation (Level set by
Intensity Dial) OR Tone if
V/Ton dial
3
4 Dog 1: Continuous stimulation
(Level set by Intensity Dial) OR
Vibe if V/T on dial
Dog 2: Continuous
stimulation (Level set by
Intensity Dial) OR Vibe if V/T
on dial
Dog 3: Continuous
stimulation (Level set by
Intensity Dial) OR Vibe if
V/Ton dial
3
5* Medium Continuous
stimulation (Level set by
Intensity Dial) OR Tone if V/T
on dial
Low Continuous stimulation
(Level set by Intensity Dial)
OR Tone if V/T on dial
High Continuous stimulation
(Level set by Intensity Dial)
OR Tone if V/T on dial
1
6 Medium Continuous
stimulation (Level set by
Intensity Dial) OR Vibe if V/T
on dial
Low Continuous stimulation
(Level set by Intensity Dial)
OR Vibe if V/T on dial
High Continuous stimulation
(Level set by Intensity Dial)
OR Vibe if V/T on dial
1
7 Continuous stimulation (Level
set by Intensity Dial) OR Tone
if V/T on dial
Momentary stimulation
(Level set by Intensity Dial)
OR Tone if V/T on dial
Locate Remote Beeper** 1
V/T
(ID
CODE)
N/A N/A See STEP 08 N/A
NOTE: Modes 1, 2, 3, 4 and 7 provide 7 levels of stimulation, which correspond to the setting of the Intensity
Dial.
Modes 5 and 6 provide more “increments” to choose from – a total of 21 levels of static stimulation. For
example, in mode 5 with the Intensity Dial set at 1, the Lower Button provides level 1 of 21, the Upper
Button provides level 2 of 21, and the Side Button provides level 3 of 21.
* Factory Default Mode.
** Locate Remote Beeper: The Side Button turns run mode off and locates the Remote Beeper. To enable run mode again, press
and hold the Side Button for 3 seconds.
12 WWW.SPORTDOG.COM
SD-1825X-E
Your Remote Transmitter has 14 operational modes (seven with the toggle switch in the grey/
a
position and
seven with the toggle in the orange/
b position
) to allow you to select the best match for your type or style of
training. The Remote Transmitter is factory set to mode 5:
a
. There is also one programming mode (Mode V/T)
which allows you to change the system’s ID code.
TO CHANGE THE MODE
1. Referring to the “SD-1825X-E MODE CHART” on page 13, choose your
desired mode number (1-7) and toggle position (
a
or
b
). Adjust both the
Intensity Dial and Toggle Switch to match your desired mode.
2. Turn the Remote Transmitter over and remove the belt clip (if attached).
3. Using a pen or the tine on the buckle of your collar strap, press and
release the Mode Button. When the Mode Button is pressed, the
Transmitter Indicator Light will be solid in colour. When it is released, it
will flash a number of times that corresponds to the mode selected.
For example, if mode 6:
a
is desired, switch the toggle to the grey/
a
position and
adjust the Intensity Dial to Level 6. Once the Mode Button has
been depressed, the Transmitter Indicator Light will be solid, and once the
Mode Button is released, the Transmitter Indicator Light will flash 6 times.
However, if you select Mode V/T (ID Code) in the grey/
a
position, the light
will remain solid in colour once the Mode Button is released.
*
Factory Default Mode.
For two-dog operation setup refer to STEP 07 on pages 14-15.
^ For three- and six-dog operation setup refer to STEP 07 on page 14-15.
•
Locate Remote Beeper: The Side Button turns run mode off and locates the
Remote Beeper. To enable run mode again, press and hold the Side Button
for 3 seconds.
TOGGLE SWITCH IN
THE
a POSITION
TOGGLE SWITCH IN
THE
b POSITION
13WWW.SPORTDOG.COM
SD-1825X-E MODE CHART
(
REFER TO PAGE 12 TO CHANGE MODE
)
MODE:
TOGGLE
POSITION
NUMBER
OF DOGS
TOGGLE SWITCH
FUNCTION
UPPER BUTTON
FUNCTION
LOWER BUTTON
FUNCTION
SIDE BUTTON
FUNCTION
a b DIAL 1-7 V/T DIAL 1-7 V/T DIAL 1-7 V/T
1:a
2
Dog 1 Dog 2
High
Continuous
Stimulation
Vibe
High
Momentary
Stimulation
Vibe Tone
1:b
2 Dog 1 Dog 2
High
Continuous
Stimulation
Vibe
High
Continuous
Stimulation
Vibe
Locate Remote
Beeper
•
2:a
2 Dog 1 Dog 2
High
Continuous
Stimulation
Tone
High
Momentary
Stimulation
Tone Vibe
2:b
2 Dog 1 Dog 2
High
Continuous
Stimulation
Vibe
Low Continuous
Stimulation
Vibe Tone
3:a
6^
Dogs
1-3
Dogs
4-6
Dog 1 (a) / Dog 4 (b) Dog 2 (a) / Dog 5 (b) Dog 3 (a) / Dog 6 (b)
High
Continuous
Stimulation
Tone
High
Continuous
Stimulation
Tone
High
Continuous
Stimulation
Tone
3:b
2 Dog 1 Dog 2
High
Continuous
Stimulation
Tone
Low Continuous
Stimulation
Tone Vibe
4:a
6
Dogs
1-3
Dogs
4-6
Dog 1 (a) / Dog 4 (b) Dog 2 (a) / Dog 5 (b) Dog 3 (a) / Dog 6 (b)
High
Continuous
Stimulation
Vibe
High
Continuous
Stimulation
Vibe
High
Continuous
Stimulation
Vibe
4:b
2 Dog 1 Dog 2
Rising High
Continuous
Stimulation
Vibe
High
Continuous
Stimulation
Vibe Tone
5:a
*
2 Dog 1 Dog 2
Medium
Continuous
Stimulation
Tone
Low Continuous
Stimulation
Tone
High
Continuous
Stimulation
Tone
5:b
2 Dog 1 Dog 2
Rising High
Continuous
Stimulation
Tone
High
Continuous
Stimulation
Tone Vibe
6:a
2 Dog 1 Dog 2
Medium
Continuous
Stimulation
Vibe
Low Continuous
Stimulation
Vibe
High
Continuous
Stimulation
Vibe
6:b
2 Dog 1 Dog 2
High
Continuous
Stimulation
Vibe Tone Vibe N/A
7:a
2 Dog 1 Dog 2
High
Continuous
Stimulation
Tone
High
Momentary
Stimulation
Tone
Locate Remote
Beeper
•
14 WWW.SPORTDOG.COM
7:b
2 Dog 1 Dog 2
High
Continuous
Stimulation
Tone Vibe Tone N/A
V/T
(ID CODE)
N/A a N/A N/A See STEP 08
STEP
::
6 MATCH THE COLLAR RECEIVER AND
REMOTE TRANSMITTER
To match the Collar Receiver to work with a new Remote Transmitter or to reprogram a new Collar Receiver to
work with your existing Remote Transmitter:
1. Turn off the Collar Receiver.
2. Press and hold the On/Off Button. The Receiver Indicator Light will come on, then turn off after 4-5
seconds. If the On/Off Button is released too early, the Receiver Indicator Light will begin flashing as
normal. If this occurs, start again from Step 1.
3. After the Receiver Indicator Light has turned off, release the On/Off Button.
4. Press and hold the Upper Button on the Remote Transmitter until the Receiver Indicator Light flashes 5
times. Once the Receiver Indicator Light has flashed 5 times, the Collar Receiver has been matched and will
begin flashing as normal. If the Receiver Indicator Light does not flash 5 times, start again from Step 1.
STEP
:
7 PROGRAM THE SYSTEM FOR MULTI-DOG
OPERATION
SD-425X-E, SD-825X-E, SD-1225X-E
SportDOG
®
Add-A-Dog
®
Collar Receiver(s) must be purchased to train two or three additional dogs.
1. Program the Remote Transmitter to mode 3 or 4 (see TO CHANGE THE MODE on page 10).
2. Program the first Collar Receiver.
A. Turn off the Collar Receiver.
B. Press and hold the On/Off Button. The Receiver Indicator Light will come on, then turn off in
4-5seconds. If the On/Off Button is released too early, the Receiver Indicator Light will begin its normal
flashing. If this occurs, start again and repeat from Step A.
C. After the Receiver Indicator Light has turned off, release the On/Off Button.
D. Press and hold the Upper Button on the Remote Transmitter until the Receiver Indicator Light flashes
5times. If the Receiver Indicator Light does not flash 5 times, start again and repeat from Step A.
3. Program the second Collar Receiver by following Steps A through D above, but using the Lower Button in
place of the Upper Button.
4. Program the third Collar Receiver by following Steps A through D above, but using the Side Button in place
of the Upper Button.
15WWW.SPORTDOG.COM
SD-1825X-E
SportDOG
®
Add-A-Dog
®
Collar Receivers must be purchased to train additional dogs in two-, three-, or six-dog
mode.
TWO-DOG OPERATION
SportDOG
®
Collar Receivers can be set to respond to either the
a
or
b
toggle position on the Remote
Transmitter.
1. Program the Remote Transmitter to mode 1, 2, 5, 6 or 7 with the toggle in the grey/
a
position, or any of
modes 1-7 with the toggle in the orange/
b
position (see TO CHANGE THE MODE on page 12).
2. Next, with the toggle switch in the grey/
a
position, you can now program the first Collar Receiver.
A. Turn off the Collar Receiver.
B. Press and hold the On/Off Button on the Collar Receiver. The Receiver Indicator Light will come on, then
turn off in 4-5 seconds. If the On/Off Button is released too early, the Receiver Indicator Light will begin
its normal flashing. If this occurs, start again and repeat from Step A.
C. After the Receiver Indicator Light has turned off, release the On/Off Button.
D. Press and hold the Upper Button on the Remote Transmitter until the Receiver Indicator Light flashes
5times. If the Receiver Indicator Light does not flash 5 times, start again and repeat from Step A.
3. To program the second Collar Receiver, repeat Steps A through D, but with the toggle switch in the
orange/
b
position.
THREE-DOG OPERATION
1. Program the Remote Transmitter to mode 3 or 4 with the toggle in the grey/
a
position (see TO CHANGE
THE MODE on page 12).
2. Next, with the toggle switch in the grey/
a
position, you can now program the first Collar Receiver.
A. Turn off the Collar Receiver.
B. Press and hold the On/Off Button on the Collar Receiver. The Receiver Indicator Light will come on, then
turn off in 4-5 seconds. If the On/Off Button is released too early, the Receiver Indicator Light will begin
its normal flashing. If this occurs, start again and repeat from Step A.
C. After the Receiver Indicator Light has turned off, release the On/Off Button.
D. Press and hold the Upper Button on the Remote Transmitter until the Receiver Indicator Light flashes 5
times. If the Receiver Indicator Light does not flash 5 times, start again and repeat from Step A.
3. To program the second Collar Receiver, repeat Steps A through D, using the Lower Button in place of the
Upper Button.
4. To program the third Collar Receiver, repeat Steps A through D, using the Side Button in place of the Upper
Button.
SIX-DOG OPERATION
Repeat Steps 1-4 from “THREE-DOG OPERATION” above for dogs 1-3. Then flip the toggle switch to the
orange/
b
position and repeat Steps 2-4 for dogs 4-6.
ADD-A-DOG® MODEL
SDR-AXF-E Original Collar Receiver for: SD-425X-E & SD-825X-E (up to 3 dogs)
SDR-AX-E Original Collar Receiver for: SD-1225X-E (up to 3 dogs) & SD-1825X-E (up to 6 dogs)
16 WWW.SPORTDOG.COM
STEP
::
8 CHANGE ID CODES
An ID Code is the signal identification between the Remote Transmitter and Collar Receiver. Each is programd
in 1 of 2,000 ID Codes from the factory. The Remote Transmitter has the flexibility to program two or more
Remote Transmitters to the same ID Code, allowing them to control one Collar Receiver. There are 64
programmable ID Codes available.
TO MANUALLY PROGRAM A REMOTE TRANSMITTER’S ID CODE
1. Turn the Intensity Dial to V/T and then press and release the Mode Button on the back of your Remote
Transmitter. This does not change the mode, so the current mode will still be active after the ID change is
complete.
2. Once the Mode Button is released, the Transmitter Indicator Light will illuminate solid green and stay on
for 15 seconds.
3. While the green Indicator Light is on, turn the Intensity Dial to select the 1st digit of the ID and then press
and release the Side Button. The green Indicator Light will flash rapidly confirming selection.
4. Again, while the green Indicator Light is on, turn the Intensity Dial to select the 2nd digit of the ID and then
press and release the Side Button. The green Indicator Light will flash rapidly confirming selection. The
2nd digit is optional and, if not desired, wait until the green light turns off and refrain from pressing the
Side Button.
5. At the end of 15 seconds, or after the second press of the Side Button, the green Indicator Light will turn off
and the ID of the Remote Transmitter will be updated. At this point, the Remote Transmitter will be in the
same mode it was in prior to setting the ID.
6. Upon changing the ID Code, you will need to match the Collar Receiver to the Remote Transmitter (see
STEP 06).
NOTE: If you press the Side Button only once (skipping Step 4) the ID is still a two digit ID. The left digit is defaulted
to 1. For example, if you selected 6 in Step 3 and pressed the Side Button only once, the ID you get will be 16.
TO RETURN THE REMOTE TRANSMITTER TO THE FACTORY ID
1. Turn the Intensity Dial to V/T and then press and release the Mode Button on the back of your Remote
Transmitter. This does not change the mode, so the current mode will still be active after the ID change is
complete.
2. Do not press any buttons and wait until the green Transmitter Indicator Light turns off.
3. You will need to match the Collar Receiver to the Remote Transmitter (see STEP 06).
ACCESSORIES
To purchase additional accessories for your SportDOG
®
Remote Trainer, contact the Customer Care Centre or
visit the Shop section on sportdog.com and search Parts & Accessories.
17WWW.SPORTDOG.COM
FREQUENTLY ASKED QUESTIONS
Is the static stimulation safe for my
dog?
While Continuous or Momentary static stimulation may be
unpleasant, it is harmless to your dog. Electronic training devices
require interaction and training from the owner to achieve desired
results.
How old does a dog have to be before
using this remote trainer?
Age is not as important as your dog’s developmental ability to learn.
Your dog should be able to learn basic obedience commands such as
“Sit” or “Stay.” The Collar Receiver may be too large for dogs under
3.6 kilograms.
Once my dog is trained and has been
obeying my commands, will my dog
have to continue to wear the Collar
Receiver?
Your dog may need to wear the Collar Receiver from time to time for
reinforcement. Also, many hunters keep the Collar Receiver on their
dogs while hunting for maximum control because they possess a high
drive and experience many distractions while in the field.
Is the Collar Receiver waterproof? Yes. If the rechargeable battery pack ever needs to be replaced, make
sure the o-ring and o-ring groove are free from dirt and debris.
Can my Collar Receiver be used
around salt water?
If the Collar Receiver is used in or around salt water, the Collar
Receiver should be rinsed with fresh water following each use.
Can I use this remote trainer with
more than one dog?
Yes, your remote trainer is expandable to a maximum of 3 dogs (up
to 6 dogs for SD-1825X-E). SportDOG
®
Add-A-Dog
®
Collar Receivers
must be purchased. Please refer to page 15 for a list of compatible
Collar Receivers.
Can I use this remote trainer on
aggressive dogs?
We do not recommend any of our products to be used on aggressive
dogs. We recommend you contact your local veterinarian or
professional trainer if you believe your dog might be aggressive.
Will I get the exact range claimed
with this remote trainer?
The range you get with your remote trainer will vary according to
terrain, weather, vegetation, as well as transmission from other radio
devices. To get the maximum amount of range, please refer to “How
the System Works” section of this guide.
How long can I continuously deliver
static stimulation to my dog?
The maximum amount of time you can press the Continuous Static
Stimulation Button and deliver static stimulation to your dog
continuously is 10 seconds. After 10 seconds, the Remote Transmitter
will “time-out,” and the Continuous Static Stimulation Button must be
released and pressed again.
What do I do if my dog’s neck
becomes red and irritated?
This condition is due to the Contact Points irritating the skin.
Discontinue use of the Collar Receiver for a few days. If the condition
persists for over 48 hours, see your veterinary surgeon. Once the skin
returns to normal, resume use and monitor the skin condition closely.
Avoid leaving the collar on your dog for more than 12 hours per day.
The Intensity Dial seems difficult to
rotate. Is this normal?
Yes. This prevents accidental changes in intensity and encourages
an optimal waterproof seal. The knob will “break in” and be slightly
easier to turn as you use it.
Can I attach a lead to this remote
trainer?
DO NOT attach a lead to your remote trainer. You may put a separate
non-metallic collar on your dog’s neck and attach a lead. Be sure the
extra collar does not interfere with the Contact Points.
18 WWW.SPORTDOG.COM
FREQUENTLY ASKED QUESTIONS
My Remote Transmitter is sending
a signal to more than one Collar
Receiver unintentionally, what
should I do?
In the rare event this occurs, you can change your Remote
Transmitter’s ID Code (see STEP 08).
TROUBLESHOOTING
The answers to these questions should help you solve any problem you have with this system. If they do not,
please contact the Customer Care Centre or visit our website at www.sportdog.com.
My dog is not responding when I
press a button.
• Check to see if the Collar Receiver has been turned on and the
Indicator Light is flashing.
• If your range has reduced from the first time you have used it, please
check to see if the battery is low in either the Remote Transmitter or
Collar Receiver.
• Many factors can impact the range you have with your system. For a
list of these factors, please refer to “How the System Works”.
• You can verify the Collar Receiver is delivering static stimulation to
your dog by placing the test light, enclosed in your kit, on the Collar
Receiver. Please refer to the “Test Light Instructions” section for
details.
• Increase the Intensity Dial. Refer to “Find the Best Intensity Level”
for your dog for more information.
• Increase the Static Stimulation Range. Refer to “Changing Static
Stimulation Ranges” for more information.
• Make sure the Collar Receiver’s Contact Points are placed snugly
against your dog’s skin. Refer to “Fit the Collar Receiver” for more
information.
• You may need to switch to the longer Contact Points included with
your system or trim the hair beneath the Contact Points. Never
shave the dog’s neck.
• If you notice your operating time dropping to about half the original
time, your Collar Receiver battery needs to be replaced. Contact the
Customer Care Centre to purchase a new one.
The Collar Receiver will not turn
on.
• Make sure the Collar Receiver has been charged. The Collar
Receiver will charge in 2 hours.
The Collar Receiver is not
responding to the Remote
Transmitter.
• Make sure the Remote Transmitter has been charged. The Remote
Transmitter will charge in 2 hours.
• Verify the Collar Receiver has been turned on and the Indicator
Light is flashing. Refer to “To Turn the Collar Receiver On and Off.”
• Refer to “Match the Collar Receiver and Remote Transmitter.”
19WWW.SPORTDOG.COM
TEST LIGHT INSTRUCTIONS
Should you need to test your system, follow these instructions:
1. Turn on the Collar Receiver.
2. Hold the Test Light Contacts to the Contact Points.
3. Press a Static Stimulation Button on the Remote Transmitter.
4. The Test Light will flash.
NOTE: At higher static stimulation levels, the Test Light will flash brighter.
5. Turn off the Collar Receiver.
Save the Test Light for future testing.
NOTE: If the Test Light does not flash, recharge the battery and re-test. If the Test Light still does not flash,
contact the Customer Care Centre.
BATTERY
This system operates on two Li-Ion battery packs. Only replace with battery received from calling the
Customer Care Centre.
• Batteries should never be removed from the battery compartment for charging.
• The rechargeable Lithium Ion (Li-Ion) batteries are not memory sensitive, do not require depletion before
charging, and cannot be over charged.
• The batteries come partially charged from the factory, but will require a full charge before the first use.
• When storing the unit for long periods, remember to regularly give batteries a full charge. This should be
done once every 3 to 4 months.
• You should expect hundreds of recharge cycles from your batteries. However, all rechargeable batteries
lose capacity over time relative to the number of recharge cycles they experience. This is normal. If your
operating time drops to half of the original life, contact the Customer Care Centre to purchase a new
battery.
• The batteries should last for a period of 3-5 years. When a battery needs replacement, you can order a new
pack by calling our Customer Care Centre. Please do not open the Collar Receiver or Remote Transmitter
until you have received the replacement.
Separate collection of spent batteries is required in many regions; check the regulations in your area before
discarding spent batteries. Please see below for instructions on how to remove the battery from the product
for separate disposal.
AT END OF PRODUCT LIFE, USE THESE BATTERY REMOVAL INSTRUCTIONS FOR FINAL DISPOSAL
(DO NOT OPEN THE COLLAR RECEIVER OR REMOTE TRANSMITTER UNTIL YOU HAVE RECEIVED THE
REPLACEMENT).
1. Using a #1 Phillips screwdriver for your Remote Transmitter and/or a 3/32 Hex Key for your Collar
Receiver, remove the case screws.
2. Remove the case back or cover.
3. Remove the old battery pack.
These instructions are not valid for repair or battery replacement. To avoid invalidating your warranty,
please call the Customer Care Centre for help in replacing your battery with one that is specifically approved
by Radio Systems Corporation.
For a list of patents protecting this product, please visit: www.radiosystemscorporation.com/patents
20 WWW.SPORTDOG.COM
Ci-après, «Nous» peut renvoyer collectivement à Radio Systems Corporation, Radio Systems PetSafe Europe
Ltd., Radio Systems Australia Pty Ltd., ainsi qu'à toute autre filiale ou marque de Radio Systems Corporation.
Merci d’avoir choisi les appareils de dressage de la marque SportDOG®. Correctement utilisé, ce produit vous
aidera dans le dressage efficace de votre chien en toute sécurité. Pour garantir votre satisfaction, veuillez
lire attentivement l’intégralité du manuel d’utilisation. Pour plus d’informations, veuillez contacter notre
Service clientèle. Pour consulter la liste des numéros de téléphone de votre région, consultez notre site Web
www.sportdog.com.
Pour bénéficier pleinement de votre garantie de deux ans, veuillez enregistrer votre article sous 30jours sur le site
www.sportdog.com. Grâce à cet enregistrement et en conservant le reçu, votre produit sera totalement couvert par
notre garantie et si vous deviez contacter notre service clientèle, nous pourrions vous aider plus rapidement. Il est
important de souligner que vos informations personnelles ne seront jamais fournies ni vendues à qui que ce soit.
Unedescription complète de la garantie est disponible sur le site internet www.sportdog.com.
AUTRES INFORMATIONS IMPORTANTES
L’utilisation de ce produit implique l’acceptation de l’ensemble des conditions, avertissements et remarques
liées à ce produit pouvant inclure, mais sans s’y limiter, ceux qui se trouvent dans le présent manuel
d’utilisation et dans l’encart relatif aux informations importantes sur la conformité aux réglementations
etsur la sécurité accompagnant votre produit.
TABLE DES MATIÈRES
CONTENU DE LA BOÎTE ...................................................................................................21
FONCTIONNEMENT DU SYSTÈME ...................................................................................21
DÉFINITIONS PRINCIPALES ........................................................................................... 22
CHARGEMENT DE L’ÉMETTEUR ..................................................................................... 23
CHARGEMENT DU COLLIER-RÉCEPTEUR ....................................................................... 24
AJUSTEMENT DU COLLIER-RÉCEPTEUR ........................................................................ 26
TROUVER LE MEILLEUR NIVEAU DE STIMULATION ....................................................... 26
CHANGEMENT DES PORTÉES DE STIMULATION ÉLECTROSTATIQUE............................. 27
CONSEILS DE DRESSAGE ............................................................................................... 27
PROGRAMMER L’ÉMETTEUR ......................................................................................... 28
COUPLAGE DE L’ÉMETTEUR ET DU COLLIER-RÉCEPTEUR ............................................. 32
PROGRAMMER LE SYSTÈME POUR PLUSIEURS CHIENS ................................................ 32
CHANGEMENT DES CODES D’IDENTIFICATION .............................................................. 34
ACCESSOIRES ................................................................................................................ 34
QUESTIONS FRÉQUEMMENT POSÉES ............................................................................ 35
DÉPANNAGE .................................................................................................................. 36
INSTRUCTIONS RELATIVES À LA CLÉ MULTIFONCTIONS ................................................37
BATTERIE ........................................................................................................................37
Les vidéos sont disponibles sur www.youtube.com/sportdogintl ou via l’onglet Vidéos de chaque
produit sur sportdog.com.
21WWW.SPORTDOG.COM
CONTENU DE LA BOÎTE
VOTRE SYSTÈME SD-425X-E, SD-825X-E, SD-1225X-E OU SD-1825X-E
COMPREND LES ÉLÉMENTS SUIVANTS:
• Émetteur
• Collier-récepteur
• Adaptateur de chargeur
• Socle de chargement (SD-1225X-E et SD-1825X-E)
• Points de contact courts et longs
• Dragonne
• Boucle de ceinture (SD-825X-E, SD-1225X-E,
SD-1825X-E)
• Clé multifonctions
FONCTIONNEMENT DU SYSTÈME
Il a été démontré que votre système® de la marque SportDOG® est sûr, confortable et efficace pour tous les
chiens de plus de 3,6kg. Une utilisation régulière et correcte de ce produit vous permet de renforcer les
ordres et de corriger les mauvais comportements jusqu'à une distance de 450 à 1 600 mètres, en fonction de
votre système (voirci-dessous). L'émetteur envoie un signal activant le collier-récepteur, qui transmet une
stimulation sans danger à l'animal. Grâce à un dressage adéquat, votre chien apprendra à associer ce signal à
un ordre. Comme tous les produits SportDOG®, ce modèle possède des niveaux de stimulation électrostatique
réglables afin d’adapter l’intensité du courant envoyé au caractère de votre chienet d’éviter tout risque de
correction excessive.
SD-425X-E : 450 MÈTRES
SD-825X-E: 800 MÈTRES
SD-1225X-E: 1 200 MÈTRES
SD-1825X-E: 1 600 MÈTRES
IMPORTANT: LA PORTÉE MAXIMALE VARIE SUIVANT LA FAÇON DONT VOUS TENEZ
L'ÉMETTEUR. POUR OBTENIRDE BONS RÉSULTATS SUR DE LONGUES DISTANCES,
TENEZ L'ÉMETTEUR VERTICAL, À BOUT DE BRAS ET AU-DESSUS DE VOTRE TÊTE. LE
TERRAIN, LE TEMPS, LA VÉGÉTATION, LES TRANSMISSIONS D'AUTRES APPAREILS
RADIO, AINSI QUE D'AUTRES FACTEURS PEUVENT AFFECTER LA PORTÉE
MAXIMALE.
22 WWW.SPORTDOG.COM
ÉMETTEUR
VOYANT LUMINEUX
ÉMETTEUR AN-
TENNE
MOLETTE DE
RÉGLAGE DE
L'INTENSITÉ
BOUTON
SUPÉRIEUR
BOUTON
INFÉRIEUR
PORT DE
RECHARGE
BOUTON
LATÉRAL
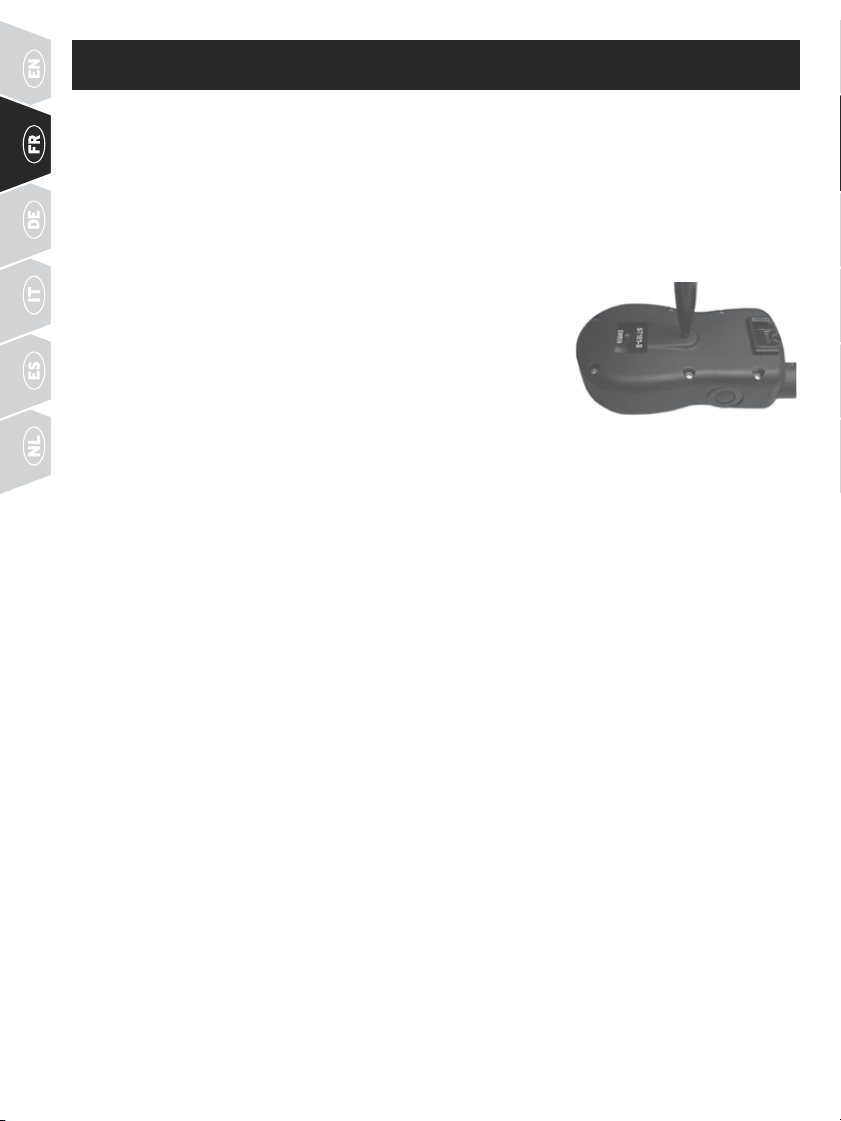
PORT DE RECHARGE: Sert à connecter le chargeur.
L'émetteurest étanche, cependant, il est recommandé
demaintenir le cache en place lorsque l'appareil n'est
pasencharge afin d'éviter toute pénétration de débris.
BOUTON DE SÉLECTION DE MODE: Ce bouton vous permet
de changer le mode de votre émetteur (veuillez consulter
la page28).
COLLIER-RÉCEPTEUR: Il reçoit le signal radio produit par
l'émetteur et permet une stimulation électrostatique ou
par signal sonore ou vibration, afin de corriger ou rappeler
votre chien à l'ordre. Étanche, il peut être plongé dans l'eau,
jusqu'à une profondeur de 7,5m.
VOYANT LUMINEUX DU RÉCEPTEUR: Indique si le collier-
récepteur est éteint ou allumé, sert de voyant de batterie
faible et indique également lorsque le bouton de stimulation
DÉFINITIONS PRINCIPALES
ÉMETTEUR: Transmet le signal radio au collier-récepteur.
Étanche, il peut être plongé dans l'eau, jusqu'à une
profondeur de 7,5m.
MOLETTE DE RÉGLAGE DE L'INTENSITÉ: Permet d'accéder
à différents niveaux de stimulation électrostatique, pour
que vous puissiez adapter la correction au tempérament
devotre chien.
VOYANT LUMINEUX DE L'ÉMETTEUR: Indique qu'un bouton
est enfoncé et sert également de voyant de pile faible.
INTERRUPTEUR À BASCULE: L'interrupteur est réglé
enusine pour que l'émetteur puisse contrôler deux
colliers-récepteurs.
BOUTON SUPÉRIEUR: Ce bouton a été réglé en usine
defaçon à permettre une stimulation électrostatique
continue de niveau moyen.
BOUTON DU BAS: Ce bouton a été réglé en usine de façon
à permettre une stimulation électrostatique continue de
niveau faible.
BOUTON LATÉRAL: Ce bouton a été réglé en usine
defaçonà permettre une stimulation électrostatique
continuede niveau fort.
BOUTON
MARCHE/
ARRÊT
RÉCEPTEUR
VOYANT LUMINEUX
POINTS DE CONTACT
électrostatique continue ou momentanée est enfoncé.
POINTS DE CONTACT: Contacteurs du collier-récepteur par lesquels la stimulation électrostatique passe.
BOUTON MARCHE/ARRÊT: Appuyez et relâchez ce bouton pour mettre le collier-récepteur en marche et pour
l'arrêter.
LE COLLIER RÉCEPTEUR EST CAPABLE D'ENVOYER QUATRE TYPES DE STIMULATIONS
CONTINUE: Vous pouvez contrôler le déclenchement et la durée de la stimulation électrostatique (10secondes
maximum). Au bout de 10secondes, la stimulation électrostatique s'arrête et vous devez relâcher et activer de
nouveau le bouton de l'émetteur pour envoyer une nouvelle stimulation électrostatique.
MOMENTANÉE: La stimulation électrostatique est envoyée pendant 1/10 de seconde, indépendamment de la
durée pendant laquelle vous avez appuyé sur le bouton.
INTER-
RUPTEUR
À BASCULE
(
1825X-E
UNIQUE-
MENT
)
23WWW.SPORTDOG.COM
SIGNAL SONORE: Le collier-récepteur émet un bref bip sonore lorsque l’on appuie sur le bouton de Signal sonore.*
VIBRATION: Le collier-récepteur vibre lorsque vous appuyez sur le bouton Vibration, pendant 10secondes
aumaximum.*
*Le signal sonore et les vibrations sont préréglés et ne sont pas réglables
*Le signal sonore et les vibrations sont préréglés et ne sont pas réglables
ÉTAPE
::
1 CHARGEMENT DE L'ÉMETTEUR
1. Soulevez le cache en caoutchouc qui protège le de
recharge et connectez le connecteur de charge
correspondant.
2. Branchez le chargeur sur une prise murale standard
pendant 2 heures à chaque fois que vous le chargez.
3. Lorsque la charge est terminée, indiquée par le
clignotement du voyant vert une fois par seconde,
remettez le cache en caoutchouc en place.
Si vous utilisez la technologie Li-Ion, le temps de charge
de l’émetteur est de 2heures seulement. Le fait de
laisser charger l’unité pendant plus de 2heures ne
l’endommagera pas.
REMARQUE: L’autonomie approximative entre deux
charges est de 50 à 70 heures pour le SD-425X-E /
SD-825X-E et de 40 à 60 heures pour le SD-1225X-E /
SD-1825X-E, selon la fréquence d’utilisation.
VOYANT LUMINEUX DE L'ÉMETTEUR
MODE DE FONCTIONNEMENT
COULEUR
DUVOYANT
ÉTAT DE CHARGE
DE LA PILE
RÉACTION DU VOYANT
Stimulation électrostatique continue,
sonore ou par vibration avec bouton
enfoncé
Verte Bon Lacouleur de la lumière reste
constante tant que le bouton
reste enfoncé
Stimulation électrostatique continue,
sonore ou par vibration avec bouton
enfoncé
Rouge Faible Lacouleur de la lumière reste
constante tant que le bouton
reste enfoncé
Bouton de stimulation électrostatique
momentanée enfoncé
Verte Bon Le voyant clignote une fois,
puiss'éteint
Bouton de stimulation électrostatique
momentanée enfoncé
Rouge Faible Le voyant clignote une fois,
puiss'éteint
L’appareil est en charge Verte Faible Le voyant s’allume fixement
lorsque l’appareil est en charge
L’appareil est complètement chargé
(chargeur encore connecté)
Verte Bon Le voyant clignote une fois par
seconde lorsque la batterie est
complètement chargée
CONNECTEUR DE
CHARGE PLACÉ
DANS L'ÉMETTEUR
PORT DE
RECHARGE
24 WWW.SPORTDOG.COM
ÉTAPE
::
2 CHARGEMENT DU COLLIER-RÉCEPTEUR
425X-E ou 825X-E 1225X-E ou 1825X-E
1.
Soulevez le cache en caoutchouc qui
protège le port de recharge du collier
etbranchez le chargeur.
Alignez les points de contact avec le socle de chargement,
en veillant à ce que le trou du socle soit aligné avec le
voyant lumineux du récepteur, et poussez le socle vers
le haut et vers l'arrière jusqu'à ce qu'il se mette en place.
Connectez le chargeur au socle de chargement.
2.
Branchez le chargeur sur une prise murale standard pendant 2 heures à chaque fois que vous le
chargez. Le voyant lumineux du récepteur clignotera en vert une fois par seconde lorsque la batterie
est complètement chargée.
3.
Retirez le chargeur et fixez
complètement le cache en caoutchouc
pour éviter que des débris ne pénètrent
dans le port de recharge.
Retirez à la fois le connecteur du chargeur et le socle de
chargement du collier-récepteur. Le socle de chargement
n'est pas destiné à être fixé lorsque le collier-récepteur
est en cours d'utilisation.
Grâce à la technologie Li-Ion, le temps de charge du collier-récepteur est de 2heures seulement. Le fait
delaisser charger l’unité pendant plus de 2heures ne l’endommagera pas.
POUR METTRE LE COLLIER-RÉCEPTEUR
EN MARCHE
Appuyez brièvement sur le bouton On/Off. Le voyant lumineux du
collier-récepteur s'allumera et le collier-récepteur émettra 1 à 2bips
pour le SD-425X-E / SD-825X-E et 1 à 3bips pour le SD-1225X-E /
SD-1825X-E, selon la portée de stimulation choisie. La portée 2
(niveau moyen) est la portée par défaut.
POUR ÉTEINDRE LE COLLIER-RÉCEPTEUR
Appuyez brièvement sur le bouton On/Off. Le voyant lumineux
du récepteur s'allume en continu en rouge et lecollier-récepteur émet un bip de 2 secondes.
Pourallongerl'autonomie entre les charges, éteindre le collier-récepteur lorsqu'il n'est pas utilisé.
REMARQUE: L'autonomie approximative entre deux charges est de 50 à 70 heures pour le SD-425X-E /
SD-825X-E et de 140 à 160 heures pour le SD-1225X-E / SD-1825X-E, selon la fréquence d'utilisation.
BOUTON
MARCHE/ARRÊT
25WWW.SPORTDOG.COM
VOYANT LUMINEUX DU RÉCEPTEUR
MODE DE
FONCTIONNEMENT
COULEUR
DU
VOYANT
ÉTAT DE
CHARGE
DE LA
PILE
RÉACTION DU VOYANT
RÉACTION DU
HAUT-PARLEUR
VIBRATION
L'appareil est
missous tension
à l'aide du bouton
Marche/Arrêt
Verte Bon Le voyant s'allume fixement
lorsque le signal sonore
est émis
Émet un signal sonore
1 à 2fois (1 à 3fois pour
SD-1225X-E et SD-
1825X-E) en fonction
du réglage de la plage
de stimulation (2 est
le réglage par défaut).
Voir la page27.
S/O
L'appareil est mis
sous tension à
l'aide du bouton
Marche/Arrêt
Rouge Faible Le voyant s'allume fixement
lorsque le signal sonore
est émis
L'appareil est mis
hors tension à
l'aide du bouton
Marche/Arrêt
Rouge S/O Le voyant s'allume fixement
lorsque le signal sonore
est émis
Le signal sonore
est émis en continu
pendant 2 secondes
S/O
Le collier est
enmarche
Verte Bon Le voyant clignote toutes les
2 secondes
S/O S/O
Le collier est
enmarche
Rouge Faible Le voyant clignote toutes
les2 secondes
S/O S/O
L'unité émet
une stimulation
électrostatique
continue
Rouge S/O Le voyant s'allume fixement
tant que vous appuyez sur le
bouton (jusqu'à 10secondes)
S/O S/O
L'appareildélivre
une stimulation
électrostatique
momentanée
Rouge S/O Le voyant clignote rapidement
une fois, quelle que soit la
durée pendant laquelle vous
appuyez sur le bouton
S/O S/O
L'unité émet une
stimulation sonore
Off
(arrêt)
S/O S/O L'unité émet un signal
sonore tant que vous
appuyez sur le bouton
S/O
L'unité envoie une
stimulation par
vibration
Off
(arrêt)
S/O S/O S/O L'unité
vibre tant
que vous
appuyez sur
le bouton
(jusqu'à
10secondes)
L’appareil est
encharge
Verte Faible Le voyant s’allume fixement
lorsque l’appareil est en
charge
S/O S/O
L’appareil est
complètement
chargé (chargeur
encore connecté)
Verte Bon
Le voyant clignote une fois par
seconde lorsque la batterie
est complètement chargée
S/O S/O
26 WWW.SPORTDOG.COM
ÉTAPE
::
3 AJUSTEMENT DU COLLIER-RÉCEPTEUR
IMPORTANT: IL EST IMPORTANT QUE LE COLLIER-RÉCEPTEUR SOIT BIEN AJUSTÉ POUR GARANTIR
UNDRESSAGE EFFICACE. LES POINTS DE CONTACT DOIVENT ÊTRE EN CONTACT DIRECT AVEC LA PEAU
DE VOTRE CHIEN.
Pour que le collier soit bien ajusté, suivez les étapes
ci-dessous:
1. Avec votre chien debout (3A ), placez le collier-
récepteur aussi haut que possible sur le cou de votre
chien, légèrement de côté, de sorte que les points
de contact touchent la peau (3B). Si votre chien a le
poil long ou épais, vous pouvez utiliser l’une des deux méthodes suivantes pour
garantirun contact homogène: couper le poil autour des points de contact ou
placerles points de contact plus longs qui sont fournis avec votre appareil.
2. Le collier-récepteur doit être bien serré, mais il faut néanmoins pouvoir passer
undoigt entre le collier et le cou du chien (3C).
3. Laissez votre chien porter le collier pendant quelques minutes, puis contrôlez
ànouveau l’ajustement. Une fois que votre chien s'est habitué au collier-récepteur,
vérifiez encore s'il est bien ajusté.
ÉTAPE
::
4 TROUVER LE MEILLEUR NIVEAU
DESTIMULATION
Votre système de la marque SportDOG® dispose de plusieurs niveaux d'intensité. Ceci vous permet de choisir le
niveau de stimulation électrostatique le plus adapté à votre chien. Pour que le dressage soit efficace, il est important
de trouver le niveau d’intensité approprié à votre chien. Ce niveau est appelé le niveau de reconnaissance, lorsque
votre chien regarde autour de lui d'un air surpris ou lorsqu'il se gratte les oreilles.
REMARQUE: Commencez toujours par le niveau le plus bas avant d'augmenter progressivement.
POUR TROUVER LE NIVEAU DE RECONNAISSANCE DE VOTRE CHIEN
REMARQUE: Tous les chiens sont différents, vous ne pouvez pas prédire quel sera le niveau de reconnaissance du vôtre.
Observez attentivement le moindre changement de comportement qui montre que votre chien réagit à la stimulation
électrostatique.
1. Assurez-vous que le collier-récepteur est allumé et bien installé sur le cou de votre chien, utilisez la molette
de réglage de l’intensité de l'émetteur pour sélectionner le niveau 1, puis appuyez sur le bouton de stimulation
électrostatique continue pendant 1 à 2secondes.
2. Si votre chien ne montre aucune réaction au niveau 1, passez au niveau 2 et répétez le processus jusqu'à ce que
vous trouviez le niveau de reconnaissance de votre chien. C'est le niveau que vous devez utiliser lorsque vous
commencez un exercice de dressage.
3. VOTRE CHIEN NE DOIT PAS ABOYER NI PANIQUER LORSQU'IL REÇOIT UNE STIMULATION ÉLECTROSTATIQUE.
SIC'EST LE CAS, LE NIVEAU DE STIMULATION ÉLECTROSTATIQUE EST TROP ÉLEVÉ ET VOUS DEVEZ
REDESCENDRE D'UN NIVEAU AVANT DE RENOUVELER L'OPÉRATION.
4. Si vous atteignez le niveau de reconnaissance le plus haut et que votre chien ne réagit toujours pas, vérifiez que
le collier-récepteur soit bien ajusté au cou de votre chien. Revenez ensuite au niveau d'intensité 1 et renouvelez
l'opération. Si votre chien ne réagit toujours pas à la stimulation électrostatique, vous avez deux solutions:
vousdevrez peut-être utiliser les points de contact plus longs fournis avec le système, ou couper le poil de
votrechien sous les points de contact.
Si après avoir effectué toutes ces étapes, votre chien ne montre toujours aucun signe de réaction à la stimulation
électrostatique ou si la stimulation électrostatique vous semble trop élevée, vous pouvez essayer de modifier
laportée de stimulation de votre collier-récepteur en suivant les instructions suivantes. Contactez le service
clientèle si vous ne parvenez pas à trouver le niveau de reconnaissance de votre chien.
3C
3A 3B
27WWW.SPORTDOG.COM
CHANGEMENT DES PORTÉES DE STIMULATION ÉLECTROSTATIQUE
Votre collier-récepteur de la marque SportDOG® est fourni avec 2 à 3portées de stimulation électrostatique selon
le modèle. Par défaut, votre télécommande possède 21niveaux de stimulation électrostatique dans chaque portée,
1étant le plus bas et 21 le plus élevé. La portée 2, ou d'intensité moyenne, est la portée par défaut.
Pour changer de portée de stimulation électrostatique, suivez ces étapes:
1. Assurez-vous que le collier-récepteur est éteint.
2. Mettez l'unité en marche en appuyant sur le bouton On/Off.
3. Dans les 5 secondes après que le voyant lumineux se soit éteint, maintenez appuyé le bouton On/Off pendant 3 secondes.
4. Le collier-récepteur émettra alors un bip et le voyant lumineux clignotera en orange comme indiqué dans le
tableau ci-dessous. Continuez à maintenir le bouton enfoncé jusqu'à ce que le nombre de bips/clignotements
orange corresponde à la portée de stimulation souhaitée.
5. Relâchez le bouton une fois que vous avez sélectionné la portée ; le collier-récepteur va alors s'éteindre.
6. Remettez l'unité en marche. L'unité émet un nombre de bips correspondant à la portée de stimulation
électrostatique sélectionnée à l'étape 4.
BIPS PORTÉE DE STIMULATION
ÉLECTROSTATIQUE
TEMPÉRAMENT
DUCHIEN
MODÈLE
1 bip sonore Faible Léger SD-425X-E, SD-825X-E, SD-1225X-E, SD-1825X-E
2 bips sonores Moyenne Normal SD-425X-E, SD-825X-E, SD-1225X-E, SD-1825X-E
3 bips sonores Élevée Entêté SD-1225X-E, SD-1825X-E
CONSEILS DE DRESSAGE
AVANT LE DRESSAGE DE VOTRE CHIEN AVEC CE PRODUIT :
Pour que l’utilisation de ce produit soit un succès, souvenez-vous de toujours apprendre l’ordre à votre chien avant
d’essayer de le consolider à l’aide du collier de dressage. Votre dressage sera plus facile et se déroulera plus rapidement
sivous suivez les directives de ce Guide de démarrage rapide. De plus, gardez toujours les conseils suivants à l’esprit :
• N’éliminez qu’un comportement ou n’enseignez qu’une commande à la fois. Si vous allez trop vite dans votre
dressage, votre chien risque d’être perturbé.
• Veillez à ce que vos séances de dressage restent positives, courtes et régulières. Si vous sentez que votre chien
ouvous-même ressentez de la frustration ou de la confusion, il est préférable de faire une pause.
• Soyez régulier. Envoyez-lui une stimulation électrostatique, sonore, ou par vibration à chaque fois qu’il se comporte mal.
• Ne corrigez pas votre chien à outrance. Utilisez les stimulations le moins souvent possible pour le dressage de
votre chien.
• Évitez que votre chien ne se retrouve dans des situations où il a tendance à mal se comporter, sauf si vous êtes
enmesure de le surveiller et d’utiliser le système de dressage pour lui envoyer une stimulation électrostatique
parsignal sonore ou vibration.
• Si vous constatez une situation qui provoque inévitablement l’emportement de votre chien, provoquez-la
poureffectuer une séance de dressage. Vous augmenterez ainsi considérablement vos chances de réussite.
• Si votre chien réagit timidement au son, aux vibrations ou à la stimulation électrostatique (surtout les deux
premières fois), ne vous inquiétez pas. Redirigez son attention vers un comportement simple et pertinent
(commepar exemple un ordre connu, tel que « Assis »).
• N’utilisez jamais votre système de dressage pour corriger ou éliminer un comportement agressif. Si votre chien
adopte ce type de comportement, contactez un dresseur professionnel. L’agressivité est liée à plusieurs facteurs
chez le chien: elle peut provenir d’un comportement appris ou d’un réflexe de peur. Un autre facteur pouvant
setraduire par l’agressivité est la domination sociale. Chaque chien est différent.
Vous pouvez maintenant commencer à utiliser le collier de dressage. L’émetteur est réglé par défaut sur
le mode 5 (basculer vers le haut en mode 5 pour SD-1825X-E), mais vous pouvez changer de mode pour
répondre à vos besoins. Veuillez consulter l’étape 5 pour une description des différents modes.
28 WWW.SPORTDOG.COM
ÉTAPE
::
5 PROGRAMMER L'ÉMETTEUR
SD-425X-E, SD-825X-E, SD-1225X-E
L’émetteur dispose de 7modes de fonctionnement pour vous permettre de choisir celui qui correspond le
mieux à votre méthode de dressage. Il existe également un mode de programmation (Mode V/T) qui vous
permet de modifier le code d’identification du système. L’émetteur est réglé par défaut sur le mode 5.
CHANGER DE MODE
1. En vous reportant au tableau suivant, réglez la molette de réglage de l’intensité sur le mode souhaité.
2. Retournez l’émetteur et retirez la fixation de ceinture (si elle est attachée) (SD-825X-E et SD-1225X-E
uniquement).
3. À l’aide d’un stylo ou de la petite barre métallique de la boucle de votre
collier, enfoncez, puis relâchez le bouton de sélection du mode. Lorsque
vous appuyez sur le bouton de sélection du mode, le voyant lumineux
de l’émetteur s’allume en continu. Lorsque vous relâchez le bouton, le
mode sélectionné clignotera.
Par exemple, si vous souhaitez utiliser le mode 6, réglez la molette de réglage
de l’intensité au mode 6. Une fois le bouton de sélection du mode enfoncé, le
voyant lumineux de l’émetteur s’allumera en continu et, une fois le bouton
relâché, le voyant lumineux de l’émetteur clignotera 6fois.
29WWW.SPORTDOG.COM
TABLEAU DES MODES POUR LES MODÈLES SD-425X-E,
SD-825X-E, SD-1225X-E
(
VEUILLEZ CONSULTER LA PAGE28 POUR CHANGER DE MODE
)
MODE
FONCTION DU BOUTON
SUPÉRIEUR
FONCTION DU BOUTON
INFÉRIEUR
FONCTION DU BOUTON
LATÉRAL
NOMBRE
DE
CHIENS
1 Stimulation électrostatique
continue (niveau défini par
la molette de réglage de
l'intensité) OU Vibration
encas de réglage sur V/T
Stimulation électrostatique
momentanée (niveau défini
par la molette de réglage de
l'intensité) OU Vibration en
cas de réglage sur V/T
Signal sonore seul 1
2 Stimulation électrostatique
continue (niveau défini par
la molette de réglage de
l'intensité) OU Signal sonore
en cas de réglage sur V/T
Stimulation électrostatique
momentanée (niveau défini
par la molette de réglage de
l'intensité) OU Signal sonore
en cas de réglage sur V/T
Vibration uniquement 1
3 Chien 1: Stimulation
électrostatique continue
(niveau défini par la molette
de réglage de l'intensité)
OU Signal sonore en cas
deréglage sur V/T
Chien 2: Stimulation
électrostatique continue
(niveau défini par la molette
de réglage de l'intensité)
OU Signal sonore en cas
deréglage sur V/T
Chien 3: Stimulation
électrostatique continue
(niveau défini par la molette
de réglage de l'intensité)
OU Signal sonore en cas
deréglage sur V/T
3
4 Chien 1: Stimulation
électrostatique continue
(niveau défini par la
molettede réglage de
l'intensité) OU Vibration
encas de réglage sur V/T
Chien 2: Stimulation
électrostatique continue
(niveau défini par la
molettede réglage de
l'intensité) OU Vibration
encas de réglage sur V/T
Chien 3: Stimulation
électrostatique continue
(niveau défini par la
molettede réglage de
l'intensité) OU Vibration
encas de réglage sur V/T
3
5* Stimulation électrostatique
continue de niveau moyen
(niveau défini par la molette
de réglage de l'intensité)
OU Signal sonore en cas
deréglage sur V/T
Stimulation électrostatique
continue de niveau faible
(niveau défini par la molette
de réglage de l'intensité)
OU Signal sonore en cas
deréglage sur V/T
Stimulation électrostatique
continue de niveau fort
(niveau défini par la molette
de réglage de l'intensité)
OU Signal sonore en cas
deréglage sur V/T
1
6 Stimulation électrostatique
continue de niveau moyen
(niveau défini par la
molettede réglage de
l'intensité) OU Vibration
encas de réglage sur V/T
Stimulation électrostatique
continue de niveau faible
(niveau défini par la
molettede réglage de
l'intensité) OU Vibration
encas de réglage sur V/T
Stimulation électrostatique
continue de niveau fort
(niveau défini par la
molettede réglage de
l'intensité) OU Vibration
encas de réglage sur V/T
1
7 Stimulation électrostatique
continue (niveau défini par
la molette de réglage de
l'intensité) OU Signal sonore
en cas de réglage sur V/T
Stimulation électrostatique
momentanée (niveau défini
par la molette de réglage de
l'intensité) OU Signal sonore
en cas de réglage sur V/T
Localisation du beeper** 1
V/T
(CODE
D'IDENTI-
FICATION)
S/O S/O Voir l'ÉTAPE 08 S/O
REMARQUE: Les modes 1, 2, 3, 4 et 7 donnent 7 niveaux de stimulation, qui correspondent au réglage
delamolette de réglage de l'intensité.
30 WWW.SPORTDOG.COM
Les modes 5 et 6 disposent d’un plus grand nombre de niveaux de stimulation électrostatique (21 au total).
Par exemple, en mode 5 avec la molette de réglage de l’intensité réglée sur 1, le bouton inférieur fournit le
niveau 1 sur 21, le bouton supérieur fournit le niveau 2 sur 21 et le bouton latéral fournit le niveau 3 sur 21.
* Mode par défaut d'usine.
** Localisation du beeper: Le bouton latéral éteint le mode «chien en mouvement» et permet de localiser le beeper.
Pour activer de nouveau le mode «chien en mouvement», enfoncez le bouton latéral et maintenez-le enfoncé pendant
3secondes.
SD-1825X-E
Votre émetteur à distance dispose de 14modes de fonctionnement (sept avec l’interrupteur à bascule dans
la position gris/
a
et sept avec la bascule dans la position orange/
b
) pour vous permettre de sélectionner
celui qui correspond le mieux à votre type ou style d’entraînement. L’émetteur est réglé par défaut sur le
mode 5:
a
. Il existe également un mode de programmation (Mode V/T) qui vous permet de modifier le code
d’identification du système.
CHANGER DE MODE
1. Référez-vous à la section «TABLEAU DES MODES SD-1825X-E»
àlapage31, choisissez le numéro de mode souhaité (1-7) et faites
basculer la position sur (
a
ou
b
). Ajustez la molette de réglage de
l’intensité et l’interrupteur à bascule selon le mode que vous souhaitez.
2. Retournez l’émetteur et retirez la fixation de ceinture (si elle est
attachée).
3. À l’aide d’un stylo ou de la petite barre métallique de la boucle de votre
collier, enfoncez, puis relâchez le bouton de sélection du mode. Lorsque
vous appuyez sur le bouton de sélection du mode, le voyant lumineux
de l’émetteur s’allume en continu. Lorsque vous relâchez le bouton,
ilclignote autant de fois que le mode sélectionné.
Par exemple, si vous souhaitez utiliser le mode 6:
a
, réglez l’interrupteur
sur la position gris/
a et
ajustez la molette de réglage de l’intensité au
niveau6. Une fois le bouton de sélection du mode enfoncé, le voyant
lumineux de l’émetteur s’allumera en continu et, une fois le bouton
relâché,le voyant lumineux de l’émetteur clignotera 6 fois. Cependant,
sivous sélectionnez le Mode V/T (Code ID) sur la position gris/
a
, le voyant
restera de couleur fixe une fois le bouton de sélection du mode relâché.
*
Mode par défaut d’usine.
Pour un fonctionnement avec deux chiens, référez-vous à l’ÉTAPE 07
auxpages 32-33.
^ Pour un fonctionnement avec trois et six chiens, référez-vous à l’ÉTAPE
07aux pages 32-33.
• Localisation du beeper: Le bouton latéral éteint le mode «chien en mouvement» et permet de localiser le
beeper. Pour activer de nouveau le mode «chien en mouvement», enfoncez le bouton latéral et maintenez-
le enfoncé pendant 3secondes.
INTERRUPTEUR
À BASCULE DANS
LA POSITION a
INTERRUPTEUR
ÀBASCULE DANS
LAPOSITION
b
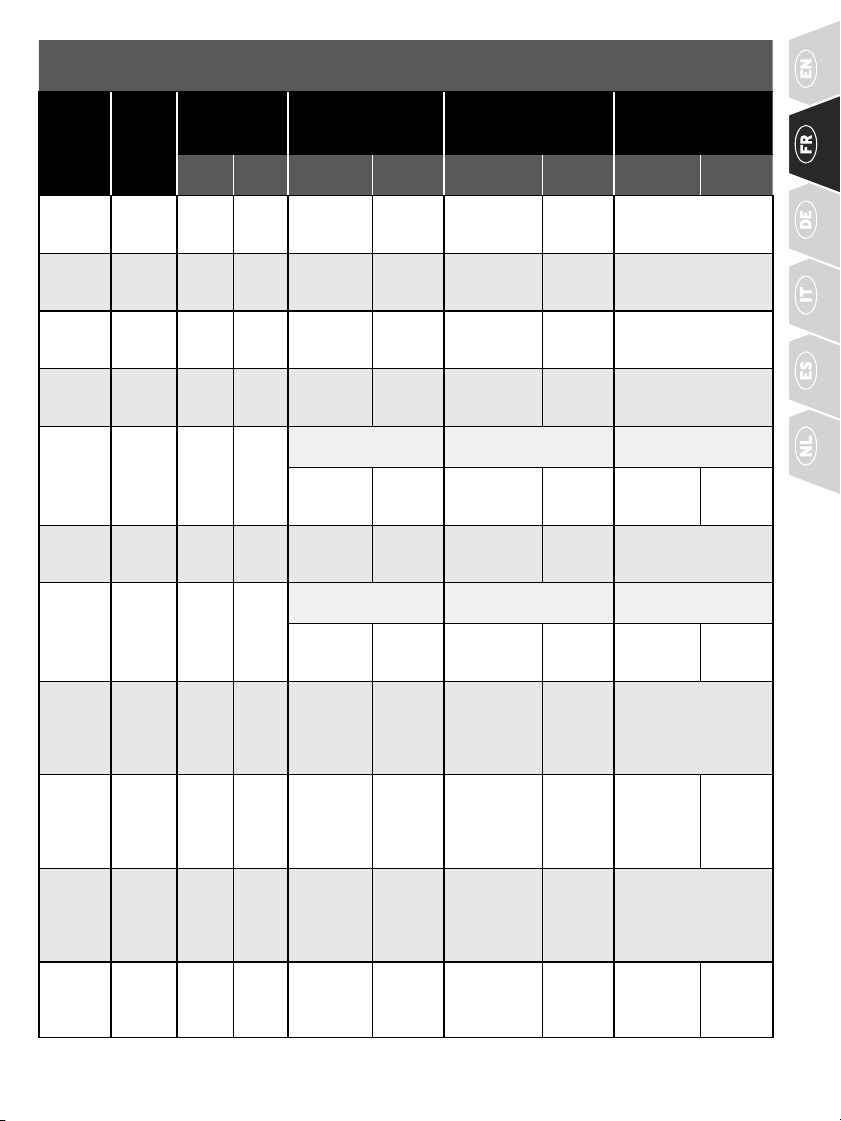
31WWW.SPORTDOG.COM
TABLEAU DES MODES SD-1825X-E
(
RÉFÉREZ-VOUS À LA PAGE30 POUR CHANGER DE MODE
)
MODE:
POSITION
DE
L'INTER-
RUPTEUR
NOMBRE
DE
CHIENS
FONCTION de
l'interrupteur
àbascule
FONCTION DU
BOUTON SUPÉRIEUR
FONCTION DU BOUTON
INFÉRIEUR
FONCTION DU
BOUTON LATÉRAL
a b
MOLETTE
1 à 7
V/T
MOLETTE
1 à 7
V/T
MOLETTE
1 à 7
V/T
1:a
2
Chien 1
Chien
2
Stimulation
continue de
niveau fort
Vibration
Stimulation
momentanée
de niveau fort
Vibration Signal sonore
1:b
2 Chien 1
Chien
2
Stimulation
continue de
niveau fort
Vibration
Stimulation
continue de
niveau fort
Vibration Localiser le beeper
•
2:a
2 Chien 1
Chien
2
Stimulation
continue de
niveau fort
Signal
sonore
Stimulation
momentanée
de niveau fort
Signal
sonore
Vibration
2:b
2 Chien 1
Chien
2
Stimulation
continue de
niveau fort
Vibration
Stimulation
continue de
niveau faible
Vibration Signal sonore
3:a
6^
Chiens
1 à 3
Chiens
4 à 6
Chien 1 (a) / Chien
4 (
b)
Chien 2 (
a) / Chien 5 (b)
Chien 3 (
a) / Chien
6 (
b)
Stimulation
continue de
niveau fort
Signal
sonore
Stimulation
continue de
niveau fort
Signal
sonore
Stimulation
continue de
niveau fort
Signal
sonore
3:b
2 Chien 1
Chien
2
Stimulation
continue de
niveau fort
Signal
sonore
Stimulation
continue de
niveau faible
Signal
sonore
Vibration
4:a
6
Chiens
1 à 3
Chiens
4 à 6
Chien 1 (a) / Chien
4 (
b)
Chien 2 (
a) / Chien 5 (b)
Chien 3 (
a) / Chien
6 (
b)
Stimulation
continue de
niveau fort
Vibration
Stimulation
continue de
niveau fort
Vibration
Stimulation
continue de
niveau fort
Vibration
4:b
2 Chien 1
Chien
2
Stimulation
continue
graduelle
de niveau
fort
Vibration
Stimulation
continue de
niveau fort
Vibration Signal sonore
5:a
*
2
Chien
1
Chien
2
Stimulation
continue
de niveau
moyen
Signal
sonore
Stimulation
continue de
niveau faible
Signal
sonore
Stimulation
continue de
niveau fort
Signal
sonore
5:b
2 Chien 1
Chien
2
Stimulation
continue
graduelle
de niveau
fort
Signal
sonore
Stimulation
continue de
niveau fort
Signal
sonore
Vibration
6:a
2 Chien 1
Chien
2
Stimulation
continue
de niveau
moyen
Vibration
Stimulation
continue de
niveau faible
Vibration
Stimulation
continue de
niveau fort
Vibration
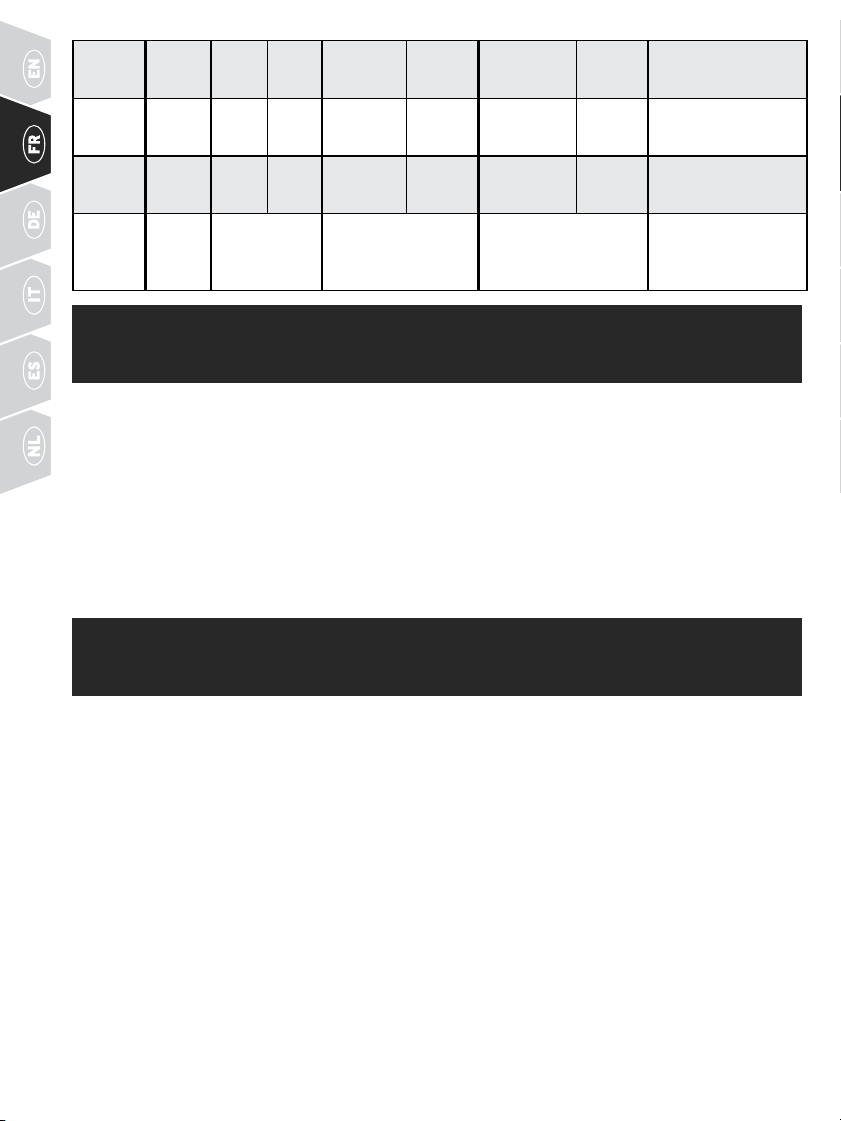
32 WWW.SPORTDOG.COM
6:b
2 Chien 1
Chien
2
Stimulation
continue de
niveau fort
Vibration
Signal
sonore
Vibration S/O
7:a
2 Chien 1
Chien
2
Stimulation
continue de
niveau fort
Signal
sonore
Stimulation
momentanée
de niveau fort
Signal
sonore
Localiser le beeper
•
7:b
2 Chien 1
Chien
2
Stimulation
continue de
niveau fort
Signal
sonore
Vibration
Signal
sonore
S/O
V/T
(CODE
D'IDENTI-
FICATION)
S/O a S/O S/O Voir l'ÉTAPE 08
ÉTAPE
::
6 COUPLAGE DE L’ÉMETTEUR
ETDUCOLLIER-RÉCEPTEUR
Pour configurer le collier-récepteur afin qu’il fonctionne avec un nouvel émetteur ou pour reprogrammer un
nouveau collier-récepteur afin qu’il fonctionne avec votre émetteur actuel, procédez comme suit:
1. Éteignez le collier-récepteur.
2. Appuyez sur le bouton Marche/Arrêt et maintenez-le enfoncé. Le voyant lumineux du récepteur s’allume,
puis s’éteint après 4 à 5 secondes. Si vous relâchez le bouton On/Off trop tôt, le voyant lumineux du
récepteur commencera à clignoter comme d’habitude. Si cela se produit, reprenez à l’étape 1.
3. Dès que le voyant lumineux du récepteur s’est éteint, relâchez le bouton On/Off.
4. Appuyez sur le bouton supérieur de l’émetteur et maintenez-le enfoncé jusqu’à ce que le voyant lumineux
du récepteur clignote 5 fois. Quand le voyant lumineux du récepteur a clignoté 5 fois, le collier-récepteur
est couplé et se met à clignoter normalement. Si le voyant lumineux du récepteur ne clignote pas 5fois,
reprenez à l’étape 1.
ÉTAPE
::
7 PROGRAMMER LE SYSTÈME POUR
PLUSIEURS CHIENS
SD-425X-E, SD-825X-E, SD-1225X-E
Vous devez acheter des colliers-récepteurs SportDOG
®
Add-A-Dog
®
pour le dressage de deux ou trois chiens
supplémentaires.
1. Programmez l’émetteur sur le mode 3 ou 4 (voir section CHANGER DE MODE à la page28).
2. Programmez le premier collier-récepteur.
A. Éteignez le collier-récepteur.
B. Appuyez sur le bouton Marche/Arrêt et maintenez-le enfoncé. Le voyant lumineux du récepteur
s’allume, puis s’éteint après 4à 5secondes. Si vous relâchez le bouton Marche/Arrêt trop tôt, le voyant
lumineux du récepteur se met à clignoter comme d’habitude. Dans ce cas, recommencez l’opération
depuis l’étape A.
C. Dès que le voyant lumineux du récepteur s’est éteint, relâchez le bouton Marche/Arrêt.
D. Appuyez sur le bouton du haut de l’émetteur et maintenez-le enfoncé jusqu’à ce que le voyant lumineux
du récepteur clignote 5fois. Si le voyant lumineux du récepteur ne clignote pas 5fois, recommencez
depuis l’étapeA.
3. Programmez le deuxième collier-récepteur en suivant les étapes A à D ci-dessus, mais en utilisant le
bouton du bas au lieu de celui du haut.
4. Programmez le troisième collier-récepteur en suivant les étapes A à D ci-dessus, mais en utilisant le
bouton latéral au lieu de celui du haut.
33WWW.SPORTDOG.COM
SD-1825X-E
Vous devez acheter des colliers-récepteurs SportDOG
®
Add-A-Dog
®
pour le dressage de chiens
supplémentaires en mode deux, trois ou six chiens.
FONCTIONNEMENT AVEC DEUX CHIENS
Les colliers-récepteurs SportDOG
®
peuvent être réglés de façon à réagir à la position a ou b de l’émetteur.
1. Programmez l’émetteur sur le mode 1, 2, 5, 6, ou 7 et réglez l’interrupteur sur la position gris/a, ou sur
n’importe quel mode compris entre 1 et 7, avec l’interrupteur sur la position orange/b (veuillez consulter
la section CHANGER DE MODE à la page30).
2. Ensuite, vous pouvez programmer le premier collier-récepteur en plaçant l’interrupteur à bascule sur la
position gris/a.
A. Éteignez le collier-récepteur.
B. Appuyez sur le bouton Marche/Arrêt du collier-récepteur et maintenez-le enfoncé. Le voyant lumineux
du récepteur s’allume, puis s’éteint après 4à 5secondes. Si vous relâchez le bouton Marche/Arrêt trop
tôt, le voyant lumineux du récepteur se met à clignoter comme d’habitude. Dans ce cas, recommencez
l’opération depuis l’étape A.
C. Dès que le voyant lumineux du récepteur s’est éteint, relâchez le bouton Marche/Arrêt.
D. Appuyez sur le bouton du haut de l’émetteur et maintenez-le enfoncé jusqu’à ce que le voyant lumineux
du récepteur clignote 5fois. Si le voyant lumineux du récepteur ne clignote pas 5fois, recommencez
depuis l’étapeA.
3. Pour programmer le deuxième collier-récepteur, répétez les étapes A à D, en plaçant l’interrupteur à
bascule sur la position orange/b.
FONCTIONNEMENT AVEC TROIS CHIENS
1. Programmez l’émetteur sur le mode 3 ou 4 et réglez l’interrupteur sur la position gris/a (veuillez
consulter la section CHANGER DE MODE à la page30).
2. Ensuite, vous pouvez programmer le premier collier-récepteur en plaçant l’interrupteur à bascule sur la
position gris/a.
A. Éteignez le collier-récepteur.
B. Appuyez sur le bouton Marche/Arrêt du collier-récepteur et maintenez-le enfoncé. Le voyant lumineux
du récepteur s’allume, puis s’éteint après 4à 5secondes. Si vous relâchez le bouton Marche/Arrêt trop
tôt, le voyant lumineux du récepteur se met à clignoter comme d’habitude. Dans ce cas, recommencez
l’opération depuis l’étape A.
C. Dès que le voyant lumineux du récepteur s’est éteint, relâchez le bouton Marche/Arrêt.
D. Appuyez sur le bouton du haut de l’émetteur et maintenez-le enfoncé jusqu’à ce que le voyant lumineux
du récepteur clignote 5fois. Si le voyant lumineux du récepteur ne clignote pas 5fois, recommencez
depuis l’étapeA.
3. Pour programmer le deuxième collier-récepteur, suivez les étapes A à D, en utilisant le bouton du bas au
lieu de celui du haut.
4. Pour programmer le troisième collier-récepteur, suivez les étapes A à D, en utilisant le bouton latéral au
lieu de celui du haut.
FONCTIONNEMENT AVEC SIX CHIENS
Répétez les étapes1 à4 de la section «FONCTIONNEMENT AVEC TROIS CHIENS» ci-dessus pour les chiens 1 à 3.
Placez ensuite l’interrupteur à bascule sur la position orange/
b
et répétez les étapes 2 à 4 pour les chiens 4 à 6.
MODÈLE ADD-A-DOG®
SDR-AXF-E Collier-récepteur original pour: SD-425X-E et SD-825X-E (jusqu'à 3chiens)
SDR-AX-E Collier-récepteur original pour: SD-1225X-E (jusqu'à 3chiens) et SD-1825X-E
(jusqu'à 6chiens)
34 WWW.SPORTDOG.COM
ÉTAPE
::
8 CHANGEMENT DES CODES D'IDENTIFICATION
Un code d'identification est l'identification du signal entre l'émetteur et le collier-récepteur. Chacun d'entre
eux est programmé avec l'un des 1 à 2000 codes d'identification en usine. L'émetteur vous offre la possibilité
de programmer deux émetteurs ou plus avec le même code ID, ce qui leur permet de contrôler un seul collier-
récepteur. Il existe 64 codes d'identification programmables.
POUR PROGRAMMER MANUELLEMENT LE CODE D'IDENTIFICATION
D'UN ÉMETTEUR
1. Tournez la molette de réglage de l'intensité sur V/T, puis appuyez brièvement sur le bouton de sélection du
mode à l'arrière de votre émetteur. Ceci ne change pas le mode, donc le mode actuel sera encore actif après
la modification du code d'identification.
2. Une fois que vous avez relâché le bouton de sélection du mode, le voyant lumineux de l'émetteur s'allume
en vert et reste allumé pendant 15 secondes.
3. Lorsque le voyant lumineux vert est allumé, tournez la molette de réglage d'intensité pour sélectionner
le1er chiffre de l'identification; ensuite, enfoncez, puis relâchez le bouton latéral. Le voyant lumineux
vertclignote rapidement pour confirmer la sélection.
4. De nouveau, lorsque le voyant lumineux vert est allumé, tournez la molette de réglage d'intensité pour
sélectionner le 2ème chiffre de l'identification; ensuite, enfoncez, puis relâchez le bouton latéral. Le
voyant lumineux vert clignote rapidement pour confirmer la sélection. Le 2ème chiffre est optionnel et,
sivous n'en avez pas besoin, attendez que le voyant vert s'éteigne et n'appuyez pas sur le bouton latéral.
5. Après 15secondes, ou après avoir appuyé pour la deuxième fois sur le bouton latéral, le voyant lumineux
vert s'éteint et l'identification de l'émetteur est mise à jour. Dès lors, l'émetteur est dans le même mode
quecelui activé avant le réglage d'identification.
6. Après avoir changé le code d'identification, vous devez coupler le collier-récepteur et l'émetteur
(consultezl'ÉTAPE 06).
REMARQUE: si vous appuyez une seule fois sur le bouton latéral (vous sautez l'étape 4), l'identification reste une
valeur à deux chiffres. Le chiffre de gauche est 1 par défaut. Par exemple si vous avez sélectionné 6 à l'étape 3 et
appuyé une seule fois sur le bouton latéral, l'identification programmée sera 16.
RÉGLER DE NOUVEAU L'ÉMETTEUR SUR LE CODE D'IDENTIFICATION PAR
DÉFAUT
1. Tournez la molette de réglage de l'intensité sur V/T, puis appuyez brièvement sur le bouton de sélection du
mode à l'arrière de votre émetteur. Ceci ne change pas le mode, donc le mode actuel sera encore actif après
la modification du code d'identification.
2. N'appuyez sur aucun bouton et attendez que le voyant lumineux de l'émetteur s'éteigne.
3. Vous devrez coupler le collier-récepteur et l'émetteur (consultez l'ÉTAPE 06).
ACCESSOIRES
Si vous souhaitez acheter des accessoires supplémentaires pour votre produit SportDOG
®
, contactez
le Service clientèle ou consultez la boutique en ligne du site sportdog.com et recherchez des pièces et
accessoires.
35WWW.SPORTDOG.COM
QUESTIONS FRÉQUEMMENT POSÉES
La stimulation électrostatique
est-elle sans danger pour mon chien?
Bien que la stimulation électrostatique continue et/ou momentanée
puisse être désagréable pour votre chien, elle est inoffensive. Les
systèmes de dressage électroniques requièrent une interaction et une
implication du propriétaire dans l’éducation du chien pour obtenir les
résultats escomptés.
Quel âge doit avoir un chien pour
pouvoir utiliser ce système de
dressage?
L'âge n'est pas aussi important que la capacité de développement de
votre chien à apprendre. Votre chien doit être capable d'apprendre
les ordres de base tels que «Assis» et «Pas bouger». Le collier-
récepteur peut être trop grand pour les chiens de moins de 3,6kilos.
Une fois que mon chien est dressé
et qu'il obéit à mes ordres, doit-il
continuer à porter le collier-
récepteur?
Parfois, il devra peut-être porter à nouveau le collier-récepteur pour
renforcer le dressage. En outre, de nombreux chasseurs gardent le
collier-récepteur sur leurs chiens pendant qu'ils chassent pour un
contrôle maximal, car les chiens ne se ménagent pas et subissent
denombreuses distractions sur le terrain.
Le collier-récepteur est-il étanche? Oui. Si le bloc de batteries rechargeables doit un jour être remplacé,
veillez à ce que le joint torique et sa rainure ne comportent pas de
saletés ni de débris.
Est-il possible d'utiliser le collier-
récepteur à proximité de la mer?
Si le collier-récepteur est utilisé dans ou à proximité de l'eau salée, il
est nécessaire de le rincer avec de l'eau claire après chaque utilisation.
Puis-je utiliser ce système de
dressage sur plusieurs chiens?
Oui, votre système de dressage est extensible jusqu'à un maximum
de 3chiens (jusqu'à 6chiens pour le SD-1825X-E). Il est nécessaire
d'acheter des colliers-récepteurs SportDOG
®
Add-A-Dog
®
. Veuillez
consulter la page33 pour une liste de colliers-récepteurs compatibles.
Puis-je utiliser ce système de
dressage avec des chiens agressifs?
Nous déconseillons l'utilisation de nos produits avec des animaux
agressifs. Nous vous recommandons de contacter votre vétérinaire
ou un dresseur professionnel si vous estimez que votre animal
pourrait avoir un comportement agressif.
Vais-je obtenir la portée exacte
annoncée avec ce système de
dressage?
La portée de votre système de dressage peut varier selon le relief, le
temps et la végétation, et en fonction des transmissions émises par
d'autres appareils radio. Pour avoir la meilleure portée possible,
consultez la section «Fonctionnement du système» de ce manuel.
Pendant combien de temps puis-je
administrer une stimulation
électrostatique à mon chien?
Le délai maximum d’activation du bouton de stimulation électrostatique
continue et d’envoi d’une stimulation électrostatique continue à votre
chien est de 10secondes. Après 10 secondes, le collier-récepteur se
met en pause et il est nécessaire de relâcher le bouton de stimulation
électrostatique continue avant d'appuyer à nouveau dessus.
Que dois-je faire si le cou de mon
chien devient rouge et irrité?
Ce problème provient d’une irritation provoquée par les points de
contact. Arrêtez d’utiliser le collier-récepteur pendant quelques jours. Si
l’éruption ou irritation cutanée persiste au-delà de 48heures, consultez
votre vétérinaire. Lorsque l’irritation a disparu, recommencez à utiliser
le dispositif et contrôlez de près la peau de votre chien. Évitez de laisser
votre chien porter le collier plus de 12heures par jour.
La molette de réglage de l’intensité a
du mal à tourner. Est-ce normal?
Oui. Ceci empêche des modifications accidentelles de l'intensité et
permet une étanchéité optimale. Avec le temps, la molette tournera
plus facilement.
36 WWW.SPORTDOG.COM
QUESTIONS FRÉQUEMMENT POSÉES
Puis-je attacher une laisse
àcesystème de dressage?
N'attachez PAS de laisse à votre système de dressage. Vous pouvez
mettre un collier non métallique au cou de votre chien et y attacher
une laisse. Vérifiez que le collier supplémentaire n’interfère pas avec
les points de contact.
Mon émetteur envoie inopinément
un signal à plusieurs colliers-
récepteurs, que dois-je faire?
Ceci arrive rarement, mais vous pouvez changer le code
d'identification de votre émetteur (consultez l'ÉTAPE 08).
DÉPANNAGE
Les réponses à ces questions devraient vous aider à résoudre tout type de problème pouvant survenir avec ce
dispositif. Si ce n'est pas le cas, veuillez contacter le Service clientèle ou visiter notre site www.sportdog.com.
Mon chien ne réagit pas lorsque
j'appuie sur un bouton.
• Contrôlez que le collier-récepteur est bien allumé et que le voyant
lumineux clignote.
• Si la portée a diminué par rapport à la première utilisation, vérifiez
l'état de charge de la batterie de l'émetteur et du collier-récepteur.
• De nombreux facteurs peuvent avoir un impact sur la portée de
votre système. La liste de ces facteurs est disponible dans la section
«Fonctionnement du système».
• Vous pouvez contrôler que le collier-récepteur envoie bien
une stimulation électrostatique à votre chien en plaçant la clé
multifonctions fournie avec votre kit, sur le collier-récepteur.
Veuillez consulter la section «Instructions relatives à la lampe
test» pour plus de détails.
• Augmenter la molette de réglage de l’intensité. Veuillez consulter
lasection «Trouver le meilleur niveau d'intensité» pour votre
chienpour plus d'informations.
• Augmentez la plage de stimulation électrostatique. Veuillez
consulter la section «Changement des portées de stimulation
électrostatique» pour plus d'informations.
• Vérifier que les points de contact du collier-récepteur sont
bien contre la peau de votre chien. Veuillez consulter la section
«Ajustement du collier-récepteur» pour plus d'informations.
• Vous devrez peut-être utiliser les points de contact plus longs
fournis avec le système, ou couper le poil du chien sous les points
decontact. Ne rasez jamais le cou de votre chien.
• Si l'autonomie diminue de moitié par rapport à la durée initiale,
lesbatteries du collier-récepteur doivent être remplacées.
Contactez le Service clientèle pour en acheter de nouvelles.
Le collier-récepteur ne
s'allumepas.
• Vérifiez que le collier-récepteur est bien chargé. Le collier-
récepteur se recharge en 2heures.
Le collier-récepteur ne répond pas
à l'émetteur.
• Assurez-vous que l'émetteur est bien chargé. L'émetteur se
recharge en 2heures.
• Contrôlez que le collier-récepteur est bien allumé et que le voyant
lumineux clignote. Veuillez consulter la section «Pour allumer
etéteindre le collier-récepteur».
• Veuillez consulter la section «Couplage de l’émetteur et du collier-
récepteur».
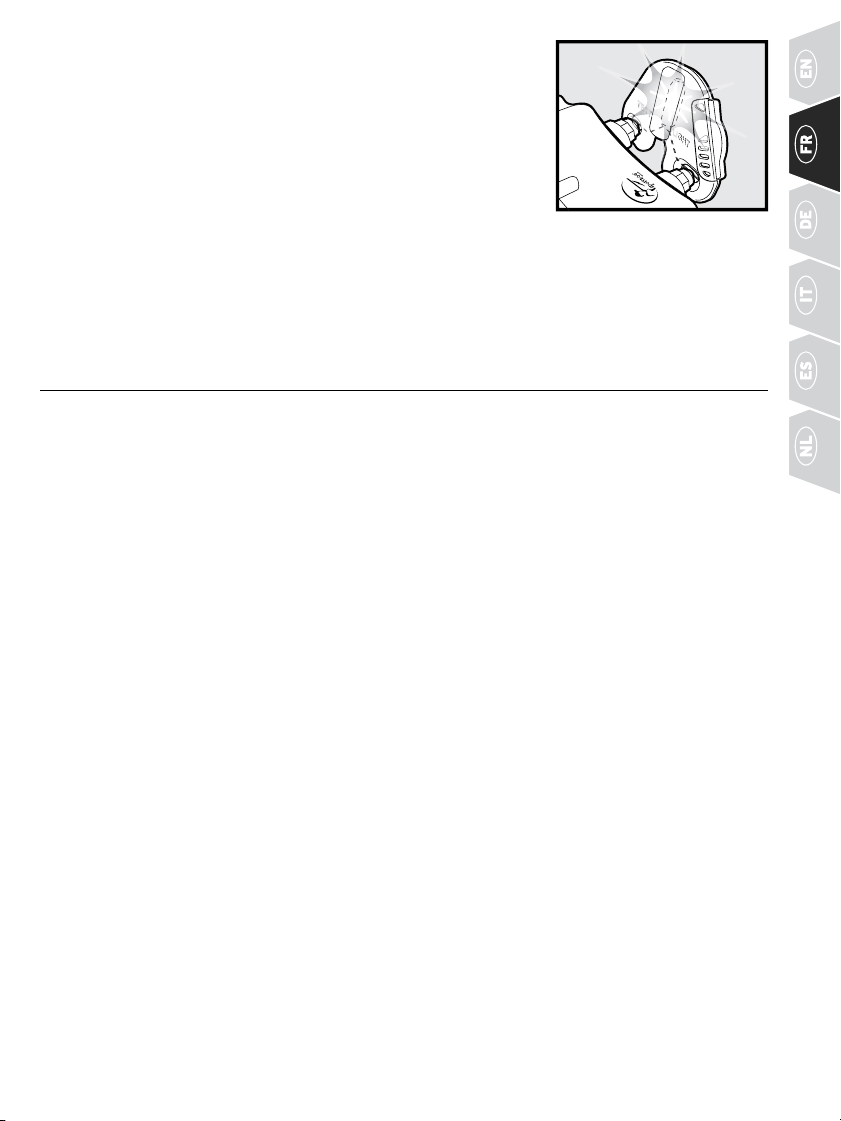
37WWW.SPORTDOG.COM
INSTRUCTIONS RELATIVES À LA CLÉ
MULTIFONCTIONS
Si vous devez tester votre système, suivez ces instructions:
1. Allumez votre collier-récepteur
2. Maintenez les contacts de la clé multifonctions contre les points de contact.
3. Appuyez sur un bouton de stimulation électrostatique de l'émetteur.
4. La clé multifonctions clignote.
REMARQUE: plus le niveau de stimulation électrostatique est élevé, plus
lalumièredelaclémultifonctionclignotefort.
5. Éteignez le collier-récepteur.
Conservez la lampe de test pour effectuer d'autres tests à l'avenir.
REMARQUE: Si la clé multifonctions ne clignote pas, rechargez la batterie et faites un nouvel essai.
Si la clé multifonctions ne clignote toujours pas, contactez le centre de service clientèle.
BATTERIE
Ce système fonctionne avec deux batterie de type lithium-ion. Pour remplacer la batterie,
utilisezexclusivementune batterie commandée auprès du service clientèle.
• Les batteries ne doivent jamais être extraites de leur compartiment pour être rechargées.
• Les batteries rechargeables au lithium-ion (Li-Ion) ne créent pas d’effet de mémoire et leur épuisement
n’estpas nécessaire avant la recharge.
• Les batteries sont partiellement chargées en usine, mais vous devez néanmoins les charger complètement
avant la première utilisation.
• Lorsque vous n’utilisez pas le dispositif pendant de longues périodes, rechargez complètement la
batterie demanière régulière. Cette opération doit être effectuée une fois tous les 3 à 4mois.
• Les batteries sont conçues pour tolérer des centaines de cycles de charge. Cependant, toutes les batteries
rechargeables perdent de leur autonomie avec le temps et avec le nombre de recharges effectuées.
Celaestnormal. Si le temps de fonctionnement de votre appareil baisse de moitié par rapport à la
duréedevie d’origine, contactez le Service clientèle pour vous procurer une nouvelle batterie.
• La durée de vie des batteries est comprise entre 3 et 5ans. Lorsqu’une batterie doit être remplacée, vous
pouvez commander un nouveau bloc batterie en appelant notre Service clientèle. Veuillez ne pas ouvrir
lecollier-récepteur ni l’émetteur avant d’avoir reçu la batterie de rechange et les instructions relatives
àson remplacement.
La collecte sélective des batteries usagées est exigée dans de nombreux pays. Renseignez-vous sur les
réglementations locales en vigueur avant de jeter les batteries usagées. Veuillez consulter les instructions
ci-dessous pour retirer la batterie de l'appareil et l'éliminer correctement.
38 WWW.SPORTDOG.COM
EN FIN DE VIE DU PRODUIT, VEUILLEZ SUIVRE LES INSTRUCTIONS CI-DESSOUS POUR L’ÉLIMINATION DES
BATTERIE (N'OUVREZ PAS LE COLLIER-RÉCEPTEUR NI L'ÉMETTEUR TANT QUE VOUS N'AVEZ PAS REÇU LA
BATTERIE DE REMPLACEMENT).
1. À l'aide d'un tournevis cruciforme n°1 pour votre émetteur et/ou d'une clé hexagonale 3/32 pour votre
collier-récepteur, retirez les vis du boîtier.
2. Retirez le cache arrière ou la protection du boîtier.
3. Retirez le bloc batterie usagé.
Ces instructions ne sont pas valables pour la réparation ou le remplacement de la batterie. Pour éviter
d'invalider votre garantie, veuillez appeler le centre de service clientèle pour obtenir de l'aide afin de
remplacer votre batterie par une batterie spécifiquement approuvée par Radio Systems Corporation.
Pour une liste des brevets protégeant ce produit, veuillez visiter: www.radiosystemscorporation.com/patents
39WWW.SPORTDOG.COM
Im Folgenden bezieht sich „wir“ oder „uns“ auf die Radio Systems Corporation, Radio Systems PetSafe
EuropeLtd., RadioSystems Australia Pty Ltd. und jegliche anderen Tochtergesellschaften oder Marken
derRadio Systems Corporation.
Vielen Dank, dass Sie sich für Trainingsprodukte der Marke SportDOG® entschieden haben. Bei
ordnungsgemäßer Verwendung erleichtert Ihnen dieses Produkt das wirkungsvolle und sichere
Training Ihres Hundes. Um Ihre Zufriedenheit sicherzustellen, lesen Sie bitte sorgfältig die gesamte
Gebrauchsanweisung. Für weitere Unterstützung setzen Sie sich bitte mit der Kundenbetreuung in
Verbindung. Eine Liste regionaler Telefonnummern finden Sie auf unserer Website www.sportdog.com.
Für den bestmöglichen Schutz im Rahmen Ihrer Garantie registrieren Sie Ihr Produkt bitte innerhalb
von 30Tagen unter www.sportdog.com. Bewahren Sie außerdem den Kaufbeleg auf. In Verbindung mit der
Registrierung genießen Sie dadurch die volle Produktgarantie und erhalten bei telefonischer Kontaktierung
unserer Kundenbetreuung schneller Hilfe. Ihre wertvollen Informationen werden in keinem Fall an Dritte
weitergegeben oder verkauft. Diekompletten Gewährleistungsdetails finden Sie unter www.sportdog.com.
WEITERE WICHTIGE INFORMATIONEN
Der Gebrauch dieses Produkts setzt das Einverständnis mit sämtlichen Bestimmungen, Bedingungen
und Hinweisen in Bezug auf dieses Produkt voraus, einschließlich jedoch nicht beschränkt auf die
Angaben zu wichtigen behördlichen Bestimmungen und Sicherheitsinformationen in der vorliegenden
Gebrauchsanweisung sowie auf dem Beiblatt.
INHALT
BESTANDTEILE ..............................................................................................................40
SO FUNKTIONIERT DAS SYSTEM ...................................................................................40
DEFINITIONEN ...............................................................................................................41
AUFLADEN DES HANDSENDERS ....................................................................................42
AUFLADEN DES EMPFÄNGERHALSBANDS ....................................................................43
ANPASSEN DES EMPFÄNGERHALSBANDS ..................................................................... 45
ERMITTELN DER BESTEN INTENSITÄTSSTUFE ..............................................................45
ÄNDERN DER INTENSITÄTSSTUFE .................................................................................46
ALLGEMEINE TRAININGSTIPPS .....................................................................................46
HANDSENDER PROGRAMMIEREN .................................................................................47
EMPFÄNGERHALSBAND MIT HANDSENDER KOPPELN .................................................51
FÜR MEHRERE HUNDE PROGRAMMIEREN .................................................................... 51
ID-CODES ÄNDERN ........................................................................................................53
ZUBEHÖR .......................................................................................................................53
HÄUFIG GESTELLTE FRAGEN .........................................................................................54
FEHLERBEHEBUNG .......................................................................................................55
SO VERWENDEN SIE DIE TESTLEUCHTE ........................................................................56
BATTERIE ....................................................................................................................... 56
-Videos sind unter www.youtube.com/sportdogintl sowie unter sportdog.com auf dem Register
VIDEOS zum jeweiligen Produkt verfügbar.
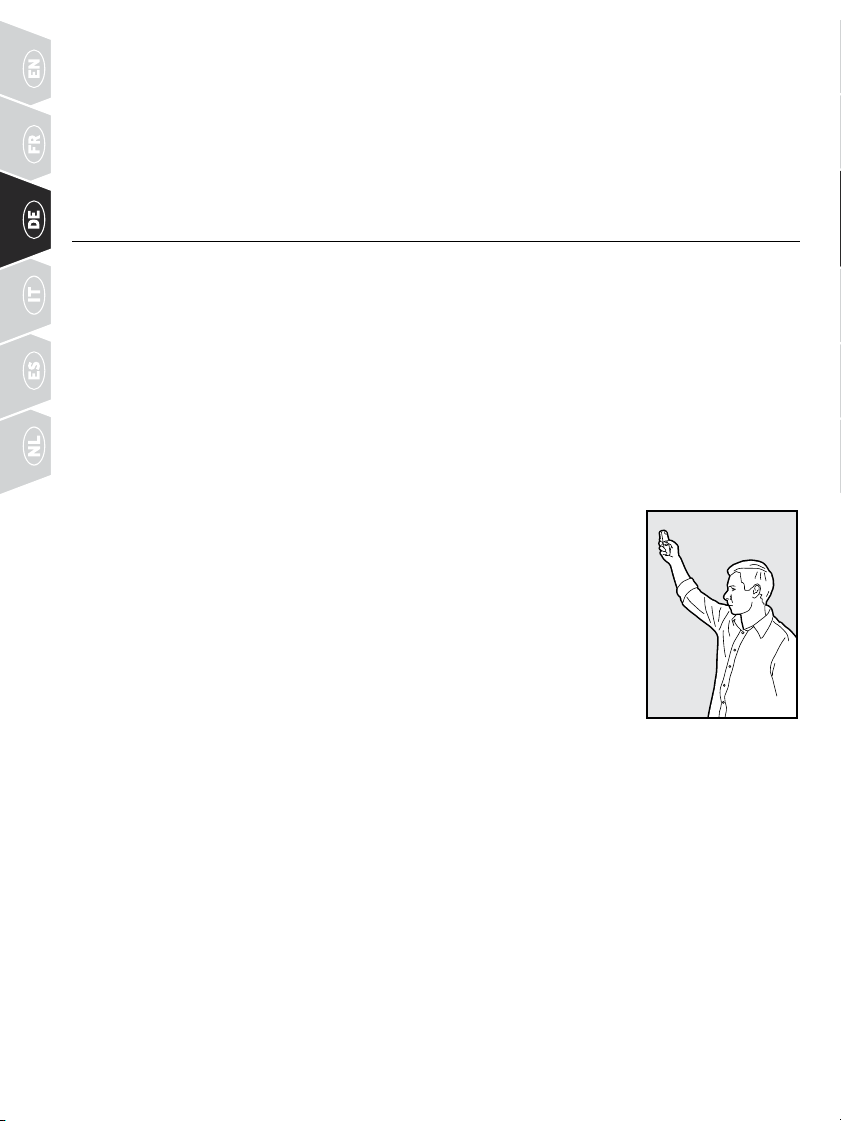
40 WWW.SPORTDOG.COM
BESTANDTEILE
DIE SYSTEME SD-425X-E, SD-825X-E, SD-1225X-E UND
SD-1825X-E BEINHALTEN FOLGENDES:
• Handsender
• Empfängerhalsband
• Ladeadapter
• Ladestation (SD-1225X-E und SD-1825X-E)
• Kurze/lange Kontaktstifte
• Handschlaufe
• Gürtelclip (SD-825X-E, SD-1225X-E, SD-1825X-E)
• Testleuchte
SO FUNKTIONIERT DAS SYSTEM
Ihr System der Marke SportDOG® hat sich für Hunde über 3,6kg als sicher, komfortabel und wirksam erwiesen.
Beikonsequenter und ordnungsgemäßer Verwendung dieses Produkts können Sie je nach System (siehe unten)
biszueiner Entfernung von 1.600Metern Befehle verstärken und Fehlverhalten korrigieren. Durch ein vom
Handsender ausgegebenes Signal wird am Empfängerhalsband ein harmloser Reizimpuls ausgelöst. Mit
entsprechendem Training lernt Ihr Hund, dieses Signal mit einem Befehl zu verknüpfen. Wie alle Produkte
der MarkeSportDOG® verfügt auch dieses Modell über statische Reizimpulsstufen, die Sie entsprechend
demTemperament Ihres Hundes einsetzen können. Sie vermeiden dadurch die Anwendung eines unnötig
hohenReizimpulses.
SD-425X-E: 450m
SD-825X-E: 800m
SD-1225X-E: 1.200m
SD-1825X-E: 1.600m
WICHTIG: DIE MAXIMALE REICHWEITE VARIIERT ABHÄNGIG DAVON, WIE
SIE DEN HANDSENDER HALTEN. FÜR KONSISTENTE RESULTATE ÜBER EINE
HÖHERE ENTFERNUNG HINWEG HALTEN SIE DEN HANDSENDER IN VERTIKALER
POSITION ÜBER DEM KOPF VOM KÖRPER WEG. DIE GELÄNDEBESCHAFFENHEIT,
WETTERBEDINGUNGEN, VEGETATION UND SIGNALE VON ANDEREN
FUNKGERÄTEN KÖNNEN SICH AUFDIEMAXIMALE REICHWEITE AUSWIRKEN:
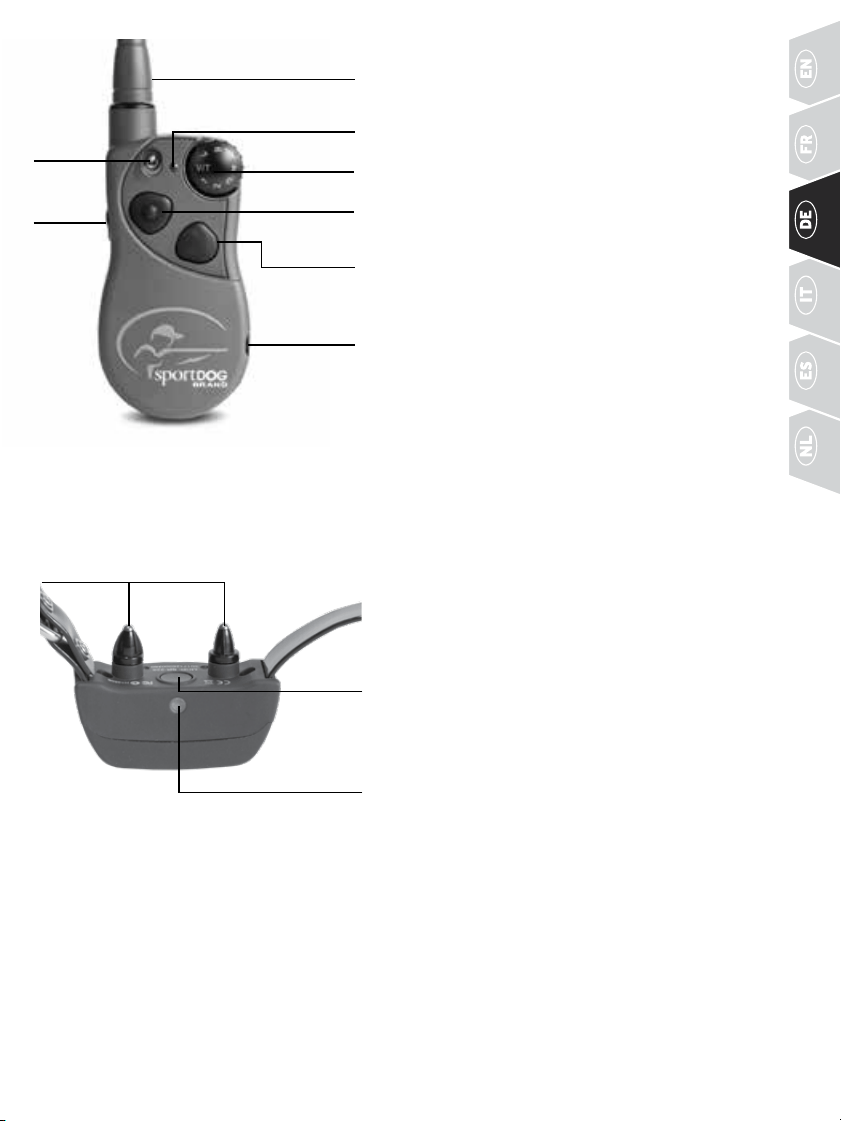
41WWW.SPORTDOG.COM
HANDSENDER
LED-LEUCHTE
HANDSENDER
ANTENNE
INTENSITÄTS-
REGLER
OBERE TASTE
UNTERE
TASTE
LADE-
ANSCHLUSS
SEITLICHE
TASTE
MODUSTASTE: Mit dieser Taste können Sie den Modus
desHandsenders ändern (siehe Seite47).
EMPFÄNGERHALSBAND: Empfängt das Funksignal vom
Handsender und gibt einen statischen Reizimpuls, ein
Vibrations- oder Tonsignal zur Korrektur oder Führung
Ihres Hundes ab. Bis zu einer Tiefe von 7,5m wasserdicht.
LEUCHTANZEIGE DES EMPFÄNGERS. Zeigt an, wenn das
Empfängerhalsband ein- oder ausgeschaltet wurde, dient
als Batteriestandsanzeige und zeigt auch an, wenn eine
Taste für einen konstanten oder kurzzeitigen statischen
Reizimpuls gedrückt wird.
KONTAKTSTIFTE: Die Kontakte, durch die das
Empfängerhalsband einen statischen Reizimpuls abgibt.
EIN-/AUS-TASTE: Durch kurzes Drücken dieser Taste wird
das Empfängerhalsband ein- und ausgeschaltet.
DEFINITIONEN
HANDSENDER: Überträgt das Funksignal an das Empfän-
gerhalsband. Bis zu einer Tiefe von 7,5m wasserdicht.
INTENSITÄTSREGLER: Bietet mehrere statische
Reizimpulsstufen, damit Sie die Korrektur an das
Temperament Ihres Hundes anpassen können.
LEUCHTANZEIGE AM SENDER: Gibt an, dass eine Taste
gedrückt ist und dient auch als Anzeige für niedrigen
Batteriestand.
KIPPSCHALTER: Dieser Schalter ist werkseitig
so eingestellt, dass das Sendegerät zwei
Empfängerhalsbänder steuern kann.
OBERE TASTE: Diese Taste ist werkseitig auf einen
mittleren konstanten statischen Reizimpuls eingestellt.
UNTERE TASTE: Diese Taste ist werkseitig auf einen
niedrigen konstanten statischen Reizimpuls eingestellt.
SEITLICHE TASTE: Diese Taste ist werkseitig auf einen
hohen konstanten statischen Reizimpuls eingestellt.
LADEANSCHLUSS: Zum Anschluss des Ladegeräts.
DerSender ist zwar ohne die Abdeckung wasserdicht,
trotzdem sollte der Deckel geschlossen werden, damit
keinSchmutz in die Öffnung eindringen kann.
EIN-/AUS-
TASTE
EMPFÄNGER
LED-LEUCHTE
KONTAKTSTIFTE
DAS EMPFÄNGERHALSBAND KANN VIER ARTEN VON REIZIMPULSEN AUSGEBEN
KONSTANT: Sie können kontrollieren, wann und wie lange ein statischer Reizimpuls (maximal 10Sekunden)
ausgegeben wird. Nach 10Sekunden wird der Reizimpuls ausgeschaltet. Um einen weiteren statischen
Reizimpuls auszugeben, muss die Taste losgelassen und erneut gedrückt werden.
KURZZEITIG: Statische Reizimpulse werden für 1/10Sekunde abgegeben, unabhängig davon, wie lange der
Knopfgedrückt wird.
TONSIGNAL: Das Empfängerhalsband gibt einen schnellen Piepton aus, wenn eine Tonsignal-Taste gedrückt wird.*
VIBRATION: Das Empfängerhalsband vibriert, wenn eine Vibrations-Taste gedrückt wird– maximal 10
Sekundenlang.*
* Ton und Vibration sind voreingestellt und nicht anpassbar.
KIPP-
SCHALTER
(
NUR
1825X-E
)
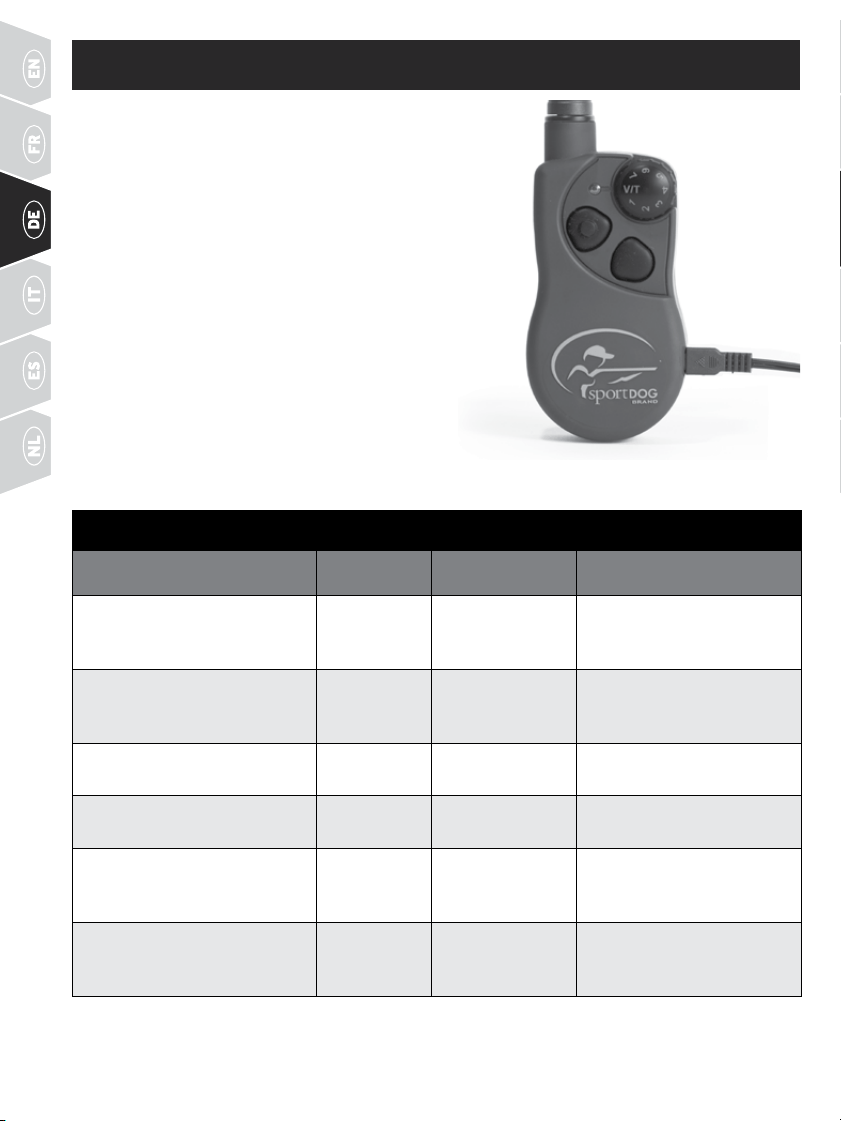
42 WWW.SPORTDOG.COM
SCHRITT
::
1 AUFLADEN DES HANDSENDERS
1. Entfernen Sie die Gummiabdeckung des
Ladeanschlusses, und schließen Sie den
Anschlussstecker des zugehörigen Ladegeräts an.
2. Schließen Sie das Ladegerät an eine herkömmliche
Steckdose an.
3. Wenn der Ladevorgang abgeschlossen ist, blinkt
die LED im Sekundentakt grün. Bringen Sie nach
dem Laden die Gummiabdeckung wieder am
Ladeanschluss an.
Dank Li-Ionen-Technologie benötigt der Handsender
nur 2Stunden zum Aufladen. Es ist für das Gerät nicht
schädlich, wenn es länger als 2Stunden an das
Ladegerät angeschlossen bleibt.
HINWEIS: Die Batterielebensdauer pro Ladung beträgt
je nach Nutzungshäufigkeit bei den Modellen SD-425X-E/
SD-825X-E zwischen 50 und 70Stunden und bei den Modellen
SD-1225X-E/SD-1825X-E zwischen 40 und 60Stunden.
LADE- KABEL
EINGESTECKT AM
LADEANSCHLUSS
DES HANDSENDERS
LEUCHTANZEIGE AM SENDER
BETRIEBSMODUS
FARBE DER
LEUCHTE
BATTERIESTATUS LED-FUNKTION
Taste für konstanten statischen
Reizimpuls, Ton- oder
Vibrationssignal gedrückt
Grün Gut Leuchtet durchgehend,
während die Taste gedrückt ist
Taste für konstanten statischen
Reizimpuls, Ton- oder
Vibrationssignal gedrückt
Rot Niedrig Leuchtet durchgehend,
während die Taste gedrückt ist
Taste für kurzzeitigen statischen
Reizimpuls gedrückt
Grün Gut Blinkt einmal und schaltet
dann ab
Taste für kurzzeitigen statischen
Reizimpuls gedrückt
Rot Niedrig Blinkt einmal und schaltet
dann ab
Gerät wird aufgeladen Grün Niedrig Leuchtet durchgehend,
während am Ladegerät
angeschlossen
Gerät vollständig aufgeladen
(noch an Ladegerät
angeschlossen)
Grün Gut Blinkt einmal pro Sekunde,
wenn Batterie vollständig
aufgeladen
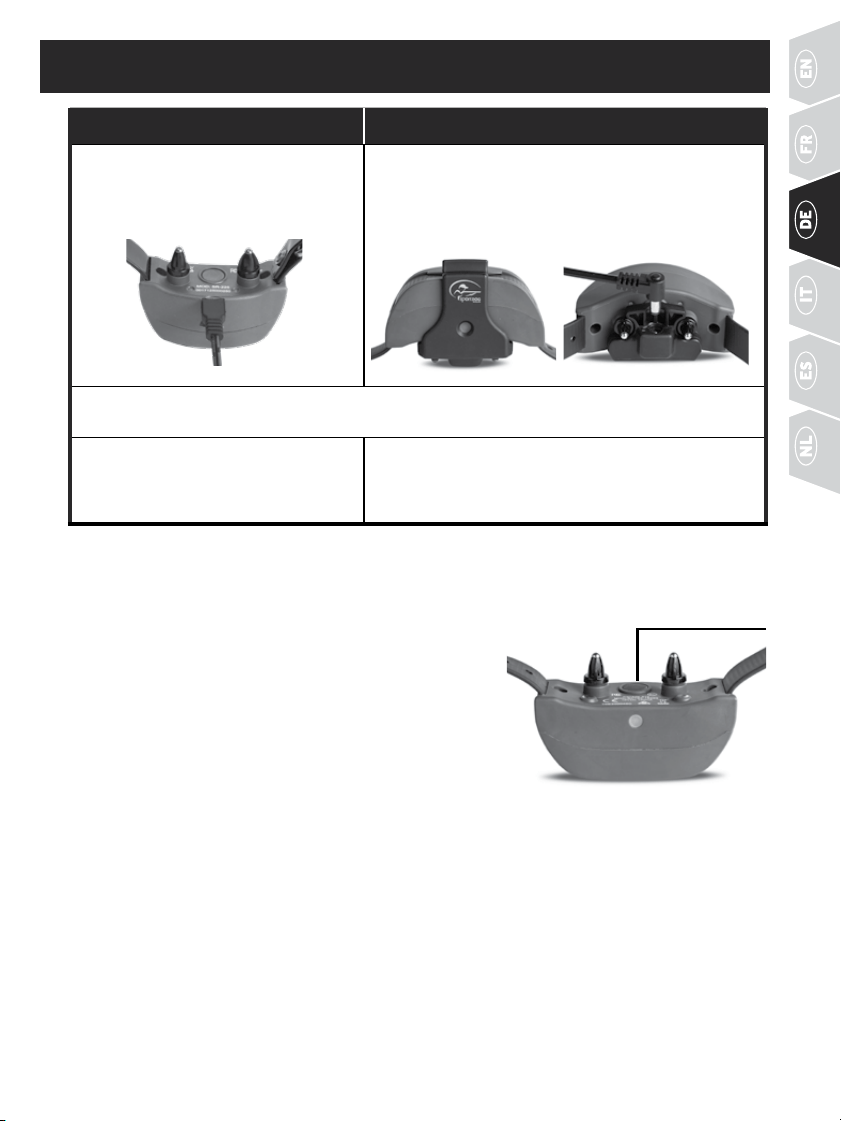
43WWW.SPORTDOG.COM
SCHRITT
::
2 AUFLADEN DES EMPFÄNGERHALSBANDS
425X-E, 825X-E 1225X-E, 1825X-E
1.
Entfernen Sie die Gummiabdeckung des
Ladeanschlusses am Halsband, und
schließen Sie das Ladegerät an.
Richten Sie die Kontaktstifte an der Ladestation aus.
Stellen Sie dabei sicher, dass das Loch an der Station auf die
Leuchtanzeige des Empfängers ausgerichtet ist. Drücken Sie
dann die Station nach oben und hinten, sodass sie einrastet.
Schließen Sie das Ladegerät an die Ladestation an.
2.
Schließen Sie das Ladegerät an eine herkömmliche Steckdose an. Nach Abschluss des Ladevorgangs
blinkt die Leuchtanzeige des Empfängers im Sekundentakt grün.
3.
Entfernen Sie das Ladegerät, und
bringen Sie die Gummiabdeckung
an,um den Ladeanschluss vor
Schmutzzuschützen.
Entfernen Sie den Anschlussstecker und die Ladestation
vom Empfängerhalsband. Die Ladestation ist nicht
dafür konzipiert, um während des Gebrauchs des
Empfängerhalsbands an diesem befestigt zu bleiben.
Dank Li-Ionen-Technologie benötigt das Empfängerhalsband nur 2Stunden zum Aufladen. Es ist für
dasGerät nicht schädlich, wenn es länger als 2Stunden an das Ladegerät angeschlossen bleibt.
EINSCHALTEN DES EMPFÄNGERHALSBANDS
Drücken Sie die Ein-/Aus-Taste, und lassen Sie sie wieder
los. Die Leuchtanzeige des Empfängers leuchtet auf, und das
Empfängerhalsband piept je nach gewählter Intensitätsstufe bei
den Modellen SD-425X-E/SD-825X-E ein- oder zweimal und bei
den Modellen SD-1225X-E/SD-1825X-E ein-, zwei- oder dreimal.
Standardmäßig ist Stufe2 (mittel) eingestellt.
AUSSCHALTEN DES EMPFÄNGERHALSBANDS
Drücken Sie die Ein-/Aus-Taste, und lassen Sie sie wieder los. Die
Leuchtanzeige des Empfängers leuchtet rot, und das Empfängerhalsband gibt 2Sekunden lang einen
Signalton aus. Schalten Sie das Empfängerhalsband bei Nichtgebrauch aus, um die Lebensdauer der Batterie
zwischen den Ladezyklen zu verlängern.
HINWEIS: Die Batterielebensdauer pro Ladung beträgt je nach Nutzungshäufigkeit bei den Modellen
SD-425X-E/SD-825X-E zwischen 50 und 70Stunden und bei den Modellen SD-1225X-E/SD-1825X-E zwischen
140 und 160Stunden.
EIN-/AUS-
TASTE
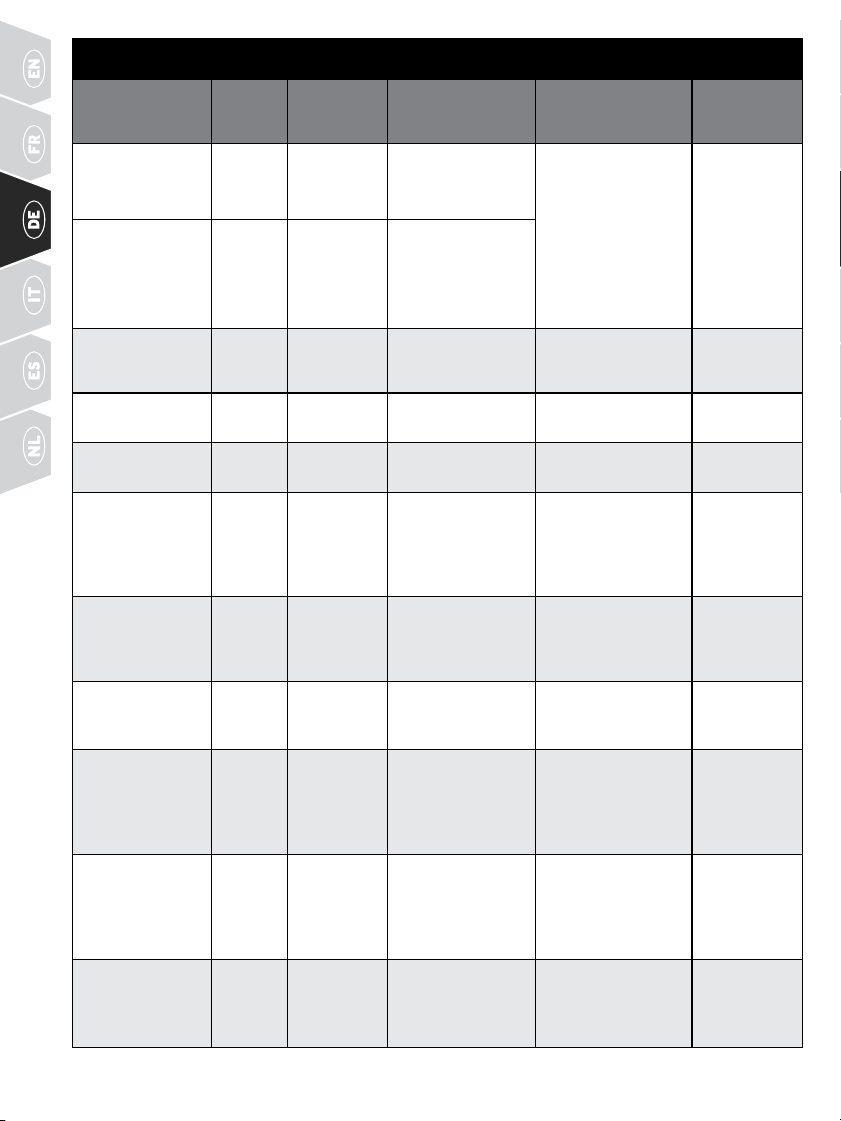
44 WWW.SPORTDOG.COM
LEUCHTANZEIGE DES EMPFÄNGERS
BETRIEBSMODUS
FARBE
DER
LEUCHTE
BATTERIE-
STATUS
LED-FUNKTION
LAUTSPRECHER-
FUNKTION
VIBRATION
Gerät wird
eingeschaltet über
Ein-/Aus-Taste
Grün Gut Leuchtet während
der Tonsequenz
dauerhaft
Piept 1–2Mal
(1–3 Mal bei
SD-1225X-E und
SD-1825X-E) je
nach eingestellter
Intensitätsstufe
(2 ist die
Standardeinstellung).
Siehe Seite46.
Nicht
verfügbar
Gerät wird
eingeschaltet über
Ein-/Aus-Taste
Rot Niedrig Leuchtet während
der Tonsequenz
dauerhaft
Gerät wird
ausgeschaltet über
Ein-/Aus-Taste
Rot Nicht
verfügbar
Leuchtet während
der Tonsequenz
dauerhaft
Durchgehender
Piepton für
2Sekunden
Nicht
verfügbar
Einheit
eingeschaltet
Grün Gut Blinkt alle
2Sekunden
Nicht verfügbar Nicht
verfügbar
Einheit
eingeschaltet
Rot Niedrig Blinkt alle
2Sekunden
Nicht verfügbar Nicht
verfügbar
Gerät gibt
konstant statische
Reizimpulse aus
Rot Nicht
verfügbar
Leuchtet
durchgehend,
solang die Taste
gedrückt wird
(biszu10Sekunden)
Nicht verfügbar Nicht
verfügbar
Gerät gibt
kurzzeitigen
statischen
Reizimpuls aus
Rot Nicht
verfügbar
Blinkt einmal kurz,
egal, wie lange die
Taste gedrückt wird
Nicht verfügbar Nicht
verfügbar
Gerät gibt
Tonsignal aus
Aus Nicht
verfügbar
Nicht verfügbar Gerät piept so
lange, wie die
Tastegedrücktist
Nicht
verfügbar
Gerät gibt
Vibrationssignal ab
Aus Nicht
verfügbar
Nicht verfügbar Nicht verfügbar Gerät vibriert,
solange die
Taste gedrückt
wird (bis zu
10Sekunden)
Gerät wird
aufgeladen
Grün Niedrig Leuchtet
durchgehend,
während am
Ladegerät
angeschlossen
Nicht verfügbar Nicht
verfügbar
Gerät vollständig
aufgeladen
(noch an Ladegerät
angeschlossen)
Grün Gut
Blinkt einmal pro
Sekunde, wenn
Batterie vollständig
aufgeladen
Nicht verfügbar Nicht
verfügbar

45WWW.SPORTDOG.COM
SCHRITT
::
3 ANPASSEN DES EMPFÄNGERHALSBANDS
WICHTIG: FÜR EIN WIRKSAMES TRAINING IST ES WICHTIG, DASS DAS EMPFÄNGERHALSBAND RICHTIG
SITZT UND KORREKT PLATZIERT IST. DIE KONTAKTSTIFTE MÜSSEN DIREKTEN KONTAKT MIT DER HAUT
DES HUNDES HABEN.
Stellen Sie wie folgt die richtige Passform sicher:
1. Wichtig ist, dass Ihr Hund bei der Anpassung steht
(3A). Platzieren Sie das Empfängerhalsband so hoch
wie möglich am Hals Ihres Hundes. Bewegen Sie es
leicht nach links und rechts, um sicherzustellen,
dass die Kontaktstifte durch das Fell hindurch
die Haut berühren (3B). Bei einem Hund mit
langem oder dichtem Fell haben Sie zwei Möglichkeiten, um den dauerhaften
Kontakt sicherzustellen: Kürzen Sie das Fell im Bereich der Kontaktstifte, oder
verwendenSie die längeren Kontaktstifte (imLieferumfang enthaltenen).
2. Das Empfängerhalsband sollte so am Hals Ihres Hundes anliegen, dass zwischen
Halsband und Hals ein Finger passt (3C).
3. Lassen Sie Ihren Hund das Halsband für einige Minuten tragen, und prüfen Sie den
Sitz anschließend erneut. Prüfen Sie die Passform ein weiteres Mal, nachdem sich
Ihr Hund an das Empfängerhalsband gewöhnt hat.
SCHRITT
::
4 ERMITTELN DER BESTEN
INTENSITÄTSSTUFE
Ihr System der Marke SportDOG® hat mehrere Intensitätsstufen. Dadurch können Sie die für Ihren Hund
passende statische Reizimpulsstufe auswählen. Für ein wirksames Training ist es wichtig, die richtige
Intensitätsstufe für Ihren Hund zu ermitteln. Diese wird als Erkennungsstufe bezeichnet. Es ist die Stufe,
beider Ihr Hund beginnt, sich neugierig umzusehen oder mit den Ohren zu spielen.
HINWEIS: Beginnen Sie immer auf der niedrigsten Stufe, und steigern Sie die Intensität schrittweise.
ERMITTELN DER ERKENNUNGSSTUFE IHRES HUNDES
HINWEIS: Jeder Hund hat eine individuelle Erkennungsstufe, die es zu ermitteln gilt. Achten Sie genau auf jede
Veränderung im Verhalten Ihres Hundes, was darauf hinweist, dass Ihr Hund den statischen Reizimpuls wahrnimmt.
1. Legen Sie Ihrem Hund das Empfängerhalsband ordnungsgemäß an, und schalten Sie es ein. Stellen Sie
den Intensitätsregler des Handsenders auf Stufe1. Drücken Sie 1 bis 2Sekunden lang die Taste für den
konstanten statischen Reizimpuls.
2. Wenn Ihr Hund auf Stufe 1 keine Reaktion zeigt, wechseln Sie zu Stufe 2 und wiederholen Sie den Vorgang
bis zu der Stufe, auf der er reagiert (Erkennungsstufe). Dies ist die Stufe, auf der Sie das Training jeweils
beginnen sollten.
3. IHR HUND SOLLTE NICHT JAULEN ODER PANISCH REAGIEREN, WENN ER EINEN STATISCHEN
REIZIMPULSES ERHÄLT. IN DIESEM FALL IST DIE STATISCHE REIZIMPULSSTUFE ZU HOCH. KEHREN
SIEZUR VORHERIGEN STUFE ZURÜCK, UND WIEDERHOLEN SIE DEN VORGANG.
4. Wenn Sie die höchste statische Reizimpulsstufe erreicht haben und Ihr Hund immer noch nicht reagiert,
prüfen Sie, ob das Empfängerhalsband ordnungsgemäß am Hals Ihres Hundes anliegt. Wechseln Sie
anschließend zur Intensitätsstufe1 zurück, und wiederholen Sie den Vorgang. Wenn Ihr Hund weiterhin
nicht auf den statischen Reizimpuls reagiert, haben Sie zwei Möglichkeiten: Kürzen Sie die Haare im
Bereich der Kontaktstifte, oder verwenden Sie die längeren Kontaktstifte (im Lieferumfang enthalten).
Wenn Ihr Hund dennoch nicht auf den statischen Reizimpuls reagiert oder der Reizimpuls zu hoch erscheint,
können Sie die Intensitätsstufe am Empfängerhalsband gemäß der folgenden Anleitung ändern. Falls Sie die
Erkennungsstufe Ihres Hundes nicht ermitteln können, kontaktieren Sie bitte die Kundenbetreuung.
3C
3A 3B
46 WWW.SPORTDOG.COM
ÄNDERN DER INTENSITÄTSSTUFE
Ihr Empfängerhalsband der Marke SportDOG® hat je nach Modell zwei oder drei Intensitätsstufen. Im Standardmodus
sind auf dem Handsender auf jeder Intensitätsstufe 21statische Reizimpulsstufen wählbar, wobei 1 die niedrigste und
21 die höchste Stufe ist. Standardmäßig ist die Intensitätsstufe auf2 (mittel) eingestellt.
Gehen Sie wie folgt vor, um die Intensitätsstufe der statischen Reizimpulse zu ändern:
1. Stellen Sie sicher, dass das Empfängerhalsband ausgeschaltet ist.
2. Schalten Sie es anschließend ein, indem Sie die Ein-/Aus-Taste drücken und loslassen.
3. Halten Sie innerhalb von 5Sekunden nach dem Erlöschen der LED-Leuchte die Ein-/Aus-Taste 3Sekunden
lang gedrückt.
4. Das Empfängerhalsband gibt einen Signalton aus, und die LED-Leuchte blinkt orange (siehe nachfolgende
Tabelle). Halten Sie die Taste weiter gedrückt, bis die Anzahl der Signaltöne/orangen Blinksignale der
gewünschten Intensitätsstufe entspricht.
5. Lassen Sie die Taste nach Erreichen der gewünschten Intensitätsstufe los. Das Empfängerhalsband
schaltet sich aus.
6. Schalten Sie es wieder ein. Das Empfängerhalsband gibt daraufhin abhängig von der in Schritt4
ausgewählten Intensitätsstufe die entsprechende Anzahl von Signaltönen aus.
SIGNALTÖNE INTENSITÄTSSTUFE HUNDETEMPERAMENT MODELL
1Signalton Niedrig Gehorsam SD-425X-E, SD-825X-E, SD-1225X-E,
SD-1825X-E
2Signaltöne Mittel Moderat SD-425X-E, SD-825X-E, SD-1225X-E,
SD-1825X-E
3Signaltöne Hoch Widerspenstig SD-1225X-E, SD-1825X-E
ALLGEMEINE TRAININGSTIPPS
VOR BEGINN DES TRAININGS IHRES HUNDES MIT DIESEM PRODUKT
Den größten Erfolg mit diesem Ferntrainer werden Sie haben, wenn Sie Ihrem Hund jeden Befehl erst ohne Ferntrainer
beibringen und ihn später mithilfe des Ferntrainers verstärken. Die in dieser Kurzanleitung erläuterten Schritte dienen
dazu, das Training zu vereinfachen und zu beschleunigen. Denken Sie auch an die folgenden Trainingstipps:
• Trainieren Sie Ihrem Hund jeweils nur ein Fehlfehlverhalten ab oder einen Befehl an. Andernfalls verwirren
oderüberfordern Sie Ihren Hund möglicherweise.
• Trainieren Sie regelmäßig in kurzen Einheiten, und schließen Sie diese mit etwas Positivem ab. Wenn sich bei
Ihnenoder Ihrem Hund Frust oder Verwirrung einstellt, legen Sie eine Pause ein.
• Seien Sie konsequent. Verknüpfen Sie jedes Fehlverhalten Ihres Hundes mit einem Ton- oder Vibrationssignal
bzw.einem statischen Reizimpuls.
• Vermeiden Sie eine Überkorrektur Ihres Hundes. Setzen Sie Reizimpulse während des Trainings möglichst sparsam ein.
• Halten Sie Ihren Hund von Situationen fern, in denen er sich bisher falsch verhalten hat, es sei denn, Sie können
ihn beaufsichtigen und zur Korrektur mit dem Ferntrainer ein Ton- oder Vibrationssignal bzw. einen statischen
Reizimpuls ausgeben.
• Nutzen Sie Situationen, in denen sich Ihr Hund regelmäßig falsch verhält, für das Training. Sie erhöhen Ihre
Erfolgschance dadurch erheblich.
• Wenn Ihr Hund (insbesondere zu Beginn) ängstlich auf das Ton- oder Vibrationssignal oder den statischen
Reizimpuls reagiert, ist dies völlig natürlich. Lenken Sie seine Aufmerksamkeit auf ein einfaches und
angemessenes Verhalten (d.h. einen bekannten Befehl wie „Platz“).
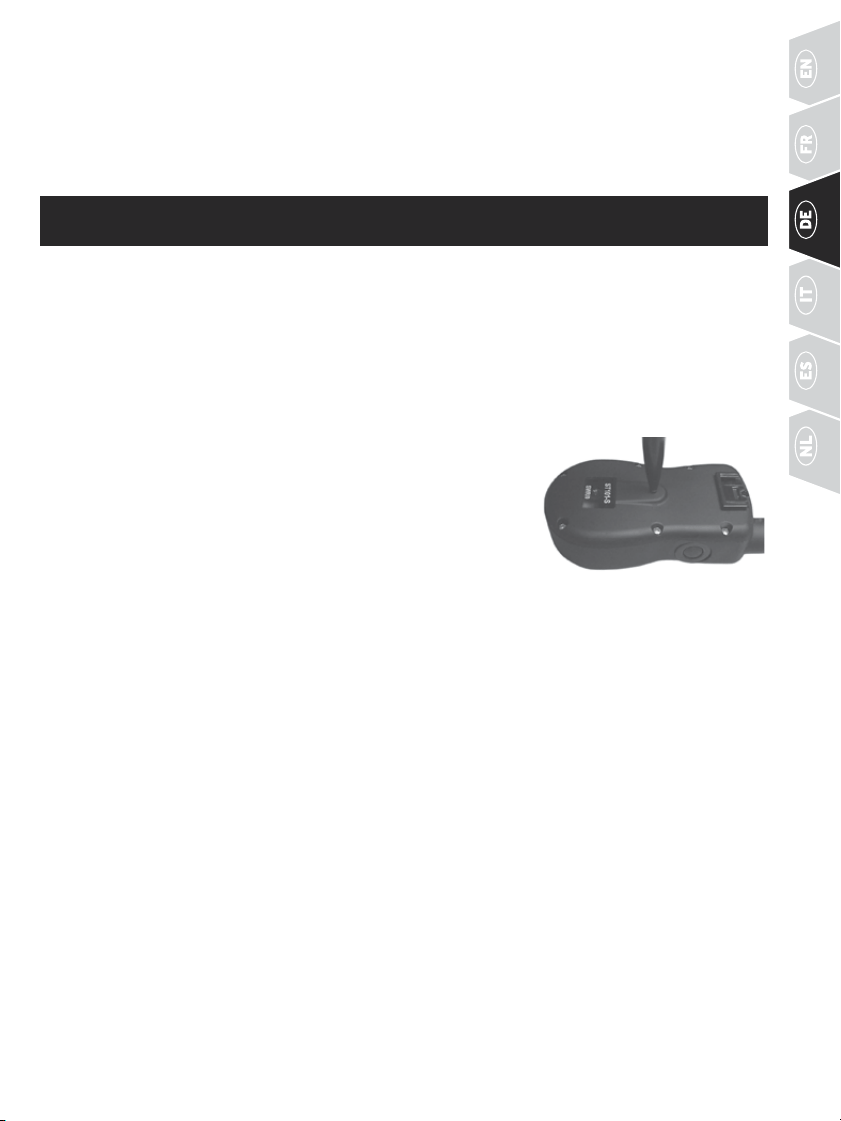
47WWW.SPORTDOG.COM
• Verwenden Sie den Ferntrainer nie, um ein aggressives Verhalten Ihres Hundes zu korrigieren oder ihm dieses
abzutrainieren. Wenn Ihr Hund ein solches Verhalten zeigt, wenden Sie sich an einen professionellen Trainer.
Hunden können aus unterschiedlichen Gründen aggressiv reagieren, etwa aufgrund eines antrainierten
Verhaltens oder aus Angst. Auch soziale Dominanz kann bei Hunden zu Aggression führen. Jeder Hund ist anders.
Ihr Ferntrainer ist jetzt einsatzbereit. Der Sender ist werkseitig auf Modus5 (Kippschalter in oberer Position
bei SD-1825X-E). Sie können den Modus jedoch anpassen. In SCHRITT5 finden Sie eine Erklärung der
Modusoptionen.
SCHRITT
::
5 HANDSENDER PROGRAMMIEREN
SD-425X-E, SD-825X-E, SD-1225X-E
Der Handsender hat sieben Betriebsmodi, aus denen Sie je nach Art des Trainings wählen können. Im
Programmiermodus (ModusV/T) können Sie den ID-Code des Systems ändern. Der Handsender ist
werksseitig auf Modus5 eingestellt.
MODUS ÄNDERN
1. Stellen Sie den Intensitätsregler gemäß der folgenden Tabelle auf den von Ihnen gewünschten Modus ein.
2. Drehen Sie den Handsender um, und nehmen Sie den Gürtelclip ab, sofern befestigt (nur SD-825X-E
undSD-1225X-E).
3. Drücken Sie die Modustaste kurz mit einem Kugelschreiber oder dem
Dorn der Halsbandschnalle. Während Sie die Modustaste drücken,
leuchtet die Leuchtanzeige am Sender durchgehend. Wenn Sie sie
loslassen, blinkt die LED gemäß der Zahl des gewählten Modus.
Wenn Sie beispielsweise Modus6 festlegen möchten, stellen Sie den
Intensitätsregler auf Stufe6 ein. Während Sie die Modustaste drücken,
leuchtetdie Leuchtanzeige am Sender durchgehend. Wenn Sie die
Modustasteloslassen, blinkt die Leuchtanzeige am Sender 6Mal.
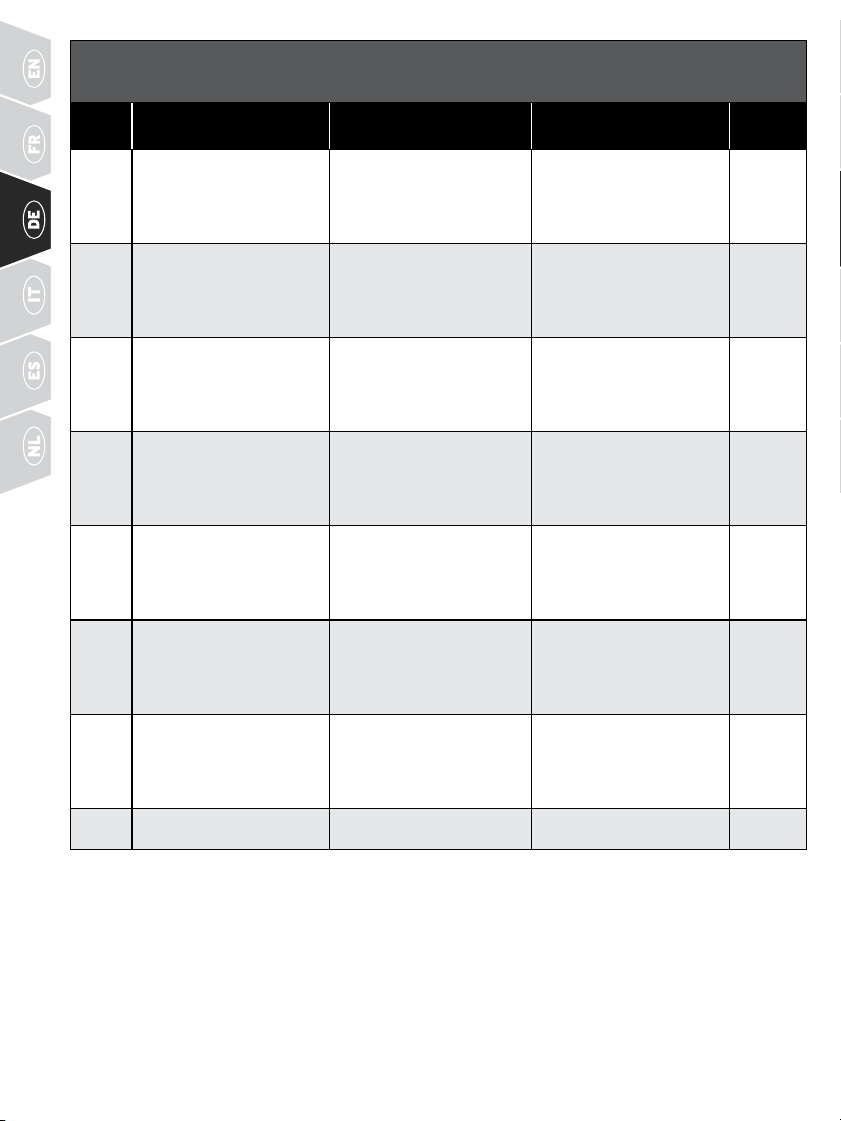
48 WWW.SPORTDOG.COM
MODUSTABELLE FÜR SD-425X-E, SD-825X-E, SD-1225X-E
(
ZUM ÄNDERN DES MODUS SIEHE SEITE47
)
MODUS FUNKTION OBERE TASTE FUNKTION UNTERE TASTE FUNKTION SEITENTASTE
ANZAHL
HUNDE
1 Konstanter Reizimpuls
(Stufe über Intensitätsregler
eingestellt) ODER Vibration,
wenn Regler auf „V/T“
eingestellt
Kurzzeitiger Reizimpuls
(Stufe über Intensitätsregler
eingestellt) ODER Vibration,
wenn Regler auf „V/T“
eingestellt
Nur Ton 1
2 Konstanter Reizimpuls
(Stufe über Intensitätsregler
eingestellt) ODER Tonsignal,
wenn Regler auf „V/T“
eingestellt
Kurzzeitiger Reizimpuls
(Stufe über Intensitätsregler
eingestellt) ODER Tonsignal,
wenn Regler auf „V/T“
eingestellt
Nur Vibration 1
3 Hund1: Konstanter
Reizimpuls (Stufe über
Intensitätsregler eingestellt)
ODER Tonsignal, wenn
Regler auf „V/T“ eingestellt
Hund2: Konstanter
Reizimpuls (Stufe über
Intensitätsregler eingestellt)
ODER Tonsignal, wenn Regler
auf „V/T“ eingestellt
Hund3: Konstanter
Reizimpuls (Stufe über
Intensitätsregler eingestellt)
ODER Tonsignal, wenn
Regler auf „V/T“ eingestellt
3
4 Hund1: Konstanter
Reizimpuls (Stufe über
Intensitätsregler eingestellt)
ODER Vibration, wenn
Regler auf „V/T“ eingestellt
Hund2: Konstanter
Reizimpuls (Stufe über
Intensitätsregler eingestellt)
ODER Vibration, wenn Regler
auf „V/T“ eingestellt
Hund3: Konstanter
Reizimpuls (Stufe über
Intensitätsregler eingestellt)
ODER Vibration, wenn
Regler auf „V/T“ eingestellt
3
5* Mittlerer konstanter
Reizimpuls (Stufe über
Intensitätsregler eingestellt)
ODER Tonsignal, wenn
Regler auf „V/T“ eingestellt
Niedriger konstanter
Reizimpuls (Stufe über
Intensitätsregler eingestellt)
ODER Tonsignal, wenn Regler
auf „V/T“ eingestellt
Hoher konstanter
Reizimpuls (Stufe über
Intensitätsregler eingestellt)
ODER Tonsignal, wenn
Regler auf „V/T“ eingestellt
1
6 Mittlerer konstanter
Reizimpuls (Stufe über
Intensitätsregler eingestellt)
ODER Vibration, wenn
Regler auf „V/T“ eingestellt
Niedriger konstanter
Reizimpuls (Stufe über
Intensitätsregler eingestellt)
ODER Vibration, wenn Regler
auf „V/T“ eingestellt
Hoher konstanter
Reizimpuls (Stufe über
Intensitätsregler eingestellt)
ODER Vibration, wenn
Regler auf „V/T“ eingestellt
1
7 Konstanter Reizimpuls
(Stufe über Intensitätsregler
eingestellt) ODER Tonsignal,
wenn Regler auf „V/T“
eingestellt
Kurzzeitiger Reizimpuls
(Stufe über Intensitätsregler
eingestellt) ODER Tonsignal,
wenn Regler auf „V/T“
eingestellt
Ferngesteuerten
Beeperorten**
1
V/T
(ID-CODE)
Nicht verfügbar Nicht verfügbar Siehe SCHRITT08 Nicht
verfügbar
HINWEIS: Modus 1, 2, 3, 4 und 7 bieten sieben Reizimpulsstufen, welche den Zahlen auf dem Intensitätsregler
entsprechen.
In Modus5 und 6 kann aus insgesamt 21statischen Reizimpulsstufen gewählt werden. Beispiel: Wenn
in Modus5 der Intensitätsregler auf1 eingestellt ist, kann mit der unteren Taste die Intensitätsstufe1,
mit der oberen Taste die Intensitätsstufe2 und mit der seitlichen Taste die Intensitätsstufe3 von
21Reizimpulsstufen gewählt werden.
* Werksseitiger Standardmodus.
** Ferngesteuerten Beeper orten: Mit der seitlichen Taste deaktivieren Sie den Modus, um den ferngesteuerten Beeper zu orten.
Zum Aktivieren des Modus halten Sie die seitliche Taste 3Sekunden lang gedrückt.
49WWW.SPORTDOG.COM
SD-1825X-E
Der Handsender hat 14Betriebsmodi (sieben mit dem Kippschalter in der Position Grau/
a
und sieben mit
dem Kippschalter in der Position Orange/
b
), um ein möglichst individuelles Training sicherzustellen.
DerHandsender ist werksseitig auf Modus5:
a
eingestellt. Im Programmiermodus (ModusV/T) können
Sieden ID-Code des Systems ändern.
MODUS ÄNDERN
1. Wählen Sie gemäß der MODUSTABELLE FÜR SD-1825X-E auf
Seite50 den gewünschten Modus (1–7) und die Umschaltposition
(
a
oder
b
) aus.Stellen Sie sowohl den Intensitätsregler als auch
denKippschalteraufden gewünschten Modus ein.
2. Drehen Sie den Handsender um, und nehmen Sie den Gürtelclip
ab(sofern befestigt).
3. Drücken Sie die Modustaste kurz mit einem Kugelschreiber oder dem
Dorn der Halsbandschnalle. Während Sie die Modustaste drücken,
leuchtet die Leuchtanzeige am Sender durchgehend. Nach dem
Loslassen blinkt sie gemäß der Zahl des gewählten Modus.
Wenn Sie beispielsweise Modus6:
a
verwenden möchten, bringen Sie den
Kippschalter in die Position Grau/
a, und
stellen Sie den Intensitätsregler
auf Stufe6 ein. Während Sie die Modustaste drücken, leuchtet die
Leuchtanzeige am Sender konstant. Sobald Sie die Modustaste loslassen,
blinkt sie 6Mal. Wenn Sie jedoch in der Position Grau/
a
den Modus V/T
(ID-Code) auswählen, leuchtet die LED durchgängig, nachdem Sie die
Modustaste loslassen.
*
Werksseitiger Standardmodus.
Zur Verwendung mit zwei Hunden siehe SCHRITT07 auf Seite51–52.
^ Zur Verwendung mit drei und sechs Hunden siehe SCHRITT07 auf
Seite51–52.
•
Ferngesteuerten Beeper orten: Mit der seitlichen Taste deaktivieren Sie
den Modus, umdenferngesteuertenBeeper zu orten. Zum Aktivieren des
Modus halten Sie die seitliche Taste 3Sekunden lang gedrückt.
KIPPSCHALTER
INPOSITION
a
KIPPSCHALTER
INPOSITION
b
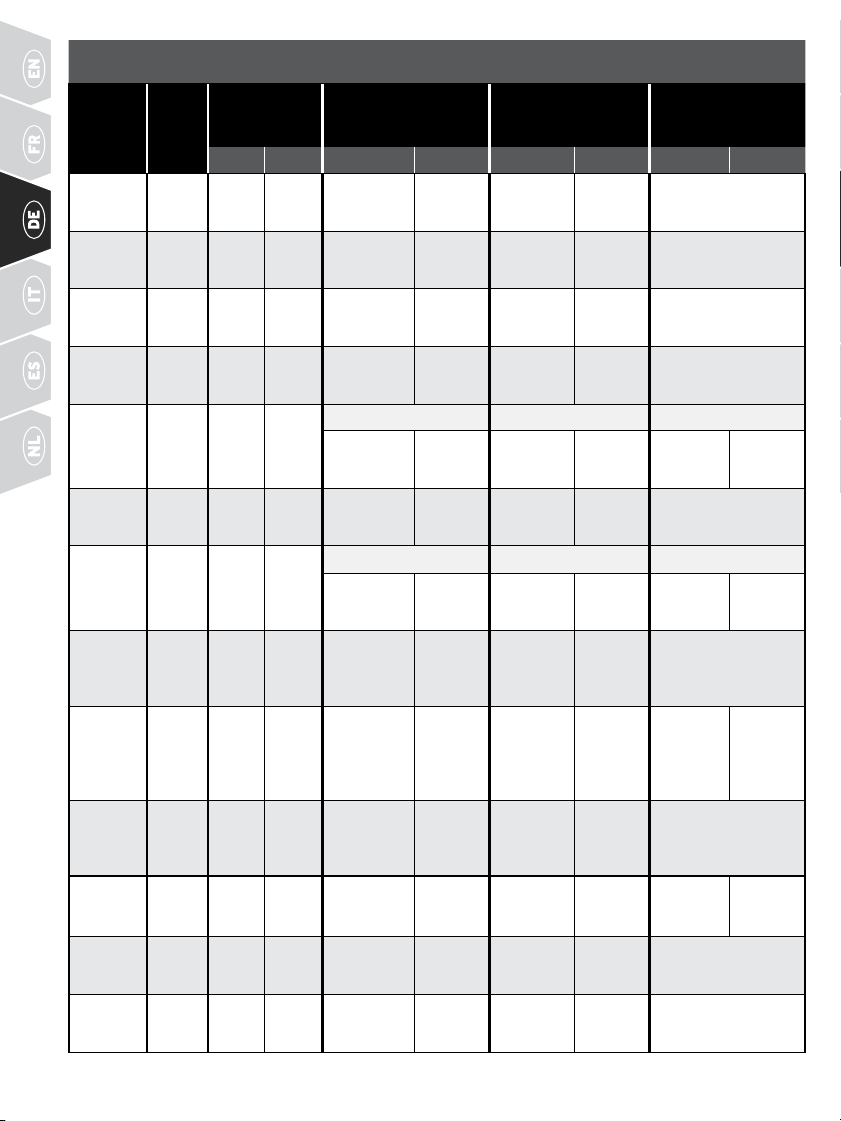
50 WWW.SPORTDOG.COM
MODUSTABELLE FÜR SD-1825X-E
(
ZUM ÄNDERN DES MODUS SIEHE SEITE49
)
MODUS:
SCHALTER-
POSITION
ANZAHL
HUNDE
KIPPSCHAL-
TER-
FUNKTION
FUNKTION OBERE
TASTE
FUNKTION UNTERE
TASTE
FUNKTION
SEITENTASTE
a b STUFE 1–7 V/T STUFE 1–7 V/T STUFE 1–7 V/T
1:a
2
Hund1 Hund2
Hoher
konstanter
Reizimpuls
Vibr.
Hoher
kurzzeitiger
Reizimpuls
Vibr. Tonsignal
1:b
2 Hund1 Hund2
Hoher
konstanter
Reizimpuls
Vibr.
Hoher
konstanter
Reizimpuls
Vibr.
Ferngesteuerten
Beeper orten
•
2:a
2 Hund1 Hund2
Hoher
konstanter
Reizimpuls
Tonsignal
Hoher
kurzzeitiger
Reizimpuls
Tonsignal Vibr.
2:b
2 Hund1 Hund2
Hoher
konstanter
Reizimpuls
Vibr.
Niedriger
konstanter
Reizimpuls
Vibr. Tonsignal
3:a
6^
Hund
1–3
Hund
4–6
Hund1 (a)/Hund4 (b) Hund2 (a)/Hund5 (b) Hund3 (a)/Hund6 (b)
Hoher
konstanter
Reizimpuls
Tonsignal
Hoher
konstanter
Reizimpuls
Tonsignal
Hoher
konstanter
Reizimpuls
Tonsignal
3:b
2 Hund1 Hund2
Hoher
konstanter
Reizimpuls
Tonsignal
Niedriger
konstanter
Reizimpuls
Tonsignal Vibr.
4:a
6
Hund
1–3
Hund
4–6
Hund1 (a)/Hund4 (b) Hund2 (a)/Hund5 (b) Hund3 (a)/Hund6 (b)
Hoher
konstanter
Reizimpuls
Vibr.
Hoher
konstanter
Reizimpuls
Vibr.
Hoher
konstanter
Reizimpuls
Vibr.
4:b
2 Hund1 Hund2
Ansteigender
hoher
konstanter
Reizimpuls
Vibr.
Hoher
konstanter
Reizimpuls
Vibr. Tonsignal
5:a
*
2 Hund1 Hund2
Mittlerer
konstanter
Reizimpuls
Tonsignal
Niedriger
konstanter
Reizimpuls
Tonsignal
Hoher
konstanter
Reizimpuls
Tonsignal
5:b
2 Hund1 Hund2
Ansteigender
hoher
konstanter
Reizimpuls
Tonsignal
Hoher
konstanter
Reizimpuls
Tonsignal Vibr.
6:a
2 Hund1 Hund2
Mittlerer
konstanter
Reizimpuls
Vibr.
Niedriger
konstanter
Reizimpuls
Vibr.
Hoher
konstanter
Reizimpuls
Vibr.
6:b
2 Hund1 Hund2
Hoher
konstanter
Reizimpuls
Vibr. Tonsignal Vibr. Nicht verfügbar
7:a
2 Hund1 Hund2
Hoher
konstanter
Reizimpuls
Tonsignal
Hoher
kurzzeitiger
Reizimpuls
Tonsignal
Ferngesteuerten
Beeper orten
•

51WWW.SPORTDOG.COM
7:b
2 Hund1 Hund2
Hoher
konstanter
Reizimpuls
Tonsignal Vibr. Tonsignal Nicht verfügbar
V/T
(ID-CODE)
Nicht
verfüg-
bar
a Nicht verfügbar Nicht verfügbar Siehe SCHRITT08
SCHRITT
::
6 EMPFÄNGERHALSBAND MIT
HANDSENDER KOPPELN
Um das Empfängerhalsband mit einem neuen Handsender oder ein neues Empfängerhalsband mit Ihrem
vorhandenen Handsender zu benutzen, gehen Sie wie folgt vor:
1. Schalten Sie das Empfängerhalsband aus.
2. Halten Sie die Ein-/Aus-Taste gedrückt. Die Leuchtanzeige des Empfängers leuchtet auf und erlischt nach
4 bis 5Sekunden wieder. Wenn die Ein-/Aus-Taste zu früh losgelassen wird, beginnt die Leuchtanzeige
desEmpfängers normal zu blinken. Beginnen Sie in diesem Fall erneut bei Schritt1.
3. Lassen Sie die Ein-/Aus-Taste los, nachdem die Leuchtanzeige des Empfängers erloschen ist.
4. Halten Sie die obere Taste des Handsenders gedrückt, bis die Leuchtanzeige des Empfängers 5Mal blinkt.
Nachdem die Leuchtanzeige des Empfängers 5 Mal geblinkt hat, ist das Empfängerhalsband gekoppelt
undbeginnt normal zu blinken. Wenn die Leuchtanzeige des Empfängers nicht 5Mal blinkt, beginnen
Sieerneut bei Schritt1.
SCHRITT
::
7 FÜR MEHRERE HUNDE
PROGRAMMIEREN
SD-425X-E, SD-825X-E, SD-1225X-E
Um zwei oder drei weitere Hunde zu trainieren, ist der Kauf zusätzlicher SportDOG
®
Add-A-Dog
®
Empfängerhalsbänder erforderlich.
1. Programmieren Sie den Handsender im Modus3 oder 4 (siehe MODUS ÄNDERN auf Seite47).
2. Programmieren Sie das erste Empfängerhalsband.
A. Schalten Sie das Empfängerhalsband aus.
B. Halten Sie die Ein-/Aus-Taste gedrückt. Die Leuchtanzeige des Empfängers leuchtet auf und
erlischt nach 4 bis 5Sekunden wieder. Wenn die Ein-/Aus-Taste zu früh losgelassen wird, fängt die
Leuchtanzeige des Empfängers normal zu blinken an. Tritt dieser Fall ein, beginnen Sie erneut bei
SchrittA.
C. Lassen Sie die Ein-/Aus-Taste los, nachdem die Leuchtanzeige des Empfängers erloschen ist.
D. Halten Sie die obere Taste des Handsenders gedrückt, bis die Leuchtanzeige des Empfängers 5Mal
blinkt. Wenn die Leuchtanzeige des Empfängers nicht 5-mal blinkt, beginnen Sie erneut bei SchrittA.
3. Programmieren Sie das zweite Empfängerhalsband gemäß den SchrittenA bisD, verwenden Sie jedoch die
untere Taste statt der oberen Taste.
4. Programmieren Sie das dritte Empfängerhalsband gemäß den SchrittenA bisD, verwenden Sie jedoch die
seitliche Taste statt der oberen Taste.
52 WWW.SPORTDOG.COM
SD-1825X-E
Um zwei, drei oder sechs weitere Hunde zu trainieren, ist der Kauf zusätzlicher SportDOG
®
Add-A-Dog
®
Empfängerhalsbänder erforderlich.
VERWENDUNG FÜR ZWEI HUNDE
SportDOG
®
Empfängerhalsbänder können wahlweise mit dem Kippschalter am Handsender in Position
a oder b angesteuert werden.
1. Programmieren Sie den Handsender im Modus1,2,5,6 oder7, während sich der Kippschalter in der
Position Grau/a befindet oder in einem der Modi 1-7, während sich der Kippschalter in der Position
Orange/b befindet (siehe MODUS ÄNDERN auf Seite49).
2. Anschließend können Sie mit dem Kippschalter in der Position Grau/a das erste Empfängerhalsband
programmieren.
A. Schalten Sie das Empfängerhalsband aus.
B. Halten Sie die Ein-/Aus-Taste am Empfängerhalsband gedrückt. Die Leuchtanzeige des Empfängers
leuchtet auf und erlischt nach 4 bis 5Sekunden wieder. Wenn die Ein-/Aus-Taste zu früh losgelassen
wird, fängt die Leuchtanzeige des Empfängers normal zu blinken an. Tritt dieser Fall ein, beginnen Sie
erneut bei SchrittA.
C. Lassen Sie die Ein-/Aus-Taste los, nachdem die Leuchtanzeige des Empfängers erloschen ist.
D. Halten Sie die obere Taste des Handsenders gedrückt, bis die Leuchtanzeige des Empfängers 5Mal
blinkt. Wenn die Leuchtanzeige des Empfängers nicht 5-mal blinkt, beginnen Sie erneut bei SchrittA.
3. Zum Programmieren des zweiten Empfängerhalsbands wiederholen Sie die SchritteA bisD, diesmal jedoch
mit dem Kippschalter in der Position Orange/b.
VERWENDUNG FÜR DREI HUNDE
1. Programmieren Sie den Handsender im Modus3 oder4 mit dem Kippschalter in der Position Grau/a (siehe
MODUS ÄNDERN auf Seite49).
2. Anschließend können Sie mit dem Kippschalter in der Position Grau/a das erste Empfängerhalsband
programmieren.
A. Schalten Sie das Empfängerhalsband aus.
B. Halten Sie die Ein-/Aus-Taste am Empfängerhalsband gedrückt. Die Leuchtanzeige des Empfängers
leuchtet auf und erlischt nach 4 bis 5Sekunden wieder. Wenn die Ein-/Aus-Taste zu früh losgelassen
wird, fängt die Leuchtanzeige des Empfängers normal zu blinken an. Tritt dieser Fall ein, beginnen Sie
erneut bei SchrittA.
C. Lassen Sie die Ein-/Aus-Taste los, nachdem die Leuchtanzeige des Empfängers erloschen ist.
D. Halten Sie die obere Taste des Handsenders gedrückt, bis die Leuchtanzeige des Empfängers 5Mal
blinkt. Wenn die Leuchtanzeige des Empfängers nicht 5-mal blinkt, beginnen Sie erneut bei SchrittA.
3. Zum Programmieren des zweiten Empfängerhalsbands wiederholen Sie die SchritteA bisD, diesmal jedoch
mit der unteren Taste statt der oberen Taste.
4. Zum Programmieren des dritten Empfängerhalsbands wiederholen Sie die SchritteA bis D, diesmal jedoch
mit der seitlichen Taste statt der oberen Taste.
VERWENDUNG FÜR SECHS HUNDE
Wiederholen Sie für die ersten drei Hunde die Schritte1-4 des vorangegangenen Abschnitts „VERWENDUNG
FÜR DREI HUNDE“. Bringen Sie den Kippschalter anschließend in die Position Orange/b, und wiederholen Sie
für den vierten, fünften und sechsten Hund die Schritte2–4.
ADD-A-DOG® MODELL
SDR-AXF-E Original-Empfängerhalsband für: SD-425X-E und SD-825X-E (bis zu 3Hunde)
SDR-AX-E Original-Empfängerhalsband für: SD-1225X-E (bis zu 3Hunde) und SD-1825X-E (bis
zu 6Hunde)

53WWW.SPORTDOG.COM
SCHRITT
::
8 ID-CODES ÄNDERN
Ein ID-Code ist die Signalkennung zwischen dem Sendegerät und dem Empfängerhalsband. Jedes ist mit
1von2.000 der werkseitigen ID-Codes programmiert. Sie können auf mehreren Handsendern denselben
ID-Code programmieren, um dasselbe Empfängerhalsband zu steuern. Es stehen 64 programmierbare
ID-Codes zur Verfügung.
ID-CODES DES SENDERS MANUELL PROGRAMMIEREN
1. Stellen Sie den Intensitätsregler auf „V/T“ und drücken Sie kurz die Modustaste auf der Rückseite des
Handsenders. Dies ändert nicht den Modus, sodass der aktuelle Modus nach der Änderung des ID-Codes
weiterhin aktiv ist.
2. Sobald die Modustaste losgelassen wird, leuchtet die Leuchtanzeige des Senders 15Sekunden lang
durchgehend grün.
3. Während die LED grüne leuchtet, wählen Sie mit dem Intensitätsregler die erste Zahl der ID. Drücken Sie
dann kurz die seitliche Taste. Die grüne LED-Leuchte blinkt schnell, um die Auswahl zu bestätigen.
4. Während die LED grüne leuchtet, wählen Sie nun mit dem Intensitätsregler die zweite Zahl der ID und
drücken dann kurz die seitliche Taste. Die grüne LED-Leuchte blinkt schnell, um die Auswahl zu bestätigen.
Die zweite Zahl ist optional. Um deren Einstellung zu überspringen, warten Sie, bis die grüne Leuchte
erlischt, ohne die seitliche Taste zu drücken.
5. Nach 15Sekunden oder nachdem Sie die Seitentaste erneut gedrückt haben, erlischt die grüne LED-
Leuchte und die ID des Handsenders ist aktualisiert. Der Handsender befindet sich noch im selben Modus,
wie vor der Einstellung der ID.
6. Nachdem Sie den ID-Code geändert haben, müssen Sie das Empfängerhalsband mit dem Handsender
koppeln (siehe SCHRITT06).
HINWEIS: Wenn Sie die seitliche Taste erneut drücken (und Schritt4 überspringen) ist die ID weiterhin zweistellig.
Die linke Ziffer ist standardmäßig auf1 eingestellt. Wenn Sie beispielsweise in Schritt3 die Ziffer6 ausgewählt
unddie seitliche Taste nur einmal drücken, wird als ID16 gespeichert.
HANDSENDER AUF WERKSEITIGE ID ZURÜCKSETZEN
1. Stellen Sie den Intensitätsregler auf „V/T“ und drücken Sie kurz die Modustaste auf der Rückseite
desHandsenders. Dies ändert nicht den Modus, sodass der aktuelle Modus nach der Änderung des
ID-Codes weiterhin aktiv ist.
2. Drücken Sie keine Taste und warten Sie, bis die grüne Leuchtanzeige am Sender erlischt.
3. Sie müssen das Empfängerhalsband mit dem Handsender koppeln (siehe SCHRITT06).
ZUBEHÖR
Um zusätzliches Zubehör für Ihren SportDOG
®
Ferntrainer zu erwerben, setzen Sie sich bitte mit der
Kundenbetreuung in Verbindung oder besuchen Sie unseren Webshop unter sportdog.com. Zubehör finden
Sieunter PARTS& ACCESSORIES.
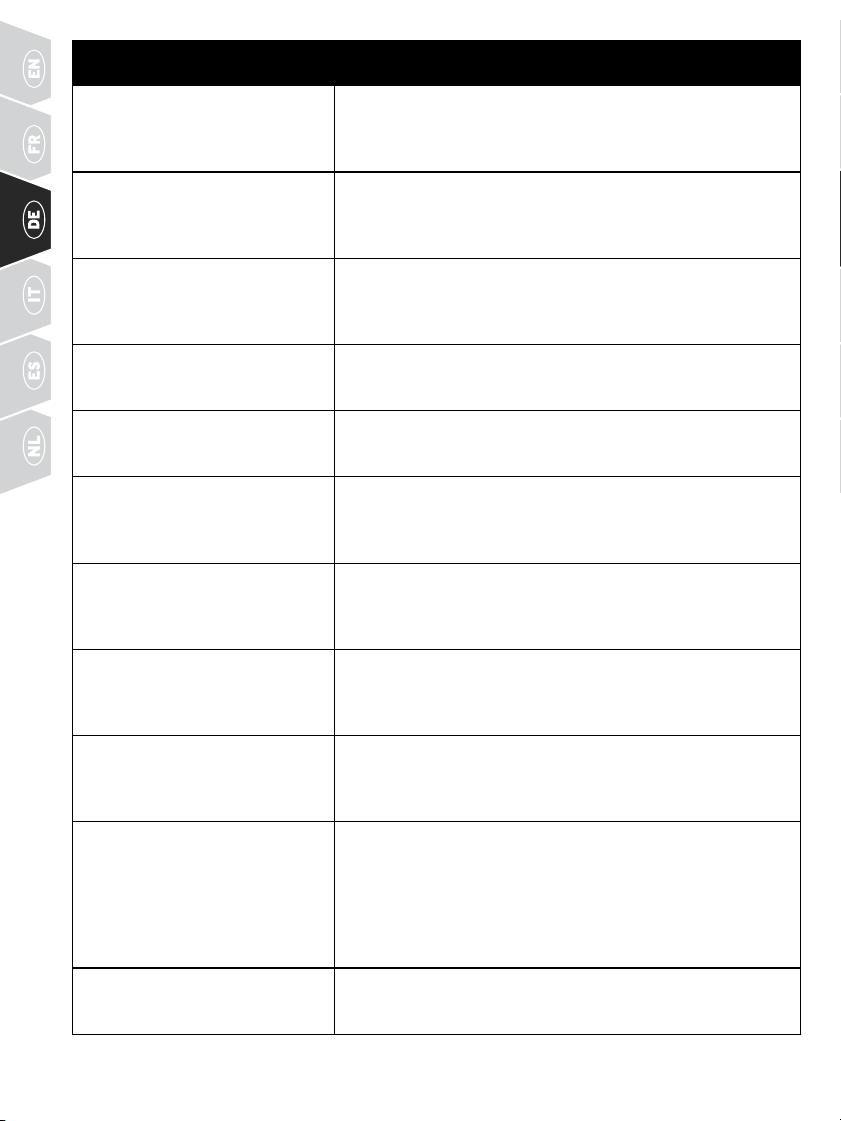
54 WWW.SPORTDOG.COM
HÄUFIG GESTELLTE FRAGEN
Ist der statische Reizimpuls sicher für
meinen Hund?
Der konstante oder kurzzeitige statische Reizimpuls kann eventuell
unangenehm sein, ist aber harmlos für ihren Hund. Elektronische
Trainingsgeräte verlangen Interaktion und Training vom Tierbesitzer,
um die gewünschten Ergebnisse zu erzielen.
Wie alt muss ein Hund sein, bevor ich
den Ferntrainer verwenden kann?
Dies hängt weniger vom Alter, sondern vielmehr von der
Lernfähigkeit Ihres Hundes ab. Ihr Hund sollte in der Lage sein,
grundlegende Gehorsamsbefehle wie „Sitz“ oder „Bleib“ zu befolgen.
Das Empfängerhalsband kann für Hunde unter 3,6kg zu groß sein.
Muss mein Hund, wenn er trainiert
ist und meinen Befehlen gehorcht,
weiterhin das Empfängerhalsband
tragen?
Das Empfängerhalsband kann eventuell von Zeit zu Zeit zur Verstär-
kung erforderlich sein. Viele Jagdhunde tragen das Empfängerhals-
band auch während der Jagd, um trotz eines starken Jagdtriebs und
zahlreicher Ablenkungen maximale Kontrolle zu haben.
Ist das Empfängerhalsband
wasserdicht?
Ja. Achten Sie beim Austausch der wiederaufladbaren Batterie darauf,
dass der O-Ring und die Aussparung für den O-Ring frei von Schmutz
und Fremdpartikeln sind.
Kann das Empfängerhalsband in
oder im Bereich von Salzwasser
verwendet werden?
Wenn das Empfängerhalsband in oder im Bereich von Salzwasser
verwendet wird, sollte es nach jeder Verwendung mit frischem
Wasser abgespült werden.
Kann ich den Ferntrainer für mehr als
nur einen Hund verwenden?
Ja, Sie können den Ferntrainer für bis zu 3Hunde verwenden
(SD-1825X-E für bis zu 6Hunde). Dafür müssen zusätzliche
SportDOG
®
Add-A-Dog
®
Empfängerhalsbänder erworben werden.
Eine Liste kompatibler Empfängerhalsbänder finden Sie auf Seite52.
Kann ich den Ferntrainer bei
aggressiven Hunden verwenden?
Wir raten davon ab, eines unserer Produkte bei aggressiven Hunden
zu verwenden. Wir empfehlen Ihnen, Ihren örtlichen Veterinär oder
professionellen Trainer zu kontaktieren, wenn Sie vermuten, dass Ihr
Hund aggressiv sein könnte.
Erhalte ich mit dem Ferntrainer
immer die angegebene Reichweite?
Die Reichweite des Ferntrainers kann je nach Gelände, Wetter und
Bewuchs sowie Störungen durch andere Funkgeräte variieren. Tipps
zum Erzielen der maximalen Reichweite finden Sie im Abschnitt
„Sofunktioniert das System“ in dieser Anleitung.
Wie lange kann ich einen statischen
Reizimpuls an meinen Hund
ausgeben?
Der konstante statische Reizimpuls schaltet sich bei gedrückter
Tastenach 10Sekunden automatisch ab. Um den statischen
Reizimpuls erneut auszulösen, müssen Sie die Taste loslassen
underneut drücken.
Was muss ich tun, wenn die Haut
amHals meines Hunds rot und
gereizt wird?
Es kann vorkommen, dass die Kontaktstifte die Haut reizen. Setzen
Sie die Verwendung des Empfängerhalsbands für ein paar Tage
aus. Falls der Zustand länger als 48Stunden anhält, konsultieren
Sie Ihren Tierarzt. Wenn die Haut wieder normal ist, können
Sie das Empfängerhalsband unter sorgfältiger Beobachtung
des Hautzustands wieder anlegen. Lassen Sie Ihren Hund das
Halsbandtäglich nicht länger als 12Stunden tragen.
Der Intensitätsregler lässt sich
schwer drehen. Ist das normal?
Ja. Das verhindert ein versehentliches Ändern der Intensität und
fördert eine optimale wasserdichte Abdichtung. Im Laufe der
Zeitwird sich die Taste leichter drehen lassen.
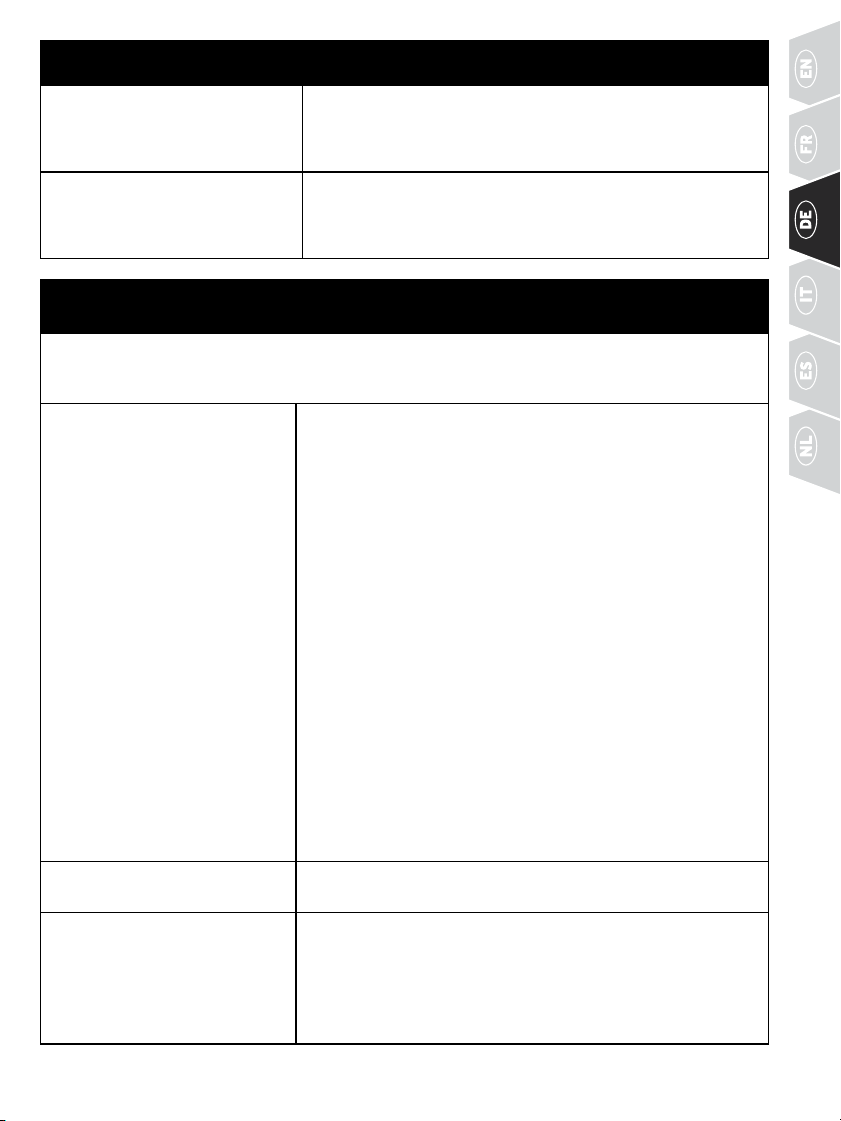
55WWW.SPORTDOG.COM
HÄUFIG GESTELLTE FRAGEN
Kann ich meinen Hund am
Empfängerhalsband anleinen?
Leinen Sie Ihren Hund NICHT am Empfängerhalsband an. Verwenden
Sie zum Anleinen bitte ein separates Leder- oder Nylonhalsband.
Stellen Sie sicher, dass das zusätzliche Halsband nicht zwischen
Kontaktstifte und Hals rutscht.
Der Handsender gibt
unbeabsichtigtSignale an mehr
alsein Empfängerhalsband aus.
Waskann ich tun?
Dies kann in seltenen Fällen auftreten. Ändern Sie den ID-Code des
Handsenders (siehe SCHRITT08).
FEHLERBEHEBUNG
Die Antworten auf diese Fragen sollten Ihnen dabei helfen, alle Probleme mit diesem System zu lösen. Sollte
Ihre Frage damit nicht beantworten werden, wenden Sie sich bitte an die Kundenbetreuung oder besuchen
Sieunsere Webseite unter www.sportdog.com.
Mein Hund reagiert nicht, wenn ich
eine Taste drücke.
• Überprüfen Sie, ob das Empfängerhalsband eingeschaltet ist und
die LED-Leuchte blinkt.
• Wenn sich die Reichweite seit der ersten Verwendung verringert
hat, prüfen Sie bitte, ob der Batteriestand im Handsender oder
Empfängerhalsband niedrig ist.
• Die Reichweite kann durch zahlreiche Faktoren beeinflusst werden.
Eine Liste dieser Faktoren finden Sie unter „So funktioniert das
System“.
• Mit der im Lieferumfang enthaltenen Testleuchte können Sie prüfen,
ob das Empfängerhalsband statische Reizimpulse ausgibt. Weitere
Details finden Sie unter „So verwenden Sie die Testleuchte“.
• Erhöhen Sie die Intensitätsstufe. Weitere Informationen erhalten
Sieunter „Intensitätsstufe ermitteln“.
• Erhöhen Sie die Intensitätsstufe. Weitere Informationen erhalten
Sieunter „Intensitätsstufe ändern“.
• Stellen Sie sicher, dass die Kontaktstifte des Empfängerhalsbands
an der Haut des Hunds anliegen. Weitere Informationen erhalten
Sieunter „Empfängerhalsband anpassen“.
• Verwenden Sie bei Bedarf die längeren Kontaktstifte oder kürzen
Siedas Fell im Bereich der Kontaktstifte. Rasieren Sie jedoch
niemals den Hals des Hundes.
• Wenn sich die Betriebszeit auf etwa die Hälfte der Originalzeit
reduziert, tauschen Sie die Batterie des Empfängerhalsbands
aus.Kontaktieren Sie die Kundenbetreuung, um eine neue
Batteriezu kaufen.
Das Empfängerhalsband lässt sich
nicht einschalten.
• Stellen Sie sicher, dass das Empfängerhalsband aufgeladen ist.
DasEmpfängerhalsband lädt in 2Stunden auf.
Das Empfängerhalsband reagiert
nicht auf den Handsender.
• Stellen Sie sicher, dass der Handsender aufgeladen ist. Der
Handsender lädt sich in 2Stunden auf.
• Stellen Sie sicher, dass das Empfängerhalsband eingeschaltet
ist und die LED-Leuchte blinkt. Siehe „Ein- und Ausschalten
desEmpfängerhalsbands“.
• Siehe „Empfängerhalsband mit Handsender koppeln“.
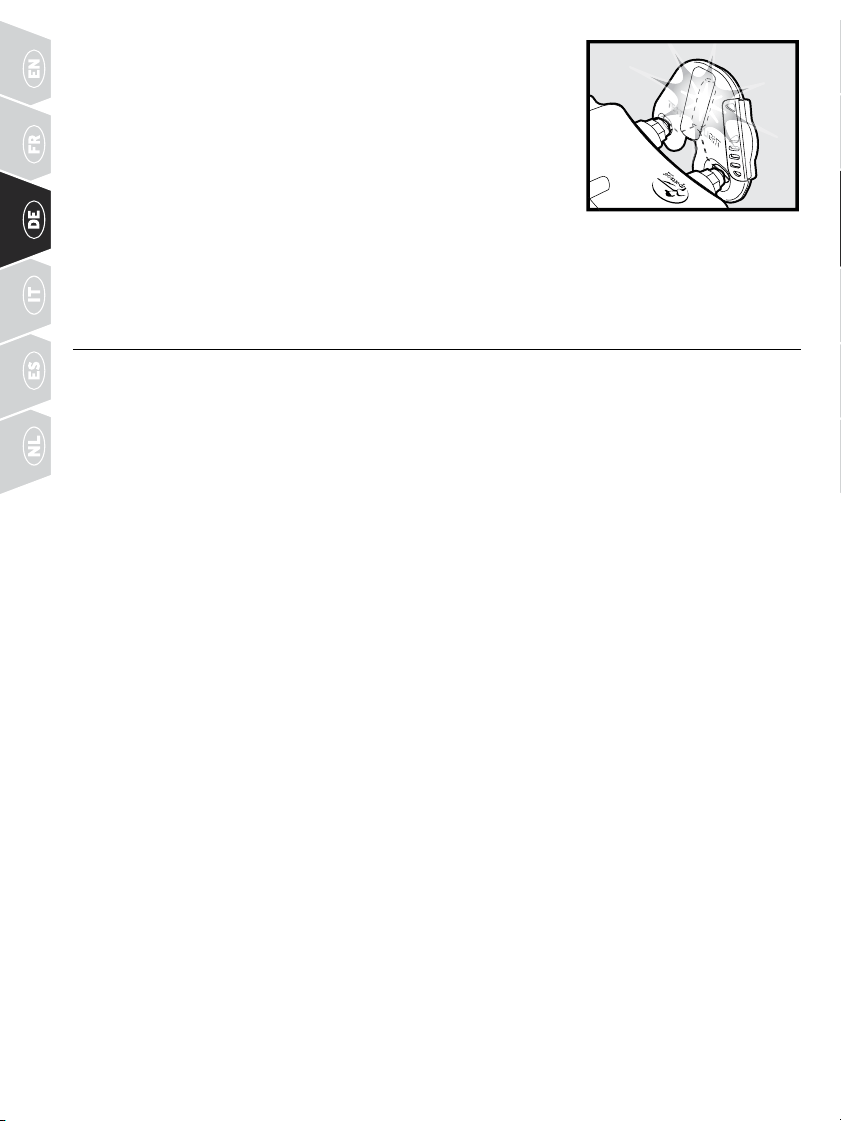
56 WWW.SPORTDOG.COM
SO VERWENDEN SIE DIE TESTLEUCHTE
Führen Sie die folgenden Schritte aus, um Ihr System zu testen:
1. Schalten Sie das Empfängerhalsband ein.
2. Halten Sie die Kontakte der Testleuchte an die Kontaktstifte.
3. Drücken Sie auf dem Handsender eine der Tasten für statische Reizimpulse.
4. Die Testleuchte blinkt.
HINWEIS: Bei höheren statischen Stimulationsstufen blinkt die
Testleuchteheller.
5. Schalten Sie das Empfängerhalsband aus.
Bewahren Sie die Testleuchte für zukünftige Tests auf.
HINWEIS: Wenn die Testleuchte nicht blinkt, laden Sie die Batterie auf und führen den Test erneut durch. Wenn
dieTestleuchte weiterhin nicht blinkt, setzen Sie sich bitte mit der Kundenbetreuung in Verbindung.
BATTERIE
Dieses System wird mit zwei Lithium-Ionen-Batterien betrieben. Verwenden Sie als Ersatz nur eine Batterie,
die Sie auf Anruf von der Kundenbetreuung erhalten haben.
• Nehmen Sie die Batterien zum Laden niemals aus dem Batteriefach.
• Die wiederaufladbaren Lithium-Ionen- (Li-Ionen-)Batterien haben keinen Speichereffekt, müssen also vor
dem Aufladen nicht geleert werden und können nicht überladen werden.
• Die Batterien sind werkseitig teilweise geladen, müssen jedoch vor der ersten Verwendung vollständig
geladen werden.
• Laden Sie die Einheit während einer längeren Aufbewahrung regelmäßig vollständig auf. Das sollte alle 3
bis 4 Monate durchgeführt werden.
• Die Batterien können mehrere Hundert Male aufgeladen werden. Wiederaufladbare Batterien verlieren
jedoch im Laufe der Zeit mit dem wiederholten Aufladen an Kapazität. Dies ist normal. Wenn sich die
Betriebszeit auf etwa die Hälfte der Originalzeit reduziert, wenden Sie sich an die Kundenbetreuung,
umeine neue Batterie zu erwerben.
• Die Lebensdauer der Batterien sollte 3-5 Jahre betragen. Wenn eine Batterie ausgetauscht werden
muss, können Sie über die Kundenbetreuung telefonisch eine neue Batterie kaufen. Öffnen Sie das
Empfängerhalsband oder den Handsender erst bei Erhalt der Ersatzbatterie.
In vielen Regionen sind leere Batterien gesondert zu entsorgen. Überprüfen Sie vor der Entsorgung leerer
Batterien die diesbezüglichen regionalen Vorschriften. Führen Sie die folgenden Schritte aus, um die
Batteriezur separaten Entsorgung zu entfernen.
BEFOLGEN SIE DIE ANLEITUNGEN ZUM ENTFERNEN DER AUSGEDIENTEN BATTERIE. (ÖFFNEN SIE
DAS EMPFÄNGERHALSBAND ODER DEN HANDSENDER ERST, NACHDEM SIE DIE ERSATZBATTERIE
ERHALTENHABEN.)
1. Verwenden Sie zum Entfernen der Gehäuseschrauben am Handsender einen Kreuzschlitzschraubendreher
Nr.1 und am Empfängerhalsband einen 3/32-Zoll-Sechskantschlüssel.
2. Entfernen Sie die Rückseite oder die Abdeckung des Gehäuses.
3. Entfernen Sie die alte Batterie.
57WWW.SPORTDOG.COM
Diese Anweisungen gelten nicht für die Reparatur oder den Austausch der Batterie. Um ein Erlöschen der
Garantie zu vermeiden, rufen Sie bitte bei der Kundenbetreuung an, um Hilfe beim Austausch der Batterie
durch eine speziell von der Radio Systems Corporation zugelassene Batterie zu erhalten.
Eine Liste der Patente, durch die dieses Produkt geschützt wird, finden Sie unter:
www.radiosystemscorporation.com/patents
SD-425X-E
Frequenzbereich - 27.145-27.145 MHz
Emissionsart - 352KF1D
Hochfrequenz Leistung - 0.005 W
Antennen-Info - Rod antenna, -27dBi
58 WWW.SPORTDOG.COM
Di seguito Radio Systems Corporation, Radio Systems PetSafe Europe Ltd., Radio Systems Australia Pty Ltd.
equalsiasi altra affiliata o marchio di Radio Systems Corporation saranno indicati collettivamente come "Noi".
Grazie per aver scelto i prodotti per l’addestramento del marchio SportDOG®. Usato correttamente, questo
prodotto ti aiuterà ad addestrare il tuo cane in modo efficiente e sicuro. Per garantirne un uso pienamente
soddisfacente, leggere attentamente la Guida all’uso. Per ulteriore assistenza, rivolgersi al Centro
assistenza clienti. Per un elenco dei numeri di telefono nella tua area, visita il nostro sito Web all’indirizzo
www.sportdog.com.
Per ottenere la massima protezione dalla garanzia, registra il prodotto entro 30 giorni su www.sportdog.com.
Registrando il prodotto e conservando la ricevuta, otterrai la garanzia completa e, nel caso in cui contattassi
il Centro assistenza clienti, potremo assisterti più rapidamente. Cosa più importante, le tue informazioni
sensibili non saranno cedute o vendute. Il testo completo della garanzia si trova sul nostro sitoWeb
all’indirizzo www.sportdog.com.
ALTRE INFORMAZIONI IMPORTANTI
L’utilizzo di questo prodotto implica l’accettazione di tutti i termini, le condizioni e gli avvisi relativi al
prodotto stesso compresi, a titolo esemplificativo e non esaustivo, quelli riportati nella presente Guida all’uso
e nel foglietto illustrativo contenente importanti informazioni sulla conformità normativa e sulla sicurezza
consegnato congiuntamente all’unità.
INDICE
COMPONENTI ................................................................................................................ 59
COME FUNZIONA IL SISTEMA ........................................................................................59
PRINCIPALI DEFINIZIONI ............................................................................................... 60
CARICAMENTO DEL TRASMETTITORE ........................................................................... 61
CARICAMENTO DEL COLLARE RICEVITORE ................................................................... 62
SISTEMAZIONE DEL COLLARE RICEVITORE ...................................................................64
IDENTIFICAZIONE DEL MIGLIOR LIVELLO DI INTENSITÀ ...............................................64
MODIFICA DEGLI INTERVALLI DI STIMOLAZIONE STATICA ............................................ 65
CONSIGLI GENERALI PER L’ADDESTRAMENTO .............................................................. 65
PROGRAMMAZIONE DEL TRASMETTITORE ................................................................... 66
SINTONIZZAZIONE DEL COLLARE RICEVITORE E DEL TRASMETTITORE ....................... 70
PROGRAMMARE IL SISTEMA PER IL FUNZIONAMENTO CON PIÙ CANI ......................... 70
MODIFICA DEI CODICI ID ................................................................................................ 72
ACCESSORI .................................................................................................................... 72
DOMANDE FREQUENTI .................................................................................................. 73
INDIVIDUAZIONE E RISOLUZIONE DEI PROBLEMI ..........................................................74
ISTRUZIONI RELATIVE ALLA CHIAVE MULTIUSI ............................................................. 75
BATTERIA ....................................................................................................................... 75
video disponibili su www.youtube.com/sportdogintl o nella scheda VIDEO di ciascun prodotto su
sportdog.com.
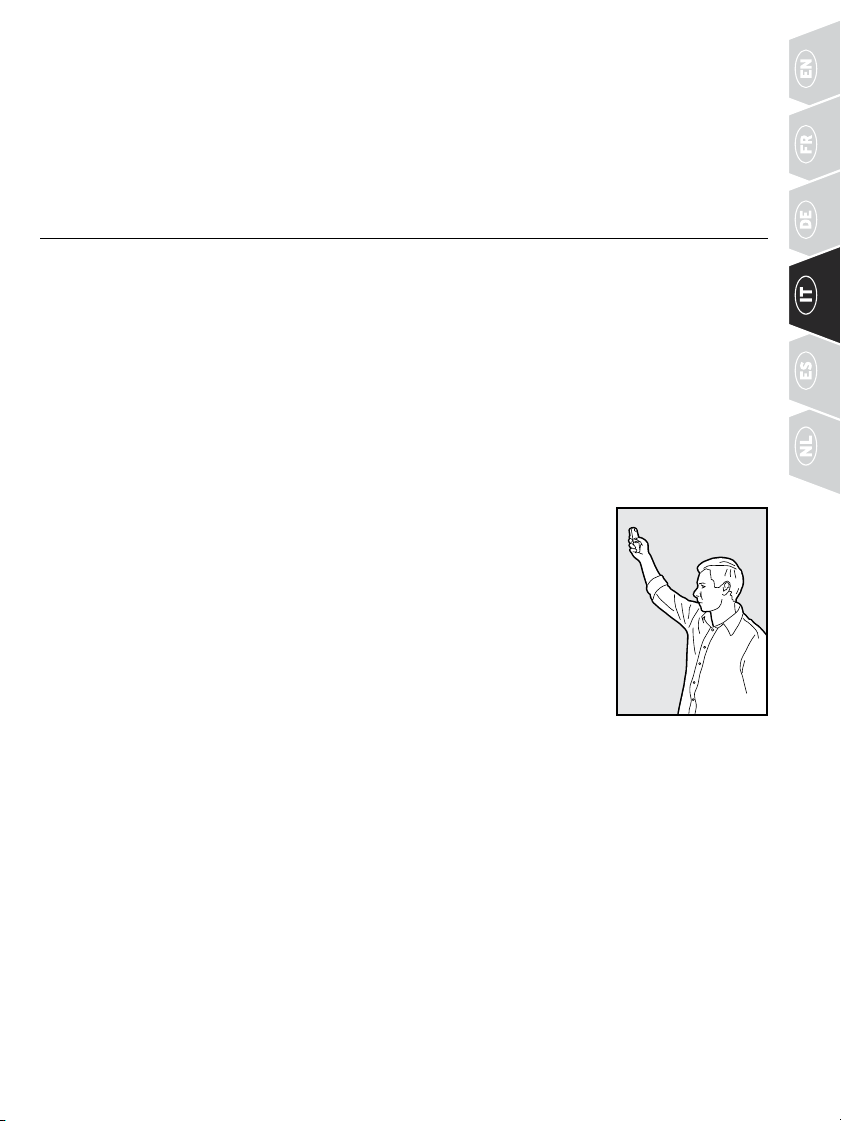
59WWW.SPORTDOG.COM
COMPONENTI
IL TUO SISTEMA SD-425X-E, SD-825X-E, SD-1225X-E O SD-1825X-E
COMPRENDE QUANTO SEGUE:
• Trasmettitore
• Collare ricevitore
• Adattatore di ricarica
• Base di ricarica (SD-1225X-E & SD-1825X-E)
• Punti di contatto lunghi e corti
• Cordoncino
• Clip da cintura (SD-825X-E, SD-1225X-E, SD-1825X-E)
• Chiave multiusi
COME FUNZIONA IL SISTEMA
Il sistema del marchio SportDOG® ha dimostrato sicurezza, comodità ed efficacia con tutti i cani di peso
superiore a 3,6 kg. L'uso coerente e corretto di questo prodotto consente di rafforzare i comandi e correggere
icomportamenti scorretti a distanze che arrivano fino a 450 o 1.600 metri, a seconda del sistema (vedi
sotto). Il trasmettitore invia un segnale, attiva il collare ricevitore che impartisce una stimolazione statica
innocua. Con il giusto addestramento, il cane apprenderà ad associare questo segnale ad un comando. Come
ogni altro prodotto SportDOG®, anche questo modello è dotato di livelli di stimolazione statica regolabili
che consentono di personalizzare il livello di stimolazione impartito al cane in base al suotemperamento,
escludendo il rischio di ipercorrezione.
SD-425X-E: 450 METRI
SD-825X-E: 800 METRI
SD-1225X-E: 1.200 METRI
SD-1825X-E: 1.600 METRI
IMPORTANTE: TUTTAVIA, IL RAGGIO MASSIMO PUÒ VARIARE IN BASE A COME
L'UTENTE POSIZIONAILTRASMETTITORE. PER OTTENERE RISULTATI UNIFORMI
ANCHE SU DISTANZE MAGGIORI, ILTRASMETTITORE DEVE ESSERE MANTENUTO
IN POSIZIONE VERTICALE, DISCOSTO DAL CORPO E AL DI SOPRA DELLA TESTA.
OLOGRAFIA DELL'AREA, CONDIZIONI CLIMATICHE, VEGETAZIONE, INTERFERENZE
PRODOTTE DA ALTRI DISPOSITIVI A RADIOFREQUENZA, COSÌ COME FATTORI DI
ALTRA NATURA, INFLUENZANO IL RAGGIO MASSIMO DEL TRASMETTITORE.
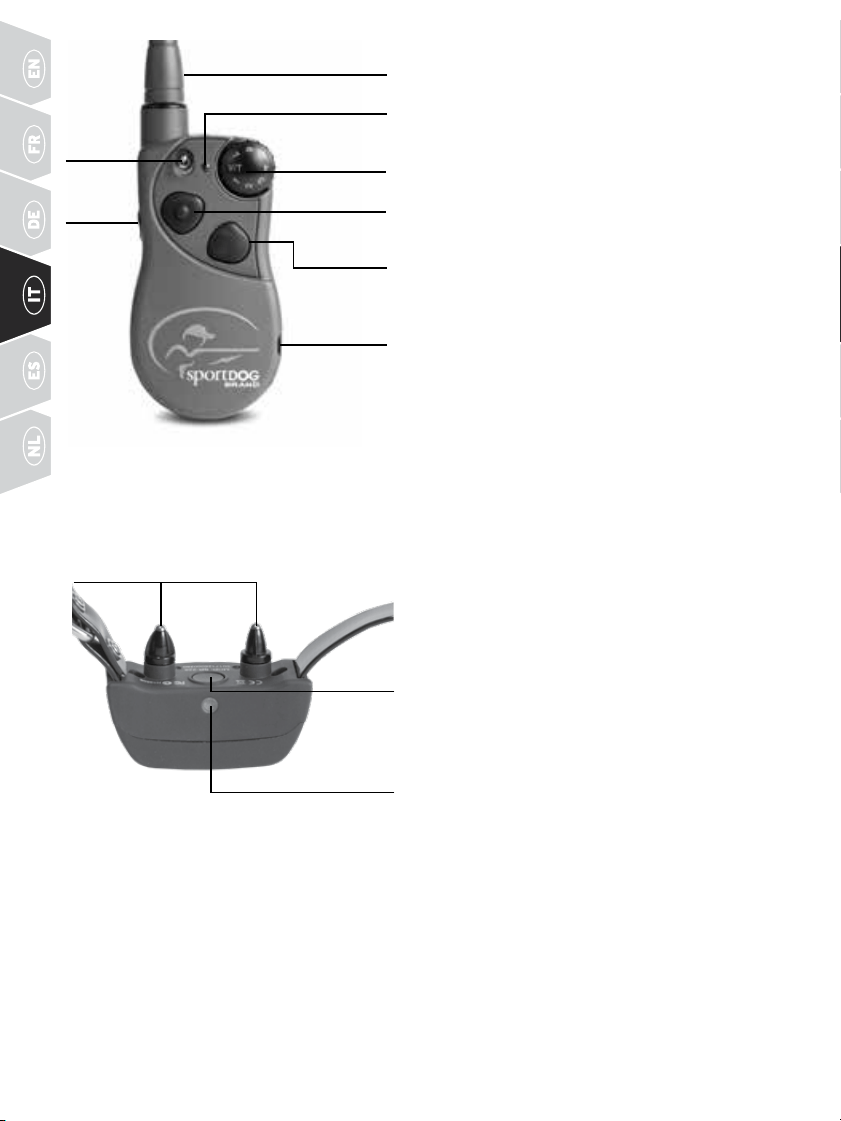
60 WWW.SPORTDOG.COM
SPIA LUMINOSA DEL
TRASMETTITORE
ANTENNA DEL
TRASMETTITORE
MANOPOLA DI REGO-
LAZIONE DELLA
INTENSITÀ
PULSANTE
SUPERIORE
PULSANTE
INFERIORE
CONNETTORE
DEL CARICA-
BATTERIE
PULSANTE
LATERALE
CONNETTORE CARICABATTERIE: per il collegamento al
caricabatterie. Sebbene il trasmettitore sia impermeabile
senza la copertura, tenere la copertura in sede quando il
dispositivo non è sotto carica per evitare l'infiltrazione di
polvere nell'apertura.
SELETTORE DELLA MODALITÀ DI FUNZIONAMENTO:
consente di cambiare la modalità del trasmettitore
(vedere pagina 66).
COLLARE RICEVITORE: riceve il segnale radio dal
trasmettitore ed eroga stimolazione statica, vibrazioni
o stimolazione con segnale acustico per correggere il
cane o inviargli un comando. è impermeabile e può essere
immerso in acqua fino a una profondità di 7,5 m.
PRINCIPALI DEFINIZIONI
TRASMETTITORE: trasmette il segnale radio al collare
ricevitore. è impermeabile e può essere immerso in acqua
fino a una profondità di 7,5 m.
MANOPOLA DI REGOLAZIONE DELLA INTENSITÀ:
fornisce più livelli di stimolazione statica in modo da poter
adattare la stimolazione al temperamento del cane.
SPIA LUMINOSA DEL TRASMETTITORE: segnala che
viene premuto un pulsante e funge anche da indicatore
dibatteria scarica.
INTERRUTTORE A BASCULA: questo interruttore è
impostato di default in modo che il trasmettitore possa
controllare due collari ricevitori.
PULSANTE SUPERIORE: questo pulsante è impostato
di default in modo da erogare una stimolazione statica
continua media.
PULSANTE INFERIORE: questo pulsante è impostato
di default in modo da erogare una stimolazione statica
continua bassa.
PULSANTE LATERALE: questo pulsante è impostato
di default in modo da erogare una stimolazione statica
continua alta.
PULSANTE
ON/OFF
SPIA LUMINOSA
DEL RICEVITORE
PUNTI DI CONTATTO
SPIA LUMINOSA DEL RICEVITORE: indica quando il collare ricevitore è stato acceso o spento, funge da
indicatore di batteria scarica e indica anche quando viene premuto un pulsante per l'erogazione di una
stimolazione statica continua o momentanea.
PUNTI DI CONTATTO: i contatti attraverso i quali il collare ricevitore eroga stimolazione statica.
PULSANTE ON/OFF: tenere premuto brevemente questo pulsante e rilasciare per accendere e spegnere il
collare ricevitore.
IL COLLARE RICEVITORE È IN GRADO DI TRASMETTERE QUATTRO TIPI DI STIMOLAZIONE:
CONTINUA: è possibile controllare sia il momento in cui viene erogata la stimolazione statica sia la sua durata,
fino a un massimo di 10 secondi. Dopo 10 secondi, la stimolazione va in pausa ed è necessario rilasciare il
pulsante del trasmettitore e premerlo di nuovo prima di poter erogare un'ulteriore stimolazione statica.
MOMENTANEA (PIZZICOTTO): la stimolazione statica viene erogata per 1/10 di secondo, indipendentemente
dal tempo di pressione del pulsante.
INTERRUT-
TORE
A BASCULA
(
SOLO
1825X-E
)
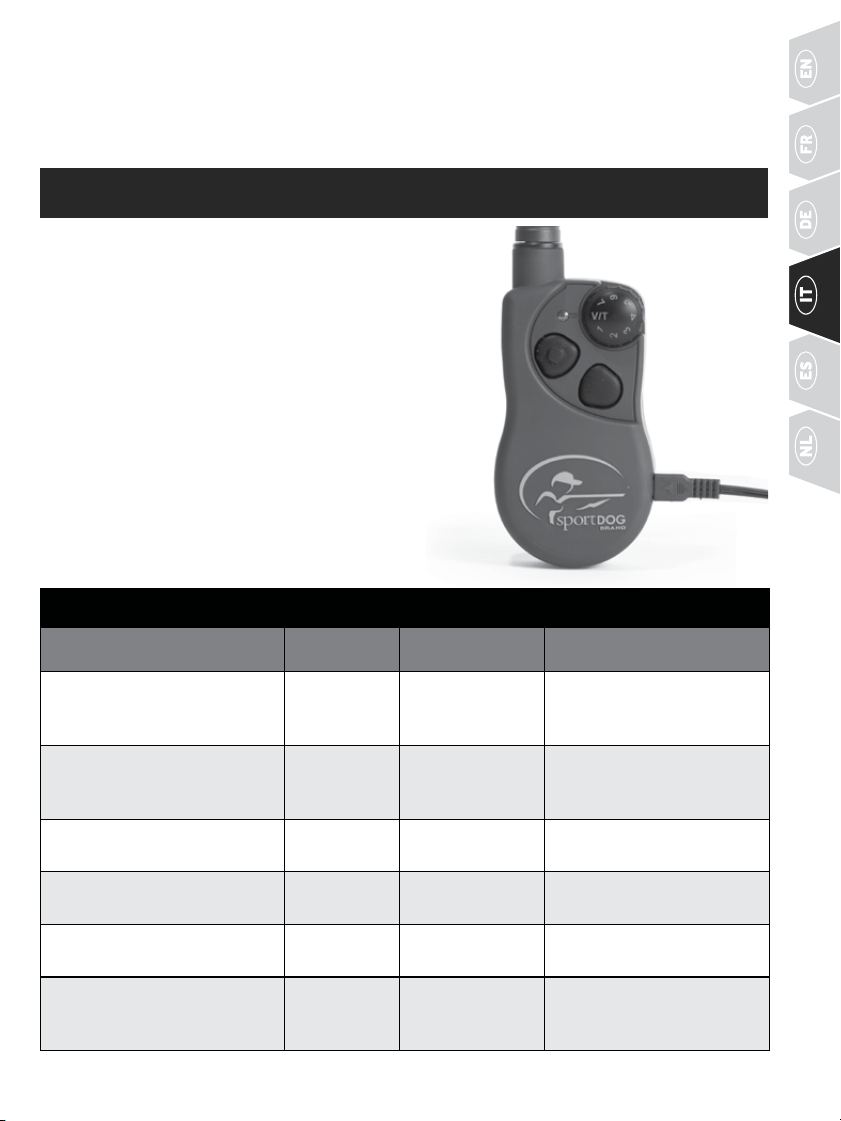
61WWW.SPORTDOG.COM
SEGNALE ACUSTICO: il collare ricevitore emette un breve segnale acustico quando viene premuto l'omonimo
pulsante corrispondente.*
VIBRAZIONE: quando si preme il pulsante Vibrazione, il collare ricevitore vibra fino a un massimo di 10
secondi.*
*Segnale acustico e vibrazione sono preimpostati e non regolabili
FASE
::
1 CARICAMENTO DEL TRASMETTITORE
1. Solleva il tappo di gomma che protegge il connettore
caricabatterie e collega il connettore caricabatterie
corrispondente.
2. Collega il caricabatterie a una presa a muro standard
per 2 ore ogni volta che lo ricarichi.
3. A ricarica completata, come indicato dalla spia
luminosa verde che lampeggia una volta al secondo,
ricolloca il coperchio di gomma.
Grazie alla tecnologia agli ioni di litio, il trasmettitore
si ricarica in sole 2 ore. Lasciare l’unità in carica oltre
le 2 ore non provoca danni.
NOTA: la durata approssimativa della batteria tra una
ricarica e l'altra va da 50 a 70 ore per SD-425X-E / SD-825X-E
e da 40 a 60 ore per SD-1225X-E / SD-1825X-E, a seconda
della frequenza di utilizzo.
SPIA LUMINOSA DEL TRASMETTITORE
MODALITÀ DI FUNZIONAMENTO
COLORE DELLA
SPIA
STATO DELLA
BATTERIA
FUNZIONE DELLA SPIA
Pulsante di segnale acustico
statico continuo o stimolazione
con vibrazione, premuto
Verde Buono Mentre si preme il pulsante
della modalità, la spia sarà
accesa in modalità fissa
Pulsante di segnale acustico
statico continuo o stimolazione
con vibrazione, premuto
Rosso Basso Mentre si preme il pulsante
della modalità, la spia sarà
accesa in modalità fissa
Pulsante della stimolazione
statica momentanea premuto
Verde Buono La spia lampeggia una volta,
quindi si spegne
Pulsante della stimolazione
statica momentanea premuto
Rosso Basso La spia lampeggia una volta,
quindi si spegne
L'unità è in caricamento Verde Basso La spia è accesa in modalità
fissa sul caricatore
L'unità è completamente carica
(caricatore ancora connesso)
Verde Buono La spia lampeggia una volta al
secondo quando la batteria è
completamente carica
CONNETTORE
PER RICARICA
COLLOCATO
NELLA PRESA DI
RICARICA DEL
TRASMETTITORE
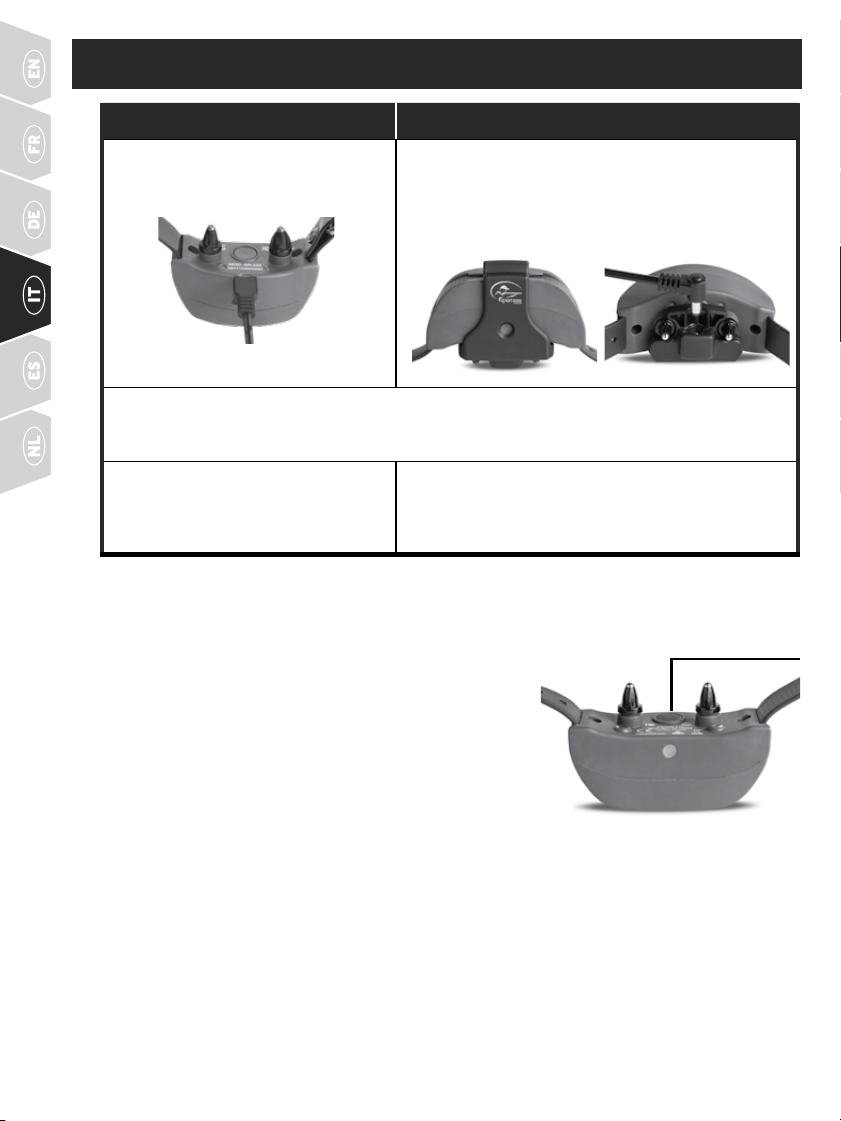
62 WWW.SPORTDOG.COM
FASE
::
2 CARICAMENTO DEL COLLARE RICEVITORE
425X-E o 825X-E 1225X-E o 1825X-E
1.
Solleva il tappo di gomma che protegge
il connettore caricabatterie del collare
ecollega il caricabatterie.
Allinea i punti di contatto con la base di ricarica,
assicurandoti che il foro sulla base sia allineato
con la spia luminosa del ricevitore e spingi la base
verso l'alto e indietro finché non scatta in posizione.
Collegailcaricatore alla base di ricarica.
2.
Collega il caricabatterie a una presa a muro standard per 2 ore ogni volta che lo ricarichi. Quando
la batteria è completamente carica, la spia luminosa del ricevitore emetterà una luce verde che
lampeggia una volta al secondo.
3.
Rimuovi il caricabatterie e fissare
saldamente la copertura in gomma per
garantire che i detriti non entrino nel
connettore caricabatterie.
Rimuovi sia il connettore di carica che la base di ricarica
dal collare ricevitore. La base di ricarica non è progettata
per essere collegata quando il collare ricevitore è in uso.
Grazie alla tecnologia agli ioni di litio, il collare ricevitore si ricarica in sole 2 ore. Lasciare l’unità in carica
oltre le 2 ore non provoca danni.
ACCENSIONE DEL COLLARE RICEVITORE
Premi e rilascia l'interruttore On/Off. La spia luminosa del collare
ricevitore si accende e il collare ricevitore emette 1-2 segnali acustici
per SD-425X-E / SD-825X-E e 1-3 segnali acustici per SD-1225X-E /
SD-1825X-E, aseconda dell'intervallo di stimolazione statica
selezionato. L'impostazione predefinita è 2 (media).
SPEGNIMENTO DEL COLLARE RICEVITORE
Premi e rilascia l'interruttore On/Off. La spia luminosa del ricevitore
emette una luce rossa fissa e il collare ricevitore emette un segnale
acustico per 2 secondi. Per prolungare la durata della batteria tra un
ciclo di caricamento e l'altro, spegni il collare ricevitore quando resta inutilizzato.
NOTA: la durata approssimativa della batteria tra una ricarica e l'altra va da 50 a 70 ore per SD-425X-E /
SD-825X-E e da 140 a 160 ore per SD-1225X-E / SD-1825X-E, a seconda della frequenza di utilizzo.
PULSANTE
ON/OFF
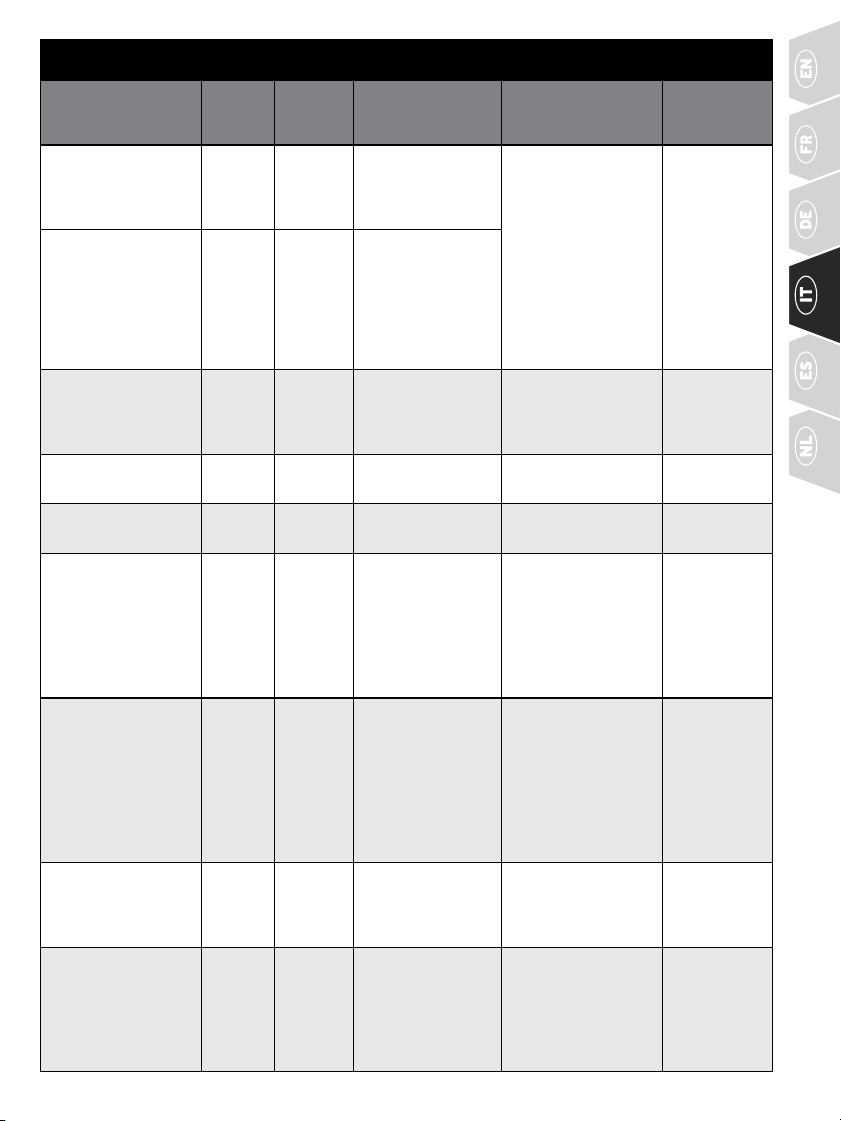
63WWW.SPORTDOG.COM
SPIA LUMINOSA DEL RICEVITORE
MODALITÀ DI
FUNZIONAMENTO
SPIA
COLORE
STATO
DELLA
BATTERIA
FUNZIONE
DELLASPIA
FUNZIONE
DELL'ALTOPARLANTE
VIBRAZIONE
L'unità viene accesa
tramite il pulsante
On/Off
Verde Buono Durante la sequenza
dei segnali la spia
mantiene un colore
fisso
Emette un segnale
acustico 1-2 volte
(1-3 volte per
SD-1225X-E e
SD-1825X-E) a
seconda del raggio
di stimolazione
impostato
(2èl'impostazione
predefinita). Vedere
apagina 65.
N/D
L'unità viene accesa
tramite il pulsante
On/Off
Rosso Basso Durante la sequenza
dei segnali la spia
mantiene un colore
fisso
L'unità viene
spentatramite il
pulsante On/Off
Rosso N/D Durante la sequenza
dei segnali la
spia mantiene un
colorefisso
Emette un segnale
continuo per 2 secondi
N/D
L'unità è accesa Verde Buono La spia lampeggia
ogni 2 secondi
N/D N/D
L'unità è accesa Rosso Basso La spia lampeggia
ogni 2 secondi
N/D N/D
L'unità sta erogando
una stimolazione
statica continua
Rosso N/D La spia è accesa
in modalità fissa
fintantoché il
pulsante viene
tenuto premuto
(finoa un massimo
di 10 secondi)
N/D N/D
L'unità sta erogando
una stimolazione
statica momentanea
Rosso N/D L'indicatore
luminoso lampeggia
rapidamente
una sola volta
indipendentemente
dal tempo per cui
il pulsante resta
premuto
N/D N/D
L'unità sta erogando
una stimolazione con
segnale acustico
Disattivo N/D N/D L'unità emetterà un
segnale acustico
finché il pulsante viene
tenuto premuto
N/D
L'unità sta erogando
una stimolazione con
vibrazione
Disattivo N/D N/D N/D L'unità vibra
finché il
pulsante resta
premuto (fino
a un massimo
di 10 secondi).
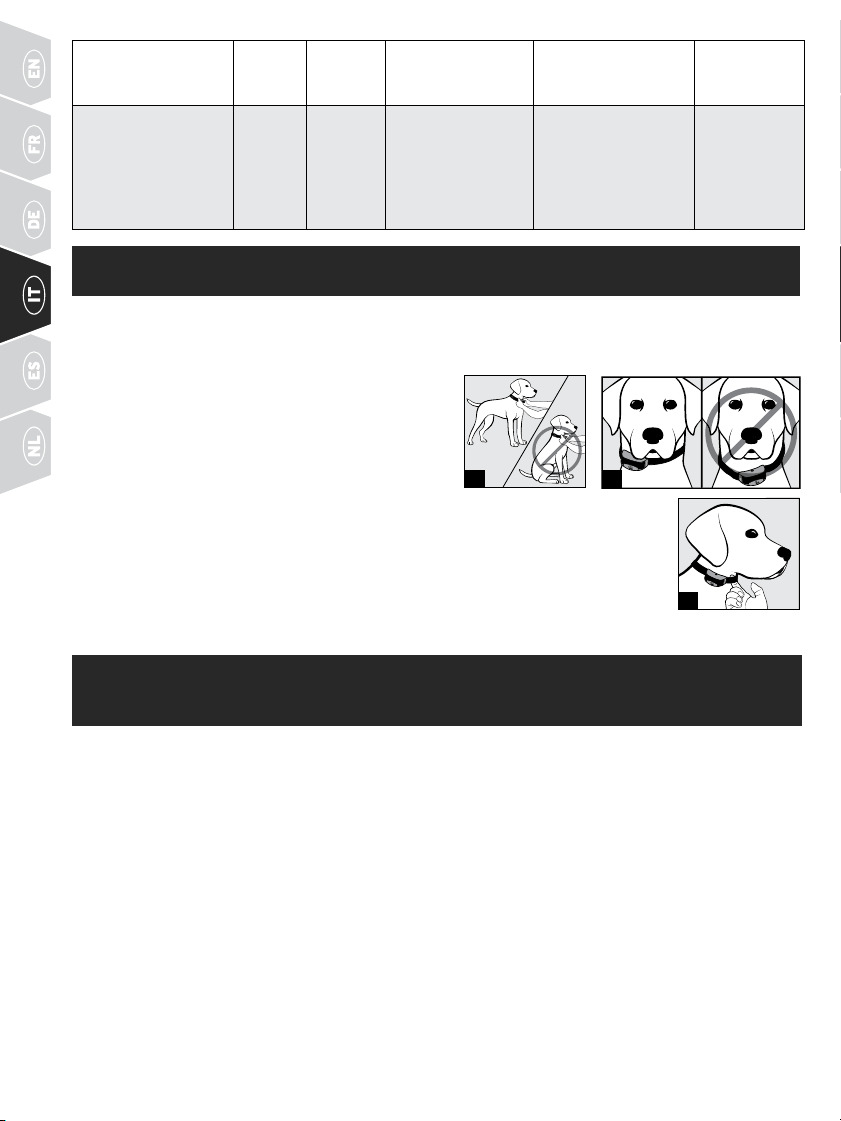
64 WWW.SPORTDOG.COM
FASE
::
3 SISTEMAZIONE DEL COLLARE RICEVITORE
IMPORTANTE: PER UN ADDESTRAMENTO EFFICACE È IMPORTANTE ADATTARE E POSIZIONARE
CORRETTAMENTE IL COLLARE RICEVITORE. I PUNTI DI CONTATTO DEVONO ESSERE A DIRETTO
CONTATTO CON LA PELLE DEL CANE.
Per garantire un'applicazione corretta, segui questo
procedimento:
1. Con il cane in posizione eretta (3A), posiziona il collare
ricevitore il più in alto possibile sul collo del cane,
leggermente su entrambi i lati, in modo che i punti di
contatto tocchino la pelle (3B). Se il cane ha il pelo
lungo o spesso, è possibile garantire un contatto
uniforme in due modi: accorcia il pelo nella zona intorno ai punti di contatto
outilizza i punti di contatto più lunghi inclusi nel sistema.
2. Fissa il collare ricevitore in modo tale che, pur aderendo, resti sufficientemente
lasco da consentire il passaggio di un dito tra cinturino e collo del cane (3C).
3. Attendi che il cane indossi il collare per alcuni minuti e poi ricontrolla l'aderenza.
Ricontrolla in seguito l'aderenza quando il cane si è abituato a indossare il collare
ricevitore.
FASE
::
4 IDENTIFICAZIONE DEL MIGLIOR LIVELLO
DIINTENSITÀ
Il sistema del marchio SportDOG® ha più livelli di intensità. Ciò consente di scegliere il livello di stimolazione
statica più adatto al cane. Perché l'addestramento sia efficace è necessario trovare il giusto livello di intensità
per il proprio cane. Questo è il cosiddetto “livello di riconoscimento”, il livello a cui il cane si guarda intorno con
curiosità o muove le orecchie.
NOTA: iniziare sempre con il livello più basso e aumentare progressivamente.
IDENTIFICAZIONE DEL LIVELLO DI RICONOSCIMENTO DEL CANE
NOTA: ogni cane è diverso ed è impossibile prevedere quale sia il suo livello di riconoscimento. Osserva attentamente
il cane per cogliere ogni lieve cambiamento nel comportamento che indica la percezione della stimolazione statica
daparte del tuo cane.
1. Con il collare ricevitore acceso e correttamente montato sul cane, imposta la manopola di regolazione della
intensità del trasmettitore sul livello 1 e premi il pulsante della stimolazione statica continua per 1 o 2 secondi.
2. Se il cane non mostra alcuna reazione al livello 1, passa al livello 2 e ripeti il processo fino a trovare il livello di
riconoscimento del tuo cane. Questo è il livello che occorre usare quando si inizia un esercizio di addestramento.
3. IL CANE NON DEVE VOCALIZZARE O DARE SEGNI DI PANICO QUANDO RICEVE LA STIMOLAZIONE STATICA.
SE QUESTO AVVIENE, IL LIVELLO DI STIMOLAZIONE STATICA È TROPPO ELEVATO ED ÈNECESSARIO
TORNARE AL LIVELLO PRECEDENTE E RIPETERE IL PROCEDIMENTO.
3C
3A 3B
L'unità è in
caricamento
Verde Basso La spia è accesa in
modalità fissa sul
caricatore
N/D N/D
L'unità è
completamente carica
(caricatore ancora
connesso)
Verde Buono
L'indicatore
lampeggia una
volta al secondo
quando la batteria
è completamente
carica
N/D N/D
65WWW.SPORTDOG.COM
4. Se nella ricerca del livello di riconoscimento si arriva al massimo livello di stimolazione statica e il cane
continua a non mostrare alcuna reazione, verifica che il collare ricevitore sia aderente al collo del cane.
Torna al livello di intensità 1 e ripeti il procedimento. Se il cane continua a non indicare di avvertire la
stimolazione statica, sono disponibili due opzioni: potrebbe essere necessario spuntare il pelo sotto ipunti
di contatto o utilizzare i punti di contatto più lunghi inclusi nel sistema.
Se dopo aver completato tutti questi passaggi il tuo cane non indica ancora di sentire la stimolazione statica
o se la stimolazione statica sembra troppo alta, puoi provare a modificare l'intervallo di stimolazione del
collare ricevitore seguendo le istruzioni seguenti. Contatta il Centro assistenza clienti se non riesci a trovare
il livello di riconoscimento del tuo cane.
MODIFICA DEGLI INTERVALLI DI STIMOLAZIONE STATICA
Il collare ricevitore del marchio SportDOG® è dotato di 2-3 intervalli di stimolazione statica, a seconda del
modello. La modalità predefinita del trasmettitore offre 21 livelli di stimolazione statica all'interno di ogni
intervallo, in cui 1 è il più basso e 21 è il più alto. L'impostazione predefinita è 2 o di livello medio.
Per modificare l'intervallo di stimolazione statica, segui questo procedimento:
1. Verifica che il collare ricevitore sia spento.
2. Accendi l'unità premendo e rilasciando l'interruttore On/Off.
3. Quando la spia luminosa si spegne e nel giro di 5 secondi, tieni premuto il pulsante On/Off per 3 secondi.
4. Il collare ricevitore emetterà quindi un segnale acustico e la spia luminosa lampeggerà in arancione
come indicato dalla tabella sottostante. Continua a tenere premuto il pulsante finché il numero di segnali
acustici/lampeggi della spia arancione non eguaglia l'intervallo di stimolazione desiderato mostrato.
5. Dopo aver selezionato l'intervallo desiderato, rilascia il pulsante; il collare ricevitore si spegnerà.
6. Riaccendi l'unità. Emetterà segnali acustici a seconda dell'intervallo di stimolazione statica selezionato
nella Fase 4.
SEGNALI
ACUSTICI
INTERVALLO DI
STIMOLAZIONE STATICA
TEMPERAMENTO
DEL CANE
MODELLO
1 segnale acustico Basso Lieve SD-425X-E, SD-825X-E, SD-1225X-E,
SD-1825X-E
2 segnali acustici Media Moderata SD-425X-E, SD-825X-E, SD-1225X-E,
SD-1825X-E
3 segnali acustici Alta Ostinato SD-1225X-E, SD-1825X-E
CONSIGLI GENERALI PER L’ADDESTRAMENTO
PRIMA DI INIZIARE L’ADDESTRAMENTO DEL CANE CON QUESTO
PRODOTTO
Per ottenere i migliori risultati con questo sistema di addestramento a distanza, occorre ricordare sempre
di insegnare un comando prima di rafforzarlo con il sistema di addestramento. L’addestramento sarà più
semplice e veloce se si seguono le linee guida riportate in questa Guida introduttiva. In più, occorre tenere
sempre a mente i seguenti consigli per l’addestramento:
• Elimina un solo comportamento scorretto o insegna un solo comando per volta. Accelerare i tempi
dell’addestramento può confondere il cane.
• Svolgi sessioni di addestramento piacevoli, brevi e frequenti. Se tu o il tuo cane siete frustrati o confusi,
siconsiglia di fare una pausa.
• Sii coerente. Dai al cane un segnale acustico, una vibrazione o una stimolazione statica, acustica o tramite
vibrazione, ad ogni comportamento scorretto.
• Non correggere eccessivamente il cane. Utilizza il numero minore di stimolazioni possibili per addestrarlo.
• Tieni il cane lontano dalle situazioni che lo inducono a dimostrare il comportamento indesiderato, a meno
che non lo si possa controllare, e utilizza il sistema di addestramento a distanza per applicare segnali
acustici, vibrazioni o stimolazioni statiche.
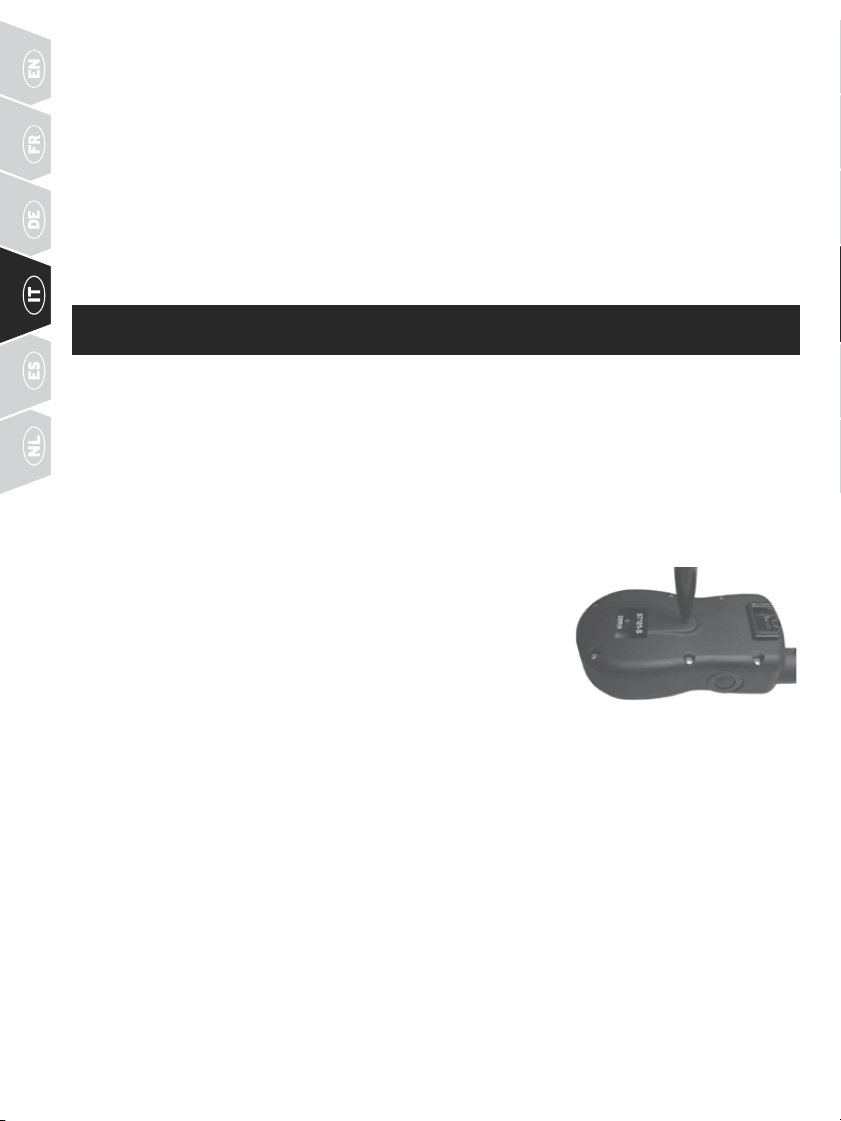
66 WWW.SPORTDOG.COM
• Se noti una situazione in cui il cane si comporta scorrettamente più volte, imposta questa situazione per una
sessione di addestramento. Questo aumenta significativamente le probabilità di successo.
• Se il cane ha una reazione esitante ad un segnale acustico, vibrazione o stimolazione statica (soprattutto
le prime due volte), non è il caso di allarmarsi. Dirigi la sua attenzione su un comportamento semplice
eappropriato (ovvero su un comando noto, ad esempio, "seduto").
• Non usare mai il sistema di addestramento a distanza per correggere o eliminare qualsiasi forma di
comportamento aggressivo. Se il cane manifesta tale comportamento, rivolgiti ad un addestratore
professionista. Nei cani il comportamento aggressivo è il prodotto di molteplici fattori: potrebbe
essereuncomportamento appreso o una risposta alla paura. Un altro fattore che incoraggia
l'aggressivitàdei cani è la dominanza sociale. Ogni cane è diverso.
Adesso il sistema di addestramento a distanza è pronto per l’uso. Il trasmettitore è preimpostato di default
sulla modalità 5 (interruttore a bascula posizionato su 5 per SD-1825X-E), ma è possibile cambiare la
modalità in base alla situazione. Vedere la FASE 5 per una spiegazione delle opzioni relative alla modalità.
FASE
::
5 PROGRAMMAZIONE DEL TRASMETTITORE
SD-425X-E, SD-825X-E, SD-1225X-E
Il trasmettitore è dotato di sette modalità di funzionamento per consentire di selezionare la combinazione,
il tipo e lo stile d’addestramento più consono alle proprie esigenze. Esiste anche una modalità di
programmazione (Modalità V/T) che consente di modificare il codice ID del sistema. Il trasmettitore è
impostato di default sulla modalità 5.
CAMBIARE MODALITÀ
1. Facendo riferimento alla tabella riportata di seguito, regolare la manopola di regolazione della intensità
sulla modalità desiderata.
2. Capovolgere il trasmettitore e rimuovere la clip per cintura se presente
(solo per SD-825X-E and SD-1225X-E).
3. Con una penna o usando il dente della fibbia del collare, premere e
rilasciare il selettore della modalità di funzionamento. Premendo
il selettore della modalità di funzionamento, la spia luminosa del
trasmettitore emetterà una luce fissa. Una volta rilasciato, la modalità
selezionata lampeggerà.
Ad esempio, se si desidera selezionare la modalità 6 è necessario impostare
la manopola di regolazione della intensità sul livello 6. Una volta che il selettore della modalità di funzionamento
è stato rilasciato, la spia luminosa del trasmettitore rimarrà accesa in modo fisso e, non appena il selettore della
modalità di funzionamento viene rilasciato, la spia luminosa del trasmettitore lampeggerà 6 volte.
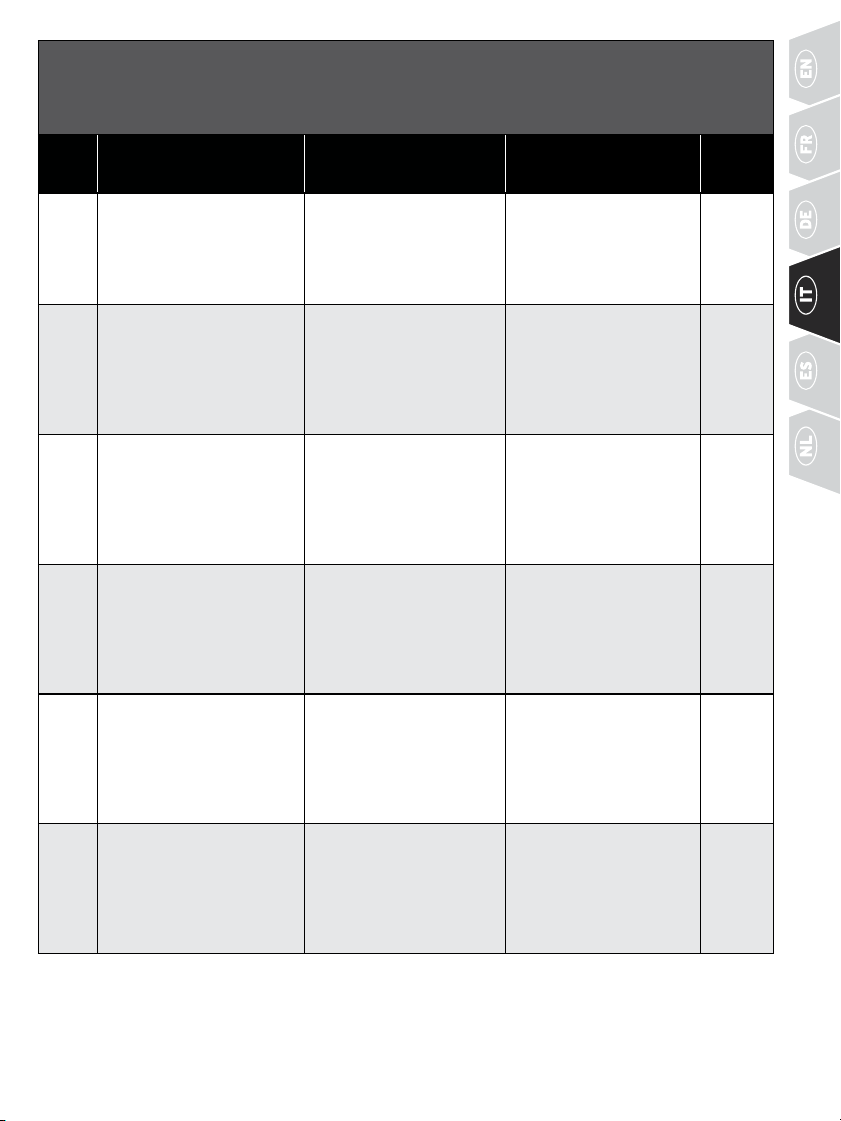
67WWW.SPORTDOG.COM
TABELLA DELLE MODALITÀ PER I MODELLI SD-425X-E,
SD-825X-E, SD-1225X-E
(
FARE RIFERIMENTO ALLA PAGINA 69 PER CAMBIARE MODALITÀ
)
MODA-
LITÀ
FUNZIONE PULSANTE
SUPERIORE
FUNZIONE PULSANTE
INFERIORE
FUNZIONE PULSANTE
LATERALE
NUMERO
DI CANI
1 Stimolazione continua (livello
impostato dalla manopola di
regolazione della intensità)
OPPURE vibrazione se
sulla manopola compare
lascrittaV/T
Stimolazione momentanea
(livello impostato dalla
manopola di regolazione
della intensità) OPPURE
vibrazione se sulla manopola
compare la scritta V/T
Solo segnale acustico 1
2 Stimolazione continua (livello
impostato dalla manopola di
regolazione della intensità)
OPPURE segnale acustico
se sulla manopola compare
lascritta V/T
Stimolazione momentanea
(livello impostato dalla
manopola di regolazione
della intensità) OPPURE
segnale acustico se sulla
manopola compare la
scrittaV/T
Solo vibrazione 1
3 Cane 1: Stimolazione
continua(livello impostato
dalla manopola di
regolazione della intensità)
OPPURE segnale acustico se
sulla manopola compare la
scritta V/T
Cane 2: Stimolazione
continua (livello impostato
dalla manopola di
regolazione della intensità)
OPPURE segnale acustico se
sulla manopola compare la
scritta V/T
Cane 3: Stimolazione
continua (livello impostato
dalla manopola di
regolazione della intensità)
OPPURE segnale acustico se
sulla manopola compare la
scritta V/T
3
4 Cane 1: Stimolazione continua
(livello impostato dalla
manopola di regolazione
della intensità) OPPURE
vibrazione se sulla manopola
compare la scritta V/T
Cane 2: Stimolazione
continua (livello impostato
dalla manopola di
regolazione della intensità)
OPPURE vibrazione se
sulla manopola compare
lascrittaV/T
Cane 3: Stimolazione
continua (livello impostato
dalla manopola di
regolazione della intensità)
OPPURE vibrazione se
sulla manopola compare
lascritta V/T
3
5* Stimolazione continua media
(livello impostato dalla
manopola di regolazione
della intensità) OPPURE
segnale acustico sulla
manopola
Stimolazione continua bassa
(livello impostato dalla
manopola di regolazione
della intensità) OPPURE
segnale acustico se sulla
manopola compare la
scrittaV/T
Stimolazione continua alta
(livello impostato dalla
manopola di regolazione
della intensità) OPPURE
segnale acustico se sulla
manopola compare la
scritta V/T
1
6 Stimolazione continua media
(livello impostato dalla
manopola di regolazione
della intensità) OPPURE
vibrazione sulla manopola
Stimolazione continua bassa
(livello impostato dalla
manopola di regolazione
della intensità) OPPURE
vibrazione se sulla manopola
compare la scritta V/T
Stimolazione continua alta
(livello impostato dalla
manopola di regolazione
della intensità) OPPURE
vibrazione se sulla
manopola compare la
scritta V/T
1
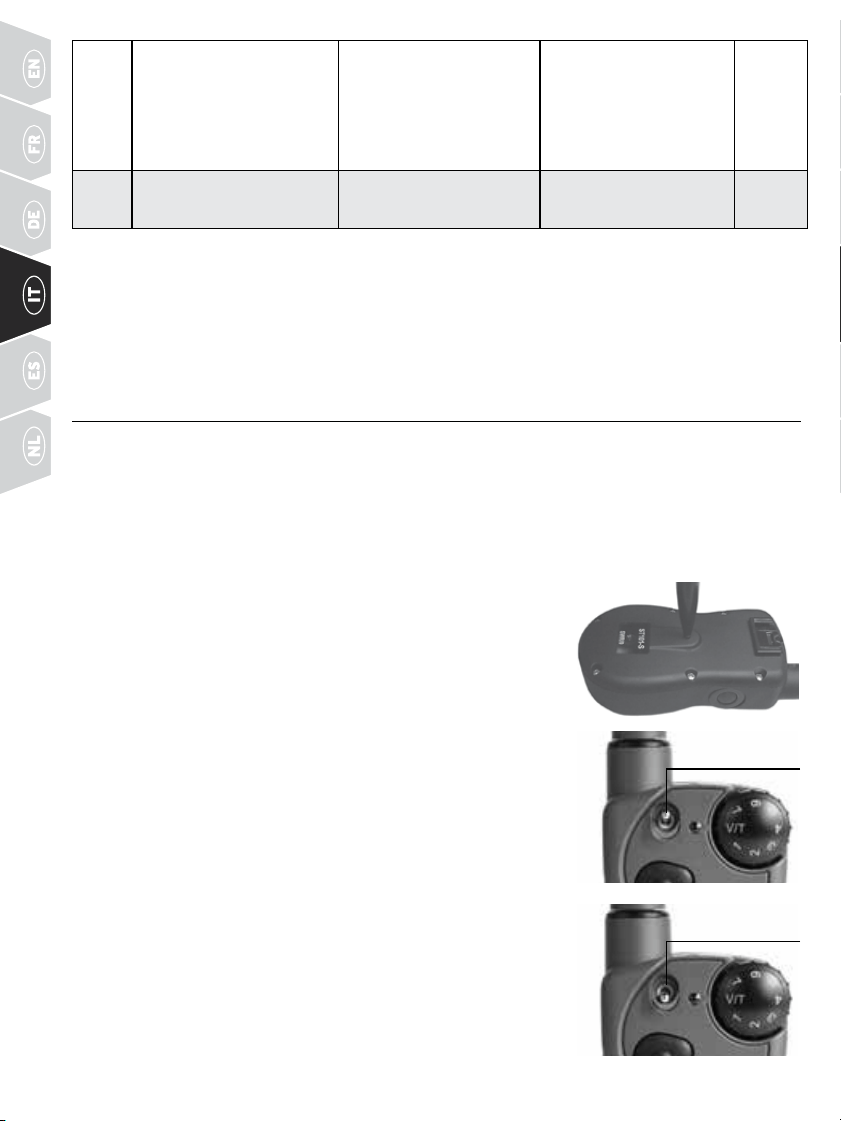
68 WWW.SPORTDOG.COM
7 Stimolazione continua (livello
impostato dalla manopola di
regolazione della intensità)
OPPURE segnale acustico se
sulla manopola compare la
scritta V/T
Stimolazione momentanea
(livello impostato dalla
manopola di regolazione
della intensità) OPPURE
segnale acustico se sulla
manopola compare la
scrittaV/T
Localizzare il beeper** 1
V/T
(CODICE
ID)
N/D N/D Vedere la FASE 08 N/D
NOTA: le modalità 1, 2, 3, 4 e 7 erogano 7 livelli di stimolazione che corrispondono all’impostazione della
manopola di regolazione della intensità.
Le modalità 5 e 6 erogano più “incrementi” tra cui scegliere, per un totale di 21 livelli di stimolazione
statica. Ad esempio, in modalità 5 con la manopola di regolazione dell’intensità impostata su 1, il
pulsante inferiore fornisce il livello 1 di 21, il pulsante superiore fornisce il livello 2 di 21 e il pulsante
laterale fornisce il livello 3 di 21.
* Modalità predefinita dalla fabbrica.
** Localizzare il beeper: il pulsante laterale disattiva la modalità di esecuzione e localizza il beeper. Per attivare di nuovo la
modalità di esecuzione, tenere premuto il pulsante laterale per 3 secondi.
SD-1825X-E
Il trasmettitore dispone di 14 modalità di funzionamento (sette con l’interruttore a bascula sulla posizione
grigia/
a
e sette con l’interruttore a bascula sulla posizione arancione/
b
) per consentire di selezionare la
migliore corrispondenza per il proprio tipo o stile di allenamento. Il trasmettitore è impostato di default sulla
modalità 5:
a
Esiste anche una modalità di programmazione (Modalità V/T) che consente di modificare il
codice ID del sistema.
CAMBIARE MODALITÀ
1. Facendo riferimento alla “TABELLA MODALITÀ SD-1825X-E” a
pagina69,scegliere il numero della modalità desiderata (1-7)
ecambiarela posizione (
a
oppure
b
). Impostare sia la manopola
diregolazione della intensità sia l’interruttore a bascula per
selezionarela modalità desiderata.
2. Capovolgere il trasmettitore e rimuovere la clip per cintura
(seagganciata).
3. Con una penna o usando il dente della fibbia del collare, premere e
rilasciare il selettore della modalità di funzionamento. Premendo
il selettore della modalità di funzionamento, la spia luminosa del
trasmettitore emetterà una luce fissa. Una volta fatto, lampeggerà
unnumero di volte pari al numero della modalità selezionata.
Ad esempio, se si desidera selezionare la modalità 6:
a
spostare
l’interruttore a bascula sulla posizione in colore grigio/
a e
impostare
la manopola di regolazione della intensità sul livello 6. Una volta che
il selettore della modalità di funzionamento sia stato premuto, la spia
luminosa del trasmettitore emetterà una luce fissa e, non appena il
selettore della modalità di funzionamento viene rilasciato, lampeggerà 6
volte. Tuttavia, se si seleziona la modalità V/T (codice ID) nella posizione
in colore grigio/
a
la spia rimarrà di colore fisso una volta rilasciato il
selettore della modalità di funzionamento.
INTERRUTTORE
A BASCULA IN
POSIZIONE
a
INTERRUTTORE
A BASCULA IN
POSIZIONE
b
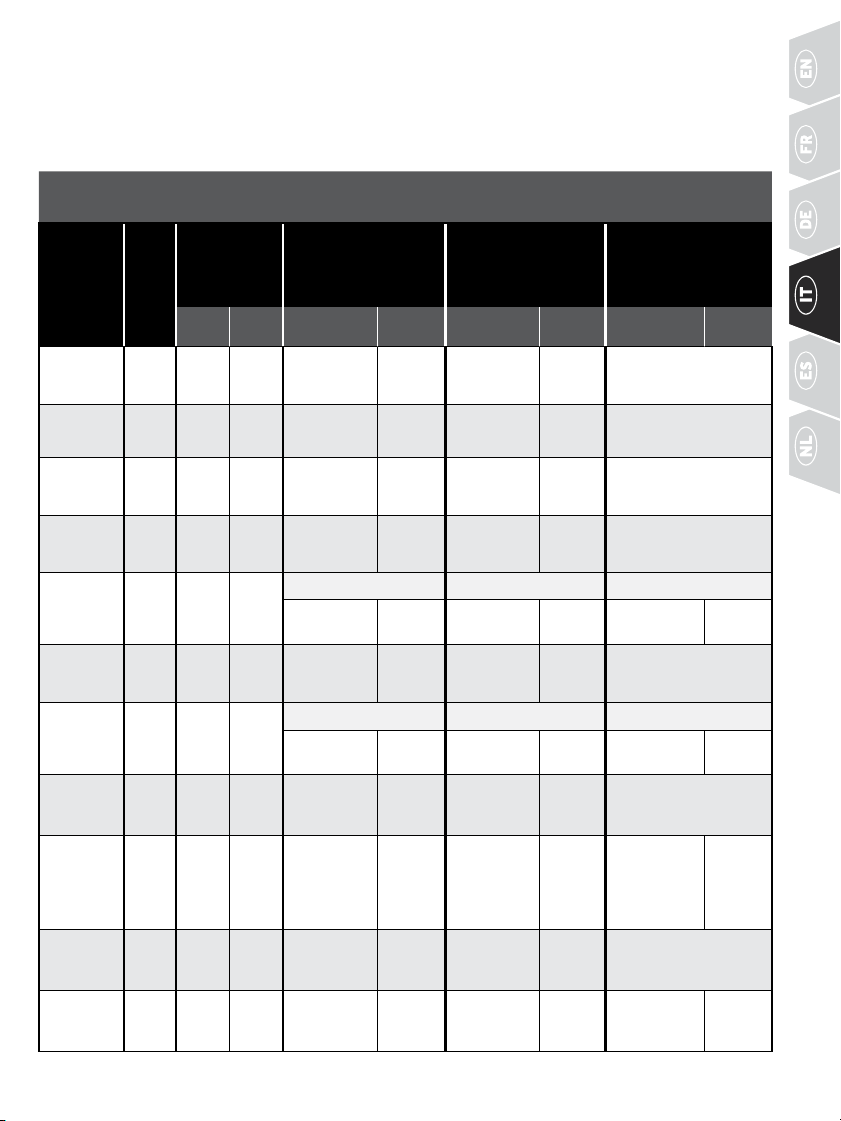
69WWW.SPORTDOG.COM
*
Modalità predefinita dalla fabbrica.
Per l’impostazione del funzionamento con due cani, fare riferimento alla FASE 07 alle pagine 70-71.
^ Per l’impostazione del funzionamento con tre e sei cani, fare riferimento alla FASE 07 alle pagine 70-71.
•
Localizzare il beeper: il pulsante laterale disattiva la modalità di esecuzione e localizza il beeper. Per attivare
di nuovo la modalità di esecuzione, tenere premuto il pulsante laterale per 3 secondi.
TABELLA DELLE MODALITÀ PER IL MODELLO SD-1825X-E
(
FARE RIFERIMENTO ALLA PAGINA 68 PER CAMBIARE MODALITÀ
)
MODA-
LITÀ:
POSIZIONE
DELL'INTER-
RUTTORE
NUME-
RO DI
CANI
FUNZIONE
dell'inter-
ruttore a
bascula
FUNZIONE PULSANTE
SUPERIORE
FUNZIONE PULSANTE
INFERIORE
FUNZIONE PULSANTE
LATERALE
a b
MANOPOLA
1-7
V/T
MANOPOLA
1-7
V/T
MANOPOLA
1-7
V/T
1:a
2
Cane 1 Cane 2
Stimolazione
continua alta
Vibra-
zione
Stimolazione
momentanea
alta
Vibra-
zione
Segnale acustico
1:b
2 Cane 1 Cane 2
Stimolazione
continua alta
Vibra-
zione
Stimolazione
continua alta
Vibra-
zione
Localizzare il beeper
•
2:a
2 Cane 1 Cane 2
Stimolazione
continua alta
Segnale
acustico
Stimolazione
momentanea
alta
Segnale
acustico
Vibrazione
2:b
2 Cane 1 Cane 2
Stimolazione
continua alta
Vibra-
zione
Stimolazione
continua
bassa
Vibra-
zione
Segnale acustico
3:a
6^
Cani
1-3
Cani
4-6
Cane 1 (a) / Cane 4 (b) Cane 2 (a) / Cane 5 (b) Cane 3 (a) / Cane 6 (b)
Stimolazione
continua alta
Segnale
acustico
Stimolazione
continua alta
Segnale
acustico
Stimolazione
continua alta
Segnale
acustico
3:b
2 Cane 1 Cane 2
Stimolazione
continua alta
Segnale
acustico
Stimolazione
continua
bassa
Segnale
acustico
Vibrazione
4:a
6
Cani
1-3
Cani
4-6
Cane 1 (a) / Cane 4 (b) Cane 2 (a) / Cane 5 (b) Cane 3 (a) / Cane 6 (b)
Stimolazione
continua alta
Vibra-
zione
Stimolazione
continua alta
Vibra-
zione
Stimolazione
continua alta
Vibra-
zione
4:b
2 Cane 1 Cane 2
Stimolazione
continua alta
crescente
Vibra-
zione
Stimolazione
continua alta
Vibra-
zione
Segnale acustico
5:a
*
2 Cane 1 Cane 2
Stimolazione
continua
media
Segnale
acustico
Stimolazione
continua
bassa
Segnale
acustico
Stimolazione
continua alta
Segnale
acustico
5:b
2 Cane 1 Cane 2
Stimolazione
continua alta
crescente
Segnale
acustico
Stimolazione
continua alta
Segnale
acustico
Vibrazione
6:a
2 Cane 1 Cane 2
Stimolazione
continua
media
Vibra-
zione
Stimolazione
continua
bassa
Vibra-
zione
Stimolazione
continua alta
Vibra-
zione
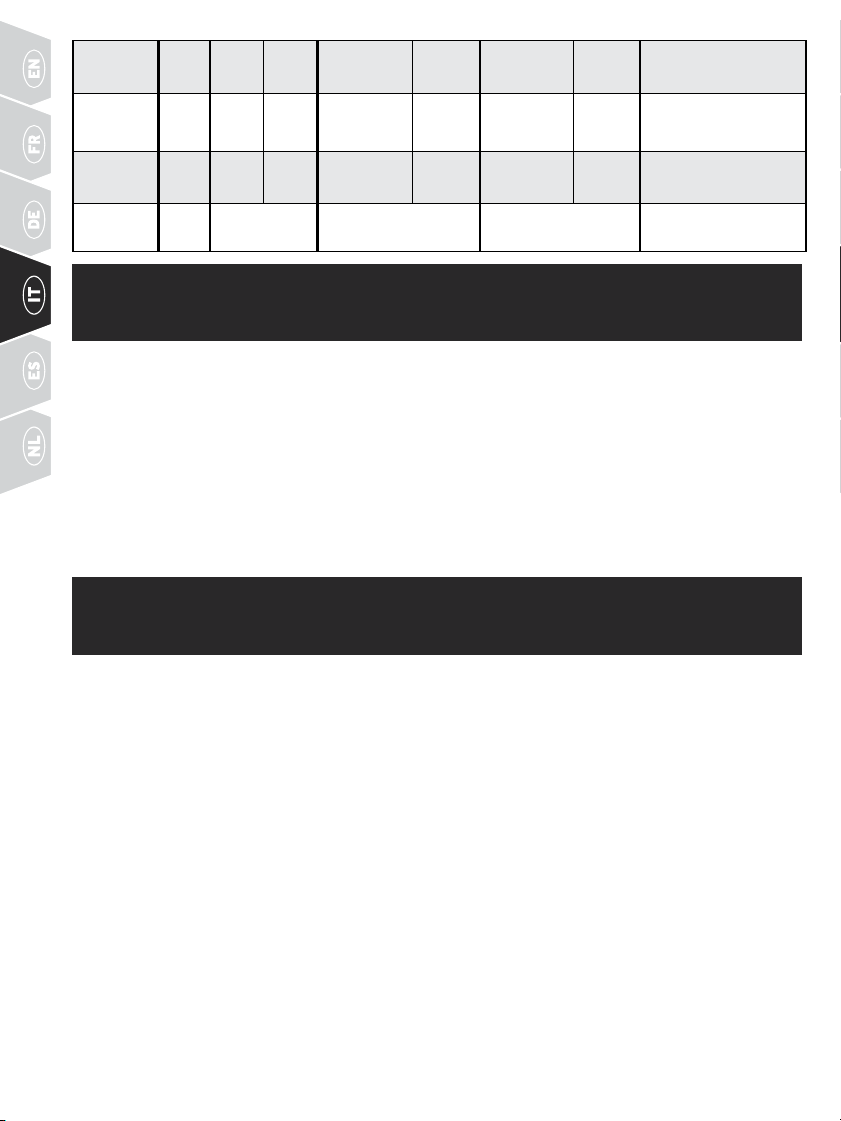
70 WWW.SPORTDOG.COM
6:b
2 Cane 1 Cane 2
Stimolazione
continua alta
Vibra-
zione
Segnale
acustico
Vibra-
zione
N/D
7:a
2 Cane 1 Cane 2
Stimolazione
continua alta
Segnale
acustico
Stimolazione
momentanea
alta
Segnale
acustico
Localizzare il beeper
•
7:b
2 Cane 1 Cane 2
Stimolazione
continua alta
Segnale
acustico
Vibrazione
Segnale
acustico
N/D
V/T
(CODICE ID)
N/D a N/D N/D Vedere la FASE 08
FASE
::
6 SINTONIZZAZIONE DEL COLLARE
RICEVITORE E DEL TRASMETTITORE
Per accoppiare il collare ricevitore affinché funzioni con un nuovo trasmettitore o per riprogrammare un
nuovo collare ricevitore affinché funzioni con il trasmettitore esistente:
1. Spegnere il collare ricevitore.
2. Tenere premuto il pulsante On/Off. La spia luminosa del ricevitore si accende, quindi si spegne dopo
4-5 secondi. Se il pulsante On/Off viene rilasciato troppo presto, la spia luminosa del ricevitore inizia a
lampeggiare come di consueto. In tal caso, ricominciare dalla fase 1.
3. Quando la spia luminosa del ricevitore si spegne, rilasciare il pulsante On/Off.
4. Tenere premuto il pulsante superiore del trasmettitore finché la spia luminosa del ricevitore non
lampeggia 5 volte. Quando la spia luminosa del ricevitore lampeggia 5 volte, il collare ricevitore è stato
accoppiato e inizia a lampeggiare come di consueto. Se la spia luminosa del ricevitore non lampeggia 5
volte, ricominciare dalla fase 1.
FASE
::
7 PROGRAMMARE IL SISTEMA PER IL
FUNZIONAMENTO CON PIÙ CANI
SD-425X-E, SD-825X-E, SD-1225X-E
Per addestrare altri due o tre cani, occorre acquistare uno o più collari ricevitori aggiuntivi SportDOG
®
Add-A-Dog
®
.
1. Programmare il trasmettitore sulla modalità 3 o 4 (vedere CAMBIARE LA MODALITÀ a pagina 66).
2. Programmare il primo collare ricevitore.
A. Spegnere il collare ricevitore.
B. Tenere premuto il pulsante On/Off. La spia luminosa del ricevitore si accenderà, per poi spegnersi dopo
4-5 secondi. Se si rilascia troppo presto il pulsante On/Off, la spia luminosa del ricevitore inizierà a
lampeggiare come di consueto. In tal caso, ricominciare e ripetere a partire dal passaggio A.
C. Una volta che la spia luminosa del ricevitore sarà spenta, rilasciare il pulsante On/Off.
D. Tenere premuto il pulsante superiore del trasmettitore finché la spia luminosa del ricevitore non
lampeggerà per 5volte. Se la spia luminosa del ricevitore non dovesse lampeggiare per 5 volte,
ricominciare e ripetere dal passaggio A.
3. Programmare il secondo collare ricevitore ripetendo i passaggi dalla A alla D sopra descritti, ma
utilizzando il pulsante inferiore al posto di quello superiore.
4. Programmare il terzo collare ricevitore ripetendo i passaggi dalla A alla D sopra descritti, ma utilizzando
il pulsante laterale al posto di quello superiore.
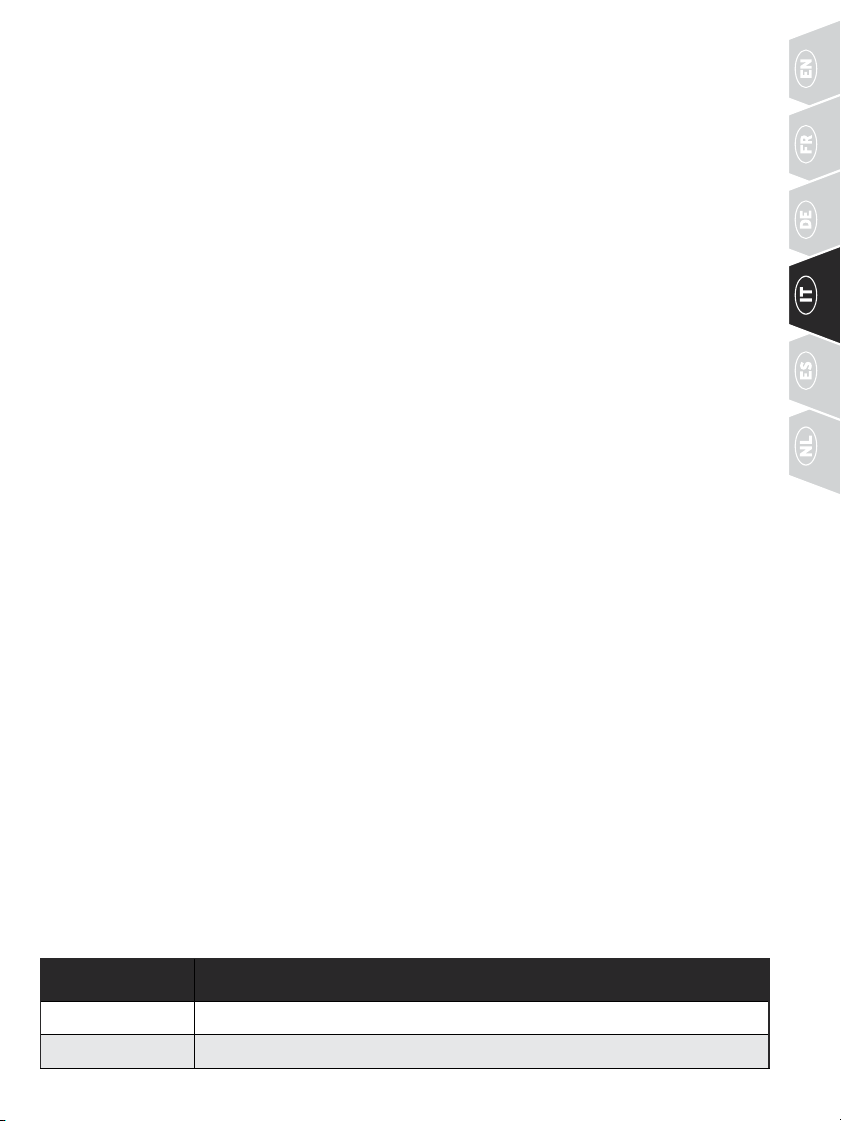
71WWW.SPORTDOG.COM
SD-1825X-E
Per addestrare altri cani in modalità due, tre o sei cani, occorre acquistare collari ricevitori aggiuntivi
SportDOG
®
Add-A-Dog
®
.
FUNZIONAMENTO CON DUE CANI
I collari ricevitori SportDOG
®
possono essere impostati per rispondere alla posizione a o b del trasmettitore.
1. Programmare il trasmettitore sulla modalità 1, 2, 5, 6 o 7 spostando l’interruttore a bascula sulla
posizione di colore grigio/a oppure programmarlo su una qualsiasi modalità tra 1 e 7 spostando
l’interruttore sulla posizione color arancione/b (vedere CAMBIARE LA MODALITÀ a pagina 68).
2. Quindi, con l’interruttore a bascula nella posizione color grigio/a, è ora possibile programmare il primo
collare ricevitore.
A. Spegnere il collare ricevitore.
B. Tenere premuto il pulsante On/Off sul collare ricevitore. La spia luminosa del ricevitore si accenderà
per poi spegnersi dopo 4-5 secondi. Se si rilascia troppo presto il pulsante On/Off, la spia luminosa del
ricevitore inizierà a lampeggiare come di consueto. In tal caso, ricominciare e ripetere a partire dal
passaggio A.
C. Una volta che la spia luminosa del ricevitore sarà spenta, rilasciare il pulsante On/Off.
D. Tenere premuto il pulsante superiore del trasmettitore finché la spia luminosa del ricevitore non
lampeggerà per 5volte. Se la spia luminosa del ricevitore non dovesse lampeggiare per 5 volte,
ricominciare e ripetere dal passaggio A.
3. Per programmare il secondo collare ricevitore, ripetere i passaggi dalla A alla D, ma con l’interruttore a
bascula nella posizione color arancione/b.
FUNZIONAMENTO CON TRE CANI
1. Programmare il trasmettitore sulla modalità 3 o 4 con l’interruttore a bascula nella posizione color
grigio/a (vedere CAMBIARE LA MODALITÀ a pagina 68).
2. Quindi, con l’interruttore a bascula nella posizione color grigio/a, è ora possibile programmare il primo
collare ricevitore.
A. Spegnere il collare ricevitore.
B. Tenere premuto il pulsante On/Off sul collare ricevitore. La spia luminosa del ricevitore si accenderà
per poi spegnersi dopo 4-5 secondi. Se si rilascia troppo presto il pulsante On/Off, la spia luminosa del
ricevitore inizierà a lampeggiare come di consueto. In tal caso, ricominciare e ripetere a partire dal
passaggio A.
C. Una volta che la spia luminosa del ricevitore sarà spenta, rilasciare il pulsante On/Off.
D. Tenere premuto il pulsante superiore del trasmettitore finché la spia luminosa del ricevitore non
lampeggerà per 5 volte. Se la spia luminosa del ricevitore non dovesse lampeggiare per 5 volte,
ricominciare e ripetere dal passaggio A.
3. Per programmare il secondo collare ricevitore, ripetere i passaggi dalla A alla D, ma utilizzando il
pulsante inferiore al posto di quello superiore.
4. Per programmare il terzo collare ricevitore, ripetere i passaggi dalla A alla D, ma utilizzando il pulsante
laterale al posto di quello superiore.
FUNZIONAMENTO CON SEI CANI
Ripetere i passaggi dall’1 al 4 della sezione “Funzionamento con TRE CANI” sopra riportata per le modalità da
1 a 3 cani. Quindi, spostare l’interruttore a bascula sulla posizione color arancione/b e ripetere i passaggi dal
2 al 4 per le modalità da 4 a 6 cani.
MODELLO DI ADD-
A-DOG®
SDR-AXF-E Collare ricevitore originale per: SD-425X-E e SD-825X-E (fino a 3 cani)
SDR-AX-E Collare ricevitore originale per: SD-1225X-E (fino a 3 cani) e SD-1825X-E (fino a 6 cani)
72 WWW.SPORTDOG.COM
FASE
::
8 MODIFICA DEI CODICI ID
Il codice ID segnala l’avvenuto riconoscimento tra il trasmettitore e il collare ricevitore. Ciascuno dei due
componenti del sistema è programmato in fabbrica con un codice ID che va da 1 a 2000. Il trasmettitore
consente di programmare due o più trasmettitori con lo stesso codice ID, affinché entrambi controllino lo
stesso collare ricevitore. I codici ID disponibili programmabili sono 64.
PROGRAMMAZIONE MANUALE DEL CODICE ID DI UN TRASMETTITORE
1. Ruotare la manopola di regolazione della intensità su V/T, quindi premere e rilasciare il selettore della
modalità di funzionamento sul retro del trasmettitore. In questo modo non si modifica la modalità,
cheresterà attiva dopo il completamento della modifica del codice ID.
2. Quando si rilascia il selettore della modalità di funzionamento, la spia luminosa del trasmettitore
dicolore verde si accende in modalità fissa e rimane accesa per 15 secondi.
3. Con la spia luminosa verde accesa, ruotare la manopola di regolazione della intensità per selezionare
la prima cifra dell’ID, quindi premere e rilasciare il pulsante laterale. La spia luminosa verde lampeggia
rapidamente, confermando la selezione.
4. Con la spia luminosa verde accesa, ruotare nuovamente la manopola di regolazione della intensità per
selezionare la seconda cifra dell’ID, quindi premere e rilasciare il pulsante laterale. La spia luminosa
verde lampeggia rapidamente, confermando la selezione. La seconda cifra è facoltativa e, se si desidera,
èpossibile attendere che la spia luminosa si spenga evitando di dover premere il pulsante laterale.
5. Al termine dei 15 secondi, o dopo aver premuto per la seconda volta il pulsante laterale, la spia luminosa
verde si spegne e l’ID del trasmettitore viene aggiornato. A questo punto, il trasmettitore si trova nella
stessa modalità in cui era prima di impostare l’ID.
6. Dopo aver modificato il codice ID, occorre accoppiare il collare ricevitore al trasmettitore
(vedereFASE06).
NOTA: se si preme il pulsante laterale solo una volta (saltando la fase 4) l’ID è ancora un ID a due cifre. La cifra
a sinistra viene configurata per impostazione predefinita su 1. Ad esempio, se si è selezionato 6 nella fase 3 e si
èpremuto il pulsante laterale soltanto una volta, l’ID programmato sarà 16.
RIPORTARE IL TRASMETTITORE ALL’ID IMPOSTATO IN FABBRICA
1. Ruotare la manopola di regolazione della intensità su V/T, quindi premere e rilasciare il selettore della
modalità di funzionamento sul retro del trasmettitore. In questo modo non si modifica la modalità, che
resterà attiva dopo il completamento della modifica del codice ID.
2. Non premere alcun pulsante e attendere che la spia luminosa verde del trasmettitore si spenga.
3. Adesso occorre accoppiare il collare ricevitore al trasmettitore (vedere FASE 06).
ACCESSORI
Per acquistare altri accessori per il sistema di addestramento a distanza SportDOG
®,
contattare il Centro
assistenza clienti o visitare la sezione Negozio sul sito sportdog.com, effettuando una ricerca nella sezione
Ricambi e accessori.
73WWW.SPORTDOG.COM
DOMANDE FREQUENTI
La stimolazione statica è sicura per
il cane?
Sebbene possa risultare sgradevole per il cane, la stimolazione
statica continua e/o momentanea è innocua. Per ottenere i risultati
desiderati, i dispositivi elettronici di addestramento richiedono
interazione e addestramento da parte del proprietario.
Che età deve avere il cane prima
di poter utilizzare il sistema di
addestramento a distanza?
Non è tanto l'età a essere importante, quanto la capacità di
apprendimento del cane. Il cane dovrebbe essere in grado di imparare
gli ordini di base come "seduto" o "resta". Il collare ricevitore
potrebbe essere troppo grande per cani di peso inferiore a 3,6 kg.
Una volta addestrato il cane a
obbedire ai miei comandi, dovrà
continuare a indossare il collare
ricevitore?
Basterà che il cane indossi il collare ricevitore di tanto in tanto
per confermare quanto appreso. Inoltre, molti cacciatori tengono
il collare ricevitore sui loro cani durante la caccia per assicurarsi
di averne il massimo controllo, poiché essi possiedono una forza
notevole e subiscono molte distrazioni mentre sono all'aperto.
Il collare ricevitore è impermeabile? Sì. Qualora dovesse essere necessario sostituire le batterie
ricaricabili, assicurarsi che l'O-ring e la scanalatura dell'O-ring siano
privi di sporcizia e detriti.
È possibile utilizzare il collare
ricevitore nei pressi di acqua salata?
Se viene utilizzato in acqua salata o nelle sue vicinanze, il collare
ricevitore deve essere sciacquato con acqua dolce dopo ogni uso.
Posso usare il sistema di
addestramento a distanza su più
cani?
Sì, il sistema di addestramento a distanza è espandibile fino a un
massimo di 3 cani (o fino a 6 cani per SD-1825X-E). Occorre tuttavia
acquistare i collari ricevitori SportDOG
®
Add-A-Dog
®
. Per un elenco
dei collari ricevitori compatibili, fare riferimento alla pagina 71.
Posso usare il sistema di
addestramento a distanza su cani
aggressivi?
L'uso dei nostri prodotti su cani aggressivi è sconsigliato. Si
raccomanda di rivolgersi al veterinario locale o a un addestratore
professionale se il cane si dimostra aggressivo.
Riceverò il raggio esatto
pubblicizzato con questo sistema di
addestramento a distanza?
Il raggio del sistema di addestramento a distanza varia a seconda
dell'olografia dell'area, delle condizioni climatiche, della vegetazione
e delle interferenze prodotte da altri dispositivi a radiofrequenza.
Per usufruire del raggio massimo disponibile, fare riferimento alla
sezione “Come funziona il sistema” di questa guida.
Per quanto tempo posso erogare una
stimolazione statica continua al mio
cane?
È possibile premere il pulsante della stimolazione statica continua ed
erogare una stimolazione statica continua al cane fino a un massimo
di 10 secondi. Trascorsi i 10 secondi, il trasmettitore segnalerà che il
tempo è scaduto e sarà necessario rilasciare la pressione sul pulsante
di stimolazione statica continua, quindi ripremere.
Che cosa faccio se il collo del cane si
arrossa e si irrita?
Questa condizione si verifica perché i punti di contatto irritano la
pelle. Sospendere l'uso del collare ricevitore per qualche giorno.
Se la condizione persiste oltre le 48 ore, consultare il veterinario
di fiducia. Quando la pelle ritorna normale, riprendere l'uso e
controllare attentamente la condizione della pelle. Evitare di far
indossare il collare al cane per più di 12 ore al giorno.
La rotazione della manopola di
regolazione della intensità risulta
difficoltosa. È normale?
Sì. In questo modo si evitano variazioni accidentali dell'intensità e si
rafforza la protezione impermeabile. La rotazione della manopola
risulterà più agevole via via che si usa.
74 WWW.SPORTDOG.COM
Posso collegare un collare/
guinzaglio a questo sistema di
addestramento a distanza?
NON collegare un collare/guinzaglio al sistema di addestramento a
distanza. Applicare piuttosto al collo del cane un altro collare non
metallico a cui fissare un collare/guinzaglio. Verificare che il collare
aggiuntivo non interferisca con i punti di contatto.
Il trasmettitore invia
accidentalmente un segnale a più
di un collare ricevitore: come devo
comportarmi?
Nei rari casi in cui ciò si verifica è possibile modificare il codice ID del
trasmettitore (vedere FASE 08).
INDIVIDUAZIONE E RISOLUZIONE DEI PROBLEMI
Le risposte a queste domande dovrebbero contribuire a risolvere eventuali problemi con il sistema.
Incasocontrario, si prega di contattare il Centro assistenza clienti o di visitare il nostro sito Web all'indirizzo
www.sportdog.com.
Il mio cane non risponde quando
premo un pulsante.
• Verificare che il collare ricevitore sia stato acceso e che la spia
luminosa lampeggi.
• Se il raggio si è ridotto rispetto alla prima volta in cui il sistema
èstato utilizzato, verificare lo stato della batteria nel trasmettitore
o nel collare ricevitore.
• Molti fattori possono influenzare il raggio del sistema. È possibile
trovarne un elenco facendo riferimento alla sezione “Come funziona
il sistema”.
• È possibile verificare che il collare ricevitore stia erogando
stimolazione statica al cane applicando al collare ricevitore
lachiave multiusi, contenuta nel kit. Per ulteriori dettagli, fare
riferimento alla sezione "Istruzioni relative alla chiave multiusi".
• Aumentare la manopola di regolazione della intensità. Per
ulterioriinformazioni, fare riferimento a "Identificazione del
livellodi intensità ottimale" per il cane.
• Aumentare l'intervallo di stimolazione statica. Per ulteriori
informazioni, consultare “Modifica degli intervalli di
stimolazionestatica”.
• Assicurarsi che i punti di contatto del collare ricevitore siano
posizionati a stretto contatto con la pelle del cane. Per ulteriori
informazioni, consultare “Collocazione del collare ricevitore”.
• Può essere necessario passare ai punti di contatto più lunghi,
inclusinel sistema, o spuntare il pelo intorno ai punti di contatto.
Non rasare mai il collo del cane.
• Se si nota che la durata di funzionamento si è ridotta all'incirca
della metà rispetto a quella originale, è necessario sostituire
labatteria del collare ricevitore. Per acquistarne una nuova,
rivolgersi al Centro assistenza clienti.
Il collare ricevitore non si accende. • Verificare che il collare ricevitore sia stato caricato. Il collare
ricevitore si ricarica nel giro di due ore.
Il collare ricevitore non risponde
altrasmettitore.
• Verificare che il trasmettitore sia stato caricato. Il trasmettitore
siricarica in 2 ore.
• Verificare che il collare ricevitore sia stato acceso e che la spia
luminosa lampeggi. Fare riferimento ad “Accensione e spegnimento
del collare ricevitore”.
• Consultare “Sintonizzazione del collare ricevitore e del
trasmettitore”.
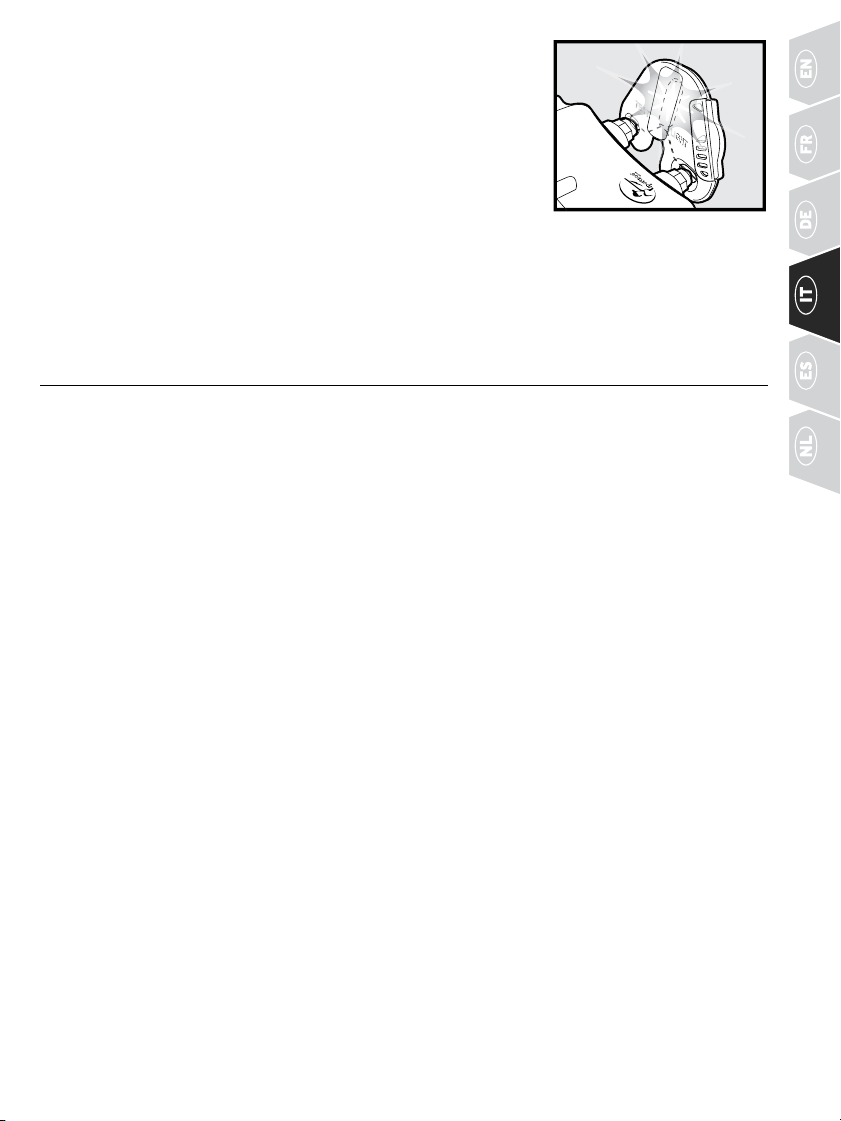
75WWW.SPORTDOG.COM
ISTRUZIONI RELATIVE ALLA CHIAVE
MULTIUSI
Per testare il sistema, segui queste istruzioni:
1. Accendi il collare ricevitore.
2. Appoggia i contatti della chiave multiusi sui punti di contatto.
3. Premi un pulsante di stimolazione statica sul trasmettitore.
4. La chiave multiusi lampeggerà.
NOTA: a livelli di stimolazione statica più elevati, la chiave multiusi
lampeggia in maniera più luminosa.
5. Spegni il collare ricevitore.
Conserva la chiave multiusi per test successivi.
NOTA: se la chiave multiusi non lampeggia, ricarica la batteria e riprova. Se la chiave multiusi continua
anonlampeggiare, contatta il Centro assistenza clienti.
BATTERIA
Il presente sistema funziona con due pacchi batteria agli ioni di litio. Sostituisci solo con la batteria ricevuta
aseguito della chiamata al Centro assistenza clienti.
• Le batterie non devono mai essere rimosse dal rispettivo vano per il caricamento.
• Le batterie ricaricabili agli ioni di litio (Li-Ion) non subiscono l’effetto memoria, non devono scaricarsi
completamente prima di essere ricaricate e non possono essere caricate più del necessario.
• Le batterie vengono fornite parzialmente cariche dalla fabbrica. In ogni caso, prima di usarle per la prima
volta, sarà necessario caricarle completamente.
• Quando l’unità rimane inutilizzata per lunghi periodi, è bene ricordarsi di ricaricare completamente le
batterie con regolarità. Questa operazione deve essere effettuata ogni 3-4 mesi.
• Le batterie sono progettate per centinaia di cicli di ricarica. Tuttavia, tutte le batterie ricaricabili perdono
capacità nel tempo, secondo il numero di cicli di ricarica a cui vengono sottoposte. È normale che ciò
si verifichi. Se il tempo di funzionamento scende a metà della durata originaria, contattare il Centro
assistenza clienti per acquistare una nuova batteria.
• Le batterie dovrebbero durare per un periodo di 3-5 anni. Quando una batteria deve essere sostituita,
è possibile ordinarne telefonicamente una confezione tramite il Centro assistenza clienti. Non aprire il
collare ricevitore né il trasmettitore prima di aver ricevuto le batterie sostitutive.
In molti Paesi è obbligatorio raccogliere separatamente le batterie esauste; controlla le norme in vigore nella
tua zona prima di gettare le batterie esauste. Osserva le istruzioni seguenti per la rimozione della batteria dal
prodotto per smaltirla separatamente.
76 WWW.SPORTDOG.COM
UNA VOLTA ESAUSTE, PER RIMUOVERE LE BATTERIE DA DESTINARE ALL'ELIMINAZIONE FINALE, FAI
RIFERIMENTO ALLE PRESENTI ISTRUZIONI (NON APRIRE IL COLLARE RICEVITORE NÉ IL TRASMETTITORE
PRIMA DI AVER RICEVUTO LE BATTERIE SOSTITUTIVE).
1. Rimuovi le viti dell'involucro utilizzando un cacciavite Phillips n. 1 per il trasmettitore e/o una chiave
esagonale da 3/32 per il collare ricevitore.
2. Rimuovi il coperchio o il retro dell'involucro.
3. Rimuovi il pacco di batterie esauste.
Queste istruzioni non sono valide per riparazioni o sostituzioni di batterie. Per evitare di invalidare la
garanzia, chiama il Centro assistenza clienti per assistenza nella sostituzione della batteria con una
specificatamente approvata da Radio Systems Corporation.
Per un elenco dei brevetti che proteggono il prodotto, visita: www.radiosystemscorporation.com/patents
77WWW.SPORTDOG.COM
De ahora en adelante se hará referencia a Radio Systems Corporation, Radio Systems PetSafe Europe Ltd.,
RadioSystems Australia Pty Ltd. y a cualquier otra filial o marca de Radio Systems Corporation colectivamente
como “Nosotros”.
Gracias por elegir los productos de adiestramiento de la marca SportDOG®. Si se usa correctamente, este
producto le ayudará a adiestrar a su perro de manera eficiente y segura. Para garantizar su satisfacción,
lea detenidamente este manual de funcionamiento. Para recibir asistencia adicional, contacte con nuestro
Centro de Atención al Cliente. Para obtener un listado de los números de teléfono de su zona, visite nuestro
sitio web, www.sportdog.com.
Para obtener la mayor protección de su garantía, registre su producto en los 30 días posteriores a su
adquisición en www.sportdog.com. Al registrar y guardar su factura, disfrutará de la garantía total del
producto y, si alguna vez necesita llamar al Centro de atención al cliente, podremos ayudarle más rápido.
Tenga la seguridad de que su valiosa información nunca se cederá ni venderá a terceros. Toda la información
sobre la garantía está disponible enlínea en www.sportdog.com.
OTRA INFORMACIÓN IMPORTANTE
El uso de este producto implica la aceptación de todos los términos, condiciones y avisos relativos a este
producto, como los que se encuentran en este Manual de funcionamiento y en el folleto con información
importante sobre seguridad y cumplimiento normativo que se incluye con la unidad.
ÍNDICE
COMPONENTES .............................................................................................................78
CÓMO FUNCIONA EL SISTEMA ......................................................................................78
DEFINICIONES PRINCIPALES .........................................................................................79
CARGAR EL TRANSMISOR .............................................................................................. 80
CARGAR EL COLLAR RECEPTOR .....................................................................................81
AJUSTAR EL COLLAR RECEPTOR ....................................................................................83
ENCUENTRE EL NIVEL DE INTENSIDAD MÁS ADECUADO ..............................................83
CAMBIAR LOS INTERVALOS DE ESTIMULACIÓN ESTÁTICA ............................................84
CONSEJOS GENERALES DE ADIESTRAMIENTO ..............................................................84
PROGRAMAR EL TRANSMISOR ......................................................................................85
VINCULAR EL TRANSMISOR CON EL COLLAR RECEPTOR ..............................................89
PROGRAMAR EL SISTEMA PARA ADIESTRAR A MÁS DE UN PERRO ...............................89
CAMBIAR LOS CÓDIGOS DE IDENTIFICACIÓN ................................................................ 91
ACCESORIOS .................................................................................................................. 91
PREGUNTAS FRECUENTES ............................................................................................. 92
RESOLUCIÓN DE PROBLEMAS .......................................................................................93
INSTRUCCIONES DE LA LLAVE MULTIUSOS ...................................................................94
BATERÍA ......................................................................................................................... 94
vídeos disponibles en www.youtube.com/sportdogintl y en la pestaña VÍDEOS de cada producto en
sportdog.com.
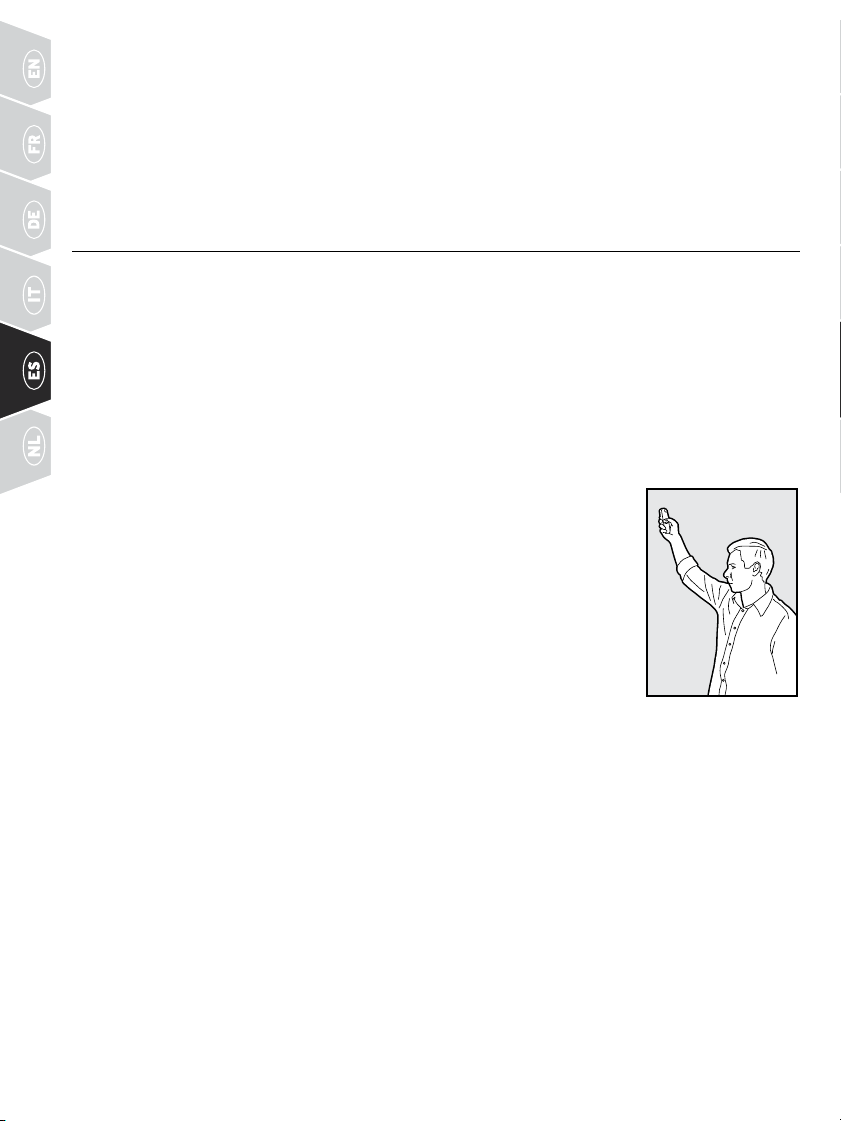
78 WWW.SPORTDOG.COM
COMPONENTES
SU SISTEMA SD-425X-E, SD-825X-E, SD-1225X-E O SD-1825X-E INCLUYE
LO SIGUIENTE:
• Transmisor
• Collar receptor
• Adaptador de carga
• Base de carga (SD-1225X-E y SD-1825X-E)
• Puntos de contacto cortos/largos
• Cordón
• Clip de cinturón (SD-825X-E, SD-1225X-E, SD-1825X-E)
• Llave multiusos
CÓMO FUNCIONA EL SISTEMA
Su sistema de la marca SportDOG® ha demostrado ser seguro, cómodo y efectivo para todos los perros que
superan los 3,6 kg. El uso correcto y constante de este producto le permite reforzar las órdenes y corregir la
mala conducta auna distancia de 450 a 1.600 metros, dependiendo del sistema (ver más abajo). El transmisor
envía una señal que activa el collar receptor y administra una estimulación inofensiva. Con el adiestramiento
adecuado, un perro aprenderá aasociar esta señal con una orden. Como todos los productos de SportDOG®, este
modelo tiene niveles de estimulación estática ajustables, para que pueda personalizar el nivel de estimulación
adecuado para el temperamento de su perro, eliminando así el riesgo de una estimulación excesiva.
SD-425X-E: 450 METROS
SD-825X-E: 800 METROS
SD-1225X-E: 1.200 METROS
SD-1825X-E: 1.600 METROS
IMPORTANTE: EL ALCANCE MÁXIMO PUEDE VARIAR EN FUNCIÓN DE LA MANERA
EN QUE SOSTENGA EL TRANSMISOR. PARA QUE FUNCIONE CORRECTAMENTE
CON UN MAYOR ALCANCE, MANTÉNGALO ALEJADO DE SU CUERPO POR ENCIMA
DE LA CABEZA Y EN POSICIÓN VERTICAL. EL TERRENO, LA VEGETACIÓN Y LA
TRANSMISIÓN DE OTROS DISPOSITIVOS DE RADIO, ASÍ COMO OTROS FACTORES,
PUEDEN AFECTAR AL ALCANCEMÁXIMO.
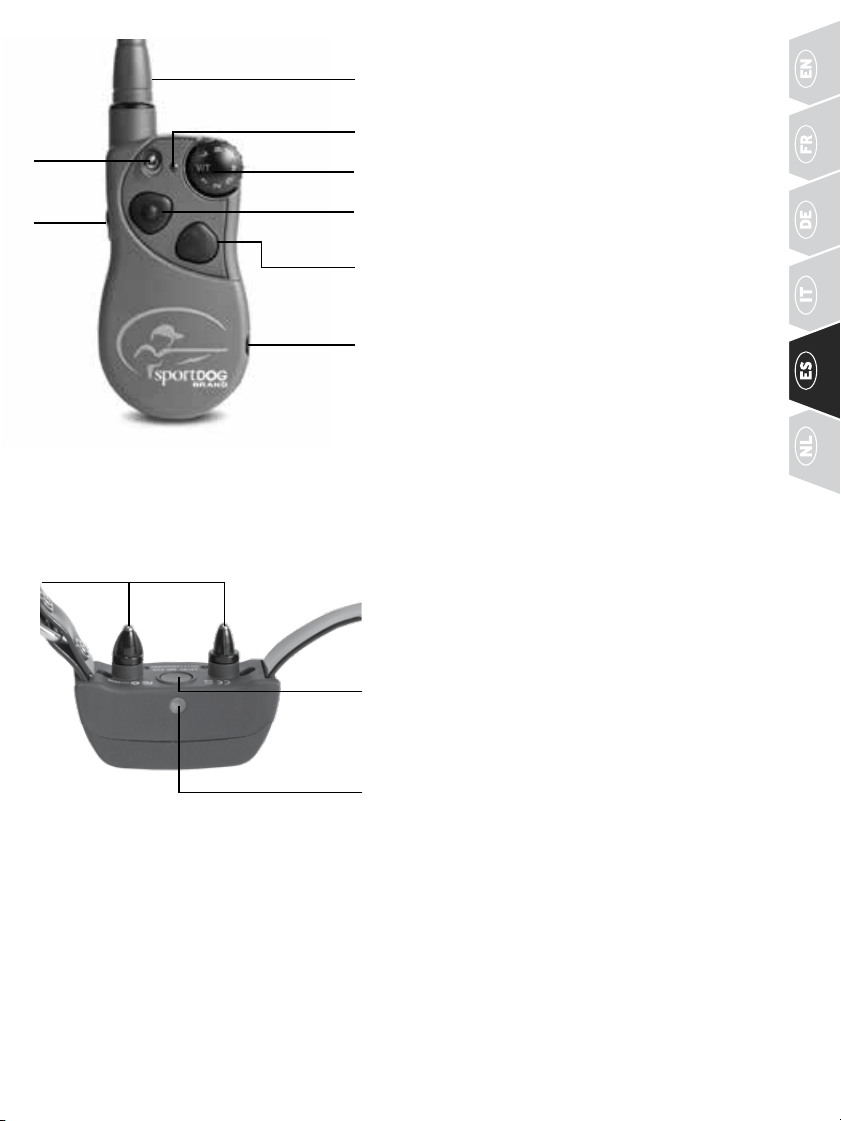
79WWW.SPORTDOG.COM
TRANSMISOR LUZ
INDICADORA
TRANSMISOR
ANTENA
SELECTOR DE
INTENSIDAD
BOTÓN
SUPERIOR
BOTÓN
INFERIOR
CONECTOR
DE CARGA
BOTÓN
LATERAL
CONECTOR DE CARGA: para conectar el cargador. Aunque
el transmisor es sumergible sin él, mantenga el protector
de goma en su sitio cuando no esté cargando para proteger
la apertura de la suciedad.
BOTÓN DEL MODO DE FUNCIONAMIENTO: este botón
le permite cambiar el modo de funcionamiento de su
transmisor (consulte la página 85).
COLLAR RECEPTOR: recibe la señal de radio desde
el transmisor y suministra la estimulación estática,
vibración o una señal acústica para corregir o indicar algo
al perro. Es estanco y puede sumergirse en agua hasta una
profundidad de 7,5 metros.
LUZ INDICADORA DEL RECEPTOR: indica cuándo se
ha encendido o apagado el collar receptor, sirve como
indicador de batería con poca carga, y también indica
cuándo se pulsa el botón de estimulación estática
(descarga) momentánea o continua.
DEFINICIONES PRINCIPALES
COLLAR TRANSMISOR: transmite la señal de radio
alcollar receptor. Es estanco y puede sumergirse
enaguahasta una profundidad de 7,5 metros.
SELECTOR DE INTENSIDAD: ofrece varios niveles
de estimulación estática para que pueda ajustar la
corrección según el temperamento de su perro.
LUZ INDICADORA DEL TRANSMISOR: indica que
sehapulsado una tecla y también sirve como indicador
debatería con poca carga.
INTERRUPTOR DE PALANCA: este interruptor viene
ajustado de fabrica para que el transmisor pueda
controlar dos collares receptores.
BOTÓN SUPERIOR: este botón viene ajustado de fábrica
para suministrar una estimulación estática media
continua.
BOTÓN INFERIOR: este botón viene ajustado de fábrica
para suministrar una estimulación estática baja continua.
BOTÓN LATERAL: este botón viene ajustado de fábrica
para suministrar una estimulación estática alta continua.
BOTÓN DE
ENCENDIDO
RECEPTOR
LUZ INDICADORA
PUNTOS DE CONTACTO
PUNTOS DE CONTACTO: los contactos a través de los cuales el collar receptor suministra la estimulación
estática.
BOTÓN ON/OFF: si pulsa momentáneamente y suelta este interruptor se encenderá y apagará el collar
receptor.
EL COLLAR RECEPTOR OFRECE CUATRO TIPOS DE ESTIMULACIÓN:
CONTINUA: usted controla cuándo y cuánta estimulación estática se suministra, hasta un máximo de 10
segundos. Después de 10 segundos, la estimulación "vencerá" y tendrá que soltar el botón del transmisor
ypulsarlo de nuevo antes de que se pueda suministrar estimulación estática adicional.
MOMENTÁNEA: la estimulación estática se suministra durante 1/10 de un segundo independientemente
dedurante cuánto tiempo se pulse el botón.
INTERRUP-
TOR DE
PALANCA
(
1825X-E
ÚNICAMENTE
)
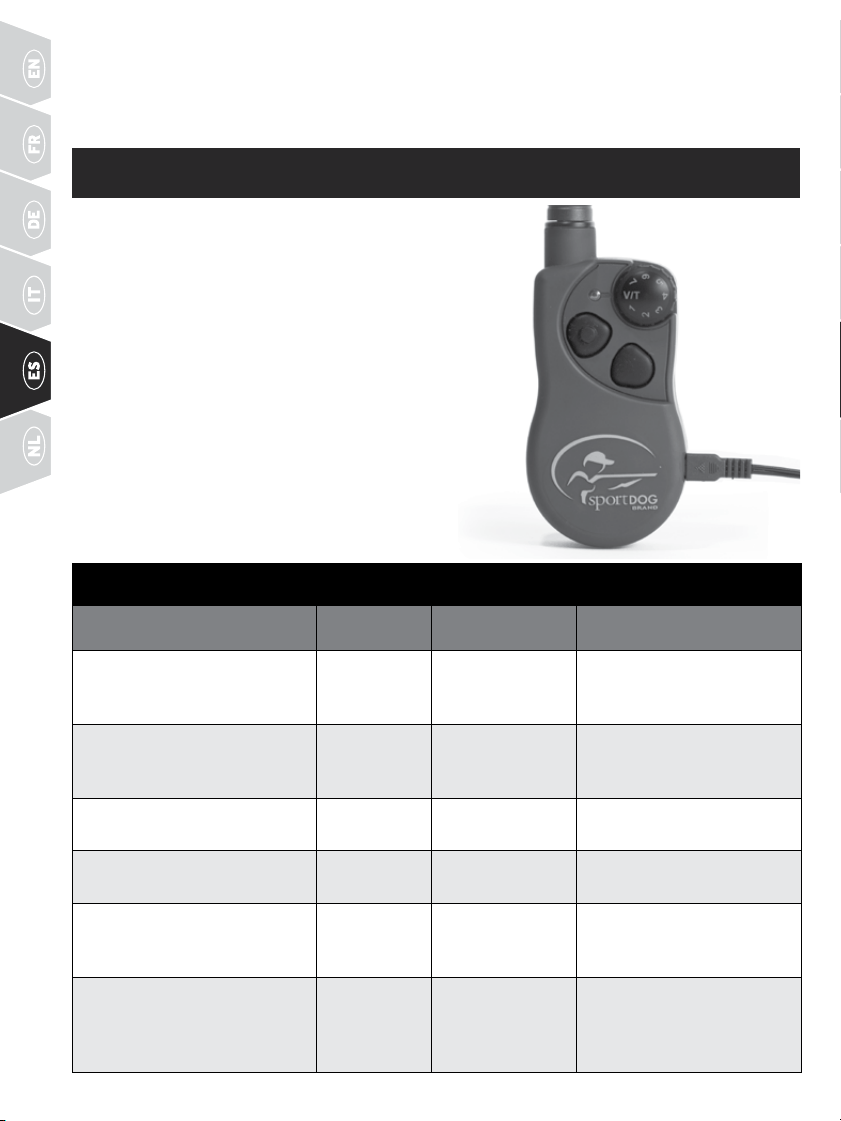
80 WWW.SPORTDOG.COM
SEÑAL ACÚSTICA: el collar receptor emitirá un sonido de pitido rápido cuando se presione el botón de señal
acústica*.
VIBRACIÓN: el collar receptor vibrará cuando se pulse el botón de vibración, hasta un máximo de 10 segundos.*
* La señal acústica y la vibración vienen preestablecidas y no son ajustables
PASO
::
1 CARGUE EL TRANSMISOR
1. Suba la tapa de goma que protege el conector de carga
y conecte el cargador correspondiente.
2. Conecte el cargador a una toma corriente de pared
estándar durante 2 horas cada vez que lo cargue.
3. Cuando se encienda la luz verde intermitente, lo que
indica que se ha completado la carga, vuelvaacolocar
la cubierta de goma.
Gracias a la tecnología de iones de litio, el transmisor
solo requiere una carga de 2 horas. No resulta perjudicial
dejar que la unidad se cargue durante más de 2 horas.
NOTA: La duración aproximada de la batería entre cargas
es de 50 a 70 horas para SD-425X-E / SD-825X-E yde40a
60 horas para SD-1225X-E / SD-1825X-E, según la
frecuencia de uso.
LUZ INDICADORA DEL TRANSMISOR
MODO DE FUNCIONAMIENTO
COLOR DE
LALUZ
ESTADO DE
BATERÍA
FUNCIÓN DE LUZ
Botón de estimulación mediante
vibración, señal acústica o estática
continua pulsado
Verde Bueno Mientras que el botón esté
presionado la luz tendrá
uncolor fijo
Botón de estimulación mediante
vibración, señal acústica o estática
continua pulsado
Rojo Bajo Mientras que el botón esté
presionado la luz tendrá
uncolor fijo
Botón de estimulación estática
momentánea pulsado
Verde Bueno La luz destella una vez y
después se apaga
Botón de estimulación estática
momentánea pulsado
Rojo Bajo La luz destella una vez y
después se apaga
La unidad se está cargando Verde Bajo La luz tiene un color sólido
mientras que está en el
cargador
La unidad está totalmente cargada
(cargador todavía conectado)
Verde Bueno La luz destella una vez por
segundo después de que la
batería está completamente
cargada
CONECTOR DE
CARGA COLOCADO
EN EL CONECTOR
DE CARGA DEL
TRANSMISOR
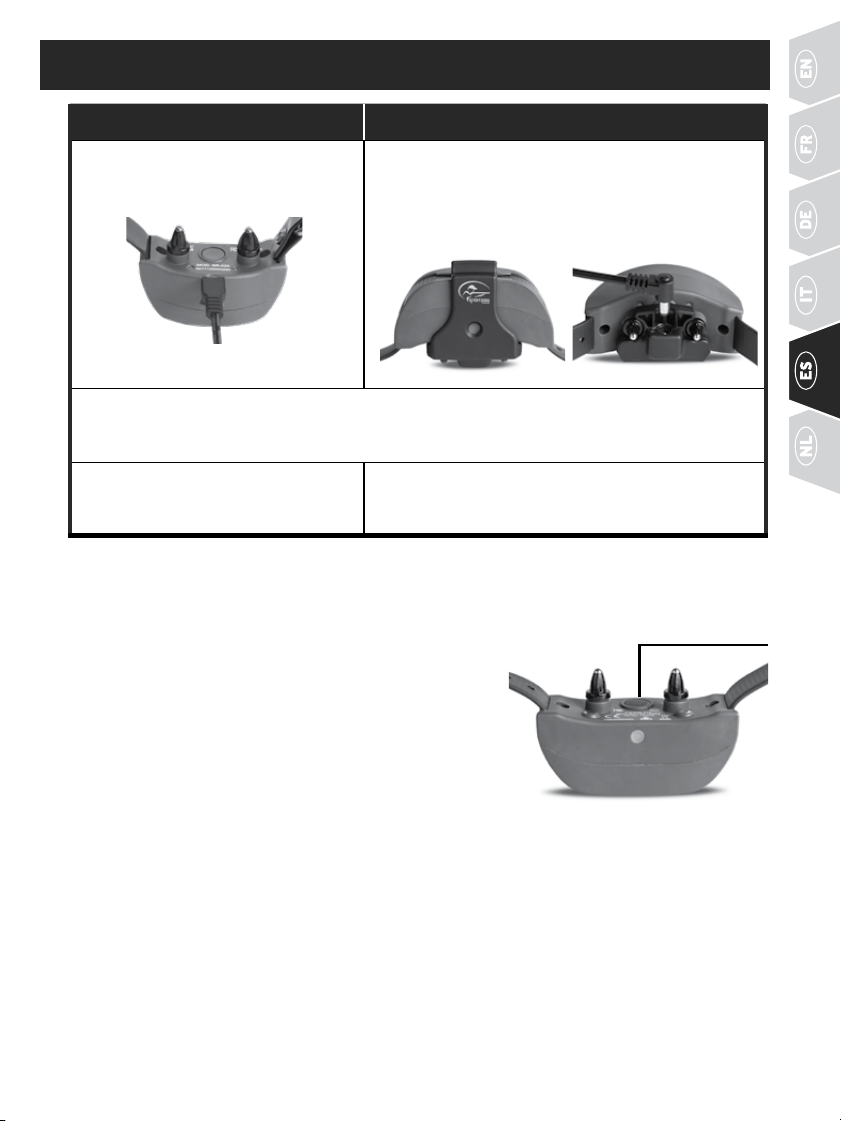
81WWW.SPORTDOG.COM
PASO
::
2 CARGUE EL COLLAR RECEPTOR
425X-E o 825X-E 1225X-E o 1825X-E
1.
Suba la tapa de goma que protege el
conector de carga del collar antiladridos
y conecte el cargador.
Alinee los puntos de contacto con la base de carga,
asegurándose de que el orificio de la base se alinee con la
luz indicadora del receptor y empuje la base hacia arriba
y hacia atrás hasta que encaje en su sitio. Conecte el
cargador a la base de carga.
2.
Conecte el cargador a una toma corriente de pared estándar durante 2 horas cada vez que lo cargue.
La luz indicadora del receptor parpadeará en verde una vez por segundo cuando la batería esté
completamente cargada.
3.
Retire el cargador y asegure la cubierta
de goma completamente para evitar que
entren residuos en el conector de carga.
Retire el conector de carga y la base de carga del
collar receptor. La base de carga no está diseñada
paracolocarse cuando el collar receptor está en uso.
Gracias a la tecnología de iones de litio, el collar receptor solo requiere una carga de 2 horas. No resulta
perjudicial dejar que la unidad se cargue durante más de 2 horas.
PARA ENCENDER EL COLLAR RECEPTOR
Pulse y suelte el botón de encendido/apagado. La luz indicadora
del collar receptor se encenderá y el collarreceptor emitirá de 1 a 2
pitidos para el SD-425X-E / SD-825X-E y de 1 a 3 pitidos para el
SD-1225X-E / SD-1825X-E, dependiendo del intervalo de estimulación
que haya elegido. El predeterminado es 2 (medio).
PARA APAGAR EL COLLAR RECEPTOR
Pulse y suelte el botón de encendido/apagado. La luz indicadora del
receptor se encenderá fija en rojo y el collar receptor pitará de forma
continua durante 2 segundos. Para prolongar la duración de la batería
entre los ciclos de carga, apague el collar receptor cuando no lo esté utilizando.
NOTA: La duración aproximada de la batería entre cargas es de 50 a 70 horas para SD-425X-E / SD-825X-E
yde 140 a 160 horas para SD-1225X-E / SD-1825X-E, según la frecuencia de uso.
BOTÓN DE
ENCENDIDO
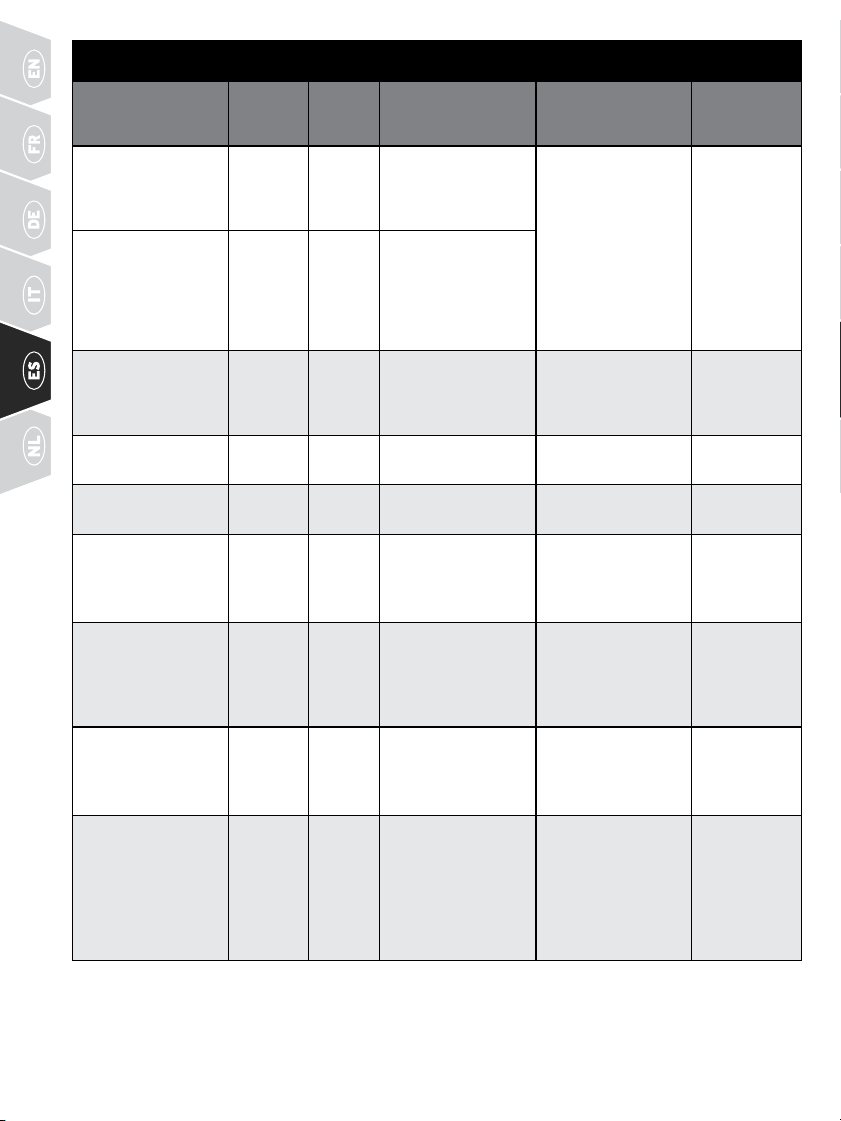
82 WWW.SPORTDOG.COM
LUZ INDICADORA DEL RECEPTOR
MODO DE
FUNCIONAMIENTO
COLOR DE
LA LUZ
ESTADO
DE LA
BATERÍA
FUNCIÓN DE LUZ
FUNCIÓN DE
ALTAVOZ
VIBRACIÓN
La unidad se
encenderá utilizando
el Interruptor de
encendido
Verde Bueno La luz se queda fija
durante la secuencia
deseñales acústicas
Suena de 1 a 2
veces (de 1 a 3 para
SD-1225X-E y
SD-1825X-E)
dependiendo del
ajuste del rango
de estimulación
(2 es el ajuste
predeterminado).
Consulte la página 84.
N/A
La unidad se
encenderá utilizando
el Interruptor de
encendido
Rojo Bajo La luz se queda fija
durante la secuencia
de señales acústicas
La unidad se
apagará utilizando
el Interruptor de
encendido
Rojo N/A La luz se queda fija
durante la secuencia
de señales acústicas
Emite señales
acústicas
continuamente
durante 2 segundos
N/A
La unidad esta
encendida
Verde Bueno La luz destella cada 2
segundos
N/A N/A
La unidad esta
encendida
Rojo Bajo La luz destella cada 2
segundos
N/A N/A
La unidad administra
estimulación estática
continua
Rojo N/A La luz tiene un color
fijo mientras se pulse
el botón (hasta10
segundos)
N/A N/A
La unidad está
suministrando
estimulación estática
momentánea
Rojo N/A La luz destellará
rápidamente una vez
independientemente
del tiempo que el
botón esté presionado
N/A N/A
La unidad suministra
estimulación
mediante una señal
acústica
Off
(Apagado)
N/A N/A La unidad emitirá
señales acústicas
mientras que el botón
esté pulsado
N/A
La unidad está
suministrando
estimulación de
vibración
Off
(Apagado)
N/A N/A N/A La unidad
vibrará
mientras el
botón esté
presionado
(hasta 10
segundos)
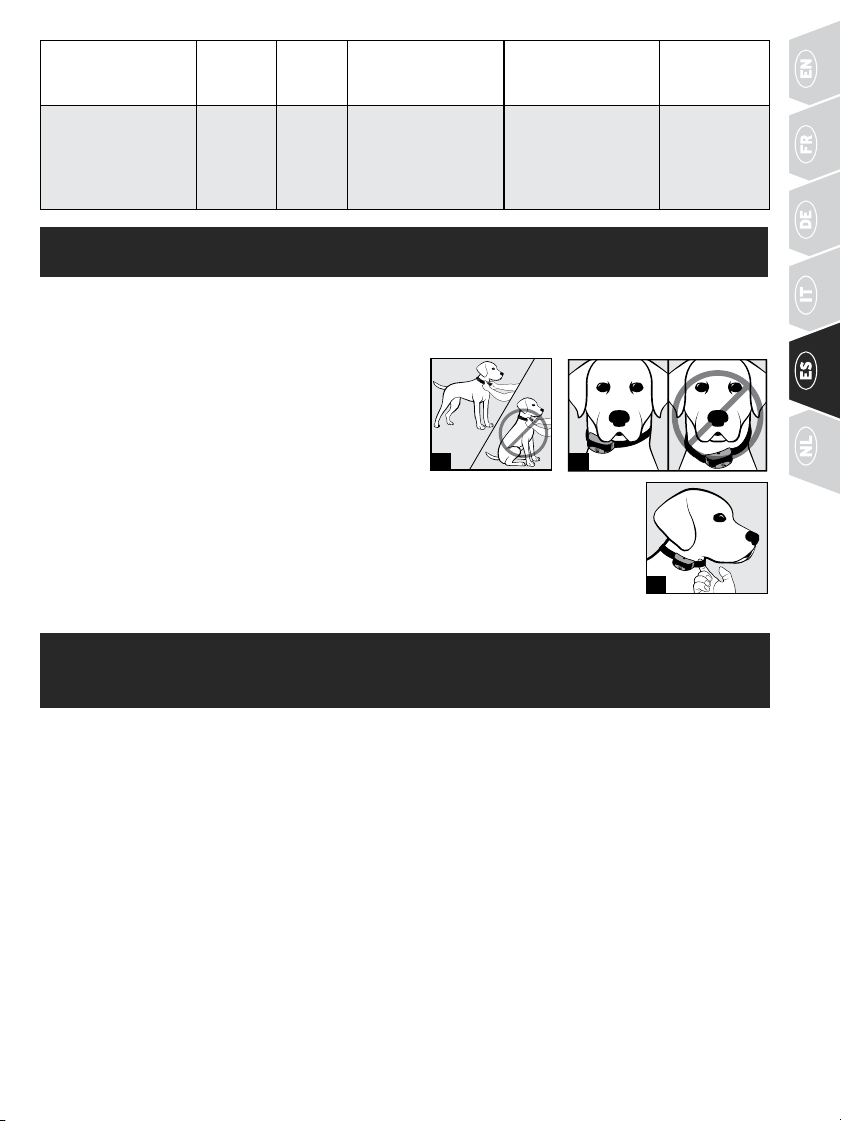
83WWW.SPORTDOG.COM
La unidad se está
cargando
Verde Bajo La luz tiene un color
sólido mientras que
está en el cargador
N/A N/A
La unidad está
totalmente cargada
(cargador todavía
conectado)
Verde Bueno
La luz destella una vez
por segundo después
de que la batería
está completamente
cargada
N/A N/A
PASO
::
3 AJUSTE EL COLLAR RECEPTOR
IMPORTANTE: EL AJUSTE Y LA COLOCACIÓN ADECUADOS DEL COLLAR RECEPTOR SON IMPORTANTES
PARA UN ADIESTRAMIENTO EFICAZ. LOS PUNTOS DE CONTACTO DEBEN HACER CONTACTO
DIRECTAMENTE CON LA PIEL DEL PERRO.
Para garantizar un ajuste adecuado, siga estos pasos:
1. Con el perro de pie (3A), coloque el collar receptor lo
más alto posible en el cuello de su perro, ajustándolo
acada lado de modo que los puntos de contacto toquen
la piel (3B). Si su perro tiene el pelo largo o grueso,
tiene dos opciones para asegurarse de que se produce
un contacto constante: recorte el pelo alrededor de los
puntos de contacto ocambiealos puntos de contacto más largos incluidos en el sistema.
2. El collar receptor debe quedar ceñido pero lo suficientemente suelto como para
permitir que un dedo pase entre la tira y el cuello del perro (3C).
3. Deje que su perro lleve el collar durante varios minutos y después vuelva a comprobar
el ajuste. Vuelva a comprobar el ajuste a medida que el perro se encuentre más
cómodo llevando el collar receptor.
PASO
::
4 ENCUENTRE EL NIVEL DE INTENSIDAD
MÁSADECUADO
Su sistema de la marca SportDOG® tiene varios niveles de intensidad. Esto permite elegir el nivel de
estimulación estática que sea mejor para su perro. Es importante encontrar el nivel de intensidad correcto
para su perro para que el adiestramiento sea eficiente. Esto se conoce como el nivel de respuesta, en el que
superro mira alrededor concuriosidad o sacude las orejas.
NOTA: Empiece siempre en el nivel inferior y vaya subiendo de nivel.
ENCONTRAR EL NIVEL DE RESPUESTA DE SU PERRO
NOTA: cada perro es diferente y no se puede predecir dónde estará el nivel de respuesta de su perro.
Vigileatentamente para ver si aparece algún cambio ligero en la conducta que le muestre que su perro
estásintiendo la estimulación estática.
1. Con el collar receptor encendido y correctamente ajustado a su perro, establezca el selector deintensidad
del transmisor en el nivel 1 y presione el botón de estimulación estática continua durante 1o 2 segundos.
2. Si su perro no muestra ninguna reacción al nivel 1, vaya al nivel 2 y repita el proceso hasta que encuentre
el nivel de respuesta de su perro. Ese es el nivel que deberá utilizar cuando comience un ejercicio de
adiestramiento.
3. SU PERRO NO DEBE LADRAR MUCHO O ASUSTARSE CUANDO RECIBA LA ESTIMULACIÓN ESTÁTICA.
SIESTO OCURRE, EL NIVEL DE ESTIMULACIÓN ESTÁTICA ES DEMASIADO ALTO Y ES NECESARIO QUE
VUELVA AL NIVEL ANTERIOR Y REPITA EL PROCESO.
3C
3A 3B
84 WWW.SPORTDOG.COM
4. Si llega hasta el mayor nivel de estimulación estática buscando el nivel de respuesta de su perro y este
continúa sin mostrar ninguna respuesta, compruebe si el collar receptor está bien ajustado al cuello del
perro. Después vuelva al nivel de intensidad 1 y repita el proceso. Si su perro sigue sin indicar que está
sintiendo la estimulación estática, tiene dos opciones: es posible que tenga que recortar el pelo de debajo
de los puntos de contacto ocambiar a los puntos de contacto más largos incluidos en su sistema.
Si después de completar todos estos pasos, su perro sigue sin mostrar que está sintiendo la estimulación
estática o la estimulación estática parece demasiado alta, puede intentar cambiar el intervalo de
estimulación del collar receptor siguiendo las siguientes instrucciones. Póngase en contacto con
Centrodeatención al cliente si no puede encontrar el nivel de respuesta de su perro.
CAMBIAR LOS INTERVALOS DE ESTIMULACIÓN ESTÁTICA
Su collar receptor de la marca SportDOG® viene con 2 o 3 intervalos de estimulación estática, según el
modelo. Enelmodo predeterminado del transmisor hay 21 niveles de estimulación estática dentro de cada
intervalo, siendo1el más bajo y 21 el más alto. El ajuste predeterminado del intervalo es 2 o medio.
Para cambiar el intervalo de estimulación estática, siga estos pasos:
1. Asegúrese de que el collar receptor esté apagado.
2. Después encienda la unidad presionando y soltando el botón de encendido/apagado.
3. Después de que se apague la luz indicadora, y en un intervalo de 5 segundos, presione y mantenga
presionado elbotón de encendido/apagado durante 3 segundos.
4. El collar receptor emitirá un pitido y la luz indicadora parpadeará en naranja como se indica en la tabla
siguiente. Continúe presionando el botón hasta que el número de pitidos/destellos naranja sea igual al
intervalo de estimulación deseado que se muestra.
5. Suelte el botón una vez que se haya seleccionado el intervalo deseado y el collar receptor se apagará.
6. Encienda la unidad de nuevo. Pitará conforme al intervalo de estimulación estática seleccionado en el paso 4.
PITIDOS INTERVALO DE
ESTIMULACIÓN ESTÁTICA
TEMPERAMENTO
DELPERRO
MODELO
1 pitido Bajo Dócil SD-425X-E, SD-825X-E, SD-1225X-E,
SD-1825X-E
2 pitidos Mediano Moderado SD-425X-E, SD-825X-E, SD-1225X-E,
SD-1825X-E
3 pitidos Alta Difícil SD-1225X-E, SD-1825X-E
CONSEJOS GENERALES DE ADIESTRAMIENTO
ANTES DE ADIESTRAR A SU PERRO CON ESTE PRODUCTO
Tendrá mayor éxito usando este sistema de adiestramiento si recuerda siempre enseñar una orden antes
de intentar reforzar la orden con un sistema de adiestramiento. El adiestramiento será más fácil y tendrá
resultados más rápidos si sigue las pautas de esta Guía de inicio rápido. Además, mantenga siempre los
siguientes consejos de adiestramiento en mente:
• Elimine una única mala conducta o enseñe una única orden cada vez. Si se mueve demasiado rápido con
eladiestramiento, el perro podría quedar confundido.
• Las sesiones de adiestramiento deben ser cortas y frecuentes, y debe mantener una actitud positiva.
Siusted osuperro se sienten frustrados o confundidos, lo mejor es tomarse un descanso.
• Sea constante. Dé a su perro una señal acústica, vibración o estimulación estática con cada mala conducta.
• No corrija excesivamente a su perro. Use la menor cantidad posible de estimulaciones para adiestrar a su perro.
• Evite que su perro se encuentre en situaciones en las que haya mostrado portarse mal a menos que pueda
supervisarle yusar el sistema de adiestramiento para aplicar estimulación estática, una señal acústica
ouna vibración.
• Si se da cuenta de una situación en la que su perro se comporta mal de forma repetida, utilice esta situación
como sesión de adiestramiento. Esto aumentará drásticamente sus oportunidades de éxito.
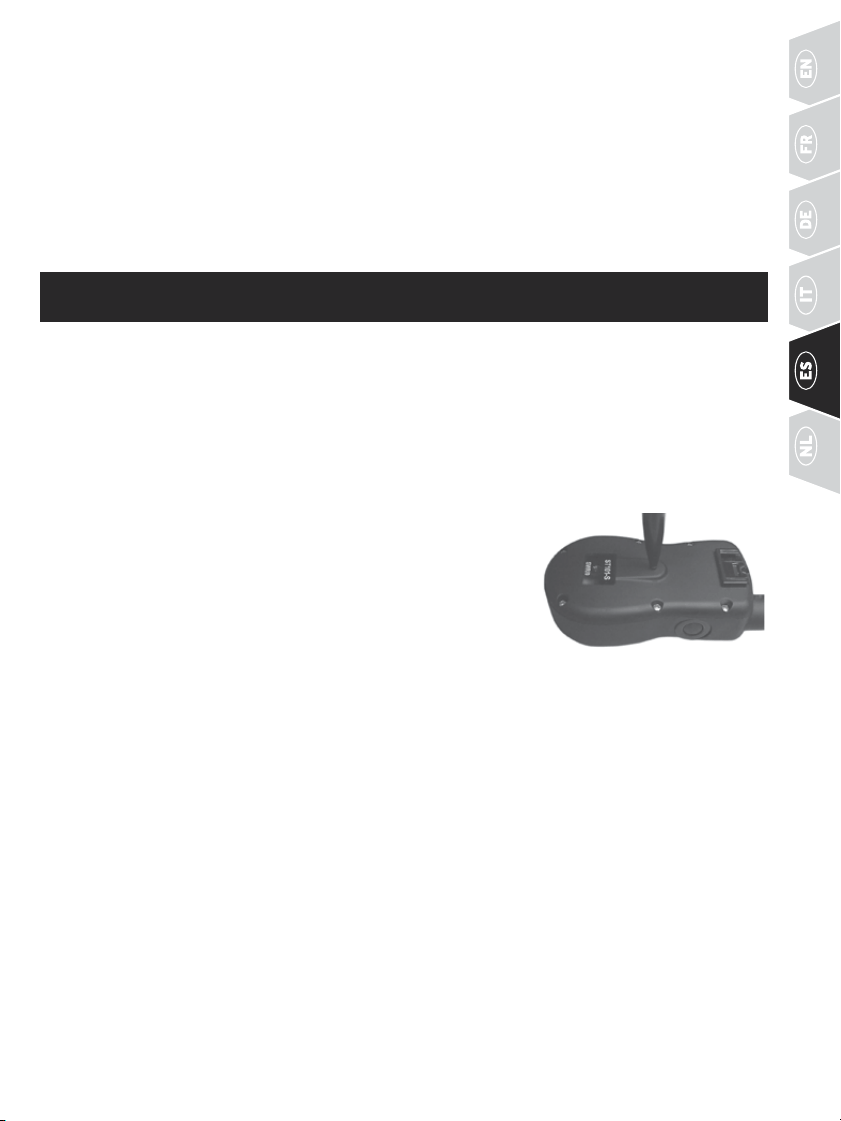
85WWW.SPORTDOG.COM
• Si su perro muestra una reacción tímida a la estimulación estática, la señal acústica o la vibración
(especialmente las primeras veces) no se preocupe. Vuelva a dirigir su atención a una conducta sencilla
yapropiada (p. ej. una orden conocida, como “Siéntate”).
• No use nunca el sistema de adiestramiento para corregir o eliminar cualquier forma de comportamiento
agresivo. Si su perro se comporta así, contacte con un adiestrador profesional. Los perros pueden mostrar
agresividad por varios factores; puede ser un comportamiento aprendido, o bien adquirido a causa del miedo.
Otro factor quecontribuye a la agresividad de los perros es la dominancia social. Cada perro es diferente.
En este momento, su collar de adiestramiento está listo para ser usado. El transmisor viene configurado
de fábrica en el nivel 5 (modo 5 con el interruptor en la posición superior para SD-1825X-E), aunque puede
cambiar el modo para adaptarse a su situación. Consulte el PASO 5 para ver una explicación de las opciones
de modos.
PASO
::
5 PROGRAMAR EL TRANSMISOR
SD-425X-E, SD-825X-E, SD-1225X-E
El transmisor tiene siete modos de funcionamiento para que pueda seleccionar el que mejor se adapte a su
tipo o estilo de adiestramiento. También hay un modo de programación (Modo V/T) que le permite cambiar
elcódigo de identificación del sistema. El transmisor está configurado de fábrica en el modo 5.
CAMBIAR EL MODO
1. Use como referencia la tabla siguiente para ajustar el selector de intensidad al modo deseado.
2. Dé la vuelta al transmisor y quite el clip de cinturón si está fijado (solo SD-825X-E y SD-1225X-E).
3. Pulse y suelte el botón del modo de funcionamiento usando un bolígrafo
o la púa de la hebilla de la correa del collar. Cuando el botón del modo
de funcionamiento esté pulsado, la luz indicadora del transmisor
tendrá un color fijo. Cuando se suelte emitirá destellos con el modo
seleccionado.
Por ejemplo, si desea el modo 6, ajuste el selector de intensidad al nivel 6.
Una vez que pulse el botón del modo de funcionamiento, la luz indicadora del
transmisor permanecerá estable y, una vez que suelte el botón del modo de
funcionamiento, la luz indicadora del transmisor parpadeará 6 veces.
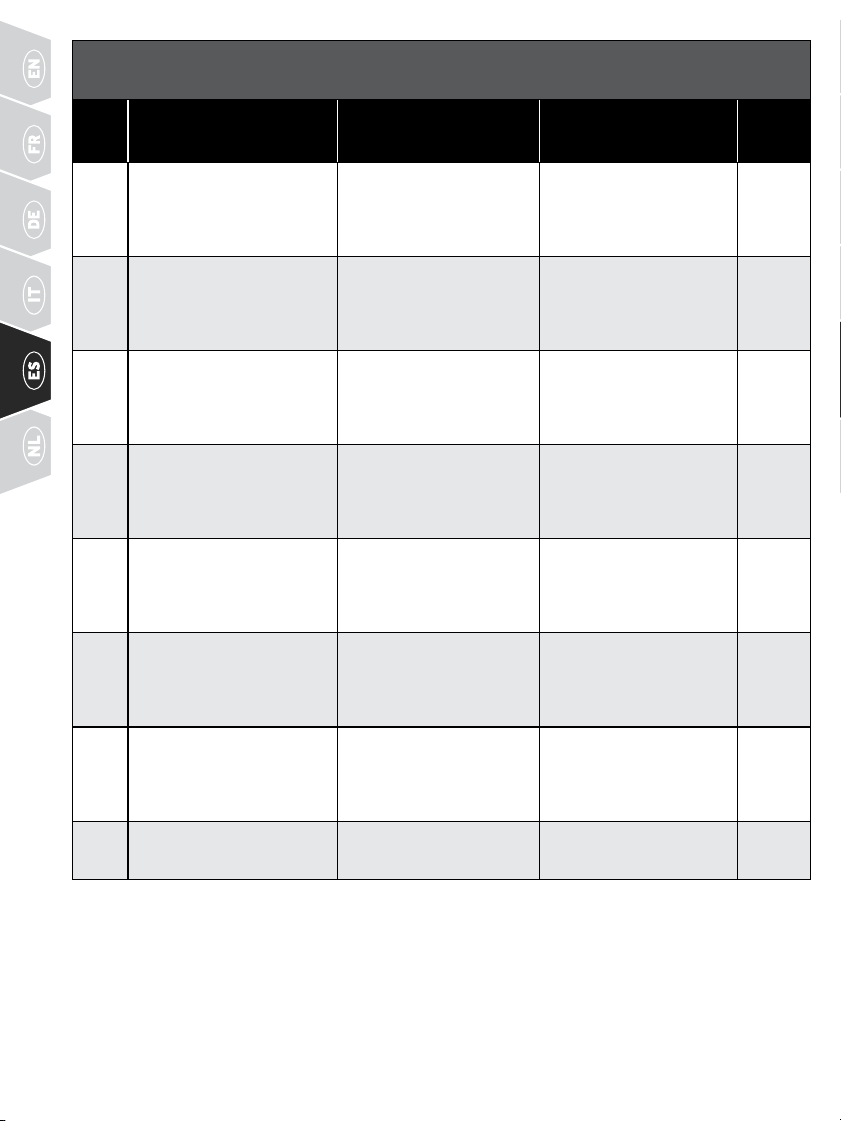
86 WWW.SPORTDOG.COM
TABLA DE MODOS DE SD-425X-E, SD-825X-E, SD-1225X-E
(
CONSULTE LA PÁGINA 85 PARA CAMBIAR DE MODO
)
MODO
FUNCIÓN DEL BOTÓN
SUPERIOR
FUNCIÓN DEL BOTÓN
INFERIOR
FUNCIÓN DEL BOTÓN
LATERAL
NÚMERO
DE
PERROS
1 Estimulación continua (nivel
establecido por el selector de
intensidad) O Vibración si está
seleccionado el modo V/T
Estimulación momentánea
(nivel establecido por el
selector de intensidad)
O Vibración si está
seleccionado el modo V/T
Solo señal acústica 1
2 Estimulación continua (nivel
establecido por el selector de
intensidad) O Señal acústica si
está seleccionado el modo V/T
Estimulación momentánea
(nivel establecido por el
selector de intensidad)
O Señal acústica si está
seleccionado el modo V/T
Señal acústica sola 1
3 Perro 1: Estimulación
continua (nivel establecido
por el selector de intensidad)
O Señal acústica si está
seleccionado el modo V/T
Perro 2: Estimulación
continua (nivel establecido
por el selector de intensidad)
O Señal acústica si está
seleccionado el modo V/T
Perro 3: Estimulación
continua (nivel establecido
por el selector de intensidad)
O Señal acústica si está
seleccionado el modo V/T
3
4 Perro 1: Estimulación
continua (nivel establecido
por el selector de intensidad)
OVibración si está
seleccionado el modo V/T
Perro 2: Estimulación
continua (nivel establecido
por el selector de intensidad)
O Vibración si está
seleccionado el modo V/T
Perro 3: Estimulación
continua (nivel establecido
por el selector de intensidad)
O Vibración si está
seleccionado el modo V/T
3
5* Estimulación continua
media (nivel establecido por
el selector de intensidad)
O Señal acústica si está
seleccionado el modo V/T
Estimulación continua
baja (nivel establecido por
el selector de intensidad)
O Señal acústica si está
seleccionado el modo V/T
Estimulación continua
alta (nivel establecido por
el selector de intensidad)
O Señal acústica si está
seleccionado el modo V/T
1
6 Estimulación continua
media (nivel establecido por
el selector de intensidad)
OVibración si está
seleccionado el modo V/T
Estimulación continua
baja (nivel establecido por
el selector de intensidad)
O Vibración si está
seleccionado el modo V/T
Estimulación continua
alta (nivel establecido por
el selector de intensidad)
O Vibración si está
seleccionado el modo V/T
1
7 Estimulación continua (nivel
establecido por el selector de
intensidad) O Señal acústica si
está seleccionado el modo V/T
Estimulación momentánea
(nivel establecido por el
selector de intensidad)
O Señal acústica si está
seleccionado el modo V/T
Encontrar el localizador** 1
V/T
(CÓDIGO
ID)
N/A N/A Consulte el PASO 08 N/A
NOTA: Los modos 1, 2, 3, 4 y 7 ofrecen 7 niveles de estimulación, que corresponden a los ajustes del selector
de intensidad.
Los modos 5 y 6 dan más “aumentos” para elegir - un total de 21 niveles de estimulación estática.
Porejemplo, en el modo 5 con el selector de intensidad establecido en 1, el botón inferior proporciona el
nivel 1 de 21, el botón superior proporciona el nivel 2 de 21 y el botón lateral proporciona el nivel 3 de 21.
* Modo predeterminado de fábrica.
** Encontrar el localizador: el botón lateral apaga el modo ejecutar y encuentra el localizador. Para activar de nuevo el modo
ejecutar, pulse y mantenga pulsado el botón lateral durante 3 segundos.
87WWW.SPORTDOG.COM
SD-1825X-E
Su transmisor tiene 14 modos de funcionamiento (7 con el interruptor de palanca en la posición gris/
a
y 7 con
el interruptor de palanca en la posición naranja/
b
) para permitirle seleccionar la mejor combinación para
su tipo o estilo de adiestramiento. El transmisor está configurado de fábrica en el modo 5:
a
. También hay
unmodo de programación (Modo V/T) que le permite cambiar el código de identificación del sistema.
CAMBIAR EL MODO
1. Consulte la “TABLA DE MODOS DEL SD-1825X-E” en la página 88,
elijaelnúmero de modo deseado (de 1 al 7) y ponga el interruptor
enlaposición adecuada (
a
o
b
). Ajuste tanto el selector de intensidad
como elinterruptor para que coincidan con el modo deseado.
2. Dé la vuelta al transmisor y quite el clip de cinturón (si está fijado).
3. Pulse y suelte el botón del modo de funcionamiento usando un bolígrafo
o la púa de la hebilla de la correa del collar. Cuando el botón del modo
de funcionamiento esté pulsado, la luz indicadora del transmisor tendrá
un color fijo. Cuando se suelte, emitirá destellos el número de veces que
corresponda al del modo seleccionado.
Por ejemplo, si desea el modo 6:
a
, ponga el interruptor en la posición
gris/
a y
ajuste el selector de intensidad al nivel 6. Una vez que pulse
el botón del modo de funcionamiento, la luz indicadora del transmisor
permanecerá estable y, una vez que suelte el botón del modo de
funcionamiento, la luz indicadora del transmisor parpadeará 6 veces. Sin
embargo, si selecciona el Modo V/T (código de ID) en la posición gris/
a
,
laluz permanecerá de color fijo una vez que se suelte el botón de modo.
*
Modo predeterminado de fábrica.
Para configurar el funcionamiento con dos perros, consulte el PASO 07
enlas páginas 89-90.
^ Para configurar el funcionamiento con tres y seis perros, consulte
elPASO07 en las páginas 89-90.
•
Encontrar el localizador: el botón lateral apaga el modo ejecutar y encuentra el localizador. Para
activardenuevo el modo ejecutar, pulse y mantenga pulsado el botón lateral durante 3 segundos.
PONGA EL INTER-
RUPTOR EN LA
POSICIÓN
a
PONGA EL
INTERRUPTOR EN
LAPOSICIÓN
b
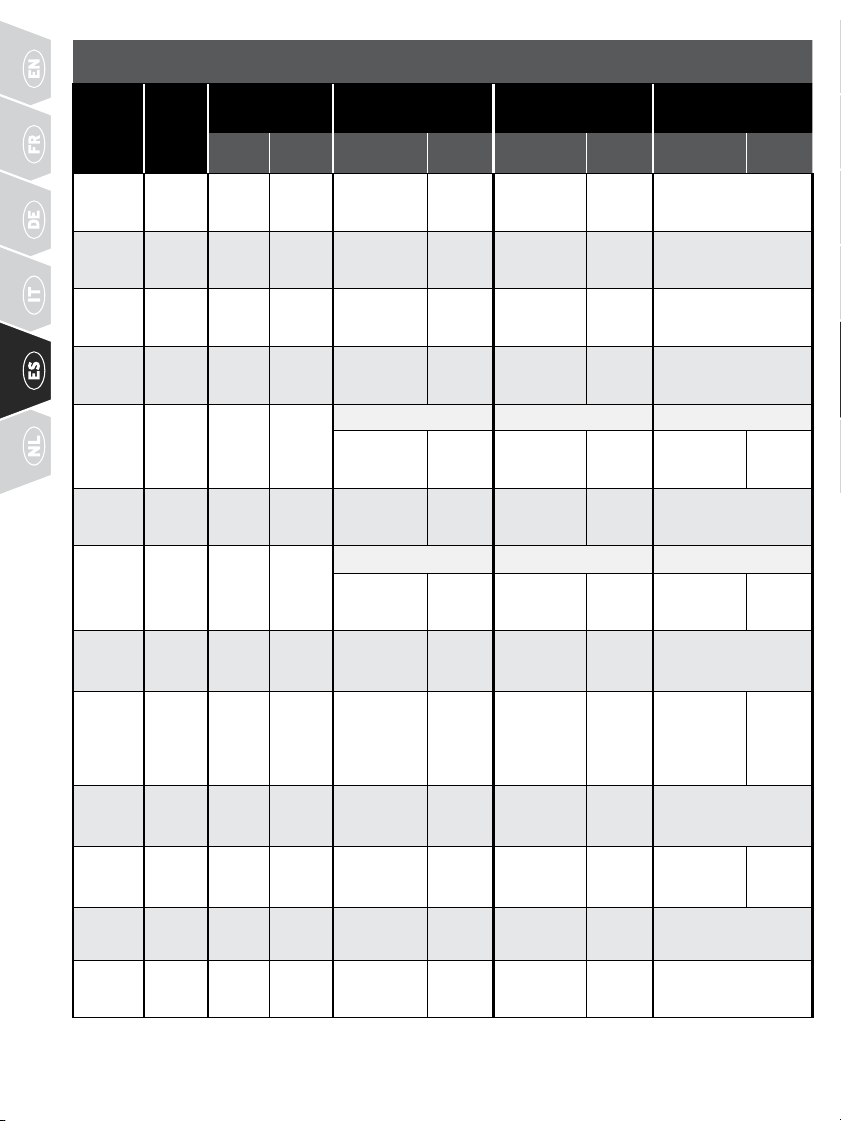
88 WWW.SPORTDOG.COM
TABLA DE MODOS: SD-1825X-E
(
CONSULTE LA PÁGINA 87 PARA CAMBIAR DE MODO
)
MODO:
POSICIÓN
DEL INTE-
RRUPTOR
NÚMERO
DE
PERROS
FUNCIÓN del
interruptor
FUNCIÓN DEL BOTÓN
SUPERIOR
FUNCIÓN DEL BOTÓN
INFERIOR
FUNCIÓN DEL BOTÓN
LATERAL
a b
SELECTOR
de 1 a 7
V/T
SELECTOR
de 1 a 7
V/T
SELECTOR
de 1 a 7
V/T
1:a
2
Perro 1 Perro 2
Estimulación
continua alta
Vibra-
ción
Estimulación
momentánea
alta:
Vibra-
ción
Señal acústica
1:b
2 Perro 1 Perro 2
Estimulación
continua alta
Vibra-
ción
Estimulación
continua
alta
Vibra-
ción
Encontrar el
localizador
•
2:a
2 Perro 1 Perro 2
Estimulación
continua alta
Señal
acústica
Estimulación
momentánea
alta:
Señal
acústica
Vibración
2:b
2 Perro 1 Perro 2
Estimulación
continua alta
Vibra-
ción
Estimulación
continua
baja:
Vibra-
ción
Señal acústica
3:a
6^
Perros
de 1 a 3
Perros
de 4 a 6
Perro 1 (a) / Perro 4 (b) Perro 2 (a) / Perro 5 (b) Perro 3 (a) / Perro 6 (b)
Estimulación
continua alta
Señal
acústica
Estimulación
continua
alta
Señal
acústica
Estimulación
continua alta
Señal
acústica
3:b
2 Perro 1 Perro 2
Estimulación
continua alta
Señal
acústica
Estimulación
continua
baja:
Señal
acústica
Vibración
4:a
6
Perros
de 1 a 3
Perros
de 4 a 6
Perro 1 (a) / Perro 4 (b) Perro 2 (a) / Perro 5 (b) Perro 3 (a) / Perro 6 (b)
Estimulación
continua alta
Vibra-
ción
Estimulación
continua
alta
Vibra-
ción
Estimulación
continua alta
Vibra-
ción
4:b
2 Perro 1 Perro 2
Estimulación
continua alta
ascendente
Vibra-
ción
Estimulación
continua
alta
Vibra-
ción
Señal acústica
5:a
*
2 Perro 1 Perro 2
Estimulación
continua
media
Señal
acústica
Estimulación
continua
baja:
Señal
acústica
Estimulación
continua
alta
Señal
acústica
5:b
2 Perro 1 Perro 2
Estimulación
continua alta
ascendente
Señal
acústica
Estimulación
continua
alta
Señal
acústica
Vibración
6:a
2 Perro 1 Perro 2
Estimulación
continua
media
Vibra-
ción
Estimulación
continua
baja:
Vibra-
ción
Estimulación
continua alta
Vibra-
ción
6:b
2 Perro 1 Perro 2
Estimulación
continua alta
Vibra-
ción
Señal
acústica
Vibra-
ción
N/A
7:a
2 Perro 1 Perro 2
Estimulación
continua alta
Señal
acústica
Estimulación
momentánea
alta:
Señal
acústica
Encontrar el
localizador
•
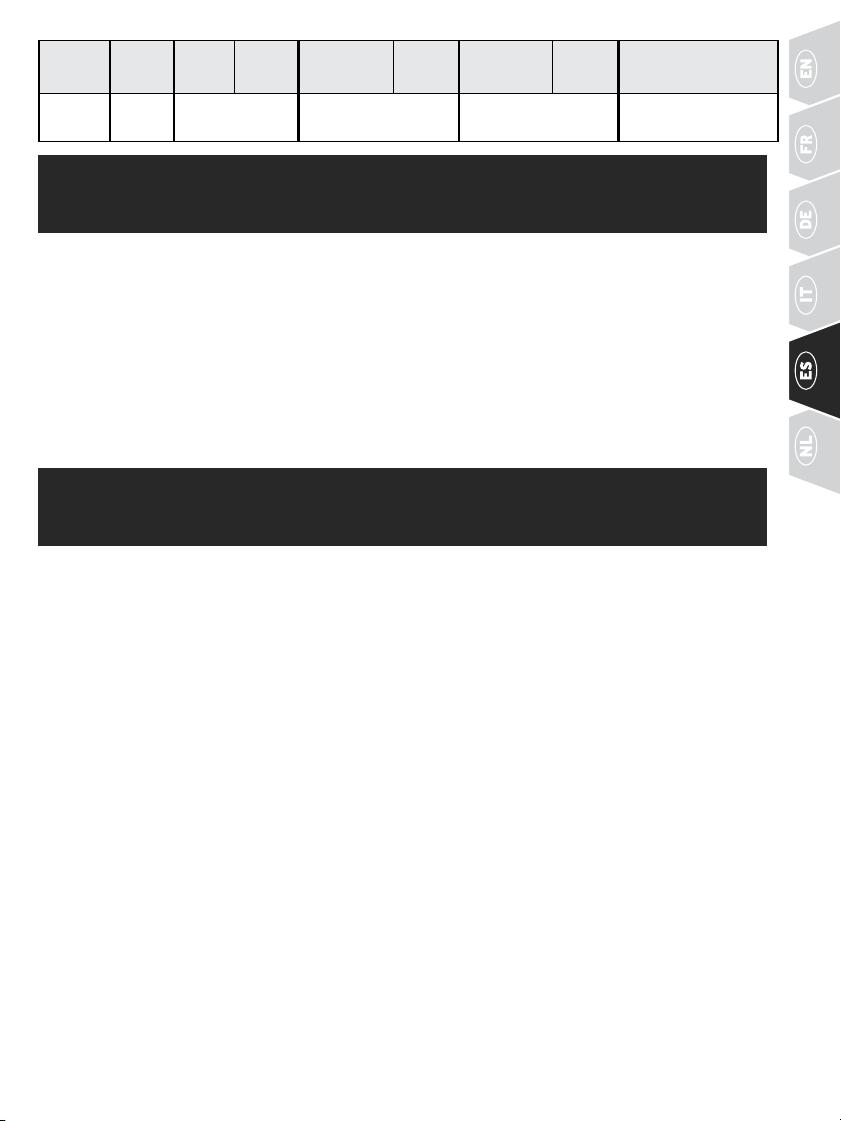
89WWW.SPORTDOG.COM
7:b
2 Perro 1 Perro 2
Estimulación
continua alta
Señal
acústica
Vibración
Señal
acústica
N/A
V/T
(CÓDIGO ID)
N/A a N/A N/A Consulte el PASO 08
PASO
::
6 VINCULAR EL TRANSMISOR CON
ELCOLLAR RECEPTOR
Para conectar el collar receptor para que reciba las señales de un nuevo transmisor, o para reprogramar un
nuevo collar receptor para que funcione con su transmisor actual:
1. Apague el collar receptor.
2. Pulse y mantenga pulsado el botón de encendido. La luz indicadora del receptor se encenderá y se apagará
después de 4-5 segundos. Si suelta demasiado rápido el interruptor de encendido, la luz indicadora del
receptor empezará a destellar con normalidad. Si esto ocurre, empiece de nuevo desde el primer paso.
3. Una vez apagada la luz indicadora del receptor, suelte el botón de encendido.
4. Pulse y mantenga pulsado el botón superior del transmisor hasta que la luz indicadora del receptor
destelle 5 veces. Tras parpadear 5 veces la luz indicadora del receptor, el collar receptor está vinculado y
comenzará a emitir destellos de forma normal. Si la luz indicadora del receptor no emite destellos 5 veces,
empiece de nuevo desde el primer paso.
PASO
::
7 PROGRAMAR EL SISTEMA PARA
ADIESTRAR A MÁS DE UN PERRO
SD-425X-E, SD-825X-E, SD-1225X-E
Para adiestrar dos o tres perros más, se necesitan los collares receptores adicionales SportDOG
®
Add-A-Dog
®
.
1. Programe el transmisor remoto en el modo 3 o 4 (consulte CAMBIAR EL MODO en la página 85).
2. Programe el primer collar receptor.
A. Apague el collar receptor.
B. Pulse y mantenga pulsado el botón de encendido. La luz indicadora del receptor se encenderá y después
de 4-5segundos se apagará. Si suelta demasiado rápido el botón de encendido, la luz indicadora del
receptor empezará a emitir destellos con normalidad. Si esto ocurre, empiece de nuevo y repita el
proceso desde el paso A.
C. Una vez apagada la luz indicadora del receptor, suelte el botón de encendido.
D. Pulse y mantenga pulsado el botón superior del transmisor hasta que la luz indicadora del receptor
destelle 5 veces. Si la luz indicadora del receptor no emite destellos 5 veces, empiece de nuevo y repita
desde el paso A.
3. Programe el segundo collar receptor siguiendo los pasos del A al D anteriores usando el botón inferior
enlugar del botón superior.
4. Programe el tercer collar receptor siguiendo los pasos del A al D anteriores usando el botón lateral
enlugar del botón superior.
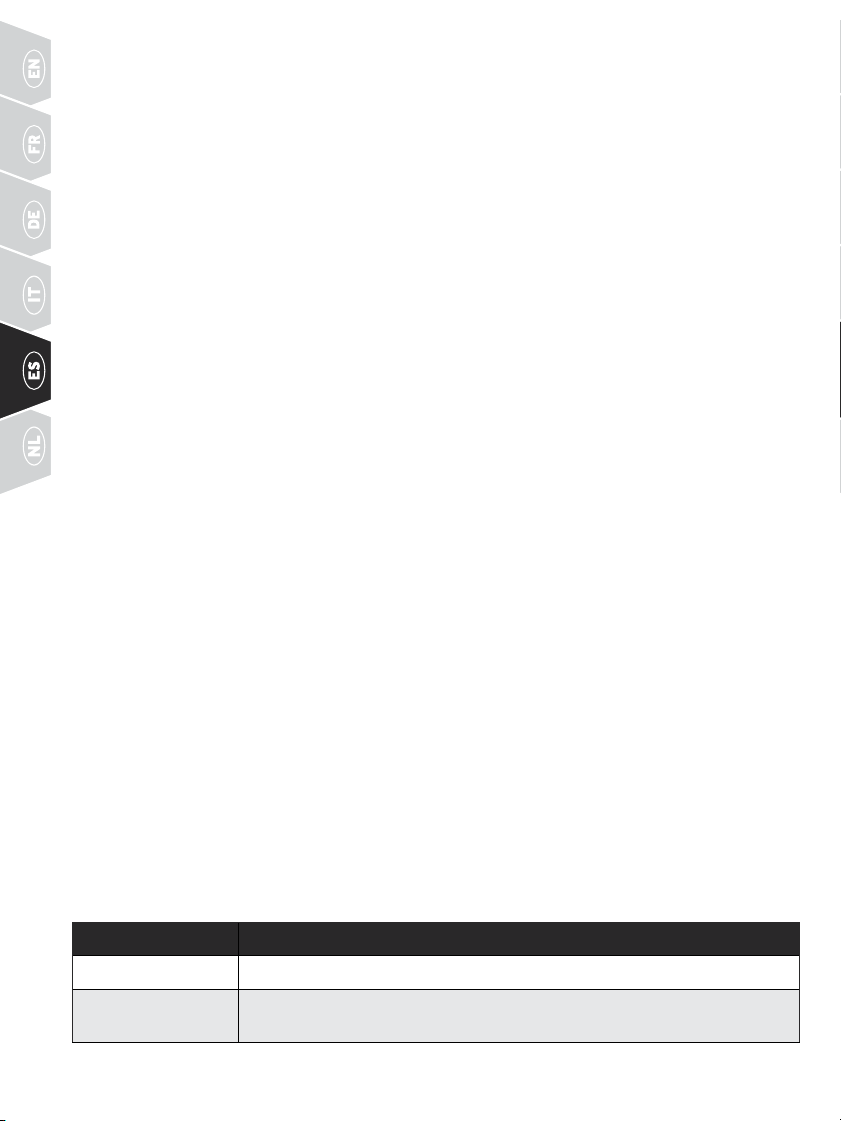
90 WWW.SPORTDOG.COM
SD-1825X-E
Para adiestrar más perros en el modo de dos, tres o seis perros, se necesitan los collares receptores
adicionales SportDOG
®
Add-A-Dog
®
.
FUNCIONAMIENTO CON DOS PERROS
Los collares receptores SportDOG
®
se pueden configurar para responder en la posición a o b del interruptor
del transmisor.
1. Programe el transmisor en el modo 1, 2, 5, 6 o 7 con el interruptor en la posición gris/a, o en cualquiera
delos modos del 1 al 7 con el interruptor en la posición naranja/b (consulte CAMBIAR EL MODO en la
página 87).
2. A continuación, con el interruptor en la posición gris/a ya puede programar el primer collar receptor.
A. Apague el collar receptor.
B. Pulse y mantenga pulsado el botón de encendido del collar receptor. La luz indicadora del receptor
seencenderá y después de 4-5 segundos se apagará. Si suelta demasiado rápido el botón de encendido,
la luz indicadora del receptor empezará a emitir destellos con normalidad. Si esto ocurre, empiece
denuevo y repita el proceso desde el paso A.
C. Una vez apagada la luz indicadora del receptor, suelte el botón de encendido.
D. Pulse y mantenga pulsado el botón superior del transmisor hasta que la luz indicadora del receptor
destelle 5veces. Si la luz indicadora del receptor no emite destellos 5 veces, empiece de nuevo y repita
desde el paso A.
3. Para programar el segundo collar receptor, repita los pasos del A al D, pero con el interruptor en la
posición naranja/b.
FUNCIONAMIENTO CON TRES PERROS
1. Programe el transmisor en el modo 3 o 4 con el interruptor en la posición gris/a (consulte CAMBIAR EL
MODO en la página 87).
2. A continuación, con el interruptor en la posición gris/a, ya puede programar el primer collar receptor.
A. Apague el collar receptor.
B. Pulse y mantenga pulsado el botón de encendido del collar receptor. La luz indicadora del receptor se
encenderá y después de 4-5 segundos se apagará. Si suelta demasiado rápido el botón de encendido,
la luz indicadora del receptor empezará a emitir destellos con normalidad. Si esto ocurre, empiece de
nuevo y repita el proceso desde el paso A.
C. Una vez apagada la luz indicadora del receptor, suelte el botón de encendido.
D. Pulse y mantenga pulsado el botón superior del transmisor hasta que la luz indicadora del receptor
destelle 5 veces. Si la luz indicadora del receptor no emite destellos 5 veces, empiece de nuevo y repita
desde el paso A.
3. Para programar el segundo collar receptor, repita los pasos del A al D usando el botón inferior en lugar
del botón superior.
4. Para programar el tercer collar receptor, repita los pasos del A al D usando el botón lateral en lugar del
botón superior.
FUNCIONAMIENTO CON SEIS PERROS
Repita los pasos del 1 al 4 del apartado “FUNCIONAMIENTO CON TRES PERROS” anterior para los perros 1 a 3.
A continuación, ponga el interruptor en la posición naranja/
b
y repita los pasos del 2 al 4 para los perros 4 a 6.
MODELO ADD-A-DOG®
SDR-AXF-E Collar receptor original para: SD-425X-E y SD-825X-E (hasta 3 perros)
SDR-AX-E Collar receptor original para: SD-1225X-E (hasta 3 perros) y SD-1825X-E
(hasta6perros)

91WWW.SPORTDOG.COM
PASO
::
8 CAMBIAR LOS CÓDIGOS DE
IDENTIFICACIÓN
Un código ID es la identificación de la señal entre el transmisor y el collar receptor. Cada uno está
programado en 1 de 2000 códigos de identificación de la fábrica. El transmisor tiene la flexibilidad de
programar dos o más transmisores con el mismo código de identificación, lo que les permite controlar
uncollar receptor. Hay 64 códigos ID programables disponibles.
PARA PROGRAMAR MANUALMENTE EL CÓDIGO ID DE UN TRANSMISOR
1. Gire el selector de intensidad a V/T, y después pulse y suelte el selector del modo de funcionamiento de
laparte de atrás del transmisor. Esto no cambia el modo, así que el modo actual seguirá activo después
deque se haya hecho el cambio de ID.
2. Una vez que libere el Botón del modo de funcionamiento, la Luz indicadora del transmisor se iluminará
encolor verde y permanecerá así durante 15 segundos.
3. Mientras que la luz verde esté encendida, gire el selector de intensidad para seleccionar el 1.er dígito
dela ID, y después presione y suelte el botón lateral izquierdo. La luz indicadora verde emitirá destellos
rápidamente para confirmar la selección.
4. Otra vez, mientras la luz indicadora verde está encendida, mueva el selector de intensidad para elegir
el segundo dígito del identificador y, a continuación, presione y suelte el botón lateral. La luz indicadora
verde emitirá destellos rápidamente para confirmar la selección. El 2.º dígito es opcional y, si no lo desea
usar, espere hasta que la luz verde se apague y no presione el botón lateral.
5. Al final de los 15 segundos, o después de la segunda presión del botón lateral, la luz indicadora verde se
apagará y la identificación del transmisor quedará actualizada. En ese momento, la unidad estará en el
mismo modo que estaba antes de configurar la ID.
6. Cuando cambie el código ID, necesitará vincular el collar receptor al transmisor (consulte el PASO 06).
NOTA: Si presiona el botón lateral solo una vez (saltándose el paso 4) la identificación será todavía una
identificación de dos dígitos. El dígito de la izquierda está predeterminado a 1. Por ejemplo, si ha seleccionado 6 en
el paso 3 y ha pulsado el botón lateral solo una vez, el identificador que obtendrá será 16.
PARA VOLVER EL TRANSMISOR AL ID DE FÁBRICA
1. Gire el selector de intensidad a V/T, y después pulse y suelte el selector del modo de funcionamiento de la
parte de atrás del transmisor. Esto no cambia el modo, así que el modo actual seguirá activo después de
que se haya hecho el cambio de ID.
2. No presione ningún botón y espere hasta que se apague la luz indicadora verde del transmisor.
3. Deberá vincular el collar receptor al transmisor (consulte el PASO 06).
ACCESORIOS
Para adquirir accesorios adicionales para el sistema de adiestramiento SportDOG
®
, póngase en contacto con
el Centro de atención al cliente o visite la sección Tienda en sportdog.com y busque Partes y accesorios.
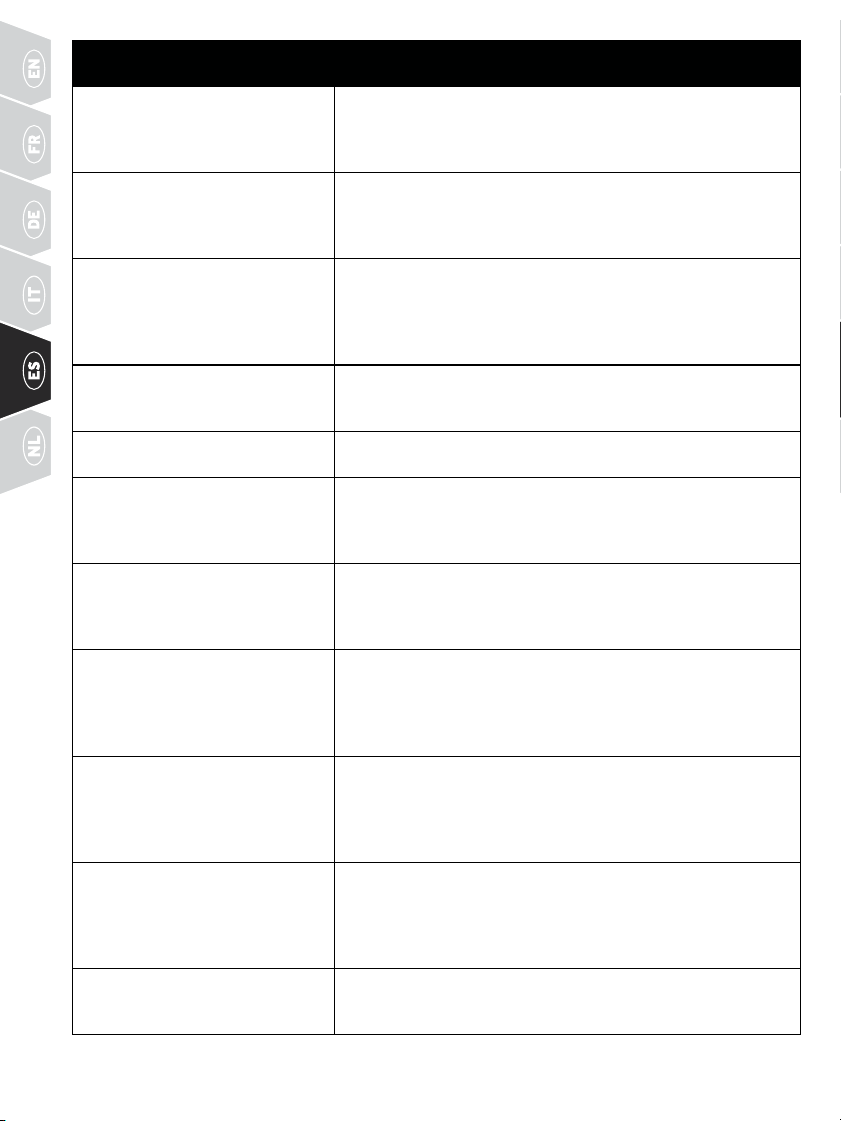
92 WWW.SPORTDOG.COM
PREGUNTAS FRECUENTES
¿Es la estimulación estática segura
para mi perro?
Aunque la estimulación estática continua o momentánea pueda
resultar desagradable, no es dañina para su perro. Los dispositivos
de adiestramiento electrónico requieren interacción y adiestramiento
por parte del propietario para conseguir los resultados deseados.
¿Qué edad debe tener mi mascota
antes de usar este sistema de
adiestramiento?
La edad no es tan importante como la capacidad de desarrollo de su
perro para aprender. Su perro debería ser capaz de aprender órdenes
básicas de obediencia, como "Siéntate" o "Quieto". El collar receptor
puede ser demasiado grande para perros de menos de 3,6 kilos.
Una vez que el perro esté adiestrado
y haya estado obedeciendo mis
órdenes, ¿deberá seguir llevando
puesto el collar receptor?
Es posible que solo tenga que llevar el collar receptor de vez en
cuando para reforzar. Además, muchos cazadores mantienen el
collar receptor en sus perros mientras cazan para tener el máximo
control, porque poseen un fuerte instinto y están expuestos a muchas
distracciones en el campo.
¿Es sumergible el collar receptor? Sí. Si el paquete de baterías recargable necesita ser sustituido alguna
vez, asegúrese de que la junta tórica y la ranura de la junta tórica no
tengan suciedad ni polvo.
¿Puedo usar el collar receptor cerca
de agua salada?
Si el collar receptor se usa en o cerca de agua salada, este debe
enjuagarse con agua fresca después de cada uso.
¿Puedo utilizar este sistema de
adiestramiento con más de un
perro?
Sí, su sistema de adiestramiento se puede ampliar hasta un máximo
de 3perros (hasta 6perros con el SD-1825X-E). Se deben adquirir
collares receptores adicionales Add-A-Dog
®
de SportDOG
®
. Consulte
la página 90 para ver la lista de collares receptores compatibles.
¿Se puede usar este sistema de
adiestramiento con perros agresivos?
No recomendamos que se use ninguno de nuestros productos con
perros agresivos. Recomendamos que contacte con su veterinario
o con un adiestrador profesional si cree que su perro podría ser
agresivo.
¿Obtendré el alcance exacto que
se ofrece con este sistema de
adiestramiento?
El alcance que se obtiene con el sistema de adiestramiento varia
dependiendo del terreno, la climatología, la vegetación y las
transmisiones de otros dispositivos de radio. Para conseguir la
máxima cantidad de alcance, consulte la sección "Cómo funciona
elsistema" de este manual.
¿Durante cuánto tiempo puedo
suministrar continuamente
estimulación estática a mi perro?
La máxima cantidad de tiempo que puede pulsar el botón de
estimulación estática continua y por tanto estimular a su perro
continuamente son 10 segundos. Después de 10 segundos, el
transmisor se desconectará automáticamente y tendrá que soltar
elbotón de estimulación estática continua y presionarlo de nuevo.
¿Qué hago si el cuello de mi perro
sepone rojo e irritado?
Esto se debe a que los puntos de contacto han irritado la piel. Deje de
usar el collar receptor unos cuantos días. Si la afección dura más de
48 horas, consulte a su veterinario. Una vez que la piel haya vuelto
a su estado normal, vuelva a usarlo y supervise el estado de la piel
atentamente. Evite que el perro lleve el collar más de 12 horas al día.
El selector de intensidad resulta
difícil de girar. ¿Esto es normal?
Sí. Eso evita cambios accidentales de la intensidad y favorece un
sellado estanco óptimo. El selector se "suavizará" e irá siendo un
poco más fácil de usar según lo vaya usando.
93WWW.SPORTDOG.COM
¿Puedo sujetar una correa a este
sistema de adiestramiento?
NO sujete ninguna correa a su sistema de adiestramiento. Puede
poner un collar independiente, que no sea de metal, en el cuello de su
perro y sujetarle una correa. Asegúrese de que el collar adicional no
ejerza presión sobre los puntos de contacto.
Mi transmisor envía señales a más
de un collar receptor de forma
accidental, ¿qué debo hacer?
En el caso poco probable de que le pase esto, puede cambiar el código
ID del transmisor (consulte el paso 08).
RESOLUCIÓN DE PROBLEMAS
Las respuestas a estas preguntas deberían ayudarle a solucionar cualquier problema que tenga con
estesistema. Si no es así, póngase en contacto con el Centro de Atención al cliente o visite nuestro sitio web,
www.sportdog.com.
Mi perro no responde cuando
presiono un botón.
• Compruebe para ver si el collar receptor se ha encendido y la luz
indicadora está emitiendo destellos.
• Si el alcance se ha reducido desde la primera vez que ha utilizado
el sistema, por favor compruebe si la batería está baja, bien la del
transmisor o la del collar receptor.
• Muchos factores pueden influir en el alcance que obtenga con su
sistema. Consulte "Cómo funciona el sistema" para ver la lista
deestos factores.
• Puede verificar si el collar receptor está suministrando
estimulación estática a su perro colocando la llave multiusos,
incluida en su kit, en el collar receptor. Consulte las "Instrucciones
relativas a la llave multiusos" para más información.
• Aumente la potencia del selector de intensidad. Consulte "Encontrar
el mejor nivel de intensidad para su perro" para más información.
• Aumente el rango de estimulación estática. Consulte “Cambiar los
intervalos de estimulación estática” para más información.
• Asegúrese de que los puntos de contacto del collar receptor están
colocados de forma ajustada contra la piel de su perro. Consulte
lasección "Ajustar el collar receptor" para más información.
• Quizás tenga que cambiar los puntos de contacto incluidos en su
sistema o recortar el pelo por debajo de los puntos de contacto.
Noafeite nunca el cuello del perro.
• Si nota que su tiempo de funcionamiento ha bajado a cerca de
la mitad del tiempo original, debe sustituir la batería del collar
receptor. Póngase en contacto con el Centro de atención al cliente
para comprar una nueva.
El collar receptor no se activa. • Asegúrese de que el collar receptor está cargado. El collar receptor
se carga en 2 horas.
El collar receptor no responde al
transmisor.
• Asegúrese de que el transmisor está cargado. El transmisor
secargará en 2 horas.
• Verifique que el collar receptor se ha encendido y la luz indicadora
está emitiendo destellos. Consulte "Encender y apagar el collar
receptor".
• Consulte "Vincular el transmisor con el collar receptor".
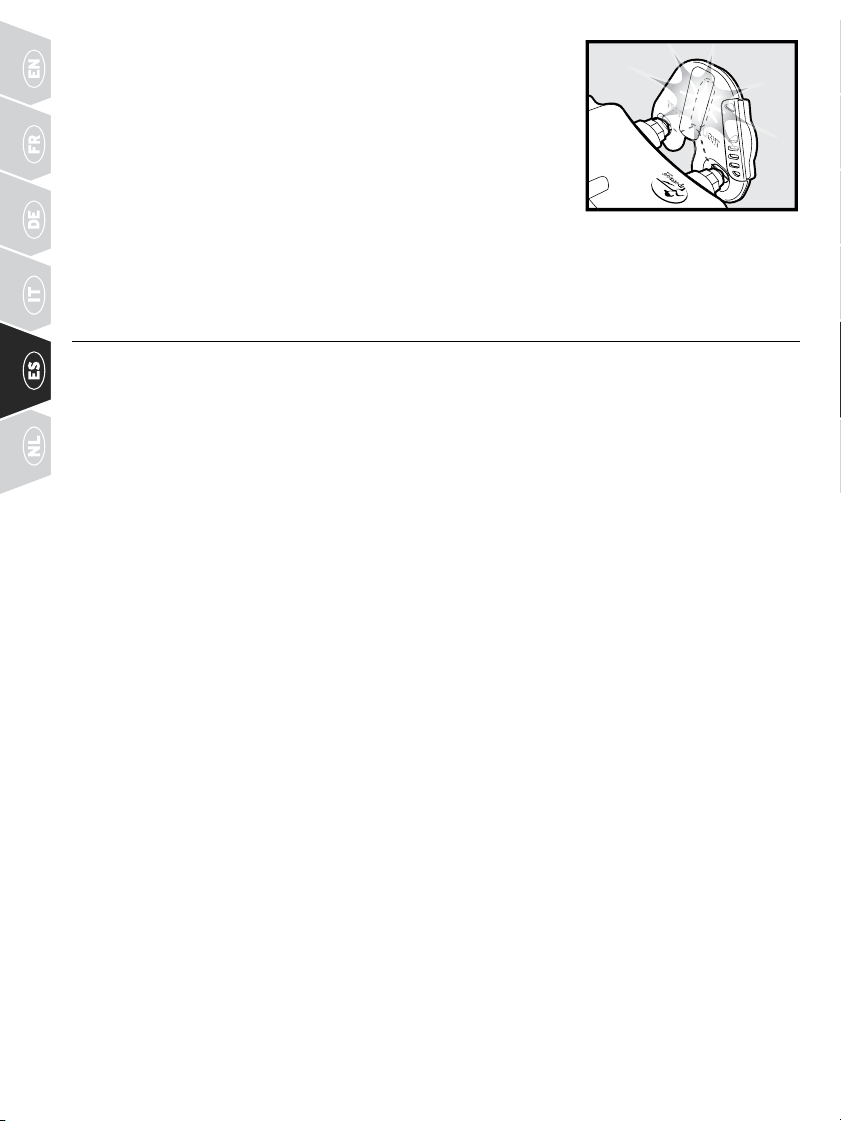
94 WWW.SPORTDOG.COM
INSTRUCCIONES DE LA LLAVE MULTIUSOS
Si necesita probar el sistema, siga estas instrucciones:
1. Encienda el collar receptor.
2. Sujete los contactos de la llave multiusos en los puntos de contacto.
3. Pulse uno de los botones de estimulación estática del transmisor.
4. La llave multiusos emitirá destellos.
NOTA: Con niveles de estimulación estática más altos, la llave
multiusos emitirá destellos más brillantes.
5. Apague el collar receptor.
Guarde la llave multiusos para futuras comprobaciones.
NOTA: Si la llave multiusos no se enciende, recargue la batería e inténtelo de nuevo. Si la llave multiusos
noemitedestellos, póngase en contacto con el Centro de atención al cliente.
BATERÍA
Este sistema funciona con dos baterías de iones de litio. Sustitúyalas solo con baterías recibidas
trasllamaralCentro de atención al cliente.
• Las baterías no deben sacarse de su compartimento para cargarlas.
• Las baterías recargables de iones de litio (Li-Ion) no son sensibles a la memoria, no es necesario que
seagoten antes de la carga y no pueden sobrecargarse.
• Las baterías salen de fábrica parcialmente cargadas, pero antes de utilizarlas por primera vez tendrá
quecargarlas completamente.
• Cuando guarde la unidad durante períodos prolongados, recuerde cargar las baterías por completo
confrecuencia. Esto debería hacerse una vez cada 3 o 4 meses.
• Puede esperar cientos de ciclos de cargas de su batería. No obstante, todas las baterías recargables
pierdencapacidad con el tiempo dependiendo del número de ciclos de recarga a que se sometan.
Estoesnormal. Si el tiempo de funcionamiento se reduce a la mitad de su duración original, póngase
encontactocon el Centro de atención al cliente para comprar una batería nueva.
• Las baterías deben durar un periodo de 3 a 5 años. Cuando sea necesario sustituir una batería puede
pedir un nuevo paquete llamando a nuestro Centro de atención al cliente. No abra el collar receptor
oeltransmisor hasta que no haya recibido la batería de recambio.
En muchas regiones las baterías gastadas se deben recoger por separado. Compruebe las normas de su
región antes de desechar las baterías gastadas. Consulte a continuación las instrucciones sobre cómo
retirarla batería del producto para eliminarla por separado.
95WWW.SPORTDOG.COM
AL FINAL DE LA VIDA ÚTIL DEL PRODUCTO, USE ESTAS INSTRUCCIONES PARA RETIRAR LAS BATERÍAS
CON EL FIN DE DESECHARLAS DE FORMA FINAL (NO ABRA EL COLLAR RECEPTOR NI EL TRANSMISOR
HASTA QUE HAYA RECIBIDO LAS BATERÍAS DE SUSTITUCIÓN).
1. Con un destornillador Phillips n.° 1 para su transmisor y una llave allen 3/32 para su collar receptor,
retirelos tornillos de la caja.
2. Retire la parte posterior o la tapa del compartimiento.
3. Retire el paquete de baterías usadas.
Estas instrucciones no son válidas para la reparación o la sustitución de la batería. Para evitar invalidar
la garantía, llame al Centro de atención al cliente para que le ayuden a reemplazar su batería por una
específicamente aprobada por Radio Systems Corporation.
Para ver una lista de patentes que protegen este producto, visite:
www.radiosystemscorporation.com/patents
96 WWW.SPORTDOG.COM
Radio Systems Corporation, Radio Systems PetSafe Europe Ltd., Radio Systems Australia Pty Ltd. en gelieerde
bedrijven en merken van Radio Systems Corporation kunnen hierna als 'Wij' of 'Ons' worden aangeduid.
Bedankt voor je aankoop van een SportDOG® Brand-trainingsproduct. Als je dit product op de juiste manier
gebruikt, kun je je hond effectief en veilig trainen. Lees de gebruiksaanwijzing zorgvuldig door voor een
optimaal gebruik van het product. Neem voor meer hulp contact op met onze klantenservice. Voor een lijst
met telefoonnummers in jouw regio ga je naar onze website www.sportdog.com.
Voor een optimale garantiedekking raden we aan uw product binnen dertig dagen te registreren op
www.sportdog.com. Als u het product registreert en de bon bewaart, geldt de volledige garantie en kunnen we u
sneller helpen als u contact opneemt met de klantenservice. Het belangrijkste is dat we uw waardevolle gegevens
nooit weggeven of verkopen. Meer informatie over de garantie is online beschikbaar op www.sportdog.com.
OVERIGE BELANGRIJKE INFORMATIE
Door dit product te gebruiken, ga je akkoord met alle bepalingen, voorwaarden en aanwijzingen met
betrekking tot dit product, met inbegrip van, maar niet beperkt tot de bepalingen, voorwaarden en
aanwijzingen in deze gebruiksaanwijzing en de meegeleverde bijsluiter met belangrijke informatie over
naleving van regelgeving en veiligheid.
INHOUDSOPGAVE
ONDERDELEN ................................................................................................................97
ZO WERKT HET SYSTEEM ..............................................................................................97
BELANGRIJKE DEFINITIES .............................................................................................98
LAAD DE AFSTANDSBEDIENING OP ...............................................................................99
LAAD DE ONTVANGERHALSBAND OP .......................................................................... 100
ZORG DAT DE ONTVANGERHALSBAND GOED PAST ..................................................... 102
BEPAAL HET BESTE INTENSITEITSNIVEAU .................................................................. 102
HET BEREIK VAN STATISCHE STIMULATIE WIJZIGEN ................................................... 103
ALGEMENE TRAININGSTIPS ........................................................................................ 103
DE AFSTANDSBEDIENING PROGRAMMEREN ...............................................................104
DE ONTVANGERHALSBAND EN AFSTANDSBEDIENING KOPPELEN .............................108
HET SYSTEEM PROGRAMMEREN VOOR GEBRUIK MET MEERDERE HONDEN .............108
ID-CODES WIJZIGEN .................................................................................................... 110
ACCESSOIRES .............................................................................................................. 110
VEELGESTELDE VRAGEN ..............................................................................................111
PROBLEMEN OPLOSSEN .............................................................................................. 112
INSTRUCTIES VOOR TESTLAMPJE ................................................................................113
BATTERIJ ......................................................................................................................113
video’s zijn beschikbaar op www.youtube.com/sportdogintl en op het tabblad VIDEO’S van elk
product op sportdog.com.
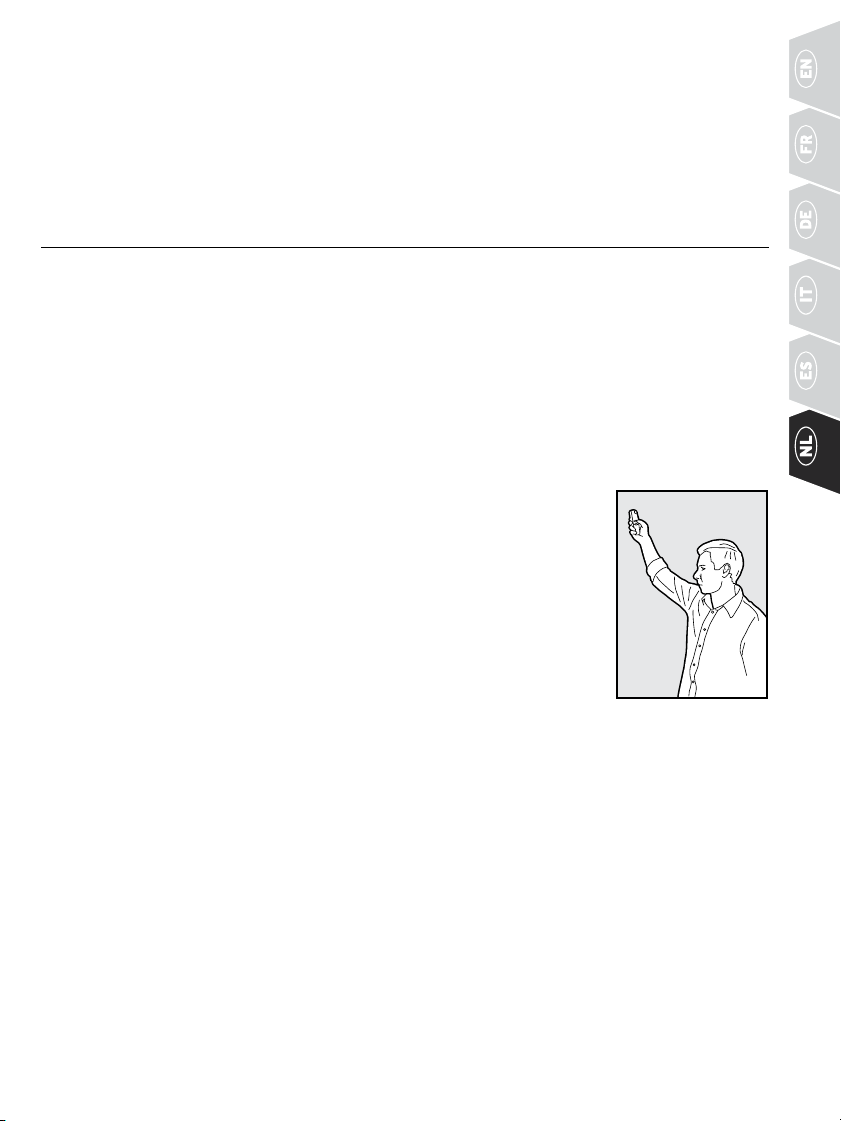
97WWW.SPORTDOG.COM
ONDERDELEN
HET SD-425X-E-, SD-825X-E-, SD-1225X-E- OF SD-1825X-E-SYSTEEM
WORDT GELEVERD MET HET VOLGENDE:
• Afstandsbediening
• Ontvangerhalsband
• Oplaadadapter
• Oplaadstation (SD-1225X-E en SD-1825X-E)
• Korte/lange contactpunten
• Draagkoord
• Riemclip (SD-825X-E, SD-1225X-E, SD-1825X-E)
• Testlamptool
ZO WERKT HET SYSTEEM
Het is aangetoond dat het SportDOG® Brand-systeem veilig, comfortabel en effectief is voor alle honden
van meer dan 3,6 kg. Als u dit product consistent en correct gebruikt, kunt u commando's afdwingen en
wangedrag corrigeren vanaf 450 meter tot 1600 meter afstand, afhankelijk van uw systeem (zie hieronder).
De afstandsbediening stuurt een signaal dat de ontvangerhalsband activeert om onschadelijke stimulatie
te geven. Met de juiste training leert een hond om dit signaal te associëren met een commando. Zoals met
alle SportDOG® Brand-producten kunt u in dit model statische-stimulatieniveaus instellen, zodat u het
stimulatieniveau kunt afstemmen op het temperament van uw hond, zonder risico van overcorrectie.
SD-425X-E: 450 METER
SD-825X-E: 800 METER
SD-1225X-E: 1200 METER
SD-1825X-E: 1600 METER
BELANGRIJK: HET MAXIMUMBEREIK VARIEERT, AFHANKELIJK VAN DE MANIER
WAAROP U DE AFSTANDSBEDIENING VASTHOUDT. VOOR CONSISTENTE
RESULTATEN BIJ GROTERE BEREIKEN HOUDT U DE AFSTANDSBEDIENING IN EEN
VERTICALE POSITIE, WEG VAN UW LICHAAM EN BOVEN UW HOOFD. TERREIN,
WEER, BEGROEIING, TRANSMISSIES VAN ANDERE RADIO-APPARATUUR EN
ANDERE FACTOREN BEÏNVLOEDEN HET MAXIMUMBEREIK.
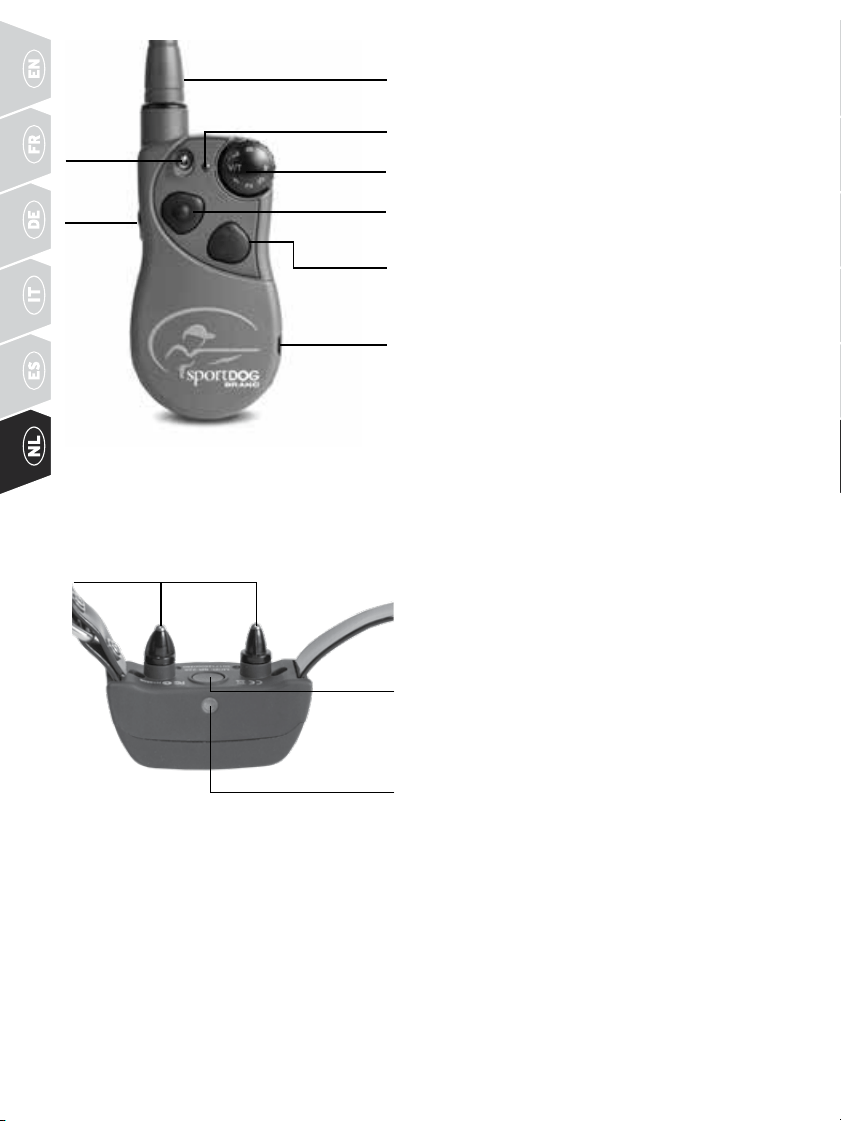
98 WWW.SPORTDOG.COM
CONTROLE-
LAMPJE
ZEND-
ANTENNE
INTENSI-
TEITSKNOP
BOVENSTE KNOP
ONDERSTE
KNOP
OPLAAD-
AANSLUITING
ZIJ-
KNOP
OPLAADAANSLUITING: Voor het aansluiten van de
oplader. Hoewel de afstandsbediening waterdicht is
zonder de afdekking, wordt het aanbevolen deze te laten
zitten wanneer de oplader niet wordt gebruikt om te
voorkomen dat er vuil in de opening terechtkomt.
MODUSKNOP: Met deze knop kun je de modus van de
afstandsbediening wijzigen (zie pagina 104).
ONTVANGERHALSBAND: Ontvangt het radiosignaal
van de afstandsbediening en geeft de statische of
geluidsstimulatie of vibratie af om je hond te corrigeren of
aan te sporen. Deze is waterdicht en kan tot een diepte van
7,5 m worden ondergedompeld in water.
CONTROLELAMPJE ONTVANGERHALSBAND: Geeft aan
wanneer de ontvangerhalsband in- of uitgeschakeld is,
fungeert als controlelampje voor een laag batterijniveau
en geeft ook aan dat een knop voor ononderbroken of
korte (tik) statische stimulatie is ingedrukt.
BELANGRIJKE DEFINITIES
AFSTANDSBEDIENING: Zendt het radiosignaal naar de
ontvangerhalsband. Deze is waterdicht en kan tot een
diepte van 7,5 m worden ondergedompeld in water.
INTENSITEITSKNOP: Biedt verschillende niveaus van
statische stimulatie, zodat je de stimulatie kunt aanpassen
aan het karakter van je hond.
CONTROLELAMPJE: Geeft aan dat een knop is ingedrukt
en fungeert ook als controlelampje voor een laag
batterijniveau.
SCHAKELAAR: Deze schakelaar is standaard zo ingesteld
dat de afstandsbediening twee ontvangerhalsbanden kan
aansturen.
BOVENSTE KNOP: Deze knop is standaard ingesteld
voor het geven van gemiddelde ononderbroken statische
stimulatie.
ONDERSTE KNOP: Deze knop is standaard ingesteld voor
het geven van lage ononderbroken statische stimulatie.
ZIJKNOP: Deze knop is standaard ingesteld voor het
gevenvan hoge ononderbroken statische stimulatie.
AAN/UIT-
KNOP
CONTROLE-
LAMPJE
CONTACTPUNTEN
CONTACTPUNTEN: De contacten via welke de ontvangerhalsband statische stimulatie afgeeft.
AAN/UIT-KNOP: Schakel de ontvangerhalsband in of uit door kort op deze knop te drukken.
DE ONTVANGERHALSBAND KAN VIER SOORTEN STIMULATIE AFGEVEN
ONONDERBROKEN: Jij bepaalt wanneer en hoe lang een statische stimulatie van maximaal 10 seconden
wordt afgegeven. Na 10 seconden eindigt de stimulatie en moet je de knop op de afstandsbediening loslaten en
weer indrukken voordat een aanvullende statische stimulatie kan worden afgegeven.
KORT (TIK): Er wordt gedurende 1/10 seconde een statische stimulatie afgegeven, ongeacht hoe lang de knop
wordt ingedrukt.
SCHAKE-
LAAR
(
ALLEEN
1825X-E
)
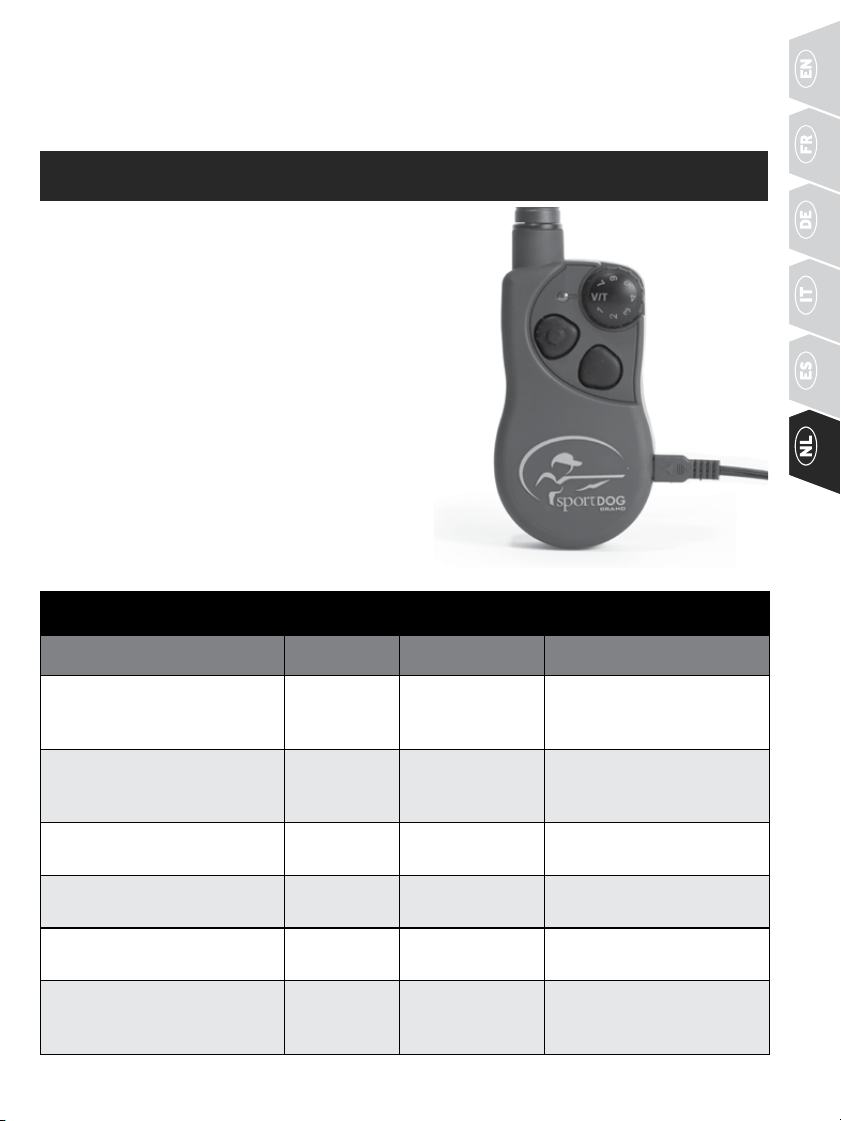
99WWW.SPORTDOG.COM
GELUIDSSIGNAAL: De ontvangerhalsband laat een korte pieptoon horen wanneer de geluidsknop wordt
ingedrukt.*
VIBRATIE: De ontvangerhalsband trilt maximaal 10 seconden wanneer op een vibratieknop wordt gedrukt.*
*Geluidssignaal en vibratie zijn vooraf ingesteld en kunnen niet worden aangepast.
STAP
::
1 LAAD DE AFSTANDSBEDIENING OP
1. Trek de rubberdop omhoog waarmee de
oplaadaansluiting wordt afgeschermd en sluit
de oplaadstekker aan.
2. Steek de oplader elke keer dat u oplaadt gedurende
2 uur in een standaardstopcontact. Het is niet
schadelijk om het product langer dan 2 uur op te laden.
3. Als het groene ledlampje elke seconde knippert, is de
batterij volledig opgeladen. Plaats de rubberdop terug.
Dankzij de gebruikte Li-Ion-technologie kan de
afstandsbediening in slechts 2 uur worden opgeladen.
Het is niet schadelijk om het product langer dan 2 uur
op te laden.
OPMERKING: Afhankelijk van de gebruiksfrequentie werkt
een volledig opgeladen batterij naar schatting 50tot 70 uur
voor SD-425X-E/SD-825X-E en 40 tot 60 uur voor
SD-1225X-E/SD-1825X-E.
CONTROLELAMPJE AFSTANDSBEDIENING
GEBRUIKSMODUS KLEUR LAMPJE BATTERIJSTATUS WERKING LAMPJE
Knop voor ononderbroken
statische, geluids- of
vibratiestimulatie is ingedrukt
Groen Goed Gekleurd lampje brandt zolang
de knop wordt ingedrukt
Knop voor ononderbroken
statische, geluids- of
vibratiestimulatie is ingedrukt
Rood Bijna leeg Gekleurd lampje brandt zolang
de knop wordt ingedrukt
Knop voor korte statische
stimulatie ingedrukt
Groen Goed Lampje knippert eenmaal en
gaat uit
Knop voor korte statische
stimulatie ingedrukt
Rood Bijna leeg Lampje knippert eenmaal en
gaat uit
Product wordt opgeladen Groen Bijna leeg Gekleurd lampje brandt terwijl
de oplader is aangesloten
Product is helemaal opgeladen
(oplader nog steeds aangesloten)
Groen Goed Lampje knippert eenmaal
per seconde zodra de batterij
volledig is opgeladen
OPLAAD- STEKKER
GEPLAATST IN
OPLAADAANSLUI-
TING VAN DE
AFSTANDSBE-
DIENING
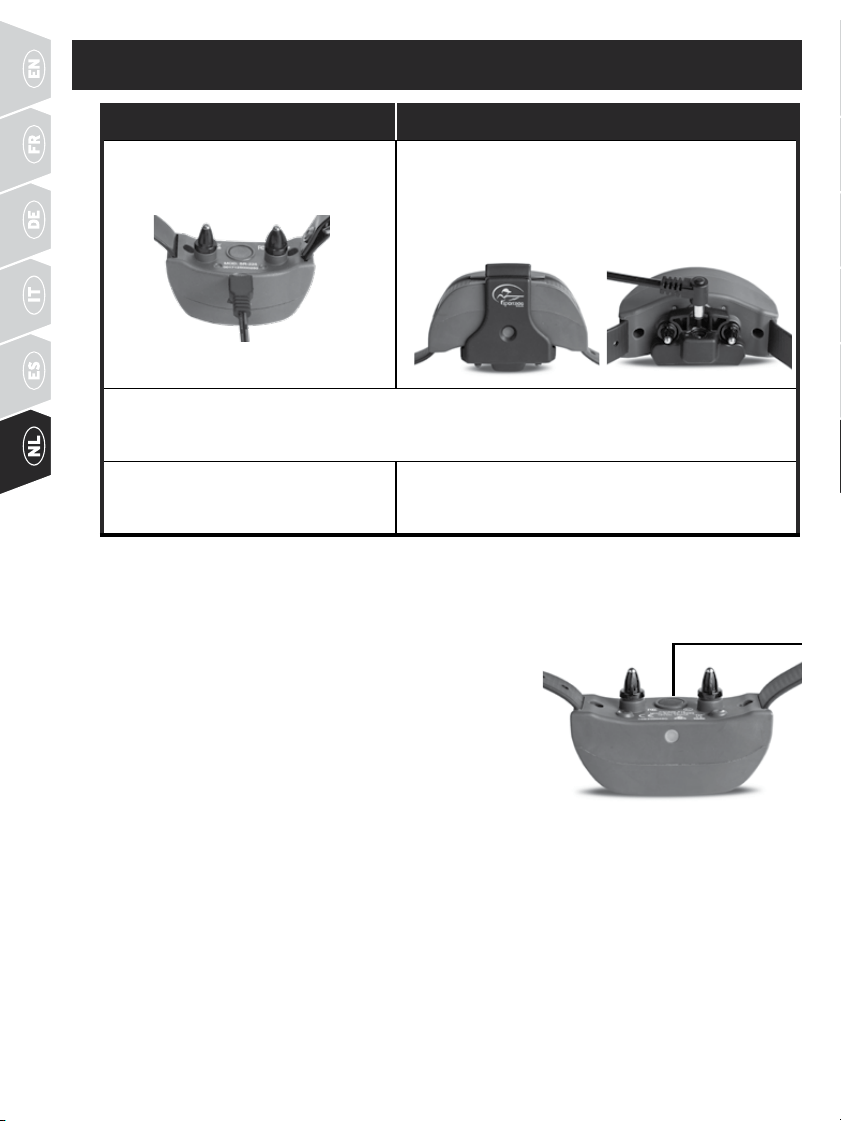
100 WWW.SPORTDOG.COM
STAP
::
2 LAAD DE ONTVANGERHALSBAND OP
425X-E of 825X-E 1225X-E of 1825X-E
1.
Trek de rubberdop over de
oplaadaansluiting van de halsband
omhoog en sluit de oplader aan.
Lijn de contactpunten uit met het oplaadstation, zorg
ervoor dat het gat in het station is uitgelijnd met het
controlelampje van de ontvangerhalsband en duw het
station omhoog en naar achteren totdat dit vastklikt.
Verbind de oplader met het oplaadstation.
2.
Steek de oplader elke keer dat u oplaadt gedurende 2 uur in een standaardstopcontact. Het
controlelampje van de ontvangerhalsband knippert elke seconde groen zodra de batterij volledig
isopgeladen.
3.
Verwijder de oplader en bevestig de
rubberdop goed om te voorkomen dat er
vuil in de oplaadaansluiting komt.
Verwijder zowel de oplaadstekker als het oplaadstation van
de ontvangerhalsband. Het oplaadstation moet niet worden
bevestigd wanneer de ontvangerhalsband wordt gebruikt.
Dankzij de gebruikte Li-Ion-technologie kan de ontvangerhalsband in slechts 2 uur worden opgeladen.
Hetis niet schadelijk om het product langer dan 2 uur op te laden.
DE ONTVANGERHALSBAND AANZETTEN
Druk op de aan/uit-knop en laat deze los. Het controlelampje van de
ontvangerhalsband gaat branden endeontvangerhalsband piept
1 tot 2 keer voor de SD-425X-E/SD-825X-E of 1 tot 3 keer voor de
SD-1225X-E/SD-1825X-E, afhankelijk van het gekozen statische-
stimulatiebereik. De standaardinstelling is 2 (medium).
DE ONTVANGERHALSBAND UITZETTEN
Druk op de aan/uit-knop en laat deze los. Het controlelampje
van de ontvangerhalsband wordt rood zonder te knipperen
endeontvangerhalsband piept gedurende 2 seconden. Zet de
ontvangerhalsband uit wanneer deze niet in gebruik is om de
gebruiksduur tussen oplaadcycli te verlengen.
OPMERKING: Een volledig opgeladen batterij werkt naar schatting 50 tot 70 uur voor SD-425X-E/SD-825X-E
en 140 tot 160 uur voor SD-1225X-E/SD-1825X-E, afhankelijk van de gebruiksfrequentie.
AAN/UIT-
KNOP
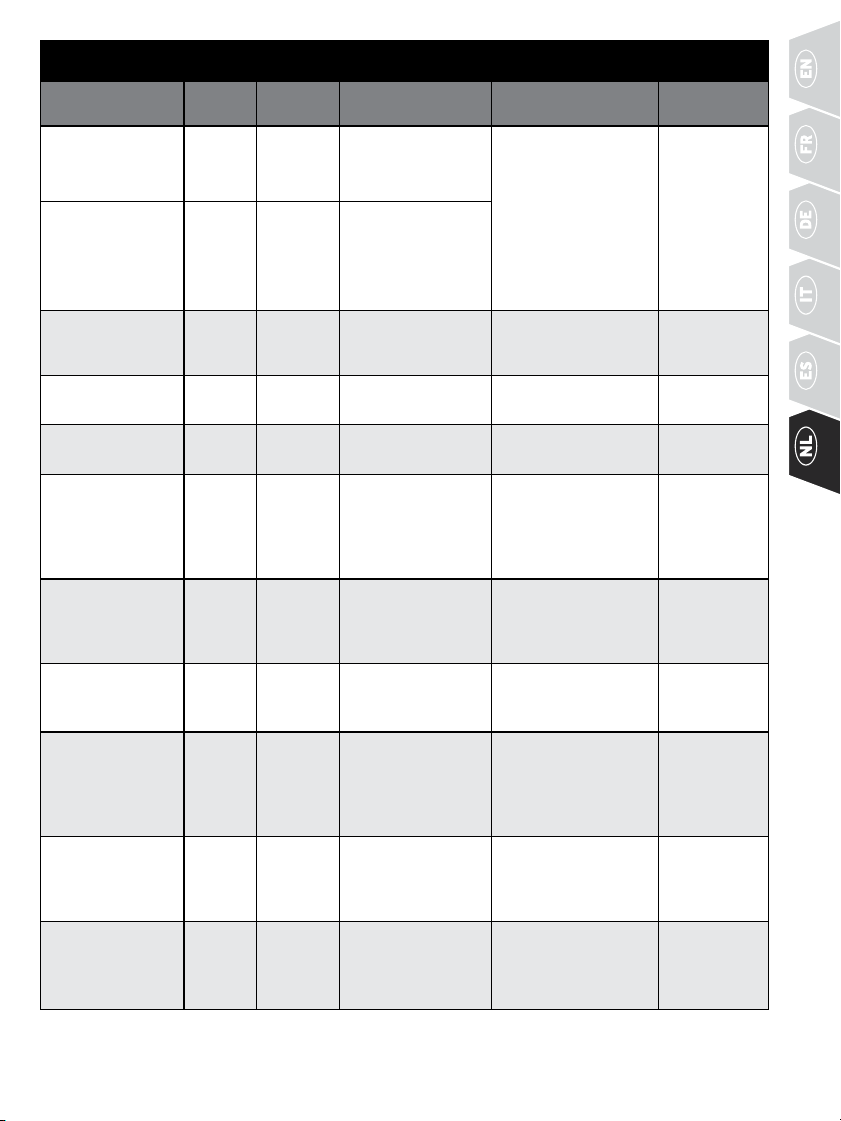
101WWW.SPORTDOG.COM
CONTROLELAMPJE ONTVANGERHALSBAND
GEBRUIKSMODUS
KLEUR
LAMPJE
BATTERIJ-
STATUS
WERKING LAMPJE
LUIDSPREKER-
FUNCTIE
VIBRATIE
Product is
ingeschakeld via
aan/uit-knop
Groen Goed Gekleurd lampje
brandt tijdens de
pieptoonfase
1-2 pieptonen
(1-3 pieptonen voor
SD-1225X-E en
SD-1825X-E)
afhankelijk van
het ingestelde
stimulatiebereik (2 is de
standaardinstelling).
Zie pagina 103.
n.v.t.
Product is
ingeschakeld via
aan/uit-knop
Rood Bijna leeg Gekleurd lampje
brandt tijdens de
pieptoonfase
Product is
uitgeschakeld via
aan/uit-knop
Rood n.v.t. Gekleurd lampje
brandt tijdens de
pieptoonfase
Continue pieptonen
gedurende 2 seconden
n.v.t.
Product is
ingeschakeld
Groen Goed Lampje knippert
elke2 seconden
n.v.t. n.v.t.
Product is
ingeschakeld
Rood Bijna leeg Lampje knippert
elke2 seconden
n.v.t. n.v.t.
Product geeft
ononderbroken
statische
stimulatieaf
Rood n.v.t. Gekleurd lampje
brandt zolang
de knop wordt
ingedrukt (tot 10
seconden)
n.v.t. n.v.t.
Product geeft
korte statische
stimulatieaf
Rood n.v.t. Lampje knippert kort
eenmaal, ongeacht
hoe lang de knop
wordt ingedrukt
n.v.t. n.v.t.
Product geeft
geluidsstimulatie af
Uit n.v.t. n.v.t. Product laat pieptonen
horen zolang de knop
wordt ingedrukt
n.v.t.
Product geeft
vibratiestimulatie af
Uit n.v.t. n.v.t. n.v.t. Product trilt
zolang de
knop wordt
ingedrukt (tot
10 seconden)
Product wordt
opgeladen
Groen Bijna leeg Gekleurd lampje
brandt terwijl
de oplader is
aangesloten
n.v.t. n.v.t.
Product is helemaal
opgeladen
(oplader nog steeds
aangesloten)
Groen Goed
Lampje knippert
eenmaal per seconde
zodra de batterij
volledig is opgeladen
n.v.t. n.v.t.
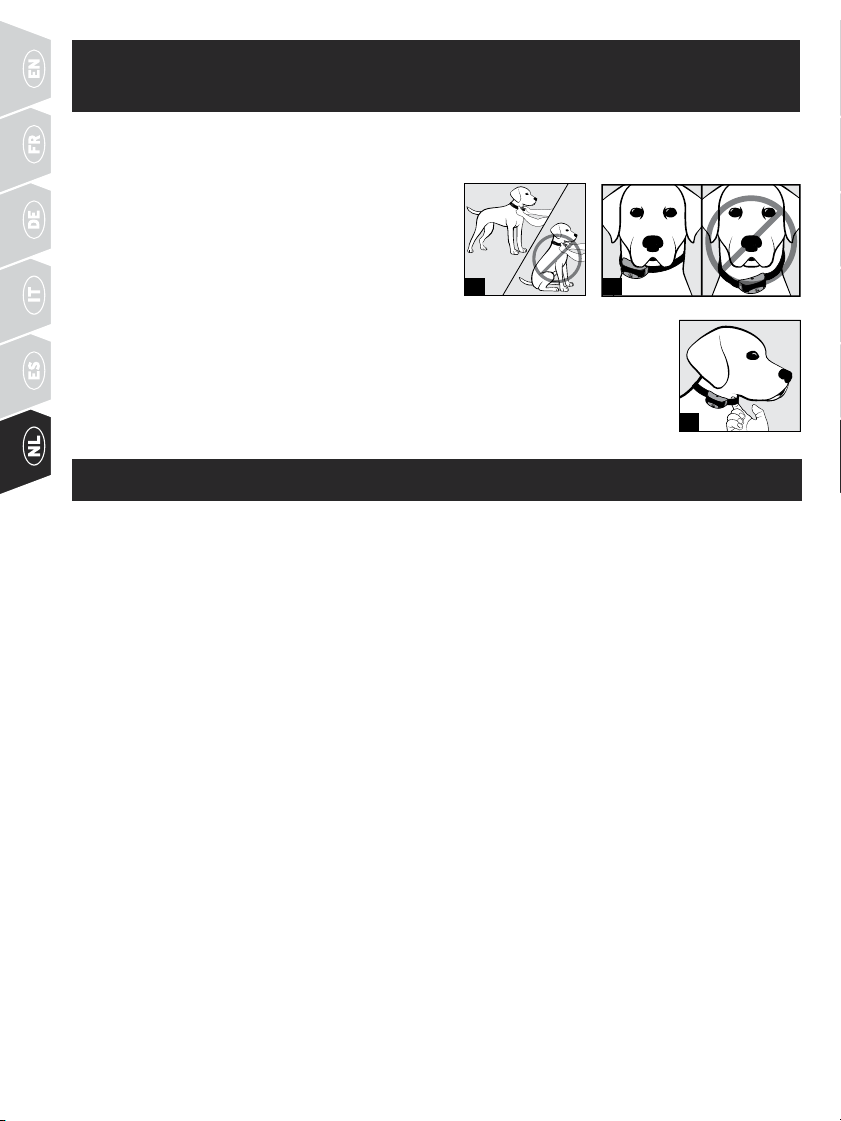
102 WWW.SPORTDOG.COM
STAP
::
3 ZORG DAT DE ONTVANGERHALSBAND
GOED PAST
BELANGRIJK: EEN CORRECTE PASVORM EN PLAATSING VAN DE ONTVANGERHALSBAND ZIJN VAN BELANG
VOOR EEN EFFECTIEVE TRAINING. DE CONTACTPUNTEN DIENEN DIRECT CONTACT TE MAKEN MET DE HUID
VAN UW HOND.
Volg deze stappen om ervoor te zorgen dat de halsband
goed past:
1. Terwijl uw hond staat (3A), plaatst u de
ontvangerhalsband zo hoog mogelijk op de nek
van uw hond, enigszins naar de zijkanten, zodat de
contactpunten de huid aanraken (3B). Als uw hond
lang haar of een dikke vacht heeft, kunt u dit op twee
manieren bewerkstelligen: knip het haar rond de contactpunten of gebruik de langere
contactpunten die met het apparaat zijn geleverd.
2. De ontvangerhalsband dient goed aan te sluiten, maar moet los genoeg zitten om één
vinger tussen de band en de nek van de hond te kunnen plaatsen (3C).
3. Laat uw hond de halsband enkele minuten dragen en controleer dan opnieuw hoe deze
past. Controleer de pasvorm na een tijdje nogmaals, als uw hond gewend raakt aan de
ontvangerhalsband.
STAP
::
4 BEPAAL HET BESTE INTENSITEITSNIVEAU
Het SportDOG® Brand-systeem heeft meerdere intensiteitsniveaus. Hiermee kunt u het meest geschikte
statische-stimulatieniveau voor uw hond kiezen. Het is belangrijk om het juiste intensiteitsniveau voor uw
hond vast te stellen, zodat de training effectief is. Dit wordt het herkenningsniveau genoemd, waarbij uw hond
nieuwsgierig rondkijkt of de oren rechtop staan.
OPMERKING: Begin altijd op het laagste niveau en verhoog het niveau daarna telkens.
HET HERKENNINGSNIVEAU VAN UW HOND BEPALEN
OPMERKING: Elke hond is anders, daarom kunt u niet voorspellen wat het herkenningsniveau van uw hond is.
Let goed op kleine veranderingen in het gedrag die aantonen dat de hond de statische stimulatie voelt.
1. Met de ingeschakelde ontvangerhalsband in de juiste pasvorm om de nek van uw hond zet u de
intensiteitsknop op de afstandsbediening op niveau 1 en drukt u gedurende 1 of 2 seconden op de knop voor
ononderbroken statische stimulatie.
2. Als uw hond niet reageert op niveau 1, ga dan naar niveau 2 en herhaal de procedure totdat u het
herkenningsniveau van uw hond heeft gevonden. Dit is het niveau dat u moet gebruiken wanneer
u met een trainingsoefening begint.
3. UW HOND MAG GEEN GELUID MAKEN OF IN PANIEK RAKEN ALS DEZE STATISCHE STIMULATIE KRIJGT. ALS
DIT GEBEURT, LIGT HET NIVEAU VAN DE STATISCHE STIMULATIE TE HOOG EN MOET U NAAR HET VORIGE
NIVEAU TERUGKEREN EN DE PROCEDURE HERHALEN.
4. Als u het hoogste niveau heeft bereikt wanneer u naar het herkenningsniveau van uw hond zoekt en uw
hond nog steeds geen enkele reactie vertoont, controleer dan of de ontvangerhalsband goed aansluit op
de nek van uw hond. Ga hierna terug naar niveau 1 en herhaal de procedure. Als uw hond nog steeds niet
reageert op de statische stimulatie, heeft u twee mogelijkheden: u kunt het haar onder de contactpunten
knippen of de langere contactpunten gebruiken die met het systeem zijn geleverd.
Als uw hond na al deze stappen nog steeds niet reageert op de statische stimulatie of als de statische stimulatie
te hoog lijkt, kunt u het stimulatiebereik van de ontvangerhalsband wijzigen aan de hand van de volgende
instructies. Neem contact op met de klantenservice als u het herkenningsniveau van uw hond niet kunt vinden.
3C
3A 3B
103WWW.SPORTDOG.COM
HET BEREIK VAN STATISCHE STIMULATIE WIJZIGEN
De SportDOG® Brand-ontvangerhalsband wordt geleverd met 2-3 statische-stimulatiebereiken, afhankelijk
van het model. In de standaardmodus van de afstandsbediening zijn er 21 statische-stimulatieniveaus binnen
elk bereik, waarbij 1 het laagste is en 21 het hoogste. De standaardinstelling voor het bereik is 2 of medium.
Volg deze stappen om het bereik van de statische stimulatie te wijzigen:
1. Controleer of de ontvangerhalsband uit staat.
2. Zet de halsband hierna aan door de aan/uit-knop kort in te drukken en dan weer los te laten.
3. Binnen 5 seconden nadat het controlelampje is uitgegaan, drukt u de aan/uit-knop gedurende 3 seconden in.
4. De ontvangerhalsband piept dan en het controlelampje knippert oranje zoals aangegeven in de
onderstaande tabel. Blijf de knop ingedrukt houden totdat het aantal pieptonen/oranje flitsen gelijk is aan
het weergegeven gewenste stimulatiebereik.
5. Laat de knop los wanneer het gewenste bereik is geselecteerd. De ontvangerhalsband wordt dan uitgezet.
6. Zet de halsband weer aan. Deze piept dan in overeenstemming met het statische-stimulatiebereik dat u in
stap 4 heeft geselecteerd.
PIEPTONEN STATISCH-STIMULATIEBEREIK TEMPERAMENT
VAN HOND
MODEL
1 piep Laag Licht SD-425X-E, SD-825X-E, SD-1225X-E,
SD-1825X-E
2 pieptonen Medium Gematigd SD-425X-E, SD-825X-E, SD-1225X-E,
SD-1825X-E
3 pieptonen Hoog Koppig SD-1225X-E, SD-1825X-E
ALGEMENE TRAININGSTIPS
VOORDAT U DE HOND MET DIT PRODUCT GAAT TRAINEN
U behaalt de beste resultaten als u uw hond eerst een commando leert voordat u dit probeert af te dwingen
met een trainer met afstandsbediening. De training verloopt makkelijker en sneller als u de richtlijnen in
dezeSnelstartgids volgt. Daarbij is het handig de volgende trainingstips in gedachten te houden:
• Elimineer één misdraging of leer één gehoorzaamheidsbevel per keer. Als u te snel gaat met de training,
kan de hond in de war raken.
• Houd de trainingssessies positief, kort en frequent. Als u of uw hond gefrustreerd of in de war raakt,
kuntuhet best een pauze nemen.
• Wees consistent. Geef uw hond een geluidssignaal of vibratie- of statische stimulatie bij elke misdraging.
• Overcorrigeer de hond niet. Gebruik zo weinig mogelijk stimulatie om de hond te trainen.
• Vermijd situaties waarin uw hond zich eerder heeft misdragen, tenzij u toezicht kunt houden en de trainer
met afstandsbediening kunt gebruiken om een geluidssignaal of vibratie- of statische stimulatie te geven.
• Wanneer u een situatie waarneemt waarin de hond zich herhaaldelijk misdraagt, gebruik deze situatie dan
als trainingsessie. Dit vergroot de kans op succes aanzienlijk.
• Als uw hond timide reageert op het geluidssignaal of de vibratie- of statische stimulatie (vooral de eerste
paar keer), maakt u zich dan geen zorgen. Leid de aandacht van de hond naar eenvoudig, gepast gedrag
(bijv. met een bekend commando, zoals “Zit”).
• Gebruik de trainer met afstandsbediening nooit om agressief gedrag te corrigeren of te elimineren. Als
uwhond zulk gedrag vertoont, neem dan contact op met een professioneel trainer. Agressie in honden
kanallerlei redenen hebben: het kan aangeleerd gedrag zijn of worden veroorzaakt door angst. Een
anderefactor die bijdraagt aan agressie in honden, is sociale dominantie. Elke hond is anders.
Op dit punt is de trainer met afstandsbediening klaar voor gebruik. De afstandsbediening is standaard
ingesteld op modus 5 (modus 5, schakelaar omhoog voor SD-1825X-E), maar je kunt de modus wijzigen,
zodat deze beter aansluit bij jouw situatie. Zie STAP 5 voor een uitleg over de mogelijke modi.
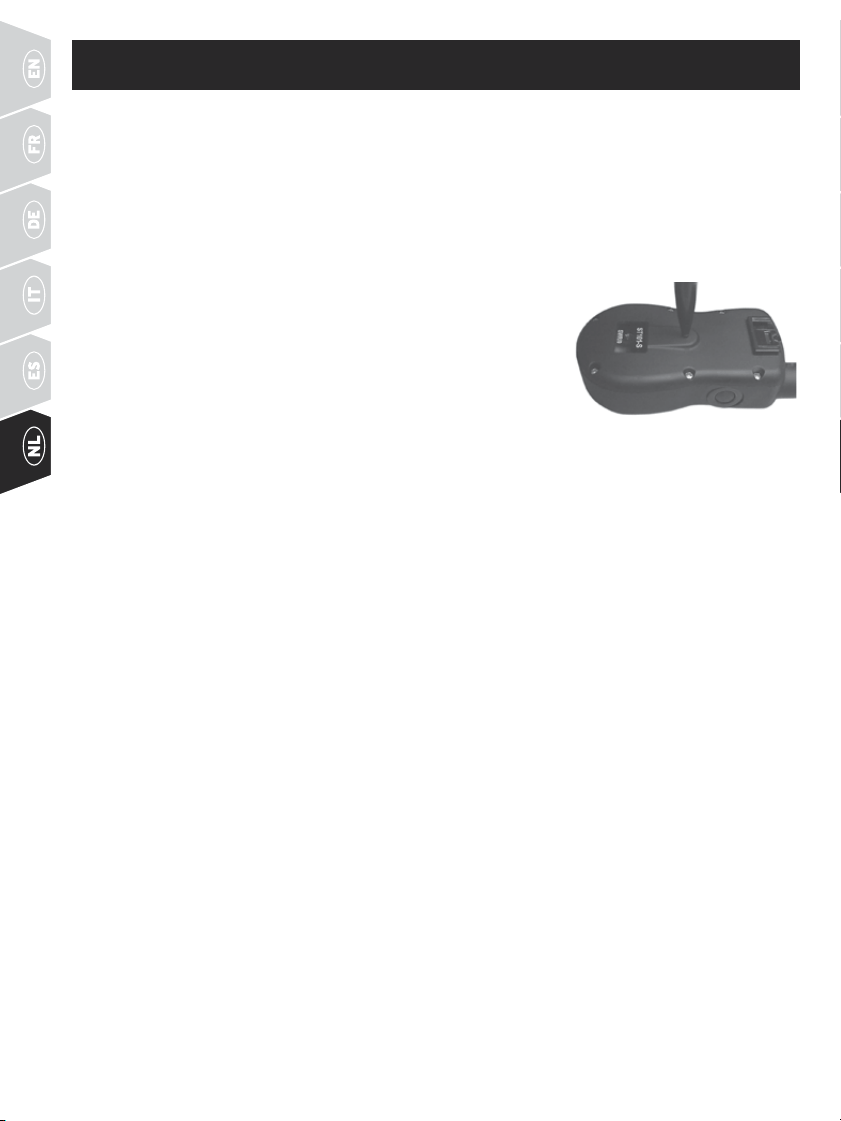
104 WWW.SPORTDOG.COM
STAP
::
5 DE AFSTANDSBEDIENING PROGRAMMEREN
SD-425X-E, SD-825X-E, SD-1225X-E
De afstandsbediening heeft zeven gebruiksmodi, zodat je de modus kunt kiezen die het beste aansluit bij jouw
manier en stijl van trainen. Er is ook een programmeermodus (modus V/T) waarmee je de ID-code van het
systeem kunt wijzigen. De fabrieksinstelling van de afstandsbediening is modus 5.
DE MODUS WIJZIGEN
1. Zet de intensiteitsknop op de gewenste modus aan de hand van de volgende tabel.
2. Draai de afstandsbediening om en verwijder de riemclip als deze is bevestigd (alleen SD-825X-E
en SD-1225X-E).
3. Druk met een pen of de stift van de gesp van de hondenriem op de
modusknop en laat deze daarna weer los. Wanneer de modusknop
wordt ingedrukt, brandt het gekleurde controlelampje van de
afstandsbediening. Wanneer je de knop loslaat, knippert het lampje in
de geselecteerde modus.
Als je bijvoorbeeld modus 6 wilt kiezen, stel je de intensiteitsknop in op niveau
6. Wanneer je de modusknop indrukt, brandt het controlelampje van de
afstandsbediening continu en wanneer je de modusknop loslaat, knippert het controlelampje 6 maal.
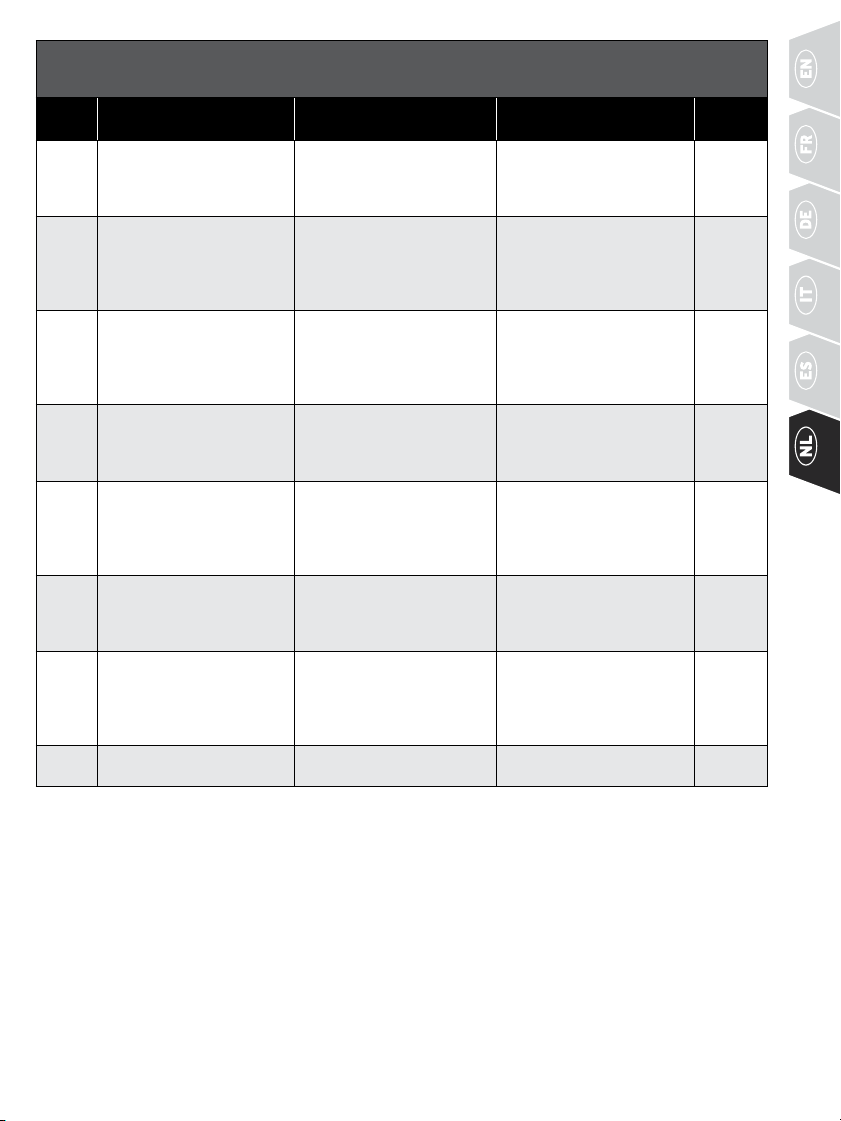
105WWW.SPORTDOG.COM
MODUSTABEL VOOR SD-425X-E, SD-825X-E, SD-1225X-E
(
ZIE PAGINA 104 OM DE MODUS TE WIJZIGEN
)
MODUS WERKING BOVENSTE KNOP WERKING ONDERSTE KNOP WERKING ZIJKNOP
AANTAL
HONDEN
1 Ononderbroken stimulatie
(niveau ingesteld met
intensiteitsknop) OF trillen
indien V/T op knop
Korte stimulatie
(niveau ingesteld met
intensiteitsknop) OF trillen
indien V/T op knop
Alleen geluidssignaal 1
2 Ononderbroken stimulatie
(niveau ingesteld met
intensiteitsknop) OF
geluidssignaal indien V/T
opknop
Korte stimulatie
(niveau ingesteld met
intensiteitsknop) OF
geluidssignaal indien
V/Topknop
Alleen trillen 1
3 Hond 1: Ononderbroken
stimulatie (niveau ingesteld
met intensiteitsknop) OF
geluidssignaal indien V/T
opknop
Hond 2: Ononderbroken
stimulatie (niveau ingesteld
met intensiteitsknop) OF
geluidssignaal indien V/T
op knop
Hond 3: Ononderbroken
stimulatie (niveau ingesteld
met intensiteitsknop) OF
geluidssignaal indien V/T
op knop
3
4 Hond 1: Ononderbroken
stimulatie (niveau ingesteld
met intensiteitsknop) OF
trillen indien V/T op knop
Hond 2: Ononderbroken
stimulatie (niveau ingesteld
met intensiteitsknop) OF
trillen indien V/T op knop
Hond 3: Ononderbroken
stimulatie (niveau ingesteld
met intensiteitsknop) OF
trillen indien V/T op knop
3
5* Gemiddelde ononderbroken
stimulatie (niveau ingesteld
met intensiteitsknop) OF
geluidssignaal indien V/T
opknop
Lage ononderbroken
stimulatie (niveau ingesteld
met intensiteitsknop) OF
geluidssignaal indien
V/Topknop
Hoge ononderbroken
stimulatie (niveau ingesteld
met intensiteitsknop) OF
geluidssignaal indien V/T
op knop
1
6 Gemiddelde ononderbroken
stimulatie (niveau ingesteld
met intensiteitsknop) OF
trillen indien V/T op knop
Lage ononderbroken
stimulatie (niveau ingesteld
met intensiteitsknop) OF
trillen indien V/T op knop
Hoge ononderbroken
stimulatie (niveau ingesteld
met intensiteitsknop) OF
trillen indien V/T op knop
1
7 Ononderbroken stimulatie
(niveau ingesteld met
intensiteitsknop) OF
geluidssignaal indien V/T
opknop
Korte stimulatie
(niveau ingesteld met
intensiteitsknop) OF
geluidssignaal indien
V/Topknop
Pieper met
afstandsbediening
lokaliseren**
1
V/T
(ID-CODE)
n.v.t. n.v.t. Zie STAP 08 n.v.t.
OPMERKING: Modi 1, 2, 3, 4 en 7 bieden in 7 niveaus van stimulatie, die overeenkomen met de instelling van de
intensiteitsknop.
Modi 5 en 6 bieden meer ‘stappen’ om uit te kiezen, voor in totaal 21 niveaus van statische stimulatie. Als
bijvoorbeeld in modus 5 de intensiteitsknop is ingesteld op 1, levert de onderste knop niveau 1 van 21,
levert de bovenste knop niveau 2 van 21 en levert de zijknop niveau 3 van 21.
* Standaardfabrieksmodus.
** Pieper met afstandsbediening lokaliseren: de zijknop schakelt de gebruiksmodus uit en lokaliseert de pieper met
afstandsbediening. Als je de gebruiksmodus opnieuw wilt inschakelen, houd je de zijknop 3 seconden ingedrukt.
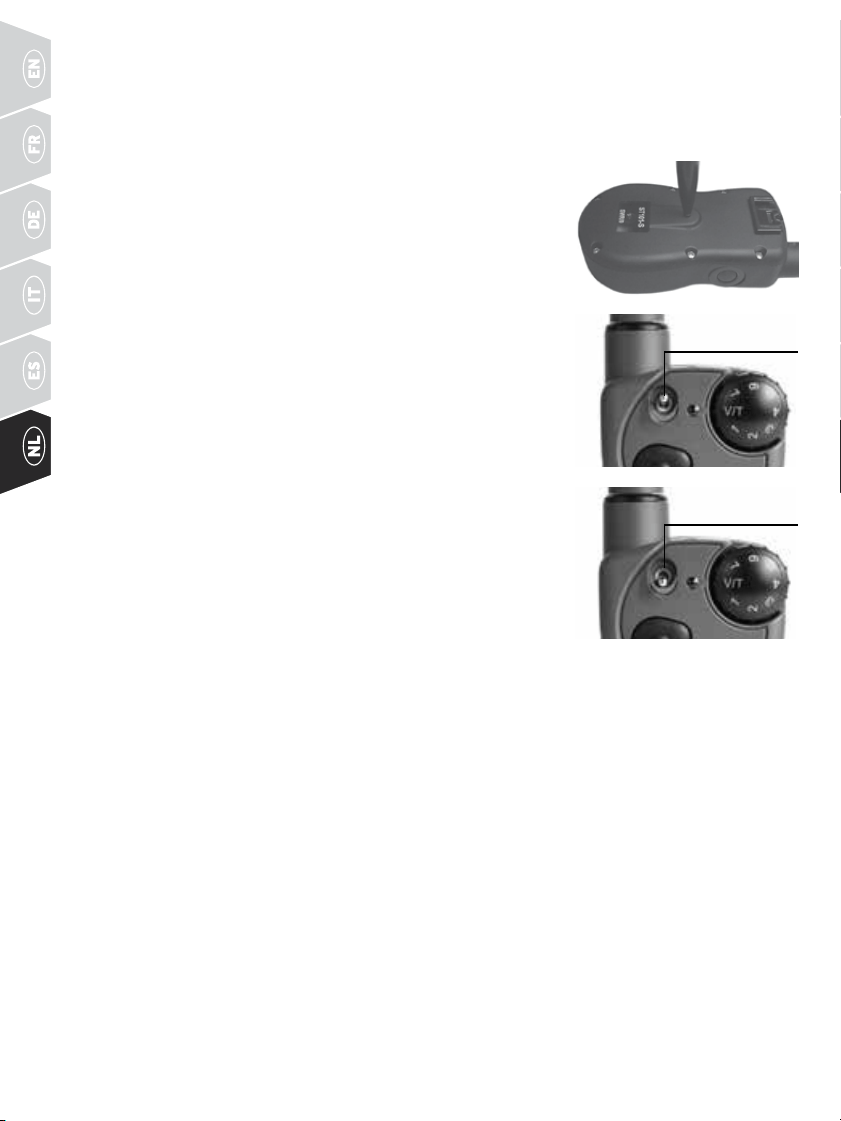
106 WWW.SPORTDOG.COM
SD-1825X-E
De afstandsbediening heeft 14 gebruiksmodi (zeven met de schakelaar in positie grijs/
a
en zeven met de
schakelaar in positie oranje/
b
), zodat je de beste instelling kunt selecteren voor jouw type of stijl van trainen.
De fabrieksinstelling van de trainer met afstandsbediening is modus 5:
a
. Er is ook een programmeermodus
(modus V/T) waarmee je de ID-code van het systeem kunt wijzigen.
DE MODUS WIJZIGEN
1. Raadpleeg ‘MODUSTABEL VOOR SD-1825X-E’ op pagina107 en kies
hetgewenste modusnummer (1-7) en de positie van de schakelaar
(
a
of
b
). Pas zowel de intensiteitsknop als de schakelaar aan de
gewenste modus aan.
2. Draai de afstandsbediening om en verwijder de riemclip (indien
bevestigd).
3. Druk met een pen of de stift van de gesp van de hondenriem op de
modusknop en laat deze daarna weer los. Wanneer de modusknop
wordt ingedrukt, brandt het gekleurde controlelampje van de
afstandsbediening. Nadat je de knop hebt losgelaten, knippert het
lampje het aantal malen dat overeenkomt met de geselecteerde modus.
Wanneer je bijvoorbeeld modus 6:
a
wilt kiezen, zet je de schakelaar
op de positie grijs/
a en
pas je de intensiteitsknop aan naar niveau 6.
Nadat je de modusknop hebt ingedrukt, gaat het controlelampje van de
afstandsbediening branden. Nadat je de modusknop hebt losgelaten,
knippert het controlelampje 6 keer. Als je echter modus V/T (ID-code)
selecteert in de positie grijs/
a
, blijft het gekleurde lampje branden nadat
jede modusknop hebt losgelaten.
*
Standaardfabrieksmodus.
Voor gebruik met twee honden raadpleeg je STAP 07 op pagina 108-109.
^ Voor gebruik met drie en zes honden raadpleeg je STAP 07 op
pagina 108-109.
•
Pieper met afstandsbediening lokaliseren: de zijknop schakelt de gebruiksmodus uit en lokaliseert de pieper
met afstandsbediening. Als je de gebruiksmodus opnieuw wilt inschakelen, houd je de zijknop 3 seconden
ingedrukt.
SCHAKELAAR IN
POSITIE
a
SCHAKELAAR IN
POSITIE
b
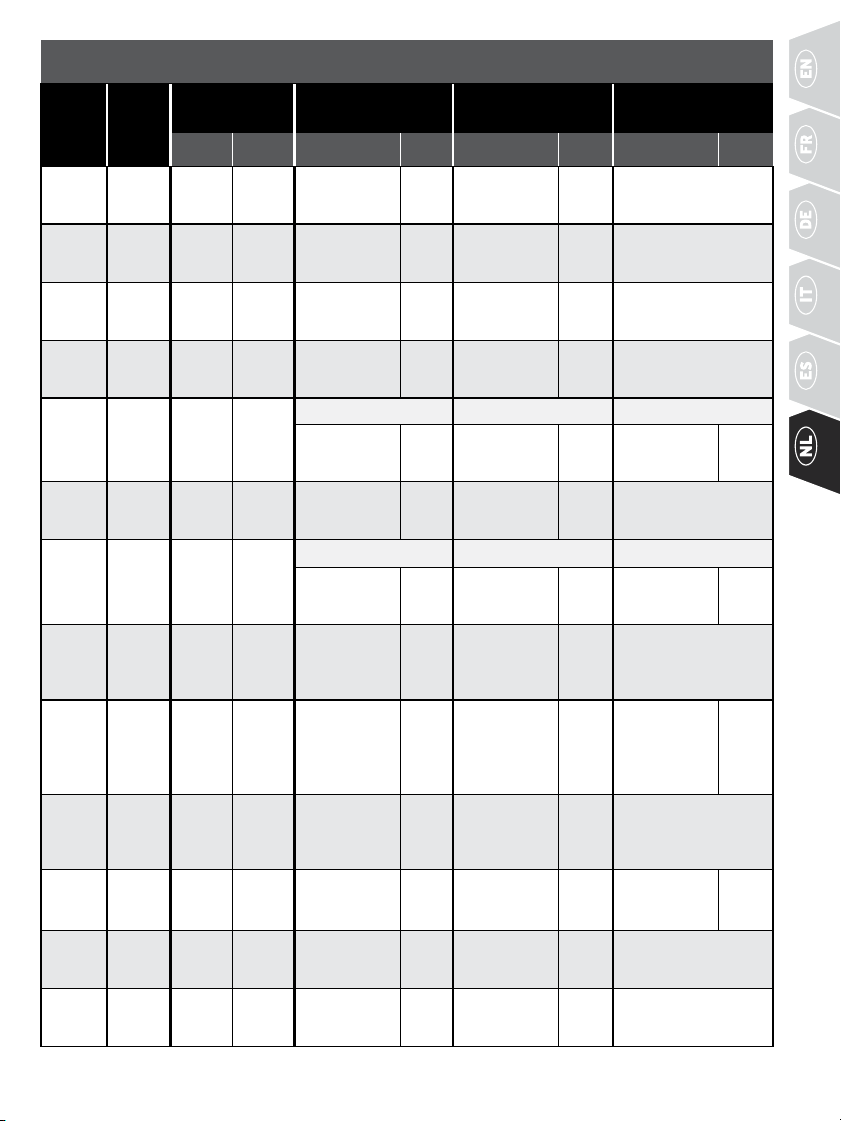
107WWW.SPORTDOG.COM
MODUSTABEL VOOR SD-1825X-E
(
ZIE PAGINA 106 ALS JE DE MODUS WILT WIJZIGEN
)
MODUS:
POSITIE
SCHAKE-
LAAR
AANTAL
HONDEN
WERKING
SCHAKELAAR
WERKING BOVENSTE
KNOP
WERKING ONDERSTE
KNOP
WERKING ZIJKNOP
a b KNOP 1-7 V/T KNOP 1-7 V/T KNOP 1-7 V/ T
1:a
2
Hond 1 Hond 2
Hoge
ononderbroken
stimulatie
Trillen
Hoge korte
stimulatie
Trillen Toon
1:b
2 Hond 1 Hond 2
Hoge
ononderbroken
stimulatie
Trillen
Hoge
ononderbroken
stimulatie
Trillen
Pieper met
afstandsbediening
lokaliseren
•
2:a
2 Hond 1 Hond 2
Hoge
ononderbroken
stimulatie
Toon
Hoge korte
stimulatie
Toon Trillen
2:b
2 Hond 1 Hond 2
Hoge
ononderbroken
stimulatie
Trillen
Lage
ononderbroken
stimulatie
Trillen Toon
3:a
6^
Honden
1-3
Honden
4-6
Hond 1 (a) / Hond 4 (b) Hond 2 (a) / Hond 5 (b) Hond 3 (a) / Hond 6 (b)
Hoge
ononderbroken
stimulatie
Toon
Hoge
ononderbroken
stimulatie
Toon
Hoge
ononderbroken
stimulatie
Toon
3:b
2 Hond 1 Hond 2
Hoge
ononderbroken
stimulatie
Toon
Lage
ononderbroken
stimulatie
Toon Trillen
4:a
6
Honden
1-3
Honden
4-6
Hond 1 (a) / Hond 4 (b) Hond 2 (a) / Hond 5 (b) Hond 3 (a) / Hond 6 (b)
Hoge
ononderbroken
stimulatie
Trillen
Hoge
ononderbroken
stimulatie
Trillen
Hoge
ononderbroken
stimulatie
Trillen
4:b
2 Hond 1 Hond 2
Toenemende
hoge
ononderbroken
stimulatie
Trillen
Hoge
ononderbroken
stimulatie
Trillen Toon
5:a
*
2 Hond 1 Hond 2
Gemiddelde
ononderbroken
stimulatie
Toon
Lage
ononderbroken
stimulatie
Toon
Hoge
ononderbroken
stimulatie
Toon
5:b
2 Hond 1 Hond 2
Toenemende
hoge
ononderbroken
stimulatie
Toon
Hoge
ononderbroken
stimulatie
Toon Trillen
6:a
2 Hond 1 Hond 2
Gemiddelde
ononderbroken
stimulatie
Trillen
Lage
ononderbroken
stimulatie
Trillen
Hoge
ononderbroken
stimulatie
Trillen
6:b
2 Hond 1 Hond 2
Hoge
ononderbroken
stimulatie
Trillen Toon Trillen n.v.t.
7:a
2 Hond 1 Hond 2
Hoge
ononderbroken
stimulatie
Toon
Hoge korte
stimulatie
Toon
Pieper met
afstandsbediening
lokaliseren
•
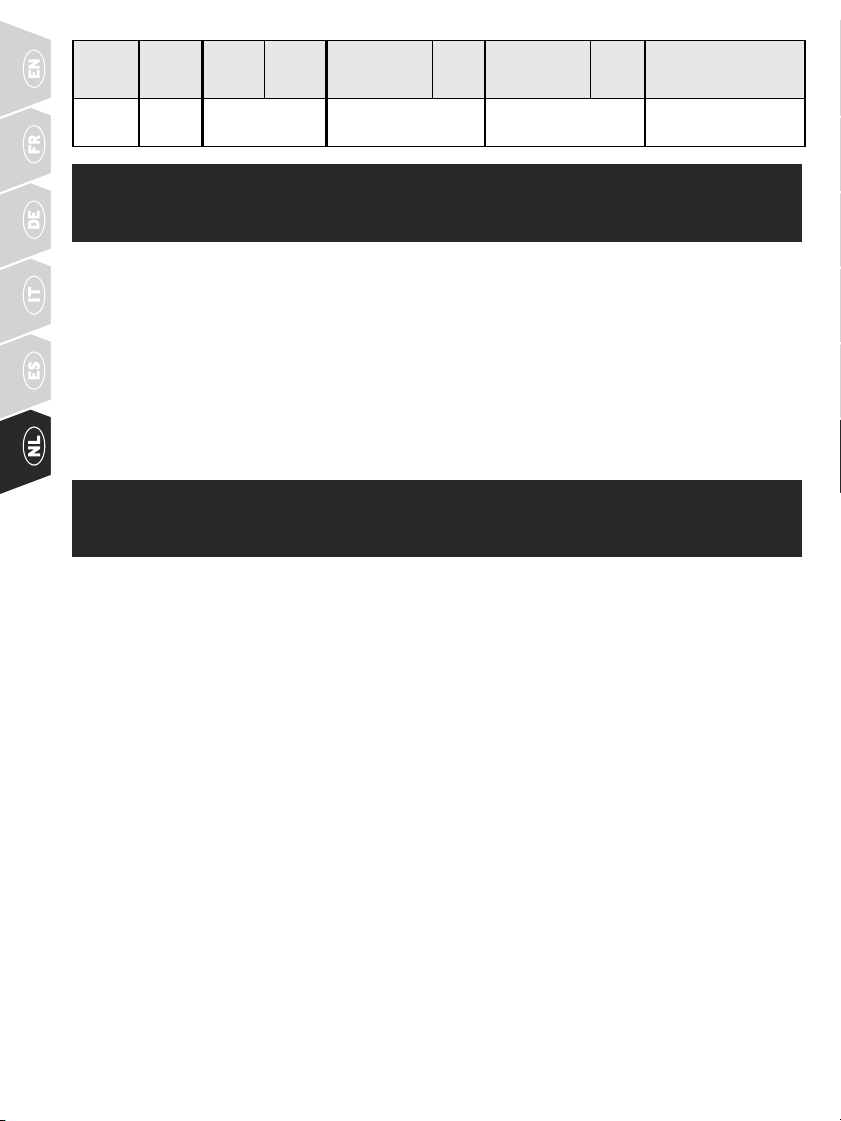
108 WWW.SPORTDOG.COM
7:b
2 Hond 1 Hond 2
Hoge
ononderbroken
stimulatie
Toon Trillen Toon n.v.t.
V/T
(ID-CODE)
n.v.t. a n.v.t. n.v.t. Zie STAP 08
STAP
::
6 DE ONTVANGERHALSBAND EN
AFSTANDSBEDIENING KOPPELEN
De ontvangerhalsband koppelen met een nieuwe afstandsbediening of een nieuwe ontvangerhalsband
programmeren voor gebruik met je huidige afstandsbediening:
1. Zet de ontvangerhalsband uit.
2. Druk op de aan/uit-knop en houd deze ingedrukt. Het controlelampje van de ontvangerhalsband gaat
branden en gaat na 4 of 5 seconden uit. Als je de aan/uit-knop te snel loslaat, knippert het controlelampje
van de ontvangerhalsband zoals normaal. Als dit gebeurt, begin je opnieuw bij stap 1.
3. Laat de aan/uit-knop los nadat het controlelampje van de ontvangerhalsband uitgaat.
4. Druk op de bovenste knop op de afstandsbediening en houd deze ingedrukt totdat het controlelampje
van de ontvangerhalsband 5 keer knippert. Zodra het lampje 5 keer knippert, is de ontvangerhalsband
gekoppeld en begint het lampje weer zoals normaal te knipperen. Als het controlelampje van de
ontvangerhalsband niet 5 keer knippert, begin je opnieuw bij stap 1.
STAP
::
7 HET SYSTEEM PROGRAMMEREN VOOR
GEBRUIK MET MEERDERE HONDEN
SD-425X-E, SD-825X-E, SD-1225X-E
Als je twee of drie honden wilt trainen, moet je extra SportDOG
®
-ontvangerhalsbanden kopen.
1. Programmeer de afstandsbediening in modus 3 of 4 (zie DE MODUS WIJZIGEN op pagina 104).
2. Programmeer de eerste ontvangerhalsband.
A. Zet de ontvangerhalsband uit.
B. Druk op de aan/uit-knop en houd deze ingedrukt. Het controlelampje van de ontvangerhalsband
gaat branden en gaat na 4-5 seconden uit. Als de aan/uit-knop te snel wordt losgelaten, gaat het
controlelampje van de ontvangerhalsband op de normale manier knipperen. Als dit gebeurt, begin je
opnieuw vanaf stap A.
C. Laat de aan/uit-knop los als het controlelampje van de ontvangerhalsband uitgaat.
D. Houd de bovenste knop op de afstandsbediening ingedrukt totdat het controlelampje van de
ontvangerhalsband 5keer knippert. Als het controlelampje van de ontvangerhalsband niet 5 keer
knippert, begin je opnieuw bij stap A.
3. Programmeer de tweede ontvangerhalsband door de stappen A tot en met D hierboven uit te voeren, maar
gebruik de onderste knop in plaats van de bovenste knop.
4. Programmeer de derde ontvangerhalsband door de stappen A tot en met D hierboven uit te voeren, maar
gebruik de zijknop in plaats van de bovenste knop.
109WWW.SPORTDOG.COM
SD-1825X-E
Als je de modus voor twee, drie of zes honden wilt gebruiken, moet je extra SportDOG
®
-
ontvangerhalsbandenkopen.
GEBRUIK MET TWEE HONDEN
SportDOG
®
-ontvangerhalsbanden kunnen zo worden ingesteld dat ze reageren op positie a of b op
deafstandsbediening.
1. Programmeer de afstandsbediening in de modus 1, 2, 5, 6 of 7 met de schakelaar op de positie grijs/a of
ineen van de modi 1-7 met de schakelaar op de positie oranje/b (zie DE MODUS WIJZIGEN op pagina 106).
2. Terwijl de schakelaar op de positie grijs/a staat, kun je de eerste ontvangerhalsband programmeren.
A. Zet de ontvangerhalsband uit.
B. Houd de aan/uit-knop op de ontvangerhalsband ingedrukt. Het controlelampje van de
ontvangerhalsband gaat branden en gaat na 4-5 seconden uit. Als de aan/uit-knop te snel wordt
losgelaten, gaat het controlelampje van de ontvangerhalsband op de normale manier knipperen.
Alsdit gebeurt, begin je opnieuw vanaf stap A.
C. Laat de aan/uit-knop los als het controlelampje van de ontvangerhalsband uitgaat.
D. Houd de bovenste knop op de afstandsbediening ingedrukt totdat het controlelampje van de
ontvangerhalsband 5 keer knippert. Als het controlelampje van de ontvangerhalsband niet 5 keer
knippert, begin je opnieuw bij stap A.
3. Om de tweede ontvangerhalsband te programmeren, herhaal je de stappen A tot en met D waarbij de
schakelaar op de positie oranje/b staat.
GEBRUIK MET DRIE HONDEN
1. Programmeer de afstandsbediening in de modus 3 of 4 met de schakelaar op de positie grijs/a
(zie DE MODUS WIJZIGEN op pagina 106).
2. Terwijl de schakelaar op de positie grijs/a staat, kun je de eerste ontvangerhalsband programmeren.
A. Zet de ontvangerhalsband uit.
B. Houd de aan/uit-knop op de ontvangerhalsband ingedrukt. Het controlelampje van de
ontvangerhalsband gaat branden en gaat na 4-5 seconden uit. Als de aan/uit-knop te snel wordt
losgelaten, gaat het controlelampje van de ontvangerhalsband op de normale manier knipperen.
Alsdit gebeurt, begin je opnieuw vanaf stap A.
C. Laat de aan/uit-knop los als het controlelampje van de ontvangerhalsband uitgaat.
D. Houd de bovenste knop op de afstandsbediening ingedrukt totdat het controlelampje van de
ontvangerhalsband 5 keer knippert. Als het controlelampje van de ontvangerhalsband niet 5 keer
knippert, begin je opnieuw bij stap A.
3. Programmeer de tweede ontvangerhalsband door de stappen A tot en met D te herhalen, waarbij je de
onderste knop in plaats van de bovenste knop gebruikt.
4. Programmeer de derde ontvangerhalsband door de stappen A tot en met D te herhalen, waarbij je de
zijknop in plaats van de bovenste knop gebruikt.
GEBRUIK MET ZES HONDEN
Herhaal stap 1 tot en met 4 in ‘GEBRUIK MET DRIE HONDEN’ hierboven voor de honden 1-3. Zet vervolgens
deschakelaar op de positie oranje/b en herhaal stap 2-4 voor de honden 4-6.
MODEL MET EXTRA
ONTVANGERHALSBAND
SDR-AXF-E Originele ontvangerhalsband voor: SD-425X-E en SD-825X-E (tot 3 honden)
SDR-AX-E Originele ontvangerhalsband voor: SD-1225X-E (tot 3 honden) en SD-1825X-E
(tot6 honden)
110 WWW.SPORTDOG.COM
STAP
::
8 ID-CODES WIJZIGEN
Een ID-code is de signaalidentificatie tussen de afstandsbediening en de ontvangerhalsband. Beide apparaten
zijn in de fabriek geprogrammeerd met 1 van 2000 ID-codes. Twee of meer afstandsbedieningen kunnen met
dezelfde ID-code worden geprogrammeerd, zodat ze beide één ontvangerhalsband kunnen aansturen. Er zijn
64 programmeerbare ID-codes beschikbaar.
DE ID-CODE VAN DE AFSTANDSBEDIENING HANDMATIG
PROGRAMMEREN
1. Draai de intensiteitsknop naar V/T, druk op de modusknop op de achterkant van de afstandsbediening
enlaat deze weer los. Hierdoor wordt de modus niet gewijzigd, dus de huidige modus is nog steeds actief
nadat de ID is gewijzigd.
2. Als je de modusknop loslaat, wordt het controlelampje van de afstandsbediening groen en brandt het
15seconden.
3. Terwijl het controlelampje groen brandt, draai je aan de intensiteitsknop om het 1e cijfer van de ID-code
teselecteren, waarna je de zijknop indrukt en weer loslaat. Het groene controlelampje knippert snel om
deselectie te bevestigen.
4. Terwijl het controlelampje groen brandt, draai je aan de intensiteitsknop om het 2e cijfer van de ID-code
te selecteren, waarna je de zijknop indrukt en weer loslaat. Het groene controlelampje knippert snel om
de selectie te bevestigen. Het tweede cijfer is optioneel en als dit niet nodig is, wacht je totdat het groene
lampje uitgaat zonder de zijknop in te drukken.
5. Na 15 seconden of nadat je de tweede maal op de zijknop hebt gedrukt, gaat het groene controlelampje
uit en wordt de ID-code van de afstandsbediening bijgewerkt. Op dit punt staat de afstandsbediening
indezelfde modus als voordat je de ID instelde.
6. Nadat je de ID-code hebt gewijzigd, moet je de ontvangerhalsband aan de afstandsbediening koppelen
(zieSTAP 06).
OPMERKING: Als je maar eenmaal op de zijknop drukt (en stap 4 overslaat), is de ID nog steeds een ID van twee
cijfers. Het linkercijfer wordt automatisch een 1. Als je in stap 3 bijvoorbeeld 6 kiest en slechts eenmaal op de
zijknop drukt, wordt de ID 16.
DE FABRIEKS-ID VAN DE AFSTANDSBEDIENING HERSTELLEN
1. Draai de intensiteitsknop naar V/T, druk op de modusknop op de achterkant van de afstandsbediening en
laat deze weer los. Hierdoor wordt de modus niet gewijzigd, dus de huidige modus is nog steeds actief nadat
de ID is gewijzigd.
2. Druk op geen enkele knop en wacht totdat het groene controlelampje van de afstandsbediening uitgaat.
3. Je moet nu de ontvangerhalsband aan de afstandsbediening koppelen (zie STAP 06).
ACCESSOIRES
Neem contact op met de klantenservice of bezoek het winkelgedeelte op sportdog.com en ga naar Parts &
Accessories als je extra accessoires wilt kopen voor je SportDOG
®
-trainer met afstandsbediening.
111WWW.SPORTDOG.COM
VEELGESTELDE VRAGEN
Is de statische stimulatie veilig voor
mijn hond?
Hoewel ononderbroken of korte statische stimulatie onprettig
kan zijn, is het niet schadelijk voor je hond. Elektronische
trainingsapparaten vereisen interactie en training van de eigenaar
omhet gewenste resultaat te bereiken.
Hoe oud moet een hond zijn voor
het gebruik van deze trainer met
afstandsbediening?
Leeftijd is niet zo belangrijk als het leervermogen van je hond. Je
hond moet de basisgehoorzaamheidscommando's kunnen leren,
zoals 'Zit' of 'Blijf'. De ontvangerhalsband is mogelijk te groot voor
honden van minder dan 4 kilo.
Moet mijn hond de
ontvangerhalsband blijven dragen
nadat hij is getraind en mijn
commando's gehoorzaamt?
Mogelijk moet je ter herhaling de ontvangerhalsband van tijd
tot tijd opnieuw omdoen. Ook laten veel jagers hun hond de
ontvangerhalsband tijdens het jagen dragen voor een maximale
controle, omdat ze veel energie hebben en veel worden afgeleid
indenatuur.
Is de ontvangerhalsband waterdicht? Ja. Als de oplaadbare batterij vervangen moet worden, zorg er dan
voor dat de o-ring en de groef voor de o-ring niet vuil zijn.
Kan de ontvangerhalsband worden
gebruikt in zout water?
Als de ontvangerhalsband wordt gebruikt in of bij zout water, moet
jedeze na elk gebruik afspoelen met schoon water.
Kan ik deze trainer met
afstandsbediening gebruiken met
meer dan één hond?
Ja, de trainer met afstandsbediening kan worden uitgebreid tot
maximaal 3 honden (tot 6 honden voor de SD-1825X-E). Hiervoor
moet je extra SportDOG
®
Add-A-Dog
®
ontvangerhalsbanden
kopen. Raadpleeg pagina 109 voor een lijst met compatibele
ontvangerhalsbanden.
Kan ik deze trainer met
afstandsbediening gebruiken met
agressieve honden?
Het wordt niet aanbevolen onze producten te gebruiken met agressieve
honden. We raden je aan contact op te nemen met je dierenarts of een
professioneel trainer als je denkt dat je hond agressief is.
Krijg ik het exacte bereik dat wordt
geclaimd voor deze trainer met
afstandsbediening?
Terrein, weer, begroeiing en signalen van andere radiozenders zijn
van invloed op het bereik van de trainer met afstandsbediening. Voor
het maximale bereik raadpleeg je de sectie 'Zo werkt het systeem' in
deze gebruiksaanwijzing.
Hoe lang kan ik mijn hond
ononderbroken statische stimulatie
geven?
Je kunt de knop voor ononderbroken statische stimulatie ingedrukt
houden en je hond een statische stimulans geven gedurende
maximaal 10 seconden. Na 10 seconden wordt de afstandsbediening
uitgeschakeld en moet je de knop voor ononderbroken statische
stimulatie loslaten en opnieuw indrukken.
Wat moet ik doen als de hals van mijn
hond rood en geïrriteerd wordt?
Dit komt doordat de contactpunten de huid irriteren. Stop een paar
dagen met het gebruik van de ontvangerhalsband. Als dit langer dan
48 uur duurt, raadpleeg je de dierenarts. Zodra de huid weer normaal
is, kan de halsband opnieuw worden gebruikt. Houd de huid echter
goed in de gaten. Je hond mag de halsband maximaal 12 uur per dag
dragen.
De intensiteitsknop lijkt moeilijk te
draaien. Is dit normaal?
Ja. Dit voorkomt onbedoelde wijzigingen in de intensiteit en is beter
voor een optimale waterdichte afdichting. De knop zal na verloop van
tijd door gebruik gemakkelijker draaien.
112 WWW.SPORTDOG.COM
Kan ik een riem bevestigen aan deze
trainer met afstandsbediening?
Bevestig GEEN riem aan deze trainer met afstandsbediening. Je kunt
je hond een aparte, niet-metalen halsband omdoen en daar een
riem aan vastmaken. Zorg ervoor dat de extra halsband geen druk
uitoefent op de contactpunten.
Mijn afstandsbediening stuurt
onbedoeld een signaal naar meer dan
één ontvangerhalsband. Wat moet
ik doen?
In het zeldzame geval dat dit gebeurt, kun je de ID-code van de
afstandsbediening wijzigen (zie STAP 08).
PROBLEMEN OPLOSSEN
De antwoorden op deze vragen zouden moeten helpen bij het oplossen van problemen met dit systeem. Als dit
niet het geval is, neem je contact op met de klantenservice of bezoek je onze website op www.sportdog.com.
Mijn hond reageert niet wanneer
ikop een knop druk.
• Controleer of de ontvangerhalsband aanstaat en of het
controlelampje knippert.
• Als het bereik is afgenomen na het eerste gebruik, controleer je
ofde batterij in de afstandsbediening of de ontvangerhalsband
bijnaleeg is.
• Vele factoren zijn van invloed op het bereik van het systeem. Voor
een lijst van deze factoren raadpleeg je “Zo werkt het systeem”.
• Je kunt controleren of de ontvangerhalsband statische stimulatie
afgeeft aan je hond door het meegeleverde testlampje in de
ontvangerhalsband te plaatsen. Raadpleeg de sectie 'Instructies
voor testlampje' voor details.
• Stel de intensiteitsknop hoger in. Raadpleeg “Het beste
intensiteitsniveau voor je hond bepalen” voor meer informatie.
• Verhoog het bereik van statische stimulatie. Raadpleeg “Het bereik
van statische stimulatie wijzigen” voor meer informatie.
• Zorg ervoor dat de contactpunten van de ontvangerhalsband goed
tegen de huid van de hond zijn geplaatst. Raadpleeg “Zorgen dat de
ontvangerhalsband goed past” voor meer informatie.
• Mogelijk moet je de langere contactpunten gebruiken die zijn
meegeleverd met het systeem of het haar onder de contactpunten
bijknippen. Scheer nooit de hals van de hond.
• Als je merkt dat de gebruiksduur afneemt tot minder dan de
helft van de oorspronkelijke duur, moet de batterij van de
ontvangerhalsband worden vervangen. Neem contact op met
deklantenservice om een nieuwe aan te schaffen.
De ontvangerhalsband wordt niet
ingeschakeld.
• Zorg ervoor dat de ontvangerhalsband is opgeladen.
Deontvangerhalsband wordt in 2 uur opgeladen.
De ontvangerhalsband reageert
niet op de afstandsbediening.
• Controleer of de afstandsbediening is opgeladen.
Deafstandsbediening wordt in 2 uur opgeladen.
• Controleer of de ontvangerhalsband aanstaat en of het
controlelampje knippert. Raadpleeg 'De ontvangerhalsband
in-enuitschakelen'.
• Zie 'De ontvangerhalsband en afstandsbediening koppelen'.
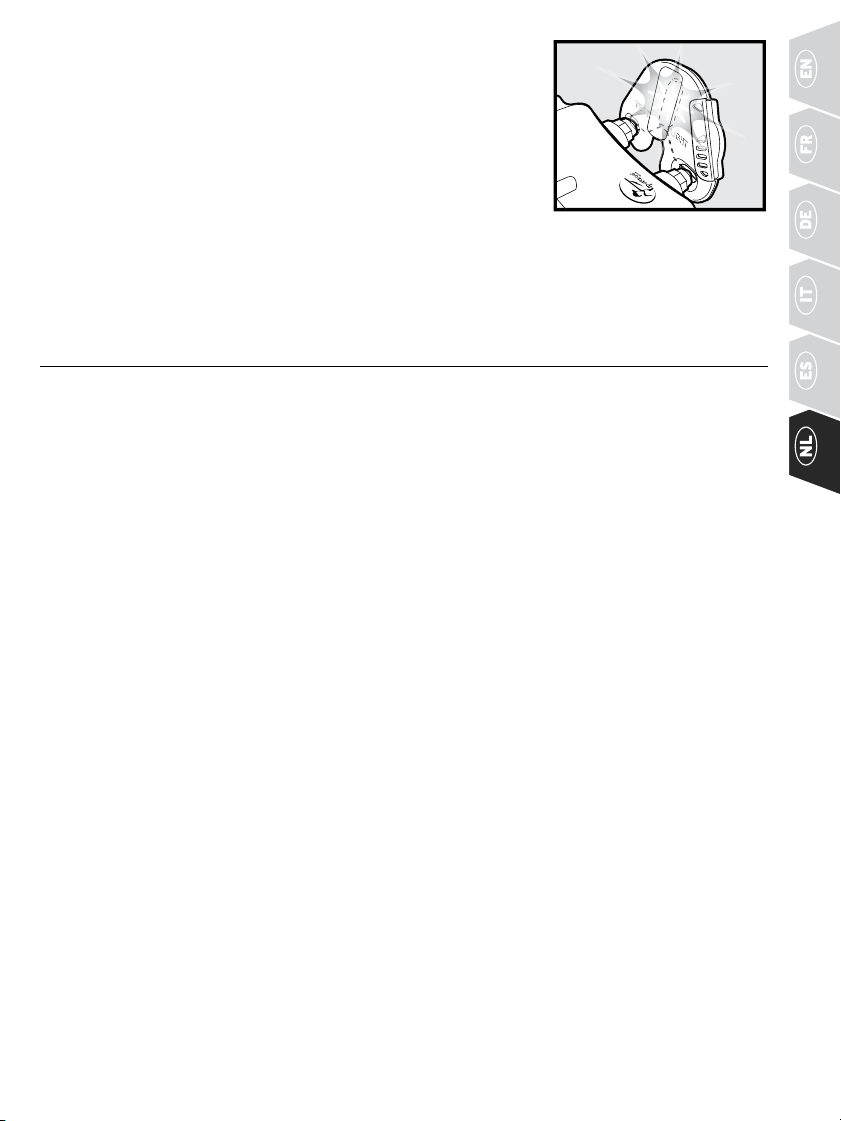
113WWW.SPORTDOG.COM
INSTRUCTIES VOOR TESTLAMPJE
Volg deze instructies om uw systeem te testen:
1. Zet de ontvangerhalsband aan.
2. Houd de testlamp voor contactpunten tegen de contactpunten van
de halsband.
3. Druk op de afstandsbediening op de knop Statische stimulatie.
4. Het testlampje gaat knipperen.
OPMERKING: Bij hogere niveaus van statische stimulatie knippert
het testlampje feller.
5. Zet de ontvangerhalsband uit.
Bewaar het testlampje voor andere testen.
OPMERKING: Als het testlampje niet knippert, laad dan de batterij opnieuw op en test opnieuw.
Als het testlampje dan nog steeds niet knippert, neemt u contact op met de klantenservice.
BATTERIJ
Dit systeem werkt met twee lithium-ionbatterijen. Vervang de batterij alleen door een batterij die u heeft
ontvangen nadat u de klantenservice heeft gebeld.
• Je mag de batterijen nooit uit het batterijcompartiment verwijderen om ze op te laden.
• De oplaadbare lithium-ion-batterijen (Li-Ion) zijn vrij van geheugeneffect, hoeven niet helemaal leeg te zijn
voordat je ze kunt opladen en kunnen niet worden overladen.
• De batterijen worden in de fabriek gedeeltelijk opgeladen, maar moeten vóór het eerste gebruik helemaal
worden opgeladen.
• Als je het product gedurende langere tijd opbergt, vergeet dan niet om de batterijen regelmatig helemaal
op te laden. Dit dient elke 3 tot 4 maanden te gebeuren.
• Je kunt de batterij naar verwachting honderden keren opladen. Alle oplaadbare batterijen verliezen in
de loop van de tijd echter capaciteit, afhankelijk van het aantal doorlopen oplaadcycli. Dit is normaal.
Als de gebruiksduur afneemt tot de helft van de oorspronkelijke gebruiksduur, neem je contact op met de
klantenservice om een nieuwe batterij te kopen.
• De batterijen moeten ongeveer 3 tot 5 jaar meegaan. Wanneer een batterij vervangen moet worden,
kun je een nieuwe bestellen door te bellen met de klantenservice. Open de ontvangerhalsband of
afstandsbediening pas nadat je de vervangende batterij hebt ontvangen.
In veel regio’s worden gebruikte batterijen afzonderlijk verwerkt. Controleer de regelgeving in uw regio
voordat u lege batterijen weggooit. Hieronder vindt u instructies om de batterij te verwijderen uit het product
zodat deze apart kan worden verwerkt.
114 WWW.SPORTDOG.COM
AAN HET EIND VAN HET PRODUCTLEVEN MOET U DEZE INSTRUCTIES VOOR VERWIJDERING VAN DE
BATTERIJ GEBRUIKEN VOOR DE UITEINDELIJKE AFVALVERWERKING (OPEN DE ONTVANGERHALSBAND
OFAFSTANDSBEDIENING PAS NADAT U DE VERVANGENDE BATTERIJ HEEFT ONTVANGEN).
1. Gebruik een kruiskopschroevendraaier nr. 1 voor de afstandsbediening en/of een 3/32-inbussleutel voor
de ontvangerhalsband om de schroeven van de behuizing te verwijderen.
2. Verwijder het batterijdeksel of de achterkant.
3. Verwijder de oude batterij.
Deze instructies gelden niet voor reparaties of vervanging van de batterij. Als u wilt voorkomen dat uw
garantie ongeldig wordt, kunt u de klantenservice bellen om de batterij te vervangen door een batterij
diespecifiek is goedgekeurd door Radio Systems Corporation.
Hier vindt u een lijst van patenten voor dit product: www.radiosystemscorporation.com/patents

©2021 RADIO SYSTEMS CORPORATION
Radio Systems Corporation • 10427 PetSafe Way • Knoxville, TN USA 37932 • 1.865.777.5404
Radio Systems PetSafe Europe Ltd. • 2nd Floor, Elgee Building, Market Square
Dundalk, Co. Louth, A91 YR9X, Ireland • +353 (0) 42 942 4122
Radio Systems Australia PTY LTD • Suite 11001 Australia Fair Office Towers
36 Marine Parade, Southport, QLD 4215 • +61 1800 786 608
400-2547-19
SPORTDOG.COM
