OUTDOOR WIRING HARNESS
QUICKSTART GUIDE
BOX CONTENTS
(1) Quickstart Guide
(1) 90’ Wiring Harness
(8) Speaker Branch Cables (4 Gray, 4 Red)
(2) Subwoofer Branch Cables (Black Plug)
(1) Amplifier Cable
OVERVIEW
This outdoor wiring harness is compatible with
Sonance Garden Series 8.1 and 8.2 systems and is
designed to save time and installation labor, while
reducing the potential for future troubleshooting.
NOTE: This document is supplemental to the Sonance
Garden Series Installation Manual. Please review that
document prior to installing your system.
PLANNING
Before you begin, plan the system for the space.
Locate the desired listening area and best placement
for the speakers and subwoofer. Ensure that you have
enough speaker wire on hand to run wire from the
amplifier location to the starting point of the wiring
harness (not included with this harness).
LAYOUT
Begin by laying out the harness in the area where the
SGS system is to be installed. Ensure that the harness
sockets are placed within two to three feet of the
desired location for each speaker and subwoofer.
NOTE: Leave the included protective caps installed on
the harness during this step to prevent dirt and debris
from entering the socket.
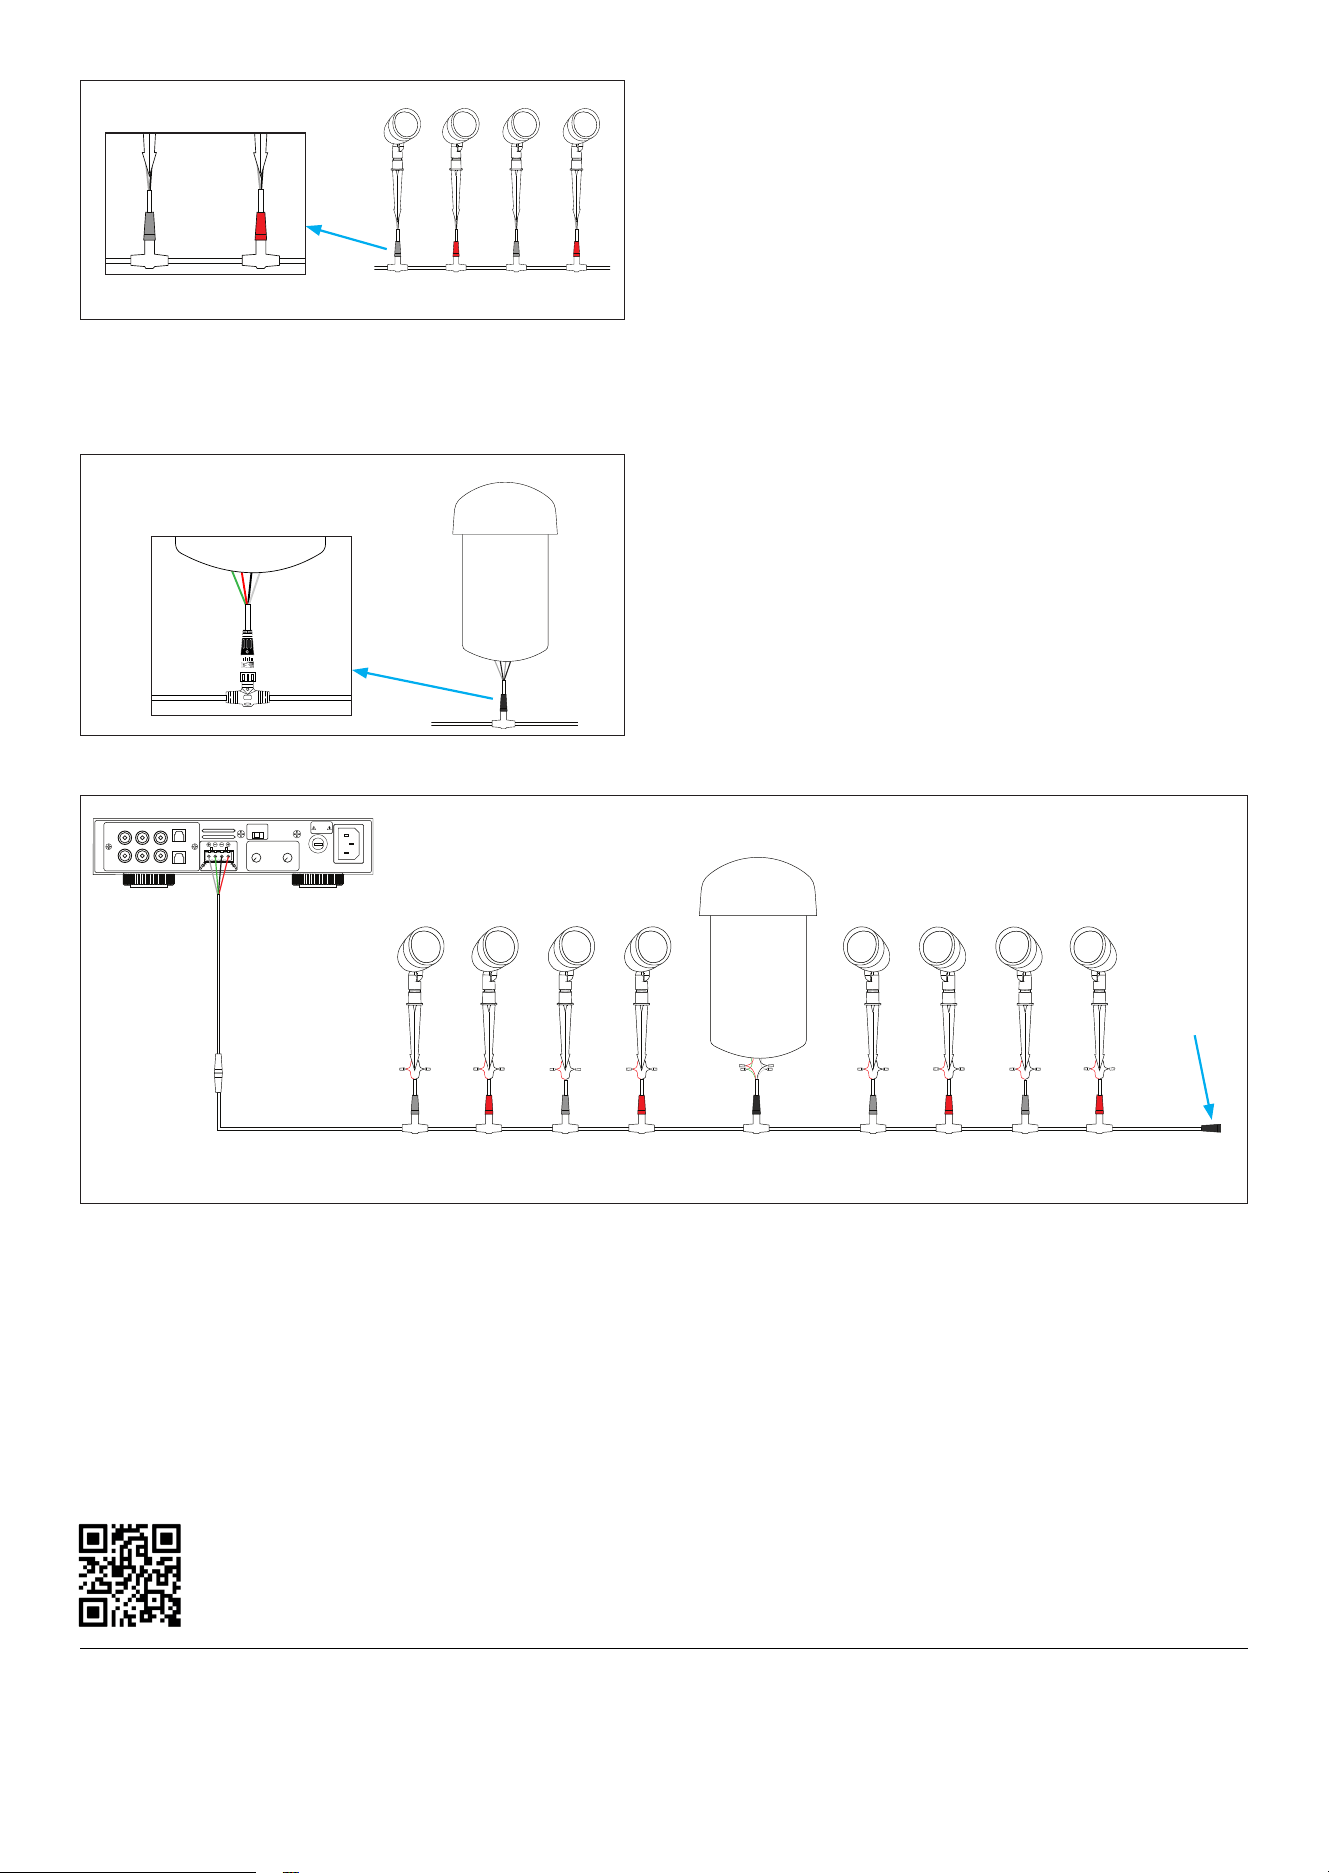
WIRING THE AMPLIFIER
1. Run a four-conductor speaker wire from the
amplifier location to the start of the wiring harness
(the end with tinned wire leads).
2. Using outdoor-rated wire nuts, connect the
speaker wire into the harness.
Note: Sonance recommends using 16-gauge speaker
wire if the length of the wire from the amplifier to the
harness will not exceed 50 feet. If exceeding 50 feet,
Sonance recommends using 14 or larger gauge wire.
CONNECTING THE SPEAKERS
NOTE: Before wiring the branch cables to the Garden
Series speakers, be sure to attach the speaker stakes.
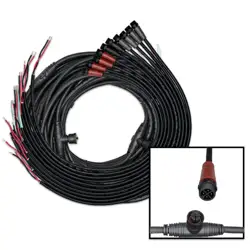
3. Connect each of the supplied branch cables to
the appropriate speaker or subwoofer wire tail.
For each Garden Series speaker, there is one
black wire and one red wire. For each Garden
Series subwoofer, there is one black wire, one
red wire, one green wire, and one white wire. The
subwoofer branch cables can each be identified
by a black plug with four loose wires. Each branch
cable with the Sonance Outdoor Wiring Harness
comes with 10mm of tinned wire exposed.
• Connect the branch cables to the speakers and
subwoofer by matching the colors (red to red,
black to black, etc).
• Secure each connection with an outdoor-rated
wire nut (supplied with every Sonance Garden
Series System, or available at any hardware store)
by feeding the combined wires into the cavity and
twisting until they are gripped within the wire nut.
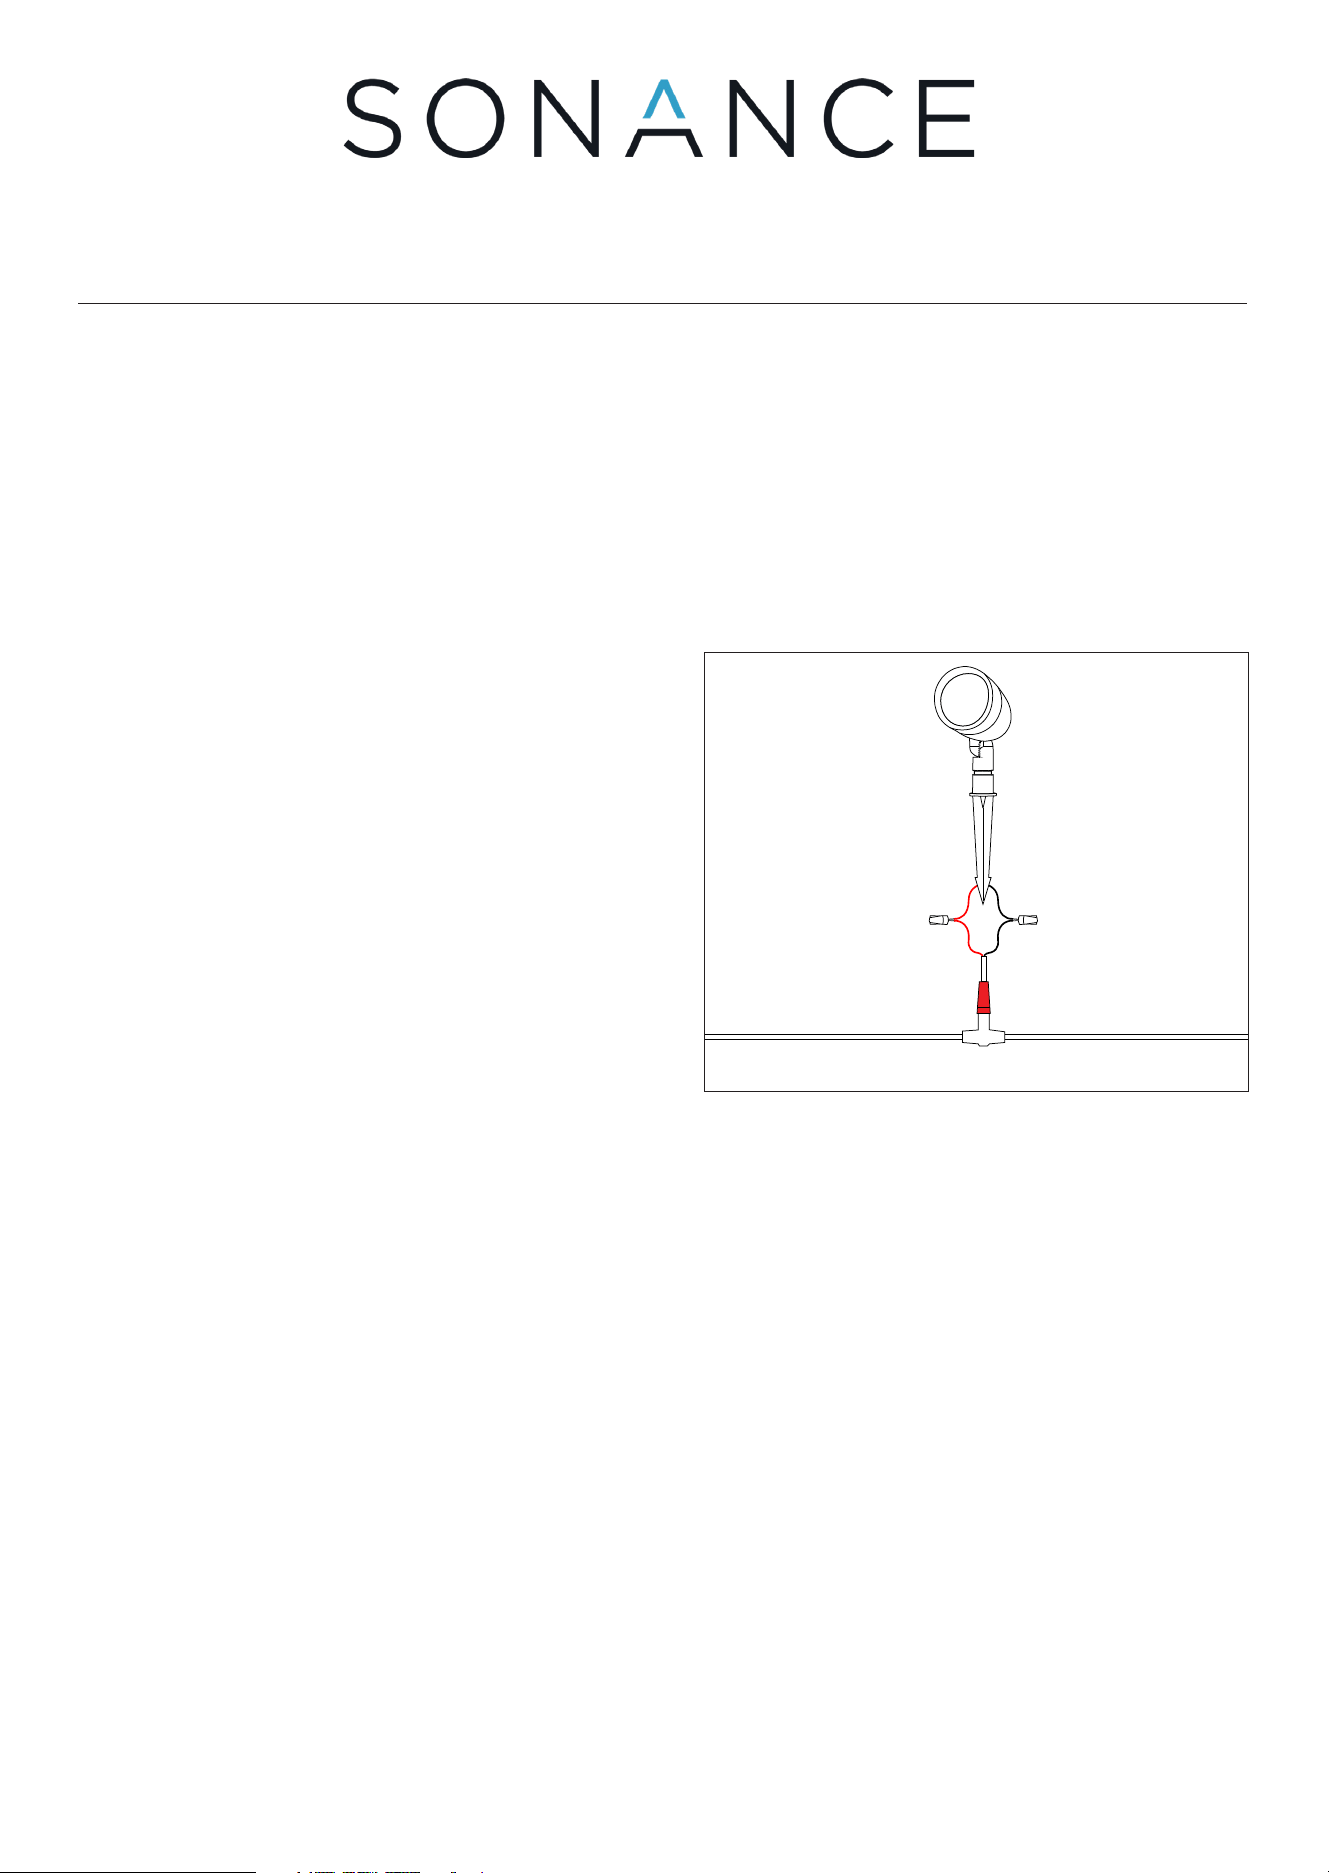
Once the branch cables are connected, there should
be four Garden Series speakers with red plugs, four
with gray plugs, and the Garden Series subwoofer
(one or two, depending on your system) will have a
black plug attached.
Zip ties or waterproof tape can be used for additional
strain relief at each connection, if desired.
CONNECTING THE HARNESS
6. Place the prepared speakers and subwoofer into
position along the wiring harness that has been
laid out along the planned installation area. In
addition to the two end connectors, the harness
has nine socket locations in the middle. The end
plug (male connector) will be used to connect to
the amplifier cable, and the end socket (female
connector) can be used to connect a speaker,
a subwoofer, or can be left with the protective
cap installed. Install each speaker and subwoofer
into the ground using the steps outlined in the
Sonance Garden Series Installation Manual.
• Any branch cable can connect to any socket.
Sonance recommends alternating between red
and gray sockets along the wiring harness to
achieve balanced left and right channel dispersion.
Secure the Wire and Wire Nuts
Scan QR code for additional
information. For technical
support call 949.492.7777
or visit www.sonance.com
EXTENDING THE WIRING HARNESS
It is possible to connect an additional wiring harness
to the end of the first harness and install a second
Garden Series kit, for a total of 16 speakers and two
subwoofers. While this configuration is compatible
with Sonance DSP amplifiers, please note that there
may be a slight volume reduction given the additional
length of the wire. Most users will not notice this
reduction.
Follow the previous installation steps to wire, install,
and connect the system and harness, omitting the
steps for wiring the amplifier. Once all the additional
system pieces are installed and connected, connect
the end socket of the first wiring harness to the
beginning plug of the second harness. When using
a Sonance DSP amplifier, the amplifier from the first
wiring harness will support the full length of the two
connected outdoor wiring harnesses.
• The subwoofer can also be placed at any socket
along the chain of the wiring harness, although it
is recommended to place the subwoofer as close
to the center of the speaker array as practical.
• Once each speaker and subwoofer is installed into
place, screw each of their branch cable plugs into
the sockets along the harness.
• In a configuration of eight speakers and one
subwoofer, one subwoofer branch cable will be left
unused. Leave the protective cap on whichever
socket is left disconnected.
T5AL / 250VAC
CAUTION
REPLACE FUSE ONLY
WITH
SAME TYPE AND RATING
ATTENTION
REMPLACER UNIQUEMENT AVEC
LE MEME TYPE ET CALIBRE DU
FUSIBLE
CAUTION
RISK OF ELECTRIC SHOCK
DO NOT OPEN
AVIS
RISQUE DE CHOC ELECTRIQUE
NE PAS OUVRIR
1
-
L
E
FT
1 - R
I
G
HT
AC 100-120V ~ 60Hz
AC 220-240V ~ 50Hz
81 watts
S/
N
MADE IN CHINA
SR 2-125
IN
OUT
IN
OUT
Use Only One Type Of Input Connection
EQ PRESET
SELECTION
L R
L&R L&R
COAX TOSLINKANALOG ANALOG
See Manual for EQ Preset List
EQ
PRESET
BANK
2
AUTO
ON
OFF
AUDIO
ON
1
4
3 5
6
7
EQ1
FLAT
EQ3
EQ2 EQ4
EQ5
EQ6
CLASS 2 WIRING
4
Ω
MIN
Left Right
Left and Right
Left RightLeft Right Left Right
Wiring Harness Diagram
T5AL / 250VAC
CAUTION
REPLACE FUSE ONLY
WITH
SAME TYPE AND RATING
ATTENTION
REMPLACER UNIQUEMENT AVEC
LE MEME TYPE ET CALIBRE DU
FUSIBLE
CAUTION
RISK OF ELECTRIC SHOCK
DO NOT OPEN
AVIS
RISQUE DE CHOC ELECTRIQUE
NE PAS OUVRIR
1
-
L
E
FT
1 - R
I
G
HT
AC 100-120V ~ 60Hz
AC 220-240V ~ 50Hz
81 watts
S/
N
MADE IN CHINA
SR 2-125
IN
OUT
IN
OUT
Use Only One Type Of Input Connection
EQ PRESET
SELECTION
L R
L&R L&R
COAX TOSLINKANALOG ANALOG
See Manual for EQ Preset List
EQ
PRESET
BANK
2
AUTO
ON
OFF
AUDIO
ON
1
4
3 5
6
7
EQ1
FLAT
EQ3
EQ2 EQ4
EQ5
EQ6
CLASS 2 WIRING
4
Ω
MIN
Left Right
Left and Right
Left RightLeft Right Left Right
Subwoofer Socket
T5AL / 250VAC
CAUTION
REPLACE FUSE ONLY
WITH
SAME TYPE AND RATING
ATTENTION
REMPLACER UNIQUEMENT AVEC
LE MEME TYPE ET CALIBRE DU
FUSIBLE
CAUTION
RISK OF ELECTRIC SHOCK
DO NOT OPEN
AVIS
RISQUE DE CHOC ELECTRIQUE
NE PAS OUVRIR
1
-
L
E
FT
1 - R
I
G
HT
AC 100-120V ~ 60Hz
AC 220-240V ~ 50Hz
81 watts
S/
N
MADE IN CHINA
SR 2-125
IN
OUT
IN
OUT
Use Only One Type Of Input Connection
EQ PRESET
SELECTION
L R
L&R L&R
COAX TOSLINKANALOG ANALOG
See Manual for EQ Preset List
EQ
PRESET
BANK
2
AUTO
ON
OFF
AUDIO
ON
1
4
3 5
6
7
EQ1
FLAT
EQ3
EQ2 EQ4
EQ5
EQ6
CLASS 2 WIRING
4
Ω
MIN
Left Right
Left and Right
Left Right
Left Right Left Right
Alternating Speaker Sockets
T5AL / 250VAC
CAUTION
REPLACE FUSE ONLY
WITH
SAME TYPE AND RATING
ATTENTION
REMPLACER UNIQUEMENT AVEC
LE MEME TYPE ET CALIBRE DU
FUSIBLE
CAUTION
RISK OF ELECTRIC SHOCK
DO NOT OPEN
AVIS
RISQUE DE CHOC ELECTRIQUE
NE PAS OUVRIR
1
-
L
E
FT
1 - R
I
G
HT
AC 100-120V ~ 60Hz
AC 220-240V ~ 50Hz
81 watts
S/
N
MADE IN CHINA
SR 2-125
IN
OUT
IN
OUT
Use Only One Type Of Input Connection
EQ PRESET
SELECTION
L R
L&R L&R
COAX TOSLINKANALOG ANALOG
See Manual for EQ Preset List
EQ
PRESET
BANK
2
AUTO
ON
OFF
AUDIO
ON
1
4
3 5
6
7
EQ1
FLAT
EQ3
EQ2 EQ4
EQ5
EQ6
CLASS 2 WIRING
4
Ω
MIN
Left Right
Left and Right
Left RightLeft Right Left Right
Protective
Cap
LIMITED THREE (3) YEAR WARRANTY
Sonance warrants to the first end-user purchaser that this Sonance-brand product (“Product”), when purchased from an authorized Sonance Dealer/Distributor, will be free
from defective workmanship and materials for the period stated above. Sonance will, at its option and expense, either repair the defect or replace the Product with a new or
remanufactured Product or a reasonable equivalent. Please visit our website and owner’s e-Manual for complete warranty and exclusion information.
©2023 Sonance. All rights reserved. Sonance is a registered trademark of Dana Innovations. Due to continuous product improvement, all features and specifications are subject to
change without notice. For the latest Sonance product specification information visit our website: www.sonance.com
SONANCE • 991 Calle Amanecer • San Clemente, CA 92673 • (949) 492-7777 04.26.2023
