
Technical Support and E-Warranty Certificate
www.vevor.com/support
CURB RAMP
USER MANUAL
We continue to be committed to provide you tools with competitive price.
"Save Half", "Half Price" or any other similar expressions used by us only represents an
estimate of savings you might benefit from buying certain tools with us compared to the major
top brands and does not necessarily mean to cover all categories of tools offered by us. You
are kindly reminded to verify carefully when you are placing an order with us if you are
actually saving half in comparison with the top major brands.

- 1 -
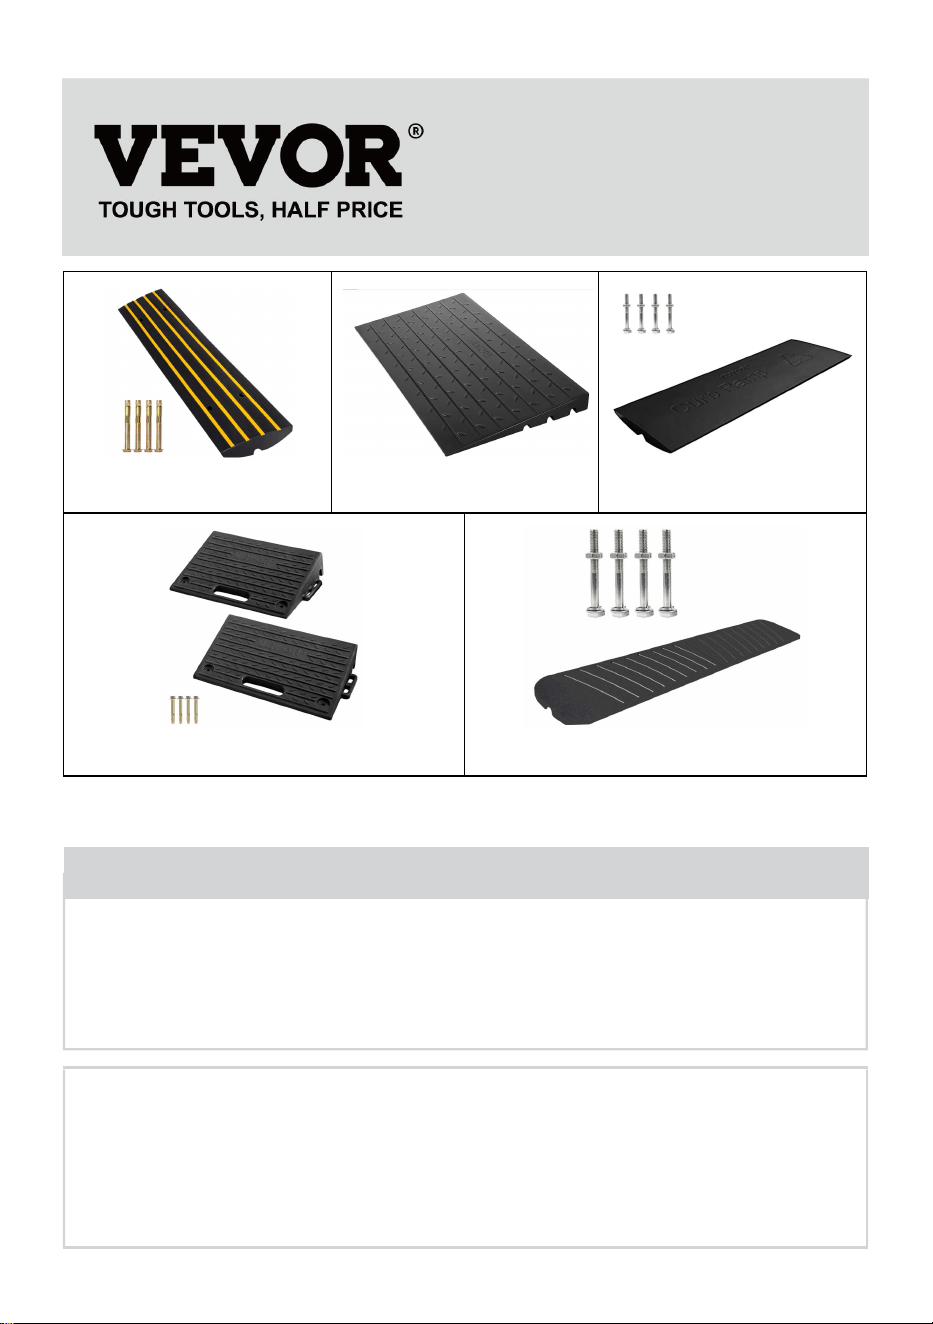
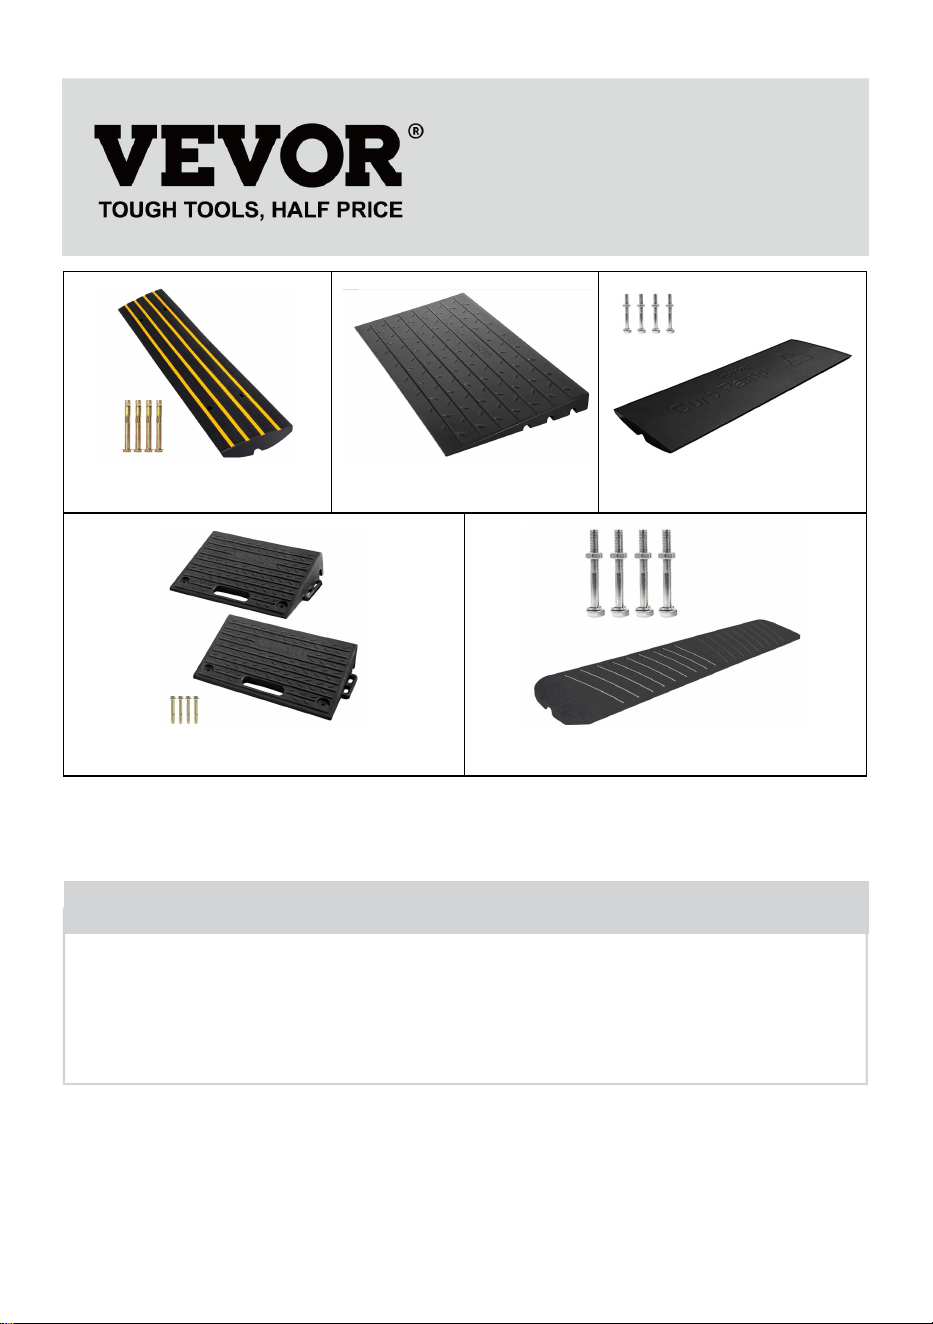
TYPE A
TYPE B
TYPE C
TYPE D
TYPE E
Note: The actual product you receive determines its look.
Have product questions? Need technical support? Please feel free to
contact us:
Technical Support and E-Warranty Certificate
www.vevor.com/support
NEED HELP? CONTACT US!
This is the original instruction, please read all manual instructions
carefully before operating. VEVOR reserves a clear interpretation of our
user manual. The appearance of the product shall be subject to the
product you received. Please forgive us that we won't inform you again if
there are any technology or software updates on our product.
CURB RAMP

- 2 -
1.INSTRUCTIONS
For your information,please read these installation instructions before using your curb
ramp; Please keep all instructions and refer to them whennecessary.It is normal the
product has a slight smell.we recommended ventilating before use to avoid the smell.
WARNINGS
Incorrect installation can cause debris to collect,impeding water flow.
Used in curbs,steps,and uneven pavement.
1. Read and understand the manual, and save these instructions for future
reference.
2. Before every use, inspect the product for any loose or damaged parts; do not use
if any are found.
3. Clean the ramps before use, removing any dirt, oil, or debris, and allow them to
dry.
4. Set up the ramps only on a solid, level, and dry surface to ensure safety.
5. Be cautious of dynamic loading to prevent product failure due to sudden load
movement which may create an excessive load.
6. Use the product strictly as intended to avoid misuse and potential hazards.
7. Keep children and bystanders away from the work area and do not allow children
to play with or near the product, as it is not a toy.
8. When not in use, store the equipment in a dry location to prevent rust and prolong
its lifespan.
9. Ensure the product is securely fixed to the ground before and after use to prevent
sliding or shifting, maintaining safety and stability.
10. Do not exceed the product's maximum load-bearing capacity to avoid overloading
and potential damage.
11. Handle the product with care during transportation to prevent damage from rough
handling.
12. The instructions, warnings, and cautions provided cannot cover all possible
conditions and situations that may occur. It is essential for the operator to exercise
common sense and caution, which are crucial for safe operation but cannot be
built into the product.
- 3 -
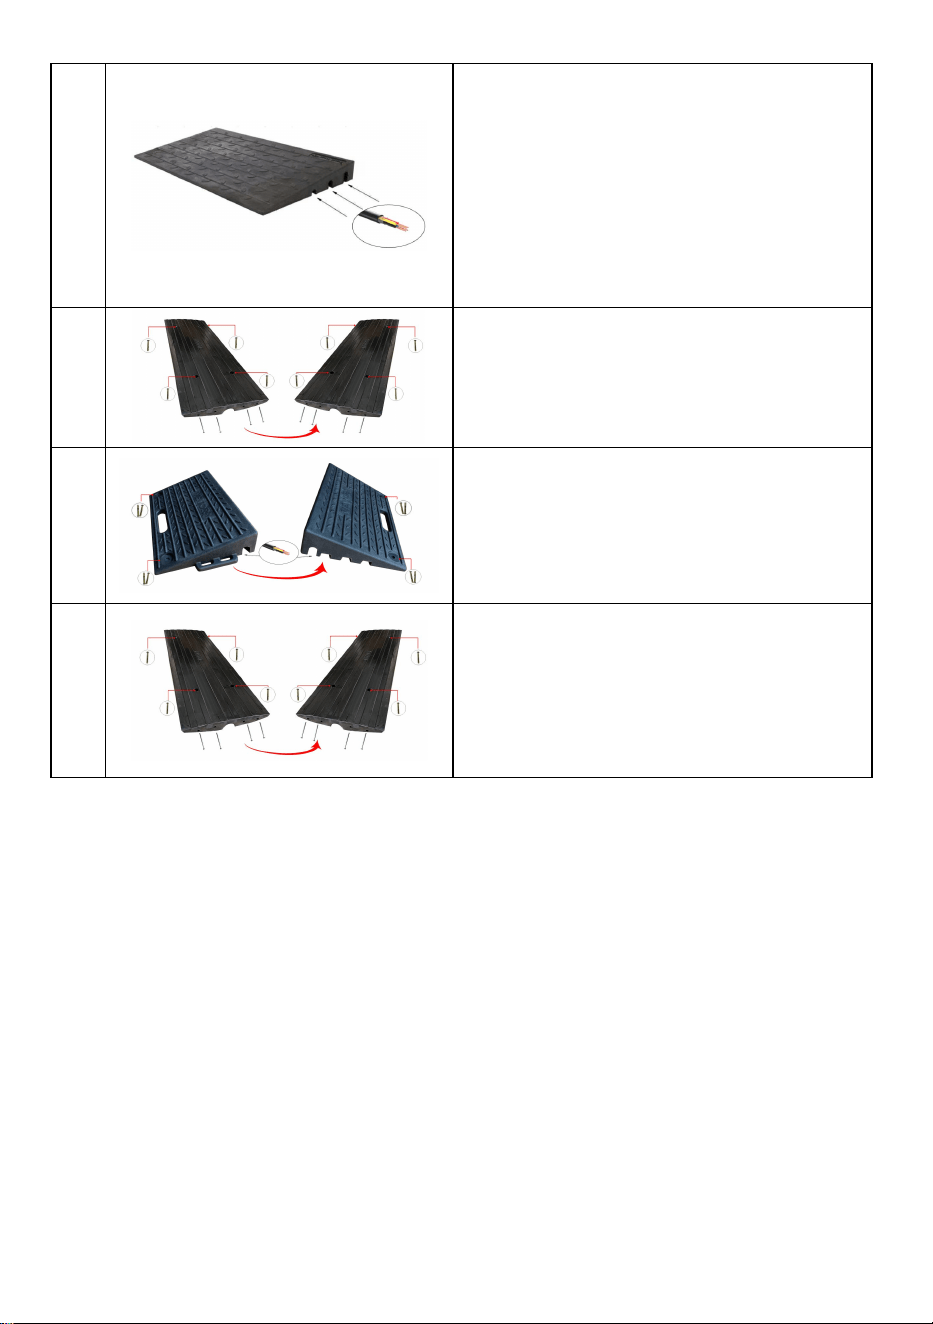
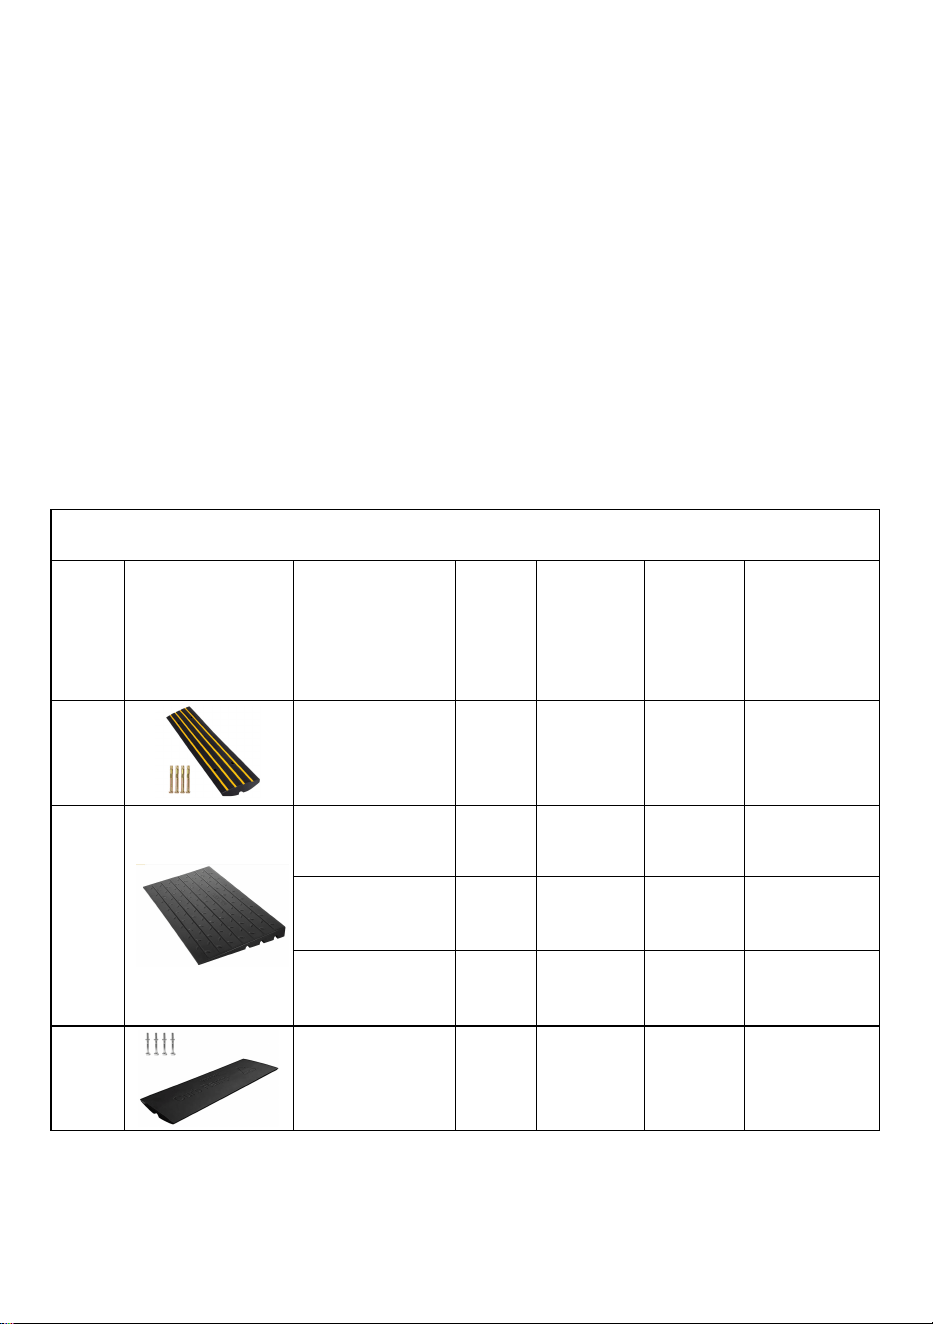
2. Product introduct and Parameter
This is a high-performance rubber product designed specifically for the safe
transition of vehicles, enabling easy passage over higher curbs or sidewalks while
protecting underground cables or pipes from damage. Made from high-quality,
wear-resistant, and pressure-resistant rubber material, it is suitable for various outdoor
environments. Its bottom channel design allows for the passage of water and cables,
the textured surface increases friction, side holes facilitate connection, and surface
holes can be used for anchoring. It is suitable for curbs, driveways, home garages,
loading docks, and other areas, compatible with various vehicle transitions.
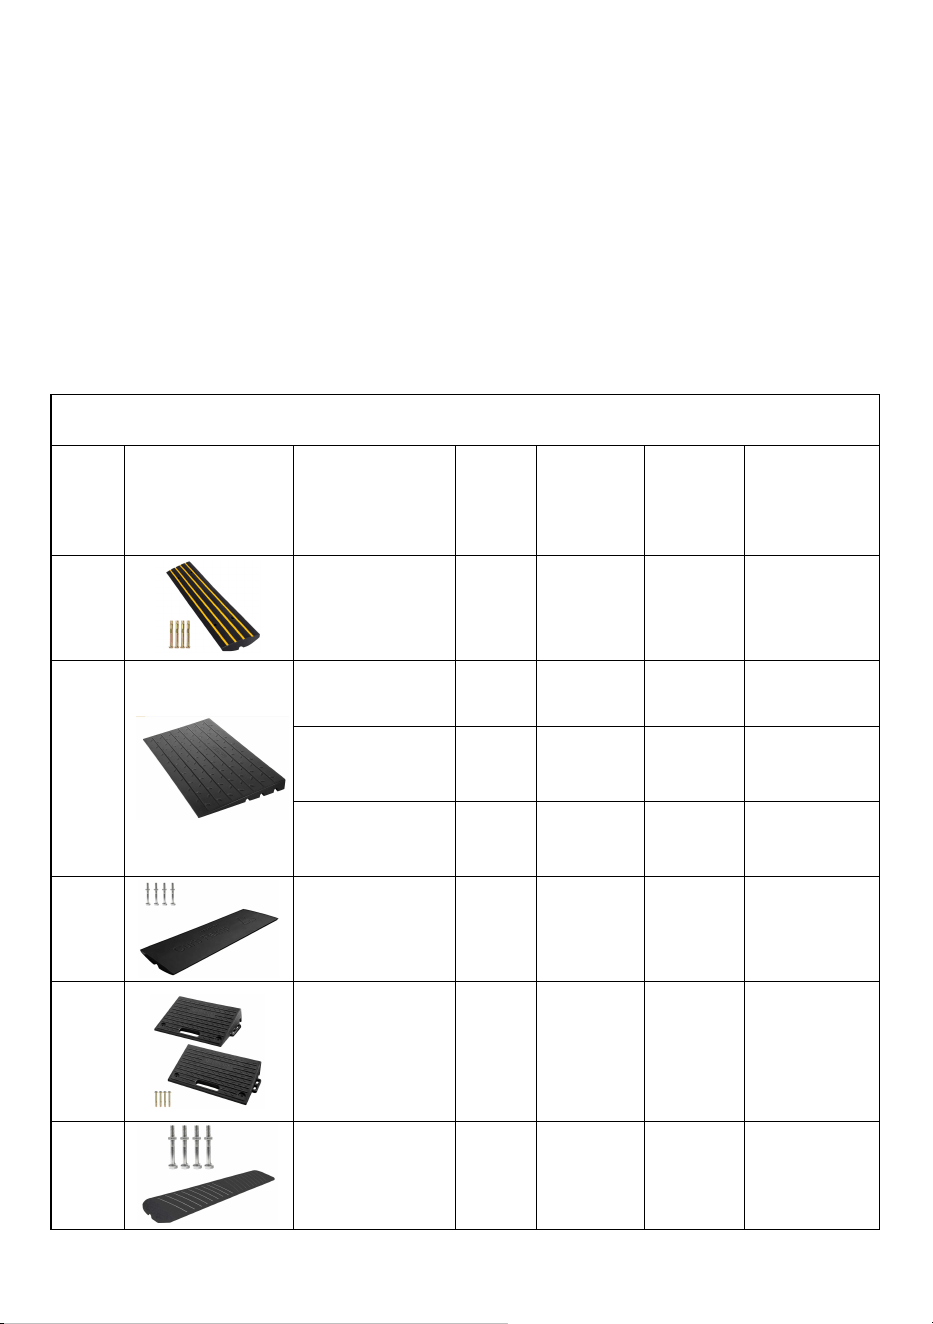
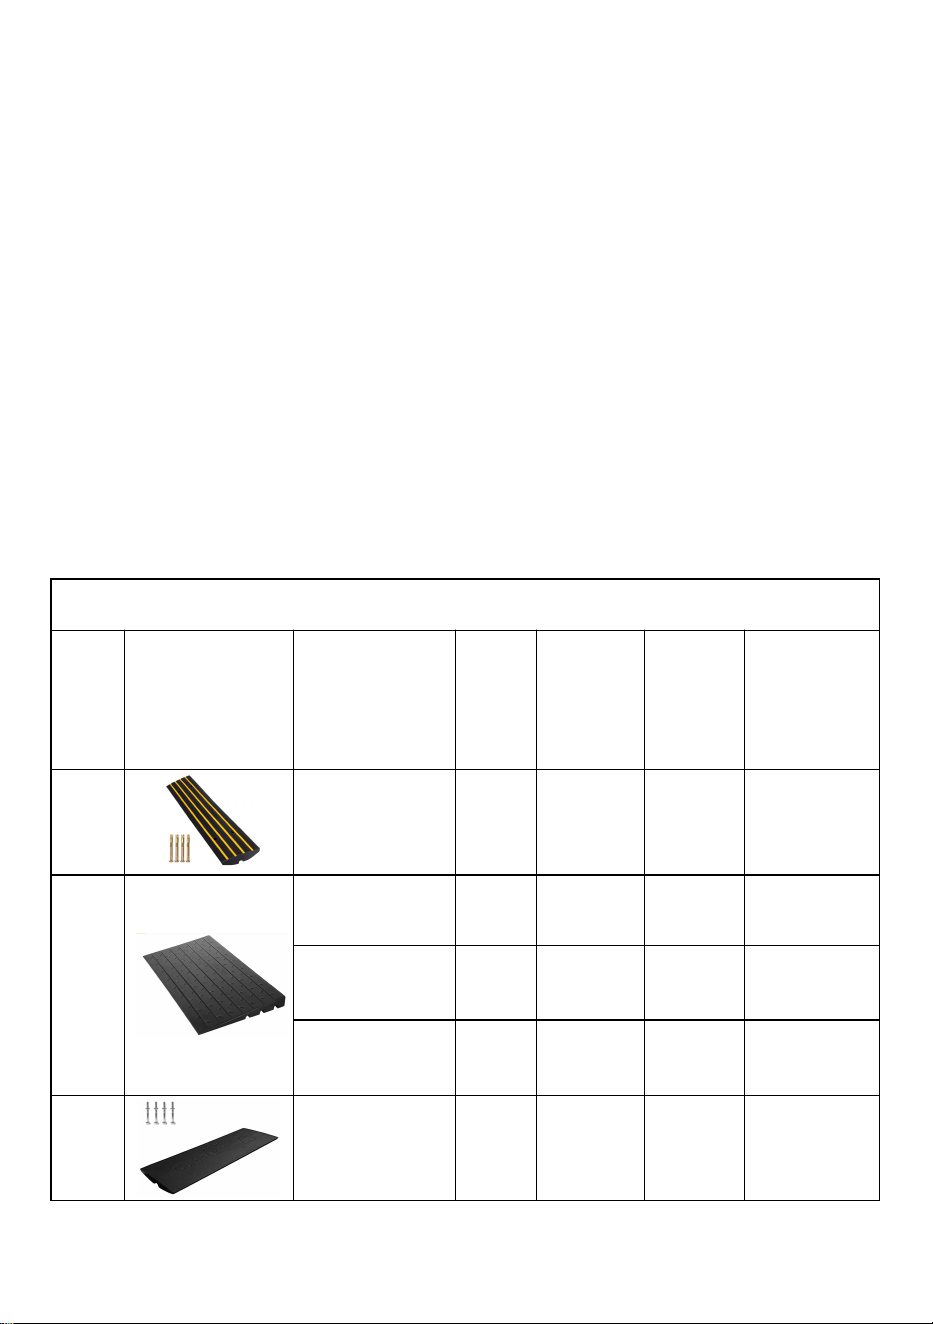
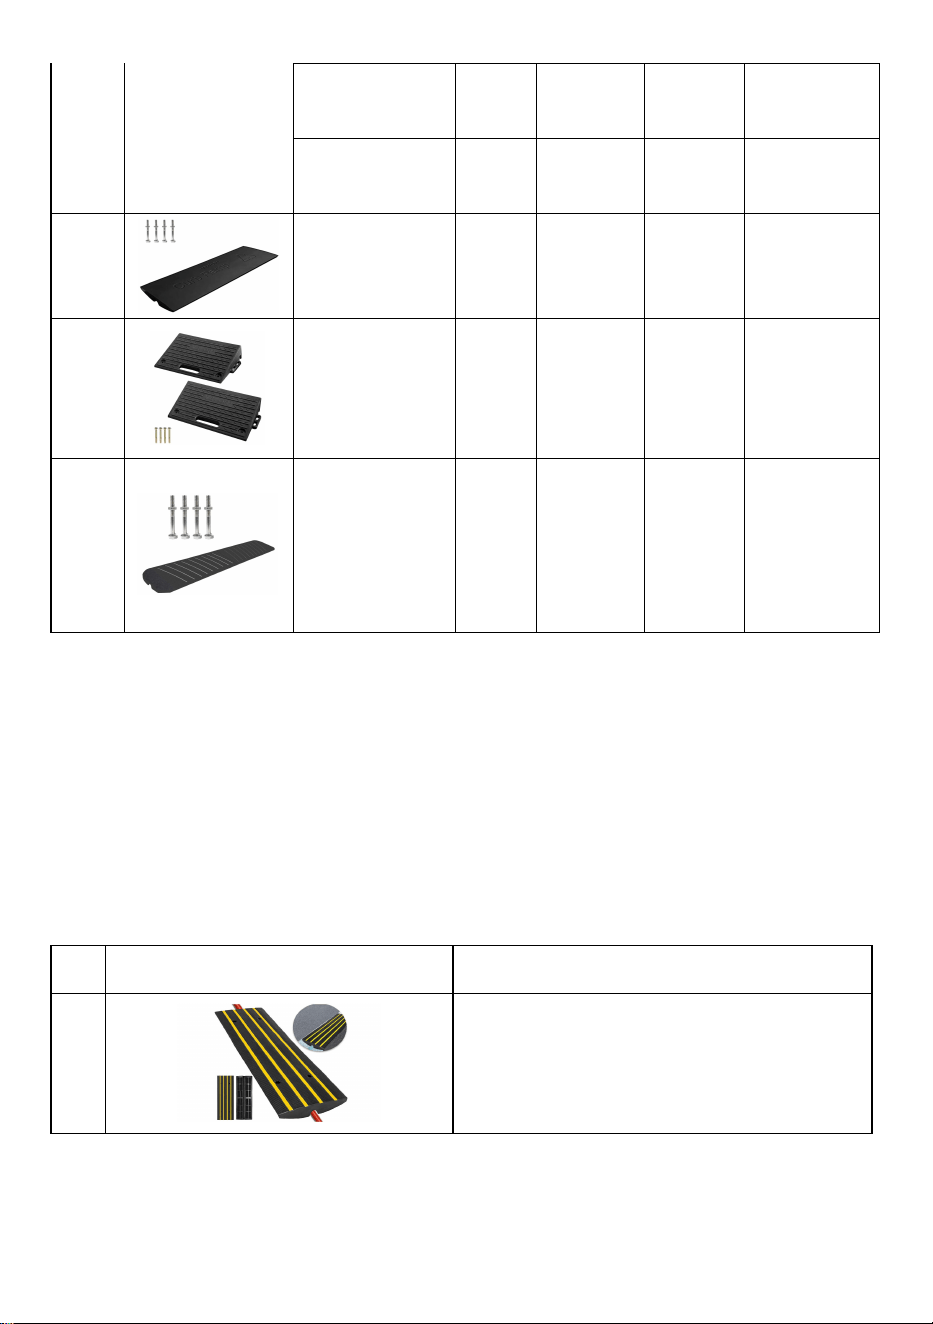
Curb Ramp -Parameter
TYPE
Picture
Model
Ramp
height
Pamp Qty
Load limit
(for each
Rapm)
Product
size/mm
A
LYPD-1
2.6"
1pc
22000lbs
1230*410*65
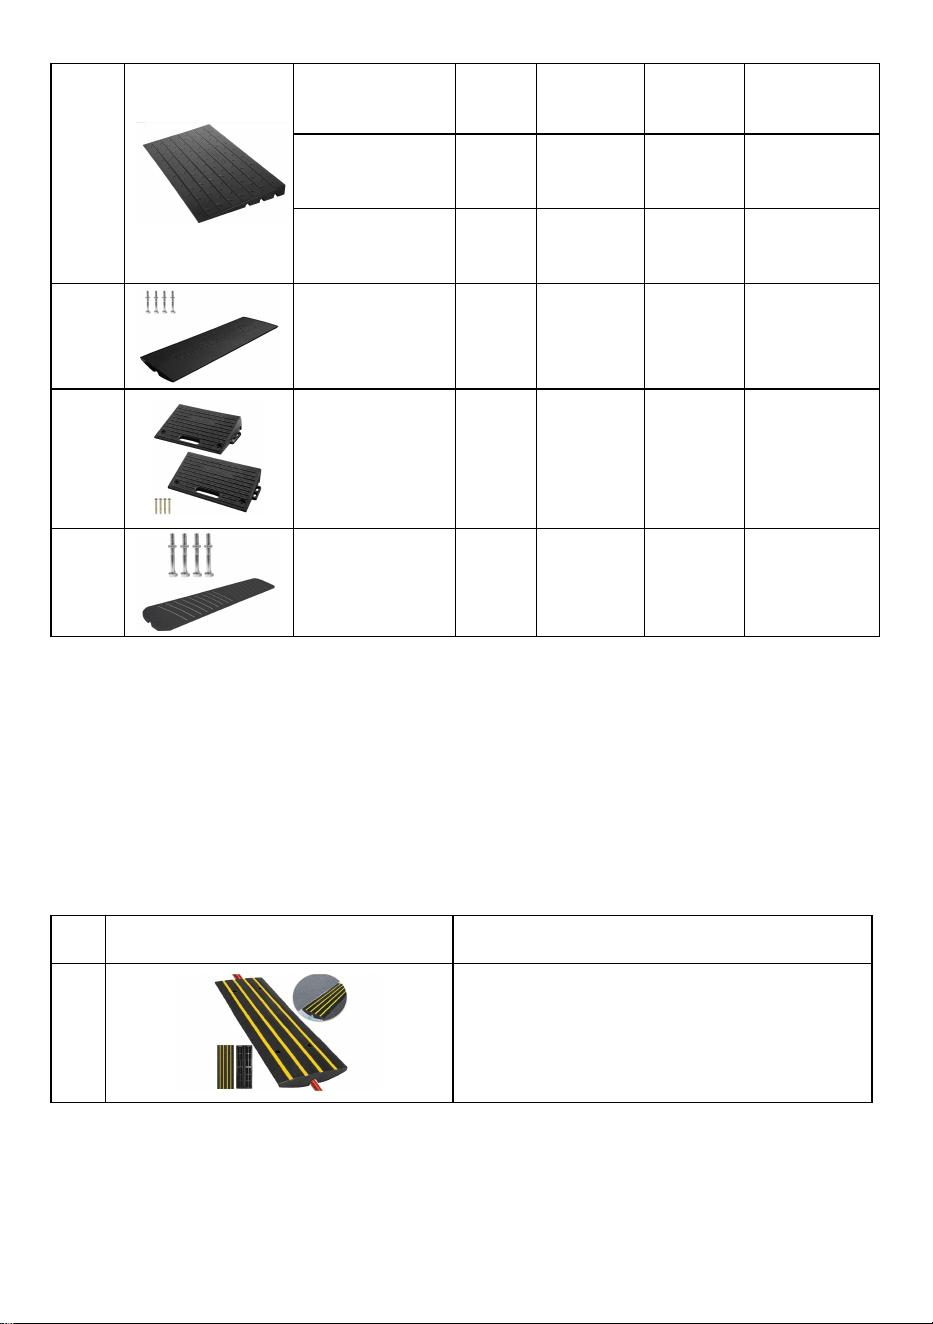
B
LYPD-24*42.5*2.5
2.6"
1pc
2200lbs
1060*610*65
LYPD-24*42*3
3"
1pc
2200lbs
1060*610*76
LYPD-24*42*4
4"
1pc
2200lbs
1060*610*101
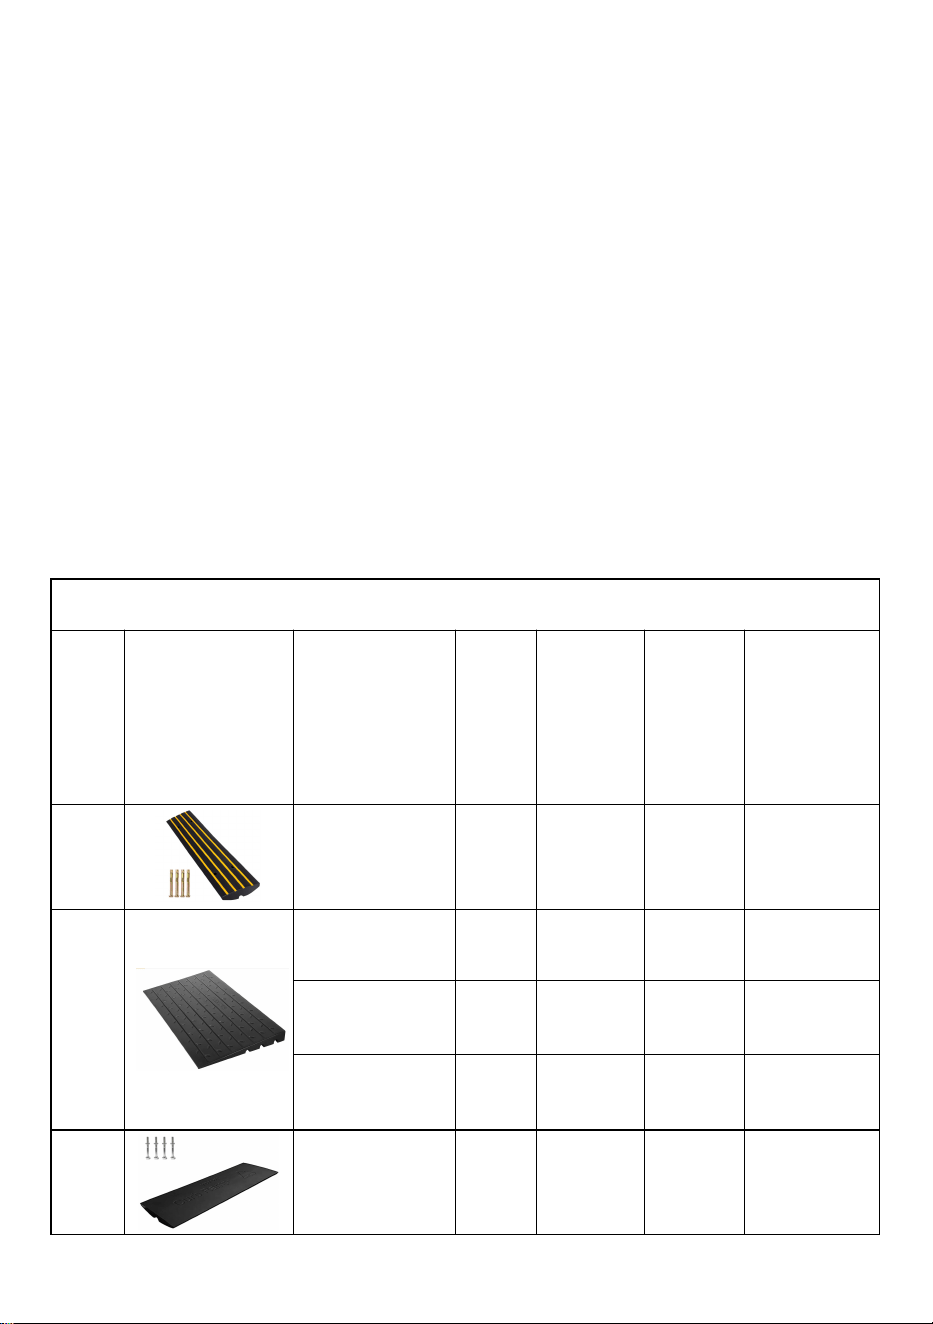
C
LYPD-47-1
2.6"
1pc
32000lbs
1210*410*65
D
LYPD-19.7x12.6x
4-2pcs
4"
2pcs
11000lbs
500*320*100
E
LYPD-47-2
2.6"
2pcs
( L and R
Each 1pc)
33069lbs
1210*410*65
- 4 -
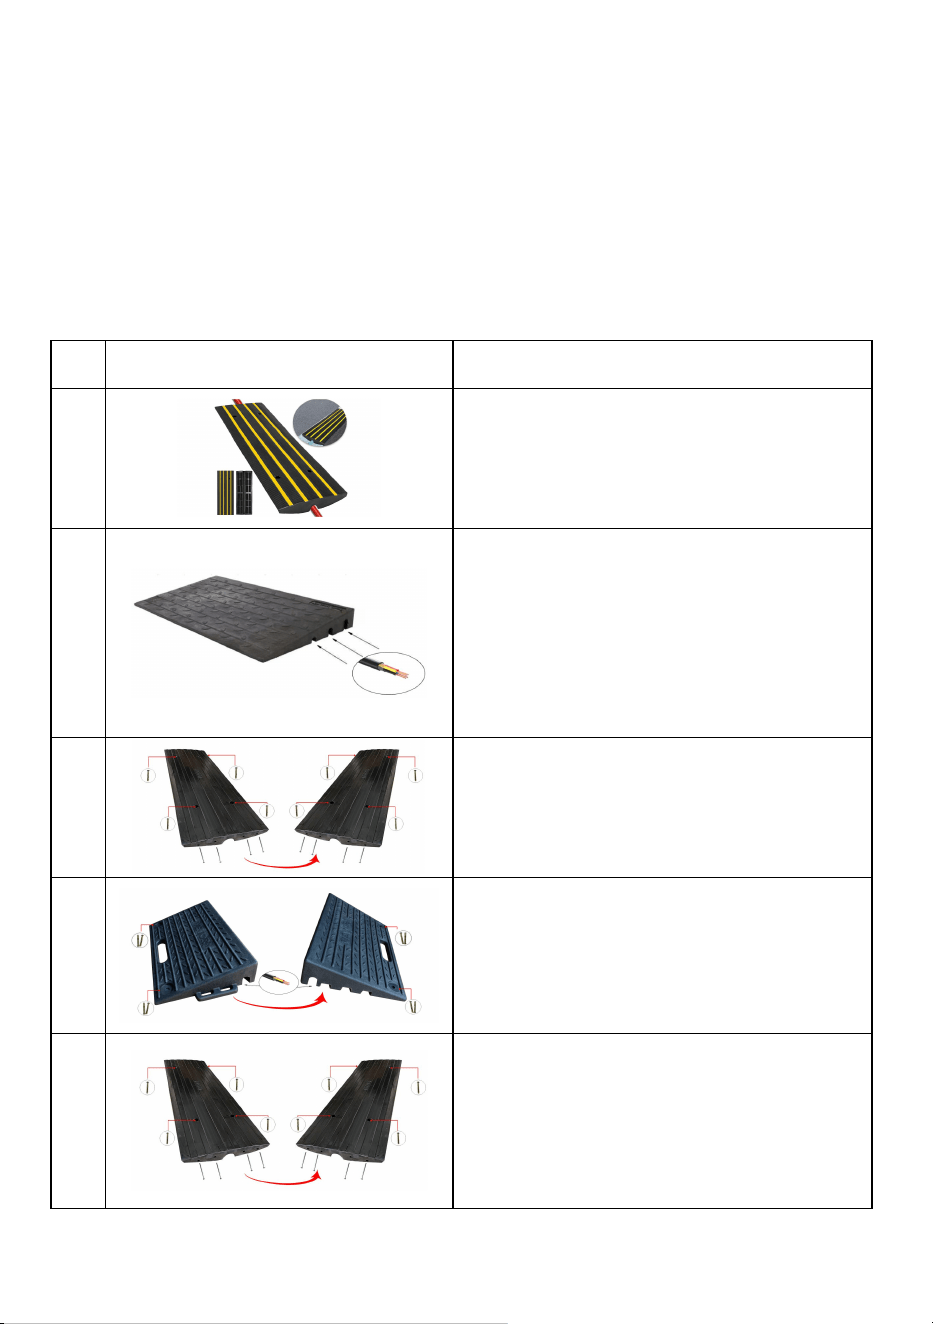
3.INSTALLATION STEPS
STEP 01 Select the dimension
The sizes of the curb ramps are listed in parameter table. The max load should be
under the loadlimit of each type. Please choose the size that matches the ramp, Before
installation, choose the appropriate location and direction to ensure that the wiring
board is in close contact with the ground.
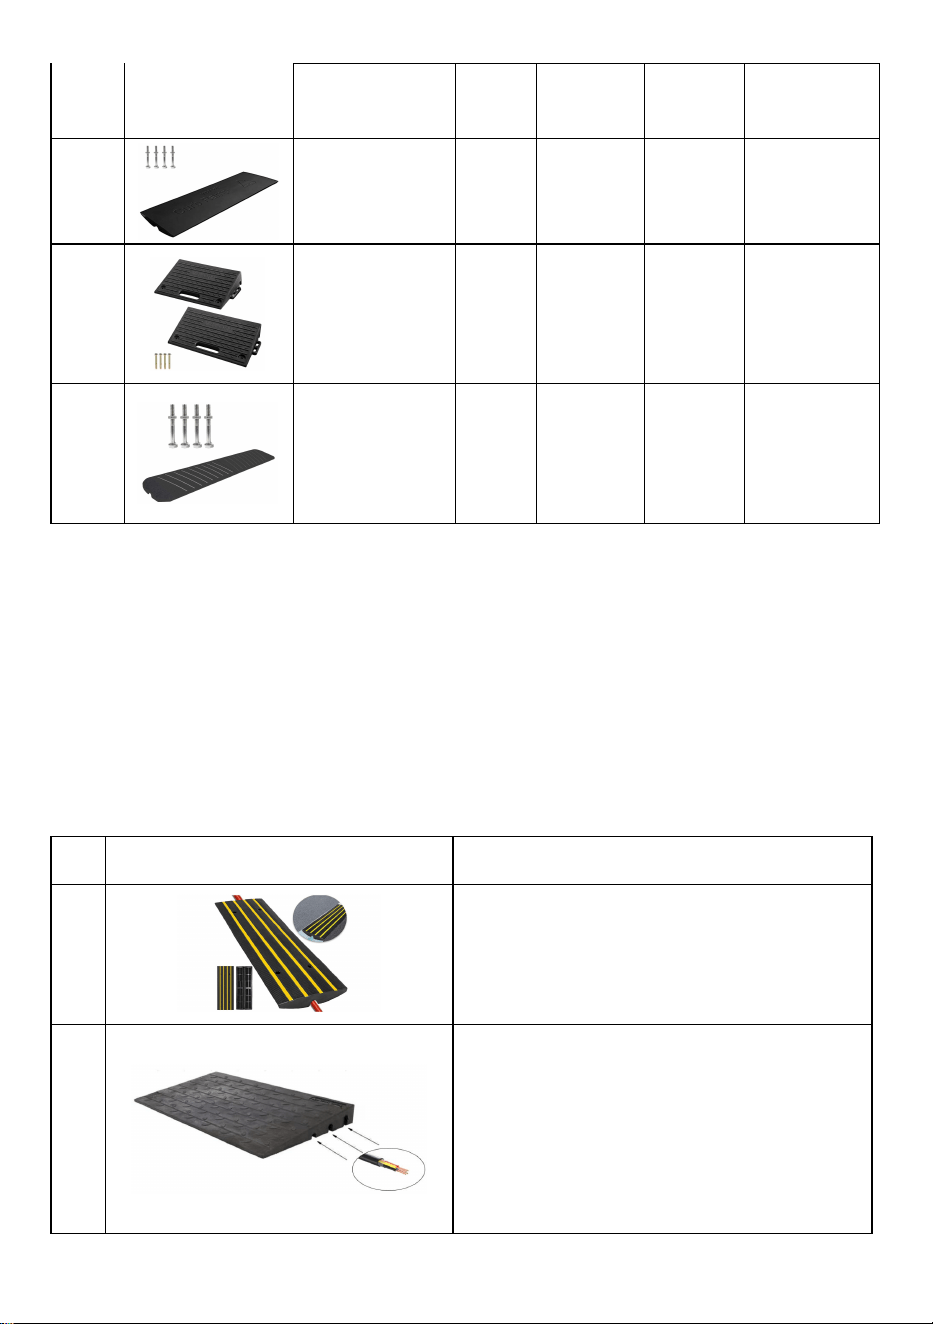
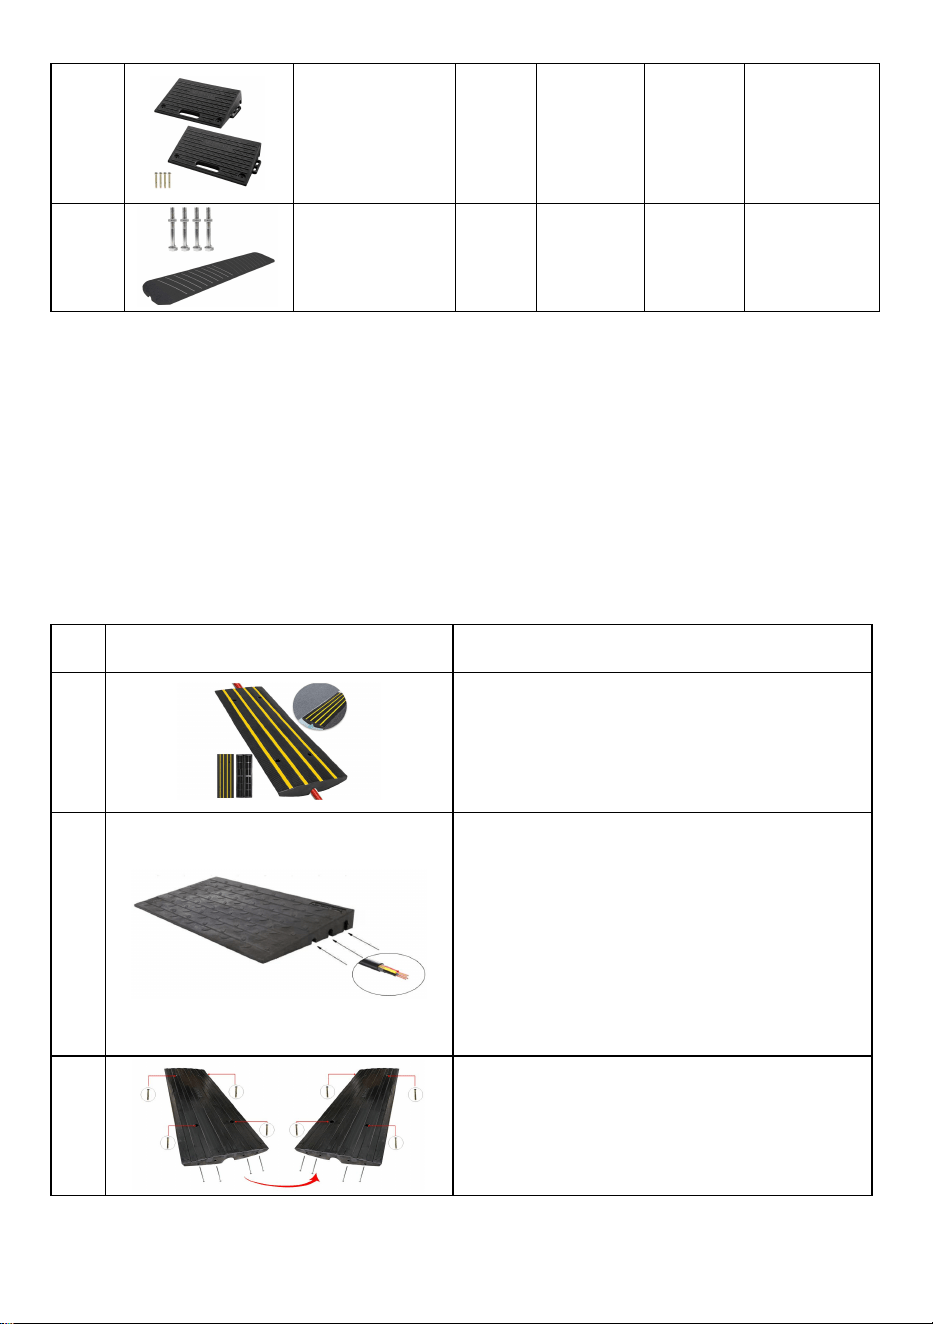
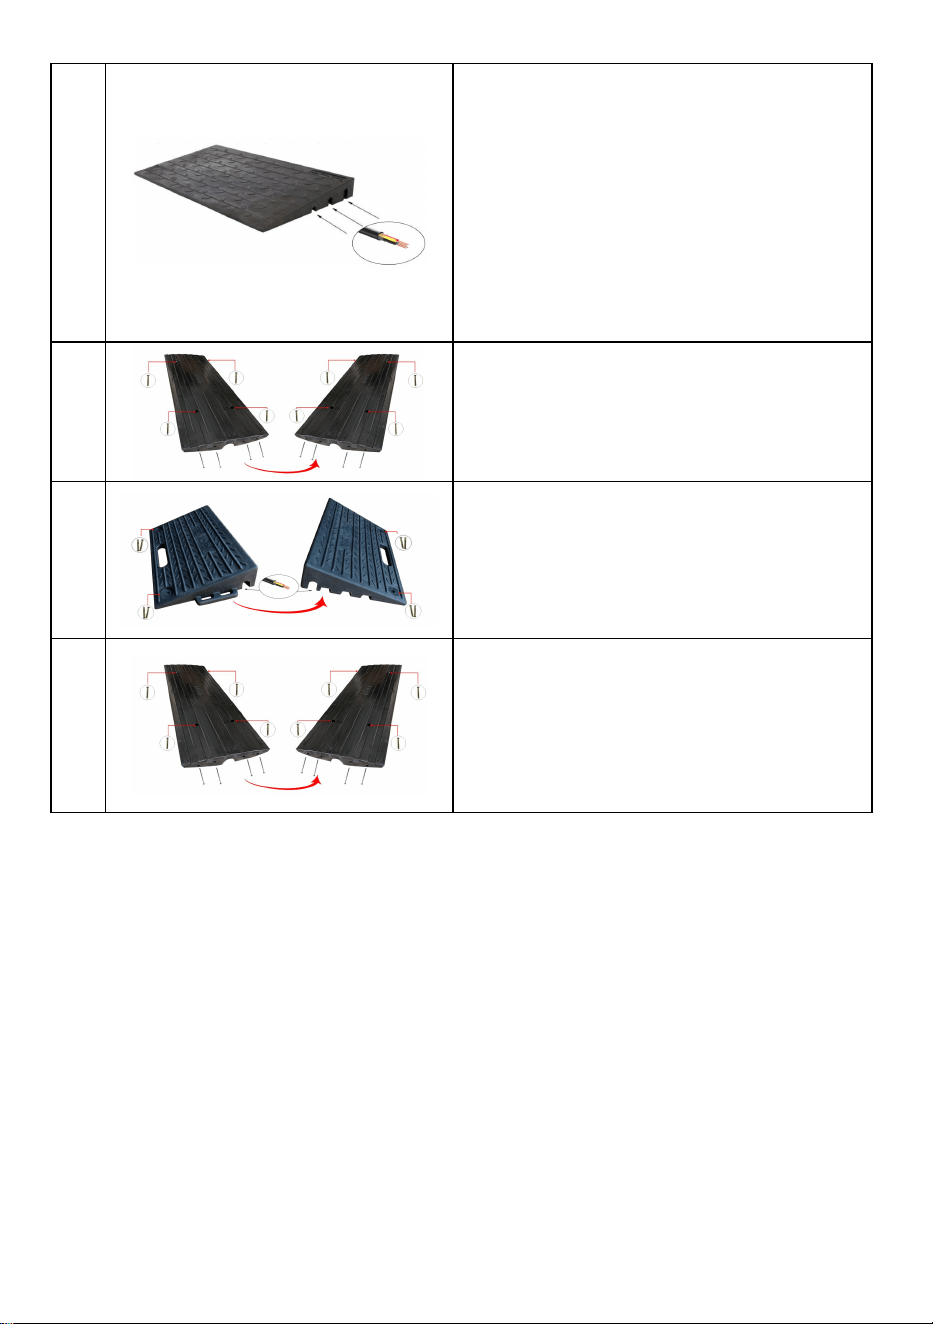
STEP 02 Secure using appropriate bolts and screws according to product type.
A
Picture
Setup guide
TYPE A
Use M8*9 Expansion Bolts need to be
fixed for installation
TYPE B
1. The ramp need to be clung to the steps.
2. Do not horizontally use or roll over from
the two sides, which may distroy its inner
structure.
3. The ramp can hold up to 2600lbs load
capacity.
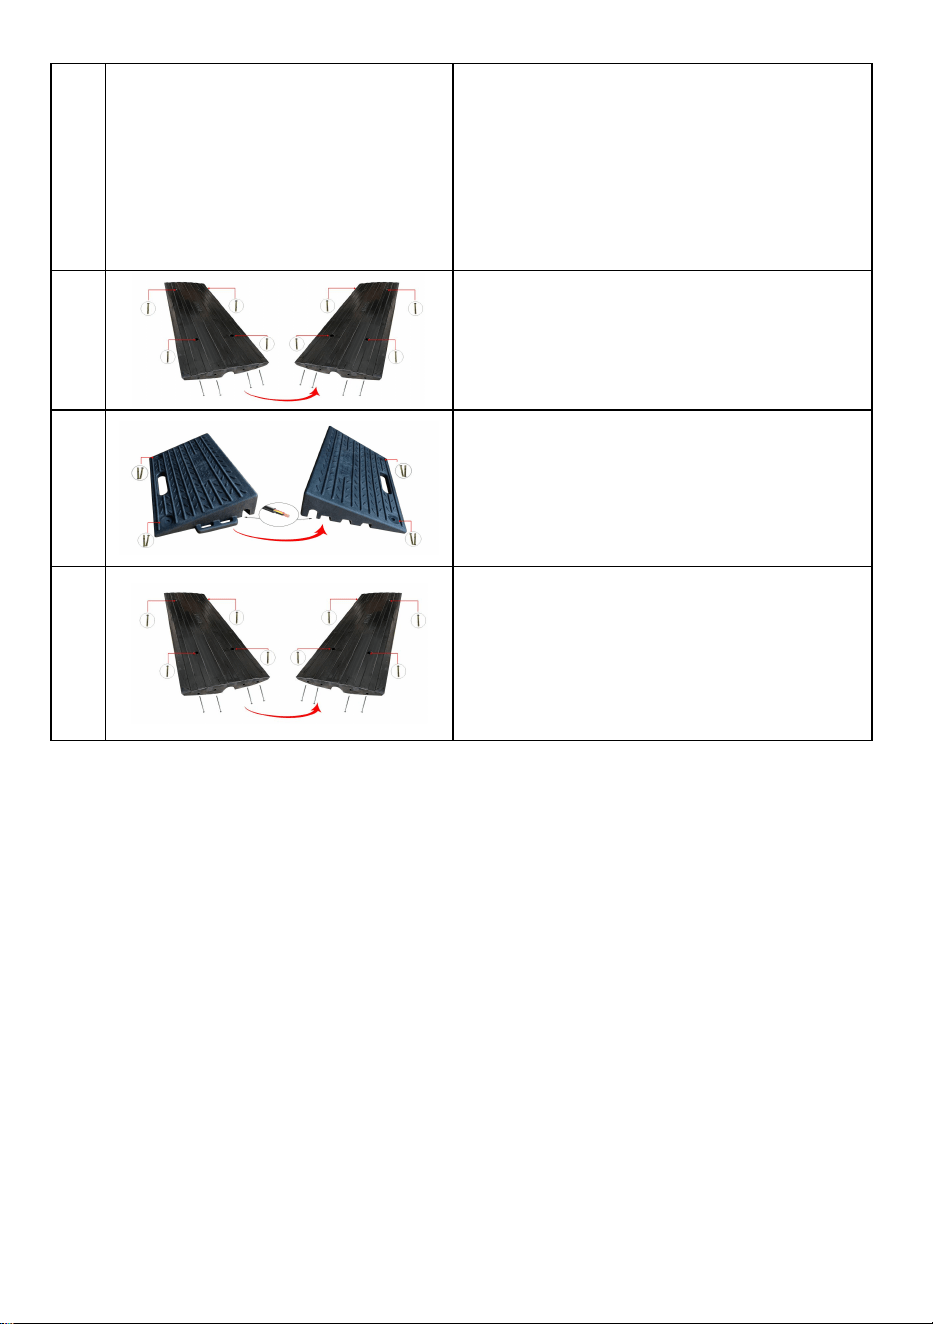
TYPE C
Use M8*9 Expansion Bolts need to be
fixed for installation
TYPE D
1.Keep from violent transportation.
2.Use screws to fix the ramp.
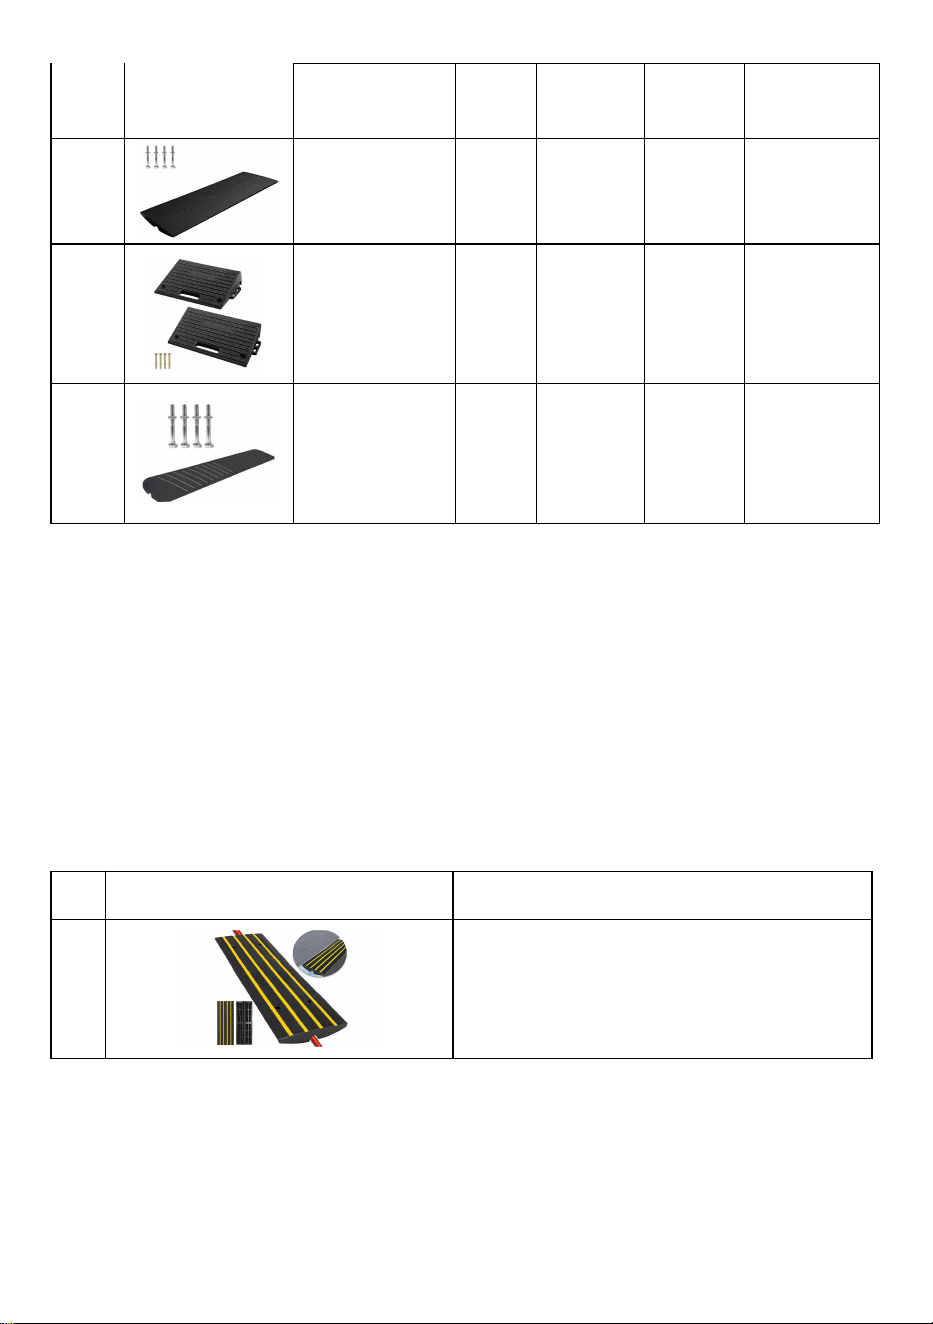
TYPE E
Use M8*9 Expansion Bolts need to be
fixed for installation

- 5 -
4.maintenance
Check product integrity and stability regularly, especially after heavy use.
Avoid using corrosive cleaners when cleaning to maintain product performance and
appearance.
Avoid using it on uneven or excessively sloped ground to avoid affecting safety and
functionality.
Pay attention to the applicable scope of the product and ensure it is used in the
appropriate environment and conditions.
Manufacturer: Shanghaimuxinmuyeyouxiangongsi
Address: Shuangchenglu 803nong11hao1602A-1609shi, baoshanqu,
shanghai 200000 CN.
Imported to AUS: SIHAO PTY LTD, 1 ROKEVA STREETEASTWOOD NSW
2122 Australia
Imported to USA: Sanven Technology Ltd., Suite 250, 9166 Anaheim Place,
Rancho Cucamonga, CA 91730
REP
EC
E-CrossStu GmbH
Mainzer Landstr.69, 60329 Frankfurt am Main.
REP
UK
YH CONSULTING LIMITED.
C/O YH Consulting Limited Office 147, Centurion House,
London Road, Staines-upon-Thames, Surrey, TW18 4AX


Technique Certificat d'assistance et de garantie électronique
www.vevor.com/support
RAMPE DE TROTTOIR
MANUEL D'UTILISATION
We continue to be committed to provide you tools with competitive price.
"Save Half", "Half Price" or any other similar expressions used by us only represents an
estimate of savings you might benefit from buying certain tools with us compared to the major
top brands and does not necessarily mean to cover all categories of tools offered by us. You
are kindly reminded to verify carefully when you are placing an order with us if you are
actually saving half in comparison with the top major brands.

- 1 -
TYPE A
TYPE B
TYPE C
TYPE D
TYPE E
Remarque : le produit réel que vous recevez détermine son apparence.
Have product questions? Need technical support? Please feel free to
contact us:
Technical Support and E-Warranty Certificate
www.vevor.com/support
NEED HELP? CONTACT US!
This is the original instruction, please read all manual instructions
carefully before operating. VEVOR reserves a clear interpretation of our
user manual. The appearance of the product shall be subject to the
product you received. Please forgive us that we won't inform you again if
there are any technology or software updates on our product.
CURB RAMP

- 2 -
1. INSTRUCTIONS
Pour votre information, veuillez lire ces instructions d'installation avant d'utiliser votre
rampe de trottoir ; Veuillez conserver toutes les instructions et vous y référer si
nécessaire. Il est normal que le produit ait une légère odeur. Nous vous
recommandons de ventiler avant utilisation pour éviter l'odeur.
AVERTISSEMENTS
Une installation incorrecte peut entraîner l’accumulation de débris, ce
qui entrave l’écoulement de l’eau.
Utilisé dans les bordures, les marches et les chaussées irrégulières.
13. Lisez et comprenez le manuel et conservez ces instructions pour référence
ultérieure.
14. Avant chaque utilisation, inspectez le produit pour détecter toute pièce desserrée
ou endommagée ; ne l'utilisez pas si vous en trouvez.
15. Nettoyez les rampes avant utilisation, en éliminant toute saleté, huile ou débris, et
laissez-les sécher.
16. Installez les rampes uniquement sur une surface solide, plane et sèche pour
garantir la sécurité.
17. Soyez prudent lors du chargement dynamique pour éviter une défaillance du
produit due à un mouvement soudain de la charge qui pourrait créer une charge
excessive.
18. Utilisez le produit strictement comme prévu pour éviter toute mauvaise utilisation
et tout danger potentiel.
19. Gardez les enfants et les personnes présentes à l’écart de la zone de travail et ne
laissez pas les enfants jouer avec ou à proximité du produit, car il ne s’agit pas
d’un jouet.
20. Lorsque vous ne l'utilisez pas, rangez l'équipement dans un endroit sec pour
éviter la rouille et prolonger sa durée de vie.
21. Assurez-vous que le produit est solidement fixé au sol avant et après utilisation
pour éviter tout glissement ou déplacement, préservant ainsi la sécurité et la
stabilité.
22. Ne pas dépasser la capacité de charge maximale du produit afin d'éviter toute
- 3 -
surcharge et tout dommage potentiel.
23. Manipulez le produit avec précaution pendant le transport afin d'éviter tout
dommage dû à une manipulation brutale.
24. Les instructions, avertissements et précautions fournis ne peuvent pas couvrir
toutes les conditions et situations possibles. Il est essentiel que l'opérateur fasse
preuve de bon sens et de prudence, qui sont essentiels pour une utilisation sûre
mais ne peuvent pas être intégrés au produit.
3. Présentation du produit et paramètres
Il s'agit d'un produit en caoutchouc haute performance conçu spécifiquement pour la
transition en toute sécurité des véhicules, permettant un passage facile sur des
bordures ou des trottoirs plus hauts tout en protégeant les câbles ou les tuyaux
souterrains contre les dommages. Fabriqué à partir d'un matériau en caoutchouc de
haute qualité, résistant à l'usure et à la pression, il convient à divers environnements
extérieurs. Sa conception de canal inférieur permet le passage de l'eau et des câbles,
la surface texturée augmente la friction, les trous latéraux facilitent la connexion et les
trous de surface peuvent être utilisés pour l'ancrage. Il convient aux bordures, aux
allées, aux garages résidentiels, aux quais de chargement et à d'autres zones,
compatible avec diverses transitions de véhicules.
Rampe de bordure - Paramètre
TAPE
R
Image
Modèle
Haute
ur de
la
rampe
Quantité
de
paquets
Limite de
charge
(pour
chaque
Rapm)
Taille du
produit/mm
UN
LYPD-1
2,6"
1 pièce
22 000
livres
1230*410*65
B
LYPD-24*42,5*2,5
2,6"
1 pièce
2200 lb
1060*610*65
LYPD-24*42* 3
3 "
1 pièce
2200 lb
1060*610* 76
- 4 -
LYPD-24*42*4
4"
1 pièce
2200 lb
1060*610*101
C
LYPD-47-1
2,6"
1 pièce
32 000 lb
1210*410*65
D
LYPD-19,7x12,6x
4-2 pièces
4"
2 pièces
11 000
livres
500*320*100
E
LYPD-47-2
2,6"
2 pièces
( G et D
Chaque
1pc)
33069
livres
1210*410*65
3. ÉTAPES D'INSTALLATION
ÉTAPE 01 Sélectionnez la dimension
Les dimensions des rampes de trottoir sont répertoriées dans le tableau des
paramètres. La charge maximale doit être inférieure à la limite de charge de chaque
type. Veuillez choisir la taille qui correspond à la rampe . Avant l'installation, choisissez
l'emplacement et la direction appropriés pour vous assurer que le panneau de câblage
est en contact étroit avec le sol.
ÉTAPE 02 Fixez à l’aide de boulons et de vis appropriés selon le type de produit.
U
N
Image
Guide d'installation
TYPE EA
Utilisez des boulons d'expansion M8*9 qui
doivent être fixés pour l'installation
TAPER B
1. La rampe doit être accrochée aux
marches.
2. Ne pas utiliser horizontalement ni rouler
des deux côtés, ce qui pourrait détruire sa
structure interne.
3. La rampe peut supporter une capacité
- 5 -
de charge allant jusqu'à 2600 lb.
TAPER C
Utilisez des boulons d'expansion M8*9 qui
doivent être fixés pour l'installation
TYPE D
1. Évitez tout transport violent.
2. Utilisez des vis pour fixer la rampe.
TYPE E
Utilisez des boulons d'expansion M8*9 qui
doivent être fixés pour l'installation
4.entretien
Vérifiez régulièrement l’intégrité et la stabilité du produit, en particulier après une
utilisation intensive.
Évitez d’utiliser des nettoyants corrosifs lors du nettoyage afin de maintenir les
performances et l’apparence du produit.
Évitez de l'utiliser sur un sol irrégulier ou excessivement en pente pour ne pas
compromettre la sécurité et la fonctionnalité.
Prêtez attention à la portée applicable du produit et assurez-vous qu’il est utilisé dans
l’environnement et les conditions appropriés.

- 6 -
Fabricant : Shanghaimuxinmuyeyouxiangongsi
Adresse : Shuangchenglu 803nong11hao1602A-1609shi, baoshanqu,
Shanghai 200000 CN.
Importé en Australie : SIHAO PTY LTD, 1 ROKEVA STREET, ASTWOOD
NSW 2122 Australie
Importé aux États-Unis : Sanven Technology Ltd., Suite 250, 9166 Anaheim
Place, Rancho Cucamonga, CA 91730
REP
EC
E-CrossStu GmbH
Mainzer Landstr.69, 60329 Frankfurt am Main.
REP
UK
YH CONSULTING LIMITED.
C/O YH Consulting Limited Office 147, Centurion House,
London Road, Staines-upon-Thames, Surrey, TW18 4AX


Technisch Support und E-Garantie-Zertifikat
www.vevor.com/support
BORDSTEINRAMPE
BENUTZERHANDBUCH
We continue to be committed to provide you tools with competitive price.
"Save Half", "Half Price" or any other similar expressions used by us only represents an
estimate of savings you might benefit from buying certain tools with us compared to the major
top brands and does not necessarily mean to cover all categories of tools offered by us. You
are kindly reminded to verify carefully when you are placing an order with us if you are
actually saving half in comparison with the top major brands.

- 1 -
TYP A
TYP B
TYP C
TYP D
TYP E
Hinweis: Das tatsächliche Produkt, das Sie erhalten, bestimmt sein Aussehen.
Have product questions? Need technical support? Please feel free to
contact us:
Technical Support and E-Warranty Certificate
www.vevor.com/support
NEED HELP? CONTACT US!
This is the original instruction, please read all manual instructions
carefully before operating. VEVOR reserves a clear interpretation of our
user manual. The appearance of the product shall be subject to the
product you received. Please forgive us that we won't inform you again if
there are any technology or software updates on our product.
CURB RAMP

- 2 -
1.ANWEISUNGEN
Zu Ihrer Information: Lesen Sie diese Installationsanweisungen bitte durch, bevor Sie
Ihre Bordsteinrampe verwenden. Bewahren Sie alle Anweisungen auf und schlagen
Sie bei Bedarf darin nach. Es ist normal, dass das Produkt einen leichten Geruch hat.
Wir empfehlen, vor der Verwendung zu lüften, um den Geruch zu vermeiden.
WARNHINWEISE
Bei falscher Installation kann es zu Schmutzansammlungen kommen,
die den Wasserfluss behindern.
Wird für Bordsteine, Stufen und unebenes Pflaster verwendet.
25. Lesen und verstehen Sie das Handbuch und bewahren Sie die Anweisungen zum
späteren Nachschlagen auf.
26. Überprüfen Sie das Produkt vor jedem Gebrauch auf lose oder beschädigte Teile.
Wenn Sie welche finden, verwenden Sie es nicht.
27. Reinigen Sie die Rampen vor der Verwendung, entfernen Sie Schmutz, Öl oder
Ablagerungen und lassen Sie sie trocknen.
28. Aus Sicherheitsgründen sollten Sie die Rampen nur auf einem festen, ebenen
und trockenen Untergrund aufstellen.
29. Gehen Sie bei dynamischer Belastung vorsichtig vor, um Produktausfälle
aufgrund plötzlicher Lastbewegungen zu vermeiden, die zu einer übermäßigen
Belastung führen können.
30. Verwenden Sie das Produkt strikt bestimmungsgemäß, um Missbrauch und
mögliche Gefahren zu vermeiden.
31. Halten Sie Kinder und Zuschauer vom Arbeitsbereich fern und erlauben Sie
Kindern nicht, mit dem Produkt oder in dessen Nähe zu spielen, da es kein
Spielzeug ist.
32. Lagern Sie das Gerät bei Nichtgebrauch an einem trockenen Ort, um Rost
vorzubeugen und seine Lebensdauer zu verlängern.
33. Stellen Sie vor und nach dem Gebrauch sicher, dass das Produkt sicher am
Boden befestigt ist, um ein Verrutschen oder Verschieben zu verhindern und
Sicherheit und Stabilität zu gewährleisten.
34. Überschreiten Sie nicht die maximale Tragfähigkeit des Produkts, um eine

- 3 -
Überlastung und mögliche Schäden zu vermeiden.
35. Gehen Sie während des Transports vorsichtig mit dem Produkt um, um Schäden
durch grobe Handhabung zu vermeiden.
36. Die bereitgestellten Anweisungen, Warnungen und Vorsichtsmaßnahmen können
nicht alle möglichen Bedingungen und Situationen abdecken, die auftreten
können. Der Bediener muss gesunden Menschenverstand walten lassen und
vorsichtig sein. Dies ist für den sicheren Betrieb entscheidend, kann jedoch nicht
in das Produkt integriert werden.
4. Produkteinführung und Parameter
Dies ist ein Hochleistungsgummiprodukt, das speziell für den sicheren Übergang
von Fahrzeugen entwickelt wurde. Es ermöglicht eine einfache Überquerung höherer
Bordsteine oder Gehwege und schützt gleichzeitig unterirdische Kabel oder Rohre vor
Beschädigungen. Es besteht aus hochwertigem, verschleißfestem und
druckbeständigem Gummimaterial und ist für verschiedene Außenumgebungen
geeignet. Das Design der Bodenkanäle ermöglicht den Durchgang von Wasser und
Kabeln, die strukturierte Oberfläche erhöht die Reibung, seitliche Löcher erleichtern
die Verbindung und Oberflächenlöcher können zur Verankerung verwendet werden. Es
eignet sich für Bordsteine, Einfahrten, Garagen, Laderampen und andere Bereiche
und ist mit verschiedenen Fahrzeugübergängen kompatibel.
Bordsteinrampe -Parameter
TYP
Bild
Modell
Ramp
enhöh
e
Pamp
Menge
Belastun
gsgrenze
(für jeden
Rapm)
Produktgröße
/mm
A
LYPD-1
2,6 Zoll
1 Stück
22000
Pfund
1230*410*65
B
LYPD-24*42,5*2,5
2,6 Zoll
1 Stück
2200
Pfund
1060*610*65
LYPD-24*42* 3
3 "
1 Stück
2200
Pfund
1060*610* 76
- 4 -
LYPD-24*42*4
4"
1 Stück
2200
Pfund
1060*610*101
C
LYPD-47-1
2,6 Zoll
1 Stück
32000
Pfund
1210*410*65
D
LYPD-19,7x12,6x
4-2 Stück
4"
2 Stück
11.000
Pfund
500*320*100
E
LYPD-47-2
2,6 Zoll
2 Stück
( L und R
Jeweils 1
Stück)
33.069
Pfund
1210*410*65
3. INSTALLATIONSSCHRITTE
SCHRITT 01 Wählen Sie die Dimension
Die Größen der Bordsteinrampen sind in der Parametertabelle aufgeführt. Die
maximale Belastung sollte unter der Belastungsgrenze des jeweiligen Typs liegen.
Bitte wählen Sie die Größe, die zur Rampe passt . Wählen Sie vor der Installation den
geeigneten Ort und die entsprechende Richtung, um sicherzustellen, dass die
Verdrahtungsplatte engen Kontakt mit dem Boden hat.
SCHRITT 02 Mit den je nach Produkttyp geeigneten Bolzen und Schrauben
befestigen.
A
Bild
Installationsanleitung
TYP EA
Zur Installation müssen
M8*9-Expansionsbolzen verwendet
werden
- 5 -
TYP B
1. Die Rampe muss an den Stufen
befestigt werden.
2. Nicht horizontal verwenden oder von
beiden Seiten umdrehen, da dies die
innere Struktur zerstören könnte.
3. Die Rampe hat eine Tragfähigkeit von
bis zu 1200 kg.
TYP C
Zur Installation müssen
M8*9-Expansionsbolzen verwendet
werden
TYP D
1. Vermeiden Sie gewaltsamen Transport.
2. Befestigen Sie die Rampe mit
Schrauben.
TYP E
Zur Installation müssen
M8*9-Expansionsbolzen verwendet
werden
4.Wartung
Überprüfen Sie regelmäßig die Integrität und Stabilität des Produkts, insbesondere
nach starker Beanspruchung.
Vermeiden Sie beim Reinigen die Verwendung ätzender Reinigungsmittel, um
Leistung und Aussehen des Produkts zu erhalten.
Vermeiden Sie die Verwendung auf unebenem oder übermäßig geneigtem Boden, um
die Sicherheit und Funktionalität nicht zu beeinträchtigen.
Achten Sie auf den Anwendungsbereich des Produkts und stellen Sie sicher, dass es
in der entsprechenden Umgebung und unter den entsprechenden Bedingungen
verwendet wird.

- 6 -
Hersteller: Shanghaimuxinmuyeyouxiangongsi
Adresse: Shuangchenglu 803nong11hao1602A-1609shi, baoshanqu,
Shanghai 200000 CN.
Nach AUS importiert: SIHAO PTY LTD, 1 ROKEVA STREETEASTWOOD
NSW 2122 Australien
Importiert in die USA: Sanven Technology Ltd., Suite 250, 9166 Anaheim
Place, Rancho Cucamonga, CA 91730
REP
EC
E-CrossStu GmbH
Mainzer Landstr.69, 60329 Frankfurt am Main.
REP
UK
YH CONSULTING LIMITED.
C/O YH Consulting Limited Office 147, Centurion House,
London Road, Staines-upon-Thames, Surrey, TW18 4AX


Tecnico Supporto e certificato di garanzia elettronica
www.vevor.com/support
RAMPA DI MARCIAPIEDE
MANUALE D'USO
We continue to be committed to provide you tools with competitive price.
"Save Half", "Half Price" or any other similar expressions used by us only represents an
estimate of savings you might benefit from buying certain tools with us compared to the major
top brands and does not necessarily mean to cover all categories of tools offered by us. You
are kindly reminded to verify carefully when you are placing an order with us if you are
actually saving half in comparison with the top major brands.
- 1 -
TIPO A
TIPO B
TIPO C
TIPO D
TIPO E
Nota: l'aspetto del prodotto che riceverai ne determina l'aspetto.
Have product questions? Need technical support? Please feel free to
contact us:
Technical Support and E-Warranty Certificate
www.vevor.com/support
NEED HELP? CONTACT US!
This is the original instruction, please read all manual instructions
carefully before operating. VEVOR reserves a clear interpretation of our
user manual. The appearance of the product shall be subject to the
product you received. Please forgive us that we won't inform you again if
there are any technology or software updates on our product.
CURB RAMP

- 2 -
1. ISTRUZIONI
Per vostra informazione, vi preghiamo di leggere queste istruzioni di installazione
prima di utilizzare la rampa per marciapiedi; conservate tutte le istruzioni e consultatele
quando necessario. È normale che il prodotto abbia un leggero odore. Si consiglia di
ventilare l'ambiente prima dell'uso per evitare l'odore.
AVVERTENZE
Un'installazione non corretta può causare l'accumulo di detriti,
ostacolando il flusso dell'acqua.
Utilizzato su cordoli, gradini e pavimentazioni irregolari.
37. Leggere e comprendere il manuale e conservare queste istruzioni per riferimento
futuro.
38. Prima di ogni utilizzo, ispezionare il prodotto per verificare che non vi siano parti
allentate o danneggiate; in tal caso, non utilizzarlo.
39. Prima dell'uso, pulire le rampe, rimuovendo eventuali tracce di sporco, olio o
detriti, quindi lasciarle asciugare.
40. Per garantire la sicurezza, installare le rampe solo su una superficie solida, piana
e asciutta.
41. Prestare attenzione al carico dinamico per evitare guasti al prodotto dovuti a
movimenti improvvisi del carico che potrebbero creare un carico eccessivo.
42. Utilizzare il prodotto esclusivamente per le finalità previste, per evitare usi
impropri e potenziali pericoli.
43. Tenere i bambini e gli astanti lontano dall'area di lavoro e non consentire loro di
giocare con il prodotto o nelle sue vicinanze, poiché non è un giocattolo.
44. Quando non viene utilizzata, riporre l'attrezzatura in un luogo asciutto per evitare
la ruggine e prolungarne la durata.
45. Assicurarsi che il prodotto sia fissato saldamente al suolo prima e dopo l'uso per
evitare che scivoli o si sposti, mantenendo così sicurezza e stabilità.
46. Non superare la capacità di carico massima del prodotto per evitare sovraccarichi
e potenziali danni.
47. Maneggiare il prodotto con cura durante il trasporto per evitare danni dovuti a
movimentazione brusca.
- 3 -
48. Le istruzioni, le avvertenze e le precauzioni fornite non possono coprire tutte le
possibili condizioni e situazioni che potrebbero verificarsi. È essenziale che
l'operatore eserciti buon senso e cautela, che sono cruciali per un funzionamento
sicuro ma non possono essere integrati nel prodotto.
5. Introduzione al prodotto e parametro
Questo è un prodotto in gomma ad alte prestazioni progettato specificamente per la
transizione sicura dei veicoli, consentendo un facile passaggio su cordoli o marciapiedi
più alti, proteggendo al contempo i cavi o le tubature sotterranee da eventuali danni.
Realizzato in materiale di gomma di alta qualità, resistente all'usura e alla pressione, è
adatto a vari ambienti esterni. Il suo design del canale inferiore consente il passaggio
di acqua e cavi, la superficie strutturata aumenta l'attrito, i fori laterali facilitano la
connessione e i fori superficiali possono essere utilizzati per l'ancoraggio. È adatto per
cordoli, vialetti, garage domestici, banchine di carico e altre aree, compatibile con varie
transizioni di veicoli.
Rampa di marciapiede - Parametro
TIPO
Immagine
Modello
Altezz
a
rampa
Quantità
Pamp
Limite di
carico
(per ogni
Rapm)
Dimensioni
del
prodotto/mm
UN
LYPD-1
2,6"
1 pz.
22000
libbre
Dimensioni:
1230*410*65
B
Dimensioni:
24*42.5*2.5
2,6"
1 pz.
2200
libbre
Dimensioni
Codice a barre
LYPD-24*42* 3
3 "
1 pz.
2200
libbre
1060*610* 76
Codice articolo:
LYPD-24*42*4
4"
1 pz.
2200
libbre
Dimensioni:
1060*610*101
C
LYPD-47-1
2,6"
1 pz.
32000
libbre
Dimensioni:
1210*410*65

- 4 -
D
LYPD-19.7x12.6x
4-2 pezzi
4"
2 pezzi
11000
libbre
Dimensioni:
500*320*100
E
LYPD-47-2
2,6"
2 pezzi
( L e R
Ogni 1 pz)
33069
libbre
Dimensioni:
1210*410*65
3. FASI DI INSTALLAZIONE
PASSO 01 Seleziona la dimensione
Le dimensioni delle rampe del marciapiede sono elencate nella tabella dei parametri. Il
carico massimo deve essere inferiore al limite di carico di ogni tipo. Si prega di
scegliere la dimensione che corrisponde alla rampa . Prima dell'installazione, scegliere
la posizione e la direzione appropriate per garantire che la scheda di cablaggio sia a
stretto contatto con il terreno.
FASE 02 Fissare utilizzando bulloni e viti appropriati in base al tipo di prodotto.
U
N
Immagine
Guida all'installazione
TIPO EA
Utilizzare bulloni di espansione M8*9 da
fissare per l'installazione
TIPO B
1. La rampa deve essere agganciata ai
gradini.
2. Non utilizzare orizzontalmente o
capovolgere da entrambi i lati, poiché ciò
potrebbe danneggiarne la struttura
interna.
3. La rampa può sostenere un carico fino
a 2600 libbre.
TIPO C
Utilizzare bulloni di espansione M8*9 da
fissare per l'installazione

- 5 -
TIPO D
1. Evitare trasporti violenti.
2. Utilizzare viti per fissare la rampa.
TIPO E
Utilizzare bulloni di espansione M8*9 da
fissare per l'installazione
4.manutenzione
Controllare regolarmente l'integrità e la stabilità del prodotto, soprattutto dopo un uso
intenso.
Per preservare le prestazioni e l'aspetto del prodotto, evitare di utilizzare detergenti
corrosivi durante la pulizia.
Evitare di utilizzarlo su terreni irregolari o eccessivamente in pendenza per non
comprometterne la sicurezza e la funzionalità.
Prestare attenzione all'ambito di applicazione del prodotto e assicurarsi che venga
utilizzato nell'ambiente e nelle condizioni appropriate.
Produttore: Shanghaimuxinmuyeyouxiangongsi
Indirizzo: Shuangchenglu 803nong11hao1602A-1609shi, baoshanqu,
shanghai 200000 CN.
Importato in AUS: SIHAO PTY LTD, 1 ROKEVA STREETEASTWOOD NSW
2122 Australia
Importato negli USA: Sanven Technology Ltd., Suite 250, 9166 Anaheim
Place, Rancho Cucamonga, CA 91730

- 6 -
REP
EC
E-CrossStu GmbH
Mainzer Landstr.69, 60329 Frankfurt am Main.
REP
UK
YH CONSULTING LIMITED.
C/O YH Consulting Limited Office 147, Centurion House,
London Road, Staines-upon-Thames, Surrey, TW18 4AX


Técnico Certificado de soporte y garantía electrónica
www.vevor.com/support
RAMPA DE BORDA
MANUAL DEL USUARIO
We continue to be committed to provide you tools with competitive price.
"Save Half", "Half Price" or any other similar expressions used by us only represents an
estimate of savings you might benefit from buying certain tools with us compared to the major
top brands and does not necessarily mean to cover all categories of tools offered by us. You
are kindly reminded to verify carefully when you are placing an order with us if you are
actually saving half in comparison with the top major brands.

- 1 -
TIPO A
TIPO B
TIPO C
TIPO D
TIPO E
Nota: El producto real que usted recibe determina su apariencia.
Have product questions? Need technical support? Please feel free to
contact us:
Technical Support and E-Warranty Certificate
www.vevor.com/support
NEED HELP? CONTACT US!
This is the original instruction, please read all manual instructions
carefully before operating. VEVOR reserves a clear interpretation of our
user manual. The appearance of the product shall be subject to the
product you received. Please forgive us that we won't inform you again if
there are any technology or software updates on our product.
CURB RAMP

- 2 -
1. INSTRUCCIONES
Para su información, lea estas instrucciones de instalación antes de usar su rampa de
acera; conserve todas las instrucciones y consúltelas cuando sea necesario. Es
normal que el producto tenga un ligero olor. Recomendamos ventilar antes de usar
para evitar el olor.
ADVERTENCIAS
Una instalación incorrecta puede provocar que se acumulen residuos,
lo que dificulta el flujo de agua.
Se utiliza en bordillos, escalones y pavimento irregular.
49. Lea y comprenda el manual y guarde estas instrucciones para futuras consultas.
50. Antes de cada uso, inspeccione el producto para detectar piezas sueltas o
dañadas; no lo utilice si encuentra alguna.
51. Limpie las rampas antes de usarlas, eliminando cualquier suciedad, aceite o
residuos y déjelas secar.
52. Coloque las rampas únicamente sobre una superficie sólida, nivelada y seca para
garantizar la seguridad.
53. Tenga cuidado con la carga dinámica para evitar fallas del producto debido a un
movimiento repentino de carga que pueda crear una carga excesiva.
54. Utilice el producto estrictamente como está previsto para evitar usos indebidos y
posibles peligros.
55. Mantenga a los niños y a otras personas alejadas del área de trabajo y no
permita que los niños jueguen con el producto o cerca de él, ya que no es un
juguete.
56. Cuando no esté en uso, guarde el equipo en un lugar seco para evitar la
oxidación y prolongar su vida útil.
57. Asegúrese de que el producto esté bien fijado al suelo antes y después de su uso
para evitar que se deslice o se mueva, manteniendo la seguridad y la estabilidad.
58. No exceda la capacidad máxima de carga del producto para evitar sobrecargas y
posibles daños.
59. Manipule el producto con cuidado durante el transporte para evitar daños debido
a una manipulación brusca.
- 3 -
60. Las instrucciones, advertencias y precauciones proporcionadas no pueden cubrir
todas las posibles condiciones y situaciones que pueden ocurrir. Es esencial que
el operador ejerza el sentido común y la precaución, que son cruciales para un
funcionamiento seguro pero que no pueden incorporarse al producto.
6. Introducción del producto y parámetros
Este es un producto de caucho de alto rendimiento diseñado específicamente para
la transición segura de vehículos, lo que permite un paso fácil sobre bordillos o aceras
más altas al mismo tiempo que protege los cables o tuberías subterráneas de daños.
Fabricado con material de caucho de alta calidad, resistente al desgaste y a la presión,
es adecuado para diversos entornos exteriores. Su diseño de canal inferior permite el
paso de agua y cables, la superficie texturizada aumenta la fricción, los orificios
laterales facilitan la conexión y los orificios de la superficie se pueden utilizar para el
anclaje. Es adecuado para bordillos, entradas de vehículos, garajes domésticos,
muelles de carga y otras áreas, compatible con varias transiciones de vehículos.
Rampa de acera - Parámetro
TIPO
Imagen
Modelo
Altura
de la
rampa
Cantidad
de pamp
Límite de
carga
(para
cada
Rapm)
Tamaño del
producto/mm
A
LYPD-1
2,6"
1 pieza
22000
libras
1230*410*65
B
LYPD-24*42,5*2,5
2,6"
1 pieza
2200
libras
1060*610*65
LYPD-24*42* 3
3 "
1 pieza
2200
libras
1060*610* 76
LYPD-24*42*4
4"
1 pieza
2200
libras
1060*610*101
do
Policía Local de
Lymington-47-1
2,6"
1 pieza
32000
libras
1210*410*65
- 4 -
D
LYPD-19,7x12,6x
4-2 piezas
4"
2 piezas
11000
libras
500*320*100
mi
Policía Local de
Lymington-47-2
2,6"
2 piezas
( L y R
Cada 1pc)
33069
libras
1210*410*65
3. PASOS DE INSTALACIÓN
PASO 01 Seleccione la dimensión
Los tamaños de las rampas de acera se enumeran en la tabla de parámetros. La
carga máxima debe estar por debajo del límite de carga de cada tipo. Elija el tamaño
que coincida con la rampa . Antes de la instalación, elija la ubicación y la dirección
adecuadas para asegurarse de que el tablero de cableado esté en estrecho contacto
con el suelo.
PASO 02 Asegure utilizando pernos y tornillos adecuados según el tipo de producto.
A
Imagen
Guía de configuración
TIPO EA
Utilice pernos de expansión M8*9 que
deben fijarse para la instalación
TIPO B
1. La rampa debe estar adherida a los
escalones.
2. No lo utilice horizontalmente ni lo gire
desde los dos lados, ya que podría dañar
su estructura interna.
3. La rampa puede soportar una
capacidad de carga de hasta 2600 libras.
TIPO do
Utilice pernos de expansión M8*9 que
deben fijarse para la instalación

- 5 -
TIPO D
1. Evitar el transporte violento.
2. Utilice tornillos para fijar la rampa.
TIPO E
Utilice pernos de expansión M8*9 que
deben fijarse para la instalación
4.mantenimiento
Compruebe periódicamente la integridad y la estabilidad del producto, especialmente
después de un uso intensivo.
Evite utilizar limpiadores corrosivos durante la limpieza para mantener el rendimiento y
la apariencia del producto.
Evite usarlo en terrenos irregulares o excesivamente inclinados para no afectar la
seguridad y funcionalidad.
Preste atención al alcance aplicable del producto y asegúrese de que se utilice en el
entorno y las condiciones adecuados.
Fabricante: Shanghaimuxinmuyeyouxiangongsi
Dirección: Shuangchenglu 803nong11hao1602A-1609shi, baoshanqu,
shanghai 200000 CN.
Importado a AUS: SIHAO PTY LTD, 1 ROKEVA STREETEASTWOOD NSW
2122 Australia
Importado a EE. UU.: Sanven Technology Ltd., Suite 250, 9166 Anaheim
Place, Rancho Cucamonga, CA 91730

- 6 -
REP
EC
E-CrossStu GmbH
Mainzer Landstr.69, 60329 Frankfurt am Main.
REP
UK
YH CONSULTING LIMITED.
C/O YH Consulting Limited Office 147, Centurion House,
London Road, Staines-upon-Thames, Surrey, TW18 4AX


Techniczny Wsparcie i certyfikat e-gwarancji
www.vevor.com/support
PODJAZD KRAWĘŻNIKOWY
INSTRUKCJA OBSŁUGI
We continue to be committed to provide you tools with competitive price.
"Save Half", "Half Price" or any other similar expressions used by us only represents an
estimate of savings you might benefit from buying certain tools with us compared to the major
top brands and does not necessarily mean to cover all categories of tools offered by us. You
are kindly reminded to verify carefully when you are placing an order with us if you are
actually saving half in comparison with the top major brands.
- 1 -
TYP A
TYP B
TYP C
TYP D
TYP E
Uwaga: Wygląd produktu, który otrzymasz, ma wpływ na jego ostateczny
wygląd.
Have product questions? Need technical support? Please feel free to
contact us:
Technical Support and E-Warranty Certificate
www.vevor.com/support
NEED HELP? CONTACT US!
CURB RAMP

- 2 -
This is the original instruction, please read all manual instructions
carefully before operating. VEVOR reserves a clear interpretation of our
user manual. The appearance of the product shall be subject to the
product you received. Please forgive us that we won't inform you again if
there are any technology or software updates on our product.
1. INSTRUKCJE
Przed użyciem rampy krawężnikowej należy zapoznać się z niniejszą instrukcją
montażu. Należy zachować wszystkie instrukcje i odwołać się do nich w razie potrzeby.
Produkt ma delikatny zapach, co jest zjawiskiem normalnym. Przed użyciem zalecamy
przewietrzenie pomieszczenia, aby pozbyć się zapachu.
OSTRZEŻENIA
Nieprawidłowy montaż może spowodować gromadzenie się
zanieczyszczeń, co utrudni przepływ wody.
Stosowany na krawężnikach, schodach i nierównych nawierzchniach.
61. Przeczytaj ze zrozumieniem instrukcję i zachowaj ją na przyszłość.
62. Przed każdym użyciem należy sprawdzić, czy produkt nie ma luźnych lub
uszkodzonych części. Nie należy używać produktu, jeżeli takie części są obecne.
63. Przed użyciem wyczyść rampy, usuwając brud, olej i zanieczyszczenia, a
następnie pozostaw do wyschnięcia.
64. Aby zapewnić bezpieczeństwo, należy ustawiać rampy wyłącznie na twardym,
równym i suchym podłożu.
65. Należy zachować ostrożność w przypadku dynamicznego obciążenia, aby
zapobiec uszkodzeniu produktu z powodu nagłego ruchu ładunku, który może
spowodować nadmierne obciążenie.
66. Używaj produktu ściśle zgodnie z przeznaczeniem, aby uniknąć niewłaściwego
użycia i potencjalnych zagrożeń.
67. Trzymaj dzieci i osoby postronne z dala od miejsca pracy. Nie pozwalaj dzieciom
bawić się produktem ani przebywać w jego pobliżu, gdyż nie jest on zabawką.
68. Gdy sprzęt nie jest używany, należy go przechowywać w suchym miejscu, aby
zapobiec rdzewieniu i przedłużyć jego żywotność.

- 3 -
69. Przed użyciem i po użyciu należy upewnić się, że produkt jest solidnie
przymocowany do podłoża, aby zapobiec jego przesuwaniu się lub przesuwaniu,
zapewniając tym samym bezpieczeństwo i stabilność.
70. Nie przekraczaj maksymalnego udźwigu produktu, aby uniknąć przeciążenia i
potencjalnych uszkodzeń.
71. Podczas transportu należy obchodzić się z produktem ostrożnie, aby zapobiec
uszkodzeniom spowodowanym nieostrożnym obchodzeniem się z nim.
72. Podane instrukcje, ostrzeżenia i przestrogi nie mogą obejmować wszystkich
możliwych warunków i sytuacji, które mogą wystąpić. Operator musi zachować
zdrowy rozsądek i ostrożność, które są kluczowe dla bezpiecznej obsługi, ale nie
mogą być wbudowane w produkt.
7. Wprowadzenie do produktu i parametry
Jest to produkt gumowy o wysokiej wydajności zaprojektowany specjalnie do
bezpiecznego przejścia pojazdów, umożliwiający łatwy przejazd przez wyższe
krawężniki lub chodniki, jednocześnie chroniąc podziemne kable lub rury przed
uszkodzeniem. Wykonany z wysokiej jakości, odpornego na zużycie i ciśnienie
materiału gumowego, nadaje się do różnych środowisk zewnętrznych. Jego dolny
kanał umożliwia przepływ wody i kabli, teksturowana powierzchnia zwiększa tarcie,
otwory boczne ułatwiają połączenie, a otwory powierzchniowe można wykorzystać do
zakotwiczenia. Nadaje się do krawężników, podjazdów, garaży domowych, doków
załadunkowych i innych obszarów, kompatybilny z różnymi przejściami pojazdów.
Podjazd krawężnikowy - Parametr
TYP
Zdjęcie
Model
Wysok
ość
rampy
Ilość
Pamp
Limit
obciążeni
a
(dla
każdego
Rapmu)
Rozmiar
produktu/mm
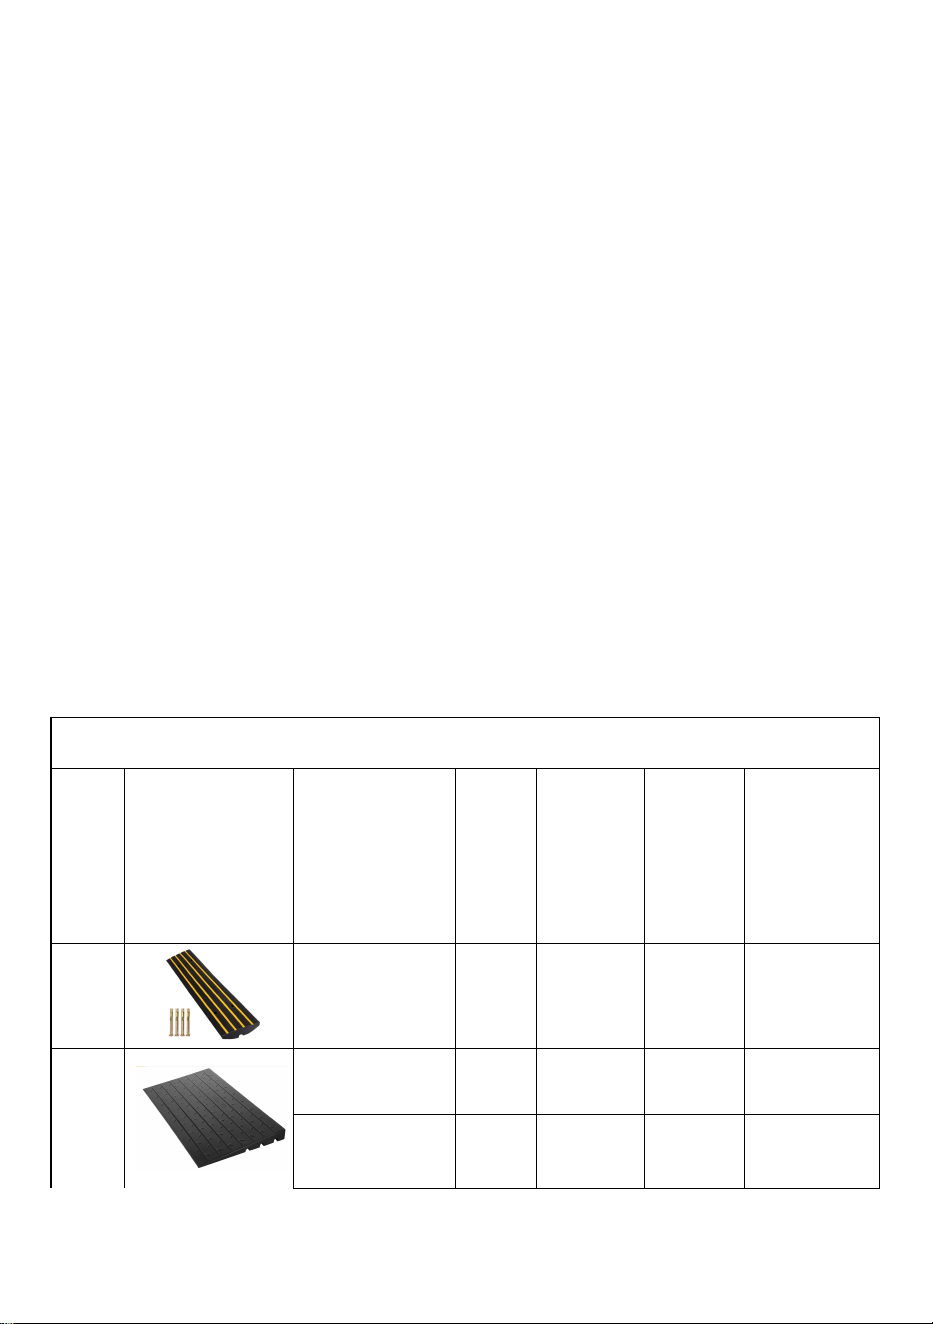
A
LYPD-1
2,6"
1 szt.
22000
funtów
1230*410*65
B
LYPD-24*42,5*2,5
2,6"
1 szt.
2200
funtów
1060*610*65
- 4 -
LYPD-24*42* 3
3 "
1 szt.
2200
funtów
1060*610* 76
LYPD-24*42*4
4"
1 szt.
2200
funtów
1060*610*101
C
LYPD-47-1
2,6"
1 szt.
32000
funtów
1210*410*65
D
LYPD-19,7x12,6x
4-2szt
4"
2 szt.
11000
funtów
500*320*100
mi
LYPD-47-2
2,6"
2 szt.
( Lewy i
prawy
Każdy 1
szt.)
33069
funtów
1210*410*65
3. KROKI INSTALACJI
KROK 01 Wybierz wymiar
Rozmiary ramp krawężnikowych są wymienione w tabeli parametrów. Maksymalne
obciążenie powinno być mniejsze od limitu obciążenia każdego typu. Wybierz rozmiar
pasujący do rampy . Przed instalacją wybierz odpowiednie miejsce i kierunek, aby
upewnić się, że płytka okablowania ma ścisły kontakt z podłożem.
KROK 02 Zabezpiecz za pomocą odpowiednich śrub i wkrętów, zgodnie z typem
produktu.
A
Zdjęcie
Przewodnik po konfiguracji
Typ EA
Do montażu należy użyć śrub
rozporowych M8*9.

- 5 -
TYP B
1. Pochylnia musi być przymocowana do
stopni.
2. Nie należy używać urządzenia w
pozycji poziomej ani przewracać go z obu
stron, ponieważ może to spowodować
uszkodzenie jego wewnętrznej struktury.
3. Rampa wytrzymuje obciążenie do 2600
funtów.
TYP C
Do montażu należy użyć śrub
rozporowych M8*9.
TYP D
1. Unikać gwałtownego transportu.
2. Za pomocą śrub przymocuj rampę.
TYP E
Do montażu należy użyć śrub
rozporowych M8*9.
4. konserwacja
Regularnie sprawdzaj integralność i stabilność produktu, zwłaszcza po intensywnym
użytkowaniu.
Aby zachować wydajność i wygląd produktu, podczas czyszczenia należy unikać
stosowania żrących środków czyszczących.
Aby uniknąć negatywnego wpływu na bezpieczeństwo i funkcjonalność urządzenia,
należy unikać użytkowania go na nierównym lub nadmiernie pochyłym podłożu.
Należy zwrócić uwagę na zakres stosowania produktu i upewnić się, że jest on
stosowany w odpowiednim środowisku i warunkach.

- 6 -
Producent: Shanghaimuxinmuyeyouxiangongsi
Adres: Shuangchenglu 803nong11hao1602A-1609shi, baoshanqu, szanghaj
200000 CN.
Importowane do AUS: SIHAO PTY LTD, 1 ROKEVA STREETEASTWOOD
NSW 2122 Australia
Importowane do USA: Sanven Technology Ltd., Suite 250, 9166 Anaheim
Place, Rancho Cucamonga, CA 91730
REP
EC
E-CrossStu GmbH
Mainzer Landstr.69, 60329 Frankfurt am Main.
REP
UK
YH CONSULTING LIMITED.
C/O YH Consulting Limited Office 147, Centurion House,
London Road, Staines-upon-Thames, Surrey, TW18 4AX


Technisch Ondersteuning en E-garantiecertificaat
www.vevor.com/support
STOEPRANDEN HELLING
GEBRUIKERSHANDLEIDING
We continue to be committed to provide you tools with competitive price.
"Save Half", "Half Price" or any other similar expressions used by us only represents an
estimate of savings you might benefit from buying certain tools with us compared to the major
top brands and does not necessarily mean to cover all categories of tools offered by us. You
are kindly reminded to verify carefully when you are placing an order with us if you are
actually saving half in comparison with the top major brands.

- 1 -
TYPE A
TYPE B
TYPE C
TYPE D
TYPE E
Let op: het uiterlijk van het product is afhankelijk van het daadwerkelijke product
dat u ontvangt.
Have product questions? Need technical support? Please feel free to
contact us:
Technical Support and E-Warranty Certificate
www.vevor.com/support
NEED HELP? CONTACT US!
CURB RAMP

- 2 -
This is the original instruction, please read all manual instructions
carefully before operating. VEVOR reserves a clear interpretation of our
user manual. The appearance of the product shall be subject to the
product you received. Please forgive us that we won't inform you again if
there are any technology or software updates on our product.
1.INSTRUCTIES
Lees voor uw eigen informatie de installatie-instructies door voordat u de oprit in
gebruik neemt. Bewaar alle instructies en raadpleeg ze indien nodig. Het is normaal
dat het product een lichte geur heeft. Wij adviseren om het product voor gebruik te
ventileren om deze geur te voorkomen.
WAARSCHUWINGEN
Bij een onjuiste installatie kan er vuil ophopen, waardoor de
waterstroom wordt belemmerd.
Wordt gebruikt bij stoepranden, treden en oneffen trottoirs.
73. Lees en begrijp de handleiding en bewaar deze instructies voor toekomstig
gebruik.
74. Controleer het product voor elk gebruik op losse of beschadigde onderdelen. Als
u dergelijke onderdelen vindt, gebruik het product dan niet.
75. Maak de hellingen schoon voor gebruik. Verwijder vuil, olie en gruis en laat ze
drogen.
76. Plaats de hellingen alleen op een stevige, vlakke en droge ondergrond om de
veiligheid te garanderen.
77. Wees voorzichtig bij dynamische belasting om te voorkomen dat het product
kapotgaat door plotselinge bewegingen van de last, waardoor er een te grote
belasting kan ontstaan.
78. Gebruik het product uitsluitend zoals bedoeld, om verkeerd gebruik en mogelijke
gevaren te voorkomen.
79. Houd kinderen en omstanders uit de buurt van het werkgebied en laat kinderen
niet met of in de buurt van het product spelen, aangezien het geen speelgoed is.
80. Wanneer u het apparaat niet gebruikt, bewaar het dan op een droge plaats om

- 3 -
roest te voorkomen en de levensduur ervan te verlengen.
81. Zorg ervoor dat het product voor en na gebruik stevig op de grond staat om te
voorkomen dat het gaat schuiven of verschuiven. Zo blijft de veiligheid en
stabiliteit gewaarborgd.
82. Overschrijd het maximale draagvermogen van het product niet om overbelasting
en mogelijke schade te voorkomen.
83. Behandel het product voorzichtig tijdens het transport om schade door ruwe
behandeling te voorkomen.
84. De verstrekte instructies, waarschuwingen en voorzorgsmaatregelen kunnen niet
alle mogelijke omstandigheden en situaties dekken die zich kunnen voordoen.
Het is essentieel dat de operator gezond verstand en voorzichtigheid betracht, die
cruciaal zijn voor een veilige bediening, maar niet in het product kunnen worden
ingebouwd.
8. Productintroductie en Parameter
Dit is een hoogwaardig rubberproduct dat speciaal is ontworpen voor de veilige
overgang van voertuigen, waardoor het gemakkelijk is om over hogere stoepranden of
trottoirs te rijden en ondergrondse kabels of leidingen worden beschermd tegen
schade. Gemaakt van hoogwaardig, slijtvast en drukbestendig rubbermateriaal, is het
geschikt voor verschillende buitenomgevingen. Het ontwerp van het onderste kanaal
maakt de doorgang van water en kabels mogelijk, het getextureerde oppervlak
verhoogt de wrijving, zijgaten vergemakkelijken de verbinding en oppervlaktegaten
kunnen worden gebruikt voor verankering. Het is geschikt voor stoepranden, opritten,
garages, laadperrons en andere gebieden, compatibel met verschillende
voertuigovergangen.
Trottoirhelling - Parameter
TYPE
Afbeelding
Model
Hoogt
e van
de
helling
Pamp
Hoeveelh
eid
Belasting
limiet
(voor
elke
Rapm)
Productgroott
e/mm
A
LYPD-1
2,6"
1 stuk
22000
pond
1230*410*65
- 4 -
B
LYPD-24*42.5*2.5
2,6"
1 stuk
2200
pond
1060*610*65
LYPD-24*42* 3
3 "
1 stuk
2200
pond
1060*610* 76
LYPD-24*42*4
4"
1 stuk
2200
pond
1060*610*101
C
LYPD-47-1
2,6"
1 stuk
32000
pond
1210*410*65
D
LYPD-19.7x12.6x
4-2st
4"
2 stuks
11000
pond
500*320*100
Ik
LYPD-47-2
2,6"
2 stuks
( L en R
Elk 1st)
33069
pond
1210*410*65
3. INSTALLATIESTAPPEN
STAP 01 Selecteer de dimensie
De maten van de stoeprandhellingen staan vermeld in de parametertabel. De
maximale belasting moet onder de belastinglimiet van elk type liggen. Kies de maat die
bij de helling past . Kies vóór de installatie de juiste locatie en richting om ervoor te
zorgen dat de bedradingsplaat nauw contact maakt met de grond.
STAP 02 Bevestig met bouten en schroeven die geschikt zijn voor het producttype.
A
Afbeelding
Installatiehandleiding
TYPE EA
Gebruik M8*9 expansiebouten die voor de
installatie vastgezet moeten worden
- 5 -
TYPE B
1. De oprit moet aan de treden worden
vastgeklemd.
2. Gebruik het apparaat niet horizontaal
en rol het niet om vanaf de twee kanten,
omdat dit de interne structuur kan
beschadigen.
3. De oprijplaat kan een laadvermogen tot
2600 lbs hebben.
TYPE C
Gebruik M8*9 expansiebouten die voor de
installatie vastgezet moeten worden
TYPE D
1. Vermijd heftig transport.
2. Gebruik schroeven om de oprit te
bevestigen.
TYPE E
Gebruik M8*9 expansiebouten die voor de
installatie vastgezet moeten worden
4.onderhoud
Controleer regelmatig de integriteit en stabiliteit van het product, vooral na intensief
gebruik.
Vermijd het gebruik van bijtende reinigingsmiddelen bij het reinigen, om de prestaties
en het uiterlijk van het product te behouden.
Gebruik het niet op oneffen of te hellende ondergrond om te voorkomen dat de
veiligheid en functionaliteit in gevaar komen.
Houd rekening met de toepasselijke reikwijdte van het product en zorg ervoor dat het
in de juiste omgeving en onder de juiste omstandigheden wordt gebruikt.

- 6 -
Fabrikant: Shanghaimuxinmuyeyouxiangongsi
Adres: Shuangchenglu 803nong11hao1602A-1609shi, baoshanqu, shanghai
200000 CN.
Geïmporteerd naar AUS: SIHAO PTY LTD, 1 ROKEVA
STREETEASTWOOD NSW 2122 Australië
Geïmporteerd naar de VS: Sanven Technology Ltd., Suite 250, 9166
Anaheim Place, Rancho Cucamonga, CA 91730
REP
EC
E-CrossStu GmbH
Mainzer Landstr.69, 60329 Frankfurt am Main.
REP
UK
YH CONSULTING LIMITED.
C/O YH Consulting Limited Office 147, Centurion House,
London Road, Staines-upon-Thames, Surrey, TW18 4AX


Teknisk Support och e-garanticertifikat
www.vevor.com/support
BRANDRAMP
ANVÄNDARMANUAL
We continue to be committed to provide you tools with competitive price.
"Save Half", "Half Price" or any other similar expressions used by us only represents an
estimate of savings you might benefit from buying certain tools with us compared to the major
top brands and does not necessarily mean to cover all categories of tools offered by us. You
are kindly reminded to verify carefully when you are placing an order with us if you are
actually saving half in comparison with the top major brands.

- 1 -
TYP A
TYP B
TYP C
TYP D
TYP E
Obs: Den faktiska produkten du får avgör dess utseende.
Have product questions? Need technical support? Please feel free to
contact us:
Technical Support and E-Warranty Certificate
www.vevor.com/support
NEED HELP? CONTACT US!
This is the original instruction, please read all manual instructions
carefully before operating. VEVOR reserves a clear interpretation of our
user manual. The appearance of the product shall be subject to the
product you received. Please forgive us that we won't inform you again if
there are any technology or software updates on our product.
CURB RAMP

- 2 -
1.INSTRUKTIONER
För din information, läs dessa installationsinstruktioner innan du använder din
trottoarramp; Vänligen spara alla instruktioner och hänvisa till dem när det är
nödvändigt. Det är normalt att produkten har en lätt lukt. Vi rekommenderar att du
ventilerar före användning för att undvika lukten.
VARNINGAR
Felaktig installation kan orsaka att skräp samlas, vilket hindrar
vattenflödet.
Används i trottoarkanter, trappsteg och ojämn trottoar.
85. Läs och förstå manualen och spara dessa instruktioner för framtida referens.
86. Före varje användning, inspektera produkten för lösa eller skadade delar; använd
inte om någon hittas.
87. Rengör ramperna före användning, ta bort all smuts, olja eller skräp och låt dem
torka.
88. Sätt upp ramperna endast på en fast, jämn och torr yta för att garantera
säkerheten.
89. Var försiktig med dynamisk belastning för att förhindra produktfel på grund av
plötsliga laströrelser som kan skapa en överdriven belastning.
90. Använd produkten strikt som avsett för att undvika felaktig användning och
potentiella faror.
91. Håll barn och åskådare borta från arbetsområdet och låt inte barn leka med eller
nära produkten, eftersom det inte är en leksak.
92. När den inte används, förvara utrustningen på en torr plats för att förhindra rost
och förlänga dess livslängd.
93. Se till att produkten är ordentligt fastsatt på marken före och efter användning för
att förhindra glidning eller förskjutning, vilket bibehåller säkerhet och stabilitet.
94. Överskrid inte produktens maximala bärförmåga för att undvika överbelastning
och potentiell skada.
95. Hantera produkten varsamt under transporten för att förhindra skador från grov
hantering.
96. Anvisningarna, varningarna och försiktighetsåtgärderna kan inte täcka alla
- 3 -
möjliga förhållanden och situationer som kan uppstå. Det är viktigt för operatören
att utöva sunt förnuft och försiktighet, vilket är avgörande för säker drift men som
inte kan byggas in i produkten.
9. Produktintroduktion och parameter
Detta är en högpresterande gummiprodukt designad speciellt för säker övergång av
fordon, som möjliggör enkel passage över högre trottoarkanter eller trottoarer samtidigt
som den skyddar jordkablar eller rör från skador. Tillverkad av högkvalitativt, slitstarkt
och tryckbeständigt gummimaterial, den är lämplig för olika utomhusmiljöer. Dess
bottenkanaldesign möjliggör passage av vatten och kablar, den strukturerade ytan
ökar friktionen, sidohålen underlättar anslutningen och ythålen kan användas för
förankring. Den är lämplig för trottoarkanter, uppfarter, hemgarage, lastkajer och andra
områden, kompatibel med olika fordonsövergångar.
Trottoarramp - Parameter
TYP
Bild
Modell
Ramp
höjd
Pamp
Antal
Belastnin
gsgräns
(för varje
Rapm)
Produktstorle
k/mm
A
LYPD-1
2,6"
1 st
22 000
pund
1230*410*65
B
LYPD-24*42,5*2,5
2,6"
1 st
2200
pund
1060*610*65
LYPD-24*42* 3
3 "
1 st
2200
pund
1060*610* 76
LYPD-24*42*4
4"
1 st
2200
pund
1060*610*101
C
LYPD-47-1
2,6"
1 st
32 000
pund
1210*410*65

- 4 -
D
LYPD-19,7x12,6x
4-2st
4"
2 st
11 000
pund
500*320*100
E
LYPD-47-2
2,6"
2 st
( L och R
Varje 1 st)
33069
pund
1210*410*65
3. INSTALLATIONSSTEG
STEG 01 Välj dimension
Storleken på trottoarramperna är listade i parametertabellen. Den maximala
belastningen bör vara under belastningsgränsen för varje typ. Vänligen välj den storlek
som matchar rampen. Välj lämplig plats och riktning innan installationen för att
säkerställa att kretskortet är i nära kontakt med marken.
STEG 02 Säkra med lämpliga bultar och skruvar enligt produkttyp.
A
Bild
Installationsguide
TYP EA
Använd M8*9 Expansionsbultar måste
fixeras för installation
TYP B
1. Rampen måste klämmas fast vid
stegen.
2. Använd inte horisontellt eller rulla över
från de två sidorna, eftersom det kan
förstöra dess inre struktur.
3. Rampen kan hålla upp till 2600lbs
lastkapacitet.
TYP C
Använd M8*9 Expansionsbultar måste
fixeras för installation

- 5 -
TYP D
1. Håll undan från våldsamma transporter.
2.Använd skruvar för att fixera rampen.
TYP E
Använd M8*9 Expansionsbultar måste
fixeras för installation
4.underhåll
Kontrollera produktens integritet och stabilitet regelbundet, särskilt efter hård
användning.
Undvik att använda frätande rengöringsmedel vid rengöring för att bibehålla
produktens prestanda och utseende.
Undvik att använda den på ojämn eller överdrivet sluttande mark för att undvika att
påverka säkerheten och funktionaliteten.
Var uppmärksam på produktens tillämpliga omfattning och se till att den används i
lämplig miljö och förhållanden.
Tillverkare: Shanghaimuxinmuyeyouxiangongsi
Adress: Shuangchenglu 803nong11hao1602A-1609shi, baoshanqu,
shanghai 200000 CN.
Importerad till AUS: SIHAO PTY LTD, 1 ROKEVA STREETEASTWOOD
NSW 2122 Australien
Importerad till USA: Sanven Technology Ltd., Suite 250, 9166 Anaheim
Place, Rancho Cucamonga, CA 91730

- 6 -
REP
EC
E-CrossStu GmbH
Mainzer Landstr.69, 60329 Frankfurt am Main.
REP
UK
YH CONSULTING LIMITED.
C/O YH Consulting Limited Office 147, Centurion House,
London Road, Staines-upon-Thames, Surrey, TW18 4AX


