
Introduction .....................................................2
Important Safety Instructions ...................3
Features ............................................................6
Controls & Operation .................................7
Care & Cleaning ........................................... 14
Troubleshooting........................................... 15
Limited Warranty ......................................... 16
Frigidaire.com USA 1-800-374-4432 Frigidaire.ca Canada 1-800-265-8352
use
&
care
A31281302 (August 2025)
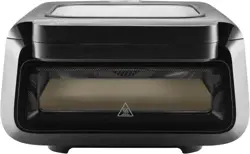
Indoor Countertop
Pizza Oven

2
Welcome to our
family
This manual is your resource for the use
and care of your product. Please read
it before using your appliance. Keep it
handy for quick reference. If something
doesn’t seem right, the troubleshooting
section will help you with common issues.
Visit Owner Support on
www.frigidaire.com
for access to FAQs,
how-to videos and articles, accessories
and cleaning products.
We are here for you! Visit our website,
chat with an agent, or call us if you need
help. If you do need service, we can get
that started for you.
For Peace of Mind Protection, register
you product. Locate your registration
card and/or label on your product with
the photo register icon.
Keep your product info here so it’s easy
to find.
Model Number:
Serial Number:
Purchase Date:
INTRODUCTION
Definitions
This is the safety alert symbol. It is
used to alert you to potential personal
injury hazards. Obey all safety messages
that follow this symbol to avoid possible
injury or death.
CAUTION
CAUTION indicates a potentially
hazardous situation which, if not
avoided, may result in minor or
moderate injury.
DANGER
DANGER indicates an imminently
hazardous situation which, if not avoided,
will result in death or serious injury.
IMPORTANT
IMPORTANT indicates installation,
operation or maintenance information
which is important but not hazard-related.
WARNING
WARNING indicates a potentially
hazardous situation which, if not avoided,
could result in death or serious injury.
Product Information
Power: 120 V 60Hz 1750W
ATTENTION
Please read all instructions related to
your product and keep this manual for
your future reference. Follow all the
warnings and instructions described in
this manual to better use your product
and get better results.
ENVIRONMENT
Frigidaire is committed to offering
products that have less impact on the
environment, thus contributing to the
sustainable development. Electronic
equipment, cells and batteries must be
disposed of separately from ordinary
waste. If your equipment has cells or
batteries, when they are replaced or
discarded, they must be sent to an
Frigidaire Authorized Service so that
they have a suitable destination.
Environmentally sound preparation of
packaging and products at the end of life
is everyone’s responsibility.
Conforms to UL Std.1026
Certified to CSA Std. CSA C22.2
No.60335-1&No.60335-2-9:20

IMPORTANT SAFETY INFORMATION
SAFETY PRECAUTIONS
IMPORTANT SAFEGUARDS
3
Read all instructions before using the
electric appliance. The following basic
precautions should always be followed.
• Children should not play with the
appliance. Cleaning and maintenance
should not be performed by children
without supervision. Close supervision
is necessary when the appliance is
used by or near children.
• Please keep the appliance and the
power cord out of the reach of
children.
• After unpacking the product, keep the
packaging material out of reach of
children.
• This appliance is intended for normal
household use only. Not for
commercial use.
• Check that the supply voltage is the
same as the product label before
connecting it.
• Unplug from outlet when not in use
and before cleaning. Allow to cool
before putting on or taking off parts.
• Do not operate any appliance with a
damaged cord or plug or after the
appliance malfunctions or has been
damaged in any manner. Always make
sure that the plug is inserted properly
into a wall outlet.
• Regularly inspect the appliance and
power cord. If the power cord is
damaged or broken, it must be
replaced by a service agent or similarly
qualified persons to avoid safety
hazards.
• Return appliance to the nearest
authorized service facility for
examination, repair, or adjustment. Do
not attempt to repair the appliance
yourself.
• Keep the power cord away from hot
surfaces or sharp objects to avoid
damage. Do not use an extension cord.
Do not use an outlet under the
counter.
• Do not excessively pinch, bend, twist
or place heavy objects on the power
cord to prevent from exposing or
breaking its shielding. Do not use the
electrical cord to pull or drag the
product.
• Do not let cord hang over edge of
table or counter, or touch hot surfaces.
• Always attach plug to appliance first(if
applicable), then plug cord into the
wall outlet. To disconnect, turn the
unit off, then remove plug from wall
outlet.
• The accessible surfaces may become
hot during use. Do not touch hot
surfaces. Use handles or knobs. Keep
hair and clothing away from heated
parts of the product.
• Do not cover the air inlet and the air
outlet openings while the appliance is
operating.
• Never unplug the product from the
outlet by pulling on the electrical
cable, use the plug.
• Do not place the appliance on or near
a hot gas or electric burner, or in a
heated oven. Do not use outdoors.
• Ne
ver put anything flammable,
explosive or corrosive in the basket or
trays. Never place paper, cardboard,
non-heat-resistant plastic or similar
combustible materials into your Oven.
Never put baking or parchment paper
into the Oven without food on top. Air
circulation can cause paper to lift and
touch heating coils.
• Do not pour oil into the cooking
basket or trays.
• Be careful of small parts.
• Extreme caution must be used when
moving an appliance containing hot oil
or other hot liquids.
• Do not insert pins, wires or other
objects into any of the openings of the
appliance to avoid an electrical shock
or injury.
• To protect against electric shock, do
not immerse the cord, plug, or housing
in water or other liquids.
• Do not move or shake the appliance
during use.
• Immediately unplug the unit if the unit
emits black smoke.
• Do not leave your appliance
unattended while in use.
• Do not store items on top of the
appliance when it is turned on.
• Do not use the appliance for any
purpose other than its intended use.
• When cooking, DO NOT place the
appliance against a wall or against
other appliances. Leave at least 4"/10
cm of free space on the back, sides,
and 5"/12.7cm above the appliance.
DO NOT operate the appliance on or
near combustible materials. DO NOT
block any ventilation openings as hot
steam is released through them. DO
NOT place anything on top of the
appliance.
• The use of accessory attachments not
recommended by the appliance
manufacturer may cause injuries.
• Please be cautious when opening and
closing the oven door. Improper
operation may cause pinching hazards.
• Do not touch the glass during
operation, as it becomes hot while in
use.
• Oversize foods or metal utensils must
not be inserted in a oven as they may
create a fire or risk of electric shock.
• A fire may occur if the oven is covered
or touching flammable material,
including curtains, draperies, walls, and
the like, when in operation. Do not
store any item on top of the appliance
when in operation.

• Children should not play with the
appliance. Cleaning and maintenance
should not be performed by children
without supervision. Close supervision
is necessary when the appliance is
used by or near children.
• Please keep the appliance and the
power cord out of the reach of
children.
• After unpacking the product, keep the
packaging material out of reach of
children.
• This appliance is intended for normal
household use only. Not for
commercial use.
• Check that the supply voltage is the
same as the product label before
connecting it.
• Unplug from outlet when not in use
and before cleaning. Allow to cool
before putting on or taking off parts.
• Do not operate any appliance with a
damaged cord or plug or after the
appliance malfunctions or has been
damaged in any manner. Always make
sure that the plug is inserted properly
into a wall outlet.
• Regularly inspect the appliance and
power cord. If the power cord is
damaged or broken, it must be
replaced by a service agent or similarly
qualified persons to avoid safety
hazards.
• Return appliance to the nearest
authorized service facility for
examination, repair, or adjustment. Do
not attempt to repair the appliance
yourself.
• Keep the power cord away from hot
surfaces or sharp objects to avoid
damage. Do not use an extension cord.
Do not use an outlet under the
counter.
• Do not excessively pinch, bend, twist
or place heavy objects on the power
cord to prevent from exposing or
breaking its shielding. Do not use the
electrical cord to pull or drag the
product.
• Do not let cord hang over edge of
table or counter, or touch hot surfaces.
• Always attach plug to appliance first(if
applicable), then plug cord into the
wall outlet. To disconnect, turn the
unit off, then remove plug from wall
outlet.
• The accessible surfaces may become
hot during use. Do not touch hot
surfaces. Use handles or knobs. Keep
hair and clothing away from heated
parts of the product.
• Do not cover the air inlet and the air
outlet openings while the appliance is
operating.
• Never unplug the product from the
outlet by pulling on the electrical
cable, use the plug.
• Do not place the appliance on or near
a hot gas or electric burner, or in a
heated oven. Do not use outdoors.
• Never put an
ything flammable,
explosive or corrosive in the basket or
trays. Never place paper, cardboard,
non-heat-resistant plastic or similar
combustible materials into your Oven.
Never put baking or parchment paper
into the Oven without food on top. Air
circulation can cause paper to lift and
touch heating coils.
• Do not pour oil into the cooking
basket or trays.
• Be careful of small parts.
• Extreme caution must be used when
moving an appliance containing hot oil
or other hot liquids.
4
IMPORTANT SAFETY INFORMATION
IMPORTANT SAFEGUARDS
• Do not clean with metal scouring pads.
Pieces can break off the pad and
touch electrical parts involving a risk
of electric shock.
• Extreme caution should be exercised
when using containers constructed of
material other than metal or glass.
• Do not store any materials, other than
manufacturers recommended
accessories, in this oven when not in
use.
• Do not cover trays, racks, or any part
of the oven with metal foil. This will
cause overheating of the oven.
• Be careful not to cut your hands when
using the pizza cutter.
• Do not touch the sharp parts of the
machine to avoid cuts.
• Do not put the product into the
cabinet.
• Do not open the door in the event
food spontaneously ignites. Any
flames will extinguish themselves.
Any changes or modifications not
expressly approved by the party
responsible for compliance could void
the use’s authority to operate the
equipment.
This device complies with Part 15 of the
FCC Rules. Operation is subject to the
following two conditions: (1) this device
may not cause harmful interference, and
(2) this device must accept any
interference received, including
interference that may cause undesired
operation.
CAN ICES-003 (B) / NMB-003 (B)
• Do not insert pins, wires or other
objects into any of the openings of the
appliance to avoid an electrical shock
or injury.
• To protect against electric shock, do
not immerse the cord, plug, or housing
in water or other liquids.
• Do not move or shake the appliance
during use.
• Immediately unplug the unit if the unit
emits black smoke.
• Do not leave your appliance
unattended while in use.
• Do not store items on top of the
appliance when it is turned on.
• Do not use the appliance for any
purpose other than its intended use.
• When cooking, DO NOT place the
appliance against a wall or against
other appliances. Leave at least 4"/10
cm of free space on the back, sides,
and 5"/12.7cm above the appliance.
DO NOT operate the appliance on or
near combustible materials. DO NOT
block any ventilation openings as hot
steam is released through them. DO
NOT place anything on top of the
appliance.
• The use of accessory attachments not
recommended by the appliance
manufacturer may cause injuries.
• Please be cautious when opening and
closing the oven door. Improper
operation may cause pinching hazards.
• Do not touch the glass during
operation, as it becomes hot while in
use.
• Oversize foods or metal utensils must
not be inserted in a oven as they may
create a fire or risk of electric shock.
• A fire may occur if the oven is covered
or touching flammable material,
including curtains, draperies, walls, and
the like, when in operation. Do not
store any item on top of the appliance
when in operation.
Note: Items marked with the following
symbol may reach high temperatures and
should be handled carefully.
FOR HOUSEHOLD USE ONLY
SAVE THESE INSTRUCTIONS FOR
FUTURE REFERENCE.
WARNING
CALIFORNIA RESIDENTS ONLY:
For cancer and reproductive harm
information visit:
www.P65Warnings.ca.gov
CAUTION
• Objects in the direct path of the hot
deformation or staining.
• The appliance is not intended for use
as a barbecue. The use of coal or wood
inside the oven presents a high risk of
fire.
IMPORTANT SAFETY INFORMATION
5
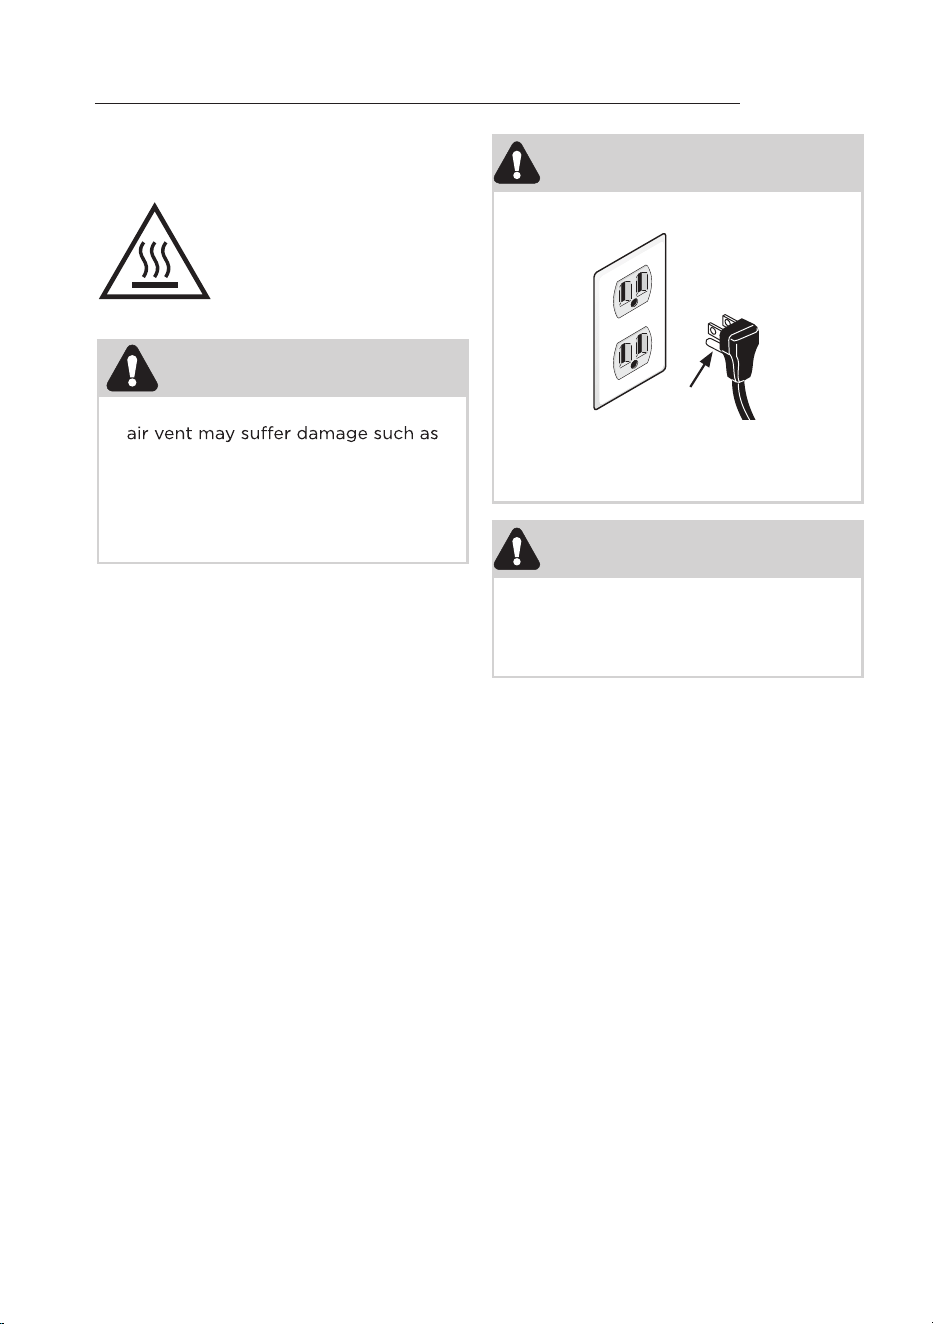
WARNING
FIRE/ELECTRICAL SHOCK HAZARD
DO NOT, under any circumstances, cut,
remove, or bypass the grounding prong.
Grounding-type
wall receptacle
Power Cord
with 3-prong
grounded plug
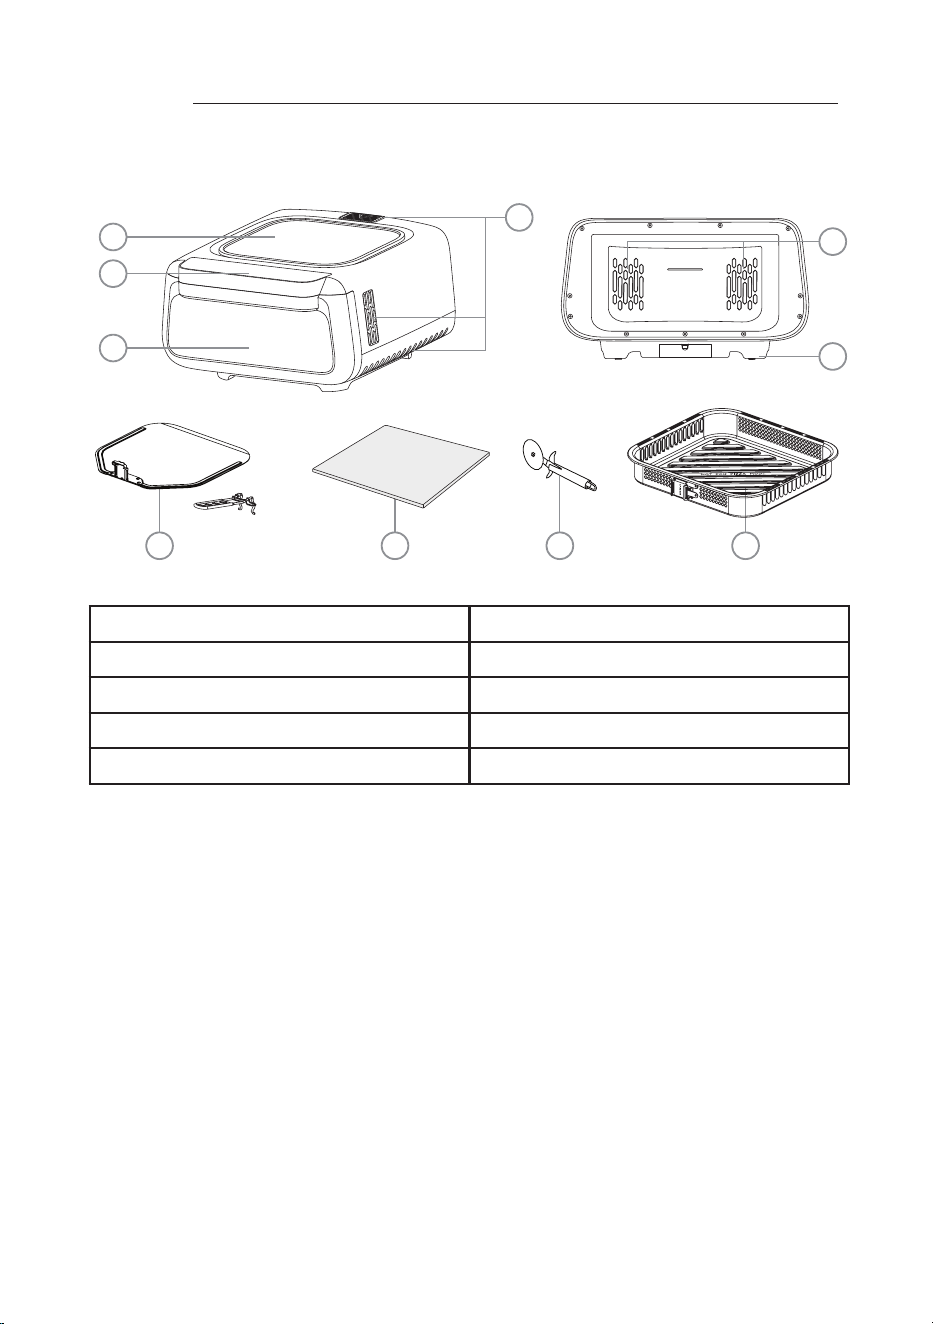
A. Air Outlet
B. Top Window
C. Control Panel
D. Door
E. Air Inlet
A
E
F
B
C
D
G H J
H. Pizza Stone
I. Pizza Cutter*
J. Air Fry Tray*
6
FEATURES
I
*Accessories vary from model to model.
F. Non-slip feet
G. Pizza Peel & Handle
1. Remove all packaging materials and
promotional labels from the inside
and outside of the appliance.
2. Place the appliance on a stable, level
and heat-resistant surface, leaving
enough space to open the door.
3. Clean the appliance and accessories
(see CARE & CLEANING).
Before First Use
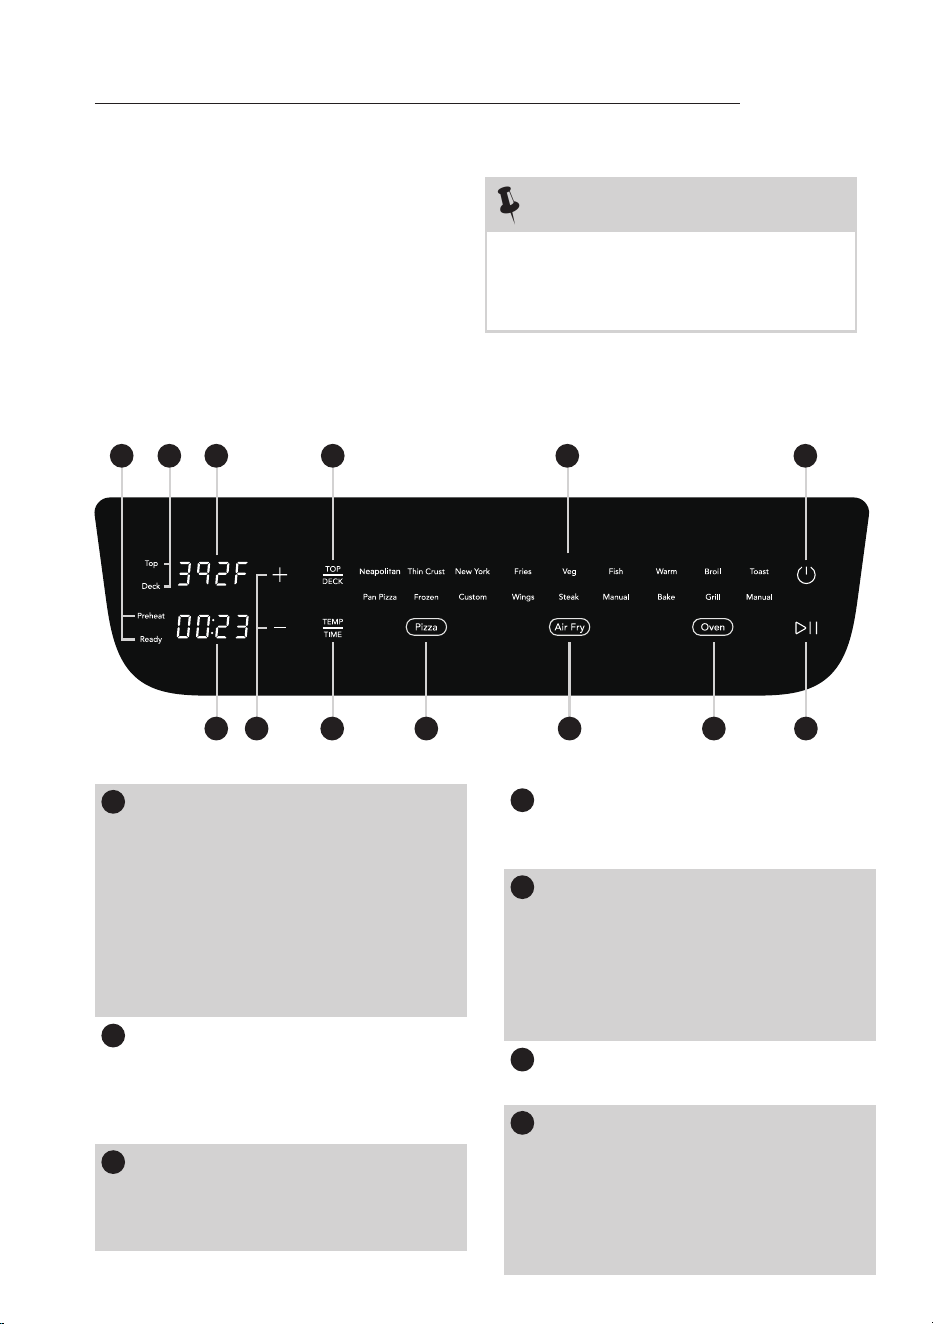
Display
NOTE
Before the first use, operate the Air Fry
mode for 10 - 15 minutes. You may
notice a small amount of smoke and/or
an odor of oil, which is normal.
1
Preheat/Ready Indicator:
3 4
13
11 7
10
9 8
5 6
During preheating, the "Preheat"
indicator light is on. When preheating is
complete, the "Ready" indicator light is
on.
Note: The preheat/Ready indicator is
for modes with preheating process only.
When preheating is complete, if no
subsequent action is taken within 5
minutes, you will need to preheat again.
3
Temperature Display:
Displays the set temperature, during
setting. Display actual temperature
during operation.
4
TOP/DECK Button:
Press to switch between upper/lower
temperature setting.
2
Top/Deck Indicator:
When adjusting the upper temperature,
the "Top" indicator light will turn on.
When adjusting the lower temperature,
the "Deck" indicator light will turn on.
5
Mode Display:
During mode selection, pressing the
Pizza, Air Fry, or Oven button will
display the corresponding modes under
that function. During operation, only the
currently running mode will be
displayed.
7
Start/Pause:
Press the button to begin the cooking
process. Pressing it again during
cooking will pause the process and
pressing it once more will restart it.
Pressing and holding the button for 5
seconds will cancel the process entirely.
6
Power Button:
Turn on/off the machine.
CONTROLS & OPERATION
7
21
12
• This mode supports consecutive
baking of up to 4 pizzas. After the
fourth pizza is cooked, the appliance
will automatically exit this mode.
• To continue baking more pizzas, it is
recommended to cool down the
product for 5 minutes, then restart it
and reselect the "Neapolitan" mode.
• You can exit this mode directly by
pressing the power button at any time.
• While cooking in Neapolitan mode,
opening and closing the door will
trigger the preheating process
automatically.
8
Oven Button:
Press to cycle through Warm, Broil,
Toast, Bake, Grill and Manual modes in
sequence.
9
Air Fry Button:
Press to cycle through Fries, Veg, Fish,
Wings, Steak and Manual modes in
sequence.
10
Pizza Button:
Press to cycle through Neapolitan, Thin
Crust, New York, Pan Pizza, Frozen and
Custom modes in sequence.
11
TEMP/TIME Button:
Press the button to switch between
temperature and time settings.
12
“ + ” and “ - ” Buttons:
Press to adjust temperature or time
settings.
The Neapolitan mode is specifically
designed for quickly baking pizzas in
succession. In this mode, we have preset
a control logic for 4 consecutive rounds
of pizza baking.
1. Press the "Pizza" button to select
"Neapolitan" mode, then press the
"Start/Pause" button to begin
preheating.
2. Once preheating is complete and the
ready icon is illuminated, open the
door and place the pizza inside.
13
Time Display:
Displays the set time during the setting.
Displays the remaining time during
operation.
Pressing and holding the " TEMP/TIME "
button for 3 seconds can switch the
temperature unit between °F and °C.
NOTE
8
CONTROLS & OPERATION
Neapolitan Mode
Key Notes for Neapolitan Mode
3. Close the door, then press the
"Start/Pause" button again to start the
timer.
4. When the timer finishes, open the door
to remove the pizza. The appliance will
automatically return to preheating
mode once the door is closed.
5. Repeat steps 2–4 to cook the next
pizza.
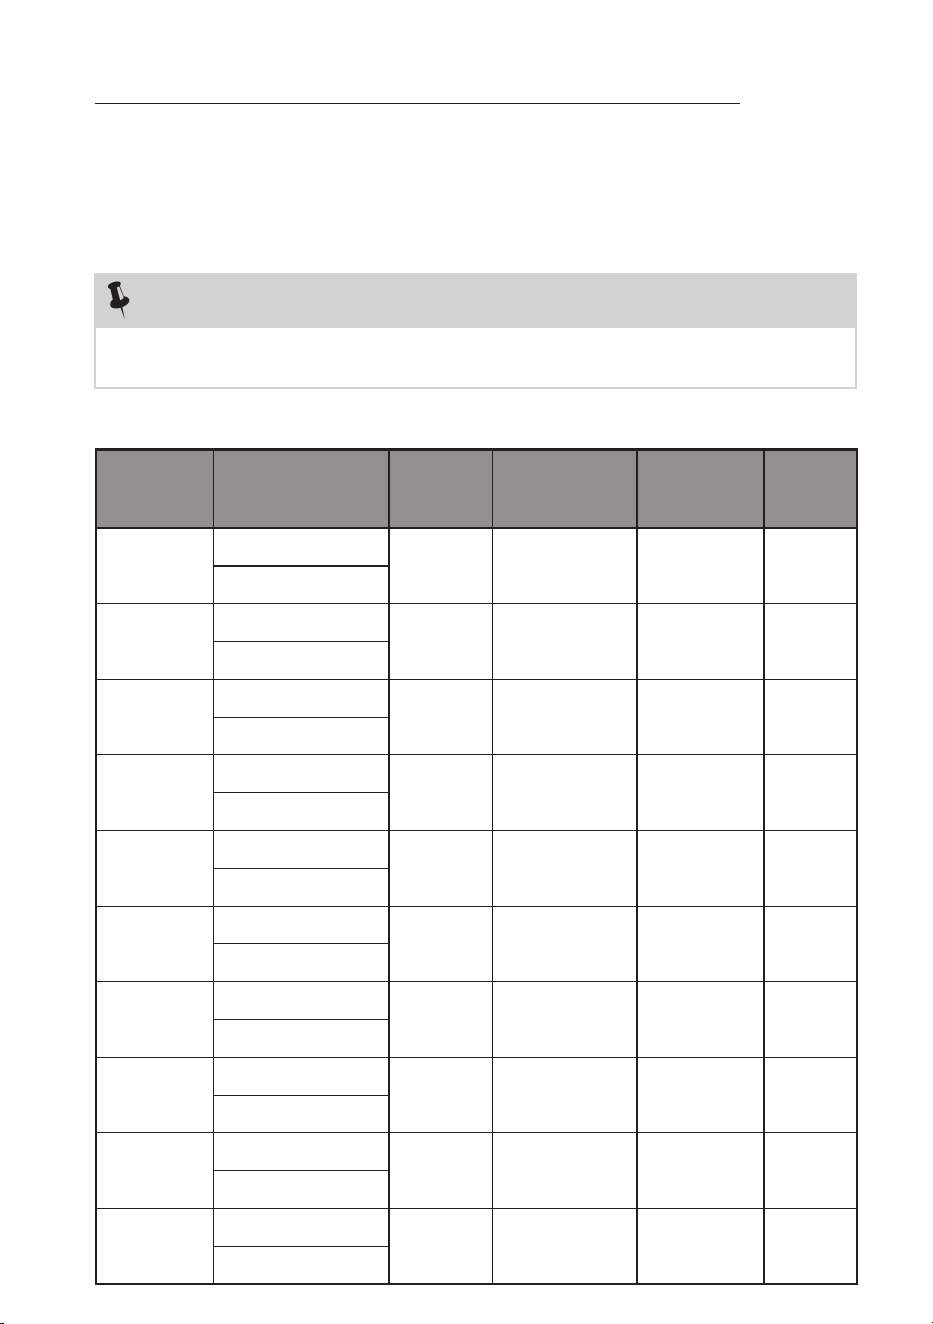
Preset Recipes
Recipes preset settings.
NOTE
It is necessary to turn certain foods at halfway through the cooking time for uniform
texture. Use gloves or tongs to ensure your safety and avoid accidents.
The adjustable ranges of temperature and time vary among different modes. Each
time a different mode is selected, the temperature and time will be reset to the values
in the preset recipe. Please select the appropriate mode according to the following
introduction of the modes.
CONTROLS & OPERATION
9
Mode
Preset Temp.
(°F/°C)
Preset
Time
(minutes)
Preheat
(Y/N)
Temp Range
Possible
(°F/°C)
Time Range
(minutes)
Neapolitan
Upper: 700°F/370°C
Lower: 660°F/350°C
3
395-700°F/
200-370°C
30sec-5min Y
Thin Crust
Upper: 500°F/260°C
Lower: 465°F/240°C
3
395-700°F/
200-370°C
30sec-30min Y
New York
Upper: 500°F/260°C
Lower: 465°F/240°C
3
395-700°F/
200-370°C
30sec-30min Y
Pan Pizza
Upper: 450°F/230°C
Lower: 410°F/210°C
5
395-700°F/
200-370°C
30sec-30min Y
Frozen
Upper: 400°F/200°C
Lower: 360°F/180°C
5
395-700°F/
200-370°C
30sec-30min Y
Custom
Upper: 700°F/370°C
Lower: 660°F/350°C
2
395-700°F/
200-370°C
30sec-30min Y
Fries
Upper: 400°F/200°C
Lower: N/A
25
180-500°F/
80-260°C
1-60min N
Veg
Upper: 375°F/190°C
Lower: N/A
12
180-500°F/
80-260°C
1-60min N
Fish
Upper: 375°F/190°C
Lower: N/A
12
180-500°F/
80-260°C
1-60min N
Wings
Upper: 450°F/230°C
Lower: N/A
13
180-500°F/
80-260°C
1-60min N
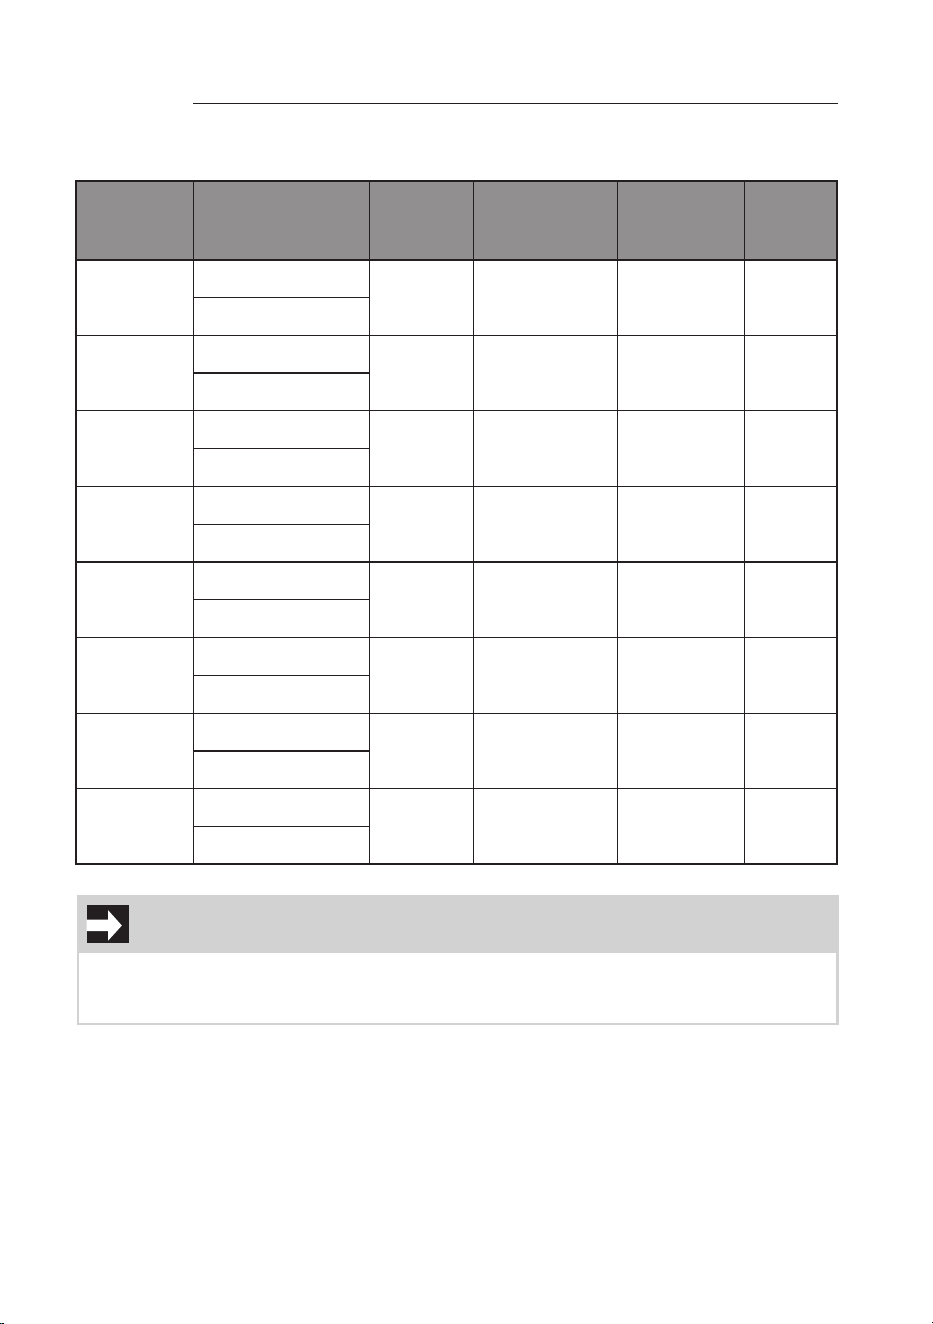
IMPORTANT
The temperature and preparation times listed in the table are guidelines and vary
depending on the recipes and the amount of ingredients, shape and texture of the
foods. You can adjust the cooking temperature and time as desired.
Mode
Preset Temp.
(°F/°C)
Preset
Time
(minutes)
Preheat
(Y/N)
Time Range
(minutes)
Steak
Upper: 400°F/200°C
Lower: N/A
12
180-575°F/
80-300°C
1-60min Y
Manual
(Air Fry)
Upper: 395°F/200°C
Lower: N/A
15
180-500°F/
80-260°C
1-60min N
Warm
Upper: 160°F/70°C
Lower: N/A
60
105-215°F/
40-100°C
1-90min N
Broil
Upper: 500°F/260°C
Lower: N/A
16
105-575°F/
40-300°C
1-90min Y
Toast
Upper: 375°F/190°C
Lower: N/A
3
105-430°F/
40-220°C
1-90min N
Bake
Upper: 350°F/175°C
Lower: N/A
20
105-430°F/
40-220°C
1-90min N
Grill
Upper: 400°F/200°C
Lower: N/A
15
105-430°F/
40-220°C
1-90min N
Manual
(Oven)
Upper: 360°F/180°C
Lower: N/A
20
105-430°F/
40-220°C
1-90min N
10
CONTROLS & OPERATION
Fries and Veg modes, have a "Shake" reminder function.
• When cooking reaches half the set time, the appliance emits 3 long beeps to prompt
the user to flip the pan, and the corresponding recipe indicator flashes for one minute
before staying on.
• If the time is reset during cooking, the "Shake" reminder resets too.
Temp Range
Possible
(°F/°C)
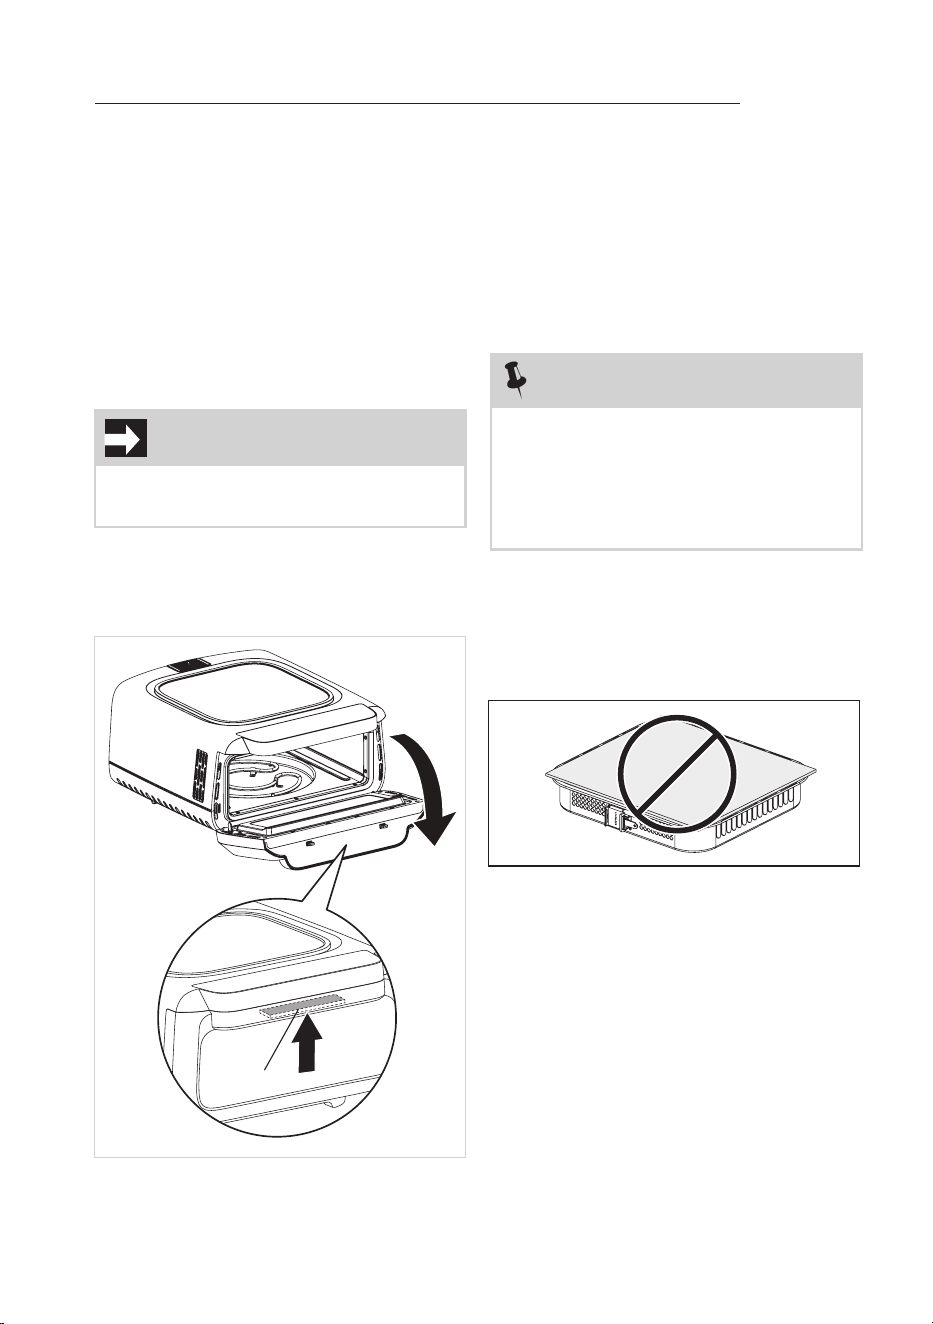
Using your Pizza Oven
IMPORTANT
Do not obstruct the air outlets of the
product.
1. Place the appliance on a stable, level
and heat-resistant surface leaving
enough room to open the door.
Do not place the appliance against a
wall or other appliances. Leave at least
4"(10cm) free space on the back and
sides, and 5"(12.7cm) above the
appliance to ensure proper ventilation.
Do not place any objects within these
areas to prevent fire hazards.
2. Plug in the appliance.
3. Push up on the button under the door
handle, then pull the door forward to
open it.
4. To ensure perfect cooking results,
choose the Air Fry Tray or Pizza
Stone based on the food you intend
to cook.
Pizza Stone
It's designed for even heat distribution,
ensuring perfect baking results every
time. Ideal for pizzas, bread, and
flatbreads.
Air Fry Tray
Perfect for chicken wings, french fries or
roasting vegetables.
Note: Please do not use the air fry tray
and pizza stone at the same time. This
could cause damage to both accessories.
• Please do not clean the stone right after
cooking, and wait until the pizza stone
cools down completely to clean.
• Do not place the pizza on the pizza stone
before preheating—this may cause the
pizza to stick to the stone.
CONTROLS & OPERATION
11
Door Button
Tips: When making Neopolitain pizza,
put the pizza stone in the appliance
before starting preheating. Use pizza
peel to put pizza on the pizza stone after
pre heating is complete. Sprinkle a thin
layer of flour or cornmeal onto the pizza
peel, then place the flattened pizza
dough on top. Before inserting it into the
appliance, make sure the pizza dough
can slide on the pizza peel and wipe off
any excess flour or cornmeal.
Note: If using a mode with a Preheat
step, please place the food only after
preheating is complete.
5. Put the food inside the oven and
ensure the door clicks in position
6. Press the Power button once to turn
on the appliance.
NOTE
12
CONTROLS & OPERATION
For modes requiring preheating: the
"Preheat" light turns on, and the oven
starts preheating. A continuous beep will
sound when preheating is complete, the
"Ready" light illuminates. Only place food
in the oven after preheating finishes.
After placing the food inside, shut the
door and ensure the door clicks in
position. Press the "Start/Pause" button
once again to begin the timer.
Preheating
Note: If the selected mode supports
separate temperature adjustment for the
upper and lower layers, press the
TOP/DECK button to switch between
adjusting the upper and lower layer
temperatures.
9. Press the "Start/Pause" button to
begin food preparation.
8. To modify the default factory settings,
press the "TEMP/TIME" button to
activate the temperature or timer
adjustment. Then use the " + " or " - "
buttons to set the desired value.
10. At the end of the programmed time,
the machine will emit a beeping
sound.
11. Pull the handle to open the door.
12. Use the detachable handle to take out
the Air Fry Tray. Or use Pizza peel to
take out the food.
• If the mode supports separate upper
and lower temperature adjustment,
preheating stops only at the higher set
temperature.
• If no food is placed inside, the
appliance will emit a beeping reminder
at intervals.
Note: If the Neapolitan mode is selected,
please refer to the instructions for
Neapolitan mode on page 8.
7. Select the desired mode by pressing
the "Pizza", "Air Fry", or "Oven"
button. Each mode features a default
factory setting optimized for typical
cooking scenarios.
NOTE
It is important to clean your appliance
after each use as the buildup of oil,
grease or food can cause unpleasant
odors, malfunctions and decrease
performance.
Note: After the program ends, the fan will
run for an additional 3 minutes.
13. Allow the appliance to fully cool down
before cleaning the inside or any
accessories. Only after the unit is
completely cool, use a damp cloth
and mild detergent. Never immerse
the appliance in water.
WARNING
• Never immerse the appliance, plug or
power cord in water or any other liquid.
• Never clean your appliance with
flammable fluids (e.g., alcohol, kerosene,
gasoline, thinner, solvents, removers),
chemicals (e.g., ammonia-based
detergents, acids, vinegar, soda), or
abrasive substances (e.g., soaps).
• Do not use steam equipment to clean
the appliance.
• After cleaning, make sure the oven is
completely dry before operating it.
• Please do not use the air fry tray and
pizza stone at the same time. This
could cause damage to both
accessories.
WARNING: Hot Air and
Steam Hazard
When opening the oven door during use,
hot air and steam may escape rapidly. This
can cause burns or scalding injuries. Always
use caution:
• Stand to the side when opening the door.
• Keep face and hands away from the
opening.
• Allow steam to dissipate before reaching
inside.
• Ensure children and pets are kept at a
safe distance during oven operation.
• Always wear heat-insulating gloves
when taking food in/out. Operating
without gloves risks scalding.
CONTROLS & OPERATION
13
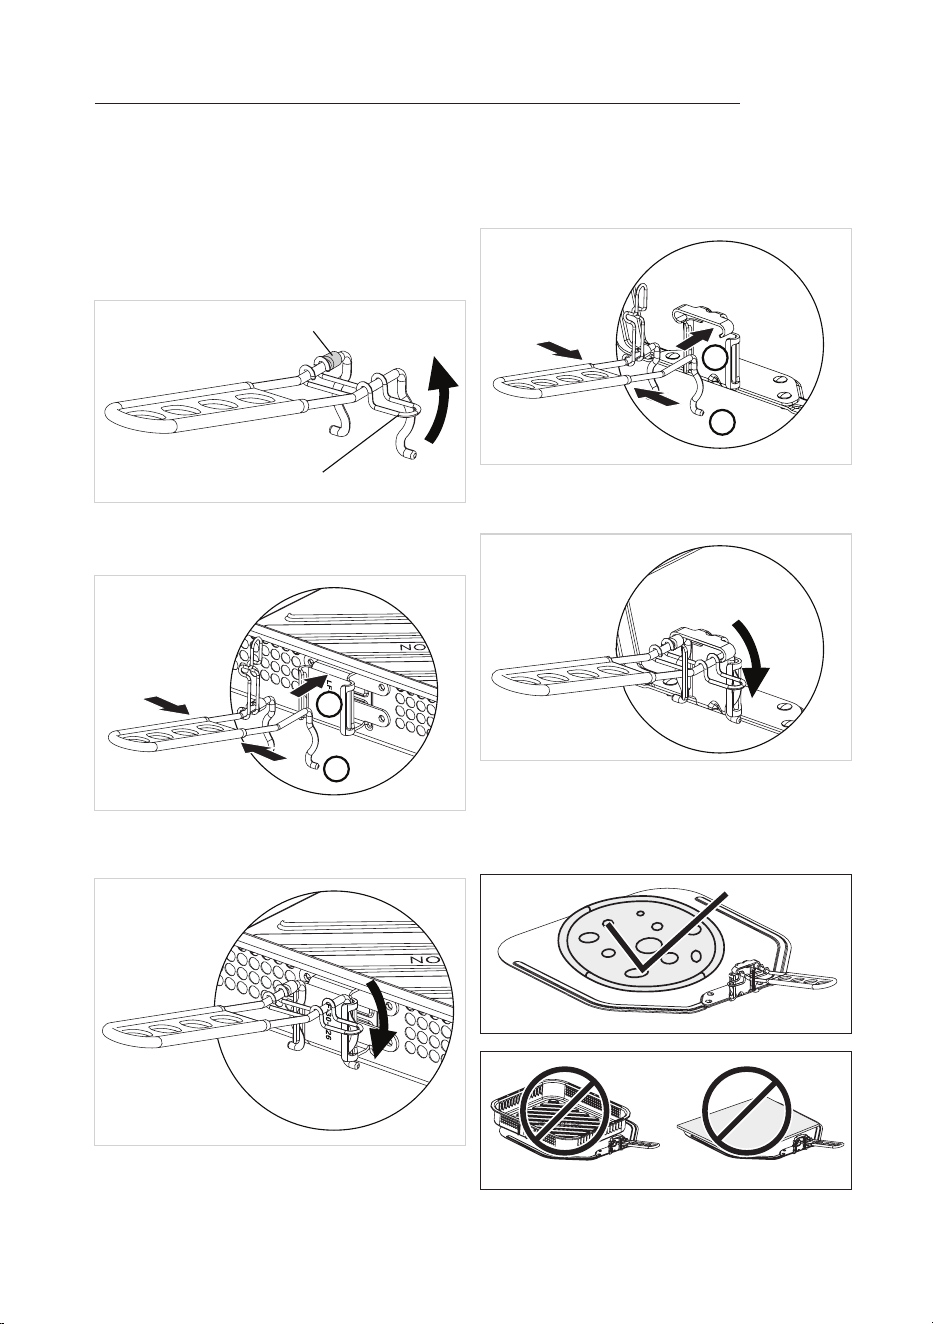
b. Release the buckle of the handle.
To use the detachable handle
Handle Buckle
Correct rubber ring position
c. Squeeze the handle with your hand.
d. Attach it to the buckle of the Air Fry Tray.
e. Release the handle and reinstall the
handle buckle.
1
2
a. Check that the black rubber ring is in the
correct position. The correct position is
shown in the figure below.
For air fry tray
b. Release the buckle of the handle.
For Pizza peel
Note: The pizza peel is designed for
transporting the pizza to and from the
appliance. Never use it to transport the
pizza stone or air fry tray.
c. Squeeze the handle with your hand.
d. Attach it to the buckle of the Pizza Peel.
1
2
e. Release the handle and reinstall the
handle buckle.
a. Check that the black rubber ring is in the
correct position. Refer to the drawing on
“Air fry tray section”.
14
CARE & CLEANING
1. Turn off the appliance and allow it to
cool completely.
2. Ensure that all components and
accessories are clean and dry.
3. Store your appliance in a flat, dry, safe
place away from children.
Storage
To avoid electric shock, remove the plug
from the outlet before performing any
cleaning or maintenance. Cleaning
should be done with a cold appliance.
Cleaning the main unit
Use only a damp cloth to clean the
outside of the appliance and its electrical
cable.
Use a soft-bristled brush to gently sweep
crumbs or flour from around the
elements—do not apply pressure or
scratch the surface.
Cleaning the accessories
For the accessories (excluding the pizza
stone), use a soft sponge and mild
detergent and rinse thoroughly to clean
the accessories. Clean the accessories
only after they cool down.
To clean the pizza stone, remove from
the unit and brush off crumbs and ash.
You may also use a wire brush to remove
baked on food. You can rinse the stone
with water if needed but DO NOT
submerge the stone in water. Make sure
the stone is completely dry before using
again in the appliance. Wet or damp
stones can crack when heated.
DO NOT cool the stone with water or
use it when damp.
Cleaning
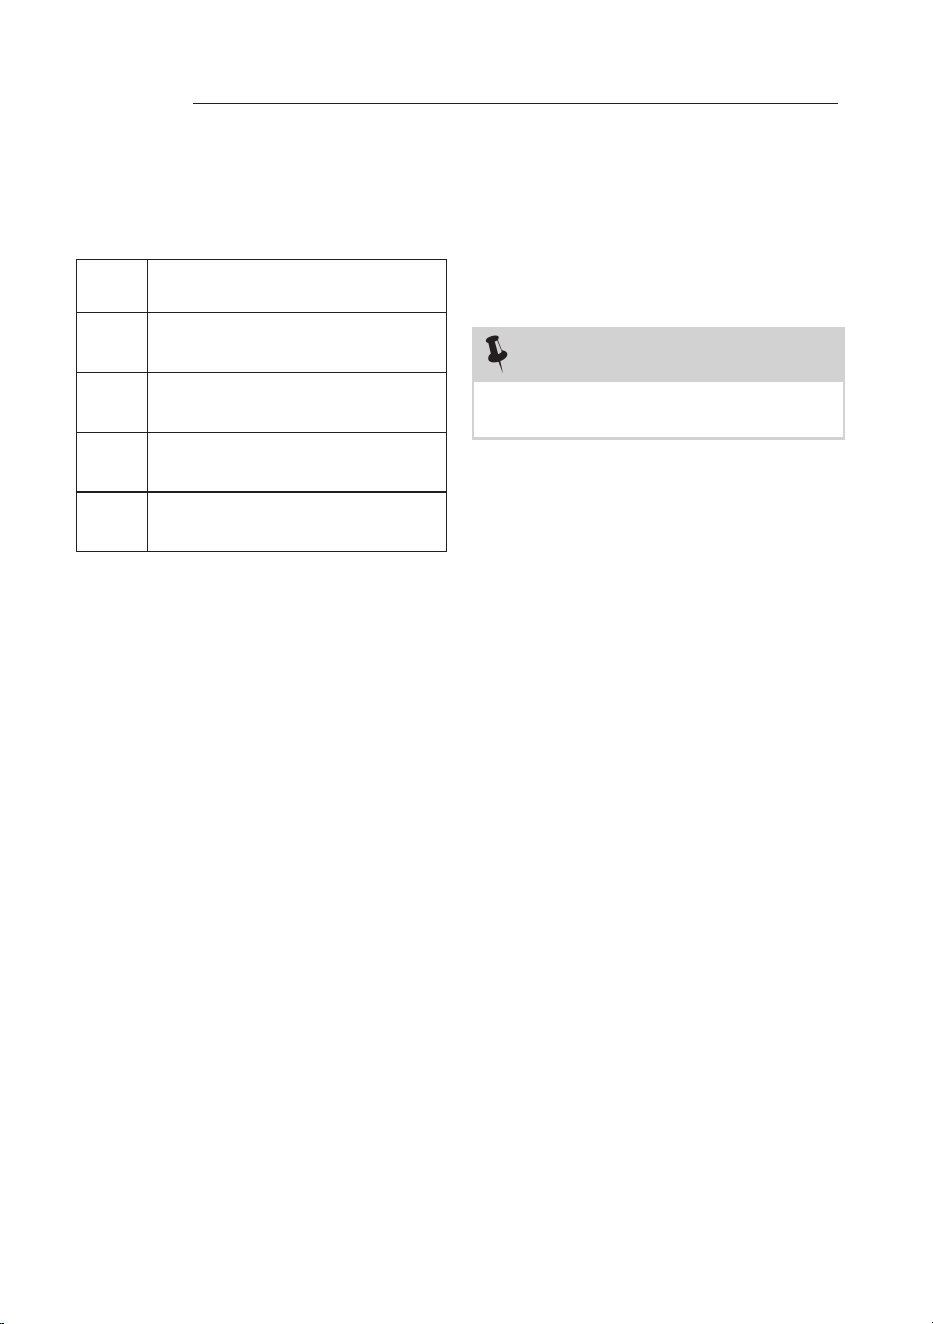
When below error codes show on the
display, please contact your Authorized
Frigidaire Service Center.
Error code
Error
Code
Description
E1
Upper heating temperature
sensor detects a broken circuit.
E2
Upper heating temperature
sensor detects a short circuit.
E3
Lower heating temperature
sensor detects a broken circuit.
E4
Lower heating temperature
sensor detects a short circuit.
NOTE
Pizza Peel and Pizza Cutter are not
dishwashable.
If your stone breaks, turn your appliance
off, let it cool completely and unplug it
before removing the broken stone. If
your appliance is in warranty, contact
our support team to order a
replacement. If your appliance is out of
warranty, you can buy a new baking
stone at frigidaire.com.
Use this guide to help with common issues that may interfere with the performance of
the product. If this does not help improve the issue, please contact Customer Service.
Model
FRPO100B, FRPO110B, FRPO120B
FRPO200BC, FRPO210BC, FRPO220BC
Voltage 120V
Frequency
60Hz
Power
1750W
Capacity
13.7Qt
Color
Black
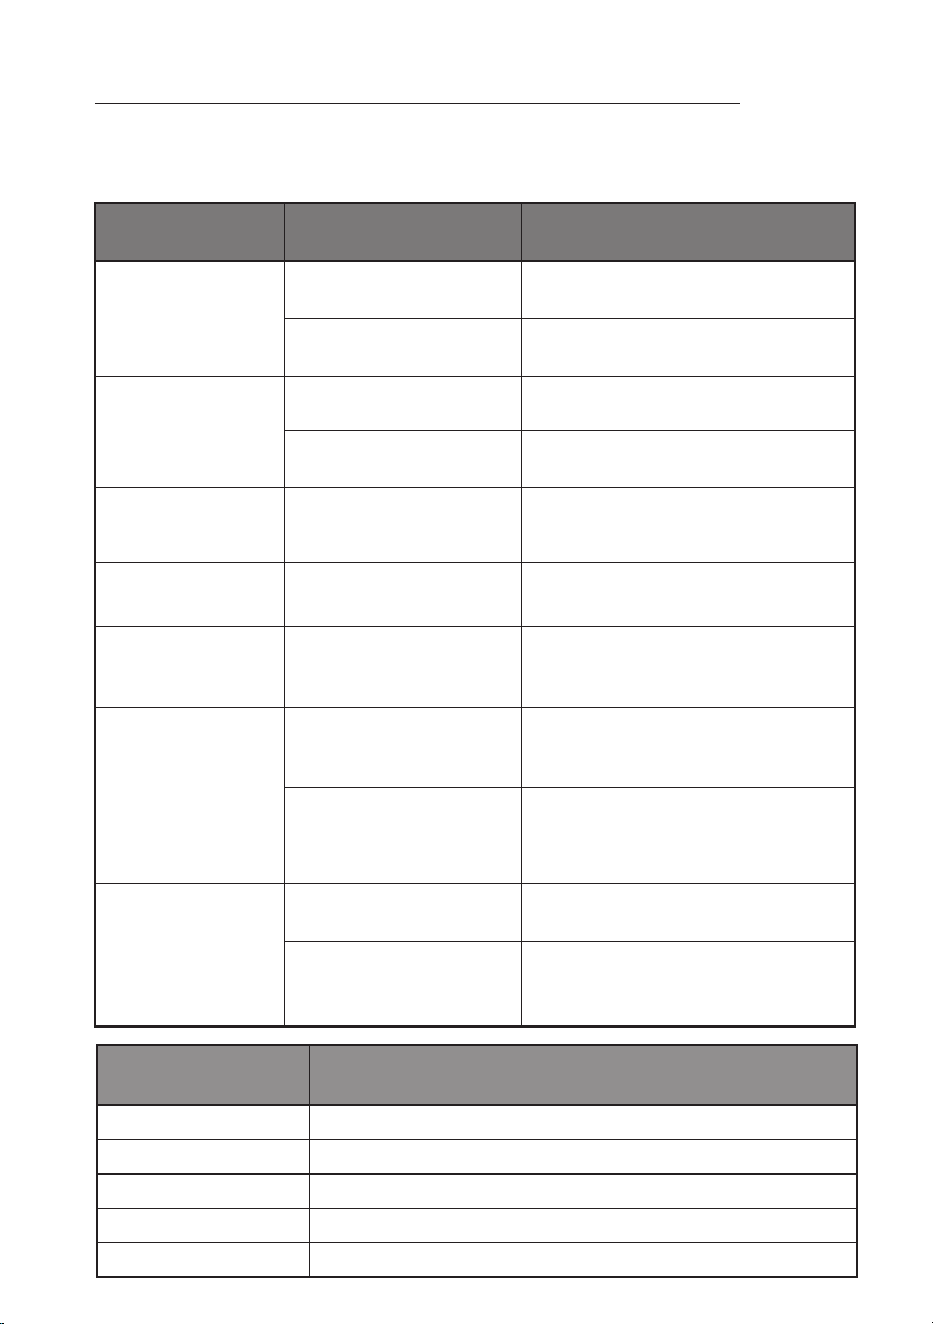
Problem Possible Cause Solution
Appliance doesn’t
work
Appliance not plugged
in.
Plug the mains plug into an
earthed wall socket.
Press the start/power button after
setting temperature and time.
Start button not
pressed.
Fried ingredients
are undercooked.
Too many ingredients in
the basket.
Cook ingredients in smaller
batches (for more even frying).
Ingredients fry
unevenly.
Certain ingredients need
shaking halfway through
cooking.
Shake ingredients stacked/crossed
(e.g., fries) halfway through
cooking.
Adjust to the required
temperature.
Set temperature too
low.
Fried snacks lack
crispiness.
Used snacks meant for
traditional deep fryers.
Use oven - suitable snacks.
Can’t slide the
basket properly.
Too many ingredients in
the basket.
Don’t fill beyond the “MAX” mark
on the basket.
White smoke
comes out of the
appliance.
Preparing greasy
ingredients.
The oil released when splash on the
heating white smoke. This is
normal.
Grease residues left in
the basket from
previous use.
White smoke is caused by the
heated grease residues in the
basket. Thoroughly clean the
basket after each use.
Fresh fries are
fried unevenly.
Using the wrong type of
potato.
Use fresh potatoes and ensure they
remain firm during frying.
Insufficient rinsing of
potato sticks before
frying.
Properly rinse the potato sticks to
remove the starch from their
surface.
TROUBLESHOOTING
15

Your appliance is covered by a one year limited warranty. For one year from your
original date of delivery, Electrolux will pay all costs for repairing or replacing any
parts of this appliance that prove to be defective in materials or workmanship
when such appliance is installed, used and maintained in accordance with the
provided instructions.
Exclusions
This warranty does not cover the following:
1. Products with original serial numbers that have been removed, altered or cannot
be readily determined.
2. Product that has been transferred from its original owner to another party or
removed outside the USA or Canada.
3. Rust on the interior or exterior of the unit.
4. Products purchased “as-is” are not covered by this warranty.
5. Products used in a commercial setting.
6. Service calls which do not involve malfunction or defects in materials or
workmanship, or for appliances not in ordinary household use or used other than
in accordance with the provided instructions.
7. Service calls to correct the installation of your appliance or to instruct you how
to use your appliance.
8. Expenses for making the appliance accessible for servicing, such as removal of
trim, cupboards, shelves, etc., which are not a part of the appliance when it is
shipped from the factory.
9. Service calls to repair or replace appliance light bulbs, air filters, other
consumables, or knobs, handles, or other cosmetic parts.
10. Pickup and delivery costs; your appliance is designed to be repaired in the home.
11. Surcharges including, but not limited to, any after hour, weekend, or holiday
service calls, tolls, ferry trip charges, or mileage expense for service calls to
remote areas, including the state of Alaska.
12. Damages to the finish of appliance or home incurred during transportation or
installation, including but not limited to floors, cabinets, walls, etc.
13. Damages caused by: services performed by unauthorized service companies;
use of parts other than genuine Electrolux parts or parts obtained from persons
other than authorized service companies; or external causes such as abuse,
misuse, inadequate power supply, accidents, fires, or acts of God.
DISCLAIMER OF IMPLIED WARRANTIES; LIMITATION OF REMEDIES
CUSTOMER’S SOLE AND EXCLUSIVE REMEDY UNDER THIS LIMITED WARRANTY SHALL BE REPAIR
OR REPLACEMENT AS PROVIDED HEREIN. CLAIMS BASED ON IMPLIED WARRANTIES, INCLUDING
WARRANTIES OF MERCHANTABILITY OR FITNESS FOR A PARTICULAR PURPOSE, ARE LIMITED
TO ONE YEAR OR THE SHORTEST PERIOD ALLOWED BY LAW, BUT NOT LESS THAN ONE YEAR.
ELECTROLUX SHALL NOT BE LIABLE FOR CONSEQUENTIAL OR INCIDENTAL DAMAGES SUCH
AS PROPERTY DAMAGE AND INCIDENTAL EXPENSES RESULTING FROM ANY BREACH OF THIS
WRITTEN LIMITED WARRANTY OR ANY IMPLIED WARRANTY. SOME STATES AND PROVINCES DO
NOT ALLOW THE EXCLUSION OR LIMITATION OF INCIDENTAL OR CONSEQUENTIAL DAMAGES,
OR LIMITATIONS ON THE DURATION OF IMPLIED WARRANTIES, SO THESE LIMITATIONS OR
EXCLUSIONS MAY NOT APPLY TO YOU. THIS WRITTEN WARRANTY GIVES YOU SPECIFIC LEGAL
RIGHTS. YOU MAY ALSO HAVE OTHER RIGHTS THAT VARY FROM STATE TO STATE.
If You Need Service
Keep your receipt, delivery slip, or some other appropriate payment record to establish
the warranty period should service be required. If service is performed, it is in your best
interest to obtain and keep all receipts. Service under this warranty must be obtained by
contacting Electrolux at the addresses or phone numbers below.
This warranty only applies in the USA, Puerto Rico and Canada. In the USA and Puerto
Rico, your appliance is warranted by Electrolux Consumer Products, Inc. In Canada, your
appliance is warranted by Electrolux Canada Corp. Electrolux authorizes no person to
change or add to any obligations under this warranty. Obligations for service and parts
under this warranty must be performed by Electrolux or an authorized service company.
Product features or specifications as described or illustrated are subject to change
without notice.
USA & Puerto Rico
1-800 374 4432
Electrolux Consumer Products, Inc.
10200 David Taylor Drive
Charlotte, NC 28262
Canada
1-800 265 8352
Electrolux Canada Corp.
5855 Terry Fox Way
Mississauga, Ontario,
Canada L5V 3E4
16
LIMITED WARRANTY

welcome
home
Frigidaire.com
1-800-374-4432
Frigidaire.ca
1-800-265-8352
owner support
accessories
service
Our home is your home. Visit us if you
need help with any of these things:
registration
(See your registration card
for more information.)
