
VHSMO. VHSMO Vol. 1 | Pocket Retro Digital Camera
www.vhsmo.com Page 1 of 8
VHSMO.
USER MANUAL
VHSMO Vol. 1
Pocket Retro Digital Camera
User Manual
VHSMO Vol. 1 is a pocket-sized, retro-styled digital still camera built for people who want to capture real
moments instead of overprocessed pictures. It shoots true vintage-style photos through an authentic
retro lens and sends them wirelessly to the VHSMO companion app in seconds — no cables, no SD card
readers, and no cloud.
This manual explains every control on the camera and how to use it. Please read it before first use and
keep it for future reference.

VHSMO. VHSMO Vol. 1 | Pocket Retro Digital Camera
www.vhsmo.com Page 2 of 8
1. Introduction
The VHSMO Vol. 1 is a simple point-and-shoot digital camera that pairs a true retro lens with modern wireless
convenience. It captures still images and transfers them directly to a paired smartphone, giving you an authentic
vintage photography experience without film, printing, cables or cloud storage.
1.1 What your camera does
• True retro lens — a genuine vintage-style lens captures naturally grainy, authentic photos. No filters, no
overlays.
• Instant wireless transfer — every photo pushes straight to the VHSMO app over a direct wireless connection
in seconds.
• Pocket-sized design — a compact body that fits in the palm of your hand and travels anywhere.
• Full data privacy — images move directly from camera to phone with no cloud communication.
• Simple point-and-shoot operation — one-button shutter with automatic exposure and white balance
handled on-device.
1.2 Where to use it
VHSMO Vol. 1 is made for casual photography, travel, social events and everyday use, indoors or out. It is a simple,
always-on-hand alternative to phone cameras and disposable film cameras, for anyone who wants a genuine retro
look without the hassle of maintaining vintage equipment.
VHSMO. VHSMO Vol. 1 | Pocket Retro Digital Camera
www.vhsmo.com Page 3 of 8
2. Parts Identification
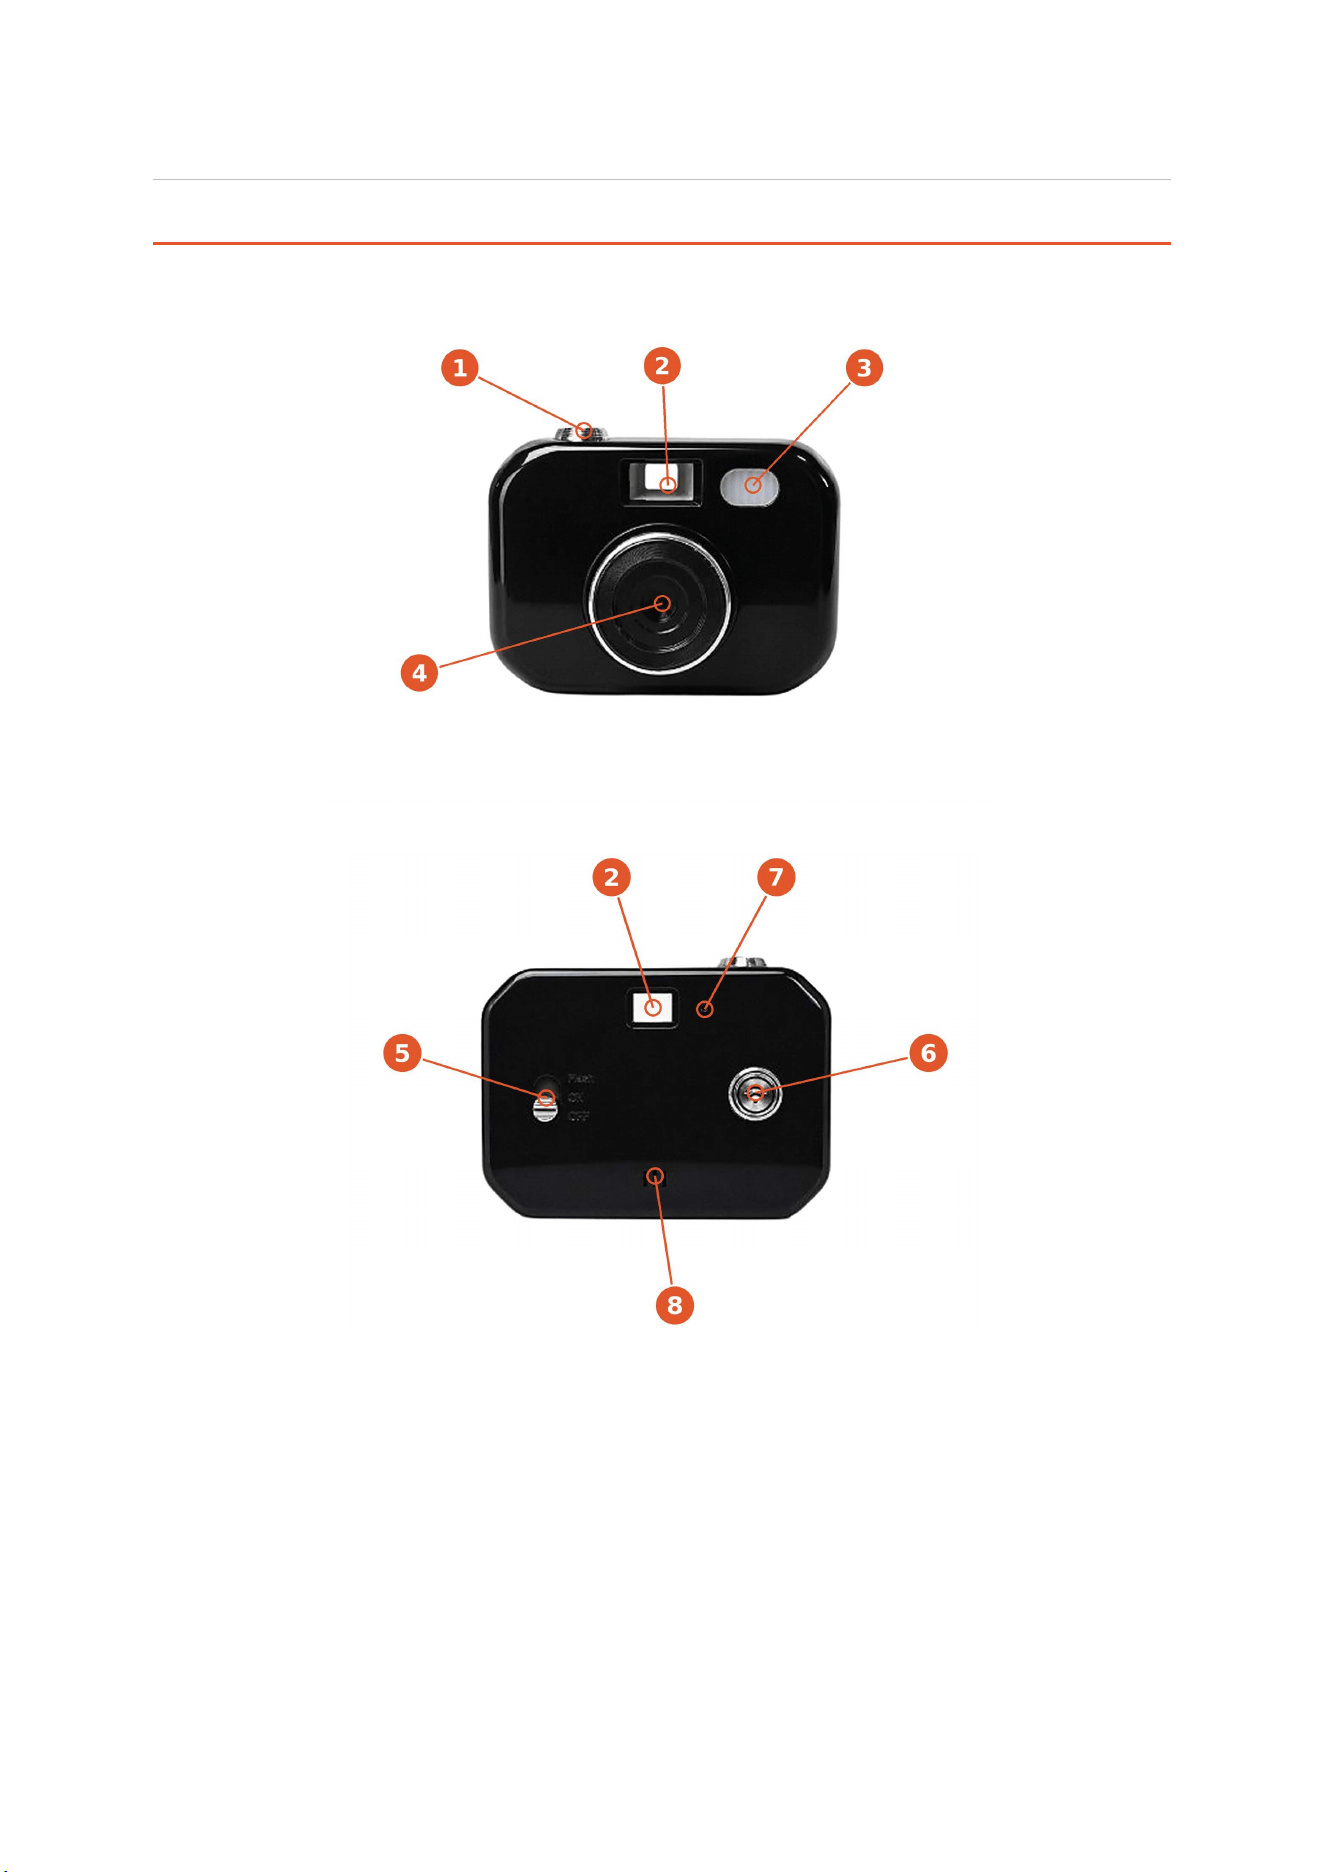
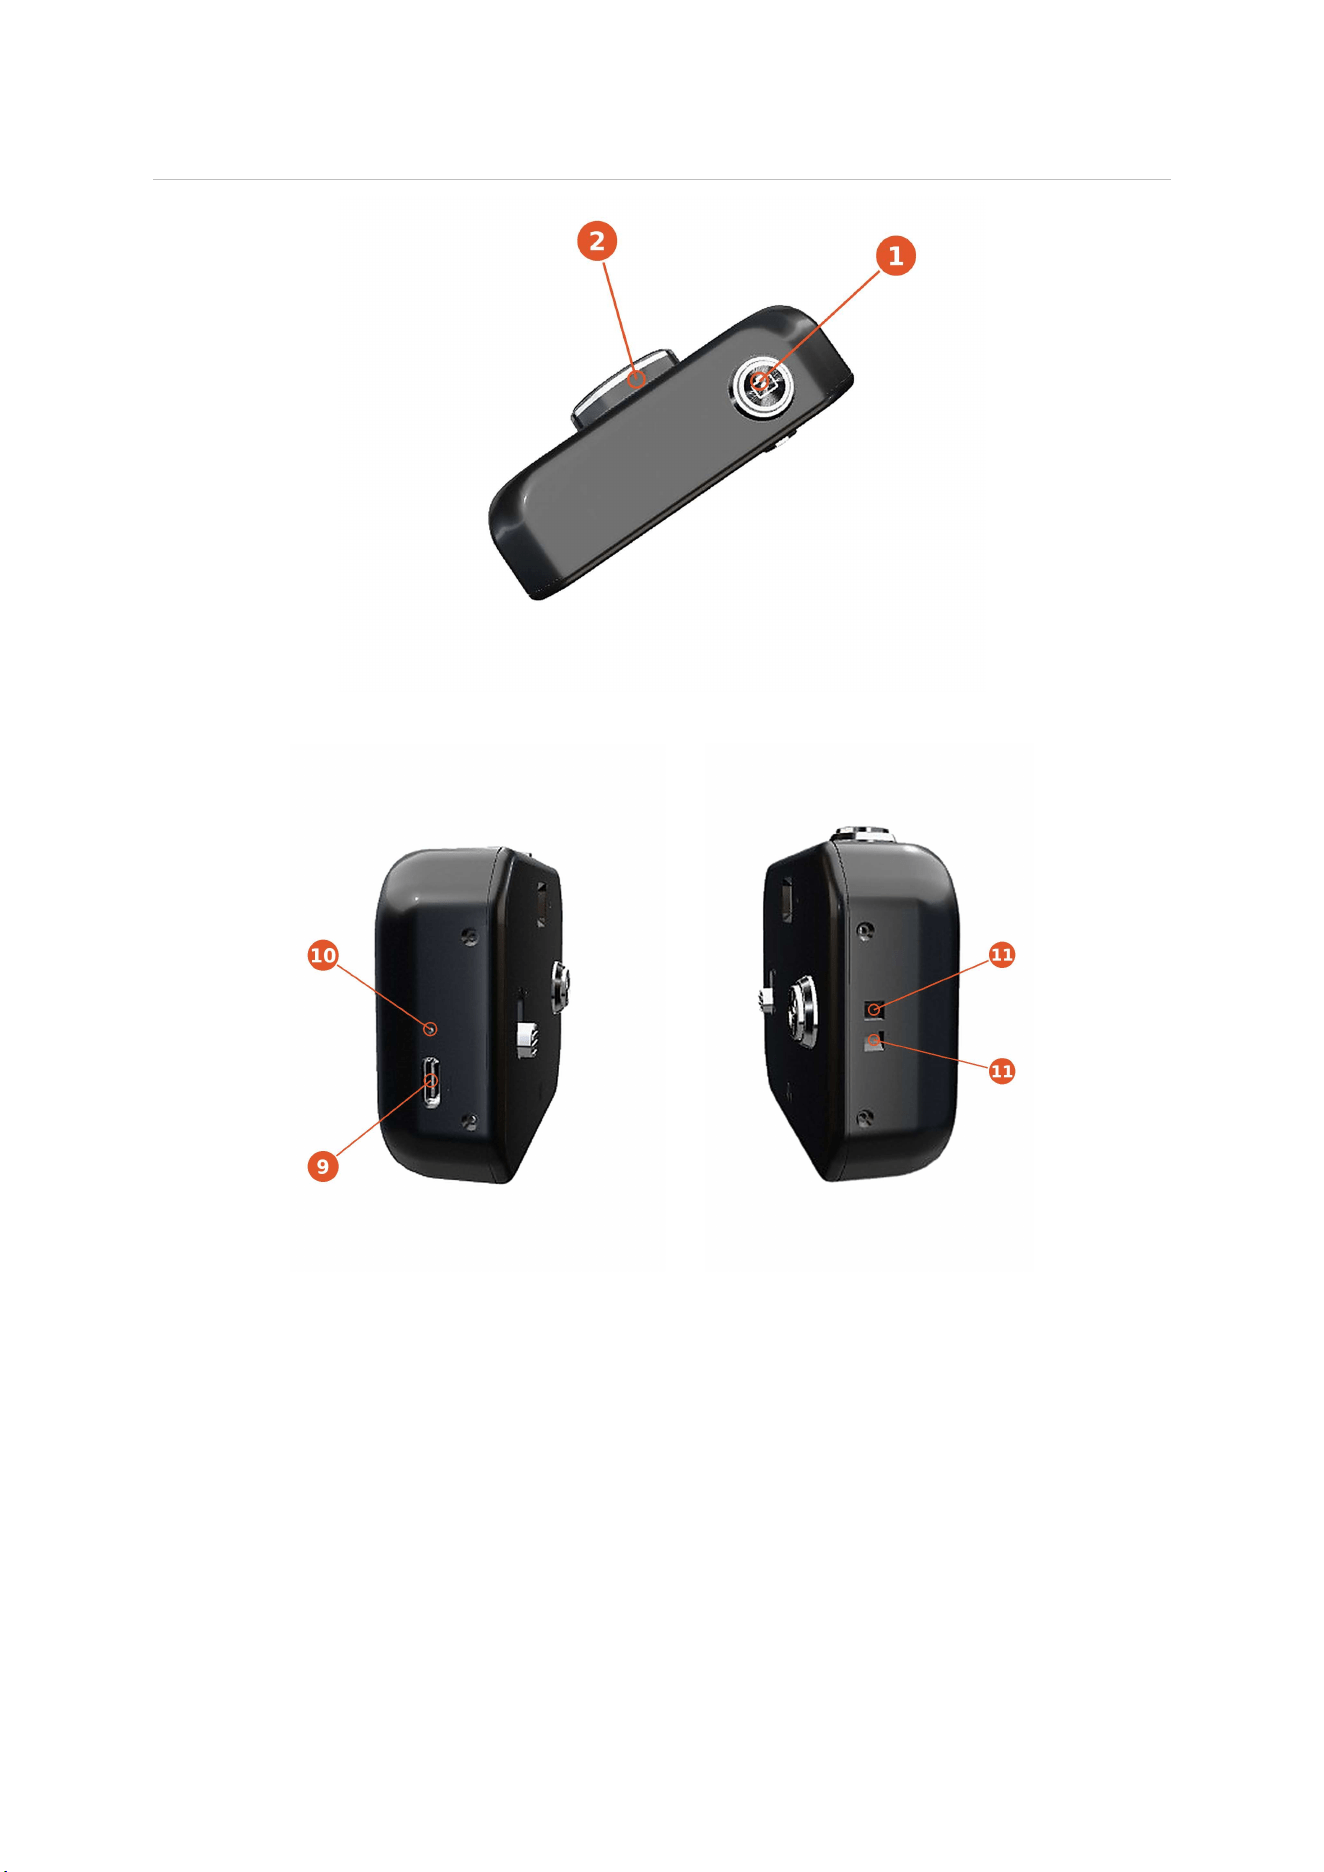
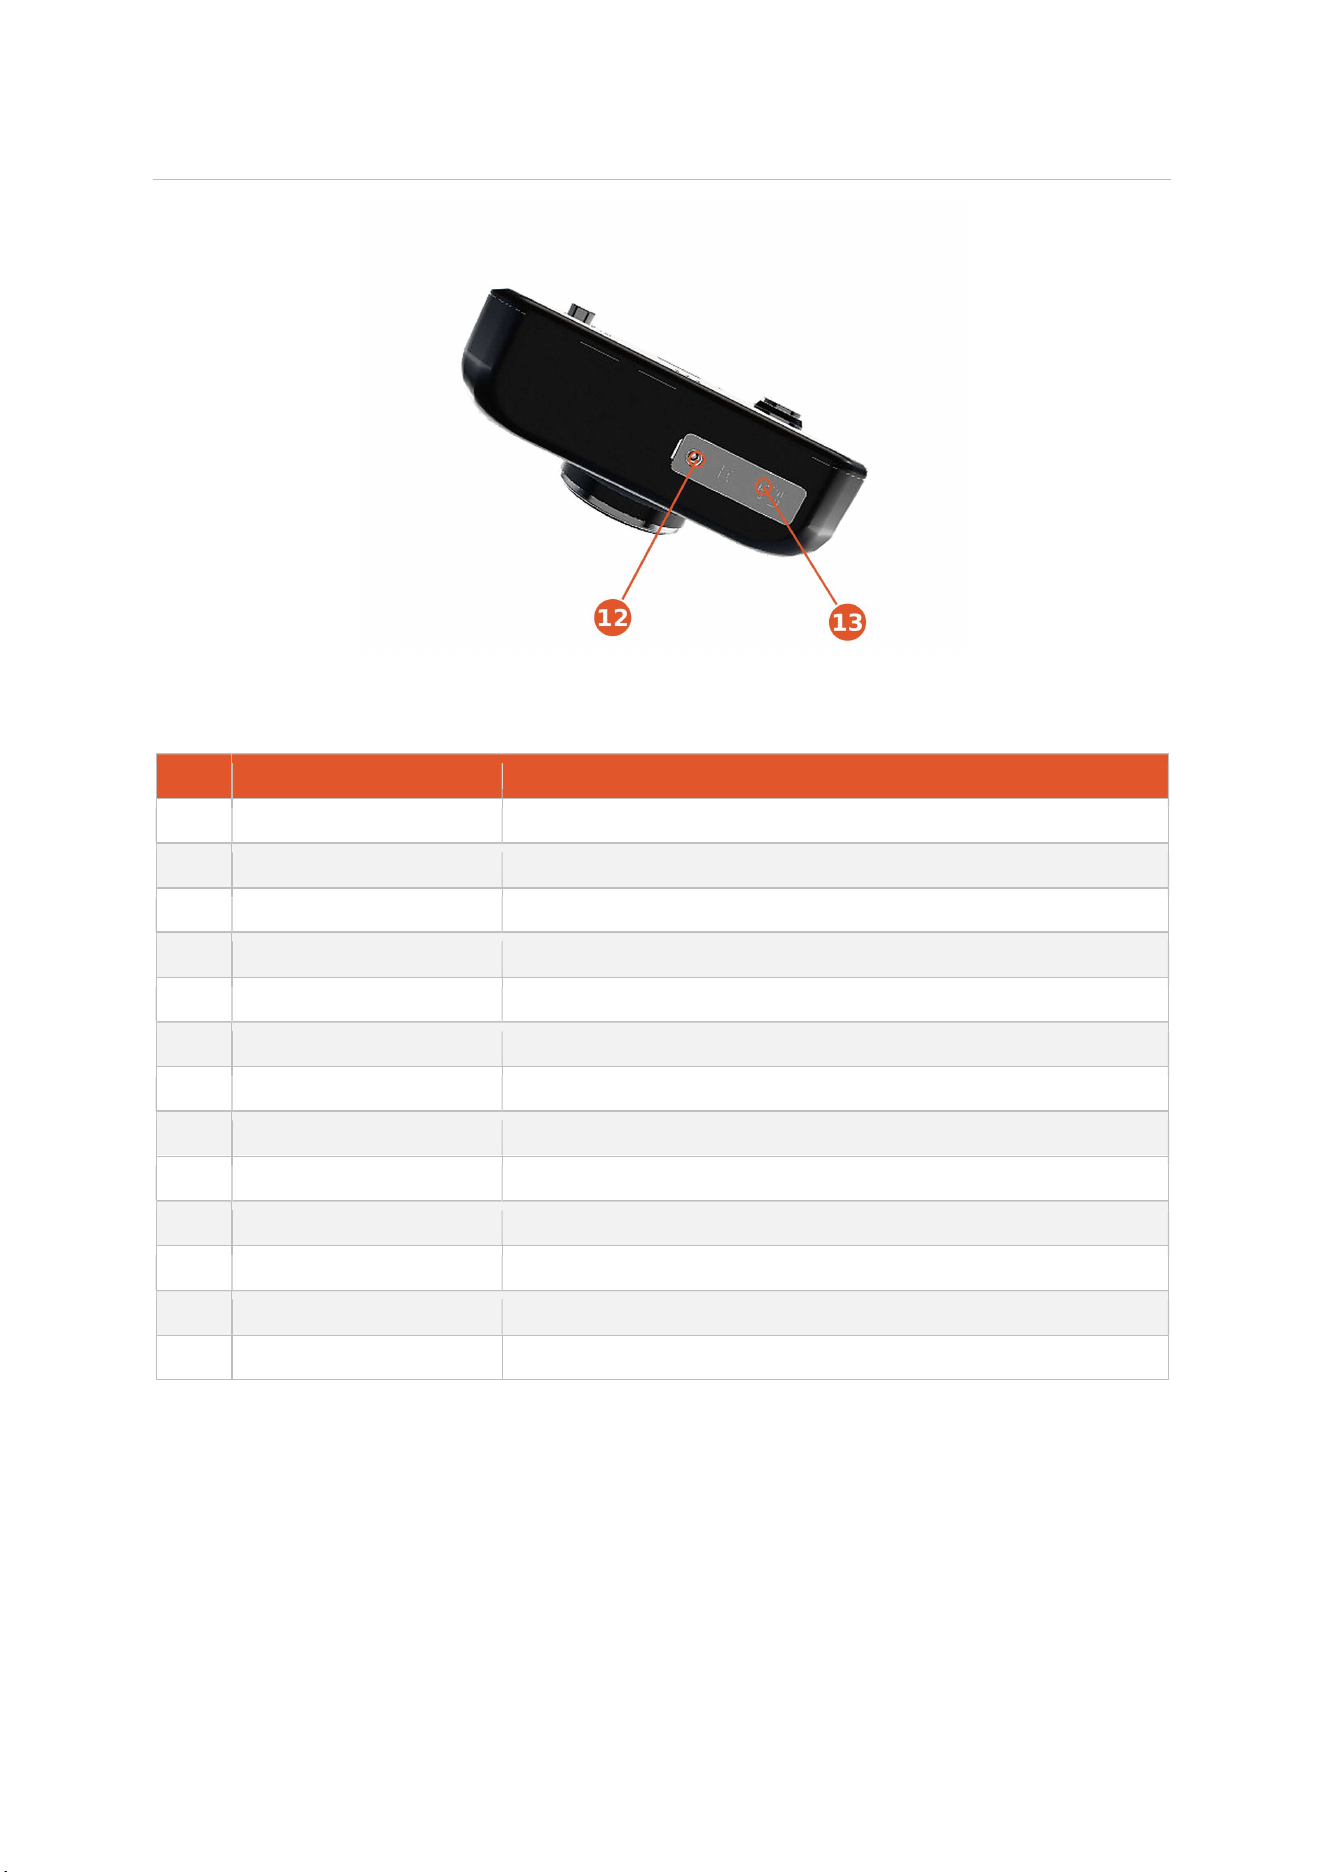
The illustrations below identify every external control, indicator, port and opening on the VHSMO Vol. 1. Callout
numbers are consistent across all six views and are described in the legend at the end of this section.
Figure 1 — Front view
Figure 2 — Rear view (controls)
VHSMO. VHSMO Vol. 1 | Pocket Retro Digital Camera
www.vhsmo.com Page 4 of 8
Figure 3 — Top plate
Figure 4 — Left side (port side) Figure 5 — Right side (lanyard side)
VHSMO. VHSMO Vol. 1 | Pocket Retro Digital Camera
www.vhsmo.com Page 5 of 8
Figure 6 — Bottom view
2.1 Legend
No.
Part
Function
1
Shutter button
Captures a still image. Located on the top plate, right-hand side.
2
Optical viewfinder
35 mm classic-style viewfinder. Front window and rear eyepiece.
3
LED flash
2 W LED. Fires only when the mode slider is set to FLASH.
4
Retro lens
Fixed-focus lens assembly. No optical or digital zoom.
5
Power / mode slider
Three positions: OFF, ON, FLASH.
6
Wi-Fi button
Starts and stops the camera Wi-Fi access point for phone pairing.
7
Status LED (red)
Lit during start-up and initialisation; off when the camera is ready.
8
Speaker
Emits the start-up tone and shutter confirmation tone.
9
USB-C port
Charging and data transfer. 5 V DC input.
10
Charge indicator LED
Red while charging, green when charging is complete.
11
Lanyard pass-through
Two openings joined by an internal channel for the supplied lanyard.
12
Reset button
Recessed reset button. Restores the camera to factory defaults.
13
microSD slot / access plate
Holds the removable microSD card supplied with the camera.

VHSMO. VHSMO Vol. 1 | Pocket Retro Digital Camera
www.vhsmo.com Page 6 of 8
3. Operating Instructions
3.1 Powering the camera on
1. Slide the power / mode slider (5) on the rear of the camera to the ON position.
2. A start-up tone is played through the speaker (8).
3. The red status LED (7) beside the viewfinder eyepiece illuminates while the camera initialises. When it
switches off, the camera is ready.
4. Press the shutter button (1) on the top plate to capture a photograph. Exposure and white balance are set
automatically; no configuration is required.
To switch the camera off, return the slider (5) to the OFF position.
3.2 Taking photographs with flash
Move the power / mode slider (5) from ON to the FLASH position. The camera remains powered on and the LED
flash (3) on the front of the camera now fires with every exposure. Return the slider to ON to resume shooting
without flash.
3.3 Wi-Fi connection and the VHSMO app
1. With the camera switched on, press the Wi-Fi button (6) on the rear of the camera. The camera starts its own
local Wi-Fi network.
2. On the paired smartphone, open the Wi-Fi settings and select the VHSMO network, then open the VHSMO
companion app (available for iOS and Android).
3. Once connected, photographs can be viewed live in the app as they are taken, and offloaded from the
camera to the phone.
4. Press the Wi-Fi button (6) again to stop the camera Wi-Fi.
The connection is direct between camera and phone. Images are not routed through, or stored on, any external
server. The effective operating range is approximately 10 metres, line of sight.
3.4 Charging
Connect the supplied USB-C cable to the USB-C port (9) on the left side of the camera and to a standard 5 V DC USB
power source.
Charge indicator (10)
Meaning
Red
Battery is charging
Green
Charging is complete
The camera may be used normally while it is connected to the charger. Typical charging time from empty is
approximately 1 hour 30 minutes. The battery is an internal, non-user-replaceable single-cell Li-Po pack of 1000
mAh.
3.5 microSD card
The microSD card slot (13) is located on the bottom of the camera, behind the bottom access plate. A 4 GB
microSD card is pre-installed at the factory and no card needs to be fitted before first use. The card is removable
and may be replaced by the user if required. Switch the camera off before removing or inserting a card.

VHSMO. VHSMO Vol. 1 | Pocket Retro Digital Camera
www.vhsmo.com Page 7 of 8
3.6 Resetting the camera
If the camera stops responding or performance degrades, press and hold the recessed reset button (12) on the
bottom of the camera for 5 seconds. The camera restarts and returns to its factory default settings.
3.7 Fitting the lanyard
The right side of the camera carries an inward lanyard channel with two openings (11). Feed the cord of the
supplied lanyard into one opening and draw it out of the other, then pass the free end of the lanyard through its
own loop and pull tight.
3.8 Indicator summary
Indicator
State
Meaning
Status LED (7)
Red, lit
Camera is starting up / initialising
Status LED (7)
Off
Camera is ready to shoot
Charge LED (10)
Red
Battery charging
Charge LED (10)
Green
Charging complete
Speaker (8)
Start-up tone
Power-on sequence has begun

VHSMO. VHSMO Vol. 1 | Pocket Retro Digital Camera
www.vhsmo.com Page 8 of 8
4. In the Box
• VHSMO Vol. 1 camera with pre-installed 4 GB microSD card
• USB-C charging cable
• Lanyard
• Sticker set
5. Warranty and Support
The VHSMO Vol. 1 is covered for a period of one year against manufacturing defects. The warranty does not cover
damage caused by misuse, unauthorised modification, or attempted disassembly.
Channel
Detail
Company
VHSMO LLP
Web
www.vhsmo.com
Email
team@vhsmo.com
Instagram
@vhsmo.cam_
Copyright © 2026 VHSMO LLP. All Rights Reserved. Product design, specifications and features are subject to change without notice. Patent
Pending.

FCC Warnning:
This equipment has been tested and found to comply with the limits for a Class B digital device,
pursuant to part 15 of the FCC Rules. These limits are designed to provide
reasonable
protection against harmful interference in a residential installation. This equipment generates,
uses and can radiate radio
frequency
energy
and,
if
not
installed
and
used
in
accordance
with
the
instructions,
may cause
harmful
interference
to
radio
communications.
However,
there
is
no
guarantee
that interference
will
not
occur
in
a
particular
installation.
If
this
equipment
does
cause
harmful interference to radio or television reception, which can be
determined by turning the equipment off
and
on,
the
user
is
encouraged
to
try
to
correct
the interference
by
one
or
more
of
the following measures:
•
Reorient or relocate the receiving antenna.
•
Increase the separation between the equipment and receiver.
•
Connect the equipment into an outlet on a circuit different from that to which the receiver is
connected.
• Consult the dealer or an experienced radio/TV technician for help.
Caution:
Any
changes
or
modifications
to
this
device
not
explicitly
approved
by
manufacturer
could void your authority to operate this equipment.
This
device
complies
with
part
15
of
the
FCC
Rules.
Operation
is
subject
to
the
following
two
conditions:
(1)This
device
may
not
cause
harmful
interference,
and
(2)
this
device
must
accept
any
interference received, including interference that may cause undesired operation.
This
equipment
complies
with
FCC
radiation
exposure
limits
set
forth
for
an
uncontrolled
environment.
This
equipment
should
be
installed
and
operated
with
minimum
distance
0cm
between the radiator and your body.