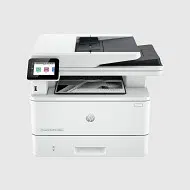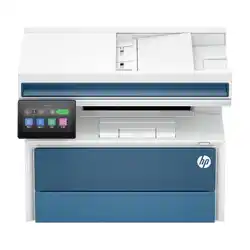
User Guide
hp.com/support/ljpro4110mfp
HP LaserJet Pro MFP 4112
HP LaserJet Pro MFP 4113
HP LaserJet Pro MFP 4114

HP LaserJet Pro MFP 4112, HP LaserJet
Pro MFP 4113, HP LaserJet Pro MFP 4114
- User Guide
SUMMARY
This guide provides conguration, use, warranty, safety and environmental information.

Legal information
Copyright and License
© Copyright 2026 HP Development
Company, L.P.
Reproduction, adaptation, or translation
without prior written permission is prohibited,
except as allowed under the copyright laws.
The information contained herein is subject to
change without notice.
The only warranties for HP products and
services are set forth in the express warranty
statements accompanying such products
and services. Nothing herein should be
construed as constituting an additional
warranty. HP shall not be liable for technical
or editorial errors or omissions contained
herein.
Edition 2, 08/2026
Trademark Credits
Adobe
®
, Adobe Photoshop
®
, Acrobat
®
, and
PostScript
®
are trademarks of Adobe
Systems Incorporated.
Apple and the Apple logo are trademarks of
Apple Inc., registered in the U.S. and other
countries.
macOS is a trademark of Apple Inc.,
registered in the U.S. and other countries.
AirPrint is a trademark of Apple Inc.,
registered in the U.S. and other countries.
Google™ is a trademark of Google Inc.
Microsoft®, Windows®, and Windows Server®
are U.S. registered trademarks of Microsoft
Corporation.
UNIX
®
is a registered trademark of The Open
Group.

Table of contents
1 Printer overview.................................................................................................................................................................................... 1
Warning icons.............................................................................................................................................................................................................................................1
Potential shock hazard........................................................................................................................................................................................................................2
Open source license.............................................................................................................................................................................................................................2
Printer views................................................................................................................................................................................................................................................2
Printer front view (MFP 4112, 4113, 4114)............................................................................................................................................................2
Printer rear view (MFP 4112, 4113, 4114) .............................................................................................................................................................3
Control-panel view (MFP 4112, 4113, 4114)........................................................................................................................................................4
Printer specications...........................................................................................................................................................................................................................6
Technical specications (4112dw, fdn, fdw)..........................................................................................................................................................6
Technical specications (4113dw, fdn, fdw)..........................................................................................................................................................8
Technical specications (4113dwg, fdng, fdwg).............................................................................................................................................10
Technical specications (4114dw, fdn, fdw)......................................................................................................................................................11
Supported operating systems ......................................................................................................................................................................................13
Mobile printing solutions....................................................................................................................................................................................................15
Printer dimensions (MFP 4112, 4113, 4114)....................................................................................................................................................15
Power consumption, electrical specications, and acoustic emissions ....................................................................................17
Operating-environment range ......................................................................................................................................................................................17
Printer hardware setup and software installation.....................................................................................................................................................17
2 Paper trays ...........................................................................................................................................................................................18
Load paper to Tray 1 (multipurpose tray)..........................................................................................................................................................................18
Load Paper to Tray 1 (multipurpose tray)..............................................................................................................................................................18
Tray 1 paper orientation.....................................................................................................................................................................................................20
Load paper to Tray 2..........................................................................................................................................................................................................................21
Load paper to Tray 2..............................................................................................................................................................................................................21
Tray 2 paper orientation.....................................................................................................................................................................................................23
Load paper to Tray 3 (optional accessory)......................................................................................................................................................................24
Load paper to Tray 3 (optional accessory)..........................................................................................................................................................24
Tray 3 paper orientation.....................................................................................................................................................................................................26
Load and print envelopes..............................................................................................................................................................................................................27
Print envelopes..........................................................................................................................................................................................................................27
Envelope orientation.............................................................................................................................................................................................................28
Load and print labels.........................................................................................................................................................................................................................28
Manually feed labels .............................................................................................................................................................................................................28
Label orientation.......................................................................................................................................................................................................................29
3 Supplies, accessories, and parts.................................................................................................................................................30
Dynamic Security Enabled Printers......................................................................................................................................................................................30
Order supplies, accessories, and parts............................................................................................................................................................................30
iii

Ordering..........................................................................................................................................................................................................................................30
Supplies and accessories................................................................................................................................................................................................31
Customer self-repair parts..............................................................................................................................................................................................32
Congure the HP toner-cartridge-protection supply settings.........................................................................................................................32
Introduction..................................................................................................................................................................................................................................32
Enable or disable the Cartridge Policy feature................................................................................................................................................33
Enable or disable the Cartridge Protection feature.....................................................................................................................................37
Replace the toner cartridge........................................................................................................................................................................................................41
Toner cartridge information............................................................................................................................................................................................41
Replace the toner cartridge............................................................................................................................................................................................42
4 Print .........................................................................................................................................................................................................47
Print tasks (Windows).......................................................................................................................................................................................................................47
How to print (Windows)........................................................................................................................................................................................................47
Automatically print on both sides (Windows) ....................................................................................................................................................48
Manually print on both sides (Windows) ...............................................................................................................................................................48
Print multiple pages per sheet (Windows)............................................................................................................................................................48
Select the paper type (Windows)................................................................................................................................................................................49
Additional print tasks............................................................................................................................................................................................................49
Print tasks (macOS)...........................................................................................................................................................................................................................49
How to print (macOS)............................................................................................................................................................................................................49
Automatically print on both sides (macOS) ........................................................................................................................................................50
Manually print on both sides (macOS)....................................................................................................................................................................50
Print multiple pages per sheet (macOS)................................................................................................................................................................51
Select the paper type (macOS)....................................................................................................................................................................................51
Additional print tasks............................................................................................................................................................................................................51
Store print jobs on the printer to print later or print privately...........................................................................................................................52
Introduction..................................................................................................................................................................................................................................52
Before beginning......................................................................................................................................................................................................................52
Set up job storage...................................................................................................................................................................................................................52
Disable or enable the job storage feature...........................................................................................................................................................53
Create a stored job (Windows)......................................................................................................................................................................................54
Create a stored job (macOS)..........................................................................................................................................................................................54
Print a stored job ......................................................................................................................................................................................................................55
Delete a stored job..................................................................................................................................................................................................................55
Information sent to printer for Job Accounting purposes.......................................................................................................................56
Wi-Fi Direct printing (wireless models only)....................................................................................................................................................................56
To turn on Wi-Fi Direct...........................................................................................................................................................................................................56
Change the printer Wi-Fi Direct name.....................................................................................................................................................................57
Print from a USB ash drive........................................................................................................................................................................................................57
Introduction..................................................................................................................................................................................................................................57
Print USB documents...........................................................................................................................................................................................................58
5 Copy.........................................................................................................................................................................................................59
Make a copy.............................................................................................................................................................................................................................................59
Copy on both sides (duplex)........................................................................................................................................................................................................59
Copy on both sides automatically..............................................................................................................................................................................59
iv

Copy on both sides manually.........................................................................................................................................................................................60
Copy an identication card .........................................................................................................................................................................................................60
Additional copy tasks.......................................................................................................................................................................................................................61
6 Scan.........................................................................................................................................................................................................62
Set up Scan to Email.........................................................................................................................................................................................................................62
Introduction..................................................................................................................................................................................................................................62
Before you begin ......................................................................................................................................................................................................................62
Set up the Scan to Email feature via the HP Embedded Web Server.............................................................................................63
Congure default job options, contact list, and Quick Sets for scan to email jobs (optional)......................................67
Set up Scan to Network Folder.................................................................................................................................................................................................69
Introduction..................................................................................................................................................................................................................................69
Before you begin ......................................................................................................................................................................................................................69
Set up the Scan to Network Folder feature via the HP Embedded Web Server....................................................................69
Set up Scan to SharePoint...........................................................................................................................................................................................................74
Step one: Access the HP Embedded Web Server (EWS)..........................................................................................................................74
Step two: Set up Scan to SharePoint .......................................................................................................................................................................75
Step three: Congure Quick Sets...............................................................................................................................................................................75
Scan to a USB ash drive..............................................................................................................................................................................................................76
Scan to email..........................................................................................................................................................................................................................................76
Scan to a network folder................................................................................................................................................................................................................77
Scan to SharePoint............................................................................................................................................................................................................................78
Scan to a computer...........................................................................................................................................................................................................................78
Scan by using HP Easy Scan Software (macOS) .......................................................................................................................................................79
Additional scan tasks.......................................................................................................................................................................................................................79
7 Fax............................................................................................................................................................................................................80
Connect and congure the printer for fax.......................................................................................................................................................................80
Connect the printer to a telephone line..................................................................................................................................................................80
Congure the printer for fax ...........................................................................................................................................................................................81
Send a fax..................................................................................................................................................................................................................................................84
Send a fax from the printer control panel.............................................................................................................................................................84
Send a fax from software (Windows).......................................................................................................................................................................85
Send a fax from a third-party software program, such as Microsoft Word...............................................................................85
Additional fax tasks............................................................................................................................................................................................................................85
8 Manage the printer............................................................................................................................................................................87
Advanced conguration with HP Embedded Web Server and Printer Home Page (EWS)........................................................87
Open the HP Embedded Web Server (EWS) from a web browser.....................................................................................................88
Embedded Web Server menus.....................................................................................................................................................................................88
Congure IP network settings...................................................................................................................................................................................................92
Printer sharing disclaimer................................................................................................................................................................................................92
View or change network settings...............................................................................................................................................................................92
Rename the printer on a network................................................................................................................................................................................92
Manually congure IPv4 TCP/IP parameters from the control panel..............................................................................................93
v

Manually congure IPv6 TCP/IP parameters from the control panel..............................................................................................93
Link speed and duplex settings....................................................................................................................................................................................94
Printer security features................................................................................................................................................................................................................94
Introduction..................................................................................................................................................................................................................................95
Assign or change the system password using the Embedded Web Server.............................................................................95
Energy-conservation settings...................................................................................................................................................................................................96
Print with EconoMode..........................................................................................................................................................................................................96
Set the Sleep Mode setting.............................................................................................................................................................................................96
Set the Shutdown Mode setting..................................................................................................................................................................................96
Set the Disable Shutdown setting..............................................................................................................................................................................97
HP Web Jetadmin................................................................................................................................................................................................................................97
Dynamic Security Enabled Printers......................................................................................................................................................................................97
Update the rmware.........................................................................................................................................................................................................................98
Method one: Update the rmware using the control panel ....................................................................................................................98
Method two: Update the rmware using the Embedded Web Server............................................................................................99
Method three: Update the rmware using the HP Printer Update utility...................................................................................100
9 Solve problems................................................................................................................................................................................. 101
Customer support...........................................................................................................................................................................................................................101
Control panel help system.........................................................................................................................................................................................................101
Restore the factory-set defaults ..........................................................................................................................................................................................102
A “Cartridge is low” or “Cartridge is very low” message displays on the printer control panel..........................................102
Change the “Very Low” settings................................................................................................................................................................................103
Ordering.......................................................................................................................................................................................................................................104
Printer does not pick up paper or misfeeds................................................................................................................................................................104
Introduction...............................................................................................................................................................................................................................104
The printer picks up multiple sheets of paper................................................................................................................................................104
The printer does not pick up paper.........................................................................................................................................................................106
The document feeder jams, skews, or picks up multiple sheets of paper...............................................................................108
Clear paper jams (MFP 4112, 4113, 4114)................................................................................................................................................................109
Paper jam locations............................................................................................................................................................................................................109
Experiencing frequent or recurring paper jams?........................................................................................................................................109
31.13 jam error in the document feeder............................................................................................................................................................110
13.02 jam error in tray 1..................................................................................................................................................................................................113
13.03 jam error in tray 2..................................................................................................................................................................................................115
13.10, 13.11, 13.13 jam error in the output bin (MFP).............................................................................................................................119
13.08, 13.09, 13.14, or 13.15 Jam error in the rear door (MFP)......................................................................................................120
13.08, 13.09, Jam error in the fuser area (MFP)...........................................................................................................................................122
13.14, 13.15 jam error in the duplexer ................................................................................................................................................................125
Resolving mono print quality problems ..........................................................................................................................................................................127
Introduction...............................................................................................................................................................................................................................127
Troubleshoot print quality..............................................................................................................................................................................................128
Improve copy and scan image quality.............................................................................................................................................................................140
Introduction...............................................................................................................................................................................................................................140
Check the scanner glass for dirt and smudges...........................................................................................................................................140
vi

Check the paper type setting on the control panel...................................................................................................................................141
Check the image adjustment settings.................................................................................................................................................................141
Optimize for text or pictures ........................................................................................................................................................................................141
Check the scanner resolution and color settings on the computer............................................................................................142
Edge-to-edge copying.......................................................................................................................................................................................................143
Improve fax image quality..........................................................................................................................................................................................................143
Introduction...............................................................................................................................................................................................................................143
Check the scanner glass for dirt and smudges...........................................................................................................................................144
Check the send-fax resolution settings..............................................................................................................................................................144
Check the Error Correction Mode setting.........................................................................................................................................................144
Send to a different fax machine................................................................................................................................................................................145
Check the sender's fax machine..............................................................................................................................................................................145
Solve wired network problems ..............................................................................................................................................................................................145
Introduction...............................................................................................................................................................................................................................145
Poor physical connection...............................................................................................................................................................................................145
The computer is using the incorrect IP address for the printer.......................................................................................................145
The computer is unable to communicate with the printer...................................................................................................................146
The printer is using incorrect link and duplex settings for the network.....................................................................................146
New software programs might be causing compatibility problems............................................................................................146
The computer or workstation might be set up incorrectly...................................................................................................................146
The printer is disabled, or other network settings are incorrect.....................................................................................................146
Solve wireless network problems .......................................................................................................................................................................................147
Introduction...............................................................................................................................................................................................................................147
Wireless connectivity checklist.................................................................................................................................................................................147
The printer does not print after the wireless conguration completes.....................................................................................147
The printer does not print, and the computer has a third-party rewall installed..............................................................148
The wireless connection does not work after moving the wireless router or printer.....................................................148
Cannot connect more computers to the wireless printer....................................................................................................................148
The wireless printer loses communication when connected to a VPN......................................................................................148
The network does not appear in the wireless networks list................................................................................................................148
The wireless network is not functioning.............................................................................................................................................................149
Perform a wireless network diagnostic test....................................................................................................................................................149
Reduce interference on a wireless network....................................................................................................................................................149
Solve fax problems..........................................................................................................................................................................................................................150
Introduction...............................................................................................................................................................................................................................150
Fax troubleshooting checklist....................................................................................................................................................................................150
Solve general fax problems..........................................................................................................................................................................................151
1 Service and support............................................................................................................................................................................ 1
HP limited warranty statement.....................................................................................................................................................................................................1
UK, Ireland, and Malta ...............................................................................................................................................................................................................2
Austria, Belgium, Germany, Luxembourg. and Switzerland........................................................................................................................3
Belgium, France, Luxembourg, and Switzerland..................................................................................................................................................3
Italy..........................................................................................................................................................................................................................................................6
Spain......................................................................................................................................................................................................................................................6
Denmark.............................................................................................................................................................................................................................................7
Norway.................................................................................................................................................................................................................................................7
Sweden................................................................................................................................................................................................................................................7
vii

Portugal...............................................................................................................................................................................................................................................7
Greece and Cyprus....................................................................................................................................................................................................................8
Hungary...............................................................................................................................................................................................................................................8
Czech Republic..............................................................................................................................................................................................................................9
Slovakia...............................................................................................................................................................................................................................................9
Poland...................................................................................................................................................................................................................................................9
Bulgaria...........................................................................................................................................................................................................................................10
Romania..........................................................................................................................................................................................................................................10
Belgium and the Netherlands........................................................................................................................................................................................10
Finland..............................................................................................................................................................................................................................................11
Slovenia...........................................................................................................................................................................................................................................11
Croatia .............................................................................................................................................................................................................................................11
Latvia.................................................................................................................................................................................................................................................12
Lithuania.........................................................................................................................................................................................................................................12
Estonia..............................................................................................................................................................................................................................................12
Limited Warranty Statement for HP Print Cartridges, Imaging Drums, and Imaging Units for use with HP
LaserJet Printers, HP Laser Printers and Samsung Branded Laser Printers.......................................................................................13
Dynamic Security Enabled Printers......................................................................................................................................................................................13
Long life consumable and maintenance kit limited warranty statement.................................................................................................13
HP policy on non-HP supplies.....................................................................................................................................................................................................14
HP anticounterfeit Web site ........................................................................................................................................................................................................14
Data stored on the toner cartridge.......................................................................................................................................................................................14
End User License Agreement....................................................................................................................................................................................................14
Customer self-repair warranty service .............................................................................................................................................................................19
Customer support..............................................................................................................................................................................................................................19
2 Environmental product stewardship program ........................................................................................................................20
Protecting the environment.........................................................................................................................................................................................................20
Battery information...........................................................................................................................................................................................................................20
Battery Notice for Brazil (for printers with non-removable battery)............................................................................................................20
Battery disposal - California.......................................................................................................................................................................................................21
Chemical substances......................................................................................................................................................................................................................21
Electronic hardware recycling...................................................................................................................................................................................................21
EPEAT............................................................................................................................................................................................................................................................21
Material restrictions..........................................................................................................................................................................................................................21
Material Safety Data Sheet (MSDS).....................................................................................................................................................................................21
Ozone production ...............................................................................................................................................................................................................................21
Paper.............................................................................................................................................................................................................................................................22
Paper use...................................................................................................................................................................................................................................................22
Plastics........................................................................................................................................................................................................................................................22
Power consumption ..........................................................................................................................................................................................................................22
HP LaserJet print supplies...........................................................................................................................................................................................................22
viii

Toner consumption............................................................................................................................................................................................................................23
For more information........................................................................................................................................................................................................................23
Brazil hardware recycling information................................................................................................................................................................................23
Restriction of Hazardous Substances (China).............................................................................................................................................................24
China SEPA...............................................................................................................................................................................................................................................25
The regulation of the implementation on China energy label for printer, fax, and copier...........................................................25
Disposal of waste equipment by users (EU, UK, and India)..................................................................................................................................25
EU Microplastics ..................................................................................................................................................................................................................................26
Product Power Data per European Union Commission Regulation 2023/826 (EU)......................................................................26
India Battery Waste Management (BWM) Rules ........................................................................................................................................................26
Restriction on Hazardous Substances (India)..............................................................................................................................................................26
Restriction of Hazardous Substances (Taiwan)..........................................................................................................................................................27
WEEE (Turkey) .........................................................................................................................................................................................................................................28
3 Regulatory information....................................................................................................................................................................29
Regulatory statements...................................................................................................................................................................................................................29
Regulatory model identication numbers...........................................................................................................................................................29
European Union & United Kingdom Regulatory Notice..............................................................................................................................29
European Union Consumer Laser Product..........................................................................................................................................................30
FCC regulations........................................................................................................................................................................................................................30
Canada - Industry Canada ICES-003 Compliance Statement ...........................................................................................................30
VCCI statement (Japan).....................................................................................................................................................................................................30
Power cord instructions .....................................................................................................................................................................................................31
Power cord statement (Japan)......................................................................................................................................................................................31
Laser safety .................................................................................................................................................................................................................................31
Laser statement for Finland............................................................................................................................................................................................31
Nordic Statements (Denmark, Finland, Norway, Sweden).......................................................................................................................32
GS statement (Germany)...................................................................................................................................................................................................32
Eurasian Conformity (Armenia, Belarus, Kazakhstan, Kyrgyzstan)...................................................................................................33
Taiwan BSMI USB Port (Walk-up) statement.......................................................................................................................................................33
Product Safety Statements.............................................................................................................................................................................................34
Battery statements ...........................................................................................................................................................................................................................34
Coin/button cell battery safety statements.......................................................................................................................................................34
Telecom (fax) statements..............................................................................................................................................................................................................34
Fax Cord Statement..............................................................................................................................................................................................................34
Europe Statement for Telecom Operation...........................................................................................................................................................34
Declaração para a ANATEL do Brasil.......................................................................................................................................................................34
New Zealand Telecom Statements ...........................................................................................................................................................................35
Additional FCC statement for telecom products (US)................................................................................................................................35
Telephone Consumer Protection Act (US)............................................................................................................................................................35
Industry Canada CS-03 requirements ..................................................................................................................................................................36
Japan Telecom Mark.............................................................................................................................................................................................................37
Wireless statements.........................................................................................................................................................................................................................37
European regulatory notice.............................................................................................................................................................................................37
ix

FCC compliance statement—United States.......................................................................................................................................................37
Australia..........................................................................................................................................................................................................................................38
Brazil ..................................................................................................................................................................................................................................................38
Canada............................................................................................................................................................................................................................................38
Products with 5 GHz Operation Industry of Canada...................................................................................................................................38
Exposure to Radio Frequency Radiation (Canada)........................................................................................................................................38
China CMIIT Wireless Statement................................................................................................................................................................................39
European Regulatory Notice ..........................................................................................................................................................................................39
Notice for use in Japan .......................................................................................................................................................................................................39
Mexico statement ...................................................................................................................................................................................................................39
Taiwan statement....................................................................................................................................................................................................................39
Taiwan NCC statement.......................................................................................................................................................................................................39
Thailand Wireless Statement.........................................................................................................................................................................................39
Index ............................................................................................................................................................................................................40
x

Printer overview1
Review the location of features on the printer, the physical and technical specications of the printer, and
where to locate setup information.
The following information is correct at the time of publication. For current information, see hp.com/
support/ljpro4110mfp
For more information:
HP's all-inclusive help for the printer includes the following information:
● Install and congure
● Learn and use
● Solve problems
● Download software and rmware updates
● Join support forums
● Find warranty and regulatory information
Warning icons
Use caution if you see a warning icon on your HP printer, as indicated in the icon denitions.
Figure 1-1 Caution: Electric shock
Figure 1-2 Caution: Hot surface
Figure 1-3 Caution: Keep body parts away from moving parts
Figure 1-4 Caution: Sharp edge in close proximity
Figure 1-5 Warning
Printer overview
1

Potential shock hazard
Review this important safety information.
● Read and understand these safety statements to avoid an electrical shock hazard.
● Always follow basic safety precautions when using this product to reduce risk of injury from re or
electric shock.
● Read and understand all instructions in the user guide.
● Observe all warnings and instructions marked on the product.
● Use only a grounded electrical outlet when connecting the product to a power source. If you do not
know whether the outlet is grounded, check with a qualied electrician.
● Do not touch the contacts on any of the sockets on the product. Replace damaged cords immediately.
● Unplug this product from wall outlets before cleaning.
● Do not install or use this product near water or when you are wet.
● Install the product securely on a stable surface.
● Install the product in a protected location where no one can step on or trip over the power cord.
● Do not place anything on top of the product. (For example, water, small metal or heavy objects,
candles, lit cigarettes, etc.).
This could result in electric shock or re.
Open source license
Some HP products use open source software.
For information on open source software used in this printer, visit www.hp.com/software/opensource.
Printer views
Identify certain parts of the printer and the control panel.
Printer front view (MFP 4112, 4113, 4114)
Identify the parts on the front of the printer.
2
Chapter 1 Printer overview
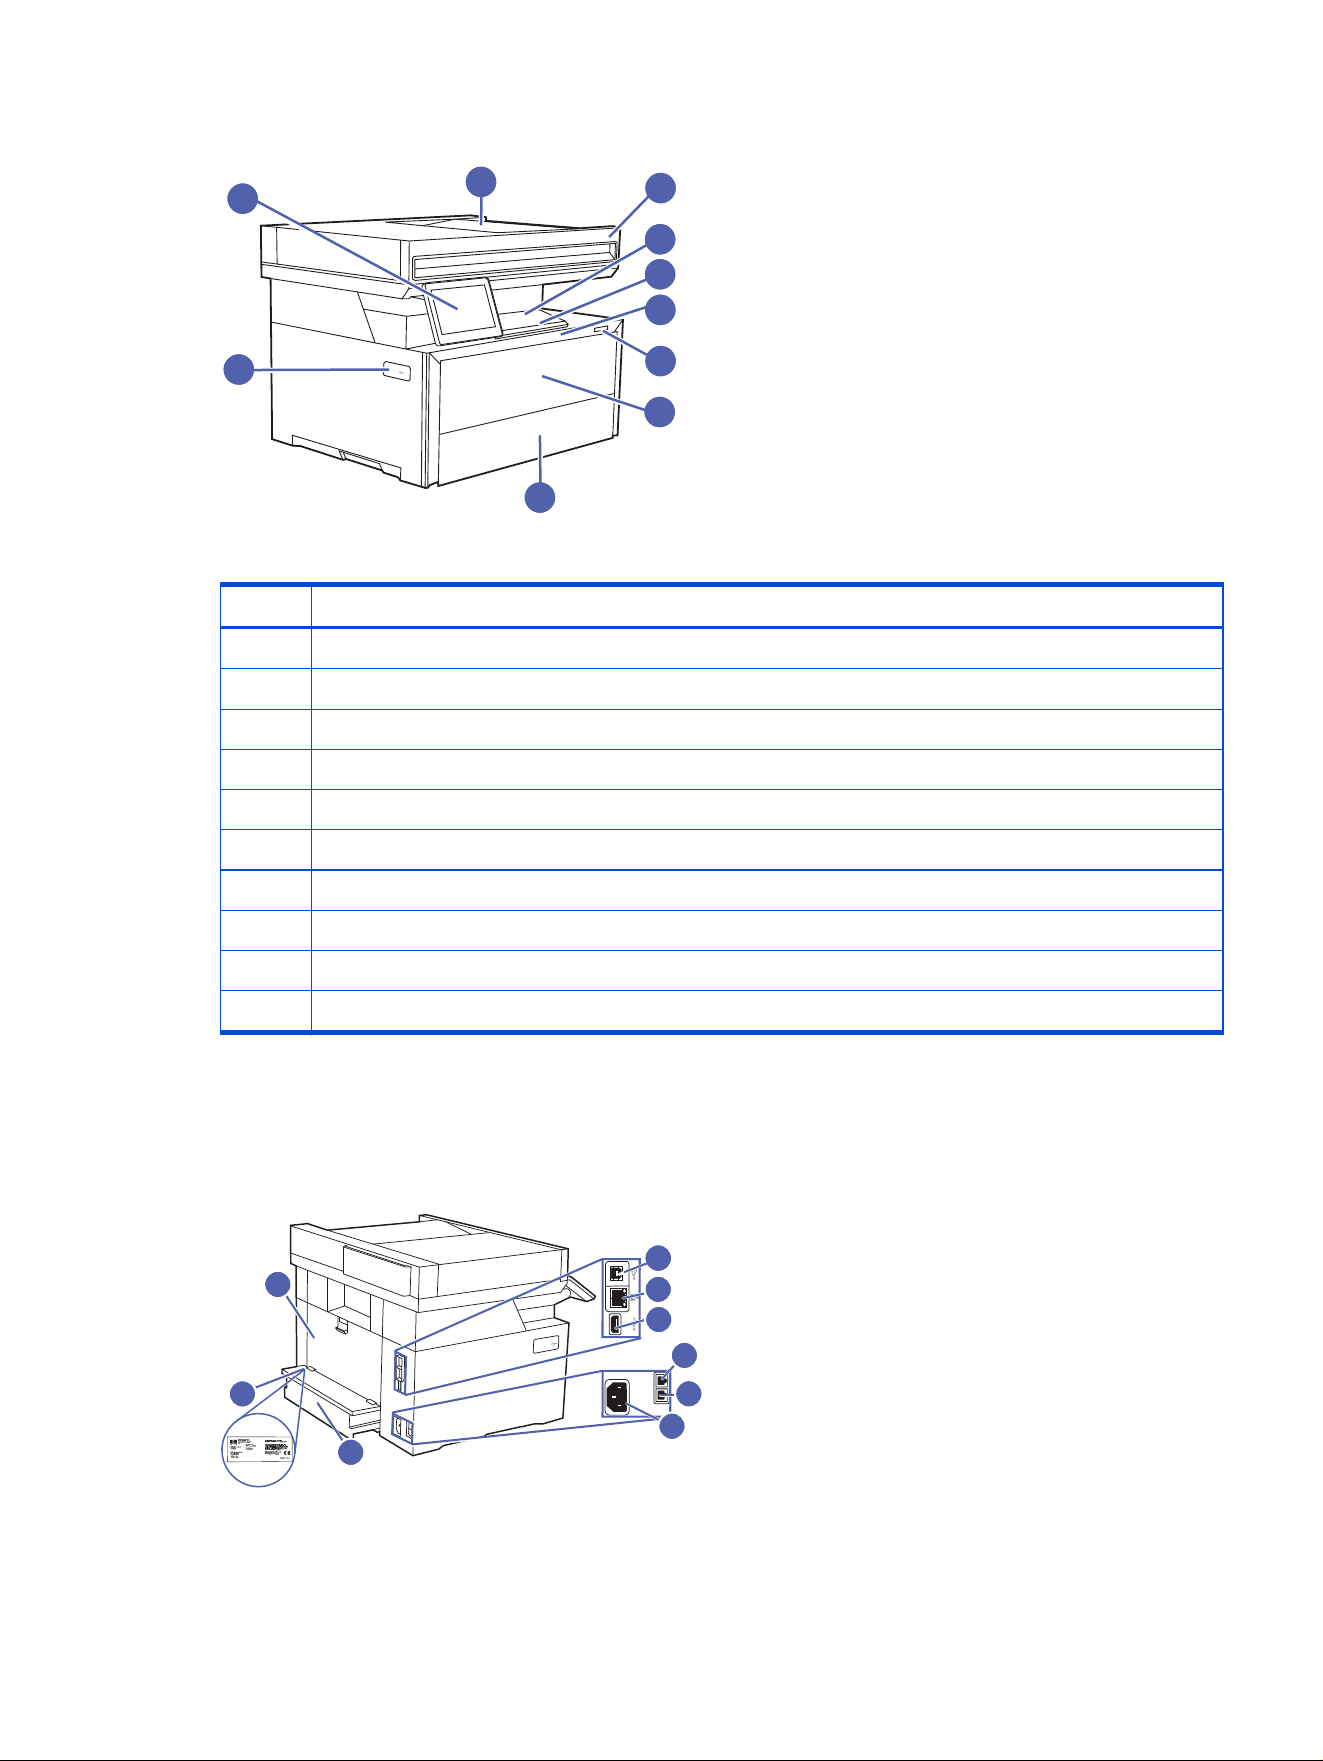
Figure 1-6 Printer front view
1
2
3
4
5
6
7
8
9
10
Table 1-1 Printer front components
Number Description
1 Document feeder
2 Scanner
3 Output bin
4 Output bin extension
5 Toner cartridge access door (Printer PIN location)
6 Power on/off button
7 Tray 1
8 Tray 2
9 Walk-up USB port (for printing and scanning without a computer)
10 Color touchscreen control panel (tilts up for easier viewing)
Printer rear view (MFP 4112, 4113, 4114)
Identify the parts on the rear of the printer.
Figure 1-7 Printer rear view
1
8
2
3
4
5
6
7
9
Printer rear view (MFP 4112, 4113, 4114)
3
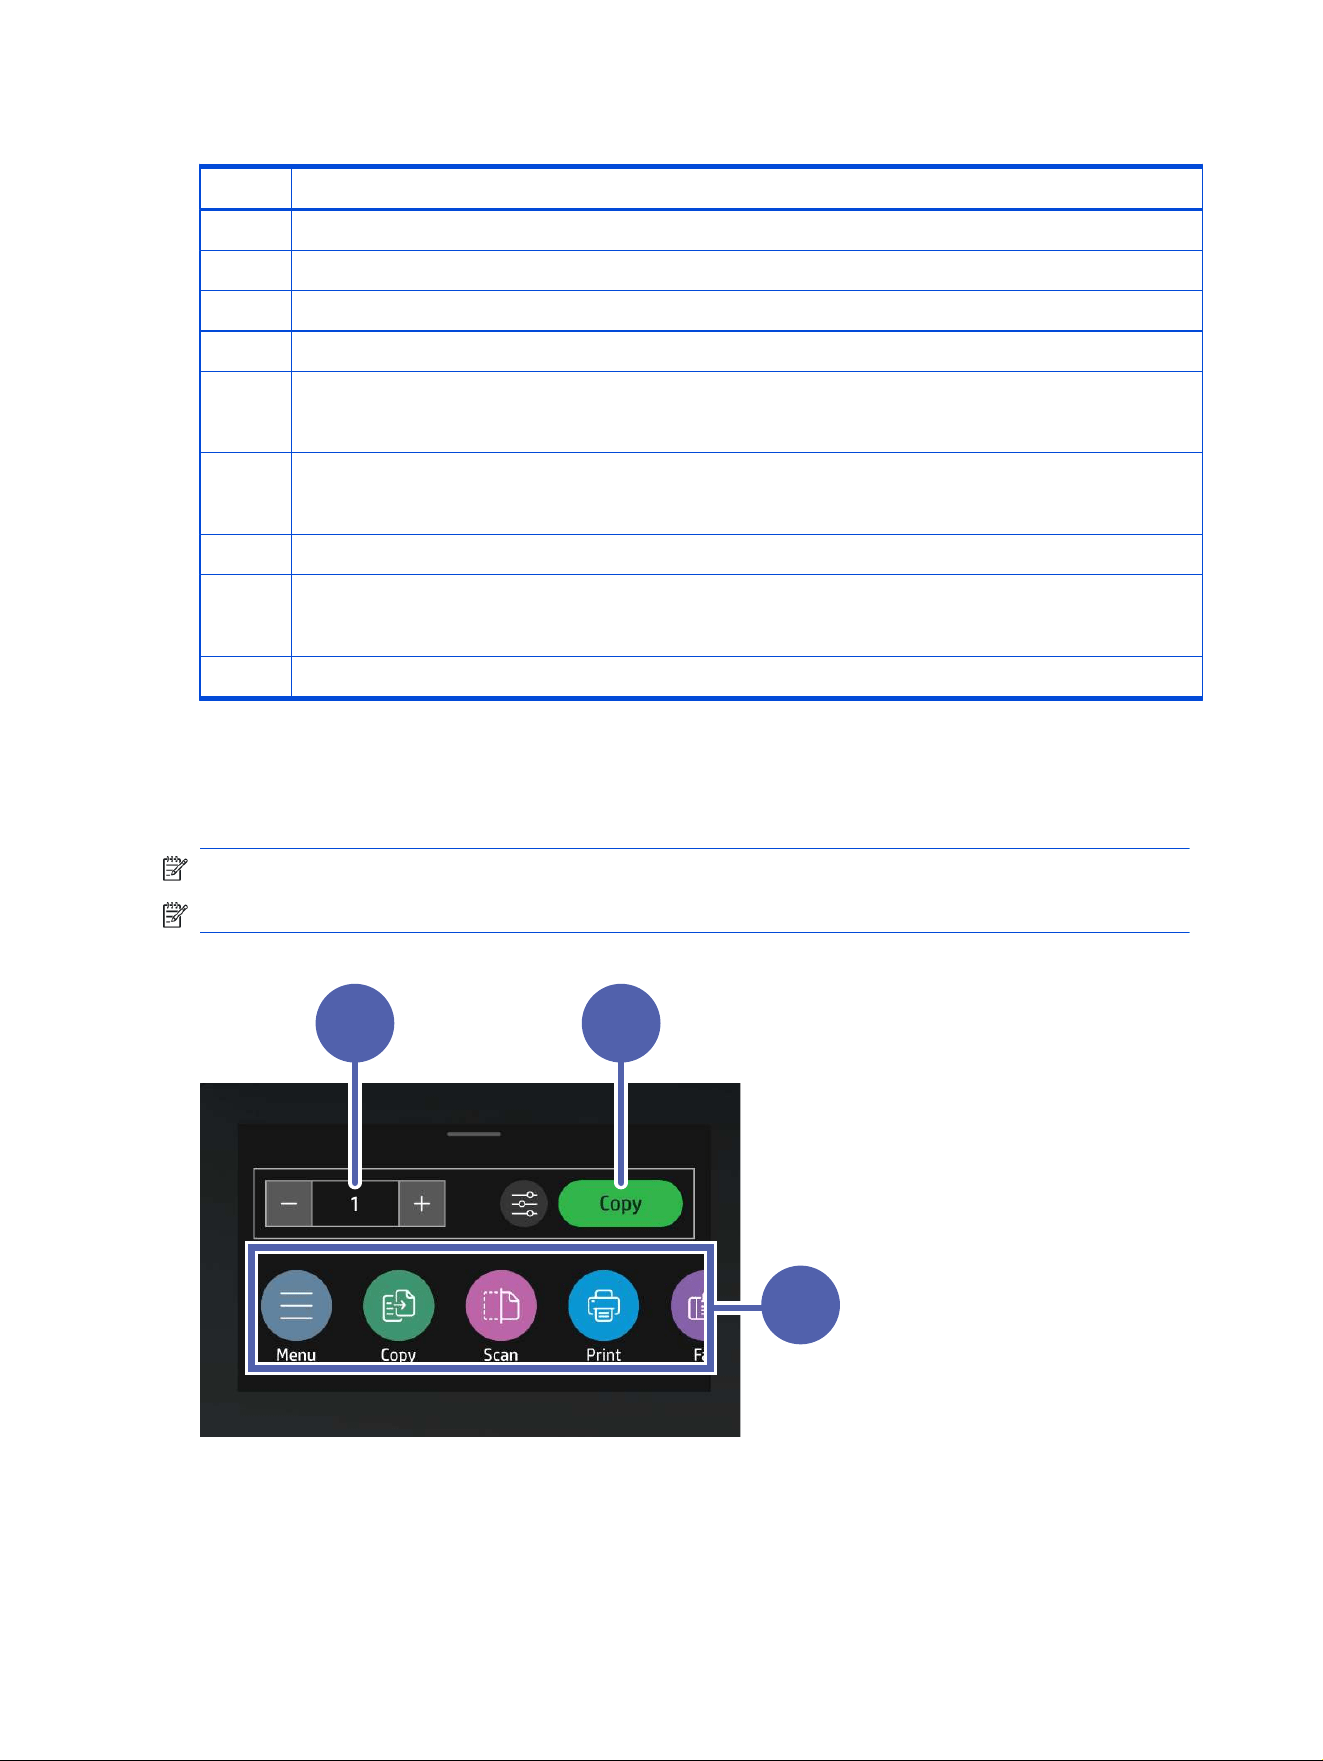
Table 1-2 Printer rear components
Number Description
1 Rear door (provides access for clearing jams)
2 USB interface port used for connecting the printer via USB
3 Ethernet port
4 USB port (for job storage and private printing)
5 Fax "line in" port (for attaching the fax phone line to the printer)
NOTE: Fax models only.
6 Telephone "line out" port (for attaching an extension phone, answering machine, or other device)
NOTE: Fax models only. This port should remain covered when not in use.
7 Power connection
8 Tray 2 extends out the rear of printer.
NOTE: Tray 2 and tray 3 extend past the rear of the printer when Letter, A4, or Legal paper is loaded.
9 Serial number and product number label
Control-panel view (MFP 4112, 4113, 4114)
Use the touchscreen control panel to obtain printer and job status information, and to congure the printer.
NOTE: Tilt the control panel for easier viewing.
NOTE: The features that appear on the Home screen can vary, depending on the printer conguration.
Figure 1-8 Printer control panel (MFP)
1 2
3
4
Chapter 1 Printer overview

Table 1-3 Control panel elements
Callout Element Description
1 Number of copies eld Touch the eld to adjust the number of copies to be
printed.
2 Copy button Touch the Copy button to start a copy job.
3 Applications area
Includes the Menu.
Select any of the icons to open the application. Swipe the
screen sideways to access more applications.
NOTE: The available applications vary by printer. The
administrator can congure which applications appear
and the order in which they appear.
Open the Menu to access the following common sub-
menus:
● Copy
● Scan
● Print
● Fax
● Info
● Quick Sets
● Contacts
● Jobs
● Supplies
● Trays
● Settings
● Tools
● Privacy
● Help
How to use the touchscreen control panel
Perform the following actions to use the printer touchscreen control panel.
How to use the touchscreen control panel
5
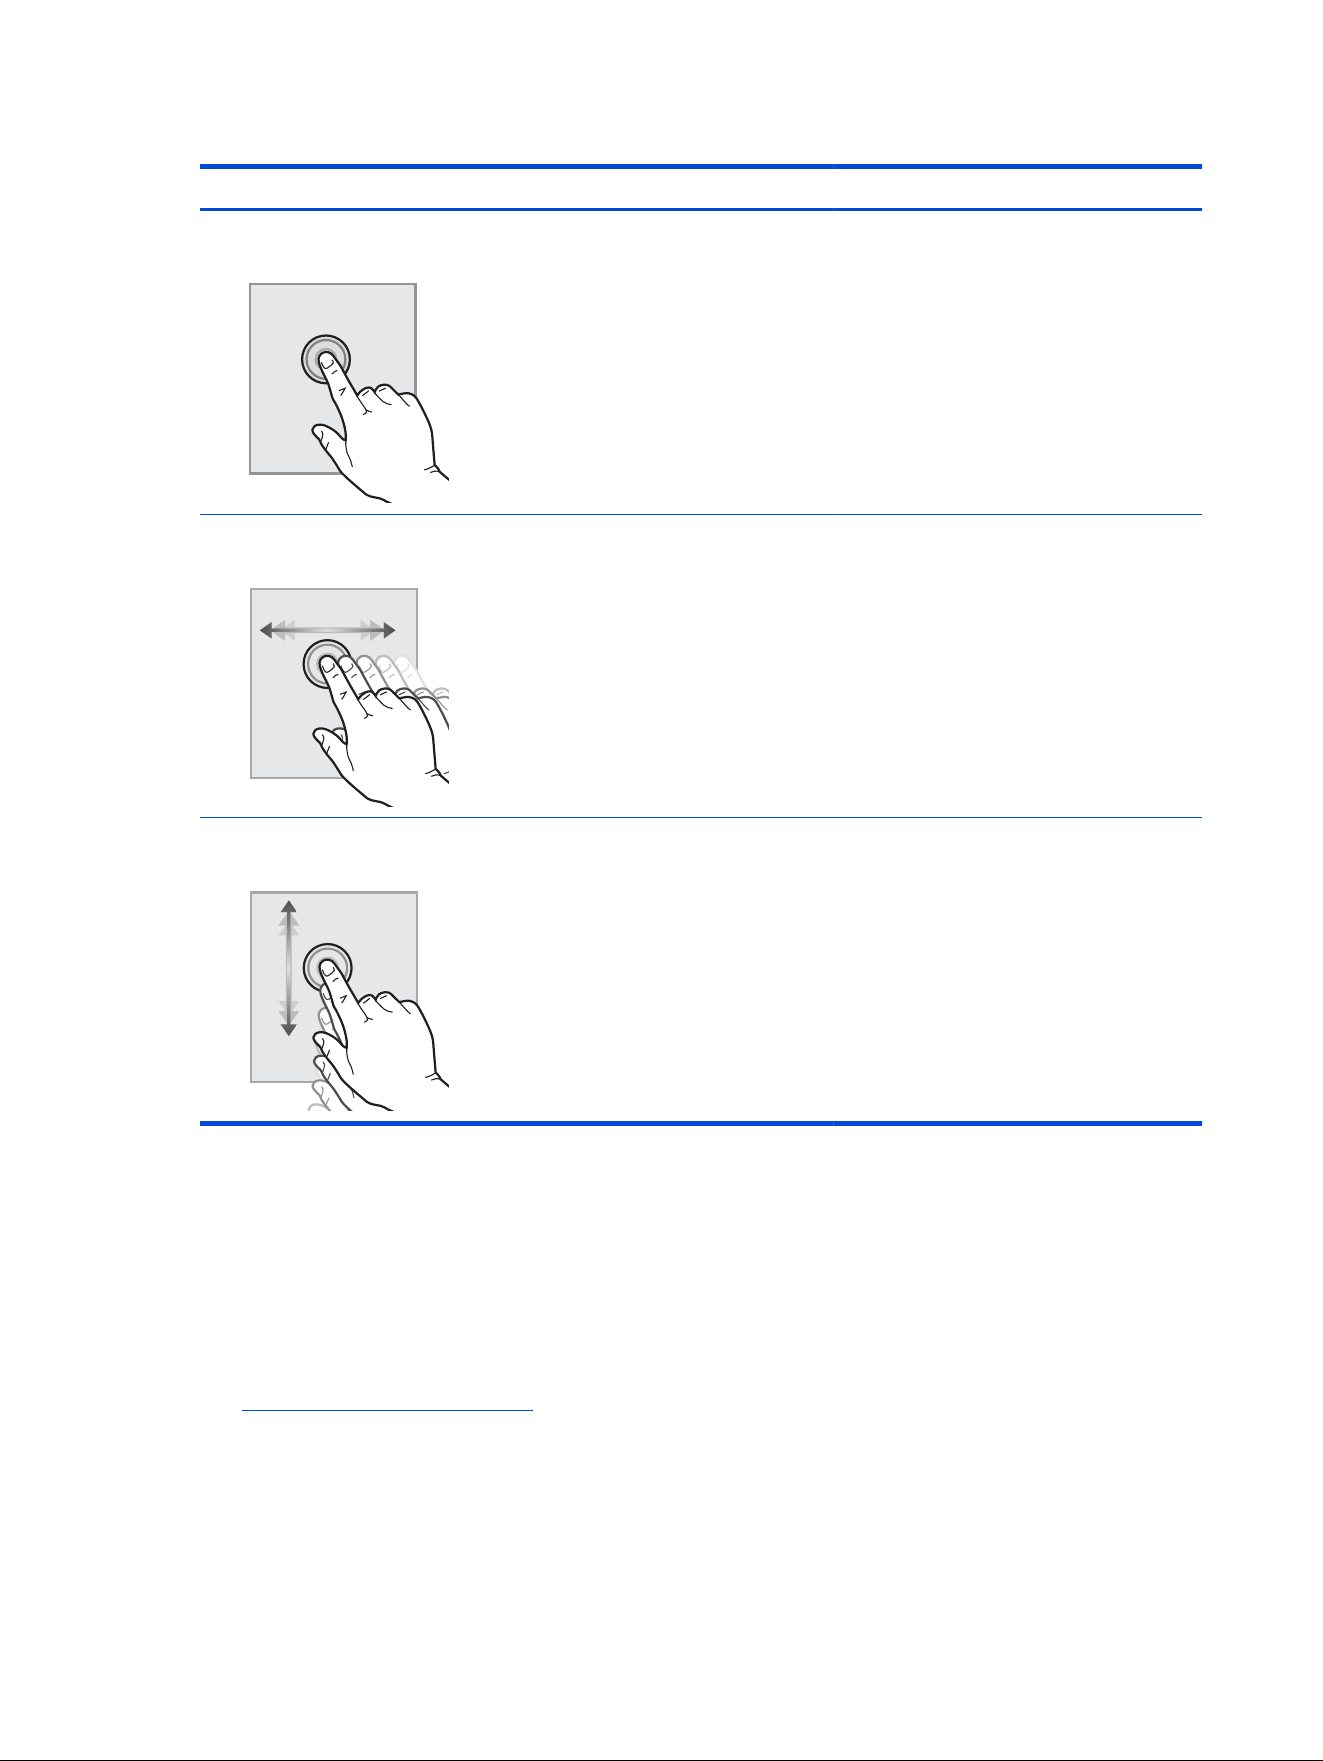
Table 1-4 Touchscreen control panel actions
Action Description Example
Touch Touch an item on the screen to select that
item or open that menu. Also, when scrolling
through menus, briey touch the screen to
stop the scrolling.
Touch the Menu icon to view the sub-menus.
Swipe Touch the screen and then move your nger
horizontally to scroll the screen sideways.
Swipe until the Help icon displays.
Scroll Touch the screen and then move your nger
vertically to scroll the screen up and down.
When scrolling through menus, briey touch
the screen to stop the scrolling.
Scroll through the sub-menus under Menu.
Printer specications
Determine the specications for your printer model.
Technical
specications (4112dw, fdn, fdw)
Review the technical specications for the printer.
See hp.com/support/ljpro4110mfp for current information.
Product numbers for each model
● 4112dw - #8X3F4A
● 4112fdn - #8X3F0A
6
Chapter 1 Printer overview

● 4112fdw - #8X3F2A
Table 1-5 Paper handling specications
Paper handling features 4112dw 4112fdn 4112fdw
Tray 1 (100-sheet capacity)
Tray 2 (250-sheet capacity)
1
Optional 550-sheet
accessory tray
Optional Optional Optional
Automatic duplex printing
1
When loaded with A4 or letter-size paper, Tray 2 extends from the rear of the printer approximately 54 mm (2.12 in). When
loaded with legal-size paper, Tray 2 extends from the rear of the printer approximately 110 mm (4.31 in).
Table 1-6 Connectivity specications
Connectivity features 4112dw 4112fdn 4112fdw
10/100/1000 Ethernet LAN
connection with IPv4 and IPv6
Hi-Speed rear USB 2.0
Walk-up USB port
Built-in dual-band wireless
card supporting wi-
functionality
Not available
Wi-Fi 6 802.11a/b/g/n/ac/ax
(2.4 / 5 GHz)
Not available
Table 1-7 Print specications
Print features 4112dw 4112fdn 4112fdw
Prints up to 45 pages per
minute (ppm) on A4 and 47
ppm on letter-sized paper
Job storage and private
printing
Table 1-8 Copy and scan specications
Copy and scan features 4112dw 4112fdn 4112fdw
Copies up to 40 pages per
minute (ppm) in black and
white (single-sided, letter) and
67 images per minute (ipm)
50-page document feeder
with dual-head scanning for
single-pass duplex copying
and scanning
Technical specications (4112dw, fdn, fdw) 7
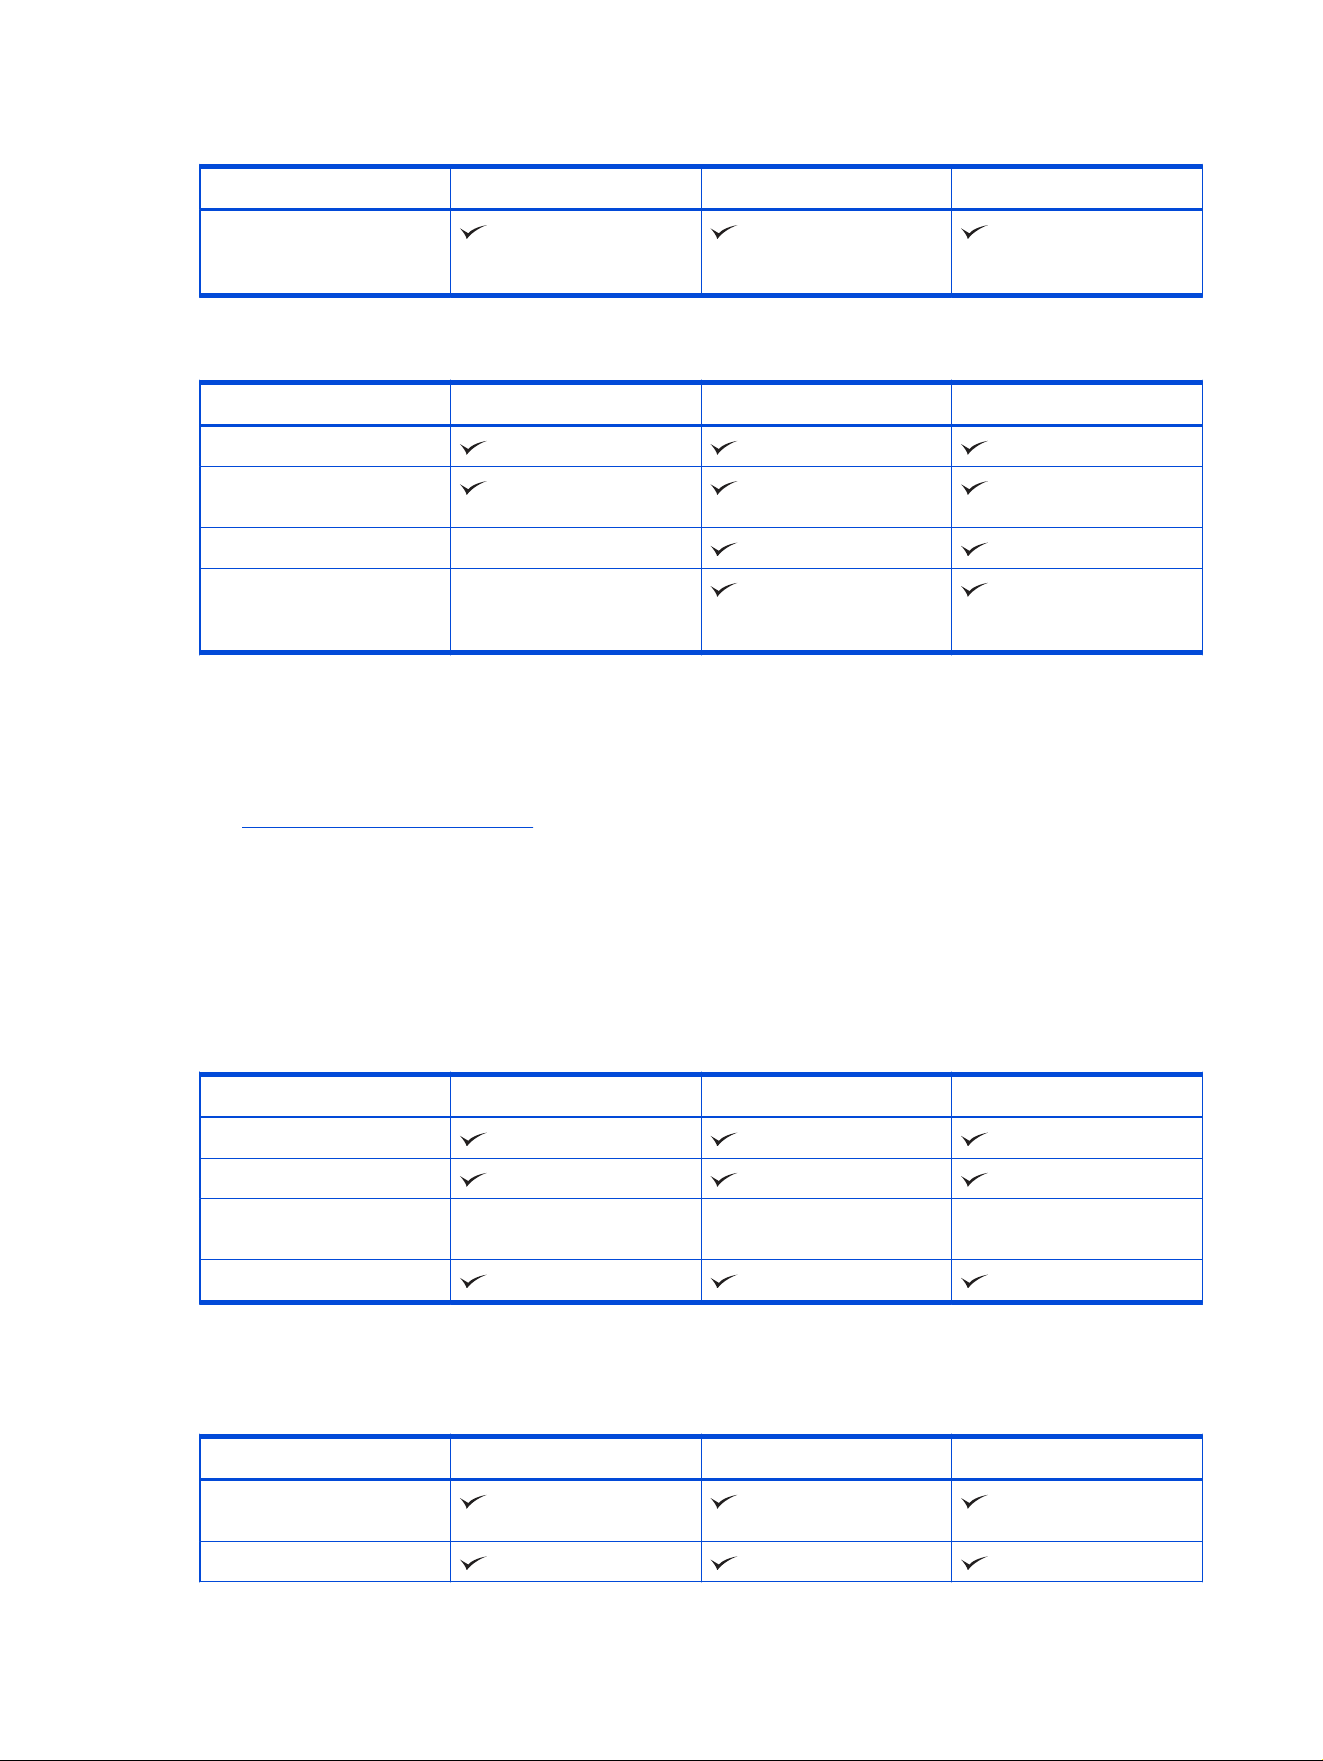
Table 1-8 Copy and scan specications (continued)
Copy and scan features 4112dw 4112fdn 4112fdw
Scan to E-mail, Scan to USB,
and Scan to Network Folder
options
Table 1-9 Other specications
Other features 4112dw 4112fdn 4112fdw
512 MB memory
Color touchscreen control
panel
Fax features Not available
HP Digital Fax (Fax to Email
and Fax to Network Folder
options)
Not available
Technical specications (4113dw, fdn, fdw)
Review the technical specications for the printer.
See hp.com/support/ljpro4110mfp for current information.
Product numbers for each model
● 4113dw - #8X3F6A
● 4113fdn - #8X3F8A
● 4113fdw - #8X3G0A
Table 1-10
Paper handling specications
Paper handling features 4113dw 4113fdn 4113fdw
Tray 1 (100-sheet capacity)
Tray 2 (250-sheet capacity)
1
Optional 550-sheet
accessory tray
Optional Optional Optional
Automatic duplex printing
1
When loaded with A4 or letter-size paper, Tray 2 extends from the rear of the printer approximately 54 mm (2.12 in). When
loaded with legal-size paper, Tray 2 extends from the rear of the printer approximately 110 mm (4.31 in).
Table 1-11
Connectivity specications
Connectivity features 4113dw 4113fdn 4113fdw
10/100/1000 Ethernet LAN
connection with IPv4 and IPv6
Hi-Speed rear USB 2.0
8 Chapter 1 Printer overview

Table 1-11 Connectivity specications (continued)
Connectivity features 4113dw 4113fdn 4113fdw
Walk-up USB port
Built-in dual-band wireless
card supporting wi-
functionality
Not available
Wi-Fi 6 802.11a/b/g/n/ac/ax
(2.4 / 5 GHz)
Not available
Table 1-12 Print specications
Print features 4113dw 4113fdn 4113fdw
Prints up to 45 pages per
minute (ppm) on A4 and 47
ppm on letter-sized paper
Job storage and private
printing
Table 1-13 Copy and scan specications
Copy and scan features 4113dw 4113fdn 4113fdw
For Single-sided, Letter-size:
Copies/scans up to 40 pages
per minute (ppm) in black and
white.
For Double-sided, Letter-
size: Scans up to 64 images
per minute (ipm) in black and
white.
50-page document feeder
with dual-head scanning for
single-pass duplex copying
and scanning
Scan to E-mail, Scan to USB,
and Scan to Network Folder
options
Table 1-14 Other specications
Other features 4113dw 4113fdn 4113fdw
512 MB memory
Color touchscreen control
panel
Fax features Not available
HP Digital Fax (Fax to Email
and Fax to Network Folder
options)
Not available
Technical specications (4113dw, fdn, fdw) 9

Technical specications (4113dwg, fdng, fdwg)
Review the technical specications for the printer.
See hp.com/support/ljpro4110mfp for current information.
Product numbers for each model
● 4113dwg - #B09RYA
● 4113fdng - #B09RZA
● 4113fdwg - #B09S0A
Table 1-15 Paper handling specications
Paper handling features 4113dwg 4113fdng 4113fdwg
Tray 1 (100-sheet capacity)
Tray 2 (250-sheet capacity)
1
Optional 550-sheet
accessory tray
Optional Optional Optional
Automatic duplex printing
1
When loaded with A4 or letter-size paper, Tray 2 extends from the rear of the printer approximately 54 mm (2.12 in). When
loaded with legal-size paper, Tray 2 extends from the rear of the printer approximately 110 mm (4.31 in).
Table 1-16
Connectivity specications
Connectivity features 4113dwg 4113fdng 4113fdwg
10/100/1000 Ethernet LAN
connection with IPv4 and IPv6
Hi-Speed rear USB 2.0
Walk-up USB port
Built-in dual-band wireless
card supporting wi-
functionality
Not available
Wi-Fi 6 802.11a/b/g/n/ac/ax
(2.4 / 5 GHz)
Not available
Table 1-17 Print specications
Print features 4113dwg 4113fdng 4113fdwg
Prints up to 45 pages per
minute (ppm) on A4 and 47
ppm on letter-sized paper
Job storage and private
printing
10 Chapter 1 Printer overview

Table 1-18 Copy and scan specications
Copy and scan features 4113dwg 4113fdng 4113fdwg
For Single-sided, Letter-size:
Copies/scans up to 38 pages
per minute (ppm) in black and
white.
For Double-sided, Letter-
size: Scans up to 64 images
per minute (ipm) in black and
white.
50-page document feeder
with dual-head scanning for
single-pass duplex copying
and scanning
Scan to E-mail, Scan to USB,
and Scan to Network Folder
options
Table 1-19 Other specications
Other features 4113dwg 4113fdng 4113fdwg
512 MB memory
Color touchscreen control
panel
Fax features Not available
HP Digital Fax (Fax to Email
and Fax to Network Folder
options)
Not available
Technical specications (4114dw, fdn, fdw)
Review the technical specications for the printer.
See hp.com/support/ljpro4110mfp for current information.
Product numbers for each model
● 4114dw - #8X3G4A
● 4114fdn - #8X3G5A
● 4114fdw - #8X3G6A
Table 1-20
Paper handling specications
Paper handling features 4114dw 4114fdn 4114fdw
Tray 1 (100-sheet capacity)
Tray 2 (250-sheet capacity)
1
Optional 550-sheet accessory tray Optional Optional Optional
Technical specications (4114dw, fdn, fdw) 11

Table 1-20 Paper handling specications (continued)
Paper handling features 4114dw 4114fdn 4114fdw
Automatic duplex printing
1
When loaded with A4 or letter-size paper, Tray 2 extends from the rear of the printer approximately 54 mm (2.12 in). When
loaded with legal-size paper, Tray 2 extends from the rear of the printer approximately 110 mm (4.31 in).
Table 1-21 Connectivity specications
Connectivity features 4114dw 4114fdn 4114fdw
10/100/1000 Ethernet LAN connection with IPv4
and IPv6
Hi-Speed rear USB 2.0
Walk-up USB port
Built-in dual-band wireless card supporting wi-
functionality
Not available
Wi-Fi 6 802.11a/b/g/n/ac/ax (2.4 / 5 GHz) Not available
Table 1-22 Print specications
Print features 4114dw 4114fdn 4114fdw
Prints up to 45 pages per minute (ppm) on A4 and
47 ppm on letter-sized paper
Job storage and private printing
Table 1-23 Copy and scan specications
Copy and scan features 4114dw 4114fdn 4114fdw
For Single-sided, Letter-size: Copies/scans up to
40 pages per minute (ppm) in black and white.
For Double-sided, Letter-size: Scans up to 64
images per minute (ipm) in black and white.
50-page document feeder with dual-head
scanning for single-pass duplex copying and
scanning
Scan to E-mail, Scan to USB, and Scan to Network
Folder options
Table 1-24 Other specications
Other features 4114dw 4114fdn 4114fdw
512 MB memory
Color touchscreen control
panel
Fax features Not available
12 Chapter 1 Printer overview

Table 1-24 Other specications (continued)
Other features 4114dw 4114fdn 4114fdw
HP Digital Fax (Fax to Email
and Fax to Network Folder
options)
Not available
Supported operating systems
The following information applies to the printer-specic Windows and HP print drivers for macOS and to
the software installer.
Windows and macOS: Windows and Mac computers and Android and Apple mobile devices are
supported with this printer.
1. Go to support.hp.com.
2. Enter the printer name to get the printer drivers.
Linux: For information and print drivers for Linux, go to developers.hp.com/hp-linux-imaging-and-printing.
UNIX: For information and print drivers for UNIX, go to www.hp.com/go/unixmodelscripts.
Citrix Ready Kit Certication - Up to Citrix Server 7.18: For more information, go to
citrixready.citrix.com.
Supported operating systems and print drivers
NOTE: HP software and drivers are no longer supported in Windows 7, Windows Server 2008, and
Windows Server 2008 R2. For more information, see the following document on HP's support web site:
HP printers - HP software and drivers no longer supported in Windows 7, Windows Server 2008, and
Windows Server 2008 R2
Table 1-25
Supported operating systems and print drivers
Operating system Print driver installed (from the software on the web)
Windows 11 21H2 64-bit and ARM64
Windows 10 22H2 64-bit and ARM64
The PCL 6/PSA printer-specic print driver is available for download from
the printer-support website.
Download the driver, and then use the Microsoft Add Printer tool to install
it.
Windows Server 2025
Windows Server 2022, 64-bit
The PCL 6 printer-specic print driver is available for download from the
printer-support website. Download the driver, and then use the Microsoft
Add Printer tool to install it.
Windows Server 2019, 64-bit The PCL 6 printer-specic print driver is available for download from the
printer-support website. Download the driver, and then use the Microsoft
Add Printer tool to install it.
Windows Server 2016, 64-bit The PCL 6 printer-specic print driver is available for download from the
printer-support website. Download the driver, and then use the Microsoft
Add Printer tool to install it.
Windows Server 2012 R2, 64-bit The PCL 6 printer-specic print driver is available for download from the
printer-support website. Download the driver, and then use the Microsoft
Add Printer tool to install it.
Supported operating systems 13

Table 1-25 Supported operating systems and print drivers (continued)
Operating system Print driver installed (from the software on the web)
Windows Server 2012, 64-bit The PCL 6 printer-specic print driver is available for download from the
printer-support website. Download the driver, and then use the Microsoft
Add Printer tool to install it.
Chrome OS (Chromebook) Chromebook devices are supported for printing using the HP Smart app,
but they are not fully supported for printer setup.
macOS 15 Sequoia, macOS 14 Sonoma, macOS
Ventura v13.0
To install the print driver, download HP Easy Start from 123.hp.com.
Follow the steps provided to install the printer software and print driver.
HPLIP The HPLIP solution has an automatic installer available for download
from hpLIP and is supported in Linux on the following:
NOTE: HPLIP support is tested by RCB on the following: Almalinux 9.6,
RHEL 9, Ubuntu 22.04, and Ubuntu 24.04.
● Almalinux (9.5,9.6)
● Boss (5.0)
● Debian (7.0, 7.1, 7.2, 7.3, 7.4, 7.5, 7.6, 7.7, 7.8, 7.9, 8.0, 8.1, 8.2, 8.3,
8.4, 8.5, 8.6, 8.7, 8.8, 9.1, 9.2, 9.3, 9.4, 9.5, 9.6, 9.7, 9.8, 9.9, 10.10.1,
10.2, 10.3, 10.4, 10.5, 10.6, 10.7, 10.8, 10.9, 11, 12)
● Elementary OS (6, 6.1,7)
● Fedora (22, 23, 24, 25, 26, 27, 28, 29, 30, 31, 32, 33, 34, 35, 36, 37,
38, 39, 40)
● Linux Mint (17, 17.1, 17.2, 17.3, 18, 18.1, 18.2, 18.3, 19,
19.1,19.2,19.3, 20.04, 20.1, 20.2, 20.3, 21.0, 21.1, 21.3, 22)
● Manjaro Linux (17.1.4, 18.0, 18.0.4, 18.1.0, 18.1.2, 19.0, 20.0, 20.2,
21.0, 21.2, 21.3)
● MX Linux (21, 21.1, 21.2, 21.3, 23)
● Red Hat Enterprise Linux (8.0, 8.2, 8.3, 8.4, 8.5, 8.6, 8.7, 9.0, 9.1)
● SUSE Linux (13.2, 42.1, 42.2, 42.3, 15.0, 15.1, 15.2, 15.3, 15.4, 15.5)
● Ubuntu (12.04, 14.04, 15.10, 16.04, 16.10, 17.04, 17.10,
18.04,18.10,19.04,19.10, 20.04, 20.10, 21.04, 21.10, 22.04, 22.10,
23.04, 23.10, 24.04)
● Zorin (16, 17.1)
NOTE: For a current list of supported operating systems, go to https://support.hp.com for HP's all-
inclusive help for the printer.
14
Chapter 1 Printer overview

Minimum system requirements
Table 1-26 Minimum system requirements for Apple
®
, Windows
®
, Chromebook, and mobile devices (iOS/
Android)
Apple
®
Microsoft
®
Chromebook Mobile devices: iOS, Android
● Operating systems:
– macOS 15 Sequoia
– macOS 14 Sonoma
– macOS 13 Ventura
● Hard drive:
2 GB hard drive
● Connectivity:
– Internet connection
– USB port
●
Operating systems:
– Windows
®
11, 64-bit
– Windows
®
10, 64-bit
● Hard drive:
2 GB hard drive
● Connectivity:
– Internet connection
– USB port
●
Operating systems:
Chrome OS
®
● CPU: Pentium 4
processor
● Hard drive: 100 MB hard
drive
● RAM: 128 MB RAM
Operating systems:
● iOS
● Android
Table 1-27 Minimum system requirements for Android, Linux, and SAP
Android Linux SAP
● Citrix XenApp & XenDesktop 2303
(OSV)
● Fedora 31, 32 ,33, 34, 35
● Harmony
Linux Mint 20.1, 20.2 Ubuntu 20.04, 20.10, 21.04, 21.10
Mobile printing solutions
HP offers multiple mobile printing solutions to enable easy printing to an HP printer from a laptop, tablet,
smartphone, or other mobile device.
To see the full list of mobile printing options available for your printer, go to Printers that can use mobile
printing solutions.
NOTE: Update the printer rmware to ensure all mobile printing capabilities are supported.
● Wi-Fi Direct on wireless models
● AirPrint
● Android Printing
● HP Smart app
Printer dimensions (MFP 4112, 4113, 4114)
Make sure your printer environment is large enough to accommodate the printer.
Mobile printing solutions
15
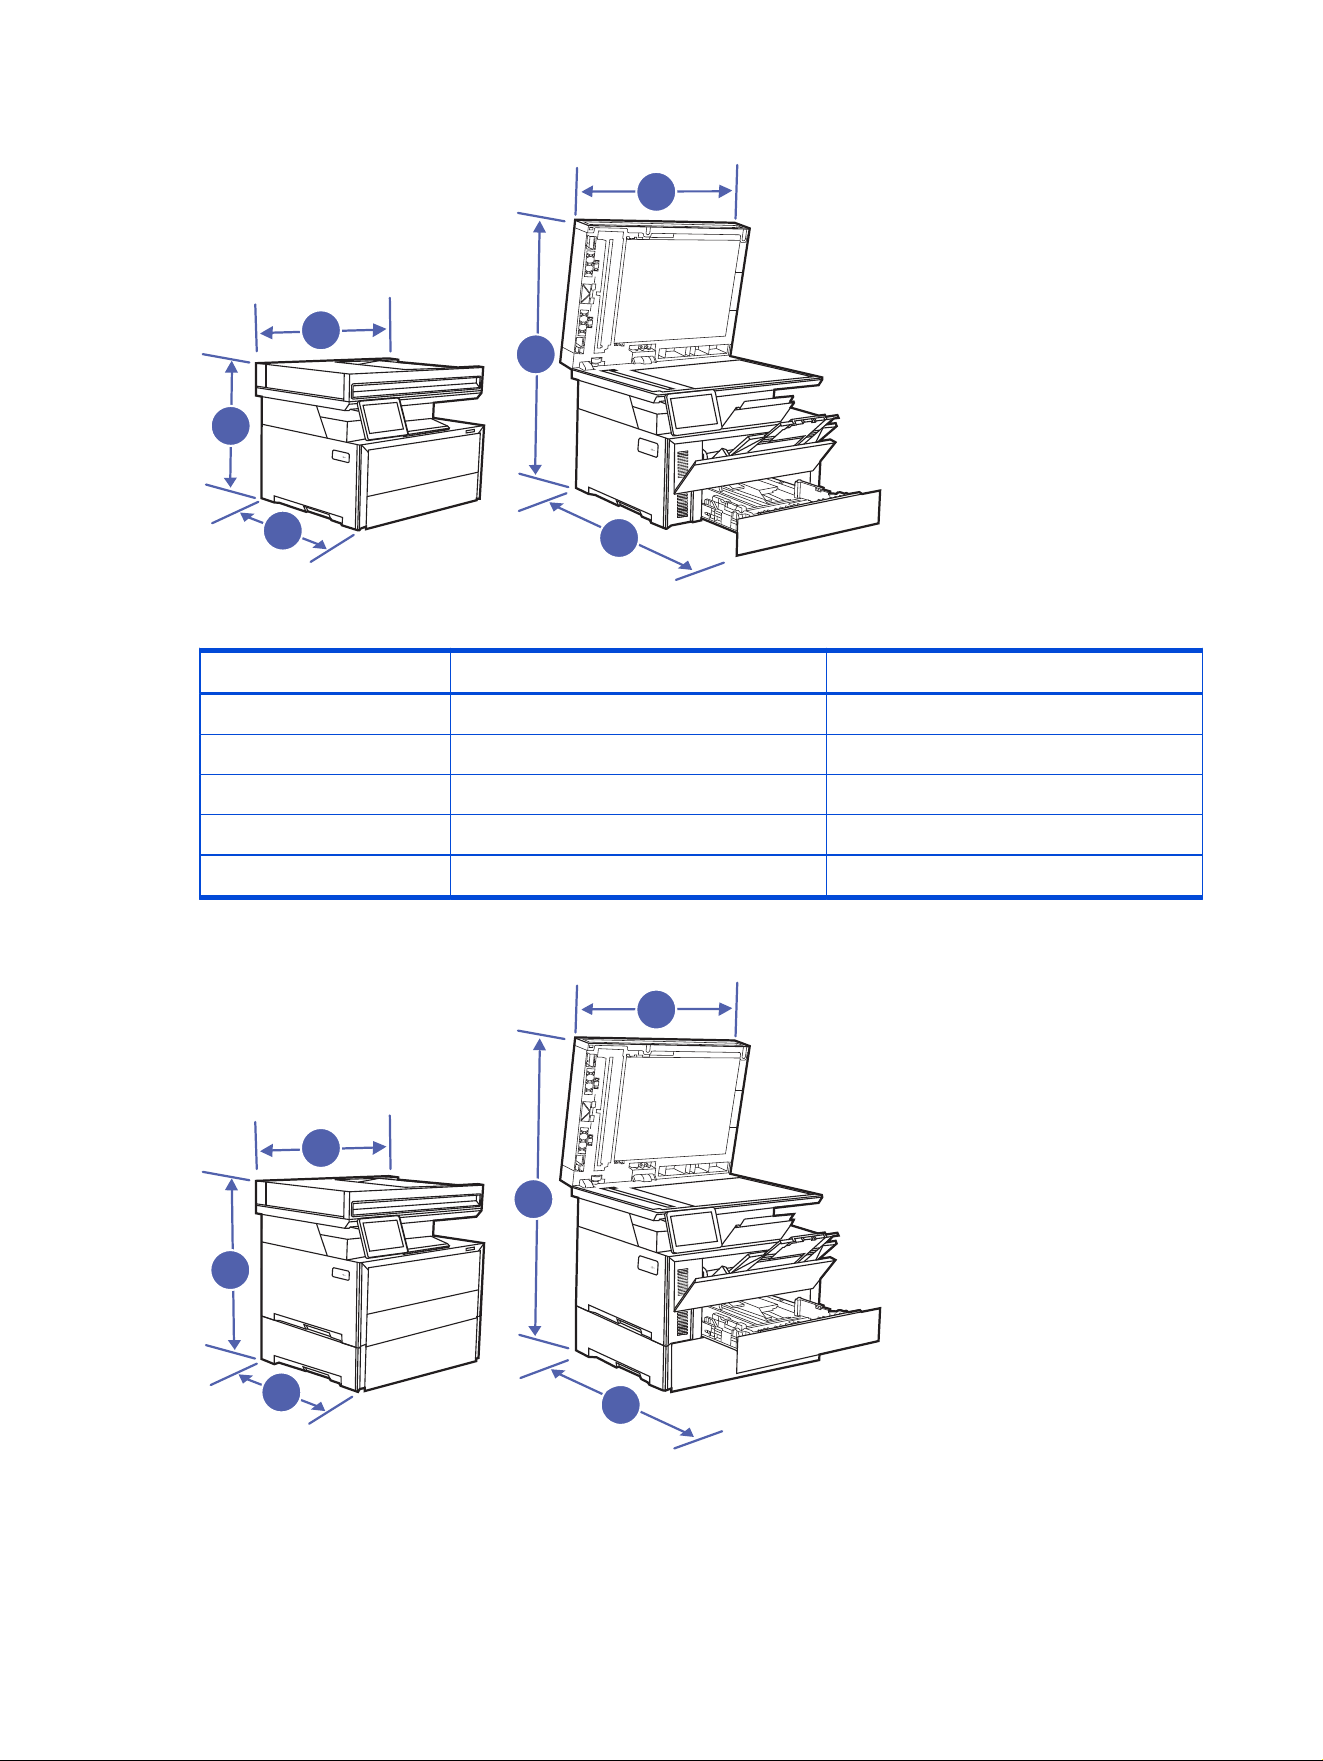
Figure 1-9 Printer dimensions
1
2
3
1
2
3
Table 1-28 Printer dimensions
Measurement Printer fully closed Printer fully opened
1. Width 420 mm (16.5 in) 452 mm (17.8 in)
2. Height 307 mm (12.1 in) 558 mm (22 in)
3. Depth (mm) Ltr/A4 386 mm (15.1 in) 557 mm (21.2 in)
3. Depth (mm) Legal 446 mm (17.5 in) 557 mm (21.2 in)
Weight (with cartridges) 12.5 kg (27 lb) 12.5 kg (27 lb)
Figure 1-10 Dimensions for the printer with the optional 550-sheet tray
1
2
3
1
2
3
16
Chapter 1 Printer overview

Table 1-29 Dimensions for the printer with the optional 550-sheet tray
Measurement Printer fully closed Printer fully opened
1. Width 420 mm (16.5 in) 452 mm (17.8 in)
2. Height 437 mm (17.2 in) 688 mm (27.1 in)
3. Depth (mm) Ltr/A4 386 mm (15.2 in) 557 mm (22 in)
3. Depth (mm) Legal 446 mm (17.5 in) 557 mm (22 in)
Weight (with cartridges) 16.1 kg (35.5 lb) 16.1 kg (35.5 lb)
Power consumption, electrical specications, and acoustic emissions
In order to operate properly, the printer must be in an environment that meets certain power
specications.
See hp.com/support/ljpro4110mfp for current information.
CAUTION: Power requirements are based on the country/region where the printer is sold. Do not
convert operating voltages. This will damage the printer and void the printer warranty.
Operating-environment range
In order to operate properly, the printer must be in an environment that meets certain
specications.
Table 1-30
Operating-environment specications
Environment Recommended Storage
Temperature 15° to 27°C (59° to 80.6°F) 10° to 32.5°C (50° to 90.5°F)
Relative humidity 30% to 70% relative humidity (RH) 10% to 80% RH
Printer hardware setup and software installation
For basic setup instructions, see the Hardware Installation Guide that came with the printer. For additional
instructions, go to HP support on the web.
Go to hp.com/support/ljpro4110mfp for HP's all-inclusive help for the printer, which includes the following
information:
● Install and congure
● Learn and use
● Solve problems
● Download software and rmware updates
● Join support forums
● Find warranty and regulatory information
● Find instructions about how to use the Microsoft Add Printer tool
Power consumption, electrical
specications, and acoustic emissions 17

Paper trays2
Discover how to load and use the paper trays, including how to load special items such as envelopes and
labels.
The following information is correct at the time of publication. For current information, see hp.com/
support/ljpro4110mfp.
For more information:
HP's all-inclusive help for the printer includes the following information:
● Install and congure
● Learn and use
● Solve problems
● Download software and rmware updates
● Join support forums
● Find warranty and regulatory information
Use caution when loading the paper trays.
CAUTION: Do not extend more than one paper tray at a time.
Do not use paper tray as a step.
All trays must be closed while relocating/moving product.
Keep hands out of paper trays or drawers when closing.
If the printer has a keyboard, close keyboard tray when not in use.
Load paper to Tray 1 (multipurpose tray)
The following information describes how to load paper into Tray 1.
Load Paper to Tray 1 (multipurpose tray)
Follow these steps to load paper in Tray 1.
This tray holds up to 50 sheets of 75 grams per square meter (20 lb) paper.
CAUTION: To avoid jams, never add or remove paper from Tray 1 during printing.
18
Chapter 2 Paper trays
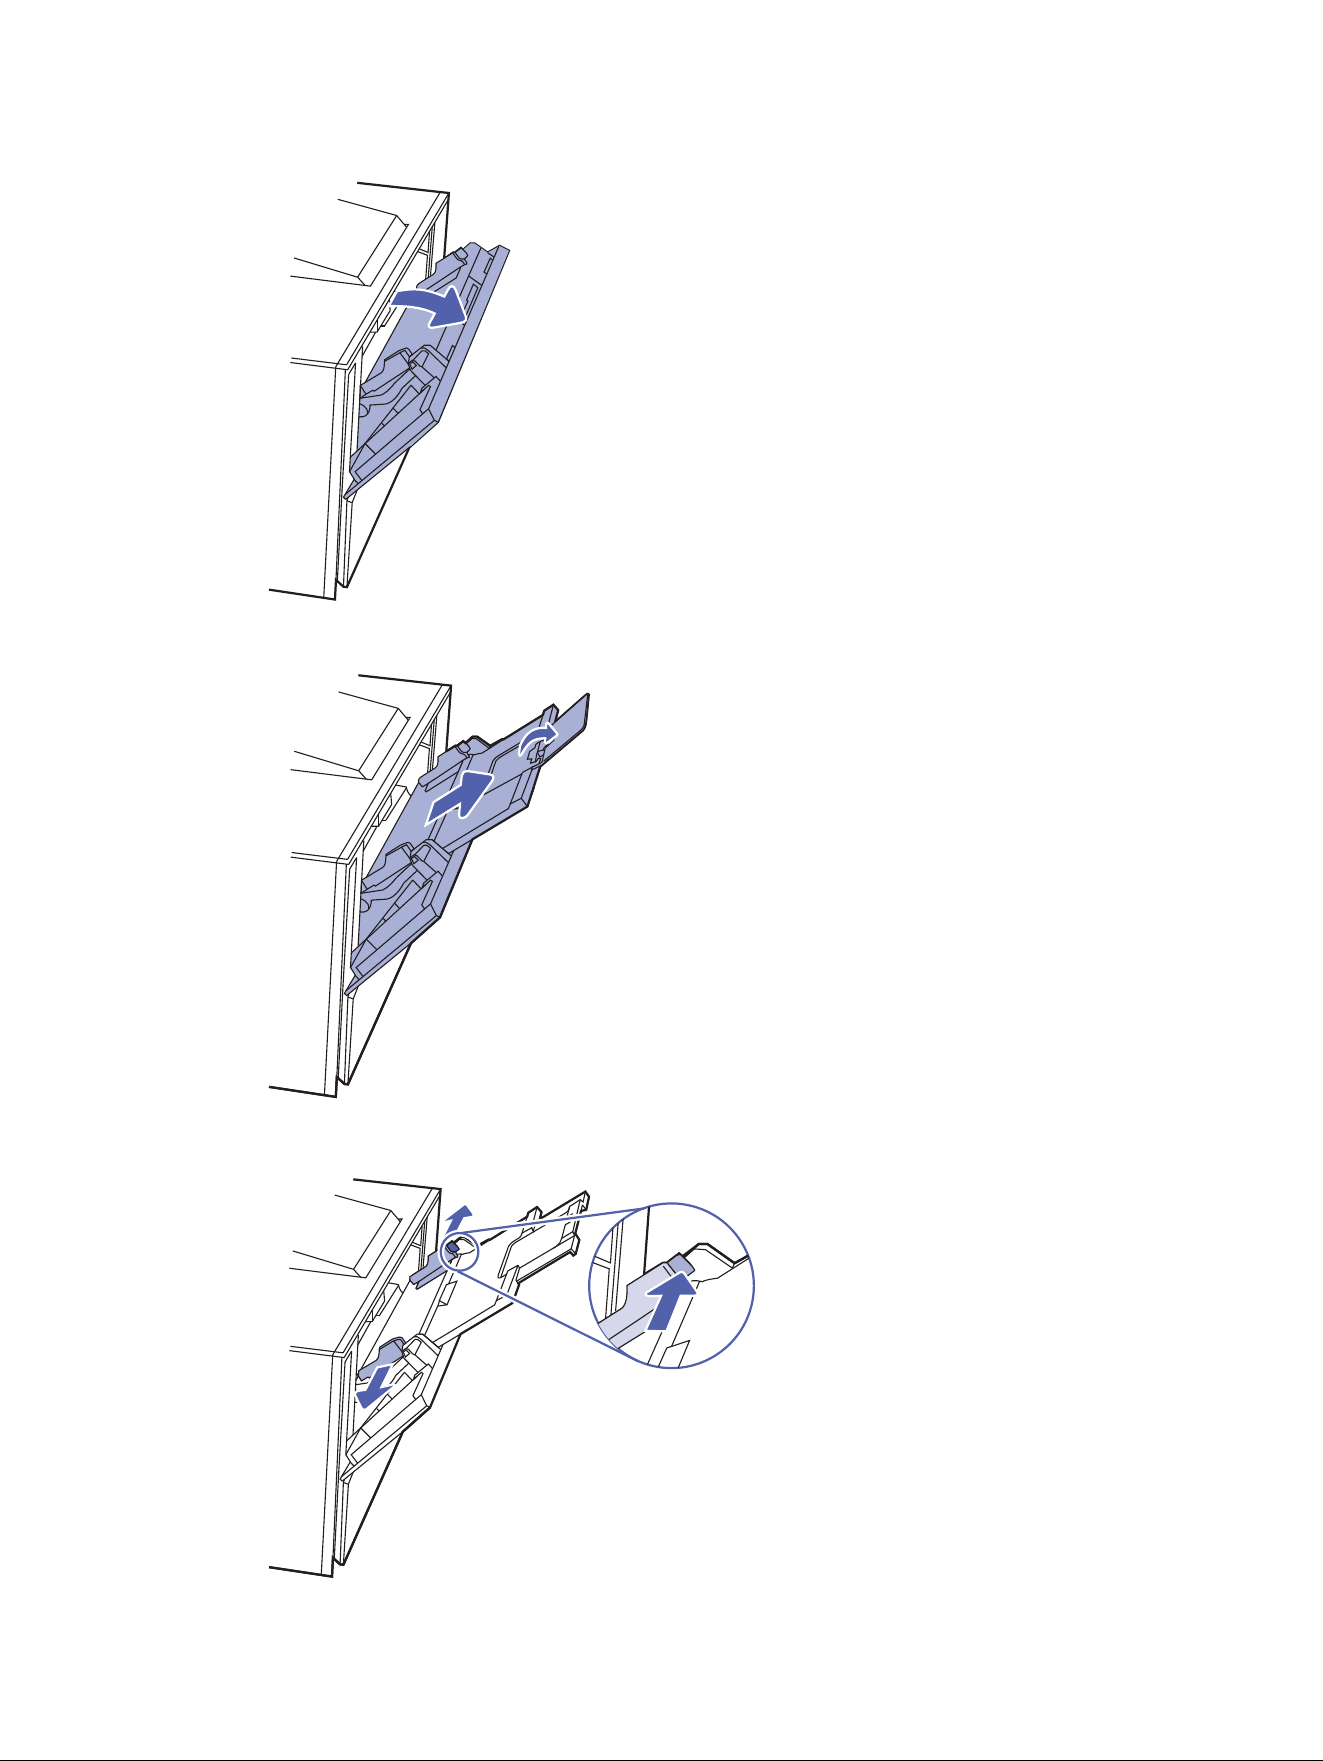
1. Open Tray 1 by grasping the sides of the tray and pulling down.
2. Slide out the tray extension.
3. Press down on the tab on the right paper guide, and then spread the paper guides to the correct size.
Load Paper to Tray 1 (multipurpose tray)
19
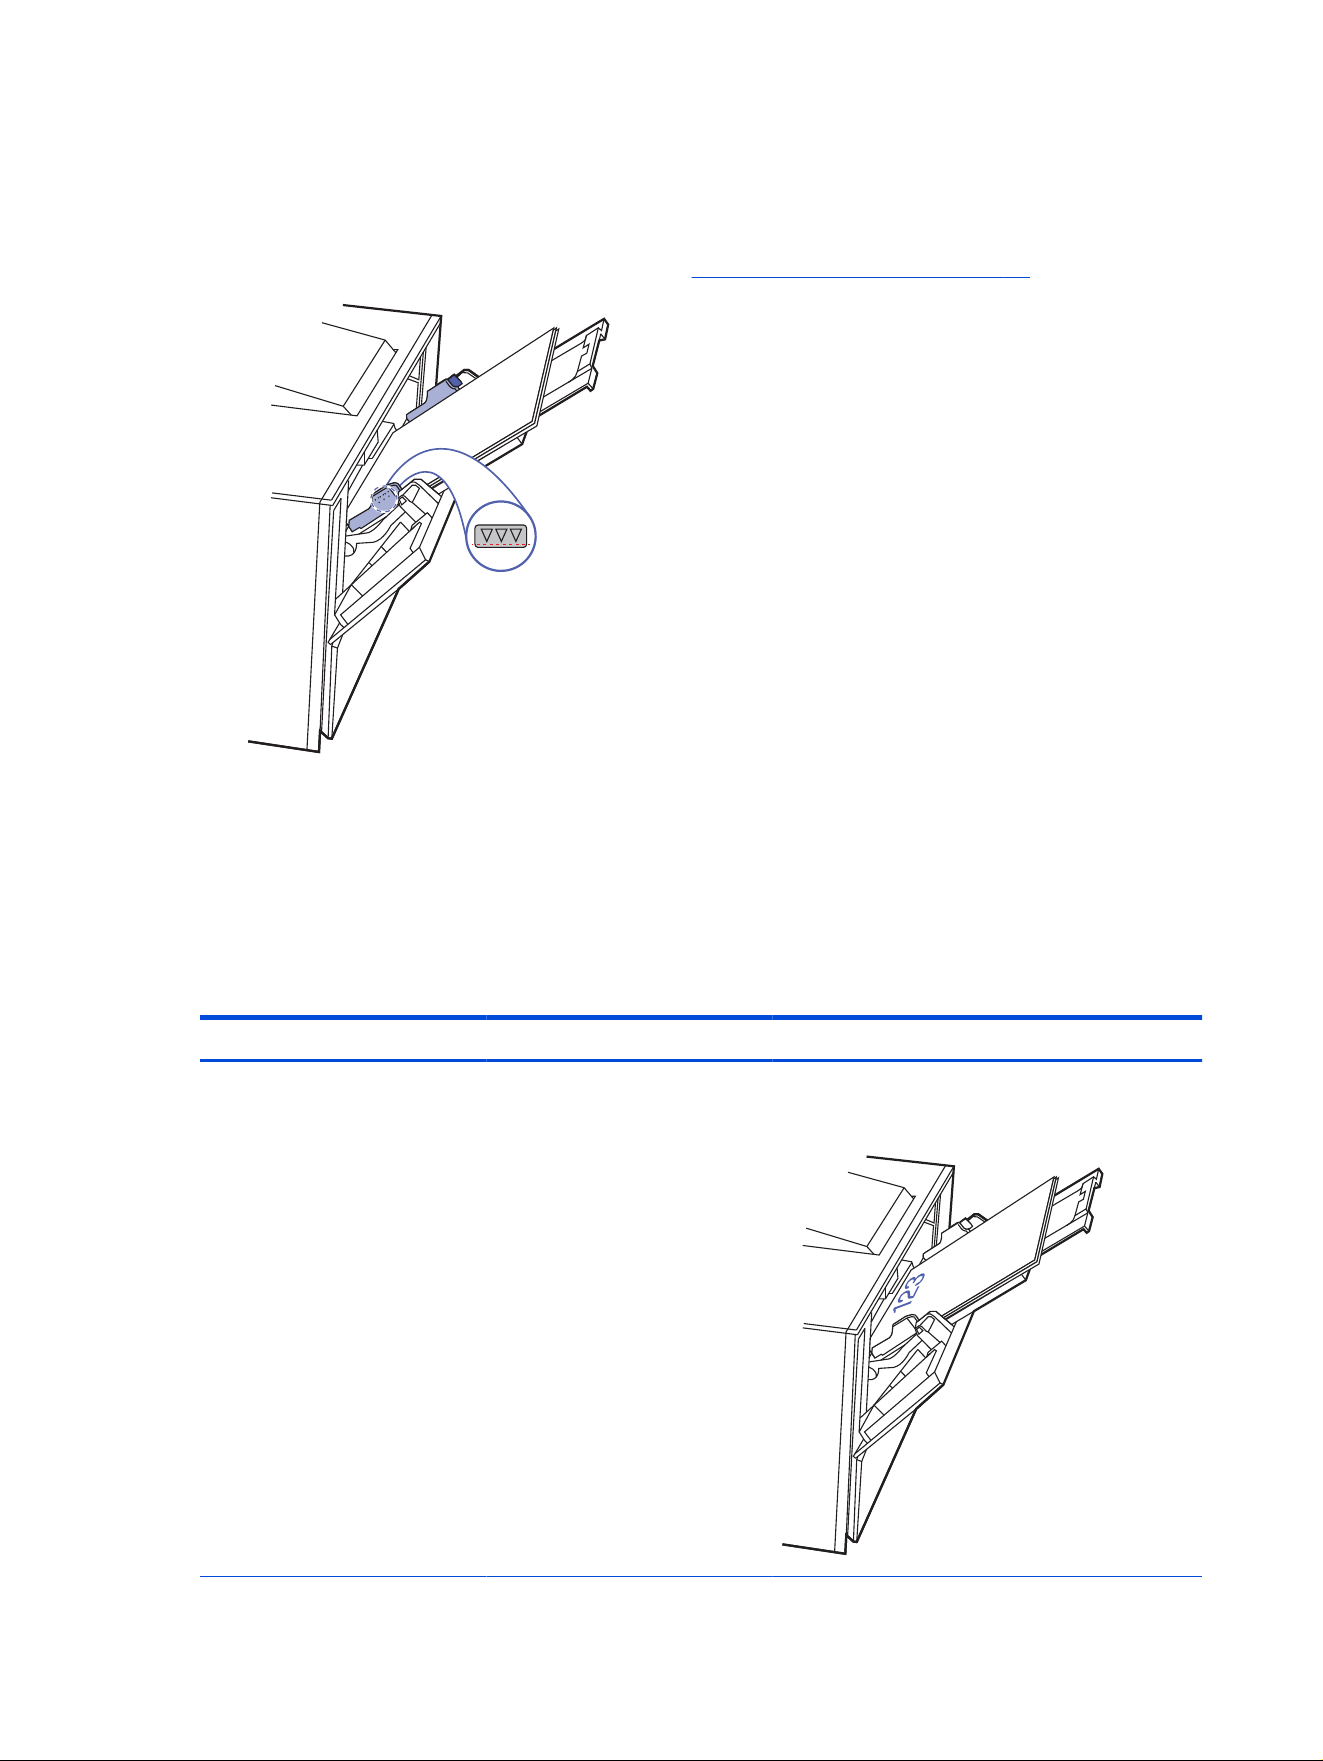
4. Set guides to paper size being loaded.
5. Load plain white paper into the input tray. Make sure that the paper ts under the tabs and below the
maximum height indicators.
For information on how to orient the paper, see Tray 1 paper orientation on page 20.
6. At your computer or mobile device, begin the printing process from the application. Make sure the
driver is set to the correct paper type and size for the paper being printed from the tray.
Tray 1 paper orientation
When using paper that requires a specic orientation, load it according to the information in the following
table.
Table 2-1
Tray 1 paper orientation
Paper type Output How to load paper
Letterhead or pre-printed 1-sided printing Face-up
Top edge leading into the printer
20 Chapter 2 Paper trays
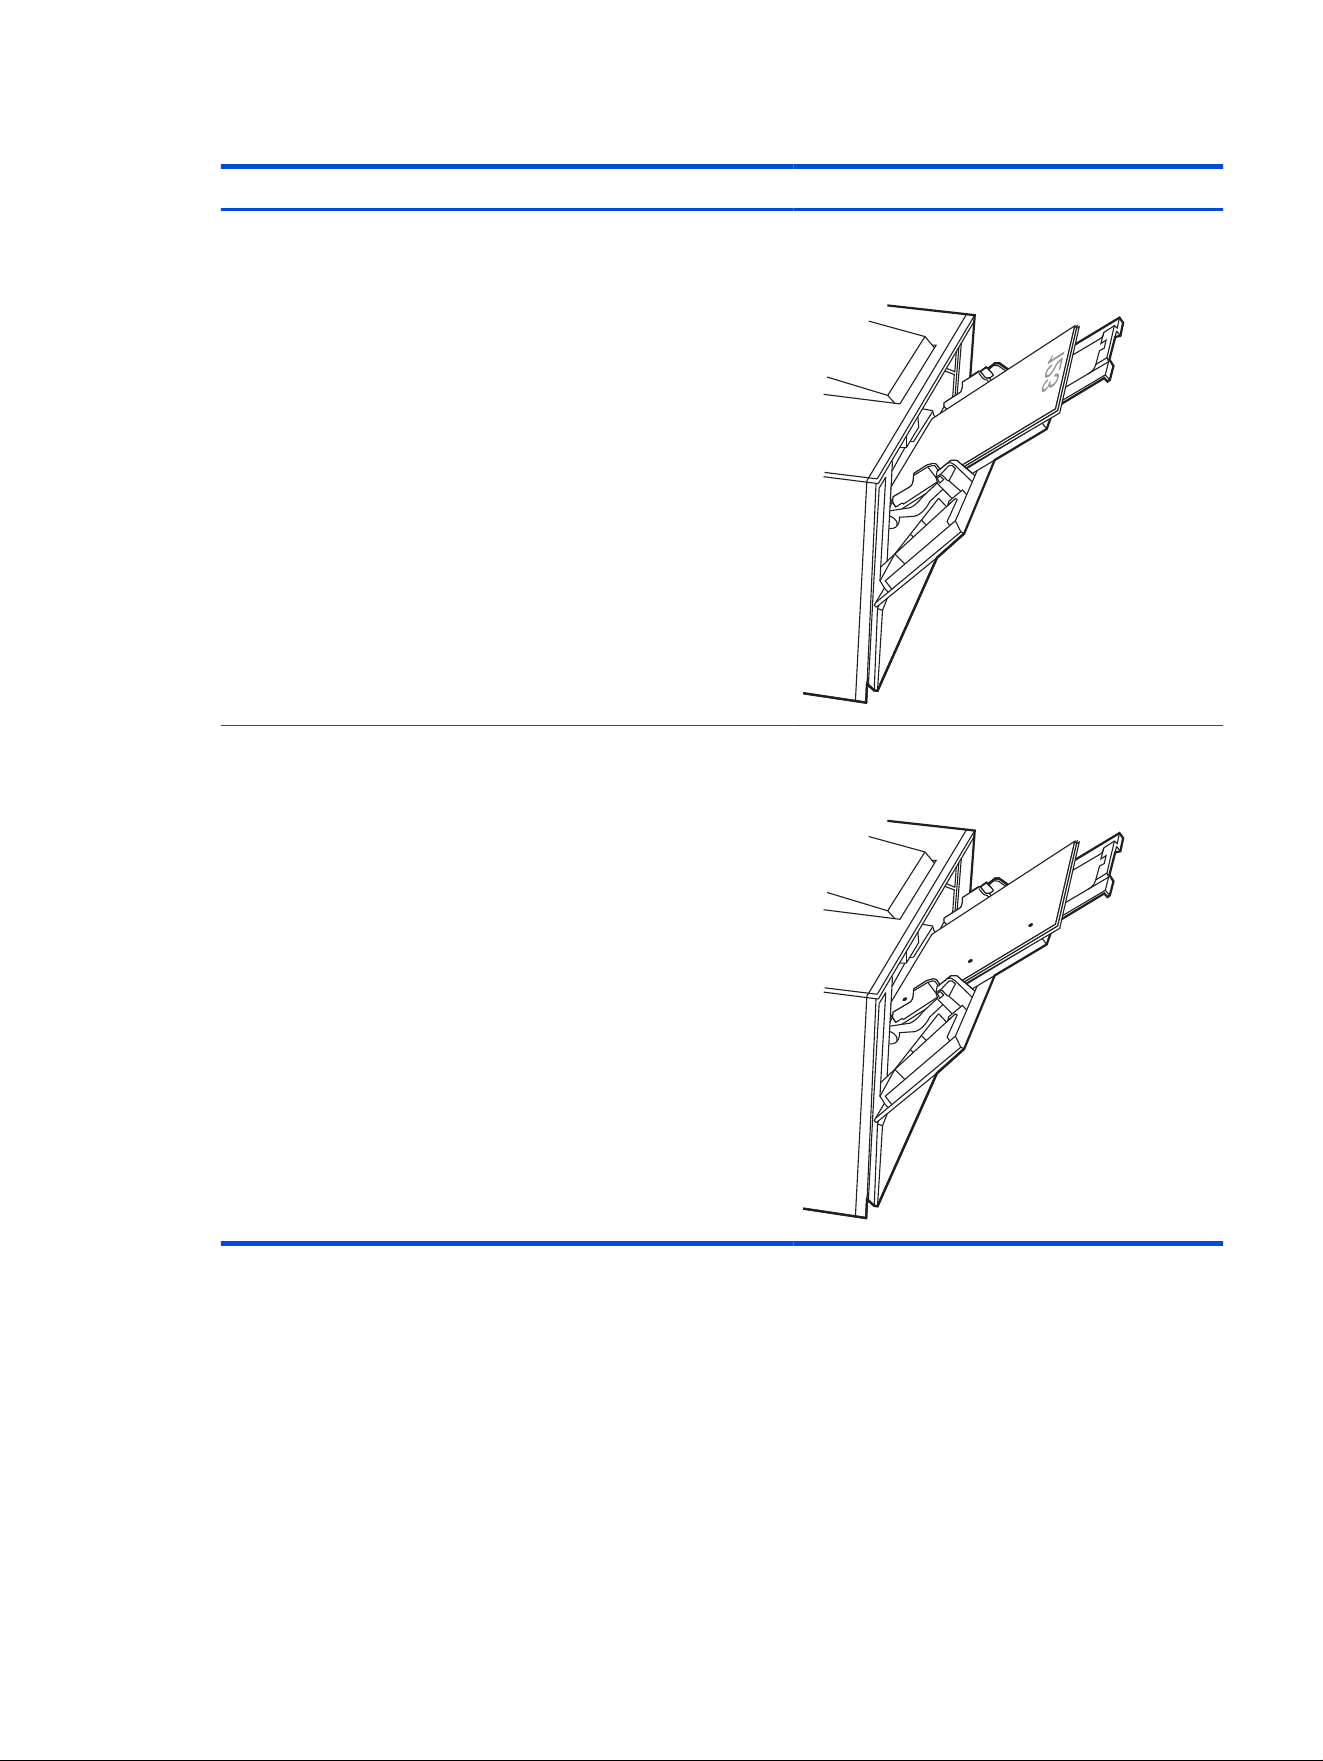
Table 2-1 Tray 1 paper orientation (continued)
Paper type Output How to load paper
Letterhead or pre-printed Two-sided printing Face-down
Top edge away from the printer
Prepunched 1-sided or two-sided printing Face-up
Holes toward the left side of the printer
Load paper to Tray 2
Review the following information about loading paper to Tray 2.
Load paper to Tray 2
Follow these steps to load the paper in Tray 2.
This tray holds up to 250 sheets of 75 grams per square meter (20 lb) paper.
Load paper to Tray 2
21
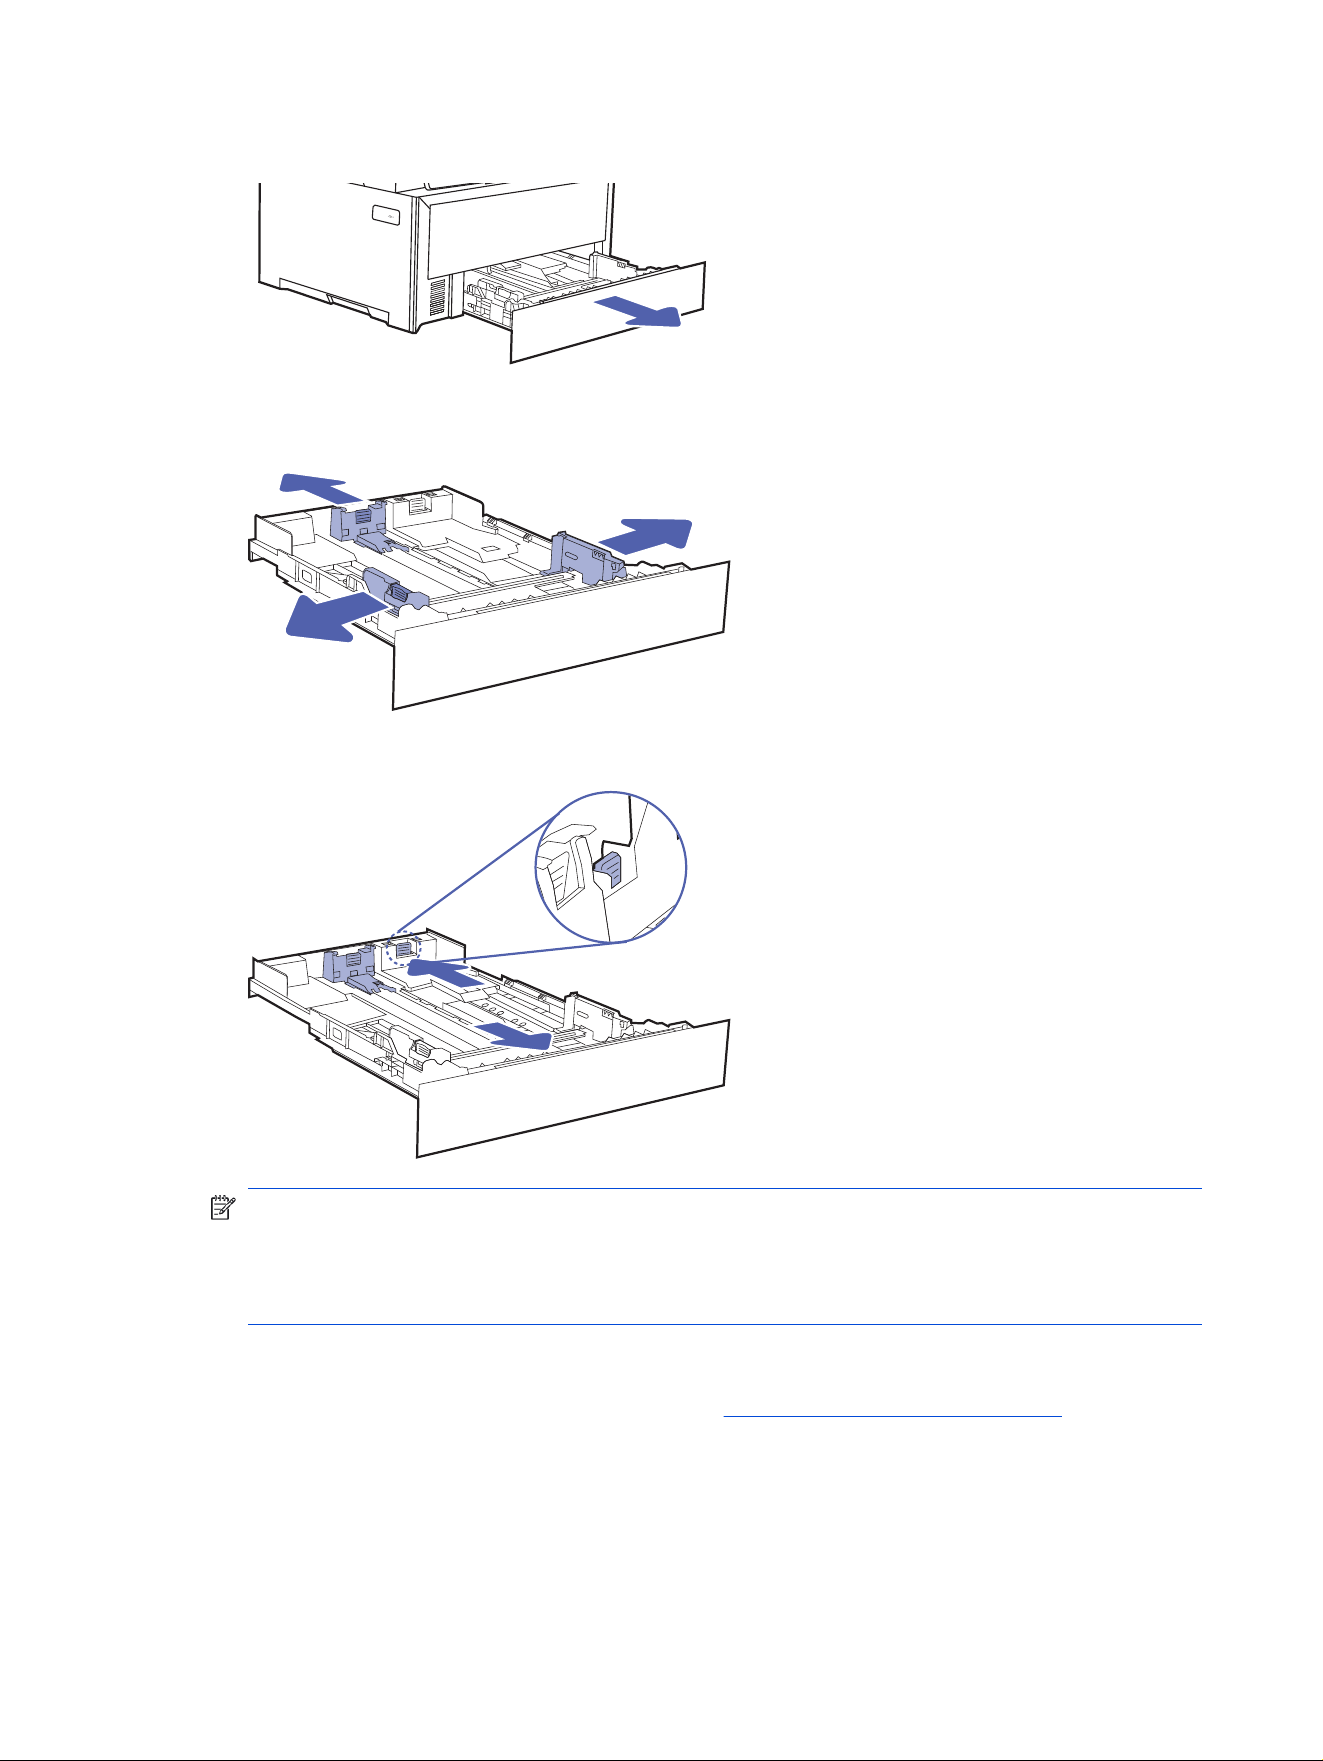
1. Open Tray 2.
2. Adjust the Paper-width guides by squeezing the adjustment latches on the guides. Slide the guides to
the size of the paper being used.
3. To load legal-size paper, extend the tray by squeezing the rear latch and pulling the front of the tray.
NOTE: When loaded with A4 or letter-size paper, Tray 2 extends from the rear of the printer
approximately 54 mm (2.12 in).
When loaded with legal-size paper, Tray 2 extends from the rear of the printer approximately 110
mm (4.31 in).
4. Make sure that the paper guides are set to the correct size paper, then load the paper into the tray.
For information about how to orient the paper, see Tray 2 paper orientation on page 23.
22
Chapter 2 Paper trays
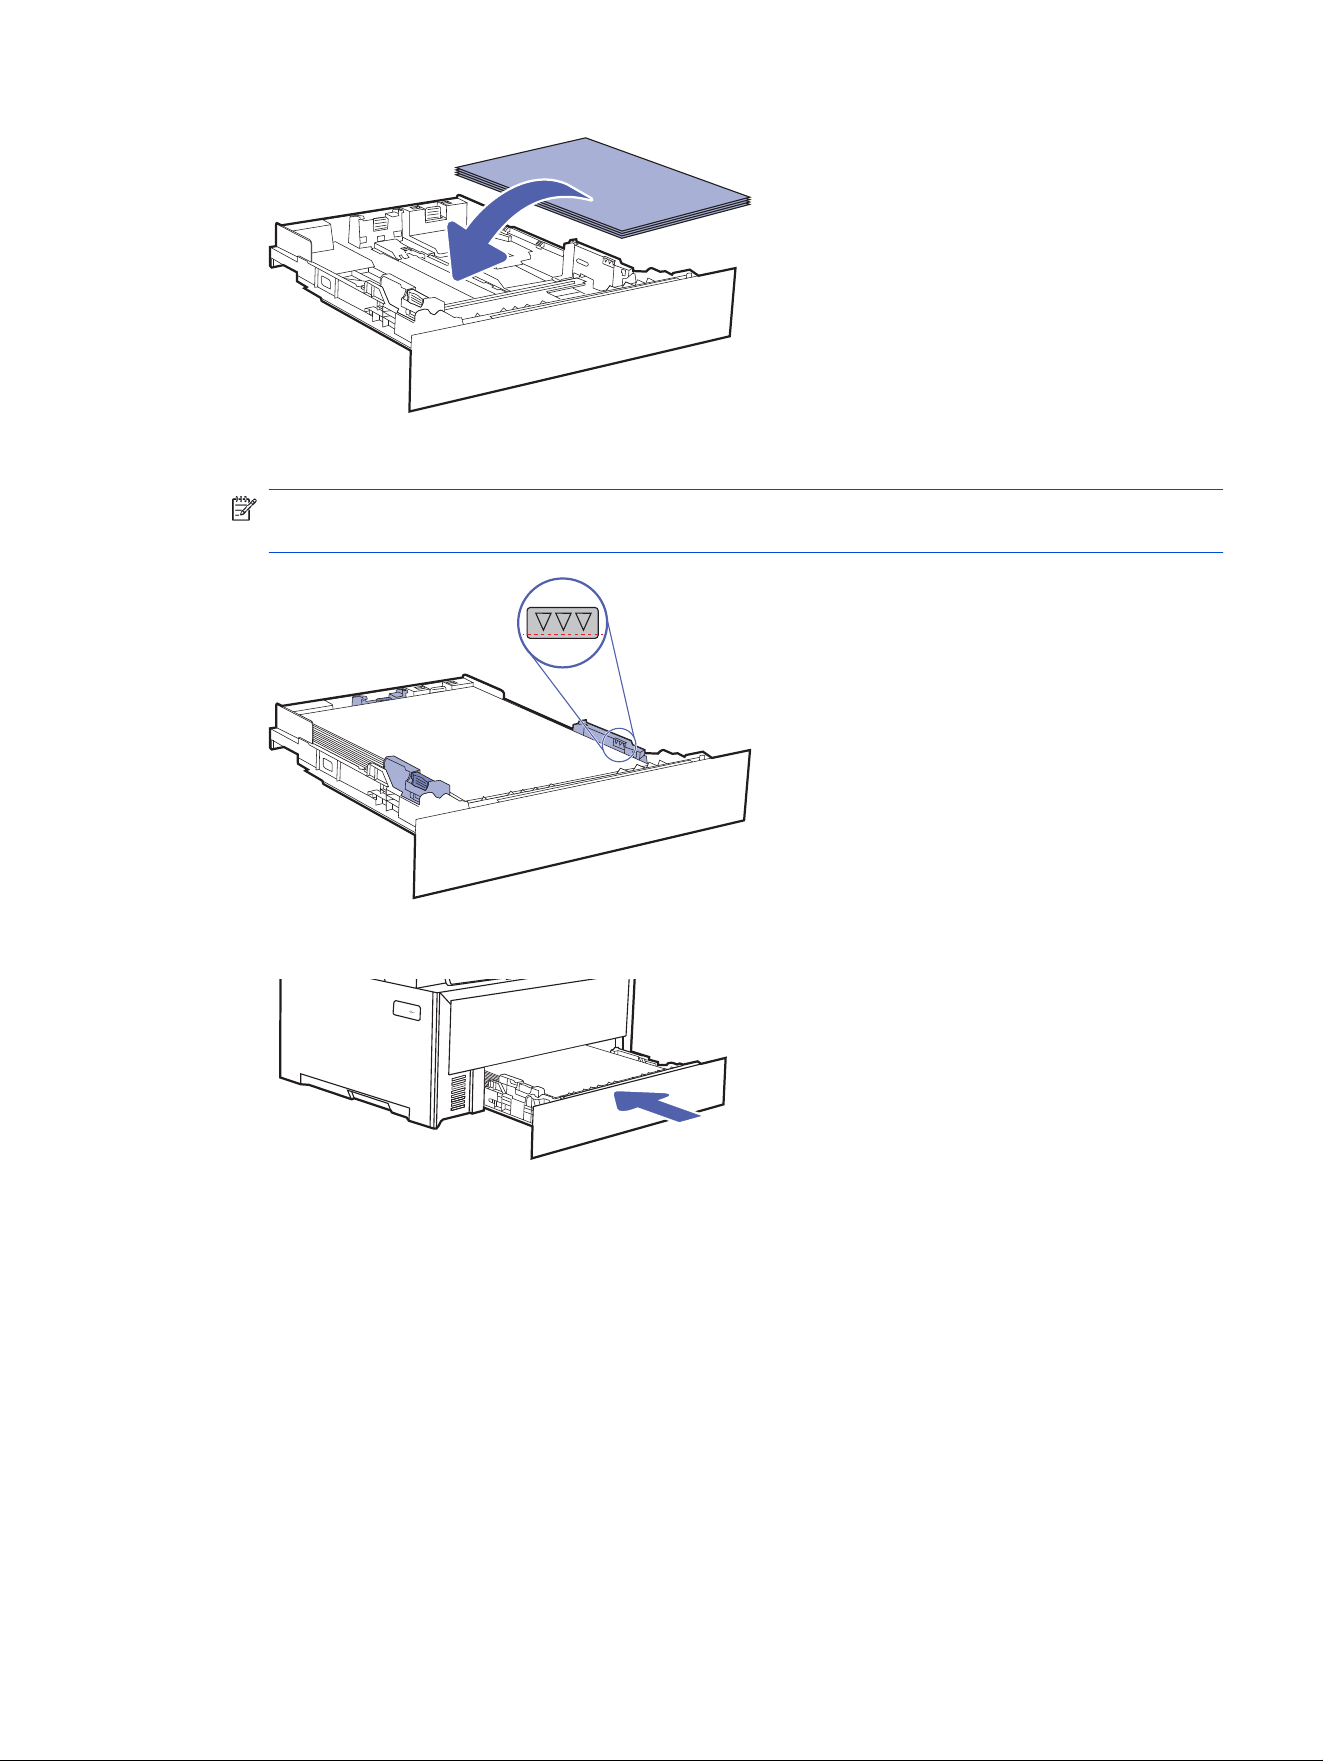
5. Make sure that the paper stack is at at all four corners and below the paper ll line.
NOTE: To prevent jams, do not overll the tray. Be sure that the top of the stack is below the tray full
indicator.
6. After making sure that the paper stack is below the tray full indicator, close the tray.
7. At your computer or mobile device, begin the printing process from the application. Make sure the
driver is set to the correct paper type and size for the paper being printed from the tray.
Tray 2 paper orientation
When using a paper that requires a specic orientation, load it according to the information in the following
table.
Tray 2 paper orientation
23
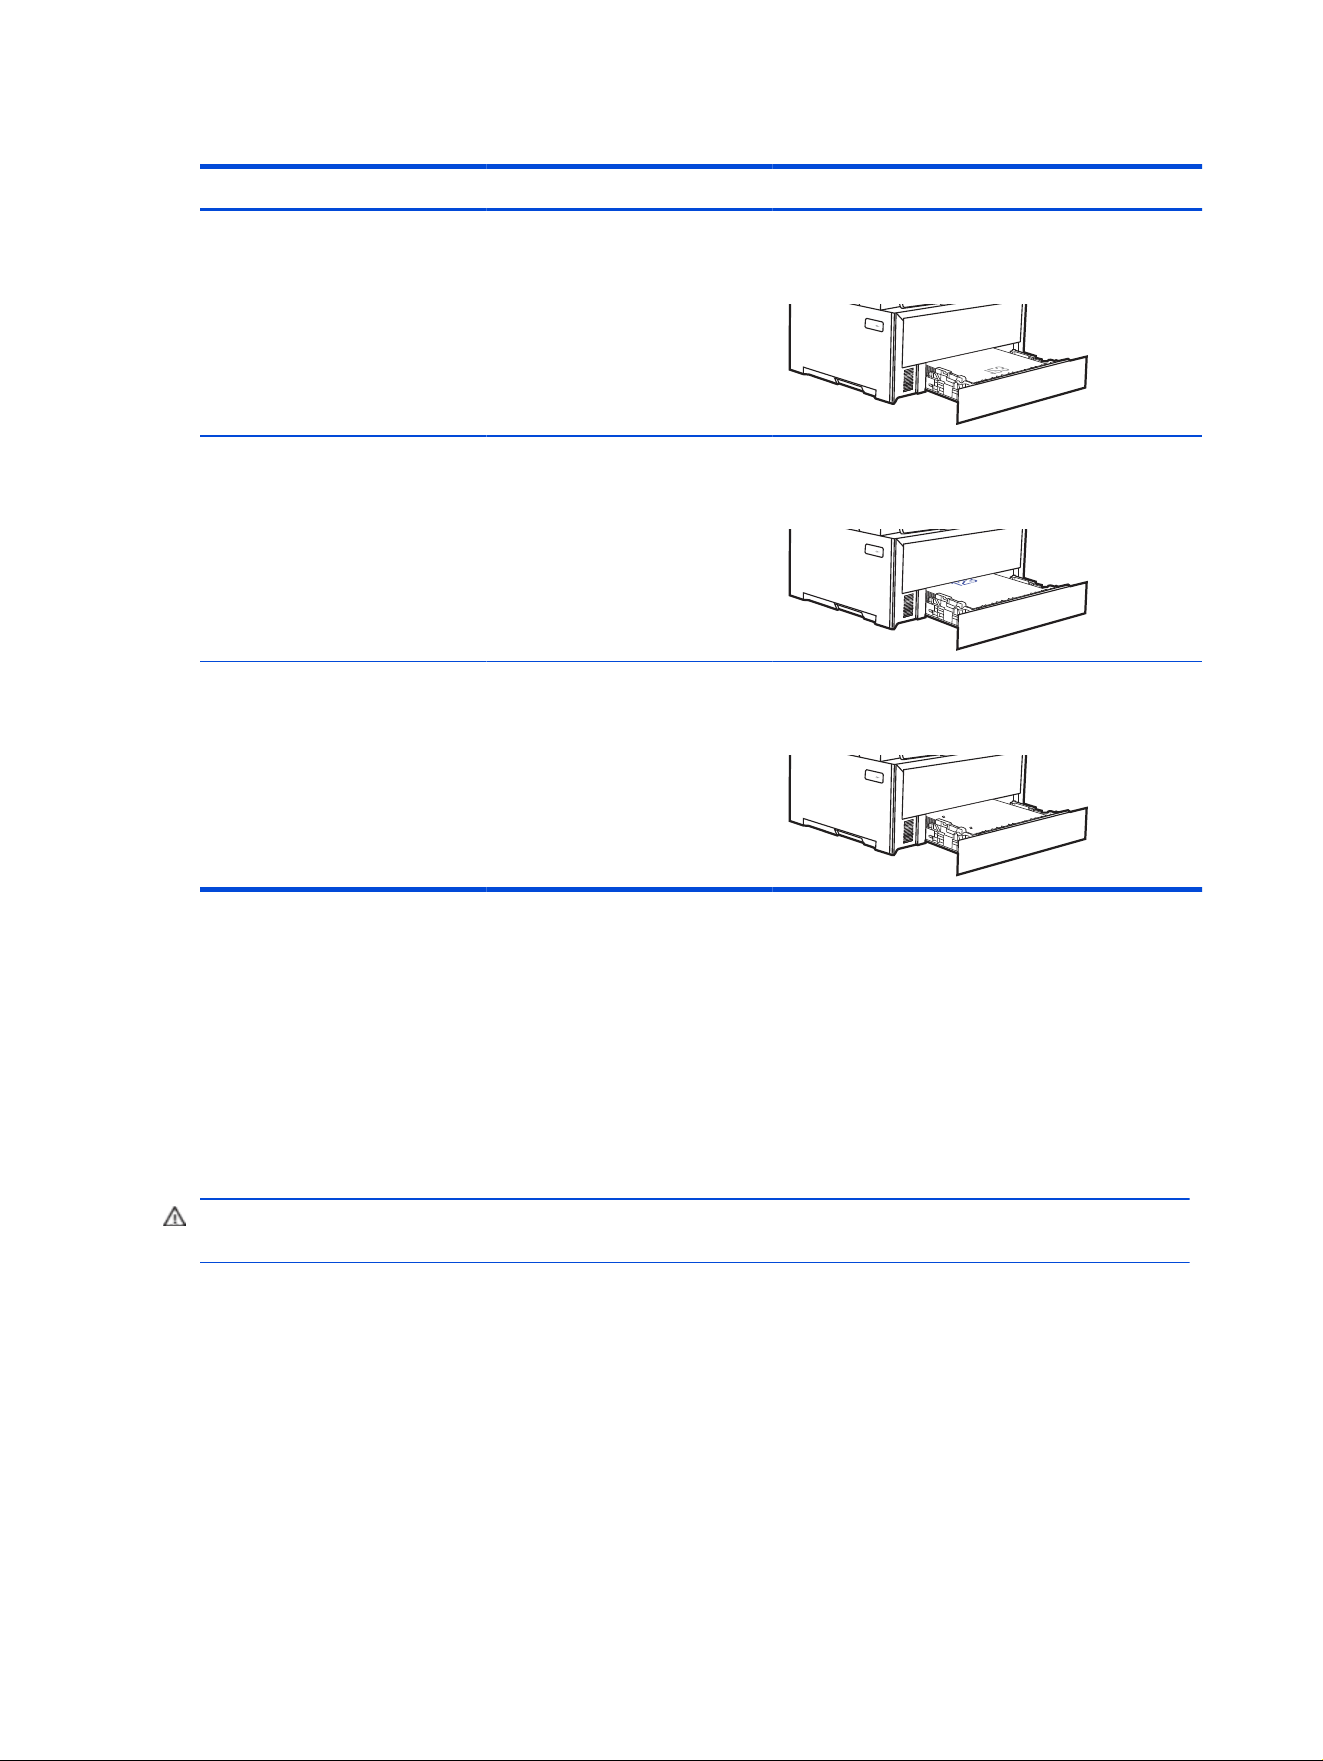
Table 2-2 Tray 2 paper orientation
Paper type Output How to load paper
Letterhead or pre-printed 1-sided printing Face-down
Top edge away from the printer.
Letterhead or pre-printed 2-sided printing Face-up
Top edge toward the printer
Pre-punched 1-sided printing or 2-sided printing Face-up
Holes toward the left side of the printer
Load paper to Tray 3 (optional accessory)
Review the following information about loading paper.
Load paper to Tray 3 (optional accessory)
Follow these steps to load the paper in Tray 3.
This tray holds up to 550 sheets of 75 grams per square meter (20 lb) paper.
CAUTION: Do not print envelopes, labels, or unsupported sizes of paper from Tray 3. Print these types
of paper only from Tray 1 depending on the type and size of media being used.
24
Chapter 2 Paper trays
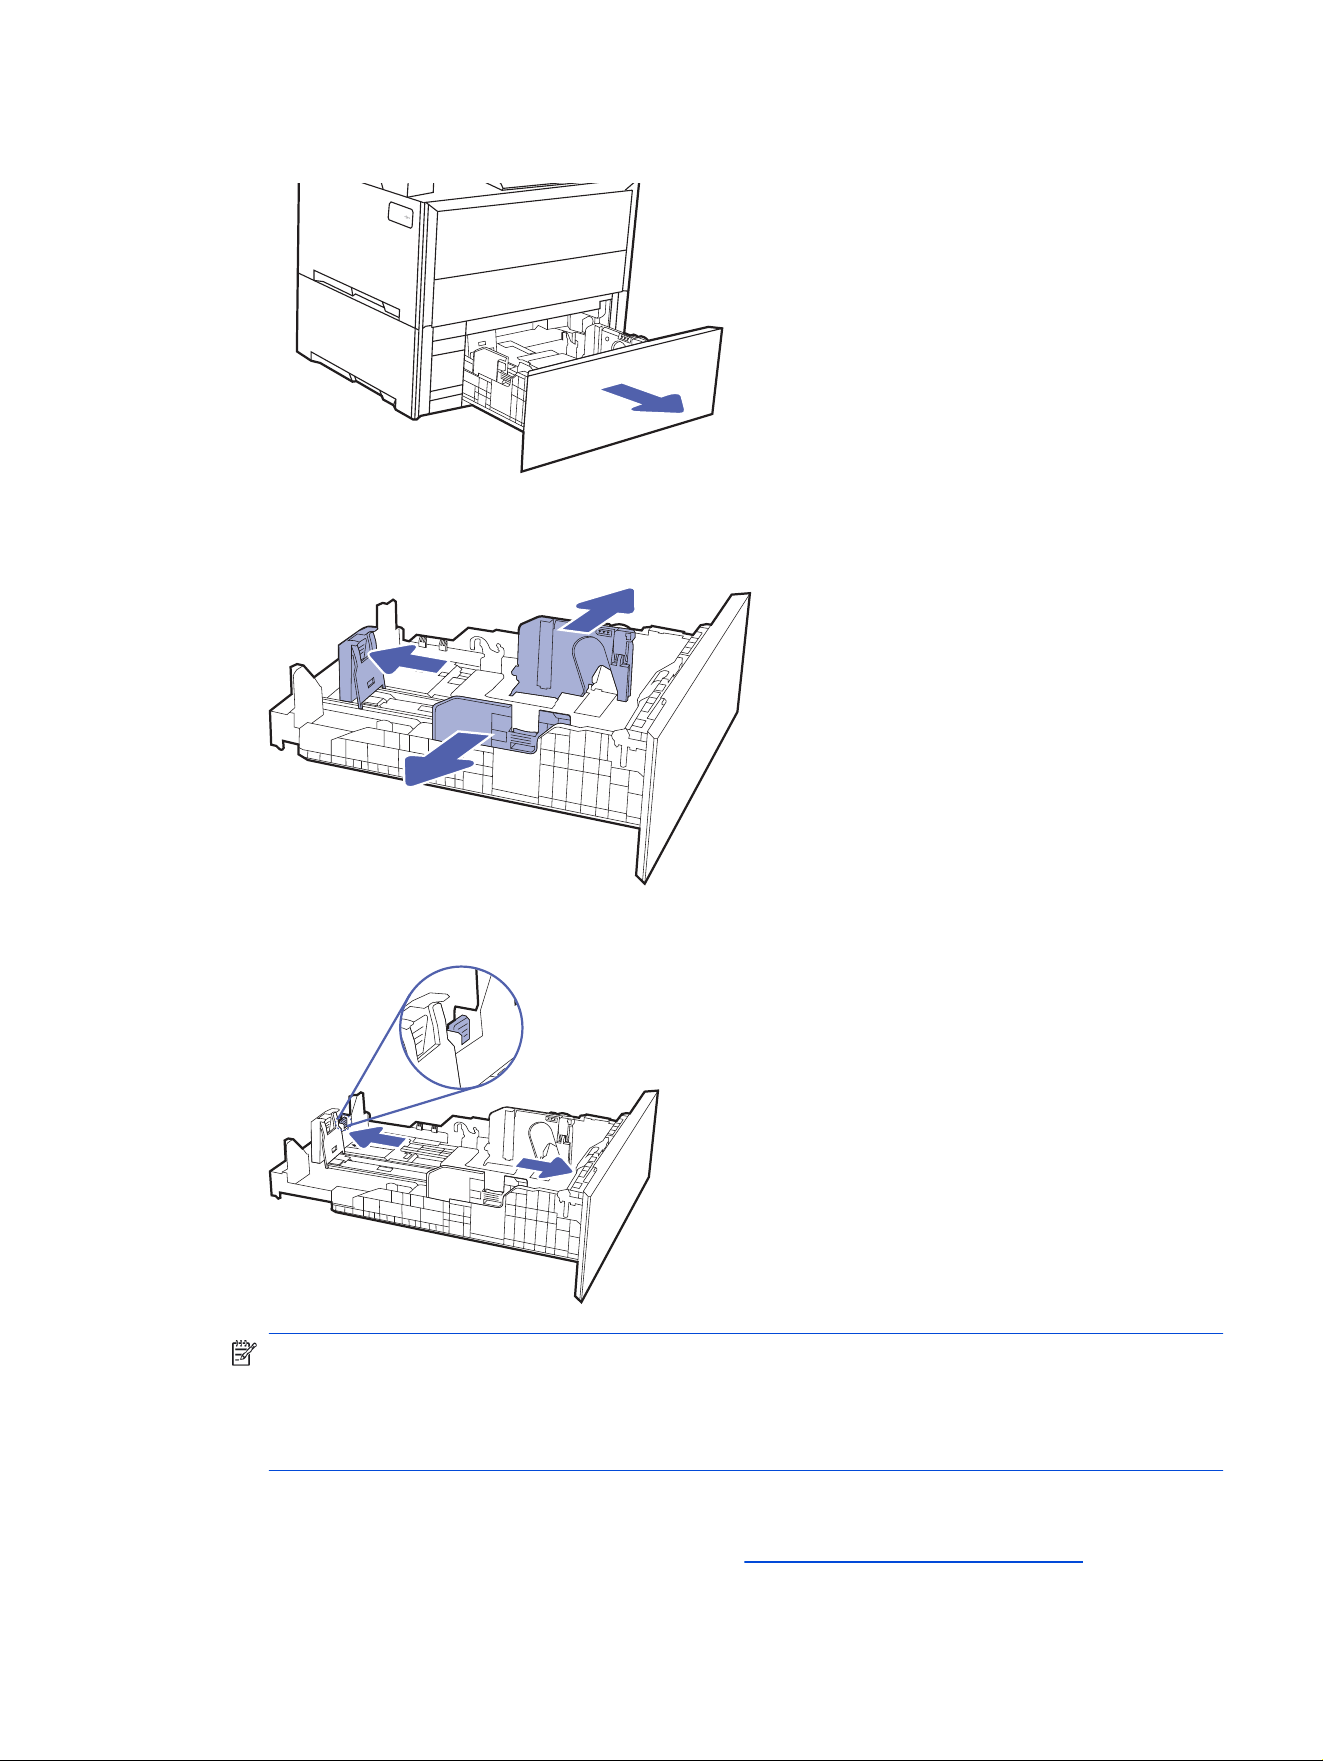
1. Open Tray 3.
2. Adjust the paper-width guides by squeezing the adjustment latches on the guides. Then slide the
guides to the size of the paper being used.
3. To load legal-size paper, extend the tray by squeezing the rear latch and pulling the front of the tray.
NOTE: When loaded with A4 or letter-size paper, Tray 2 extends from the rear of the printer
approximately 54 mm (2.12 in).
When loaded with legal-size paper, Tray 2 extends from the rear of the printer approximately 110
mm (4.31 in).
4. Load plain white paper into the input tray.
For information about how to orient the paper, see Tray 3 paper orientation on page 26.
Load paper to Tray 3 (optional accessory)
25
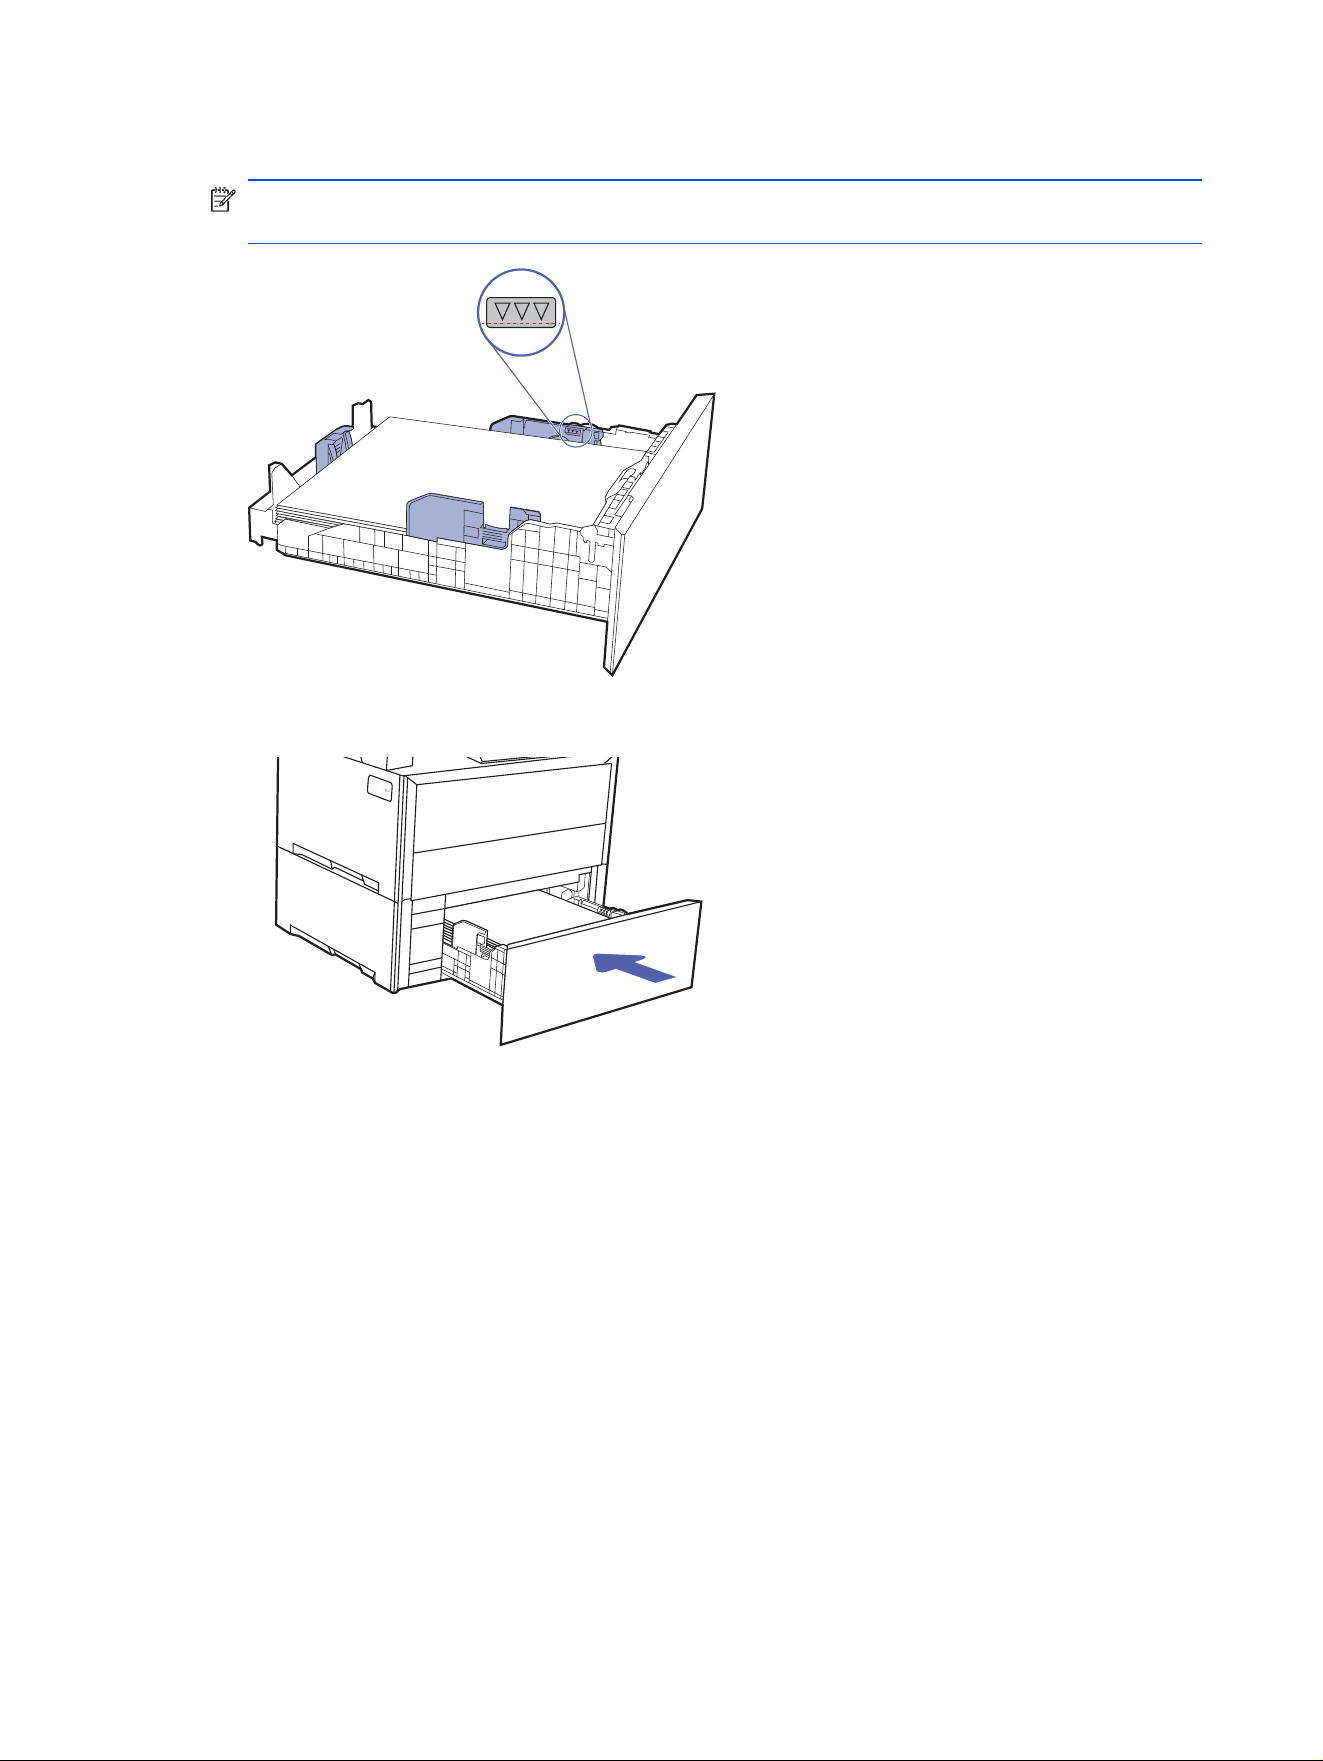
5. Make sure that the paper stack is at at all four corners and below the paper ll line.
NOTE: To prevent jams, do not overll the tray. Be sure that the top of the stack is below the tray full
indicator.
6. After making sure that the paper stack is below the tray full indicator, close the tray.
7. At your computer or mobile device, begin the printing process from the application. Make sure the
driver is set to the correct paper type and size for the paper being printed from the tray.
Tray 3 paper orientation
When using paper that requires a specic orientation, load it according to the information in the following
table.
26
Chapter 2 Paper trays
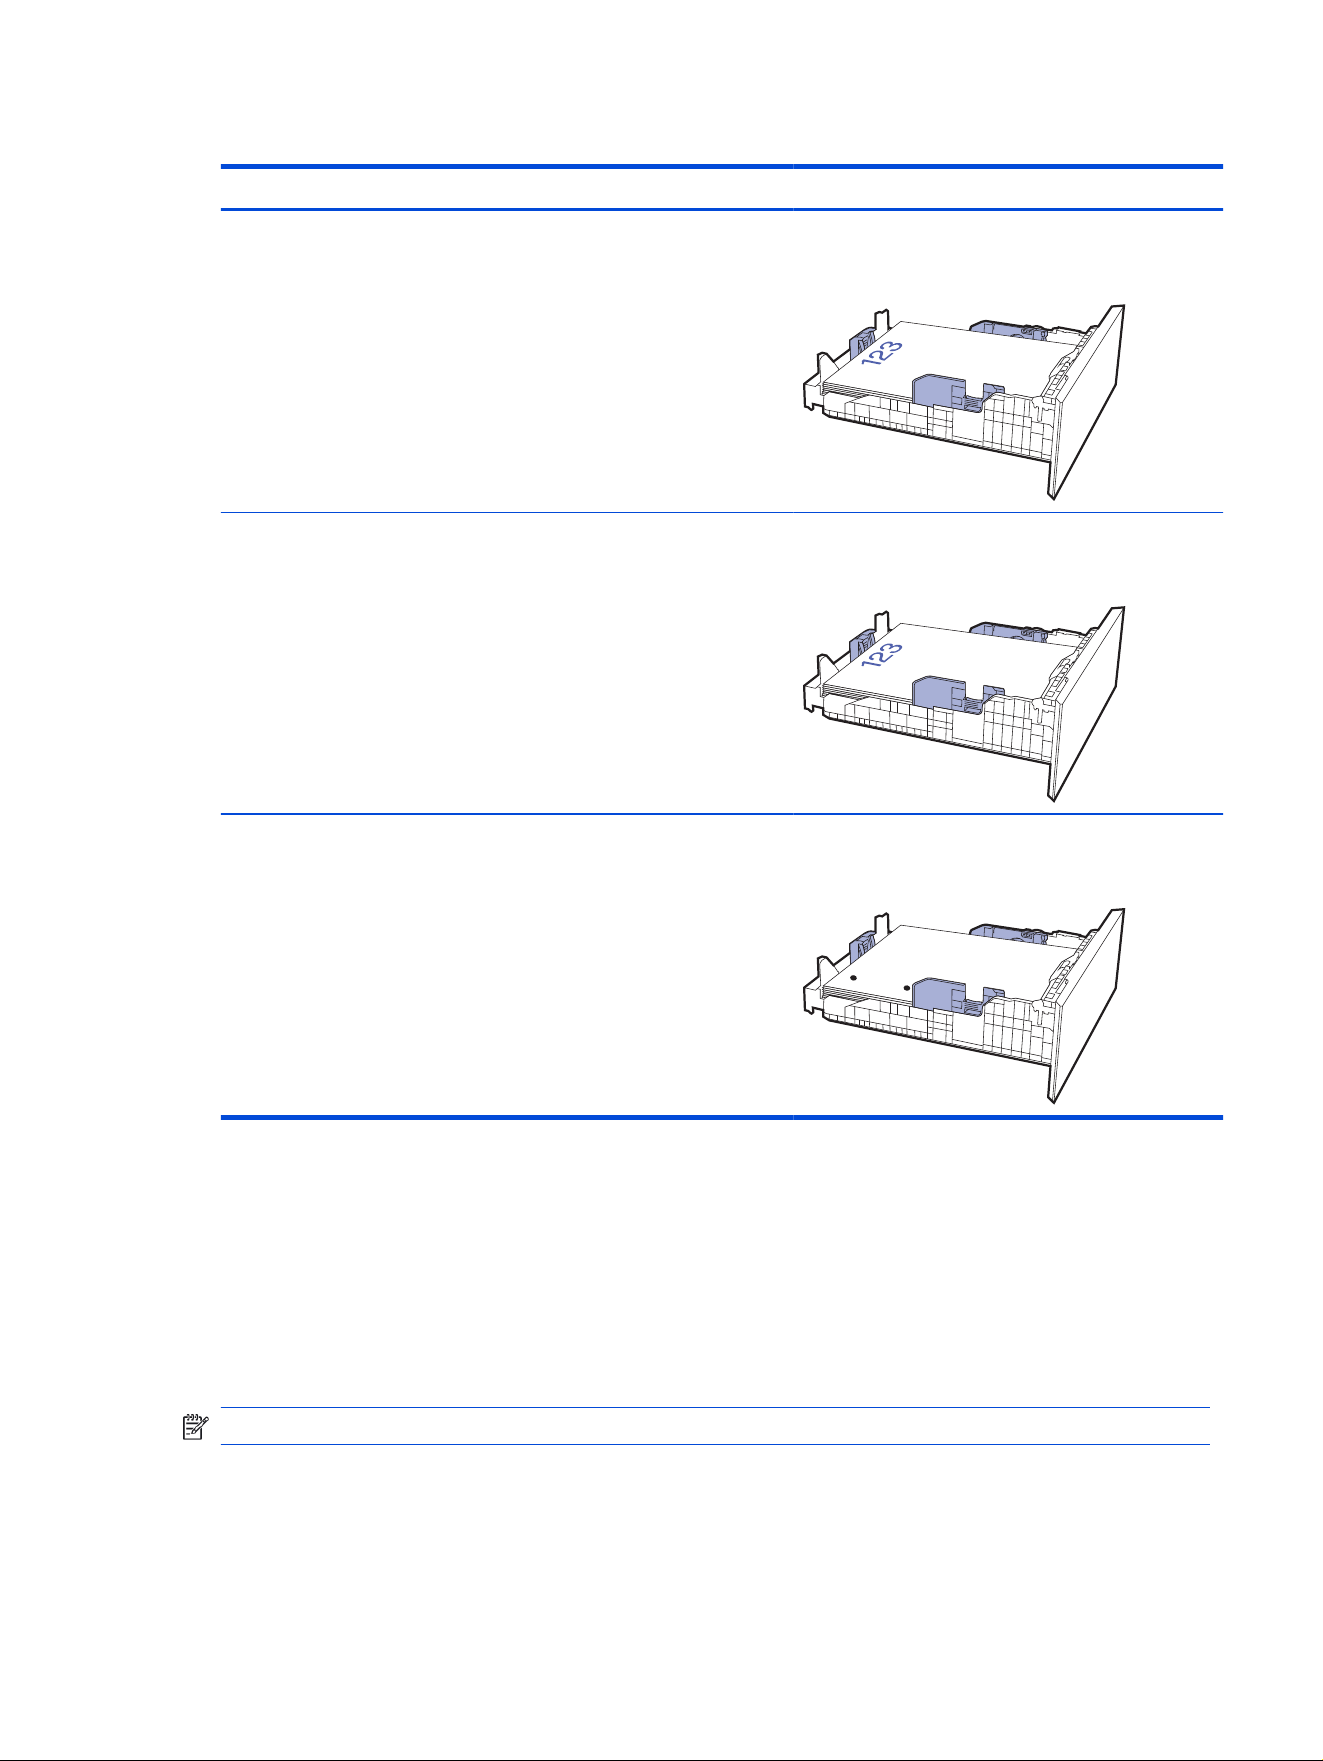
Table 2-3 Tray 3 paper orientation
Paper type Output How to load paper
Letterhead or pre-printed 1-sided printing Face-down
Top edge away from the printer
Letterhead or pre-printed Two-sided printing Face-up
Top edge toward the printer.
Pre-punched one-sided printing or two-sided
printing
Face-up
Holes on left side of the printer
Load and print envelopes
Review the following information about loading and printing envelopes.
Print envelopes
To print envelopes using Tray 1, follow the steps to select the correct settings in the print driver. Tray 1
holds up to 10 envelopes.
NOTE: Envelopes cannot be printed from tray 2 or from the optional tray 3.
1. From the software program, select the Print option.
Load and print envelopes
27
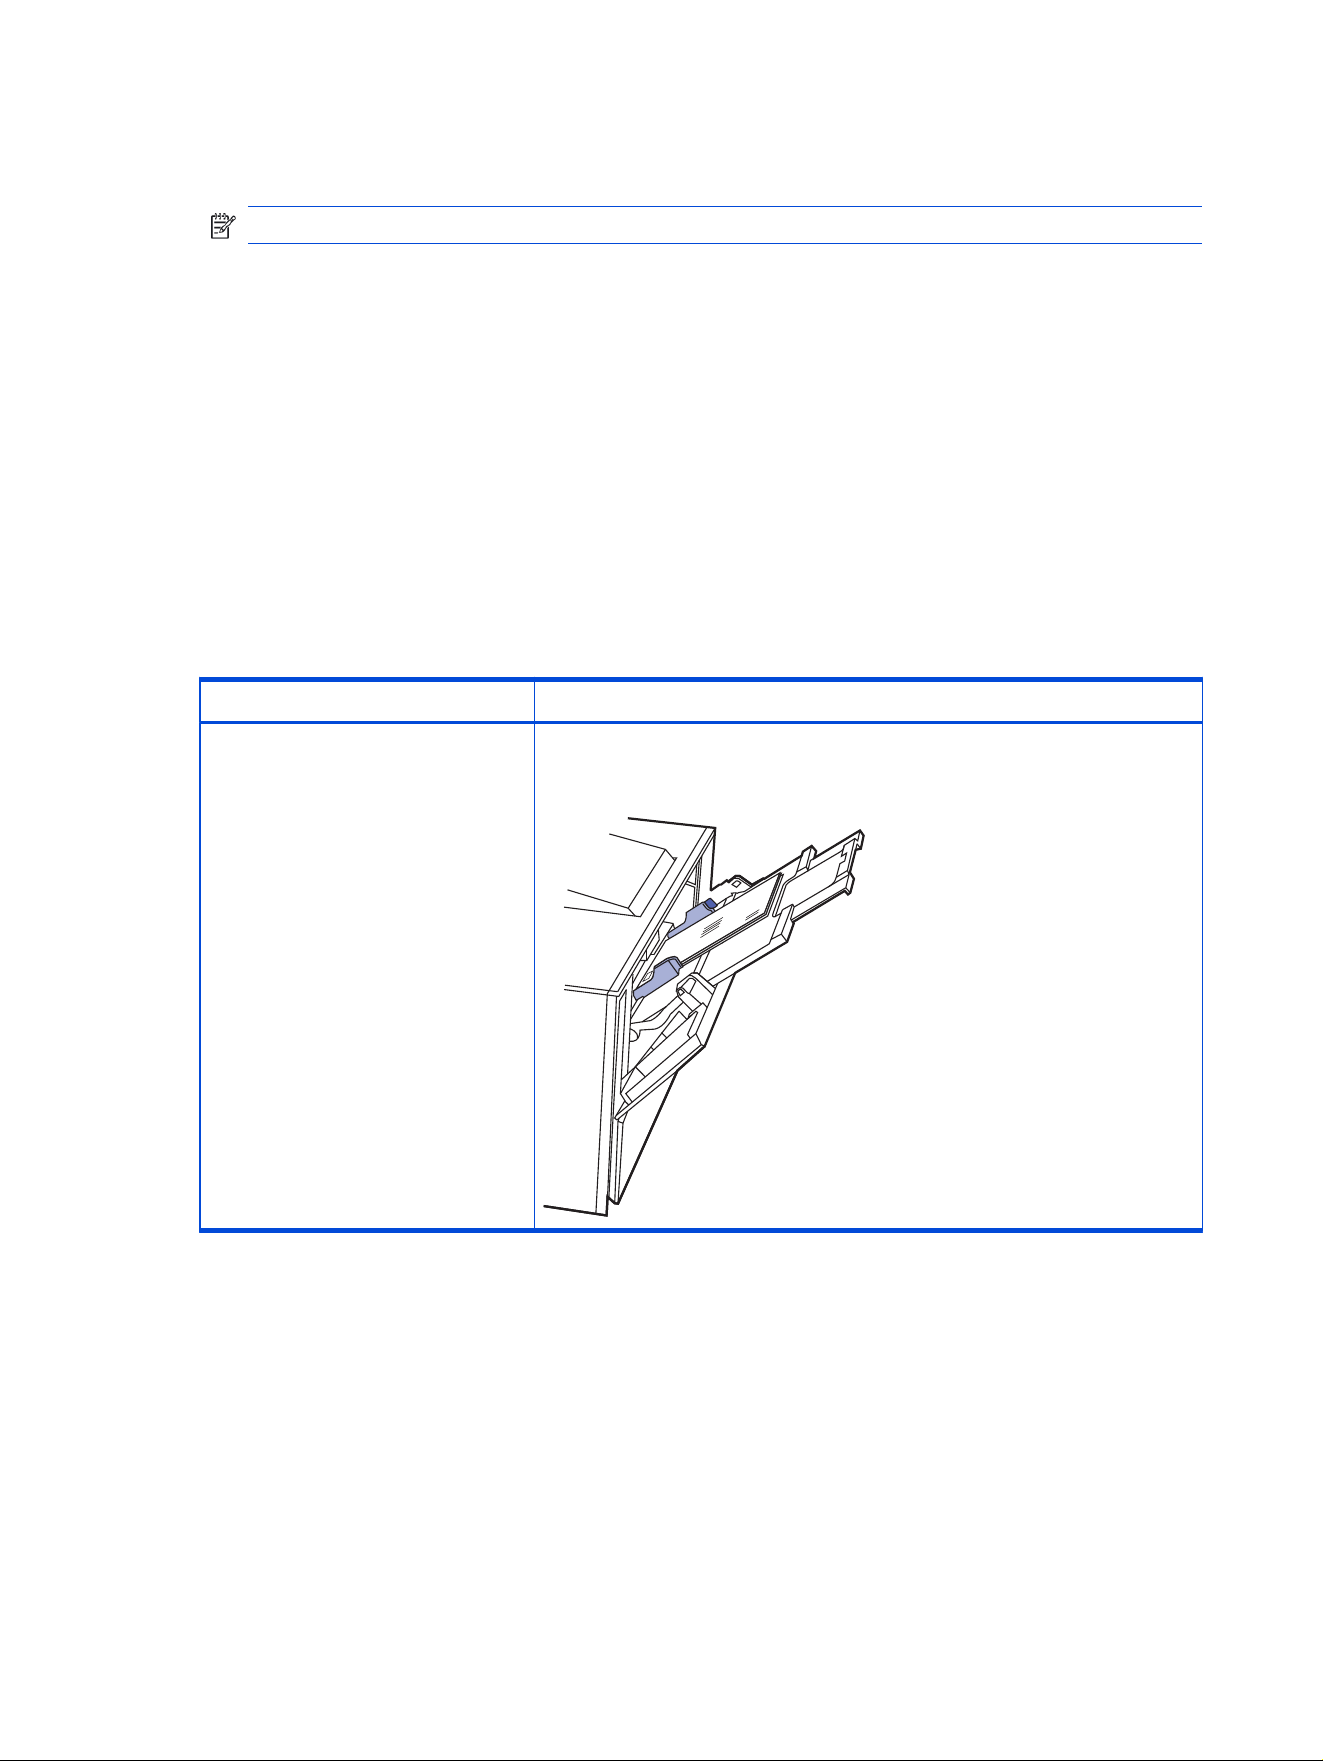
2. Select the printer from the list of printers, and then click or tap the Properties or Preferences button
to open the print driver.
NOTE: The name of the button varies for different software programs.
3. Click or tap the Document tab.
4. In the Paper size drop-down list, select the correct size for the envelopes.
5. In the Paper type drop-down list, select Envelope.
6. In the Paper source drop-down list, select Manual feed.
7. Click the OK button to close the Document Properties dialog box.
8. In the Print dialog box, click the OK button to print the job.
Envelope orientation
When using envelopes, load them according to the information in the following table.
Table 2-4 Envelope orientation
Tray How to load
Tray 1 Face-up
Short, postage-end leading into the printer
Load and print labels
To print on sheets of labels, use only Tray 1 (multipurpose tray), Tray 2, and optional Tray(s).
Manually feed labels
Use the manual feed mode for Tray 1 (multipurpose tray) to print sheets of labels.
1. From the software program, select the Print option.
28
Chapter 2 Paper trays
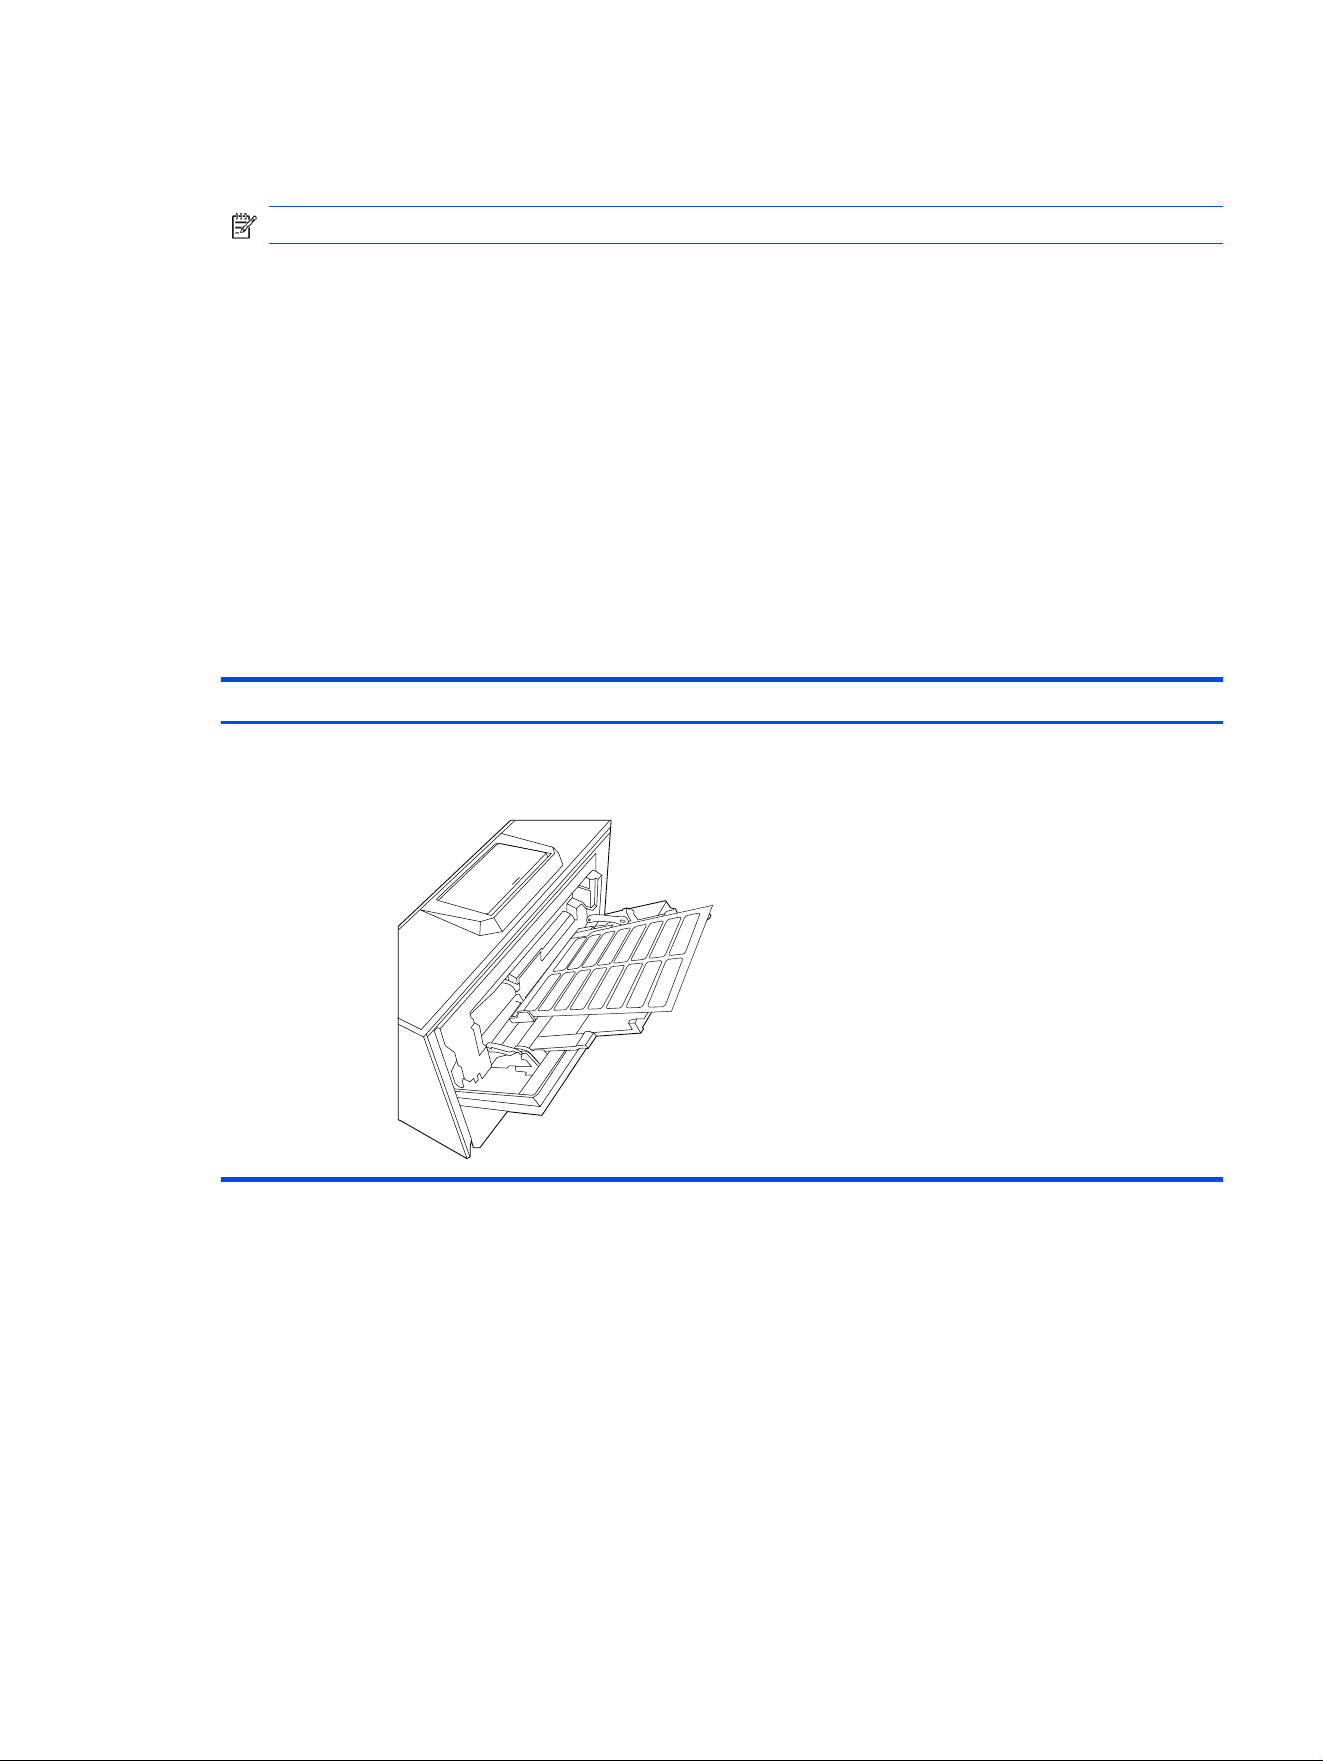
2. Select the printer from the list of printers, and then click the Properties or Preferences button to
open the print driver.
NOTE: The name of the button varies for different software programs.
3. Click the Paper/Quality tab.
4. In the Paper size drop-down list, select the correct size for the sheets of labels.
5. In the Paper type drop-down list, select Labels.
6. In the Paper source drop-down list, select Manual feed.
7. Click the OK button to close the Document Properties dialog box.
8. In the Print dialog box, click the Print button to print the job.
Label orientation
Labels need to be loaded in a specic manner in order to print correctly.
Table 2-5 Label orientation
Tray How to load labels
Tray 1 Face-down
Bottom edge leading into the printer
Label orientation 29

Supplies, accessories, and parts3
Order supplies or accessories, replace the toner cartridges, or remove and replace another part.
The following information is correct at the time of publication. For current information, see hp.com/
support/ljpro4110mfp.
HP's all-inclusive help for the printer includes the following information:
● Install and congure
● Learn and use
● Solve problems
● Download software and rmware updates
● Join support forums
● Find warranty and regulatory information
Dynamic Security Enabled Printers
This printer is intended to work only with cartridges that have a new or reused HP chip. A reused HP chip
enables the use of reused, remanufactured, and relled cartridges.
The printer uses dynamic security measures to block cartridges using a non-HP chip. Periodic rmware
updates delivered over the internet will maintain the effectiveness of the dynamic security measures and
block cartridges that previously worked.
Updates can improve, enhance, or extend the printer’s functionality and features, protect against security
threats, and serve other purposes, but these updates can also block cartridges using a non-HP chip from
working in the printer, including cartridges that work today. Unless you are enrolled in certain HP programs
such as Instant Ink or use other services that require automatic online rmware updates, most HP printers
can be congured to receive updates either automatically or with a notication that allows you to choose
whether to update or not. For more information on dynamic security and how to congure online rmware
updates, please go to www.hp.com/learn/ds.
Order supplies, accessories, and parts
Find out how to obtain replacement supplies, accessories, and parts for the printer.
Ordering
Order parts, supplies, or accessories through one of the following channels.
Table 3-1
Ordering options
Ordering option Ordering information
Order supplies and paper www.hp.com
Order genuine HP parts or accessories www.hp.com/buy/parts
30 Chapter 3 Supplies, accessories, and parts

Table 3-1 Ordering options (continued)
Ordering option Ordering information
Order through service or support providers Contact an HP-authorized service or support provider.
Order using the HP Embedded Web Server (EWS) To access, in a supported web browser on your computer, enter
the printer IP address or host name in the address/URL eld.
The EWS contains a link to the HP website, which provides
options for purchasing Original HP supplies.
Supplies and accessories
Find information about the supplies and accessories that are available for your printer.
NOTE: Cartridges are for distribution and use with their designated product only; they will not work with
other printer models.
Toner cartridges
Table 3-2 MFP 4112: North America, Australia, New Zealand, Rest of World
Item Description Part number
HP 161A Black Original LaserJet Toner
Cartridge
Standard-capacity replacement black
toner cartridge
W1610A
HP 161X High Yield Black Original
LaserJet Toner Cartridge
High-capacity replacement black toner
cartridge
W1610X
Table 3-3 MFP 4113: Europe, Middle East, Africa (EMEA)
Item Description Part number
HP 162A Black Original LaserJet Toner
Cartridge
Standard-capacity replacement black
toner cartridge
W1620A
HP 162X High Yield Black Original
LaserJet Toner Cartridge
High-capacity replacement black toner
cartridge
W1620X
Table 3-4 MFP 4114 China/India
Item Description Part number
HP 164A Black Original LaserJet Toner
Cartridge
Standard-capacity replacement black
toner cartridge
W1640A
HP 164X High Yield Black Original
LaserJet Toner Cartridge
High-capacity replacement black toner
cartridge
W1640X
Accessories
Table 3-5
Accessories
Product Number Product Description Part Number
HP LaserJet 550-Sheet Gray Input Tray HP LaserJet 550-Sheet Gray Input Tray A4BU3A
Supplies and accessories 31

Table 3-5 Accessories (continued)
Product Number Product Description Part Number
HP LaserJet 550-Sheet Blue Input Tray HP LaserJet 550-Sheet Blue Input Tray A4BU4A
Customer self-repair parts
Customer Self-Repair (CSR) parts are available for many HP LaserJet printers to reduce repair time.
More information about the CSR program and benets can be found at http://www.hp.com/go/csr-support.
Genuine HP replacement parts can be ordered at http://www.hp.com/buy/parts or by contacting an HP-
authorized service or support provider. When ordering, one of the following will be needed: part number,
serial number (found on back of printer), product number, or printer name.
● Parts listed as Mandatory self-replacement are to be installed by customers, unless you are willing to
pay HP service personnel to perform the repair. For these parts, on-site or return-to-depot support is
not provided under the HP printer warranty.
● Parts listed as Optional self-replacement can be installed by HP service personnel at your request for
no additional charge during the printer warranty period.
Table 3-6 Customer self repair parts
Item Description Self replacement options
Transfer Roller/T2 Transfer roller Mandatory
Pick up rollers Paper pick up rollers Mandatory
Separation pads/rollers Paper separation rollers Mandatory
Feed Rollers Paper feed rollers Mandatory
Congure the HP toner-cartridge-protection supply settings
A network administrator can congure the toner-cartridge-protection settings using the printer control
panel or the HP Embedded Web Server (EWS).
Introduction
Use HP Cartridge Policy and Cartridge Protection to control which cartridges are installed in the printer
and protect the cartridges that are installed from theft.
In HP Web Jetadmin, the settings are located under the Device Management pane in the following menu
chain: Cong > Supplies > Cartridge Policy or Supply Protection.
● Cartridge Policy: This feature protects the printer from counterfeit toner cartridges by allowing only
genuine HP cartridges to be used with the printer. Using genuine HP cartridges ensures the best
possible print quality. When someone installs a cartridge that is not a genuine HP cartridge, the printer
control panel displays a message that the cartridge is unauthorized and it provides information
explaining how to proceed.
32
Chapter 3 Supplies, accessories, and parts

● Cartridge Protection: This feature permanently associates toner cartridges with a specic printer,
or eet of printers, so they cannot be used in other printers. Protecting cartridges protects your
investment. When this feature is enabled, if someone attempts to transfer a protected cartridge
from the original printer into an unauthorized printer, that printer will not print with the protected
cartridge. The printer control panel displays a message that the cartridge is protected, and it provides
information explaining how to proceed.
CAUTION: After enabling supply protection for the printer, all subsequent toner cartridges installed
in the printer are automatically and permanently protected. To avoid protecting a new cartridge,
disable the feature before installing the new cartridge.
Turning the feature off does not turn off protection for cartridges that are currently installed.
Enable or disable the Cartridge Policy feature
The Cartridge Policy feature can be enabled or disabled using the control panel or the Embedded Web
Server (EWS).
NOTE: Enabling or disabling this feature might require entering an administrator password.
Check with your administrator to determine if an administrator password has been set. EWS passwords
cannot be recovered.
Use the printer control panel to enable the Cartridge Policy feature
From the printer control panel, a network administrator can enable the Cartridge Policy feature. This allows
only genuine HP cartridges to be used with the printer.
1. From the Home screen on the printer control panel, touch the Menu icon.
2. Open the following menus:
a. Settings
b. Supplies
3. Touch the button next to Authorized HP Cartridge Policy to turn on (enable) the feature.
Use the printer control panel to disable the Cartridge Policy feature
From the printer control panel, a network administrator can disable the Cartridge Policy feature. This
removes the restriction that only genuine HP cartridges can be used.
1. From the Home screen on the printer control panel, touch the Menu icon.
2. Open the following menus:
a. Settings
b. Supplies
3. Touch the button next to Authorized HP Cartridge Policy to disable the feature.
Use the HP Embedded Web Server (EWS) to enable the Cartridge Policy feature
From the EWS, a network administrator can enable the Cartridge Policy feature. This allows only genuine
HP cartridges to be used with the printer.
1. Open the HP Embedded Web Server (EWS):
Enable or disable the Cartridge Policy feature
33
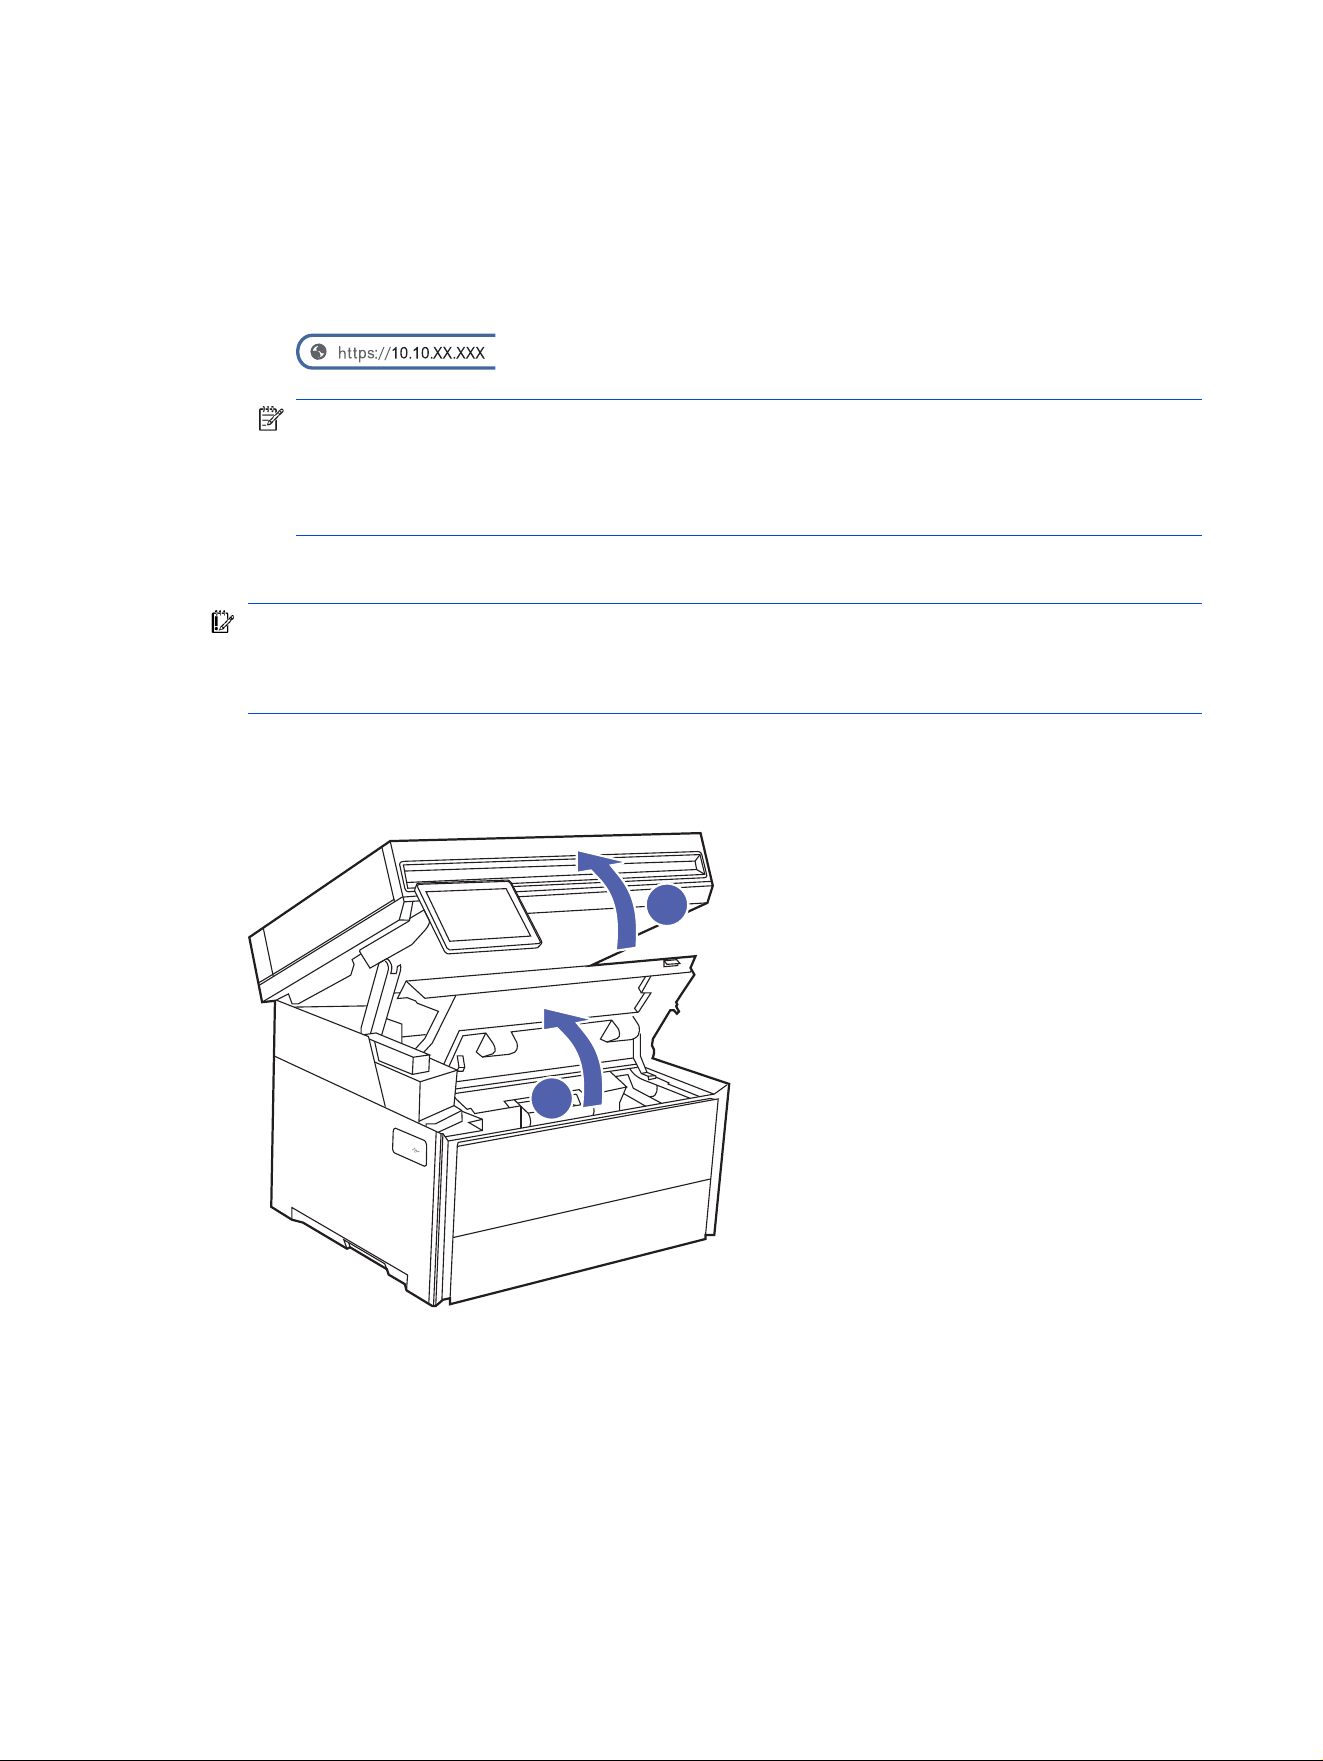
a. From the Home screen on the printer control panel, touch the Menu icon, and then touch Info.
b. Touch Connectivity to display the IP address or host name.
c. Open a web browser, and in the address line, type the IP address or host name exactly as it
displays on the printer control panel. Press the Enter key on the computer keyboard. The EWS
opens.
NOTE: If the web browser displays a message indicating that the connection is not private or
secure, click the Advanced option, and then click the link to Continue... or Proceed... to the
website.
Accessing this website will not harm the computer.
2. From the left navigation pane, select Supplies.
IMPORTANT: Use a printer PIN or administrator password to access the Embedded Web Server
(EWS) printer settings.
Only a user or an administrator can change the default PIN.
To obtain the default printer PIN: Open the toner cartridge access door by lifting the scanner
(callout 1), and then lifting the cartridge door (callout 2). The default printer PIN is located on a label at
the left side of the toner cartridge access area. Use this PIN to log in when prompted.
34
Chapter 3 Supplies, accessories, and parts
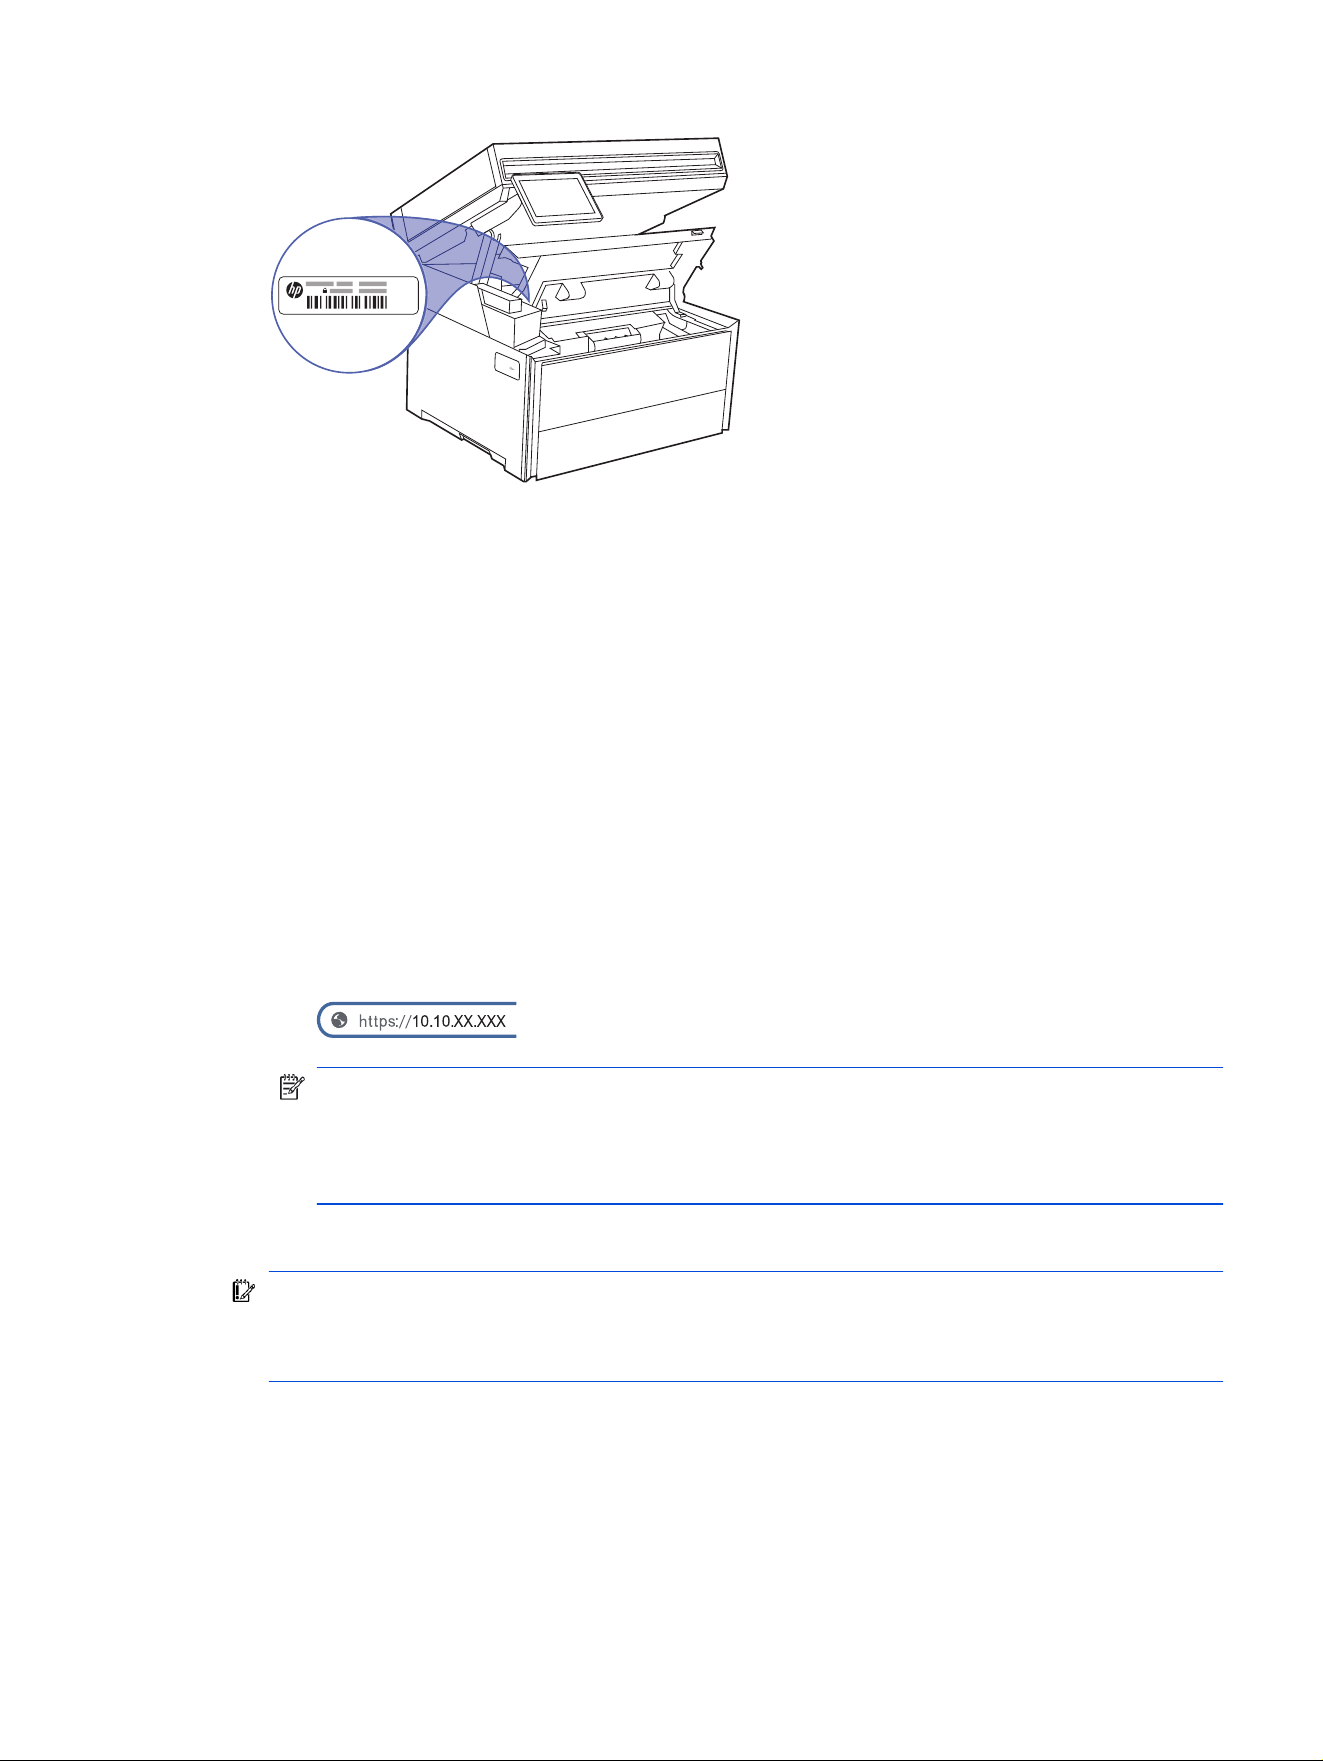
3. On the Supplies page, select the Supply Settings tab.
4. Under Authorized HP Cartridge Policy, click the button to enable the setting. The button turns blue
and a message conrms that the setting has been changed.
Use the HP Embedded Web Server (EWS) to disable the Cartridge Policy feature
From the EWS, a network administrator can disable the Cartridge Policy feature. This removes the
restriction that only genuine HP cartridges can be used.
1. Open the HP Embedded Web Server (EWS):
a. From the Home screen on the printer control panel, touch the Menu icon, and then touch Info.
b. Touch Connectivity to display the IP address or host name.
c. Open a web browser, and in the address line, type the IP address or host name exactly as it
displays on the printer control panel. Press the Enter key on the computer keyboard. The EWS
opens.
NOTE: If the web browser displays a message indicating that the connection is not private or
secure, click the Advanced option, and then click the link to Continue... or Proceed... to the
website.
Accessing this website will not harm the computer.
2. From the left navigation pane, select Supplies.
IMPORTANT: Use a printer PIN or administrator password to access the Embedded Web Server
(EWS) printer settings.
Only a user or an administrator can change the default PIN.
To obtain the default printer PIN: Open the toner cartridge access door by lifting the scanner
(callout 1), and then lifting the cartridge door (callout 2). The default printer PIN is located on a label at
the left side of the toner cartridge access area. Use this PIN to log in when prompted.
Use the HP Embedded Web Server (EWS) to disable the Cartridge Policy feature
35
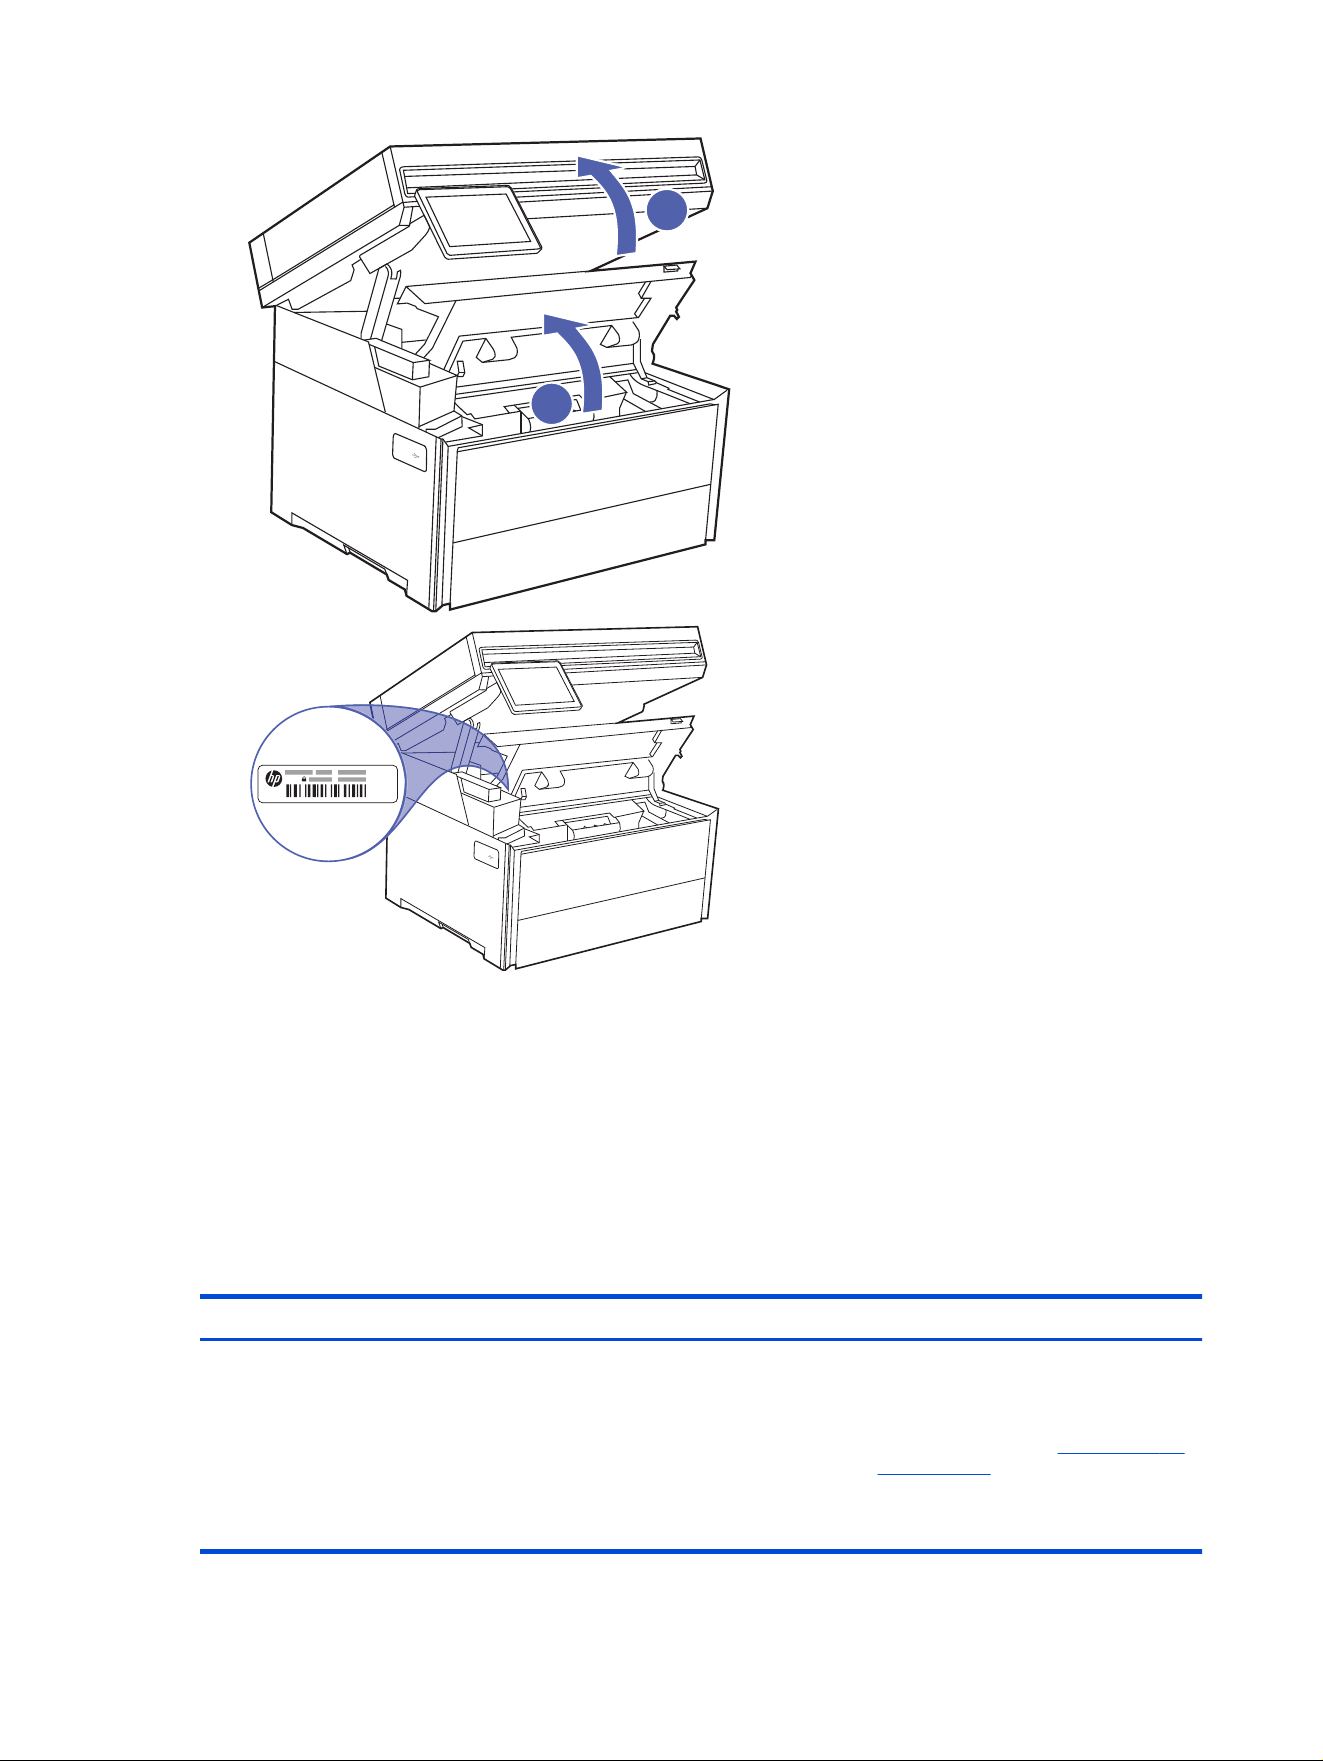
3. On the Supplies page, select the Supply Settings tab.
4. On the Supplies page, select the Supply Settings tab.
5. Under Authorized HP Cartridge Policy, click the button to disable the setting. The button turns black
and a message conrms that the setting has been changed.
Troubleshoot Cartridge Policy control panel error messages
Review the recommended actions for Cartridge Policy error messages.
Table 3-7
Cartridge Policy control panel error messages
Error message Description Recommended action
10.0X.30 Unauthorized <Color>
Cartridge
The administrator has congured this
printer to use only genuine HP supplies
that are still under warranty. The
cartridge must be replaced to continue
printing.
Replace the cartridge with a genuine HP
toner cartridge.
If you believe you purchased a
genuine HP supply, visit www.hp.com/go/
anticounterfeit to determine if the toner
cartridge is a genuine HP cartridge, and
learn what to do if it is not a genuine HP
cartridge.
36 Chapter 3 Supplies, accessories, and parts

Enable or disable the Cartridge Protection feature
The Cartridge Protection feature can be enabled or disabled using the control panel or the Embedded
Web Server (EWS).
NOTE: Enabling or disabling this feature might require entering an administrator password.
Check with your administrator to determine if an administrator password has been set. EWS passwords
cannot be recovered.
Use the printer control panel to enable the Cartridge Protection feature
From the printer control panel, a network administrator can enable the Cartridge Protection feature. This
protects the cartridges associated with the printer from being stolen and used in other printers.
1. From the Home screen on the printer control panel, touch the Menu icon.
2. Open the following menus:
a. Settings
b. Supplies
3. Touch the button next to Cartridge Protection to turn on (enable) the feature.
CAUTION: After enabling cartridge protection for the printer, all subsequent toner cartridges
installed in the printer are automatically and permanently protected. To avoid protecting a new
cartridge, disable the feature before installing the new cartridge.
Turning the feature off does not turn off protection for cartridges that are currently installed.
Use the printer control panel to disable the Cartridge Policy feature
From the EWS, a network administrator can disable the Cartridge Protection feature. This removes
protection for any new cartridges installed in the printer.
1. From the Home screen on the printer control panel, touch the Menu icon.
2. Open the following menus:
a. Settings
b. Supplies
3. Touch the button next to Authorized HP Cartridge Policy to disable the feature.
Use the HP Embedded Web Server (EWS) to enable the Cartridge Protection feature
From the EWS, a network administrator can enable the Cartridge Protection feature. This protects the
cartridges associated with the printer from being stolen and used in other printers.
1. Open the HP Embedded Web Server (EWS):
a. From the Home screen on the printer control panel, touch the Menu icon, and then touch Info.
b. Touch Connectivity to display the IP address or host name.
Enable or disable the Cartridge Protection feature
37
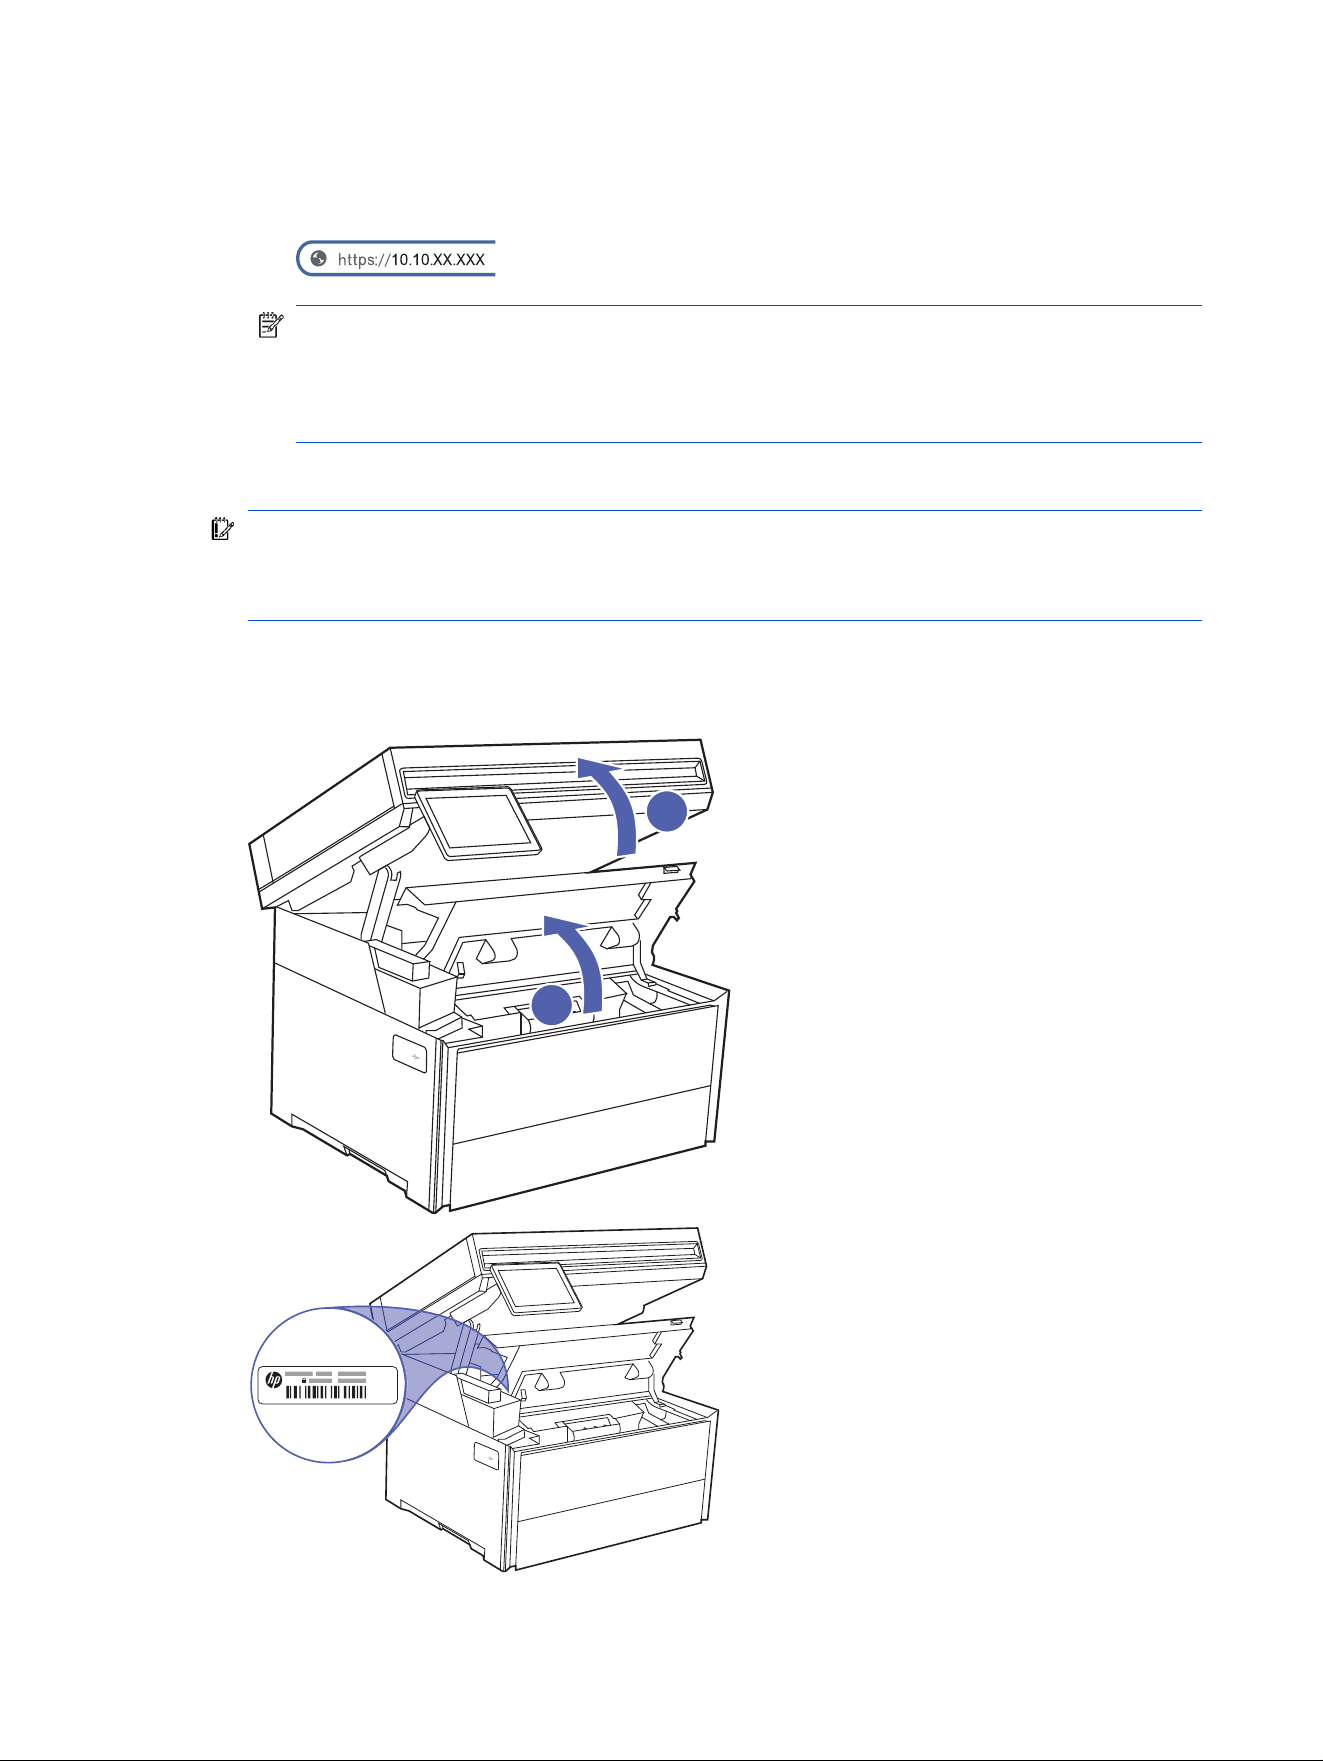
c. Open a web browser, and in the address line, type the IP address or host name exactly as it
displays on the printer control panel. Press the Enter key on the computer keyboard. The EWS
opens.
NOTE: If the web browser displays a message indicating that the connection is not private or
secure, click the Advanced option, and then click the link to Continue... or Proceed... to the
website.
Accessing this website will not harm the computer.
2. From the left navigation pane, select Supplies.
IMPORTANT: Use a printer PIN or administrator password to access the Embedded Web Server
(EWS) printer settings.
Only a user or an administrator can change the default PIN.
To obtain the default printer PIN: Open the toner cartridge access door by lifting the scanner
(callout 1), and then lifting the cartridge door (callout 2). The default printer PIN is located on a label at
the left side of the toner cartridge access area. Use this PIN to log in when prompted.
38
Chapter 3 Supplies, accessories, and parts

3. On the Supplies page, select the Supply Settings tab.
4. Under Cartridge Protection, click the button to enable the setting. The button turns blue and a
message conrms that the setting has been changed.
CAUTION: After enabling cartridge protection for the printer, all subsequent toner cartridges
installed in the printer are automatically and permanently protected. To avoid protecting a new
cartridge, disable the feature before installing the new cartridge.
Turning the feature off does not turn off protection for cartridges that are currently installed.
Use the HP Embedded Web Server (EWS) to disable the Cartridge Protection feature
From the EWS, a network administrator can disable the Cartridge Protection feature. This removes
protection for any new cartridges installed in the printer.
1. Open the HP Embedded Web Server (EWS):
a. From the Home screen on the printer control panel, touch the Menu icon, and then touch Info.
b. Touch Connectivity to display the IP address or host name.
c. Open a web browser, and in the address line, type the IP address or host name exactly as it
displays on the printer control panel. Press the Enter key on the computer keyboard. The EWS
opens.
NOTE: If the web browser displays a message indicating that the connection is not private or
secure, click the Advanced option, and then click the link to Continue... or Proceed... to the
website.
Accessing this website will not harm the computer.
2. From the left navigation pane, select Supplies.
IMPORTANT: Use a printer PIN or administrator password to access the Embedded Web Server
(EWS) printer settings.
Only a user or an administrator can change the default PIN.
To obtain the default printer PIN: Open the toner cartridge access door by lifting the scanner
(callout 1), and then lifting the cartridge door (callout 2). The default printer PIN is located on a label at
the left side of the toner cartridge access area. Use this PIN to log in when prompted.
Use the HP Embedded Web Server (EWS) to disable the Cartridge Protection feature
39
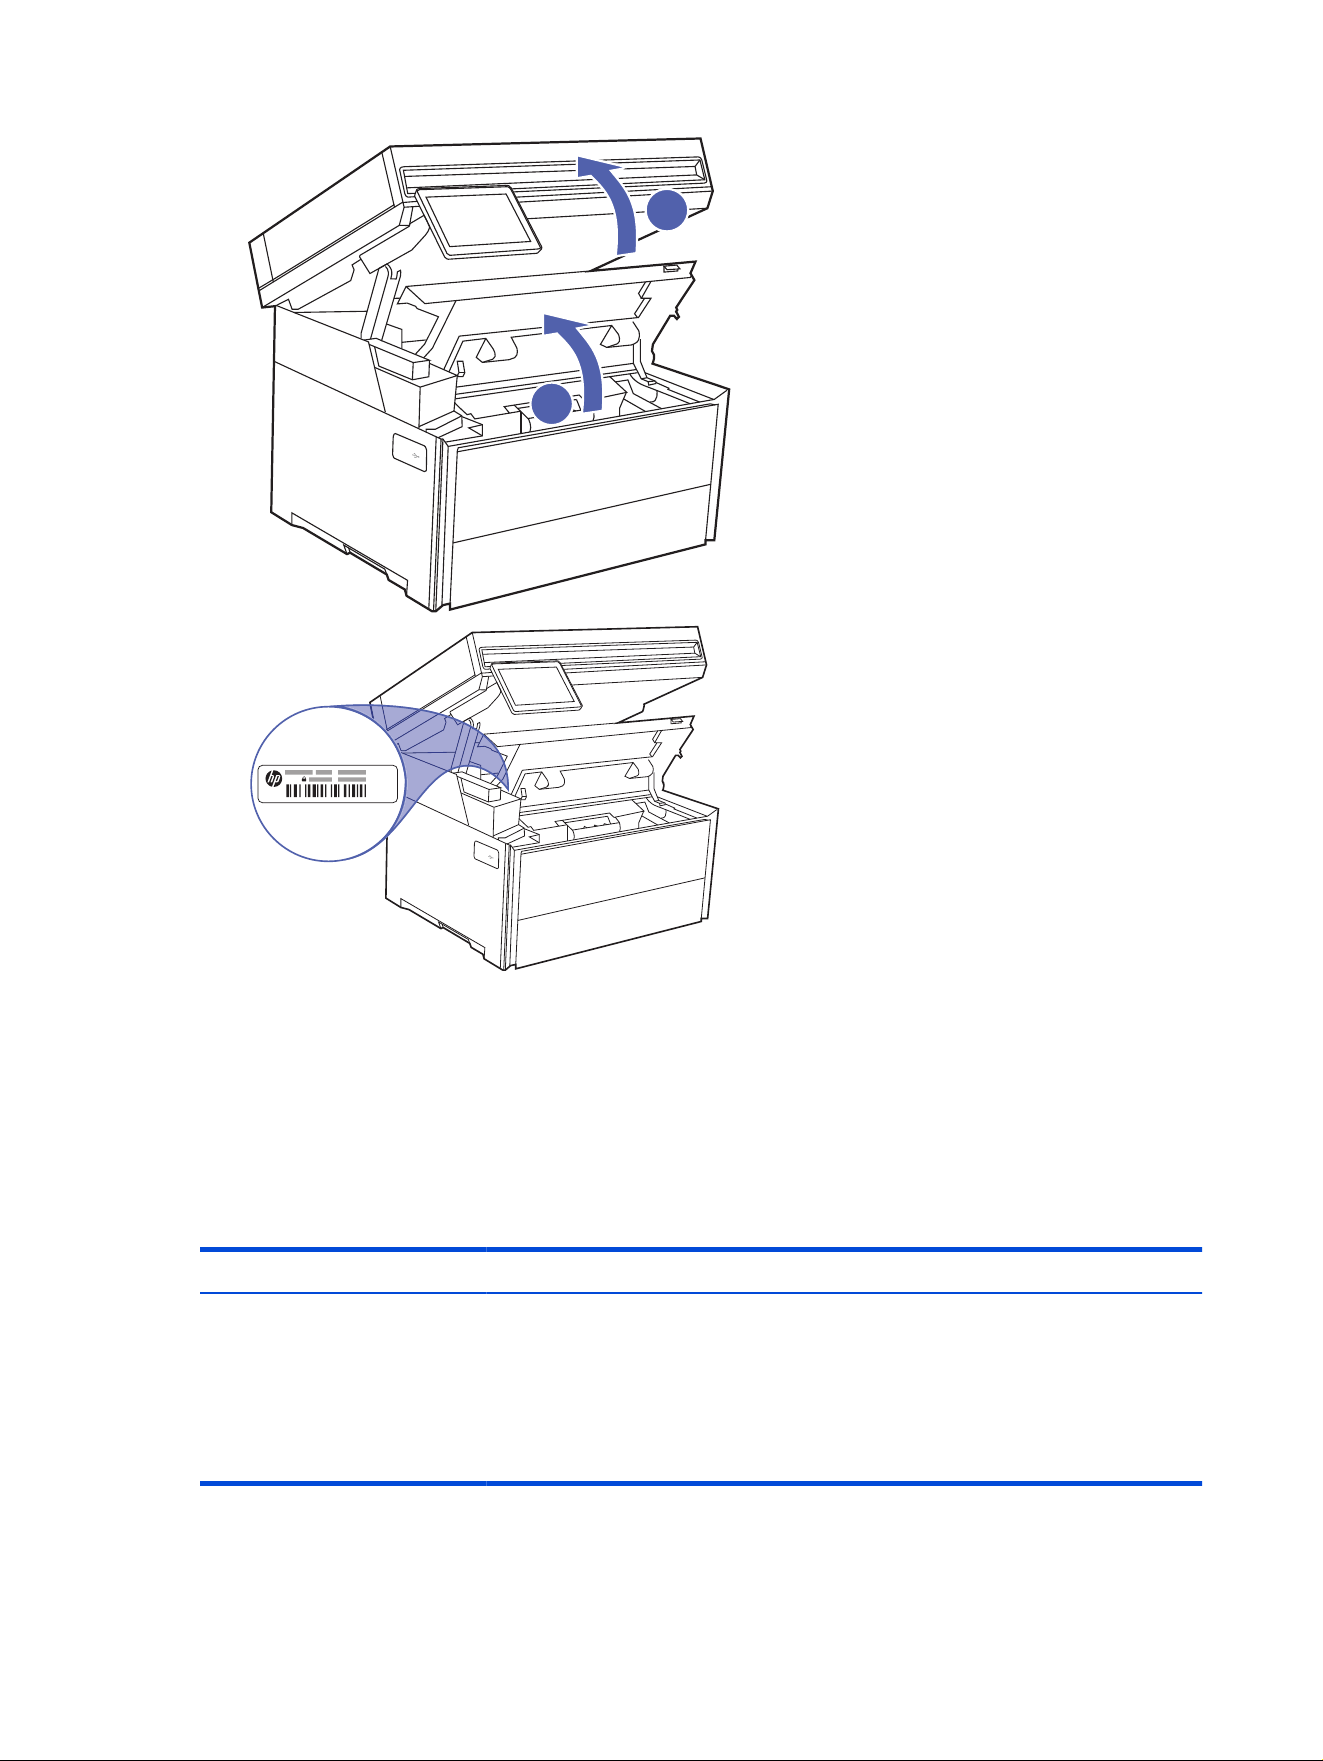
3. On the Supplies page, select the Supply Settings tab.
4. Under Cartridge Protection, click the button to disable the setting. The button turns blue and a
message conrms that the setting has been changed.
Troubleshoot Cartridge Protection control panel error messages
Review the recommended actions for Cartridge Protection error messages.
Table 3-8
Cartridge Protection control panel error messages
Error message Description Recommended action
10.0X.57 Protected <Color>
Cartridge
The cartridge can only be used in the printer or eet
of printers that initially protected it using HP Supply
Protection.
The Cartridge Protection feature allows an
administrator to restrict cartridges to work in only
one printer or eet of printers. The cartridge must be
replaced to continue printing.
Replace the cartridge with a new
toner cartridge.
40 Chapter 3 Supplies, accessories, and parts

Replace the toner cartridge
To ensure optimal print quality, replace the toner cartridge when the printer alerts you that the toner is low
or empty.
Toner cartridge information
The printer indicates when the toner cartridge level is low. The actual toner cartridge life remaining
can vary. Consider having a replacement cartridge available to install when print quality is no longer
acceptable.
Continue printing with the current cartridge until redistributing the toner no longer yields acceptable print
quality. To redistribute the toner, remove the toner cartridge from the printer and gently rock the cartridge
back and forth end to end. For graphical representation, see the cartridge replacement instructions.
Reinsert the toner cartridge into the printer, and then close the cover.
To purchase cartridges or check cartridge compatibility for the printer, go to Learn about HP supplies at
https://learn-about-supplies.ext.hp.com/. Scroll to the bottom of the page and verify that the country/region
is correct.
NOTE: Cartridges are for distribution and use with their designated product only; they will not work with
other printer models.
Toner cartridges
Table 3-9
MFP 4112: Americas, New Zealand, Australia and Rest of World
Item Description Part number
HP 161A Black Original LaserJet Toner
Cartridge
Standard-capacity replacement black
toner cartridge
W1610A
HP 161X High Yield Black Original
LaserJet Toner Cartridge
High-capacity replacement black toner
cartridge
W1610X
Table 3-10 MFP 4113: Europe, Middle East, Africa (EMEA)
Item Description Part number
HP 162A Black Original LaserJet Toner
Cartridge
Standard-capacity replacement black
toner cartridge
W1620A
HP 162X High Yield Black Original
LaserJet Toner Cartridge
High-capacity replacement black toner
cartridge
W1620X
Table 3-11 MFP 4114 China/India
Item Description Part number
HP 164A Black Original LaserJet Toner
Cartridge
Standard-capacity replacement black
toner cartridge
W1640A
HP 164X High Yield Black Original
LaserJet Toner Cartridge
High-capacity replacement black toner
cartridge
W1640X
Replace the toner cartridge 41
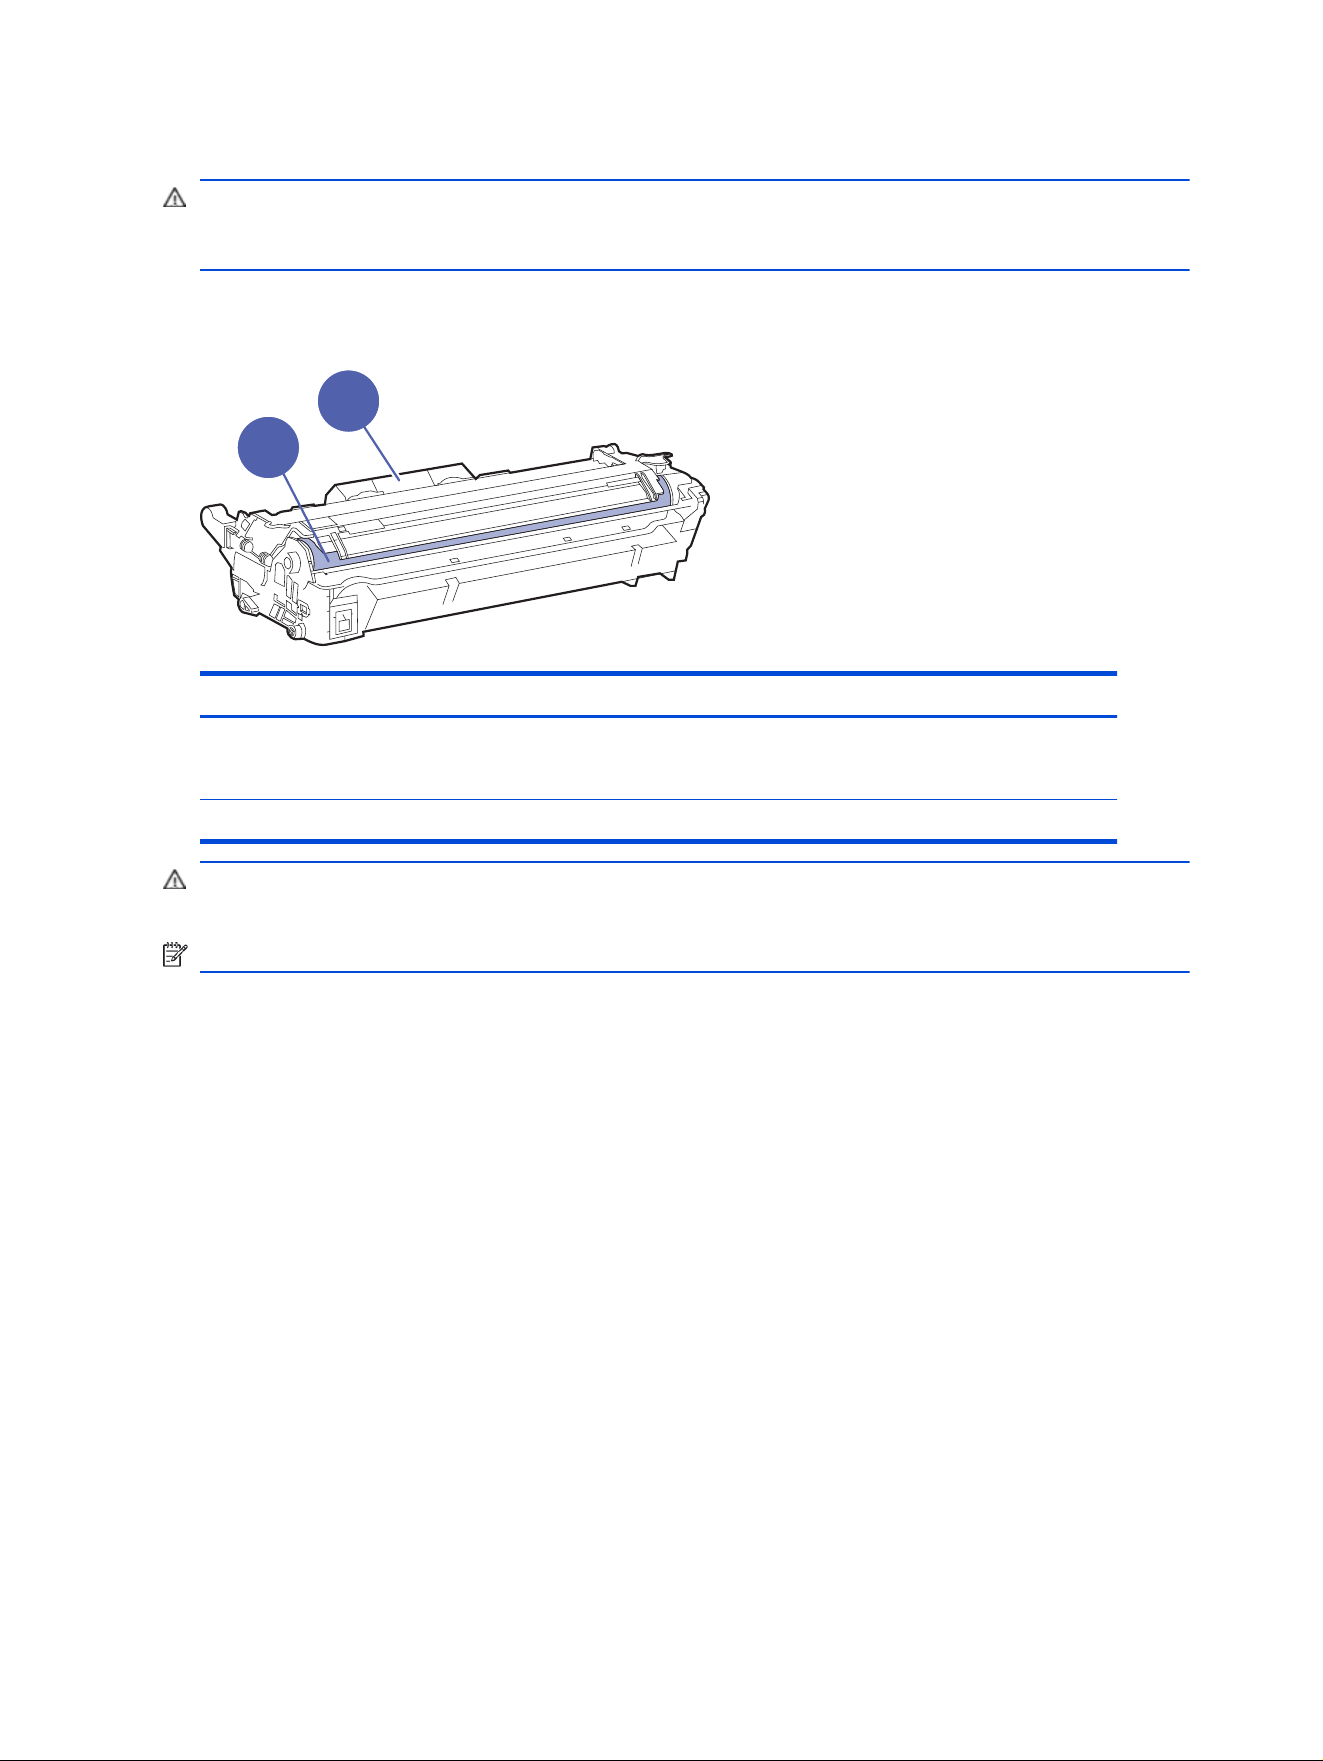
Do not remove the toner cartridge from its package until it is time to replace it.
CAUTION: To prevent damage to the toner cartridge, do not expose it to light for more than a few
minutes. If the toner cartridge must be removed from the printer for an extended period of time, place the
cartridge in the original plastic packaging, or cover the cartridge with a lightweight opaque item.
The following illustration shows the toner cartridge components.
Figure 3-1 Toner cartridge components
1
2
Number Description
1 Imaging drum
CAUTION: Do not touch the imaging drum. Fingerprints can cause print-quality problems.
2 Handle
CAUTION: If toner gets on clothing, wipe it off by using a dry cloth and wash the clothes in cold water.
Hot water sets toner into fabric.
NOTE: Information about recycling used toner cartridges is in the toner cartridge box.
Replace the toner cartridge
Follow these steps to replace the toner cartridges.
42
Chapter 3 Supplies, accessories, and parts
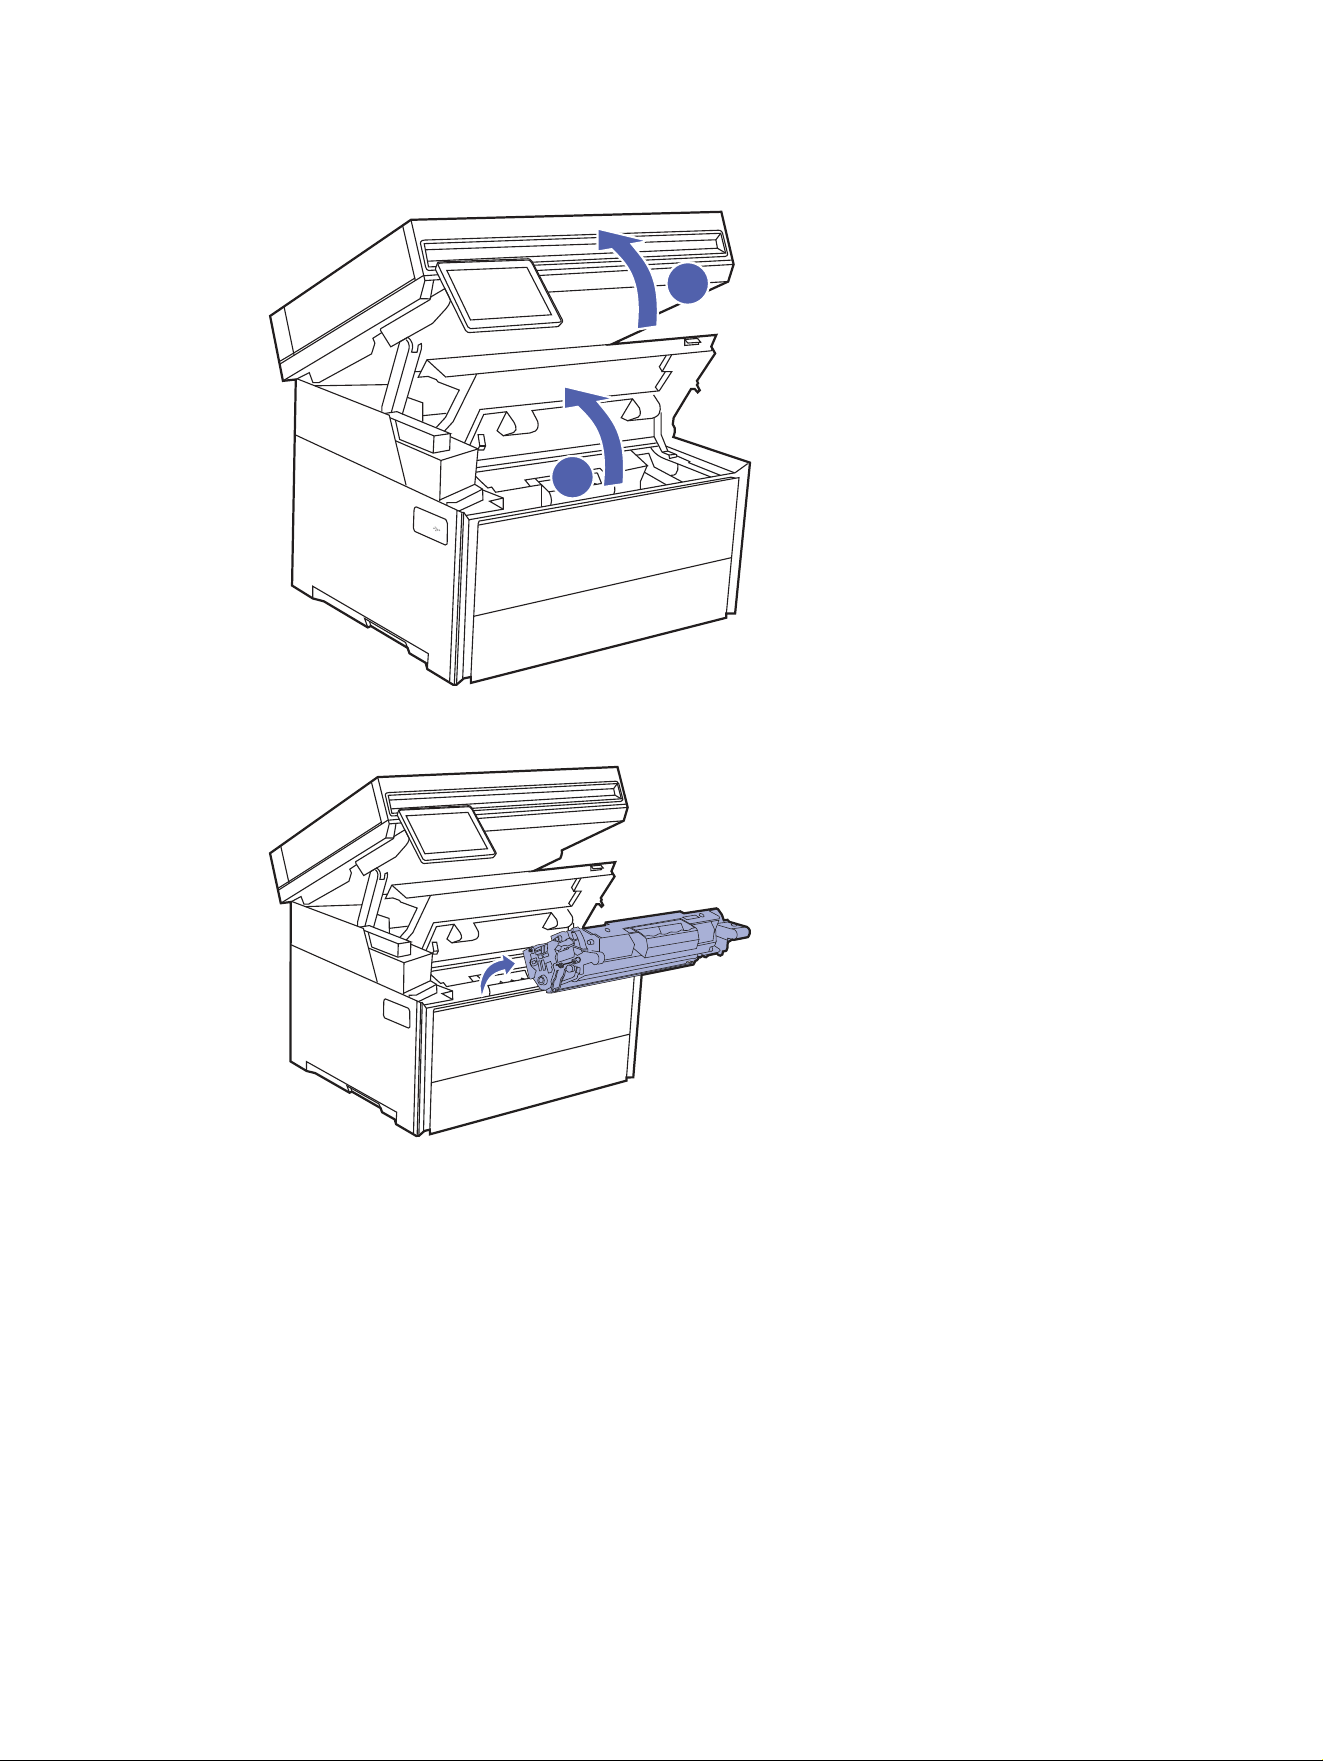
1. Open the toner cartridge access door by lifting the scanner (callout 1), and then lifting the cartridge
door (callout 2).
2. Grasp the handle on the toner cartridge, and then pull the toner cartridge out to remove it.
Replace the toner cartridge
43
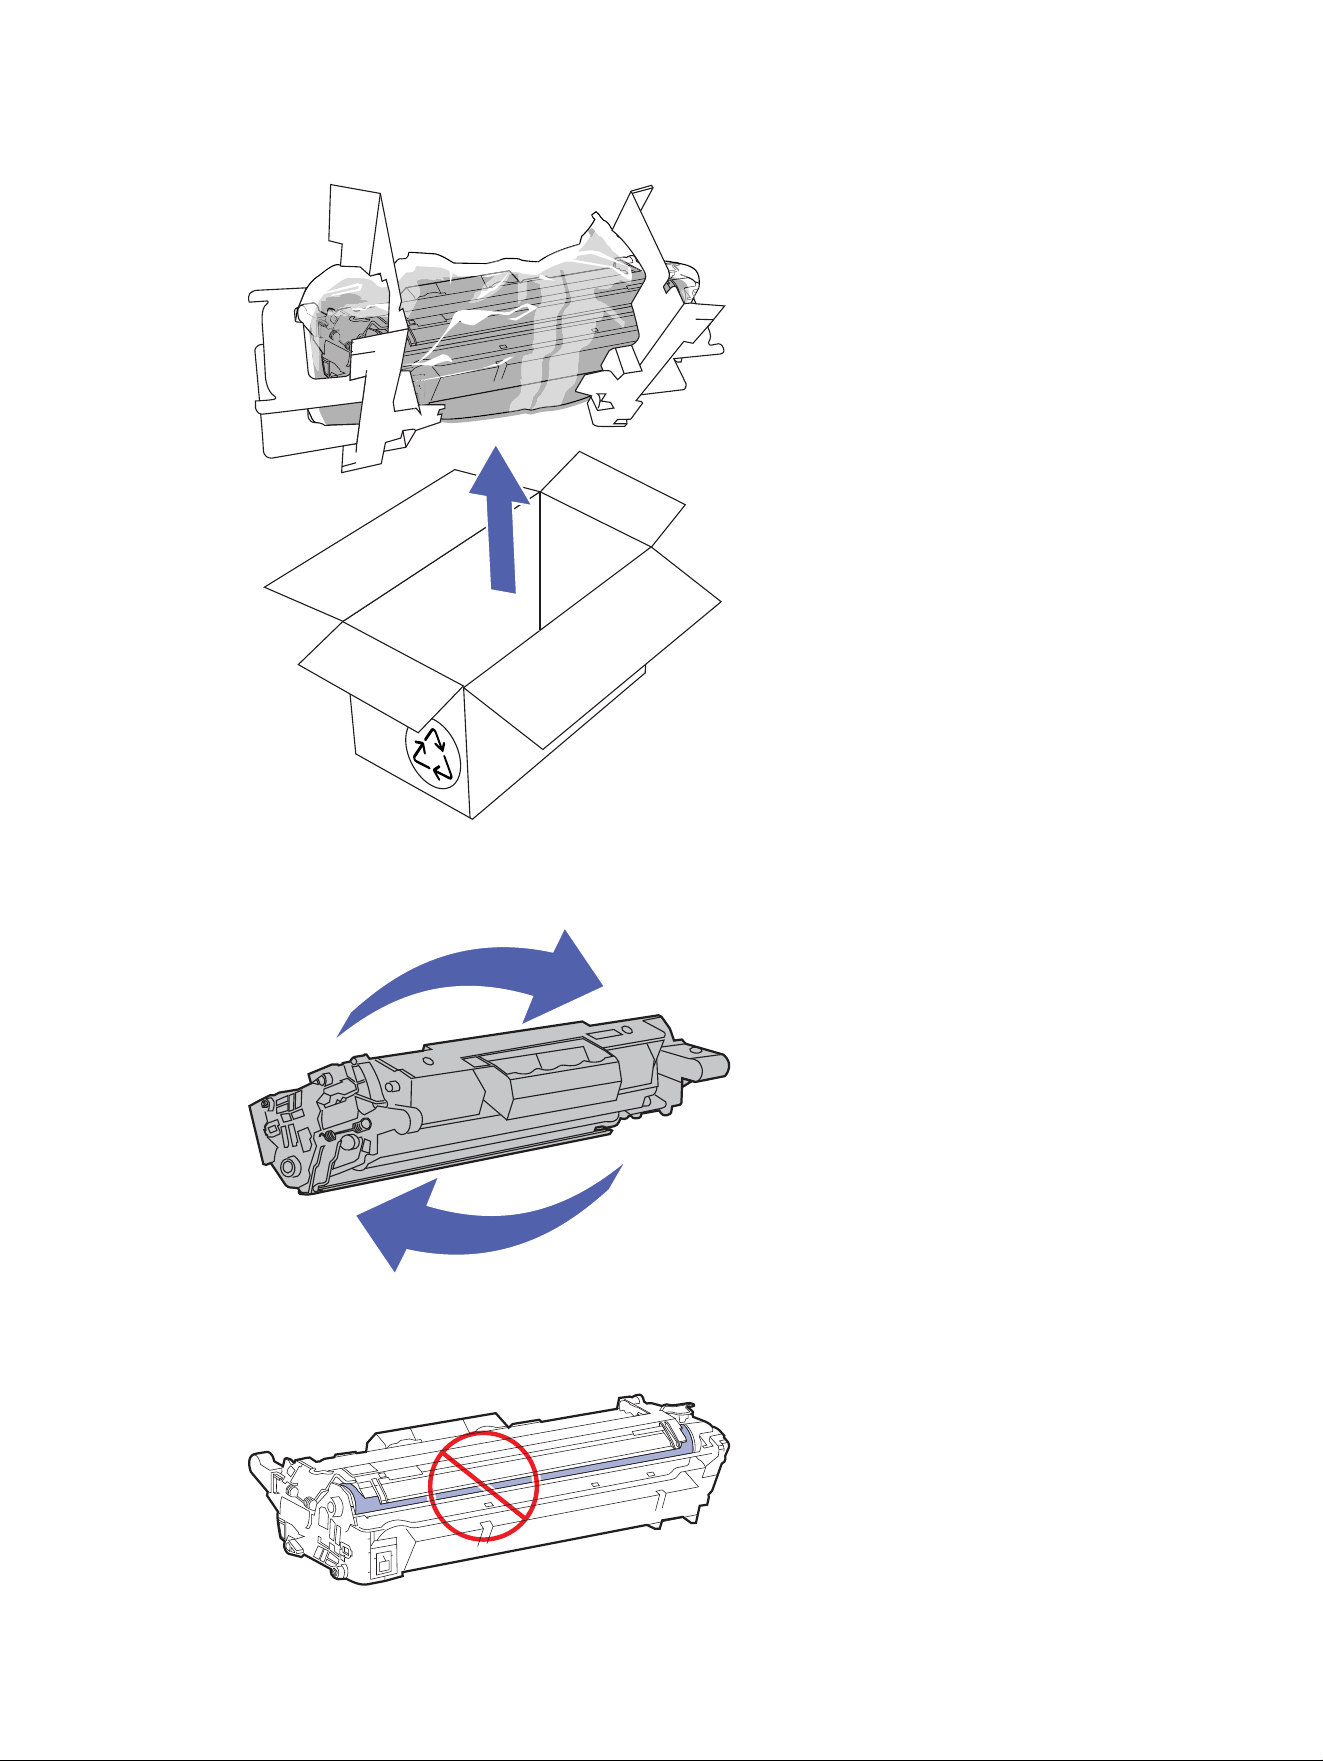
3. Remove the new toner cartridge package from the box, and then remove it from the packaging.
4. Hold both ends of the toner cartridge and rock it end to end, to distribute the toner evenly inside the
cartridge.
5. Do not touch the imaging drum on the bottom of the toner cartridge. Fingerprints on the imaging
drum can cause print-quality problems. Also, do not expose the cartridge to light unnecessarily.
44
Chapter 3 Supplies, accessories, and parts
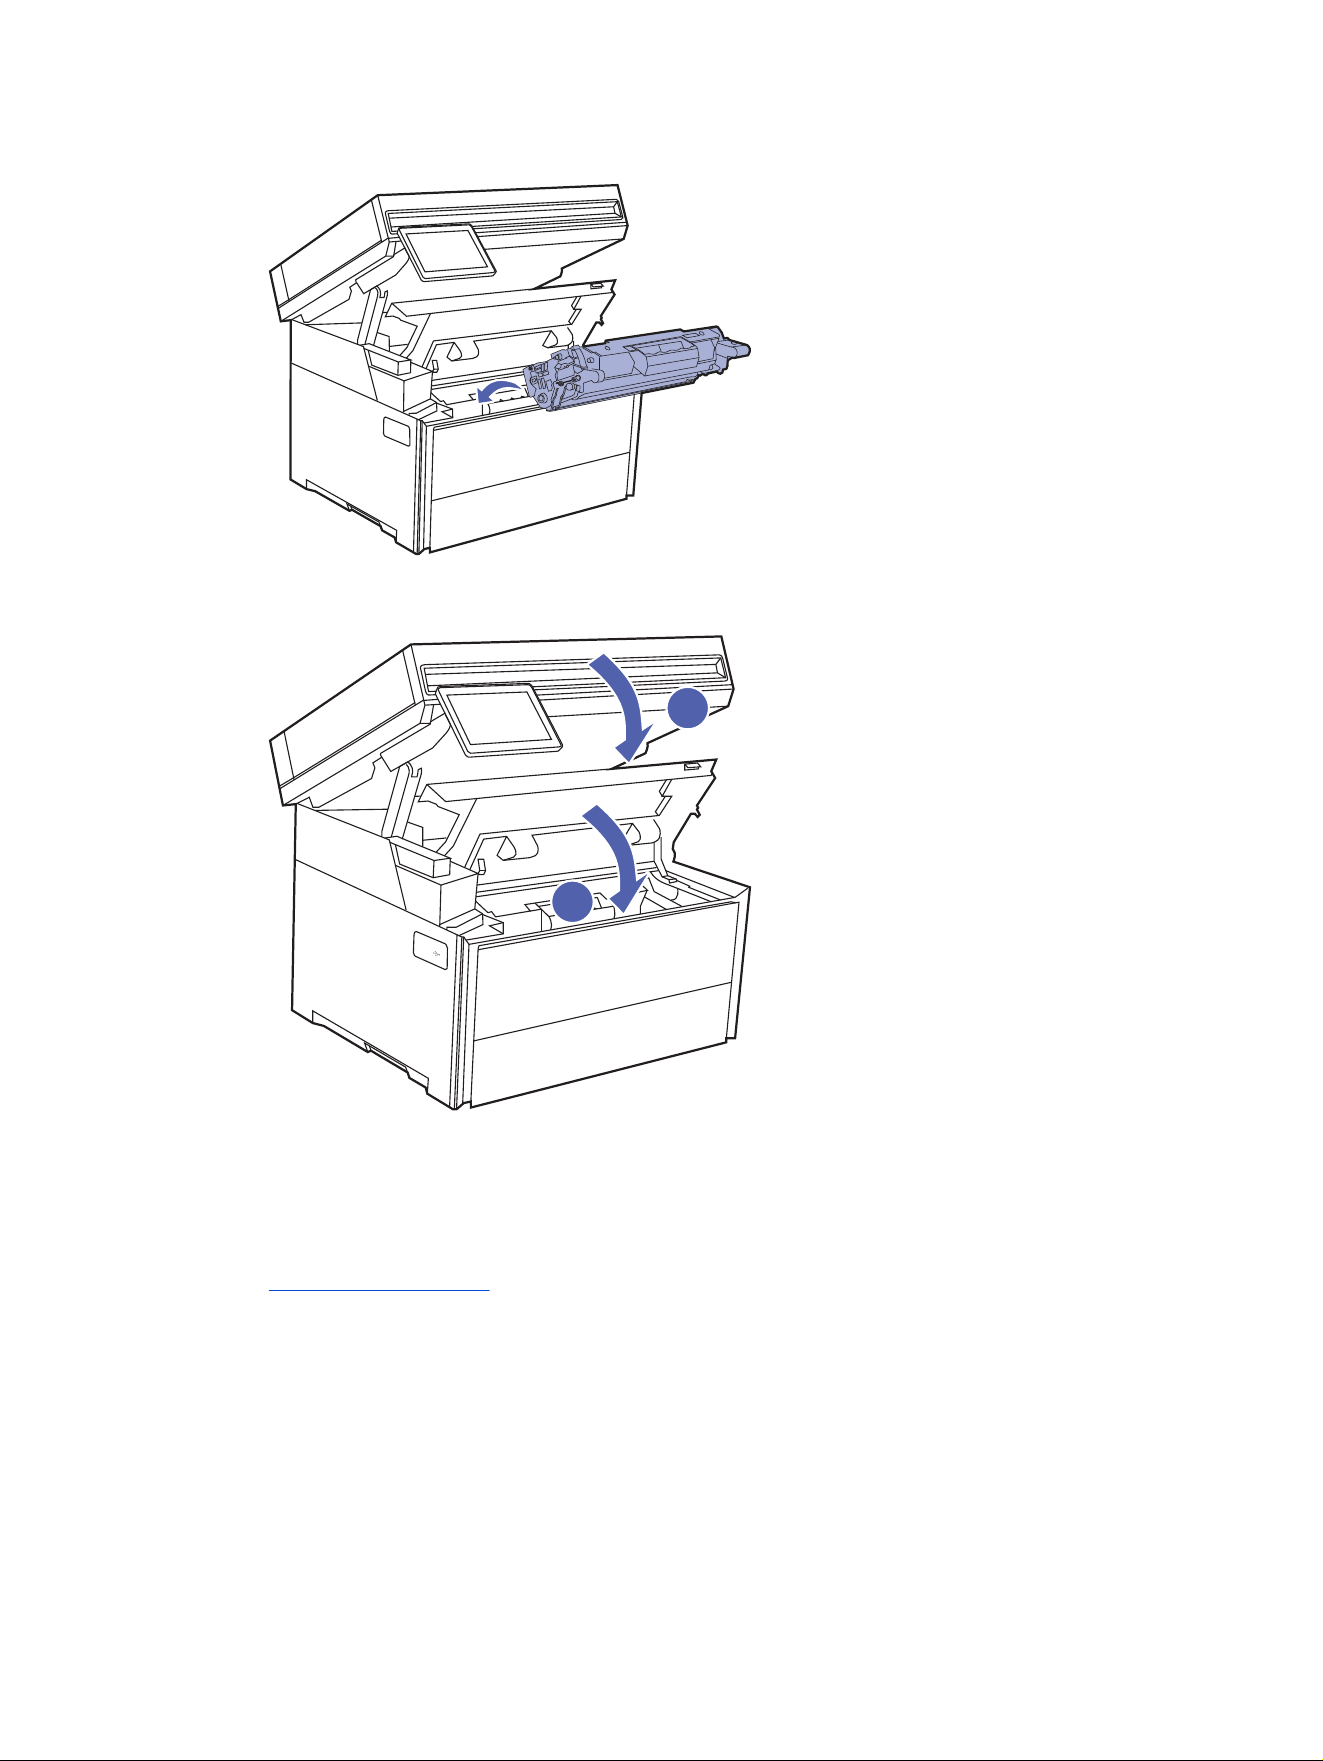
6. Insert the new toner cartridge into the printer.
7. Close the toner cartridge access door and lower the scanner.
8. Pack the used toner cartridge into the box the new cartridge came in, or use a large cardboard box
and ll it with several cartridges you need to recycle. See the enclosed recycling guide for information
about recycling.
In the US, a pre-paid shipping label is included in the box. In other countries/regions, go to
www.hp.com/hprecycle to print a pre-paid shipping label.
Adhere the pre-paid shipping label to the box, and return the used cartridge to HP for recycling.
Replace the toner cartridge
45
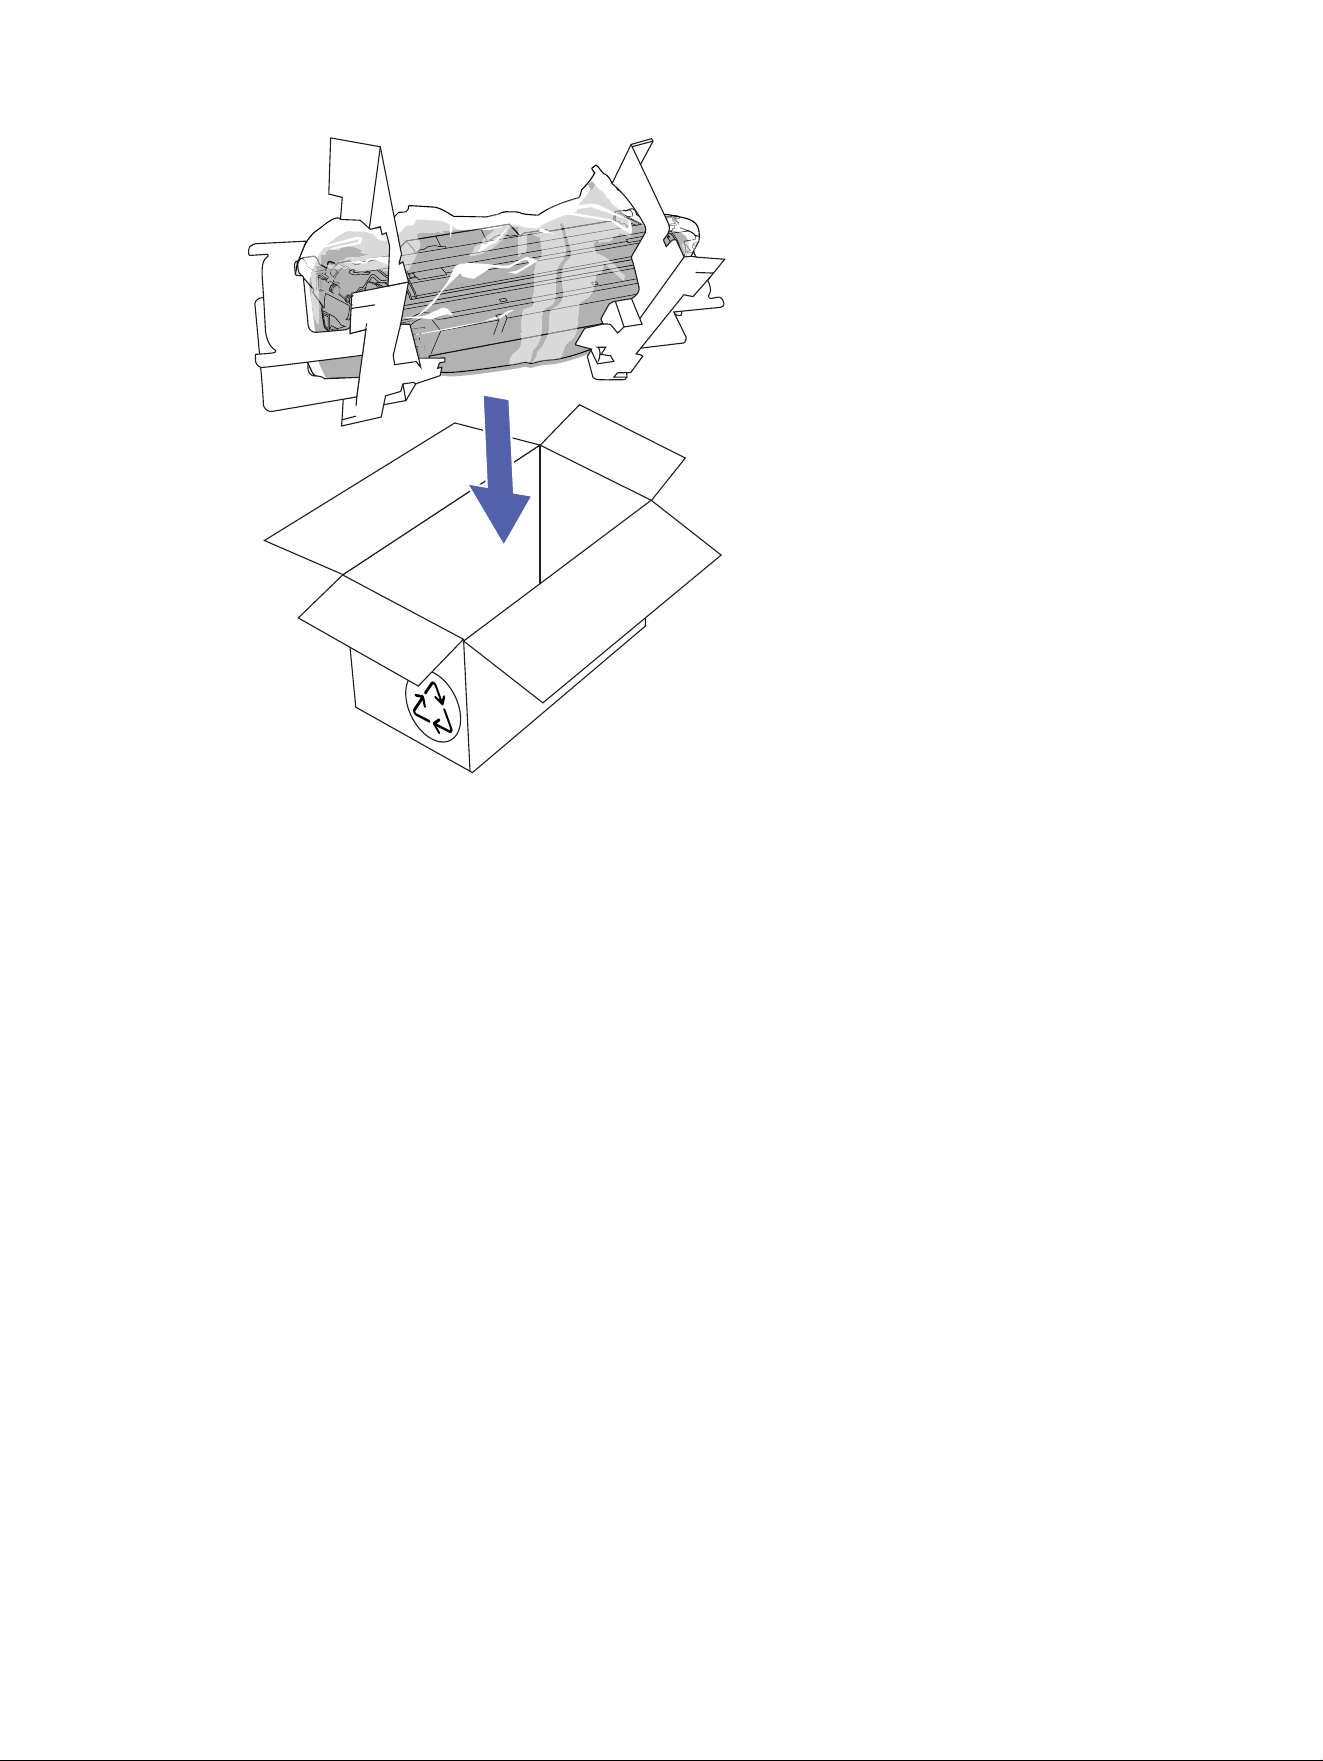
46 Chapter 3 Supplies, accessories, and parts

Print4
Print using the software, or print from a mobile device or USB ash drive.
The following information is correct at the time of publication. For current information, see hp.com/
support/ljpro4110mfp.
For more information:
HP's all-inclusive help for the printer includes the following information:
● Install and congure
● Learn and use
● Solve problems
● Download software and rmware updates
● Join support forums
● Find warranty and regulatory information
Print tasks (Windows)
Learn about common printing tasks for Windows users.
How to print (Windows)
Use the Print option from a software application to select the printer and basic options for your print job.
The following procedure describes the basic printing process for Windows.
1. From the software program, select the Print option.
2. Select the printer from the list of printers. To change settings, click the Properties or Preferences
button to open the print driver.
NOTE: The name of the button varies for different software programs.
NOTE: For more information, click the Help (?) button in the print driver.
3. Click the tabs in the print driver to congure the available options. For example, set the paper
orientation, paper source, media type, and paper size on the Document tab, and set the quality
settings on the Basic tab.
4. Click the OK button to return to the Print dialog box. Select the number of copies to print from this
screen.
5. Click the Print button to print the job.
Print
47

Automatically print on both sides (Windows)
If your printer has an automatic duplexer installed, you can automatically print on both sides of the paper.
Use a paper size and type supported by the duplexer.
1. From the software program, select the Print option.
2. Select the printer from the list of printers, and then click the Properties or Preferences button to
open the print driver.
NOTE: The name of the button varies for different software programs.
3. Click the Basic tab.
4. Select Flip on long edge or Flip on short edge for the Two-sided Printing option. Click OK to close
the Document Properties dialog.
5. In the Print dialog, click Print to print the job.
Manually print on both sides (Windows)
Use this procedure for printers that do not have an automatic duplexer installed or to print on paper that
the duplexer does not support.
1. From the software program, select the Print option.
2. Select the printer from the list of printers, and then click the Properties or Preferences button to
open the print driver.
NOTE: The name of the button varies for different software programs.
3. Click the Finishing tab.
4. Select Flip on long edge or Flip on short edge for the Two-sided Printing option, and then click OK
to close the Document Properties dialog.
5. In the Print dialog, click Print to print the rst side of the job.
6. Retrieve the printed stack from the output bin, and place it in Tray 1.
7. If prompted, select the appropriate control panel button to continue.
Print multiple pages per sheet (Windows)
When you print from a software application using the Print option, you can select an option to print
multiple pages on a single sheet of paper. For example, you might want to do this if you are printing a very
large document and want to save paper.
1. From the software program, select the Print option.
2. Select the printer from the list of printers, and then click the Properties or Preferences button to
open the print driver.
NOTE: The name of the button varies for different software programs.
3. Click the Basic tab.
4. Select the number of pages per sheet from the Pages per sheet drop-down.
48
Chapter 4 Print

5. Select the Print page borders and Page order settings on the Basic tab, then set the Orientation
setting on the Document tab, if needed. Click OK to close the Document Properties dialog.
6. In the Print dialog, click Print to print the job.
Select the paper type (Windows)
When you print from a software application using the Print option, you can set the paper type you are
using for your print job. For example, if your default paper type is Letter, but you are using a different paper
type for a print job, select that specic paper type.
1. From the software program, select the Print option.
2. Select the printer from the list of printers, and then click or tap the Properties or Preferences button
to open the print driver.
NOTE: The name of the button varies for different software programs.
3. Click the Document tab.
4. Select the Media type option for the type of paper you are using, and then click OK.
5. Click OK to close the Document Properties dialog.
6. In the Print dialog, click Print to print the job.
Additional print tasks
Locate information on the Web for performing common printing tasks.
Go to hp.com/support/ljpro4110mfp.
Instructions are available for print tasks, such as the following:
● Create and use printing shortcuts or presets
● Select the paper size, or use a custom paper size
● Select the page orientation
● Create a booklet
● Scale a document to t a specic paper size
● Print the rst or last pages of the document on different paper
● Print watermarks on a document
Print tasks (macOS)
Print using the HP printing software for macOS, including how to print on both sides or print multiple pages
per sheet.
How to print (macOS)
Use the Print option from a software application to select the printer and basic options for your print job.
The following procedure describes the basic printing process for macOS.
Select the paper type (Windows)
49

1. Click the File menu, and then click the Print option.
2. Select the printer.
3. Click Show Details or Copies & Pages, and then select other menus to adjust the print settings.
NOTE: The name of the item varies for different software programs.
4. Click the Print button.
Automatically print on both sides (macOS)
If your printer has an automatic duplexer installed, you can automatically print on both sides of the paper.
Use a paper size and type supported by the duplexer.
This feature is available if you install the HP print driver. It might not be available if you are using AirPrint.
1. Click the File menu, and then click the Print option.
2. Select the printer.
3. Click Show Details or Copies & Pages, and then click the Layout menu.
NOTE: The name of the item varies for different software programs.
4. Select a binding option from the Two-Sided drop-down list.
5. Click the Print button.
Manually print on both sides (macOS)
If your printer does not have an automatic duplexer installed, or you are using a paper size or type not
supported by the duplexer, you can print on both sides of the paper using a manual process. You will need
to reload the pages for the second side.
This feature is available if you install the HP print driver. It might not be available if you are using AirPrint.
1. Click the File menu, and then click the Print option.
2. Select the printer.
3. Click Show Details or Copies & Pages, and then click the Manual Duplex menu.
NOTE: The name of the item varies for different software programs.
4. Click the Manual Duplex check box, and select a binding option.
5. Go to the printer, and remove any blank paper that is in Tray 1.
6. Click the Print button.
7. Retrieve the printed stack from the output bin and place it with the printed-side facing down in the
input tray.
8. If prompted, touch the appropriate control panel button to continue.
50
Chapter 4 Print

Print multiple pages per sheet (macOS)
When you print from a software application using the Print option, you can select an option to print
multiple pages on a single sheet of paper. For example, you might want to do this if you are printing a very
large document and want to save paper.
1. Click the File menu, and then click the Print option.
2. Select the printer.
3. Click Show Details or Copies & Pages, and then click the Layout menu.
NOTE: The name of the item varies for different software programs.
4. From the Pages per Sheet drop-down list, select the number of pages that you want to print on each
sheet.
5. In the Layout Direction area, select the order and placement of the pages on the sheet.
6. From the Border menu, select the type of border to print around each page on the sheet.
7. Click the Print button.
Select the paper type (macOS)
When you print from a software application using the Print option, you can set the paper type you are
using for your print job. For example, if your default paper type is Letter, but you are using a different paper
type for a print job, select that specic paper type.
1. Click the File menu, and then click the Print option.
2. Select the printer.
3. Click Show Details or Copies & Pages, and then click the Media & Quality menu or the Paper/
Quality menu.
NOTE: The name of the item varies for different software programs.
4. Select from the Media & Quality or Paper/Quality options.
NOTE: This list contains the master set of options available. Some options are not available on all
printers.
● Media Type: Select the option for the type of paper for the print job.
● Print Quality: Select the resolution level for the print job.
● EconoMode: Select this option to conserve toner when printing drafts of documents.
5. Click the Print button.
Additional print tasks
Locate information on the Web for performing common printing tasks.
Go to hp.com/support/ljpro4110mfp.
Instructions are available for print tasks, such as the following:
Print multiple pages per sheet (macOS)
51

● Create and use printing shortcuts or presets
● Select the paper size, or use a custom paper size
● Select the page orientation
● Create a booklet
● Scale a document to t a specic paper size
● Print the rst or last pages of the document on different paper
● Print watermarks on a document
Store print jobs on the printer to print later or print privately
Store print jobs in the printer memory for printing at a later time.
Introduction
The following information provides procedures for creating and printing documents that are stored on the
USB ash drive. These jobs can be printed at a later time or printed privately.
Before beginning
Review the requirements for using the job storage feature.
The job storage feature has the following requirements:
● A dedicated USB 2.0 storage device that is at least 16 GB in size must be installed in the rear host
USB. This USB storage device holds the job storage jobs sent to the printer. Removing this USB
storage device from the printer disables the job storage feature.
● If you are using an HP Universal Print Driver (UPD), you must use UPD version 5.9.0 or above.
Set up job storage
Set up job storage in the print driver, insert the storage media (USB ash drive) in the printer, and verify the
feature is ready to use.
Before you begin, install the printer software if it is not already installed. Go to www.hp.com/support, click
Software and Drivers, and then follow the onscreen instructions to download the latest HP software.
When the print driver is installed, the Job Storage option is set to Auto Cong by default. The option is
located as follows:
● Windows: Devices and Printers > Printer Properties > Device Settings
● macOS: Printers & Scanners > Options & Supplies
To complete Job Storage setup:
1. Locate the side USB port.
NOTE: Open the USB port by pushing on the backside of the port.
52
Chapter 4 Print
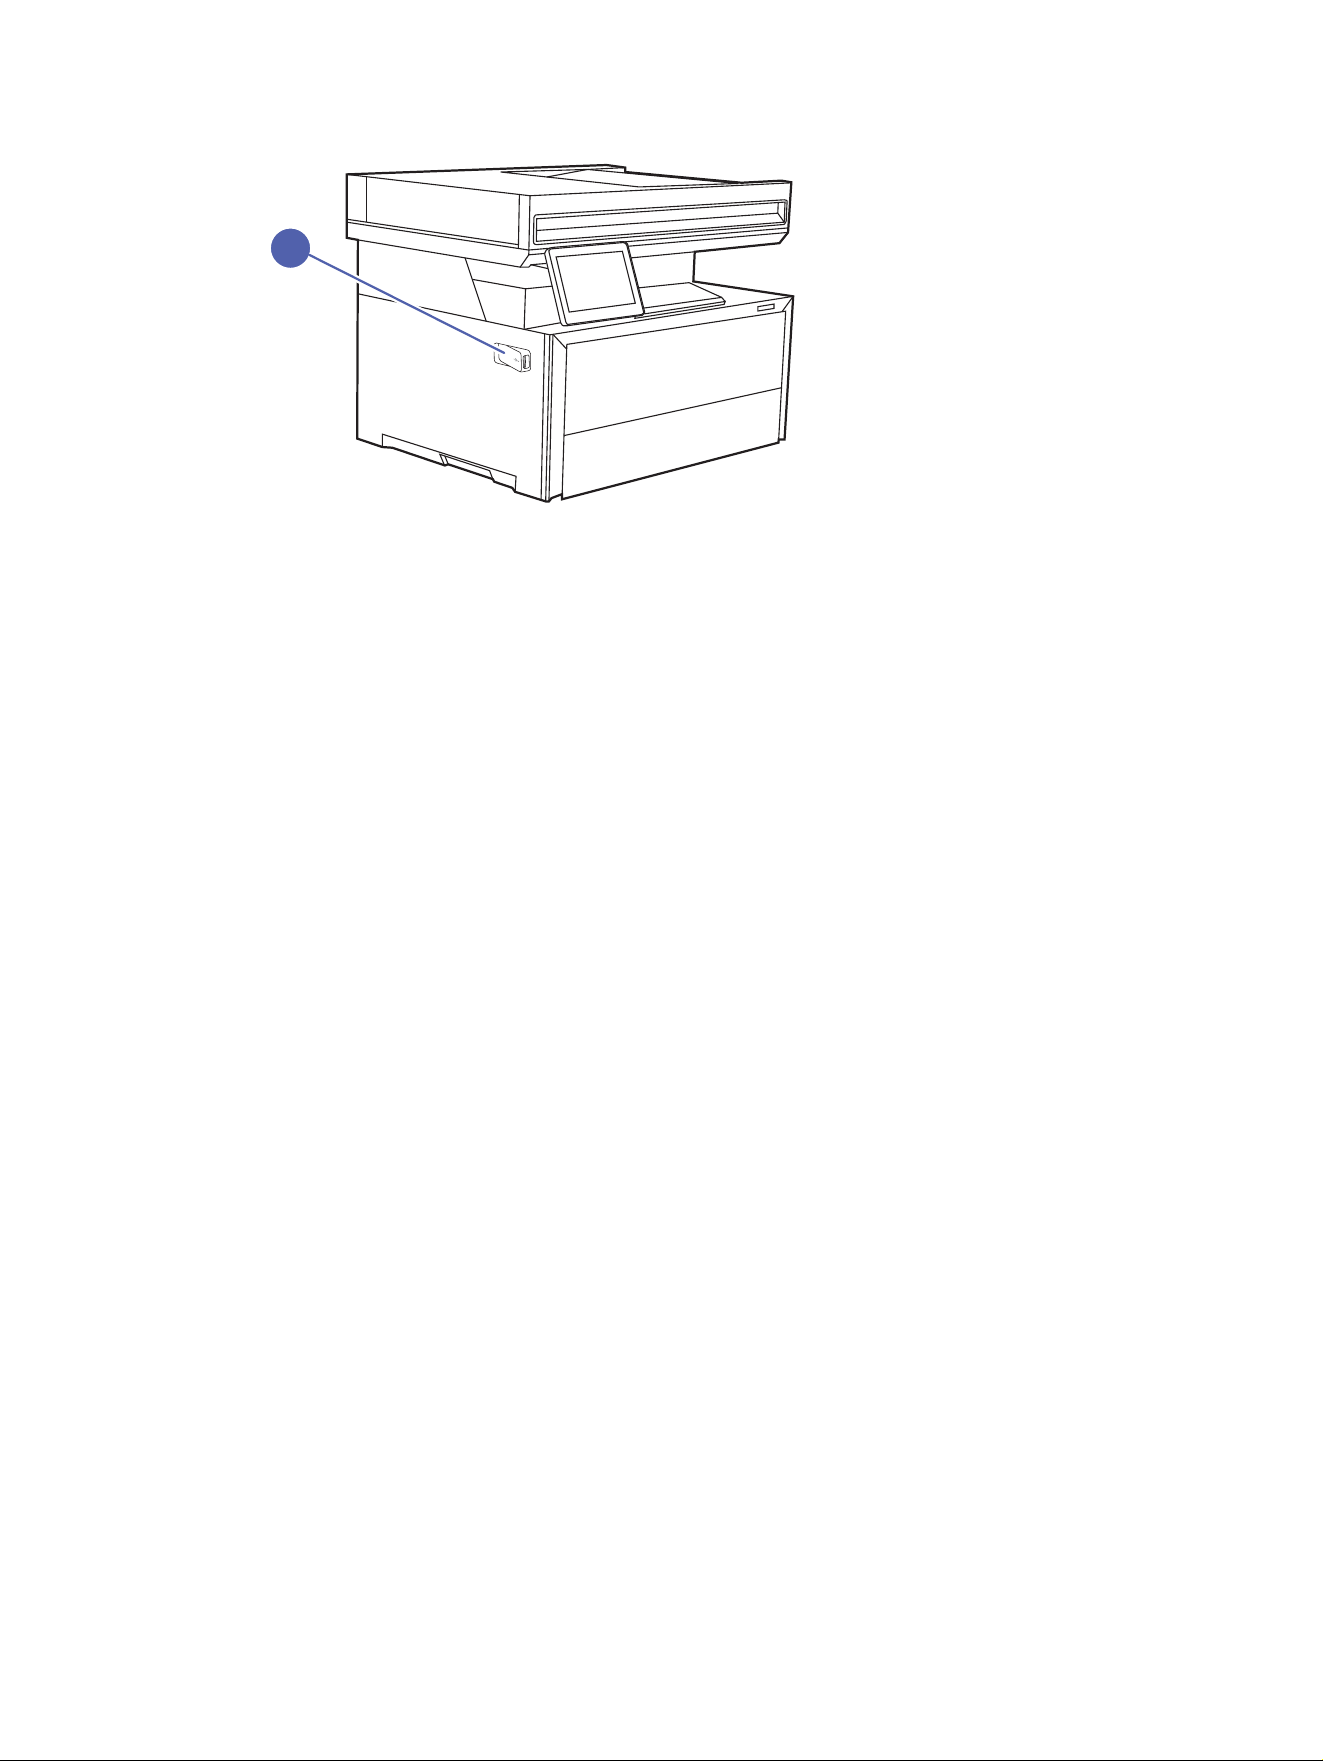
Figure 4-1 Insert USB ash drive
1
2. Insert the USB ash drive into the side USB port.
A message displays on the control panel warning that the USB drive will be formatted. Select OK to
complete the procedure.
3. Open the print driver to verify that the Job Storage check box appears on the Basic tab. If it is there,
the feature is ready to use.
From a software program, select the Print option, select your printer from the list of printers, and do
the following:
● Windows: Select Properties or Preferences. Click the Basic tab.
If the Job Storage check box is not showing, activate it as follows:
From the Start menu, open Settings, click Devices, and then click Devices and Printers. Right-
click on the printer name and click Printer Properties. Click the Device Settings tab, click on
Job Storage, and then select Auto Cong. Click Apply and OK.
● macOS: The print driver displays the Copies & Pages menu. Open the drop-down list, and then
click the Job Storage menu.
If the Job Storage menu is not showing, close the Print window and then reopen it to activate the
menu.
Disable or enable the job storage feature
Disable the job storage feature to make it unavailable, even if a USB drive is inserted into the printer. Enable
the feature to make it available again.
1. Open the Printer Properties:
● Windows: From the Start menu, open Settings, click Devices, and then click Devices and
Printers. Right-click on the printer and click Printer properties.
● macOS: From the Apple menu, open System Preferences, and then click Printers & Scanners.
Select the printer and click Options & Supplies.
2. Disable the Job Storage option as follows:
● Windows: Click the Device settings tab, click on Job Storage, and then select Disable.
Disable or enable the job storage feature
53

● macOS: On the Options tab, clear the Job Storage check box.
To enable the feature, set the Job Storage option back to Auto Cong (Windows), or select the Job
Storage check box (macOS).
Create a stored job (Windows)
Store jobs on the USB ash drive for private or delayed printing.
1. From the software program, select the Print option.
2. Select the printer from the list of printers, and then select Properties or Preferences.
NOTE: The name of the button varies for different software programs.
3. Click the Basic tab.
4. Select the Job Storage check box.
NOTE: If the Job Storage check box is not showing, follow the instructions in the "Disable or enable
job storage feature" section to activate the feature.
5. Select a Print Mode option:
● Normal print: Sends print job to the printer and prints them immediately.
● PIN released: Saves the print job on the printer as a stored job that can only be printed using a
Personal Identication Number (PIN). Enter a 4-digit PIN in the Enter PIN eld and the Conrm
PIN eld. The PIN must be entered at the printer control panel to print the stored job.
NOTE: If a PIN is not entered, the default PIN is 0000.
● Secure encrypted: Saves the print job on the printer as an encrypted print job. Enter a print job
password in the Enter Password eld and the Conrm Password eld. The password must be
entered at the printer control panel to print the encrypted job.
6. Click the OK button to close the Document Properties dialog box. In the Print dialog box, click the
Print button to print the job.
Create a stored job (macOS)
Store jobs on the USB ash drive for private or delayed printing.
1. Click the File menu, and then click the Print option.
2. In the Printer menu, select the printer.
3. Click Show Details or Copies & Pages, and then click the Job Storage menu.
NOTE: If the Job Storage menu is not showing, follow the instructions in the "Disable or enable job
storage feature" section to activate the menu.
4. In the Mode drop-down list, select the type of stored job.
● Proof and Hold: Print and proof one copy of a job, and then print more copies. The rst copy
prints immediately. Printing of the subsequent copies must be initiated from the device's front
control panel. For example, if 10 copies are sent, one copy prints immediately, and the other nine
copies will print when the job is retrieved. The job is deleted after all copies are printed.
54
Chapter 4 Print

● Personal Job: The job does not print until someone requests it at the printer control panel. If the
job has a personal identication number (PIN), provide the required PIN at the control panel. The
print job is deleted from memory after it prints.
● Quick Copy: Print the requested number of copies of a job and store a copy of the job in the
printer memory to print it again later. The job is deleted manually or by the job retention schedule.
● Stored Job: Store a job on the printer and allow other users to print the job at any time. If the
job has a personal identication number (PIN), the person who prints the job must provide the
required PIN at the control panel. The job is deleted manually or by the job retention schedule.
5. To use a custom user name or job name, click the Custom button, and then enter the user name or
the job name.
NOTE: macOS 12.0 Monterey and above: The print driver no longer includes the Custom button.
Use the options below the Mode drop-down list to set up the saved job.
Select which option to use if another stored job already has that name.
● Use Job Name + (1-99): Append a unique number to the end of the job name.
● Replace Existing File: Overwrite the existing stored job with the new one.
6. If you selected the Stored Job or Personal Job option in the Mode drop-down list, you can protect
the job with a PIN. Type a 4-digit number in the Use PIN to Print eld. When other people attempt to
print this job, the printer prompts them to enter this PIN.
7. Click the Print button to process the job.
Print a stored job
Use the following procedure to print a job that is stored in the printer memory.
1. From the Home screen on the printer control panel, select the Print icon.
2. Select Print from Job Storage.
3. Select the name of the folder where the job is stored.
4. Select the name of the job. If the job is private or encrypted, enter the PIN or password.
5. To adjust the number of copies, select the number of copies eld. Use the keypad to enter the number
of copies to print.
6. Select Print to print the job.
Delete a stored job
When a new job is stored on a USB ash drive, any previous jobs with the same user and job name are
overwritten. If the memory on the USB ash drive is full, the following message displays on the printer
control panel: The USB ash storage device is out of memory. Delete unused jobs, and then try again.
Existing stored jobs must be deleted before additional print jobs can be stored.
Delete a job that is stored on the printer
Delete a job that is stored on a USB ash drive.
1. From the Home screen on the printer control panel, touch the Print icon, and then touch Job Storage.
Print a stored job
55

2. Scroll to and touch the name of the folder where the job is stored.
3. Select the check box next to the name of the job that you want to delete.
NOTE: If the job is private or encrypted, enter the PIN or password, and then touch Done.
4. Touch Delete to delete the job.
Information sent to printer for Job Accounting purposes
Printing jobs sent from drivers on the client (e.g., PC) may send personally identiable information to HP’s
Printing and Imaging devices. This information may include, but is not limited to, user name and client
name from which the job originated that may be used for job accounting purposes, as determined by the
Administrator of the printing device. This same information may also be stored with the job on the mass
storage device (e.g., disk drive) of the printing device when using the job storage feature.
Wi-Fi Direct printing (wireless models only)
Wi-Fi Direct enables printing from a wireless mobile device without requiring a connection to a network or
the Internet.
NOTE: Not all mobile operating systems are currently supported by Wi-Fi Direct.
Use Wi-Fi Direct to print wirelessly from the following devices:
● Android mobile devices compatible with the Android embedded print solution
● iPhone, iPad, or iPod touch using Apple AirPrint or the HP Smart app
● Android mobile devices using the HP Smart app or the Android embedded print solution
● HP Roam
For more information on Wi-Fi Direct printing, go to www.hp.com/go/wirelessprinting.
Wi-Fi Direct can be enabled or disabled from the printer control panel.
To turn on Wi-Fi Direct
To print wirelessly from mobile devices, Wi-Fi Direct must be turned on.
Follow these steps to turn on Wi-Fi Direct from the printer control panel.
1. At the printer control panel, touch the Menu icon.
2. Select Settings, and then select Network.
3. Select Wi-Fi Direct.
4. If Wi-Fi Direct is set to Off, select it to turn it on.
NOTE: In environments where more than one model of the same printer is installed, it might be helpful
to provide each printer a unique Wi-Fi Direct name for easier printer identication when using Wi-Fi Direct
printing.
56
Chapter 4 Print
Change the printer Wi-Fi Direct name
Change the printer Wi-Fi Direct name using the HP Embedded Web Server (EWS):
Step one: Open the HP Embedded Web Server
Use the EWS to manage your printer from a computer instead of the printer control panel.
Your printer must be connected to an IP-based network before you can access the EWS.
1. At the printer control panel, select the Menu option.
2. Select Info, then select Connectivity to view the printer's IP address.
3. Open a web browser, and in the address line, type the IP address or host name exactly as it displays
on the printer control panel. Press the Enter key on the computer keyboard. The EWS opens.
NOTE: If a message displays in the web browser indicating that the website might not be safe,
select the option to continue to the website. Accessing this website will not harm the computer.
Step two: Change the Wi-Fi Direct name
Use the following procedure to change the Wi-Fi Direct name.
1. On the EWS Home page, click Network in the left navigation pane.
2. Under Network in the left navigation pane, click Wi-Fi Direct.
3. At the top of the Wi-Fi Direct page, click Conguration.
4. In the Wi-Fi Direct Name eld, enter the new name, and then click Apply.
Print from a USB
ash drive
Learn how to print directly from a USB ash drive.
Introduction
This printer features walk-up USB printing, for quickly printing les without sending them from a computer.
The printer accepts standard USB ash drives in the USB port that is located on top of the printer.
Walk-up USB printing supports the following types of les:
● .pdf
● .jpg
● .prn and .PRN
● .pcl and .PCL
● .ps and .PS
● .doc and .docx
● .ppt and .pptx
Change the printer Wi-Fi Direct name
57

Print USB documents
Use the following procedure to print USB documents.
1. Insert the USB ash drive into the USB port on the side of the printer.
2. Touch Print on the control panel.
3. Select Print from USB.
4. Touch the name of the le that you want to print. If the le is stored in a folder, select the name of the
folder, and then select the name of the le.
5. Touch the icon next to the Print button to see the print options.
6. Select any of the following menu items to change the settings for the print job:
● Color Mode
● Sides
● Quality
● Collate
NOTE: To see the default print options, touch Defaults.
7. After selecting the settings for the print job, select Print to print the job.
8. Retrieve the printed job from the output bin, and then remove the USB ash drive from the USB port.
58
Chapter 4 Print

Copy5
Make copies with the printer, learn how to copy a two-sided document, and locate additional copy tasks on
the web.
The following information is correct at the time of publication. For current information, see hp.com/
support/ljpro4110mfp.
For more information:
HP's all-inclusive help for the printer includes the following information:
● Install and congure
● Learn and use
● Solve problems
● Download software and rmware updates
● Join support forums
● Find warranty and regulatory information
Make a copy
Copy a document or picture from the scanner glass or automatic document feeder.
1. Load the original print-side down on the scanner glass or print-side up in the automatic document
feeder.
2. From the Home screen on the printer control panel, touch the Copy icon to start the copy job
immediately, or touch the Settings icon to the left of the copy button to adjust the copy settings.
NOTE: To save your settings to use on future copy jobs, touch the Save icon at the bottom of the
touchscreen.
3. To adjust the number of copies, touch the box to the left of the Copy button and then enter the
number of copies using the touch keypad. Touch Done to close the keypad.
4. Touch Copy to begin copying.
Copy on both sides (duplex)
The printer allows you to copy a two-sided document. You can select an automatic or manual method,
depending on if you copy from a document feeder or from the scanner glass.
Copy on both sides automatically
Use the automatic document feeder to copy a two-sided document without manual intervention.
Copy
59

1. Load the original documents into the document feeder with the rst page facing up, and with the top
of the page leading.
2. Adjust the paper guides to t the size of the document.
3. From the Home screen on the printer control panel, touch the Settings icon to the left of the Copy
button.
4. Touch Sides, and then touch the option you want to use for your copy job.
If you have two-sided originals, you can choose 2 to 1-sided to create single-sided copies, or 2 to
2-sided to create two-sided copies. If you have single-sided originals, you can choose 1 to 1-sided to
create single-sided copies, or 1 to 2-sided to make two-sided copies.
5. Touch the Copy button to start copying.
Copy on both sides manually
Use the scanner to copy a two-sided document using a manual process. The printer prompts when to
place and copy each page.
1. Place the document face-down on the scanner glass with the upper-left corner of the page in the
upper-left corner of the glass, and then close the scanner lid.
2. From the Home screen on the printer control panel, touch the Settings icon to the left of the Copy
button.
3. Touch Sides, and then touch the option you want to use for your copy job.
You can choose 1 to 1-sided to make a single-sided copy from a single-sided original, or 1 to 2-sided
to make single-sided copies from a two-sided original.
4. Touch the Copy button to start copying.
5. The printer prompts you to load the next original document. Place the next page on the glass, or turn
the two-sided document over to copy the second side.
6. Touch the OK button.
7. Repeat this process until you have scanned the last page. Touch Copy to nish printing the copies.
Copy an
identication card
Use this feature to copy both sides of an identication card, or other small-sized documents, onto the
same side of one sheet of paper. The printer prompts you to copy the rst side, and then turn the card over
to copy the other side.
1. Place the ID card onto the scanner glass, near the icon at the back left corner, and slightly away from
the edges of the scanner glass.
2. Close the scanner lid.
3. From the Home screen on the printer control panel, touch the Settings icon to the left of the Copy
button.
4. Touch the green Quick Sets menu at the top of the screen.
5. Touch the ID Card icon.
60
Chapter 5 Copy

6. Select the number of sides and tray settings, and then touch Copy.
7. Follow the prompts on the control panel screen to copy the rst side of the ID card and then turn the
card over to copy the other side.
Additional copy tasks
Locate information on the Web for performing common copy tasks.
Go to hp.com/support/ljpro4110mfp.
Instructions are available for copy tasks, such as the following:
● Copy or scan pages from books or other bound documents
● Copy mixed-size documents
● Copy or scan a document into a booklet format
Additional copy tasks
61

Scan6
Scan using the software, or scan directly to email, a USB ash drive, a network folder or another
destination.
For more information:
The following information is correct at the time of publication. For current information, see hp.com/
support/ljpro4110mfp.
HP's all-inclusive help for the printer includes the following information:
● Install and congure
● Learn and use
● Solve problems
● Download software and rmware updates
● Join support forums
● Find warranty and regulatory information
Set up Scan to Email
The Scan to Email feature allows you to scan a document and send it directly to one or more email
addresses. The printer must be connected to a network, and the Scan to Email feature must be set up by a
network administrator before it can be used.
Introduction
There are two methods for conguring Scan to Email: the HP Universal Scan Solution software, which can
be installed as part of the full software installation; or the Scan to Email Setup through the HP Embedded
Web Server (EWS).
If you set up Scan to Email during the software install process, it is ready to use and no additional setup is
required.
Before you begin
To set up the Scan to Email feature, you need access to the printer and SMTP server settings of your
email provider. The email provider SMTP settings include the server, port, and other authentication
requirements. The printer must have an active network connection to the same network as the computer
that will run the setup process.
You need the following information before beginning the conguration process:
● Administrative access to the printer
● SMTP server (e.g., smtp.mycompany.com)
● SMTP port number
62
Chapter 6 Scan

● SMTP server authentication requirements for outgoing email messages, including the user name and
password used for authentication, if applicable.
NOTE: If you do not know the SMTP server name, SMTP port number, or authentication information,
contact the email/Internet service provider or system administrator for the information. SMTP server
names and port names are typically easy to nd by doing an Internet search. For example, use terms
like "gmail smtp server name" or "outlook smtp server name" to search.
NOTE: Consult your email service provider's documentation for information on digital sending
limits for your email account. Some providers may temporarily lock your account if you exceed your
sending limit.
Set up the Scan to Email feature via the HP Embedded Web Server
Use the HP Embedded Web Server (EWS) to set up the Scan to Email feature. This method is available for
all supported operating systems.
Step one: Access the HP Embedded Web Server (EWS)
Locate the printer's IP address and then enter it into a web browser to access the EWS.
Your printer must be connected to an IP-based network before you can access the Embedded Web Server.
1. From the Home screen on the printer control panel, touch the Menu icon, and then touch Info.
2. Touch Connectivity to display the printer's IP address or host name.
3. Open a web browser, and in the address line, type the IP address or host name exactly as it displays
on the printer control panel. Press the Enter key on the computer keyboard. The EWS opens.
NOTE: If the web browser displays a message indicating that the connection is not private or
secure, click the Advanced option, and then click the link to Continue... or Proceed... to the website.
Accessing this website will not harm the computer.
IMPORTANT: Use a printer PIN or administrator password to access the Embedded Web Server
(EWS) printer settings.
Only a user or an administrator can change the default PIN.
To obtain the default printer PIN: Open the toner cartridge access door by lifting the scanner
(callout 1), and then lifting the cartridge door (callout 2). The default printer PIN is located on a label at
the left side of the toner cartridge access area. Use this PIN to log in when prompted.
Set up the Scan to Email feature via the HP Embedded Web Server
63
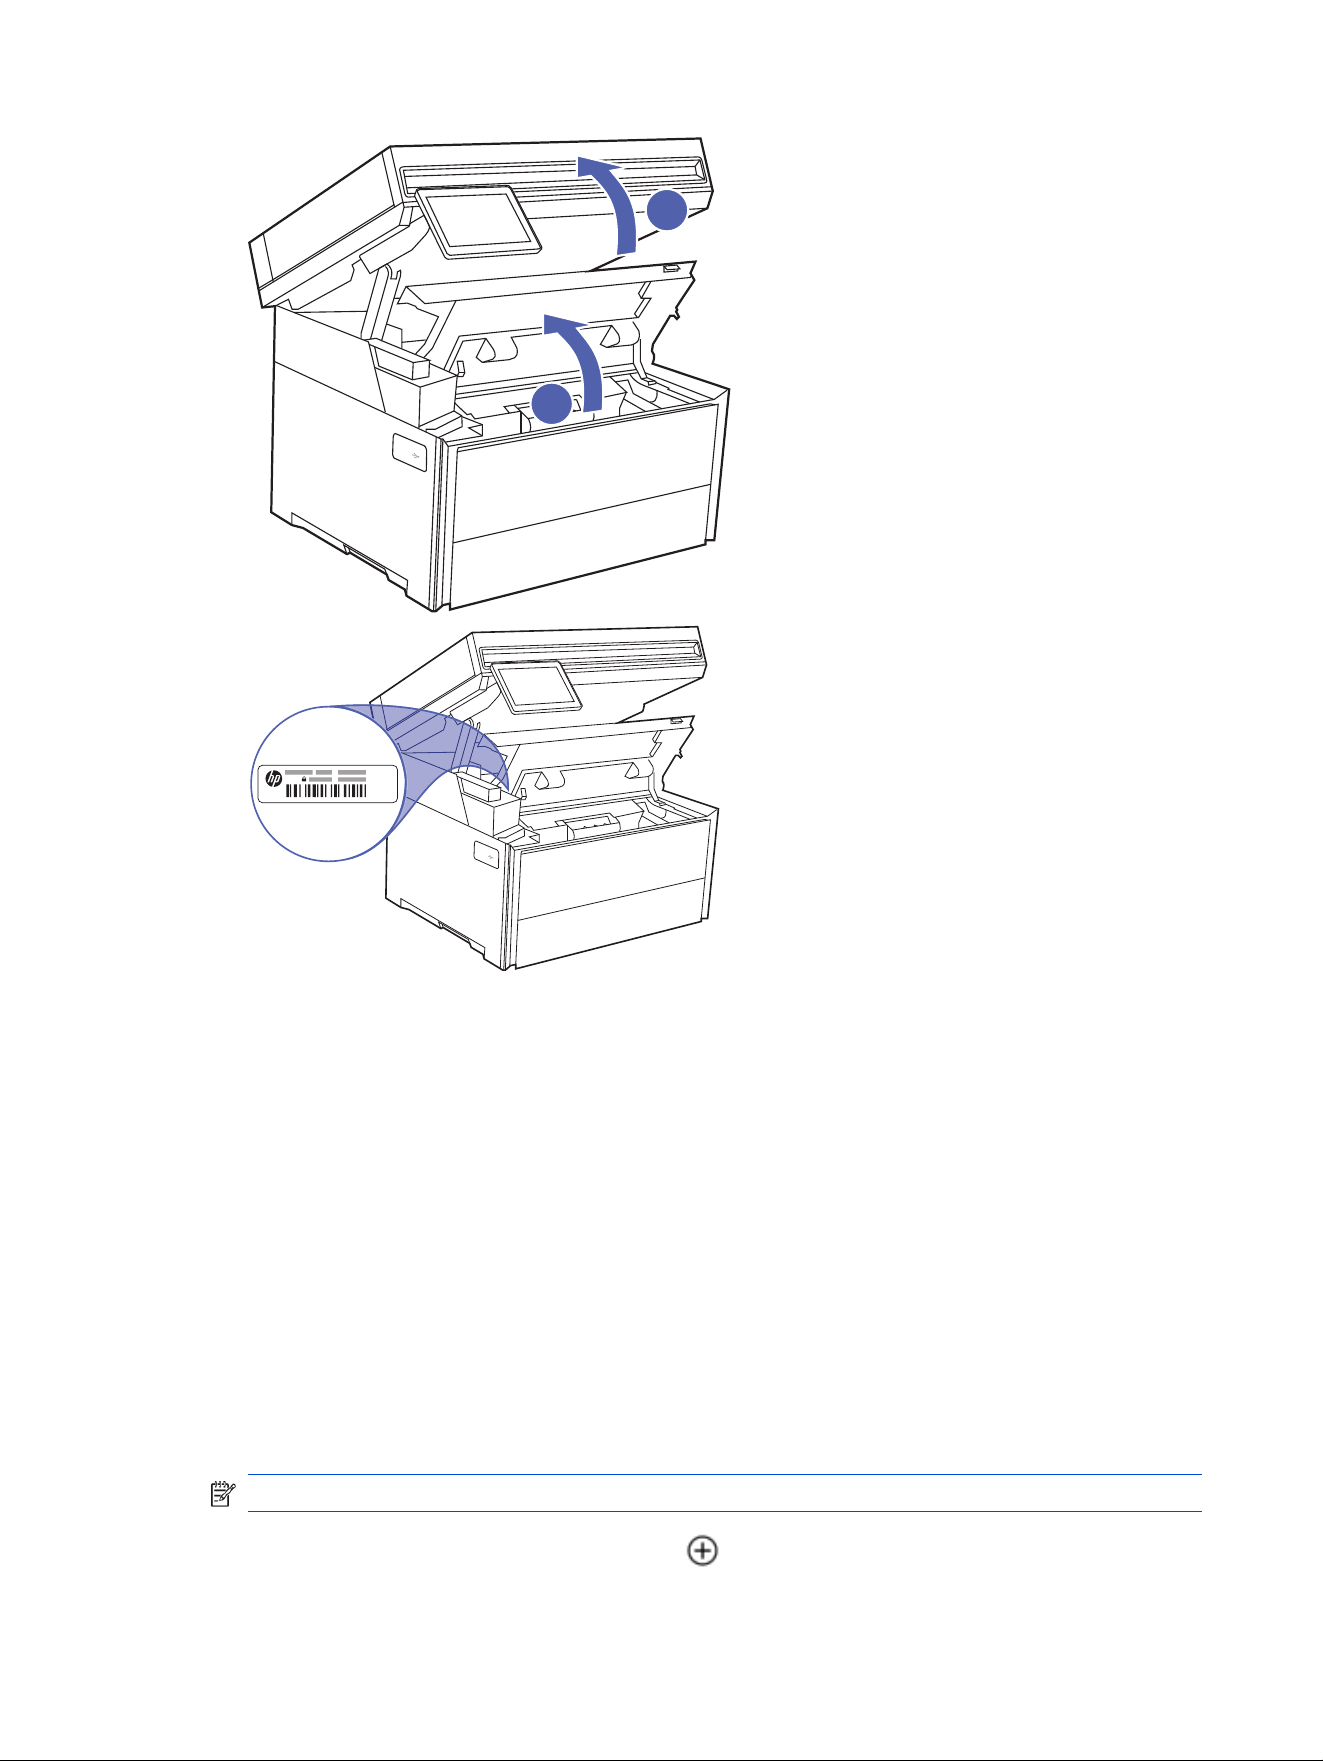
Step two: Congure the Email Servers in the EWS
Learn how to create an email prole and congure the email SMTP server settings for the outgoing email
prole using the Embedded Web Server (EWS).
Follow the steps in the order presented to congure the email server settings in the Email Servers page:
1. Create an email prole
2. Congure the email SMTP server settings
Create an email prole
Follow these steps to access the Email Servers page in the Embedded Web Server (EWS) and create an
email prole.
1. On the EWS Home page, click General in the left navigation pane, and then click Email Servers.
2. On the Sign In screen, enter the printer PIN or the EWS password.
NOTE: If the factory default PIN was changed, enter a custom PIN in the PIN text box.
3. On the Email Servers page, click the Add icon to create an email prole.
64
Chapter 6 Scan

Congure the email SMTP server settings
Follow these steps to congure the email SMTP server settings and authentication requirements for the
newly created email prole in the Add New screen.
1. Select the appropriate email server prole, enter the name and email for sending emails, and then
enter the SMTP server name and port number.
a. Select the appropriate email server prole from the Prole Type drop-down list.
● User-dened email prole: Select this option if your organization uses multiple email
servers for its emails.
● SMTP Server: Select this option if your organization uses one email server for all its emails.
b. In the Display Name, enter a name you want to display on the printer control panel when you
send emails (sender's name).
c. In the Email address, enter an email address for sending emails.
d. Enter the SMTP server name and SMTP port number.
The following table provides examples of SMTP server names and port numbers for common
email services.
Table 6-1 Examples of SMTP server name and port number
Email service provider SMTP server name SMTP port number
Gmail smtp.gmail.com 465/587
Outlook smtp.ofce365.com 587
e. Set the Maximum size of email to Unlimited.
2. Select the Always Use Secure Connection (SSL/TLS) toggle button to enable this setting for
security.
NOTE: If a certicate was not imported to the printer, ensure to disable Validate Certicates.
3. Select the appropriate authentication from the Server Authentication drop-down list.
● Server does not require authentication: Select this option if your email account does not
require authentication.
● Server requires authentication: Select this option if your email account requires
authentication, and then enter a user name and password in the appropriate elds.
NOTE: Yahoo mail is not supported as Yahoo has discontinued the app password feature.
IMPORTANT: To set up "Scan to email" using a Gmail account, a Google app password is
required (different from a Gmail password).
The following table provides examples of authentication for common server providers.
Congure
the email SMTP server settings 65

Table 6-2 Information of username and password for common email providers
Email service providers Username Password
Gmail Your Gmail email address Google app password.
NOTE: Do not enter your Gmail
password.
See below for instructions to create a
Google app password.
Outlook Your outlook email address Password for your outlook email.
Instructions on how to create a Google app password
NOTE: To create an app password, you will need to enable a 2-step verication on your Google
account.
a. Go to your Google Account (https://myaccount.google.com).
b. On the left pane, select Security.
c. Under "How you sign in to Google," select 2-Step Verication.
d. Select Get started, follow the on-screen instructions, and then select TURN ON.
e. Scroll down to the bottom of the 2-step Verication page, and then select App passwords.
f. In the Select device drop-down list, select the Other option.
g. Enter your printer model name or a device name that you will use for the app password.
NOTE: Make sure to note the name used for the app password.
h. Select Generate.
NOTE: The app password is the 16-character code.
i. Copy and paste the app password in the Password eld in the EWS Server requires
authentication section.
j. Select Apply.
If you cannot nd the App passwords option under Google Security settings, use the following steps
to troubleshoot the issue:
● Ensure the 2-step Verication is ON.
NOTE: Google only displays the App passwords menu after you enable the 2-Step Verication
for your account.
● Use the direct link to access the App passwords page, go to
https://myaccount.google.com/apppasswords.
NOTE: If the direct link does not work, use the search bar at the top of your Google Account
page and type "App passwords".
66
Chapter 6 Scan

If you have issues when adding an app password, refer to the table below for the possible cause and
solution.
Table 6-3 Cause and Solution to add an app password
Cause Solution
Your Google Account is set up to use security keys for a
2-Step Verication.
Go to Use a security key 2-step verication.
Your Google Account has advanced protection. Go to Common questions with Advanced Protection
Program.
You are logged into a work, school, or another organization
account.
Contact your organization.
4. If you selected the User-dened email prole option for the email prole, select the Use Security
PIN toggle button to enable this setting.
NOTE: HP recommends creating a PIN to secure the email prole. When a Security PIN is created,
it must be entered on the printer control panel each time the prole is used to send a Scan to Email.
a. Enter a four-digit PIN in the Security PIN eld.
The Security PIN must be a four-digit number.
b. Enter the PIN again in the Conrm Security PIN eld.
NOTE: Make sure to note this pin number. This PIN is required before you send an email from
the printer.
5. Click the Add button to add the SMTP email server settings.
6. Test the email server for the new email prole created.
a. Select the check box for the new email prole created, and then click the Test icon .
b. Click the Test button.
c. Make sure that you receive a message that the email test server was successful.
Congure
default job options, contact list, and Quick Sets for scan to email
jobs (optional)
Learn how to congure the default job options, add contacts to the Address Book, and congure Quick
Sets for scan to email jobs using the Embedded Web Server (EWS).
If prompted to enter a PIN on the Sign In screen when accessing a printer setting in the Embedded Web
Server (EWS), enter the factory default PIN (printer PIN).
NOTE: If the factory default PIN was changed, enter a custom PIN in the PIN text box.
Congure
default job options for scan to email jobs (optional)
Follow these steps to congure the default job options for scan to email jobs using the Embedded Web
Server.
1. On the EWS Home page, click Scan in the left navigation pane, and then click scan to e-mail.
Congure
default job options, contact list, and Quick Sets for scan to email jobs (optional) 67

2. Select the options that you want to assign as the default settings.
a. Select the appropriate options from the Address Field Restrictions, From, and To drop-down
lists.
b. Enter a subject line and message for the email.
c. Select the default scan and le options for the scanned les.
3. Click Apply to save the settings.
Set up contact lists (optional)
Follow these steps to add contacts to the Address Book for scan to email jobs using the Embedded Web
Server (EWS).
1. On the EWS Home page, click Contacts in the left navigation pane.
2. Select the appropriate address book option to add contacts from the Select Address Book drop-
down list.
3. Use one of the following options to set up a contact list:
● You can add contacts individually to the contacts list. Click the Add Contact or Add Group icon
to add contacts to the list.
● A Network Directory Server (LDAP) can be set up to search for users within a company. Click the
Address Books tab at the top of the Contacts page to congure LDAP.
● You can also use the Address Books page to set up more than one contact list. Under Manage
Address Books, click the Add icon to add additional custom address books.
Congure
Quick Sets (optional)
Follow these steps to congure Quick Sets using the Embedded Web Server (EWS).
Quick Sets are optional shortcut jobs that can be accessed from the Home screen on the printer control
panel. They are useful for saving scan settings for jobs that you carry out frequently.
IMPORTANT: If the printer settings are being controlled using the HP Smart Admin portal, Quick Sets
are disabled in the EWS. Instead, you can set up Shortcuts in the HP Smart Admin portal.
1. On the EWS Home page, click Quick Sets in the left navigation pane.
2. On the Quick Sets page, click the Add icon .
3. In the Quick Set Type drop-down list, select the appropriate type for the quick set, and then click Next.
4. Follow the onscreen prompts to set the desired settings for the Quick Set.
NOTE: The settings will vary depending on the Quick Set Type that you selected.
NOTE: When choosing Network Folder for the Quick Set Type, you will be prompted to enter the
path to the network folder and the sign-in credentials. To verify that the sign-in credentials are
working, click the Verify Access button.
The network folder must be set up as a shared folder for the Scan to Network Folder feature to work.
68
Chapter 6 Scan

Set up Scan to Network Folder
The Scan to Folder feature allows you to scan a document directly to network folder. The printer must be
connected to a network, and the Scan to Folder feature must be set up by a network administrator before it
can be used.
Introduction
There are two methods for conguring Scan to network folder: the HP Universal Scan Solution software,
which can be installed as part of the full software installation; or the Network Folder Setup through the HP
Embedded Web Server (EWS).
If you set up Scan to network folder during the software install process, it is ready to use and no additional
setup is required.
Before you begin
To set up the Scan to Folder feature, the network administrator needs access to the printer and
information about the network path and destination folder. The printer must have an active network
connection to the same network as the computer that will run the setup process.
Administrators need the following information before beginning the conguration process.
● Administrative access to the printer
● The network path of the destination folder (e.g., \\servername.us.companyname.net\scans)
NOTE: The network folder must be set up as a shared folder for the Scan to Network Folder feature
to work.
Set up the Scan to Network Folder feature via the HP Embedded Web Server
Use the HP Embedded Web Server (EWS) to set up the Scan to Network Folder feature. This method is
available for all supported operating systems.
Step one: Create a shared network folder
Learn how to create a shared folder in a Windows or Mac operating system (OS) that is accessible to users
or devices on a network.
Windows OS
Follow these steps to set up a shared folder on a network using a Windows operating system.
1. Create a new folder on your computer.
a. Open File Explorer.
Press Windows logo key and the E key simultaneously on your keyboard.
OR
Click the folder icon in the taskbar.
b. Navigate to the location where you want to create a new folder.
c. Right-click in the location, select New, and then select Folder.
d. Type a name for the new folder, and then press Enter on your keyboard.
Set up Scan to Network Folder
69

2. Right-click the new folder, and then select Properties.
3. Select the Sharing tab, and then click the Share button.
4. In the Choose people on your network to share with section, select Everyone from the drop-down
menu, and then click Add.
5. Under the Permission Level column, select the Read/Write option for Everyone, and then click
Share.
6. Click Done in the Your folder is shared window.
7. Make sure to note the network path located under the Network File and Folder Sharing section in
the Properties window.
NOTE: Use this network path when sharing the folder with users or devices and when setting up a
shared folder using the "Scan to Network" feature in the Embedded Web Server (EWS).
8. Click Close.
macOS
Follow these steps to create a shared folder and share the new folder or an existing folder on the network
using a macOS.
In addition to the instructions below, you can view the following video of how to create a shared folder or
share an existing folder on the network using a macOS.
1. Create a new folder on your computer.
a. Click the Finder icon in the dock.
b. Navigate to the location where you want to create a new folder.
Make sure to note the location of this folder.
c. Click File, and then select New Folder.
d. Type a name for the new folder, and then press return on your keyboard.
2. Enable the File Sharing service for the new folder.
a. Click the Apple icon in the menu bar, and then select System Preferences.
b. Click the Sharing icon in the System Preferences screen.
c. In the left pane, select the File Sharing check box to turn on this service.
3. Share the new folder created or an existing folder.
a. Click the plus icon under the Shared Folders list.
b. Locate the new folder created or select an existing folder for sharing, and then click Add.
c. Select the folder in the Shared Folders list.
70
Chapter 6 Scan

d. In the Users list, make sure that your name is listed and has Read & Write permissions to
access the folder.
Table 6-4 Resolve "Users" list issues
Issue Solution
Your name is not listed in the Users list. 1. Click the plus icon under the Users list.
2. Select your user name, and then click Select to
add your name.
Your user name does not have Read & Write
permissions.
1. Select your user name, and then click the
arrow next to the permission set for your user
name.
2. Select the Read & Write option from the drop-
down list.
4. Share the les and folders using SMB.
Server Message Block (SMB) is a network le sharing protocol.
a. Click the Options button.
b. Select the Share les and folders using SMB check box.
c. Select the user account for SMB access.
A check mark will display in the On check box for this account.
d. Enter the password for the account, and then click OK.
e. Click Done.
5. Under the File Sharing: On section, note the shared folder "IP address" listed after "smb://" (for
example, smb://100.100.1.100).
NOTE: Use this "IP address" to congure the "Scan to Network folder" feature in the Embedded
Web Server (EWS).
6. Make sure to use the following format for the network folder path "\\<IP address>\<folder
name>".
<IP address>: Enter the "IP address" listed on the System Preferences Sharing screen under File
Sharing: On.
<folder name>: Enter the name of the shared folder.
7. Click the red button icon to close the System Preferences dialog box.
Step two: Access the HP Embedded Web Server (EWS)
Locate the printer's IP address and then enter it into a web browser to access the EWS.
Your printer must be connected to an IP-based network before you can access the Embedded Web Server.
1. From the Home screen on the printer control panel, touch the Menu icon, and then touch Info.
2. Touch Connectivity to display the printer's IP address or host name.
Step two: Access the HP Embedded Web Server (EWS)
71
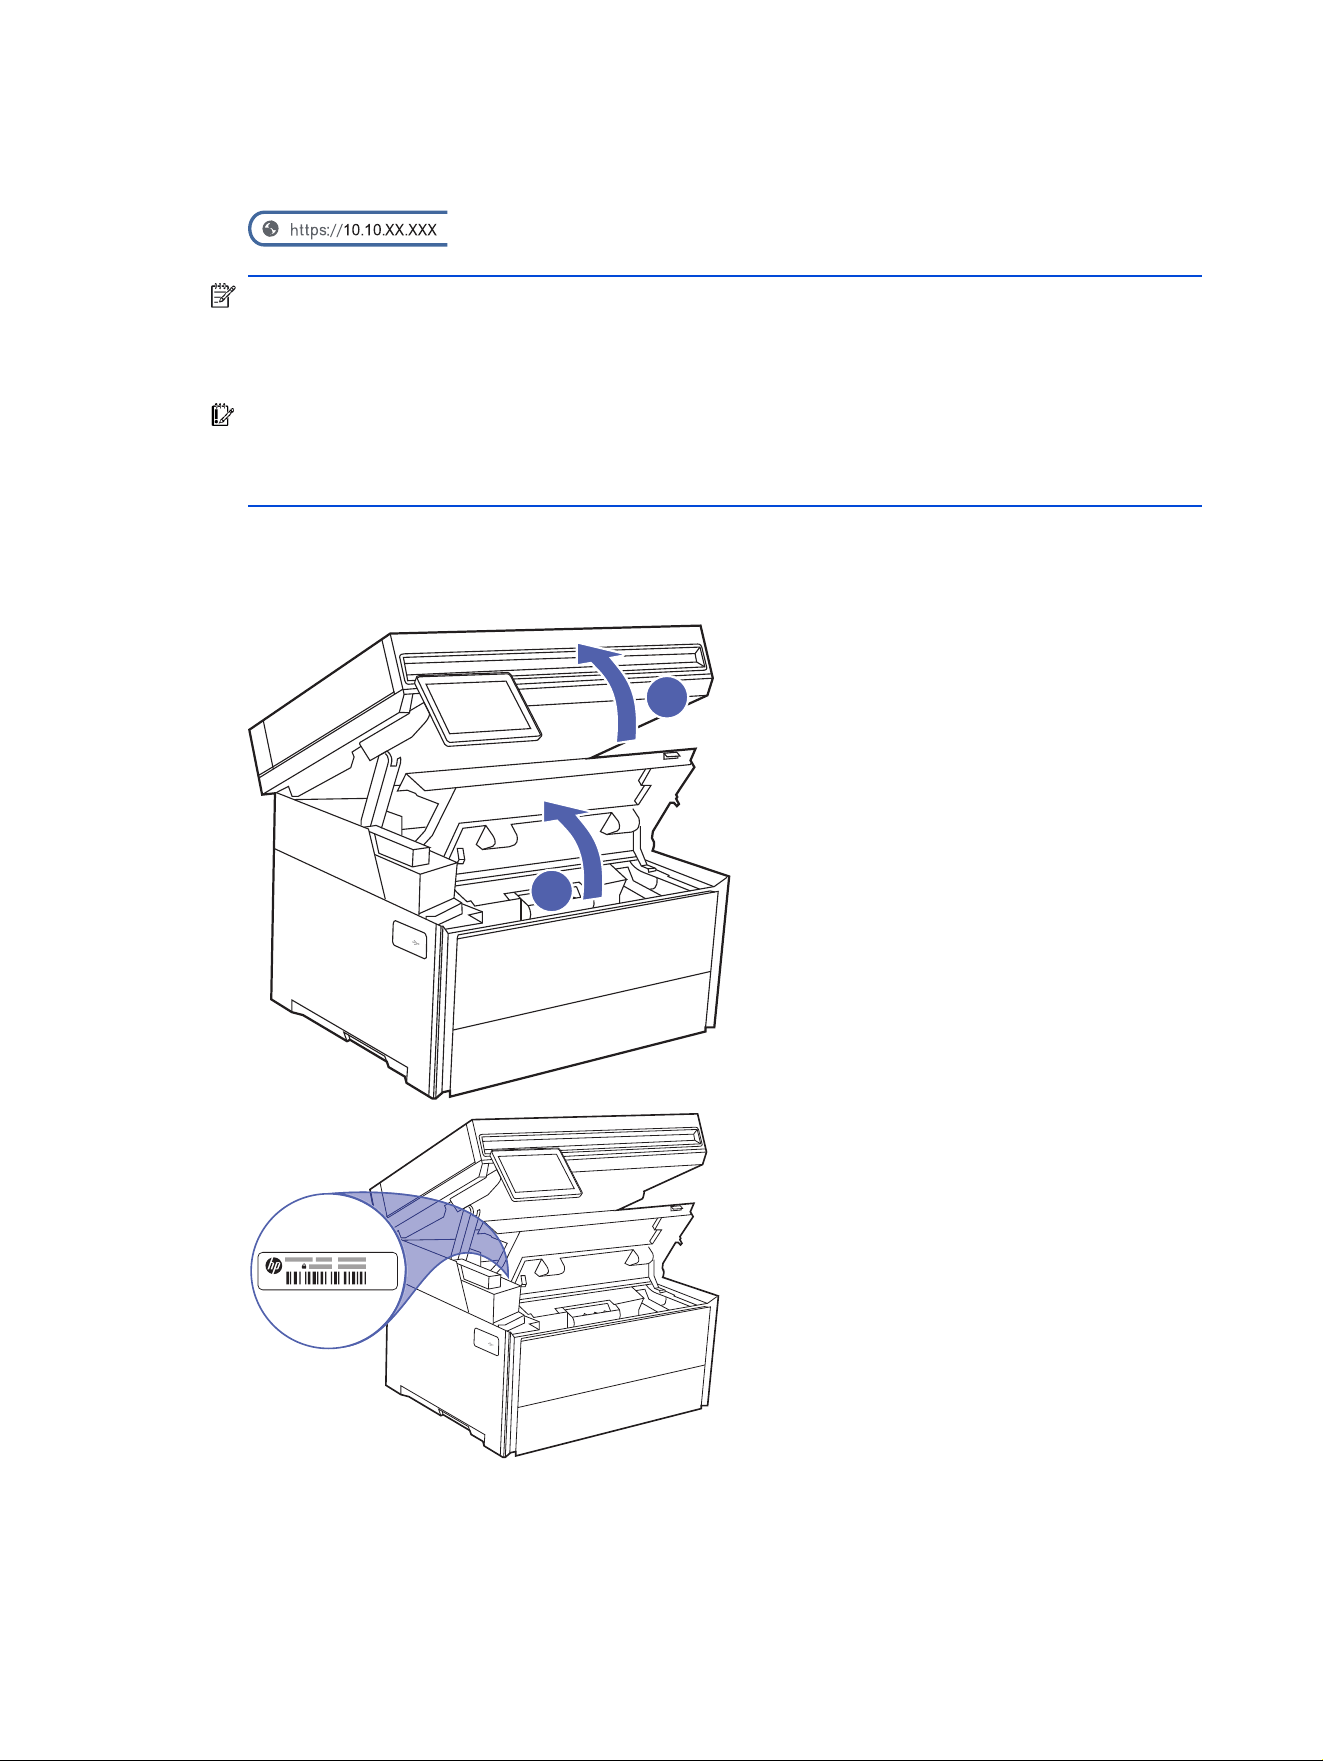
3. Open a web browser, and in the address line, type the IP address or host name exactly as it displays
on the printer control panel. Press the Enter key on the computer keyboard. The EWS opens.
NOTE: If the web browser displays a message indicating that the connection is not private or
secure, click the Advanced option, and then click the link to Continue... or Proceed... to the website.
Accessing this website will not harm the computer.
IMPORTANT: Use a printer PIN or administrator password to access the Embedded Web Server
(EWS) printer settings.
Only a user or an administrator can change the default PIN.
To obtain the default printer PIN: Open the toner cartridge access door by lifting the scanner
(callout 1), and then lifting the cartridge door (callout 2). The default printer PIN is located on a label at
the left side of the toner cartridge access area. Use this PIN to log in when prompted.
Step three: Congure Quick Sets
Follow these steps to congure Quick Sets using the Embedded Web Server (EWS).
72
Chapter 6 Scan

Quick Sets are optional shortcut jobs that can be accessed from the Home screen on the printer control
panel. They are useful for saving scan settings for jobs that you carry out frequently.
IMPORTANT: If the printer settings are being controlled using the HP Smart Admin portal, Quick Sets
are disabled in the EWS. Instead, you can set up Shortcuts in the HP Smart Admin portal.
1. On the EWS Home page, click Quick Sets in the left navigation pane.
2. On the Sign In screen, enter the printer PIN or EWS password.
NOTE: If the factory default PIN was changed, enter a custom PIN in the PIN text box.
3. On the Quick Sets page, click the Add icon .
4. In the Quick Set Type drop-down list, select Network Folder, and then click Next.
5. Enter the information in the Name section.
a. Enter a Quick Set name to display on the control panel in the Quick Set Name eld.
b. Enter a short description for the Quick Set in the Description eld.
c. Select an option from the Quick Set Start Option drop-down list, and then click Next.
6. Enter the information for the shared network folder in the Network Folder Options section.
a. Enter the shared network folder path (created in Step one on page 69) in the Network Folder
Path eld.
b. Select Use the following credentials from the Sign-In Method drop-down list.
c. Leave the Windows Domain eld blank.
NOTE: The Windows Domain information is optional and is not required for the network folder
path.
d. Enter your computer user name and password in the corresponding elds.
e. Click Verify Access to conrm the sign-in credentials are correct.
Make sure that you receive a message that the access verication was successful.
f. Enter a four to eight digit PIN in the Security PIN eld.
The Security PIN must be a four or eight digit number.
HP recommends to create a "Security Pin" to prevent unauthorized people from saving scanned
documents in this network folder.
g. Enter the PIN again in the Conrm Security PIN eld.
NOTE: Make sure to note this pin number. This Security PIN must be entered at the printer
control panel before any scanned documents can be saved to the folder.
h. Click Next.
7. Select the options to be set as the default settings when scanning to the network folder in the
Options section, and then click Next.
Step three:
Congure Quick Sets 73

8. Review the information in the Summary section, and then click Next.
9. Click OK when a check mark displays for Saving Quick Set and Finish in the Finish section.
Set up Scan to SharePoint
Learn how to set up the Scan to SharePoint feature in the Embedded Web Server (EWS) so you can scan
and save les to a SharePoint site from the printer.
NOTE: Scan to SharePoint is not supported with SharePoint 365.
Step one: Access the HP Embedded Web Server (EWS)
Locate the printer's IP address and then enter it into a web browser to access the EWS.
Your printer must be connected to an IP-based network before you can access the Embedded Web Server.
1. From the Home screen on the printer control panel, touch the Menu icon, and then touch Info.
2. Touch Connectivity to display the printer's IP address or host name.
3. Open a web browser, and in the address line, type the IP address or host name exactly as it displays
on the printer control panel. Press the Enter key on the computer keyboard. The EWS opens.
NOTE: If the web browser displays a message indicating that the connection is not private or
secure, click the Advanced option, and then click the link to Continue... or Proceed... to the website.
Accessing this website will not harm the computer.
IMPORTANT: Use a printer PIN or administrator password to access the Embedded Web Server
(EWS) printer settings.
Only a user or an administrator can change the default PIN.
To obtain the default printer PIN: Open the toner cartridge access door by lifting the scanner
(callout 1), and then lifting the cartridge door (callout 2). The default printer PIN is located on a label at
the left side of the toner cartridge access area. Use this PIN to log in when prompted.
74
Chapter 6 Scan
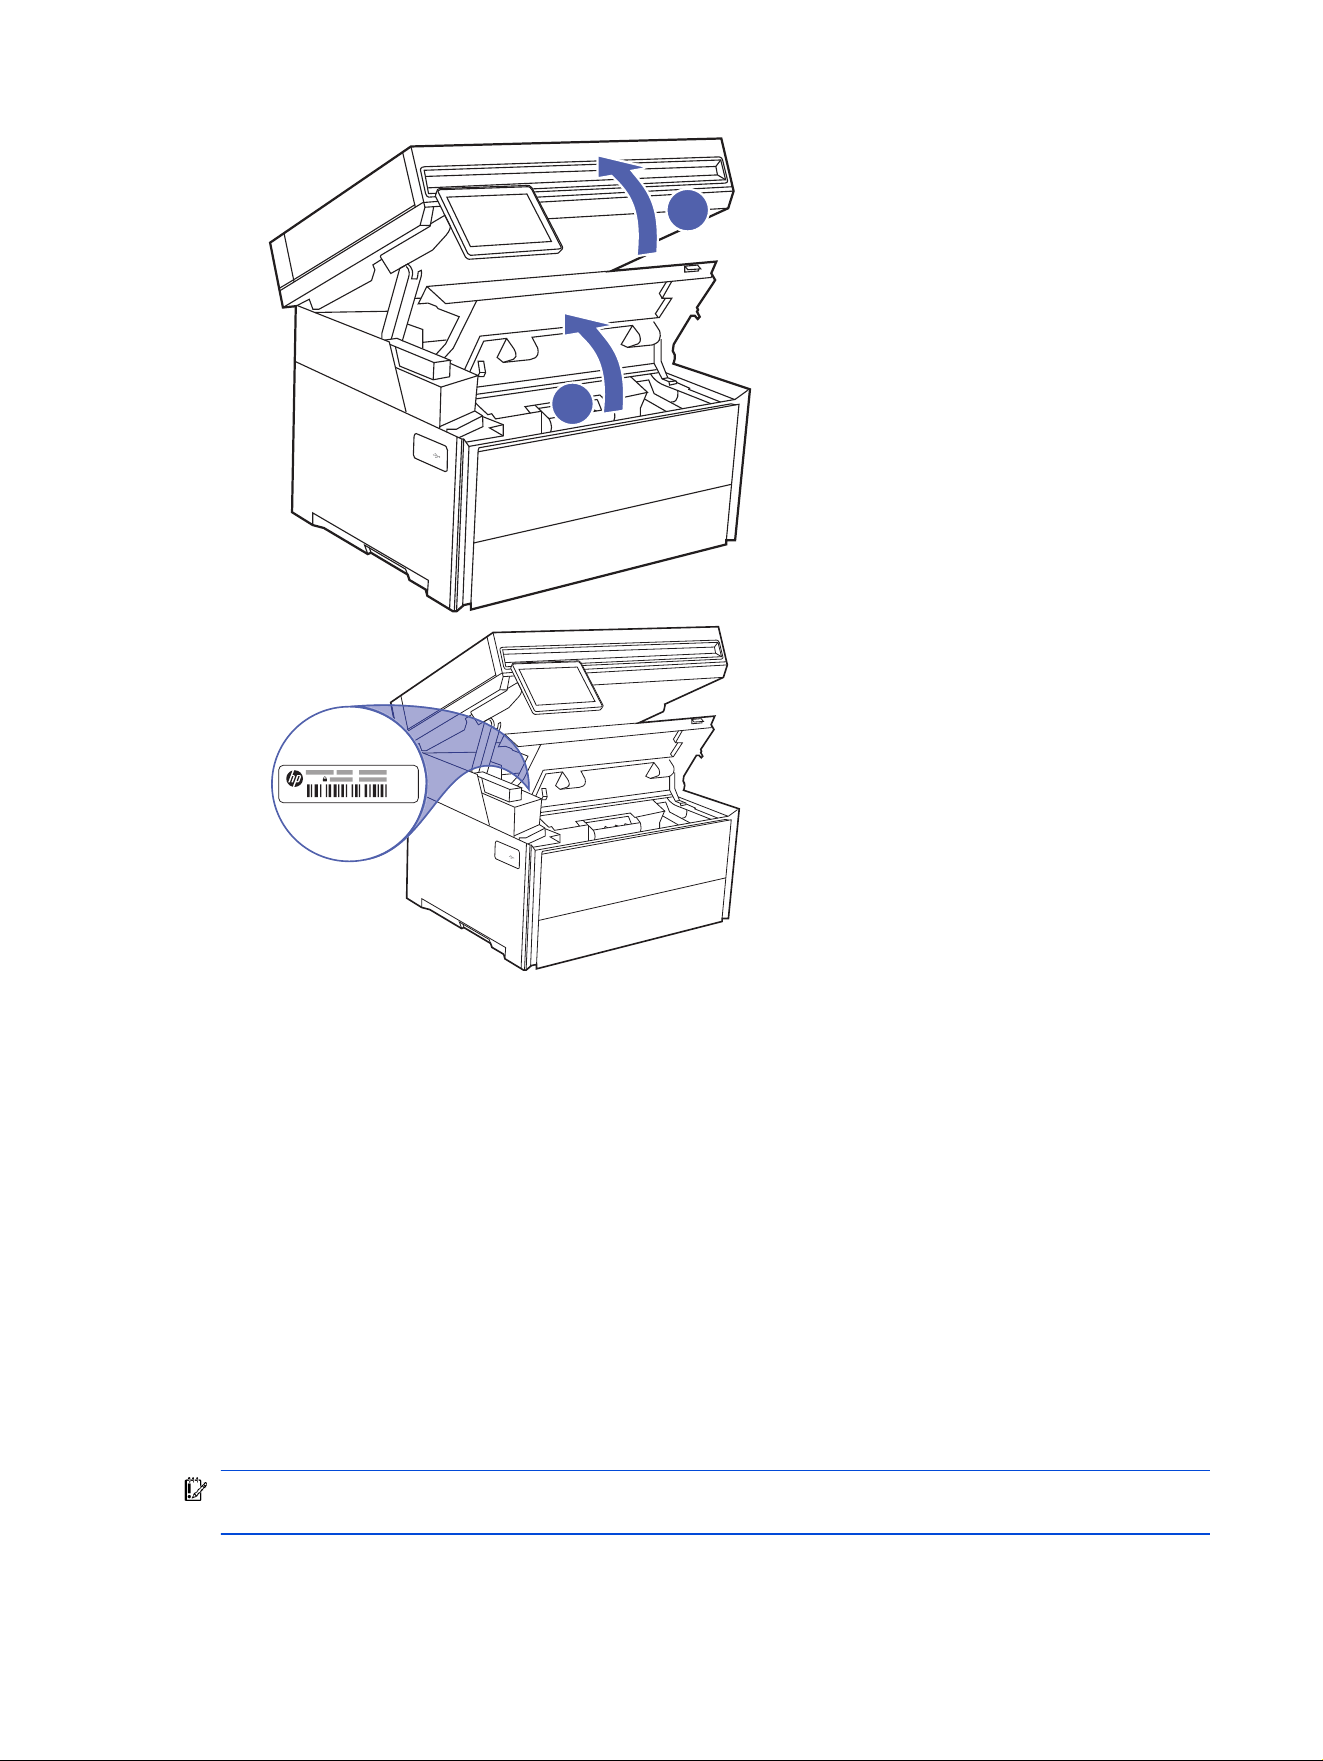
Step two: Set up Scan to SharePoint
Follow these steps to congure the default settings for the Scan to SharePoint feature using the
Embedded Web Server (EWS).
1. On the EWS Home page, click Scan in the left navigation pane, and then click Scan to SharePoint.
When prompted, enter the PIN.
2. Select the options that you want to assign as the default settings when scanning to the Sharepoint.
When nished, click Apply to save the settings.
Step three:
Congure Quick Sets
Follow these steps to congure Quick Sets using the Embedded Web Server (EWS).
Quick Sets are optional shortcut jobs that can be accessed from the Home screen on the printer control
panel. They are useful for saving scan settings for jobs that you carry out frequently.
IMPORTANT: If the printer settings are being controlled using the HP Smart Admin portal, Quick Sets
are disabled in the EWS. Instead, you can set up Shortcuts in the HP Smart Admin portal.
1. On the EWS Home page, click Quick Sets in the left navigation pane.
Step two: Set up Scan to SharePoint
75

2. On the Quick Sets page, click the Add icon .
3. In the Quick Set Type drop-down list, select the appropriate type for the quick set, and then click Next.
4. Follow the onscreen prompts to set the desired settings for the Quick Set.
NOTE: The settings will vary depending on the Quick Set Type that you selected.
NOTE: When choosing Network Folder for the Quick Set Type, you will be prompted to enter the
path to the network folder and the sign-in credentials. To verify that the sign-in credentials are
working, click the Verify Access button.
The network folder must be set up as a shared folder for the Scan to Network Folder feature to work.
Scan to a USB
ash drive
Use the printer control panel to scan a le directly to a USB ash drive.
1. Place the document on the scanner glass or into the document feeder according to the indicators on
the printer.
2. Insert the USB ash drive into the USB port on top of the printer.
3. From the home screen on the printer control panel, touch the Scan icon, and then touch Scan to USB.
4. Select the location on the USB drive where you want to save the scanned le.
5. Touch the File Name eld and type in the le name using the onscreen keypad.
6. Touch the File Format drop-down list to select a le type.
7. If you want to preview the scan or change the scan options, do the following:
● To preview the scan, touch the Preview icon to the left of the Send button.
● For additional scan options, touch the drop-down list at the top of the Scan to USB window.
8. Touch Send to scan the document and save it to the USB drive.
Scan to email
Use the printer control panel to scan a le directly to an email address or contact list. The scanned le is
sent to the address as an email message attachment.
In order to use this feature, the printer must be connected to a network and the Scan to Email feature must
be congured by using the HP Embedded Web Server.
1. Load the document on the scanner glass or into the document feeder according to the indicators on
the printer.
2. From the Home screen on the printer control panel, touch the Scan icon, and then touch E-mail.
3. If prompted, enter your login information in the Sign In screen.
This will set the From (or sender) address to the email address associated with your login.
76
Chapter 6 Scan

4. Enter the email recipient or recipients:
● Touch the To eld to enter an email address using the keypad. Touch Done.
● Touch the Address Book icon to the right of the To eld to select an individual or group contact
from the address book.
a. Touch each individual or group that you want to send to.
b. Touch Add when done.
NOTE: The Add button will indicate how many individuals or groups you are adding.
5. Touch the Subject eld to add a subject line.
6. Touch the File Name eld to specify a le name for the scanned le.
7. Touch the File Type drop-down list to select a le type.
8. If you want to preview the scan or change the scan options, do the following:
● To preview the scan, touch the Preview icon to the left of the Send button.
● For additional scan options, touch the drop-down list at the top of the Scan to Email window.
9. Touch Send to scan the document and send the email.
Scan to a network folder
Use the printer control panel to scan a document and save it to a folder on the network.
NOTE: In order to use this feature, the printer must be connected to a network and the Scan to Network
Folder feature must be congured by using the HP Embedded Web Server (EWS). You will also need the
network folder path created when conguring a Quick Set for a network folder.
1. Load the document on the scanner glass or into the document feeder according to the indicators on
the printer.
2. From the Home screen on the printer control panel, touch the Scan icon, and then touch Scan to
Network Folder.
3. On the Scan to Network Folder screen, select one of the following options for the Destination eld:
● Select Network Folder: Touch the Quick Sets folder icon created (shared network folder) for the
Destination folder path.
or
● Address book icon : Touch the Address Book icon to select a network path from
the address book.
4. Touch the File Name eld and type in the le name using the onscreen keypad.
5. Set the other le options such as Original Sides and File Type by touching each drop-down list.
Scan to a network folder
77

6. To preview the scan, touch the Preview icon to the left of the Send button.
NOTE: The preview feature is only available when using the atbed scanner.
7. Touch Send to scan the document and save it to the selected network location.
Scan to SharePoint
Use the printer control panel to scan a document directly to a SharePoint site.
NOTE: Scan to SharePoint is not supported with SharePoint 365.
In order to use this feature, the printer must be connected to a network and at least one Scan to
SharePoint Quick Set must be set up using the HP Embedded Web Server.
1. Load the document on the scanner glass or into the document feeder according to the indicators on
the printer.
2. From the home screen on the printer control panel, touch the Scan icon, and then touch Sharepoint.
3. Accept the default location on the Sharepoint drive that is listed, or touch Change to choose a new
location.
4. Touch the File Name eld and type in the le name using the onscreen keypad.
5. Touch the File Format drop-down list to select a le type.
6. If you want to preview the scan or change the scan options, do the following:
● To preview the scan, touch the Preview icon to the left of the Send button.
● For additional scan options, touch the drop-down list at the top of the Scan to Sharepoint window.
7. Touch Send to scan the document and save it to the Sharepoint location.
Scan to a computer
Use this feature to scan directly to your computer by using the Emebedded Web Server.
In order to scan to a computer, your printer and computer must be connected to an IP-based network so
that you can access the Embedded Web Server.
1. Load the document on the scanner glass or into the document feeder according to the indicators on
the printer.
2. From the Home screen on the printer control panel, touch the Menu icon, and then touch Info.
3. Touch Connectivity to display the printer's IP address or host name.
78
Chapter 6 Scan

4. At your computer, open a web browser, and in the address line, type the IP address or host name
exactly as it displays on the printer control panel. Press the Enter key on the computer keyboard. The
EWS opens.
NOTE: If a message displays in the web browser indicating that the website might not be safe,
select the Advanced option to continue to the website. Accessing this website will not harm the
computer.
5. On the Embedded Web Server home page, click Jobs in the left navigation pane. Enter the EWS PIN
number when prompted.
6. Under Jobs in the left navigation pane, click Scan to Computer.
7. Adjust the settings for your scan, and then click Start Scan. You will be prompted to save the scanned
le to the computer.
Scan by using HP Easy Scan Software (macOS)
Use the HP Easy Scan software to initiate scanning from software on your computer.
1. Load the document in the document feeder or on the scanner glass according to the indicators on
the printer.
2. From the computer, open HP Easy Scan, which is located in the Applications folder.
3. Follow the on-screen instructions to scan the document.
4. When you have scanned all the pages, click File and then Save to save them to a le.
Additional scan tasks
Locate information on the Web for performing common scan tasks.
Go to hp.com/support/ljpro4110mfp.
Instructions are available for scan tasks, such as the following:
● How to scan a general photo or document
● How to scan as editable text (OCR)
● How to scan multiple pages into a single le
Scan by using HP Easy Scan Software (macOS)
79

Fax7
Congure the fax features, and send and receive faxes using the printer.
For more information:
The following information is correct at the time of publication. For current information, see hp.com/
support/ljpro4110mfp.
HP's all-inclusive help for the printer includes the following information:
● Install and congure
● Learn and use
● Solve problems
● Download software and rmware updates
● Join support forums
● Find warranty and regulatory information
Connect and
congure the printer for fax
Before using the printer to fax, connect the printer to a telephone line and congure the fax settings.
Connect the printer to a telephone line
This printer is an analog fax device. HP recommends using the printer on a dedicated analog telephone
line.
■
Connect the telephone cable to the fax port on the printer and to the telephone jack on the wall.
NOTE: On some printers, the fax port might be above the phone port. Refer to the icons on the printer.
NOTE: Some countries/regions might require an adapter for the telephone cable that came with the
printer.
80
Chapter 7 Fax

Congure the printer for fax
Use this information to congure the fax settings after the printer is connected to a phone line.
To begin, use one of the following methods:
● Congure the time, date, and header using the printer control panel on page 81
● Congure the time, date, and header using the HP Embedded Web Server and Printer Home Page
(EWS) on page 81 (if the software is installed)
NOTE: In the United States and many other countries/regions, setting the time, date, and other fax
header information is a legal requirement.
Congure
the time, date, and header using the printer control panel
Change the fax settings using the printer control panel (after
rst-time setup using the Fax Setup Wizard).
1. At the printer control panel, touch the Menu icon.
2. Touch Settings.
3. Touch General, and then select Date and Time.
4. By default, the date and time is set automatically. To set it manually, select Set Automatically to turn
this option off.
5. To set the date, scroll to select the date, and then set the month, day, and year.
6. To set the time, select the time, and then set the hour, minutes, and AM or PM.
7. Return to the Menu list and then touch the Fax icon. When the Fax Setup screen displays, touch
Continue to begin setup.
8. Touch the Country/Region eld, and then select the correct country/region from the available options.
9. Touch the Fax Header Name eld, and use the keypad to type in the company name. Then touch the
OK button.
10. Follow the onscreen prompts, and when the Fax Setup Complete screen displays, touch the OK
button to nish the setup.
Congure
the time, date, and header using the HP Embedded Web Server and Printer Home
Page (EWS)
Congure
the fax settings using the HP Embedded Web Server (EWS).
1. Open the HP Embedded Web Server (EWS):
a. From the Home screen on the printer control panel, touch the Menu icon, and then touch Info.
b. Touch Connectivity to display the IP address or host name.
Congure
the printer for fax 81
c. Open a web browser, and in the address line, type the IP address or host name exactly as it
displays on the printer control panel. Press the Enter key on the computer keyboard. The EWS
opens.
NOTE: If the web browser displays a message indicating that accessing the website might not
be safe, select the Advanced option to continue to the website. Accessing this website will not
harm the computer.
2. From the left navigation pane, select Fax, and then select Fax Setup.
Enter the EWS PIN when prompted.
3. Fill in the country/region, the fax header information, and the fax phone number, then click Apply.
Add fax contacts using the HP Embedded Web Server and Printer Home Page (EWS)
Add frequently-used fax contacts using the HP Embedded Web Server (EWS). They can then be accessed
from the Address Book on the printer control panel.
1. Open the HP Embedded Web Server (EWS):
a. From the Home screen on the printer control panel, touch the Menu icon, and then touch Info.
b. Touch Connectivity to display the IP address or host name.
c. Open a web browser, and in the address line, type the IP address or host name exactly as it
displays on the printer control panel. Press the Enter key on the computer keyboard. The EWS
opens.
NOTE: If the web browser displays a message indicating that accessing the website might not
be safe, select the Advanced option to continue to the website. Accessing this website will not
harm the computer.
2. To set up your contact list or lists, select Contacts in the left navigation pane. Enter the EWS PIN
number when prompted.
● You can add contacts individually to the contacts list. Click the Add Contact or Add Group icons
to add contacts to the list.
● Click Address Books at the top of the Contacts page to set up more than one contact list. Under
Manage Address Books, click the plus icon to add additional custom address books.
Congure
for an answering machine
Follow these steps to set up the printer on a shared voice/fax line with an answering machine.
1. Disconnect any devices that are connected to the telephone jack.
2. Remove the plug from the telephone line out port on the rear of the printer.
82
Chapter 7 Fax
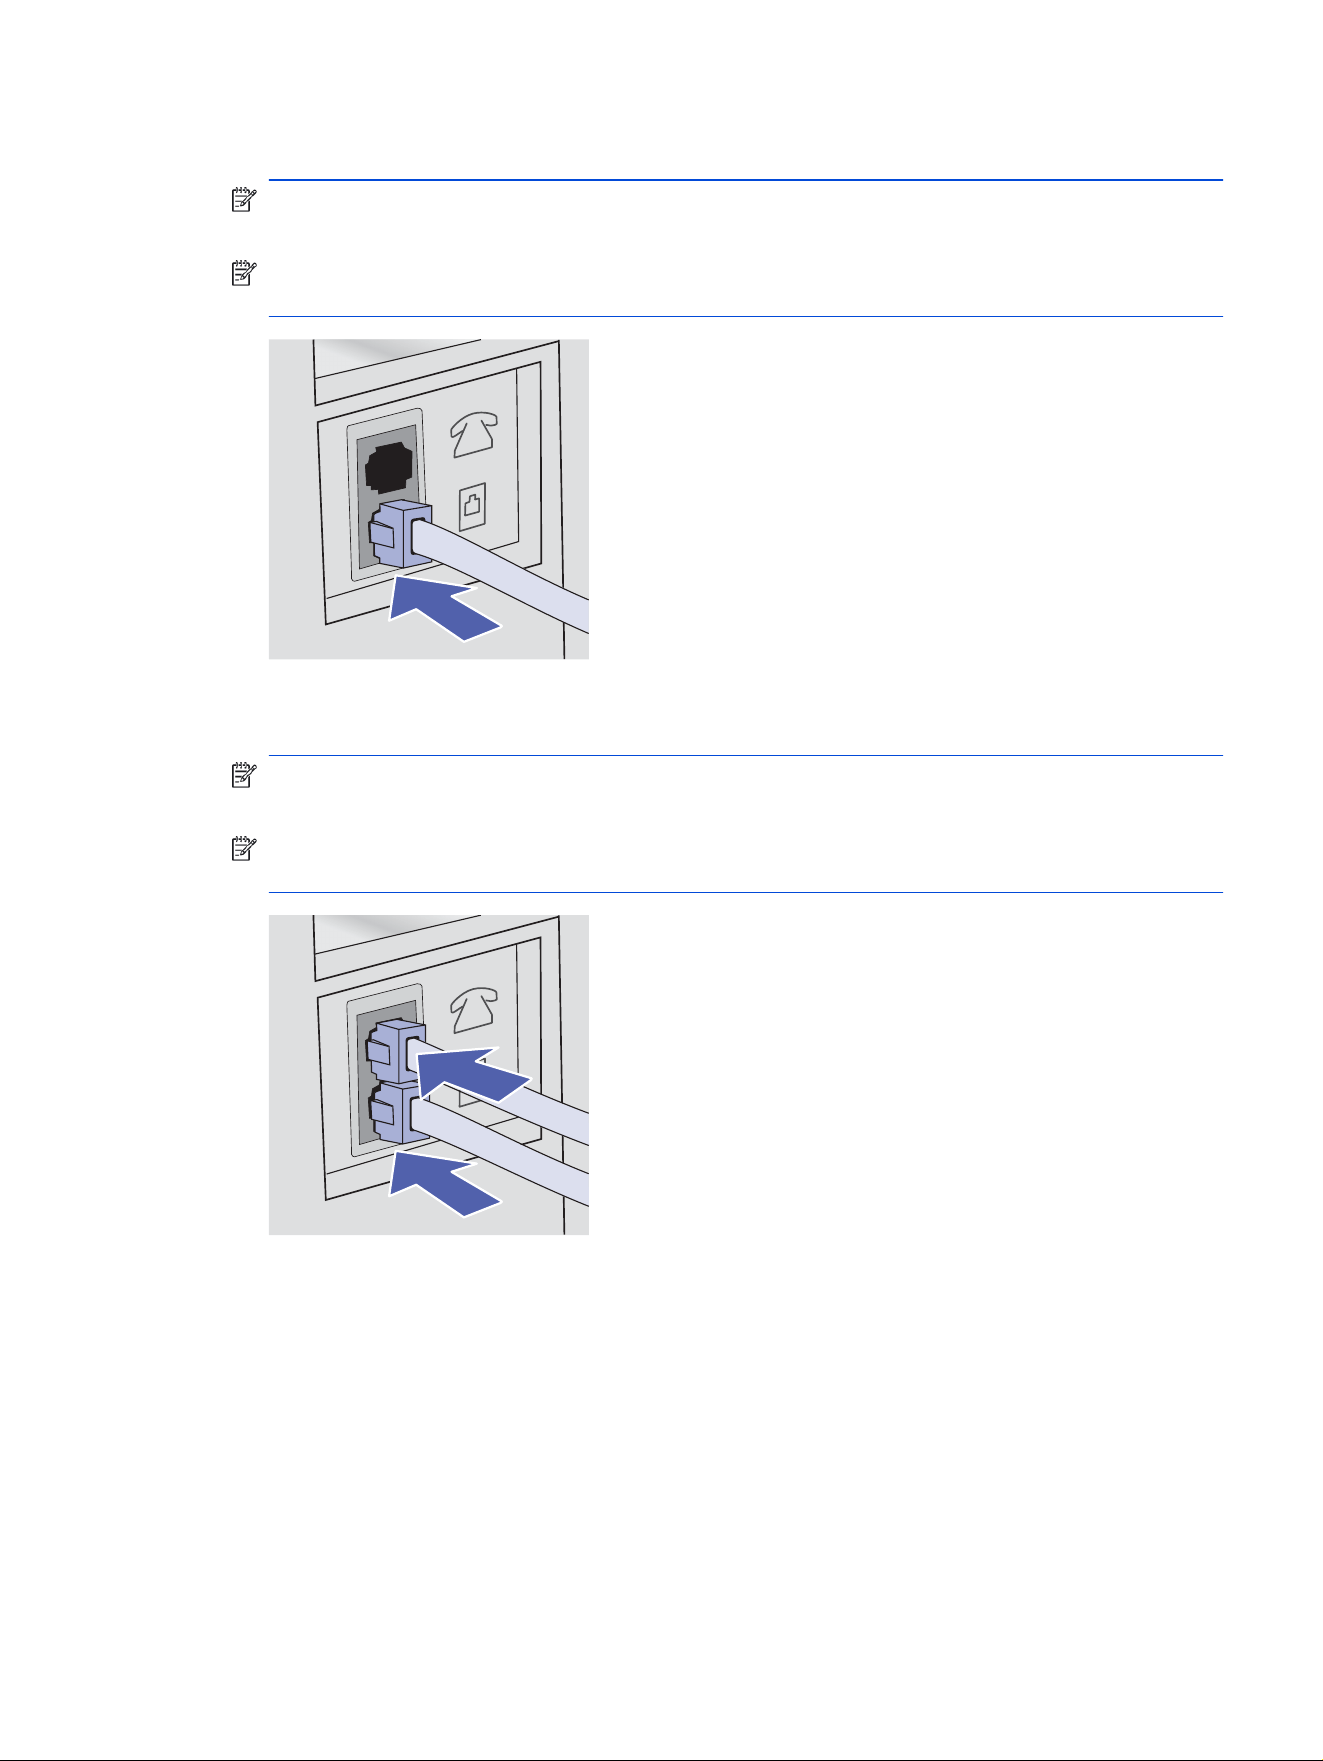
3. Connect the telephone cable to the fax port on the printer and to the telephone jack on the wall.
NOTE: Some countries/regions might require an adapter for the telephone cable that came with
the printer.
NOTE: On some printers, the fax port might be above the phone port. Refer to the icons on the
printer.
4. Connect the answering machine telephone cable to the telephone line out port on the rear of the
printer.
NOTE: If you do not connect the answering machine directly to the printer, the answering machine
might record fax tones from a sending fax machine and the printer might not receive faxes.
NOTE: If the answering machine does not have a built-in telephone, connect a telephone to the OUT
port on the answering machine for convenience.
5. Congure the Rings to Answer setting on the printer:
a. From the Home screen on the printer control panel, touch the Menu icon, and then touch
Settings.
b. Touch Fax Settings, and then Fax Receive.
c. Select Rings to Answer and select the number of rings.
d. When you are nished, touch the back button to return to the previous menu, or touch the Home
button to return to the Home screen.
Congure
for an answering machine 83

Install the HP Universal Fax Driver in Windows (optional)
With the HP Universal Fax Driver, you can fax electronic documents from a computer using the printer.
To use the HP Fax software, the following conditions are required:
● The printer is connected directly to the computer or to a network to which the computer is connected
● The printer software is installed on the computer
● The computer operating system is supported by the printer
The HP Universal Fax Driver is installed as part of the full software install for this printer.
Send a fax
Send a fax from the printer or a third-party software program. Learn how to use speed dials and group-dial
entries.
Send a fax from the printer control panel
Follow the instructions below to send a fax using the printer control panel.
1. Load the document:
● If you are loading an original on the scanner glass, place it face-down on the left rear corner of
the glass.
● If you are loading multiple pages in the document feeder, load the pages face-up and adjust the
paper guides so they are snug against the paper.
NOTE: If documents are in the document feeder and on the scanner glass at the same time, the
printer processes the document in the document feeder and not the one on the scanner glass.
2. At the printer control panel, touch the Fax icon.
3. To enter the fax number, do one of the following:
● Touch the Enter the Fax Number eld, and then use the keypad to enter the fax number. To send
to multiple fax numbers, touch the Pause button after entering each fax number. When nished
entering all fax numbers, touch the Done button.
● Touch the Address Book icon next to the Enter the Fax Number eld to open the Address Book.
Touch each contact that you want to send the fax to, and then touch Add when done.
NOTE: The Add button will indicate how many contacts you are adding.
4. Verify that the fax numbers are correct, and then touch Conrm.
5. Touch Send to send the fax.
NOTE: If you are faxing from the scanner glass and your document includes multiple pages, follow
the control panel prompts to conrm and load additional pages.
84
Chapter 7 Fax

Send a fax from software (Windows)
Fax a document using the HP Universal Fax Driver in Windows. This option is only available if the HP
Universal Fax Driver was installed as part of the printer software installation process.
The procedure to send a fax varies according to your specications. The most typical steps follow.
1. From the software program, select the Print option.
2. Select HP Universal Fax Driver from the list of printers, and then click Print.
The HP Fax Finder dialog opens.
3. In the HP Fax Finder dialog, select the HP printer that you want to use.
The dialog includes options to select the printer from a list of recently used printers, nd a printer by
IP address, search for a network printer, or select a Local Device.
4. After you have selected the printer, click Fax.
The Send Fax dialog opens.
5. In the To eld, enter the fax number(s) of one or more recipients, and then click Add.
NOTE: To adjust the fax settings, click the Settings button.
6. When you are ready to send the fax, click Send Fax.
Send a fax from a third-party software program, such as Microsoft Word
If you created a document using a third-party software program, such as Microsoft Word, you can fax the
document directly from the software.
1. Open a document in a third-party program.
2. Click the File menu, and then click Print.
3. Select the fax print driver from the print driver drop-down list.
The fax software opens.
4. Enter the fax number of one or more recipients.
5. Include any pages loaded at the printer. This step is optional.
6. Click Send Now.
Additional fax tasks
Locate information on the Web for performing common fax tasks.
Go to hp.com/support/ljpro4110mfp.
Instructions are available for fax tasks, such as the following:
● Create and manage fax speed dial lists
● Congure fax billing codes
Send a fax from software (Windows)
85

● Use a fax printing schedule
● Block incoming faxes
● Fax archiving and forwarding
86 Chapter 7 Fax

Manage the printer8
Utilize management tools, congure security and energy-conservation settings, and manage rmware
updates for the printer.
The following information is correct at the time of publication. For current information, see hp.com/
support/ljpro4110mfp.
For more information:
HP's all-inclusive help for the printer includes the following information:
● Install and congure
● Learn and use
● Solve problems
● Download software and rmware updates
● Join support forums
● Find warranty and regulatory information
Advanced
conguration with HP Embedded Web Server and
Printer Home Page (EWS)
Use the HP Embedded Web Server to manage printing functions from your computer instead of the printer
control panel.
● View printer status information
● Determine the remaining life for all supplies and order new ones
● View and change tray congurations (paper types and sizes)
● View and print internal pages
● View and change network conguration
The HP Embedded Web Server works when the printer is connected to an IP-based network. The HP
Embedded Web Server does not support IPX-based printer connections. You do not have to have Internet
access to open and use the HP Embedded Web Server.
When the printer is connected to the network, the HP Embedded Web Server is automatically available.
NOTE: Printer Home Page (EWS) is software used to connect to the HP Embedded Web Server when
the printer is connected to a computer via USB. It is available only if a full installation was performed
when the printer was installed on a computer. Depending on how the printer is connected, some features
might not be available.
NOTE: The HP Embedded Web Server is not accessible beyond the network rewall.
Manage the printer
87
Open the HP Embedded Web Server (EWS) from a web browser
Use the EWS to manage your printer from a computer instead of the printer control panel.
Your printer must be connected to an IP-based network before you can access the EWS.
1. From the Home screen on the printer control panel, touch the Menu icon, and then touch Info.
2. Touch Connectivity to display the IP address or host name of the printer.
3. Open a web browser, and in the address line, type the IP address or host name exactly as it displays
on the printer control panel. Press the Enter key on the computer keyboard. The EWS opens.
If a message displays in the web browser indicating that the website might not be safe, select the
Advanced option to continue to the website. Accessing this website will not harm the computer
IMPORTANT: Access to the Embedded Web Server (EWS) menus requires a personal identication
number (PIN).
To obtain the default printer PIN: Open the toner cartridge access door by lifting the scanner
(callout 1), and then lifting the cartridge door (callout 2). The default printer PIN is located on a label
at the left side of the toner cartridge access area.
Use this PIN to log in when prompted. The default PIN can be changed by a user or administrator.
Embedded Web Server menus
Refer to the table below for a list of tabs and features available in the EWS.
Table 8-1
HP Embedded Web Server menus
Page Description
Home page
Provides supplies and trays status
information.
● Cartridges: View the status of the cartridges and the estimated cartridge levels.
● Paper: View paper tray levels and paper type settings for each tray.
Jobs Job Queue: View current print jobs in progress and a history of past jobs.
Copy Use the Default Copy Options to view or change copy settings.
Scan ● Web Scan: Enable this feature to scan directly to your computer.
● Scan to Email: Congure the default email settings for digital sending.
● Scan to Network Folder: Congure the network folder settings for digital sending.
● Scan to SharePoint: Congure the SharePoint settings for digital sending.
● Scan to USB: Congure the USB settings for digital sending.
88 Chapter 8 Manage the printer

Table 8-1 HP Embedded Web Server menus (continued)
Page Description
Print ● Print from USB: View or change the default print options when printing using a USB
ash drive.
● Print from Job Storage : Congure job-storage options for print jobs.
● Default Print Options: Congure the default options for print jobs.
●
● General Print settings: Set an option for jam recovery when printing.
● PCL and PostScript: Adjust the PCL and PostScript settings for all print jobs.
● Stamps: Allows you to upload an image and include it to the top center of every printed
page.
Fax
● Analog Fax Setup: Use this page to set up the basic analog fax settings for the printer,
such as fax number and header.
● Fax Send Settings: Use this page to set up the default fax send settings.
● Fax Receive Settings: Use this page to set up the default fax receive settings.
● Fax Archive and Forwarding: Use this page to choose whether to archive or forward
incoming faxes.
● Fax Activity Log: View information about the faxes received and sent from the printer.
Quick Sets Quick Sets are pre-congured sets of options that allow you to start a job without having
to congure manually individual options. Use this page to set up Quick Sets for Copy, Email,
Network Folder, USB Drive, or SharePoint jobs.
Contacts Use the Contact page to add stored contacts or Address Books to be used for Email and
Fax jobs. The Address Books tab allows you to congure an LDAP server to be used for
accessing network contacts.
Supplies View the status of the printer supplies, and access supply settings.
Paper Trays: View the printer paper size and type in each tray and congure general settings for
the paper trays.
Print Quality ● Tools: Print the Print Quality Diagnostic Report to get instructions for how to solve
print-quality problems.
● Calibration Settings: Enable or disable the automatic cleaning feature.
● Optimize: View or change settings that may help to improve print quality.
● Paper Type Adjustment: The settings on this page allow you to adjust the print mode
settings for specic paper types. This should be done under supervision from HP
technical support.
● Image Registration: Adjusts the image to the center on the front and back of a page.
● Toner Density: Sets the toner density to enable all print jobs to be lighter or darker
than the factory default settings.
Embedded Web Server menus 89

Table 8-1 HP Embedded Web Server menus (continued)
Page Description
General ● About the Printer: Lists all the basic technical information about this printer, including
the rmware version.
● Event Log: View or print the log showing all the printer errors.
● Location: View or change the printer's country/region.
● Language: View or change the printer's default language or the language to display
the EWS information.
● Alerts: Set up email alerts for events that could interrupt printer usage.
● Date and Time: Allows you to set the time zone and the date and time format for the
printer.
● Power Settings: Restart the printer or congure the energy settings to reduce energy
consumption.
● Display Settings: View or change what action the printer will take when a non-critical
error occurs.
● Firmware Update: Checks to see if the rmware version is the latest available, and
provides an option to update it.
● Quiet Mode: Use this feature to reduce printing noise. This can reduce the print speed.
● Email Servers: Use this page to set up the outgoing email server for sending scanned
documents via email.
● Restore Default Settings: Allows you to restore network settings or all printer
settings back to default.
● Reports and Pages: Select one or more reports, then select the Print button to print
them.
● Import/Export: Use this feature to export les that can be used to congure other
devices.
90
Chapter 8 Manage the printer

Table 8-1 HP Embedded Web Server menus (continued)
Page Description
Network (Network-connected printers only)
Provides the ability to change printer network settings from your computer.
● Network Summary: View information about the network protocols that are currently
in use on this printer.
● Network Settings: Provides access to a variety of network settings including SNMP
and IP settings.
● Network Security: View or change the Firewall, Secure Communication, and
Announcement Agent settings.
● Proxy Settings: Congure any proxy settings necessary for your network.
● Primary Ethernet: View or change Ethernet settings for the printer.
● Wi-Fi: View or change Wi-Fi settings for the printer.
● Advanced Settings: Set up any advanced network settings required for your printing
environment.
● Bluetooth Low Energy: Bluetooth low energy is an ultra-low power, Wi-Fi technology
that provides connections between the printer and other devices. Use this page to
turn it on or off.
● Wi-Fi Direct: With Wi-Fi Direct, you can print directly from a Wi-Fi-capable computer
or mobile device without connecting to an existing wireless network. Use this page to
enable and
congure it.
● Diagnostics: Troubleshoot printer problems or enhance network operation.
Security
● Password Settings: Set up an administrator password to restrict access to certain
features on the printer.
● Printer Features: Customize the printer features displayed on the printer control
panel.
● General Security: View or change the EWS and printer time-outs
● Access Control: Add an Admin password for the EWS and control other types of
access such as LDAP and Windows authentication.
● Protect Stored Data: Provides a way to erase securely stored data from the printer.
● Printer Supply Region Reset: Enables the printer to use cartridges from a new
country/region.
● Certicate Management: Create or install any security certicates required on this
printer.
Support Tools
● Reports and pages: Shows a list of internal reports and pages for the printer that can
be printed.
● Online Resources: Links to HP Support online help to assist in troubleshooting printer
issues.
● Service Support: Used by HP technical support to assist you in troubleshooting
printer problems.
● Auto Recovery: Enable this option to allow the printer to recover from system errors
● Back up and Restore: Allows you to create a backup copy of the printer conguration
and settings.
Embedded Web Server menus 91
Table 8-1 HP Embedded Web Server menus (continued)
Page Description
Privacy Enable the Printer Analytics feature to allow HP collect and analyze printer usage data to
improve printer functionality.
HP Cloud Connection ● HP Cloud Connection: Use this feature to connect the printer to HP Cloud after you
opt in to an HP cloud service or choose to share printer analytics.
● Printer Paring: Use this page to pair this printer to an HP account. Pairing your printer
to your HP account allows access to HP cloud solutions.
● Reset Cloud Connection: Use this feature for cloud connection issues.
Accessibility Enables users who have vision disabilities to access the control panel icons and menus.
Congure IP network settings
Review the following information about conguring IP network settings.
Printer sharing disclaimer
HP does not support peer-to-peer networking, as the feature is a function of Microsoft operating systems
and not of the HP printer drivers.
Go to Microsoft at www.microsoft.com.
View or change network settings
Use the HP Embedded Web Server to view or change IP conguration settings.
1. Open the HP Embedded Web Server (EWS):
a. From the Home screen on the printer control panel, touch the Menu icon, and then touch Info.
b. Touch Connectivity to display the IP address or host name of the printer.
c. Open a web browser, and in the address line, type the IP address or host name exactly as it
displays on the printer control panel. Press the Enter key on the computer keyboard. The EWS
opens.
NOTE: If a message displays in the web browser indicating that the website might not be safe,
select the Advanced option to continue to the website. Accessing this website will not harm the
computer.
2. On the EWS Home page, click Network in the left navigation pane, and then select Network Settings
to view network information. Change settings as needed.
NOTE: Enter the EWS PIN number when prompted.
Rename the printer on a network
Use the HP Embedded Web Server (EWS) to rename the printer on a network so it can be uniquely
identied.
92
Chapter 8 Manage the printer

1. Open the HP Embedded Web Server (EWS):
a. From the Home screen on the printer control panel, touch the Menu icon, and then touch Info.
b. Touch Connectivity to display the IP address or host name of the printer.
c. Open a web browser, and in the address line, type the IP address or host name exactly as it
displays on the printer control panel. Press the Enter key on the computer keyboard. The EWS
opens.
NOTE: If a message displays in the web browser indicating that the website might not be safe,
select the Advanced option to continue to the website. Accessing this website will not harm the
computer.
2. On the EWS Home page, click Network in the left navigation pane.
3. Under Network, click Network Settings.
4. On the Network Settings page, click Identication.
5. In the Host Name text eld, enter a name to uniquely identify this printer, and then click Apply to save
the changes.
Manually
congure IPv4 TCP/IP parameters from the control panel
Use the control-panel menus to manually set the IPv4 address, subnet mask, and default gateway.
1. At the printer control panel, touch the Menu icon, and then select Settings.
2. Touch Network to open the network settings list.
3. Open the following menus:
● Ethernet
● IPv4
4. Touch the button next to Manual Address to enable the setting.
5. To congure the address, touch the Manual Address text eld.
6. Use the keypad to enter the address, and then touch the OK button.
7. Touch Apply.
Manually
congure IPv6 TCP/IP parameters from the control panel
Use the control-panel Settings menus to manually set an IPv6 address.
1. At the printer control panel, touch the Menu icon, and then select Settings.
2. Touch Network to open the network settings list.
3. Open the following menus:
● Ethernet
Manually
congure IPv4 TCP/IP parameters from the control panel 93

● IPv6
4. Touch the button next to Manual Address to enable the setting.
5. To congure the address, touch the Manual Address text eld.
6. Use the keypad to enter the address, and then touch the OK button.
7. Touch Apply.
Link speed and duplex settings
The link speed and communication mode of the print server must match the network hub. For most
situations, leave the printer in automatic mode. Incorrect changes to the link speed and duplex settings
might prevent the printer from communicating with other network devices. If you need to make changes,
use the printer control panel.
NOTE: This information applies only to Ethernet (wired) networks. It does not apply to wireless
networks.
NOTE: The printer setting must match the setting for the network device (a network hub, switch,
gateway, router, or computer).
NOTE: Making changes to these settings causes the printer to turn off and then on. Make changes only
when the printer is idle.
1. At the printer control panel, touch the Menu icon, and then select Settings.
2. Open the following menus:
a. Network
b. Ethernet
c. Link Speed
3. Select one of the following options:
Table 8-2
Link Speed settings
Setting Description
10 Mb Half 10 Mbps, half-duplex operation
10 Mb Full 10 Mbps, full-duplex operation
100 Mb Half 100 Mbps, half-duplex operation
100 Mb Full 100 Mbps, full-duplex operation
1000 Mb Full 1000 Mbps, full-duplex operation
Automatic The print server automatically congures itself for the
highest link speed and communication mode allowed on the
network.
Printer security features
Review the following information about the printer security features.
94
Chapter 8 Manage the printer
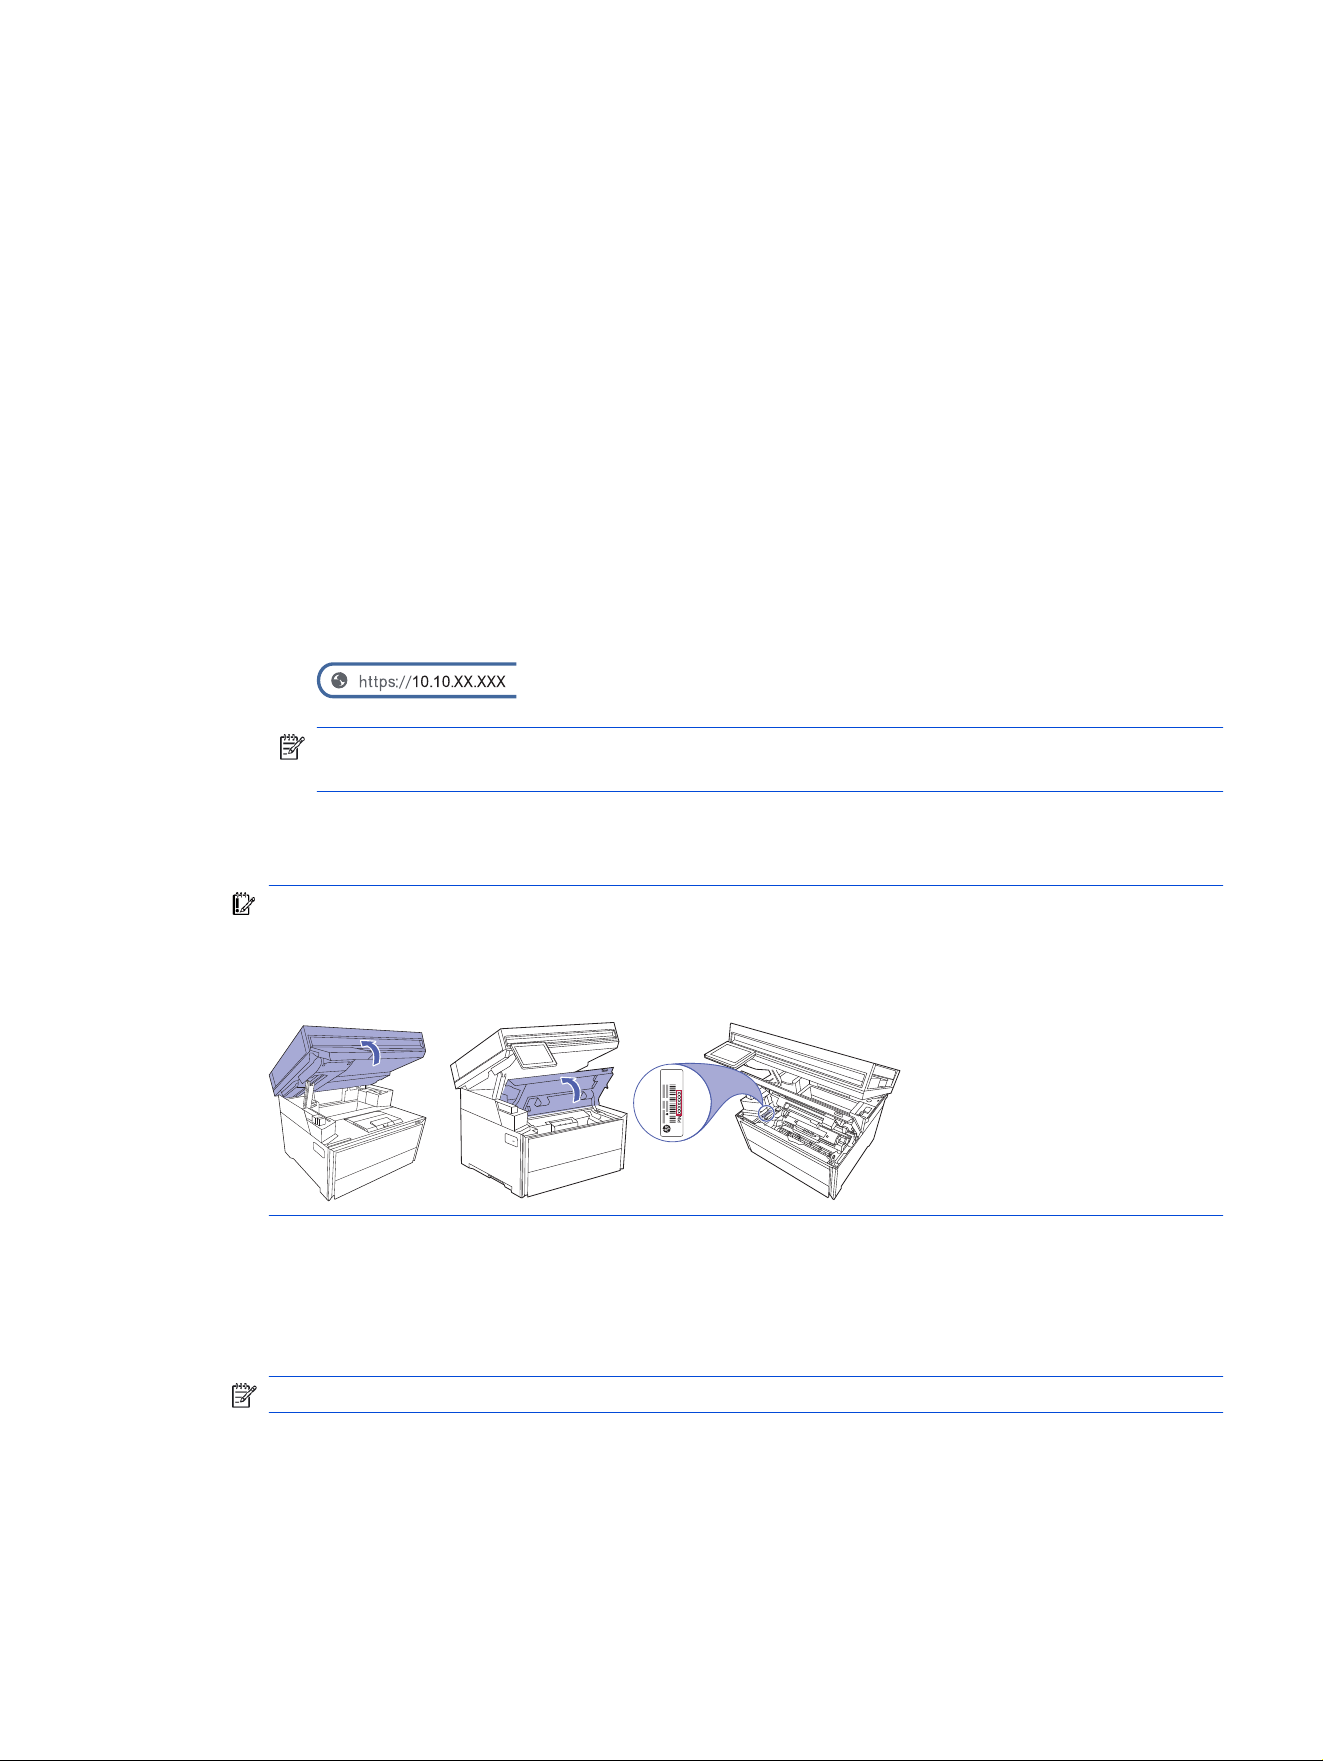
Introduction
The printer includes several security features to restrict who has access to conguration settings, to
secure data, and to prevent access to valuable hardware components.
Assign or change the system password using the Embedded Web Server
Assign an administrator password for access to the printer and the HP Embedded Web Server so that
unauthorized users cannot change the printer settings.
1. Open the HP Embedded Web Server (EWS):
a. Locate the printer's IP address on the printer control panel by using the control pad to select
Menu, and then OK. Then use the control pad to select Info, then select Connected under either
WiFi or Ethernet (whichever method you are using to connect), then use the control pad to view
the printer's IP address.
b. Open a web browser, and in the address line, type the IP address or host name exactly as it
displays on the printer control panel. Press the Enter key on the computer keyboard. The EWS
opens.
NOTE: If a message displays in the web browser indicating that the website might not be safe,
select the option to continue to the website. Accessing this website will not harm the computer.
2. On the EWS Home page, click Security in the left navigation pane to expand the options, and then
click Access Control.
IMPORTANT: Access to the Embedded Web Server (EWS) menus requires a personal identication
number (PIN). The default PIN for this printer is located on a sticker inside the toner cartridge access
door. Use this PIN to log in when prompted.
The default PIN can be changed by a user or administrator.
3. Enter the current password, if one has been assigned.
4. Enter the new password.
5. Re-enter the password in the Conrm Password eld, and then click Apply.
NOTE: Make note of the password and store it in a safe place.
Introduction
95

Energy-conservation settings
Learn about the energy-conservation settings that are available on your printer.
NOTE: Conguring longer times for these settings or turning off these features will increase energy
consumption.
Print with EconoMode
This printer has an EconoMode option for printing drafts of documents. Using EconoMode can use less
toner. However, using EconoMode can also reduce print quality.
HP does not recommend the full-time use of EconoMode. If EconoMode is used full-time, the toner supply
might outlast the mechanical parts in the toner cartridge. If print quality begins to degrade and is no longer
acceptable, consider replacing the toner cartridge.
NOTE: If this option is not available in your print driver, you can set it using the HP Embedded Web
Server.
1. From the software program, select the Print option.
2. Select the printer, and then click the Properties or Preferences button.
3. Click the Paper/Quality tab.
4. Click the drop-down menu in the Print Quality section, and then select EconoMode.
5. Click OK to save the change.
Set the Sleep Mode setting
Use the control panel menus to specify the amount of time the printer must be inactive before it goes into
sleep mode.
1. From the Home screen on the printer control panel, touch the Menu icon, and then touch Settings.
2. Scroll to and open the following menus:
a. General
b. Energy
c. Sleep
3. Touch an option to specify the amount of time the printer must be inactive before it goes into sleep
mode.
4. When you are nished, touch the back arrow button to return to the General settings menu, or touch
the Home button to return to the Home screen.
Set the Shutdown Mode setting
Use the control panel menus to specify the amount of time the printer must be inactive before it shuts
down.
NOTE: After the printer shuts down, the power consumption is 1 watt or less.
1. From the Home screen on the printer control panel, touch the Menu icon, and then touch Settings.
96
Chapter 8 Manage the printer

2. Scroll to and open the following menus:
a. General
b. Energy
c. Shutdown- Adjust the inactive time before shutdown
3. Touch an option to specify the amount of time the printer must be inactive before it shuts down.
4. When you are nished, touch the back arrow button to return to the General settings menu, or touch
the Home button to return to the Home screen.
Set the Disable Shutdown setting
Use the control panel menus to disable the printer from shutting down after a period of inactivity.
1. From the Home screen on the printer control panel, touch the Menu icon, and then touch Settings.
2. Scroll to and open the following menus:
a. General
b. Energy
c. Disable Shutdown
3. Touch one of the following options:
● When ports are active: The printer will not shut down unless all ports are inactive. An active
network link or fax connection will prevent the printer from shutting down.
● Do not disable: The printer will shut down after a period of inactivity as determined by the
Shutdown Mode setting.
NOTE: The default setting is When ports are active.
HP Web Jetadmin
HP Web Jetadmin is an award-winning, industry-leading tool for efciently managing a wide variety of
networked HP products, including printers, multifunction printers, and digital senders. This single solution
allows you to remotely install, monitor, maintain, troubleshoot, and secure your printing and imaging
environment — ultimately increasing business productivity by helping you save time, control costs, and
protect your investment.
HP Web Jetadmin upgrades are periodically made available to provide support for specic product
features. Go to www.hp.com/go/webjetadmin for more information.
Dynamic Security Enabled Printers
This printer is intended to work only with cartridges that have a new or reused HP chip. A reused HP chip
enables the use of reused, remanufactured, and relled cartridges.
The printer uses dynamic security measures to block cartridges using a non-HP chip. Periodic rmware
updates delivered over the internet will maintain the effectiveness of the dynamic security measures and
block cartridges that previously worked.
Set the Disable Shutdown setting
97

Updates can improve, enhance, or extend the printer’s functionality and features, protect against security
threats, and serve other purposes, but these updates can also block cartridges using a non-HP chip from
working in the printer, including cartridges that work today. Unless you are enrolled in certain HP programs
such as Instant Ink or use other services that require automatic online rmware updates, most HP printers
can be congured to receive updates either automatically or with a notication that allows you to choose
whether to update or not. For more information on dynamic security and how to congure online rmware
updates, please go to www.hp.com/learn/ds.
Update the rmware
HP regularly updates features that are available in the printer rmware. To take advantage of the most
current features, HP recommends that you update the printer rmware regularly.
There are two supported methods to perform a rmware update on this printer. Use only one of the
following methods to update the printer rmware.
Method one: Update the rmware using the control panel
Follow these steps to update the rmware using the printer control panel (for network-connected printers
only), and/or set the printer to install future rmware updates automatically. For USB-connected printers,
skip to Method two.
1. Make sure the printer is connected to a wired (Ethernet) or wireless network with an active Internet
connection.
NOTE: The printer must be connected to the internet to update the rmware via a network
connection.
2. From the Home screen on the printer control panel, touch the Menu icon, and then touch Tools.
3. Scroll to and touch Maintenance.
4. Scroll to and touch Firmware.
5. Touch Check to check for updates.
NOTE: The printer automatically checks for an update, and if a newer version is detected, the
update process starts automatically.
6. Set the printer to automatically update the rmware when updates become available:
a. From the Home screen on the printer control panel, touch the Menu icon, and then touch
Settings.
b. Scroll to and touch Printer Update, and then touch Allow Updates.
NOTE: You might be prompted to log in as a device administrator to access and change the
printer update settings.
A message displays with information about the benets of updating the rmware.
c. Scroll to the bottom of the message, and then touch one of the following options:
● Auto Update (Recommended): When this option is selected, the printer automatically checks for
and installs new rmware updates.
98
Chapter 8 Manage the printer
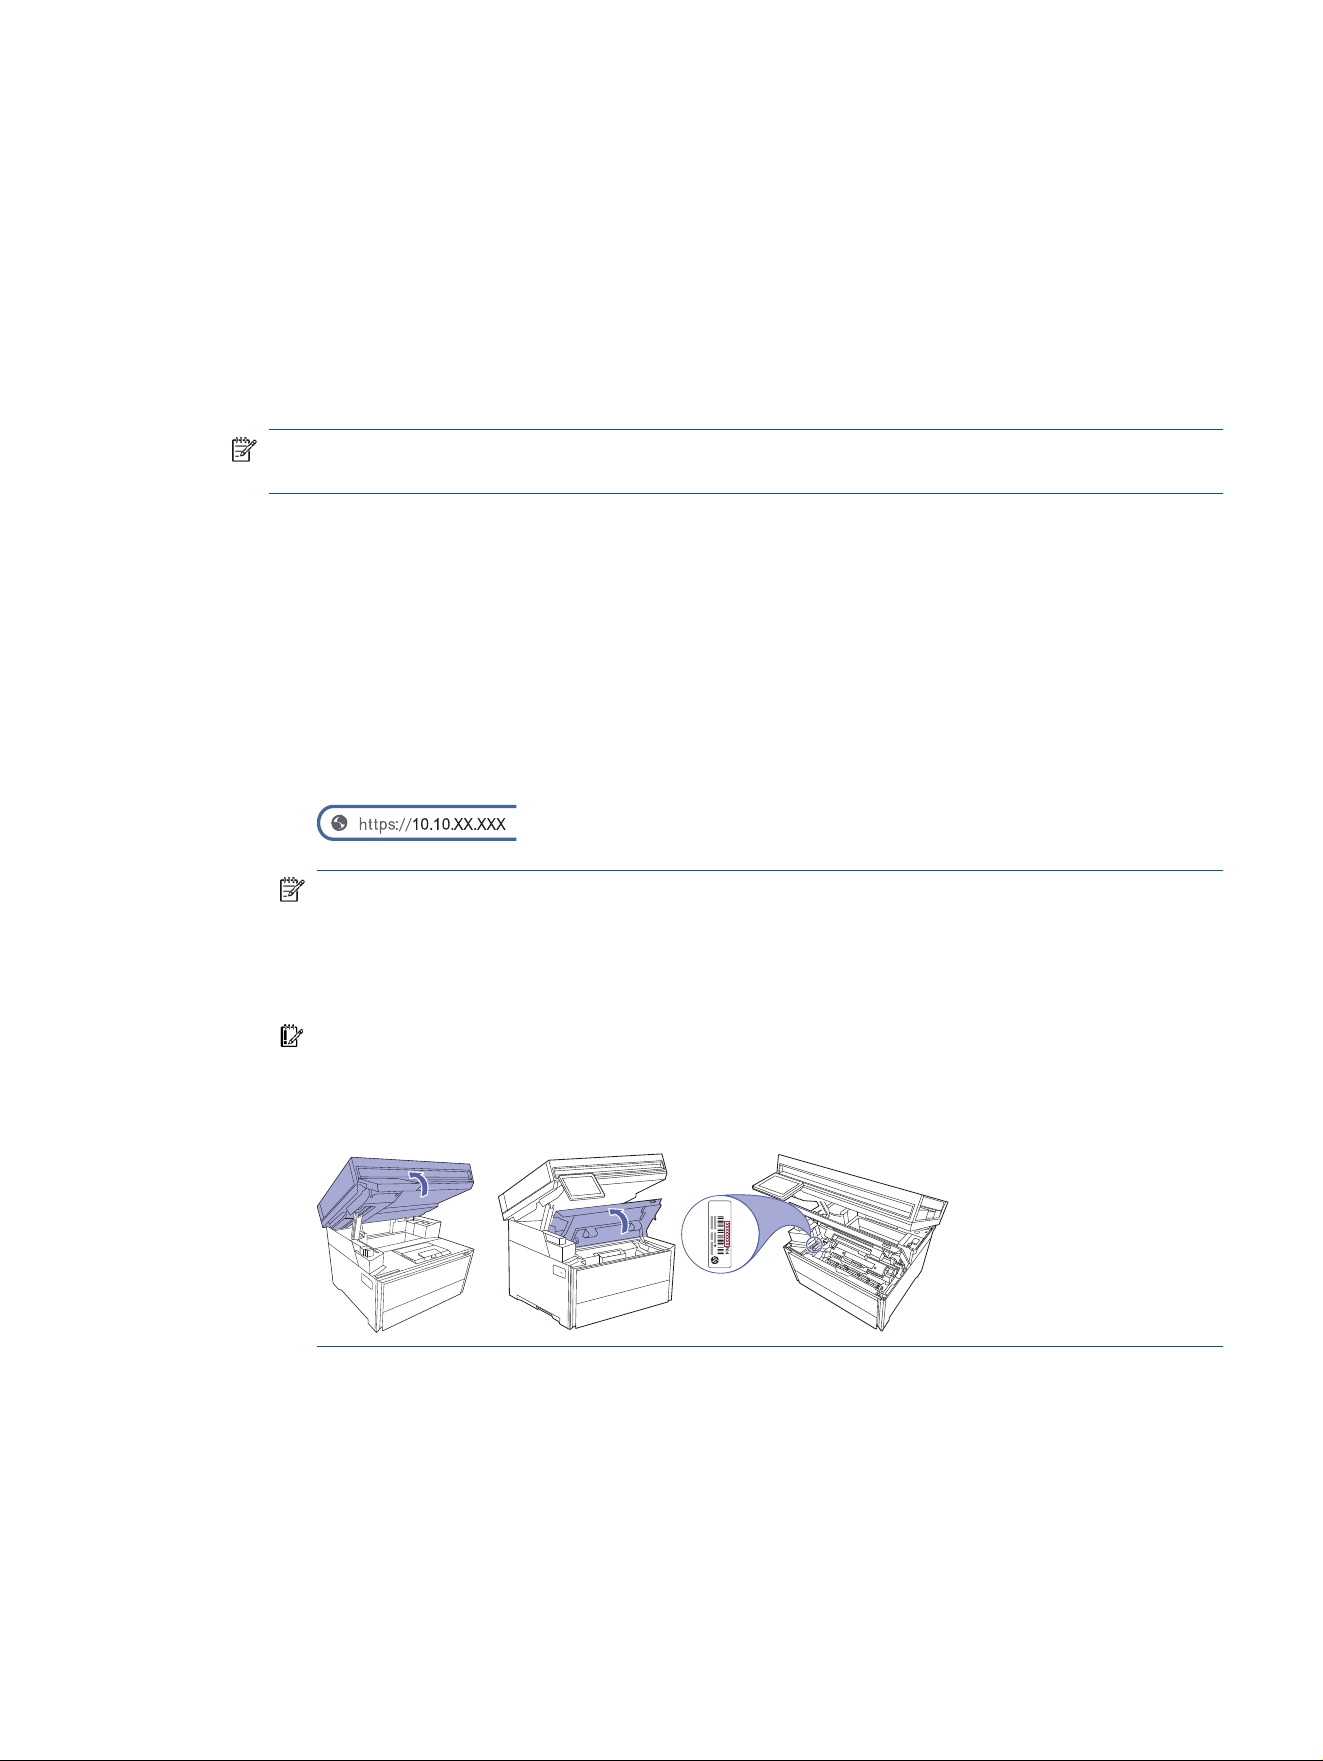
● Notify: When this option is selected, the printer automatically checks for new updates. When
a new update is available, a notication displays on the control panel and the user can select
whether or not to install the update.
● Do Not Check: When this option is selected, the printer will not check for rmware updates.
Method two: Update the rmware using the Embedded Web Server
Follow the instructions below to update the printer rmware using the Embedded Web Server.
1. Make sure the printer is connected to a wired (Ethernet) with an active Internet connection.
NOTE: The printer must be connected to the internet to update the rmware via a network
connection.
2. From the Home screen on the printer control panel, touch the Menu icon, and then touch Info.
3. Open the HP Embedded Web Server (EWS):
a. At the printer control panel, select the Menu option, and then select Info.
b. Use the control panel to view the printer's IP address.
c. Open a web browser, and in the address line, type the IP address or host name exactly as it
displays on the printer control panel. Press the Enter key on the computer keyboard. The EWS
opens.
NOTE: If the web browser displays a message indicating that the connection is not private or
secure, click the Advanced option, and then click the link to Continue... or Proceed... to the
website.
Accessing this website will not harm the computer.
IMPORTANT: Access to the Embedded Web Server (EWS) menus requires a personal
identication number (PIN). The default PIN for this printer is located on a sticker inside the toner
cartridge access door. Use this PIN to log in when prompted.
The default PIN can be changed by a user or administrator.
4. On the EWS Home page, click General in the left navigation pane to expand the options, and
then click Firmware Update. The program checks to see whether the printer has the most recent
rmware.
5. If the rmware needs to be upgraded, click Check for Update, and follow the onscreen instructions.
Method two: Update the
rmware using the Embedded Web Server 99

Method three: Update the rmware using the HP Printer Update utility
Follow these steps to manually download and install the HP Printer Update utility.
NOTE: This method is the only rmware update option available for printers connected to the computer
via a USB cable. This method also works for printers that are connected to a network.
NOTE: You must have a print driver installed in order to use this method.
1. Go to support.hp.com, click Software and Drivers, and then click Printer.
2. In the text eld, type the printer name, click Submit, and then click your printer model from the list of
search results.
3. In the Firmware section, locate the Firmware Update le.
4. Click Download, and then click Run.
5. When the HP Printer Update utility launches, select the printer that you wish to update, and then click
Update.
6. Follow the on-screen instructions to complete the installation, and then click the OK button to close
the utility.
100
Chapter 8 Manage the printer

Solve problems9
Troubleshoot problems with the printer. Locate additional resources for help and technical support.
The following information is correct at the time of publication. For current information, see hp.com/
support/ljpro4110mfp.
For more information:
HP's all-inclusive help for the printer includes the following information:
● Install and congure
● Learn and use
● Solve problems
● Download software and rmware updates
● Join support forums
● Find warranty and regulatory information
Customer support
Find support contact options for your HP printer.
Table 9-1
HP support options
Support option Contact information
Get telephone support for your country/region
Have the printer name, serial number, date of purchase, and
problem description ready
Country/region phone numbers are on the yer that was in the
box with the printer or at support.hp.com.
Get 24-hour Internet support, and download software utilities
and drivers
hp.com/support/ljpro4110mfp
Order additional HP service or maintenance agreements www.hp.com/go/carepack
Register the printer www.register.hp.com
Control panel help system
The printer has a built-in Help system that explains how to use each screen.
To open the Help system:
1. From the Home screen on the printer control panel, touch the Menu icon.
2. Scroll to and touch Help.
Solve problems
101

Restore the factory-set defaults
Restoring the factory-set defaults returns all of the printer and network settings to the factory defaults. It
will not reset the page count, or tray size.
To restore the printer to the factory-default settings, follow these steps.
CAUTION: Restoring the factory-set defaults returns all of the settings to the factory defaults, and it
also deletes any pages that are stored in the memory.
1. From the Home screen on the printer control panel, touch the Menu icon, and then touch Settings.
2. Scroll to and open the following menus:
a. Maintenance
b. Restore Settings
3. Touch Restore All Factory Defaults.
A Restoring Printer Settings message displays on the screen, and then the printer automatically
restarts.
A “Cartridge is low” or “Cartridge is very low” message
displays on the printer control panel
Understand the cartridge-related messages on the control panel and what actions to take.
Cartridge is low: The printer indicates when a toner cartridge level is low. Actual toner cartridge life
remaining may vary. Consider having a replacement available to install when print quality is no longer
acceptable. The toner cartridge does not need to be replaced now.
Continue printing with the current cartridge until redistributing the toner no longer yields acceptable print
quality. To redistribute the toner, remove the toner cartridge from the printer and gently rock the cartridge
back and forth end to end. Reinsert the toner cartridge into the printer and close the cover.
Cartridge is very low: The printer indicates when the toner cartridge level is very low. Actual toner
cartridge life remaining may vary. To extend the life of the toner, gently rock the cartridges back and forth
end to end. Consider having a replacement available to install when print quality is no longer acceptable.
The toner cartridge does not need to be replaced now unless the print quality is no longer acceptable.
102
Chapter 9 Solve problems
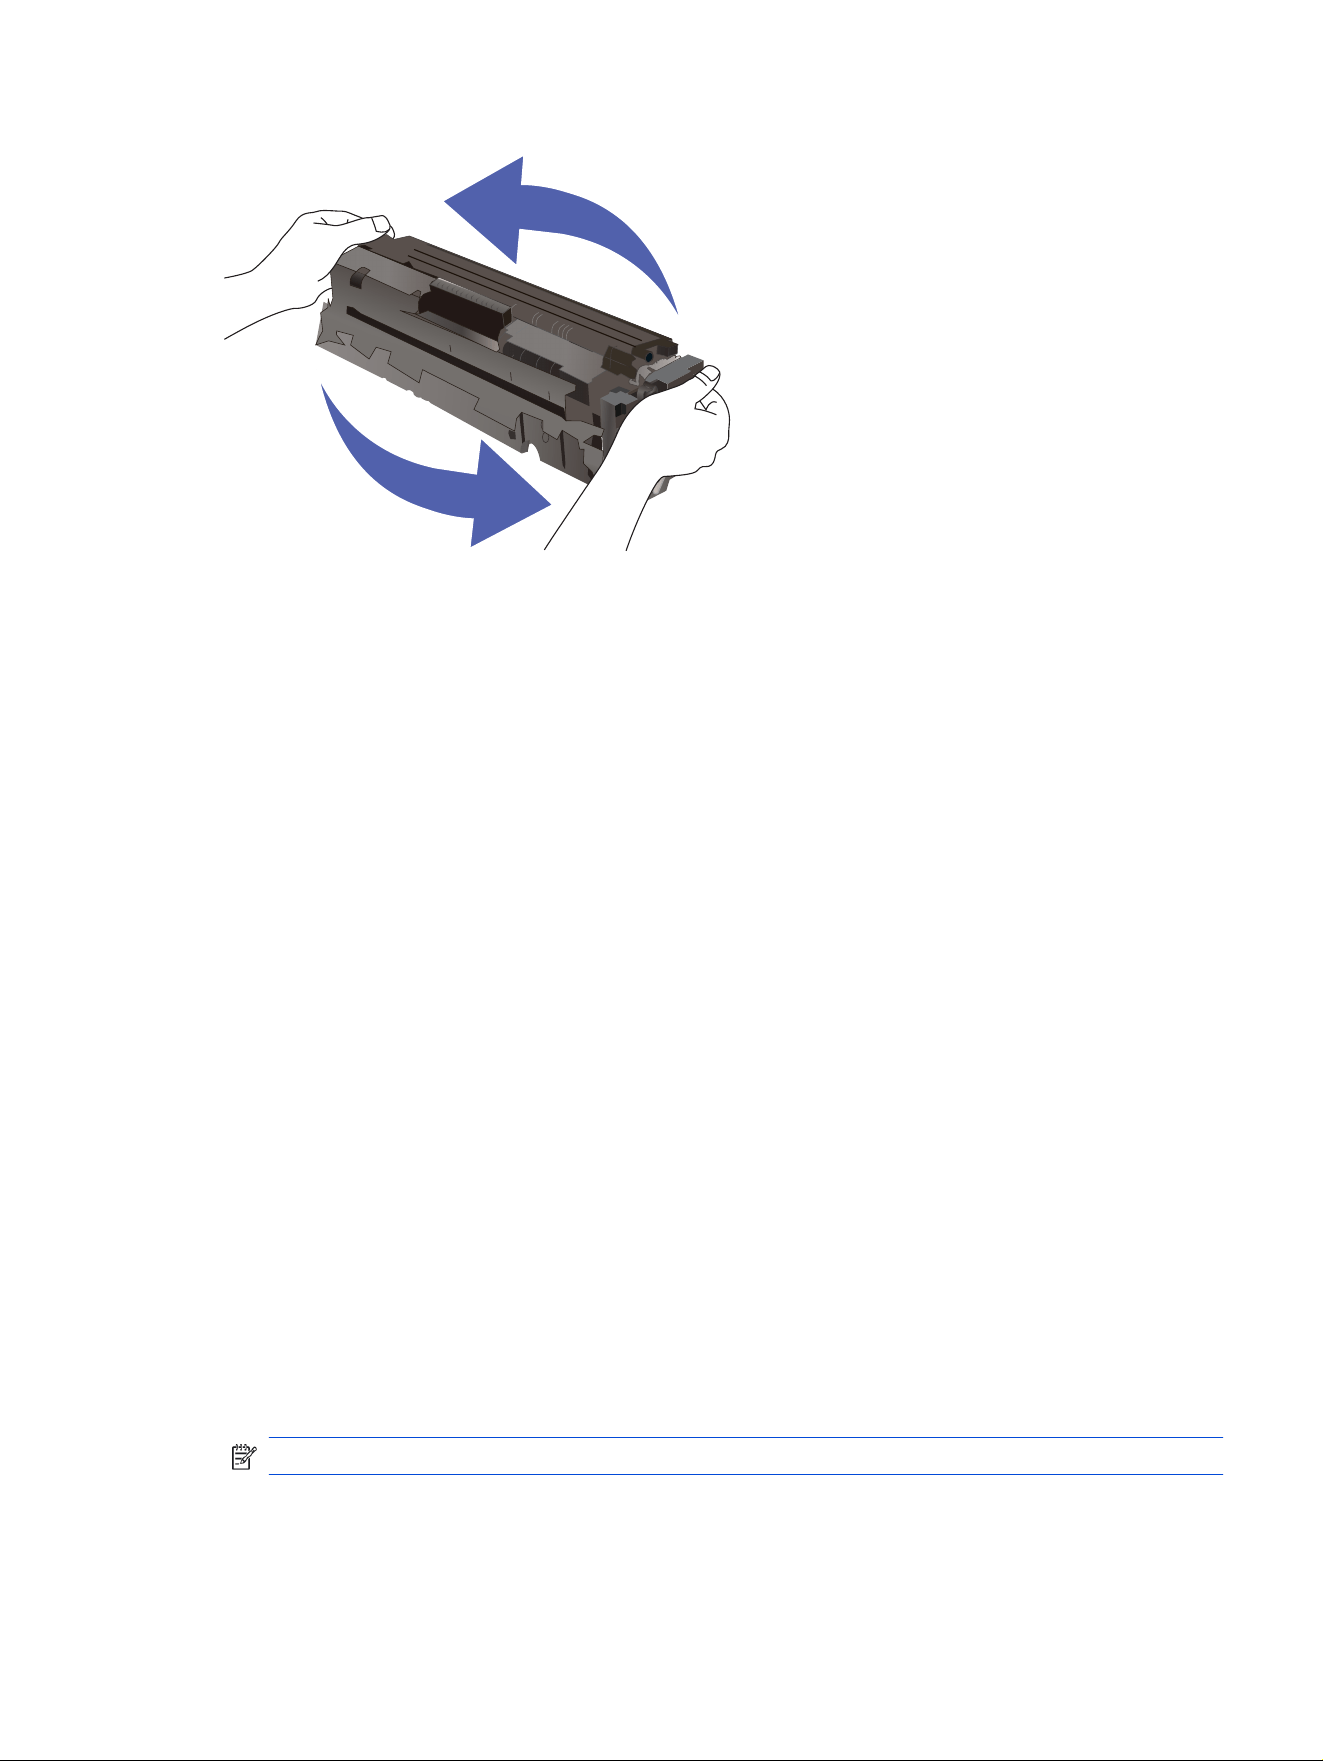
HP’s Premium Protection Warranty expires when a message indicating that HP’s Premium Protection
Warranty on this supply has ended appears on the Supplies Status Page or the EWS.
Change the “Very Low” settings
You can change the way the printer reacts when supplies reach the Very Low state. You do not have to
re-establish these settings when you install a new toner cartridge.
Change the "Very Low" settings from the control panel
Determine how the printer will notify you about very low cartridge levels.
1. From the Home screen on the printer control panel, touch the Menu icon, and then touch Settings.
2. Scroll to and touch the following menus:
a. Supplies
b. Very Low Behavior
c. Black Cartridge or Color Cartridge
3. Select one of the following options:
● Select the Stop option to set the printer to stop printing until you replace the toner cartridge.
● Select the Prompt to Continue option to set the printer to stop printing and prompt you to replace
the toner cartridge. You can acknowledge the prompt and continue printing.
● Select the Continue option to set the printer to alert you that the toner cartridge is very low, but to
continue printing.
● (For Color Cartridges) Select the Print Black option to set the printer to alert you that the toner
cartridge is very low, but to continue printing using black only.
NOTE: The Low Threshold option allows you to dene the level of ink that is considered very low.
Change the “Very Low” settings
103

For printers with fax capability
When the printer is set to the Stop or Prompt option, there is some risk that faxes will not print when the
printer resumes printing. This can occur if the printer has received more faxes than the memory can hold
while the printer is waiting.
The printer can print faxes without interruption when it passes the Very Low threshold if you select the
Continue option for the toner cartridge, but print quality might degrade.
Ordering
Order parts, supplies, or accessories through one of the following channels.
Table 9-2 Ordering options
Ordering option Ordering information
Order supplies and paper www.hp.com
Order genuine HP parts or accessories www.hp.com/buy/parts
Order through service or support providers Contact an HP-authorized service or support provider.
Order using the HP Embedded Web Server (EWS) To access, in a supported web browser on your computer, enter
the printer IP address or host name in the address/URL eld.
The EWS contains a link to the HP website, which provides
options for purchasing Original HP supplies.
Printer does not pick up paper or misfeeds
Review the following information about the printer not picking up paper or misfeeding paper.
Introduction
The following solutions can help solve problems if the printer is not picking up paper from the tray or is
picking up multiple sheets of paper at one time. Either of these situations can result in paper jams.
The printer picks up multiple sheets of paper
If the printer picks up multiple sheets of paper from the tray, try these solutions.
1. Remove the stack of paper from the tray and ex it, rotate it 180 degrees, and ip it over. Do not fan
the paper. Return the stack of paper to the tray.
NOTE: Fanning the paper introduces static electricity. Instead of fanning the paper, ex the stack
by holding it at each end and bringing the ends up to form a U shape. Then, rotate the ends down to
reverse the U shape. Next, hold each side of the stack of paper, and repeat this process. This process
releases individual sheets without introducing static electricity. Straighten the paper stack against a
table before returning it to the tray.
104
Chapter 9 Solve problems

Figure 9-1 Technique for exing the paper stack
1
2
2. Use only paper that meets HP specications for this printer.
3. Verify that the humidity in the room is within specications for this printer, and that paper is being
stored in unopened packages. Most reams of paper are sold in moisture-proof wrapping to keep paper
dry.
In high-humidity environments, paper at the top of the stack in the tray can absorb moisture, and it
might have a wavy or uneven appearance. If this happens, remove the top 5 to 10 sheets of paper
from the stack.
In low-humidity environments, excess static electricity can cause sheets of paper to stick together. If
this happens, remove the paper from the tray, and ex the stack as described above.
4. Use paper that is not wrinkled, folded, or damaged. If necessary, use paper from a different package.
5. Make sure the tray is not overlled by checking the stack-height markings inside the tray. If it is
overlled, remove the entire stack of paper from the tray, straighten the stack, and then return some of
the paper to the tray.
The following images show examples of the stack-height markings in the trays for various printers.
Most HP printers have markings similar to these. Also make sure that all sheets of paper are below the
tabs near the stack-height marks. These tabs help hold the paper in the correct position as it enters
the printer.
The printer picks up multiple sheets of paper
105
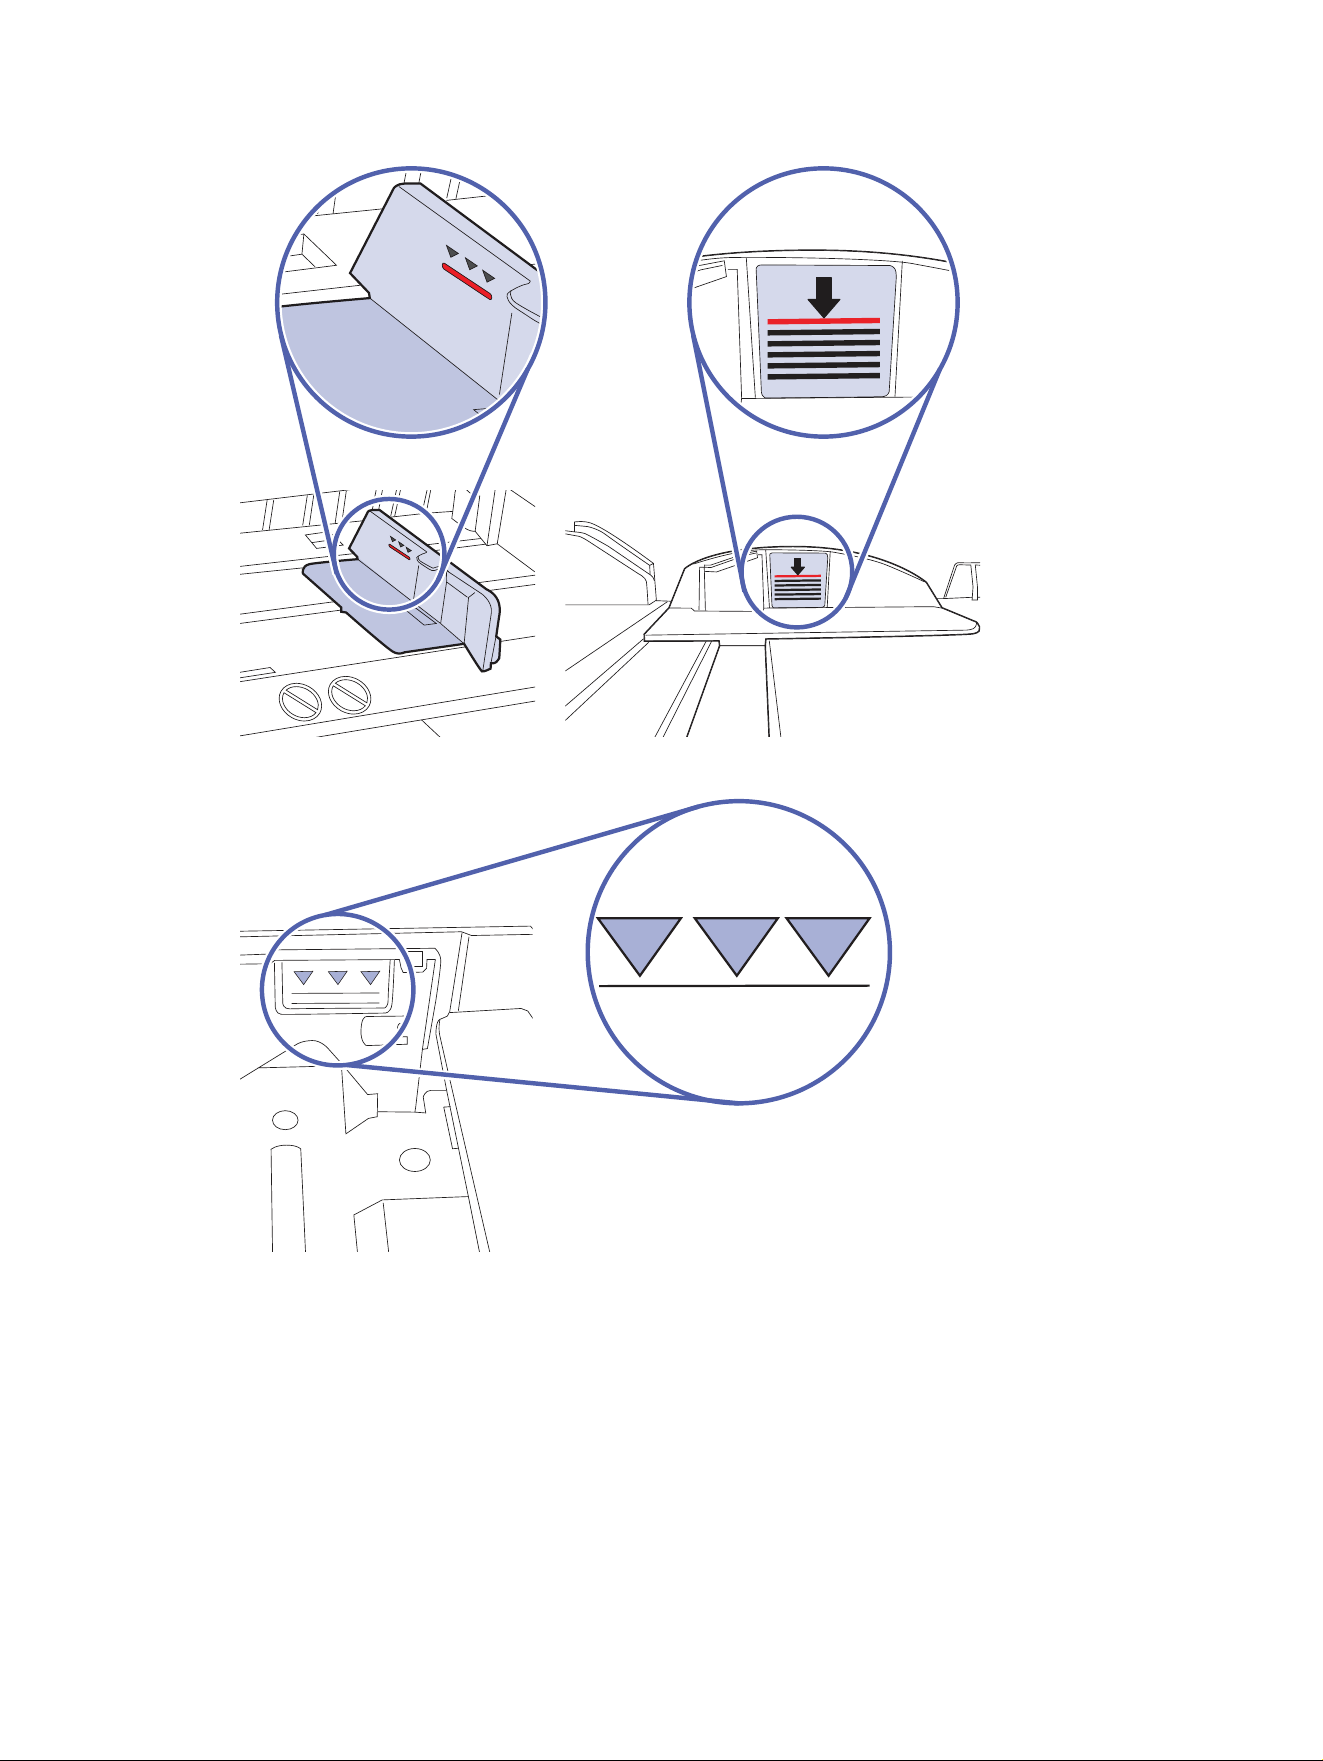
Figure 9-2 Stack height markings
Figure 9-3 Tab for the paper stack
6. Make sure the paper guides in the tray are adjusted correctly for the size of paper. Adjust the guides to
the appropriate indentation in the tray.
7. Make sure the printing environment is within recommended specications.
The printer does not pick up paper
If the printer does not pick up paper from the tray, try these solutions.
1. Open the printer and remove any jammed sheets of paper. Verify that no torn remnants of paper
remain inside of the printer.
106
Chapter 9 Solve problems
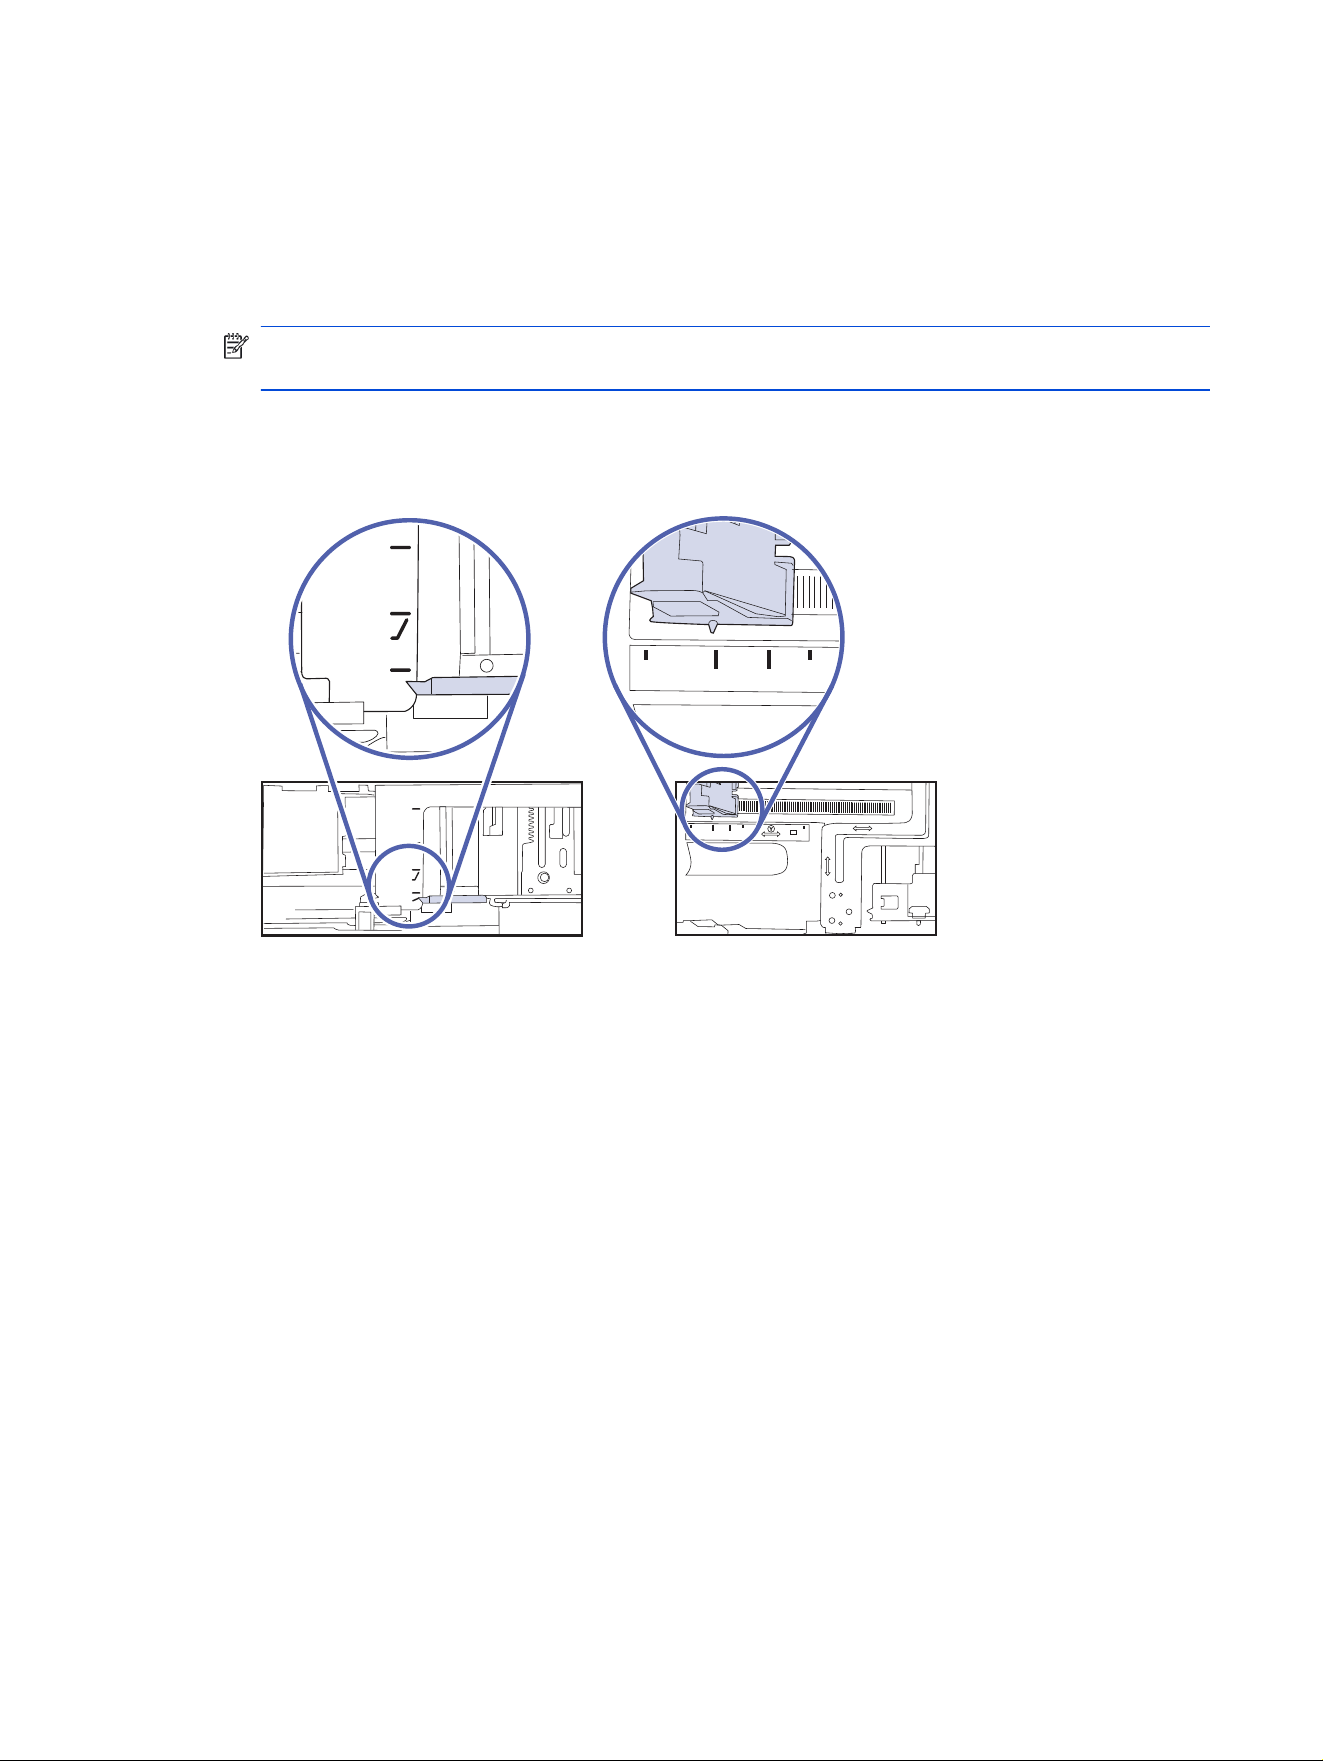
2. Load the tray with the correct size of paper for the job.
3. Make sure the paper size and type are set correctly on the printer control panel.
4. Make sure the paper guides in the tray are adjusted correctly for the size of paper. Adjust the guides
to the appropriate indentation in the tray. The arrow on the tray guide should line up exactly with the
marking on the tray.
NOTE: Do not adjust the paper guides tightly against the paper stack. Adjust them to the
indentations or markings in the tray.
The following image shows examples of the paper-size indentations in the trays. Most HP printers have
markings similar to these.
Figure 9-4 Examples of size markings
A6
A5
A4
LTR/LGL
JIS B5
EXEC
A5
EXEC
A4
LTR/LGL
JIS B5
A4 B5
A5
11
10.5
A4
11 10.5
B5
5. Verify that the humidity in the room is within specications for this printer, and that paper is being
stored in unopened packages. Most reams of paper are sold in moisture-proof wrapping to keep paper
dry.
In high-humidity environments, paper at the top of the stack in the tray can absorb moisture, and it
might have a wavy or uneven appearance. If this happens, remove the top 5 to 10 sheets of paper
from the stack.
In low-humidity environments, excess static electricity can cause sheets of paper to stick together. If
this happens, remove the paper from the tray, and ex the stack by holding it at each end and bringing
the ends up to form a U shape. Then, rotate the ends down to reverse the U shape. Next, hold each
side of the stack of paper, and repeat this process. This process releases individual sheets without
introducing static electricity. Straighten the paper stack against a table before returning it to the tray.
The printer does not pick up paper
107
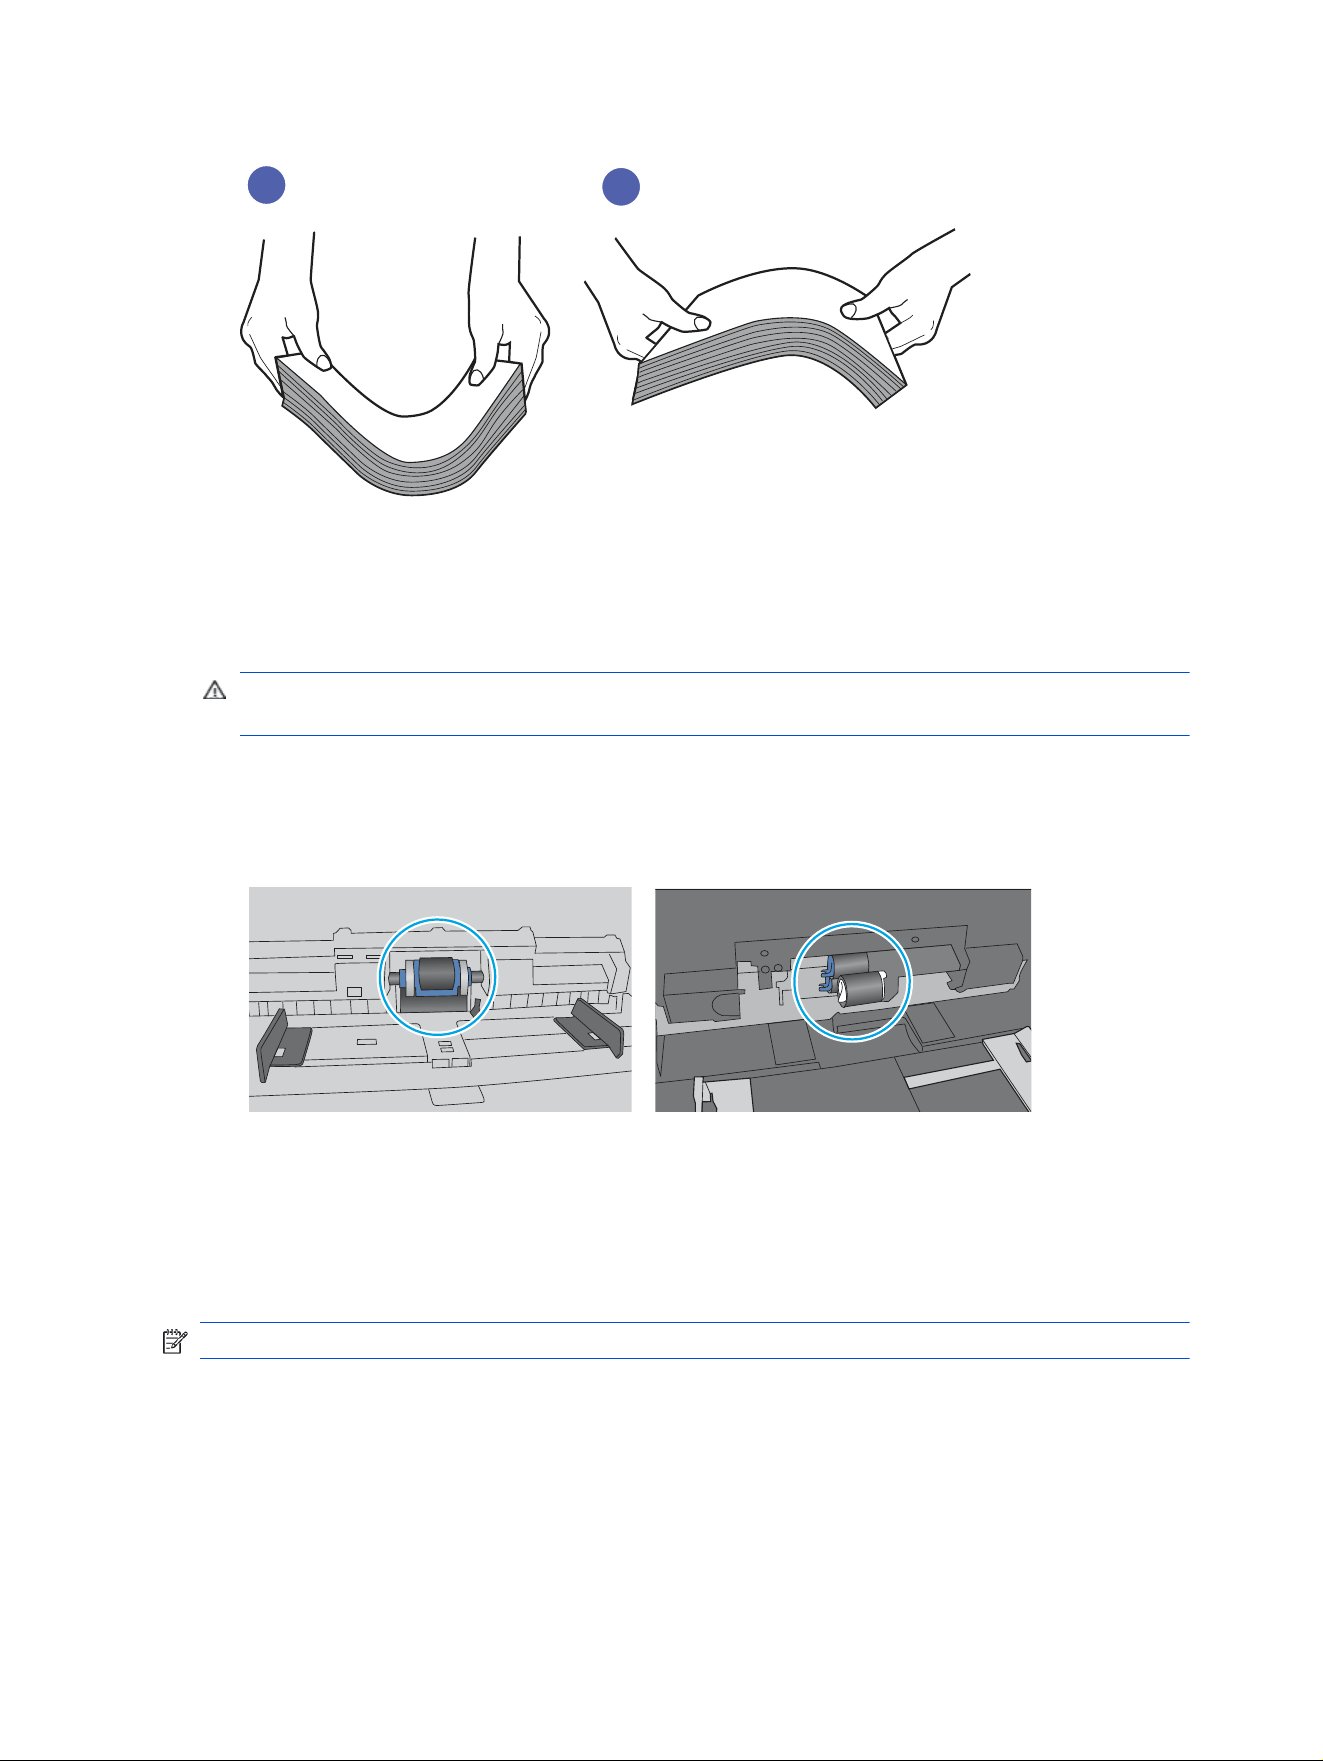
Figure 9-5 Technique for exing the paper stack
1
2
6. Check the printer control panel to see if it is displaying a prompt to feed the paper manually. Load
paper, and continue.
7. The rollers above the tray might be contaminated. Clean the rollers with a lint-free cloth dampened
with warm water. Use distilled water, if it is available.
CAUTION: Do not spray water directly on to the printer. Instead, spray water on the cloth or dab the
cloth in water and wring it out before cleaning the rollers.
The following image shows examples of the roller location for various printers.
Figure 9-6 Roller locations for Tray 1 or the multipurpose tray
The document feeder jams, skews, or picks up multiple sheets of paper
Try the suggested xes if the document feeder is jamming, skewing pages, or picking up multiple sheets of
paper at a time.
NOTE: This information applies to MFP printers only.
● The original might have something on it, such as staples or self-adhesive notes, that must be removed.
● Check that all rollers are in place and that the roller-access cover inside the document feeder is
closed.
● Make sure that the top document-feeder cover is closed.
108
Chapter 9 Solve problems
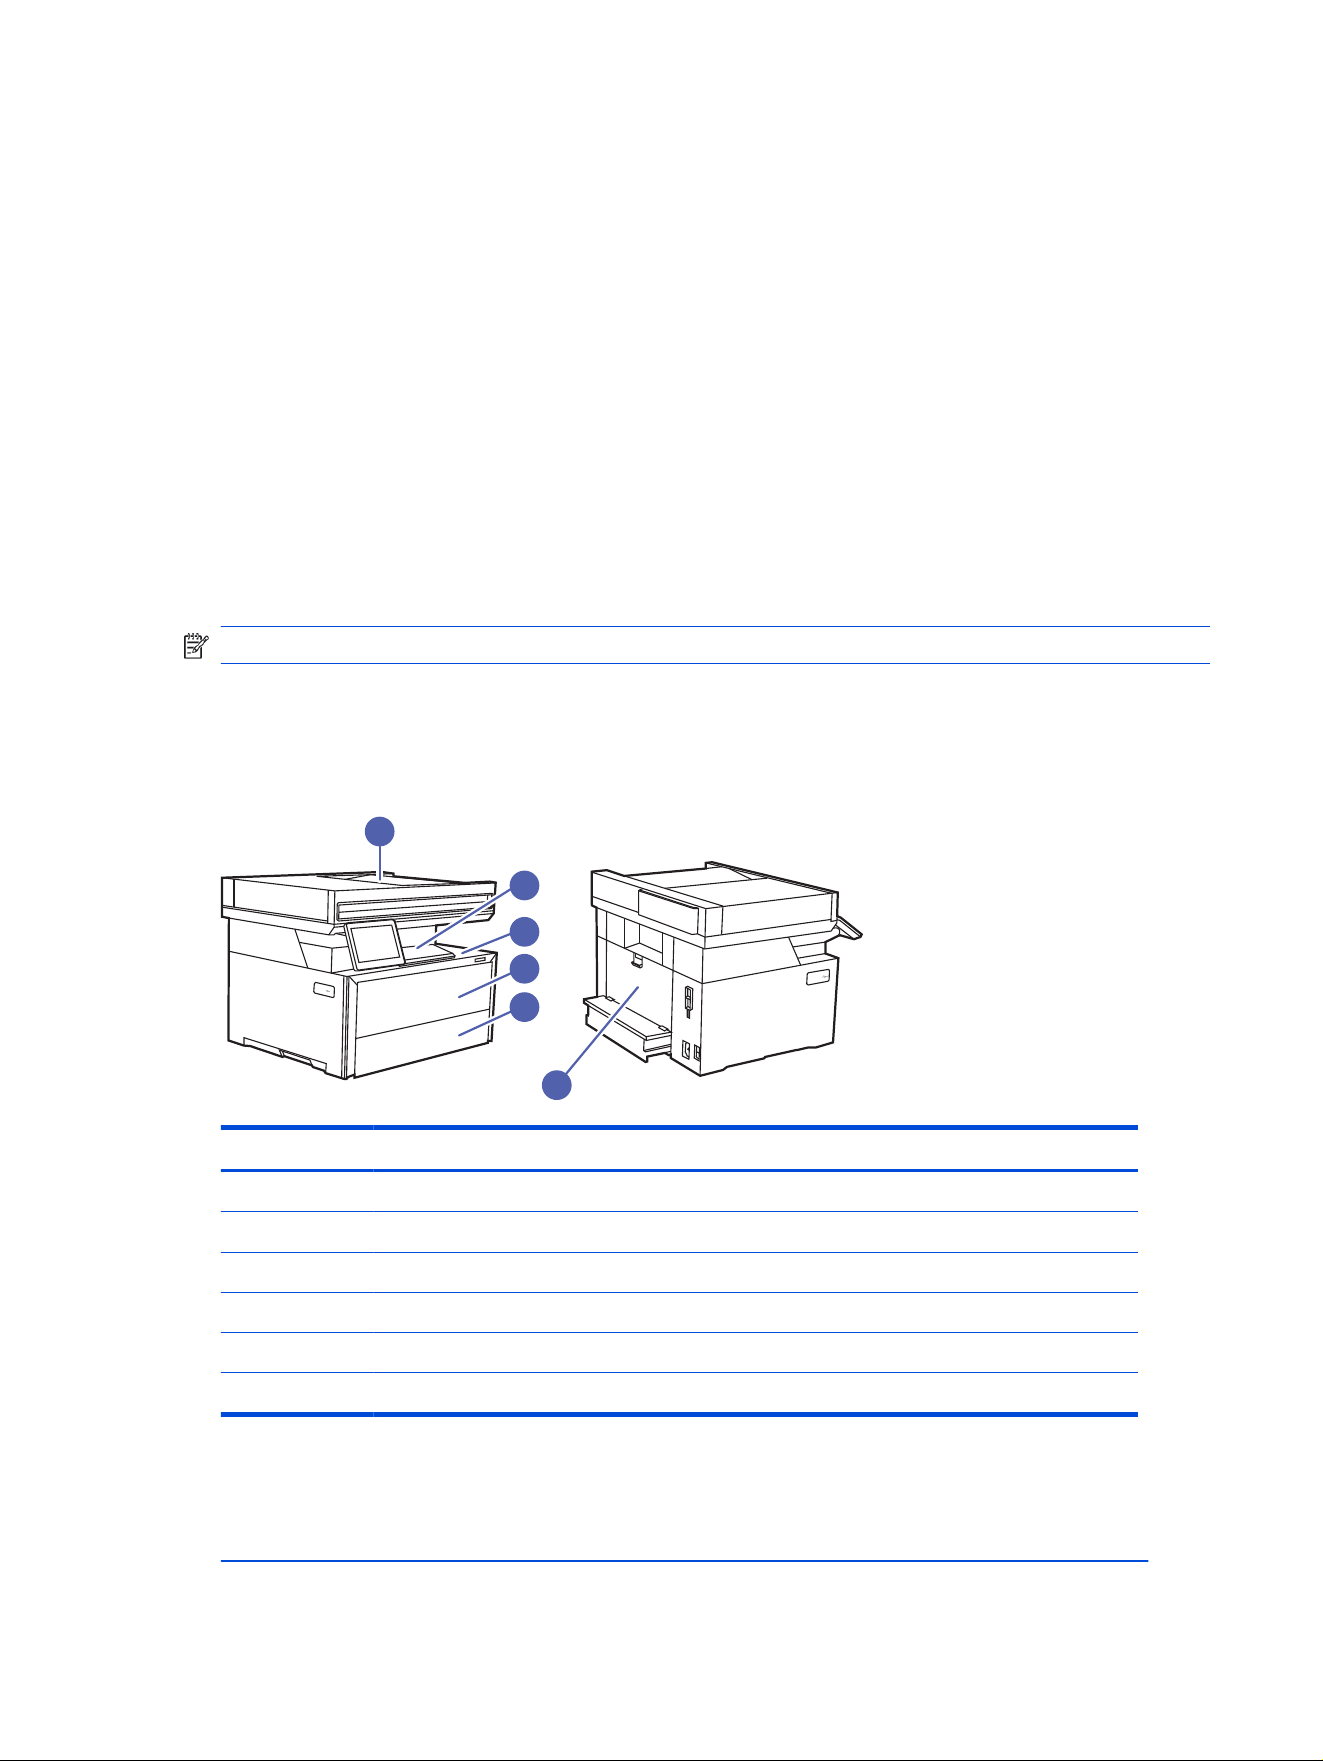
● The pages might not be placed correctly. Straighten the pages and adjust the paper guides to center
the stack.
● The paper guides must be touching the sides of the paper stack to work correctly. Make sure that the
paper stack is straight and the guides are against the paper stack.
● The document feeder input tray or output bin might contain more than the maximum number of pages.
Make sure the paper stack ts below the guides in the input tray, and remove pages from the output
bin.
● Verify that there are no pieces of paper, staples, paper clips, or other debris in the paper path.
● Clean the document-feeder rollers and the separation pad. Use compressed air or a clean, lint-free
cloth moistened with warm water. If misfeeds still occur, replace the rollers.
Clear paper jams (MFP 4112, 4113, 4114)
Use the procedures in this section to clear jammed paper from the printer paper path.
NOTE: Images used might not reect your exact model and conguration.
Paper jam locations
Jams can occur in these locations.
Figure 9-7 Jam locations
1
2
6
5
2
3
4
Number
Description
1 Document feeder
2 Output bin
3 Toner cartridge access door
4 Tray 1
5 Tray 2
6 Rear door/Duplexer
Experiencing frequent or recurring paper jams?
To reduce the number of paper jams, try these solutions.
View a video that demonstrates how to load paper in a way that reduces the number of paper jams
Clear paper jams (MFP 4112, 4113, 4114)
109
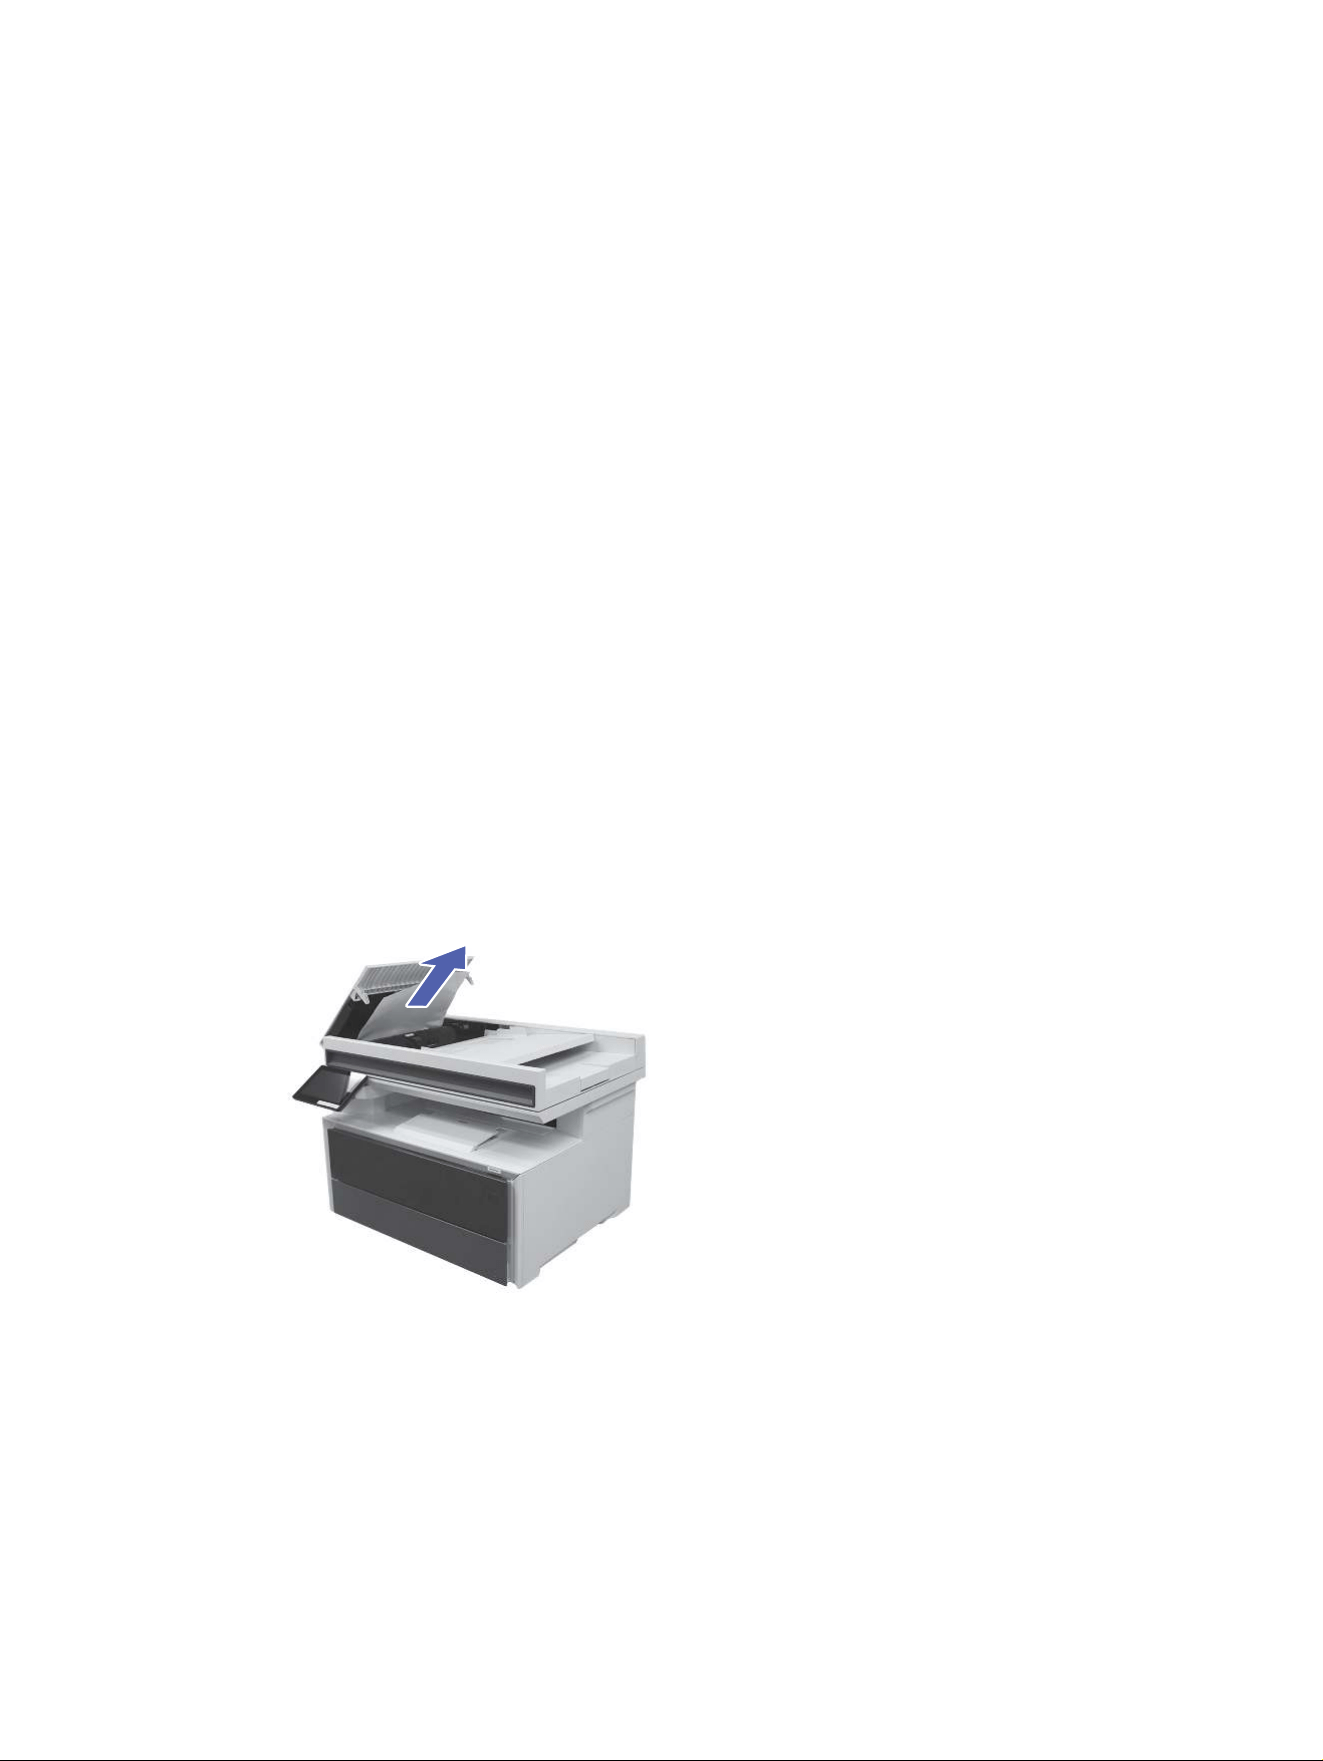
1. Use only paper that meets HP specications for this printer.
2. Use paper that is not wrinkled, folded, or damaged. If necessary, use paper from a different package.
3. Use paper that has not previously been printed or copied on.
4. Make sure the tray is not overlled. If it is, remove the entire stack of paper from the tray, straighten the
stack, and then return some of the paper to the tray.
5. Make sure the paper guides in the tray are adjusted correctly for the size of paper. Adjust the guides
so they are touching the paper stack without bending it.
6. Make sure that the tray is fully inserted in the printer.
7. If you are printing on heavy, embossed, or perforated paper, use the manual feed feature and feed
sheets one at a time.
8. Open the Trays menu on the printer control panel. Verify that the tray is congured correctly for the
paper type and size.
9. Make sure the printing environment is within recommended specications.
31.13 jam error in the document feeder
Use the following procedure to check for paper in all possible jam locations related to the document
feeder.
Recommended action for customers
When a jam occurs, the control panel displays an error message that assists in clearing the jam.
1. Open the document feeder cover.
110
Chapter 9 Solve problems
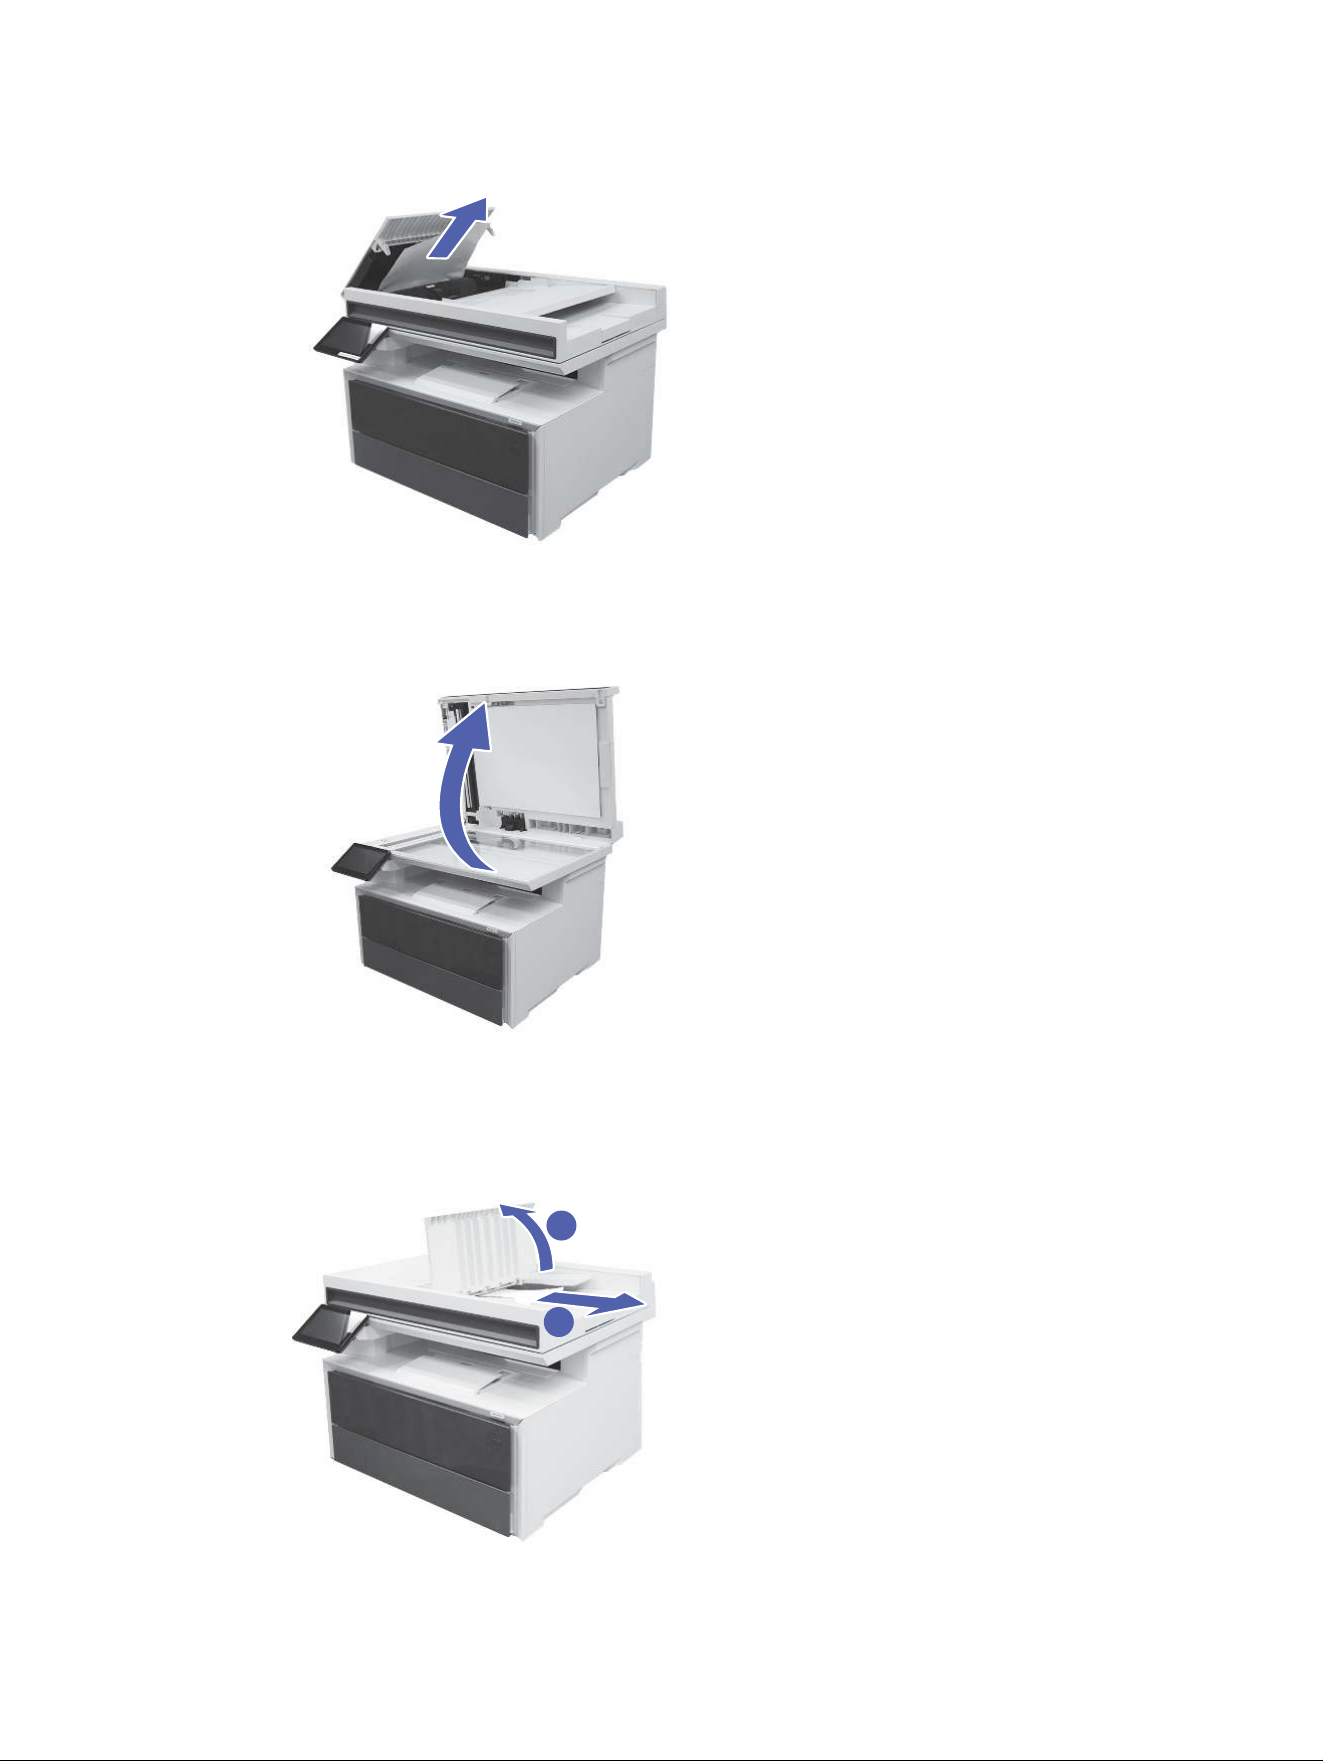
2. Remove any jammed paper.
3. Close the document feeder cover.
4. Open the scanner lid and remove gently any visible jammed paper.
5. Lower the scanner lid.
6. If no paper is seen in either of the rst two locations, lift the document feeder input tray and check for
jammed paper.
1
2
31.13 jam error in the document feeder
111
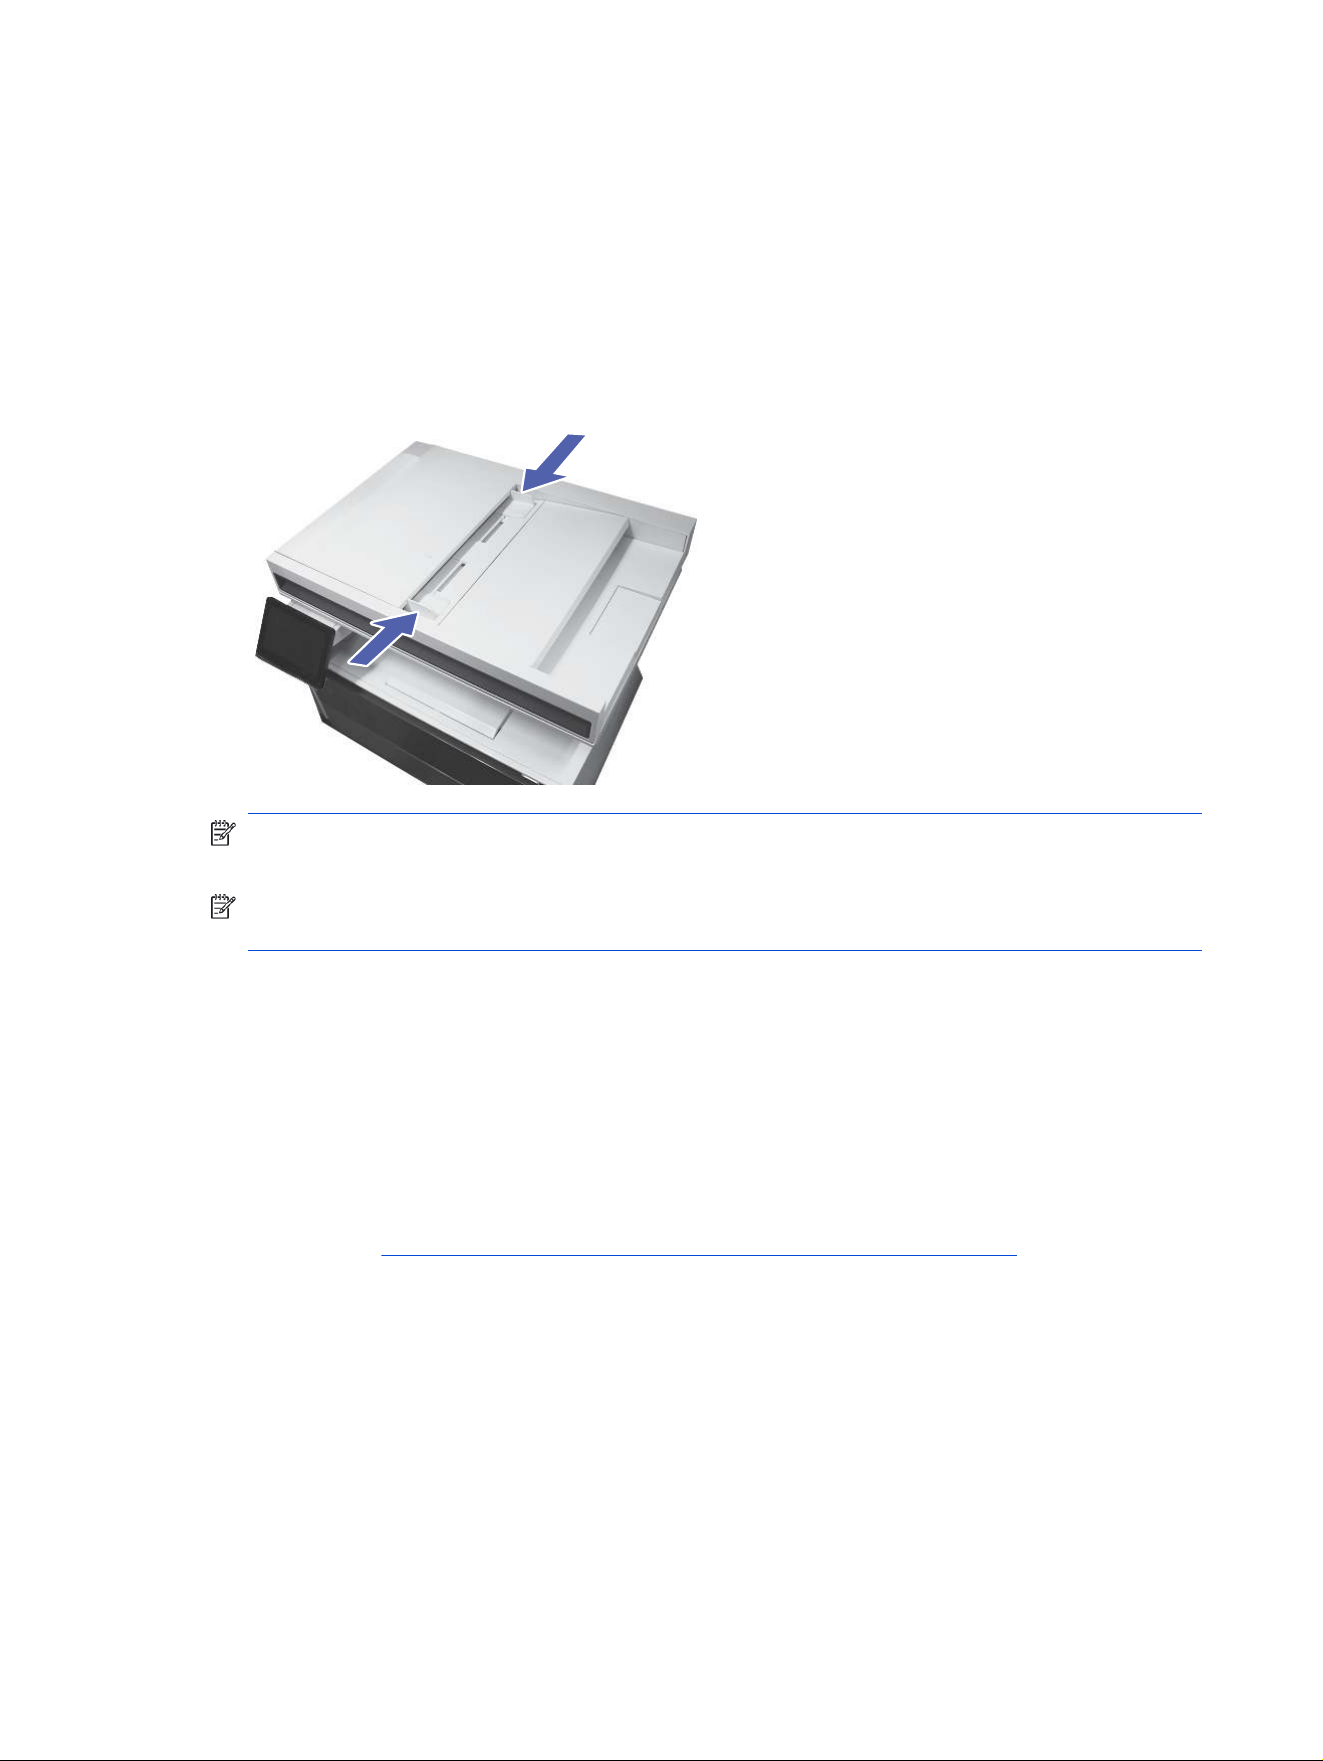
7. If the error persists, ensure that the paper meets the document feeder (ADF) specications for the
printer.
8. Ensure the paper is loaded correctly in the input tray.
a. Ensure the input tray is not overloaded.
b. Adjust the tray guides to the correct paper size.
c. Align the paper stack in the center of the input tray so it is straight and parallel with the direction
of travel into the document feeder paper path.
NOTE: To avoid jams, make sure the guides in the document feeder input tray are adjusted
correctly. Remove all staples, paper clips, or tape from the original documents.
NOTE: Original documents that are printed on heavy, glossy paper can jam more frequently than
originals that are printed on plain paper.
9. Clean the document feeder rollers and separation pad.
a. Open the document feeder.
b. Inspect the document feeder kit rollers and separation pad for any visible lint or dust.
c. Using a clean lint-free cloth moistened with warm water, gently wipe each feed roller and the
separation pad to remove any lint or dust.
d. Ensure all rollers and the pad are dry before closing the document feeder.
View the How to Clean the Pick Rollers in HP LaserJet and PageWide Printers for detailed
instructions.
112
Chapter 9 Solve problems
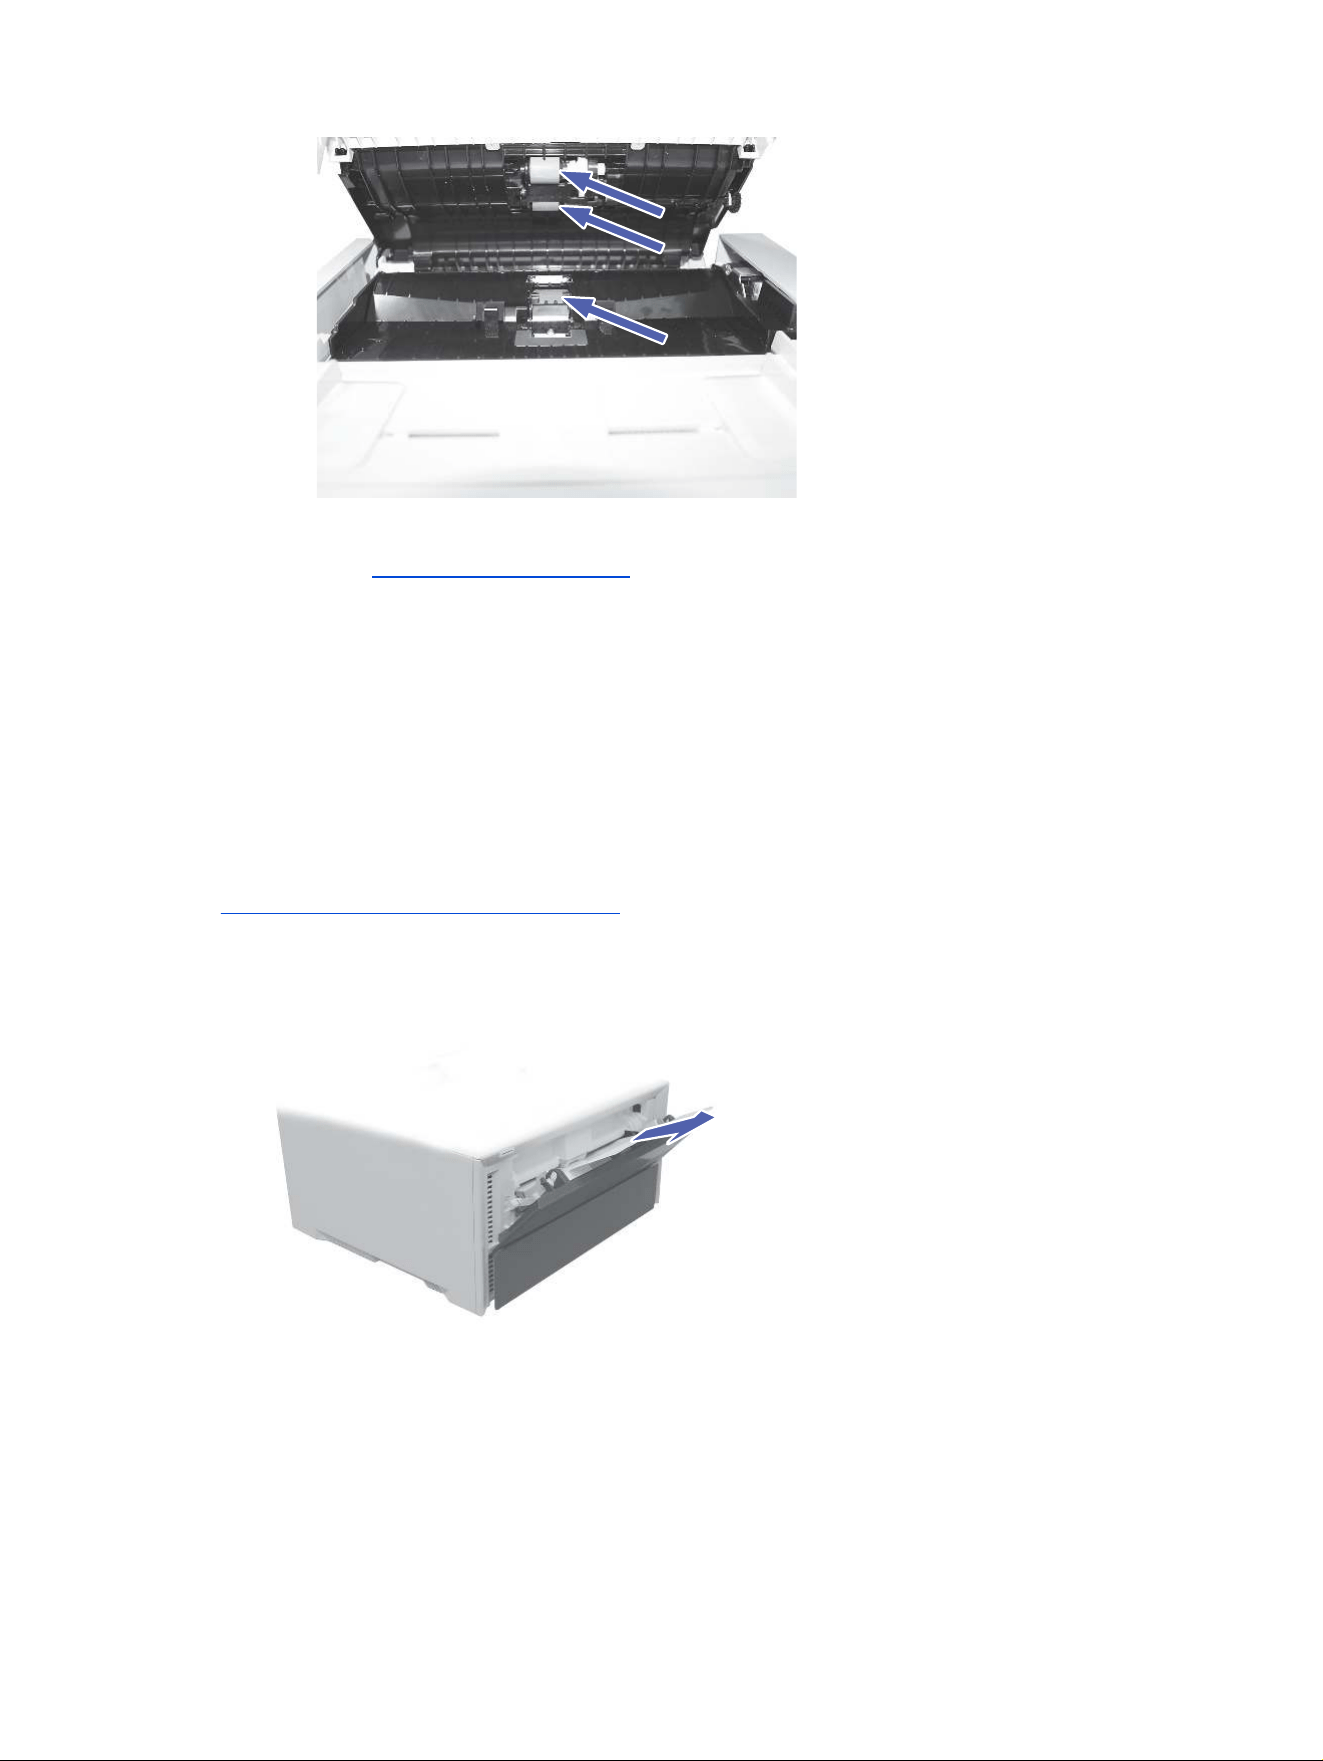
10. If the error persists, contact your HP-authorized service or support provider, or contact customer
support at www.hp.com/go/contactHP.
13.02 jam error in tray 1
Use the following procedure to clear paper jams in Tray 1.
Recommended action for customers
When a jam occurs, the control panel displays a message that assists in clearing the jam.
● 13.02.yz Paper jam in Tray 1
Y and Z are variables and can be any of the following 0-9 or A-F.
View a video of how to clear a jam in Tray 1
1. Look inside Tray 1 and remove any jammed paper by pulling it straight out.
13.02 jam error in tray 1
113
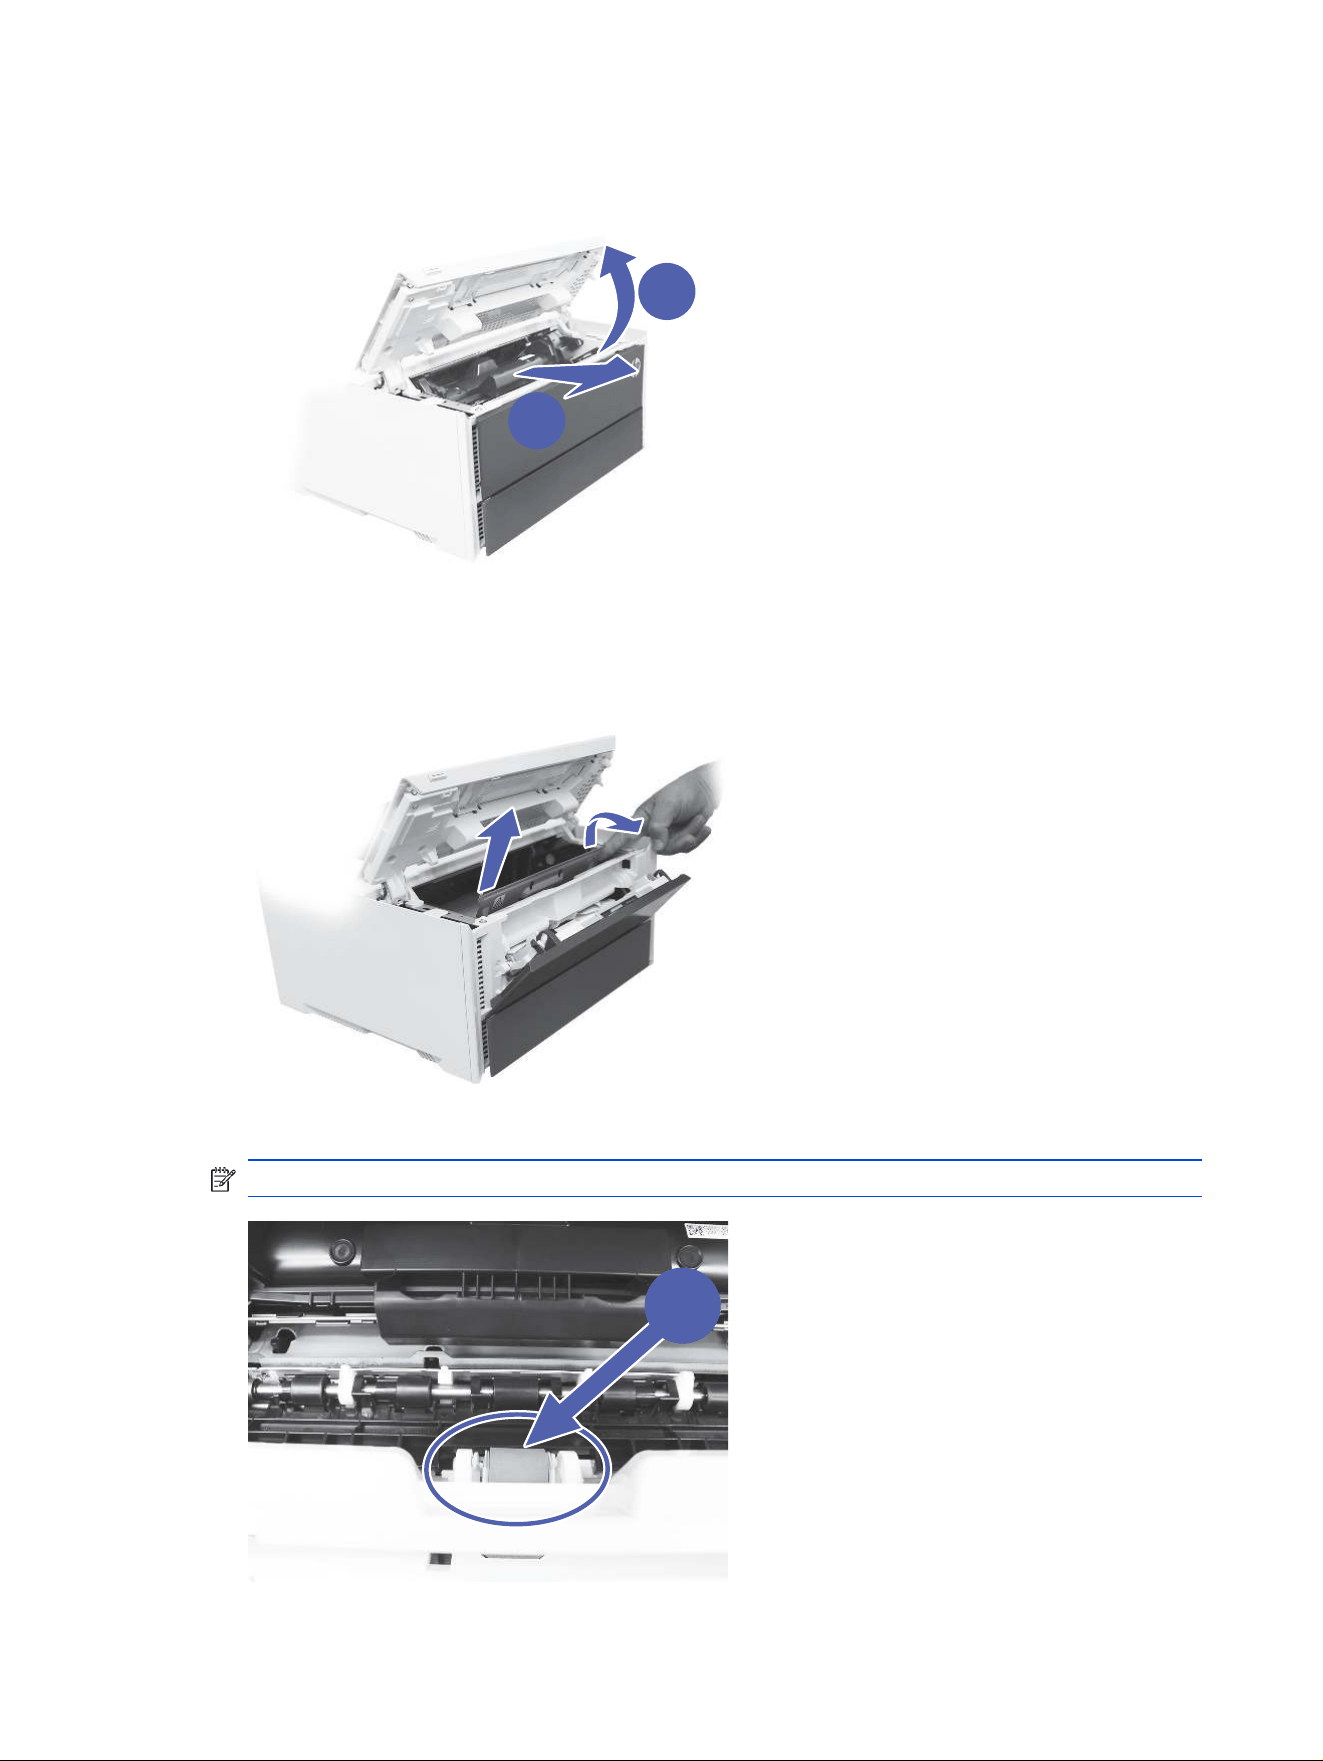
2. If you cannot see the jammed paper, open the toner cartridge access door (callout 1) and remove the
toner cartridge (callout 2).
1
2
Callout 1: Open top cover.
Callout 2: Remove toner cartridge.
3. Lift the metal ap to access the jammed paper. Remove any jammed paper and close the metal ap.
4. With the top cover open, locate and clean the feed roller for Tray 1.
NOTE: Use a dampened lint-free cloth to clean the roller.
1
114
Chapter 9 Solve problems

Callout 1: Tray 1 roller
5. Install the toner cartridge and close the top cover.
6. Make sure the type and quality of the paper being used meets the HP specications for the printer.
7. Reopen Tray 1 and load the paper into the tray.
● Ensure the tray is not overlled. Paper should be below the detent in callout image.
● Ensure the tray guides are set to the correct paper size.
To adjust guides, press the adjust lever in the direction indicated (callout 1), and then move the guides
to the desired paper size (callout 2).
1
2
8. If the error persists, contact your HP-authorized service or support provider, or contact customer
support at www.hp.com/go/contactHP.
13.03 jam error in tray 2
Use the following procedure to check for a paper jam in Tray 2.
Recommended action for customers
When a jam occurs, the control panel displays a message that assists in clearing the jam.
● 13.03.yz Paper jam in Tray 2
Y and Z are variables and can be any of the following 0-9 or A-F.
View a video of how to clear a jam in Tray 2
13.03 jam error in tray 2
115
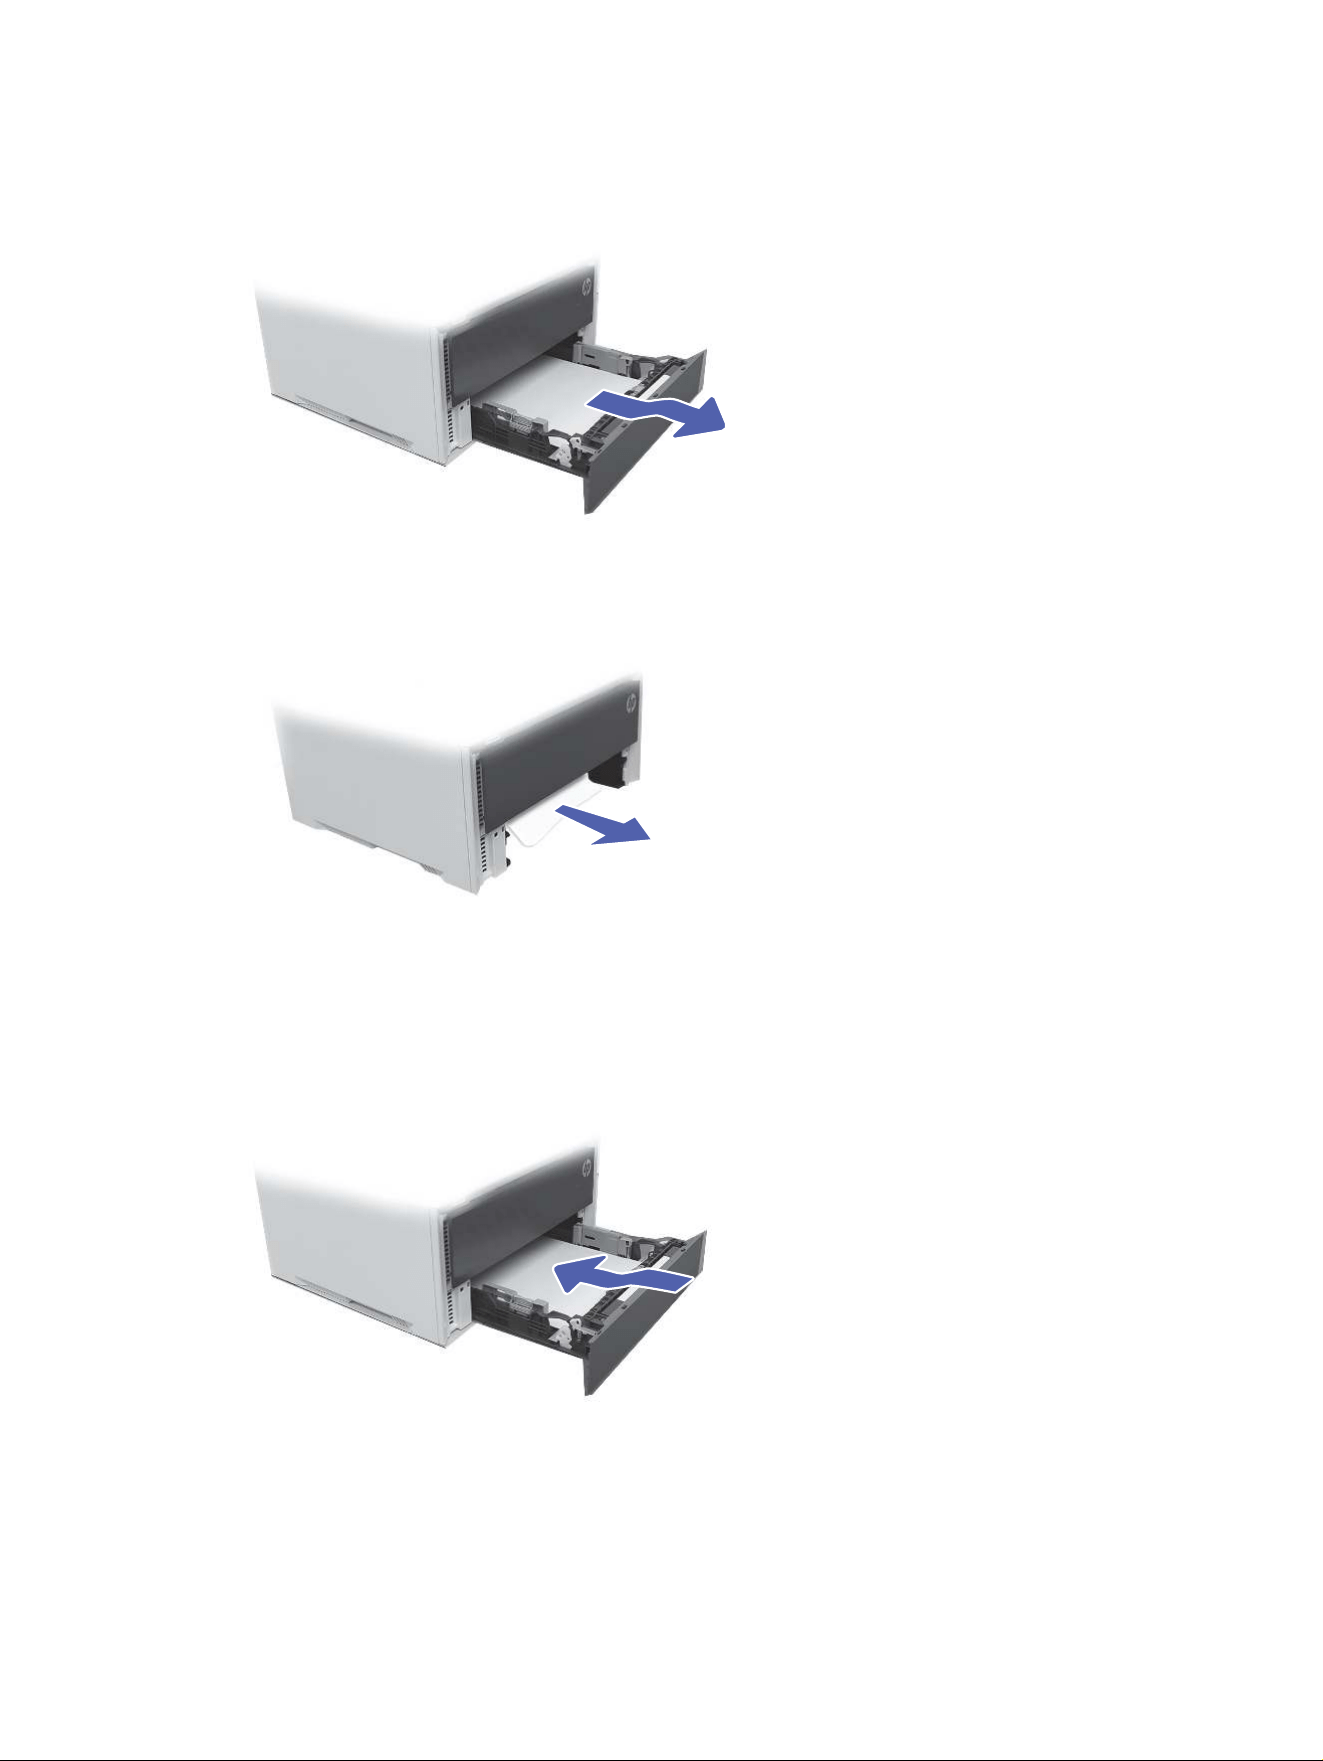
1. Pull the tray completely out of the printer.
2. Remove any jammed or damaged sheets of paper.
3. Reinsert and close Tray 2.
116
Chapter 9 Solve problems
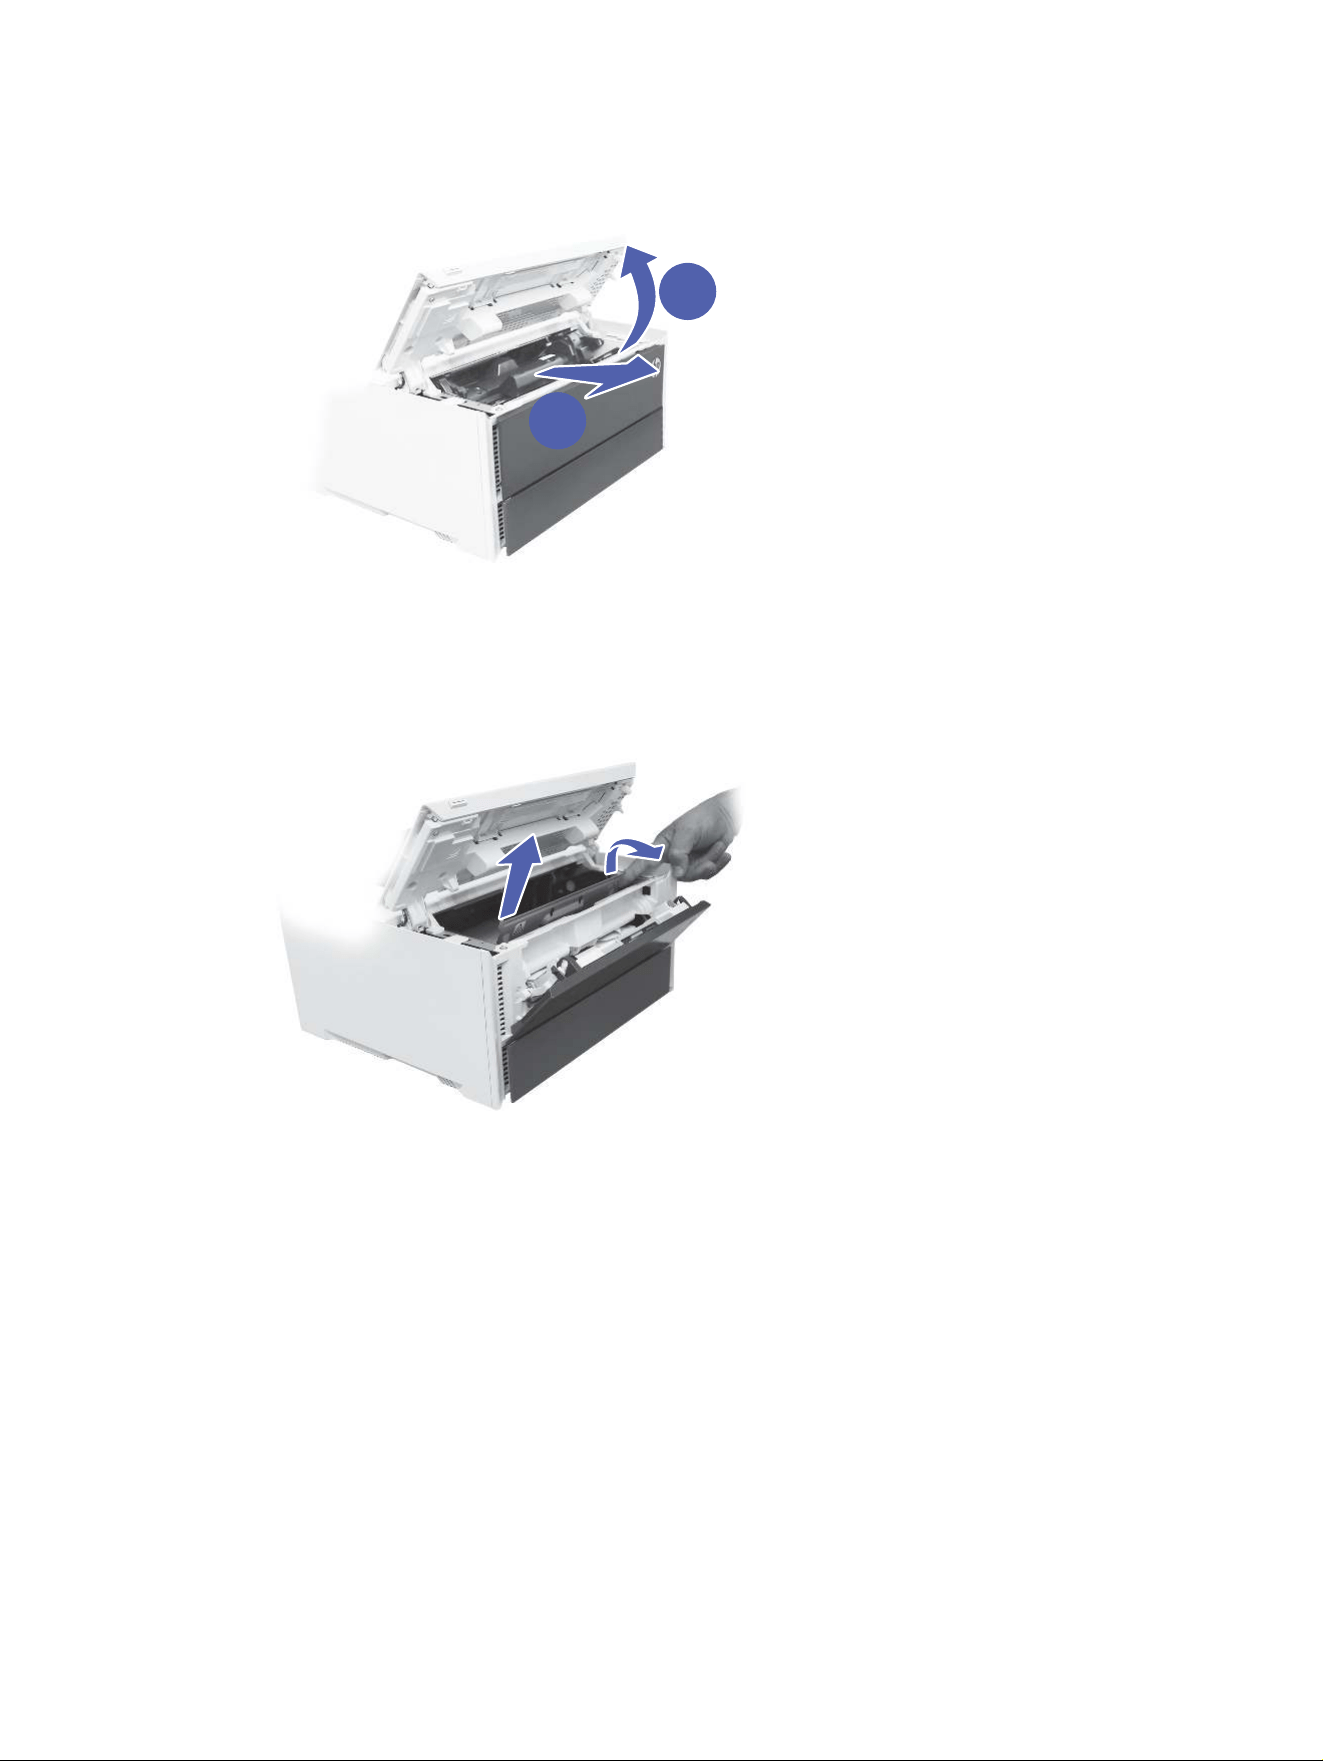
4. If you cannot see the jammed paper, open the toner cartridge access door (callout 1) and remove the
toner cartridge (callout 2).
1
2
Callout 1: Open top cover.
Callout 2: Remove toner cartridge.
5. Lift the metal ap to access the jammed paper. Remove any jammed paper, and then close the metal
ap.
6. Ensure the type and quality of the paper being used meets the HP specications for the printer.
13.03 jam error in tray 2
117
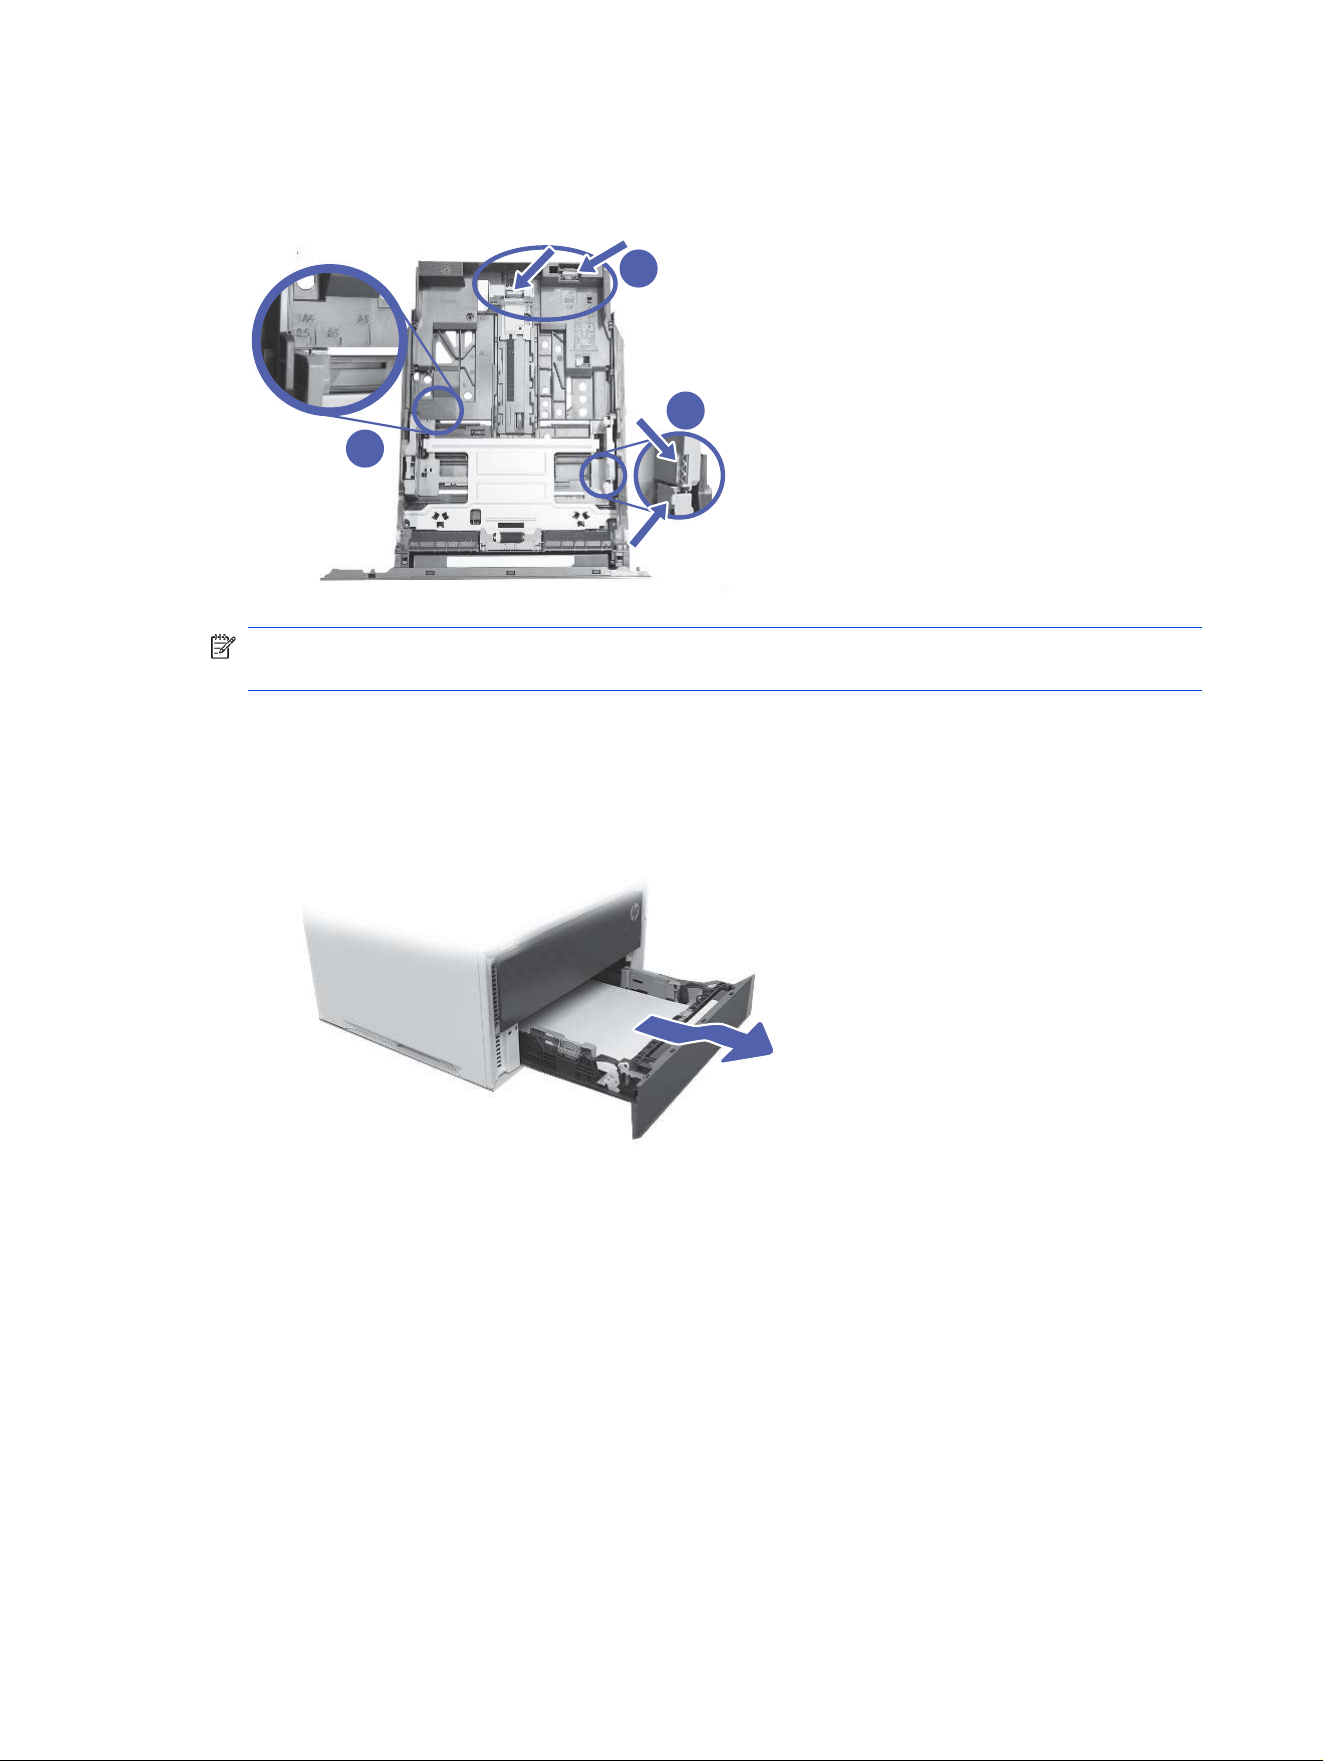
7. If the error persists, ensure the tray width and length guides match the paper size loaded in the tray
and the tray is not over lled above the ll mark (line below triangles, callout 3). See the following
image for guidance.
1
2
3
NOTE: When reinserting the paper, make sure the paper guides are adjusted properly for the paper
size.
8. If the error persists, clean the tray pick, feed, and separation rollers.
a. Remove Tray 2.
b. Remove the tray roller assembly.
Pull the tab forward (callout 1) and then slide the rollers in the indicated direction to remove it.
118
Chapter 9 Solve problems
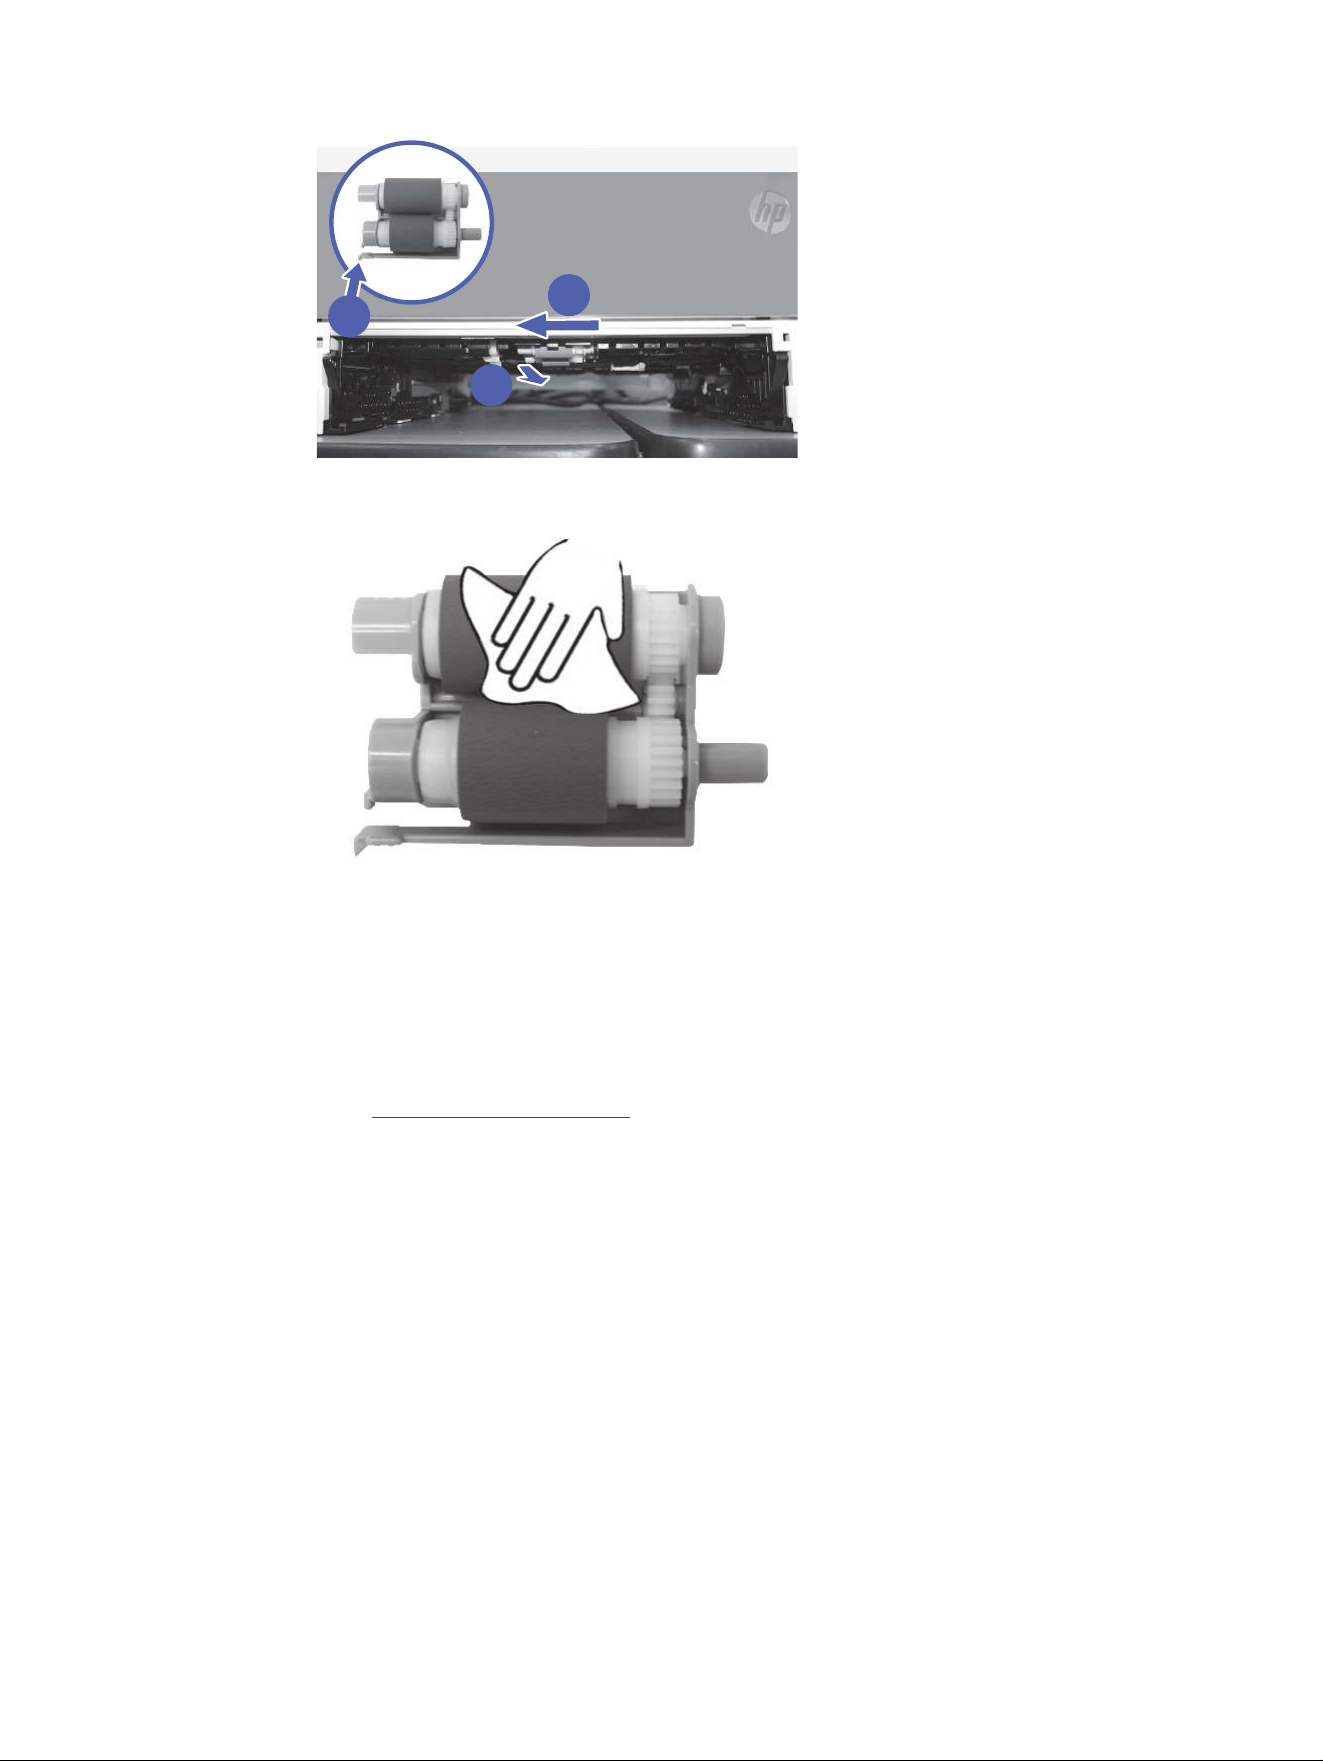
1
2
1
c. Clean the rollers with a dampened lint-free cloth.
d. Reinstall the roller by sliding them back onto the shaft.
e. Install Tray 2.
f. Adjust the guides and install the paper.
9. If the error persists, contact your HP-authorized service or support provider, or contact customer
support at www.hp.com/go/contactHP.
13.10, 13.11, 13.13 jam error in the output bin (MFP)
Use the following procedure to check for paper in all possible jam locations related to the output bin.
Recommended action for customers
When a jam occurs, the control panel displays an error message that assists in clearing the jam.
13.10, 13.11, 13.13 jam error in the output bin (MFP)
119
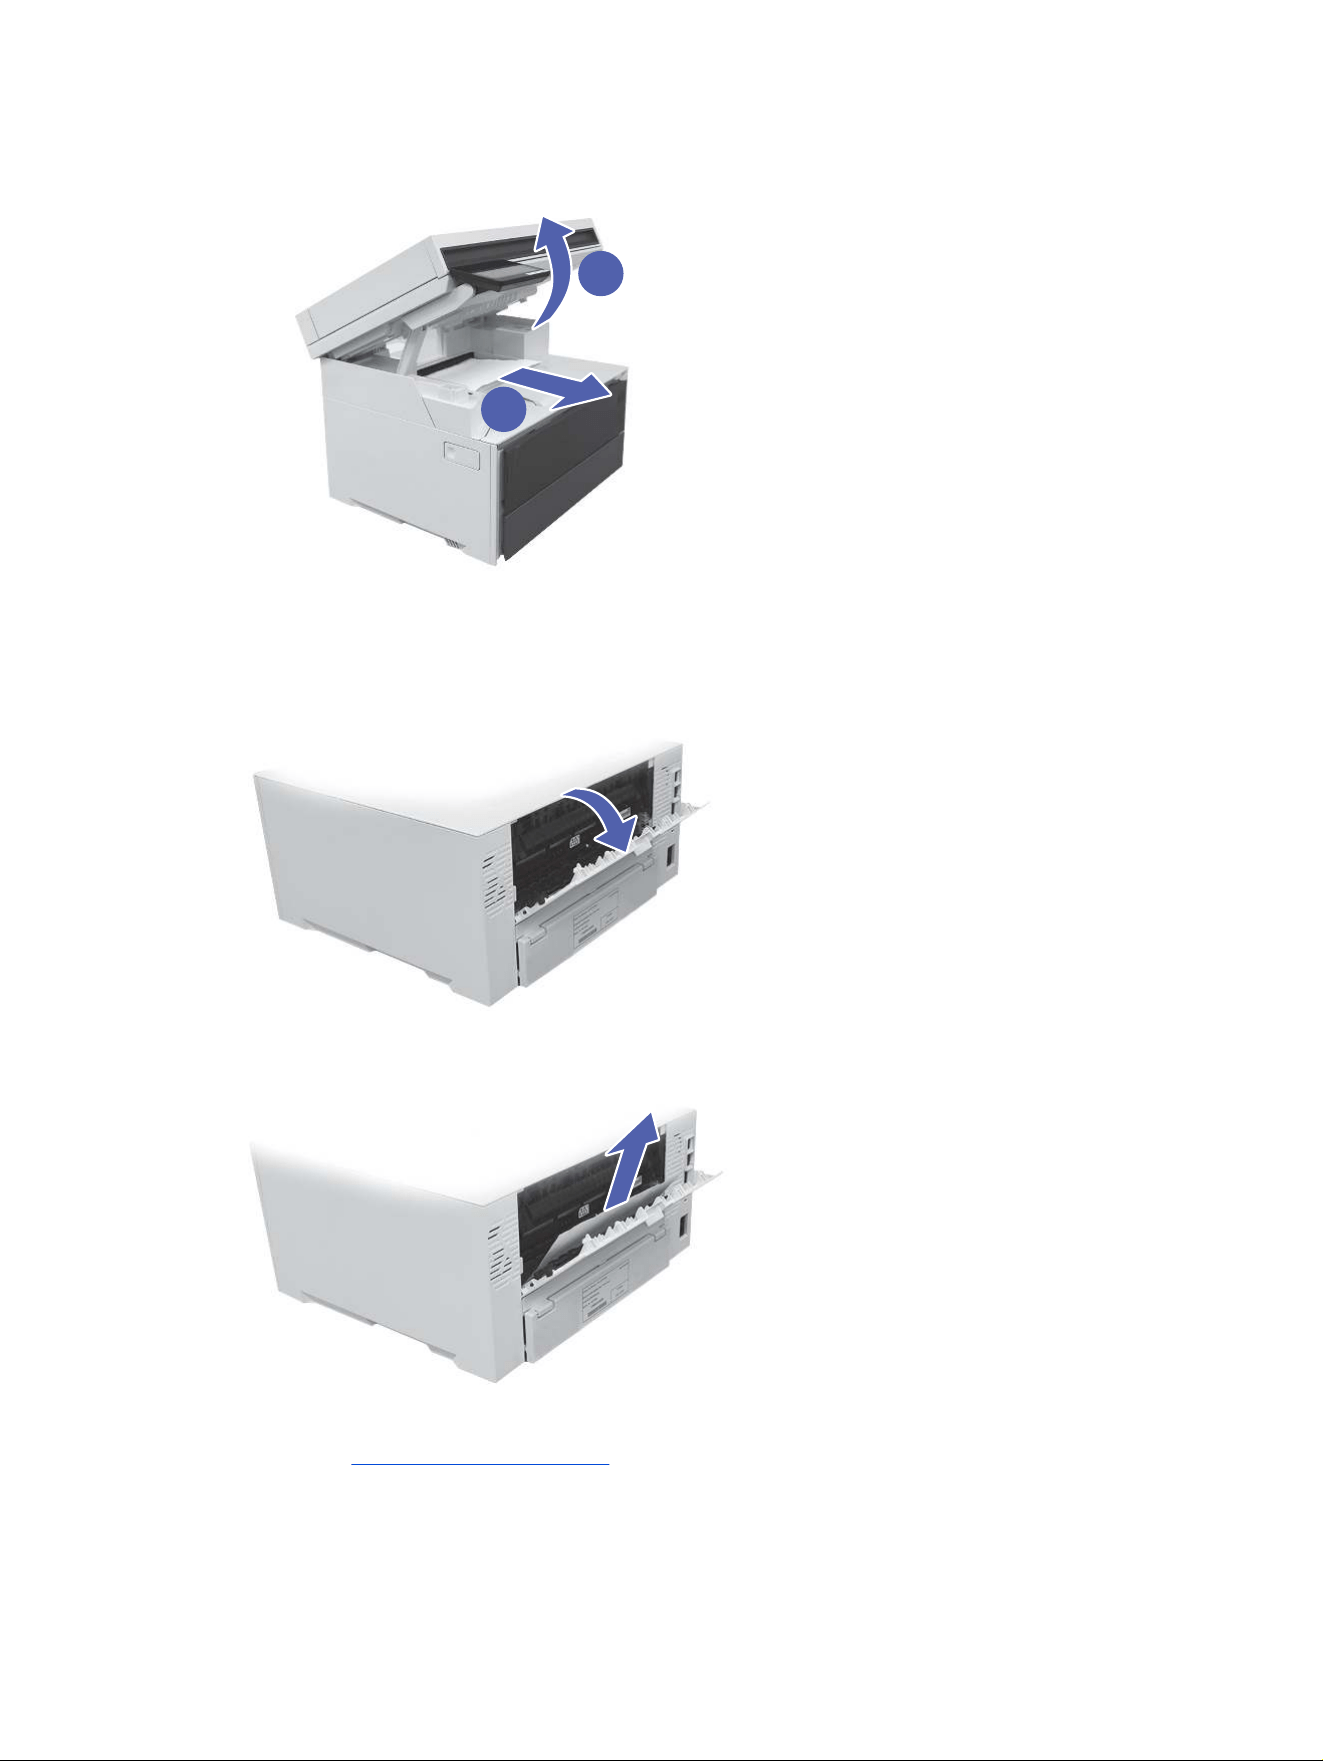
1. If paper is visible in the output bin, lift the scanner (callout 1) and then grasp the leading edge of the
paper and remove it (callout 2).
1
2
2. If the paper cannot be removed, open the rear door to remove the paper.
3. If the error persists, contact your HP-authorized service or support provider, or contact customer
support at www.hp.com/go/contactHP.
13.08, 13.09, 13.14, or 13.15 Jam error in the rear door (MFP)
Use the following procedure to check for paper in all possible jam locations inside the rear door.
120
Chapter 9 Solve problems
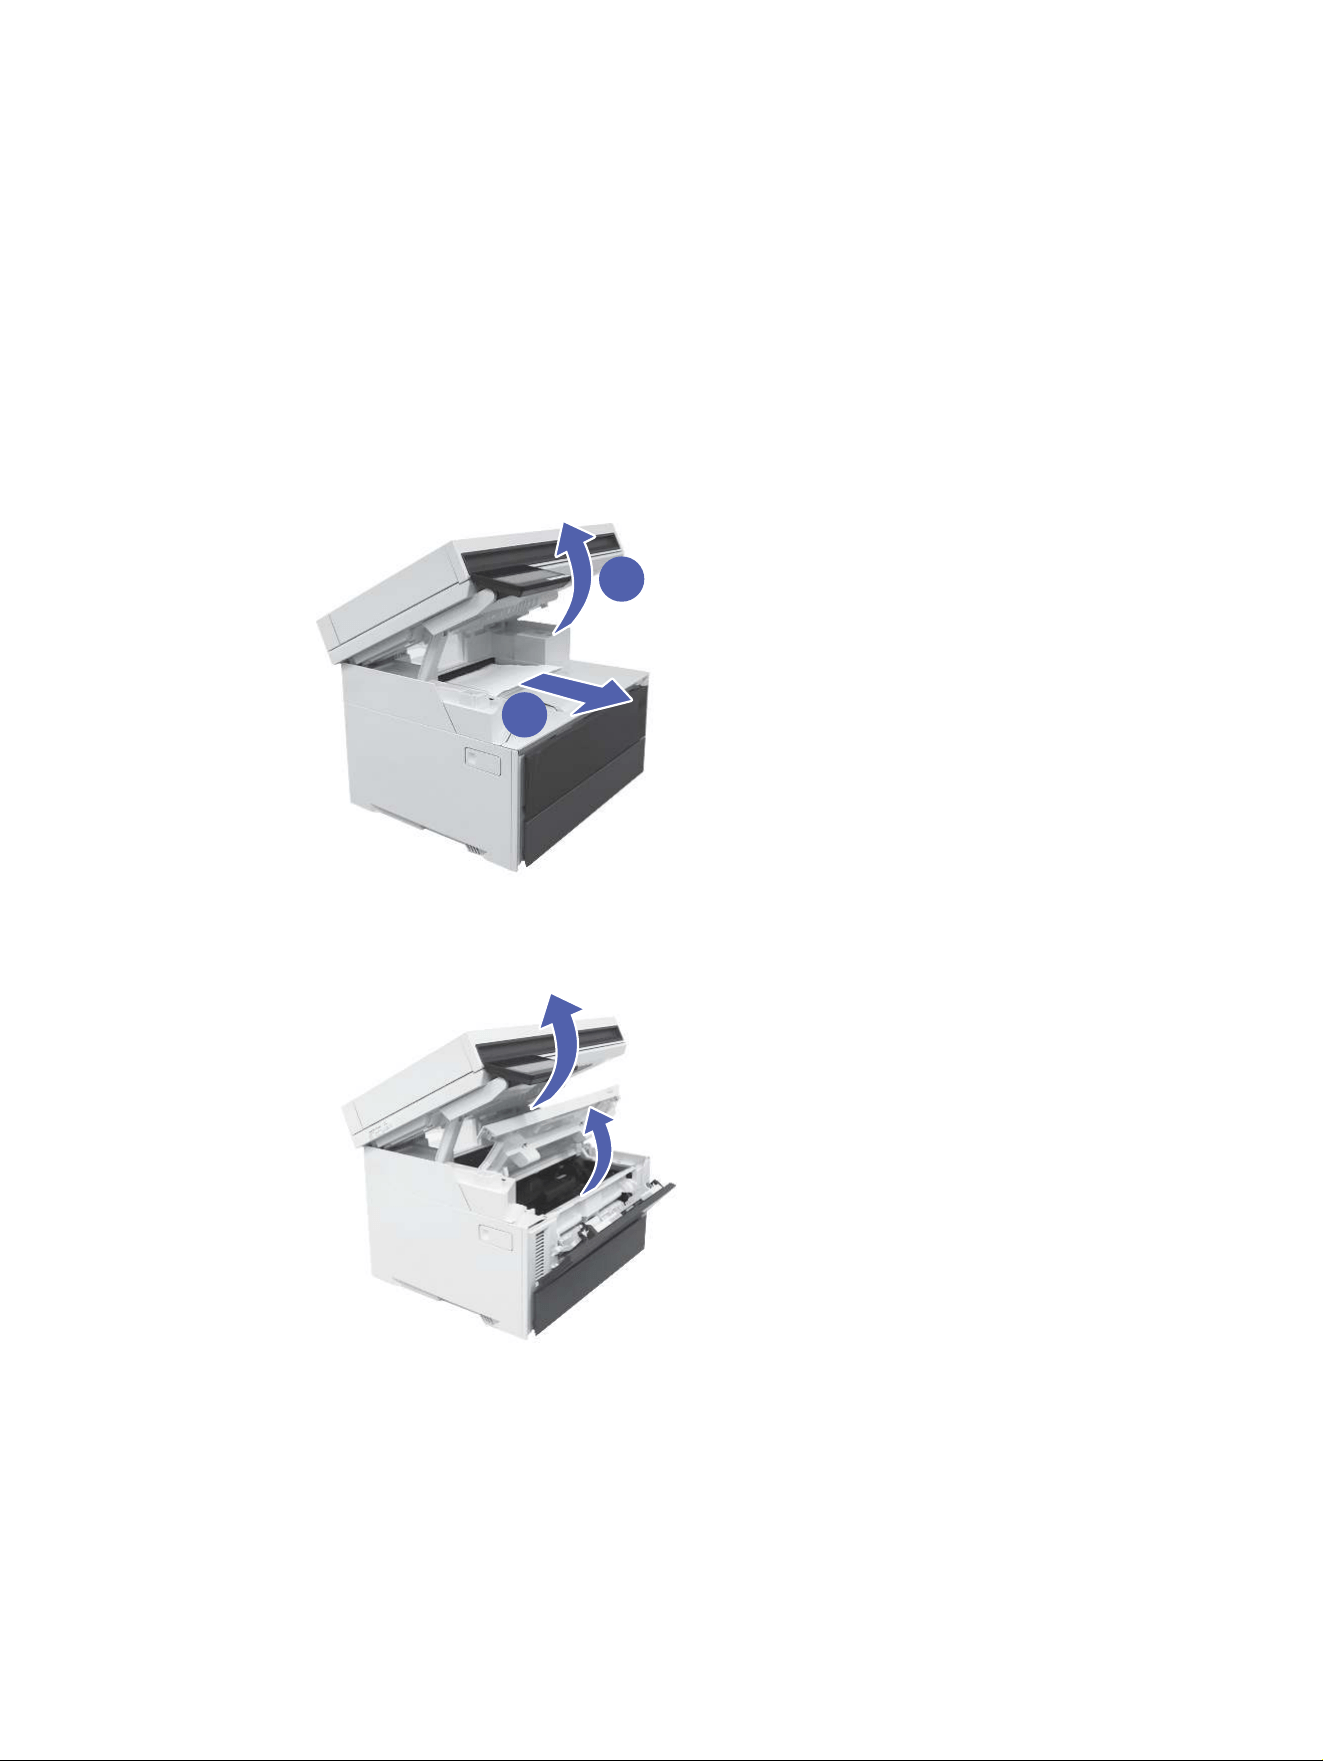
Recommended action for customers
When a jam occurs, the control panel displays a message that assists in clearing the jam.
● 13.08.yz Paper jam in rear door
● 13.09.yz Paper jam in rear door
● 13.14.yz Paper jam in rear door
● 13.15.yz Paper jam in rear door
Y and Z are variables and can be any of the following 0-9 or A-F.
1. Check the output area of the printer. If the paper is extending out, slowly pull it out of the printer.
1
2
2. If the paper is difcult to remove, open the toner cartridge access door and the rear door. Remove
the jammed paper slowly.
13.08, 13.09, 13.14, or 13.15 Jam error in the rear door (MFP)
121
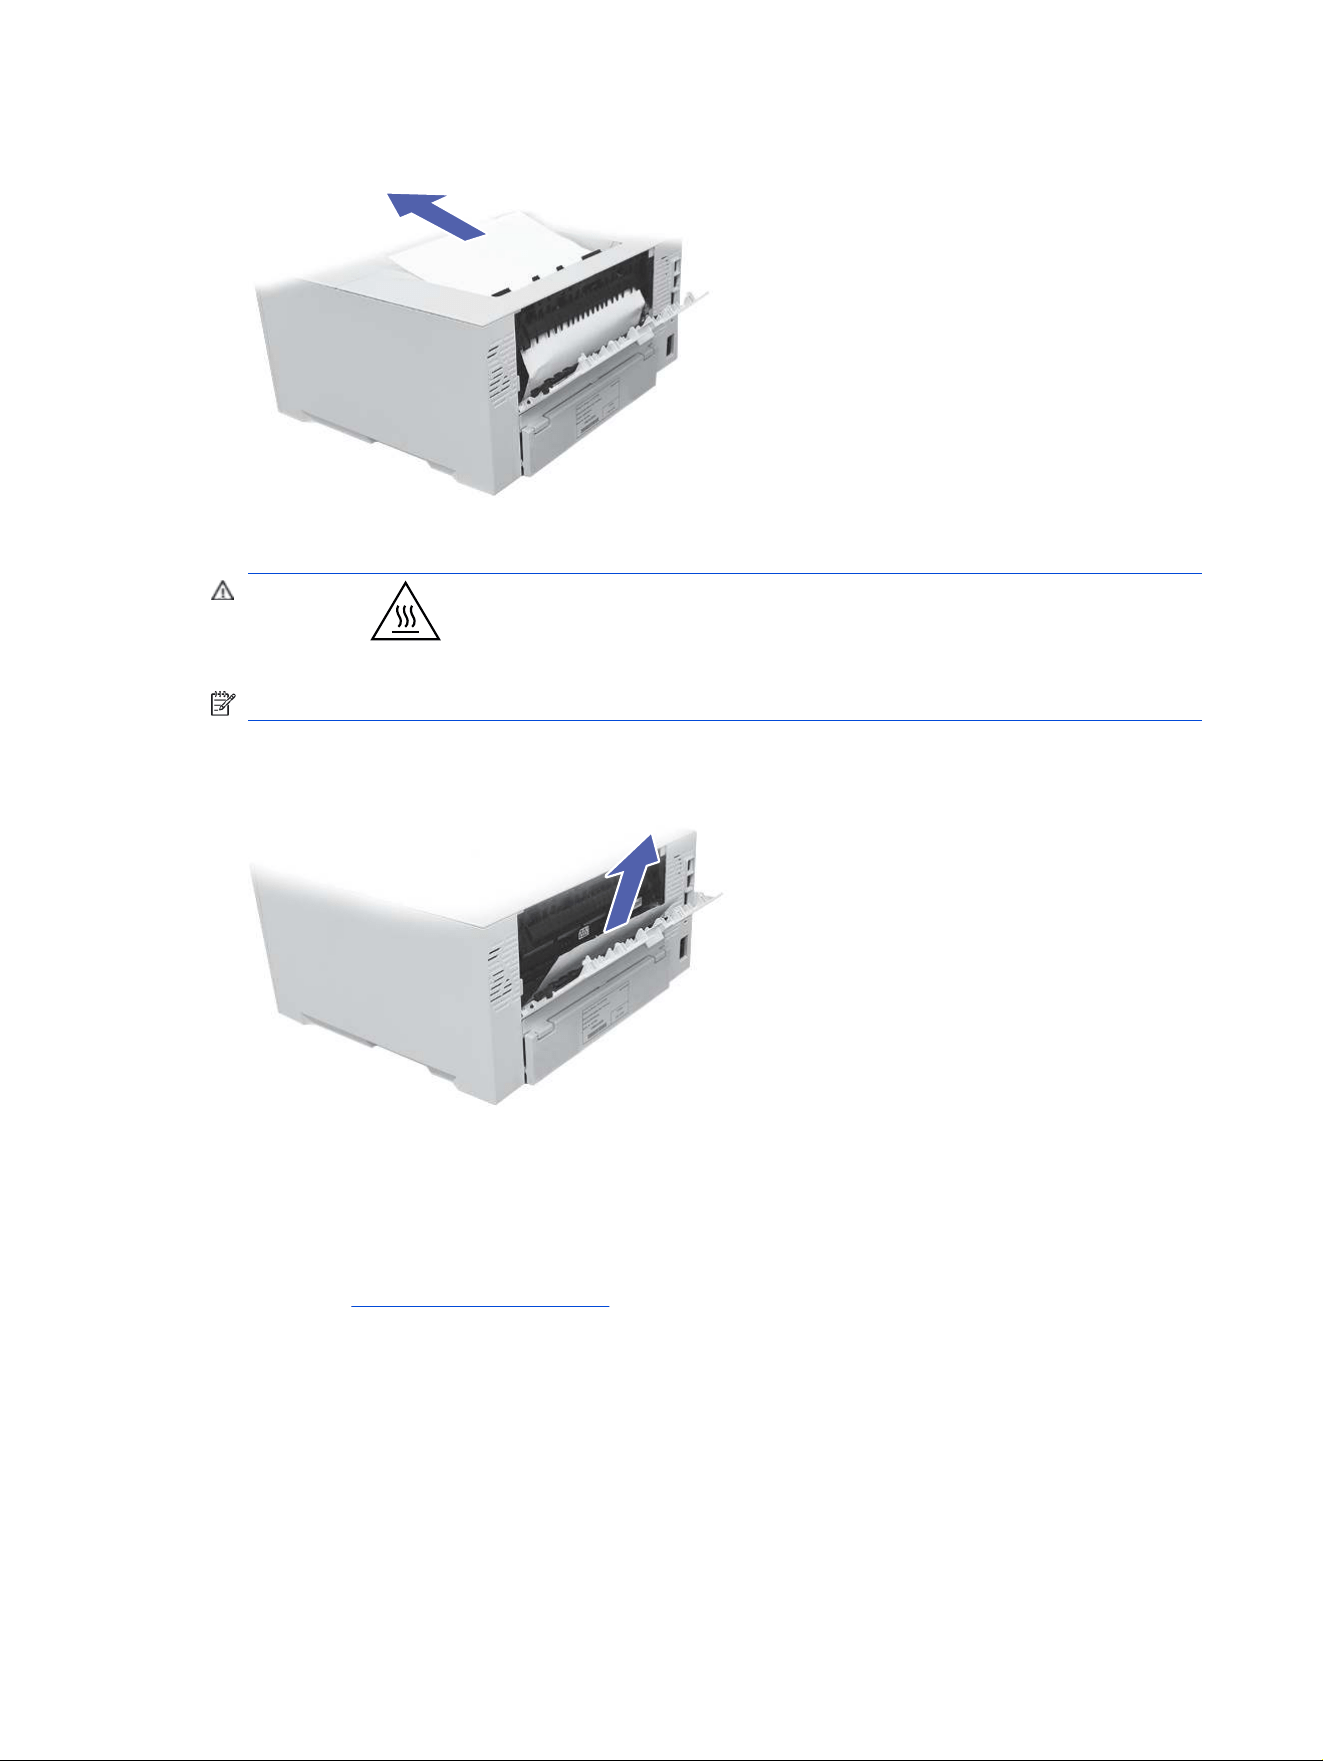
3. Remove any jammed or damaged sheets of paper from the rear door of the printer.
CAUTION: The fuser is located above the rear door, and it is hot. Do not attempt to reach
into the area above the rear door until the fuser is cool.
NOTE: Check all places inside the rear door for paper.
4. Close the rear door.
5. If the error persists, ensure the type and quality of the paper being used meets the HP specications
for the printer.
6. If the error persists, contact your HP-authorized service or support provider, or contact customer
support at www.hp.com/go/contactHP.
13.08, 13.09, Jam error in the fuser area (MFP)
Use the following procedure to check for paper in all possible jam locations in the fuser area.
Recommended action for customers
When a jam occurs, the control panel displays a message that assists in clearing the jam.
122
Chapter 9 Solve problems
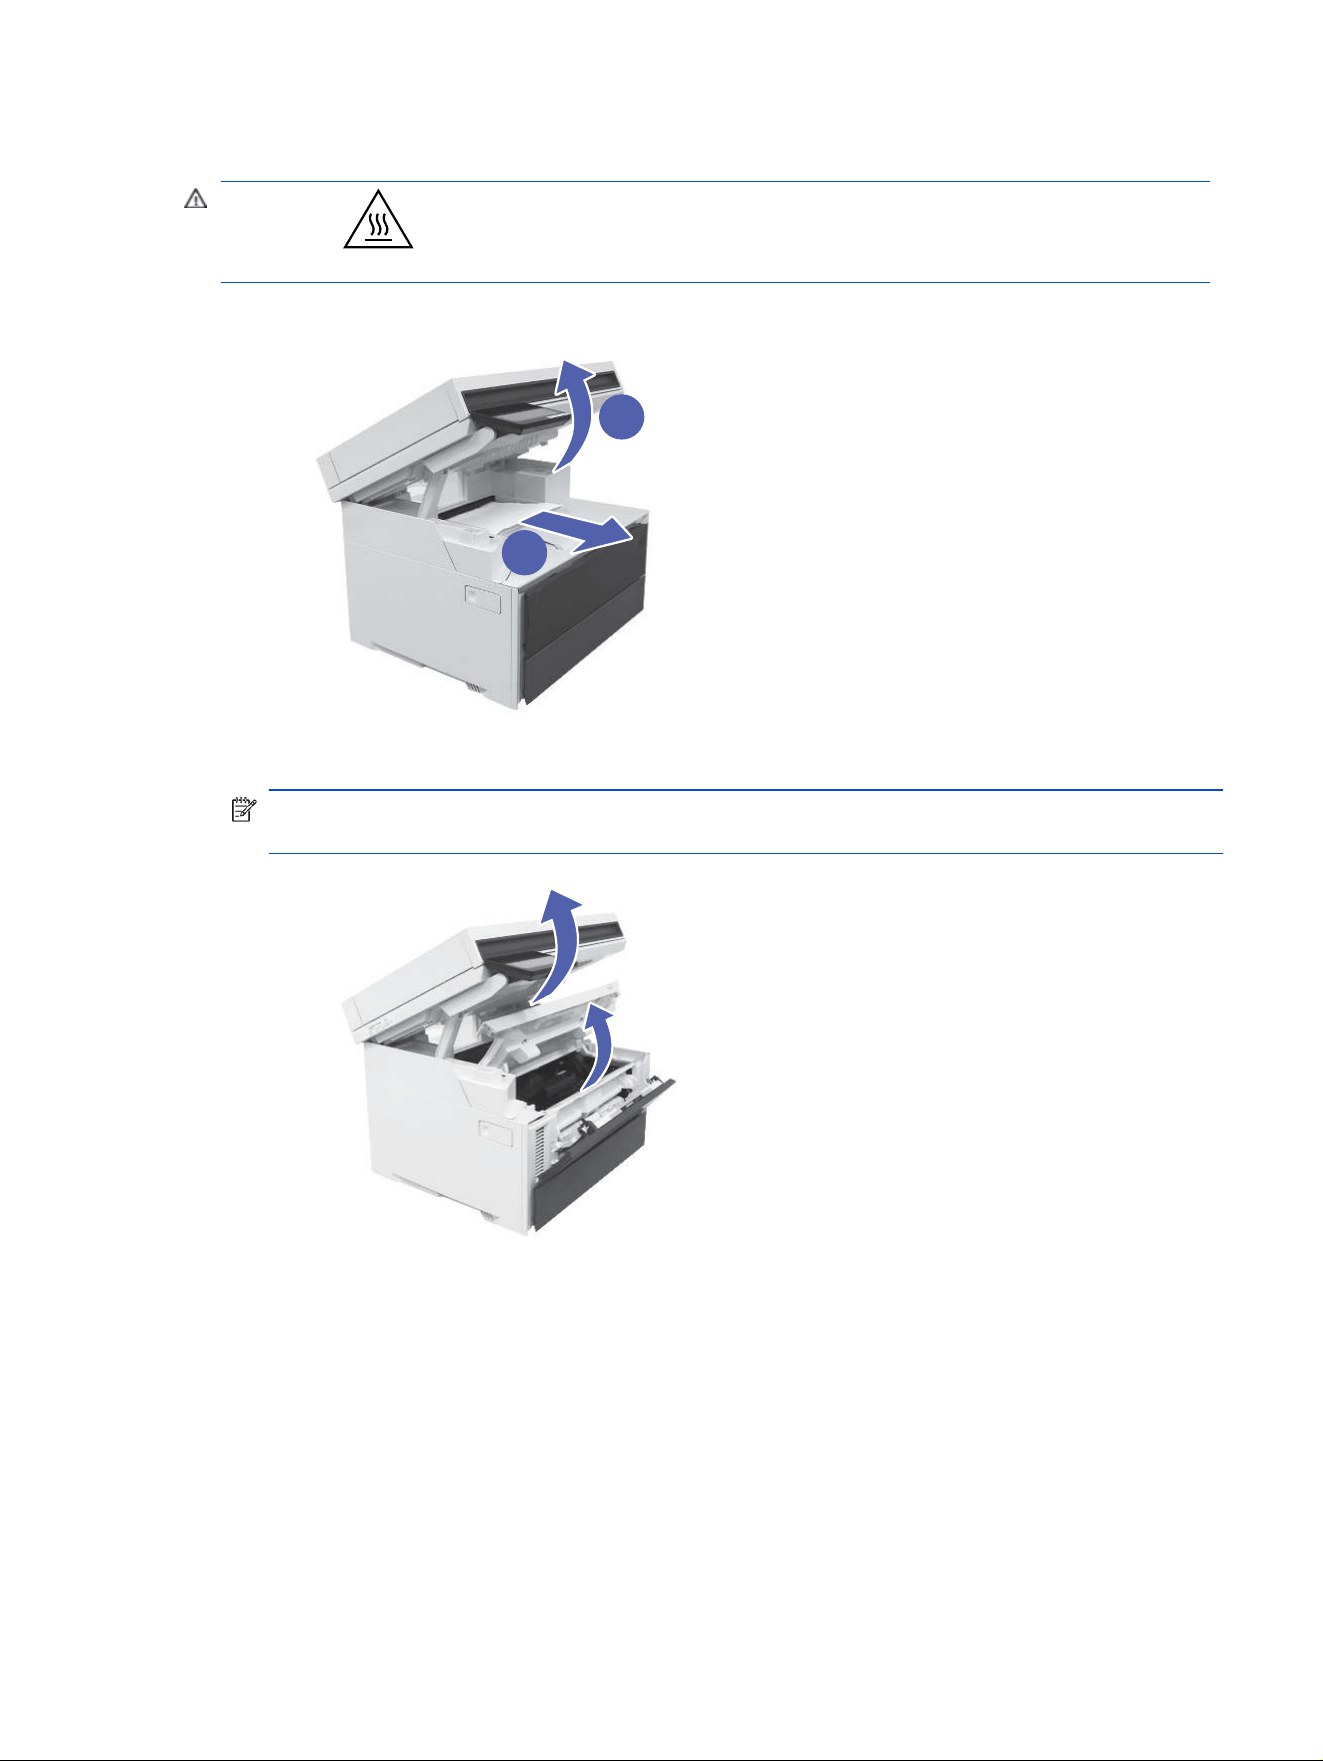
● Jam in rear door
CAUTION: The fuser can be hot while the printer is in use. Wait for the fuser to cool before
handling it.
1. Check the output area of the printer. If the paper is extending out, slowly pull it out of the printer.
1
2
2. Open the toner cartridge access door by lifting the scanner, and then lifting the cartridge door.
NOTE: Opening the cartridge door releases the fuser pressure roller and makes it easier to remove
the jammed paper.
13.08, 13.09, Jam error in the fuser area (MFP)
123
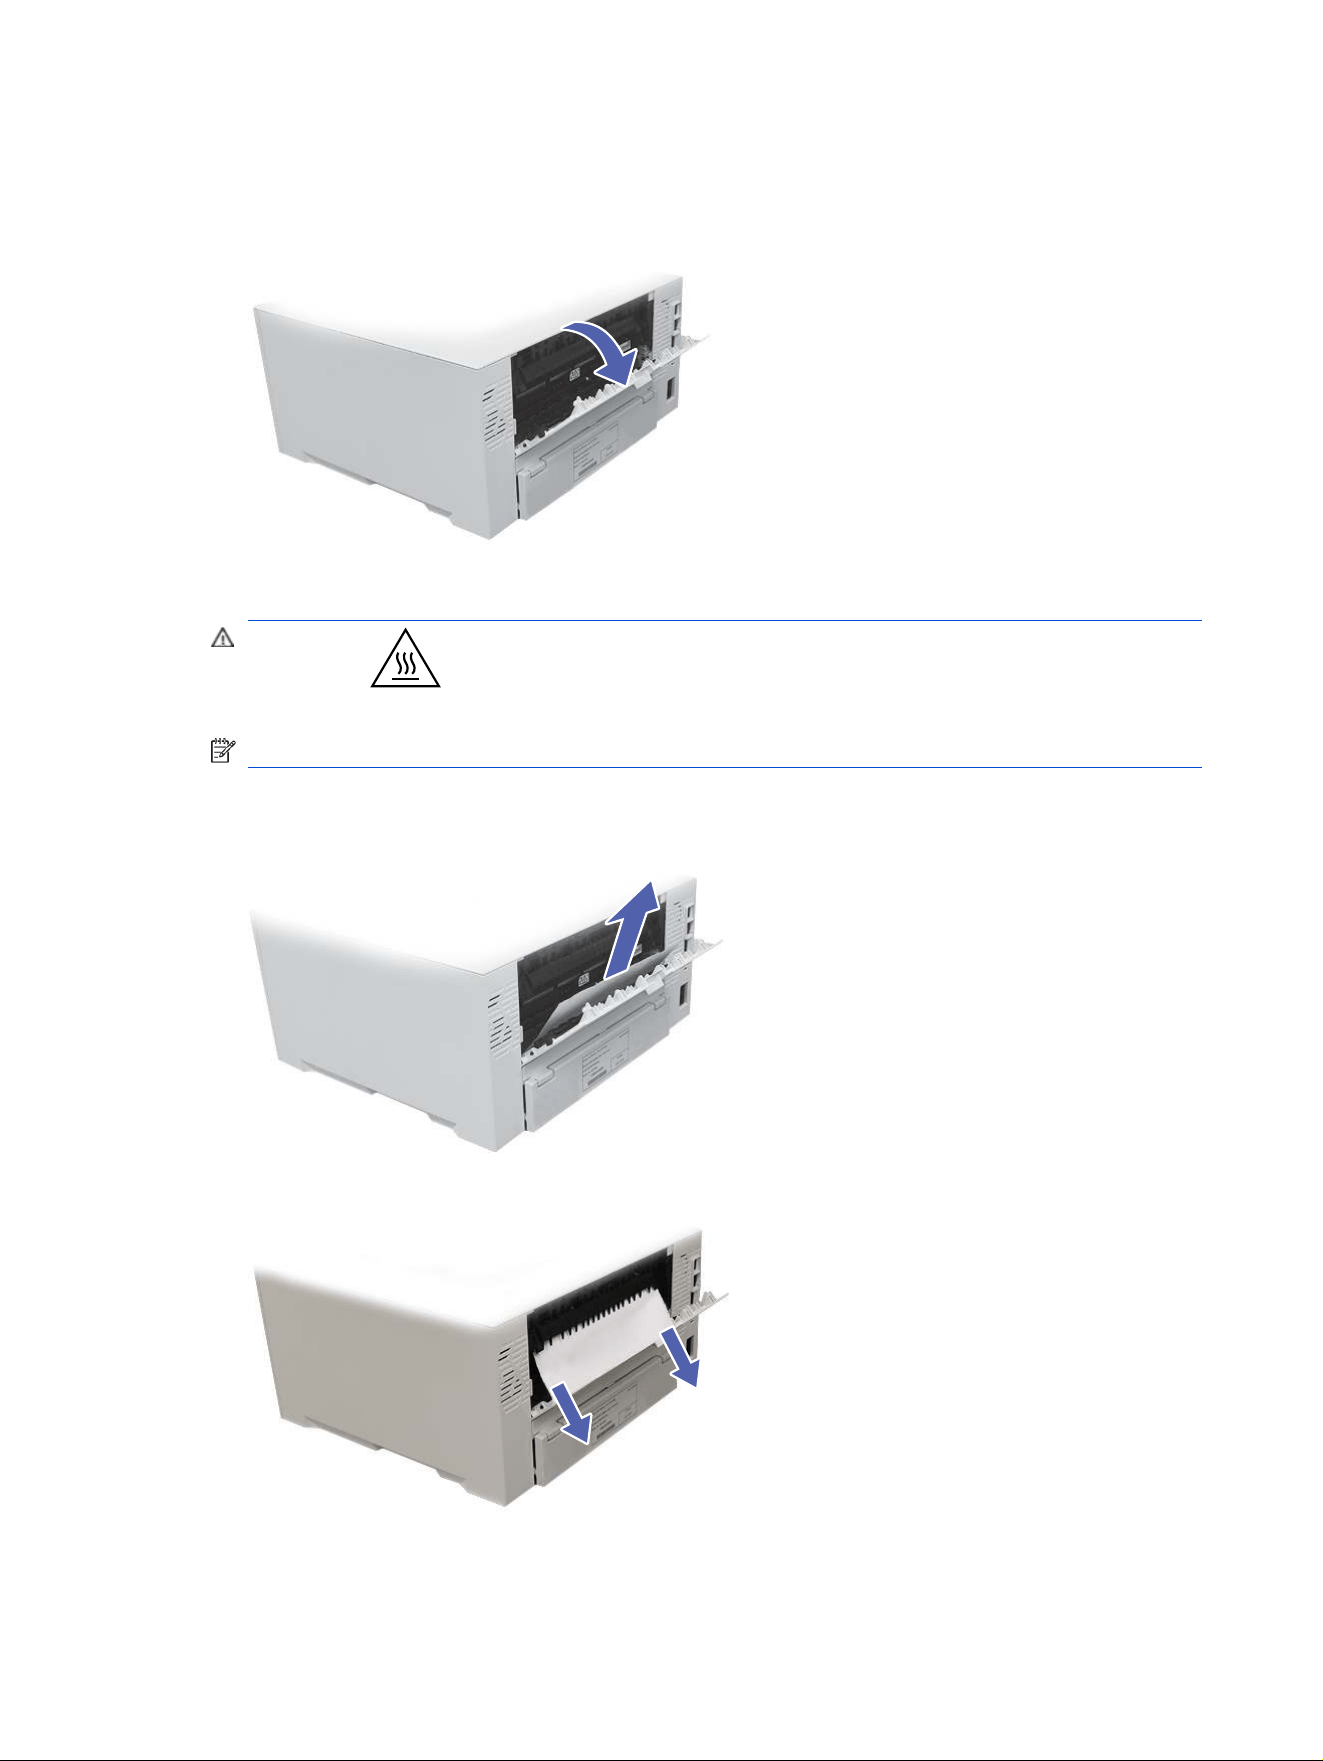
3. Open the rear door located at the rear of the printer.
4. Remove any jammed or damaged sheets of paper from the rear door of the printer.
CAUTION: The fuser is located above the rear door, and it is hot. Do not attempt to reach
into the area above the rear door until the fuser is cool.
NOTE: Check all places inside the rear door for paper.
If paper sticking out of the fuser cannot be removed from the printer through the output bin, grab
both sides of the sheet and pull the page down, and then out of the printer.
124
Chapter 9 Solve problems
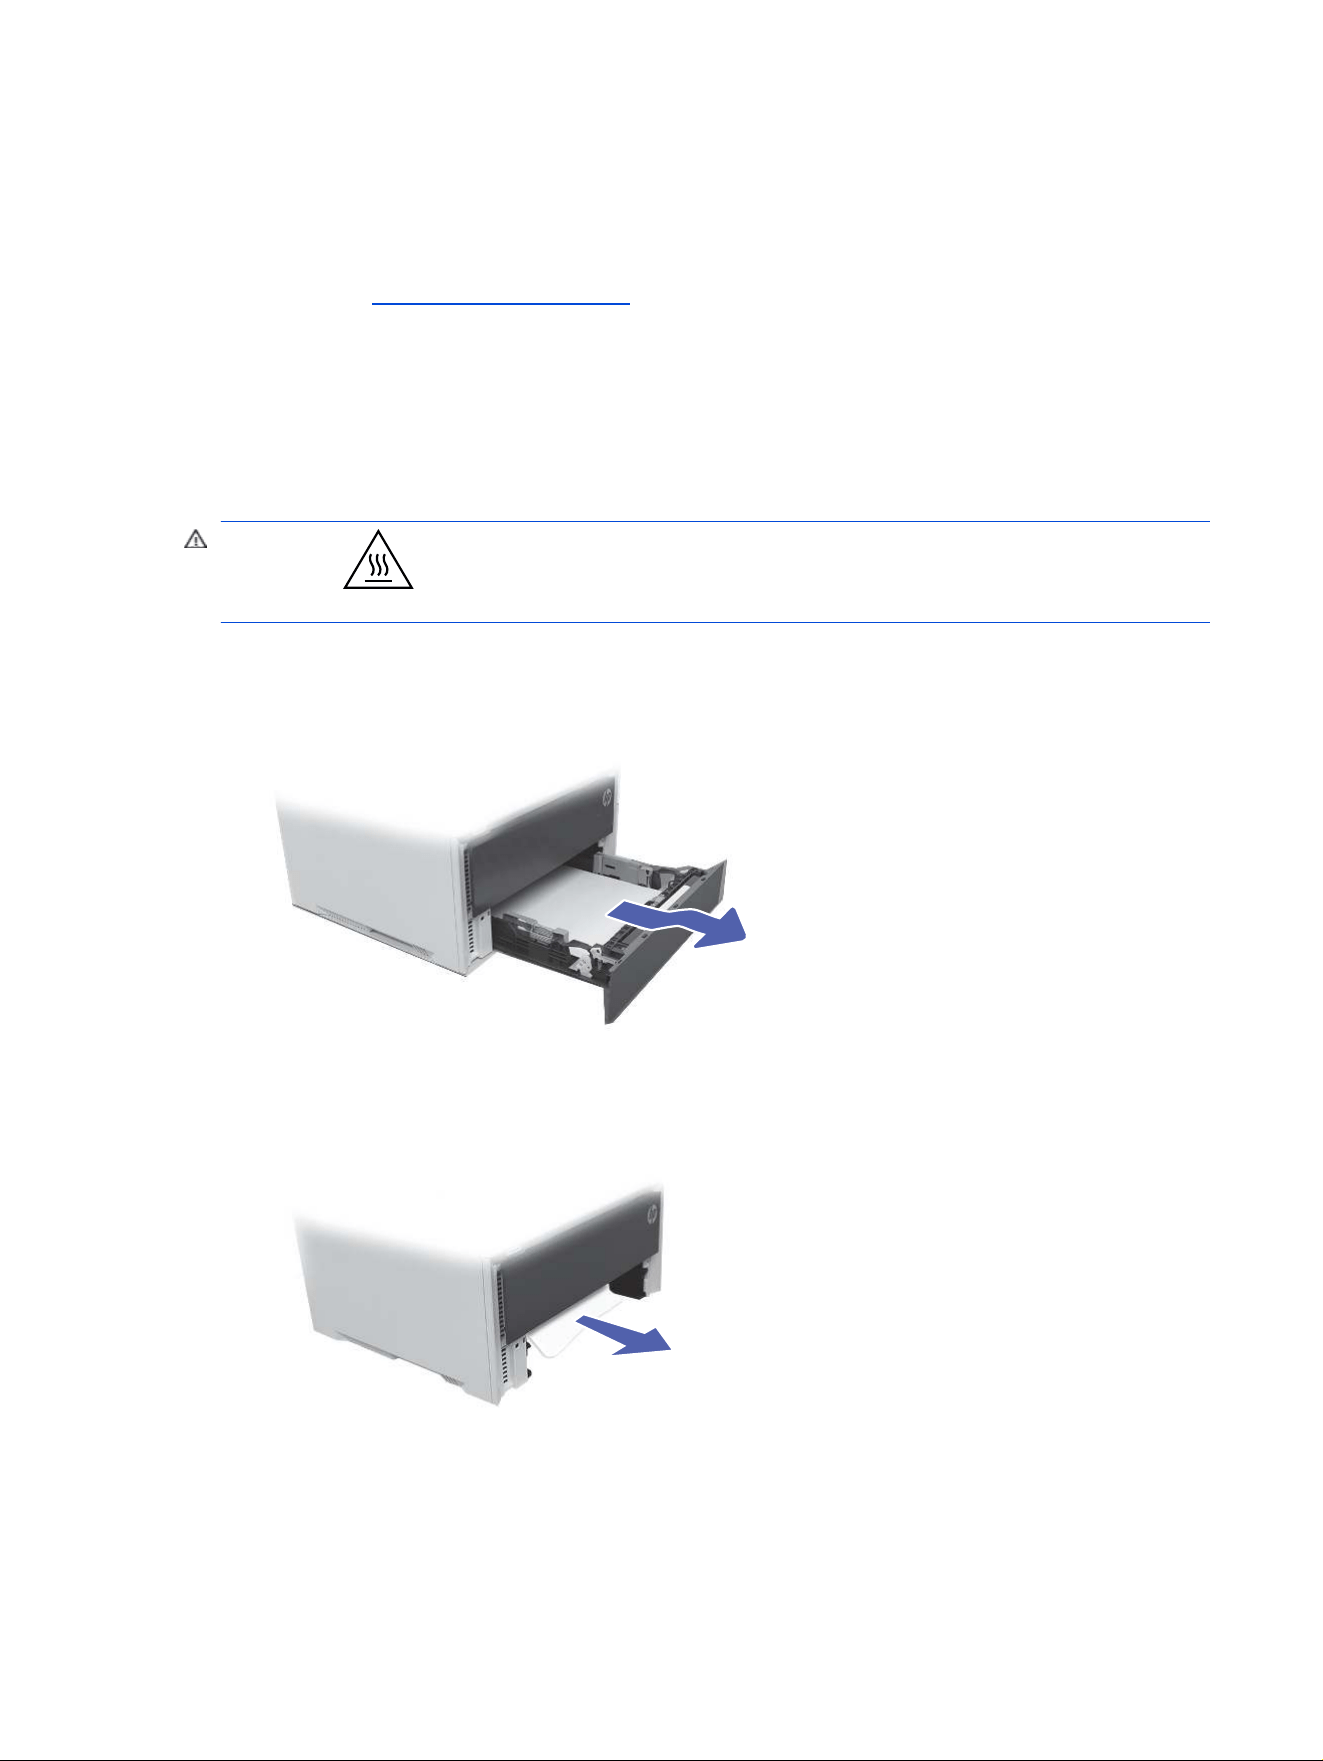
5. Close the rear door.
6. If the error persists, ensure the type and quality of the paper being used meets the HP specications
for the printer.
7. If the error persists, contact your HP-authorized service or support provider, or contact customer
support at www.hp.com/go/contactHP.
13.14, 13.15 jam error in the duplexer
Use the following procedure to check for paper in all possible jam locations in the duplex area.
Recommended action for customers
When a jam occurs, the control panel displays a message that assists in clearing the jam.
CAUTION: The fuser can be hot while the printer is in use. Wait for the fuser to cool before
handling it.
1. Pull the tray completely out of the printer.
2. Remove any jammed or damaged sheets of paper seen.
13.14, 13.15 jam error in the duplexer
125
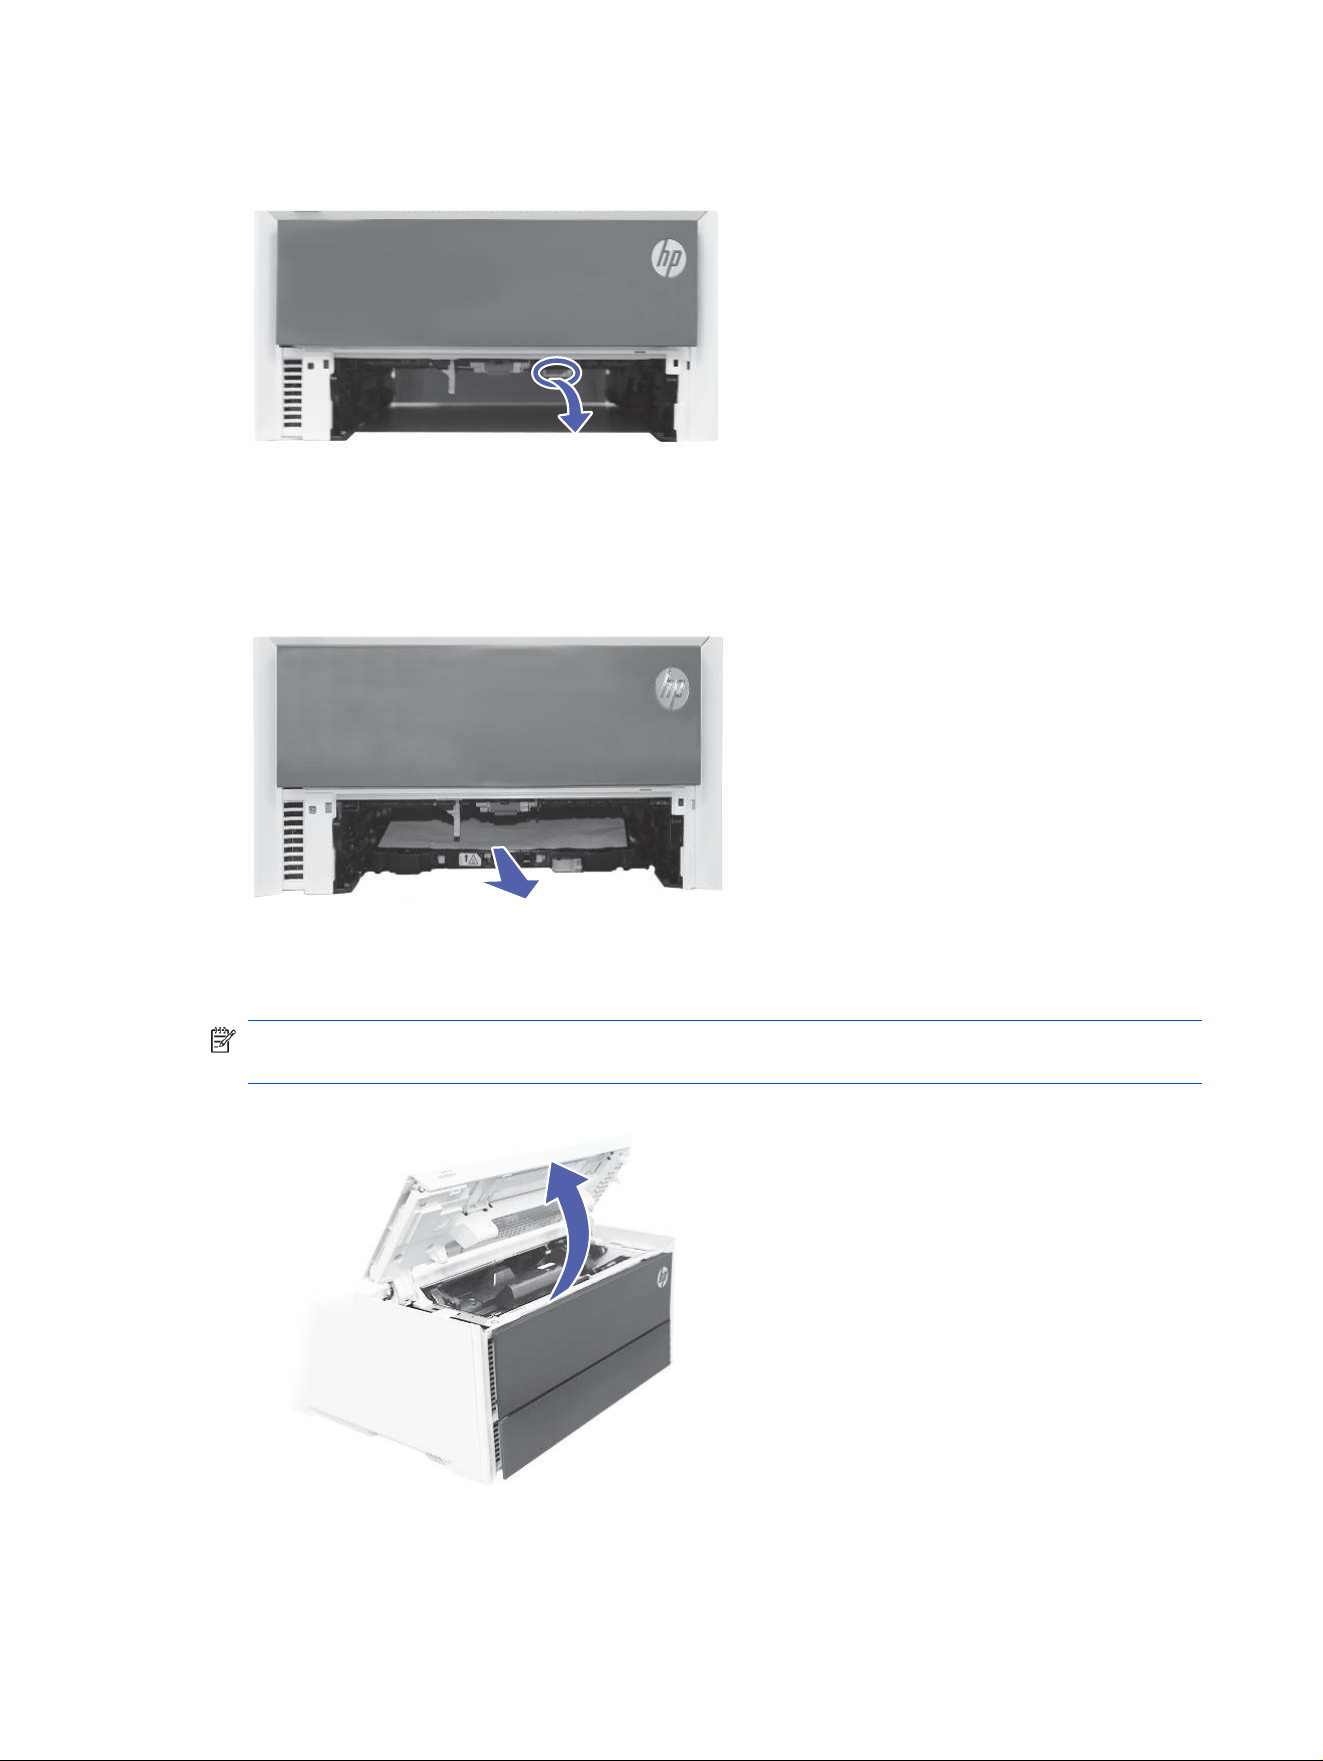
3. If no paper is found, lower the duplex path tray.
4. Remove paper from duplex path as needed.
5. If no paper is found in the duplex tray area, open the toner cartridge access door.
NOTE: Opening the cartridge door releases the fuser pressure roller and makes it easier to remove
the jammed paper.
126
Chapter 9 Solve problems
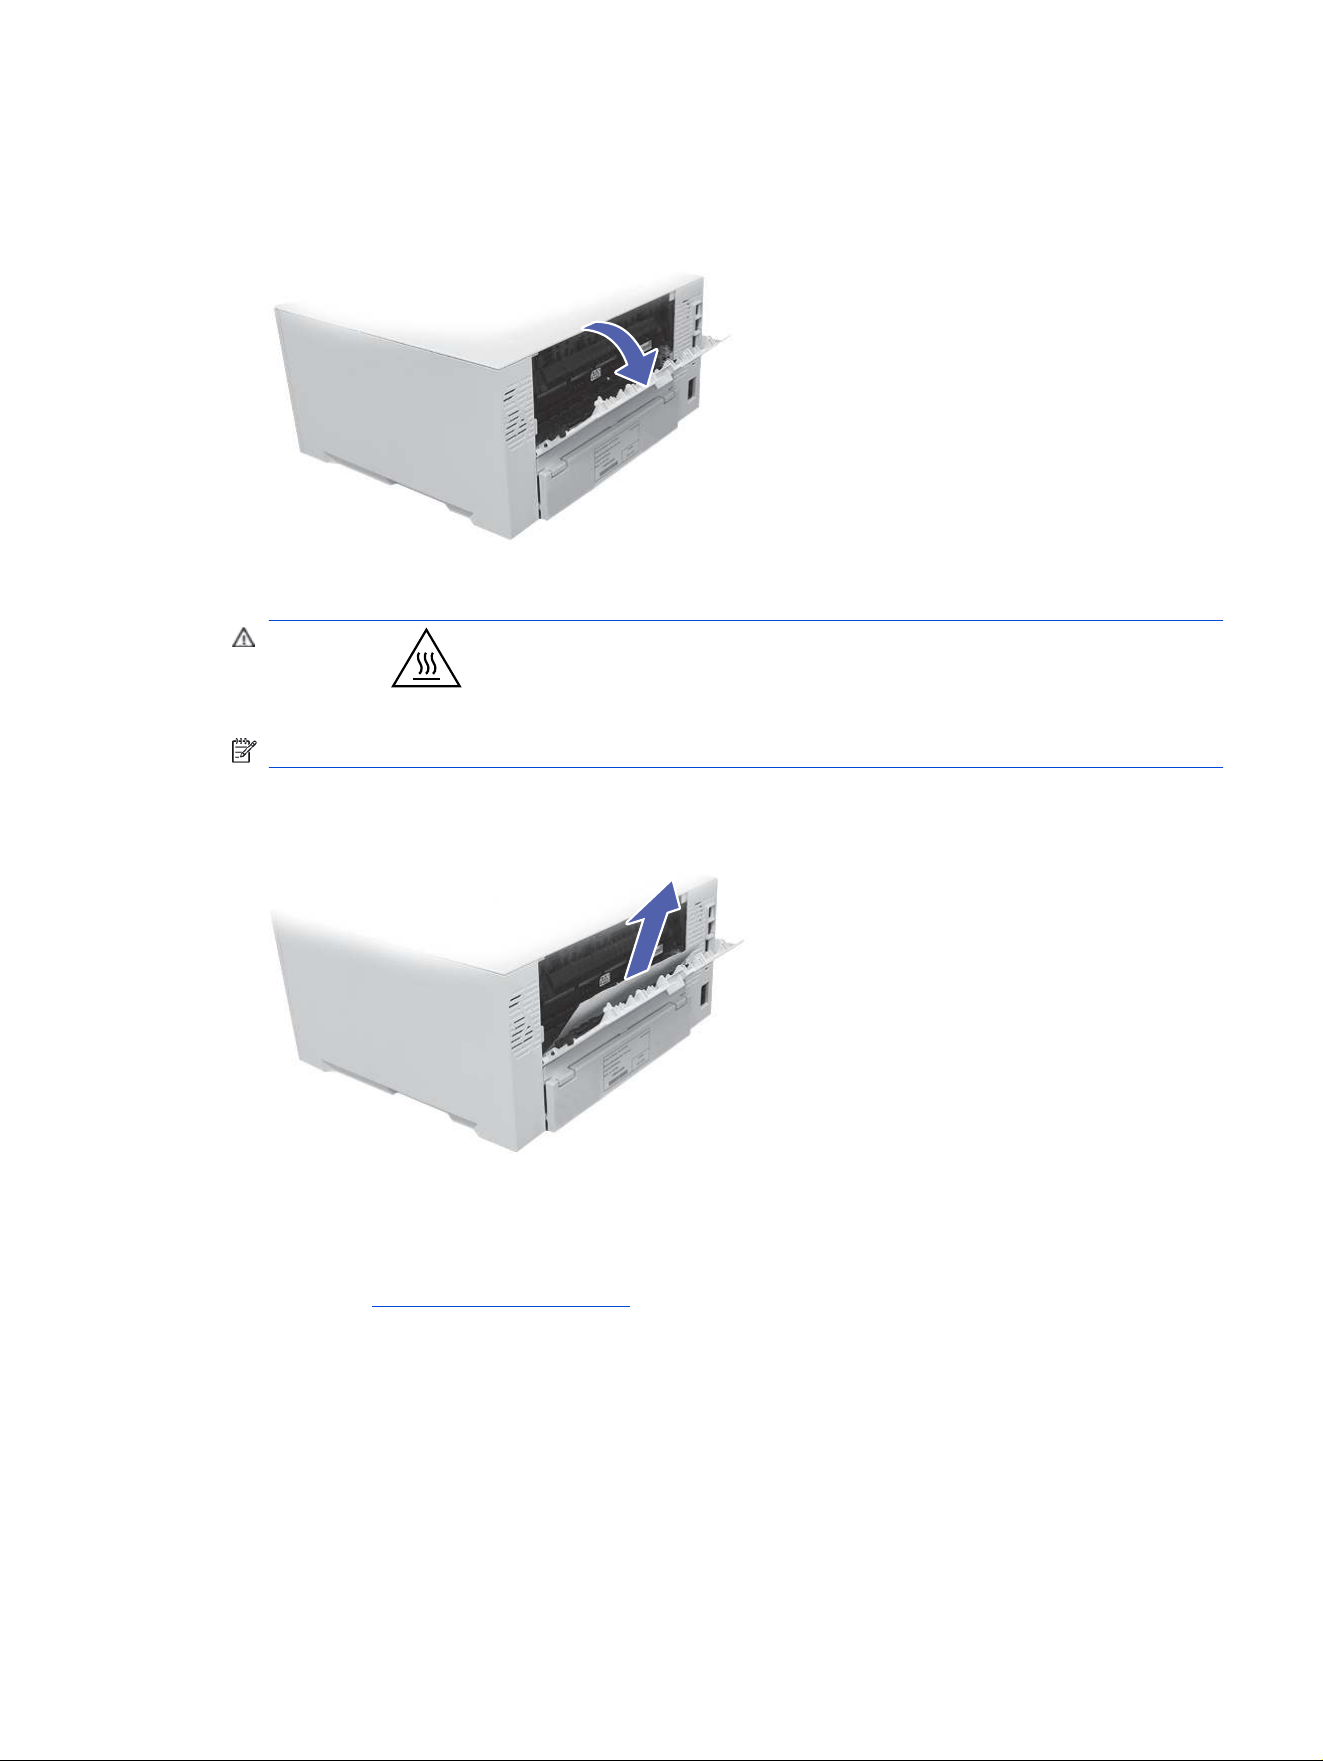
6. Open the rear door.
7. Remove any jammed or damaged sheets of paper from the rear door of the printer.
CAUTION: The fuser is located above the rear door, and it is hot. Do not attempt to reach
into the area above the rear door until the fuser is cool.
NOTE: Check all places inside the rear door for paper.
8. If the error persists, ensure the type and quality of the paper being used meets the HP specications
for the printer.
9. If the error persists, contact your HP-authorized service or support provider, or contact customer
support at www.hp.com/go/contactHP.
Resolving mono print quality problems
Use the information below to troubleshoot print-quality and image-quality problems on mono (black and
white) HP LaserJet Enterprise printers.
Introduction
The troubleshooting steps can help resolve the following defects:
Resolving mono print quality problems
127

● Blank pages
● Black pages
● Curled paper
● Dark or light bands
● Dark or light streaks
● Fuzzy print
● Gray background or dark print
● Light print
● Loose toner
● Missing toner
● Scattered dots of toner
● Skewed images
● Smears
● Streaks
Troubleshoot print quality
To resolve print-quality issues, try these steps in the order presented.
To troubleshoot specic image defects, see Troubleshoot image defects.
Update the printer
rmware
Try upgrading the printer rmware.
For instructions, go to www.hp.com/support.
Print from a different software program
Try printing from a different software program.
If the page prints correctly, the problem is with the software program from which you were printing.
Check the paper-type setting for the print job
Check the paper type setting when printing from a software program and the printed pages have smears,
fuzzy or dark print, curled paper, scattered dots of toner, loose toner, or small areas of missing toner.
Check the paper type setting on the control panel
Check the paper type setting on the printer control panel, and change the setting as needed.
1. Open and close the paper tray.
2. Follow the control panel prompts to conrm or modify the paper type and size settings for the tray.
3. Make sure the paper loaded meets specications.
128
Chapter 9 Solve problems

4. Adjust the humidity and resistance setting on the control panel to match the environment.
a. Open the following menus:
i. Settings
ii. Copy/Print or Print
iii. Print Quality
iv. Adjust Paper Type
b. Select the paper type that matches the type loaded in the tray.
c. Use the arrows to increase or decrease the humidity and resistance setting.
5. Make sure the driver settings match the control panel settings.
NOTE: The print driver settings will override any control panel settings.
Check the paper type setting (Windows)
Check the paper type setting for Windows, and change the setting as needed.
NOTE: The print driver settings will override any control panel settings.
1. From the software program, select the Print option.
2. Select the printer, and then click the Properties or Preferences button.
3. Click the Paper/Quality tab.
4. From the Paper Type drop-down list, click the More... option.
5. Expand the list of Type is: options.
6. Expand the category of paper types that best describes your paper.
7. Select the option for the type of paper you are using, and click the OK button.
8. Click the OK button to close the Document Properties dialog box. In the Print dialog box, click the
OK button to print the job.
Check the paper type setting (macOS)
Check the paper type setting for macOS, and change the setting as needed.
1. Click the File menu, and then click the Print option.
2. In the Printer menu, select the printer.
3. By default, the print driver displays the Copies & Pages menu. Open the menus drop-down list, and
then click the Finishing menu.
4. Select a type from the Media Type drop-down list.
5. Click the Print button.
Check the paper type setting (Windows)
129

Check toner-cartridge status
Follow these steps to check the estimated life remaining in the toner cartridges and if applicable, the
status of other replaceable maintenance parts.
Step one: Print the Supplies Status Page
The supplies status page indicates the cartridge status.
1. From the Home screen on the printer control panel, select the Reports menu.
2. Select the Conguration/Status Pages menu.
3. Select Supplies Status Page, and then select Print to print the page.
Step two: Check supplies status
Check the supplies status report as follows.
1. Look at the supplies status report to check the percent of life remaining for the toner cartridges and,
if applicable, the status of other replaceable maintenance parts.
Print quality problems can occur when using a toner cartridge that is at its estimated end of life. The
supplies status page indicates when a supply level is very low. After an HP supply has reached the
very low threshold, HP’s premium protection warranty on that supply has ended.
The toner cartridge does not need to be replaced now unless the print quality is no longer
acceptable. Consider having a replacement available to install when print quality is no longer
acceptable.
If you determine that you need to replace a toner cartridge or other replaceable maintenance parts,
the supplies status page lists the genuine HP part numbers.
2. Check to see if you are using a genuine HP cartridge.
A genuine HP toner cartridge has the word “HP” on it, or has the HP logo on it. For more information on
identifying HP cartridges go to www.hp.com/go/learnaboutsupplies.
Print a cleaning page
During the printing process paper, toner, and dust particles can accumulate inside the printer and can
cause print-quality issues such as toner specks or spatter, smears, streaks, lines, or repeating marks.
Follow these steps to clean the printer paper path:
1. From the Home screen on the printer control panel, select the Support Tools menu.
2. Select the following menus:
a. Maintenance
b. Calibration/Cleaning
c. Cleaning Page
3. Select Print to print the page.
A Cleaning... message displays on the printer control panel. The cleaning process takes a few
minutes to complete. Do not turn the printer off until the cleaning process has nished. When it is
nished, discard the printed page.
130
Chapter 9 Solve problems

Visually inspect the toner cartridge or cartridges
Follow these steps to inspect each toner cartridge:
1. Remove the toner cartridge from the printer, and verify that the sealing tape has been removed.
2. Check the memory chip for damage.
3. Examine the surface of the green imaging drum.
CAUTION: Do not touch the imaging drum. Fingerprints on the imaging drum can cause print-
quality problems.
4. If you see any scratches, ngerprints, or other damage on the imaging drum, replace the toner
cartridge.
5. Reinstall the toner cartridge and print a few pages to see if the problem has resolved.
Check paper and the printing environment
Use the following information to check the paper selection and the printing environment.
Step one: Use paper that meets HP specications
Some print-quality problems arise from using paper that does not meet HP specications.
● Always use a paper type and weight that this printer supports.
● Use paper that is of good quality and free of cuts, nicks, tears, spots, loose particles, dust, wrinkles,
voids, staples, and curled or bent edges.
● Use paper that has not been previously printed on.
● Use paper that does not contain metallic material, such as glitter.
● Use paper that is designed for use in laser printers. Do not use paper that is designed only for use in
Inkjet printers.
● Use paper that is not too rough. Using smoother paper generally results in better print quality.
Step two: Check the environment
The environment can directly affect print quality and is a common cause of print-quality or paper-feeding
issues. Try the following solutions:
● Move the printer away from drafty locations, such as open windows or doors, or air-conditioning vents.
● Make sure the printer is not exposed to temperatures or humidity outside of printer specications.
● Do not place the printer in a conned space, such as a cabinet.
● Place the printer on a sturdy, level surface.
● Remove anything that is blocking the vents on the printer. The printer requires good air ow on all
sides, including the top.
● Protect the printer from airborne debris, dust, steam, grease, or other elements that can leave residue
inside the printer.
Visually inspect the toner cartridge or cartridges
131

Step three: Set the individual tray alignment
Follow these steps when text or images are not centered or aligned correctly on the printed page when
printing from specic trays.
1. From the Home screen on the printer control panel, select the Settings menu.
2. Select the following menus:
a. Copy/Print or Print
b. Print Quality
c. Image Registration
3. Select Tray, and then select the tray to adjust.
4. Select Print Test Page, and then follow the instructions on the printed pages.
5. Select Print Test Page again to verify the results, and then make further adjustments if necessary.
6. Select Done to save the new settings.
Try a different print driver
Try a different print driver when printing from a software program and the printed pages have unexpected
lines in graphics, missing text, missing graphics, incorrect formatting, or substituted fonts.
Download a different print driver from the HP support Web site: hp.com/support/ljpro4110mfp.
Check the EconoMode settings
HP does not recommend the full-time use of EconoMode. If EconoMode is used full-time, the toner supply
might outlast the mechanical parts in the toner cartridge. If print quality begins to degrade and is no longer
acceptable, consider replacing the toner cartridge.
NOTE: This feature is available with the PCL 6 print driver for Windows. If you are not using that driver,
you can enable the feature by using the HP Embedded Web Server.
Follow these steps if the entire page is too dark or too light.
1. From the software program, select the Print option.
2. Select the printer, and then click the Properties or Preferences button.
3. Click the Paper/Quality tab, and locate the Print Quality area.
4. If the entire page is too dark, use these settings:
● Select the 600 dpi option, if available.
● Select the EconoMode check box to enable it.
If the entire page is too light, use these settings:
● Select the FastRes 1200 option, if available.
● Clear the EconoMode check box to disable it.
5. Click the OK button to close the Document Properties dialog box. In the Print dialog, click the OK
button to print the job.
132
Chapter 9 Solve problems
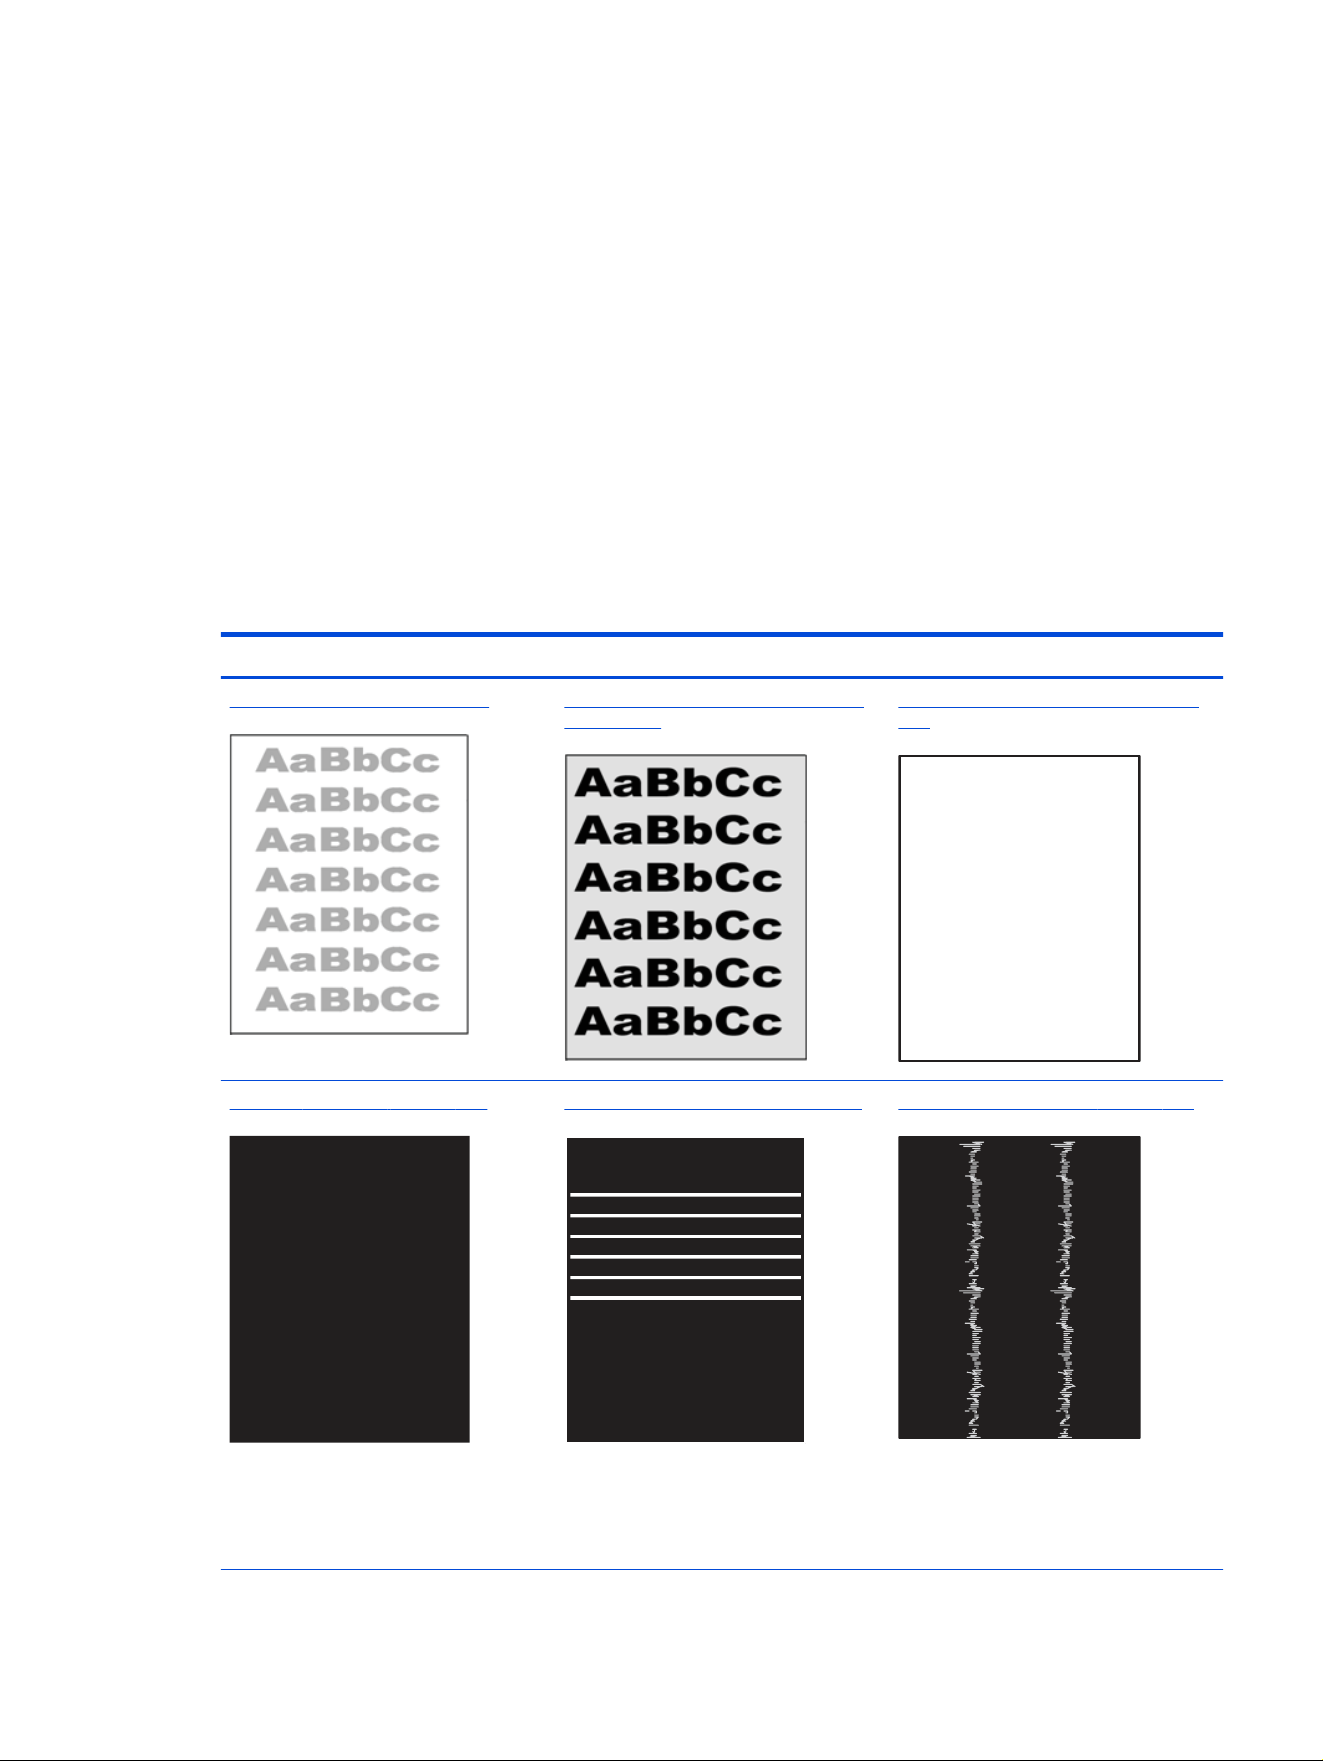
Adjust print density
Complete the following steps to adjust the print density.
1. From the Home screen on the printer control panel, select the Settings menu.
2. Open the following menus:
a. Copy/Print or Print
b. Print Quality
c. Toner Density
3. Move the slider toward either Less or More to the desired density setting.
Troubleshoot image defects
Review examples of image defects and steps to resolve these defects.
Table 9-3 Image defects table quick reference
Sample Description Possible solutions
Table 9-10 Light print on page 138 Table 9-8 Gray background or dark print
on page 137
Table 9-6 Blank page — No print on page
136
Table 9-5 Black page on page 135 Table 9-4 Banding defects on page 135 Table 9-12 Streak defects on page 139
Adjust print density 133
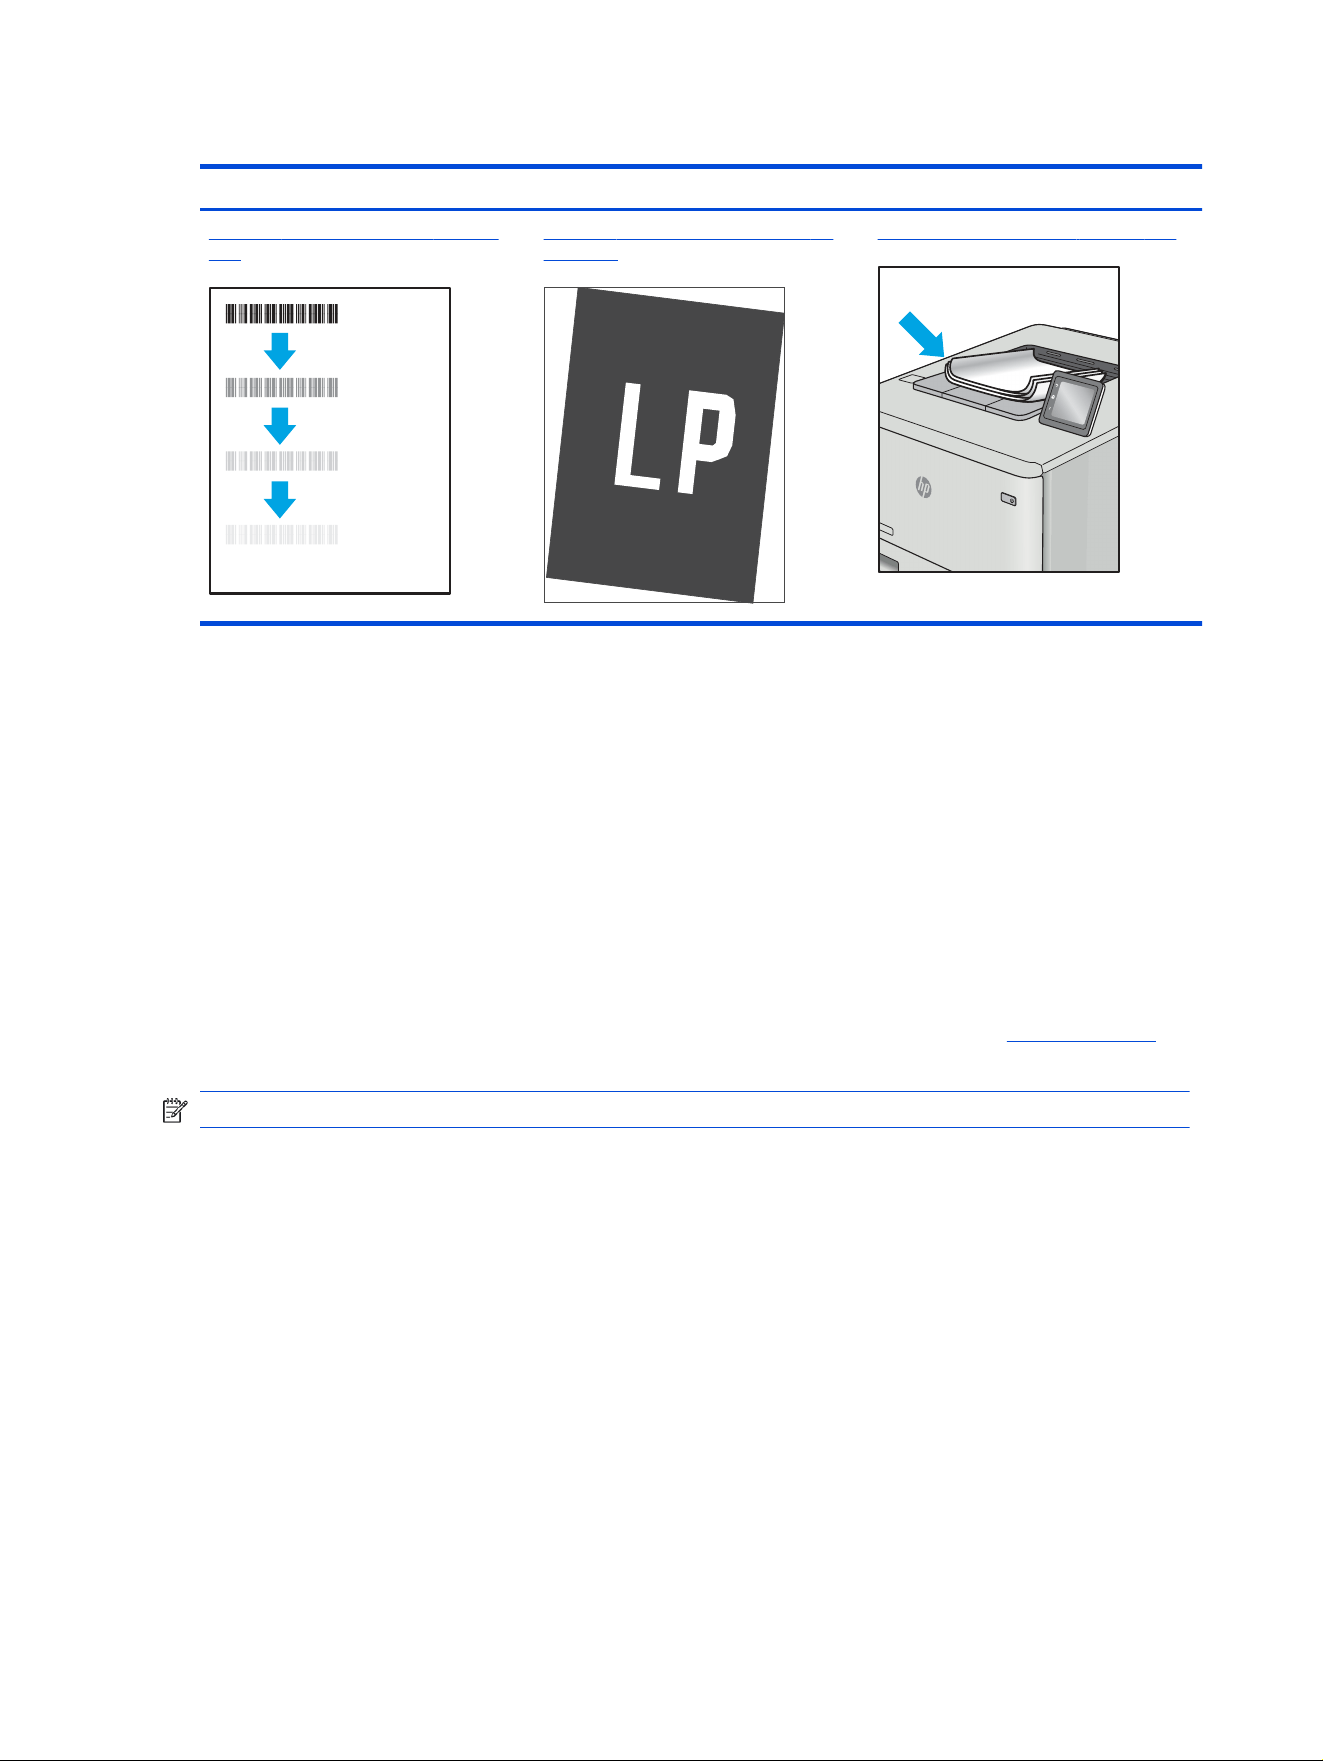
Table 9-3 Image defects table quick reference (continued)
Sample Description Possible solutions
Table 9-7 Fixing/fuser defects on page
136
Table 9-9 Image placement defects on
page 137
Table 9-11 Output defects on page 138
Image defects, no matter the cause, can often be resolved using the same steps. Use the following steps
as a starting point for solving image defect issues.
1. Reprint the document. Print quality defects can be intermittent in nature or can go away completely
with continued printing.
2. Check the condition of the cartridge or cartridges. If a cartridge is in a Very Low state (it has passed
the rated life), replace the cartridge.
3. Make sure that the driver and tray print mode settings match the media that is loaded in the tray. Try
using a different ream of media or a different tray. Try using a different print mode.
4. Make sure that the printer is within the supported operating temperature/humidity range.
5. Make sure that the paper type, size, and weight are supported by the printer. See support.hp.com for
a list of the supported paper sizes and types for the printer.
NOTE: The term “fusing” refers to the part of the printing process where toner is afxed to paper.
The following examples depict letter-size paper that has passed through the printer short edge rst.
134
Chapter 9 Solve problems

Table 9-4 Banding defects
Sample Description Possible solutions
Dark or light lines which repeat down
the length of the page, and are wide-
pitch and/or impulse bands. They might
be sharp or soft in nature. The defect
displays only in areas of ll, not in text or
sections with no printed content.
1. Reprint the document.
2. Try printing from another tray.
3. Replace the cartridge.
4. Use a different paper type.
5. Enterprise models only: From the
Home screen on the printer control
panel, go to the Adjust Paper Types
menu, and then choose a print
mode that is designed for a slightly
heavier media than what you are
using. This slows the print speed
and might improve the print quality.
6. If the issue persists, go to
support.hp.com.
Table 9-5 Black page
Sample Description Possible solutions
The entire printed page is black.
1. Visually inspect the cartridge to
check for damage.
2. Make sure that the cartridge is
installed correctly.
3. Replace the cartridge.
4. If the issue persists, go to
support.hp.com.
Troubleshoot image defects 135
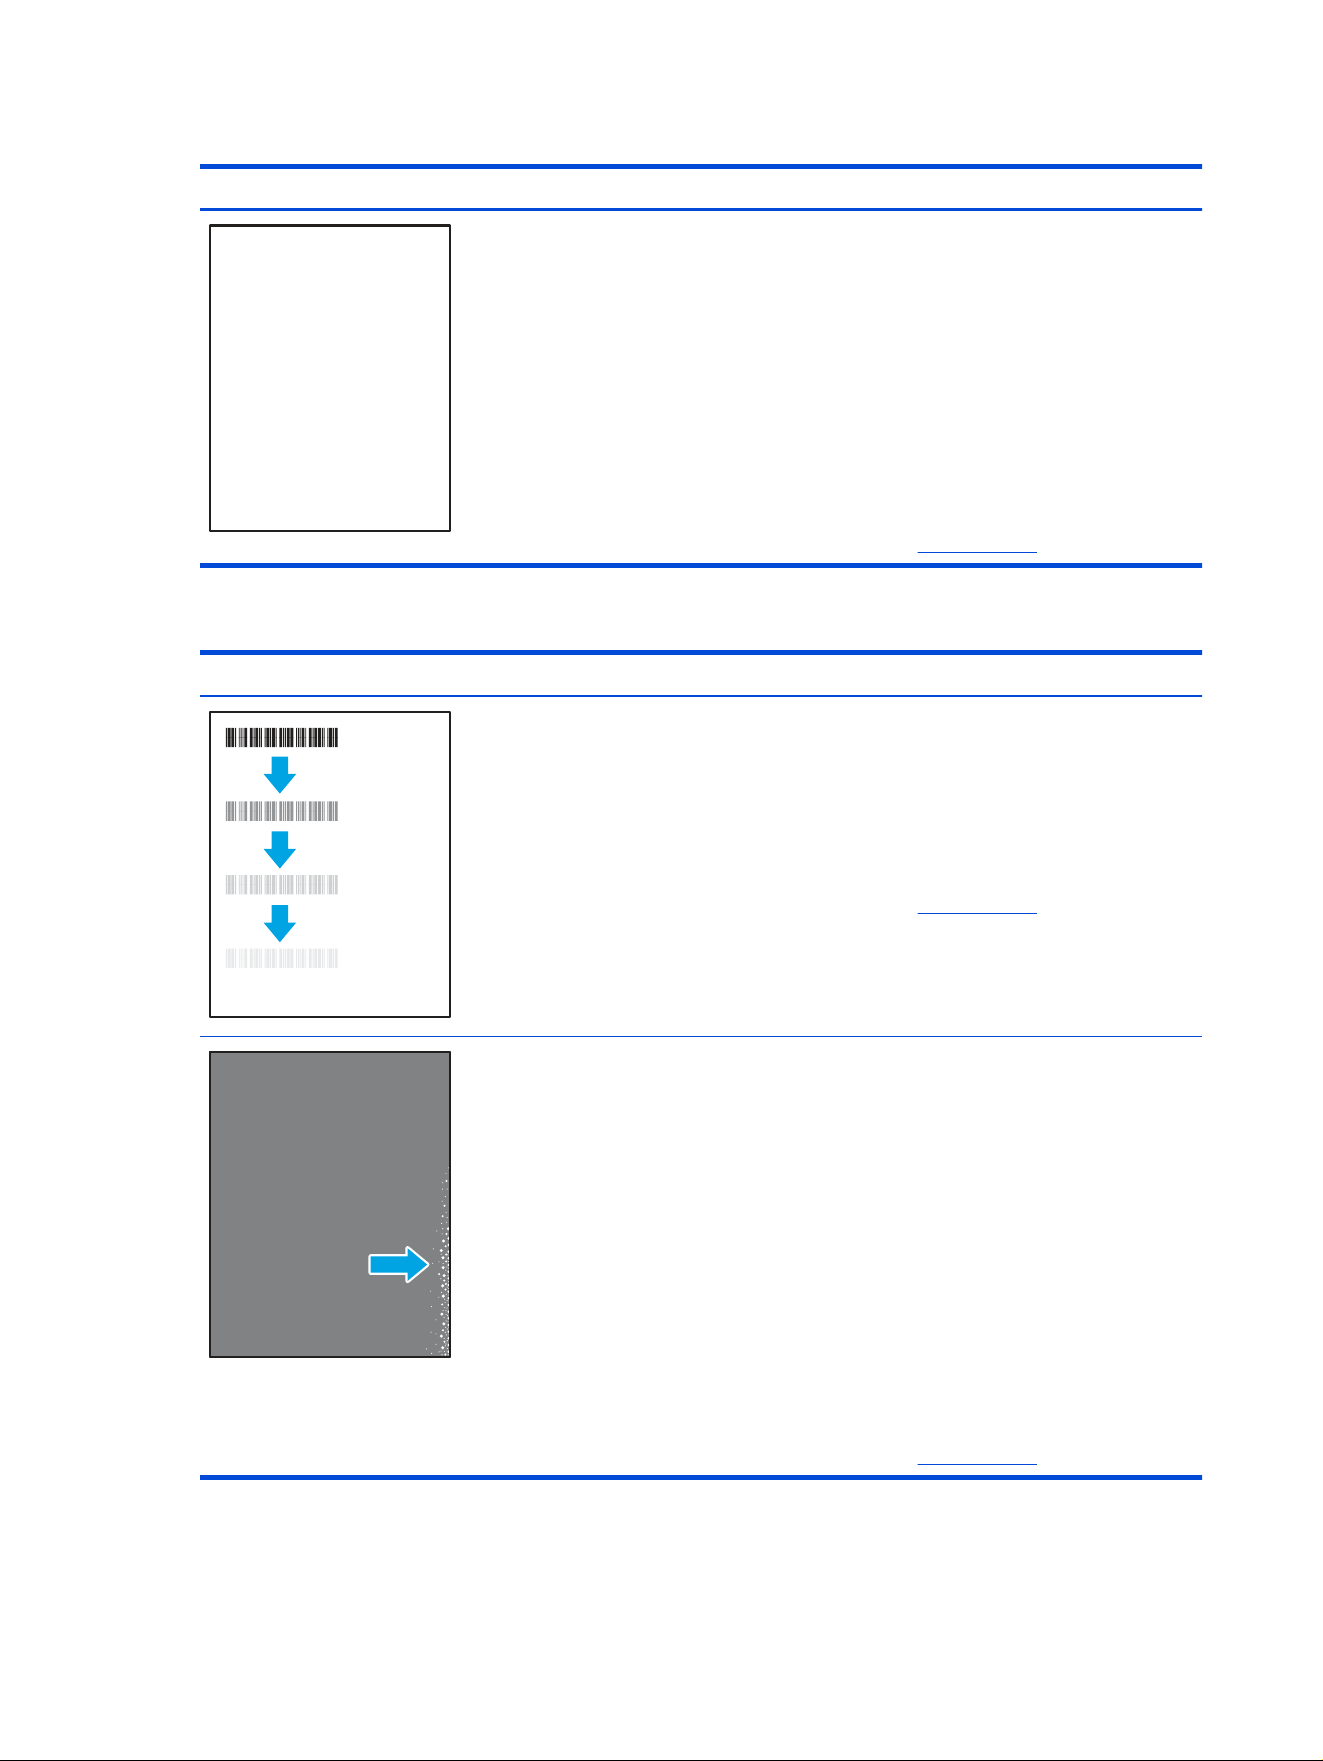
Table 9-6 Blank page — No print
Sample Description Possible solutions
The page is completely blank and
contains no printed content.
1. Make sure that the cartridges are
genuine HP cartridges.
2. Make sure that the cartridge is
installed correctly.
3. Print with a different cartridge.
4. Check the paper type in the paper
tray and adjust the printer settings
to match. If necessary, select a
lighter paper type.
5. If the issue persists, go to
support.hp.com.
Table 9-7 Fixing/fuser defects
Sample Description Possible solutions
Slight shadows or offsets of the image
are repeated down the page. The
repeated image might fade with each
recurrence.
1. Reprint the document.
2. Check the paper type in the paper
tray and adjust the printer settings
to match. If necessary, select a
lighter weight paper type.
3. If the issue persists, go to
support.hp.com.
Toner rubs off along either edge of the
page. This defect is more common at the
edges of high-coverage jobs, and on light
media types, but can occur anywhere on
the page.
1. Reprint the document.
2. Check the paper type in the paper
tray and adjust the printer settings
to match. If necessary, select a
heavier paper type.
3. Enterprise models only: From the
printer control panel, go to the
Edge-to-Edge menu and then select
Normal. Reprint the document.
4. Enterprise models only: From the
printer control panel, select Auto
Include Margins and then reprint the
document.
5. If the issue persists, go to
support.hp.com.
136
Chapter 9 Solve problems
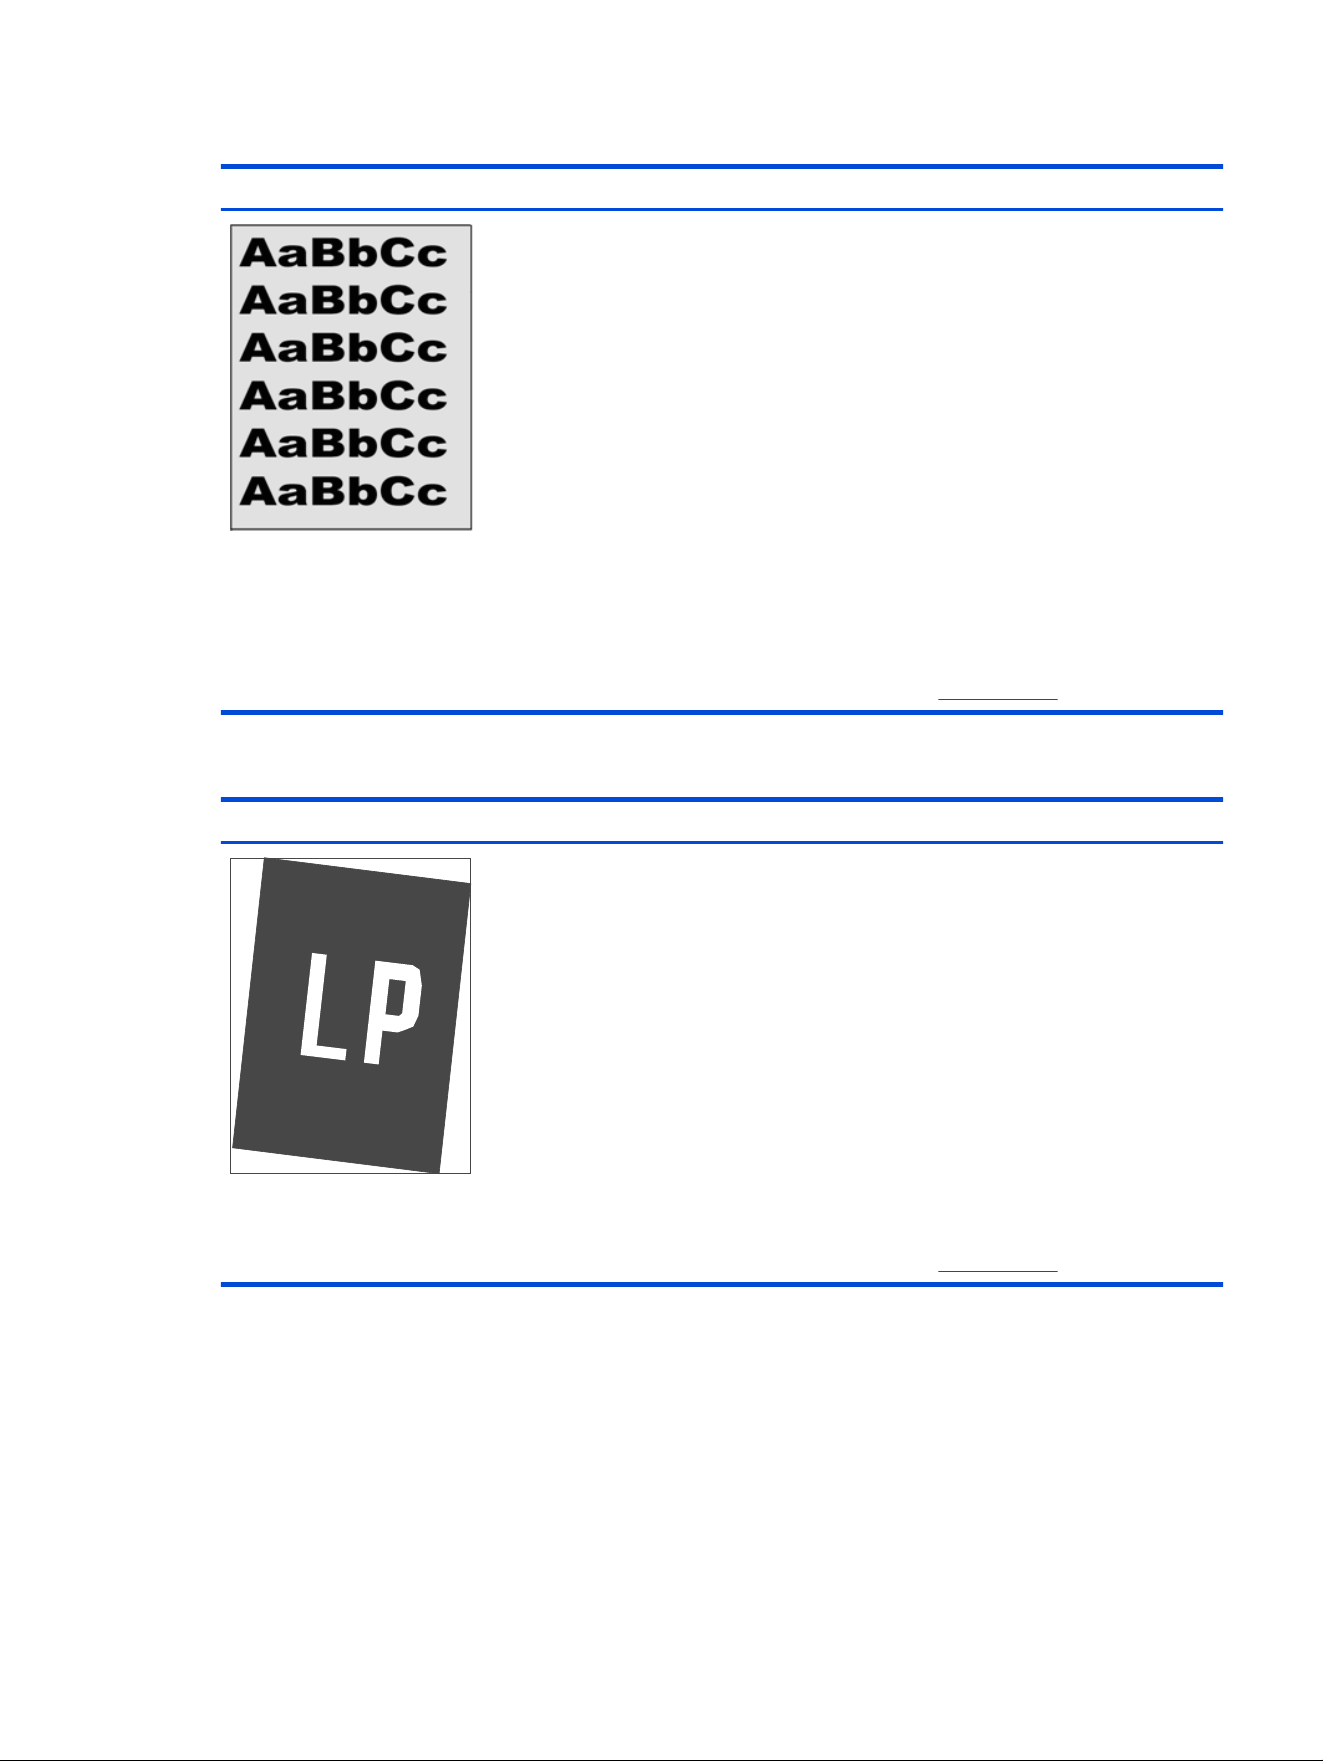
Table 9-8 Gray background or dark print
Sample Description Possible solutions
The image or text is darker than expected
and/or the background is gray.
1. Make sure that the paper in the
trays has not already been run
through the printer.
2. Use a different paper type.
3. Reprint the document.
4. Mono models only: From the Home
screen on the printer control panel,
go to the Adjust Toner Density menu,
and then adjust the toner density to
a lower level.
5. Make sure that the printer is
within the supported operating
temperature and humidity range.
6. Replace the cartridge.
7. If the issue persists, go to
support.hp.com.
Table 9-9 Image placement defects
Sample Description Possible solutions
The image is not centered, or is skewed
on the page. The defect occurs when the
paper is not positioned properly as it is
pulled from the tray and moves through
the paper path.
1. Reprint the document.
2. Remove the paper and then reload
the tray. Make sure that all the paper
edges are even on all sides.
3. Make sure that the top of the paper
stack is below the tray-full indicator.
Do not overll the tray.
4. Make sure that the paper guides
are adjusted to the correct size
for the paper. Do not adjust the
paper guides tightly against the
paper stack. Adjust them to the
indentations or markings in the tray.
5. If the issue persists, go to
support.hp.com.
Troubleshoot image defects
137
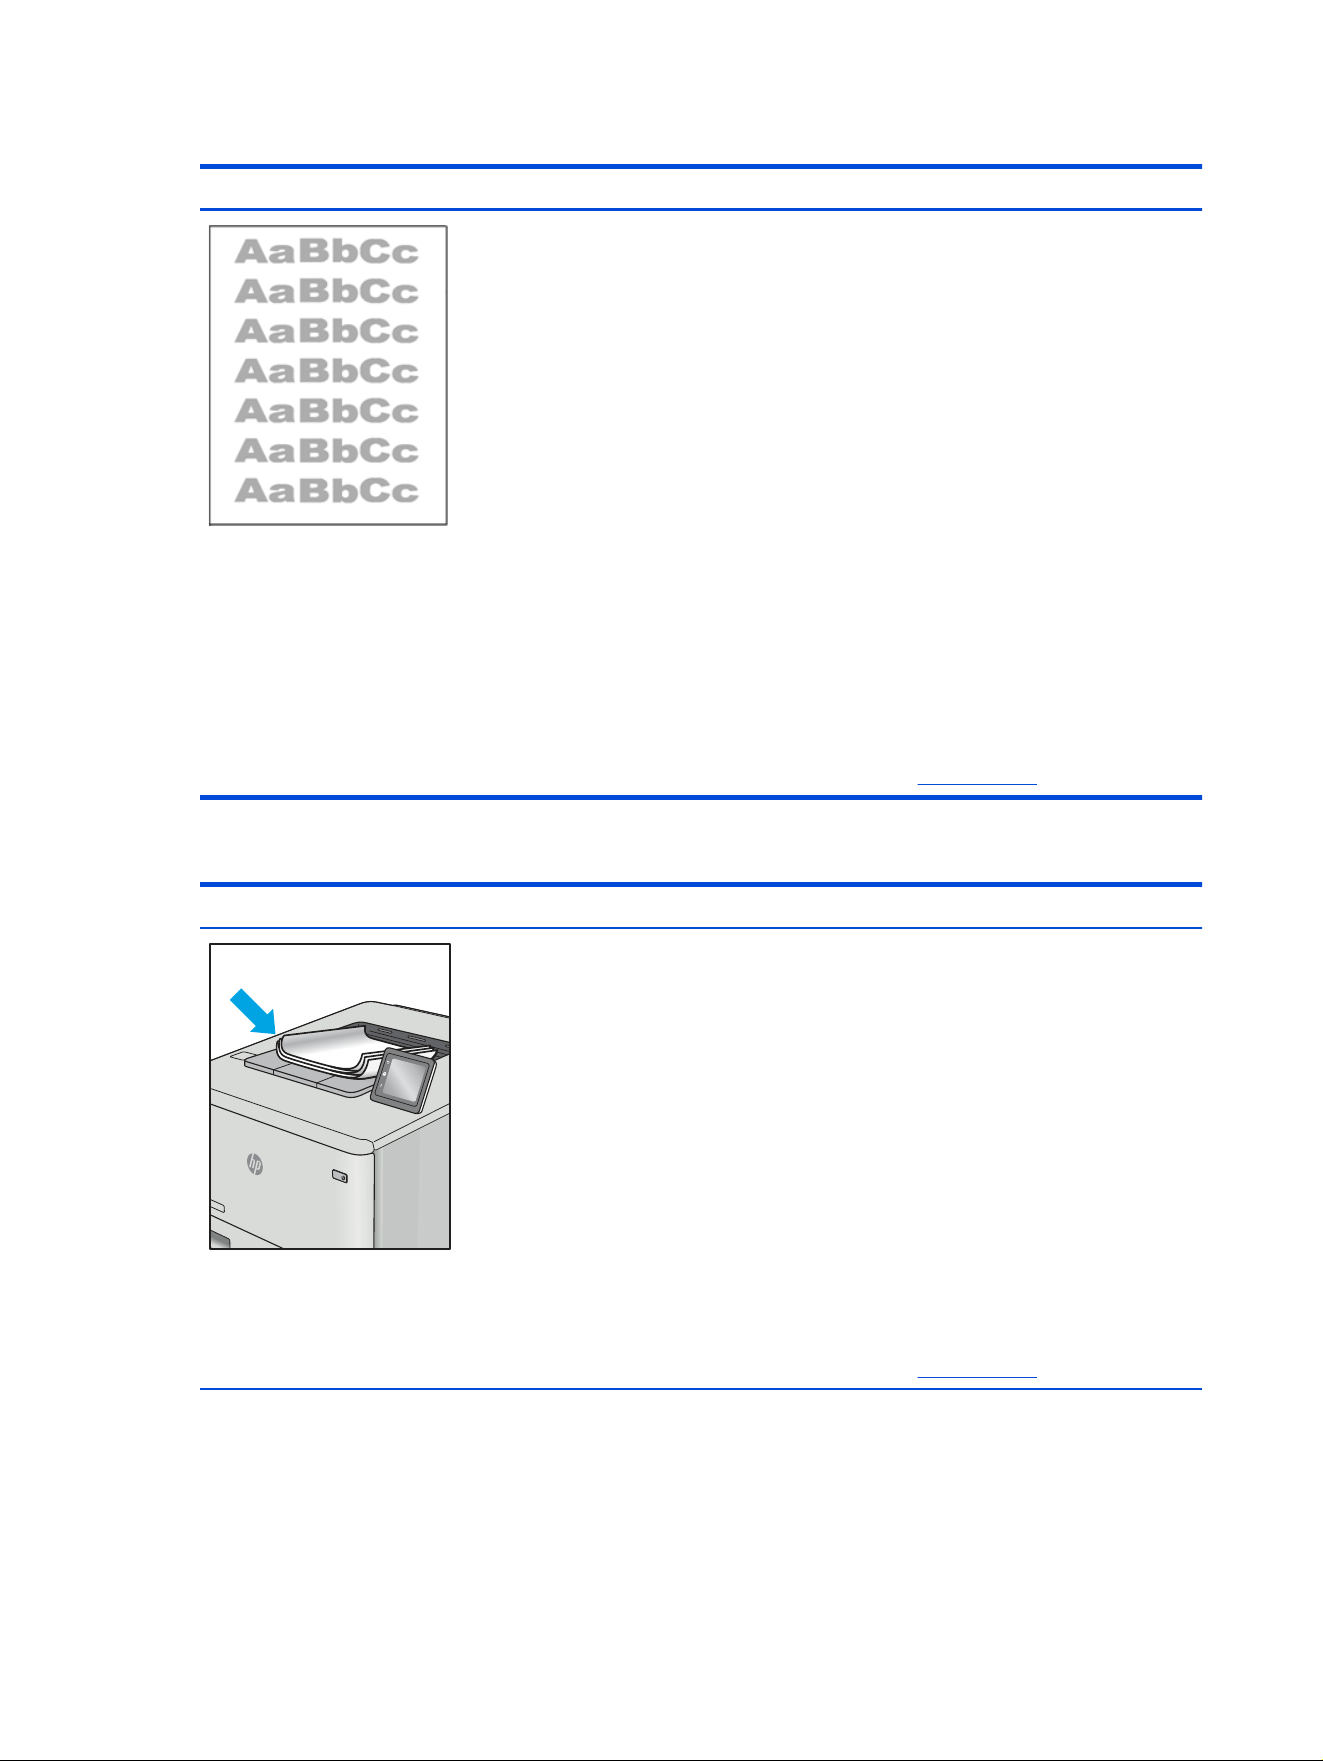
Table 9-10 Light print
Sample Description Possible solutions
The printed content is light or faded on
the entire page.
1. Reprint the document.
2. Remove the cartridge, and then
shake it to redistribute the toner.
Reinsert the toner cartridges into
the printer and close the cover. For
a graphical representation of this
procedure, see Replace the toner
cartridges.
3. Mono models only: Make sure that
the EconoMode setting is disabled,
both at the printer control panel and
in the print driver.
4. Make sure that the cartridge is
installed correctly.
5. Print a Supplies Status Page and
check the life and usage of the
cartridge.
6. Replace the cartridge.
7. If the issue persists, go to
support.hp.com.
Table 9-11 Output defects
Sample Description Possible solutions
Printed pages have curled edges. The
curled edge can be along the short or
long side of the paper. Two types of curl
are possible:
● Positive curl: The paper curls
toward the printed side. The defect
occurs in dry environments or when
printing high-coverage pages.
● Negative curl: The paper curls
away from the printed side. The
defect occurs in high-humidity
environments or when printing low-
coverage pages.
1. Reprint the document.
2. Positive curl: From the printer
control panel, select a heavier
paper type. The heavier paper type
creates a higher temperature for
printing.
Negative curl: From the printer
control panel, select a lighter paper
type. The lighter paper type creates
a lower temperature for printing.
Try storing the paper in a dry
environment prior to use, or use
freshly opened paper.
3. Print in duplex mode.
4. If the issue persists, go to
support.hp.com.
138
Chapter 9 Solve problems
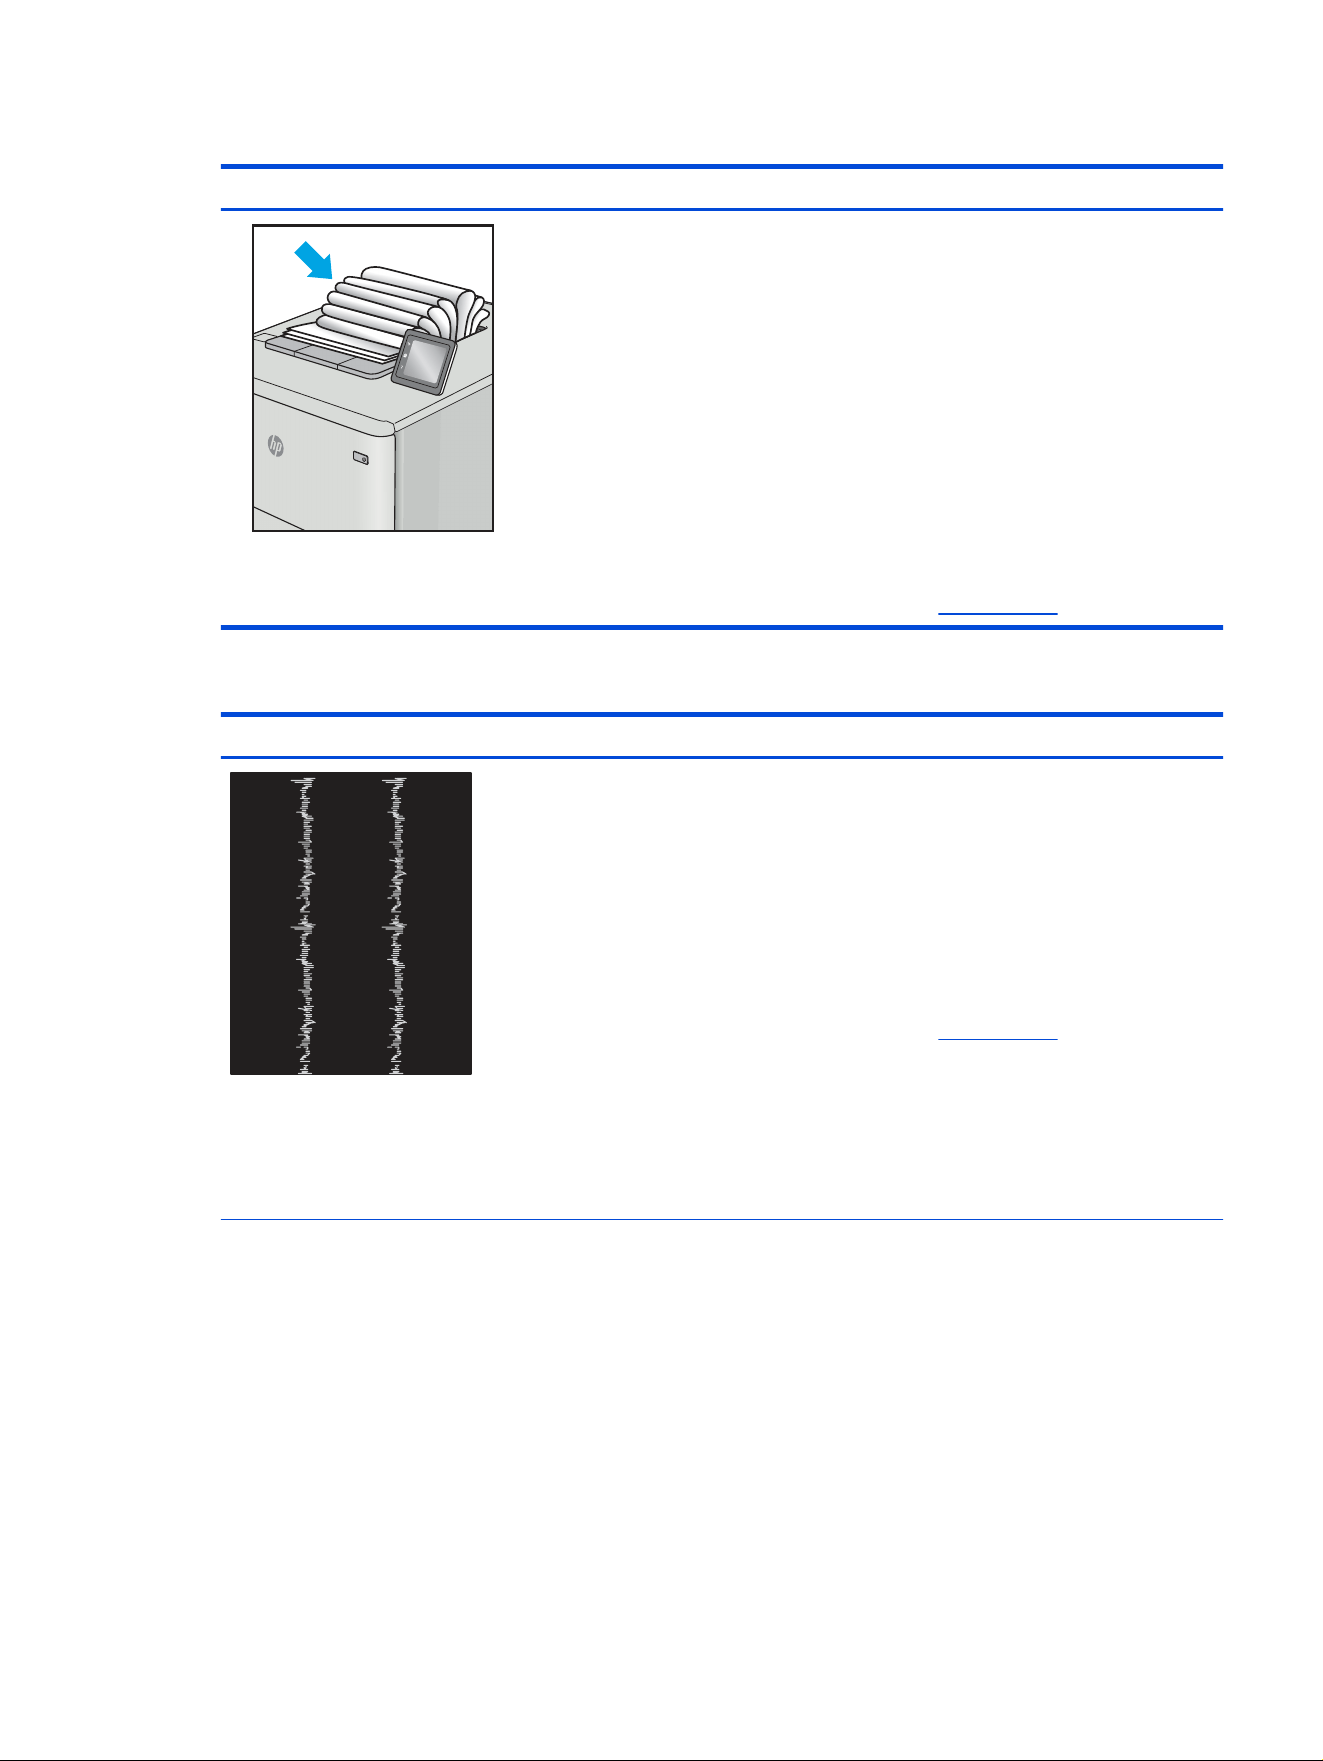
Table 9-11 Output defects (continued)
Sample Description Possible solutions
The paper does not stack well in the
output tray. The stack might be uneven,
skewed, or the pages might be pushed
out of the tray and onto the oor. Any of
the following conditions can cause this
defect:
● Extreme paper curl
● The paper in the tray is wrinkled or
deformed
● The paper is a non-standard paper
type, such as envelopes
● The output tray is too full
1.
Reprint the document.
2. Extend the output bin extension.
3. If the defect is caused by
extreme paper curl, refer to the
troubleshooting steps for "Output
curl."
4. Use a different paper type.
5. Use freshly opened paper.
6. Remove the paper from the output
tray before the tray gets too full.
7. If the issue persists, go to
support.hp.com.
Table 9-12 Streak defects
Sample Description Possible solutions
Light vertical streaks that usually span
the length of the page. The defect
displays only in areas of ll, not in text or
sections with no printed content.
1. Reprint the document.
2. Remove the cartridge, and then
shake it to redistribute the toner.
Reinsert the toner cartridges into
the printer and close the cover. For
a graphical representation of this
procedure, see Replace the toner
cartridges.
3. If the issue persists, go to
support.hp.com.
NOTE: Both light and dark vertical
streaks can occur when the printing
environment is outside the
specied
range for temperature or humidity. Refer
to your printer's environmental
specications for allowable temperature
and humidity levels.
Troubleshoot image defects
139

Table 9-12 Streak defects (continued)
Sample Description Possible solutions
Dark vertical lines which occur down the
length of the page. The defect might
occur anywhere on the page, in areas of
ll or in sections with no printed content.
1. Reprint the document.
2. Remove the cartridge, and then
shake it to redistribute the toner.
Reinsert the toner cartridges into
the printer and close the cover. For
a graphical representation of this
procedure, see Replace the toner
cartridges.
3. Print a cleaning page.
4. Check the toner level in the
cartridge.
5. If the issue persists, go to
support.hp.com.
Improve copy and scan image quality
Learn how to improve the quality of copies and scanned images, and how to properly clean the scanner
glass.
Introduction
If the printer is having image quality problems, try the following solutions in the order presented to resolve
the issue.
Try these few simple steps rst:
● Use the atbed scanner rather than the document feeder.
● Use high-quality originals.
● When using the document feeder, load the original document into the feeder correctly, using the
paper guides, to avoid unclear or skewed images.
If the problem still exists, try these additional solutions. If they do not x the problem, see "Improve print
quality" for further solutions.
Check the scanner glass for dirt and smudges
Over time, specks of debris might collect on the scanner glass and white plastic backing, which can affect
performance. Use the following procedure to clean the scanner.
1. Press the Power button to turn off the printer, and then disconnect the power cable from the
electrical outlet.
2. Open the scanner lid.
140
Chapter 9 Solve problems

3. Clean the scanner glass and the white plastic backing underneath the scanner lid with a soft cloth or
sponge that has been moistened with nonabrasive glass cleaner.
CAUTION: Do not use abrasives, acetone, benzene, ammonia, ethyl alcohol, or carbon tetrachloride
on any part of the printer; these can damage the printer. Do not place liquids directly on the glass or
platen. They might seep and damage the printer.
4. Dry the glass and white plastic parts with a chamois or a cellulose sponge to prevent spotting.
5. Connect the power cable to an outlet, and then press the Power button to turn on the printer.
Check the paper type setting on the control panel
Check the paper type setting on the printer control panel, and change the setting as needed.
1. Open and close the paper tray.
2. Follow the control panel prompts to conrm or modify the paper type and size settings for the tray.
3. Make sure the paper loaded meets specications.
4. Check the paper type setting for each tray (and modify, if needed):
a. From the Home screen on the printer control panel, touch the Menu icon, and then touch Paper.
b. Touch Paper Source.
c. Touch the tray name (Tray 1 or Tray 2) to view the paper type setting for that tray.
To change the setting, touch Modify, then touch the paper type from the list of available options.
d. Touch Done to save the settings.
5. Make sure the driver settings match the control panel settings.
NOTE: The print driver settings will override any control panel settings.
Check the image adjustment settings
To improve copy quality, adjust the image settings using the printer control panel.
1. At the printer control panel, touch Copy.
2. Adjust the following settings (touch All Options to see the full list of options):
● Quality: Choose the output quality for the image.
● Lighter/Darker: Adjust the lightness/darkness setting.
● Sharpness: Adjust the sharpness of the scanned output.
● Detailed Background Removal: Adjust this setting to remove unwanted background objects.
3. Select Copy to begin copying.
Optimize for text or pictures
Follow these steps to optimize the scan or copy for text or photos.
Check the paper type setting on the control panel
141

1. At the printer control panel, touch Copy.
2. Touch the icon to the left of the Copy button, and then touch Content Type.
3. Touch one of the predened options (Mixed, Photograph, or Text).
4. Touch the back arrow button to return to the Copy menu, and then touch the Copy button to start the
copy job.
Check the scanner resolution and color settings on the computer
If you are printing a scanned image, and the quality is not what you expected, you might have selected a
resolution or color setting in the scanner software that does not match your needs. Resolution and color
affect the following features of scanned images:
● Image clarity
● Texture of gradations (smooth or rough)
● Scan time
● File size
Scanning resolution is measured in pixels per inch (ppi).
NOTE: Scanning ppi levels are not interchangeable with printing dpi (dots per inch) levels.
Color, grayscale, and black and white dene the number of colors possible. You can adjust the scanner
hardware resolution for up to 1200 ppi.
The resolution and color guidelines table lists simple tips that you can follow to meet your scanning needs.
NOTE: Setting the resolution and color to a high value can create large les that take up disk space and
slow the scanning process. Before setting the resolution and color, determine how you are going to use
the scanned image.
Resolution and color guidelines
The following table describes the recommended resolution and color settings for different types of scan
jobs.
NOTE: The default resolution is 200 ppi.
Table 9-13
Resolution and color guidelines
Intended use Recommended resolution Recommended color settings
Fax 150 ppi ● Black and White
Email 150 ppi ● Black and White, if the image does not require smooth
gradation
● Grayscale, if the image requires smooth gradation
● Color, if the image is in color
Edit text 300 ppi ● Black and White
142 Chapter 9 Solve problems

Table 9-13 Resolution and color guidelines (continued)
Intended use Recommended resolution Recommended color settings
Print (graphics or text) 600 ppi for complex graphics,
or if you want to signicantly
enlarge the document
300 ppi for normal graphics
and text
150 ppi for photos
● Black and White for text and line art
● Grayscale for shaded or colored graphics and photos
● Color, if the image is in color
Display on screen 75 ppi ● Black and White for text
● Grayscale for graphics and photos
● Color, if the image is in color
Color
You can set the color values to the following settings when scanning.
Table 9-14 Color settings
Setting Recommended use
Color Use this setting for high-quality color photos or documents in which the color is important.
Black and White Use this setting for text documents.
Grayscale Use this setting when le size is an issue or when you want to scan a document or photograph
quickly.
Edge-to-edge copying
The printer cannot print fully edge-to-edge. There is a 4 mm (1/6 inch) unprintable border around the page.
Considerations for printing or scanning documents with cropped edges:
● When the original is smaller than the output size, move the original 4 mm (1/6 inch) away from the
corner indicated by the icon on the scanner. Recopy or scan in this position.
● When the original is the size of the printed output that you want, use the Reduce/Enlarge feature to
reduce the image so the copy is not cropped.
Improve fax image quality
Review the following information to improve fax image quality.
Introduction
If the printer is having image quality problems, try the following solutions in the order presented to resolve
the issue.
Try these few simple steps rst:
● Use the atbed scanner rather than the document feeder.
Color
143

● Use high-quality originals.
● When using the document feeder, load the original document into the feeder correctly, using the
paper guides, to avoid unclear or skewed images.
If the problem still exists, try these additional solutions. If they do not x the problem, see "Improve print
quality" for further solutions.
Check the scanner glass for dirt and smudges
Over time, specks of debris might collect on the scanner glass and white plastic backing, which can affect
performance. Use the following procedure to clean the scanner.
1. Press the Power button to turn off the printer, and then disconnect the power cable from the
electrical outlet.
2. Open the scanner lid.
3. Clean the scanner glass and the white plastic backing underneath the scanner lid with a soft cloth or
sponge that has been moistened with nonabrasive glass cleaner.
CAUTION: Do not use abrasives, acetone, benzene, ammonia, ethyl alcohol, or carbon tetrachloride
on any part of the printer; these can damage the printer. Do not place liquids directly on the glass or
platen. They might seep and damage the printer.
4. Dry the glass and white plastic parts with a chamois or a cellulose sponge to prevent spotting.
5. Connect the power cable to an outlet, and then press the Power button to turn on the printer.
Check the send-fax resolution settings
If the printer was unable to send a fax because the receiving fax machine did not answer or was busy, the
printer attempts to redial based on the redial-on-busy, redial-on-no-answer, and redial-on-communication-
error options.
1. At the printer control panel, touch Fax.
2. Touch the icon to the left of the Send button, and then scroll to and touch Resolution.
3. Select one of the predened options (Standard, Fine, or Superne).
Check the Error Correction Mode setting
Usually, the printer monitors the signals on the telephone line while it is sending or receiving a fax. If the
printer detects an error during the transmission and the Error Correction Mode setting is On, the printer
can request that the portion of the fax be resent. The factory-set default for error correction is On.
You should turn off error correction only if you are having trouble sending or receiving a fax, and you are
willing to accept the errors in the transmission. Turning off the setting might be useful when you are trying
to send a fax overseas or receive one from overseas, or if you are using a satellite telephone connection.
1. From the Home screen on the printer control panel, touch the Menu icon, and then touch Settings.
2. Touch Fax Settings, and then touch Fax Send.
3. Touch the button next to Error Correction Mode to turn the setting off or on.
144
Chapter 9 Solve problems

Send to a different fax machine
Try sending the fax to a different fax machine. If the fax quality is better, the problem is related to the initial
recipient's fax machine settings or supplies status.
Check the sender's fax machine
Ask the sender to try sending from a different fax machine. If the fax quality is better, the problem is with
the sender's fax machine. If a different fax machine is unavailable, ask the sender to consider making the
following changes:
● Make sure the original document is on white (not colored) paper.
● Increase the fax resolution, quality level, or contrast settings.
● If possible, send the fax from a computer software program.
Solve wired network problems
Check the following information to resolve wired network issues.
Introduction
Certain types of problems can indicate there is a network communication problem. These problems
include the following issues:
Poor physical connection
Check the cable connections.
1. Verify that the printer is attached to the correct network port using a cable of the correct length.
2. Verify that cable connections are secure.
3. Look at the network port connection on the rear of the printer, and verify that the amber activity
light ashes indicating network trafc, and the green link-status light is continuously lit indicating a
network link.
4. If the problem continues, try a different cable or port on the hub.
The computer is using the incorrect IP address for the printer
If the computer is using the incorrect IP address for the printer, try these solutions.
1. Open the printer properties and click the Ports tab. Verify that the current IP address for the printer is
selected. The printer IP address is listed on the printer conguration page.
2. If you installed the printer using the HP standard TCP/IP port, select the check box next to Always
print to this printer, even if its IP address changes.
3. If you installed the printer using a Microsoft standard TCP/IP port, use the hostname instead of the IP
address.
4. If the IP address is correct, delete the printer and then add it again.
Send to a different fax machine
145

The computer is unable to communicate with the printer
Verify that the printer is communicating with the network and your computer.
1. Test network communication by pinging the network.
a. Open a command-line prompt on your computer.
● For Windows, click Start, click Run, type cmd, and then press Enter.
● For macOS, go to Applications, then Utilities, and open Terminal.
b. Type ping followed by the IP address for your printer.
c. If the window displays round-trip times, the network is working.
2. If the ping command failed, verify that the network hubs are on, and then verify that the network
settings, the printer, and the computer are all congured for the same network (also known as
subnet).
3. If the network is working, make sure that the computer is using the correct IP address for the printer.
a. Open the printer properties and click the Ports tab. Verify that the current IP address for the
printer is selected. The printer IP address is listed on the printer conguration page.
b. If you installed the printer using the HP standard TCP/IP port, select the box labeled Always print
to this printer, even if its IP address changes.
c. If you installed the printer using a Microsoft standard TCP/IP port, use the printer’s hostname
instead of the IP address.
d. If the IP address is correct, delete the printer and then add it again.
The printer is using incorrect link and duplex settings for the network
HP recommends leaving these settings in automatic mode (the default setting). If you change these
settings, you must also change them for your network.
New software programs might be causing compatibility problems
Verify that any new software programs are correctly installed and that they use the correct print driver.
The computer or workstation might be set up incorrectly
An incorrectly congured computer can cause issues with printing.
1. Check the network drivers, print drivers, and the network redirection settings.
2. Verify that the operating system is congured correctly.
The printer is disabled, or other network settings are incorrect
Check the network settings.
1. Review the printer’s conguration/networking pages to check the status of the network settings and
protocols.
2. Recongure the network settings if necessary.
146
Chapter 9 Solve problems

Solve wireless network problems
To resolve network issues, try these steps in the order presented.
Introduction
Use the troubleshooting information to help resolve issues.
NOTE: To determine whether Wi-Fi Direct printing is enabled on your printer, print a conguration page
from the printer control panel
Wireless connectivity checklist
Review the following information to check wireless connectivity.
● Verify that the network cable is not connected.
● Verify that the printer and the wireless router are turned on and have power. Also make sure that the
wireless radio in the printer is turned on.
● Verify that the service set identier (SSID) is correct. Print a conguration page to determine the SSID.
If you are not sure the SSID is correct, run the wireless setup again.
● With secured networks, verify that the security information is correct. If the security information is
incorrect, run the wireless setup again.
● If the wireless network is working correctly, try accessing other computers on the wireless network. If
the network has Internet access, try connecting to the Internet over a wireless connection.
● Verify that the encryption method (AES or TKIP) is the same for the printer as it is for the wireless
access point (on networks using WPA security).
● Verify that the printer is within the range of the wireless network. For most networks, the printer must
be within 30 m (100 ft) of the wireless access point (wireless router).
● Verify that obstacles do not block the wireless signal. Remove any large metal objects between the
access point and the printer. Make sure poles, walls, or support columns containing metal or concrete
do not separate the printer and wireless access point.
● Verify that the printer is located away from electronic devices that might interfere with the wireless
signal. Many devices can interfere with the wireless signal including motors, cordless phones, security
system cameras, other wireless networks, and some Bluetooth devices.
● Verify that the print driver is installed on the computer.
● Verify that you have selected the correct printer port.
● Verify that the computer and printer connect to the same wireless network.
● For macOS, verify that the wireless router supports Bonjour.
The printer does not print after the wireless
conguration completes
If the printer does not print after the wireless conguration completes, try these solutions.
1. Make sure that the printer is turned on and in the ready state.
2. Turn off any third-party rewalls on your computer.
Solve wireless network problems
147

3. Make sure that the wireless network is working correctly.
4. Make sure that your computer is working correctly. If necessary, restart the computer.
5. Verify that you can open the printer HP Embedded Web Server from a computer on the network.
The printer does not print, and the computer has a third-party rewall installed
If the printer does not print, and the computer has a third-party rewall installed, try these solutions.
1. Update the rewall with the most recent update available from the manufacturer.
2. If programs request rewall access when you install the printer or try to print, make sure you allow the
programs to run.
3. Temporarily turn off the rewall, and then install the wireless printer on the computer. Enable the
rewall when you have completed the wireless installation.
The wireless connection does not work after moving the wireless router or
printer
If the wireless connection does not work after moving the wireless router or printer, try these solutions.
1. Make sure that the router or printer connects to the same network that your computer connects to.
2. Print a conguration page.
3. Compare the service set identier (SSID) on the conguration page to the SSID in the printer
conguration for the computer.
4. If the numbers are not the same, the devices are not connecting to the same network. Recongure
the wireless setup for the printer.
Cannot connect more computers to the wireless printer
If additional computers cannot connect to the wireless printer, try these solutions.
1. Make sure that the other computers are within the wireless range and that no obstacles block the
signal. For most networks, the wireless range is within 30 m (100 ft) of the wireless access point.
2. Make sure that the printer is turned on and in the ready state.
3. Make sure there are not more than 5 concurrent Wi-Fi Direct users.
4. Turn off any third-party rewalls on your computer.
5. Make sure that the wireless network is working correctly.
6. Make sure that your computer is working correctly. If necessary, restart the computer.
The wireless printer loses communication when connected to a VPN
Typically, you cannot connect to a VPN and other networks at the same time.
The network does not appear in the wireless networks list
If the network does not appear in the wireless networks list, try these solutions.
● Make sure the wireless router is turned on and has power.
148
Chapter 9 Solve problems

● The network might be hidden. However, you can still connect to a hidden network.
The wireless network is not functioning
If the wireless network is not functioning, try these solutions.
1. Make sure that the network cable is not connected.
2. To verify if the network has lost communication, try connecting other devices to the network.
3. Test network communication by pinging the network.
a. Open a command-line prompt on your computer.
● For Windows, click Start, click Run, type cmd, and then press Enter.
● For macOS, go to Applications, then Utilities, and open Terminal.
b. Type ping followed by the router IP address.
c. If the window displays round-trip times, the network is working.
4. Make sure that the router or printer connects to the same network that the computer connects to.
a. Print a conguration page.
b. Compare the service set identier (SSID) on the conguration report to the SSID in the printer
conguration for the computer.
c. If the numbers are not the same, the devices are not connecting to the same network.
Recongure the wireless setup for the printer.
Perform a wireless network diagnostic test
From the printer control panel, you can run a diagnostic test that provides information about the wireless
network settings.
1. From the Home screen on the printer control panel, touch the Menu icon, and then touch Settings.
2. Scroll to and touch Network Reports.
3. Scroll to and touch Print Wi-Fi Test Report.
The printer prints a test page that shows test results.
Reduce interference on a wireless network
The following tips can reduce interference in a wireless network:
● Keep the wireless devices away from large metal objects, such as ling cabinets, and other
electromagnetic devices, such as microwaves and cordless telephones. These objects can disrupt
radio signals.
● Keep the wireless devices away from large masonry structures and other building structures. These
objects can absorb radio waves and lower signal strength.
● Position the wireless router in a central location in line of sight with the wireless printers on the
network.
The wireless network is not functioning
149

Solve fax problems
Use the following information to solve fax problems.
Introduction
Use the fax troubleshooting information to help resolve issues.
Fax troubleshooting checklist
After each recommended action, retry faxing to see if the problem is resolved.
For best results during fax problem solving, make sure the line from the printer is connected directly to the
wall phone port. Disconnect all other devices that are connected to the printer.
1. Verify that the telephone cord is connected to the correct port on the back of the printer.
2. Verify that the printer rmware is current:
NOTE: To determine the current rmware version on your printer, print a Printer Status Report from
the printer control panel, and then look on the report to nd the rmware date code. Then visit the HP
product support page (using the steps below) and compare the rmware date code to the latest
rmware version that is available from HP. If there is a newer version available, follow the steps below
to update the rmware on your printer.
a. Go to support.hp.com, click the Drivers & Software link, type the printer name in the search
eld, press the ENTER button, and then select the printer from the list of search results.
b. Select the operating system.
c. Under the Firmware section, locate the Firmware Update Utility.
NOTE: Make sure to use the rmware update utility that is specic to the printer model.
d. Click Download, click Run, and then click Run again.
e. When the utility launches, select the printer from the drop-down list, and then click Send
Firmware.
f. Follow the on-screen instructions to complete the installation, and then click the Exit button to
close the utility.
3. Verify that the fax was set up when the printer software was installed.
From the computer, in the HP program folder, run the Fax Setup Utility.
4. Verify that the telephone service supports analog fax.
● If using ISDN or digital PBX, contact your service provider for information about conguring to an
analog fax line.
● If using a VoIP service, change the Fax Speed setting to Speed-Slow (9600 bps). From the control
panel Home Screen, select Fax, select Setup, and then select Preferences.
● Ask if your service provider supports fax, and what the recommended fax modem speed is.
Some companies might require an adapter.
150
Chapter 9 Solve problems

● If you are using a DSL service, make sure that a lter is included on the phone-line connection to
the printer. Contact the DSL service provider, or purchase a DSL lter if you do not have one. If a
DSL lter is installed, try another lter because lters can be defective.
Solve general fax problems
Review suggestions and tips for resolving various fax-related issues.
Faxes are sending slowly
The printer is experiencing poor phone line quality.
Try the following suggestions to resolve the issue:
● Try resending the fax when the line conditions have improved.
● Check with the phone service provider to verify that the line supports fax.
● Turn off the Error Correction Mode setting:
1. From the Home screen on the printer control panel, touch the Menu icon, and then touch Settings.
2. Touch Fax Settings, and then touch Fax Send.
3. Touch the button next to Error Correction Mode to turn the setting off.
NOTE: This can reduce image quality.
● Use white paper for the original. Do not use colors such as gray, yellow, or pink.
● Increase the Fax Speed setting:
1. From the Home screen on the printer control panel, touch the Menu icon, and then touch Settings.
2. Touch Fax Settings, and then touch Fax Send.
3. Select the desired speed setting.
● Divide large fax jobs into smaller sections, and then fax them individually.
Fax quality is poor
Faxes are blurry or too light.
Try the following suggestions to resolve the issue:
● Increase fax resolution when sending faxes:
NOTE: Resolution does not affect received faxes.
1. At the printer control panel, touch Fax.
2. Touch the icon to the left of the Send button, and then scroll to and touch Resolution.
3. Select the desired resolution setting.
NOTE: Increasing resolution slows transmission speed.
● Turn on the Error Correction Mode setting:
Solve general fax problems
151

1. From the Home screen on the printer control panel, touch the Menu icon, and then touch Settings.
2. Touch Fax Settings, and then touch Fax Send.
3. Touch the button next to Error Correction Mode to turn the setting on.
● Check the toner cartridges and replace if necessary.
● Ask the sender to darken the contrast setting on the sending fax machine, and then resend the fax.
Fax cuts off or prints on two pages
If the paper size settings on the printer do not match the paper size of the document being faxed, the
received fax might be missing content, or it could print on two pages.
Try the following suggestions to resolve the issue:
● Set the Default Paper Size setting:
NOTE: Faxes print on a single size of paper based on the Default Paper Size settings.
1. From the Home screen on the printer control panel, touch the Menu icon, and then touch Paper.
2. Touch Paper Source.
3. Touch the tray name (Tray 1 or Tray 2) to view the paper size and type settings for that tray. To
change the settings, touch Modify, then touch the paper size and/or type from the list of available
options.
● Set the paper type and size for the tray that is used for faxes.
152
Chapter 9 Solve problems

Service and support1
HP limited warranty statement
HP PRODUCT DURATION OF LIMITED WARRANTY*
HP LaserJet Pro MFP 4112dw, 4112fdn, 4112fdw,
HP LaserJet Pro MFP 4113dw, 4113dwg, 4113fdn,
4113fdng, 4113fdw, 4113fdwg, HP LaserJet Pro MFP
4114dw, 4114fdn, 4114fdw
One-year, next-business day, onsite warranty
NOTE: *Warranty and support options vary by product, country, and local legal requirements. Go to
support.hp.com to learn about HP award-winning service and support options in your region.
HP warrants to you, the end-user customer, this HP Limited Warranty applies only to HP branded products
sold or leased a) from HP Inc., its subsidiaries, afliates, authorized resellers, authorized distributors, or
country distributors; and, b) with this HP Limited Warranty, that HP hardware and accessories will be free
from defects in materials and workmanship after the date of purchase, for the period specied above.
If HP receives notice of such defects during the warranty period, HP will, at its option, either repair or
replace products which prove to be defective. Replacement products may be either new or equivalent in
performance to new.
HP warrants to you that HP software will not fail to execute its programming instructions after the date
of purchase, for the period specied above, due to defects in material and workmanship when properly
installed and used. If HP receives notice of such defects during the warranty period, HP will replace
software which does not execute its programming instructions due to such defects.
HP does not warrant that the operation of HP products will be uninterrupted or error free. If HP is unable,
within a reasonable time, to repair or replace any product to a condition as warranted, you will be entitled
to a refund of the purchase price upon prompt return of the product.
HP products may contain remanufactured parts equivalent to new in performance or may have been
subject to incidental use.
Warranty does not apply to defects resulting from (a) improper or inadequate maintenance or calibration,
(b) software, interfacing, parts or supplies not supplied by HP, (c) unauthorized modication or misuse,
(d) operation outside of the published environmental specications for the product, or (e) improper site
preparation or maintenance.
TO THE EXTENT ALLOWED BY LOCAL LAW, THE ABOVE WARRANTIES ARE EXCLUSIVE AND NO
OTHER WARRANTY OR CONDITION, WHETHER WRITTEN OR ORAL, IS EXPRESSED OR IMPLIED AND
HP SPECIFICALLY DISCLAIMS ANY IMPLIED WARRANTIES OR CONDITIONS OF MERCHANTABILITY,
SATISFACTORY QUALITY, AND FITNESS FOR A PARTICULAR PURPOSE. Some countries/regions, states
or provinces do not allow limitations on the duration of an implied warranty, so the above limitation or
exclusion might not apply to you. This warranty gives you specic legal rights and you might also have
other rights that vary from country/region to country/region, state to state, or province to province.
HP's limited warranty is valid in any country/region or locality where HP has a support presence for this
product and where HP has marketed this product. The level of warranty service you receive may vary
according to local standards. HP will not alter form, t or function of the product to make it operate in a
country/region for which it was never intended to function for legal or regulatory reasons.
Service and support
1

TO THE EXTENT ALLOWED BY LOCAL LAW, THE REMEDIES IN THIS WARRANTY STATEMENT ARE YOUR
SOLE AND EXCLUSIVE REMEDIES. EXCEPT AS INDICATED ABOVE, IN NO EVENT WILL HP OR ITS
SUPPLIERS BE LIABLE FOR LOSS OF DATA OR FOR DIRECT, SPECIAL, INCIDENTAL, CONSEQUENTIAL
(INCLUDING LOST PROFIT OR DATA), OR OTHER DAMAGE, WHETHER BASED IN CONTRACT, TORT, OR
OTHERWISE. Some countries/regions, states or provinces do not allow the exclusion or limitation of
incidental or consequential damages, so the above limitation or exclusion may not apply to you.
THE WARRANTY TERMS CONTAINED IN THIS STATEMENT, EXCEPT TO THE EXTENT LAWFULLY
PERMITTED, DO NOT EXCLUDE, RESTRICT OR MODIFY AND ARE IN ADDITION TO THE MANDATORY
STATUTORY RIGHTS APPLICABLE TO THE SALE OF THIS PRODUCT TO YOU.
UK, Ireland, and Malta
The HP Limited Warranty is a commercial guarantee voluntarily provided by HP. The name and address
of the HP entity responsible for the performance of the HP Limited Warranty in your country/region is as
follows:
UK: HP Inc UK Limited, Earley West, 300 Thames Valley Park Drive, Reading, RG6 1PT, United Kingdom
Ireland: HP Technology Ireland Limited, Liffey Valley Ofce Campus, 1st FLOOR, BLOCK B Quarryvale, Co.
Dublin D22 X0Y3 Ireland
Malta: HP Europe B.V., Amsterdam, Meyrin Branch, Route du Nant-d'Avril 150, 1217 Meyrin, Switzerland
United Kingdom: The HP Limited Warranty benets apply in addition to any legal rights to
a guarantee from seller of nonconformity of goods with the contract of sale. These rights expire
six years from delivery of goods for products purchased in England or Wales and ve years from
delivery of goods for products purchased in Scotland. However various factors may impact your
eligibility to receive these rights. For further information, please consult the following link: Consumer
Legal Guarantee (http://www.hp.com/go/eu-legal) or you may visit the European Consumer Centers
website (https://commission.europa.eu/live-work-travel-eu/consumer-rights-and-complaints/resolve-your-
consumer-complaint/european-consumer-centres-network-ecc-net). Consumers have the right to choose
whether to claim service under the HP Limited Warranty or against the seller under the legal guarantee.
Ireland: The HP Limited Warranty benets apply in addition to any statutory rights from seller in
relation to nonconformity of goods with the contract of sale. However various factors may impact
your eligibility to receive these rights. Consumer statutory rights are not limited or affected in
any manner by HP Care Pack. For further information, please consult the following link: Consumer
Legal Guarantee (www.hp.com/go/eu-legal) or you may visit the European Consumer Centers
website (https://commission.europa.eu/live-work-travel-eu/consumer-rights-and-complaints/resolve-your-
consumer-complaint/european-consumer-centres-network-ecc-net). Consumers have the right to choose
whether to claim service under the HP Limited Warranty or against the seller under the legal guarantee.
Malta: The HP Limited Warranty benets apply in addition to any legal rights to a two-year guarantee
from seller of nonconformity of goods with the contract of sale; however various factors may
impact your eligibility to receive these rights. Consumer statutory rights are not limited or affected
in any manner by the HP Limited Warranty. For further information, please consult the following link:
Consumer Legal Guarantee (www.hp.com/go/eu-legal) or you may visit the European Consumer Centers
website (https://commission.europa.eu/live-work-travel-eu/consumer-rights-and-complaints/resolve-your-
consumer-complaint/european-consumer-centres-network-ecc-net). Consumers have the right to choose
whether to claim service under the HP Limited Warranty or against the seller under two-year legal
guarantee.
2
Chapter 1 Service and support

Austria, Belgium, Germany, Luxembourg. and Switzerland
Die beschränkte HP Herstellergarantie ist eine von HP auf freiwilliger Basis angebotene kommerzielle
Garantie. Der Name und die Adresse der HP Gesellschaft, die in Ihrem Land für die Gewährung der
beschränkten HP Herstellergarantie verantwortlich ist, sind wie folgt:
Schweiz: Die beschränkte HP Herstellergarantie ist eine von HP auf freiwilliger Basis angebotene
kommerzielle Garantie. Der Name und die Adresse der HP Entität, die in Ihrem Land für die Gewährung der
beschränkten HP Herstellergarantie verantwortlich ist, sind wie folgt:
Deutschland: HP Deutschland GmbH, Schickardstr. 32, D-71034 Böblingen
Österreich: HP Austria GmbH., Technologiestrasse 5, A-1120 Wien
Luxemburg: HP Luxembourg S.C.A., 75, Parc d'Activités Capellen, L-8308 Capellen
Belgien: HP Belgium BV, Hermeslaan 1, Building B, B-1831 Diegem, Unternehmensnummer
0597.618.285
Schweiz: HP Schweiz GmbH, Glatt Tower, Neue Winterthurerstrasse 99, 8304 Wallisellen
Deutschland: Die Rechte aus der beschränkten HP Herstellergarantie gelten zusätzlich zu den
gesetzlichen Ansprüchen wegen Sachmängeln auf eine zweijährige Gewährleistung ab dem
Lieferdatum. Ob Sie Anspruch auf diese Rechte haben, hängt von zahlreichen Faktoren ab.
Die Rechte des Kunden sind in keiner Weise durch die beschränkte HP Herstellergarantie
eingeschränkt bzw. betroffen. Weitere Hinweise nden Sie auf der folgenden Website:
Gewährleistungsansprüche für Verbraucher (http://www.hp.com/go/eu-legal) oder Sie können die Website
des Europäischen Verbraucherzentrums (https://commission.europa.eu/live-work-travel-eu/consumer-
rights-and-complaints/resolve-your-consumer-complaint/european-consumer-centres-network-ecc-net)
besuchen. Verbraucher haben das Recht zu wählen, ob sie eine Leistung von HP gemäß der beschränkten
HP Herstellergarantie in Anspruch nehmen oder ob sie sich gemäß der gesetzlichen zweijährigen Haftung
für Sachmängel (Gewährleistung) sich an den jeweiligen Verkäufer wenden.
Österreich, Luxemburg und Belgien: Die Rechte aus der beschränkten HP Herstellergarantie gelten
zusätzlich zu den gesetzlichen Ansprüchen wegen Sachmängeln auf eine zweijährige Gewährleistung
ab dem Lieferdatum. Ob Sie Anspruch auf diese Rechte haben, hängt von zahlreichen Faktoren
ab. Die Rechte des Kunden sind in keiner Weise durch die beschränkte HP Herstellergarantie
eingeschränkt bzw. betroffen. Weitere Hinweise nden Sie auf der folgenden Website:
Gewährleistungsansprüche für Verbraucher (http://www.hp.com/go/eu-legal) oder Sie können die Website
des Europäischen Verbraucherzentrums (https://commission.europa.eu/live-work-travel-eu/consumer-
rights-and-complaints/resolve-your-consumer-complaint/european-consumer-centres-network-ecc-net)
besuchen. Verbraucher haben das Recht zu wählen, ob sie eine Leistung von HP gemäß der beschränkten
HP Herstellergarantie in Anspruch nehmen oder ob sie sich gemäß der gesetzlichen zweijährigen Haftung
für Sachmängel (Gewährleistung) sich an den jeweiligen Verkäufer wenden.
Schweiz: Die beschränkte HP Herstellergarantie Vorteile gelten zusätzlich zu den rechtlichen
Gewährleistungsansprüchen bei fehlerhaften Produkten aus dem Kaufvertrag. Ob Sie Anspruch auf diese
Rechte haben, hängt von zahlreichen Faktoren ab. Die Rechte des Kunden sind in keiner Weise durch die
beschränkte HP Herstellergarantie eingeschränkt bzw. betroffen.
Verbraucher haben das Recht zu wählen, ob sie die beschränkte HP Herstellergarantie beanspruchen
wollen oder sich mit den Gewährleistungsansprüchen an den Verkäufer richten wollen
Belgium, France, Luxembourg, and Switzerland
La garantie limitée HP est une garantie commerciale fournie volontairement par HP. Voici les coordonnées
de l'entité HP responsable de l'exécution de la garantie limitée HP dans votre pays:
Austria, Belgium, Germany, Luxembourg. and Switzerland
3

France: HP France SAS, société par actions simpliée identiée sous le numéro 448 694 133 RCS
Nanterre, Meudon Campus Bât. 1, 14 rue de la Verrerie 92190 Meudon, tel. 09 69 32 04 35 (produits
des gammes grand public et gaming) ou 01 70 48 53 19 (produits de la gamme professionnelle). Autres
options de contact : WhatsApp et Messenger.
G.D. Luxembourg: HP Luxembourg S.C.A., 75, Parc d'Activités Capellen, L-8308 Capellen
Belgique: HP Belgium BV, Hermeslaan 1, Building B, B-1831 Diegem, numéro d’entreprise 0597.618.285
Suisse: HP Suisse Sàrl, Glatt Tower, Neue Winterthurerstrasse 99, 8304 Wallisellen
France: La Garantie Limitée HP s'applique sans préjudice du droit pour le consommateur de bénécier de
la garantie légale de conformité dans les conditions prévues aux articles L. 217-1 à L. 217-32 du code
de la consommation et de celle relative aux vices cachés dans les conditions prévues aux articles 1641
à 1649 du code civil. Le consommateur peut ainsi choisir d'exercer ses droits au titre de la Garantie
Limitée HP ou, auprès du vendeur, au titre des garanties légales dont les modalités de mises en œuvre
sont rappelées ci-dessous.
4
Chapter 1 Service and support

Le consommateur dispose d’un délai de deux ans à compter de la délivrance du bien pour obtenir la mise en oeuvre de la garantie
légale de conformité en cas d’apparition d’un défaut de conformité. Durant ce délai, le consommateur n’est tenu d’établir que
l’existence du défaut de conformité et non la date d’apparition de celui-ci.
Lorsque le contrat de vente du bien prévoit la fourniture d’un contenu numérique ou d’un service numérique de manière continue
pendant une durée supérieure à deux ans, la garantie légale est applicable à ce contenu numérique ou ce service numérique
tout au long de la période de fourniture prévue. Durant ce délai, le consommateur n’est tenu d’établir que l’existence du défaut de
conformité affectant le contenu numérique ou le service numérique et non la date d’apparition de celui-ci.
La garantie légale de conformité emporte obligation pour le professionnel, le cas échéant, de fournir toutes les mises à jour
nécessaires au maintien de la conformité du bien.
La garantie légale de conformité donne au consommateur droit à la réparation ou au remplacement du bien dans un délai de
trente jours suivant sa demande, sans frais et sans inconvénient majeur pour lui.
Si le bien est réparé dans le cadre de la garantie légale de conformité, le consommateur bénécie d’une extension de six mois de
la garantie initiale. Si le consommateur demande la réparation du bien, mais que le vendeur impose le remplacement, la garantie
légale de conformité est renouvelée pour une période de deux ans à compter de la date de remplacement du bien.
Le consommateur peut obtenir une réduction du prix d’achat en conservant le bien ou mettre n au contrat en se faisant
rembourser intégralement contre restitution du bien, si:
1° Le professionnel refuse de réparer ou de remplacer le bien;
2° La réparation ou le remplacement du bien intervient après un délai de trente jours;
3° La réparation ou le remplacement du bien occasionne un inconvénient majeur pour le consommateur, notamment lorsque
le consommateur supporte dénitivement les frais de reprise ou d’enlèvement du bien non conforme, ou s’il supporte les frais
d’installation du bien réparé ou de remplacement;
4° La non-conformité du bien persiste en dépit de la tentative de mise en conformité du vendeur restée infructueuse.
Le consommateur a également droit à une réduction du prix du bien ou à la résolution du contrat lorsque le défaut de conformité
est si grave qu’il
justie que la réduction du prix ou la résolution du contrat soit immédiate. Le consommateur n’est alors pas tenu
de demander la réparation ou le remplacement du bien au préalable.
Le consommateur n’a pas droit à la résolution de la vente si le défaut de conformité est mineur.
Toute période d’immobilisation du bien en vue de sa réparation ou de son remplacement suspend la garantie qui restait à courir
jusqu’à la délivrance du bien remis en état.
Les droits mentionnés ci-dessus résultent de l’application des articles L. 217-1 à L. 217-32 du code de la consommation.
Le vendeur qui fait obstacle de mauvaise foi à la mise en oeuvre de la garantie légale de conformité encourt une amende civile
d’un montant maximal de 300 000 euros, qui peut être porté jusqu’à 10 % du chiffre d’affaires moyen annuel (article L. 241-5 du
code de la consommation).
Le consommateur bénécie également de la garantie légale des vices cachés en application des articles 1641 à 1649 du code
civil, pendant une durée de deux ans à compter de la découverte du défaut. Cette garantie donne droit à une réduction de prix si le
bien est conservé ou à un remboursement intégral contre restitution du bien.
Pour de plus amples informations, veuillez consulter le lien suivant: Garanties légales accordées au
consommateur (http://www.hp.com/go/eu-legal) ou vous pouvez également consulter le site Web des
Centres européens des consommateurs (https://commission.europa.eu/live-work-travel-eu/consumer-
rights-and-complaints/resolve-your-consumer-complaint/european-consumer-centres-network-ecc-net).
G.D. Luxembourg et Belgique: Les avantages de la garantie limitée HP s'appliquent en
complément des droits dont vous disposez au titre de la garantie de non-conformité des biens
avec le contrat de vente. Cependant, de nombreux facteurs peuvent avoir un impact sur le
bénéce de ces droits. Vos droits en tant que consommateur au titre de ces garanties ne
sont en aucune façon limités ou affectés par la garantie limitée HP. Pour de plus amples
informations, veuillez consulter le lien suivant: Garanties légales accordées au consommateur
(http://www.hp.com/go/eu-legal) ou vous pouvez également consulter le site Web des Centres européens
des consommateurs (https://commission.europa.eu/live-work-travel-eu/consumer-rights-and-complaints/
Belgium, France, Luxembourg, and Switzerland
5

resolve-your-consumer-complaint/european-consumer-centres-network-ecc-net). Les consommateurs
ont le droit de choisir de réclamer un service sous la garantie limitée HP ou auprès du vendeur au cours
d'une garantie légale de deux ans.
Suisse: Les avantages de la garantie limitée HP s'appliquent en complément des droits
dont vous disposez au titre de la garantie de non-conformité des biens avec le contrat
de vente. Cependant, de nombreux facteurs peuvent avoir un impact sur le bénéce de
ces droits. Vos droits en tant que consommateur au titre de ces garanties ne sont
en aucune façon limités ou affectés par la garantie limitée HP. Pour de plus amples
informations, veuillez consulter le lien suivant: Garanties légales accordées au consommateur
(http://www.hp.com/go/eu-legal) ou vous pouvez également consulter le site Web des Centres européens
des consommateurs (https://commission.europa.eu/live-work-travel-eu/consumer-rights-and-complaints/
resolve-your-consumer-complaint/european-consumer-centres-network-ecc-net). Les consommateurs
ont le droit de choisir de réclamer un service sous la garantie limitée HP ou auprès du vendeur au cours
d'une garantie légale.
Italy
La Garanzia limitata HP è una garanzia commerciale fornita volontariamente da HP. Di seguito sono
indicati nome e indirizzo della società HP responsabile della fornitura dei servizi coperti dalla Garanzia
limitata HP nel vostro Paese:
Italia: HP Italy S.r.l., Via G. Di Vittorio 9, 20063 Cernusco S/Naviglio
I vantaggi della Garanzia limitata HP vengono concessi ai consumatori in aggiunta ai diritti derivanti
dalla garanzia di due anni fornita dal venditore in caso di non conformità dei beni rispetto al
contratto di vendita. Tuttavia, diversi fattori possono avere un impatto sulla possibilita’ di beneciare
di tali diritti. I diritti spettanti ai consumatori in forza della garanzia legale non sono in alcun modo
limitati, né modicati dalla Garanzia limitata HP. Per ulteriori informazioni, si prega di consultare
il seguente link: Garanzia legale per i clienti (http://www.hp.com/go/eu-legal), oppure visitare il sito
Web dei Centri europei per i consumatori (https://commission.europa.eu/live-work-travel-eu/consumer-
rights-and-complaints/resolve-your-consumer-complaint/european-consumer-centres-network-ecc-net). I
consumatori hanno il diritto di scegliere se richiedere un servizio usufruendo della Garanzia limitata HP
oppure rivolgendosi al venditore per far valere la garanzia legale di due anni.
Spain
Su Garantía limitada de HP es una garantía comercial voluntariamente proporcionada por HP. El nombre
y dirección de las entidades HP que proporcionan la Garantía limitada de HP (garantía comercial adicional
del fabricante) en su país es:
España: HP Printing and Computing Solutions S.L. Calle Jose Echegaray 18 Las Rozas, 28232 Madrid
Los benecios de la Garantía limitada de HP son adicionales a la garantía legal de 2 años
a la que los consumidores tienen derecho a recibir del vendedor en virtud del contrato de
compraventa; sin embargo, varios factores pueden afectar su derecho a recibir los benecios bajo
dicha garantía legal. A este respecto, la Garantía limitada de HP no limita o afecta en modo alguno
los derechos legales del consumidor (http://www.hp.com/go/eu-legal). Para más información, consulte
el siguiente enlace: Garantía legal del consumidor o puede visitar el sitio web de los Centros
europeos de los consumidores (https://commission.europa.eu/live-work-travel-eu/consumer-rights-and-
complaints/resolve-your-consumer-complaint/european-consumer-centres-network-ecc-net). Los clientes
tienen derecho a elegir si reclaman un servicio acogiéndose a la Garantía limitada de HP o al vendedor de
conformidad con la garantía legal de dos años.
6
Chapter 1 Service and support

Denmark
Den begrænsede HP-garanti er en garanti, der ydes frivilligt af HP. Navn og adresse på det HP-selskab, der
er ansvarligt for HP's begrænsede garanti i dit land, er som følger:
Danmark: HP Inc Danmark ApS, Engholm Parkvej 8, 3450, Allerød
Den begrænsede HP-garanti gælder i tillæg til eventuelle juridiske rettigheder, for en toårig garanti
fra sælgeren af varer, der ikke er i overensstemmelse med salgsaftalen, men forskellige faktorer kan
dog påvirke din ret til at opnå disse rettigheder. Forbrugerens lovbestemte rettigheder begrænses
eller påvirkes ikke på nogen måde af den begrænsede HP-garanti. Se nedenstående link for at få
yderligere oplysninger: Forbrugerens juridiske garanti (http://www.hp.com/go/eu-legal) eller du kan besøge
De Europæiske Forbrugercentres websted (https://commission.europa.eu/live-work-travel-eu/consumer-
rights-and-complaints/resolve-your-consumer-complaint/european-consumer-centres-network-ecc-net).
Forbrugere har ret til at vælge, om de vil gøre krav på service i henhold til HP's begrænsede garanti
eller hos sælger i henhold til en toårig juridisk garanti.
Norway
HPs garanti er en begrenset og kommersiell garanti som HP selv har valgt å tilby. Følgende lokale selskap
innestår for garantien:
Norge: HP Norge AS, Rolfbuktveien 4b, 1364 Fornebu
HPs garanti kommer i tillegg til det mangelsansvar HP har i henhold til norsk forbrukerkjøpslovgivning,
hvor reklamasjonsperioden kan være to eller fem år, avhengig av hvor lenge salgsgjenstanden
var ment å vare. Ulike faktorer kan imidlertid ha betydning for om du kvaliserer til å
kreve avhjelp iht slikt mangelsansvar. Forbrukerens lovmessige rettigheter begrenses ikke av
HPs garanti. Hvis du vil ha mer informasjon, kan du klikke på følgende kobling: Juridisk
garanti for forbruker (http://www.hp.com/go/eu-legal) eller du kan besøke nettstedet til de
europeiske forbrukersentrene (https://commission.europa.eu/live-work-travel-eu/consumer-rights-and-
complaints/resolve-your-consumer-complaint/european-consumer-centres-network-ecc-net). Forbrukere
har retten til å velge å kreve service under HPs garanti eller iht selgerens lovpålagte mangelsansvar.
Sweden
HP:s begränsade garanti är en kommersiell garanti som tillhandahålls frivilligt av HP. Namn och adress till
det HP-företag som ansvarar för HP:s begränsade garanti i ditt land är som följer:
Sverige: HP PPS Sverige AB, SE-169 73 Stockholm
Fördelarna som ingår i HP:s begränsade garanti gäller utöver de lagstadgade rättigheterna till tre års
garanti från säljaren angående varans bristande överensstämmelse gentemot köpeavtalet, men olika
faktorer kan påverka din rätt att utnyttja dessa rättigheter. Konsumentens lagstadgade rättigheter varken
begränsas eller påverkas på något sätt av HP:s begränsade garanti. Mer information får du om du
följer denna länk: Lagstadgad garanti för konsumenter (http://www.hp.com/go/eu-legal) eller så kan du gå
till European Consumer Centers webbplats (https://commission.europa.eu/live-work-travel-eu/consumer-
rights-and-complaints/resolve-your-consumer-complaint/european-consumer-centres-network-ecc-net).
Konsumenter har rätt att välja om de vill ställa krav enligt HP:s begränsade garanti eller på säljaren enligt
den lagstadgade treåriga garantin.
Portugal
A Garantia Limitada HP é uma garantia comercial fornecida voluntariamente pela HP. O nome e a morada
da entidade HP responsável pela prestação da Garantia Limitada HP no seu país são os seguintes:
Denmark
7

Portugal: HPCP – Computing and Printing Portugal, Unipessoal, Lda., Edicio D. Sancho I, Quinta da Fonte,
Porto Salvo, Lisboa, Oeiras, 2740 244
As vantagens da Garantia Limitada HP aplicam-se cumulativamente com quaisquer direitos decorrentes
da legislação aplicável à garantia de dois anos do vendedor, relativa a defeitos do produto e constante
do contrato de venda. Existem, contudo, vários fatores que poderão afetar a sua elegibilidade para
beneciar de tais direitos. Os direitos legalmente atribuídos aos consumidores não são limitados ou
afetados de forma alguma pela Garantia Limitada HP. Para mais informações, consulte a ligação
seguinte: Garantia legal do consumidor (http://www.hp.com/go/eu-legal) ou visite o Web site da
Rede dos Centros Europeus do Consumidor (https://commission.europa.eu/live-work-travel-eu/consumer-
rights-and-complaints/resolve-your-consumer-complaint/european-consumer-centres-network-ecc-net).
Os consumidores têm o direito de escolher se pretendem reclamar assistência ao abrigo da Garantia
Limitada HP ou contra o vendedor ao abrigo de uma garantia jurídica de dois anos.
Greece and Cyprus
Η Περιορισμένη εγγύηση HP είναι μια εμπορική εγγύηση η οποία παρέχεται εθελοντικά από την HP. Η
επωνυμία και η διεύθυνση του νομικού προσώπου ΗΡ που παρέχει την Περιορισμένη εγγύηση ΗΡ στη χώρα
σας είναι η εξής:
Ελλάδα /Κύπρoς: HP Printing and Personal Systems Hellas EPE, Tzavella 1-3, 15232 Chalandri, Attiki
Ελλάδα /Κύπρoς: HP Συστήματα Εκτύπωσης και Προσωπικών Υπολογιστών Ελλάς Εταιρεία Περιορισμένης
Ευθύνης, Tzavella 1-3, 15232 Chalandri, Attiki
Τα προνόμια της Περιορισμένης εγγύησης HP ισχύουν επιπλέον των νόμιμων δικαιωμάτων για διετή εγγύηση
έναντι του Πωλητή για τη μη συμμόρφωση των προϊόντων με τις συνομολογημένες συμβατικά ιδιότητες, ωστόσο
η άσκηση των δικαιωμάτων σας αυτών μπορεί να εξαρτάται από διάφορους παράγοντες. Τα νόμιμα δικαιώματα
των καταναλωτών δεν περιορίζονται ούτε επηρεάζονται καθ’ οιονδήποτε τρόπο από την Περιορισμένη
εγγύηση HP. Για περισσότερες πληροφορίες, συμβουλευτείτε την ακόλουθη τοποθεσία web: Νόμιμη εγγύηση
καταναλωτή (http://www.hp.com/go/eu-legal) ή μπορείτε να επισκεφτείτε την τοποθεσία web των Ευρωπαϊκών
Κέντρων Καταναλωτή (https://commission.europa.eu/live-work-travel-eu/consumer-rights-and-complaints/
resolve-your-consumer-complaint/european-consumer-centres-network-ecc-net). Οι καταναλωτές έχουν το
δικαίωμα να επιλέξουν αν θα αξιώσουν την υπηρεσία στα πλαίσια της Περιορισμένης εγγύησης ΗΡ ή από τον
πωλητή στα πλαίσια της νόμιμης εγγύησης δύο ετών.
Hungary
A HP korlátozott jótállás egy olyan kereskedelmi jótállás, amelyet a HP a saját elhatározásából biztosít. Az
egyes országokban a HP mint gyártó által vállalt korlátozott jótállást biztosító vállalatok neve és címe a
jótállási jegyen vagy a termékhez csatolt egyéb dokumentumban található, vagy ennek hiányában erről az
eladó ad tájékoztatást.
Budapest, Hungary, (BUD): HP Inc Magyarország Kft. 1117 Budapest, Újbuda Allee Corner Október
huszonharmadika u. 8-10.
A HP korlátozott jótállásban biztosított jogok azokon a jogokon felül illetik meg Önt, amelyek
a termékeknek az adásvételi szerződés szerinti minőségére vonatkozó kétéves, jogszabályban foglalt
eladói szavatosságból, továbbá ha az Ön által vásárolt termékre alkalmazandó, a jogszabályban
foglalt kötelező eladói jótállásból erednek, azonban számos körülmény hatással lehet arra,
hogy ezek a jogok Önt megilletik-e. További információért kérjük, keresse fel a következő
webhelyet: Jogi Tájékoztató Fogyasztóknak (http://www.hp.com/go/eu-legal) vagy látogassa meg az
Európai Fogyasztói Központok webhelyét (https://commission.europa.eu/live-work-travel-eu/consumer-
rights-and-complaints/resolve-your-consumer-complaint/european-consumer-centres-network-ecc-net).
A fogyasztóknak jogában áll, hogy megválasszák, hogy a jótállással kapcsolatos igényüket a HP
8
Chapter 1 Service and support

korlátozott jótállás alapján vagy a kétéves, jogszabályban foglalt eladói szavatosság, illetve, ha
alkalmazandó, a jogszabályban foglalt kötelező eladói jótállás alapján érvényesítik.
Czech Republic
Omezená záruka HP je obchodní zárukou dobrovolně poskytovanou společností HP. Názvy a adresy
společností skupiny HP, které odpovídají za plnění omezené záruky HP ve vaší zemi, jsou následující:
Česká republika: HP Inc Czech Republic s. r. o., Za Brumlovkou 5/1559, 140 00 Praha 4
Výhody, poskytované omezenou zárukou HP, se uplatňuji jako doplňek k jakýmkoli právním nárokům na
dvouletou záruku poskytnutou prodejcem v případě nesouladu zboží s kupní smlouvou. Váš nárok na
uznání těchto práv však může záviset na mnohých faktorech. Omezená záruka HP žádným způsobem
neomezuje ani neovlivňuje zákonná práva zákazníka. Další informace získáte kliknutím na následující
odkaz: Zákonná záruka spotřebitele (http://www.hp.com/go/eu-legal) případně můžete navštívit webové
stránky Evropského spotřebitelského centra (https://commission.europa.eu/live-work-travel-eu/consumer-
rights-and-complaints/resolve-your-consumer-complaint/european-consumer-centres-network-ecc-net).
Spotřebitelé mají právo se rozhodnout, zda chtějí službu reklamovat v rámci omezené záruky HP nebo
v rámci zákonem stanovené dvouleté záruky u prodejce.
Slovakia
Obmedzená záruka HP je obchodná záruka, ktorú spoločnosť HP poskytuje dobrovoľne. Meno a adresa
subjektu HP, ktorý zabezpečuje plnenie vyplývajúce z Obmedzenej záruky HP vo vašej krajine:
Slovenská republika: HP Inc Slovakia, s.r.o., Galvaniho 7, 821 04 Bratislava
Výhody Obmedzenej záruky HP sa uplatnia vedľa prípadných zákazníkových zákonných nárokov voči
predávajúcemu z vád, ktoré spočívajú v nesúlade vlastností tovaru s jeho popisom podľa predmetnej
zmluvy. Možnosť uplatnenia takých prípadných nárokov však môže závisieť od rôznych faktorov. Služby
Obmedzenej záruky HP žiadnym spôsobom neobmedzujú ani neovplyvňujú zákonné práva zákazníka,
ktorý je spotrebiteľom. Ďalšie informácie nájdete na nasledujúcom prepojení: Zákonná záruka spotrebiteľa
(http://www.hp.com/go/eu-legal), prípadne môžete navštíviť webovú lokalitu európskych zákazníckych
stredísk (https://commission.europa.eu/live-work-travel-eu/consumer-rights-and-complaints/resolve-your-
consumer-complaint/european-consumer-centres-network-ecc-net). Spotrebitelia majú právo zvoliť si, či
chcú uplatniť servis v rámci Obmedzenej záruky HP alebo počas zákonnej dvojročnej záručnej lehoty
u predajcu.
Poland
Ograniczona gwarancja HP to komercyjna gwarancja udzielona dobrowolnie przez HP. Nazwa i adres
podmiotu HP odpowiedzialnego za realizację Ograniczonej gwarancji HP w Polsce:
Polska: HP Inc Polska sp. z o.o., ul. Szturmowa 2a, 02-678 Warszawa, wpisana do rejestru przedsiębiorców
prowadzonego przez Sąd Rejonowy dla m.st. Warszawy w Warszawie, XIII Wydział Gospodarczy Krajowego
Rejestru Sądowego, pod numerem KRS 0000546115, NIP 5213690563, REGON 360916326, BDO
000006211, kapitał zakładowy 480.500 PLN.
Świadczenia wynikające z Ograniczonej gwarancji HP stanowią dodatek do praw przysługujących
nabywcy w związku z dwuletnią odpowiedzialnością sprzedawcy z tytułu niezgodności towaru
z umową (rękojmia). Niemniej, na możliwość korzystania z tych praw mają wpływ różne
czynniki. Ograniczona gwarancja HP w żaden sposób nie ogranicza praw konsumenta ani
na nie nie wpływa. Więcej informacji można znaleźć pod następującym łączem: Gwarancja
prawna konsumenta (http://www.hp.com/go/eu-legal), można także odwiedzić stronę internetową
Europejskiego Centrum Konsumenckiego (https://commission.europa.eu/live-work-travel-eu/consumer-
rights-and-complaints/resolve-your-consumer-complaint/european-consumer-centres-network-ecc-net).
Konsumenci mają prawo wyboru co do możliwosci skorzystania albo z usług gwarancyjnych
Czech Republic
9

przysługujących w ramach Ograniczonej gwarancji HP albo z uprawnień wynikających z dwuletniej rękojmi
w stosunku do sprzedawcy.
Bulgaria
Ограничената гаранция на HP представлява търговска гаранция, доброволно предоставяна от HP. Името и
адресът на дружеството на HP за вашата страна, отговорно за предоставянето на гаранционната поддръжка
в рамките на Ограничената гаранция на HP, са както следва:
HP Inc Bulgaria EOOD (Ейч Пи Инк България ЕООД), HP Inc България ЕООД, Бизнес Парк София, 1766
София, сграда 10, България
Предимствата на Ограничената гаранция на HP се прилагат в допълнение към всички законови
права за двугодишна гаранция от продавача при несъответствие на стоката с договора за продажба.
Въпреки това, различни фактори могат да окажат влияние върху условията за получаване на тези
права. Законовите права на потребителите не са ограничени или засегнати по никакъв начин от
Ограничената гаранция на HP. За допълнителна информация, моля вижте Правната гаранция на
потребителя (http://www.hp.com/go/eu-legal) или посетете уебсайта на Европейския потребителски
център (https://commission.europa.eu/live-work-travel-eu/consumer-rights-and-complaints/resolve-your-
consumer-complaint/european-consumer-centres-network-ecc-net). Потребителите имат правото да
избират дали да претендират за извършване на услуга в рамките на Ограничената гаранция на HP или
да потърсят такава от търговеца в рамките на двугодишната правна гаранция.
Romania
Garanția limitată HP este o garanție comercială furnizată în mod voluntar de către HP. Numele și adresa
entității HP răspunzătoare de punerea în aplicare a Garanției limitate HP în țara dumneavoastră sunt
următoarele:
Romănia: HP Inc Romania SRL, 5 Fabrica de Glucoza Str., Building F, Ground Floor and Floor 8, 2nd District,
Bucureşti
Beneciile Garanției limitate HP se aplică suplimentar faţă de orice drepturi privind garanţia
de doi ani oferită de vânzător pentru neconformitatea bunurilor cu contractul de vânzare;
cu toate acestea, diverşi factori pot avea impact asupra eligibilităţii dvs. de a benecia
de aceste drepturi. Drepturile legale ale consumatorului nu sunt limitate sau afectate în
vreun fel de Garanția limitată HP. Pentru informaţii suplimentare consultaţi următorul link:
garanția acordată consumatorului prin lege (http://www.hp.com/go/eu-legal) sau puteți accesa site-
ul Centrul European al Consumatorilor (https://commission.europa.eu/live-work-travel-eu/consumer-
rights-and-complaints/resolve-your-consumer-complaint/european-consumer-centres-network-ecc-net).
Consumatorii au dreptul să aleagă dacă să pretindă despăgubiri în cadrul Garanței limitate HP sau de
la vânzător, în cadrul garanției legale de doi ani.
Belgium and the Netherlands
De Beperkte Fabrieksgarantie van HP is een commerciële garantie vrijwillig verstrekt door HP. De naam en
het adres van de HP-entiteit die verantwoordelijk is voor het uitvoeren van de Beperkte Fabrieksgarantie
van HP in uw land is als volgt:
Nederland: HP Nederland B.V., Startbaan 16, 1187 XR Amstelveen
België: HP Belgium BV, Hermeslaan 1, Building B, B-1831 Diegem, ondernemingsnummer 0597.618.285
De voordelen van de Beperkte Fabrieksgarantie van HP vormen een aanvulling op de wettelijke garantie
voor consumenten gedurende twee jaren na de levering te verlenen door de verkoper bij een gebrek aan
conformiteit van de goederen met de relevante koopovereenkomst. Niettemin kunnen diverse factoren
een impact hebben op de eventuele aanspraak van de consument op deze wettelijke rechten. De
10
Chapter 1 Service and support

wettelijke rechten van de consument worden op geen enkele wijze beperkt of beïnvloed door de Beperkte
Fabrieksgarantie van HP. Raadpleeg voor meer informatie de volgende webpagina: Wettelijke garantie
voor consumenten (http://www.hp.com/go/eu-legal) of u kan de website van het Europees Consumenten
Centrum bezoeken (https://commission.europa.eu/live-work-travel-eu/consumer-rights-and-complaints/
resolve-your-consumer-complaint/european-consumer-centres-network-ecc-net). Consumenten hebben
het recht om te kiezen tussen enerzijds de Beperkte Fabrieksgarantie van HP of anderzijds het
aanspreken van de verkoper ter uitoefening van de wettelijke garantie.
Finland
HP:n rajoitettu takuu on HP:n vapaaehtoisesti antama kaupallinen takuu. HP:n myöntämästä takuusta
maassanne vastaavan HP:n edustajan yhteystiedot ovat:
Suomi: HP Finland Oy, Piispankalliontie, FIN - 02200 Espoo
HP:n takuun edut ovat voimassa mahdollisten kuluttajansuojalakiin perustuvien
oikeuksien lisäksi sen varalta, että tuote ei vastaa myyntisopimusta. Saat lisätietoja
seuraavasta linkistä: Kuluttajansuoja (http://www.hp.com/go/eu-legal) tai voit käydä Euroopan
kuluttajakeskuksen sivustolla (https://commission.europa.eu/live-work-travel-eu/consumer-rights-and-
complaints/resolve-your-consumer-complaint/european-consumer-centres-network-ecc-net). Kuluttajilla
on oikeus vaatia virheen korjausta HP:n takuun ja kuluttajansuojan perusteella HP:lta tai myyjältä.
Slovenia
Omejena garancija HP je prostovoljna trgovska garancija, ki jo zagotavlja podjetje HP. Ime in naslov
poslovne enote HP, ki je odgovorna za omejeno garancijo HP v vaši državi, sta naslednja:
Slovenija: HP Europe B.V. Meyrin Branch, Route du Nant-d'Avril 150, 1217 Meyrin, Switzerland
Ugodnosti omejene garancije HP veljajo poleg zakonskih pravic, ki ob sklenitvi kupoprodajne pogodbe
izhajajo iz dveletne garancije prodajalca v primeru neskladnosti blaga, vendar lahko na izpolnjevanje
pogojev za uveljavitev pravic vplivajo različni dejavniki. Omejena garancija HP nikakor ne omejuje
strankinih z zakonom predpisanih pravic in ne vpliva nanje. Za dodatne informacije glejte naslednjo
povezavo: Strankino pravno jamstvo (http://www.hp.com/go/eu-legal); ali pa obiščite spletno mesto
evropskih središč za potrošnike (https://commission.europa.eu/live-work-travel-eu/consumer-rights-and-
complaints/resolve-your-consumer-complaint/european-consumer-centres-network-ecc-net). Potrošniki
imajo pravico izbrati, ali bodo uveljavljali pravice do storitev v skladu z omejeno garancijo HP ali proti
prodajalcu v skladu z dvoletno zakonsko garancijo.
Croatia
HP ograničeno jamstvo komercijalno je dobrovoljno jamstvo koje pruža HP. Ime i adresa HP subjekta
odgovornog za HP ograničeno jamstvo u vašoj državi:
Hrvatska: HP Computing and Printing d.o.o. za računalne i srodne aktivnosti, Radnička cesta 41, 10000
Zagreb
Pogodnosti HP ograničenog jamstva vrijede zajedno uz sva zakonska prava na dvogodišnje jamstvo kod
bilo kojeg prodavača s obzirom na nepodudaranje robe s ugovorom o kupnji. Međutim, razni faktori mogu
utjecati na vašu mogućnost ostvarivanja tih prava. HP ograničeno jamstvo ni na koji način ne utječe niti ne
ograničava zakonska prava potrošača. Dodatne informacije potražite na ovoj adresi: Zakonsko jamstvo
za potrošače (http://www.hp.com/go/eu-legal) ili možete posjetiti web-mjesto Europskih potrošačkih
centara (https://commission.europa.eu/live-work-travel-eu/consumer-rights-and-complaints/resolve-your-
consumer-complaint/european-consumer-centres-network-ecc-net). Potrošači imaju pravo odabrati žele
li ostvariti svoja potraživanja u sklopu HP ograničenog jamstva ili pravnog jamstva prodavača u trajanju
ispod dvije godine.
Finland
11

Latvia
HP ierobežotā garantija ir komercgarantija, kuru brīvprātīgi nodrošina HP. HP uzņēmums, kas sniedz HP
ierobežotās garantijas servisa nodrošinājumu jūsu valstī:
Latvija: HP Finland Oy, PO Box 515, 02201 Espoo, Finland
HP ierobežotās garantijas priekšrocības tiek piedāvātas papildus jebkurām likumīgajām tiesībām uz
pārdevēja un/vai rażotāju nodrošinātu divu gadu garantiju gadījumā, ja preces neatbilst pirkuma līgumam,
tomēr šo tiesību saņemšanu var ietekmēt vairāki faktori. HP ierobežotā garantija nekādā veidā neierobežo
un neietekmē patērētāju likumīgās tiesības. Lai iegūtu plašāku informāciju, izmantojiet šo saiti: Patērētāju
likumīgā garantija (http://www.hp.com/go/eu-legal) vai arī Eiropas Patērētāju tiesību aizsardzības
centra tīmekļa vietni (https://commission.europa.eu/live-work-travel-eu/consumer-rights-and-complaints/
resolve-your-consumer-complaint/european-consumer-centres-network-ecc-net). Patērētājiem ir tiesības
izvēlēties, vai pieprasīt servisa nodrošinājumu saskaņā ar HP ierobežoto garantiju, vai arī pārdevēja
sniegto divu gadu garantiju.
Lithuania
HP ribotoji garantija yra HP savanoriškai teikiama komercinė garantija. Toliau pateikiami HP bendrovių,
teikiančių HP garantiją (gamintojo garantiją) jūsų šalyje, pavadinimai ir adresai:
Lietuva: HP Finland Oy, PO Box 515, 02201 Espoo, Finland
HP ribotoji garantija papildomai taikoma kartu su bet kokiomis kitomis įstatymais nustatytomis teisėmis
į pardavėjo suteikiamą dviejų metų laikotarpio garantiją dėl prekių atitikties pardavimo sutarčiai, tačiau
tai, ar jums ši teisė bus suteikiama, gali priklausyti nuo įvairių aplinkybių. HP ribotoji garantija niekaip
neapriboja ir neįtakoja įstatymais nustatytų vartotojo teisių. Daugiau informacijos rasite paspaudę šią
nuorodą: Teisinė vartotojo garantija (http://www.hp.com/go/eu-legal) arba apsilankę Europos vartotojų
centro internetinėje svetainėje (https://commission.europa.eu/live-work-travel-eu/consumer-rights-and-
complaints/resolve-your-consumer-complaint/european-consumer-centres-network-ecc-net). Vartotojai
turi teisę prašyti atlikti techninį aptarnavimą pagal HP ribotąją garantiją arba pardavėjo teikiamą dviejų
metų įstatymais nustatytą garantiją.
Estonia
HP piiratud garantii on HP poolt vabatahtlikult pakutav kaubanduslik garantii. HP piiratud garantii eest
vastutab HP üksus aadressil:
Eesti: HP Finland Oy, PO Box 515, 02201 Espoo, Finland
HP piiratud garantii rakendub lisaks seaduses ettenähtud müüjapoolsele kaheaastasele
garantiile, juhul kui toode ei vasta müügilepingu tingimustele. Siiski võib esineda
asjaolusid, mille puhul teie jaoks need õigused ei pruugi kehtida. HP piiratud
garantii ei piira ega mõjuta mingil moel tarbija seadusjärgseid õigusi. Lisateavet leiate
järgmiselt lingilt: tarbija õiguslik garantii (http://www.hp.com/go/eu-legal) või võite külastada
Euroopa tarbijakeskuste veebisaiti (https://commission.europa.eu/live-work-travel-eu/consumer-rights-
and-complaints/resolve-your-consumer-complaint/european-consumer-centres-network-ecc-net). Tarbijal
on õigus valida, kas ta soovib kasutada HP piiratud garantiid või seadusega ette nähtud müüjapoolset
kaheaastast garantiid.
12
Chapter 1 Service and support

Limited Warranty Statement for HP Print Cartridges, Imaging
Drums, and Imaging Units for use with HP LaserJet Printers,
HP Laser Printers and Samsung Branded Laser Printers
This product is covered by the HP Commercial/Limited Warranty in countries/regions authorized for use/
distribution. For complete warranty details, see: hp.com/toner/info.
Dynamic Security Enabled Printers
This printer is intended to work only with cartridges that have a new or reused HP chip. A reused HP chip
enables the use of reused, remanufactured, and relled cartridges.
The printer uses dynamic security measures to block cartridges using a non-HP chip. Periodic rmware
updates delivered over the internet will maintain the effectiveness of the dynamic security measures and
block cartridges that previously worked.
Updates can improve, enhance, or extend the printer’s functionality and features, protect against security
threats, and serve other purposes, but these updates can also block cartridges using a non-HP chip from
working in the printer, including cartridges that work today. Unless you are enrolled in certain HP programs
such as Instant Ink or use other services that require automatic online rmware updates, most HP printers
can be congured to receive updates either automatically or with a notication that allows you to choose
whether to update or not. For more information on dynamic security and how to congure online rmware
updates, please go to www.hp.com/learn/ds.
Long life consumable and maintenance kit limited warranty
statement
This HP product is warranted to be free from defects in materials and workmanship until the earlier of a)
the printer providing a low-life indicator on the control panel, or b) the expiration of the warranty period.
Replacement Preventative Maintenance kits or LLCs products carry a 90 day parts only limited warranty,
from the last purchase date.
This warranty does not apply to products that (a) have been refurbished, remanufactured or tampered with
in any way, (b) experience problems resulting from misuse, improper storage, or operation outside of the
published environmental specications for the printer product or (c) exhibit wear from ordinary use.
To obtain warranty service, please return the product to place of purchase (with a written description of
the problem) or contact HP customer support. At HP’s option, HP will either replace products that prove to
be defective or refund your purchase price.
TO THE EXTENT ALLOWED BY LOCAL LAW, THE ABOVE WARRANTY IS EXCLUSIVE AND NO OTHER
WARRANTY OR CONDITION, WHETHER WRITTEN OR ORAL, IS EXPRESSED OR IMPLIED. HP SPECIFICALLY
DISCLAIMS ANY IMPLIED WARRANTIES OR CONDITIONS OF MERCHANTABILITY, SATISFACTORY
QUALITY, AND FITNESS FOR A PARTICULAR PURPOSE.
TO THE EXTENT ALLOWED BY LOCAL LAW, IN NO EVENT WILL HP OR ITS SUPPLIERS BE LIABLE
FOR DIRECT, SPECIAL, INCIDENTAL, CONSEQUENTIAL (INCLUDING LOST PROFIT OR DATA), OR OTHER
DAMAGE, WHETHER BASED IN CONTRACT, TORT, OR OTHERWISE.
THE WARRANTY TERMS CONTAINED IN THIS STATEMENT, EXCEPT TO THE EXTENT LAWFULLY
PERMITTED, DO NOT EXCLUDE, RESTRICT OR MODIFY AND ARE IN ADDITION TO THE MANDATORY
STATUTORY RIGHTS APPLICABLE TO THE SALE OF THE PRODUCT TO YOU.
Limited Warranty Statement for HP Print Cartridges, Imaging Drums, and Imaging Units for use with HP LaserJet
Printers, HP Laser Printers and Samsung Branded Laser Printers 13

HP policy on non-HP supplies
HP cannot recommend the use of non-HP toner cartridges, either new or remanufactured.
NOTE: For HP printer products, the use of a non-HP toner cartridge or a relled toner cartridge does
not affect either the warranty to the customer or any HP support contract with the customer. However, if
product failure or damage is attributable to the use of a non-HP toner cartridge or relled toner cartridge,
HP will charge its standard time and materials charges to service the product for the particular failure or
damage.
HP anticounterfeit Web site
Go to
www.hp.com/go/anticounterfeit when you install an HP cartridge and the control-panel message
indicates the cartridge is non-HP. HP will help determine if the cartridge is genuine and take steps to
resolve the problem.
Your cartridge might not be a genuine HP cartridge if you notice the following:
● The supplies status page indicates that a non-HP supply is installed.
● You are experiencing a high number of problems with the cartridge.
● The cartridge does not look like it usually does (for example, the packaging differs from HP packaging).
Data stored on the toner cartridge
The HP toner cartridges used with this product contain a memory chip that assists in the operation of the
product.
In addition, this memory chip collects a limited set of information about the usage of the product, which
might include the following: the date when the toner cartridge was rst installed, the date when the
toner cartridge was last used, the number of pages printed using the toner cartridge, the page coverage,
the printing modes used, any printing errors that might have occurred, and the product model. This
information helps HP design future products to meet our customers' printing needs.
The data collected from the toner cartridge memory chip does not contain information that can be used to
identify a customer or user of the toner cartridge or their product.
HP collects a sampling of the memory chips from toner cartridges returned to HP's free return and
recycling program (HP Planet Partners: www.hp.com/hprecycle). The memory chips from this sampling are
read and studied in order to improve future HP products. HP partners who assist in recycling this toner
cartridge might have access to this data, as well.
Any third party possessing the toner cartridge might have access to the anonymous information on the
memory chip.
End User License Agreement
READ CAREFULLY BEFORE USING THIS SOFTWARE EQUIPMENT: This End-User License Agreement
("EULA") is a legal agreement between (a) you (either an individual or a single entity) and (b) HP Inc. ("HP")
that governs your use of the Sign-In Once application installed on or made available by HP for use with
your printing device (the “Software”).
An amendment or addendum to this EULA may accompany the HP Product.
14
Chapter 1 Service and support

RIGHTS IN THE SOFTWARE ARE OFFERED ONLY ON THE CONDITION THAT YOU AGREE TO ALL TERMS
AND CONDITIONS OF THIS EULA. BY INSTALLING, COPYING, DOWNLOADING, OR OTHERWISE USING THE
SOFTWARE, YOU AGREE TO BE BOUND BY THE TERMS OF THIS EULA. IF YOU DO NOT ACCEPT THESE
LICENSE TERMS, YOUR SOLE REMEDY IS TO IMMEDIATELY STOP USING SOFTWARE AND TO UNINSTALL
THE PRODUCT FROM YOUR DEVICE.
THIS EULA IS A GLOBAL AGREEMENT AND IS NOT SPECIFIC TO ANY PARTICULAR COUNTRY, STATE OR
TERRITORY. IF YOU ACQUIRED THE SOFTWARE AS A CONSUMER WITHIN THE MEANING OF RELEVANT
CONSUMER LEGISLATION IN YOUR COUNTRY, STATE OR TERRITORY, THEN DESPITE ANYTHING TO
THE CONTRARY IN THIS EULA, NOTHING IN THIS EULA AFFECTS ANY NON EXCLUDABLE STATUTORY
RIGHTS OR REMEDIES THAT YOU MAY HAVE UNDER SUCH CONSUMER LEGISLATION AND THIS EULA IS
SUBJECT TO THOSE RIGHTS AND REMEDIES. REFER TO SECTION 17 FOR FURTHER INFORMATION ON
YOUR CONSUMER RIGHTS.
1. GRANT OF LICENSE. HP grants you the following rights provided you comply with all terms and
conditions of this EULA. In the case you are representing an entity or organization, the same terms
and conditions in this Section 1 shall also apply with respect to the use, copying, and storage of the
Software on the devices of your respective entity or organization.
a. Use. You may use one copy of the Software on your device for the purpose of accessing and using
the Software. You may not separate component parts of the Software for use on more than one
device. You do not have the right to distribute the Software, nor do you have the right to modify the
Software or disable any licensing or control feature of the Software. You may load the Software
into the temporary memory (RAM)of your device for purposes of using the Software.
b. Storage. You may copy the Software into the local memory or storage device of your device.
c. Copying. You may make archival or back-up copies of the Software, provided the copy contains all
of the original Software's proprietary notices and that it is used only for back-up purposes.
d. Reservation of Rights. HP and its suppliers reserve all rights not expressly granted to you in this
EULA.
e. Freeware. Notwithstanding the terms and conditions of this EULA, all or any portion of the
Software which constitutes non-proprietary HP software or software provided under public
license by third parties ("Freeware"), is licensed to you subject to the terms and conditions of the
software license agreement or other documentation accompanying such Freeware at the time
of download, installation, or use of the Freeware. Use of the Freeware by you shall be governed
entirely by the terms and conditions of such license.
2. UPGRADES. To use Software identied as an upgrade, you must rst be licensed for the original
Software identied by HP as eligible for the upgrade. After upgrading, you may no longer use the
original Software Product that formed the basis for your upgrade eligibility.
3. ADDITIONAL SOFTWARE. This EULA applies to updates or supplements to the original Software
provided by HP unless HP provides other terms along with the update or supplement. In case of a
conict between such terms, the other terms will prevail.
4. TRANSFER.
a. Third Party. The initial user of the Software may make a one-time transfer of the Software to
another end user. Any transfer must include all component parts, media, printed materials, this
EULA, and if applicable, the Certicate of Authenticity. The transfer may not be an indirect transfer,
such as a consignment. Prior to the transfer, the end user receiving the transferred product
must agree to all the EULA terms. Upon transfer of the Software, your license is automatically
terminated.
End User License Agreement
15

b. Restrictions. You may not rent, lease or lend the Software or use the Software for commercial
timesharing or bureau use. You may not sublicense, assign or transfer the license or Software
except as expressly provided in this EULA.
5. PROPRIETARY RIGHTS. All intellectual property rights in the Software and user documentation
are owned by HP or its suppliers and are protected by law, including but not limited to United
States copyright, trade secret, and trademark law, as well as other applicable laws and international
treaty provisions. You shall not remove any product identication, copyright notices or proprietary
restrictions from the Software.
6. LIMITATION ON REVERSE ENGINEERING. You may not reverse engineer, decompile, or disassemble
the Software, except and only to the extent that the right to do so is mandated under applicable law
notwithstanding this limitation or it is expressly provided for in this EULA.
7. TERM. This EULA is effective unless terminated or rejected. This EULA will also terminate upon
conditions set forth elsewhere in this EULA or if you fail to comply with any term or condition of this
EULA.
8. ACCOUNT SET-UP.
a. You must register and establish an account on HP ID in order to use the Software. It is your
responsibility to obtain and maintain all equipment, services and software needed for access to
and use of the HP ID account, any applications linked via this Software, and your device(s), as well
as paying any applicable charges.
b. YOU ARE SOLELY AND FULLY RESPONSIBLE FOR MAINTAINING THE CONFIDENTIALITY OF
ANY USERNAMES AND PASSWORDS COLLECTED BY THE SOFTWARE. You must notify HP
immediately of any unauthorized use of your HP ID account or any other breach of security
related to this Software or the device(s) it is installed on.
9. NOTICE OF DATA COLLECTION. HP may collect usernames, passwords, device IP addresses, and/or
other authentication information used by you to access HP ID and the various applications connected
via this Software. HP may use this data to optimize Software performance based on user preferences,
provide support and maintenance, and assure security and software integrity. You can read more
about the data collection in the sections titled “What Data We Collect” and “How We Use Data” in the
HP Privacy Statement.
10. DISCLAIMER OF WARRANTIES. TO THE MAXIMUM EXTENT PERMITTED BY APPLICABLE LAW,
HP AND ITS SUPPLIERS PROVIDE THE SOFTWARE “AS IS” AND WITH ALL FAULTS, AND HEREBY
DISCLAIM ALL OTHER WARRANTIES, DUTIES, AND CONDITIONS, EITHER EXPRESS, IMPLIED, OR
STATUTORY, INCLUDING, BUT NOT LIMITED TO, WARRANTIES: (i) OF TITLE AND NON-INFRINGEMENT;
(ii) OF MERCHANTABILITY; (iii) OF FITNESS FOR A PARTICULAR PURPOSE; (iv) THAT THE SOFTWARE
WILL FUNCTION WITH NON-HP SUPPLIES OR ACCESSORIES; AND (v), OF LACK OF VIRUSES ALL WITH
REGARD TO THE SOFTWARE. Some states/jurisdictions do not allow exclusion of implied warranties
or limitations on the duration of implied warranties, so the above disclaimer may not apply to you in its
entirety.
16
Chapter 1 Service and support

11. LIMITATION OF LIABILITY. Subject to local law, notwithstanding any damages that you might
incur, the entire liability of HP and any of its suppliers under any provision of this EULA and your
exclusive remedy for all of the foregoing shall be limited to the greater of the amount actually
paid by you separately for the Software or U.S. $5.00. TO THE MAXIMUM EXTENT PERMITTED
BY APPLICABLE LAW, IN NO EVENT SHALL HP OR ITS SUPPLIERS BE LIABLE FOR ANY SPECIAL,
INCIDENTAL, INDIRECT, OR CONSEQUENTIAL DAMAGES WHATSOEVER (INCLUDING, BUT NOT
LIMITED TO, DAMAGES FOR LOSS OF PROFITS OR CONFIDENTIAL OR OTHER INFORMATION, FOR
BUSINESS INTERRUPTION, FOR PERSONAL INJURY, OR FOR LOSS OF PRIVACY) ARISING OUT OF
OR IN ANY WAY RELATED TO THE USE OF OR INABILITY TO USE THE SOFTWARE, OR OTHERWISE
IN CONNECTION WITH ANY PROVISION OF THIS EULA, EVEN IF HP OR ANY SUPPLIER HAS BEEN
ADVISED OF THE POSSIBILITY OF SUCH DAMAGES AND EVEN IF THE REMEDY FAILS OF ITS
ESSENTIAL PURPOSE. Some states/jurisdictions do not allow the exclusion or limitation of incidental
or consequential damages, so the above limitation or exclusion may not apply to you.
12. U.S. GOVERNMENT CUSTOMERS. Consistent with FAR 12.211 and 12.212, Commercial Computer
Software, Computer Software Documentation, and Technical Data for Commercial Items are licensed
to the U.S. Government under HP's standard commercial license.
13. COMPLIANCE WITH EXPORT LAWS. You shall comply with all laws and regulations of the United
States and other countries ("Export Laws") to assure that the Software is not (1) exported, directly or
indirectly, in violation of Export Laws, or (2) used for any purpose prohibited by Export Laws, including,
without limitation, nuclear, chemical, or biological weapons proliferation.
14. CAPACITY AND AUTHORITY TO CONTRACT. You represent that you are of the legal age of majority
in your state of residence and, if applicable, you are duly authorized by your employer to enter into this
contract.
15. APPLICABLE LAW. This EULA is governed by the laws of the State of California, U.S.A.
16. ENTIRE AGREEMENT. Unless you have entered into a separate license agreement for the Software,
this EULA (including any addendum or amendment to this EULA which is included with the HP Product)
is the entire agreement between you and HP relating to the Software and it supersedes all prior or
contemporaneous oral or written communications, proposals and representations with respect to the
Software or any other subject matter covered by this EULA. To the extent the terms of any HP policies
or programs for support services conict with the terms of this EULA, the terms of this EULA shall
control.
17. CONSUMER RIGHTS. Consumers in some countries, states or territories may have the benet of
certain statutory rights and remedies under consumer legislation in respect of which HP’s liability
cannot lawfully be excluded or limited. If you acquired the Software as a consumer within the
meaning of relevant consumer legislation in your country, state or territory, the provisions of this EULA
(including the disclaimers of warranties, limitations and exclusions of liability) must be read subject to
applicable law and apply only to the maximum extent permitted by that applicable law.
Australian Consumers: If you acquired the Software as a consumer within the meaning of the
‘Australian Consumer Law’ under the Australian Competition and Consumer Act 2010 (Cth) then
despite any other provision of this EULA:
a. the Software comes with guarantees that cannot be excluded under the Australian Consumer
Law, including that goods will be of acceptable quality and services will be supplied with due care
and skill. You are entitled to a replacement or refund for a major failure and compensation for any
other reasonably foreseeable loss or damage. You are also entitled to have the Software repaired
or replaced if it is not of acceptable quality and the failure does not amount to a major failure
b. nothing in this EULA excludes, restricts or modies any right or remedy, or any guarantee,
warranty or other term or condition implied or imposed by the Australian Consumer Law which
cannot be lawfully excluded or limited; and
End User License Agreement
17

c. the benets provided to you by the express warranties in this EULA are in addition to other
rights and remedies available to you under the Australian Consumer Law. Your rights under the
Australian Consumer Law prevail to the extent that they are inconsistent with any limitations
contained in the express warranty.
The Software may be capable of retaining user-generated data. HP hereby provides you with
notice that if HP repairs your Software, that repair may result in the loss of that data. To the full
extent permitted by law, the limitations and exclusions of HP’s liability in this EULA apply in respect
of any such loss of data.
If you think that you are entitled to any warranty under this agreement or any of the above
remedies, please contact HP:
Table 1-1
HP PPS Australia Pty Ltd
Building F, 1 Homebush Bay
Drive
Rhodes, NSW 2138
Australia
To initiate a support request or warranty claim, please call 13 10 47 (within Australia) or +61 2 8278
1039 (if dialing internationally) or visit www.hp.com.au and select the “Support” tab for the most
current customer service options.
If you are a consumer within the meaning of the Australia Consumer Law and you are purchasing the
Software or warranty and support services for the Software which are not of a kind ordinarily acquired
for personal, domestic or household use or consumption, then despite any other provision of this
EULA, HP limits its liability for failure to comply with a consumer guarantee as follows:
a. provision of warranty or support services for the Software: to any one or more of the following:
re-supply of the services or payment of the costs of having the services re-supplied;
b. provision of the Software: to any one or more of the following: replacement of the Software or
the supply of equivalent software; repair of the Software; payment of the costs of replacing the
Software or of acquiring equivalent software; or payment of the costs of having the Software
repaired; and
c. otherwise, to the maximum extent permitted by law.
New Zealand Consumers: In New Zealand, the Software comes with guarantees that cannot be
excluded under the Consumer Guarantees Act 1993. In New Zealand, Consumer Transaction means
a transaction involving a person who is purchasing goods for personal, domestic or household
use or consumption and not for the purpose of a business. New Zealand consumers who are
purchasing goods for personal, domestic or household use or consumption and not for the purpose
of a business ("New Zealand Consumers") are entitled to repair, replacement or refund for a failure
and compensation for other reasonably foreseeable loss or damage. A New Zealand Consumer (as
dened above) may recover the costs of returning the product to the place of purchase if there
is a breach of the New Zealand consumer law; furthermore, if it will be of signicant cost to the
New Zealand Consumer to return the goods to HP then HP will collect such goods at its own cost.
Where any supply of products or services is for business purposes, you agree that the Consumer
Guarantees Act 1993 does not apply and that given the nature and value of the transaction, this is fair
and reasonable.
© Copyright 2019 HP Development Company, L.P.
18
Chapter 1 Service and support

The information contained herein is subject to change without notice. All other product names mentioned
herein may be trademarks of their respective companies. To the extent permitted by applicable law,
the only warranties for HP products and services are set forth in the express warranty statements
accompanying such products and services. Nothing herein should be construed as constituting an
additional warranty. To the extent permitted by applicable law, HP shall not be liable for technical or
editorial errors or omissions contained herein.
Version: April 2019
Customer self-repair warranty service
HP products are designed with many Customer Self Repair (CSR) parts to minimize repair time and
allow for greater
exibility in performing defective parts replacement. If during the diagnosis period, HP
identies that the repair can be accomplished by the use of a CSR part, HP will ship that part directly to
you for replacement. There are two categories of CSR parts: 1) Parts for which customer self repair is
mandatory. If you request HP to replace these parts, you will be charged for the travel and labor costs
of this service. 2) Parts for which customer self repair is optional. These parts are also designed for
Customer Self Repair. If, however, you require that HP replace them for you, this may be done at no
additional charge under the type of warranty service designated for your product.
Based on availability and where geography permits, CSR parts will be shipped for next business day
delivery. Same-day or four-hour delivery may be offered at an additional charge where geography permits.
If assistance is required, you can call the HP Technical Support Center and a technician will help you over
the phone. HP species in the materials shipped with a replacement CSR part whether a defective part
must be returned to HP. In cases where it is required to return the defective part to HP, you must ship the
defective part back to HP within a dened period of time, normally ve (5) business days. The defective
part must be returned with the associated documentation in the provided shipping material. Failure to
return the defective part may result in HP billing you for the replacement. With a customer self repair, HP
will pay all shipping and part return costs and determine the courier/carrier to be used.
Customer support
Get telephone support for your country/region
Have the product name, serial number, date of purchase, and
problem description ready.
Country/region phone numbers are on the yer that was in the
box with your product or at www.hp.com/support/.
Get 24-hour Internet support, and download software utilities
and drivers
hp.com/support/ljpro4110mfp
Order additional HP service or maintenance agreements www.hp.com/go/carepack
Register your product www.register.hp.com
Customer self-repair warranty service 19

Environmental product stewardship
program
2
Protecting the environment
HP is committed to providing quality products in an environmentally sound manner. This product has been
designed with several attributes to minimize impacts on our environment.
Battery information
This product may contain a:
● Poly-carbonmonouoride lithium (BR type) or
● Manganese dioxide lithium (CR type)
battery that may require special handling at end-of-life.
NOTE: NOTE for CR type only: Perchlorate material - special handling may apply. See www.dtsc.ca.gov/
hazardouswaste/perchlorate.
Weight: ~3 g
Location: On motherboard
User Removable: No
廢電池請回收
For recycling information, you can contact www.hp.com/hprecycle or contact your local authorities or the
Electronics Industries Alliance: www.eiae.org.
Battery Notice for Brazil (for printers with non-removable
battery)
A bateria deste equipamento não foi projetada para ser removida pelo cliente.
20
Chapter 2 Environmental product stewardship program

Battery disposal - California
Perchlorate material - special handling may apply. See www.dtsc.ca.gov/hazardouswaste/perchlorate/.
This product’s real-time clock battery or coin cell battery may contain perchlorate and may require special
handling when recycled or disposed of in California.
Chemical substances
HP is committed to providing our customers with information about the chemical substances in our
products as needed to comply with legal requirements such as REACH (Regulation EC No 1907/2006 of
the European Parliament and the Council). A chemical information report for this product can be found at:
www.hp.com/go/reach.
Electronic hardware recycling
HP encourages customers to recycle used electronic hardware. For more information about recycling
programs go to: www.hp.com/hprecycle.
EPEAT
EPEAT is an Electronic Product Environmental Assessment Tool used to evaluate the effects of a product
on the environment.
HP products are designed to meet EPEAT criteria. Click here for information on HP's EPEAT registered
products.
For more information on EPEAT, go to EPEAT.net.
Material restrictions
This HP product does not contain added mercury.
Material Safety Data Sheet (MSDS)
Material Safety Data Sheets (MSDS) for supplies containing chemical substances (for example, toner) can
be obtained by accessing the HP Web site at www.hp.com/go/msds.
Ozone production
The airborne emissions of ozone for this product has been measured according to a standardized
protocol* and when these emissions data are applied to an anticipated high-use scenario in an ofce
workspace**, HP has determined there is no appreciable amount of ozone generated during printing and
the levels are well within current indoor air quality standards and guidelines.
* Test method for the determination of emissions from hardcopy devices with respect to awarding the
environmental label for ofce devices with printing function; RAL-UZ 219 - BAM January, 2021
** Based on ozone concentration when printing 2 hours per day in 30.6 cubic meter room with a ventilation
rate of 0.68 air changes per hour with HP printing supplies
Battery disposal - California
21

Paper
This product is capable of using recycled paper and lightweight paper (EcoFFICIENT™) when the paper
meets the guidelines outlined in the HP LaserJet Printer Family Print Media Guide. This product is suitable
for the use of recycled paper and lightweight paper (EcoFFICIENT™) according to EN12281:2002.
Paper use
This product’s duplex feature (manual or automatic) and N-up printing (multiple pages printed on one page)
capability can reduce paper usage and the resulting demands on natural resources.
Plastics
Plastic parts over 25 grams are marked according to international standards that enhance the ability to
identify plastics for recycling purposes at the end of the product’s life.
Power consumption
Power usage drops signicantly while in Ready, Sleep, or Off mode, which saves natural resources and
saves money without affecting the high performance of this product. HP printing and imaging equipment
marked with the ENERGY STAR
®
logo is qualied to the U.S. Environmental Protection Agency's ENERGY
STAR specications for imaging equipment. The following mark will appear on ENERGY STAR qualied
imaging products:
Additional ENERGY STAR qualied imaging product model information is listed at:
www.hp.com/go/energystar
HP LaserJet print supplies
Original HP Supplies were designed with the environment in mind. HP makes it easy to conserve resources
and paper when printing. And when you are done, we make it easy and free to recycle.
1
All HP cartridges returned to HP Planet Partners go through a multiphase recycling process where
materials are separated and rened for use as raw material in new Original HP cartridges and everyday
products. No Original HP cartridges returned through HP Planet Partners are ever sent to a landll, and HP
never rells or resells Original HP cartridges.
To participate in the HP Planet Partners return and recycling program, visit www.hp.com/hprecycle.
Select your country/region for information on how to return HP printing supplies. Multi-lingual
program information and instructions are also included in every new HP LaserJet print cartridge
package.
1
Program availability varies. For more information, visit www.hp.com/hprecycle.
22
Chapter 2 Environmental product stewardship program

Toner consumption
EconoMode uses less toner, which might extend the life of the print cartridge. HP does not recommend the
full-time use of EconoMode. If EconoMode is used full-time, the toner supply might outlast the mechanical
parts in the print cartridge. If print quality begins to degrade and is no longer acceptable, consider
replacing the print cartridge.
For more information
To obtain information about these environmental topics:
● Product environmental prole sheet for this and many related HP products
● HP’s commitment to the environment
● HP’s environmental management system
● HP’s end-of-life product return and recycling program
● Material Safety Data Sheets
Visit www.hp.com/go/environment.
Also, visit www.hp.com/hprecycle.
Brazil hardware recycling information
Este produto eletrônico e seus componentes não devem ser descartados no lixo comum, pois embora
estejam em conformidade com padrões mundiais de restrição a substâncias nocivas, podem conter,
ainda que em quantidades mínimas, substâncias impactantes ao meio ambiente. Ao nal da vida útil deste
produto, o usuário deverá entregá-lo à HP. A não observância dessa orientação sujeitará o infrator às
sanções previstas em lei.
Após o uso, as pilhas e/ou baterias dos produtos HP deverão ser entregues ao estabelecimento comercial
ou rede de assistência técnica autorizada pela HP.
Para maiores informações, inclusive sobre os pontos de recebimento, acesse:
www.hp.com.br/reciclar
Toner consumption 23
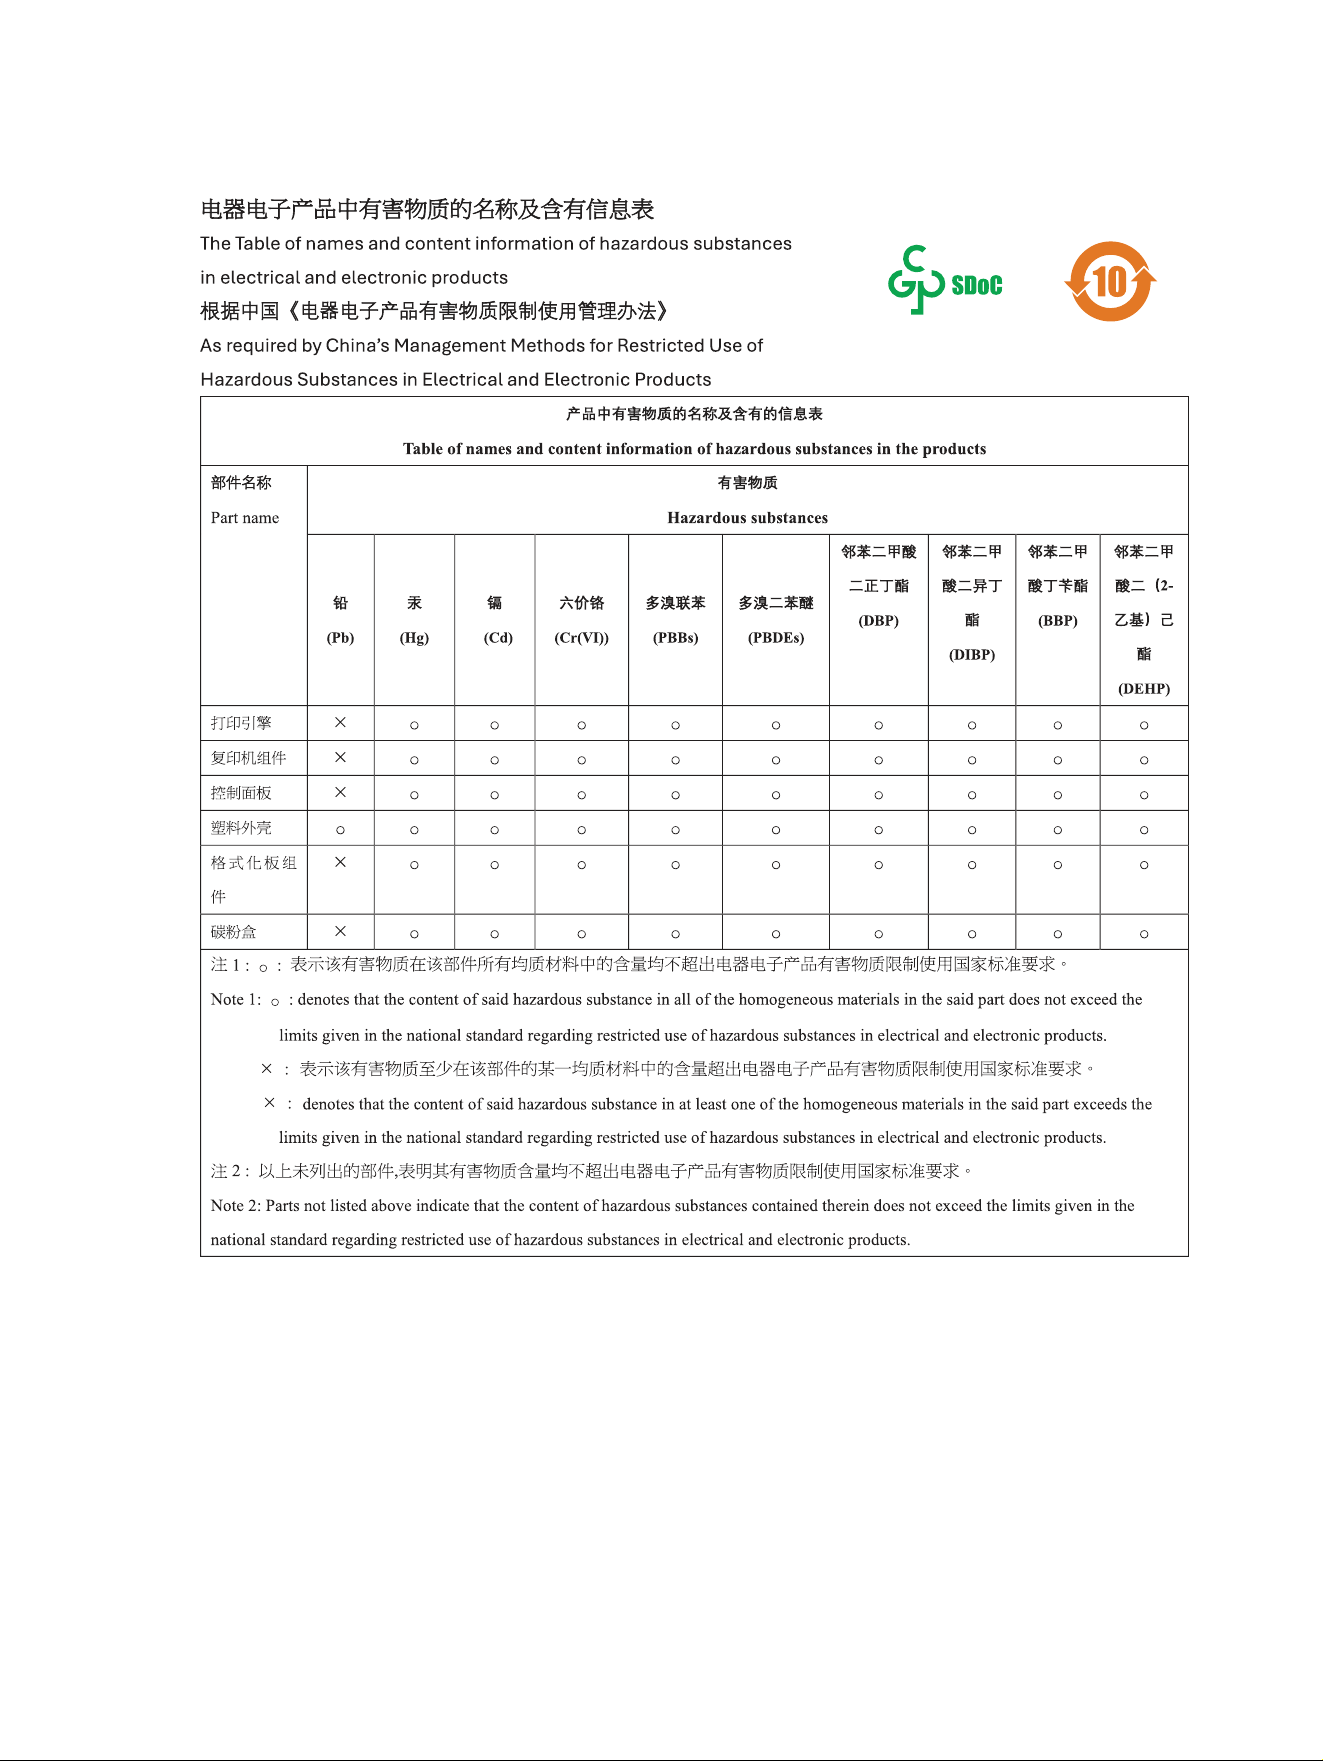
Restriction of Hazardous Substances (China)
CHR-LJ-PK-MFP-03
24 Chapter 2 Environmental product stewardship program
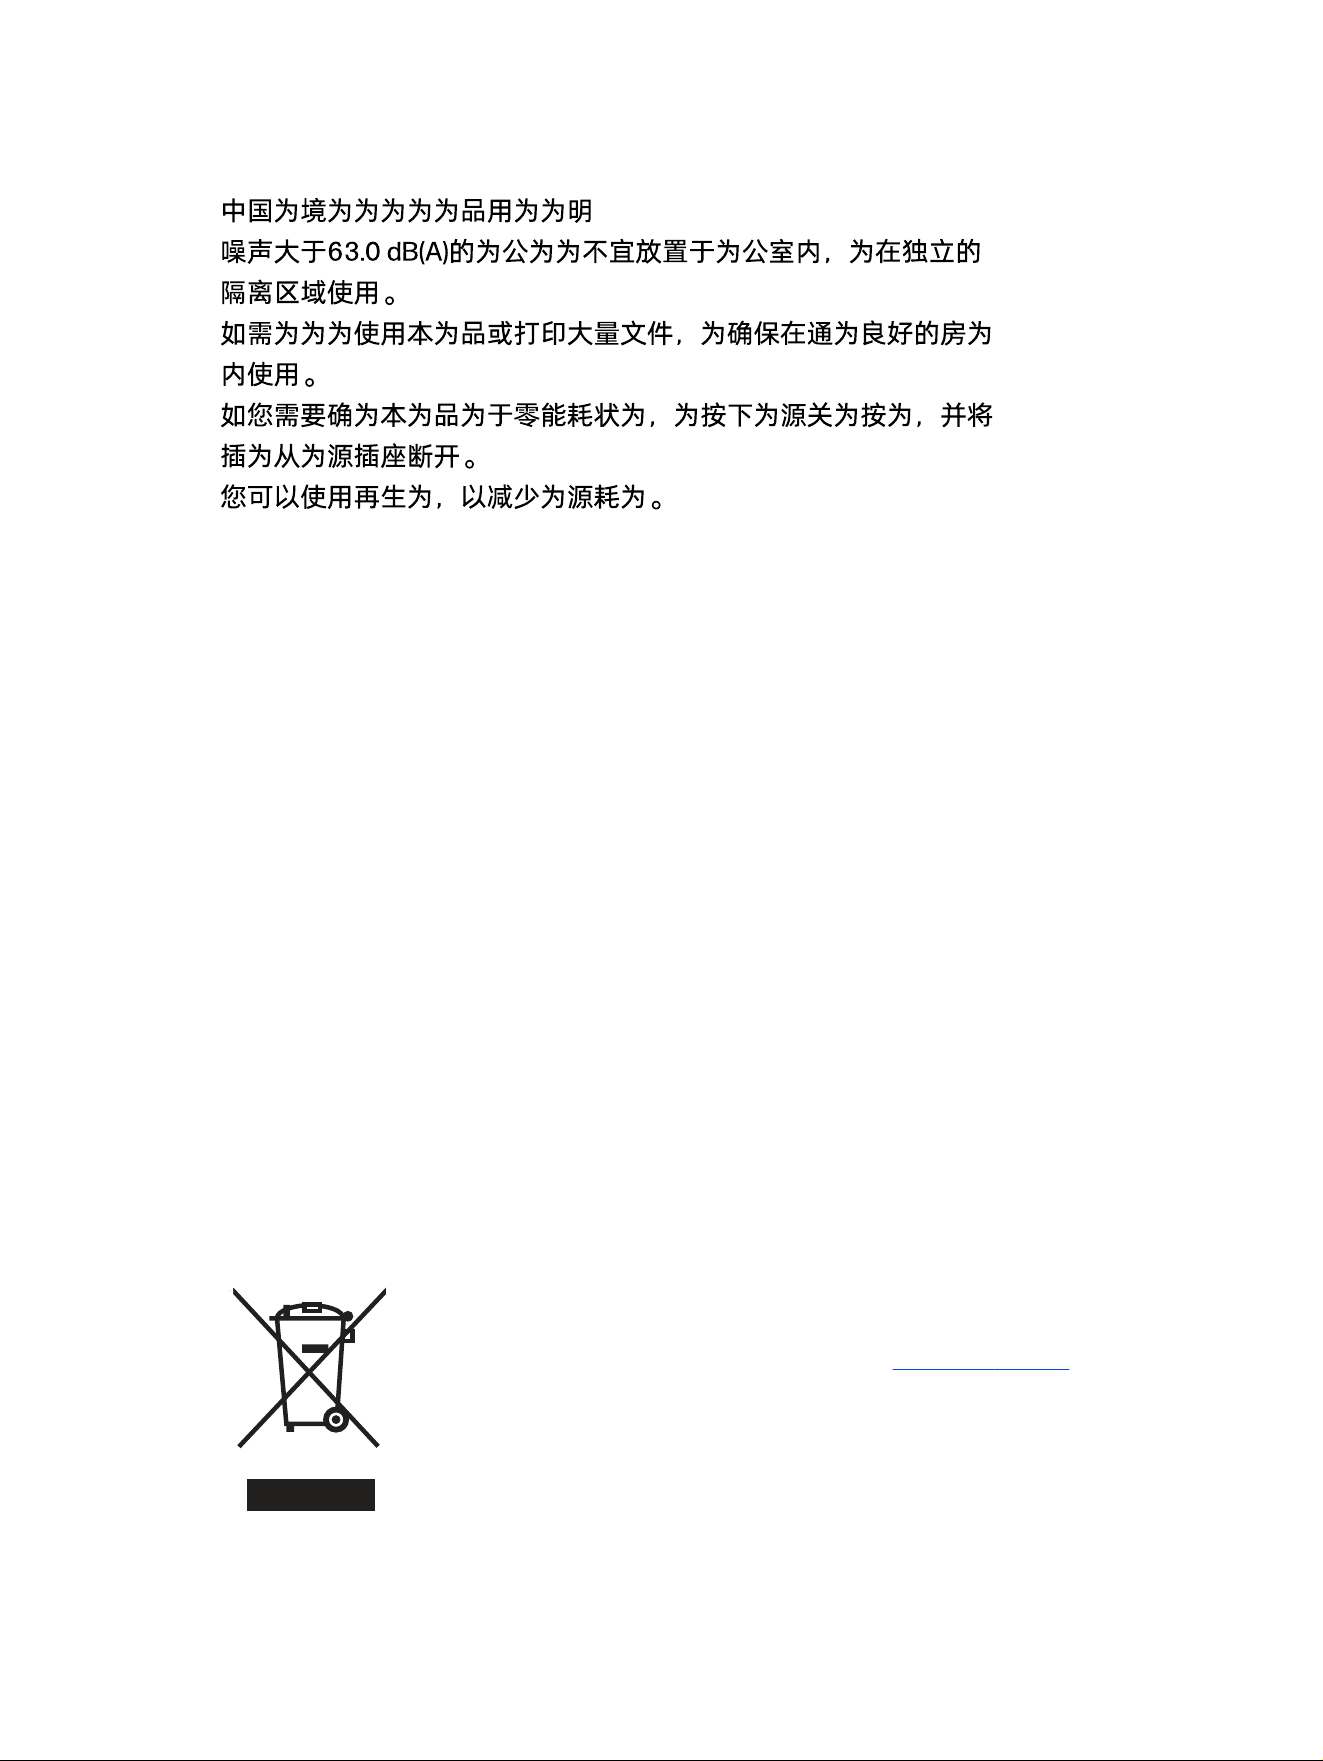
China SEPA
The regulation of the implementation on China energy label
for printer, fax, and copier
依据“复印机、打印机和传真机能源效率标识实施规则”,本打印机具有中国能效标签。根据“复印机、打印
机和传真机能效限定值及 能效等级” (“GB21521”) 决定并计算得出该标签上所示的能效等级和 TEC (典型
能耗) 值。
1. 能效等级
能效等级分为三个等级,等级 1 级能效最高。 根据产品类型和打印速度标准决定能效限定值。
2. 能效信息
2.1 LaserJet 打印机和高性能喷墨打印机
● 典型能耗
典型能耗是正常运行 GB21521 测试方法中指定的时间后的耗电量。 此数据表示为每周千瓦时
(kWh)。
标签上所示的能效数字按涵盖根据“复印机、打印机和传真机能源效率标识实施规则”选择的登记装置中
所有配置的代表性配置测定而 得。因此,本特定产品型号的实际能耗可能与标签上所示的数据不同。
有关规格的详细信息,请参阅 GB21521 标准的当前版本。
Disposal of waste equipment by users (EU, UK, and India)
This symbol means do not dispose of your product with your other household waste. Instead, you should
protect human health and the environment by handing over your waste equipment to a designated
collection point for the recycling of waste electrical and electronic equipment. For more information,
please contact your household waste disposal service, or go to: www.hp.com/hprecycle.
China SEPA 25

EU Microplastics
Product Power Data per European Union Commission
Regulation 2023/826 (EU)
For product power data, including the power consumption of the product in networked standby if all
wired network ports are connected and all wireless network ports are activated, please refer to section
P15 ‘Additional Information’ of the product IT ECO Declaration at www.hp.com/us-en/hp-information/
sustainable-impact/document-reports.html.
India Battery Waste Management (BWM) Rules
EPR Registration No: 141163
Restriction on Hazardous Substances (India)
This product, as well as its related consumables and spares, complies with the reduction in hazardous
substances provisions of the "India E-waste Rule 2016." It does not contain lead, mercury, hexavalent
chromium, polybrominated biphenyls or polybrominated diphenyl ethers in concentrations exceeding 0.1
weight % and 0.01 weight % for cadmium, except where allowed pursuant to the exemptions set in
Schedule 2 of the Rule.
26
Chapter 2 Environmental product stewardship program
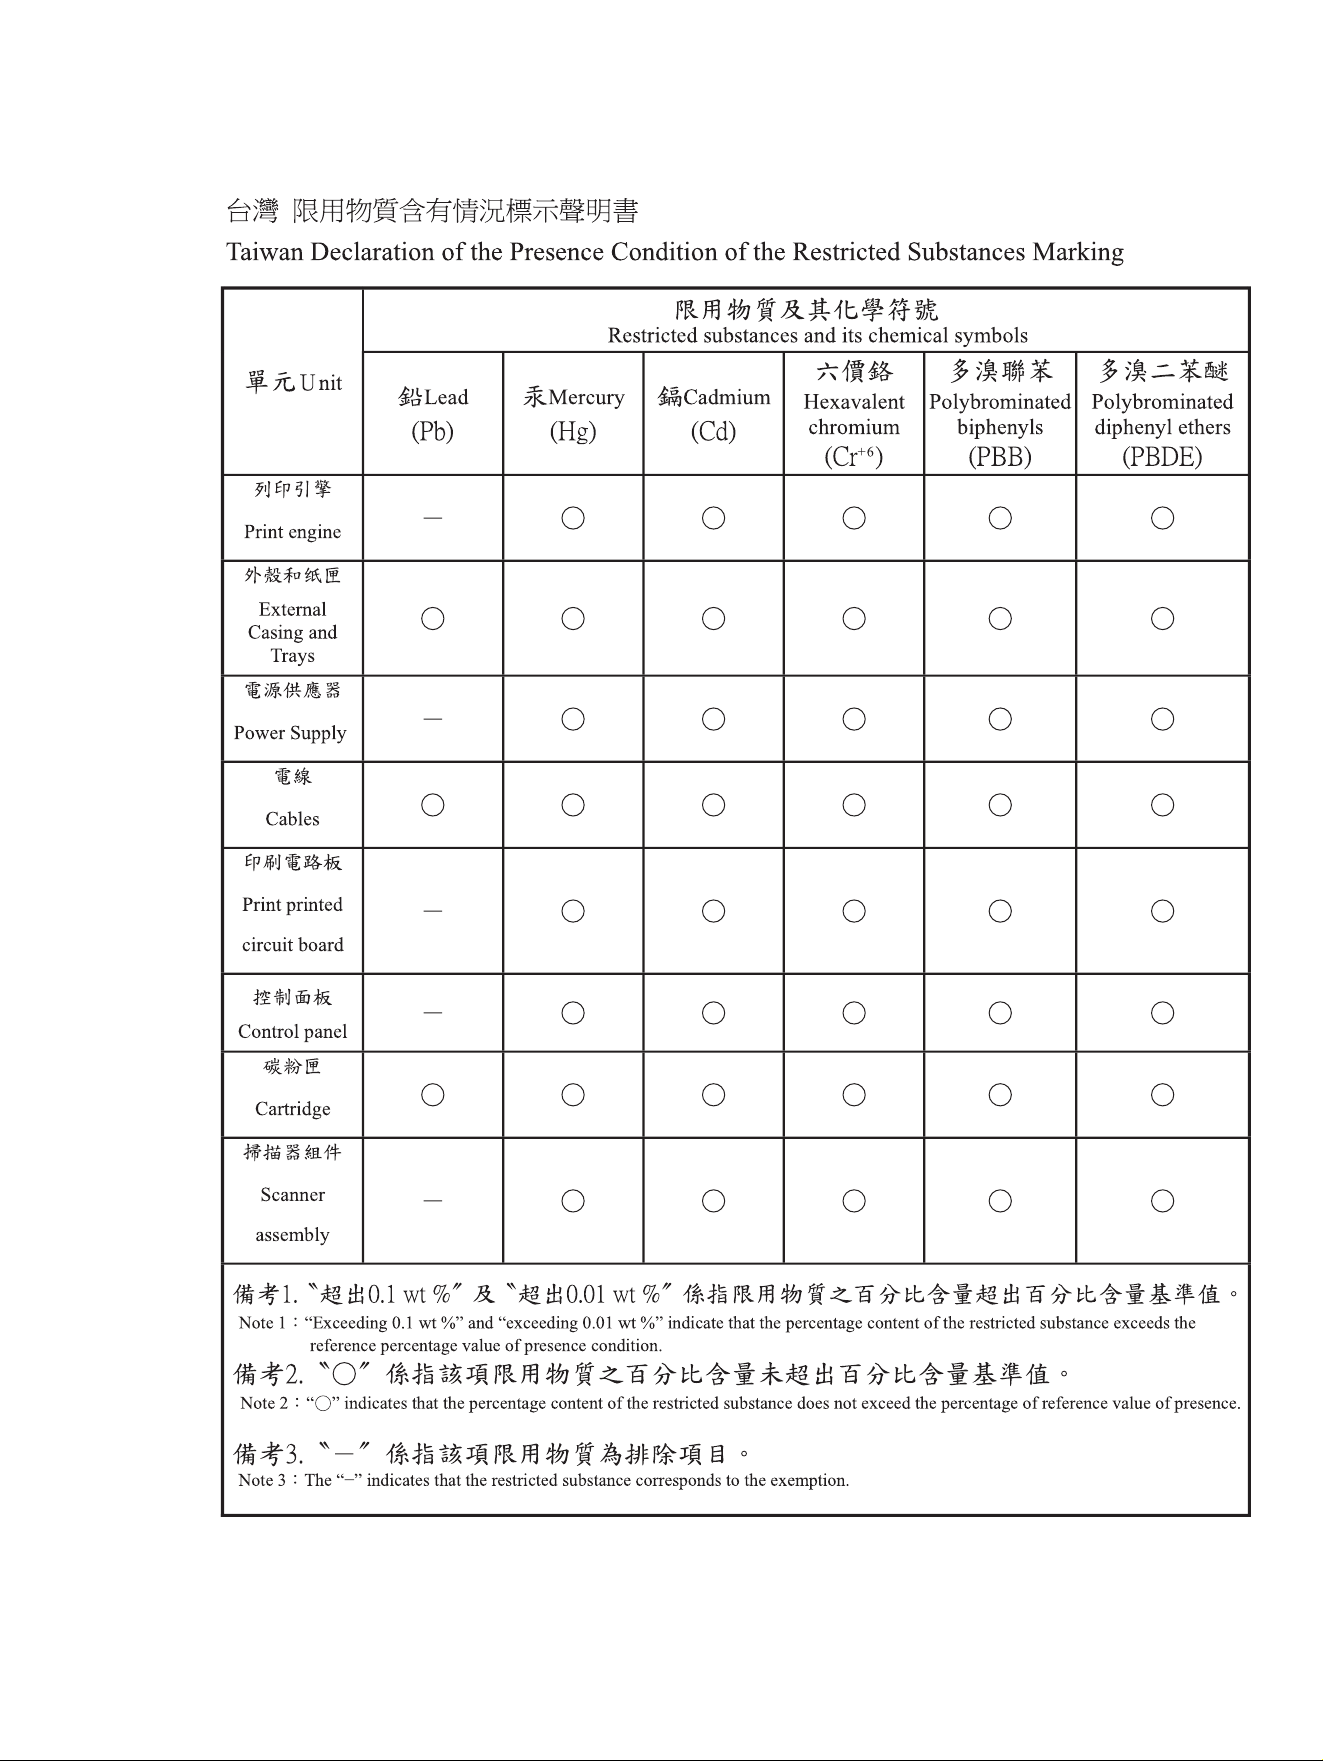
Restriction of Hazardous Substances (Taiwan)
Restriction of Hazardous Substances (Taiwan) 27

WEEE (Turkey)
Türkiye Cumhuriyeti: AEEE Yönetmeliğine Uygundur
28 Chapter 2 Environmental product stewardship program

Regulatory information3
Regulatory statements
Regulatory model identication numbers
For regulatory identication purposes, your product is assigned a regulatory model number. Regulatory
model numbers should not be confused with marketing names or product numbers.
Table 3-1 Regulatory model identication numbers
Product model number Regulatory model number
HP LaserJet Pro MFP 4112fdn
HP LaserJet Pro MFP 4113fdn
HP LaserJet Pro MFP 4113fdng
HP LaserJet Pro MFP 4114fdn
BOISB-2300-03
HP LaserJet Pro MFP 4112fdw
HP LaserJet Pro MFP 4113fdw
HP LaserJet Pro MFP 4113fdwg
HP LaserJet Pro MFP 4114fdw
BOISB-2300-04
HP LaserJet Pro MFP 4112dw
HP LaserJet Pro MFP 4113dw
HP LaserJet Pro MFP 4113dwg
HP LaserJet Pro MFP 4114dw
BOISB-2300-05
European Union & United Kingdom Regulatory Notice
Products bearing the CE marking and UKCA marking comply with one or more of the following EU
Directives and/or equivalent UK Statutory Instruments as may be applicable: Low Voltage Directive
2014/35/EU, EMC Directive 2014/30/EU, Eco Design Directive 2009/125/EC, RED 2014/53/EU, RoHS
Directive 2011/65/EU, Battery Regulation 2023/1542.
Compliance with these directives is assessed using applicable European Harmonized Standards. The full
EU and UK Declaration of Conformity can be found at the following website: www.hp.com/go/certicates
Regulatory information
29

(Search with the product model name or its Regulatory Model Number (RMN), which may be found on the
regulatory label.)
The point of contact for regulatory matters is: Email r[email protected]
The EU point of contact for regulatory matters is:
HP REG 23010, 08028, Barcelona, Spain
The UK point of contact for regulatory matters is:
HP Inc UK Ltd, Regulatory Enquiries, Earley West, 300 Thames Valley Park Drive, Reading, RG6 1PT
European Union Consumer Laser Product
CLASS 1 LASER PRODUCT
CONSUMER LASER PRODUCT
EN 50689:2021
FCC regulations
This equipment has been tested and found to comply with the limits for a Class B digital device, pursuant
to part 15 of the FCC Rules. These limits are designed to provide reasonable protection against harmful
interference in a residential installation. This equipment generates, uses and can radiate radio frequency
energy and, if not installed and used in accordance with the instructions, may cause harmful interference
to radio communications. However, there is no guarantee that interference will not occur in a particular
installation. If this equipment does cause harmful interference to radio or television reception, which
can be determined by turning the equipment off and on, the user is encouraged to try to correct the
interference by one or more of the following measures:
● Reorient or relocate the receiving antenna.
● Increase the separation between the equipment and receiver.
● Connect the equipment into an outlet on a circuit different from that to which the receiver is
connected.
● Consult the dealer or an experienced radio/TV technician for help.
NOTE: Any changes or modications to the printer that are not expressly approved by HP could void
the user’s authority to operate this equipment.
Use of a shielded interface cable is required to comply with the Class B limits of Part 15 of FCC rules.
Canada - Industry Canada ICES-003 Compliance Statement
CAN ICES (B)/NMB (B)
VCCI statement (Japan)
VCCI 32-1 規定適合の場合
30
Chapter 3 Regulatory information
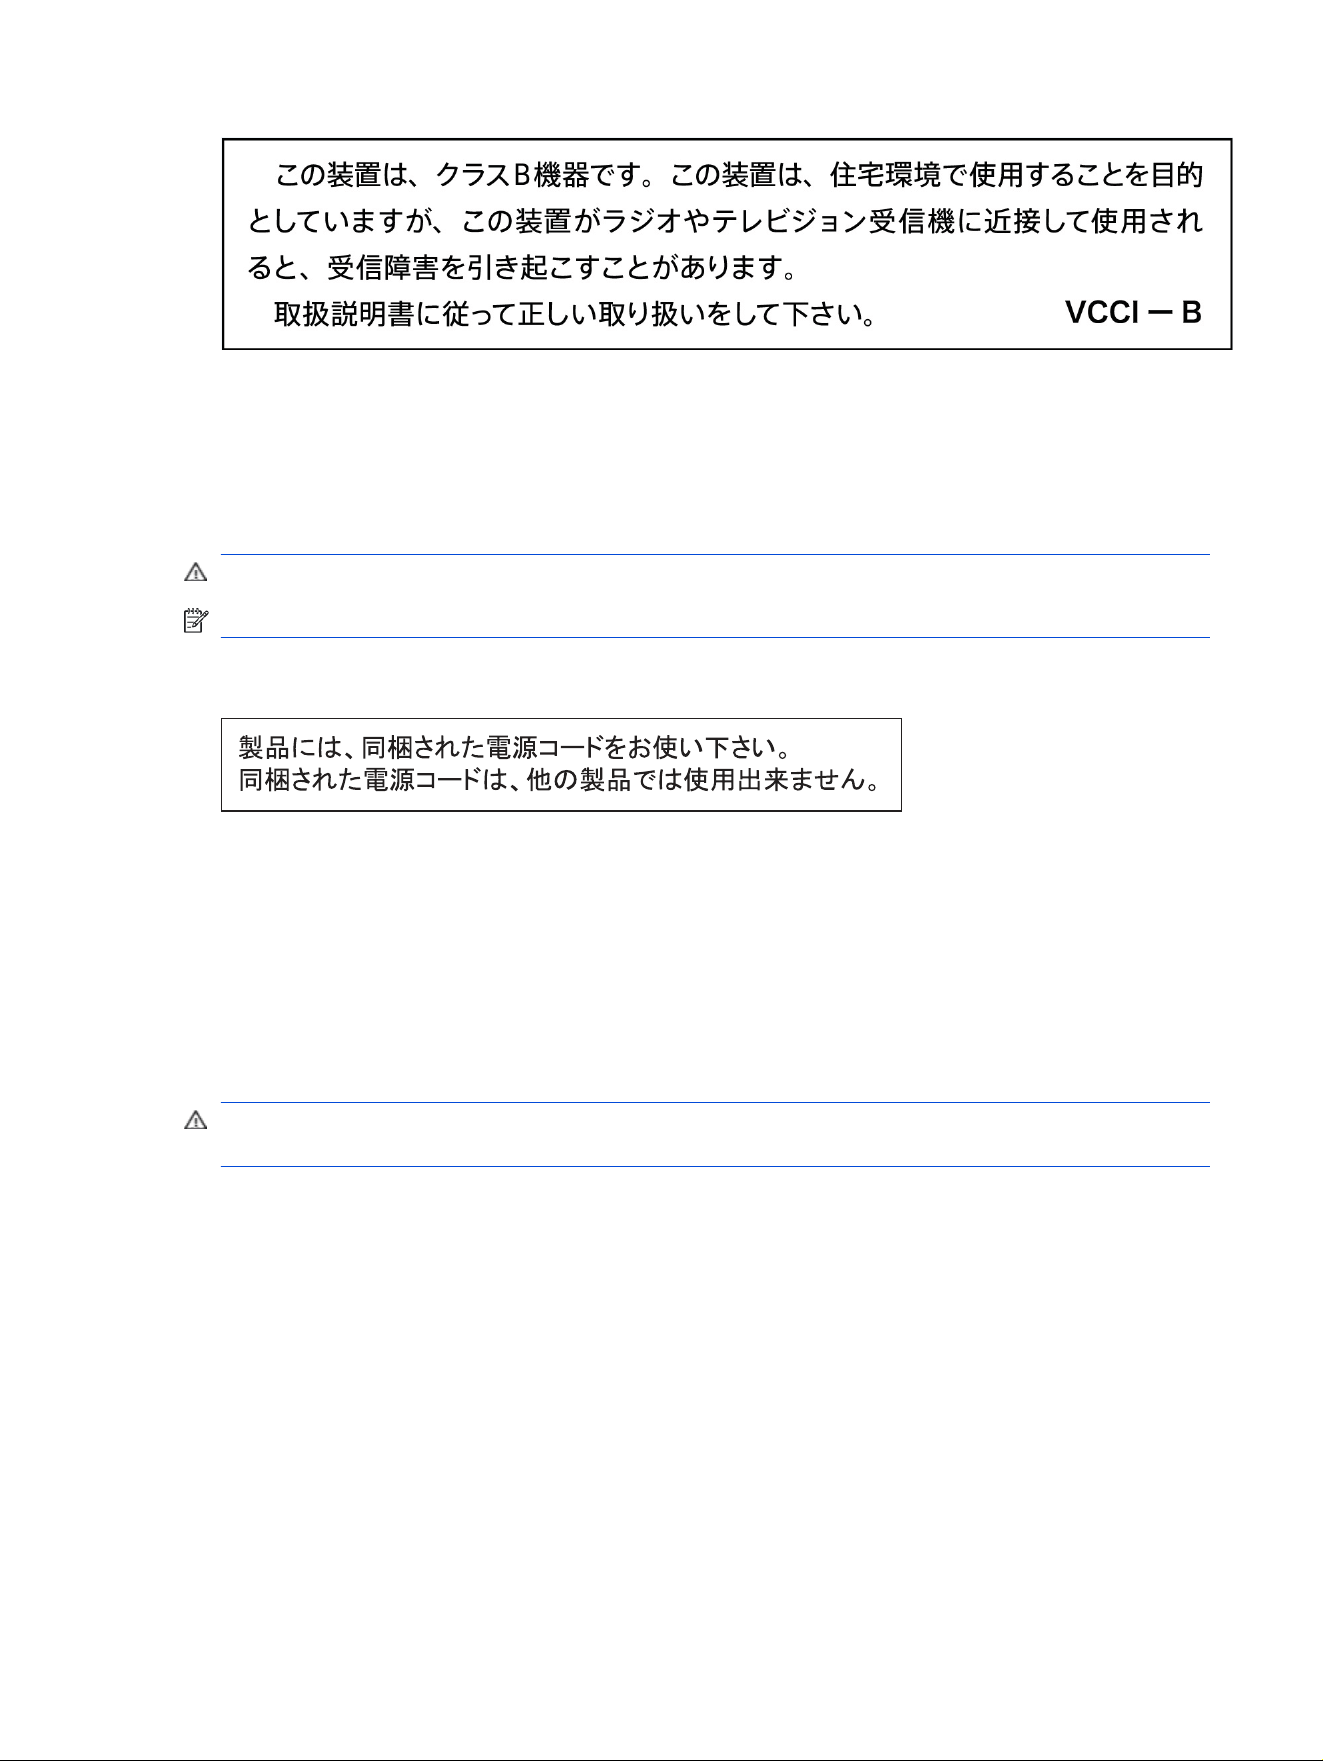
Power cord instructions
Make sure your power source is adequate for the product voltage rating. The voltage rating is on the
product label. The product uses either 100-127 Vac or 220-240 Vac and 50/60 Hz.
Connect the power cord between the product and a grounded AC outlet.
CAUTION: To prevent damage to the product, use only the power cord that is provided with the product.
NOTE: Symbol "~" represents alternating current.
Power cord statement (Japan)
Laser safety
The Center for Devices and Radiological Health (CDRH) of the U.S. Food and Drug Administration
has implemented regulations for laser products manufactured since August 1, 1976. Compliance is
mandatory for products marketed in the United States. The device is certied as a “Class 1” laser product
under the U.S. Department of Health and Human Services (DHHS) Radiation Performance Standard
according to the Radiation Control for Health and Safety Act of 1968. Since radiation emitted inside the
device is completely conned within protective housings and external covers, the laser beam cannot
escape during any phase of normal user operation.
WARNING! Using controls, making adjustments, or performing procedures other than those specied
in this user guide may result in exposure to hazardous radiation.
For other US/Canada regulatory matters, please contact:
HP Inc.
1501 Page Mill Rd, Palo Alto, CA 94304, USA
Email contact: r[email protected] or Telephone contact: +1 (650) 857-1501
Laser statement for Finland
Luokan 1 laserlaite
HP LaserJet Pro MFP 4112dw, 4112fdn, 4112fdw, 4113dw, 4113dwg, 4113fdn, 4113fdng, 4113fdw,
4113fdwg, 4114dw, 4114fdn, 4114fdw, laserkirjoitin on käyttäjän kannalta turvallinen luokan 1 laserlaite.
Normaalissa käytössä kirjoittimen suojakotelointi estää lasersäteen pääsyn laitteen ulkopuolelle. Laitteen
turvallisuusluokka on määritetty standardin EN 60825-1:2014 +A11:2021 mukaisesti.
Power cord instructions
31

VAROITUS !
Laitteen käyttäminen muulla kuin käyttöohjeessa mainitulla tavalla saattaa altistaa käyttäjän
turvallisuusluokan 1 ylittävälle näkymättömälle lasersäteilylle.
VARNING !
Om apparaten används på annat sätt än i bruksanvisning specicerats, kan användaren utsättas för
osynlig laserstrålning, som överskrider gränsen för laserklass 1.
HUOLTO
HP LaserJet Pro MFP 4112dw, 4112fdn, 4112fdw, 4113dw, 4113dwg, 4113fdn, 4113fdng, 4113fdw,
4113fdwg, 4114dw, 4114fdn, 4114fdw - kirjoittimen sisällä ei ole käyttäjän huollettavissa olevia
kohteita. Laitteen saa avata ja huoltaa ainoastaan sen huoltamiseen koulutettu henkilö. Tällaiseksi
huoltotoimenpiteeksi ei katsota väriainekasetin vaihtamista, paperiradan puhdistusta tai muita käyttäjän
käsikirjassa lueteltuja, käyttäjän tehtäväksi tarkoitettuja ylläpitotoimia, jotka voidaan suorittaa ilman
erikoistyökaluja.
VARO !
Mikäli kirjoittimen suojakotelo avataan, olet alttiina näkymättömällelasersäteilylle laitteen ollessa
toiminnassa. Älä katso säteeseen.
VARNING !
Om laserprinterns skyddshölje öppnas då apparaten är i funktion, utsättas användaren för osynlig
laserstrålning. Betrakta ej strålen.
Tiedot laitteessa käytettävän laserdiodin säteilyominaisuuksista: Aallonpituus 775-800 nm Teho 5 mW
Luokan 3B laser.
Nordic Statements (Denmark, Finland, Norway, Sweden)
Denmark:
Apparatets stikprop skal tilsuttes en stikkontakt med jord, som giver forbindelse til stikproppens jord.
Finland:
Laite on liitettävä suojakoskettimilla varustettuun pistorasiaan.
Norway:
Apparatet må tilkoples jordet stikkontakt.
Sweden:
Apparaten skall anslutas till jordat uttag.
GS statement (Germany)
Das Gerät ist nicht für die Benutzung im unmittelbaren Gesichtsfeld am Bildschirmarbeitsplatz
vorgesehen. Um störende Reexionen am Bildschirmarbeitsplatz zu vermeiden, darf dieses Produkt nicht
im unmittelbaren Gesichtsfeld platziert werden.
Das Gerät ist kein Bildschirmarbeitsplatz gemäß BildscharbV. Bei ungünstigen Lichtverhältnissen (z. B.
direkte Sonneneinstrahlung) kann es zu Reexionen auf dem Display und damit zu Einschränkungen der
Lesbarkeit der dargestellten Zeichen kommen.
32
Chapter 3 Regulatory information
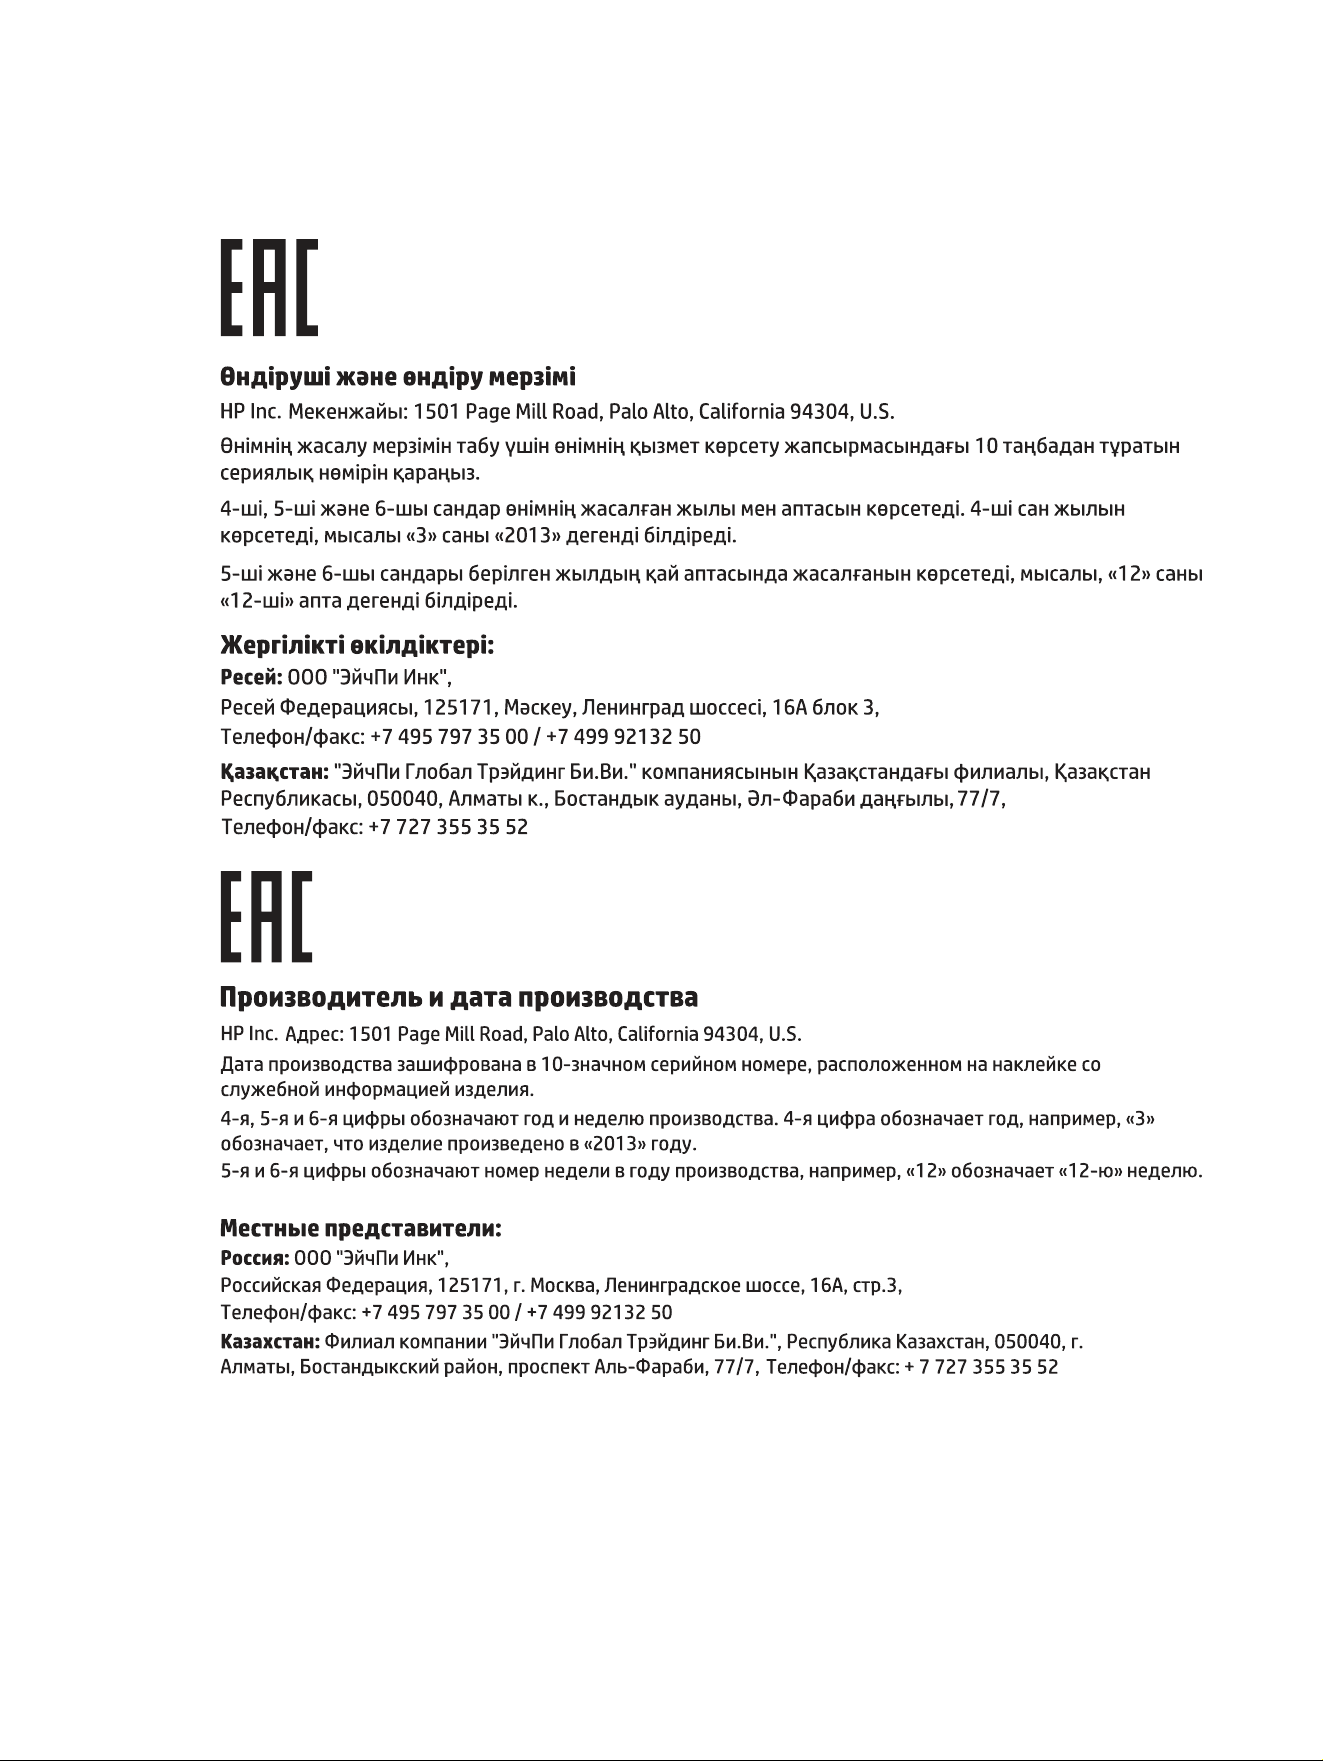
Die Bilddarstellung dieses Gerätes ist nicht für verlängerte Bildschirmtätigkeiten geeignet.
Eurasian Conformity (Armenia, Belarus, Kazakhstan, Kyrgyzstan)
Taiwan BSMI USB Port (Walk-up) statement
台灣 BSMI USB 埠 (Walk-up) 聲明
產品前端, 上方或側邊之 USB 埠 (walk-up 埠), 僅支持隨身碟.
Eurasian Conformity (Armenia, Belarus, Kazakhstan, Kyrgyzstan)
33

Product Safety Statements
Do not extend more than one paper tray at a time.
Do not use paper tray as a step.
All trays must be closed while relocating/moving product.
Keep hands out of paper tray when closing.
If the printer has a keyboard, close keyboard tray when not in use.
Battery statements
Coin/button cell battery safety statements
The following statements are only applicable for products with a coin/button cell battery.
WARNING! This product contains a coin/button cell battery. If the coin/button cell battery is swallowed,
it can cause severe internal burns in just 2 hours and can lead to death.
WARNING! Keep new and used batteries away from children.
WARNING! If the battery compartment does not close securely, stop using the product and keep it
away from children.
WARNING! If you think batteries might have been swallowed or placed inside any part of the body, seek
immediate medical attention.
Telecom (fax) statements
Fax Cord Statement
Product may or may not have fax/telephone cord enclosed. If not provided, use only No. 26 AWG or larger
telecommunication line cord to reduce the risk of re.
Europe Statement for Telecom Operation
The printer meets applicable EU Directive & UK Statutory Instruments and carries the CE & UKCA mark
accordingly. For details see EU & UK Declaration of Conformity issued by the manufacturer.
For printers with the feature to be connected to the analog Public Switched Telecommunication Networks
(PSTN):
Due to differences between individual European national PSTNs the product may not guarantee
unconditional assurance of successful operation on every PSTN termination point. Network compatibility
depends on the correct setting being selected by the customer in preparation of its connection to the
PSTN. Please follow the instructions provided in the user manual. If you experience network compatibility
issues, please contact your equipment supplier or HP Inc. help desk in the country of operation.
Connecting to a PSTN termination point may be the subject of additional requirements set out by the
local PSTN operator.
Declaração para a ANATEL do Brasil
Para maiores informações consulte o site da ANATEL – www.anatel.gov.br
34
Chapter 3 Regulatory information

New Zealand Telecom Statements
The grant of a Telepermit for any item of terminal equipment indicates only that Telecom has accepted
that the item complies with minimum conditions for connection to its network. It indicates no endorsement
of the product by Telecom, nor does it provide any sort of warranty. Above all, it provides no assurance
that any item will work correctly in all respects with another item of Telepermitted equipment of a different
make or model, nor does it imply that any product is compatible with all of Telecom’s network services.
This equipment may not provide for the effective hand-over of a call to another device connected to the
same line.
This equipment shall not be set up to make automatic calls to the Telecom “111” Emergency Service.
This product has not been tested to ensure compatibility with the FaxAbility distinctive ring service for
New Zealand.
Additional FCC statement for telecom products (US)
This equipment complies with Part 68 of the FCC rules and the requirements adopted by the ACTA. On the
back of this equipment is a label that contains, among other information, a product identier in the format
US:AAAEQ##TXXXX. If requested, this number must be provided to the telephone company.
The REN is used to determine the quantity of devices, which may be connected to the telephone line.
Excessive RENs on the telephone line may result in the devices not ringing in response to an incoming call.
In most, but not all, areas, the sum of the RENs should not exceed ve (5.0). To be certain of the number
of devices that may be connected to the line, as determined by the total RENs, contact the telephone
company to determine the maximum REN for the calling area.
This equipment uses the following USOC jacks: RJ11C.
FCC-compliant telephone cord, jack and modular plug should be used with this equipment. This equipment
is designed to be connected to the telephone network or premises wiring using a compatible modular jack,
which is Part 68 compliant. This equipment cannot be used on telephone company-provided coin service.
Connection to Party Line Service is subject to state tariffs.
If this equipment causes harm to the telephone network, the telephone company will notify you in
advance that temporary discontinuance of service may be required. If advance notice is not practical,
the telephone company will notify the customer as soon as possible. Also, you will be advised of your right
to le a complaint with the FCC if you believe it is necessary.
The telephone company may make changes in its facilities, equipment, operations, or procedures that
could affect the operation of the equipment. If this happens, the telephone company will provide advance
notice in order for you to make the necessary modications in order to maintain uninterrupted service.
If trouble is experienced with this equipment, please see the numbers in this manual for repair and (or)
warranty information. If the trouble is causing harm to the telephone network, the telephone company may
request you remove the equipment from the network until the problem is resolved.
The customer can do the following repairs: Replace any original equipment that came with the device. This
includes the toner cartridge, the supports for trays and bins, the power cord, and the telephone cord. It
is recommended that the customer install an AC surge arrestor in the AC outlet to which this device is
connected. This is to avoid damage to the equipment caused by local lightning strikes and other electrical
surges.
Telephone Consumer Protection Act (US)
The Telephone Consumer Protection Act of 1991 makes it unlawful for any person to use a computer
or other electronic device, including fax machines, to send any message unless such message clearly
New Zealand Telecom Statements
35

contains, in a margin at the top or bottom of each transmitted page or on the rst page of the
transmission, the date and time it is sent and an identication of the business, other entity, or individual
sending the message and the telephone number of the sending machine or such business, or other entity,
or individual. (The telephone number provided cannot be a 900 number or any other number for which
charges exceed local or long distance transmission charges).
Industry Canada CS-03 requirements
Notice: The Industry Canada label identies certied equipment. This certication means the equipment
meets certain telecommunications network protective, operational, and safety requirements as
prescribed in the appropriate Terminal Equipment Technical Requirement document(s). The Department
does not guarantee the equipment will operate to the user’s satisfaction. Before installing this equipment,
users should ensure that it is permissible for the equipment to be connected to the facilities of the local
telecommunications company. The equipment must also be installed using an acceptable method of
connection. The customer should be aware that compliance with the above conditions may not prevent
degradation of service in some situations. Repairs to certied equipment should be coordinated by a
representative designated by the supplier. Any repairs or alterations made by the user to this equipment,
or equipment malfunctions, may give the telecommunications company cause to request the user to
disconnect the equipment. Users should ensure for their own protection that the electrical ground
connections of the power utility, telephone lines, and internal metallic water pipe system, if present, are
connected together. This precaution can be particularly important in rural areas.
CAUTION: Users should not attempt to make such connections themselves, but should contact the
appropriate electric inspection authority, or electrician, as appropriate. The Ringer Equivalence Number
(REN) of this device is shown on the regulatory chassis label.
This product meets the applicable Innovation, Science and Economic Development Canada technical
specications.
The Ringer Equivalence Number (REN) indicates the maximum number of devices allowed to be connected
to a telephone interface. The termination of an interface may consist of any combination of devices
subject only to the requirement that the sum of the RENs of all the devices not exceed ve (5).
The standard connecting arrangement code (telephone jack type) for equipment with direct connections
to the telephone network is CA11A.
Remarque: L'étiquette Industrie Canaca identie un équiement certié. Cette certication signie que
l'équipement satisfait à certaines exigences en matière de protection, d'exploitation et de sécurité du
réseau de télécommunications, conformément au(x) document(s) sur les exigences techniques relatives
à l'équipement terminal. Le Ministère ne garantit pas que l'équipement donnera satisfaction à l'utilisateur.
Avant d'installer cet équipement, les utilisateurs doivent s'assurer qu'ils sont autorisés à connecter
l'équipement aux installations de l'entreprise locale de télécommunications. L'équipement doit également
être installé via une méthode de connexion appropriée. Le client doit être conscient que le respect
des conditions ci-dessus ne peut pas empêcher la dégradation du service dans certaines situations.
Les réparations de l'équipement certié doivent être coordonnées par un représentant désigné par
le fournisseur. Toute réparation ou modication apportée par l'utilisateur à cet équipement ou tout
dysfonctionnement de l'équipement peut amener l'entreprise de télécommunications à demander à
l'utilisateur de débrancher l'équipement. Pour leur propre protection, les utilisateurs doivent s'assurer que
les connexions électriques à la terre du service public d'électricité, des lignes téléphoniques et, le cas
échéant, des conduites d'eau métalliques internes sont raccordées ensemble. Cette précaution peut être
particulièrement importante dans les zones rurales.
CAUTION: Les utilisateurs ne doivent pas tenter d'effectuer eux-mêmes de tels raccordements, mais
doivent prendre contact avec les services d'inspection électrique appropriés ou avec un électricien,
36
Chapter 3 Regulatory information

selon le cas. Le numéro d'équivalence de sonnerie (REN) de cet appareil est indiqué sur l'étiquette
réglementaire du châssis.
Ce produit est conforme aux spécications techniques applicables d'Innovation, Sciences et
Développement économique Canada.
Le numéro d'équivalence de sonnerie (REN) indique le nombre maximum d'appareils pouvant être
connectés à une interface téléphonique. La terminaison d'une interface peut consister en n'importe quelle
combinaison de dispositifs, à la seule condition que la somme des REN de tous les dispositifs ne dépasse
pas cinq (5).
Le code de raccordement standard (type prise téléphonique) pour les appareils directement raccordés au
réseau téléphonique est CA11A.
Japan Telecom Mark
この製品には、認定済みファックス モジュールが含まれています。
認証番号 (XXX XXXXXXXX) は、HP アナログ ファックス アクセサリにあります。
Wireless statements
European regulatory notice
Wireless functionality in Europe
For products with 802.11b/g/n or Bluetooth radio
This product operates on radio frequency between 2400 MHz
and 2483.5 MHz, with a transmit power of 20 dBm (100 mW) or
less.
For products with 802.11a/b/g/n radio
CAUTION: IEEE802.11x wireless LAN with 5.15-5.35
GHz frequency band is restricted for indoor use only in
all European Union member states, EFTA (Iceland, Norway,
Liechtenstein) and most other European countries (i.e.:
Switzerland, Turkey, Republic of Serbia). Using this WLAN
application outdoors might lead to interference issues with
existing radio services.
This product operates on radio frequencies between 2400 MHz
and 2483.5 MHz, and between 5170 MHz and 5710 MHz, with
a transmit power of 20 dBm (100 mW) or less.
FCC compliance statement—United States
Exposure to radio frequency radiation
CAUTION: The radiated output power of this device is far below the FCC radio frequency exposure
limits. Nevertheless, the device shall be used in such a manner that the potential for human contact
during normal operation is minimized.
In order to avoid the possibility of exceeding the FCC radio frequency exposure limits, human proximity to
the antenna shall not be less than 20 cm (8 in) during normal operation.
Japan Telecom Mark
37

This device complies with Part 15 of FCC Rules. Operation is subject to the following two conditions:
(1) this device may not cause interference, and (2) this device must accept any interference, including
interference that may cause undesired operation of the device.
CAUTION: Based on Section 15.21 of the FCC rules, changes of modications to the operation of this
product without the express approval by HP may invalidate its authorized use.
Australia
This device incorporates a radio-transmitting (wireless) device. For protection against radio transmission
exposure, it is recommended that this device be operated no less than 20 cm from the head, neck, or body.
Brazil
Este equipamento não tem direito à proteção contra interferência prejudicial e não pode causar
interferência em sistemas devidamente autorizados.
Para maiores informações consulte o site da ANATEL – www.anatel.gov.br
Canada
For Indoor Use. This digital apparatus does not exceed the Class B limits for radio noise emissions
from digital apparatus as set out in the radio interference regulations of the Canadian Department of
Communications. The internal wireless radio complies with RSS 210 of Industry Canada.
Pour l´usage d´intérieur. Le présent appareil numérique n´émet pas de bruits radioélectriques
dépassant les limites applicables aux appareils numériques de Classe B prescribes dans le règlement sur
le brouillage radioélectrique édicté par le Ministère des Communications du Canada. Le composant RF
interne est conforme à la norme CNR-210 d´Industrie Canada.
Products with 5 GHz Operation Industry of Canada
CAUTION: When using IEEE 802.11a wireless LAN, this product is restricted to indoor use, due to its
operation in the 5.15- to 5.25-GHz frequency range. Industry Canada requires this product to be used
indoors for the frequency range of 5.15 GHz to 5.25 GHz to reduce the potential for harmful interference
to co-channel mobile satellite systems. High-power radar is allocated as the primary user of the 5.25- to
5.35-GHz and 5.65- to 5.85-GHz bands. These radar stations can cause interference with and/or
damage to this device.
Lors de l'utilisation d'un réseau local sans l IEEE 802.11a, ce produit est réservé à une utilisation en
intérieur en raison de sa plage de fréquences, comprise entre 5,15 et 5,25 GHz. Industrie Canada
recommande l'utilisation en intérieur de ce produit pour la plage de fréquences comprise entre 5,15 et
5,25 GHz an de réduire les interférences nuisibles potentielles avec les systèmes de satellite portables
utilisant le même canal. Le radar à haute puissance est déni comme étant le principal utilisateur des
bandes 5,25 à 5,35 GHz et 5,65 à 5,85 GHz. Ces stations radar peuvent provoquer des interférences sur
ce périphérique et/ou l'endommager.
Exposure to Radio Frequency Radiation (Canada)
WARNING! Exposure to Radio Frequency Radiation The radiated output power of this device is below
the Industry Canada radio frequency exposure limits. Nevertheless, the device should be used in such a
manner that the potential for human contact is minimized during normal operation.
To avoid the possibility of exceeding the Industry Canada radio frequency exposure limits, human
proximity to the antennas should not be less than 20 cm (8 inches).
38
Chapter 3 Regulatory information

AVERTISSEMENT! Exposition aux émissions de fréquences radio. La puissance de sortie émise par ce
périphérique est inférieure aux limites xées par Industrie Canada en matière d’exposition aux fréquences
radio. Néanmoins, les précautions d'utilisation du périphérique doivent être respectées an de limiter tout
risque de contact avec une personne.
China CMIIT Wireless Statement
中国无线电发射设备通告
型号核准代码显示在产品本体的铭牌上。
European Regulatory Notice
The telecommunications functionality of this product may be used in the following European countries/
regions:
Austria, Belgium, Bulgaria, Cyprus, Czech Republic, Denmark, Estonia, Finland, France, Germany, Greece,
Hungary, Iceland, Ireland, Italy, Latvia, Liechtenstein, Lithuania, Luxembourg, Malta, Netherlands, Norway,
Poland, Portugal, Romania, Slovak Republic, Slovenia, Spain, Sweden, Switzerland, and United Kingdom.
Notice for use in Japan
この機器は技術基準適合証明又は工事設計認証を受けた無線設備を搭載しています。
Mexico statement
Aviso para los usuarios de México
“La operación de este equipo está sujeta a las siguientes dos condiciones: (1) es posible que este equipo
o dispositivo no cause interferencia perjudicial y (2) este equipo o dispositivo debe aceptar cualquier
interferencia, incluyendo la que pueda causar su operación no deseada."
Para saber el modelo de la tarjeta inalámbrica utilizada, revise la etiqueta regulatoria de la impresora.
Taiwan statement
取得審驗證明之低功率射頻器材,非經核准,公司、商號或使用者均不得擅自變更頻率、加大功率或變更
原設計之特性及功能。低功率射頻器材之使用不得影響飛航安全及干擾合法通信;經發現有干擾現象時,
應立即停用,並改善至無干擾時方得繼續使用。前述合法通信,指依電信管理法規定作業之無線電通信。
低功率射頻器材須忍受合法通信或工業、科學及醫療用電波輻射性電機設備之干擾。
Taiwan NCC statement
應避免影響附近雷達系統之操作。
高增益指向性天線只得應用於固定式點對點系統。
Thailand Wireless Statement
เครื่องวิทยุคมนาคมนี้มีระดบั การแผ ่คลื ่นแม่เหล็กไฟฟ้ าสอดคล้องตามมาตรฐานความปลอดภยั ต่อสุขภาพของมนุษย์จาก
การ ใช้เครื่องวิทยุคมนาคมที่คณะกรรมการกิจการโทรคมนาคมแห่งชาติประกาศกําหนด
This radio communication equipment has the electromagnetic eld strength in compliance with the Safety
Standard for the Use of Radio Communication Equipment on Human Health announced by the National
Telecommunications Commission.
China CMIIT Wireless Statement
39

Index
Symbols/Numerics
550-sheet paper trays
part numbers 31
550-sheet tray
jams 109
A
accessories
ordering 30, 104
overview 30
part numbers 31
acoustic specications 17
Address Book
set up 63
alternative letterhead mode 18
anticounterfeit supplies 1, 14
B
batteries included 20, 21
battery disposal, California 21
battery notice,Brazil 20
Battery Waste Management
(BWM) 26
bin, output
locating 2
browser requirements
HP Embedded Web Server 87
C
cartridge
replacing 41
cartridge policy 32, 33
cartridge protection 32, 37
cartridges
non-HP 1, 14
order numbers 41
recycling 20, 22
warranty 1, 13
ce marking 29
checklist
fax troubleshooting 150
wireless connectivity 147
Class 1 consumer laser 30
cleaning
glass 140, 143
paper path 128
Contact Lists
set up 63
control panel
help 101
locating 2
locating features on the
touchscreen control
panel 4
copying
edges of documents 140, 143
multiple copies 59
optimizing for text or
pictures 140
overview 59
setting paper size and
type 140
single copies 59
two-sided documents 59
counterfeit supplies 1, 14
customer support
online 101, 1, 19
D
default gateway, setting 93
deleting
stored jobs 52, 55
dimensions, printer 15
disposal, end-of-life 20, 21
document feeder 59
copying two-sided
documents 59
faxing from 84
jams 109, 110
paper-feeding problems 108
double-sided copying 59
double-sided printing
Mac 49
Windows 47
drivers, supported 13
duplex 59
duplex printing
Mac 49
duplex printing (double-sided)
settings (Windows) 47
Windows 47
duplexer
jams 109
duplexing
manually (Mac) 49
manually (Windows) 47
Dynamic Security Enabled
Printers 30, 97, 13
E
EconoMode setting 96, 128
economy settings 96
electrical specications 17
electronic faxes
sending 84
electronic hardware recycling 20,
21
Embedded Web Server (EWS)
assigning passwords 94
features 87
end-of-life disposal 20, 21
envelopes
loading 27
orientation 27
environmental stewardship
program 20
eu microplastics 26
Eurasian conformity 29, 33
F
fax
sending from software 84
solve general problems 150,
151
speed dials 84
fax troubleshooting
checklist 150
faxing
from a computer
(Windows) 84
from the document feeder 84
from the atbed scanner 84
FCC regulations 29
Finnish laser safety
statement 29, 31
rmware
updating 98
fraud Web site 1, 14
fuser
jams 109, 122, 125
40
Index

G
gateway, setting default 93
genuine HP cartridges 32, 33
glass, cleaning 140, 143
H
hardware recycling, Brazil 20, 23
help, control panel 101
HP Customer Care 101, 1, 19
HP Easy Scan Software
(macOS) 79
HP Embedded Web Server
menus 88
settings 88
HP Embedded Web Server (EWS)
features 87
HP EWS, using 87
HP fraud Web site 1, 14
HP Printer Home Page, using 87
HP Web Jetadmin 97
I
image quality
check toner cartridge
status 128
check toner-cartridge
status 130
interface ports
locating 3
IP network settings
congure 92
IPv6 address 93
J
jams
550-sheet tray 109
causes of 109
document feeder 109, 110
duplexer 109
fuser 109, 122, 125
locations 109
output bin 109, 110, 119
rear door 120
Tray 1 109, 113
Tray 2 109, 115
Japanese VCCI statement 29, 30
Jetadmin, HP Web 97
jobs, stored
creating (Windows) 52
deleting 52, 55
Mac settings 52
printing 52, 55
K
Korean EMC statement 29
L
label
orientation 28
labels
orientation, loading 29
printing on 28
labels, loading 28
laser safety statements 29, 31
license, software 1, 14
loading
paper in Tray 1 18
paper in Tray 2 21
paper in Tray 3 24
local area network (LAN)
locating 3
M
Mac driver settings
Job Storage 52
managing the printer
overview 87
manual duplex
Mac 49
Windows 47
material restrictions 20, 21
Material Safety Data Sheet
(MSDS) 20, 21
memory
included 6, 8, 10, 11
memory chip (toner)
locating 41
memory chip, toner cartridge
description 1, 14
menus
HP Embedded Web Server 88
mercury-free product 20, 21
Microsoft Word, faxing from 84
mobile printing, software
supported 15
multiple pages per sheet
printing (Mac) 49
printing (Windows) 47
N
network settings 92
networks
default gateway 93
HP Web Jetadmin 97
IPv6 address 93
subnet mask 93
supported 6, 8, 10, 11
non-HP supplies 1, 14
number of copies, changing 59
O
on/off button
locating 2
online help, control panel 101
online support 101, 1, 19
Open source license 2
operating systems, supported 13
ordering
supplies and accessories 30,
104
orientation
labels 29
output bin
clear jams 109, 110, 119
locating 2
P
pages per minute 6, 8, 10, 11
pages per sheet
selecting (Mac) 49
selecting (Windows) 47
paper
jams 109
loading Tray 1 18
loading Tray 2 21
loading Tray 3 24
selecting 128, 131
Tray 1 orientation 18, 20
Tray 2 orientation 23
Tray 3 orientation 26
paper jams
550-sheet tray 109
document feeder 109, 110
duplexer 109
fuser 109, 122, 125
locations 109
output bin 109, 110, 119
rear door 120
Tray 1 109, 113
Tray 2 109, 115
paper pickup problems
solving 104, 106
paper trays
overview 18
part numbers 31
paper type
selecting (Windows) 47
paper types
selecting (Mac) 49
paper, ordering 30, 104
Index
41

part numbers
accessories 31
replacement parts 32
supplies 31
toner cartridges 31
parts
overview 30
phone book, fax
adding entries 84
ports
locating 3
potential shock hazard 2
power
consumption 17
power connection
locating 3
power switch
locating 2
print drivers, supported 13
print media
loading in Tray 1 18
print on both sides
Mac 49
manually, Windows 47
Windows 47
printer
overview 1
printing
from USB ash drives 57
overview 47
stored jobs 52, 55
printing on both sides
settings (Windows) 47
private printing 52
product number
location 3
protect cartridges 32, 37
R
rear door
clear jams 120
locating 3
recycling 20, 22
electronic hardware 20, 21
replace cartridge 42
replacement parts
part numbers 32
replacing
toner cartridge 41
S
safety statements 29, 31
scan setup
scan to email 62
scan to network folder 69
scan to SharePoint 74
Scan to Email
set up with EWS 63
Scan to Folder
set up with EWS 69
scanner
faxing from 84
glass cleaning 140, 143
scanning
from HP Easy Scan Software
(macOS) 79
to computer 78
to email 76
to network folder 77
to SharePoint 78
to USB drive 76
security features 94
sending faxes
from software 84
shut down after delay
setting 96
sleep delay
setting 96
software
sending faxes 84
software license agreement 1,
14
solve problems
fax 150, 151
specications
electrical and acoustic 17
speed dials
programming 84
storage, job
Mac settings 52
store print jobs 52
stored jobs
creating (Mac) 52
creating (Windows) 52
deleting 52, 55
printing 52, 55
storing jobs
with Windows 52
subnet mask 93
supplies
counterfeit 1, 14
low threshold settings 102
non-HP 1, 14
ordering 30, 104
overview 30
part numbers 31
recycling 20, 22
replacing toner cartridge 41
using when low 102
support
online 101, 1, 19
supported operating systems 13
system requirements
HP Embedded Web Server 87
T
Taiwan EMI statement 29
TCP/IP
manually conguring IPv6
parameters 93
technical support
online 101, 1, 19
toner cartridge
components 41
low threshold settings 102
replacing 41
using when low 102
toner cartridges
memory chips 1, 14
non-HP 1, 14
order numbers 41
part numbers 31
recycling 20, 22
See toner cartridges
warranty 1, 13
touchscreen
locating features 4
Tray 1
jams 109, 113
loading envelopes 27
paper orientation 18, 20
Tray 2
jams 109, 115
loading 21
paper orientation 23
Tray 3
loading 24
paper orientation 26
trays
capacity 6, 8, 10, 11
included 6, 8, 10, 11
locating 2
troubleshooting
check toner cartridge
status 128
check toner-cartridge
status 130
faxes 150
jams 109
network problems 145
overview 101
paper feed problems 104
wired network 145
42
Index

wireless network 147
two-sided copying 59
two-sided printing
settings (Windows) 47
U
USB ash drives
printing from 57
W
walk-up USB printing 57
warranty
customer self repair 1, 19
license 1, 14
product 1
toner cartridges 1, 13
waste disposal 20, 25
web browser requirements
HP Embedded Web Server 87
Web sites
customer support 101, 1, 19
fraud reports 1, 14
Material Safety Data Sheet
(MSDS) 20, 21
websites
HP Web Jetadmin,
downloading 97
weight, printer 15
Wi-Fi Direct Print 15
Wi-Fi Direct Printing 56
Windows
faxing from 84
wireless network
troubleshooting 147
wireless network
interference 147, 149
Word, faxing from 84
Index
43