
1
INSTRUCTION MANUAL
Please read this manual carefully before using, and keep it for future reference.
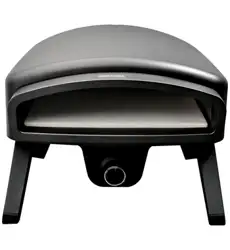
14” GAS
PIZZA OVEN
GR14GPOV
FOR OUTDOOR USE ONLY
PLEASE READ INSTRUCTIONS CAREFULLY BEFORE ASSEMBLY
RETAIN THIS MANUAL FOR FUTURE REFERENCE

2

3
General Safety 4
Installation 16
Product Overview 17
Assembly 19
Operating Procedures 20
Troubleshooting 24
Cleaning & Care 26
Specifications 27
Support Last Page
CONTENTS

4
GENERAL SAFETY
Below is a summary of important safety warnings and advice. It is imperative that you
follow the instructions and observe the warnings provided in the operating manual as
failure to do so can result in serious bodily injury or damage to property. This is not a
complete list, please ensure you are familiar with the whole booklet prior to installation
or operation of the Pizza Oven.
- This product is for outdoor use only. Under no circumstances should it
be used indoors.
- Do not move appliance when in operation.
- Always maintain 680 mm minimum clearance to combustible materials
at the sides and back of the Pizza Oven, and Overhead 1500mm of the Pizza Oven.
- Turn o gas supply at the LPG cylinder after use.
- Any modifications, improper installation, adjustment alteration, service
or maintenance may be dangerous and can cause injury, death or property damage.
Read the installation, operating and maintenance instructions thoroughly
before installing or servicing this appliance.
- Before lighting read all operating instructions.
- Check for leaks when replacing or reconnecting cylinder.
- Parts may become very hot, unsupervised children must be kept away
from the Pizza Oven while cooking or during warm up and cool down.
- Servicing must be performed by authorized technicians and must not be
done yourself. The appliance shall not be modified.
- Keep chemicals and flammable materials away from appliance.
- Do not leave food unattended on the Pizza Oven.
- Care must be taken when removing drip tray.
If you have any questions concerning assembly or operation, consult your dealer
or LPG Gas Company.
- DO NOT SPRAY AEROSOLS IN THE VICINITY OF THIS APPLIANCE WHILE IT IS IN
OPERATION
- DO NOT PLACE ARTICLES ON OR AGAINST THIS APPLIANCE
- DO NOT USE OR STORE FLAMMABLE MATERIALS IN OR NEAR THIS APPLIANCE
- DO NOT MODIFY THIS APPLIANCE
WARNING!
Safety Instructions
GENERAL SAFETY

5
GENERAL SAFETY (Cont.)
- Highly flammable clothing such as nylon etc. should be kept away from
the Pizza Oven when in operation
- DO NOT let children operate or play near Pizza Oven.
- DO NOT block holes in bottom or back of Pizza Oven.
- Check burner flames regularly.
- Use Pizza Oven in well-ventilated space.
- DO NOT use charcoal or ceramic briquettes in a gas Pizza Oven.
- This appliance is not intended for use on recreational vehicles or a marine
environment.
- Accessible parts may be very hot. Please keep young children and pets away.
- Contact your local municipality for any building codes regulating the
installation of outdoor barbecue appliances. Outdoor installations must conform
to local codes or, in the absence of local codes, with the AUST/NZ: Australian
Standards Code AS: 5601 as well as the requirements of any local council, gas,
electricity authority or other statutory regulation.
- Do not allow the flexible gas supply hose or any electrical cord to come
in contact with any heated surface of the appliance.
- Do not use plastic or glass utensils on the Pizza Oven.
- Do not disconnect any gas fittings while the appliance is operating.
- Do not replace the Pizza Oven with all hotplates as this may cause the Pizza Oven
to overheat. It is always necessary to have at least one Pizza Oven plate to allow
for proper ventilation.
- The hose and regulator supplied with this Pizza Oven must be used at all times
whilst operating the Pizza Oven. Inspect the hose and regulator for cracks or any
sign of wear or damage. If there is excessive abrasion or wear, replace only with
the approved hose and regulator.
Safety Instructions
Gas Safety
- Never leave burners on high for more than 10 minutes unless during cooking.
If burner makes a hissing sound when lit, it may be burning inside. Immediately
turn o the burner and allow to cool down before lighting the burner again.
- Do not allow buildup of unburned gas.
- When using the hood to cook make sure the burners are on low only.
GENERAL SAFETY (Cont.)

6
GENERAL SAFETY (Cont.)
LPG cylinder Safety Information
- This appliance is designed to be used with a LPG cylinder: Max 9 kg, Min 4 kg.
- The LPG cylinder supply valve must be turned o when the appliance is not in use.
- LPG cylinders must be stored outdoors, out of reach of children and must
not be stored in a building, garage or any other enclosed area.
- The LPG cylinder used must incorporate a safety collar to protect the
valve assembly.
- Do not store LPG cylinders on their side as this could allow liquid gas into
the supply pipes with serious results.
- Leak test your grille before each use. Leak test the hose connections each time
you reconnect the LPG cylinder. (Refer to leak test procedure)
- Always turn o the gas at the cylinder when not in use.
- Never store a spare cylinder near the Pizza Oven. Any LPG cylinder not
attached to the Pizza Oven for use should be stored outdoors and well away from
this appliance.
- Keep LPG cylinder away from heat.
- Only one LPG cylinder can be attached to the appliance at any one time.
- When using an LPG supply system (e.g. portable LPG cylinder) in an enclosure,
ventilation must be provided. Keep ventilation opening of any cylinder enclosure
clear and free of any debris. Gas vapour is highly explosive and can cause serious
bodily injury or damage to property if allowed to accumulate in a confined
space and ignited.
- Use only cylinder in a good condition, avoid use of rust or dented cylinder with a
damaged gas valve.
- Do not fill the LPG cylinder beyond 80% capacity.
- The cylinder and hose must be sheltered from the sun’s direct heat.
The flexible PVC hose assembly supplied must not be exposed to temperatures
in excess of 60°C. DO NOT allow the hose to come in contact with the hot surface
of the Pizza Oven body.
- Have the LPG cylinder filled by an authorized Propane supplier.

7
GENERAL SAFETY (Cont.)
Important:
Gas Smells
- When disconnecting and removing the LPG cylinder for the purpose of refilling,
always observe the following procedure:
- Ensure that all gas control valves on the appliance and the LPG cylinder
are turned o before disconnecting the regulator from the cylinder.
- Do not smoke or use a naked flame near the appliance or LPG cylinder
while disconnecting the gas line between the appliance and LPG cylinder.
- Remove the LPG cylinder from the enclosure before disconnecting the
regulator from the appliance.
- Tighten all connections before placing the LPG cylinder back in its enclosure.
- The gas leak testing procedure should be conducted every time the LPG cylinder
is refilled and reconnected to the appliance before using the appliance.
A strong gas smell or the hissing sound of gas indicates a serious problem with your
gas Pizza Oven or LP gas tank. Immediately follow the steps below, failure to do so can
result in serious injury, death or property damage.
- Immediately shut o gas supply to the gas Pizza Oven
-Turn the control knobs to OFF position
- Extinguish any flames with a class B fire extinguisher
- Open the Pizza Oven hood
- Stay away from LP gas tank
- Do not try to fix the problem yourself
If odor continues or you cannot extinguish the fire contact your emergency hotline immediately.
NOTE: The normal flow of gas through the regulator will create a soft humming sound, this low
volume sound is normal and will not interfere with the operation of the Pizza Oven.

8
GENERAL SAFETY (Cont.)
Hose and regulator safety
Regulator Connection
In Case of fire
In the event there is an issue with your hose or regulator please contact your Pizza
Oven supplier service agent to obtain the approved replacement part.
1. Check that all control knobs are in the ‘O’ position.
2. Make sure the cylinder valve is o.
3. Remove the protective cap from the cylinder if present.
4. Connect the pressure reducing valve connector to the LPG cylinder.
5. Leak test the connection with a soapy water solution. (See Gas Leak Testing
Procedure)
Most fires are caused by a buildup of grease, or by improper gas connection. In the
case where there is a fire you cannot extinguish, turn o the gas immediately and call
your emergency hotline.
- Avoid calling close to the LPG gas tank because electrical device could potentially
create a spark and cause a fire or explosion.
- Use a fire extinguisher if possible. If water is the only fire retardant available,
thoroughly soak the area around the appliance.
- When spraying water on the Pizza Oven itself, do not use a strong jet of water,
as this may cause splashing of burning grease, resulting in a further spreading
of the fire. Rather spray lightly over the frame cooking surfaces to cool the
appliance below ignition
Safe Lighting
- Visually check burner flames to confirm lighting.
- Do not lean over the Pizza Oven when lighting.
- Do not use charcoal or any other solid fuel in this appliance.

9
GENERAL SAFETY (Cont.)
Gas Leak Test Procedure
Never use a naked flame to check for gas leaks. Always use the following procedure to
check forgas leaks.
1. In a small container, mix up a solution of water and detergent or soap.
Mix the solution well.
2. Make sure that the gas supply valve on the LPG cylinder is turned on.
3. Make sure that the gas control valves on the appliance are all turned o.
4. Using a brush or spray bottle apply the solution to the gas line and each join
in the gas line.
5. Bubbling of the solution will indicate
that there is a leak present.
6. Re-tighten or re-seal any joints that are leaking.
7. If a leak persists then contact
your distributor or the manufacturer
for assistance.
10
GENERAL SAFETY (Cont.)
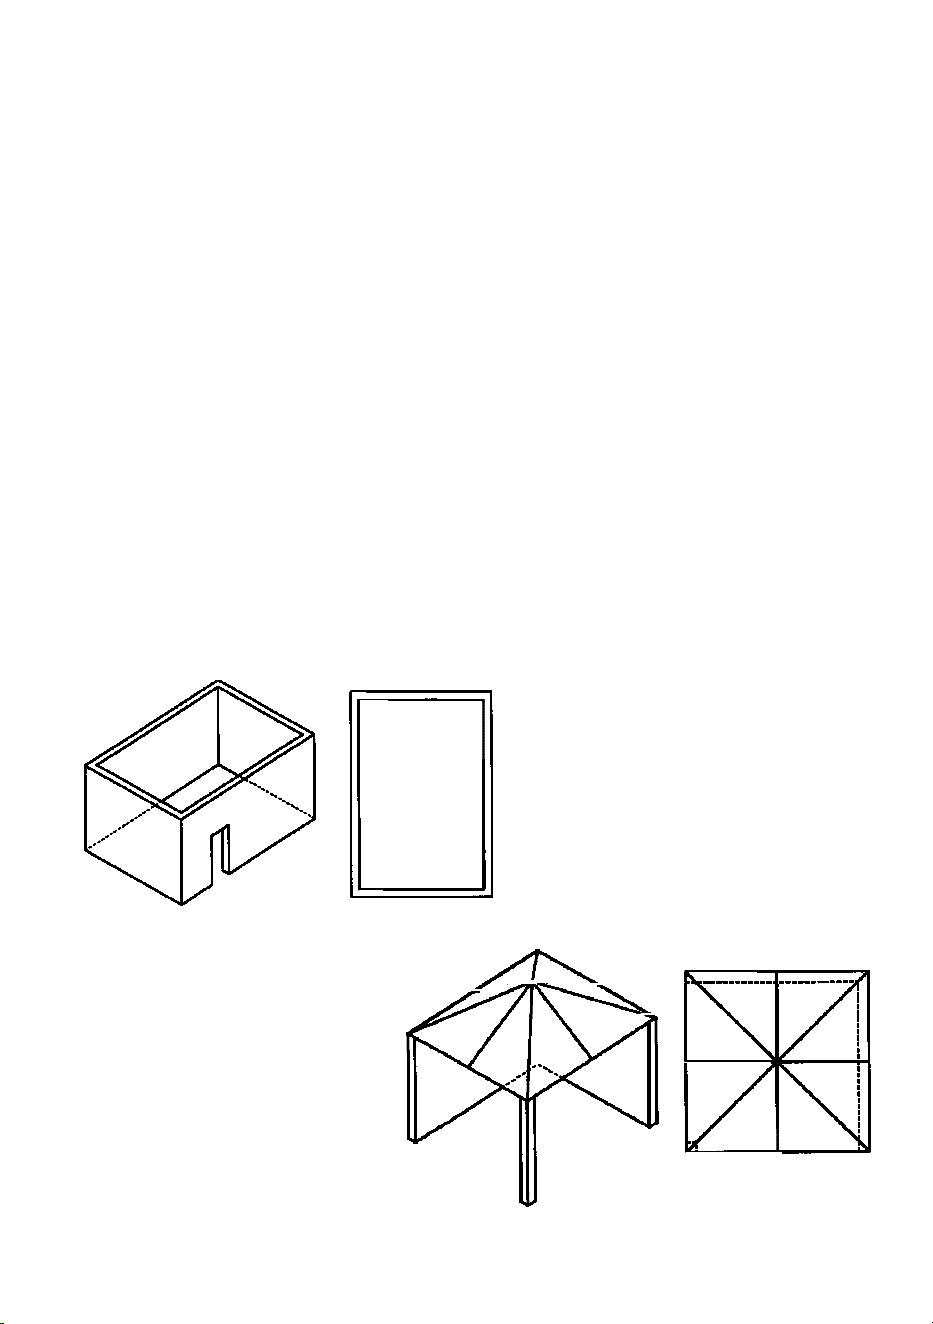
SAFE LOCATION - USE OUTDOORS ONLY
This appliance shall only be used in an above ground open-air situation with
natural ventilation, without stagnant areas, where gas leakage and products of
combustion are rapidly dispersed by wind and natural convection.
Any outdoor enclosure in which the appliance is used shall comply with one of
the following:
- An enclosure with walls on all sides, but at least one permanent opening at
ground level and no overhead cover. See Figure 1.
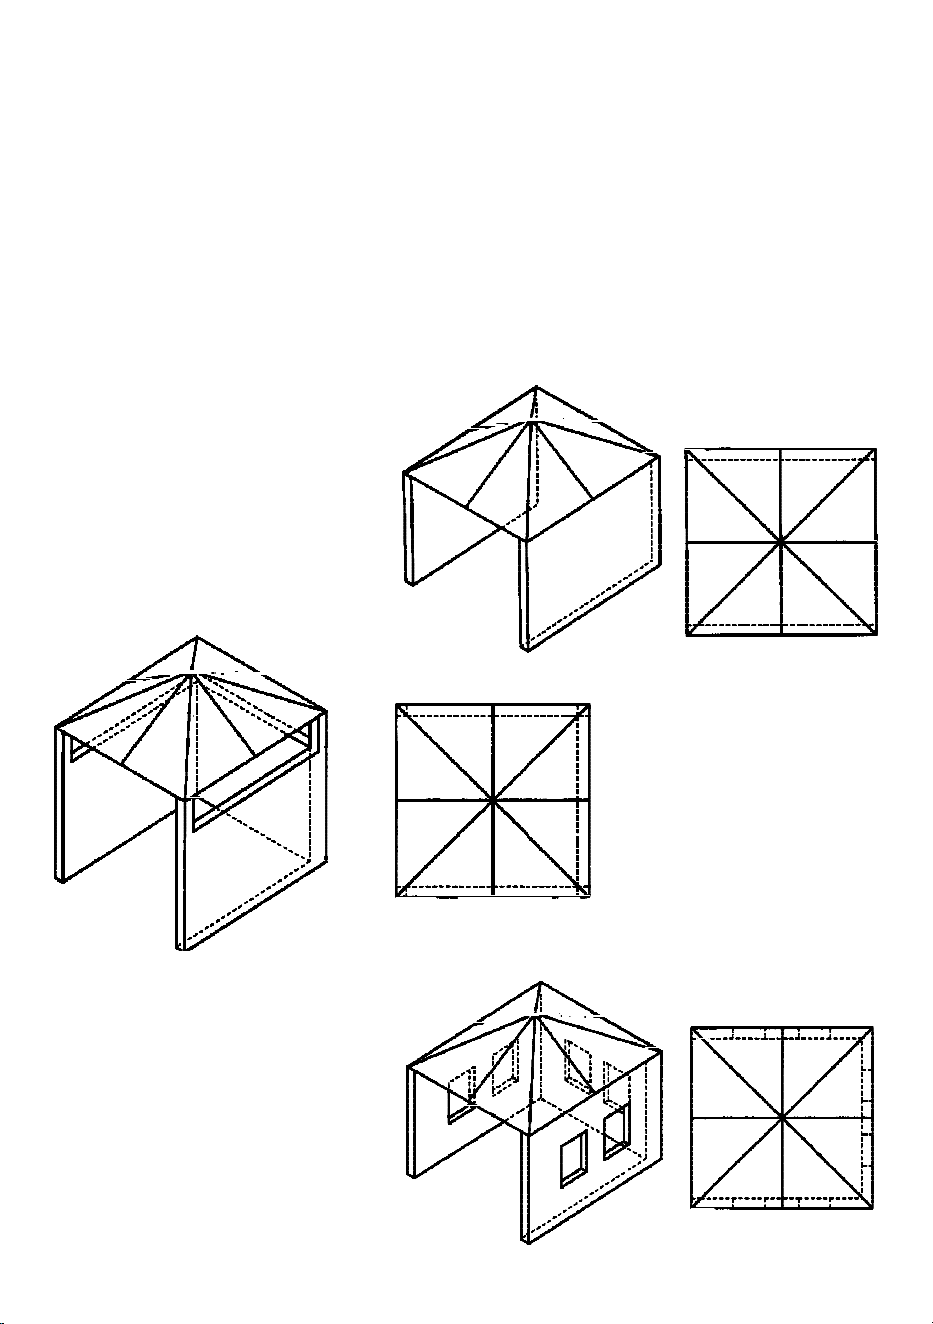
- Within a partial enclosure that includes an overhead cover and no more than two walls.
See Figure 2 & 3.
- Within a partial enclosure that includes an overhead cover and more than two walls, the
following shall apply:
- At least 25% of the total wall area is completely open; and
P
Figure 1
-OUTDOOR
AREA-EXAMPLE1
Figure 2
– Partial enclosure
withoverhead cover and
no more than two walls.
11
GENERAL SAFETY (Cont.)
- At least 25% of the total wall area is completely open; and
- At least 30% of the remaining wall area is open and unrestricted. See Figure 4 & 5.
- In the case of balconies, at least 20% of the total of the side, back and front
wall areas shall be and remain open and unrestricted.
The following diagrams provide a diagrammatic representation of outdoor areas.
Rectangular areas have been used in these figures - the same principles apply to any
other shaped area
Figure 4
– Open side at least 25%
of total wall area. 30%
or more in total of the
remaining wall area is
open and unrestricted.
Figure 5
– Open side at least 25%
of total wall area. 30% or
more in total of the
remaining wall area is open
and unrestricted.
Figure 3
– Partial enclosure with
overhead cover and
no more than two walls.
12
GENERAL SAFETY
For your safety - If you smell gas:
1. Shut o gas to the appliance.
2. Extinguish any open flame.
3. If odor continues, keep away from the appliance and immediately
call your gas supplier or your fire department.
Failure to follow these instructions and warnings could result in fire
or explosion, which could cause property damage, personal injury or death.
1. Never operate this appliance unattended.
2. This appliance is not for frying turkeys.
3. If a fire should occur, keep away from the appliance and immediately
call your fire department. Do not attempt to extinguish an oil or grease
fire with water.
Failure to follow these instructions could result in fire, explosion or
burn hazard, which could cause property damage, personal injury or death.
This instruction manual contains important information necessary for the
proper assembly and safe use of the appliance.
Read and follow all warnings and instructions before assembling and using
the appliance.
Follow all warnings and instructions when using the appliance.
Keep this manual for future reference.
Installer - leave the manual with the consumer.
DANGER
DANGER
DANGER
13
GENERAL SAFETY (Cont.)
READ ALL SAFEGUARDS AND INSTRUCTIONS THOROUGHLY!
YOUR SAFETY IS VERY IMPORTANT - FAILURE TO FOLLOW PROPER
PROCEDURES AND SAFEGUARDS MAY RESULT IN PROPERTY DAMAGE,
PERSONAL INJURY OR DEATH.
DANGER
THIS PRODUCT IS FOR OUTDOOR USE ONLY.
. Never operate this product unattended.
. The use of alcohol, prescription or non prescription drugs may impair the consumer’s
ability to properly assemble or safely operate the product
. Never operate this product within 700m of any gas cylinder. Never operate this product
within 25 feet (7.5 m)of any flammable liquids.
. Use this product only on a level, stable non- combustible surface like brick, concrete or dirt.
Do not use product on or around any surface that will burn or mel like wood decks, dry
grass, leaves, wood rails, asphalt, vinyl, or plastic.
. Never operate this product under any overhead roof covering, awning or overhang.
Never use inside an enclosed area such as screen patios, garage, buildings, tents. Keep
a minimum clearance of 700mm from all sides of the product.
. Never use in or on recreational vehicles and/or boats.
. Never use this product for anything other than its intended purposes. This product is not
intended for commercial use. Never use this product as a heater.
. Keep the area clear of all flammable liquids, combustible material including but not limited
to wood, dry plants including grass, brush, paper, and canvas.
. This product is HOT while in use and after use - Avoid touching hot surfaces. Always
USE ONLY THE HOSE AND HOSE CONNECTOR PROVIDED!
IF A REPLACEMENT IS NECESSARY, PLEASE CONTACT EITHER OUR
CUSTOMER SERVICE DEPARTMENT OR YOUR LOCAL DEALER.
THE USE OF UNAUTHORISED PARTS CAN CREATE UNSAFE CONDITIONS
AND ENVIRONMENT.
APPLIANCE IS NOT INTENDED FOR COMMERCIAL USE.
THE CYLINDER SUPPLY SYSTEM MUST BE ARRANGED FOR VAPOR
WITHDRAWAL

14
GENERAL SAFETY (Cont.)
DANGER
DANGER
WEAR PROTECTIVE GLOVES OR MITTS WHEN OPERATING THE PRODUCT
. Keep children and pets away from the product at all times.
. Do not allow anyone to conduct activities around the product during or following its
use until the unit has cooled. The product is hot during operation and remains hot for
a period of time following its use.
. Never move the product when it is in use. Allow the product to cool below 115oF
(40C) before moving or storing it.
. Always wear shoes and protective clothing during operation of this product
. Accessory attachments and cookware not manufactured or supplied for this product
are not recommended for use.
. Keep the fuel supply hose away from any heated surfaces.
. Do not attempt to disconnect any gas fitting while the product is in operation.
THIS INSTALLATION MUST CONFORM WITH LOCAL CODES OR,
IN THE ABSENCE OF LOCAL CODES, WITH THE
NATURAL GAS AND PROPANE INSTALLATION CODE, AS/NZS 5601.1
. Before each use, inspect gas hose for any signs of damage and check all nuts and
bolts to be sure that they are tight and secure.
. When lighting your product, do not cover the burner or restrict airflow from the
burner. An explosion could occur.
. If burner does not ignite, turn o the control valve and gas and wait 5 minutes
before trying to light it again. If the burner goes out during operation, first turn the
control valve OFF, then the gas cylinder OFF.
. Do not obstruct flow of combustion and ventilation. Keep the ventilation opening(s)
of the cylinder enclosure free and clear of debris.
. Keep clear of the product hose. Tripping over the product hose may result in the
spilling of HOT grease or water, causing personal injury or property damage.
15
GENERAL SAFETY (Cont.)
CAUTION: HOT SURFACES
DANGER
. In the event of an oil/grease fire, immediately turn o gas supply and call the Fire
Department. Do not attempt to extinguish a fire with water. A Type BC orABC fire
extinguisher may in some cases contain the fire.
. Keep your hands, hair and face away from the burner flame. Do not lean over or into
the product when lighting the burner. This product has an open flame. Be careful of
loose hair and clothing during operation which could catch fire.
. After use, always tum the control knob OFF first.
. Always allow the hot water to cool completely below 100° F (38C) before
moving to avoid the possibility of severe burns.
. Never use glassware, plastic, or ceramic cookware in this product
. Always disconnect the gas pipeline from your product when not in use.
. If you smell, hear or see gas escaping, immediately get away from the gas cylinder and
call the Fire Department.
USE CAUTION AND COMMON SENSE WHEN OPERATING YOUR PRODUCT.
READ ALL INSTRUCTIONS, WARNINGS AND SAFEGUARDS PRIOR
TO ASSEMBLING AND OPERATING YOUR PRODUCT.
SAVE THESE INSTRUCTIONS

16
Before installing your appliance, read all safety instructions in this manual,
especially the sections on electrical safety and installation.
INSTALLATION
UNPACKING
• When unpacking the appliance, be sure to keep all the packaging materials
until you have made sure your new appliance is undamaged and in good
working order. This product has been packaging to protect itself
against transportation.
• Be sure to remove all packaging materials around the appliance and that
the plastic film used is also removed.
• CAUTION: Plastic wrapping can be a suffocation hazard for babies and young
children. Make sure all packaging materials are out of reach for children and
that they are disposed of correctly.
CAUTION
1. Remove all protective wrappings prior to cooking.
2. If product starts to smoke, turn off the power outlet the product is
connected to immediately.
3. Never attempt to remove hot contents without turning off the power
outlet to turn off the product, then unplugging the product from the
electrical outlet first. Be sure not to damage the internal
mechanism or heating elements when removing hot baked contents.
4. The product is only applicable for cooking Pizza.
17
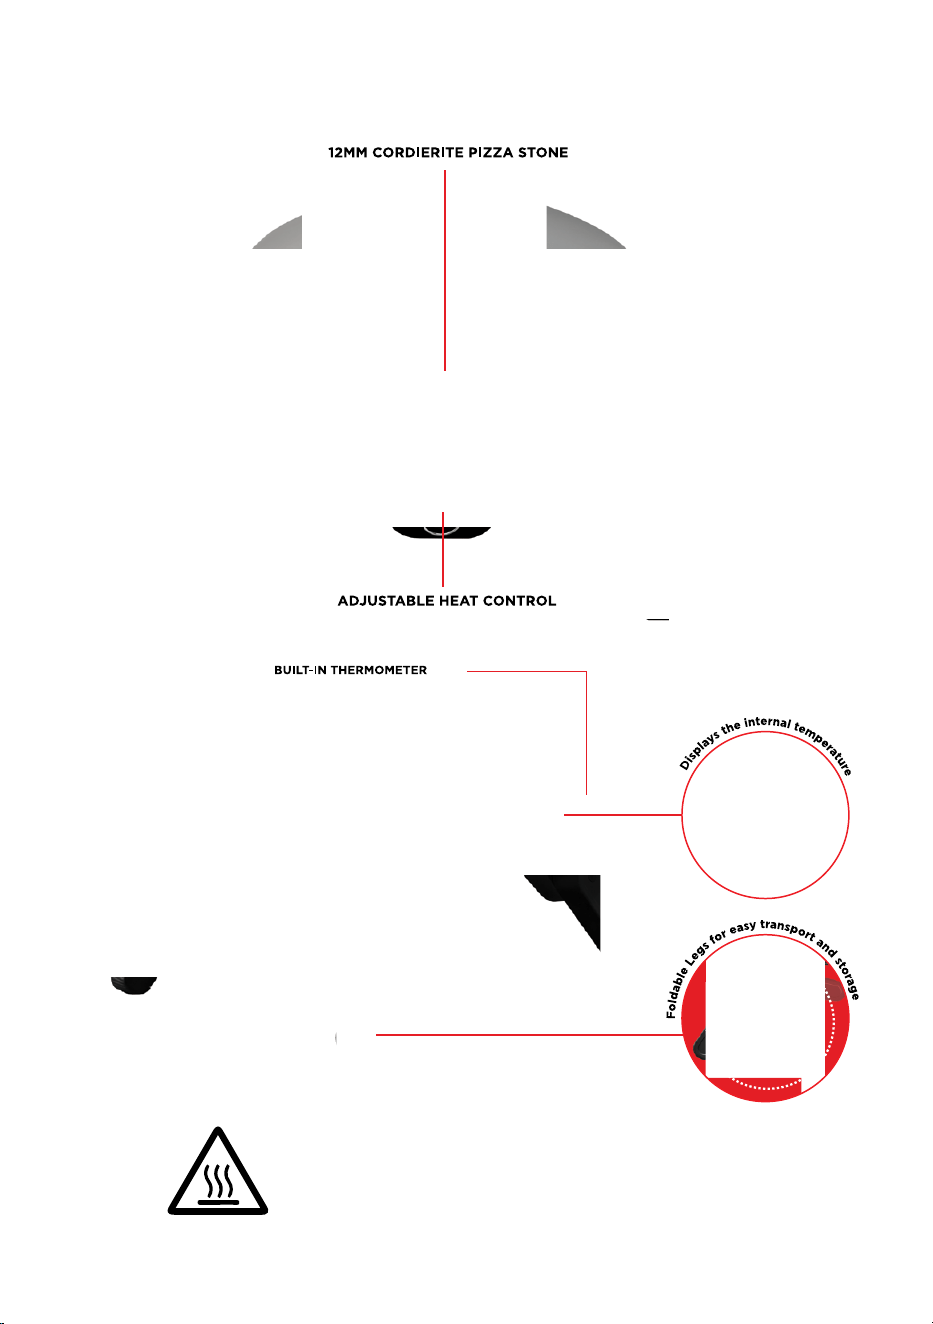
PRODUCT OVERVIEW
CAUTION: HOT SURFACES
18
Before assembly, make sure all parts are present. If any part is missing
or damaged, do not attempt to assemble the appliance. Contact customer
service for replacement parts.
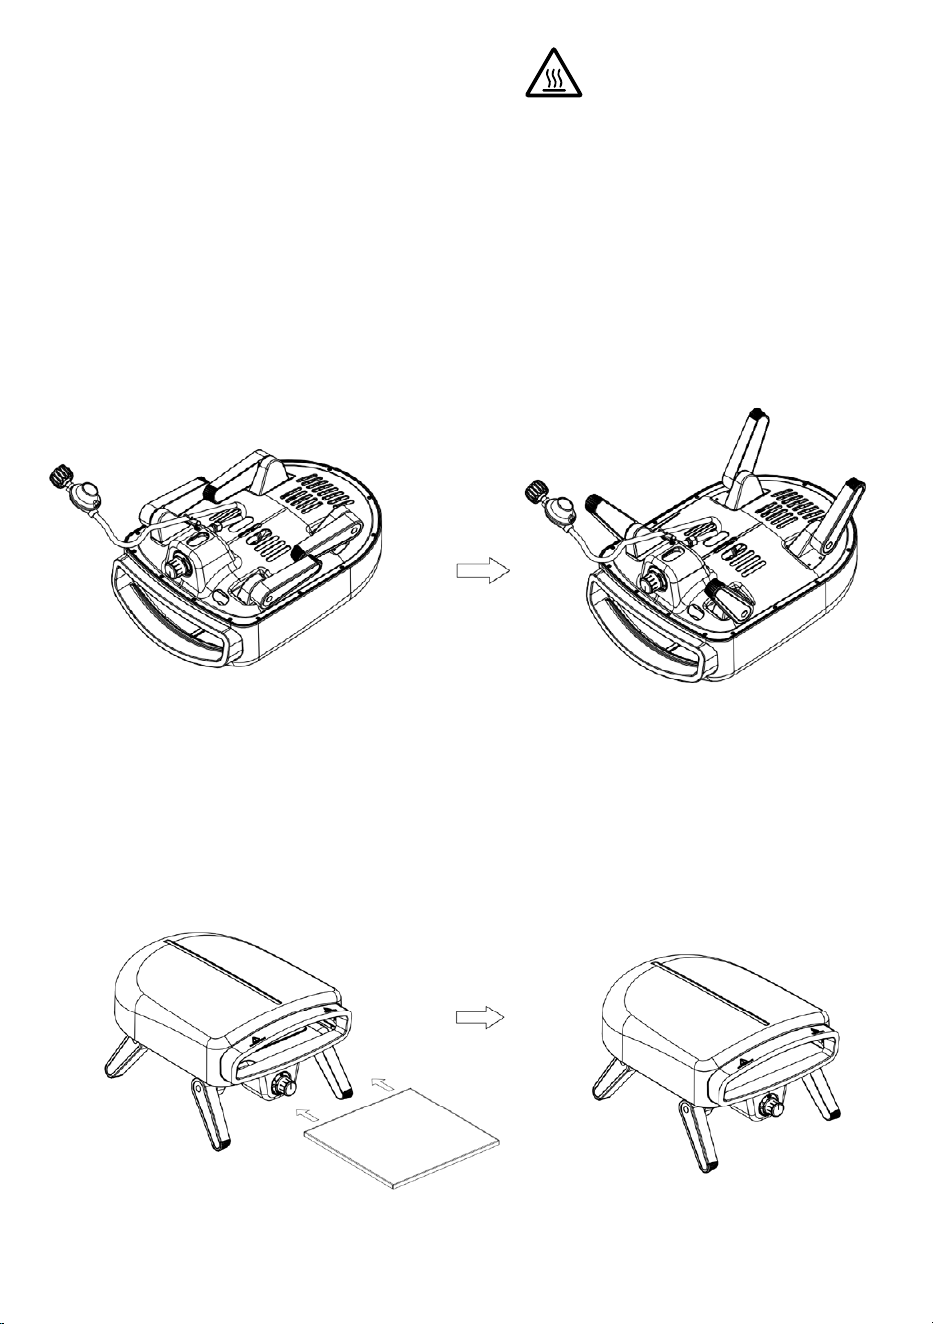
ASSEMBLY
CAUTION: HOT SURFACES
1. Unfold legs.
2. Insert the stone baking board
Warning The rubber hose
is pre installed on the hook
5
19
a.Do not store a spare LP-gas cylinder under or near this appliance.
b.Never fill the cylinder beyond 80 percent full;
If the information in (a) and (b) is not followed exactly, a fire causing death or
serious injury may occur.
Check that all the control knobs (including side burner) are in the OFF position
before any attempt is made to connect the regulator to the gas cylinder.
• Double check that the gas cylinder valve is securely in theOFF position before
attempting to connect the regulator to the gas bottle.
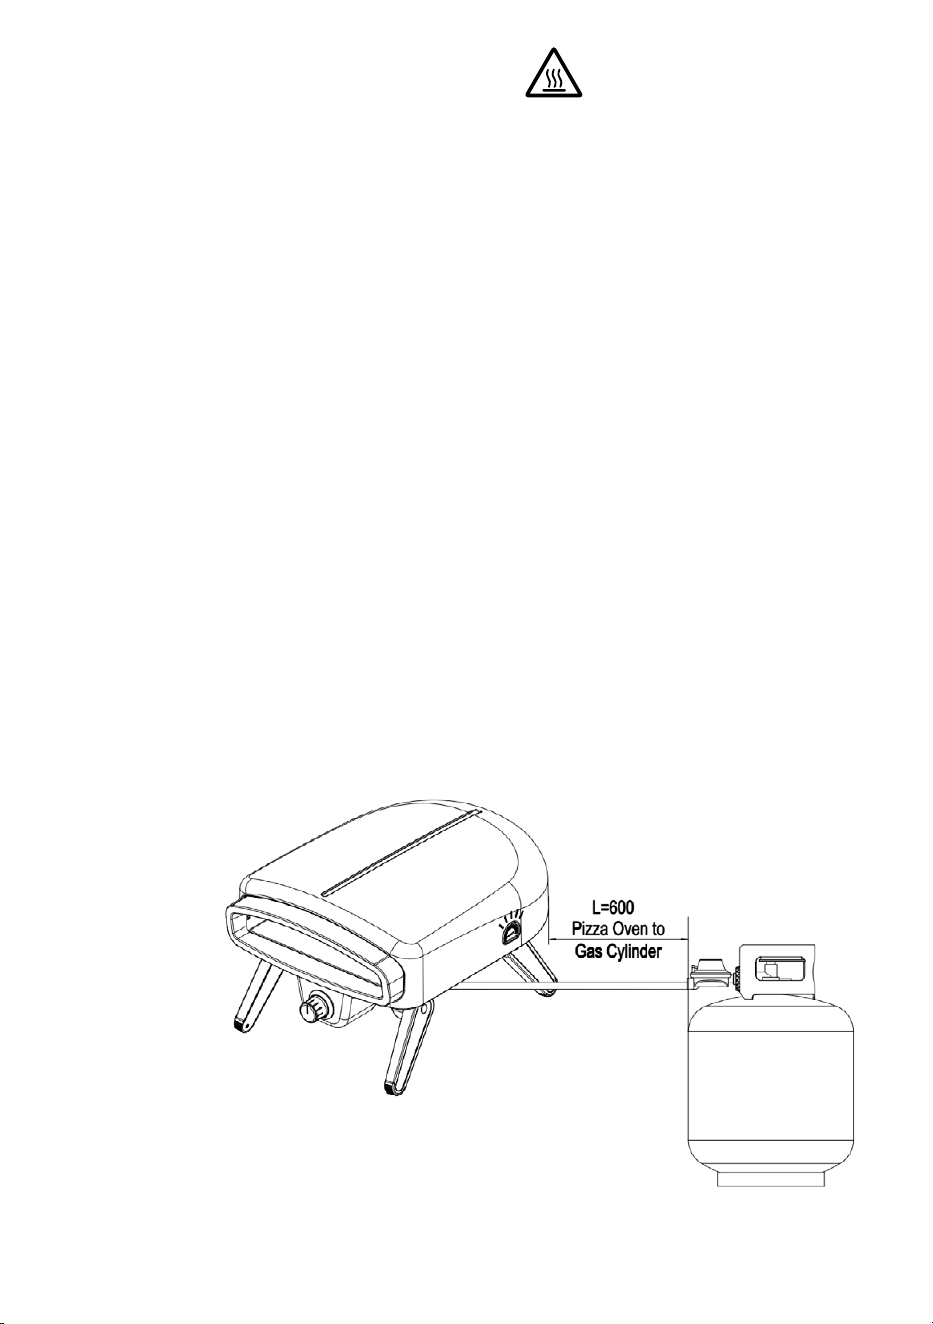
• Make sure that the oven and cylinder are positioned in safe, sturdy places,
at least 600mm apart.
• Inspect the valve connections, burner ports and the hose and regulator
assembly. Remove any debris.
• Connect the loose end of the hose to the gas cylinder. You won’t need
a spanner here. Just turn the fitting in a clockwise direction and hand tighten
as much as you can. This should seal it suciently.
• The regulator as supplied should be firmly tightened but care must be taken
not to over-tighten the connections. Use of a wrench could damage the quick
coupling nut and result in a hazardous situation.
• The regulator as supplied is the correct regulator for this item.
• Ensure the gas cylinder remains upright at all times.
• Should there be any concern in making the correct regulator connection
please contact after sales support help line mentioned at the back of this manual.
ASSEMBLY
CAUTION: HOT SURFACES
3. Connect to LPG cylinder

20
OPERATING PROCEDURES
CAUTION: HOT SURFACES
LIGHTING INSTRUCTIONS
1.Turn the control knob clockwise to”OFF” position.
2.Connect the regulator to the LPG cylinder. Check with the use of soap water
of any gas leakages.
3. Push down the control knob and keep pressing whilst turning anticlokwise
to the”min”position and the will light the burner
4.If the burner stil does not light,turn wait 5 minutes and repeat step 3.
Adjust the heat by turning the knob to the MIN/MXA position.
The burners have three basic position, rotate the knob between low and high to
achieve desired flame height.
It is best to turn o the cylinder first and allow all the gas remains in the hose to
burn o, this will only take a s few seconds. Then turn o all burners.
Lighting your Pizza Oven
Controlling the burners
Turning o the Pizza Oven safely
21
OPERATING PROCEDURES
CAUTION: HOT SURFACES
It is a good idea to leave the Pizza Oven on for about 10 minutes after you have
finished cooking. This helps to burn away any excess food residues and oil,
and makes cleaning easier.
1. Be sure to turn o all control knobs and the gas supply.
2. Allow the Pizza Oven to cool.
3. Clean the drip tray and cooking surfaces. Clean any food spills from
the side burner, if one is installed.
4. Lower the hood.
5. The LPG cylinder supply valve must be turned o when the appliance
is not in use.
Coat the grills with a layer of cooking oil. This will help protect the surfaces
between uses.
If any burner fails to ignite, turn the control knob o (clockwise)
and also turn the cylinder valve o. Wait five minutes before
attempting to relight with ignition sequence.
Before cooking for the first time, operate the Pizza Oven for about 15
minutes with the gas turned on HIGH. This will “heat clean” the internal
parts and dissipate odor from the painted finish.(The colour of cooking
area may change a slightly, this is normal and is the nature of the
material)
- Should the burners extinguish for any reason, turn o all control
knobs and the cylinder gas valve. Wait 5 minutes before attempting
to relight the appliance.
- If a grease or fat fire occur, turn o at control knobs and
LPG cylinder valve immediately until the fire is out.
- A leak test must be carried out prior to using the appliance
for the first time or each time the LPG cylinder is refilled or each
time the gas hose and gas regulator being disconnected from the
LPG cylinders or appliance.
After use

22
OPERATING PROCEDURES
CAUTION: HOT SURFACES
It is recommended to wash your cast iron plate and Pizza Oven with warm soapy
water and a soft cloth and rinse before use.
To protect the cast iron surface and grille avoid heavy impact with other metal
utensils.
Any of the following are considered to be abnormal operation and may require
servicing:
- Yellow tipping of the burner flame.
- Sooting up of Pizza Oven plates.
- Burners not igniting properly.
- Burners failing to remain alight.
- Burners extinguished by trolley doors.
- Gas valves, which are dicult to turn
We suggest three ways to clean the burner tubes. Use the one easiest for you.
(A) Bend a sti wire( a light weight coat hanger works well) into a small hook.
Run the hook through each burner tube and burner several times.
(B) Use a narrow bottle brush with a flexible handle (DO NOT use a brass
wire brush), run the brush through each burner tube and burner several times.
(C) Wear eye protection: use an air hose to force air into the burner tube and
out the air ports. Check each port to make sure air comes out each hole.
Preparing the plate and Pizza Oven
ABNORMAL OPERATION
Regulators which fit inside the mouth of the cylinder valve are
tightened anti-clockwise.

23
OPERATING PROCEDURES
Follow these instructions to clean and / or replace parts of burner assembly
or if you have trouble igniting Pizza Oven.
1. Turn gas o at control knobs and LP Tank.
2. Remove cooking grates, grease tray and grease cup.
3. Remove screw at end of burner using a screwdriver.
4. Carefully lift each burner up and away from valve openings.
Using your Pizza Oven

24
TROUBLESHOOTING
Problem Possible Cause Prevention/Solution
Burner(s) will
not light using
ignitor.
Sudden drop in
gas flow or low
flame.
Flames blow out.
Flare-up.
Persistent
greasefire.
Flashback...
(fire in burner
tube(s)).
Unable to fill
LP tank.
•Out of gas.
•Excess flow valve tripped.
•High or gusting winds.
•Low on LP gas.
•Excess flow valve tripped.
•Grease buildup.
•Excessive fat in meat.
•Excessive cooking
temperature.
•Grease trapped by food
builduparound
burner system.
• Burner and/or burner
tubes are blocked.
•Some dealers have older
fill nozzles with worn
threads.
• Turn knobs to OFF.
Clean burner and/
or burner tubes.
• The worn nozzles don’t
have enough “bite” to engage
the valve. Try a second LP
dealer.
• Clean Pizza Oven.
• Trim fat from meat before
grilling.
• Adjust (lower) temperature
accordingly.
• Turn knobs to OFF. Turn gas o
at LP tank. Leave lid in position
and let fire burn out. After Pizza
Oven cools, remove and clean
all parts.
• Turn front of Pizza Oven
to face wind or increase
flame height.
• Refill LP tank.
• Refer to “Sudden drop in
gas flow” above.
• Check for gas in LP tank.
• Turn o knobs, wait 30
seconds and light Pizza
Oven. If flames are still low,
turn o knobs and
LP tank valve. Disconnect
regulator. Reconnect regulator
and leak test. Turn on LP tank
valve, wait 30 seconds and
then light Pizza Oven.
• Wire and/or electrode
covered with cooking residue.
•Electrode cracked or broken
“sparks at crack”.
• Electrode tip not in proper
position.
•Wires are loose or
disconnected.
•Wires are shorting (sparking)
between ignitor & electrode.
• Clean wire and/or electrode
with rubbing alcohol and
clean swab.
• Replace electrode(s).
• Reconnect wires or replace
electrode/wire assembly.
• Replace ignitor wire/electrode
assembly.

25
Problem Possible
Cause
Check
Procedure
Prevention
/Solution
No sparks
appear at any
electrodes
when ignition
Sparks are
present
but not at all
electrodes
and/or not at
full strength.
Loose/detach of
ignition wire
Check to insure
ignition wire in
position properly
Reassembly
ignition wire
Reassembly
electrode.
Check to insure
electrode in position
properly
Loose/detach of
electrode
·Output lead
connections
not complete.
·Arcing to Pizza
Ovenaway from
burner(s)
·Electrodes are wet
·Electrodes cracked
or broken “sparks
at crack”
·Inspect electrodes
for cracks.
·Replace cracked
or broken
electrodes.
·Are output
connections on
and tight?
·If possible, observe
Pizza Oven in dark
location. Operate
ignition system
and look for arcing
between output
wires and
Pizza Oven flames.
·Has moisture
accumulated on
electrode and/or in
burner ports?
·Use paper towel
to remove
moisture.
·Remove and
reconnect all
output
connections
at module and
electrodes.
·If sparks are
observed other
than from
burner(s), wire
insulation
maybe
damaged.
Replace wires.
TROUBLESHOOTING
TROUBLESHOOTING-ELECTRONIC IGNITION

26
CLEANING & CARE
CAUTION: HOT SURFACES
COVERS
A cover is recommended to cover and protect your outdoor kitchen from all
weather conditions.
E.g. Polyester or vinyl Pizza Oven cover.
SERVICE
We recommend you have your Pizza Oven serviced by an authorized agent
every 5 years. This will ensure there are no leaks and all the components are still
functions correctly.
OUTSIDE SURFACE CLEANING
Use mild detergent or baking soda and hot water solution. Non-abrasive scouring
powder can be used on stubborn stains, then rinse with water.
INSIDE SURFACE CLEANING
Clean thoroughly with strong hot soapy water solution. Rinse with water and allow
to completely dry. NEVER USE OVEN CLEANER.
INTERIOR OF PIZZA OVEN BOTTOM
Remove residue using brush, scraper and/or cleaning pad then wash with a soapy
water solution. Rinse with water and allow to dry.
COOKING GRID
Use a mild soapy water solution. Non-abrasive scouring power can be used on
stubborn stains then rinse with water.
CLEANING THE DRIP TRAY
Always allow for the Pizza Oven to cool down completely before touching the drip
tray. The drip tray should be emptied after each use of the Pizza Oven.
The drip tray can be lined with foil and replaced regularly. Do not use kitty litter or
any combustible material.
27
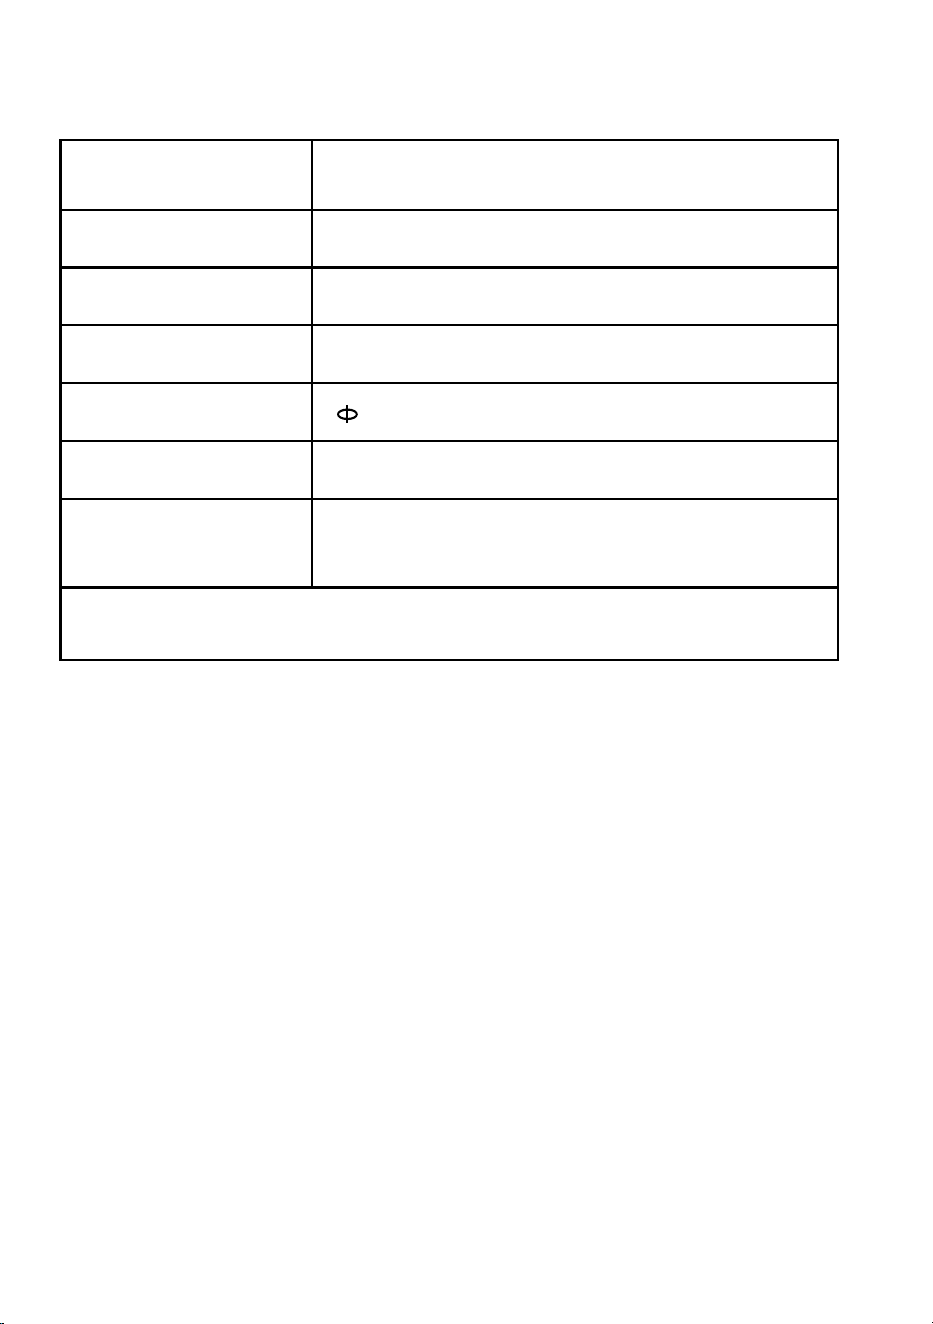
SPECIFICATIONS
MODEL: GR14GPOV
CONSUMPTION: 18.6 MJ/h
TYPES OF GAS: LPG & PROPANE
GAS PRESSURE: 2.75 kpa
INJECTOR SIZE: 1.2 mm
UNIT DIMENSIONS: 437 (w) x 614.4 (d) x 355.5 (h) mm
GROSS WEIGHTS: 16.5Kgs (including the regulator&hose,
the 12mm pizza stone
cylinder connection type of LPG regulator:
LCC27

28
SUPPORT: info@ayonz.com DISTRIBUTOR: Ayonz Pty Ltd
02 8279 8606
